administrator's guide - blackberry docs
TRANSCRIPT

Good™ Mobile MessagingGood™ Mobile Control
for Microsoft™ Exchange®
Wireless Enterprise Messaging and Data Access System
Administrator’s GuideGMC 2.7.0
GMM 8.3.2 (SQL Version)
Last revised: 03/29/16

Good for Enterprise Administrator’s Guide Last revised 03/29/16Documentation complies with Good Mobile Control version 2.7.0, Good Mobile Messaging version 8.3.2 (SQL Version).
Legal NoticeThis document, as well as all accompanying documents for this product, is published by Good Technology Corporation (“Good”). Good may have patents or pending patent applications, trademarks, copyrights, and other intellectual property rights covering the subject matter in these documents. The furnishing of this, or any other document, does not in any way imply any license to these or other intellectual properties, except as expressly provided in written license agreements with Good. This document is for the use of licensed or authorized users only. No part of this document may be used, sold, reproduced, stored in a database or retrieval system or transmitted in any form or by any means, electronic or physical, for any purpose, other than the purchaser’s authorized use without the express written permission of Good. Any unauthorized copying, distribution or disclosure of information is a violation of copyright laws.While every effort has been made to ensure technical accuracy, information in this document is subject to change without notice and does not represent a commitment on the part of Good. The software described in this document is furnished under a license agreement or nondisclosure agreement. The software may be used or copied only in accordance with the terms of those written agreements.The documentation provided is subject to change at Good’s sole discretion without notice. It is your responsibility to utilize the most current documentation available. Good assumes no duty to update you, and therefore Good recommends that you check frequently for new versions. This documentation is provided “as is” and Good assumes no liability for the accuracy or completeness of the content. The content of this document may contain information regarding Good’s future plans, including roadmaps and feature sets not yet available. It is stressed that this information is non-binding and Good creates no contractual obligation to deliver the features and functionality described herein, and expressly disclaims all theories of contract, detrimental reliance and/or promissory estoppel or similar theories.
Patents, Legal Information & Trademarks© Copyright 2016. All rights reserved. All use is subject to license terms posted at http://www1.good.com/legal/legal.html. GOOD, GOOD TECHNOLOGY, the GOOD logo, Good for Enterprise, GOOD FOR GOVERNMENT, GOOD FOR YOU, GOOD APPCENTRAL, GOOD DYNAMICS, SECURED BY GOOD, GOOD MOBILE MANAGER, GOOD CONNECT, GOOD SHARE, GOOD TRUST, GOOD VAULT, and GOOD DYNAMICS APPKINETICS are trademarks of Good Technology Corporation and its related entities. All third-party technology products are protected by issued and pending U.S. and foreign patents.
Good Technology, Inc. 430 N. Mary Avenue, Suite 200Sunnyvale, CA 94085
Web site: http://www.good.com.
Be Good. Be Safe.Please do not use while driving or engaged in any other activity that requires your full attention.
ii Good Mobile Messaging Administrator’s Guide

Contents
1 Quick Installation 1
Prerequisites 1Scalability 8Preparing for SQL Server Use 8Microsoft Exchange configuration requirements 12
Pre-Installation 13Set Calendar Processing 15Enable Exchange 2010/2013/2016 Impersonation Permission 15Enable Exchange Online Impersonation Permission 18Verify the impersonation permissions 20Verify Single Sign-on for Exchange Online (Office 365) 24
Installing Good for Enterprise 27
Setting Up the Device 28
2 Overview 31
Wireless Synchronization 32
On-Premise and Exchange Online (Office 365) Environments 33
Deployment Scenarios 34
MDM-Only 38
Good Security 38Good System Security Architecture 38
Good Mobile Messaging Administrator’s Guide iii

Good Secure OTA Architecture 41Good Security Policies 42
Managing an Exchange Account 42
Multiple Exchange and Good Mobile Messaging Servers 44
Installation Concepts 46Accounts and Permissions 46Good Mobile Control Server and Console 47Good Mobile Messaging Server 49Handheld Setup 49
Wireless Handheld Management 50Wireless Handheld Setup 51Wireless Policy Synchronization 52Wireless Handheld Software Upgrades 52Custom Software for Wireless Distribution 53
Localizing the Application 54
3 Pre-installation 55
Checking Prerequisites and System Requirements 55Scalability 62Preparing for SQL Server Use 63Microsoft Exchange configuration requirements 69
Good Secure WiFi: Prerequisites and System Requirements 71
Setting Up the Necessary Accounts and Permissions 72Creating the GoodAdmin Account 75Set Calendar Processing 83Enable Exchange 2010/2013/2016 Impersonation Permission 83Verify Single Sign-on for Exchange Online (Office 365) 92Creating the Good Mobile Control Account 95
4 Installation 97
Migration Path 98
iv Good Mobile Messaging Administrator’s Guide

Installing Good Mobile Control Server 99
Installing Good Mobile Messaging Server 122Enable detailed calendar reminder notifications 143
Configuring the Good Mobile Control Console 144Kerberos Single Sign-On 145Importing a Certificate 147Understanding Console Filters 150
Setting Up Role-Based Administration 151
Setting Software Download Defaults 159
5 Preparing New Devices 161
Preparing for Handheld Setup 162Wireless Setup Preparation 163
Setting Up the Handheld 165OTA Setup Process 168OTA Setup Process - iOS/Android 169
Completing the Setup Process 170
Setting Up Multiple Handhelds (OTA) 172
Adding Custom Software OTA 175
Interaction with WiFi 175
Self Service (Good for Enterprise) 176
MDM-Only Devices 178Setting Up the MDM-Only Device (Administrator) 179Setting Up the MDM-Only Device (Self Service) 182
6 Managing the Handhelds 185
Managing Roles 186The Superuser 186Creating, Configuring, and Customizing Roles 187Adding and Removing Role Members 192Exporting Rights 193
Good Mobile Messaging Administrator’s Guide v

Creating and Changing Handheld Policy Sets and Templates 195
Understanding Policy Templates 200Good for Enterprise Policies 202User Agents 232Mobile Device Management 247Application Management 303Legacy Controls 304Completing Policy Configuration 314
Importing and Exporting Policy Sets 314
Managing Wireless Software Deployment 317Managing Software Policies 319Restricting Handheld Platform OTA Setup 324Generating New User PINs 325Customizing Console-Generated Email Messages 326Custom Applications: Adding to and Deleting from the Software Package 328
Managed Applications 335
Volume Purchased Applications 337
Managing S/MIME 338Enabling S/MIME 339
Easy Activation 344Policy Mappings 348Diagnostics and Troubleshooting 354
Locking Out a User 355
Resetting a Device Password or Good for Enterprise Password Remotely 357
Providing a Temporary Unlock Password (Windows Mobile, Palm) 358
Enabling/Disabling Data Roaming 359
Resetting Good for Enterprise on a Device 359
Sending a Message to a User 360
Suspending Handheld Messaging 360
vi Good Mobile Messaging Administrator’s Guide

Erasing (Wiping) Handheld Data 361Client Error Codes Following a Wipe 364
Enabling FIPS Testing 365
Removing a Handheld from Good Mobile Messaging Server 366
Transferring a Handheld to a New User 367
Viewing and Using Handheld Information 368Selecting Users in the Handhelds Tab 370Scheduling and Generating Device Reports 370Handheld Info Link 372Enabling Logging for Handhelds 373Security Link 376MDM Profile Link 377Connection Status Link 377Applications Link 381OTA Link 382Messaging Link 384Using the Good Monitoring Portal Dashboard 388Using the Good Online License Portal 390Inactive Handhelds 390Displaying a Paused Handhelds Report 390Running Mailbox Diagnostics 391Exporting Handheld Information to a File 392
Generating (Exporting) a List of Users 401
Exporting Software Information to a File 403
Changing a User’s Good Mobile Messaging Server, Exchange Server, Mobile Control Server, or User Name 403
Changing a User’s Display Name, Alias, or Email Address 403Moving a User’s Mailbox to a Different Exchange Server 405Moving a Handheld to a Different Good Mobile Messaging Server 408Exchanging a User’s Handheld 411
Good Mobile Messaging Administrator’s Guide vii

Moving a User to a Different Good Mobile Control Server 411
Data Storage and Aging 413
Notes on Synchronization 413Initial and Continuing Synchronization 413Exceptions 415Memory 416
7 Managing Good Mobile Messaging Server 419
Moving Good Mobile Messaging Server to a New Host 420
Moving Good Mobile Control Server to a New Host 420Preparing to Move Good Mobile Control Server 421Installing Good Mobile Control Server on the New Host 424
Monitoring Good Mobile Messaging Servers 430Server Dashboard (Good Monitoring Portal) 430Displaying the Server List 435Displaying Server Information 435IP Ranges 439Server Logging 440Using Performance Monitor 443
Stopping Good for Enterprise Services 447
Error Messages 448
Troubleshooting 448
Best Practices 448Deployment 448Anti-virus and Backup Software 449Backing up and Restoring the Good Mobile Control Database 450Disaster Recovery 457
8 GMM and GMC Failover 459
GMM Service Failover 459
viii Good Mobile Messaging Administrator’s Guide

Performing a GMM Failover 461
SQL Mirroring (High Safety Mode) 466
SQL AlwaysOn 482Preconditions 482Setting Up Windows Cluster 483Setting Up SQL AlwaysOn 491Test Failover 503Setting Up Good Mobile Messaging Server with AlwaysOn Present 505
Good Mobile Control Clustering 506Microsoft Clustering Services Overview and Requirements 507Hardware Requirements 509Network Requirements 509
Good Mobile Control in a Clustered Environment 511Installing Good Mobile Control Servers with Cluster Services 512Adding the Shared Disk 517Installing Primary and Standby Good Mobile Control Server on Cluster Nodes 523Installing the Standby Good Mobile Control Server 532Installing Good Mobile Control Cluster Tools and Configuring Cluster Services 537Good Mobile Control Cluster Resources 543GMC Server Resource 544GMC SQLServer Resource 544GMC Cache Lock Resource 544Disk R Resource 544Uninstalling Good Mobile Control from Cluster Servers 544
Good Mobile Control Cold Failover 546
Installing Good Mobile Control as a Primary Server 547
Installing Good Mobile Control on the Standby Server 548
Good Mobile Messaging Administrator’s Guide ix

Repeat the final four steps of this procedure whenever you need to failover to the primary or standby server. 551
9 Utilities 553
Installing the Utilities 555
Using the GoodTools Interface 555
GoodLinkAddUser 556
GoodLinkDeleteUser 558
GoodLinkQueryUser 559XML file format 562
GoodLinkEraseData 565
GoodLinkRegenOTAPIN 565
GoodLinkUpdateUser 566
LookUpHandheldFromDN 568
ExportComplianceReport 569
GetAppsForHandheld 571
RefreshAppsForDevice 572
MoveHandheld 573
GoodLinkUnregisterServer 575
ExportPolicySets 576
ImportPolicySets 577
gmexportstats 579
GdGLSConnect 583
uploadLog 586
Diagnostic Log Files 587
10 Uninstalling Good for Enterprise 589
Uninstalling Good Mobile Messaging Server 589
Uninstalling Good Mobile Control Server 592
Uninstalling SQL Server 593SQL 2008 593
x Good Mobile Messaging Administrator’s Guide

A Using the GMC Web Service 601
Working with the GMC Web Service 602About the BulkServiceResult array 602Integrating with the GMC Web Service 603Web Service Authentication 603GMC Web Service Example 604
Summary of the GMC Web Service Functions 622Role Functions 622Policy Set Function 623Handheld Functions 624Server Functions 627Self-Service Functions 628Miscellaneous Functions 629
B Mobile Device Management 631
Configuring MDM 632iOS Configuration 632Android Configuration 655Compliance Management 659Application Management 659Setting Up (Provisioning) Mobile Devices with MDM 665
Using MDM 665Asset Management 665Self Service 675
C Good Mobile Control Performance and Scalability 677
Scalability Improvements 677
Supportability Guidelines 679
Monitoring Guidelines 680
Good Mobile Messaging Administrator’s Guide xi

Index 683
Document Revision List 693
xii Good Mobile Messaging Administrator’s Guide

1 Quick Installation
Welcome to Good for Enterprise, the behind-the-firewall, wireless
corporate email and data system from Good Technology, Inc.
Good for Enterprise installation is simple and straightforward. An experienced Microsoft® Exchange® administrator should be able to complete the process in a few hours. No special wireless knowledge is required to perform the installation.
This chapter outlines the installation process. Chapter 2 provides an overview of the Good for Enterprise system. Chapters 3 through 6 provide detailed installation instructions, should you need them.
Prerequisites
You will be creating a Good for Enterprise user account (named GoodAdmin in this guide) and a GoodAdmin Exchange mailbox. Then you will be installing:
• A Good Mobile Control (GMC) Server, which provides facilities for managing Good for Enterprise users and their devices. You’ll install this server first.
If you’re upgrading, you can just use your current Good Mobile account.
Good Mobile Messaging Administrator’s Guide 1

Quick Installation
• Good Mobile Messaging (GMM) Servers, which synchronize user devices with their Exchange accounts.
Ensure that the Good Mobile Messaging Server and Good Mobile Control Server host machines, and your Exchange server, conform to the following prerequisites. Good Mobile Messaging Server and Good Mobile Control Server can run on the same host machine, but cannot run on the same host machine as Microsoft Exchange Server®. (Note that Good for Enterprise also supports the Exchange Server running in the Office 365 cloud, with Exchange Online.) For environments serving more than 1,000 devices, we recommend installing the Good Mobile Control Server on a separate host machine.
The Good Mobile Messaging Server should have a low latency and good bandwidth with the Exchange Servers it communicates with. The Good Mobile Control Server should be close to its SQL database. (For both Good Mobile Messaging and Good Mobile Control Servers, recommended is less than 10 ms latency). The Servers should not be burdened with other work.
Good Mobile Messaging Server minimum host system requirements:
• Hard drive space free for each Good Mobile Messaging Server:- 400MB system installation
- 10GB logsThese space requirements do not include those for Good Mobile Control Server if it is on the same machine.
• x64-bit: Intel Pentium IV dual-core processor (2GHz or greater), 8GB RAM, Windows 2008 SP2, Windows 2008 R2 SP1 or Windows 2012 Standard, or newer.
If a virtual machine session is used for Good Messaging, the free drive space and RAM requirements also apply.
• Good for Enterprise is an I/O intensive application; consider this fact when deciding which other applications are to run on the same host machine.
2 Good Mobile Messaging Administrator’s Guide

Prerequisites
Good Mobile Messaging Server is supported as a Guest on VMware ESX 3.0.1, 3.5, 4.0, 4.1 (using vSphere 4), and 5.0. Good Mobile Control is supported as a Guest on VMware ESX 3.5, 4.0, 4.1, and 5.0. If Good Mobile Control is installed in the same Guest as another Good product, then VMware ESX 3.5, 4.0, 4.1, or 5.0 is required. Good Mobile Messaging Server and Good Mobile Control are supported as Guests on a Windows 2012 Standard or Windows 2008 64-bit Standard and Enterprise SP2 and R2 64 Bit Hyper-V Host.
Note: VMware Snapshots are not a viable option for Good-environment backups. Good For Enterprise does not support taking snapshots or reverting to earlier snapshots. Snapshots taken on a Good Server may cause high CPU utilization and performance issues. This may also result in users not being initialized due to "Advise Reconnect" and/or "Exchange server Down" errors.
• Required minimum LAN speed for the Good Mobile Messaging Servers: 100Mb/s. Note: When configuring Good Mobile Messaging Servers to connect with an Exchange server, the speed of the network connection must be a sustained minimum rate of at least 100Mb/s. Slower network connections between Exchange and Good Mobile Messaging Servers will cause increased message latency.
• Microsoft Outlook® must not be installed on the Good Mobile Messaging Server or Good Mobile Control Server host machines. Uninstall Outlook if it is present.
• Installing Good Mobile Messaging Server on a Microsoft Exchange server machine is not supported. Installing Good Mobile Messaging Server on a domain controller is not supported.
Good Mobile Control Server minimum host requirements:
• Hard drive space free for each Good Mobile Control Server:- 300MB system installation
- 250MB logs
Good Mobile Messaging Administrator’s Guide 3

Quick Installation
These space requirements do not include those for Good Mobile Messaging Server if it is on the same machine.
• Dual-core Intel® Xeon® processor (2GHz or greater), 1.5GB RAM; for increased number of users: Intel Pentium IV dual processor (2GHz or greater), 2GB RAM. We recommend multicore processors; inhouse testing is performed using four cores.
We recommend 4GB of RAM, not the minimum. For increased numbers of users, refer to “Good Mobile Control Performance and Scalability” on page 677.
To configure Good Mobile Control to use more RAM: -Xms2160m -Xmx2160m.
Registry settings:
[HKEY_LOCAL_MACHINE\SYSTEM\CurrentControlSet\services\GMCServer\Parameters\ChildArgs\-Xms]"Value"="2160m"
[HKEY_LOCAL_MACHINE\SYSTEM\CurrentControlSet\services\GMCServer\Parameters\ChildArgs\-Xmx]"Value"="2160m"
• For Good Mobile Control Server performance and scalability information, refer to “Good Mobile Control Performance and Scalability” on page 677.
• Supported browsers.
Good Mobile Messaging Server and Good Mobile Control Server requirements:
• Note that during Server startup, significantly more processing occurs than during runtime. If the Messaging Server cache is located on VM disk or SAN rather than on a physical disk, the processing will be somewhat slower and will result in measurably more latency during startup.
• Good Mobile Control Server requires Windows 2003 with Service Pack 2, or Windows 64-bit 2008 Standard and Enterprise with Service Pack 2 or R2 SP1 64-bit.
4 Good Mobile Messaging Administrator’s Guide

Prerequisites
• Good Mobile Messaging Servers must have access to the Microsoft Exchange Server that will manage user mailboxes.
• Both the Good Mobile Messaging Server and Good Mobile Control Server host machines must have Internet access. They should be able to connect to http port 443 (secure https).
If you’ll be using a proxy server, you’ll enter the necessary information for that server during the installation process.
In most environments, firewall modification will not be necessary. If your environment has “egress” filtering in place, firewall modification should be made to allow outbound-initiated bi-directional (established) TCP traffic on ports 80 and 443 from GFE server to Good’s NOC. The GFE to NOC connection may utilize a combination of IPs in the following two Good-owned networks (216.136.156.64/27 and 198.76.161.0/24).
GFE must also be able to egress on port 443 to ALL IP addresses owned by Microsoft which service their 365 tenants.
To test appropriate access, open the following URLs on your Good for Enterprise server – successful connectivity is noted by a “Congratulations!” message at the top of the page.
- https://xml29.good.com
- https://xml28.good.comDo not put the Good Mobile Messaging Server and Good Mobile Control Server in the DMZ zone or block any LAN ports. The Good Mobile Messaging Server and operating system calls have many port dependencies for interfacing with mail servers and AD, especially TCP 1433 (Database).
Outbound network hostnames for Good Operations Center:
• ws.good.com HTTPS 443 216.136.156.64/27
• www.good.com HTTPS 443 216.136.156.64/27
• upl01.good.com HTTPS 443 216.136.156.64/27
• xml28.good.com HTTPS 443 198.76.161.0/24
• xml29.good.com HTTPS 443 198.76.161.0/24
Good Mobile Messaging Administrator’s Guide 5

Quick Installation
• xml30.good.com HTTPS 443 198.76.161.0/24
• gti01.good.com HTTPS 443 198.76.161.0/24
NOTE: No "external" ports or NAT configuration is required. All communication is initiated by GFE server "outbound" to Good's NOC.
The Windows firewall is not supported for use with Good Mobile Control or Good Mobile Messaging Servers. Note that in Windows 2008, the Windows firewall is turned on by default. If currently on, turn off the firewall in Windows 2003 or 2008.
Good does not recommend a DMZ deployment nor is it supported, as a number of outbound ports need to be opened to connect to the Microsoft Exchange server
• Good Mobile Control Server requires port 19005 to be open for communication with Good Mobile Messaging Server and for web services. Good Mobile Messaging Server requires ports 10009 and 10010 to be open for communication with Good Mobile Control Server and other uses.
• In order to receive new message notifications while using the Good client for iOS devices on wifi networks, the following IP range and port need to be open:
TCP port 5223 incoming/outgoing (for iOS)
TCP ports 5228, 5229, 5230 outgoing (for Android)
For iOS, the firewall needs to accept traffic from 17.0.0.0/8 port 5223. This is the external IP range of the Apple Push Notification Service servers, which provide the message notifications for the Good email service on the iOS devices.
• The Good Mobile Control host machine should not have an MSDE or SQL Server installed on it, unless you choose to create a database on an existing Microsoft SQL 2008 or 2012 Server for use with Good for Enterprise.
To uninstall SQL Server if present, refer to “Uninstalling SQL Server” on page 593.
6 Good Mobile Messaging Administrator’s Guide

Prerequisites
• Before installing Good Mobile Messaging Servers and Good Mobile Control Servers, ensure that the host machines’ time and date are set to your network's correct time and date. Otherwise, errors such as a Security Alert regarding a problem with the site's security certificate may occur.
• Don’t share hardware resources with other processes/virtual machines. If the Good Server is on a physical machine, don’t run other processes on the same machine. Good Mobile Control and Good Mobile Messaging should be on separate machines for all but small installations. If on a virtual machine, treat the situation as the same as for a physical machine, adding the fact that the virtual machine should have dedicated CPUs and RAM.
• To activate the S/MIME secure-email feature in the Good Mobile Control Console, all installed Servers must be version 5.0 or higher.
• Ports 80 and 389 should be open on the Good Mobile Messaging Server for OCSP and LDAP lookup when using S/MIME. Also port 636 for LDAP SSL.
• For secure LDAP connections (SSLv3/TLS1.x) between the Good Mobile Control Console and AD, add the following to the config.props file. Default location is C:\Program Files (x86)\Good Technology\Good Mobile Control.
setsystem.directory.adsi.ssl true
If the GMC is installed and running, restart its service for the change to take effect.
• Good Mobile Control and Good Mobile Messaging Servers require Microsoft .NET Framework 3.5.1.
• Good Mobile Control and Good Mobile Messaging Servers require SQL. (If needed, Good Mobile Control will install SQL Express for you. SQL Express supports up to 4GB databases only.) For SQL requirements, refer to “Preparing for SQL Server Use” on page 8.
Good Mobile Messaging Administrator’s Guide 7

Quick Installation
• Good for Enterprise Clients using WiFi behind a firewall require access to the following IP ranges for connection to the Network Operations Center (NOC):
- 206.124.114.1 through 206.124.114.254 (206.124.114.0/24) on port 443
- 206.124.121.1 through 206.124.121.254 (206.124.121.0/24) on port 443
- 206.124.122.1 through 206.124.122.254 (206.124.122.0/24) on port 443
Scalability
A single Good Mobile Control Server can handle up to 35,000 devices spread over up to 35 Good Mobile Messaging Servers, subject to the machine and operating-system requirements provided above, and up to 25,000 devices using iOS MDM. 2.5MB/user SQL space is required.
Scalability for Good Mobile Messaging Servers is discussed in the GMM EWS/SQL Deployment Planning Guide. The GMM Servers can support approximately 2,100 devices each with average load per Server. If each GMM Server manages its maximum 2,100 devices, 17 GMM Servers would be supported by one GMC; if the GMM Servers average only 1,000 devices each, 35 GMM Servers (the maximum) would be supported by the GMC.
Preparing for SQL Server Use
Good Mobile Control and Good Mobile Messaging Servers require access to a Microsoft SQL server. You can use an existing Enterprise or Standard Microsoft SQL Server (minimum versions: 2008 R2 SP1 CU6 (GMC) and 2008 SP2 (GMM)) or SQL Server instance, local or remote, available within the organization, including remote SQL /SQL Cluster. Refer to the compatability matrix for details. If you don’t have an SQL server that you want to use, a (local) SQL Express server will be installed along with the Good Mobile Control Server (but not for the Good Mobile Messaging Server).
8 Good Mobile Messaging Administrator’s Guide

Prerequisites
Note that multiple SQL Server named instances can run on the same Windows Server. Each of these instances can contain multiple databases. When multiple GMM servers are present, each must be assigned its own database. Multiple Good Mobile Control Servers can use the same SQL instance but each Good Mobile Control Server must use a separate user database within that instance. If two Good Mobile Control Servers attach to the same user database in the same SQL Server named instance running on a Windows Server, data loss may occur. An SQL instance is defined as a separate copy of SQL Server running on the same computer.
When installing SQL server 2008 on Windows server 2012, a “Not able to install Microsoft SQL Server Express” error is encountered if the hard drive is compressed.
Some knowledge of SQL installation, configuration, and maintenance will be useful if you plan to use an existing database.
2.5MB/user SQL space required.
You’ll need the name of the service account you will use to run the Good Mobile Control and Good Mobile Messaging services.
Verify that the GoodAdmin account owns dbcreator permissions.
SQL Servers enforce their own authentication and authorization. If you encounter an SQL error during the installation process, you’ll need to confirm that your SQL configuration information was entered correctly. If you will be using your own previously installed SQL Server instance, gather the following information in advance. You’ll be required to provide it during Good Mobile Control and Good Mobile Messaging Server installation.
• The fully qualified machine name of your SQL Server instance
• Method of connection to your existing SQL Server instance (static port, named instance (dynamic port), or connected to it as the default instance)
Good Mobile Messaging Administrator’s Guide 9

Quick Installation
• If static port, the port number
• If named instance, the instance name
• Authentication mode used to connect to your SQL Server instance (Windows authentication/SQL Server authentication)
• If Windows authentication, the service account name entered above must already have a login to SQL Server, or, if not, add a login for the service account name to your SQL Server instance, granting it at least the Server-Level Role of “dbcreator.”
• If SQL Server authentication, the SQL Server login name you use to connect to SQL Server with, and the password for this SQL Server login. You will be prompted for the login and password during the Good Mobile Control and Good Mobile Messaging installation. The SQL Server login must be a member of the “dbcreator” security role. If not, add the login to the dbcreator security role so that the Good Mobile Control and Good Mobile Messaging install can create its own database and table within the SQL Server instance.
• Whether your existing database server is local or remote, ensure that TCP/IP is enabled for “Local and Remote connections” on your SQL Server instance.
Note: For security, a patch is required for SQL Server. Without the hotfix, the GMC service will start but within a few seconds will crash. Several errors will appear in the Windows Event Log. The key log message that appears in the EMF.log file is:
com.good.base.GoodException: org.apache.commons.dbcp.SQLNestedException: Cannot create PoolableConnectionFactory (Connection reset)
The following patches are available. These are the minimum versions required for GMC to work correctly; later versions are supported:
10.00.5770 SQL Server 2008 SP3 CU3 16 Jan 2012
10.50.2811 SQL Server 2008 R2 SP1 CU6 16 Apr 2012
10 Good Mobile Messaging Administrator’s Guide

Prerequisites
Remote SQL
To use remote access, the IT administrator should configure the remote SQL server to accept the necessary connections from Good Mobile Control and Good Mobile Messaging Server. This includes but is not limited to:
• Allowing connections via TCP/IP
• Allowing connections via a preconfigured port
• Opening any necessary port in any firewall between Good Mobile Control and Good Mobile Messaging Server and the SQL server
• Creating or obtaining a valid SQL Server user name and password to connect to the remote SQL server during installation or the ability to log in as admin "sa."
We recommend testing remote database SQL server connectivity before beginning an installation. Related articles from Microsoft:
• To configure using TCP/IP - http://support.microsoft.com/kb/914277
• To configure using static Port - http://support.microsoft.com/kb/823938
• SQL Server Installation (SQL Server 2008 R2) - http://msdn.microsoft.com/en-us/library/bb500469.aspx
• SQL Server Installation (SQL Server 2008 SP2) - http://www.microsoft.com/download/en/details.aspx?id=12548
Mirroring
Database mirroring maintains two copies of a single database that must reside on different server instances of SQL Server Database Engine. Typically, these server instances reside on computers in different locations. Starting database mirroring on a database initiates
- SQL Server 2008 R2 SP2 26 July 2012
Good Mobile Messaging Administrator’s Guide 11

Quick Installation
a relationship, known as a database mirroring session, between these server instances.
Note that Microsoft is deprecating mirroring in future SQL versions, in favor of AlwaysOn Availability Groups.
If you’ll be using SQL mirroring with your Good Mobile Messaging Servers, install the databases prior to installing the Servers. This release supports synchronous database mirroring (High-Safety Mode). When you install a Good Mobile Messaging Server, you’ll be prompted to identify the primary database and failover-partner (secondary) database.
Note that the Good Mobile Control Server uses cold failover or clustering as its failover configurations, while Good Mobile Messaging Servers use mirroring.
If you configure SQL mirroring after installing your Good Mobile Messaging Servers, you can re-run the installation media a second time and identify the mirrored, failover-partner databases at that time.
Microsoft mirroring documentation is found at http://msdn.microsoft.com/en-us/library/ms189852(v=sql.105).aspx.
A simple mirroring guide can be found at http://www.codeproject.com/Articles/109236/Mirroring-a-SQL-Server-Database-is-not-as-hard-as.
Microsoft Exchange configuration requirements
Microsoft Exchange configuration requirements:
• Exchange 2010, and 2013/2016 (in environments with Office 365) requires a host with a 64-bit OS. (Note that Good software can be installed on a Win2008 64-bit host regardless of which versions of Exchange are being used. Good Mobile Messaging Servers are 32-bit.)
12 Good Mobile Messaging Administrator’s Guide

Pre-Installation
The procedures provided in this guide pertain to hybrid Exchange environments (as opposed to federated environments); it is assumed that you have completed the Microsoft hybrid configuration wizard, which will also make DirSync available.
• Every Good for Enterprise user account must be set up with an SMTP address (the standard Microsoft Exchange configuration).
The domain containing the Good for Enterprise account (GoodAdmin) must be trusted by the following domains: every domain containing one or more Exchange servers with mailboxes for Good for Enterprise device users; the domain containing the Exchange server where the GoodAdmin mailbox itself is located. Subject to this restriction, all Windows architectures are supported.
• The GoodAdmin service account must have a mailbox, which is also migrated to the cloud for Exchange Online installations.
For the operating-system and Exchange software required on the Messaging and Control Server hosts, refer to the compatibility matrices posted at http://www1.good.com/support/technical-support-resources.html.
Pre-Installation
To get your users up and running, you’ll need to perform the following tasks, as described in the procedure below (Exchange 2010 SP2 RU4 and Exchange 2013/2016, and Exchange Online are supported).
• Check prerequisites; establish initial Good Mobile Messaging Server and Good Mobile Control Server host machine configuration.
• Set up the necessary GoodAdmin user account with account permissions for the Good for Enterprise and Good Mobile Control Servers, and with a mailbox for the GoodAdmin account.
For detailed instructions, refer to “Pre-installation” on page 55.
Good Mobile Messaging Administrator’s Guide 13

Quick Installation
On a machine that has Exchange Management Shell installed, follow these instructions.
1. First, confirm that the prerequisites for Good Mobile Messaging Servers and Good Mobile Control Servers are in place.
2. Second, create a new Windows domain user account and mailbox for the Good Mobile Messaging Server and user account for the Good Mobile Control Server. The same account can be used for both. Give this account the proper permissions. In this manual, the user is named GoodAdmin. The name must not contain any special characters. Use A-Z, a-z, 0-9, period (.), and dash (-).
GoodAdmin should only be a member of Domain Users; it is added to this group by default. Do not add this user to any additional groups (Enterprise Admins or Domain Admins). By default, Exchange 2010/2013/2016/Online restrict the access of these groups to mailboxes, so administrators won't be able to read/write to a user's mailbox.
3. The Good Mobile Control account, if different from GoodAdmin, needs only local admin rights and does not need domain admin rights.
4. Create the GoodAdmin account/mailbox from an Exchange server using the Exchange Management Console or from a command shell prompt. Depending on your organization’s configuration when a mailbox is created, the domain login user account is also set for this GoodAdmin account. Once the mailbox is created, make sure that the Password Expired option is set to Never for this account.
5. After successful creation of GoodAdmin on premise, along with Exchange mailbox, verify email functionality and, if also using Exchange Online, migrate and enable the mailbox in the cloud. (For an overview of Good for Enterprise and the Exchange Online environment, refer to “On-Premise and Exchange Online (Office 365) Environments” on page 33.)
a. Verify the Directory Synchronization process has run (2 hr interval by default) before migrating the mailbox to the 365 cloud. This can be manually forced from the 365 Dir-Synch
14 Good Mobile Messaging Administrator’s Guide

Pre-Installation
Server required for hybrid configuration, but must be run before migrating the mailbox to the 365 cloud. Force synch can be performed from Dir-Synch by running start-onlinecoexis-tencsync from this directory:
PS C:\Program Files\Windows Azure Active Directory Sync> start-onlinecoexistencesync
b. Using Microsoft ECP (Exchange Control Panel) from your 365 tenant, login as an administrator with rights to perform a mail-box move/migration.
c. Verify the move request completes, is finalized and cleared, and the move request is cleared after completion.
d. GoodAdmin mailbox must be assigned an O365 license to func-tion.
6. Add the permissions for the GoodAdmin account necessary for the Good Mobile Messaging Server to work efficiently. To do this, on a machine that has Exchange Management Shell installed, follow the instructions in the following sections.
Set Calendar Processing
Run the following cmdlet to allow accepting meeting requests from the user device:
Get-mailbox | set-calendarprocessing–processExternalMeetingMessages $true
Enable Exchange 2010/2013/2016 Impersonation Permission
(For Exchange Online, refer to “Enable Exchange Online Impersonation Permission” on page 18.)
Application Impersonation is the only required Exchange-side setting to be applied to the GoodAdmin service account. For any user that is GFE-enabled and wishes to send/receive email on a handheld
Good Mobile Messaging Administrator’s Guide 15

Quick Installation
device, the GoodAdmin service account must be able to “impersonate” this specific user.
If the installation has users in both the cloud and on premise, application impersonation must be applied in 2 separate and distinct locations. Applying this permission for the on-premise Exchange organization will not apply it to users in the cloud Exchange organization.
Option #1: To configure Exchange Impersonation for all users in an organization
1. Open the Exchange Management Shell.
2. Run the New-ManagementRoleAssignment cmdlet to add the permission to impersonate the specified user. The following example shows how to configure Exchange Impersonation to enable a service account to impersonate all other users in an organization.
New-ManagementRoleAssignment -Name:impersonationAssignmentName -Role:ApplicationImpersonation-User:serviceAccount
The vlue following -Name is arbitrary.
Example:
New-ManagementRoleAssignment-Name:GMMEWSPermissions -Role:ApplicationImpersonation -User:"[email protected]"
Successful cmdlet input and return should look like this:
Option #2: To configure Exchange Impersonation for specific users or groups of users.
16 Good Mobile Messaging Administrator’s Guide

Pre-Installation
1. Open the Exchange Management Shell.
2. Run the New-ManagementScope cmdlet to create a scope to which the impersonation role can be assigned. If an existing scope is available, you can skip this step. The following example shows how to create a management scope.
New-ManagementScope -Name:scopeName -RecipientRestrictionFilter:recipientFilter
The RecipientRestrictionFilter parameter of the New-ManagementScope cmdlet defines the members of the scope. You can use properties of the Identity object to create the filter. The following example for RecipientFilter is a filter that restricts the result to a single user with the user name "john.”
{Name -eq 'john'}
The following RecipientFilter is a filter that restricts results to a list filtered by all those with a primary smtp address of @smtp.com:
{RecipientFilter -like ‘@smtp.com’}
3. Run the New-ManagementRoleAssignment cmdlet to add the permission to impersonate the members of the specified scope. The following example shows how to configure Exchange Impersonation to enable a service account to impersonate all users in a scope.
New-ManagementRoleAssignment -Name:impersonationAssignmentName -Role:ApplicationImpersonation -User:serviceAccount -CustomRecipientWriteScope:scopeName
To verify that application impersonation has been applied for the GoodAdmin service account, run the following cmdlet from within Exchange Management Shell:
get-managementroleassignment >C:\managementroles.txt
Good Mobile Messaging Administrator’s Guide 17

Quick Installation
A properly configured service account should be listed with the name of your service account in a role assignment of applicationImpersonation.
Enable Exchange Online Impersonation Permission
The GoodAdmin service account must have Application Impersonation rights on the O365 Exchange server.
Method 1: Apply Impersonation via the Exchange Management Shell
To apply Impersonation Permission to the GoodAdmin service account in Exchange Online (Windows Azure AD):
1. Create a Remote Session into O365 using Exchange Management Shell:
$LiveCred = Get-Credential
$Session = New-PSSession –ConfigurationName Microsoft.Exchange –ConnectionUri https://ps.outlook.com/powershell/ -Credential $LiveCred –Authentication Basic –AllowRedirectionImport–PSSession $Session –AllowClobber
2. Run the following cmdlet to apply impersonation to the cloud Exchange organization for the service account:
> New-ManagementRoleAssignment -Name:impersonationAssignmentName -Role:ApplicationImpersonation -User:serviceAccount
18 Good Mobile Messaging Administrator’s Guide

Pre-Installation
Notes:
• Use the SMTP address of your GoodAdmin service account in your domain.
• Use a Unique Name for the name of the permission, e.g.“ApplicationImpersonation-GMM”
• -AllowClobber is required when creating the remote session.
• Allow 30 minutes for the changes to propagate through Azure.
• No further permissions or changes to Active Directory or Exchange are required for GFE to function.
Method 2: Apply Impersonation via O365 Admin Console
To enable these rights:
1. Log in to the O365 Admin Console.
2. Click Admin -> Exchange -> Permissions.
Good Mobile Messaging Administrator’s Guide 19

Quick Installation
3. Click the "+" button and add the following permissions:
Verify the impersonation permissions
Verify the on-premise and cloud impersonation permissions you have configured.
Check 1 – Use to verify Impersonation Permission.
Check 2 - Must be ran locally on the GFE server host machine before beginning the installation. This is required to verify a successful AutoDiscover process. This Check will also verify the ability of the service account to impersonate specific users.
20 Good Mobile Messaging Administrator’s Guide

Pre-Installation
Check 1
Use https://www.testexchangeconnectivity.com/.
1. Select the “Exchange Server” tab (for on-premise) or “Office 365” tab (for cloud).
2. Locate the “Microsoft Exchange Web Service Connectivity Tests” section.
3. Select “Service Account Access (Developers).”
4. Select “Next.”
5. Type in the SMTP address of the GoodAdmin service account in the space provided for “Target Mailbox.”
6. Type in the SMTP address of the Good Admin service account for “Microsoft Account” (O365)/”Service Account User Name” (on premise).
If your UPN or “login name” differs from the SMTP address of the GoodAdmin service account, input the UPN here.
Example: [email protected] = UPN aka credentials used to login to the GFE server via RDP. SMTP address for this account is [email protected]. The UPN will be used in the username field.
7. Input the password of the GoodAdmin service account.”
8. Select “Use Autodiscover to detect settings.”
9. Select “Inbox” for the Test predefined folder.
10.Leave the “Specify folder ID” blank.
11.Select “Use Exchange Impersonation.”
12.Type in the SMTP address of a user who will be GFE enabled.
13.Click on the “I understand…” and input the required Verification.
14.Select “Perform Test.” No errors should be reported. Look for all green. The test expects the inbox for the account being impersonated by GoodAdmin to be empty; if RED is displayed, click Expand All; if only the lower return failed, the results are fine
Good Mobile Messaging Administrator’s Guide 21

Quick Installation
Check 2
1. Download the latest EWS Editor release from http://ewseditor.codeplex.com/.
a. This must be downloaded and run from the actual GMM server upon which devices will be provisioned.
b. Extract the zip file and click on the EWSeditor application. Select “File -> Select New Exchange Service.”
c. Click on check mark “Use Autodiscover to get the Exchange Web Service URL.”
d. Input the actual SMTP email address of the GoodAdmin user.
e. Select Exchange 2010_SP2 for the “Requested Exchange Ver-sion.”
f. Click on box for “Use the following credentials instead of the default Windows Credentials.”
For the “User Name,” type the SMTP address of the GoodAd-min Service Account.
22 Good Mobile Messaging Administrator’s Guide

Pre-Installation
If your UPN or “login name” differs from the SMTP address of the GoodAdmin service account, input the UPN here, as you did in Check 1.
g. Select “Use Impersonation” in the last checkbox with ID Type=SMTP address.
h. Input the email address of the user that you would like to test permissions on.
The following example is for a 365-Multi-Tenant deployment where the SMTP address is the same as the UPN. [email protected] is attempting to impersonate [email protected].
Good Mobile Messaging Administrator’s Guide 23

Quick Installation
i. If any other output is generated besides the following screen, impersonation is not applied correctly and GoodAdmin cannot impersonate the user in question.
If this test is not successful, the logging for the autodiscover and attempt at impersonation can be found in a text file named ewseditor.txt residing in the C:\users\goodadmin\documents directory.If any other output is generated besides this screen asking to automatically add the mailbox root to the tree view, GFE instal-lation/operation will not be successful. Unsuccessful testing signifies environmental problems causing AutoDiscover to malfunction and/or that impersonation has not been applied correctly. Successful passing of this test is absolutely manda-tory before beginning GFE installation.
Verify Single Sign-on for Exchange Online (Office 365)
If Single Sign-on is configured, verify that it is working properly. Single Sign-On allows using Active Directory Domain User name/password to logon to cloud services.
• Federation Service – Internal Identity Management
• Federated Proxy Service – External Facing Identity Management
24 Good Mobile Messaging Administrator’s Guide

Pre-Installation
Verify the above federation service is working.Use https://www.testexchangeconnectivity.com/ to confirm.
• Select “Microsoft Single Sign-On”
Good Mobile Messaging Administrator’s Guide 25

Quick Installation
• Input Good Admin Service account for “Microsoft Online logon ID:”
• Type in the password.
• Fill in the verification form and select “Next.”
26 Good Mobile Messaging Administrator’s Guide

Installing Good for Enterprise
A results screen is displayed.
Installing Good for Enterprise
We recommend against running BlackBerryTM Enterprise Server on the same machine as a Good Mobile Messaging Server or Good Mobile Control Server, when both are present. (You can enable Good for Enterprise users who are also using BlackBerry.)
1. Download Good for Enterprise software and run setup.exe. You use this utility for the Good Mobile Control Server and Good Mobile Messaging Server software installations.
2. Install the Good Mobile Control server first and then install one or more Good Mobile Messaging Servers.
3. Run Good Mobile Control Console and create roles for use of the console on different machines. Roles for service administrator, administrator, and helpdesk are packaged with the console. Note: First Console access must be by the Superuser specified during Good Mobile Control Server installation. Launch the Console using https://servername:8443 or http://servername:8080, where
Good Mobile Messaging Administrator’s Guide 27

Quick Installation
servername is the name of the machine on which Good Mobile Control Server is installed. You cannot access the console from a browser on the GMC machine. Use your Windows username and password to log in.
Note: The Good Mobile Control session in your browser will time out after 30 minutes of no activity. The timeout is configurable.
4. Set up user devices as described in the following section.
5. Create policies and assign them to handhelds as described in “Creating and Changing Handheld Policy Sets and Templates” on page 195.
Setting Up the Device
You set up devices wirelessly (Over The Air or “OTA” - distributed deployment model).
For details, refer to “Preparing New Devices” on page 161.
To set up the device:
1. Confirm with your service or sales representative that the device is a supported device type. It must have an active, supported network data service, as well as Good for Enterprise service. Some supported data services may not support roaming. In such cases, Good for Enterprise, like the device’s browser, will not work outside service areas. Visit http://www.good.com for more information.
2. Devices should have the following available memory:
• iOS - Application: 5MB. Runtime footprint: ~9MB (with occasional spikes to 14MB)
• Android - Application: 16.6MB (may increase with future releases). Runtime footprint: up to 33MB, depending upon user mailbox data
• Palm OS - 14.5MB
28 Good Mobile Messaging Administrator’s Guide

Setting Up the Device
• Pocket PC - 12MB (14MB for Treo 700WX)
• Smartphone - 12MB
Contact your authorized service representative for additional information on memory requirements.
Note that Palm is not supported by version 6.0 Client software, but earlier software versions do support Palm.
3. The device battery should be fully charged (an alert will be displayed if the battery is below 25%).
4. Use Good Mobile Control Console to set up and activate user devices wirelessly:
a. On the Console Home page, click the “Add devices” link.
b. Select the user who will be assigned the device. If the user already has one or more devices assigned to him/her, you’ll be prompted to add another. Click OK.
c. Specify a policy and group for the device.
d. When finished, an email is sent to the user's account. The email contains a PIN and URL. The device user connects to the URL and enters his/her email address and the PIN and from the site, Good downloads the OTA Setup application. OTA Setup is a wizard-like application that leads the user through a set of steps to authenticate the user, download and install Good for Enterprise Client software, and connect to Good Mobile Mes-saging Server to wirelessly synchronize the user's account. You can set policies for PIN expiration and reuse, as described in “Preparing New Devices” on page 161. You can display the PIN and URL information at the Console by going to the OTA page for the device on the Handhelds tab.
You can quickly check the connection status between devices and the Good Operations Center using the Good Monitoring Portal located at http://www.good.com/gmp. Like the Good Mobile Control Console, the Good Monitoring Portal provides information about users, their device types and service carriers, and much more.
Good Mobile Messaging Administrator’s Guide 29

Quick Installation
30 Good Mobile Messaging Administrator’s Guide

2 Overview
Good for Enterprise provides Android, iOS, Windows Mobile, Palm, and Nokia mobile users with a wirelessly synchronized connection to their company servers, so they can instantly access up-to-date corporate email, attachments, contacts, and calendar, global address lists, and critical enterprise data when away from their desks.
Good for Enterprise‘s enterprise-class solutions are now available on a variety of handhelds. Good for Enterprise is a complete encrypted wireless system for accessing corporate messaging and data from behind the firewall on the mobile handheld.
The Good for Enterprise system includes:
• The Good for Enterprise Client, supporting a growing number of handhelds
• The Good Mobile Messaging Server, an easy-to-install enterprise class application allowing for elegant fleet management/global policy control and remote security enforcement of wireless synchronization.
• The Good Mobile Control (GMC) Server and Console and the Good Monitoring Portal, used to monitor and manage user handhelds. Good Mobile Messaging acts as a plugin to GMC Server.
• Good Mobile Access Secure Browser (an integrated browser for Intranet use)
Good Mobile Messaging Administrator’s Guide 31

Overview
Note: If you’re upgrading from an earlier version of Good for Enterprise, refer to Good Mobile Messaging Upgrade Note for instructions and a list of differences in this version.
Wireless Synchronization
Good for Enterprise provides automatic synchronization of email, calendar, and contacts, notes the user’s Microsoft Exchange Server account and iOS, Android, Windows Mobile, Palm, or Nokia handheld.
FIGURE 1. Synchronizing Exchange account and handheld
As shown in Figure 1, Good Mobile Messaging Server software monitors the user’s Exchange account and forwards all account activity to the user’s handheld via the Network Operations Center
32 Good Mobile Messaging Administrator’s Guide

On-Premise and Exchange Online (Office 365) Environments
and your wireless network. Similarly, changes made at the handheld travel over the wireless network, and are returned from the Network Operations Center to Exchange via Good Mobile Messaging Server. The email arrives at both the user’s desktop and handheld, available to be read, forwarded, and replied to from either location.
Note that a user can have his/her Exchange account synchronized to multiple handhelds.
On-Premise and Exchange Online (Office 365) Environments
Microsoft Office 365 enables enterprises to move their Exchange servers into the cloud, where they are managed by Microsoft. This can reduce administrative burdens for the enterprise, as Microsoft assumes responsibility to update the Exchange servers and maintain them. Good Mobile Messaging Server for Office 365 allows enterprises to extend all the benefits of Good for Enterprise to Office 365 Exchange Online environments.
As with the Good Mobile Messaging Server for Exchange, the Good Mobile Messaging Server for Office 365 is installed and located in the enterprise network. Instead of connecting directly to the Exchange server on the Enterprise network, Good Mobile Messaging Server for Office 365 utilizes the Exchange Web Services (EWS) interface to communicate with the Exchange Online server(s) in the Microsoft cloud. Security of data exchanged with the Office 365 cloud is provided through the use of the SSL protocol.
This release of Good Mobile Messaging Server for Office 365 provides support for email, calendar, and contact functions. As with the Exchange version of the Good Mobile Messaging Server, the Office 365 version, Exchange Online, allows the user to synchronize their desktop email, calendar and contacts with the Good for Enterprise client application on their mobile device.
Good Mobile Messaging Administrator’s Guide 33

Overview
Deployment Scenarios
Microsoft Office 365 (Exchange Online) is a resource forest. A resource forest contains a domain, users, and Exchange servers. In a resource forest, user accounts are disabled. Resource forests are normally used to separate user domains from server domains. Forests are used in large organizations when IT wants to put all the servers in a separate domain to isolate and manage them separately, outside the user domain.
Microsoft offers three deployment scenarios for Office 365 (Exchange in the Cloud): Dedicated, Hybrid and Pure Office 365.
For Dedicated deployment, the organization will have its own private Exchange server and full access to the domain in the Microsoft cloud. The organization may have a mix of local on-premise and cloud Exchange servers. The organization will have a private circuit between its data center and the Microsoft data center. This type of deployment normally serves large enterprises. It’s not common, is very expensive, and requires a multi-year commitment.
Hybrid Office 365 is normally a transitional state for organizations that are moving their user mailboxes to Office 365. In the Hybrid configuration, the organization has on-premise Exchange servers and cloud Exchange servers. The organization will move its mailboxes to the cloud Exchange Server at the rate they require. All changes are replicated between the on-premise and cloud domains.
For Pure Office 365, the organization no longer has any Exchange servers on-premise. All mailboxes have migrated to the Office 365 cloud. The local domain no longer has replication of Exchange data for the users that are in the cloud.
34 Good Mobile Messaging Administrator’s Guide

On-Premise and Exchange Online (Office 365) Environments
Dedicated Office 365
The diagram depicts Good Mobile Messaging Server placement in a dedicated deployment
• Good Mobile Console is configured to communicate with the cloud AD using LDAP or EWS, as the organization has a private connection to the Microsoft cloud. The organization has a domain controller in the Microsoft cloud.
• Good Mobile Messaging Servers use EWS to communicate with both cloud and on-premise Exchange servers.
Deployment Type
Directory Sync
Direct Access to Domain in the Cloud
Exchange On-Premise
Private Circuit to MSFT Cloud
Dedicated x x x xHybrid x xPure x
Good Mobile Messaging Administrator’s Guide 35

Overview
• GMC adds users from the local domain to Roles in Good Mobile Control.
• All changes from the local AD are synchronized with Office 365.
Hybrid Office 365
In a Hybrid 365 deployment, there are on-premise and Office 365 Exchange servers.
• Good Mobile Control is configured to use EWS/AD on-premise.
• Office 365 credentials are required to communicate with Office 365 using EWS.
• Good Mobile Control looks up users to enable them for Good for Enterprise using AD/LDAP or EWS.
• Good Mobile Control looks up users to add them to Roles from the organization’s local domain (AD) using existing LDAP.
• Good Mobile Messaging uses EWS to communicate with Office 365 Exchange.
36 Good Mobile Messaging Administrator’s Guide

On-Premise and Exchange Online (Office 365) Environments
Pure Office 365 Scenarios
I
In a Pure Office 365 deployment, there are no on-premise Exchange servers.
• Good Mobile Control is configured to use EWS/AD in-cloud.
• Office 365 credentials are required to communicate with Office 365 using EWS.
• Good Mobile Control looks up users to enable them for Good for Enterprise using EWS.
• Good Mobile Control looks up users to add them to Roles from the organization’s local domain (AD) using existing LDAP.
• Good Mobile Messaging uses EWS to communicate with Office 365 Exchange.
Good Mobile Messaging Administrator’s Guide 37

Overview
MDM-Only
The Good Mobile Control Console can also manage iOS devices that do not connect to a Good Messaging Server, using Mobile Device Management (MDM). In this case, the device is configured with an Apple Good configuration profile and an MDM configuration profile.
With these profiles in place, the Console can provide asset and application management, including the ability to install/uninstall applications, restrict application use on the device, enforce passcode policies, manage WiFi, VPN, web clips, and ActiveSyuc use, and lock and wipe devices remotely.
Good Security
A complete discussion of Good’s extensive security features is beyond the scope of this overview. For details, refer to the Good Technology white papers. For more, contact your account representative.
Good security can be divided into the following areas:
• Good System Security architecture
• Good Secure OTA architecture
• Good Security Policies
Good System Security Architecture
The Good System has been specifically designed to meet the security needs of even the largest, most security-sensitive corporations. It provides an end-to-end system designed to protect corporate information at all times—while it is being transmitted over the wireless network and while it resides on the handheld. The Good System uses today’s up-to-date security technologies. Installation of Good applications does not require any modifications to the
38 Good Mobile Messaging Administrator’s Guide

Good Security
customer’s firewall, and allows you to leverage your existing network security infrastructure.
Network Perimeter Security
Connections from the Good Mobile Messaging Server to the Good Network Operations Center use HTTP and are protected by the Secure Sockets Layer (SSL). Since the connection is established in the outbound direction, there is no need to create an inbound opening in the corporate firewall. Most corporate security policies allow this type of traffic through port 443 without the need to reconfigure the firewall. Connections to the Good Network Operations Center are used only for sending data to and receiving data from handheld devices.
Perimeter security includes:
• End-to-end encryption
• AES
• FIPS 140-2 validation
• Reliable message delivery
Handheld Security
The handheld device can be configured with a password. When the handheld device is locked, Good applications will not display any of the user’s data. Access can be restored only by entering the correct password. If an unauthorized user tries to guess the password too many times, the Good client software can be configured to lock the device or delete all Good application data stored on it.
Passwords set on Windows Mobile and Palm devices control access to the device. Passwords set on Android control access to the Good application. Passwords set on iOS devices can control access to the device or Good application, or both.
Good Mobile Messaging Administrator’s Guide 39

Overview
The IT administrator can specify policies for the password provided by the user. These policies are applied wirelessly.
Good data is encrypted and cannot be downloaded from the device.
If a user’s handheld device is lost or stolen, the IT administrator can use the Good Mobile Control Console to remotely disable access to Good on the device and remove all Good application data. If a handheld device is recovered, Good for Enterprise and all handheld applications selected by it will be restored OTA. Deleting the device from the Console will automatically wipe its Good data.
On handhelds that support external SD cards, Good applications can be backed up, allowing Good for Enterprise to later reconnect to the enterprise. This backup can be useful in the event that the battery drains completely, which causes temporary memory on some handhelds to be lost. (Not applicable to Android.)
Handheld Authentication
The Good System provides a number of safeguards against unauthorized access. The Good Mobile Messaging Server resides behind a corporate firewall, and any handheld device attempting to contact it requires a three-step authentication process among
• the Good Network Operations Center and the Good Mobile Messaging Server
• the handheld and the Good Network Operations Center
• the handheld and the Good Mobile Messaging Server
Administrative Security
The Good System offers Role-Based-Administration (RBA) features that allow system-administration permissions to be customized according to the needs and qualifications of each user. By controlling users’ access according to their roles and the associated permissions, RBA provides a tool for managing IT assets and increasing security. Routine tasks—such as adding a new user or loading software—can
40 Good Mobile Messaging Administrator’s Guide

Good Security
be delegated to a wider group of IT managers across multiple locations. More sensitive permissions, such as those required for setting policies for users, can be restricted to a smaller group, increasing the overall security of the system. RBA also encourages the most efficient use of IT resources, since permissions can be based on skill and job function.
Good Secure OTA Architecture
OTA Deployment Security Considerations
Beginning with GoodLink 4.0, Good provides Secure Over-The-Air (OTA) setup of Good for Enterprise, without ever giving the handheld to IT. Good Secure OTA capability encompasses several features, including deploying and upgrading Good for Enterprise, installation of any handheld software, and handheld policy updates.
The high-level process flow for Good Secure OTA setup of handhelds is detailed in the Good security white paper.
As described previously, the Good System does not require any inbound connections through the enterprise firewall. This advantage is maintained for Good Secure OTA. All communications between Good OTA Setup and the Good Mobile Messaging Server run through the same outbound connection that Good for Enterprise normally uses.
Good’s comprehensive OTA setup authentication is explained in detail in the security white paper.
In order to protect all traffic between Good OTA Setup and the Good Mobile Messaging Servers, all communication during the provisioning process runs over HTTP/SSL. The package of provisioning information is further encrypted using an AES key derived from the user’s OTA PIN. After the client receives the package of provisioning information, it begins to use the normal end-
Good Mobile Messaging Administrator’s Guide 41

Overview
to-end encryption capabilities that Good for Enterprise uses after provisioning a handheld at the Good Mobile Control Console.
OTA Software Installation Security Considerations
The Good OTA software distribution system supports distribution of Good applications and custom applications provided by a customer’s internal IT department. Security is maintained via the following:
• Digital Signatures - Good software is digitally signed using X.509v3 certificates.
• Encryption - Before the custom software package is uploaded, it is encrypted using a key generated by the Good Mobile Control Console using Microsoft’s CryptoAPI.
• Software Versions - The Console provides a policy for IT to specify the version of client software which will be installed.
• Mandatory Installation - IT can mark software packages as mandatory or optional.
• Off-Peak Downloads - When IT initiates a Good for Enterprise upgrade or distribution of other handheld software for multiple handhelds, the Good for Enterprise client will begin the download at a random time overnight.
Good Security Policies
Good for Enterprise allows the administrator to set a wide variety of policies to be enforced on user handhelds. These include passwords; storage-card encryption; mandatory or permitted applications, databases, and folders; and other policies. Refer to “Managing the Handhelds” on page 185 for details.
Managing an Exchange Account
In order to monitor and update the Exchange accounts of handheld users, Good Mobile Messaging Server runs as a service under a
42 Good Mobile Messaging Administrator’s Guide

Managing an Exchange Account
Windows 2008® Standard and Enterprise with Service Pack 2 or R2, or Windows 2012, 64-bit network domain user account that you set up (named GoodAdmin in this guide).
Communications between the Exchange and Good Mobile Messaging Server uses the Exchange Web Services (EWS) SOAP protocol.
FIGURE 2. Monitoring the user’s account
As shown in Figure 2, Good Mobile Messaging Server monitors activity in the handheld user’s email, calendar, and contacts, and other folders, and relays all changes to the Network Operations Center, where they are queued up and delivered to the handheld. In the same way, handheld activity is passed along to the Exchange
Good Mobile Messaging Administrator’s Guide 43

Overview
account. Synchronization is dynamic and real-time, not scheduled. The messages cannot be viewed by anyone along the way because they are encrypted. Data can be viewed only from Outlook and on the handheld.
As mentioned before, one user can have his/her Exchange account synchronized to multiple handhelds.
Multiple Exchange and Good Mobile Messaging Servers
Good Mobile Messaging Server can manage synchronization for accounts on multiple Exchange servers in an Exchange Organization.
Good Mobile Messaging Server and Good Mobile Control Server are installed on host machines. For large installations, these will typically be different machines. The Messaging Servers will reside close to the Exchange Servers they communicate with. The Good Mobile Control
44 Good Mobile Messaging Administrator’s Guide

Multiple Exchange and Good Mobile Messaging Servers
Server will reside close to the SQL database that it uses. Good Mobile Control Consoles are available via the Web.
FIGURE 3. Handheld users on multiple Exchange servers and sites
Figure 3 shows Good Mobile Messaging Server maintaining user accounts on multiple Exchange servers. Good Mobile Control Server uses ADSI to list, monitor, and manage handheld users across sites. The console is used to assign handhelds to users and to monitor and manage Good Mobile Messaging Servers.
If you have thousands of handheld users, you may need to install additional Good Mobile Messaging Servers to handle the synchronization tasks. Each new Good Mobile Messaging Server will need to be installed on a separate machine. When configuring Good Mobile Messaging Server to connect with an Exchange Server, the speed of the network connection must be a sustained minimum rate of at least 100Mb/s.
Good Mobile Messaging Administrator’s Guide 45

Overview
Installation Concepts
This section provides an overview of the installation process. For an outline of the installation steps, see “Pre-Installation” on page 13.
You will install one or more Good Mobile Messaging Servers on host computers. Each Good Mobile Messaging Server will manage a set of user accounts and handhelds that you specify. The accounts can be located on any Exchange servers in the Exchange Organization, as long as they appear in the Global Address List and the Good Mobile Messaging Servers have the necessary permissions for the sites. You will assign users to a Good Mobile Messaging Server according to the organization scheme most convenient to you and according to your capacity planning. No special configuration is necessary to have multiple Good Mobile Messaging Servers manage handhelds on multiple Exchange servers.
Accounts and Permissions
Each Good Mobile Messaging Server runs as a service under a Windows network domain user account that you set up for the servers. In this guide, the account is called GoodAdmin. You also set up an Exchange mailbox that all Good Mobile Messaging Servers use to facilitate their work in synchronizing user mailboxes with their handhelds. In this guide, the mailbox is called GoodAdmin.
Good Mobile Control Server communicates directly with the Good Mobile Messaging Servers to query user session/service details and to upload log files. Also, when you list Good Mobile Messaging Servers in the Good Mobile Control Console, Good Mobile Control Server checks each Good Mobile Messaging Server for its current status.
To function correctly, the Good Mobile Messaging Server’s Windows account requires specific domain, local, and Exchange privileges, which vary depending upon the Windows version and Exchange
46 Good Mobile Messaging Administrator’s Guide

Installation Concepts
environment. Privileges required for your specific environment are provided in the table on page 73.
Good Mobile Control and Good Mobile Messaging Servers can use the same or different mailbox accounts.
Good Mobile Control Server and Console
Good Mobile Control Console communicates with Good Mobile Control Server. There must be at least one Good Mobile Control Server installed. A Good Mobile Control Console can communicate with any Good Mobile Control Server; a Console menu item allows you to specify which.
To access the Console, administrators enter a URL to the Server. Console use is controlled by the roles that you assign to the administrators who use it.
You will use Good Mobile Control Console to assign handhelds to users, to set up, monitor, and manage the handhelds, to create and manage policy sets, and to manage the Good Mobile Messaging Servers.
Good Mobile Messaging Administrator’s Guide 47

Overview
Most of the handheld management tasks are initiated from the Console’s Handhelds, Policies, and Servers pages. Figure 4 displays the Console tabs for these pages.
FIGURE 4. Good Mobile Control Console Management Tabs
You can use these windows to display ongoing handheld activity, set handheld policies, erase data, lock out a user, create an unlock password, disable the handheld, and otherwise manage handhelds and servers.
You will use the Good for Enterprise setup program to install the Good Mobile Control Server and Console. You can limit access to Good Mobile Control facilities using role-based administration in the Console.
You can quickly check the connection status between devices and the Good Network Operations Center using the Good Monitoring Portal located at www.good.com/gmp. Like the Good Mobile Control Console, the Good Monitoring Portal provides information about users, their handheld types and service carriers, and much more.
mp
48 Good Mobile Messaging Administrator’s Guide

Installation Concepts
Good Mobile Messaging Server
With the proper GoodAdmin account, permissions, and mailbox set up (see “Accounts and Permissions” on page 46), you are ready to install Good Mobile Control Server and Good Mobile Messaging Server. Installation consists of:
• Checking system prerequisites
• Installing Good Mobile Control Server and Good Mobile Messaging Server
• Assigning usage roles for Good Mobile Control Console
• Setting up an optional Good for Enterprise standby configuration. Good Mobile Control backup options are handled during installation.
Handheld Setup
Handheld setup consists of adding the handheld to a Good Mobile Messaging Server and downloading Good for Enterprise and Custom applications onto it.
Good for Enterprise applications are made available from Good Technology to your Good Mobile Control Servers.
Use Good Mobile Control Console to add handhelds to a Server and to configure the software to be downloaded to the handhelds wirelessly.
Wireless download begins with the Good Mobile Control Console sending email to the user whose handheld is to be set up (if the OTA policy has been set to send welcome email). The email contains a PIN and URL that the user will need to initiate the download and setup. The user downloads OTA Setup from the URL site and runs it to install the software, entering the PIN when prompted. You can set policies for PIN expiration and reuse (refer to “Creating and Changing Handheld Policy Sets and Templates” on page 195).
Good Mobile Messaging Administrator’s Guide 49

Overview
As prerequisites to setup, the handheld must have the proper amount of available memory and have established phone and data services running on it.
You can assign users to the SelfService role to allow them to use the Good Management Console, in Self Service mode, to add their handhelds to Good for Enterprise, resend and regenerate PINs, lock and erase the handhelds, download idenity certificates for web-service authentication, and delete them from Good for Enterprise.
Wireless Handheld Management
Good for Enterprise allows supported handhelds to be set up and managed wirelessly. This feature is referred to as OTA (Over The Air) functionality.
50 Good Mobile Messaging Administrator’s Guide

Wireless Handheld Management
Policies governing security, synchronization, and software applications can be set at the Good Mobile Control Console for every handheld. These policies are synchronized continuously.
FIGURE 5. Data Flow
Wireless Handheld Setup
Wireless setup of a handheld comprises the following general steps. Refer to Figure 5 for a view of the interrelationship of the system components involved.
• At the Good Mobile Control Console, enable the user/handheld for OTA Setup. This configures the user's Exchange account and
Good Mobile Messaging Administrator’s Guide 51

Overview
authorizes the user for OTA setup in the Good Network Operations Center.
• An OTA Setup email message is sent to the user (if the OTA policy has been set to do so). With the information and PIN it contains, the user navigates to App Store (iOS), Android Market, or downloads the OTA Setup application from the Network Operations Center (Windows Mobile, Nokia, Palm).
• The user follows the installation or OTA Setup prompts. With installation and validation via PIN complete, Good for Enterprise starts and synchronizes the handheld with the user’s Exchange account.
Wireless Policy Synchronization
The OTA feature provides continuous wireless synchronization of handheld policies and implements policy changes as soon as they are made:
• When you configure or reconfigure policies using Good Mobile Control Console, the settings are applied for each user by Good.
• Good Mobile Messaging Server monitors the user's account and forwards policy changes to the handheld along the path shown in Figure 5.
• The policy changes are then applied to the handheld.
• When you configure or reconfigure individual user policies using Good Mobile Control Console, the settings are applied for the user and stored in the Good Mobile Control database.
Wireless Handheld Software Upgrades
You can update Good for Enterprise software policies wirelessly for an individual handheld. These policies determine which versions of Good for Enterprise Client and custom applications are to be downloaded to the specified handhelds:
52 Good Mobile Messaging Administrator’s Guide

Wireless Handheld Management
• Use Good Mobile Control Console to set and change software policies.
• Policy changes are applied to each user/handheld by the Console in Exchange.
• Good Mobile Messaging Server monitors each user's Exchange account and forwards any software policy changes to the handheld via the path shown in the figure.
• On the handhelds, Good for Enterprise Client receives these policies and schedules required software downloads or notifies the user of the available new software applications that can be downloaded.
• Good for Enterprise Client downloads the application from the Good Network Operations Center.
• With the application downloaded, the software is verified with the software certificates for Good applications or decrypted for Custom applications.
• The software application is then installed on the handheld.
Custom Software for Wireless Distribution
Wireless handheld software upgrades can include custom applications for a specific handheld type. Custom applications are applications that you have appropriate licenses for and want to distribute OTA. Custom applications are first uploaded to all Good Mobile Messaging Servers at the site level, and then appropriately enabled as a software policy for the users.
• The Good Mobile Control Console is used to add custom applications for a specific Good Mobile Messaging Server.
• An application is added by entering information about the application (e.g., the name, version, and description of the application) and then uploading the application to the Good Network Operations Center.
Good Mobile Messaging Administrator’s Guide 53

Overview
• The uploaded application then appears as a Custom application for the handheld type, and can be made available to users in encrypted form through the normal wireless handheld software upgrade process.
Localizing the Application
GFE is an internationalized application that supports localization. You can translate user-interface text to your language and format dates to obey rules unique to your region. This is done through the International Settings at the device level. GFE currently supports localization in English, French, Italian, German, Spanish, Dutch, Portuguese (Brazilian), and Japanese.
GFE supports right-to-left text formatting for languages such as Hebrew. Note that this is not localization support, but ability to properly display content.
54 Good Mobile Messaging Administrator’s Guide

3 Pre-installation
This chapter provides detailed instructions for preparing for installation of Good Mobile Messaging Server and Good Mobile Control (GMC) Server.
Before performing the installation, you will need to complete the following tasks. Each task is explained in the following sections.
• Check prerequisites; perform initial Good Mobile Messaging Server and Good Mobile Control Server host configuration
• Set up the GoodAdmin user account, permissions, and mailbox for use with Good Mobile Messaging Server and Good Mobile Control Server
• Set the required GoodAdmin local permissions for each Good Mobile Messaging Server host machine.
Checking Prerequisites and System Requirements
Ensure that the Good Mobile Messaging Server and Good Mobile Control Server host machines, and your Exchange server, conform to the following prerequisites. Good Mobile Messaging Server and Good Mobile Control Server can run on the same host machine, but cannot run on the same host machine as Microsoft Exchange Server. For environments serving more than 1,000 handhelds, we
Good Mobile Messaging Administrator’s Guide 55

Pre-installation
recommend installing the Good Mobile Control Server on a separate host machine. (Refer to “Scalability” on page 62.)
The Good Mobile Messaging Server should have a low latency and good bandwidth with the Exchange Servers it communicates with. The Good Mobile Control Server should be close to its SQL database. (For both Good Mobile Messaging and Good Mobile Control Servers, recommended is less than 10 ms latency). The Servers should not be burdened with other work.
Good Mobile Messaging Server minimum host system requirements:
• Hard drive space free for each Good Mobile Messaging Server:- 400MB system installation
- 10GB logsThese space requirements do not include those for Good Mobile Control Server if it is on the same machine.
• 64-bit: Intel Pentium IV dual-core processor (2GHz or greater), 8GB RAM, Windows 2008 SP2, Windows 2008 R2 SP1 or Windows 2012 Standard, or newer.
• For scalability information, refer to “Good Mobile Control Performance and Scalability” on page 677 and, for Good Mobile Messaging Server, the GMM 8.1 EWS/SQL Deployment Planning Guide.
• If a virtual machine session is used for Good Messaging, the free drive space and RAM requirements also apply.
• Good for Enterprise is an I/O intensive application; consider this fact when deciding which other applications are to run on the same host machine.
• Good Mobile Messaging Server is supported as a guest on VMware ESX 3.0.1, 3.5, 4.0, 4.1 (using vSphere 4), and 5.0. Good Mobile Control is supported as a Guest on VMware ESX 3.5, 4.0, 4.1, and 5.0. If Good Mobile Control is installed in the same Guest as another Good product, then VMware ESX 3.5, 4.0, 4.1, or 5.0 is required. Good Mobile Messaging Server and Good Mobile
56 Good Mobile Messaging Administrator’s Guide

Checking Prerequisites and System Requirements
Control are supported as Guests on a Windows 2012 Standard or Windows 2008 64-bit Standard and Enterprise SP2 and R2 64 Bit Hyper-V Host.
Note: VMware Snapshots are not a viable option for Good-environment backups. Good For Enterprise does not support taking snapshots or reverting to earlier snapshots. Snapshots taken on a Good Server may cause high CPU utilization and performance issues. This may also result in users not being initialized due to "Advise Reconnect" and/or "Exchange server Down" errors.
• Required minimum LAN speed for the Good Mobile Messaging Servers: 100Mb/s. Note: When configuring Good Mobile Messaging Servers to connect with an Exchange server, the speed of the network connection must be a sustained minimum rate of at least 100Mb/s. Slower network connections between Exchange and Good Mobile Messaging Servers will cause increased message latency.
• Microsoft Outlook® must not be installed on the Good Mobile Messaging Server or Good Mobile Control Server host machines. Uninstall Outlook if it is present. Installing Good Mobile Messaging Server on a Microsoft Exchange server machine is not supported. Installing Good Mobile Messaging Server on a domain controller is not supported.
Good Mobile Control Server minimum host requirements:
• Hard drive space free for each Good Mobile Control Server:- 300MB system installation
- 250MB logsThese space requirements do not include those for Good Mobile Messaging Server if it is on the same machine.
• Dual-core Intel® Xeon® processor (2GHz or greater), 1.5GB RAM; for more than several hundred users: Intel Pentium IV dual processor (2GHz or greater), 2GB RAM. We recommend multicore processors; inhouse testing is performed using four cores.
Good Mobile Messaging Administrator’s Guide 57

Pre-installation
We recommend 4GB of RAM, not the minimum. For increased numbers of users, refer to “Good Mobile Control Performance and Scalability” on page 677.
To configure Good Mobile Control to use more RAM: -Xms2160m -Xmx2160m (JVM heap memory parameters):
Registry settings:
[HKEY_LOCAL_MACHINE\SYSTEM\CurrentControlSet\services\GMCServer\Parameters\ChildArgs\-Xms]"Value"="2160m"
[HKEY_LOCAL_MACHINE\SYSTEM\CurrentControlSet\services\GMCServer\Parameters\ChildArgs\-Xmx]"Value"="2160m"
For more than 20K devices served by the GMC, increase JVM heap size to 2160MB.
Java VM Heap sizing arguments:
-XX:MaxPerm-Size=128m –Xms2160m –Xmx2160m
• For Good Mobile Control Server performance and scalability information, refer to “Good Mobile Control Performance and Scalability” on page 677.
• Supported browsers.
Good Mobile Messaging Server and Good Mobile Control Server requirements:
• Note that during Server startup, significantly more processing occurs than during runtime. If the Messaging Server cache is located on VM disk or SAN rather than on a physical disk, the processing will be somewhat slower and will result in measurably more latency during startup. (Refer to “Scalability” on page 62.)
• Good Mobile Control Server requires Windows 2003 with Service Pack 2 or Windows 2008 64-bit Standard and Enterprise with Service Pack 2 or R2 SP1 64-bit.
58 Good Mobile Messaging Administrator’s Guide

Checking Prerequisites and System Requirements
• Good Mobile Messaging Servers must have access to the Microsoft Exchange Server that will manage user mailboxes.
• Both the Good Mobile Messaging Server and Good Mobile Control Server host machines must have Internet access. They should be able to connect to http port 443 (secure https).
If you’ll be using a proxy server, you’ll enter the necessary information for that server during the installation process.
In most environments, firewall modification will not be necessary. If your environment has “egress” filtering in place, firewall modification should be made to allow outbound-initiated bi-directional (established) TCP traffic on ports 80 and 443 from GFE server to Good’s NOC. The GFE to NOC connection may utilize a combination of IPs in the following two Good-owned networks (216.136.156.64/27 and 198.76.161.0/24).
GFE must also be able to egress on port 443 to ALL IP addresses owned by Microsoft which service their 365 tenants.
To test appropriate access, open the following URLs on your Good for Enterprise server – successful connectivity is noted by a “Congratulations!” message at the top of the page.
- https://xml29.good.com
- https://xml28.good.comDo not put the Good Mobile Messaging Server and Good Mobile Control Server in the DMZ zone or block any LAN ports. The Good Mobile Messaging Server and operating system calls have many port dependencies for interfacing with mail servers and AD, especially TCP 1433 (Database).
Outbound network hostnames for Good Operations Center:
• ws.good.com HTTPS 443 216.136.156.64/27
• www.good.com HTTPS 443 216.136.156.64/27
• upl01.good.com HTTPS 443 216.136.156.64/27
• xml28.good.com HTTPS 443 198.76.161.0/24
• xml29.good.com HTTPS 443 198.76.161.0/24
Good Mobile Messaging Administrator’s Guide 59

Pre-installation
• xml30.good.com HTTPS 443 198.76.161.0/24
• gti01.good.com HTTPS 443 198.76.161.0/24
NOTE: No "external" ports or NAT configuration is required. All communication is initiated by GFE server "outbound" to Good's NOC.
The Windows firewall is not supported for use with Good Mobile Controller or Good Mobile Messaging Servers. Note that in Windows 2008, the Windows firewall is turned on by default. If currently on, turn off the firewall in Windows 2003 or 2008.
Note: Good does not recommend a DMZ deployment nor is it supported, as a number of outbound ports need to be opened to connect to the Microsoft Exchange server
• Good Mobile Control Server requires port 19005 to be open for communication with Good Mobile Messaging Server and for web services. Good Mobile Messaging Server requires ports 10009 and 10010 to be open for communication with Good Mobile Control Server and other uses.
• In order to receive new message notifications while using the Good client for iOS devices on wifi networks, the following IP range and port need to be open:
TCP port 5223 incoming/outgoing (for iOS)
TCP port 5228, 5229, 5230 outgoing (for Android)
For iOS, the firewall needs to accept traffic from 17.0.0.0/8 port 5223. This is the external IP range of the Apple Push Notification Service servers, which provide the message notifications for the Good email service on the iOS devices.
• The Good Mobile Control host machine should not have an MSDE or SQL server installed on it. To uninstall SQL if present, refer to “Uninstalling SQL Server” on page 593.
• (Exchange Online excepted) Before installing Good Mobile Messaging Servers and Good Mobile Control Servers, ensure that the host machines’ time and date are set to your network's correct
60 Good Mobile Messaging Administrator’s Guide

Checking Prerequisites and System Requirements
time and date. Otherwise, errors such as a Security Alert regarding a problem with the site's security certificate may occur.
• Don’t share hardware resources with other processes/virtual machines. If the Good Server is on a physical machine, don’t run other processes on the same machine. Good Mobile Control and Good Mobile Messaging should be on separate machines for all but small installations. If on a virtual machine, treat the situation as the same as for a physical machine, adding the fact that the virtual machine should have dedicated CPUs and RAM. For more, refer to “Good Mobile Control Performance and Scalability” on page 677.
• To activate the S/MIME secure-email feature in the Good Mobile Control Console, all installed Servers must be version 5.0 or higher.
• Ports 80 and 389 should be open on the Good Mobile Messaging Server for OCSP and LDAP lookup when using S/MIME.
• For secure LDAP connections (SSLv3/TLS1.x) between the Good Mobile Control Console and AD, add the following to the config.props file. Default location is C:\Program Files (x86)\Good Technology\Good Mobile Control.
setsystem.directory.adsi.ssl true
If the GMC is installed and running, restart its service for the change to take effect.
• If you plan to use Deep Packet Inspection (DPI), configure it with a span port with mirroring. If you implement DPI directly inline with the traffic between the Good Messaging Server and the Good Operations Center, the connection to the Operations Center will fail due to certificate interception Also, ensure that the latency of the connection between the Messaging Server and Operations Center not be degraded as a result of using DPI or our system performance will degrade or possibly fail. In general, <100ms of latency between the Messaging Server and Operations Center is required for best performance. Note that we do not recommend DPI for user with Good for Enterprise, as the inspected packets
Good Mobile Messaging Administrator’s Guide 61

Pre-installation
are all encrypted and the inspection operation only affects performance.
• Good Mobile Messaging Server requires Microsoft .NET Framework 3.5.1, installed using Server Manager. Right-click on “Features,” add-features, select .NET.
• Good for Enterprise Clients using WiFi behind a firewall require access to the following IP ranges for connection to the Network Operations Center (NOC):
- 206.124.114.1 through 206.124.114.254 (206.124.114.0/24) on port 443
- 206.124.121.1 through 206.124.121.254 (206.124.121.0/24) on port 443
- 206.124.122.1 through 206.124.122.254 (206.124.122.0/24) on port 443
Good Mobile Control SQL, .NET Framework, and Console requirements (links subject to change) (note these requirements if you plan to use an SQL server of your own (not recommended); otherwise, Good Mobile Control will install SQL Express for you. SQL Express supports up to 4GB databases only.):
• Microsoft .NET Framework 3.5 Service Pack 1:
http://www.microsoft.com/en-us/download/details.aspx?id=22
• Microsoft SQL Server Management Studio Express Service Pack 2:
http://www.microsoft.com/downloads/details.aspx?FamilyID=6053c6f8-82c8-479c-b25b-9aca13141c9e&DisplayLang=en#Requirements
• On a clean Windows2008 SP2 32-bit system, Windows PowerShell may be absent. If so, you will need to install it.
Scalability
A single Good Mobile Control Server can handle up to 35,000 devices spread over up to 35 Good Mobile Messaging Servers, subject to the
62 Good Mobile Messaging Administrator’s Guide

Checking Prerequisites and System Requirements
machine and operating-system requirements provided above, and up to 25,000 devices using iOS MDM. 2.5MB/user SQL space is required.
Scalability for Good Mobile Messaging Servers is discussed in the GMM EWS/SQL Deployment Planning Guide. The GMM Servers can support approximately 2,100 devices each with average load per Server. If each GMM Server manages its maximum 2,100 devices, 17 GMM Servers would be supported by one GMC; if the GMM Servers average only 1,000 devices each, 35 GMM Servers (the maximum) would be supported by the GMC.
Preparing for SQL Server Use
Good Mobile Control and Good Mobile Messaging Servers require access to a Microsoft SQL server. You can use an existing Enterprise or Standard Microsoft SQL Server (minimum versions: 2008 R2 SP1 CU6 (GMC) and 2008 SP2 (GMM)) or SQL Server instance, local or remote, available within the organization, including remote SQL/SQL Cluster. Refer to the compatability matrix for details. If you don’t have an SQL server that you want to use, a (local) SQL Express server will be installed along with the Good Mobile Control Server (but not for the Good Mobile Messaging Server).
Note that multiple SQL Server named instances can run on the same Windows Server. Each of these instances can contain multiple databases. When multiple GMM servers are present, each must be assigned its own database. Multiple Good Mobile Control Servers can use the same SQL instance but each Good Mobile Control Server must use a separate user database within that instance. If two Good Mobile Control Servers attach to the same user database in the same SQL Server named instance running on a Windows Server, data loss may occur. An SQL instance is defined as a separate copy of SQL Server running on the same computer.
When installing SQL server 2008 on Windows server 2012, a “Not able to install Microsoft SQL Server Express” error is encountered if the hard drive is compressed.
Good Mobile Messaging Administrator’s Guide 63

Pre-installation
Some knowledge of SQL installation, configuration, and maintenance will be useful if you plan to use an existing database.
2.5MB/user SQL space required.
You’ll need the name of the service account you will use to run the Good Mobile Control and Good Mobile Messaging services.
Verify that the GoodAdmin account owns dbcreator permissions.
SQL Servers enforce their own authentication and authorization. If you encounter an SQL error during the installation process, you’ll need to confirm that your SQL configuration information was entered correctly. If you will be using your own previously installed SQL Server instance, gather the following information in advance. You’ll be required to provide it during Good Mobile Control and Good Mobile Messaging Server installation.
• The fully qualified machine name of your SQL Server instance
• Method of connection to your existing SQL Server instance (static port, named instance (dynamic port), or connected to it as the default instance)
• If static port, the port number
• If named instance, the instance name
• Authentication mode used to connect to your SQL Server instance (Windows AD authentication/SQL Server authentication)
- If Windows authentication, the service account name entered above must already have a login to SQL Server, or, if not, add a login for the service account name to your SQL Server instance, granting it at least the Server-Level Role of “dbcreator.”
- If SQL Server authentication, the SQL Server login name you use to connect to SQL Server with, and the password for this SQL Server login. You will be prompted for the login and password during the Good Mobile Control and Good Mobile Messaging installation. The SQL Server login must be a
64 Good Mobile Messaging Administrator’s Guide

Checking Prerequisites and System Requirements
member of the “dbcreator” security role. If not, add the login to the dbcreator security role so that the Good Mobile Control and Good Mobile Messaging install can create its own database and table within the SQL Server instance.
• Whether your existing database server is local or remote, ensure that TCP/IP is enabled for “Local and Remote connections” on your SQL Server instance.
Note: For security, a patch is required for SQL Server. Without the hotfix, the GMC service will start but within a few seconds will crash. Several errors will appear in the Windows Event Log. The key log message that appears in the EMF.log file is:
com.good.base.GoodException: org.apache.commons.dbcp.SQLNestedException: Cannot create PoolableConnectionFactory (Connection reset)
The following patches are available. These are the minimum versions required for GMC to work correctly; later versions are supported:
Microsoft SQL Server CPU/RAM Planning
• 1-5,000 users - 4 core 8GB RAM
• 5,000-10,000 - 4 core 12GB RAM
• 10,000-25,000 - 8 core 24GB RAM
• 25,000-75,000 - 8-12 core 32GB RAM
• 75,000-100,000+ - 12-16 core 64GB RAM
Microsoft SQL Server Storage Planning
(On average, about 60MB/user)
• 1,000 users - 60GB
10.00.5770 SQL Server 2008 SP3 CU3 16 Jan 201210.50.2811 SQL Server 2008 R2 SP1 CU6 16 Apr 2012- SQL Server 2008 R2 SP2 26 July 2012
Good Mobile Messaging Administrator’s Guide 65

Pre-installation
• 5,000 users - 300GB
• 10,000 users – 600GB
• 20,000 users – 1.2TB
• 50,000 users – 3.0TB
• 100,000 users – 6.0TB
You can test SQL functionality by stopping the SQL server and verifying that GFE users are paused, with synchronization stopped in both directions. Resuming SQL service will cause synchronization to start up again for all users with no emails or other data lost.
Windows Service Dependency
If a Good Mobile Messaging Server restarts and tries to connect to its SQL database but the SQL server is not presently ready, the Messaging Server will report a “Cannot connect to DB” error, quit, and not restart. To prevent this, create a Windows service dependency.
Use the following instructions to create a Windows service dependency. After a Messaging Server reboot, you will want the SQL services to start before the Good services. Windows dependencies take care of this. This requires a registry change so if you are not familiar with editing the registry, make sure to run a backup first.
To create the Windows dependency:
1. Open the registry editor:
Start -> Run -> regedit
2. Navigate to the specific service you are trying to delay:
HKEY_LOCAL_MACHINE\SYSTEM\CurrentControlSet\Services\GoodlinkServer
3. If there is a “DependOnService” value, simply modify it and add the service MSSQL$GMC to start before GoodLinkServer services.
66 Good Mobile Messaging Administrator’s Guide

Checking Prerequisites and System Requirements
If no “DependOnService” value exists, create one:
Right-click service name -> New -> Multi-string value
Enter the name DependOnService, then modify this new record and add the service MSSQL$GMC to start before GoodLinkServer services.
To verify that you have the right service GoodLinkServer, open Services, right-click the service GoodLinkServer, and choose properties. Ensure it is MSSQL$GMC.
4. The server will require a restart to apply the change. Once restarted, open Services, right-click GoodLinkServer, choose Properties, then the Dependencies tab. Confirm that the change is displayed.
Remote SQL
To use remote access, the IT administrator should configure the remote SQL server to accept the necessary connections from Good Mobile Control and Good Mobile Messaging Server. This includes but is not limited to:
• Allowing connections via TCP/IP
• Allowing connections via a preconfigured port
• Opening any necessary port in any firewall between Good Mobile Control and Good Mobile Messaging Server and the SQL server
• Creating or obtaining a valid SQL Server user name and password to connect to the remote SQL server during installation or the ability to log in as admin "sa."
We recommend testing remote database SQL server connectivity before beginning an installation. Related articles from Microsoft:
• To configure using TCP/IP - http://support.microsoft.com/kb/914277
• To configure using static Port - http://support.microsoft.com/kb/823938
Good Mobile Messaging Administrator’s Guide 67

Pre-installation
• SQL Server Installation (SQL Server 2008 R2) - http://msdn.microsoft.com/en-us/library/bb500469.aspx
• SQL Server Installation (SQL Server 2008 SP2) - http://www.microsoft.com/download/en/details.aspx?id=12548
SQL Mirroring
GMM data high availability is handled through SQL mirroring. Database mirroring maintains two copies of a single database that must reside on different server instances of SQL Server Database Engine. Typically, these server instances reside on computers in different locations. Starting database mirroring on a database initiates a relationship, known as a database mirroring session, between these server instances.
Note that Microsoft is deprecating mirroring in future SQL versions, in favor of AlwaysOn Availability Groups.
If you’ll be using SQL mirroring with your Good Mobile Messaging version 8.1 or higher Servers, install the databases prior to installing the Servers. This release supports synchronous database mirroring (High-Safety Mode). When you install a Good Mobile Messaging Server, you’ll be prompted to identify the primary database and failover-partner (secondary) database. Good recommends using synchronous operating mode for mirroring.
If you configure SQL mirroring after installing your Good Mobile Messaging Servers, you can re-run the installation media a second time and identify the mirrored, failover-partner databases at that time.
Microsoft mirroring documentation is found at http://msdn.microsoft.com/en-us/library/ms189852(v=sql.105).aspx.
A simple mirroring guide can be found at http://www.codeproject.com/Articles/109236/Mirroring-a-SQL-Server-Database-is-not-as-hard-as.
68 Good Mobile Messaging Administrator’s Guide

Checking Prerequisites and System Requirements
Other SQL High Availability Facilities
GMM supports AlwaysOn Availability Groups. You are required to create an Availability Group listener, configured to use AlwaysOn AG.
GMM supports SQL Server 2012, and functions correctly without mirroring, with mirroring, and with AG.
Microsoft Exchange configuration requirements
• GMM 8.0 and higher utilize Exchange Web Services (EWS) rather than MAPI for connections to the Exchange environment. For your local Exchange servers, configuring accounts and permissions and other necessary parameter settings remains the same as for earlier GMM versions, with the following exceptions:
• Port 135 no longer needs to be open for TCP connections from the Good Mobile Messaging Server to all Exchange Servers for enabled Good for Enterprise users.
• Hidden Good for Enterprise user mailboxes are supported.
• Increasing the NSPI Connections on a Windows 2008-Based Domain Organization is not necessary.
• Setting SendAs permissions and throttling policies are no longer required.
Microsoft Exchange configuration requirements:
• Every Good for Enterprise user account must be set up with an SMTP address (the standard Microsoft Exchange configuration).
The domain containing the Good for Enterprise account (GoodAdmin) must be trusted by the following domains: every domain containing one or more Exchange servers with mailboxes for Good for Enterprise handheld users; the domain containing the Exchange server where the GoodAdmin mailbox itself is located. Subject to this restriction, all Windows architectures are supported.
• The GoodAdmin service account must have a mailbox.
Good Mobile Messaging Administrator’s Guide 69

Pre-installation
• For hybrid on-premise/O365 environments, the GoodAdmin mailbox must also be migrated to the cloud, as described in “Creating the GoodAdmin Account” on page 75. (For an overview of Good for Enterprise and the Exchange Online environment, refer to “On-Premise and Exchange Online (Office 365) Environments” on page 33.)
For the operating-system and Exchange software required on the Messaging and Control Server hosts, refer to the compatibility matrices posted at http://www1.good.com/support/technical-support-resources.html.
Operating System
Good Mobile Messaging Server andGood Mobile Control ServerWindows 2012 Standard, Windows 2008 Server® SP2 and R2 SP1 64-bit (English (US)),* Windows 2003 Server® (English (US)) SP2 (GMC only). Good Mobile Messaging Server is supported as a Guest on VMware ESX 3.0.1, 3.5, 4.0, 4.1, and 5.0. Good Mobile Control is supported as a Guest on VMware ESX 3.5, 4.0, 4.1, and 5.0. If Good Mobile Control is installed in the same Guest as another Good product, then VMware ESX 3.5, 4.0, 4.1, or 5.0 is required. Good Mobile Messaging Server and Good Mobile Control are supported as Guests on a Windows 2008 64-bit Standard, Windows 2012 Standard, and Enterprise SP2 and R2 SP1 64 Bit Hyper-V Host.
Exchange Software
Good Mobile Messaging Server andGood Mobile Control Server
70 Good Mobile Messaging Administrator’s Guide

Good Secure WiFi: Prerequisites and System Requirements
Good Secure WiFi: Prerequisites and System Requirements
If you are deploying Good on WiFi-enabled handhelds in your corporate environment, ensure that your access points conform to the following guidelines.
Good uses UDP packets to transmit data to Good-enabled handsets.
Some enterprises block UDP packets at the firewall, even if TCP/IP connections are allowed. In order to use Good over WiFi, the following destination ports are required to be open:
• UDP Ports 12000 and TCP port 15000 - Used to pass outbound-initiated traffic to Good once the Good client is installed on the handheld. You should allow reply traffic for both ports using TCP/UDP.
• TCP Port 80 - Used to redirect to secure port 443
• TCP Port 443 - Used for secure access to Good webstore for OTA distribution and download
• TCP Port 21 - Used to FTP logs to Good Technical Support (optional, but highly recommended)
• TCP Port 15000 - Used for attachment downloading and S/MIME; reply traffic is then automatically allowed.
Exchange Server 2010®, Exchange Online (Office 365), Exchange Server 2013/2016®. Go to http://customerportal.good.com/ or http://www.good.com/support/compatibility-matrices for any compatibility updates and for compatibility with older Good for Enterprise and GoodLink versions.Exchange 2010 SP2 RU4, and Exchange 2013/2016. All Good Mobile Messaging Servers are 32-bit.
Exchange Software
Good Mobile Messaging Administrator’s Guide 71

Pre-installation
• TCP Ports 5228, 5229, 5230 outgoing (for Android)
UDP security
All connections to Good's NOC are device-initiated only (but require bidirectional flow). From a security perspective, there are no significant differences between using TCP and UDP for Good's traffic. Good uses a sequenced and encrypted protocol over UDP similar to TCP.
IP addressing
Good requires customers to open a range of IP addresses (Class C 216.136.156.64/27 and 198.76.161.0/24).
NAT time-outs
To ensure that Good can remain up-to-date at all times, Good requires that the NAT time-out be set to 9 minutes or longer. This will keep users connected to the network while maximizing the battery life performance on the device.
Server requirements
Good Mobile Messaging Server 4.0 or higher is required for provisioning WiFi-only handhelds. All provisioning and upgrading of Good on WiFi-only handhelds will be performed via Good's Secure OTA process.
Setting Up the Necessary Accounts and Permissions
With the Good Mobile Messaging Server and Good Mobile Control server hosts properly configured, create the user accounts and permissions that the servers need to function. You only need to create these accounts once. The accounts, with the proper permissions, can then be used when installing additional servers.
72 Good Mobile Messaging Administrator’s Guide

Setting Up the Necessary Accounts and Permissions
When installed, Good Mobile Messaging Servers and Good Mobile Control servers use services (Good Mobile Messaging service, Good Mobile Control service, Good for Enterprise Exchange directory service, Good server Exchange directory service) that run under Windows domain user accounts. These can be Windows domain accounts. The Good for Enterprise account requires a mailbox. The Good Mobile Control Server account, which can be the same or a different account, requires only “local administrator” privileges for installation. GoodAdmin must be a member of “Local Administrators Group” and have the local security right “Logon as a Service.”
This section describes how to:
• Create the GoodAdmin user account and the GoodAdmin mailbox
• Assign the required Exchange permissions to the user accounts
• Assign the necessary local permissions on Good Mobile Messaging Server and Good Mobile Control Server host machines
Why are these permissions required? The following tables list the requirements for the GoodAdmin account, local permissions required by the host machines, and the reasons for them. The user account permissions that are required vary according to the Exchange environment. Use the procedures provided in the following sections to grant the proper permissions; do not try to use this table as a standalone installation guide.
Domain Requirementsfor GoodAdmin Account ReasonsDomain Users group Allows Good Mobile Messaging Servers
and Good Mobile Control Servers to log on to the network and hence to Exchange server
Good Mobile Messaging Administrator’s Guide 73

Pre-installation
Exchange Requirementsfor GoodAdmin Account ReasonsExchange 2010/2013/2016 requirements (refer to “Set Calendar Processing” on page 83)
Allows Good Mobile Messaging Servers and Good Mobile Control Servers to monitor user mailboxes enabled for Good for Enterprise.
Local Host Requirementsfor Good Mobile Messaging Server and Good Mobile Control Server ReasonsAdministrators group (local) Required for creation/deletion of a set of
directories and files during Good server installation/uninstallation
The default local rights that are needed by the GoodAdmin account on Good Mobile Messaging Server are granted by default to members of the local Administrators group. Check to confirm that the following are present:Back up files and directories Necessary for directory and file creation/
deletionAllow log on locally Necessary to run the Good for Enterprise
servicesProfile system performance Permits the use of PerfMon to monitor
Good server performanceRestore files and directories Allows creation of the Good for Enterprise
cache, access, and diagnostic logsAdded local rights:
Log on as a service The basic permission for a Windows service. Good Mobile Messaging Servers and Good Mobile Control Servers run as services.
74 Good Mobile Messaging Administrator’s Guide

Setting Up the Necessary Accounts and Permissions
Creating the GoodAdmin Account
Note: Do not hide the GoodAdmin mailbox.
Set only the permissions indicated here. This account should not be part of any other security group, such as the Domain Admin Group, Enterprise Admin Group, etc. This user should be a member of the Domain Users Groups only.
Use the following procedure to
• Create the GoodAdmin Windows account
• Create the GoodAdmin mailbox
• Refer to the next section to grant the GoodAdmin account the required Exchange permissions
This account can be used in Exchange 2010/2013/2016/Exchange Online (Office 365) environments. The procedures given here pertain to such hybrid Exchange environments (as opposed to federated environments); it is assumed that you have completed the Microsoft hybrid configuration wizard, which will also make DirSync available.
For an overview of cloud deployment, refer to “On-Premise and Exchange Online (Office 365) Environments” on page 33.
Support for Office 365 (aka cloud-based mailboxes) here requires a hybrid Exchange configuration. A hybrid configuration is identified by at least one Exchange 2010 SP2+ or Exchange 2013/2016 mailbox server on-premise (all Exchange roles required) configured in a federated and hybrid mode with O365.
Hybrid configuration allows user mailboxes to reside on-premise or in the cloud. The Exchange administrator can actively move mailboxes to and from the cloud without breaking Exchange communications.
Good Mobile Messaging Administrator’s Guide 75

Pre-installation
While Hybrid mode is mandatory, ADFS and SSO are NOT requirements for Good for Enterprise functionality.
To create the account in an Exchange 2010 environment:
1. Launch Exchange 2010 Exchange Management Console.
2. In the left panel, click on the plus at Microsoft Exchange On-Premises. Select Recipient Configuration.
76 Good Mobile Messaging Administrator’s Guide

Setting Up the Necessary Accounts and Permissions
3. In the right panel click on New Mailbox. Select User Mailbox, then click Next.
Good Mobile Messaging Administrator’s Guide 77

Pre-installation
4. Select Create mailboxes for: New User, then click Next.
78 Good Mobile Messaging Administrator’s Guide

Setting Up the Necessary Accounts and Permissions
5. Enter user information, then click Next.
Good Mobile Messaging Administrator’s Guide 79

Pre-installation
6. Input mailbox settings using the default, then click Next.
80 Good Mobile Messaging Administrator’s Guide

Setting Up the Necessary Accounts and Permissions
7. Enter archive settings using the default, then click Next.
Good Mobile Messaging Administrator’s Guide 81

Pre-installation
8. Check your settings. Click New.
82 Good Mobile Messaging Administrator’s Guide

Setting Up the Necessary Accounts and Permissions
9. Click Finish.
Set Calendar Processing
Run the following cmdlet to allow accepting meeting requests from the user device:
Get-mailbox | set-calendarprocessing–processExternalMeetingMessages $true
Enable Exchange 2010/2013/2016 Impersonation Permission
(For Exchange Online, refer to “Enable Exchange Online Impersonation Permission” on page 86.)
Application Impersonation is the only required Exchange-side setting to be applied to the GoodAdmin service account. For any user that is GFE-enabled and wishes to send/receive email on a handheld
Good Mobile Messaging Administrator’s Guide 83

Pre-installation
device, the GoodAdmin service account must be able to “impersonate” this specific user.
If the installation has users in both the cloud and on premise, application impersonation must be applied in 2 separate and distinct locations. Applying this permission for the on-premise Exchange organization will not apply it to users in the cloud Exchange organization.
Option #1: To configure Exchange Impersonation for all users in an organization
1. Open the Exchange Management Shell.
2. Run the New-ManagementRoleAssignment cmdlet to add the permission to impersonate the specified user. The following example shows how to configure Exchange Impersonation to enable a service account to impersonate all other users in an organization.
New-ManagementRoleAssignment -Name:impersonationAssignmentName -Role:ApplicationImpersonation-User:serviceAccount
The vlue following -Name is arbitrary.
Example:
New-ManagementRoleAssignment-Name:GMMEWSPermissions -Role:ApplicationImpersonation -User:"[email protected]"
Successful cmdlet input and return should look like this:
Option #2: To configure Exchange Impersonation for specific users or groups of users.
84 Good Mobile Messaging Administrator’s Guide

Setting Up the Necessary Accounts and Permissions
1. Open the Exchange Management Shell.
2. Run the New-ManagementScope cmdlet to create a scope to which the impersonation role can be assigned. If an existing scope is available, you can skip this step. The following example shows how to create a management scope.
New-ManagementScope -Name:scopeName -RecipientRestrictionFilter:recipientFilter
The RecipientRestrictionFilter parameter of the New-ManagementScope cmdlet defines the members of the scope. You can use properties of the Identity object to create the filter. The following example for RecipientFilter is a filter that restricts the result to a single user with the user name "john.”
{Name -eq 'john'}
The following RecipientFilter is a filter that restricts results to a list filtered by all those with a primary smtp address of @smtp.com:
{RecipientFilter -like ‘@smtp.com’}
3. Run the New-ManagementRoleAssignment cmdlet to add the permission to impersonate the members of the specified scope. The following example shows how to configure Exchange Impersonation to enable a service account to impersonate all users in a scope.
New-ManagementRoleAssignment -Name:impersonationAssignmentName -Role:ApplicationImpersonation -User:serviceAccount -CustomRecipientWriteScope:scopeName
To verify that application impersonation has been applied for the GoodAdmin service account, run the following cmdlet from within Exchange Management Shell:
get-managementroleassignment >C:\managementroles.txt
Good Mobile Messaging Administrator’s Guide 85

Pre-installation
A properly configured service account should be listed with the name of your service account in a role assignment of applicationImpersonation.
Enable Exchange Online Impersonation Permission
The GoodAdmin service account must have Application Impersonation rights on the O365 Exchange server.
Method 1: Apply Impersonation via the Exchange Management Shell
To apply Impersonation Permission to the GoodAdmin service account in Exchange Online (Windows Azure AD):
1. Create a Remote Session into O365 using Exchange Management Shell:
$LiveCred = Get-Credential
$Session = New-PSSession –ConfigurationName Microsoft.Exchange –ConnectionUri https://ps.outlook.com/powershell/ -Credential $LiveCred –Authentication Basic –AllowRedirectionImport–PSSession $Session –AllowClobber
2. Run the following cmdlet to apply impersonation to the cloud Exchange organization for the service account:
> New-ManagementRoleAssignment -Name:impersonationAssignmentName -Role:ApplicationImpersonation -User:serviceAccount
86 Good Mobile Messaging Administrator’s Guide

Setting Up the Necessary Accounts and Permissions
Notes:
• Use the SMTP address of your GoodAdmin service account in your domain.
• Use a Unique Name for the name of the permission, e.g.“ApplicationImpersonation-GMM”
• -AllowClobber is required when creating the remote session.
• Allow 30 minutes for the changes to propagate through Azure.
• No further permissions or changes to Active Directory or Exchange are required for GFE to function.
Method 2: Apply Impersonation via O365 Admin Console
To enable these rights:
1. Log in to the O365 Admin Console.
2. Click Admin -> Exchange -> Permissions.
Good Mobile Messaging Administrator’s Guide 87

Pre-installation
3. Click the "+" button and add the following permissions:
Verify the impersonation permissions
Verify the on-premise and cloud impersonation permissions you have configured.
Check 1 – Use to verify Impersonation Permission.
Check 2 - Must be ran locally on the GFE server host machine before beginning the installation. This is required to verify a successful AutoDiscover process. This Check will also verify the ability of the service account to impersonate specific users.
Check 1
Use https://www.testexchangeconnectivity.com/.
88 Good Mobile Messaging Administrator’s Guide

Setting Up the Necessary Accounts and Permissions
1. Select the “Exchange Server” tab (for on-premise) or “Office 365” tab (for cloud).
2. Locate the “Microsoft Exchange Web Service Connectivity Tests” section.
3. Select “Service Account Access (Developers).”
4. Select “Next.”
5. Type in the SMTP address of the GoodAdmin service account in the space provided for “Target Mailbox.”
6. Type in the SMTP address of the Good Admin service account for “Microsoft Account” (O365)/”Service Account User Name” (on premise).
If your UPN or “login name” differs from the SMTP address of the GoodAdmin service account, input the UPN here.
Example: [email protected] = UPN aka credentials used to login to the GFE server via RDP. SMTP address for this account is [email protected]. The UPN will be used in the username field.
7. Input the password of the GoodAdmin service account.”
8. Select “Use Autodiscover to detect settings.”
9. Select “Inbox” for the Test predefined folder.
10.Leave the “Specify folder ID” blank.
11.Select “Use Exchange Impersonation.”
12.Type in the SMTP address of a user who will be GFE enabled.
13.Click on the “I understand…” and input the required Verification.
14.Select “Perform Test.” No errors should be reported. Look for all green. The test expects the inbox for the account being impersonated by GoodAdmin to be empty; if RED is displayed, click Expand All; if only the lower return failed, the results are fine
Check 2
1. Download the latest EWS Editor release from http://ewseditor.codeplex.com/.
Good Mobile Messaging Administrator’s Guide 89

Pre-installation
a. This must be downloaded and run from the actual GMM server upon which devices will be provisioned.
b. Extract the zip file and click on the EWSeditor application. Select “File -> Select New Exchange Service.”
c. Click on check mark “Use Autodiscover to get the Exchange Web Service URL.”
d. Input the actual SMTP email address of the GoodAdmin user.
e. Select Exchange 2010_SP2 for the “Requested Exchange Ver-sion.”
f. Click on box for “Use the following credentials instead of the default Windows Credentials.”
For the “User Name,” type the SMTP address of the GoodAd-min Service Account.If your UPN or “login name” differs from the SMTP address of the GoodAdmin service account, input the UPN here, as you did in Check 1.
g. Select “Use Impersonation” in the last checkbox with ID Type=SMTP address.
90 Good Mobile Messaging Administrator’s Guide

Setting Up the Necessary Accounts and Permissions
h. Input the email address of the user that you would like to test permissions on.
The following example is for a 365-Multi-Tenant deployment where the SMTP address is the same as the UPN. [email protected] is attempting to impersonate [email protected].
Good Mobile Messaging Administrator’s Guide 91

Pre-installation
i. If any other output is generated besides the following screen, impersonation is not applied correctly and GoodAdmin cannot impersonate the user in question.
If this test is not successful, the logging for the autodiscover and attempt at impersonation can be found in a text file named ewseditor.txt residing in the C:\users\goodadmin\documents directory.If any other output is generated besides this screen asking to automatically add the mailbox root to the tree view, GFE instal-lation/operation will not be successful. Unsuccessful testing signifies environmental problems causing AutoDiscover to malfunction and/or that impersonation has not been applied correctly. Successful passing of this test is absolutely manda-tory before beginning GFE installation.
Verify Single Sign-on for Exchange Online (Office 365)
If Single Sign-on is configured, verify that it is working properly. Single Sign-On allows using Active Directory Domain User name/password to logon to cloud services.
• Federation Service – Internal Identity Management
• Federated Proxy Service – External Facing Identity Management
92 Good Mobile Messaging Administrator’s Guide

Setting Up the Necessary Accounts and Permissions
Verify the above federation service is working.Use https://www.testexchangeconnectivity.com/ to confirm.
• Select “Microsoft Single Sign-On”
Good Mobile Messaging Administrator’s Guide 93

Pre-installation
• Input Good Admin Service account for “Microsoft Online logon ID:”
• Type in the password.
• Fill in the verification form and select “Next.”
94 Good Mobile Messaging Administrator’s Guide

Setting Up the Necessary Accounts and Permissions
A results screen is displayed.
Creating the Good Mobile Control Account
This section describes how to create the Good Mobile Control account, if you don’t want to use the GoodAdmin account for the GMC Server.
The GoodAdmin account that you created for use with the Good Mobile Messaging Server can also be used with the Good Mobile Control Server and Console. However, the Good Mobile Control account requires fewer rights and permissions than the Good for Enterprise account. If you want to use a Good Mobile Control account without mailbox rights, for security reasons, create it using the instructions in this section.
Set only the permissions listed here; this account should not be part of any other security group, such as the Domain Admin Group or Enterprise Admin Group. This user should be part of the following Admin groups only:
• Domain Users
Good Mobile Messaging Administrator’s Guide 95

Pre-installation
Assigning Good Mobile Control Server Host Local Permissions
Assign local administrator permissions to the Good Mobile Control account on each Good Mobile Messaging Server/Good Mobile Control server host machine. To do so, add the Good Mobile Control account name to the local Administrator group.
Ensure that the Good Mobile Control host machines, and your Exchange server, conform to the following prerequisites. Good Mobile Messaging Server and Good Mobile control Server cannot run on the same host machine as Microsoft Exchange Server.
1. Log on to the server that will host Good Mobile Control Server using an account with administrative privileges.
2. From the Start menu, select Programs > Administrative Tools > Computer Management.
3. Expand Local Users and Groups and select Groups.
4. Double-click Administrators.
5. In the Administrators Properties window, click Add.
6. Click on the Good Mobile Control account name and click Add. If the name isn't listed, use the Look In pull-down to select the domain that the Good Mobile Control account resides in.
7. Click OK.
The Good Mobile Control account is added to the local Administrators group.
8. Click OK to close the Administrators Properties window.
9. Close the Computer Management window.
96 Good Mobile Messaging Administrator’s Guide

4 Installation
This chapter provides detailed instructions for installing Good Mobile Messaging Server and Good Mobile Control (GMC) Server.
Migrating users to Good Mobile Messaging version 8.1 or higher from version 7.x or 8.0 is not a simple version upgrade. The process requires care and preparation; there are core changes in the system architecture. If you are migrating users to Good for Enterprise 8.1 or higher, refer to the Good for Enterprise Deployment Planning Guide and confirm that the preparations described in “Pre-installation” on page 55 have been completed. Also, read “Migration Path” on page 98 below.
This chapter applies to hybrid premise-and-cloud Exchange installations.
To get your users up and running, you will need to perform the following tasks. Each task is explained in detail in the following sections.
• Install Good Mobile Control Server and Good Mobile Messaging Server. The Good Mobile Control Console will then be available via the Internet.
• Configure role-based administration (controlling the Good Mobile Control Console features available to an individual or group)
• Set default Over The Air software policy for handheld families
Good Mobile Messaging Administrator’s Guide 97

Installation
Note: Verify that all antivirus, HIDS/HIPS, or other security engines are stopped and disabled, and that no restrictive GPOs are being applied to the computer account before installing Good for Enterprise software.
With the installation complete, you will be ready to prepare handhelds for use, as described in “Preparing New Devices” on page 161.
Rerunning installation media allows you to select the “Repair” option. Use this option to change installation settings.
Migration Path
With pre-installation preparations complete, you will Install a new 8.1 GMM Server and use the GMC Console to move users from a 7.x or 8.0 GMM Server to it,
Moving users between MAPI (7.x) and EWS (8.1) Messaging Servers is described in “Moving a Handheld to a Different Good Mobile Messaging Server” on page 408, for GMC 2.4 and higher.
When installing a new 8.1 GMM and using the GMC to move users to it, the GMM services continue to run and those users who are not actively being moved can send and receive email as normal.
When migrating from a MAPI version of the GMM to the EWS 8.1 GMM, user data cannot be moved and must be recreated from the Exchange server. Within the GMM this is called a “re-sync.” Users do not have to delete their app and get a new provisioning PIN, but when their account is moved from the MAPI GMM (version 7.x) to the 8.1 EWS GMM, they will be instructed (on the handheld) that their data needs to be recreated and they will need to click the “OK” button to begin this procedure.
The user’s email is rebuilt starting with the 500 latest emails and working backward. Their inbox and other synched folders will be
98 Good Mobile Messaging Administrator’s Guide

Installing Good Mobile Control Server
synchronizing over time. Bookmarks stored within the Good Secure Browser are not deleted during the move. Also documents stored within the document repository are not deleted.
Installing Good Mobile Control Server
Use the following procedure to install Good Mobile Control (GMC) Server.
The Good Mobile Control Server host machine must be configured as described in “Checking Prerequisites and System Requirements” on page 55. This host should be secure (the machine should be located in a secure location and the proper permissions should be set to control access to the machine).
Note: Install Good Mobile Control Server before installing Good Mobile Messaging Server.
For information on using Good Mobile Control Server in cluster and cold failover environments, refer to “GMM and GMC Failover” on page 459.
We recommend against running BlackBerryTM Enterprise Server on the same machine as Good Mobile Control Server, when both are present.
GMC Server and Good Mobile Messaging Server can be installed on the same host machine.
Verify that an SQL server is not installed on the host machine.
1. Begin by logging on to the machine where the Good Mobile Control Server is to be installed. You’ll need “local administrator” privileges for Good Mobile Control Server installation. The GoodAdmin account (to be used to install Good Mobile Messaging Server later) can be used for Good Mobile Control Server installation but is not required.
Good Mobile Messaging Administrator’s Guide 99

Installation
2. Execute setup.exe from the Good distribution media.
An Installation Manager screen is displayed.
3. Click Add/Remove for the Good Mobile Control.
The program checks for the presence of required Windows and Exchange components, as listed in “Checking Prerequisites and System Requirements” on page 55. You may be informed that files are being updated.
Otherwise, installation files are extracted from the Good distribution media.
If an earlier version of Good Mobile Control Server is detected, you will be prompted to upgrade it. If the same version of Good Mobile Control Server is detected, you will be prompted to either repair or uninstall it.
4. When the process is complete, click Next.
100 Good Mobile Messaging Administrator’s Guide

Installing Good Mobile Control Server
The installation wizard is launched to guide you through the rest of the setup process.
An initial installation window is displayed.
5. Click Next.
A License Agreement window opens.
6. To proceed with the installation, you must accept the terms of the Good Technology software license agreement by clicking Yes.
7. Click Next. The installer will check for prerequisite software and setup. You’ll be prompted if problems exist. Refer to the Pre-installation chapter if necessary. Click OK at a prompt to proceed; the installer will rectify the problem when possible.
Good Mobile Messaging Administrator’s Guide 101

Installation
A Login screen for the account is displayed.
8. In the User field, enter the user name to be used when Good Mobile Control Server runs. For example: Domain\ Good Mobile Control account name. The name isn’t case sensitive. The current logged-in user and domain are displayed as the default. Enter the user’s password.
9. Click Next.
102 Good Mobile Messaging Administrator’s Guide

Installing Good Mobile Control Server
A Good Mobile Control Server Installation Location screen is displayed.
10.Accept the default location for Good Mobile Control Server software or browse to select a different location. If the default folder does not exist, the wizard will ask you if it should be created.
11.Click Next when done.
Good Mobile Messaging Administrator’s Guide 103

Installation
A Choose Log Directory screen is displayed.
12.Accept the default location for the Good for Enterprise log or browse to select a different location. If the folder does not exist, the wizard will ask you if it should be created. This directory should be secure.
This log file records the administrative tasks performed by Good Mobile Control Console. It contains auditing information about when the tasks were performed and who performed them. Event messages are recorded in the Windows Event Viewer Application log.
For better performance, you can locate the directory on the fastest local disk. Click Next when done.
Important: Exclude the GMC log directories from anti-virus and backup software, to prevent file contention and performance issues.
The setup program displays the information you have entered.
13. If the information is correct, click Next.
104 Good Mobile Messaging Administrator’s Guide

Installing Good Mobile Control Server
Next, a Setup Type screen is displayed.
14.Accept the default standalone option, or, if you’re installing in a clustered environment, choose the failover option and refer to “GMM and GMC Failover” on page 459 for an explanation of Good for Enterprise in a clustered environment.
Choose the failover option if you’ll be using cold failover.
Good Mobile Messaging Administrator’s Guide 105

Installation
A screen for selecting the host of the SQL Server is displayed.
15.Select Local SQL Server Host (this current machine) or Remote SQL Server Host for the SQL Server host. We recommend that you allow the installation program to create a local instance for your use.
SQL instance and database: An instance is an SQL installation, one per host. An instance can contain multiple databases.
Note that if you’re repairing or upgrading, you must use the existing instance. The top option on the screen is grayed out. to introduce a new instance in this case, you would create the instance manually and then choose it from the “Use existing ...” drop-down.
106 Good Mobile Messaging Administrator’s Guide

Installing Good Mobile Control Server
Note that multiple SQL Server named instances can run on the same Windows Server. Each of these instances can contain multiple user databases. Multiple Good Mobile Control Servers can use the same SQL instance but each Good Mobile Control Server must use a separate user databases within that instance. If two Good Mobile Control Servers attach to the same user database in the same SQL Server named instance running on a Windows Server, data loss may occur. An SQL instance is defined as a separate copy of SQL Server running on the same computer.
If you select Local SQL Server Host, the SQL server need not be present. If you select Remote SQL Server Host, it must exist. You might select Remote SQL Server Host if, for example, your organization maintains a database farm to ensure protection and scalability of application data.
If you select Remote SQL Server Host, enter the host name for the Server in the format Hostname.domain_name (e.g., SQLServerHostName.domain.com).
For information on SQL setup requirements for use with Good Mobile Control, refer to “Preparing for SQL Server Use” on page 63.
Good Mobile Messaging Administrator’s Guide 107

Installation
16.Click Next.
17.Specify the type of SQL instance that the Good Mobile Control database will be created in. If you select the Named Instance or Port Number radio button, you must enter a value in the associated field or an error will be returned.
Warning: Multiple Good Mobile Control Servers can share an SQL instance but must use separate databases within that instance. If two Good Mobile Control servers attach to the same database, data loss may occur.
Do not automatically select the default. You must select the correct field of the three to describe the instance that is to be used.
Note that if you are upgrading or repairing the Server, the Named Instance is grayed out, as the current instance must be used.
Click Default Instance if the SQL database is to be created in the default instance, local or remote. If it doesn’t exist, it isn’t created; an error is returned.
108 Good Mobile Messaging Administrator’s Guide

Installing Good Mobile Control Server
Click Named Instance and provide a name for the instance if the database is to be created in a named instance. If it does not exist and is local, it will be created; if it does not exist and is remote, an error is returned. Choose a meaningful name to avoid future confusion. Example: netmachinename_GMCDB.
Click Port Number and provide a port number if an instance using a static port number is to be used. If it doesn’t exist, it isn’t created; an error is returned.
SQL Servers enforce their own authentication and authorization. If you encounter an error, refer to “Preparing for SQL Server Use” on page 63 to recheck your current SQL setup.
18.Click Next.
A named database will be created in the SQL Server instance that you have specified or that is to be created locally. Enter a name of your choice for the database here. Remember that multiple Good Mobile Control Servers can share an instance but must use separate databases.
19.Click Next.
Good Mobile Messaging Administrator’s Guide 109

Installation
If the SQL database that Good Mobile Control uses is to be created in an existing instance of an SQL Server and your current logon username and password are not those required by the Server, you’ll be prompted for them now.
If you’ve specified that a new instance be created, an Authentication Mode screen is displayed.
20.Choose an authentication mode for the SQL Server.
Windows Authentication Mode allows you to access the SQL database using your logon username and password. Mixed Mode requires you to specify a password for database access. Use mixed mode if you want access to the database to be controlled by this separate password.
For mixed mode, enter and confirm the logon password. Observe the following rules when choosing a password:
• The password must contain all or part of the account name of the user. Part of an account name is defined as three or more consecutive alphanumeric characters delimited on both ends by white space such as space, tab, and return, or any of the
110 Good Mobile Messaging Administrator’s Guide

Installing Good Mobile Control Server
following characters: comma (,), period (.), hyphen (-), underscore (_), or number sign (#).
• The password must be at least eight characters long.
• The password must contains characters from three of the following four categories:
- Latin uppercase letters (A through Z)
- Latin lowercase letters (a through z)
- Base 10 digits (0 through 9)
- Non-alphanumeric characters such as: exclamation point (!), dollar sign ($), number sign (#), or percent (%).
Passwords can be up to 128 characters long. You should use passwords that are as long and complex as possible.
21.Click Next.
At this point, if the local machine doesn't have Microsoft .net 3.5.1 Framework installed, the setup program will install it. Click OK if prompted, to initiate the installation.
Good Mobile Messaging Administrator’s Guide 111

Installation
If the local machine doesn't have Microsoft SQL Server Express installed, the setup program will next install it. Again, click OK if prompted to install it.
22.Specify a location for the database directory by clicking Next to accept the default or browse to choose a different location.
If the directory that you specify does not exist, you’ll be prompted to accept its creation. The destination folder name cannot exceed 50 characters in length.
112 Good Mobile Messaging Administrator’s Guide

Installing Good Mobile Control Server
With the database directory specified, the setup program will commence installation of the database. A series of progress screens is displayed.
23. When the Good Mobile Control Server Registration Information screen is displayed, enter your license key, serial number, and a name for the server. Note that for an upgrade or repair, the server name is grayed out and cannot be changed.
Good Mobile Messaging Administrator’s Guide 113

Installation
24.Click Next.
25.You can use an approved proxy server to communicate with Good for Enterprise Network Operations Center if you are unable to grant access via your firewall. The proxy server can be configured without granting additional access on the firewall.
Note: HTTP/1.1 is required. HTTP/1.0 is not supported. The Good Mobile Messaging Servers and Good Mobile Control Servers have been tested for use with the Squid 2.4 and 2.7 proxy servers and a NetCache 3100 proxy server (NetApp Release 5.2.1R2) set with basic configurations.
Proxy Address is the IP address or name of the proxy server to use.Proxy Port is the port of the proxy server to use.User is the username to use with HTTP/1.1 Basic Authentica-tion for authenticating to the Proxy.Password is the password to use with HTTP/1.1 Basic Authen-tication for authenticating to the Proxy.
To correct/change information entered on this screen, run this setup program and use its “repair” option.
114 Good Mobile Messaging Administrator’s Guide

Installing Good Mobile Control Server
The proxy server must be configured to allow at least 5 minutes of idle time before timing out Good Mobile Messaging Server or Good Mobile Control Server connections.
The usernames and passwords for connecting to the proxy server must not contain ':', '@' or '/' characters.
26.Click Next.
27.Select your Active Directory source. This is where the user directory resides:
• On-Premise Only – Choose Active Directory (on premise).
• O365 Dedicated – Choose Active Directory (on premise).
• O365 Hybrid – Choose Active Directory (on premise).
The AD will service the GoodAdmin mailbox in the cloud.
• O365 Pure – Choose Active Directory on Cloud.
(For an overview of Good for Enterprise and the Exchange Online environment, refer to “On-Premise and Exchange Online (Office 365) Environments” on page 33.)
Notes:
Good Mobile Messaging Administrator’s Guide 115

Installation
• Choosing Active Directory on Cloud is irreversible for upgrades and repairs. Self Service will not be supported.
• Regardless of which deployment model is employed, a GoodAdmin AD service account is required to install and run the Good Mobile Control and Good Mobile Messaging Servers, so that an on-premise AD will be required in all cases.
Click Next.
28.Enter the Active Directory domain name to use for directory lookups for Good Mobile users.
• On-Premise Only – Example: mydomain or mydomain.com.
• O365 Dedicated – Enter the address for your management forest in the form <site #>.mgd.msft.com.
• O365 Hybrid – Example: mydomain or mydomain.com.
• O365 Pure – Leave blank.
116 Good Mobile Messaging Administrator’s Guide

Installing Good Mobile Control Server
29.Click Next.
30.Enter the administrator domain/username of the user to be the Good Mobile Control Console Superuser. There can be only one. The Superuser can later enable other users to perform a subset of console tasks. Only the Superuser can access the Console the first time. For more on the Superuser function, refer to “The Superuser” on page 186.
Good Mobile Messaging Administrator’s Guide 117

Installation
31.Click Next to proceed.
32. (Pure Office 365) Select the appropriate credentials to connect with the autodiscover service.
If you are using an On-premise Microsoft Exchange server or an Office 365 dedicated server configured for integrated Windows authentication, select the Default Credentials.
Otherwise, if using an Office 365 hybrid server or Pure Office 365, select New Credentials. Enter the login username and password of the Office 365 service account that you have created. The login username is normally entered in the following format: user@domain
If using existing credentials, the current stored credentials will be displayed and cannot be modified.
118 Good Mobile Messaging Administrator’s Guide

Installing Good Mobile Control Server
33.Click Next to proceed.
34. (Pure Office 365) This screen is used to verify the default GoodAdmin SMTP address ([email protected]). (Do not use the UNP address, [email protected]) Enter the SMTP address for an Autodiscover operation; this may or may not be the same as the Login for New Credentials which is typically the service account.
Initially, these fields will be blank.
If you want to enable SCP lookup for Autodiscover, check Enable SCP Lookup. To bypass SCP lookup, uncheck Enable SCP Lookup. For dedicated Office365, you should always disable SCP. For O365-Hybrid, you should always disable SCP. For on-premise Exchange with no O365, try to use SCP - if there are autodiscover failures, disable SCP and see if the issues are resolved
35.Click Next to perform autodiscover validation and proceed.
Good Mobile Messaging Administrator’s Guide 119

Installation
36.Click Next.
37.Provide the path to a directory for automatic remote backup of the SQL database that Good Mobile Control uses. Increment backups occur hourly; a full backup is performed once a day. This is not configurable. Specify the number of days of backup copies to keep. The default is 7.
To alter backup parameters, click the check box to disable automatic backup and use instead the backup facilities of the full version of SQL Server.
For more information about backing up and restoring the SQL database that Good Mobile Control uses, see “Backing up and Restoring the Good Mobile Control Database” on page 450.
120 Good Mobile Messaging Administrator’s Guide

Installing Good Mobile Control Server
38.Click Next.
39.Review the information that you have entered. If correct, click Next to initiate installation of the Good Mobile Control Server.
Good Mobile Messaging Administrator’s Guide 121

Installation
A screen is displayed indicate installation progress. When the process is complete, you are notified.
40.Ensure that the “Start Good Mobile Control Server service” check box is checked. The Good Mobile Control Server must be up and running in order to install Good Mobile Messaging Server, as described in the following section.
41.Click Finish.
Installing Good Mobile Messaging Server
Use the following procedure to install a Good Mobile Messaging Server. This procedure applies to fresh installations. This server, v8.1 or higher, can also be used as a destination when moving users from an existing GMM 7.x or 8.0 Server using the GMC, or when upgrading an existing GMM v8.0 Server to v8.1 (includes transferring users to the new Server database). Repeat the procedure for additional servers as needed. Each server can manage hundreds
122 Good Mobile Messaging Administrator’s Guide

Installing Good Mobile Messaging Server
of handhelds on multiple Exchange servers. No special preparations are necessary. You assign handhelds to Good Mobile Messaging Servers according to the organizational scheme most convenient to you.
For considerations involving moving users from one Exchange server and Good Mobile Messaging Server to another at the same time, refer to “Moving a User’s Mailbox to a Different Exchange Server” on page 405.
The Good Mobile Messaging Server host machine must be configured as described in “Checking Prerequisites and System Requirements” on page 55. Use a secure host (the machine should be located in a secure location and the proper permissions should be set to control access to the machine).
Note the following:
• During Server startup, significantly more processing occurs than during runtime. If the Messaging Server cache is located on VM disk or SAN rather than on a physical disk, the processing will be somewhat slower and will result in measurably more latency during startup.
• Install Good Mobile Control Server before Good Mobile Messaging Server. Good Mobile Control Server must be up and running for Good Mobile Messaging Server installation.
• Installing Good Mobile Messaging Server on a Microsoft Exchange server or domain controller is not supported.
• We recommend against running BlackBerryTM Enterprise Server on the same machine as Good Mobile Messaging Server, when both are present.
• In order to install the Good Mobile Messaging Server, you must log in as a member of the Administrators group on that machine.
• The failover functionality in this release cannot be utilized to perform rolling upgrades of GMM Servers (“GMM Service Failover” on page 459).
Good Mobile Messaging Administrator’s Guide 123

Installation
To change settings later that you enter during this installation, use the repair option available in the installation media.
To install a Good Mobile Messaging Server:
1. Begin by logging on to the machine where the Good Mobile Messaging Server is to be installed, using a GoodAdmin account.
2. Execute setup.exe from the Good distribution media.
3. From the introductory screen, choose to add a Mobile Messaging Server.
An Installation screen is displayed.
4. Click Next to proceed. A license agreement is displayed.
5. Click View license in HTML to bring up a browser with license agreement displayed.
124 Good Mobile Messaging Administrator’s Guide

Installing Good Mobile Messaging Server
6. Click Yes to proceed. Click No to cancel the installation.
7. Select the Good Mobile Messaging database type.
Select BDB for a new Good Mobile Messaging server that is to use this type of database, or to upgrade an existing server that uses BDB. The BDB option is not displayed for a server to be upgraded that is currently using an SQL database. If you select BDB, you will be prompted to confirm. If you select BDB, refer to the Good For Enterprise Administrator’s Guide (BDB Version).
This guide pertains to Good Mobile Messaging Servers that use the SQL database.
Select SQL for a new or existing server that uses SQL, or to upgrade a server from BDB to SQL.
Next, a server setup type screen is displayed.
Good Mobile Messaging Administrator’s Guide 125

Installation
8. Select PRIMARY or STANDBY Good Mobile Message Server type.
The standby Server is available as a failover Server. For more on this subject, refer to “GMM Service Failover” on page 459.
126 Good Mobile Messaging Administrator’s Guide

Installing Good Mobile Messaging Server
Click Next to proceed.
If STANDBY is selected on the previous screen or this is an upgrade from 8.0, this screen will not be displayed. Skip this step.
Enter the license, serial number, and Server name for GMM registration.
The Server name is the name that will appear in Good Mobile Control Console. Enter a descriptive name of your choice. Use A-Z, a-z, 0-9, period (.), and dash (-).
Good Mobile Messaging Administrator’s Guide 127

Installation
9. Click Next to proceed.
Click the Browse button if you want to change the default location for GMM installation. Skip this step for v8.0 upgrade.
128 Good Mobile Messaging Administrator’s Guide

Installing Good Mobile Messaging Server
10.Click Next to proceed.
The “Choose Log Directory” screen is not displayed for standby Servers or for a v8.0 upgrade. Skip this step for these cases.
11.Accept the default location for the Good Mobile Messaging Server log or browse to select a different location. If the folder does not exist, the wizard will ask you if it should be created. This directory should be secure.
This log file records the Server’s Exchange/handheld synchronization activity for messages and events. Synchronization error and event messages are recorded in the Windows Event Viewer Application log.
For better performance, you can locate the directory on the fastest local disk. Click Next when done.
Important: Exclude the GMM log directories from anti-virus and backup software, to prevent file contention and performance issues.
Good Mobile Messaging Administrator’s Guide 129

Installation
12.Click Next to proceed.
13.Select the appropriate credentials for autodiscover and impersonation validation.
If you select Default Credentials, the Login and Password fields are not displayed.
If you are using an On-premise Microsoft Exchange server or an Office 365 dedicated server configured for integrated Windows authentication, select the Default Credentials.
Otherwise, if using an Office 365 hybrid server, select New Credentials. Enter the login username and password of the Office 365 service account that you have created. The login username is normally entered in the following format: user@domain
130 Good Mobile Messaging Administrator’s Guide

Installing Good Mobile Messaging Server
14.Click Next to proceed.
This screen is used to verify the default GoodAdmin SMTP address ([email protected]). (Do not use the UNP address, [email protected]) Enter the SMTP address for an Autodiscover operation; this may or may not be the same as the Login for New Credentials which is typically the service account. The Impersonation field allows you to enter an admin email address if the admin logging in is in a different domain from the Good Mobile Messaging Server.
Initially, these fields will be blank.
Good Mobile Messaging Administrator’s Guide 131

Installation
If you want to enable SCP lookup for Autodiscover, check Enable SCP Lookup. To bypass SCP lookup, uncheck Enable SCP Lookup. If you want to check the current permissions, check Test Impersonation. For dedicated Office365, you should always disable SCP. For O365-Hybrid, you should always disable SCP. For on-premise Exchange with no O365, try to use SCP - if there are autodiscover failures, disable SCP and see if the issues are resolved
15.Click Next to perform autodiscover validation and test impersonation, if configured, and proceed.
Click Skip to skip Autodiscover validation and proceed.
If validation and tests are performed, a results window is displayed.
Click Next to proceed.
A Server proxy screen is displayed.
16. If using a proxy, check Use Proxy and enter the proxy information.
132 Good Mobile Messaging Administrator’s Guide

Installing Good Mobile Messaging Server
If STANDBY is selected on the Good Mobile Message Server Type screen or this is a v8.0 upgrade, this screen will not be displayed. Skip this step for these cases.
You can use an approved proxy server to communicate with Good for Enterprise Network Operations Center if you are unable to grant access via your firewall. The proxy server can be configured without granting additional access on the firewall.
Note: HTTP/1.1 is required. HTTP/1.0 is not supported. The Good Mobile Messaging Servers and Good Mobile Control Servers have been tested for use with the Squid 2.4 and 2.7 proxy servers and a NetCache 3100 proxy server (NetApp Release 5.2.1R2) set with basic configurations.
Proxy Address is the IP address or name of the proxy server to use.
Proxy Port is the port of the proxy server to use.
User is the username to use with HTTP/1.1 Basic Authentication for authenticating to the Proxy.
Password is the password to use with HTTP/1.1 Basic Authentication for authenticating to the Proxy.
Supported outbound IP ranges are provided in the pre-installation information above.
To correct/change information entered on this screen, run this setup program and use its “repair” option.
The proxy server must be configured to allow at least 5 minutes of idle time before timing out Good Mobile Messaging Server or Good Mobile Control Server connections.
The usernames and passwords for connecting to the proxy server must not contain ':', '@' or '/' characters.
Good Mobile Messaging Administrator’s Guide 133

Installation
17.Click Next to proceed.
18.Enter the login and password for your Microsoft Exchange account.
Enter the login in the form domain\windows account name. The name isn’t case sensitive. The current logged in user and domain are displayed as the default.
Enter the account password you set up for this GoodAdmin account. The password is case sensitive. The installation wizard tests the username and password that you provide. If they don’t work, you are warned.
134 Good Mobile Messaging Administrator’s Guide

Installing Good Mobile Messaging Server
19.Click Next to proceed.
If STANDBY is selected from Good Mobile Message Server Type screen, this screen will not be displayed.
Do not use “localhost.” Provide the full hostname.
20.Enter the primary database information. Refer to the SQL sections of this note for information on filling out the fields on this screen.
21.Click Next to validate access to the primary database and proceed.
Good Mobile Messaging Administrator’s Guide 135

Installation
If STANDBY is selected from Good Mobile Message Server Type screen, this screen will not be displayed.
Do not use “localhost.” Provide the full hostname.
22. If using a failover database, check Failover Database Server and enter the failover database information.
23.Click Next to validate access to the failover database and proceed.
136 Good Mobile Messaging Administrator’s Guide

Installing Good Mobile Messaging Server
24. If you entered the name of a primary database that does not exist, you will be prompted to have it created. Click Start.
Good Mobile Messaging Administrator’s Guide 137

Installation
25.Progress is displayed as the database is created.
With the database successfully created, the following screen is displayed, in which you will identify your Good Mobile Control Server.
138 Good Mobile Messaging Administrator’s Guide

Installing Good Mobile Messaging Server
26. If STANDBY is selected from Good Mobile Message Server Type screen, this screen will not be displayed.
Do not use “localhost.” Provide the full hostname.
Enter the hostname of the Good Mobile Control Server. Click on the Advanced button to change the URL or authorized user.
If you click the Advance button, the following screen is displayed. If you want to change the URL, check “Use specific Good Mobile Control Server URL” and enter a new URL. If you want to change
Good Mobile Messaging Administrator’s Guide 139

Installation
the authorized user, check “User specific console user account…” and enter a new user and password.
27.Enter a specific URL and username and password as needed. The username must be for an account that has Manage Server rights for the Good Mobile Control Server or is the Superuser.
Note: The port 19005 in the URL is used for accessing the Good Mobile Control service, not the Good Mobile Control console. You’ll launch the console later using https://servername:8443 or http://servername:8080, where servername is the name of the machine on which Good Mobile Control Server is installed. You cannot access the console from a browser on the GMC machine.
28.Click OK accept the changes and return to previous screen.
140 Good Mobile Messaging Administrator’s Guide

Installing Good Mobile Messaging Server
29.Click Next to register with GMC and proceed.
If this is a standby GMM, the Log directory location, Good Messaging Server, Primary Database Server, and Database Name information will not be shown.
30.Review the current settings.
Good Mobile Messaging Administrator’s Guide 141

Installation
31.Click Next to complete the installation.
32. If PRIMARY is selected from Good Mobile Message Server Type screen, this screen will be displayed when installation is complete.
The “Start Good Message Server service” checkbox is checked by default.
Click Finish to start the service and exit the installer.
Exception: If you will be using Exchange Online (Office 365), uncheck the box. You will need to run CredentialManager manually to store the SMTP address and password of the GoodAdmin service account before running the Messaging Server.
cd %GoodInstallDirectory%\util
CredentialManager.exe /p
The default location for CredentialManager is C:\Program Files (x86)\Good Technology\Good Messaging Server\util.
142 Good Mobile Messaging Administrator’s Guide

Installing Good Mobile Messaging Server
You will be prompted for a username ([email protected]) and password.
Enter the credentials for the Office365 GoodAdmin service account and click OK to save the credentials.
Running CredentialManager without any switches displays tool usage help. In particular the /r switch reads saved credentials if any, and prints them at the command line.
33. If STANDBY is selected from Good Mobile Message Server Type screen, the Installation Complete screen will be displayed without the checkbox to start the service. The GMMS service will not be started.
Click Finish to exit installer.
34.You can check your installation using the Good Mobile Control console. Navigate to the Servers tab and select the newly installed Server from the list. Its information will be displayed. The “Standby enabled” entry will reflect whether the Server is Primary (Standby enabled = No) or Standby (Standby enabled = Yes).
An in-place upgrade from GMM 8.0 to 8.1 is supported; however, it is not recommended. During an in-place upgrade, devices are automatically moved over to the new SQL database format. All devices will not be able to receive or send mail. Due to varying mailbox sizes and system resources, this downtime is unpredictable. As such, a parallel server upgrade is recommended. This involves installing a new 8.1 GMM server and then (at your own discretion) moving users over to it. Moving users from a 7.x or 8.0 GMM using GMC is described in “Moving a Handheld to a Different Good Mobile Messaging Server” on page 408.
Enable detailed calendar reminder notifications
To add subject/location information to iOS Calendar reminders, set the registry string value as follows and restart the GoodLink Server service:
Good Mobile Messaging Administrator’s Guide 143

Installation
[HKEY_LOCAL_MACHINE\SYSTEM\CurrentControlSet\Services\GoodLinkServer\parameters\PushManager] "SendSubjectLocation"="1"
where
"sendsubjectlocation"="1" ;Send the subject and location
"sendsubjectlocation" = "0" ; Send the default generic Event Reminder message.
Note: Only calendar items created after this change will contain detailed calendar reminders.
Configuring the Good Mobile Control Console
Access the Good Mobile Control (GMC) Console using a supported browser. Use the Console to manage Good for Enterprise and Good Mobile Access users and handhelds.
Note: First Console access must be by the Superuser specified during Good Mobile Control Server installation.
Launch the Console using https://servername:8443 or http://servername:8080, where servername is the name of the machine on which Good Mobile Control Server is installed. You cannot access the console from a browser on the GMC machine. Use your Windows username and password to log in. The role that you have been assigned (“Setting Up Role-Based Administration” on page 151) determines your Console rights and the actions that you can perform. You must be member of a role to use the Console. All Good Servers to be managed through the Good Mobile Control Server register themselves with the Center during installation and will be available to you through the Console.
144 Good Mobile Messaging Administrator’s Guide

Configuring the Good Mobile Control Console
Note: The Good Mobile Control session in your browser will time out after 30 minutes of no activity. The timeout is configurable.
You can disable auto-completion of password entry (remembering login credentials) on the Console login page. To do so, on the Settings tab select “Login Settings” and check the “Disable remembering login credentials” checkbox.
Kerberos Single Sign-On
If your system is configured to use Kerberos Single Sign-On, the Console can take advantage of the service. This is supported in Active Directory environments only.
“Super admin” privileges are required for updating the setting for Kerberos-based SSO.
To configure the admin accounts:
1. The GMC service account must be registered as Service Principal Name (SPN) to run the SSO HTTP service.
• This must be done for every domain where GMC Admins/Self-Service users exist.
• The trusted domains list can be found under GMC > Settings > Directory > Directory for Console Users Authentication.
• If the GMC Service Account (admin) does not exist in a domain, it should be created before registering as SPN.
• setspn commands should be run once per domain, not per Domain Controller.
2. Register on the Domain Controller:
a. Log in to the Domain Controller as the admin, for the domain that Good Mobile Control is on.
b. Launch the command prompt window.
Start > Run > type in: cmd
Good Mobile Messaging Administrator’s Guide 145

Installation
c. Browse to the directory:
cd C:\Program Files (x86)\Support Tools
d. Run these commands using the values for your domain and admin account.:
setspn.exe -A HTTP/gmcHostname.domain.DomainName.com GMCServiceAccountDomain\GMCServiceAccountUser
setspn.exe -A HTTP/gmcHostname GMCServiceAccountDomain\GMCServiceAccountUser
Note that the setspn commands only need to be run once per domain (not once per DC).
3. In the Good Mobile Console, on the Settings tab as Superadmin, select “Login Settings” and click the radio button “Kerberos-based Single Sign-On.” To allow login from a standard web-based console as a secondary option when SSO is not available, click the check box “Allow web-based login as a secondary option.” If not checked, only SSO authentication will be allowed.
If SSO fails at some point (if your Kerberos server is down, for example) and “Allow web-based login as a secondary option” is not selected, you will need to disable SSO from the GMC database using the following query, to allow login to the GMC:
update gmcdb.dbo.configuration set value='false' where name='sso.kerberos.enabled';
where gmcdb is the name of the gmc database. This unclicks the Kerberos radio button in the Console. Once your Kerberos access problem is resolved, you’ll need to reclick the button to turn SSO on again.
When login settings are set to "Kerberos-based Single Sign-On (SSO)" and "Web-based login as a secondary option" is disallowed in GMC, login to GMC via Internet Explorer and Mozilla Firefox is not supported. Login using Google Chrome is supported.
146 Good Mobile Messaging Administrator’s Guide

Configuring the Good Mobile Control Console
To configure a browser for Kerberos SSO, refer to this Good Support knowledge-base article.
For Firefox, refer to https://bugzilla.mozilla.org/show_bug.cgi?id=520668#c0.
Kerberos-based Single Sign-On is not available if the source of “Directory for Console Users Authentication” is Domino.
To have users read and accept a login statement, enter the text to be displayed for acceptance in the box provided on the Login Settings page. If you leave the box empty, no acceptance page is displayed. When these options are configured as desired, click Save.
To turn off Single Sign-On for a particular login, so that you aren’t automatically logged in to the Console but can instead enter a different account name, add ?noSSO=true to the Console URL. For example, use this to log in with an admin account.
Note: Due to a Microsoft limitation, Kerberos SSO does not work if the browser in on the same machine as the server.
Importing a Certificate
To avoid certificate warnings when logging into the Console, you can import a certificate. By default, the Console Server is installed using a self-signed certificate.
To import a certificate for the Console Server:
1. Open a command prompt.
2. Go to
C:\Program Files\Good Technology\Good Mobile Con-trol\bin
3. Run the .bat file
c>importCertificate.bat
Good Mobile Messaging Administrator’s Guide 147

Installation
4. Select a service type: 1 for Console or 2 for Web Service.
5. Select certificate type: 1 for JKS or 2 for PKCS12. Good recommends getting a PKCS12 format file.
6. Point to the location of the filepath.
7. Enter the password for the certificate file.
8. Complete the process. Then restart Good Mobile Control Services for the change to take effect.
Default entries are not provided. The following sample displays choices made by the admin.
• On all workstations where the Console is to be launched using IE, Firefox, or Chrome, create a permanent trust by importing the certificate chain of the CA. Supported browsers.
Restoring a Certificate into Good Mobile Control Serverc
To restore a certificate:
1. Open a command prompt.
2. Go to
C:\Program Files\Good Technology\Good Mobile Con-trol\bin
3. Run the .bat file
148 Good Mobile Messaging Administrator’s Guide

Configuring the Good Mobile Control Console
c>RestoreCertificate.bat
The original certificate is restored.
Importing a Certificate into Internet Explorer
This optional procedure allows you to use your own signed CA. Follow a similar procedure for Firefox.
The root CA certificate or certificate chain must be imported into IE or Firefox for workstations used to access the Console. If the certificate is signed by Verisign or any other industry-standard certificate authority, IE is preloaded with the certificate and the following procedure is not required.
1. Open an IE browser session.
2. Click on Tools > Internet Options. Tools can be found in the upper right-hand corner of the browser, just above the border of the web page you are viewing.
3. Click on the Content Tab.
4. Click on Certificates.
5. Click on Import.
6. Click Next on "Welcome to the Certificate Import Wizard."
7. Use Browse or type in the filepath and name of the certificate file.
Good Mobile Messaging Administrator’s Guide 149

Installation
8. Select the first radio button "Automatically select the certificate store based on the type of certificate."
9. Click on Finish.
Understanding Console Filters
You’ll use the Console to display and manage lists of users, handhelds, and servers and information about them. You can configure filters to limit the lists to those specific items that you are interested in. With only items of interest displayed, you can apply bulk actions, such as applying the same policy settings to all the handhelds that you choose.
Note to users of earlier versions of Good for Enterprise: In this version, filters serve much the same purpose as groups in earlier versions, for use in applying the same action to more than one user, handheld, or server at a time. (Handhelds can also be grouped by sorting according to the Groups column and then selecting the handhelds listed for a group in the Handhelds tab matrix.)
To configure filtering, use the left panel on the Handhelds page and Servers page. You can hide or display this panel on the Handhelds page by clicking the arrow in the panel’s right border and on the Servers page by using the Show/Hide Filters button.
On the Handhelds page, the left panel automatically lists all policy sets, groups, servers, and platforms. Clicking check boxes within a category limits the handhelds listed to those in the selected items. Clicking check boxes in more than one category limits the handhelds listed to only those that are included in at least one selected item in each category.
150 Good Mobile Messaging Administrator’s Guide

Setting Up Role-Based Administration
Setting Up Role-Based Administration
When you installed Good Mobile Control Server, Good Mobile Control (GMC) Console was made available to you on the Internet.
You’ll be using Good Mobile Control Console to manage the Good for Enterprise handhelds and servers. You can control and limit the tasks performed by an individual or group using Good Mobile Control Console. For example, you can configure the console so that some individuals and groups can use it only to set up handhelds and not to add or remove users from Good Mobile Messaging Servers. To do so, you’ll create roles for different users and groups of users for Good Mobile Control Console. The Console comes with several predefined roles that you can use (roles for service administrator, administrator, SelfService, and helpdesk). You can also create additional roles now. Finally, you can create, delete, and reassign roles at any later time as needed.
Note: The Roles features are not supported for pure Office 365/Exchange Online environments in the Good Mobile Control user interface.
A member of two roles receives the rights of both roles.
The SelfService role allows your users to optionally add their own devices to Good for Enterprise and the Console, delete these devices, wipe and lock them, resend OTA mail and regenerate a PIN. A member of the SelfService role can be added to other roles.
Note: The first time you launch the Console, you must be logged on as the Superuser you specified when installing the Good Mobile Control Server. For more on the Superuser function, refer to “The Superuser” on page 186. You can then use the Console to grant access
Good Mobile Messaging Administrator’s Guide 151

Installation
to other accounts using the Role Based Administration feature.
The Superuser automatically has all rights and need not be assigned to a role.
To create new roles and limit access to Good Mobile Control Console features, perform the following steps:
1. Log in to the Good Mobile Control Console.
2. Click the Roles tab.
152 Good Mobile Messaging Administrator’s Guide

Setting Up Role-Based Administration
A list of all currently defined roles is displayed in the left panel.
3. To add a new role, click the Add link above the left panel.
Default Roles Default RightsService Administrator
All rights: Add handheld for a user, Delete handheld, Add additional handhelds for a user, Set handheld policy, Manage handheld policy and software, Handheld authentication, Erase handheld data and lock out user, View OTA setup PIN, Manage servers (Manage Good Mobile Messaging Server: Clear Server statistics using the Console; display Server license key in Server Properties window; Upload custom software; Configure OTA Setup software download), Manage roles, Manage OTA Email Templates, Manage custom software
Administrator Add handheld for OTA Setup, Delete Handheld, Add additional handhelds for a user, Manage handheld policy and software, Handheld authentication, Erase handheld data and lock out user, View OTA setup PIN, Manage servers, Manage OTA Email Templates, Manage custom software.
Help Desk Add handheld for OTA Setup, Delete handheld, Add additional handhelds for a user, Erase handheld data and lock out user
SelfService Add GFE devices. Add MDM devices. Delete handhelds. Resend OTA mail and regenerate PIN. Wipe handheld data and lock handheld. Upload identity certificates.
Good Mobile Messaging Administrator’s Guide 153

Installation
The Add Role page opens.
4. Enter a name for the new role and describe its purpose. For example, if the role is to provide the IT administrator with full rights for use of the console, you might name the role Good for Enterprise Admin and in Description type “This role grants full console rights to the IT administrator.”
5. Click the Add Role button.
By default the new role is assigned View-Only Administrator rights (view all data except sensitive data such as OTA PINs).
6. Click on “Change the rights for this role.”
154 Good Mobile Messaging Administrator’s Guide

Setting Up Role-Based Administration
The Change Rights page opens.
7. Click the All Rights radio button to give this role full rights in the console (view and edit all data). These are the default rights for the Service Administrator role.
Note that for SelfService, a limited set of rights is displayed to choose from.
Good Mobile Messaging Administrator’s Guide 155

Installation
8. Click on Custom and click on individual rights to limit this role’s use of the console.
9. Click the Custom radio button and check the boxes for the desired rights for the role.
Handheld Rights
• Add handheld for a user - Add first handheld for a user.
• Delete handhelds
• Add additional handhelds for a user
• Set handheld policy
• Manage handheld policy and software - Modify inheritance and customize handheld policy (except Handheld Authentication policies, unless that role is also checked)
156 Good Mobile Messaging Administrator’s Guide

Setting Up Role-Based Administration
• Handheld authentication - Modify handheld authentication policies, edit delegate settings
• Manage handheld action - Allows checking for new services in settings from the Good Operations Center and apply new actions in devices based on those services.
• Provide access to Cisco ISE - Authorizes sharing of compliance data with Cisco ISE.
Handheld Security Rights
• Erase handheld data and lock handheld.
• View OTA setup PIN
• MDM profile installation access - Allows access to MDM profile installation URL for clientless MDM
Manage Mobile Service Settings
• Manage mobile device general settings
Servers Rights
• Manage servers - Manage servers. Includes the ability to check IP ranges, upload server logs, manage backup settings, and view complete server information such as license key.
Deployment Rights
• Manage roles - View, create, edit and delete roles. Includes the ability to manage rights and membership for a role.
• Manage OTA email templates - Create, edit and delete OTA Email Templates.
• Manage custom software - Upload and remove custom software.
Self-Service Rights
• Add handheld for a user - The user can add a handheld to the Console.
• Delete handhelds - The user can delete any handhelds that he/she has added to the Console.
Good Mobile Messaging Administrator’s Guide 157

Installation
• Resend/regenerate PIN - If necessary, the user can resend the welcome email to himself/herself with a PIN included.
• Erase handheld data and lock handheld - Allows the user to earte and lock the handheld.
10.Click on Update to save your changes.
11.To remove users from this role, click the check box next to each user to be removed and click Delete.
12.Click on the Add button under Members to add users to the role.
The Add Role Members page opens.
13.Choose a domain from the drop-down and enter the partial name of a corporate user to be added to the role. Click Look Now and then select the desired name(s) in the panel for search results.
14.Click Add to add this name to the new role.
Include all users who are to add their own handhelds to the Console in the SelfService role.
158 Good Mobile Messaging Administrator’s Guide

Setting Software Download Defaults
Setting Software Download Defaults
You can ensure that the desired versions of Good for Enterprise and custom third-party software are installed when performing wireless downloads to handhelds. Use the Good Mobile Control Console to set the global policy defaults for wireless download for each handheld family. This consists of specifying which version of the applications should be downloaded to handheld types by default.
View and changing these download defaults is explained in “Managing Wireless Software Deployment” on page 317.
Good Mobile Messaging Administrator’s Guide 159

Installation
160 Good Mobile Messaging Administrator’s Guide

5 Preparing New Devices
As the administrator responsible for the maintenance and management of Good for Enterprise handhelds, you will need to set up handhelds for new users. You can do this for one or more users at a time, wirelessly. Note that in an Exchange environment, a user’s account can be set up on multiple handhelds (limit of 10).
The OTA (wireless Over The Air) user will always use OTA to complete setup of the handheld, and can later upgrade software on the handheld in the same way. Minimal steps are required by the user.
For MDM-Only iOS devices that will not connect to a Good for Enterprise Mobile Messaging Server and Exchange, refer to “MDM-Only Devices” on page 178 and “Setting Up the MDM-Only Device (Self Service)” on page 182.
If your installation includes WiFi-only handhelds, refer to “Good Secure WiFi: Prerequisites and System Requirements” on page 71.
Up to ten handhelds per user are supported.
Refer to “Scalability” on page 62 for information on the number of handhelds supported by Good Servers.
To allow users to set up their handhelds on their own, refer to “Self Service (Good for Enterprise)” on page 176.
Good Mobile Messaging Administrator’s Guide 161

Preparing New Devices
Preparing for Handheld Setup
This section describes how to set up a new handheld wirelessly, using the Good Mobile Control (GMC) Console. To set up multiple handhelds at the same time, refer to “Setting Up Multiple Handhelds (OTA)” on page 172.
Note: A user’s account can be made available on multiple handhelds. The “Add multiple handhelds to a user” right is necessary to accomplish this.
For MDM-Only iOS devices that will not connect to a Good for Enterprise Mobile Messaging Server and Exchange, refer to “MDM-Only Devices” on page 178 and “Setting Up the MDM-Only Device (Self Service)” on page 182.
Handhelds should have the following available memory:
• iOS total memory footprint:
- Application: 8.1MB (compressed download .ipa file)
- Runtime footprint: ~15-20MB plus space utilized by file repository
- Attachment cache: 40MB maximum
- Repository cache: No limit
• Android total memory footprint:
- Application: 16.6MB (compressed download file)
- Runtime footprint: ~22.5 (no data)
- Attachment cache: The larger of (1) 10MB or (2) size of last attachment downloaded
- File repository: No limit.
• Palm OS - 14.5MB
• Pocket PC - 12MB (14MB for Treo 700WX)
• Smartphone - 12MB
162 Good Mobile Messaging Administrator’s Guide

Preparing for Handheld Setup
Contact your authorized service representative for additional information on memory requirements.
The handheld battery should be fully charged (an alert will be displayed if the battery is below 25%).
Wireless Setup Preparation
1. Visit http://www.good.com/support/devices-supported.php or confirm with your service or sales representative that the handheld is a supported type.
The handheld must have active, supported voice and network data services. The user can make a call and browse the web with the handheld to confirm the presence of these services. Note that some supported data services may not support roaming; Good for Enterprise, like the handheld browser, will not operate outside the service area in these cases. If calling or browsing fails, contact your wireless service provider to add the missing service to your service plan.
An SD card is recommended for handhelds without flash memory, to be used by the Good for Enterprise software for backup.
For GPRS devices, a SIM card is required.
2. Users will be informed automatically by Good Mobile Control Console when you perform the wireless handheld setup. The Console will email instructions to the user’s email account describing how the user is to complete the setup wirelessly.
We recommend that you alert users in advance to expect these Good for Enterprise email instructions and to fully charge their handhelds before performing the setup. They will need to be in radio coverage for the setup to complete successfully.
3. You can set up more than one handheld per user.
4. Handhelds may require a ROM update. For more information, go to http://www.good.com/gmp. (You’ll be required to log in to access the site.) Click on Documentation for a link to ROM update information. See all the section there on Supported Devices.
Good Mobile Messaging Administrator’s Guide 163

Preparing New Devices
Note that Good for Enterprise 6.0 Client does not support Palm; Good Mobile Control Console does support earlier Client versions that include Palm support.
5. Before adding users to Good Mobile Messaging Servers for OTA setup, the server software download policies must be set up as explained in “Managing Software Policies” on page 319. This is true for adding users in Good Mobile Control Console using the Add handhelds or Add MDM links, or using the Import facility or the command-line GoodLinkAddUser utility for download to the handheld of the default software versions.
Unique Device Identifier (UDID)
Due to privacy concerns, in the past Apple required all applications using the Unique Device Identifier (UDID) to obtain user authorization. As a result, users were prompted to allow the Good for Enterprise app to use the UDID when they upgraded or installed release version 2.0 or 2.1. If existing users did not allow use of the UDID, they needed to re-provision Good for Enterprise.
Good Technology used the UDID to uniquely identify the device. If the user denied use of the UDID, Good Technology generated a random number as a method for uniquely identifying the device. This number always started with a k.
With GFE iOS Client v2.2, the UDID is no longer prompted for. Instead, Good Technology generates the random number as the method for uniquely identifying the device. This number starts with a k.
Note that if a user performs a factory reset on their device (erases all content and settings), they will require a new PIN, even if their PIN is set not to expire.
164 Good Mobile Messaging Administrator’s Guide

Setting Up the Handheld
Setting Up the Handheld
Setting up the handheld for the first time consists of:
• Adding the handheld to the Good Mobile Messaging Servers and Good Mobile Control Server
• Installing Good for Enterprise software wirelessly
• Data exchange between the handheld and Exchange server
• Generation of an encryption key
• Activation with the Good for Enterprise Service
• Wireless synchronization of the handheld with the user’s Exchange account
• Downloading optional third-party applications
(To add a new user wirelessly from the command line or using a script, refer to “GoodLinkAddUser” on page 556.)
To set up a new handheld Over The Air:
1. Click the Add handhelds link in the Quick Start box on the Good Mobile Control Console home page, or click the Add Handhelds button on the Handhelds tab.
2. Click the Good Mobile Messaging radio button.
Good Mobile Messaging Administrator’s Guide 165

Preparing New Devices
3. Enter a full or partial first or last name in the “Find user” field and click the Look Now button to list matching individuals in your corporate directory. Click on the user name in the search results to add a user with handhelds that you want to set up to the user list on the Handhelds tab (maximum of 75). They’re added in the “Add new handhelds for” box.
To add multiple users, select them one by one.
(To add multiple users at one time by importing names from a file, refer to “Setting Up Multiple Handhelds (OTA)” on page 172.)
4. Use the pulldowns to the right to assign the user(s) of the handheld(s) to a Good Mobile Messaging Server and to assign a policy set to the user(s).
The Good Mobile Messaging Server will manage the handheld’s synchronization with the user’s Exchange mailbox.
Important: If the Console detects no mailbox in the AD system for the user, the Messaging Server setting is automatically set to “None.” Such devices are flagged with a “No email account” icon
. Such devices can be managed using the Good Manage product.
You can manage a user’s handheld behavior using a variety of policy settings. The Console maintains a global (default) version of these settings. You can change the default settings.
To change a policy set or add a new set for use by this handheld, refer to “Creating and Changing Handheld Policy Sets and Templates” on page 195 after setup is complete.
Software to be installed: The software to be installed on the handheld is specified by the settings in the policy set that the handheld uses.
To change the software package and settings for the policy set used by the handheld, refer to “Managing Software Policies” on page 319.
166 Good Mobile Messaging Administrator’s Guide

Setting Up the Handheld
Check this section also if you want to set up the handheld from an SD card. You’ll be changing a policy set’s software deployment policies so that the installation source is changed to a storage card.
5. Click the Add button.
The user(s) are added to the current list of users/handhelds on the Handhelds tab.
If the user is already set up with a handheld and you’re adding another handheld for the same Exchange server account, it will be treated as a new user/handheld item, on a separate line. The user with more than one handheld running his/her account is displayed in the Console once each for every handheld. In other words, there is a one-to-one correspondence in the user list between user and handheld.
in versions prior to Good Mobile Messaging Server 7.0.0.6 User name, email address, policy set, and assigned servers are displayed by default in the row for the handheld. The other values in the row will be filled in automatically during the setup process. Use the icon in the far-right column to select which columns are to be displayed
The handheld is added to the Good Mobile Messaging Server. At the same time, the wireless handheld setup process, described in the following section, commences.
Good Mobile Messaging Administrator’s Guide 167

Preparing New Devices
OTA Setup Process
The following sequence completes the handheld setup. A detailed description is provided in the User’s Guide.
Note: For iOS and Android, refer to “OTA Setup Process - iOS/Android” on page 169.
• The Console sends an email message to the user. The default message contains a PIN and a link to the Good wireless software download site (https://get.good.com). You can edit this message, create customized messages for different users or groups of users, or suppress the message. To do so, refer to “Customizing Console-Generated Email Messages” on page 326.
You can display the PIN and URL information at the Console by going to the OTA link in the handheld's properties page. (Click on the user’s name & go to the OTA link available on the left hand pane). You can set policies for PIN expiration and reuse (refer to “Creating and Changing Handheld Policy Sets and Templates” on page 195). If the PIN has an expiration date/time, that date/time is included in the email message to the user. The date/time are also displayed in the OTA link in the handheld's properties page.
• When the user goes to the download site and clicks Download Now using the handheld browser, the site downloads the OTA Setup executable to the handheld.
• The user is prompted to save OTA Setup.
• The user launches OTA Setup and follows the prompts to complete Good for Enterprise software package installation. The user enters his/her email address and the PIN during this installation.
• The user repeats this process for each handheld to be set up with the user’s account. A separate welcome message with a different PIN is provided for each handheld. The “Add multiple handhelds to a user” right is required to add more than one handheld to the user.
168 Good Mobile Messaging Administrator’s Guide

Setting Up the Handheld
Setup is completed automatically, wirelessly, as described in “Completing the Setup Process” on page 170.
OTA Setup Process - iOS/Android
The following sequence completes the iOS or Android setup. Detailed descriptions are provided in the Good for Enterprise for iPhone/iPad User’s Guide and Good for Enterprise for Android User’s Guide.
• The Console sends an email message to the user. The default message contains the email address, a PIN (and expiration date, if applicable), and a URL address. You can edit this message, create customized messages for different users or groups of users, or suppress the message. To do so, refer to “Customizing Console-Generated Email Messages” on page 326.
1. The user should make sure that his or her iOS device or Android is fully charged and its wireless connection is active.
2. The user employs the device browser to navigate to the URL address provided in the email sent in the welcome email. The user selects the download link.
3. An Apps Store or Android Market page opens on the device.
4. The Free button transforms into an Install button when tapped. The user taps the Install button.
5. The user enters his or her device password when prompted, and taps OK.
A loading icon appears on the Home screen.
6. With loading complete, the user can tap the new Good icon and tap Start on the information screen that is displayed; then tap as necessary to accept license information.
7. The user enters his or her email address and PIN. If the PIN has expired, they must contact you, the administrator.
8. If you have set a policy requiring a password to access Good for Enterprise, the user will be prompted to enter and confirm a
Good Mobile Messaging Administrator’s Guide 169

Preparing New Devices
password. A message will display any restrictions that you’ve set on the password (minimum length, special characters, etc.).
The user will be prompted to choose whether to delete the device’s existing onboard native contacts, replacing them with the user’s Outlook contacts, or whether to add the Outlook contacts to the existing contacts on the device. Whichever the user chooses, once setup is complete, changes to the Outllook and device contacts will be synchronized.
Good for Enterprise now automatically synchronizes the device with information in the Exchange account. When synchronization is complete, the “Welcome to Good for Enterprise” message that was received will appear in the device email Inbox.
Completing the Setup Process
Once started, handheld setup occurs automatically over the air (and through the app stores for iOS, Android, and Windows Phone).
During this time:
• The handheld is activated with the Network Operations Center. To become fully operational, the handheld will send a message through the wireless network, establishing a connection with the Good Mobile Messaging Server managing the handheld.
• User policies are downloaded from Good Mobile Messaging Server, including passcode restrictions and Good for Enterprise software versions to be used. Encryption keys are generated for wireless communication.
• In some cases, the user is prompted to back up Good for Enterprise.
• Exchange and handheld data is synchronized between PC and handheld. For initial setup, synchronization consists of importing the data from mailbox to handheld.
170 Good Mobile Messaging Administrator’s Guide

Completing the Setup Process
The following are synchronized from the user’s Exchange Server account:
- All contacts in the top level Contacts folder
- Calendar appointments beginning one week in the past, and all future appointments including recurring events
- Email folders, except for Outbox and Drafts. Sent Items headers are synchronized only if you configure the user policy to do so. During synchronization, the 500 most recent emails in the Inbox and in Sent Items are sent to the handheld (for most recent Good for Enterprise Clients; earlier clients sync the 100 most recent). For emails older than 3 days, only the headers are sent.
- All tasks/To Dos (the first 4K of note bodies within the task)The handheld synchronizes information stored on the Microsoft Exchange server. It does not synchronize information stored in local folders on the user’s computer.
During this phase of setup, activity screens are displayed on the handheld. Setup time varies depending upon the amount of user data and coverage quality. Typically, handheld setup requires about twenty minutes.
• The user will be prompted to back up the Good for Enterprise applications. The user clicks OK and provides a passcode when prompted. The passcode must be at least 4 characters. All characters are allowed.
• Mandatory OTA policies that are set for more than 5 users are implemented in staggered fashion. The policies themselves are sent to the handhelds immediately, as soon as there is activity on the handhelds; however, when the user checks for scheduled time of download, the time will range between 8 P.M. and 2 A.M.
• When progress messages stop appearing, the handheld is fully synchronized. Recharge it to full strength if necessary.
• To test the handheld, you can send a message from the handheld to your administrative account or from your account to the user.
Good Mobile Messaging Administrator’s Guide 171

Preparing New Devices
Confirm that you receive the message from the handheld or that the handheld receives your message to the user.
• Warning: If the user for this handheld employs Outlook filters to automatically file new email into Inbox subfolders, the user may want these subfolders also synchronized on the handheld.
To enable subfolder synchronization, so that new email filed to them will automatically be available on the handheld, select Preferences | Email Delivery on the handheld. Then bring up the menu and select Add Folder. To display Inbox subfolders, select Inbox, bring up the menu, and select Open. Select a subfolder to be synchronized, bring up the menu, and choose Select.
After setup is complete, all email and PIM synchronization occurs wirelessly.
Important: For security reasons, Good does not allow backup of your Good data to iTunes or iCloud, as doing so could make your corporate data accessible to unauthorized users. Since this data is not backed up to iTunes or iCloud, it cannot be restored as part of any iOS upgrade or restore from backup that you perform. As a result, you'll need to set up your device again, updating and re-syncing the Good for Enterprise application; that is, after the iOS upgrade or backup, you'll be taken to a provisioning screen and be prompted for your email address and PIN.
Setting Up Multiple Handhelds (OTA)
You can set up multiple handhelds by importing user names from a list. The handhelds will be set up using the current default policies
172 Good Mobile Messaging Administrator’s Guide

Setting Up Multiple Handhelds (OTA)
and software package. This feature is not supported for MDM-only (clientless) devices.
To set up multiple handhelds:
1. From the “Select Import/Export Action” drop-down menu in the Handhelds tab in the Good Mobile Control Console, select “Import Handhelds From File.”
An Import window is displayed.
2. Select or enter the name of a .csv file containing a list of the handheld users to be added. The list should be in the following format.
All parameters must be listed in the header.
If the user has more than one handheld, supply a line for each.
Display Name,Compliance,Alias Name,Serial No,Server Name,Handheld ID,Network ID,Phone,Sta-tus,Handheld Type,Good Intranet Server, Policy-Set,DN,S/MIME,Good Mobile Connection, PolicySet GUID,GMM Server GUID,GMI Server GUID,Handheld GUID,IMEI,Client Type
Required fields (the rest can be left blank):
Display Name is the display name of the handheld user. If the display name has a comma in it, the name should be enclosed in quotation marks. If no display name is defined, the comma alone is included in the line.
Good Mobile Messaging Administrator’s Guide 173

Preparing New Devices
Alias Name is the mailbox name (alias) of the handheld user
Server Name is the name of the Good Mobile Messaging Server that is to manage synchronization for the user/handheld.
DN is the Exchange distinguished name for the user mailbox. The field cannot be left blank. If the user has more than one handheld, enter {gdid:n} at the end of the field, where n=1 is the first additional handheld.
Information about optional fields:
Policy is the name of the policy set that is to provide the policy settings for the user. If the field is left empty, the user is assigned the software policies from the Unassigned group.
Software is the name of the user group that is to provide the software policy settings for the user. If the field is left empty, the user is assigned the software policies from the Unassigned group.
You can add a # to the beginning of a line to enter a comment line.
Use the Export function on the Handhelds page in your Good Mobile Control Console to generate a sample based on your current Good for Enterprise setup. (You can also use Export files as Import files.) Refer to “Generating (Exporting) a List of Users” on page 401 for more information.
3. Click Open.
Handhelds for the users listed in the file are added to the Good Mobile Messaging Server. The Good Mobile Messaging Server specified for each user will manage synchronization with Exchange for the user’s handheld when the handheld is set up for use.
If there is an error in user name or Good Mobile Messaging Server name, the error is logged in the applications portion of the Windows Event Viewer.
The Good Mobile Control Console now sets up the handhelds for the listed users wirelessly, as described in “OTA Setup Process” on page 168.
174 Good Mobile Messaging Administrator’s Guide

Adding Custom Software OTA
Adding Custom Software OTA
To add or delete custom applications (“Custom”) to/from the software package for your site, refer to “Custom Applications: Adding to and Deleting from the Software Package” on page 328.
Interaction with WiFi
Depending on the type of networking supported by a handheld, Good Messaging can use either a standard mobile phone network (such as GPRS) or WiFi to access the corporate network, synchronize mail, and more. While standard mobile phone networks have broad availability, WiFi supports much higher data transfer rates.
For devices that support both standard and WiFi connections:
• Good Messaging stays connected when the user moves from a standard connection to a WiFi connection.
• Some handhelds automatically switch between WiFi and standard connections which can impact connection speed and battery life.
The user may not be able to connect using WiFi if:
• The corporate network doesn’t allow users to connect to the Internet via WiFi.
• The corporate network does not allow UDP connections to the Internet.
• The access point to the corporate network requires a VPN or other types of filtering.
Note: If the WiFi connection cannot be activated, the user may need to turn off the WiFi radio on the handheld and reconnect using a standard mobile phone network.
For more information, review the WiFi documentation included with the handheld.
Good Mobile Messaging Administrator’s Guide 175

Preparing New Devices
To set policies that control iOS WiFi use, refer to “Keyboard and Voice Input” on page 215.
Self Service (Good for Enterprise)
The Self Service feature allows you to use the SelfService role to specify which of your users can:
• Add their own device to Good for Enterprise via the Good Management Console
• Add additional devices to Good for Enterprise
• Resend the PIN that was included in the original welcome message
• Regenerate the PIN
• Lock and erase (wipe) their devices
• Delete their devices from Good for Enterprise
• Upload identity certificates for Good Mobile Access (Secure Browser) authentication
• Upload one or two S/MIME certificates for signing and encryption, if the S/MIME feature is enabled and the user is provided with the proper role rights
Note: The Self-Service features are not supported for pure Office 365/Exchange Online environments in the Good Mobile Control user interface; the web service features are supported (“Self-Service Functions” on page 628).
To set up self service for a user:
1. Add the user to the SelfService role (“Setting Up Role-Based Administration” on page 151).
Note that a member of the SelfService role has only the rights of that role, even if a member of other roles.
176 Good Mobile Messaging Administrator’s Guide

Self Service (Good for Enterprise)
2. Provide the user with the Good Management Console URL. The user will log in with their regular network name and password.
When the user logs in to the Console, the Self Service window is displayed.
p
Only fields, buttons, and icons that apply to the specific rights you’ve granted to the SelfService role will be displayed for the user. The S\MIME option, “Upload S/MIME Certificate,” enables uploading signing and encrypted certificates. The “Upload Identity Certificate” option is for use with Good Mobile Access (Secure Browser); the user can browse to the identity certificate they need to upload in order to visit their intranet sites using their Good Mobile Access Secure Browser.
3. If granted the right to add handhelds, the user can click the Add handhelds option for Good for Enterprise devices.
A welcome message will be sent to the user and the user can proceed to set up the new handheld in the same way as for a handheld added to the Console by the administrator.
See also “Easy Activation” on page 344 and “Erasing (Wiping) Handheld Data” on page 361.
Good Mobile Messaging Administrator’s Guide 177

Preparing New Devices
MDM-Only Devices
If a device does not use a mail server connected to Good for Enterprise, you can manage it through Good Mobile Console using the GMC MDM features. These require separate licensing via the Good Manager product.
Device management is set up in the following way:
1. As administrator, you add a user/device to the Good Mobile Control Server and the Server informs the Good Operations Center of this action. You have the option of giving the user Self Service rights to add a device.
2. Using the Good Operations Center URL embedded in a QR code, you, or the user (with Self Service rights), contacts the Operations Center with the device. A Mobile Device Manager profile is installed on the device. Alternatively, you or the user can log into GMC using the device and use the install option.
3. The Operations Center informs the GMC that the MDM profile is installed on the device. Now the GMC sends to the Operations Center a Good configuration (child) profile, which contains the settings for the MDM policy assigned to the device. Using the Apple Push Notification Server, the Operations Center requests that the device contact it again. (The Operations Center responds
178 Good Mobile Messaging Administrator’s Guide

MDM-Only Devices
to device contact but does not contact the device directly, per Apple protocols.)
4. The Operations Center installs the managed (child) profile on the device. The security policy settings that you’ve assigned to the device using the GMC are now implemented on the device.
With the profiles installed on the device, the Operations Center periodically requests the device to contact it, and gathers information from the device. The GMC displays this information. In addition, GMC can transmit actions to the device through the Operations Center, such as refreshing data, locking/unlocking the device, resetting the device password, and wiping the device.
Setting Up the MDM-Only Device (Administrator)
Setting up the device for the first time consists of:
• Adding the device to the Good Mobile Control Server
• Setting up an Apple Good configuration profile and an MDM profile on it.
If the user is adding the device to GMC, refer to “Setting Up the MDM-Only Device (Self Service)” on page 182.
For device use after setup, refer to “Mobile Device Management” on page 631.
Good Mobile Messaging Administrator’s Guide 179
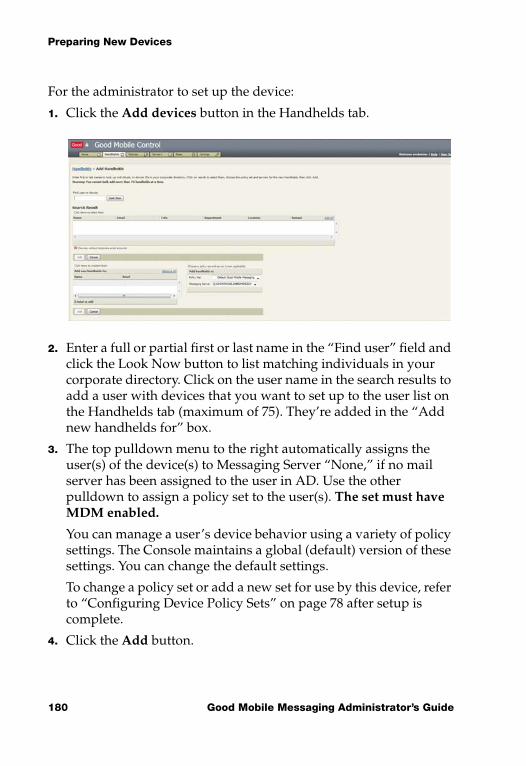
Preparing New Devices
For the administrator to set up the device:
1. Click the Add devices button in the Handhelds tab.
2. Enter a full or partial first or last name in the “Find user” field and click the Look Now button to list matching individuals in your corporate directory. Click on the user name in the search results to add a user with devices that you want to set up to the user list on the Handhelds tab (maximum of 75). They’re added in the “Add new handhelds for” box.
3. The top pulldown menu to the right automatically assigns the user(s) of the device(s) to Messaging Server “None,” if no mail server has been assigned to the user in AD. Use the other pulldown to assign a policy set to the user(s). The set must have MDM enabled.
You can manage a user’s device behavior using a variety of policy settings. The Console maintains a global (default) version of these settings. You can change the default settings.
To change a policy set or add a new set for use by this device, refer to “Configuring Device Policy Sets” on page 78 after setup is complete.
4. Click the Add button.
180 Good Mobile Messaging Administrator’s Guide

MDM-Only Devices
The user(s) are added to the current list of users/devices on the Handhelds tab.
If the user is already set up with a device and you’re adding another device, it will be treated as a new user/device item, on a separate line. The user with more than one device running his/her account is displayed in the Console once each for every device. In other words, there is a one-to-one correspondence in the user list between user and device. Limit of 10 devices/user.
User name and policy set are displayed by default in the row for the device. The other values in the row will be filled in automatically during the setup process. Use the icon in the far-right column to select which columns are to be displayed.
5. Click on the username for the new device, to navigate to the Handheld Info page for the device.
Good Mobile Messaging Administrator’s Guide 181

Preparing New Devices
6. Click the MDM Profile link.
7. If you’re running GMC on the desktop, use a QR Code reader on the device you’re setting up to scan the image on this page. Note: When using a QR code scanner, ensure you are opening the scanned URL in the device’s Safari browser. Some QR code scanners have their own browser, but only Apple’s Safari browser has privileges to install Apple MDM Profiles;
or,
if you’ve logged in to GMC using the device, click the Install MDM Profile button.
In either case, the device will be configured with Apple Good and MDM configuration profiles. Follow the prompts on the device to complete the setup. The settings for the policy assigned to the device will take effect. The GMC will be populated with supported device information.
Setting Up the MDM-Only Device (Self Service)
The Self Service feature allows you to use the SelfService role to specify which of your users can add their own device using the Good Management Console. Process for a user to set up their device:
182 Good Mobile Messaging Administrator’s Guide

MDM-Only Devices
1. Add the user to the SelfService role (“Setting Up Role-Based Administration” on page 53).
Note that a member of the SelfService role has only the rights of that role, even if a member of other roles.
2. Provide the user with the Good Management Console URL. The user will log in with their regular network name and password.
When the user logs in to the Console, the Self Service window is displayed.
Only fields, buttons, and icons that apply to the specific rights you’ve granted to the SelfService role will be displayed for the user.
3. If granted the right to add devices, the user can click the Add MDM option for MDM-Only (Good Manager) iOS devices.
4. If the user is running GMC on the desktop, he/she will use a QR Code reader on the device being set up to scan the image on the page displayed. Note: When using a QR code scanner, the user should ensure that the scanned URL is opened in the device’s
Good Mobile Messaging Administrator’s Guide 183

Preparing New Devices
Safari browser. Some QR code scanners have their own browser, but only Apple’s Safari browser has privileges to install Apple MDM Profiles.
Note that you can configure the default MDM profile to limit the amount of time that the install button is available to the user for the device, using the Provisioning “OTA Provisioning PIN and MDM Profile Install-Window expire” policy option.
If the user has logged in to GMC using the device, he/she will click the Install MDM Profile button (within any time limit that you set by policy).
In either case, the device will be configured with Apple Good and MDM configuration profiles. Follow the prompts on the device to complete the setup. The settings for the policy assigned to the device will take effect. The GMC will be populated with supported device information.
184 Good Mobile Messaging Administrator’s Guide

6 Managing the Handhelds
Once the handheld is activated and in use, you may need to perform the following tasks to maintain the Good for Enterprise setup:
• Limiting access to Good Mobile Control (GMC) Console facilities (Role-Based Administration)
• Changing user handheld policies
• Changing client software policies
• Updating handheld software wirelessly
• Adding and deleting handheld software
• Generating a temporary password for a locked handheld
• Pausing messaging for a handheld
• Locking a user out of his/her handheld
• Clearing (removing all user data from) the handheld
• Viewing current handheld operational status, including a list of paused user handhelds
• Removing a handheld from Good Mobile Messaging Server
• Viewing, exporting, and clearing handheld statistics
• Generating a list of users, serial numbers, and their Good Mobile Messaging Servers
• Exporting software and policy information.
Good Mobile Messaging Administrator’s Guide 185

Managing the Handhelds
• Changing a user’s name, Exchange server, Good Mobile Messaging Server, or handheld
• Performing Exchange server maintenance
Note: Windows Mobile OTA Setup functionality described in the following sections requires Client version 5.0 or higher. Much of the security and all of the S/MIME functionality requires Client version 5.0 or higher. Also, although 5.0 Servers support the 6.0 Client, the 6.0 Client requires the 6.0 Servers as described in this guide to fully take advantage of new Client features.
Use the Good Mobile Control Console in the following procedures. Limit access to Good Mobile Control Console facilities by using the procedure described in “Managing Roles.”
Managing Roles
You use Good Mobile Control Console to manage the Good for Enterprise handhelds and servers. You can control and limit the tasks performed by an individual using Good Mobile Control Console. For example, you can configure the console so that some individuals can use it only to set up handhelds and not to add or remove users from Good Mobile Messaging Servers. To do so, you’ll create roles for different users for Good Mobile Control Console. Roles for service administrator, administrator, and helpdesk are packaged with the Console.
Note: Roles are not available to users in pure Office 365 environments.
The Superuser
The Superuser is handled differently in the Console from the other users. The Superuser is granted all rights and can perform some tasks that no other user can perform. The Superuser does not need to be assigned to a role. There can be only one Superuser.
186 Good Mobile Messaging Administrator’s Guide

Managing Roles
You specify a Superuser name during Good Mobile Control Server installation. You can change this name later on the Settings tab.
The Superuser must run the Good Mobile Control Console the first time it is accessed, and can then provide rights/roles for other users.
The Superuser has all rights, including the following rights:
• Create new roles
• Enable FIPS for handhelds
• Enable logging for handhelds
• Pausing handhelds
Note: If you change the Superuser, you’ll lose your current Superuser rights when you exit the Console.
To change the Superuser:
1. In the Good Mobile Control Console, click the Settings tab.
2. Click the Superuser link in the left panel.
3. Click Change Superuser.
4. Choose a domain from the drop-down menu and enter the partial name of a corporate user. Click Look Now and then select the desired name in the panel for search results.
5. Click Change Superuser to assign the user as the Superuser.
Creating, Configuring, and Customizing Roles
To create additional roles (if the default roles are not sufficient) to limit access to Good Mobile Control Console features:
1. Log in to the Good Mobile Control Console.
2. Select the Roles tab.
Good Mobile Messaging Administrator’s Guide 187

Managing the Handhelds
A list of all currently defined roles is displayed in the left panel
3. To add a new role, click the Add link above the left panel.
The Add Role page opens.
4. Enter a name for the new role.
5. Under Description, describe the purpose of the role. For example, if the role is to provide the IT administrator with full rights for use of the console, you might name the role Good for Enterprise Admin and in the description type “This role grants full console rights to the IT administrator.”
6. Click the Add Role button.
188 Good Mobile Messaging Administrator’s Guide

Managing Roles
By default the new role is assigned View-Only Administrator rights (view all data except sensitive data such as OTA PINs).
7. Click on “Change the rights for this role” in the right panel to assign different rights to any new or existing role.
The Change Rights page opens.
8. Click the All Rights radio button to give this role full rights in the console (view and edit all data). These are the default rights for the Service Administrator role.
Good Mobile Messaging Administrator’s Guide 189

Managing the Handhelds
9. Click on Custom and click on individual rights to limit this role’s use of the console.
Handheld Rights
Provisioning and Activations
• Add handheld for a user - Add first handheld for a user.
- Add additional handhelds for a user.
• Delete handhelds
• View OTA setup PIN
• MDM profile installation access - Allows access to MDM profile installation URL for clientless MDM.
Support Actions
• Lock Good for Enterprise app or device
• Wipe Good for Enterprise app or entire device data
• Reset Good for Enterprise
• Set handheld policy
190 Good Mobile Messaging Administrator’s Guide

Managing Roles
• Send service notifications
• Move handheld between Good Mobile Messaging Servers
• Move handheld between Good Mobile Control Servers
• Manage mobile device general settings
Troubleshooting Rights
• Send server logs to Good Technology
• Send Good app logs to Good Technology
• Control Good app logging
Policy Rights
• View Policy Sets
- Manage policies (handheld and application) - Modify inheritance and customize handheld policy (except Handheld Authentication policies, unless that role is also checked).
- Manage handheld authentication - Modify handheld authentication policies., edit delegate settings.
Server Rights
Good Mobile Control (GMC)
• View and configure Settings
- Manage OTA email templates - Create, edit and delete OTA Email Templates.
- Manage certificates
- Manage relationship between GMCs
- Manage custom software - Upload and remove custom software.
• Provide access to Cisco ISE - Authorizes sharing of compliance data with Cisco ISE.
Good Mobile Messaging Server (GMMS)
• View Servers
Good Mobile Messaging Administrator’s Guide 191

Managing the Handhelds
- Manage servers - Includes the ability to check IP ranges, upload server logs, manage backup settings, and view complete server information such as license key.
Enterprise Servers
• View enterprise servers - Allows right owner to view settings for enterprise servers including Good Control server. Controls access to Enterprise Servers section under Settings.
- Manage enterprise servers - Allows Right owner to add or edit settings for enterprise servers including Good Control server.
Roles
• Manage roles - Manage servers. Includes the ability to check IP ranges, upload server logs, manage backup settings, and view complete server information such as license key.
10.Click Update to save your changes.
Adding and Removing Role Members
To add users to a role:
1. Choose the role in the left panel to which you want to add users.
2. Click the Add button under Members to add corporate users to the Access Control List for the role.
192 Good Mobile Messaging Administrator’s Guide

Managing Roles
The Add Role Members page opens.
3. Choose a domain from the drop-down and enter the partial name (first or last) of a corporate user to be added to the role. Click Look For: and then select the desired name(s) in the panel for search results.
4. Click Add to add these names to the new role.
To remove corporate users from the access list for a role:
1. Choose the role in the left panel that contains the users you want to remove.
2. Click the check box next to each user under Members and click the Delete button.
Exporting Rights
You can export the current rights for all users in a role to a .csv file. To do so, select the role in the left panel whose rights are to be exported, and click the Export Rights link at the top of the left panel.
Good Mobile Messaging Administrator’s Guide 193

Managing the Handhelds
The columns are listed in this order:
Mamber Roles All rights Add handheld for a user Delete handhelds Wipe Good for Enterprise app or entire device data Move handheld between Good Mobile Messaging Servers Move handheld between Good Mobile Control Servers View OTA setup PIN MDM profile installation access Set handheld policy Manage policies (handheld and application) Manage handheld authentication Manage servers Manage roles Manage custom software Manage OTA email tem-plates Add additional handhelds for a user View only administration Self Service Add GFE Devices Add MDM Devices Delete handhelds Wipe handheld data and lock handheld Resend OTA mail and regen-erate PIN View OTA activation PIN Upload S/MIME user certificates Unlock GFE Reset device password Manage mobile device general settings Provide access to Cisco ISE Upload identity certificate(s) Send service notifications Reset Good for Enter-prise View Policy Sets View Servers View and con-figure Settings Manage relationship between GMCs Manage certificates Lock Good for Enterprise app or device Send server logs to Good Technology Send Good app logs to Good Technology Control Good app logging Reset Good for Enterprise View enterprise servers Manage enterprise servers
If a user has the named right, an 'X' will appear in the column. If the user does not have the named right, the column will be left blank.
If an error is detected when opening the export file, a dialog box will be displayed immediately with text indicating the cause of the error. If any errors are detected during the actual export, errors will be logged to the event log and a dialog box will be displayed at the end with text indicating the number of errors and where the error information can be found.
194 Good Mobile Messaging Administrator’s Guide

Creating and Changing Handheld Policy Sets and Templates
Creating and Changing Handheld Policy Sets and Templates
Every handheld has a named policy set associated with it. This policy set comprises a collection of policy settings that allow you to manage the handheld in an organizational setting. Good for Enterprise comes with a default policy set. You can edit the policy settings for this policy set and you can create new policy sets of your own. The new policy sets can be created from scratch or can be based on templates that are included with the Console or that you create.
When you change a policy set’s settings, the changes apply to every handheld to which that policy set is assigned.
For each policy set, there are policy settings available in the following categories:
Good for Enterprise Policies
• Good for Enterprise Authentication
• Messaging
• File Handling
• Good Mobile Access (Secure Browser) (an integrated browser for Intranet use)
• Provisioning
Mobile Device Management
• iOS configuration
• Android configuration
• Compliance Manager
Application Management
• Application Management
Good Mobile Messaging Administrator’s Guide 195

Managing the Handhelds
Legacy Controls (apply to Windows Mobile Pocket PC, Windows Mobile Smartphone, and Palm OS devices)
• Blocked Applications
• Network Communication
• Storage Cards
• Data Encryption
Software OTA distribution policies are described in “Managing Wireless Software Deployment” on page 317. S/MIME configuration and usage are described in “Managing S/MIME” on page 338.
When you first set up a handheld, it will inherit the settings of the default policy set automatically unless you assign a different policy set to the handheld.
Note: Not all policy settings apply to all handheld platforms. The Good Mobile Control console uses icons and tool tips to indicate which settings are supported for a particular platform.
196 Good Mobile Messaging Administrator’s Guide

Creating and Changing Handheld Policy Sets and Templates
Move the cursor over a platform icon at the top of the page to display
info and warning icons on the page that apply only to the platform. The tool tips for blue info icons indicate unsupported platforms for a policy. Selecting an unsupported policy causes the blue icon to change to a yellow warning triangle.
To change the policy set assigned to a handheld, go to the Handhelds tab, click the check box next to the user assigned to the handheld in question, and select a new policy set for the handheld from the “Assign policy set” drop-down. You can do this for multiple handhelds by making multiple selections before assigning the new policy set.
Moving cursor over platform icon causes page to display only info and warning icons for that platform
Blue info-icon tool tip lists unsupported platforms
Warning icon indicates selected,unsupported policy
Good Mobile Messaging Administrator’s Guide 197

Managing the Handhelds
To create a new policy set or change a policy set’s settings, perform the following steps:
1. In Good Mobile Control Console, click the Policies tab.
2. Click Create New to create a new policy set, or click on the name of an existing policy set whose settings are to be changed.
A name-and-description page is displayed for the new policy set or a Summary page is displayed for the existing policy set.
For a new policy set:
3. Enter a name and description for the new policy set and click OK. Then, click on its name in the list of policy sets.
198 Good Mobile Messaging Administrator’s Guide
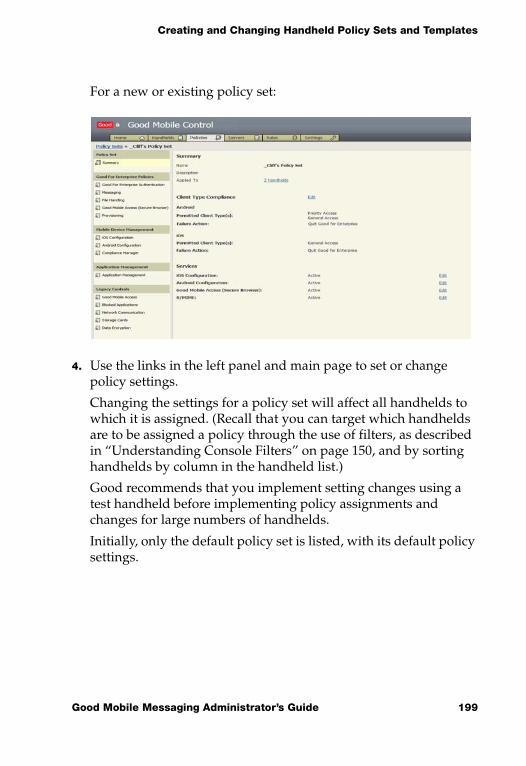
Creating and Changing Handheld Policy Sets and Templates
For a new or existing policy set:
4. Use the links in the left panel and main page to set or change policy settings.
Changing the settings for a policy set will affect all handhelds to which it is assigned. (Recall that you can target which handhelds are to be assigned a policy through the use of filters, as described in “Understanding Console Filters” on page 150, and by sorting handhelds by column in the handheld list.)
Good recommends that you implement setting changes using a test handheld before implementing policy assignments and changes for large numbers of handhelds.
Initially, only the default policy set is listed, with its default policy settings.
Good Mobile Messaging Administrator’s Guide 199

Managing the Handhelds
To delete a policy set, select the policy name in the right panel and click Delete. To copy a policy set, select the policy name in the right panel and click Make Copy.
Understanding Policy Templates
You can control Good for Enterprise behavior on user handhelds by setting policies and applying them to the handhelds. Handheld policies are grouped into policy sets, which you create and name. Each handheld must have a policy set assigned to it.
A policy template contains policies of the following types:
• Good for Enterprise Authentication
• S/MIME
• Messaging
• File Handling
• Good Mobile Access (Secure Browser)
• Provisioning
• iOS Configuration
• Android Configuration
• Compliance Manager
• Application Management
• For older devices
- Network Communication
- Storage Cards
- Blocked Applications
- Data Encryption
Each type comprises a number of settings. You can create one or more templates for each type, and use them when creating new policy sets. A policy set can consist of settings that you specify individually
200 Good Mobile Messaging Administrator’s Guide

Creating and Changing Handheld Policy Sets and Templates
using the Console, or can use templates for any or all of its setting types. When a policy set uses a template for a setting type, those settings are grayed out for the policy set. Changing the template settings changes the settings for all the policy sets that are using the template.
Creating a New Policy Template
To create a new policy template:
1. In Good Mobile Control Console, click the Policies tab.
2. Select Policy Templates in the left panel.
3. Click Create New in the right panel.
4. In the window that opens, enter a name and description for the new template and use the drop-down list to define its policy type. Click OK.
The new template is entered in the template list.
5. Click on the link for the new template in the list.
A page of default settings for that template type is displayed. Edit and save the settings as necessary for the new template. For information on the policy pages and their default settings, refer to “Good for Enterprise Policies” on page 202.
Applying a Policy Template
When you’re configuring policy settings for the first time, or editing them later, a drop-down list of available policy templates is displayed at the bottom of the page next to “Policy Template”. To use the template settings, simply select the desired template from the list.
Editing a Policy Template
To edit a policy template, click the template to be changed in the template list. On the page of settings that is displayed, make the desired changes and click Save.
Good Mobile Messaging Administrator’s Guide 201

Managing the Handhelds
Warning: Any changes to the template will affect all policy sets that currently use the template.
To list the handhelds to be affected by the changes, click the “Applied To” link for the template in the template list. Good recommends that you implement setting changes using a test handheld before implementing policy assignments and changes for large numbers of handhelds.
Good for Enterprise Policies
This section describes the policies currently available in the Good Mobile Control Console.
Reminder: Not all policies apply to all handheld platforms.
Good for Enterprise Authentication
Use the Good for Enterprise Authentication link in the left panel of the Policy Sets page for a particular policy set to configure locking and password policies on the handheld.
These policies (along with the encryption, compliance, and authorization policies available as Application-type policies) are designed to enhance and replace the default OS security. Good for Enterprise may conflict with third-party applications that try to bypass the default OS security.
Types of applications that are most likely to conflict:
• Third-party security applications (any application that provides password protection and/or encryption).
• Handwriting recognition applications (user handhelds typically may crash at the lock-out screen).
You can delegate authentication to third-party applications beginning with GFE Android Client v2.7.1 and GFE iOS Client v3.0.0 does not yet support this feature. To add applications to a list for this purpose,
202 Good Mobile Messaging Administrator’s Guide

Creating and Changing Handheld Policy Sets and Templates
use the Authentication Delegates link on the Settings tab (“Authentication Delegates” on page 208). See also “Easy Activation” on page 344.
To change handheld password policies for a user:
1. Click the Policies tab and click the policy name link in the right panel for the policy set currently applied to the user’s handheld.
2. Click the Good for Enterprise Authentication link in the left panel of the Policies page.
3. Move the cursor over a platform icon at the top of the page to display info and warning icons on the page that apply only to the platform. The tool tips for blue info icons indicate unsupported platforms for a policy. Selecting an unsupported policy causes the blue icon to change to a yellow warning triangle.
Good Mobile Messaging Administrator’s Guide 203

Managing the Handhelds
4. To delegate authentication to another application, tap the Delegated Authentication radio button and from the drop-down, choose the application that is to be used for authentication. You create the list in the drop-down using the Authentication Delegates link on the Settings page, as described in “Authentication Delegates” on page 208. See also “Easy Activation” on page 344.
Delegated Authentication is not supported on all platforms. For handhelds running on unsupported platforms, a weak password-protected setting will be applied.
S/MIME authentication via delegation is supported.
Delegated Authentication may not work as intended when authentication delegation is enabled in your Good Control server or when Good for Enterprise is selected as an authentication delegate in Good Control server. Make sure you check your Good Control server policy when enabling Delegated Authentication.
Delegating authentication to an Android app and applying the policy to an iOS device will cause Good for Enterprise to require a password on that device.
5. To require a password on handhelds, choose Password-protected (with or without soft token and S/MIME) as the handheld authentication type.
This password controls access to Windows Mobile and Palm devices. To control access to the iOS device, refer to the Passcode Policies section of “iOS Configuration” on page 247 and “Android Configuration” on page 269.
If a password is already set on the handheld, when the handheld user starts Good for Enterprise, a prompt will require that the password be entered. If restrictions are set on the password (see below), the current password is checked; if it doesn’t meet the new restrictions, the user is instructed to enter a new password.
If no password is currently set on the handheld, a prompt will require that the user enter a new password.
204 Good Mobile Messaging Administrator’s Guide

Creating and Changing Handheld Policy Sets and Templates
Note: For GFE iOS Clients 2.9 and higher, Smartcard PIN authentication behaves like the regular password-protected policy. Card readers are not supported.
6. Click the “Enable S/MIME” and S/MIME management check boxes provided to set up S/MIME management on the device.
The “From provider” option requires that the Delegated Authentication service support S/MIME authentication.
7. For Password Authentication, set the following:
• Expire password after - Causes the password to expire after the selected number of days (from 1 day to 1 year). The default is 1 day if the check box is checked. If the check box is not checked, the password never expires. Expiration is calculated from the date the password is created and saved. This date is not changed by a policy change. Therefore, imposing or decreasing an expiration value may cause the password to expire when the device screen next locks.
• Disallow previously used passwords - Prevents repetition of a password over the specified number of times (1 to 10). For example, if 8 is chosen, a new password must differ from the previous 8 passwords set on the device. The default is No Restriction (Unchecked).
• Require minimum length of - Requires that the password be at least the length you specify (1 to 14). The default is No Restriction (Unchecked).
• Disallow repeated characters after - Limits the number of times a character can be used, consecutively or non-consecutively. The default is No Restriction (Unchecked). Applies to Smartphone’s numeric password as well as the Treo and PPC alphanumeric passwords.
• Require both letters and numbers (Default is Unchecked)
• Require both upper and lower case (Default is Unchecked)
• Require at least one special character (Default is Unchecked)
Good Mobile Messaging Administrator’s Guide 205

Managing the Handhelds
• Do not allow sequential numbers (that is, do not allow two or more consecutive numbers in a row either forwards, such as 5-6-7-8, or backwards, such as 9-8-7-6) (Default is Unchecked)
• Do not allow personal information (personal information includes variations of user name, email address, and X400 name) (Default is Unchecked)
• Do not allow more than one password change per day (Default is Unchecked)
8. For Lock Screen Protection, set the following:
• Require password when idle for longer than - Enter the maximum allowed time that the handheld can remain idle before the screen is locked and a password must be entered to reactivate it. Values range from 1 minute to 1 day.
For iOS, this setting applies only to the Good application. If the application is running but idle for the specified time, the screen will lock. The user can tap the Home button to leave the lock screen. Tapping the Good application icon will return the user to the lock screen. If the application is not running and the specified time has passed, the lock screen will be displayed at Good startup.
• For iOS, always require password on application startup or when power button is pressed (recommended) - Displays the lock screen whenever the Good application is run.
• Enable notifications on the lock screen - Allows the user to track message activity without unlocking the handheld. Checked by default. (Windows Mobile)
Note that Good for Enterprise automatically supports push notifications for email and calendar reminders specific to the iOS device, with no policy setting necessary.
• Check “Allow access to Good Contacts (numbers only) for dialing” to allow the user to make calls to Good Contact numbers even when the screen is locked or the user has been locked out of the handheld by the administrator.
206 Good Mobile Messaging Administrator’s Guide

Creating and Changing Handheld Policy Sets and Templates
• Select “After n invalid password attempts” to specify the number of unsuccessful attempts at password entry. Values range from 3 to 12 attempts. Default is 10. If the number of attempts is exceeded, specify one of the following actions to take:
- Select “Lock out handheld user” to lock the user out of the handheld permanently. (Will have no effect for the iOS device, as only the erase (wipe) option is supported.)
- Select “Erase handheld data” to clear the user data from the handheld and force the handheld to be set up again (Windows Mobile). For Android and iOS, the Good application is left in place, but cannot be accessed again without a hard reset and reprovision of the handheld.)
For new installations, the default is that the user is locked out; for upgrades from installations that did not have this option, the default is that the user data is erased. If the user is locked out, follow the procedure in “Providing a Temporary Unlock Password (Windows Mobile, Palm)” on page 358 to generate a temporary password to allow access to the handheld again.Note: “After n invalid password attempts” is not supported on Nokia 5.1.0.37 clients.
• Allow Touch ID (iOS 8)
- Allow Touch ID for application login after idle timeout
- Allow Touch ID for application login after restart
Warning: Touch ID after application start is a potential security risk that might allow exposure of user credentials and data.
• Enable Good Work app on Apple Watch
9. Click Save to save the changes.
Good Mobile Messaging Administrator’s Guide 207

Managing the Handhelds
Note: The native lock settings on Nokia 5.1.0.37 clients are not overwritten by less strict settings configured in a Good Mobile Control policy.
Emergency Calls
In order to make emergency calls when a password is enabled, for some Windows Mobile handhelds the user must press and hold the Fn or Option key while dialing the emergency number. For example, to dial 911, the user must press and hold the Fn or Option key while dialing 911. Alternatively, the user can press the Fn or Option key twice and then type 911.
For Palm Treo Windows Mobile devices, when keyguard is enabled, users do NOT have to use the Fn or Option key to dial an emergency number.
This is the same behavior as when Good for Enterprise is not installed and the native device lock is set to use strong alphanumeric password type.
Authentication Delegates
To add third-party applications as delegates for Good for Enterprise authentication (“Good for Enterprise Authentication” on page 202) and “Easy Activation” on page 344:
Note that for a GD or third-party app to act as delegate, Importing/Exporting between Good Mobile Control and the app must be enabled and the app must be white-listed in Good Mobile Control.
208 Good Mobile Messaging Administrator’s Guide

Creating and Changing Handheld Policy Sets and Templates
1. In the Good For Enterprise Mobile Control Console, click on the Authentication Settings link under Application Settings on the Settings tab.
2. Click Add to add an application to the list of authentication delegates.
Good Mobile Messaging Administrator’s Guide 209

Managing the Handhelds
3. Complete the fields and click Save.
Messaging
Note: Messaging policies work in conjunction with File Handling (“File Handling” on page 217) policies.
Use the Messaging link in the left panel of the Policy Sets page to set policies for:
• Good Mobile News (RSS)
• Contacts
• Calendar
• Copy and paste
• Sending and receiving/opening attachments
• Voice and keyboard input
210 Good Mobile Messaging Administrator’s Guide

Creating and Changing Handheld Policy Sets and Templates
The Superuser can also use this page to suspend synchronization on a handheld, as described in “Suspending Handheld Messaging” on page 360.
To set messaging policies:
1. Click the Messaging link in the left panel of the Policies page.
2. For Email, click the following check boxes to enable the Email settings:
• For folders other than the Inbox - Synchronize headers only or synchronize headers and bodies from email filtered to folders other than the Inbox. If desktop rules are set to filter messages to a folder other than the Inbox, this feature determines whether only the header or both the header and body of the message are synchronized to the handheld. By default, the Synchronize headers and body radio button is selected.
• Synchronize Sent Items Folder - The desktop and handheld Sent items folders are synchronized only if this option is checked. It is checked by default.
Note: Checking the Sync check box will increase radio traffic and decrease battery life for affected handhelds.
• Enable email classification marking. Allows the user to choose among Internal, Public, Public Release, CUI, Confidential, Unclassified, Classified, and Restricted on the device. No actions are performed by Good for Enterprise based on the classification, it is for integration with other systems only. Refer to “Rule File for Additional Email Classification Markings” on page 288 to replace the classification list with one of your own.
• Enable email recipient warning for unauthorized email domains. You can cause a warning dialog to be displayed on the user’s handheld if he/she attempts to send a message outside the domains that you specify here as authorized email domains. (Android and iOS only)
Good Mobile Messaging Administrator’s Guide 211

Managing the Handhelds
This feature is not supported for addresses and domains within personal distribution lists.To specify the domains that you consider “inside” the enterprise, click the Edit key.
Enter a domain name (e.g., yourcompanyname.com) and click Add. Note: Calendar meeting requests and domains embedded in distribution lists are not checked by the handheld client in this release.Select names in the list and click Remove to delete them.Click Ok when done.Edit the Warning message box as desired.
3. For Good Mobile News, click the Enable Good Mobile News (RSS) check box to enable the Good Mobile RSS application on the handheld. Adds a Good for Enterprise News icon to the Good for Enterprise launcher on the handheld. The application hosts a variety of RSS feeds. By default, the check box is checked. (Windows Mobile and Symbian only)
4. For Contacts, click the following check boxes to enable the Contacts settings:
• Enable access to Good contacts. Allows syncing of handheld local (native) contacts with Good contacts on the device. The default is On. To choose which of the fields in Good Contacts are to be synchronized with the handheld’s local contacts for
212 Good Mobile Messaging Administrator’s Guide

Creating and Changing Handheld Policy Sets and Templates
use with phone applications (e.g., voice dial), click the Choose Fields button. In the window that opens, click the check boxes for the desired fields and click OK. Enable setting in Preferences on device to synch Good contacts and local contacts.
Warning: For Windows Phone, syncing with native contacts is not supported. This setting, when enabled, has no effect; however, disabling this setting will disable Good Contacts syncing on the device.
• Enable Exchange Global Address List lookup. The default is On.
• Allow SMS (text) messaging from the Good application. The default is On. (iOS and Android only)
• Allow contact beaming. The default is On. Check Allow contact beaming to allow Good for Enterprise to handle incoming and outgoing beaming of contacts for supported handhelds. If enabled, Good for Enterprise replaces native contacts. If disabled, Good for Enterprise cannot send or receive contacts via beaming; beaming of native contacts is unaffected. Enabled by default. IR radio must be enabled. (Not supported on Android and iOS.)
5. For Calendar, click the following check box to enable the Calendar setting (Android and iOS only):
• Allow event reminder details over lock screen
Creating and accepting/declining calendar invites from the device by calendar delegates is not supported by Good for Enterprise. On the device, delegates receive email notifications for calendar invites, but are not provided with the “Accept/Tentative/Decline” options; instead, the following message is displayed: “To respond to this delegated meeting request, please access it from your computer.” No interface is provided for the delegate to create a meeting. The delegator’s calendar is not displayed on the delegate’s device. Calendar delegates can use the full delegation features from the desktop, with full support of synchronization to the delegator’s device for viewing.
Good Mobile Messaging Administrator’s Guide 213

Managing the Handhelds
6. For Copy and Paste, click the following check boxes to disable copying and pasting data between Good and other applications (Android and iOS only):
• Do not allow data to be copied from the Good application
• Do not allow data to be copied into the Good application
7. For Sending Attachments and Receiving/Opening Attachments, click the following check boxes to enable the attachment settings. Note that these settings affect the File Handling import/export settings, as noted below (see also “File Handling” on page 217).
• Allow handheld to send attachments - When enabled, allows the user to send Good Messaging emails with attachments. You can limit the attachments to the size that you specify in the “Block attachments larger than” pull-down menu. Note that attachments added to emails directly through Compose on the handheld come from the Good file repository on the device; otherwise, they are added via third-party Open In (send through, or export) facilities.
This policy setting is required to be enabled for sending attachments as described in File Handling (refer to “File Handling” on page 217), but also requires that those policies for importing and/or file repository are enabled.
- Block attachments larger than - Size values range from 25KB to 32MB. Default is 2MB. Default is On.
- Exceptions to sending files:
Block attachments by file extension (blacklist) - Filter specified types of attachments, such as .PRC, .PDB, and .EXE files, so that handhelds cannot send them. After selecting this option, click Edit. In the window that opens, enter a file type, click Add for each file type to be filtered, and then click OK. The default is no filtering.
Only allow these file extensions (whitelist) - Filter types of attachments, so that handhelds can send only those that you specify here. After selecting this option, click Edit. In the window that opens, enter a file type, click Add for each file
214 Good Mobile Messaging Administrator’s Guide

Creating and Changing Handheld Policy Sets and Templates
type to be allowed, and then click OK. The default is no filtering.
If the File Handling policy’s “Disable all importing and exporting” setting is not checked, you can completely disable the importing of files into the Good secure container by select ’Only allow these extensions’ and leaving the extensions list blank.
• Allow handheld to receive/open attachments - Allows attachment viewing when a capable viewer is present on the handheld. With this option disabled, simple formatting (i.e., stripped view-only text) will be used. Simplified formatting does not apply to iOS and Android platforms; disallowing this option will prevent attachment downloads and any importing from third-party applications for these platforms.
Note that emails are limited to 16 attachments.
- Block attachments larger than - Size values range from 25KB to 32MB. Default is 2MB. If an attachment exceeds this size, the user must choose to view the attachment as a text file. Factory default is 2MB. Default is On.
- Exceptions to receiving/opening files:
Block attachments by file extension (blacklist) - Filter specified types of attachments, such as .PRC, .PDB, and .EXE files so that handhelds cannot download them. After selecting this option, click Edit. In the window that opens, enter a file type, click Add for each file type to be filtered, and then click OK. The default is no filtering.
Only allow these file extensions (whitelist) - Filter types of attachments, so that handhelds can receive/open only those that you specify here. After selecting this option, click Edit. In the window that opens, enter a file type, click Add for each file type to be allowed, and then click OK. The default is no filtering.
8. Keyboard and Voice Input
- Allow Siri dictation in Good for Enterprise (iOS)
Good Mobile Messaging Administrator’s Guide 215

Managing the Handhelds
- Allow 3rd party (custom) keyboards (iOS)
- Allow Apple Watch - Notifications displayed on a paired iPhone will also be displayed on the Apple Watch. The user will not be able to use the Good for Enterprise Apple Watch app without the policy enabled. Good for Enterprise does not use a secure container to secure storage or communication of data between the mobile device and the watch. By default, the Apple Watch policy is off.
Supported Attachments
Some of the file types that are supported. In general, Good can display those file types supported by the native viewer and/or third party viewers if allowed by IT policy (refer to “File Handling” on page 217).
iOS devices
• Microsoft Office® (doc, docx, ppt, pptx, xls, xlsx)
• Adobe Acrobat® (pdf), HTML (htm and html)
• Image (png, jpg, jpeg, tif, gif, animated gif)
• Plain text (txt)
• Message (msg) (plain text only)
Android 1.6.5 and later
Some of the file types that are supported. Good can display QuickOffice documents within Good (no image files) and those file types supported by the native viewer and/or third party viewers if allowed by IT policy (refer to “File Handling” on page 217) outside of Good.
• pdf, txt, wav, wma, wpd, htm, html, jsp, xml, bmp, gif, jpg, png, tif, tiff, xls, xlsx, pps, ppt, pptx, pttx, doc, docx, rtf, zip, 3gp, mp4, mp3, msg (Android 2.5.0)
216 Good Mobile Messaging Administrator’s Guide

Creating and Changing Handheld Policy Sets and Templates
Windows Phone
• doc, docx, docm, dotx, dotm, xls, xlsx, xlsm, csv, ppt, pps, pptm, pptx, potx, potm, pot, ppsx, ppsm, rtf, pdf, txt, gif, jpg, jpeg, png, msg
Windows Mobile/Symbian
• Microsoft Office® (*.doc, *.docx, *.ppt, *.pptx, *.xls, *.xlsx)
• Adobe Acrobat® (*.pdf), Word Perfect® (*.wpd), HTML (*.htm and .html), Rich Text (*.rtf), message (*.msg), sound (.wav, .mp3, etc.), image (.bmp, .png, etc.), and plain text (*.txt)
File Handling
Note: File Handling policies work in conjunction with Messaging policies (“Messaging” on page 210).
File Transfer Privileges
Use these policy settings to control which attachments in Good email and the file repository (“File Repository” on page 220) can be imported from and exported to third-party applications.
Good Mobile Messaging Administrator’s Guide 217

Managing the Handhelds
If “Default Good Mobile Messaging settings” is selected, the Android user’s device will open Office files and PDFs inside Good; all other attachments and repository files will use external applications, if the attachment or file is supported and a viewer is present. iOS will not allow transferring with third-party applications; all available attachment and repository files will be opened within Good.
If “Disable all importing and exporting” is selected, Android will only open Office files and PDFs securely, inside Good. iOS will not allow transferring with third-party applications; all available files will be opened within Good (the same as with the default selection).
If “Enable importing/exporting between Good and third-party applications” is selected, the device user is presented with a list of applications available on his/her device when opening the attachment or repository file. For files open in third-party applications, the user is given the choice of adding the file to a secure Good email or, for iOS platforms 4.2 or higher, of saving the file to the Good file repository.
If “Enable importing to Good only” is selected, for files open in third-party applications, the user is given the choice of adding the file to a secure Good email or, for supported platforms, of saving the file to the Good file repository.
Note that sending an attachment within a Good email requires the Messaging policy’s Sending Attachments setting to be enabled. You can restrict which attachments are sent by adding extension types to that policy’s lists of allowed or blocked extensions.
Also, saving a third-party file to the Good file repository (iOS platform) requires the Messaging policy’s Receiving/Opening Attachments setting to be enabled. You can restrict which attachments are saved by adding extension types to that policy’s lists of allowed or blocked extensions.
218 Good Mobile Messaging Administrator’s Guide

Creating and Changing Handheld Policy Sets and Templates
To limit the list of trusted third-party applications, click the “Exceptions to importing/exporting” check box and select the “Block these external applications” or “Trust only these external applications” radio button. Choose the applications to be allowed or blocked from the list displayed. You build this list in the Settings tab (refer to “Creating a Third-Party Applications List” on page 244).
Note regarding Good Dynamics (GD) applications
Some GD partner applications (such as Copiun, iAnnotate, Quickoffice, etc.) interact with Good for Enterprise to share files and authenticate using Good for Enterprise. In order for this functionality to work, you must ensure that Good Mobile Control allows file handling with these applications. If you do not set this correctly, the user will get the following error when trying to use the partner app with Good for Enterprise: "Application not allowed by IT Administrator."
In GMC, select the appropriate policy and go to the File Handling tab. As described above, you use this page to grant permission for other apps to export/import data to/from Good for Enterprise. Depending on your setting, ensure the following:
• If you enable import and export without exceptions, no further action is required.
• If you enable import and export with blocked applications, ensure that the GD applications you are deploying are not in the blocked list.
• If you enable import and export with trusted applications, make sure that the GD applications you are deploying are in the trusted list.
You will need the application ID (for example, the iAnnotate ID is com.branchfire.iannotate.gd and the Quickoffice ID is com.quickoffice.proselect.gooddynamics, etc.). As noted above, you build this list in the Settings tab (refer to “Creating a Third-Party Applications List” on page 244).
Good Mobile Messaging Administrator’s Guide 219

Managing the Handhelds
File Repository
File Repository allows you to save email attachments within the secure Good application. For iOS, you can also allow your users to save files from trusted third-party applications. In order for these features to work, check the "Enable file repository" policy setting on the File Handling page. This setting is disabled by default.
You can prevent certain types of files from being saved to the repository. For instance, block .zip files from being saved to the file repository by setting the Receiving/Opening Attachments policy on the Messaging policy page to enable “Exceptions to receiving/opening files” and “Block attachments by file extension,” then editing the list of blocked files to add the .zip extension to it. This will prevent the user from being able to view or save zip files. Similarly, you can change the "Sending Attachments" policy in "Messaging" to block sending certain attachment types. You can also use importing and exporting controls on the File Handling page to allow opening files with third-party editors, sending files from third-party editors through the Good for Enterprise email client, and saving third-party files to the repository (iOS only). Note that importing from and exporting to third-party applications on iOS devices requires an iOS version greater than 4.2. (For more information, refer to “File Handling” on page 217 and “File Handling” on page 217).
The file repository is currently a flat structure and does not support folders. The data in the file repository is not synced with the user's desktop. The files in the repository represent data unique to the device. The user has the option of self-mailing the files as attachments and receiving them on the desktop. There is no size limit on the repository.
The repository is not backed up. The files will be retained when the application is upgraded. However, these files will be deleted if the application is reinstalled or if you disable the file-repository policy setting .
220 Good Mobile Messaging Administrator’s Guide

Creating and Changing Handheld Policy Sets and Templates
Android Client v1.8.0 or higher and iOS Client v1.9.6 or higher are required.
Camera and Device Photo Gallery Use
The File Handling policy options include the following for camera and device gallery use when composing messages with attachments on supported devices:
• No access to camera or device photo gallery
• Allow access to camera only
• Allow access to camera & device photo gallery
(Camera use must be enabled in MDM configuration policy settings to allow access to camera but not to device photo gallery.)
If the File Repository is disabled and no access is granted to the device camera or photo gallery, photos cannot be attached to messages composed within the Good application.
If the File Repository is disabled but access is granted to the device camera, a camera icon on the attachment page allows photos taken at that time to be attached to the message, but not stored in the Repository.
If the File Repository is disabled but access is granted to the device camera and device photo gallery, a camera icon on the attachment page allows photos taken at that time and photos chosen from the device gallery to be attached to the message, but not stored in the Repository.
If the File Repository is enabled but no access is granted to the device camera or photo gallery, photos can only be attached from the File Repository.
If the File Repository is enabled and access is granted to the device camera, a camera icon on the attachment page allows photos taken at
Good Mobile Messaging Administrator’s Guide 221

Managing the Handhelds
that time to be attached to the message and stored in the Repository. Photos can also be attached from the File Repository.
If the File Repository is enabled and access is granted to the device camera and device photo gallery, a camera icon on the attachment page allows photos taken at that time and photos chosen from the device gallery to be attached to the message and stored in the Repository.
Good Mobile Access (Secure Browser)
Good Mobile Access (Secure Browser) (GMA) is a Good Messaging plugin that provides a browser on supported devices for use with your corporate Intranet. The browser is integrated to the Good Mobile Messaging Client on the device and provides seamless access to Intranet sites without need for VPN.
Refer to the Secure Browser User’s Guide for additional information.
Good Mobile Access (Secure Browser) uses Console policies to determine whether a web page should be loaded on the user’s device or redirected to the native browser. The secure-browser policy lists all the Intranet domains, sub-domains, and embedded Internet domains that you as administrator want to make available on the mobile device.
The secure browser provides a browser history, which can be cleared. Naming and editing bookmarks is supported. The browser supports pinch and zoom, and landscape mode. No special training is required.
Secure Browser supports HTML 4.
Overview
Good Mobile Access (Secure Browser) provides browsing-only functionality for supported devices. It does not provide connectivity
222 Good Mobile Messaging Administrator’s Guide

Creating and Changing Handheld Policy Sets and Templates
for other applications to your Intranet. It utilizes the secure container for browsing, thus storing all the data in encrypted format. The browser is included with Good Mobile Messaging Server and does not require additional server installation. Browser access is at the HTTP level (Application/Proxy layer) rather than the IP packet level (Network Layer). This ensures secure and separate corporate data:
• Integration with the Good for Enterprise app
• Encryption of browser cache, bookmarks, history and downloaded files inside the enterprise container
• End-to-end encryption of data over-the-air
• No outbound firewall holes
• Application password policies
This graphic illustrates the Client communication flow:
• The user enters a URL in the secure browser.
• The Client issues an HTTP proxy connection over GMM server.
Good Mobile Messaging Administrator’s Guide 223

Managing the Handhelds
The browser supports an HTTPS connection end-to-end from Client to web server.
• GMM Server resolves the host name of the requested web server, checks the host names against the domain list defined by the Secure Browser policy in Good Mobile Control.
• Once the HTTP connection is established, the client does HTTP transaction (POST/GET). Good Messaging server will simply pass the data to and fro between the web server and the Client as the session requires.
Notes on the secure transport:
• Over-the-air transmissions are encrypted from the device to the Good Messaging Server using AES 192 Bit Encryption.
• Good Messaging Server establishes a TCP connection to the web server based on the URL being requested by the secure browser.
• Good Messaging server relays data between the web server and the secure browser on the mobile device.
- Data exchanged between the secure browser and web server is encrypted using HTTPS.
- Good Messaging Server does not store or analyze any of the data between the secure browser and the web server.
- Access restrictions are applied based on the administrative policies defined in Good Mobile Control.
The Good Messaging Server logs the server names and ports that users of Secure Browser attempt to connect to. Since logs age out, this record of connection attempts is limited by time. If a proxy is used by the destination server, the proxy server name and port are recorded, not the actual destination server name and port.
Preparation
Before setting up secure browsers for users, confirm the following:
224 Good Mobile Messaging Administrator’s Guide

Creating and Changing Handheld Policy Sets and Templates
• Good Messaging Server should be able to directly connect to requested host.
• Good Messaging Server should be able to resolve the host name to IP address through DNS lookup.
• Good Messaging Server should be able to directly connect to the resolved IP address and requested port number
In addition:
• Secure browser requires the Good iOS Client 1.8.2 or higher, or Good Android Client 1.8.2 or higher. No other iPhone or iPad preparation is required. For Android, a WebKit download from the Android Market is required; the first time the user runs Secure Browser, it will lead the user through WebKit installation. Only Android 2.2 and 2.3 devices are supported.
• NTLM v2 (only), and HTTP basic and digest authentication are supported.
• For connection to a host through a proxy server, refer to “Using a Proxy with GMA Secure Browser” on page 239.
• Network problems such as router bottlenecks and inefficient firewalls can manifest themselves in poor browser performance. Some customers have reported that for their networks, changing their router setting from 100MB half-duplex to 1GB full-duplex and deleting old access lists from their firewall improved browser performance.
You can set up a home page for the browsers. You’ll specify it when setting secure-browser policies. The page can serve as a launching point to all your internal web-based resource, streamlining Intranet access and making all its resources easily available to your users.
Using Kerberos Authentication (iOS Only)
The domain controller (DC) for the Key Distribution Center (KDC) server and services (which the GMA clients communicate with) needs to have at least one of the following common encryption types
Good Mobile Messaging Administrator’s Guide 225

Managing the Handhelds
to work properly. You do not need to disable Single DES encryption on the KDC server and in service accounts, but you do need to ensure that they are not configured to use only Single DES encryption. In such a case, KDC will not generate a ticket for the GMA client, because it will not have a suitable key to do so. Refer to the following for details: http://support.microsoft.com/kb/977321.
Secure Browser supported encryption types:
(Weak encryption such as Single DES is not supported.)
des3-cbc-sha1des3-hmac-sha1des3-cbc-sha1-kdTriple DES cbc mode with HMAC/sha1
aes256-cts-hmac-sha1-96aes256-ctsAES-256 CTS mode with 96-bit SHA-1 HMAC
aes128-cts-hmac-sha1-96aes128-ctsAES-128 CTS mode with 96-bit SHA-1 HMAC
arcfour-hmacrc4-hmacarcfour-hmac-md5RC4 with HMAC/MD5
des3The triple DES family: des3-cbc-sha1
aesThe AES family: aes256-cts-hmac-sha1-96 and aes128-cts-hmac-sha1-96
226 Good Mobile Messaging Administrator’s Guide

Creating and Changing Handheld Policy Sets and Templates
The Windows KDC server listens by default on port 88 for UDP/TCP, which is suitable for use with GMA. The GMA client connects to KDC server using TCP and according to RFC 4120, KDC accepts TCP requests. If the KDC server listens on a TCP port, communication should work properly. There is no need to make changes on the DC/KDC because all the connections are initiated from the Client and the client whether the connection will use TCP or UDP.
Good testing was performed with KDC installed on Windows Server 2008 R2. No additional changes were made to AD.
Enabling Secure Browser
To enable Secure Browser for users via a policy, first go to the Good Mobile Console Settings tab and click on the Good Mobile Access link in the left panel. On the Good Mobile Access page that is displayed, click the Enable check box.
rc4The RC4 family: arcfour-hmac
Good Mobile Messaging Administrator’s Guide 227

Managing the Handhelds
To set policies for Intranet browser use:
1. Display the Good Mobile Access (Secure Browser) policies page by clicking on its link in the Plugins portion of the left column of the Policies tab.
2. Click the “Enable access to the Intranet” check box to turn on the browser feature for supported handhelds using this policy (and to display the full screen above).
Note: Although the policy page uses the word “Intranet,” enabling access also allows you to specify accessible Internet domains for the secure browser.
3. If desired, supply a homepage address for the homepage to be displayed when the Good secure browser is invoked. If no address is specified, the browser opens on a blank page.
4. Enter the specific Intranet or Internet domains that the browser can access. No other public domains will be allowed. That is, this
228 Good Mobile Messaging Administrator’s Guide

Creating and Changing Handheld Policy Sets and Templates
list is used as an “allow” list for public IPs: allow hosts with public IPs whose domain suffix matches an entry in this list.
Note: Non-fully qualified domain names (NFQD) are supported, with the exception of names such as .com, .net, .gov, and .edu. With Good Mobile Control 2.3.0, an “Allow non-fully qualified domain” policy is available, to enable or disable.
To enter the domains, click the Edit button.
Type in the domains that you will allow, separated by commas. These can be Intranet or Internet domains. If an Intranet domain includes embedded Internet domains, such as in links to the Internet on a page or pictures that are referenced from the Internet, you’ll want to include those Internet domains in this list (see Troubleshooting below).
Wildcards are not supported. However, entering “acme.com” will allow any URLs ending with that string (e.g., “test.acme.com” will be allowed).
Good Mobile Messaging Administrator’s Guide 229

Managing the Handhelds
Note that if a user enters a non-fully qualified domain name such as http://info, the browser will connect to it by bypassing the domain suffix list that you have entered above.
DNS settings on the Good Messaging Server are used to resolve host names. The Server does not contact DNS providers for the domains you enter in your allowed list, to resolve host names.”
However, note that the Secure Browser debug commands (for example, debug://policyprint for iOS and sbdebug://policyprint for Android) will not function by default.
To enable the debug commands, a new GMC setting is required:. Under a device’s Good for Enterprise policy set, on the Good Mobile Access (Secure Browser) page, a new string must be added to the “Allow access to the following Intranet domains” list:
enabledebugcommands.gmm.good
Once this updated policy syncs to the client, the debug commands on GMA will function as desired.
Popups: Popups are enabled in the browser by adding the following to the allowed domains:
15popupflag.gmm.good
230 Good Mobile Messaging Administrator’s Guide

Creating and Changing Handheld Policy Sets and Templates
5. Use the checkboxes to enable:
• Redirect domains not listed above to native browser (enabled by default)
• Allow non-fully qualified host domains (enabled by default)
• Allow user to persist enterprise credentials in Good secure container for website and web proxy access (disabled by default) - When enabled, the user does not have to repeatedly reenter credentials. Persistence lasts until the Good app is closed.
• Allow user to accept unsigned or expired certificates (enabled by default) (iOS only)
• Allow user to persist enterprise credentials in Good secure container for website and web proxy access (disabled by default)
6. If you will be using Kerberos authentication (iOS only), click the Kerberos check box to enable it. Browse to your Kerberos authentication file and select it. The file will be downloaded to those iOS devices using the policy.
7. If you will be using proxy servers (iOS only), on the Settings > Good Mobile Access page, enter the IP Addresses for the HTTP and HTTPS servers. If any IP prefixes/domains are to bypass the proxy servers, enter the prefixes and domains, separated by commas, in the field provided, one pair per line. Refer to “Using a Proxy with GMA Secure Browser” on page 239 for rules concerning prefix and domain definitions, and more information on proxy server use.
8. Click Add to add entries to the list and OK to finish.
Usability
Users may ask why they have to enter their domain credentials so often to access Intranet sites.
• Good does not cache authentication credentials.
Good Mobile Messaging Administrator’s Guide 231

Managing the Handhelds
• If a Good Client session has expired or terminated, the user will need to authenticate the session again.
• Your remote application/server may also have a timeout value.
Note also that if a user requires a client certificate when using GMA Secure Browser, they can visit the Good Mobile Control Self Service page and download an identity certificate to their device.
User Agents
Android
ROM2.3:
Mozilla/5.0(Linux; U; Android 2.3.5;en-us;ME860 Build/4.5.3-118_OLY_14) AppleWekbit/533.1 (KHTML, Like Gecko) Version/4.0 Mobile Safari/533.1
ROM4.0/4.1/4.2/4.3:
Mozilla/5.0(Linux; U; Android 4.2;en-us;Galaxy Nexus Build/JDQ39) AppleWekbit/534.30 (KHTML, Like Gecko) Version/4.0 Mobile Safari/534.30
iOS
Iphone4 (6.1.3)
Mozilla/5.0(iPhone; CPU iPhone OS 6_1_3 like Mac OS X); AppleWekbit/536.26 (KHTML, Like Gecko) Mobile/10B329 Safari Version/6.0; Your IP Address: 206.124.127.15
232 Good Mobile Messaging Administrator’s Guide

Creating and Changing Handheld Policy Sets and Templates
Iphone5s (7.0.4)
Mozilla/5.0(iPad; CPU iPhone OS 7_0_4 like Mac OS X); AppleWekbit/537.51.1 (KHTML, Like Gecko) Mobile/11B554a Safari Version/6.0; Your IP Address: 206.124.127.15
Ipad4 (7.0.6)
Mozilla/5.0(iPad; CPU iPhone OS 7_0_6 like Mac OS X); AppleWekbit/537.51.1 (KHTML, Like Gecko) Mobile/11B651 Safari Version/6.0; Your IP Address: 206.124.127.15
SSL Server Certificate Validation
GMA iOS only, using GFE iOS Client 2.1.
For security purposes, GMA iOS performs validation on the SSL Server certificate.
This feature requires the root certificate to be available on the device’s key store. For GMA to consider the certificate as valid:
• The SSL certificate must be signed by a certificate authority with a root certificate pre-installed on IOS 5/6 devices: http://support.apple.com/kb/HT5012?viewlocale=en_US&locale=en_US
• Or the root certificate is put into the device keystore via a solution such as Good Management Control’s Mobile Device Management feature. Deploy the root certificate to the device keystore by creating a WIFI (Enterprise) profile.
To turn this security feature off, add the keyword, "disablecertwarning.gmm.good" (without quotes) to the list of allowed domains via the "Allow access to the following Intranet domains” option within the Good Management Console.
Note that GMA does not support SSL 3.0 by default. For 3.0, add “ssl30only.gmm.good” to the list of allowed domains via the "Allow
Good Mobile Messaging Administrator’s Guide 233

Managing the Handhelds
access to the following Intranet domains” option within the Good Management Console.
If the SSL server certificate is considered not valid by GMA or has expired, users can choose whether or not to continue to access the website. If a user elects to "Continue" onto a website after the warning, that user’s preference persists after the Good for Enterprise client restarts or is upgraded. If the user selects "Cancel" after being prompted, Secure Browser will prompt the user when the user goes back to the website again. The user is also able to see the details of the certificate when prompted.
If the user selects "Cancel" when notified that the SSL server certificate for that web server is not validated, and returns to the website again, GMA will prompt the user again to see if the user wants to continue to access the website.
Client Certificate-based Authentication Support
This feature is for customers wanting to use soft token-based mutual authentication by using identity certificates.
Note: iOS only, using GFE iOS Client 2.1.
• Only one identity certificate supported per user/device. One certificate can be used across all websites requiring soft-token mutual authentication.)
• GMA will alert the user if the certificate has expired or has been revoked based on information from the authentication server or web server.
• GMA is able to use this certificate only for SSL mutual-based authentication, not for Kerberos client certificate-based authentication. However, a Kerberos identity certificate can be used.
• The identity certificate, including the private key, is stored in the Good for Enterprise app’s secure container.
234 Good Mobile Messaging Administrator’s Guide

Creating and Changing Handheld Policy Sets and Templates
• The Self Service Portal enables users to upload identity certificates. The Self Service Portal is also required for users to use the “Upload identity certificate” features.
Identity Certificate Deployment Flow Using the GMC Self Service Portal:
Outside of Good
• The user obtains an identity certificate, exported from a desktop app such as Internet Explorer (Internet Explorer -> Internet Options -> Certificate). The user must export the private key as well. The exported file is a PKCS#12 certificate (.p12 or .pks file). The user encrypts this PKCS#12 certificate using a password/PIN. This is the password/PIN that GMA will use to install the certificate for use by GMA.
On Good Management Console (GMC)
• The IT admin sets a role allowing the user to enable “Upload identity certificate.”
On GMC Self Service Portal
• The user uploads the identity certificate.
In the Good for Enterprise app
• Secure Browser in the GFE app receives the identity certificate after the user has uploaded it via the Self Service Portal. Secure Browser prompts the user to install the identity certificate with their certificate encryption password/PIN. The user can choose to install the identity certificate later, at a time when a website requests an identity certificate.
Good Mobile Messaging Administrator’s Guide 235

Managing the Handhelds
How Secure Browser Uses the Identity CertificateIn the Good for Enterprise app, when Secure Browser gets a request from a website for a client certificate for mutual authentication, Secure Browser will:• Look for an installed certificate for the user in the secure container.• If there is no valid secure certificate installed, the Secure Browser looks for an identity certificate yet to be installed in the secure container. It will prompt the user to install the certificate.• Once an identity certificate is found, the Secure Browser prompts the user for “Always trust” if they want to use that identity certificate every time they try to access that website. Good app’s Secure Browser will not ask the user to use the identity certificate for that website again even after the Good app restarts, until the identity certificate expires or is revoked.If the identity certificate has expired or been revoked, the user can upload another identity certificate via GMC’s Self Service Portal.
Disabling Redirection To Native Browser
The IT admin can block users from being passed to the native browser (Safari on iOS) by enabling the option “Redirect domains not listed above to native browser” in the policy section of the Good Mobile Control Console. With this policy setting, users will no longer see the “Open In Native Browser” option when the website is not on the allowed domain list in the policy. A standard message saying “The website you are trying to reach is blocked due to IT Security policy” will be displayed. Enabling this policy does not mean that the web traffic will go through GMA if the web server is on a domain not
236 Good Mobile Messaging Administrator’s Guide

Creating and Changing Handheld Policy Sets and Templates
on the GMA allowed domain list. Instead, the user will receive a message that the website is blocked due to IT Security Policy.
If the “Redirect domains not listed above to native browser” setting is enabled (the checkbox is marked), any random text selected by an end-user, copied from a GFE email, and pasted into the GMA’s address bar will be accepted and compared against the catalog of whitelisted domains as if a true URL. The GMA will attempt to access that URL if there is a match; otherwise the entire content will be handed over to the native browser (Safari, Chrome, etc.). As a consequence, the entire URL string can be selected and copied by the end-user to another application. If such behavior is undesirable, consider implementing the following mitigating controls:
• Disable Copy/Paste extensions;
• Disable opening URLs in the native browser and configure a well-refined whitelist of allowed domains (the checkbox should be unmarked).
Saving a Document to the Repository and Opening the Document in Another Application
Good Mobile Messaging Administrator’s Guide 237

Managing the Handhelds
In Secure Browser, the user can:
• Save files on websites to the Good for Enterprise document repository on the device.
• Open files on websites using IT policy-compliant native and Good Dynamics applications.
Documents not supported:
• HTML/HTM files• Image files not reachable at the top-level URL (for previewing)• Files not accessible via the top level URL. Example: Word
Document and Powerpoint files on Sharepoint 2003 and 2010 with Office Web Apps enabled.
Files are previewed in Secure Browser before the user is able to click on an Action icon at the top right of the screen, to bring up the menu items “ Save As" or "Open In." Excepted are audio/video files where users will not be able to preview the file via GMA first but are asked if they want to download it into Docs Repository for listening/viewing).
Troubleshooting: Activation
If the secure-browser icon is not displayed on the user’s device:
• Is GMA enabled on the Settings page in Good Mobile Control? (GMC 2.2 and earlier. GMC 2.3 removes this setting.)
• Is GMA Policy Enabled and added to this handheld?
• Have you waited for the Policy Update Delay to expire?
• Try completely exiting Good Client (kill the background task) and launching again.
• Restart Good Mobile Messaging and Good Mobile Control Services.
238 Good Mobile Messaging Administrator’s Guide

Creating and Changing Handheld Policy Sets and Templates
Troubleshooting: Access
If a user attempts to navigate to a domain that you have allowed, but receives a “Failed hosts identification” message, use the browser to navigate to
debug://listfailedhosts
The command must be enabled in the Good Mobile Access portion of the policy set applied to the device.
Check the domain names that are causing the problem. Confirm that you have allowed them in the policy. These may include, for example, embedded Internet sites that are referenced on your Intranet pages.
If a domain is properly listed in the policy but causing access problems, confirm the following:
• Can Good Messaging Server connect to the requested host.
• Can Good Messaging Server resolve the host name to an IP address through DNS lookup?
• Can Good Messaging Server connect to the resolved IP address and requested port number?
• Is the connection to the host accomplished through a proxy server? This is not supported.
The device screen should be kept on during secure browsing. The user may encounter an error if the device goes to sleep during browsing.
Using a Proxy with GMA Secure Browser
You can use an HTTP and/or HTTPS proxy with Secure Browser. Configure this in the Good Mobile Control Console on the Settings > Good Mobile Access (Secure Browser) page. (Requires the Good for Enterprise iOS Client version 1.9.8 or higher or Android Client
Good Mobile Messaging Administrator’s Guide 239
Managing the Handhelds
version 2.0 or higher. Android OS 4.0 supports only HTTP, not HTTPS.)
• HTTP proxy is used to connect to HTTP sites (non-SSL sites). The browser requests the page from the proxy by passing a full URLto it; the proxy checks the URL and fetches the page or sends it from its cache to the browser. The HTTP proxy will know the URL and content of pages flowing to and fro between browser and website.
• HTTPS proxy is used to connect to HTTPS sites (SSL sites), setting up end -to-end SSL connections. In this case, the browser will first set up an HTTP tunnel connection to the end website through the proxy server and then perform the SSL negotiation over the HTTP tunnel connection.
If an HTTP URL is entered, Secure Browser will use the HTTP proxy; if an HTTP proxy entry is not set, Secure Browser will try to connect without a proxy. If an HTTPS URL is entered, Secure Browser will use the proxy from the HTTPS proxy entry; if an HTTPS proxy entry is not set, Secure Browser will try to connect directly without using a proxy.
One HTTP proxy server and one HTTPS proxy server are supported in this release. Multiple proxy servers using Proxy Auto Configuration (PAC) files are not supported
Bypass Rules
You can enter exceptions on the Settings > Secure Browser page for particular hosts of URLs.
240 Good Mobile Messaging Administrator’s Guide

Creating and Changing Handheld Policy Sets and Templates
URLs entered in the device’s secure browser for pages on these hosts cannot be reached via proxy. Enter the excepted hosts, separated by commas, using any of the following:
• Host names or fully qualified host names. Examples: kb, hub, hub.corp.good.com. Note: Host name and fully qualified host name will not match with each other; enter both in the exceptions list if the user might enter either in Secure Browser.
• Domain names with wild card. Examples: good.com, *.good.com, .good.com. Formatting matches Firefox usage. The following formats are supported:
- domain.com or *domain.com. Example: will exclude http://test.domain.com, http://domain.com, and http://test.mydomain.com
- .domain.com or *.domain.com. Example: will exclude http://test.comain.com, but not http://domain.com or http://test.mydomain.com.
Good Mobile Messaging Administrator’s Guide 241

Managing the Handhelds
• IP addresses. Example: 192.168.1.2. If the secure-browser user enters a URL, Secure Browser will first try to resolve the IP address of the host using the Good Mobile Messaging Server and then match the IP address to the IP addresses in the exception list. If either Secure Browser is not able to resolve the IP or the IP does not match an IP in exception list, Secure Browser uses the proxy.
• IP address groups. Example: 192.168.0.0/16.
• allhostswithnodomain – If this keyword is included in the proxy bypass list, all URLs containing a non-fully qualified name (like https://testhost, https://hub, instead of https://testhost.good.com) will be excluded from proxy use.
If a host name is used instead of an IP address in the URL, Secure Browser matches the host to the list of host names in the allowed list of hosts sent from the Good Mobile Messaging Server. If the host is present in the list, Secure Browser will process it; otherwise, the user will be prompted to open the page in native browser. Note that the host name in the exception list on the Settings page and the allowed list on the GMA policy page must match exactly.
If proxies are present, Secure Browser handles host names as follows:
• Matches the host name to the proxy exception list
• If the host name is matched with an entry in the proxy exception list, Secure Browser will try to connect without using the HTTP proxy.
• If the host name is not matched with an entry in the proxy exception list, but the exception list contains IP addresses, Secure Browser will first request the Good Mobile Messaging Server to resolve the IP address of the host name and then match it to the IP addresses in the exception list. If the IP address cannot be resolved or the received IP address does not match an entry in the exception list, Secure Browser will use the HTTP proxy server.
If an IP address is used in the URL, GMA decides whether to process it or launch the native browser, using the following rules:
242 Good Mobile Messaging Administrator’s Guide

Creating and Changing Handheld Policy Sets and Templates
• If the IP address is a private IP, it is simply processed using Secure Browser
• If the IP address is public, it is matched to the allowed host list set in the Good Mobile Control Console (Plugin Policies > Good Mobile Access (Secure Browser)); if found, it is processed with Secure Browser; otherwise, native browser is launched. If the “Disable redirect to native browser” policy setting is enabled, GMA will inform the user.
• The IP address is matched with the proxy exception list. If the IP address is matched with an entry in the exception list, Secure Browser will connect without using HTTP proxy; otherwise, it will connect using the HTTP proxy.
Note: If a page host has more than one IP address, all such addresses should be entered in the proxy exception list. Secure Browser only matches the first IP address in a list of IPs sent from a host server to the proxy exception list; entering all the host addresses assures that the exception will be recognized.
Authentication types supported for proxies
Secure Browser supports the following HTTP/HTTPS proxy authentications:
• Basic
• Digest
• NTLMv2
• Kerberos
Good recommends using NTLM, as Basic authentication involves sending plain passwords to the proxy server. Anyone sniffing data between Good Mobile Messaging Server and the HTTP proxy server can discover such a password.
The authentication will be cached in the program memory of the application and will not prompt the user for subsequent access until the application is restarted. Every time the application is
Good Mobile Messaging Administrator’s Guide 243

Managing the Handhelds
restarted (after being killed manually or by OS) the user will be prompted for credentials when accessing the proxy.
Creating a Third-Party Applications List
Some policy settings can be applied according to your selections from a third-party application list (refer to “File Handling” on page 217 and the information on application exceptions in “Compliance Manager” on page 274), which you create. These are applications that may be installed on the device but were not installed via Good for Enterprise.
To create the third-party applications list:
1. On the Settings tab, click on the “Third-Party Applications” link.
244 Good Mobile Messaging Administrator’s Guide

Creating and Changing Handheld Policy Sets and Templates
2. Click Add.
3. Choose a supported device platform and add the application’s product ID or package name. This is the internal identifier that the device's OS knows the application by.
For iOS devices, the Application ID can be found by using iPCU. If the iOS 4 MDM feature is enabled, it can also be seen for a specific device in the Handheld Info/Installed Applications App ID column.
For Android devices, use an application such as Application Manager to view the package name
4. Enter an application name and description.
5. Click Save.
Provisioning
Use the Provisioning link in the left panel of the Policies page to set:
• OTA provisioning PIN and MDM profile installation policy
• Provisioning email policies
To set provisioning PIN and MDM profile policies:
1. Click the Provisioning link in the left panel of the Policies page.
Good Mobile Messaging Administrator’s Guide 245

Managing the Handhelds
When you enable a user for OTA, the user is sent an email containing a PIN to use during wireless handheld setup. You can set OTA PIN policy such that this PIN will expire after a specified period of time. PIN expiration will prevent handheld setup, including MDM profile installation (“iOS Configuration” on page 247).
You can also prevent the PIN from being reused.
2. To limit the time that a PIN can be used, click the “OTA Provisioning PIN and MDM Profile Install Window expire after” check box and from the drop-down menu select the length of time after which the PIN and MDM profile installation will not work. The default is that the PIN and profile never expire because the check box is not checked. The PIN can remain effective from one to 60 days, or permanently.
The expiration clock starts when a new OTA user is created or when a new PIN for the user is generated.
Note: If an iOS user factory-resets their device (erases all content and setttings), their PIN automatically expires.
To generate a new PIN for one or more users after their current PINs have expired, refer to “Generating New User PINs” on page 325.
3. To prevent reuse of the PIN, uncheck the “Allow OTA PIN reuse” check box. Default is checked.
This setting applies to attempts to set up a handheld that has already been set up successfully. It does not apply to unsuccessful setup attempts or to ongoing automatic OTA software updates to the handheld.
4. To send a different welcome email message to the user, use the “Welcome email template” drop-down to choose a different message. To set the importance level for the email (normal, high, or low), use the Importance drop-down. To create new messages or delete or customize existing ones, refer to “Customizing Console-Generated Email Messages” on page 326.
246 Good Mobile Messaging Administrator’s Guide

Creating and Changing Handheld Policy Sets and Templates
In the same way, you can create and manage email messages to be sent to the user when a PIN is regenerated or as a reminder to the user before the PIN is to expire. You can specify the number of reminders to be sent, how many days apart they will be sent, and how many days after the original welcome email they will be sent.
To suppress welcome email, uncheck the “Send email after OTA Provisioning PIN is created” check box. Default is checked.
Mobile Device Management
iOS Configuration
The iOS configuration feature allows you to set policies for your enterprise iOS devices, utilizing iOS configuration profiles. During Good for Enterprise setup on the iOS device. Good will create a new configuration profile with the name you specify in the policy, in Settings/General/Profiles (the default name is the name of the policy).
Once you set and save iOS configuration policies in the Good Management Console, your settings are implemented in the following way:
• During Good for Enterprise handheld setup, or when a user runs or is running Good on their handheld, a “Profile Required” dialog is displayed. The user can delay the installation twice, one hour each time.
• The user accepts this dialog and Good exits, Safari runs, and an “Install Profile” dialog is displayed.
• The user accepts this dialog, follows the installation prompts, provides his/her device passcode, and the Good configuration profile is installed, containing your policy settings.
• The user is returned to Good installation or to the Good for Enterprise application.
Good Mobile Messaging Administrator’s Guide 247

Managing the Handhelds
• Whenever configuration settings are changed for the policy in Good Mobile Console, the process is repeated, unless the MDM (Mobile Device Manager) option is selected (explained below); if MDM is selected, configuration settings are updated automatically on the device.
If the Good profile is removed from the iOS device, Good for Enterprise is disabled. The user must repeat the procedure to install the profile for Good for Enterprise to run again.
General Policies
Enable iOS configuration - Sets up a Good configuration file on the iOS device (default: unchecked).
Profile name (shown on device) - Default is the policy set name
Organization - Default is an empty field
Enable remote full device wipe - Check to enable this feature on the Handhelds page (“Erasing (Wiping) Handheld Data” on page 361). Otherwise, wipe is enabled for Good data only. Default is unchecked.
Enable MDM profile
If the MDM check box is checked, any changes made and saved to settings on the iOS Configuration pages (General, Passcode,
248 Good Mobile Messaging Administrator’s Guide

Creating and Changing Handheld Policy Sets and Templates
Restrictions, WiFi, VPN, Web Clips) will be made to all devices to which the present policy is applied. The user is not required to reinstall the configuration file when changes to its settings are made. (See exception Note below.)
Consent message: You can enter a message to be displayed during profile installation.
If the MDM check box is checked, two new options are available on the handheld security page: remote device lock and remote device password reset. (Requires iOS4.)
In addition, you can limit or allow Console access to information on the device as follows, using policy settings:
• Installation, removal and inspection of configuration profiles (required to use the Passcode, Restrictions, WiFi, VPN, Web Clips, and Exchange ActiveSync tabs)
• Installation, removal and inspection of provisioning profiles (the ability to install and remove provisioning profiles is not available in this release)
• Inspection of installed applications
• Query of device information
• Query of network information
• Restriction-related queries
• Security-related queries
Query and inspection data, when its collection is enabled, is displayed in the Console on the Handhelds page for the device.
Note: If these additional access rights are changed after MDM profile installation, affected devices are notified that the profile must be reinstalled, and are led through that installation, including acceptance of the changes. MDM-only devices are not notified; the user must reinstall the profile as explained in “Setting Up the MDM-Only Device (Self Service)” on page 182.
Automatically Remove Profile - Controls when the profile is automatically removed: Never (the default), On date (nn/nn/
Good Mobile Messaging Administrator’s Guide 249

Managing the Handhelds
nnnn, After interval (days since creation). Note that when a device is deleted from the GMC or the Enable MDM Profile check box is unchecked, the MDM profile is automatically removed from the device regardless of this setting.
Important: The MDM feature requires an Enterprise MDM Certificate signed by Apple. Using the Generate Certificate Request button on the Settings > Certificates page, create a certificate request file and save it to your local drive. Once it is saved locally, upload it to https://identity.apple.com/pushcert/. This will generate a signed certificate that you must save; then return to the Settings > Certificates page to upload it using the Upload Apple Signed Certificate button. For details on this procedure, refer to “Obtaining a Mobile Device Management Certificate Signed by Apple” on page 266.
If you attempt to enable MDM without a certificate, you’ll be taken to the Settings Certificate page to import one.
If you want to delete the certificate later, you must first uncheck the MDM feature within all policy sets where it has been selected.
Warning: Renew this certificate when it expires, rather than generating a new one. Generating a new certificate will require users to manually remove the Good iOS Configuration profile from General > Settings, relaunch the Good Client, and reinstall the new Configuration Profile.
Profile Security (available only if MDM check box is not checked)
Allow user to remove profile (the default), or
Require password to remove profile (with field to define the passcode), or
Do not allow profile to be removed
If the MDM check box is selected, the user always has the option to remove the MDM profile from the device. If the MDM profile is present on the device, the Good profile cannot be removed by the user; if the user removes the MDM profile, the Good profile is removed with it.
250 Good Mobile Messaging Administrator’s Guide

Creating and Changing Handheld Policy Sets and Templates
If the Good profile is removed from the iOS device, the user will no longer be able to access Good data. Instead, a prompt to install the missing profile is displayed at startup.
If the MDM check box is later unchecked, the MDM profile is removed and device restrictions, configs (WiFi/VPN/EAS), and managed apps are removed (deleted).
Passcode Policies
Allow device lock and passcode removal - This setting grants access to the Administrator to the Security link for the device on the Handhelds tab. There the administrator can wipe the device, lock the device, or select the reset password option, which will clear the password for the device itself. (See “Erasing (Wiping) Handheld Data” on page 361 for details.)
Require passcode - Use these policies to control access to the iOS device through use of a mandatory passcode. (To control access to the Good application on the iOS device, refer to “Good for Enterprise Authentication” on page 202.) If you tighten passcode requirements, the user is prompted to define a new password and is given an hour to do so. This check box requires a user to enter a passcode to access the Good applications (default: checked).
Good Mobile Messaging Administrator’s Guide 251

Managing the Handhelds
Minimum length of - Specifies the minimum length allowed for the passcode (1-10 characters) (default: 1 character).
Allow simple value - Allows the use of repeating, ascending, and descending character sequences in the passcode (default: checked).
Alphanumeric - Requires the passcode to contain at least one letter and one number (default: unchecked).
Minimum number of complex characters - Requires the passcode to contain at least this many complex characters, such as @, #. $, or % (1 - 10 characters)(default: unchecked)
Maximum passcode age - Days after which passcode must be changed (1 day to 730 days) (default: unchecked)
Auto-Lock - Maximum allowed idle time after which device automatically locks. (1 minute to 1 hour) (default: unchecked)
Passcode history - The number of unique passcodes required before reuse (1 to 10) (default: unchecked)
Grace period - Maximum amount of time device can be locked without prompting for passcode on unlock (1 minute to 4 hours) (default: unchecked)
Maximum failed attempts - Wipe device after n attempts (a number between 4 and 10)(default: unchecked). The full device is wiped. (Refer to “Client Error Codes Following a Wipe” on page 364 for error codes displayed on the user’s device after an erase/wipe.)
252 Good Mobile Messaging Administrator’s Guide

Creating and Changing Handheld Policy Sets and Templates
Restrictions on the iOS device
Uncheck the Enable Restrictions checkbox or specific options to disable the following restrictions on the iOS device. These restrictions cannot be modified by the user. The restrictions are enabled by default, with the exception of “Force fraud warning” and “Block pop-ups.”
Changing any option will require the user to install a new MDM profile.
Device functionality (enable use of device features)
• Allow installing apps
• Allow use of camera
- Allow FaceTime • Allow screen capture
• Allow syncing of consumer email accounts while roaming
• Allow voice dialing
• Allow In-App purchases
• Allow Siri Assistant
- Allow Siri while device locked
Good Mobile Messaging Administrator’s Guide 253

Managing the Handhelds
• Allow multiplayer gaming
• Allow adding Game Center friends
• Allow Passbook while device locked
• Allow lock screen notifications view
• Allow lock screen today view
• Allow fingerprint for unlock (Touch ID)
• Allow lock screen control center
iTunes Settings
• Require user to enter their iTunes password for each transaction
iCloud Sync Settings
• Allow iCloud backup
• Allow document syncing
• Allow Photo Stream
- Disallowing can cause data loss • Allow Shared Photo Stream
• Allow iCloud keychain sync
• Allow managed apps to store data in iCloud
Security and Privacy
• Allow diagnostic data to be sent to Apple
• Allow user to accept/reject untrusted HTTPS certificates
• Require iTunes backups to be encrypted
• Allow OTA PKI updates
• Force limit Ad tracking
• Require passcode on first AirPlay pairing
• Allow handoff
254 Good Mobile Messaging Administrator’s Guide

Creating and Changing Handheld Policy Sets and Templates
Document sharing between enterprise EAS accounts and apps**
• Allow “Open In” from managed to unmanaged
• Allow “Open In” from unmanaged to managed
Applications (enable access to applications on the device)
• Allow use of YouTube
• Allow use of iTunes Music Store
• Allow use of Safari*
- Enable autofill
- Force fraud warning
- Enable javascript
- Block pop-ups
- Accept cookies (pull-down menu). Controls when Safari accepts cookies (Always, Never, From visited sites)
• Allow explicit music & podcasts
Allowed content and applications (pull-down menus):
- Ratings region (choose from pull-down)
- Allowed Ratings (choose from pull-downs)
• Movies
• TV Shows
• Apps
*Note: Safari is required to install the iOS Good profile that sets these restrictions; Safari is also required for any subsequent updates to these settings. Also, if you disallow Apps installation, you’ll need to allow it again later if the Good Client is to be updated on the device.
** Good for Enterprise is considered an unmanaged app. Unchecking these boxes prevents any communication between managed apps on the device and the GFE client. Checking the boxes allows communication between GFE and managed apps at the device level;
Good Mobile Messaging Administrator’s Guide 255

Managing the Handhelds
however, policy settings at the application level (“File Handling” on page 217) may limit this access.
Important: For security reasons, Good does not allow backup of your Good data to iTunes or iCloud, as doing so could make your corporate data accessible to unauthorized users. Since this data is not backed up to iTunes or iCloud, it cannot be restored as part of any iOS upgrade or restore from backup that you perform. As a result, you'll need to set up your device again, updating and re-syncing the Good for Enterprise application; that is, after the iOS upgrade or backup, you'll be taken to a provisioning screen and be prompted for your email address and PIN.
Wireless Networks
Good for Enterprise allows you to set or change wireless-network connection settings for an iOS user via policy settings for the policy set applied to the device.
To define wireless network settings for the policy set:
1. Click the WiFi tab.
All wireless connections that you’ve defined so far are listed. Click the check box next to those whose connection details are to be sent to iOS devices using this policy set.
256 Good Mobile Messaging Administrator’s Guide

Creating and Changing Handheld Policy Sets and Templates
2. To add details for a new connection, click Add Network.
3. Provide a Network name (SSID). Select a network type and proxy type. Click the check boxes if desired for Auto Join, and if this is a hidden network. You will provide additional specifications depending upon the network type you select.
Selecting a different network type may display additional connection parameters to be defined.
Note: The network type you select may allow a Trusted Root/Expected Certificate. Available certificates are listed in this window, but only if you import them first into the Console. To do so, use the Certificate link on the Settings tab.
A field is provided to configure a password for enterprise-type WiFi networks (WEP Enterprise, WPA/WPA2 Enterprise, and Any Enterprise).
The Trusted Server Certificate Names field allows multiple names to be entered, separated by commas.
4. To change the settings for a network, click the edit link for the network on the Wireless Connections page.
5. Click Save.
Good Mobile Messaging Administrator’s Guide 257

Managing the Handhelds
VPN Connections
To set or change VPN connection settings for an iOS user:
1. Click the VPN tab.
All VPN connections that you’ve defined so far are listed. Click the check box next to those whose connection details are to be sent to iOS devices using this policy set.
2. To add details for a new connection, click Add Connection.
3. Provide a connection name and server hostname in the appropriate fields. From the drop-downs, select a connection type and account type.
Selecting a connection type will display additional connection parameters to be defined.
258 Good Mobile Messaging Administrator’s Guide

Creating and Changing Handheld Policy Sets and Templates
Note: You can add connections with a Trusted Root/Expected Certificate. Available certificates are listed in this connection parameter window, but only if you import them first into the Console. To do so, use the Certificate link on the Settings tab.
4. To change the settings for a connection, click the edit link for the connection on the VPN Connections page. Select the connection type to display additional fields that can be changed.
5. Click Save.
Web Clips
Use the Web Clips tab to add web clips to the Home screen of the user’s device. Web clips provide links to specified web pages.
1. Click the Web Clip tab.
Good Mobile Messaging Administrator’s Guide 259

Managing the Handhelds
2. Click Add.
3. Enter a label for the web clip. This will be displayed on the user’s Home screen.
4. Enter a URL to define the web clip’s link.
Note: The URL you specify must include the prefix http:// or https://. The URL won’t be accepted without it.
5. To give the user the option of removing the clip, check the Removable box.
6. To add a custom icon, use the Browse button or enter the path and file name of a graphic file in gif, jpeg, or png format, 59 x 60 pixels in size. The image is automatically scaled and cropped to fit, and converted to png format if necessary. You can specify a precomposed icon and that the clip be displayed full-screen.
260 Good Mobile Messaging Administrator’s Guide

Creating and Changing Handheld Policy Sets and Templates
Exchange ActiveSync
You can add and configure Exchange ActiveSync accounts on the device using the “Add Exchange ActiveSync” button on the iOS Configuration > ActiveSync page.
Good Mobile Messaging Administrator’s Guide 261

Managing the Handhelds
For an explanation of the setting choices: http://help.apple.com/iosdeployment-ipcu/#appbec2b50b.
Unlike Apple’s IPCU tool, this policy includes an “Auto-Populate User Credentials” setting. When this setting is checked, the user name and email address are auto-filled with the values of the devices to which the policy applies. When unchecked, manual configuration is required, as with Apple.
Single Sign-on
Authenticating into corporate apps can now be done just once from the device (iOS 7 only). Enterprise single sign-on (SSO) user credentials can be used across apps, including apps from the App
262 Good Mobile Messaging Administrator’s Guide

Creating and Changing Handheld Policy Sets and Templates
Store. Each new app configured with SSO verifies user permissions for enterprise resources and logs users in without requiring them to reenter passwords.
• Kerberos-based single sign-on for enterprises.
• SSO configuration delivered over-the-air to managed devices.
• One or more MDM-managed apps can be mapped to the SSO configuration.
To configure this SSO for device use with apps:
1. Click on the SSO button under the Single Sign-on tab.
Good Mobile Messaging Administrator’s Guide 263

Managing the Handhelds
2. Enter a descriptive name for this SSO.
3. Select the Kerberos principal name to be used with the SSO apps (alias, email address, display name, directory GUID, or DN). This is the name of the user when the profile is sent to an app for SSO. This is the same name used to configure the user name under the Exchange ActiveSync tab when the “Auto-populate user credentials” option is selected (“Exchange ActiveSync” on page 261).
4. Enter the name of the Kerberos realm that this SSO applies to. This entry is case sensitive.
5. Click the appropriate radio buttons to allow all apps set up for SSO to use it, or enter the prefixes for allowed URLs and identifiers for allowed apps.
The prefixes http:// and https:// allow all URLs. No identifiers are specified when all apps are allowed.
Extensions
Additional configurations supported on iOS devices can be added by uploading configuration profile .mobileconfig files as XML files following Apple's defined "PList" format. Apple's iPCU or Apple Configurator (available from Apple.com) can be used to generate the file. (Steps for exporting using Configurator are not provided here.)
264 Good Mobile Messaging Administrator’s Guide

Creating and Changing Handheld Policy Sets and Templates
If MDM is enabled, this configuration file is added to the existing configuration settings. If MDM is disabled, you’ll be warned that selecting this option will override existing policy settings under the other tabs on this page. If you wish to apply those device policies and configurations, be sure to add relevant profiles via Apple's iPCU tool.
Using iPCU
1. Install and run iPCU.
2. Select "Configuration Profiles" from the left hand side.
3. Click "New" from the upper toolbar. This should create "Profile Name" (with an optional number).
4. Configure the profile's data:
a. Click in the "General" section, change Name from "Profile Name" if desired.
b. Pick a section to configure, like Restrictions. Fill in the desired data.
5. Export the profile.
a. Click Export from the upper toolbar.
b. A dialog box will come up. Select "None" in the dropdown.
c. Click the Export button, pick the directory to put it in, and click Save.
From GMC -- importing the profile
1. Edit the iOS Configuration policy.
2. Check "Enable iOS Configuration."
3. In the Extensions tab, check "Use an Extended Configuration Profile."
4. Click Browse, select the exported file.
GMC should show the file and additional details.
5. Click Save to save the profile changes.
Good Mobile Messaging Administrator’s Guide 265

Managing the Handhelds
Additional Notes
1. While the Identifier field is required by iPCU, for consistency with GMC's profiles, GMC will ignore it.
2. If MDM is enabled, this configuration file is added to the existing configuration settings. If MDM is disabled, you'll be warned that selecting this option will override existing policy settings under the other tabs on this page. If you wish to apply those device policies and configurations, add relevant profiles via Apple's tools.
3. Do not sign the profile while exporting.
4. "Supervised only" restrictions can also be applied to devices that are in Supervised Mode.
5. The complete Apple reference can be found here https://developer.apple.com/library/ios/featuredarticles/iPhoneConfigurationProfileRef/Introduction/Introduction.html.
Obtaining a Mobile Device Management Certificate Signed by Apple
To generate the signed certificate required by the iOS MDM policy feature, follow this procedure:
Generate the file and upload to Apple
1. Click the Generate Certificate Request button on the Settings > Certificates page.
2. Enter the required information and click Next.
3. Make a note of the Apple URL to which you will upload the certificate request.
You must log in with your Apple I.D. to https://identity.apple.com/pushcert/.
4. Select Generate and save the generated file to your local drive.
The file should end with the extension .plist.
266 Good Mobile Messaging Administrator’s Guide

Creating and Changing Handheld Policy Sets and Templates
Obtain a signed certificate from Apple
1. At https://identity.apple.com/pushcert/, sign in to Apple's Push Certificate Portal with your Apple ID. (Accept the terms and conditions, if you have not already done so.)
2. Click Create a Certificate.
(Accept the terms and conditions, if you have not already done so.)
3. Choose the .plist file that you downloaded and saved, and select Upload.
You should see a confirmation message with a Download button.
4. Download the file to your local hard drive and return to the Good Mobile Control Settings > Certificates page.
This file will have the extension: .pem.
* Internet Explorer users, see known issues below.
Upload the signed certificate to Good Mobile Control
1. Click the Upload Signed Apple Certificate button on the Settings > Certificates page.
You will be prompted for your password. Enter your Apple ID password.
2. Navigate to find the signed .pem file on your local drive.
3. The signed file should now appear in the certificate list.
* Internet Explorer users
On Internet Explorer, you will need to log out and then log back in again to see the signed certificate. IE may also create an additional file prior to the generation of the '.pem' file. This additional file is not needed, but can be used to check for any possible errors.
{"ErrorCode":*80013,"ErrorMessage":"Invalid Certf-icate Signing Request","ErrorDescrip:on":"The Certficate Signing Request you entered appears to be invalid. Make sure that request file uploaded is in the <a href="http://www.apple.com/business/
Good Mobile Messaging Administrator’s Guide 267

Managing the Handhelds
mdm" target="_blank">correct format</a>and not empty.="}
If this shows up, delete both files and re-try the previous steps until a clean file is generated. A clean file is an indication that the .plist file was signed with no errors from Apple.
Renewing a Certificate
Warning: Renew this certificate when it expires, rather than generating a new one. Generating a new certificate will require users to manually remove the Good iOS Configuration profile from General > Settings, relaunch the Good Client, and reinstall the new Configuration Profile.
Do not delete the existing MDM certificate; just upload the renewed version. On upload, the new certificate will override the old.
MDM Push Certificate Migration Information
The information in this section is provided by Apple. It documents the older processes for creating and managing push certificates.
MDM push certificates created in the iOS Developer Enterprise Program were migrated to the Apple Push Certificates Portal. This impacted the creation of new MDM push certificates and the renewal, revocation and downloading of existing MDM push certificates. It did not impact other (non-MDM) APNS certificates.
If your MDM push certificate was created in the iOS Developer Enterprise Program:
- It was migrated for you automatically.
- You can renew it in the Apple Push Certificates Portal without impacting your users (and the topic will not change).
- You’ll still need to use the iOS Developer Enterprise Program to revoke or download a pre-existing cert.
268 Good Mobile Messaging Administrator’s Guide

Creating and Changing Handheld Policy Sets and Templates
If none of your MDM push certificates are near expiration, no action is needed. If you do have an MDM push certificate that is approaching expiration, have your iOS Developer Program Agent login to the Apple Push Certificates Portal with their Apple ID.
Renewal of MDM push certificates
To renew an MDM push certificate that was created in the iOS Developer Enterprise Program, visit Apple Push Certificates Portal and login with the Apple ID of the Agent on your iOS Developer Enterprise Program membership. Existing certificates will list "Migrated" as the Vendor.
Renewal of existing MDM push certificates via the Apple Push Certificates Portal will ensure the topic of the certificate will not change. This means users will not need to re-enroll devices and MDM service will not be impacted by this change. New MDM push certificates created in the Apple Push Certificates Portal are assigned a topic automatically and cannot be customized.
To renew an MDM push certificate that was created in the Apple Push Certificates Portal, visit Apple Push Certificates Portal and login with your Apple ID.
Downloading of MDM push certificates
To download an MDM push certificate that was created in the iOS Developer Enterprise Program, login to the iOS Developer Enterprise Program and visit the iOS Provisioning Portal.
To download an MDM push certificate that was created in the Apple Push Certificates Portal, visit Apple Push Certificates Portal and login with your Apple ID.
Android Configuration
The Android configuration feature provides additional policy settings for your enterprise Android devices.
Good Mobile Messaging Administrator’s Guide 269

Managing the Handhelds
General Policies
Enable Android Full-Device Administration - Enables the Android configuration plugin feature.
Enable remote full device wipe
Enable remote full device lock
Enable remote device password reset
Check the check box to enable the feature on the Handhelds page for a device via the Security link. Otherwise, the wipe, lock and change-password actions are available only for the Good for Enterprise application on the device. Default is unchecked.
If you enable these additional settings, Good is added to affected devices as an administrator in Settings/Location/Security. If the user should deselect Good via “Select device administrators,” he/she is locked out of the Good for Enterprise application. Any passcode settings remain in effect, but the user can change them. The device
270 Good Mobile Messaging Administrator’s Guide

Creating and Changing Handheld Policy Sets and Templates
can still be wiped or locked if these features are enabled, until the Good application is removed from the device. To delete Good from the device, disable device administration or on the device deselect Good as a device administrator.
Passcode Policies
Use these policies to control access to the Android device through use of a mandatory passcode. (To control access to the Good application on the Android, refer to “Good for Enterprise Authentication” on page 202.)
Require passcode - User must enter a passcode to access the Good applications (default: checked).
Minimum length of - Specifies the minimum length allowed for the passcode (1-10 characters) (default: 4 characters).
Good Mobile Messaging Administrator’s Guide 271

Managing the Handhelds
Alphanumeric - Requires the passcode to contain at least one letter and one number (default: checked).
Complex - Choose among restrictive suboptions. (default: unchecked)
Maximum passcode age - Days after which passcode must be changed (1 to 730)(default: 180 days).
Auto-Lock - Maximum allowed idle time after which device automatically locks. (1 minute to 1 hour) (default: 1 minute)
Passcode history - The number of unique passcodes required before reuse (a number between 1 and fifty)(default: 1)
Maximum failed attempts - Wipe device after n attempts (a number between 4 and 16)(default: 10). The full device is wiped.
Restrictions
Restriction policy settings are enforced by the Android OS and cannot be modified by the user.
These policy settings allow the administrator to enable/disable use of device hardware features:
• Allow use of camera (4.0 and above) (default is On)
272 Good Mobile Messaging Administrator’s Guide

Creating and Changing Handheld Policy Sets and Templates
• Enforce storage encryption (3.0 and above) (default is Off) - This setting directs the Android operating system to enable encryption of all application data that is stored on the device. A pop-up such as the following is displayed and encryption is enforced when the Proceed option is selected. Users will not be able to access Good for Enterprise until the device has completed the encryption of all device data.
Notes:
• Requires device reboot
• Requires user-entered PIN to encrypt the device
• Process may take up to an hour
• Users will need to enter PIN every time they log in
• Some devices will allow encryption only when plugged in to an electrical outlet
• The encryption process is not reversible. Users who wish to unencrypt will have to reset device to default factory settings thereby erasing all installed apps and data.
Good Mobile Messaging Administrator’s Guide 273

Managing the Handhelds
Important Note: The process and behavior outlined above is not enforced by Good Technology, rather is standard Android/device behavior. As such these may differ between OS versions and device models.
Good recommends that users are notified of the expected behavior before IT turns the policy ON.
Compliance Manager
Compliance-management policies cause Good for Enterprise to check user handhelds periodically for specified applications. If these required applications are not present (or, in some cases, present but not running), you can choose from the following failure actions, when supported: quit Good for Enterprise, force download of the missing application to the handheld (when the rule involves checking for an application), or wipe the Good data or complete device.
To set Compliance Manager policies:
1. Click the Compliance Manager link in the left panel for the policy set.
Use this window to specify which applications must be present on user handhelds.
274 Good Mobile Messaging Administrator’s Guide

Creating and Changing Handheld Policy Sets and Templates
Note: This feature is not intended for use with applications specified using the Application Management policy options, or for handheld ROM applications. The mandatory option for software distribution requires the user to download and install Good OTA-distributed software on the handheld when prompted to do so; the compliance-management option requires the user to have specified applications on the handheld, regardless of how they are put there.
2. If necessary, click a handheld platform in the right panel to expand the list of rules for onboard applications for that platform. (Unsupported platforms are not listed.)
3. Application checks occur automatically on a handheld when it is set up for the first time and whenever Good for Enterprise starts up or exits on it and then by default once every 12 hours (as well as when policy changes are received). To specify more frequent checks for a particular rule, click the “edit” link for the rule. In the Edit compliance rule window that opens, choose the desired frequency from the “Check Every” drop-down menu and then click OK.
4. Some application rules may be listed in the right panel for the selected handheld type by default. To delete a rule from the list, click the check box next to the rule and click Delete.
The order that applications appear in this list is the order that applications will be checked on the handhelds.
The changes you make in the Compliance Manager window do not take effect until you click the Save button.
The applications listed in this window for a handheld platform are specified in a rule file for that platform. The file is located in the console’s database. Creating and editing you own rule files is described in the following section.
Good Mobile Messaging Administrator’s Guide 275

Managing the Handhelds
5. To add an application rule to the list, click Add Rule. The Add Compliance Rule page is displayed.
6. Select the handheld platform to be checked for onboard applications from the drop-down menu.
7. Enter a descriptive application name (required) for the new rule, built-in or custom.
Note that while "custom" rules are supported for iOS/Android, the custom rules do not apply to the "Application Management" window.
8. Enter a description of the application, what will be checked, and the action that will be taken when a failure is encountered (not required). This description can be from 0 to 256 characters in length.
9. Select the type of rule to be run from the Check to Run drop-down menu.
a. Built-in rules:
Built-in rules are available for the following checks. Rules that are unavailable for a handheld platform are not displayed.
• Application Exceptions
276 Good Mobile Messaging Administrator’s Guide

Creating and Changing Handheld Policy Sets and Templates
From the list of applications displayed, select those to be blocked (blacklisted) or trusted (whitelisted). This can be set only once (that is, in only one rule) per policy set.
The blocked list is the list of third-party applications that you build on the Settings page (“Creating a Third-Party Applications List” on page 244).
The trusted list included the list of third-party applications that you build on the Settings page and the list, or catalog, of custom applications that you build on the Settings page (“Custom Applications: Adding to and Deleting from the Software Package” on page 328).
• Application verification (requires GFE Android v2.5 and Android OS 4.22 or higher)
Confirm that the Verify Apps setting is checked in Settings > Security on the device
• Client version verification
Specify the minimum allowed version on the device.
• Connectivity verification
Specify how often the device must have connected to your enterprise (at least once in the last 1 to 365 days).
• Hardware model verification
Specify all allowed hardware models.
For Android devices, hardware devices are listed by manufacturer at the highest level, with model numbers, and in some cases, build numbers for specific models, for manufacturers, nested below. This level of detail permits you to disallow specific manufacturer model builds by leaving them unchecked, when such a build may, for
Good Mobile Messaging Administrator’s Guide 277

Managing the Handhelds
example, be subject to a known virus. The builds can then be whitelisted when the threat has passed.
Click a manufacturer checkbox to whitelist all device models for that manufacturer.
To whitelist only selected models, open the device list for the manufacturer and click the checkboxes for the desired models.
278 Good Mobile Messaging Administrator’s Guide

Creating and Changing Handheld Policy Sets and Templates
In the same way, open a model list when multiple builds are listed for it and click the checkboxes for the desired builds.
Click a model checkbox to whitelist all builds for it.
Refer to “Adding Android Models and Builds to Hardware Compliance” on page 283 for information on expanding the available hardware list.
• Jailbreak/Rooted detection
Hypervigilant mode (Android ) - If the device is detected connecting via USB cable to an external computer, malware detection runs continuously.
• MDM profile removed (one-time use)
• OS version verification
Specify all those OS to be allowed on the device. A “Permit newer (previously unknown) OS versions” check box permits you to OK future versions in advance, “future-proofing” the device. Newer versions are those higher than any listed in the current Console. Later, when these new versions are added dynamically to the Console checkboxes,
Good Mobile Messaging Administrator’s Guide 279

Managing the Handhelds
you can re-specify the allowed OS versions and Save and the policy set will be updated on all devices using it.
• Permitted client type - Once you’ve created a rule for this, the option is grayed out, as additional such rules would be duplicates (one-time use).
• SELinux (Security Enhanced Linux) Enforced Mode (requires GFE Android v2.4 and Android OS 4.22 or higher)
Checks to ensure SELinux is present on the device.
b. Custom rules:
For “Perform checks using”, choose the method of checking for the application.
• Click the “Executable name” radio button if you want to enter the name of the application as it appears on the handheld. This is the default.
For Palm, enter the exact Palm database name of the application (required). Maximum length is 31 characters. Use a third-party tool or contact the application manufacturer for information on how to obtain this name.
For PPC and Smartphone, enter the exact executable path or name (required). Pathnames can begin with %xxx% or \ format. Simple filenames must be at root level on the handheld (where xxx is PROGRAMFILES, MYDOCUMENTS, or WINDOWS). Maximum length is 256 characters. Use \ in pathnames. Invalid characters: <>:\”/\\|?*. Valid characters: ^&’@{}[],$=!-#()%.+~_.
The option is not available on all devices in this release.
• To check for an application by more advanced methods (for example, by process name or registry entry) on a Windows Mobile or Palm device, click the “Rule file” radio button to use an XML rule file. Enter the path and filename or browse for the rule file. This is an optional method.
You can also use such a rule file to cause a disclaimer to be displayed before the Good for Enterprise lock screen on
280 Good Mobile Messaging Administrator’s Guide

Creating and Changing Handheld Policy Sets and Templates
supported devices (“Rule File for Displaying Disclaimer” on page 287).
For information about creating rules files and their format, see “Rule Files for Compliance Policies” on page 295. Default rules files are stored in the console’s \etc\confs\rule directory, but rules files that you create should be stored elsewhere, so that they won’t be lost if you uninstall and reinstall the console.
When you select a rules file by entering its path and name or by clicking Open after browsing for it, the file is checked to confirm that its XML is correct and that the basic rules format is correct in it. The file is also checked to confirm that its size plus the enabled rules file sizes for the handheld family don’t exceed 8KB for iOS.
If the file doesn’t pass a check, you’ll be warned and given an opportunity to edit the file. The warning will remain in place until you’ve corrected the file in the window provided, or until you click the Cancel button.
10.From the Failure Action drop-down, choose the action that the handheld will take if it is out of compliance with this rule. The choices, when supported, are to quit Good for Enterprise, force download of the missing application to the handheld (when the rule involves checking for an application), wipe the Good data, lock Good for Enterprise, or simply send a report (a report is also sent with any other failure action). (The Send Report Only option is not available on all platforms.) If you choose to force download, ensure that the application is available to be downloaded. To do so, check the Application Management window for the appropriate platform (“Managing Software Policies” on page 319). (Refer to “Client Error Codes Following a Wipe” on page 364 for error codes displayed on the user’s device after an erase/wipe.)
Note: the “Send Report Only” option adds the failure information to the Compliance Report available at the Console (refer to “Compliance Report” on page 299) and in the notification to specified admins.
Good Mobile Messaging Administrator’s Guide 281

Managing the Handhelds
The Quit option will deny use of Good for Enterprise until the handheld is in compliance or the policy is changed. The download option, when applicable, will take the user to a download screen to acquire the necessary missing software. Note: The Quit option will allow the user to reenter Good and will briefly display the current email list, but will then force an exit.
The Wipe Enterprise Data option, for supported devices, will remove all Good for Enterprise data from the device and require reinstallation of Good for Enterprise for the application to be used again. In all cases, Good data is removed. For iOS, you can configure policy settings to either erase (wipe) Good data only or erase the device. (Refer to “Client Error Codes Following a Wipe” on page 364 for error codes displayed on the user’s device after an erase/wipe.)
A failure action requires the device to be successfully connected to the Good Servers via the Good Operations Center (NOC). Good for Enterprise can be installed on the device and the user PIN used, even if out of compliance, but when the device successfully connects to the NOC, provisioning will fail and GFE will be inoperative on the device.
11.From the Check Every drop-down, choose how often you want the compliance rule checked while the handheld is running (from every minute to once every 24 hours). Frequency may impact performance and battery life. The rule is also checked at Client startup and launch.
Note: This value is not used for the “Application Exceptions” option. Instead, compliance is checked every 8 hours.
12.When finished, click OK to close the Add Compliance Rule window.
13.Click Save in the Compliance Manager window. Your changes are applied to the policy.
Applying the settings may take some time.
Compliance rule errors and messages are also written to the output file produced using Export Statistics.
282 Good Mobile Messaging Administrator’s Guide

Creating and Changing Handheld Policy Sets and Templates
If a device fails the test for a rule, a message is displayed to that effect and the failure action that you have specified is performed. If the problem is rectified, but the device fails a second rule, then a message to that effect is similarly displayed, followed by a failure action.
In the event of a failure, a Compliance Report link is added in the left pane of the handheld’s page in the Mobile Control Console. (Refer to “Compliance Report” on page 299.) If configured to do so, GMC also sends the report to admins that you specify (“Automatic Notification of Compliance Failures” on page 286.)
Adding Android Models and Builds to Hardware Compliance
Manufacturer, model, and build items are listed in Hardwares.xml in GMC/Settings/Hardware Models. You can add model and build items to Good Mobile Control by editing the Hardwares1.xml file.
Note: Editing Hardwares.xml is not recommended. If your xml changes to this file contain errors, GMC will not start or the data in the file will not be displayed correctly and may be corrupted.
The file Manufacturer.xml, which you can use to display additional in your compliance checklist, is not present by default at GMC installation. Create it as needed. For example, if there are devices introduced as “Sony_Europe” instead of “Sony,” you can create this file and map “Sony_Europe” to “Sony.”
Enter a new hardware entry in Hardwares1.xml in this form:
<e manufacturer="name"><symbol>C6603</symbol> <desc>model name(VFUK, Unlocked)</desc> <builds><build>10.5.1.A.0.292</build> <build>2</build></builds></e>
Example:
<enum name="AndroidHardware">
<e manufacturer="Amazon"><symbol>SD4930UR</symbol> <desc>Amazon Fire Phone (SD4930UR)</desc>
Good Mobile Messaging Administrator’s Guide 283

Managing the Handhelds
<builds><build>1234A</build> <build> ABC.1234_DEF#$%^</build></builds></e>
<e manufacturer="Acer"><symbol>A500</symbol> <desc> Acer A500</desc></e>
<e manufacturer="Acer"><symbol>A1-840FHD</sym-bol><desc>Acer Iconia Tab 8 (A1-840FHD)</desc></e>
<e manufacturer="Alcatel"><symbol>ALCATEL ONE TOUCH 8020X</symbol><desc>Alcatel OneTouch HERO (ALCATEL ONE TOUCH 8020X)</desc></e>
<e manufacturer="Samsung"><symbol>BP1</symbol> <desc>Blackphone</desc></e>
</enum>
This example would display:
Acer
Acer A500
Acer Iconia Tab 8 (A1-840FHD)
Amazon
Amazon Fire Phone (SD4930UR)
1234A
ABC.134_DEF#$%^
Alcatel
Alcatel OneTouch HERO (ALCATEL ONE TOUCH 8020X)
Samsung
Blackphone
The Hardware1.xml will have the following structure:
<?xml version="1.0" encoding="UTF-8"?><complianceManagerBuiltInRules xmlns:xsi="http://www.w3.org/2001/XMLSchema-instance">
<enum_appendV2 name="AndroidHardware" minVer-sion="2.3.2">
284 Good Mobile Messaging Administrator’s Guide

Creating and Changing Handheld Policy Sets and Templates
<e manufacturer="HTC"><symbol>HTC One X+</sym-bol><desc>HTC One X+ (AT&T, VFUK)</desc> <builds><build>ABC.1234</build></builds></e><e manufacturer="Lenovo"><symbol>Lenovo A850+</symbol><desc>Lenovo A850+</desc></e>
</enum_appendV2></complianceManagerBuiltInRules>
Notes on Hardware.xml and Hardware1.xml:
• These hardware compliance changes apply only to Android devices in the GMC v2.7.0 release.
• If build version is not provided, model will be shown without it onscreen.
• If an identical entry is present in both files, only the entry in Hardwares1.xml will be shown in the compliance lists onscreen in the GMC. Devices are identified by the Symbol property in xml.
• It is not necessary to restart GMC after making changes to Hardwares1.xml. To view the changes, go to GMC/Settings/Hardware Models and click on the Refresh button.
• The Hardwares.xml configuration file is overwritten when GMC restarts or after a specific interval, to ensure that the file is consistent with the corresponding file on the Webapps server. Hardwares1.xm. is not checked and overwritten in this way.
• Hardwares.xml and Hardwares1.xml are overwritten by defaults during a GMC upgrade. If you have added multiple changes to Hardwares1.xml, make a backup before upgrading GMC.
• The manufacturer and build tags are new and are not required
• If a manufacturer is not provided for an entry, the device will be shown under the "Others" section in the compliance rule. This section is created automatically by GMC.
Good Mobile Messaging Administrator’s Guide 285

Managing the Handhelds
manufacturer.xml
A new manufacturer.xml file has also been added to the GMC. It is uploaded to Webapps and synchronized in the same way as hardwares.xml.
This file maps manufacturers from hardwares.xml to various manufacturers potentially returned by Android API on various devices. For example, some Samsung device might return “samsung” from the API but another device might return “samsung_el_asia.” GMC needs to handle the case where if the admin selects Samsung, then both “samsung” and “samsung_el_asia” are added as acceptable manufacturers.
The files form:
<?xml version="1.0" encoding="UTF-8"?><complianceManagerBuiltInRules xmlns:xsi="http://www.w3.org/2001/XMLSchema-instance"> <enum name="manufacturers"> <e> <symbol>samsung_el_asia</symbol> <!-- sent to
device --> <desc>Samsung</desc> <!-- seen in UI --> </e> <e> <symbol>samsung</symbol> <!-- sent to device--> <desc>Samsung</desc> <!-- seen in UI --> </e> <e> <symbol>AMAZON</symbol> <desc>Amazon</desc> </e> </enum></complianceManagerBuiltInRules>
Automatic Notification of Compliance Failures
To have compliance failure reports sent automatically to specified admins, check the Send Alert box in Compliance Manager, and check
286 Good Mobile Messaging Administrator’s Guide

Creating and Changing Handheld Policy Sets and Templates
the boxes for the specific rules for which a failure is to generate an alert.
Enter the email addresses of the admins to be alerted in the field provided at the bottom of the page.
Rule File for Displaying Disclaimer
You can create a rule file that will cause a disclaimer to be displayed before the Good for Enterprise lock screen on a handheld. The user must click the Accept button to continue. The rule file contains the text of the disclaimer. You can specify English or other supported language for the message.
Password policy must be enabled for the disclaimer to be displayed.
To turn off the disclaimer, disable or delete the rule that you have created for it.
The inclusion of this rule file and the specification of its location is handled like any compliance rule, using the Rule File radio button and Browse button in the Compliance Manager/Add Compliance Rule window. Note, however, that the Failure Action setting has no effect.
Good Mobile Messaging Administrator’s Guide 287

Managing the Handhelds
Example file content:
Default value - A single entry, omitting "lang" attribute. This is the minimum file content to enable the disclaimer. The default disclaimer text that you specify will be used for unspecified locales.
<disclaimer><dtext value="your default disclaimer text"></dtext></disclaimer>
Specifying disclaimer text for English ("en"). Note: default value must always be available. In this example, your English disclaimer text will display on English handhelds and your default text will display on handhelds using all other languages.
<disclaimer><dtext value="your default disclaimer text"></dtext><dtext lang="en" value="your English disclaimer text"></dtext></disclaimer>
Language specification lines are mandatory if you will be providing different disclaimer text for GFE-supported languages. Note: default value must always be available. If you omit the line for a particular language, the default text will be displayed for handhelds using that language.
<disclaimer><dtext value="your default disclaimer text"></dtext><dtext lang="en" value="your English disclaimer"></dtext><dtext lang="fr" value="your French disclaimer"></dtext><dtext lang="de" value="your German disclaimer"></dtext><dtext lang="it" value="your Italian disclaimer"></dtext><dtext lang="es" value="your Spanish disclaimer"></dtext></disclaimer>
Rule File for Additional Email Classification Markings
(iOS Client only)
288 Good Mobile Messaging Administrator’s Guide

Creating and Changing Handheld Policy Sets and Templates
The "Enable email classification marking" setting on the Messaging page of a policy allows the user to choose in the Good application among: Internal, Public, Public Release, CUI, Confidential, Unclassified, Classified, and Restricted on the device. No actions are performed by Good for Enterprise based on the classification; it’s for integration with other systems only.
You can create a rule file that defines additional email classifications, such as for do-not-forward messages.
These markings allow you to insert special tags into an email in conformance with your company’s requirements. Normally, these markings are placed in the subject line of the email, but they may also appear in the body of the email (at the top of the body and/or at the bottom of the body).
You can also use “caveats” such as Do Not Copy, Do Not Forward, and Do Not Print (that is, additional marks that indicate restrictions on the use of the email). Caveats, like classification markings, can appear in the subject line, and top and bottom of the email body.
Note that if you alter the default list provided with the product, the user option in Preferences on the device to define a default classification to be entered automatically on the Compose screen will not be available.
You can define the specific markings that are available to the user when sending email messages by defining a set of rules for the Good Mobile Control Server to use. Use an XML file to define these rules.
Copy the following sample file into any text editor and make the changes necessary to support the markings that are required for your organization. The edited file can be saved using any appropriate filename (e.g. myXML.xml).
The inclusion of this rule file and the specification of its location is handled like any compliance rule, using the Rule File radio button
Good Mobile Messaging Administrator’s Guide 289

Managing the Handhelds
and Browse button in the Compliance Manager/Add Compliance Rule window. Note, however, that the Failure Action setting has no effect.
Options
The OPTIONS section is delimited by the tags <options></options> and defines general options for the markings. The options available are:
• Enable/disable classification markings
• Enable/disable caveats
• Define the default value for the classification markings
• Define the default value for caveats
Disabling classification markings disables all other features.
Classifications
The CLASSIFICATIONS section is delimited by <classifications></classifications> and defines the classification markings that are available to the user. For each classification marking to be supported, the following sub-tags are available.
• The SELECT tag is used to define the specific text that appears in the classification selector on the GFE client. The total number of characters per select item is limited to 20, including spaces. Example:
<subject>INTERNAL</subject>
• The SUBJECT tag is used to define the specific text that appears appended to the subject line in the email. The text in this field does not need to be identical to the text in the selector. This is to accommodate longer markings than those that fit in the selector. If no entry is made in the subject tag, then this marking will not appear in the subject line. Example:
290 Good Mobile Messaging Administrator’s Guide

Creating and Changing Handheld Policy Sets and Templates
<subject>[CLASSIFICATION: INTERNAL]</subject>
• The TOPBODY tag is used to define the specific text that appears at the top of the email body. The text in this field does not need to be identical to the text in the selector. This is to accommodate longer markings than those that fit in the selector. If no entry is made in the TOPBODY tag, then this marking will not appear at the top of the mail body. Example:
<topbody>[CLASSIFICATION: INTERNAL]</topbody>
• The BOTTOMBODY tag is used to define the specific text that appears at the bottom of the email body. The text in this field does not need to be identical to the text in the selector. This is to accommodate longer markings than what fit in the selector. If no entry is made in the bottombody tag, then this marking will not appear at the bottom of the mail body. Example:
<bottombody>[CLASSIFICATION: INTERNAL]</bottombody>
Caveats
The CAVEATS section is delimited by <caveats></caveats>, and defines the caveats that are available to the user. For each caveat that needs to be supported, there are four sub-tags available.
• The SELECT tag is used to define the specific text that appears in the caveat selector on the client. The total number of characters per select item is limited to 20, including spaces. Example:
<select>DO NOT FORWARD</select>
• The SUBJECT tag is used to define the specific text that appears appended to the subject line in the email. The text in this field does not need to be identical to the text in the selector. This is to accommodate longer caveats than those that fit in the selector. If no entry is made in the subject tag, then this caveat will not appear in the subject line. Example:
Good Mobile Messaging Administrator’s Guide 291

Managing the Handhelds
<subject>[CAVEAT: DO NOT FORWARD]</subject>
• The TOPBODY tag is used to define the specific text that appears at the top of the email body. The text in this field does not need to be identical to the text in the selector. This is to accommodate longer caveats than those that fit in the selector. If no entry is made in the TOPBODY tag, then this caveat will not appear at the top of the mail body. Example:
<topbody>[CAVEAT: INTERNAL]</topbody>
• The BOTTOMBODY tag is used to define the specific text that appears at the bottom of the email body. The text in this field does not need to be identical to the text in the selector. This is to accommodate longer caveats than those that fit in the selector. If no entry is made in the BOTTOMBODY tag, then this caveat will not appear at the bottom of the mail body. Example:
<bottombody>[CLASSIFICATION: INTERNAL]</bottombody>
The use of square brackets (“[“ and “]”) above is arbitrary. You have full control over the actual content. Likewise, the inclusion of the words “CONFIDENTIAL” and “CAVEAT” in the actual marking is arbitrary, and up to you to define. Some companies include these words to make it clear that it is a marking (to avoid confusion with normal content in the subject line).
Example XML file
<emailClassificationMarks> <options> <classifications>ON</classifications> <caveats>OFF</caveats> <classificationDefault>INTERNAL
</classificationDefault> <caveatDefault>NO FORWARD</caveatDefault> </options> <classifications> <classification> <select>INTERNAL</select>
292 Good Mobile Messaging Administrator’s Guide

Creating and Changing Handheld Policy Sets and Templates
<subject>(INTERNAL)</subject> <topBody>Classification: INTERNAL
</topBody> <bottomBody>Classification: INTERNAL
</bottomBody> </classification> <classification> <select>CONFIDENTIAL</select> <subject>[CONFIDENTIAL]</subject> <topBody>Classification: Confidential
</topBody> </classification> </classifications> <caveats> <caveat> <select>NO FORWARD</select> <subject>(DO NOT FORWARD)</subject> <topBody>Caveat: DO NOT FORWARD
</topBody> <bottomBody>Caveat: DO NOT FORWARD
</bottomBody> </caveat> <caveat> <select>NO REPLY</select> <subject>(DO NOT REPLY) </subject> </caveat> </caveats> </emailClassificationMarks>
XML Schema
<xs:schema attributeFormDefault="unqualified"elementFormDefault="qualified" xmlns:xs="http://www.w3.org/2001/XMLSchema"> <xs:simpleType name="ONOFF"> <xs:restriction base="xs:string"> <xs:enumeration value="ON"/> <xs:enumeration value="OFF"/> </xs:restriction> </xs:simpleType>
Good Mobile Messaging Administrator’s Guide 293

Managing the Handhelds
<xs:element name="emailClassificationMarks"> <xs:complexType> <xs:sequence> <xs:element name="options"> <xs:complexType> <xs:sequence> <xs:element type="ONOFF"
name="classifications"/> <xs:element type="ONOFF"
name="caveats"/> <xs:element type="xs:string"
name="classificationDefault"/> <xs:element type="xs:string"
name="caveatDefault"/> </xs:sequence> </xs:complexType> </xs:element> <xs:element name="classifications"> <xs:complexType> <xs:sequence> <xs:element name="classification"
maxOccurs="unbounded" minOccurs="0"> <xs:complexType> <xs:sequence> <xs:element type="xs:string"
name="select"/> <xs:element type="xs:string"
name="subject"/> <xs:element type="xs:string"
name="topBody"minOccurs="0"/>
<xs:element type="xs:string"name="bottomBody"minOccurs="0"/>
</xs:sequence> </xs:complexType> </xs:element> </xs:sequence>
294 Good Mobile Messaging Administrator’s Guide

Creating and Changing Handheld Policy Sets and Templates
</xs:complexType> </xs:element> <xs:element name="caveats"> <xs:complexType> <xs:sequence> <xs:element name="caveat"
maxOccurs="unbounded"minOccurs="0">
<xs:complexType> <xs:sequence> <xs:element type="xs:string"
name="select"/> <xs:element type="xs:string"
name="subject"/> <xs:element type="xs:string"
name="topBody"minOccurs="0"/>
<xs:element type="xs:string"name="bottomBody" minOccurs="0"/>
</xs:sequence> </xs:complexType> </xs:element> </xs:sequence> </xs:complexType> </xs:element> </xs:sequence> </xs:complexType> </xs:element></xs:schema>
Rule Files for Compliance Policies
To check for a specifically required application on a particular type of Windows Mobile or Palm handheld, a rules file is required. Default rules files are stored in the Console database, but rules files that you create should be stored in a location of your choosing.
Good Mobile Messaging Administrator’s Guide 295

Managing the Handhelds
The following template rule files are included with Good Mobile Control Server in the Console database. Several files for specific popular applications are also included. These files allow you to check for the presence of applications by filename, process, and/or registry entries. The files are XML in format.
Template for PPC Handhelds:
<!-- Sample Rule File for PocketPC Operating System Hand-helds --> <?xml version="1.0" ?> - <rules> - <files> <file name="" minsize="" maxsize="" version="" />
</files> - <registries>
<registry path="" key="" type="" value="" /> </registries> - <processes> <process name="" />
</processes> </rules>
where:
filename - The exact executable path or name (required). Pathnames can begin with %xxx% or \ format. Simple filenames must be at root level on the handheld. Maximum length is 256 characters. Use \ in pathnames. Invalid characters: <>:\”/\\|?*. Valid characters: ^&’@{}[],$=!-#()%.+~_.
minsize - Minimum allowable size in bytes for the application (optional)
maxsize - Maximum allowable size in bytes for the application (optional)
version - Required application version
registry path - Registry path for the application entry
296 Good Mobile Messaging Administrator’s Guide

Creating and Changing Handheld Policy Sets and Templates
key - Key value for the application registry entry
type - The word Int or string
value - Type value
process name - Name of the application process (e.g., application name without the extension)
Example using registries:
<!-- Sample Rule File to check for Credant(tm) on PocketPC Operating System Handhelds -->- <rules>
- <registries><registry path="HKEY_LOCAL_MACHINE\Soft-
ware\Credant Technologies" key="Active" type="int" value="1"/>
</registries></rules>
Template for Palm Handhelds
<!-- Sample Rule File for Palm Operating System Handhelds --> <?xml version="1.0" ?> - <rules> - <dbs>
<db name="" type="" creator="" version="" min-size="" maxsize="" /> </dbs>
</rules>
where:
db name - The exact Palm database name of the application (required). Maximum length is 31 characters. Use a third-party tool or contact the application manufacturer for information on how to obtain this name.
Good Mobile Messaging Administrator’s Guide 297

Managing the Handhelds
type - 4-character value for required application type. Use a third-party tool or contact the application manufacturer to obtain.
creator - 4-character value for required application creator. Use a third-party tool or contact the application manufacturer to obtain.
version - Required application version.
minsize - Minimum allowable size in bytes for the application (optional)
maxsize - Maximum allowable size in bytes for the application (optional)
Example using db name:
- <rules>
- <dbs>
<db name="ShieldLib" type="libr" cre-ator="MGSH" version="" minsize="" maxsize=""/>
</dbs>
</rules>
Template for Smartphone:
<!-- Sample Rule File for Windows Mobile Smartphones --> <?xml version="1.0" ?> - <rules> - <files>
<file name="" minsize="" maxsize="" version="" /> </files> - <registries> <registry path="" key="" type="" value="" />
</registries> - <processes>
<process name="" /> </processes>
</rules>
298 Good Mobile Messaging Administrator’s Guide

Creating and Changing Handheld Policy Sets and Templates
where:
filename - The exact executable path or name (required). Pathnames can begin with %xxx% or \ format. Simple filenames must be at root level on the handheld. Maximum length is 256 characters. Use \ in pathnames. Invalid characters: <>:\”/\\|?*. Valid characters: ^&’@{}[],$=!-#()%.+~_.
minsize - Minimum allowable size in bytes for the application (optional)
maxsize - Maximum allowable size in bytes for the application (optional)
version - Required application version
registry path - Registry path for the application entry
key - Key value for the application registry entry
type - Int (DWORD) or string
value - Type value
process name - Name of the application process (e.g., application name without the extension)
Compliance Report
The Good Management Console makes it easy for you to track your devices with respect to their compliance with your policy settings. If a device’s compliance status changes, Good Mobile Control keeps track of the fact. This section describes how to access and review your compliance data.
For a quick overview of the compliance situation, go to the Handhelds tab. You can customize the device information view by
clicking on the “Select Columns” icon and choosing from the
Good Mobile Messaging Administrator’s Guide 299

Managing the Handhelds
drop-down menu. Device compliance status is tracked in the second column of the device list.
This second (untitled) column can display three possible compliance indicators: a blank field, a red circle with an exclamation point, and a yellow triangle.
A blank field indicates the device is an compliance with respect to its currently configured policy settings. A red circle with an exclamation point indicates that the device is out of compliance with these policies. A yellow triangle indicates that the compliance check is pending for the device. This can happen when the device is not connected, is not set up, is not sync’d, or that the device (e.g., Windows Mobile) is not supported for this feature, or that the device is running an earlier, unsupported Client (less than 1.7.3 for Android; less than 1.9.3 for iOS).
To display only those devices in or out of compliance, use the related Filter by Compliance filters in the left panel.
Compliance status
300 Good Mobile Messaging Administrator’s Guide

Creating and Changing Handheld Policy Sets and Templates
On the Handhelds tab, you can run a full compliance report and export it to an Excel spreadsheet. To do so, select Export Compliance Report from the Select Import/Export Action pull-down menu.
This generates a report showing all changes in device compliance for all devices in the current view.
The rows in the report are grouped by device, with a separate row for each change in the compliance status of the device. The report provides the changed status, the affected policy setting, the cause for the change, and any action taken, as specified by the policy.
Out-of-compliance causes can include jailbreak detection, connectivity verification (device must have connected to Good within a specified time), OS version verification, hardware model
Good Mobile Messaging Administrator’s Guide 301

Managing the Handhelds
verification, etc. Out-of-compliance actions can include exiting from the Good Client on the device, deactivating the Client, and creating a compliance report. (Refer to “Compliance Manager” on page 274.)
Notes on the out-of-compliance exclamation point:
• No exclamation point will be displayed in the compliance report or on the GMC, even if a device is out of compliance, until the device is successfully connected to the Good Servers via the Good Operations Center (NOC). Good for Enterprise can be installed on the device and the user PIN used, but when the device successfully connects to the NOC, provisioning will fail and GFE will be inoperative on the device.
• An exclamation point will be displayed when compliance has failed but the device is not to be wiped by policy. In this case the user PIN is reusable.
For more information about a specific device, click its link on the Handhelds page to open a detailed view for it. If a device is out of compliance, a report link is added to the left panel.
Compliance report is added for devices with compliance data available
302 Good Mobile Messaging Administrator’s Guide

Creating and Changing Handheld Policy Sets and Templates
Click the Compliance Report link to display the report.
Click Refresh to update the report. The Console will query the device; device response will depend upon the current device state. The request for information will persist until the device is available to answer it. Click Export to create an Excel report based upon the screen display.
Cisco ISE Access
To grant Cisco ISE access, assign the “Provide access to Cisco ISE” right to a user (“Creating, Configuring, and Customizing Roles” on page 187) and configure Cisco ISE to use that user along with the location of the Good Mobile Control Server. To change the right, you’ll go to the Roles page, select a role, click the “Change the rights for this role” link, and click the check box for Cisco.
By default in the Console, only the Superuser and Service Administrator can change roles and rights. By default, the Administrator role has this new right, while the Help Desk role does not. For an upgrade, whatever roles have the “View OTA setup PIN” right will now also have the Cisco right.
Application Management
For a description of software deployment policy options, refer to “Managing Wireless Software Deployment” on page 317.
Good Mobile Messaging Administrator’s Guide 303

Managing the Handhelds
Legacy ControlsThe policies available in this section apply to Windows Mobile Pocket PC, Windows Mobile Smartphone, and Palm OS devices.
Blocked Applications
You can restrict the use of certain applications installed on a user's handheld. With this feature, these applications (from a list provided with Good for Enterprise) can only be launched when unchecked (unblocked) in Good Mobile Control Console.
Note: Blocking applications is not supported on Nokia 5.1.0.37 clients.
To restrict user access to the applications on the approved applications list:
1. On the Policies page, click the name of a policy set.
304 Good Mobile Messaging Administrator’s Guide

Creating and Changing Handheld Policy Sets and Templates
2. Click the Blocked Applications link in the left panel of the Policy Sets page.
3. Click a handheld platform in the right panel to expand a list of blocked applications for that platform. (Unsupported platforms are not listed.)
4. Select the applications that you want to block from use by selecting the check box next to each application and clicking the Block button.
“Blocked” appears in the Status column next to applications that are blocked. An advisory is displayed on the handheld: “The administrator has blocked the use of this application.”
“Allowed” applications are approved for use. Applications installed by the user that are not on this list are allowed to launch.
Good Mobile Messaging Administrator’s Guide 305

Managing the Handhelds
Note: The “Downloads” and “Download Agent” items in the list for Windows Mobile refer to two Microsoft content utilities. Clicking the check box next to them prevents the handheld from running/displaying content downloaded from the desktop using ActiveSync.
Note: To block an application, select all the related entries for it listed in the Policy Manager application list. Otherwise the application may still run. In the same way, to approve an application, deselect all the application entries. For example, to approve or block the camera application, you might need to approve or block a camcorder application as well.
Note that Good applications have their own inherent security. They will not be listed in this tab.
When the policy is set, a user with a disapproved application on the handheld will no longer be able to run that application. Trying to do so will result in an error dialog.
5. Click the Save button to save the settings.
Network Communication
Use the Network Communication link in the left panel of the Policy Sets page to set policies for:
• Infrared
• Bluetooth
• WiFi
Note: Enabling and disabling network communication policies is not supported on Nokia 5.1.0.37 clients.
To set network communication policies:
1. Click the Network Communication link in the left panel of the Policies page.
Note: Changing any of these settings will cause affected Windows Mobile handhelds to reset.
306 Good Mobile Messaging Administrator’s Guide

Creating and Changing Handheld Policy Sets and Templates
2. Click the following check boxes to enable:
• Enable infrared radio - Default is On. Leave unchecked to prevent a user's handheld from receiving or sending data via the infrared (IrDA) port.
• Enable WiFi radio- Default is On. Leave unchecked to prevent WiFi usage on the device.
• Enable Bluetooth radio - Default is On. Leave unchecked to prevent a user's handheld from receiving or sending Bluetooth wireless signals.
• Enable discovery - To disable a handheld’s Bluetooth discoverability feature, even if currently enabled on the handheld, leave unchecked. However, note that any pairing already in force on the handheld will not be affected; the pairing will continue until the paired device is reset. Default is On.
This policy must be enabled if the S/MIME CAC options are enabled.
3. Click Show Profiles to display Bluetooth profile settings. Click the Bluetooth profiles that you want to enable on the handheld.
For more information about Bluetooth technology and Bluetooth profiles, see:
http://www.bluetooth.com
Notes:
• The profiles listed in the Sub-profile sections are dependant on the profiles listed in the Base profiles section. For example, the Basic Imaging Profile, OBEX File Transfer Profile, and Object Push Profile are Data Transfer Sub-profiles that are dependant on the Generic Object (Exchange) Base Profile. If the Generic Object (Exchange) Base Profile is disabled, then all of its dependant sub-profiles will not work.
• Do not disable the serial-port profile if S/MIME is present because that profile is required by the CAC reader.
Good Mobile Messaging Administrator’s Guide 307

Managing the Handhelds
• The Bluetooth Profile Management feature requires Windows Mobile 6.1 or later on the handheld. Profiles that are not supported on the handheld will be ignored.
Storage Cards
To set storage-card policies:
1. Click the Storage link in the left panel of the Policies page.
2. Click the following check boxes to enable:
• Erase storage card when erasing data. Default is On. Wiping a storage card as a defensive action will only work for a card in the handheld when the option was enabled. A card inserted later will not be affected by the policy.
• Enable backup to storage card - Deselect the radio button to remove the Backup option from the Preferences menu on the user handheld (the preference is not available on all devices). Default is On. You cannot enable backup to a storage card if the following option is selected (that is, you cannot enable backup to an encrypted storage card).
• Enable storage card encryption. Default is Off.
Note: The Enable storage card encryption option is not supported on Nokia 5.1.0.37 clients. Enable this option to require any storage cards present or inserted into the handheld to be formatted with a password-protected encrypted volume before they can be read from or written to. The entire card is encrypted.Given the amount of data that these cards now hold, it is common for users to use these and share them. For this reason, encryption is recommended. Note: Be careful when using this option, as it will require users to format their storage cards, completely wiping all data from the card. When this option is set, the user is prompted to format the card when it is inserted in the handheld; if the user selects Cancel, the card cannot be used (the card is unmounted
308 Good Mobile Messaging Administrator’s Guide

Creating and Changing Handheld Policy Sets and Templates
and cannot be accessed) unless the user removes and re-inserts the card and performs a soft reset to reformat the card.If this option is not set, storage cards can be used as usual. The password to be set is not affected by the password policies set for the Mobile Defense password. If the password is lost, the data on the card cannot be retrieved. Encrypted storage cards cannot be used for automatic backup. The card can be moved to a different handheld so long as the current password is entered on the new handheld. Encourage user backup of the handheld before enabling this policy.If this policy is not set, the user can use Good Mobile on the handheld to encrypt part of the card. Attachments saved to the card are saved only in the encrypted area.To prevent an encrypted storage card from being removed and used in a different handheld, select “Allow encrypted storage cards to work only with handheld that originally encrypted them.” Default is Off.Only email attachments can be saved to the storage card.
3. Inform users of the following:
If the “Enable storage card encryption” policy is set, the user will be required to accept a reformat of any storage card upon initial insertion, completely wiping all data from the card. Otherwise, the card will not be usable, regardless of the Security Preferences settings in Good for Enterprise on the handheld.
Unprotecting a card using Security Preferences removes all protected (encrypted) data from the card. Information added to any unprotected portion of the card will be unaffected by unprotecting the card.
Data Encryption
You can encrypt selected databases and folders on the handheld.
Databases designated for encryption are encrypted when Good for Enterprise locks the handheld. The databases are decrypted when
Good Mobile Messaging Administrator’s Guide 309

Managing the Handhelds
Good for Enterprise unlocks the handheld. When more than 1MB of data is to be decrypted, this process can last several minutes.
There are no utilities that can be used to decrypt an encrypted database.
Good for Enterprise applications take care of their own encryption. Good for Enterprise databases are bitwiped (all data erased) when the handheld is wiped as described in “Erasing (Wiping) Handheld Data” on page 361.
Good for Enterprise does not encrypt data on the desktop/laptop, but it does transfers encrypted data to the desktop. When the handheld is unlocked all data reads are seen as authorized by Good for Enterprise, including ActiveSync. Good for Enterprise will decrypt all data before it is ActiveSynced to the desktop/laptop.
Note: Data encryption is not supported on Nokia 5.1.0.37 clients.
To set Data Encryption policies:
1. On the Policies page, click the name of a policy set.
310 Good Mobile Messaging Administrator’s Guide

Creating and Changing Handheld Policy Sets and Templates
2. Click the Data Encryption link in the left panel for the policy set.
3. If necessary, click a handheld platform in the right panel to expand the list of databases and folders for that platform. (Unsupported platforms are not listed.)
4. Click the check box next to the databases and folders you want to encrypt, and then click the Encrypt button.
Note that Good applications have their own inherent security. They are not listed in the Data Encryption page.
5. Click the Save button to save the settings.
Preventing Application Termination When a Handheld Is Locked
In versions previous to 5.0.2, Mobile Messaging terminated all third-party applications running on a handheld when it was locked. Now, all such applications will continue to run when the handheld is locked, unless folder encryption is enabled.
Good Mobile Messaging Administrator’s Guide 311

Managing the Handhelds
If one or more folders are listed for encryption, the following applications will continue to run anyway: Native Windows Music player, Symantec AV, Blue Fire firewall, McAfee AV, Instant Messaging, Google Maps, Internet Explorer, Opera, MSP Agent, MotoNav. You can create a list of additional applications that will continue to run when the handheld is locked. All other applications will be terminated.
The list of applications is contained in a file named “DevicesAppList.ini.” (The ini file must have this name.) A template is provided with the Good for Enterprise Console; it is empty (does not list any applications) by default. On the handheld, the Good for Enterprise Client will consult the DevicesAppList.ini file to determine which applications should not be terminated when the device lock is triggered.
Entries in the DevicesAppList.ini file consist of the .exe names of the applications to remain running. Edit the file using any standard text editor. In the sample provided, replace [ALLOWED_APP_LIST] with a device-specific name.
The template provided:
; DevicesAppList.ini (ppc);;This file follows the usual INI file format, and includes allowed application list for PPC devices.;;Sections must be in brackets, starting in column 1 of a line.;Application name will be used as a key. They must start in column 1.;;Syntax of the section is as follows:;[<Section_name>];----------------------------------------;Syntax of the key is as follows:;<application_name><whitespace>\n;;----------------------------------------
312 Good Mobile Messaging Administrator’s Guide

Creating and Changing Handheld Policy Sets and Templates
;;----------------------------------------;Allowed Application list;----------------------------------------
[ALLOWED_APP_LIST]MobileCalculator.exeiexplorer.exepxl.exeppt.exepword.exeBubbleBreaker.exesolitare.exeGoodCalendar.exe;----------------------------------------
Pushing DeviceAppList to the desired handhelds
DeviceAppList, once created, must be pushed to the handhelds to take effect. To do so, refer to “Managing Wireless Software Deployment” on page 317, beginning with the section “Custom Applications: Adding to and Deleting from the Software Package” on page 328.
The push process is transparent to the user. No notifications are provided on the handheld unless it is being upgraded from a pre-5.0.4 version.
This feature applies to Pocket PC and SmartPhone handhelds only.
Note: ActiveSync cannot be used to push the file to a handheld.
To check whether DeviceAppList.ini has been successfully installed on a handheld:
1. In the Console, select the user.
2. Select Manage User Groups, Policy, and Software.
3. Under the Software section, select either “View Current” or “Edit” for Custom Settings. (This is the “Distribute Software” page.) You
Good Mobile Messaging Administrator’s Guide 313

Managing the Handhelds
will see the entry for DevicesAppList.ini and “Success” for the status.
DeviceAppList.ini file status should be Success.
To test whether a specified application continues running upon device lock:
1. Go to Task manager and confirm that application present in DeviceAppList.ini file are running and all other applications have been terminated when the device is locked.
2. Alternatively, lock the device and provide an async password in the password box. This will allow you to enable ActiveSync when the handheld is locked. Go to the process viewer to confirm that all applications present in DeviceApplist.ini are running during the lock.
Completing Policy Configuration
As you finish editing a page and click Save, your changes are applied to the user to which the policy is applied.
If you want to delay application of the new policy settings for a few minutes while you make additional changes, you can set a delay time of from 1 to 15 minutes. To do so, go to the Settings tab and click on Policy.
Policy changes will be applied OTA.
Importing and Exporting Policy Sets
You can create policy sets on a Good Mobile Control Console and then copy them to other GMC Consoles. To do this, you export the policy sets you create to an XML file, using the GMC where you created them, and then import the policy sets from the file using other GMC Consoles as desired.
314 Good Mobile Messaging Administrator’s Guide

Importing and Exporting Policy Sets
The command-line utilities ImportPolicySets and ExportPolicySets also support these functions (“ExportPolicySets” on page 576 and “ExportPolicySets” on page 576).
To export a policy set:
1. On the Policies tab, select the policy sets to be exported. Click the Export button.
2. In the window displayed, specify which settings are to be exported. The default is all settings. The same settings will be exported for all policy sets you have specified.
3. Click OK. When prompted, save the XML file to a download file rather than opening it. Move the file to the location where you want to keep it.
Note: We recommend that you not attempt to edit the file.
Good Mobile Messaging Administrator’s Guide 315

Managing the Handhelds
To import policy sets on another GMC:
1. On the Policies tab, tap Create New.
2. Select Import. Browse to the XML file you saved during the Export operation and open it. Click Next.
3. Select the policy sets to be imported from the list of those you exported. Click Next.
316 Good Mobile Messaging Administrator’s Guide

Managing Wireless Software Deployment
4. When prompted, select those policy-set settings in the file that you want to import; the rest will use the default setting for that policy.
5. Click OK. An advisory window will inform you of the number of policy sets to be created and will provide a link to a report on the operation. A link is also provided to any warnings generated.
No existing policy sets are overwritten; instead, for imported policy sets with the same name as existing sets, a copy is created.
Managing Wireless Software Deployment
You can update the Good for Enterprise software package and software policies wirelessly for all handhelds using a particular policy.
Good Mobile Messaging Administrator’s Guide 317

Managing the Handhelds
This section describes how to:
• Specify which applications are enabled/disabled for wireless setup and upgrades (enabling new versions of applications and disabling old versions)
• Change the software-installation reminder schedule for handhelds being set up or updated
• Change which applications must be installed by users upon handheld setup or update (mandatory install)
• Specify which handheld families can be set up using OTA
• Set up installation from a Good for Enterprise software package on the handheld itself, or on a storage card (Windows Mobile)
• Enable/disable Certification Revocation List (CRL) use during software installation or upgrade
• Generate new user PINs
• Customize the initial email message for setup that is sent to the user
• Add custom applications to the software package
• For iOS5 devices, push third-party applications to the device and manage application install/uninstall
Note: The tasks described in this section apply to the applications present in the Good Mobile Management software package. To set policies that permit, require, or prohibit other handheld applications, databases, and folders on the handheld, refer to “Mobile Device Management” on page 247.
Note: Software-management procedures are the same whether or not S/MIME security features are activated and enabled, except as noted in “Setting S/MIME Software Policies” on page 343. However, some additional setup is required with the assistance of your authorized Good for Enterprise representative; the steps required are beyond the scope of this guide.
318 Good Mobile Messaging Administrator’s Guide

Managing Wireless Software Deployment
When setting up handhelds, Good for Enterprise applications cannot be added to or deleted from the package, but the default settings can be changed for Good Mobile, Palm and Symbian platforms. Custom downloads are accomplished OTA after Good for Enterprise is operational on the handheld. Good for Enterprise client-application updates are posted by Good to your Good Mobile Control Servers automatically. You can add/delete custom applications as necessary.
Changes to the default software package take effect immediately. However, downloads to handhelds affected by the change will occur during off-hours. A user can override this download schedule using Good for Enterprise Preferences > Applications on supported handhelds.
Managing Software Policies
To update Good Mobile applications and/or change software policies on all handhelds using a particular policy, use the following procedures.
To manage software policies:
1. On the Policies tab, click on the policy set to be edited.
2. In the left panel for the policy set, click on the Application Management link under Application Management.
Good Mobile Messaging Administrator’s Guide 319

Managing the Handhelds
An Application Management screen for the policy set is displayed.
S/MIME users: Windows Mobile S/MIME software is distributed only if S/MIME is also enabled as a policy for the user, as described in “Good for Enterprise Authentication” on page 202. If S/MIME is enabled, the handheld will automatically receive the selected version of Good for Enterprise+S/MIME. For information on S/MIME for iOS and Android devices, refer to the “S/MIME on Good for Enterprise Client” release notes for these devices.
Applications in the software package are divided into the following categories:
• Good Software - Developed and distributed by Good Technology, with or without S/MIME functionality
• Enterprise Applications - Applications that customers own or license from others.
320 Good Mobile Messaging Administrator’s Guide

Managing Wireless Software Deployment
(This release does not include support for distribution of partner applications.)
Applications in the first category are included with the product and cannot be deleted from the package by the customer. They are added, removed, or updated on your Console remotely by Good Technology. You can add and delete Custom (Enterprise) applications, as described in “Custom Applications: Adding to and Deleting from the Software Package” on page 328.
3. Click the Check for Updates button to synchronize your Mobile Messaging Server with the latest software available from Good Technology. The software catalog displayed on the Application Management page will be updated. The Server service will not need to be restarted.
4. To display and edit the default settings for software deployment, click the Default Deployment Options button.
Note: These options do not apply to iOS, Android, or Windows Phone devices.
The defaults as shipped are shown in the figure. Click the appropriate check boxes to force software installation. Use the pull-downs to set the number and frequency of reminders to the handheld user to complete the download process.
Reminders are pop-up dialogs that appear periodically (according to your specifications) on the handheld.
Good Mobile Messaging Administrator’s Guide 321

Managing the Handhelds
“Mandatory” software is downloaded in the handheld background (during off hours for global changes, staggered from 8 P.M. to 2 A.M. for more than 5 users) without previous notification to the user. If the user declines to install the software when reminded, the installation is forced after the specified number of reminders is completed.
The default for reminders is once a day for three days. The default for mandatory installation is Good Technology applications.
5. After selecting the options in the Set Deployment Options dialog box, click OK.
6. To change the software download options for Good for Enterprise for a particular handheld platform, click its Edit link in the right panel.
7. In the window that opens, choose the version to install from the drop-down, or click “Do not install on this platform” to prevent downloading of Good applications to the device type/operating system.
322 Good Mobile Messaging Administrator’s Guide

Managing Wireless Software Deployment
Note: In the case of the iOS, Android, and Windows Phone platforms, application software is available via App Store, Google Play, and Windows Marketplace. These options don’t apply.
Note: For Windows devices only, with GMC release 2.6.0, ”Do not install on this platform” is the default setting for all new policies. When GMC is updated to release 2.6.0, any previous settings for version to install are retained.
8. To force installation of the Good software and/or to change the number of reminders and reminder frequency for that installation, check the ”Override default options” check box. Use the “Mandatory installation” check box and pulldowns to configure the changes from the default.
9. To enable Good for Enterprise setup on the handheld via a Good for Enterprise client package installed previously on a storage card or on the handheld itself, rather than via Over The Air setup, change the setting in the “Install From” drop-down.
Client packages for this use are available at http://www.good.com/download.
If this local setup policy is enabled but the requisite Good software is not found on the handheld or a storage card during the setup process, the regular OTA setup process will be followed.
10.Click Show Details to display details about the application.
11.Click OK to close the modification window.
The changes you made take effect after you click Save in the Application Management window.
Handheld users are notified of changes to the package, with instructions on how to download and install updated applications wirelessly on the handhelds. Any software policy changes are employed.
Good Mobile Messaging Administrator’s Guide 323

Managing the Handhelds
Applications that have been deleted from the software package by Good Technology are not deleted from the handheld if they have been previously installed.
Restricting Handheld Platform OTA Setup
You can allow OTA setup for all handheld platforms that use a particular policy, or you can specify those specific platforms for which OTA setup is allowed. (Windows Mobile, Palm, Symbian)
To configure this feature:
1. On the Policies page, click on the policy set to be edited.
2. In the left panel for the policy set, click on the Application Management link under Application Management.
3. To disallow Good for Enterprise download for a particular handheld platform, click its Edit link.
4. Click the “Do not install on this platform” radio button.
324 Good Mobile Messaging Administrator’s Guide

Managing Wireless Software Deployment
For iOS, Android, and Windows Phone, this will not prevent App Store, Google Play, or Windows Marketplace download and installation, but will prevent activation and provisioning of Good for Enterprise on the phone.
Note: The other options in this window do not apply to iOS, Windows Phone, or Android devices.
5. Click OK to exit the window.
6. Click Save to close the Application Management page and cause your changes to be implemented.
Generating New User PINs
To set up a handheld for the first time wirelessly, users require a PIN created by Good for Enterprise and provided to the users via email. You can set a policy to cause this PIN to expire if it is not used within a period of time that you specify, and to prevent reuse of the PIN once a handheld has been set up successfully. Refer to “File Handling” on page 217 for details.
To generate a new PIN for a user:
1. In the Good Mobile Control Console list of users on the Handhelds tab, select the user for whom new PINs are to be created.
2. From the Apply Action drop-down menu, select Regenerate Provisioning PIN. (An individual PIN can also be regenerated from the OTA link on the handheld’s information page.
If the menu item is grayed out for a user, the user logged into the Good Mobile Control Console does not have the “Add User for OTA Setup” and “View User OTA Setup PIN” role rights. At least one of these rights is required.
3. Click OK when prompted.
The new PINs are generated.
Good Mobile Messaging Administrator’s Guide 325

Managing the Handhelds
Note that the installation reminder counter for the user is not reset when a new PIN is issued.
Customizing Console-Generated Email Messages
You can edit the default welcome email message that is sent to users and create additional messages to be used with different users. The default message provides information about the wireless setup process, together with the PIN to be used when downloading the software and the URL of the download site. The template to be used is specified by the policy set that a handheld uses.
In the same way, you can edit the default messages and create and manage new messages to be sent to users when their PINs are regenerated and as reminders of pending PIN expiration.
To view the name of the templates used to send the current welcome email, PIN regeneration, and reminder messages specified by a particular policy set, go to the Provisioning link for the policy set.
To edit a message and/or create new messages to be listed in one of the template drop-downs (built-in messages cannot be edited):
1. Click the Settings tab in the Good Mobile Control Console.
2. Click the Messaging & Templates link in the left panel.
326 Good Mobile Messaging Administrator’s Guide

Managing Wireless Software Deployment
3. To create a new template based on an existing one, click the “Make a copy” link in the Email Templates page. To edit an existing template, click the name of an existing message.
4. Change the name and description of the message as desired.
5. Change the subject line and change or add an optional attachment for the message as desired. There is a limit of one attachment, maximum size 1MB.
6. Click Edit to change the body of the message. Built-in messages cannot be edited, but can be copied and customized.
7. If you have chosen an HTML template, there are a few things you need to know. We have also provided comments within the code to assist you in making any changes and to warn you of critical sections which you shouldn't remove.
User name, PIN, expiration date, and reminder counter
Good Mobile Messaging Administrator’s Guide 327

Managing the Handhelds
The first three pieces of information are required in order for your users to successfully provision or reprovision. This section contains the email login, the provisioning PIN/key, and the expiration date of that PIN/key. The reminder counter displays how many reminders have been sent.
If you disable the PIN/key expiration (Policy Set > Provisioning) you should comment out or remove that block of code.
Email display
We've done our best to provide a base template for your HTML welcome email. However, email clients are far more indiscriminate in how they render HTML and CSS code than Web browsers are. For example, most mail clients do not recognize many standard HTML and/or CSS best practices for page layout. You should rely on table-based layout for now.
Be sure to test how your custom code displays in the email clients you support. There are a number of services available online that can assist in this validation.
Code Limitations
Contain your changes and additions to HTML and CSS. Any other languages (javascript, PHP, etc.) will be removed from the HTML file.
8. Click Save to save the message.
If you delete an existing template, any user to receive that message will now receive the default message; that is, any policy sets using the template will now use the default template. The default message cannot be renamed or deleted.
Custom Applications: Adding to and Deleting from the Software Package
To add and delete custom applications to or from the software package for a policy set, first ensure that the applications are available in the Console applications catalog by using the Custom
328 Good Mobile Messaging Administrator’s Guide

Managing Wireless Software Deployment
Software page on the Settings tab to check the list of available applications for this Console.
Use the instructions in this section to add or delete applications to the list (catalog) on the Custom Software page on the Settings tab. Then you can add and delete third-party applications to or from the software package for a policy set on the Application Management page.
Note that if you specify iOS applications by URL, as described below, you can easily distribute to users direct links to apps in Intranet sites and the App Store.
To add or delete custom applications from the software package:
1. First, ensure that the desired application is listed in the catalog, or add it to the catalog. To do so, click the Custom Software link on the Settings tab.
Good Mobile Messaging Administrator’s Guide 329

Managing the Handhelds
2. To add a custom application to the package, click the Add button.
3. Choose the handheld platform for the application from the drop-down.
4. Enter the application path and filename or use the Browse button to navigate to it and select it. (For iOS files, .ipa/.mobileprovision.)
For iOS files, there is a radio button providing you with the option of specifying a URL rather than a path and filename for an application. An additional radio button allows you to search the iTunes store for an application.
5. Click Continue.
330 Good Mobile Messaging Administrator’s Guide

Managing Wireless Software Deployment
For iOS URL entries:
6. Enter values for the Name, Version, and Description fields and then click the Finish button.
Restrictions on the custom software:
• Name: 50 characters
• Version: 21 characters
• Description: 256 characters
• Name, Version, and Description fields cannot be empty
• Field properties cannot be changed after upload
• Zero-length files cannot be uploaded
• Single stand-alone applications only can be uploaded
• There is a limit of 50MB for each file uploaded. You can upload 1,000 files or up to a total of 190MB of files, whichever comes first. To add more, you must remove some of the existing files, to get below both of these limits.
• Android files will be .apk.
Good Mobile Messaging Administrator’s Guide 331

Managing the Handhelds
• iOS applications are uploadable in .ipa form.
• Note: Most Windows Smartphone handhelds have code-signing requirements. Applications that are not signed by Mobile2Market (or by proprietary carrier certificates) may not install properly.
For URLs:
Enter application information such as manufacturer, application ID, version, size, and default icon. You’ll find this information for iOS apps, for example, at the App Store. (For iOS apps, you’ll get the application ID from your iTunes account.)
Once you click Finish, the URL link and the information you have entered will be validated. If your network does allow not the server to connect to the URL, you’ll get an error message.
7. If you later want to delete a custom application from the list, click the check box next to the application and click the Delete button. Multiple selections are supported.
If the operation is not supported for a particular handheld platform, no applications will be displayed.
8. To manage a custom application using a specific policy set, now add the custom application to the policy set.
a. On the Policies/ Application Management/Application Man-agement screen, under Enterprise Applications click Add Application. Choose an OS Platform from the drop-down.
332 Good Mobile Messaging Administrator’s Guide

Managing Wireless Software Deployment
Choose the desired application from the list (which reflects the custom applications added using Settings/Application Set-tings/Custom Software).For supported, “managed,” applications, select the Set as Man-aged check box to allow installation/uninstallation of the application on all or individual devices from the Console. Select “Disable syncing to iTunes/iCloud” and/or “Auto-unin-stall if MDM removed” to enable these automatic device-man-agement policy functions.
b. Click Continue when done.
9. To enable the application for a policy set, click the check box next to it.
10.To remove the application from the software package later, click the check box next to it and click the Remove button.
Good Mobile Messaging Administrator’s Guide 333

Managing the Handhelds
For supported (iOS5), managed applications, you are given the option of either just removing the application from the package, or removing it from the package and deleting it from all affected handhelds. To remove the application from the package and from selected handhelds only, choose to remove it only from the package here and then uninstall it from each handheld using the Actions Uninstall link in Applications for the handheld on the Handhelds tab. Note that the application does not ever appear in the user’s application catalog.
All handheld users for the affected Good Mobile Messaging Servers are notified when additions to the package are enabled using the Application Management option, with instructions on how to download and install the applications wirelessly on their handhelds.
To view information about the new software, click the name of the application in the Custom Software list on the Settings tab. For example, the following information is displayed for an application named “Call Tracker”.
Deleted applications are not deleted from handhelds that already have them installed, unless configured as managed with Auto-Uninstall enabled (“Managed Applications” on page 335).
334 Good Mobile Messaging Administrator’s Guide

Managed Applications
Managed Applications
Some platforms (iOS5 and higher in this release) provide the following added management features for third-party applications. You can enable/disable them when adding an application to the package and later on the Policies/Application Management page in the Enterprise Applications section.
• Install/uninstall
For supported applications, you are given the option of removing the application from the software package, or removing it from the package and deleting it from all affected handhelds. To remove the application from the package and from selected handhelds only, choose to remove it only from the package using Policies/Application Management/Remove, and then uninstall it from each desired handheld using Handhelds/Applications/Actions/Uninstall.
• Automatic uninstall if MDM profile is removed from the device. Use the check box provided to enable/disable (enabled by default).
• Disable syncing to iTunes/iCloud. Use the check box provided to enable/disable (enabled by default).
• Add an iOS application configuration for iPhone 4/iOS v7.0 and higher. Click on the Create link in the Configuration column. When finished, Edit and Delete links become available.
The configuration file you create is uploaded automatically to those devices to which the policy is applied. The configuration elements in the file are determined by the business application that has been implemented by your developers.
Important: The managed app configuration is stored as unencrypted files. Do not store passwords or private keys in these dictionaries.
Use the following schema definition for the XSD file that you create:
<?xml version="1.0" encoding="UTF-8"?>
Good Mobile Messaging Administrator’s Guide 335

Managing the Handhelds
<xsd:schema xmlns:xsd="http://www.w3.org/2001/XMLSchema" elementFormDefault="qualified"> <xsd:element name="dict" type="dictElements"/> <xsd:group name="plistGroup"> <xsd:choice> <xsd:element name="array" type="arrayElements"/> <xsd:element name="data" type="xsd:base64Binary"/> <xsd:element name="date" type="date"/> <xsd:element name="dict" type="dictElements"/> <xsd:element name="real" type="xsd:double"/> <xsd:element name="integer" type="xsd:long"/> <xsd:element name="string" type="xsd:string"/> <xsd:element name="true" type="nothing"/> <xsd:element name="false" type="nothing"/> </xsd:choice> </xsd:group> <xsd:complexType name="plistObject"> <xsd:group ref="plistGroup"/> </xsd:complexType> <xsd:complexType name="arrayElements"> <xsd:sequence minOccurs="0" maxOccurs="unbounded"> <xsd:group ref="plistGroup"/> </xsd:sequence> </xsd:complexType> <xsd:complexType name="dictElements"> <xsd:sequence minOccurs="0" maxOccurs="unbounded"> <xsd:element name="key" type="xsd:string"/> <xsd:group ref="plistGroup"/> </xsd:sequence> </xsd:complexType> <xsd:simpleType name="date"> <xsd:restriction base="xsd:string"> <xsd:pattern value="\d\d\d\d(-\d\d(-\d\d(T\d\d(:\d\d(:\d\d(Z)?)?)?)?)?)?"/> </xsd:restriction> </xsd:simpleType> <xsd:simpleType name="nothing">
336 Good Mobile Messaging Administrator’s Guide

Volume Purchased Applications
<xsd:restriction base="xsd:string"> <xsd:maxLength value="0"/> </xsd:restriction> </xsd:simpleType> </xsd:schema>
Volume Purchased Applications
The Console provides support for Apple’s Volume Purchase Program (United States only). To utilize this Console feature:
1. Search for desired applications on Apple’s VPP portal and purchase one or more apps in bulk.
2. Download the spreadsheet that is generated by the Apple VPP portal, from Apple’s website.
3. On the Console Settings tab, tap the Volume Purchased Applications link.
4. Browse to your downloaded spreadsheet and click Upload.
Good Mobile Messaging Administrator’s Guide 337

Managing the Handhelds
5. To distribute an application to user devices, click the “distribute” link next to it.
6. Select the devices to receive the app by clicking the check box next to them. Search for users/devices as needed.
7. Enable any or all of the following options:
- Set as Managed (iOS only)
- Allow sync to iTunes/iCloud
- Auto-uninstall if MDM removed
8. Click Apply. The selected user(s) will be prompted to download any configured apps.
Ports 80 and 389 should be open on the Good Mobile Messaging Server for OCSP and LDAP lookup when using S/MIME
Managing S/MIME
S/MIME (Secure/Multipurpose Internet Mail Extensions) is a standard for public key encryption and signing of email encapsulated in MIME. S/MIME provides cryptographic security services for electronic messaging applications, such as authentication, message integrity, and non-repudiation of origin (using digital signatures) and privacy and data security (using encryption). S/MIME features are supported for select handhelds.
This Help assumes that your Exchange environment is configured for S/MIME and that you are conversant with S/MIME and its uses in
338 Good Mobile Messaging Administrator’s Guide

Managing S/MIME
your Exchange installation, or that your PKI (Public Key Infrastructure) administrator or Certificate Authority administrator will be available to provide information to assure that you configure Good for Enterprise correctly.
Note: S/MIME is not supported for pure Office 365/Exchange Online environments in Self Service, but is supported via web services.
Note: This feature is available on select handhelds only by arrangement with your authorized sales representative. The procedures provided in this guide relating to S/MIME assume that the feature is available and enabled as described in “Enabling S/MIME.” S/MIME must be implemented on the handheld at setup using OTA; it cannot be implemented later.
Note: S/MIME support for iOS is documented in a separate note for this release. The CAC logon behavior for iOS does not occur at system level, but is implemented instead at application level.
The Good Mobile Backup and Restore features are not recommended for use with the S/MIME feature.
Enabling S/MIME
When enabled, S/MIME will appear as added fields on various console policy pages.
Enablement will require:
• The setup assistance of your authorized sales representative
• Manage Server rights for the console
• Ports 80 and 389 should be open on the Good Mobile Messaging Server for OCSP and LDAP lookup when using S/MIME
All Good Servers will be affected by S/MIME enablement.
Good Mobile Messaging Administrator’s Guide 339

Managing the Handhelds
To enable S/MIME:
1. Click the Settings tab of the Good Mobile Control Console.
2. Click the Secure Messaging (S/MIME) link in the left panel.
3. Click the check box for “Enable Secure Messaging (S/MIME).”
Note: Once the check box is clicked and this change is saved, S/MIME cannot be disabled.
4. Enter values for the following, if required:
• Host, port, and base for the LDAPs to be used
• URL for OCSP Responder
5. Click the check box to enable OCSP responder if desired.
Enter the URL for a default OCSP Responder that Good for Enterprise can contact to check for revocation status.
340 Good Mobile Messaging Administrator’s Guide

Managing S/MIME
Specify the number of certificates (1 or 2) that the user will be allowed to upload for signing and encryption (assuming that the “Upload S/MIME certificates” right has been assigned to the user’s role) (default is 1). Users with the proper rights can initiate the uploads from the Self Service page and from their page on the Handhelds tab in the Console at the time of handheld setup.
6. Click Save.
Values that you enter (or fail to enter) are not checked at this time.
The feature is enabled. When this is complete, a console message is displayed telling you so.
Setting S/MIME Password Policies
For S/MIME policies to be effective, the S/MIME version of the Good Mobile Client must be downloaded to the affected handhelds. Exchange and S\MIME must be enabled.
To set S/MIME password policies for a policy set:
1. In the Good Mobile Control Console, click the Policies tab.
2. Click the name of the policy set listed on the Policies Sets page.
3. Click the Good for Enterprise Authentication link in the left pane.
4. In the right pane of the Handheld Authentication page, click the “Password-protected (with or without soft token and S/MIME)” radio button if it is not already selected.
Good Mobile Messaging Administrator’s Guide 341

Managing the Handhelds
5. Click the “Show” link next to “Common Access Card for S/MIME is enabled” if the S/MIME settings aren’t already displayed.
Good recommends that you try the following procedure using a policy set that only affects a test handheld before implementing using a policy set that affects handhelds more widely.
6. Choose S/MIME policy features and software download for supported handhelds.
The following secure-email options are made available:
• Authenticate with CAC PIN - Require the user to enter the CAC PIN instead of the handheld password when prompted
• Authenticate with CAC PIN and Require CAC to be present - Require the user to enter the CAC PIN as the system password when prompted, and in addition, require the user to use the CAC reader with the handheld to verify the PIN when prompted and when working with encrypted email. The rechallenge setting on the S/MIME tab applies to working
342 Good Mobile Messaging Administrator’s Guide

Managing S/MIME
with encrypted email but not to entering the PIN as system password.
• Authenticate with password - Require the user to enter the handheld password instead of the CAC PIN
• Re-challenge user for CAC PIN every - When the user is prompted to enter his/her PIN on the handheld using the CAC reader, and does so correctly, he/she can then work with encrypted email for the period selected in the drop-down menu for this option. Any such activity after this time limit will require the user to re-enter the PIN in order to continue. This setting does not affect using the PIN as the system password.
• Digitally sign all outgoing mail
• Encrypt contents and attachments of all outgoing messages
7. Click Save.
The policies take effect immediately. They must be set at device setup and cannot be changed later.
Setting S/MIME Software Policies
Once the S/MIME extension is activated, with basic S/MIME policies configured, software distribution policies are set in the same way as for non-S/MIME handhelds. Refer to “Managing Wireless Software Deployment” on page 317 for details.
If S/MIME is enabled, the handheld will automatically receive the selected version of Good for Enterprise+S/MIME.
Note that some setup beyond the scope of this guide will be necessary with the assistance of your authorized Good for Enterprise representative.
Preparing the Handheld
If you have set handheld policy to require the presence of the CAC reader, you’ll need to install a CAC driver on all affected handhelds.
Good Mobile Messaging Administrator’s Guide 343

Managing the Handhelds
Driver installation is explained in the instructions that you receive with the reader.
Managing Server S/MIME Properties
To view and change S/MIME certificate settings for a specific Good Mobile Messaging Server, user the procedure given in “Enabling S/MIME” on page 339.
Easy Activation
The Good Mobile Console (GMC) can be configured to provide a Good for Enterprise user’s PIN to the Good Dynamics Console (GC) (aka Enterprise Server), for use when a user is installing additional Good Dynamics apps on his/her device. In this way, the user does not have to enter a new PIN every time a new GD app is installed.
Using Easy Activation with Good For Enterprise requires the Good Mobile Control user to also be present in GD’s Good Control. The 2.6 version of Good Mobile Control introduces a new feature that lets you import your GMC users into GC as part of Easy Activation setup. This feature also allows you to optionally assign a pre-existing policy to the imported user or to have a policy in GC dynamically created based upon the user’s handheld policy settings in GMC. This feature will streamline the addition of users from GMC to a GC environment.
At the time of installation of a new GD app, the user will be prompted to choose which PIN to use, the GMC or GC.
The user’s name must be the same for the GMC and GC consoles.
This feature can be applied to a single GC.
Minimum requirements:
• Good Control Server v1.8Good Proxy Server v1.8
344 Good Mobile Messaging Administrator’s Guide

Easy Activation
Good Mobile Control Server v2.GD Connect v2.2Good Work 1.4Good Access v1.1GFE Android Client 2.4GFE iOS Client 2.5.2
To enable Easy Activation:
1. From the Settings tab in GMC, click on the Enterprise Servers link.
2. Click Add.
If a GC is already present, use the Replace and Remove buttons that are displayed if you want to change it. To use a GC already present, skip to step 5.
3. Enter the URL for the GC console that manages GD users, and the username, password, and domain for the GC admin who has rights to manage GC, especially users.
Note: This information is not stored.
4. A new GC service account will be created. At this time, GC admin credentials need to be specified, because only an admin can create this type of account. In order for GMC to be able to communicate with GC, there must be a valid GC certificate in GMC trust store. GMC now checks the cert trust store and if a GC cert is not there,
Good Mobile Messaging Administrator’s Guide 345

Managing the Handhelds
you’ll be prompted to add the certificate before GC is added to GMC.
You must agree to continue.
If you cancel, the cert are not added.
You can expand the cert details to see if they are correct and match the GC cert's data.
346 Good Mobile Messaging Administrator’s Guide

Easy Activation
5. With a GC already present or specified by the previous steps, the following screen is displayed.
For Easy Activation to function correctly, the user must be present in this GC with the same name as in GMC. To cause users to be added to the GC automatically when they respond to the authentication prompt with the request to use the GMC PIN, check “Enable automatic import of users into Good Control server.”
Choose the GC application group to apply to the user from the drop-down provided, which displays a list of all application groups currently on the Good Control Server. Select an application group that includes the GD application that will be used for easy activation with Good For Enterprise. Click “Refresh” to ensure the list of GC groups is up-to-date.
Good Mobile Messaging Administrator’s Guide 347

Managing the Handhelds
Chose the policy set to apply to the user from the drop-down provided, or choose “Dynamically create policy.” If you choose the dynamic option, when the first user is imported into GC, a new policy will be created, populated with the default GC settings and named after the current GMC server. This policy will be applied to all subsequent users imported. Optionally, you can also edit the prefix for a policy. Click “Refresh” to ensure that the list of GC policy sets is up-to-date.
Policy Mappings
When an administrator chooses to dynamically create a policy in GC, the user is assigned a policy set in GC that has settings similar to the policy settings in GMC that apply to that user’s handheld. If such a policy does not exist in GC, GMC creates a policy for the user.
The following policy settings are mapped from GMC to GC when the user is to be assigned a dynamically created policy
348 Good Mobile Messaging Administrator’s Guide

Easy Activation
Good for Enterprise Authentication and Messaging
• In the GFE Authentication policy, the settings for Password Authentication (2) and Lock Screen Protection (3) will be mapped over to GC only when the policy is set to Password-protected (with or without soft token and S/MIME) (1).
• For all other GFE authentication options, Password Policies and Lock Screen Policies in GC will be set to the default, i.e., not changed during mapping process.
• The policy options to Show notifications on the lock screen and Allow access to Good Contacts (numbers only) for dialing (4) are not mapped.
Good Mobile Messaging Administrator’s Guide 349

Managing the Handhelds
• The Prevent Data Leakage policy option in GC is derived from the settings for “Copy and Paste” in Good for Enterprise Policies > Messaging (6). If either setting in the Copy and Paste option is checked, the GC option for “Prevent Data Leakage” will be set.
• If Delegated Authentication is checked as a GFE authentication option in GMC, then the package name of the GFE authentication delegate is set as the authentication delegate in the GC Security Policy. This assumes that the authentication delegate exists as a managed app in GC.
Provisioning
• The setting for “OTA Provisioning PIN and MDM Profile Install Windows expire after” (1) maps to “Access Keys expire after” in GC. The value for PIN expiration is mapped to the best available option in GC. In cases where a value is not available, GMC selects the next most restrictive value in GC. For example, if a PIN expires after it is set to 15 days in GMC, its corresponding mapped value in GC will be 14 days.
350 Good Mobile Messaging Administrator’s Guide

Easy Activation
• Email template settings are not mapped over. Default settings in GC are used.
Good Mobile Access
Settings for Good Mobile Access are mapped over into the relevant settings for Good Access in the Application policy for Good Access.
• If "Redirect domains not listed above to native browser" in GMC is selected and "Enforce strict tunnel" in GC (Good Access application policy) is not selected, then "Enforce strict tunnel" is set to selected in order to enable "Allow user to persist enterprise credentials in Good secure...”
• “Allow non-fully qualified host domains" and "Enable Kerberos authentication" are not mapped from GMC to GC.
Compliance Manager Policies
The following set of compliance rules are mapped over from GMC to GC.
• OS Version Verification
• Hardware Model Verification
• Connectivity Verification
• Jailbreak/Rooted Detection
Good Mobile Messaging Administrator’s Guide 351

Managing the Handhelds
Since Rule Name and Rule Description are unique to GMC, these fields are not copied over.
In GMC, the Check Every option is set for every compliance rule. In GC, there is one setting (Enforce every) for all compliance rules. So the GMC Check Every etting will be copied to GC even if it is enabled for only one compliance rule.
OS verification
• If the GMC policy has no OS Version Verification defined in Compliance Manager, the GC option Allow all OS Versions (1) will be set to Yes.
• For Permitted OS versions (2) only versions available in GC will be mapped.
• The GMC option to Permit newer (previously unknown) OS version (3) is skipped (not supported in GC).
• For Failure Action (4) all values from GMC (except Wipe Enterprise Data) will be mapped to Application not allowed to run in GC.
352 Good Mobile Messaging Administrator’s Guide

Easy Activation
Hardware Model verification
• If the GMC policy has no Hardware Model Verification defined in Compliance Manager, the GC option Allow all hardware models (1) will be set to Yes.
• For Permitted hardware models (2) only hardware models available in GC will be mapped.
• For Failure Action (3), all values from GMC (except Wipe Enterprise Data) will be copied to GC as “Application not allowed to run.”
• As noted earlier, the “Check Every” (4) option in GMC is copied to the “Enforce Every” setting in the GC Compliance Policy.
Jailbreak/Rooted detection
mmmp
Good Mobile Messaging Administrator’s Guide 353

Managing the Handhelds
• If GMC policy has no Jailbreak/Rooted Detection defined in Compliance Manager, the GC option Check if device has been jail-broken will be set to Disable.
• Hyper-vigilant mode (1) will not be copied from GMC to GC (not supported in GC).
• For Failure Action (2) all values from GMC (except Wipe Enterprise Data) will be copied over to GC as Application not allowed to run.
Connectivity verification
• If the GMC policy has no Connectivity Verification rule (1) defined in Compliance Manager, the GC setting for Connectivity Verification will remain in its default setting (30 days).
• For Failure Action (2), all values from GMC (except Wipe Enterprise Data) will be copied over to GC as Application not allowed to run.
Diagnostics and Troubleshooting
GMC provides diagnostic logs to help you debug issues related to Easy Activation and migration of users from GMC to GC.
• In Settings->Enterprise Servers, GMC provides logs to provide you visibility into user auto-import. For each user import request
354 Good Mobile Messaging Administrator’s Guide

Locking Out a User
triggered via easy activation, GC Import Logs displays the handheld GUID, username, and application name of the app performing Easy Activation, Bundle id of the app, Timestamp of the request and a status for the request.
You clear these logs and export them into a.csv file.
• In the Handhelds page for each handheld, GMC now provides an “Easy Activation” section for displaying the results of every Easy Activation request. This page displays the Bundle ID of the application performing Easy Activation, Details of the GC server, application name, timestamp of the request, and a status for the request.
Locking Out a User
From the Good Mobile Console, you can lock the Good application on a user’s device or lock the entire device. (Locking the Good
Good Mobile Messaging Administrator’s Guide 355

Managing the Handhelds
application is not supported for all clients in this release. If not supported, the option will be grayed out or absent for the device.)
For iOS and Android, the option to lock the entire device must be enabled using the iOS or Android configuration locking policy option (“iOS Configuration” on page 247 and “Android Configuration” on page 269).
If a user is a member of the SelfService role and is granted the right, he/she can log in to the Good for Enterprise Console and lock his/her handheld remotely from there.
To lock the Good application or entire device:
1. In the Good Mobile Control Console, click the Handhelds tab.
2. Click the name of the handheld listed on the Handhelds page.
3. Click the Security link in the left pane.
4. Click the Lock Out button.
A warning dialog informs you that this command sends a request over the air to lock out the user.
For iPhone 4/iOS v.7.0 and higher, you can enter an on-screen message and callback number to be displayed on the lock screen.
The iOS or Android user can unlock the entire device by entering the current device password.
356 Good Mobile Messaging Administrator’s Guide

Resetting a Device Password or Good for Enterprise Password Remotely
To unlock the Good application, you will need the ID from the handheld’s lock screen to generate a temporary password. The user must enter this password in the lock screen. (“Resetting a Device Password or Good for Enterprise Password Remotely” on page 357)
Resetting a Device Password or Good for Enterprise Password Remotely
Good for Enterprise allows you to remove a device or Good for Enterprise password remotely using the Console. The user is then prompted to enter a new device password within a specified amount of time or to work with you to generate a new application password. You’ll need to do this if you have locked a user out of his/her handheld (“Easy Activation” on page 344) or if a user forgets his/her password.
For iOS and Android, the option to reset the device and application password must be enabled using the iOS or Android configuration lock and passcode removal policy option (“iOS Configuration” on page 247 and “Android Configuration” on page 269).
To reset a device password:
1. Open the Good Console.
2. Select the user’s account on the Handhelds page.
3. Click the Security link in the left-hand panel.
4. Click the Reset Password button for the device.
The user will now be prompted to change the password on the device.
To reset a Good for Enterprise password:
1. The user must first click the Forgot Password link when prompted for their Good password.
A code is displayed.
Good Mobile Messaging Administrator’s Guide 357

Managing the Handhelds
2. The user must communicate this code to you.
3. Select the user’s account on the Handhelds page.
4. Click the Security link in the left-hand panel.
5. Click the Reset Password button for the Good application.
A window opens prompting for the user’s reset code.
6. Enter the user-provided code into the window.
A code is displayed.
7. Communicate this code to the user.
8. On the device, the user clicks Next and enters the code you have provided.
The user will now be prompted to change the password on the device.
Providing a Temporary Unlock Password (Windows Mobile, Palm)
Good for Enterprise allows you to generate a temporary unlock password remotely for a user. The password can be used once, with no time limit. You’ll need to do this if you have locked a user out of his/her handheld (“Easy Activation” on page 344) or if a user forgets his/her password.
Note: A temporary unlock password is not supported on all clients. The option is grayed out in the Console if not supported.
To generate a temporary unlock password:
1. Obtain the Good device ID for the handheld. The ID is displayed on the handheld lock screen or via a reset link on the lock screen, if either of these options is supported by the particular handheld.
2. In the Good Mobile Control Console, click the name of the handheld listed on the Handhelds tab.
3. Click the Security link in the left pane.
358 Good Mobile Messaging Administrator’s Guide

Enabling/Disabling Data Roaming
4. Click the Reset Password button.
5. Enter the ID Number generated by the user handheld in the text box.
6. Click OK.
The generated temporary password is displayed.
7. Give the user the password. Note that it is not case-sensitive; upper- and lower-case is not important.
If the user later needs another password, repeat the procedure, since the password can be used only once.
Enabling/Disabling Data Roaming
You can enable or disable data roaming for supported handhelds. To do so for multiple handhelds, select the action from the Apply Action drop-down menu on the Handhelds page. To do so for a specific handheld, navigate to its Handheld Info page and from the information list on the page, use the enable/disable drop-down menu for data roaming.
Resetting Good for Enterprise on a Device
You can reset Good for Enterprise on a user’s device or on multiple devices, from the Good Mobile Control Console. To do so, go to the Handhelds tab and select the devices to be reset. From the Apply Action drop-down menu, select Reset GFE.
The GFE application continues to run. It is reprovisioned according to the same rules as a new device. (Refer to “Notes on Synchronization” on page 413.) All GFE preference settings are retained. All documents in the Document Repository are retained. GMA bookmarks and the default secure-browser setting are retained.
Good Mobile Messaging Administrator’s Guide 359

Managing the Handhelds
Note: All Good Mobile Messaging Servers must be version 7.2 (MAPI) or 8.1 (EWS), or higher, for this option to be supported.
Sending a Message to a User
You can send an email to a user or multiple users from the Good Mobile Console. To do so, go to the Handhelds tab and select the devices to receive the message. From the Apply Action drop-down menu, select Send Service Notification.
Note: All Good Mobile Messaging Servers must be version 7.2 (MAPI) or 8.1 (EWS), or higher, for this option to be supported.
When performing a mass email or other action from a GMC that supports this feature, note the following when selecting recipients for the email:
• You can designate individual users as recipients by clicking the checkbox next to their names. To select all users in the list on the page, click the checkbox at the top of the page. A maximum of 100 users are displayed in the list per page.
• To display an additional 100 users, click Next. Note, however, that this deselects the initial 100 users.
• A link is provided next to the top checkbox which allows you to select all users registered with the GMC, not just the 100 displayed on any page.
• You can use filters to limit the number of users displayed, making recipient selection more convenient.
Suspending Handheld Messaging
You can use the Good Mobile Control Console to suspend all synchronization on a handheld.
360 Good Mobile Messaging Administrator’s Guide

Erasing (Wiping) Handheld Data
Note: Suspending messaging is not supported on all clients. The option is grayed out if not supported.
To suspend messaging on a handheld:
1. In the Good Mobile Control Console, click the Handhelds tab.
2. Click the name of the handheld listed on the Handhelds page.
3. Click the Messaging link in the left pane.
4. Click the Suspend button and then click OK to confirm.
The button is grayed-out if the handheld is not set up with the Good Client.
To cause synchronization to resume, click the Resume button and then click OK to confirm.
Suspended handhelds continue to synchronize policy changes and can be wiped and otherwise managed as usual.
Erasing (Wiping) Handheld Data
You can erase all Good data or all data from a device, using the Good Mobile Control Console. Erasing all data hard-resets the device, removing all data and returning the device to its factory defaults. Erasing Good data removes all email, contacts, and calendar data.
To be used again, the handheld must be set up wirelessly as described in “Setting Up the Handheld” on page 165. It is good practice to delete the device from GMC after confirming that it has been wiped (deleting before the wipe is complete may cause the wipe to fail).
If the “Enable access to Good Contacts” policy is enabled and Good contacts have been added to a handheld's native contacts, these contacts will be deleted.
Good Mobile Messaging Administrator’s Guide 361

Managing the Handhelds
Note: If you delete a device using the Good Mobile Control Console, you will be advised that the user’s device will be wiped automatically before the deletion.
Note: To erase the entire iOS or Android device remotely, the option to do so must be enabled in the iOS or Android Configuration portion of the policy set applied to the device. Refer to the General section of either “iOS Configuration” on page 247 or “Android Configuration” on page 269.
If the Good application is erased, it is left in place, but cannot be accessed again without a reinstallation of Good for Enterprise on the handheld. You cannot set it up again simply by regenerating a PIN; you must rename and set up the device again from the beginning.
For Windows Mobile devices, the entire device is wiped, including any SD card present, if that policy option is enabled.
If a user is a member of the SelfService role and is granted the right, he/she can log in to the Good for Enterprise Console and erase his/her handheld remotely from there.
To erase the Good data or all data on a handheld wirelessly:
1. In the GMC Console, click the Handhelds tab.
2. Click the name of the handheld listed on the Handhelds page.
3. Click the Security link in the left pane.
4. Click the Remote Wipe button for the Good application or the entire device.
5. Click OK to confirm you want to erase the handheld.
To erase (wipe) multiple handhelds :
1. In the Good Mobile Control Console, click the Handhelds tab.
2. Click the check box by those handhelds listed on the Handhelds page that are to be wiped.
362 Good Mobile Messaging Administrator’s Guide

Erasing (Wiping) Handheld Data
3. Click the Apply Action drop-down menu.
4. Select the wipe option (or the desired wipe option, when more than one option is present).
If the corresponding policy is set for iOS and/or Androids, you’ll have the choice of wiping the entire device or just its Enterprise data. If you select multiple devices and some of them only support wiping of the entire device while others only support wiping the Good data, both options will be grayed out. If you select multiple devices and some support both options while others support only one of the two options, only that option will be available.
5. Click OK to confirm you want to wipe the handheld.
For Good data erasure, an alert such as the following is displayed: "This command sends a request over the air to erase the handheld. The user will have to download Good Software again and reprovision."
The following rules apply:
• The device and its radio must be turned on and in network coverage to be completely erased. For Android devices, Good for Enterprise must also be running in the foreground or background; this is not necessary for iOS devices.
• For only the Good app to be wiped, it must be running in the foreground for iOS or Android, or in the background for Android.
• If a wipe command is issued when the device is turned off or is out of coverage, the command will wait for the device to be turned on and to be in network coverage, and will then be sent to the device.
• If there is a device password, it need not be entered for an iOS device to be completely erased. It need not be entered for an Android device to be erased only if Good is already running on the device (behind an idle device lock screen).
Good Mobile Messaging Administrator’s Guide 363

Managing the Handhelds
• If a password is set on the Good app and the app is not running in the background, the password must be entered before the Good app is wiped.
• The Erase message is carried out by the handheld in the order received (that is, messages sent to the handheld before the Erase message are received by the handheld first).
When the erase operation is completed successfully, an audit message is written to the host Windows Application event log for Good Mobile Messaging Server, from the source “GoodLink Server’ with an event ID of 3341.
Note: Confirm the erasure in the Good Mobile Control Console’s Erase State field for the handheld. Display this via the Security link on the handheld’s page, on the Handhelds tab.
Note: If the user’s mailbox is unavailable, if the user is paused on the Exchange server, or if the user is suspended on the Good Mobile Control Console, the remote wipe will not reach the device until the mailbox is available. In the case of lost and stolen devices, the IT administrator can remotely disable access to Good on the device and remove all Good application data. If a handheld device is recovered, Good for Enterprise and all handheld applications selected by it will be restored OTA. Deleting the device from the Console will automatically wipe its Good data.
Client Error Codes Following a Wipe
One of the following error codes may be displayed on the user’s device after it has been wiped, via the procedures described here or as a policy action, such as a wipe following the entry of too many incorrect passwords.
If the user receives any one of these errors, the Good app will need to be reinstalled and reprovisioned on the device. Additional actions to be taken before reinstallation are noted in the table.
364 Good Mobile Messaging Administrator’s Guide

Enabling FIPS Testing
For jailbreak, restore the device to the manufacturer’s settings.
Enabling FIPS Testing
The client-side device cryptographic modules for Good for Enterprise run in a mode that conforms to the FIPS 140-2 Level 1 standard. You can set a policy to enable the handheld to run a suite of FIPS tests each time that Good for Enterprise starts up. Default is Disabled.
Code Description1 Too many password attempts.2 Jailbreak.3 Jailbreak.4 Jailbreak.5 Jailbreak.6 Jailbreak.7 Jailbreak.8 Jailbreak.9 OpsCenter (NOC) connectivity policy.
10 Jailbreak.11 Remote wipe.12 Upgrade denial. Restore permitted version or add version to
policy.13 Jailbreak.14 App checker hardware. Upgrade hardware or add current
hardware to the policy.15 OS version. Restore permitted version.16 Jailbreak.17 Good Mobile Messaging Client version.18 Disclaimer/Custom rule check.19 Multiple copies of GFE exist.20 Application ID not allowed by IT admin.
Good Mobile Messaging Administrator’s Guide 365

Managing the Handhelds
Note: This feature is not supported on all clients. The option is grayed out if not supported.
To enable FIPS testing:
1. In the Good Mobile Control Console, click the Handhelds tab.
2. Click the name of the handheld listed on the Handhelds page.
3. Click the Handheld Info link in the left pane.
4. Click the Enable FIPS Tests button.
With the policy in effect, the handheld will run a suite of tests relating to FIPS when Good for Enterprise starts up. If a test fails, Good will not run. If the policy takes effect while Good for Enterprise is already running, and the testing fails, Good for Enterprise will stop running.
Removing a Handheld from Good Mobile Messaging Server
“Removing a user from Good” is equivalent to removing all the user’s handhelds from Good using the Good Mobile Control Console.
Removing a handheld from Good automatically clears the user’s Good data from the handheld. You are advised of this when you delete the handheld.
You would remove a handheld from Good Mobile Messaging Server and then add it again when an owner’s email address changes.
To remove a handheld from Good Mobile Messaging Server:
1. In Good Mobile Control Console, click the Handhelds tab.
2. Select the handheld(s) to be deleted and select “Delete handheld(s)” from the Apply Action drop-down menu.
366 Good Mobile Messaging Administrator’s Guide

Transferring a Handheld to a New User
You will be warned that the handheld’s data will be cleared, that the handheld will be disabled and removed from the network, and that it will no longer be able to send or receive messages.
If an MDM profile is present on the device, the profile is deleted. That is, device restrictions, configs (WiFi/VPN/EAS), and managed apps are removed (deleted).
3. Click OK to remove the handheld.
To remove more than one handheld at a time, click the check boxes by multiple users before selecting “Delete handheld(s).” You will be prompted once to confirm the multiple deletions.
Important: You must remove a user from Good Mobile Messaging Server using Good Mobile Control Console before the user is disabled, expired, or removed from Active Directory and/or the Global Address List. If a user is not removed from Good Mobile Control Console and the user’s mailbox still exists, messages can still be sent to and from the handheld.
If a user’s mailbox is removed from Exchange before the user is removed from Good Mobile Messaging Server, select the user’s handheld on the Handhelds tab and from the Import/Export drop-down menu select Export Statistics. This will list users missing from the Global Address List or having mailbox access problems. Messages are also logged as warnings in the Event Log. Remove the users from Good Mobile Messaging Server using the console.
Transferring a Handheld to a New User
To transfer a handheld to a new user:
• Retrieve the handheld from the former user.
• Clear the handheld as described in “Erasing (Wiping) Handheld Data” on page 361.
• Remove the handheld from Good Mobile Messaging Server, as described in “Removing a Handheld from Good Mobile
Good Mobile Messaging Administrator’s Guide 367

Managing the Handhelds
Messaging Server” on page 366.
For the new user:
• Prepare the handheld as described in “Preparing New Devices” on page 161.
Viewing and Using Handheld Information
Use the Home tab to display up-to-date information about compliance violations (MDM profile uninstalls), number of enrolled devices (click on device bars for details; top 8 types plus “Other” are displayed, and server status statistics.
Use the Handhelds tab on the console to display updated information about a list of handhelds and their owners, as well as detailed information about each handheld. Information available
368 Good Mobile Messaging Administrator’s Guide

Viewing and Using Handheld Information
includes handheld connection status to the Good Mobile Messaging Server.
Note: Some information is not available on all clients.
Note: To display an iOS device’s Alternate Identifier (its IMEI or hardware model) in the Console, you must enable the iOS configuration profile on the device, with the profile installed.
To view and use handheld information:
1. In the Good Mobile Control Console, click the Handhelds tab.
The Handhelds page displays information such as the name of each device, the email account associated with it, its phone number, status, platform, device model, the policy set currently applied to it, its Good Mobile Messaging Server, its current Client version, S/MIME status, and so on (the columns are configurable).
The second (untitled) column provides compliance indicators. A blank field indicates current device compliance with respect to its currently configured policy settings. An exclamation point indicates that the device is out of compliance with these policies. A question mark indicates that the device is not set up and sync’d, or that the device (e.g., Windows Mobile) is not supported for this feature, or that the device is running an earlier, unsupported Client (less than 1.7.3 for Android; less than 1.9.3 for iOS). For more information on compliance issues with the device, click on the device and check the list of reports for it in the left pane on the device’s Handheld Details page. See also “Compliance Report” on page 299.
2. Use the left panel of filters to display subsets of the complete list, according to Good Messaging Server, compliance, device platform, carrier, and department
3. Click the name of the handheld listed on the Handhelds page.
4. Click the various links in the left pane to display handheld information and to run diagnostic tests and configure logging. For more information, see the following sections.
Good Mobile Messaging Administrator’s Guide 369

Managing the Handhelds
Note that the link for a compliance report is displayed only if a supported device has failed one or more compliance tests. (Refer to “Compliance Report” on page 299.)
You can also use the Good Monitoring Portal to help monitor and manage the handhelds (“Using the Good Monitoring Portal Dashboard” on page 388 and “Using the Good Online License Portal” on page 390).
Use the Home tab to display a report on currently paused handhelds (“Inactive Handhelds” on page 390).
Selecting Users in the Handhelds Tab
When performing a mass email or other action from a GMC that supports this feature, note the following when selecting users/devices:
• You can select individual devices by clicking the checkbox next to their names. To select all devices in the list on the page, click the checkbox at the top of the page. A maximum of 100 devices are displayed in the list per page.
• To display an additional 100 devices, click Next. Note, however, that this deselects the initial 100 devices.
• A link is provided next to the top checkbox which allows you to select all devices registered with the GMC, not just the 100 displayed on any page.
• You can use filters to limit the number of devices displayed, making device selection more convenient.
Scheduling and Generating Device Reports
To generate device reports manually, use the “Select Import/Export Action” dropdown menu on the Handhelds tab:
• Export Handhelds to File
• Export Software
370 Good Mobile Messaging Administrator’s Guide

Viewing and Using Handheld Information
• Export Statistics
• Export Paused Handhelds Report (“Displaying a Paused Handhelds Report” on page 390)
• Export Compliance Report (“Compliance Report” on page 299)
These reports are exported to a csv file in your Downloads folder.
To schedule reports to be generated, use the Add Report Schedule window in Settings > Reports.
Name the report, specify its type and when it is to be generated. Add email addresses for those to receive the report.
In future, click the Suspend radio button to stop scheduled report generation.
Good Mobile Messaging Administrator’s Guide 371

Managing the Handhelds
Handheld Info Link
The Handheld Info link in the left panel for a handheld displays a great variety of device information, including but not limited to the following:
• Name - User’s Active Directory display name
• Email - User’s email address for the account sync’d to this handheld
• Serial number - Handheld’s serial number
• Department - User’s Active Directory department
• Directory status - Current Active Directory status
• Status - Current handheld status (blank (active) or “Inactive”). The amount of inactivity that qualifies the device for an Inactive setting is specified on the Policy Settings page in the Settings tab.
• Policy Set - Policy set assigned to handheld
372 Good Mobile Messaging Administrator’s Guide

Viewing and Using Handheld Information
• Policy Status - “Using the Good Monitoring Portal Dashboard” on page 388 and “Enabled Applications Status Details” on page 379
• Firmware version
• Handheld OS
• Handheld OS version
• Handheld OS language
• Device type
• System Identifier - Unique Good Mobile Control Server ID number for the handheld
• ROM version
For supported devices with MDM enabled (“iOS Configuration” on page 247), lists of installed applications, certificates, and provisioning profiles are included.
Select Refresh Data in the Apply Action drop-down to update the handheld information (iOS MDM). The Console sends a query to the handheld and retrieves data from it. The button is grayed out if the handheld family is not supported, or if the handheld is unavailable due to OS version or policy settings. If the handheld is turned off or is out of its service area, the request will persist until the handheld is able to respond.
For supported devices, from the Apply Action drop-down you can also delete the handheld from GMC, enable FIPS, reset Good for Enterprise on the device, send logs to Good, disable logging, or send a message to the device.
Enabling Logging for Handhelds
Every handheld maintains logged data for use by your authorized service representative. If you are asked to send this data to Good from the Good Mobile Control Console, use the “Send Logs to Good” action from the Apply Action drop-down menu on the handheld’s
Good Mobile Messaging Administrator’s Guide 373

Managing the Handhelds
Handheld Info page. Users can also send logs to Good from their Good for Enterprise Preferences About menu.
Your service representative may ask you to confirm that handheld logging is actually enabled for a device. Handheld logging for new handhelds is enabled as the default setting in the Handheld Logging section of the Settings > Server Information page. You have the option of changing this setting to “Manually enable handheld logging.”
To enable handheld logging, your account must have Superuser rights.
You can:
• Enable logging for existing handhelds
• Enable logging for all newly added handhelds
• Send a handheld’s logs to Good Customer Support
• Enable automatic delivery of Good Mobile Messaging Server, Good Mobile Control Server, and handheld logs to Good Customer Support.
To enable logging for existing handhelds:
1. In the GMC Console, click the Handhelds tab.
2. On the Handhelds page, select the name of one or more handhelds.
3. Select Enable Logging from the Apply Action drop-down menu.
4. Click OK to confirm.
Note: You can also click the name of a handheld on the Handhelds page, click Enable Logging from the Apply Action drop-down menu, and then click OK to confirm.
To enable logging for all newly added handhelds:
1. In the GMC Console, click the Settings tab.
374 Good Mobile Messaging Administrator’s Guide

Viewing and Using Handheld Information
2. In the Handheld Logging section, select “Automatically enable handheld logging (applies to newly added handhelds only).” This setting is enabled by default.
The other option is to require manual enablement for each new device.
3. Click OK to confirm.
To send handheld logs to Good:
1. In the GMC Console, click the Handhelds tab.
2. Click the name of a handheld on the Handhelds page.
3. Select the Send Logs to Good item from the Apply Action drop-down menu on the device’s Handheld Info page.
4. Click OK in the dialog box that specifies the email address.
To enable automatic delivery of logs (Good Support guided troubleshooting):
1. In Good Mobile Control Server, go to the Settings page.
2. Check either or both of the following check boxes under “Opt-in to Good Support guided troubleshooting”:
• Allow access to server logs – Good Mobile Control and Good Mobile Messaging server logs
• Allow access to Good for Enterprise app logs
3. Click Save.
Enabling these options allows the Good Support team to have access to Good Mobile Control and Good Mobile Messaging Server logs and/or Good for Enterprise (handheld) logs, to troubleshoot reported issues. The Good Support team will be able to remotely access customer logs for troubleshooting issues when this setting is enabled. Manual steps to upload logs via the GMC are still supported.
Good Mobile Messaging Administrator’s Guide 375

Managing the Handhelds
With Automatic Log Upload enabled, Good Support pulls logs as needed using a Good Operations Center Web Interface tool. Good Support can retrieve the same logs your Good Admin is able to upload manually.
Note: Good Mobile Control contacts the Good Operations Center periodically (every 4 hours) to check if it has a pending request to upload the logs. If it has a pending request, the Good Operations Center interface tool sends the request to Good Mobile Control and Good Mobile Control then uploads its Good Mobile Messaging/Good for Enterprise Client logs.
Security Link
The Security link in the left panel for a handheld displays the following information:
• Erase state - Not Applicable (no Erase Data issued for this handheld), Erase Data issued, Erase Data confirmed.
Actions on the Security page:
• Lock Handheld - Refer to “” on page 355.
• Erase Data - Refer to “Erasing (Wiping) Handheld Data” on page 361.
• Reset Password - Refer to “Resetting a Device Password or Good for Enterprise Password Remotely” on page 357.
376 Good Mobile Messaging Administrator’s Guide

Viewing and Using Handheld Information
MDM Profile Link
This link applies only to devices without a Good for Enterprise Client on them. This page reports if and when an MDM profile has been installed. It also provides buttons to install an MDM profile and to regenerate an expiration date for self service if the user does not complete the installation process within the time limit set.
Connection Status Link
The Connection Status link in the left panel for a handheld displays the following information:
• Connection status - The state of the connection between devices and the Network Operations Center (IN, OUT, Connection error, Not queried, Not OK (IP address range check failed), Unreachable)
• Pending messages - Messages waiting to be sent to the handheld from the Good Mobile Messaging Server
• Network name - Identifier for the current carrier for the handheld service
Good Mobile Messaging Administrator’s Guide 377

Managing the Handhelds
• Connection History - Color-coded status-bar graphs of the last 24 and 4 hours
For more information, click the link at the bottom of the page to access the Good Portal and its handheld information, described in “Using the Good Monitoring Portal Dashboard” on page 388:
View connection history and pending message status in the Good Monitoring Portal (GMP)
Enabled Applications Status
The status column in this view provides a general summary of the state of the application policy at the present time for the user’s handheld. Each status includes several possible states, with details available by selecting the state and selecting Status Details in the Application Management window. Following are possible values for those states:
• Blank Status - The policy is in the process of being enabled and will be committed when the OK button is selected.
• Not Applied - The policy has been set but has not been applied to the user’s handheld because the user has not yet completed provisioning of the Good for Enterprise software on the handheld or has not yet upgraded to 4.0 or higher.
• In Progress - The policy has been received by the handheld and is being processed by it.
• Waiting on User - The policy has been received by the handheld but is waiting for the user to take some action (e.g., freeing up memory or pressing Install).
• Success - The policy has been applied to the handheld.
• Failed - There was an error which prevented processing of the policy by the handheld.
378 Good Mobile Messaging Administrator’s Guide

Viewing and Using Handheld Information
Enabled Applications Status Details
More detailed information about an application status is displayed in the Status Detail column. Each general status summary can have several different detailed statuses. Policy status is always time-stamped with the change to the current state. Following are possible detailed statuses, grouped by general status:
Not Applied
• User not connected - The user has not connected to the Good Mobile Messaging Server by setting up a handheld with the Good for Enterprise software.
• User has not upgraded GoodLink Software to 4.0 (or higher) version - The user needs to upgrade his/her handheld to GoodLink Software version 4.0 (or higher).
In Progress
• Pending notification to handheld - The policy is waiting for the Good Mobile Messaging Server to process the policy and notify the handheld.
• Notified handheld. Pending response from handheld. - Good Mobile Messaging Server has notified the handheld of the policy and is waiting for status update responses from the handheld.
• Download in progress - The handheld is currently downloading the application from Good’s operation center.
• File verification in progress - The handheld is verifying the integrity of the downloaded application.
• Install in progress - The handheld is currently installing the application on the handheld.
• Scheduled for download - The policy is scheduled for download by the handheld at a later time. Policies that are globally applied have this status.
Good Mobile Messaging Administrator’s Guide 379

Managing the Handhelds
Waiting on User
• Waiting for user to download or accept policy - The policy has been received by the handheld and the handheld is waiting for the user to choose to download or accept the policy. Policies that are Optional will have this state.
• Download deferred - The user has deferred the application download.
• Waiting for user to install - The application has been downloaded and is ready to be installed. The handheld is waiting for the user to install the application.
• Install deferred - The application has been downloaded and is ready to be installed. The user has deferred installation.
• Waiting for user to free memory - The user needs to free up memory on the handheld for the policy to continue to be processed.
Failed
• Codesign verification failure - A problem occurred during the verification of the application that was signed by Good Technology.
• Decryption failure - A problem occurred trying to decrypt the downloaded application.
• Insufficient handheld disk space - The handheld does not have enough space to process the application policy.
• Download failure - A problem occurred when attempting to download the application from the Good Webstore.
• Install failure - A problem occurred when attempting to install the downloaded application.
• Insufficient handheld memory - The handheld does not have enough memory to process the application policy.
• User cancelled - The user cancelled the processing of the policy.
380 Good Mobile Messaging Administrator’s Guide

Viewing and Using Handheld Information
• File not found in Webstore - The policy being processed could not be found on the Good Webstore.
• Webstore determined that this application policy is incompatible for the user's handheld type - The Good Webstore prevented the download of the application because the application is incompatible with the user’s handheld type.
The Applications link lists the package name, version, size, type, source, status, and actions (install, uninstall) for every software package installed on the device. If the iOS device is to be “managed” (take advantage of MDM policy settings, the device must contain an enabled MDM profile (refer to “iOS Configuration” on page 247).
Click the Export button and choose an application such as Excel, to which you can export the information on-screen.
Applications Link
The Applications link lists the package name, version, size, type, source, status, and, for “Managed” devices, actions (install, uninstall) for every software package installed on the device. If the iOS device is to be managed (take advantage of MDM policy settings), the device must contain an enabled MDM profile (refer to “iOS Configuration” on page 247).
Click the Export button and choose an application such as Excel, to export the information on-screen into a file.
For managed devices, click the install/uninstall link in the Actions column to add or remove the custom software to or from the device.
Good Mobile Messaging Administrator’s Guide 381

Managing the Handhelds
OTA Link
The OTA page provides the following information:
• OTA state - Unknown, Enabled, Provisioning_Failed, Provisioning_Denied, Provisioned, Erase_Data_Issued, Erase_Data_Confirmed, Erase_Data_Error (refer to “Provisioning State (aka OTA State)” on page 399)
• OTA PIN
• OTA PIN state*
• OTA PIN expire time
• EMail - Email address for the handheld
• Last provisioned - Date and time
• OTA download URL - Source for application download
*For “OTA PIN state,” the following values are possible:
382 Good Mobile Messaging Administrator’s Guide

Viewing and Using Handheld Information
Refer to “File Handling” on page 217 for more on PIN expiration and reuse.
Actions on the OTA page:
• To resend the OTA welcome email message, click the Resend Email button.
• To regenerate the OTA PIN, click the Regenerate Provisioning PIN button. Refer to “Generating New User PINs” on page 325.
Status DescriptionValid PIN is valid and can be used.Expired PIN has expired. IT must generate a new PIN for any
new OTA setup.Reuse exceeded At least one OTA setup has taken place on the handheld.
The PIN cannot be reused until it has been regenerated. (Applicable if the “Disallow PIN after first-time use” check box is checked on the OTA PIN Policies tab.)
Expired and reuse exceeded
The PIN has expired. The PIN cannot be reused until it has been regenerated.
Good Mobile Messaging Administrator’s Guide 383

Managing the Handhelds
Messaging Link
The Messaging page provides information including the following:
• Service status - This field serves as a collective indicator for the health or problems of the service details displayed at the bottom of the page.
• Status message
• Paused
• Paused reason
• Suspend state
• Flow controlled
• Good Mobile Messaging Server
• Good Mobile Messaging Server version
• Good Mobile Messaging Server language
384 Good Mobile Messaging Administrator’s Guide

Viewing and Using Handheld Information
• Good for Enterprise handheld version
• Email server type
• Email server
• Email server version
• SMTP address
• Mailbox address (DN)
• Alias
• Email signature
• Enabled time
• Last key rotate time
Messaging Statistics
• Total messages sent to and received from the handheld by Good Mobile Messaging Server (messages can be any type, including control)
• Date of last messages sent to and received from the handheld by Good Mobile Messaging Server (messages can be any type, including control)
• Total Email, Calendar, Contacts (Address Book), Notes, and Tasks messages sent to and received from the handheld by Good Mobile Messaging Server (messages can be any type, including control)
• Date of last Email, Calendar, Contacts (Address Book), Notes, and Tasks messages sent to and received from the handheld by Good Mobile Messaging Server (messages can be any type, including control)
• Total filtered (blocked) email for the handheld
Note that all statistics are accumulated by the server.
Since messages can be sent in batches, undisplayed messages (e.g., “Mark Read”) and control messages between handheld and server
Good Mobile Messaging Administrator’s Guide 385

Managing the Handhelds
are included in the statistics, these totals are useful mostly to determine general activity levels.
Click the a button to update. Click Clear Stats to return all cumulative values to zero or to default. Click Export to write the statistics to a file.
Service Details
Connection State: For each handheld, there are two Good Mobile Messaging Server connection states (“Connected” or “Not Connected”) for each service type:
• Attachments (Email Attachments)
• Calendar
• Contacts
• Public Folders (Public d Folders)
• Notes
• Admin
• Tasks
• GAL (Global Address List Lookup)
Connected - A user's Service Type will show as “Connected” if:
• The user is Good for Enterprise-enabled for this service type.
• The user is provisioned for this service type.
Not Connected - A user's service type will show as “Not Connected” if:
• The user is not Good for Enterprise-enabled for this service type.
• The user is not set up for this service type.
386 Good Mobile Messaging Administrator’s Guide

Viewing and Using Handheld Information
For detailed information, go to http://www.good.com/faq/17222.html.
Flow Control Status: Flow Control is a process used by Good Mobile Messaging Server to adjust data flow to the device, to ensure that the device can handle the amount of incoming traffic. Flow Control may be used when the device is not able to handle the incoming flow of messages/data all at once, such as when a user is out of data coverage or in slow or marginal coverage for a long time. If a user’s status is “Yes” for Flow Controlled, the Good Mobile Messaging Server is holding off outgoing traffic until the device has caught up. All messages will then be delivered to the handheld.
Applications
You can update the Good for Enterprise software package and software policies wirelessly for all devices using a particular policy. Setting this up is described in “Managing Wireless Software Deployment” on page 317. The Applications link on the Handheld page displays tables for packaged and unpackaged applications associated with a particular policy for a device.
Good Mobile Messaging Administrator’s Guide 387

Managing the Handhelds
Using the Good Monitoring Portal Dashboard
To quickly list and check the connection status of user handhelds, log in to the Good Monitoring Portal at http://www.good.com/gmp.
When you log in, the Good Monitoring Portal (GMP) home page is displayed.
If the Good Server you are interested in isn’t displayed in the dashboard, refer to “Adding a Server to the Dashboard” on page 433.
The dashboard displays the number of users/handhelds currently added to the Server. To display a list of the users, together with
388 Good Mobile Messaging Administrator’s Guide

Viewing and Using Handheld Information
information about their handhelds, click on the value displayed in the Users column.
A user list with the following information for the user handheld is displayed:
• Email address
• Handheld type
• Serial number
• Man/Phone number
• Network Carrier
• ROM Type
• Connection status - In Coverage, Idle Coverage, Marginal Coverage, Out of Coverage
Search the list using the search bar at the top of the list. Sort the list by clicking on the column headings. Export the list to a text file using the Export Entire Dataset button at the bottom of the page.
Good Mobile Messaging Administrator’s Guide 389

Managing the Handhelds
Using the Good Online License Portal
Used in conjunction with the Good Monitoring Portal, the Good License Portal allows you to quickly and effectively manage, track, and monitor server licenses for Good software products and services. Whenever you register for a Good server evaluation or purchase, you receive an email with instructions on installing the server software through the Good Portal. You can then use the Good License Portal to monitor the status of your server licenses and also automatically assign newly provisioned handhelds to a specific server license. In those cases where particular data plans are required by a device carrier, the License Portal will display which handhelds require such plans.
Inactive Handhelds
Define “inactive” using the Policy page on the Settings tab.
If a handheld has been inactive for the time that you specify, an alert will be displayed at the top of the device’s Handheld Info page on the Handhelds tab. In addition, the handheld’s status will be displayed as inactive in the Status column on the Handhelds tab.
Displaying a Paused Handhelds Report
To display a list of handhelds that have been paused with respect to Good Mobile Messaging Server synchronization, click the “View Paused Device report” link on the Home tab.
390 Good Mobile Messaging Administrator’s Guide

Viewing and Using Handheld Information
Paused Reason: The Good Mobile Messaging Server can pause a handheld for a variety of reasons. This is normally a temporary condition that arises when the Server is having trouble communicating with the handheld user's mailbox. When a handheld is Paused, it will not receive incoming data. Pause intervals can be anywhere from 5 to 60 minutes depending upon the situation. After the first Pause interval, the Good Mobile Messaging Server will re-attempt communication. If the situation persists, it will pause the handheld for another 5 to 60 minutes, and continue the pauses until the situation is resolved. Then the handheld's incoming data should flow with no messages lost. For detailed information on the reason for the pause, go to http://goodpkb.force.com/PublicKnowledgeBase/articles/Answer/1670.
To export the report to a csv file, select “Export Paused Handhelds Report” from the Import/Export drop-down on the Handhelds tab. The file columns will be:
Name, Email, Phone, Messaging Server, Paused, Paused Reason, Paused Time, Notes, IMEI
Running Mailbox Diagnostics
When a Good for Enterprise user/handheld is added, Good Mobile Control Server tests access to the user’s mailbox by simulating Good Mobile Messaging Server actions and accessing the mailbox
However, your environment may have changed since that user was added. You can run these tests again by doing the following:
1. On the Good Mobile Control Console Handhelds tab, select the user/handheld to be tested.
2. Select Run Mailbox Diagnostics from the Apply Action drop-down menu.
3. Click OK to start the mailbox diagnostics.
Tests are run in the following order. Any failure returns an error dialog on the Console.
Good Mobile Messaging Administrator’s Guide 391

Managing the Handhelds
• Open user mailbox.
• Create a dynamic profile and access the user mailbox.
• Create a CDO session and access the Calendar folder
• Attempt to update the user mailbox, to see if overquota has been reached
If the tests succeed, a message is displayed:
Mailbox diagnostics passed for selected user(s)
Exporting Handheld Information to a File
You can generate a file containing all of the handheld information of all of the users listed in the Good Mobile Control Console.
To generate the file:
1. From the “Select Import/Export Action” drop-down menu in the Handhelds tab in the Good Mobile Control Console, select “Export Statistics.”
A csv file will be generated containing a list with the following header, followed by data in order for all users (whether displayed in a filtered list or not). You’ll be prompted for file name and location if your browser is configured to do so.
Display Name, Compliance, Alias Name,Serial No,Server Name,Handheld ID,Network ID,Phone,Sta-tus, Handheld Type,Good Intranet Server,Policy-Set,DN,S/MIME,Good Mobile Access,PolicySet GUID,GMM Server GUID,GMI Server GUID, Handheld GUID,IMEI, Good Messaging Client Version,Last mes-sage received,Last message sent,Email messages sent,Email messages received,Last email message received,Last email message sent,Filtered email,Calendar messages sent,Calendar messages received,Last Calendar message received,Last Cal-endar message sent,Address Book messages sent,Address Book messages received,Last Address Book message received,Last Address Book message
392 Good Mobile Messaging Administrator’s Guide

Viewing and Using Handheld Information
sent,Note messages sent,Note messages received,Last Note message received,Last Note mes-sage sent,Task messages sent,Task messages received,Last Task message received,Last Task mes-sage sent,Messages sent,Messages received,Handheld Policy State,Exchange Server,Exchange Server Ver-sion,Good Messaging Server Version,Handheld OS Version,Handheld ROM Version,Network Name,Firmware Version,Good Messaging Enabled Time,Good Messaging Provisioned Time,Provisioning state,OTA PIN State,OTA PIN Expire Time,Compliance Rule Error,Compliance Rule ErrorMsg,Good Messaging Cli-ent Language,Handheld OS Language,Department,Hand-held Logging,Email,Device Name,Serial Number,MAC#,Build Version,Available Device Capac-ity,Data Roaming (Current Status),iOS Configura-tion Policy Status,Passcode Compliant,Passcode Compliant With Profiles,Passcode Present,Client Type,Title,Location,Mail Server
You can use this file later if necessary to import users.
You can also export handheld user information to a file in CSV format using the command-line utility gmexportstats, installed with Good for Enterprise, for backup and audit use. You can use Windows Scheduler to run the utility on an automated basis. You can export the following information:
• User list
• User statistics
• User software policy settings and status
Note that ROM version is exported as a number. For more information on the ROM and handheld, refer to Supported Devices in the Good Monitoring Portal (“Using the Good Monitoring Portal Dashboard” on page 388).
Good Mobile Messaging Administrator’s Guide 393

Managing the Handhelds
To export user information to a file from the command line, refer to “ExportPolicySets” on page 576.
Export Columns
Column Data DescriptionName in GMC
Display Name
[Client display name] Client's display name from AD. Name
Compliance Non-compliant/Pending/Compliant
Compliance status, based on results of compliance rules set by policy. “Pending” indicates the server is waiting for a response from the device.
(Unnamed column between check boxes and Name)
Alias Name [Client Alias ID] Client's alias ID from AD. This is not necessarily the same as their login id. Although it is in most cases.
Alias
Serial No [Various types of UUID] Unique identifier for a device. Can be a hex string, WPID, IMSI, MEID, ESN, MAC…, depending on device. E.g., Good for Enterprise has access to the device GUID but not the serial number for iOS.
Identifier
Server Name Which GMM server the client is assigned to.
GMM Server
Handheld ID [Device model name] Device model name if known. Device Model
Network ID [Carrier company]/iPhone Network/Windows Phone Network
Name of carrier company. If this cannot be collected, a generic network name is applied. In the Console, this is labeled “Network Name” rather than “Network ID.”
Carrier
Phone [Phone number] Client's phone number (entered manually during setup)
Phone #
394 Good Mobile Messaging Administrator’s Guide

Viewing and Using Handheld Information
Status [BLANK]/Inactive Blank unless the inactivity timer set on the Console has expired (currently 12 weeks). The timer starts with last message received or sent.
Status
Handheld Type
[BLANK]/Android/Apple iPhone OS
Type of device. Shows iPhone even for iPads. Blank if device is Windows Phone.
Platform
Good Intranet Server
N/A Legacy column N/A
PolicySet [Policy name] Security policy assigned to client's device
Policy Set
DN [Distinguished Name] Full distinguished name for the client
(Not shown)
S/MIME Enabled/disabled Reflects the S/MIME policy setting on the Console GFE Authentication page.
S/MIME
Good Mobile Connection
N/A Legacy column N/A
PolicySet GUID
[Policy Set GUID] Good's unique identifier for the security policy applied to the client's device
(Not shown)
GMM Server GUID
[GMM Server GUID] Good's unique identifier for the GMM that the client is assigned to
(Not shown)
GMI Server GUID
N/A Legacy column N/A
Handheld GUID
[Handheld GUID] Good's unique identifier for the client's handheld
(Not shown)
IMEI [Handheld IMEI] IMEI number of the handheld, if known
Alt. Identifier (data is 'IMEI: [IMEI]')
Good Messaging Client Version
[Good Messaging Client Version]
Good Messaging Client Version installed on handheld
GMM Client Version
Column Data DescriptionName in GMC
Good Mobile Messaging Administrator’s Guide 395

Managing the Handhelds
Last message received
[Date and Time] Date and time the last message of any type was sent from the handheld to the server (NOTE: report is from the SERVER's viewpoint)
(Not shown)
Last message sent
[Date and Time] Date and time the last message of any type was synced to the handheld from the server (with GFE open, not just the no. of messages on the icon)
(Not shown)
Email messages sent
[INT] The number of emails sent to the device
(Not shown)
Email messages received
[INT] The number of emails received from the device
(Not shown)
Last email message received
[Date and Time] Date and time the last email message was sent from the handheld to the server
(Not shown)
Last email message sent
[Date and Time] Date and time the last email message was synced to the handheld from the server (with GFE open, not just the number of messages on the icon).
(Not shown)
Filtered email
[INT] Number of “Heading Only” and “Sent item” emails synced to the device.
(Not shown)
Calendar messages sent
[INT] The number of calendar messages sent to the device
(Not shown)
Calendar messages received
[INT] The number of calendar messages received from the device
(Not shown)
Last Calendar message received
[Date and Time] Date and time the last calendar message was sent from the handheld to the server
(Not shown)
Last Calendar message sent
[Date and Time] Date and time the last calendar message was synced to the handheld from the server
(Not shown)
Column Data DescriptionName in GMC
396 Good Mobile Messaging Administrator’s Guide

Viewing and Using Handheld Information
Address Book messages sent
[INT] The number of address book messages sent to the device
(Not shown)
Address Book messages received
[INT] The number of address book messages received from the device
(Not shown)
Last Address Book message received
[Date and Time] Date and time the last address book message was sent from the handheld to the server
(Not shown)
Last Address Book message sent
[Date and Time] Date and time the last address book message was synced to the handheld from the server
(Not shown)
Note messages sent
[INT] The number of note messages sent to the device
(Not shown)
Note messages received
[INT] The number of note messages received from the device
(Not shown)
Last Note message received
[Date and Time] Date and time the last note message was sent from the handheld to the server
(Not shown)
Last Note message sent
[Date and Time] Date and time the last note message was synced to the handheld from the server
(Not shown)
Task messages sent
[INT] The number of task messages sent to the device
(Not shown)
Task messages received
[INT] The number of task messages received from the device
(Not shown)
Last Task message received
[Date and Time] Date and time the last task message was sent from the handheld to the server
(Not shown)
Last Task message sent
[Date and Time] Date and time the last task message was synced to the handheld from the server
(Not shown)
Column Data DescriptionName in GMC
Good Mobile Messaging Administrator’s Guide 397

Managing the Handhelds
Messages sent
[INT] The total number of messages of any type sent to the device
(Not shown)
Messages received
[INT] The total number of messages of any type received from the device
(Not shown)
Handheld Policy State
NOTAPPLIED_USER_NOT_CONNECTED/INPROGRESS_PENDING_HANDHELD_NOTIFICATION
Blank if the policy has been applied.
(Not shown)
Exchange Server
[Exchange Server FQDN] The FQDN of the client's Exchange server
(Not shown)
Exchange Server Version
[Exchange Server Version] The version of the client's Exchange server
(Not shown)
Good Messaging Server Version
[GMM Version] The version of the GMM that the client's handheld is on
(Not shown)
Handheld OS Version
[Handheld OS Version] The handheld's OS version (Not shown)
Handheld ROM Version
[Handheld ROM Version] The handheld's ROM version. Usually the same as 'Handheld OS version'.
ROM Version
Network Name
[Carrier company]/iPhone Network/Windows Phone Network
Name of carrier company. In the handhelds Export file, the column is named Network ID.
Carrier
Firmware Version
[Handheld Firmware Version]
Firmware version of the handheld. Usually the same as 'Handheld OS version', or in the case of iOS devices, iOS model type and 'Handheld OS version
'(Not shown)
Good Messaging Enabled Time
[Date and Time] Date and time the handheld was added to the GMC
(Not shown)
Column Data DescriptionName in GMC
398 Good Mobile Messaging Administrator’s Guide

Viewing and Using Handheld Information
Provisioning State (aka OTA State)
Possible values for the exported item “Provisioning State,” which is labeled “OTA State” on the Handheld detail page:
Good Messaging Provisioned Time
[Date and Time] Date and time the client ran through the GFE client setup and connected to the service
(Not shown)
Provisioning state
PROVISIONED/ENABLED
Provisioning state of the handheld. Either PROVISIONED if the client has successfully completed the GFE client setup, or ENABLED if this is still pending
(Not shown)
OTA PIN State
Valid/Expired Whether the OTA PIN is still valid (and able to be used to provision the GFE client) or expired.
(Not shown)
OTA PIN Expire Time
[Date and Time] The date and time the OTA PIN expired/will expire
(Not shown)
Compliance Rule Error
[BLANK]/SUCCESS Whether compliance rules have been successfully applied to the handheld.
(Not shown)
Compliance Rule ErrorMsg
[BLANK]/[Error message]/Success
The reason for a compliance rule failure, if applicable.
(Not shown)
Good Messaging Client Language
EN Two character country code for GFE client language. Always EN.
(Not shown)
Handheld OS Language
[Two character country code]
Two character country code for handheld OS language.
(Not shown)
Department [Department name] Client's department, from AD. Department
Handheld logging
Enabled (in our environment)
Whether handheld logging is enabled or disabled. Always 'enabled' in our environment.
(Not shown)
Column Data DescriptionName in GMC
Good Mobile Messaging Administrator’s Guide 399

Managing the Handhelds
“Service Not Enabled” - The server was never provisioned by the Client. For IPhone and Android, this is expected for the Task and Notes service. Recovery: Open the GMC and delete/re-add the user. Have user OTAP/Provisioned device.
“Failed To Recover” - During Good Messaging startup, the Server was unable recover the session data from the database. Possible causes:
• Database is gone (someone had deleted the database or directory)
• The connection ID was not found in the database.
Recovery: Delete/re-add the user. Have user set up device again.
"User Not Enabled” - The Config Database indicates the user is not enabled. A disconnect request will be sent to the device. The information comes from the Console. Recovery: Delete/re-add the user. Have user set up device again.
"Incorrect Server" - The user was not found on this server. The Console has stale data for the user. Recovery: Run Console reconciliation tools.
"Sync State Is Corrupted" - The database was corrupted and the user was sent a disconnect message. Possible causes:
• Database not in consistent state
• LSN error. This can be caused by antivirus scanning, backup software, or any software that might be locking the file when the Messaging Server tries to write to the database.
Recovery: Set up the device again.
"Never Connected" - The user has not set up the device. The user was added to the Console, but has not provisioned.
400 Good Mobile Messaging Administrator’s Guide

Generating (Exporting) a List of Users
"Client Disconnected" - The client side requested the Messaging Server to disconnect its service. This would normally be received by the Messaging Server after a wipe was requested and sent to the device. Recovery: Delete/re-add the user. Have user set up device again.
"Running" - The device is running properly without issue.
"Disabled" - The service is not enabled. See "Service Not Enabled"
"Failed" - Fatal error when trying to start up the user. User was sent a disconnect message. Recovery: Delete/re-add the user. Have user set up device again.
"Disconnected" - The user is informed they are disconnected. The user is no longer enabled and should be deleted. Recovery: Delete/re-add the user. Have user set up device again. This condition may occur, for example, if the device has been wiped.
Generating (Exporting) a List of Users
You can generate a file containing a list of all the handheld users in the Exchange site, together with their handheld serial numbers and the name of the Good Mobile Messaging Server to which each handheld has been added.
You can use this file with the Import command to add users to a Good Mobile Messaging Server later. The file is also Excel-friendly.
To generate the file:
1. From the “Select Import/Export Action” drop-down menu in the Handhelds tab in the Good Mobile Control Console, select “Export Handhelds to File.”
Good Mobile Messaging Administrator’s Guide 401

Managing the Handhelds
A file will be generated containing a list in the following format. You’ll be prompted for file name and location if your browser is configured to do so.
Display Name,Compliance,Alias Name,Serial No,Server Name,Handheld ID,Network ID,Phone,Sta-tus,Handheld Type,Good Intranet Server, Policy-Set,DN,S/MIME,Good Mobile Connection, PolicySet GUID,GMM Server GUID,GMI Server GUID,Handheld GUID,IMEI,Client Type
Display Name is the display name of the handheld user. If the display name has a comma in it, the name will be enclosed in quotation marks. If no display name is defined, the comma alone is included in the line.
Alias Name is the mailbox name (alias) of the handheld user
Serial No is the electronic serial number of the handheld.
Server name is the name of the Good Mobile Messaging Server that is to manage synchronization for the user/handheld.
Handheld ID is a value filled in during the setup process and used by the Network Operations Center.
Network ID is a value filled in during the setup process and used by the Network Operations Center.
Phone is the handheld’s phone number.
Handheld Type is iOS, Android, Treo, PPC, Smartphone.
OTA defines whether the user is enabled for OTA setup.
Policy provides the name of the policy set applied to the handheld
Software provides the source of software policy settings (Unassigned, group name, or custom for the user)
DN is the Exchange distinguished name for the user mailbox.
402 Good Mobile Messaging Administrator’s Guide

Exporting Software Information to a File
Exporting Software Information to a File
To export software information for all handhelds, select “Export Software” from the “Select Import/Export Action” drop-down menu in the Handhelds tab in the Good Mobile Control Console. You’ll be prompted for file name and location if your browser is configured to do so.
The file contains the following line of information for each handheld, listing the enterprise software managed by the current policy applied to the handheld:
Server Name,CurGLSServerVersion,Display Name,Alias Name,DN,Serial No,Handheld Type,Handheld Type Fam-ily,Type,Enabled,Handheld Family,Application ID,GUID,Application Name,Version,Status Time,Sta-tus,Low Level Error,Message,Installation Manda-tory,Launch after Download
Changing a User’s Good Mobile Messaging Server, Exchange Server, Mobile Control Server, or User Name
A user’s email name, alias, or address may change. In addition, the user’s mailbox may move to a different Exchange server, within the current Exchange site or outside of it. Finally, you might need to assign a user’s handheld to a different Good Mobile Messaging Server. The following sections describe how to manage these changes.
Changing a User’s Display Name, Alias, or Email Address
If the display name for a mailbox is changed in Exchange, you do not need to update Good Mobile Messaging Server to reflect the change. Good Mobile Messaging Server will update automatically.
Good Mobile Messaging Administrator’s Guide 403

Managing the Handhelds
If you make multiple changes for users, you can select “Export Handhelds to File” from the “Select Import/Export Action” drop-down menu in the Handhelds tab in the Good Mobile Control Console. Provide a temporary file name. This will cause all user accounts to be examined and changes will be reflected in the console.
If a user mailbox is deleted and recreated, remove the handheld from Good Mobile Messaging Server and set up the handheld again with the updated mailbox.
Timing with Respect to Changing a User’s Email Address
When you change a user’s email address, the change may not be noted by the GMC or GC for up to two hours. It may not be noted by the Good Operations Center (NOC) for up to four hours.
Example:
Assume a device A with email A in GMC A, and change email A for the device A to email B. 3. GMC sees the email change, but the NOC may not have seen it yet because the NOC is informed of email changes every 2 hours, or when the first 500 handhelds have a new email address (default batch size), whichever comes first.
If device A is now moved to GMC B using the Move Handheld feature, before the NOC is informed, the email change for this handheld will not be complete at this point. The NOC will not be notified.
If this scenario is encountered, you can rectify the situation by restarting GMC B. The GMC does a standard check to determine whether any handhelds have had their email address changed where the NOC hasn’t been notified yet. In this case the GMC will detect device A and send a notification to the NOC so that in about 5 minutes after GMC restart, the email change for device A will be completed with the NOC informed.
404 Good Mobile Messaging Administrator’s Guide

Changing a User’s Good Mobile Messaging Server, Exchange Server, Mobile
Moving a User’s Mailbox to a Different Exchange Server
If a GFE user mailbox is moved to a different Exchange server of the same version within the same Exchange site, no changes are necessary to maintain handheld synchronization.
Warning: Do not use the Exmerge utility to move user mailboxes. Using Exmerge to move a mailbox will lead to setting up the user handheld again.
Note: You cannot move user accounts between on-premise Exchange Servers and Exchange Online (Office 365).
Moving a User’s Mailbox to a Different Version Exchange Server (as part of a GMM/MAPI to GMM/EWS move)
When transitioning to Exchange 2010/2013/2016 from an older version of Exchange, the Exchange environment will be in “Coexistence Scenario” until deprecation of the legacy version. This coexistence scenario allows the Exchange administrators to perform mailbox moves from the legacy Exchange platform to the new Exchange platform.
For your deployments of GFE against Exchange 2007/2010, you will need to utilize a new Server version of the GMM which utilizes EWS (that is, GMM version 8.0 or higher) to replace the GMM version 7.x utilizes MAPI for connectivity to Exchange. A MAPI GMM cannot be configured to communicate with Exchange 2007/2010 and 2013/2016 at the same time, and the EWS GMM does not support Exchange 2007.
As part of the planned migration of user mailboxes to Exchange 2013/2016, the steps provided here must be taken to allow GFE-enabled users to continue synchronization without requirement of a re-provisioning process.
This procedure applies to enterprises utilizing GFE with MAPI connectivity (GMM 7.x) against Exchange 2007 who are migrating
Good Mobile Messaging Administrator’s Guide 405

Managing the Handhelds
user mailboxes to Exchange 2010, 2013, or 2016 and against Exchange 2003 who are migrating mailboxes to Exchange 2010.
Note: Exchange 2003 to 2013/2016 is not a supported co-existence scenario by MSFT, and GFE using EWS is not supported against Exchange 2007.
As part of the user-mailbox migration to a new Exchange platform, GFE-enabled users must be moved from legacy MAPI-GMM 7.x Servers to new EWS-GMM 8.1 (or higher) servers that utilize Exchange Web Services to replace MAPI.
Configuration and Preparation of GFE Implementation
1. Create a new GoodAdmin service account with mailbox on Exchange 2013/2016.
2. Grant the ApplicationImpersonation permission to the new GoodAdmin service account. (Refer to “Enable Exchange Online Impersonation Permission” on page 86.)
3. Within the currently deployed GMC server, add the newly created service account as a Service Administrator from the Roles tab.
4. Utilizing the newly created GoodAdmin account, install Good’s 8.1.x GMM server on a new server (“Installing Good Mobile Messaging Server” on page 122). Note: In-place upgrade of GMM 7.x to 8.x is NOT possible.
a. The Server must be configured with the new GoodAdmin account as Local Administrator and logon as a service right granted to new GoodAdmin.
b. During installation, the new 8.x GMM server should be config-ured to use the same parent GMC server as the currently deployed 7.x GMM servers. There is no requirement to install a second GMC server. Adding the newly created account to the Service Administrator role will allow the GMM to authenticate to the GMC without needing to specify different credentials.
5. Verify the environment is configured properly for the new EWS-GMM solution by adding a non-GFE-enabled user whose mailbox
406 Good Mobile Messaging Administrator’s Guide

Changing a User’s Good Mobile Messaging Server, Exchange Server, Mobile
resides on Exchange 2013/2016 and successfully completing the provisioning process. This test can be done using a currently enabled GFE user, although this will require deletion of the device within the GMC and re-adding the user while selecting the newly installed EWS-GMM server. This process will require the end user to delete the application, re-install, and re-provision with the newly provided 15-digit pin.
Exchange Mailbox Migration and Move of Users to New GMM Server
1. Initiate the mailbox move request from Exchange Management Shell or ECP.
2. Upon full completion of the user mailbox migration take the following steps:
a. Within the GMC portal, initiate a “Change Messaging Server” for the user device(s) associated with the Exchange user mail-box that was moved in the previous step.
b. If multiple mailboxes were migrated in a batch migration, selection of the devices associated with these mailboxes may be done by selecting all of the associated devices and performing the “Change Messaging Server” option from the “Apply Now” drop-down box within the GMC.
c. Good Professional Services is available to aid in streamlining this process for large clients who may be migrating large num-bers of users in single batches. This process requires engage-ment with the team performing the Exchange user mailbox migrations.
3. Once the change of messaging server is initialized within the GMC for the migrated mailboxes, the users migrated will be presented with a pop up screen stating the device must re-synchronize with its messaging server. This process can take 1 to 15 minutes depending on the size and number of items in the migrated users Exchange mailbox.
Good Mobile Messaging Administrator’s Guide 407

Managing the Handhelds
Notes: Steps must be followed in this order to guarantee successful migration and prevent users from experiencing synchronization issues on the devices. The change of GMM messaging server should be done immediately after the verified successful move of the Exchange user mailbox to the new version. Devices will not synchronize data post-Exchange mailbox migration until the appropriate steps have been taken to move the device to the new EWS-GMM server.
Moving a Handheld to a Different Good Mobile Messaging Server
To change the Good Mobile Messaging Server that will manage a handheld, the following prerequisites are required:
• All Server software must be version 6.0 or higher.
• Moving handhelds from 7.0 or higher MAPI servers to 8.x EWS servers is supported.
• The handheld’s mailbox must not be over quota.
• The administrator must have the GMC rights in their role to move users between GMM Servers.
• The source and destination Servers must both be functioning.
• Both Servers must be visible and available in the Good Mobile Control Console.
Warning: Do not use the Good Mobile Control Console to move users from Good Mobile Messaging Server version 6.4 or earlier to GMM 8.1.x, or to move users from Good Mobile Messaging Server versions earlier than 6.4.1.x to version 6.4.2. To move users, upgrade the Good Mobile Messaging Server itself to the new 7.x or higher version and the users will be included in the upgrade, or delete the users from the old Server and add and reprovision them on the new Server.
408 Good Mobile Messaging Administrator’s Guide

Changing a User’s Good Mobile Messaging Server, Exchange Server, Mobile
For moves between 7.x and 8.x, use the following table. Unsupported moves are grayed out in the GMC “Destination server” dropdown menu when changing the messaging server..
To move the handheld, follow this procedure. Note: Be advised that the end user will receive a pop-up message indicating the status of their handheld account move.
1. In the Good Mobile Control Console list of users on the Handhelds tab, select the handheld(s) to be moved.
2. From the Apply Action drop-down menu, choose “Change Messaging Server.” This option is also available on the individual handheld pages.
3. Choose the new Good Mobile Messaging Server to manage the selected user handhelds.
4. Click OK.
The handhelds are transferred to the new Server. This happens immediately; it cannot be deferred or scheduled. In the case of multiple handhelds, they are moved in chunks.
SourceMAPI BDB (7.x)
EWS BDB (8.0)
EWS SQL (8.1)
MAPI BDB (7.x) Yes No YesEWS BDB (8.0) No Yes YesEWS SQL (8.1) No Yes Yes
Good Mobile Messaging Administrator’s Guide 409

Managing the Handhelds
Each handheld will be paused and cease synchronization until its move is complete. A dialog will display the progress of the moves, handheld by handheld.
During the moves, Good Mobile Control Console functions for the handhelds (such as changing to a different Server, regenerating the OTA PIN, sending handheld logs, locking out the handheld user, erasing the handheld, or enabling/disabling Good for Enterprise Intranet) will be blocked.GMC Console status display for the handheld may not be up-to-date. To check handheld status, display the Paused User list. Once a move is complete, the handheld resumes synchronization and is removed from the Paused list.
When migrating from a MAPI version of the GMM (version 7.x) to the EWS 8.1 GMM, user data cannot be moved and must be recreated from the Exchange server. Within the GMM this is called a “re-sync.” Users do not have to delete their app and get a new provisioning PIN, but when their account is moved from the MAPI GMM (version 7.x) to the 8.1 EWS GMM, they will be instructed (on the handheld) that their data needs to be recreated and they will need to click the “OK” button to begin this procedure.
The user’s email is rebuilt starting with the 100 latest emails and working backward. Their inbox and other synched folders will be synchronizing over time. Bookmarks stored within the Good Secure Browser are not deleted during the move. Also documents stored within the document repository are not deleted.
When migrating from an EWS version of GMM (version 8.0) to the EWS 8.1 GMM, user devices will simply be paused while the move is accomplished.If the operational status of the destination Server is anything other than “Running,” a warning dialog is displayed and the move is cancelled. Retry the operation when the Server is operational again.
410 Good Mobile Messaging Administrator’s Guide

Changing a User’s Good Mobile Messaging Server, Exchange Server, Mobile
If an error is encountered and only one handheld is being transferred, the error will be displayed. If multiple handhelds are being transferred, any errors are written to a log file; a warning dialog provides a link to the file. Use the Move Handhelds link on the Settings page to display this information.
Exchanging a User’s Handheld
To provide a user with a handheld previously assigned to a different user, follow the procedure described in “Transferring a Handheld to a New User” on page 367.
Moving a User to a Different Good Mobile Control Server
Moving a user from one Mobile Control Server to another requires that the destination server be a version equal to or higher than the source Server. The source Good Mobile Control Server must be at least version 2.4.0.
Moving a user from one Mobile Control Server to another automatically means moving the user from one Good Mobile Messaging Server to another, since a Mobile Messaging Server can be registered with a single Good Mobile Control Server only. Refer to “Moving a Handheld to a Different Good Mobile Messaging Server” on page 408 for which moves from Messaging Server to Messaging Server are supported. Unsupported moves are grayed out in the GMC “Destination server” dropdown menu when changing the messaging server.
To move a user from one Mobile Control Server to another:
1. Open the source and destination Control Servers in your browser.
Good Mobile Messaging Administrator’s Guide 411

Managing the Handhelds
2. Click Move Handhelds in the left panel of the Settings tab for the source and destination GMCs.
3. Copy the Trust Identity of the source GMC. Click Add New in the destination GMC and paste in the source Trust Identity that you’ve copied, and click Add.
4. Repeat in the opposite direction.
5. Use the MoveHandheld utility to move handhelds from the source GMC to the destination GMC. (Refer to “MoveHandheld” on page 573.)
6. Use the Settings/Move Handhelds page to monitor the status of move operations.
412 Good Mobile Messaging Administrator’s Guide

Data Storage and Aging
Data Storage and Aging
Information and email on the user’s handheld are subject to removal according to the aging and data-accumulation rules, and space requirements, in effect for that handheld’s particular platform. Refer to the product release notes for details.
Notes on Synchronization
Initial and Continuing Synchronization
The length of time required for initial synchronization of a user’s device will vary according to the amount of data (number of contacts, email, etc.) to be synchronized. Once initial synchronization is complete, subsequent synchronizations will occur more quickly, as only changes are handled, rather than all the data concerned with a user’s Outlook or Lotus Notebook account.
Typically, initial synchronization (non-wifi), even of a large number of contacts, should take no more than several minutes.
The following are synchronized from the user’s corporate email account:
• All contacts in the top level Contacts folder
• Calendar appointments beginning one week in the past, and all future appointments including recurring events
• Email folders, except for Outbox and Drafts. Sent Items headers are synchronized only if you configure the user policy to do so. During synchronization, the 100 most recent emails in the Inbox and in Sent Items are sent to the handheld. For emails older than 3 days, only the headers are sent.
- All tasks (the first 4K of body within the task). Recurring tasks and tasks created by flagged email are not supported.
Good Mobile Messaging Administrator’s Guide 413

Managing the Handhelds
If Good for Enterprise switches to background mode before synchronization is complete:
• Devices with GFE iOS Client v2.4.1 and higher with iOS 7 utilize iOS 7 Multitasking Enhancements (aka Background App Refresh) from Apple for improved syncing. As allowed by Background App Refresh, push notifications will cause GFE to start in the background and sync the new mail, etc., as it arrives.
• For other iOS devices with GFE, synchronization between desktop and device continues for some minutes and then ceases; contact sync with native contacts ceases immediately.
• For Android devices, synchronization continues until complete.
When iOS synchronization resumes after the app returns to the foreground, it will pick up where it left off. However, a reset and restart is possible if any of the following are true:
• Good for Enterprise discovers an inconsistency in the last updated timestamp of the native database.
• Policy changes from Good Mobile Control have occurred.
• The user toggles a preference on/off/on.
• Server-side address fields are different from what was originally set on the device.
If native contacts are added/modified/deleted in the Good for Enterprise group and the Good for Enterprise app is in the background, when GFE resumes to the foreground these modifications will be synced to Good.
Client contacts and settings will not resync upon Client upgrade.
Toggling the “Sync to device” setting to Off will cause a resync to native contacts when the setting is toggled back to On.
Once an initial synchronization is complete on the device, only contact changes (additions, modifications, deletions) to the user’s
414 Good Mobile Messaging Administrator’s Guide

Notes on Synchronization
desktop account or in Good on the device will be sync’ed to the device native contacts. When Good for Enterprise is running in the foreground on the device, if new contacts are added to the native Good group (for example, by a third party app), the contacts will not be synced immediately to Good. The sync will be accomplished when Good for Enterprise starts up or when it resumes from the background (assuming that the synchronization setting is set to On in Preferences).
If the Good app abnormally terminates while a contact sync is in progress, the next time Good is started the Good for Enterprise group in the native address book will be deleted and synced again, causing a temporary disappearance of the Good for Enterprise contacts in the native address book.
Exceptions
The following are exceptions to synchronization between the Exchange server account and handheld:
• Calendar delegation has not been tested and is not supported by Good Technology for Good for Enterprise use.
• Items removed from the handheld via aging to save space are not deleted from the Exchange server account.
• Items in the Outlook and handheld Sent Items folders are not synchronized unless you explicitly enable this synchronization using the Good Mobile Control Console’s Policy feature.
• New mail received on the handheld in folders other than Inbox (set up by the user using Preferences | Email Delivery) will include only the header or the header and body of the message, depending upon which of these two options you have enabled for the handheld using the Good Mobile Control Console Policy feature. The body of the message is synchronized only if the user chooses to display it.
Good Mobile Messaging Administrator’s Guide 415

Managing the Handhelds
• Items in the Drafts folder are not synchronized between handheld and Outlook.
• Items originally filtered into an unsynchronized Exchange server folder are synchronized if moved or copied to a synchronized folder, subject to the rules in the following item.
• For email messages older than three days that have built up while your handheld was turned off (when you were on vacation and out of coverage, for example), only headers are sent to the handheld. The body of the message is synchronized only if you choose to display it. Email messages older than a month are not synchronized.
• Email recipients in the To: field are limited to 32.
• Good for Enterprise does not support ICalendar meetings.
• Calendar: For booking rooms and resources to work properly, customers must install auto-responders for all of their resource email accounts. This will cause a room to accept or decline the meeting automatically, and to send the organizer an email indicating the response. It is up to the organizer, having received a declining email from a resource, to edit the meeting and select a different resource.
For information on the Microsoft Auto Accept Agent, refer to http://www.microsoft.com/technet/prodtechnol/exchange/2003/insider/Accept_Agent.mspx.
Resynchronization or reprovisioning of a handheld can occur if the device was not able to initialize one of the services. When the client starts up, the client is not able to initialize one of the services and automatically sends out a disconnect to the server. The client will attempt to re-establish the connection.
Memory
If Good for Enterprise is running in the foreground and a low-memory state is encountered, the device OS will terminate or limit
416 Good Mobile Messaging Administrator’s Guide

Notes on Synchronization
memory in other applications and terminate background applications. If memory continues to be insufficient, the Good app is requested to free up memory as possible. If the condition continues, Good for Enterprise is terminated. No data loss will occur. When the app is restarted (after, for example, a device reboot), synchronization resumes.
Good Mobile Messaging Administrator’s Guide 417

Managing the Handhelds
418 Good Mobile Messaging Administrator’s Guide

7 Managing Good Mobile Messaging Server
In addition to setting up and maintaining handhelds, you will want to monitor Good Mobile Messaging Server to ensure that mailbox and handheld synchronization are occurring normally.
Use the following resources to manage Good Mobile Messaging Server and handheld synchronization:
• Good Monitoring Portal
• Good Mobile Messaging Server properties and statistics
• User/handheld properties and statistics
• Good for Enterprise logs
• Error messages
• Troubleshooting
• Best Practices - Deployment, redundancy, backup, and recovery
Information about these resources is provided in the following sections.
This chapter also describes how to move Good Mobile Messaging Servers and Good Mobile Control (GMC) Servers to a new host.
Good Mobile Messaging Administrator’s Guide 419

Managing Good Mobile Messaging Server
Moving Good Mobile Messaging Server to a New Host
To move a Primary Good Mobile Messaging Server to a new host:
1. Install Good Mobile Messaging Server on the new machine as a Standby Server (“Installing Good Mobile Messaging Server” on page 122).
2. Perform a failover from the current Primary server to the new Standby Server using the failover command-line tool (“Performing a GMM Failover” on page 461).
The former Primary server can now serve as a Standby server. If you already have a Standby server installed, either or both of these servers can be retained for future use as failover targets.
Moving Good Mobile Control Server to a New Host
The following procedures allow you to move Good Mobile Control (GMC) Server to a new host machine without disconnecting all provisioned handhelds.
This procedure assumes that your new host meets minimum system requirements per “Checking Prerequisites and System Requirements” on page 55.
Note: We recommended only moving a server using the same install version of GFE. Refer to the Good for Enterprise Upgrade Notes when installing a newer version.
Important: We do not recommend moving Good Mobile Control Server to a new computer that has a different Good install Server instance name than the original Good install Server instance name. We recommend using the same NetBIOS and FQDN names on the new host as the old host. However, this is not necessary provided
420 Good Mobile Messaging Administrator’s Guide

Moving Good Mobile Control Server to a New Host
you use the original Good install Server instance name in the registry as defined in this procedure.
Preparing to Move Good Mobile Control Server
To prepare to move Good Mobile Control Server:
1. On the original host machine, stop the Good Mobile Control Server service. After the service stops, set it to Disabled.
2. If the SQL database being used by the Server is located on the same machine, detach the SQL database files by performing the following steps.
Note: The GoodAdmin account needs to have dbo or sa permissions in SQL to perform functions on the database or to use the local administrator account for all database procedures.
Good Mobile Messaging Administrator’s Guide 421

Managing Good Mobile Messaging Server
a. Open the SQL Management Studio: Start > Programs > Micro-soft SQL Server 2008 > SQL Server Management Studio Express.Note: SQL Management Studio Express is installed during ini-tial set up of Good Mobile Control Server. If you did not install SQL Management Studio Express, you must install SQL Man-agement Studio Express now or use SQL Management Studio Express already available in your organization to connect to the database.
b. Log in by selecting <YOUR_MACHINE>\GMC as the Server Name and choosing Authentication as Windows Authentica-tion.
c. Right click on the gmcdb database and then choose Tasks > Detach.
422 Good Mobile Messaging Administrator’s Guide

Moving Good Mobile Control Server to a New Host
d. Check the Drop Connections box and click OK.
e. The detach is complete.
f. Open Good DB Install path - default:
Server 2003 C:\Program Files\Microsoft SQLServer\MSSQL.1\MSSQL
Server 2008/2012 C:\Program Files (x86)\GoodTechnology\database\MSSQL.1\MSSQL\data
g. Copy gmcdb.mdf to a backup folder.
h. Copy gmcdb_log.LDF to a backup folder.
3. If there are any custom settings made as a part of Good Mobile Control Server configuration, copy the following file to the backup folder: config.props.
Server 2003 C:\Program Files\Good Technology\GMC Server
Server 2008/2012 C:\Program Files (x86)\GoodTechnology\Good Mobile Control
4. Export the following registry key and save as a text file to the backup folder:
Server 2003: HKEY_LOCAL_MACHINE\SOFTWARE\Good Technology\EMF Server
Server 2008/2012: HKEY_LOCAL_MACHINE\SOFTWARE\Wow6432Node\Good Technology\EMF Server
Note: Do not install the full registry keys. Not all information in the keys is needed. The information needed from the keys is detailed throughout the process.
Good Mobile Messaging Administrator’s Guide 423

Managing Good Mobile Messaging Server
5. Log on as GoodAdmin and uninstall the Good Mobile Control Server.
Note: Do not use Add/Remove Programs in Windows. Use the install program for Good Mobile Messaging Server for uninstalling.
a. Choose “Uninstall the Good Mobile Control Server,” click Next, and Next.
b. At the prompt “Do you want to completely remove the selected application and all if its components?” click OK.
c. At the prompt “Are you uninstalling to downgrade?” click No.
d. Confirm removal of the Mobile Control Server and click Next.
e. At the prompt “Do you want to delete all files, including logs?” click No and Finish.
When the uninstall completes, shut down the host machine or isolate it from the network by changing the NetBIOS and FQDN names.
Installing Good Mobile Control Server on the New Host
To install Good Mobile Control Server on the new host:
1. Log on as local administrator and copy the backup folder to the new host.
2. Make the domain GoodAdmin user part of the local administrators group on the new system.
3. Log on as GoodAdmin. Run the GMC installer and follow the installation instructions in “Installing Good Mobile Control Server” on page 99.
If you’re installing the GMC SQL database on the machine, use the default db/instance names for initial installation when prompted.
When prompted, use the License, Serial Number and Server values from the registry key backed up from the original host.
424 Good Mobile Messaging Administrator’s Guide

Moving Good Mobile Control Server to a New Host
Important: Changing the Server name from its former name will break the iOS MDM facilities. Use the same name when prompted.
4. Copy config.props from the backup folder to:
Server 2008 C:\Program Files (x86)\Good Technol-ogy\Good Mobile Control
5. Set the Good Mobile Control Server service to Automatic. Start the Good Mobile Control Server service.
6. Verify you can access the Good Mobile Control Console and login at http://<servername>:8080
If you’re moving the SQL database from the original host, perform the following steps. Otherwise, installation is complete.
Good Mobile Messaging Administrator’s Guide 425

Managing Good Mobile Messaging Server
1. After verifying the Good Mobile Control Server is running, stop the Good Mobile Control Server service and set it to Disabled.
2. Detach the current database:Note: The GoodAdmin account needs to have dbo or sa permissions in SQL to perform functions on the database or to use the local administrator account for all database procedures.
a. Open the SQL Management Studio: Start > Programs > Micro-soft SQL Server 2008 > SQL Server Management Studio Express.Note: SQL Management Studio Express is installed during ini-tial set up of Good Mobile Control Server. If you did not install SQL Management Studio Express, you must install SQL Man-
426 Good Mobile Messaging Administrator’s Guide

Moving Good Mobile Control Server to a New Host
agement Studio Express now or use SQL Management Studio Express already available in your organization to connect to the database.
b. Log in by selecting <YOUR_MACHINE>\GMC as the Server Name and choosing Authentication as Windows Authentica-tion.
c. Open Databases, right click on the gmcdb database and then choose Tasks > Detach.
d. Check the Drop Connections box and click OK.
e. Delete the gmcdb.mdf and gmcdb_log.ldf files just detached in this location:
Server 2003 C:\Program Files\Microsoft SQL Server\MSSQL.1\MSSQL
Good Mobile Messaging Administrator’s Guide 427

Managing Good Mobile Messaging Server
Server 2008/2012 C:\Program Files (x86)\GoodTechnology\database\MSSQL.1\MSSQL\data
f. Now copy the db files backed up from the old host to the new host in this location:
Server 2008/2012 C:\Program Files (x86)\Good Tech-nology\database\MSSQL.1\MSSQL\data
3. Attach the old database by opening SQL Management Studio, right click on Databases and then choose Tasks > Attach.
428 Good Mobile Messaging Administrator’s Guide

Moving Good Mobile Control Server to a New Host
a. Choose Add
b. Navigate to the gmcdb.mdf file (gmcdb_log.LDF automatically attaches) and click OK.
c. Verify the db names. Click OK and close SQL Management Stu-dio.
4. Restart the Good Mobile Control service.
Good Mobile Messaging Administrator’s Guide 429

Managing Good Mobile Messaging Server
Monitoring Good Mobile Messaging Servers
Good for Enterprise software provides tools that allow you to monitor Good Mobile Messaging Server using Good Monitoring Portal, Good Mobile Control (GMC) Console, and Microsoft Windows on the server machines. You can display information in the following categories:
• Server Dashboard - Server status, users, and pending messages
• Server Information
• Server Statistics
• IP Ranges
• Server Logging
• User Performance Monitor
Server Dashboard (Good Monitoring Portal)
To quickly check the operating status of your Good Servers, along with information about Server users and handheld message flow, log in to the Good Monitoring Portal at http://www.good.com/gmp.
430 Good Mobile Messaging Administrator’s Guide

Monitoring Good Mobile Messaging Servers
When you log in, the Good Monitoring Portal (GMP) home page is displayed. Click on Monitor Servers.
If the Good Server you are interested in isn’t displayed in the dashboard, refer to “Adding a Server to the Dashboard” on page 433.
The Dashboard section displays current status information for each Good Server:
• Status - Connection status for devices to the Good Network Operations Center (IN, OUT, Connection error, Not queried, Not OK [IP address range check failed], Unreachable). Use, for example, for problems that result because of lapsed entitlements, such as unauthorized STS grants.
• # Users - All users currently added to this Server
• Pending Msgs - Number of messages (emails, calendar events, etc.) that are waiting for transmission from the handheld to the Server or vice versa. This should be zero or close to it. If the Server is disconnected from the Network Operations Center, the number will grow because messages are not being processed. If a handheld is out of coverage, it's queue of undelivered messages
Good Mobile Messaging Administrator’s Guide 431

Managing Good Mobile Messaging Server
on the Server will grow as emails sent to the handheld are not delivered.
For more information on a Server’s current status, click the Server name in the Dashboard section. A Server details screen is displayed.
The page contains:
• Server Information - Server name, Server version, product and edition, number of users
• Server License Information - Serial number, license key
• Server Connection - Status of connection to the Network Operations Center, IP address, last connection time, pending messages
• Connection History - Two histograms of the Server's recent connection history with the Network Operations Center. The first
432 Good Mobile Messaging Administrator’s Guide

Monitoring Good Mobile Messaging Servers
histogram covers the Server's connection history over the last 24 hours, and the second histogram shows the Server's connection history over the last 4 hours. Red sections indicate times when the Server was not connected, and green sections indicate when the Server was connected. When operating normally, the histograms should be green.
For more information on displaying handheld/user status in the Good Monitoring Portal, refer to “Using the Good Monitoring Portal Dashboard” on page 388.
Adding a Server to the Dashboard
If the Server you want to check isn’t listed on the dashboard, do the following to add it:
1. Click the “Monitor Servers” link in the sidebar of the Good Monitoring Portal.
The Monitor Servers window appears.
2. Click the Add External Servers button.
Good Mobile Messaging Administrator’s Guide 433

Managing Good Mobile Messaging Server
A page is displayed which allows you to specify the Server that you want added to the dashboard.
3. Enter the name you assigned to the Server when installing it.
4. Enter the serial number and license key that you obtained at the time of purchase.
If you don’t have the serial number or license key available, click “Server Licenses” in the sidebar to display them. You can also display the values for these items in the Properties page for the Server in the Good Mobile Control Console.
5. Click Add.
The Server is added to the dashboard. If an error is returned, check to see whether the server has already been added using Customize View.
434 Good Mobile Messaging Administrator’s Guide

Monitoring Good Mobile Messaging Servers
Displaying the Server List
To list the Good Mobile Messaging Servers in the Exchange site:
1. In the Good Mobile Control Console, click the Servers tab.
Current Mobility Suite Servers are listed, along with their product type, version, number of handhelds added to the server, service status, network status (NOC), and pending messages (NOC).
# of Handhelds: Shows current number of handhelds. Service status: OK, Unreachable, Stopped, or Running.
Type: For disaster-recovery, high-availability environments, the server is shown as primary or standby.
Network status: IN, OUT, Connection error, Not queried, Not OK (IP address range check failed), Unreachable, Unknown.
Pending messages: Shows the number of messages pending for the handhelds listed for the Server.
2. Click Refresh List to update the server list.
Displaying Server Information
To display the properties of a Good Mobile Messaging Server:
1. Click the Servers tab in the Good Mobile Control Console.
Good Mobile Messaging Administrator’s Guide 435

Managing Good Mobile Messaging Server
2. Click on the Good Mobile Messaging Server name in the list of servers on the Servers tab.The following window displays information about the selected Good Mobile Messaging Server.
The Server Information section displays the following:
• Name - Good Mobile Messaging Server name
• Serial number
• System Identifier
• License key
• Product - GMM, GMA
• Version - Good Mobile Messaging Server version
• Handhelds - Number of handhelds
• Service status - Unreachable, stopped, or running
• Network status (NOC)
• Pending messages (NOC)
• Good for Enterprise host address - URL for the Network Operations Center
• Server setup time - Date the server was installed
436 Good Mobile Messaging Administrator’s Guide

Monitoring Good Mobile Messaging Servers
• Installed on machine - Name of the computer on which the server is installed
• Windows logon account
• CDO version
• Log Upload URL - URL for the site that will receive any diagnostic logs that you upload to your authorized support representative.
3. To display statistics for the selected Good Mobile Messaging Server, click Statistics in the left panel of the window.
The Statistics section displays the following:
• Email messages sent to handhelds - Total Email messages sent to all handhelds from Good Mobile Messaging Server
• Email messages received from handhelds - Total Email messages received from all handhelds by Good Mobile Messaging Server
• Filtered Email for handhelds - Number of messages not sent to handhelds due to filters set on handhelds (using the Blocked Senders email option)
• Messages sent to handhelds - Total Email, Calendar, Contact, Note, and Task messages sent to all handhelds by Good Mobile Messaging Server (includes control messages)
• Messages received from handhelds - Total Email, Calendar, Contact, Note, and Task messages received from all handhelds by Good Mobile Messaging Server (includes control messages)
• Last Email message received from handhelds - Date and time received by Good Mobile Messaging Server
• Last message received from handhelds - Date and time received by Good Mobile Messaging Server
• Last Email message sent to handhelds - Date and time sent by Good Mobile Messaging Server
Good Mobile Messaging Administrator’s Guide 437

Managing Good Mobile Messaging Server
• Last message sent to handhelds - Date and time sent by Good Mobile Messaging Server
Statistics are accumulated by Good Mobile Messaging Server.
Since messages can be sent in batches, and undisplayed messages (e.g., “Mark Read”) are included in the statistics, these totals are useful mostly to determine general current activity levels.
Click the Refresh button to update the page. Click Clear to reset all counts to 0 except dates, which are retained. The date when the statistics were last cleared is displayed at the bottom of the window. Click Export to export the statistics in a file.
4. To display the status of IP ranges for the selected Good Mobile Messaging Server, click IP ranges in the left panel of the window.
For information on the IP addresses portion of this page, refer to “IP Ranges” on page 439.
Notes:
• You can also display server information by clicking the Settings tab. The information about the server appears in the “About Good Mobile Control” page.
• To display information about the Directories for handheld enablement and console users authentication, click the Settings tab and then click the Directory link in the left panel. The handheld-enablement directory is the source for the data/information on the Handhelds tab relating to adding/enabling user devices. The users authentication directory is the source for data/information relating to the console log-in page and the Roles tab.
• The “Check for New Services” button on the Server Information page on the Settings tab will not return any information in this release.
438 Good Mobile Messaging Administrator’s Guide

Monitoring Good Mobile Messaging Servers
IP Ranges
If you limit outbound HTTP and HTTPS on your firewall, you should open outbound ports 80 and 443 for IP ranges 216.136.156.64/27 and 198.76.161.0/24 for Good Mobile Messaging Server and Good Mobile Control Server, for Good for Enterprise to work properly. (Version 5 required that you open outbound ports 80 and 443 for IP address 198.76.161.28 for Good for Enterprise to work properly. Version 6 requires, in addition, IP address 198.76.161.29 for use by Good Mobile Control.) Do not put the Good Mobile Messaging Server and Good Mobile Control Server in the DMZ zone or block any LAN ports. The Good Mobile Messaging Server and operating system calls have many port dependencies for interfacing with mail servers and AD, especially TCP 1433 (Database).
Good for Enterprise checks for proper access to the Good Network Operations Center periodically. Open ranges are displayed on the IP Addresses tab with a status of “0.” The proxy column can be “Yes” or “No.” If an error condition occurs, a description will appear in the Description column.
Any other entries on this tab indicate error conditions. If other entries are displayed, open the ranges given above and check the tab again.
Good Mobile Messaging Administrator’s Guide 439

Managing Good Mobile Messaging Server
Work with your customer service representative when error conditions persist.
Server Logging
To monitor synchronization and error conditions, use the Windows Event Viewer Application log and Good Mobile Server logs. Diagnostic logs are maintained by Good Mobile Messaging and Good Mobile Control Servers; these encoded logs are for use by your authorized support representative.
To upload the Good Mobile Messaging diagnostic log to your authorized support representative, do the following. To use a command-line utility for the upload, refer to “uploadLog” on page 586.
1. In the Good Mobile Control Console, click the Servers tab.
2. In the Name column for the list of Servers, click the name of the Server whose log you want to upload.
3. Click the Upload Logs button.
An upload screen is displayed.
4. Specify the date range of the log data that you want uploaded.
5. To include the System Event log and the Application Event log, click the corresponding check boxes.
6. Click OK.
440 Good Mobile Messaging Administrator’s Guide

Monitoring Good Mobile Messaging Servers
The log data for the specified date range is uploaded to the URL listed for “Log Upload URL” in the Server Info page for the Server you clicked.
To upload the Good Mobile Control diagnostic log to your authorized support representative, do the following.
1. In the Good Mobile Control Console, click the Settings tab.
2. Click the Upload Server Logs button.
An upload screen is displayed.
3. Specify the date range of the log data that you want uploaded.
4. To include the System Event log and the Application Event log, click the corresponding check boxes.
5. Click OK.
The log data for the specified date range is uploaded to the URL listed for “Log Upload URL” in the Server Info page for the Server you clicked.
Windows Event Viewer Application Log
The Windows Event Viewer Application log displays successful and unsuccessful server actions and provides information about the success or failure.
Good Mobile Messaging Server Log
Every Good Mobile Messaging Server maintains a log containing a separate line for every email message and event exchanged between mailbox and handheld via that server. Use the file to check account use.
The log is named servername.access and is located in the logs directory for the server installation.
Good Mobile Messaging Administrator’s Guide 441

Managing Good Mobile Messaging Server
Each line in the server log includes the following entries, separated by tabs:
• Time - Date and time of the transaction
mm/dd/yyyy hh:mm:ss time_zone
• Msg_id - The session ID of the message or event
ID_string
• App - Service or application that sent or is receiving the message or event. For example, note, task, admin.
application_name
• Cmd - Command used by the issuing or receiving service or application
command
• IP - IP address of Good Mobile Messaging Server. Allows concatenation of server log files.
nn.nn.nn.nn
• Mailbox - Display name of the mailbox involved in the transaction
name
• Direction - Transaction direction (INBOUND = towards Exchange)
INBOUND | OUTBOUND
• Dest_conn_id - For use by Customer Service
nnnnnnnnnn
• Num_byte - Size of the transaction, read or written
nnnn
• Status - 0 = OK. Any other number or string indicates an error condition, but is used by Customer Service only.
n
442 Good Mobile Messaging Administrator’s Guide

Monitoring Good Mobile Messaging Servers
Good for Enterprise Diagnostic Log
Good Mobile Messaging Server maintains encoded diagnostic logs. These logs are turned on by default. The information in the logs is for use by your authorized support representative. Good Mobile Control Server maintains encoded diagnostic logs as well, turned on by default.
To upload logs to your support representative, refer to “Server Logging” on page 440.
Using Performance Monitor
You can use the Windows Performance Monitor to display Good Mobile Messaging Server dynamic statistics. These are the statistics described in “Displaying Server Information” on page 435.
For example, to view server statistics using the Performance Monitor in Windows 2012:
1. From the Server Manager, select Tools > Performance Monitor.
Good Mobile Messaging Administrator’s Guide 443

Managing Good Mobile Messaging Server
Or go to C:\Windows\SysWOW64\perfmon.exe
mmmmmmmmp
444 Good Mobile Messaging Administrator’s Guide

Monitoring Good Mobile Messaging Servers
2. Click the Performance Monitor button in the left panel.
3. Click the green Plus button in the top right panel to open the Add Counters window.
4. Select the computer and GoodLinkServer Exchange Messaging, then click Add. GoodLinkServer Exchange Messaging will show in the Added counters list.
Good Mobile Messaging Administrator’s Guide 445

Managing Good Mobile Messaging Server
Click OK.
446 Good Mobile Messaging Administrator’s Guide

Stopping Good for Enterprise Services
5. The Good Mobile Messaging Server statistics are displayed dynamically on the chart.
Stopping Good for Enterprise Services
To stop a Good Mobile Messaging Server, stop the GoodLink Service. To do so:
1. If the Server will be stopped for an extended period of time, notify handheld users that synchronization will cease during the stoppage.
2. Open the Windows Control Panel.
3. Open Administrative Tools.
4. Open Services.
5. Select and open GoodLink Server Service.
6. In the Properties window, on the General tab, click the Stop button.
Good Mobile Messaging Administrator’s Guide 447

Managing Good Mobile Messaging Server
Error Messages
Errors are returned in the following ways:
• Written to Windows Event Viewer Application log
• Displayed as dialog windows in Good Mobile Control Console
• Displayed as dialogs during installation.
Troubleshooting
Support is available by contacting Good Support at http://www.good.com/support.
Best Practices
As with any mission-critical application, you will want to make provisions for optimal deployment, redundancy, backup, and disaster recovery for Good for Enterprise. This section describes or references procedures and rules for doing so.
Deployment
The following rules and generalizations apply to deployment of Good for Enterprise:
• Outlook cannot be installed on the Good Mobile Messaging Server host.
• Outlook can be installed on a Good Mobile Control Console host.
• In the case where Good Mobile Messaging Server and Good Mobile Control Console are installed on the same host, Outlook cannot be installed.
448 Good Mobile Messaging Administrator’s Guide

Best Practices
Anti-virus and Backup Software
Exclude the GMC log directories and GMM log directories from anti-virus and backup software, to prevent file contention and performance issues.
VMWare Snapshots
VMWare Snapshots cannot be used to back up Good Mobile Messaging Servers.
• Snapshots are not backups. As the snapshot file is only a change log of the original virtual disk, do not rely upon it as a direct backup process. The virtual machine is running on the most current snapshot, not the original vmdk disk files.
• Snapshots are not complete copies of the original vmdk disk files. The change log in the snapshot file combines with the original disk files to make up the current state of the virtual machine. If the base disks are deleted, the snapshot files are useless.
• Snapshot files can grow to the same size as the original base disk file, which is why the provisioned storage size of a virtual machine increases by an amount equal to the original size of the virtual machine multiplied by the number of snapshots on the virtual machine.
• The maximum supported amount in a chain is 32. However, VMware recommends that you use only 2-3 snapshots in a chain.
• Use no single snapshot for more than 24-72 hours.
- This prevents snapshots from growing so large as to cause issues when deleting/committing them to the original virtual machine disks. Take the snapshot, make the changes to the virtual machine, and delete/commit the snapshot as soon as you have verified the proper working state of the virtual machine.
- Be especially diligent with snapshot use on high-transaction virtual machines such as email and database servers. These
Good Mobile Messaging Administrator’s Guide 449

Managing Good Mobile Messaging Server
snapshots can very quickly grow in size, filling datastore space. Commit snapshots on these virtual machines as soon as you have verified the proper working state of the process you are testing.|
• If using a third party product that takes advantage of snapshots (such as virtual machine backup software), regularly monitor systems configured for backups to ensure that no snapshots remain active for extensive periods of time.
- Snapshots should only be present for the duration of the backup process.
- Snapshots taken by third party software (called via API) may not show up in the vCenter Snapshot Manager. Routinely check for snapshots via the command-line.
http://kb.vmware.com/selfservice/microsites/search.do?language=en_US&cmd=displayKC&externalId=1025279
Backing up and Restoring the Good Mobile Control Database
The SQL database that Good Mobile Control uses contains configuration information related to routing and provisioning of Good servers and handhelds. Good Mobile Messaging Servers find out how to connect to Good for Enterprise enabled handhelds by synchronizing with Good Mobile Control Server.
Backing up the Good Mobile Control Database
To back up the Good Mobile Control database:
1. Click the Settings tab in the Good Mobile Control Console.
450 Good Mobile Messaging Administrator’s Guide

Best Practices
2. Click the Backup link in the left panel. The Backup Settings page appears.
3. Select Enable automatic backup of this Good Mobile Control server to enable automatic backup. Increment backups occur hourly; a full backup is performed once a day. This is not configurable.
4. Specify the Backup directory to store the backup files and the number of days of backup copies to keep. The default is 7.
5. To do a manual full backup immediately, click Start Full Backup Now. To do a manual incremental backup immediately, click Start Incremental Backup Now.
6. Click Save to save the changes.
Restoring the Good Mobile Control Database
The restore process consists of two steps in the following order:
1. Restore a full back up
2. Restore an incremental back up
In order to restore the correct database state, you must restore both the full and incremental backups in sequential order. Choose the most recent full daily backup file and the most recent incremental hourly back up files.
Good Mobile Messaging Administrator’s Guide 451

Managing Good Mobile Messaging Server
For more information, refer to the “How to: Restore a Database Backup (SQL Server Management Studio)”:
http://msdn.microsoft.com/en-us/library/ms177429.aspx
To restore the Good Mobile Control database:
1. Stop the Good Mobile Control Service.
2. Open the SQL Management Studio: Start > Programs > Microsoft SQL Server 2008 > SQL Server Management Studio Express.
Note: SQL Management Studio Express is installed during initial set up of Good Mobile Control Server. If you did not install SQL Management Studio Express, you must install SQL Management Studio Express (2008) now or use SQL Management Studio Express already available in your organization to connect to the database.
3. Log in by selecting <YOUR_MACHINE>\GMC as the Server Name and choosing Authentication as Windows Authentication.
4. Right click on the database and then choose Restore Database.
452 Good Mobile Messaging Administrator’s Guide

Best Practices
5. Select From Device under Source for Restore in the Restore Database dialog box.
Good Mobile Messaging Administrator’s Guide 453

Managing Good Mobile Messaging Server
6. Navigate to the folder where the full backup file is located, select the file, and then click OK.
7. In the left panel of the Restore Database dialog box, click Options and select the middle option “Leave the database non-operational and do not roll back uncommitted transactions. Additional
454 Good Mobile Messaging Administrator’s Guide

Best Practices
transaction logs can be restored (RESTORE WITH NORECOVERY)”.
8. Click OK.
After a few minutes, the full database is restored.
9. Restore the incremental database by repeating the steps and choosing the incremental database:
a. Right click on the database and choose Tasks > Restore > Data-base.
b. Select From Device under Source for Restore in the Restore Database dialog box.
c. Navigate to the folder where the incremental backup file is located, select the file, and then click OK.
Good Mobile Messaging Administrator’s Guide 455

Managing Good Mobile Messaging Server
d. In the left panel of the Restore Database dialog box, click Options and select the first option “Leave the database ready to use by rolling back uncommitted transactions. Additional transaction logs cannot be restored. RESTORE WITH RECOV-ERY”.
e. Click OK.
10.Exit SQL Server Management Studio Express.
11. Start the Good Mobile Control Service and verify that Good Mobile Control Console rolls back changes prior to the hourly incremental backup time.
The restore procedure is now complete.
456 Good Mobile Messaging Administrator’s Guide

Best Practices
Disaster Recovery
Disaster recovery for Good Mobile Control and Good Mobile Messaging Servers requires you to restore the configuration information in the Good Mobile Control database to a consistent state to allow the system to work properly. The reconciliation process resets handheld provisioning information so that the handhelds may be added back to the system. This is a mechanism for cleaning up inconsistent records for all Good servers. Good Mobile Control, Good Mobile Messaging, and the handheld client are all part of the same system. To work properly, all the parts of the system must know about the same handhelds in the system. Reconciliation helps identify and remove inconsistent entries in the system.
Note: There are some data loss scenarios that the following reconciliation procedure may not be able to remediate. If you are unable to reconcile configuration inconsistencies, contact your authorized support representative.
Reconciling configuration inconsistencies
If you restore the Good Mobile Control database from a backup to a previous state, the configuration information that was added to the Good Mobile Control database after the backup was performed is lost. Any handhelds that were configured and thus added to the Good Mobile Control database after the backup was performed must be reset in order for you to be able to administer those handhelds again. Before the handhelds can be reset, they must first be identified through a reconciliation process.
During each startup, Good Mobile Control Server checks whether the Good Mobile Control database was restored and for any configuration inconsistencies. If necessary, the Good Mobile Control Server runs a handheld consistency check in a reconciliation mode. While in the reconciliation mode, the Good Mobile Control Server is not accessible to other servers. Web services to and from Good Mobile Messaging are shut down until you resolve the reconciliation items and exit reconciliation mode.
Good Mobile Messaging Administrator’s Guide 457

Managing Good Mobile Messaging Server
To resolve the reconciliation items and exit reconciliation mode:
1. Login as service administrator or Superuser.
2. On the Reconciliation Panel that appears, select the reconciliation items and click Remove as necessary.
3. Click Finished on the Reconciliation Panel to exit reconciliation mode.
The Good Mobile Control Server is now accessible to other servers.
Manually running a reconciliation consistency check
If the Good Mobile Control Server starts up normally but you suspect there are configuration inconsistencies, you can manually run the reconciliation consistency check.
To manually run the reconciliation consistency check:
1. On the Server Information page of the Settings tab, click Run Consistency Check.
If no inconsistencies are detected or if Good Mobile Control Server cannot connect with Good Mobile Messaging Server to perform the consistency check, the message “No inconsistencies found.” is displayed.
If an inconsistency is detected, the Reconciliation Panel appears.
2. If the Reconciliation Panel appears, select the reconciliation items and click Remove as necessary.
Note: To resolve inconsistencies, you must have the Manage Servers right or the Superuser right.
3. Click Finished on the Reconciliation Panel to exit reconciliation mode.
458 Good Mobile Messaging Administrator’s Guide

8 GMM and GMC Failover
GMM Service Failover
This section describes failover resources for the GMM service. High availability for the GMM data is handled through SQL Server Mirroring or AlwaysOn Availability Groups (refer to “SQL Mirroring (High Safety Mode)” on page 466 and “SQL AlwaysOn” on page 482).
High availability for GMC data continues to be handled through Microsoft Clustering. The GMM service doesn’t support automatic failover; it requires manual interaction to bring up a failover Server.
GMM failover is accomplished using the command-line tool GMMFailoverTool.exe.
When you install or upgrade GMM Servers to 8.1, the installation media will ask you whether the Servers are to be active or standby. In addition to your active GMM Servers, install one or more Servers that you designate as standby; these are set to Disabled by default, so that they don’t start. These should conform to all GMM Server prerequisites.
GMM version numbers must match for failover to succeed.
The GMC will not display Servers that are in standby mode, but this is being considered for a future release. In addition, the ability to
Good Mobile Messaging Administrator’s Guide 459

GMM and GMC Failover
initiate a failover from the GMC rather than from the Standby Server command line is being considered for a future release.
If an active Server goes down or otherwise needs to be replaced, you will run GMMFailoverTool for a standby Server and specify which active Server it is to replace, providing the active Server’s database credentials at the same time (or, for log shipping, the backup database credentials); this is a manual operation. The necessary Server configuration information is downloaded from the SQL Server database. GMC will know how to communicate with the new primary Server because the new Server will publish the new endpoint when it starts up.
You can run the failover tool against a primary Server that is operating normally if you want to swap it out. However, end users will not receive mail while the standby Server takes over. If the primary Server being taken over is still running against the database, those database connections will be disconnected by the failover tool and when the Server attempts to reconnect, the database will be marked to inform the Server that it is no longer primary. At this time, the Server will also disable its services from starting up in the future.
A GMM Server that was previously a primary Server can become a standby Server after another Server has taken over for it, without having to reinstall the Server. Even though this Server was previously a primary Server (with settings still retained from that mode), the failover tool can be run on it to take over for another primary Server. The old settings are discarded and the new ones take over.
If you manually start up the services for a GMM Server that is installed as a standby, without using the failover tool, it will fail to start up because it has no settings with which to proceed. If the services are started for a GMM Server that was previously a primary Server and is now a standby Server, startup will also fail because once the Server checks the database, it will know that it is not the active Server (unless the log-shipping option is used).
460 Good Mobile Messaging Administrator’s Guide

GMM Service Failover
This HA failover functionality cannot be utilized to perform rolling upgrades of GMM Servers.
Performing a GMM Failover
If you detect that a GMM Server is down, or otherwise want to switch operations to a standby Server, use the following procedure to initiate failover.
This procedure generates a log containing the details of the failover, stored in the log directory you defined when installing the secondary server. The default is:
C:\Program Files (x86)\Good Technology\GoodMessaging Server\logs
The failover utility requires the following permissions. If SQL authentication is used, the “-user” and “-password” parameters must be included (along with appropriate values). If Windows authentication is used, the user and password parameters are not necessary.
• VIEW SERVER STATE - This permission allows the admin running the failover to see all active connections to the database. This is to ensure that no other GMM Servers are accessing the same database. If such a connection exists, the tool will try to kill the connection before attempting to failover.
• ALTER ANY CONNECTION - This permission allows the admin running the failover to kill any GMMS DB connection as stated above. It will only kill connections that are identified as GMM Server clients. This will cause GMM users to reconnect and ultimately exit, because they won’t be allowed to use the database after the failover has taken place. If such connections are not found, this permission isn’t required and the tool will continue the failover. If such connecctions are found and this permission is not present, the failover will exit with a failure. In this case, IT will need to shut down the GMM Server and/or have their DBA kill
Good Mobile Messaging Administrator’s Guide 461

GMM and GMC Failover
those GMM client connections before attempting the failover again.
• Local administrator permissions
To initiate failover:
1. Access the host machine for the standby GMM to be used. To list current standby Servers, run the failover tool:
GMMFailoverTool.exe list
By default, the tool is in C:\Program Files (x86)\Good Technology\Good Messaging Server\bin.
2. On the standby host machine, start the standby Server.
3. Stop the primary machine, if it is not already down. If you neglect this step, the failover process will stop it unless the log-shipping option is used; in this case, you must not only stop the primary server in advance, but also permanently disable it.
4. Start the secondary machine and run the following command:
GMMFailoverTool.exe [OPTIONS] failover GMM_Server_to_failover_from
The GMM_Server_to_failover_from value corresponds to the “GMM Server name” value, which is found by running the failover utility with the “list” option.
The options are:
-mssql=“(Server=[SQL server\instancename]; Database=[name_of_DB_to_failover_from])”
(Note: For log shipping, the server information you enter for the -mssql option will be for the secondary database.)
-user=<mssql user> (Required for SQL authentication)
-password=<mssql password> (Required for SQL authentication)
-logshipping (Turns on log shipping failover)
462 Good Mobile Messaging Administrator’s Guide

GMM Service Failover
The command is case sensitive. Capitalize “Server” and “Database.”
Warning: If the logshipping option has been used, the original primary Server must not be allowed to restart when the new primary Server is running. Since the two Servers will be using separate databases, with both Servers communicating with the Good Operations Center (NOC) using the same name, data corruption and service interruption could occur.
If the original primary Server is inadvertently started after failover, shut it down immediately and disable its log shipping.
5. If the GMM server requires a proxy server for external access and the proxy server is different for the primary and standby GMM, then a REPAIR must be ran on the failover server after the failover process. During the repair, enter the correct proxy server for the GMM server.
Note: It is normal for the “GoodLink Server” service to be in a stopped state on the standby server.
Example usage (list)
GMMFailoverTool.exe -mssql="Server=poc10\gmc;Database=gmms2" list
“poc10\gmc” is the name and instance of the SQL server. “gmms2” is the database name of the primary GMM server. “poc11q” is the primary GMM server name. Windows authentication, so the -user and -password options are not required.
Good Mobile Messaging Administrator’s Guide 463

GMM and GMC Failover
Example usage (failover)
Two GMMS servers, one primary and one standby: machine names are POC11 (primary) and POC12 (standby). The “GMM Server Name” of the primary server is “POC11Q.” This will become the GMM server name of the secondary server after failover.
“poc10\gmc” is the name and instance of the SQL server. “gmms2” is the database name for the primary GMM server. The primary and secondary server will use the same database.
To failover from POC11 to POC12, run the following on POC12:
GMMFailoverTool.exe -mssql="Server=poc10\gmc;Database=gmms2" failover poc11q
To failback, run the following on POC11:
GMMFailoverTool.exe -mssql="Server=poc10\gmc;Database=gmms2" failover poc11q
Notice that the two commands are identical, but executed on different machines.
464 Good Mobile Messaging Administrator’s Guide

GMM Service Failover
The output from the CLI after failback:
Example usage (failover with log-shipping option)
Two GMM servers, one primary and one standby: machine names are POC11 (primary) and POC12 (standby). The “GMM Server Name” of the primary server is “POC11Q.” This will become the GMM server name of the secondary server after failover.
“poc11\gmc” is the name and instance of the primary SQL server. “gmms1” is the database name for the primary GMM server. “poc12\gmc” is the name and instance of the secondary SQL server. “gmms2” is the database name for the secondary GMM server.
To failover from POC11 to POC12, run the following on POC12:
GMMFailoverTool.exe -mssql="Server=poc12\gmc;Database=gmms2" -logshipping failover poc11q
Good Mobile Messaging Administrator’s Guide 465

GMM and GMC Failover
To failback, run the following on POC11:
GMMFailoverTool.exe -mssql="Server=poc11\gmc;Database=gmms1" -logshipping failover poc11q
Notice that the two commands use an identical GMM server name, but executed on different machines. The SQL server, instance, and database names in the command vary according to which GMM server is using them.
For failover and for failback, the current primary server must not be running or allowed to start up during or after failover, or serious service interruption may occur. Stop and disable the current primary server before beginning the failover or failback procedure.
SQL Mirroring (High Safety Mode)
SQL Servers supported by this release provide a high-availability database mirroring feature that supports failover of an SQL database in case of an SQL server failure.
The feature requires three SQL servers (principal, mirror, witness), preferably in separate locations. The principal and mirror servers must be the same Standard or Enterprise version, preferably with the latest service pack and cumulative updates installed. The third server (witness) can be SQL Server Standard, Enterprise, Workgroup, or Express. The witness server pings the principal and mirror servers in case of a failure. The witness server initiates an automatic failover when required; it contains no database.
Use the following procedure to set up high-availability database mirroring:
1. Verify the following:
a. You have three SQL servers.
466 Good Mobile Messaging Administrator’s Guide

SQL Mirroring (High Safety Mode)
b. The SQL servers use Active Directory accounts. Preferably, the same account is used for all three servers.
c. The primary-server database is in Full Recovery mode.
2. Back up the database on the principal SQL Server.
a. Right-click on the database and select Tasks > Backup.
b. Select “Full” backup type and click OK to create it.
c. Repeat step a and select “Transactional Log” for the backup type; click OK.
d. Copy this backup file to the host machine for the mirroring database. The default location is
C:\Program Files\Microsoft SQL Server\MSSQL10_50.MSSQLSERVER\MSSQL\Backup
where MSSQL10_50.MSSQLSERVER is the default instance file-name.
3. Create a database with the same name as the principal SQL server on the mirroring SQL server.
Note: When creating the database, select the service account to be the owner of the database.
Good Mobile Messaging Administrator’s Guide 467

GMM and GMC Failover
a. Click the ellipse and search for the service account created for GMMS and select OK.
4. Restore the backup on the mirroring SQL server with the option to “Overwrite the existing database” checked and the RESTORE WITH NORECOVERY radio button selected.
468 Good Mobile Messaging Administrator’s Guide
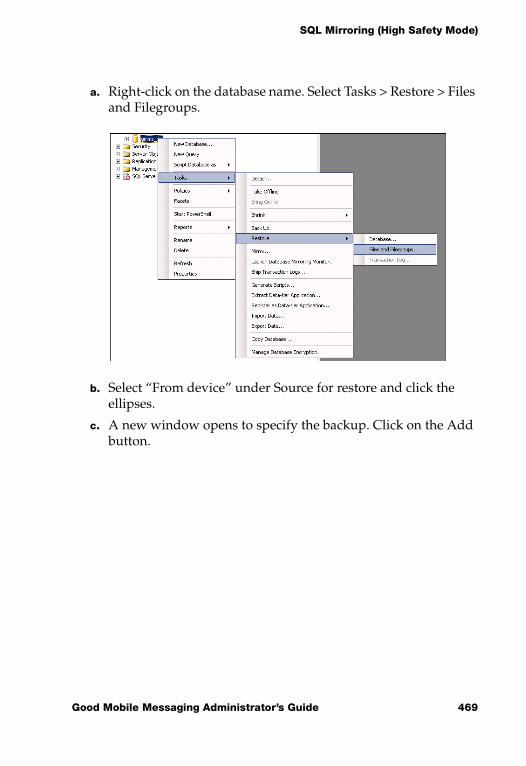
SQL Mirroring (High Safety Mode)
a. Right-click on the database name. Select Tasks > Restore > Files and Filegroups.
b. Select “From device” under Source for restore and click the ellipses.
c. A new window opens to specify the backup. Click on the Add button.
Good Mobile Messaging Administrator’s Guide 469

GMM and GMC Failover
d. Select the backed-up file from step 2.
470 Good Mobile Messaging Administrator’s Guide

SQL Mirroring (High Safety Mode)
e. Select both the check boxes for full backup along with transac-tional logs.
Good Mobile Messaging Administrator’s Guide 471

GMM and GMC Failover
a. Select “Options” page and select “Overwrite the existing data-base” checked and select RESTORE WITH NORECOVERY.
You’re now in Restoring mode because you have chosen the NORECOVERY option. The configuration will remain in Restoring state to prevent users from accessing the database. The database can be accessed only if the database fails over to
472 Good Mobile Messaging Administrator’s Guide

SQL Mirroring (High Safety Mode)
the mirror and the former principal goes to the recovering state.
5. Start the mirroring configuration process on the principal SQL server. Right-click Database > Properties > Mirroring and click Configure Security.
Good Mobile Messaging Administrator’s Guide 473

GMM and GMC Failover
6. On the Include Witness Server screen, select “Yes” and click Next.
474 Good Mobile Messaging Administrator’s Guide

SQL Mirroring (High Safety Mode)
7. Verify the “Principal server instance” name and click Next.
Good Mobile Messaging Administrator’s Guide 475

GMM and GMC Failover
8. Now from the dropdown menu choose “Mirror server instance” and “Connect.”
476 Good Mobile Messaging Administrator’s Guide

SQL Mirroring (High Safety Mode)
9. Choose a “Witness Server Instance” and “Connect.”
Good Mobile Messaging Administrator’s Guide 477

GMM and GMC Failover
10.Now enter the SQL server service accounts for each SQL server instance. If all of your SQL instances are using the same account, leave the fields blank.
478 Good Mobile Messaging Administrator’s Guide

SQL Mirroring (High Safety Mode)
11.Completing the Wizard:
Good Mobile Messaging Administrator’s Guide 479

GMM and GMC Failover
12.Start the mirroring.
You have mirrored your SQL. The display for both servers should display as follows.
480 Good Mobile Messaging Administrator’s Guide

SQL Mirroring (High Safety Mode)
The principal SQL Server:
The mirror SQL Server:
Note: You might find an issue when you start mirroring and encounter this error:
Good Mobile Messaging Administrator’s Guide 481

GMM and GMC Failover
“The mirror database, “YourDatabaseName”, has insufficient transaction log data to preserve the log backup chain of the principal database. This may happen if a log backup from the principal database has not been taken or has not been restored on the mirror database. (Microsoft SQL Server, Error: 1478)”
As the error suggests, you need to back up the Principal SQL Server Transaction Logs and restore them to the Mirroring SQL Server using the same restore options that you used when you restored the database. If this happens, you can cancel the wizard and start configuring again after this step from step 4.
SQL AlwaysOn
This section describes how to set up SQL AlwaysOn for functionality testing with Good Mobile Messaging Server. SQL AlwaysOn must be set up before Good Mobile Messaging Server is installed. (AlwaysOn performance is not considered here.)
In this section:
• Preconditions
• Setting up Windows Cluster
• Setting up SQL Server AlwaysOn
• Testing failover
• Installing Good Mobile Messaging Server with AlwaysOn
Preconditions
AlwaysOn requires Windows Cluster, but not Quorum. Here, Node Majority is used. This requires three Windows servers
• Prepare three Windows servers with the same configuration, Windows 2008 or 2012 . Here, Windows 2012 is used.
• Prepare at least 25 GB disk space. Here, 32 GB is used.
• Prepare an SQL Server 2012 setup file.
482 Good Mobile Messaging Administrator’s Guide

SQL AlwaysOn
• The login account for the Windows server should belong to a domain administrator.
Setting Up Windows Cluster
AlwaysOn requires Windows Cluster, but not Quorum. For simplicity, Node Majority is used here.
To set up Windows Cluster:
1. In Windows Server Manager, go to Add Roles and Features.
Good Mobile Messaging Administrator’s Guide 483

GMM and GMC Failover
2. Add the feature Failover Clustering.
484 Good Mobile Messaging Administrator’s Guide

SQL AlwaysOn
3. After the feature Failover Clustering is installed, open Failover Cluster Manager.
Good Mobile Messaging Administrator’s Guide 485

GMM and GMC Failover
4. In Cluster Manager, click "Validate Configuration."
5. Click Next.
486 Good Mobile Messaging Administrator’s Guide

SQL AlwaysOn
6. In "Select Servers or a Cluster," click Browse to select the servers to be added to the cluster.
7. Click Next.
8. Let the validating test finish. If the test is passed without errors (warnings are acceptable), click Finish to create a cluster.
9. In the Create Cluster wizard, enter a name for the cluster. Using the cluster name, a computer will be created within the domain,
Good Mobile Messaging Administrator’s Guide 487

GMM and GMC Failover
and the cluster can be accessed using this name. If the cluster is using in a DHCP network, the IP address need not be set.
10.Click Next.
488 Good Mobile Messaging Administrator’s Guide

SQL AlwaysOn
11.After the cluster is created, it can be seen in the Failover Cluster Manager.
Good Mobile Messaging Administrator’s Guide 489

GMM and GMC Failover
12. If you cannot see the cluster info in the Failover Cluster Manager, you can manually connect to the cluster.
Windows Cluster has now been set up.
490 Good Mobile Messaging Administrator’s Guide

SQL AlwaysOn
Setting Up SQL AlwaysOn
Setting Up the SQL Server
1. Launch SQL Installation Center, and choose "New SQL Server stand-alone installation or add features to an existing installation."
Good Mobile Messaging Administrator’s Guide 491

GMM and GMC Failover
2. Click Next. We recommend installing the features framed in red:
492 Good Mobile Messaging Administrator’s Guide

SQL AlwaysOn
3. In the Server Configuration window, set the account name to the domain account and set the startup type to "Manual."
Good Mobile Messaging Administrator’s Guide 493

GMM and GMC Failover
4. In the Database Engine Configuration window, in Server Configuration, either Windows authentication mode or Mixed Mode can be specified, but "Add Current User" must be clicked.
5. In the Database Engine Configuration window, in Data Directories, the default or any other directory can be used. No share storage is required.
6. Click Next as necessary to finish installation.
With this, SQL server has been set up.
494 Good Mobile Messaging Administrator’s Guide

SQL AlwaysOn
Setting Up SQL AlwaysOn
1. On each machine in the cluster, open SQL Server Configuration Manager and open the properties of the SQL server.
2. Enable AlwaysOn Availability Groups.
Good Mobile Messaging Administrator’s Guide 495

GMM and GMC Failover
3. Do a full backup for the database that will reside in an AlwaysOn group. The backup should be in a shared folder that the other nodes of the cluster can reach and read.
4. Open Microsoft SQL Server Management Studio and launch the wizard to create a new AlwaysOn group.
496 Good Mobile Messaging Administrator’s Guide

SQL AlwaysOn
Specify an “Availability Group Name.” This name is for display only, not for connection.
Good Mobile Messaging Administrator’s Guide 497

GMM and GMC Failover
5. Select the databases for AlwaysOn. Only those databases that meet the prerequisites previously stated can proceed.
498 Good Mobile Messaging Administrator’s Guide

SQL AlwaysOn
6. You can add a replica by clicking "Add Replica."
Good Mobile Messaging Administrator’s Guide 499

GMM and GMC Failover
7. Specify replicas. Up to two replicas can be set to automatically failover; checked replicas can failover automatically. Up to three replicas can be set to Synchronous sync.
8. If no AlwaysOn listener has been created, create one now; otherwise, an existing listener can be used. The listener is the DN
500 Good Mobile Messaging Administrator’s Guide

SQL AlwaysOn
used to connect the database. The listener's name can be found in the domain computer on DC.
Good Mobile Messaging Administrator’s Guide 501

GMM and GMC Failover
9. Locate the shared folder.
502 Good Mobile Messaging Administrator’s Guide

SQL AlwaysOn
10. If validation succeeds, click Next. The AlwaysOn group is created.
With this, SQL AlwaysOn is set up successfully.
Test Failover
Automatic failover
To test automatic failover:
1. Connect the database using the listener.
2. In a query, execute "select @@servername." The hostname of the current primary server will be listed.
3. Restart the primary server and verify whether the replica, which is configured for automatic failover, can take the AlwaysOn group to be the primary.
4. Execute "select @@servername" to see if a result can be returned and if the host name has changed.
Good Mobile Messaging Administrator’s Guide 503

GMM and GMC Failover
Manual failover
1. Connect to the database using the listener.
2. In a query, execute "select @@servername." The hostname of current primary server will be listed.
3. Connect to the database using the primary server name.
4. In the AlwaysOn group, click failover and select the target replica for failover.
5. Execute "select @@servername" on the AlwaysOn database to see whether a result can be returned and if the hostname has changed.
504 Good Mobile Messaging Administrator’s Guide

SQL AlwaysOn
Setting Up Good Mobile Messaging Server with AlwaysOn Present
For Good Mobile Messaging Server, the database in the AlwaysOn group can be considered a standalone database, which means that in the connection string, only primary database information is needed. There is no need to configure a failover database.
To install Good Mobile Messaging Server connected to a database in AlwaysOn, the instance name should be set to the listener in the AlwaysOn group, not the cluster name and not the hostname of the host server in the cluster.
The database used for Good Mobile Messaging Server should be created and added into AlwaysOn group, but manual creation of the tables is not necessary.
Good Mobile Messaging Administrator’s Guide 505

GMM and GMC Failover
For example, in the screenshot below, the Good Mobile Messaging Server database carl1 should be created already on the primary SQL Node and added to the Availability Group.
During Good Mobile Messaging Server installation, at the screen to enter the primary database server, specify the AlwaysOn listener as the database address, and for the Good Mobile Messaging Server database name enter the name of the database that was added to the Availability Group.
The failover of AlwaysOn is theoretically transparent to Good Mobile Messaging Server. However, when a failover occurs, there may be an interruption of service for several minutes.
Good Mobile Control Clustering
This section describes how to install Good Mobile Control (GMC) Server in a cluster environment.
506 Good Mobile Messaging Administrator’s Guide

Good Mobile Control Clustering
Good Mobile Control Server and its associated components are supported in a two-node Active-Passive Cluster on Windows Server 2003 SP1 and above. This chapter focuses on the Windows Server 2008 R2 environment.
Two GMC Servers can be configured to run in a clustered environment as Primary and Standby. Good Mobile Control cluster tools are used to install and configure the integration of these Servers into the cluster. Good Technology recommends that the procedure provided in this chapter be performed by an administrator experienced with Microsoft Clustering and Good for Enterprise Servers. When setting up GMC Servers in a clustered environment for the first time, we recommend that the administrator first do a dry run with a small number of users.
When the cluster service detects a failure, it determines to which node to move a failed resource group based on several factors, such as nodal load and preference. The resources of the resource group being moved are then started on the new node in the order specified by the resource-group dependencies.
Microsoft Clustering Services Overview and Requirements
This introduction is based on information provided by Microsoft about Windows Server 2008 R2 clustering services, also known as Windows Server Failover Clustering (WSFC). For the latest information on clusters, visit the Microsoft web site and search for information on “how clustering works.”
The following links also provide useful information:
For the Windows Server 2008 home page, visit:
http://www.microsoft.com/windowsserver2008/en/us/default.aspx
For the clustering and high availability blog, visit:
Good Mobile Messaging Administrator’s Guide 507

GMM and GMC Failover
http://blogs.msdn.com/clustering/default.aspx
For more information about the Windows Server 2008 Failover Cluster Configuration Program, visit:
http://www.microsoft.com/windowsserver2008/en/us/failover-clustering-program-overview.aspx
Windows Server 2008 R2
Windows Server 2008 R2 builds on the foundation of Windows Server 2008, expanding existing technology and adding new features to enable IT professionals to increase the reliability and flexibility of their server infrastructures. New virtualization tools, Web resources, and management enhancements help save time, reduce costs, and provide a solid foundation for enterprise workloads. Tools—such as Internet Information Services (IIS) version 7.0 and Hyper-V™ technology—combine to provide greater control, increased efficiency, and the ability to react to front-line business needs faster than previous Windows Server versions.
Failover Clustering
Failover clusters provide support for mission-critical applications—such as databases, messaging systems, file and print services, and virtualized workloads—that require high availability, scalability, and reliability. A failover cluster is a group of independent computers, or nodes that are physically connected by a local-area network (LAN) or a wide-area network (WAN) and that are programmatically connected by cluster software. The group of nodes is managed as a single system and shares a common namespace. The group usually includes multiple network connections and data storage connected to the nodes via storage area networks (SANs). The failover cluster operates by moving resources between nodes to provide service if system components fail.
508 Good Mobile Messaging Administrator’s Guide

Good Mobile Control Clustering
Hardware Requirements
Microsoft supports a failover cluster solution for Windows Server 2008 R2 only if all the hardware components are marked as "Certified for Windows Server 2008 R2." In addition, the complete configuration (servers, network, and storage) must pass all tests in the Validate a Configuration Wizard, which is included in the Failover Cluster Manager snap-in. For more information, see Failover Cluster Step-by-Step Guide: Validating Hardware for a Failover Cluster.
• Two servers identical in hardware configuration
• Each server should have two network cards
• Disk configurations:
- The internal disk configuration of each server can be either IDE, SCSI, or SAN.
- If using SCSI, each server should have identical SCSI RAID controllers.
- External SCSI disk array with two SCSI ports. We recommend that you purchase a “cluster aware” SCSI disk array. As always, prior to purchasing hardware that will run Microsoft system software, be sure to check the Microsoft Hardware Compatibility List (HCL) (http://www.microsoft.com/whdc/hcl/default.mspx).
Operating System Requirements
The servers for a failover cluster must run the same version of Windows Server 2008 R2 (Enterprise or Datacenter Edition), including the same hardware version (x64-based, or Itanium architecture-based). They should also have the same software updates (patches) and service packs.
Network Requirements
• A unique NetBIOS cluster name.
Good Mobile Messaging Administrator’s Guide 509

GMM and GMC Failover
• Five unique, static IP addresses: two for the network adapters on the private network, two for the network adapters on the public network, and one for the cluster itself.
• A domain user account for Cluster service (all nodes must be members of the same domain).
• Each node should have two network adapters—one for the connection to the public network and the other for the node-to-node private cluster network. If you use only one network adapter for both connections, your configuration is unsupported. A separate private network adapter is required for HCL certification.
Shared Disk Requirements
All shared disks, including the Witness disk, must be physically attached to a shared bus. SAN is supported. Network drives (or Network Attached Storage (NAS)) are not supported; this includes NetApp filer, known also as NetApp Fabric-Attached Storage (FAS), NetApp's network attached storage (NAS) device. Verify that disks attached to the shared bus can be seen from all nodes. This can be checked at the host adapter setup level.
• SCSI devices must be assigned unique SCSI identification numbers and properly terminated, as per manufacturer's instructions.
• All shared disks must be configured as basic (not dynamic).
• All partitions on the disks must be formatted as NTFS.
While not required, the use of fault-tolerant RAID configurations is strongly recommended for all disks.
Other Service Requirements and Software Requirements
The two nodes/machines should be installed and configured for Microsoft Clustering service as Active-Active node.
510 Good Mobile Messaging Administrator’s Guide

Good Mobile Control in a Clustered Environment
The Distributed Transaction Coordinator Service should be installed and configured in cluster nodes. For details, refer to “How to configure Microsoft Distributed Transaction Coordinator on a Windows Server 2008 cluster” at http://technet.microsoft.com/en-us/library/cc730992.aspx
Good Mobile Control in a Clustered Environment
Please note the following important points about information in the rest of this chapter:
• Although it is possible during the GMC install process to choose to install SQL Server Express local to the GMC node, this configuration is strongly discouraged, although supported. This option can be helpful for test and development purposes but is not recommended in a production environment.
• None of the Good server components ever writes to the Witness (or Quorum) drive.
• Due to the history of Good’s clustering implementation, there is a drive Q: called out in some instructions and screen shots. In prior implementations (for Windows Server 2003) the Q: drive mapped to the Quorum drive for GMC. In the current implementation the shared drive resource for GMC must be Q:.
Good Mobile Messaging Administrator’s Guide 511

GMM and GMC Failover
• The following diagram illustrates a standard cluster configuration of Good Mobile Control Server:
Here, Good Mobile Control Servers are installed on Node 1 and Node 2. The shared disk stores the Good Mobile Control cluster database files (only for a local SQL Server Express configuration). The clustering service ensures that only one node is running the Good Mobile Control service at a time. If a node fails, then the Good Mobile Control service is started on the other node.
Installing Good Mobile Control Servers with Cluster Services
Configuring the Quorum Drive in the Windows 2008 R2 cluster
1. In Failover Cluster Manager, the quorum configuration can be changed through the Configure Cluster Quorum Wizard. This page can be reached by right clicking on the cluster name,
512 Good Mobile Messaging Administrator’s Guide

Good Mobile Control in a Clustered Environment
selecting “More Actions…” and then “Configure Cluster Quorum Settings…”
2. Once “Configure Cluster Quorum Setting…” is selected, the Configure Cluster Quorum Wizard appears. This will recommend the best configuration for you based on the number of nodes and Available Storage and inform you about the number of failures you can sustain. Fortunately, Failover Cluster Manager intelligently picks the best model for you based on the number of nodes and disk availability when creating the cluster. It will use Node and Disk Majority Quorum settings when create cluster
Good Mobile Messaging Administrator’s Guide 513

GMM and GMC Failover
with even number of nodes, provided that cluster disk resource is available.
514 Good Mobile Messaging Administrator’s Guide

Good Mobile Control in a Clustered Environment
3. Select Next to proceed and select the disk from the available storage.
Good Mobile Messaging Administrator’s Guide 515

GMM and GMC Failover
4. Confirm the selection by clicking Next:
5. Select Next to view the cluster Quorum drive settings:
516 Good Mobile Messaging Administrator’s Guide

Good Mobile Control in a Clustered Environment
Adding the Shared Disk
Open Failover Cluster Manager and select Add Disk on the top right:
Good Mobile Messaging Administrator’s Guide 517

GMM and GMC Failover
1. The available disks for the cluster will be displayed on the next screen:
518 Good Mobile Messaging Administrator’s Guide

Good Mobile Control in a Clustered Environment
2. Select Ok and observe that the disk is added to the available storage group:
Good Mobile Messaging Administrator’s Guide 519

GMM and GMC Failover
3. Right Click on the added shared disk and select Change Drive letter to map the shared disk resource to change the drive letter.
520 Good Mobile Messaging Administrator’s Guide

Good Mobile Control in a Clustered Environment
4. Select the shared-drive letter from the Selection and click OK.
5. Run command prompt as an administrator and create GMC group.
Good Mobile Messaging Administrator’s Guide 521

GMM and GMC Failover
[NOTE: These instructions may need to be modified to use the GMC group]
6. Bring the GMC group online using the command prompt.
522 Good Mobile Messaging Administrator’s Guide

Good Mobile Control in a Clustered Environment
7. Add the shared resource Disk to the GMC group using the command prompt.
Installing Primary and Standby Good Mobile Control Server on Cluster Nodes
Note: In addition to the pre-requisites for cluster mentioned in the following sections, there are other necessary pre-requisites required for installing Good Mobile Control Server as described in “Checking Prerequisites and System Requirements” in Chapter 3 of the Good for Enterprise Administrator’s Guide. After the necessary permissions and setup is done, the cluster environment is ready for you to install Good Mobile Control Server.
To install the Primary Good Mobile Control Server on a cluster node:
1. Log in using the Good Mobile Control account.
Good Mobile Messaging Administrator’s Guide 523

GMM and GMC Failover
2. Open the Failover Cluster Manager from Administrative Tools. You should see a configuration similar to the following when running the Failover Cluster Manager.
524 Good Mobile Messaging Administrator’s Guide

Good Mobile Control in a Clustered Environment
3. Verify that the resource including the shared disk drive R exists within the GMC group also. You can also run the command prompt as an administrator and enter the following command:
4. Select one node and designate it as Primary. (In the previous figure, the example node is cl-win2k8r2-1). Use Failover Cluster Manager to make sure that all of the resources, such as network drive and shared disk, are owned by this node.
Install the Primary Good Mobile Control Server according to the instructions in “Installing Good Mobile Control Server” on page 99. While running the setup program, make sure you select the following options:
Good Mobile Messaging Administrator’s Guide 525

GMM and GMC Failover
1. Select Yes if prompted to enable this Good Mobile Control Server to participate in failover.
Then select Primary Good Mobile Control Server (the Default).
2. Specify the SQL Server database to use for GMC’s data storage. Since a local GMC database installation is not recommended or supported in a clustered production environment, select “Using existing SQL Server instance on Remote Drive” in the following dialog. This tells the installer you are going to use a remote installation of Microsoft SQL Server, which is the recommended
526 Good Mobile Messaging Administrator’s Guide

Good Mobile Control in a Clustered Environment
option for a clustered environment. Enter the SQL Server host name:
Good Mobile Messaging Administrator’s Guide 527

GMM and GMC Failover
Enter the SQL Server instance name at the prompt as shown below:
528 Good Mobile Messaging Administrator’s Guide

Good Mobile Control in a Clustered Environment
Enter the name for the GMC database:
Follow the instructions in the subsequent screens to complete the creation of/connection to the GMC SQL Server database.
Good Mobile Messaging Administrator’s Guide 529

GMM and GMC Failover
Select Windows Authentication or SQL Server authentication to connect to the database.
530 Good Mobile Messaging Administrator’s Guide

Good Mobile Control in a Clustered Environment
3. Click Next and enter the Serial Number, License Key and server Name for the Good Mobile Control Server in the following Dialog box:
Note: The node host name can be different than the Server name entered in this dialog box. The same Good Mobile Control Server Name will be entered again during the Standby server installation.
4. After successfully installing the Good Mobile Control Server, verify that the administrator can log into the Good Mobile Control Console.
Note: The default URL to access the Good Mobile Control Server Console is http://clustername:8443 (The default port is 8443.)
Good Mobile Messaging Administrator’s Guide 531

GMM and GMC Failover
Installing the Standby Good Mobile Control Server
To install the Standby Good Mobile Control Server:
1. After installing the Primary Good Mobile Control Server, stop the Good Mobile Control Server services in Windows Services on the Primary node before installing the Standby Good Mobile Control Server.
2. Log in using the Good Mobile Control account.
3. Using the Failover Cluster Manager, change the group that contains the resources to Standby Good Mobile Control Server (the default cluster group). Use the command Line to transfer cluster group and GMC group to the standby server.
Transferring GMC Group to the Standby Server.
532 Good Mobile Messaging Administrator’s Guide

Good Mobile Control in a Clustered Environment
Transferring Cluster Group to the Standby Server.
Make sure that the second node (designated as Standby) is now the owner of the Network and shared disk resources
4. Log into the Standby host machine and make sure the Standby node is the owner of resources. Run command prompt as an administrator and enter the following command:
C:\Windows\system32>cluster resource
Good Mobile Messaging Administrator’s Guide 533

GMM and GMC Failover
5. Navigate to the directory on the shared drive where the Good Mobile Control Server is installed.
6. Install the Standby Good Mobile Control Server according to the instructions in “Installing Good Mobile Control Server” on page 99.. During the Standby Good Mobile Control Server installation, specify the same license key, serial number, and name of the Primary Good Mobile Control Server. Also during installation, specify the shared files in the same directory as for the Primary Good Mobile Control Server (the R Shared drive location).
The installer comes with default options that are required for the Standby server. Please verify the details; in most cases no changes are required.
7. While running the set up program, make sure you select the following options:
a. Select Yes at the following Installation dialog box to enable this Good Mobile Control Server to participate in failover:
534 Good Mobile Messaging Administrator’s Guide

Good Mobile Control in a Clustered Environment
b. In the following dialog box, select Standby Good Mobile Con-trol Server:
c. As in the installation for the Primary GMC, follow the instruc-tions for connecting to the remote GMC SQL Server database, selecting the shared resource directory, and specifying the License Key, Serial Number and the Server name.
Note: If you specify a different server name than the Primary GMC, the Standby Good Mobile Control Server will not be installed.
d. If you specified a proxy server during installation of the Pri-mary Good Mobile Control Server, then you must specify the
Good Mobile Messaging Administrator’s Guide 535

GMM and GMC Failover
same proxy server during the installation of the Standby Good Mobile Control Server.
Note: If your organization has more than one proxy server, do not use any other proxy server during the Standby Good Mobile Control Server installation. You must use the same proxy server for the Primary Good Mobile Control Server and Standby Good Mobile Control Server.
e. Navigate to the \GMC folder and delete the emfdbfiles.lck file, if this file is not deleted GMC service won’t start on the standby Node.
f. After successfully installing the Good Mobile Control Server, verify that the administrator can log into the Good Mobile Control Console. For the Good Mobile Control Server URL, we recommend that you use the unique Netbios cluster name instead of an individual node name.
536 Good Mobile Messaging Administrator’s Guide

Good Mobile Control in a Clustered Environment
Note: The default URL to access the Good Mobile Control Server Console is http://clustername:8443. (The default port is 8443.)To log into the Good Mobile Control Server Console, use the Good Mobile Control Superuser name defined during installa-tion. For more on the Superuser function, refer to “The Super-user” on page 186.
Installing Good Mobile Control Cluster Tools and Configuring Cluster Services
Before configuring cluster resources and tools, both the Primary and Standby Good Mobile Control Servers should be installed on both nodes.
To install Good Mobile Control cluster tools and configure cluster services:
1. Log on to the Primary Good Mobile Control Server node.
2. Verify the following:
• Both the Primary and Standby nodes are running and there are no errors displayed in the Failover Cluster Manager.
• Using command prompt, confirm the Primary machine is the owner of the cluster resources. If not, move the cluster resources ownership from the Standby machine to the Primary machine using the following command:
Cluster [cluster name] group [cluster group] /moveto:clusternodename
Good Mobile Messaging Administrator’s Guide 537

GMM and GMC Failover
Moving the Good Link Group:
Moving the Cluster Group:
538 Good Mobile Messaging Administrator’s Guide

Good Mobile Control in a Clustered Environment
Listing Status of all cluster resources:
• Check that GMC Server Services are stopped on both cluster nodes.
3. Delete the lock file called “emfdbfiles.lck” from the shared drive.
4. Launch the “Good Mobile Control Cluster Tools” Install Shield executable file GMCClusterTools-version.exe on the Primary server. You will find the executable on the distribution media in a tools directory.
Good Mobile Messaging Administrator’s Guide 539

GMM and GMC Failover
5. Proceed with installation. Select the path in the R- Drive (Shared drive) when prompted for the location:
6. Click Next and complete the installation. The InstallShield program will install cluster script files that are used to configure the Good Mobile Control services and add support for clustering for Good Mobile Control Server in the \GMC Server folder. When the installation is complete, you will see a shortcut on the desktop with a name such as “Good Mobile Control Cluster Setup.”
7. Right-click this icon and select “Run as administrator “on the Primary server to integrate the Good Mobile Control services into the cluster.
540 Good Mobile Messaging Administrator’s Guide

Good Mobile Control in a Clustered Environment
You should see the following screen:
Press the ENTER key. After a few seconds, the following screen will appear if the script ran successfully:
8. Press the ENTER key to complete the set up. The script has now configured the Good Mobile Control Service and Good Mobile Control SQL database server services and Good Mobile Control Cache Lock on the cluster nodes into the cluster environment. Verify that the GMC Cache Lock and GMC Service are added to the GMC Group.
Good Mobile Messaging Administrator’s Guide 541

GMM and GMC Failover
9. Open Failover Cluster Manager and you should see the following screen:
10. If any errors occur while running the script, follow the instructions to fix the problem and then run the script again. The installation of Good Mobile Control Server Cluster tool is complete.
To make sure the services are started on the cluster:
1. Using the Failover Cluster Manager, right click on each resource for the, GMC Cache Lock, and GMC Server services and bring them online.
Note: GMC SQLServer Service will appear when Local SQL is used while installing GMC.
2. If any resource fails to run, check the Event Log for errors. Services are installed and configured within the cluster. Using the
542 Good Mobile Messaging Administrator’s Guide

Good Mobile Control in a Clustered Environment
following command, cluster resources can be moved to the standby server and vice-versa:
Cluster [cluster name] group [cluster group] /moveto:nodename
The following screen indicates the services are up and running on the node:
The cluster setup for GMC is now complete.
Good Mobile Control Cluster Resources
The Cluster Tools setup will add the following separate resources to the cluster under Default Cluster Group. These resources are GMC Server, GMC SQLServer, and GMC Cache Lock services.
Good Mobile Messaging Administrator’s Guide 543

GMM and GMC Failover
GMC Server Resource
The GMC Server is added to the cluster as a resource named “GMC Server.” The cluster service monitors this resource and if the resource fails, the service is either restarted on the same node or restarted on another node. This resource is dependent on the GMC SQL Server Resource.
GMC SQLServer Resource
For use with local SQL Server Express configurations only.
The GMC SQL server database service is added to the cluster as a resource named “GMC SQLServer Service.” The cluster service monitors this resource and if the resource fails, the service is either restarted on the same node or restarted on another node. This resource is added to the GFE Group only when local SQL Server is used for installing GMC.
GMC Cache Lock Resource
Before the GMC Server service resource can be started on either Primary or Standby node, the cache lock file must be deleted in order to allow the service to start automatically. If the GMC cache is on a shared drive, then this resource is dependent on the shared drive resource.
Disk R Resource
The Disk R resource stores the GMC database files (only for a local SQL Server Express configuration).
Uninstalling Good Mobile Control from Cluster Servers
Note: The Standby server must be uninstalled before the Primary.
To uninstall Good Mobile Control servers from Cluster Servers:
544 Good Mobile Messaging Administrator’s Guide

Good Mobile Control in a Clustered Environment
1. Using the command prompt, transfer ownership of the cluster resources to the Standby server.
Cluster [cluster name] group [cluster group] /moveto:nodename
2. While uninstalling GMC, take the GMC Server (Service) resource, and the GMC Cache Lock resource offline. Also take GMC SQL Server resource offline while uninstalling GMC if local SQL is used while installation.
3. Uninstall the Standby server for GMC server as you would a standalone GMC Server. (See “Uninstalling Good Mobile Control Server” on page 592.)
4. After completing the uninstall of the Standby server, from the Primary server, transfer ownership of the resources by moving the group back to the Primary server.
5. Uninstall the Primary server for GMC Server as you would a standalone GMC Server. Delete all of the resources from the Cluster resource groups after both the Primary and Standby servers are uninstalled:
a. From the Primary server, launch the Failover Cluster Manager
b. Select GMC Group.
c. For each GMC service (GMC SQL Server, GMC SQLServer (only for a local SQL Server Express configuration) and GMC
Good Mobile Messaging Administrator’s Guide 545

GMM and GMC Failover
Cache Lock service), right-click the resource and choose Offline. Then choose Delete.
d. Repeat a. through c. until all resources are deleted.
6. Manually delete any remaining files from the installation directories of GMC Server, and the shared drive.
Good Mobile Control Cold Failover
When setting up your Good for Enterprise system, you have the option of installing a standby Good Mobile Control Server to provide redundancy in case of hardware failure or software corruption on the computer running Good for Enterprise.
As shown in the figure, two GMC computers share an SQL database. If the primary computer fails, you start the Good Mobile Control Server on the standby computer. The Good for Enterprise GMC cold failover system requires a shared storage device that is connected directly to both the primary and standby servers. However, based on Good's architecture, only one server will access or connect to the drive at any point in time.
The primary Good Mobile Control is normally running. The standby server is used only when the primary server fails and cannot be
546 Good Mobile Messaging Administrator’s Guide

Installing Good Mobile Control as a Primary Server
brought back online. Synchronization data is stored in the shared disk. A lock file (dbfiles.lck) in the shared root directory prevents both of the Servers from accessing the shared files at the same time.
Note: If the primary Good Mobile Control Server fails, the secondary Server will be aware of all Good Mobile Messaging Servers via the shared database. However, if a Good Mobile Messaging Server subsequently fails, the secondary Good Messaging Server will attempt to communicate with the primary Good Mobile Control Server, unless the Primary and Secondary Mobile Control Servers share the same virtual name.
If the primary Good Mobile Control Server fails and the secondary Control Server starts up, it notifies all Good Mobile Messaging Servers of the new Control Server URL
Installing Good Mobile Control as a Primary Server
Most of the steps below are the same steps as for installing a Good Mobile Control Server in a standalone configuration. Refer to “Installing Good Mobile Control Server” on page 99 for details on those steps.
Without clustering, Windows does not support two servers accessing a shared SAN drive. It is a limitation with NTFS files. However, Good's architecture does not call for two (primary and standby) servers being online at the same time.
Prior to starting installation of the standby servers, the primary servers should be shut down so there is no contention for the SAN drive. During setup of cold failover, the .lck files should be left in the directory so that the setup will see them and recognize that this server will be a standby.
Good Mobile Messaging Administrator’s Guide 547

GMM and GMC Failover
Now install the Good Mobile Control Server according to the instructions provided in “Installing Good Mobile Control Server” on page 78. Note the following, for cold failover:
When prompted, choose the failover option. When prompted, select the Primary Server option.
When prompted, choose a "Remote SQL Server Host" and enter the host name. Using a local database with Good Mobile Control failover is only supported when using Microsoft Clustering (MSCS). To use Good Mobile Control failover without MSCS, use a remote SQL Server database.
When prompted, choose Failover remote directory.
Only two files will be placed in this shared directory, the lock files emfdbfiles.lck and emfdbsetup.ini. Specify a non-local directory that is reachable by both primary and secondary Good Mobile Control Servers. The emfdbfiles.lck file plays an important part during a failover situation.
When install is done, log in to the GMC Console to confirm access is successful.
Before installing on the Standby node, be sure to stop and disable the Good Mobile Control server service on the primary node.
Installing Good Mobile Control on the Standby Server
After installing the Primary Good Mobile Control Server, stop the GMC Server services in Windows Services on the Primary node, before installing the Standby GMC Server.
1. Log in using the Good Mobile Control service account.
548 Good Mobile Messaging Administrator’s Guide

Installing Good Mobile Control on the Standby Server
2. Install Good Mobile Control on this standby node. Refer to “Installing Good Mobile Control Server” on page 78. Most of the steps are identical to installing GMC on the Primary node, with the exceptions noted here.
3. When prompted during the install, choose "Standby GMC Server." (This is one of the differences between this being a primary host and standby host.)
Good Mobile Messaging Administrator’s Guide 549

GMM and GMC Failover
4. The SQL Server Host must be remote in a cold standby configuration. This remote SQL Server must be the same SQL server as the one selected for the Primary server.
The Named instance must be the same as well.
You must name the same database as the one selected for the Primary Server install.
If the following screen is not displayed, you must cancel the install.
5. Choose "Yes."
550 Good Mobile Messaging Administrator’s Guide

Installing Good Mobile Control on the Standby Server
Important: By default the Server field is populated with the Netbios name of the host it is being installed on. You must change this to be exactly the same server name that you specified during the install of your primary server. The License and Serial Number must also be the same as those for your primary server.
6. At the end of the installation you will be prompted to start the Good Mobile Control Server service. Do not start the service at this point. If you do, it will stop automatically after a few seconds.
7. Navigate to the Failover Remote Directory. Delete emfdbfiles.lck.
8. Start the Good Mobile Control service on the standby node.
9. Confirm that the policy set named TestingColdFailover still exists.
You have successfully installed primary and standby Good Mobile Control Servers.
Repeat the final four steps of this procedure whenever you need to failover to the primary or standby server.
Good Mobile Messaging Administrator’s Guide 551

GMM and GMC Failover
552 Good Mobile Messaging Administrator’s Guide

9 Utilities
This chapter describes some of the web-service utilities available for use in Good for Enterprise administration and troubleshooting. For more information, contact your authorized Good for Enterprise service representative.
The command-line utilities require JRE 8 to run.
Management Utilities
• GoodTools User Interface - A user interface provided by GoodTools.exe, located in the Good Mobile Messaging Server utils directory, which allows the administrator to run the Good for Enterprise utilities using a tabbed interface with fields for entry of the values for required utility parameters.
• GoodLinkAddUser - Adds a new user to Good Mobile Messaging Server.
• GoodLinkDeleteUser - Deletes a user from Good Mobile Messaging Server.
• GoodLinkQueryUser - Provides essential information about existing users.
• GoodLinkEraseData - Issues an Erase Data command to a GoodLink handheld to wipe all data on the handheld.
• GoodLinkRegenOTAPIN - Generates a new OTA PIN for the specified user.
Good Mobile Messaging Administrator’s Guide 553

Utilities
• GoodLinkUpdateUser - Enables/disables Good Intranet once a user is already GoodLink enabled. Changes the GMM server for the user. Changes the policy set.
• LookUpHandheldFromDN - Retrieves all GUID for a user for a specified user DN.
• ExportComplianceReport - Export the compliance report for a specified handheld.
• GetAppsForHandheld - Get a list of applications installed for a device.
• RefreshAppsForDevice - Refresh the application list in the GMC repository for a specified handheld.
• MoveHandheld - Move a handheld from one Good Mobile Control Server to another.
• GoodLinkUnregisterServer - Unregisters the Good Mobile Messaging Server from Good Mobile Control Server and does not display the Server in the list under the Console Servers tab.
• ImportPolicySets - Imports selected policy sets from an XML file.
• ExportPolicySets - Exports selected policy sets to an XML file.
Troubleshooting Utilities
• gmexportstats - Exports handheld user statistics, user software policy settings and status information, and server software policy information to a file in CSV format, for backup and audit use.
• testcreateprofile - Tests the GoodAdmin profile and Good Mobile Messaging Server’s ability to create temporary user profiles.
• GdGLSConnect - Tests connectivity from the server that it is running on to the Good Data Center.
• uploadLog - Allows Good for Enterprise diagnostic files to be easily uploaded to a Good Network Operations Center server.
554 Good Mobile Messaging Administrator’s Guide

Installing the Utilities
Installing the Utilities
The command-line utilities described here are included with the Good for Enterprise download media in a zip file labeled gmc-cli_n.n.n.nn.zip, where the n values are defined by the Good Mobile Control version that you download (e.g., gmc-cli_1.0.3.36.zip). Unzip the files and copy them to C:\Program Files\Good Technology\Good Mobile Control\jre\bin\.
Using the GoodTools Interface
The utilities described in the following sections can be run from the command line or from the user interface provided by GoodTools.exe, which is located in the Good Mobile Messaging Server utils directory.
GoodTools provides a window with tabs for supported utilities.
Good Mobile Messaging Administrator’s Guide 555

Utilities
Each tab provides fields that allow you to enter that utility’s required data. Details about the data to be entered are provided in the following sections for the supported utilities.
Note: When using Goodtools and specifying a Good user, always enter the user's alias, not the user’s Display Name or SMTP email address.
You can then click Send to send the data to customer support or Save to save the data for later transmission to your authorized support representative.
GoodLinkAddUser
GoodLinkAddUser adds a user to Good Mobile Messaging Server.
The utility is available on machines with Good Mobile Control (GMC) Server installed on them.
Run the utility from the installed Server bin directory.
The user or thread/process/CGI that launches this utility must have Administrator rights in Console > Roles > Rights or must have “Add user for OTA Setup Provisioning” rights for Good for Enterprise to add an OTA Setup user. (To test, log on as the user with the necessary rights and attempt to add a user from the Console). To add a user, you must know the user’s Exchange display name.
For a usage example, go to C:\Program Files\Good Technology\GMC Server\jre\bin and run GoodLinkAddUser without any parameters specified.
Syntax:
GoodLinkAddUser -URL=username:password@https://MachineName:19005-GLS=Good Mobile Messaging Server Name
556 Good Mobile Messaging Administrator’s Guide

GoodLinkAddUser
[-UserDisplayName=User Exchange GAL Display Name ][-UserAlias=User Exchange Alias ]-UserDN=User Exchange DN -GIS=Good Intranet Server Name -PolicySet=PolicySet-LogFile=Log File Path-AdditionalHH=True|False
username:password@MachineName:portnumber
The user must have a role assigned for the Good Mobile Control Server.
https://MachineName:19005 points to the webservice secure endpoint, port 19005.
Good Mobile Messaging Server Name
Name of the Good Mobile Messaging Server to add the user. If -GIS is included in the command line, this value cannot be empty.
User Exchange GAL Display Name
Display name of the user as specified in the Exchange GAL (or Active Directory)
User Exchange Alias
Alias of the user. This is referred to as mailNickName in Active Directory.
User Exchange DN User's Exchange Distinguished Name. Represented as the legacyExchangeDN attribute in Active Directory. Form:
/o=Good/ou=BusDev/cn=Recipients/cn=myalias
Note: The Good Mobile Control Server must resolve the user from Exchange GAL. The UserDN cannot be empty even if both UserDisplayName and UserAlias are specified. UserDisplayName and UserAlias can be empty but User Exchange DN must be specified.
Good Intranet Server Name
Name of the Good Intranet Server, if present. This value can be empty.
PolicySet Causes the handheld to get the policies from the specified PolicySet. If the specified PolicySet does not exist, then PolicySet is set to the "Default Policy Set."
Log File Path Errors and warnings are appended to this file. The file will not be overwritten. A valid pathname is required. The path cannot be a network path; it must be on the local machine.
Good Mobile Messaging Administrator’s Guide 557

Utilities
GoodLinkDeleteUser
This program deletes a user that was Good for Enterprise-enabled. All errors are logged into a file. On successful completion, the program will remove the user from the Good Mobile Control Console, and the handheld will receive a disconnect message.
The command-line machine must have Good Mobile Control Server installed on it.
Run the utility from the installed Server bin directory.
The user or thread/process/CGI that launches this utility must have “Delete User” rights for Good for Enterprise (to test, attempt to delete a user from the Console).
Do not use this utility for a user/handheld currently being moved from one Good Mobile Messaging Server to another.
Syntax:
GoodLinkDeleteUser -URL=username:password@https://MachineName:19005-GUID=string [-UserDisplayName=User Exchange GAL Display Name][-UserAlias=User Exchange Alias] [-UserDN=User Exchange DN] -LogFile=Log File Path
All parameters are case insensitive. All parameters must be specified even if they are empty.
username:password@MachineName:portnumber
The user must have a role assigned for the Good Mobile Control Server.
https://MachineName:19005 points to the webservice secure endpoint, port 19005.
GUID string The unique identifier of the handheld.
558 Good Mobile Messaging Administrator’s Guide

GoodLinkQueryUser
Note: UserDisplayName, UserAlias, and UserDN are optional if the GUID string is specified. If the GUID is not specified, you can specify the UserDN, UserDisplayName, and UserAlias but it may fail if there is more than one handheld assigned to the user.
Example:
GoodLinkDeleteUser.bat -URL=domain\user:password@https://localhost:19005 -GUID="7341A062-28B6-4C68-B112-D85BF8B44AFE" -LogFile="C:\temp\deleteuser.log"
GoodLinkQueryUser
GoodLinkQueryUser takes an existing user's identity and outputs the essential attributes for that user into a simple XML file.
The command-line machine must have Good Mobile Control Server installed on it.
Run the utility from the installed Server bin directory.
User Exchange GAL Display Name
Display name of the user as specified in the Exchange GAL (or Active Directory)
User Exchange Alias
Alias of the user. This is referred to as mailNickName in Active Directory.
User Exchange DN User's Exchange Distinguished Name. Represented as legacyExchangeDN attribute in Active Directory.
Form: /o=Good/ou=BusDev/cn=Recipients/cn=myalias
Note: The Good Mobile Control Server must resolve the user from Exchange GAL. User Exchange DN cannot be empty even if both UserDisplayName and UserAlias are specified. UserDisplayName and UserAlias can be empty but User Exchange DN must be specified.
Log File Path Errors and warnings are appended to this file. The file will not be overwritten.
Good Mobile Messaging Administrator’s Guide 559

Utilities
The user or thread/process/CGI that launches this utility must have, at the minimum, “View only Administration” rights for Good for Enterprise.
Running the command-line tool without any options prints its usage.
Syntax:
GoodLinkQueryUser -URL=username:password@https://MachineName:19005[-UserDisplayName=User Exchange GAL Display Name] [-UserAlias=User Exchange Alias] [-UserDN=User Exchange DN] -EncodeString=0 or 1 -XMLOutFile=XML Output File Path -LogFile=Log File Path (all errors logged) [-HHS1No=Serial Number][GUID=Unique identifier string of the handheld][-GetAll]
-UserDisplayName, -GUID, -UserDM, or -HHSS1No must be provided.
If the HHSlNO parameter is specified with a value, to specify a handheld serial number instead of user parameters, then -GUID, -UserDisplayName, -UserAlias, and -UserDN must be set to empty.
The -EncodeString option (if set to 1) escapes non-alphanumeric characters with % sign (e.g., %20 for the space character) as in the HTML specification for string values in the output XML file. This option can be used based on the type of XML parser that you will use. We recommend setting this to 0.
If the program is run against a non-Good for Enterprise-enabled user, the program terminates with an error, and an error code is generated.
The optional -GetAll parameter obtains data for multiple handhelds enabled for this user. The <xmlfilepath> will be of the format <users><user><user>...</users>, where <user> node is for each
560 Good Mobile Messaging Administrator’s Guide

GoodLinkQueryUser
handheld enabled. The following screens show output with and without the -GetAll parameter specified. If you use the -GetAll parameter, you must specify the legacyExchangeDN to retrieve all of the handhelds.
With -GetAll (OTAPin value is different for different handhelds of the same user):
Good Mobile Messaging Administrator’s Guide 561

Utilities
Without -GetAll:
XML file format
The format is simple, with a set of user properties under <user> tag. The file can be parsed by the simplest XML parser.
Each property has a name, data type, and value. The data type is set to "string."
Following is a sample output XML file for a user/handheld enabled for OTA but not yet set up. -EncodeString is set to 0.
<?xml version="1.0" ?>
<user>
<UserDisplayName type="string">bhattreo650</User
562 Good Mobile Messaging Administrator’s Guide

GoodLinkQueryUser
DisplayName>
<UserAlias type="string">BhatTreo650</UserAlias>
<UserDN type="string">/o=Dev Eng Good Technology/
ou=Site1/cn=Recipients/cn=BhatTreo650</UserDN>
<UserEmail
type="string">[email protected]
</UserEmail>
<OTAEnabled type="string">1</OTAEnabled>
<OTAPin type="string">blb26lh1j37km2b</OTAPin>
<OTANumericPin type=”string”></OTANumericPin>
<OTAURL type="string">https://good.com/ota</
OTAURL>
<GoodLinkServerName type="string">SBHATXP</
GoodLinkServerName>
<GoodLinkServerVersion type="string">4.5.0.0</
GoodLinkServerVersion>
<HHSlNo type="string"></HHSlNo>
<HHType type="string"></HHType>
<HHPhoneNo type="string"></HHPhoneNo>
<HHNetworkName type="string"></HHNetworkName>
<GoodLinkClientVersion type="string"></GoodLink
ClientVersion>
<UserDepartment type="string"></UserDepartment>
<GoodIntranetServerName type="string">GASBHATXP
</Good IntranetServerName>
<EraseDataRequested type=”string”>1
</EraseDataRequested>
<EraseDataState type=”string”>Error
</EraseDataState>
</user>
Good Mobile Messaging Administrator’s Guide 563

Utilities
Notes:
• If the -EncodeString is set to 1, the string value will be encoded with HTML escaping rules. For example, in the above case, the UserDN of
/o=Dev Eng Good Technology/ou=Site1/cn=Recipients/cn=BhatTreo650
will look like
%2Fo%3DDev%20Eng%20Good%20Technology%2Fou%3DSite1%2Fcn%3DRecipients%2Fcn%3DBhatTreo650
• OTAEnabled specifies whether the user is OTA enabled. If it is 1, then the user is enabled. 0 means not enabled.
• OTAPin is the setup PIN. If the Windows user that executes the utility does not have “View user OTA setup Pin” rights in GMC->Roles->Rights, this field will be empty.
• OTAURL is the location from which the Good OTA setup stub can be downloaded.
• The HHxxxx properties are handheld properties. They will be available once the handheld is fully set up.
• EraseDataRequested can be 0=False or 1=True.
• EraseDataState is a string that shows the EraseData transaction state. This state value is valid only if EraseDataRequested is True. The following strings are possible:
"Erase requested" - A request to EraseData is made by Good Mobile Control Server to the Good Mobile Messaging Server.
"Erase sent to handheld" - Good Mobile Messaging Server sent a wireless request to the handheld.
"Erase Confirmed by handheld" - Handheld received the request and erased the data on the handheld.
"Error" - There was an error processing this request.
564 Good Mobile Messaging Administrator’s Guide

GoodLinkEraseData
GoodLinkEraseData
Issues an Erase Data command to a Good for Enterprise handheld to wipe all data on the handheld. Erasing and disabling the handheld in most cases hard resets it, removing all data and returning the device to its factory defaults. In all cases it erases all Good data from the handheld. For Windows Mobile devices, any SD card is also erased. Use GoodLinkQueryUser to query the status of the Erase Data request (see the EraseDataRequested and EraseDataState explanations there).
The command-line machine must have Good Mobile Control Server installed on it.
Run the utility from the installed Server bin directory.
The user or thread/process/CGI that launches this utility must have either Administrator rights or the “Erase handheld data and lock out user” right for Good for Enterprise.
Running the command-line tool without any options prints its usage.
Syntax:
GoodLinkEraseData -URL=username:password@https://MachineName:19005[-UserDisplayName=User Exchange GAL Display Name] [-UserAlias=User Exchange Alias] [-UserDN=User Exchange DN] -LogFile=Log File Path
LogFile must be specified; all errors are logged.
GoodLinkRegenOTAPIN
Issues a new OTA PIN for a user. Analogous to the right-click menu item Regenerate Provisioning PIN in the Good Mobile Control Console, when a user in the user list is selected.
Good Mobile Messaging Administrator’s Guide 565

Utilities
The command-line machine must have Good Mobile Control Server installed on it.
Run the utility from the installed Server bin directory.
The user or thread/process/CGI that launches this utility must have “View user OTA Setup PIN” rights for Good for Enterprise.
Running the command-line tool without any options prints its usage.
Syntax:
GoodLinkRegenOTAPIN -URL=username:password@https://MachineName:19005-GUID=string [-UserDisplayName=User Exchange GAL Display Name] [-UserAlias=User Exchange Alias] [-UserDN=User Exchange DN] -SendEmail=0|1 -LogFile=Log File Path
SendEmail sends the OTA email with the new PIN to the user. 1=Send, 0=Do not send.
LogFile must be specified; all errors are logged.
GoodLinkUpdateUser
Enables/disables Good Intranet once a user is already Good for Enterprise-enabled.
The command-line machine must have Good Mobile Control Server installed on it.
Run the utility from the installed Server bin directory.
The user or thread/process/CGI that launches this utility must have “Add user for OTA Setup” rights for Good for Enterprise.
566 Good Mobile Messaging Administrator’s Guide

GoodLinkUpdateUser
If you run this utility to disable Good Intranet for a user but then decide to re-enable the user, wait at least ten minutes before running the utility again to do so.
Running the command-line tool without any options prints its usage.
Syntax:
GoodLinkUpdateUser -URL=username:password@https://MachineName:19005-GMM=hostname -UserDisplayName=DisplayName -UserAlias=Alias -UserDN=DN -LogFile=filepath [-GIS=Good Intranet Server Name | -GMMServer=GMM Server Name]
hostname - The hostname (NetBIOS or Fully Qualified Domain Name) of the Good Mobile Control Server. If the Good Mobile Control Server is local, you can specify "".
DisplayName - User display name in Exchange GAL. Parameter must be specified even if empty.
Alias - User alias in Exchange GAL. Parameter must be specified even if empty.
DN - User Exchange address in Exchange GAL. Parameter must be specified even if empty.
Form:
/o=Good/ou=BusDev/cn=Recipients/cn=myalias
Specify -GIS only if it needs to be enabled or disabled. If Good Intranet Server Name is specified as "", the user will be disabled from Good Intranet.
Good Mobile Messaging Administrator’s Guide 567

Utilities
Specify -GMMServer to request the GMM system to change user to the specified GMM Server Name server.
filepath - Errors and status will be logged in this file.
Example: To change the policy set
GoodLinkUpdateUser -URL=domain\user:password@https://localhost:19005-GUID=B06A6CD0-759C-4332-9665-729787CFB27E -PolicySet=PolicySet-LogFile=GoodLinkupdate.log
Example: To change the GMM server
GoodLinkUpdateUser -URL=domain\user:password@https://localhost:19005-GUID=B06A6CD0-759C-4332-9665-729787CFB27E -GMMServer=GMMSERVER2-LogFile=GoodLinkupdate.log
LookUpHandheldFromDN
This utility retrieves all GUID for a user for a specified legacyExchangeDN.
Run the utility from the installed Server bin directory
Syntax:
LookUpHandheldFromDN -URL=domain\user:password@https://localhost:19005-UserDN=<DN> -LogFile=<filepath> -DNType=<0/1>
All parameters must be specified even if they are empty.
568 Good Mobile Messaging Administrator’s Guide

ExportComplianceReport
-URL <domain\usern:password@https://localhost:19005> - Specify the logon credentials and URL of the Good Mobile Control server. For Active Directory, include the domain name. If null, the default is server.conf.
-UserDN=<DN> - User legacy Exchange address in Exchange GA. For example:
/o=OrgRoot/ou=Site1/cn=Recipients/cn=tuser
-LogFile =<filepath> - Errors and status will be logged in this file
Optional Arguments:
-DNType <0/1> - If 0, then DN is LegacyExchangeDN. If 1, then DN is User DN. Default to LegacyExchangeDN.
The following examples use the Active Directory Authenticator:
Example 1:
LookUpHandheldFromDN -URL=domain\user:password@https://localhost:19005 -UserDN="/o=OrgRoot/ou=Site1/cn=Recipients/cn=tuser" -LogFile=LookUpHandheldFromDN.log
Example 2:
LookUpHandheldFromDN -URL=domain\user:password@https://localhost:19005 -UserDN="/o=OrgRoot/ou=Site1/cn=Recipients/cn=tuser" -LogFile=LookUpHandheldFromDN.log -DNType=1
ExportComplianceReport
Export the compliance report for a specified handheld.
Good Mobile Messaging Administrator’s Guide 569

Utilities
Usage:
ExportComplianceReport <required-arguments> [optional-arguments]
Required Arguments:
(Must be specified even if they are empty.)
-Url <username:password@https://MachineName:19005>
Specify the logon credential and URL of the GAC server. For Active Directory, include the domain name. If null, defaults to server.conf.
-LogFile <filepath>
Errors and status will be logged in this file.
Optional Arguments:
-GUID <guid>
Guid of the handheld.
-UserDN <DN>
User legacy Exchange address in Exchange GAL.
-UserDisplayName <DisplayName>
User display name in Exchange GAL.
-UserAlias <Alias>
User alias in Exchange GAL.
-LogLevel <level>
Logging levels:
all|sever|warning|info(default)|config|fine|finer|finest
570 Good Mobile Messaging Administrator’s Guide

GetAppsForHandheld
-file <output file name>
The output filename. Either GUID or UserDisplayName or UserDN must be provided. If GUID is provided, UserDN will be ignored.
Note that depending on your shell, white space in arguments may need to be quoted and backslashes escaped.
Example usage using Active Directory Authenticator (credentials are the same as the GMC login page):
ExportComplianceReport -Url=domain\emfadmin:password@https://localhost:19005 -UserDN="/o=Dev Eng Good Technology/ou=Site1/cn=Recipients/cn=testUser" -LogFile=ExportComplianceReport.log
ExportComplianceReport -Url=domain\emfadmin:password@https://localhost:19005-GUID=4DC18D5E-F30D-4A01-8210-AD5615B0C9C1-LogFile=ExportComplianceReport.log
GetAppsForHandheld
Get a list of applications installed for a device.
Usage:
GetAppsForHandheld <required-arguments> [optional-arguments]
Required Arguments:
(Must be specified even if they are empty.)
-Url <username:password@https://MachineName:19005>
Specifiy the logon creditential and URL of the GMC server. For Active Directory, include the domain name. If null, defaults to server.conf
Good Mobile Messaging Administrator’s Guide 571

Utilities
-LogFile <filepath>
Errors and status will be logged in this file.
-GUID <guid>
Guid of the handheld.
Optional Arguments:
-LogLevel <level>
Logging levels :
all|severe|warning|info(default)|config|fine|finer|finest -file <output file name>
Example usage using Active Directory Authenticator:
GetAppsForHandheld -Url=domain\emfadmin:password@https://localhost:19005-GUID=4DC18D5E-F30D-4A01-8210-AD5615B0C9C1-LogFile=GetAppsForHandheld.log
RefreshAppsForDevice
Refresh the application list in the GMC repository for a specified handheld.
Usage:
RefreshAppsForDevice <required arguments> [optional arguments]
Required Arguments:
(Must be specified even if they are empty.)
-Url <username:password@https://MachineName:19005>
572 Good Mobile Messaging Administrator’s Guide

MoveHandheld
Specifiy the logon credential and URL of the GMC server. For Active Directory, include the domain name. If null, defaults to server.conf.
-LogFile <filepath>
Errors and status will be logged in this file.
-GUID <guid>
Guid of the handheld.
Optional Arguments:
-LogLevel <level>
Logging levels:
all|severe|warning|info(default)|config|fine|finer|finest
Note that depending on your shell, white space in arguments may need to be quoted and backslashes escaped.
Example usage using Active Directory Authenticator (credentials are the same as the GMC login page):
Example 1: RefreshAppsForDevice -Url=domain\emfadmin:password@https://localhost:19005-GUID=4DC18D5E-F30D-4A01-8210-AD5615B0C9C1-LogFile=RefreshAppsForDevice.log
MoveHandheld
Move handheld(s) to a different Good Mobile Control Server.
Usage:
MoveHandheld <required arguments> [optional argu-ments]
Good Mobile Messaging Administrator’s Guide 573

Utilities
Required arguments (must be specified, even if empty):
-Url=<username:password@https://Machine-Name:nnnnn>
Specifiy the logon credentials and URL of the source GMC server. For Active Directory, include the domain name. If null, default to server.conf.
-DestinationGmc=<fully qualified NOC hostname>
Specify destination GMC fully qualified NOC hostname (serial number.NOC hostname, as displayed in Settings/Server Information for the GMC).
-LogFile=<filepath>
Errors and status will be logged in this file
Optional Arguments:
-GUID=<guid>
GUID of the handheld to move; shown as “System Identifier” on the Handheld Details page in the GMC.
-file=<input csv filepath>
The CSV file containing handheld data should be in same format as those for exported handhelds in GMC.
-GMMServer=<fully qualified NOC hostname>
Specify destination Good Mobile Messaging fully qualified NOC hostname (displayed as “Name” on the GMC Servers page).
-PolicySet=<policyset name>
Specify destination policy set name.
-ignoreWarnings=<true/false>
Ignore any warnings if true. Default is false.
Either GUID (for moving a single handheld) or file (for moving multiple devices) must be provided. If GUID is provided, file will be ignored.
574 Good Mobile Messaging Administrator’s Guide

GoodLinkUnregisterServer
If a Good Messaging Server is not specified, the default good Messaging Server associated with the destination GMC will be used. The default GMM server is the first server name when sorted alphabetically.
If a destination policy-set name is not specified, the default policy set associated with the destination GMC will be used.
Note that depending upon your shell, white space in arguments may need to be quoted and backslashes escaped.
Important: Allow time for the move to be accomplished. Using the handheld before the operation is complete will cause it to fail.
GoodLinkUnregisterServer
GoodLinkUnregisterServer unregisters the Good Mobile Messaging Server from Good Mobile Control Server and does not display the Server in the list under the Console Servers tab. If you simply uninstall the Messaging Server using Windows or the Good for Enterprise installer, the Server listing will persist in the Console list. Use this utility to delete the Server from the list.
Usage:
GoodLinkUnregisterServer –Url=DomainName\GMCAdmin:Password@https://GMCServerName:19005 -GUID=System IdentifierFoundInGMCServerTab -LogFile=GoodLinkUn-registerServer.log
Warning: The GUID allows you to remove only one unique Server. Make sure that you are using the correct System Identifier for the Server you want to remove. There is no undo. This step will remove the Server and all its users.
More on deleting a decommissioned Messaging Server from the Console can be found at Deleting Decommissioned GMM Server from GMC v1.3.1.122 or higher.
Good Mobile Messaging Administrator’s Guide 575

Utilities
ExportPolicySets
Exports selected policy sets to an XML file.
Usage:
ExportPolicySets -Url=<username:password@https:\MachineName:19005> -PolicyName -PolicyType -Output=<path/to/file.xml> -Url
<username:password@https:\MachineName:19005>:
Specifies the logon credential and URL of the GAC server. For Active Directory, include the domain name
-PolicyName <name>:
Specifies policy name from GMC to be exported. This parameter can be used multiple times per call to allow exporting multiple policies per one command call.
-PolicyType <type>:
Specifies policy type(s) to be exported. This parameter can be used multiple times per call.
Allowed types are:
PASSWORD (for policy type: Good for Enterprise authentication)GMM (for policy type: Messaging)FILE_EXPORTING_SET (for policy type: File handling)GMA20_POLICY (for policy type: Good mobile access)OTA (for policy type: Provisioning)IPHONE_SCALAR_SET (for policy type: iOS configuration)ANDROID (for policy type: Android configuration)COMPLIANCE (for policy type: Complicance manager)
576 Good Mobile Messaging Administrator’s Guide

ImportPolicySets
SOFTWARE (for policy type: Application management)ALL - to export all policy types
-Output <path/to/file.xml>:
Specifies a path (with target file name) to a file that will be created with the received XML data.
-LogFile <path/to/file.log>:
Errors and status will be logged in this file.
You can run this program periodically using Windows Scheduler (Control Panel->Scheduled Tasks).
Example usage using Active Directory Authenticator:
Example 1:
ExportPolicySets -Url=domain\username:password@https://localhost:19005 -PolicyName=My_Policy_1 -PolicyType=OTA -PolicyType=ANDROID -Output=c:\PolicySets.xml -LogFile=ExportPolicySets.log
Example 2:
ExportPolicySets -Url=domain\username:password@https://localhost:19005 -PolicyName="Default Good Policy" -PolicyType=ALL -Output=PolicySets.xml -LogFile=ExportPolicySets.log
ImportPolicySets
Imports selected policy sets to an XML file.
Good Mobile Messaging Administrator’s Guide 577

Utilities
Usage:
ImportPolicySets -Url=<username:password@https:\MachineName:19005>-PolicyName -PolicyType -Input=<path/to/file.xml>
-Url <username:password@https:\MachineName:19005>:
Specifies the logon credential and URL of the GAC server. For Active Directory, include the domain name
-PolicyName <name>:
Specifies policy set name from XML file to be imported. This parameter can be used multiple times per call to import multiple policies per one command call.
-PolicyType <type>:
Specifies policy type(s) to be imported. This parameter can be used multiple times per call.
Allowed types are:
PASSWORD (for policy type: Good for Enterprise authentication)GMM (for policy type: Messaging)FILE_EXPORTING_SET (for policy type: File handling)GMA20_POLICY (for policy type: Good mobile access)OTA (for policy type: Provisioning)IPHONE_SCALAR_SET (for policy type: iOS configuration)ANDROID (for policy type: Android configuration)COMPLIANCE (for policy type: Complicance manager)SOFTWARE (for policy type: Application management)ALL - to import all policy types
578 Good Mobile Messaging Administrator’s Guide

gmexportstats
-Input <path/to/file.xml>:
Specifies a path to a XML file to be imported.
-LogFile <path/to/file.log>:
Errors and status will be logged in this file
Example usage using Active Directory Authenticator:
Example 1:
ImportPolicySets -Url=domain\username:password@https://localhost:19005 -PolicyName="Default Good Policy" -PolicyName="My_Policy" -PolicyType=OTA -PolicyType=MDM -Input=c:\PolicySets.xml -LogFile=ImportPolicySets.log
Example 2:
ImportPolicySets -Url=domain\username:password@https://localhost:19005 -PolicyName="Default Good Policy" -PolicyType=ALL -Input=PolicySets.xml -LogFile=ImportPolicySets.log
gmexportstats
You can export handheld user and server information to a file in CSV format using the command-line utility gmexportstats, installed with Good for Enterprise, for backup and audit use. You can use Windows Scheduler to run the utility on an automated basis. You can export the following information:
• User list
• User statistics
• User software policy settings and status
Good Mobile Messaging Administrator’s Guide 579

Utilities
To export user or server information to a file:
1. Open a command shell (CMD.EXE) on a Good Mobile Control Server or Good Mobile Control Console host.
2. Go to the Good Mobile Control Server installation \bin directory.
3. Run gmexportstats using the following syntax:
gmexportstats -URL=username:password@https://MachineName:19005-[autogenerate=yes|no] -file=filepath -clearstat=yes|no [-exporttype=type] [-gls=Good Mobile Messaging Server name]
user:password@URL:19005 - The user must have a role assigned for the Good Mobile Control Server. URL:19005 points to the webservice secure endpoint, port 19005).
filepath is the required full file path where the statistics file is to be created. If the file exists, it will be overwritten. If the autogenerate parameter is no, a filename must be included in the path; if autogenerate is yes, the path must not include a filename.
If the required -autogenerate value is specified as “yes,“ a file is created in the directory specified by filepath. filepath cannot be the root (C:\). The filename format is 'YYYY-MM-DD.hh-mm-ss-mmmm.csv' and is based on local time. If the autogenerate value is “no,” the filename that you provide in filepath is used.
If the -clearstat value is specified as “yes,” the user statistics counters will be reset after exporting. This parameter is required if exporttype is specified as “userstats.” Otherwise, it is ignored.
Possible values for the optional exporttype parameter:
userlist - Exports Good for Enterprise-enabled user list. This option outputs minimal user information. Similar to the Good Mobile Control Console menu command “Import/Export Actions->Export Handhelds to file.”
userstats - Exports user statistics.
580 Good Mobile Messaging Administrator’s Guide

gmexportstats
usersoftware - Exports user software policy information.
The default for exporttype is userstats.
Good Mobile Messaging Server name: For exporttype “usersoftware,” this optional parameter filters users only on the Good Mobile Messaging Server specified.
Errors are logged with an .ERR extension in the directory where the CSV file is created.
Column output:
userlist
Display Name,Compliance,Alias Name,Serial No,Server Name,Handheld ID,Network ID,Phone,Sta-tus,Handheld Type,Good Intranet Server, Policy-Set,DN,S/MIME,Good Mobile Access, PolicySet GUID,GMM Server GUID,Handheld Guid,IMEI
userstats
Display Name,Compliance,Alias Name,Serial No,Server Name,Handheld ID,Network ID,Phone,Sta-tus,Handheld Type,Good Intranet Server, Policy-Set,DN,S/MIME,Good Mobile Access, PolicySet GUID,GMM Server GUID,Handheld Guid,IMEI,Good for Enterprise Client Version,Last message received,Last message sent,Email messages sent,Email messages received,Last email message received,Last email message sent,Filtered email,Calendar messages sent,Calendar messages received,Last Calendar message received,Last Cal-endar message sent,Address Book messages sent,Address Book messages received,Last Address Book message received,Last Address Book message sent,Note messages sent,Note messages received,Last Note message received,Last Note mes-sage sent,Task messages sent,Task messages received,Last Task message received,Last Task mes-sage sent,Messages sent,Messages received,Handheld Policy State,Exchange Server,Exchange Server Ver-
Good Mobile Messaging Administrator’s Guide 581

Utilities
sion,Good Mobile Messaging Server Version,Handheld OS Version,Handheld ROM Version,Network Name,Firm-ware Version,Good for Enterprise Enabled Time,Good for Enterprise Provisioned Time,Provisioning state,OTA PIN State,OTA PIN Expire Time,Compliance Rule Error,Compliance Rule ErrorMsg,Good for Enterprise Client Language,Handheld OS Lan-guage,Department,Handheld Logging
usersoftware
Server Name,CurGLSServerVersion,Display Name,Alias Name,DN,Serial No,Handheld Type,Handheld Type Fam-ily,Type,Enabled,Handheld Family,Application ID,GUID,Application Name,Version,Status Time,Sta-tus,Low Level Error,Message,Software Notes,Instal-lation Mandatory,Launch after Download
Examples:
gmexportStats -URL=domain\gmcadmin:password@https://local-host:19005 -GLS=GLS1 -ExportType=UserStats -file=c:\\GoodLinkUserStats.csv -clearstat=no
Exports user statistics to the file named GoodLinkUserStats.csv using the local Good Mobile Control Server. The user statistics are not cleared during the export.
gmexportStats -URL=domain\gmcadmin:password@https://local-host:19005 -GLS=GLS1 -ExportType=UserList -file=c:\\GoodLinkUserList.csv -clearstat=no
Exports a user list to the file named GoodLinkUserList.csv using the Good Mobile Control Server on the local host. The user statistics are not cleared during the export.
582 Good Mobile Messaging Administrator’s Guide

GdGLSConnect
gmexportStats -URL=domain\gmcadmin:password@https://GLS01:19005 -GLS=GLS1 -ExportType=UserSoftware -file=c:\\GoodLinkUserSoftware.csv -clearstat=no
Exports user software policy information to the file named GoodLinkUserSoftware.csv using the Good Mobile Control Server located on machine GLS01. The user statistics are not cleared during the export.
gmexportstats-URL=domain\gmcadmin:password@https://GLS01:19005 -autogenerate=yes -ExportType=usersoftware-file="C:\SWSettings\GLS01 Software\UserStates" -GLS=GLS01-clearstat=no
Exports the user software policy settings and status to the directory C:\SWSettings\GLS01 Software\UserStates with an automatically generated name using the Good Mobile Control Server located on machine GLS01. Filter only users who are set up on the Good Mobile Messaging Server named GLS01. The user statistics are not cleared during the export.
GdGLSConnect
GdGLSConnect tests connectivity from the server that it is running on to the Good Data Center.
Run this tool from the command line. GdGLSConnect is available under the util\ folder in the Good Mobile Messaging Server installed location. To run the utility on a different computer, you must copy all of the files (including all dll’s) from the util directory.
Syntax:
Good Mobile Messaging Administrator’s Guide 583

Utilities
GdGLSConnect.exe -k login key -l license_key -s serial_number [-p product name] [-u ‘<<<url>>>’] [-n requests] [-w seconds] [-t] [-d] [-g]
where:
-k login key specifies the product login key. The key is stored in the following registry key on the Good Mobile Messaging Server host machine:
HKEY_LOCAL_MACHINE\SOFTWARE\Good Technology\Good-Link Install Parameters
or
HKEY_LOCAL_MACHINE\SYSTEM\CurrentControlSet\Ser-vices\GoodLinkServer\parameters
-l license key specifies the product license key.
-s serial number specifies the product serial number in serialNumber.hostname format
-u ‘<<<url>>>’ optionally specifies the Good Network Operations Center url (defaults to '<<<https://xml28.good.com/>>>').
-n number of requests optionally specifies the number of times the request is issued (defaults to 1).
-w seconds between requests optionally specifies the time between requests in seconds when more than one is issued (defaults to 30).
-t turns on tracing.
-d turns on debugging.
-g checks connectivity to a datacenter using the gdrpc
584 Good Mobile Messaging Administrator’s Guide

GdGLSConnect
Example output:
gdglsconnect built Nov 2 2004 at 14:17:12Will test usingVersion 4.8.0.0URL: https://qa2xml.qa2.good.com/SerialNumber: QA00000001LicensKey: ASIA-ASIA-ASIA-ASIA-ASIA-ASIANumber: 1Timout: 20
CurDir is C:\Program Files\Good Technology\Good Mobile Messaging Server\utilSSL dir set to C:\Program Files\Good Technol-ogy\Good Mobile Messaging Server\etc\sslSSL library databases initialized OKAttempting first connection to https://qa2xml.qa2.good.com/Initial connect to https://qa2xml.qa2.good.com/ okay.OK (12 ms)I made 1 operation requests, and all of them suc-ceeded.PASS
Starting Good Data Center address range check...
We are not using proxy server to get to the Good Data Center...
checkIPRanges took 1 seconds
protocol:HTTP address:gw1.dev1.good.com port:10000 IPRange:172.18.7.31:172.18.7.32 isproxy:0 error:0 error String:errOkprotocol:HTTP address:gw2.dev1.good.com port:10000 IPRange:172.18.7.31:172.18.7.32 isproxy:0 error:0 error String:errOkprotocol:HTTP address:gw2.dev1.good.com port:10003 IPRange:172.18.7.31:172.18.7.32 isproxy:0 error:65538 error String:errNetConnect
Good Mobile Messaging Administrator’s Guide 585

Utilities
Good Data Center address range check for 1 out of 3 range *** FAILED ***
===============================================
Testing retrieving device list from Orca.
Deleted device.xml file from previous run.
2005-12-30 11:38:54 -08:00 getDeviceTable() START-ING2005-12-30 11:38:54 -08:00 getDeviceTable() FIN-ISH. Bytes Received: 784732005-12-30 11:38:54 -08:00 Start saving the device file.2005-12-30 11:38:54 -08:00 Finished saving the device file.
Total time to download device table from Orca: 0 seconds.
**** GetDeviceList SUCCESS****
uploadLog
uploadLog allows your Good Mobile Messaging Server and Good Mobile Control Server diagnostic files to be easily uploaded to the Good Network Operations Center server. Use the utility to upload files when instructed to do so by your authorized service representative.
Run this tool from the command line on the Good Mobile Messaging Server to be diagnosed. uploadLog is available under the util\ folder and bin\ folder in the Good Mobile Messaging Server installed location.
Syntax:
uploadLog.exe
586 Good Mobile Messaging Administrator’s Guide

Diagnostic Log Files
When you run the utility, the following screen is displayed:
You must be running the utility on the host machine for this Server.
Select the range of dates for the data to be included in the uploaded file. If instructed to do so by your service representative, click the check boxes to exclude (uncheck) System Event Log and/or Application Event Log data. The check boxes are checked by default.
Diagnostic Log Files
The diagnostic log files that your service representative may ask you to upload are created automatically by Good Mobile Messaging Server and Good Mobile Control Server during Server operation.
The location of the Good Mobile Messaging Server diagnostic files is specified under the value "AccessLogDir" inside the registry key
HKEY_LOCAL_MACHINE\\SYSTEM\\CurrentControl-Set\\Services\\GoodLinkServer\\Parameters\\
uploadLog will retrieve the log files from this location.
Good Mobile Messaging Server diagnostic log files are named
Good Mobile Messaging Administrator’s Guide 587

Utilities
servername.diagnosticsmm-dd-yy.hh-mm-ss.
The log files that you specied in the “To” and “From” fields will be transferred.
All files transferred by default will be compressed in gzip format.
588 Good Mobile Messaging Administrator’s Guide

10 Uninstalling Good for Enterprise
Uninstallation of the product consists of stopping the Good services, removing the Good Mobile Control (GMC) and Good Mobile Messaging Servers from their hosts, and verifying that the supporting SQL database instance has also been removed.
Uninstalling Good Mobile Messaging Server
To uninstall Good Mobile Messaging Server software from its host machine, use the following procedure. The procedure applies to primary and standby servers.
Note: For versions less than 6.3.1.24, there are prompts for Typical or Custom Uninstall, Retain or Remove Users and Archive logs, and Save Cache. For more information, refer to the appropriate version of the Administrator’s Guide.
Note: To delete a decommissioned GMM Server from Good Mobile Control, refer to “GoodLinkUnregisterServer” on page 575. If you need your GMM record manually removed from the NOC, contact Good Technical Support and they will be able to assist you.
You will be prompted to specify whether or not you are uninstalling in order to downgrade to a previous specific version. If yes, the Good
Good Mobile Messaging Administrator’s Guide 589

Uninstalling Good for Enterprise
Mobile Messaging database will be replaced with the previous version. If no, it will be left untouched.
1. If a Good Mobile Messaging Server is being removed permanently (not simply upgraded), and more than one such Server is present, move any handhelds managed by Good Mobile Messaging Server to a different server, as described in “Moving a Handheld to a Different Good Mobile Messaging Server” on page 408.
2. If you will be uninstalling the software for all Good Mobile Messaging Servers in an Exchange site, do so before removing the GMC Server, as described in “Uninstalling Good Mobile Control Server” on page 592. Do not remove this if any Good Mobile Messaging Servers are to remain operational in the site.
This step is not necessary if you plan to reinstall the server.
3. Close all programs before proceeding with the uninstall. Confirm that no applications are being run remotely (such as PerfMon) by rebooting the server or by going to Start > Programs > Administrative Tools > Server Manager and disconnecting any drive/application shares currently in place.
If the process mmc.exe is running, stop it.
4. Run setup.exe from the Good distribution media. From the introductory installation screen click Add/Remove for the Good Mobile Messaging Server snap-in.
The Uninstall Wizard prepares to run, and then guides you through the uninstall process.
5. Click Next to proceed.
You are prompted to confirm the uninstall.
6. When prompted, click OK to confirm that you want to remove the application and all of its components.
(Refer to “Moving a Handheld to a Different Good Mobile Messaging Server” on page 408 for information on moving users to a different server.) User data is retained after uninstallation.
7. Click Next.
A summary screen is displayed.
590 Good Mobile Messaging Administrator’s Guide

Uninstalling Good Mobile Messaging Server
If the information it contains is correct, click Next to proceed with the uninstall.
A progress bar is displayed as the console is removed. When the uninstall is complete, a final screen is displayed.
8. Click Finish.
9. Alternatively, to uninstall the Good GMM server software from a particular machine, go to the machine's Control Panel window and double-click Add/Remove Programs.
10.From the list of programs, select Good Mobile Messaging Server and click Change/Remove.
You’ll be given the option to repair or uninstall the Server. Choose to uninstall it.
Good Mobile Messaging Administrator’s Guide 591

Uninstalling Good for Enterprise
Uninstalling Good Mobile Control Server
To uninstall GMC Server software from its host machine (for example, because you want to install a later version of server software), use the following procedure. The procedure applies to primary and standby servers.
1. Close all programs before proceeding with the uninstall. Confirm that no applications are being run remotely (such as PerfMon) by rebooting the server or by going to Start > Programs > Administrative Tools > Server Manager and disconnecting any drive/application shares currently in place.
2. Run setup.exe from the Good distribution media. From the introductory installation screen click Add/Remove for the GMC Server snap-in.
If GMC Console is detected, the required uninstall files are unpacked from the Good distribution media.
The Uninstall Wizard prepares to run, and then guides you through the uninstall process.
3. Click Next to proceed.
You are prompted to confirm the uninstall.
4. When prompted, click OK to confirm that you want to remove the application and all of its components.
You can choose to delete or retain all log files.
5. Click Next.
A summary screen is displayed.
If the information it contains is correct, click Next to proceed with the uninstall.
A progress bar is displayed as the console is removed. When the uninstall is complete, a final screen is displayed.
6. Click Finish.
592 Good Mobile Messaging Administrator’s Guide

Uninstalling SQL Server
GMC Server automatically archives the entire GoodAdmin mailbox daily at midnight, local time, to an archive file in a backup directory.
Uninstalling SQL Server
After uninstalling GMC, you may want to remove the SQL database it used. You can uninstall the database using the following procedures.
SQL 2008
To uninstall SQL Server:
1. Stop Services on the SQL 2008 Server.
Good Mobile Messaging Administrator’s Guide 593

Uninstalling Good for Enterprise
2. Go into Control Panel > Programs > Programs and Features and click on Uninstall/Change.
3. Click on Remove.
594 Good Mobile Messaging Administrator’s Guide

Uninstalling SQL Server
4. Click OK when completed.
5. Click on Next.
Good Mobile Messaging Administrator’s Guide 595

Uninstalling Good for Enterprise
6. Choose Select All and click on Next.
7. Click on the Next button.
596 Good Mobile Messaging Administrator’s Guide

Uninstalling SQL Server
8. Click on the Remove button.
9. Progress bar moves to uninstall.
Good Mobile Messaging Administrator’s Guide 597

Uninstalling Good for Enterprise
10.With the files removed, click on Next.
11.Click on Close.
598 Good Mobile Messaging Administrator’s Guide

Uninstalling SQL Server
12.Verify that SQL 2008 is no longer showing in Services.
Good Mobile Messaging Administrator’s Guide 599

Uninstalling Good for Enterprise
600 Good Mobile Messaging Administrator’s Guide

A Using the GMC Web Service
This appendix describes an overview of how to use the Good Mobile Control (GMC) Web Service to integrate your existing automated work-flow system with the GMC Server. For example, you can have your work-flow system use the GMC Web Service to automatically enable or disable handhelds on the GMC Server. The GMC Web Service allows you to automate many of the same operations you can do manually with the GMC Console.
A GMC_API.zip file located in the GMC installation directory contains generated documentation for the GMC Web Service APIs.
Good Mobile Control Server uses Tomcat version 6.
Here is a summary of the operations you can automate with the GMC Web Service:
• Roles:
• Create, assign, list, update, revoke, and delete roles
• List role members, list and update role rights
• Policy Sets:
• List policy sets
• Handhelds:
• Enable, disable, list, and wipe handhelds
• Export handheld list, statistics, or software
Good Mobile Messaging Administrator’s Guide 601

Using the GMC Web Service
• Regenerate Provisioning PINs for handhelds
• Server:
• Export and reset GMC Server statistics
• Miscellaneous:
• Get the directory entries, effective rights, product types
• Returns the GUID for the specified DN of a user
Working with the GMC Web Service
Use the following important guidelines when working with the GMC Web Service:
• Use a SOAP-based web services client to access the GMC Web Service.
• The GMC Web Service uses Globally Unique Identifiers (GUIDs), a uniquely generated string, to identify all handhelds, roles, policy sets, and GMM and GMA Servers.
About the BulkServiceResult array
BulkServiceResult is an array that is returned for the GMC Web Service functions that can operate on multiple items at the same time. For example, enableHandhelds allows you to enable multiple handhelds at a time. Each request on multiple items is treated independently. If the request is successful, the function’s result element is set to a successful object (for example, the “handheldResult” element is set to a Handheld object). If the request is not successful (for example, a handheld is not enabled because a user does not exist), the item’s hardError element is set.
Some BulkServiceResult results are returned as a string such as a GUID, and other results are returned as objects such as handhelds.
602 Good Mobile Messaging Administrator’s Guide

Working with the GMC Web Service
BulkServiceResult results can also be returned as “warnings” or “soft errors”. For example, if you attempt to disable a handheld that does not exist, the request is granted but a warning occurs informing you that the handheld does not exist.
Integrating with the GMC Web Service
You can find the Web Services Description Language (WSDL) file for the GMC Web Service at the following URL:
https://<GMCServer>:19005/PublicService?wsdl
where:
<GMCServer> is the machine name of the GMC Server.
To integrate with the GMC Web Service, set your application to read or import the GMC Web Service WSDL file and discover the operations that are available on the GMC Server. Your application can then use SOAP to call one of the operations listed in the GMC Web Service WSDL.
Web Service Authentication
The GMC Web Service uses HTTP Basic Authentication to authenticate your application before allowing any operations on the GMC Server. The username and password for the GMC Web Service are the same credentials you use to log into the GMC Console. The application then has the same rights for that account as if you logged into the GMC Console.
The Autodiscover Web Service uses Basic Authentication by default; Windows Authentication NTLM/Kerberos is also supported. The Exchange Web Service uses Windows Authentication NTLM/Kerberos by default; Basic Authentication is also supported.
Good Mobile Messaging Administrator’s Guide 603

Using the GMC Web Service
GMC Web Service Example
The GMC Web Service Example is a Java client example that illustrates how to use the GMC Web Services to perform several operations on a GMC Server. You can download the GMC Web Service Example zip file from http://media.www1.good.com/binary/GACJavaClientApp.zip.
The GMC Web Service Example illustrates how to perform these operations:
• Print all GMM Servers (shows basic querying)
• Select a single GMM Server (shows how a server is identified)
• Enable a single handheld based on a user name that is specified in the code (shows how to enable a handheld and how it is identified)
• Enable multiple handhelds (shows how bulk operations are handled)
• Print all handhelds
• Print the details of the first enabled handheld
• Send the wipe command to a handheld
• Disable a single handheld or multiple handhelds
• Perform authentication
Web ServiceBasic Authentication
NTLM/Kerberos
Exchange X X
Autodiscover X X
GMC X
604 Good Mobile Messaging Administrator’s Guide

Working with the GMC Web Service
Note: An example username and password are specified in the source code. If you want to run the example source code, you must change the user name and password for your GMC Server. (See the src/gacclientapp/main/Main.java file.) You must also change the location of the GMC server, which is also specified in the code.
Source Code Files in the GMC Web Service ExampleThis section contains the following source code files that are in the GMC Web Service Example:
• Main.java - The starting point for the examples (see “Main.java” on page 605).
• ExampleClient.java - This client shows off how to make calls to GMC using JAX-WS (see “ExampleClient.java” on page 607).
• GMCWS.java - Static class for getting a hold of a web service client for GMC using JAX-WS (see “GMCWS.java” on page 618).
Main.java
/*
* The starting point for this example.
*/
package gmcclientapp.main;
import java.net.URL;
import java.util.Collection;
import java.util.logging.Level;
import java.util.logging.Logger;
/**
*
* @author cdraper
*/
public class Main {
/**
Good Mobile Messaging Administrator’s Guide 605

Using the GMC Web Service
* @param args the command line arguments
*/
public static void main(String[] args) {
try {
// Put in your own values here:
URL wsdlLocation = new URL("https://cdraper-xw4600:19005/PublicService?wsdl");
String username = "de\\gmcadmin";
String password = "password";
String testUserDn100 = "CN=User_100,OU=Users,OU=QaTest,OU=GMC,DC=de,DC=qagood,DC=com";
String testUserDn101 = "CN=User_101,OU=Users,OU=QaTest,OU=GMC,DC=de,DC=qagood,DC=com";
String testUserDn102 = "CN=User_102,OU=Users,OU=QaTest,OU=GMC,DC=de,DC=qagood,DC=com";
ExampleClient client = new ExampleClient(wsdlLocation, username, password);
client.printAllGMMServers();
// Locate a GMM server to do enablement on.
String gmmServerGuid = client.pickAGMMServer();
String handheldGuid = client.enableHandheld(gmmServerGuid, testUserDn100);
// An example calling in bulk
Collection<String> handheldGuids = client.enableHandhelds(gmmServerGuid,
testUserDn101, testUserDn102);
client.printAllHandhelds();
client.printHandheldDetails(handheldGuid);
client.wipeHandheld(handheldGuid);
client.disableHandheld(handheldGuid);
606 Good Mobile Messaging Administrator’s Guide

Working with the GMC Web Service
// An example calling in bulk
client.disableHandhelds(handheldGuids);
} catch (Throwable ex) {
Logger.getLogger(Main.class.getName()).log(Level.SEVERE, null, ex);
}
}
}
ExampleClient.java
/*
* This client shows off how to make calls to GMC using JAX-WS.
*/
package gmcclientapp.main;
// Note that gmcclientapp.ws.* is generated by JAX-WS, see README on how to build.
import gmcclientapp.ws.BulkServiceResult;
import gmcclientapp.ws.BulkServiceResultItem;
import gmcclientapp.ws.EMFException;
import gmcclientapp.ws.EnableHandheld;
import gmcclientapp.ws.EnableHandhelds;
import gmcclientapp.ws.GUIDs;
import gmcclientapp.ws.Handheld;
import gmcclientapp.ws.HandheldAttribute;
import gmcclientapp.ws.HandheldDetails;
import gmcclientapp.ws.HandheldException;
import gmcclientapp.ws.PublicService;
Good Mobile Messaging Administrator’s Guide 607

Using the GMC Web Service
import gmcclientapp.ws.Server;
import gmcclientapp.ws.ServerList;
import gmcclientapp.ws.ServiceResult;
import java.net.URL;
import java.util.ArrayList;
import java.util.Arrays;
import java.util.Collection;
import java.util.List;
/**
*
* @author cdraper
*/
public class ExampleClient {
private final PublicService port;
public ExampleClient(URL wsdlLocation, String username, String password) {
port = GMCWS.getPort(wsdlLocation, username, password);
}
/**
* Print out all handhelds in GMC.
*/
public void printAllHandhelds() {
printAPageOfHandhelds(0, Integer.MAX_VALUE);
}
/**
* Print a "page" of handhelds with a starting spot.
608 Good Mobile Messaging Administrator’s Guide

Working with the GMC Web Service
* Page size of 25.
*/
public void printAPageOfHandhelds(int startIndex) {
printAPageOfHandhelds(startIndex, 25); // page size of 25
}
public void printAPageOfHandhelds(int startIndex, int pageSize) {
Boolean sortAscending = Boolean.TRUE;
List<Handheld> result = port.listAllHandhelds(startIndex, pageSize,
HandheldAttribute.EMAIL, sortAscending);
System.out.println("Found " + result.size() + " handheld(s)");
for (Handheld handheld : result) {
print(handheld);
}
}
public int getHandheldCount() {
return port.getNumOfHandhelds();
}
private void print(Handheld handheld) {
System.out.println("Handheld for " + handheld.getEmailAddress()
+ " GUID " + handheld.getGuid()
+ " state " + handheld.getProvisioningStatus());
Good Mobile Messaging Administrator’s Guide 609

Using the GMC Web Service
}
public void printAllGMMServers() {
System.out.println("Retrieving all GMM Servers");
ServerList gmmServers = port.getServersByProductType("GMM");
System.out.println("Found " + gmmServers.getItems().size() + " GMM server(s)");
for (Server gmmServer : gmmServers.getItems()) {
print(gmmServer);
}
}
private void print(Server server) {
System.out.println(server.getProductType()
+ " server " + server.getHostname()
+ " " + server.getVersion()
+ " GUID " + server.getGuid());
}
public String pickAGMMServer() {
ServerList gmmServers = port.getServersByProductType("GMM");
List<Server> servers = gmmServers.getItems();
if (servers.isEmpty()) {
throw new RuntimeException("Unable to find any GMM servers");
}
Server server = servers.get(0);
610 Good Mobile Messaging Administrator’s Guide

Working with the GMC Web Service
return server.getGuid();
}
/**
* Enable a handheld for OTAP.
*
* @param directoryDn The DN for the user as found in the directory.
* (This DN is different from the mailbox DN.)
* @param serverGuid The GUID for the server to enable them on.
* @return The GUID that identifies this handheld
* @throws EMFException if the handheld could not be enabled.
*/
public String enableHandheld(String serverGuid, String directoryDn) throws EMFException {
EnableHandheld params = new EnableHandheld();
params.getServerGUIDs().add(serverGuid);
params.setUserDN(directoryDn);
String handheldGuid = port.enableHandheld(params);
System.out.println("Enabled handheld with GUID "+handheldGuid+" for "+directoryDn);
return handheldGuid;
}
public String enableHandheldViaBulk(String serverGuid, String directoryDn) {
EnableHandhelds params = new EnableHandhelds();
params.getUserDNs().add(directoryDn);
params.getServerGUIDs().add(serverGuid);
Good Mobile Messaging Administrator’s Guide 611

Using the GMC Web Service
BulkServiceResult bsr = port.enableHandhelds(params);
// Must check BulkServiceResult for error!
// Only 1 result item expected as only 1 handheld was attempted to be enabled.
// So just get the zeroth element from the BulkServiceResult.
BulkServiceResultItem bsri = bsr.getItems().get(0);
if (!bsri.getHardError().isEmpty()) {
// There was an error!
throw new RuntimeException("Unable to enable handheld for '"+directoryDn+"': "+bsri.getHardError());
}
String handheldGuid = bsri.getStringResult();
System.out.println("Enabled handheld with GUID "+handheldGuid+" for "+directoryDn);
return handheldGuid;
}
/**
* Bulk enabling of handhelds. Each DN (user) passed in is treated separately;
* if one fails, the rest are not affected.
*
* @param serverGuid Which server to put the handhelds on
* @param directoryDns The users to enable
* @return The handheld GUIDs of the new handhelds in GMC.
612 Good Mobile Messaging Administrator’s Guide

Working with the GMC Web Service
*/
public Collection<String> enableHandhelds(String serverGuid, String... directoryDns) {
EnableHandhelds params = new EnableHandhelds();
params.getUserDNs().addAll(Arrays.asList(directoryDns));
params.getServerGUIDs().add(serverGuid);
BulkServiceResult bsr = port.enableHandhelds(params);
// Must check BulkServiceResult for error!
Collection<String> enabledHandheldGuids = new ArrayList<String>();
for (BulkServiceResultItem bsri : bsr.getItems()) {
if (bsri.getHardError().isEmpty()) {
String handheldGuid = bsri.getStringResult();
System.out.println("Enabled handheld with GUID "+handheldGuid+" for "+bsri.getId());
enabledHandheldGuids.add(handheldGuid);
} else {
// There was an error!
// Note that even if this one hit an error, the others may have
// succeded.
System.err.println("Unable to enable handheld for '"+bsri.getId()+"': "+bsri.getHardError());
}
}
return enabledHandheldGuids;
Good Mobile Messaging Administrator’s Guide 613

Using the GMC Web Service
}
/**
* Go get the handheld details and print them out.
*/
public void printHandheldDetails(String handheldGuid) {
GUIDs params = guidToGuids(handheldGuid);
BulkServiceResult bsr = port.getHandheldsInfo(params);
// Must check BulkServiceResult for error!
// Only 1 result item expected as only 1 handheld was attempted to be enabled.
// So just get the zeroth element from the BulkServiceResult.
BulkServiceResultItem bsri = bsr.getItems().get(0);
if (!bsri.getHardError().isEmpty()) {
// There was an error!
throw new RuntimeException("Unable to enable handheld for '"+handheldGuid+"': "+bsri.getHardError());
}
HandheldDetails handheldDetailsResult = bsri.getHandheldDetailsResult();
print(handheldDetailsResult);
}
private void print(HandheldDetails handheld) {
614 Good Mobile Messaging Administrator’s Guide

Working with the GMC Web Service
System.out.println("Handheld details for " + handheld.getEmailAddress()
+ " GUID " + handheld.getGuid()
+ " state " + handheld.getProvisioningStatus()
+ " PIN " + handheld.getOtaPin());
}
public void disableHandheld(String handheldGuid) throws EMFException {
port.disableHandheld(handheldGuid);
System.out.println("Disabled handheld with GUID "+handheldGuid);
}
public void disableHandheldViaBulk(String handheldGuid) {
GUIDs params = guidToGuids(handheldGuid);
BulkServiceResult bsr = port.disableHandhelds(params);
// Must check BulkServiceResult for error!
// Only 1 result item expected as only 1 handheld was attempted to be disabled.
// So just get the zeroth element from the BulkServiceResult.
BulkServiceResultItem bsri = bsr.getItems().get(0);
if (!bsri.getHardError().isEmpty()) {
// There was an error!
throw new RuntimeException("Unable to disable handheld for '"+handheldGuid+"': "+bsri.getHardError());
Good Mobile Messaging Administrator’s Guide 615

Using the GMC Web Service
}
System.out.println("Disabled handheld with GUID "+handheldGuid);
// Warnings might occur if the handheld was not found, which is not
// a big deal if we're trying to disable the handheld. Normally, warnings
// can be ignored.
List<String> warnings = bsri.getSoftErrors();
for (String warningMessage : warnings) {
System.out.println("Warning while disabling "+handheldGuid+": "+warningMessage);
}
}
public void disableHandhelds(Collection<String> handheldGuids) {
GUIDs params = new GUIDs();
params.getItems().addAll(handheldGuids);
BulkServiceResult bsr = port.disableHandhelds(params);
// Must check BulkServiceResult for error!
for (BulkServiceResultItem bsri : bsr.getItems()) {
String handheldGuid = bsri.getId();
if (bsri.getHardError().isEmpty()) {
System.out.println("Disabled handheld with GUID "+handheldGuid);
} else {
616 Good Mobile Messaging Administrator’s Guide

Working with the GMC Web Service
// There was an error!
System.err.println("Unable to disable handheld for '"+handheldGuid+"': "+bsri.getHardError());
}
// Warnings might occur if the handheld was not found, which is not
// a big deal if we're trying to disable the handheld. Normally, warnings
// can be ignored.
List<String> warnings = bsri.getSoftErrors();
for (String warningMessage : warnings) {
System.out.println("Warning while disabling "+handheldGuid+": "+warningMessage);
}
}
}
public void wipeHandheld(String handheldGuid) {
Boolean justAppData = true;
try {
ServiceResult sr = port.wipeHandheld(handheldGuid, justAppData);
System.out.println("Sent wipe message to handheld with GUID "+handheldGuid);
// Normally, warnings can be ignored.
List<String> warnings = sr.getSoftErrors();
for (String warningMessage : warnings) {
System.out.println("Warning while wiping "+handheldGuid+": "+warningMessage);
}
Good Mobile Messaging Administrator’s Guide 617

Using the GMC Web Service
} catch (EMFException ex) {
throw new RuntimeException(ex);
} catch (HandheldException ex) {
throw new RuntimeException(ex);
}
}
private GUIDs guidToGuids(String guid) {
GUIDs params = new GUIDs();
params.getItems().add(guid);
return params;
}
}
GMCWS.java
/*
* Static class for getting ahold of a web service client for GMC using JAX-WS.
*/
package gmcclientapp.main;
// Note that gmcclientapp.ws.* is generated by JAX-WS, see README on how to build.
import gmcclientapp.ws.PublicService;
import gmcclientapp.ws.PublicService_Service;
import java.net.URL;
import java.security.KeyManagementException;
import java.security.NoSuchAlgorithmException;
618 Good Mobile Messaging Administrator’s Guide

Working with the GMC Web Service
import java.util.Map;
import javax.net.ssl.HostnameVerifier;
import javax.net.ssl.HttpsURLConnection;
import javax.net.ssl.KeyManager;
import javax.net.ssl.SSLContext;
import javax.net.ssl.SSLSession;
import javax.net.ssl.TrustManager;
import javax.net.ssl.X509TrustManager;
import javax.xml.namespace.QName;
import javax.xml.ws.BindingProvider;
/**
*
* @author cdraper
*/
public class GMCWS {
private static final QName SERVICE_QNAME = new QName("http://good.com/emf", "PublicService");
private static final Integer TIMEOUT = 2 * 60 * 1000; // in ms
private GMCWS() {}
private static PublicService_Service getService(URL wsdlLocation) {
makeTrustAllSSLCerts();
return new PublicService_Service(wsdlLocation, SERVICE_QNAME);
}
public static PublicService getPort(URL wsdlLocation, String username, String password) {
Good Mobile Messaging Administrator’s Guide 619

Using the GMC Web Service
PublicService_Service service = getService(wsdlLocation);
PublicService port = service.getPublicService();
BindingProvider bp = (BindingProvider) port;
Map<String, Object> requestContext = bp.getRequestContext();
// set timeout
requestContext.put("com.sun.xml.ws.connect.timeout", TIMEOUT);
requestContext.put("com.sun.xml.ws.request.timeout", TIMEOUT);
// set HTTP Basic Auth username & password
requestContext.put(BindingProvider.USERNAME_PROPERTY, username);
requestContext.put(BindingProvider.PASSWORD_PROPERTY, password);
return port;
}
private static void makeTrustAllSSLCerts() {
try {
// The GMC cert is self-signed and so might not be trusted by this client.
// Create a trust manager that trusts all certs. Another option (if one
// didn't want to go this way) would be to add the GMC cert into the keystore).
620 Good Mobile Messaging Administrator’s Guide

Working with the GMC Web Service
TrustManager[] trustAllCerts = new TrustManager[]{new X509TrustManager() {
public java.security.cert.X509Certificate[] getAcceptedIssuers() {
return null;
}
public void checkClientTrusted(java.security.cert.X509Certificate[] certs, String authType) {
}
public void checkServerTrusted(java.security.cert.X509Certificate[] certs, String authType) {
}
}};
SSLContext sc = SSLContext.getInstance("SSL");
sc.init((KeyManager[]) null, trustAllCerts, new java.security.SecureRandom());
HttpsURLConnection.setDefaultSSLSocketFactory(sc.getSocketFactory());
// Tell it to trust every host.
HostnameVerifier hv = new HostnameVerifier() {
public boolean verify(String urlHostName, SSLSession session) {
return true;
}
};
Good Mobile Messaging Administrator’s Guide 621

Using the GMC Web Service
HttpsURLConnection.setDefaultHostnameVerifier(hv);
} catch (NoSuchAlgorithmException ex) {
// We're expecting to have the algorithm for SSL
throw new RuntimeException(ex);
} catch (KeyManagementException ex) {
throw new RuntimeException(ex);
}
}
}
Summary of the GMC Web Service Functions
This section contains a summary of the GMC Web Service functions.
Role Functions
• Assigns a role:
List<ConsoleEntity> assignRole(String roleGuid, List<String> nativeGuid)
• Creates a role
Role createRole(String name, String description, List<Right> rights)
• Deletes roles:
void deleteRoles(List<String> items)
• Gets effective roles:
List<Role> getEffectiveRoles(String consoleEntityGuid)
622 Good Mobile Messaging Administrator’s Guide

Summary of the GMC Web Service Functions
• Lists rights for roles:
List<Right> listRightsForRole(String roleGuid)
• Lists role members:
List<ConsoleEntity> listRoleMembers(String roleGuid)
• Lists roles:
List<Role> listRoles()
• Lists roles for GMC Console entity:
List<Role> listRolesForConsoleEntity(String consoleEntityGuid)
• Revokes role:
void revokeRole(String roleGuid, List<String> consoleEntityGuid)
• Updates the name and description of the specified role:
Role updateRole(String roleGuid, String name, String description, List<Right> rights)
• Updates role rights of the specified role:
Role updateRoleRights(String roleGuid, List<Right> rights)
• Gets all rights:
List<String> listAllRights()
• Gets effective rights:
List<Right> getEffectiveRights(String consoleEntityGuid)
Policy Set Function
• Lists all policy sets:
List<PolicySet> listPolicySets()
Good Mobile Messaging Administrator’s Guide 623

Using the GMC Web Service
Handheld Functions
• Disables a handheld from a specified server:
void disableHandheldForProduct(String handheldGuid, String serverGuid)
• Disables one or more handhelds:
BulkServiceResult disableHandhelds(GUIDs params)
• Disables a single handheld:
ServiceResult disableHandheld (String params)
• Enables a handheld for a specified server for that server’s product:
void enableHandheldForProduct(String handheldGuid, String serverGuid)
• Enables one or more handhelds by directory (for instance, AD) DN:
BulkServiceResult enableHandhelds(EnableHandhelds params)
• Enables a single handheld by directory DN:
String enableHandheld (EnableHandheld params)
• Enables one or more handhelds by GUID:
BulkServiceResult enableHandheldsByGuids(EnableHandheldsByGuids params)
• Enables one or more handhelds by mailbox DN:
BulkServiceResult enableHandheldsByMailboxDn(EnableHandheldsByMailboxDn params)
• Lock a handheld:
ServiceResult lockHandheld (String handheldGuid)
• Get a handheld’s temporary unlock code:
624 Good Mobile Messaging Administrator’s Guide

Summary of the GMC Web Service Functions
ServiceResult getHandheldTemporaryUnlockCode(String handheldGuid, String deviceId) throws EMFException
• Get detailed information for handheld. Return information via HandheldDetails such as PIN and device properties.
getHandheldInfo
• Enable handheld logging:
ServiceResult setHandheldDetailedLogging(String handheldGuid, boolean enabled)throws EMFException
• Export list of handhelds:
List<ExportHandheldItem> exportHandheldList(String serverGuid)
• Export handheld software:
List<ExportHandheldSoftwareItem> exportHandheldSoftware(String serverGuid)
• Export handheld statistics:
HandheldStatsView exportHandheldStats(String handheldGuid)
• List the handhelds with the specified GUIDs:
BulkServiceResult getHandheldsInfo(GUIDs handheldGUIDs)
• Get the number of enabled handhelds:
int getNumOfHandhelds()
• List all handhelds:
List<Handheld> listAllHandhelds(int startIndex, int maxCount, HandheldAttribute sortByAttribute, Boolean sortAscending)
• List handhelds that have the specified attribute key and attribute-value substring:
Good Mobile Messaging Administrator’s Guide 625

Using the GMC Web Service
List<Handheld> listHandhelds(HandheldAttribute searchByAttribute, String searchByValue, int startIndex, int maxCount, Boolean ascending, Boolean prefixSearch)
• List all handhelds assigned to the specified policy set:
List<Handheld> listHandheldsForPolicySet(String policySetGUID)
• Lists all handhelds assigned to the specified server:
List<Handheld> listHandheldsForServer(String serverGUID)
• Regenerate OTA pins for handhelds that have the specified GUIDs:
BulkServiceResult regenOTAPin(GUIDs params)
• Resend the OTA email to the user(s) associated with the specified handheld GUID(s):
BulkServiceResult resendOTAEmail(GUIDs params)
• Reset statistical counters for enabled handhelds on the GMC server that is specified by the handheld GUID:
void resetHandheldStats(String handheldGuid)
• Set the specified handhelds to use the specified policy set:
BulkServiceResult setHandheldsPolicySet(GUIDs handheldGUIDs, String policySetGUID)
• Send a “wipe” message to the specified handheld:
ServiceResult wipeHandheld(String guid)
• Start a handheld moving within an EMF
String startIntraMoveHandheld (StartIntraMoveHandheld req)
• Report on handheld status (how “well” the handheld is):
626 Good Mobile Messaging Administrator’s Guide

Summary of the GMC Web Service Functions
GetHandheldNocStatusResponse getHandheldNocStatus(String params)
• Third-party application management for iOS and Android platforms, if the policies are properly configured. (Get list of applications on device.)
getAppsForHandheld(String handheldGUID)
• Third-party application management for iOS and Android platforms, if the policies are properly configured. (Refresh list of applications on device.)
refreshAppsForDevice(String handheldGUID)
Server Functions
• Exports server statistics:
ServerStatsView exportServerStats(String req)
• Gets the server name that has the specified GUID:
String getServerGuidByName(String serverName)
• Gets the list of servers for a specified product type:
ServerList getServersByProductType(String params)
• Gets the list of servers that have the specified GUIDs:
BulkServiceResult getServersInfo(GUIDs serverGUIDs)
• Gets the list of all servers:
ServerList getAllServers ()
• Resets statistics for the specified GMC server:
void resetServerStats(String serverGuid)
Good Mobile Messaging Administrator’s Guide 627

Using the GMC Web Service
Self-Service Functions
The administrator can send web-service requests for a particular user using the GUID of the user. Note that the GMC does not support self-service functions in pure Office 365 environments.
Send activation PIN:
BulkServiceResult sendActivationPin(GUIDs params)
Provide UDID of the handheld. This sends an email with activation PIN or regenerates PIN and sends to customer an email with new PIN when old one is expired.
Example:
<soapenv:Envelope xmlns:soapenv="http://schemas.xmlsoap.org/soap/envelope/" xmlns:emf="http://good.com/emf">
<soapenv:Header/> <soapenv:Body> <emf:sendActivationPinNoWrapper> <emf:items>410D9E3A-D9C4-4461-9258-
6A5FEB949CB4</emf:items> <emf:items>9E574704-0552-4C4C-B73A-
2839261990D9</emf:items> </emf:sendActivationPinNoWrapper> </soapenv:Body></soapenv:Envelope>
• Device password reset
ServiceResult resetDevicePassword(String handheldGuid)
Example:
<soapenv:Envelope xmlns:soapenv="http://schemas.xmlsoap.org/soap/envelope/" xmlns:emf="http://good.com/emf"> <soapenv:Header/>
628 Good Mobile Messaging Administrator’s Guide

Summary of the GMC Web Service Functions
<soapenv:Body><emf:resetDevicePasswordNoWrapped>9595B19B-8B90-49ED-A4A5-BBC76004CBE7</emf:resetDevicePasswordNoWrapped>
</soapenv:Body></soapenv:Envelope>
• Device lock
ServiceResult lockHandheldDevice(LockHandheldDevice handheldLock)
Example:
<soapenv:Envelope xmlns:soapenv="http://schemas.xmlsoap.org/soap/envelope/" xmlns:emf="http://good.com/emf"> <soapenv:Header/> <soapenv:Body> <emf:lockHandheldDevice> <emf:handheldGuid>410D9E3A-D9C4-4461-
9258-6A5FEB949CB4</emf:handheldGuid> <!--Optional:--> <emf:lockMessage>hello Message</
emf:lockMessage> <!--Optional:--> <emf:lockPhoneNumber>?</
emf:lockPhoneNumber> <!--You may enter ANY elements at this
point--> </emf:lockHandheldDevice> </soapenv:Body></soapenv:Envelope>
Miscellaneous Functions
• Gets the directory entries:
List<DirectoryEntry> findDirectoryEntries(DirectorySearch filter,
Good Mobile Messaging Administrator’s Guide 629

Using the GMC Web Service
DirectorySearchAttributeId sortAttrId, Boolean sortAscending)
• Lists the product types:
List<ProductType> listProductTypes()
• Uploads the SMIME certificate for a specific device, defined by its GUID.
void uploadSmimeCertificate(String guid, byte[] encryptionCertificate,
String encryptionCertificateName, byte[] signatureCertificate,
String signatureCertificateName)
guid = handheld GUIDencryptionCertificate = the certificate to encrypt byencryptionCertificateName = what name to give isignatureCertificate = the certificate to use for digital signatures -- optional, if not given, then encryptionCertificate will be used signatureCertificateName = what name to give the signature certificate -- optional
630 Good Mobile Messaging Administrator’s Guide

B Mobile Device Management
Good for Enterprise provides an easy, secure, and comprehensive way to manage mobile devices. By accessing a universal dashboard through any Web browser, IT administrators can instantly access all smartphones, tablets and handheld devices in their mobile fleet. This easy, over-the-air device management tool allows for granular and consistent mobile security policy enforcement, and end-to-end visibility for troubleshooting and support. IT can quickly provision new devices, enforce passwords, enforce device restrictions (like disable camera), configure device settings (like WiFi, VPN, Certificates), distribute custom or third-party enterprise applications, and establish role-based policies—from virtually anywhere, anytime. Spend less time managing software and more time protecting business data.
Good for Enterprise manages personally-owned and corporate-issued smartphones and tablets, and is instantly compatible with existing components, servers and mobile devices from most major device manufacturers.
Devices that are set up as MDM-Only use the features described here.
The Good Mobile Control Console (GMC) serves as your primary device-management tool. You use the GMC to add users/devices to the system, configure policies that manage device use, and monitor the devices after they are set up.
Good Mobile Messaging Administrator’s Guide 631

Mobile Device Management
This appendix includes the following:
Configuring MDM
- iOS Configuration (page 632)
- Android Configuration (page 655)
- Compliance Management (page 659)
- Application Management (page 659)
- Setting Up (Provisioning) Mobile Devices with MDM (page 665)
Using MDM
- Asset Management (page 665)
- Self Service (page 675)
Configuring MDM
iOS Configuration
As a first step in turning on the iOS MDM feature, you will need to obtain a Mobile Device Management (MDM) Certificate signed by Apple. Without the certificate you cannot perform administration tasks remotely on Apple devices.
Obtaining a Mobile Device Management Certificate Signed by Apple
To generate the signed certificate required by the iOS MDM policy feature, follow this procedure:
Generate the file and upload to Apple
1. Click the Generate Certificate Request button on the Settings > Certificates page.
2. Enter the required information and click Next.
632 Good Mobile Messaging Administrator’s Guide

Configuring MDM
3. Make a note of the Apple URL to which you will upload the certificate request.
You must log in with your Apple I.D. to https://identity.apple.com/pushcert/.
4. Select Generate and save the generated file to your local drive.
The file should end with the extension .plist.
Obtain a signed certificate from Apple
1. At https://identity.apple.com/pushcert/, sign in to Apple's Push Certificate Portal with your Apple ID. (Accept the terms and conditions, if you have not already done so.)
2. Click Create a Certificate.
3. Choose the .plist file that you downloaded and saved, and select Upload.
You should see a confirmation message with a Download button.
4. Download the file to your local hard drive and return to the Good Mobile Control Settings > Certificates page.
This file will have the extension: .pem.
* Internet Explorer users, see known issues below.
Upload the signed certificate to Good Mobile Control
1. Click the Upload Signed Apple Certificate button on the Settings > Certificates page.
You will be prompted for your password. Enter your Apple ID password.
2. Navigate to find the signed .pem file on your local drive.
3. The signed file should now appear in the certificate list.
* Internet Explorer users
On Internet Explorer, you will need to log out and then log back in again to see the signed certificate. IE may also create an additional file prior to the generation of the '.pem' file. This additional file is not needed, but can be used to check for any possible errors.
Good Mobile Messaging Administrator’s Guide 633

Mobile Device Management
{"ErrorCode":*80013,"ErrorMessage":"Invalid Certf-icate Signing Request","ErrorDescrip:on":"The Certficate Signing Request you entered appears to be invalid. Make sure that request file uploaded is in the <a href="http://www.apple.com/business/mdm" target="_blank">correct format</a>and not empty.="}
If this shows up, delete both files and re-try the previous steps until a clean file is generated. A clean file is an indication that the .plist file was signed with no errors from Apple.
Renewing a Certificate
Warning: Renew this certificate when it expires, rather than generating a new one. Generating a new certificate will require users to manually remove the Good iOS Configuration profile from General > Settings, relaunch the Good Client, and reinstall the new Configuration Profile.
Do not delete the existing MDM certificate; just upload the renewed version. On upload, the new certificate will override the old.
Scenario 1: You generated the certificate using iOS Developer Enterprise Program’s (iDEP) Provisioning Portal (older process).
Step 1 – Follow the instructions in “MDM Push Certificate Migration Information” on page 635 to renew the certificate with Apple. This older process did not involve Good Technology and is between you and Apple. If you cannot renew the certificate for any reason, you’ll have no option but to generate a new MDM certificate.
Step 2 – Upload to Good Mobile Control by going to Settings > Certificates and clicking the Import button. Do not delete the existing certificate, just upload the renewed one and it will overwrite the old.
Scenario 2: You generated the certificate using Apple Push Certificate Portal (APCP) (new process).
634 Good Mobile Messaging Administrator’s Guide

Configuring MDM
Step 1 – Go to the APCP website - https://identity.apple.com/pushcert. Log in using the same Apple ID that was used to generate the certificate. You will see an option to renew the certificate. Click that button and download the renewed certificate.
Step 2 – Upload to Good Mobile Control by going to Settings > Certificates and clicking the Import button. Do not delete existing certificate, just upload the renewed one and it will overwrite the old.
MDM Push Certificate Migration Information
The information in this section is provided by Apple. It documents the older processes for creating and managing push certificates.
MDM push certificates created in the iOS Developer Enterprise Program were migrated to the Apple Push Certificates Portal. This impacted the creation of new MDM push certificates and the renewal, revocation and downloading of existing MDM push certificates. It did not impact other (non-MDM) APNS certificates.
If your MDM push certificate was created in the iOS Developer Enterprise Program:
- It was migrated for you automatically.
- You can renew it in the Apple Push Certificates Portal without impacting your users (and the topic will not change).
- You’ll still need to use the iOS Developer Enterprise Program to revoke or download a pre-existing cert.
If none of your MDM push certificates are near expiration, no action is needed. If you do have an MDM push certificate that is approaching expiration, have your iOS Developer Program Agent login to the Apple Push Certificates Portal with their Apple ID.
Good Mobile Messaging Administrator’s Guide 635

Mobile Device Management
Renewal of MDM push certificates
To renew an MDM push certificate that was created in the iOS Developer Enterprise Program, visit Apple Push Certificates Portal and login with the Apple ID of the Agent on your iOS Developer Enterprise Program membership. Existing certificates will list "Migrated" as the Vendor.
Renewal of existing MDM push certificates via the Apple Push Certificates Portal will ensure the topic of the certificate will not change. This means users will not need to re-enroll devices and MDM service will not be impacted by this change. New MDM push certificates created in the Apple Push Certificates Portal are assigned a topic automatically and cannot be customized.
To renew an MDM push certificate that was created in the Apple Push Certificates Portal, visit Apple Push Certificates Portal and login with your Apple ID.
Downloading of MDM push certificates
To download an MDM push certificate that was created in the iOS Developer Enterprise Program, login to the iOS Developer Enterprise Program and visit the iOS Provisioning Portal.
To download an MDM push certificate that was created in the Apple Push Certificates Portal, visit Apple Push Certificates Portal and login with your Apple ID.
Setting iOS MDM Policies
The iOS configuration feature allows you to set policies for your enterprise iOS devices, utilizing iOS configuration profiles. During Good for Enterprise setup on the iOS device. Good will create a new configuration profile with the name you specify in the policy, in Settings/General/Profiles (the default name is the name of the policy).
636 Good Mobile Messaging Administrator’s Guide

Configuring MDM
Once you set and save iOS configuration policies in the Good Management Console, your settings are implemented in the following way:
• During Good for Enterprise handheld setup, or when a user runs or is running Good on their handheld, a “Profile Required” dialog is displayed. The user can delay the installation twice, one hour each time.
• The user accepts this dialog and Good exits, Safari runs, and an “Install Profile” dialog is displayed.
• The user accepts this dialog, follows the installation prompts, provides his/her device passcode, and the Good configuration profile is installed, containing your policy settings.
• The user is returned to Good installation or to the Good for Enterprise application.
• Whenever configuration settings are changed for the policy in Good Mobile Console, the process is repeated, unless the MDM (Mobile Device Manager) option is selected (explained below); if MDM is selected, configuration settings are updated automatically on the device.
If the Good profile is removed from the iOS device, Good for Enterprise is disabled. The user must repeat the procedure to install the profile for Good for Enterprise to run again.
Good Mobile Messaging Administrator’s Guide 637

Mobile Device Management
General Policies
Enable iOS configuration - Sets up a Good configuration file on the iOS device (default: unchecked).
Profile name (shown on device) - Default is the policy set name
Organization - Default is an empty field
Enable remote full device wipe - Check to enable this feature on the Handhelds page (“Erasing (Wiping) Handheld Data” on page 361). Otherwise, wipe is enabled for Good data only. Default is unchecked.
Enable MDM profile
If the MDM check box is checked, any changes made and saved to settings on the iOS Configuration pages (General, Passcode, Restrictions, WiFi, VPN, Web Clips) will be made to all devices to which the present policy is applied. The user is not required to reinstall the configuration file when changes to its settings are made.
638 Good Mobile Messaging Administrator’s Guide

Configuring MDM
If the MDM check box is checked, two new options are available on the handheld security page: remote device lock and remote device password reset. (Requires iOS4.)
In addition, you can limit or allow Console access to information on the device as follows, using policy settings:
• Installation, removal and inspection of configuration profiles (required to use the Passcode, Restrictions, WiFi, VPN, Web Clips, and Exchange ActiveSync tabs)
• Installation, removal and inspection of provisioning profiles (the ability to install and remove provisioning profiles is not available in this release)
• Inspection of installed applications
• Query of device information
• Query of network information
• Restriction-related queries
• Security-related queries
Query and inspection data, when its collection is enabled, is displayed in the Console on the Handhelds page for the device.
Note: If these additional access rights are changed after MDM profile installation, affected devices are notified that the profile must be reinstalled, and are led through that installation, including acceptance of the changes. MDM-only devices are not notified; the user must reinstall the profile as explained in “Setting Up the MDM-Only Device (Self Service)” on page 182.
Reminder: The MDM feature requires an Enterprise MDM Certificate signed by Apple. Using the Generate Certificate Request button on the Settings > Certificates page, create a certificate request file and save it to your local drive. Once it is saved locally, upload it to https://identity.apple.com/pushcert/. This will generate a signed certificate that you must save; then return to the Settings > Certificates page to upload it using the Upload Apple Signed Certificate button. For details on this procedure, refer to “Obtaining a Mobile Device Management
Good Mobile Messaging Administrator’s Guide 639

Mobile Device Management
Certificate Signed by Apple” on page 632.
If you attempt to enable MDM without a certificate, you’ll be taken to the Settings Certificate page to import one.
If you want to delete the certificate later, you must first uncheck the MDM feature within all policy sets where it has been selected.
Profile Security (available only if MDM check box is not checked)
Allow user to remove profile (the default), or
Require password to remove profile (with field to define the passcode), or
Do not allow profile to be removed
If the MDM check box is selected, the user always has the option to remove the MDM profile from the device. If the MDM profile is present on the device, the Good profile cannot be removed by the user; if the user removes the MDM profile, he/she can then remove the Good profile.
If the Good profile is removed from the iOS device, the user will no longer be able to access Good data. Instead, a prompt to install the missing profile is displayed at startup.
640 Good Mobile Messaging Administrator’s Guide

Configuring MDM
Passcode Policies
Use these policies to control access to the iOS device through use of a mandatory passcode. (To control access to the Good application on the iOS device, refer to “Good for Enterprise Authentication” on page 202.) If you tightened passcode requirements, the user is prompted to define a new password and given an hour to do so.
Require passcode - User must enter a passcode to access the Good applications (default: checked).
Minimum length of - Specifies the minimum length allowed for the passcode (1-10 characters) (default: 1 character).
Allow simple value - Allows the use of repeating, ascending, and descending character sequences in the passcode (default: checked).
Good Mobile Messaging Administrator’s Guide 641

Mobile Device Management
Alphanumeric - Requires the passcode to contain at least one letter and one number (default: unchecked).
Minimum number of complex characters - Requires the passcode to contain at least this many complex characters, such as @, #. $, or % (1 - 10 characters)(default: unchecked)
Maximum passcode age - Days after which passcode must be changed (1 day to 730 days) (default: unchecked)
Auto-Lock - Maximum allowed idle time after which device automatically locks. (1 minute to 1 hour) (default: unchecked)
Passcode history - The number of unique passcodes required before reuse (1 to 10) (default: unchecked)
Grace period - Maximum amount of time device can be locked without prompting for passcode on unlock (1 minute to 4 hours) (default: unchecked)
Maximum failed attempts - Wipe device after n attempts (a number between 4 and 10)(default: unchecked). The full device is wiped.
642 Good Mobile Messaging Administrator’s Guide

Configuring MDM
Restrictions on the iOS device
Uncheck the Enable Restrictions checkbox or specific options to disable the following restrictions on the iOS device. These restrictions cannot be modified by the user. The restrictions are enabled by default, with the exception of “Force fraud warning” and “Block pop-ups.”
Changing any option will require the user to install a new MDM profile.
Device functionality (enable use of device features)
• Allow installing apps
• Allow use of camera
- Allow FaceTime • Allow screen capture
• Allow syncing of consumer email accounts while roaming
• Allow voice dialing
Good Mobile Messaging Administrator’s Guide 643

Mobile Device Management
• Allow In-App purchases
• Allow Siri Assistant
- Allow Siri while device locked • Allow lock screen notifications view
• Allow adding Game Center friends
• Allow Passbook while device locked
• Allow lock screen today view
• Allow fingerprint to unlock
• Allow lock screen control center
• Allow multiplayer gaming
• Allow adding Game Center friends
• Allow Passbook While Device Locked
iTunes Settings
• Require user to enter their iTunes password for each transaction
iCloud Sync Settings
• Allow iCloud backup
• Allow document syncing
• Allow Photo Stream
- Disallowing can cause data loss • Allow Shared Photo Stream
Security and Privacy
• Allow diagnostic data to be sent to Apple
• Allow user to accept/reject untrusted HTTPS certificates
• Require iTunes backups to be encrypted
• Allow OTA PKI updates
644 Good Mobile Messaging Administrator’s Guide

Configuring MDM
• Force limit Ad tracking
Document sharing between enterprise EAS accounts and apps**
• Allow “Open In” from managed to unmanaged
• Allow “Open In” from unmanaged to managed
Applications (enable access to applications on the device)
• Allow use of YouTube
• Allow use of iTunes Music Store
• Allow use of Safari*
- Enable autofill
- Force fraud warning
- Enable javascript
- Block pop-ups
- Accept cookies (pull-down menu). Controls when Safari accepts cookies (Always, Never, From visited sites)
• Allow explicit music & podcasts
Allowed content and applications (pull-down menus):
- Ratings region (choose from pull-down)
- Allowed Ratings (choose from pull-downs)
• Movies
• TV Shows
• Apps
*Note: Safari is required to install the iOS Good profile that sets these restrictions; Safari is also required for any subsequent updates to these settings. Also, if you disallow Apps installation, you’ll need to allow it again later if the Good Client is to be updated on the device.
Good Mobile Messaging Administrator’s Guide 645

Mobile Device Management
Wireless NetworksGood for Enterprise allows you to set or change wireless-network connection settings for an iOS user via policy settings for the policy set applied to the device.
To define wireless network settings for the policy set:
1. Click the WiFi tab.
All wireless connections that you’ve defined so far are listed. Click the check box next to those whose connection details are to be sent to iOS devices using this policy set.
646 Good Mobile Messaging Administrator’s Guide

Configuring MDM
2. To add details for a new connection, click Add Network.
3. Provide a Network name (SSID). Select a network type and proxy type. Click the check boxes if desired for Auto Join, and if this is a hidden network. You will provide additional specifications depending upon the network type you select.
Selecting a different network type may display additional connection parameters to be defined.
Note: The network type you select may allow a Trusted Root/Expected Certificate. Available certificates are listed in this window, but only if you import them first into the Console. To do so, use the Certificate link on the Settings tab.
The Trusted Server Certificate Names field allows multiple names to be entered, separated by commas.
4. To change the settings for a network, click the edit link for the network on the Wireless Connections page.
5. Click Save and send email update to have the new policy settings sent to all affected handhelds as an email attachment. Click Save without updating to save the new policy settings without sending the changes to any handhelds currently using this policy set. The changes will take effect for any handhelds assigned this policy set subsequently.
Good Mobile Messaging Administrator’s Guide 647

Mobile Device Management
VPN ConnectionsTo set or change VPN connection settings for an iOS user:
1. Click the VPN tab.
All VPN connections that you’ve defined so far are listed. Click the check box next to those whose connection details are to be sent to iOS devices using this policy set.
2. To add details for a new connection, click Add Connection.
648 Good Mobile Messaging Administrator’s Guide

Configuring MDM
3. Provide a connection name and server hostname in the appropriate fields. From the drop-downs, select a connection type and account type.
Selecting a connection type will display additional connection parameters to be defined.
Note: You can add connections with a Trusted Root/Expected Certificate. Available certificates are listed in this connection parameter window, but only if you import them first into the Console. To do so, use the Certificate link on the Settings tab.
4. To change the settings for a connection, click the edit link for the connection on the VPN Connections page. Select the connection type to display additional fields that can be changed.
5. Click Save and send email update to have the new policy settings sent to all affected handhelds as an email attachment. (That is, the user must open the email on the iOS device.) Click Save without updating to save the new policy settings without sending the changes to any handhelds currently using this policy set. The changes will take effect for any handhelds assigned this policy set subsequently.
Web ClipsUse the Web Clips tab to add web clips to the Home screen of the user’s device. Web clips provide links to specified web pages.
Good Mobile Messaging Administrator’s Guide 649

Mobile Device Management
1. Click the Web Clip tab.
2. Click Add.
3. Enter a label for the web clip. This will be displayed on the user’s Home screen.
4. Enter a URL to define the web clip’s link.
Note: The URL you specify must include the prefix http:// or https://. The URL won’t be accepted without it.
650 Good Mobile Messaging Administrator’s Guide

Configuring MDM
5. To give the user the option of removing the clip, check the Removable box.
6. To add a custom icon, use the Browse button or enter the path and file name of a graphic file in gif, jpeg, or png format, 59 x 60 pixels in size. The image is automatically scaled and cropped to fit, and converted to png format if necessary. You can specify a precomposed icon and that the clip be displayed full-screen.
Exchange ActiveSync
You can add and configure Exchange ActiveSync accounts on the device using the “Add Exchange ActiveSync” button on the iOS Configuration > ActiveSync page.
Good Mobile Messaging Administrator’s Guide 651

Mobile Device Management
Unlike Apple’s IPCU tool, this policy includes an “Auto-Populate User Credentials” setting. When this setting is checked, the user name and email address are auto-filled with the values of the devices to which the policy applies. When unchecked, manual configuration is required, as with Apple.
Single Sign-on
Authenticating into corporate apps can now be done just once from the device (iOS 7 only). Enterprise single sign-on (SSO) user credentials can be used across apps, including apps from the App Store. Each new app configured with SSO verifies user permissions
652 Good Mobile Messaging Administrator’s Guide

Configuring MDM
for enterprise resources and logs users in without requiring them to reenter passwords.
• Kerberos-based single sign-on for enterprises.
• SSO configuration delivered over-the-air to managed devices.
• One or more MDM-managed apps can be mapped to the SSO configuration.
To configure this SSO for device use with apps:
1. Click on the SSO button under the Single Sign-on tab.
Good Mobile Messaging Administrator’s Guide 653

Mobile Device Management
2. Enter a descriptive name for this SSO.
3. Select the Kerberos principal name to be used with the SSO apps (alias, email address, display name, directory GUID, or DN). This is the name of the user when the profile is sent to an app for SSO. This is the same name used to configure the user name under the Exchange ActiveSync tab when the “Auto-populate user credentials” option is selected (“Exchange ActiveSync” on page 651).
4. Enter the name of the Kerberos realm that this SSO applies to. This entry is case sensitive.
5. Click the appropriate radio buttons to allow all apps set up for SSO to use it, or enter the prefixes for allowed URLs and identifiers for allowed apps.
The prefixes http:// and https:// allow all URLs. No identifiers are specified when all apps are allowed.
Extensions
Additional configurations supported on iOS devices can be added by uploading a .mobileconfig file that is generated from Apple tools such as iPCU.
If MDM is enabled, this configuration file is added to the existing configuration settings. If MDM is disabled, you’ll be warned that
654 Good Mobile Messaging Administrator’s Guide

Configuring MDM
selecting this option will override existing policy settings under the other tabs on this page. If you wish to apply those device policies and configurations, be sure to add relevant profiles via Apple's iPCU tool.
To upload the .mobileconfig file:
1. Install iPCU (iPhone Configuration Utility).
2. Define the configuration you want to add. MDM configuration is not allowed, as it would conflict with other operations.
3. Export the .mobileconfig file without encryption or signing.
Android Configuration
The Android configuration feature provides additional policy settings for your enterprise Android devices.
Good Mobile Messaging Administrator’s Guide 655

Mobile Device Management
General Policies
Enable Android Full-Device Administration - Enables the Android configuration plugin feature.
Enable remote full device wipe
Enable remote full device lock
Enable remote device password reset
Check the check box to enable the feature on the Handhelds page for a device via the Security link. Otherwise, the wipe, lock and change-password actions are available only for the Good for Enterprise application on the device. Default is unchecked.
If you enable these additional settings, Good is added to affected devices as an administrator in Settings/Location/Security. If the user
656 Good Mobile Messaging Administrator’s Guide

Configuring MDM
should deselect Good via “Select device administrators,” he/she is locked out of the Good for Enterprise application. Any passcode settings remain in effect , but the user can change them. The device can still be wiped or locked if these features are enabled, until the Good application is removed from the device. To delete Good from the device, disable device administration or on the device deselect Good as a device administrator.
Passcode Policies
Use these policies to control access to the Android device through use of a mandatory passcode. (To control access to the Good application on the Android, refer to “Good for Enterprise Authentication” on page 202.)
Require passcode - User must enter a passcode to access the Good applications (default: checked).
Good Mobile Messaging Administrator’s Guide 657

Mobile Device Management
Minimum length of - Specifies the minimum length allowed for the passcode (1-10 characters) (default: 4 characters).
Alphanumeric - Requires the passcode to contain at least one letter and one number (default: checked).
Auto-Lock - Maximum allowed idle time after which device automatically locks. (1 minute to 15 minutes) (default: unchecked)
Maximum failed attempts - Wipe device after n attempts (a number between 4 and 16)(default: unchecked). The full device is wiped.
Restrictions
Restriction policy settings are enforced by the Android OS and cannot be modified by the user.
These policy settings allow the administrator to enable/disable use of device hardware features:
• Allow use of camera (4.0 and above) (default is On)
• Allow storage encryption (3.0 and above) (default is Off) - This setting directs the Android operating system to enable encryption of all application data that is stored on the device. The following pop-up is displayed and encryption is enforced when the Proceed
658 Good Mobile Messaging Administrator’s Guide

Configuring MDM
option is selected. For some devices which diverge from the applicable API, encryption is enabled but not enforced.
Compliance Management
Compliance management options, including compliance reporting, are described in “Compliance Manager” on page 274.
Application Management
Adding and Managing Enterprise Applications Using a Policy
To add and delete custom applications to or from the software package for a policy set, first ensure that the applications are available in the Console applications catalog by using the Custom Software page on the Settings tab to check the list of available applications for this Console.
Use the instructions in this section to add or delete applications to the list (catalog) on the Custom Software page on the Settings tab. Then you can add and delete third-party applications to or from the
Good Mobile Messaging Administrator’s Guide 659

Mobile Device Management
software package for a policy set on the Application Management page.
To add or delete custom applications from the software package:
1. First, ensure that the desired application is listed in the catalog, or add it to the catalog. To do so, click the Custom Software link on the Settings tab.
2. To add a custom application to the package, click the Add button.
3. Choose the handheld platform for the application from the drop-down. Enter the application path and filename or use the Browse
660 Good Mobile Messaging Administrator’s Guide

Configuring MDM
button to navigate to it and select it. (For iOS files, .ipa/.mobileprovision.)
For iOS5 files, you have the option of specifying a URL rather than a path and filename for an application. An additional radio button allows you to search the iTunes store for an application.
4. Click Continue.
5. Enter values for the Name, Version, and Description fields and then click the Finish button.
Restrictions on the custom software:
• Name: 50 characters
• Version: 21 characters
• Description: 256 characters
• Name, Version, and Description fields cannot be empty
• Field properties cannot be changed after upload
• Zero-length files cannot be uploaded
• Single stand-alone applications only can be uploaded
• There is a limit of 50MB for each file uploaded. You can upload 1,000 files or up to a total of 190MB of files, whichever comes first. To add more, you must remove some of the existing files, to get below both of these limits.
• Android files will be .apk.
• iOS applications are uploadable in .ipa form.
Good Mobile Messaging Administrator’s Guide 661

Mobile Device Management
• Note: Most Windows Smartphone handhelds have code-signing requirements. Applications that are not signed by Mobile2Market (or by proprietary carrier certificates) may not install properly.
6. If you later want to delete a custom application from the list, click the check box next to the application and click the Delete button. Multiple selections are supported.
If the operation is not supported for a particular handheld platform, no applications will be displayed.
7. To manage a custom application using a specific policy set, now add the custom application to the policy set.
a. On the Policies/ Application Management/Application Man-agement screen, under Enterprise Applications click Add Application. Choose an OS Platform from the drop-down.
Choose the desired application from the list (which reflects the custom applications added using Settings/Custom Software).For supported, “managed,” applications, select the Set as Man-aged check box to allow installation/uninstallation of the application on all or individual devices from the Console.
662 Good Mobile Messaging Administrator’s Guide

Configuring MDM
Select “Disable syncing to iTunes/iCloud” and/or “Auto-unin-stall if MDM removed” to enable these automatic device-man-agement policy functions.
b. Click Continue when done.
8. To enable the application for a policy set, click the check box next to it.
9. To remove the application from the software package later, click the check box next to it and click the Remove button.
For supported (iOS5), managed applications, you are given the option of either just removing the application from the package, or removing it from the package and deleting it from all affected handhelds. To remove the application from the package and from selected handhelds only, choose to remove it only from the package here and then uninstall it from each handheld using the Actions Uninstall link in Applications for the handheld on the Handhelds tab. Note that the application does not ever appear in the user’s application catalog.
All handheld users for the affected Good Mobile Messaging Servers are notified when additions to the package are enabled using the Application Management option, with instructions on how to download and install the applications wirelessly on their handhelds.
To view information about the new software, click the name of the application in the Custom Software list on the Settings tab. For
Good Mobile Messaging Administrator’s Guide 663

Mobile Device Management
example, the following information is displayed for an application named “Call Tracker”.
Deleted applications are not deleted from handhelds that already have them installed.
“Managed” Applications
Some platforms (iOS5 in this release) provide the following added MDM management features for third-party applications. You can enable/disable them when adding an application to the package and later on the Policies/Application Management page.
• Install/uninstall
For supported applications, you are given the option of removing the application from the software package, or removing it from the package and deleting it from all affected handhelds. To remove the application from the package and from selected handhelds only, choose to remove it only from the package using Policies/Application Management/Remove, and then uninstall it from each desired handheld using Handhelds/Applications/Actions/Uninstall.
664 Good Mobile Messaging Administrator’s Guide

Using MDM
• Automatic uninstall if MDM profile is removed from the device. Use the check box provided to enable/disable (enabled by default).
• Disable syncing to iTunes/iCloud. Use the check box provided to enable/disable (enabled by default).
Handheld users are notified of changes to the package, with instructions on how to download and install updated applications wirelessly on the handhelds. Any software policy changes are employed.
Applications that have been deleted from the software package by Good Technology are not deleted from the handheld if they have been previously installed.
Setting Up (Provisioning) Mobile Devices with MDM
The Mobile Device Management features included with the Good for Enterprise Android and iOS Clients are embedded in the Clients. No special setup steps are required when setting up a device, as described in Chapter 5.
Using MDM
Asset Management
Use the Handhelds tab on the console to display a list of handhelds and their owners, as well as detailed information about each handheld. Information available includes handheld connection status to the Good Mobile Messaging Server.
Note: Some information is not available on all clients.
Good Mobile Messaging Administrator’s Guide 665

Mobile Device Management
Note: To display an iOS device’s Alternate Identifier (its IMEI or hardware model) in the Console, you must enable the iOS configuration profile on the device, with the profile installed.
To view and use handheld information:
1. In the Good Mobile Control Console, click the Handhelds tab.
The Handhelds page displays information such as the name of each device, the email account associated with it, its phone number, status, platform, device model, the policy set currently applied to it, its Good Mobile Messaging Server, its current Client version, and so on (the columns are configurable).
The second (untitled) column provides compliance indicators. A blank field indicates current device compliance with respect to its currently configured policy settings. An exclamation point indicates that the device is out of compliance with these policies. A question mark indicates that the device is not set up and sync’d, or that the device (e.g., Windows Mobile) is not supported for this feature, or that the device is running an earlier, unsupported Client (less than 1.7.3 for Android; less than 1.9.3 for iOS). For more information on compliance issues with the device, click on the device and check the list of reports for it in the left pane on the device’s Handheld Details page. See also “Compliance Report” on page 671.
2. Use the left panel of filters to display subsets of the complete list, according to Good Messaging Server, compliance, device platform, carrier, and department
3. Click the name of the handheld listed on the Handhelds page.
4. Click the various links in the left pane to display handheld information and to run diagnostic tests and configure logging. For more information, see the following sections.
5. For more information about a specific device, click its link on the Handhelds page to open a Detailed View for it.
6. You can enable or disable data roaming for supported handhelds. To do so for multiple handhelds, select the action from the Apply
666 Good Mobile Messaging Administrator’s Guide

Using MDM
Action drop-down menu on the Handhelds page. To do so for a specific handheld, navigate to its Handheld Info page and from the information list on the page, use the enable/disable drop-down menu for data roaming.
Note that the link for a compliance report is displayed only if a supported device has failed one or more compliance tests. (Refer to “Compliance Report” on page 671.)
You can also use the Good Monitoring Portal to help monitor and manage the handhelds (“Using the Good Monitoring Portal Dashboard” on page 388 and “Using the Good Online License Portal” on page 390).
Use the Home tab to display a report on currently paused handhelds (“Inactive Handhelds” on page 390).
Viewing Device Information
Good Mobile Messaging Administrator’s Guide 667

Mobile Device Management
The Handheld Info link in the left panel for a handheld displays a great variety of device information, including but not limited to the following:
• Name - User’s Active Directory display name
• Email - User’s email address for the account sync’d to this handheld
• Serial number - Handheld’s serial number
• Department - User’s Active Directory department
• Directory status - Current Active Directory status
• Status - Current handheld status (blank (active) or “Inactive”). The amount of inactivity that qualifies the device for an Inactive setting is specified on the Policy Settings page in the Settings tab.
• Status Message - Never provisioned, Running, Disabled, Failed, Client disconnect, Console disconnect, User not enabled, Failed to recover, Out of sync
• Policy Set - Policy set assigned to handheld
• Policy Status - “Using the Good Monitoring Portal Dashboard” on page 388 and “Using the Good Online License Portal” on page 390.
• Firmware version
• Handheld OS
• Handheld OS version
• Handheld OS language
• Good for Enterprise Client Language
• Device type
• System Identifier - Unique Good Mobile Control Server ID number for the handheld
• ROM version
668 Good Mobile Messaging Administrator’s Guide

Using MDM
For supported devices with MDM enabled (“iOS Configuration” on page 632), lists of installed applications, certificates, and provisioning profiles are included.
Click Refresh Data to update the handheld information (iOS MDM). The Console sends a query to the handheld and retrieves data from it. The button is grayed out if the handheld family is not supported, or if the handheld is unavailable due to OS version or policy settings. If the handheld is turned off or is out of its service area, the request will persist until the handheld is able to respond.
Click on a device name to open a Detailed View of device information.
To enable FIPS, refer to “Enabling FIPS Testing” on page 365.
Performing Device Actions
MDM allows you to lock handhelds and erase handheld data remotely, as well as create temporary unlock passwords.
The Security link in the left panel for a handheld displays the following information:
• Erase state - Not Applicable (no Erase Data issued for this handheld), Erase Data issued, Erase Data confirmed.
Actions on the Security page:
• Lock Handheld - Refer to “Easy Activation” on page 344.
Good Mobile Messaging Administrator’s Guide 669

Mobile Device Management
• Erase Data - Refer to “Erasing (Wiping) Handheld Data” on page 361.
• Create Unlock Password - Refer to “Resetting a Device Password or Good for Enterprise Password Remotely” on page 357.
Managing Device Provisioning
On the OTA page, you can resend OTA messages and create new user OTA PINs.
The OTA page provides the following information:
• OTA state - Unknown, Enabled, Provisioning_Failed, Provisioning_Denied, Provisioned, Erase_Data_Issued, Erase_Data_Confirmed, Erase_Data_Error
• OTA PIN
• OTA PIN state*
• OTA PIN expire time
• EMail - Email address for the handheld
• Last provisioned - Date and time
• OTA download URL - Source for application download
670 Good Mobile Messaging Administrator’s Guide

Using MDM
*For “OTA PIN state,” the following values are possible:
Refer to “File Handling” on page 217 for more on PIN expiration and reuse.
Actions on the OTA page:
• To resend the OTA welcome email message, click the Resend Email button.
• To regenerate the OTA PIN, click the Regenerate Provisioning PIN button. Refer to “Generating New User PINs” on page 325.
Managing Device Applications
Compliance ReportThe Good Management Console makes it easy for you to track your devices with respect to their compliance with your policy settings. If a device’s compliance status changes, Good Mobile Control keeps track of the fact. This section describes how to access and review your compliance data.
If a device is out of compliance with your application policies, you can lock or erase the device, or in some cases remove the problem application.
Status DescriptionValid PIN is valid and can be used.Expired PIN has expired. IT must generate a new PIN for any
new OTA setup.Reuse exceeded At least one OTA setup has taken place on the handheld.
The PIN cannot be reused until it has been regenerated. (Applicable if the “Disallow PIN after first-time use” check box is checked on the OTA PIN Policies tab.)
Expired and reuse exceeded
The PIN has expired. The PIN cannot be reused until it has been regenerated.
Good Mobile Messaging Administrator’s Guide 671

Mobile Device Management
For a quick overview of the compliance situation, go to the Handhelds tab. You can customize the device information view by
clicking on the “Select Columns” icon and choosing from the drop-down menu. Device compliance status is tracked in the second column of the device list.
This second (untitled) column can display three possible compliance indicators: a blank field, an exclamation point, and a question mark.
A blank field indicates the device is an compliance with respect to its currently configured policy settings. An exclamation point indicates that the device is out of compliance with these policies. A question mark indicates that the compliance check is pending for the device. This can happen when the device is not connected, is not set up, is not sync’d, or that the device (e.g., Windows Mobile) is not supported for this feature, or that the device is running an earlier, unsupported Client (less than 1.7.3 for Android; less than 1.9.3 for iOS).
To display only those devices in or out of compliance, use the related Filter by Compliance filters in the left panel.
Compliance status
672 Good Mobile Messaging Administrator’s Guide

Using MDM
On the Handhelds tab, you can run a full compliance report and export it to an Excel spreadsheet. To do so, select Export Compliance Report from the Select Import/Export Action pull-down menu.
This generates a report showing all changes in device compliance for all devices in the current view.
The rows in the report are grouped by device, with a separate row for each change in the compliance status of the device. The report provides the changed status, the affected policy setting, the cause for the change, and any action taken, as specified by the policy.
Out-of-compliance causes can include jailbreak detection, connectivity verification (device must have connected to Good within a specified time), OS version verification, hardware model verification, etc. Out-of-compliance actions can include exiting from
Good Mobile Messaging Administrator’s Guide 673

Mobile Device Management
the Good Client on the device, deactivating the Client, and creating a compliance report. (Refer to “Compliance Manager” on page 274.)
For more information about a specific device, click its link on the Handhelds page to open a detailed view for it. If a device is out of compliance, a report link is added to the left pane.
Click the Compliance Report link to display the report.
Click Refresh to update the report. The Console will query the device; device response will depend upon the current device state. The request for information will persist until the device is available to
Compliance report is added for devices with compliance data available
674 Good Mobile Messaging Administrator’s Guide

Using MDM
answer it. Click Export to create an Excel report based upon the screen display.
Installed Applications
The Applications link lists the package name, version, size, type, source, status, and, for “Managed” devices, actions (install, uninstall) for every software package installed on the device. If the iOS device is to be managed (take advantage of MDM policy settings, the device must contain an enabled MDM profile (refer to “iOS Configuration” on page 632).
Click the Export button and choose an application such as Excel, to export the information on-screen into a file.
For managed devices, click the install/uninstall link in the Actions column to add or removed the custom software to or from the device.
Self Service
The Self Service feature allows you to use the SelfService role to specify which of your users can:
• Add their own handheld to Good for Enterprise via the Good Management Console
• Add additional handhelds to Good for Enterprise
• Resend the PIN that was included in the original welcome message
• Regenerate the PIN
• Lock and erase (wipe) their handhelds
• Delete their handhelds from Good for Enterprise
To set up self service for a user:
1. Add the user to the SelfService role (“Setting Up Role-Based Administration” on page 151).
Good Mobile Messaging Administrator’s Guide 675

Mobile Device Management
Note that a member of the SelfService role has only the rights of that role, even if a member of other roles.
2. Provide the user with the Good Management Console URL. The user will log in with their regular network name and password.
When the user logs in to the Console, the Self Service window is displayed.
Only fields, buttons, and icons that apply to the specific rights you’ve granted to the SelfService role will be displayed for the user.
3. If granted the right to add handhelds, the user can click the Add handhelds option.
A welcome message will be sent to the user and the user can proceed to set up the new handheld in the same way as for a handheld added to the Console by the administrator.
See also “Easy Activation” on page 344 and “Erasing (Wiping) Handheld Data” on page 361.
676 Good Mobile Messaging Administrator’s Guide

C Good Mobile Control Performance and Scalability
Performance and scalability improvements are added in ongoing releases of the Good Mobile Control (GMC) and Good Mobile Messaging Servers. These enhancements have greatly improved the number of devices that can be managed on a single Server. The focused improvements along with appropriate server configurations will enable you to achieve the higher performance level. The purpose of this appendix is to share details on changes made to GMC and provide guidance on recommended configuration settings.
For performance and scalability information about the Good Mobile Messaging Server, refer to the GMM 8.1 EWS/SQL Deployment Planning Guide.
Scalability Improvements
A single Good Mobile Control Server can handle up to 35,000 devices spread over up to 35 Good Mobile Messaging Servers, subject to the machine and operating-system requirements provided above, and up to 25,000 devices using iOS MDM. 2.5MB/user SQL space is required.
Scalability for Good Mobile Messaging Servers is discussed in the GMM EWS/SQL Deployment Planning Guide. The GMM Servers can support approximately 2,100 devices each with average load per Server. If each GMM Server manages its maximum 2,100 devices, 17 GMM Servers would be supported by one GMC; if the GMM Servers
Good Mobile Messaging Administrator’s Guide 677

Good Mobile Control Performance and Scalability
average only 1,000 devices each, 35 GMM Servers (the maximum) would be supported by the GMC.
Several enhancements made in the server code together with specific environment settings helped us achieve increased performance levels.
Server code change highlights: A. Database usage improvements
I. Optimized queries for background operations to return targeted data.
II. Added additional indices on some frequently searched columns.
III. Improved the device inventory “Select All” IV. view by writing more targeted SQL.V. Improved throughput for certain operations by
replacing loops with bulk processing.B. iOS MDM processing improvements
I. Tuned several SQL queries to make them more effi-cient, added filters to get just the right amount of data.
II. Non critical computations moved to background.III. Non critical file uploads and other I/O operations
moved to background.C. General processing
I. Improved resource utilization for certain lengthy operations.
II. Improved response time and reliability by batching several high volume operations.
Note: Actual time to bulk process handhelds could vary by operations or number of devices. The system processing has been improved to support 35,000 handhelds; however, the actual UI
678 Good Mobile Messaging Administrator’s Guide

Supportability Guidelines
response time could be up to 5 minutes or more depending on the task.
Supportability Guidelines
Performance of a Good Mobile Control instance depends on a large number of factors, including server settings, environment variables, instance capacity, and load. This section provides additional guidelines for administrators to achieve optimal performance levels.
1. Supported Application Server Software
Good Mobile Control v2.4.0.501 (or above)
Windows(R) Server 2003 x64 or Windows(R) Server 2008 R2 x64
2. Supported Database Server Software
Microsoft SQL Server 2008 R2
Microsoft Windows Server 2008 R2 Enterprise x64 Edition
3. Network SLA Requirements
Network bandwidth is 100Mb/s port or better.
Latency between Microsoft SQL Server and GMC Java Application Server is 20 milliseconds or less. Both servers should be in the same physical subnet, preferably on the same rack or on the same physical server.
4. Capacity Planning Guidelines
You should use these sizing guidelines for initial capacity planning, perform load testing and use the results to fine tune the GMC instance and recalculate capacity needed to ensure desirable performance level.
a. Deploy low latency, high bandwidth network between GMC and its database. The best practice is a latency <= 1ms. Minimum is a latency <= 10 ms. SQL Server should not be burdened with a lot of additional work.
b. Don’t share hardware resources with processes/virtual machines other than GMC and database servers.
Good Mobile Messaging Administrator’s Guide 679

Good Mobile Control Performance and Scalability
c. GMM should be on a separate machine from GMC server.
d. If on a virtual machine, the requirements are same as that of a physical machine. Additionally, the virtual machine should have dedicated CPUs and RAM.
Hardware Requirements for GMC production environments for managing up to 35,000 devices:
Monitoring Guidelines
1. CPU load should average 80% or less over a 10 minute period; exceptions include start-up right after an upgrade, and changing iOS MDM policy.
2. Assumes SOAP logging is off.
3. The new GMC release enhances the current logging process to bring more “self-awareness.” It empowers system admins to find the performance bottlenecks by capturing information about the most egregious processes. Admins should monitor the GMC log
Max Number
of Devices
GMC Java Application Server HW
Specification
GMC Database Server HW
Specification
DB Server - App Server
Network Latency, ms
CPU Cores
Memory GB
CPU Cores
Memory GB
0-2000 1 2 1 4 20
2001-5000
2 4 2 4 20
5001-10000
4 4 3 4 10
10001-35000
8 4 4 4 10
680 Good Mobile Messaging Administrator’s Guide

Monitoring Guidelines
file periodically. Grepping for the keyword “Slow” will reveal system stress points.
Note: Single instance of a “Slow” report could be an outlier; many instances probably point to a problem.
Example What It Might Mean
Slow login time of 7259 ms.
This is the time spent trying to authenticate the credentials of the user logging in. To make faster, examine directory server (Domain Controls for AD) and the network to them from GMC.
Slow query, 8000ms. Loading of devices. For 100 devices.
This is the time it took to load the rows for 100 handhelds. Check the latency and bandwidth from GMC to SQL Server. Check to make sure SQL Server is not overburdened.
Slow query, 6000 ms. For 100 devices
This is the query for devices without loading the entire row. Latency and bandwidth should not matter much to this one. Check to make sure SQL Server is not overburdened.
Slow home page time of 9000 ms
The home page is mostly about showing counts about the data in the database. This is probably not a bandwidth problem since the amount of data retrieved from SQL Server is small. This likely is not a latency problem as the number of queries is not too many. Check to make sure SQL Server is not overburdened.
Good Mobile Messaging Administrator’s Guide 681

Good Mobile Control Performance and Scalability
682 Good Mobile Messaging Administrator’s Guide

Index
Aaccounts and permissions
installation 73overview 46setting up 73
address, Good Messaging host 436Android hardware policy
restrictions 272, 658Apple Watch 216application configuration, iOS 335application exceptions 276application status details 379Application verification 277applications list, third party 244Applications tab 303applications, installed on
handheld 373, 669attachments
camera and device photo gallery use 221
exceptions to receiving 215exceptions to sending 214receiving 215receiving blacklist 215receiving size limits 215receiving whitelist 215sending 214sending blacklist 214sending size limits 214sending whitelist 214
attachments supported by Email 216
auto-completion of Console password entry 145
automatic delivery of logs 375
automatic handheld logging 375
Bbackup
Good Mobile Messaging Server 449
backup GMC databaseautomatic option in installer 120manual backup and restore 450
beaming contacts 213blacklist
receiving attachments 215sending attachments 214
blocking applications 274Bluetooth radio, enable 307
Ccalendar delegation 415callback, lock screen 356Camera and Device Photo Gallery
Use 221card, SD 40, 163, 318, 323catalog, applications 328, 659
adding/deleting files 329, 660certificate
importing 147obtaining a mobile device
management certificate signed by Apple 266, 632
restoring 148Certificate Authority 339certificates on handheld 373, 669
Good Mobile Messaging Administrator’s Guide 683

Index
certificates, uploading S/MIME signing and encryption 341
changingExchange server 405handheld user 367handheld user name 403iOS VPN connections
policies 258, 648password policies 203policies 195policy assigned to a
handheld 197, 203user alias, display name, or email
address 403user’s server 403
Check for New Services button 438Cisco ISE access 303classification, email marking 211classifications, additional email 288cloud, Exchange Online 33clusters
Windows 2008 506collecting handheld data (Refresh
Data button) 373, 669columns, export file 394command-line utilities 553compliance failures, automatic
notification 286Compliance Manager 274
"Check every" 275"Check to Run" 276Add Rule 276built-in rules 276checking for required
applications 274custom rules 280rule files 295rules files 295setting policies 274wiping the iOS device 282
Compliance Report 283, 299, 370, 667
configurationiOS 247, 632iOS general policies 248, 638iOS passcode policies 271, 657iOS wipe policy 248, 270, 638, 656iOSgeneral policies 270, 656
configuration file, iOS application 335
Console users authentication, directory for 438
Console, overview 47contacts
beaming 213synchronized 171, 413
custom file for additional email classifications 288
custom keyboards 216custom software, adding and
deleting from the software package 329, 659
customizing OTA setup message 326
Ddashboard (Good Monitoring
Server) 430adding a Server 433
data roaming 359database, GMC
automatic backup in installer 120manual backup and restore 450
Deep Packet Inspection 61delegate authentication 208delegation, calendar 415deployment, Good Messaging
Server 448detailed calendar reminder
notifications 143DeviceAppList.ini 312devices, selecting 370diagnostic log files 443, 587directory information
Console users authentication 438handheld enablement 438
disaster recoveryGood Mobile Control (GMC) 457
disclaimer display rules file 287discovery, enable 307DPI 61
EEasy Activation 344email address, changing 403email classifications, additional 288
684 Good Mobile Messaging Administrator’s Guide

enabled application status details 379
erasinghandhelds 361
error messages 448errors 559
Windows Event Viewer Application log 174
event and error message synchronization 104
exceptions to synchronization 413Exchange Online 2, 18, 24, 33, 71,
75, 86, 92Exchange Online (Office 365) 33,
142Exchange server, moving handheld
to different 405exchanging a user’s handheld 411export file columns 394exporting
policy sets 314, 576ExportPolicySets 576
Ffile handling
camera and device photo gallery use 221
Good Dynamics applications 219file repository 220files, rules for application
control 295flash card 40, 163, 318, 323
GGD
Easy Activation 344GdGLSConnect 583General tab 447generating a report 370getHandheldInfo 625GMA (Secure Browser) 222GMC
scalability and performance 677GMC database
automatic backup in installer 120GMC Web Service
authentication 603BulkServiceResult array 602examples 605
functions summary 622integrating applications with 603overview of 601working with 602
GMC_API.zip 601GMCdatabase
manual backup and restore 450gmexportstats 393, 576
userlist output 581usersoftware output 582userstats output 581
Good DynamicsEasy Activation 344
Good Dynamics applicationsfile handling policy settings 219
Good for Enterprise, overview 31Good Messaging Server
deployment 448handheld ID 358host address 436host prerequisites 55, 71host system requirements 2information, displaying 435installing 27, 122introduction 49license key 436logging 440managing 419moving handheld to
different 408moving to new host 420name 436redundancy 449serial number 436server list 435Server requirements 4service 46software license agreement 101stopping the service 447uninstalling 589user account, setting up 75utilities 553
Good Mobile Access (Secure Browser) 222
Good Mobile Consoledisabling auto-completion of
login credentials 145Good Mobile Control (GMC)
Console filters 150
Good Mobile Messaging Administrator’s Guide 685

Index
Console, configuring 144disaster recovery 457host requirements 3manual consistency check 458moving to new host 420overview 47reconciling configuration
inconsistencies 457Server requirements 4Server, described 1uninstalling Server 592
Good Mobile Control ConsoleSingle Sign-On 145
Good Monitoring Portal 29, 31, 48, 430, 431
adding a Server to dashboard 433dashboard 388server dashboard 430user and handheld status 370,
667Good Network Operations
Center 32Good Online License Portal 390Good Support guided
troubleshooting 375GoodAdmin
account 75setting up account 75Windows 2000 domain user
account 75GoodLinkAddUser 556GoodLinkDeleteUser 558GoodLinkEraseData 565GoodLinkQueryUser 559GoodLinkRegenOTAPIN 565guided troubleshooting, opt-in 375
Hhandheld
adding a list to server 172authentication 40changing policy assigned to a
handheld 197, 203changing server or user
name 403changing user 367exchanging a user’s 411Handheld Authentication
link 203
ID 358information, viewing 369, 666locking out a user 355logging, enabling 373management 185moving to different Exchange
server 405moving to different Good
Messaging Server 408preparation 161security 39setup 28, 49, 165, 179suspending messaging 360transferring to new user 367wireless setup 171
handheld enablement, directory for 438
handheldspaused 390
Handhelds tabselecting devices 370
host address, Good Messaging Server 436
IiCloud
disable syncing 333, 663ID, handheld Good Messaging 358identity certificate
self service upload 177self service upload for GMA
Secure Browser 232, 696user upload 177
IMEI 369, 666impersonation permission 15, 18,
83, 86import, syntax 173importing
certificate 147policy sets 314, 577
ImportPolicySets 577inactive status 390infrared radio, enable 307installation 1, 55, 97
accounts and permissions 73concepts 46Good Messaging Server 122outline 55, 97prerequisites 55, 71
686 Good Mobile Messaging Administrator’s Guide

steps 55, 97tasks 55, 97
installed applications 373, 669intranet browser policies 222introduction
accounts and permissions 46Good Messaging Server 49Good Mobile Control (GMC) 47installation 46multiple servers 44wireless
synchronization 32iOS
changing passcode policy 258, 648
configuration 247, 632general policies 248, 270, 638, 656IMEI 369, 666passcode policies 251, 271, 641,
657restrictions on the device 253, 643VPN connections 258, 648web clips 259, 649WiFi 256, 646wipe policy 248, 270, 638, 656
iOS configurationMDM 248, 638WiFi enterprise password 257
IPIP addressing 72IP range 439
iTunesdisable syncing 333, 663
KKerberos authentication (Secure
Browser) 225, 231Kerberos Single Sign-On
Good Mobile Contrl Console 145key, license 436
LLDAP
secure (GMC to AD) 7, 61legacy controls 304license
License Portal 390license agreement 101license key 436
list of handhelds, adding to Good Messaging Server 172
location ofGMC Server software 103Good Messaging log 104
lock screencallback 356
lockdown WiFi 307locking out a user 355lock-screen
message 356log file
diagnostic 443Windows Event Viewer
Application Log 174Log Upload tab 440, 441logging
Good Messaging Server 440handhelds, enabling on 373
logging, automatic handheld 375logging, for handhelds 373
Mmailbox diagnostics, running 391mailbox user 46managed applications 335, 664managed devices 333, 334, 335, 662,
663, 664managing
Good Messaging Servers 419handhelds 185with Performance Monitor 443
manual consistency check, GMC 458
MDM profile 248, 638MDM-Only 38, 161, 162, 631
administrator 179Self Service 182
memory card 40, 163, 318, 323message, customizing OTA
setup 326message, lock screen 356messaging link, viewing 384Microsoft Exchange
configuration requirements 12Microsoft Outlook (not installed) 3,
57moving handheld
to different Exchange server 405
Good Mobile Messaging Administrator’s Guide 687
Index
to different Good Messaging Server 408
multiple Exchange and Good Messaging Servers 44
Nname
Good Messaging Server 436user 403
Network Operations Center 32new services check 438
OOffice 365 2, 18, 24, 33, 71, 75, 86, 92opt-in, guided troubleshooting 375OTA 29, 41, 50, 161, 317
customizing setup message 326link, viewing 382PIN 29, 49, 168, 325
OTA State 382OTA state 399Outlook (not installed) 3, 57Over The Air 29, 50, 161, 317overview
accounts and permissions 46Good Messaging Server 49Good Mobile Control (GMC) 47installation 46multiple servers 44wireless
synchronization 32
Ppasscode policies
iOS 251, 641password
changing policies 203temporary unlock 358
password, resetting remotely 357paused reasons and users 391Performance Monitor 443performance, GMC 677permission
impersonation 15, 18, 83, 86permissions
installation 73overview 46setting up 73
PIN 29, 49, 168, 325policies
changing 195changing iOS VPN
connections 258, 648changing password 203changing policy assigned to a
handheld 197, 203compliance rules 295Data tab 303Good Mobile Access (Secure
Browser) 222policy sets
importing and exporting 314popups (Secure Browser) 230Portal, Good License 390Pre-installation 13prerequisites
Good Messaging system 1, 55installation 55
Provisioning link 245provisioning profiles on
handheld 373, 669provisioning state 399proxy column 439Proxy layer 223proxy screen 132proxy server
Good Messaging 5, 59, 114, 132Secure Browser 231, 239
Rrange, IP 439reconciling configuration
inconsistencies, GMC 457redundancy, Good Messaging
Server 449Refresh Data button 373, 669remembering Console login
credentials 145remote wipe 361report, compliance 283, 299, 370,
667reports
scheduling and generating 370repository, file 220require password 203resetting device password
remotely 357
688 Good Mobile Messaging Administrator’s Guide

restore GMCdatabase 450restoring a certificate 148restrictions
iOS device 253, 643resynchronization 416roaming, data 359role-based administration 151, 186roles 151, 186ROM, handheld 163, 393rules
disclaimer display 287files for compliance policies 295for required handheld
applications 295
SS/MIME
certificate upload right in Self Service role 153
enabling 339password policies 341self service certificate upload 176software distribution 320software policies 343uploading signing and
encryption certificates 341scalability 62scalability, GMC 677scheduling a report 370SD card 40, 163, 318, 323SE Linux Enforced Mode 280Secure Browser (Good Mobile
Access)popups 230Upload Identity Certificate 232
Secure Browser, Good Mobile Access 222
secure LDPA (GMC to AD) 7, 61security
administrative security 40handheld 39handheld authentication 40overview 38password 203Security Link 376
Security Enhanced Linux 280self service
erasing the handheld 362locking the handheld 356
overview 50role and rights 151role/rights 153S/MIME certificate upload 176upload identity certificate 177using the Console 176, 182wiping the handheld 362
sending a message to a device 360sending device logs to Good 375serial number
Good Messaging 436server information, displaying 435server list, Good Messaging
Servers 435server name (Good Messaging) 436service, Good Messaging Server 46setting up the handheld 28, 49, 165,
179Settings tab
superuser 187certificates 257, 259, 647, 649creating template messages 326policy application delay 314S/MIME 340secure browser 227security 270, 656Superuser 187third-party applications list 244
setupGood Messaging Server 122handheld 161setup message, customizing
OTA 326setup time, server 436wireless (handheld) 171
Single Sign-Ondevice 262, 652GMC Kerberos 145
Sire dictation 215Siri dictation (within GFE)(iOS) 216software
download defaults 159license agreement 101
SSOdevice 262, 652GMC 145
statisticsGood Messaging Server 435
Good Mobile Messaging Administrator’s Guide 689

Index
statusdefinitions for user OTA
application policies 378enable applications details 379inactive 390
stopping the Good Messaging Service 447
storage card 40, 163, 309, 318, 323Superuser
changing 187defining for first time 117described 186
support 448supported attachments 216suspending handheld
messaging 360synchronization 32
see also wireless synchronizationerror and event messages 104exceptions 413
syntax, import 173
Ttab
Applications 303General 447IP range 439Log Upload 440, 441range, IP 439
technical support 448template
OTA Setup email message 326rule files 295
temporary unlock password 358third-party applications list 244time, server setup 436Touch ID 207, 254transferring handheld to new
user 367
UUDID 164UDP security 72uninstalling
GMC Server 592Good Messaging Server 589
Unique Device Identifier (UDID) 164
unlock password, temporary 358
Upload Identity Certificate (Secure Browser) 232
Upload Identity Certificate (Self Service) 177
uploadLog 586user alias, changing 403user name, changing for
handheld 403user PIN 29, 49, 168, 325users, selecting 370utilities
diagnostic log files 587GdGLSConnect 583gmexportstats 576Good Messaging 553GoodLinkAddUser 556GoodLinkDeleteUser 558GoodLinkEraseData 565GoodLinkQueryUser 559GoodLinkRegenOTAPIN 565uploadLog 586
VVerify Apps 277VMWare Snapshots 449VPN connections 258, 648
changing iOSpolicies 258, 648
Wweb clips
iOS 259, 649Web Service, GMC 601welcome email, customizing 326whitelist
receiving attachments 215sending attachments 214
WiFiiOS 256, 646
WifiiOS 256, 646
WiFi connectivityinteraction with 175NAT time-outs 72server requirement 72system requirements 72
WiFi lockdown 307WiFi network password 257WiFi-only handhelds 71
network setting requirements 71
690 Good Mobile Messaging Administrator’s Guide

Windows 2008clustering 506
Windows Event Viewer Application Log 174
wipinghandhelds 361
wirelesshandheld management 50handheld setup 51, 161, 171, 317overview of 161synchronization 32, 52
wireless networksiOS 256, 646
Good Mobile Messaging Administrator’s Guide 691

Index
692 Good Mobile Messaging Administrator’s Guide

Document Revision List
Good Mobile Control 2.2.0/Good Mobile Messaging 7.0.0
07/18/12
Volume Purchased Applications (“Volume Purchased Applications” on page 337)
Secure Browser Kerberos Support (“Using Kerberos Authentication (iOS Only)” on page 225)
Handheld Authentication options added (“Good for Enterprise Authentication” on page 202)
Compliance Manager/Check to Run/Application Exceptions option added (“Compliance Manager” on page 274)
Quad-core requirements replaced with dual-core (“Checking Prerequisites and System Requirements” on page 55).
Classification marking added to Messaging policy settings (“File Handling” on page 217)
Import Only added to File Handling policy settings (“File Handling” on page 217)
Good Mobile Messaging Administrator’s Guide 693

Document Revision List
Enhanced enterprise reporting (“Viewing and Using Handheld Information” on page 368)
File Handling: camera and device photo gallery use in attachments (“Camera and Device Photo Gallery Use” on page 221)
Searching iTunes store for custom applications (“Custom Applications: Adding to and Deleting from the Software Package” on page 328)
A Wifi enterprise network password configuration field is provided for iOS configuration policies (“Wireless Networks” on page 256).
08/03/12
Replaced “Moving Good Mobile Messaging Server to a New Host” on page 420 and “Moving Good Mobile Control Server to a New Host” on page 420 with updated steps and screenshots provided by QA.
08/06/12
Explanation added, of the blocked and trusted application exception lists (“Application Exceptions” on page 276).
Secure Browser Proxy now supports Android (“Using a Proxy with GMA Secure Browser” on page 239).
8/30/12
ExportComplianceReport, GetAppsForHandheld, RefreshAppsForDevice added to Utilities chapter.
One GMC now supports 35 GMM.
Exchange SP@ RU4 is supported.
694 Good Mobile Messaging Administrator’s Guide

9/21/12
Added device error codes following a device wipe. (“Client Error Codes Following a Wipe” on page 364)
10/09/12
Added warning: Do not use the GMC to move users from GMM Server version 6.4 or earlier to GMM 7.x, or to move users from GMM Server versions 6.4.1.x or earlier to version 6.4.2. To move users, upgrade the GMM Server itself to the new 7.x version and the users will be included in the upgrade, or delete the users from the old Server and add and reprovision them on the new Server.
10/10/12
UDP Ports 12000 and TCP port 15000 - Used to pass outbound-initiated traffic to Good once the Good client is installed on the handheld. You should allow reply traffic for both ports using TCP/UDP. (Edited text in italics.)
Added warning and best-practices writeup: VMWare Snapshots cannot be used for Good Mobile Messaging Server backup.
11/08/12
Added table describing exported device information, by column. (“Exporting Handheld Information to a File” on page 392)
12/03/13
Version 7.5.0 of the Good Mobile Messaging Server for Exchange adds SQL database support for Good Mobile Messsaging Server operation.
01/16/13
Good Mobile Messaging Administrator’s Guide 695

Document Revision List
Good Mobile Messaging Server Version 7.1.0.34, Good Mobile Control Server 2.3.0.402
New in GMM
• RTF Embedded images: Support is added to display embedded images in RTF mail bodies,
• OLE Embedded images: Support is added to display the embedded image in attachments to Calendar,
• HTML Welcome Message: IT admin is able to improve the user experience when activation PINs are sent to users. Activation email is customizable, user-friendly, HTML-based. (“Customizing Console-Generated Email Messages” on page 326)
New in GMC
• Set up GMC with new IS2012 installer (updated installation screenshots)
• Ability to upload/distribute client based certificates for Good Mobile Access (Secure Browser) (GMA) authentication)
• Good Prevue GE: Priority Access and General Access availability (refer to the Prevue GE Priority Access Planning Guide for information on the Priority Access program.)
• GMA (Secure Browser): Added policies to enable/disable the following (“Enabling Secure Browser” on page 227)
- Access to non-fully qualified domains
- Default/native browser redirection
- Allow user to accept unsigned/expired certificates
• Policy to disable Siri (“Restrictions on the iOS device” on page 253)
• New Attributes for GMC Handheld List View (“Handheld Info Link” on page 372)
• HTML Email Template: Ability for the activation email to be customizable and HTML based that is user friendly (“Customizing Console-Generated Email Messages” on page 326)
696 Good Mobile Messaging Administrator’s Guide

• Support New Attributes for GMC Reports
• Support Web-based Application catalog
• Support for new attributes for GMC CLI "Export Statistics"
• New filters for GMC Handheld List View page
• Summary page/screen for each policy now supports new edit links: MDM, SMIME, GMA.
• iOS 6 MDM restrictions now support request to include the "EAP-TLS" option for Wifi profile in iOS Config
02/22/13
Added uninstall SQL Server 2008 section to Uninstall chapter.
03/14/13
EWS replaces MAPI.
03/26/13
Added links to required SQL patches. (“Preparing for SQL Server Use” on page 63)
04/02/13
Adding missing Android Configuration information for the Restrictions tab. (“Restrictions” on page 272)
04/10/13
Added information on device synchronization. (“Notes on Synchronization” on page 413)
04/19/13
Good Mobile Messaging Administrator’s Guide 697

Document Revision List
Additional information about Android encryption policies. (“Android Configuration” on page 269)
05/29/13
Adding Exchange 2013
08/13/13
Good Mobile Control 2.4.0
New in GMC
• Support for moving users between GMCs (“Moving a User to a Different Good Mobile Control Server” on page 411) *
• Ability to send service notifications/alerts (“Sending a Message to a User” on page 360)
• Ability to view additional account details when searching for users and filtering for bulk actions
• Ability to use separate email template when regenerating a PIN (“Customizing Console-Generated Email Messages” on page 326.)
• Auto-send reminders for pending activations (“Provisioning” on page 245)
• Improved role-based access control (expanded rights on the Roles tab) (“Setting Up Role-Based Administration” on page 151)
• Ability to reset Good for Enterprise on a device from the GMC (Over-The-Air resynchronization) (“Resetting Good for Enterprise on a Device” on page 359)
• Ability for self-service users to reset Good for Enterprise client on a device (Over-The-Air resynchronization)
• HTML-based welcome and regeneration emails
• Kerberos-based Single Sign-on (“Configuring the Good Mobile Control Console” on page 144)
698 Good Mobile Messaging Administrator’s Guide

• Good Support guided access to server/client logs (“Enabling Logging for Handhelds” on page 373) *
• Automated non-compliance actions when MDM profile is removed from iOS devices. (“Compliance Manager” on page 274) *
• iOS MDM profile re-enrollment is no longer required when moving users between policy sets *
• Automated removal of device restrictions, configs (WiFi/VPN/EAS), and apps when iOS MDM-enabled device is removed (deleted) from GMC or the MDM policy checkbox is unchecked *
• GFE iOS App Catalog localization *
• Search, add, distribute apps in non-US Apple App Stores *
• Reset device password (“Resetting a Device Password or Good for Enterprise Password Remotely” on page 357) *
• Reset Good for Enterprise password (“Resetting a Device Password or Good for Enterprise Password Remotely” on page 357)
• Single-click action for regenerating or resending PIN
• Ability to view activation PIN
• Upgrade to JRE 8 (GFE command-line utilities now require JRE 8)
• Increased GMC max number of users (“Scalability” on page 62)
* Requires updated NOC software (release date: 07/20/13)
10/22/13
Good Mobile Control 2.4.1
New in GMC
• Added iOS configuration policy restrictions (“Restrictions on the iOS device” on page 253)
• SSO for iOS device apps (“Single Sign-on” on page 262)
Good Mobile Messaging Administrator’s Guide 699

Document Revision List
• Configuration extensions for iOS devices (“Extensions” on page 264)
• Lock-screen message and callback number (“Easy Activation” on page 344)
• Add an iOS application configuration for iPhone 4/iOS v7.0 and higher (“Managed Applications” on page 335)
01/28/14
Good Mobile Messaging 8.1.0
New in GMM
• GMM 8.1 utilizes Exchange Web Services (EWS) rather than MAPI for connections to the Exchange environment. (“Creating the GoodAdmin Account” on page 75.)
• GMM 8.1 utilizes Microsoft SQL Server for storage of persistent user data (cache), rather than files stored locally on the GMM Server. (“Preparing for SQL Server Use” on page 63.)
• GMM 8.1 utilizes a Good-provided command-line failover utility, rather than Microsoft Clustering, in a manual process for high-availability setups. (“GMM and GMC Failover” on page 459.)
02/10/14
Good Mobile Messaging 8.1.1
This release disables upgrading from GMM 8.0 using the installation media. Instead, install a new GMM 8.1.1 and move users to it using the GMC (v.2.4.1 or higher).
11/05/14
Good Mobile Messaging 8.3.0 (SQL Version)
• S/MIME enhanced so that LDAP lookups will check for multiple entries.
700 Good Mobile Messaging Administrator’s Guide

• If first LDAP entry does not contain a valid certificate, subsequent entries will be searched until a valid certificate is found.
• Support for the new Client feature for enhanced handling of Calendar invites with large number of invitees (requires GFE iOS Client 2.7.0 or higher; Android Client to be released).
• Updates the digital certificate used to authenticate GMM to GMC.
• Issues resolved.
12/16/14
Good Mobile Control 2.6.0
• Support for 3rd party Auth Delegates (“Authentication Delegates” on page 176)
• Support auto-import of users from GMC to GC via Easy Activation (“Easy Activation” on page 303)
• Support Windows Pro 8.1 GFE clients
• iOS 8 MDM - Support for new device restrictions (“Restrictions on the iOS device” on page 253)
• Support Easy Activation after email address change*
* Requires GFE iOS Client version 2.7.0 or Android Client version 2.7.1 for support of Easy Activation. Requires Good Control Server v1.8.42 or higher and GD SDK iOS 1.9.4340 and Android 1.9.1162 or higher for support of GD app interoperability.
Note: For Windows devices only, with GMC release 2.6.0, ”Do not install on this platform” is the default setting for all new policies. When GMC is updated to release 2.6.0, any previous settings for “Version to install” are retained.
04/28/15
Good Mobile Control 2.6.2
Good Mobile Messaging Administrator’s Guide 701

Document Revision List
This release includes:
• Support for third-party keyboards in GFE (iOS)(“Messaging” on page 210)
• Apple Touch ID in GFE (“Good for Enterprise Authentication” on page 202)
• SMIME authentication delegation (“Good for Enterprise Authentication” on page 202)
07/29/15
Good Mobile Control 2.6.3
This release includes support for Windows 10.
09/24/15
Good Mobile Control 2.6.4
• Policy import/export improvements
• Support for iOS 9 MDM device restrictions (non-supervised)
• Policy setting for allowing Apple Watch*
• Web services API enhancement for exportHandheldStats to return handheld status
• Upgrade to Java 8 libraries. GFE command-line utilities now require Java 8.
• iOS 9 compatibility
• Android M compatibility
• Apache Tomcat upgraded to version 6.0.43
• Support for iOS 8 + MDM Restrictions - Apple Watch Wrist Detection, Book Backup and Book MetaData Sync
* Notifications displayed on a paired iPhone will also be displayed on the Apple Watch. The user will not be able to use
702 Good Mobile Messaging Administrator’s Guide

the Good for Enterprise Apple Watch app without the feature being enabled on the GFE policy. GFE does not use a secure container to secure storage or communication of data between the mobile device and the watch. By default, the GFE Apple Watch policy is off.
02/03/16
Good Mobile Control Server 2.7.0
• Hardware compliance: Compliance by manufacturer of device model (Android only)
• Hardware compliance: Compliance by build number of device (Android device)
• Support for proxy in Office 365 environments
• Replacement of SHA1 with SHA256 certificates
• Added Flow control status to Handheld reports
• Display Deleted Domino users in Handhelds report
• Upgrade to Tomcat 8
03/14/16
• Added cross reference in Uninstall chapter to the GoodLinkUnregisterServer command in the Utilities chapter.
• Corrected various typos.
Good Mobile Messaging Administrator’s Guide 703

Document Revision List
704 Good Mobile Messaging Administrator’s Guide