vulnerability scanner nessus introduction - cybersecurityhoy
TRANSCRIPT

CompTIA Cybersecurity Analyst (CySA+)
Vulnerability Scanner Nessus
IntroductionExercise 1 - Downloading and Installing NessusExercise 2 - Configuring NessusExercise 3 - Scanning with NessusExercise 4 - Reviewing a Nessus ScanExercise 5 - Saving Nessus ReportsSummary
Introduction
The Vulnerability Scanner Nessus module provides you with the instructions anddevices to develop your hands-on skills in the following topics.
Downloading and Installing NessusConfiguring NessusScanning with NessusReviewing a Nessus ScanSaving Nessus Reports
Lab time: It will take approximately 1 hour to complete this lab.
Exam Objectives
The following exam objectives are covered in this lab:
CS0-001 2.1 Given a scenario, implement an information security vulnerabilitymanagement processCS0-001 2.2 Given a scenario, analyze the output resulting from a vulnerabilityscanCS0-001 2.3 Compare and contrast common vulnerabilities found in the followingtargets within an organization
CS0-001 3.2 Given a scenario, prepare a toolkit and use appropriate forensics toolsduring an investigation - Hashing
Lab Prerequisites
In this lab, you will be required to sign up for a free trial of the Nessus Scanner byTenable. Once you have signed up to Nessus, you will be emailed an Activation Codewhich you will need to use to install the product.
In this module, you use the Professional version of Nessus, which requires you to haveaccess to a commercial or academic e-mail address.
If you don’t have access to a commercial or academic e-mail address, you can downloadand use the Home version of Nessus. Please be aware, however, that the Home versiondoesn’t have all the reporting features that the Professional version includes, andtherefore Exercise 4 and 5 of this module will differ.
Alert: It is also important to note that Nessus Professional is only accessible for oneinstallation, for a period of 7 days. If you uninstall Nessus or log out of the labs, youwill be required to contact Nessus to request a new Activation code.
Lab Diagram
During your session, you will have access to the following lab configuration. Dependingon the exercises you may or may not use all of the devices, but they are shown here in thelayout to get an overall understanding of the topology of the lab.

Connecting to your lab
In this module, you will be working on the following equipment to carry out the stepsdefined in each exercise.
PLABDC01 (Windows Server 2012 R2 - Domain Controller)PLABDM01 (Windows Server 2012 R2 - Member Server)PLABWIN801 (Windows 8.1 - Domain Member)PLABWIN10 (Windows 10 - Domain Member)PLABKALI01 (Kali 2016.2)
To start, simply choose a device and click Power on. In some cases, the devices maypower on automatically.
For further information and technical support, please see our Help and Supportpage.
Copyright Notice
This document and its content is copyright of Practice-IT - © Practice-IT 2017. All rights reserved. Any

redistribution or reproduction of part or all of the contents in any form is prohibited other than the
following:
1. You may print or download to a local hard disk extracts for your personal and non-commercial use
only.
2. You may copy the content to individual third parties for their personal use, but only if you
acknowledge the website as the source of the material. You may not, except with our express written
permission, distribute or commercially exploit the content. Nor may you transmit it or store it in any
other website or other form of electronic retrieval system.
Exercise 1 - Downloading and Installing Nessus
Nessus is one of the most trusted vulnerability scanning platforms for auditors andsecurity analysts. Users can schedule scans across multiple scanners, use wizards toeasily and quickly create policies, schedule scans and send results via email.
Download NessusConfirm the HashInstall Nessus
Note: Please be aware that as Nessus is an external website, it is subject tochange. If you notice that the content differs from the website, please let us knowso we can update this.
Please refer to your course material or use your favorite search engine to research formore information about this topic.
Task 1 - Download Nessus
In this task, you will sign up for a 7-day evaluation trial of the Nessus Scanner byTenable, the professional edition. Please read the introduction of this module as there areprerequisites to performing this task.
Alert: Installing the evaluation version of Nessus can be tricky, and it is importantyou follow these steps as precisely as possible.

Step 1Ensure the devices listed in the introduction are powered on.
Connect to PLABDM01, which is our tool server.
Open up Firefox and type the following into the search bar:
http://www.tenable.com/products/nessus/nessus-professional/evaluate
From here you will register and download the latest version of Nessus. Here you will begreeted with a screen to place your registration details in:
Note: A message box titled Tracking Preferences appears. Click Opt in.

Figure 1.1 PLABDM01: Nessus Register Screen.
Enter your information and an Activation Code will be sent to your email address.
Alert: If you receive an error stating that too many activation codes have beenrequested, please try requesting the activation code through a browser on your ownPC. You’ll then need to log in and go to My Trials in the top right corner and copythe code given for later in this module. You’ll then need to download Nessus in thelabs using the following URL: http :// www . tenable . com / products / nessus /select - your - operating - system which takes you the webpage in the below guide.
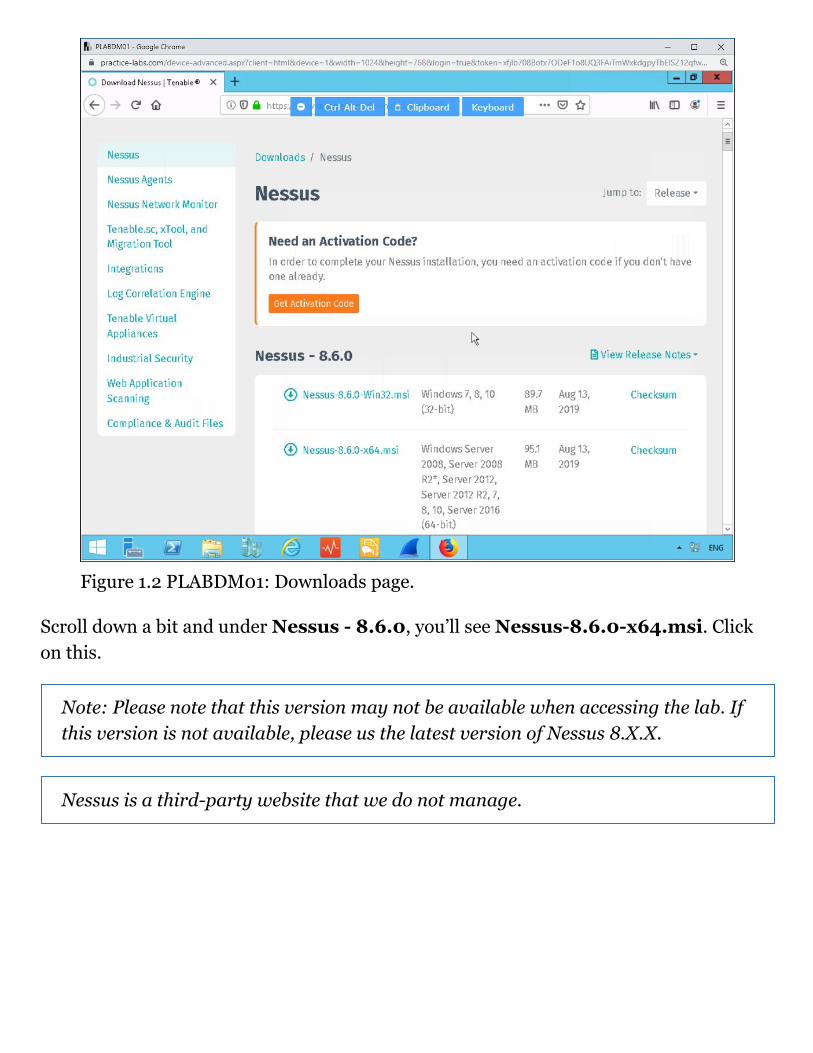
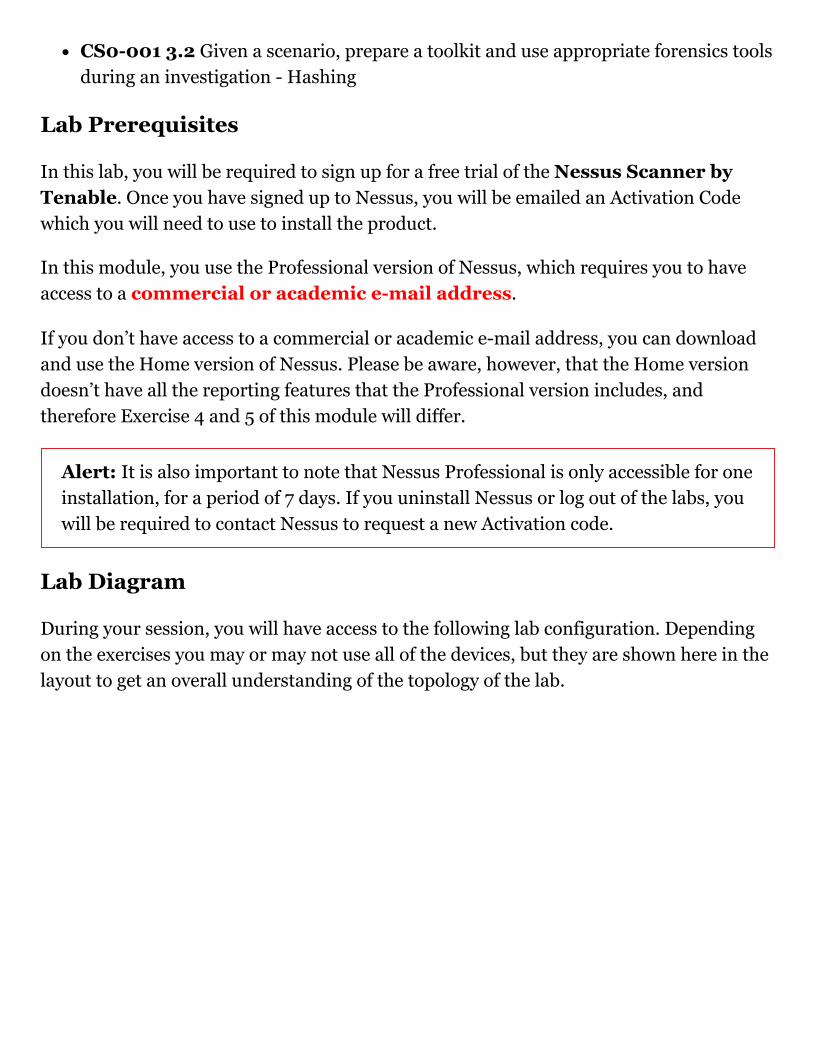
Figure 1.2 PLABDM01: Downloads page.
Scroll down a bit and under Nessus - 8.6.0, you’ll see Nessus-8.6.0-x64.msi. Clickon this.
Note: Please note that this version may not be available when accessing the lab. Ifthis version is not available, please us the latest version of Nessus 8.X.X.
Nessus is a third-party website that we do not manage.

Figure 1.3 PLABDM01: Downloading Nessus-8.6.0-x64.msi.
Step 2A License Agreement dialog box appears. Click I Agree.

Figure 1.4 PLABDM01: License Agreement screen.
A message will appear at the bottom asking Do you want to run or save Nessus-8.6.0-x64.msi (90.6 mb) from tenable.com?, click the dropdown arrow next toSave and click Save as.
The Save As window appears already in the Downloads folder. Click Save file.
Figure 1.5. PLABDM01: Nessus download being saved.
Note: The MD5 value found on the page.
Step 3Click the File symbol next to the Nessus installation.

Figure 1.6: PLABDM01: Saved in the Downloads folder
Task 2 - Confirm the Hash
Good security practice means confirming the Hash of the installation file; this is a checkof the integrity of the program to confirm it is exactly the file being distributed byTenable.
Step 1Once downloaded you will confirm the Hash is the correct value by using theHashMyFiles application.
Navigate to the desktop and open the HashMyFiles folder.
Double-click on the HashMyFiles application icon.
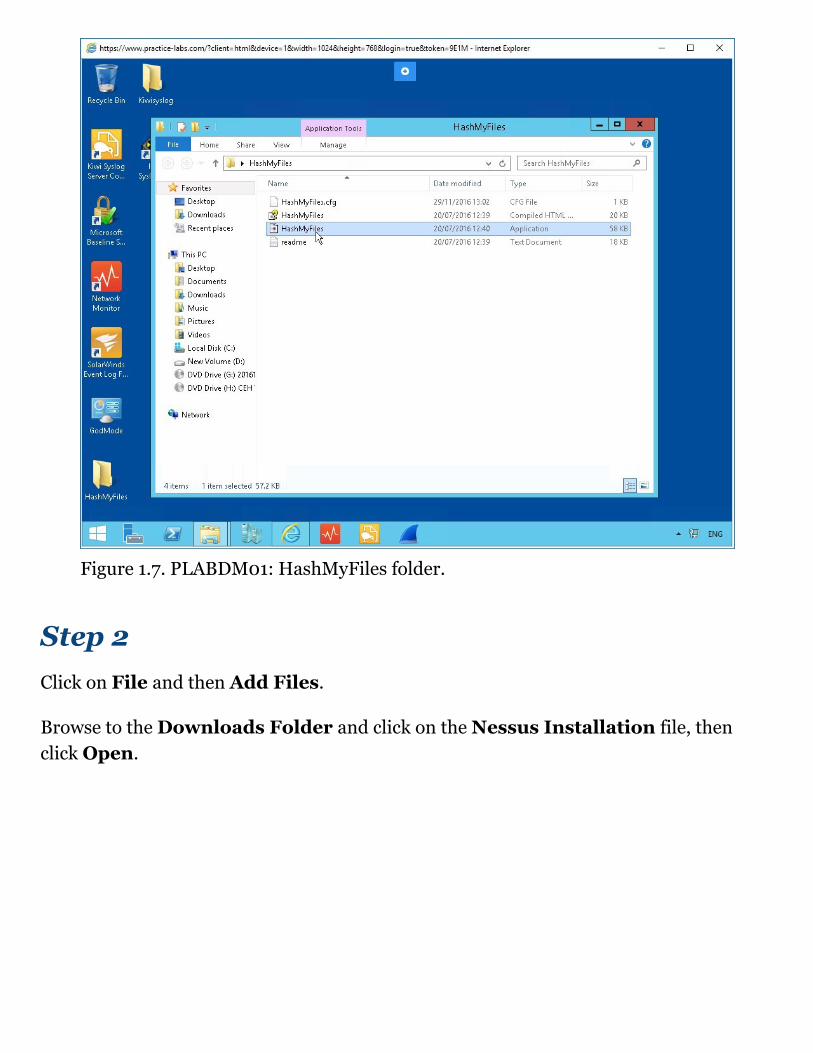
Figure 1.7. PLABDM01: HashMyFiles folder.
Step 2Click on File and then Add Files.
Browse to the Downloads Folder and click on the Nessus Installation file, thenclick Open.

Figure 1.8. PLABDM01: Nessus installation location browsed via HashMyFiles.
The Hash will automatically be generated. You are comparing the MD5 sum hash visuallyto the MD5 value found on the Nessus download page.
You should still have Internet Explorer opened. Click on the icon on the taskbar andyou should still be on the Nessus download page.

Figure 1.9 PLABDM01: Nessus downloads page
Step 3On the right of Windows Server 2008, Server 2008 R2*, Server 2012, Server2012 R2, 7, 8, 10, Server 2016 (64-bit), click Checksum.
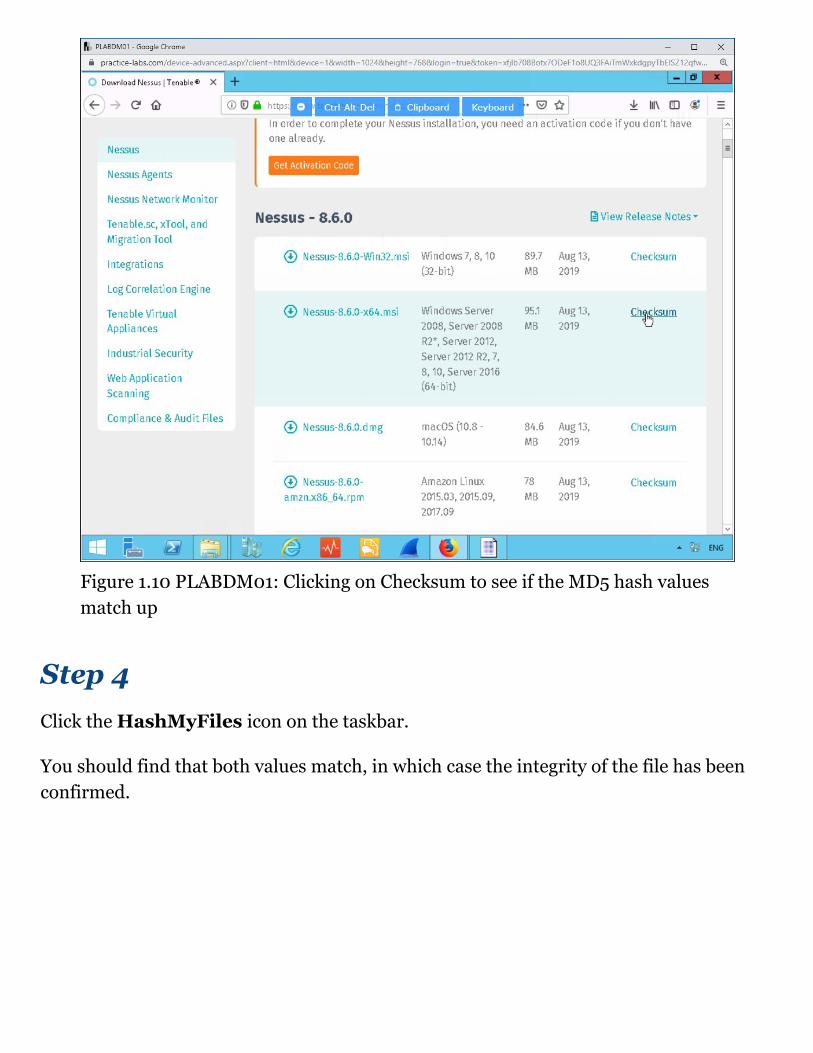
Figure 1.10 PLABDM01: Clicking on Checksum to see if the MD5 hash valuesmatch up
Step 4Click the HashMyFiles icon on the taskbar.
You should find that both values match, in which case the integrity of the file has beenconfirmed.

Figure 1.11. PLABDM01: Matching the MD5 hash values.
Task 3 - Install Nessus
In this task, you will install the Nessus Scanner by Tenable.
Alert: It is also important to note that Nessus Professional is only accessible for 1installation, for a period of 7 days. If you uninstall Nessus or log out of the labs, youwill be required to contact Nessus to request a new Activation code.
Step 1Navigate to the Downloads folder, and locate the Nessus installer.
Next, double-click on the file name to start the installation process.
Click Run.
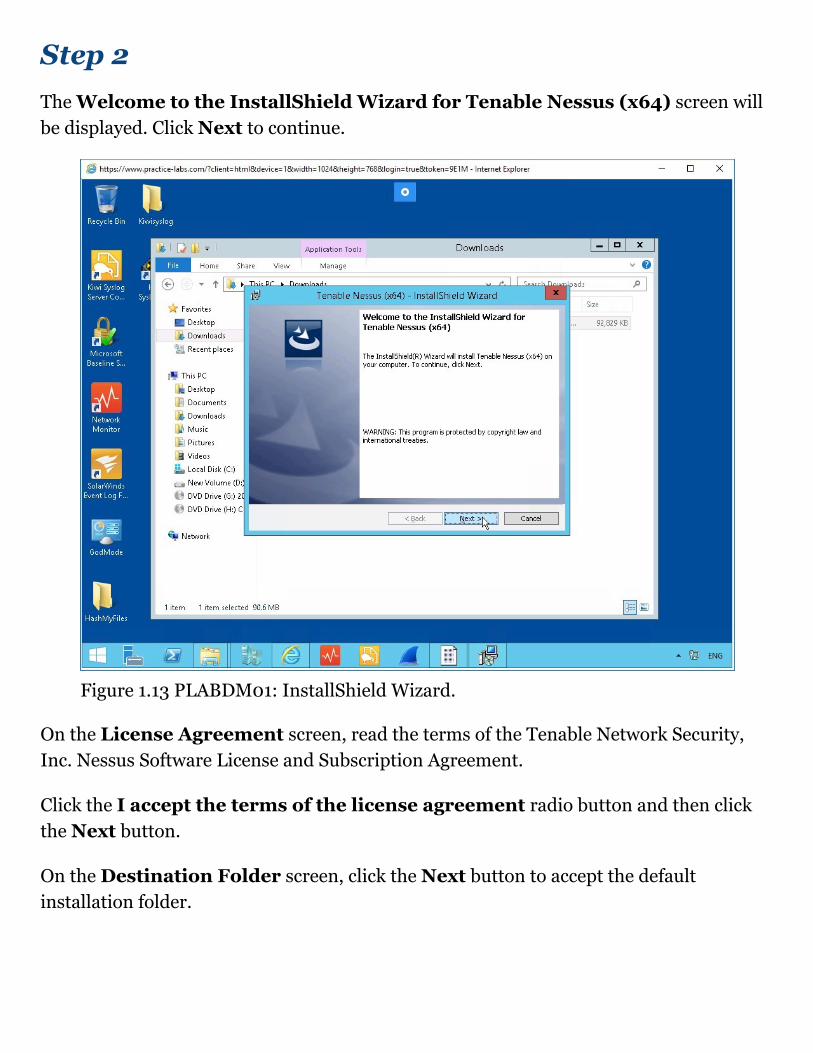
Step 2The Welcome to the InstallShield Wizard for Tenable Nessus (x64) screen willbe displayed. Click Next to continue.
Figure 1.13 PLABDM01: InstallShield Wizard.
On the License Agreement screen, read the terms of the Tenable Network Security,Inc. Nessus Software License and Subscription Agreement.
Click the I accept the terms of the license agreement radio button and then clickthe Next button.
On the Destination Folder screen, click the Next button to accept the defaultinstallation folder.

Figure 1.14 PLABDM01: InstallShield Wizard for Nessus directed to the C drive.
On the Ready to Install the Program screen, click the Install button.
Note: The Installing Tenable Nessus screen will be displayed, anda Status indication bar will illustrate the installation progress. The process maytake several minutes.

Figure 1.15 PLABDM01: Completion screen for the InstallShield Wizard.
Finally, the Tenable Nessus (x64) - InstallShield Wizard completed screen will bedisplayed. Click the Finish button.
Optional Information
If presented with WinPcap, as part of the Nessus installation process, WinPcap needs tobe installed. If it was previously installed as part of another network application, thefollowing steps would not be displayed, and you will continue with the installation ofNessus.
On the Welcome to the WinPcap Setup Wizard screen, click the Next button.
On the License Agreement screen, read the terms of the license agreement, and then clickthe I Agree button to continue.
On the Installation options screen, ensure that the Automatically start the WinPcapdriver at boot time option is checked, and then click the Install button.

Next, on the Completing the Setup Wizard screen, click the Finish button.
After the InstallShield Wizard completes, the Welcome to Nessus page will load in yourdefault browser.
Leave all devices powered on in their current state and proceed to the next exercise.
Exercise 2 - Configuring Nessus
A basic configuration is required to get Nessus up and running; you will explore this hereso that a scan can take place against the network.
Perform the configuration
Please refer to your course material or use your favorite search engine to research formore information about this topic.
Task 1 - Configuration
In this task, you will configure Nessus.
Step 1On the Nessus - Welcome page, click Connect via SSL. You’ll be bought to theThere is a problem with this website’s security certificate. page. ClickContinue to this website (not recommended).
Caution: This page is expected and normal behavior; Nessus is providing a self-signed SSL certificate.

Figure 2.1 PLABDM01: Windows security Alert to continue to the Nessusinterface.
On the Welcome to Nessus page, keep Nessus Essentials selected and clickthe Continue button.

Figure 2.2 PLABDM01: Nessus Welcome Screen and information.
Step 2On the Get an activation code page, because you already received an activation codefrom earlier in exercise 1, task 1, step 1, click Skip.
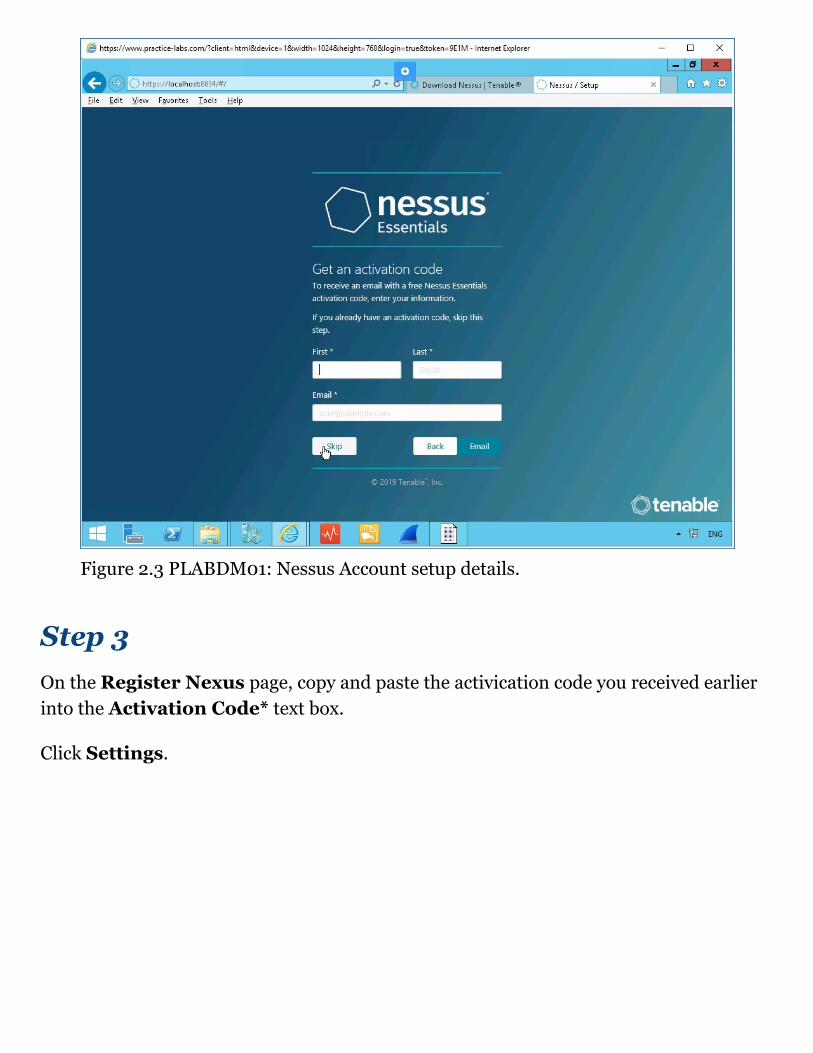
Figure 2.3 PLABDM01: Nessus Account setup details.
Step 3On the Register Nexus page, copy and paste the activication code you received earlierinto the Activation Code* text box.
Click Settings.
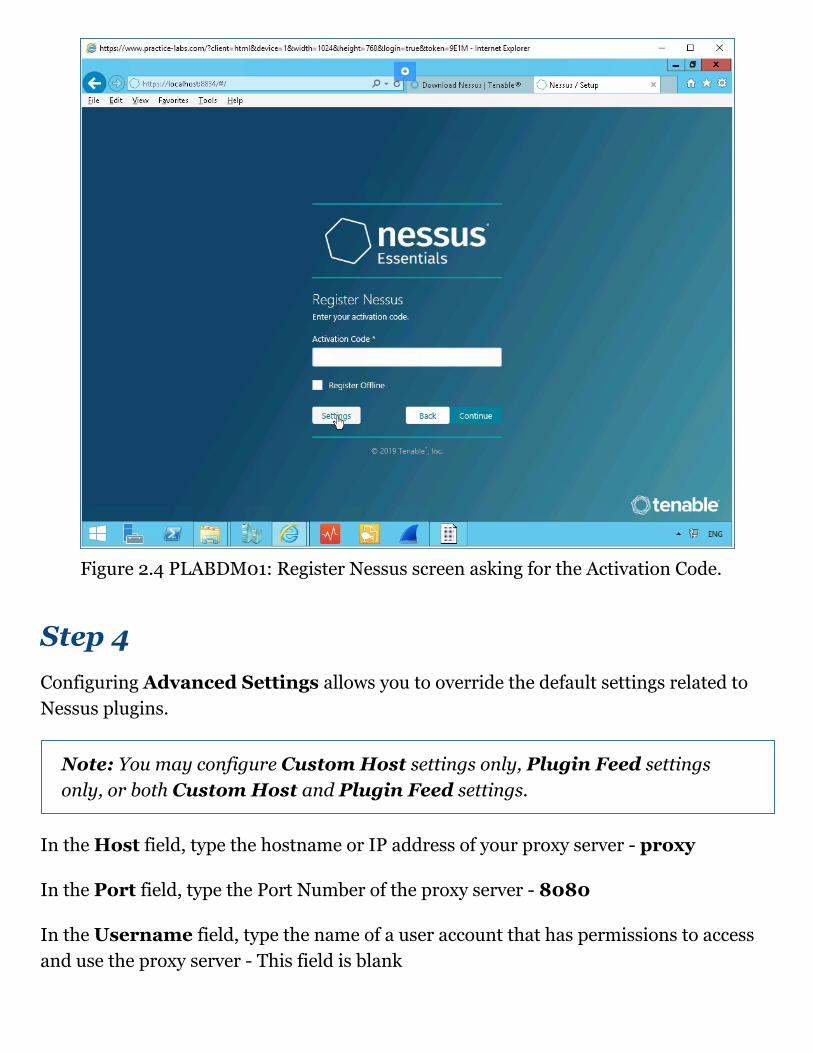
Figure 2.4 PLABDM01: Register Nessus screen asking for the Activation Code.
Step 4Configuring Advanced Settings allows you to override the default settings related toNessus plugins.
Note: You may configure Custom Host settings only, Plugin Feed settingsonly, or both Custom Host and Plugin Feed settings.
In the Host field, type the hostname or IP address of your proxy server - proxy
In the Port field, type the Port Number of the proxy server - 8080
In the Username field, type the name of a user account that has permissions to accessand use the proxy server - This field is blank

In the Password, type the password of the user account that you specified in theprevious step - This field is blank
In the Plugin Feed portion of the page, use the Custom Host field to enter thehostname or IP address of a custom plugin feed - This field is blank
Leave all other fields as they are.
Click Save to commit your Advanced Settings.
Figure 2.5 PLABDM01: Nessus Advanced details for the proxy and portnumbers.
Step 5Back on the Register Nessus page, click Continue.
You’re now on the Create a user account page.

In the Username* field, type:
Admin
In the Password* field, type:
Passw0rd
Click Submit.
Step 6Nessus will finish the installation process; this may take several minutes.
Figure 2.6 PLABDM01: Initialising files needed to scan assets

Leave all devices powered on in their current state and proceed to the next exercise.
Exercise 3 - Scanning with Nessus
Nessus prevents network attacks by identifying the vulnerabilities and configurationissues that hackers use to penetrate your network. Nessus provides High-Speed AssetDiscovery, Vulnerability Assessment, broad coverage, and profiling. You will beperforming a basic network scan and then using the details to understand the systemvulnerabilities.
Basic Scanning
Please refer to your course material or use your favorite search engine to research formore information about this topic.
Task 1 - Performing a basic scan
In this task, you will use Nessus to perform a basic scan.
Step 1After initialisation has completed, you’ll be redirected to the My Scans page.
Press x to close the Welcome to Nessus Professional 8 window.
The message telling you your trial will expire in 6 days in the top right corner, press x toclose it.

Figure 3.1 PLABDM01. Closing the trial will expire message.
From the My Scans page, use the Create a new scan button to create a new scan.

Figure 3.2 PLABDM01: Nessus initial scan interface menu.
Step 2You will be redirected to the Scan Library.
Select the Basic Network Scan template.
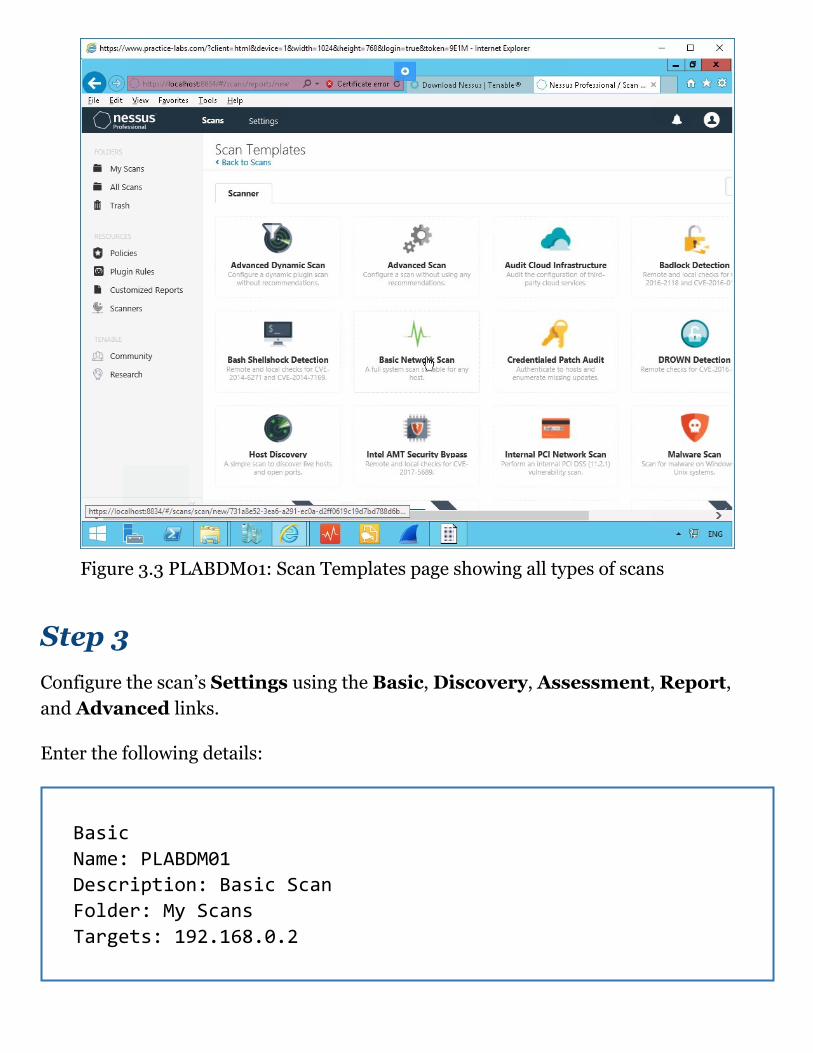
Figure 3.3 PLABDM01: Scan Templates page showing all types of scans
Step 3Configure the scan’s Settings using the Basic, Discovery, Assessment, Report,and Advanced links.
Enter the following details:
Basic Name: PLABDM01 Description: Basic Scan Folder: My Scans Targets: 192.168.0.2

Figure 3.4 PLABDM01: Nessus initial credentials interface entered
Step 3Next, click Credentials.
From the Credentials list, select applicable credentials required to perform the scan.Multiple credentials can be added.
Click on Host then on Windows.
Enter the following credentials into the fields.
Authentication Method: Password Username: Administrator Password: Passw0rd Domain: PRACTICELABS

Figure 3.5 PLABDM01: Nessus Windows credentials entered
Step 4When done, you have the option to Save the scan or Launch the scan.
Click the Save button and the scan will be saved but not launched; you’ll be redirected tothe My Scans page where the scan will be set to On Demand, and can also be launchedfrom this page.
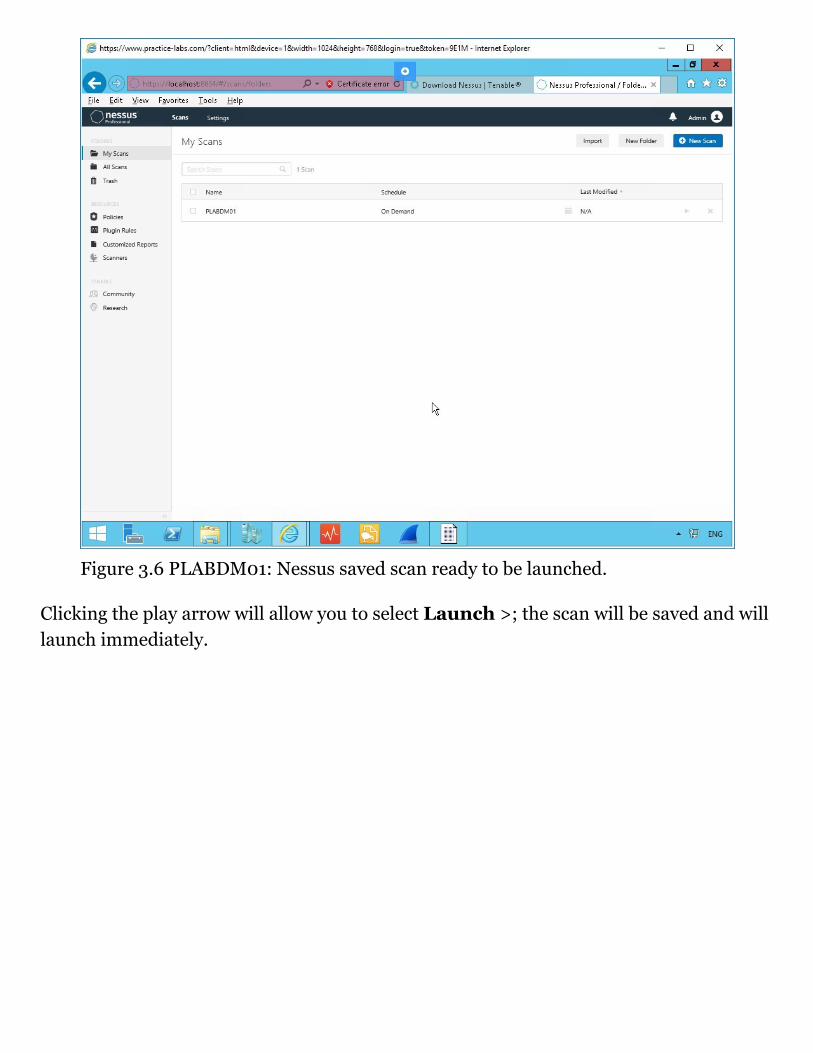
Figure 3.6 PLABDM01: Nessus saved scan ready to be launched.
Clicking the play arrow will allow you to select Launch >; the scan will be saved and willlaunch immediately.

Figure 3.7 PLABDM01: Nessus basic scan running.
Note: After a scan is created, its report is displayed by opening the scan. If a scanhas not run, the results page will display the No history is available for thisscan. message. Scan results display data based on the scan’s template andconfigured actions.
Leave all devices powered on in their current state and proceed to the next exercise.
Exercise 4 - Reviewing a Nessus Scan
Based on permissions and the scan’s actions, you can Configure the scan, search thescan’s Audit Trail, Launch the scan, or Export the scan’s results.
Nessus outputs these details to the 3 different main formats which are HTML, Nessus,CSV and Nessus DB.
Reviewing the results of a Nessus scan
Please refer to your course material or use your favorite search engine to research formore information about this topic.
Task 1 - Reviewing the results of a Nessus scan
In the last task, you completed a basic scan using Nessus. You will now review the resultsgenerated from this scan.
Alert: Please refer back to the prerequisites in the introduction. If you are using adifferent version of Nessus to perform this task, the results will differ.
Step 1Wait for the scan to finish. This could take up to 12 minutes.
Step 2When the scan is done, click the scan on the My Scans page.
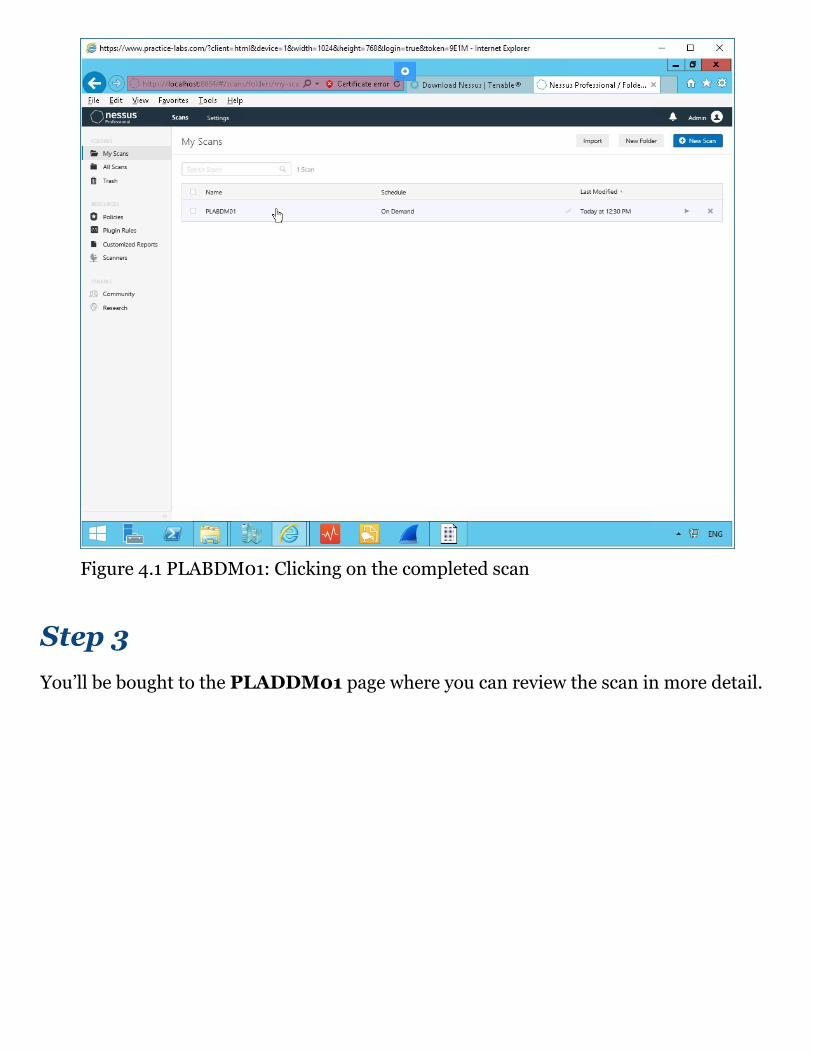
Figure 4.1 PLABDM01: Clicking on the completed scan
Step 3You’ll be bought to the PLADDM01 page where you can review the scan in more detail.

Figure 4.2 PLABDM01: Nessus basic scan completed with results.
Here you are on the Hosts Tab.
Click on the Device IP i.e. 192.168.0.2 or on the Vulnerabilities Tab.
This will open the next screen to list all the vulnerabilities found in detail on the device.
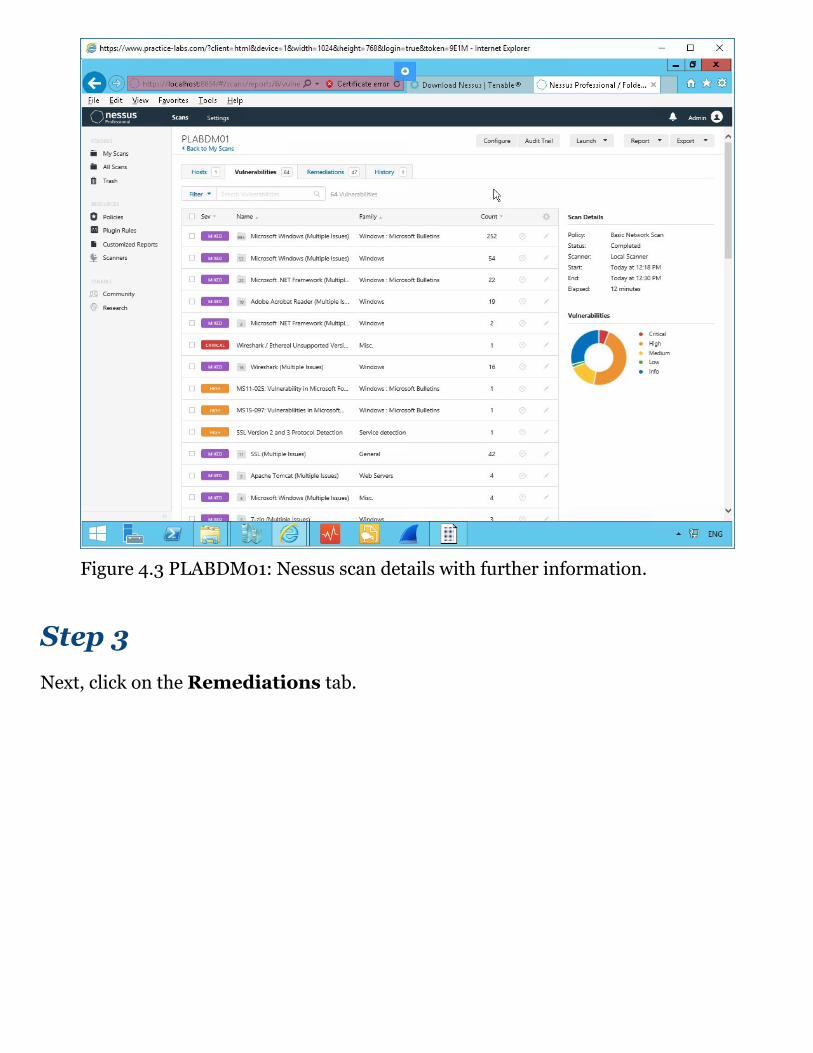
Figure 4.3 PLABDM01: Nessus scan details with further information.
Step 3Next, click on the Remediations tab.

Figure 4.4 PLABDM01: Nessus the remediation’s tab highlighted.
Leave all devices powered on in their current state and proceed to the next exercise.
Exercise 5 - Saving Nessus Reports
Saving the files to provide an audit trail and review any remediations is critical. Thesefiles might need to be passed to another member of the team or onto someone toimplement the controls.
Saving reports
Please refer to your course material or use your favorite search engine to research formore information about this topic.
Task 1 - Saving Reports
In this task you will save a report, using the Export feature in Nessus.
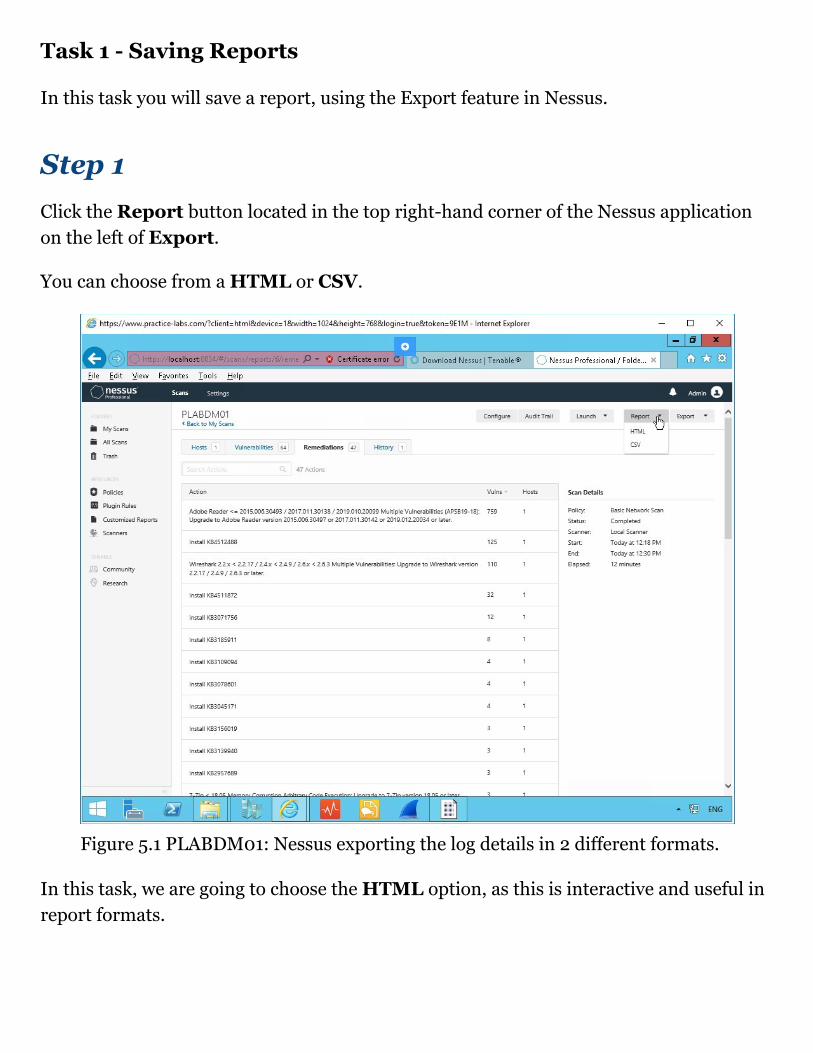
Step 1Click the Report button located in the top right-hand corner of the Nessus applicationon the left of Export.
You can choose from a HTML or CSV.
Figure 5.1 PLABDM01: Nessus exporting the log details in 2 different formats.
In this task, we are going to choose the HTML option, as this is interactive and useful inreport formats.
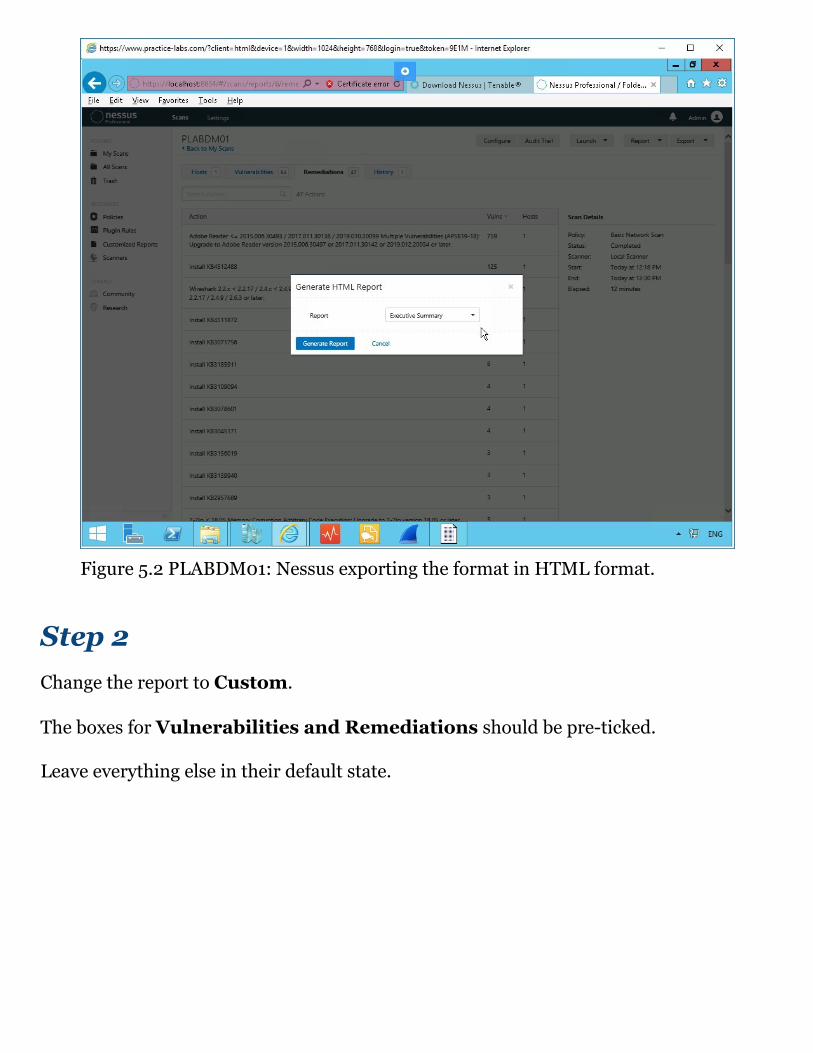
Figure 5.2 PLABDM01: Nessus exporting the format in HTML format.
Step 2Change the report to Custom.
The boxes for Vulnerabilities and Remediations should be pre-ticked.
Leave everything else in their default state.
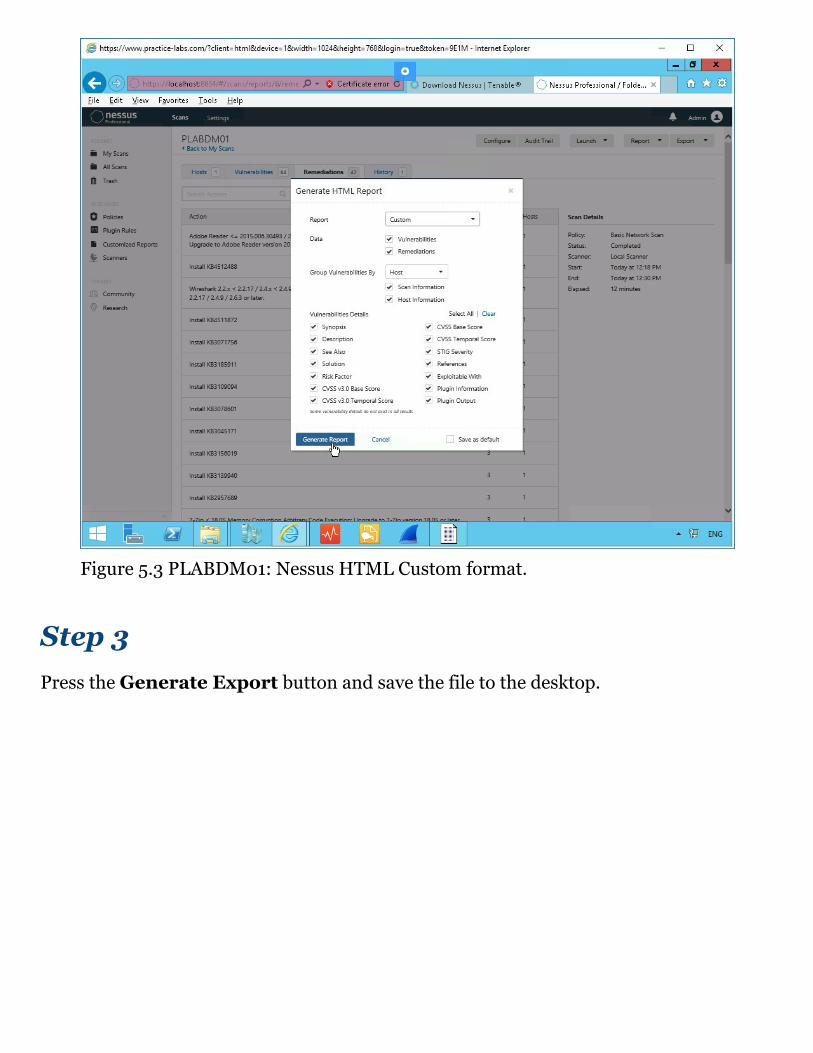
Figure 5.3 PLABDM01: Nessus HTML Custom format.
Step 3Press the Generate Export button and save the file to the desktop.

Figure 5.4 PLABDM01: Nessus exporting the file to Desktop.
These reports can be saved to a log directory or repository to be reviewed by other teammembers and to demonstrate that scans have taken place according to company policy.
Shut down all virtual machines used in this exercise using Practice Labs powerbutton function to revert these devices to their default settings. Alternatively, youmay sign out of the lab portal to power down all devices.
Summary
You covered the following activities in this module:
Downloading and Installing NessusConfiguring Nessus

Scanning with NessusReviewing a Nessus ScanSaving Nessus Reports