system installation guide - synergy!
TRANSCRIPT

System Installation Guide
The Edupoint software and any form of supporting documentation are proprietary and confidential.Unauthorized reproduction or distribution of the software and any form of supporting documentation is strictlyprohibited andmay result in severe civil and criminal penalties.Information in this document is provided in connection with Edupoint Educational Systems, LLC. products. Nolicense to any intellectual property rights is granted by this document.
The screens, procedural steps, and sample reports in this manual may be slightly different from the actualsoftware due tomodifications in the software based on state requirements and/or school districtcustomization.
The data in this document may include the names of individuals, schools, school districts, companies, brands,and products. Any similarities to actual names and data are entirely coincidental.
Copyright ©2003-2020 Edupoint Educational Systems, LLC.
Edupoint, Synergy Student Information System, Synergy Special Education, Synergy Assessment,TeacherVUE, LessonVUE, StudentVUE, and ParentVUE are registered trademarks of Edupoint EducationalSystems. Inspect is a registered trademark of Key Data Systems. Google and theGoogle logo are registeredtrademarks of Google Inc. Apple and iPad Pro are trademarks of Apple Inc. Microsoft andOneDrive aretrademarks of theMicrosoft group of companies.
Other names and brands may be claimed as the property of others.
Copyright 2003-2020 Edupoint Educational Systems, LLC.

About This ManualEdupoint Educational Systems, LLC. develops software with multiple release dates for the softwareand related documentation. The documentation is released inmultiple volumes tomeet thiscommitment.
This document serves as a reference for Edupoint's recommendations and Best Practices forSynergy processes. Due to the complex nature andmyriad configurations possible within theSynergy software, it is not feasible to include every possible scenario within this guide.
Conventions Used in This Manual
l Bold indicates user interactions such as a button or field on the screen.l Italics indicate the option to select or text to enter.l Notes, Tips, References, and Cautions display in themargin to provide additional information.
Notes provide additional informationabout the subject.
Tips suggest advanced options orother ways of approaching thesubject.
References list another source ofinformation, such as another manualor website.
Cautionswarn of potential problems.Take special care when readingthese sections.
Before You Begin
Before installing any of the Edupoint family of software products, be sure to review the systemrequirements andmake sure the district’s computer hardware and softwaremeet theminimumrequirements.
Software and Document History
DocumentVersion
ReleaseDate
SoftwareRelease Description
2.0 May 2017 2018
Updates:
l Updated Updating the License Key to include RT-PAD.xmldeployment information.
l Added Consortium Deployment Updates.
3.0 – –
Updates:
l Updated installation process to reference version 2018 installers.
l Updated .NET requirements to 4.6.2
l Updated screen shots to display 2018 installers.
l Updated screen shots and captions for quality and consistency
System Installation Guide 3
Copyright 2003-2020 Edupoint Educational Systems, LLC

DocumentVersion
ReleaseDate
SoftwareRelease Description
- Dec 2017 2018.01 No changes required
- Jun 2018 2019 No changes required
4.0 Dec 2018 2019.01
Updates:
l Added Installing Additional Process Servers to Server DatabaseInstallation
l Updated Manually Adding Servers in Setting Up RT Dashboard
5.0 Jun 2019 2020 Updated .NET requirements to 4.7.2 for Synergy version 2020
- Mar 2020 2021 No changes required
4 System Installation Guide
Edupoint Proprietary and Confidential
Table of Contents
About ThisManual 3
ConventionsUsed in ThisManual 3
Before You Begin 3
Software and Document History 3
Table of Contents 5
Chapter 1: Overview 8Overview of Installation 9
Implementation Considerations 10
Sample Deployment Configurations 11
Possible Server Configurations 11
Chapter 2: Preparation 13RecommendedHardware Configuration 14
Pre-Installation Checklist 15
Database Server 15
Web Servers and Process Servers 16
.NET Configuration 19
Database Configuration 22
Creating the Database 22
Adding a RevUser Login 23
Creating the Schema 25
Mapping the Schema to the User 26
Downloading Releases 27
Chapter 3: New Installation 30Server and Database Installation 31
Installing AdditionalWeb Servers 37
Installing the Process Server 43
Installing Additional Process Servers 46
DBTools Setup 53
Other Synergy SIS Software Installation 57
IIS Application Initialization 58
Application Initialization Server Role 59
ASPX PageModifications 60
Using APPCMD to Update Application Pools 60
System Installation Guide 5
Copyright 2003-2020 Edupoint Educational Systems, LLC
Manually Configuring Application Pools 62
Web.config Changes 64
Chapter 4: Upgrading to a New Release 68Software Update Overview 69
Naming Convention 69
State Specific Releases 69
ReleaseManagement Services 70
Before Applying Releases 70
Updating the License Key 71
Edit SystemConfiguration Attributes 71
Deploying License Key to Servers 72
Downloading Releases 75
Turning Off Synergy Access 77
LDAP Integration 77
Default Entry Access Times 78
Backup Content 80
UninstallingWeb Servers 81
Uninstalling Process Servers 81
Uninstall Additional Synergy SIS Software 83
Installing New Releases 84
Website Installation 84
Process Server Installation 90
Installing Offline Applications 92
Post-Installation 94
ConsortiumDeployment Updates 94
Adding a NewWeb.Config/Database Access 95
Updating theWeb.Config File 98
CommonUpdate Issues 101
Missing Latest SCHEMA.XML 101
Installing toWrong Virtual Folder 101
Running Setup.exe Instead of InstallUserPrompt.exe 101
Database Login Has Sysadmin Role 102
Chapter 5: RT Dashboard 103Setting UpRT Dashboard 104
6 System Installation Guide
Edupoint Proprietary and Confidential
Automatically Adding Servers 104
Manually Adding Servers 106
Managing Server Groups 110
Setting Dashboard Options 112
View Dashboard Version 114
Managing Servers through the Dashboard 114
Managing Process Servers 117
Deploying Updates 118
Post-Installation 121
CommonUpdate Issues 122
Incorrect UpgradeOrder 122
Out of Date Process Server 122
ParentVUE (PVUE) Server Entered asWebserver 123
Remote Registry ServicesNot Running 124
Process Server Not Stopped Before Deployment 125
System Installation Guide 7
Copyright 2003-2020 Edupoint Educational Systems, LLC
Chapter 1:Overview
Overview of Installation 9Implementation Considerations 10Sample Deployment Configurations 11
System Installation GuideChapter 1: Overview 9
Overview of InstallationThe Synergy SIS software has four main components: the web server, the process server, thedatabase server, and the remote access server.
l The database server houses the database for all districts and schools. Unlike other studentinformation systems, Edupoint keeps all data in one database for all schools and all years.This simplifies the system administration and reduces duplicate data entry and errors.
l The process server processes all reports and other high-resource jobs, such as the new yearrollover. Performing these jobs on a separate server or servers improves performance for theend-user.
l Theweb server displays the user interface on a web browser. Synergy SIS has the followinginterfaces:
l TeacherVUE andGrade Book for teachers.l Themain Synergy SIS interface for all staff.
l The remote access server contains the ParentVUE and StudentVUE interfaces for parentsand students.
You can configure each of thesemain server components as a separate testing and/or trainingenvironment. Other software programs also integrate with the Synergy SIS software but installseparately, such as theGeneric Conversion software. Prior to software installation, there are anumber of hardware and software requirements to configure.
See RecommendedHardware Configuration for more information onhardware and software requirements.
Edupoint constantly improves and refines Synergy SIS based on user feedback. Edupoint offers allsoftware releases free of charge to current customers.
Copyright 2003-2020 Edupoint Educational Systems, LLC
10 System Installation GuideChapter 1: Overview
Implementation ConsiderationsWhen determining how to install and configure Synergy SIS, there are several factors to take intoconsideration.
How will the software be accessed?Synergy SIS is a web-based system accessible via any Internet browser. You can access it throughan internal LAN/WAN environment or over the Internet. Alternatively, you can set up Synergy SISas amixed system to allow parents and students to access information through ParentVUE/StudentVUE, while staff access information over a LAN. Users only need to access the webservers, which you can configure with dual NICs to allow communication with secured process anddatabase servers.
What types of servers are required?Synergy SIS has four main components – the web server, the process server, the database server,and the remote access server. Edupoint typically installs the database on only one protected serverin the LAN environment. Depending on the size of a district, youmay requiremultiple process andweb servers to handle the number of users accessing the system.
What additional software will be installed?Additional software programs integrate with Synergy SIS. You can determine which softwareprograms to install and where to install them.
SeeOther Synergy SIS Software Installation for more information onadditional programs.
Will separate testing and training environments be needed?In addition to themain production environment, you can also set up Synergy SIS in a separateconfiguration for testing and training. Youmust determine how many testing and trainingenvironments to configure and where to set up these environments.
How many end users will be accessing the system?Synergy SIS contains additional interfaces such as TeacherVUE and ParentVUE. To helpdetermine the installation configuration, you should estimate how many users plan to access eachtype of software at the same time.
How will the software be introduced to the staff?Many districts implement Synergy SIS in stages to allow different schools to convert and transitionas needed. Smaller districtsmay choose to convert the entire district in one year. Synergy SIS canalso run parallel to an older system until staff complete training in the new software.
See theSynergyData ConversionsGuide for more information onconverting data from a previous SIS.
Edupoint Proprietary and Confidential
System Installation GuideChapter 1: Overview 11
Sample Deployment ConfigurationsWhen determining how to install Synergy SIS, you should consider several factors:
l Which servers to use for Synergy SIS Production and/or Synergy SISTesting/Training.l What web servers, processes and organizations to support with each process server.l The location of the training/testing and production databases.
This installation guide provides information for multiple implementations.
Youmust complete the installation or update process for each type ofserver completely before installing or updating the next server type. Forexample, complete the update to the web server(s) before updating theprocess server(s).
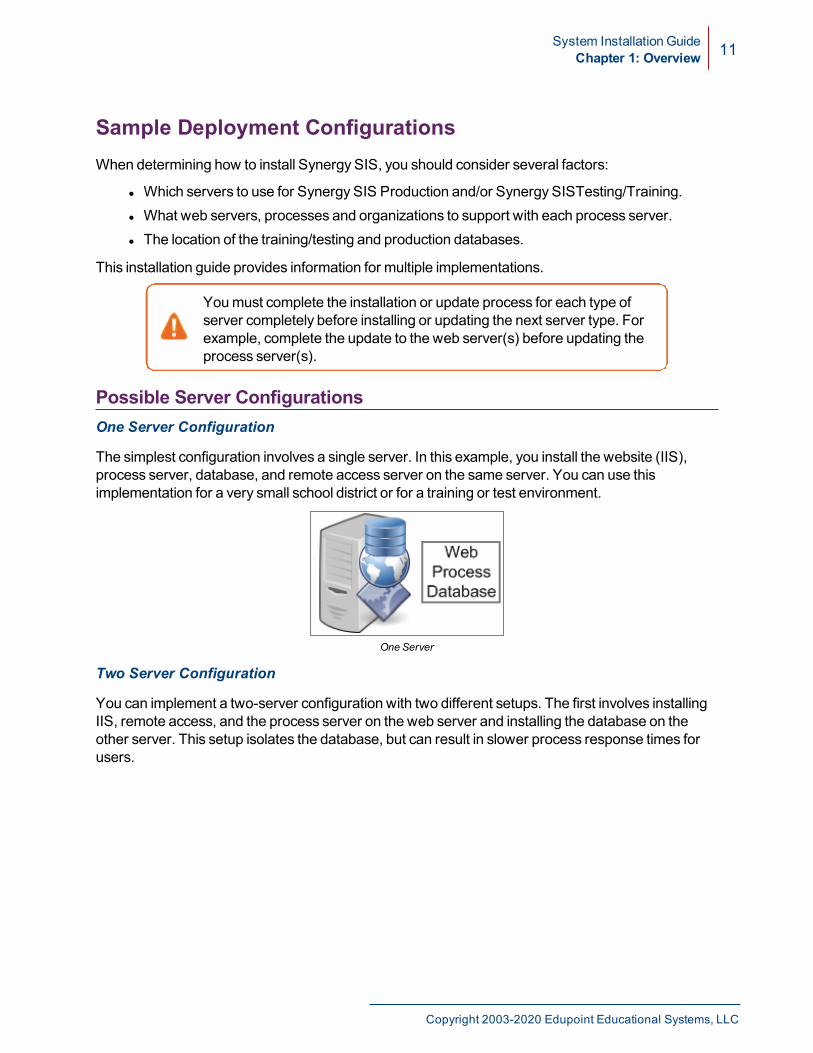
Possible Server ConfigurationsOne Server Configuration
The simplest configuration involves a single server. In this example, you install the website (IIS),process server, database, and remote access server on the same server. You can use thisimplementation for a very small school district or for a training or test environment.
One Server
Two Server Configuration
You can implement a two-server configuration with two different setups. The first involves installingIIS, remote access, and the process server on the web server and installing the database on theother server. This setup isolates the database, but can result in slower process response times forusers.
Copyright 2003-2020 Edupoint Educational Systems, LLC

12 System Installation GuideChapter 1: Overview
The second involves installing IIS and remote access on the web server and installing the processserver and database on the other server. This setup results in amore consistent user response timeregardless of the work performed by the process server.
Two Servers (Database) Two Servers (Web)
Web Farm Configuration
You can also configuremultiple IIS web servers andmultiple process servers with a single databaseserver and remote server. This implementation is ideal for large school districts with many users.The number of users and the size of the district determine the number of web servers and processservers needed. This configuration ensures a good user response time regardless of the largenumber of users in the district.
SampleWeb FarmConfiguration
Edupoint Proprietary and Confidential
Chapter 2:Preparation
Recommended Hardware Configuration 14Pre-Installation Checklist 15.NET Configuration 19Database Configuration 22Downloading Releases 27
14 System Installation GuideChapter 2: Preparation
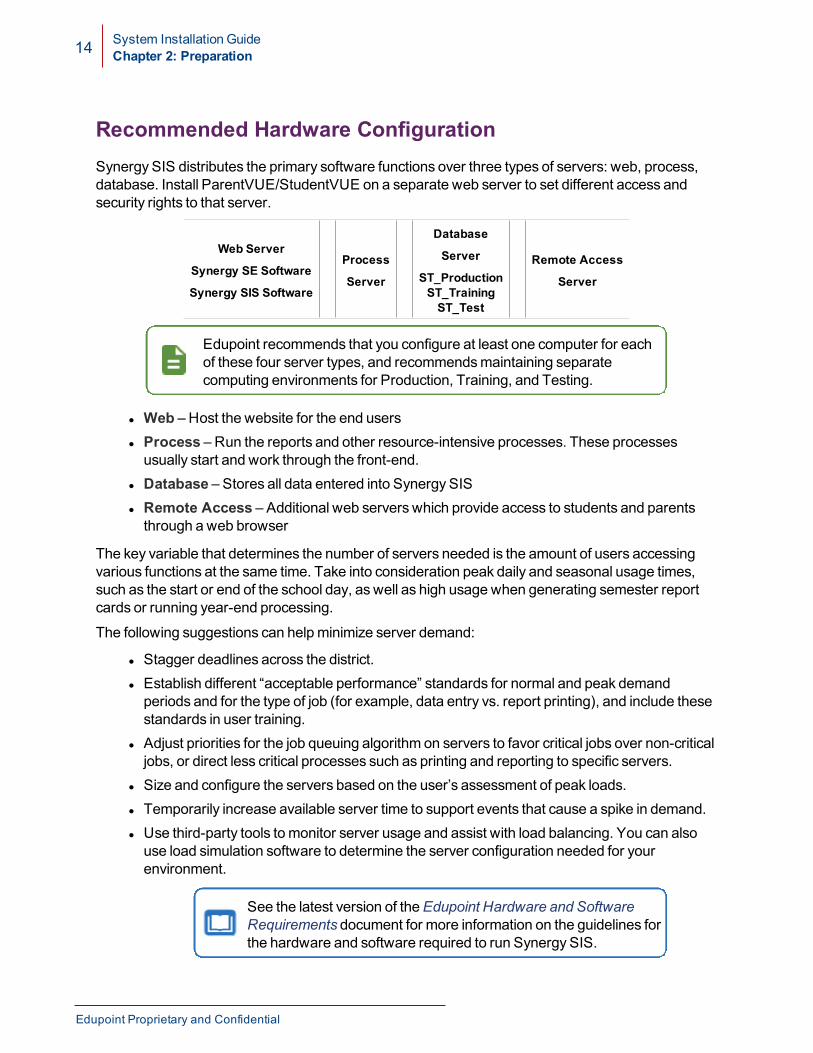
Recommended Hardware ConfigurationSynergy SIS distributes the primary software functions over three types of servers: web, process,database. Install ParentVUE/StudentVUE on a separate web server to set different access andsecurity rights to that server.
Web Server
Synergy SE Software
Synergy SIS Software
Process
Server
Database
Server
ST_ProductionST_TrainingST_Test
Remote Access
Server
Edupoint recommends that you configure at least one computer for eachof these four server types, and recommendsmaintaining separatecomputing environments for Production, Training, and Testing.
l Web – Host the website for the end usersl Process – Run the reports and other resource-intensive processes. These processesusually start and work through the front-end.
l Database – Stores all data entered into Synergy SISl Remote Access – Additional web servers which provide access to students and parentsthrough a web browser
The key variable that determines the number of servers needed is the amount of users accessingvarious functions at the same time. Take into consideration peak daily and seasonal usage times,such as the start or end of the school day, as well as high usage when generating semester reportcards or running year-end processing.
The following suggestions can helpminimize server demand:
l Stagger deadlines across the district.l Establish different “acceptable performance” standards for normal and peak demandperiods and for the type of job (for example, data entry vs. report printing), and include thesestandards in user training.
l Adjust priorities for the job queuing algorithm on servers to favor critical jobs over non-criticaljobs, or direct less critical processes such as printing and reporting to specific servers.
l Size and configure the servers based on the user’s assessment of peak loads.l Temporarily increase available server time to support events that cause a spike in demand.l Use third-party tools to monitor server usage and assist with load balancing. You can alsouse load simulation software to determine the server configuration needed for yourenvironment.
See the latest version of theEdupoint Hardware and SoftwareRequirements document for more information on the guidelines forthe hardware and software required to run Synergy SIS.
Edupoint Proprietary and Confidential
System Installation GuideChapter 2: Preparation 15
While the guidelines in theEdupoint Hardware and SoftwareRequirements provide a basis for the initial configuration, districtsand schools can reconfigure computing environments based uponpersonal "acceptable performance” standards. If needed, Edupointdoes offer consulting services at an additional cost to assist districtsand schools with server sizing and implementation.
Edupoint provides these recommendations but makes norepresentations, warranties, or claims that by following theserecommendations a given customer will experience “acceptableperformance.” Customers are advised to use this information incombination with their own technical knowledge andunderstanding of their network environment to determine thehardware configuration for the Synergy SIS servers. The aboverecommendations are the only recommendationsmade byEdupoint in regards to sourcing, sizing, and configuring servers forthe installation and operation of Synergy SIS. No otherrecommendations are offered by Edupoint, whether statedverbally, or within other working papers, emails, or projectdocuments shared prior to the date of this document. No otherrecommendations are valid or binding on Edupoint.
Pre-Installation ChecklistBefore installing Synergy SIS, youmust configure the following software installed on each server.Synergy SIS supports 64-bit installations. The default Microsoft installation options are sufficient.
Database Server
1. InstallWindows Server (64-bit version of 2008 or later). No roles or features required.2. Install anti-virus software.3. InstallSQL Server 2008 R2 (or later) Standard 64-bit installation and install all service packs
and updates.4. Install all Microsoft patches and updates.5. Configure the database as outlined in the Database Configuration section.6. Setup a databasemaintenance plan through SQL Server.
Copyright 2003-2020 Edupoint Educational Systems, LLC
16 System Installation GuideChapter 2: Preparation
7. Setup daily database backups.8. Enable secure remote access for Edupoint support.
Edupoint must have administrator-level access to the server andWindows-integrated administrator access to SQL server to installthe Synergy SIS software. Remote Desktop is preferred eitherthrough a secure VPN, from another computer accessible from theInternet via Remote Desktop, or directly to the server.
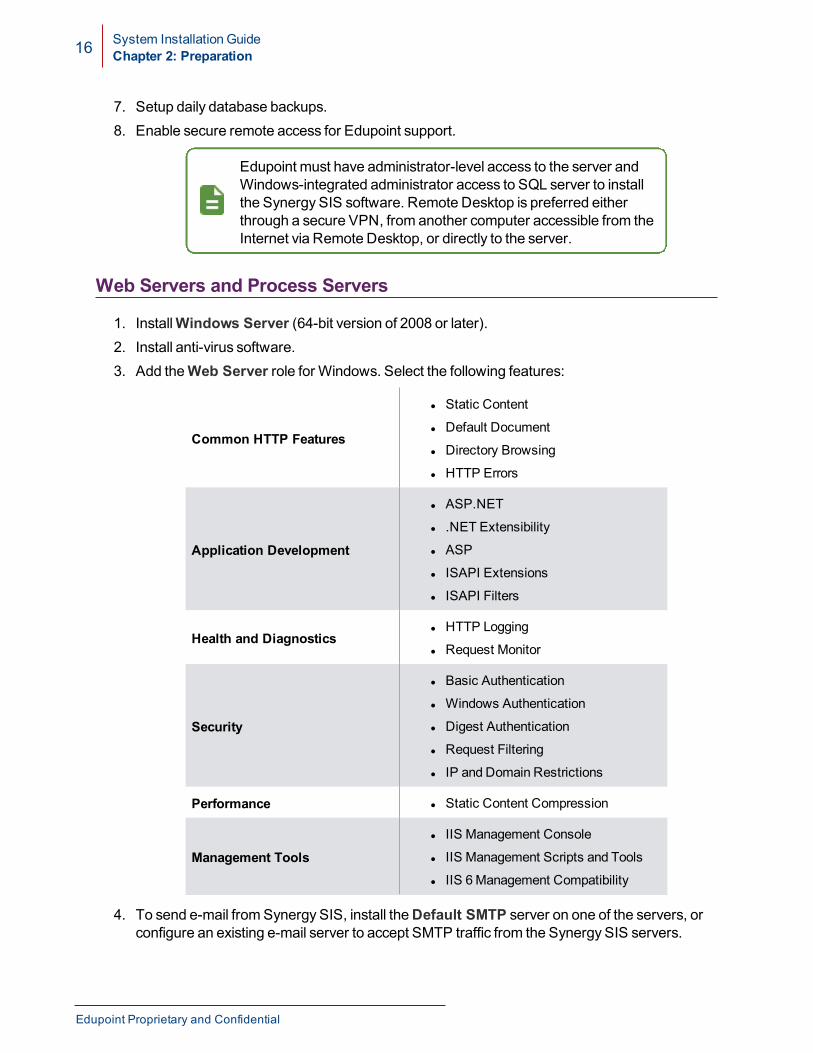
Web Servers and Process Servers
1. InstallWindows Server (64-bit version of 2008 or later).2. Install anti-virus software.3. Add theWeb Server role for Windows. Select the following features:
Common HTTP Features
l Static Content
l Default Document
l Directory Browsing
l HTTP Errors
Application Development
l ASP.NET
l .NET Extensibility
l ASP
l ISAPI Extensions
l ISAPI Filters
Health and Diagnosticsl HTTP Logging
l Request Monitor
Security
l Basic Authentication
l Windows Authentication
l Digest Authentication
l Request Filtering
l IP and Domain Restrictions
Performance l Static Content Compression
Management Toolsl IIS Management Console
l IIS Management Scripts and Tools
l IIS 6Management Compatibility
4. To send e-mail fromSynergy SIS, install theDefault SMTP server on one of the servers, orconfigure an existing e-mail server to accept SMTP traffic from the Synergy SIS servers.
Edupoint Proprietary and Confidential

System Installation GuideChapter 2: Preparation 17
5. If installing certain web servers outside the firewall, verify that they can communicate with thedatabase and process servers.
6. Install the .NET 4.0 Framework and set it as the default ASP .NET service.
See .NET Configuration for more information.
7. For districts using theGrade Book, installMicrosoft Report Viewer 2010 on the processserver.
You can downloadMicrosoft Report Viewer 2010 for free athttps://www.microsoft.com/en-us/download/details.aspx?id=6442
8. Install all Microsoft patches and updates.9. Enable secure remote access for Edupoint support and provide Edupoint with remote access
information.10. Create a folder on every web and process server to store the Synergy SIS software, such as
Edupoint Work Folder. Edupoint installs and sets up the database when installing the firstweb server.
11. Download the latest release from the Edupoint FTP site to the Synergy SIS folder on everyweb and process server.
See Downloading Releases for more information.
12. Extract the files from the downloaded .zip file.
Many servers require user account accesswhen extracting theinstallation files. Youmay need to do one of the following to ensureall .dll files remain unlocked:
l Add the Edupoint FTP site to your trusted sites in yourbrowser.
l Make sure that your user account setting allows changes.l Remove security from the .zip file before unzipping it to aninstallation folder.
If .dll files are locked, application errors occur after the installation.
13. Determine where to install any additional Synergy SIS software. The table below outlinesrecommended installations, but most tools can be installed on any server.
Software Description Location
DB Tools Tool to manage the Synergy SIS database. Web server
Designer Tool to customize the Synergy SISsoftware – must purchase separately. Any workstation
Copyright 2003-2020 Edupoint Educational Systems, LLC
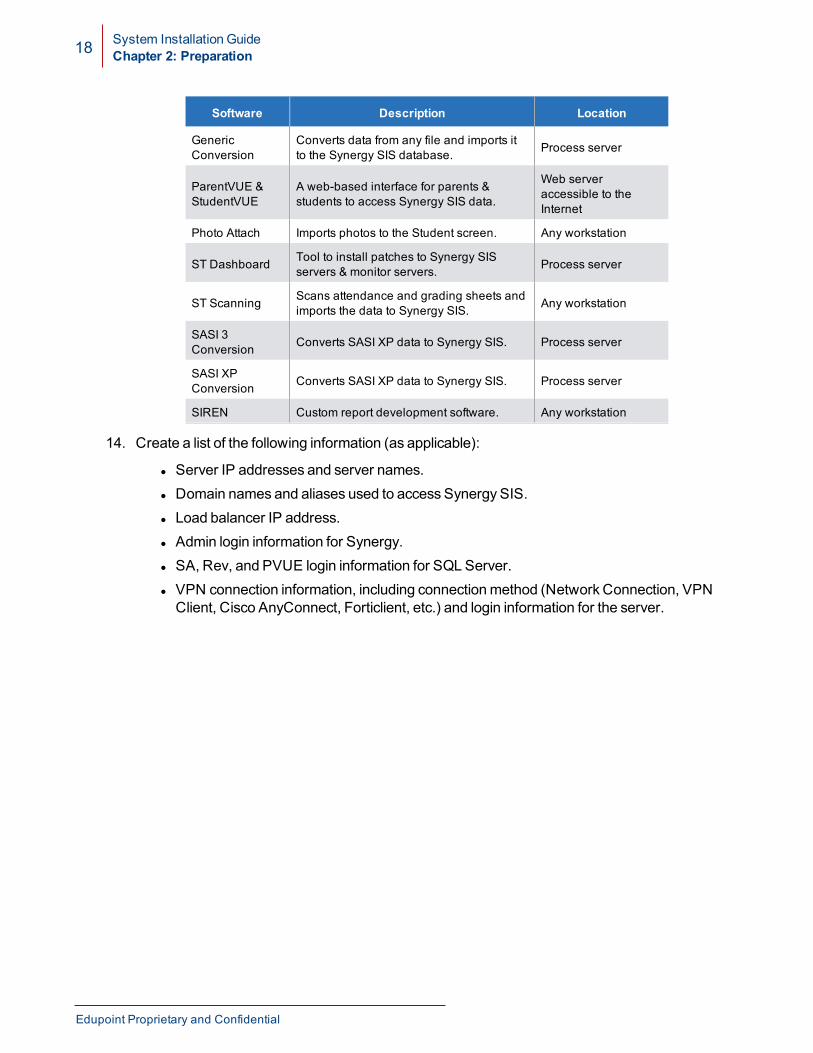
18 System Installation GuideChapter 2: Preparation
Software Description Location
GenericConversion
Converts data from any file and imports itto the Synergy SIS database. Process server
ParentVUE &StudentVUE
A web-based interface for parents &students to access Synergy SIS data.
Web serveraccessible to theInternet
Photo Attach Imports photos to the Student screen. Any workstation
ST Dashboard Tool to install patches to Synergy SISservers & monitor servers. Process server
ST Scanning Scans attendance and grading sheets andimports the data to Synergy SIS. Any workstation
SASI 3Conversion Converts SASI XP data to Synergy SIS. Process server
SASI XPConversion Converts SASI XP data to Synergy SIS. Process server
SIREN Custom report development software. Any workstation
14. Create a list of the following information (as applicable):
l Server IP addresses and server names.l Domain names and aliases used to access Synergy SIS.l Load balancer IP address.l Admin login information for Synergy.l SA, Rev, and PVUE login information for SQL Server.l VPN connection information, including connectionmethod (Network Connection, VPNClient, Cisco AnyConnect, Forticlient, etc.) and login information for the server.
Edupoint Proprietary and Confidential
System Installation GuideChapter 2: Preparation 19
.NET ConfigurationSynergy SIS version 2020 requires .NET 4.7.2. Synergy SIS versions 2018, 2018.01, 2019, and2019.01 require .NET 4.6.2 or later. All web servers and process serversmust run this versionbefore installing the software.
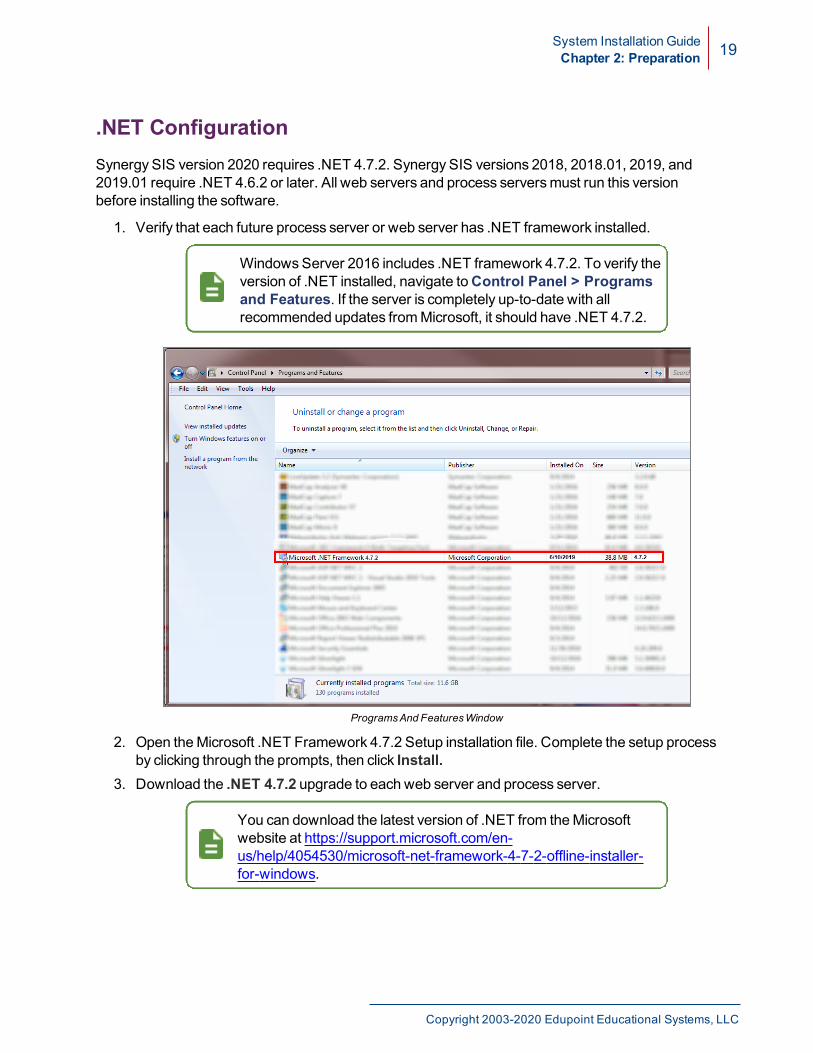
1. Verify that each future process server or web server has .NET framework installed.
WindowsServer 2016 includes .NET framework 4.7.2. To verify theversion of .NET installed, navigate toControl Panel > Programsand Features. If the server is completely up-to-date with allrecommended updates fromMicrosoft, it should have .NET 4.7.2.
ProgramsAnd FeaturesWindow
2. Open theMicrosoft .NET Framework 4.7.2 Setup installation file. Complete the setup processby clicking through the prompts, then click Install.
3. Download the .NET 4.7.2 upgrade to each web server and process server.
You can download the latest version of .NET from theMicrosoftwebsite at https://support.microsoft.com/en-us/help/4054530/microsoft-net-framework-4-7-2-offline-installer-for-windows.
Copyright 2003-2020 Edupoint Educational Systems, LLC

20 System Installation GuideChapter 2: Preparation
4. Run the downloaded file.
Microsoft .NET Framework4 SetupWindow
5. ClickNext until the installation completes. Leave all settings at the default choice.6. ClickFinish.
Installation CompleteWindow
7. Set the application pool on the web server to use .NET CLR Version 4.0.
The default app pool setting uses .NET CLR Version 4.0, and built-in app pools have the correct .NET CLR version set.
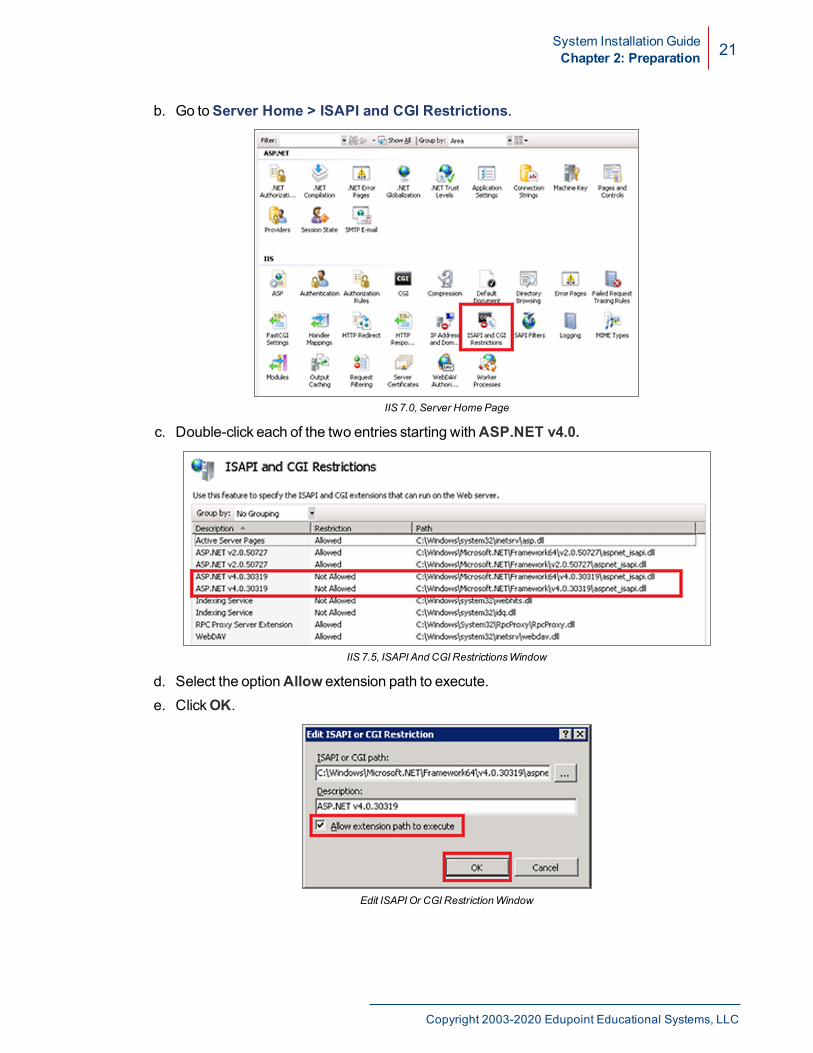
8. In IIS 7.5 and later, you can also set the .NET 4.0 ISAPI filters to allowed.
a. Open the Internet Information Service (IIS) Manager, found under AdministrativeTools on the server.
Edupoint Proprietary and Confidential
System Installation GuideChapter 2: Preparation 21
b. Go toServer Home > ISAPI and CGI Restrictions.
IIS 7.0, Server HomePage
c. Double-click each of the two entries starting withASP.NET v4.0.
IIS 7.5, ISAPI And CGI RestrictionsWindow
d. Select the optionAllow extension path to execute.e. ClickOK.
Edit ISAPI Or CGI RestrictionWindow
Copyright 2003-2020 Edupoint Educational Systems, LLC
22 System Installation GuideChapter 2: Preparation
Database ConfigurationYou can install Synergy on SQL Server 2008 or later andOracle 11gR2.
If your district usesOracle Database, contact the Edupoint technicalsupport team at [email protected] or call for support at 1-877-899-9111 option 1 for specific instructions.
When installing the web server software with an empty database, the installation process creates alltables and enters default data. Youmust have a user and login set on the database for theinstallation to create data. If a database exists and contains data from a previous Synergyinstallation, the installation process updates the database structure and product-owned lookuptables.
Creating the Database
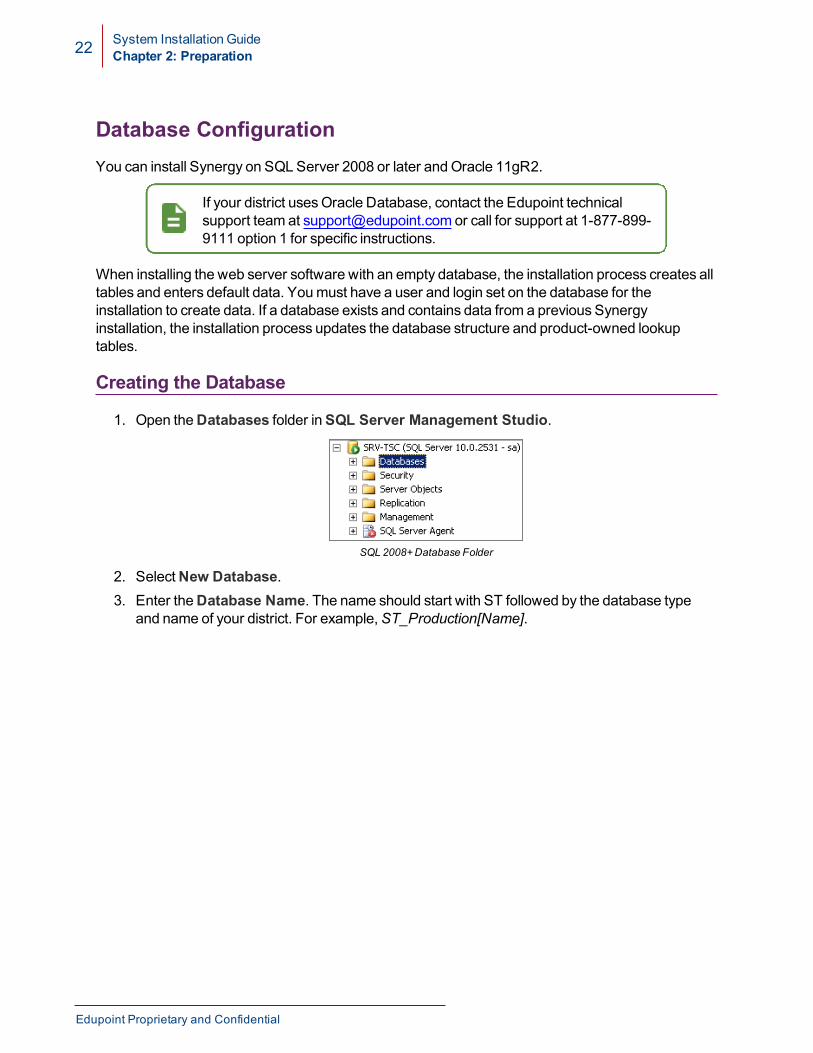
1. Open theDatabases folder inSQL Server Management Studio.
SQL 2008+Database Folder
2. SelectNew Database.3. Enter theDatabase Name. The name should start with ST followed by the database type
and name of your district. For example,ST_Production[Name].
Edupoint Proprietary and Confidential

System Installation GuideChapter 2: Preparation 23
4. ClickOK to create the database.
SQL 2008+New DatabaseWindow
Adding a Rev User Login
1. Navigate toSecurity > Logins in SQL Server Management Studio (2008 or later).2. Right-click the folder and selectNew Login.
SQL 2008+LoginsFolder
3. Enter a Login Name.4. ChooseSQL Server Authentication and enter aPassword.
Edupoint provides a randomized Login Name and Password to thedistrict in an Access document.
For SQL 2008 or later, clear Enforce Password Policy.
Copyright 2003-2020 Edupoint Educational Systems, LLC
24 System Installation GuideChapter 2: Preparation
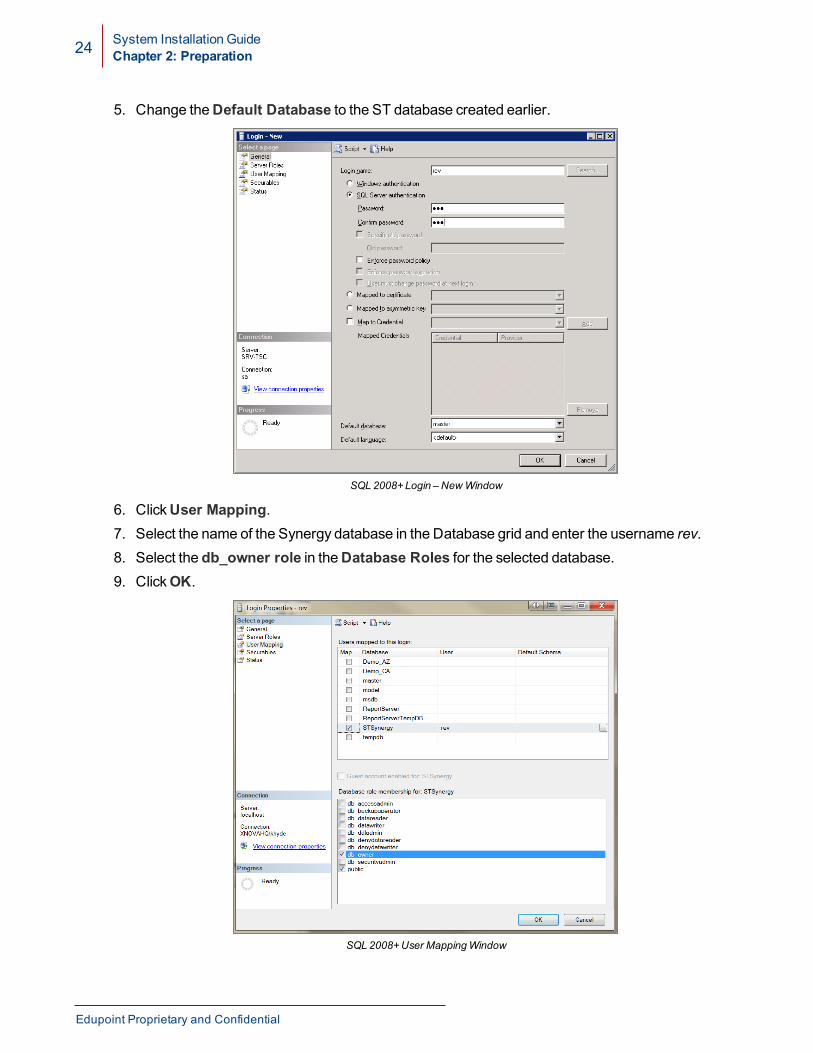
5. Change theDefault Database to the ST database created earlier.
SQL 2008+Login – NewWindow
6. ClickUser Mapping.7. Select the name of the Synergy database in the Database grid and enter the username rev.8. Select the db_owner role in theDatabase Roles for the selected database.9. ClickOK.
SQL 2008+User MappingWindow
Edupoint Proprietary and Confidential
System Installation GuideChapter 2: Preparation 25
Creating the Schema
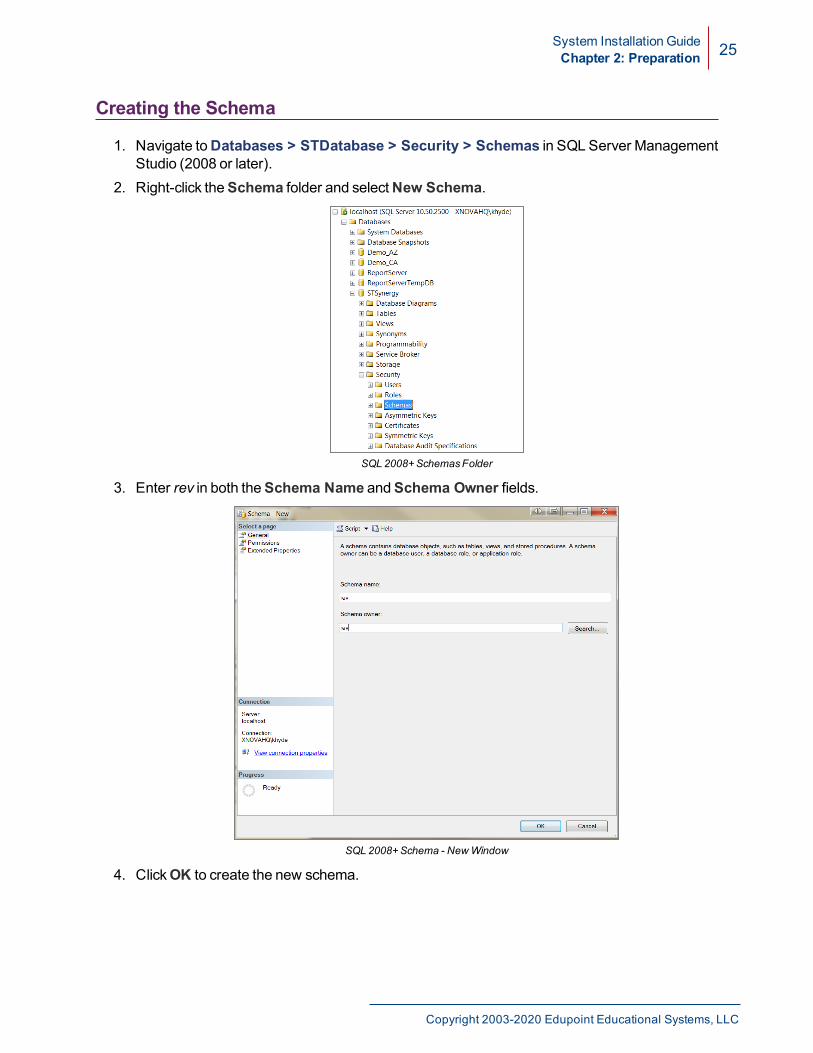
1. Navigate toDatabases > STDatabase > Security > Schemas in SQL Server ManagementStudio (2008 or later).
2. Right-click theSchema folder and selectNew Schema.
SQL 2008+SchemasFolder
3. Enter rev in both theSchema Name andSchema Owner fields.
SQL 2008+Schema - NewWindow
4. ClickOK to create the new schema.
Copyright 2003-2020 Edupoint Educational Systems, LLC
26 System Installation GuideChapter 2: Preparation
Mapping the Schema to the User
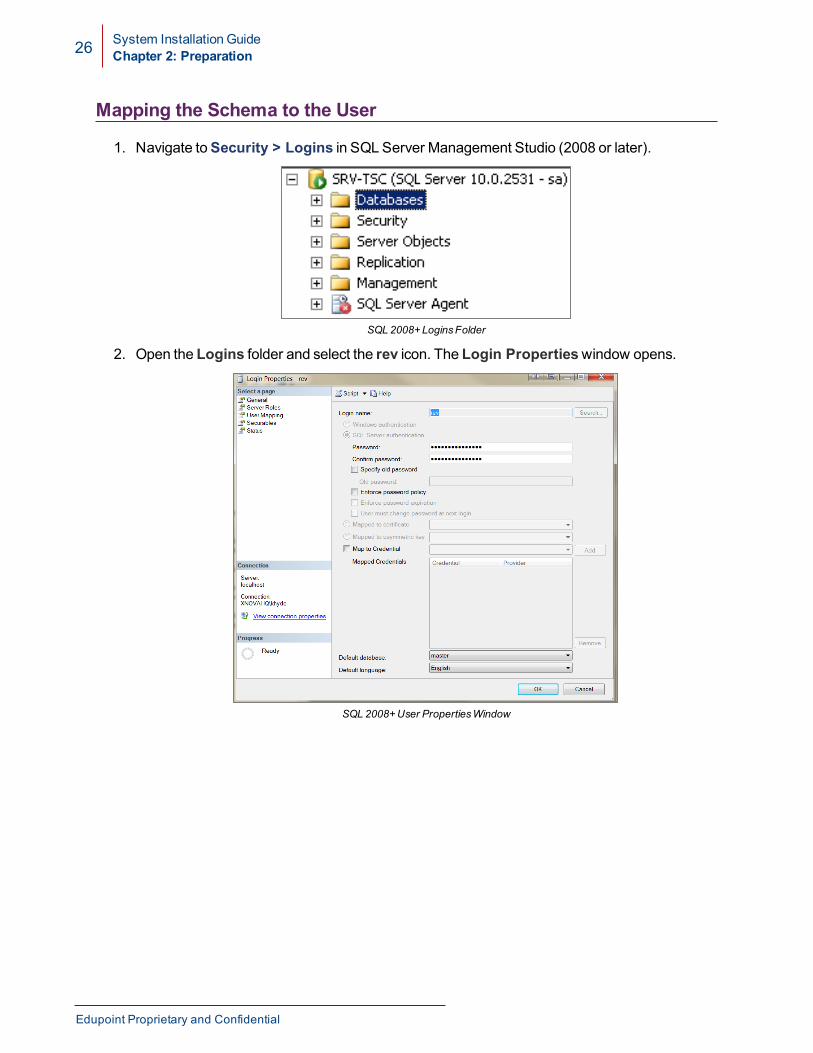
1. Navigate toSecurity > Logins in SQL Server Management Studio (2008 or later).
SQL 2008+LoginsFolder
2. Open the Logins folder and select the rev icon. The Login Propertieswindow opens.
SQL 2008+User PropertiesWindow
Edupoint Proprietary and Confidential
System Installation GuideChapter 2: Preparation 27
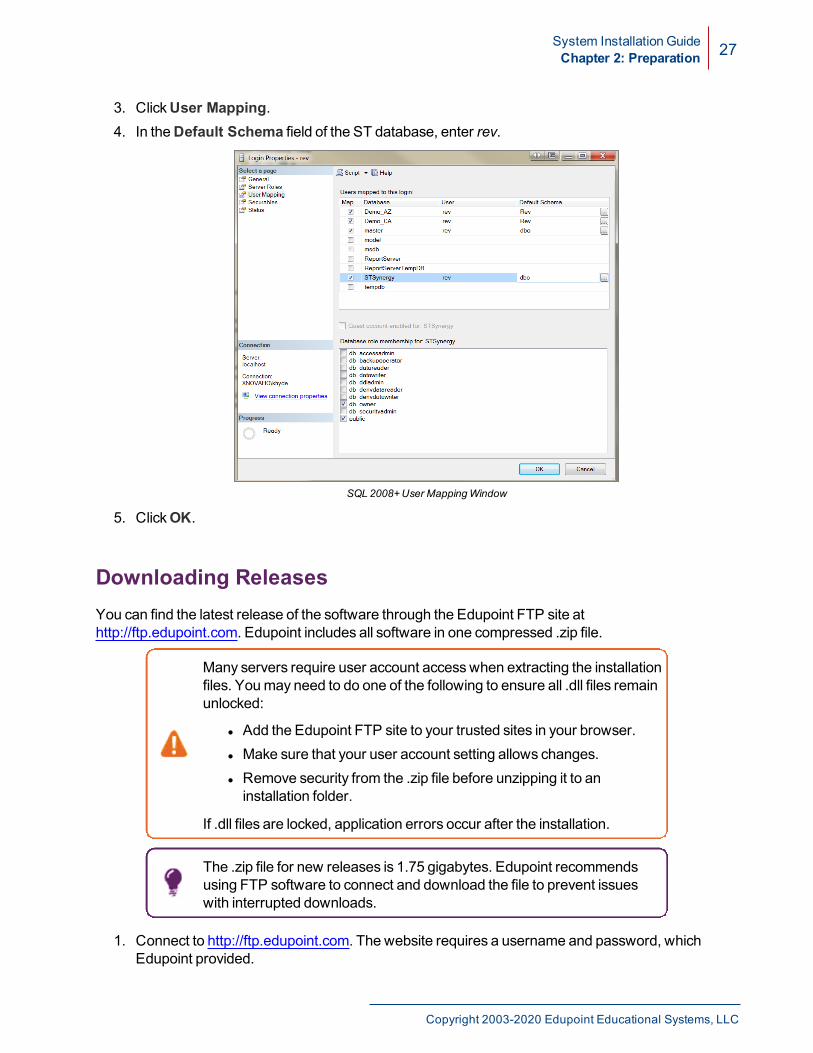
3. ClickUser Mapping.4. In theDefault Schema field of the ST database, enter rev.
SQL 2008+User MappingWindow
5. ClickOK.
Downloading ReleasesYou can find the latest release of the software through the Edupoint FTP site athttp://ftp.edupoint.com. Edupoint includes all software in one compressed .zip file.
Many servers require user account accesswhen extracting the installationfiles. Youmay need to do one of the following to ensure all .dll files remainunlocked:
l Add the Edupoint FTP site to your trusted sites in your browser.l Make sure that your user account setting allows changes.l Remove security from the .zip file before unzipping it to aninstallation folder.
If .dll files are locked, application errors occur after the installation.
The .zip file for new releases is 1.75 gigabytes. Edupoint recommendsusing FTP software to connect and download the file to prevent issueswith interrupted downloads.
1. Connect to http://ftp.edupoint.com. The website requires a username and password, whichEdupoint provided.
Copyright 2003-2020 Edupoint Educational Systems, LLC
28 System Installation GuideChapter 2: Preparation
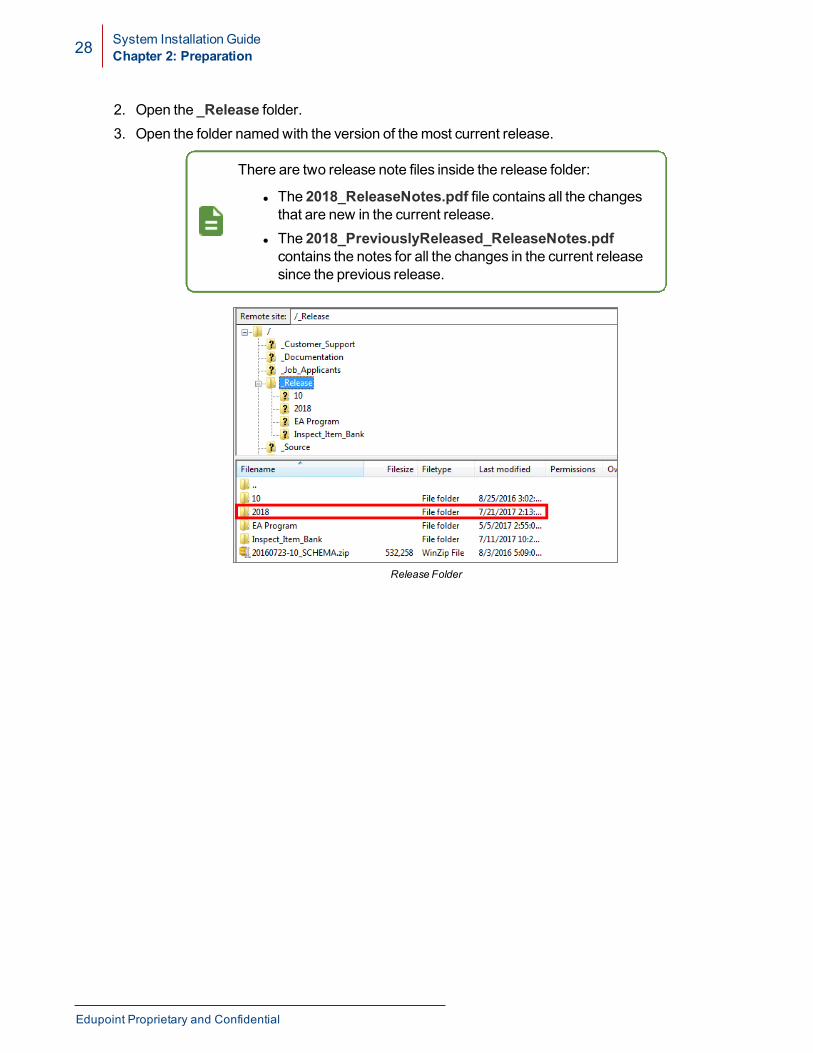
2. Open the _Release folder.3. Open the folder namedwith the version of themost current release.
There are two release note files inside the release folder:
l The 2018_ReleaseNotes.pdf file contains all the changesthat are new in the current release.
l The 2018_PreviouslyReleased_ReleaseNotes.pdfcontains the notes for all the changes in the current releasesince the previous release.
Release Folder
Edupoint Proprietary and Confidential
System Installation GuideChapter 2: Preparation 29
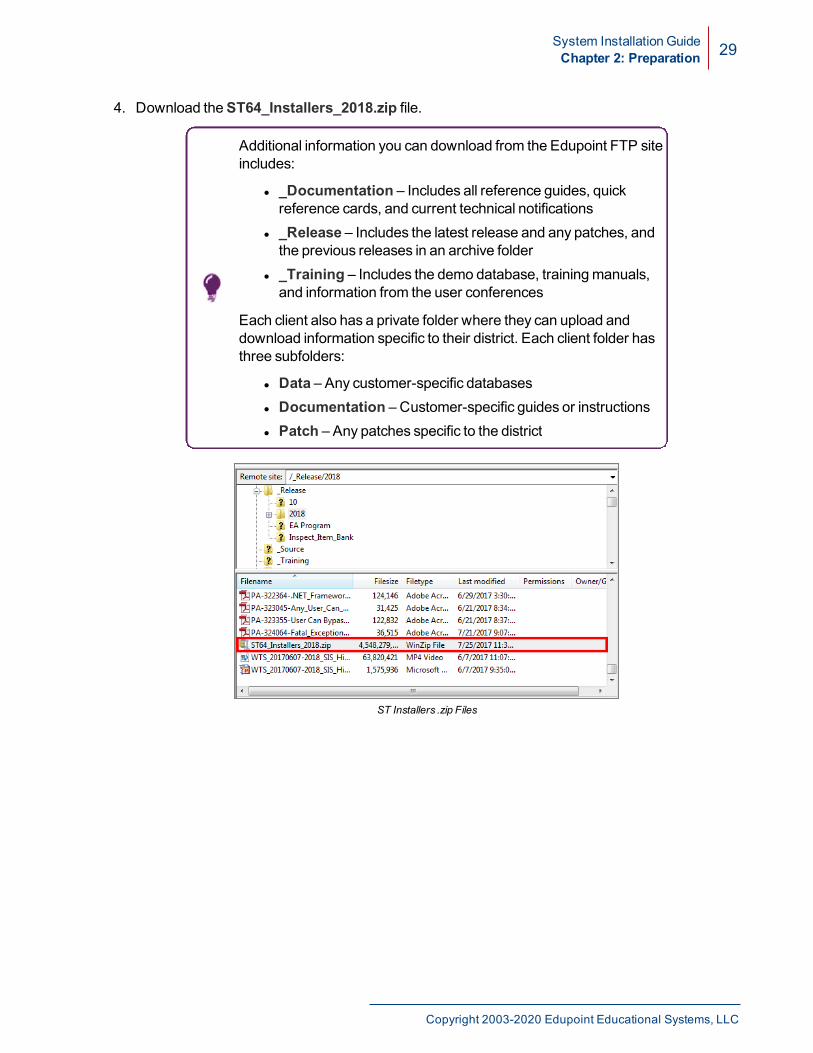
4. Download theST64_Installers_2018.zip file.
Additional information you can download from the Edupoint FTP siteincludes:
l _Documentation – Includes all reference guides, quickreference cards, and current technical notifications
l _Release – Includes the latest release and any patches, andthe previous releases in an archive folder
l _Training – Includes the demo database, trainingmanuals,and information from the user conferences
Each client also has a private folder where they can upload anddownload information specific to their district. Each client folder hasthree subfolders:
l Data – Any customer-specific databasesl Documentation – Customer-specific guides or instructionsl Patch – Any patches specific to the district
ST Installers .zip Files
Copyright 2003-2020 Edupoint Educational Systems, LLC
Chapter 3:New Installation
Server and Database Installation 31DBTools Setup 53Other Synergy SIS Software Installation 57IIS Application Initialization 58
System Installation GuideChapter 3: New Installation 31
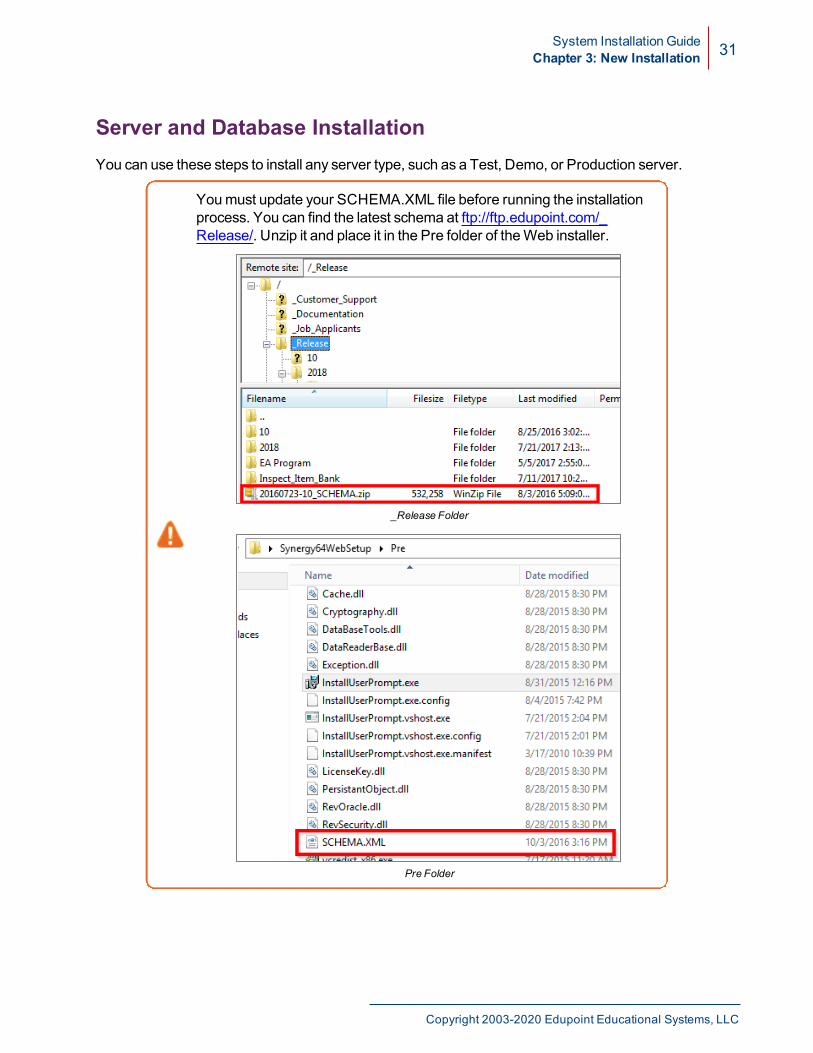
Server and Database InstallationYou can use these steps to install any server type, such as a Test, Demo, or Production server.
Youmust update your SCHEMA.XML file before running the installationprocess. You can find the latest schema at ftp://ftp.edupoint.com/_Release/. Unzip it and place it in the Pre folder of theWeb installer.
_Release Folder
Pre Folder
Copyright 2003-2020 Edupoint Educational Systems, LLC
32 System Installation GuideChapter 3: New Installation
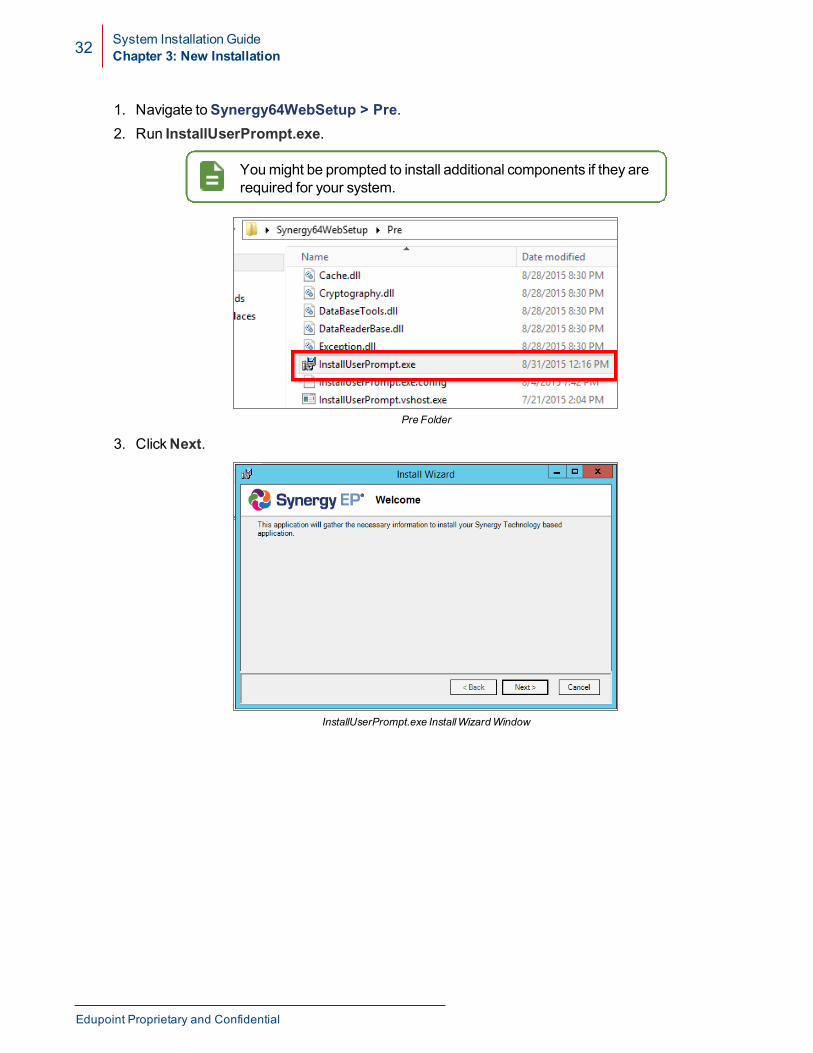
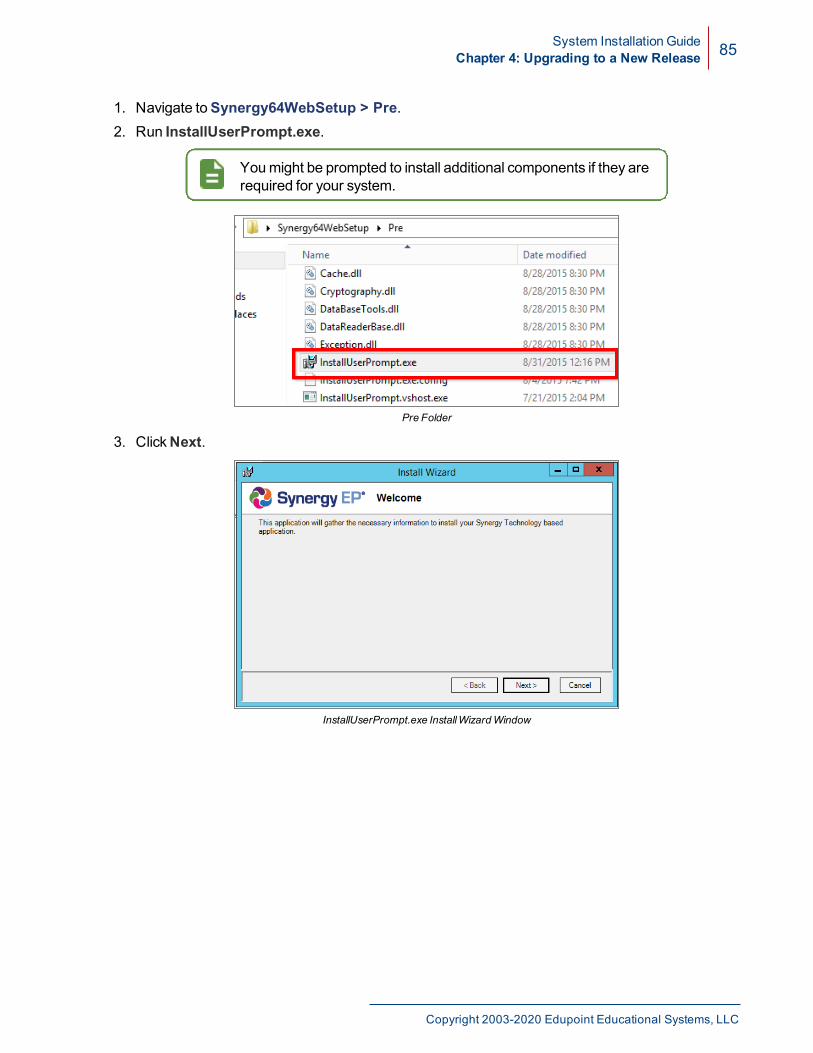
1. Navigate toSynergy64WebSetup > Pre.2. Run InstallUserPrompt.exe.
Youmight be prompted to install additional components if they arerequired for your system.
Pre Folder
3. ClickNext.
InstallUserPrompt.exe InstallWizardWindow
Edupoint Proprietary and Confidential
System Installation GuideChapter 3: New Installation 33
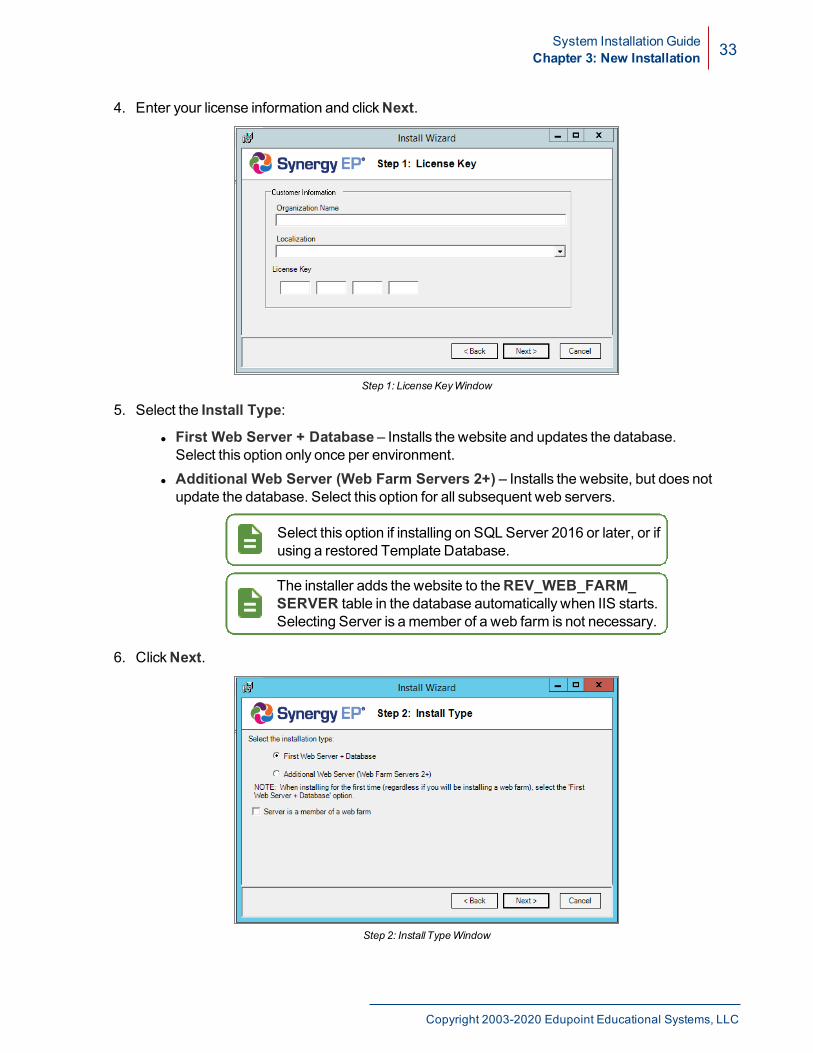
4. Enter your license information and clickNext.
Step 1: License KeyWindow
5. Select the Install Type:
l First Web Server + Database – Installs the website and updates the database.Select this option only once per environment.
l Additional Web Server (Web Farm Servers 2+) – Installs the website, but does notupdate the database. Select this option for all subsequent web servers.
Select this option if installing on SQL Server 2016 or later, or ifusing a restored Template Database.
The installer adds the website to theREV_WEB_FARM_SERVER table in the database automatically when IIS starts.Selecting Server is amember of a web farm is not necessary.
6. ClickNext.
Step 2: Install TypeWindow
Copyright 2003-2020 Edupoint Educational Systems, LLC
34 System Installation GuideChapter 3: New Installation
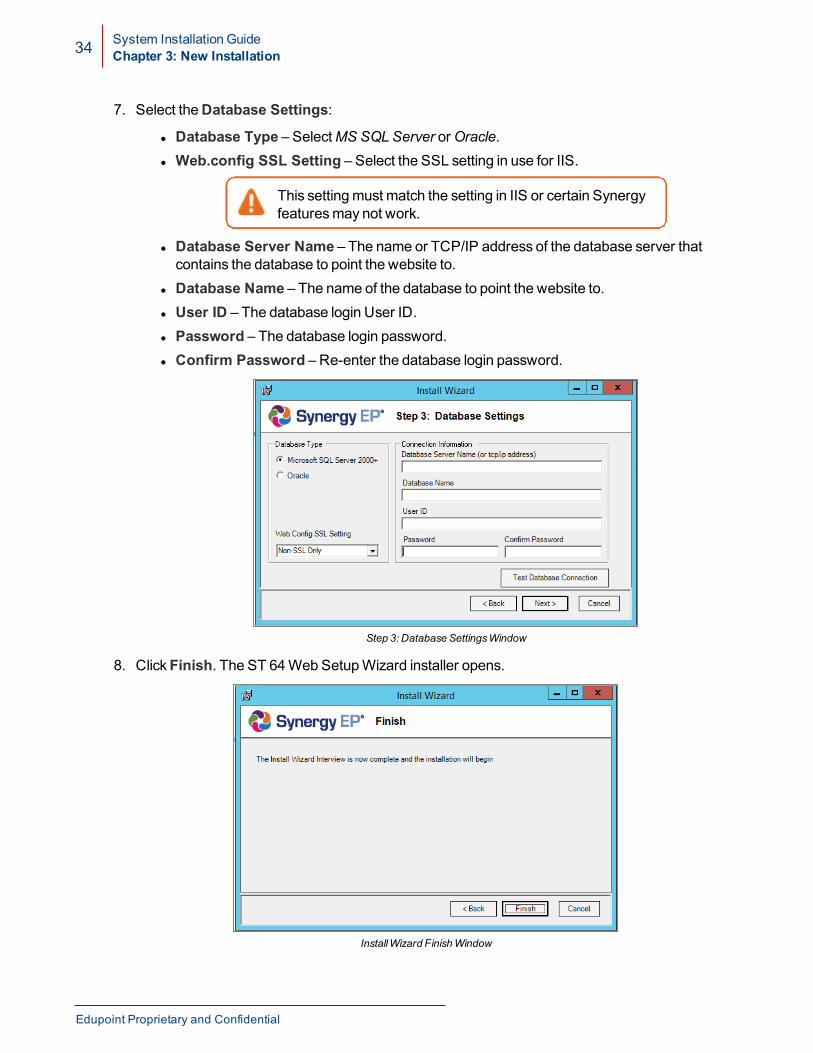
7. Select theDatabase Settings:
l Database Type – SelectMS SQLServer orOracle.l Web.config SSL Setting – Select the SSL setting in use for IIS.
This settingmust match the setting in IIS or certain Synergyfeaturesmay not work.
l Database Server Name – The name or TCP/IP address of the database server thatcontains the database to point the website to.
l Database Name – The name of the database to point the website to.l User ID – The database login User ID.l Password – The database login password.l Confirm Password – Re-enter the database login password.
Step 3: Database SettingsWindow
8. ClickFinish. The ST 64Web SetupWizard installer opens.
InstallWizard FinishWindow
Edupoint Proprietary and Confidential
System Installation GuideChapter 3: New Installation 35
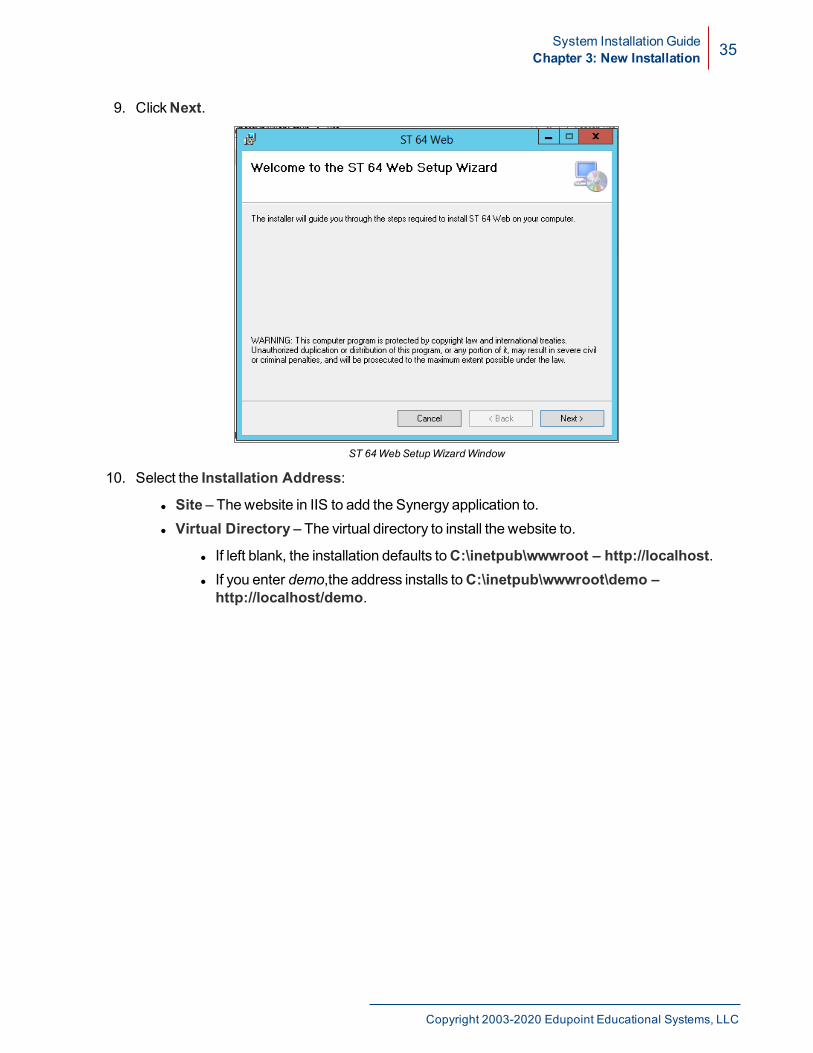
9. ClickNext.
ST 64Web SetupWizardWindow
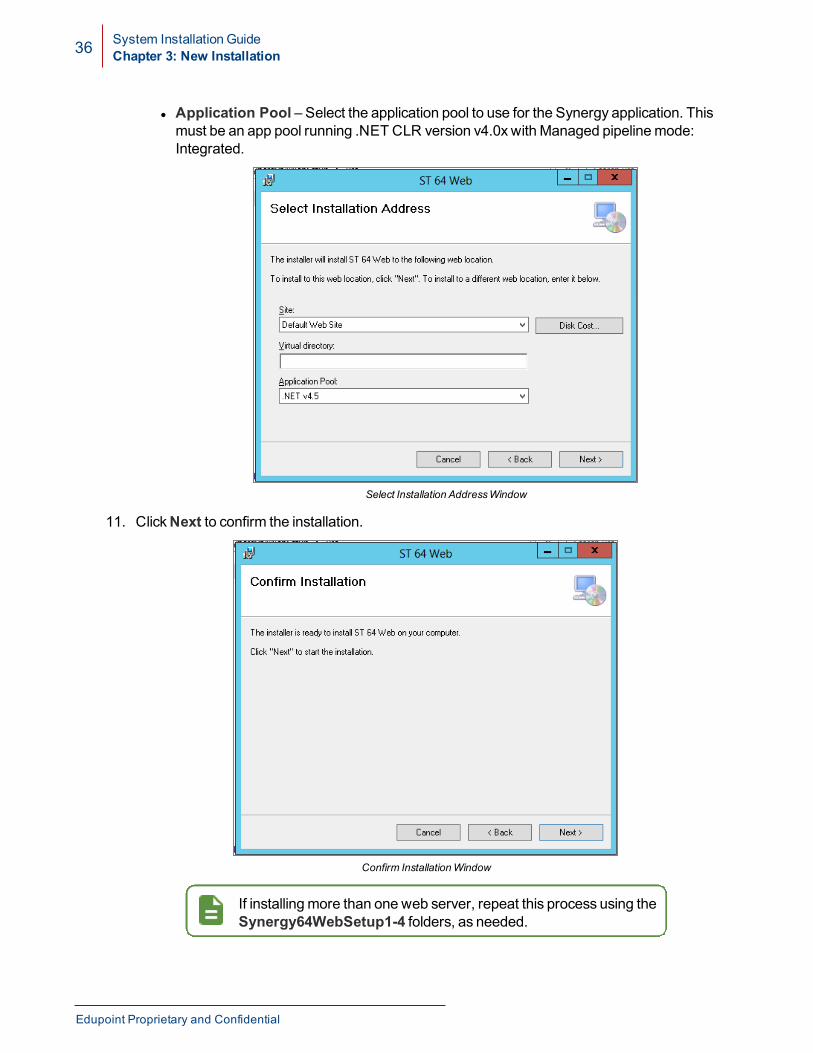
10. Select the Installation Address:
l Site – The website in IIS to add the Synergy application to.l Virtual Directory – The virtual directory to install the website to.
l If left blank, the installation defaults toC:\inetpub\wwwroot – http://localhost.l If you enter demo,the address installs toC:\inetpub\wwwroot\demo –http://localhost/demo.
Copyright 2003-2020 Edupoint Educational Systems, LLC
36 System Installation GuideChapter 3: New Installation
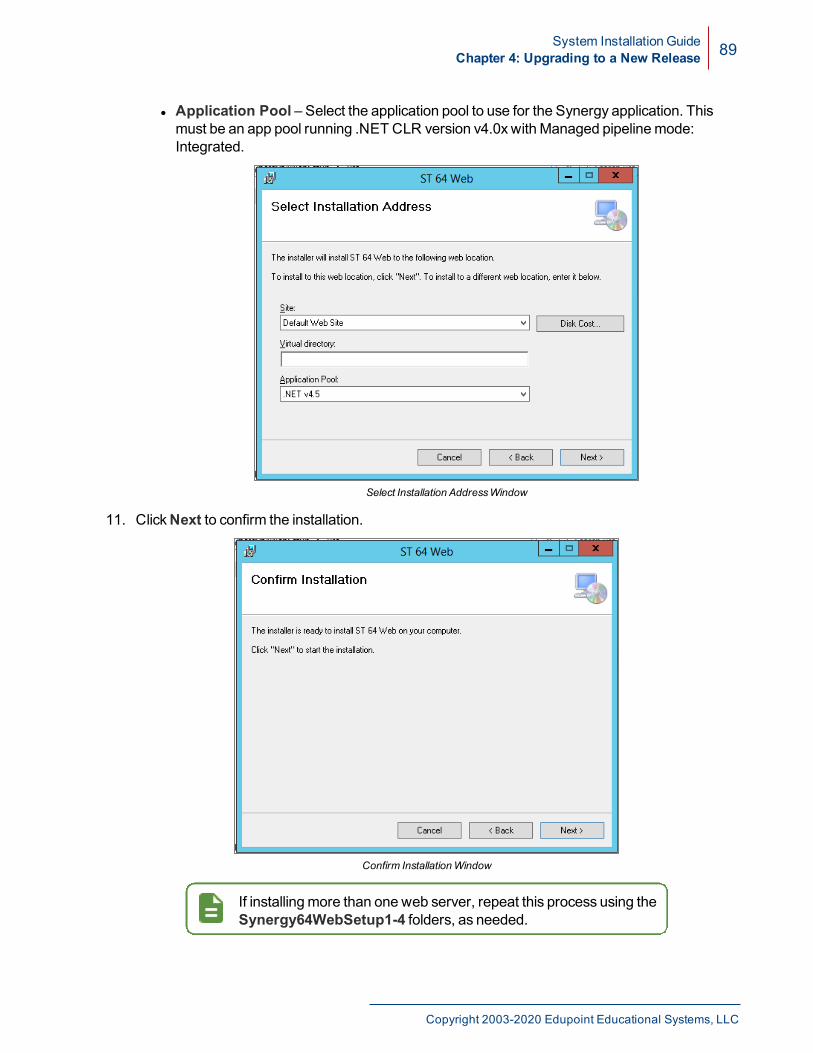
l Application Pool – Select the application pool to use for the Synergy application. Thismust be an app pool running .NET CLR version v4.0xwith Managed pipelinemode:Integrated.
Select Installation AddressWindow
11. ClickNext to confirm the installation.
Confirm InstallationWindow
If installingmore than one web server, repeat this process using theSynergy64WebSetup1-4 folders, as needed.
Edupoint Proprietary and Confidential
System Installation GuideChapter 3: New Installation 37
After installing the web server software and the database, install the process server and any otherSynergy software.
Youmust uninstall and reinstall all Synergymoduleswith each newrelease, as the core software that eachmodule uses updates each time.However, Synergy saves the settings entered during installation, such asthe license key.
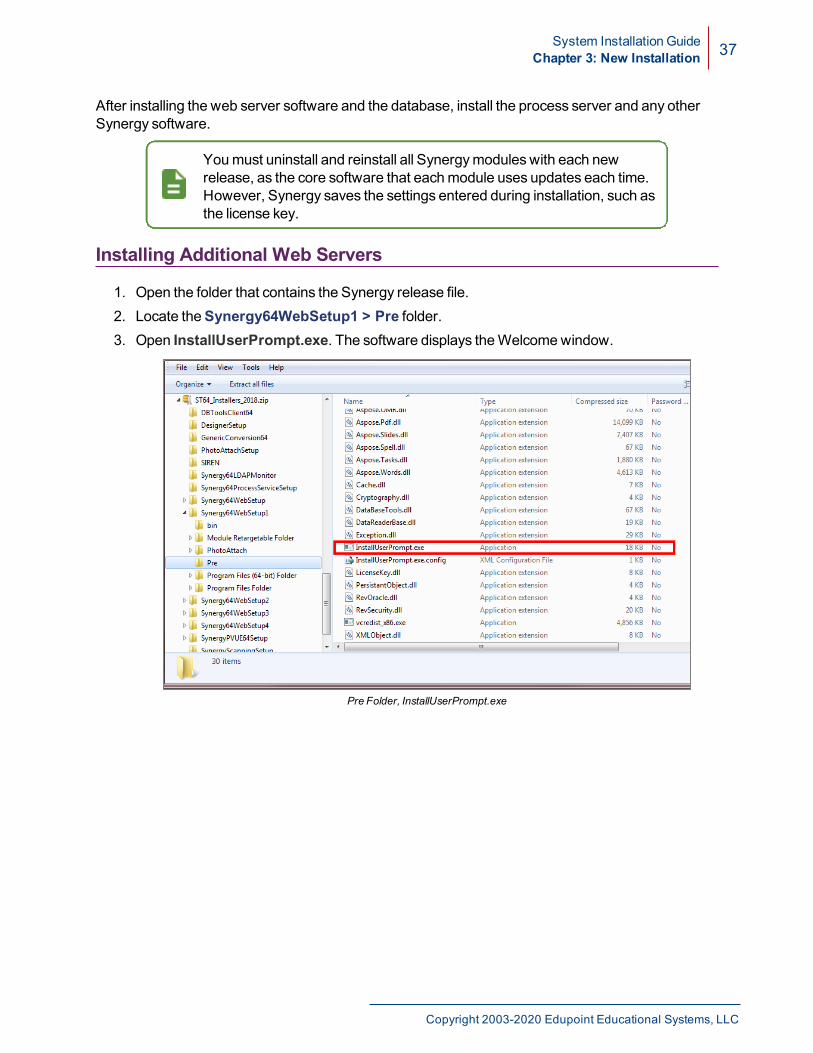
Installing Additional Web Servers
1. Open the folder that contains the Synergy release file.2. Locate theSynergy64WebSetup1 > Pre folder.3. Open InstallUserPrompt.exe. The software displays theWelcomewindow.
Pre Folder, InstallUserPrompt.exe
Copyright 2003-2020 Edupoint Educational Systems, LLC
38 System Installation GuideChapter 3: New Installation
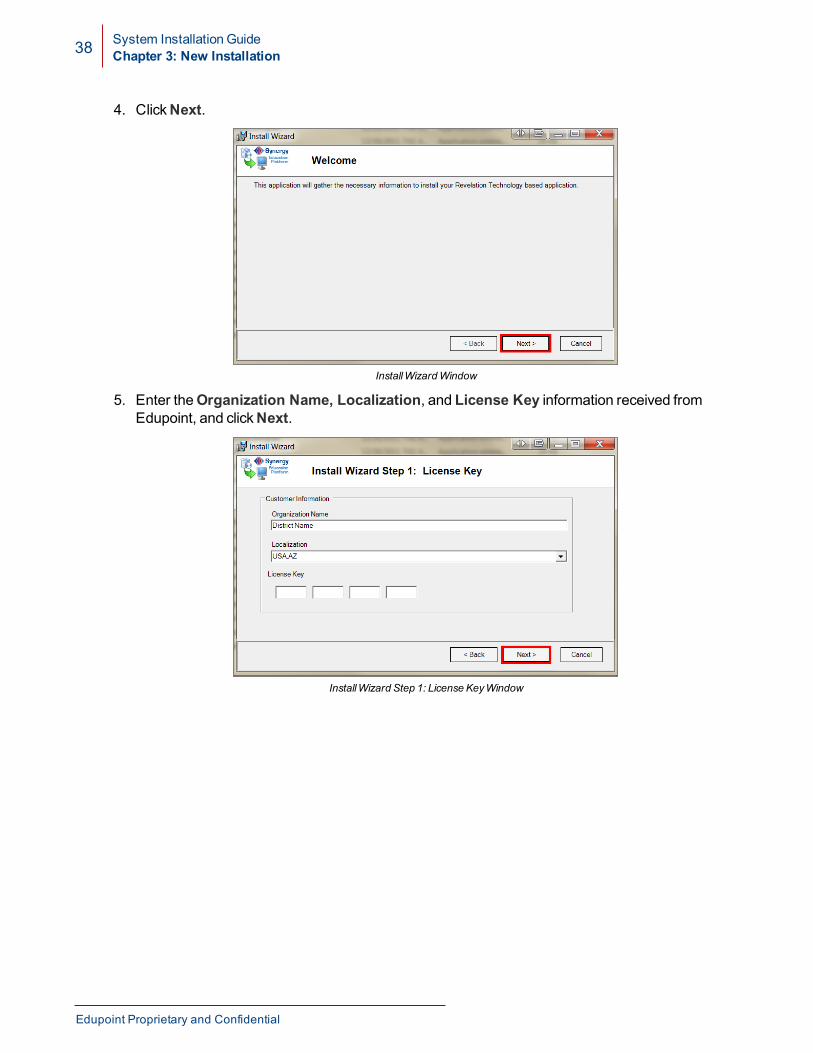
4. ClickNext.
InstallWizardWindow
5. Enter theOrganization Name, Localization, and License Key information received fromEdupoint, and clickNext.
InstallWizard Step 1: License KeyWindow
Edupoint Proprietary and Confidential

System Installation GuideChapter 3: New Installation 39
6. ChooseAdditional Web Server (Web Farm Servers 2+) to install Synergy SIS on anotherweb server.
7. SelectServer is a member of a web farm.8. Select the IP address used to communicate with the other web servers. If the server has
multiple network cards, choose the IP address for the private LAN.9. ClickNext.
InstallWizard Step 2: Install TypeWindow
10. Choose the type of database used for the Synergy SIS installation:Microsoft SQL Server2000+ orOracle 9i. Then enter the values for each type of database as outlined below.
11. For SQL Server 2000+:
a. Enter the server name or TCP/IP address in theDatabase Server Name field.b. Enter theDatabase Name.c. Enter rev in theUser ID fieldd. Enter thePassword andConfirm Password fields.
InstallWizard Step 3: Database SettingsWindow
Copyright 2003-2020 Edupoint Educational Systems, LLC
40 System Installation GuideChapter 3: New Installation
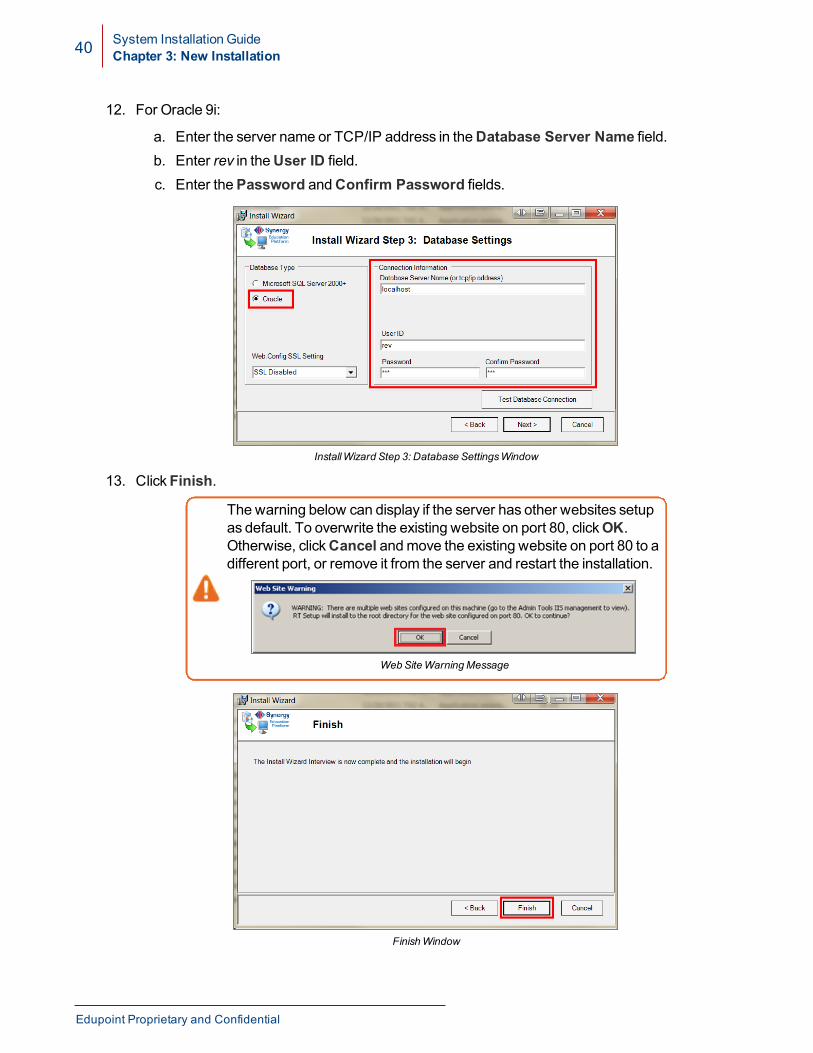
12. For Oracle 9i:
a. Enter the server name or TCP/IP address in theDatabase Server Name field.b. Enter rev in theUser ID field.c. Enter thePassword andConfirm Password fields.
InstallWizard Step 3: Database SettingsWindow
13. ClickFinish.
The warning below can display if the server has other websites setupas default. To overwrite the existing website on port 80, clickOK.Otherwise, clickCancel andmove the existing website on port 80 to adifferent port, or remove it from the server and restart the installation.
WebSiteWarningMessage
FinishWindow
Edupoint Proprietary and Confidential

System Installation GuideChapter 3: New Installation 41
14. ClickNext on theWelcome to the ST SetupWizard screen.
Welcome To The ST 64Web 1 SetupWizardWindow
15. Select theSite.16. SelectASP.NET V4.0 Integrated underApplication Pool. To see how much space the
software takes on the drive, clickDisk Cost.17. ClickNext.
Select Installation AddressWindow
Copyright 2003-2020 Edupoint Educational Systems, LLC
42 System Installation GuideChapter 3: New Installation
18. ClickNext.
Confirm InstallationWindow
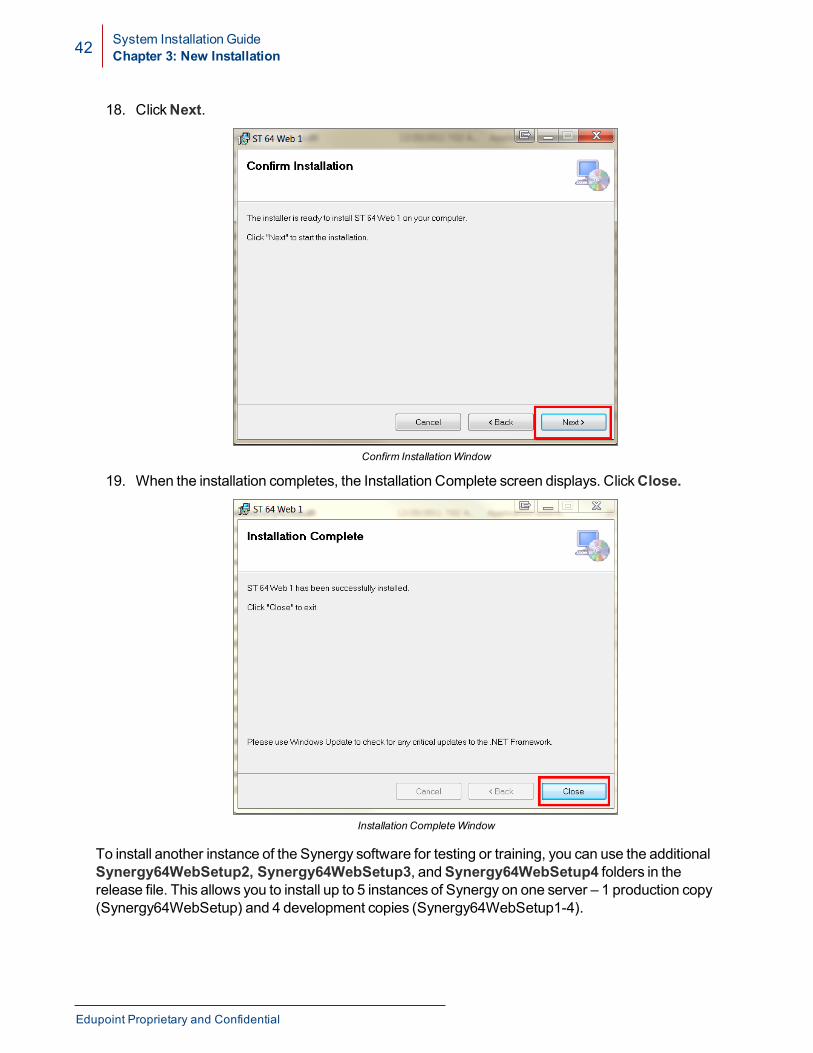
19. When the installation completes, the Installation Complete screen displays. ClickClose.
Installation CompleteWindow
To install another instance of the Synergy software for testing or training, you can use the additionalSynergy64WebSetup2, Synergy64WebSetup3, andSynergy64WebSetup4 folders in therelease file. This allows you to install up to 5 instances of Synergy on one server – 1 production copy(Synergy64WebSetup) and 4 development copies (Synergy64WebSetup1-4).
Edupoint Proprietary and Confidential
System Installation GuideChapter 3: New Installation 43
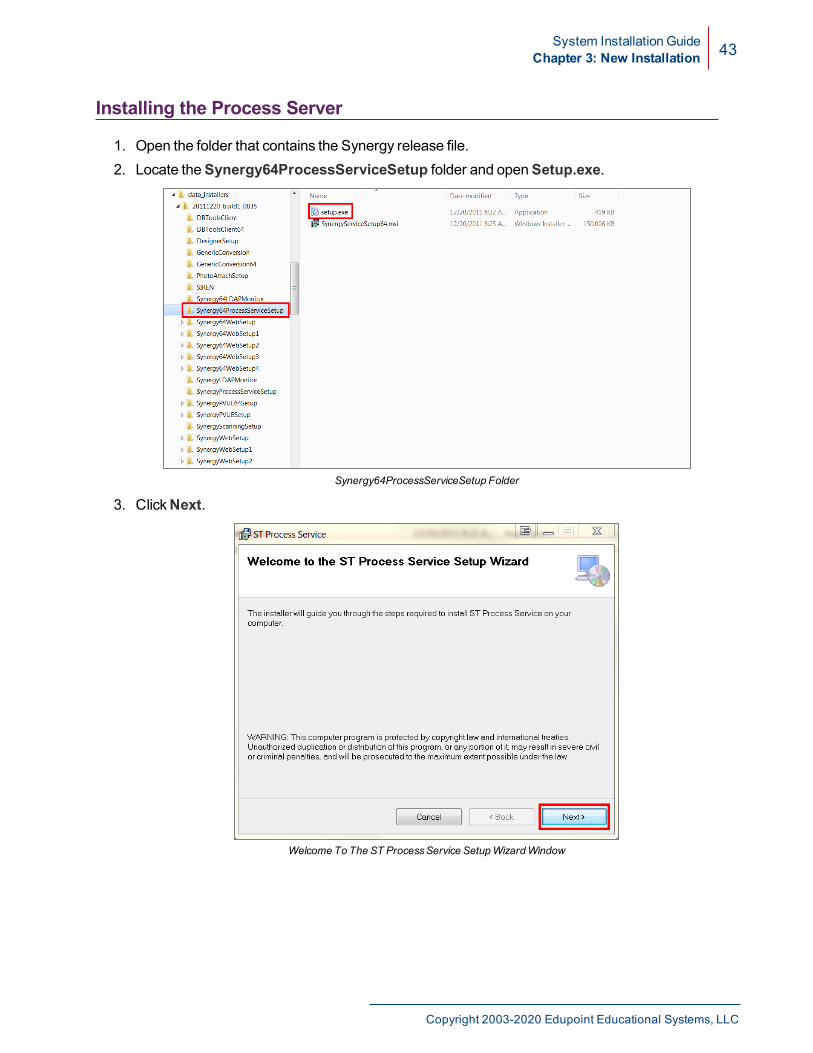
Installing the Process Server
1. Open the folder that contains the Synergy release file.2. Locate theSynergy64ProcessServiceSetup folder and openSetup.exe.
Synergy64ProcessServiceSetup Folder
3. ClickNext.
Welcome To The ST ProcessService SetupWizardWindow
Copyright 2003-2020 Edupoint Educational Systems, LLC
44 System Installation GuideChapter 3: New Installation
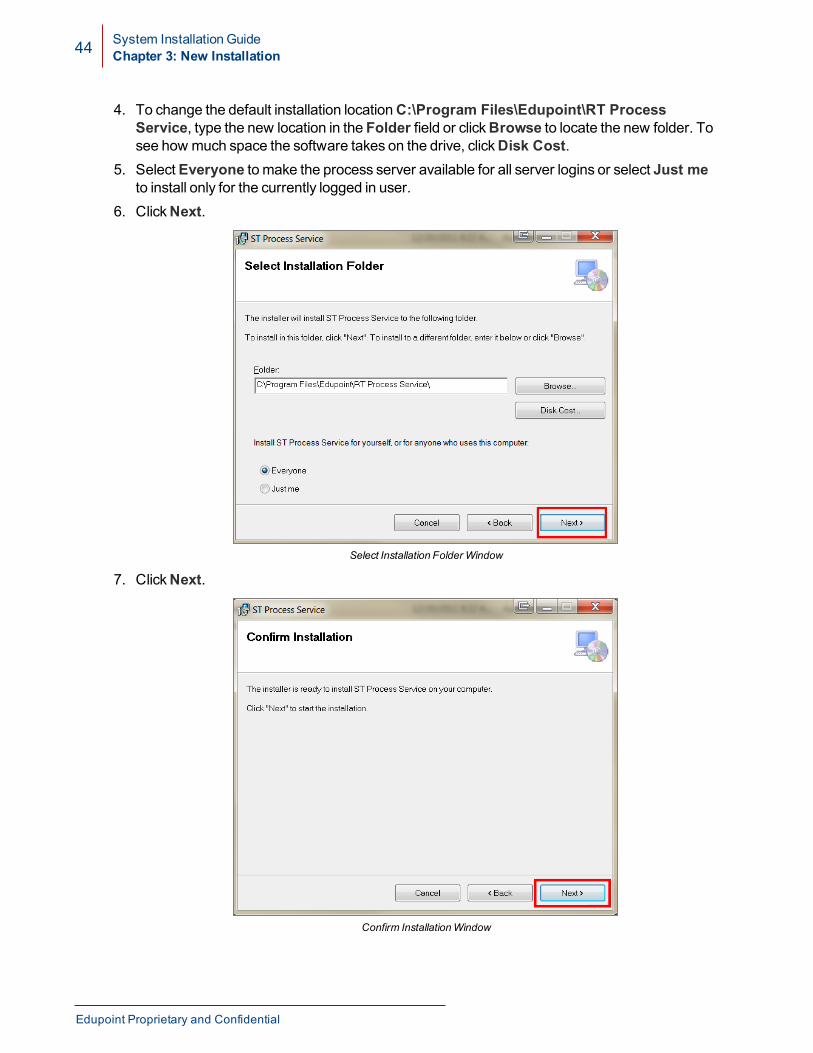
4. To change the default installation locationC:\Program Files\Edupoint\RT ProcessService, type the new location in the Folder field or clickBrowse to locate the new folder. Tosee how much space the software takes on the drive, clickDisk Cost.
5. SelectEveryone to make the process server available for all server logins or select Just meto install only for the currently logged in user.
6. ClickNext.
Select Installation Folder Window
7. ClickNext.
Confirm InstallationWindow
Edupoint Proprietary and Confidential
System Installation GuideChapter 3: New Installation 45
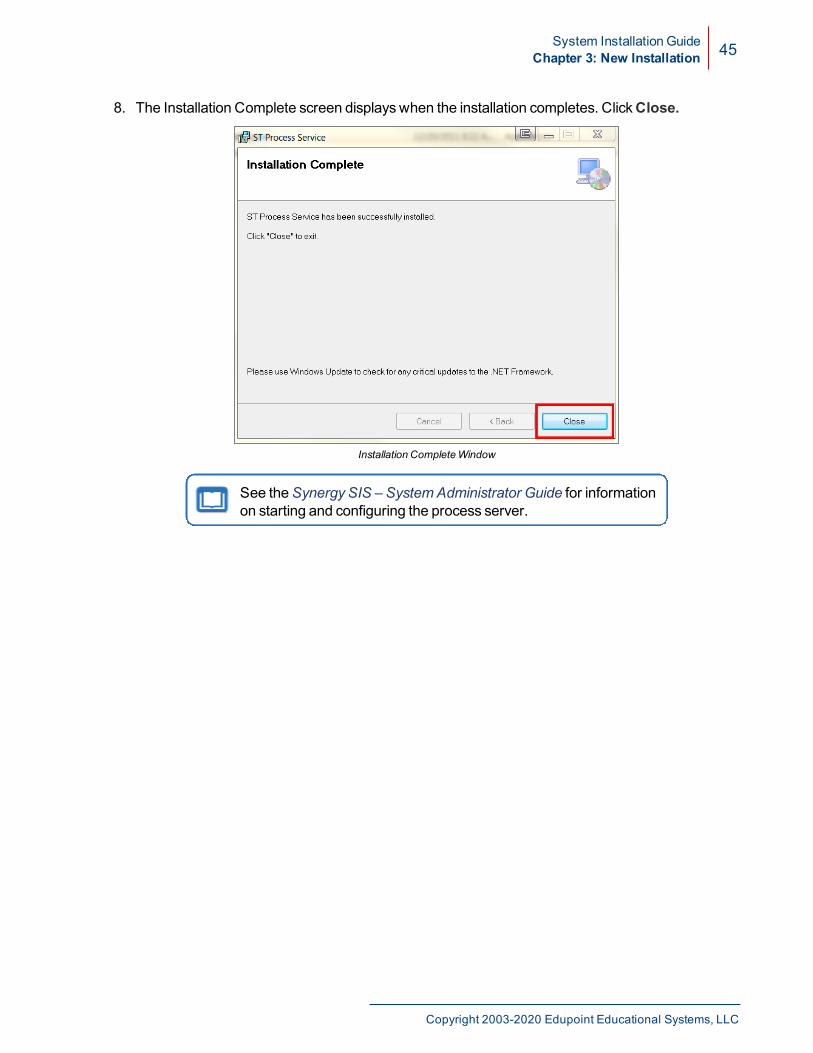
8. The Installation Complete screen displayswhen the installation completes. ClickClose.
Installation CompleteWindow
See theSynergy SIS – SystemAdministrator Guide for informationon starting and configuring the process server.
Copyright 2003-2020 Edupoint Educational Systems, LLC
46 System Installation GuideChapter 3: New Installation
Installing Additional Process Servers
Prior to version 2019.01, each Process Server had to be installed on a singlemachine. A machinecould not havemore than one process server installed. The ability to install and runmultiple ProcessServers on a singlemachine was added to version 2019.01. This section describes how to installmultiple RT Process Service instances on a singlemachine for Synergy version 2019.01 and higher.
Process Server Changes
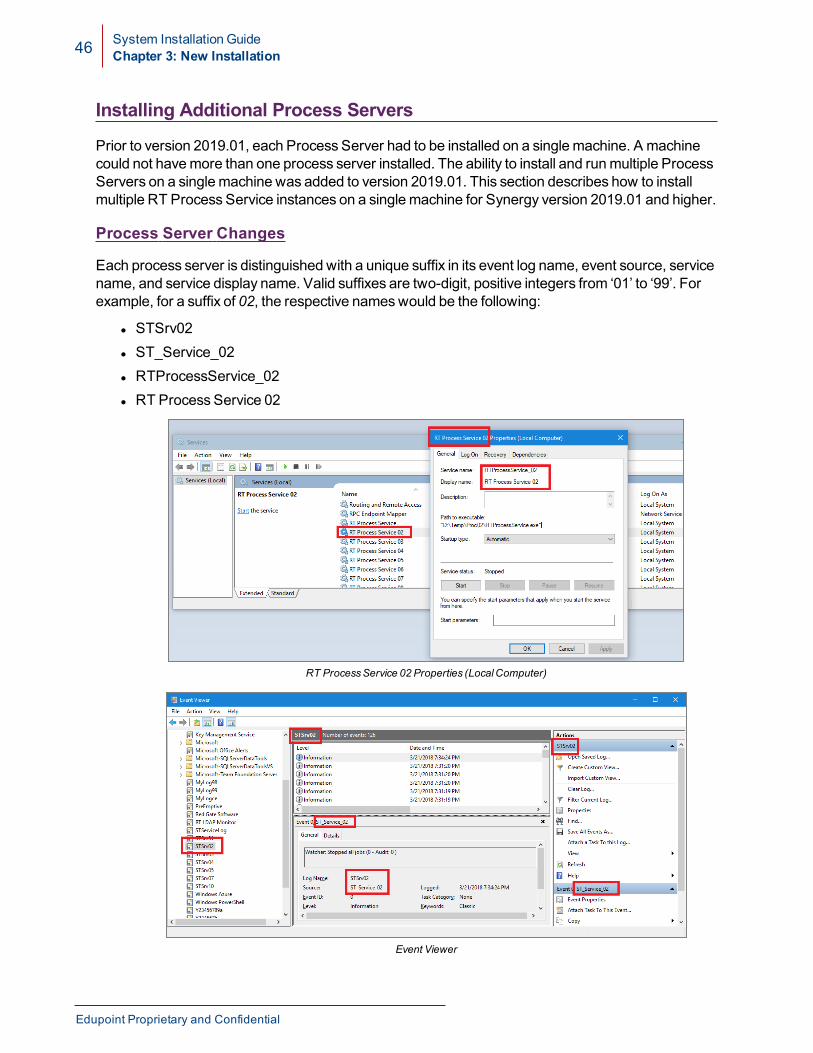
Each process server is distinguished with a unique suffix in its event log name, event source, servicename, and service display name. Valid suffixes are two-digit, positive integers from ‘01’ to ‘99’. Forexample, for a suffix of 02, the respective nameswould be the following:
l STSrv02l ST_Service_02l RTProcessService_02l RT Process Service 02
RT ProcessService 02 Properties (LocalComputer)
Event Viewer
Edupoint Proprietary and Confidential
System Installation GuideChapter 3: New Installation 47
Requirements
A version 2019.01 or higher Process Server must be installed. This version 2019.01 or higherProcess Server can either be:
1. Installed on the samemachine where the additional Process Servers are to be installed.2. Installed on a different machine where access to the Process Server files on the file system is
available.
The RT Process Service SetupWindows applicationmust be run with Administrator permissions inorder to install new Process Servers.
On single Process Server machines (as is the case for all 2019 and earlier versions) TCP port 8184must be open. For any new Process Servers you wish to install beyond that, TCP port 8184 + nnmust be open, where nn is the suffix of the Process Server you wish to install. Valid suffixes are twodigit positive integers from 01 to 99. For example, if you wish to install a new Process Server withsuffix 02, TCP port 8184 + 02 or TCP port 8186must be open. To support all Process Servers withsuffixes 01 to 99, aswell as the base Process Server, TCP ports 8184-8283must be open.
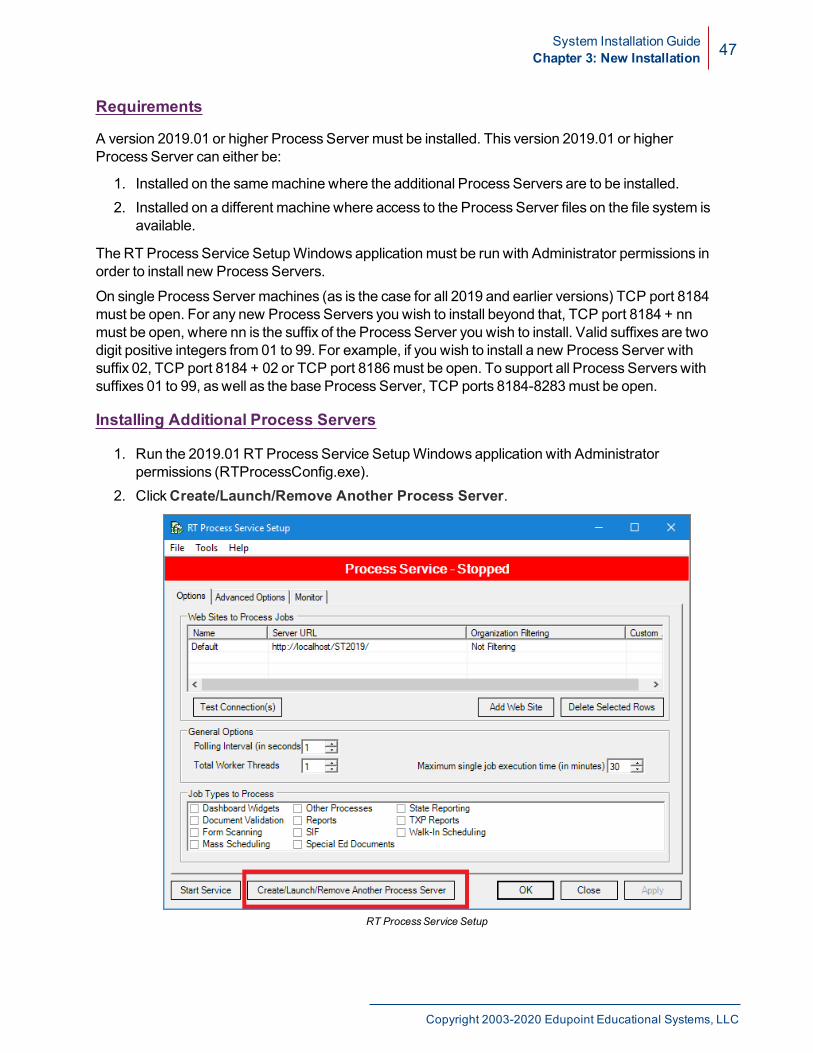
Installing Additional Process Servers
1. Run the 2019.01 RT Process Service SetupWindows application with Administratorpermissions (RTProcessConfig.exe).
2. ClickCreate/Launch/Remove Another Process Server.
RT ProcessService Setup
Copyright 2003-2020 Edupoint Educational Systems, LLC
48 System Installation GuideChapter 3: New Installation
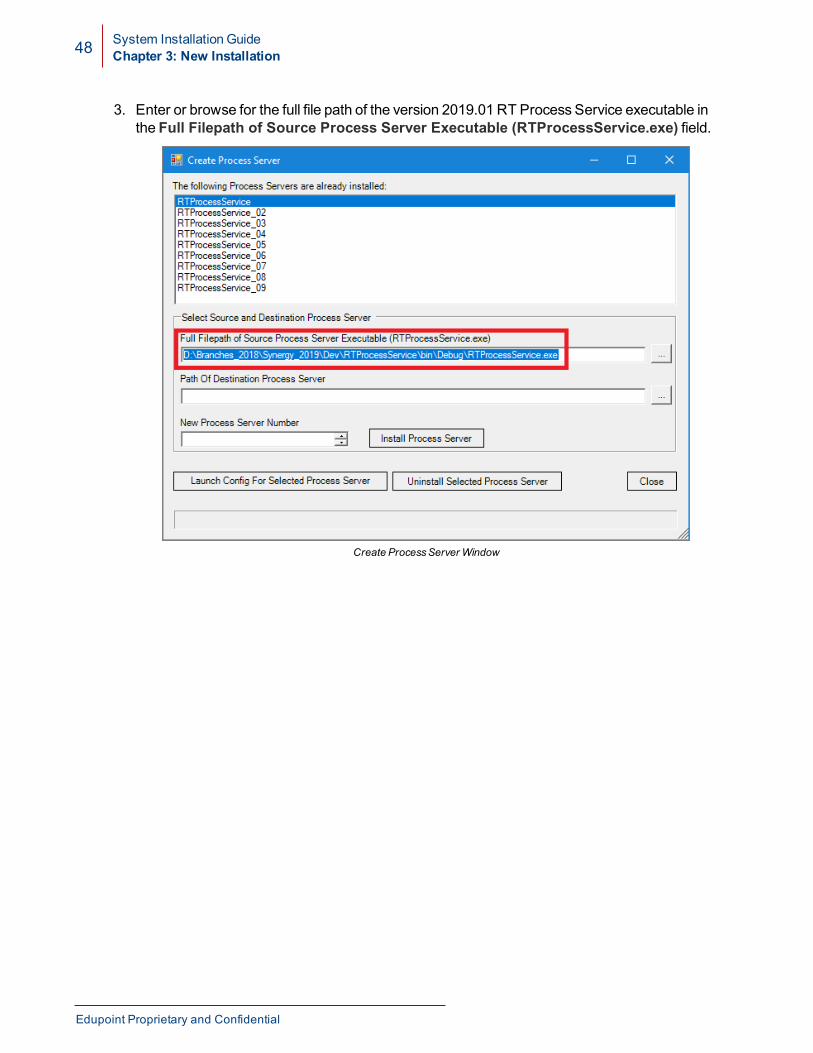
3. Enter or browse for the full file path of the version 2019.01 RT Process Service executable inthe Full Filepath of Source Process Server Executable (RTProcessService.exe) field.
Create ProcessServer Window
Edupoint Proprietary and Confidential
System Installation GuideChapter 3: New Installation 49
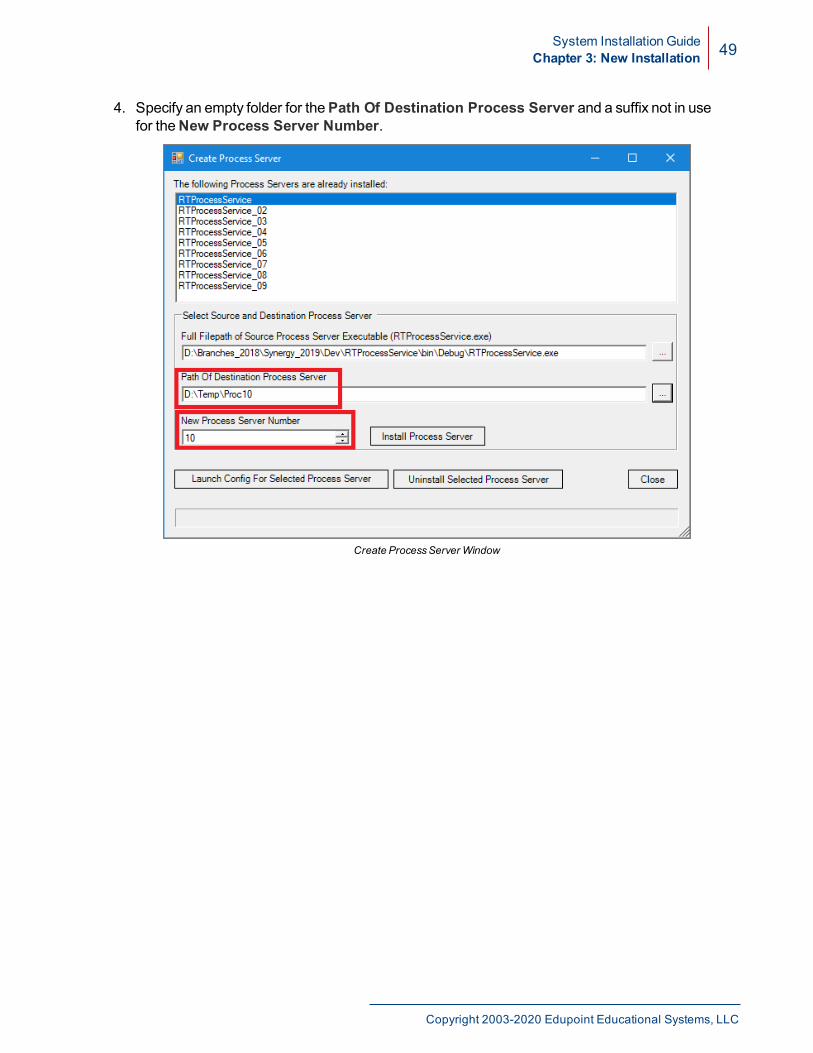
4. Specify an empty folder for thePath Of Destination Process Server and a suffix not in usefor theNew Process Server Number.
Create ProcessServer Window
Copyright 2003-2020 Edupoint Educational Systems, LLC

50 System Installation GuideChapter 3: New Installation
5. Click Install Process Server.
Create ProcessServer Window
Edupoint Proprietary and Confidential
System Installation GuideChapter 3: New Installation 51
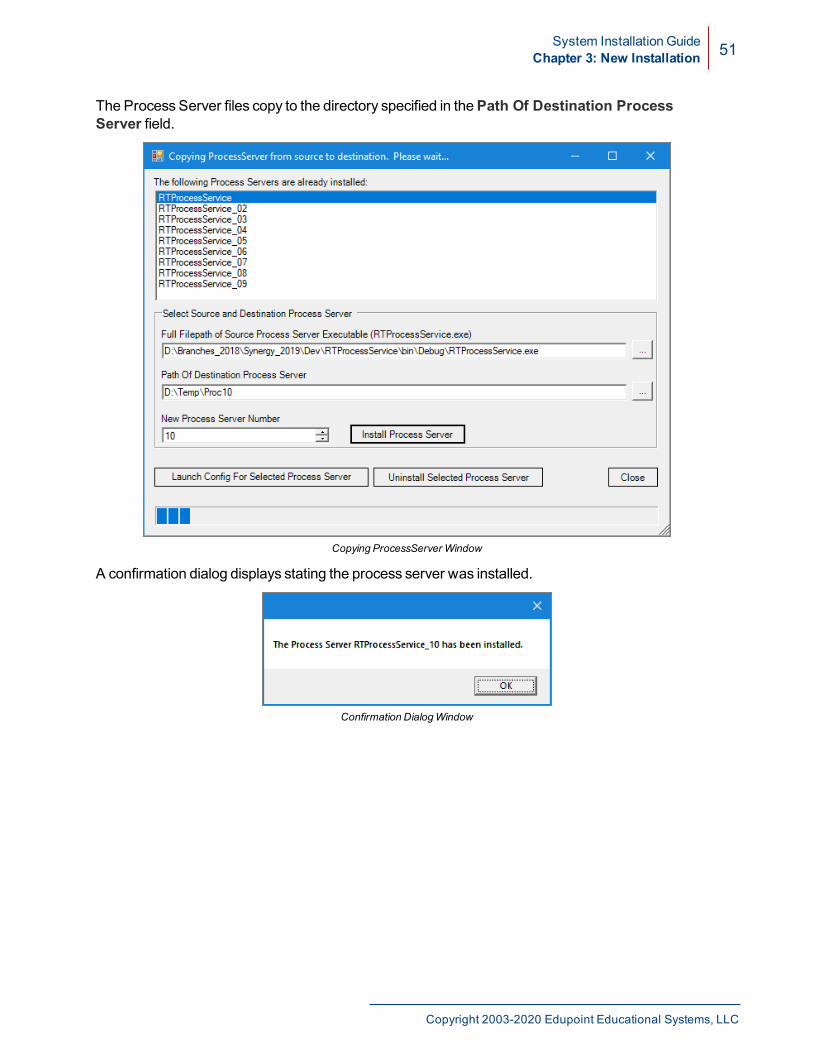
The Process Server files copy to the directory specified in thePath Of Destination ProcessServer field.
Copying ProcessServer Window
A confirmation dialog displays stating the process server was installed.
Confirmation DialogWindow
Copyright 2003-2020 Edupoint Educational Systems, LLC
52 System Installation GuideChapter 3: New Installation
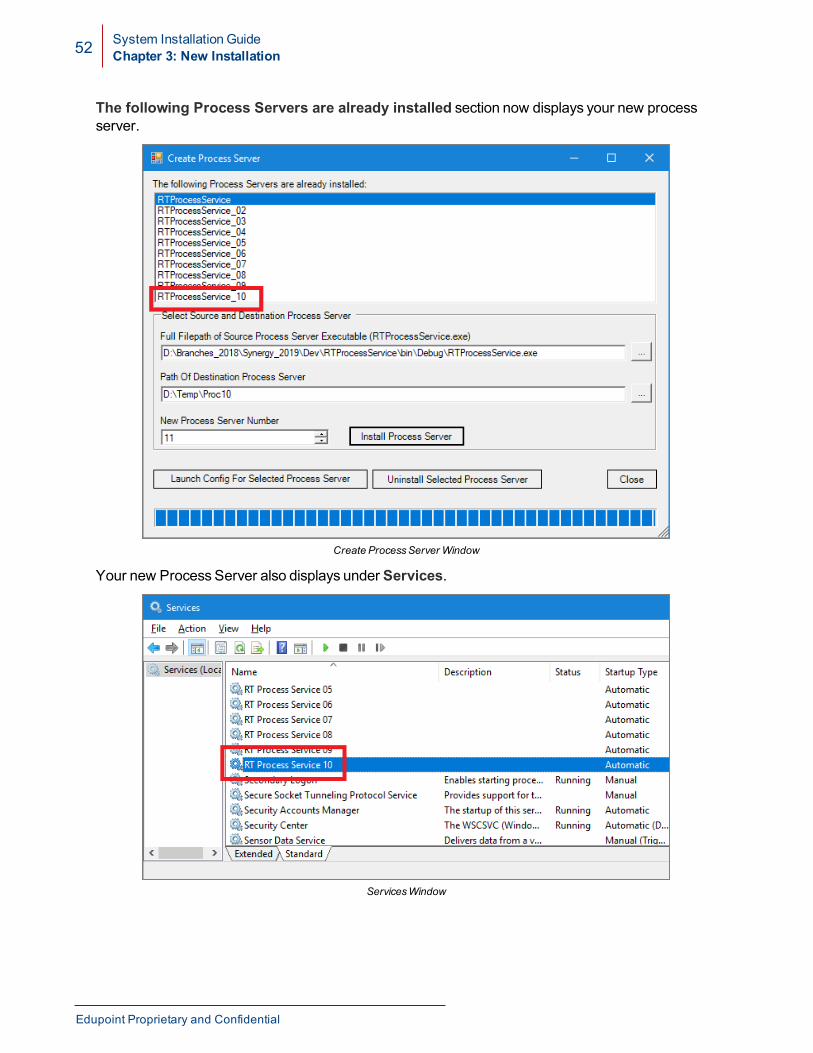
The following Process Servers are already installed section now displays your new processserver.
Create ProcessServer Window
Your new Process Server also displays under Services.
ServicesWindow
Edupoint Proprietary and Confidential
System Installation GuideChapter 3: New Installation 53
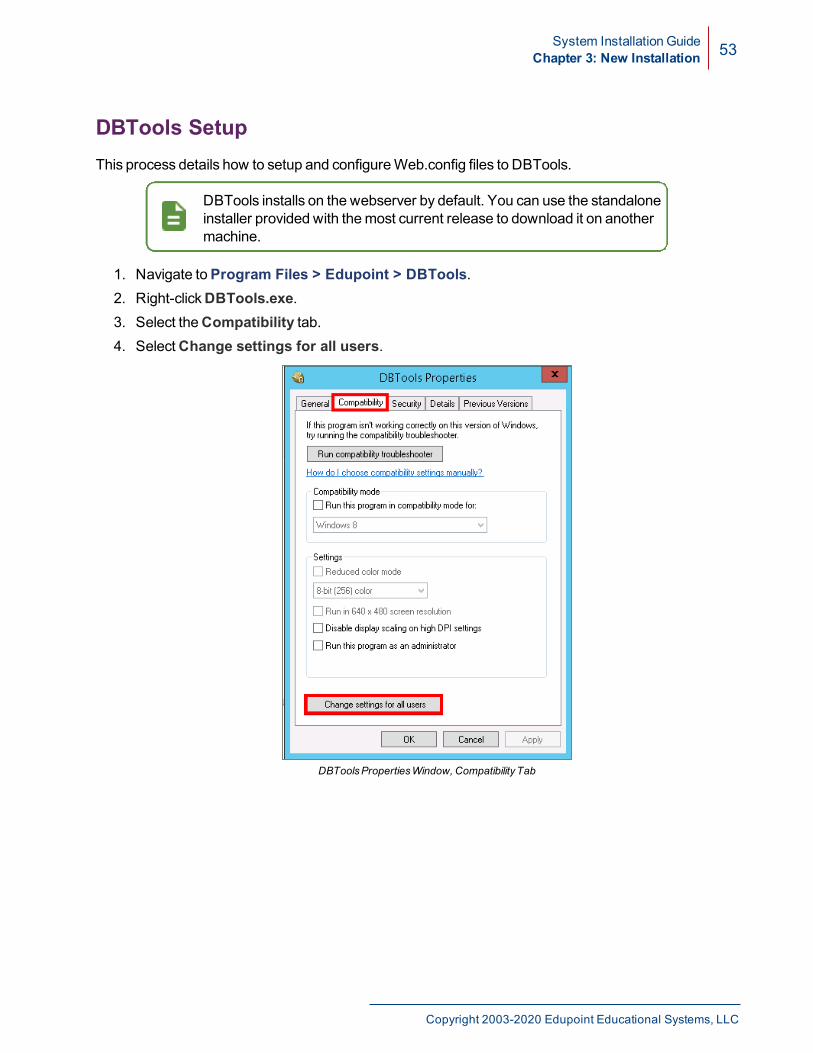
DBTools SetupThis process details how to setup and configureWeb.config files to DBTools.
DBTools installs on the webserver by default. You can use the standaloneinstaller provided with themost current release to download it on anothermachine.
1. Navigate toProgram Files > Edupoint > DBTools.2. Right-clickDBTools.exe.3. Select theCompatibility tab.4. SelectChange settings for all users.
DBToolsPropertiesWindow, Compatibility Tab
Copyright 2003-2020 Edupoint Educational Systems, LLC

54 System Installation GuideChapter 3: New Installation
5. SelectRun this program as an administrator and clickOK.
DBToolsPropertiesWindow
6. Launch DBTools.7. SelectAddNewWeb.config/Database Access from theDatabasesmenu.
DBToolsWindow, DatabasesMenu
Edupoint Proprietary and Confidential
System Installation GuideChapter 3: New Installation 55
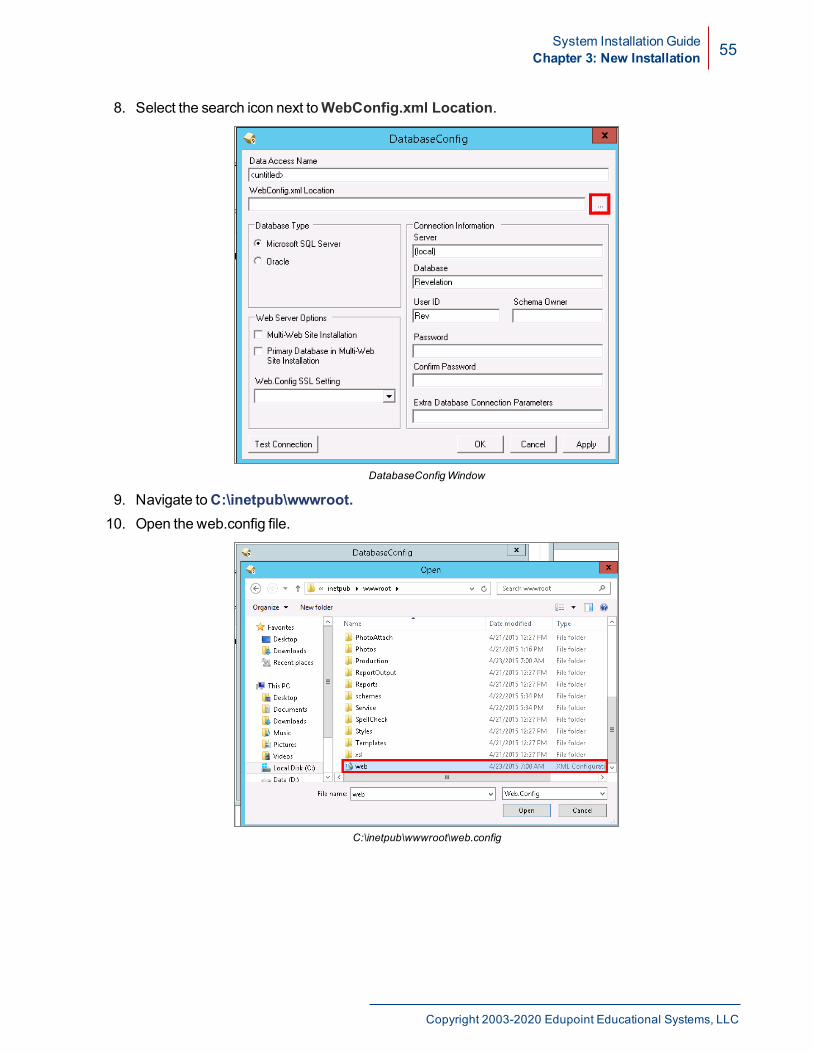
8. Select the search icon next toWebConfig.xml Location.
DatabaseConfigWindow
9. Navigate toC:\inetpub\wwwroot.10. Open the web.config file.
C:\inetpub\wwwroot\web.config
Copyright 2003-2020 Edupoint Educational Systems, LLC
56 System Installation GuideChapter 3: New Installation
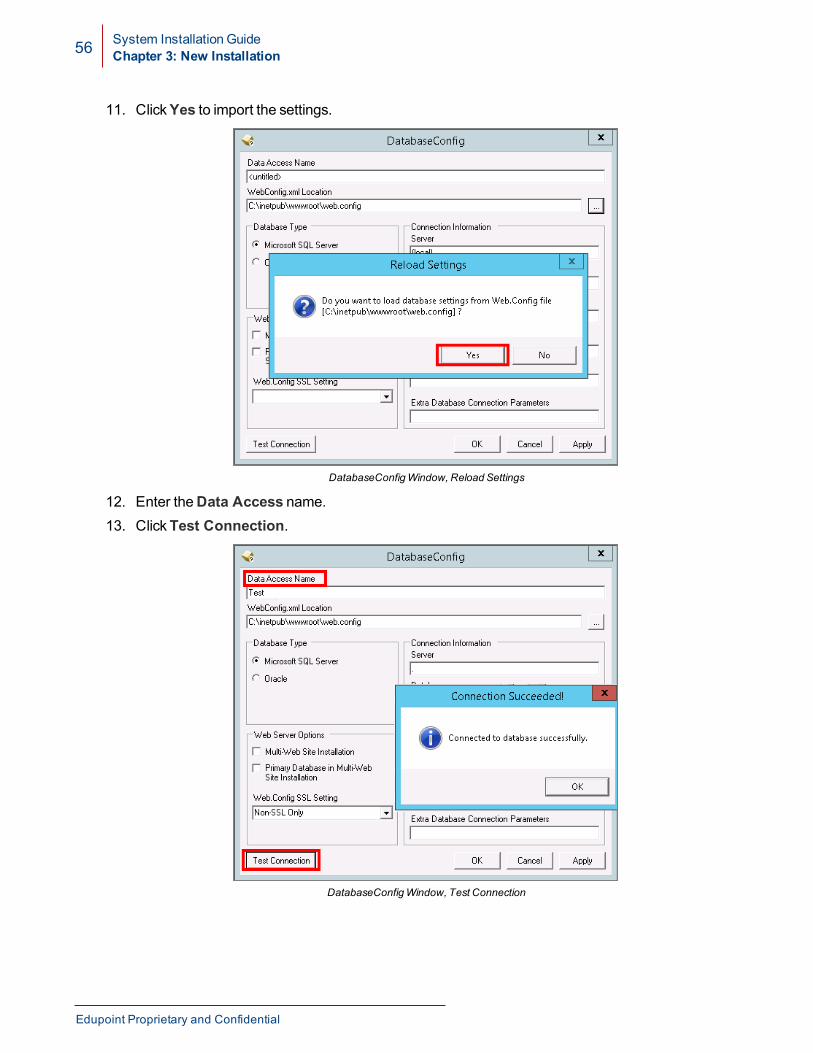
11. ClickYes to import the settings.
DatabaseConfigWindow, Reload Settings
12. Enter theData Access name.13. ClickTest Connection.
DatabaseConfigWindow, Test Connection
Edupoint Proprietary and Confidential
System Installation GuideChapter 3: New Installation 57
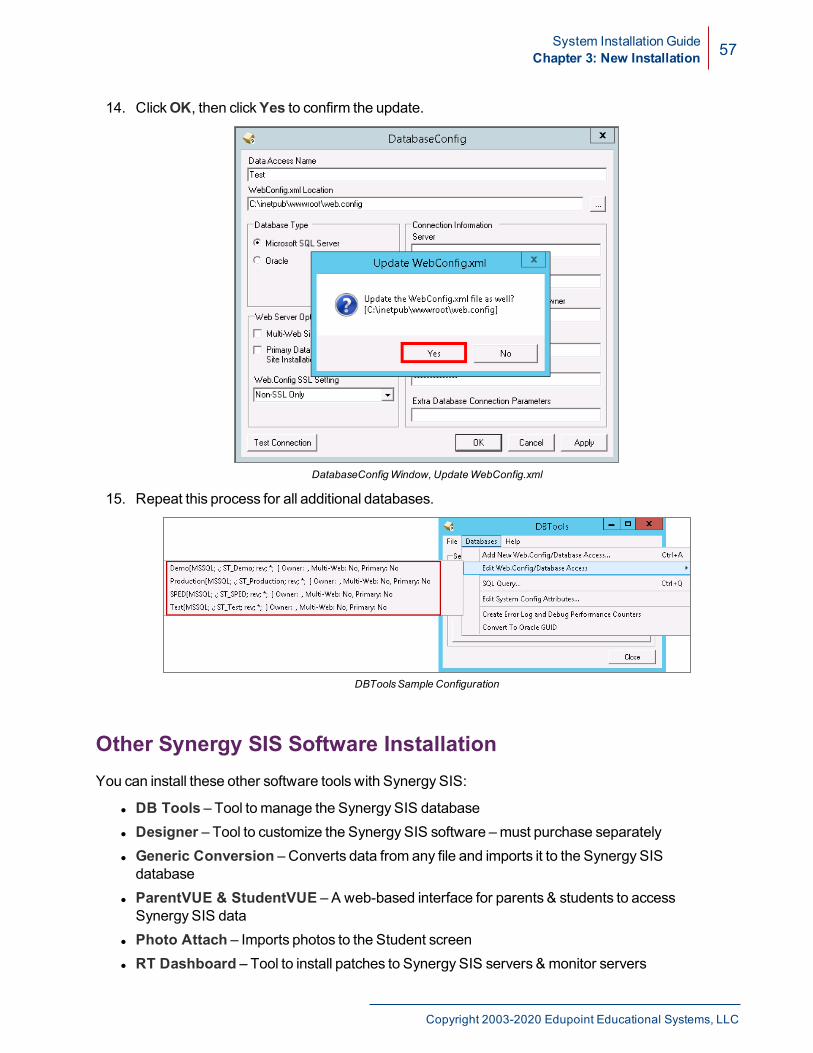
14. ClickOK, then clickYes to confirm the update.
DatabaseConfigWindow, UpdateWebConfig.xml
15. Repeat this process for all additional databases.
DBToolsSample Configuration
Other Synergy SIS Software InstallationYou can install these other software tools with Synergy SIS:
l DB Tools – Tool to manage the Synergy SIS databasel Designer – Tool to customize the Synergy SIS software –must purchase separatelyl Generic Conversion – Converts data from any file and imports it to the Synergy SISdatabase
l ParentVUE & StudentVUE – A web-based interface for parents & students to accessSynergy SIS data
l Photo Attach – Imports photos to the Student screenl RT Dashboard – Tool to install patches to Synergy SIS servers & monitor servers
Copyright 2003-2020 Edupoint Educational Systems, LLC

58 System Installation GuideChapter 3: New Installation
l ST Scanning – Scans attendance and grading sheets and imports the data to Synergy SISl SASI 3 Conversion – Converts SASI XP data to Synergy SISl SASI XP Conversion – Converts SASI XP data to Synergy SISl SIREN – Custom report development software
The instructions for installing each of these tools are in the following guides:
Software Guide
DB Tools Synergy SIS – System Administrator Guide
Designer ST Developer Training Guide
Generic Conversion Synergy Data Conversions
ParentVUE &StudentVUE
Synergy SIS – ParentVUE & StudentVUE AdministratorGuide
Photo Attach Synergy SIS – Student Management Administrator Guide
RT Dashboard Setting UpRT Dashboard
RT Scanning Synergy SIS – System Administrator Guide
SASI 3 Conversion Synergy SIS – SASI Conversion Guide
SASI XP Conversion Synergy SIS – SASI Conversion Guide
SIREN Synergy SIREN Report Designers Guide
IIS Application InitializationSynergy requires you tomake the following changes to theWeb.config file to prevent ambiguouscompilation errors. The change requires IIS to compile each .dll in amore discretemanner.Web.config files useOptimize Compilations by default, which are shown below.<compilation defaultLanguage="c#" debug="false"targetFramework="4.7.2" optimizeCompilations="true">
Replace this line in the web.config file with the following:<compilation batch="false" debug="false" defaultLanguage="c#"optimizeCompilations="false" targetFramework="4.7.2">
Setting optimizeCompilations to false causes .dll files to compile as requested, which can causepoor performance issues and slow response times.
Using the Application Initialization processwarms up application pools and theGlobal AssemblyCache (GAC) by ensuring IIS compiles all necessary .dll files in advance. Both of these changesassist in preloading web servers tomake them ready for use after clearing the .NET cache or afterapplying a Synergy update.
See http://www.iis.net/learn/get-started/whats-new-in-iis-8/iis-80-application-initialization#TOC301259911 for more information.
Edupoint Proprietary and Confidential

System Installation GuideChapter 3: New Installation 59
You can use either the appcmd command or IIS Manager to configure application pool settings.Edupoint also provides required web.config changes for various server types in the followinginstructions.
Application Initialization Server Role
You can find the standalone installer for IIS 7.5 or Windows 2008 R2 athttp://www.iis.net/downloads/microsoft/application-initialization.
You can install the Application Initialization server role in IIS Manager.
AddRolesAnd FeaturesWizardWindow
This allows users to view a splash page on websites while waiting for application pools to warm up.
WebServer Sample Splash Page
Users see the normal Synergy login screen after IIS finishes compiling the JIT code in the GAC.
Copyright 2003-2020 Edupoint Educational Systems, LLC
60 System Installation GuideChapter 3: New Installation
ASPX Page Modifications
You can edit thePXP_ClassWebsite.aspx file and add the following to the Register commands:<%@ Register Src="PXP_ClassWebsiteControl.ascx" TagName="PXPClassWeb"TagPrefix="PC" %>
This starts the JIT compiler every time the application starts. This displays the loading splash page tousers when they visit the website.
Using APPCMD to Update Application Pools
Using the appcmd command is the only way to set the preloadEnabled flag to True. It is also amore efficient way to update all of the application pools and site settings than using IIS Manager.
Single site web serverC:\Windows\System32\inetsrv\appcmd SET APPPOOL Production -startMode:"AlwaysRunning" -processModel.idleTimeout:"00:00:00" -processModel.pingingEnabled:"false"C:\Windows\System32\inetsrv\appcmd SET APPPOOL Train -startMode:"AlwaysRunning" -processModel.idleTimeout:"00:00:00" -processModel.pingingEnabled:"false"C:\Windows\System32\inetsrv\appcmd set APP "Default Web Site/" -preloadEnabled:TruePause
ParentVUE Web ServerC:\Windows\System32\inetsrv\appcmd SET APPPOOL pvue -startMode:"AlwaysRunning" -processModel.idleTimeout:"00:00:00" -processModel.pingingEnabled:"false"C:\Windows\System32\inetsrv\appcmd set APP "Default Web Site/" -preloadEnabled:TruePause
Multiple Web Servers and Application Pools (Consortium Installation)C:\Windows\System32\inetsrv\appcmd SET APPPOOL bcs -startMode:"AlwaysRunning"-processModel.idleTimeout:"00:00:00" -processModel.pingingEnabled:"false"C:\Windows\System32\inetsrv\appcmd SET APPPOOL MASTER -startMode:"AlwaysRunning" -processModel.idleTimeout:"00:00:00" -processModel.pingingEnabled:"false"C:\Windows\System32\inetsrv\appcmd SET APPPOOL ECS -startMode:"AlwaysRunning"-processModel.idleTimeout:"00:00:00" -processModel.pingingEnabled:"false"C:\Windows\System32\inetsrv\appcmd SET APPPOOL GCS -startMode:"AlwaysRunning"-processModel.idleTimeout:"00:00:00" -processModel.pingingEnabled:"false"C:\Windows\System32\inetsrv\appcmd SET APPPOOL MCCS -startMode:"AlwaysRunning" -processModel.idleTimeout:"00:00:00" -processModel.pingingEnabled:"false"C:\Windows\System32\inetsrv\appcmd SET APPPOOL MCS -startMode:"AlwaysRunning"-processModel.idleTimeout:"00:00:00" -processModel.pingingEnabled:"false"
Edupoint Proprietary and Confidential
System Installation GuideChapter 3: New Installation 61
C:\Windows\System32\inetsrv\appcmd SET APPPOOL MONCS -startMode:"AlwaysRunning" -processModel.idleTimeout:"00:00:00" -processModel.pingingEnabled:"false"C:\Windows\System32\inetsrv\appcmd SET APPPOOL PCS -startMode:"AlwaysRunning"-processModel.idleTimeout:"00:00:00" -processModel.pingingEnabled:"false"C:\Windows\System32\inetsrv\appcmd SET APPPOOL RCS -startMode:"AlwaysRunning"-processModel.idleTimeout:"00:00:00" -processModel.pingingEnabled:"false"C:\Windows\System32\inetsrv\appcmd SET APPPOOL SCS -startMode:"AlwaysRunning"-processModel.idleTimeout:"00:00:00" -processModel.pingingEnabled:"false"C:\Windows\System32\inetsrv\appcmd set APP "Default Web Site/Master" -preloadEnabled:TrueC:\Windows\System32\inetsrv\appcmd set APP "Default Web Site/BCS" -preloadEnabled:TrueC:\Windows\System32\inetsrv\appcmd set APP "Default Web Site/ECS" -preloadEnabled:TrueC:\Windows\System32\inetsrv\appcmd set APP "Default Web Site/GCS" -preloadEnabled:TrueC:\Windows\System32\inetsrv\appcmd set APP "Default Web Site/MCCS" -preloadEnabled:TrueC:\Windows\System32\inetsrv\appcmd set APP "Default Web Site/MCS" -preloadEnabled:TrueC:\Windows\System32\inetsrv\appcmd set APP "Default Web Site/MONCS" -preloadEnabled:TrueC:\Windows\System32\inetsrv\appcmd set APP "Default Web Site/PCS" -preloadEnabled:TrueC:\Windows\System32\inetsrv\appcmd set APP "Default Web Site/RCS" -preloadEnabled:TrueC:\Windows\System32\inetsrv\appcmd set APP "Default Web Site/SCS" -preloadEnabled:TruePause
Copyright 2003-2020 Edupoint Educational Systems, LLC
62 System Installation GuideChapter 3: New Installation
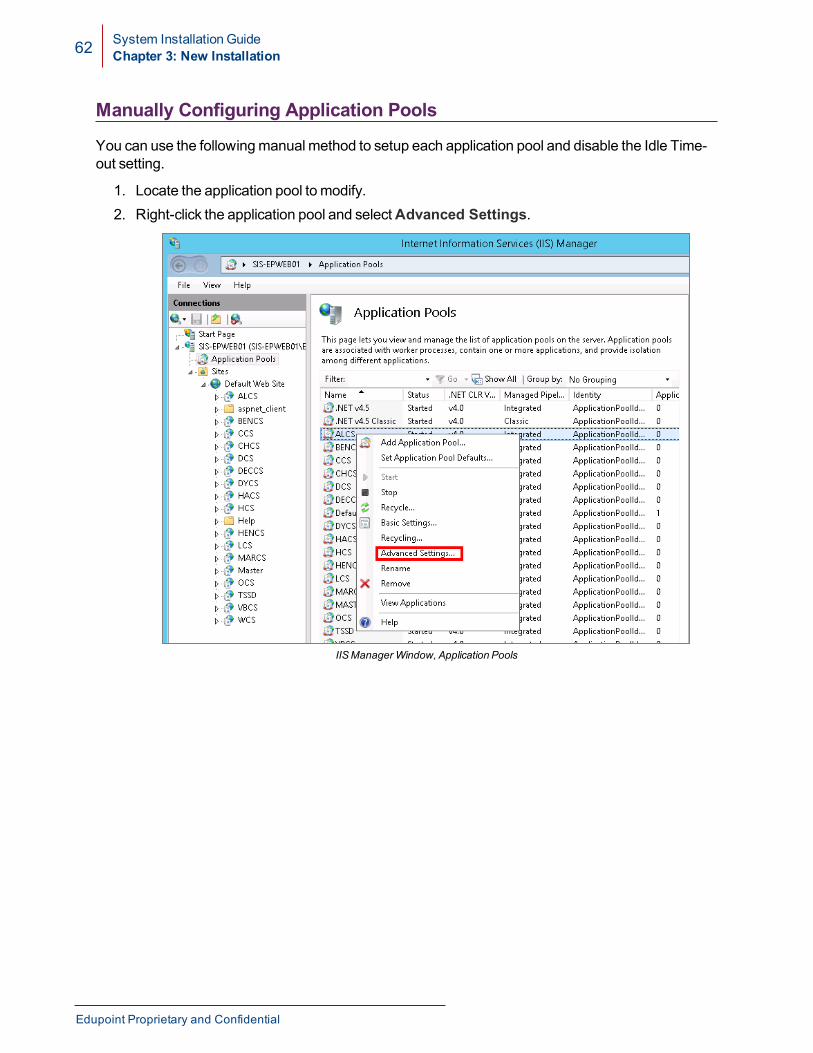
Manually Configuring Application Pools
You can use the followingmanual method to setup each application pool and disable the Idle Time-out setting.
1. Locate the application pool to modify.2. Right-click the application pool and selectAdvanced Settings.
IISManager Window, Application Pools
Edupoint Proprietary and Confidential
System Installation GuideChapter 3: New Installation 63
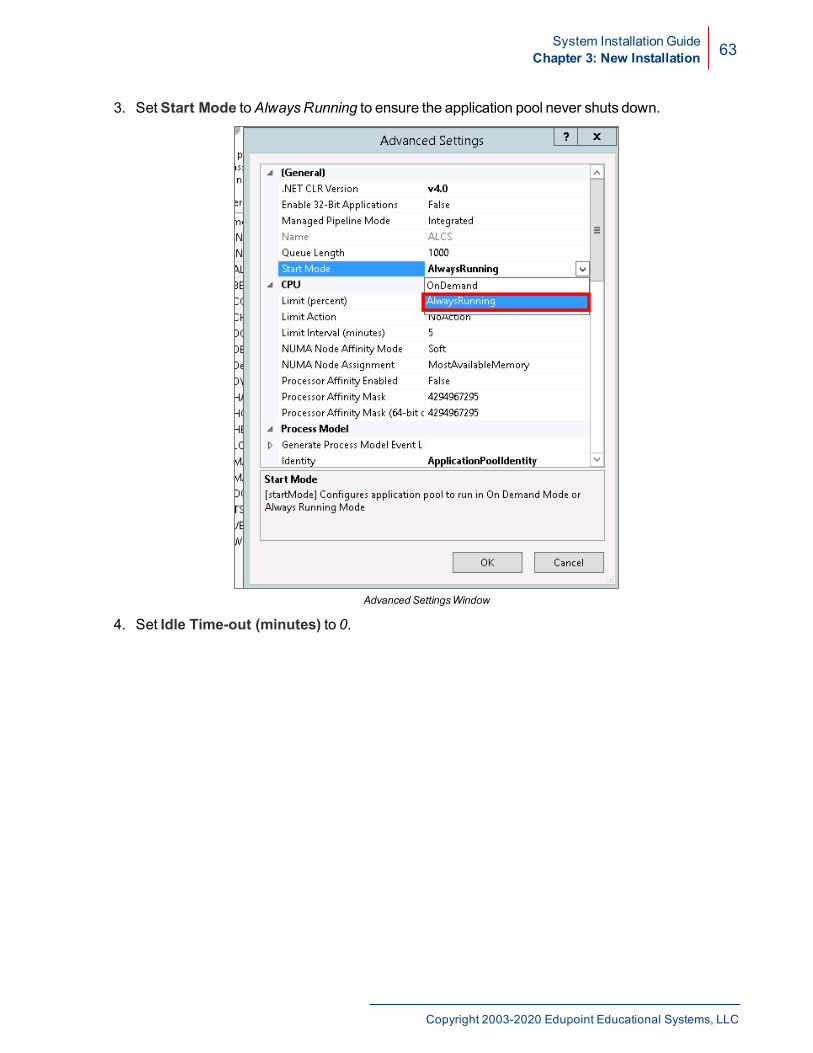
3. Set Start Mode toAlwaysRunning to ensure the application pool never shuts down.
Advanced SettingsWindow
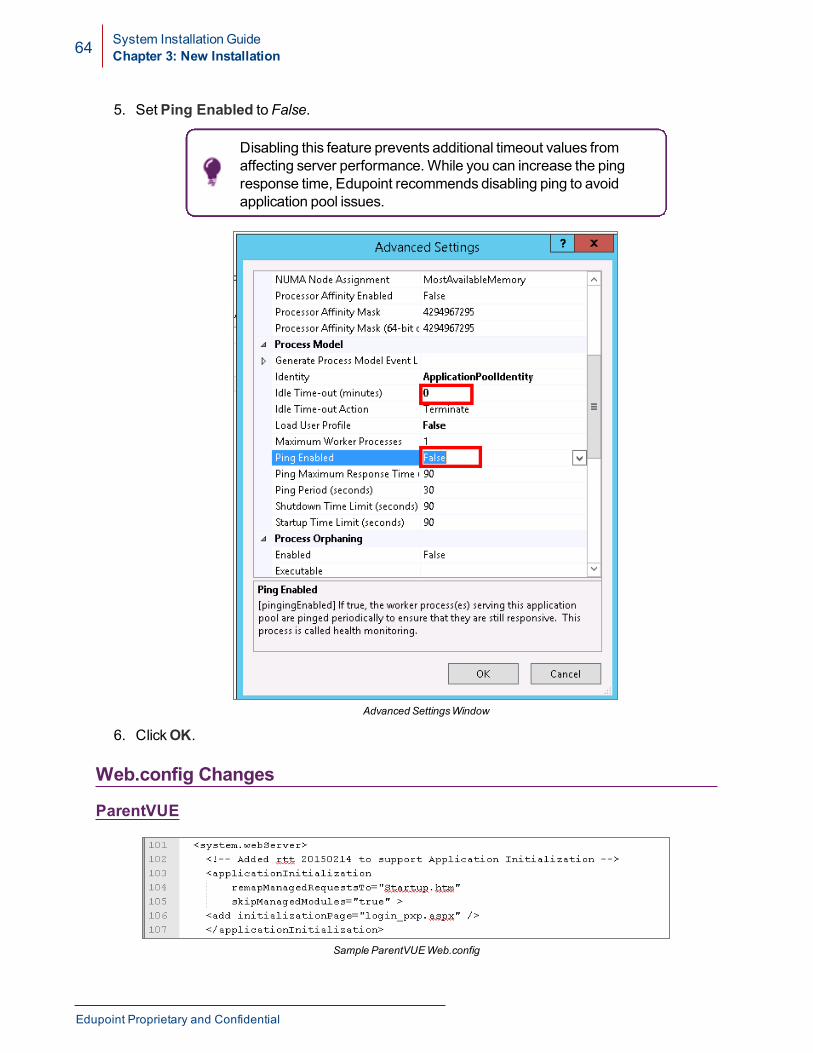
4. Set Idle Time-out (minutes) to 0.
Copyright 2003-2020 Edupoint Educational Systems, LLC
64 System Installation GuideChapter 3: New Installation
5. Set Ping Enabled to False.
Disabling this feature prevents additional timeout values fromaffecting server performance.While you can increase the pingresponse time, Edupoint recommends disabling ping to avoidapplication pool issues.
Advanced SettingsWindow
6. ClickOK.
Web.config Changes
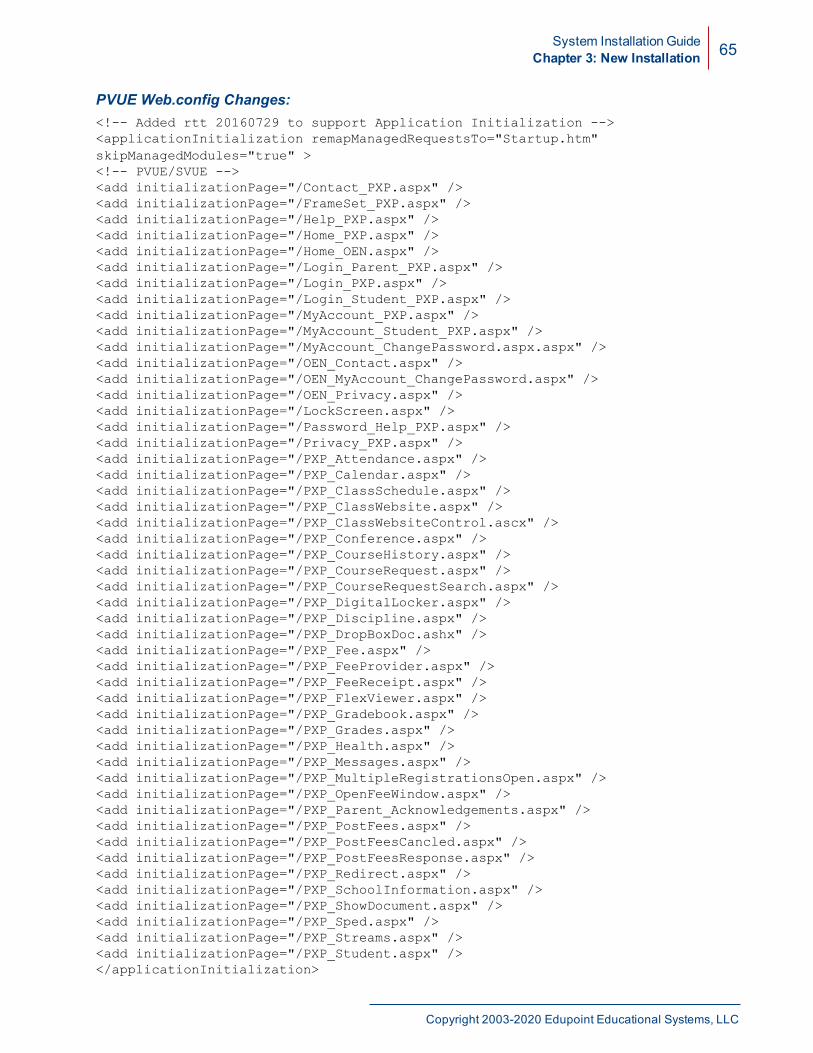
ParentVUE
Sample ParentVUEWeb.config
Edupoint Proprietary and Confidential
System Installation GuideChapter 3: New Installation 65
PVUE Web.config Changes:<!-- Added rtt 20160729 to support Application Initialization --><applicationInitialization remapManagedRequestsTo="Startup.htm"skipManagedModules="true" ><!-- PVUE/SVUE --><add initializationPage="/Contact_PXP.aspx" /><add initializationPage="/FrameSet_PXP.aspx" /><add initializationPage="/Help_PXP.aspx" /><add initializationPage="/Home_PXP.aspx" /><add initializationPage="/Home_OEN.aspx" /><add initializationPage="/Login_Parent_PXP.aspx" /><add initializationPage="/Login_PXP.aspx" /><add initializationPage="/Login_Student_PXP.aspx" /><add initializationPage="/MyAccount_PXP.aspx" /><add initializationPage="/MyAccount_Student_PXP.aspx" /><add initializationPage="/MyAccount_ChangePassword.aspx.aspx" /><add initializationPage="/OEN_Contact.aspx" /><add initializationPage="/OEN_MyAccount_ChangePassword.aspx" /><add initializationPage="/OEN_Privacy.aspx" /><add initializationPage="/LockScreen.aspx" /><add initializationPage="/Password_Help_PXP.aspx" /><add initializationPage="/Privacy_PXP.aspx" /><add initializationPage="/PXP_Attendance.aspx" /><add initializationPage="/PXP_Calendar.aspx" /><add initializationPage="/PXP_ClassSchedule.aspx" /><add initializationPage="/PXP_ClassWebsite.aspx" /><add initializationPage="/PXP_ClassWebsiteControl.ascx" /><add initializationPage="/PXP_Conference.aspx" /><add initializationPage="/PXP_CourseHistory.aspx" /><add initializationPage="/PXP_CourseRequest.aspx" /><add initializationPage="/PXP_CourseRequestSearch.aspx" /><add initializationPage="/PXP_DigitalLocker.aspx" /><add initializationPage="/PXP_Discipline.aspx" /><add initializationPage="/PXP_DropBoxDoc.ashx" /><add initializationPage="/PXP_Fee.aspx" /><add initializationPage="/PXP_FeeProvider.aspx" /><add initializationPage="/PXP_FeeReceipt.aspx" /><add initializationPage="/PXP_FlexViewer.aspx" /><add initializationPage="/PXP_Gradebook.aspx" /><add initializationPage="/PXP_Grades.aspx" /><add initializationPage="/PXP_Health.aspx" /><add initializationPage="/PXP_Messages.aspx" /><add initializationPage="/PXP_MultipleRegistrationsOpen.aspx" /><add initializationPage="/PXP_OpenFeeWindow.aspx" /><add initializationPage="/PXP_Parent_Acknowledgements.aspx" /><add initializationPage="/PXP_PostFees.aspx" /><add initializationPage="/PXP_PostFeesCancled.aspx" /><add initializationPage="/PXP_PostFeesResponse.aspx" /><add initializationPage="/PXP_Redirect.aspx" /><add initializationPage="/PXP_SchoolInformation.aspx" /><add initializationPage="/PXP_ShowDocument.aspx" /><add initializationPage="/PXP_Sped.aspx" /><add initializationPage="/PXP_Streams.aspx" /><add initializationPage="/PXP_Student.aspx" /></applicationInitialization>
Copyright 2003-2020 Edupoint Educational Systems, LLC
66 System Installation GuideChapter 3: New Installation
<!-- end Added rtt 20160729 -->
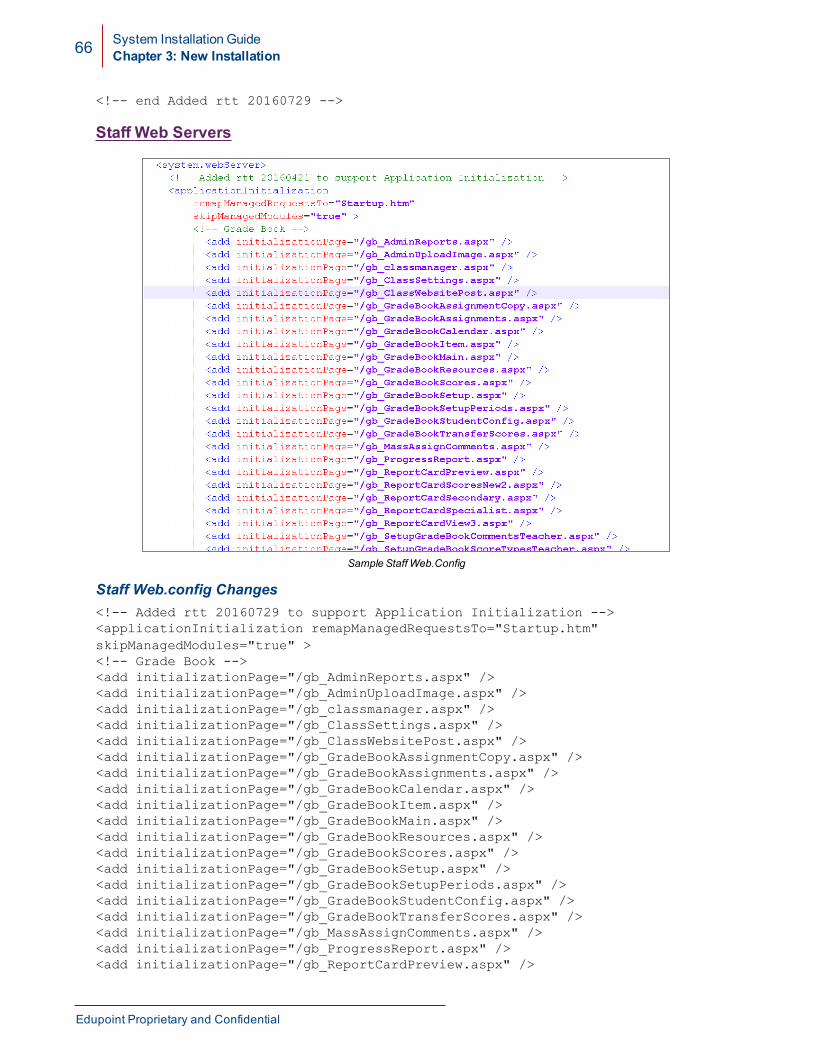
Staff Web Servers
Sample StaffWeb.Config
Staff Web.config Changes<!-- Added rtt 20160729 to support Application Initialization --><applicationInitialization remapManagedRequestsTo="Startup.htm"skipManagedModules="true" ><!-- Grade Book --><add initializationPage="/gb_AdminReports.aspx" /><add initializationPage="/gb_AdminUploadImage.aspx" /><add initializationPage="/gb_classmanager.aspx" /><add initializationPage="/gb_ClassSettings.aspx" /><add initializationPage="/gb_ClassWebsitePost.aspx" /><add initializationPage="/gb_GradeBookAssignmentCopy.aspx" /><add initializationPage="/gb_GradeBookAssignments.aspx" /><add initializationPage="/gb_GradeBookCalendar.aspx" /><add initializationPage="/gb_GradeBookItem.aspx" /><add initializationPage="/gb_GradeBookMain.aspx" /><add initializationPage="/gb_GradeBookResources.aspx" /><add initializationPage="/gb_GradeBookScores.aspx" /><add initializationPage="/gb_GradeBookSetup.aspx" /><add initializationPage="/gb_GradeBookSetupPeriods.aspx" /><add initializationPage="/gb_GradeBookStudentConfig.aspx" /><add initializationPage="/gb_GradeBookTransferScores.aspx" /><add initializationPage="/gb_MassAssignComments.aspx" /><add initializationPage="/gb_ProgressReport.aspx" /><add initializationPage="/gb_ReportCardPreview.aspx" />
Edupoint Proprietary and Confidential
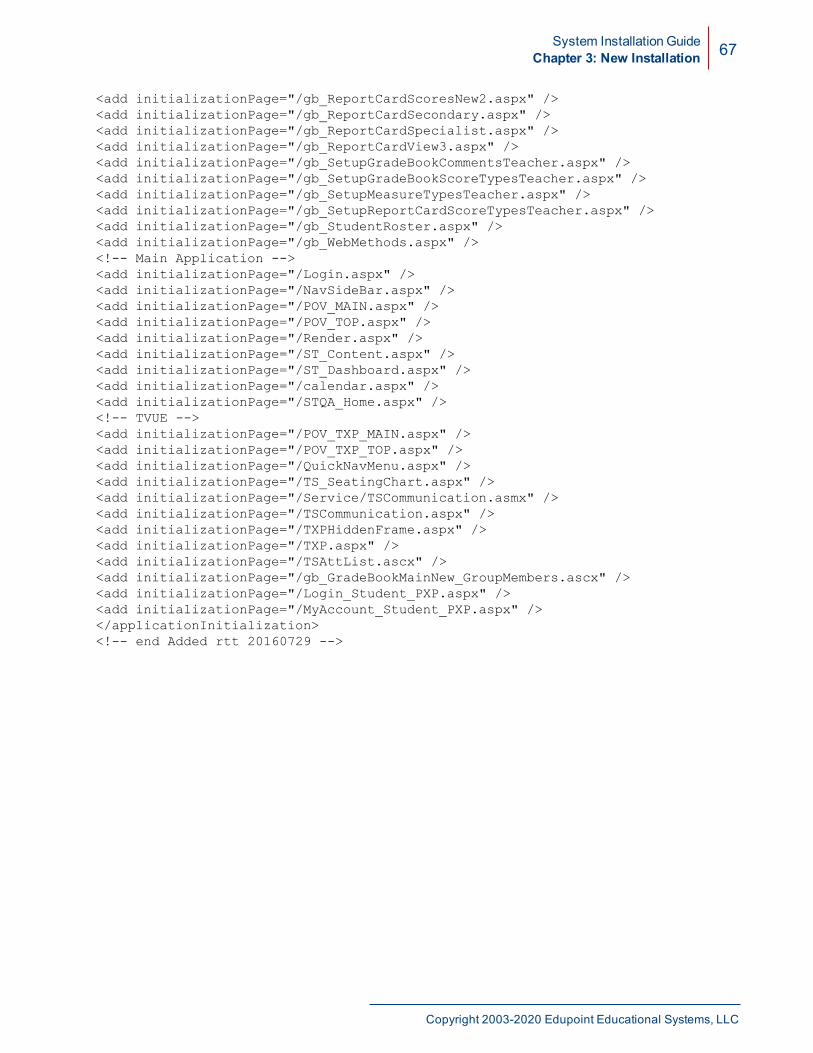
System Installation GuideChapter 3: New Installation 67
<add initializationPage="/gb_ReportCardScoresNew2.aspx" /><add initializationPage="/gb_ReportCardSecondary.aspx" /><add initializationPage="/gb_ReportCardSpecialist.aspx" /><add initializationPage="/gb_ReportCardView3.aspx" /><add initializationPage="/gb_SetupGradeBookCommentsTeacher.aspx" /><add initializationPage="/gb_SetupGradeBookScoreTypesTeacher.aspx" /><add initializationPage="/gb_SetupMeasureTypesTeacher.aspx" /><add initializationPage="/gb_SetupReportCardScoreTypesTeacher.aspx" /><add initializationPage="/gb_StudentRoster.aspx" /><add initializationPage="/gb_WebMethods.aspx" /><!-- Main Application --><add initializationPage="/Login.aspx" /><add initializationPage="/NavSideBar.aspx" /><add initializationPage="/POV_MAIN.aspx" /><add initializationPage="/POV_TOP.aspx" /><add initializationPage="/Render.aspx" /><add initializationPage="/ST_Content.aspx" /><add initializationPage="/ST_Dashboard.aspx" /><add initializationPage="/calendar.aspx" /><add initializationPage="/STQA_Home.aspx" /><!-- TVUE --><add initializationPage="/POV_TXP_MAIN.aspx" /><add initializationPage="/POV_TXP_TOP.aspx" /><add initializationPage="/QuickNavMenu.aspx" /><add initializationPage="/TS_SeatingChart.aspx" /><add initializationPage="/Service/TSCommunication.asmx" /><add initializationPage="/TSCommunication.aspx" /><add initializationPage="/TXPHiddenFrame.aspx" /><add initializationPage="/TXP.aspx" /><add initializationPage="/TSAttList.ascx" /><add initializationPage="/gb_GradeBookMainNew_GroupMembers.ascx" /><add initializationPage="/Login_Student_PXP.aspx" /><add initializationPage="/MyAccount_Student_PXP.aspx" /></applicationInitialization><!-- end Added rtt 20160729 -->
Copyright 2003-2020 Edupoint Educational Systems, LLC
Chapter 4:Upgrading to a New Release
Software Update Overview 69Updating the License Key 71Downloading Releases 75Turning Off Synergy Access 77Backup Content 80Uninstalling Web Servers 81Uninstalling Process Servers 81Uninstall Additional Synergy SIS Software 83Installing New Releases 84Consortium Deployment Updates 94Common Update Issues 101
System Installation GuideChapter 4: Upgrading to a New Release 69
Software Update OverviewEdupoint provides the following types of software updates:
l Releases – Includes all functionality from previous releases, as well asmajor frameworkchanges. These updates require you to uninstall the previous version of Synergy SIS beforeinstalling the new release, which Edupoint bundles in an installer file.
l Continuous Enhancements (CE) – Released to all clients and contain previously releasedStatewide Improvements, along with additional product changes. You can install these PKGfiles through Dashboard.
l Statewide Improvements – Contain critical, time-sensitive patches such as fixes,enhancements, and product changes. Only clients that require an immediate update receivethe files before the CE. You can install these PKG files through Dashboard.
l Other Updates – Details updates for a specific feature and use no spaces or specialcharacters.
Naming Convention
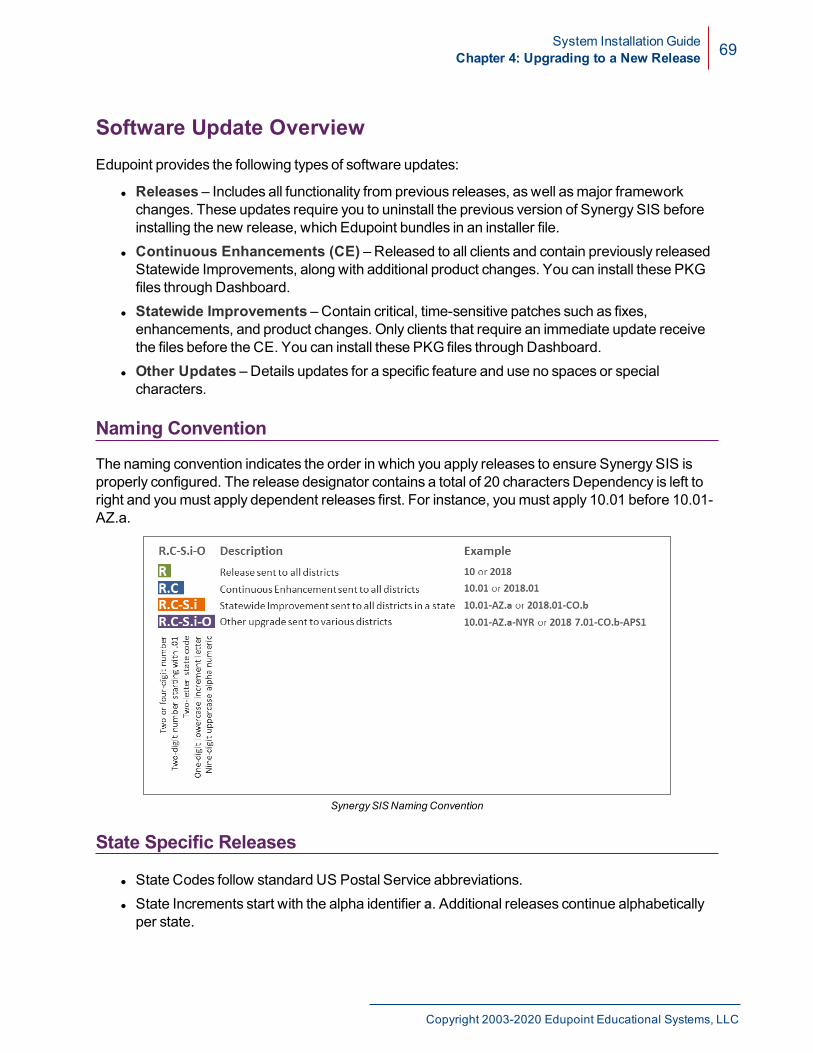
The naming convention indicates the order in which you apply releases to ensure Synergy SIS isproperly configured. The release designator contains a total of 20 characters Dependency is left toright and youmust apply dependent releases first. For instance, youmust apply 10.01 before 10.01-AZ.a.
SynergySISNaming Convention
State Specific Releases
l State Codes follow standard US Postal Service abbreviations.l State Increments start with the alpha identifier a. Additional releases continue alphabeticallyper state.
Copyright 2003-2020 Edupoint Educational Systems, LLC
70 System Installation GuideChapter 4: Upgrading to a New Release
l The increment sequence is shared by the state and district.l When Edupoint releases a new CE, the state increment resets to a.
Do not apply releases frommultiple states to the same system, asthey are incompatible. For example, 10.01-CA.b is incompatiblewith 10.01-AZ.a.
Release Management Services
If you contracted with us for ReleaseManagement services, Edupoint applies all software updatesto your system for you. These updates are applied during off-hours tominimize any disruption toyour end users.
Contact your releasemanager to schedule a time to upgrade your systemwhen it is convenient foryour district. Your releasemanager defines critical changes and anymodifications youmust makebased on the new functionality. They also install updates in your test and production environments,and notify you when your system is updated.
Before Applying Releases
Before applying the latest release of Synergy, notate the following for reference:
l Database server location and login informationl Process server machine informationl Web server machine and installation informationl Offline Applications installation locationsl Synergy License Key
Youmust also complete the following:
l Backup Databasesl Uninstalling Process Serversl UninstallingWeb Serversl Uninstall Additional Synergy SIS Softwarel Turning Off Synergy Access
Youmust patch theGeneric Conversion tool, DBTools, and all otheroffline applicationswhen updates are released. See InstallingOffline Applications for more information.
Edupoint Proprietary and Confidential
System Installation GuideChapter 4: Upgrading to a New Release 71
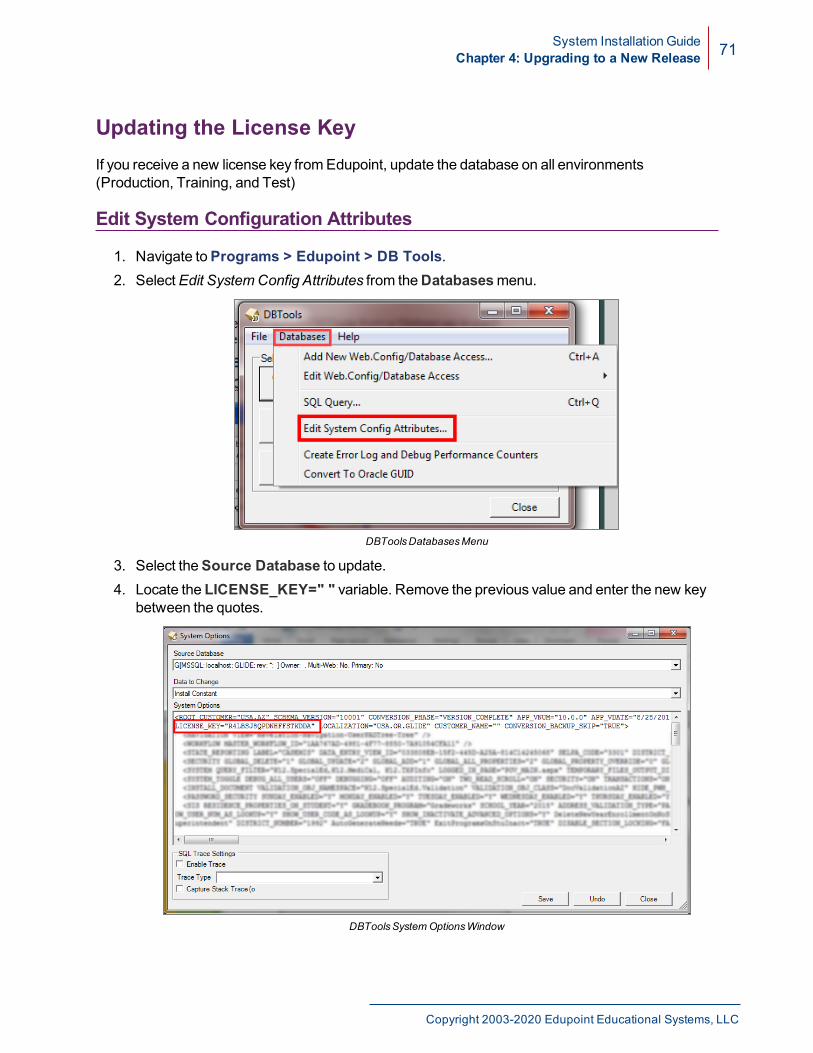
Updating the License KeyIf you receive a new license key fromEdupoint, update the database on all environments(Production, Training, and Test)
Edit System Configuration Attributes
1. Navigate toPrograms > Edupoint > DB Tools.2. SelectEdit SystemConfig Attributes from theDatabasesmenu.
DBToolsDatabasesMenu
3. Select theSource Database to update.4. Locate the LICENSE_KEY=" " variable. Remove the previous value and enter the new key
between the quotes.
DBToolsSystemOptionsWindow
Copyright 2003-2020 Edupoint Educational Systems, LLC
72 System Installation GuideChapter 4: Upgrading to a New Release
5. ClickSave.6. Repeat these steps for all databases in all Synergy environments.
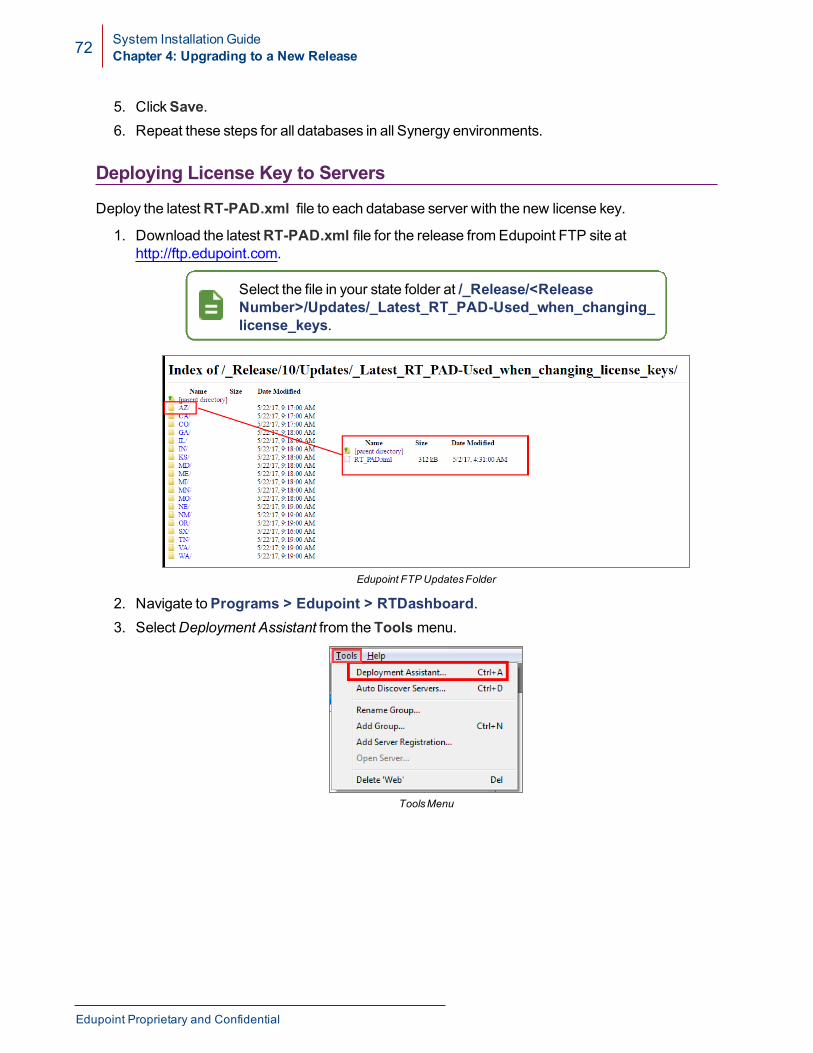
Deploying License Key to Servers
Deploy the latestRT-PAD.xml file to each database server with the new license key.
1. Download the latestRT-PAD.xml file for the release fromEdupoint FTP site athttp://ftp.edupoint.com.
Select the file in your state folder at /_Release/<ReleaseNumber>/Updates/_Latest_RT_PAD-Used_when_changing_license_keys.
Edupoint FTP UpdatesFolder
2. Navigate toPrograms > Edupoint > RTDashboard.3. SelectDeployment Assistant from the Tools menu.
ToolsMenu
Edupoint Proprietary and Confidential
System Installation GuideChapter 4: Upgrading to a New Release 73
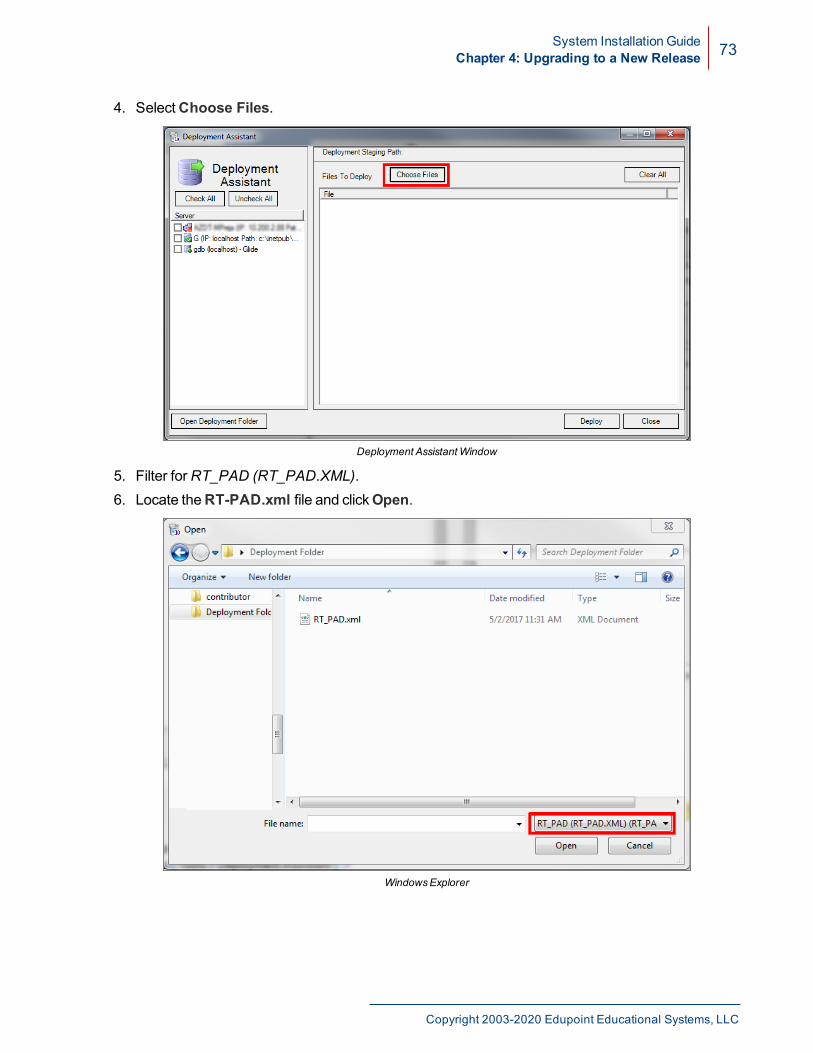
4. SelectChoose Files.
Deployment AssistantWindow
5. Filter forRT_PAD (RT_PAD.XML).6. Locate theRT-PAD.xml file and clickOpen.
WindowsExplorer
Copyright 2003-2020 Edupoint Educational Systems, LLC
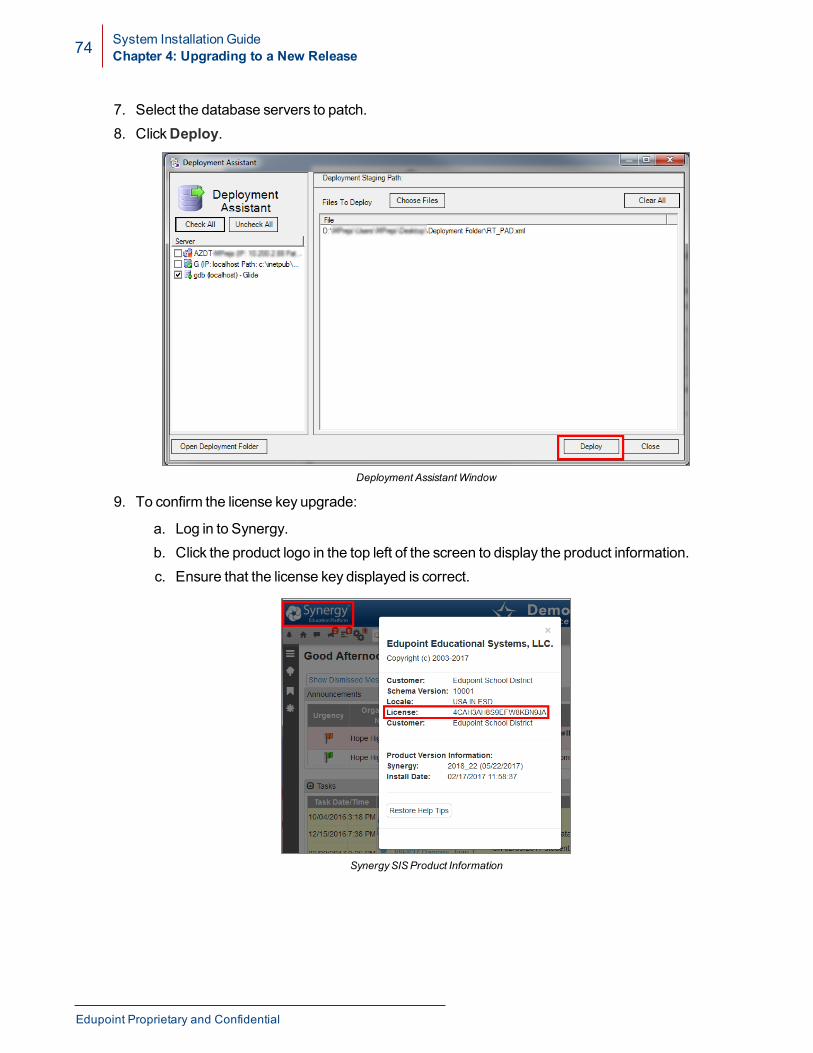
74 System Installation GuideChapter 4: Upgrading to a New Release
7. Select the database servers to patch.8. ClickDeploy.
Deployment AssistantWindow
9. To confirm the license key upgrade:
a. Log in to Synergy.b. Click the product logo in the top left of the screen to display the product information.c. Ensure that the license key displayed is correct.
SynergySISProduct Information
Edupoint Proprietary and Confidential
System Installation GuideChapter 4: Upgrading to a New Release 75
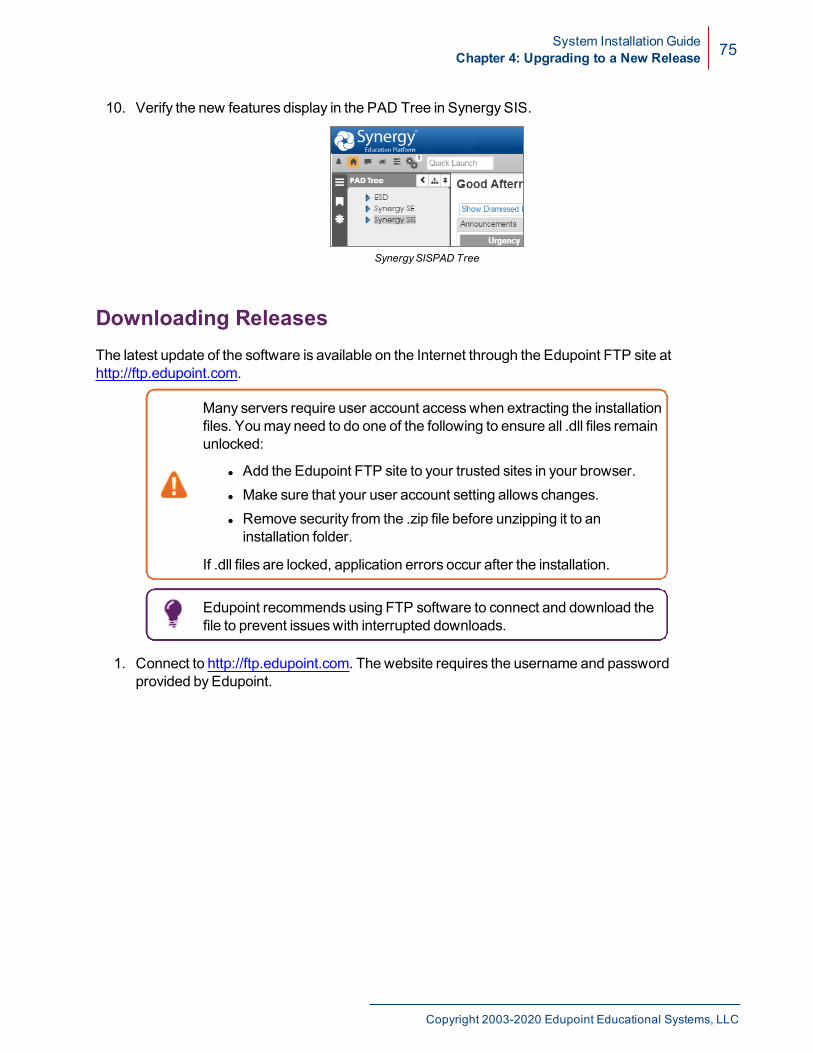
10. Verify the new features display in the PAD Tree in Synergy SIS.
Synergy SISPAD Tree
Downloading ReleasesThe latest update of the software is available on the Internet through the Edupoint FTP site athttp://ftp.edupoint.com.
Many servers require user account accesswhen extracting the installationfiles. Youmay need to do one of the following to ensure all .dll files remainunlocked:
l Add the Edupoint FTP site to your trusted sites in your browser.l Make sure that your user account setting allows changes.l Remove security from the .zip file before unzipping it to aninstallation folder.
If .dll files are locked, application errors occur after the installation.
Edupoint recommends using FTP software to connect and download thefile to prevent issueswith interrupted downloads.
1. Connect to http://ftp.edupoint.com. The website requires the username and passwordprovided by Edupoint.
Copyright 2003-2020 Edupoint Educational Systems, LLC
76 System Installation GuideChapter 4: Upgrading to a New Release
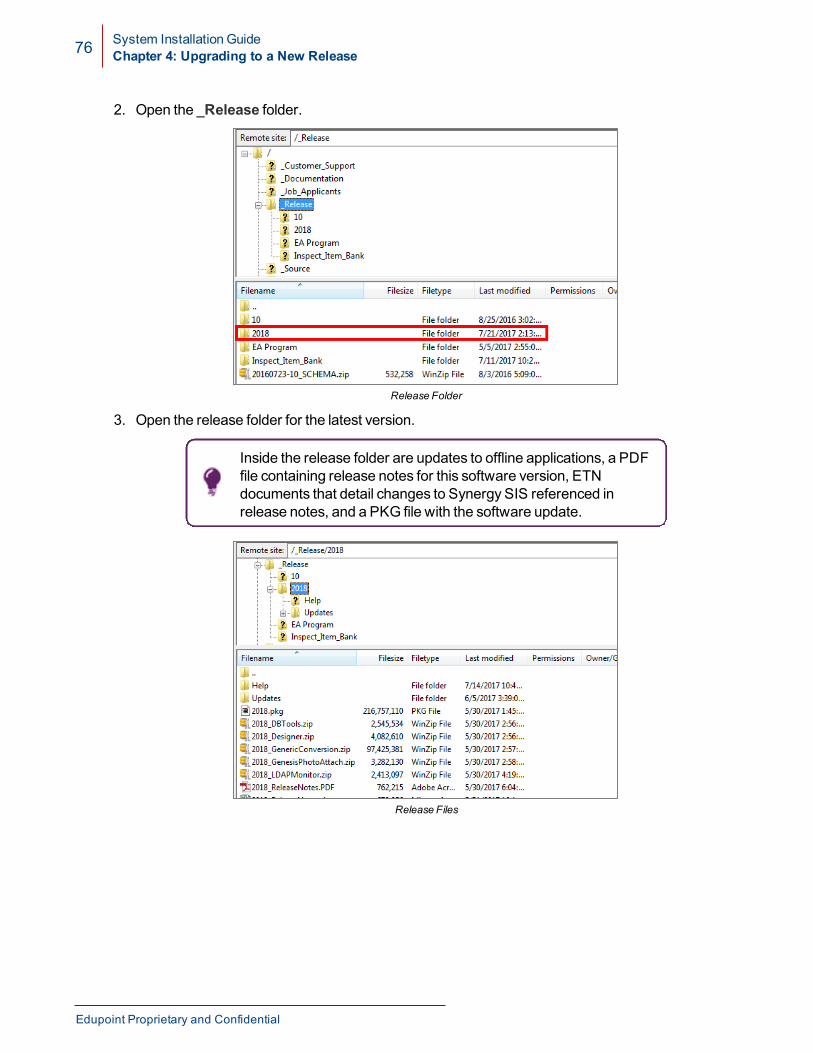
2. Open the _Release folder.
Release Folder
3. Open the release folder for the latest version.
Inside the release folder are updates to offline applications, a PDFfile containing release notes for this software version, ETNdocuments that detail changes to Synergy SIS referenced inrelease notes, and a PKG file with the software update.
Release Files
Edupoint Proprietary and Confidential
System Installation GuideChapter 4: Upgrading to a New Release 77
4. Download the PKG file and any additional files.
Additional information you can download from the Edupoint FTP siteincludes:
l _Documentation – Includes all reference guides, quickreference cards, and technical notifications
l _Release – Includes the latest release and any patches andthe previous releases in an archive folder
l _Training – Includes the demo database, trainingmanuals,and information from the user conferences
Each client also has a private folder where they can upload anddownload information specific to their district. Each client folder hasthree subfolders:
l Data – Any customer-specific databasesl Documentation – Customer-specific guides or instructionsl Patch – Any patches specific to the district
Turning Off Synergy Access
LDAP Integration
Before beginning the upgrade process, you should turn off access to the Synergy SIS software forall users. When using LDAP integration, you can disable access on the SystemConfigurationscreen of Synergy SIS.
Administratorsmust know the native password to the admin login forSynergy to turn access on again.
1. Navigate toSynergy SIS > System > Setup > System Configuration.2. Scroll to the LDAP Integration section.
Copyright 2003-2020 Edupoint Educational Systems, LLC
78 System Installation GuideChapter 4: Upgrading to a New Release
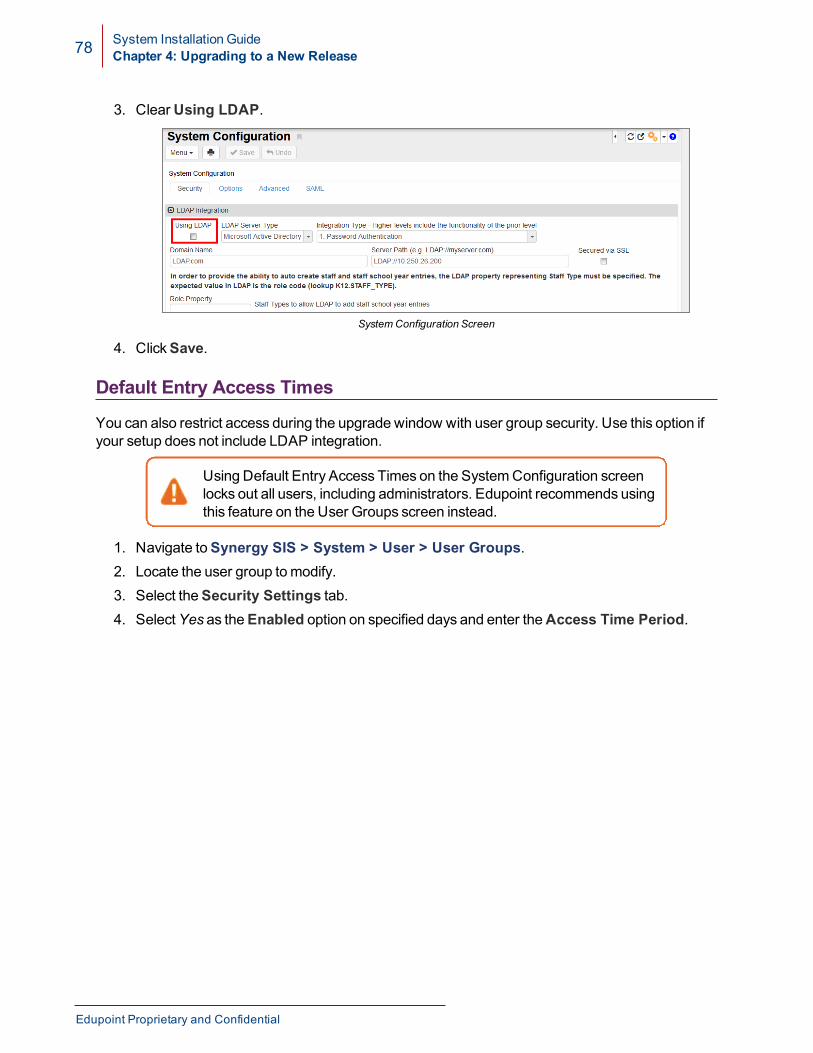
3. ClearUsing LDAP.
SystemConfiguration Screen
4. ClickSave.
Default Entry Access Times
You can also restrict access during the upgrade window with user group security. Use this option ifyour setup does not include LDAP integration.
Using Default Entry Access Times on the SystemConfiguration screenlocks out all users, including administrators. Edupoint recommends usingthis feature on the User Groups screen instead.
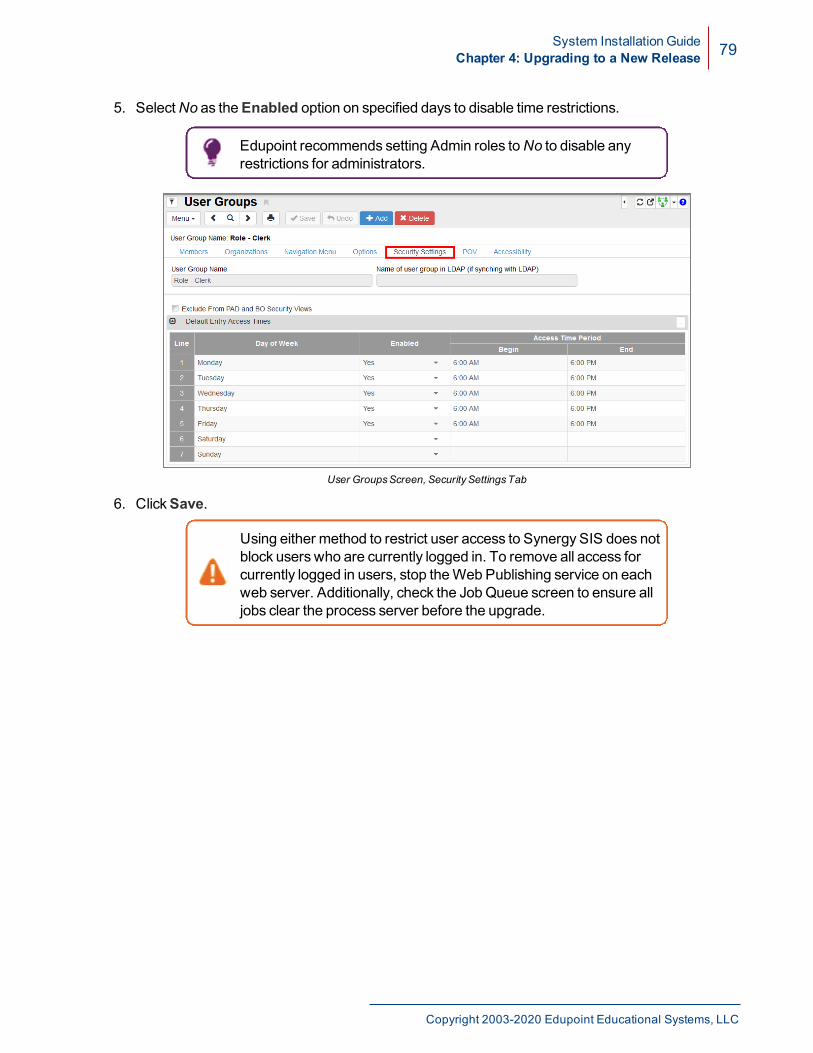
1. Navigate toSynergy SIS > System > User > User Groups.2. Locate the user group tomodify.3. Select theSecurity Settings tab.4. SelectYes as theEnabled option on specified days and enter theAccess Time Period.
Edupoint Proprietary and Confidential
System Installation GuideChapter 4: Upgrading to a New Release 79
5. SelectNo as theEnabled option on specified days to disable time restrictions.
Edupoint recommends setting Admin roles toNo to disable anyrestrictions for administrators.
User GroupsScreen, SecuritySettingsTab
6. ClickSave.
Using either method to restrict user access to Synergy SIS does notblock users who are currently logged in. To remove all access forcurrently logged in users, stop theWeb Publishing service on eachweb server. Additionally, check the JobQueue screen to ensure alljobs clear the process server before the upgrade.
Copyright 2003-2020 Edupoint Educational Systems, LLC

80 System Installation GuideChapter 4: Upgrading to a New Release
Backup ContentYou should back up a copy of the existing web server directory, the current release zip file with anyapplied patches, and the database before upgrading to a new release.
l Web Server Directory – Copy the root directory/folder of the Default Web Site on each webserver to another folder. You can copy the backup folder back to the original location if youneed access to the previous release. You can also access it from a new location in the websitefolder by adding the new folder name to the web address.
l Release/Patches Files – Keep a copy of the previous release and a copy of any patchesapplied in case it is necessary to re-install the previous release.
l Database –While the database can automatically back up as part of the installation of thenew release, Edupoint advises youmake a separate backup. To back up a SQL serverdatabase, right-click the database fromwithin SQL Server Management Studio and selectBackup Database from the Tasksmenu.
You can only upload data for the current year to the state from thelatest release. To upload data from previous years, youmustmaintain backups of the web server directory, database, andprocess server from past years and create a new Synergy SISinstallation separate from the current release.
When installing a new release of the Synergy SIS software over an existing installation, theMicrosoft SQL Server database is automatically backed up by default before the install processoverwrites it. You can change the automatic backup process by following the steps below.
1. Navigate toSynergy SIS > System > Setup > System Configuration.2. Choose one of the following:
a. SelectDisable the pre-installation backup of the MSSQL Server database.b. Enter the override database backup location. The default path isC:\Program
Files\Microsoft SQL Server\MSSQL\BACKUP.
SystemConfiguration Screen
3. ClickSave.
Edupoint Proprietary and Confidential
System Installation GuideChapter 4: Upgrading to a New Release 81
Uninstalling Web Servers
For assistance in removing custom installations, contact the Edupointtechnical support team at [email protected] or by phone at 1-877-899-9111 option 1.
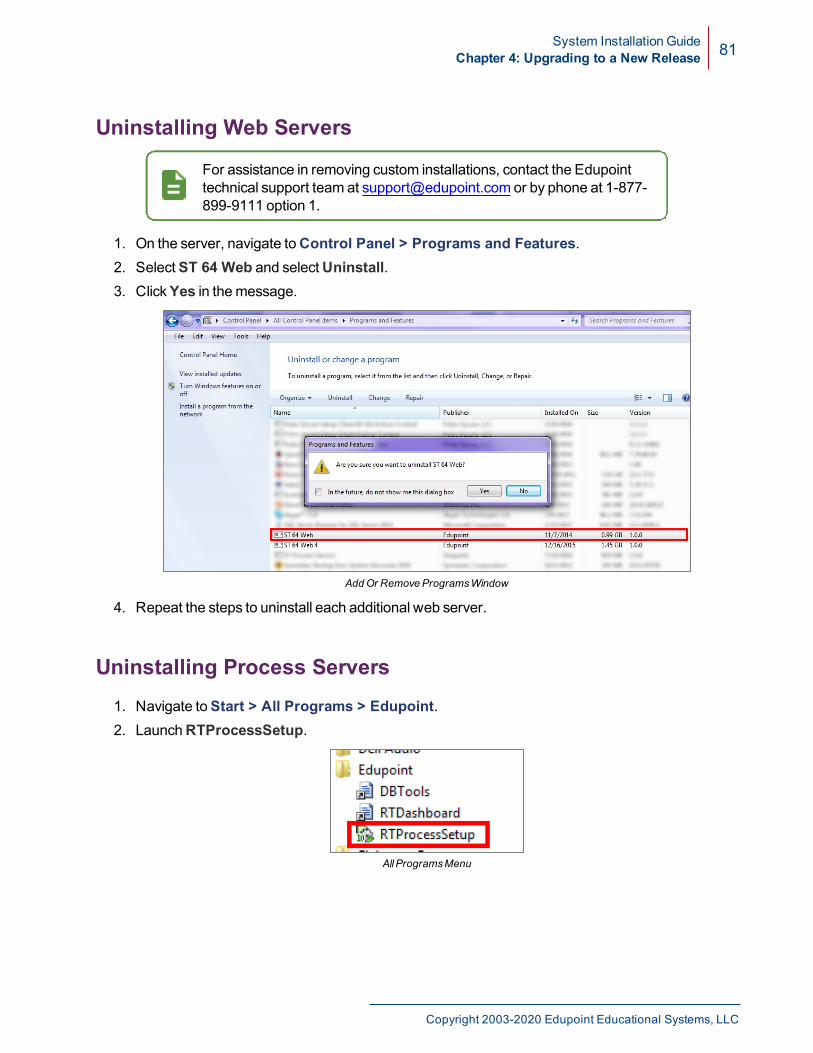
1. On the server, navigate toControl Panel > Programs and Features.2. SelectST 64 Web and selectUninstall.3. ClickYes in themessage.
AddOr Remove ProgramsWindow
4. Repeat the steps to uninstall each additional web server.
Uninstalling Process Servers1. Navigate toStart > All Programs > Edupoint.2. LaunchRTProcessSetup.
All ProgramsMenu
Copyright 2003-2020 Edupoint Educational Systems, LLC
82 System Installation GuideChapter 4: Upgrading to a New Release
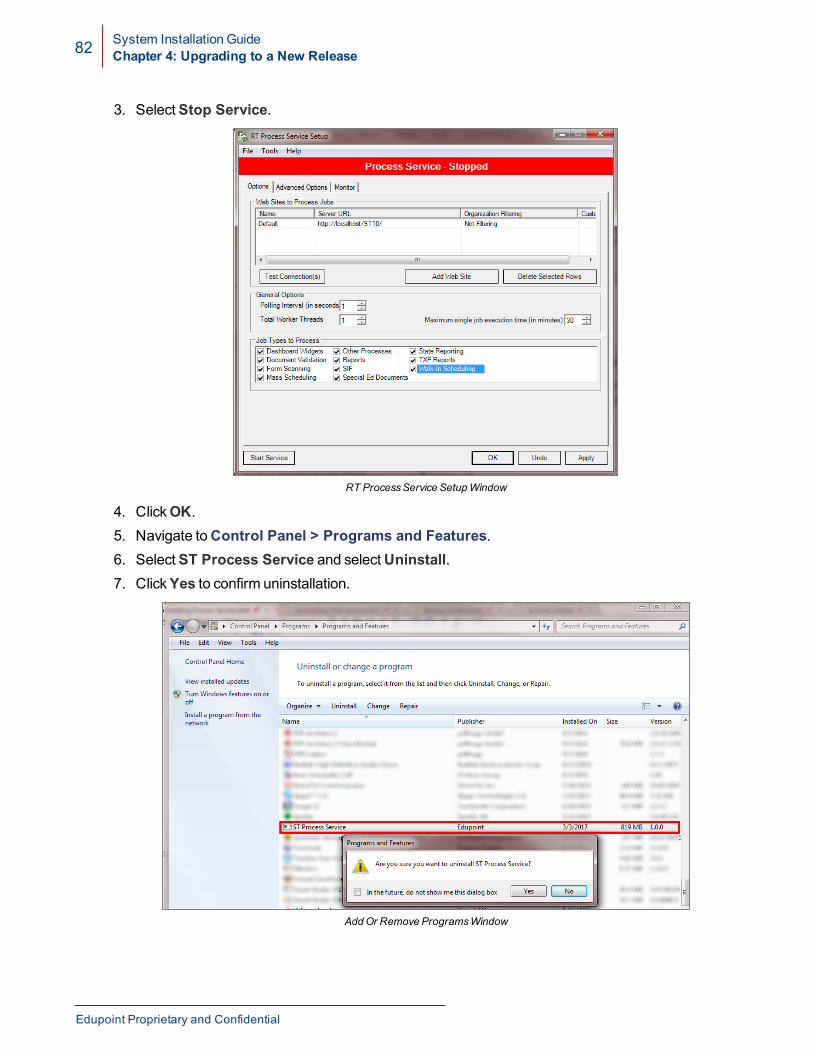
3. SelectStop Service.
RT ProcessService SetupWindow
4. ClickOK.5. Navigate toControl Panel > Programs and Features.6. SelectST Process Service and selectUninstall.7. ClickYes to confirm uninstallation.
AddOr Remove ProgramsWindow
Edupoint Proprietary and Confidential

System Installation GuideChapter 4: Upgrading to a New Release 83
Uninstall Additional Synergy SIS Software1. Navigate toControl Panel > Programs and Features on the installed server.2. Locate the software to uninstall.3. ClickUninstall.4. ClickYes to confirm uninstallation.
ProgramsAnd FeaturesWindow
5. Repeat the steps to uninstall each additional program.
Copyright 2003-2020 Edupoint Educational Systems, LLC

84 System Installation GuideChapter 4: Upgrading to a New Release
Installing New Releases
Website Installation
If you are applying a release that was published before the update you arecurrently on, you need to use a new SCHEMA.XML file. For example, ifyou aremoving from version AZ-9.0.14.0e released 5/9/2016 to version 10released 8/31/2015, you need a new schema file.
You can find the latest schema at ftp://ftp.edupoint.com/_Release/. Unzip itand place it in the Pre folder of theWeb installer.
_Release Folder
Pre Folder
Edupoint Proprietary and Confidential
System Installation GuideChapter 4: Upgrading to a New Release 85
1. Navigate toSynergy64WebSetup > Pre.2. Run InstallUserPrompt.exe.
Youmight be prompted to install additional components if they arerequired for your system.
Pre Folder
3. ClickNext.
InstallUserPrompt.exe InstallWizardWindow
Copyright 2003-2020 Edupoint Educational Systems, LLC
86 System Installation GuideChapter 4: Upgrading to a New Release
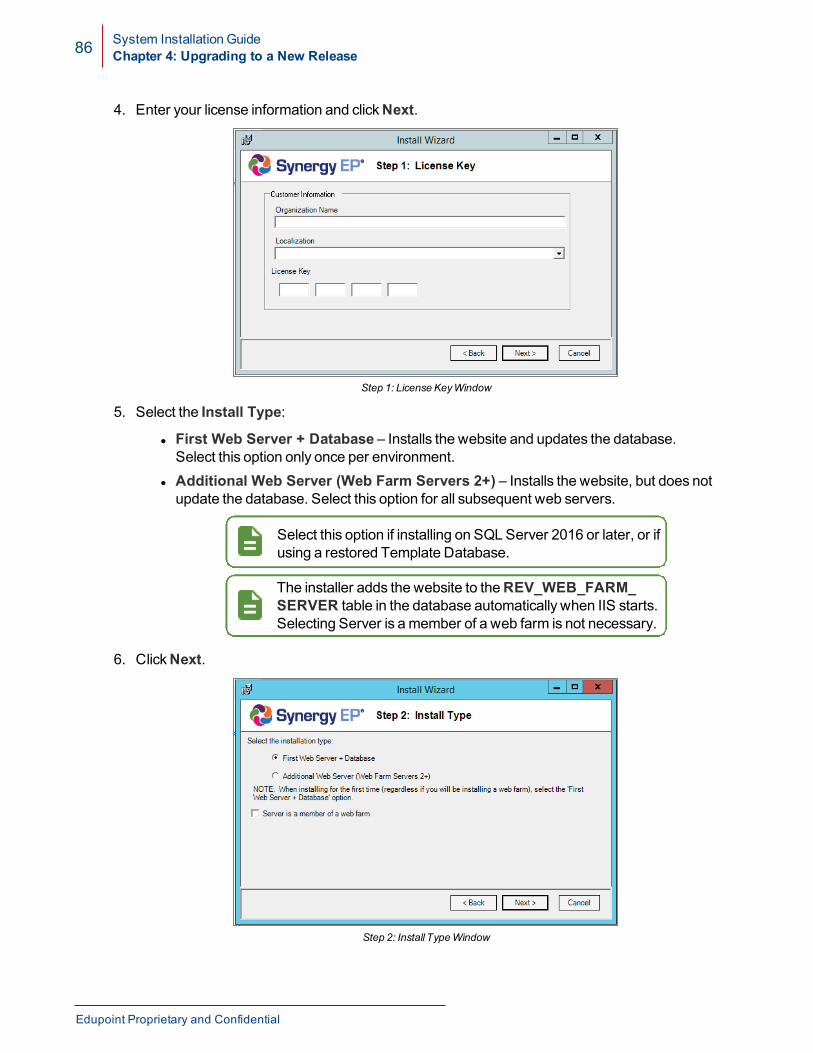
4. Enter your license information and clickNext.
Step 1: License KeyWindow
5. Select the Install Type:
l First Web Server + Database – Installs the website and updates the database.Select this option only once per environment.
l Additional Web Server (Web Farm Servers 2+) – Installs the website, but does notupdate the database. Select this option for all subsequent web servers.
Select this option if installing on SQL Server 2016 or later, or ifusing a restored Template Database.
The installer adds the website to theREV_WEB_FARM_SERVER table in the database automatically when IIS starts.Selecting Server is amember of a web farm is not necessary.
6. ClickNext.
Step 2: Install TypeWindow
Edupoint Proprietary and Confidential
System Installation GuideChapter 4: Upgrading to a New Release 87
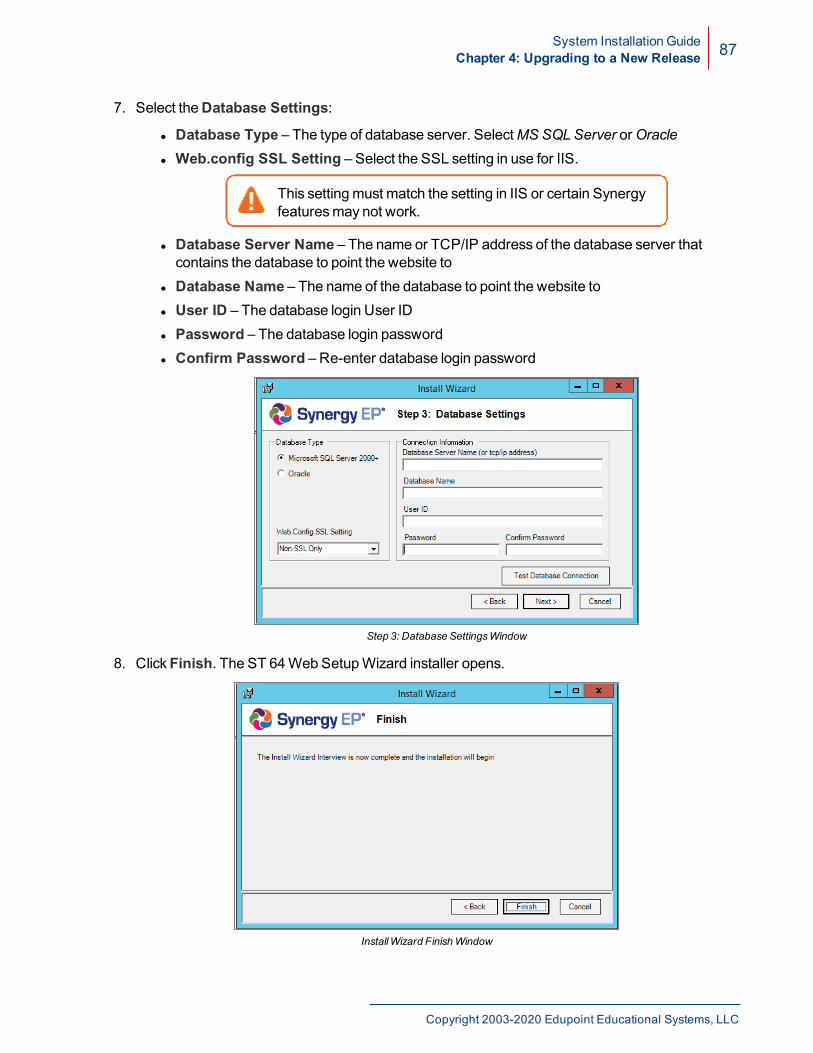
7. Select theDatabase Settings:
l Database Type – The type of database server. SelectMS SQLServer orOraclel Web.config SSL Setting – Select the SSL setting in use for IIS.
This settingmust match the setting in IIS or certain Synergyfeaturesmay not work.
l Database Server Name – The name or TCP/IP address of the database server thatcontains the database to point the website to
l Database Name – The name of the database to point the website tol User ID – The database login User IDl Password – The database login passwordl Confirm Password – Re-enter database login password
Step 3: Database SettingsWindow
8. ClickFinish. The ST 64Web SetupWizard installer opens.
InstallWizard FinishWindow
Copyright 2003-2020 Edupoint Educational Systems, LLC
88 System Installation GuideChapter 4: Upgrading to a New Release
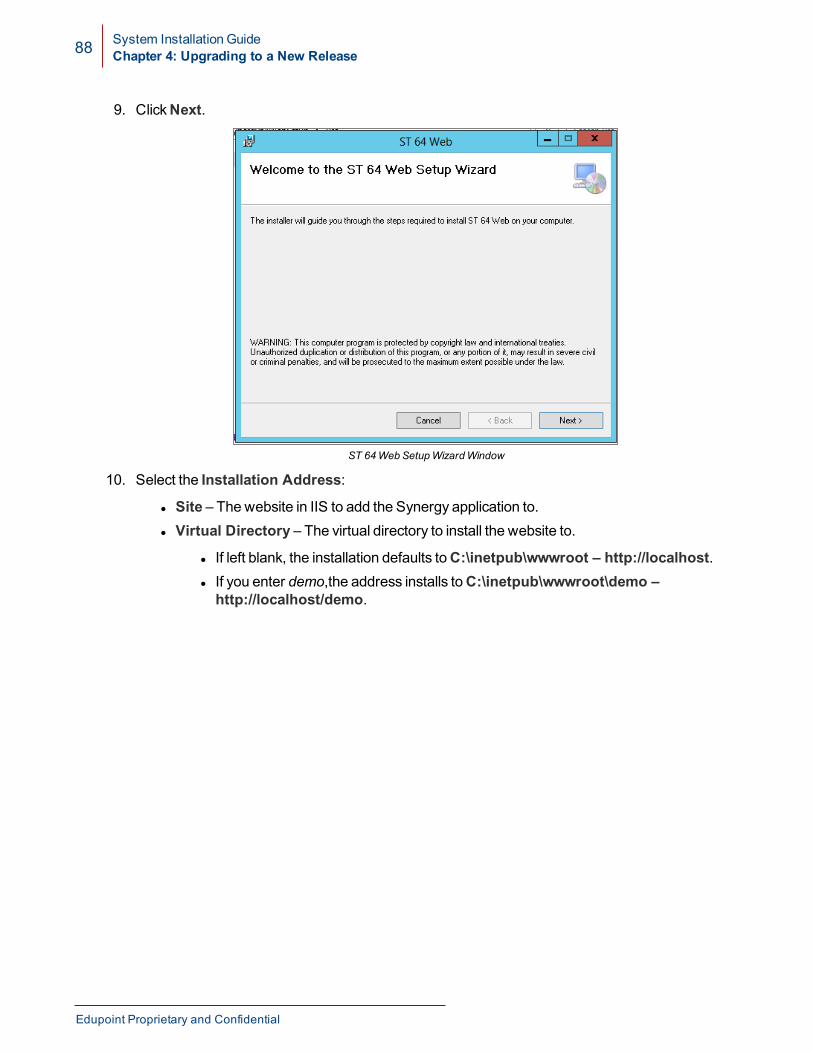
9. ClickNext.
ST 64Web SetupWizardWindow
10. Select the Installation Address:
l Site – The website in IIS to add the Synergy application to.l Virtual Directory – The virtual directory to install the website to.
l If left blank, the installation defaults toC:\inetpub\wwwroot – http://localhost.l If you enter demo,the address installs toC:\inetpub\wwwroot\demo –http://localhost/demo.
Edupoint Proprietary and Confidential
System Installation GuideChapter 4: Upgrading to a New Release 89
l Application Pool – Select the application pool to use for the Synergy application. Thismust be an app pool running .NET CLR version v4.0xwith Managed pipelinemode:Integrated.
Select Installation AddressWindow
11. ClickNext to confirm the installation.
Confirm InstallationWindow
If installingmore than one web server, repeat this process using theSynergy64WebSetup1-4 folders, as needed.
Copyright 2003-2020 Edupoint Educational Systems, LLC

90 System Installation GuideChapter 4: Upgrading to a New Release
Process Server Installation
1. Open theSynergy64ProcessServiceSetup folder.2. Run setup.exe as Administrator.
ST ProcessService Setup.exe
3. ClickNext.
ST ProcessService SetupWizardWindow
4. Select the Installation Folder:
l Enter the Folder location, or clickBrowse to select it.l SelectEveryone as the Install ST Process Service option.
Edupoint Proprietary and Confidential

System Installation GuideChapter 4: Upgrading to a New Release 91
5. ClickNext.
Select Installation Folder Window
6. ClickNext to confirm the installation.
Confirm InstallationWindow
Copyright 2003-2020 Edupoint Educational Systems, LLC
92 System Installation GuideChapter 4: Upgrading to a New Release
Installing Offline Applications
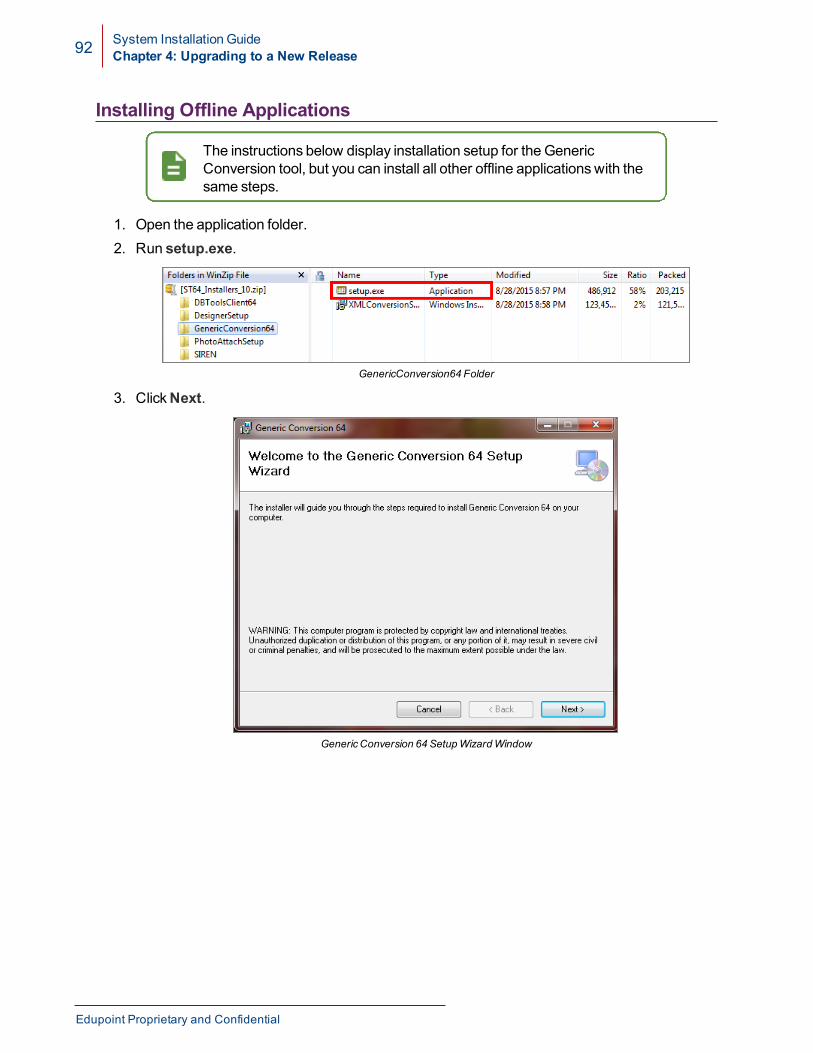
The instructions below display installation setup for the GenericConversion tool, but you can install all other offline applicationswith thesame steps.
1. Open the application folder.2. Run setup.exe.
GenericConversion64 Folder
3. ClickNext.
GenericConversion 64 SetupWizardWindow
Edupoint Proprietary and Confidential

System Installation GuideChapter 4: Upgrading to a New Release 93
4. Select the Installation Folder.5. SelectEveryone as the Install application for option.
Select Installation Folder Window
6. ClickNext.7. ClickNext to confirm the installation.
Confirm Installation Folder Window
Copyright 2003-2020 Edupoint Educational Systems, LLC
94 System Installation GuideChapter 4: Upgrading to a New Release
Post-Installation
After the installation runs, youmust validate the installation.
1. Perform an IIS reset.2. Login to Synergy SIS.3. Start the Process server.4. Run a job, such as printing a report, and ensure it completes.
You can review the installation logs in theC:\Program Files (x86)\Edupoint\Install Files folder.
l MSI Log – Shows the actions taken to create the website. Displays as Install_Detail_yyyymmdd_hhmmss_MSI.logwith the actual installation date and time added
l SCHEMA Log – Shows the actions taken to update the database schema. Displays asInstall_Detail_yyyymmdd_hhmmss_DB.logwith the actual installation date and timeadded
l Data Log – Shows the actions taken to update the database data. Displays as Install_Detail_yyyymmdd_hhmmss.logwith the actual installation date and time added
Edupoint may ask for one or more of these logswhen troubleshooting installer problems.
Consortium Deployment UpdatesSynergy SIS version 2018 added an additional bin folder to the web site named BINK12. This folderstores .dll files in the K12 namespace. If using RT Dashboard to update all of your environments, noadditional actions are required. RT Dashboard automaticallymoves the appropriate files to the newfolder and adds the necessary settings to theWeb.Config file(s).
The following process only applies if using a consortium deployment model where RT Dashboarddeploys to a staging site and a robocopy script copies updated files to other websites. Generally, thisscript excludes theWeb.Config file as the sites being updated connect to different databases. Youmust update theWeb.Config files for your Synergy SIS installation if either of the following apply:
l Your sites did not update directly with RT Dashboard.l Your sites did not update their Web.Config file from a site directly updated with RTDashboard.
Update DBTools to version 2018 beforemodifyingWeb.Config files.
Edupoint Proprietary and Confidential
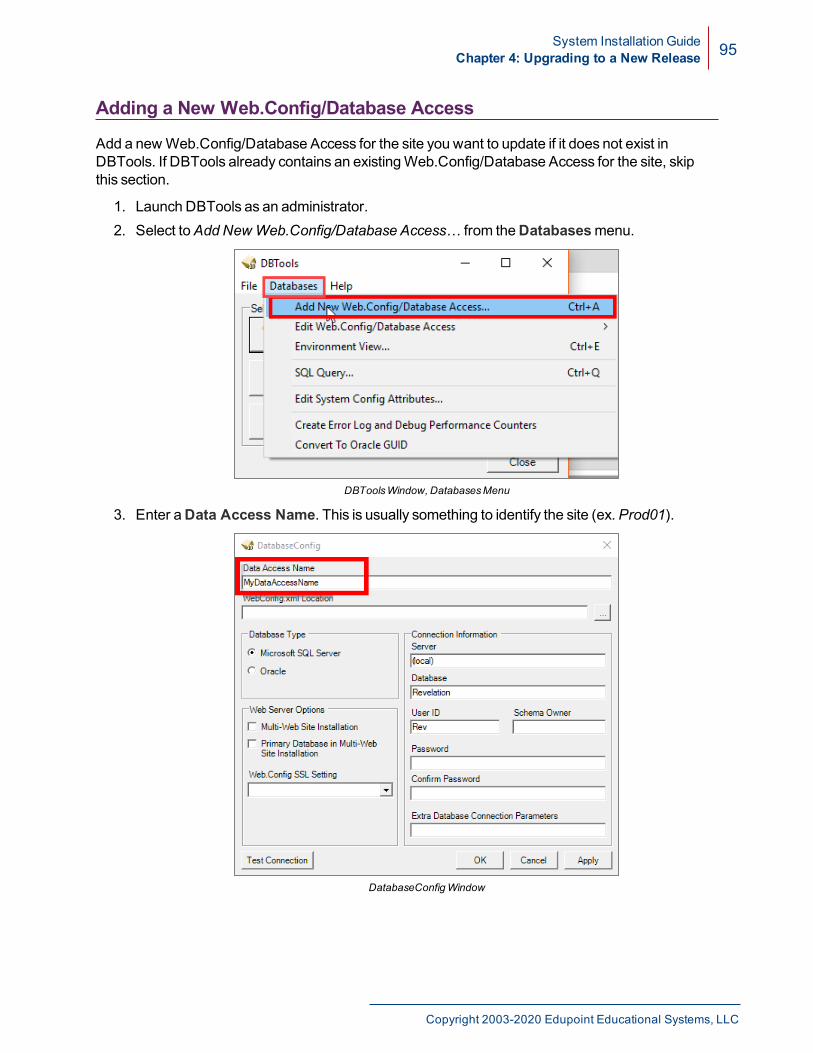
System Installation GuideChapter 4: Upgrading to a New Release 95
Adding a New Web.Config/Database Access
Add a newWeb.Config/Database Access for the site you want to update if it does not exist inDBTools. If DBTools already contains an existingWeb.Config/Database Access for the site, skipthis section.
1. Launch DBTools as an administrator.2. Select toAddNewWeb.Config/Database Access… from theDatabasesmenu.
DBToolsWindow, DatabasesMenu
3. Enter aData Access Name. This is usually something to identify the site (ex. Prod01).
DatabaseConfigWindow
Copyright 2003-2020 Edupoint Educational Systems, LLC

96 System Installation GuideChapter 4: Upgrading to a New Release
4. Click the to browse to theWeb.Config file for the site to update.
DatabaseConfigWindow
5. ClickYes on the Reload Setting prompt to populate the connection information from thespecifiedWeb.Config file.
Reload SettingsMessage
Edupoint Proprietary and Confidential
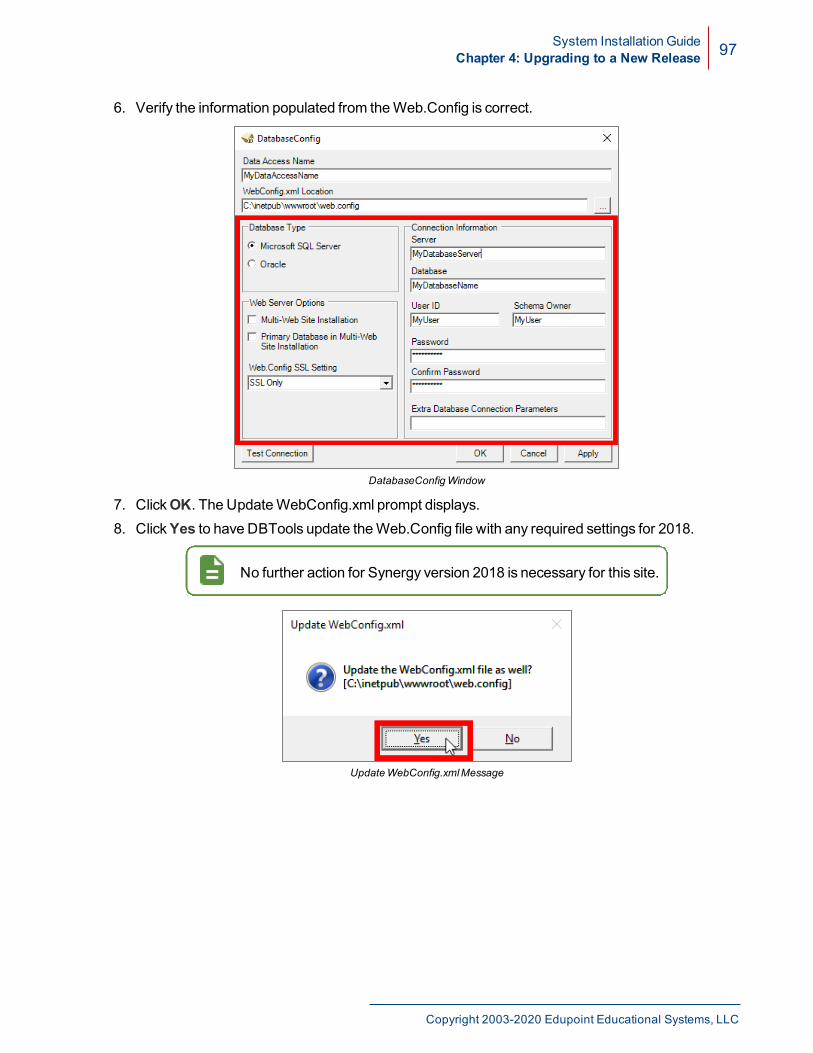
System Installation GuideChapter 4: Upgrading to a New Release 97
6. Verify the information populated from theWeb.Config is correct.
DatabaseConfigWindow
7. ClickOK. The UpdateWebConfig.xml prompt displays.8. ClickYes to have DBTools update theWeb.Config file with any required settings for 2018.
No further action for Synergy version 2018 is necessary for this site.
UpdateWebConfig.xmlMessage
Copyright 2003-2020 Edupoint Educational Systems, LLC

98 System Installation GuideChapter 4: Upgrading to a New Release
Updating the Web.Config File
1. Launch DBTools as an administrator.2. SelectEdit Web.Config/Database Access > <Data AccessName> from theDatabases
menu to select the site to modify.
DBTools, DatabasesMenu
3. Verify the information on the DatabaseConfig screen is correct.
DatabaseConfigWindow
Edupoint Proprietary and Confidential

System Installation GuideChapter 4: Upgrading to a New Release 99
4. ClickTest Connection. If the connection is successful, the Connection Succeeded! Messagedisplays.
DatabaseConfigWindow
5. ClickOK.
Connection ConfirmationMessage
Copyright 2003-2020 Edupoint Educational Systems, LLC
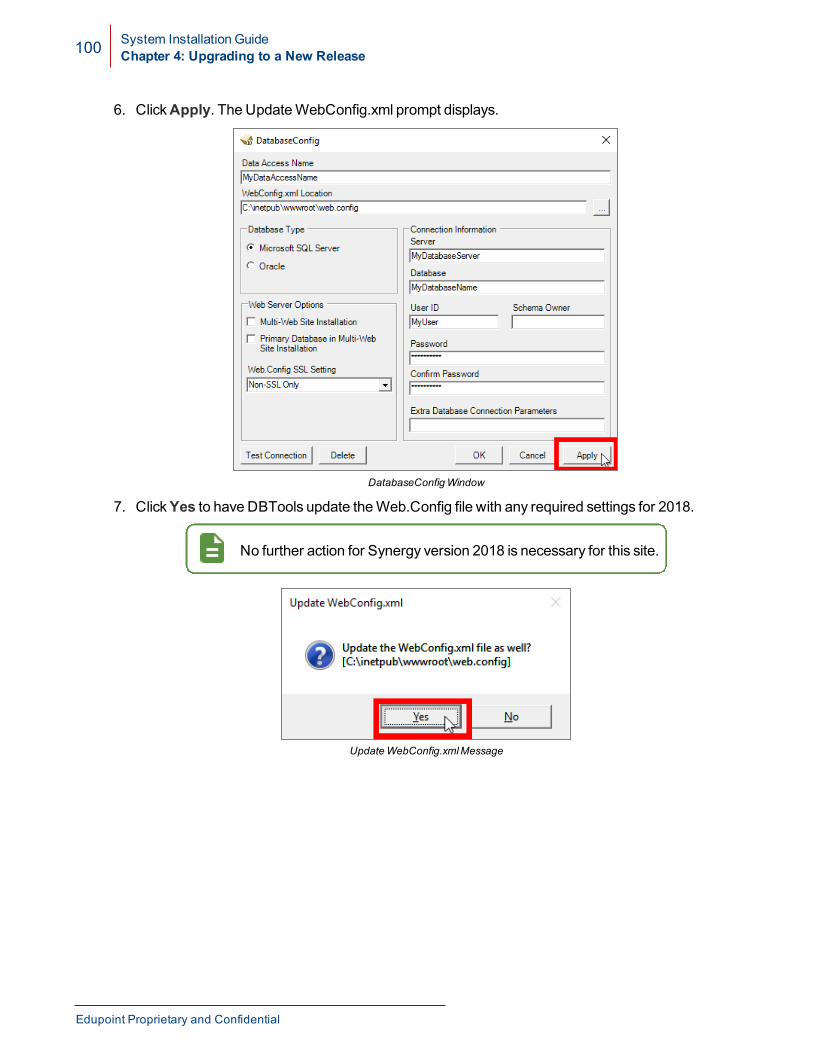
100 System Installation GuideChapter 4: Upgrading to a New Release
6. ClickApply. The UpdateWebConfig.xml prompt displays.
DatabaseConfigWindow
7. ClickYes to have DBTools update theWeb.Config file with any required settings for 2018.
No further action for Synergy version 2018 is necessary for this site.
UpdateWebConfig.xmlMessage
Edupoint Proprietary and Confidential

System Installation GuideChapter 4: Upgrading to a New Release 101
Common Update Issues
Missing Latest SCHEMA.XML
l Problem – The installer generates an error similar to the one below:13:41:22 - Process Started 7/22/2016 - 1:41:22 PM13:41:32 - MAX_PRIOR_DATE: 2016-06-3013:41:32 - Current version "7/22/2016 12:00:00 AM" CANNOT be upgraded asMAX_PRIOR_DATE attribute in Schema.xml is "6/30/2016 12:00:00 AM". Anewer Schema.xml is required that has a MAX_PRIOR_DATE greater than orequal to "7/22/2016 12:00:00 AM". Aborting install.
l Solution – The latest SCHEMA.XML file ismissing from the Pre folder. Place the latestSCHEMA.XML from the ftp site into the Pre folder and then re-run the installer.
Installing to Wrong Virtual Folder
l Problem –While this issue can causemultiple errors, the error below commonly displayswhen users open the website:
Server Error Example
l Solution – The web server is installed in the wrong virtual directory. Check the physical folderfor themissing file. If the file ismissing, uninstall the site, then re-install it using the correctvirtual folder.
Running Setup.exe Instead of InstallUserPrompt.exe
l Problem – This issue can causemultiple errors. By running the setup.exe applicationinstead of thePre\InstallUserPrompt.exe application, the installer runswith the settings thatwere last used on thismachine.
l Solution – Run the installer by executing the InstallUserPrompt.exe.
Copyright 2003-2020 Edupoint Educational Systems, LLC
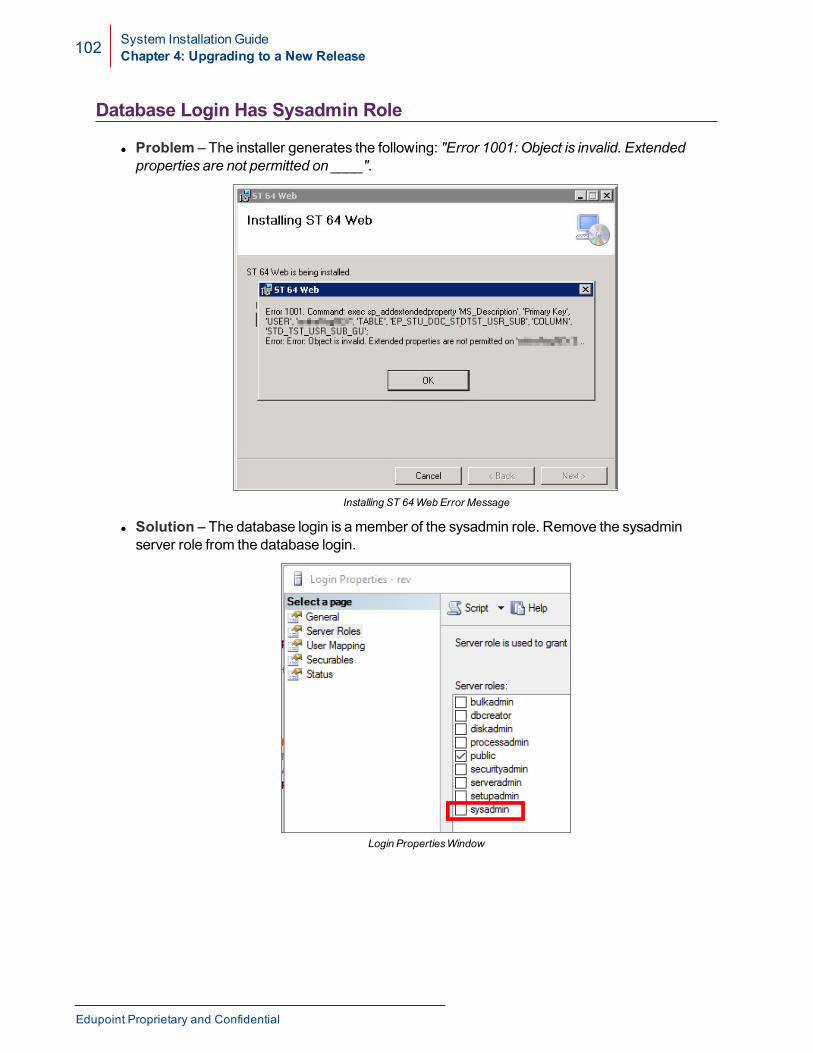
102 System Installation GuideChapter 4: Upgrading to a New Release
Database Login Has Sysadmin Role
l Problem – The installer generates the following: "Error 1001: Object is invalid. Extendedproperties are not permitted on ____".
Installing ST 64Web Error Message
l Solution – The database login is amember of the sysadmin role. Remove the sysadminserver role from the database login.
Login PropertiesWindow
Edupoint Proprietary and Confidential
Chapter 5:RT Dashboard
Setting Up RT Dashboard 104Setting Dashboard Options 112Managing Servers through the Dashboard 114Deploying Updates 118Common Update Issues 122
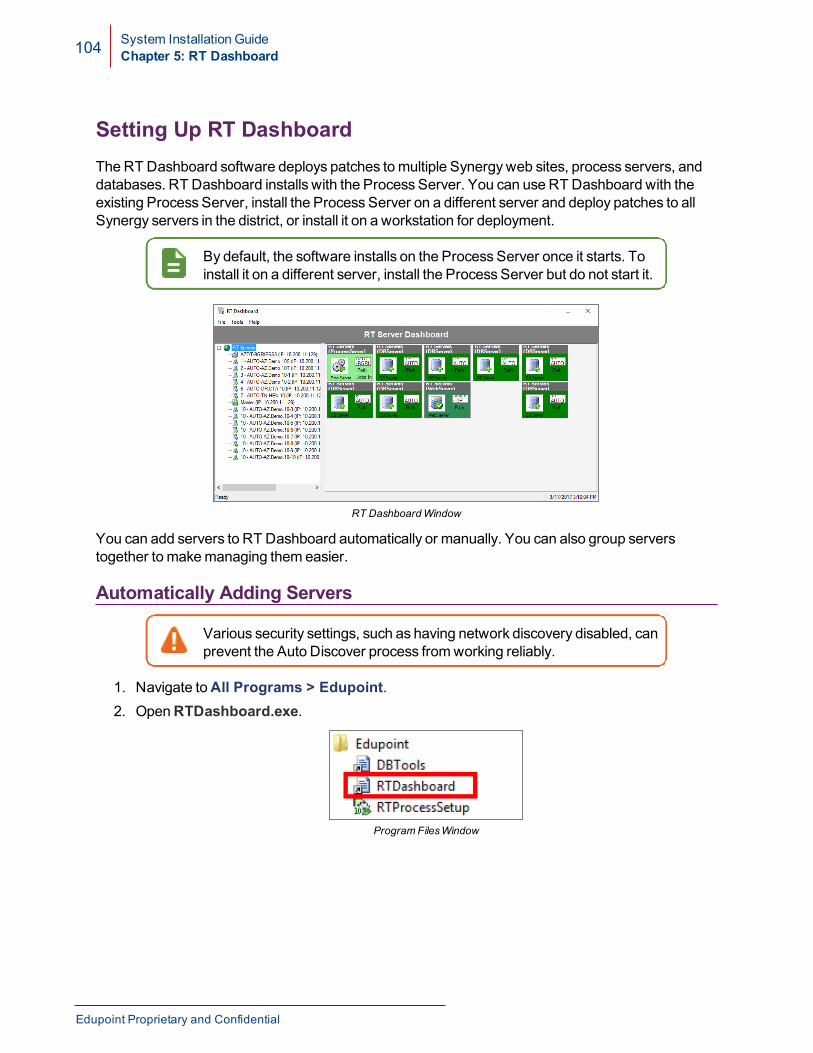
104 System Installation GuideChapter 5: RT Dashboard
Setting Up RT DashboardTheRT Dashboard software deploys patches tomultiple Synergyweb sites, process servers, anddatabases. RT Dashboard installs with the Process Server. You can use RT Dashboard with theexisting Process Server, install the Process Server on a different server and deploy patches to allSynergy servers in the district, or install it on a workstation for deployment.
By default, the software installs on the Process Server once it starts. Toinstall it on a different server, install the Process Server but do not start it.
RT DashboardWindow
You can add servers to RT Dashboard automatically or manually. You can also group serverstogether to makemanaging them easier.
Automatically Adding Servers
Various security settings, such as having network discovery disabled, canprevent the Auto Discover process fromworking reliably.
1. Navigate toAll Programs > Edupoint.2. OpenRTDashboard.exe.
Program FilesWindow
Edupoint Proprietary and Confidential
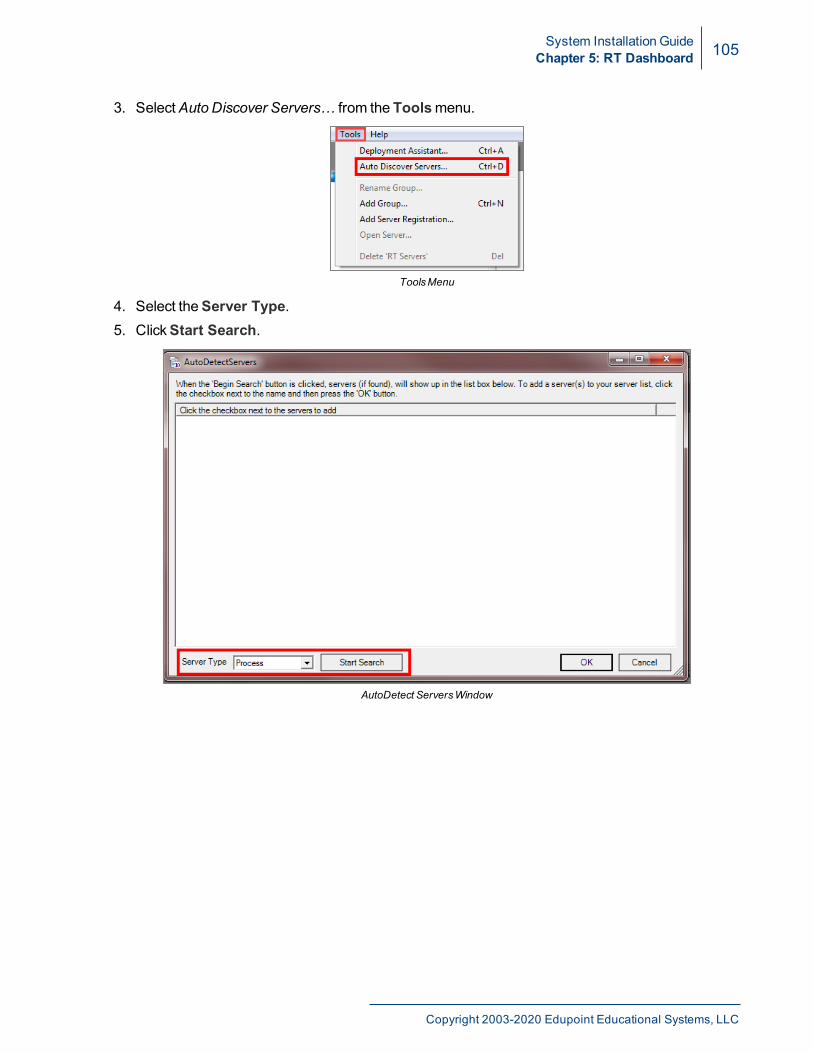
System Installation GuideChapter 5: RT Dashboard 105
3. SelectAuto Discover Servers… from the Toolsmenu.
ToolsMenu
4. Select theServer Type.5. ClickStart Search.
AutoDetect ServersWindow
Copyright 2003-2020 Edupoint Educational Systems, LLC
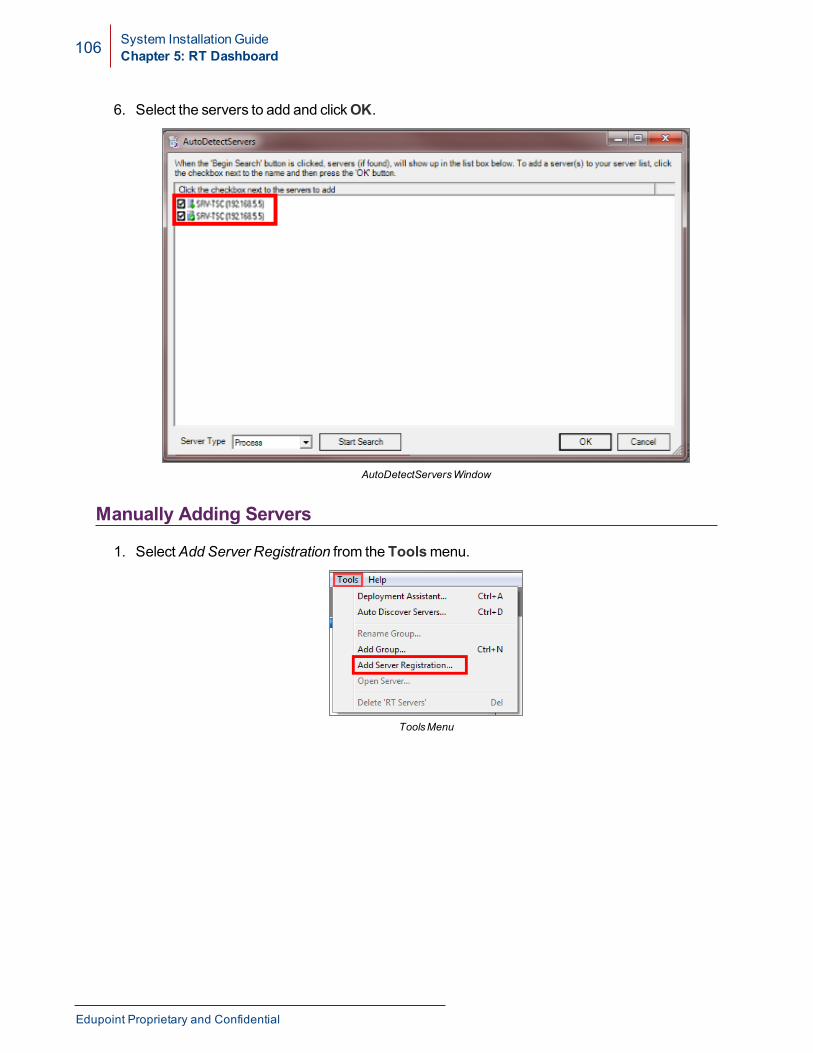
106 System Installation GuideChapter 5: RT Dashboard
6. Select the servers to add and clickOK.
AutoDetectServersWindow
Manually Adding Servers
1. SelectAdd Server Registration from the Toolsmenu.
ToolsMenu
Edupoint Proprietary and Confidential
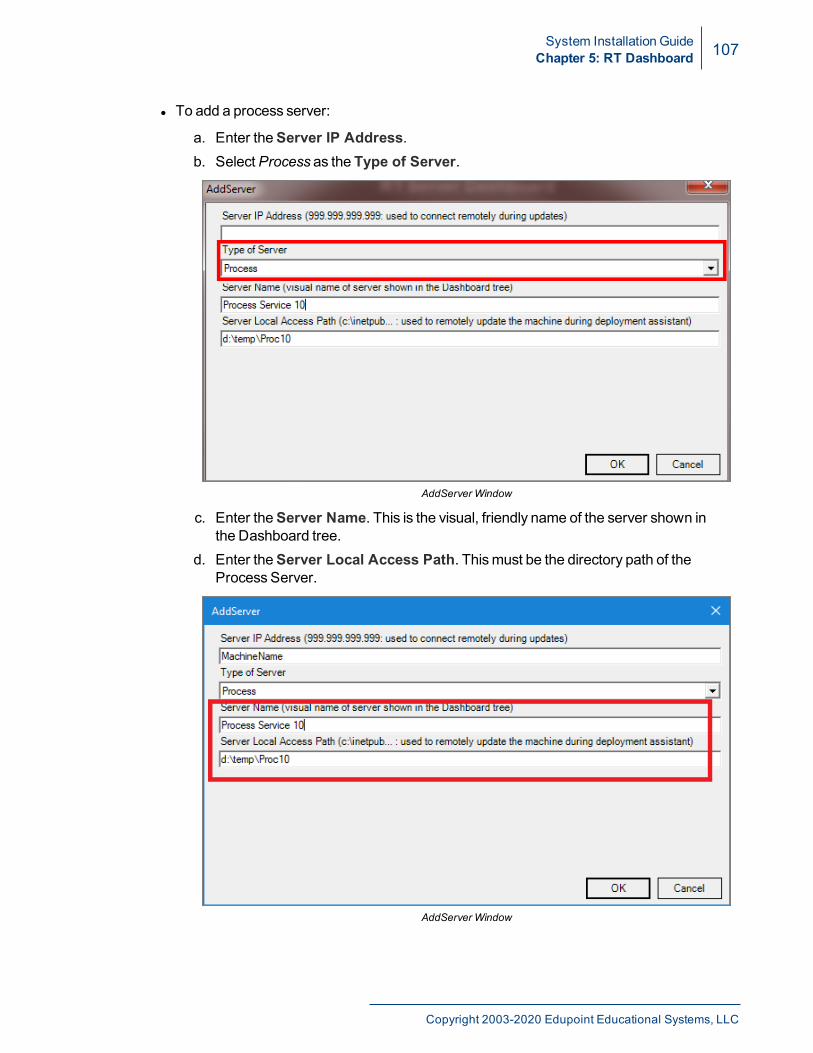
System Installation GuideChapter 5: RT Dashboard 107
l To add a process server:
a. Enter theServer IP Address.b. SelectProcess as the Type of Server.
AddServer Window
c. Enter theServer Name. This is the visual, friendly name of the server shown inthe Dashboard tree.
d. Enter theServer Local Access Path. Thismust be the directory path of theProcess Server.
AddServer Window
Copyright 2003-2020 Edupoint Educational Systems, LLC
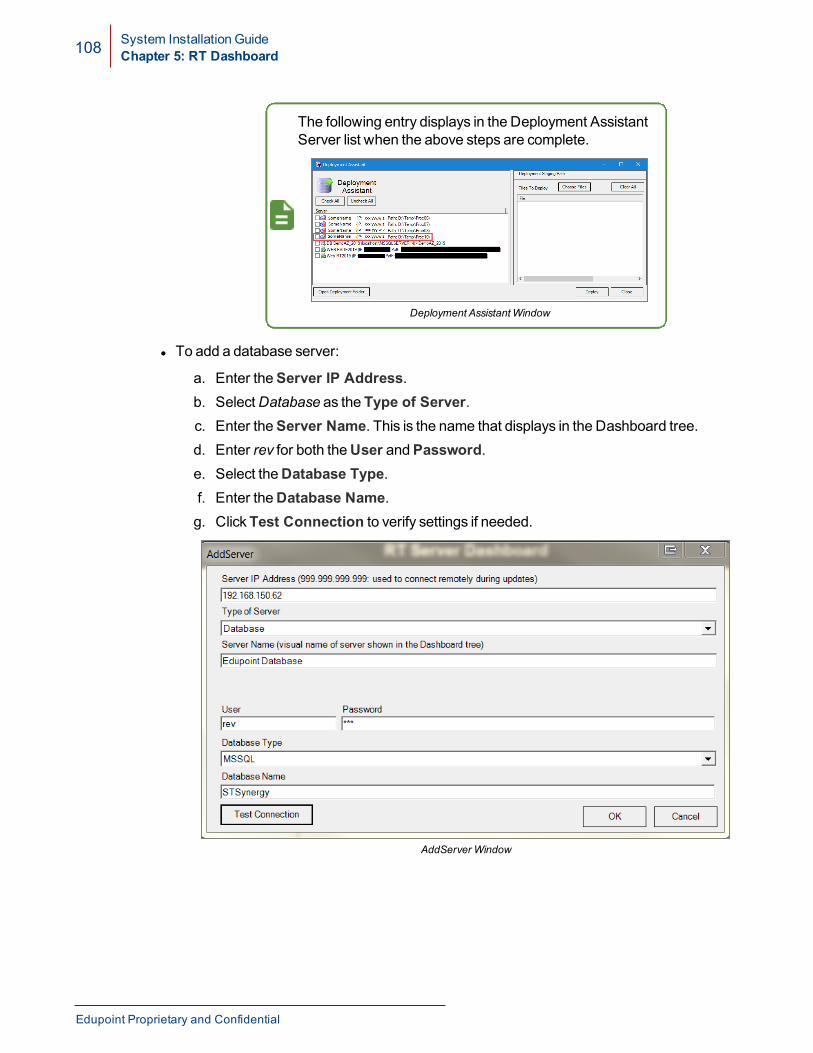
108 System Installation GuideChapter 5: RT Dashboard
The following entry displays in the Deployment AssistantServer list when the above steps are complete.
Deployment AssistantWindow
l To add a database server:
a. Enter theServer IP Address.b. SelectDatabase as the Type of Server.c. Enter theServer Name. This is the name that displays in the Dashboard tree.d. Enter rev for both theUser andPassword.e. Select theDatabase Type.f. Enter theDatabase Name.g. ClickTest Connection to verify settings if needed.
AddServer Window
Edupoint Proprietary and Confidential

System Installation GuideChapter 5: RT Dashboard 109
The following entry displays in the Deployment AssistantServer list when the above steps are complete.
Deployment AssistantWindow
l To add a web server:
a. Enter theServer IP Address.b. SelectWeb as the Type of Server.c. Enter theServer Name. This is the name that displays in the Dashboard tree.d. Enter the folder name of the web server as theServer Local Access Path.
To ensure the path is correct, navigate to the folderlocation on the local machine and copy the path fromWindowsExplorer.
AddServer Window
Copyright 2003-2020 Edupoint Educational Systems, LLC
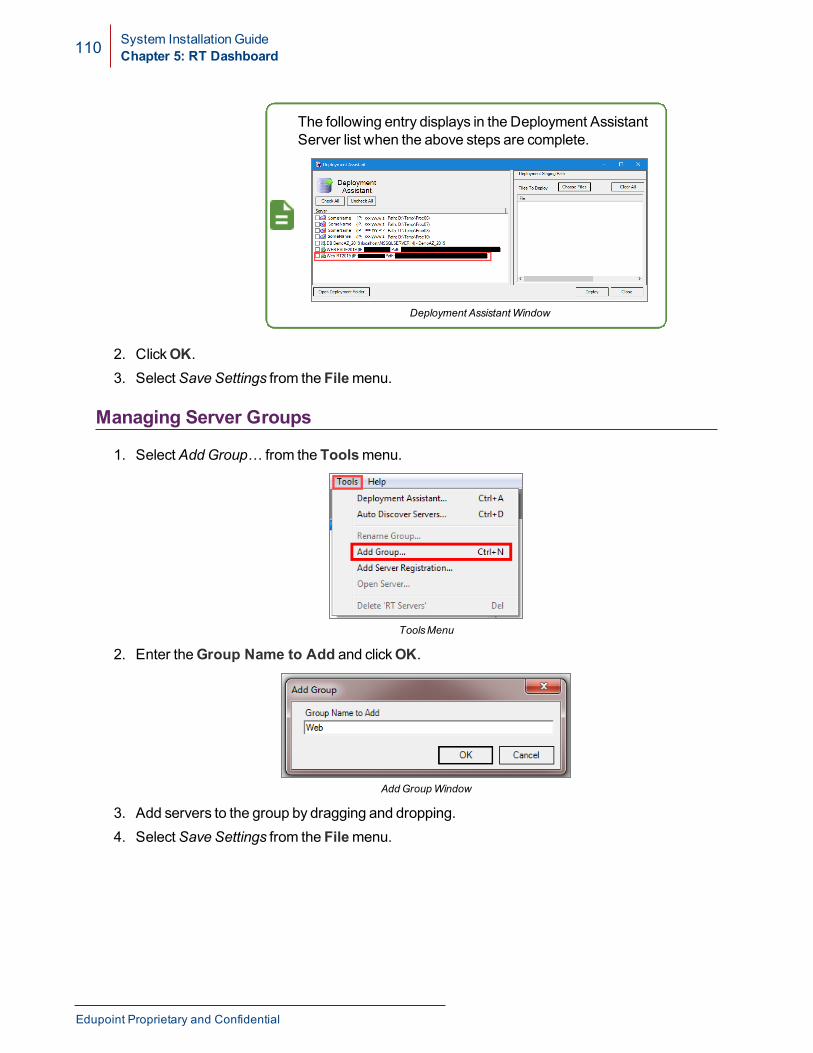
110 System Installation GuideChapter 5: RT Dashboard
The following entry displays in the Deployment AssistantServer list when the above steps are complete.
Deployment AssistantWindow
2. ClickOK.3. SelectSave Settings from the Filemenu.
Managing Server Groups
1. SelectAddGroup… from the Toolsmenu.
ToolsMenu
2. Enter theGroup Name to Add and clickOK.
AddGroupWindow
3. Add servers to the group by dragging and dropping.4. SelectSave Settings from the Filemenu.
Edupoint Proprietary and Confidential

System Installation GuideChapter 5: RT Dashboard 111
5. To rename a group:
a. Select the group.b. SelectRenameGroup from the Toolsmenu.
ToolsMenu
c. Enter the new name inRename Group To, then clickOK.
RenameGroupWindow
6. To delete a group:
a. Select the group.b. SelectDelete <GROUPNAME> from the Toolsmenu.
ToolsMenu
Copyright 2003-2020 Edupoint Educational Systems, LLC
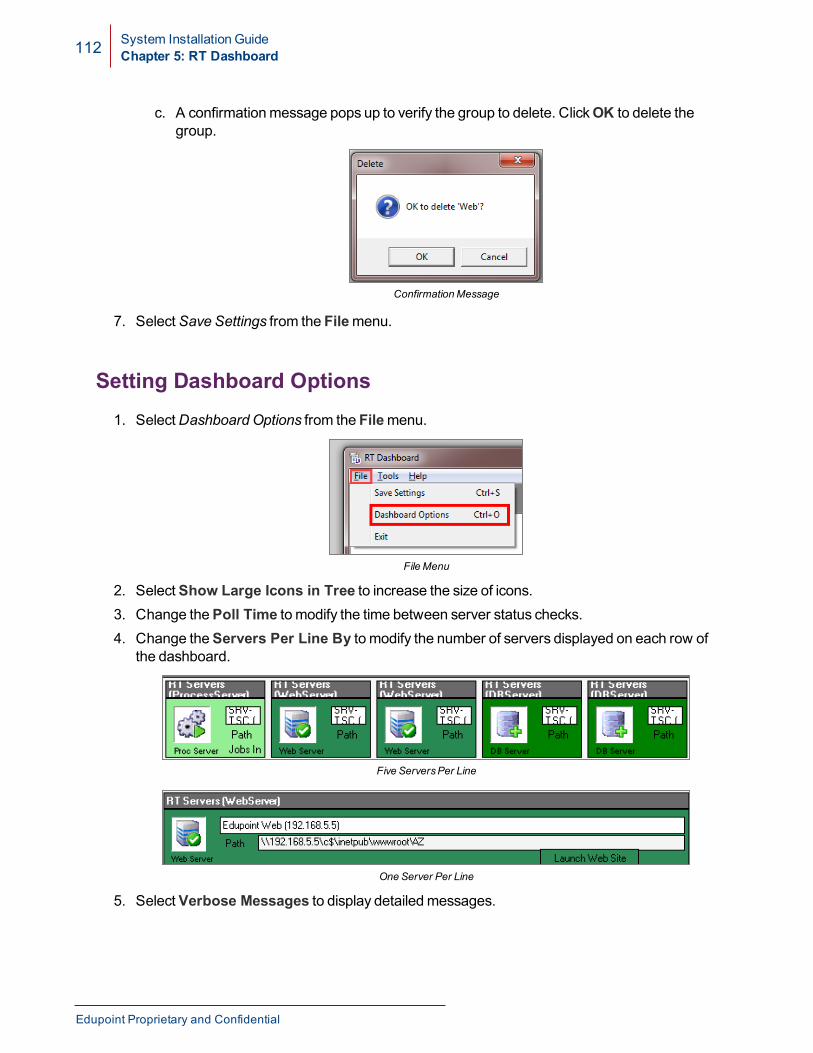
112 System Installation GuideChapter 5: RT Dashboard
c. A confirmationmessage pops up to verify the group to delete. ClickOK to delete thegroup.
ConfirmationMessage
7. SelectSave Settings from the Filemenu.
Setting Dashboard Options1. SelectDashboard Options from the Filemenu.
File Menu
2. SelectShow Large Icons in Tree to increase the size of icons.3. Change thePoll Time to modify the time between server status checks.4. Change theServers Per Line By to modify the number of servers displayed on each row of
the dashboard.
Five ServersPer Line
One Server Per Line
5. SelectVerbose Messages to display detailedmessages.
Edupoint Proprietary and Confidential
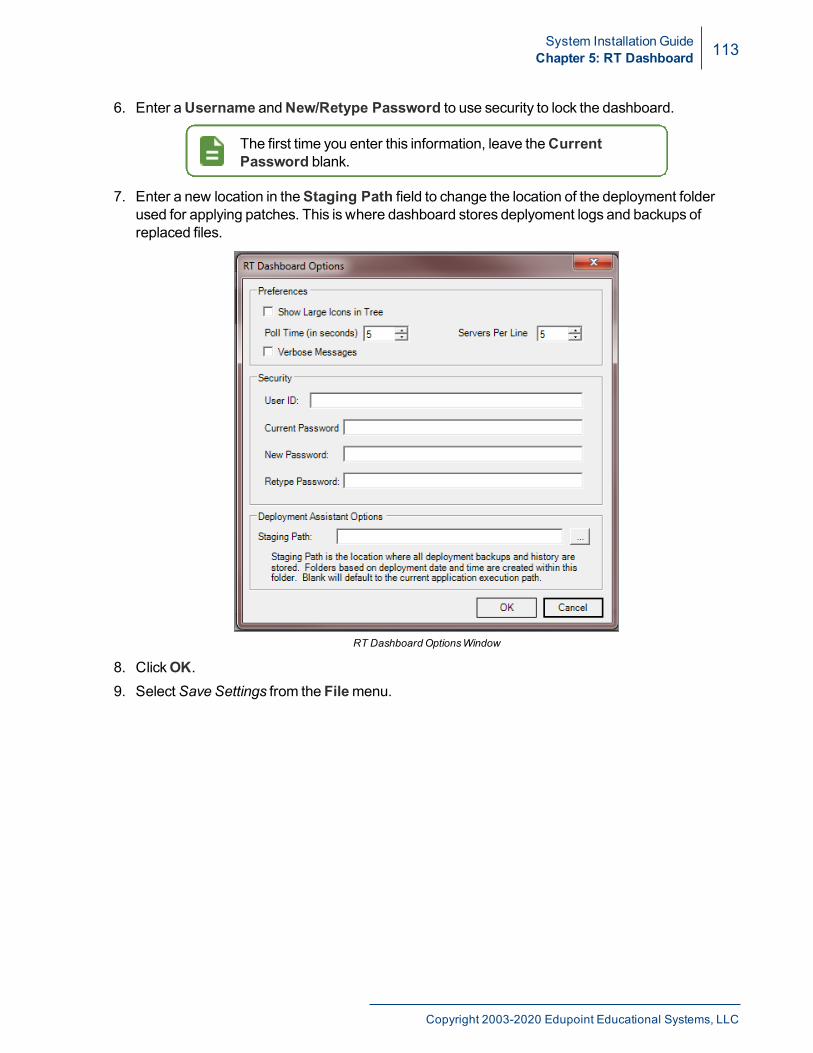
System Installation GuideChapter 5: RT Dashboard 113
6. Enter aUsername andNew/Retype Password to use security to lock the dashboard.
The first time you enter this information, leave theCurrentPassword blank.
7. Enter a new location in theStaging Path field to change the location of the deployment folderused for applying patches. This is where dashboard stores deplyoment logs and backups ofreplaced files.
RT Dashboard OptionsWindow
8. ClickOK.9. SelectSave Settings from the Filemenu.
Copyright 2003-2020 Edupoint Educational Systems, LLC
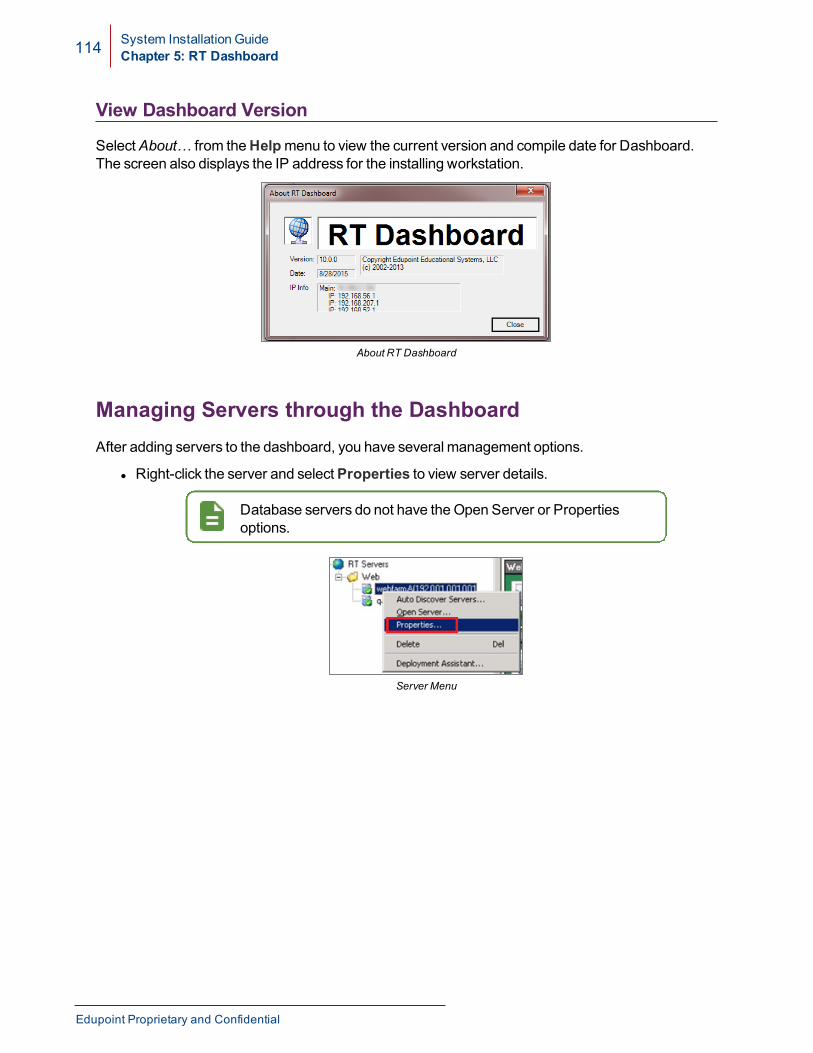
114 System Installation GuideChapter 5: RT Dashboard
View Dashboard Version
SelectAbout… from theHelpmenu to view the current version and compile date for Dashboard.The screen also displays the IP address for the installing workstation.
About RT Dashboard
Managing Servers through the DashboardAfter adding servers to the dashboard, you have several management options.
l Right-click the server and selectProperties to view server details.
Database servers do not have theOpen Server or Propertiesoptions.
Server Menu
Edupoint Proprietary and Confidential
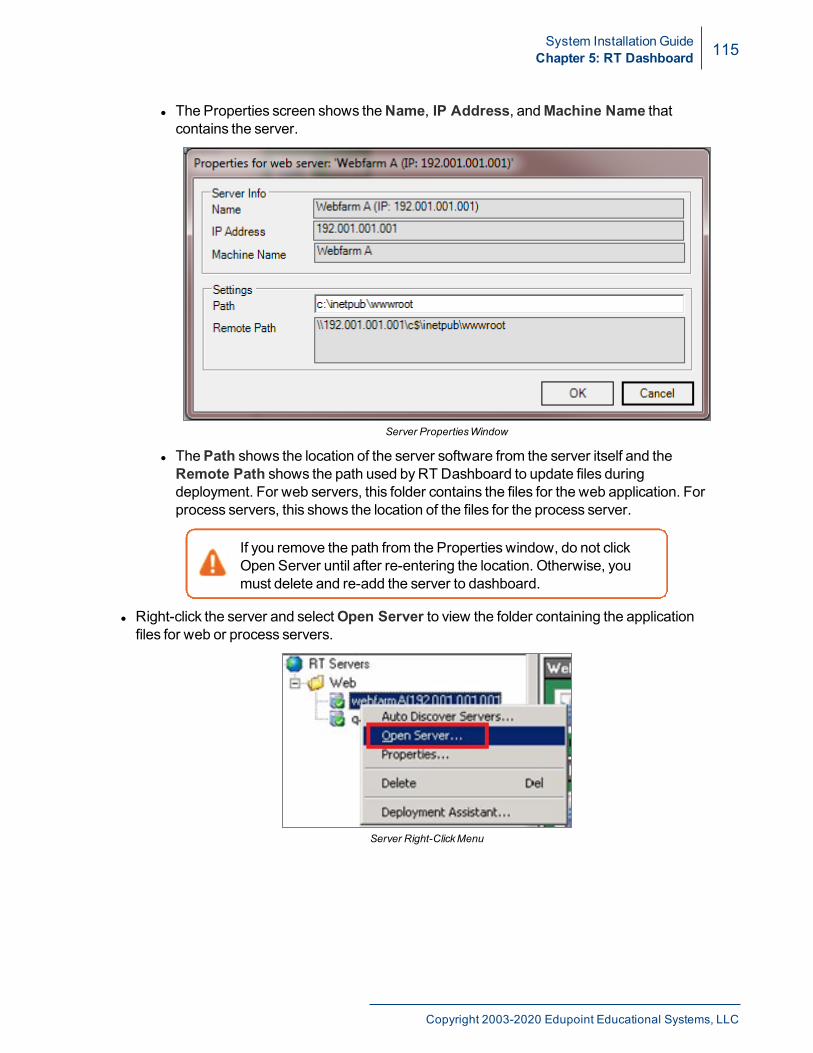
System Installation GuideChapter 5: RT Dashboard 115
l The Properties screen shows theName, IP Address, andMachine Name thatcontains the server.
Server PropertiesWindow
l ThePath shows the location of the server software from the server itself and theRemote Path shows the path used byRT Dashboard to update files duringdeployment. For web servers, this folder contains the files for the web application. Forprocess servers, this shows the location of the files for the process server.
If you remove the path from the Properties window, do not clickOpen Server until after re-entering the location. Otherwise, youmust delete and re-add the server to dashboard.
l Right-click the server and selectOpen Server to view the folder containing the applicationfiles for web or process servers.
Server Right-ClickMenu
Copyright 2003-2020 Edupoint Educational Systems, LLC

116 System Installation GuideChapter 5: RT Dashboard
l WindowsExplorer opens the folder of the application files.
Server FilesWindow
l Dashboard displays each type of server with a different icon. The color of each server iconindicates the current status of the server.
WebServer ProcessServer Database Server
l Green indicates the server is up and running.
Server Up AndRunning
l Yellow indicates the server is paused.
Server Paused
Edupoint Proprietary and Confidential
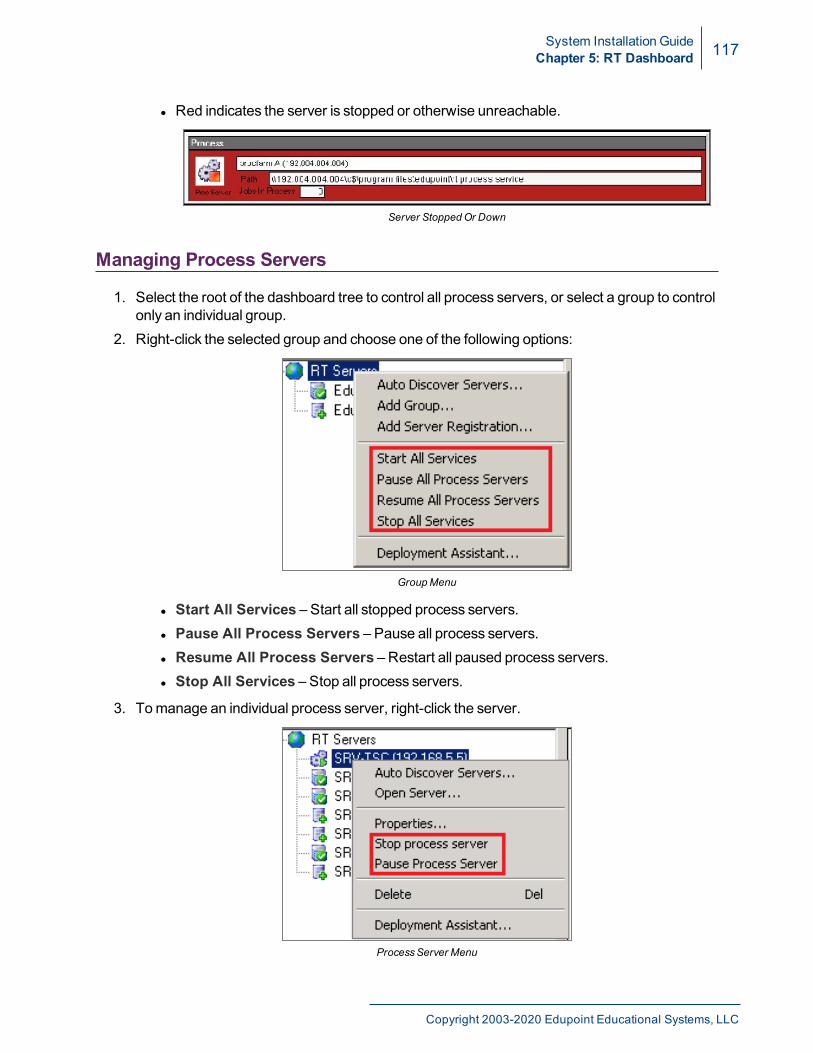
System Installation GuideChapter 5: RT Dashboard 117
l Red indicates the server is stopped or otherwise unreachable.
Server StoppedOr Down
Managing Process Servers
1. Select the root of the dashboard tree to control all process servers, or select a group to controlonly an individual group.
2. Right-click the selected group and choose one of the following options:
GroupMenu
l Start All Services – Start all stopped process servers.l Pause All Process Servers – Pause all process servers.l Resume All Process Servers – Restart all paused process servers.l Stop All Services – Stop all process servers.
3. Tomanage an individual process server, right-click the server.
ProcessServer Menu
Copyright 2003-2020 Edupoint Educational Systems, LLC
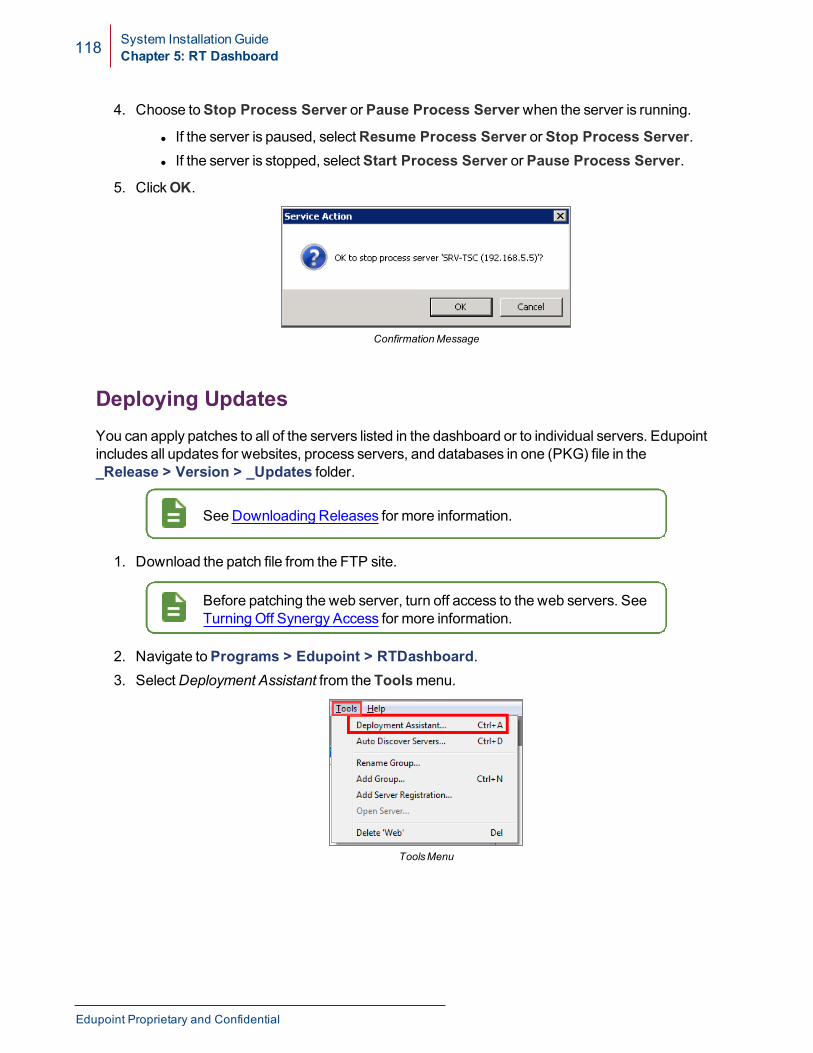
118 System Installation GuideChapter 5: RT Dashboard
4. Choose toStop Process Server or Pause Process Server when the server is running.
l If the server is paused, selectResume Process Server or Stop Process Server.l If the server is stopped, selectStart Process Server or Pause Process Server.
5. ClickOK.
ConfirmationMessage
Deploying UpdatesYou can apply patches to all of the servers listed in the dashboard or to individual servers. Edupointincludes all updates for websites, process servers, and databases in one (PKG) file in the _Release > Version > _Updates folder.
See Downloading Releases for more information.
1. Download the patch file from the FTP site.
Before patching the web server, turn off access to the web servers. SeeTurning Off Synergy Access for more information.
2. Navigate toPrograms > Edupoint > RTDashboard.3. SelectDeployment Assistant from the Toolsmenu.
ToolsMenu
Edupoint Proprietary and Confidential
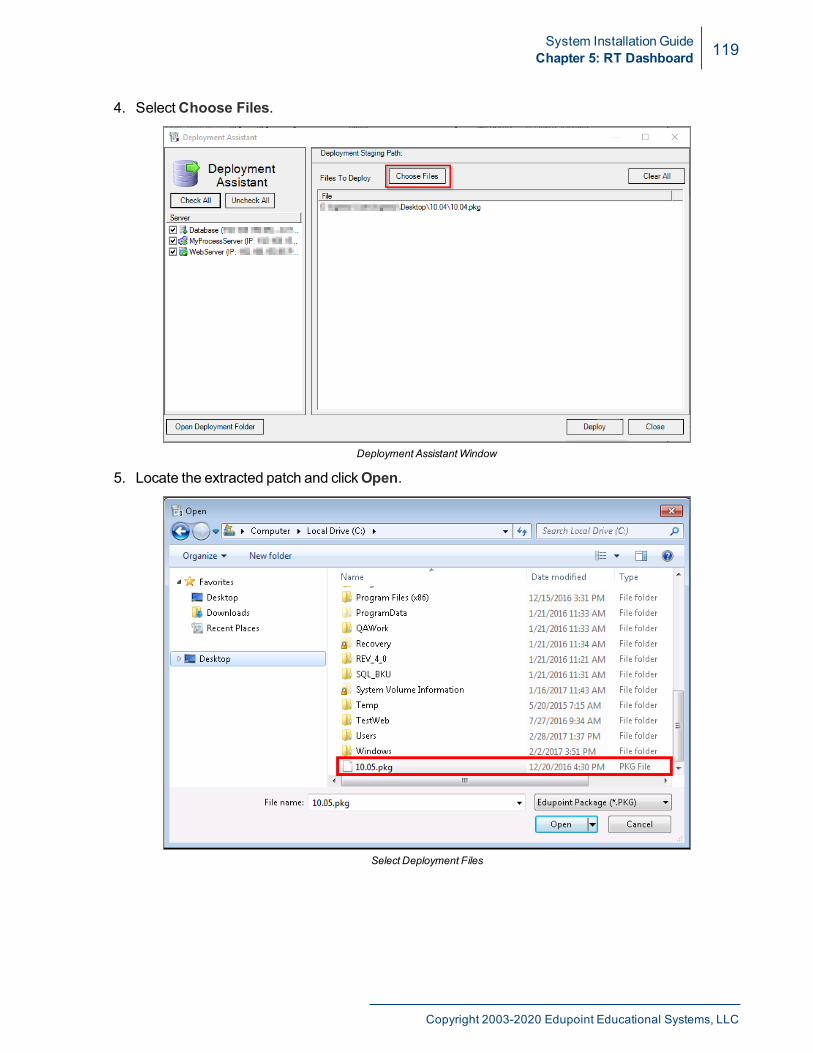
System Installation GuideChapter 5: RT Dashboard 119
4. SelectChoose Files.
Deployment AssistantWindow
5. Locate the extracted patch and clickOpen.
Select Deployment Files
Copyright 2003-2020 Edupoint Educational Systems, LLC
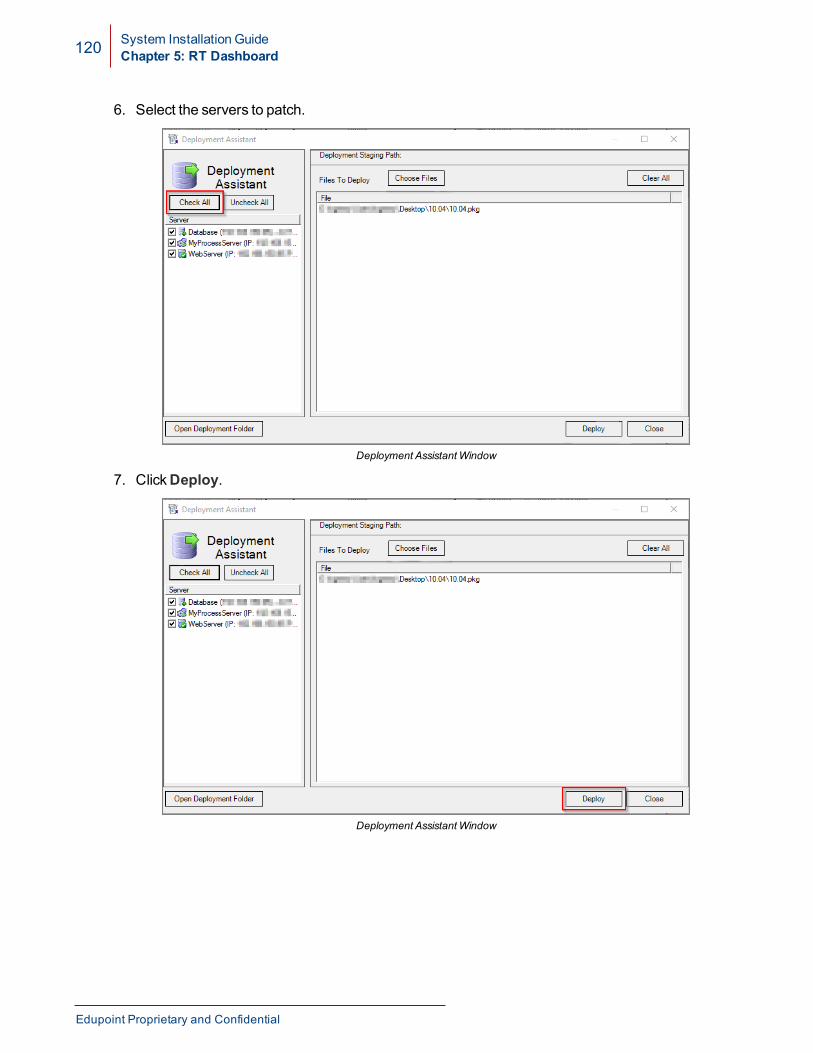
120 System Installation GuideChapter 5: RT Dashboard
6. Select the servers to patch.
Deployment AssistantWindow
7. ClickDeploy.
Deployment AssistantWindow
Edupoint Proprietary and Confidential
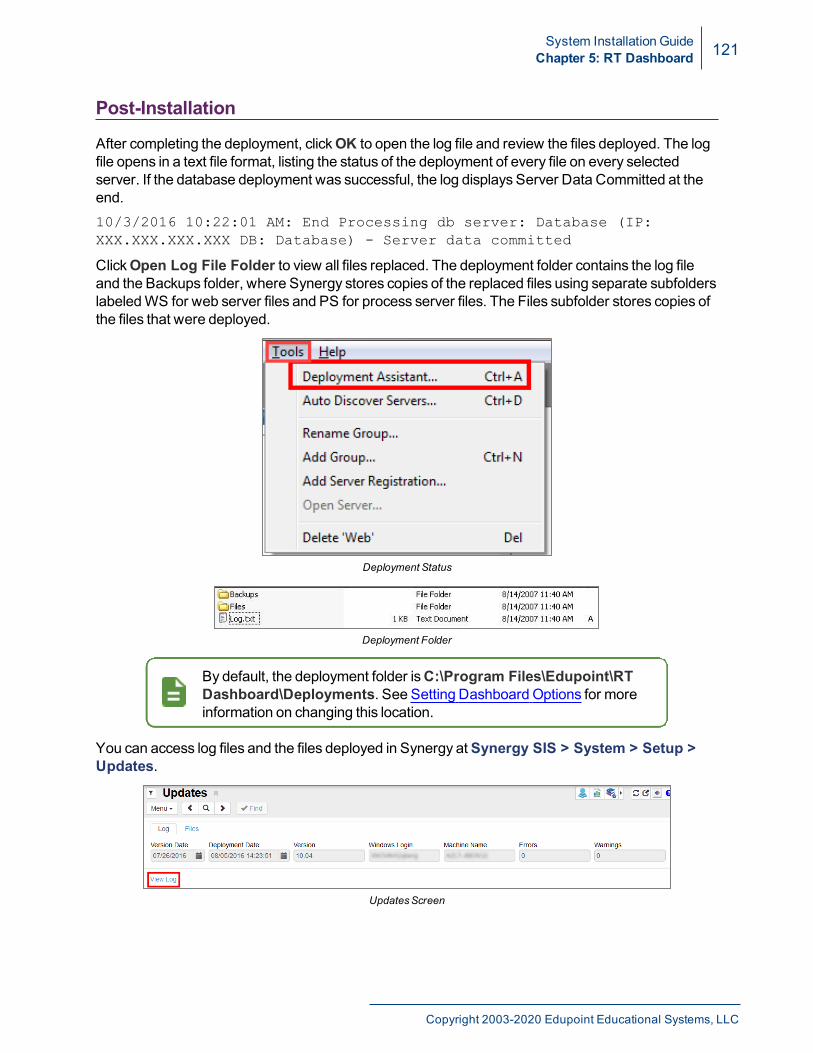
System Installation GuideChapter 5: RT Dashboard 121
Post-Installation
After completing the deployment, clickOK to open the log file and review the files deployed. The logfile opens in a text file format, listing the status of the deployment of every file on every selectedserver. If the database deployment was successful, the log displays Server Data Committed at theend.10/3/2016 10:22:01 AM: End Processing db server: Database (IP:XXX.XXX.XXX.XXX DB: Database) - Server data committed
ClickOpen Log File Folder to view all files replaced. The deployment folder contains the log fileand the Backups folder, where Synergy stores copies of the replaced files using separate subfolderslabeledWS for web server files and PS for process server files. The Files subfolder stores copies ofthe files that were deployed.
Deployment Status
Deployment Folder
By default, the deployment folder isC:\Program Files\Edupoint\RTDashboard\Deployments. See Setting Dashboard Options for moreinformation on changing this location.
You can access log files and the files deployed in Synergy at Synergy SIS > System > Setup >Updates.
UpdatesScreen
Copyright 2003-2020 Edupoint Educational Systems, LLC
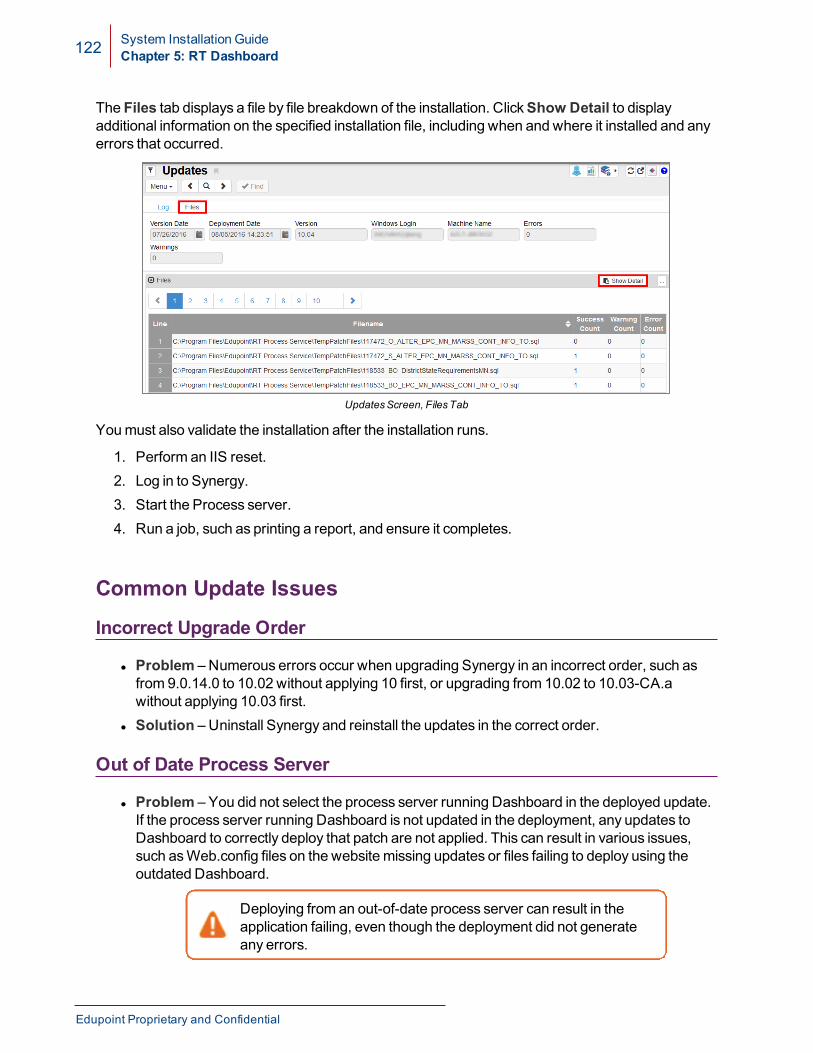
122 System Installation GuideChapter 5: RT Dashboard
The Files tab displays a file by file breakdown of the installation. ClickShow Detail to displayadditional information on the specified installation file, including when and where it installed and anyerrors that occurred.
UpdatesScreen, FilesTab
Youmust also validate the installation after the installation runs.
1. Perform an IIS reset.2. Log in to Synergy.3. Start the Process server.4. Run a job, such as printing a report, and ensure it completes.
Common Update Issues
Incorrect Upgrade Order
l Problem – Numerous errors occur when upgrading Synergy in an incorrect order, such asfrom 9.0.14.0 to 10.02 without applying 10 first, or upgrading from 10.02 to 10.03-CA.awithout applying 10.03 first.
l Solution – Uninstall Synergy and reinstall the updates in the correct order.
Out of Date Process Server
l Problem – You did not select the process server running Dashboard in the deployed update.If the process server running Dashboard is not updated in the deployment, any updates toDashboard to correctly deploy that patch are not applied. This can result in various issues,such asWeb.config files on the website missing updates or files failing to deploy using theoutdated Dashboard.
Deploying from an out-of-date process server can result in theapplication failing, even though the deployment did not generateany errors.
Edupoint Proprietary and Confidential
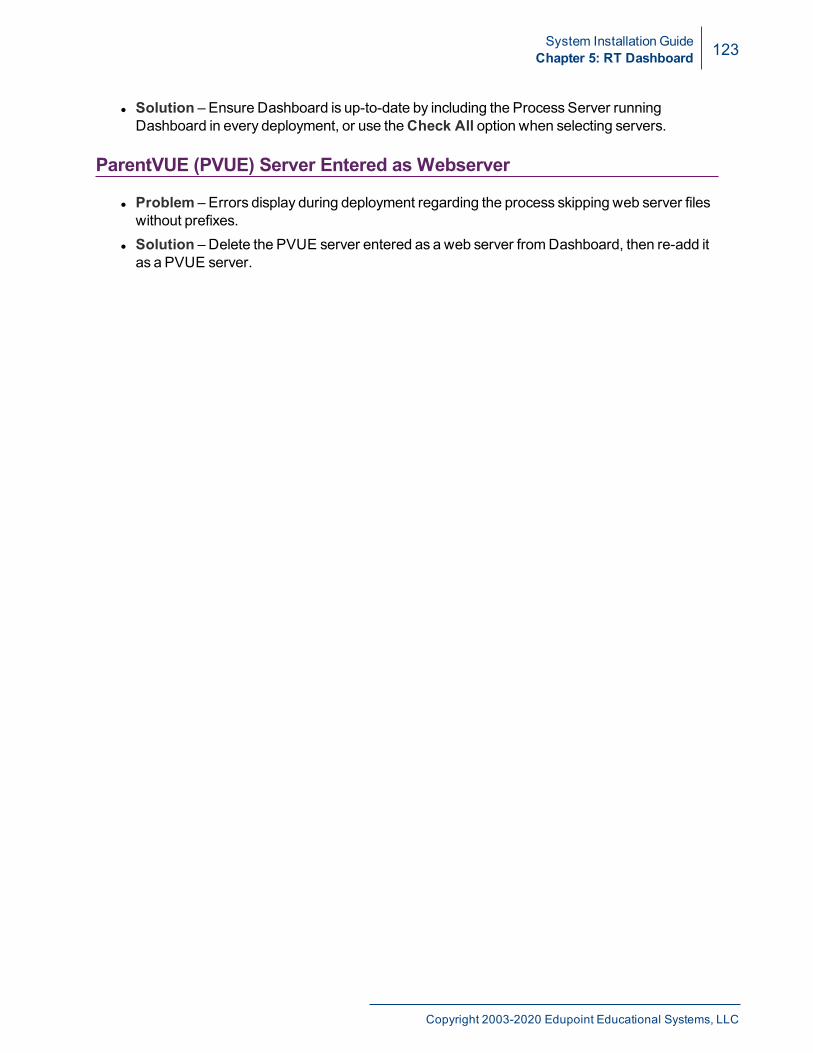
System Installation GuideChapter 5: RT Dashboard 123
l Solution – Ensure Dashboard is up-to-date by including the Process Server runningDashboard in every deployment, or use theCheck All option when selecting servers.
ParentVUE (PVUE) Server Entered as Webserver
l Problem – Errors display during deployment regarding the process skipping web server fileswithout prefixes.
l Solution – Delete the PVUE server entered as a web server fromDashboard, then re-add itas a PVUE server.
Copyright 2003-2020 Edupoint Educational Systems, LLC

124 System Installation GuideChapter 5: RT Dashboard
Remote Registry Services Not Running
l Problem – The deployment fails with the following error:9/27/2016 2:30:52 PM: Begin Update Process Servers:9/27/2016 2:30:52 PM: Processing process server: PS (IP: 1.1.1.1)9/27/2016 2:30:52 PM: Pausing Service9/27/2016 2:30:54 PM: Stopping Service: Pausing9/27/2016 2:30:54 PM: ERROR: => Revelation.RevExceptionRevelation.RevExceptionSource: Exception, Msg: Couldn't connect to remote machine.Stack: at Revelation.RevError.HandleError(Exception inner)at Revelation.Process.Deployer.UpdateProcessServers()at Revelation.Process.Deployer.Execute()
l Solution – Turn on the Remote Registry service for themachine running Dashboard and setit to run automatically.
Remote RegistryService
Edupoint Proprietary and Confidential

System Installation GuideChapter 5: RT Dashboard 125
Process Server Not Stopped Before Deployment
l Problem – Deployment to the process server fails with the errors displayed below, especiallywith smaller update packages:10/3/2016 8:07:01 PM: Deploying file: D:\TempPatchFiles\Some.dll10/3/2016 8:07:01 PM: Deploy location: \\1.1.1.1\D$\RT PROCESSSERVICE\BIN\Some.dll10/3/2016 8:07:01 PM: Backup already exist: \\1.1.1.1\D$\RT PROCESSSERVICE\BIN\Some.dll10/3/2016 8:07:01 PM: Success10/3/2016 8:07:01 PM: Revelation.RevExceptionRevelation.RevExceptionSource: Exception, Msg: The process cannot access the file'\\1.1.1.1\D$\RT PROCESS SERVICE\BIN\Some.dll' because it is being usedby another process.Stack: at Revelation.RevError.HandleError(Exception inner)at Revelation.Process.Deployer.DeployFile(String s, Int32 fCount, StringdeployPath, String backupPath)at Revelation.Process.Deployer.UpdateProcessServers()--------------------------Revelation.RevExceptionRevelation.RevExceptionSource: Exception, Msg: The process cannot access the file'\\1.1.1.1\D$\RT PROCESS SERVICE\BIN\Some.dll' because it is being usedby another process.Stack: at Revelation.RevError.HandleError(Exception inner)at Revelation.Process.Deployer.SureCopy(String srcPath, String dstPath,Boolean overwrite)at Revelation.Process.Deployer.DeployFile(String s, Int32 fCount, StringdeployPath, String backupPath)--------------------------System.IO.IOExceptionSystem.IO.IOExceptionSource: mscorlib, Msg: The process cannot access the file'\\1.1.1.1\D$\RT PROCESS SERVICE\BIN\Some.dll' because it is being usedby another process.Stack: at System.IO.__Error.WinIOError(Int32 errorCode, StringmaybeFullPath)at System.IO.File.InternalCopy(String sourceFileName, StringdestFileName, Boolean overwrite, Boolean checkHost)at Revelation.Process.Deployer.SureCopy(String srcPath, String dstPath,Boolean overwrite)--------------------------
l Solution –While Dashboard sends a kill signal to the process server before it starts copyingfiles, the processmay not fully stop in time. Stopping the process server in RT ProcessConfigor killing theRTProcessService.exe process in the TaskManager on themachine runningDashboard ensures the process server stops before the deployment begins.
Copyright 2003-2020 Edupoint Educational Systems, LLC