standard parts installation guide - siemens plm
TRANSCRIPT

SIEMENSSIEMENSSIEMENS
Standard PartsInstallation Guide
ST10

Proprietary and restricted rights notice
This software and related documentation are proprietary to Siemens Product Lifecycle ManagementSoftware Inc.
© 2017 Siemens Product Lifecycle Management Software Inc.
2 Standard Parts Installation Guide ST10
Contents
Proprietary and restricted rights notice . . . . . . . . . . . . . . . . . . . . . . . . . . . . . . . . . . . . . . 2
Setup overview . . . . . . . . . . . . . . . . . . . . . . . . . . . . . . . . . . . . . . . . . . . . . . . . . . . . . . . 1-1
Installing Standard Parts in an unmanaged environment . . . . . . . . . . . . . . . . . . . . . . . . . 2-1
Installing Standard Parts in an Insight environment . . . . . . . . . . . . . . . . . . . . . . . . . . . . 3-1
Installing Standard Parts in a Teamcenter environment . . . . . . . . . . . . . . . . . . . . . . . . . . 4-1
Installing Standard Parts in a Solid Edge SP environment . . . . . . . . . . . . . . . . . . . . . . . . 5-1
Upgrading Standard Parts . . . . . . . . . . . . . . . . . . . . . . . . . . . . . . . . . . . . . . . . . . . . . . . 6-1
Configuring SQL Server . . . . . . . . . . . . . . . . . . . . . . . . . . . . . . . . . . . . . . . . . . . . . . . . 7-1
Installing Parts Libraries . . . . . . . . . . . . . . . . . . . . . . . . . . . . . . . . . . . . . . . . . . . . . . . . 8-1
Basic Definitions . . . . . . . . . . . . . . . . . . . . . . . . . . . . . . . . . . . . . . . . . . . . . . . . . . . . . 9-1
ST10 Standard Parts Installation Guide 3


Chapter 1: Setup overview
Standard Parts requires SQLExpress or SQLServer to be installed on the Standard PartsAdministrator machine.
Note
SQLExpress 2012 SP1 or SQLServer 2012 are recommended for Windows 7, Windows8.1, and Windows 10 operating system. If it is not already loaded on the system, StandardParts Administrator installs SQLExpress 2012 SP1. For the SQL server administration,you can download the SQL Server Management Studio 2012 that is compatible withSQLExpress 2012 from https://www.microsoft.com/en-us/download/details.aspx?id=29062.
The installation of Standard Parts Administrator installs and configures SQL Express 2012 SP1 suchthat the Administrator and Master Part Files are available to use. When installing Standard PartsAdministrator for the first time, installation of the Master Part Files is on by default.
The Master Part Files include free sample content. It is recommended that if this is the first time youare installing Standard Parts Administrator to install the sample files. This will create a database andconfigure the system so it is ready to use fora single user.
Note
If the Master Part Files are not installed you will have to create a database and configureStandard Parts manually after installation is complete.
Standard Parts Administrator and SQL Server do not need to be installed on the client machinesthat access the components in the Standard Parts Database. They only need to be installed on themachine intended for Standard Parts administration.
Instructions on how to install and configure Standard Parts in the recommended manner are locatedin the following chapters.
ST10 Standard Parts Installation Guide 1-1


Chapter 2: Installing Standard Parts in anunmanaged environment
Follow these instructions to install Standard Parts in an environment where you manage files withouta PDM system. Later sections describe how to install Standard Parts in environments wheredocuments are managed with Insight, Solid Edge SP, or Teamcenter.
Standard Parts Administrator installation - demonstration or single user
1. Run the Standard Parts Administrator installation on the desired workstation with Solid Edgeinstalled. If the default destination folder for Master Part Files, C:\Solid Edge Standard Parts, ispredefined in the Custom Setup step needs to be changed, set another local or network folder.
Note
The Master Part Files feature installs only a free sample set of standard parts. Howeverinstalling this feature creates the necessary Solid Edge Standard Parts configurationfolder structure and database. You can create this structure and database later usingthe Solid Edge Standard Parts Configuration Wizard.
2. Complete the installation.
After completing these steps, Standard Parts is ready to use with the free sample standard partscontent. If you want to use the full content of Standard Parts libraries continue with the stepsdescribed in the section Installing Parts Libraries.
Standard Parts Administrator installation - multiple users
1. Run the Standard Parts Administrator installation on the workstation intended for StandardParts administration. In the Custom Setup step, deselect Installing Master Part Files. Only theStandard Parts Administrator application is installed.
2. Complete the installation.
3. Choose Windows Start→All Programs→Solid Edge ST10→Standard Parts→ConfigurationWizard.
4. In the Step 1 area of the configuration wizard, specify the desired location of the Standard Partsconfiguration folder. You can use the Browse button to search for the appropriate folder. Thislocation should be accessible with full permissions by all Standard Parts users. It is suggestedthat you specify this location as a UNC path, for example \\Server\Public\SEStdParts).
ST10 Standard Parts Installation Guide 2-1

Chapter 2: Installing Standard Parts in an unmanaged environment
Note
When you enter the Standard Parts configuration folder for the first time, default valuesare added to all settings in the Step 2 area. If it is not the case click the Defaults button.
5. Choose Browse in the Step 2 area to define the Working Database.
a. On the Database Managerdialog box, select the External Network Database option.
b. In the External Database Server dialog box, specify an SQL Server (name, user andpassword) accessible for all Standard Parts users. See Configuring SQL Server for details.
c. New button and enter a name for the new database.
Note
This action creates two databases on the server – the Standard Parts workingdatabase. For example, xse109_StandardParts109 and GUID database,xCP_localGUIDdb95.
d. Click OK to accept the new working database.
6. On the Configuration Wizard dialog box, click Save.
After saving the configuration, the Solid Edge Standard Parts configuration folder is created. Inthis case at the location, \\Server\Public\SEStdParts. It contains SMAPINIFile.sac, which is thefile containing the configuration, along with folders, HTML, Standard Parts and Working folder.For more details about folder structure, see the Standard Parts User Guide.
2-2 Standard Parts Installation Guide ST10
Chapter 2: Installing Standard Parts in an unmanaged environment

Installing Standard Parts in an unmanaged environment
7. If you want to use content from the Standard Parts libraries, proceed with the steps describedin Installing Parts Libraries.
Standard Parts workstation setup
After you have set up the administration workstation, set the Standard Parts SAC file location onother workstations . The SAC file must be located in the UNC path that you defined during theStandard Parts configuration.
ST10 Standard Parts Installation Guide 2-3
Installing Standard Parts in an unmanaged environment

Chapter 2: Installing Standard Parts in an unmanaged environment
Set the Standard Parts SAC file location
1. Start Solid Edge and open an Assembly file.
Note
The assembly file can be an existing document or a new one. It does not matter,because you will not save any changes to the document, you are just using it to getinto the Assembly environment.
2. On the Application menu, click the Settings→Solid Edge Options button.
3. On the Solid Edge Options dialog box, click the File Locations tab.
4. In the list of file types, click Standard Parts SAC file, click Modify, and browse to the location ofthe SMAPINIFile.sac file in the configuration folder created Standard Parts configuration.
2-4 Standard Parts Installation Guide ST10
Chapter 2: Installing Standard Parts in an unmanaged environment
Chapter 3: Installing Standard Parts in an Insight environment
This section describes how to set your Standard Parts system to store parts in an Insight-managedenvironment.
For more details about Solid Edge and Insight installation and workflows, refer to the Solid Edge andInsight documentation. Some Standard Parts themes are described in the Solid Edge help file.
All Insight server and client installation requirements must be met prior to performing theseconfiguration steps. For more details about installation and working with Insight, see Microsoftdocumentation for SharePoint, and see the Solid Edge Insight Implementation Guide for informationabout Insight services. The minimum supported role at SharePoint is Contributor for all users.
The Solid Edge Standard Parts system has many limitations for Insight localization that are derivedfrom SharePoint and Insight limitations and rules; most important are:
1. Global limitations:
• There is a limitation for filename and path lengths, and some special characters are notsupported.
• Mandatory Insight properties must be added to all Document Libraries at the server, prior toimporting files to the library.
2. Workstation limitations:
• Proxy must be disabled or bypassed for LAN.
Insight Modes
Solid Edge allows the use of Insight in the following modes:
Generated parts and working folder on Insight (recommended)Uses Insight only as the location for generated parts and working folder.
All on InsightPlaces the entire Standard Parts folder structure, including the SAC file but excluding thedatabase, on Insight.
Standard Parts Administrator Setup - Generated parts and Working folder on Insight
1. Run the Standard Parts Administrator installation on the workstation intended for Standard Partsadministration. In the Custom Setup step, deselect Installing Master Part Files so only theStandard Parts Administrator application is installed.
2. Complete the installation.
3. Create a target SharePoint document library, for example,http://isst3/SiteDirectory/example/StdParts. Be sure to add Insight mandatory properties fromInsight Server to this document library.
ST10 Standard Parts Installation Guide 3-1
Chapter 3: Installing Standard Parts in an Insight environment
4. Add a Network Place on your workstation pointing to the SharePoint URL. This step is necessaryfor accessibility from some standard dialogs not customized for working with URLs.
5. Add the Document Library location to the searchscope.txt file, typically located at C:\ProgramFiles\Solid Edge ST9\Preferences.
6. Choose Windows Start→All Programs→Solid Edge ST10→Standard Parts→ConfigurationWizard.
7. In the Step 1 area of the configuration wizard, specify the desired location of the Standard Partsconfiguration folder. You can use the Browse button to search for the appropriate folder. Thislocation should be accessible with full permissions by all Standard Parts users. It is suggestedthat you specify this location as a UNC path, for example \\Server\Public\SEStdParts).
Note
When you enter the Standard Parts configuration folder for the first time, default valuesare added to all settings in the Step 2 area. If it is not the case click the Defaults button.
8. To define the Working Database, in the Step 2 area, choose Browse.
a. On the Database Managerdialog box, select the External Network Database option.
b. In the External Database Server dialog box, specify an SQL Server (name, user andpassword) accessible for all Standard Parts users. See Configuring SQL Server for details.
c. Click the New button and enter a name for the new database.
Note
This action creates two databases on the server – the Standard Parts workingdatabase. For example, xse109_StandardParts109 and GUID database,xCP_localGUIDdb95.
d. Click OK to accept the new working database.
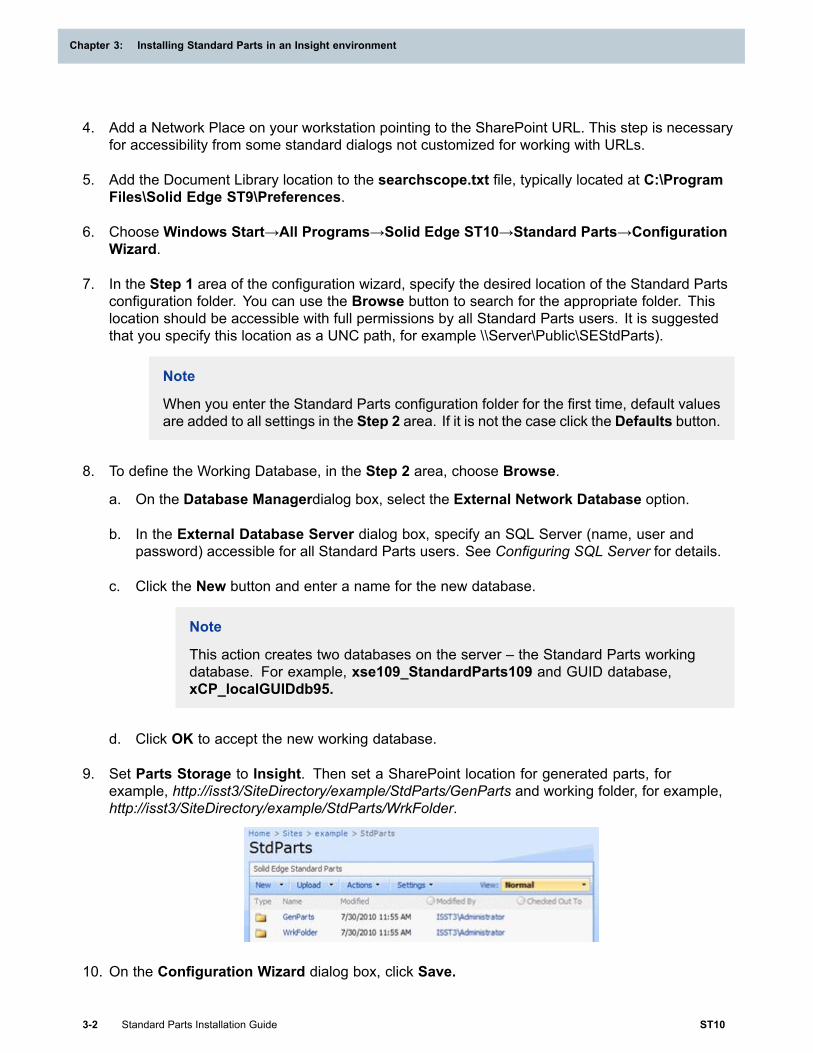
9. Set Parts Storage to Insight. Then set a SharePoint location for generated parts, forexample, http://isst3/SiteDirectory/example/StdParts/GenParts and working folder, for example,http://isst3/SiteDirectory/example/StdParts/WrkFolder.
10. On the Configuration Wizard dialog box, click Save.
3-2 Standard Parts Installation Guide ST10
Chapter 3: Installing Standard Parts in an Insight environment

Installing Standard Parts in an Insight environment
After saving the configuration, the Solid Edge Standard Parts configuration folder is created. Inthis case at the location, \\Server\Public\SEStdParts. It contains SMAPINIFile.sac, which is thefile containing the configuration, along with folders, HTML, Standard Parts and Working folder.For more details about folder structure, see the Standard Parts User Guide.
11. If you want to use content from the Standard Parts libraries, proceed with the steps describedin Installing Parts Libraries.
ST10 Standard Parts Installation Guide 3-3
Installing Standard Parts in an Insight environment
Chapter 3: Installing Standard Parts in an Insight environment
Standard Parts workstation Setup
After you have set up the administration workstation, set the Standard Parts SAC file locationon other workstations. The SAC file must be located at the UNC path that you defined duringthe Standard Parts configuration.
Set the Standard Parts SAC file location
1. Start Solid Edge and open an Assembly file.
Note
The assembly file can be an existing document or a new one. It does not matter,because you will not save any changes to the document, you are just using itto get into the Assembly environment.
2. On the Application menu, click the Settings→Solid Edge Options button.
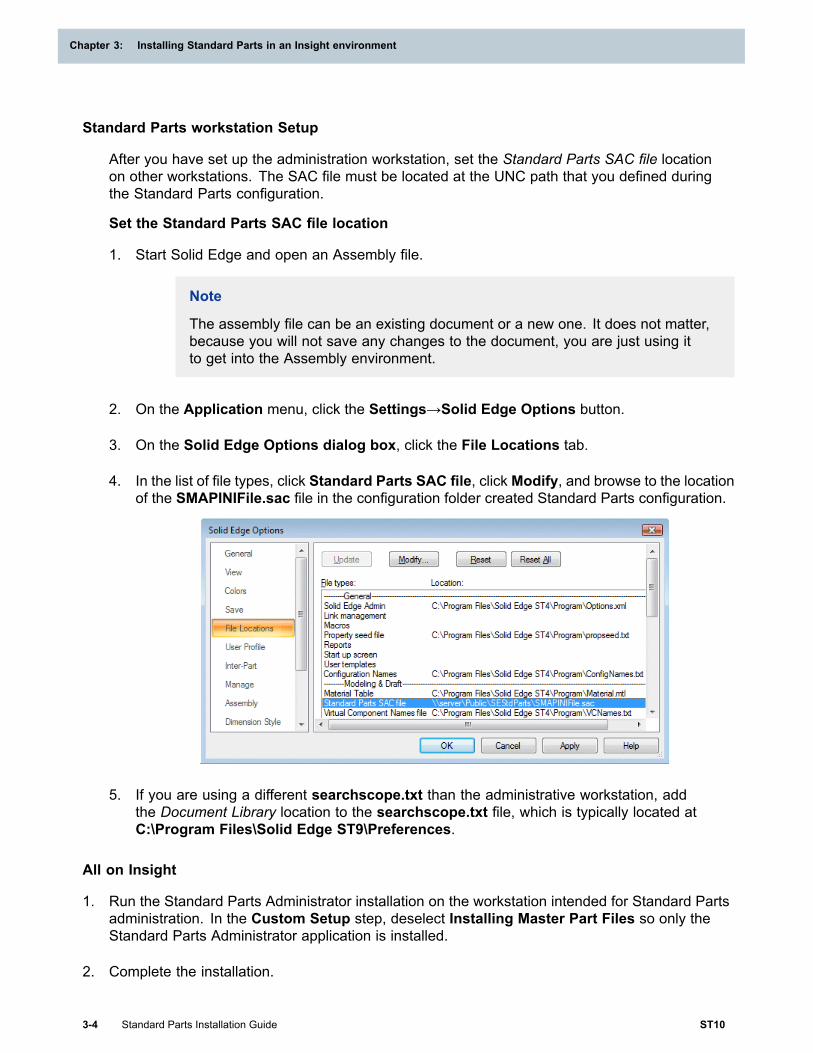
3. On the Solid Edge Options dialog box, click the File Locations tab.
4. In the list of file types, click Standard Parts SAC file, clickModify, and browse to the locationof the SMAPINIFile.sac file in the configuration folder created Standard Parts configuration.
5. If you are using a different searchscope.txt than the administrative workstation, addthe Document Library location to the searchscope.txt file, which is typically located atC:\Program Files\Solid Edge ST9\Preferences.
All on Insight
1. Run the Standard Parts Administrator installation on the workstation intended for Standard Partsadministration. In the Custom Setup step, deselect Installing Master Part Files so only theStandard Parts Administrator application is installed.
2. Complete the installation.
3-4 Standard Parts Installation Guide ST10
Chapter 3: Installing Standard Parts in an Insight environment

Installing Standard Parts in an Insight environment
3. Create a target SharePoint document library (for example,http://isst3/SiteDirectory/example/StdParts). Do not forget to add Insight mandatory propertiesfrom Insight Server at this document library.
4. Add a Network Place on your workstation pointing to the SharePoint URL. This step is necessaryfor accessibility from some standard dialogs not customized for working with URLs.
5. Add the Document Library location to the searchscope.txt file, typically located at C:\ProgramFiles\Solid Edge ST10\Preferences.
6. Choose Windows Start→All Programs→Solid Edge ST10→Standard Parts→ConfigurationWizard.
7. In the Step 1 area of the configuration wizard, specify the desired location of the Standard Partsconfiguration folder. You can use the Browse button to search for the appropriate folder. Thislocation should be accessible with full permissions by all Standard Parts users. It is suggestedthat you specify this location as a UNC path, for example \\Server\Public\SEStdParts).
Note
When you enter the Standard Parts configuration folder for the first time, default valuesare added to all settings in the Step 2 area. If it is not the case click the Defaults button.
If the configuration folder is a URL path, the Parts storage setting is automaticallyset to Insight.
8. To define the Working Database, in the Step 2 area, choose Browse.
a. On the Database Manager dialog box, select the External Network Database option.
b. In the External Database Server dialog box, specify an SQL Server (name, user andpassword) accessible for all Standard Parts users. See Configuring SQL Server for details.
c. New button and enter a name for the new database.
Note
This action creates two databases on the server – the Standard Parts workingdatabase. For example, xse109_StandardParts109 and GUID database,xCP_localGUIDdb95.
d. Click OK to accept the new working database.
9. On the Configuration Wizard dialog box, click Save.
After saving the configuration, the Solid Edge Standard Parts configuration folder is created. Inthis case at the location, \\Server\Public\SEStdParts. It contains SMAPINIFile.sac, which is thefile containing the configuration, along with folders, HTML, Standard Parts and Working folder.For more details about folder structure, see the Standard Parts User Guide.
ST10 Standard Parts Installation Guide 3-5
Installing Standard Parts in an Insight environment
Chapter 3: Installing Standard Parts in an Insight environment
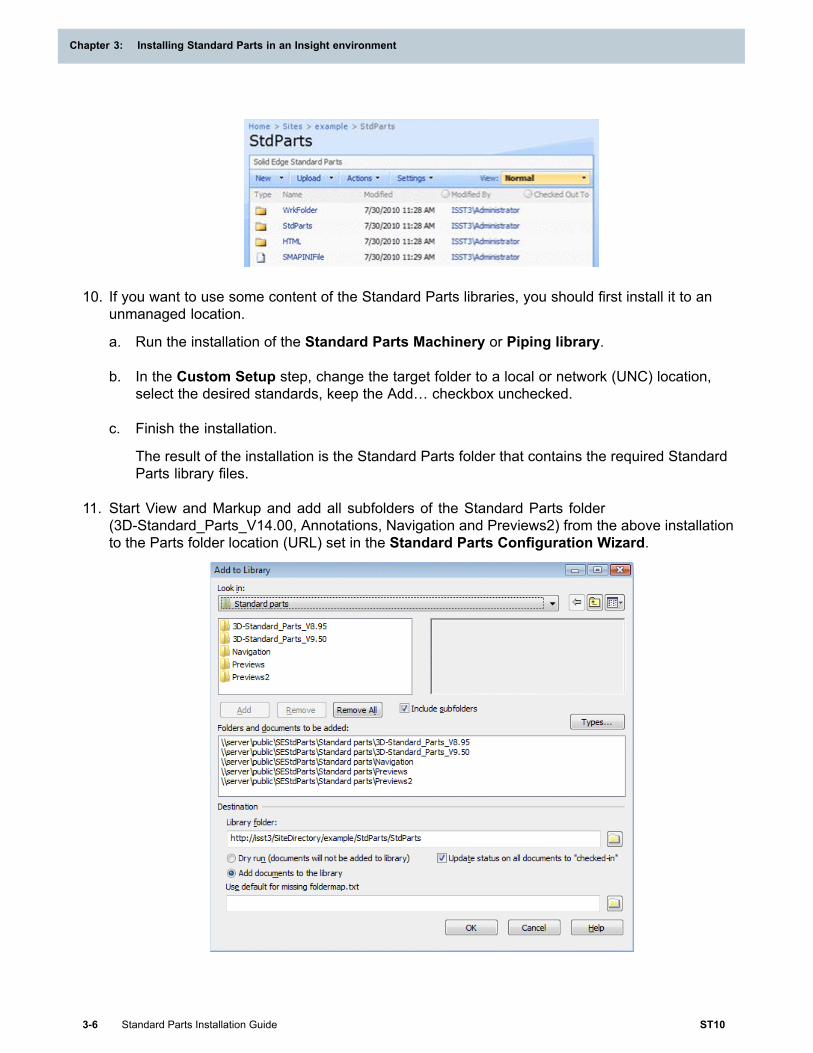
10. If you want to use some content of the Standard Parts libraries, you should first install it to anunmanaged location.
a. Run the installation of the Standard Parts Machinery or Piping library.
b. In the Custom Setup step, change the target folder to a local or network (UNC) location,select the desired standards, keep the Add… checkbox unchecked.
c. Finish the installation.
The result of the installation is the Standard Parts folder that contains the required StandardParts library files.
11. Start View and Markup and add all subfolders of the Standard Parts folder(3D-Standard_Parts_V14.00, Annotations, Navigation and Previews2) from the above installationto the Parts folder location (URL) set in the Standard Parts Configuration Wizard.
3-6 Standard Parts Installation Guide ST10
Chapter 3: Installing Standard Parts in an Insight environment

Installing Standard Parts in an Insight environment
Note
This action may take several minutes, depending on the file size and number of filesyou are attempting to upload
Standard Parts workstation Setup
After you have set up the administration workstation, set the Standard Parts SAC file locationon other workstations. The SAC file must be located at the UNC path that you defined duringthe Standard Parts configuration.
Set the Standard Parts SAC file location
1. Start Solid Edge and open an Assembly file.
Note
The assembly file can be an existing document or a new one. It does not matter,because you will not save any changes to the document, you are just using itto get into the Assembly environment.
2. On the Application menu, click the Settings→Solid Edge Options button.
3. On the Solid Edge Options dialog box, click the File Locations tab.
4. In the list of file types, click Standard Parts SAC file, clickModify, and browse to the locationof the SMAPINIFile.sac file in the configuration folder created Standard Parts configuration.
5. If you are using a different searchscope.txt than the administrative workstation, addthe Document Library location to the searchscope.txt file, which is typically located atC:\Program Files\Solid Edge ST9\Preferences.
ST10 Standard Parts Installation Guide 3-7
Installing Standard Parts in an Insight environment


Chapter 4: Installing Standard Parts in aTeamcenter environment
This section describes how to set the Standard Parts system to store generated parts and newlycreated documents in a Teamcenter-managed environment.
All Teamcenter server and client installation requirements must be met prior to performing theseinstallation steps. For more details about installation and working with Teamcenter, see theTeamcenter server and client installation documentation.
For more information about using Solid Edge in a Teamcenter-managed environment, refer to theTeamcenter Integration for Solid Edge (SEEC) Guide for Users and Administrators. Some StandardParts themes are described in the Solid Edge help file.
Standard Parts Administrator Installation
1. Install Teamcenter client and Solid Edge on the workstation intended for Standard Partsadministration.
2. Run the Standard Parts Administrator installation on the workstation intended for Standard Partsadministration. In the Custom Setup step, deselect Installing Master Part Files so only theStandard Parts Administrator application is installed.
3. Complete the installation.
4. Choose Windows Start→All Programs→Solid Edge ST10→Standard Parts→ConfigurationWizard.
5. In the Step 1 area of the configuration wizard, specify the desired location of the Standard Partsconfiguration folder. You can use the Browse button to search for the appropriate folder. Thislocation should be accessible with full permissions by all Standard Parts users. It is suggestedthat you specify this location as a UNC path, for example \\Server\Public\SEStdParts).
Note
When you enter the Standard Parts configuration folder for the first time, default valuesare added to all settings in the Step 2 area. If it is not the case click the Defaults button.
If the configuration folder is a URL path, the Parts storage setting is automaticallyset to Insight.
6. To define the Working Database, in the Step 2 area, choose Browse.
a. On the Database Managerdialog box, select the External Network Database option.
b. In the External Database Server dialog box, specify an SQL Server (name, user andpassword) accessible for all Standard Parts users. See Configuring SQL Server for details.
ST10 Standard Parts Installation Guide 4-1
Chapter 4: Installing Standard Parts in a Teamcenter environment
c. Click the New button and enter a name for the new database.
Note
This action creates two databases on the server – the Standard Parts workingdatabase. For example, xse109_StandardParts109 and GUID database,xCP_localGUIDdb95.
d. Click OK to accept the new working database.
7. Set Parts storage to Teamcenter.
8. Set the desired Item type for generated standard parts. It must be a valid Item type for yourTeamcenter. If the selected Item type allows it, you can also specify Item ID and Revision pattern.
9. On the Configuration Wizard dialog box, click Save.
After saving the configuration, the Solid Edge Standard Parts configuration folder is created. Inthis case at the location, \\Server\Public\SEStdParts. It contains SMAPINIFile.sac, which is thefile containing the configuration, along with folders, HTML, Standard Parts and Working folder.For more details about folder structure, see the Standard Parts User Guide.
4-2 Standard Parts Installation Guide ST10
Chapter 4: Installing Standard Parts in a Teamcenter environment

Installing Standard Parts in a Teamcenter environment
10. If you want to use some content of the Standard Parts libraries, proceed with the steps describedin Installing Parts Libraries.
Standard Parts workstation setup
If the administrator workstation is set up, on other workstations, set the Standard Parts SAC filelocation: in the Solid Edge Assembly environment, on the Solid Edge Options dialog box, onthe File Locations tab, set the Standard Parts SAC File location the same as for a local ornetwork installation.
ST10 Standard Parts Installation Guide 4-3
Installing Standard Parts in a Teamcenter environment

Chapter 4: Installing Standard Parts in a Teamcenter environment
Note
The Teamcenter client and Solid Edge with a license for the Teamcenter Integration forSolid Edge must be installed on all workstations.
Set the Standard Parts SAC file location
1. Start Solid Edge and open an Assembly file.
Note
The assembly file can be an existing document or a new one. It does not matter,because you will not save any changes to the document, you are just using itto get into the Assembly environment.
2. On the Application menu, click the Settings→Solid Edge Options button.
3. On the Solid Edge Options dialog box, click the File Locations tab.
4. In the list of file types, click Standard Parts SAC file, clickModify, and browse to the locationof the SMAPINIFile.sac file in the configuration folder created Standard Parts configuration.
4-4 Standard Parts Installation Guide ST10
Chapter 4: Installing Standard Parts in a Teamcenter environment

Chapter 5: Installing Standard Parts in a SolidEdge SP environment
This section describes how to set the Standard Parts system to store generated parts and newlycreated documents in a Solid Edge SP-managed environment.
All Solid Edge SP server and client installation requirements must be met prior to performing theseinstallation steps. For more details about installation and working with Solid Edge SP, see the SolidEdge SP server and client installation documentation.
For more information about using Solid Edge in a Solid Edge SP-managed environment, refer to theSolid Edge SP Implementation Guide.
Standard Parts Administrator installation
1. Install Solid Edge and Solid Edge SP Client on the workstation intended for Standard Partsadministration
2. Run the Standard Parts Administrator installation on the workstation intended for Standard Partsadministration. In the Custom Setup step, deselect Installing Master Part Files so only theStandard Parts Administrator application is installed.
3. Complete the installation.
4. Choose Windows Start→All Programs→Solid Edge ST9→Standard Parts→ConfigurationWizard.
5. In the Step 1 area of the configuration wizard, specify the desired location of the Standard Partsconfiguration folder. You can use the Browse button to search for the appropriate folder. Thislocation should be accessible with full permissions by all Standard Parts users. It is suggestedthat you specify this location as a UNC path, for example \\Server\Public\SEStdParts).
Note
When you enter the Standard Parts configuration folder for the first time, default valuesare added to all settings in the Step 2 area. If it is not the case click the Defaults button.
6. To define the Working Database, in the Step 2 area, choose Browse.
a. On the Database Managerdialog box, select the External Network Database option.
b. In the External Database Server dialog box, specify an SQL Server (name, user andpassword) accessible for all Standard Parts users. See Configuring SQL Server for details.
c. Click the New button and enter a name for the new database.
ST10 Standard Parts Installation Guide 5-1

Chapter 5: Installing Standard Parts in a Solid Edge SP environment
Note
This action creates two databases on the server – the Standard Parts workingdatabase. For example, xse109_StandardParts109 and GUID database,xCP_localGUIDdb95.
d. Click OK to accept the new working database.
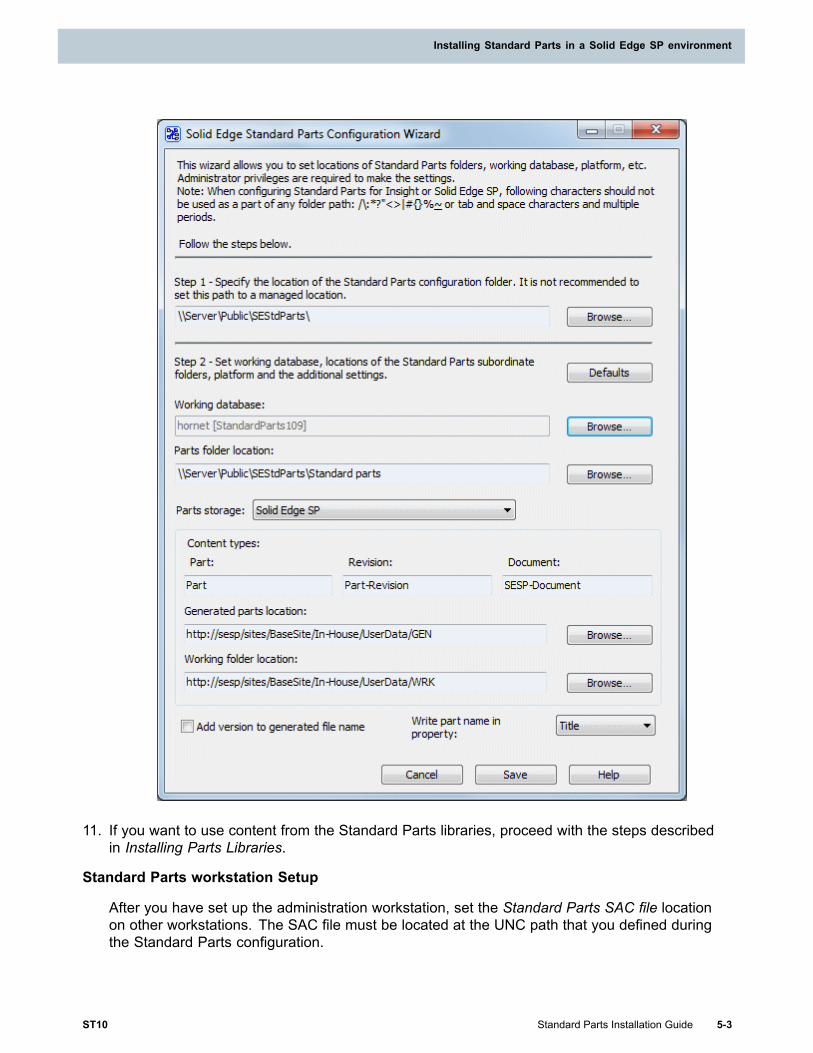
7. Set Parts Storage to Solid Edge SP.
8. Set the desired Solid Edge SP content types for generated standard parts. The contenttypes must correspond to the Solid Edge SP server configuration. Default values are Part,Part-Revision, and SESP-Document.
9. Set a generated parts and working folder location. These must be URL paths to some folderswithin a Solid Edge SP Document Library on the active site set in the Solid Edge SP ServerManager.
10. On the Configuration Wizard dialog box, click Save.
After saving the configuration, the Solid Edge Standard Parts configuration folder is created. Inthis case at the location, \\Server\Public\SEStdParts. It contains SMAPINIFile.sac, which is thefile containing the configuration, along with folders, HTML, Standard Parts and Working folder.For more details about folder structure, see the Standard Parts User Guide.
5-2 Standard Parts Installation Guide ST10
Chapter 5: Installing Standard Parts in a Solid Edge SP environment
Installing Standard Parts in a Solid Edge SP environment
11. If you want to use content from the Standard Parts libraries, proceed with the steps describedin Installing Parts Libraries.
Standard Parts workstation Setup
After you have set up the administration workstation, set the Standard Parts SAC file locationon other workstations. The SAC file must be located at the UNC path that you defined duringthe Standard Parts configuration.
ST10 Standard Parts Installation Guide 5-3
Installing Standard Parts in a Solid Edge SP environment
Chapter 5: Installing Standard Parts in a Solid Edge SP environment
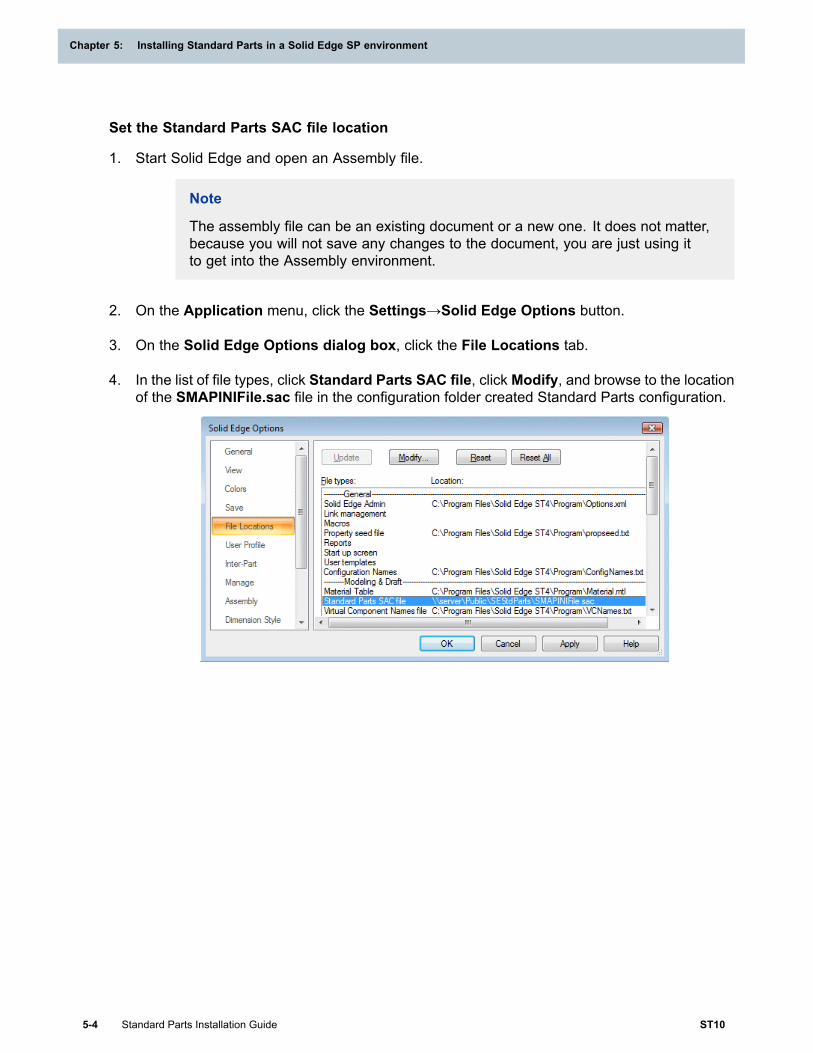
Set the Standard Parts SAC file location
1. Start Solid Edge and open an Assembly file.
Note
The assembly file can be an existing document or a new one. It does not matter,because you will not save any changes to the document, you are just using itto get into the Assembly environment.
2. On the Application menu, click the Settings→Solid Edge Options button.
3. On the Solid Edge Options dialog box, click the File Locations tab.
4. In the list of file types, click Standard Parts SAC file, clickModify, and browse to the locationof the SMAPINIFile.sac file in the configuration folder created Standard Parts configuration.
5-4 Standard Parts Installation Guide ST10
Chapter 5: Installing Standard Parts in a Solid Edge SP environment

Chapter 6: Upgrading Standard Parts
When upgrading Solid Edge and Standard Parts (version ST5 or newer) to version ST9, there is noneed to create new Standard Parts configuration folder. It is possible to simply use the existingconfiguration folder and migrate the database.
All installation requirements for the given platform (file system, Insight, Teamcenter, or Solid EdgeSP) must be met prior to performing these installation steps.
Standard Parts Administrator installation
1. Run the Standard Parts Administrator installation on the workstation intended for Standard Partsadministration. In the Custom Setup step, deselect Installing Master Part Files so only theStandard Parts Administrator application is installed.
2. Complete the installation.
3. Choose Windows Start→All Programs→Solid Edge ST10→Standard Parts→ConfigurationWizard.
4. In the Step 1 area of the configuration wizard, specify the desired location of the Standard Partsconfiguration folder. You can use the Browse button to search for the appropriate folder.
Note
After entering the Standard Parts configuration folder the settings are loaded.
5. On the Configuration Wizard dialog box, click Save.
6. Click the Yes button to confirm the information about migrating the database.
After finishing the configuration wizard, the Solid Edge Standard Parts configuration folder isset and the database migrated to the current version. So it is not necessary to add parts tothe database again. However, you might proceed with Standard Parts libraries installation toupgrade the installed standard parts to the newly delivered version. To do so, proceed with thesteps described in Installing Parts Libraries.
Standard Parts workstation Setup
After you have set up the administration workstation, set the Standard Parts SAC file location onother workstations. For the detailed instructions please refer to the above chapter respective tothe given platform (file system, Insight, Teamcenter, or Solid Edge SP).
ST10 Standard Parts Installation Guide 6-1

Chapter 7: Configuring SQL Server
To manually configure SQL Server or SQL Express for Standard Parts so that it will accessible forusers across a network perform the following steps:
Note
These instructions use SQL Server Management Studio from Microsoft. This is a freedatabase maintenance tool that can be downloade, for example, from the following link:
http://www.microsoft.com/en-us/download/details.aspx?id=29062
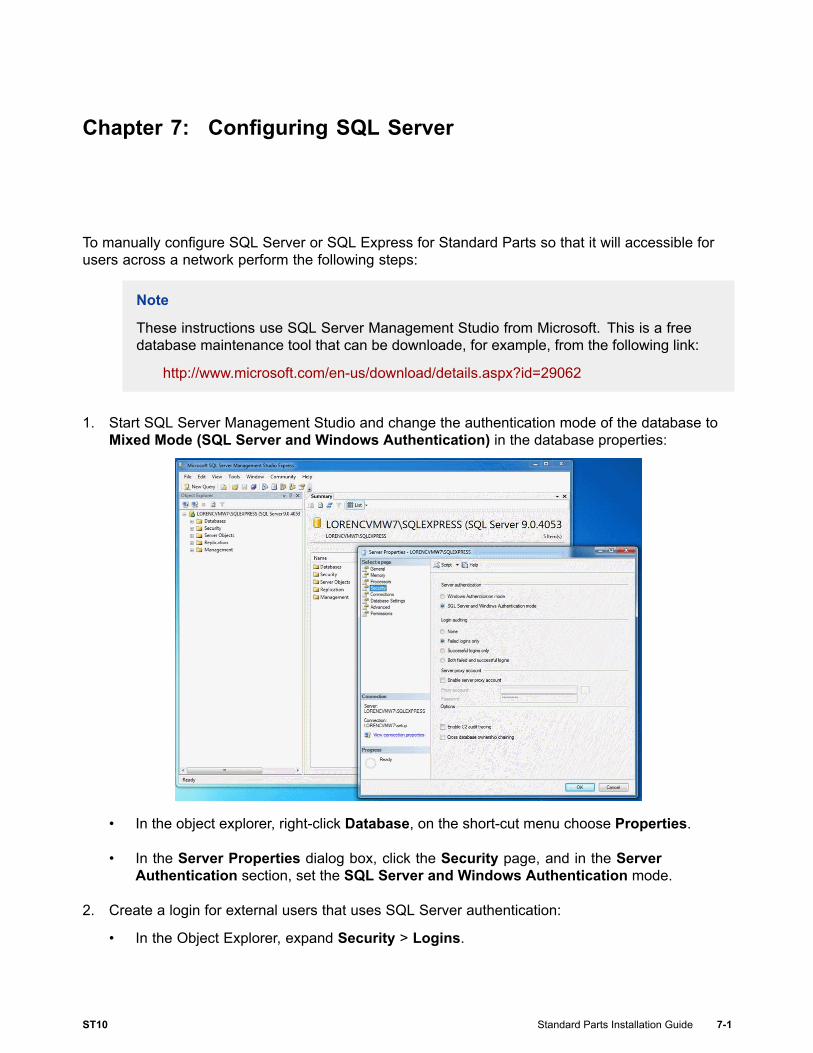
1. Start SQL Server Management Studio and change the authentication mode of the database toMixed Mode (SQL Server and Windows Authentication) in the database properties:
• In the object explorer, right-click Database, on the short-cut menu choose Properties.
• In the Server Properties dialog box, click the Security page, and in the ServerAuthentication section, set the SQL Server and Windows Authentication mode.
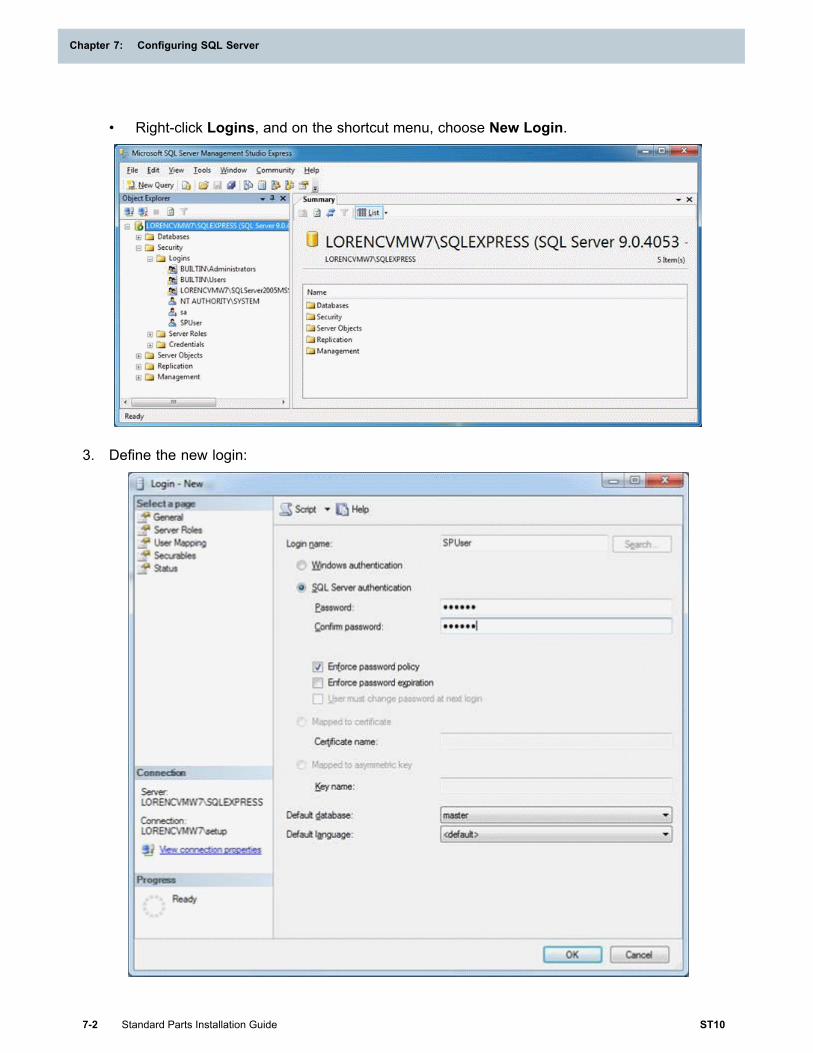
2. Create a login for external users that uses SQL Server authentication:
• In the Object Explorer, expand Security > Logins.
ST10 Standard Parts Installation Guide 7-1
Chapter 7: Configuring SQL Server
• Right-click Logins, and on the shortcut menu, choose New Login.
3. Define the new login:
7-2 Standard Parts Installation Guide ST10
Chapter 7: Configuring SQL Server

Configuring SQL Server
• Define the login name, set the SQL Server Authentication mode, and specify a password.
• The new login is now available for users from other machines in the network.
• On network machines that will access and modify the database (machines with StandardParts Administrator installed) use the Standard Parts Configuration Wizard to connect to theExternal network database using the server machine name and login.
• On the server machine you may continue to use the localhost or set the database as externalusing the server machine name and login.
Note
In the next step grant database creation privileges to this user. This is required for thefirst time the database is being created.
4. Grant database creation privileges to the user:
• On the New Login dialog box, click the Server Roles page.
• In the Server Roles list, set the dbcreator option.
ST10 Standard Parts Installation Guide 7-3
Configuring SQL Server

Chapter 7: Configuring SQL Server
• Click OK on all dialogs to accept the changes.
5. Make sure that SQL Server is allowed through the firewall.
7-4 Standard Parts Installation Guide ST10
Chapter 7: Configuring SQL Server

Chapter 8: Installing Parts Libraries
The setup of Standard Parts libraries for Solid Edge ST10 brings the possibility to add the installedparts to the database directly (as a part of the library setup). However, it is still possible to install thelibraries and add the parts to the database later using the Solid Edge Standard Parts Administrator.
Installation
1. Run the installation of the selected Standard Parts library.
2. During the Custom Setup step of the installation wizard, you can do following:
a. Select the standards (ANSI, DIN, etc.) of the parts you want to install.
b. Select the destination folder. The active Standard Parts configuration folder (set in Step 1of Standard Parts Configuration Wizard) is used by default. The library content is copied toits subfolder “Standard Parts” that is usually defined as Parts folder (in Step 2 of StandardParts Configuration Wizard).
c. Activate the option to add the installed parts to the database as part of the library setup. If thisis the initial Standard Parts library installation (no other version has been installed before),select the AddAndUpdateAll option. This automatically add parts of all selected standardsto the database. The other options can be used by the users which had installed someprevious Standard Parts version. The Update New option updates only the parts which wereinstalled in a previous version and have some changes in the delivered version. The UpdateAll option updates the parts which were installed in a previous version to the current version(regardless on changes between the versions).
Note
The direct adding of installed parts to the database may significantly extend theinstallation time. Depending on the number of selected standards, the installationmay take hours. However, you will not spend the same time later by adding partsto the database by means of Solid Edge Standard Parts Administrator.
3. In the Delivery Content Database step select the language version for the delivery ContentDatabase (Standard Parts Installation Database). It can be used later when adding parts to thedatabase using the Add from the Standard Parts Installation Database option.
4. If you complete the library installation without direct adding parts, launch the Solid Edge StandardParts Administrator and click Add Parts.
Adding Parts
The following options can be used for adding parts from the installed Standard Parts libraries.
ST10 Standard Parts Installation Guide 8-1
Chapter 8: Installing Parts Libraries
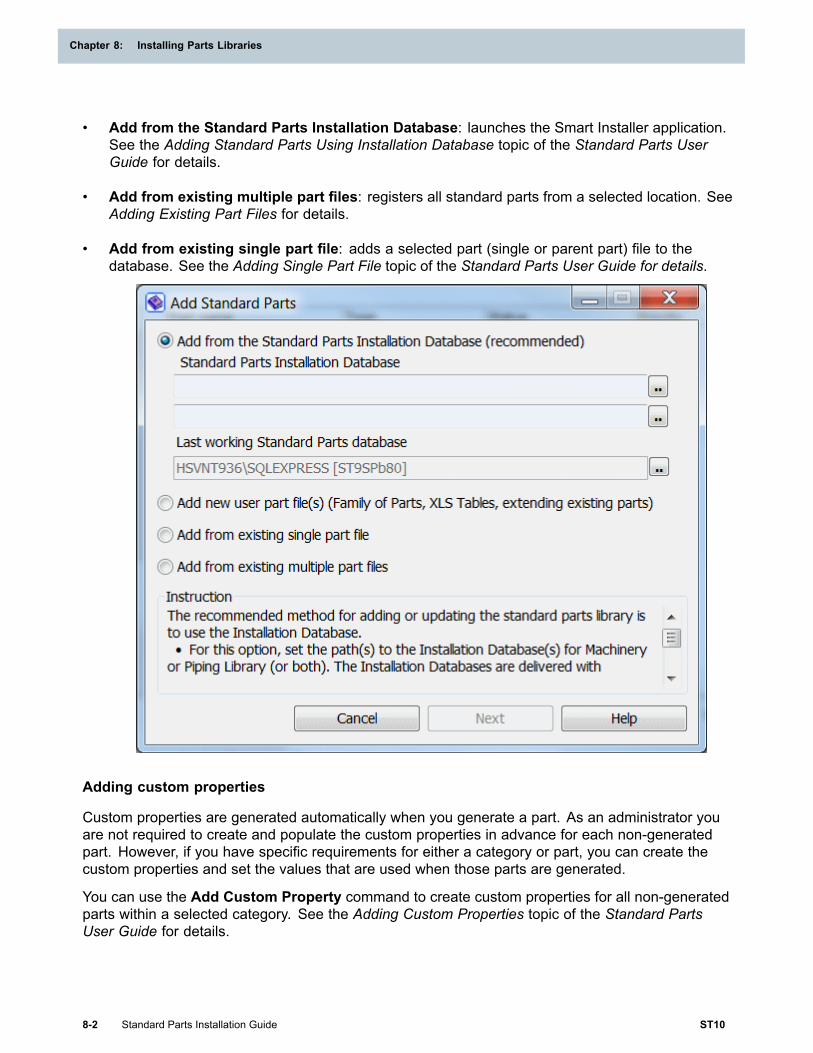
• Add from the Standard Parts Installation Database: launches the Smart Installer application.See the Adding Standard Parts Using Installation Database topic of the Standard Parts UserGuide for details.
• Add from existing multiple part files: registers all standard parts from a selected location. SeeAdding Existing Part Files for details.
• Add from existing single part file: adds a selected part (single or parent part) file to thedatabase. See the Adding Single Part File topic of the Standard Parts User Guide for details.
Adding custom properties
Custom properties are generated automatically when you generate a part. As an administrator youare not required to create and populate the custom properties in advance for each non-generatedpart. However, if you have specific requirements for either a category or part, you can create thecustom properties and set the values that are used when those parts are generated.
You can use the Add Custom Property command to create custom properties for all non-generatedparts within a selected category. See the Adding Custom Properties topic of the Standard PartsUser Guide for details.
8-2 Standard Parts Installation Guide ST10
Chapter 8: Installing Parts Libraries
Chapter 9: Basic Definitions
Standard PartsThe main application. It lets you find and place parts from the Standard Parts database.
Solid Edge Standard Parts AdministratorThe application for database administration.
Standard Parts DatabaseThe information storage structure for information about all Standard Parts documents.
Solid Edge Standard Parts Configuration WizardThe application for managing Solid Edge Standard Parts global configuration.
BulkPartAdderThe application for creating Customer Standard Parts from existing Solid Edge documents.BulkPartAdder is a part of Solid Edge Standard Parts Administrator.
Smart InstallerThe application for installing and updating Standard Parts within a Standard Parts database.Smart Installer is a part of the Solid Edge Standard Parts Administrator.
PartEditorThe application for managing content, such as properties, categorization, and streams ofstandard part files.
Standard Parts Installation DatabaseA database file (*.ddb) that contains information on parts in the Standard Parts Library. Thisinformation serves mainly to keep parts registered in the database up-to-date. This ensures thatif a new version of Standard Parts Libraries becomes available, only parts that have changedcompared to older versions will be updated in working (active) Standard Parts database.
Solid Edge Machinery and Piping LibrarySets of standard parts for machinery (fasteners, bearings, structural shapes) and piping (pipes,fittings, valves) design. Libraries contain international norms of standard such as US standards(ANSI, ASME, etc.), DIN, ISO, BS, UNI, GB, JIS, GOST, CNS, IS, CSN, KS, etc.
Standard Parts configuration folderThe main (usually root) folder of the Standard Parts system. This folder contains subfolders withLibrary parts, configuration files, and other system files. For more details, see the description ofthe Solid Edge Standard Parts Configuration Wizard.
Standard Parts folderThe folder with your standard parts. For more details, see the description of Solid Edge StandardParts Configuration Wizard and Standard Parts.
ST10 Standard Parts Installation Guide 9-1
Chapter 9: Basic Definitions
Standard PartA part of Standard Parts Machinery or Piping Library. It can be a parent or single part.
Custom Standard PartA customer-specific Standard Part that you can create from an existing Solid Edge using theBulkPartAdder or PartEditor.
Parent partThe Standard Parts Library global file. It contains definitions of all relevant Single parts within thesame category. It is delivered with the Standard Parts Library to a version-specific folder.
Single partA generated (final) standard part, derived from the Parent part.
Part nameA global part identifier. It should be a full, detailed and unique descriptor for each file in theStandard Parts database. It supports fast and correct identification of parts in Standard Partsapplications.
CategoryA collection of parts, classified to sub-categories, and finally to end categories, that have somecommon feature. This can be standard (such as ANSI and DIN), part type (such as bolt, nut,and pipe) and so forth.
End categoryA collection of similar parts that differ typically by some parameters, set by characteristic values.All parts included in an end category must have the same set of characteristics.
CharacteristicA parameter that varies among parts within an end category. Characteristics usually correspondto some property of the single part, such as length, thread diameter, nominal size, material, andso forth. Each part within an end category must have a unique combination of the characteristicvalues.
SAC fileThe global definition and settings file named SMAPINIFile.sac.
9-2 Standard Parts Installation Guide ST10
Chapter 9: Basic Definitions


Siemens Industry Software
HeadquartersGranite Park One5800 Granite ParkwaySuite 600Plano, TX 75024USA+1 972 987 3000
AmericasGranite Park One5800 Granite ParkwaySuite 600Plano, TX 75024USA+1 314 264 8499
EuropeStephenson HouseSir William Siemens SquareFrimley, CamberleySurrey, GU16 8QD+44 (0) 1276 413200
Asia-PacificSuites 4301-4302, 43/FAIA Kowloon Tower, Landmark East100 How Ming StreetKwun Tong, KowloonHong Kong+852 2230 3308
About Siemens PLM Software
Siemens PLM Software, a business unit of the SiemensIndustry Automation Division, is a leading global providerof product lifecycle management (PLM) software andservices with 7 million licensed seats and 71,000 customersworldwide. Headquartered in Plano, Texas, SiemensPLM Software works collaboratively with companiesto deliver open solutions that help them turn moreideas into successful products. For more informationon Siemens PLM Software products and services, visitwww.siemens.com/plm.
© 2017 Siemens Product Lifecycle ManagementSoftware Inc. Siemens and the Siemens logo areregistered trademarks of Siemens AG. D-Cubed,Femap, Geolus, GO PLM, I-deas, Insight, JT, NX,Parasolid, Solid Edge, Teamcenter, Tecnomatix andVelocity Series are trademarks or registered trademarksof Siemens Product Lifecycle Management SoftwareInc. or its subsidiaries in the United States and in othercountries. All other trademarks, registered trademarksor service marks belong to their respective holders.