requirements engineering - aras plm
TRANSCRIPT


Copyright © 2019 by Aras Corporation. This material may be distributed only subject to the terms and conditions set forth in the Open Publication License, V1.0 or later (the latest version is presently available at http://www.opencontent.org/openpub/).
Distribution of substantively modified versions of this document is prohibited without the explicit permission of the copyright holder.
Distribution of the work or derivative of the work in any standard (paper) book form for a commercial purpose is prohibited unless prior permission is obtained from the copyright holder.
Aras Innovator, Aras, and the Aras Corp "A" logo are registered trademarks of Aras Corporation in the United States and other countries.
All other trademarks referenced herein are the property of their respective owners.
Microsoft, Office, SQL Server, IIS and Windows are either registered trademarks or trademarks of Microsoft Corporation in the United States and/or other countries.
Notice of Liability The information contained in this document is distributed on an "As Is" basis, without warranty of any kind, express or implied, including, but not limited to, the implied warranties of merchantability and fitness for a particular purpose or a warranty of non-infringement. Aras shall have no liability to any person or entity with respect to any loss or damage caused or alleged to be caused directly or indirectly by the information contained in this document or by the software or hardware products described herein.

Page 1
Requirements Engineering
Overview: You are introduced to the Aras Requirements Engineering application. You learn about some of its features, how to create both a Requirement and a Requirements Document, add Requirements to a Requirements Document, and how to relate a part to a requirement.
Objectives: Describe the features of Requirements Engineering Create a Requirement Edit a Requirement Create a Requirements Document Add a Requirement to a Requirements Document Describe the available Requirements relationships Relate a part to a Requirement Navigate Requirement Relationships Manage Requirements LifeCycle

ACE 2019
Page 2
s
Requirements Engineering (RE) Aras Requirements Engineering supports a set of use cases for the authoring and editing of requirements, and their relationships to other items managed by the Innovator PLM platform (the “digital thread”). There are traceability capabilities to perform detailed requirements analysis. The key benefit of Aras Requirements Engineering is having it embedded within PLM.
Why embed requirements into PLM? Management of requirements as related to and managed with the other design artifacts controlled by the PLM platform (ex: parts) is critical to meeting the challenge of the ever-increasing complexity of products and systems. It is critical for:
Verification – Are we designing the correct product?
Versioning – Are we building the correct product?
Traceability – Can we trace requirements to all related cross disciplines?
Aras Requirements Engineering supports the capture, traceability, and validation of requirements throughout the development process.
NOTES:
The Requirements Engineering application does not require a Subscription license.
Requirements Engineering application supersedes the existing Requirements Management application.
© 2018 Aras3
Requirements Engineering (RE)
A new generation of requirements management
The editor is based on Tech Docs Framework
Improved usability and flexibility
Includes Visual Collaboration
Editing and
Collaboration on full
Requirement
Document
Individual
Requirements
are Reusable

Requirements Engineering
Page 3
Support for Concurrent Editing The main toolbar has a quite different look than similar toolbars for other Aras PLM items. In particular, it does not contain the typical Lock/Unlock buttons. This feature allows you to edit large numbers of Requirements without having to remember to Lock/Unlock. It also allows multiple users to edit the same Requirement, concurrently. Conflicts that arise from concurrent editing are resolved when it is saved by one of the concurrent users. When a conflict arises from editing a single Requirement, then the following options are presented:
Save As – To save as a different Requirement.
Save Anyway – To save your changes thus overwriting the other user’s unsaved changes.
Discard Changes – To discard the changes you made.
© 2018 Aras4
Support for Concurrent Editing
Individual Requirements can be edited without explicit locking
Requirements in Requirement
Documents can also be edited
without explicit locking
Conflicts between potential separate
simultaneous edits are resolved
on Save of Requirement or
Requirement Document
Conflict resolution is interactive
and under full user control

ACE 2019
Page 4
Create a New Requirement You edit Requirements and Requirements Document metadata in their Form views. Requirements and Requirements Document items include standard PLM item attributes such as Release and Lifecycle states.
You can create Requirements independently from Requirements Documents. You can also create Requirements from within a Requirements Document. Regardless of how you create a Requirement, every can be related to any number of Requirements Documents.
The application does not interpret the metadata (other than Type and CM related) in any specific way.
© 2018 Aras5
Create a New Requirement

Requirements Engineering
Page 5
Try it … Create a New Requirement
In this exercise, you create a new Requirement.
1. Login to Aras Innovator as the user Mike Miller with Username “mmiller” and Password “innovator”. 2. From the ToC, open the Requirements Engineering category and click to select Requirements. 3. Create a new Requirement and fill in the following fields:
Field Value
Managed By RE Requirements Manager
Title Printer Server - Hardware
Owned By RE Requirements Engineer
Type Requirement
Category Documentation
Group System
Tier Specification
Complexity, Priority, Risk DEFAULT: Low, Low, Low
4. Save the Requirement.
Saving a new Requirement with one of the save commands completes its definition and exposes the Editor view for creating content.
5. Write down the Requirement Number: __________.
Note: Type, Category, Group, and Tier classifications are tied to the Technical Document Structure discussed at the end of this session.

ACE 2019
Page 6
Define Requirements Relationships A Requirement can relate to various other items. Unless otherwise indicated, these relationships involve items managed by the Aras PLM platform.
The Documents tab allows you to relate various types of documents with this Requirement.
The following relationships imply dependency of this Requirement on the related items.
The Related Parts tab allows you to see what Parts are related to this Requirement.
The External Links tab allows you to create links to information external to the PLM platform.
The Outgoing Links tab allows you to relate other Requirements to this Requirement. Outgoing Requirement relationships are established from this Requirement (as in “children” of this Requirement): they have a dependency on this Requirement.
The Incoming Links tab allows you to see what other Requirements are related to this Requirement. Incoming relationships are established from those items to this Requirement (as in “parents” of this Requirement).
Try it … Add a Related Document to a Requirement
In this exercise, you add a related document to a requirement.
1. With your Requirement open from the previous exercise, click the New Relationship button for the Documents tab.
2. In the search dialog window, select Document as the Item Type and run the search. 3. In the results list click to select and return the MP0103-DOC-1 document. 4. Save the Requirement.
© 2018 Aras6
Define Requirements Relationships
The Documents tab allows to relate various types of documents with a Requirement
The Related Parts tab allows you to see what Parts are related to the Requirement
The External Links tab allows you to create links to information external to the PLM
platform
The Outgoing Links tab allows you to relate other Requirements with the Requirement
The Incoming Links tab allows you to see what other Requirements are related to the
Requirement

Requirements Engineering
Page 7
Edit Requirement Content Saving a new Requirement with one of the save commands completes its definition and exposes the Editor view for creating content.
© 2018 Aras7
Edit Requirement Content
Note: You can also edit Requirement content in a
Requirements Document.
Editor
view
Editor toolbar
Context
menu
Element tree
Content panel
ACE 2019
Page 8
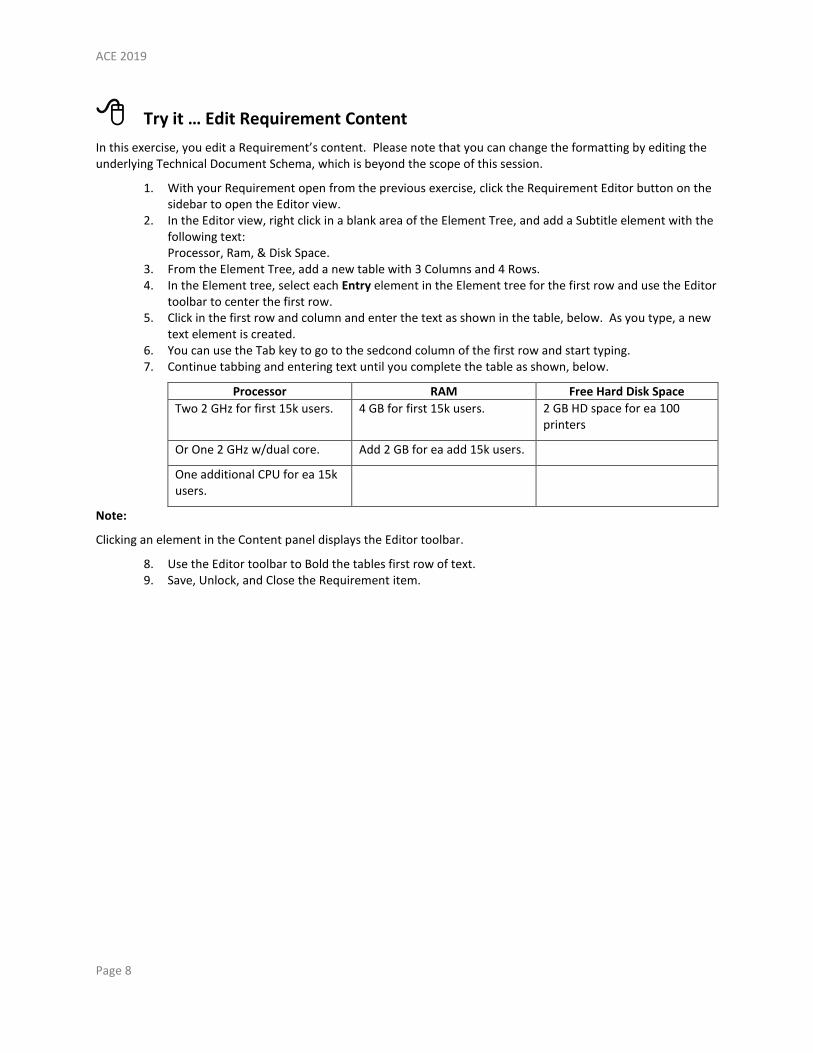
Try it … Edit Requirement Content
In this exercise, you edit a Requirement’s content. Please note that you can change the formatting by editing the underlying Technical Document Schema, which is beyond the scope of this session.
1. With your Requirement open from the previous exercise, click the Requirement Editor button on the sidebar to open the Editor view.
2. In the Editor view, right click in a blank area of the Element Tree, and add a Subtitle element with the following text: Processor, Ram, & Disk Space.
3. From the Element Tree, add a new table with 3 Columns and 4 Rows. 4. In the Element tree, select each Entry element in the Element tree for the first row and use the Editor
toolbar to center the first row. 5. Click in the first row and column and enter the text as shown in the table, below. As you type, a new
text element is created. 6. You can use the Tab key to go to the sedcond column of the first row and start typing. 7. Continue tabbing and entering text until you complete the table as shown, below.
Processor RAM Free Hard Disk Space
Two 2 GHz for first 15k users. 4 GB for first 15k users. 2 GB HD space for ea 100 printers
Or One 2 GHz w/dual core. Add 2 GB for ea add 15k users.
One additional CPU for ea 15k users.
Note:
Clicking an element in the Content panel displays the Editor toolbar.
8. Use the Editor toolbar to Bold the tables first row of text. 9. Save, Unlock, and Close the Requirement item.

Requirements Engineering
Page 9
Requirements Documents The Requirements Document Editor (view) shows all related Requirements as chapters. While the Chapter tree allows you to insert, remove, and shift Requirements. As you work, Requirement content is dynamically aggregated into a single HTML rendered document. And, you can edit Requirement content and structure in this view. You can also use find to search text throughout the aggregated content. Please keep in mind that a Requirements Document has no content, it is simply an aggregator of Requirements.
Try it … Add a Requirement to a Requirements Document
In this exercise, you add an existing Requirement to an existing Requirements Document.
1. From the TOC, open the Requirements Engineering category and click to select Requirements Document.
2. Open Requirements Document for editing: RD-00001 (3D Printer Requirements). 3. Click on the Requirements Document Editor button (sidebar). 4. Right click on second chapter (2- Requirements) and choose Pick Requirement
from the context menu. 5. In the Search dialog window, click to select and return the Requirement
you created in the previous exercise (Printer Server – Hardware). 6. Notice the Requirement now displays as Chapter 2.1 in the Chapter Tree. 7. Right click on the newly added 2.1 Requirement and choose Move > Down. 8. Again, right click on the newly added Requirement and choose Move > Down. 9. The new Requirement should now display as 2.3. 10. Save, Unlock, and Close the Requirements Document.
© 2018 Aras8
Requirements Documents
The Requirement Document Editor (view) shows all related Requirements as chapters
The Chapter tree allows Insertion, Removal, and Shifting of Requirements
Requirement content is dynamically
aggregated into a single HTML
rendered document
Requirement content and structure
can be edited in this view
Find allows searching of text
throughout the aggregated content

ACE 2019
Page 10
Create a New Requirements Document You create Requirements Documents similar to Requirements by using the a New Item button in the main TOC grid or in the Requirements Document Form view.
Try it … Create a Requirements Document
1. From the TOC, open the Requirements Engineering category and click to select Requirements Document.
2. Create a new Requirements Document and enter the following field values:
Field Value
Managed By RE Requirements Manager
Title Printer server and client requirements
Owned By RE Requirements Engineer
Description Printer server and client requirements
Category Documentation
Group System
Tier Specification
3. Save the Requirements Document item.
Saving a new Requirements Document with one of the save commands completes its definition and exposes the Editor view for creating content.
4. Write down the Requirements Document Number: __________.
© 2018 Aras9
Create a New Requirements Document

Requirements Engineering
Page 11
Add a Requirement to a Requirements Document Open a Requirements Document for content editing by clicking on the Requirements Document Editor button.
The Editor toolbar shows editing commands applicable to the selected content element.
The Chapter tree shows chapter assignments/organization of the related Requirements.
The Element tree shows the element tree of the selected content.
Content panel shows an aggregated content view of all the related Requirements.
Right mouse click anywhere in the Chapter tree open area and select an appropriate action. The system adds new Requirements as a new Chapter in the Requirements Document just below the selected chapter.
Create - displays a dialog window for a new Requirement.
Pick - displays a search dialog window to select from existing Requirements.
Paste - pastes a copy of a previously copied Requirement.
Try it … Add a Requirement to (an empty) Requirements Document
In this exercise, you add a Requirement to a Requirements Document.
1. With your Requirements Document open from the previous exercise, click to open the Requirements Document Editor (from the sidebar).
2. Right mouse click a blank area in the Chapter Tree and click to select Pick Requirement. 3. In the Search dialog window, search for and select the Printer Server Hardware Requirement
you created earlier in this course. 4. Save the Requirements Document item.
Note:
You can also edit Requirement content from a Requirements Document.
© 2018 Aras10
Add a Requirement to a Requirements Document
Editor toolbar
Chapter tree
Content panel
Element tree
Requirement
Document
Editor

ACE 2019
Page 12
Try it … Edit Requirement Content from a Requirements Document
In this exercise, you edit a Requirement from a Requirements Document.
1. With your Requirements Document open from the previous exercise, click to open the Requirements Document Editor (from the sidebar).
2. In the Chapter Tree, right click the Requirement and click View Requirement from the context menu. 3. When the Requirement opens in a separate tab, click to open the Requirements Editor (from the
sidebar). 4. In the Element Tree of the opened Requirement, right click an empty area and
add a Graphic element. 5. In the Search dialog – Graphic window, click to select any graphic. 6. Save, Unlock, and Close the Requirement. 7. When you are returned to the originating Requirements Document, you should see the revised
Requirement (the added Graphic element). 8. Save the Requirement Document.
Try it … Create and Edit a Requirement from a Requirements Document
In this exercise, you a Requirement from a Requirements Document.
1. With your Requirements Document open from the previous exercise, click to open the Requirements Document Editor (from the sidebar).
2. In the Chapter Tree, right click in an empty area and click Create Requirement from the context menu.
3. When the Requirement editor opens in a separate dialog window, enter the following values:
Field Value
Managed By RE Requirements Manager
Title Printer server - OS
Owned By RE Requirements Engineer
Type Requirement
Category Documentation
Group System
Tier Specification
4. Click in the Chapter Tree to retain the values and close the Requirement editor. 5. Save the Requirements Document. 6. Using either method, open the Requirement Editor, and add a Text element with some descriptive
text (like Windows server 2016 or later). 7. Save, Unlock, and Close the new Requirement. 8. Save, Unlock, and Close the Requirement Document.

Requirements Engineering
Page 13
Requirements and Requirements Document Views As with many Items in Innovator, both Requirements and Requirements Documents have several views available.
Try it … Use the View Menu
In this exercise, you explore the various available views for a Requirements Document.
1. Open the RD-00001 (3D Printer Product Specification) Requirements Document. 2. From the Views menu, feel free to explore the Revisions view, the Where Used view, the Structure
Browser view, and te LifeCycle view. 3. When you are done exploring each view, close the Requirements Document.
© 2018 Aras11
Requirements and Requirements Document Views
Using the Views menu,
you can view:
Permissions
History
Revisions
Where Used
Workflow
LifeCycle
You can also manage the LifeCycle
for each Requirement and
Requirements Document.

ACE 2019
Page 14
Define Requirements Documents Relationships Note: Requirements Documents relationships are similar to Requirements relationships.
A Requirements Document can relate to various other items. Unless otherwise indicated, these relationships involve items managed by the Aras PLM platform.
The Documents tab allows you to relate various types of documents with this Requirement. These relationships imply dependency of this on the related items.
The Related Parts tab allows you to see what Parts are related to this Requirements Document.
The External Links tab allows you to links to information external to the PLM platform
The Outgoing Links tab allows you to relate other Requirements Documents to this Requirements Document. Outgoing Requirements Documents relationships are established from this Requirements Document (as in “children” of this Requirements Document): they have a dependency on this Requirements Document.
The Incoming Links tab allows you to see what other Requirements Documents are related to this Requirements Document. Incoming Requirements Documents relationships are established from those items to this Requirements Document (as in “parents” of this Requirements Document).
Note There is no current underlying functionality for both Outgoing and Incoming Links. They merely display any desired Parent/Child relationships between Requirements.
© 2018 Aras12
Define Requirements Documents Relationships
The Documents tab allows to relate various types of documents with a Requirements Document
The Related Parts tab allows you to see what Parts are related to the Requirements Document
The External Links tab allows you to create links to information external to the PLM platform
The Outgoing Links tab allows you to relate other Requirements Documents with the
Requirements Document
The Incoming Links tab allows you to see what other Requirements Documents are related to the
Requirements Document
Requirements Engineering
Page 15
Try it … Add a Requirement and a Requirements Document to a Part
In this exercise, you add a Requirement to a part item.
1. From the TOC, open the Design category and click to select Parts. 2. Open the MP0103 MakerBot Replicator with Cover Assembly (a 3D printer) for editing. 3. In the Relationships grid, open the Requirements tab and click the New Relationship button. 4. In the Search dialog window, search for and select all requirements. 5. Click the Return Selected (green check mark) button. 6. Save the Part item record. 7. Click to open the Requirements Document tab and click the New Relationship button. 8. Search for, select, and return all of the Requirements Documents. 9. Save the Part item record. 10. Save, Unlock, and Close the Part item record.
Try it … View a Related Part on a Requirements Document
In this exercise, you view the related part for a Requirements Document.
1. Open for viewing one of the two Requirements Documents from this session. (RD-00001 or RD-00002)
2. Click the Related Parts tab. 3. You should see the part we just related to the Requirements Document: MP0103. 4. You can close the Requirements Document.

ACE 2019
Page 16
Requirements Document (Technical Documents) structure Since the document style and structure is based on the Technical Documents item type, you could modify the “RE-Standard” Technical Documents AML Schema. However, you must use extreme caution in doing so. Type, Category, Group, and Tier classifications are tied to the Technical Document Structure. Each one points to a different section of the RE Standard Document Type allowing you to have different elements for each category based on the selected value. Out-of-the-box (OOTB), each value for each classification are the same. For example, for the TYPE category, all of the selections (Requirement, Structure, Text, Use Case, Validation, Verification)) allow the same structured elements. But you could, for instance, have a TEXT Type allow only Text elements.
Try it … View the Requirements Document
Technical Documents structure
1. Login to Aras Innovator as an administrator with Username “admin” and Password “innovator”. 2. From the TOC, open the Technical Documentation category and click to select Document Types. 3. In the Search grid, open, for viewing only – do not edit, the RE-Standard Document Type. 4. Beyond the scope of this session, the structure of a Requirement is defined using XML. 5. Close the tab and sign out of Aras Innovator.
© 2018 Aras13
Requirements Document (Technical Documents) Structure
The Technical Documents
application includes an
“RE-Standard” XML Schema
when Requirements
Engineering is installed.

Requirements Engineering
Page 17
Summary
In this unit, you learned how to create both a Requirements Document and add Requirements to a Requirements Document.
Describe the features of Requirements Engineering a Edit a a Requirements Document Add a to a Requirements Document Describe the available Requirements relationships Relate a part to a Navigate Relationships Manage Requirements LifeCycle
ACE 2019
Page 18
This page intentionally left blank.