spring and summer planting for fall and winter harvests
TRANSCRIPT
THIS GUIDE IS COMPOSTABLE
Call us @ (604) 952-8820 orToll Free 1-888-804-8820or visit www.westcoastseeds.com
Untreated Seeds for Organic Growing, non-gmo
Planting GuideSpring and Summer Planting for Fa ll and Winter Harvests
www.westcoastseeds.com
What is Winter Gardening?Start with planning and planting in the summer! To turn those winter blues into winter greens plants need to borrow the energy of the sun while it is shining bright and warm. This will help to grow garden vegetables strong and mature enough to manage the cold. With planning and choosing the right varieties, a host of vegetables can be harvested right through the fall and winter. These plants want to be full size before frost starts in November. Until mid-February these plants grow very slowly and will not re-grow after harvest as some do in the summer. Some winter vegetables will lie dormant in the ground, ready to be dug up for winter eating. Others will continue to grow if given some protection. Understanding the needs of each variety is key.
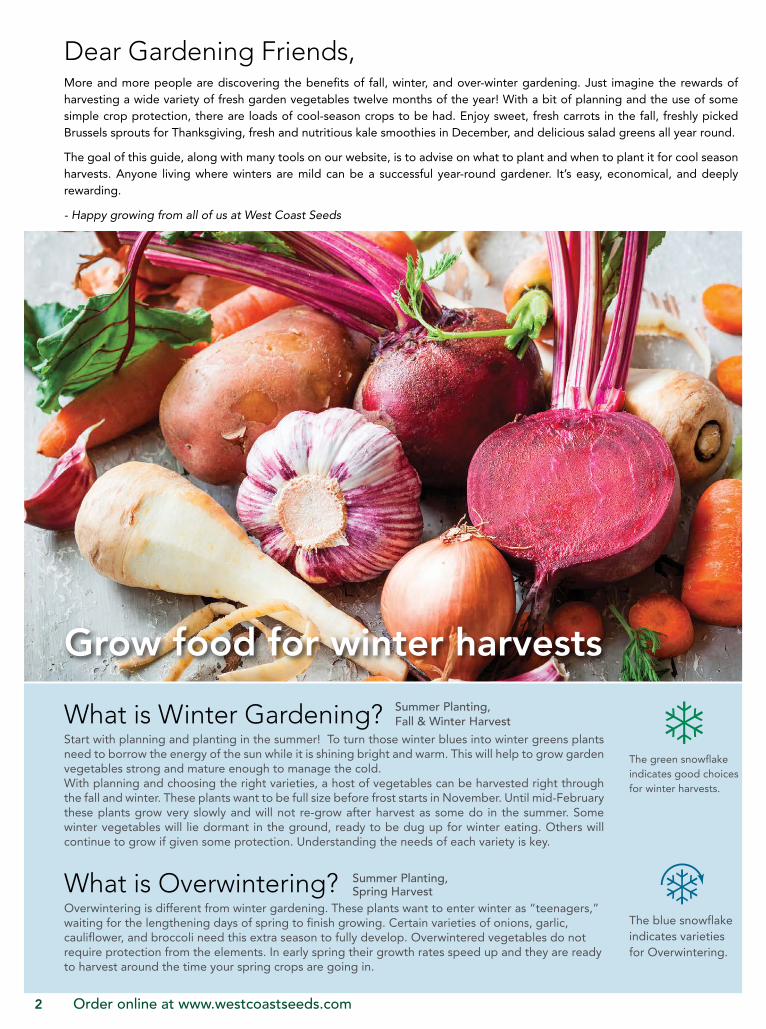
Dear Gardening Friends,More and more people are discovering the benefits of fall, winter, and over-winter gardening. Just imagine the rewards of harvesting a wide variety of fresh garden vegetables twelve months of the year! With a bit of planning and the use of some simple crop protection, there are loads of cool-season crops to be had. Enjoy sweet, fresh carrots in the fall, freshly picked Brussels sprouts for Thanksgiving, fresh and nutritious kale smoothies in December, and delicious salad greens all year round.
The goal of this guide, along with many tools on our website, is to advise on what to plant and when to plant it for cool season harvests. Anyone living where winters are mild can be a successful year-round gardener. It’s easy, economical, and deeply rewarding.
- Happy growing from all of us at West Coast Seeds
What is Overwintering?Overwintering is different from winter gardening. These plants want to enter winter as “teenagers,” waiting for the lengthening days of spring to finish growing. Certain varieties of onions, garlic, cauliflower, and broccoli need this extra season to fully develop. Overwintered vegetables do not require protection from the elements. In early spring their growth rates speed up and they are ready to harvest around the time your spring crops are going in.
The green snowflake indicates good choices for winter harvests.
The blue snowflake indicates varieties for Overwintering.
Summer Planting, Fall & Winter Harvest
Summer Planting, Spring Harvest
Grow food for winter harvests
Order online at www.westcoastseeds.com2
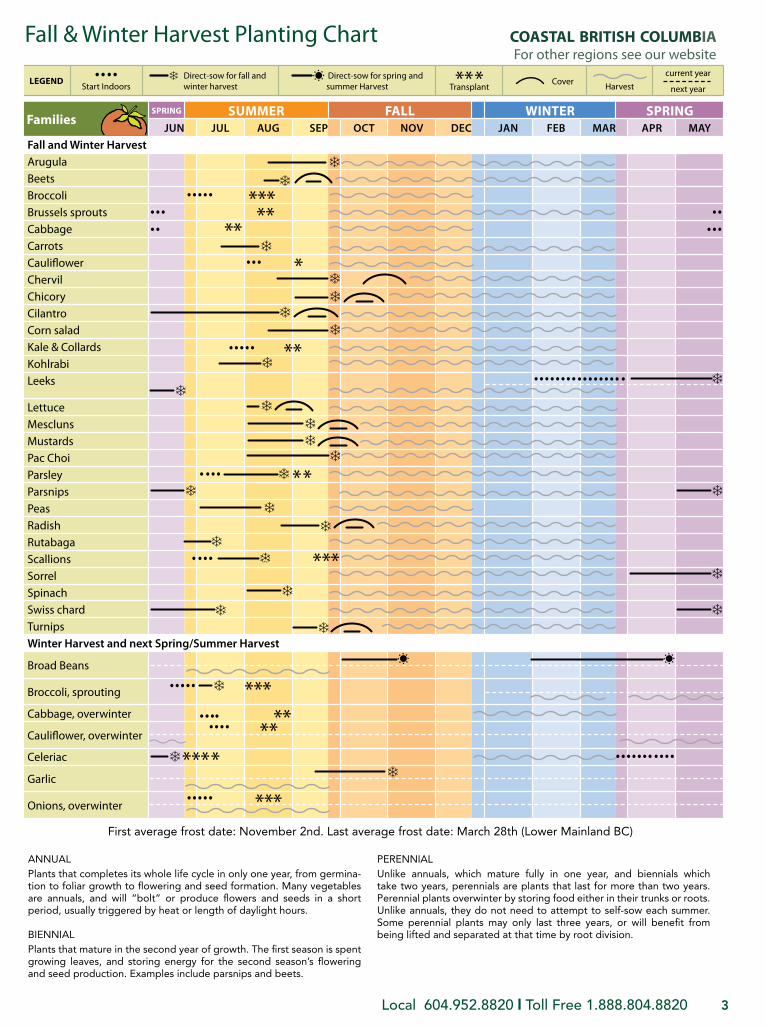
LEGEND Start Indoors
Direct-sow for fall and winter harvest
Direct-sow for spring and summer Harvest
Transplant
Cover Harvestcurrent year
next year
Families SPRING SUMMER FALL WINTER SPRING
JUN JUL AUG SEP OCT NOV DEC JAN FEB MAR APR MAYFall and Winter HarvestArugulaBeetsBroccoliBrussels sproutsCabbage CarrotsCauliflowerChervilChicoryCilantroCorn saladKale & CollardsKohlrabiLeeks
LettuceMesclunsMustardsPac ChoiParsleyParsnipsPeasRadishRutabagaScallionsSorrelSpinach Swiss chardTurnipsWinter Harvest and next Spring/Summer Harvest
Broad Beans
Broccoli, sprouting
Cabbage, overwinter
Cauliflower, overwinter
Celeriac
Garlic
Onions, overwinter
First average frost date: November 2nd. Last average frost date: March 28th (Lower Mainland BC)
Fall & Winter Harvest Planting Chart coastal british columbia For other regions see our website
ANNUALPlants that completes its whole life cycle in only one year, from germina-tion to foliar growth to flowering and seed formation. Many vegetables are annuals, and will “bolt” or produce flowers and seeds in a short period, usually triggered by heat or length of daylight hours.
BIENNIALPlants that mature in the second year of growth. The first season is spent growing leaves, and storing energy for the second season’s flowering and seed production. Examples include parsnips and beets.
PERENNIALUnlike annuals, which mature fully in one year, and biennials which take two years, perennials are plants that last for more than two years. Perennial plants overwinter by storing food either in their trunks or roots. Unlike annuals, they do not need to attempt to self-sow each summer.Some perennial plants may only last three years, or will benefit from being lifted and separated at that time by root division.
Local 604.952.8820 l Toll Free 1.888.804.8820 3
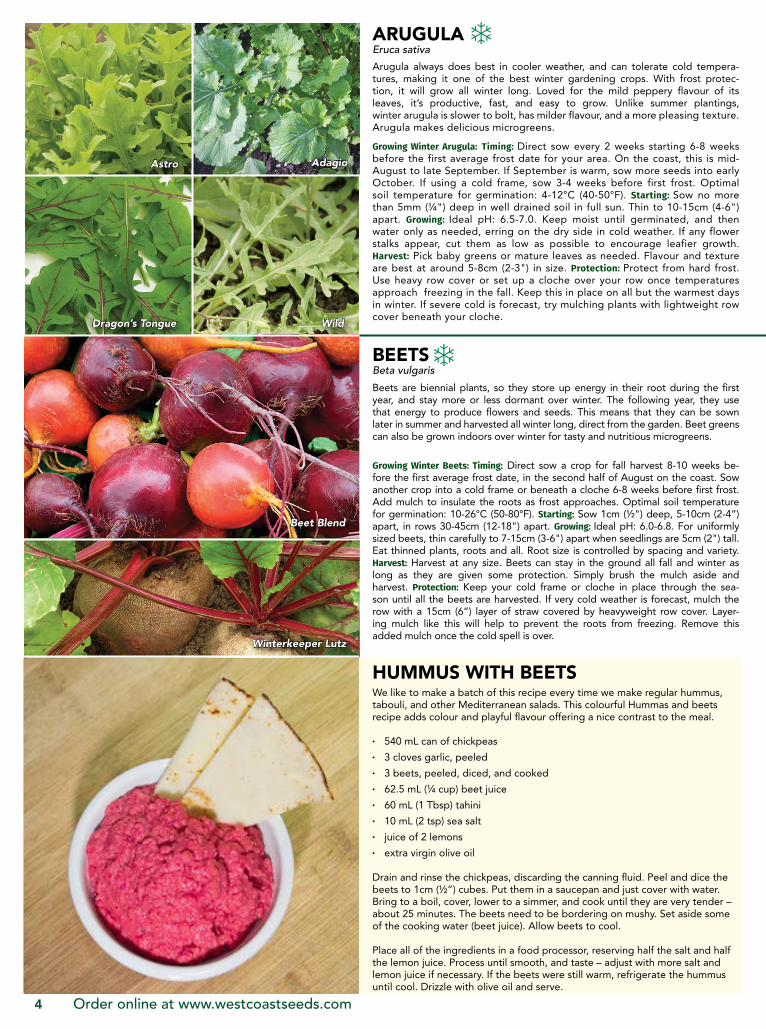
HUMMUS WITH BEETSWe like to make a batch of this recipe every time we make regular hummus, tabouli, and other Mediterranean salads. This colourful Hummas and beets recipe adds colour and playful flavour offering a nice contrast to the meal.
· 540 mL can of chickpeas
· 3 cloves garlic, peeled
· 3 beets, peeled, diced, and cooked
· 62.5 mL (¼ cup) beet juice
· 60 mL (1 Tbsp) tahini
· 10 mL (2 tsp) sea salt
· juice of 2 lemons
· extra virgin olive oil
Drain and rinse the chickpeas, discarding the canning fluid. Peel and dice the beets to 1cm (½”) cubes. Put them in a saucepan and just cover with water. Bring to a boil, cover, lower to a simmer, and cook until they are very tender – about 25 minutes. The beets need to be bordering on mushy. Set aside some of the cooking water (beet juice). Allow beets to cool.
Place all of the ingredients in a food processor, reserving half the salt and half the lemon juice. Process until smooth, and taste – adjust with more salt and lemon juice if necessary. If the beets were still warm, refrigerate the hummus until cool. Drizzle with olive oil and serve.
Order online at www.westcoastseeds.com
Astro
Wild
Beet Blend
Winterkeeper Lutz
4
Dragon’s Tongue
Adagio
ARUGULAEruca sativa
BEETS Beta vulgaris
Arugula always does best in cooler weather, and can tolerate cold tempera-tures, making it one of the best winter gardening crops. With frost protec-tion, it will grow all winter long. Loved for the mild peppery flavour of its leaves, it’s productive, fast, and easy to grow. Unlike summer plantings, winter arugula is slower to bolt, has milder flavour, and a more pleasing texture. Arugula makes delicious microgreens.
Beets are biennial plants, so they store up energy in their root during the first year, and stay more or less dormant over winter. The following year, they use that energy to produce flowers and seeds. This means that they can be sown later in summer and harvested all winter long, direct from the garden. Beet greens can also be grown indoors over winter for tasty and nutritious microgreens.
Growing Winter Arugula: Timing: Direct sow every 2 weeks starting 6-8 weeks before the first average frost date for your area. On the coast, this is mid-August to late September. If September is warm, sow more seeds into early October. If using a cold frame, sow 3-4 weeks before first frost. Optimal soil temperature for germination: 4-12°C (40-50°F). Starting: Sow no more than 5mm (¼") deep in well drained soil in full sun. Thin to 10-15cm (4-6") apart. Growing: Ideal pH: 6.5-7.0. Keep moist until germinated, and then water only as needed, erring on the dry side in cold weather. If any flower stalks appear, cut them as low as possible to encourage leafier growth. Harvest: Pick baby greens or mature leaves as needed. Flavour and texture are best at around 5-8cm (2-3") in size. Protection: Protect from hard frost. Use heavy row cover or set up a cloche over your row once temperatures approach freezing in the fall. Keep this in place on all but the warmest days in winter. If severe cold is forecast, try mulching plants with lightweight row cover beneath your cloche.
Growing Winter Beets: Timing: Direct sow a crop for fall harvest 8-10 weeks be-fore the first average frost date, in the second half of August on the coast. Sow another crop into a cold frame or beneath a cloche 6-8 weeks before first frost. Add mulch to insulate the roots as frost approaches. Optimal soil temperature for germination: 10-26°C (50-80°F). Starting: Sow 1cm (½") deep, 5-10cm (2-4”) apart, in rows 30-45cm (12-18") apart. Growing: Ideal pH: 6.0-6.8. For uniformly sized beets, thin carefully to 7-15cm (3-6") apart when seedlings are 5cm (2") tall. Eat thinned plants, roots and all. Root size is controlled by spacing and variety. Harvest: Harvest at any size. Beets can stay in the ground all fall and winter as long as they are given some protection. Simply brush the mulch aside and harvest. Protection: Keep your cold frame or cloche in place through the sea-son until all the beets are harvested. If very cold weather is forecast, mulch the row with a 15cm (6”) layer of straw covered by heavyweight row cover. Layer-ing mulch like this will help to prevent the roots from freezing. Remove this added mulch once the cold spell is over.
Windsor
Windsor Natalino
Everest
Santee
Red Spear
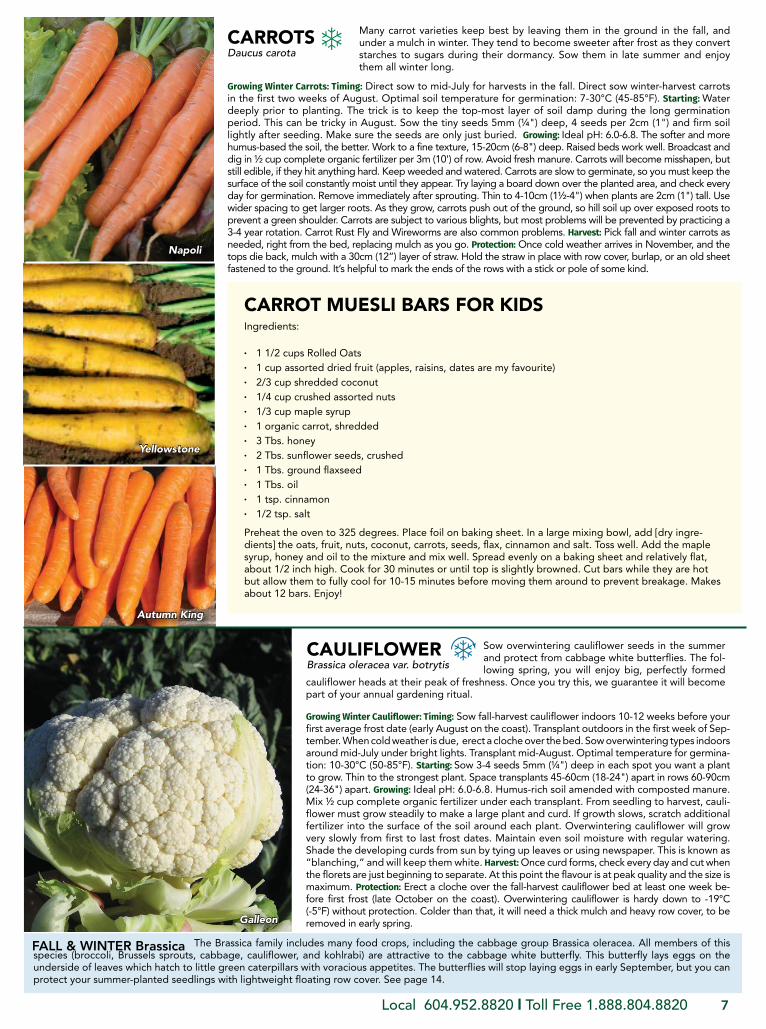
Broad Windsor has been
a customer favourite for
decades. It’s very reliable
and utterly cold hardy. Big
tasty beans!
Local 604.952.8820 l Toll Free 1.888.804.8820 5
BROAD BEANSVicia faba
Broad beans (or fava beans) are very cold hardy, and will continue to grow throughout the winter. Fall-sown broad beans mature in early spring the following year, and are ready to har-vest before the arrival of the black aphids that are such a nuisance on spring-sown plants. They are bulky plants that produce a great deal of very brittle, easy-to-use organic matter for the spring compost. They even fix nitrogen in the soil as they grow, which enriches the soil for spring crops.
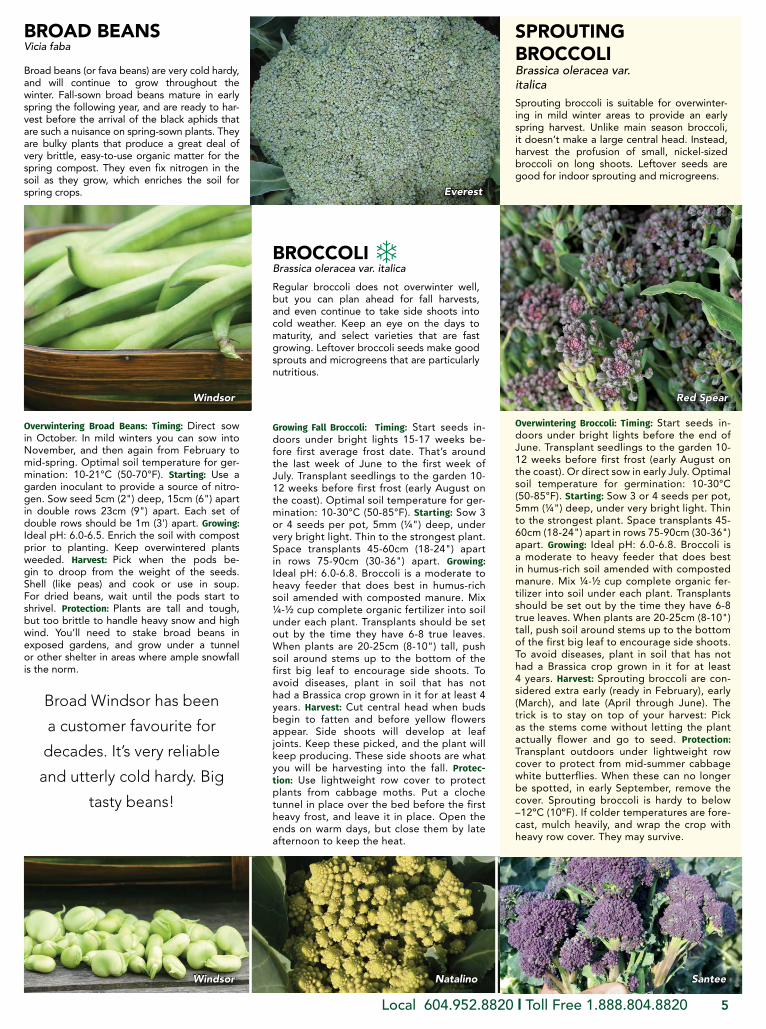
BROCCOLIBrassica oleracea var. italica
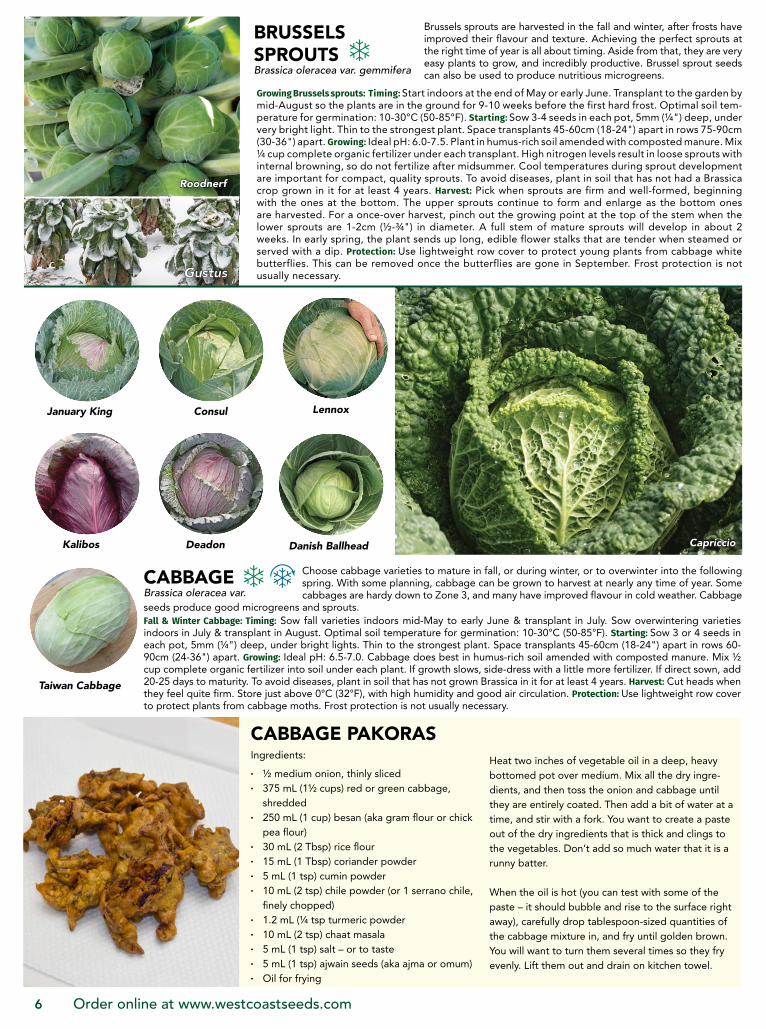
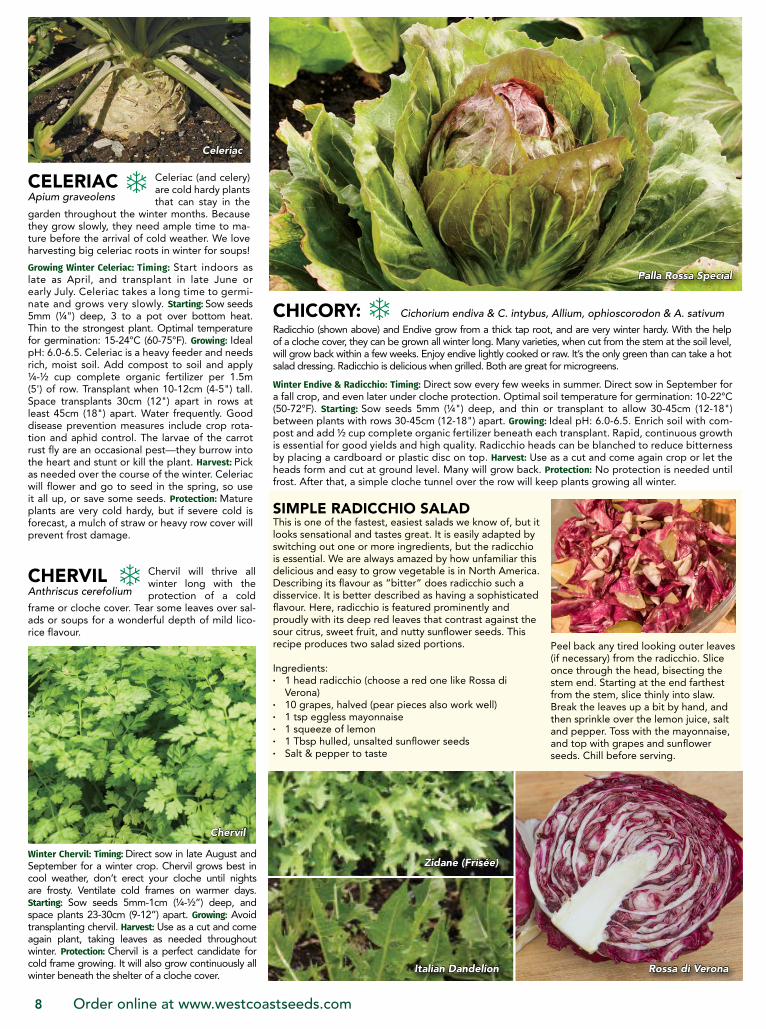
SPROUTING BROCCOLIBrassica oleracea var. italica
Regular broccoli does not overwinter well, but you can plan ahead for fall harvests, and even continue to take side shoots into cold weather. Keep an eye on the days to maturity, and select varieties that are fast growing. Leftover broccoli seeds make good sprouts and microgreens that are particularly nutritious.
Sprouting broccoli is suitable for overwinter-ing in mild winter areas to provide an early spring harvest. Unlike main season broccoli, it doesn’t make a large central head. Instead, harvest the profusion of small, nickel-sized broccoli on long shoots. Leftover seeds are good for indoor sprouting and microgreens.
Overwintering Broad Beans: Timing: Direct sow in October. In mild winters you can sow into November, and then again from February to mid-spring. Optimal soil temperature for ger-mination: 10-21°C (50-70°F). Starting: Use a garden inoculant to provide a source of nitro-gen. Sow seed 5cm (2") deep, 15cm (6") apart in double rows 23cm (9") apart. Each set of double rows should be 1m (3') apart. Growing: Ideal pH: 6.0-6.5. Enrich the soil with compost prior to planting. Keep overwintered plants weeded. Harvest: Pick when the pods be-gin to droop from the weight of the seeds. Shell (like peas) and cook or use in soup. For dried beans, wait until the pods start to shrivel. Protection: Plants are tall and tough, but too brittle to handle heavy snow and high wind. You’ll need to stake broad beans in exposed gardens, and grow under a tunnel or other shelter in areas where ample snowfall is the norm.
Growing Fall Broccoli: Timing: Start seeds in-doors under bright lights 15-17 weeks be-fore first average frost date. That’s around the last week of June to the first week of July. Transplant seedlings to the garden 10-12 weeks before first frost (early August on the coast). Optimal soil temperature for ger-mination: 10-30°C (50-85°F). Starting: Sow 3 or 4 seeds per pot, 5mm (¼") deep, under very bright light. Thin to the strongest plant. Space transplants 45-60cm (18-24") apart in rows 75-90cm (30-36") apart. Growing: Ideal pH: 6.0-6.8. Broccoli is a moderate to heavy feeder that does best in humus-rich soil amended with composted manure. Mix ¼-½ cup complete organic fertilizer into soil under each plant. Transplants should be set out by the time they have 6-8 true leaves. When plants are 20-25cm (8-10") tall, push soil around stems up to the bottom of the first big leaf to encourage side shoots. To avoid diseases, plant in soil that has not had a Brassica crop grown in it for at least 4 years. Harvest: Cut central head when buds begin to fatten and before yellow flowers appear. Side shoots will develop at leaf joints. Keep these picked, and the plant will keep producing. These side shoots are what you will be harvesting into the fall. Protec-tion: Use lightweight row cover to protect plants from cabbage moths. Put a cloche tunnel in place over the bed before the first heavy frost, and leave it in place. Open the ends on warm days, but close them by late afternoon to keep the heat.
Overwintering Broccoli: Timing: Start seeds in-doors under bright lights before the end of June. Transplant seedlings to the garden 10-12 weeks before first frost (early August on the coast). Or direct sow in early July. Optimal soil temperature for germination: 10-30°C (50-85°F). Starting: Sow 3 or 4 seeds per pot, 5mm (¼") deep, under very bright light. Thin to the strongest plant. Space transplants 45-60cm (18-24") apart in rows 75-90cm (30-36") apart. Growing: Ideal pH: 6.0-6.8. Broccoli is a moderate to heavy feeder that does best in humus-rich soil amended with composted manure. Mix ¼-½ cup complete organic fer-tilizer into soil under each plant. Transplants should be set out by the time they have 6-8 true leaves. When plants are 20-25cm (8-10") tall, push soil around stems up to the bottom of the first big leaf to encourage side shoots. To avoid diseases, plant in soil that has not had a Brassica crop grown in it for at least 4 years. Harvest: Sprouting broccoli are con-sidered extra early (ready in February), early (March), and late (April through June). The trick is to stay on top of your harvest: Pick as the stems come without letting the plant actually flower and go to seed. Protection: Transplant outdoors under lightweight row cover to protect from mid-summer cabbage white butterflies. When these can no longer be spotted, in early September, remove the cover. Sprouting broccoli is hardy to below –12ºC (10ºF). If colder temperatures are fore-cast, mulch heavily, and wrap the crop with heavy row cover. They may survive.
Order online at www.westcoastseeds.com
Lennox January King
Kalibos Danish BallheadDeadon
Consul
Taiwan Cabbage
Gustus
Roodnerf
6
Capriccio
Choose cabbage varieties to mature in fall, or during winter, or to overwinter into the following spring. With some planning, cabbage can be grown to harvest at nearly any time of year. Some cabbages are hardy down to Zone 3, and many have improved flavour in cold weather. Cabbage
seeds produce good microgreens and sprouts.
CABBAGE Brassica oleracea var.
BRUSSELS SPROUTSBrassica oleracea var. gemmifera
Brussels sprouts are harvested in the fall and winter, after frosts have improved their flavour and texture. Achieving the perfect sprouts at the right time of year is all about timing. Aside from that, they are very easy plants to grow, and incredibly productive. Brussel sprout seeds can also be used to produce nutritious microgreens.
Fall & Winter Cabbage: Timing: Sow fall varieties indoors mid-May to early June & transplant in July. Sow overwintering varieties indoors in July & transplant in August. Optimal soil temperature for germination: 10-30°C (50-85°F). Starting: Sow 3 or 4 seeds in each pot, 5mm (¼") deep, under bright lights. Thin to the strongest plant. Space transplants 45-60cm (18-24") apart in rows 60-90cm (24-36") apart. Growing: Ideal pH: 6.5-7.0. Cabbage does best in humus-rich soil amended with composted manure. Mix ½ cup complete organic fertilizer into soil under each plant. If growth slows, side-dress with a little more fertilizer. If direct sown, add 20-25 days to maturity. To avoid diseases, plant in soil that has not grown Brassica in it for at least 4 years. Harvest: Cut heads when they feel quite firm. Store just above 0°C (32°F), with high humidity and good air circulation. Protection: Use lightweight row cover to protect plants from cabbage moths. Frost protection is not usually necessary.
Growing Brussels sprouts: Timing: Start indoors at the end of May or early June. Transplant to the garden by mid-August so the plants are in the ground for 9-10 weeks before the first hard frost. Optimal soil tem-perature for germination: 10-30°C (50-85°F). Starting: Sow 3-4 seeds in each pot, 5mm (¼") deep, under very bright light. Thin to the strongest plant. Space transplants 45-60cm (18-24") apart in rows 75-90cm (30-36") apart. Growing: Ideal pH: 6.0-7.5. Plant in humus-rich soil amended with composted manure. Mix ¼ cup complete organic fertilizer under each transplant. High nitrogen levels result in loose sprouts with internal browning, so do not fertilize after midsummer. Cool temperatures during sprout development are important for compact, quality sprouts. To avoid diseases, plant in soil that has not had a Brassica crop grown in it for at least 4 years. Harvest: Pick when sprouts are firm and well-formed, beginning with the ones at the bottom. The upper sprouts continue to form and enlarge as the bottom ones are harvested. For a once-over harvest, pinch out the growing point at the top of the stem when the lower sprouts are 1-2cm (½-¾") in diameter. A full stem of mature sprouts will develop in about 2 weeks. In early spring, the plant sends up long, edible flower stalks that are tender when steamed or served with a dip. Protection: Use lightweight row cover to protect young plants from cabbage white butterflies. This can be removed once the butterflies are gone in September. Frost protection is not usually necessary.
CABBAGE PAKORASIngredients:
· ½ medium onion, thinly sliced· 375 mL (1½ cups) red or green cabbage, shredded· 250 mL (1 cup) besan (aka gram flour or chick pea flour)· 30 mL (2 Tbsp) rice flour· 15 mL (1 Tbsp) coriander powder· 5 mL (1 tsp) cumin powder· 10 mL (2 tsp) chile powder (or 1 serrano chile, finely chopped)· 1.2 mL (¼ tsp turmeric powder· 10 mL (2 tsp) chaat masala· 5 mL (1 tsp) salt – or to taste· 5 mL (1 tsp) ajwain seeds (aka ajma or omum)· Oil for frying
Heat two inches of vegetable oil in a deep, heavy bottomed pot over medium. Mix all the dry ingre-dients, and then toss the onion and cabbage until they are entirely coated. Then add a bit of water at a time, and stir with a fork. You want to create a paste out of the dry ingredients that is thick and clings to the vegetables. Don’t add so much water that it is a runny batter.
When the oil is hot (you can test with some of the paste – it should bubble and rise to the surface right away), carefully drop tablespoon-sized quantities of the cabbage mixture in, and fry until golden brown. You will want to turn them several times so they fry evenly. Lift them out and drain on kitchen towel.
FALL & WINTER Brassica The Brassica family includes many food crops, including the cabbage group Brassica oleracea. All members of this species (broccoli, Brussels sprouts, cabbage, cauliflower, and kohlrabi) are attractive to the cabbage white butterfly. This butterfly lays eggs on the underside of leaves which hatch to little green caterpillars with voracious appetites. The butterflies will stop laying eggs in early September, but you can protect your summer-planted seedlings with lightweight floating row cover. See page 14.
Galleon
Local 604.952.8820 l Toll Free 1.888.804.8820 7
CARROTSDaucus carota
Many carrot varieties keep best by leaving them in the ground in the fall, and under a mulch in winter. They tend to become sweeter after frost as they convert starches to sugars during their dormancy. Sow them in late summer and enjoy them all winter long.
Napoli
Yellowstone Carrots
Autumn King Carrots
CAULIFLOWERBrassica oleracea var. botrytis
Sow overwintering cauliflower seeds in the summer and protect from cabbage white butterflies. The fol-lowing spring, you will enjoy big, perfectly formed
cauliflower heads at their peak of freshness. Once you try this, we guarantee it will become part of your annual gardening ritual.
Growing Winter Cauliflower: Timing: Sow fall-harvest cauliflower indoors 10-12 weeks before your first average frost date (early August on the coast). Transplant outdoors in the first week of Sep-tember. When cold weather is due, erect a cloche over the bed. Sow overwintering types indoors around mid-July under bright lights. Transplant mid-August. Optimal temperature for germina-tion: 10-30°C (50-85°F). Starting: Sow 3-4 seeds 5mm (¼") deep in each spot you want a plant to grow. Thin to the strongest plant. Space transplants 45-60cm (18-24") apart in rows 60-90cm (24-36") apart. Growing: Ideal pH: 6.0-6.8. Humus-rich soil amended with composted manure. Mix ½ cup complete organic fertilizer under each transplant. From seedling to harvest, cauli-flower must grow steadily to make a large plant and curd. If growth slows, scratch additional fertilizer into the surface of the soil around each plant. Overwintering cauliflower will grow very slowly from first to last frost dates. Maintain even soil moisture with regular watering. Shade the developing curds from sun by tying up leaves or using newspaper. This is known as “blanching,” and will keep them white. Harvest: Once curd forms, check every day and cut when the florets are just beginning to separate. At this point the flavour is at peak quality and the size is maximum. Protection: Erect a cloche over the fall-harvest cauliflower bed at least one week be-fore first frost (late October on the coast). Overwintering cauliflower is hardy down to -19°C (-5°F) without protection. Colder than that, it will need a thick mulch and heavy row cover, to be removed in early spring.
Growing Winter Carrots: Timing: Direct sow to mid-July for harvests in the fall. Direct sow winter-harvest carrots in the first two weeks of August. Optimal soil temperature for germination: 7-30°C (45-85°F). Starting: Water deeply prior to planting. The trick is to keep the top-most layer of soil damp during the long germination period. This can be tricky in August. Sow the tiny seeds 5mm (¼") deep, 4 seeds per 2cm (1") and firm soil lightly after seeding. Make sure the seeds are only just buried. Growing: Ideal pH: 6.0-6.8. The softer and more humus-based the soil, the better. Work to a fine texture, 15-20cm (6-8") deep. Raised beds work well. Broadcast and dig in ½ cup complete organic fertilizer per 3m (10') of row. Avoid fresh manure. Carrots will become misshapen, but still edible, if they hit anything hard. Keep weeded and watered. Carrots are slow to germinate, so you must keep the surface of the soil constantly moist until they appear. Try laying a board down over the planted area, and check every day for germination. Remove immediately after sprouting. Thin to 4-10cm (1½-4") when plants are 2cm (1") tall. Use wider spacing to get larger roots. As they grow, carrots push out of the ground, so hill soil up over exposed roots to prevent a green shoulder. Carrots are subject to various blights, but most problems will be prevented by practicing a 3-4 year rotation. Carrot Rust Fly and Wireworms are also common problems. Harvest: Pick fall and winter carrots as needed, right from the bed, replacing mulch as you go. Protection: Once cold weather arrives in November, and the tops die back, mulch with a 30cm (12”) layer of straw. Hold the straw in place with row cover, burlap, or an old sheet fastened to the ground. It’s helpful to mark the ends of the rows with a stick or pole of some kind.
CARROT MUESLI BARS FOR KIDSIngredients:
· 1 1/2 cups Rolled Oats· 1 cup assorted dried fruit (apples, raisins, dates are my favourite)· 2/3 cup shredded coconut· 1/4 cup crushed assorted nuts· 1/3 cup maple syrup· 1 organic carrot, shredded· 3 Tbs. honey· 2 Tbs. sunflower seeds, crushed· 1 Tbs. ground flaxseed· 1 Tbs. oil· 1 tsp. cinnamon· 1/2 tsp. salt
Preheat the oven to 325 degrees. Place foil on baking sheet. In a large mixing bowl, add [dry ingre-dients] the oats, fruit, nuts, coconut, carrots, seeds, flax, cinnamon and salt. Toss well. Add the maple syrup, honey and oil to the mixture and mix well. Spread evenly on a baking sheet and relatively flat, about 1/2 inch high. Cook for 30 minutes or until top is slightly browned. Cut bars while they are hot but allow them to fully cool for 10-15 minutes before moving them around to prevent breakage. Makes about 12 bars. Enjoy!
Yellowstone
Autumn King
Order online at www.westcoastseeds.com
Chervil
Celeriac
Palla Rossa Special
8
CELERIACApium graveolens
CHICORY: Cichorium endiva & C. intybus, Allium, ophioscorodon & A. sativum
CHERVILAnthriscus cerefolium
Rossa di Verona
Chervil will thrive all winter long with the protection of a cold
frame or cloche cover. Tear some leaves over sal-ads or soups for a wonderful depth of mild lico-rice flavour.
Celeriac (and celery) are cold hardy plants that can stay in the
garden throughout the winter months. Because they grow slowly, they need ample time to ma-ture before the arrival of cold weather. We love harvesting big celeriac roots in winter for soups!
Radicchio (shown above) and Endive grow from a thick tap root, and are very winter hardy. With the help of a cloche cover, they can be grown all winter long. Many varieties, when cut from the stem at the soil level, will grow back within a few weeks. Enjoy endive lightly cooked or raw. It’s the only green than can take a hot salad dressing. Radicchio is delicious when grilled. Both are great for microgreens.
Growing Winter Celeriac: Timing: Start indoors as late as April, and transplant in late June or early July. Celeriac takes a long time to germi-nate and grows very slowly. Starting: Sow seeds 5mm (¼") deep, 3 to a pot over bottom heat. Thin to the strongest plant. Optimal temperature for germination: 15-24°C (60-75°F). Growing: Ideal pH: 6.0-6.5. Celeriac is a heavy feeder and needs rich, moist soil. Add compost to soil and apply ¼-½ cup complete organic fertilizer per 1.5m (5') of row. Transplant when 10-12cm (4-5") tall. Space transplants 30cm (12") apart in rows at least 45cm (18") apart. Water frequently. Good disease prevention measures include crop rota-tion and aphid control. The larvae of the carrot rust fly are an occasional pest—they burrow into the heart and stunt or kill the plant. Harvest: Pick as needed over the course of the winter. Celeriac will flower and go to seed in the spring, so use it all up, or save some seeds. Protection: Mature plants are very cold hardy, but if severe cold is forecast, a mulch of straw or heavy row cover will prevent frost damage.
Winter Endive & Radicchio: Timing: Direct sow every few weeks in summer. Direct sow in September for a fall crop, and even later under cloche protection. Optimal soil temperature for germination: 10-22°C (50-72°F). Starting: Sow seeds 5mm (¼") deep, and thin or transplant to allow 30-45cm (12-18") between plants with rows 30-45cm (12-18") apart. Growing: Ideal pH: 6.0-6.5. Enrich soil with com-post and add ½ cup complete organic fertilizer beneath each transplant. Rapid, continuous growth is essential for good yields and high quality. Radicchio heads can be blanched to reduce bitterness by placing a cardboard or plastic disc on top. Harvest: Use as a cut and come again crop or let the heads form and cut at ground level. Many will grow back. Protection: No protection is needed until frost. After that, a simple cloche tunnel over the row will keep plants growing all winter.
Winter Chervil: Timing: Direct sow in late August and September for a winter crop. Chervil grows best in cool weather, don’t erect your cloche until nights are frosty. Ventilate cold frames on warmer days. Starting: Sow seeds 5mm-1cm (¼-½”) deep, and space plants 23-30cm (9-12”) apart. Growing: Avoid transplanting chervil. Harvest: Use as a cut and come again plant, taking leaves as needed throughout winter. Protection: Chervil is a perfect candidate for cold frame growing. It will also grow continuously all winter beneath the shelter of a cloche cover.
Italian Dandelion
Zidane (Frisée)
SIMPLE RADICCHIO SALADThis is one of the fastest, easiest salads we know of, but it looks sensational and tastes great. It is easily adapted by switching out one or more ingredients, but the radicchio is essential. We are always amazed by how unfamiliar this delicious and easy to grow vegetable is in North America. Describing its flavour as “bitter” does radicchio such a disservice. It is better described as having a sophisticated flavour. Here, radicchio is featured prominently and proudly with its deep red leaves that contrast against the sour citrus, sweet fruit, and nutty sunflower seeds. This recipe produces two salad sized portions.
Ingredients:· 1 head radicchio (choose a red one like Rossa di Verona)· 10 grapes, halved (pear pieces also work well)· 1 tsp eggless mayonnaise· 1 squeeze of lemon· 1 Tbsp hulled, unsalted sunflower seeds· Salt & pepper to taste
Peel back any tired looking outer leaves (if necessary) from the radicchio. Slice once through the head, bisecting the stem end. Starting at the end farthest from the stem, slice thinly into slaw. Break the leaves up a bit by hand, and then sprinkle over the lemon juice, salt and pepper. Toss with the mayonnaise, and top with grapes and sunflower seeds. Chill before serving.
Red Russian Music
Purple Softneck
Local 604.952.8820 l Toll Free 1.888.804.8820 9
CORN SALAD (Mâche)Valerianella locusta
Vit
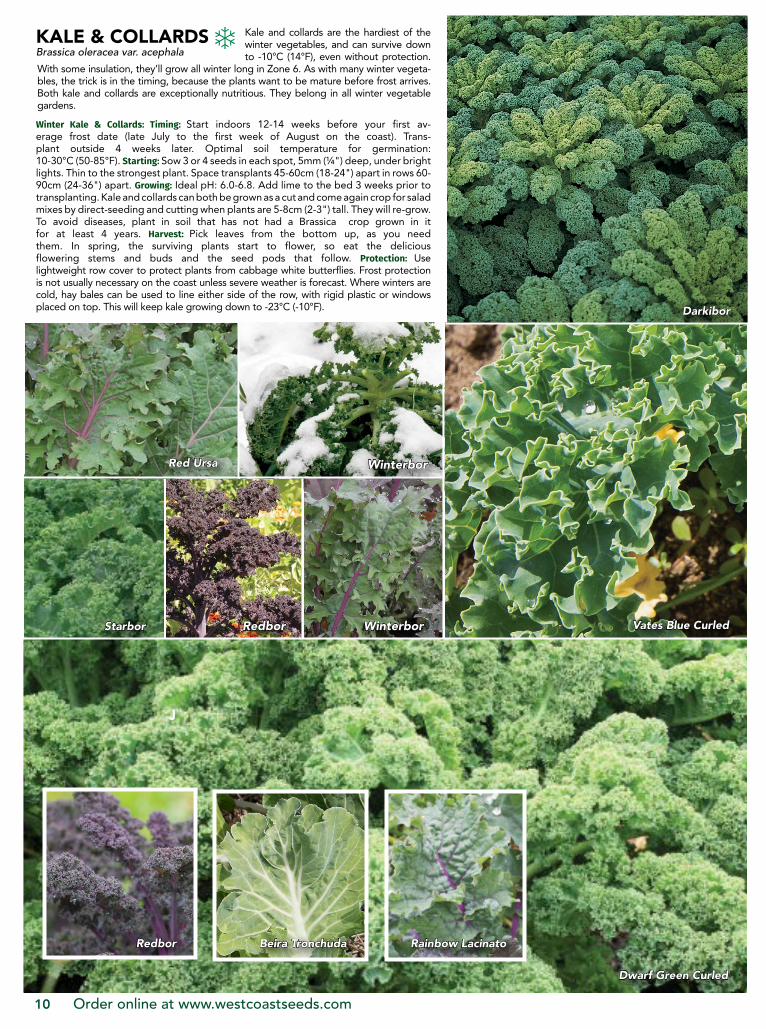
Still unfamiliar to many North American gardeners, this cold hardy salad green is variably known by such European names as mâche, lamb’s lettuce, bird let-tuce, field salad, fetticus, vit, and Rapunzel. The leaves are crisp and mild, with a higher vitamin content than lettuce. Corn salad belongs in every winter garden.
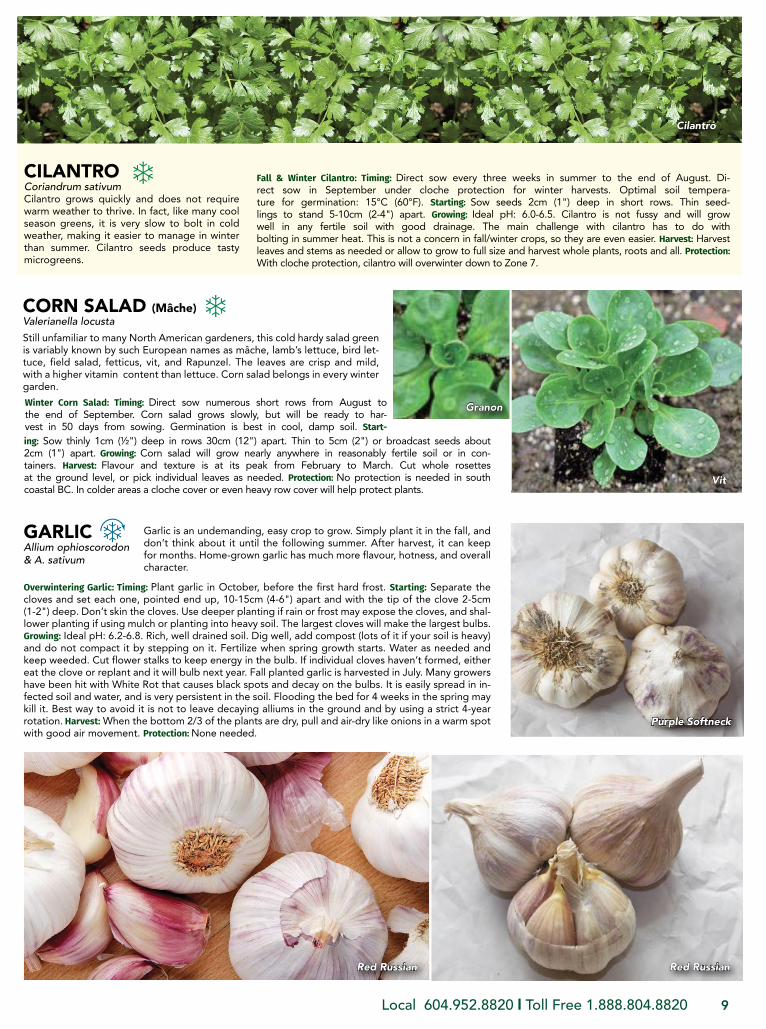
Fall & Winter Cilantro: Timing: Direct sow every three weeks in summer to the end of August. Di-rect sow in September under cloche protection for winter harvests. Optimal soil tempera-ture for germination: 15°C (60°F). Starting: Sow seeds 2cm (1") deep in short rows. Thin seed-lings to stand 5-10cm (2-4") apart. Growing: Ideal pH: 6.0-6.5. Cilantro is not fussy and will grow well in any fertile soil with good drainage. The main challenge with cilantro has to do with bolting in summer heat. This is not a concern in fall/winter crops, so they are even easier. Harvest: Harvest leaves and stems as needed or allow to grow to full size and harvest whole plants, roots and all. Protection: With cloche protection, cilantro will overwinter down to Zone 7.
Cilantro
CILANTRO Coriandrum sativum Cilantro grows quickly and does not require warm weather to thrive. In fact, like many cool season greens, it is very slow to bolt in cold weather, making it easier to manage in winter than summer. Cilantro seeds produce tasty microgreens.
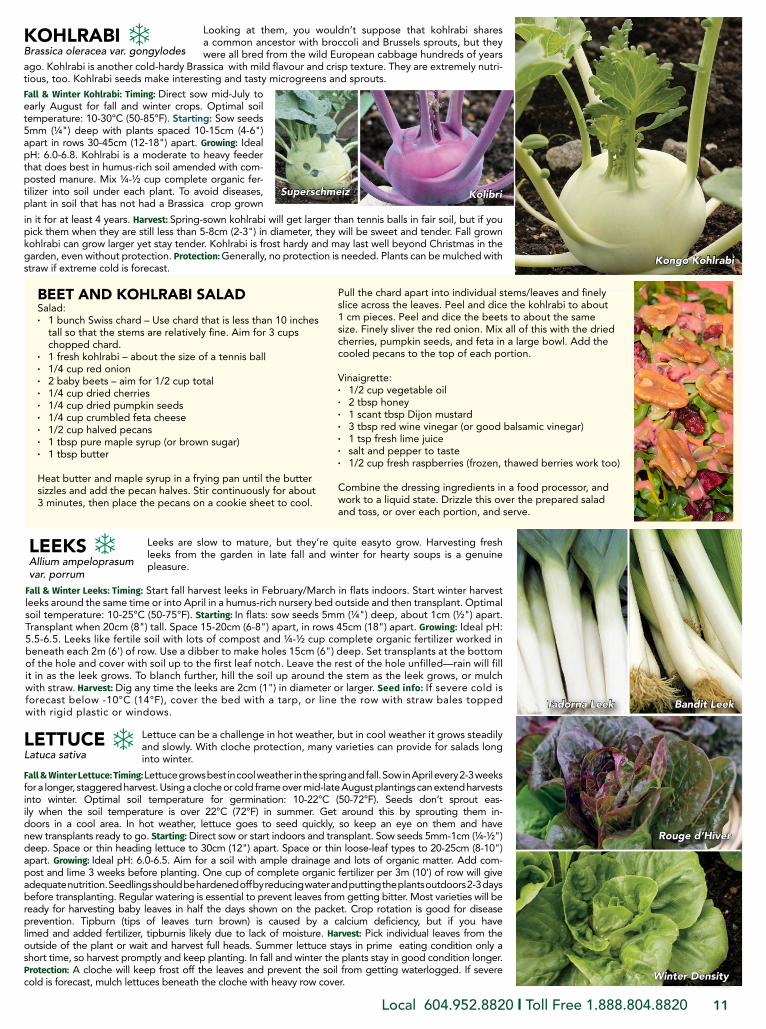
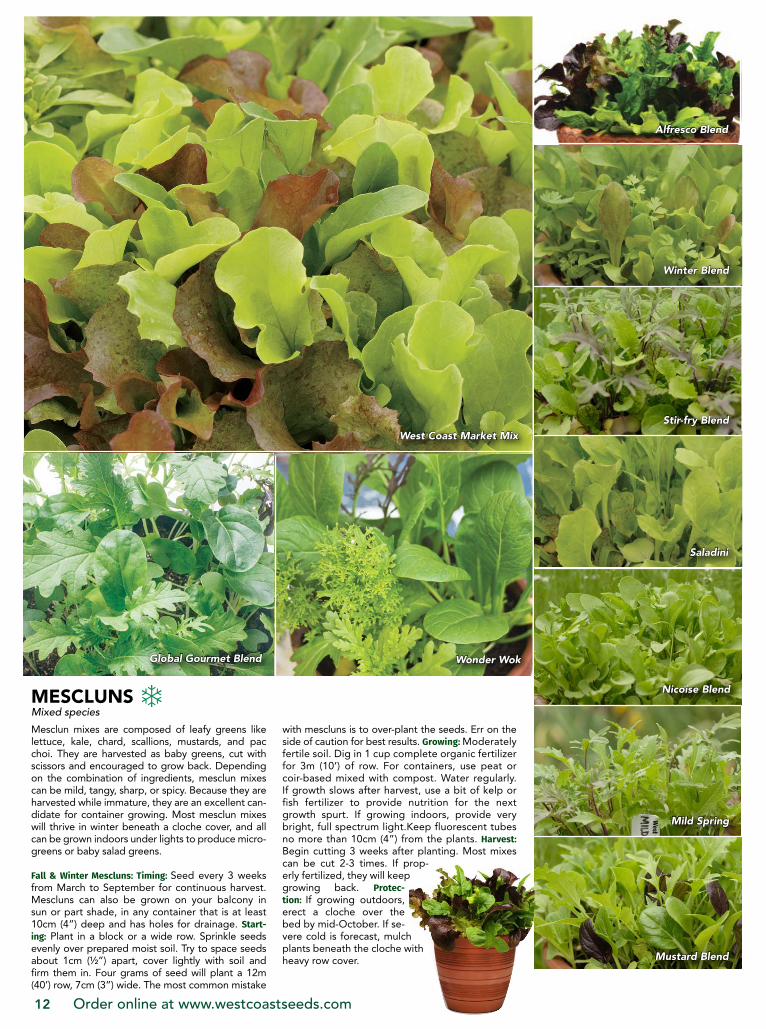
Garlic is an undemanding, easy crop to grow. Simply plant it in the fall, and don’t think about it until the following summer. After harvest, it can keep for months. Home-grown garlic has much more flavour, hotness, and overall character.
GARLIC Allium ophioscorodon & A. sativum
Winter Corn Salad: Timing: Direct sow numerous short rows from August to the end of September. Corn salad grows slowly, but will be ready to har-vest in 50 days from sowing. Germination is best in cool, damp soil. Start-
Overwintering Garlic: Timing: Plant garlic in October, before the first hard frost. Starting: Separate the cloves and set each one, pointed end up, 10-15cm (4-6") apart and with the tip of the clove 2-5cm (1-2") deep. Don’t skin the cloves. Use deeper planting if rain or frost may expose the cloves, and shal-lower planting if using mulch or planting into heavy soil. The largest cloves will make the largest bulbs. Growing: Ideal pH: 6.2-6.8. Rich, well drained soil. Dig well, add compost (lots of it if your soil is heavy) and do not compact it by stepping on it. Fertilize when spring growth starts. Water as needed and keep weeded. Cut flower stalks to keep energy in the bulb. If individual cloves haven’t formed, either eat the clove or replant and it will bulb next year. Fall planted garlic is harvested in July. Many growers have been hit with White Rot that causes black spots and decay on the bulbs. It is easily spread in in-fected soil and water, and is very persistent in the soil. Flooding the bed for 4 weeks in the spring may kill it. Best way to avoid it is not to leave decaying alliums in the ground and by using a strict 4-year rotation. Harvest: When the bottom 2/3 of the plants are dry, pull and air-dry like onions in a warm spot with good air movement. Protection: None needed.
ing: Sow thinly 1cm (½") deep in rows 30cm (12") apart. Thin to 5cm (2") or broadcast seeds about 2cm (1") apart. Growing: Corn salad will grow nearly anywhere in reasonably fertile soil or in con-tainers. Harvest: Flavour and texture is at its peak from February to March. Cut whole rosettes at the ground level, or pick individual leaves as needed. Protection: No protection is needed in south coastal BC. In colder areas a cloche cover or even heavy row cover will help protect plants.
Granon
Red Russian
Purple Softneck
Order online at www.westcoastseeds.com10
KALE & COLLARDSBrassica oleracea var. acephala
Redbor Winterbor
Kale and collards are the hardiest of the winter vegetables, and can survive down to -10°C (14°F), even without protection.
With some insulation, they’ll grow all winter long in Zone 6. As with many winter vegeta-bles, the trick is in the timing, because the plants want to be mature before frost arrives. Both kale and collards are exceptionally nutritious. They belong in all winter vegetable gardens.
Winter Kale & Collards: Timing: Start indoors 12-14 weeks before your first av-erage frost date (late July to the first week of August on the coast). Trans-plant outside 4 weeks later. Optimal soil temperature for germination: 10-30°C (50-85°F). Starting: Sow 3 or 4 seeds in each spot, 5mm (¼") deep, under bright lights. Thin to the strongest plant. Space transplants 45-60cm (18-24") apart in rows 60-90cm (24-36") apart. Growing: Ideal pH: 6.0-6.8. Add lime to the bed 3 weeks prior to transplanting. Kale and collards can both be grown as a cut and come again crop for salad mixes by direct-seeding and cutting when plants are 5-8cm (2-3") tall. They will re-grow. To avoid diseases, plant in soil that has not had a Brassica crop grown in it for at least 4 years. Harvest: Pick leaves from the bottom up, as you need them. In spring, the surviving plants start to flower, so eat the delicious flowering stems and buds and the seed pods that follow. Protection: Use lightweight row cover to protect plants from cabbage white butterflies. Frost protection is not usually necessary on the coast unless severe weather is forecast. Where winters are cold, hay bales can be used to line either side of the row, with rigid plastic or windows placed on top. This will keep kale growing down to -23°C (-10°F).
J
Redbor Beira Tronchuda
WinterborRed Ursa
Rainbow Lacinato
Dwarf Green Curled
Vates Blue Curled
Darkibor
Starbor
Winter Density
Rouge d’Hiver
Bandit Leek
Kongo Kohlrabi
Local 604.952.8820 l Toll Free 1.888.804.8820 11
KOHLRABIBrassica oleracea var. gongylodes
LEEKSAllium ampeloprasum var. porrum
LETTUCE Latuca sativa
Leeks are slow to mature, but they’re quite easyto grow. Harvesting fresh leeks from the garden in late fall and winter for hearty soups is a genuine pleasure.
Lettuce can be a challenge in hot weather, but in cool weather it grows steadily and slowly. With cloche protection, many varieties can provide for salads long into winter.
Looking at them, you wouldn’t suppose that kohlrabi shares a common ancestor with broccoli and Brussels sprouts, but they were all bred from the wild European cabbage hundreds of years
ago. Kohlrabi is another cold-hardy Brassica with mild flavour and crisp texture. They are extremely nutri-tious, too. Kohlrabi seeds make interesting and tasty microgreens and sprouts.
Fall & Winter Kohlrabi: Timing: Direct sow mid-July to early August for fall and winter crops. Optimal soil temperature: 10-30°C (50-85°F). Starting: Sow seeds 5mm (¼") deep with plants spaced 10-15cm (4-6") apart in rows 30-45cm (12-18") apart. Growing: Ideal pH: 6.0-6.8. Kohlrabi is a moderate to heavy feeder that does best in humus-rich soil amended with com-posted manure. Mix ¼-½ cup complete organic fer-tilizer into soil under each plant. To avoid diseases, plant in soil that has not had a Brassica crop grown
Fall & Winter Leeks: Timing: Start fall harvest leeks in February/March in flats indoors. Start winter harvest leeks around the same time or into April in a humus-rich nursery bed outside and then transplant. Optimal soil temperature: 10-25°C (50-75°F). Starting: In flats: sow seeds 5mm (¼") deep, about 1cm (½") apart. Transplant when 20cm (8") tall. Space 15-20cm (6-8") apart, in rows 45cm (18") apart. Growing: Ideal pH: 5.5-6.5. Leeks like fertile soil with lots of compost and ¼-½ cup complete organic fertilizer worked in beneath each 2m (6') of row. Use a dibber to make holes 15cm (6") deep. Set transplants at the bottom of the hole and cover with soil up to the first leaf notch. Leave the rest of the hole unfilled—rain will fill it in as the leek grows. To blanch further, hill the soil up around the stem as the leek grows, or mulch with straw. Harvest: Dig any time the leeks are 2cm (1") in diameter or larger. Seed info: If severe cold is forecast below -10°C (14°F), cover the bed with a tarp, or line the row with straw bales topped with rigid plastic or windows.
Fall & Winter Lettuce: Timing: Lettuce grows best in cool weather in the spring and fall. Sow in April every 2-3 weeks for a longer, staggered harvest. Using a cloche or cold frame over mid-late August plantings can extend harvests into winter. Optimal soil temperature for germination: 10-22°C (50-72°F). Seeds don’t sprout eas-ily when the soil temperature is over 22°C (72°F) in summer. Get around this by sprouting them in-doors in a cool area. In hot weather, lettuce goes to seed quickly, so keep an eye on them and have new transplants ready to go. Starting: Direct sow or start indoors and transplant. Sow seeds 5mm-1cm (¼-½") deep. Space or thin heading lettuce to 30cm (12") apart. Space or thin loose-leaf types to 20-25cm (8-10") apart. Growing: Ideal pH: 6.0-6.5. Aim for a soil with ample drainage and lots of organic matter. Add com-post and lime 3 weeks before planting. One cup of complete organic fertilizer per 3m (10') of row will give adequate nutrition. Seedlings should be hardened off by reducing water and putting the plants outdoors 2-3 days before transplanting. Regular watering is essential to prevent leaves from getting bitter. Most varieties will be ready for harvesting baby leaves in half the days shown on the packet. Crop rotation is good for disease prevention. Tipburn (tips of leaves turn brown) is caused by a calcium deficiency, but if you have limed and added fertilizer, tipburnis likely due to lack of moisture. Harvest: Pick individual leaves from the outside of the plant or wait and harvest full heads. Summer lettuce stays in prime eating condition only a short time, so harvest promptly and keep planting. In fall and winter the plants stay in good condition longer. Protection: A cloche will keep frost off the leaves and prevent the soil from getting waterlogged. If severe cold is forecast, mulch lettuces beneath the cloche with heavy row cover.
Darkibor
in it for at least 4 years. Harvest: Spring-sown kohlrabi will get larger than tennis balls in fair soil, but if you pick them when they are still less than 5-8cm (2-3") in diameter, they will be sweet and tender. Fall grown kohlrabi can grow larger yet stay tender. Kohlrabi is frost hardy and may last well beyond Christmas in the garden, even without protection. Protection: Generally, no protection is needed. Plants can be mulched with straw if extreme cold is forecast.
BEET AND KOHLRABI SALADSalad:· 1 bunch Swiss chard – Use chard that is less than 10 inches tall so that the stems are relatively fine. Aim for 3 cups chopped chard.· 1 fresh kohlrabi – about the size of a tennis ball· 1/4 cup red onion· 2 baby beets – aim for 1/2 cup total· 1/4 cup dried cherries· 1/4 cup dried pumpkin seeds· 1/4 cup crumbled feta cheese· 1/2 cup halved pecans· 1 tbsp pure maple syrup (or brown sugar)· 1 tbsp butter
Heat butter and maple syrup in a frying pan until the butter sizzles and add the pecan halves. Stir continuously for about 3 minutes, then place the pecans on a cookie sheet to cool.
Pull the chard apart into individual stems/leaves and finely slice across the leaves. Peel and dice the kohlrabi to about 1 cm pieces. Peel and dice the beets to about the same size. Finely sliver the red onion. Mix all of this with the dried cherries, pumpkin seeds, and feta in a large bowl. Add the cooled pecans to the top of each portion.
Vinaigrette:· 1/2 cup vegetable oil· 2 tbsp honey· 1 scant tbsp Dijon mustard· 3 tbsp red wine vinegar (or good balsamic vinegar)· 1 tsp fresh lime juice· salt and pepper to taste· 1/2 cup fresh raspberries (frozen, thawed berries work too)
Combine the dressing ingredients in a food processor, and work to a liquid state. Drizzle this over the prepared salad and toss, or over each portion, and serve.
Tadorna Leek
KolibriSuperschmeiz
Order online at www.westcoastseeds.com
West Coast Market Mix
12
MESCLUNSMixed species
Global Gourmet Blend
Wonder Wok
Mesclun mixes are composed of leafy greens like lettuce, kale, chard, scallions, mustards, and pac choi. They are harvested as baby greens, cut with scissors and encouraged to grow back. Depending on the combination of ingredients, mesclun mixes can be mild, tangy, sharp, or spicy. Because they are harvested while immature, they are an excellent can-didate for container growing. Most mesclun mixes will thrive in winter beneath a cloche cover, and all can be grown indoors under lights to produce micro-greens or baby salad greens.
Fall & Winter Mescluns: Timing: Seed every 3 weeks from March to September for continuous harvest. Mescluns can also be grown on your balcony in sun or part shade, in any container that is at least 10cm (4”) deep and has holes for drainage. Start-ing: Plant in a block or a wide row. Sprinkle seeds evenly over prepared moist soil. Try to space seeds about 1cm (½”) apart, cover lightly with soil and firm them in. Four grams of seed will plant a 12m (40’) row, 7cm (3”) wide. The most common mistake
with mescluns is to over-plant the seeds. Err on the side of caution for best results. Growing: Moderately fertile soil. Dig in 1 cup complete organic fertilizer for 3m (10’) of row. For containers, use peat or coir-based mixed with compost. Water regularly. If growth slows after harvest, use a bit of kelp or fish fertilizer to provide nutrition for the next growth spurt. If growing indoors, provide very bright, full spectrum light.Keep fluorescent tubes no more than 10cm (4”) from the plants. Harvest: Begin cutting 3 weeks after planting. Most mixes can be cut 2-3 times. If prop-erly fertilized, they will keep growing back. Protec-tion: If growing outdoors, erect a cloche over the bed by mid-October. If se-vere cold is forecast, mulch plants beneath the cloche with heavy row cover. Mustard Blend
Mild Spring
Nicoise Blend
Saladini
Stir-fry Blend
Winter Blend
Alfresco Blend
WINTER SUGGESTIONSUse raised beds: It is often waterlogged soil, rather than frost, that kills winter plants. If soil becomes too sodden, oxygen cannot get to the roots of plants, and they drown. Raised beds make natural use of gravity for better drainage. Also, the soil in raised beds warms faster in the day, which helps plants grow.
Use frost protection: Mulch with straw or use heavyweight row cover to keep frost off your plants. In severe weather, straw and row cover can be used in combination to blanket winter veggies.
Use wind protection: Simply planting down wind from summer’s corn stalks will help keep temperatures marginally warmer. Build a windbreak out of stakes and row cover, or only fill your raised beds halfway with soil. The extra height of the walls will offer some protection.
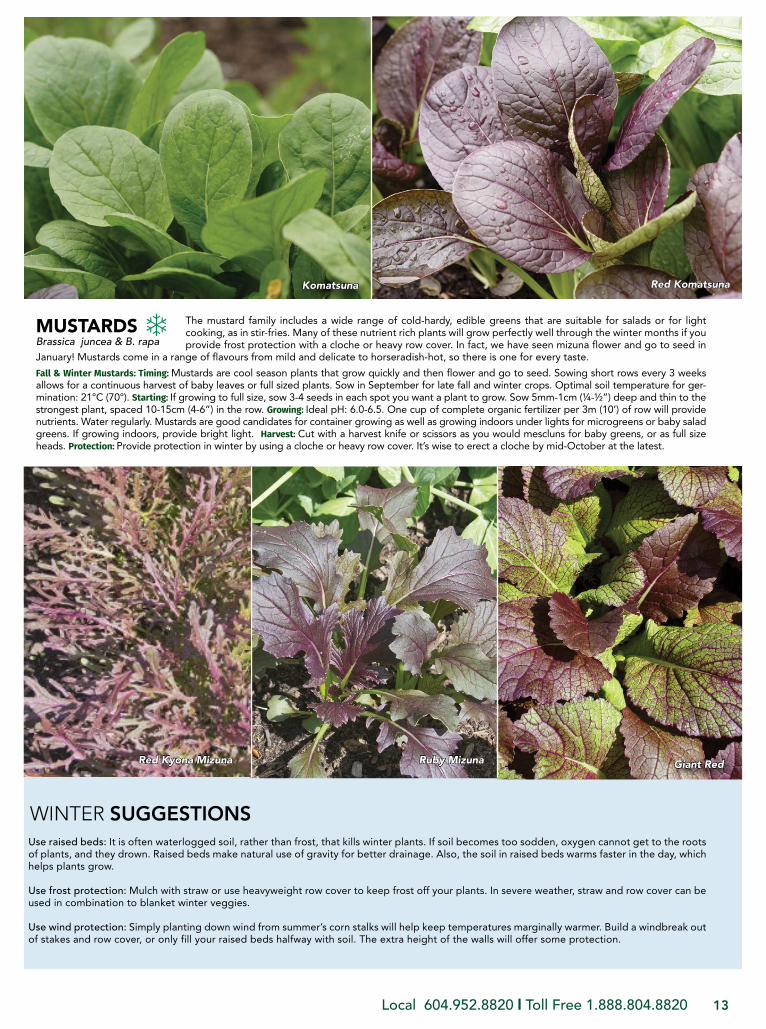
Komatsuna
Giant Red
Red Komatsuna
Local 604.952.8820 l Toll Free 1.888.804.8820 13
MUSTARDSBrassica juncea & B. rapa
Ruby Mizuna
The mustard family includes a wide range of cold-hardy, edible greens that are suitable for salads or for light cooking, as in stir-fries. Many of these nutrient rich plants will grow perfectly well through the winter months if you provide frost protection with a cloche or heavy row cover. In fact, we have seen mizuna flower and go to seed in
January! Mustards come in a range of flavours from mild and delicate to horseradish-hot, so there is one for every taste.
Fall & Winter Mustards: Timing: Mustards are cool season plants that grow quickly and then flower and go to seed. Sowing short rows every 3 weeks allows for a continuous harvest of baby leaves or full sized plants. Sow in September for late fall and winter crops. Optimal soil temperature for ger-mination: 21°C (70°). Starting: If growing to full size, sow 3-4 seeds in each spot you want a plant to grow. Sow 5mm-1cm (¼-½”) deep and thin to the strongest plant, spaced 10-15cm (4-6”) in the row. Growing: Ideal pH: 6.0-6.5. One cup of complete organic fertilizer per 3m (10’) of row will provide nutrients. Water regularly. Mustards are good candidates for container growing as well as growing indoors under lights for microgreens or baby salad greens. If growing indoors, provide bright light. Harvest: Cut with a harvest knife or scissors as you would mescluns for baby greens, or as full size heads. Protection: Provide protection in winter by using a cloche or heavy row cover. It’s wise to erect a cloche by mid-October at the latest.
Red Kyona Mizuna
Saladini
Order online at www.westcoastseeds.com
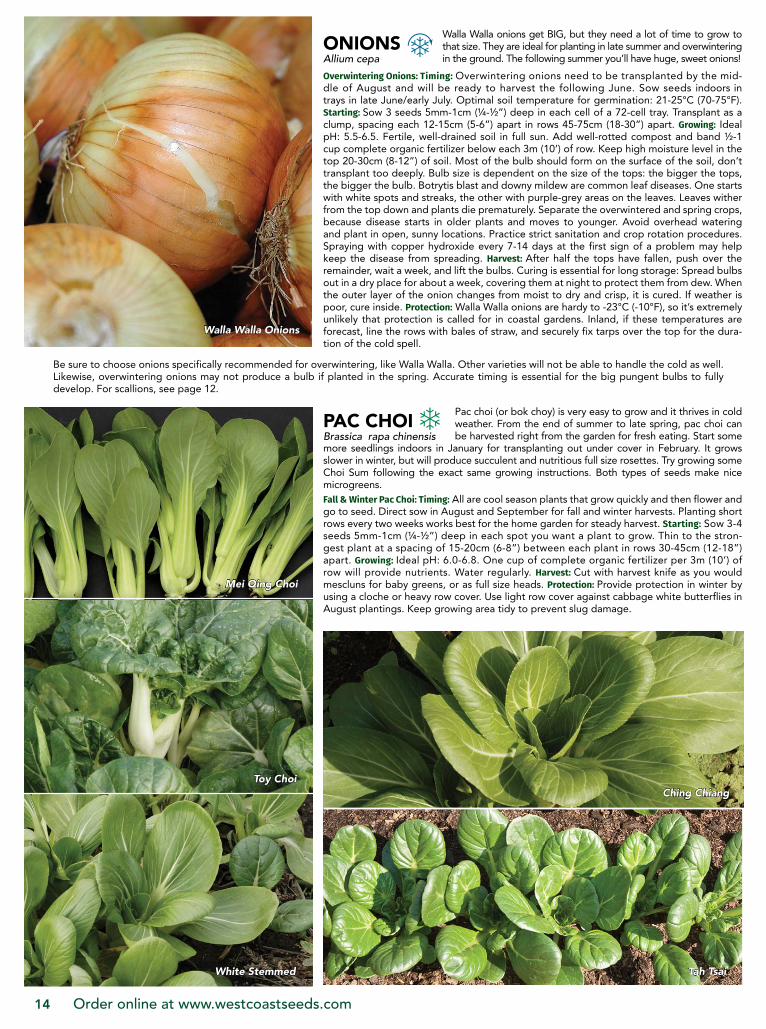
Mei Qing Choi
Walla Walla Onions
14
ONIONSAllium cepa
PAC CHOIBrassica rapa chinensis
Tah Tsai
Toy Choi
White Stemmed
Ching Chiang
Walla Walla onions get BIG, but they need a lot of time to grow to that size. They are ideal for planting in late summer and overwintering in the ground. The following summer you’ll have huge, sweet onions!
Overwintering Onions: Timing: Overwintering onions need to be transplanted by the mid-dle of August and will be ready to harvest the following June. Sow seeds indoors in trays in late June/early July. Optimal soil temperature for germination: 21-25°C (70-75°F). Starting: Sow 3 seeds 5mm-1cm (¼-½”) deep in each cell of a 72-cell tray. Transplant as a clump, spacing each 12-15cm (5-6”) apart in rows 45-75cm (18-30”) apart. Growing: Ideal pH: 5.5-6.5. Fertile, well-drained soil in full sun. Add well-rotted compost and band ½-1 cup complete organic fertilizer below each 3m (10’) of row. Keep high moisture level in the top 20-30cm (8-12”) of soil. Most of the bulb should form on the surface of the soil, don’t transplant too deeply. Bulb size is dependent on the size of the tops: the bigger the tops, the bigger the bulb. Botrytis blast and downy mildew are common leaf diseases. One starts with white spots and streaks, the other with purple-grey areas on the leaves. Leaves wither from the top down and plants die prematurely. Separate the overwintered and spring crops, because disease starts in older plants and moves to younger. Avoid overhead watering and plant in open, sunny locations. Practice strict sanitation and crop rotation procedures. Spraying with copper hydroxide every 7-14 days at the first sign of a problem may help keep the disease from spreading. Harvest: After half the tops have fallen, push over the remainder, wait a week, and lift the bulbs. Curing is essential for long storage: Spread bulbs out in a dry place for about a week, covering them at night to protect them from dew. When the outer layer of the onion changes from moist to dry and crisp, it is cured. If weather is poor, cure inside. Protection: Walla Walla onions are hardy to -23°C (-10°F), so it’s extremely unlikely that protection is called for in coastal gardens. Inland, if these temperatures are forecast, line the rows with bales of straw, and securely fix tarps over the top for the dura-tion of the cold spell.
Pac choi (or bok choy) is very easy to grow and it thrives in cold weather. From the end of summer to late spring, pac choi can be harvested right from the garden for fresh eating. Start some
more seedlings indoors in January for transplanting out under cover in February. It grows slower in winter, but will produce succulent and nutritious full size rosettes. Try growing some Choi Sum following the exact same growing instructions. Both types of seeds make nice microgreens.Fall & Winter Pac Choi: Timing: All are cool season plants that grow quickly and then flower and go to seed. Direct sow in August and September for fall and winter harvests. Planting short rows every two weeks works best for the home garden for steady harvest. Starting: Sow 3-4 seeds 5mm-1cm (¼-½”) deep in each spot you want a plant to grow. Thin to the stron-gest plant at a spacing of 15-20cm (6-8”) between each plant in rows 30-45cm (12-18”) apart. Growing: Ideal pH: 6.0-6.8. One cup of complete organic fertilizer per 3m (10’) of row will provide nutrients. Water regularly. Harvest: Cut with harvest knife as you would mescluns for baby greens, or as full size heads. Protection: Provide protection in winter by using a cloche or heavy row cover. Use light row cover against cabbage white butterflies in August plantings. Keep growing area tidy to prevent slug damage.
Be sure to choose onions specifically recommended for overwintering, like Walla Walla. Other varieties will not be able to handle the cold as well. Likewise, overwintering onions may not produce a bulb if planted in the spring. Accurate timing is essential for the big pungent bulbs to fully develop. For scallions, see page 12.
Forest Green
Dark Green Italian
Gladiator
Local 604.952.8820 l Toll Free 1.888.804.8820 15
Tah Tsai
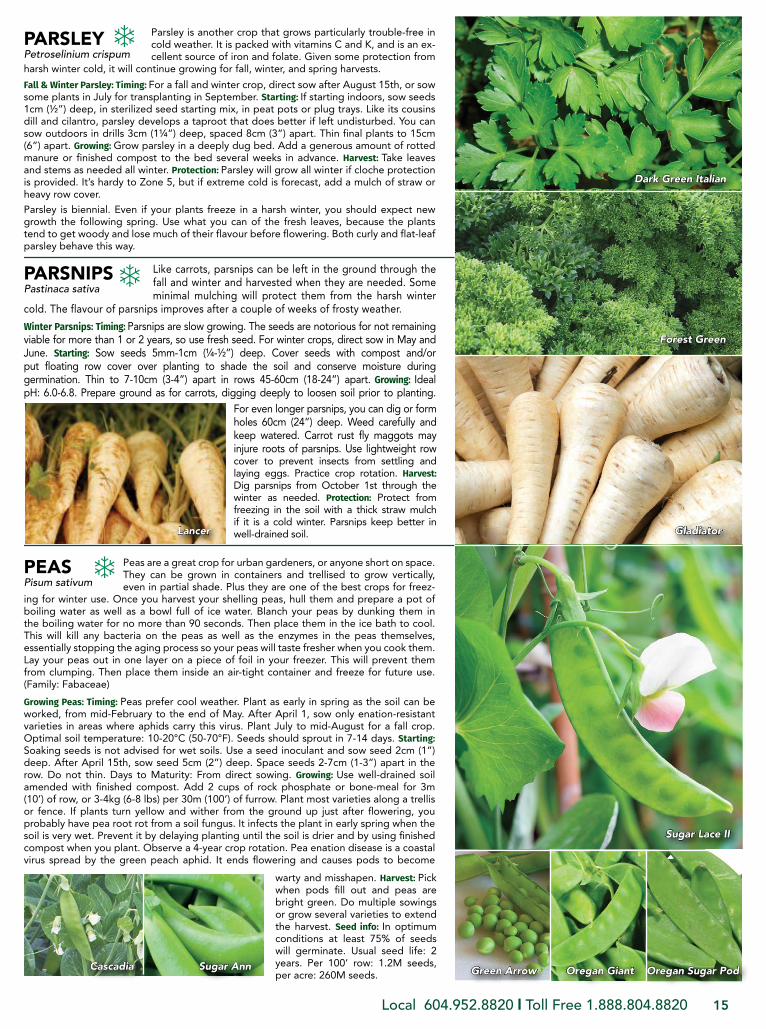
PARSNIPSPastinaca sativa
PEASPisum sativum
PARSLEYPetroselinium crispum
Sugar Lace II
Ching Chiang
Parsley is another crop that grows particularly trouble-free in cold weather. It is packed with vitamins C and K, and is an ex-cellent source of iron and folate. Given some protection from
harsh winter cold, it will continue growing for fall, winter, and spring harvests.
Fall & Winter Parsley: Timing: For a fall and winter crop, direct sow after August 15th, or sow some plants in July for transplanting in September. Starting: If starting indoors, sow seeds 1cm (½”) deep, in sterilized seed starting mix, in peat pots or plug trays. Like its cousins dill and cilantro, parsley develops a taproot that does better if left undisturbed. You can sow outdoors in drills 3cm (1¼”) deep, spaced 8cm (3”) apart. Thin final plants to 15cm (6”) apart. Growing: Grow parsley in a deeply dug bed. Add a generous amount of rotted manure or finished compost to the bed several weeks in advance. Harvest: Take leaves and stems as needed all winter. Protection: Parsley will grow all winter if cloche protection is provided. It’s hardy to Zone 5, but if extreme cold is forecast, add a mulch of straw or heavy row cover.
Like carrots, parsnips can be left in the ground through the fall and winter and harvested when they are needed. Some minimal mulching will protect them from the harsh winter
cold. The flavour of parsnips improves after a couple of weeks of frosty weather.
Winter Parsnips: Timing: Parsnips are slow growing. The seeds are notorious for not remaining viable for more than 1 or 2 years, so use fresh seed. For winter crops, direct sow in May and June. Starting: Sow seeds 5mm-1cm (¼-½”) deep. Cover seeds with compost and/or put floating row cover over planting to shade the soil and conserve moisture during germination. Thin to 7-10cm (3-4”) apart in rows 45-60cm (18-24”) apart. Growing: Ideal pH: 6.0-6.8. Prepare ground as for carrots, digging deeply to loosen soil prior to planting.
Peas are a great crop for urban gardeners, or anyone short on space. They can be grown in containers and trellised to grow vertically, even in partial shade. Plus they are one of the best crops for freez-
ing for winter use. Once you harvest your shelling peas, hull them and prepare a pot of boiling water as well as a bowl full of ice water. Blanch your peas by dunking them in the boiling water for no more than 90 seconds. Then place them in the ice bath to cool. This will kill any bacteria on the peas as well as the enzymes in the peas themselves, essentially stopping the aging process so your peas will taste fresher when you cook them. Lay your peas out in one layer on a piece of foil in your freezer. This will prevent them from clumping. Then place them inside an air-tight container and freeze for future use. (Family: Fabaceae) Growing Peas: Timing: Peas prefer cool weather. Plant as early in spring as the soil can be worked, from mid-February to the end of May. After April 1, sow only enation-resistant varieties in areas where aphids carry this virus. Plant July to mid-August for a fall crop. Optimal soil temperature: 10-20°C (50-70°F). Seeds should sprout in 7-14 days. Starting: Soaking seeds is not advised for wet soils. Use a seed inoculant and sow seed 2cm (1”) deep. After April 15th, sow seed 5cm (2”) deep. Space seeds 2-7cm (1-3”) apart in the row. Do not thin. Days to Maturity: From direct sowing. Growing: Use well-drained soil amended with finished compost. Add 2 cups of rock phosphate or bone-meal for 3m (10’) of row, or 3-4kg (6-8 lbs) per 30m (100’) of furrow. Plant most varieties along a trellis or fence. If plants turn yellow and wither from the ground up just after flowering, you probably have pea root rot from a soil fungus. It infects the plant in early spring when the soil is very wet. Prevent it by delaying planting until the soil is drier and by using finished compost when you plant. Observe a 4-year crop rotation. Pea enation disease is a coastal virus spread by the green peach aphid. It ends flowering and causes pods to become
For even longer parsnips, you can dig or form holes 60cm (24”) deep. Weed carefully and keep watered. Carrot rust fly maggots may injure roots of parsnips. Use lightweight row cover to prevent insects from settling and laying eggs. Practice crop rotation. Harvest: Dig parsnips from October 1st through the winter as needed. Protection: Protect from freezing in the soil with a thick straw mulch if it is a cold winter. Parsnips keep better in well-drained soil.
warty and misshapen. Harvest: Pick when pods fill out and peas are bright green. Do multiple sowings or grow several varieties to extend the harvest. Seed info: In optimum conditions at least 75% of seeds will germinate. Usual seed life: 2 years. Per 100’ row: 1.2M seeds, per acre: 260M seeds.
Lancer
Oregan Sugar PodOregan GiantGreen ArrowSugar AnnCascadia
Parsley is biennial. Even if your plants freeze in a harsh winter, you should expect new growth the following spring. Use what you can of the fresh leaves, because the plants tend to get woody and lose much of their flavour before flowering. Both curly and flat-leaf parsley behave this way.
Order online at www.westcoastseeds.com
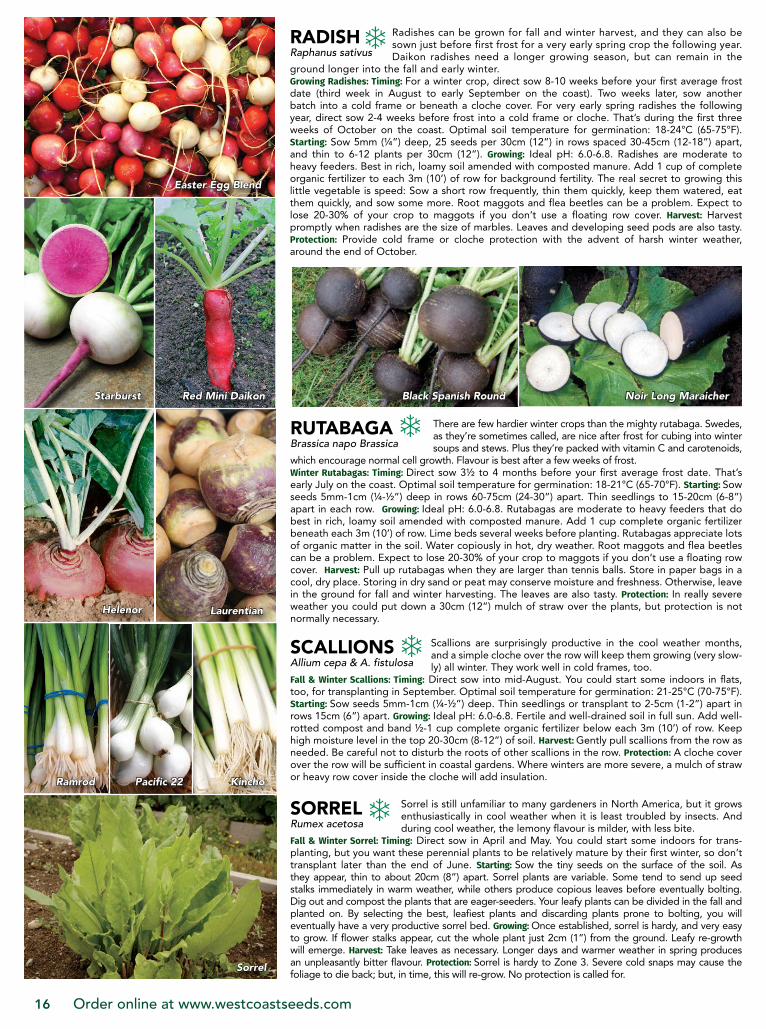
Laurentian
Ramrod
Sorrel
Easter Egg Blend
16
SORRELRumex acetosa
SCALLIONSAllium cepa & A. fistulosa
RUTABAGABrassica napo Brassica
Pacific 22 Kincho
Helenor
Starburst Red Mini Daikon Black Spanish Round Noir Long Maraicher
There are few hardier winter crops than the mighty rutabaga. Swedes, as they’re sometimes called, are nice after frost for cubing into winter soups and stews. Plus they’re packed with vitamin C and carotenoids,
which encourage normal cell growth. Flavour is best after a few weeks of frost.Winter Rutabagas: Timing: Direct sow 3½ to 4 months before your first average frost date. That’s early July on the coast. Optimal soil temperature for germination: 18-21°C (65-70°F). Starting: Sow seeds 5mm-1cm (¼-½”) deep in rows 60-75cm (24-30”) apart. Thin seedlings to 15-20cm (6-8”) apart in each row. Growing: Ideal pH: 6.0-6.8. Rutabagas are moderate to heavy feeders that do best in rich, loamy soil amended with composted manure. Add 1 cup complete organic fertilizer beneath each 3m (10’) of row. Lime beds several weeks before planting. Rutabagas appreciate lots of organic matter in the soil. Water copiously in hot, dry weather. Root maggots and flea beetles can be a problem. Expect to lose 20-30% of your crop to maggots if you don’t use a floating row cover. Harvest: Pull up rutabagas when they are larger than tennis balls. Store in paper bags in a cool, dry place. Storing in dry sand or peat may conserve moisture and freshness. Otherwise, leave in the ground for fall and winter harvesting. The leaves are also tasty. Protection: In really severe weather you could put down a 30cm (12”) mulch of straw over the plants, but protection is not normally necessary.
Scallions are surprisingly productive in the cool weather months, and a simple cloche over the row will keep them growing (very slow-ly) all winter. They work well in cold frames, too.
Fall & Winter Scallions: Timing: Direct sow into mid-August. You could start some indoors in flats, too, for transplanting in September. Optimal soil temperature for germination: 21-25°C (70-75°F). Starting: Sow seeds 5mm-1cm (¼-½”) deep. Thin seedlings or transplant to 2-5cm (1-2”) apart in rows 15cm (6”) apart. Growing: Ideal pH: 6.0-6.8. Fertile and well-drained soil in full sun. Add well-rotted compost and band ½-1 cup complete organic fertilizer below each 3m (10’) of row. Keep high moisture level in the top 20-30cm (8-12”) of soil. Harvest: Gently pull scallions from the row as needed. Be careful not to disturb the roots of other scallions in the row. Protection: A cloche cover over the row will be sufficient in coastal gardens. Where winters are more severe, a mulch of straw or heavy row cover inside the cloche will add insulation.
Sorrel is still unfamiliar to many gardeners in North America, but it grows enthusiastically in cool weather when it is least troubled by insects. And during cool weather, the lemony flavour is milder, with less bite.
Fall & Winter Sorrel: Timing: Direct sow in April and May. You could start some indoors for trans-planting, but you want these perennial plants to be relatively mature by their first winter, so don’t transplant later than the end of June. Starting: Sow the tiny seeds on the surface of the soil. As they appear, thin to about 20cm (8”) apart. Sorrel plants are variable. Some tend to send up seed stalks immediately in warm weather, while others produce copious leaves before eventually bolting. Dig out and compost the plants that are eager-seeders. Your leafy plants can be divided in the fall and planted on. By selecting the best, leafiest plants and discarding plants prone to bolting, you will eventually have a very productive sorrel bed. Growing: Once established, sorrel is hardy, and very easy to grow. If flower stalks appear, cut the whole plant just 2cm (1”) from the ground. Leafy re-growth will emerge. Harvest: Take leaves as necessary. Longer days and warmer weather in spring produces an unpleasantly bitter flavour. Protection: Sorrel is hardy to Zone 3. Severe cold snaps may cause the foliage to die back; but, in time, this will re-grow. No protection is called for.
RADISHRaphanus sativus
Radishes can be grown for fall and winter harvest, and they can also be sown just before first frost for a very early spring crop the following year. Daikon radishes need a longer growing season, but can remain in the
ground longer into the fall and early winter.Growing Radishes: Timing: For a winter crop, direct sow 8-10 weeks before your first average frost date (third week in August to early September on the coast). Two weeks later, sow another batch into a cold frame or beneath a cloche cover. For very early spring radishes the following year, direct sow 2-4 weeks before frost into a cold frame or cloche. That’s during the first three weeks of October on the coast. Optimal soil temperature for germination: 18-24°C (65-75°F).Starting: Sow 5mm (¼”) deep, 25 seeds per 30cm (12”) in rows spaced 30-45cm (12-18”) apart, and thin to 6-12 plants per 30cm (12”). Growing: Ideal pH: 6.0-6.8. Radishes are moderate to heavy feeders. Best in rich, loamy soil amended with composted manure. Add 1 cup of complete organic fertilizer to each 3m (10’) of row for background fertility. The real secret to growing this little vegetable is speed: Sow a short row frequently, thin them quickly, keep them watered, eat them quickly, and sow some more. Root maggots and flea beetles can be a problem. Expect to lose 20-30% of your crop to maggots if you don’t use a floating row cover. Harvest: Harvest promptly when radishes are the size of marbles. Leaves and developing seed pods are also tasty. Protection: Provide cold frame or cloche protection with the advent of harsh winter weather, around the end of October.
Yukon
Local 604.952.8820 l Toll Free 1.888.804.8820 17
TURNIPSBrassica rapa var. rapa
Like parsnips and rutabagas, turnips are an important, if somewhat neglected fall and early winter harvest root crop. Turnips grow much faster than rutabagas, and produce tasty and nutritious leaves, as well as roots, and even seed pods.
Growing Turnips: Timing: Direct sow 6-8 weeks before your first frost date. On the coast, that’s during the first three weeks of September. You can continue to sow turnips into October, but you should sow them and grow them under a cloche tunnel or cold frame. Optimal soil temperature for germination: 18-21°C (65-70°F). Starting: Sow 5mm-1cm (¼-½”) deep, in rows spaced 45-60cm (18-24”) apart, spacing plants to 10-15cm (4-6”) apart. Growing: Ideal pH: 6.0-6.8. Humus-rich, deeply cultivated soil is key. Add plenty of well rotted compost or manure to the beds and cultivate to a depth of 20cm (8”). Dig in 1 cup of complete organic fertilizer for every 3m 10’ of row. The real secret to growing turnips is speed. Sow a short row frequently, thin them quickly, keep them watered, harvest, and sow some more. Harvest: Begin gathering radish-sized roots just 35 days after sowing. Make sure to harvest turnips while they’re 5-10cm (2-4”) across, as larger roots start to get woody.The leaves can be harvested as needed. Immature seed pods are also tasty. Protec-tion: Erect a cloche tunnel or cold frame over fall plantings beginning in October. Leave this in place until the last turnips are harvested in November.Hakurei Turnip Purple Top White
GlobeTurnip
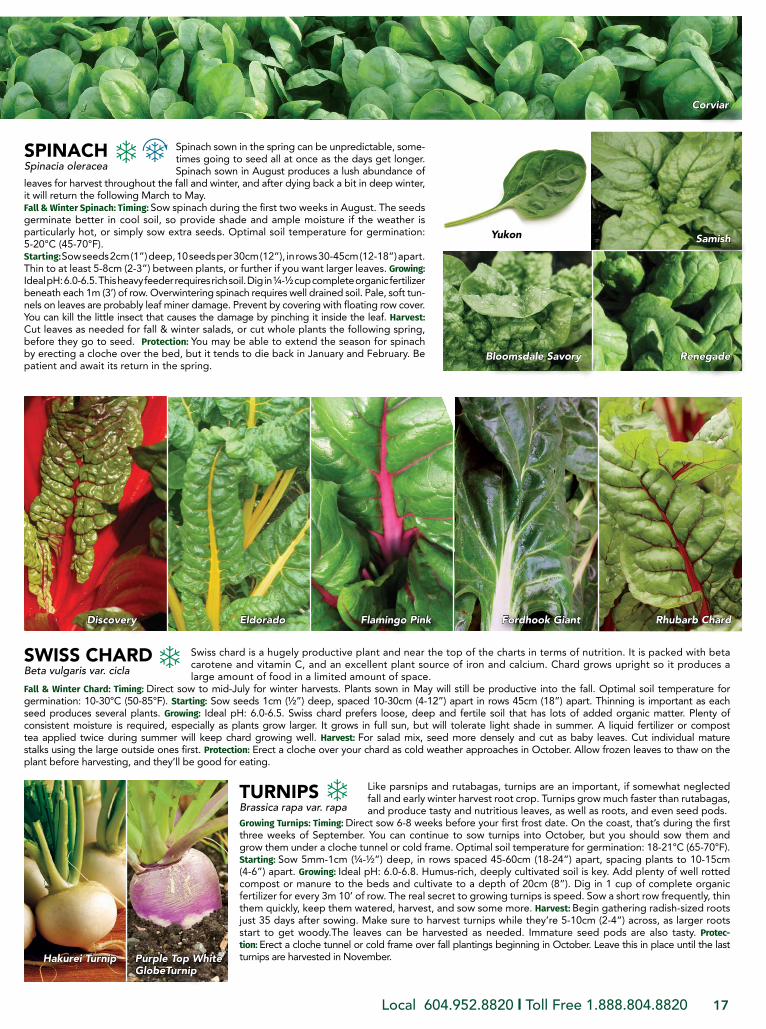
Flamingo Pink Rhubarb ChardFordhook GiantEldoradoDiscovery
SPINACHSpinacia oleracea
Corviar
Samish
RenegadeBloomsdale Savory
Spinach sown in the spring can be unpredictable, some-times going to seed all at once as the days get longer. Spinach sown in August produces a lush abundance of
leaves for harvest throughout the fall and winter, and after dying back a bit in deep winter, it will return the following March to May.Fall & Winter Spinach: Timing: Sow spinach during the first two weeks in August. The seeds germinate better in cool soil, so provide shade and ample moisture if the weather is particularly hot, or simply sow extra seeds. Optimal soil temperature for germination: 5-20°C (45-70°F).Starting: Sow seeds 2cm (1”) deep, 10 seeds per 30cm (12”), in rows 30-45cm (12-18”) apart. Thin to at least 5-8cm (2-3”) between plants, or further if you want larger leaves. Growing: Ideal pH: 6.0-6.5. This heavy feeder requires rich soil. Dig in ¼-½ cup complete organic fertilizer beneath each 1m (3’) of row. Overwintering spinach requires well drained soil. Pale, soft tun-nels on leaves are probably leaf miner damage. Prevent by covering with floating row cover. You can kill the little insect that causes the damage by pinching it inside the leaf. Harvest: Cut leaves as needed for fall & winter salads, or cut whole plants the following spring, before they go to seed. Protection: You may be able to extend the season for spinach by erecting a cloche over the bed, but it tends to die back in January and February. Be patient and await its return in the spring.
SWISS CHARDBeta vulgaris var. cicla
Swiss chard is a hugely productive plant and near the top of the charts in terms of nutrition. It is packed with beta carotene and vitamin C, and an excellent plant source of iron and calcium. Chard grows upright so it produces a large amount of food in a limited amount of space.
Fall & Winter Chard: Timing: Direct sow to mid-July for winter harvests. Plants sown in May will still be productive into the fall. Optimal soil temperature for germination: 10-30°C (50-85°F). Starting: Sow seeds 1cm (½”) deep, spaced 10-30cm (4-12”) apart in rows 45cm (18”) apart. Thinning is important as each seed produces several plants. Growing: Ideal pH: 6.0-6.5. Swiss chard prefers loose, deep and fertile soil that has lots of added organic matter. Plenty of consistent moisture is required, especially as plants grow larger. It grows in full sun, but will tolerate light shade in summer. A liquid fertilizer or compost tea applied twice during summer will keep chard growing well. Harvest: For salad mix, seed more densely and cut as baby leaves. Cut individual mature stalks using the large outside ones first. Protection: Erect a cloche over your chard as cold weather approaches in October. Allow frozen leaves to thaw on the plant before harvesting, and they’ll be good for eating.

What is a cloche?
One Concept, Numerous Applications
Order online at www.westcoastseeds.com18
Heavyweight Row Cover .9ozA heavier fabric, this cover offers frost protection down to -5°C. Placed over heat-loving vegetables, it can make a 2-3 month difference in cool summer areas. When using with tall seedlings, support the fabric on hoops to prevent the plants from bearing weight. Doubling the fabric gives more frost protection but it transmits less light. Our heavyweight row cover is 3.048m (10') wide.
Easy Poly TunnelThe tough UV stabilized 150 micron polyethylene sheet forms a complete barrier, retaining humidity and warmth while protecting against frosts, harsh weather, and pests. Easy Poly Tunnels can also be used for warming the soil prior to planting out.
Year-Round Cold Frame ZRC600AFrom Austria comes this new dynamic, easy-to-assemble cold frame that snaps together in minutes. Perfect for large and small space gardening. In early spring and in autumn, when temperatures are too cold for planting out, the double-skin 4mm polycarbonate lid folds down to keep plants warm and heat the soil beneath them. It can be propped open on sunny days for ventilation. As the weather warms up, the polycarbonate slides out revealing a screen that will protect your crops from insects and small animals. This can also be raised up, out of the way, or you can water straight through the mesh. The footprint is 127cm l x 60cm w (50Lx23"W). Front panel is 30cm (12") tall, and Back panel is 40cm (16") tall. Shipping size in box: 142 x 68 x 5cm (56 x 27 x 2").
The word cloche is derived from the French word for bell. It describes the curved glass cover that protects the face of a clock. In 19th century France, market growers would use a bell-shaped glass cover (or bell jar) to cover individual
plants early or late in the growing season. Modern agricultural cloches are nearly all made of plastic.We take this definition further and apply it to the idea of cloche row cover, or simply cloche cover. A cloche cover works particularly well over vegetable beds with defined dimensions like raised beds. If the bed is four by eight feet in size, it is easy to determine the amount of materials needed to build a cloche cover.
All cloche covers follow a basic construction plan. A simple skeleton is built over the bed to support a variety of materials from mesh to screen to cloth to plastic. Select the cover to achieve the desired purpose.
Frost Protection – As with the original glass bell jars, a cloche cover can be put in place to pro-tect young seedlings (or mature plants) from frost damage. There is an average last frost date in spring, and an average last frost date in the fall. By employing frost protection, the grower can ex-tend the season by two weeks or more at either end of the season. The prefered material for this kind of cloche is Heavyweight Row Cover. At 9 oz per yard, it lets through rain, air, and 70% of sunlight.
Insect Protection – Insects follow predictable life cycles. Commonly, adult insects appear in spring and look for host crops on which to lay their eggs. Cabbage moths prefer the cabbage family just as carrot rust flies prefer carrots for their young to feed on. To protect crops, the grower places a physical barrier between the adult insect and the crop. In many cases this is enough to protect crops from serious damage or infestation. Light-weight Row Cover is the standard material to use for this purpose. It allows water, air, and 85% of sunlight to pass through.
Animal Protection – Protect garden beds from cats, rabbits, and larger pests by employing chicken wire or mesh over the cloche frame. This simple physical barrier is all that is needed to pre-vent damage to plants (and soil).
Mini Greenhouse– Use the same basic cloche skeleton to suspend tough Greenhouse (plastic) Film for a quick and inexpensive green-house. The plastic captures energy from the sun and creates a substantially hot
environment beneath. Heat loving plants like melons, tomatoes, eggplants, and cucumbers thrive in these condi-tions. This system acts as an umbrella, also, which is useful for keeping rain off of tomato plants. It’s important to roll up the sides or leave leave the ends open to allow for air circulation around plants – moreso as the weather heats up.
Shade House – In high summer, some plants suffer heat stress or sunscald. Minimize this damage by placing Shade Cloth over the cloche frame. It reduces the impact of sunlight by 50%.

STORING ROOT VEGETABLESIt used to be that root cellars were a common feature of every home. Even without such a specialized room in your house, you can still store beets, carrots, potatoes, and other root vegetables for months if you provide the right conditions. The first issue is moisture—some growers prefer the tradi-tional method of storing roots in buckets of damp sawdust or sand, but moist burlap works very well, and it’s much tidier. Remove the tops of all root crops, and brush off any excess soil. Wrap them in damp burlap, and try to store them in a cool place with at least some air movement. Hanging them, or storing them on racks works well. A temperature of 4 ºC (39ºF) works best. The garage might be the ideal spot in most homes. Make a point of checking the stored roots once a week or so, to be sure they’re keeping fresh. Moisten the burlap at least once a week, and you should be able to keep many root crops (as well as winter squash) fresh for several months.
SLOWER GROWTHIn summer, growers rely on “days to maturity” to estimate when they can harvest, and how quickly a particular variety will mature. From fall to early spring, though, this estimate goes out the window. The air and soil are cold, and the sun is low in the sky, with light levels even lower. Even if you can maintain warmer soil beneath a cloche or in a greenhouse, all plants are going to grow slower than they would in the warm days of summer. We have intentionally used the somewhat vague terms “fall harvest,” “winter harvest,” and “overwintering” because the mildness of winter weather plays a big role in what we can expect in the garden.
In November of 2010, we experienced an unusual cold snap that lasted over a week. Daytime highs were -3°C (26°F), with night time dips down below -10°C (14°F). That winter, only the toughest vegetables survived, even with heavy mulch. So just as in a summer that is less than ideal for growing tomatoes, some winters do not cooperate with winter gardeners. But cold snaps like that only come along every ten years or so in coastal BC, and we can rely on relatively mild winter weather in which to grow our winter crops.
Local 604.952.8820 l Toll Free 1.888.804.8820 19
Arugula (page 4)¨ Astro ¨ Adagio¨ Dragon’s Tongue¨ Wild Augula
Beets (page 4)¨ Beet Blend¨ Winterkeeper Lutz
Broad Bean (page 5)¨ Windsor
Broccoli (page 5)¨ Everest¨ Natalino
Purple Sprouting
Broccoli (page 5)¨ Red Spear¨ Santee
Brussels Sprouts (page 6)¨ Gustus¨ Roodnerf
Cabbage (page 6)¨ Capriccio¨ Consul¨ Deadon¨ Danish Ballhead¨ January King¨ Kalibos¨ Lennox¨ Taiwan
Carrots (page 7)¨ Autumn King¨ Napoli¨ Yellowstone
Cauliflower (page 7)¨ Galleon
¨Celeriac (page 8)
¨Chervil (page 8)
Chicory (page 8)¨ Italian Dandelion¨ Palla Rossa Special¨ Rossa di Verona¨ Zidane (Frisée)
¨Cilantro (page 9)
Corn Salad (page 9)¨ Granon¨ Vit
Garlic (page 9)¨ Music¨ Purple Softneck¨ Red Russian
Kale & Collards (page 10)¨ Beira Tronchuda¨ Champion Collards¨ Darkibor¨ Dwarf Green Curled¨ Rainbow Lacinato¨ Red Ursa¨ Redbor¨ Reflex
¨ Scarlet (Cover)¨ Scots¨ Starbor¨ Vates Blue Curled ¨ Winterbor¨ Winter Red
Kohlrabi (page 11)¨ Kolibri¨ Kongo¨ Superschmetz
Leeks (page 11)¨ Bandit¨ Tadorna
Lettuce (page 11)¨ Rouge d’Hiver¨ Winter Density
Mescluns (page 12)¨ Alfresco Blend¨ City Garden Blend¨ Global Gourmet¨ Mild Spring ¨ Mustard Green Blend¨ Nicoise Blend¨ Saladini¨ Stir-fry Blend¨ West Coast Market Mix¨ Winter Blend¨ Wonder Wok
Mustards (page 13)¨ Giant Red¨ Komatsuna¨ Mizuna¨ Red Komatsuna¨ Red Kyona Mizuna¨ Ruby Mizuna
Onions (page 14)¨ Walla Walla
Pac Choi (page 14)¨ Ching Chiang¨ Mei Qing Choi¨ Tah Tsai¨ Toy Choi¨ White-Stemmed
Parsley (page 15)¨ Dark Green Italian¨ Forest Green
Parsnips (page 15)¨ Gladiator¨ Lancer
Peas (page 15)¨ Cascadia¨ Green Arrow¨ Oregan Giant¨ Oregan Sugar Pod II¨ Sugar Ann¨ Sugar Lace II
Radish (page 16)¨ Black Spanish Round ¨ Easter Egg Blend¨ Noir Long Maraicher¨ Red Mini Daikon¨ Starburst
Rutabaga (page 16)¨ Helenor¨ Laurentian
Scallions (page 16)¨ Kincho¨ Pacific 22¨ Ramrod
¨Sorrel (page 16)
Spinach (page 17)¨ Bloomsdale Savory¨ Corvair¨ Renegade¨ Samish¨ Yukon
Swiss Chard (page 17)¨ Discovery ¨ Eldorado¨ Flamingo Pink ¨ Fordhook Giant¨ Rhubarb Chard
Turnips (page 17)¨ Hakurei¨ Purple Top White Globe
West Coast Seeds Checklist Order online at www.westcoastseeds.com
Harvest Keeper HG993Store carrots and beets for months into winter with this simple, traditional storage bin. A sturdy wire bin is lined with jute to be kept in a cool and dark spot. Root crops actually get sweeter in storage, and stay firm and crunchy. Alternate layers of vegetables with damp sand or sawdust. Or use it to store potatoes or winter squash on their own. 45 x 32 x 22cm (18 x 12.5 x 8.5”).

Order online at www.westcoastseeds.com
Eat local, Grow food, Grow from seed.Take advantage of mild winter weather by keeping active in the garden — and keeping the garden active. Dozens of cool-loving crops can be cultivated organically for fall and winter harvests.
• Winter gardening provides fresh, nutritious vegetables and herbs all year round.
• Add diversity to meals with fresh winter vegetables — eat what’s in season!
• Reduce carbon demands on the food supply.
• Save money on grocery bills.
• Share with others the riches a winter garden can provide.
• Experience the diversity of salad greens that thive in cold weather.
THIS GUIDE IS COMPOSTABLE
West Coast Seeds Ltd. 5300 34B Avenue Delta, BC V4L 2P1
Printed in Canada
Call us @ (604) 952-8820 orToll Free 1-888-804-8820or visit www.westcoastseeds.com