sewing room ideas
TRANSCRIPT
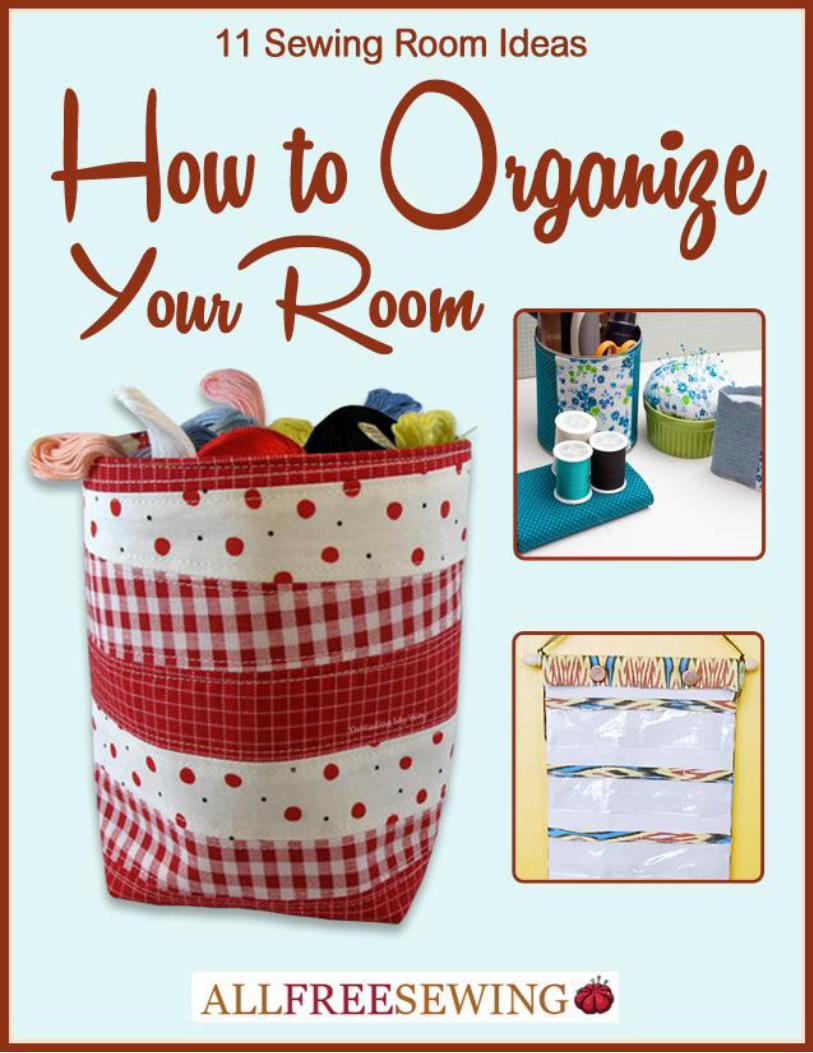
11 Sewing Room Ideas: How to Organize Your Room
Copyright 2013 by Prime Publishing LLC
All rights reserved. No part of this book may be reproduced or transmitted in any form or by any means,
electronic or mechanical, including photocopying, recording, or by any information storage or retrieval
system, without written permission from the publisher, except in the case of brief quotations embodied
in critical articles and reviews.
Trademarks are property of their respective holders. When used, trademarks are for the benefit of the
trademark owner only.
Published by Prime Publishing LLC, 3400 Dundee Road, Northbrook, IL 60062 – www.primecp.com
Free Sewing Projects
Free Crochet Projects Free Knitting Projects Free Craft Projects
Free Sewing Projects Free Quilt Projects Free Jewelry Projects
Free Holiday Projects Free Christmas Projects
Free Crochet Afghan Projects
Free Paper Projects
11 Sewing Room Ideas: How to Organize Your Room
Find thousands of free sewing patterns, tips, tutorials and more at www.AllFreeSewing.com. 3
Letter from the Editors
Hi Sewists,
It’s never too early (or too late) to get your sewing room and craft closet in order. With this amazing
eBook, we present to you some truly creative ways to clean up your scraps and thread and other
important crafting tools. From scissor holders to crafty wrapping paper storage, this collection of great
projects is sure to turn your room from messy to immaculate in no time at all.
Sew your way to a more organized crafting room with these fun projects. You’re going to love all the
great ideas we have for you to try. These sewing room ideas are sure to make you crafting life so much
easier. You won’t believe how easy it is to clean up the disarray and straighten up. You’ll kick yourself for
not downloading this eBook sooner.
Don’t delay! Get organized today!
Happy Sewing!
You can find additional beginner sewing projects and more at www.AllFreeSewing.com.
Our eBooks, like all our sewing projects, are absolutely FREE to members of our sewing community.
Please feel free to share with family and friends and ask them to sign up at our website for our
free e-mail newsletter.
Happy Sewing,
The Editors of AllFreeSewing
www.AllFreeSewing.com
11 Sewing Room Ideas: How to Organize Your Room
Find thousands of free sewing patterns, tips, tutorials and more at www.AllFreeSewing.com. 4
11 Sewing Room Ideas:
How to Organize Your Room
Thrifted Clothing Sewing Kit ................. 5
Scrappy Fabric Baskets .......................... 8
DIY Hanging Jewelry Organizer ........... 14
Sewing Filing Pockets .......................... 17
Lovely Scissors Holder ......................... 21
Wall Pocket Organizer ......................... 24
Wrapping Paper Organizer ................. 25
Sewing Needle Organizing Tip ............ 29
Fat Quarter Project Tote ..................... 30
DIY “Sewing Room” ............................ 34
Handmade Pin Cushion and Zipper
Pouch .................................................. 35

11 Sewing Room Ideas: How to Organize Your Room
Find thousands of free sewing patterns, tips, tutorials and more at www.AllFreeSewing.com. 5
Thrifted Clothing Sewing Kit By: Kendra McCracken for Fiskars If you have old clothing or fabric scraps lying around because you just like the pattern, this Thrifted Clothing Sewing Kit is perfect for you. This tutorial will show you how to take those old patterned fabrics scraps and turn them into a pincushion, a needle book, and a cover for an old can. With these handy objects lying around your craft space, you’ll always have your sewing tools at hand. Never lose your tools again with this recycled clothing sewing project.
Materials:
Ramekin or other base for pincushion
Old Clothes
Thread
1 Sheet of Craft Felt
Large vegetable can
Directions:
1. Start by tracing a large circle on the back side of the fabric.
2. Next, fold 2 sides of the circle toward the center, slightly overlapping them and stapling them several times. Stuff the fiberfill in under the staples. This needs to be very firmly packed so you will use a lot more filling than it looks like you should be using. To complete the pincushion, fold the rest of the fabric down around the ball of fiberfill and test it in the ramekin to get a good tight fit. Put hot glue in the bottom of the ramekin and firmly press the fabric ball down into the glue.
3. The needle book was constructed using jeans and a shirt. Cut one 5 inch x 4 inch piece and one 7 inch x 4 inch piece from the jeans, and cut two 2.5 inch x 4 inch pieces from the shirt. Cut one 7 inch x 4 inch piece of fusible web.

11 Sewing Room Ideas: How to Organize Your Room
Find thousands of free sewing patterns, tips, tutorials and more at www.AllFreeSewing.com. 6
4. With right sides together and using a ½ inch seam allowance, stitch one of the 2.5 inch x 4 inch shirt pieces to each side of the 5 inch x 4 inch jean piece. Iron the seams open when finished.
5. Follow the manufacturer instructions and use
an iron to apply the fusible web to the wrong
side of one of the panels. When it's cool, fuse
that piece to the wrong side of the other cover
piece.
6. Next, fold the cover in half and placed it in
the Fuse curvy square die (taking care to place
the folded edge inside the cutting edge of the
die to prevent the fold from being die cut) and
run it through the Fuse.
7. To complete the needle book, cut 2 pieces of
felt to 5.5 inches x 3 inches, centered them
inside the cover, and machine stitched down
the center.
8. The final part of the sewing kit is a large
vegetable can for which you created a pretty
cover. Use the measuring tape from the Sew
Taxi, measure the circumference of the can and
divided the number by 4 since you want to use
4 panels. Measure from top to bottom of the
can. Add 1 inch to both numbers to allow for

11 Sewing Room Ideas: How to Organize Your Room
Find thousands of free sewing patterns, tips, tutorials and more at www.AllFreeSewing.com. 7
seam allowances and cut 2 pieces from the shirt
and 2 pieces from a coordinating fabric.
9. Using a ½ inch seam allowance, stitch the 4
panels together. Hem the top and bottom
edges ½ inch. Complete the can cover by
stitching together the 2 ends of the fabric panel
and slip it over the can.

11 Sewing Room Ideas: How to Organize Your Room
Find thousands of free sewing patterns, tips, tutorials and more at www.AllFreeSewing.com. 8
Scrappy Fabric Baskets
By: Pam from Threading My Way
Use scrap fabric to store scrap fabric! These Scrappy Fabric Baskets are a thrifty way to utilize leftover materials to create storage and organization in your sewing room. Sturdy and durable, this solution to messy fabric drawers is flexible enough to fit in any space. They're your DIY storage answer to excess fabric, sewing equipment, yarn, or any other impossible-to-organize equipment. Mix and match fabrics for a layered, quilted look that will bring a cozy farmhouse feel to any room. Best of all, this pattern is easily adjustable for size, so you can design your baskets to fit your space.
Materials:
20 pieces – 11 inches x 2 inches (28 cm x 5 cm) - fabric strips for the exterior of the basket.
2 pieces – 9 inches x 9 inches (23 cm x 23 cm) - contrast color for the lining
2 pieces – 9 inches x 9 inches (23 cm x 23 cm) - lightweight iron-on interfacing
2 pieces – 9 inches x 9 inches (23 cm x 23 cm) - medium to heavy weight, woven, sew-in interfacing
The fabric strips can be any combination of prints. This tutorial uses quilting cotton. You
may not use all the strips. the combination of the light weight iron-on interfacing and the medium to heavy weight, woven, sew-in interfacing. This produces a basket that will stand up by itself, without being bulky to sew. You could substitute this with different weight interfacing, fleece or batting. It all depends on the look you are after and what you are used to sewing with. The combination of the light weight iron-on interfacing and the medium to heavy weight, woven, sew-in interfacing produces a basket that will stand up by itself, without being bulky to sew. You could substitute this with different weight interfacing, fleece or batting. It all depends on the look you are after and what you are used to sewing with. Directions: 1. All seams are 3/8″ (1 cm), unless otherwise indicated. Use a NON steam setting for pressing. Back-stitch at the beginning and ending of seams. 2. Arrange fabric strips. Lay 10 fabric strips side by side for the front and the same for the back. Play with the strips until you are happy with the arrangement.
3. Sew the fabric strips together, at random angles, making sure the seams are straight as you sew. The long edges of the fabric will not be level. 4. Lay the second strip on the first strip, right sides together and at an angle, beginning in the left corner. Line up your presser foot with the top fabric and sew.
11 Sewing Room Ideas: How to Organize Your Room
Find thousands of free sewing patterns, tips, tutorials and more at www.AllFreeSewing.com. 9
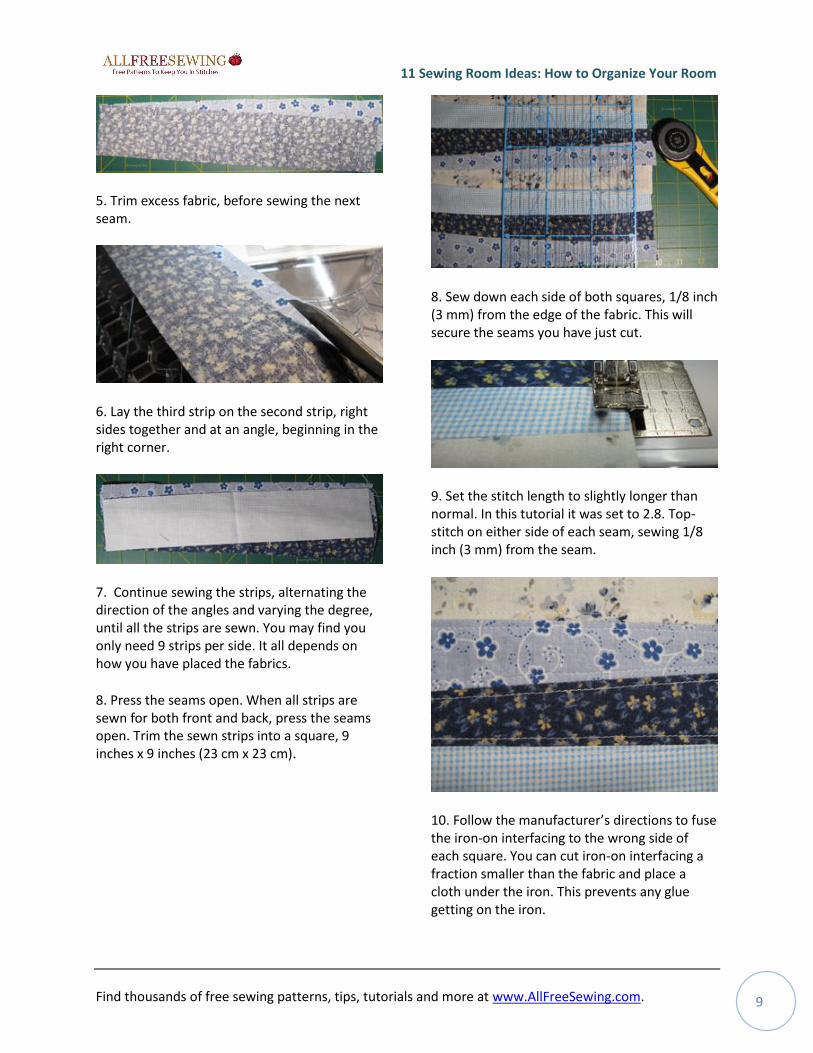
5. Trim excess fabric, before sewing the next seam.
6. Lay the third strip on the second strip, right sides together and at an angle, beginning in the right corner.
7. Continue sewing the strips, alternating the direction of the angles and varying the degree, until all the strips are sewn. You may find you only need 9 strips per side. It all depends on how you have placed the fabrics.
8. Press the seams open. When all strips are sewn for both front and back, press the seams open. Trim the sewn strips into a square, 9 inches x 9 inches (23 cm x 23 cm).
8. Sew down each side of both squares, 1/8 inch (3 mm) from the edge of the fabric. This will secure the seams you have just cut.
9. Set the stitch length to slightly longer than normal. In this tutorial it was set to 2.8. Top-stitch on either side of each seam, sewing 1/8 inch (3 mm) from the seam.
10. Follow the manufacturer’s directions to fuse the iron-on interfacing to the wrong side of each square. You can cut iron-on interfacing a fraction smaller than the fabric and place a cloth under the iron. This prevents any glue getting on the iron.
11 Sewing Room Ideas: How to Organize Your Room
Find thousands of free sewing patterns, tips, tutorials and more at www.AllFreeSewing.com. 10
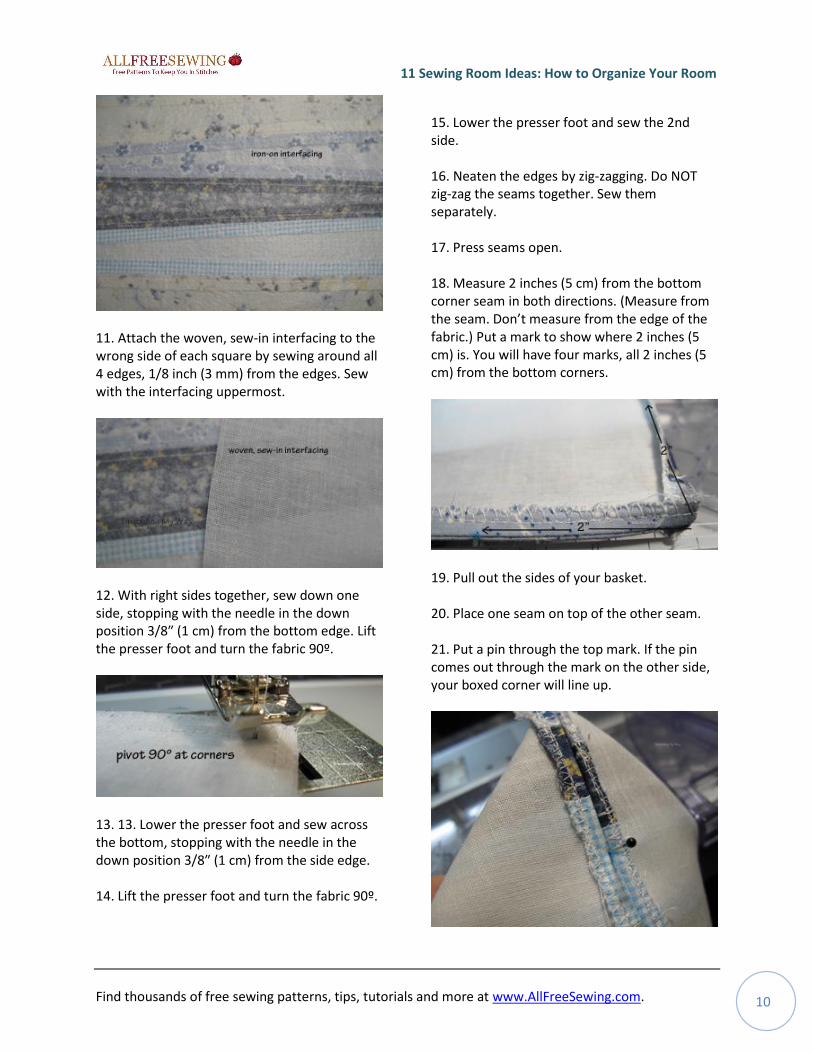
11. Attach the woven, sew-in interfacing to the wrong side of each square by sewing around all 4 edges, 1/8 inch (3 mm) from the edges. Sew with the interfacing uppermost.
12. With right sides together, sew down one side, stopping with the needle in the down position 3/8″ (1 cm) from the bottom edge. Lift the presser foot and turn the fabric 90º.
13. 13. Lower the presser foot and sew across the bottom, stopping with the needle in the down position 3/8″ (1 cm) from the side edge. 14. Lift the presser foot and turn the fabric 90º.
15. Lower the presser foot and sew the 2nd side. 16. Neaten the edges by zig-zagging. Do NOT zig-zag the seams together. Sew them separately. 17. Press seams open. 18. Measure 2 inches (5 cm) from the bottom corner seam in both directions. (Measure from the seam. Don’t measure from the edge of the fabric.) Put a mark to show where 2 inches (5 cm) is. You will have four marks, all 2 inches (5 cm) from the bottom corners.
19. Pull out the sides of your basket. 20. Place one seam on top of the other seam. 21. Put a pin through the top mark. If the pin comes out through the mark on the other side, your boxed corner will line up.
11 Sewing Room Ideas: How to Organize Your Room
Find thousands of free sewing patterns, tips, tutorials and more at www.AllFreeSewing.com. 11
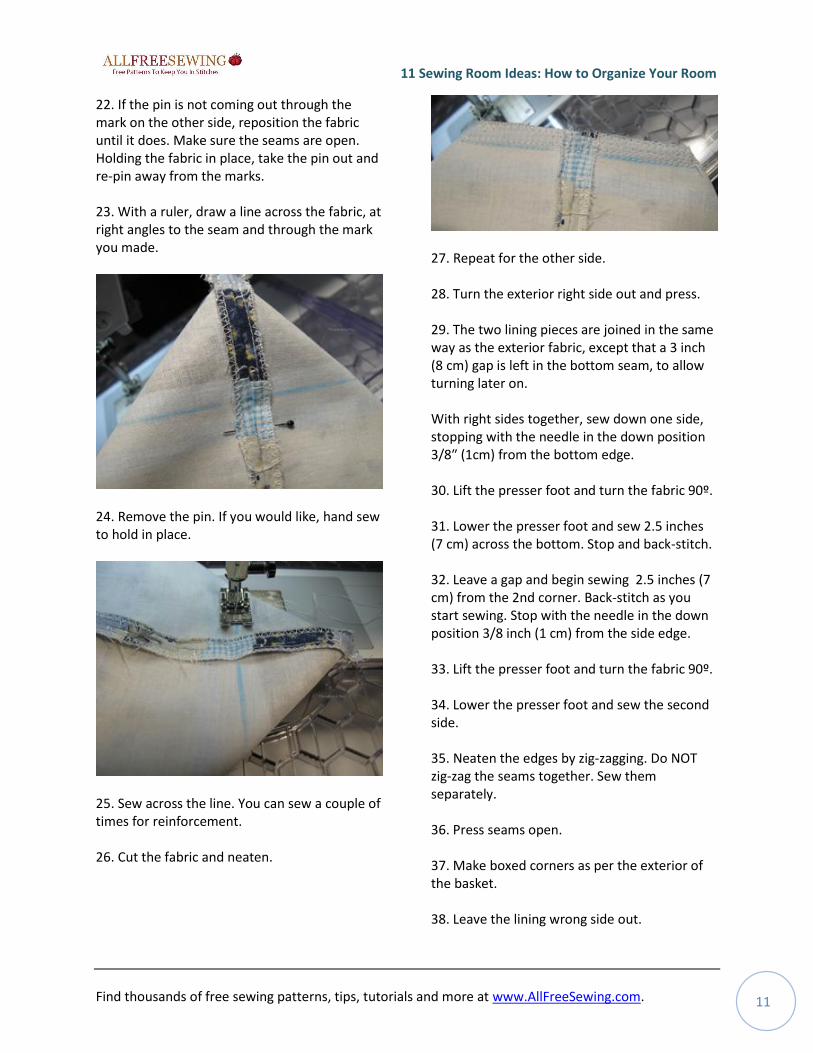
22. If the pin is not coming out through the mark on the other side, reposition the fabric until it does. Make sure the seams are open. Holding the fabric in place, take the pin out and re-pin away from the marks. 23. With a ruler, draw a line across the fabric, at right angles to the seam and through the mark you made.
24. Remove the pin. If you would like, hand sew to hold in place.
25. Sew across the line. You can sew a couple of times for reinforcement. 26. Cut the fabric and neaten.
27. Repeat for the other side. 28. Turn the exterior right side out and press. 29. The two lining pieces are joined in the same way as the exterior fabric, except that a 3 inch (8 cm) gap is left in the bottom seam, to allow turning later on. With right sides together, sew down one side, stopping with the needle in the down position 3/8″ (1cm) from the bottom edge. 30. Lift the presser foot and turn the fabric 90º. 31. Lower the presser foot and sew 2.5 inches (7 cm) across the bottom. Stop and back-stitch. 32. Leave a gap and begin sewing 2.5 inches (7 cm) from the 2nd corner. Back-stitch as you start sewing. Stop with the needle in the down position 3/8 inch (1 cm) from the side edge. 33. Lift the presser foot and turn the fabric 90º. 34. Lower the presser foot and sew the second side. 35. Neaten the edges by zig-zagging. Do NOT zig-zag the seams together. Sew them separately. 36. Press seams open. 37. Make boxed corners as per the exterior of the basket. 38. Leave the lining wrong side out.
11 Sewing Room Ideas: How to Organize Your Room
Find thousands of free sewing patterns, tips, tutorials and more at www.AllFreeSewing.com. 12
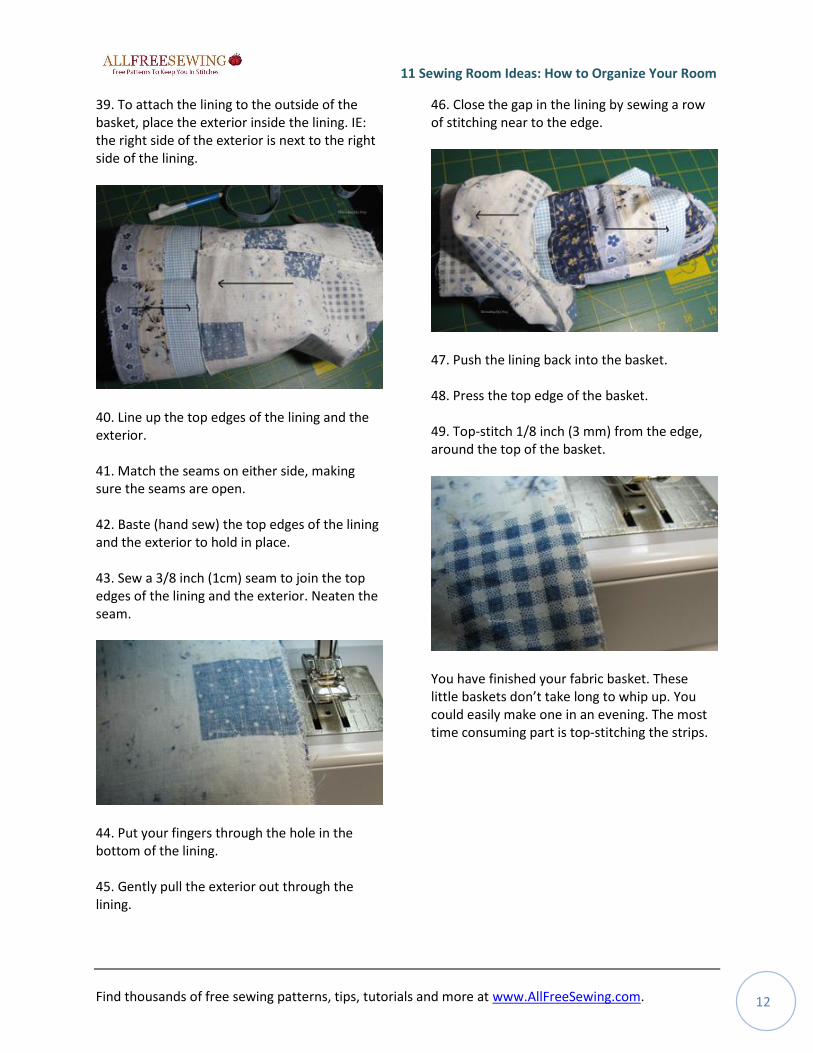
39. To attach the lining to the outside of the basket, place the exterior inside the lining. IE: the right side of the exterior is next to the right side of the lining.
40. Line up the top edges of the lining and the exterior. 41. Match the seams on either side, making sure the seams are open. 42. Baste (hand sew) the top edges of the lining and the exterior to hold in place. 43. Sew a 3/8 inch (1cm) seam to join the top edges of the lining and the exterior. Neaten the seam.
44. Put your fingers through the hole in the bottom of the lining. 45. Gently pull the exterior out through the lining.
46. Close the gap in the lining by sewing a row of stitching near to the edge.
47. Push the lining back into the basket. 48. Press the top edge of the basket. 49. Top-stitch 1/8 inch (3 mm) from the edge, around the top of the basket.
You have finished your fabric basket. These little baskets don’t take long to whip up. You could easily make one in an evening. The most time consuming part is top-stitching the strips.
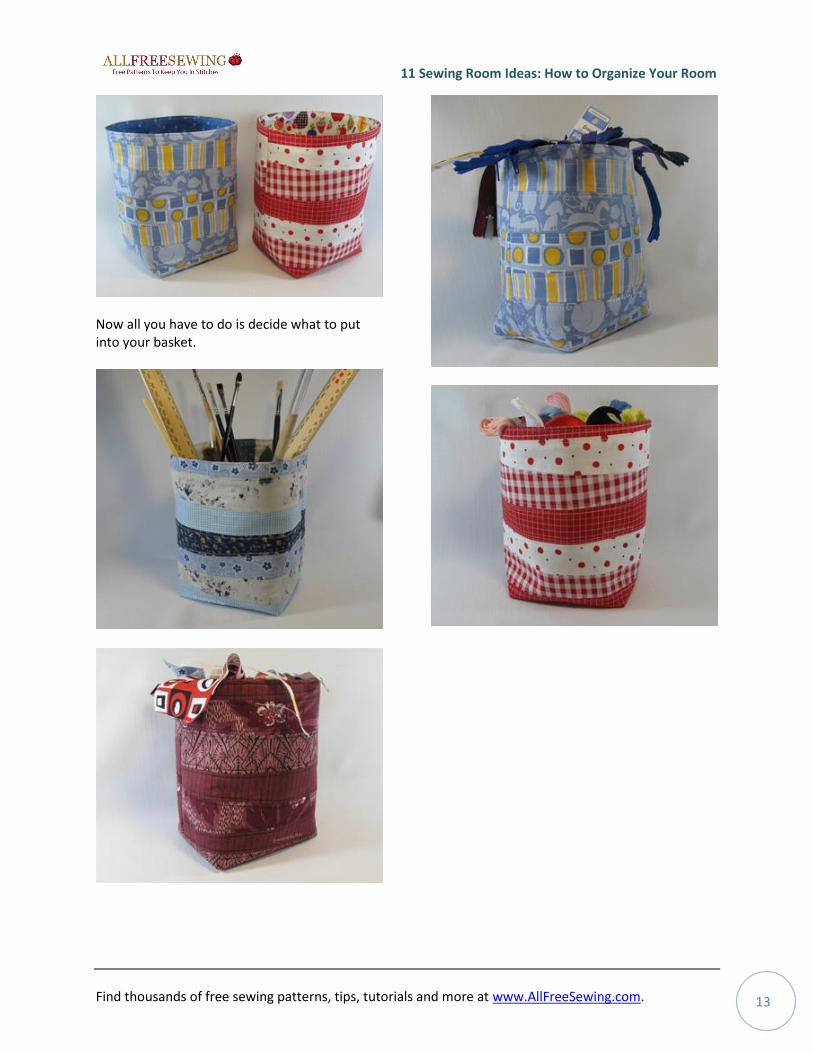
11 Sewing Room Ideas: How to Organize Your Room
Find thousands of free sewing patterns, tips, tutorials and more at www.AllFreeSewing.com. 13
Now all you have to do is decide what to put into your basket.
11 Sewing Room Ideas: How to Organize Your Room
Find thousands of free sewing patterns, tips, tutorials and more at www.AllFreeSewing.com. 14
DIY Hanging Jewelry Organizer
By: Meream from Bored and Crafty
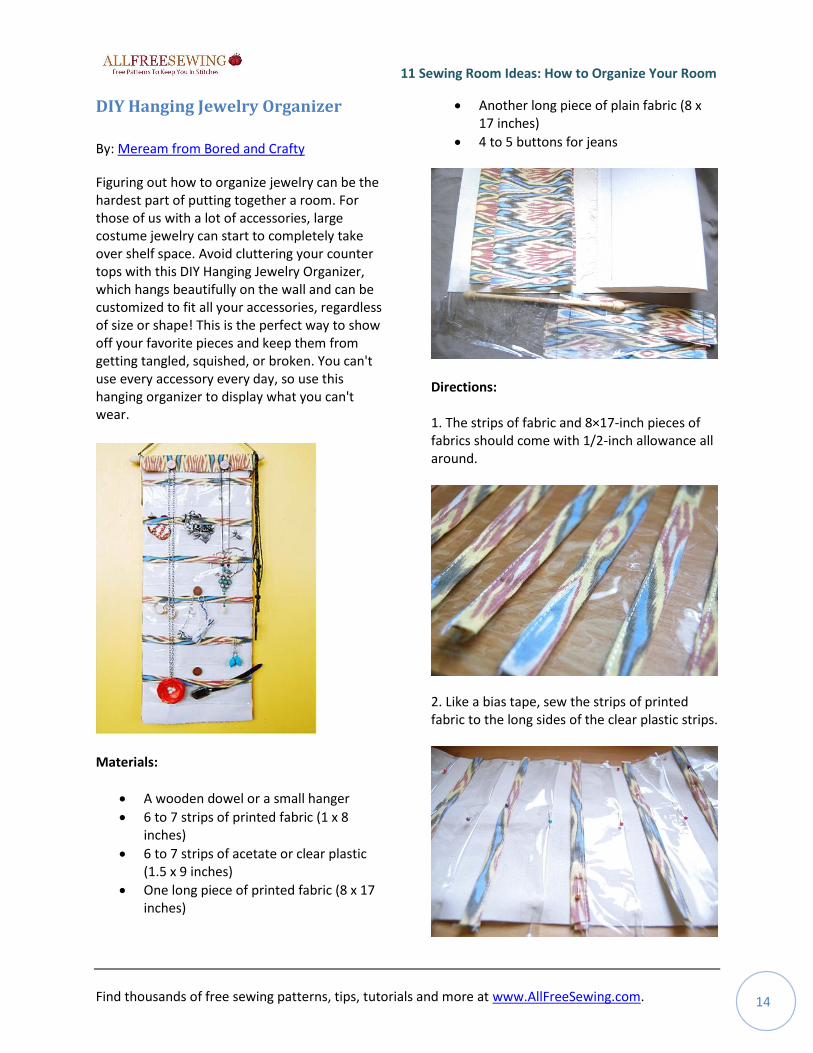
Figuring out how to organize jewelry can be the hardest part of putting together a room. For those of us with a lot of accessories, large costume jewelry can start to completely take over shelf space. Avoid cluttering your counter tops with this DIY Hanging Jewelry Organizer, which hangs beautifully on the wall and can be customized to fit all your accessories, regardless of size or shape! This is the perfect way to show off your favorite pieces and keep them from getting tangled, squished, or broken. You can't use every accessory every day, so use this hanging organizer to display what you can't wear.
Materials:
A wooden dowel or a small hanger
6 to 7 strips of printed fabric (1 x 8 inches)
6 to 7 strips of acetate or clear plastic (1.5 x 9 inches)
One long piece of printed fabric (8 x 17 inches)
Another long piece of plain fabric (8 x 17 inches)
4 to 5 buttons for jeans
Directions: 1. The strips of fabric and 8×17-inch pieces of fabrics should come with 1/2-inch allowance all around.
2. Like a bias tape, sew the strips of printed fabric to the long sides of the clear plastic strips.

11 Sewing Room Ideas: How to Organize Your Room
Find thousands of free sewing patterns, tips, tutorials and more at www.AllFreeSewing.com. 15
3. With the other long side folded under, position the clear strips onto the interfaced plain piece of fabric. Make sure that the allowance between each clear plastic strip pocket is equal. Mine were a quarter of an inch apart.
4. Sew the folded bottoms to the plain fabric. You should use long stitch lengths so as not to rip the plastic strips.
5. Sew lines to make your pockets. The size of your clear pockets is completely up to you. Small pockets are perfect for storing pairs of earrings. I like bigger ones for watches and chunkier pieces of jewelry.
6. Place the printed fabric on top of the plain fabric with clear pockets. The printed fabric’s right side should be facing down. Sew but leave the top short side un-sewn. Clip off the corners.
7. Turn inside out. At this point, you can choose to top-stitch the long sides and bottom of your jewelry organizer.
8. Trim the un-sewn short side with pinking shears.
11 Sewing Room Ideas: How to Organize Your Room
Find thousands of free sewing patterns, tips, tutorials and more at www.AllFreeSewing.com. 16
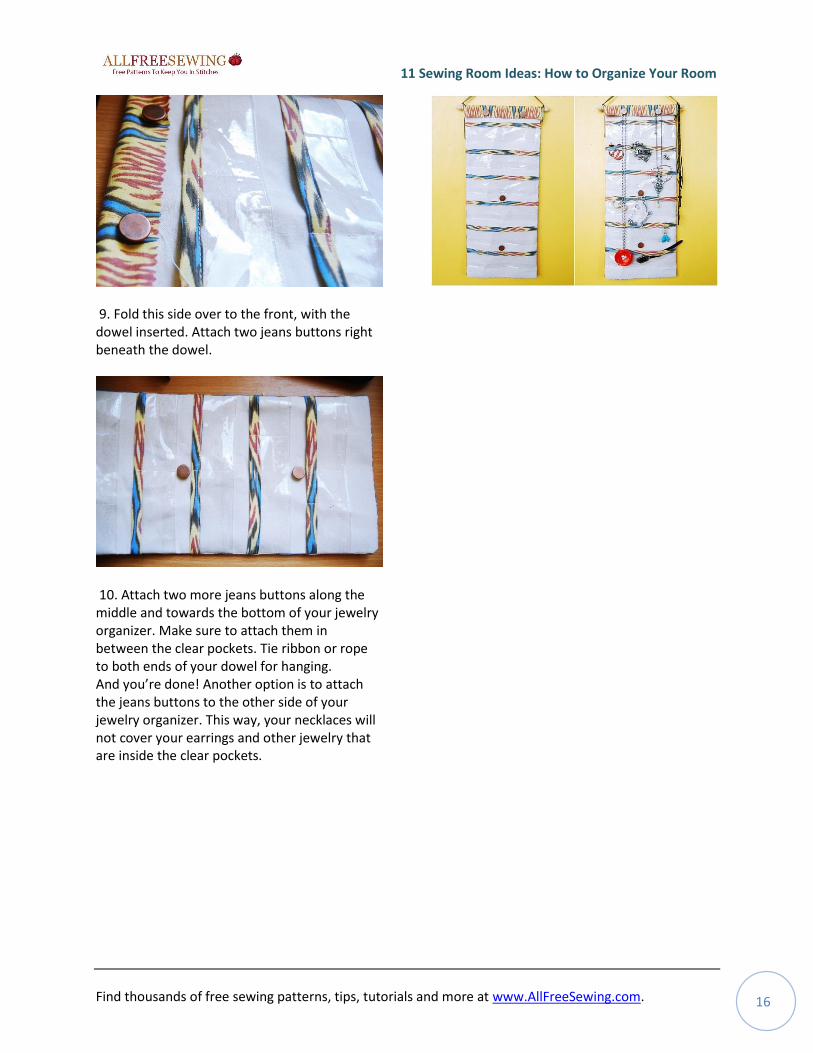
9. Fold this side over to the front, with the dowel inserted. Attach two jeans buttons right beneath the dowel.
10. Attach two more jeans buttons along the middle and towards the bottom of your jewelry organizer. Make sure to attach them in between the clear pockets. Tie ribbon or rope to both ends of your dowel for hanging. And you’re done! Another option is to attach the jeans buttons to the other side of your jewelry organizer. This way, your necklaces will not cover your earrings and other jewelry that are inside the clear pockets.
11 Sewing Room Ideas: How to Organize Your Room
Find thousands of free sewing patterns, tips, tutorials and more at www.AllFreeSewing.com. 17
Sewing Filing Pockets
By: Wendy from Handmade Harbour
One of the hardest parts of keeping your sewing room organized is finding more space for storage! These Sewing Room Filing Pockets solve that problem without taking up floor space. It's a great way to organize your sewing tools, like rulers and scissors, but has enough space to hold anything from seam rippers to fat quarters. This is a bit of DIY organization that will keep your craft space looking spick-and-span.
Materials:
One meter of this blue check fabric
from Abakhan
One meter of bleached calico
One meter clear PVC
Three meters of print bias binding
Pelmet Vilene
Iron-on interfacing
D-Rings
An extra scrap of fabric
A traycloth
Cut:
white calico backing fabric 50cm x 100cm
pelmet Vilene 50cm x 100cm iron-on interfacing 50cm x 100cm
(optional) red stripe: 56cm x 106cm - this one will
be used as a fold-over binding too, so it will show around the front edges as well as being the final backing piece showing from behind
blue check: 4 pockets measuring 50cm x 28cm each
blue check: 1 piece of fabric measuring 50cm x 76cm (this will be folded in half to make the top piece)
Cut 1 piece of PVC measuring 45cm x 32cm (this will become the top pocket where you can stash 2 x A4 sheets you want to be able to see at a glance)
1 piece of PVC for small pocket: 21cm x 16cm
white calico for small pocket: 24cm x 22cm
Instructions
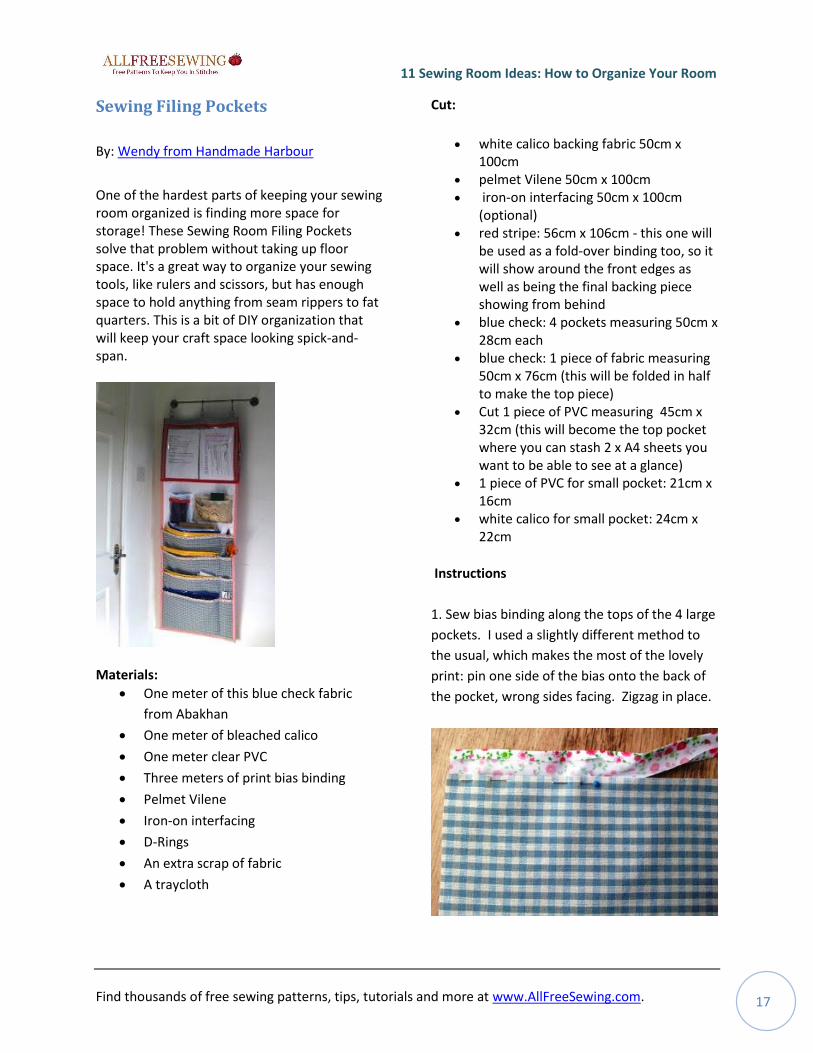
1. Sew bias binding along the tops of the 4 large
pockets. I used a slightly different method to
the usual, which makes the most of the lovely
print: pin one side of the bias onto the back of
the pocket, wrong sides facing. Zigzag in place.
11 Sewing Room Ideas: How to Organize Your Room
Find thousands of free sewing patterns, tips, tutorials and more at www.AllFreeSewing.com. 18
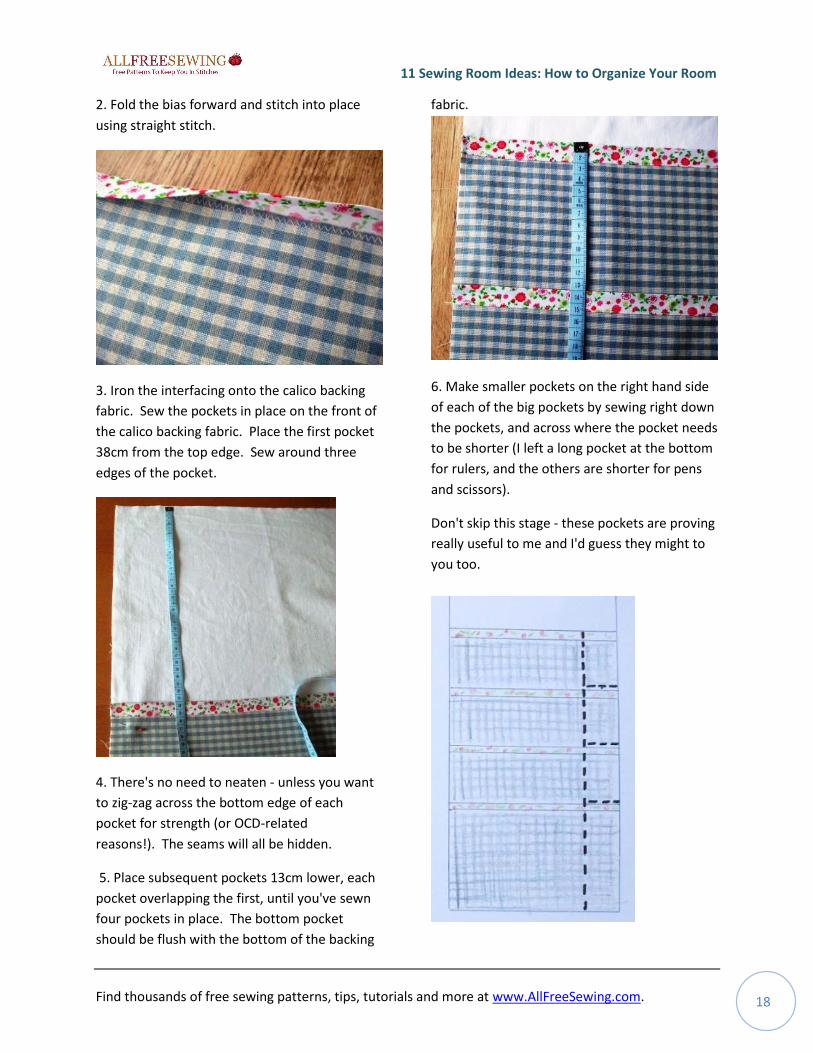
2. Fold the bias forward and stitch into place
using straight stitch.
3. Iron the interfacing onto the calico backing
fabric. Sew the pockets in place on the front of
the calico backing fabric. Place the first pocket
38cm from the top edge. Sew around three
edges of the pocket.
4. There's no need to neaten - unless you want
to zig-zag across the bottom edge of each
pocket for strength (or OCD-related
reasons!). The seams will all be hidden.
5. Place subsequent pockets 13cm lower, each
pocket overlapping the first, until you've sewn
four pockets in place. The bottom pocket
should be flush with the bottom of the backing
fabric.
6. Make smaller pockets on the right hand side
of each of the big pockets by sewing right down
the pockets, and across where the pocket needs
to be shorter (I left a long pocket at the bottom
for rulers, and the others are shorter for pens
and scissors).
Don't skip this stage - these pockets are proving
really useful to me and I'd guess they might to
you too.
11 Sewing Room Ideas: How to Organize Your Room
Find thousands of free sewing patterns, tips, tutorials and more at www.AllFreeSewing.com. 19
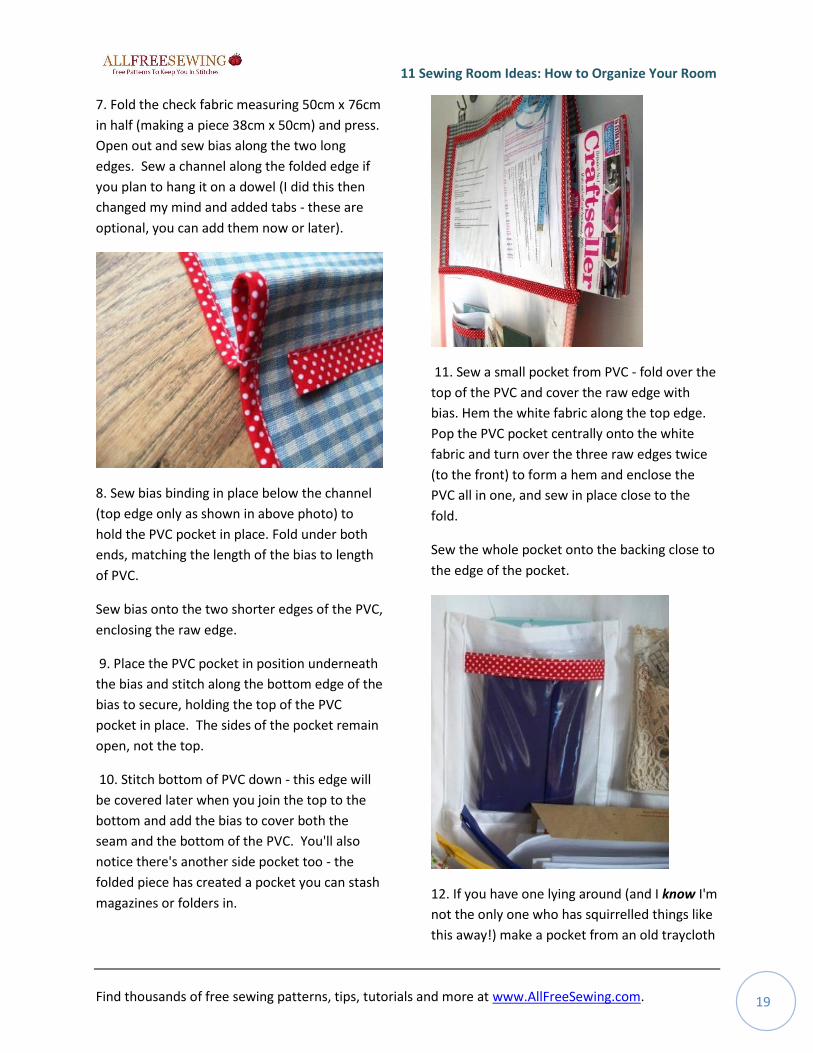
7. Fold the check fabric measuring 50cm x 76cm
in half (making a piece 38cm x 50cm) and press.
Open out and sew bias along the two long
edges. Sew a channel along the folded edge if
you plan to hang it on a dowel (I did this then
changed my mind and added tabs - these are
optional, you can add them now or later).
8. Sew bias binding in place below the channel
(top edge only as shown in above photo) to
hold the PVC pocket in place. Fold under both
ends, matching the length of the bias to length
of PVC.
Sew bias onto the two shorter edges of the PVC,
enclosing the raw edge.
9. Place the PVC pocket in position underneath
the bias and stitch along the bottom edge of the
bias to secure, holding the top of the PVC
pocket in place. The sides of the pocket remain
open, not the top.
10. Stitch bottom of PVC down - this edge will
be covered later when you join the top to the
bottom and add the bias to cover both the
seam and the bottom of the PVC. You'll also
notice there's another side pocket too - the
folded piece has created a pocket you can stash
magazines or folders in.
11. Sew a small pocket from PVC - fold over the
top of the PVC and cover the raw edge with
bias. Hem the white fabric along the top edge.
Pop the PVC pocket centrally onto the white
fabric and turn over the three raw edges twice
(to the front) to form a hem and enclose the
PVC all in one, and sew in place close to the
fold.
Sew the whole pocket onto the backing close to
the edge of the pocket.
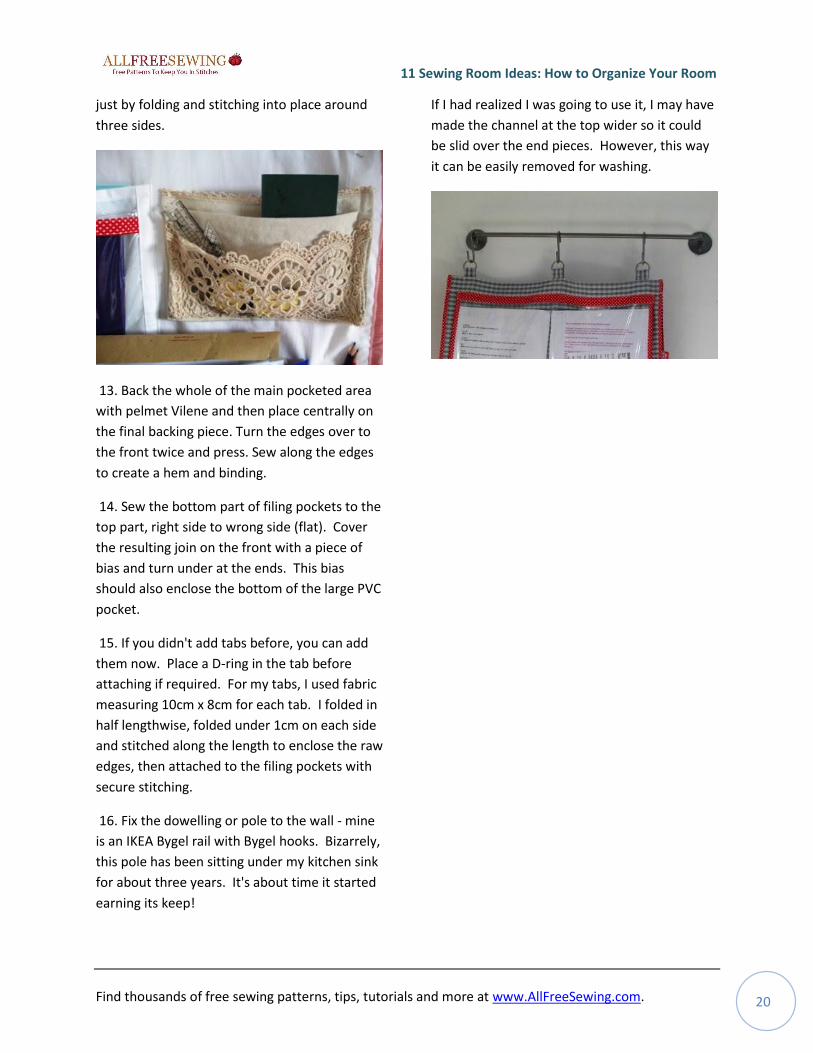
12. If you have one lying around (and I know I'm
not the only one who has squirrelled things like
this away!) make a pocket from an old traycloth
11 Sewing Room Ideas: How to Organize Your Room
Find thousands of free sewing patterns, tips, tutorials and more at www.AllFreeSewing.com. 20
just by folding and stitching into place around
three sides.
13. Back the whole of the main pocketed area
with pelmet Vilene and then place centrally on
the final backing piece. Turn the edges over to
the front twice and press. Sew along the edges
to create a hem and binding.
14. Sew the bottom part of filing pockets to the
top part, right side to wrong side (flat). Cover
the resulting join on the front with a piece of
bias and turn under at the ends. This bias
should also enclose the bottom of the large PVC
pocket.
15. If you didn't add tabs before, you can add
them now. Place a D-ring in the tab before
attaching if required. For my tabs, I used fabric
measuring 10cm x 8cm for each tab. I folded in
half lengthwise, folded under 1cm on each side
and stitched along the length to enclose the raw
edges, then attached to the filing pockets with
secure stitching.
16. Fix the dowelling or pole to the wall - mine
is an IKEA Bygel rail with Bygel hooks. Bizarrely,
this pole has been sitting under my kitchen sink
for about three years. It's about time it started
earning its keep!
If I had realized I was going to use it, I may have
made the channel at the top wider so it could
be slid over the end pieces. However, this way
it can be easily removed for washing.
11 Sewing Room Ideas: How to Organize Your Room
Find thousands of free sewing patterns, tips, tutorials and more at www.AllFreeSewing.com. 21
Lovely Scissors Holder
By: Wendy from Handmade Harbour
When putting your craft space together, it is
always a good idea to keep your most-used
tools in a handy space. With the Lovely Scissor
Holder, your trusty scissors will always be
within reach. This very simple scrapbuster
project is perfect for beginners to work on, and
the holder can hold far more than just scissors.
Use this finished product to hold all your
necessary sewing supplies. This is an easy
beginner project, and it can be sewn by hand or
by machine.
Materials:
Denim fabric for backing
Scraps of cotton or polycotton
prints/plains (you'll be sewing through
lots of layers, so don't use heavyweight
fabrics here)
Black sewing thread (or whatever
colour you choose)
Something to form hanging loops -
tape, string, ribbon
wadding (optional)
Buttons to finish (optional)
Directions:
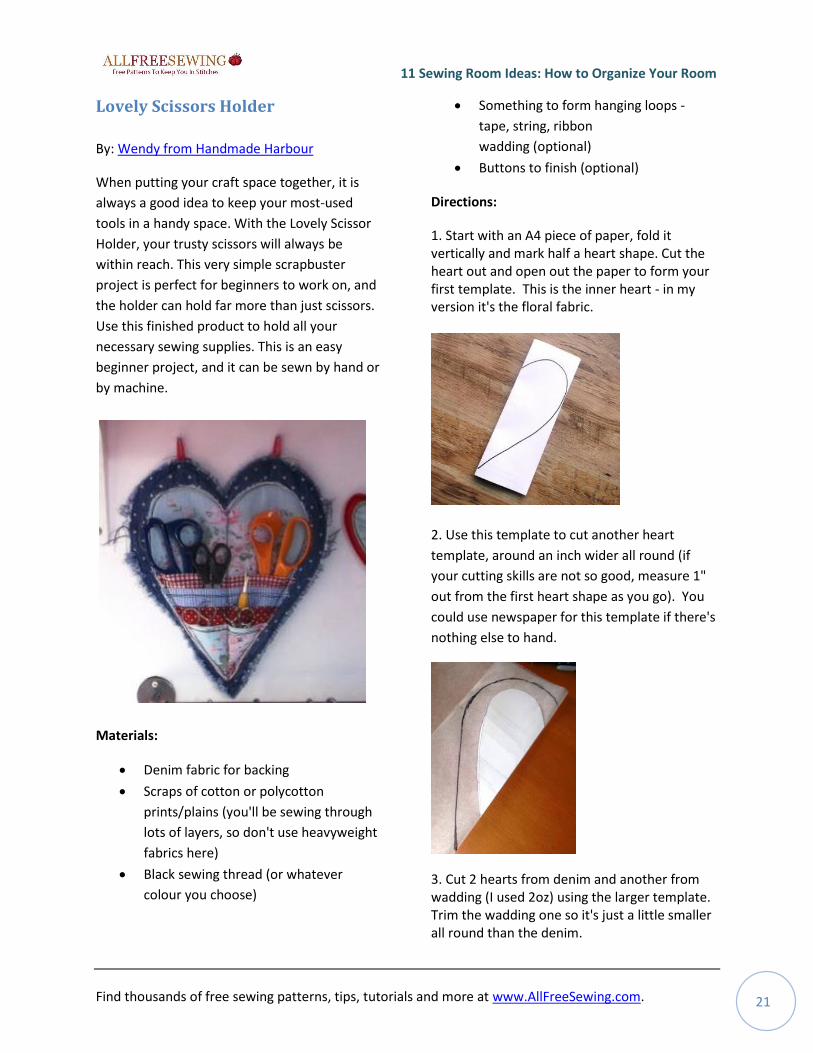
1. Start with an A4 piece of paper, fold it vertically and mark half a heart shape. Cut the heart out and open out the paper to form your first template. This is the inner heart - in my version it's the floral fabric.
2. Use this template to cut another heart
template, around an inch wider all round (if
your cutting skills are not so good, measure 1"
out from the first heart shape as you go). You
could use newspaper for this template if there's
nothing else to hand.
3. Cut 2 hearts from denim and another from wadding (I used 2oz) using the larger template. Trim the wadding one so it's just a little smaller all round than the denim.
11 Sewing Room Ideas: How to Organize Your Room
Find thousands of free sewing patterns, tips, tutorials and more at www.AllFreeSewing.com. 22
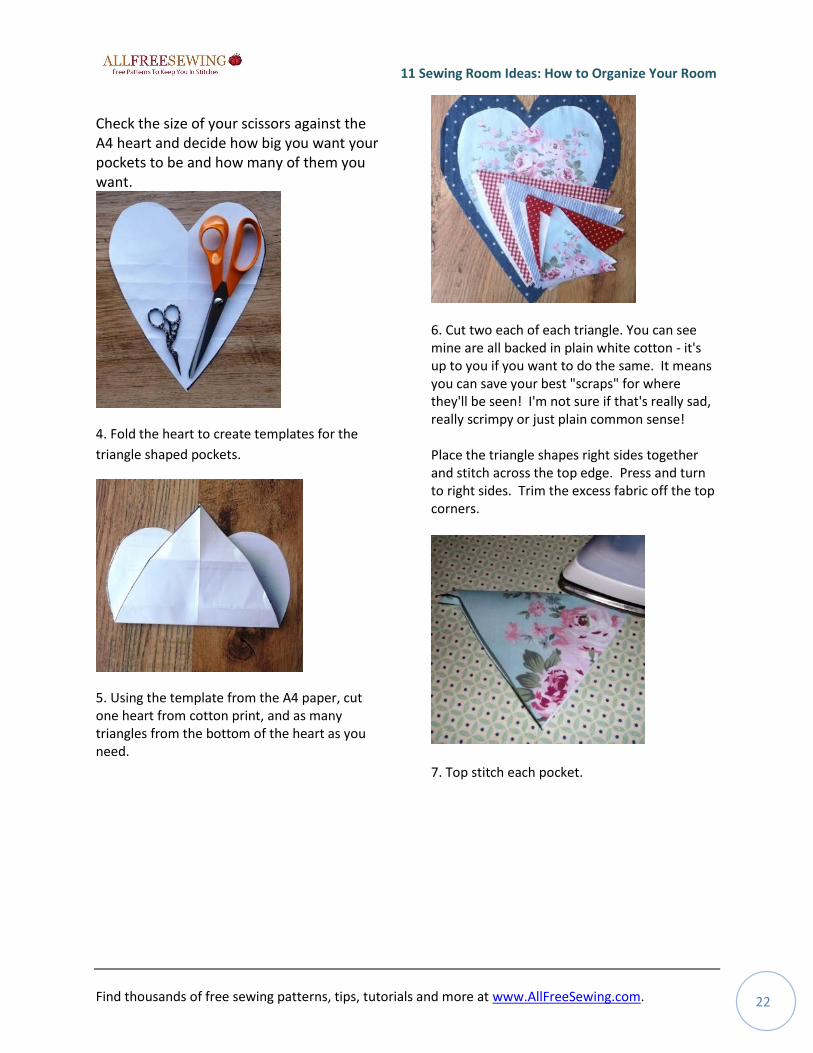
Check the size of your scissors against the A4 heart and decide how big you want your pockets to be and how many of them you want.
4. Fold the heart to create templates for the
triangle shaped pockets.
5. Using the template from the A4 paper, cut one heart from cotton print, and as many triangles from the bottom of the heart as you need.
6. Cut two each of each triangle. You can see mine are all backed in plain white cotton - it's up to you if you want to do the same. It means you can save your best "scraps" for where they'll be seen! I'm not sure if that's really sad, really scrimpy or just plain common sense! Place the triangle shapes right sides together and stitch across the top edge. Press and turn to right sides. Trim the excess fabric off the top corners.
7. Top stitch each pocket.
11 Sewing Room Ideas: How to Organize Your Room
Find thousands of free sewing patterns, tips, tutorials and more at www.AllFreeSewing.com. 23
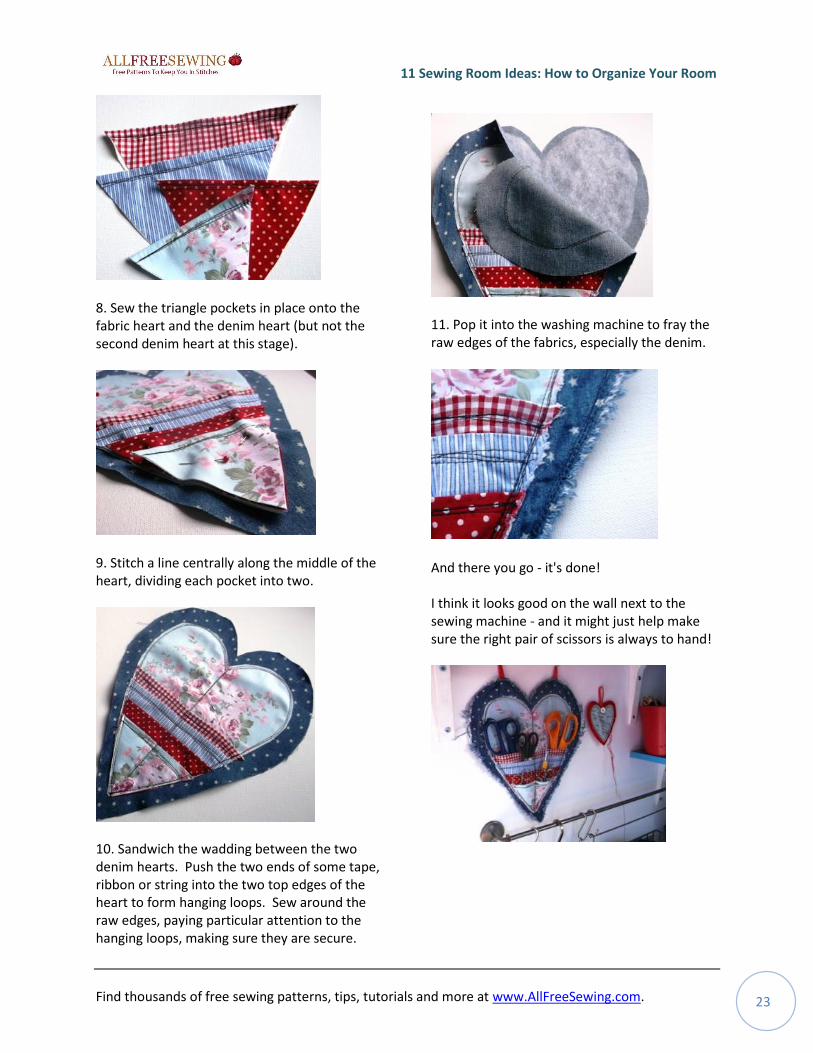
8. Sew the triangle pockets in place onto the fabric heart and the denim heart (but not the second denim heart at this stage).
9. Stitch a line centrally along the middle of the heart, dividing each pocket into two.
10. Sandwich the wadding between the two denim hearts. Push the two ends of some tape, ribbon or string into the two top edges of the heart to form hanging loops. Sew around the raw edges, paying particular attention to the hanging loops, making sure they are secure.
11. Pop it into the washing machine to fray the raw edges of the fabrics, especially the denim.
And there you go - it's done! I think it looks good on the wall next to the sewing machine - and it might just help make sure the right pair of scissors is always to hand!
11 Sewing Room Ideas: How to Organize Your Room
Find thousands of free sewing patterns, tips, tutorials and more at www.AllFreeSewing.com. 24
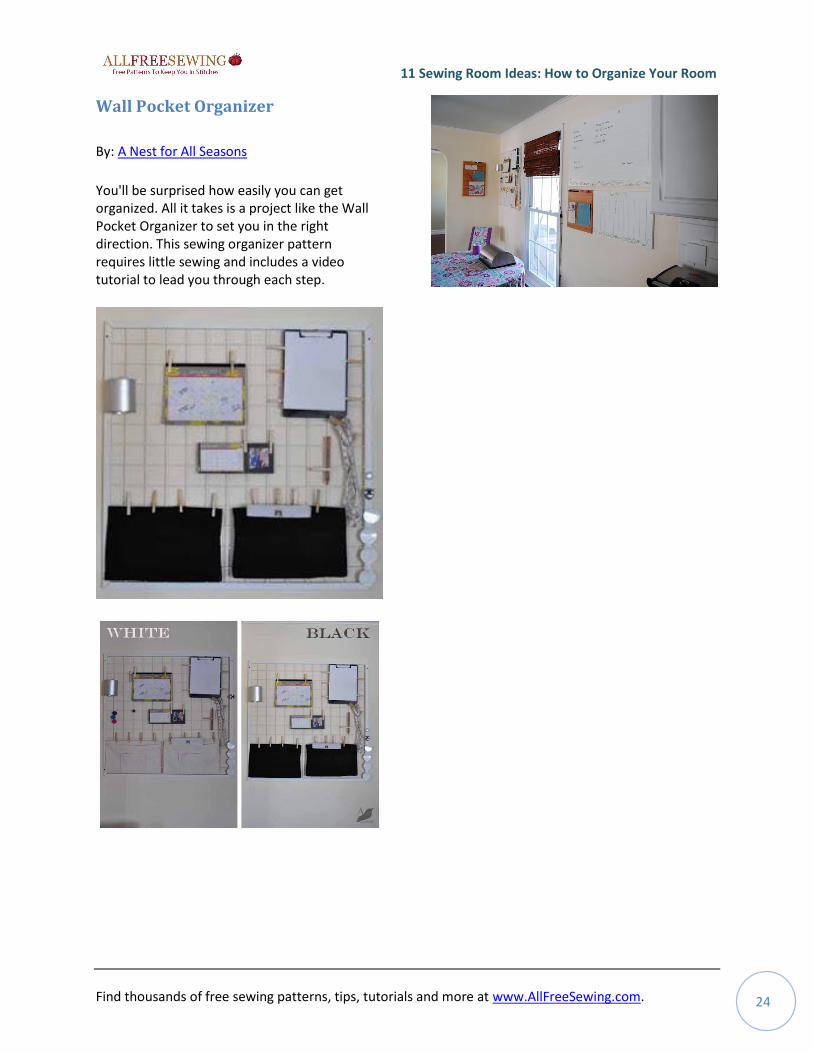
Wall Pocket Organizer
By: A Nest for All Seasons
You'll be surprised how easily you can get organized. All it takes is a project like the Wall Pocket Organizer to set you in the right direction. This sewing organizer pattern requires little sewing and includes a video tutorial to lead you through each step.
11 Sewing Room Ideas: How to Organize Your Room
Find thousands of free sewing patterns, tips, tutorials and more at www.AllFreeSewing.com. 25
Wrapping Paper Organizer
By: Christina from 2 Little Holligans
Wrapping paper is a year-round essential; you need it for Christmas, birthdays, and other events that require a gift. This neat Wrapping Paper Organizer serves as an excellent tutorial for DIY storage. This upcycled craft uses an upside down stool, to create the perfect base for all of your storage bags. Simply tying the sewn bags to the stool will give you plenty of storage space for all of your Christmas tools. You'll never have to search for the scissors, tape, or wrapping paper again.
Materials:
Kitchen stool
2 1/2 yards of fabric
4 Casters
2 packages of bias tape or about 4 yards of homemade bias tape
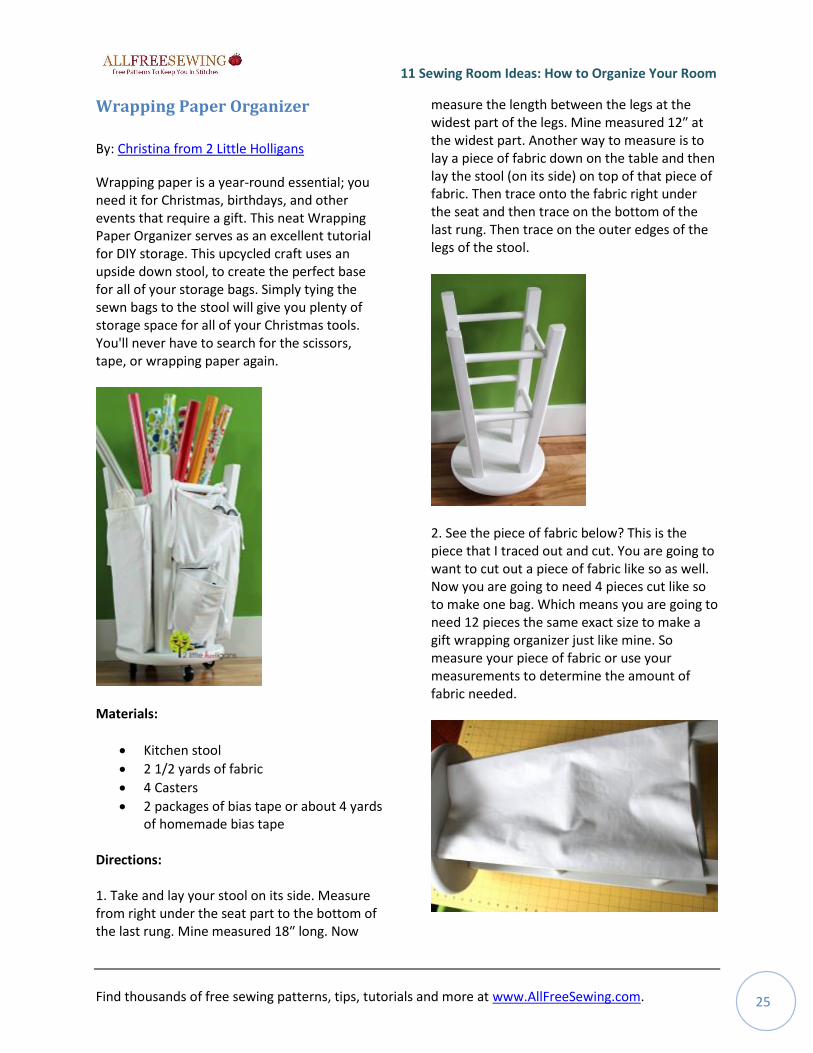
Directions: 1. Take and lay your stool on its side. Measure from right under the seat part to the bottom of the last rung. Mine measured 18″ long. Now
measure the length between the legs at the widest part of the legs. Mine measured 12″ at the widest part. Another way to measure is to lay a piece of fabric down on the table and then lay the stool (on its side) on top of that piece of fabric. Then trace onto the fabric right under the seat and then trace on the bottom of the last rung. Then trace on the outer edges of the legs of the stool.
2. See the piece of fabric below? This is the piece that I traced out and cut. You are going to want to cut out a piece of fabric like so as well. Now you are going to need 4 pieces cut like so to make one bag. Which means you are going to need 12 pieces the same exact size to make a gift wrapping organizer just like mine. So measure your piece of fabric or use your measurements to determine the amount of fabric needed.

11 Sewing Room Ideas: How to Organize Your Room
Find thousands of free sewing patterns, tips, tutorials and more at www.AllFreeSewing.com. 26
3. Cut out your 12 pieces of fabric per your measurements. Take two pieces of fabric and sew right sides together on the sides and the bottom. Leave the top (widest part of bag) open. See picture below.
4. Now you want to square off the edges to give the bag shape. To do this, fold your bag out like shown below. Now measure in about 1 1/2″ from the tip of the bag. Draw a line across.
5. Sew on the lines you just drew.
6. Trim off the excess fabric.
7. Now your bag has shape. Make 3 more bags like you just did. You will want a total of 4 bags with 4 pieces of fabric left over. The remaining 4 pieces will be cut later to make the smaller bags.

11 Sewing Room Ideas: How to Organize Your Room
Find thousands of free sewing patterns, tips, tutorials and more at www.AllFreeSewing.com. 27
8. Now gather your bias tape. You are going to cut your bias tape or ribbons to the length that you want your ties to be. I cut 6 pieces of bias tape 24″ long. Now top stitch your bias tape shut.
9. Measure in 2″ from the edge of your bag on both sides. This is where you will want to attach your bias tape. Fold bias tape in half. Place folded part of bias tape on top of marks and tack in place.
10. Now take one of your bags and turn it wrong side out. Place right side out bag that has ties inside. Pin both bags together at top.
11. Sew around top while leaving an opening for turning right sides out. 12. Turn bag right side out through opening.
13. Press and top stitch around top edge.
11 Sewing Room Ideas: How to Organize Your Room
Find thousands of free sewing patterns, tips, tutorials and more at www.AllFreeSewing.com. 28
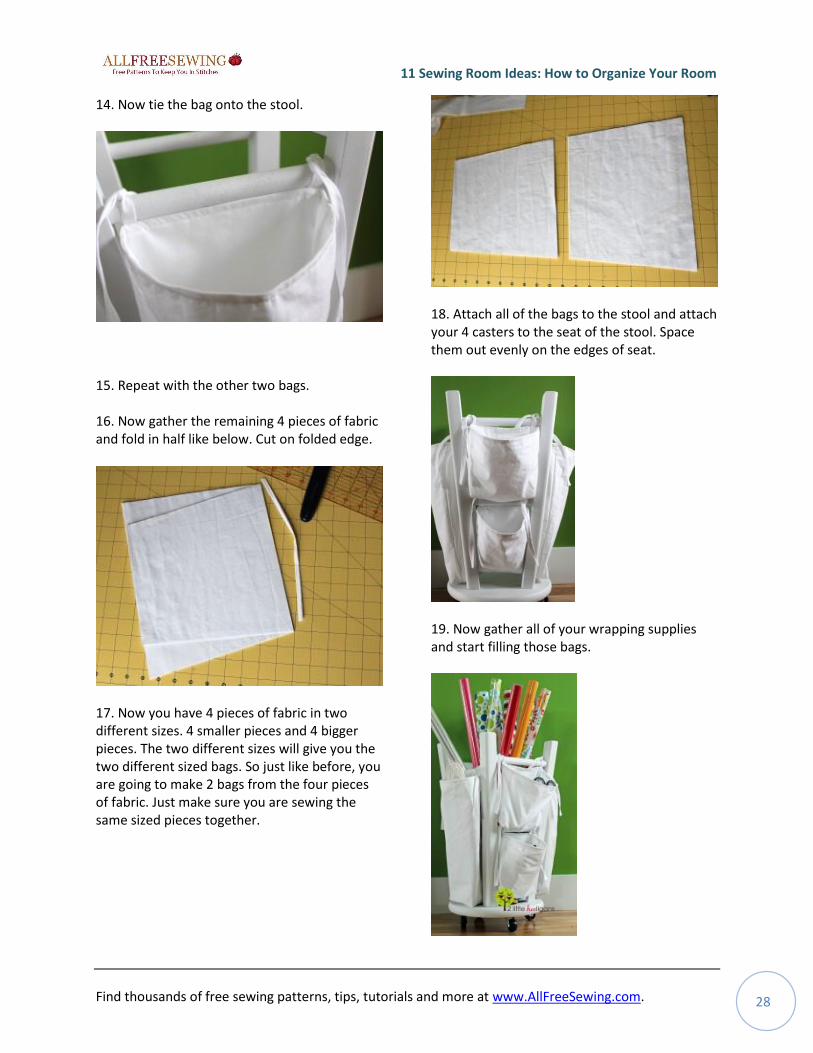
14. Now tie the bag onto the stool.
15. Repeat with the other two bags. 16. Now gather the remaining 4 pieces of fabric and fold in half like below. Cut on folded edge.
17. Now you have 4 pieces of fabric in two different sizes. 4 smaller pieces and 4 bigger pieces. The two different sizes will give you the two different sized bags. So just like before, you are going to make 2 bags from the four pieces of fabric. Just make sure you are sewing the same sized pieces together.
18. Attach all of the bags to the stool and attach your 4 casters to the seat of the stool. Space them out evenly on the edges of seat.
19. Now gather all of your wrapping supplies and start filling those bags.
11 Sewing Room Ideas: How to Organize Your Room
Find thousands of free sewing patterns, tips, tutorials and more at www.AllFreeSewing.com. 29
Sewing Needle Organizing Tip
By: Christina from 2 Little Hooligans
Sewing machine needles are small and easily
misplaced or mixed up. Try this Sewing Needle
Organizing Tip to keep your collection of sewing
needles in order. Follow these few tips to keep
your sewing needles both easily identified and
neatly organized. Never lose a needle or be
confused by its size again. By following this
organizing tip you can get your entire
workspace neatly in order and never waste time
looking for supplies again.
Materials:
Needles
Different colored markers
A box or tin
Directions:
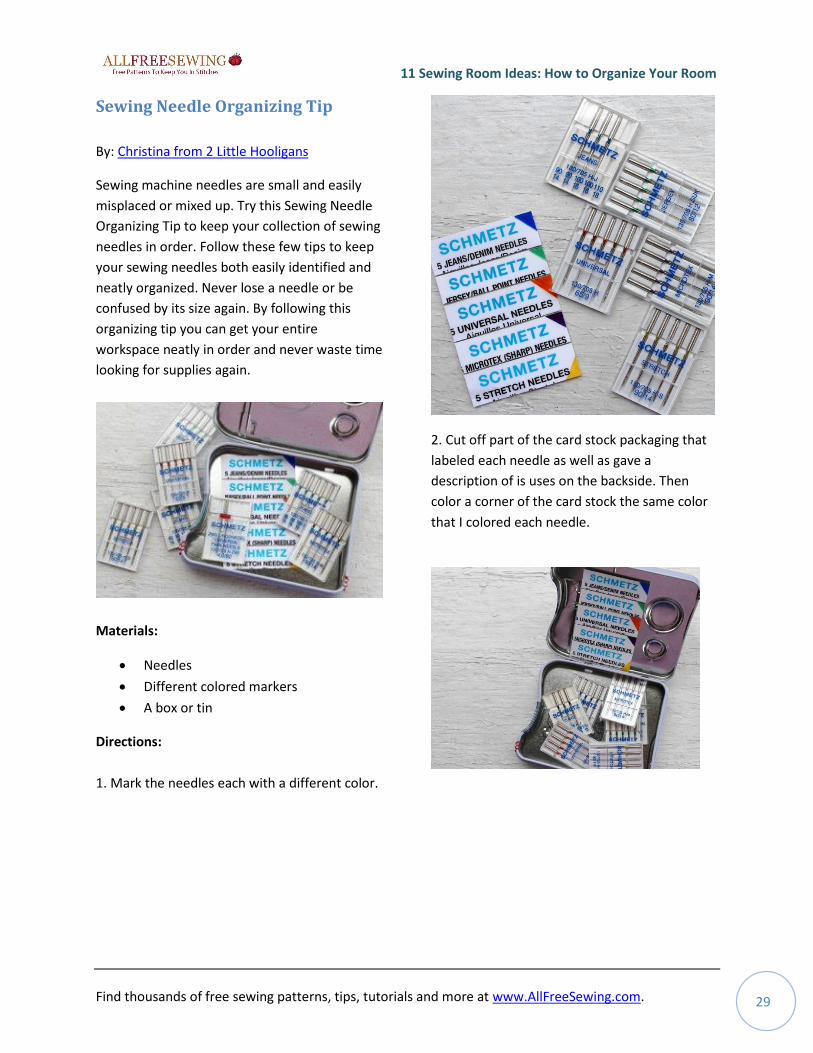
1. Mark the needles each with a different color.
2. Cut off part of the card stock packaging that
labeled each needle as well as gave a
description of is uses on the backside. Then
color a corner of the card stock the same color
that I colored each needle.
11 Sewing Room Ideas: How to Organize Your Room
Find thousands of free sewing patterns, tips, tutorials and more at www.AllFreeSewing.com. 30
Fat Quarter Project Tote
By: Christina from 2 Little Hooligans
It is normal to have a few projects in varying stages of completion, and keeping them all organized can be tricky. Use the Fat Quarter Project Tote to keep all of your started projects in one place. This tote can be made by beginners in about an hour, and by more experienced sewists in less time. Easily transport your projects if you change your workspace location, or have a place to stash them when you are not working on them with this cute pattern.
Materials:
1 wooden dowel cut in half
1 1/4 yards of fabric to make one bag
about 20″ x 16″ when folded closed
(use more or less fabric depending on
the size of your bag)
Fabric scraps for handles or you can use
ribbon or whatever else you have in
your stash
1/2 yard of cotton batting or stabilizer
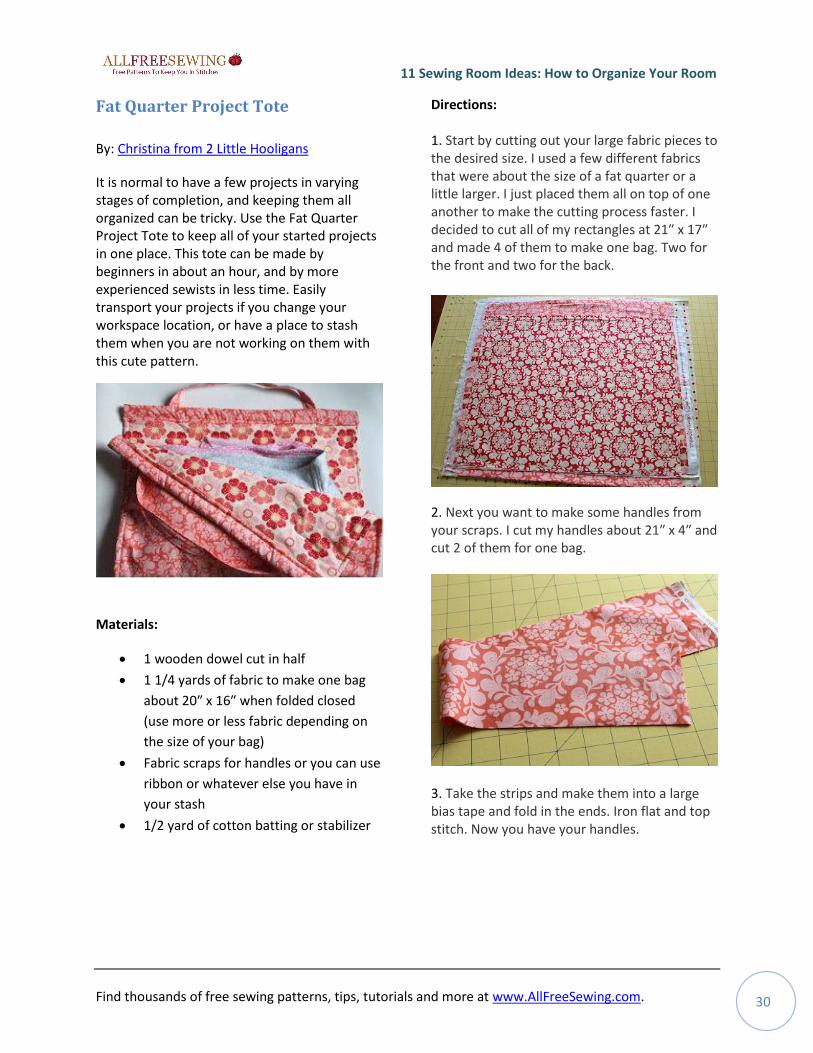
Directions: 1. Start by cutting out your large fabric pieces to the desired size. I used a few different fabrics that were about the size of a fat quarter or a little larger. I just placed them all on top of one another to make the cutting process faster. I decided to cut all of my rectangles at 21″ x 17″ and made 4 of them to make one bag. Two for the front and two for the back.
2. Next you want to make some handles from your scraps. I cut my handles about 21″ x 4″ and cut 2 of them for one bag.
3. Take the strips and make them into a large bias tape and fold in the ends. Iron flat and top stitch. Now you have your handles.
11 Sewing Room Ideas: How to Organize Your Room
Find thousands of free sewing patterns, tips, tutorials and more at www.AllFreeSewing.com. 31
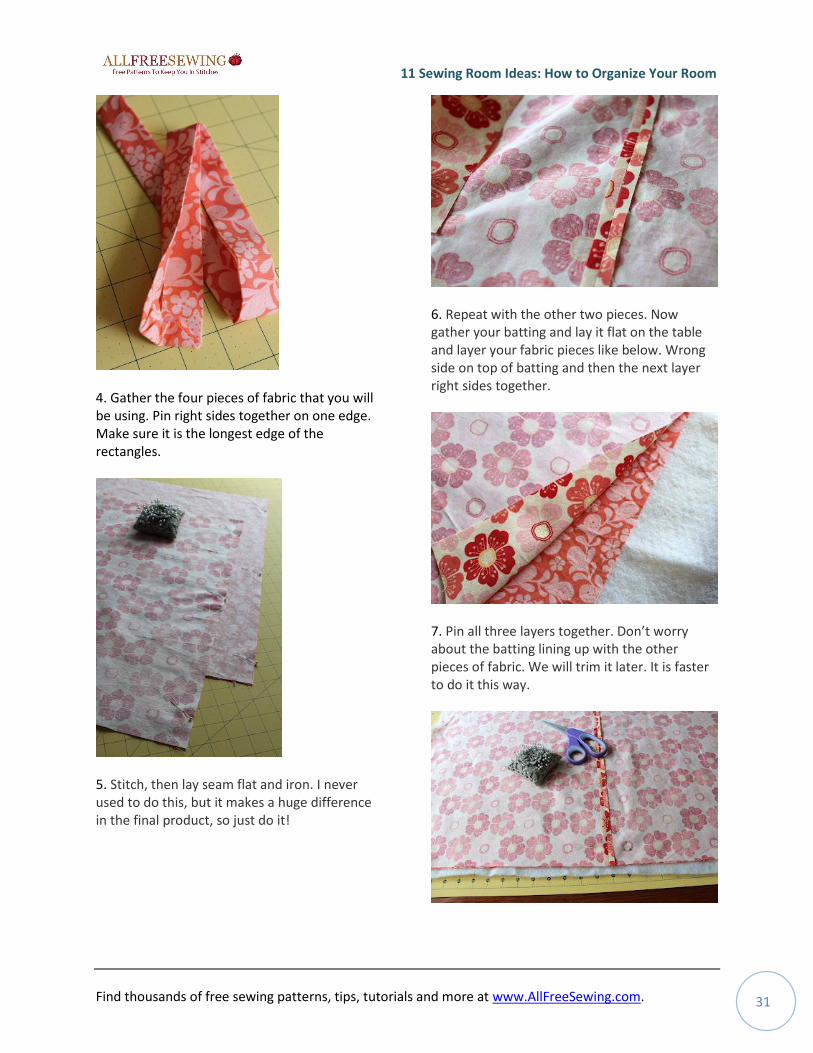
4. Gather the four pieces of fabric that you will be using. Pin right sides together on one edge. Make sure it is the longest edge of the rectangles.
5. Stitch, then lay seam flat and iron. I never used to do this, but it makes a huge difference in the final product, so just do it!
6. Repeat with the other two pieces. Now gather your batting and lay it flat on the table and layer your fabric pieces like below. Wrong side on top of batting and then the next layer right sides together.
7. Pin all three layers together. Don’t worry about the batting lining up with the other pieces of fabric. We will trim it later. It is faster to do it this way.
11 Sewing Room Ideas: How to Organize Your Room
Find thousands of free sewing patterns, tips, tutorials and more at www.AllFreeSewing.com. 32
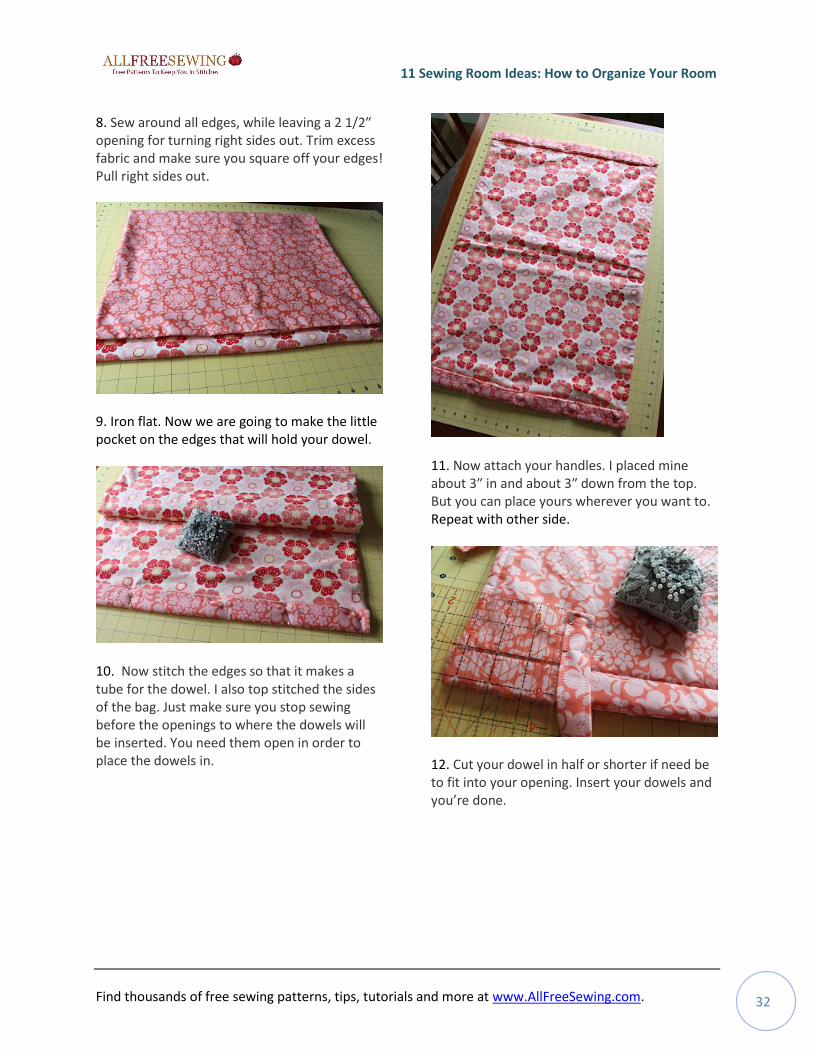
8. Sew around all edges, while leaving a 2 1/2″ opening for turning right sides out. Trim excess fabric and make sure you square off your edges! Pull right sides out.
9. Iron flat. Now we are going to make the little pocket on the edges that will hold your dowel.
10. Now stitch the edges so that it makes a tube for the dowel. I also top stitched the sides of the bag. Just make sure you stop sewing before the openings to where the dowels will be inserted. You need them open in order to place the dowels in.
11. Now attach your handles. I placed mine about 3″ in and about 3″ down from the top. But you can place yours wherever you want to. Repeat with other side.
12. Cut your dowel in half or shorter if need be to fit into your opening. Insert your dowels and you’re done.
11 Sewing Room Ideas: How to Organize Your Room
Find thousands of free sewing patterns, tips, tutorials and more at www.AllFreeSewing.com. 33
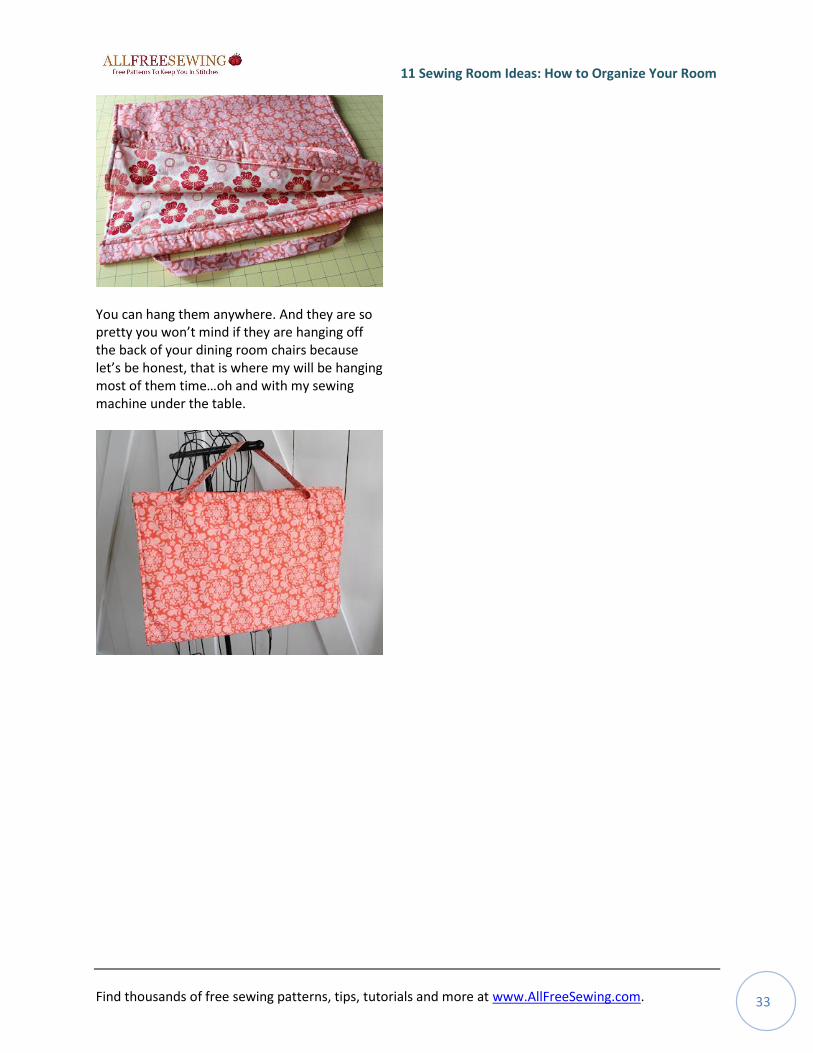
You can hang them anywhere. And they are so pretty you won’t mind if they are hanging off the back of your dining room chairs because let’s be honest, that is where my will be hanging most of them time…oh and with my sewing machine under the table.
11 Sewing Room Ideas: How to Organize Your Room
Find thousands of free sewing patterns, tips, tutorials and more at www.AllFreeSewing.com. 34
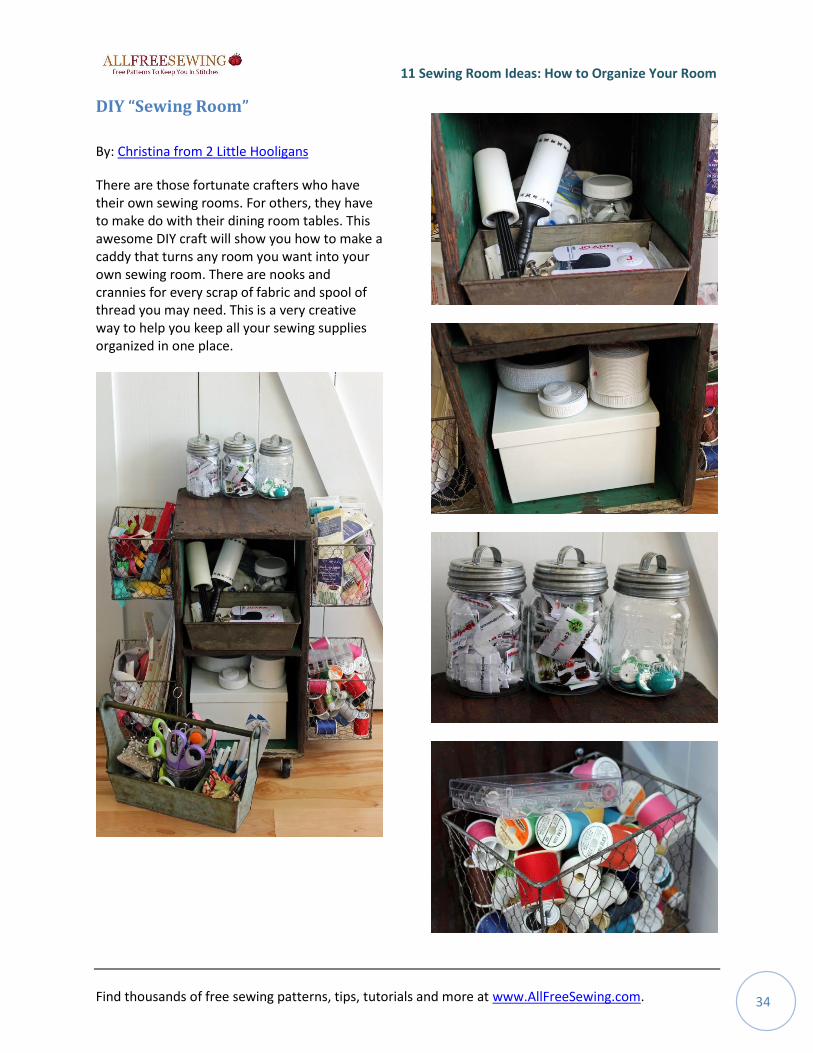
DIY “Sewing Room”
By: Christina from 2 Little Hooligans
There are those fortunate crafters who have their own sewing rooms. For others, they have to make do with their dining room tables. This awesome DIY craft will show you how to make a caddy that turns any room you want into your own sewing room. There are nooks and crannies for every scrap of fabric and spool of thread you may need. This is a very creative way to help you keep all your sewing supplies organized in one place.
11 Sewing Room Ideas: How to Organize Your Room
Find thousands of free sewing patterns, tips, tutorials and more at www.AllFreeSewing.com. 35
Handmade Pin Cushion and Zipper
Pouch
By Emma Jeffrey for Fiskars
This adorable Handmade Pin Cushion and Zipper Pouch set is the perfect gift for the fellow sewists in your life! Roomy and easily adjusted for size, the sewn zipper pouch makes for a great place to store scissors, rulers, pens, and even small needle cases. It's the ideal match for the DIY pin cushion, which sports a soft pillowed look and is topped off with a button. Safely store all the sewing miscellanea that inevitably disappears if you don't keep it all in one place.
Materials:
Fabric
Pins
Craft filling
Thread
Sewing machine
Iron and ironing board
Lightweight fusible interfacing
9” zipper
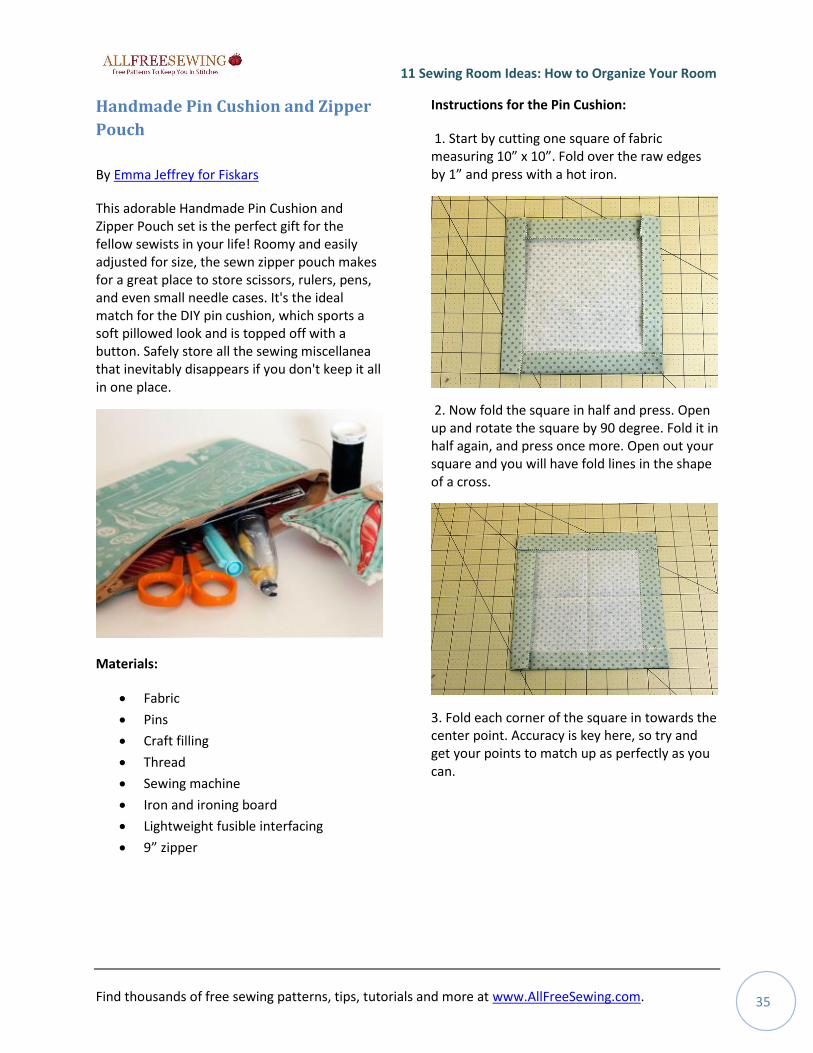
Instructions for the Pin Cushion:
1. Start by cutting one square of fabric measuring 10” x 10”. Fold over the raw edges by 1” and press with a hot iron.
2. Now fold the square in half and press. Open up and rotate the square by 90 degree. Fold it in half again, and press once more. Open out your square and you will have fold lines in the shape of a cross.
3. Fold each corner of the square in towards the center point. Accuracy is key here, so try and get your points to match up as perfectly as you can.
11 Sewing Room Ideas: How to Organize Your Room
Find thousands of free sewing patterns, tips, tutorials and more at www.AllFreeSewing.com. 36
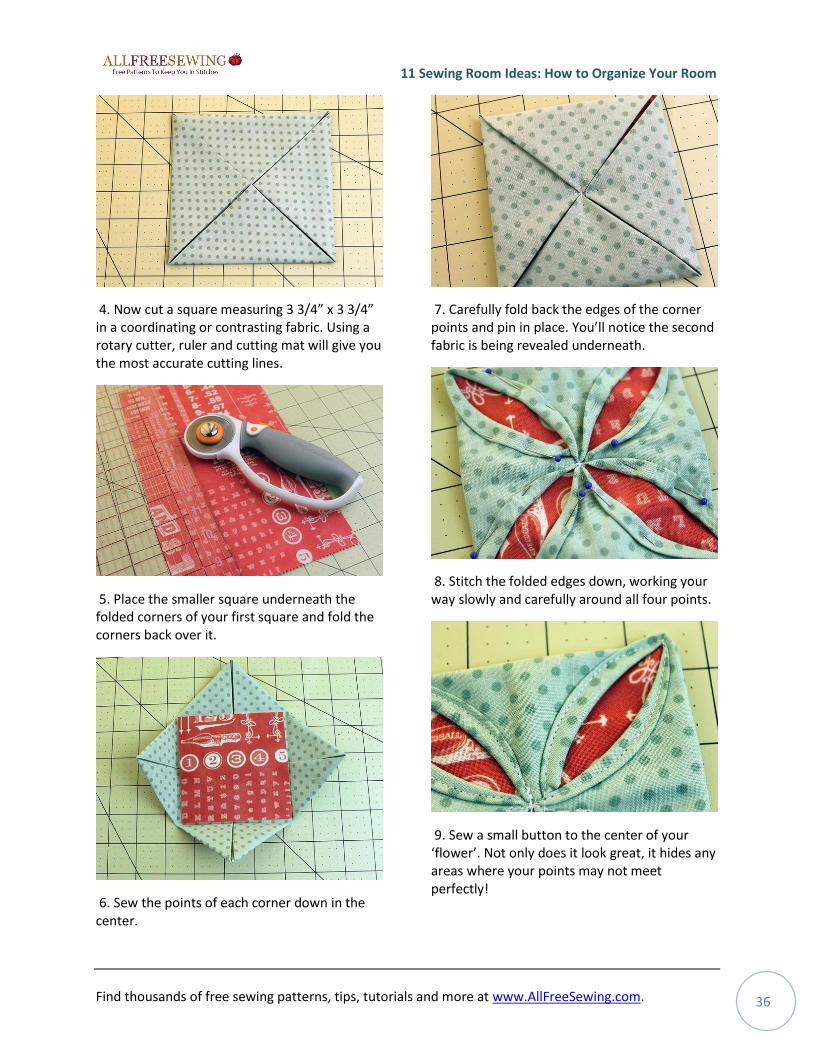
4. Now cut a square measuring 3 3/4” x 3 3/4” in a coordinating or contrasting fabric. Using a rotary cutter, ruler and cutting mat will give you the most accurate cutting lines.
5. Place the smaller square underneath the folded corners of your first square and fold the corners back over it.
6. Sew the points of each corner down in the center.
7. Carefully fold back the edges of the corner points and pin in place. You’ll notice the second fabric is being revealed underneath.
8. Stitch the folded edges down, working your way slowly and carefully around all four points.
9. Sew a small button to the center of your ‘flower’. Not only does it look great, it hides any areas where your points may not meet perfectly!
11 Sewing Room Ideas: How to Organize Your Room
Find thousands of free sewing patterns, tips, tutorials and more at www.AllFreeSewing.com. 37
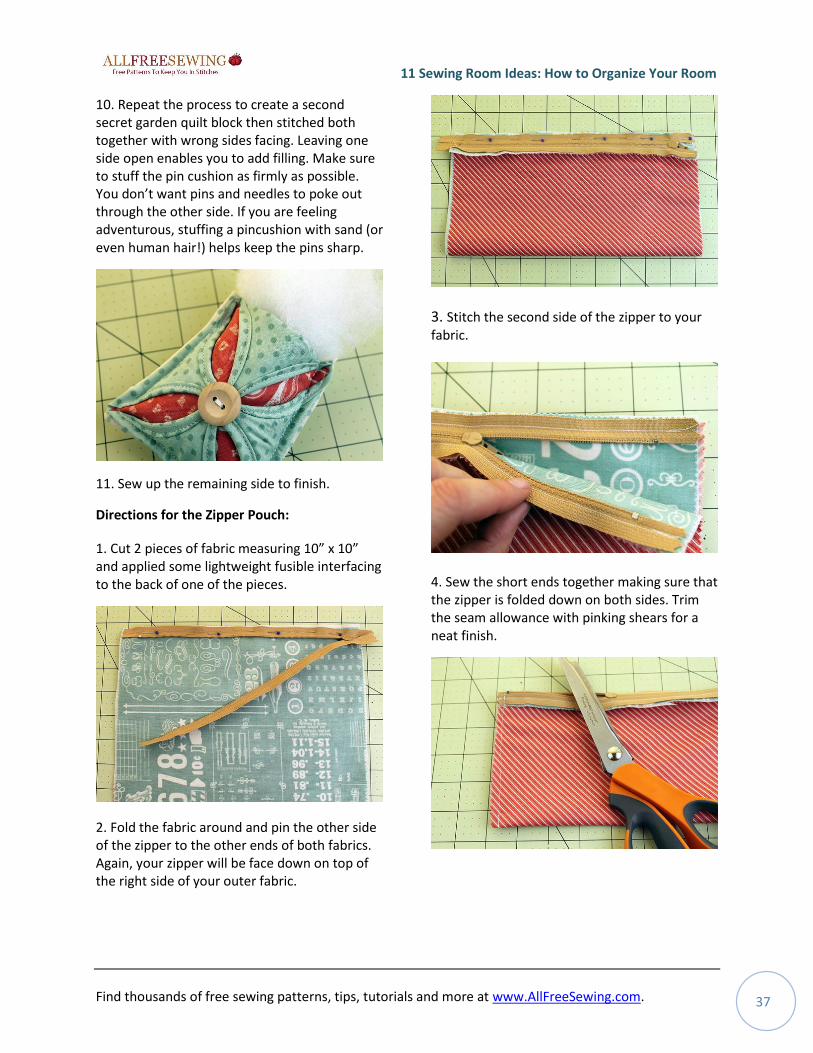
10. Repeat the process to create a second secret garden quilt block then stitched both together with wrong sides facing. Leaving one side open enables you to add filling. Make sure to stuff the pin cushion as firmly as possible. You don’t want pins and needles to poke out through the other side. If you are feeling adventurous, stuffing a pincushion with sand (or even human hair!) helps keep the pins sharp.
11. Sew up the remaining side to finish.
Directions for the Zipper Pouch:
1. Cut 2 pieces of fabric measuring 10” x 10” and applied some lightweight fusible interfacing to the back of one of the pieces.
2. Fold the fabric around and pin the other side of the zipper to the other ends of both fabrics. Again, your zipper will be face down on top of the right side of your outer fabric.
3. Stitch the second side of the zipper to your fabric.
4. Sew the short ends together making sure that the zipper is folded down on both sides. Trim the seam allowance with pinking shears for a neat finish.
11 Sewing Room Ideas: How to Organize Your Room
Find thousands of free sewing patterns, tips, tutorials and more at www.AllFreeSewing.com. 38
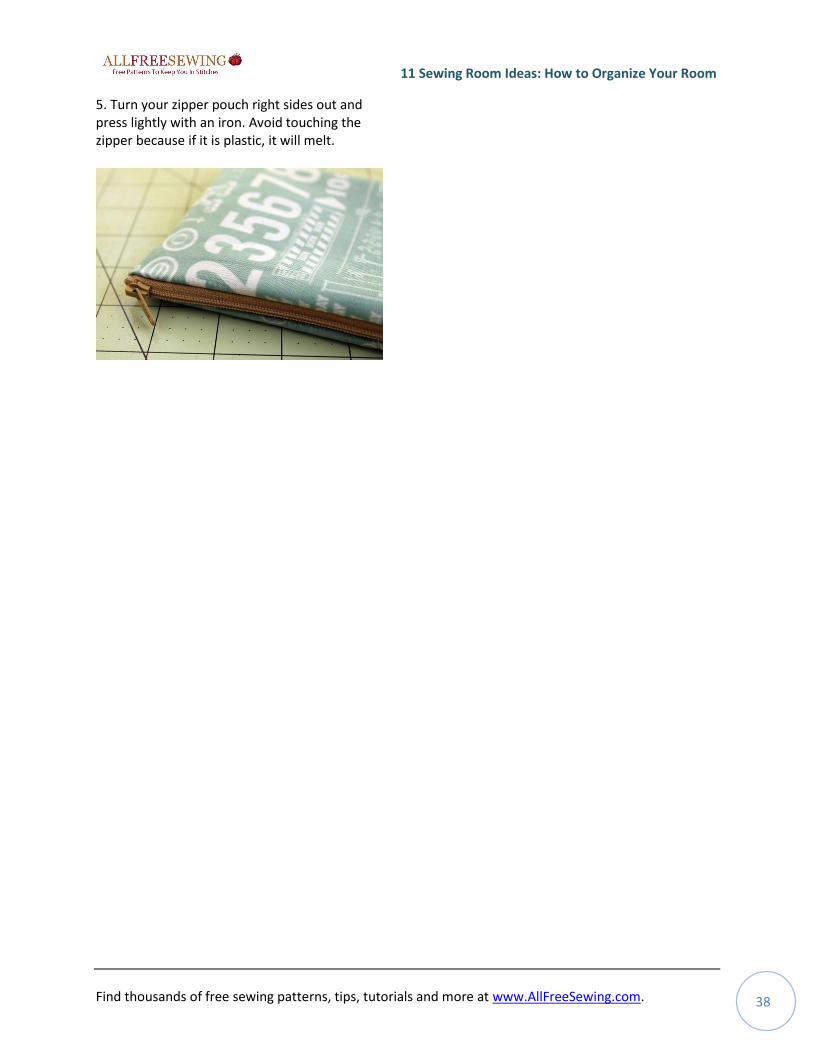
5. Turn your zipper pouch right sides out and press lightly with an iron. Avoid touching the zipper because if it is plastic, it will melt.
11 Sewing Room Ideas: How to Organize Your Room
Find thousands of free sewing patterns, tips, tutorials and more at www.AllFreeSewing.com. 39
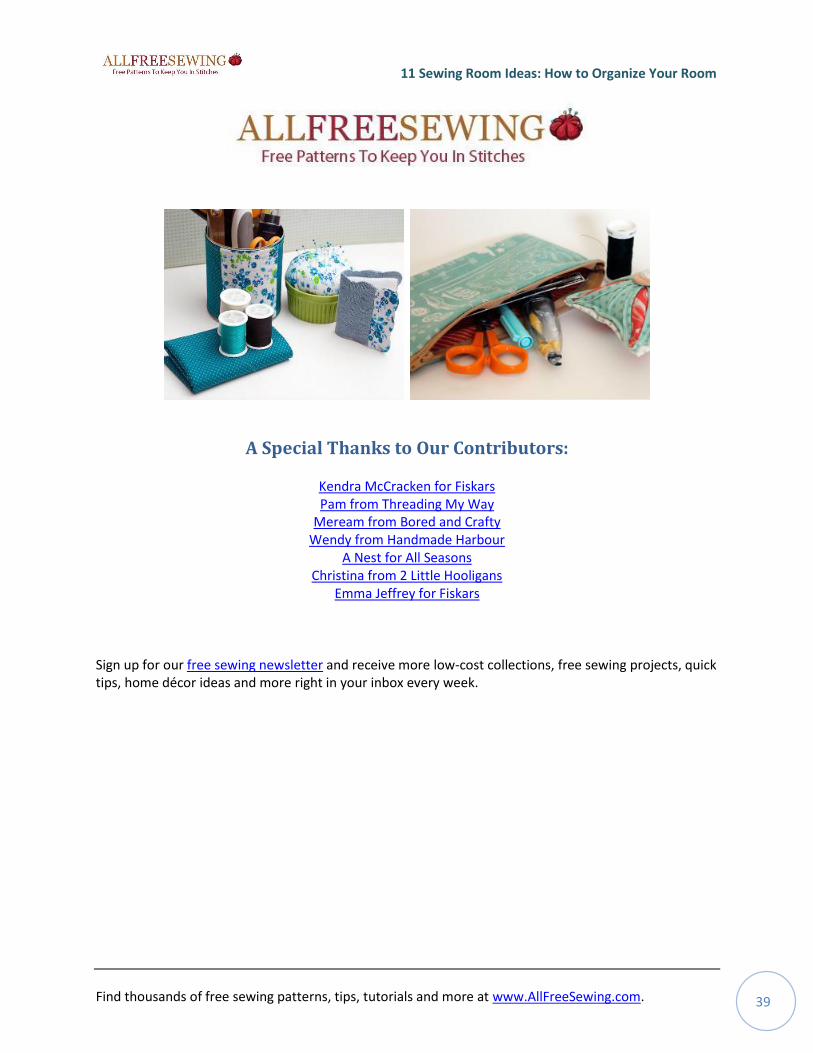
A Special Thanks to Our Contributors:
Kendra McCracken for Fiskars Pam from Threading My Way
Meream from Bored and Crafty Wendy from Handmade Harbour
A Nest for All Seasons Christina from 2 Little Hooligans
Emma Jeffrey for Fiskars
Sign up for our free sewing newsletter and receive more low-cost collections, free sewing projects, quick tips, home décor ideas and more right in your inbox every week.