setting up your courses & using schoology - aiken county
TRANSCRIPT
Setting up your courses & using Schoology
Schoology is ACPSD’s LMS or Learning Management System, or digital classroom space.
Your courses for each class should be pre-loaded into your Schoology at the beginning of the school
year. Your courses from the previous school year are archived and still accessible, but any things that you liked
and would like to use again should be saves to your resources to use in other courses. You can save individual
items, folders, or even whole course sets.
This guide will walk you through setting up your course to dealing with common issues that you will
encounter with the software and how to easily fix them. To find a specific topic, press Ctrl+F to search for a
specific issue. Use the links in the Table of Contents to navigate through the document to general topics.
Table of Contents
1. Logging in to Schoology
2. Navigating Schoology
3. Notifications
4. Schoology Messages
5. Magnifying Glass
6. Setting up Gradebook
7. Your Courses
8. What will your course page look like?
9. Creating a course folder
10. Editing Course Folders
11. Adding Media
12. Assignment Types
13. Creating an Assignment Item
14. Grading & Feedback on Assignments
15. Test/Quiz Items
16. Assessment Items
17. Audio/Video Recording
18. Creating Resources
19. Adding Apps to Schoology
20. Quick Help Guide
Logging in to Schoology
• Go to acpsd.schoology.com by clicking here or navigate from the ACPSD Digital Resources page.
• Teachers will use their email and district password to login
o Students will use their lunch number and their password (the default is usually FCTstudent, but
you can view their password if they are in your course.)
▪ For password issues, contact your school media specialist.
▪ You can also reset a student’s password as long as they are in your course (more on this
later).
Still having trouble logging in? Contact [email protected] or [email protected]
Top of Section
Back to Table of Contents
Navigating Schoology
Schoology is an easy tool that can help you organize your digital learning space but there are a few tips
and tricks to getting around like a pro and understanding where to go for what. There are designated areas for
your courses, your groups, and your resources which can all be found at the top of the Schoology webpage
next to the Aiken County logo. Courses are where you will probably spend most of your time and will be your
digital classroom space. Groups are similar to courses but do not have places for graded assignments and are
better used for communication and sharing of resources and ideas within the school community. Resources is
where you can store course materials that you have made, share materials between teachers, or find
materials made publicly available on Schoology.
On the home page you will see by default recent activity such as course updates or announcements
taking up most of the page, with upcoming events or assignments along the right-hand side of the page. When
you start assigning items to your students or have coursework for courses you are enrolled in, this is where
reminders will show up as long as there is a due date assigned for the item. You may also see school or district
events show up here as well.
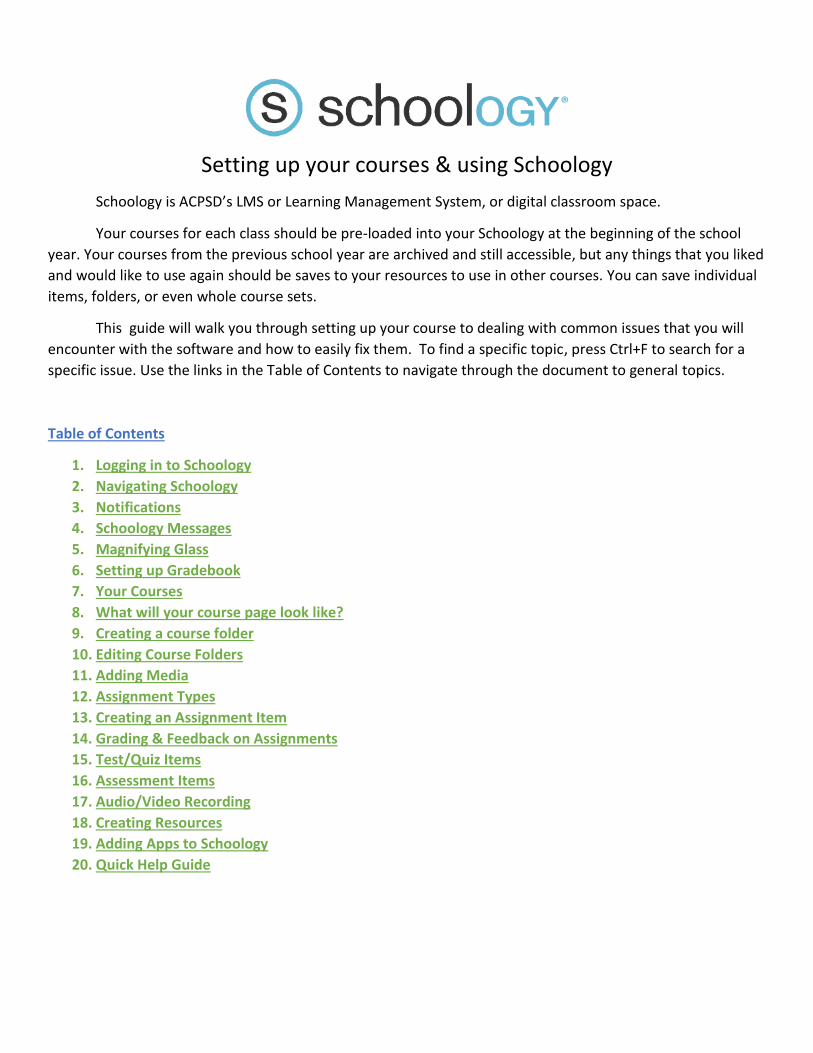
In the recent activity part of the home page you can organize and limit what you are seeing. You can
select one of the options in the drop-down menu in the right-hand corner of the area, as seen in the image
below. You can sort to see all of the most recent activity or just updates (announcements) or polls (short
survey questions that can be part of an update).
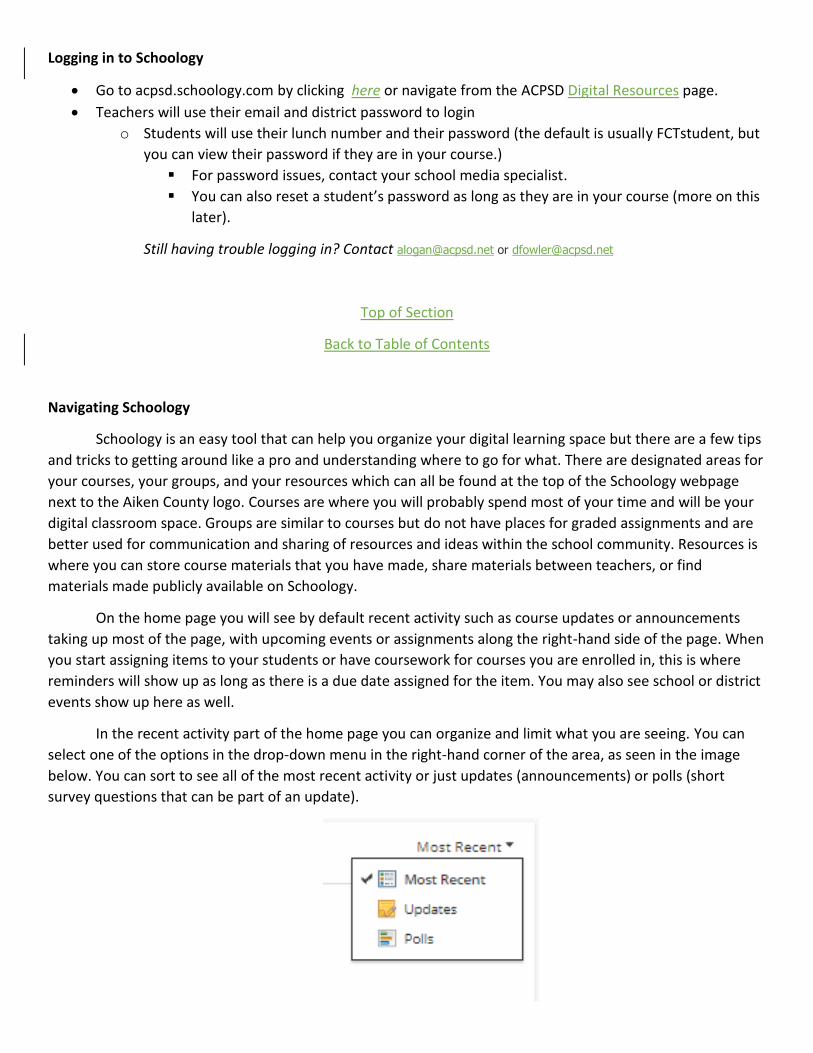
You can also quickly add items to your courses in the recent activity area. At the top of the area you
will see options to quickly add items to your courses. You can do this for individual courses, groups of courses,
or all your courses if you need to. From the home page you can post an update or announcement with
information your class may need along with any attached files or even poll questions, an assignment where
students need to upload a file an event, or a personal blog post. The image below shows the quick-add menu.
For more information about how to use and post updates on Schoology, check out some of these
resources from Casey Troutman.
Find more about Schoology updates here.
You can also switch the home page view to your “Course Dashboard” by clicking the option for it right
above the recent activity box. Here you can see a grid-view list of your courses, both ones you run and ones
you participate in, on one page. Your upcoming events and dates calendar will still be on the right side of the
page.
For more information on how to use the Schoology Calendar, watch the video below provided by Casey
Troutman and click here.
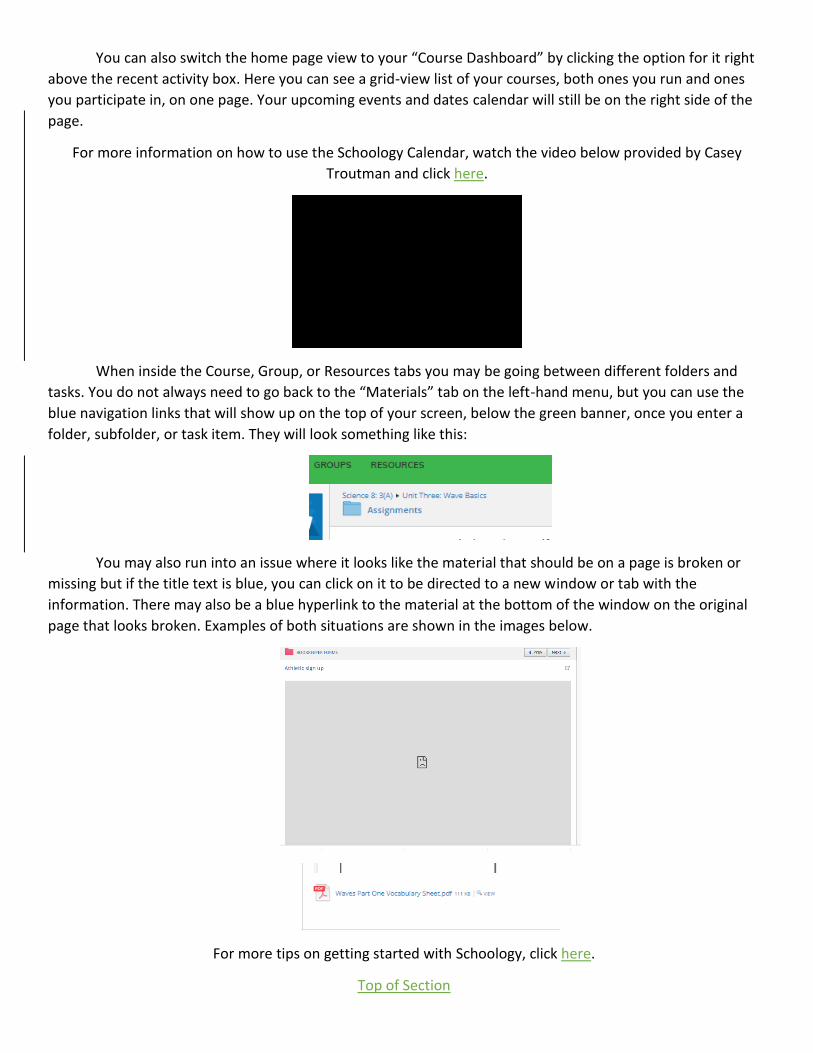
When inside the Course, Group, or Resources tabs you may be going between different folders and
tasks. You do not always need to go back to the “Materials” tab on the left-hand menu, but you can use the
blue navigation links that will show up on the top of your screen, below the green banner, once you enter a
folder, subfolder, or task item. They will look something like this:
You may also run into an issue where it looks like the material that should be on a page is broken or
missing but if the title text is blue, you can click on it to be directed to a new window or tab with the
information. There may also be a blue hyperlink to the material at the bottom of the window on the original
page that looks broken. Examples of both situations are shown in the images below.
For more tips on getting started with Schoology, click here.
Top of Section
Back to Table of Contents
Notifications
Once you are on Schoology you can start getting notifications. You can personalize how you get and what you get
notifications for.
• Click on the bell icon at the top of the page on the right, right next to your name.
o If it has a little yellow circle with a number on it, it means you have notifications. Sometimes you just
have to click on the bell to remove this number, but sometimes you have to click through each
notification for it to go away.
o A short list of your notifications from your courses and groups will appear. At the bottom of the list
there will be a blue button that says “View All,” where you can see a complete list in a new window.
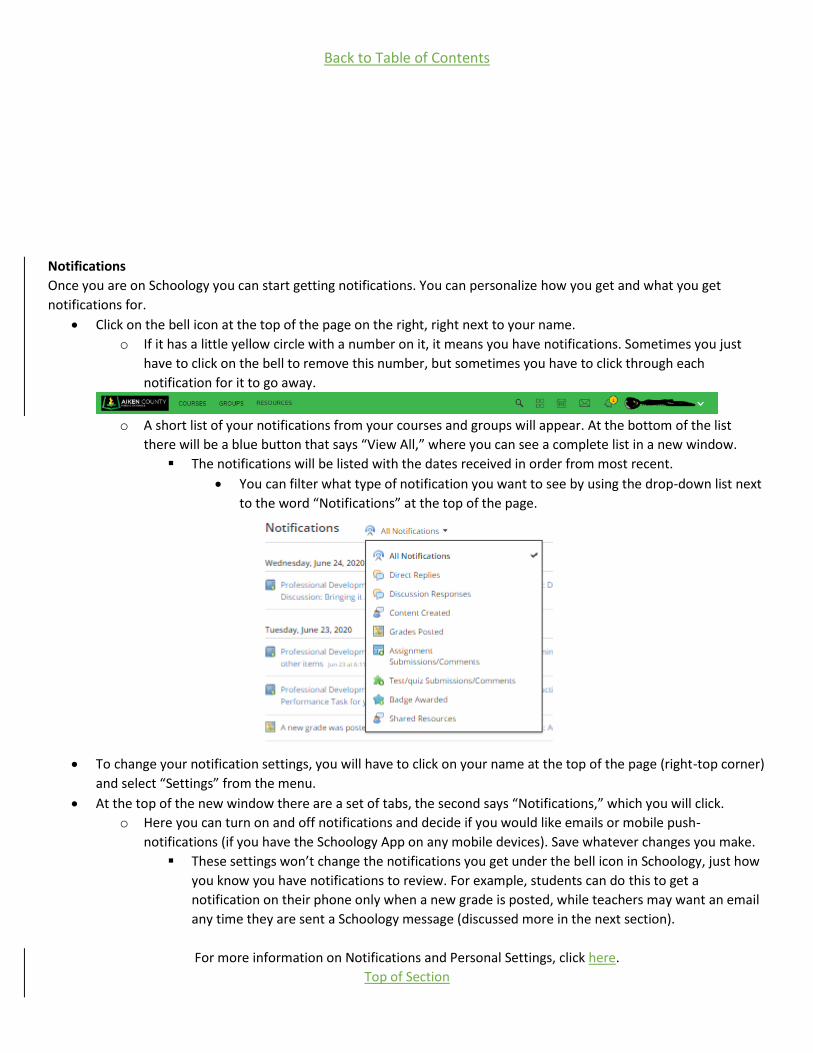
▪ The notifications will be listed with the dates received in order from most recent.
• You can filter what type of notification you want to see by using the drop-down list next
to the word “Notifications” at the top of the page.
• To change your notification settings, you will have to click on your name at the top of the page (right-top corner)
and select “Settings” from the menu.
• At the top of the new window there are a set of tabs, the second says “Notifications,” which you will click.
o Here you can turn on and off notifications and decide if you would like emails or mobile push-
notifications (if you have the Schoology App on any mobile devices). Save whatever changes you make.
▪ These settings won’t change the notifications you get under the bell icon in Schoology, just how
you know you have notifications to review. For example, students can do this to get a
notification on their phone only when a new grade is posted, while teachers may want an email
any time they are sent a Schoology message (discussed more in the next section).
For more information on Notifications and Personal Settings, click here.
Top of Section
Back to Table of Contents
Schoology Messages
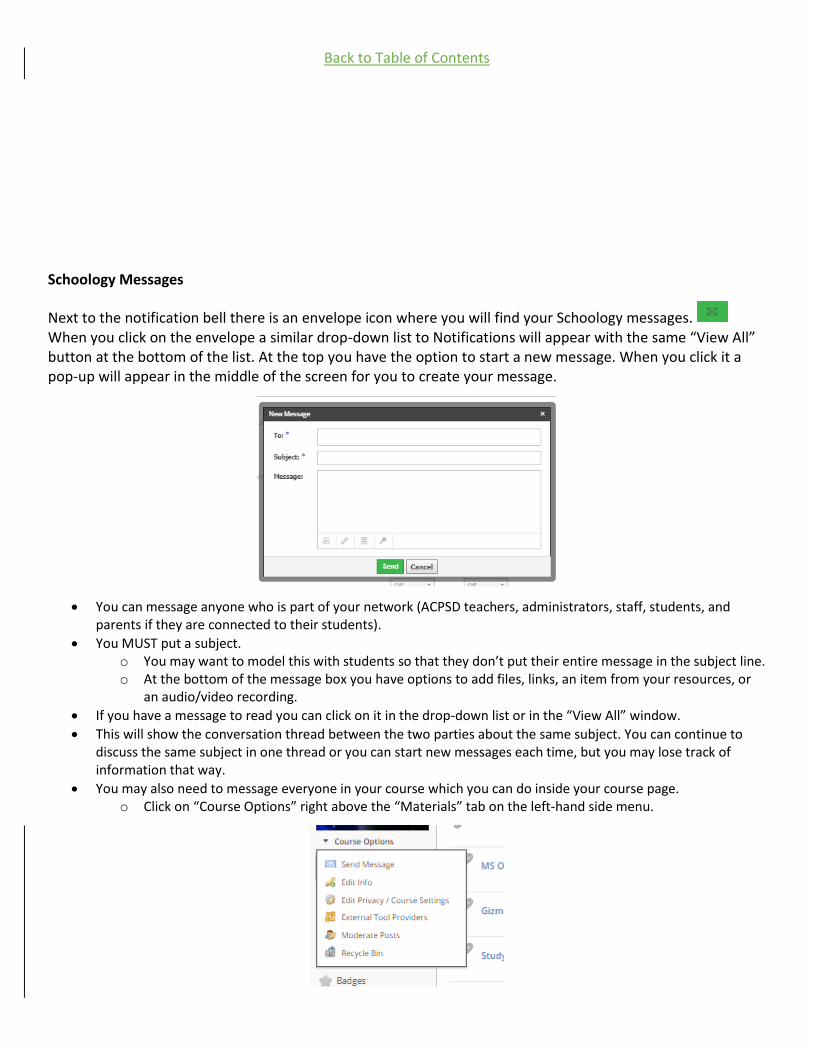
Next to the notification bell there is an envelope icon where you will find your Schoology messages. When you click on the envelope a similar drop-down list to Notifications will appear with the same “View All” button at the bottom of the list. At the top you have the option to start a new message. When you click it a pop-up will appear in the middle of the screen for you to create your message.
• You can message anyone who is part of your network (ACPSD teachers, administrators, staff, students, and parents if they are connected to their students).
• You MUST put a subject. o You may want to model this with students so that they don’t put their entire message in the subject line. o At the bottom of the message box you have options to add files, links, an item from your resources, or
an audio/video recording.
• If you have a message to read you can click on it in the drop-down list or in the “View All” window.
• This will show the conversation thread between the two parties about the same subject. You can continue to discuss the same subject in one thread or you can start new messages each time, but you may lose track of information that way.
• You may also need to message everyone in your course which you can do inside your course page. o Click on “Course Options” right above the “Materials” tab on the left-hand side menu.
o You have a few other options in this menu which will be discussed later, but to send your course message hit “Send Message.”
o A window will pop up to allow you to write your message and to choose who in the course receives the message.
For more information on Course Messaging, heck out these resources provided by Casey Troutman.
For more information about Schoology messages, click here, here, and here.
Top of Section
Back to Table of Contents
Magnifying Glass
The icon that looks like a magnifying glass on the header bar can be used to quickly find courses, groups,
resources, and other material you have on Schoology. For example, if you knew you created a folder named
“Test 123” but couldn’t remember where you had created it, you can type the title or a part of the title and it
will give you some options. Clicking on the result will bring you there, or you can click “See more results” at
the bottom of the list. This will not help troubleshoot things on Schoology or find you help.
To find Schoology tutorials, help, or contact Schoology district support, go to the bottom of any page on
Schoology and click “Support” in the footer. A pop-up will show up with ways to message district personel and
will give links to the help center, community, and latest news pages. The Schoology Blog link may also be
helpful. The magnifying glass icons at the tops of those pages will bring you to topics outside your personal
Schoology that can hep you figure out some issues you may be having.
Top of Section
Back to Table of Contents
Setting Up Gradebook
Setting up your Schoology gradebook is very similar to setting up your PowerSchool gradebook.
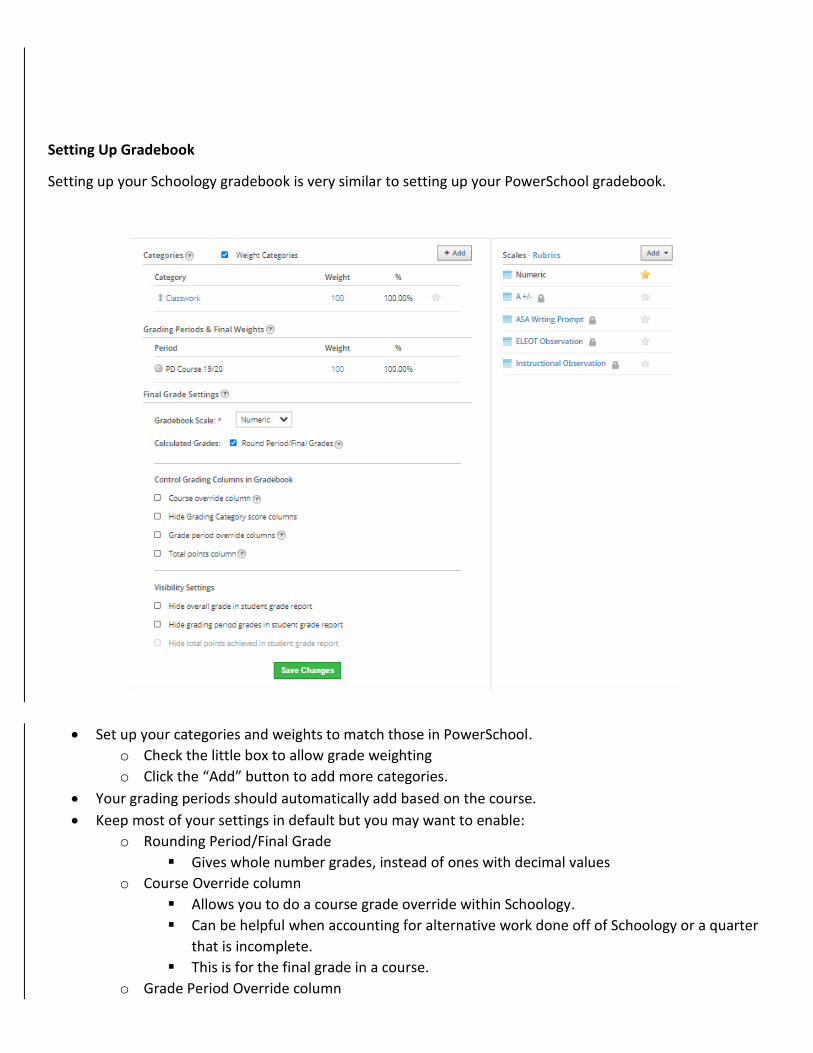
• Set up your categories and weights to match those in PowerSchool.
o Check the little box to allow grade weighting
o Click the “Add” button to add more categories.
• Your grading periods should automatically add based on the course.
• Keep most of your settings in default but you may want to enable:
o Rounding Period/Final Grade
▪ Gives whole number grades, instead of ones with decimal values
o Course Override column
▪ Allows you to do a course grade override within Schoology.
▪ Can be helpful when accounting for alternative work done off of Schoology or a quarter
that is incomplete.
▪ This is for the final grade in a course.
o Grade Period Override column

▪ Similar to course override but for a quarter grade.
• Make sure you save your changes.
• On the right-hand side of the page you can choose default rubrics and add rubrics.
o Clicking the menu above this section will give you options to create custom grading scales and
rubrics
o Custom rubrics can also be made in “Resources.”
• You can copy your settings to other courses with the same grade categories.
For more information about setting up your gradebook, click here.
For information about reading and using your gradebook, click here.
Top of Section
Back to Table of Contents
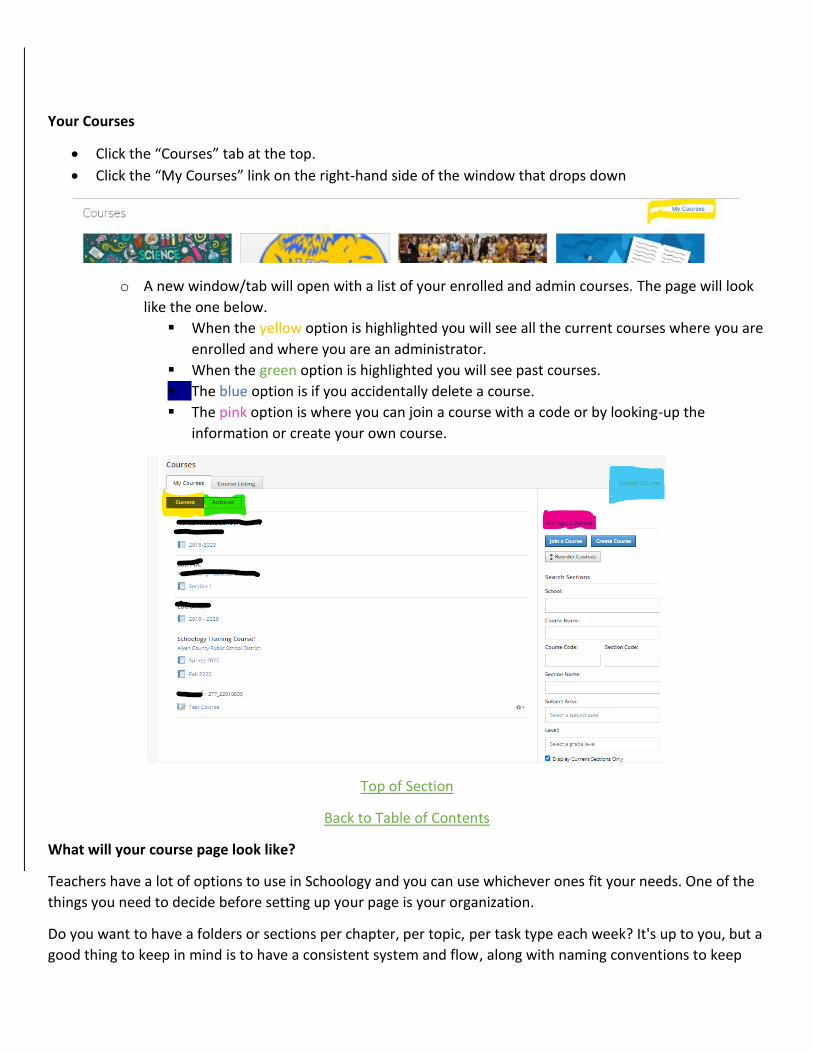
Your Courses
• Click the “Courses” tab at the top.
• Click the “My Courses” link on the right-hand side of the window that drops down
o A new window/tab will open with a list of your enrolled and admin courses. The page will look
like the one below.
▪ When the yellow option is highlighted you will see all the current courses where you are
enrolled and where you are an administrator.
▪ When the green option is highlighted you will see past courses.
▪ The blue option is if you accidentally delete a course.
▪ The pink option is where you can join a course with a code or by looking-up the
information or create your own course.
Top of Section
Back to Table of Contents
What will your course page look like?
Teachers have a lot of options to use in Schoology and you can use whichever ones fit your needs. One of the
things you need to decide before setting up your page is your organization.
Do you want to have a folders or sections per chapter, per topic, per task type each week? It's up to you, but a
good thing to keep in mind is to have a consistent system and flow, along with naming conventions to keep
you and your students organized. You can also use different colors to keep folders organized and to give
additional information.
Example: “Hey, miss where do I find the assignment?”
“Billy, it's in the assignments folder.”
“I don’t see it.”
“It's the blue folder.”
“I found it.”
Subfolders can be used in any folder that you create but beware of stacking to many folders. More click
through to more screens can mean it's harder to find or get to the assigned task.
The organization of the content in the folders is also important. You can reorder the content in folders
whenever you want but if they always follow the same pattern the tasks will always be easy to find. You can
group them by type, alphabetize them, organize by due date or level of importance, or just by the default
which is what was added when (newest at the bottom, oldest at the top).
Once you have these decisions made you can start to create and customize your course and folders.
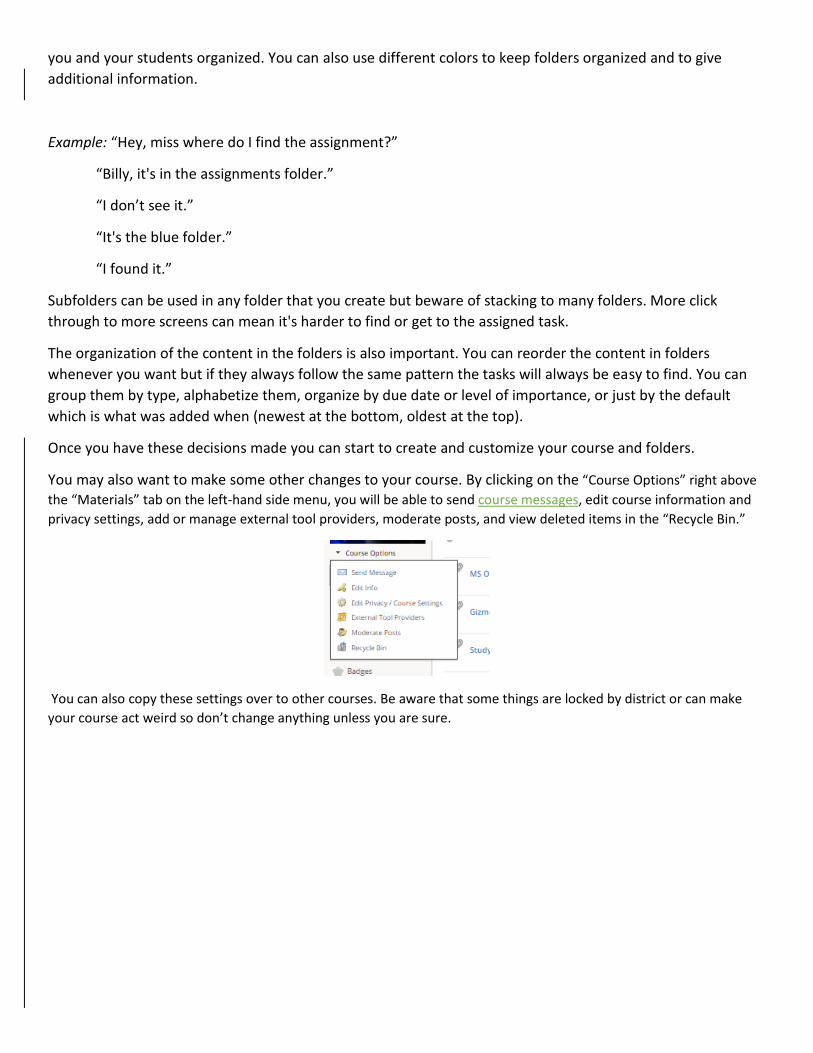
You may also want to make some other changes to your course. By clicking on the “Course Options” right above
the “Materials” tab on the left-hand side menu, you will be able to send course messages, edit course information and
privacy settings, add or manage external tool providers, moderate posts, and view deleted items in the “Recycle Bin.”
You can also copy these settings over to other courses. Be aware that some things are locked by district or can make
your course act weird so don’t change anything unless you are sure.
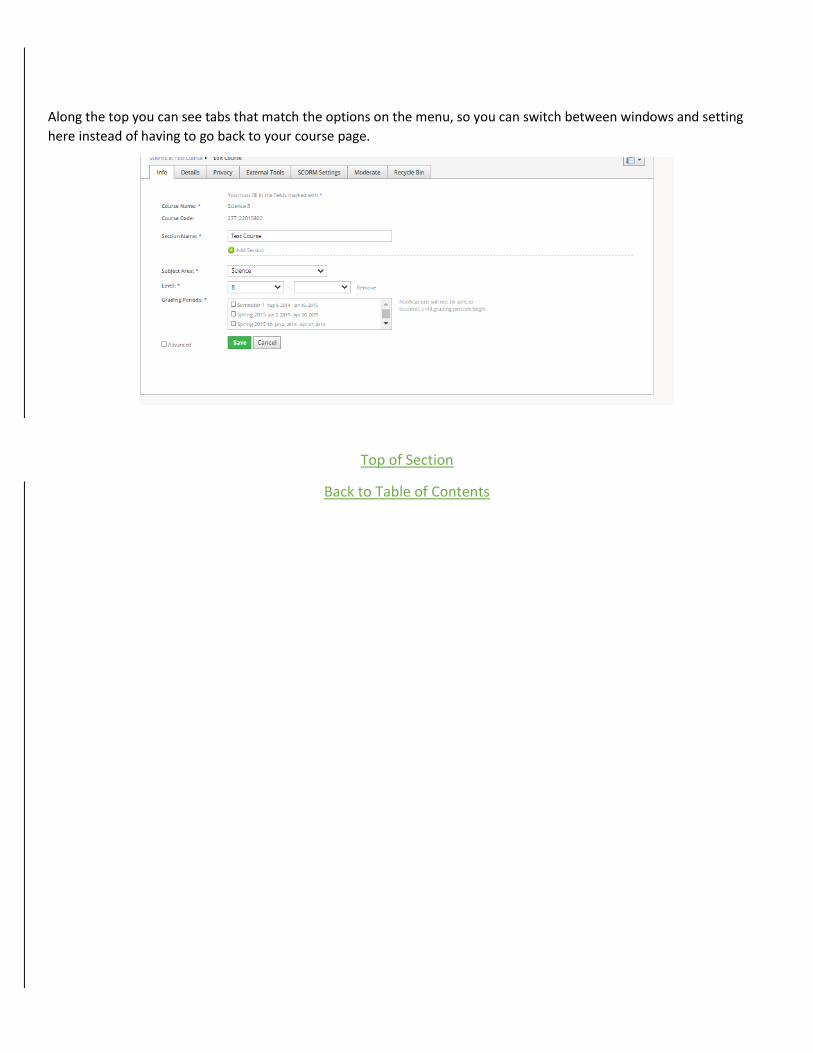
Along the top you can see tabs that match the options on the menu, so you can switch between windows and setting
here instead of having to go back to your course page.
Top of Section
Back to Table of Contents
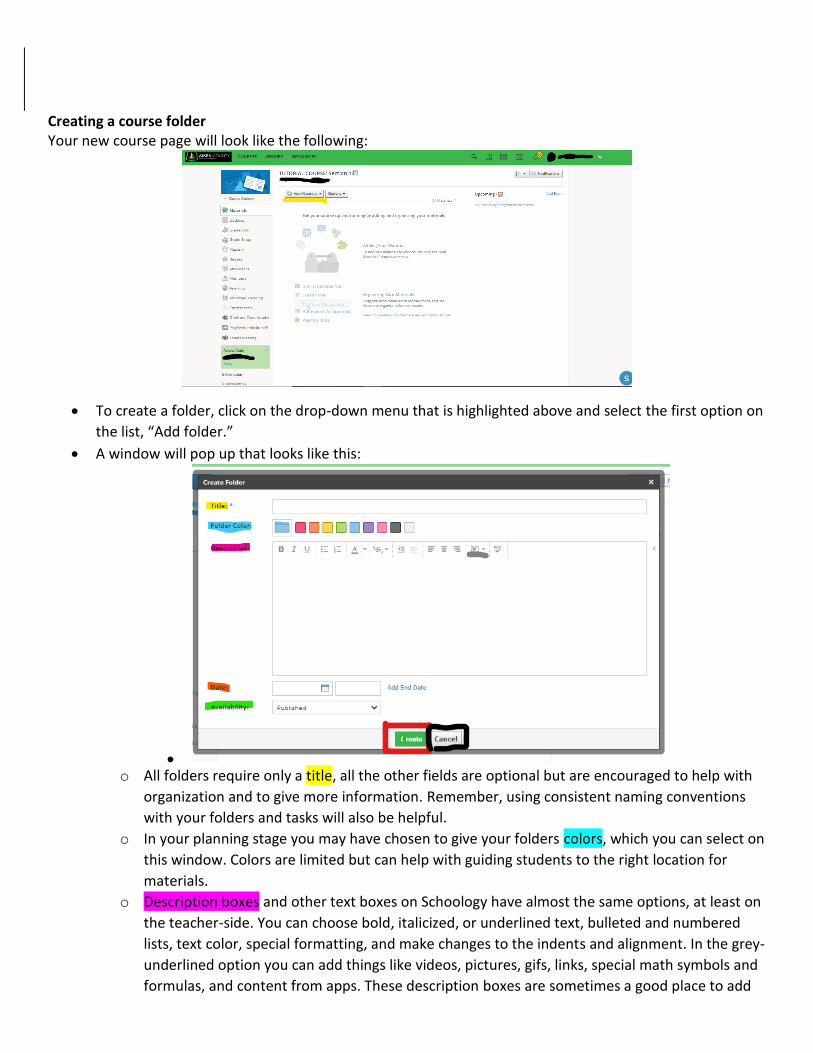
Creating a course folder Your new course page will look like the following:
• To create a folder, click on the drop-down menu that is highlighted above and select the first option on
the list, “Add folder.”
• A window will pop up that looks like this:
• o All folders require only a title, all the other fields are optional but are encouraged to help with
organization and to give more information. Remember, using consistent naming conventions
with your folders and tasks will also be helpful.
o In your planning stage you may have chosen to give your folders colors, which you can select on
this window. Colors are limited but can help with guiding students to the right location for
materials.
o Description boxes and other text boxes on Schoology have almost the same options, at least on
the teacher-side. You can choose bold, italicized, or underlined text, bulleted and numbered
lists, text color, special formatting, and make changes to the indents and alignment. In the grey-
underlined option you can add things like videos, pictures, gifs, links, special math symbols and
formulas, and content from apps. These description boxes are sometimes a good place to add

some customization to your page, like in the example shown below. This is an intermediate
level skill, so try starting with a simple sentence or list to start, you can always change, edit, and
customize as you get more comfortable.
o By default, all folders are visible and accessible to the student as long as the course is open and
they are enrolled, but you can change that. The date function allows you to set roll-out and roll-
back dates for folders to be accessed. The folder will be visible, although lighter, but students
won’t be able to open it before the date you set, or after an end date if you choose one. If you
would like students to not be able to see the folder yet, you can set this after you are done
creating the folder or in the next step.
o Availability allows you to make the folder visible to your students. By default, it will be set to
“Published,” but you can change this when making the folder and after it has been added to
your course. “Unpublished” means you and other admins for the course can see and open the
folder but students can’t. Adding a start date or a date range is similar to the date feature
discussed in the last point, but this will make the folder only appear on the date or dates you
have set. Again, all of this can be changed even after the folder is created. You also have this
option for individual tasks in a folder.
o To finish your folder, click “Create” or click “Cancel” to close. Changes will only be saved and
the folder will only be created if you click “Create,” it will not automatically save.
For more information on how to use folders and organize them in your course, click here.
Top of Section
Back to Table of Contents
Editing Course Folders
After you have created folders you have a few options. You can edit them to fix mistakes or to add more or
less information, you can add subfolders, or start adding tasks and content to them.
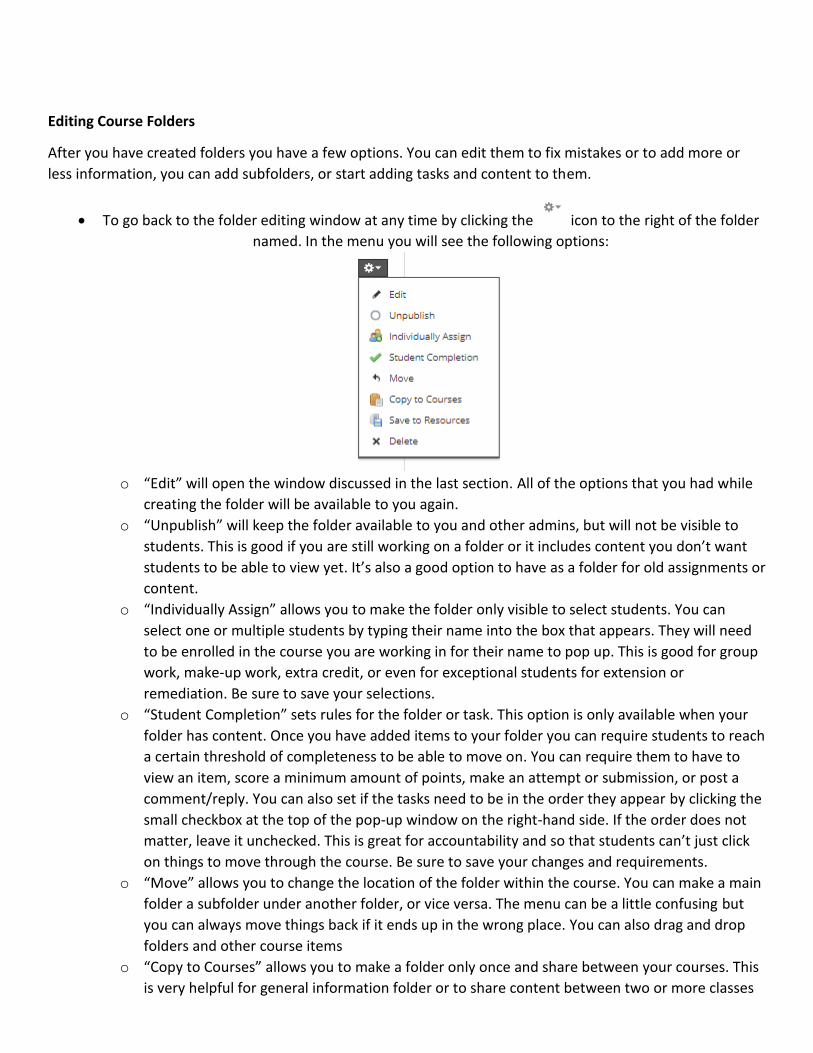
• To go back to the folder editing window at any time by clicking the icon to the right of the folder
named. In the menu you will see the following options:
o “Edit” will open the window discussed in the last section. All of the options that you had while
creating the folder will be available to you again.
o “Unpublish” will keep the folder available to you and other admins, but will not be visible to
students. This is good if you are still working on a folder or it includes content you don’t want
students to be able to view yet. It’s also a good option to have as a folder for old assignments or
content.
o “Individually Assign” allows you to make the folder only visible to select students. You can
select one or multiple students by typing their name into the box that appears. They will need
to be enrolled in the course you are working in for their name to pop up. This is good for group
work, make-up work, extra credit, or even for exceptional students for extension or
remediation. Be sure to save your selections.
o “Student Completion” sets rules for the folder or task. This option is only available when your
folder has content. Once you have added items to your folder you can require students to reach
a certain threshold of completeness to be able to move on. You can require them to have to
view an item, score a minimum amount of points, make an attempt or submission, or post a
comment/reply. You can also set if the tasks need to be in the order they appear by clicking the
small checkbox at the top of the pop-up window on the right-hand side. If the order does not
matter, leave it unchecked. This is great for accountability and so that students can’t just click
on things to move through the course. Be sure to save your changes and requirements.
o “Move” allows you to change the location of the folder within the course. You can make a main
folder a subfolder under another folder, or vice versa. The menu can be a little confusing but
you can always move things back if it ends up in the wrong place. You can also drag and drop
folders and other course items
o “Copy to Courses” allows you to make a folder only once and share between your courses. This
is very helpful for general information folder or to share content between two or more classes
that are the same prep. This will copy EVERYTHING about the folder, including its settings and
contents to the course. Before copying it would helpful to complete the folder with all of its
tasks and content so you don’t have to keep adding individual items in later, but you can if you
need to. One thing that may not copy are documents that are part of an item type called
“Assignment,” which will be discussed in another section.
o “Save to Resources” will save the folder and its contents to your resources, which can be
accessed from the top of the Schoology webpage. You can choose the Collection and/or folder
you would like to add it to in your resources. This is good to use when you know you will use
the folder and its contents in other courses or school years that have not started yet, or to
share to other teachers. Resources do not automatically get archived at the end of the school
year and will be saved as long as you are will Aiken County. Resources can be shared with any
teacher or school staff in district, and can be shared publicly to Schoology as a whole.
o “Delete” will permanently the folder. You cannot recover deleted folders.
For more information on how to use folders and organize them in your course, click here.
Top of Section
Back to Table of Contents
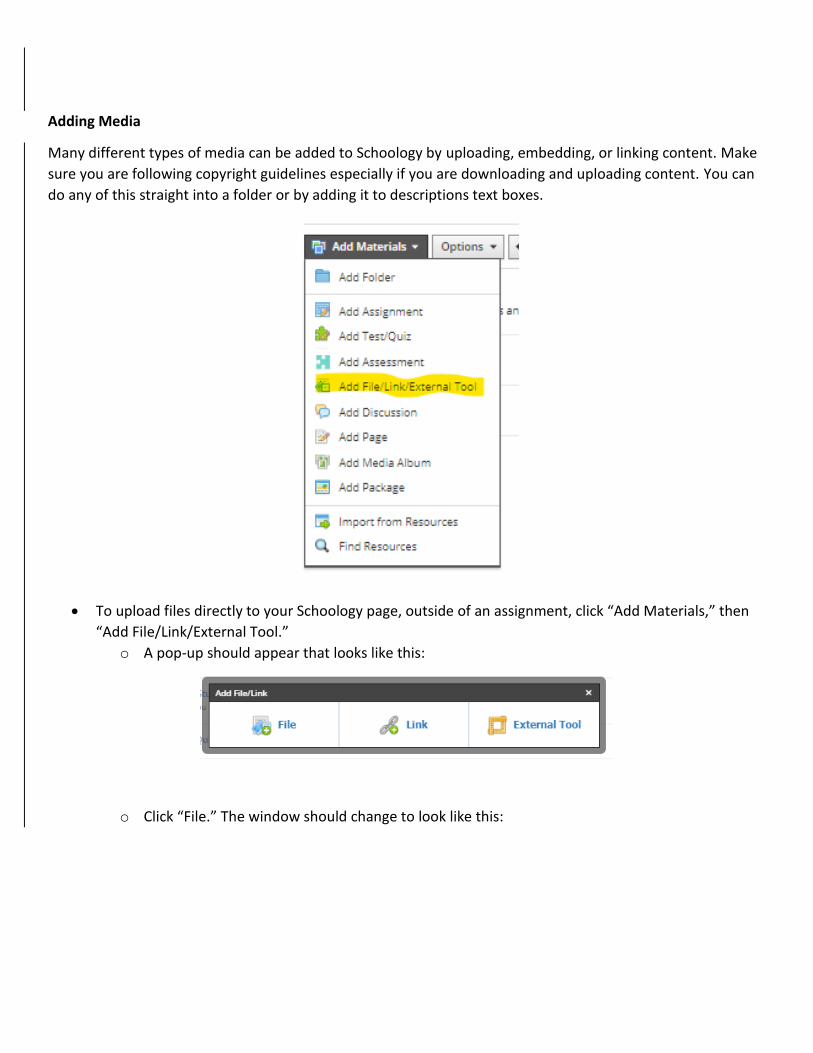
Adding Media
Many different types of media can be added to Schoology by uploading, embedding, or linking content. Make
sure you are following copyright guidelines especially if you are downloading and uploading content. You can
do any of this straight into a folder or by adding it to descriptions text boxes.
• To upload files directly to your Schoology page, outside of an assignment, click “Add Materials,” then
“Add File/Link/External Tool.”
o A pop-up should appear that looks like this:
o Click “File.” The window should change to look like this:
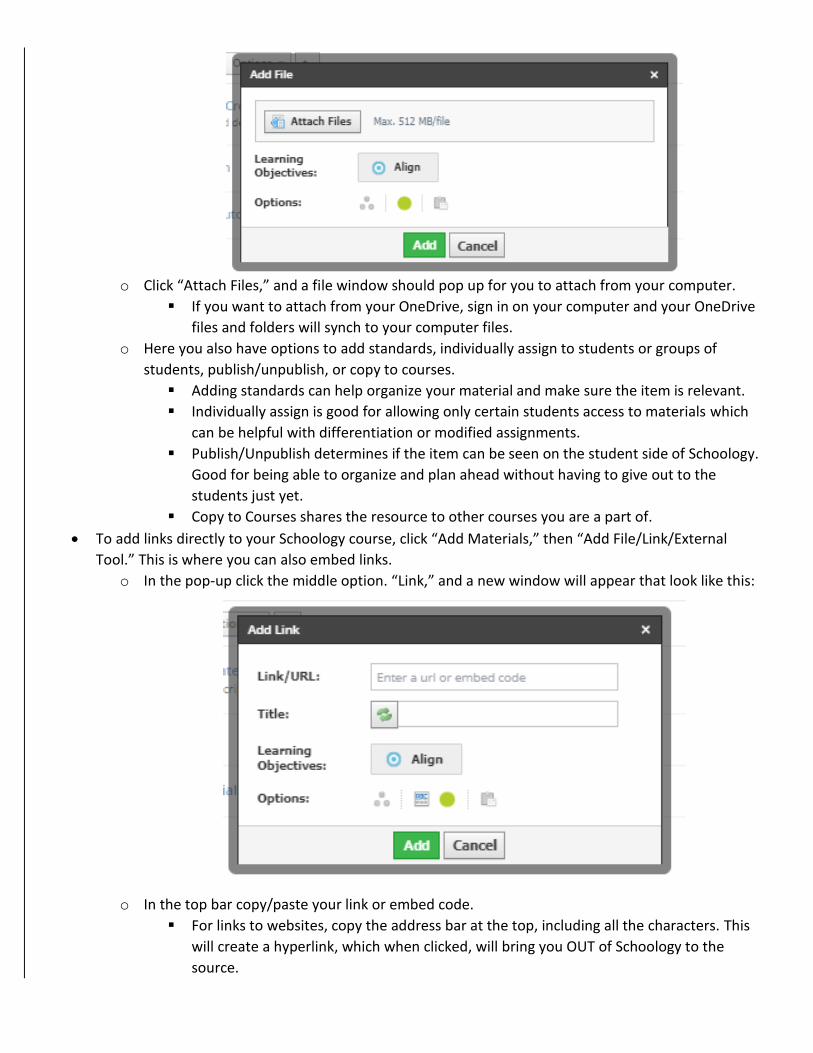
o Click “Attach Files,” and a file window should pop up for you to attach from your computer.
▪ If you want to attach from your OneDrive, sign in on your computer and your OneDrive
files and folders will synch to your computer files.
o Here you also have options to add standards, individually assign to students or groups of
students, publish/unpublish, or copy to courses.
▪ Adding standards can help organize your material and make sure the item is relevant.
▪ Individually assign is good for allowing only certain students access to materials which
can be helpful with differentiation or modified assignments.
▪ Publish/Unpublish determines if the item can be seen on the student side of Schoology.
Good for being able to organize and plan ahead without having to give out to the
students just yet.
▪ Copy to Courses shares the resource to other courses you are a part of.
• To add links directly to your Schoology course, click “Add Materials,” then “Add File/Link/External
Tool.” This is where you can also embed links.
o In the pop-up click the middle option. “Link,” and a new window will appear that look like this:
o In the top bar copy/paste your link or embed code.
▪ For links to websites, copy the address bar at the top, including all the characters. This
will create a hyperlink, which when clicked, will bring you OUT of Schoology to the
source.
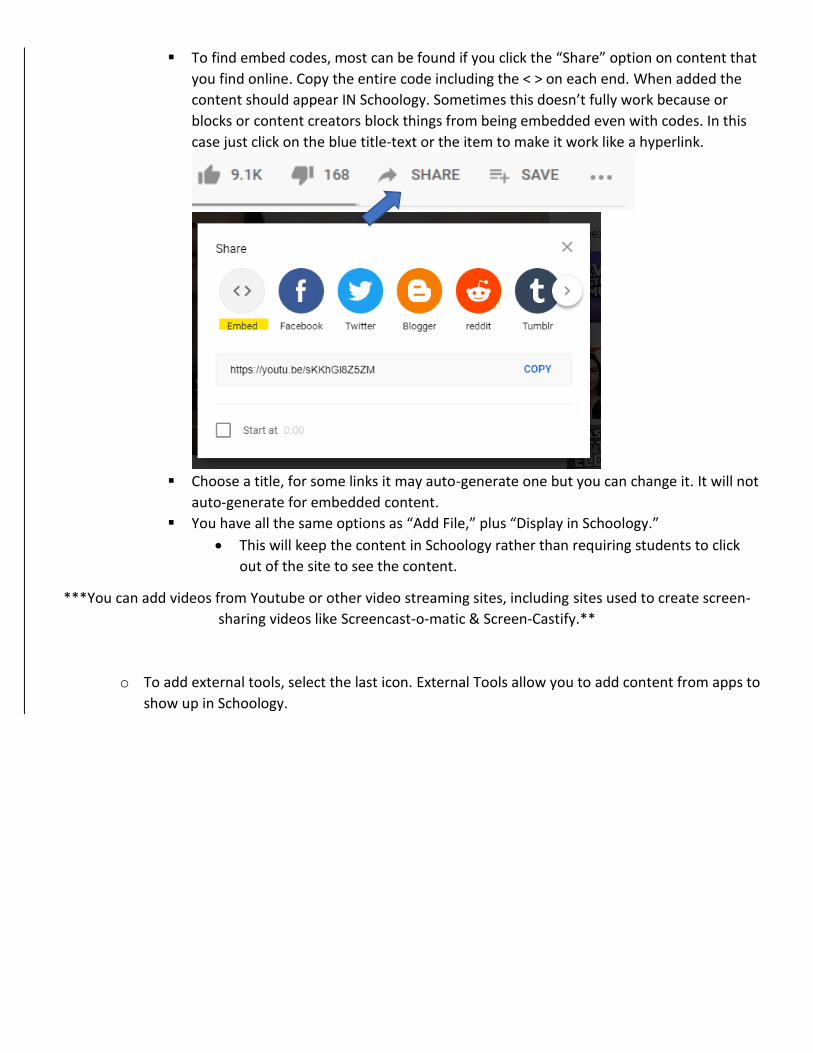
▪ To find embed codes, most can be found if you click the “Share” option on content that
you find online. Copy the entire code including the < > on each end. When added the
content should appear IN Schoology. Sometimes this doesn’t fully work because or
blocks or content creators block things from being embedded even with codes. In this
case just click on the blue title-text or the item to make it work like a hyperlink.
▪ Choose a title, for some links it may auto-generate one but you can change it. It will not
auto-generate for embedded content.
▪ You have all the same options as “Add File,” plus “Display in Schoology.”
• This will keep the content in Schoology rather than requiring students to click
out of the site to see the content.
***You can add videos from Youtube or other video streaming sites, including sites used to create screen-
sharing videos like Screencast-o-matic & Screen-Castify.**
o To add external tools, select the last icon. External Tools allow you to add content from apps to
show up in Schoology.
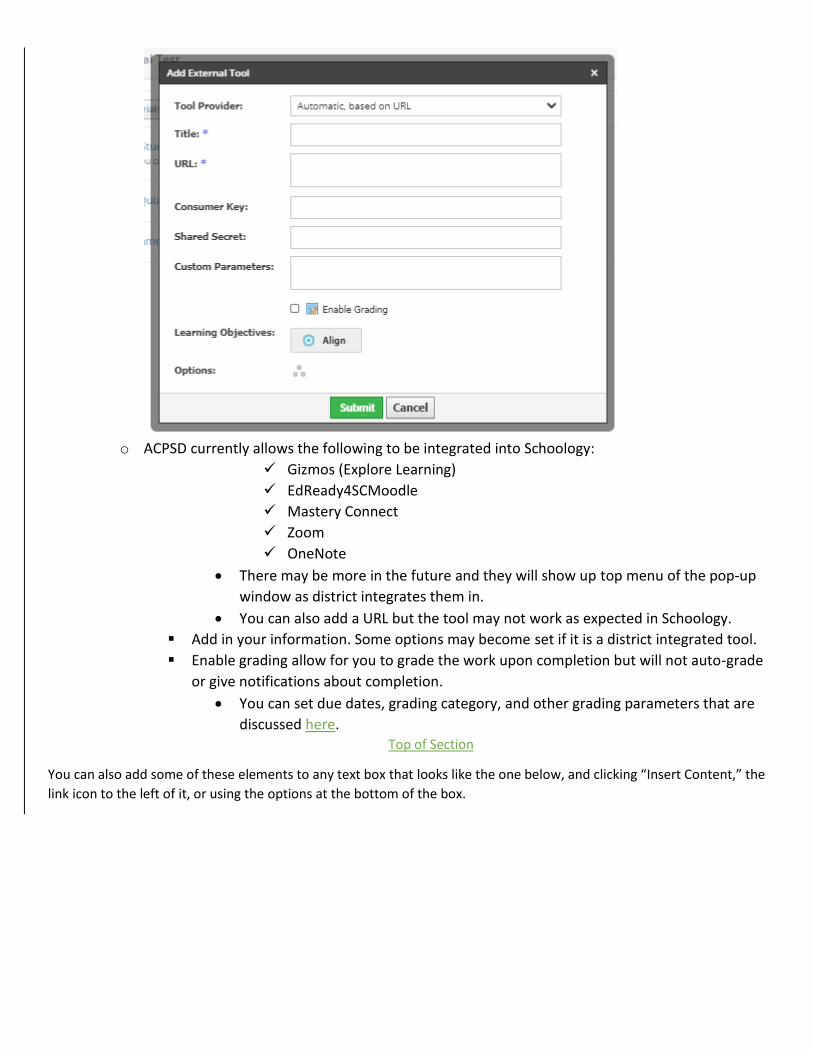
o ACPSD currently allows the following to be integrated into Schoology:
✓ Gizmos (Explore Learning)
✓ EdReady4SCMoodle
✓ Mastery Connect
✓ Zoom
✓ OneNote
• There may be more in the future and they will show up top menu of the pop-up
window as district integrates them in.
• You can also add a URL but the tool may not work as expected in Schoology.
▪ Add in your information. Some options may become set if it is a district integrated tool.
▪ Enable grading allow for you to grade the work upon completion but will not auto-grade
or give notifications about completion.
• You can set due dates, grading category, and other grading parameters that are
discussed here. Top of Section
You can also add some of these elements to any text box that looks like the one below, and clicking “Insert Content,” the
link icon to the left of it, or using the options at the bottom of the box.
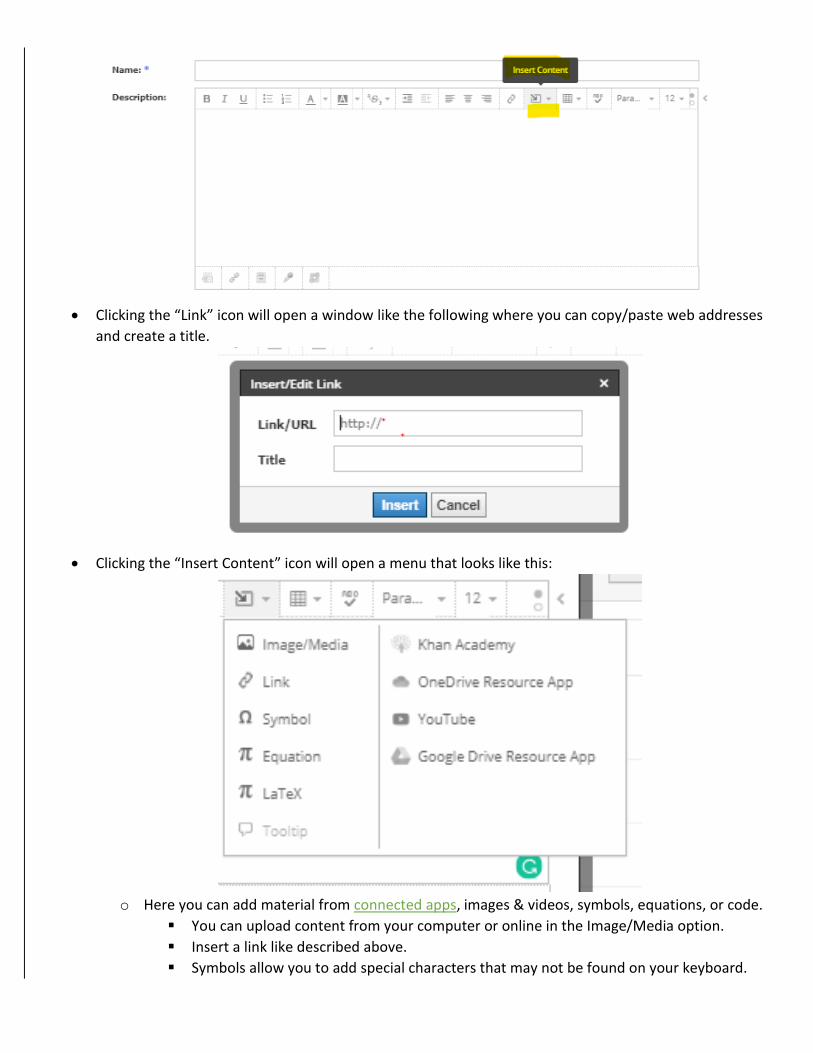
• Clicking the “Link” icon will open a window like the following where you can copy/paste web addresses
and create a title.
• Clicking the “Insert Content” icon will open a menu that looks like this:
o Here you can add material from connected apps, images & videos, symbols, equations, or code.
▪ You can upload content from your computer or online in the Image/Media option.
▪ Insert a link like described above.
▪ Symbols allow you to add special characters that may not be found on your keyboard.
▪ Equation gives options to enter common math functions and equations and fill in your
values.
▪ LaTex is where you can enter code for math equations and formulas.
▪ ToolTip is disabled on ACPSD Schoology.
• At the bottom of the description text box you have a few more options for adding content.
✓ File
✓ Link
✓ Resource
✓ Audio/Video Recording
✓ External Tool
**Using any of these options described above will add additional content to your description text boxes where
ever they are.**
Top of Section
Back to Table of Contents
Assignment Types
Schoology has many different types of assignments that can cover almost any classroom need. Not only does
it have options for typical assessment types and self-grading assignments, but there are a number of
applications that tie into Schoology to add even more options, specifically into OneDrive and Microsoft Office,
including Teams and OneNote.
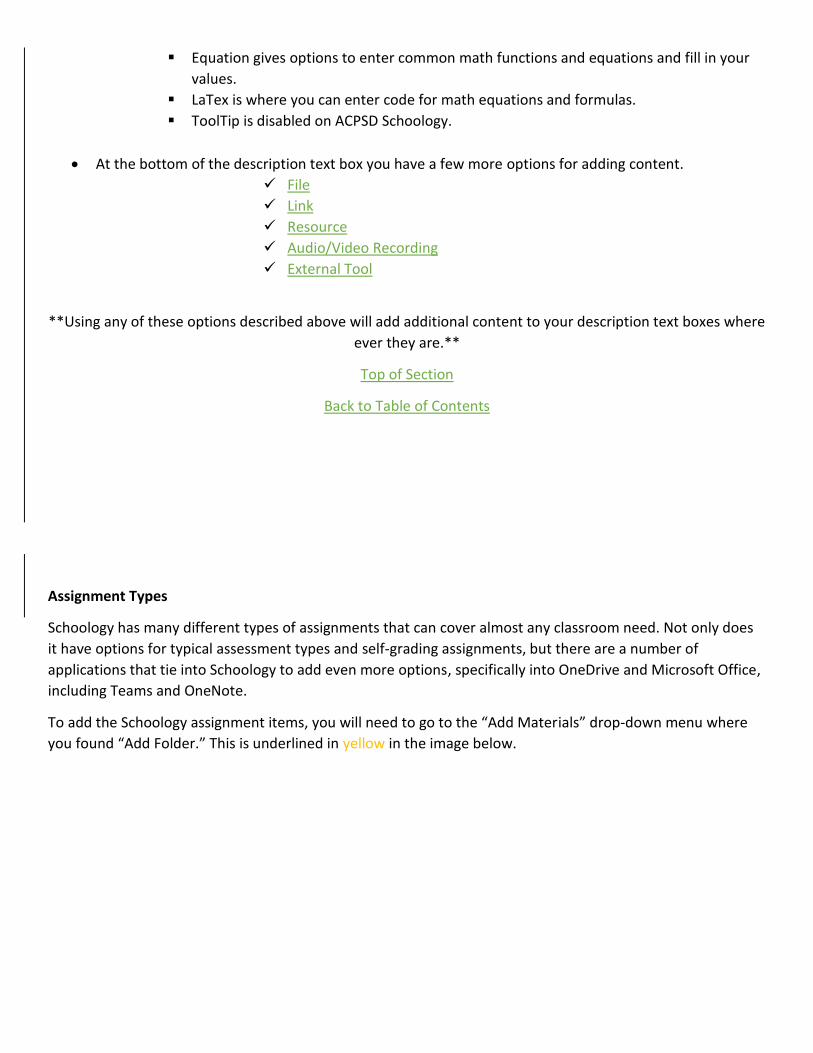
To add the Schoology assignment items, you will need to go to the “Add Materials” drop-down menu where
you found “Add Folder.” This is underlined in yellow in the image below.
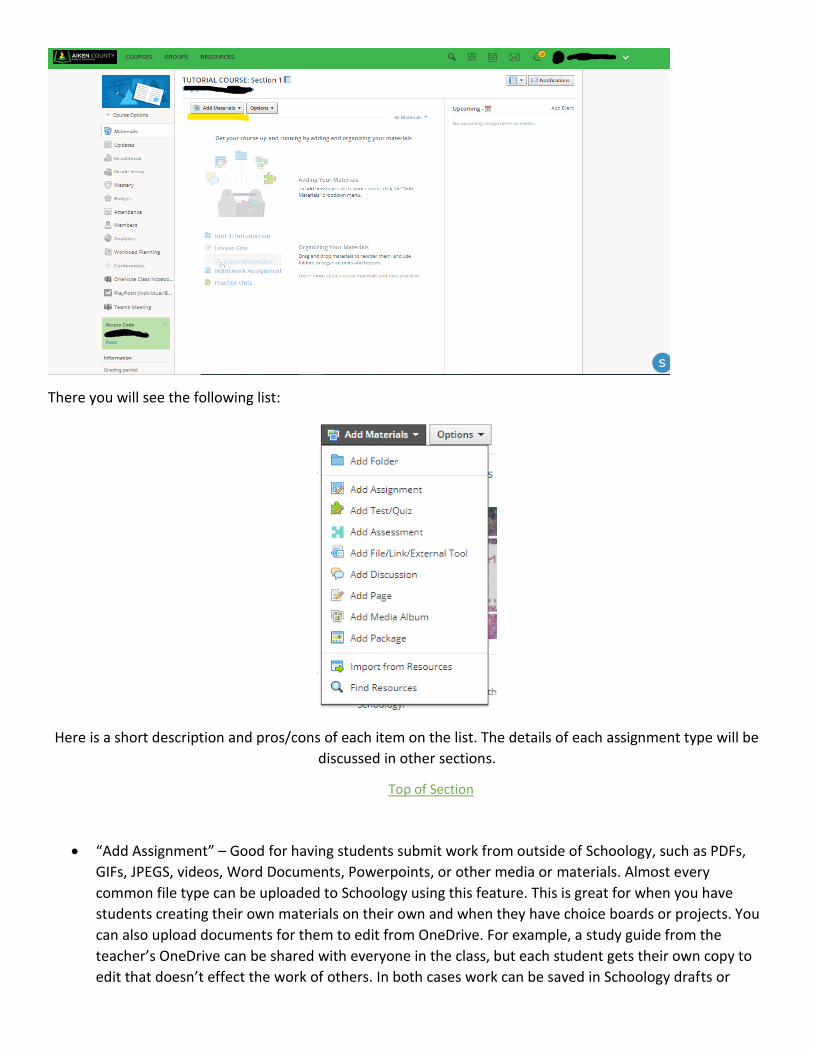
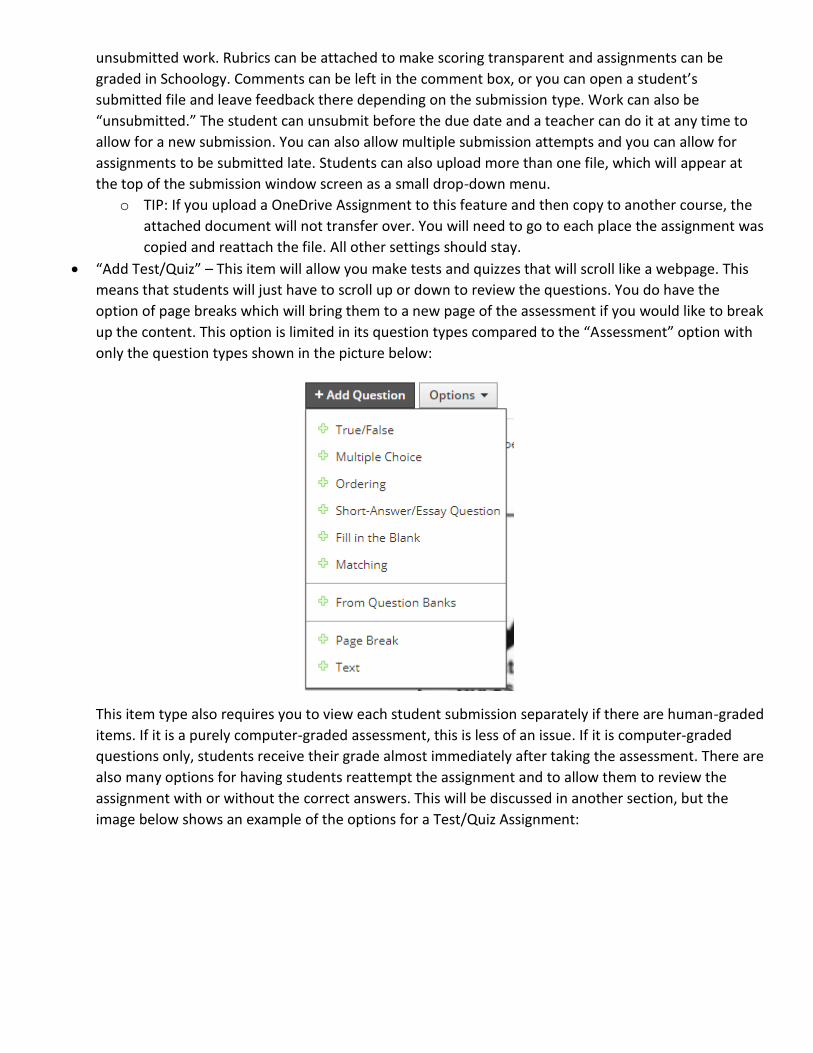
There you will see the following list:
Here is a short description and pros/cons of each item on the list. The details of each assignment type will be
discussed in other sections.
Top of Section
• “Add Assignment” – Good for having students submit work from outside of Schoology, such as PDFs,
GIFs, JPEGS, videos, Word Documents, Powerpoints, or other media or materials. Almost every
common file type can be uploaded to Schoology using this feature. This is great for when you have
students creating their own materials on their own and when they have choice boards or projects. You
can also upload documents for them to edit from OneDrive. For example, a study guide from the
teacher’s OneDrive can be shared with everyone in the class, but each student gets their own copy to
edit that doesn’t effect the work of others. In both cases work can be saved in Schoology drafts or
unsubmitted work. Rubrics can be attached to make scoring transparent and assignments can be
graded in Schoology. Comments can be left in the comment box, or you can open a student’s
submitted file and leave feedback there depending on the submission type. Work can also be
“unsubmitted.” The student can unsubmit before the due date and a teacher can do it at any time to
allow for a new submission. You can also allow multiple submission attempts and you can allow for
assignments to be submitted late. Students can also upload more than one file, which will appear at
the top of the submission window screen as a small drop-down menu.
o TIP: If you upload a OneDrive Assignment to this feature and then copy to another course, the
attached document will not transfer over. You will need to go to each place the assignment was
copied and reattach the file. All other settings should stay.
• “Add Test/Quiz” – This item will allow you make tests and quizzes that will scroll like a webpage. This
means that students will just have to scroll up or down to review the questions. You do have the
option of page breaks which will bring them to a new page of the assessment if you would like to break
up the content. This option is limited in its question types compared to the “Assessment” option with
only the question types shown in the picture below:
This item type also requires you to view each student submission separately if there are human-graded
items. If it is a purely computer-graded assessment, this is less of an issue. If it is computer-graded
questions only, students receive their grade almost immediately after taking the assessment. There are
also many options for having students reattempt the assignment and to allow them to review the
assignment with or without the correct answers. This will be discussed in another section, but the
image below shows an example of the options for a Test/Quiz Assignment:
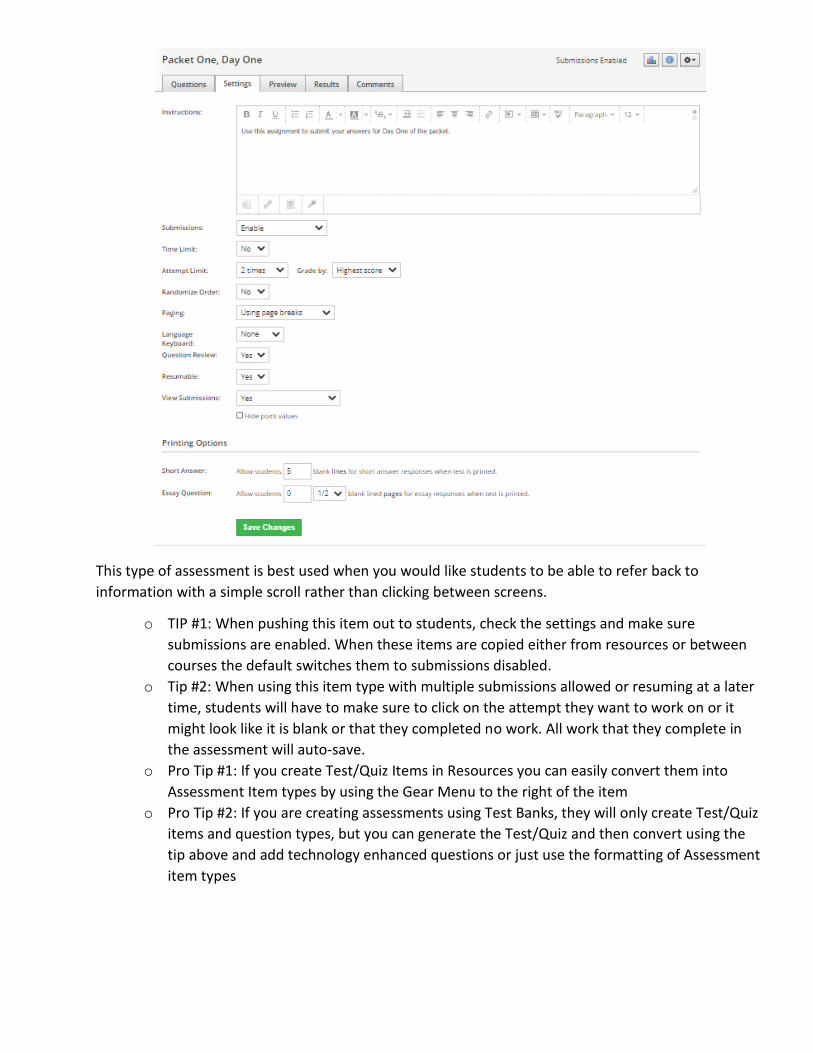
This type of assessment is best used when you would like students to be able to refer back to
information with a simple scroll rather than clicking between screens.
o TIP #1: When pushing this item out to students, check the settings and make sure
submissions are enabled. When these items are copied either from resources or between
courses the default switches them to submissions disabled.
o Tip #2: When using this item type with multiple submissions allowed or resuming at a later
time, students will have to make sure to click on the attempt they want to work on or it
might look like it is blank or that they completed no work. All work that they complete in
the assessment will auto-save.
o Pro Tip #1: If you create Test/Quiz Items in Resources you can easily convert them into
Assessment Item types by using the Gear Menu to the right of the item
o Pro Tip #2: If you are creating assessments using Test Banks, they will only create Test/Quiz
items and question types, but you can generate the Test/Quiz and then convert using the
tip above and add technology enhanced questions or just use the formatting of Assessment
item types
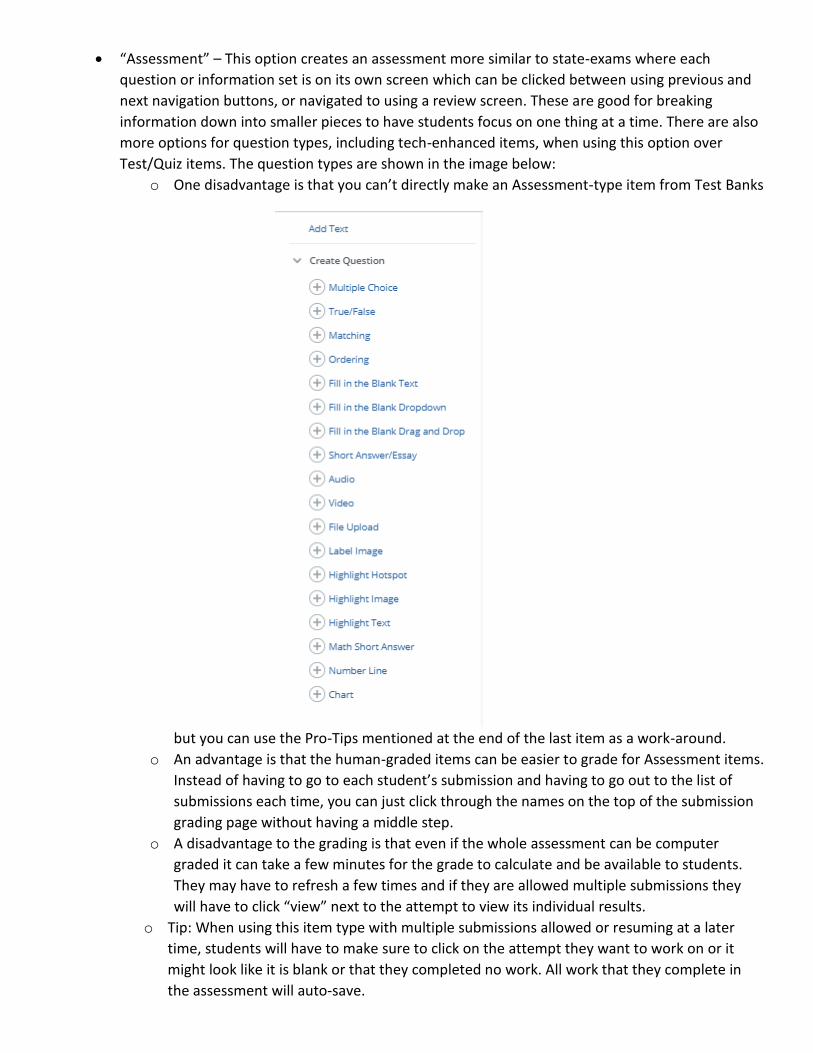
• “Assessment” – This option creates an assessment more similar to state-exams where each
question or information set is on its own screen which can be clicked between using previous and
next navigation buttons, or navigated to using a review screen. These are good for breaking
information down into smaller pieces to have students focus on one thing at a time. There are also
more options for question types, including tech-enhanced items, when using this option over
Test/Quiz items. The question types are shown in the image below:
o One disadvantage is that you can’t directly make an Assessment-type item from Test Banks
but you can use the Pro-Tips mentioned at the end of the last item as a work-around.
o An advantage is that the human-graded items can be easier to grade for Assessment items.
Instead of having to go to each student’s submission and having to go out to the list of
submissions each time, you can just click through the names on the top of the submission
grading page without having a middle step.
o A disadvantage to the grading is that even if the whole assessment can be computer
graded it can take a few minutes for the grade to calculate and be available to students.
They may have to refresh a few times and if they are allowed multiple submissions they
will have to click “view” next to the attempt to view its individual results.
o Tip: When using this item type with multiple submissions allowed or resuming at a later
time, students will have to make sure to click on the attempt they want to work on or it
might look like it is blank or that they completed no work. All work that they complete in
the assessment will auto-save.
• “Add File/Link/External Tool” – This allows you to add things from outside Schoology to your course
page. Files for documents PDFs, Powerpoints, and other common files can be added to your course
pages and folders. You can also add video and image files. Links to sites outside of Schoology can
also be added. Be aware that some links that work from home may be blocked at school or on
student’s accounts and devices. Some that do work might look “broken” to students but they can
click the blue title of the page to get to the content. Some sites can be embedded as tools like
Gizmos and pHet simulations.
• “Add Discussion” – This feature allows you to facilitate class discussions. These are similar to the
ones you would find in the gifted courses offered online through USC Aiken and Read to Succeed.
You can set a task or question and set requirements for responses and replies to others. You can
also add rubrics to help set expectations for your students.
• “Add Page” – This item allows you to add a page with information. These are good ways to create
guides or information sets for students.
• “Add Media Album” – In this feature you and your students can create a video and photo gallery of
your class and your learning.
• “Add package” – This is an advanced-level feature. Here you can add your own coded programs and
content.
**With all almost all of these item types you will get a text box similar or the same to when you make a folder.
You can add text, format it, add links, and different media types. In some you may also be able to attach files.
Consider adding some student completion rules to guide students through the content you add to your
course**
For more information on Assignments, click here.
For Test/Quiz, click here.
For Assessment, click here.
Top of Section
Back to Table of Contents
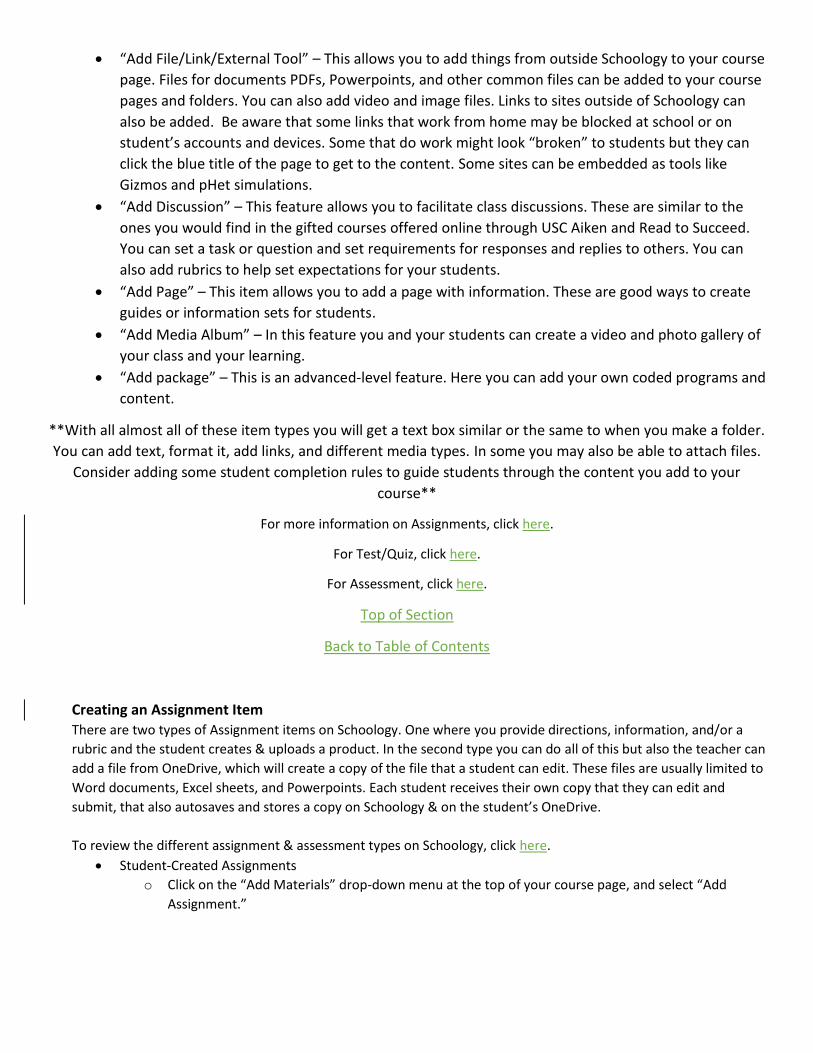
Creating an Assignment Item There are two types of Assignment items on Schoology. One where you provide directions, information, and/or a
rubric and the student creates & uploads a product. In the second type you can do all of this but also the teacher can
add a file from OneDrive, which will create a copy of the file that a student can edit. These files are usually limited to
Word documents, Excel sheets, and Powerpoints. Each student receives their own copy that they can edit and
submit, that also autosaves and stores a copy on Schoology & on the student’s OneDrive.
To review the different assignment & assessment types on Schoology, click here.
• Student-Created Assignments
o Click on the “Add Materials” drop-down menu at the top of your course page, and select “Add
Assignment.”
o A pop-up window will appear that looks like this:
o First you must name your assignment. Remember having a naming convention or style will be
helpful. This step is required.
o You may add a description to the assignment. You will see that the text box is the similar to when
you make a folder. There are a few more options available to you in this box. You have the same
options as the folder but you also have the choice to change the color and highlight the text, align
the text (left, right, center), add links, add media (videos/images, math symbols), set text
formatting, and font size. The two dots on the end toggle the box from visual (plain text) to HTML. IF
you would like to embed code, this is where you can enter it.
o SKIP the Assign from OneDrive for this
o Set a due date (optional), if you would like students to have one. This will also allow it to appear in
the Upcoming Events on the home page and course page. Assignments without a set due date will
not appear. You can also allow for late submissions, which will be marked with a red “LATE” in the
submissions menu which will be discussed later.
o You must set a category for your assignments, even if it is “ungraded.” You will want to match these
with your grading categories in PowerSchool if you want to have them sync and work together. You
can create them on this screen or you can set them up before-hand in the “Grading” tab on the left-
hand menu. You can choose ungraded so it will not add to gradebook on Schoology or sync to
PowerSchool but then you will not be able to give as much feedback when you get to the
submissions page. You can also change this later if you are undecided on how you want the
assignment to fit into a student’s grade.
o You will also need to choose a grading period. Use the drop-down menu to choose what grading
quarter you would like this assignment to count for. If the assignment is a midterm or final you may
want to check the box.

o You do need to set a factor but it does have a default. For most assignments you will not need to
change from the default value. The factor changes the weight of the item. If you chose a grading
category and have set them to match your values in PowerSchool, keeping the value at the default
will allow for Schoology to use the weighting you have already set. If you would like an assignment
to count for double (essentially two grades), set the value to 2.0. This can be done for any multiplier.
o It is also required to set a score or rubric. This will change your options later on when you are
grading submissions later. Usually you can keep it on the numeric default, which will allow you to
give a number or percent grade. You may also want to use a rubric. You will either need to create
these in advance under the Resources tab, or find one in the public resources area. Creating and
finding rubrics will be discussed more in another section.
o It is optional if you want to align your learning objectives or standards to the task. If you type the SC
Standards alpha-numeric code in the search bar it will find it and you will click on the standard and
save before closing the objectives option.
Top of Section
o The last row on the Assignment window gives you options for how the assignment will be pushed
out. In order from left to right they are:
➢ Individually Assign, assign to only select students or groups of students
➢ Lock, allows students to submit if unlocked, if locked it will not allow students to submit.
You can also set a range of dates for submissions. If you want to allow students to turn in
late work, leave unlocked.
➢ Submissions enabled, leave this enabled to allow both you and your students to view their
submitted work. If you disable submissions you will not be able to view student work.
➢ Published to students, publish if you want students to be able to see the assignment or
unpublish to hold it back until ready
➢ Grading statistics enabled. Allows for you to track the scores made on the submissions and
compare students. You can also choose to keep them disabled which is the default setting.
➢ Comments enabled, at the bottom of the page that will be created you can allow students
to make comments which can be useful for class discussions or questions. This is enabled by
default but can be turned off.
➢ Copy to Courses, if you would like to use what you created in more than one course you will
want to click on this and then the course and location in that course that you would like to
add this item to. You can change this later and once copied they become separate items. If
you change one, the other will stay the same.
o Once you are done with the set-up click “Create” to save your work and to publish (unless you
selected unpublish, them you will see it but students won’t).
➢ If you need to edit any of these options you will need to click the gear icon on the right of
the item and select “Edit.”
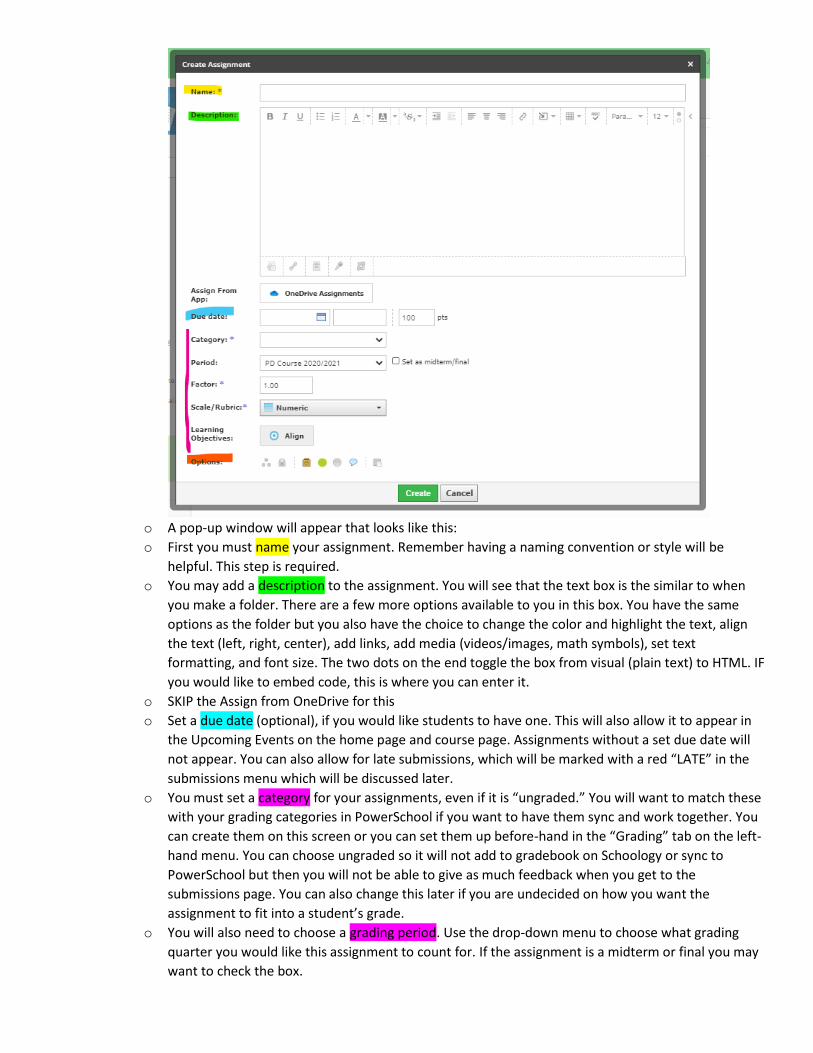
o To see the item similar to how a student will see it, click on the blue title text of the item. A new
screen will open and you will see your assignment information over most of the screen with a list of
student submissions on the right-hand side. It will look similar to this:
o Edit grades – make changes to graded assignments
o View Stats – analyze and compare data between student’s grades in this class
o View Grade Info – where the grade is being entered in gradebook
o Gear/Settings – edit, publish/unpublish, copy to courses, delete (permanent!), save to resources
For more information on this type of assignment, click here.
Top of Section
• Teacher-Created Assignments
o Connect your OneDrive to Schoology by logging in using your ACPSD info.
➢ If for some reason your Assign from App is not automatically showing up as OneDrive you
may need to add the app to Schoology. Instructions can be found here.
o You will want to create your file in OneDrive first before setting the assignment up in Schoology. You
can only use the following file types:
➢ Word doc.
➢ Powerpoint
➢ Excel Sheets
o Once you have your file saved in OneDrive you can attach it to the assignment by clicking “OneDrive
Assignments” next to Assign From App.
➢ You can only assign one file at a time but they can have multiple pages, slides, or sheets.
➢ If copying the assignment to a course, you will HAVE TO go and do this step again to each
copy of the assignment. The files assigned through OneDrive DO NOT copy over.
o All of the same steps from the section above still apply to create and add settings for your
assignment. To review them, click here.
o For students to access their own copy they will have to click the Assignment link in their Schoology,
and then click the "My Document" button next to "Assignment" under the assignment title. They
will then have to click Edit (right-hand side) and sign into Microsoft Office. They may need to sign in
each time with their district information.
➢ This will create a copy of your file that will autosave each student’s work on their own page.
Sometimes they save on the student’s OneDrive but they always save in Schoology but they
will have to follow the above steps again.
➢ Once students have opened and started editing the file you will be able to see that it is “In
Progress” until they submit. This will be found under the “In Progress” tab when you click on
the title of the assignment.
o Student’s copies WILL be saved in the teacher or course admin’s OneDrive. Schoology will create a
folder in your OneDrive that will store student copies of assignments to be reviewed. DO NOT
rename, edit, or delete the folders that are auto-generated by Schoology.
For more information or help with this type of assignment, click here.
Top of Section
Back to Table of Contents

Grading & Feedback for Assignments
Once students have submitted an assignment you can view them and assign a score and give feedback. To
do this you will have to make sure you have a Category other than (Ungraded) when setting up or editing
your assignment (gear icon).
• To start you will have to click on the blue title-text of the assignment to go to the screen where you
can see student submissions. It will look like this
• This area will show how your description or text box information looks to students if you added
anything to that section in the set-up of your assignment.
• Students who have made submissions will be on the right-hand side.
o Grades for the assignments (if graded).
o Number of students that submitted out of the total students enrolled
▪ If there is a due-date you may get something that looks like this:
*This will show you who was on-time and who was late, if you allow late
submissions.
• If the assignment was given a grading category, when you click on the student’s name it will open a
window to view the files submitted.
o If the student submitted multiple files, look under their name at the top of the page. Their file
name will be there along with a small downward facing arrow. If they uploaded more than one
file you can find them there.
➢ You can also use downward arrow NEXT to the student’s name to switch between
student submissions.
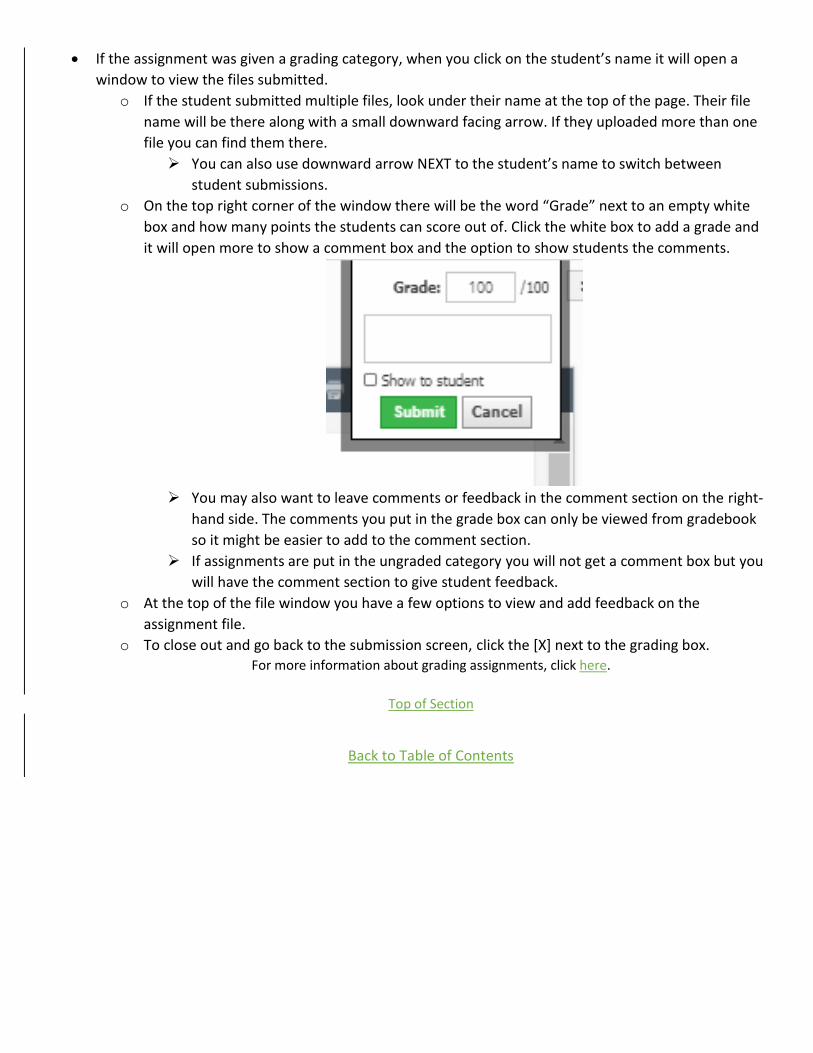
o On the top right corner of the window there will be the word “Grade” next to an empty white
box and how many points the students can score out of. Click the white box to add a grade and
it will open more to show a comment box and the option to show students the comments.
➢ You may also want to leave comments or feedback in the comment section on the right-
hand side. The comments you put in the grade box can only be viewed from gradebook
so it might be easier to add to the comment section.
➢ If assignments are put in the ungraded category you will not get a comment box but you
will have the comment section to give student feedback.
o At the top of the file window you have a few options to view and add feedback on the
assignment file.
o To close out and go back to the submission screen, click the [X] next to the grading box. For more information about grading assignments, click here.
Top of Section
Back to Table of Contents
Test/Quiz Items
This item type gives you many options that a paper assignment may have but many of the questions can
be computer-grade which can give instant feedback to your students on their progress. There are a few
item types that will need to be human graded but students can still get an idea of how they did on an
assignment based on the settings you select.
An advantage to using this item type over “Assessments” is that you can pull from question banks and that
you can import other Test/Quiz items to reuse in new assignments.
This item type generates a single-page/window assignment where students can simply scroll through
sections or all of the assignment at once rather than clicking through different window screens with
separate items.
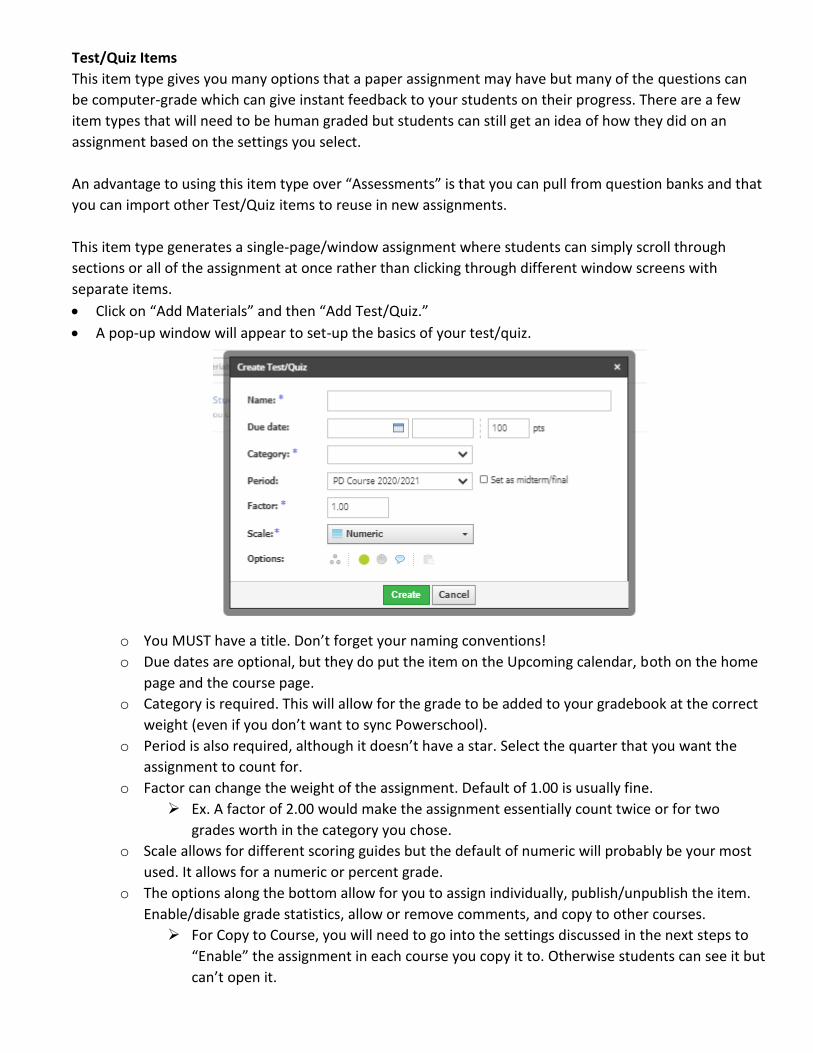
• Click on “Add Materials” and then “Add Test/Quiz.”
• A pop-up window will appear to set-up the basics of your test/quiz.
o You MUST have a title. Don’t forget your naming conventions!
o Due dates are optional, but they do put the item on the Upcoming calendar, both on the home
page and the course page.
o Category is required. This will allow for the grade to be added to your gradebook at the correct
weight (even if you don’t want to sync Powerschool).
o Period is also required, although it doesn’t have a star. Select the quarter that you want the
assignment to count for.
o Factor can change the weight of the assignment. Default of 1.00 is usually fine.
➢ Ex. A factor of 2.00 would make the assignment essentially count twice or for two
grades worth in the category you chose.
o Scale allows for different scoring guides but the default of numeric will probably be your most
used. It allows for a numeric or percent grade.
o The options along the bottom allow for you to assign individually, publish/unpublish the item.
Enable/disable grade statistics, allow or remove comments, and copy to other courses.
➢ For Copy to Course, you will need to go into the settings discussed in the next steps to
“Enable” the assignment in each course you copy it to. Otherwise students can see it but
can’t open it.
o Select “Create.” It does not autosave.
➢ If you need to change any of these settings again you will have to be in the folder or
course page and click the Gear icon in the right-hand side.
Top of Section
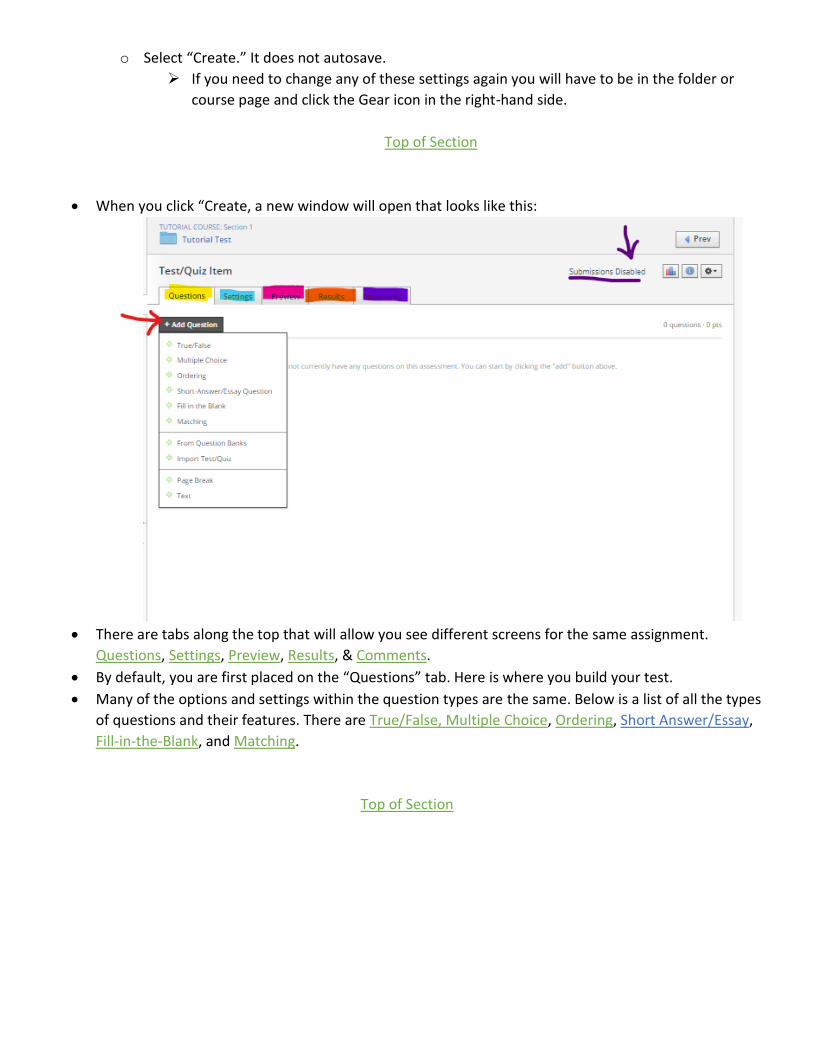
• When you click “Create, a new window will open that looks like this:
• There are tabs along the top that will allow you see different screens for the same assignment.
Questions, Settings, Preview, Results, & Comments.
• By default, you are first placed on the “Questions” tab. Here is where you build your test.
• Many of the options and settings within the question types are the same. Below is a list of all the types
of questions and their features. There are True/False, Multiple Choice, Ordering, Short Answer/Essay,
Fill-in-the-Blank, and Matching.
Top of Section
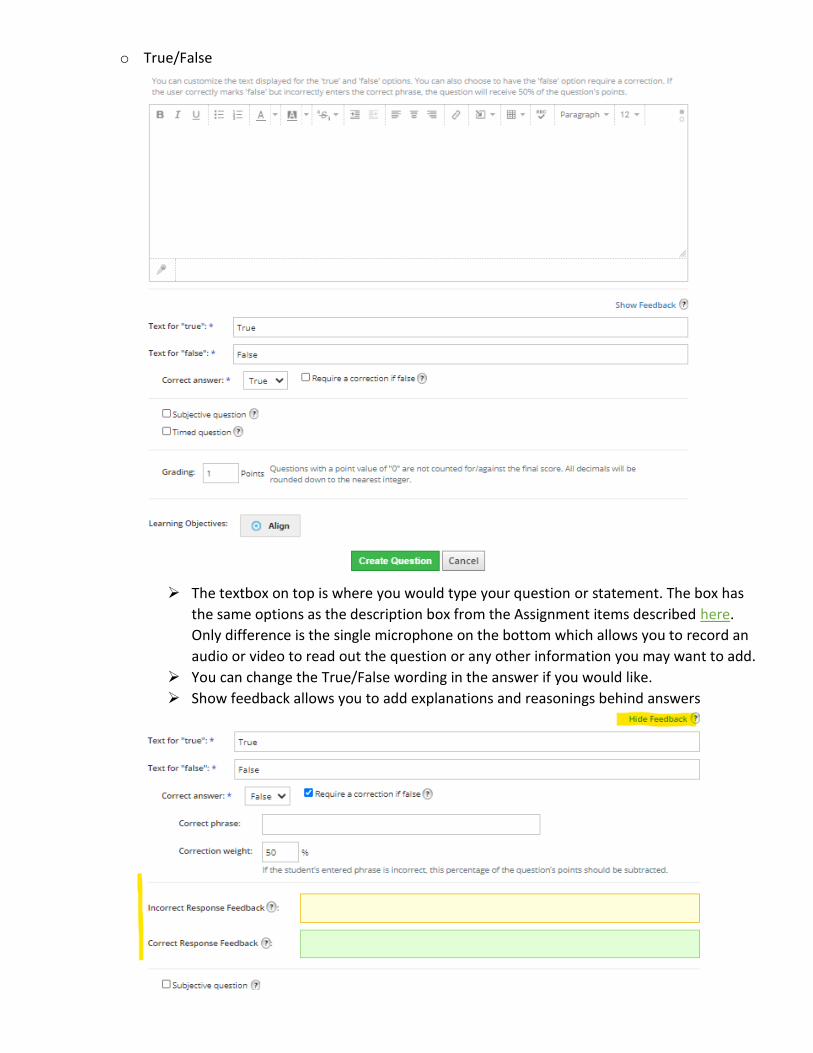
o True/False
➢ The textbox on top is where you would type your question or statement. The box has
the same options as the description box from the Assignment items described here.
Only difference is the single microphone on the bottom which allows you to record an
audio or video to read out the question or any other information you may want to add.
➢ You can change the True/False wording in the answer if you would like.
➢ Show feedback allows you to add explanations and reasonings behind answers
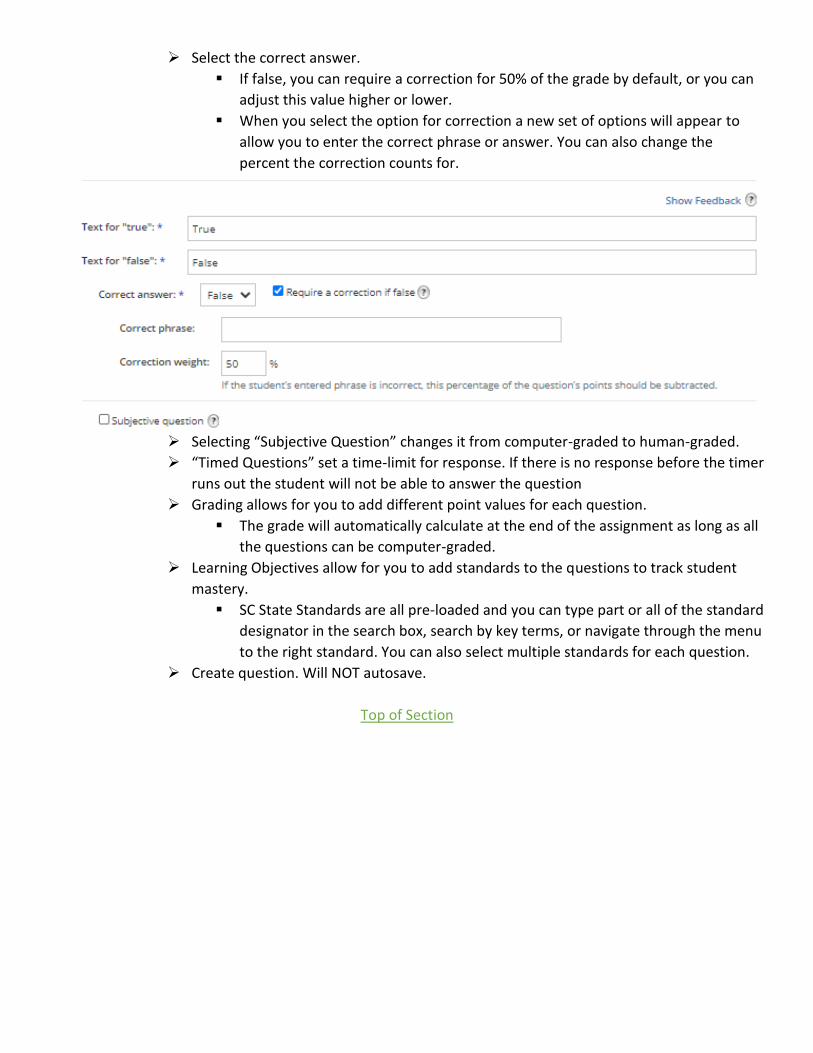
➢ Select the correct answer.
▪ If false, you can require a correction for 50% of the grade by default, or you can
adjust this value higher or lower.
▪ When you select the option for correction a new set of options will appear to
allow you to enter the correct phrase or answer. You can also change the
percent the correction counts for.
➢ Selecting “Subjective Question” changes it from computer-graded to human-graded.
➢ “Timed Questions” set a time-limit for response. If there is no response before the timer
runs out the student will not be able to answer the question
➢ Grading allows for you to add different point values for each question.
▪ The grade will automatically calculate at the end of the assignment as long as all
the questions can be computer-graded.
➢ Learning Objectives allow for you to add standards to the questions to track student
mastery.
▪ SC State Standards are all pre-loaded and you can type part or all of the standard
designator in the search box, search by key terms, or navigate through the menu
to the right standard. You can also select multiple standards for each question.
➢ Create question. Will NOT autosave.
Top of Section
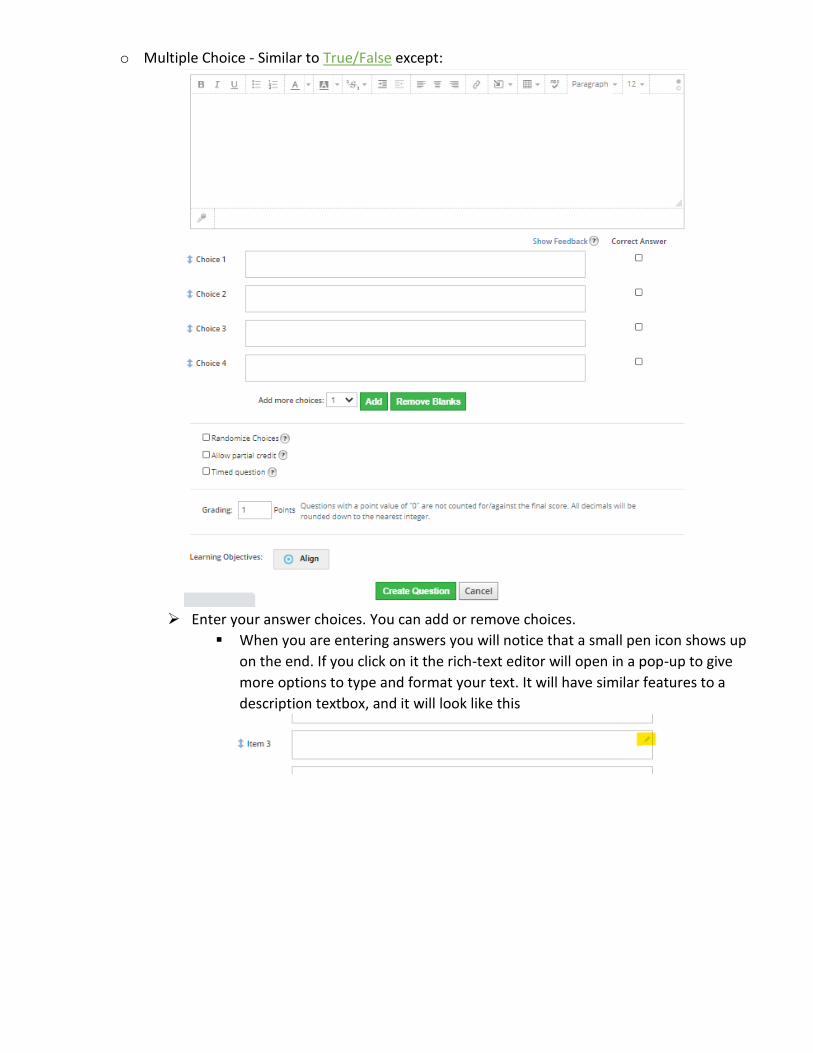
o Multiple Choice - Similar to True/False except:
➢ Enter your answer choices. You can add or remove choices.
▪ When you are entering answers you will notice that a small pen icon shows up
on the end. If you click on it the rich-text editor will open in a pop-up to give
more options to type and format your text. It will have similar features to a
description textbox, and it will look like this
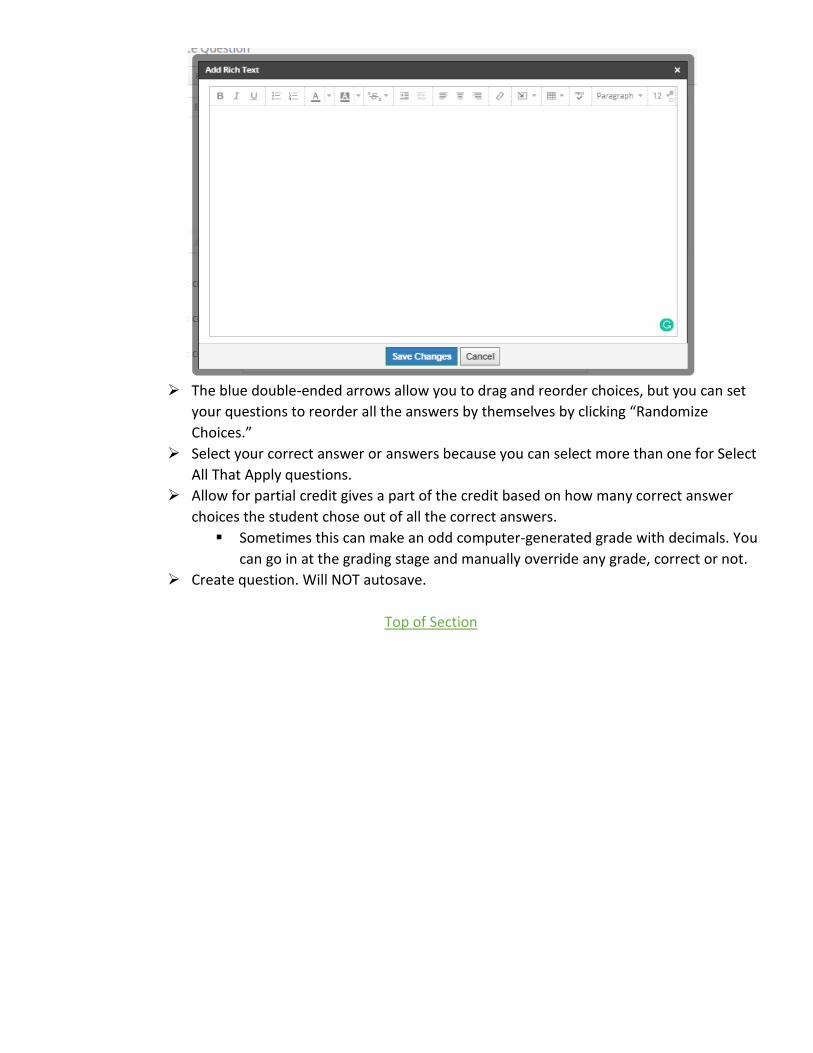
➢ The blue double-ended arrows allow you to drag and reorder choices, but you can set
your questions to reorder all the answers by themselves by clicking “Randomize
Choices.”
➢ Select your correct answer or answers because you can select more than one for Select
All That Apply questions.
➢ Allow for partial credit gives a part of the credit based on how many correct answer
choices the student chose out of all the correct answers.
▪ Sometimes this can make an odd computer-generated grade with decimals. You
can go in at the grading stage and manually override any grade, correct or not.
➢ Create question. Will NOT autosave.
Top of Section
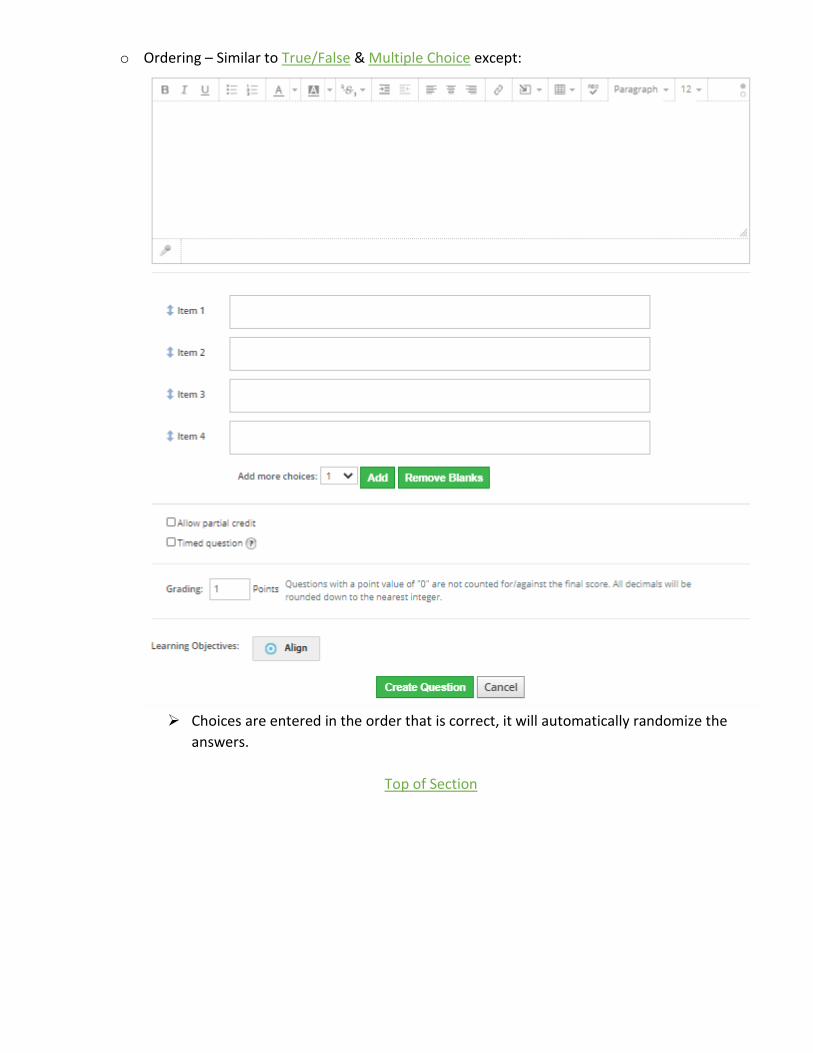
o Ordering – Similar to True/False & Multiple Choice except:
➢ Choices are entered in the order that is correct, it will automatically randomize the
answers.
Top of Section
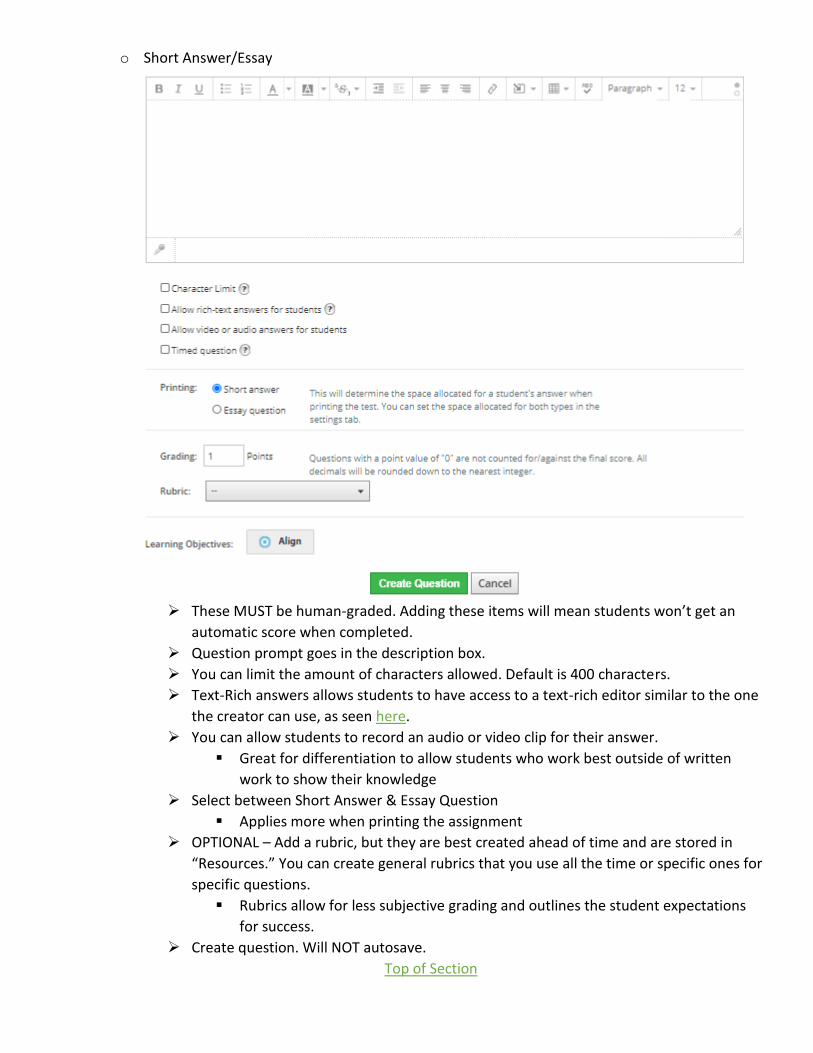
o Short Answer/Essay
➢ These MUST be human-graded. Adding these items will mean students won’t get an
automatic score when completed.
➢ Question prompt goes in the description box.
➢ You can limit the amount of characters allowed. Default is 400 characters.
➢ Text-Rich answers allows students to have access to a text-rich editor similar to the one
the creator can use, as seen here.
➢ You can allow students to record an audio or video clip for their answer.
▪ Great for differentiation to allow students who work best outside of written
work to show their knowledge
➢ Select between Short Answer & Essay Question
▪ Applies more when printing the assignment
➢ OPTIONAL – Add a rubric, but they are best created ahead of time and are stored in
“Resources.” You can create general rubrics that you use all the time or specific ones for
specific questions.
▪ Rubrics allow for less subjective grading and outlines the student expectations
for success.
➢ Create question. Will NOT autosave.
Top of Section
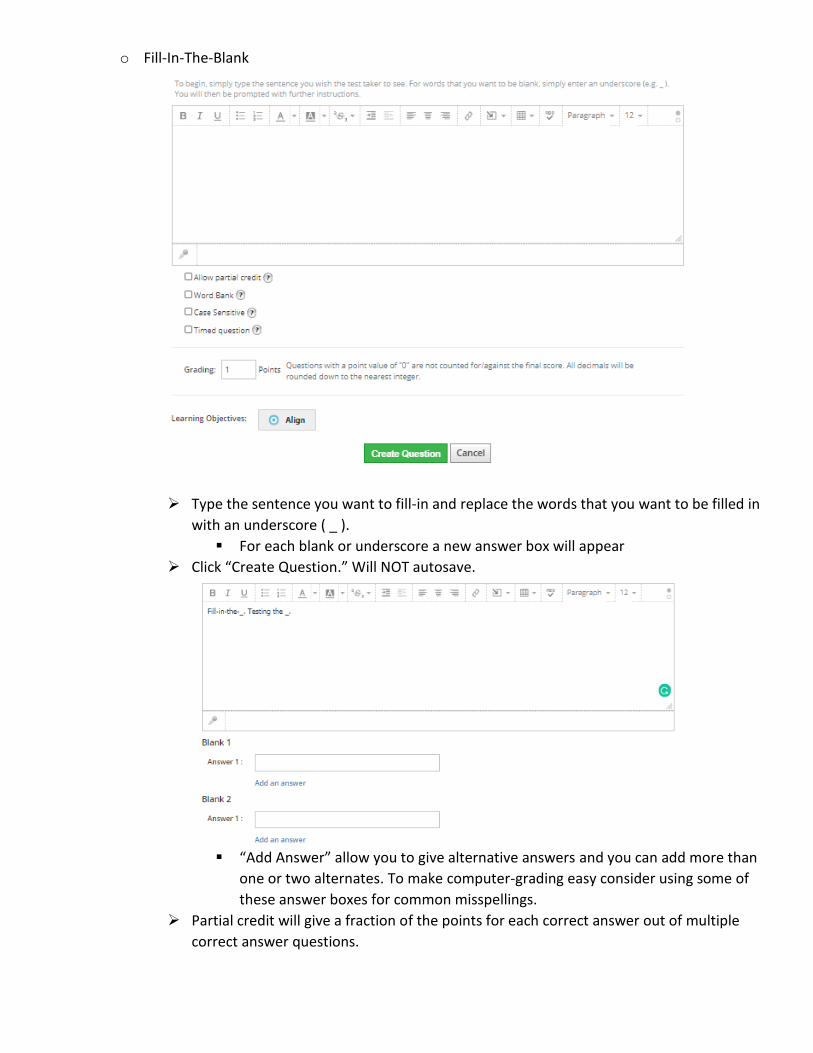
o Fill-In-The-Blank
➢ Type the sentence you want to fill-in and replace the words that you want to be filled in
with an underscore ( _ ).
▪ For each blank or underscore a new answer box will appear
➢ Click “Create Question.” Will NOT autosave.
▪ “Add Answer” allow you to give alternative answers and you can add more than
one or two alternates. To make computer-grading easy consider using some of
these answer boxes for common misspellings.
➢ Partial credit will give a fraction of the points for each correct answer out of multiple
correct answer questions.
➢ Word Banks are optional but you will add every word you want to appear as an option
EXCEPT the ones you entered in the answer boxes. If you add them, they will show u
twice in the answer. Enter each filler word on its own line.
▪ When students are answering they DO NOT need to type their answers out for
the blanks, they just have to click the words into their correct places.
➢ Case sensitive requires students to match the capital and lowercase letters exactly to be
correct. Recommend leaving unchecked unless it is necessary.
➢ Suggest setting points at the same number of blanks items if using partial grading
➢ Click “Create Question.” Will NOT autosave.
Top of Section
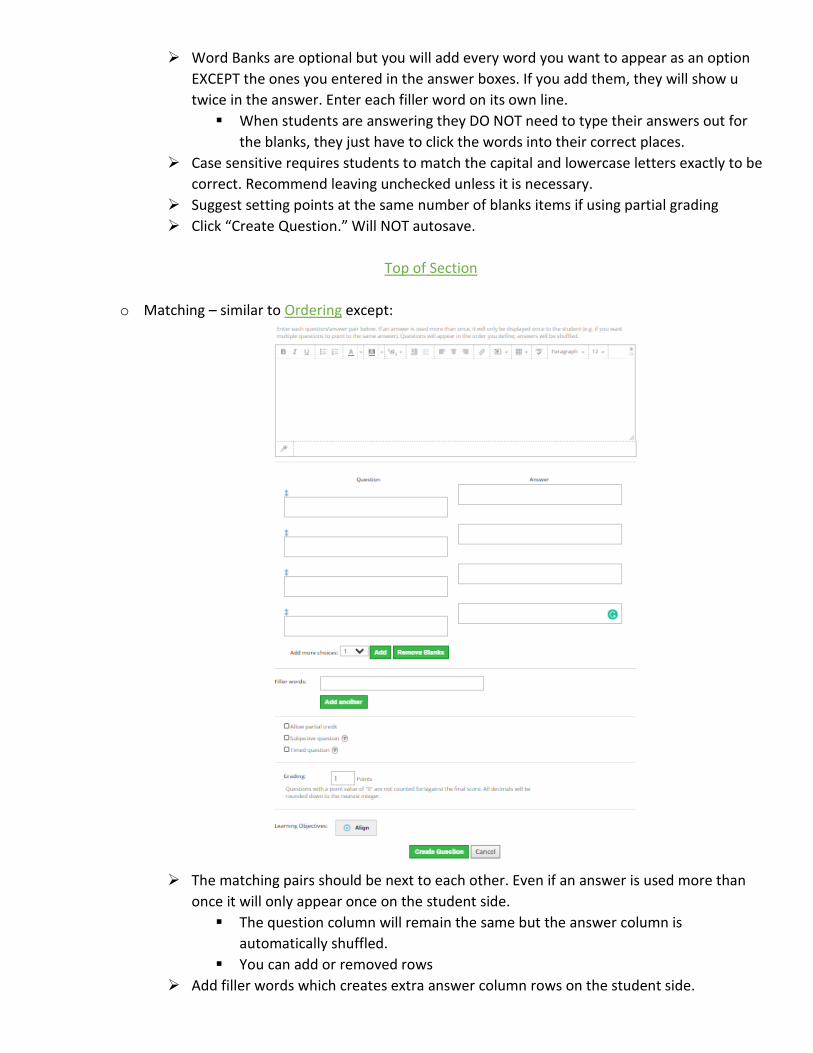
o Matching – similar to Ordering except:
➢ The matching pairs should be next to each other. Even if an answer is used more than
once it will only appear once on the student side.
▪ The question column will remain the same but the answer column is
automatically shuffled.
▪ You can add or removed rows
➢ Add filler words which creates extra answer column rows on the student side.
➢ Subjective grading switches from computer-graded to human-graded.
➢ Suggest setting points at the same amount of question column items if using partial
grading.
➢ Click “Create Question.” Will NOT autosave.
Top of Section
o Import from Question Bank or Test/Quiz
➢ Quickly add items from other assignments
➢ You can edit the items by clicking on the gear.
o Page Break
➢ This item is unique because it allows students to scroll through and review and check
their answers all on one page. Adding page breaks creates more pages, which can be
good to separate topics or chunk assignments.
o Text
➢ Creates a text box without a question. Good for instructions or adding passages or other
resources.
For more information about Test/Quiz Question Types, click here.
Top of Section
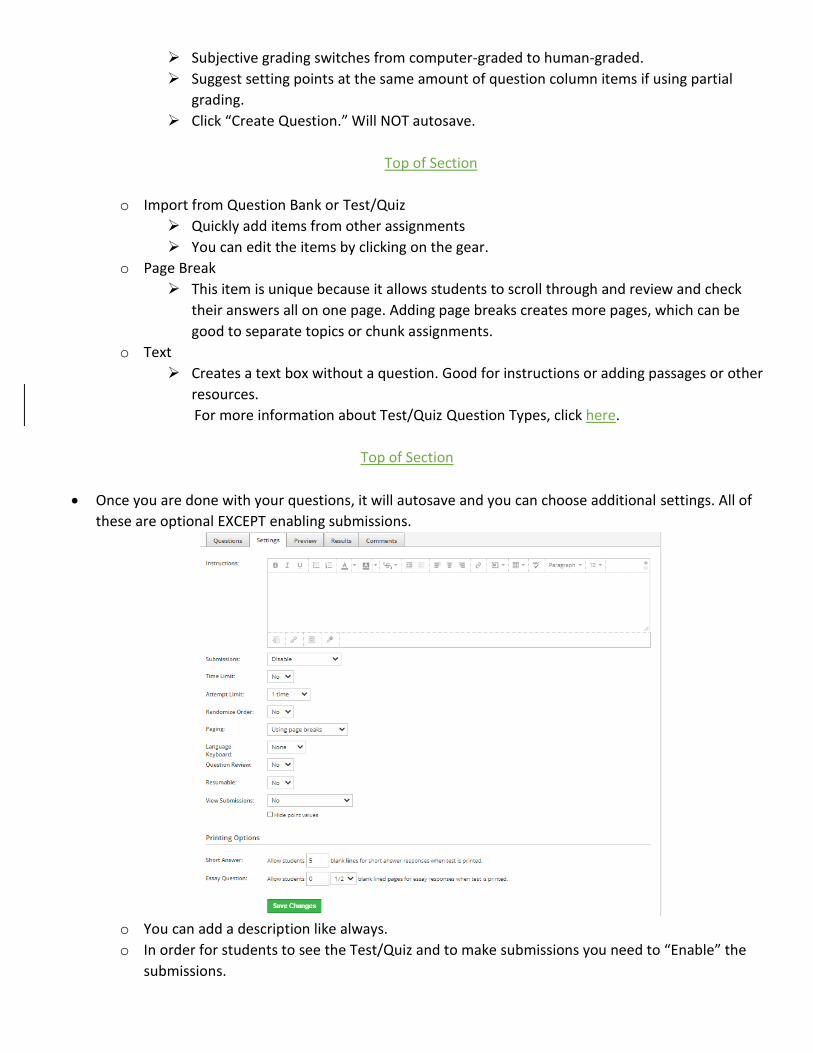
• Once you are done with your questions, it will autosave and you can choose additional settings. All of
these are optional EXCEPT enabling submissions.
o You can add a description like always.
o In order for students to see the Test/Quiz and to make submissions you need to “Enable” the
submissions.
➢ You will need to do this to EVERY Test/Quiz, even copied ones between courses where
the item was already enabled. They automatically switch to the default of “Disable.”
➢ You may want to disable these items until the start of the activity if you are using them
as an in-class assessments and want to keep test confidentiality.
o Time limits can be set using minutes.
o Students can be allowed to resubmit an assignment up to 20 times, if needed.
➢ If you allow more than one attempt, you must choose what score will be taken (Highest,
Most Recent, or Average).
o Randomizing the order will create different versions of the exam for everyone, especially if you
chose randomize answers when building your questions.
o You can choose to show only one question at a time or use any page breaks you may have
added in. If there are no page breaks all text and questions will appear on one page.
o You can change the on-screen keyboard to Spanish.
o Allow or ban students from reviewing their questions.
o Making the Test/Quiz resumable means students can got back into the assignment after they
may have left it.
o View submissions gives students a chance to self-evaluate. You can choose to show just the
student answers or the correct ones.
o The bottom deals with printing options for the written answers.
o Be sure to SAVE to keep your work.
Top of Section
• Preview
o This allows you to go though the assignment similar to how a student may go through the
assignment
o Good idea to go through and check everything is right, especially when starting out.
o It WILL NOT grade your preview.
Top of Section
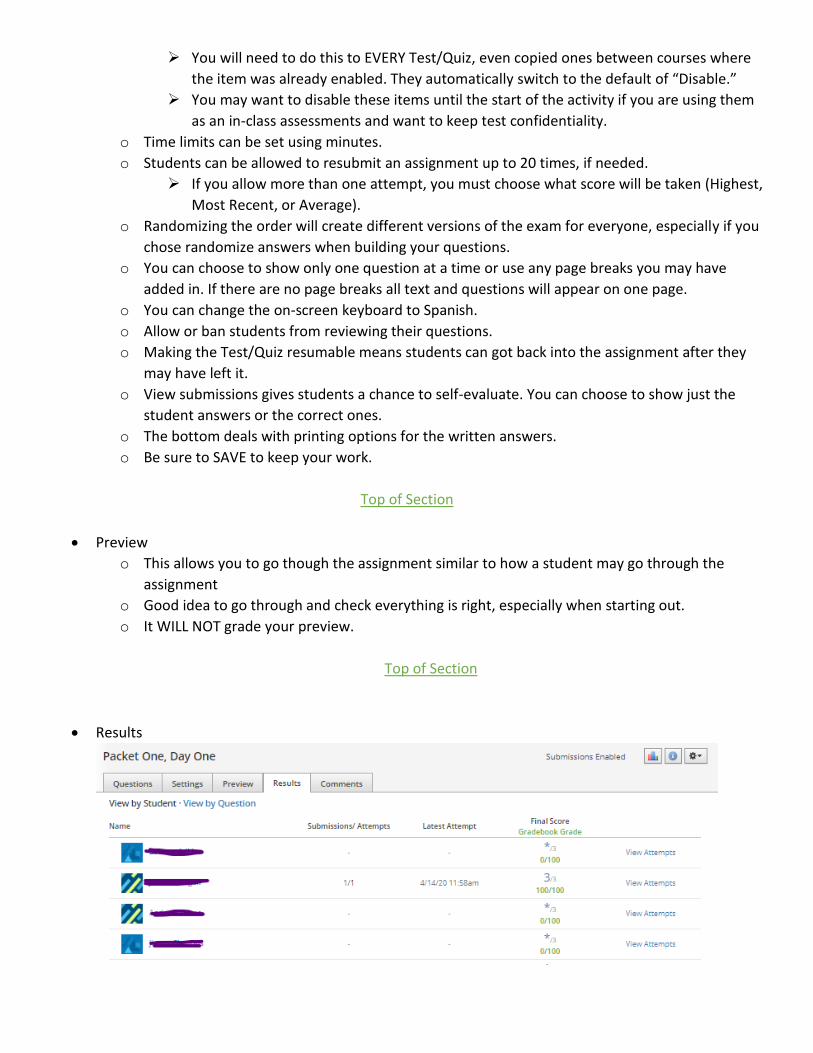
• Results
o If all items can be computer-graded, a grade will be instantly available to students and will add
itself to Gradebook.
➢ If you have a question that needed to be corrected (wrong correct answer selected or
typo), once fixed it will adjust throughout the test even if it has already been attempted
or submitted.
o If there are human-graded items you will have to go to EACH student’s submission on the list
and enter a score for those items.
➢ Click on the student name to see their attempts, and click on the gear on the right-hand
side to view and score their attempts
➢ If they were allowed multiple attempts you may have more than one attempt to grade.
➢ When allowing multiple submissions and resuming at a later time, students will have to
make sure to click on the attempt they want to work on or it might look like it is blank or
that they completed no work. All work that they complete in the assessment will auto-
save.
o Some students may have not attempted or submitted/completed and assignment. You can tell
who has by looking at the Submission Attempt column.
➢ Refresh to see who may have completed their work after your page loaded.
o If students were allowed multiple attempts, their score may change based on the choice you
made for scoring (Highest, Most Recent, or Average).
o All student attempts will autosave their answer choices.
Top of Section
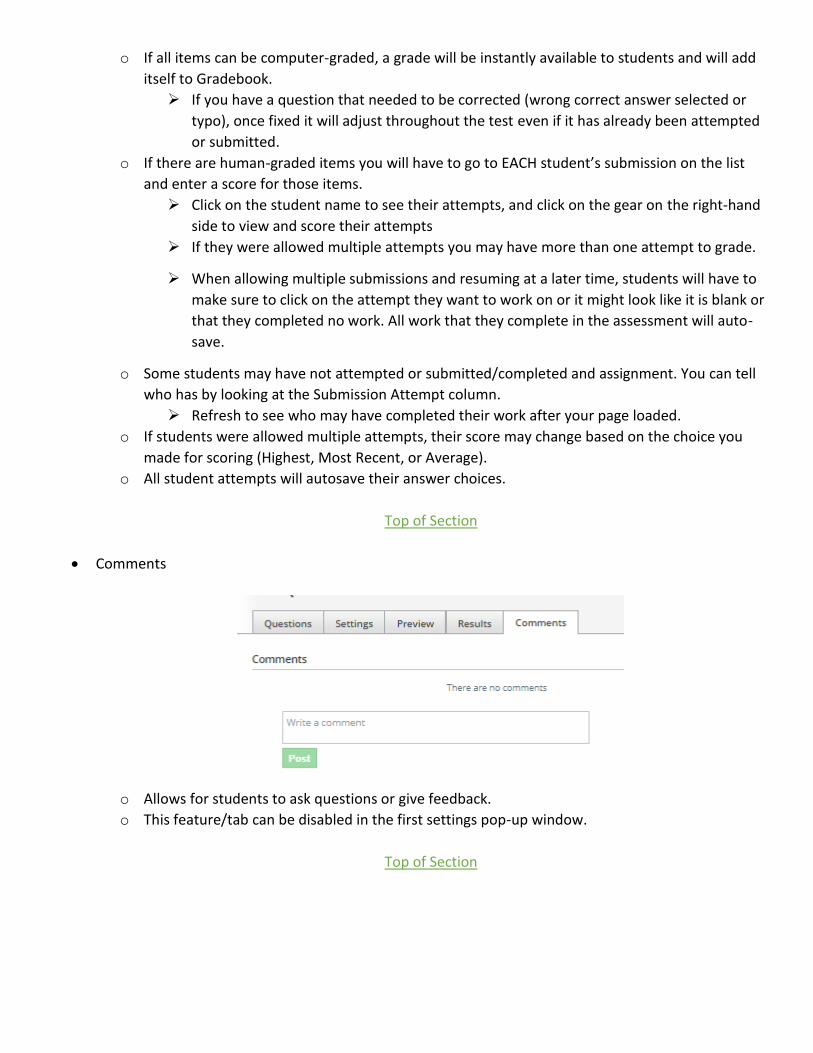
• Comments
o Allows for students to ask questions or give feedback.
o This feature/tab can be disabled in the first settings pop-up window.
Top of Section
▪ Additional Options
o At the top right corner of the page you will see a few more options to help analyze the
data collected during the assignment.
o In the Gear (settings) menu you can export and print what you collected.
Top of Section
Back to Table of Contents
Assessment Items
Assessments have many similar question types to Test/Quiz items, but also has many technology-enhanced
question types. You can even convert Test/Quiz Items into Assessments by following the workaround
directions found here.
In addition to the technology-enhanced questions, the format is different and more closely resembles a state
test. Each question is on its own page within the test and the students will have a number of tools that can be
made available during the task.
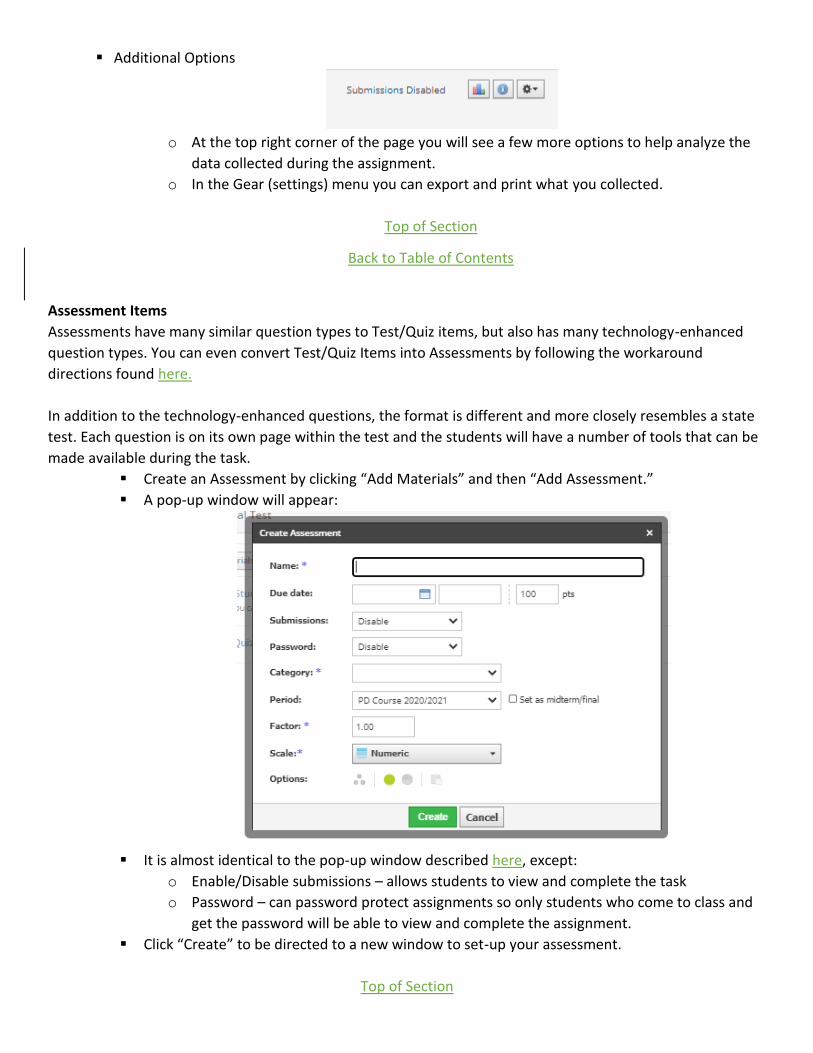
▪ Create an Assessment by clicking “Add Materials” and then “Add Assessment.”
▪ A pop-up window will appear:
▪ It is almost identical to the pop-up window described here, except:
o Enable/Disable submissions – allows students to view and complete the task
o Password – can password protect assignments so only students who come to class and
get the password will be able to view and complete the assignment.
▪ Click “Create” to be directed to a new window to set-up your assessment.
Top of Section
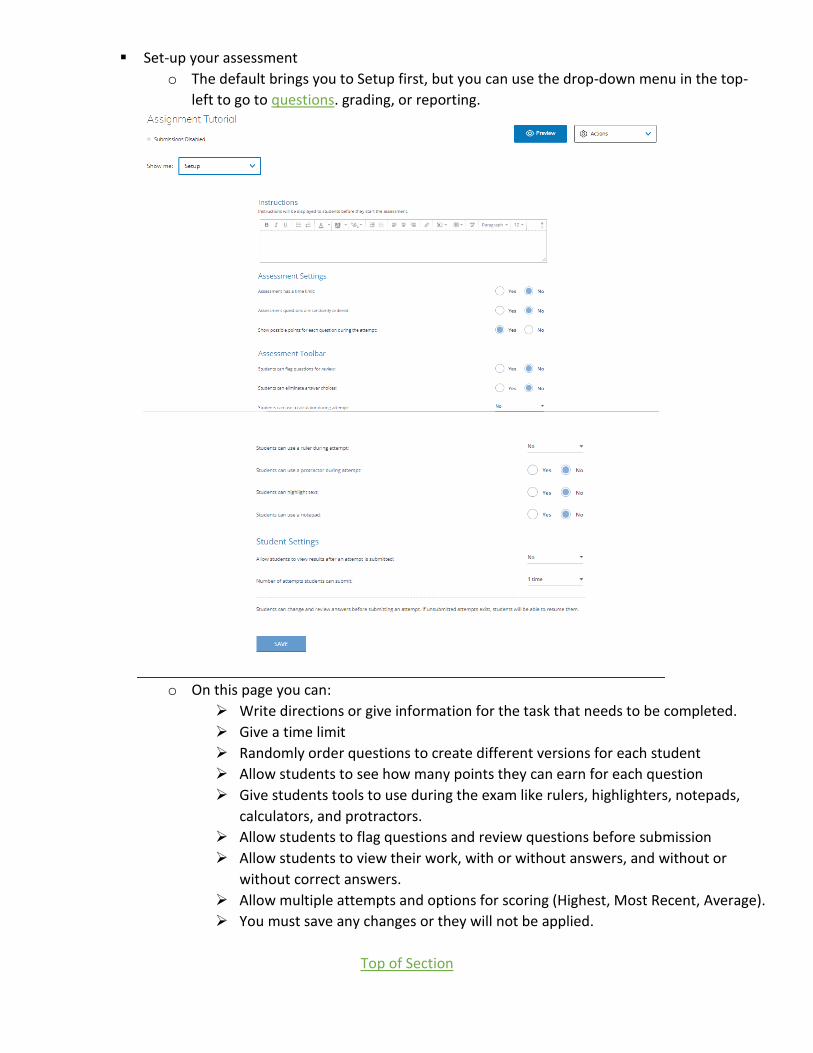
▪ Set-up your assessment
o The default brings you to Setup first, but you can use the drop-down menu in the top-
left to go to questions. grading, or reporting.
o On this page you can:
➢ Write directions or give information for the task that needs to be completed.
➢ Give a time limit
➢ Randomly order questions to create different versions for each student
➢ Allow students to see how many points they can earn for each question
➢ Give students tools to use during the exam like rulers, highlighters, notepads,
calculators, and protractors.
➢ Allow students to flag questions and review questions before submission
➢ Allow students to view their work, with or without answers, and without or
without correct answers.
➢ Allow multiple attempts and options for scoring (Highest, Most Recent, Average).
➢ You must save any changes or they will not be applied.
Top of Section
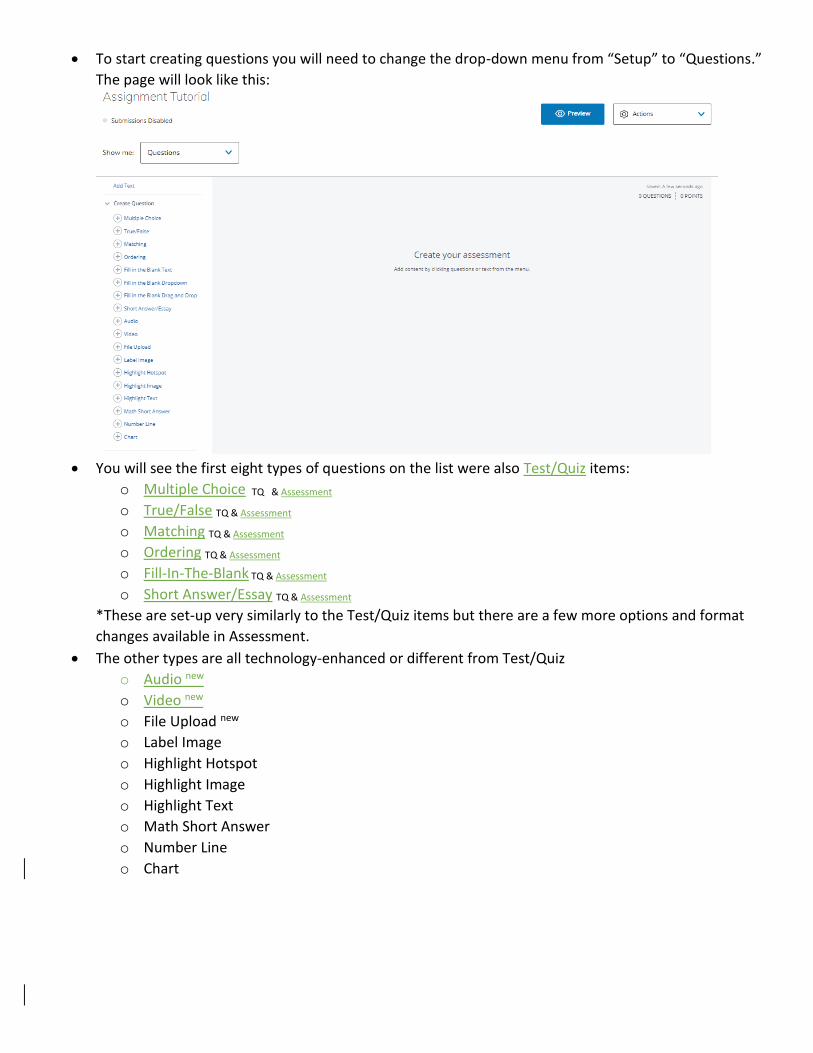
• To start creating questions you will need to change the drop-down menu from “Setup” to “Questions.”
The page will look like this:
• You will see the first eight types of questions on the list were also Test/Quiz items:
o Multiple Choice TQ & Assessment
o True/False TQ & Assessment
o Matching TQ & Assessment
o Ordering TQ & Assessment
o Fill-In-The-Blank TQ & Assessment
o Short Answer/Essay TQ & Assessment
*These are set-up very similarly to the Test/Quiz items but there are a few more options and format
changes available in Assessment.
• The other types are all technology-enhanced or different from Test/Quiz
o Audio new
o Video new
o File Upload new
o Label Image
o Highlight Hotspot
o Highlight Image
o Highlight Text
o Math Short Answer
o Number Line
o Chart
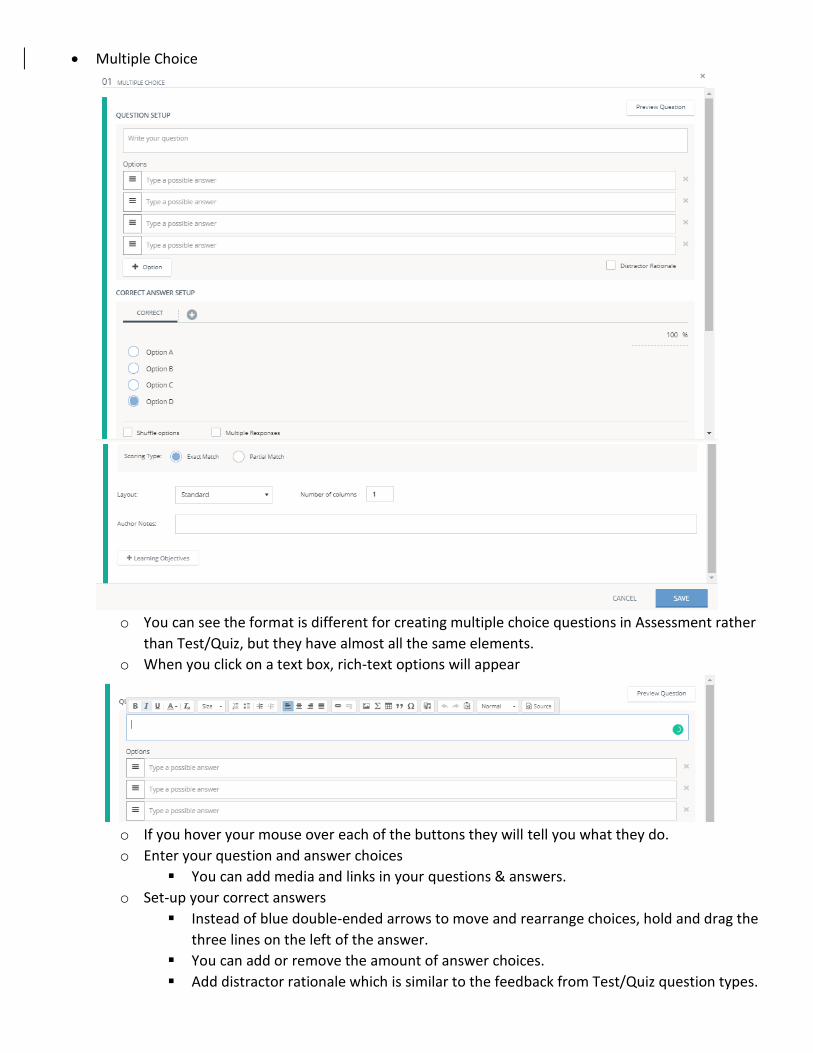
• Multiple Choice
o You can see the format is different for creating multiple choice questions in Assessment rather
than Test/Quiz, but they have almost all the same elements.
o When you click on a text box, rich-text options will appear
o If you hover your mouse over each of the buttons they will tell you what they do.
o Enter your question and answer choices
▪ You can add media and links in your questions & answers.
o Set-up your correct answers
▪ Instead of blue double-ended arrows to move and rearrange choices, hold and drag the
three lines on the left of the answer.
▪ You can add or remove the amount of answer choices.
▪ Add distractor rationale which is similar to the feedback from Test/Quiz question types.

▪ Notice the tab at the top of this section. In assessments you can add more than one set
of correct answers and you can set how much the other answer sets can earn. Ex. If the
question has two answers that could be right, but it asks for the most correct, maybe
the distractor answer could be worth 50% of the points that the question is worth.
▪ If you select partial credit students can answer only part of the question correctly and
still earn a percentage of the credit for the question.
▪ You can also choose to randomly order the answers on an individual basis or choose
multiple answers.
▪ The layout of the question can be adjusted to change how the answer choice is selected.
▪ Add any notes or citations to complete the question.
▪ Align Learning Objective(s)
▪ Save and Preview (top right).
Top of Section
• True/False
o Much more similar to the True/False items from Test/Quiz than the multiple choice.
▪ You do lose the option to make the correction a percentage, if students don’t do it when
required it doesn’t count.
o Make sure you save and preview when done.
Top of Section
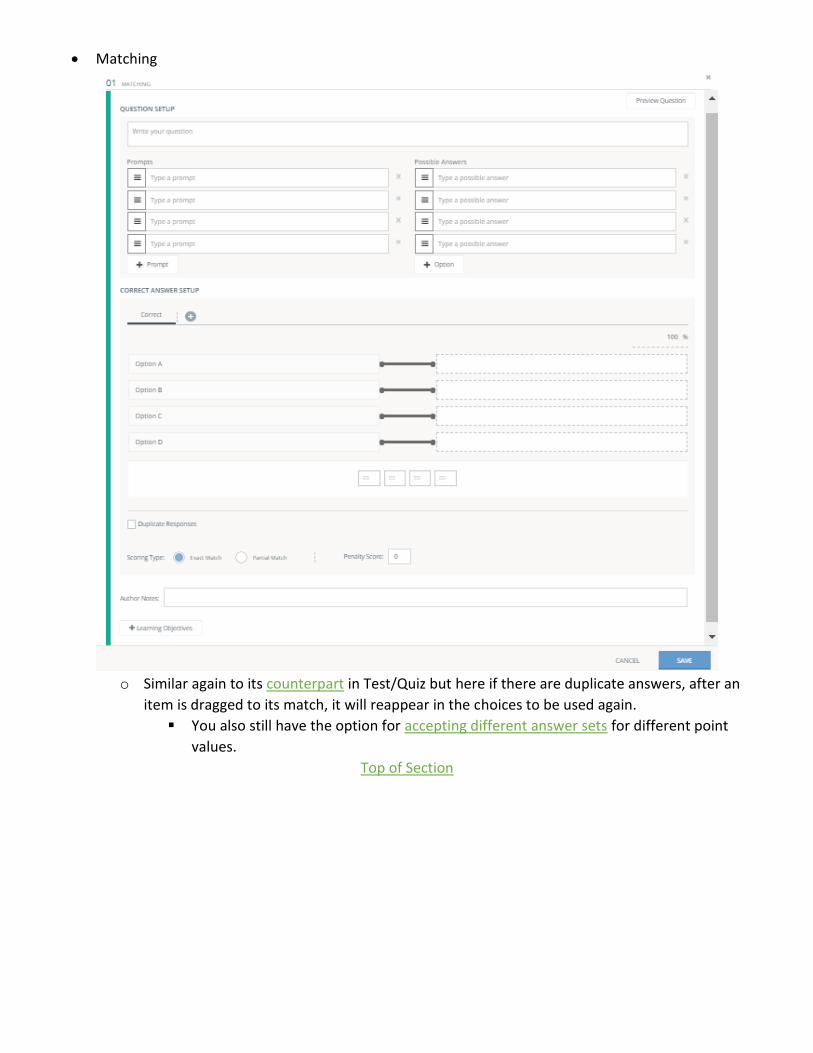
• Matching
o Similar again to its counterpart in Test/Quiz but here if there are duplicate answers, after an
item is dragged to its match, it will reappear in the choices to be used again.
▪ You also still have the option for accepting different answer sets for different point
values.
Top of Section
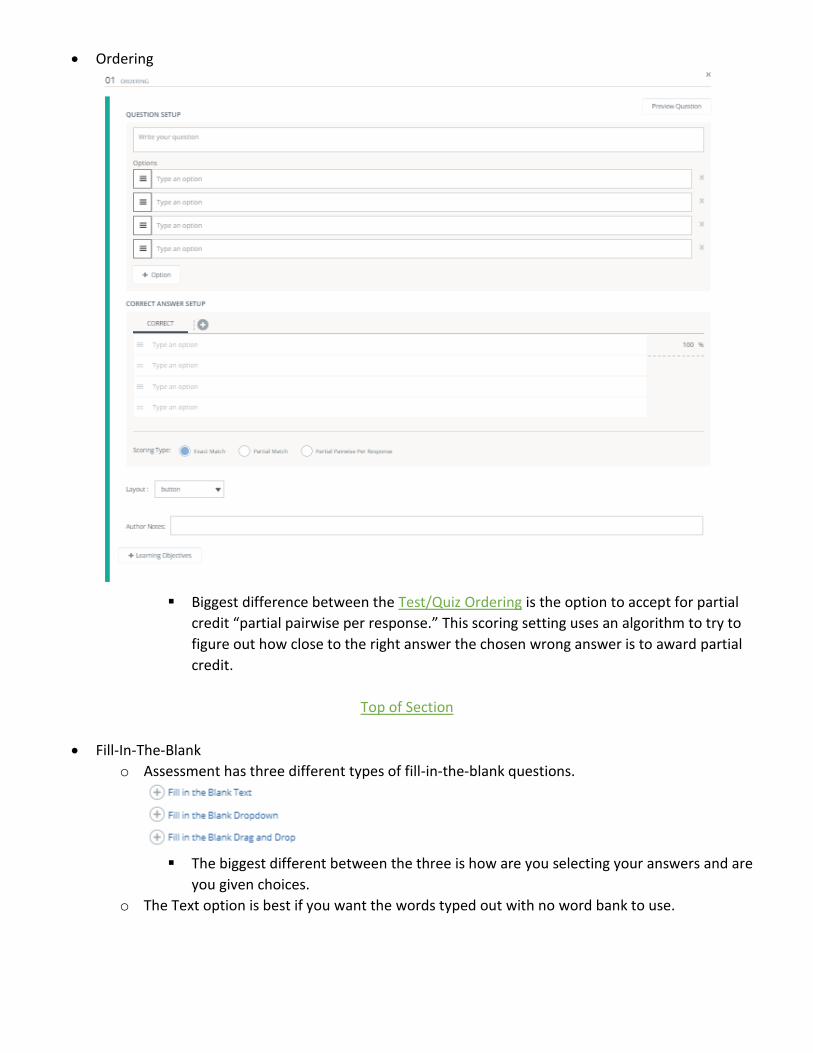
• Ordering
▪ Biggest difference between the Test/Quiz Ordering is the option to accept for partial
credit “partial pairwise per response.” This scoring setting uses an algorithm to try to
figure out how close to the right answer the chosen wrong answer is to award partial
credit.
Top of Section
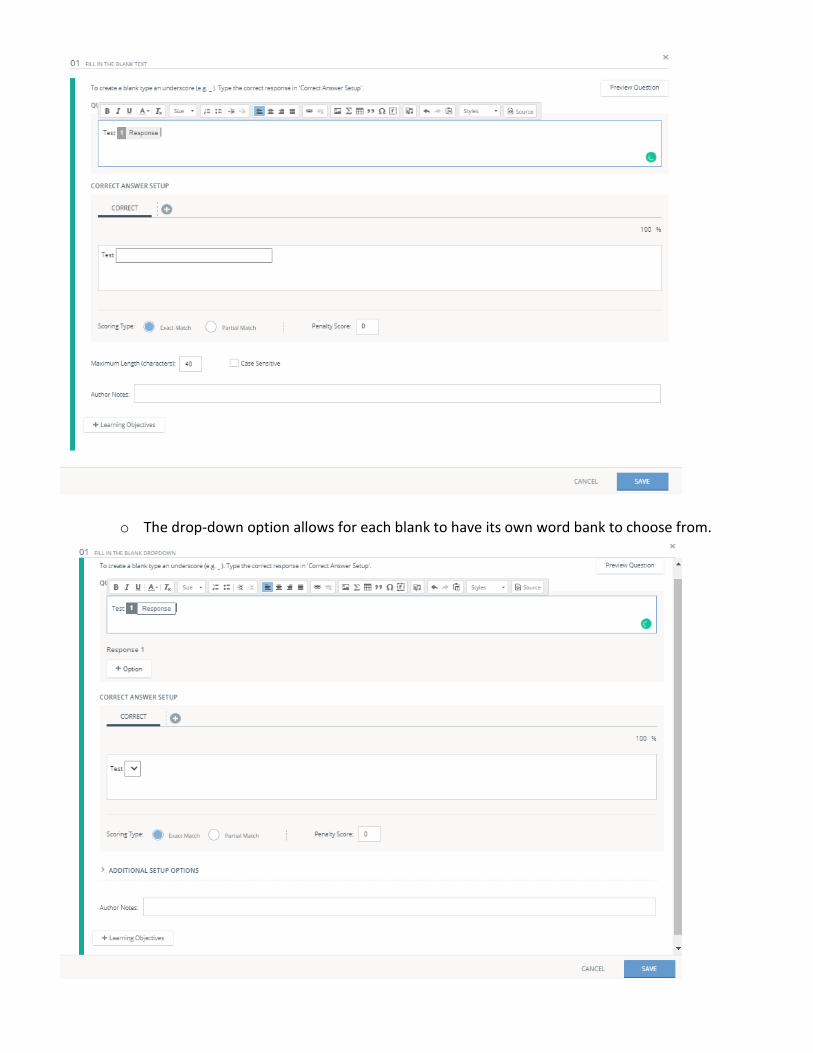
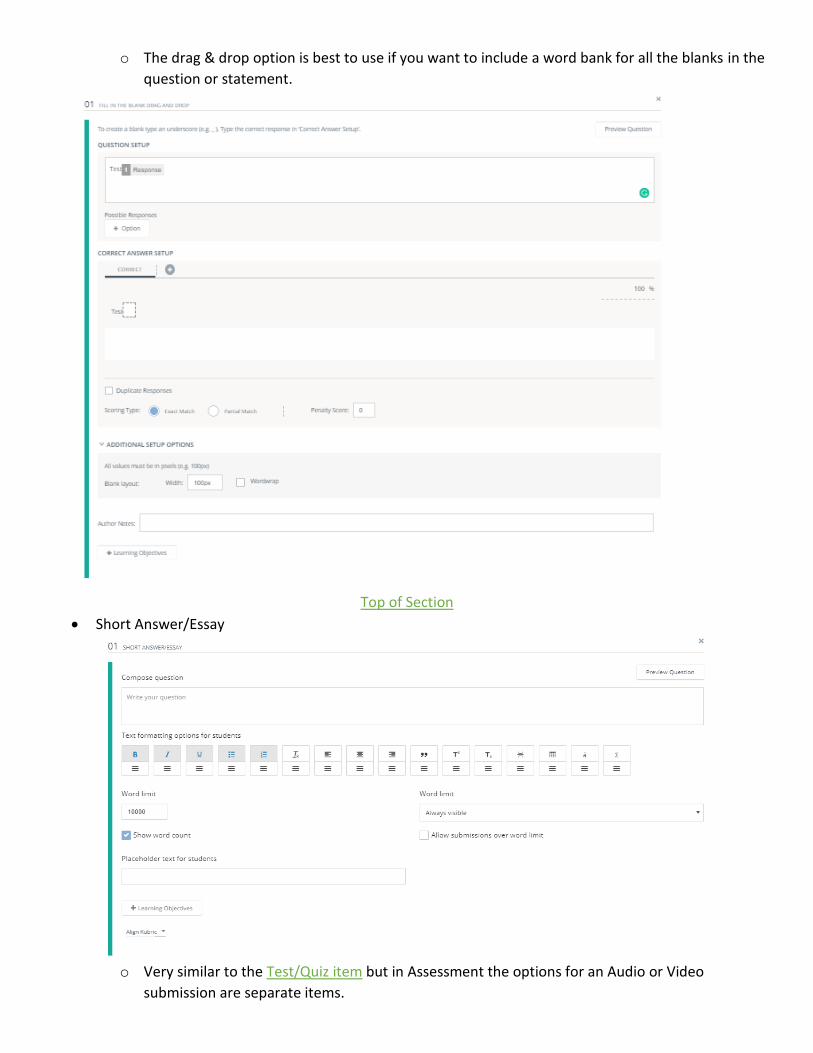
• Fill-In-The-Blank
o Assessment has three different types of fill-in-the-blank questions.
▪ The biggest different between the three is how are you selecting your answers and are
you given choices.
o The Text option is best if you want the words typed out with no word bank to use.
o The drop-down option allows for each blank to have its own word bank to choose from.
o The drag & drop option is best to use if you want to include a word bank for all the blanks in the
question or statement.
Top of Section
• Short Answer/Essay
o Very similar to the Test/Quiz item but in Assessment the options for an Audio or Video
submission are separate items.
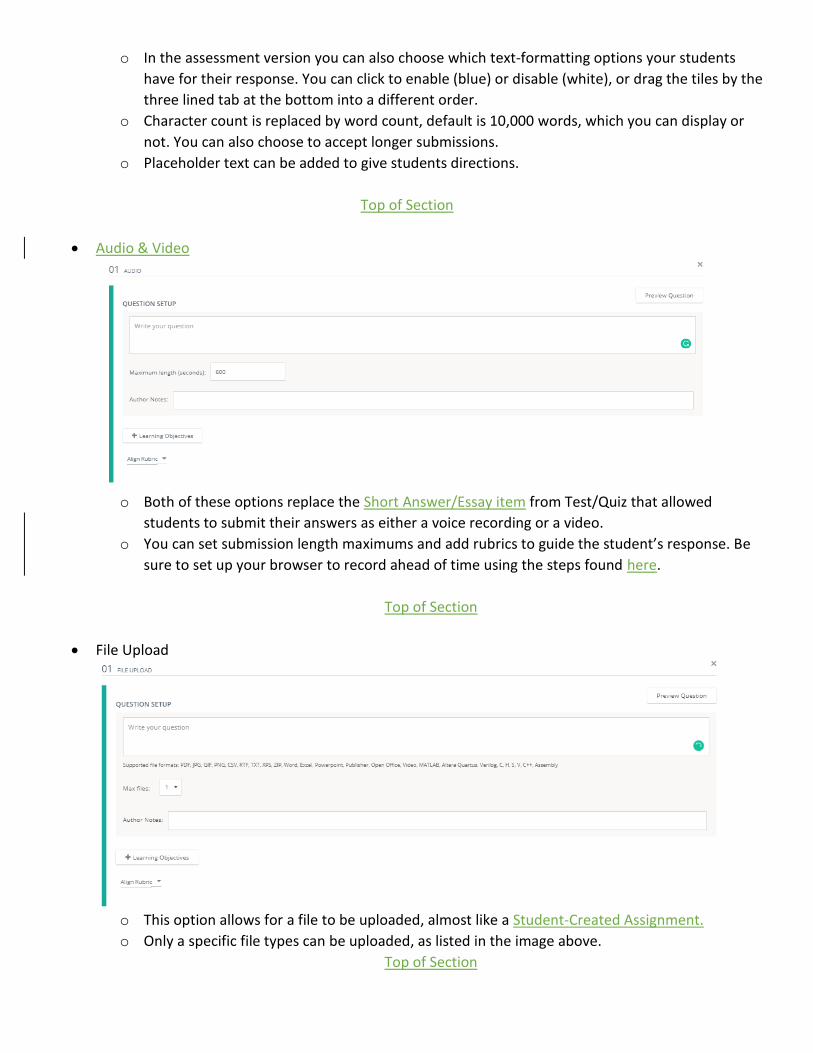
o In the assessment version you can also choose which text-formatting options your students
have for their response. You can click to enable (blue) or disable (white), or drag the tiles by the
three lined tab at the bottom into a different order.
o Character count is replaced by word count, default is 10,000 words, which you can display or
not. You can also choose to accept longer submissions.
o Placeholder text can be added to give students directions.
Top of Section
• Audio & Video
o Both of these options replace the Short Answer/Essay item from Test/Quiz that allowed
students to submit their answers as either a voice recording or a video.
o You can set submission length maximums and add rubrics to guide the student’s response. Be
sure to set up your browser to record ahead of time using the steps found here.
Top of Section
• File Upload
o This option allows for a file to be uploaded, almost like a Student-Created Assignment.
o Only a specific file types can be uploaded, as listed in the image above.
Top of Section
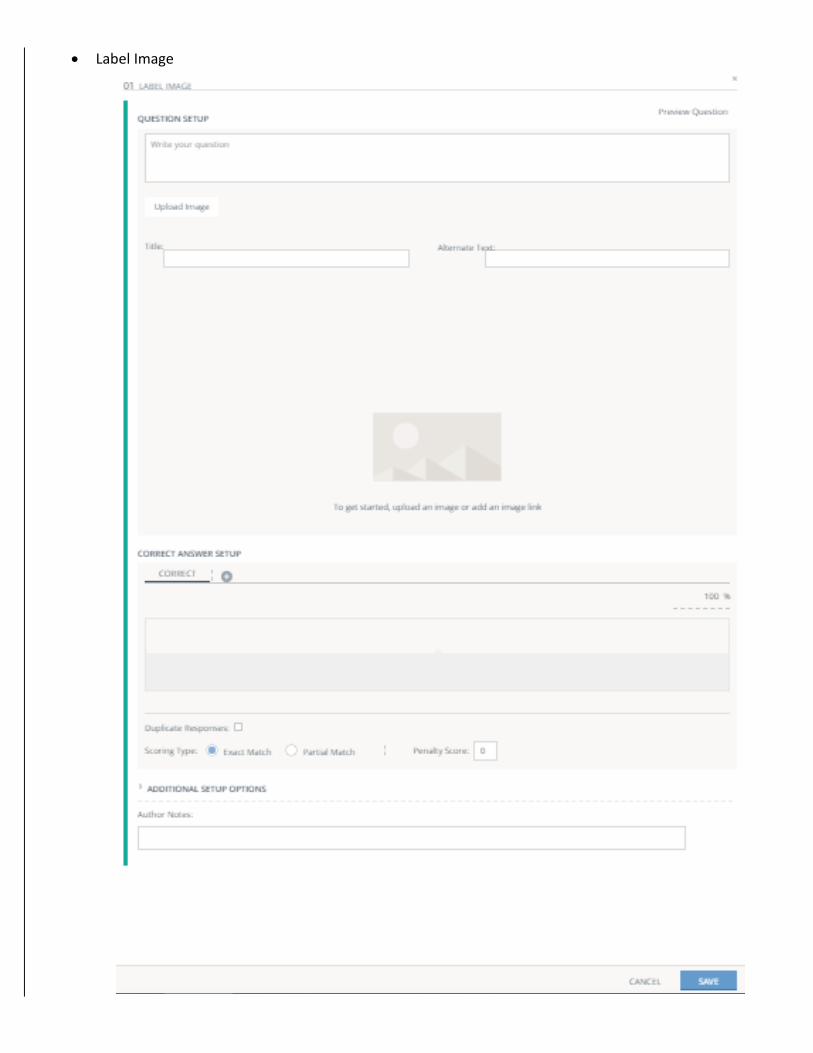
• Label Image
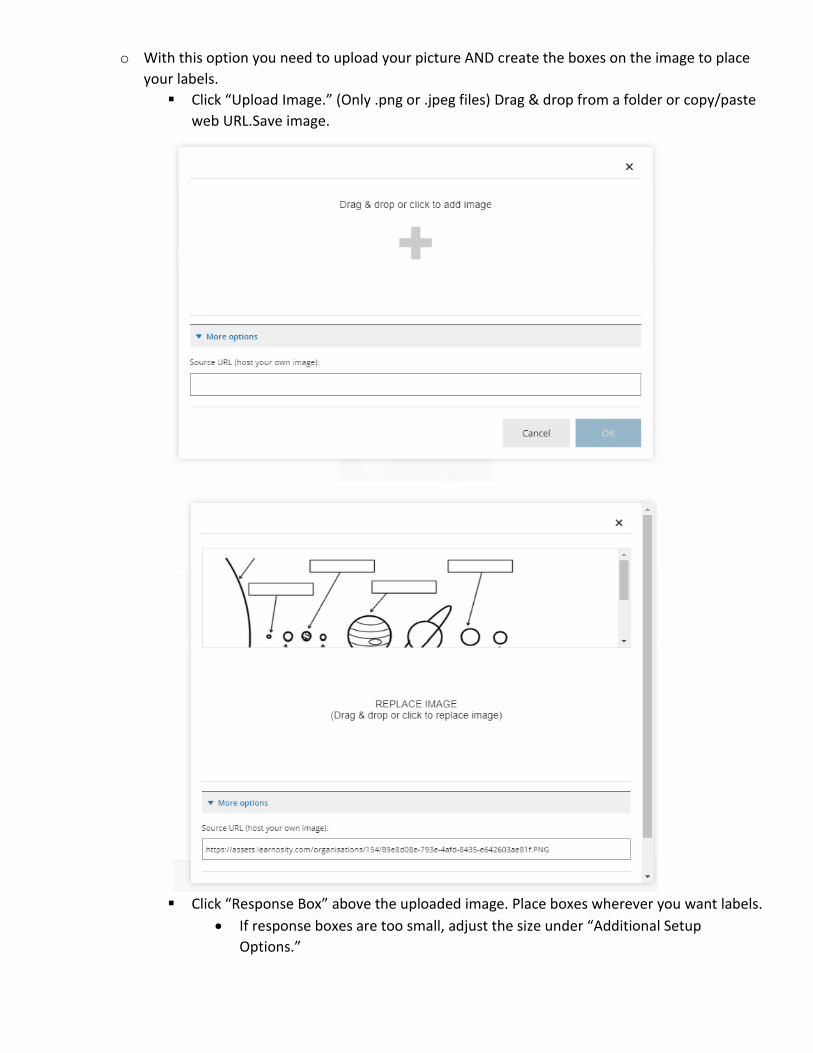
o With this option you need to upload your picture AND create the boxes on the image to place
your labels.
▪ Click “Upload Image.” (Only .png or .jpeg files) Drag & drop from a folder or copy/paste
web URL.Save image.
▪ Click “Response Box” above the uploaded image. Place boxes wherever you want labels.
• If response boxes are too small, adjust the size under “Additional Setup
Options.”
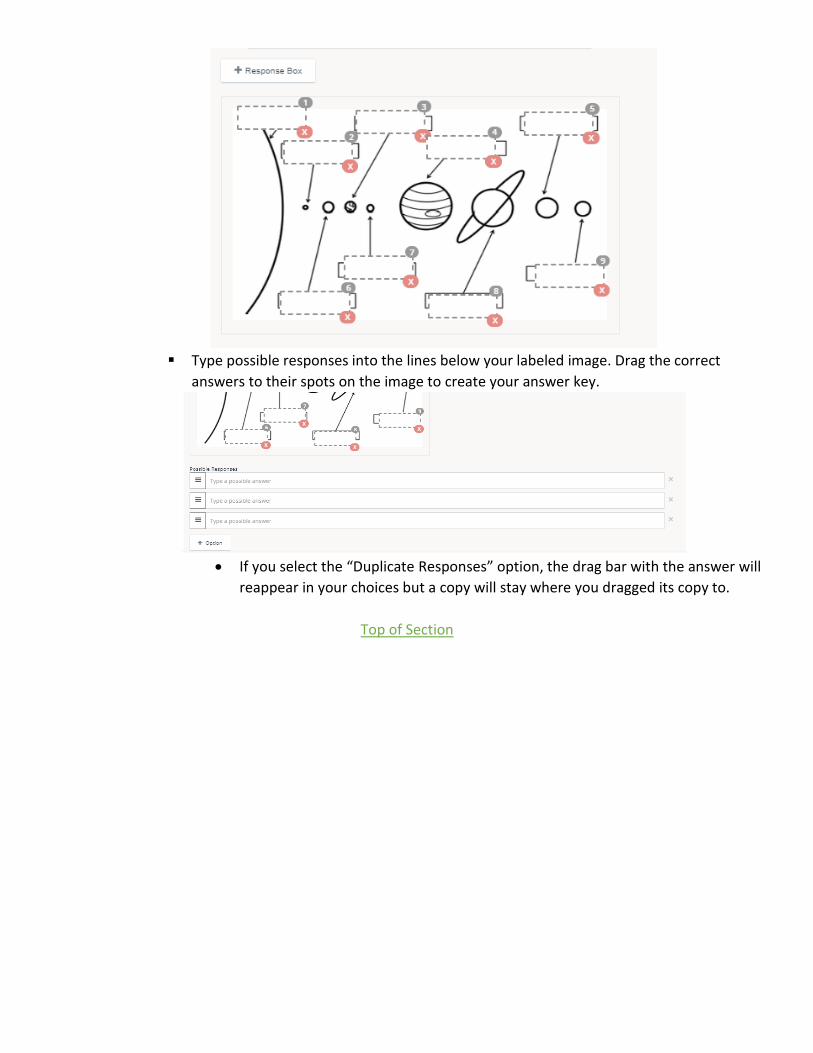
▪ Type possible responses into the lines below your labeled image. Drag the correct
answers to their spots on the image to create your answer key.
• If you select the “Duplicate Responses” option, the drag bar with the answer will
reappear in your choices but a copy will stay where you dragged its copy to.
Top of Section
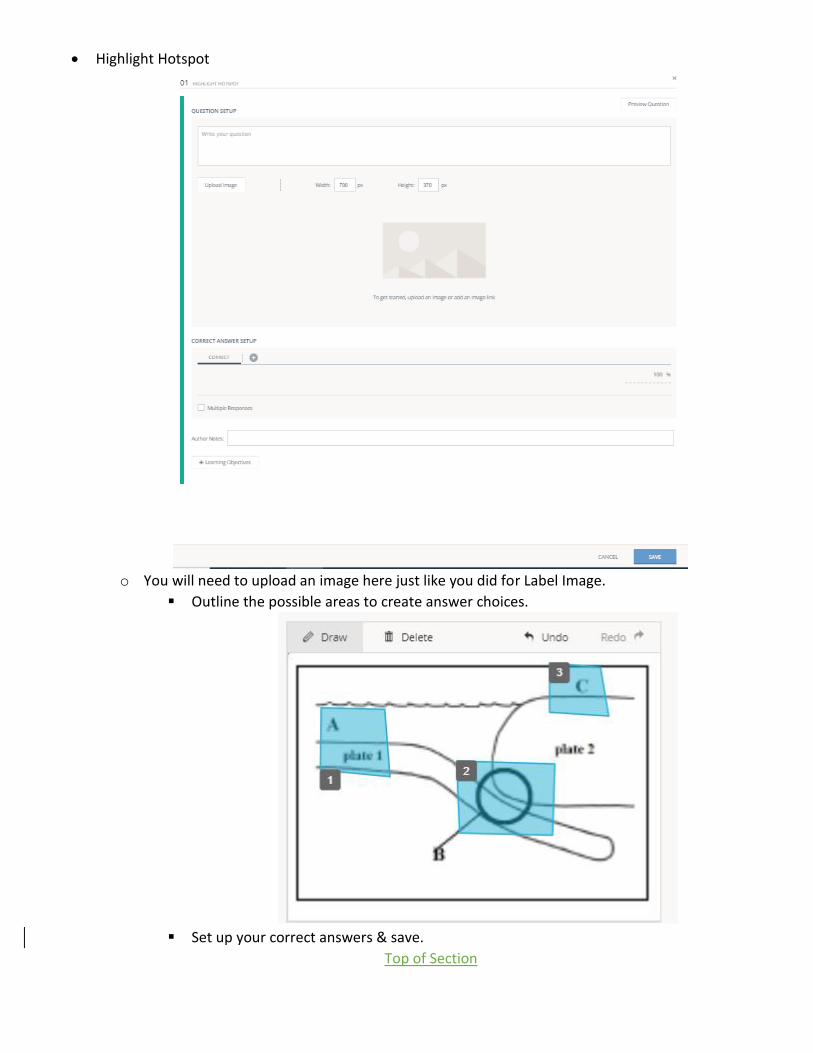
• Highlight Hotspot
o You will need to upload an image here just like you did for Label Image.
▪ Outline the possible areas to create answer choices.
▪ Set up your correct answers & save.
Top of Section
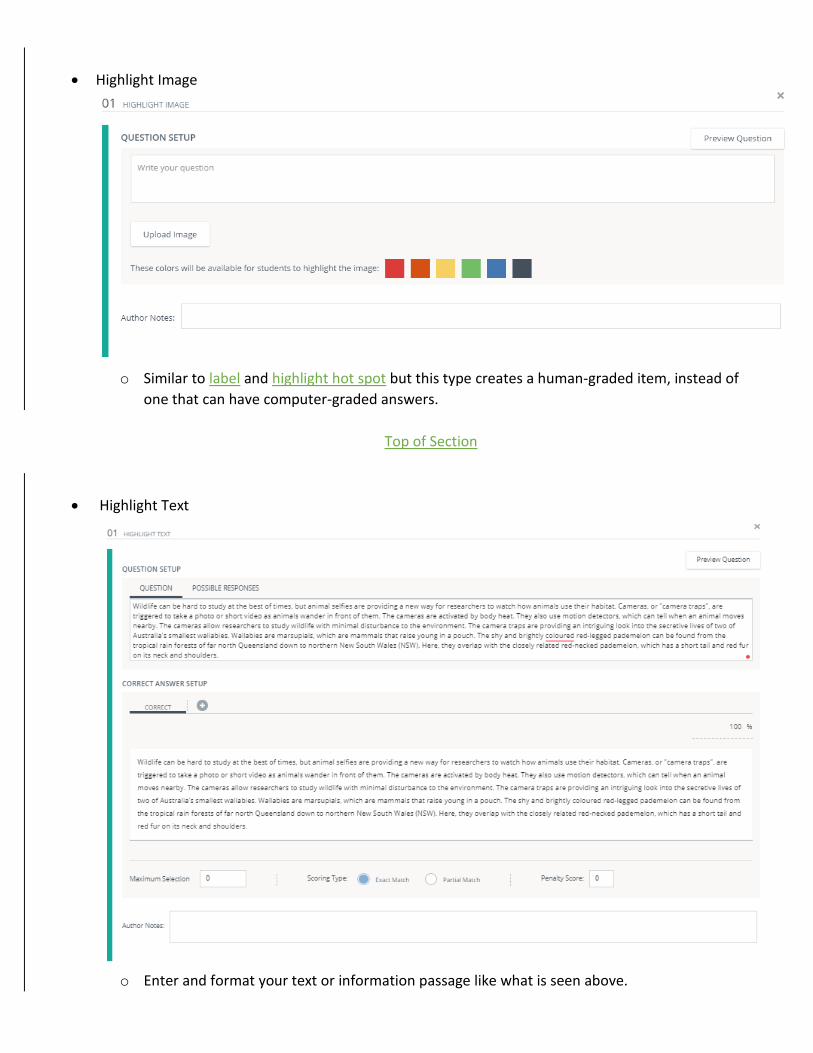
• Highlight Image
o Similar to label and highlight hot spot but this type creates a human-graded item, instead of
one that can have computer-graded answers.
Top of Section
• Highlight Text
o Enter and format your text or information passage like what is seen above.
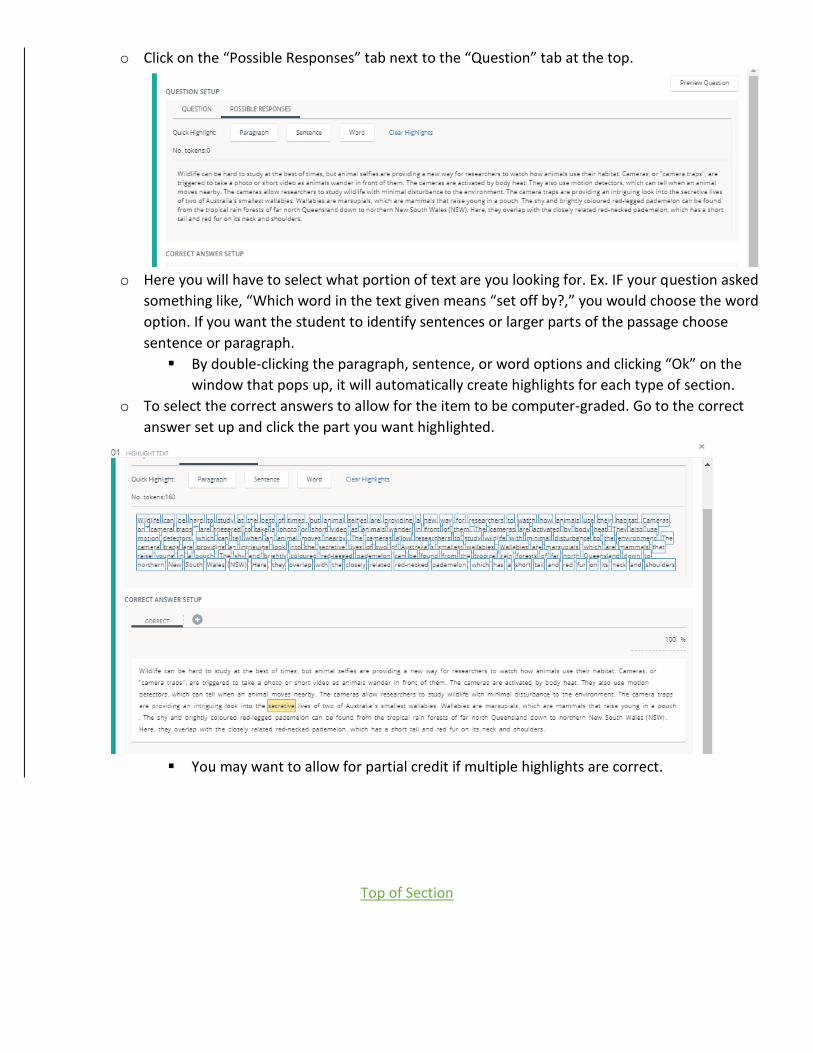
o Click on the “Possible Responses” tab next to the “Question” tab at the top.
o Here you will have to select what portion of text are you looking for. Ex. IF your question asked
something like, “Which word in the text given means “set off by?,” you would choose the word
option. If you want the student to identify sentences or larger parts of the passage choose
sentence or paragraph.
▪ By double-clicking the paragraph, sentence, or word options and clicking “Ok” on the
window that pops up, it will automatically create highlights for each type of section.
o To select the correct answers to allow for the item to be computer-graded. Go to the correct
answer set up and click the part you want highlighted.
▪ You may want to allow for partial credit if multiple highlights are correct.
Top of Section
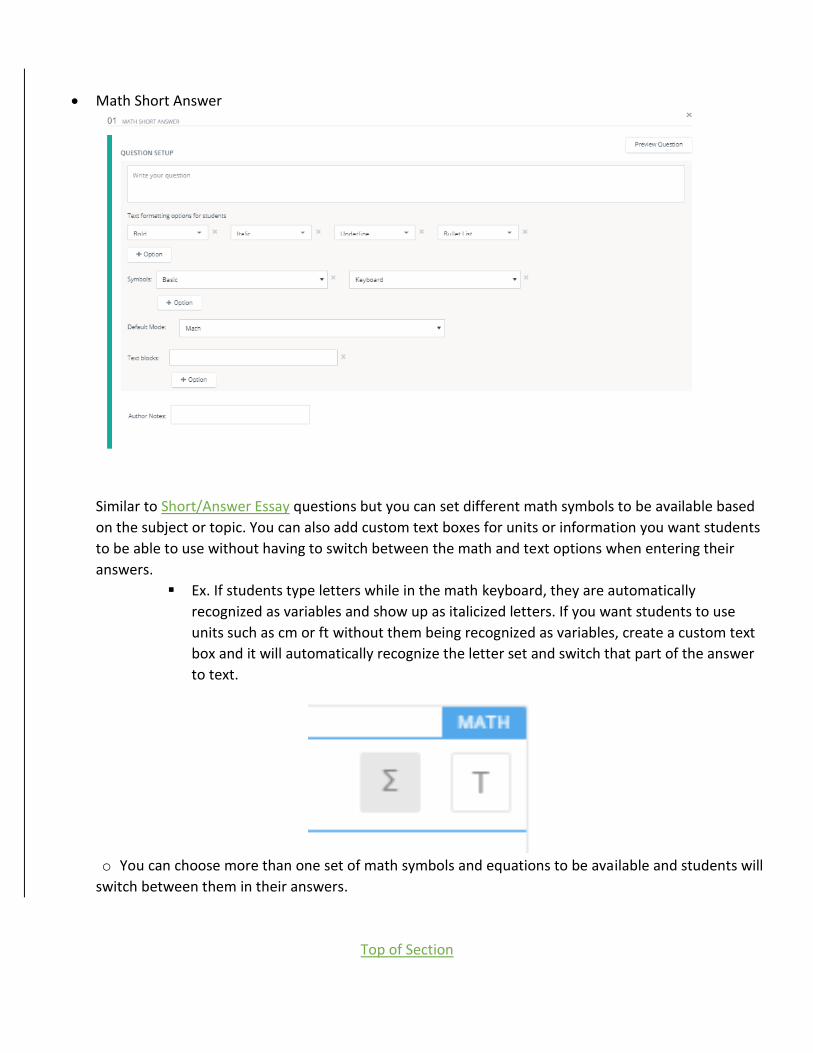
• Math Short Answer
Similar to Short/Answer Essay questions but you can set different math symbols to be available based
on the subject or topic. You can also add custom text boxes for units or information you want students
to be able to use without having to switch between the math and text options when entering their
answers.
▪ Ex. If students type letters while in the math keyboard, they are automatically
recognized as variables and show up as italicized letters. If you want students to use
units such as cm or ft without them being recognized as variables, create a custom text
box and it will automatically recognize the letter set and switch that part of the answer
to text.
o You can choose more than one set of math symbols and equations to be available and students will
switch between them in their answers.
Top of Section
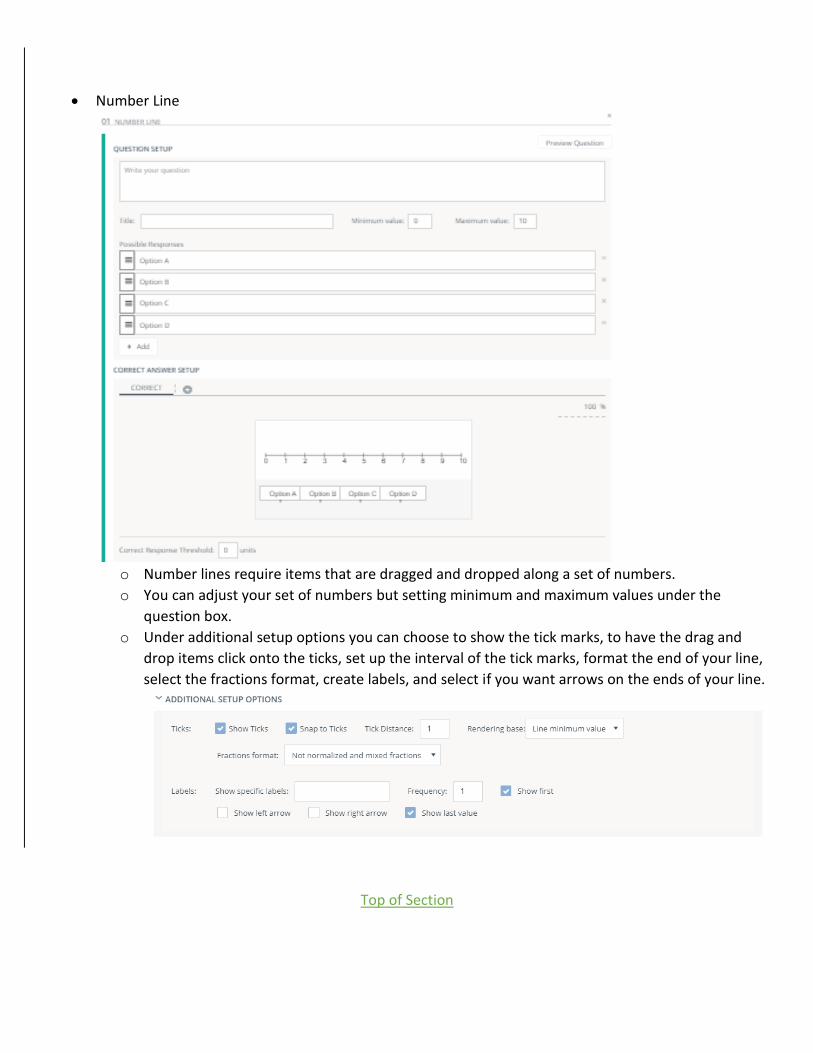
• Number Line
o Number lines require items that are dragged and dropped along a set of numbers.
o You can adjust your set of numbers but setting minimum and maximum values under the
question box.
o Under additional setup options you can choose to show the tick marks, to have the drag and
drop items click onto the ticks, set up the interval of the tick marks, format the end of your line,
select the fractions format, create labels, and select if you want arrows on the ends of your line.
Top of Section
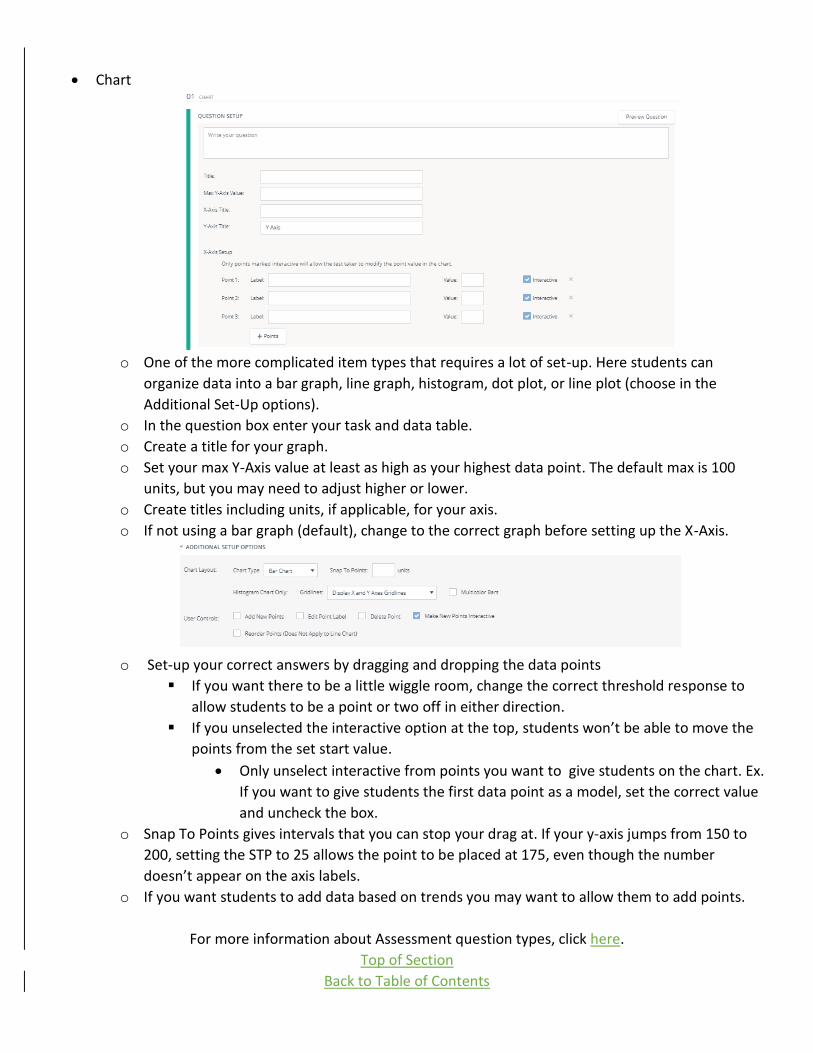
• Chart
o One of the more complicated item types that requires a lot of set-up. Here students can
organize data into a bar graph, line graph, histogram, dot plot, or line plot (choose in the
Additional Set-Up options).
o In the question box enter your task and data table.
o Create a title for your graph.
o Set your max Y-Axis value at least as high as your highest data point. The default max is 100
units, but you may need to adjust higher or lower.
o Create titles including units, if applicable, for your axis.
o If not using a bar graph (default), change to the correct graph before setting up the X-Axis.
o Set-up your correct answers by dragging and dropping the data points
▪ If you want there to be a little wiggle room, change the correct threshold response to
allow students to be a point or two off in either direction.
▪ If you unselected the interactive option at the top, students won’t be able to move the
points from the set start value.
• Only unselect interactive from points you want to give students on the chart. Ex.
If you want to give students the first data point as a model, set the correct value
and uncheck the box.
o Snap To Points gives intervals that you can stop your drag at. If your y-axis jumps from 150 to
200, setting the STP to 25 allows the point to be placed at 175, even though the number
doesn’t appear on the axis labels.
o If you want students to add data based on trends you may want to allow them to add points.
For more information about Assessment question types, click here.
Top of Section
Back to Table of Contents
Audio/Video Recording
Schoology has added a lot more opportunities for teachers to record their own audio and video to help
students with their specific content. This can be great for differentiation and give you more options to
communicate to your students and have them communicate with you.
If your device has a built-in webcam and microphone, recording straight to Schoology is very easy. If you have
separate hardware you may have to set that up on your computer first according to the manufacturer.
You will want to use Google Chrome when you are recording to Schoology. The first time you want to record
you will first have to make sure you have Flash enabled. Follow the steps here when on Schoology to allow
access to your webcam and mic for recording. Students will have to do this too so you may want to have a
lesson or time set aside where you have students set this up. Be sure to click Allow when Chrome prompts you
to allow access.
Once you make a recording you can listen to it, start over if you need to, and insert it. Both video and audio
recorded for description text-boxes in Schoology cannot be edited or stitched together, so it must be done in
one take. You can add multiple clips if you need to. Student audio and video recordings can be paused and
resumed while creating a submission.
For more information about recording in Schoology, click here.
Top of Section
Back to Table of Contents
Creating Resources
In Schoology you can create items to use for your courses and groups. You can store, edit, share, and copy
content you create outside of a specific course. This is great when you want to pre-plan content and build-up a
library of course content.
By clicking the “Resources” tab at the top of the page you can create and store course materials. The first page
you come to looks a little like OneDrive with folders. You can store your own creations and uploads but you
can also share and get resources from other schools if they are public. You can keep everything in folders on
your Home section or you can create new “Collections” by clicking the icon that looks like this near
where it says “My Resources.”.
In Resources you can make all of the same items as when you are in your courses or groups, but you also have
some new items you can create only in Resources, using the “Add Resources” menu. You can create rubrics,
badges, and question banks.
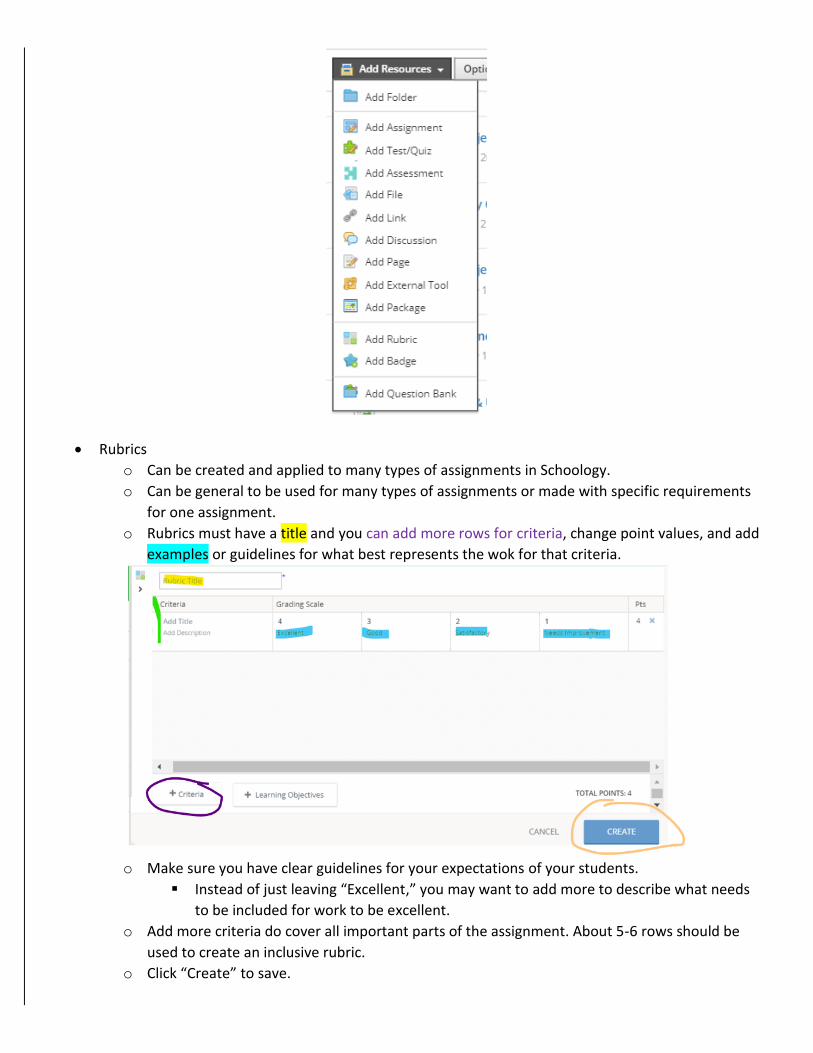
• Rubrics
o Can be created and applied to many types of assignments in Schoology.
o Can be general to be used for many types of assignments or made with specific requirements
for one assignment.
o Rubrics must have a title and you can add more rows for criteria, change point values, and add
examples or guidelines for what best represents the wok for that criteria.
o Make sure you have clear guidelines for your expectations of your students.
▪ Instead of just leaving “Excellent,” you may want to add more to describe what needs
to be included for work to be excellent.
o Add more criteria do cover all important parts of the assignment. About 5-6 rows should be
used to create an inclusive rubric.
o Click “Create” to save.
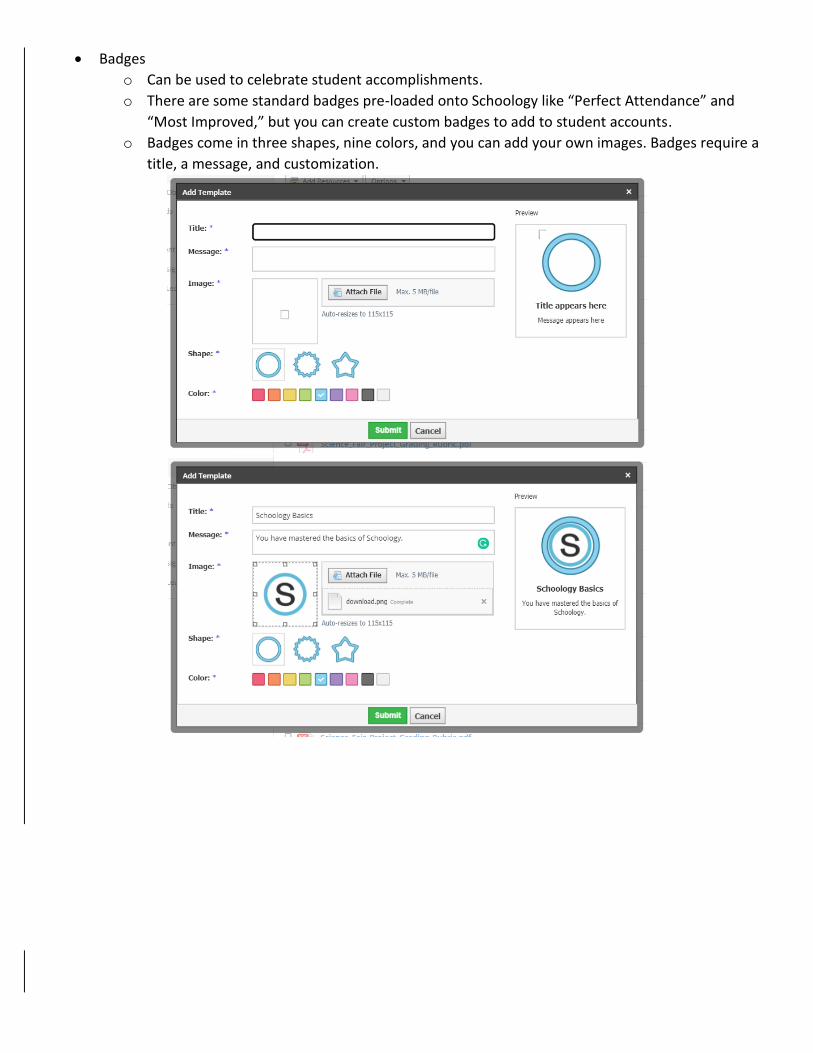
• Badges
o Can be used to celebrate student accomplishments.
o There are some standard badges pre-loaded onto Schoology like “Perfect Attendance” and
“Most Improved,” but you can create custom badges to add to student accounts.
o Badges come in three shapes, nine colors, and you can add your own images. Badges require a
title, a message, and customization.
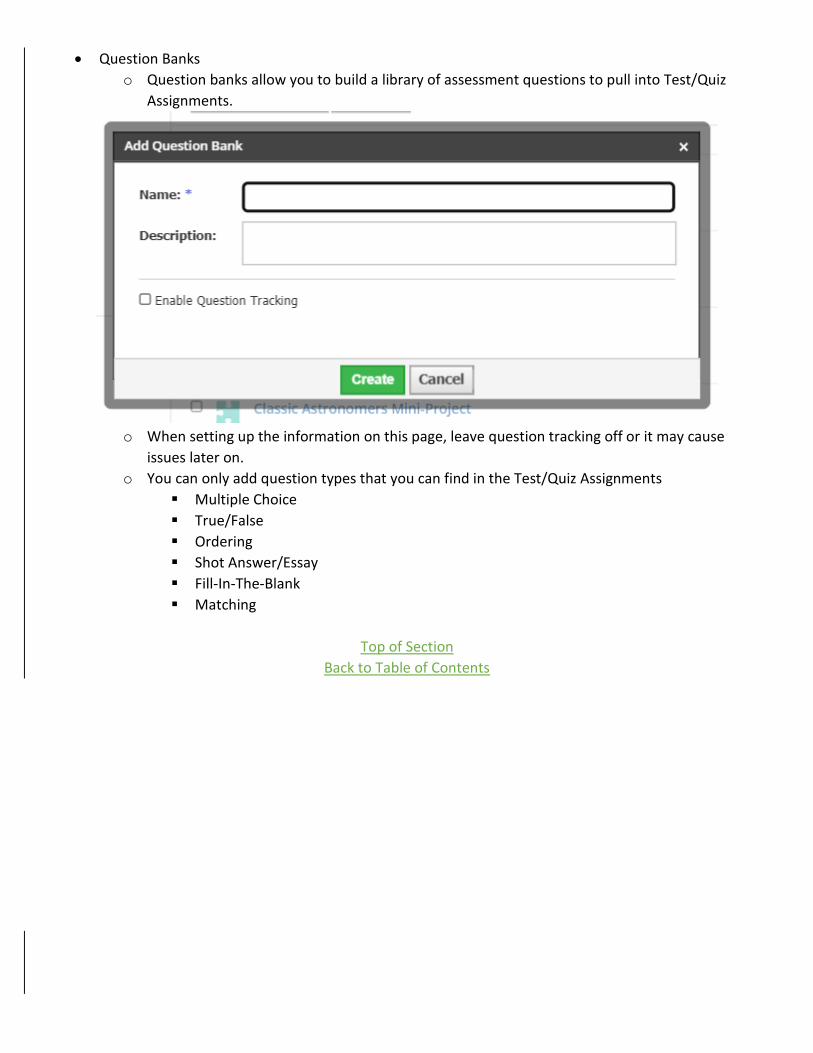
• Question Banks
o Question banks allow you to build a library of assessment questions to pull into Test/Quiz
Assignments.
o When setting up the information on this page, leave question tracking off or it may cause
issues later on.
o You can only add question types that you can find in the Test/Quiz Assignments
▪ Multiple Choice
▪ True/False
▪ Ordering
▪ Shot Answer/Essay
▪ Fill-In-The-Blank
▪ Matching
Top of Section
Back to Table of Contents
Adding Apps to Schoology
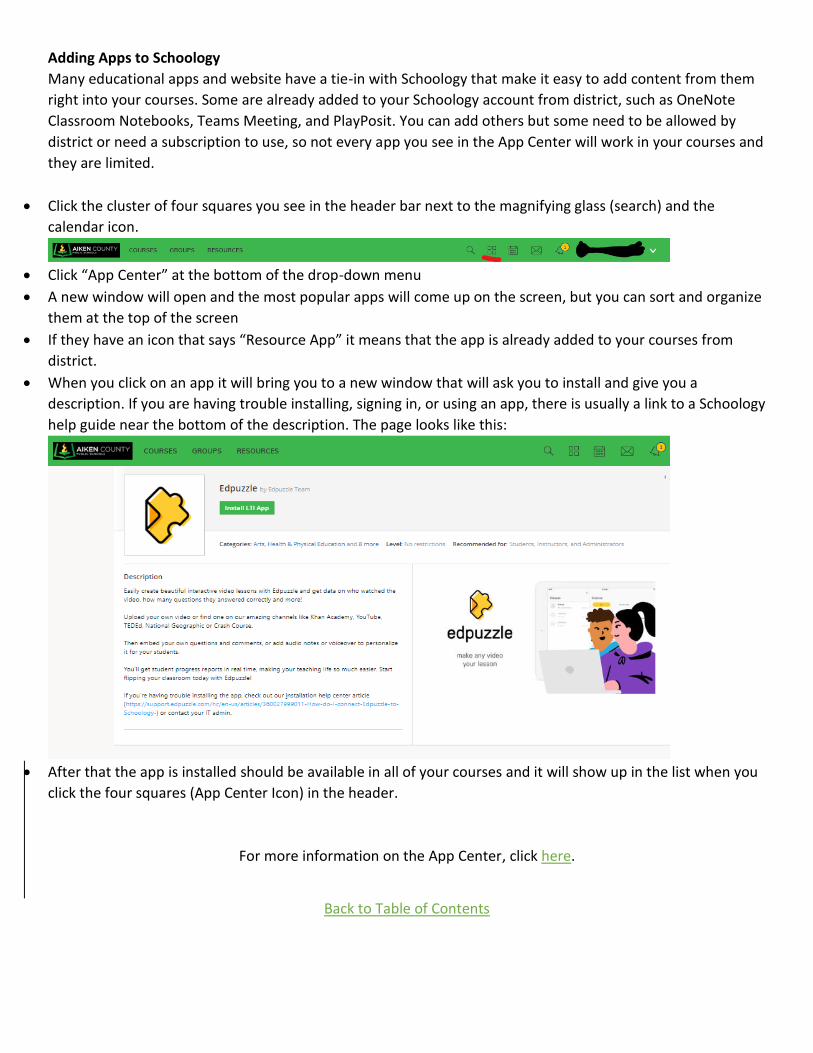
Many educational apps and website have a tie-in with Schoology that make it easy to add content from them
right into your courses. Some are already added to your Schoology account from district, such as OneNote
Classroom Notebooks, Teams Meeting, and PlayPosit. You can add others but some need to be allowed by
district or need a subscription to use, so not every app you see in the App Center will work in your courses and
they are limited.
• Click the cluster of four squares you see in the header bar next to the magnifying glass (search) and the
calendar icon.
• Click “App Center” at the bottom of the drop-down menu
• A new window will open and the most popular apps will come up on the screen, but you can sort and organize
them at the top of the screen
• If they have an icon that says “Resource App” it means that the app is already added to your courses from
district.
• When you click on an app it will bring you to a new window that will ask you to install and give you a
description. If you are having trouble installing, signing in, or using an app, there is usually a link to a Schoology
help guide near the bottom of the description. The page looks like this:
• After that the app is installed should be available in all of your courses and it will show up in the list when you
click the four squares (App Center Icon) in the header.
For more information on the App Center, click here.
Back to Table of Contents
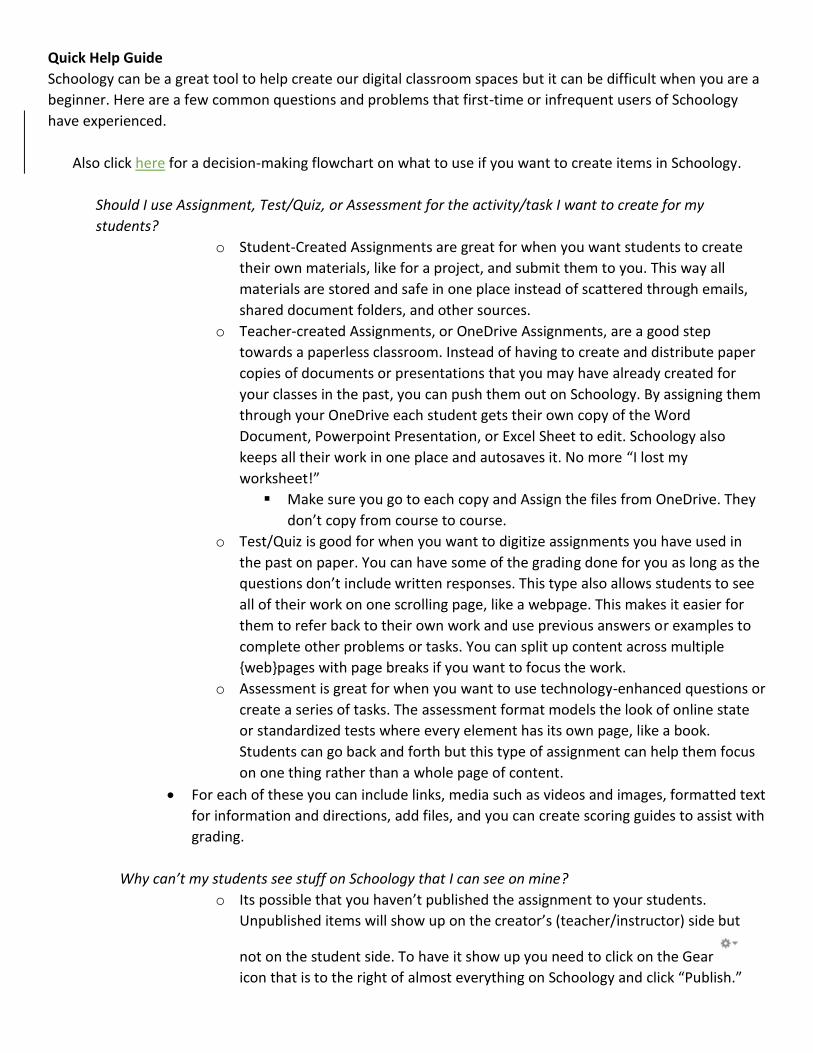
Quick Help Guide
Schoology can be a great tool to help create our digital classroom spaces but it can be difficult when you are a
beginner. Here are a few common questions and problems that first-time or infrequent users of Schoology
have experienced.
Also click here for a decision-making flowchart on what to use if you want to create items in Schoology.
Should I use Assignment, Test/Quiz, or Assessment for the activity/task I want to create for my
students?
o Student-Created Assignments are great for when you want students to create
their own materials, like for a project, and submit them to you. This way all
materials are stored and safe in one place instead of scattered through emails,
shared document folders, and other sources.
o Teacher-created Assignments, or OneDrive Assignments, are a good step
towards a paperless classroom. Instead of having to create and distribute paper
copies of documents or presentations that you may have already created for
your classes in the past, you can push them out on Schoology. By assigning them
through your OneDrive each student gets their own copy of the Word
Document, Powerpoint Presentation, or Excel Sheet to edit. Schoology also
keeps all their work in one place and autosaves it. No more “I lost my
worksheet!”
▪ Make sure you go to each copy and Assign the files from OneDrive. They
don’t copy from course to course.
o Test/Quiz is good for when you want to digitize assignments you have used in
the past on paper. You can have some of the grading done for you as long as the
questions don’t include written responses. This type also allows students to see
all of their work on one scrolling page, like a webpage. This makes it easier for
them to refer back to their own work and use previous answers or examples to
complete other problems or tasks. You can split up content across multiple
{web}pages with page breaks if you want to focus the work.
o Assessment is great for when you want to use technology-enhanced questions or
create a series of tasks. The assessment format models the look of online state
or standardized tests where every element has its own page, like a book.
Students can go back and forth but this type of assignment can help them focus
on one thing rather than a whole page of content.
• For each of these you can include links, media such as videos and images, formatted text
for information and directions, add files, and you can create scoring guides to assist with
grading.
Why can’t my students see stuff on Schoology that I can see on mine?
o Its possible that you haven’t published the assignment to your students.
Unpublished items will show up on the creator’s (teacher/instructor) side but
not on the student side. To have it show up you need to click on the Gear
icon that is to the right of almost everything on Schoology and click “Publish.”
o If it is published it may be “Disabled.”
▪ For Assignments, you need to click the Gear icon go to the bottom
of the pop-up window where it says “Options.” Go to the third & fourth
icon from the left and they should look like this: . If either one of
them is gray, click on it to make it colorful and active.
▪ For Test/Quiz, click on the blue title-text and go into the “Settings” tab.
The first thing under the text box is the submissions options. Switch from
this: , to this or any of the options
that say enable.
• If you copied this from another course or from Resources, you will
have to go to each course and enable each copy.
▪ For Assessment, click the Gear icon. On the pop-up window make
sure you have submissions enabled and password disabled (or check and
give out the password).
o For Teacher-Created Assignments, the document is only showing up in one class.
▪ Any time you assign from OneDrive in an Assignment, you need to go to
each copy of the assignment in your courses and add the document.
I added a link or embedded content that I can see on my computer but it looks broken or missing on my
student’s.
o Teacher and student computers do have different permissions so it is possible it is
blocked for the student. If it is a site you would like “white-listed,” or unblocked, contact
district to start the process.
o Sometimes OneDrive and other sites have communication issues with Schoology. If you
added it as a link, clicking the blue title text at the top of the page should bring you to
the source material. If it was a file, usually there is a link to the file close to the bottom
of the page that will open a window to view the file.
I got a new student and they weren’t automatically enrolled in my class, but they have a Schoology
account.
o Student Schoology accounts can take a few days to be active, but if they have an ASPSD
Schoology account (they transferred in district), you can give them the class access
code that is at the bottom of the right-hand side of your course page. They enter the
code by clicking “My Courses” in the “Courses” tab and there is a place to enter it on
the left side.
For any other questions, try clicking here.
Top of Section
Back to Table of Contents