sap sourcing 9.0
TRANSCRIPT
Configuration GuideDocument version 110 ndash 2015-04-16
SAP Sourcing 90
PUBLIC
Document History
The following table provides an overview of the most important document changes
Table 1
Version Date Description
10 2011-02-28 Initial version
11 2011-11-11 Enhanced Global Search information
12 2012-03-09 Corrected workbook names
13 2012-05-17 Added security system property
14 2012-08-20 Added SMTP Server Setup instructions
15 2013-01-29 Added Supplier Workflow Management
16 2013-12-06 Updated Echosign instructions
17 2014-09-24 Updated Symantec information
18 2014-10-30 Updated EchoSign URL
19 2014-11-21 Added EchSign error handling advice
110 2015-04-16 Added controls for Global Search
2
PUBLICcopy Copyright 2015 SAP SE or an SAP affiliate companyAll rights reserved
SAP Sourcing 90Document History
Content
1 Introduction 5
2 Define System Properties 6
3 Set Up SMTP Server 11
4 Context Cluster and Directory Configuration 1241 Manual Context Cluster and Directory Configuration 1242 Create Cluster Template 1643 Create Internal Directory Template 1744 Create External Directory Template 1845 Managing the SSL Certificate 2046 Create Tenant Configuration 20
5 Master Data 2251 Overview of Master Data 2252 Create Master Data Manually 2653 Import Master Data Using CSV File 2754 Workbooks 28
Overview of Workbooks 28 Download and Customize Workbooks 28 Import Master Data Using Workbooks 29
6 Create and Verify Purchaser User 31
7 Create and Verify Supplier User 32
8 Install Company Logo 33
9 Specify Internal Address of SAP Sourcing Server 34
10 Update Master Time Zone 35
11 Install License Key 36
12 Change Session Timeout 37
13 Enable Contract Authoring 38
14 e-Signature 39141 Set Up EchoSign Account and System Configuration 39142 Check EchoSign Configuration Status 41143 Set Up User Rights 41144 Resolve e-Signature Errors 42145 Set Up Scheduled Task to Retrieve e-Signature Status 42
SAP Sourcing 90Content
PUBLICcopy Copyright 2015 SAP SE or an SAP affiliate company
All rights reserved 3
15 Configure Workbench 44
16 Configure Branding 45
17 Configuring Supplier Workflow Management 46
4
PUBLICcopy Copyright 2015 SAP SE or an SAP affiliate companyAll rights reserved
SAP Sourcing 90Content
1 Introduction
This guide describes the deployment of SAP Sourcing 90 on SAP NetWeaver 73 SP03
How to Construct an SAP Sourcing Login URL
At various points this guide will instruct you to log in as a certain user You can log in as a purchaser user a supplier user the enterprise user or the system user You must connect to the system using a different URL depending on which user the instructions call for This section explains how to construct the correct login URL for the specified user
SAP Sourcing login URLs can be constructed as follows
[protocol][hostname][port][context][login type][login path]Table 2
[protocol] http or https Typically https for customer productive
systems
[port] The [port] element is optional
[context] This is the context you defined during installation
[login type] Use one of the following depending what user is called for in the instructions
If the instructions call for a purchaser user use fsbuyer
For a supplier user use fsvendor
For the system user use fssystem
For the enterprise user use fsenterprise
[login path] For fsbuyer fsenterprise and fssystem this is
portallogin
For fsvendor this is vendordesktoplogin
Example httpswwwmycompanycommycontextfsenterpriseportallogin httpswwwmycompanycommycontextfsvendorvendordesktoplogin httpswwwmycompanycom8080mycontextfssystemportallogin
NoteAfter the initial login the system prompts you to change your password
SAP Sourcing 90Introduction
PUBLICcopy Copyright 2015 SAP SE or an SAP affiliate company
All rights reserved 5
2 Define System Properties
NoteSome system properties can be overridden at the enterprise level To do so log in as the enterprise user
J2EE System Properties
The following are the default values
NoteThese properties can also be defined automatically using a dbimport script For more information see Define J2EE System Properties in the Installation Guide for SAP Sourcing 90 on SAP Service Marketplace at servicesapcomeso SAP Sourcing On-Premise SAP Sourcing 90
Initial JNDI Context
system j2eejndijavanamingfactoryinitial=comsapengineservicesjndiInitialContextFactoryImpl
JNDI Naming Factory
system j2eejndijavanamingfactoryurlpkgs=comsaptmjndiproviders
JNDI Provider
system j2eejndijavanamingproviderurl=localhost50004
Virus Scanner Properties
If you are deploying the Symantec Scan Engine to scan uploaded attachments for viruses SAP Sourcing requires use of the native protocol for Release 9 SP16 and earlier and the ICAP protocol for Release 9 SP17 and later Additionally certain properties must be set up as described below
Log in as the system user and modify the properties listed in the table below as specified
Release 9 through Release 9 SP16Table 3
Property Instructions
system systemavscannerhostname
Set to the host where the Symantec Scan Engine is installed
system systemavscannerport
Set to the port where you have the service listening (default is 7777)
system systemavscannerpolicy
Can be set to either SCAN_ONLY or SCAN_REPAIR
6
PUBLICcopy Copyright 2015 SAP SE or an SAP affiliate companyAll rights reserved
SAP Sourcing 90Define System Properties
Property Instructions
sysstem systemavscannerenabled
Should be set to True
Release 9 SP17 and Later
NoteIf you are deploying the Symantec Protection Engine for Cloud Services to scan uploaded attachments for viruses you will use the Remote Access API
Table 4
Property Description
systemsystemavscannerenabled
Set to TRUE
system systemavscannertype
Determines the type of scan mechanism Set to SYMANTEC_AV
system systemavscannerhostname
Set to the Symantec engine IP address
system systemavscannerpolicy
Set either to SCAN_ONLY or SCAN_REPAIR
system systemavscannerport
Set to the Symantec ICAP port The default value is 1344
system systemavscannerreadWriteTime
Socket timeout The default value is 30 seconds
Security System Propertiessystem systemsecuritycsrftrusted_referrer_domainsYou can specify patterns to identify authorized URLs from which users may submit requestsA request is trusted under the following circumstances If the referrer (the URL from which the request originates) is absent it is trusted If the referrers domain name is exactly the same as the applications domain it is trusted If the referrers domain name matches any of the patterns in the system
systemsecuritycsrftrusted_referrer_domains system property it is trusted
To protect the enterprise itself set this property as the enterprise user To provide protection for system-level tasks you must also set this property as the system user
ExampleIf you set this property only as the enterprise user any URL can refer requests for system user functionality but requests for supplier functionality must come from URLs that match one or more patterns in this system
SAP Sourcing 90Define System Properties
PUBLICcopy Copyright 2015 SAP SE or an SAP affiliate company
All rights reserved 7
property If you set this property as the system user also then even requests for system user functionality must come from a trusted URL
Set the value of the system property system systemsecuritycsrftrusted_referrer_domains by adding one or more of the following patterns separated by semi-colons
Table 5
Pattern Description
Any referrer is trusted
namecom Trusted referrer domains must end with the specified string
ExamplemydomaincomRequests from wwwmydomaincom and
mobilemydomaincom and
cloudmydomaincom etc would all be trusted
Requests from wwwmydomainorg would not be
trusted
namecom Trusted referrer domains must match the specified string exactly
ExamplewwwmydomaincomOnly requests from wwwmydomaincom would be
trusted
If you add more than one pattern to the property requests that match any of the included patterns will be trusted
Examplewwwyourdomaincom mydomaincomRequests from any domain ending in mydomaincom would be trusted along with requests from the wwwyourdomaincom domain
NoteBy default this system property is empty so the only trusted domain is the applications own domain
Other Security System Properties
This table lists the other security system properties in SAP Sourcing
Table 6
Property Description
system systemcookiesenable_http_only When True the browser denies Javascript access to
cookies
8
PUBLICcopy Copyright 2015 SAP SE or an SAP affiliate companyAll rights reserved
SAP Sourcing 90Define System Properties
Property Description
system systemcookiesenable_secured When True cookies can only be passed using the secure
https protocol
system systemsecuritydirectorydisplay_entry_does_not_exist_error
When True error messages for failed login attempts
distinguish between invalid credentials (password) and nonexistent directory entry (username) When False both
failures result in the same error message
system systemsecuritydomainvalidate_redirect_url
When True this property forces the system to work only
under a single domain This can adversely affect performance
system systemsecurityseparate_pswd_and_name
When True creation or modification of a user account
results in two separate email notifications one with a username one with a password
system systemallowembediniframe When True SAP Sourcing can be embedded in an iframe
Global Search Properties
The system administrator can influence whether Global Search functionality is available at all and which document classes are searchable by setting the values of the system properties described in this section
NoteAs of SAP Sourcing 90 SP22 the system administrator can also influence which users have access to Global Search functionality by using a new Global Search User security profile This new security profile has the new Global Search activity within the System group set to Allow
The Application User security profile also has the new Global Search permission in the System group set to Allow so that by default all purchaser users have access to Global Search functionality
To restrict access to Global Search to a subset of users or groups change the Application User security profile so that the Global Search activity has the value Deny and then add the Global Search User security profile to all users who should have access to Global Search
The new security profile can be applied to groups and sub-groups as well
globalSearchenable
Global Search functionality can be turned on or off using the userinterface globalSearchenabled system property If the value of this property is True Global Search functionality is available If the value is False this functionality is not available
globalSearchclassIds
Due to enhancements in SAP Sourcing 90 SP22 the globalSearchclassids system property can control what document classes are searchable when Global Search is enabled By default all document classes are searchable however the system administrator can limit which document classes are searchable by defining the userinterface globalSearchclassIds system property
The default value of this property is ALL which means that all document classes are searchable
SAP Sourcing 90Define System Properties
PUBLICcopy Copyright 2015 SAP SE or an SAP affiliate company
All rights reserved 9
NoteSimilarly if this property is absent for example because it has been deleted and not added back the default behavior of the Global Search feature is to search all document classes
If the value of the globalSearchclassIDs system property is left blank or contains only invalid values the fields associated with Global Search will not be displayed in the UI even if the value of globalSearchenable is True
To restrict Global Search functionality to a subset of the searchable document classes set the value of this property to a semicolon-delimited list of searchable class IDs For example if the value of this property were 81690550061003 then users could search only in Auction RFx Response Scenario and Agreement documents
The following table describes all supported class IDs
Table 7
Class ID Description
397 Global Discussion Manager
816 Auction
900 RFx
905 RFx Response
1003 Agreement
1004 Master Agreement
1100 Project
1600 XPress Request
1623 XPress Quote Request
1801 Clause
5006 Scenario
9999101 User Defined BizDoc 1
9999102 User Defined BizDoc 2
9999103 User Defined BizDoc 3
9999104 User Defined BizDoc 4
9999105 User Defined BizDoc 5
10
PUBLICcopy Copyright 2015 SAP SE or an SAP affiliate companyAll rights reserved
SAP Sourcing 90Define System Properties
3 Set Up SMTP Server
Procedure
1 Navigate to Configuration Setup Configuration System Properties
2 Edit the system property in the messaging set for the SMTP mailhost messagingsmtpmailhost as follows
Table 8
Property Value
Set Messaging
Name messagingsmtpmailhost
Context ltnew contextgt
Notes Hostname of the SMTP server This assumes port 25 and anonymous connection If using a different port or if a username and password are required three additional properties can be set
messagingsmtpport
messagingsmtpusername
messagingsmtppassword
3 Save
SAP Sourcing 90Set Up SMTP Server
PUBLICcopy Copyright 2015 SAP SE or an SAP affiliate company
All rights reserved 11
4 Context Cluster and Directory Configuration
To establish a working environment you must configure the following components
Context
Cluster
Directory configurations (internal and external)
Log on as the system user to access all of these configurations These can be individually created and manually associated or they can be configured using the Tenant Configuration utility When using the utility the individual cluster and directory components are created as templates The Tenant Configuration utility will then create the context and associate the context cluster and directories automatically
For the purposes of clarity the association between the three components is as follows
Context None
Cluster Context
Directory configuration Context and cluster
If SSL Termination is occurring in the load balancer prior to arrival at SAP Sourcing add the HTTP header X-Original-HTTPS to the request with a value of on Sticky sessions must also be enabled by cookie or another method
For information related to using SAML 20 for the authentication mechanism see ldquoSingle Sign-On User Authenticationrdquo in the SAP Sourcing 90 Security Guide located at servicesapcomeso SAP Sourcing On-Premise SAP Sourcing 90
For more information about Cluster Configuration see the SAP Sourcing help at helpsapcomsourcing SAP Sourcing 90 Help for Purchasers [choose a language] Setup System Setup Configuration Cluster Configuration
41 Manual Context Cluster and Directory Configuration
NoteThe manual procedures described in this section can be used instead of using templates for context cluster and directory configuration If you choose to use templates do not execute these procedures you can skip this section In general if you need to make several configurations using the templates can save you time and effort If you only have to make one or a small number you might prefer to make them manually
Procedure
Create the Enterprise Context
1 Log on as the system user
12
PUBLICcopy Copyright 2015 SAP SE or an SAP affiliate companyAll rights reserved
SAP Sourcing 90Context Cluster and Directory Configuration
2 Choose Setup System Enterprise Contexts
3 Choose New
4 Fill in the following fields
Display Name
External ID
Sys Admin Password
Sys Admin Password (again)
5 Choose Save This will take several minutes to complete
6 Choose Done
Create a Cluster Configuration
A cluster configuration is the setup object in SAP Sourcing that provides the means to assign the host name port and selected protocol for the system In addition this is where the services that will be available to this cluster are assigned
1 Log on as the system user
2 Choose Setup System Cluster Configuration then choose New
3 Create a new cluster replacing the parameters in the following example with values appropriate to your needs
Table 9
Field Value Description
Display Name ClusterExample
External ID clusterexample
Context Select the context you created in the previous procedure
Host Name examplesapcomSupply the IP address or fully qualified hostname
Port 50000Supply the appropriate port The default is 50000
4 In the Settings area
Choose either HTTP or HTTPS
NoteWe suggest starting with HTTP and enabling HTTPS later
Leave Automatically add new services and Enable Load Balancing on this cluster unchecked
5 Add the service or services to the cluster by executing the following steps for each service you want to add
1 In the Cluster Members collection choose Add
2 In the Host Name field supply the host name
3 Using the picker add a service
4 Select the Active checkbox
5 Choose OK
6 Choose Save
SAP Sourcing 90Context Cluster and Directory Configuration
PUBLICcopy Copyright 2015 SAP SE or an SAP affiliate company
All rights reserved 13
NoteThe cluster will display the following message
ldquoThis cluster is inactive and cannot be used until it is assigned to both a user directory and enterprise contextrdquo
Furthermore the Inactive Cluster checkbox will be grayed out This is expected and will be dealt with later in the manual configuration process
Create an Internal Directory Configuration
The internal directory configuration is the setup object that allows the configuration of the authentication method to be used by internal (supplier-side) users It can be NetWeaver UME or one of the supported LDAPs The example below uses UME
ExampleNetWeaver UME Directory Configuration
1 Log on as the system user and choose Directory Configuration
2 Choose New
3 Create the directory configuration replacing the (example) parameters
External ID directoryinternalexample
Display Name Internal Directory Example
Context using the dropdown choose the context created above
Default Select (checked)
Usage Active Internal
Authentication Support true
External Role Assigned UME Sourcing Role
Case Sensitive Username false
Driver NetWeaver UME
Cluster using the picker choose the cluster created above
Features Select (check) the following
Changeable Passwords
Expired Passwords
New Accounts
Browsing
Properties Tab
Property Name bypass_error_block
Property Value true
Attributes Mapping Tab
Local ID NAME
Mapped ID uniquename
Edit Mode Pull
Local ID EMAIL
Mapped ID email
Edit Mode Pull
14
PUBLICcopy Copyright 2015 SAP SE or an SAP affiliate companyAll rights reserved
SAP Sourcing 90Context Cluster and Directory Configuration
Local ID FIRST_NAME
Mapped ID firstname
Edit Mode Pull
Local ID LAST_NAME
Mapped ID lastname
Edit Mode Pull
Create an External Directory Configuration
The external directory configuration is the setup object that allows the configuration of the authentication method to be used by external (supplier-side) users It can be NetWeaver UME or one of the supported LDAPs The example below uses UME
ExampleNetWeaver UME Directory Configuration
1 Log on as the system user and choose Directory Configuration
2 Choose New
3 Create the directory configuration replacing the (example) parameters
External ID directoryexternalexample
Display Name External Directory Example
Context using the dropdown choose the context created above
Default Select (checked)
Usage Active External
Authentication Support true
External Role Assigned UME Sourcing Role
Case Sensitive Username false
Driver NetWeaver UME
Cluster using the picker choose the cluster created above
Features Select (check) the following
Changeable Passwords
Expired Passwords
New Accounts
Browsing
Properties Tab
Property Name bypass_error_block
Property Value true
Attributes Mapping Tab
Local ID NAME
Mapped ID uniquename
Edit Mode Pull
Local IDEMAIL
Mapped ID email
SAP Sourcing 90Context Cluster and Directory Configuration
PUBLICcopy Copyright 2015 SAP SE or an SAP affiliate company
All rights reserved 15
Edit Mode Pull
Local ID FIRST_NAME
Mapped ID firstname
Edit Mode Pull
Local ID LAST_NAME
Mapped ID lastname
Edit Mode Pull
Finish and Test the New Context Cluster Directory Configuration
In order to complete the configuration the new cluster must be made active as follows
1 Log on as the system user
2 Choose Cluster Configuration
3 Choose and edit the inactive cluster configuration you created above
4 Uncheck the Inactive checkbox
5 Save the cluster
Test the new enterprise login as follows
1 Log out as the system user and log on as the enterprise user as follows
lthostnamegtltportgtltcontextgtfsenterpriseportallogincid=ltcluster-idgt
Noteltcluster-idgt is the external ID of the new cluster
42 Create Cluster Template
Cluster Templates can be created to make the tenant configuration process faster but it is not necessary to create them The cluster information can also be entered manually in the Create Tenant Configuration [page 20]
Procedure
1 Log on as the system user and choose Cluster Templates
2 Choose New
3 Create a new cluster template with the following (example) parameters
External ID clusterexample
Display Name Cluster Example
Host Name examplesapcom
16
PUBLICcopy Copyright 2015 SAP SE or an SAP affiliate companyAll rights reserved
SAP Sourcing 90Context Cluster and Directory Configuration
43 Create Internal Directory Template
Directory Templates can be created to make the tenant configuration process faster but it is not necessary to create them The directory information can also be entered manually in Create Tenant Configuration [page 20]
Procedure
ExampleNetWeaver UME Directory Configuration
1 Log on as the system user and choose Directory Templates
2 Choose New
3 Create a new directory template with the following (example) parameters
External ID directoryinternalexample
Display Name Internal Directory Example
Usage Active Internal
Authentication Support true
External Role Assigned UME Sourcing Role
Case Sensitive Username false
Driver NetWeaver UME
Properties
Property Name bypass_error_block
Property Value true
Attributes Mapping
Local ID NAME
Mapped ID uniquename
Edit Mode Pull
Local ID EMAIL
Mapped ID email
Edit Mode Pull
Local ID FIRST_NAME
Mapped ID firstname
Edit Mode Pull
Local ID LAST_NAME
Mapped ID lastname
Edit Mode Pull
ExampleMSAD LDAP Directory Configuration
1 Log on as the system user and choose Directory Templates
2 Choose New
SAP Sourcing 90Context Cluster and Directory Configuration
PUBLICcopy Copyright 2015 SAP SE or an SAP affiliate company
All rights reserved 17
3 Create a new directory template with the following (example) parameters
External ID directoryinternalexample
Display Name Internal Directory Example
Usage Active Internal
Authentication Support true
Case Sensitive Username false
Driver LDAP Microsoft Active Directory
LDAP Configuration
Host msadldapcom
Port 636
User ID Attribute samaccountname
Attributes Mapping
Local ID NAME
Mapped ID sAMAccountName
Edit Mode Pull
Local ID EMAIL
Mapped ID mail
Edit Mode Pull
Local ID FIRST_NAME
Mapped ID givenName
Edit Mode Pull
Local ID LAST_NAME
Mapped ID sn
Edit Mode Pull
44 Create External Directory Template
Directory Templates can be created to make the tenant configuration process faster but it is not necessary to create them The directory information can also be entered manually in Create Tenant Configuration [page 20]
Procedure
ExampleNetWeaver UME Directory Configuration
1 Log on as the system user and choose Directory Templates
2 Choose New
3 Create a new directory template with the following (example) parameters
External ID directoryexternalexample
18
PUBLICcopy Copyright 2015 SAP SE or an SAP affiliate companyAll rights reserved
SAP Sourcing 90Context Cluster and Directory Configuration
Display Name External Directory Example
Usage Active External
Authentication Support true
External Role Assigned UME Sourcing Role
Case Sensitive Username false
Driver NetWeaver UME
Properties
Property Name bypass_error_block
Property Value true
Attributes Mapping
Local ID NAME
Mapped ID uniquename
Edit Mode Pull
Local ID EMAIL
Mapped ID email
Edit Mode Pull
Local ID FIRST_NAME
Mapped ID firstname
Edit Mode Pull
Local ID LAST_NAME
Mapped ID lastname
Edit Mode Pull
ExampleMSAD LDAP Directory Configuration
1 Log on as the system user and choose Directory Templates
2 Choose New
3 Create a new directory template with the following (example) parameters
External ID directoryexternalexample
Display Name External Directory Example
Usage Active External
Authentication Support true
Case Sensitive Username false
Driver LDAP Microsoft Active Directory
LDAP Configuration
Host msadldapcom
Port 636
User ID Attribute samaccountname
Attributes Mapping
Local ID NAME
Mapped ID sAMAccountName
SAP Sourcing 90Context Cluster and Directory Configuration
PUBLICcopy Copyright 2015 SAP SE or an SAP affiliate company
All rights reserved 19
Edit Mode Pull
Local ID EMAIL
Mapped ID mail
Edit Mode Pull
Local ID FIRST_NAME
Mapped ID givenName
Edit Mode Pull
Local ID LAST_NAME
Mapped ID sn
Edit Mode Pull
45 Managing the SSL Certificate
In order to write to an Active Directory Microsoft requires that communication to the LDAP is conducted over SSL
Getting SSL Working
In order to enable SSL communication you need to do the following
Change the communication port in the Directory Configuration from 389 (the default setting) to 636
Select the SSL checkbox in the Directory Configuration
Verify that the Certificate Authority (CA) that issued the server certificate is in the Java Keystore
When an intermediate CA is used to generate server certificates the intermediate CA certificate will need to be imported manually
If any Issuer CA certificates required to complete the server certificate chain are missing from the Java security repository on the application server install them manually into that repository
Use the following command to install the certificate
ltJAVA_HOMEgtbinkeytool -import -trustcacerts -keystore cacerts -file ltLocation_of_exported_Certificate xxxcrtgt -alias ltsome_aliasgtltJAVA_HOMEgt is the location of the SAPJVM For example sapmntltSIDgtexejvmlinuxx86_64sapjvm_51064sapjvm_5
For this ltJAVA_HOMEgt the cacerts file would be located at sapmntltSIDgtexejvmlinuxx86_64sapjvm_51064sapjvm_5jrelibsecurity
After performing these tasks restart NetWeaver and test by creating a new user in SAP Sourcing
46 Create Tenant Configuration
The creation of a tenant configuration will also create
a context
a cluster
20
PUBLICcopy Copyright 2015 SAP SE or an SAP affiliate companyAll rights reserved
SAP Sourcing 90Context Cluster and Directory Configuration
an internal directory
an external directory
The information necessary can be retrieved from cluster and directory templates or entered manually
NoteFor multiple landscape use all the configurations must have the same name If not migration will be affected
Procedure
1 Log on as the system user and choose Tenant Configuration
2 Choose New
3 Create a new tenant configuration with the following (example) parameters
Using Templates
External ID tenantexample
Display Name Tenant Example
Sys Admin Password
Sys Admin Password (again)
Cluster Cluster Example
Directory Internal Site Internal Directory Example
Directory External Site External Directory Example
No Templates
External ID tenantexample
Display Name Tenant Example
Sys Admin Password
Sys Admin Password (again)
Overwrite Templates Configurations
Cluster (checked)
Directory Internal Site (checked)
Directory External Site (checked)
Cluster Configuration [page 16] step
Internal Directory Configuration [page 17] step
External Directory Configuration [page 18] step
SAP Sourcing 90Context Cluster and Directory Configuration
PUBLICcopy Copyright 2015 SAP SE or an SAP affiliate company
All rights reserved 21
5 Master Data
Gathering Critical Information
For each deployment gather critical information including (but not limited to) the following
Purchaser organizational data Locations Companies Business Units Groups and Users
Supplier organizational data Suppliers and Contacts
Commodity Information Internal and External Categories
The current implementation methodology recommends defining these attributes before going live to maximize efficiency Data attributes may be modified or added throughout the life of the implementation using the Setup module
51 Overview of Master Data
SAP Sourcing provides the following means to install master data
Manual entry from Setup
Import from CSV file
Import from deployment workbook
Define the components of master data that exist within each context after contexts and clusters have been defined The following table lists the master data object types requiring definition for the enterprise The data classification Configurable indicates that default data is provided but can be customized for deployment The data classification Custom indicates that no default data is provided and the deployment must provide the data
Table 10
Contents Data Classification Description
Numbering table definitions for enterprise-level objects
Configurable Defines the format of IDs For example an RFP might follow the format RFP-nnnn where nnnn increments for each new rfp created
Default list of extendible enterprise-level objects
Configurable Lists those enterprise-level objects which can be extended
Default list of objects that can used referenced in an extension
Configurable One type of extension allows a reference to another type of object This list identifies the allowed kinds of references
Value List Types Configurable Default value list types
Value List Values Configurable Default value list values such as countries time zones and so on
22
PUBLICcopy Copyright 2015 SAP SE or an SAP affiliate companyAll rights reserved
SAP Sourcing 90Master Data
Contents Data Classification Description
Units of Measure Configurable Standard units of measure used throughout the system
Currencies Configurable A list of all currencies used by your organization
Currency Conversions Configurable Default values for any currency conversion rates
Document Link Definitions Configurable Lists the allowable kinds of document links
Scheduled Task Types Configurable Used to define categories of scheduled tasks
Scheduled Tasks Configurable Lists scheduled or background tasks
Metrics Configurable Used to define metrics for scorecards
Contract Terms Configurable Used to define terms on contracts
Contract Types Configurable Types define what set of contract features are available
Project Types Configurable Types define what set of Project features are available
RFx Types Configurable Types define what set of RFx features are available
Auction Types Configurable Types define what set of Auction features are available
DA Types Configurable Types define what set of Demand features are available
Security Profiles Configurable Identifies the security profiles installed with the system
Rights on security profiles Configurable Defines the rights for each security profile
Time Periods Configurable Defines information about quarters years and so on
Reporting Calendars Configurable Used for managing how data is reported with relation to the calendar
Collaborator Roles Configurable Defines the role (rights and responsibilities) of a persongroup on a specific document instance
Document Security Templates Configurable Sets up the default collaborators and security when new documents are created
SAP Sourcing 90Master Data
PUBLICcopy Copyright 2015 SAP SE or an SAP affiliate company
All rights reserved 23
Contents Data Classification Description
Shared Discussions Configurable A list of discussion forums available as a channel and not relating to a specific document
Workbench Channels Configurable Channels available on a users desktop
Workbench IFrames Configurable Data to create iFrames
Workbench Channel Configurations Configurable Channel configuration parameters
Workbench Pages Configurable Pre-defined desktop pages
Workbench Page Configurations Configurable Channel content and placement settings for predefined pages
Configuration Properties Configurable Various deployment settings including mail
Enterprise Extensions Custom Actual extensions on enterprise-level objects
Directory Configurations Custom Used for the LDAP directory configuration
Geographies Custom Used to represent the Geographic regions
Locations Custom Locations of plants companies and other organizational elements
Payment Terms Custom Terms of payment between the purchaser and supplier
External Categories Custom Typically this data set consists of industry standard category codes such as UN-SPSC or SIC codes if used by your organization
Internal Categories Custom All internal purchasing categories used by the purchaser
Vendors Custom Used in all components for various purchasing actions
Vendor Extensions in List Form Custom Actual extensions on enterprise-level objects
Companies Custom Used by all components of the system for purchasing actions such as Auctions and RFPs
Registration Categories Custom Defines mapping from arbitrary category names to actual internal or external categories Used during supplier self-registration
24
PUBLICcopy Copyright 2015 SAP SE or an SAP affiliate companyAll rights reserved
SAP Sourcing 90Master Data
Contents Data Classification Description
Organizational Units Custom Further definition of the organizational hierarchy Use to define departments business units and so on
Groups Custom Arbitrary groups of purchaser users
Contacts Custom Used for all suppliers to distinguish the various contacts at each supplier
Accounts Custom Handles all user accounts for the system
Terms Templates Custom Standard terms and conditions phrases to which a supplier must agree before accessing an event
Purchasing Organization Custom An organizational unit in SAP ERP subdividing an enterprise according to the requirements of purchasing
Purchasing Group Custom A key for a purchaser or group of purchasers in SAP ERP
Vendor Account Group Custom A classifying feature of supplier master records in SAP ERP
Business System Custom Represents a system in the landscape for example SAP Sourcing or SAP ERP
Text Id Custom Represents SAP ERP header and item texts
Transaction Type Custom Represents SAP ERP transation types
After configuring the enterprise master data you must next configure the company master data This data must be created once for each sub-context This example only uses a single context so this data must only be created once
Table 11
Contents Data Classification Description
UFNs System Metadata for RFx utility functions
System Answered Sources Configurable Defines the available sources of system answered questions
Company Extension Definitions Configurable List of company-scoped objects which have extensions
Document Security Templates Configurable Sets up the default collaborators and security when new documents are created
Contract Generation Phases Configurable Used to define Phases for Contract Generation library documents
SAP Sourcing 90Master Data
PUBLICcopy Copyright 2015 SAP SE or an SAP affiliate company
All rights reserved 25
Contents Data Classification Description
Contract Generation Tags Configurable Used to define Tags for Contract Generation
Company extensions Custom List of extensions on individual object types
masterdataActivity Custom Used for general accounting purposes
Cost Centers Custom Used for accounting purposes to assign cost on a center by center basis
Cost Center Groups Custom
Entities Custom Used for accounting purposes for purchasing by division
GL Accounts Custom Used for general accounting purposes
Plants Custom Plants or facilities
Materials Custom Standard materials for use in line items
Category Managers Custom Users who are responsible for certain categories
Master Data Security
When configuring and importing Master Data there are some things to remember about security
1 Each piece of importable master data has an Import right as part of its ACL list By default this right is only added for the System Administrator security profile and therefore only those users can import master data out of the box As always an admin can add Import rights to other security profiles on and object-by-object basis
ExampleIf Supplier Administrators need to import Supplier records then that can be enabled
2 When importing Master Data be it via CSV XLS XML etc the user running the imports must have Import right allowed for all objects in question The Enterprise user is considered trusted and can import any of these objects
52 Create Master Data Manually
Procedure
NoteThe user account being used to import the following must have Allow Import rights on these specific objects If you do not have Allow Import on these objects it must be added or the import will fail
1 Log on as the enterprise user
26
PUBLICcopy Copyright 2015 SAP SE or an SAP affiliate companyAll rights reserved
SAP Sourcing 90Master Data
2 Create objects from within the Setup module
3 Log on as a purchaser user with administrative rights to configure company master data
For more information see the SAP Sourcing help at helpsapcomsourcing To access the help system scroll to SAP Sourcing 90 Help for Purchasers and choose a language In the help choose Setup System Setup Master Data
53 Import Master Data Using CSV File
NoteThe user account being used to import the following must have Allow Import rights on these specific objects If you do not have Allow Import on these objects it must be added or the import will fail
You can import master data files with CSV XLS or XLSX format in two ways
Use the standard web user interface
Use a client application distributed with the system which allows data to be imported outside of the web environment
The following procedure describes how to import using the web-based UI
Procedure
1 If application users have already been created log on as a purchaser user with administrative rights If users have not been created log on as the enterprise user
2 Choose Setup System Administration Import Export Tools Import Data and then choose OK
3 Choose Create
The import wizard opens
4 Specify whether you want to upload the file to the server or whether the file is already located on the application server and choose Next
5 Choose Upload Import File and select the CSV or Deployment Workgroup file to import
6 For CSV files select the object type and choose Next
7 Indicate whether you want to wait for the import to finish or perform the import in the background and then choose Next
8 Choose Finish to view the results
SAP Sourcing 90Master Data
PUBLICcopy Copyright 2015 SAP SE or an SAP affiliate company
All rights reserved 27
54 Workbooks
541 Overview of Workbooks
NoteThere are many sheets in the workbooks that have the prefix eso While these sheets may appear as duplicates of other sheets the data in them is in fact different These sheets should be imported by default You may also add data to these sheets if you would like to augment the data provided in the sample workbooks
We recommend using the deployment workbook for initial deployment of the system to ensure that all required data is imported into the system
To facilitate the import of data SAP Sourcing provides an alternative to CSV files for import SAP Sourcing provides the ability to import Microsoft Excel files containing one or more master data imports The system processes these Excel files directly without the user having to export the data to a raw CSV file The Enterprise Deployment Workbook and Company Deployment Workbook are two sample deployment workbooks delivered with SAP Sourcing
Anyone with system administrator access rights can download the deployment workbooks from the web user interface The deployment workbooks are included in the online Reference Guide (RG)
When starting a new deployment project preserve the original workbook templates by making a copy of them and saving them with a new name Import data using your modified templates only By doing so you assure continuity if future additional deployments are required
NoteKeep the following in mind when using deployment workbooks
The Configuration Sheet controls the import process Refer to the Help Sheet for input specifications of Configuration Sheet columns
The system can import the workbooks directly but there are limitations to what Excel constructs are supported The Help Sheet describes the rules that must be observed
The same importing process supports both CSV files and Excel workbooks
There is a one to one relationship with the workbook configuration file and the worksheet tabs
542 Download and Customize Workbooks
The sample enterprise and company workbooks that you download from SAP Sourcing are designed for you to configure a base system using a sample enterprise context We recommend modifying the default deployment workbooks Choose the appropriate workbooks from this table
Table 12
System Workbooks
SAP Sourcing Enterprise Deployment Workbook
Company Deployment Workbook
Users setting up a base system should adjust the various settings in these workbooks prior to running them in the system For example the company data should be updated to reflect specifics about the company that is
28
PUBLICcopy Copyright 2015 SAP SE or an SAP affiliate companyAll rights reserved
SAP Sourcing 90Master Data
installing the system Similarly you should review other tabs to ensure that the configurations are consistent with the desired implementation For details on customizable fields see Master Data [page 22]
Procedure
1 Log on as the enterprise user and choose Reference Guide Download the sample enterprise and company workbooks appropriate for your system
NoteThe enterprise workbook should be run as the enterprise user The company workbook should be run as a system administrator associated with the company object intended to be configured
2 From the Enterprise Deployment workbook open the file and find the sheet labeled locations and edit this sheet as necessary
Only one location is required
3 Find each sheet review each sheet and the comments in the sheet and update the data accordingly
4 Provide at least one internal category
5 Find the sheet labeled companies and edit it as necessary
6 Repeat for org_units groups accounts and so on
Your are establishing a hierarchy To configure the hierarchy correctly you must ensure that the child references the parent correctly For example the PARENT column in the business_units page should include a valid EXTERNAL_ID from the companies sheet
NoteTo build all custom data in the user interface simply deactivate the import of the above data types in the deployment workbook See the Help page for instructions on how to skip a specific worksheet
7 Import the enterprise and company workbooks into SAP Sourcing by choosing Setup System Administration Import and Export Tools Import Data and then choose Create
543 Import Master Data Using Workbooks
Procedure
1 Log on as the user specified in this table and choose Setup
Table 13
Workbook Login User
Enterprise workbook
Enterprise user
Company workbook Purchaser user
2 From the Import and Export Tools dropdown chooseImport Data and then choose OK
The Import Data page appears
SAP Sourcing 90Master Data
PUBLICcopy Copyright 2015 SAP SE or an SAP affiliate company
All rights reserved 29
3 Choose Create to start a new import job
4 Choose Upload to the Server and then choose Next
5 Select the modified workbook and choose Next
6 Wait for the import to finish and choose Next
Typically running the enterprise workbook can take several minutes
30
PUBLICcopy Copyright 2015 SAP SE or an SAP affiliate companyAll rights reserved
SAP Sourcing 90Master Data
6 Create and Verify Purchaser User
Procedure
For the SAP NetWeaver UME driver users should be created in SAP Sourcing and the SAP NetWeaver UME with the same username
For LDAP drivers depending on how the LDAP was set up you must perform one of the following
Create the user in SAP Sourcing and supply the information FROM the LDAP
If you have access create the account and supply the information TO the LDAP
In either case an e-mail is generated giving the user a path to the application and his or her user name If the account is created a temporary password is also mailed A system property determines whether this information is delivered in the same e-mail or separate e-mails
1 Choose Setup WYSIWYG Page Customization User Account and create a purchaser user as follows
1 On the Account Properties tab enter required information
2 On the Account Management tab enter information as follows
Enable User to Login Select
Directory Select as needed
User ID Type userid
Create Directory Account Select
Generate a New Password Select
Send Notification Select
3 On the Security tab enter information as follows
Purchaser Select
Purchaser Manager Select
System Administrator Select
Supplier Administrator Select
Make sure this first user is given Administrator privileges to import the Company Workbook
2 Wait for the e-mail to be sent and received If you do not receive it check the following
To verify the mail was sent choose Setup System Administration Processed Messages
To check for stuck or failed messages choose Setup System Administration Queued Messages
3 To test the new account log on as a purchaser user using the credentials sent in the e-mail
4 Reset your password and choose OK
If you can successfully log into the new purchaser account the context cluster and directory are properly configured and the SMTP server is processing e-mail
SAP Sourcing 90Create and Verify Purchaser User
PUBLICcopy Copyright 2015 SAP SE or an SAP affiliate company
All rights reserved 31
7 Create and Verify Supplier User
Procedure
Create a supplier user to test the supplier portal A supplier user is a contact on a supplier record
1 Choose Supplier Management Create Supplier
2 Enter and save the required information
3 Choose the Contacts tab
4 Under Supplier Contacts choose Add
5 Enter and save the required information
6 Log on as a supplier user using the credentials provided in the test user e-mail
7 Reset the password as prompted and accept the usage terms
32
PUBLICcopy Copyright 2015 SAP SE or an SAP affiliate companyAll rights reserved
SAP Sourcing 90Create and Verify Supplier User
8 Install Company Logo
Procedure
NoteWe do not recommend installing an image larger than 200 x 29
1 Log on as the enterprise user
2 Attach the logo as follows
1 Choose Setup Organization and Accounting Information Companies
2 Select the enterprise company from the list and choose Edit Document
3 Attach your logo image to the company using the Logo Attachment field
3 Save your entries
Resize Company Logo
If you have uploaded a company logo in your source release you must resize the image to 200x29
1 Log on as a purchaser user with system administrator rights
2 Choose Setup
3 On the Master Data tab find the Organization and Accounting section and choose Companies
4 Choose the company
5 Choose Edit
6 In the Logo field upload the resized image
SAP Sourcing 90Install Company Logo
PUBLICcopy Copyright 2015 SAP SE or an SAP affiliate company
All rights reserved 33
9 Specify Internal Address of SAP Sourcing Server
Procedure
When SAP Sourcing is first installed or whenever a new server is added to an application cluster the Internet address that is used for internal communications within SAP Sourcing is initially set to the external host name of the server In many cases this will result in unexpected or delayed behavior in the application
If the application landscape includes a network firewall accessing the server through this name requires exiting the firewall and re-entering If the firewall blocks incoming traffic on SAP Sourcingrsquos notification ports this will result in failure to deliver notifications for some events To avoid this do the following
1 Log on as the system user
2 Open the System Information record for editing
3 Change the value in the Internal Address field to an internal IP address or host name
4 Save your changes
34
PUBLICcopy Copyright 2015 SAP SE or an SAP affiliate companyAll rights reserved
SAP Sourcing 90Specify Internal Address of SAP Sourcing Server
10 Update Master Time Zone
Procedure
This procedure is required to enable SAP Sourcing to normalize all dates and times that are used in sourcing events Normalizing allows time fields to be presented differently for each user according to his or her preferred time zone while maintaining a consistent reference to the same point in time
1 Log on as the system user
2 Choose Setup Configuration System Properties
3 Edit the systemmaster_timezone property in the system set This property value should be set to the Java time zone identifier that corresponds to the current database server time zone
NoteThe SAP Sourcing Time Zone Value List Type provides a relatively comprehensive list of java time zone identifiers To view this list log on as a purchaser user and navigate to Setup Master Data Value List Types and Values Time Zone The Alternate Name column of this list contains the java time zone identifier for the corresponding time zone
ExampleldquoAmericaNew_Yorkrdquo is the alternate name of the SAP Sourcing Timezone ValueListValue for ldquo(GMT-500) Eastern Standard Timerdquo
SAP Sourcing 90Update Master Time Zone
PUBLICcopy Copyright 2015 SAP SE or an SAP affiliate company
All rights reserved 35
11 Install License Key
Procedure
You must install a license key before the SAP Sourcing system can be used in production mode
1 Choose Setup System Administration System Management System Information
2 Note the installation ID from the Installation ID field on the Service Registration tab
3 Create OSS ticket this ID and a list of the requested modules to license (include the optimizer) to SAP Customer Support You will receive a csv file including all the license keys
NoteRequesting the optimizer key without installing an optimizer server will result in a high volume of irrelevant optimizer-related messages in your log files If you do not intend to install an optimizer server do not request an optimizer key
4 Log on as the enterprise user and choose Setup System Administration Import and Export ToolsImport Data
5 Use the import tool to import the licenses you received from Support as follows
1 On the Import Wizard Select a File screen type a description such as License Keys and choose Upload Import File to upload the csv file Choose Next
2 On the Import Wizard CSV Contents screen select Module License as the Object Type choose Next and follow any additional prompts to finish the process The successful file import is displayed on the File Import tab
6 Choose Setup System Administration System Management System Information
7 Choose the Components tab and verify that the appropriate licenses are checked under SRM Module Licenses
8 If you are installing the optimizer verify that a new Optimizer tab appears and displays an appropriate Status Queue value and JVM information (If the optimizer is not installed the Status Queue value is OFFLINE and the JVM Information is set to unknown)
36
PUBLICcopy Copyright 2015 SAP SE or an SAP affiliate companyAll rights reserved
SAP Sourcing 90Install License Key
12 Change Session Timeout
Procedure
NoteThis is optional
The deployment descriptor for the SAP Sourcing application defaults to a 30-minute session timeout or to the value that was set during installation
NoteThe above property should be set longer than the below two properties
To change this setting
1 Log on as the system user and set the following system property in SAP Sourcing
uppmeteringlogin_inactivity_timeout and set to the timeout that was chosen when running the configure utility
2 Property uppmeteringcleanup_interval defines the time between runs of the daemon which removes inactive sessions It is recommended that this value be set to a value that is slightly larger than the uppmeteringlogin_inactivity_timeout setting is set to
3 Set the time-out using the configure tool For information about the configure tool see the Installation Guide for SAP Sourcing 90 on the SAP Service Marketplace at servicesapcomeso SAP Sourcing On-Premise SAP Sourcing 90
NoteBoth internal property in SAP Sourcing and configuration tool in NetWeaver should be set to the same value
SAP Sourcing 90Change Session Timeout
PUBLICcopy Copyright 2015 SAP SE or an SAP affiliate company
All rights reserved 37
13 Enable Contract Authoring
Contracts amendments and clauses use the Word service This service must be referenced For more information see ldquoCreate OfficeAutomationUser Accountrdquo in the Installation Guide for SAP Sourcing 90 on SAP Service Marketplace at servicesapcomeso SAP Sourcing On-Premise SAP Sourcing 90
Procedure
Configure a path to the Word service in SAP Sourcing as follows
1 Choose Setup System Properties
2 From the Name dropdown list choose contractgenserviceurl
3 Set the value to ltprotocolgtlthostnamegtltvirtual directorygtwordserviceasmx
38
PUBLICcopy Copyright 2015 SAP SE or an SAP affiliate companyAll rights reserved
SAP Sourcing 90Enable Contract Authoring
14 e-Signature
To enable e-Signature functionality users first get user accounts from EchoSign EchoSign adds the users to the EchoSign SAP channel System administrators define the integrated system configuration and set up the management of customer and user accounts System administrators can schedule automated checks of contract document signature statuses System users can check the availability of e-Signature components
141 Set Up EchoSign Account and System Configuration
Procedure
Set Up EchoSign Account
Before a system administrator enables e-Signature features for a customer EchoSign adds the customer to the EchoSign SAP channel The customer gives the account key provided by EchoSign to the system administrator The system administrator then configures e-Signature to work with EchoSign
Set Up Integrated System Configuration
Adding an EchoSign account to SAP Sourcing configuration enables e-Signature functionality in SAP Sourcing To set up an EchoSign account for use with e-Signature a system administrator creates an integrated system configuration object for EchoSign integration
1 Log on as the enterprise user
2 Choose Setup Integrated System Configuration
3 On the subsequent screen choose New
4 On the subsequent screen select EchoSign for System Type and select Continue
5 Under EchoSign Properties the customer enters the EchoSign account key provided the customer by EchoSign and choose Done
Set Up Proxy Settings
To configure EchoSign on a NetWeaver-based system follow these steps
1 Configure the HTTP properties as described on the SAP Help Portal at helpsapcomsaphelp_nw73helpdataen48479b6163524bb9e10000000a42189bframesethtm
2 To add proxy parameters to JVM settings in NetWeaver navigate to [host][port]nwa ConfigurationInfrastructure Java System Properties Additional VM Properties and add the following parameters with the appropriate values
-DhttpproxyHost -DhttpproxyPort -DhttpsproxyHost -DhttpsproxyPort
SAP Sourcing 90e-Signature
PUBLICcopy Copyright 2015 SAP SE or an SAP affiliate company
All rights reserved 39
NoteIf your proxy server requires a username and password provide this information with the following parameters
-DhttpproxyUser -DhttpproxyPassword -DhttpsproxyUser -DhttpsproxyPassword
3 Import the SSL certificate file into the NetWeaver key storage as follows
1 Navigate to lthostgtltportgtnwa Security Certificates and Keys
2 Select the WebServiceSecurity keystore view
3 If you are updating or replacing the EchoSign certificate remove any previous certificates with the same Common Name
4 Choose Import Entry and select x509 certificate as the entry type
5 Get the EchoSign certificate from your browserrsquos certificate interface
NoteSpecific steps will vary from browser to browser but the general process should be similar Here are sample instructions for Firefox
1 Navigate to secureechosigncomservicesEchoSignDocumentService9
NoteYou can ignore the error message that says Invalid SOAP Request
2 Click on the lock icon next to the URL
3 Click More Information
4 Open the Security tab
5 Click View Certificate
6 Open the Details tab
7 Click Export
8 From the Save as Type dropdown list choose the SSL certificate for the version you require
9 If Windows does not recognize the exported file as a certificate add a cer or crt extension to the filename
6 Restart NetWeaver
Change EchoSign service URL
SAP Sourcing ships with the current EchoSign service URL Change the service URL value in System Properties only when EchoSign changes the service URL To change this value do the following
1 Log on as the system user
2 On the System Setup tab choose System Properties
3 Open contractgenesignature_url from the Properties list
4 Enter the new EchoSign service URL provided by EchoSign
40
PUBLICcopy Copyright 2015 SAP SE or an SAP affiliate companyAll rights reserved
SAP Sourcing 90e-Signature
NoteSet the URL property only if the EchoSign domain has changed The current URL is secureechosigncomservicesEchoSignDocumentService9 Note that the API version should be set to 9
Change the length of the EchoSign timeout
By default SAP Sourcing sets the length of the EchoSign timeout to 300000 milliseconds or five minutes Change the length of the EchoSign timeout only if the default timeout causes issues when you send documents to EchoSign
1 Log on as the system user
2 On the System Setup tab choose System Properties
3 Choose contractgenesignature_timeout from the Name dropdown menu
4 Enter a numeral specifying the desired length in milliseconds for the EchoSign timeout in the Value field The Value field requires no minimum nor maximum value nor number formatting
142 Check EchoSign Configuration Status
Procedure
1 Log on as the system user
2 Choose System Information Then on the subsequent screen choose the Audits tab
3 Choose the correct context for the customers location from the Context dropdown menu
4 In the Availability pane OK appears in the Status column next to EchoSign Availability if you configured SAP Sourcing correctly for EchoSign
143 Set Up User Rights
Procedure
Assign Right to Send Contract Documents for Signatures or to Resolve Errors
To enable a user to send contract documents for signatures a customer system administrator adds Contract e-Signature to the users security profiles
To assign the right to send contract documents out for signatures to a user a system administrator does the following
1 In Setup choose System Administration Internal User Accounts
2 Select the desired user account
3 Choose the Security tab Then choose Contract e-Signature or Contract e-Signature Admin
A system administrator can assign either of the following e-Signature rights to a user
SAP Sourcing 90e-Signature
PUBLICcopy Copyright 2015 SAP SE or an SAP affiliate company
All rights reserved 41
Table 14
Right Description
ESO_CONTRACT_ESIGNATURE Users with this right can send contract documents out for signatures using the e-Signature feature
ESO_CONTRACT_ESIGNATURE_ADMIN This right allows designated users to resolve errors Users with this right can change a contract document while it is out for signatures Users with this right can change the signature status of a contract document to Error and can thus allow the contract document author to unlock a frozen document System administrators assign this right only to other administrators not to standard users
4 Choose Done
144 Resolve e-Signature Errors
Procedure
Contract Document Status Frozen
Unexpected errors such as network or system errors can freeze the status of a contract document to Sending for e-Signature or Out for Signature A user with the right ESO_CONTRACT_ESIGNATURE_ADMIN can unfreeze the status of the contract document so that the contract author can cancel the e-Signature process A system administrator can assign the right ESO_CONTRACT_ESIGNATURE_ADMIN to a user
1 The contract author adds a user with the ESO_CONTRACT_ESIGNATURE_ADMIN right to the affected Master Agreement as a collaborator
2 The user with the ESO_CONTRACT_ESIGNATURE_ADMIN right manually changes the status of the frozen contract document to ERROR
3 The contract author logs in to EchoSign and manually cancels the e-Signature process for the contract document
Invalid Password Error
You may receive the following error message Error Invalid password for user sending a Contract Document to EchoSign for signature
This message indicates that the user sending a request for e-signatures via EchoSign is not properly set up in their EchoSign account Contact EchoSign for assistance in resolving this error
145 Set Up Scheduled Task to Retrieve e-Signature Status
Procedure
You can set SAP Sourcing to retrieve the e-Signature statuses of all contract documents at a frequency you specify automatically However an end user need not wait for these automated retrievals to see the current e-
42
PUBLICcopy Copyright 2015 SAP SE or an SAP affiliate companyAll rights reserved
SAP Sourcing 90e-Signature
Signature status of a contract document End users can get instant updates of the e-Signature status manually through the contract document user interface
1 Log on as the enterprise user
2 Choose Setup
3 On the System Setup tab choose Scheduled Tasks
4 On the subsequent page choose New then select the e-Signature Status radio button then choose Continue
5 Enter the display name and start date Set the frequency and end date as desired
NoteSAP recommends automatically retrieving e-Signature statuses daily and setting the retrievals to run at night
6 Choose Save
SAP Sourcing 90e-Signature
PUBLICcopy Copyright 2015 SAP SE or an SAP affiliate company
All rights reserved 43
15 Configure Workbench
The CLM system is delivered with a base workbench page that is available to all internal users Additionally the system is configured with a workbench page intended to be used by CLM contract managers
The workbench page is established in the system but requires additional configuration to make it available to the desired users This configuration is done by adding collaborators to the Contract Management Workbench page
Prerequisites
You must be logged on as the enterprise user
Procedure
Configure the Contract Management Workbench page with the individual users or user groups that should also have access to the page
To do this go to Setup System Setup Workbench Workbench Page All Workbench Pages Edit the Contract Management page and add collaborators
44
PUBLICcopy Copyright 2015 SAP SE or an SAP affiliate companyAll rights reserved
SAP Sourcing 90Configure Workbench
16 Configure Branding
The following procedures enable you to change the branding from the default SAP Sourcing to SAP CLM Four branding items are affected
Branding text in the title bar of the browser (for example SAP Sourcing)
SAP CLM logo image for the purchaser login page
SAP CLM Business Partner logo image for the supplier login page
Images on the login page
Images on the splash screen
Procedure
Change the Branding after Installation
1 Choose Setup System Properties
2 Change the value of systembrand_name to (for example) SAP CLM
Themes
NoteThe following two steps require editing of themes For futher information about themes see the SAP Sourcing help at helpsapcomsourcing To access the help system scroll to SAP Sourcing 90 Help for Purchasers and choose a language In the help choose Setup Themes
1 Open the current enterprisersquos theme Branding area and choose Purchaser Login Banner link then Image link Delete the original path in Image Path field and paste imageslogoslogo_sapXCLMgif
2 Choose Delete on Background Image field
3 Choose the Supplier Login Banner link then Image link Delete the original path in Image Path field and paste imageslogoslogo_sapXCLMBusinessPartnergif
4 Choose Delete on Background Image field
SAP Sourcing 90Configure Branding
PUBLICcopy Copyright 2015 SAP SE or an SAP affiliate company
All rights reserved 45
17 Configuring Supplier Workflow Management
By default supplier workflow management feature is disabled in SAP Sourcing To enable this feature you need to perform following general steps
1 Create Workflow Definitions
2 Create Supplier Configurable Phase Definition
3 CreateModify Supplier Type
4 Create Supplier Field Access Definition (optional)
5 Configure Security Templates
6 Assign Supplier Types to Suppliers
7 Configure Supplier UI Mapping
The following subsections provide details for each of these steps
Create Workflow Definitions
1 Click Setup in the toolbar at the top of the page and select Platform
2 In the Workflow section of System Setup click on Workflow Definitions
3 On the Workflow Definitions List page click New
4 On the Workflow Definition Summary page fill in the fields with workflow information For details see the Field Help for Workflow Definition Summary page
5 Click the Add New Version button to add a process template to the workflow definition For details see the Field Help for Process Template Dialog Box page
6 Click the Save button in the toolbar
7 Create another Workflow Definition if necessary
Create Supplier Configurable Phase Definition
Supplier phases determine the actions that can be performed on supplier registration and modification requests To create a supplier configurable phase definition
1 Click Setup in the toolbar at the top of the page and select Platform
2 In the Suppliers section of Document Setup click on Supplier Configurable Phase Definition
3 On the Supplier Configurable Phase Definition List page click New
4 On the Header page fill in the fields with phase information For details see the Field help for Supplier Configurable Phase Definition Header page
5 Click Add to add phases to the definition
6 In the dialog box that appears select each phase to include in the phase definition and click OK
7 (optional) Click the Edit icon for each phase to edit phase information including the sequence of phases in the workflow On this page you can assign workflow definition and supplier field access definition For details see the Field help for Supplier Configurable Phase Header page
8 Click the Save button in the toolbar
46
PUBLICcopy Copyright 2015 SAP SE or an SAP affiliate companyAll rights reserved
SAP Sourcing 90Configuring Supplier Workflow Management
9 Create another Supplier Configurable Phase Definition if necessary
CreateModify Supplier Type
Supplier types can be used to determine whioch workflow phase definition to enable in a supplier registration or modification requests The Configurable Phase Definition field of Supplier Type is responsible for defining whether registrationmodification requests will use workflow and which phases will have these requests If Configurable Phase Definition is empty then supplier registration and modification requests will not have configured phases and any supplier administrator will be able to approve or deny request of such type as it was in previous versions of SAP Sourcing To enable supplier workflow management some supplier-configurable phase definition must be assigned to supplier types
SAP Sourcing provides one default supplier type You can modify this type and create new ones
1 Click Setup in the toolbar at the top of the page and select Platform
2 In the Suppliers section of Document Setup select Supplier Type
3 On the Supplier Type List page click New for creating new type or select existing from the list for editing
4 On the Type page fill in necessary fields On this page you can assign Supplier Configurable Phase Definition to Supplier Type For details see the Field Help for Supplier Type page
Create Supplier Field Access Definition
This step is optional
Supplier Field Access Definition allows you to configure access rules foe approver on specific phase
To create a supplier field access definition
1 Click Setup in the toolbar at the top of the page and select Platform
2 In the Suppliers section of Document Setup select Supplier Field Access Definition
3 On the Supplier Field Access Definition List page click New
4 On the UI page fill in necessary fields For details see the Field Help for Supplier Field Access Definition page
5 Click the Save button in the toolbar
6 Open existing Supplier Configurable Phase Definition
7 Click Edit
8 Click the Edit icon for the phase where you want to configure access rights for approvers This should be the approval phase
9 Click the Lookup icon to select a supplier field access definition to associate with this phase
10 Save the Supplier Configurable Phase Definition
Configure Security Templates
This is a very important configuration step In the case of supplier registrationsmodifications without configured workflows requests can be viewed and approved by any Supplier Administrator But in the case of new functionality collaborator security is used to define access rights A document security template is a set of rules governing the way an SAP Sourcing document assigns collaborator roles You should configure collaborators defined by role and user type that are automatically added to a registration and modification requests
You must configure two security templates first for Workflow Supplier Registration and second for Workflow Supplier Modification The following must be configured in these templates
The document owner must be any specified buy-side user Otherwise automatic phase transitions will not work for sell-side and the phase will need to be changed manually by any buy-side user
SAP Sourcing 90Configuring Supplier Workflow Management
PUBLICcopy Copyright 2015 SAP SE or an SAP affiliate company
All rights reserved 47
Document creator (current user) must be added to collaborator list with a role that allows viewing editing and changing phases (eg Collaborator)
Supplier administrators should be included to collaborator list to be able view and manually complete registrationmodification requests in case automatic completion should fail for some reason
Assign Supplier Type to Supplier
After the upgrade procedure one default supplier type is created and assigned to all suppliers It will be used to recognize phases for supplier modifications via workflow The supplier type can be changed for any supplier as follows
1 Open the supplier whose supplier type you want to reassign
2 Press Edit
3 Click the Lookup icon under the Document Type field
4 Select a new supplier type
5 Click Ok
6 Click Save
NoteWhen the supplier is created via workflow the supplier type used for creation is assigned to created supplier
Configure Supplier UI Mapping
The supplier type can be mapped to any supplier-side self-registration form The Supplier Type UI includes a collection of Supplier registration UI Mappings This allows you to configure the mapping between supplier type and self-registration forms
1 Open any Supplier Type
2 Click Edit
3 Click Add under Sell-Side Supplier Registration UI Mapping to add the UI page that will be mapped to this type
4 Click Save
NoteThe self-registration form can be assigned to only one supplier type If no form is assigned to a supplier type the default supplier type will be used for registration
48
PUBLICcopy Copyright 2015 SAP SE or an SAP affiliate companyAll rights reserved
SAP Sourcing 90Configuring Supplier Workflow Management
Typographic Conventions
Table 15
Example Description
ltExamplegt Angle brackets indicate that you replace these words or characters with appropriate entries to make entries in the system for example ldquoEnter your ltUser Namegtrdquo
Example Example Arrows separating the parts of a navigation path for example menu options
Example Emphasized words or expressions
Example Words or characters that you enter in the system exactly as they appear in the documentation
wwwsapcom Textual cross-references to an internet address
example Quicklinks added to the internet address of a homepage to enable quick access to specific content on the Web
123456 Hyperlink to an SAP Note for example SAP Note 123456
Example Words or characters quoted from the screen These include field labels screen titles pushbutton labels menu names and menu options
Cross-references to other documentation or published works
Example Output on the screen following a user action for example messages
Source code or syntax quoted directly from a program
File and directory names and their paths names of variables and parameters and names of installation upgrade and database tools
EXAMPLE Technical names of system objects These include report names program names transaction codes database table names and key concepts of a programming language when they are surrounded by body text for example SELECT and INCLUDE
EXAMPLE Keys on the keyboard
SAP Sourcing 90Typographic Conventions
PUBLICcopy Copyright 2015 SAP SE or an SAP affiliate company
All rights reserved 49
wwwsapcom
copy Copyright 2015 SAP SE or an SAP affiliate company All rights reservedNo part of this publication may be reproduced or transmitted in any form or for any purpose without the express permission of SAP SE or an SAP affiliate companySAP and other SAP products and services mentioned herein as well as their respective logos are trademarks or registered trademarks of SAP SE (or an SAP affiliate company) in Germany and other countries Please see wwwsapcomcorporate-enlegalcopyrightindexepxtrademark for additional trademark information and noticesSome software products marketed by SAP SE and its distributors contain proprietary software components of other software vendors National product specifications may varyThese materials are provided by SAP SE or an SAP affiliate company for informational purposes only without representation or warranty of any kind and SAP SE or its affiliated companies shall not be liable for errors or omissions with respect to the materials The only warranties for SAP SE or SAP affiliate company products and services are those that are set forth in the express warranty statements accompanying such products and services if any Nothing herein should be construed as constituting an additional warrantyIn particular SAP SE or its affiliated companies have no obligation to pursue any course of business outlined in this document or any related presentation or to develop or release any functionality mentioned therein This document or any related presentation and SAP SEs or its affiliated companies strategy and possible future developments products andor platform directions and functionality are all subject to change and may be changed by SAP SE or its affiliated companies at any time for any reason without notice The information in this document is not a commitment promise or legal obligation to deliver any material code or functionality All forward-looking statements are subject to various risks and uncertainties that could cause actual results to differ materially from expectations Readers are cautioned not to place undue reliance on these forward-looking statements which speak only as of their dates and they should not be relied upon in making purchasing decisions
- SAP Sourcing 90
-
- Table of Contents
- 1 Introduction
- 2 Define System Properties
- 3 Set Up SMTP Server
- 4 Context Cluster and Directory Configuration
-
- 41 Manual Context Cluster and Directory Configuration
- 42 Create Cluster Template
- 43 Create Internal Directory Template
- 44 Create External Directory Template
- 45 Managing the SSL Certificate
- 46 Create Tenant Configuration
-
- 5 Master Data
-
- 51 Overview of Master Data
- 52 Create Master Data Manually
- 53 Import Master Data Using CSV File
- 54 Workbooks
-
- 541 Overview of Workbooks
- 542 Download and Customize Workbooks
- 543 Import Master Data Using Workbooks
-
- 6 Create and Verify Purchaser User
- 7 Create and Verify Supplier User
- 8 Install Company Logo
- 9 Specify Internal Address of SAP Sourcing Server
- 10 Update Master Time Zone
- 11 Install License Key
- 12 Change Session Timeout
- 13 Enable Contract Authoring
- 14 e-Signature
-
- 141 Set Up EchoSign Account and System Configuration
- 142 Check EchoSign Configuration Status
- 143 Set Up User Rights
- 144 Resolve e-Signature Errors
- 145 Set Up Scheduled Task to Retrieve e-Signature Status
-
- 15 Configure Workbench
- 16 Configure Branding
- 17 Configuring Supplier Workflow Management
- Copyright and Trademarks
-
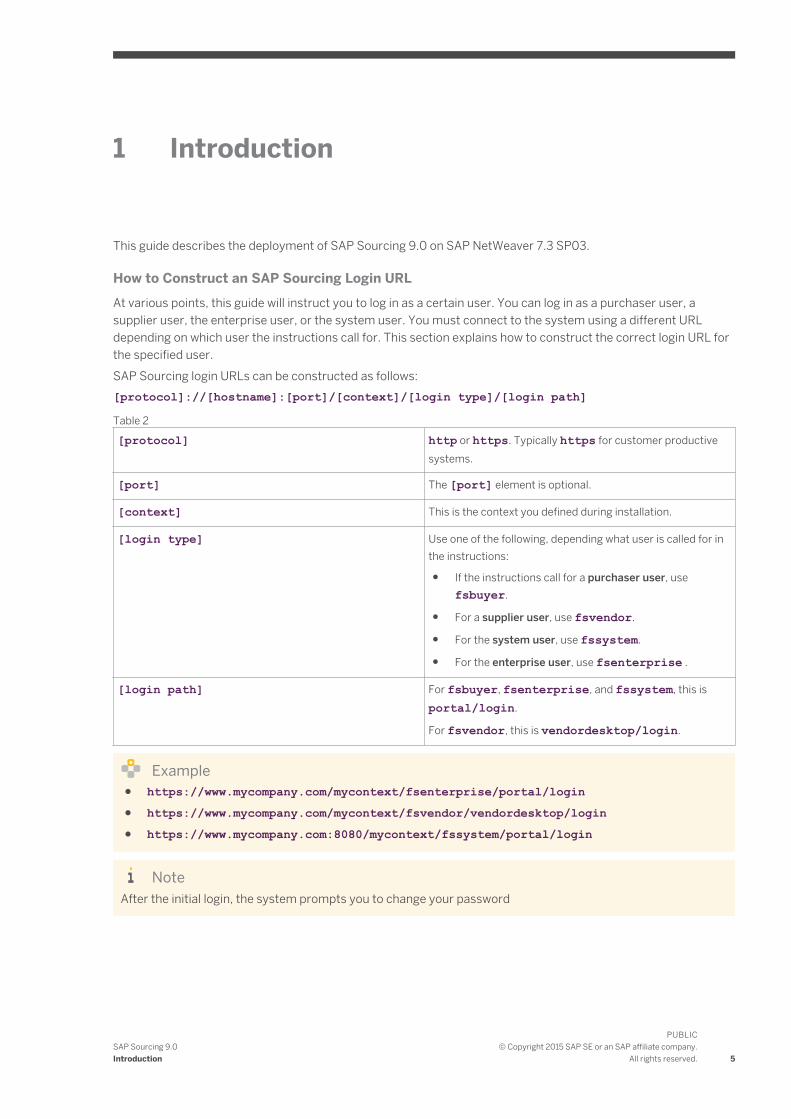
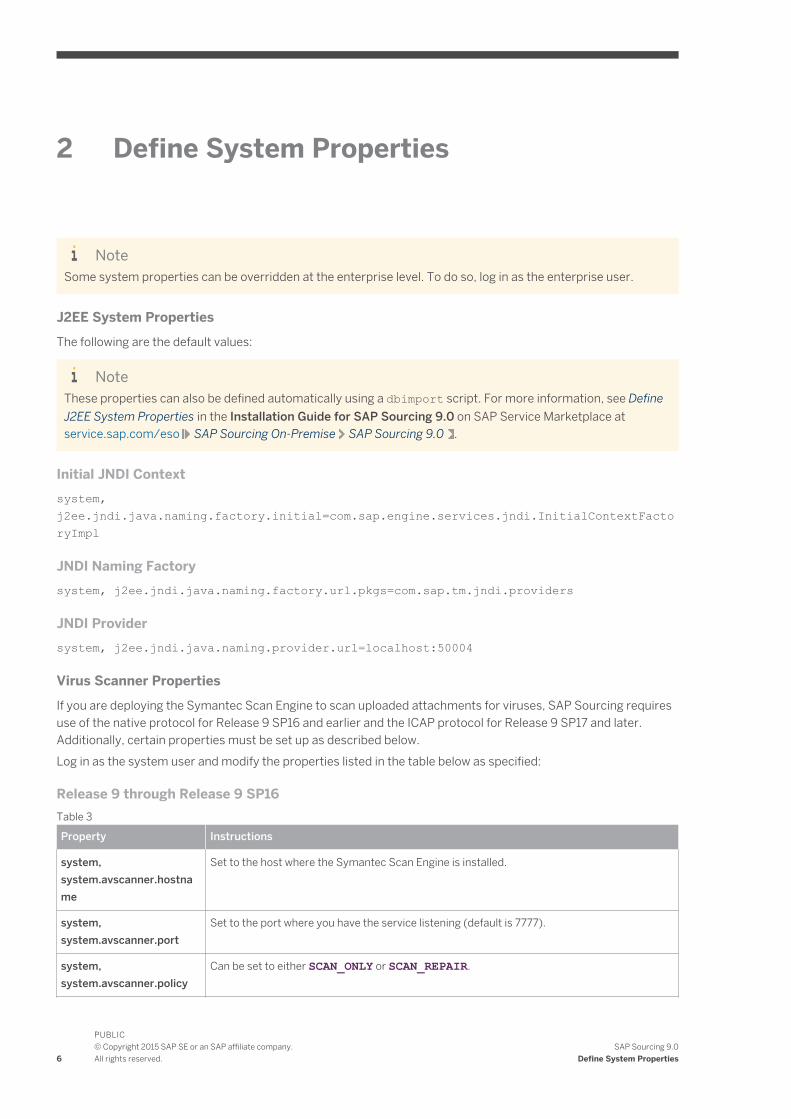
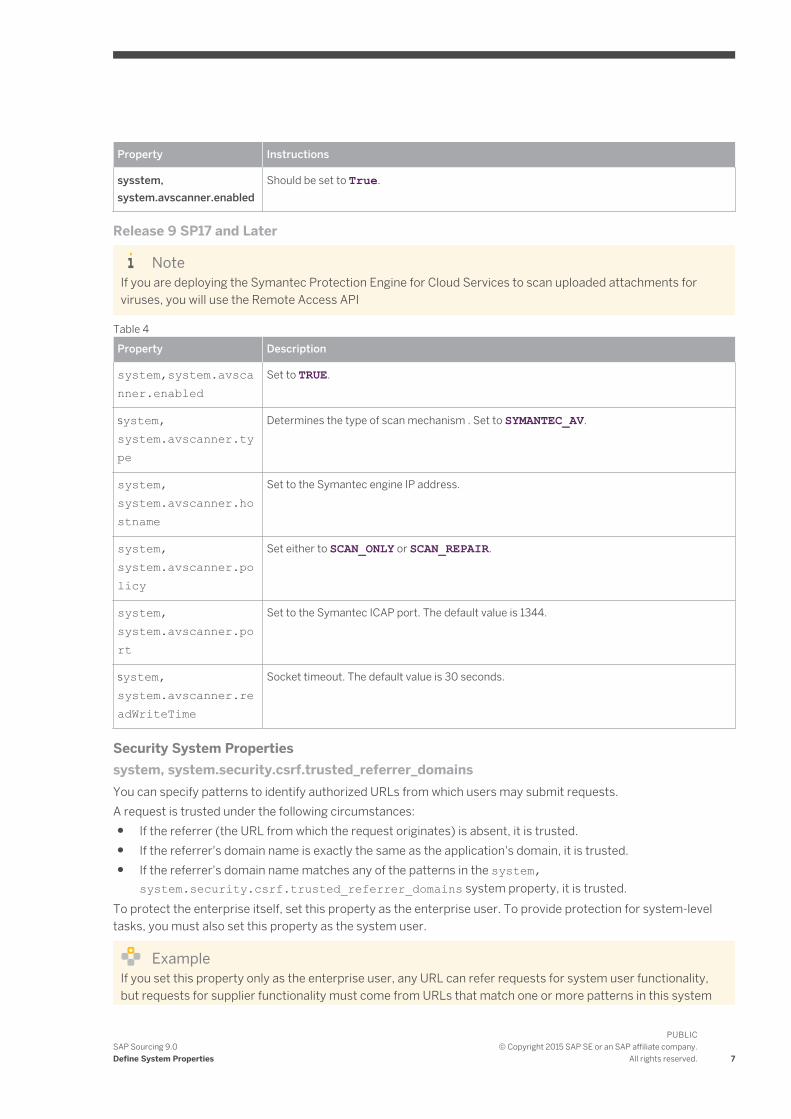
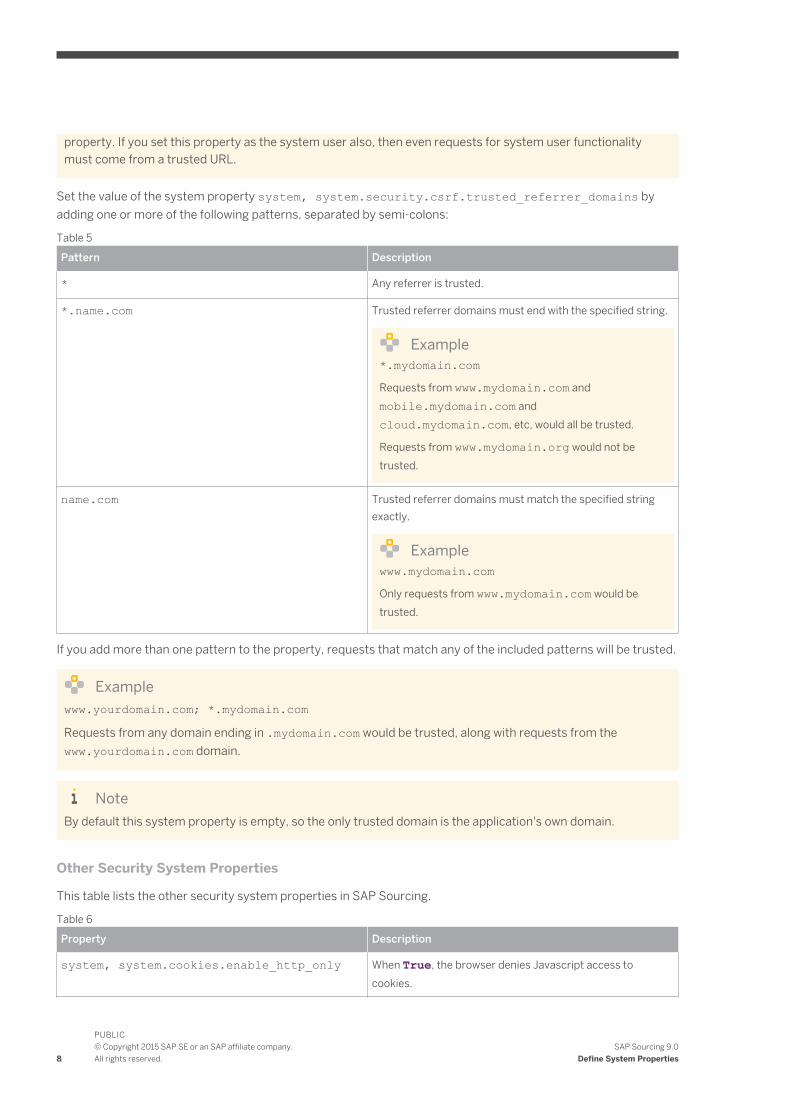
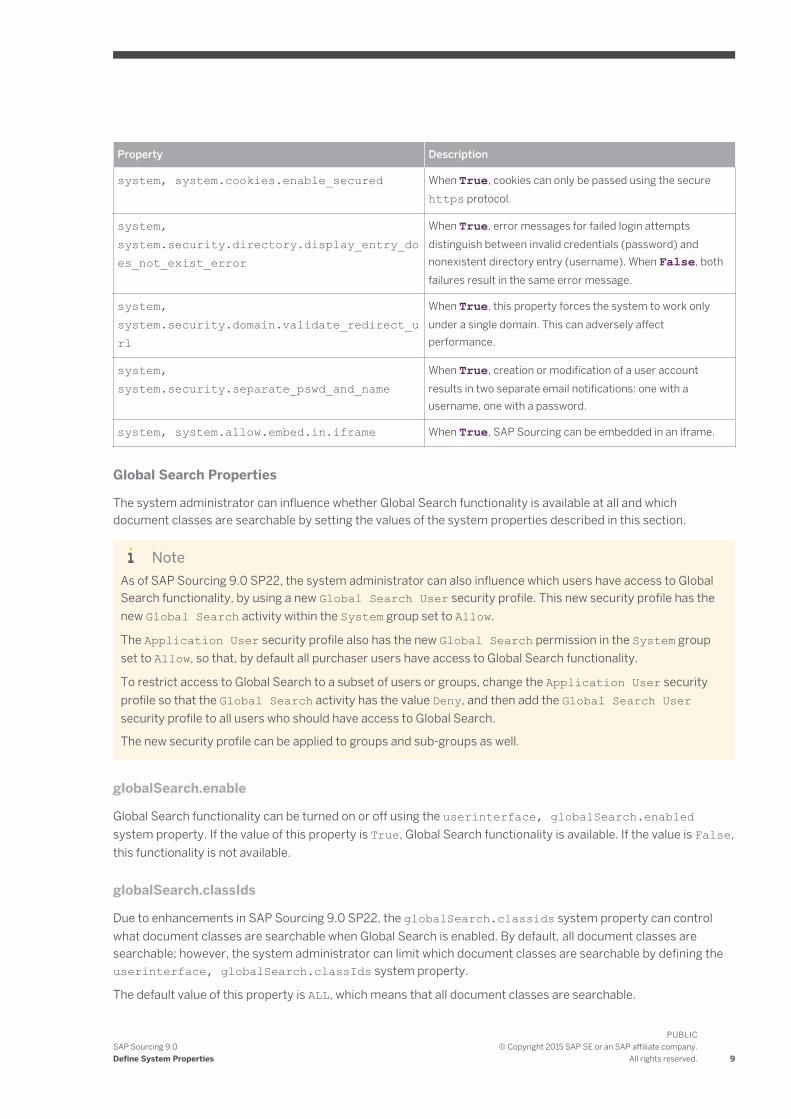
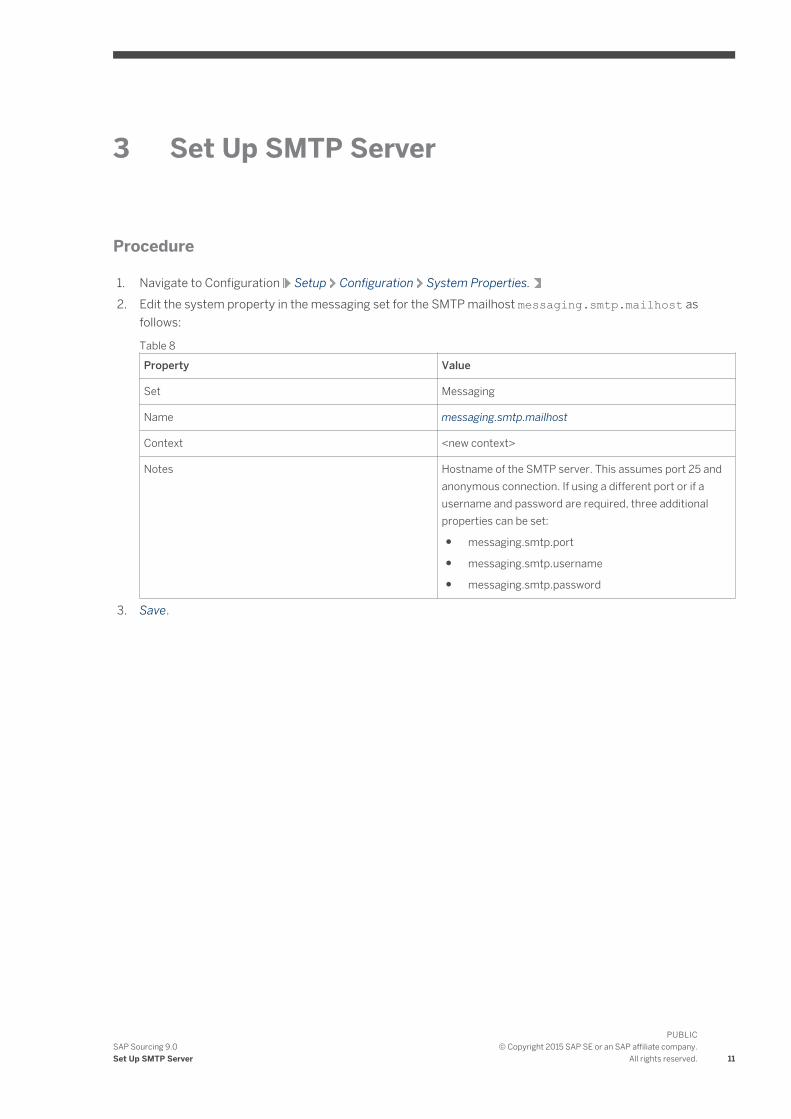
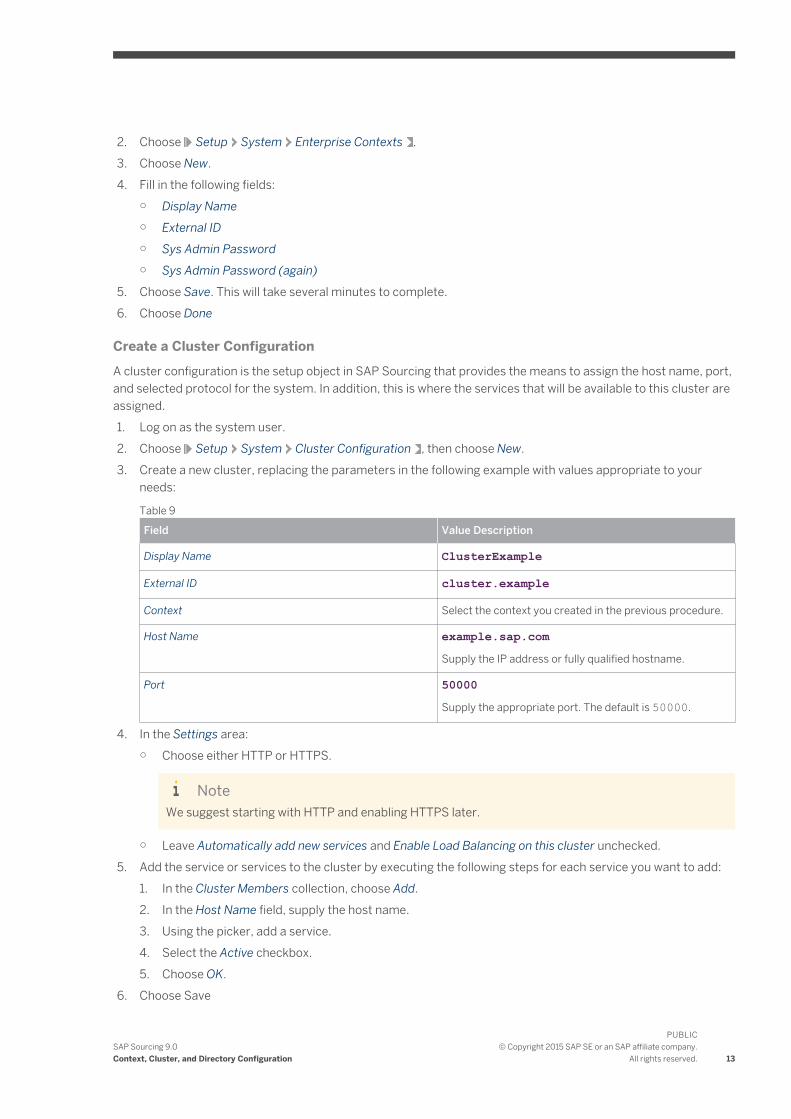
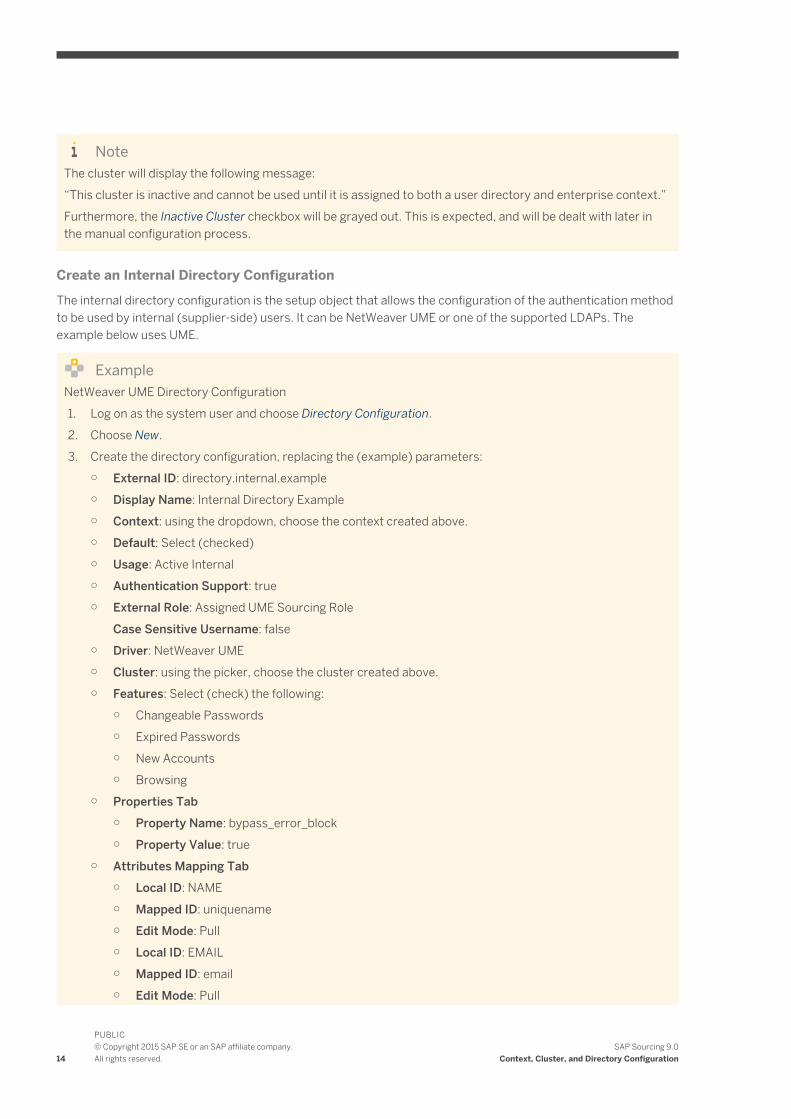
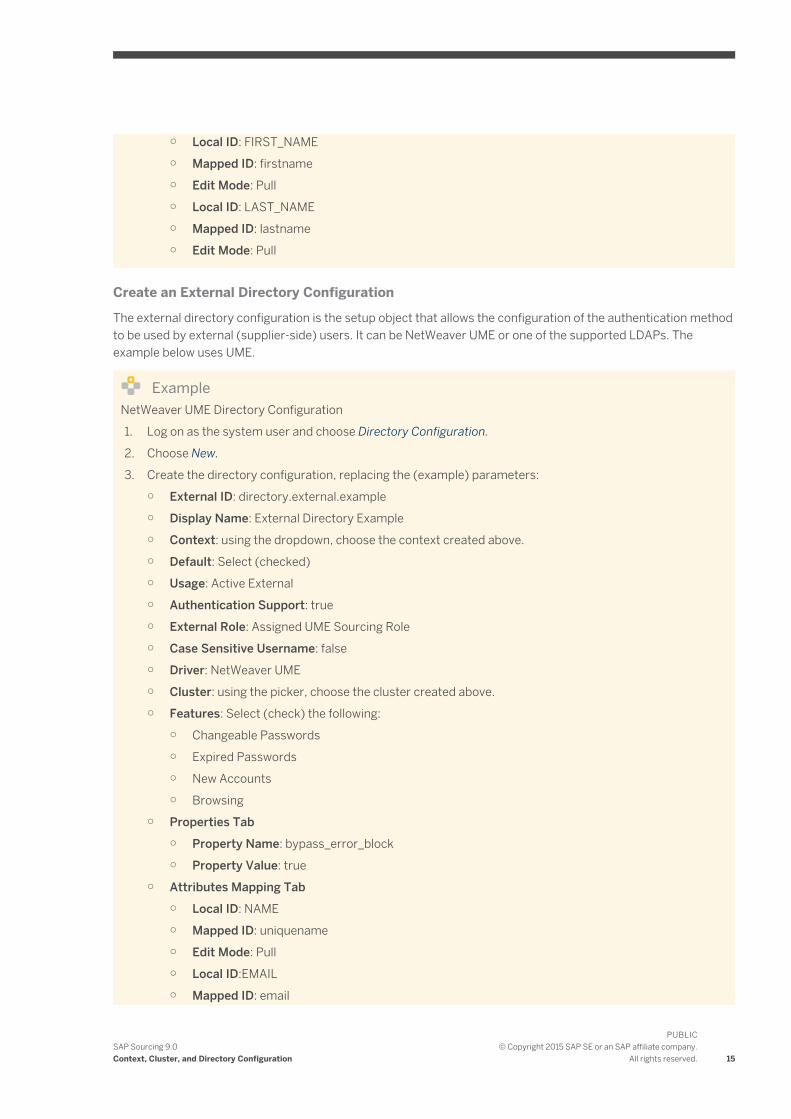
Local ID FIRST_NAME
Mapped ID firstname
Edit Mode Pull
Local ID LAST_NAME
Mapped ID lastname
Edit Mode Pull
Create an External Directory Configuration
The external directory configuration is the setup object that allows the configuration of the authentication method to be used by external (supplier-side) users It can be NetWeaver UME or one of the supported LDAPs The example below uses UME
ExampleNetWeaver UME Directory Configuration
1 Log on as the system user and choose Directory Configuration
2 Choose New
3 Create the directory configuration replacing the (example) parameters
External ID directoryexternalexample
Display Name External Directory Example
Context using the dropdown choose the context created above
Default Select (checked)
Usage Active External
Authentication Support true
External Role Assigned UME Sourcing Role
Case Sensitive Username false
Driver NetWeaver UME
Cluster using the picker choose the cluster created above
Features Select (check) the following
Changeable Passwords
Expired Passwords
New Accounts
Browsing
Properties Tab
Property Name bypass_error_block
Property Value true
Attributes Mapping Tab
Local ID NAME
Mapped ID uniquename
Edit Mode Pull
Local IDEMAIL
Mapped ID email
SAP Sourcing 90Context Cluster and Directory Configuration
PUBLICcopy Copyright 2015 SAP SE or an SAP affiliate company
All rights reserved 15
Edit Mode Pull
Local ID FIRST_NAME
Mapped ID firstname
Edit Mode Pull
Local ID LAST_NAME
Mapped ID lastname
Edit Mode Pull
Finish and Test the New Context Cluster Directory Configuration
In order to complete the configuration the new cluster must be made active as follows
1 Log on as the system user
2 Choose Cluster Configuration
3 Choose and edit the inactive cluster configuration you created above
4 Uncheck the Inactive checkbox
5 Save the cluster
Test the new enterprise login as follows
1 Log out as the system user and log on as the enterprise user as follows
lthostnamegtltportgtltcontextgtfsenterpriseportallogincid=ltcluster-idgt
Noteltcluster-idgt is the external ID of the new cluster
42 Create Cluster Template
Cluster Templates can be created to make the tenant configuration process faster but it is not necessary to create them The cluster information can also be entered manually in the Create Tenant Configuration [page 20]
Procedure
1 Log on as the system user and choose Cluster Templates
2 Choose New
3 Create a new cluster template with the following (example) parameters
External ID clusterexample
Display Name Cluster Example
Host Name examplesapcom
16
PUBLICcopy Copyright 2015 SAP SE or an SAP affiliate companyAll rights reserved
SAP Sourcing 90Context Cluster and Directory Configuration
43 Create Internal Directory Template
Directory Templates can be created to make the tenant configuration process faster but it is not necessary to create them The directory information can also be entered manually in Create Tenant Configuration [page 20]
Procedure
ExampleNetWeaver UME Directory Configuration
1 Log on as the system user and choose Directory Templates
2 Choose New
3 Create a new directory template with the following (example) parameters
External ID directoryinternalexample
Display Name Internal Directory Example
Usage Active Internal
Authentication Support true
External Role Assigned UME Sourcing Role
Case Sensitive Username false
Driver NetWeaver UME
Properties
Property Name bypass_error_block
Property Value true
Attributes Mapping
Local ID NAME
Mapped ID uniquename
Edit Mode Pull
Local ID EMAIL
Mapped ID email
Edit Mode Pull
Local ID FIRST_NAME
Mapped ID firstname
Edit Mode Pull
Local ID LAST_NAME
Mapped ID lastname
Edit Mode Pull
ExampleMSAD LDAP Directory Configuration
1 Log on as the system user and choose Directory Templates
2 Choose New
SAP Sourcing 90Context Cluster and Directory Configuration
PUBLICcopy Copyright 2015 SAP SE or an SAP affiliate company
All rights reserved 17
3 Create a new directory template with the following (example) parameters
External ID directoryinternalexample
Display Name Internal Directory Example
Usage Active Internal
Authentication Support true
Case Sensitive Username false
Driver LDAP Microsoft Active Directory
LDAP Configuration
Host msadldapcom
Port 636
User ID Attribute samaccountname
Attributes Mapping
Local ID NAME
Mapped ID sAMAccountName
Edit Mode Pull
Local ID EMAIL
Mapped ID mail
Edit Mode Pull
Local ID FIRST_NAME
Mapped ID givenName
Edit Mode Pull
Local ID LAST_NAME
Mapped ID sn
Edit Mode Pull
44 Create External Directory Template
Directory Templates can be created to make the tenant configuration process faster but it is not necessary to create them The directory information can also be entered manually in Create Tenant Configuration [page 20]
Procedure
ExampleNetWeaver UME Directory Configuration
1 Log on as the system user and choose Directory Templates
2 Choose New
3 Create a new directory template with the following (example) parameters
External ID directoryexternalexample
18
PUBLICcopy Copyright 2015 SAP SE or an SAP affiliate companyAll rights reserved
SAP Sourcing 90Context Cluster and Directory Configuration
Display Name External Directory Example
Usage Active External
Authentication Support true
External Role Assigned UME Sourcing Role
Case Sensitive Username false
Driver NetWeaver UME
Properties
Property Name bypass_error_block
Property Value true
Attributes Mapping
Local ID NAME
Mapped ID uniquename
Edit Mode Pull
Local ID EMAIL
Mapped ID email
Edit Mode Pull
Local ID FIRST_NAME
Mapped ID firstname
Edit Mode Pull
Local ID LAST_NAME
Mapped ID lastname
Edit Mode Pull
ExampleMSAD LDAP Directory Configuration
1 Log on as the system user and choose Directory Templates
2 Choose New
3 Create a new directory template with the following (example) parameters
External ID directoryexternalexample
Display Name External Directory Example
Usage Active External
Authentication Support true
Case Sensitive Username false
Driver LDAP Microsoft Active Directory
LDAP Configuration
Host msadldapcom
Port 636
User ID Attribute samaccountname
Attributes Mapping
Local ID NAME
Mapped ID sAMAccountName
SAP Sourcing 90Context Cluster and Directory Configuration
PUBLICcopy Copyright 2015 SAP SE or an SAP affiliate company
All rights reserved 19
Edit Mode Pull
Local ID EMAIL
Mapped ID mail
Edit Mode Pull
Local ID FIRST_NAME
Mapped ID givenName
Edit Mode Pull
Local ID LAST_NAME
Mapped ID sn
Edit Mode Pull
45 Managing the SSL Certificate
In order to write to an Active Directory Microsoft requires that communication to the LDAP is conducted over SSL
Getting SSL Working
In order to enable SSL communication you need to do the following
Change the communication port in the Directory Configuration from 389 (the default setting) to 636
Select the SSL checkbox in the Directory Configuration
Verify that the Certificate Authority (CA) that issued the server certificate is in the Java Keystore
When an intermediate CA is used to generate server certificates the intermediate CA certificate will need to be imported manually
If any Issuer CA certificates required to complete the server certificate chain are missing from the Java security repository on the application server install them manually into that repository
Use the following command to install the certificate
ltJAVA_HOMEgtbinkeytool -import -trustcacerts -keystore cacerts -file ltLocation_of_exported_Certificate xxxcrtgt -alias ltsome_aliasgtltJAVA_HOMEgt is the location of the SAPJVM For example sapmntltSIDgtexejvmlinuxx86_64sapjvm_51064sapjvm_5
For this ltJAVA_HOMEgt the cacerts file would be located at sapmntltSIDgtexejvmlinuxx86_64sapjvm_51064sapjvm_5jrelibsecurity
After performing these tasks restart NetWeaver and test by creating a new user in SAP Sourcing
46 Create Tenant Configuration
The creation of a tenant configuration will also create
a context
a cluster
20
PUBLICcopy Copyright 2015 SAP SE or an SAP affiliate companyAll rights reserved
SAP Sourcing 90Context Cluster and Directory Configuration
an internal directory
an external directory
The information necessary can be retrieved from cluster and directory templates or entered manually
NoteFor multiple landscape use all the configurations must have the same name If not migration will be affected
Procedure
1 Log on as the system user and choose Tenant Configuration
2 Choose New
3 Create a new tenant configuration with the following (example) parameters
Using Templates
External ID tenantexample
Display Name Tenant Example
Sys Admin Password
Sys Admin Password (again)
Cluster Cluster Example
Directory Internal Site Internal Directory Example
Directory External Site External Directory Example
No Templates
External ID tenantexample
Display Name Tenant Example
Sys Admin Password
Sys Admin Password (again)
Overwrite Templates Configurations
Cluster (checked)
Directory Internal Site (checked)
Directory External Site (checked)
Cluster Configuration [page 16] step
Internal Directory Configuration [page 17] step
External Directory Configuration [page 18] step
SAP Sourcing 90Context Cluster and Directory Configuration
PUBLICcopy Copyright 2015 SAP SE or an SAP affiliate company
All rights reserved 21
5 Master Data
Gathering Critical Information
For each deployment gather critical information including (but not limited to) the following
Purchaser organizational data Locations Companies Business Units Groups and Users
Supplier organizational data Suppliers and Contacts
Commodity Information Internal and External Categories
The current implementation methodology recommends defining these attributes before going live to maximize efficiency Data attributes may be modified or added throughout the life of the implementation using the Setup module
51 Overview of Master Data
SAP Sourcing provides the following means to install master data
Manual entry from Setup
Import from CSV file
Import from deployment workbook
Define the components of master data that exist within each context after contexts and clusters have been defined The following table lists the master data object types requiring definition for the enterprise The data classification Configurable indicates that default data is provided but can be customized for deployment The data classification Custom indicates that no default data is provided and the deployment must provide the data
Table 10
Contents Data Classification Description
Numbering table definitions for enterprise-level objects
Configurable Defines the format of IDs For example an RFP might follow the format RFP-nnnn where nnnn increments for each new rfp created
Default list of extendible enterprise-level objects
Configurable Lists those enterprise-level objects which can be extended
Default list of objects that can used referenced in an extension
Configurable One type of extension allows a reference to another type of object This list identifies the allowed kinds of references
Value List Types Configurable Default value list types
Value List Values Configurable Default value list values such as countries time zones and so on
22
PUBLICcopy Copyright 2015 SAP SE or an SAP affiliate companyAll rights reserved
SAP Sourcing 90Master Data
Contents Data Classification Description
Units of Measure Configurable Standard units of measure used throughout the system
Currencies Configurable A list of all currencies used by your organization
Currency Conversions Configurable Default values for any currency conversion rates
Document Link Definitions Configurable Lists the allowable kinds of document links
Scheduled Task Types Configurable Used to define categories of scheduled tasks
Scheduled Tasks Configurable Lists scheduled or background tasks
Metrics Configurable Used to define metrics for scorecards
Contract Terms Configurable Used to define terms on contracts
Contract Types Configurable Types define what set of contract features are available
Project Types Configurable Types define what set of Project features are available
RFx Types Configurable Types define what set of RFx features are available
Auction Types Configurable Types define what set of Auction features are available
DA Types Configurable Types define what set of Demand features are available
Security Profiles Configurable Identifies the security profiles installed with the system
Rights on security profiles Configurable Defines the rights for each security profile
Time Periods Configurable Defines information about quarters years and so on
Reporting Calendars Configurable Used for managing how data is reported with relation to the calendar
Collaborator Roles Configurable Defines the role (rights and responsibilities) of a persongroup on a specific document instance
Document Security Templates Configurable Sets up the default collaborators and security when new documents are created
SAP Sourcing 90Master Data
PUBLICcopy Copyright 2015 SAP SE or an SAP affiliate company
All rights reserved 23
Contents Data Classification Description
Shared Discussions Configurable A list of discussion forums available as a channel and not relating to a specific document
Workbench Channels Configurable Channels available on a users desktop
Workbench IFrames Configurable Data to create iFrames
Workbench Channel Configurations Configurable Channel configuration parameters
Workbench Pages Configurable Pre-defined desktop pages
Workbench Page Configurations Configurable Channel content and placement settings for predefined pages
Configuration Properties Configurable Various deployment settings including mail
Enterprise Extensions Custom Actual extensions on enterprise-level objects
Directory Configurations Custom Used for the LDAP directory configuration
Geographies Custom Used to represent the Geographic regions
Locations Custom Locations of plants companies and other organizational elements
Payment Terms Custom Terms of payment between the purchaser and supplier
External Categories Custom Typically this data set consists of industry standard category codes such as UN-SPSC or SIC codes if used by your organization
Internal Categories Custom All internal purchasing categories used by the purchaser
Vendors Custom Used in all components for various purchasing actions
Vendor Extensions in List Form Custom Actual extensions on enterprise-level objects
Companies Custom Used by all components of the system for purchasing actions such as Auctions and RFPs
Registration Categories Custom Defines mapping from arbitrary category names to actual internal or external categories Used during supplier self-registration
24
PUBLICcopy Copyright 2015 SAP SE or an SAP affiliate companyAll rights reserved
SAP Sourcing 90Master Data
Contents Data Classification Description
Organizational Units Custom Further definition of the organizational hierarchy Use to define departments business units and so on
Groups Custom Arbitrary groups of purchaser users
Contacts Custom Used for all suppliers to distinguish the various contacts at each supplier
Accounts Custom Handles all user accounts for the system
Terms Templates Custom Standard terms and conditions phrases to which a supplier must agree before accessing an event
Purchasing Organization Custom An organizational unit in SAP ERP subdividing an enterprise according to the requirements of purchasing
Purchasing Group Custom A key for a purchaser or group of purchasers in SAP ERP
Vendor Account Group Custom A classifying feature of supplier master records in SAP ERP
Business System Custom Represents a system in the landscape for example SAP Sourcing or SAP ERP
Text Id Custom Represents SAP ERP header and item texts
Transaction Type Custom Represents SAP ERP transation types
After configuring the enterprise master data you must next configure the company master data This data must be created once for each sub-context This example only uses a single context so this data must only be created once
Table 11
Contents Data Classification Description
UFNs System Metadata for RFx utility functions
System Answered Sources Configurable Defines the available sources of system answered questions
Company Extension Definitions Configurable List of company-scoped objects which have extensions
Document Security Templates Configurable Sets up the default collaborators and security when new documents are created
Contract Generation Phases Configurable Used to define Phases for Contract Generation library documents
SAP Sourcing 90Master Data
PUBLICcopy Copyright 2015 SAP SE or an SAP affiliate company
All rights reserved 25
Contents Data Classification Description
Contract Generation Tags Configurable Used to define Tags for Contract Generation
Company extensions Custom List of extensions on individual object types
masterdataActivity Custom Used for general accounting purposes
Cost Centers Custom Used for accounting purposes to assign cost on a center by center basis
Cost Center Groups Custom
Entities Custom Used for accounting purposes for purchasing by division
GL Accounts Custom Used for general accounting purposes
Plants Custom Plants or facilities
Materials Custom Standard materials for use in line items
Category Managers Custom Users who are responsible for certain categories
Master Data Security
When configuring and importing Master Data there are some things to remember about security
1 Each piece of importable master data has an Import right as part of its ACL list By default this right is only added for the System Administrator security profile and therefore only those users can import master data out of the box As always an admin can add Import rights to other security profiles on and object-by-object basis
ExampleIf Supplier Administrators need to import Supplier records then that can be enabled
2 When importing Master Data be it via CSV XLS XML etc the user running the imports must have Import right allowed for all objects in question The Enterprise user is considered trusted and can import any of these objects
52 Create Master Data Manually
Procedure
NoteThe user account being used to import the following must have Allow Import rights on these specific objects If you do not have Allow Import on these objects it must be added or the import will fail
1 Log on as the enterprise user
26
PUBLICcopy Copyright 2015 SAP SE or an SAP affiliate companyAll rights reserved
SAP Sourcing 90Master Data
2 Create objects from within the Setup module
3 Log on as a purchaser user with administrative rights to configure company master data
For more information see the SAP Sourcing help at helpsapcomsourcing To access the help system scroll to SAP Sourcing 90 Help for Purchasers and choose a language In the help choose Setup System Setup Master Data
53 Import Master Data Using CSV File
NoteThe user account being used to import the following must have Allow Import rights on these specific objects If you do not have Allow Import on these objects it must be added or the import will fail
You can import master data files with CSV XLS or XLSX format in two ways
Use the standard web user interface
Use a client application distributed with the system which allows data to be imported outside of the web environment
The following procedure describes how to import using the web-based UI
Procedure
1 If application users have already been created log on as a purchaser user with administrative rights If users have not been created log on as the enterprise user
2 Choose Setup System Administration Import Export Tools Import Data and then choose OK
3 Choose Create
The import wizard opens
4 Specify whether you want to upload the file to the server or whether the file is already located on the application server and choose Next
5 Choose Upload Import File and select the CSV or Deployment Workgroup file to import
6 For CSV files select the object type and choose Next
7 Indicate whether you want to wait for the import to finish or perform the import in the background and then choose Next
8 Choose Finish to view the results
SAP Sourcing 90Master Data
PUBLICcopy Copyright 2015 SAP SE or an SAP affiliate company
All rights reserved 27
54 Workbooks
541 Overview of Workbooks
NoteThere are many sheets in the workbooks that have the prefix eso While these sheets may appear as duplicates of other sheets the data in them is in fact different These sheets should be imported by default You may also add data to these sheets if you would like to augment the data provided in the sample workbooks
We recommend using the deployment workbook for initial deployment of the system to ensure that all required data is imported into the system
To facilitate the import of data SAP Sourcing provides an alternative to CSV files for import SAP Sourcing provides the ability to import Microsoft Excel files containing one or more master data imports The system processes these Excel files directly without the user having to export the data to a raw CSV file The Enterprise Deployment Workbook and Company Deployment Workbook are two sample deployment workbooks delivered with SAP Sourcing
Anyone with system administrator access rights can download the deployment workbooks from the web user interface The deployment workbooks are included in the online Reference Guide (RG)
When starting a new deployment project preserve the original workbook templates by making a copy of them and saving them with a new name Import data using your modified templates only By doing so you assure continuity if future additional deployments are required
NoteKeep the following in mind when using deployment workbooks
The Configuration Sheet controls the import process Refer to the Help Sheet for input specifications of Configuration Sheet columns
The system can import the workbooks directly but there are limitations to what Excel constructs are supported The Help Sheet describes the rules that must be observed
The same importing process supports both CSV files and Excel workbooks
There is a one to one relationship with the workbook configuration file and the worksheet tabs
542 Download and Customize Workbooks
The sample enterprise and company workbooks that you download from SAP Sourcing are designed for you to configure a base system using a sample enterprise context We recommend modifying the default deployment workbooks Choose the appropriate workbooks from this table
Table 12
System Workbooks
SAP Sourcing Enterprise Deployment Workbook
Company Deployment Workbook
Users setting up a base system should adjust the various settings in these workbooks prior to running them in the system For example the company data should be updated to reflect specifics about the company that is
28
PUBLICcopy Copyright 2015 SAP SE or an SAP affiliate companyAll rights reserved
SAP Sourcing 90Master Data
installing the system Similarly you should review other tabs to ensure that the configurations are consistent with the desired implementation For details on customizable fields see Master Data [page 22]
Procedure
1 Log on as the enterprise user and choose Reference Guide Download the sample enterprise and company workbooks appropriate for your system
NoteThe enterprise workbook should be run as the enterprise user The company workbook should be run as a system administrator associated with the company object intended to be configured
2 From the Enterprise Deployment workbook open the file and find the sheet labeled locations and edit this sheet as necessary
Only one location is required
3 Find each sheet review each sheet and the comments in the sheet and update the data accordingly
4 Provide at least one internal category
5 Find the sheet labeled companies and edit it as necessary
6 Repeat for org_units groups accounts and so on
Your are establishing a hierarchy To configure the hierarchy correctly you must ensure that the child references the parent correctly For example the PARENT column in the business_units page should include a valid EXTERNAL_ID from the companies sheet
NoteTo build all custom data in the user interface simply deactivate the import of the above data types in the deployment workbook See the Help page for instructions on how to skip a specific worksheet
7 Import the enterprise and company workbooks into SAP Sourcing by choosing Setup System Administration Import and Export Tools Import Data and then choose Create
543 Import Master Data Using Workbooks
Procedure
1 Log on as the user specified in this table and choose Setup
Table 13
Workbook Login User
Enterprise workbook
Enterprise user
Company workbook Purchaser user
2 From the Import and Export Tools dropdown chooseImport Data and then choose OK
The Import Data page appears
SAP Sourcing 90Master Data
PUBLICcopy Copyright 2015 SAP SE or an SAP affiliate company
All rights reserved 29
3 Choose Create to start a new import job
4 Choose Upload to the Server and then choose Next
5 Select the modified workbook and choose Next
6 Wait for the import to finish and choose Next
Typically running the enterprise workbook can take several minutes
30
PUBLICcopy Copyright 2015 SAP SE or an SAP affiliate companyAll rights reserved
SAP Sourcing 90Master Data
6 Create and Verify Purchaser User
Procedure
For the SAP NetWeaver UME driver users should be created in SAP Sourcing and the SAP NetWeaver UME with the same username
For LDAP drivers depending on how the LDAP was set up you must perform one of the following
Create the user in SAP Sourcing and supply the information FROM the LDAP
If you have access create the account and supply the information TO the LDAP
In either case an e-mail is generated giving the user a path to the application and his or her user name If the account is created a temporary password is also mailed A system property determines whether this information is delivered in the same e-mail or separate e-mails
1 Choose Setup WYSIWYG Page Customization User Account and create a purchaser user as follows
1 On the Account Properties tab enter required information
2 On the Account Management tab enter information as follows
Enable User to Login Select
Directory Select as needed
User ID Type userid
Create Directory Account Select
Generate a New Password Select
Send Notification Select
3 On the Security tab enter information as follows
Purchaser Select
Purchaser Manager Select
System Administrator Select
Supplier Administrator Select
Make sure this first user is given Administrator privileges to import the Company Workbook
2 Wait for the e-mail to be sent and received If you do not receive it check the following
To verify the mail was sent choose Setup System Administration Processed Messages
To check for stuck or failed messages choose Setup System Administration Queued Messages
3 To test the new account log on as a purchaser user using the credentials sent in the e-mail
4 Reset your password and choose OK
If you can successfully log into the new purchaser account the context cluster and directory are properly configured and the SMTP server is processing e-mail
SAP Sourcing 90Create and Verify Purchaser User
PUBLICcopy Copyright 2015 SAP SE or an SAP affiliate company
All rights reserved 31
7 Create and Verify Supplier User
Procedure
Create a supplier user to test the supplier portal A supplier user is a contact on a supplier record
1 Choose Supplier Management Create Supplier
2 Enter and save the required information
3 Choose the Contacts tab
4 Under Supplier Contacts choose Add
5 Enter and save the required information
6 Log on as a supplier user using the credentials provided in the test user e-mail
7 Reset the password as prompted and accept the usage terms
32
PUBLICcopy Copyright 2015 SAP SE or an SAP affiliate companyAll rights reserved
SAP Sourcing 90Create and Verify Supplier User
8 Install Company Logo
Procedure
NoteWe do not recommend installing an image larger than 200 x 29
1 Log on as the enterprise user
2 Attach the logo as follows
1 Choose Setup Organization and Accounting Information Companies
2 Select the enterprise company from the list and choose Edit Document
3 Attach your logo image to the company using the Logo Attachment field
3 Save your entries
Resize Company Logo
If you have uploaded a company logo in your source release you must resize the image to 200x29
1 Log on as a purchaser user with system administrator rights
2 Choose Setup
3 On the Master Data tab find the Organization and Accounting section and choose Companies
4 Choose the company
5 Choose Edit
6 In the Logo field upload the resized image
SAP Sourcing 90Install Company Logo
PUBLICcopy Copyright 2015 SAP SE or an SAP affiliate company
All rights reserved 33
9 Specify Internal Address of SAP Sourcing Server
Procedure
When SAP Sourcing is first installed or whenever a new server is added to an application cluster the Internet address that is used for internal communications within SAP Sourcing is initially set to the external host name of the server In many cases this will result in unexpected or delayed behavior in the application
If the application landscape includes a network firewall accessing the server through this name requires exiting the firewall and re-entering If the firewall blocks incoming traffic on SAP Sourcingrsquos notification ports this will result in failure to deliver notifications for some events To avoid this do the following
1 Log on as the system user
2 Open the System Information record for editing
3 Change the value in the Internal Address field to an internal IP address or host name
4 Save your changes
34
PUBLICcopy Copyright 2015 SAP SE or an SAP affiliate companyAll rights reserved
SAP Sourcing 90Specify Internal Address of SAP Sourcing Server
10 Update Master Time Zone
Procedure
This procedure is required to enable SAP Sourcing to normalize all dates and times that are used in sourcing events Normalizing allows time fields to be presented differently for each user according to his or her preferred time zone while maintaining a consistent reference to the same point in time
1 Log on as the system user
2 Choose Setup Configuration System Properties
3 Edit the systemmaster_timezone property in the system set This property value should be set to the Java time zone identifier that corresponds to the current database server time zone
NoteThe SAP Sourcing Time Zone Value List Type provides a relatively comprehensive list of java time zone identifiers To view this list log on as a purchaser user and navigate to Setup Master Data Value List Types and Values Time Zone The Alternate Name column of this list contains the java time zone identifier for the corresponding time zone
ExampleldquoAmericaNew_Yorkrdquo is the alternate name of the SAP Sourcing Timezone ValueListValue for ldquo(GMT-500) Eastern Standard Timerdquo
SAP Sourcing 90Update Master Time Zone
PUBLICcopy Copyright 2015 SAP SE or an SAP affiliate company
All rights reserved 35
11 Install License Key
Procedure
You must install a license key before the SAP Sourcing system can be used in production mode
1 Choose Setup System Administration System Management System Information
2 Note the installation ID from the Installation ID field on the Service Registration tab
3 Create OSS ticket this ID and a list of the requested modules to license (include the optimizer) to SAP Customer Support You will receive a csv file including all the license keys
NoteRequesting the optimizer key without installing an optimizer server will result in a high volume of irrelevant optimizer-related messages in your log files If you do not intend to install an optimizer server do not request an optimizer key
4 Log on as the enterprise user and choose Setup System Administration Import and Export ToolsImport Data
5 Use the import tool to import the licenses you received from Support as follows
1 On the Import Wizard Select a File screen type a description such as License Keys and choose Upload Import File to upload the csv file Choose Next
2 On the Import Wizard CSV Contents screen select Module License as the Object Type choose Next and follow any additional prompts to finish the process The successful file import is displayed on the File Import tab
6 Choose Setup System Administration System Management System Information
7 Choose the Components tab and verify that the appropriate licenses are checked under SRM Module Licenses
8 If you are installing the optimizer verify that a new Optimizer tab appears and displays an appropriate Status Queue value and JVM information (If the optimizer is not installed the Status Queue value is OFFLINE and the JVM Information is set to unknown)
36
PUBLICcopy Copyright 2015 SAP SE or an SAP affiliate companyAll rights reserved
SAP Sourcing 90Install License Key
12 Change Session Timeout
Procedure
NoteThis is optional
The deployment descriptor for the SAP Sourcing application defaults to a 30-minute session timeout or to the value that was set during installation
NoteThe above property should be set longer than the below two properties
To change this setting
1 Log on as the system user and set the following system property in SAP Sourcing
uppmeteringlogin_inactivity_timeout and set to the timeout that was chosen when running the configure utility
2 Property uppmeteringcleanup_interval defines the time between runs of the daemon which removes inactive sessions It is recommended that this value be set to a value that is slightly larger than the uppmeteringlogin_inactivity_timeout setting is set to
3 Set the time-out using the configure tool For information about the configure tool see the Installation Guide for SAP Sourcing 90 on the SAP Service Marketplace at servicesapcomeso SAP Sourcing On-Premise SAP Sourcing 90
NoteBoth internal property in SAP Sourcing and configuration tool in NetWeaver should be set to the same value
SAP Sourcing 90Change Session Timeout
PUBLICcopy Copyright 2015 SAP SE or an SAP affiliate company
All rights reserved 37
13 Enable Contract Authoring
Contracts amendments and clauses use the Word service This service must be referenced For more information see ldquoCreate OfficeAutomationUser Accountrdquo in the Installation Guide for SAP Sourcing 90 on SAP Service Marketplace at servicesapcomeso SAP Sourcing On-Premise SAP Sourcing 90
Procedure
Configure a path to the Word service in SAP Sourcing as follows
1 Choose Setup System Properties
2 From the Name dropdown list choose contractgenserviceurl
3 Set the value to ltprotocolgtlthostnamegtltvirtual directorygtwordserviceasmx
38
PUBLICcopy Copyright 2015 SAP SE or an SAP affiliate companyAll rights reserved
SAP Sourcing 90Enable Contract Authoring
14 e-Signature
To enable e-Signature functionality users first get user accounts from EchoSign EchoSign adds the users to the EchoSign SAP channel System administrators define the integrated system configuration and set up the management of customer and user accounts System administrators can schedule automated checks of contract document signature statuses System users can check the availability of e-Signature components
141 Set Up EchoSign Account and System Configuration
Procedure
Set Up EchoSign Account
Before a system administrator enables e-Signature features for a customer EchoSign adds the customer to the EchoSign SAP channel The customer gives the account key provided by EchoSign to the system administrator The system administrator then configures e-Signature to work with EchoSign
Set Up Integrated System Configuration
Adding an EchoSign account to SAP Sourcing configuration enables e-Signature functionality in SAP Sourcing To set up an EchoSign account for use with e-Signature a system administrator creates an integrated system configuration object for EchoSign integration
1 Log on as the enterprise user
2 Choose Setup Integrated System Configuration
3 On the subsequent screen choose New
4 On the subsequent screen select EchoSign for System Type and select Continue
5 Under EchoSign Properties the customer enters the EchoSign account key provided the customer by EchoSign and choose Done
Set Up Proxy Settings
To configure EchoSign on a NetWeaver-based system follow these steps
1 Configure the HTTP properties as described on the SAP Help Portal at helpsapcomsaphelp_nw73helpdataen48479b6163524bb9e10000000a42189bframesethtm
2 To add proxy parameters to JVM settings in NetWeaver navigate to [host][port]nwa ConfigurationInfrastructure Java System Properties Additional VM Properties and add the following parameters with the appropriate values
-DhttpproxyHost -DhttpproxyPort -DhttpsproxyHost -DhttpsproxyPort
SAP Sourcing 90e-Signature
PUBLICcopy Copyright 2015 SAP SE or an SAP affiliate company
All rights reserved 39
NoteIf your proxy server requires a username and password provide this information with the following parameters
-DhttpproxyUser -DhttpproxyPassword -DhttpsproxyUser -DhttpsproxyPassword
3 Import the SSL certificate file into the NetWeaver key storage as follows
1 Navigate to lthostgtltportgtnwa Security Certificates and Keys
2 Select the WebServiceSecurity keystore view
3 If you are updating or replacing the EchoSign certificate remove any previous certificates with the same Common Name
4 Choose Import Entry and select x509 certificate as the entry type
5 Get the EchoSign certificate from your browserrsquos certificate interface
NoteSpecific steps will vary from browser to browser but the general process should be similar Here are sample instructions for Firefox
1 Navigate to secureechosigncomservicesEchoSignDocumentService9
NoteYou can ignore the error message that says Invalid SOAP Request
2 Click on the lock icon next to the URL
3 Click More Information
4 Open the Security tab
5 Click View Certificate
6 Open the Details tab
7 Click Export
8 From the Save as Type dropdown list choose the SSL certificate for the version you require
9 If Windows does not recognize the exported file as a certificate add a cer or crt extension to the filename
6 Restart NetWeaver
Change EchoSign service URL
SAP Sourcing ships with the current EchoSign service URL Change the service URL value in System Properties only when EchoSign changes the service URL To change this value do the following
1 Log on as the system user
2 On the System Setup tab choose System Properties
3 Open contractgenesignature_url from the Properties list
4 Enter the new EchoSign service URL provided by EchoSign
40
PUBLICcopy Copyright 2015 SAP SE or an SAP affiliate companyAll rights reserved
SAP Sourcing 90e-Signature
NoteSet the URL property only if the EchoSign domain has changed The current URL is secureechosigncomservicesEchoSignDocumentService9 Note that the API version should be set to 9
Change the length of the EchoSign timeout
By default SAP Sourcing sets the length of the EchoSign timeout to 300000 milliseconds or five minutes Change the length of the EchoSign timeout only if the default timeout causes issues when you send documents to EchoSign
1 Log on as the system user
2 On the System Setup tab choose System Properties
3 Choose contractgenesignature_timeout from the Name dropdown menu
4 Enter a numeral specifying the desired length in milliseconds for the EchoSign timeout in the Value field The Value field requires no minimum nor maximum value nor number formatting
142 Check EchoSign Configuration Status
Procedure
1 Log on as the system user
2 Choose System Information Then on the subsequent screen choose the Audits tab
3 Choose the correct context for the customers location from the Context dropdown menu
4 In the Availability pane OK appears in the Status column next to EchoSign Availability if you configured SAP Sourcing correctly for EchoSign
143 Set Up User Rights
Procedure
Assign Right to Send Contract Documents for Signatures or to Resolve Errors
To enable a user to send contract documents for signatures a customer system administrator adds Contract e-Signature to the users security profiles
To assign the right to send contract documents out for signatures to a user a system administrator does the following
1 In Setup choose System Administration Internal User Accounts
2 Select the desired user account
3 Choose the Security tab Then choose Contract e-Signature or Contract e-Signature Admin
A system administrator can assign either of the following e-Signature rights to a user
SAP Sourcing 90e-Signature
PUBLICcopy Copyright 2015 SAP SE or an SAP affiliate company
All rights reserved 41
Table 14
Right Description
ESO_CONTRACT_ESIGNATURE Users with this right can send contract documents out for signatures using the e-Signature feature
ESO_CONTRACT_ESIGNATURE_ADMIN This right allows designated users to resolve errors Users with this right can change a contract document while it is out for signatures Users with this right can change the signature status of a contract document to Error and can thus allow the contract document author to unlock a frozen document System administrators assign this right only to other administrators not to standard users
4 Choose Done
144 Resolve e-Signature Errors
Procedure
Contract Document Status Frozen
Unexpected errors such as network or system errors can freeze the status of a contract document to Sending for e-Signature or Out for Signature A user with the right ESO_CONTRACT_ESIGNATURE_ADMIN can unfreeze the status of the contract document so that the contract author can cancel the e-Signature process A system administrator can assign the right ESO_CONTRACT_ESIGNATURE_ADMIN to a user
1 The contract author adds a user with the ESO_CONTRACT_ESIGNATURE_ADMIN right to the affected Master Agreement as a collaborator
2 The user with the ESO_CONTRACT_ESIGNATURE_ADMIN right manually changes the status of the frozen contract document to ERROR
3 The contract author logs in to EchoSign and manually cancels the e-Signature process for the contract document
Invalid Password Error
You may receive the following error message Error Invalid password for user sending a Contract Document to EchoSign for signature
This message indicates that the user sending a request for e-signatures via EchoSign is not properly set up in their EchoSign account Contact EchoSign for assistance in resolving this error
145 Set Up Scheduled Task to Retrieve e-Signature Status
Procedure
You can set SAP Sourcing to retrieve the e-Signature statuses of all contract documents at a frequency you specify automatically However an end user need not wait for these automated retrievals to see the current e-
42
PUBLICcopy Copyright 2015 SAP SE or an SAP affiliate companyAll rights reserved
SAP Sourcing 90e-Signature
Signature status of a contract document End users can get instant updates of the e-Signature status manually through the contract document user interface
1 Log on as the enterprise user
2 Choose Setup
3 On the System Setup tab choose Scheduled Tasks
4 On the subsequent page choose New then select the e-Signature Status radio button then choose Continue
5 Enter the display name and start date Set the frequency and end date as desired
NoteSAP recommends automatically retrieving e-Signature statuses daily and setting the retrievals to run at night
6 Choose Save
SAP Sourcing 90e-Signature
PUBLICcopy Copyright 2015 SAP SE or an SAP affiliate company
All rights reserved 43
15 Configure Workbench
The CLM system is delivered with a base workbench page that is available to all internal users Additionally the system is configured with a workbench page intended to be used by CLM contract managers
The workbench page is established in the system but requires additional configuration to make it available to the desired users This configuration is done by adding collaborators to the Contract Management Workbench page
Prerequisites
You must be logged on as the enterprise user
Procedure
Configure the Contract Management Workbench page with the individual users or user groups that should also have access to the page
To do this go to Setup System Setup Workbench Workbench Page All Workbench Pages Edit the Contract Management page and add collaborators
44
PUBLICcopy Copyright 2015 SAP SE or an SAP affiliate companyAll rights reserved
SAP Sourcing 90Configure Workbench
16 Configure Branding
The following procedures enable you to change the branding from the default SAP Sourcing to SAP CLM Four branding items are affected
Branding text in the title bar of the browser (for example SAP Sourcing)
SAP CLM logo image for the purchaser login page
SAP CLM Business Partner logo image for the supplier login page
Images on the login page
Images on the splash screen
Procedure
Change the Branding after Installation
1 Choose Setup System Properties
2 Change the value of systembrand_name to (for example) SAP CLM
Themes
NoteThe following two steps require editing of themes For futher information about themes see the SAP Sourcing help at helpsapcomsourcing To access the help system scroll to SAP Sourcing 90 Help for Purchasers and choose a language In the help choose Setup Themes
1 Open the current enterprisersquos theme Branding area and choose Purchaser Login Banner link then Image link Delete the original path in Image Path field and paste imageslogoslogo_sapXCLMgif
2 Choose Delete on Background Image field
3 Choose the Supplier Login Banner link then Image link Delete the original path in Image Path field and paste imageslogoslogo_sapXCLMBusinessPartnergif
4 Choose Delete on Background Image field
SAP Sourcing 90Configure Branding
PUBLICcopy Copyright 2015 SAP SE or an SAP affiliate company
All rights reserved 45
17 Configuring Supplier Workflow Management
By default supplier workflow management feature is disabled in SAP Sourcing To enable this feature you need to perform following general steps
1 Create Workflow Definitions
2 Create Supplier Configurable Phase Definition
3 CreateModify Supplier Type
4 Create Supplier Field Access Definition (optional)
5 Configure Security Templates
6 Assign Supplier Types to Suppliers
7 Configure Supplier UI Mapping
The following subsections provide details for each of these steps
Create Workflow Definitions
1 Click Setup in the toolbar at the top of the page and select Platform
2 In the Workflow section of System Setup click on Workflow Definitions
3 On the Workflow Definitions List page click New
4 On the Workflow Definition Summary page fill in the fields with workflow information For details see the Field Help for Workflow Definition Summary page
5 Click the Add New Version button to add a process template to the workflow definition For details see the Field Help for Process Template Dialog Box page
6 Click the Save button in the toolbar
7 Create another Workflow Definition if necessary
Create Supplier Configurable Phase Definition
Supplier phases determine the actions that can be performed on supplier registration and modification requests To create a supplier configurable phase definition
1 Click Setup in the toolbar at the top of the page and select Platform
2 In the Suppliers section of Document Setup click on Supplier Configurable Phase Definition
3 On the Supplier Configurable Phase Definition List page click New
4 On the Header page fill in the fields with phase information For details see the Field help for Supplier Configurable Phase Definition Header page
5 Click Add to add phases to the definition
6 In the dialog box that appears select each phase to include in the phase definition and click OK
7 (optional) Click the Edit icon for each phase to edit phase information including the sequence of phases in the workflow On this page you can assign workflow definition and supplier field access definition For details see the Field help for Supplier Configurable Phase Header page
8 Click the Save button in the toolbar
46
PUBLICcopy Copyright 2015 SAP SE or an SAP affiliate companyAll rights reserved
SAP Sourcing 90Configuring Supplier Workflow Management
9 Create another Supplier Configurable Phase Definition if necessary
CreateModify Supplier Type
Supplier types can be used to determine whioch workflow phase definition to enable in a supplier registration or modification requests The Configurable Phase Definition field of Supplier Type is responsible for defining whether registrationmodification requests will use workflow and which phases will have these requests If Configurable Phase Definition is empty then supplier registration and modification requests will not have configured phases and any supplier administrator will be able to approve or deny request of such type as it was in previous versions of SAP Sourcing To enable supplier workflow management some supplier-configurable phase definition must be assigned to supplier types
SAP Sourcing provides one default supplier type You can modify this type and create new ones
1 Click Setup in the toolbar at the top of the page and select Platform
2 In the Suppliers section of Document Setup select Supplier Type
3 On the Supplier Type List page click New for creating new type or select existing from the list for editing
4 On the Type page fill in necessary fields On this page you can assign Supplier Configurable Phase Definition to Supplier Type For details see the Field Help for Supplier Type page
Create Supplier Field Access Definition
This step is optional
Supplier Field Access Definition allows you to configure access rules foe approver on specific phase
To create a supplier field access definition
1 Click Setup in the toolbar at the top of the page and select Platform
2 In the Suppliers section of Document Setup select Supplier Field Access Definition
3 On the Supplier Field Access Definition List page click New
4 On the UI page fill in necessary fields For details see the Field Help for Supplier Field Access Definition page
5 Click the Save button in the toolbar
6 Open existing Supplier Configurable Phase Definition
7 Click Edit
8 Click the Edit icon for the phase where you want to configure access rights for approvers This should be the approval phase
9 Click the Lookup icon to select a supplier field access definition to associate with this phase
10 Save the Supplier Configurable Phase Definition
Configure Security Templates
This is a very important configuration step In the case of supplier registrationsmodifications without configured workflows requests can be viewed and approved by any Supplier Administrator But in the case of new functionality collaborator security is used to define access rights A document security template is a set of rules governing the way an SAP Sourcing document assigns collaborator roles You should configure collaborators defined by role and user type that are automatically added to a registration and modification requests
You must configure two security templates first for Workflow Supplier Registration and second for Workflow Supplier Modification The following must be configured in these templates
The document owner must be any specified buy-side user Otherwise automatic phase transitions will not work for sell-side and the phase will need to be changed manually by any buy-side user
SAP Sourcing 90Configuring Supplier Workflow Management
PUBLICcopy Copyright 2015 SAP SE or an SAP affiliate company
All rights reserved 47
Document creator (current user) must be added to collaborator list with a role that allows viewing editing and changing phases (eg Collaborator)
Supplier administrators should be included to collaborator list to be able view and manually complete registrationmodification requests in case automatic completion should fail for some reason
Assign Supplier Type to Supplier
After the upgrade procedure one default supplier type is created and assigned to all suppliers It will be used to recognize phases for supplier modifications via workflow The supplier type can be changed for any supplier as follows
1 Open the supplier whose supplier type you want to reassign
2 Press Edit
3 Click the Lookup icon under the Document Type field
4 Select a new supplier type
5 Click Ok
6 Click Save
NoteWhen the supplier is created via workflow the supplier type used for creation is assigned to created supplier
Configure Supplier UI Mapping
The supplier type can be mapped to any supplier-side self-registration form The Supplier Type UI includes a collection of Supplier registration UI Mappings This allows you to configure the mapping between supplier type and self-registration forms
1 Open any Supplier Type
2 Click Edit
3 Click Add under Sell-Side Supplier Registration UI Mapping to add the UI page that will be mapped to this type
4 Click Save
NoteThe self-registration form can be assigned to only one supplier type If no form is assigned to a supplier type the default supplier type will be used for registration
48
PUBLICcopy Copyright 2015 SAP SE or an SAP affiliate companyAll rights reserved
SAP Sourcing 90Configuring Supplier Workflow Management
Typographic Conventions
Table 15
Example Description
ltExamplegt Angle brackets indicate that you replace these words or characters with appropriate entries to make entries in the system for example ldquoEnter your ltUser Namegtrdquo
Example Example Arrows separating the parts of a navigation path for example menu options
Example Emphasized words or expressions
Example Words or characters that you enter in the system exactly as they appear in the documentation
wwwsapcom Textual cross-references to an internet address
example Quicklinks added to the internet address of a homepage to enable quick access to specific content on the Web
123456 Hyperlink to an SAP Note for example SAP Note 123456
Example Words or characters quoted from the screen These include field labels screen titles pushbutton labels menu names and menu options
Cross-references to other documentation or published works
Example Output on the screen following a user action for example messages
Source code or syntax quoted directly from a program
File and directory names and their paths names of variables and parameters and names of installation upgrade and database tools
EXAMPLE Technical names of system objects These include report names program names transaction codes database table names and key concepts of a programming language when they are surrounded by body text for example SELECT and INCLUDE
EXAMPLE Keys on the keyboard
SAP Sourcing 90Typographic Conventions
PUBLICcopy Copyright 2015 SAP SE or an SAP affiliate company
All rights reserved 49
wwwsapcom
copy Copyright 2015 SAP SE or an SAP affiliate company All rights reservedNo part of this publication may be reproduced or transmitted in any form or for any purpose without the express permission of SAP SE or an SAP affiliate companySAP and other SAP products and services mentioned herein as well as their respective logos are trademarks or registered trademarks of SAP SE (or an SAP affiliate company) in Germany and other countries Please see wwwsapcomcorporate-enlegalcopyrightindexepxtrademark for additional trademark information and noticesSome software products marketed by SAP SE and its distributors contain proprietary software components of other software vendors National product specifications may varyThese materials are provided by SAP SE or an SAP affiliate company for informational purposes only without representation or warranty of any kind and SAP SE or its affiliated companies shall not be liable for errors or omissions with respect to the materials The only warranties for SAP SE or SAP affiliate company products and services are those that are set forth in the express warranty statements accompanying such products and services if any Nothing herein should be construed as constituting an additional warrantyIn particular SAP SE or its affiliated companies have no obligation to pursue any course of business outlined in this document or any related presentation or to develop or release any functionality mentioned therein This document or any related presentation and SAP SEs or its affiliated companies strategy and possible future developments products andor platform directions and functionality are all subject to change and may be changed by SAP SE or its affiliated companies at any time for any reason without notice The information in this document is not a commitment promise or legal obligation to deliver any material code or functionality All forward-looking statements are subject to various risks and uncertainties that could cause actual results to differ materially from expectations Readers are cautioned not to place undue reliance on these forward-looking statements which speak only as of their dates and they should not be relied upon in making purchasing decisions
- SAP Sourcing 90
-
- Table of Contents
- 1 Introduction
- 2 Define System Properties
- 3 Set Up SMTP Server
- 4 Context Cluster and Directory Configuration
-
- 41 Manual Context Cluster and Directory Configuration
- 42 Create Cluster Template
- 43 Create Internal Directory Template
- 44 Create External Directory Template
- 45 Managing the SSL Certificate
- 46 Create Tenant Configuration
-
- 5 Master Data
-
- 51 Overview of Master Data
- 52 Create Master Data Manually
- 53 Import Master Data Using CSV File
- 54 Workbooks
-
- 541 Overview of Workbooks
- 542 Download and Customize Workbooks
- 543 Import Master Data Using Workbooks
-
- 6 Create and Verify Purchaser User
- 7 Create and Verify Supplier User
- 8 Install Company Logo
- 9 Specify Internal Address of SAP Sourcing Server
- 10 Update Master Time Zone
- 11 Install License Key
- 12 Change Session Timeout
- 13 Enable Contract Authoring
- 14 e-Signature
-
- 141 Set Up EchoSign Account and System Configuration
- 142 Check EchoSign Configuration Status
- 143 Set Up User Rights
- 144 Resolve e-Signature Errors
- 145 Set Up Scheduled Task to Retrieve e-Signature Status
-
- 15 Configure Workbench
- 16 Configure Branding
- 17 Configuring Supplier Workflow Management
- Copyright and Trademarks
-
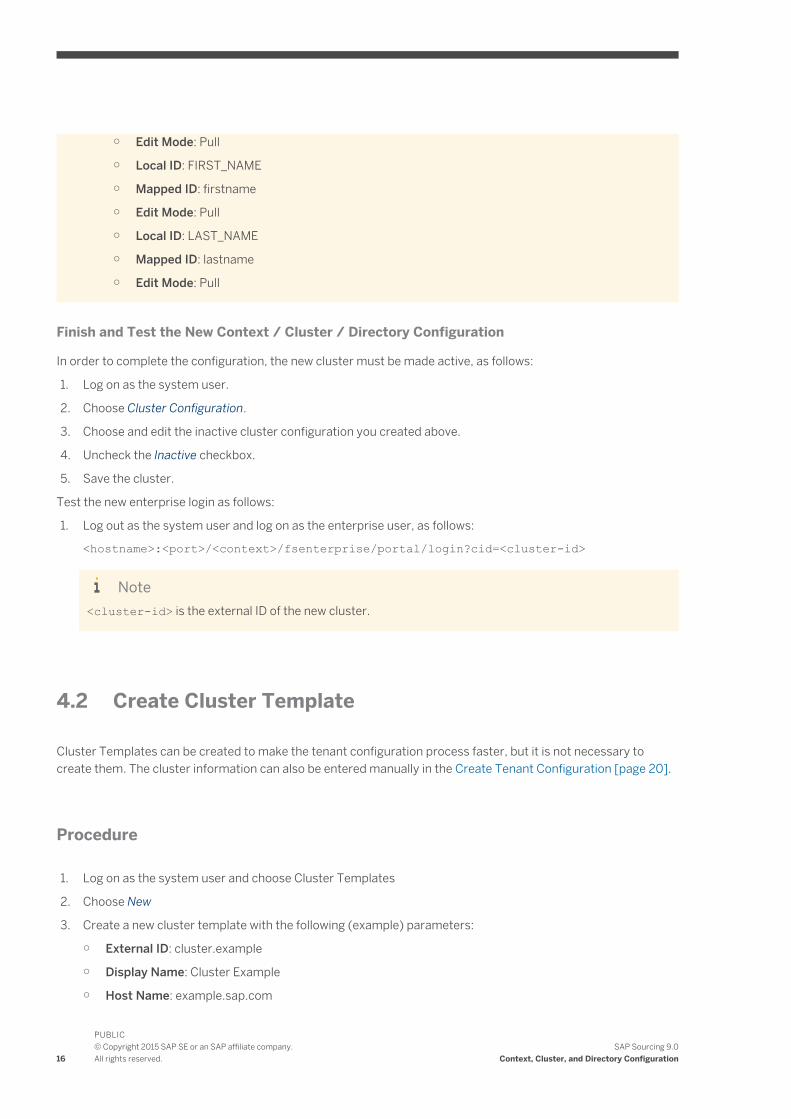
Edit Mode Pull
Local ID FIRST_NAME
Mapped ID firstname
Edit Mode Pull
Local ID LAST_NAME
Mapped ID lastname
Edit Mode Pull
Finish and Test the New Context Cluster Directory Configuration
In order to complete the configuration the new cluster must be made active as follows
1 Log on as the system user
2 Choose Cluster Configuration
3 Choose and edit the inactive cluster configuration you created above
4 Uncheck the Inactive checkbox
5 Save the cluster
Test the new enterprise login as follows
1 Log out as the system user and log on as the enterprise user as follows
lthostnamegtltportgtltcontextgtfsenterpriseportallogincid=ltcluster-idgt
Noteltcluster-idgt is the external ID of the new cluster
42 Create Cluster Template
Cluster Templates can be created to make the tenant configuration process faster but it is not necessary to create them The cluster information can also be entered manually in the Create Tenant Configuration [page 20]
Procedure
1 Log on as the system user and choose Cluster Templates
2 Choose New
3 Create a new cluster template with the following (example) parameters
External ID clusterexample
Display Name Cluster Example
Host Name examplesapcom
16
PUBLICcopy Copyright 2015 SAP SE or an SAP affiliate companyAll rights reserved
SAP Sourcing 90Context Cluster and Directory Configuration
43 Create Internal Directory Template
Directory Templates can be created to make the tenant configuration process faster but it is not necessary to create them The directory information can also be entered manually in Create Tenant Configuration [page 20]
Procedure
ExampleNetWeaver UME Directory Configuration
1 Log on as the system user and choose Directory Templates
2 Choose New
3 Create a new directory template with the following (example) parameters
External ID directoryinternalexample
Display Name Internal Directory Example
Usage Active Internal
Authentication Support true
External Role Assigned UME Sourcing Role
Case Sensitive Username false
Driver NetWeaver UME
Properties
Property Name bypass_error_block
Property Value true
Attributes Mapping
Local ID NAME
Mapped ID uniquename
Edit Mode Pull
Local ID EMAIL
Mapped ID email
Edit Mode Pull
Local ID FIRST_NAME
Mapped ID firstname
Edit Mode Pull
Local ID LAST_NAME
Mapped ID lastname
Edit Mode Pull
ExampleMSAD LDAP Directory Configuration
1 Log on as the system user and choose Directory Templates
2 Choose New
SAP Sourcing 90Context Cluster and Directory Configuration
PUBLICcopy Copyright 2015 SAP SE or an SAP affiliate company
All rights reserved 17
3 Create a new directory template with the following (example) parameters
External ID directoryinternalexample
Display Name Internal Directory Example
Usage Active Internal
Authentication Support true
Case Sensitive Username false
Driver LDAP Microsoft Active Directory
LDAP Configuration
Host msadldapcom
Port 636
User ID Attribute samaccountname
Attributes Mapping
Local ID NAME
Mapped ID sAMAccountName
Edit Mode Pull
Local ID EMAIL
Mapped ID mail
Edit Mode Pull
Local ID FIRST_NAME
Mapped ID givenName
Edit Mode Pull
Local ID LAST_NAME
Mapped ID sn
Edit Mode Pull
44 Create External Directory Template
Directory Templates can be created to make the tenant configuration process faster but it is not necessary to create them The directory information can also be entered manually in Create Tenant Configuration [page 20]
Procedure
ExampleNetWeaver UME Directory Configuration
1 Log on as the system user and choose Directory Templates
2 Choose New
3 Create a new directory template with the following (example) parameters
External ID directoryexternalexample
18
PUBLICcopy Copyright 2015 SAP SE or an SAP affiliate companyAll rights reserved
SAP Sourcing 90Context Cluster and Directory Configuration
Display Name External Directory Example
Usage Active External
Authentication Support true
External Role Assigned UME Sourcing Role
Case Sensitive Username false
Driver NetWeaver UME
Properties
Property Name bypass_error_block
Property Value true
Attributes Mapping
Local ID NAME
Mapped ID uniquename
Edit Mode Pull
Local ID EMAIL
Mapped ID email
Edit Mode Pull
Local ID FIRST_NAME
Mapped ID firstname
Edit Mode Pull
Local ID LAST_NAME
Mapped ID lastname
Edit Mode Pull
ExampleMSAD LDAP Directory Configuration
1 Log on as the system user and choose Directory Templates
2 Choose New
3 Create a new directory template with the following (example) parameters
External ID directoryexternalexample
Display Name External Directory Example
Usage Active External
Authentication Support true
Case Sensitive Username false
Driver LDAP Microsoft Active Directory
LDAP Configuration
Host msadldapcom
Port 636
User ID Attribute samaccountname
Attributes Mapping
Local ID NAME
Mapped ID sAMAccountName
SAP Sourcing 90Context Cluster and Directory Configuration
PUBLICcopy Copyright 2015 SAP SE or an SAP affiliate company
All rights reserved 19
Edit Mode Pull
Local ID EMAIL
Mapped ID mail
Edit Mode Pull
Local ID FIRST_NAME
Mapped ID givenName
Edit Mode Pull
Local ID LAST_NAME
Mapped ID sn
Edit Mode Pull
45 Managing the SSL Certificate
In order to write to an Active Directory Microsoft requires that communication to the LDAP is conducted over SSL
Getting SSL Working
In order to enable SSL communication you need to do the following
Change the communication port in the Directory Configuration from 389 (the default setting) to 636
Select the SSL checkbox in the Directory Configuration
Verify that the Certificate Authority (CA) that issued the server certificate is in the Java Keystore
When an intermediate CA is used to generate server certificates the intermediate CA certificate will need to be imported manually
If any Issuer CA certificates required to complete the server certificate chain are missing from the Java security repository on the application server install them manually into that repository
Use the following command to install the certificate
ltJAVA_HOMEgtbinkeytool -import -trustcacerts -keystore cacerts -file ltLocation_of_exported_Certificate xxxcrtgt -alias ltsome_aliasgtltJAVA_HOMEgt is the location of the SAPJVM For example sapmntltSIDgtexejvmlinuxx86_64sapjvm_51064sapjvm_5
For this ltJAVA_HOMEgt the cacerts file would be located at sapmntltSIDgtexejvmlinuxx86_64sapjvm_51064sapjvm_5jrelibsecurity
After performing these tasks restart NetWeaver and test by creating a new user in SAP Sourcing
46 Create Tenant Configuration
The creation of a tenant configuration will also create
a context
a cluster
20
PUBLICcopy Copyright 2015 SAP SE or an SAP affiliate companyAll rights reserved
SAP Sourcing 90Context Cluster and Directory Configuration
an internal directory
an external directory
The information necessary can be retrieved from cluster and directory templates or entered manually
NoteFor multiple landscape use all the configurations must have the same name If not migration will be affected
Procedure
1 Log on as the system user and choose Tenant Configuration
2 Choose New
3 Create a new tenant configuration with the following (example) parameters
Using Templates
External ID tenantexample
Display Name Tenant Example
Sys Admin Password
Sys Admin Password (again)
Cluster Cluster Example
Directory Internal Site Internal Directory Example
Directory External Site External Directory Example
No Templates
External ID tenantexample
Display Name Tenant Example
Sys Admin Password
Sys Admin Password (again)
Overwrite Templates Configurations
Cluster (checked)
Directory Internal Site (checked)
Directory External Site (checked)
Cluster Configuration [page 16] step
Internal Directory Configuration [page 17] step
External Directory Configuration [page 18] step
SAP Sourcing 90Context Cluster and Directory Configuration
PUBLICcopy Copyright 2015 SAP SE or an SAP affiliate company
All rights reserved 21
5 Master Data
Gathering Critical Information
For each deployment gather critical information including (but not limited to) the following
Purchaser organizational data Locations Companies Business Units Groups and Users
Supplier organizational data Suppliers and Contacts
Commodity Information Internal and External Categories
The current implementation methodology recommends defining these attributes before going live to maximize efficiency Data attributes may be modified or added throughout the life of the implementation using the Setup module
51 Overview of Master Data
SAP Sourcing provides the following means to install master data
Manual entry from Setup
Import from CSV file
Import from deployment workbook
Define the components of master data that exist within each context after contexts and clusters have been defined The following table lists the master data object types requiring definition for the enterprise The data classification Configurable indicates that default data is provided but can be customized for deployment The data classification Custom indicates that no default data is provided and the deployment must provide the data
Table 10
Contents Data Classification Description
Numbering table definitions for enterprise-level objects
Configurable Defines the format of IDs For example an RFP might follow the format RFP-nnnn where nnnn increments for each new rfp created
Default list of extendible enterprise-level objects
Configurable Lists those enterprise-level objects which can be extended
Default list of objects that can used referenced in an extension
Configurable One type of extension allows a reference to another type of object This list identifies the allowed kinds of references
Value List Types Configurable Default value list types
Value List Values Configurable Default value list values such as countries time zones and so on
22
PUBLICcopy Copyright 2015 SAP SE or an SAP affiliate companyAll rights reserved
SAP Sourcing 90Master Data
Contents Data Classification Description
Units of Measure Configurable Standard units of measure used throughout the system
Currencies Configurable A list of all currencies used by your organization
Currency Conversions Configurable Default values for any currency conversion rates
Document Link Definitions Configurable Lists the allowable kinds of document links
Scheduled Task Types Configurable Used to define categories of scheduled tasks
Scheduled Tasks Configurable Lists scheduled or background tasks
Metrics Configurable Used to define metrics for scorecards
Contract Terms Configurable Used to define terms on contracts
Contract Types Configurable Types define what set of contract features are available
Project Types Configurable Types define what set of Project features are available
RFx Types Configurable Types define what set of RFx features are available
Auction Types Configurable Types define what set of Auction features are available
DA Types Configurable Types define what set of Demand features are available
Security Profiles Configurable Identifies the security profiles installed with the system
Rights on security profiles Configurable Defines the rights for each security profile
Time Periods Configurable Defines information about quarters years and so on
Reporting Calendars Configurable Used for managing how data is reported with relation to the calendar
Collaborator Roles Configurable Defines the role (rights and responsibilities) of a persongroup on a specific document instance
Document Security Templates Configurable Sets up the default collaborators and security when new documents are created
SAP Sourcing 90Master Data
PUBLICcopy Copyright 2015 SAP SE or an SAP affiliate company
All rights reserved 23
Contents Data Classification Description
Shared Discussions Configurable A list of discussion forums available as a channel and not relating to a specific document
Workbench Channels Configurable Channels available on a users desktop
Workbench IFrames Configurable Data to create iFrames
Workbench Channel Configurations Configurable Channel configuration parameters
Workbench Pages Configurable Pre-defined desktop pages
Workbench Page Configurations Configurable Channel content and placement settings for predefined pages
Configuration Properties Configurable Various deployment settings including mail
Enterprise Extensions Custom Actual extensions on enterprise-level objects
Directory Configurations Custom Used for the LDAP directory configuration
Geographies Custom Used to represent the Geographic regions
Locations Custom Locations of plants companies and other organizational elements
Payment Terms Custom Terms of payment between the purchaser and supplier
External Categories Custom Typically this data set consists of industry standard category codes such as UN-SPSC or SIC codes if used by your organization
Internal Categories Custom All internal purchasing categories used by the purchaser
Vendors Custom Used in all components for various purchasing actions
Vendor Extensions in List Form Custom Actual extensions on enterprise-level objects
Companies Custom Used by all components of the system for purchasing actions such as Auctions and RFPs
Registration Categories Custom Defines mapping from arbitrary category names to actual internal or external categories Used during supplier self-registration
24
PUBLICcopy Copyright 2015 SAP SE or an SAP affiliate companyAll rights reserved
SAP Sourcing 90Master Data
Contents Data Classification Description
Organizational Units Custom Further definition of the organizational hierarchy Use to define departments business units and so on
Groups Custom Arbitrary groups of purchaser users
Contacts Custom Used for all suppliers to distinguish the various contacts at each supplier
Accounts Custom Handles all user accounts for the system
Terms Templates Custom Standard terms and conditions phrases to which a supplier must agree before accessing an event
Purchasing Organization Custom An organizational unit in SAP ERP subdividing an enterprise according to the requirements of purchasing
Purchasing Group Custom A key for a purchaser or group of purchasers in SAP ERP
Vendor Account Group Custom A classifying feature of supplier master records in SAP ERP
Business System Custom Represents a system in the landscape for example SAP Sourcing or SAP ERP
Text Id Custom Represents SAP ERP header and item texts
Transaction Type Custom Represents SAP ERP transation types
After configuring the enterprise master data you must next configure the company master data This data must be created once for each sub-context This example only uses a single context so this data must only be created once
Table 11
Contents Data Classification Description
UFNs System Metadata for RFx utility functions
System Answered Sources Configurable Defines the available sources of system answered questions
Company Extension Definitions Configurable List of company-scoped objects which have extensions
Document Security Templates Configurable Sets up the default collaborators and security when new documents are created
Contract Generation Phases Configurable Used to define Phases for Contract Generation library documents
SAP Sourcing 90Master Data
PUBLICcopy Copyright 2015 SAP SE or an SAP affiliate company
All rights reserved 25
Contents Data Classification Description
Contract Generation Tags Configurable Used to define Tags for Contract Generation
Company extensions Custom List of extensions on individual object types
masterdataActivity Custom Used for general accounting purposes
Cost Centers Custom Used for accounting purposes to assign cost on a center by center basis
Cost Center Groups Custom
Entities Custom Used for accounting purposes for purchasing by division
GL Accounts Custom Used for general accounting purposes
Plants Custom Plants or facilities
Materials Custom Standard materials for use in line items
Category Managers Custom Users who are responsible for certain categories
Master Data Security
When configuring and importing Master Data there are some things to remember about security
1 Each piece of importable master data has an Import right as part of its ACL list By default this right is only added for the System Administrator security profile and therefore only those users can import master data out of the box As always an admin can add Import rights to other security profiles on and object-by-object basis
ExampleIf Supplier Administrators need to import Supplier records then that can be enabled
2 When importing Master Data be it via CSV XLS XML etc the user running the imports must have Import right allowed for all objects in question The Enterprise user is considered trusted and can import any of these objects
52 Create Master Data Manually
Procedure
NoteThe user account being used to import the following must have Allow Import rights on these specific objects If you do not have Allow Import on these objects it must be added or the import will fail
1 Log on as the enterprise user
26
PUBLICcopy Copyright 2015 SAP SE or an SAP affiliate companyAll rights reserved
SAP Sourcing 90Master Data
2 Create objects from within the Setup module
3 Log on as a purchaser user with administrative rights to configure company master data
For more information see the SAP Sourcing help at helpsapcomsourcing To access the help system scroll to SAP Sourcing 90 Help for Purchasers and choose a language In the help choose Setup System Setup Master Data
53 Import Master Data Using CSV File
NoteThe user account being used to import the following must have Allow Import rights on these specific objects If you do not have Allow Import on these objects it must be added or the import will fail
You can import master data files with CSV XLS or XLSX format in two ways
Use the standard web user interface
Use a client application distributed with the system which allows data to be imported outside of the web environment
The following procedure describes how to import using the web-based UI
Procedure
1 If application users have already been created log on as a purchaser user with administrative rights If users have not been created log on as the enterprise user
2 Choose Setup System Administration Import Export Tools Import Data and then choose OK
3 Choose Create
The import wizard opens
4 Specify whether you want to upload the file to the server or whether the file is already located on the application server and choose Next
5 Choose Upload Import File and select the CSV or Deployment Workgroup file to import
6 For CSV files select the object type and choose Next
7 Indicate whether you want to wait for the import to finish or perform the import in the background and then choose Next
8 Choose Finish to view the results
SAP Sourcing 90Master Data
PUBLICcopy Copyright 2015 SAP SE or an SAP affiliate company
All rights reserved 27
54 Workbooks
541 Overview of Workbooks
NoteThere are many sheets in the workbooks that have the prefix eso While these sheets may appear as duplicates of other sheets the data in them is in fact different These sheets should be imported by default You may also add data to these sheets if you would like to augment the data provided in the sample workbooks
We recommend using the deployment workbook for initial deployment of the system to ensure that all required data is imported into the system
To facilitate the import of data SAP Sourcing provides an alternative to CSV files for import SAP Sourcing provides the ability to import Microsoft Excel files containing one or more master data imports The system processes these Excel files directly without the user having to export the data to a raw CSV file The Enterprise Deployment Workbook and Company Deployment Workbook are two sample deployment workbooks delivered with SAP Sourcing
Anyone with system administrator access rights can download the deployment workbooks from the web user interface The deployment workbooks are included in the online Reference Guide (RG)
When starting a new deployment project preserve the original workbook templates by making a copy of them and saving them with a new name Import data using your modified templates only By doing so you assure continuity if future additional deployments are required
NoteKeep the following in mind when using deployment workbooks
The Configuration Sheet controls the import process Refer to the Help Sheet for input specifications of Configuration Sheet columns
The system can import the workbooks directly but there are limitations to what Excel constructs are supported The Help Sheet describes the rules that must be observed
The same importing process supports both CSV files and Excel workbooks
There is a one to one relationship with the workbook configuration file and the worksheet tabs
542 Download and Customize Workbooks
The sample enterprise and company workbooks that you download from SAP Sourcing are designed for you to configure a base system using a sample enterprise context We recommend modifying the default deployment workbooks Choose the appropriate workbooks from this table
Table 12
System Workbooks
SAP Sourcing Enterprise Deployment Workbook
Company Deployment Workbook
Users setting up a base system should adjust the various settings in these workbooks prior to running them in the system For example the company data should be updated to reflect specifics about the company that is
28
PUBLICcopy Copyright 2015 SAP SE or an SAP affiliate companyAll rights reserved
SAP Sourcing 90Master Data
installing the system Similarly you should review other tabs to ensure that the configurations are consistent with the desired implementation For details on customizable fields see Master Data [page 22]
Procedure
1 Log on as the enterprise user and choose Reference Guide Download the sample enterprise and company workbooks appropriate for your system
NoteThe enterprise workbook should be run as the enterprise user The company workbook should be run as a system administrator associated with the company object intended to be configured
2 From the Enterprise Deployment workbook open the file and find the sheet labeled locations and edit this sheet as necessary
Only one location is required
3 Find each sheet review each sheet and the comments in the sheet and update the data accordingly
4 Provide at least one internal category
5 Find the sheet labeled companies and edit it as necessary
6 Repeat for org_units groups accounts and so on
Your are establishing a hierarchy To configure the hierarchy correctly you must ensure that the child references the parent correctly For example the PARENT column in the business_units page should include a valid EXTERNAL_ID from the companies sheet
NoteTo build all custom data in the user interface simply deactivate the import of the above data types in the deployment workbook See the Help page for instructions on how to skip a specific worksheet
7 Import the enterprise and company workbooks into SAP Sourcing by choosing Setup System Administration Import and Export Tools Import Data and then choose Create
543 Import Master Data Using Workbooks
Procedure
1 Log on as the user specified in this table and choose Setup
Table 13
Workbook Login User
Enterprise workbook
Enterprise user
Company workbook Purchaser user
2 From the Import and Export Tools dropdown chooseImport Data and then choose OK
The Import Data page appears
SAP Sourcing 90Master Data
PUBLICcopy Copyright 2015 SAP SE or an SAP affiliate company
All rights reserved 29
3 Choose Create to start a new import job
4 Choose Upload to the Server and then choose Next
5 Select the modified workbook and choose Next
6 Wait for the import to finish and choose Next
Typically running the enterprise workbook can take several minutes
30
PUBLICcopy Copyright 2015 SAP SE or an SAP affiliate companyAll rights reserved
SAP Sourcing 90Master Data
6 Create and Verify Purchaser User
Procedure
For the SAP NetWeaver UME driver users should be created in SAP Sourcing and the SAP NetWeaver UME with the same username
For LDAP drivers depending on how the LDAP was set up you must perform one of the following
Create the user in SAP Sourcing and supply the information FROM the LDAP
If you have access create the account and supply the information TO the LDAP
In either case an e-mail is generated giving the user a path to the application and his or her user name If the account is created a temporary password is also mailed A system property determines whether this information is delivered in the same e-mail or separate e-mails
1 Choose Setup WYSIWYG Page Customization User Account and create a purchaser user as follows
1 On the Account Properties tab enter required information
2 On the Account Management tab enter information as follows
Enable User to Login Select
Directory Select as needed
User ID Type userid
Create Directory Account Select
Generate a New Password Select
Send Notification Select
3 On the Security tab enter information as follows
Purchaser Select
Purchaser Manager Select
System Administrator Select
Supplier Administrator Select
Make sure this first user is given Administrator privileges to import the Company Workbook
2 Wait for the e-mail to be sent and received If you do not receive it check the following
To verify the mail was sent choose Setup System Administration Processed Messages
To check for stuck or failed messages choose Setup System Administration Queued Messages
3 To test the new account log on as a purchaser user using the credentials sent in the e-mail
4 Reset your password and choose OK
If you can successfully log into the new purchaser account the context cluster and directory are properly configured and the SMTP server is processing e-mail
SAP Sourcing 90Create and Verify Purchaser User
PUBLICcopy Copyright 2015 SAP SE or an SAP affiliate company
All rights reserved 31
7 Create and Verify Supplier User
Procedure
Create a supplier user to test the supplier portal A supplier user is a contact on a supplier record
1 Choose Supplier Management Create Supplier
2 Enter and save the required information
3 Choose the Contacts tab
4 Under Supplier Contacts choose Add
5 Enter and save the required information
6 Log on as a supplier user using the credentials provided in the test user e-mail
7 Reset the password as prompted and accept the usage terms
32
PUBLICcopy Copyright 2015 SAP SE or an SAP affiliate companyAll rights reserved
SAP Sourcing 90Create and Verify Supplier User
8 Install Company Logo
Procedure
NoteWe do not recommend installing an image larger than 200 x 29
1 Log on as the enterprise user
2 Attach the logo as follows
1 Choose Setup Organization and Accounting Information Companies
2 Select the enterprise company from the list and choose Edit Document
3 Attach your logo image to the company using the Logo Attachment field
3 Save your entries
Resize Company Logo
If you have uploaded a company logo in your source release you must resize the image to 200x29
1 Log on as a purchaser user with system administrator rights
2 Choose Setup
3 On the Master Data tab find the Organization and Accounting section and choose Companies
4 Choose the company
5 Choose Edit
6 In the Logo field upload the resized image
SAP Sourcing 90Install Company Logo
PUBLICcopy Copyright 2015 SAP SE or an SAP affiliate company
All rights reserved 33
9 Specify Internal Address of SAP Sourcing Server
Procedure
When SAP Sourcing is first installed or whenever a new server is added to an application cluster the Internet address that is used for internal communications within SAP Sourcing is initially set to the external host name of the server In many cases this will result in unexpected or delayed behavior in the application
If the application landscape includes a network firewall accessing the server through this name requires exiting the firewall and re-entering If the firewall blocks incoming traffic on SAP Sourcingrsquos notification ports this will result in failure to deliver notifications for some events To avoid this do the following
1 Log on as the system user
2 Open the System Information record for editing
3 Change the value in the Internal Address field to an internal IP address or host name
4 Save your changes
34
PUBLICcopy Copyright 2015 SAP SE or an SAP affiliate companyAll rights reserved
SAP Sourcing 90Specify Internal Address of SAP Sourcing Server
10 Update Master Time Zone
Procedure
This procedure is required to enable SAP Sourcing to normalize all dates and times that are used in sourcing events Normalizing allows time fields to be presented differently for each user according to his or her preferred time zone while maintaining a consistent reference to the same point in time
1 Log on as the system user
2 Choose Setup Configuration System Properties
3 Edit the systemmaster_timezone property in the system set This property value should be set to the Java time zone identifier that corresponds to the current database server time zone
NoteThe SAP Sourcing Time Zone Value List Type provides a relatively comprehensive list of java time zone identifiers To view this list log on as a purchaser user and navigate to Setup Master Data Value List Types and Values Time Zone The Alternate Name column of this list contains the java time zone identifier for the corresponding time zone
ExampleldquoAmericaNew_Yorkrdquo is the alternate name of the SAP Sourcing Timezone ValueListValue for ldquo(GMT-500) Eastern Standard Timerdquo
SAP Sourcing 90Update Master Time Zone
PUBLICcopy Copyright 2015 SAP SE or an SAP affiliate company
All rights reserved 35
11 Install License Key
Procedure
You must install a license key before the SAP Sourcing system can be used in production mode
1 Choose Setup System Administration System Management System Information
2 Note the installation ID from the Installation ID field on the Service Registration tab
3 Create OSS ticket this ID and a list of the requested modules to license (include the optimizer) to SAP Customer Support You will receive a csv file including all the license keys
NoteRequesting the optimizer key without installing an optimizer server will result in a high volume of irrelevant optimizer-related messages in your log files If you do not intend to install an optimizer server do not request an optimizer key
4 Log on as the enterprise user and choose Setup System Administration Import and Export ToolsImport Data
5 Use the import tool to import the licenses you received from Support as follows
1 On the Import Wizard Select a File screen type a description such as License Keys and choose Upload Import File to upload the csv file Choose Next
2 On the Import Wizard CSV Contents screen select Module License as the Object Type choose Next and follow any additional prompts to finish the process The successful file import is displayed on the File Import tab
6 Choose Setup System Administration System Management System Information
7 Choose the Components tab and verify that the appropriate licenses are checked under SRM Module Licenses
8 If you are installing the optimizer verify that a new Optimizer tab appears and displays an appropriate Status Queue value and JVM information (If the optimizer is not installed the Status Queue value is OFFLINE and the JVM Information is set to unknown)
36
PUBLICcopy Copyright 2015 SAP SE or an SAP affiliate companyAll rights reserved
SAP Sourcing 90Install License Key
12 Change Session Timeout
Procedure
NoteThis is optional
The deployment descriptor for the SAP Sourcing application defaults to a 30-minute session timeout or to the value that was set during installation
NoteThe above property should be set longer than the below two properties
To change this setting
1 Log on as the system user and set the following system property in SAP Sourcing
uppmeteringlogin_inactivity_timeout and set to the timeout that was chosen when running the configure utility
2 Property uppmeteringcleanup_interval defines the time between runs of the daemon which removes inactive sessions It is recommended that this value be set to a value that is slightly larger than the uppmeteringlogin_inactivity_timeout setting is set to
3 Set the time-out using the configure tool For information about the configure tool see the Installation Guide for SAP Sourcing 90 on the SAP Service Marketplace at servicesapcomeso SAP Sourcing On-Premise SAP Sourcing 90
NoteBoth internal property in SAP Sourcing and configuration tool in NetWeaver should be set to the same value
SAP Sourcing 90Change Session Timeout
PUBLICcopy Copyright 2015 SAP SE or an SAP affiliate company
All rights reserved 37
13 Enable Contract Authoring
Contracts amendments and clauses use the Word service This service must be referenced For more information see ldquoCreate OfficeAutomationUser Accountrdquo in the Installation Guide for SAP Sourcing 90 on SAP Service Marketplace at servicesapcomeso SAP Sourcing On-Premise SAP Sourcing 90
Procedure
Configure a path to the Word service in SAP Sourcing as follows
1 Choose Setup System Properties
2 From the Name dropdown list choose contractgenserviceurl
3 Set the value to ltprotocolgtlthostnamegtltvirtual directorygtwordserviceasmx
38
PUBLICcopy Copyright 2015 SAP SE or an SAP affiliate companyAll rights reserved
SAP Sourcing 90Enable Contract Authoring
14 e-Signature
To enable e-Signature functionality users first get user accounts from EchoSign EchoSign adds the users to the EchoSign SAP channel System administrators define the integrated system configuration and set up the management of customer and user accounts System administrators can schedule automated checks of contract document signature statuses System users can check the availability of e-Signature components
141 Set Up EchoSign Account and System Configuration
Procedure
Set Up EchoSign Account
Before a system administrator enables e-Signature features for a customer EchoSign adds the customer to the EchoSign SAP channel The customer gives the account key provided by EchoSign to the system administrator The system administrator then configures e-Signature to work with EchoSign
Set Up Integrated System Configuration
Adding an EchoSign account to SAP Sourcing configuration enables e-Signature functionality in SAP Sourcing To set up an EchoSign account for use with e-Signature a system administrator creates an integrated system configuration object for EchoSign integration
1 Log on as the enterprise user
2 Choose Setup Integrated System Configuration
3 On the subsequent screen choose New
4 On the subsequent screen select EchoSign for System Type and select Continue
5 Under EchoSign Properties the customer enters the EchoSign account key provided the customer by EchoSign and choose Done
Set Up Proxy Settings
To configure EchoSign on a NetWeaver-based system follow these steps
1 Configure the HTTP properties as described on the SAP Help Portal at helpsapcomsaphelp_nw73helpdataen48479b6163524bb9e10000000a42189bframesethtm
2 To add proxy parameters to JVM settings in NetWeaver navigate to [host][port]nwa ConfigurationInfrastructure Java System Properties Additional VM Properties and add the following parameters with the appropriate values
-DhttpproxyHost -DhttpproxyPort -DhttpsproxyHost -DhttpsproxyPort
SAP Sourcing 90e-Signature
PUBLICcopy Copyright 2015 SAP SE or an SAP affiliate company
All rights reserved 39
NoteIf your proxy server requires a username and password provide this information with the following parameters
-DhttpproxyUser -DhttpproxyPassword -DhttpsproxyUser -DhttpsproxyPassword
3 Import the SSL certificate file into the NetWeaver key storage as follows
1 Navigate to lthostgtltportgtnwa Security Certificates and Keys
2 Select the WebServiceSecurity keystore view
3 If you are updating or replacing the EchoSign certificate remove any previous certificates with the same Common Name
4 Choose Import Entry and select x509 certificate as the entry type
5 Get the EchoSign certificate from your browserrsquos certificate interface
NoteSpecific steps will vary from browser to browser but the general process should be similar Here are sample instructions for Firefox
1 Navigate to secureechosigncomservicesEchoSignDocumentService9
NoteYou can ignore the error message that says Invalid SOAP Request
2 Click on the lock icon next to the URL
3 Click More Information
4 Open the Security tab
5 Click View Certificate
6 Open the Details tab
7 Click Export
8 From the Save as Type dropdown list choose the SSL certificate for the version you require
9 If Windows does not recognize the exported file as a certificate add a cer or crt extension to the filename
6 Restart NetWeaver
Change EchoSign service URL
SAP Sourcing ships with the current EchoSign service URL Change the service URL value in System Properties only when EchoSign changes the service URL To change this value do the following
1 Log on as the system user
2 On the System Setup tab choose System Properties
3 Open contractgenesignature_url from the Properties list
4 Enter the new EchoSign service URL provided by EchoSign
40
PUBLICcopy Copyright 2015 SAP SE or an SAP affiliate companyAll rights reserved
SAP Sourcing 90e-Signature
NoteSet the URL property only if the EchoSign domain has changed The current URL is secureechosigncomservicesEchoSignDocumentService9 Note that the API version should be set to 9
Change the length of the EchoSign timeout
By default SAP Sourcing sets the length of the EchoSign timeout to 300000 milliseconds or five minutes Change the length of the EchoSign timeout only if the default timeout causes issues when you send documents to EchoSign
1 Log on as the system user
2 On the System Setup tab choose System Properties
3 Choose contractgenesignature_timeout from the Name dropdown menu
4 Enter a numeral specifying the desired length in milliseconds for the EchoSign timeout in the Value field The Value field requires no minimum nor maximum value nor number formatting
142 Check EchoSign Configuration Status
Procedure
1 Log on as the system user
2 Choose System Information Then on the subsequent screen choose the Audits tab
3 Choose the correct context for the customers location from the Context dropdown menu
4 In the Availability pane OK appears in the Status column next to EchoSign Availability if you configured SAP Sourcing correctly for EchoSign
143 Set Up User Rights
Procedure
Assign Right to Send Contract Documents for Signatures or to Resolve Errors
To enable a user to send contract documents for signatures a customer system administrator adds Contract e-Signature to the users security profiles
To assign the right to send contract documents out for signatures to a user a system administrator does the following
1 In Setup choose System Administration Internal User Accounts
2 Select the desired user account
3 Choose the Security tab Then choose Contract e-Signature or Contract e-Signature Admin
A system administrator can assign either of the following e-Signature rights to a user
SAP Sourcing 90e-Signature
PUBLICcopy Copyright 2015 SAP SE or an SAP affiliate company
All rights reserved 41
Table 14
Right Description
ESO_CONTRACT_ESIGNATURE Users with this right can send contract documents out for signatures using the e-Signature feature
ESO_CONTRACT_ESIGNATURE_ADMIN This right allows designated users to resolve errors Users with this right can change a contract document while it is out for signatures Users with this right can change the signature status of a contract document to Error and can thus allow the contract document author to unlock a frozen document System administrators assign this right only to other administrators not to standard users
4 Choose Done
144 Resolve e-Signature Errors
Procedure
Contract Document Status Frozen
Unexpected errors such as network or system errors can freeze the status of a contract document to Sending for e-Signature or Out for Signature A user with the right ESO_CONTRACT_ESIGNATURE_ADMIN can unfreeze the status of the contract document so that the contract author can cancel the e-Signature process A system administrator can assign the right ESO_CONTRACT_ESIGNATURE_ADMIN to a user
1 The contract author adds a user with the ESO_CONTRACT_ESIGNATURE_ADMIN right to the affected Master Agreement as a collaborator
2 The user with the ESO_CONTRACT_ESIGNATURE_ADMIN right manually changes the status of the frozen contract document to ERROR
3 The contract author logs in to EchoSign and manually cancels the e-Signature process for the contract document
Invalid Password Error
You may receive the following error message Error Invalid password for user sending a Contract Document to EchoSign for signature
This message indicates that the user sending a request for e-signatures via EchoSign is not properly set up in their EchoSign account Contact EchoSign for assistance in resolving this error
145 Set Up Scheduled Task to Retrieve e-Signature Status
Procedure
You can set SAP Sourcing to retrieve the e-Signature statuses of all contract documents at a frequency you specify automatically However an end user need not wait for these automated retrievals to see the current e-
42
PUBLICcopy Copyright 2015 SAP SE or an SAP affiliate companyAll rights reserved
SAP Sourcing 90e-Signature
Signature status of a contract document End users can get instant updates of the e-Signature status manually through the contract document user interface
1 Log on as the enterprise user
2 Choose Setup
3 On the System Setup tab choose Scheduled Tasks
4 On the subsequent page choose New then select the e-Signature Status radio button then choose Continue
5 Enter the display name and start date Set the frequency and end date as desired
NoteSAP recommends automatically retrieving e-Signature statuses daily and setting the retrievals to run at night
6 Choose Save
SAP Sourcing 90e-Signature
PUBLICcopy Copyright 2015 SAP SE or an SAP affiliate company
All rights reserved 43
15 Configure Workbench
The CLM system is delivered with a base workbench page that is available to all internal users Additionally the system is configured with a workbench page intended to be used by CLM contract managers
The workbench page is established in the system but requires additional configuration to make it available to the desired users This configuration is done by adding collaborators to the Contract Management Workbench page
Prerequisites
You must be logged on as the enterprise user
Procedure
Configure the Contract Management Workbench page with the individual users or user groups that should also have access to the page
To do this go to Setup System Setup Workbench Workbench Page All Workbench Pages Edit the Contract Management page and add collaborators
44
PUBLICcopy Copyright 2015 SAP SE or an SAP affiliate companyAll rights reserved
SAP Sourcing 90Configure Workbench
16 Configure Branding
The following procedures enable you to change the branding from the default SAP Sourcing to SAP CLM Four branding items are affected
Branding text in the title bar of the browser (for example SAP Sourcing)
SAP CLM logo image for the purchaser login page
SAP CLM Business Partner logo image for the supplier login page
Images on the login page
Images on the splash screen
Procedure
Change the Branding after Installation
1 Choose Setup System Properties
2 Change the value of systembrand_name to (for example) SAP CLM
Themes
NoteThe following two steps require editing of themes For futher information about themes see the SAP Sourcing help at helpsapcomsourcing To access the help system scroll to SAP Sourcing 90 Help for Purchasers and choose a language In the help choose Setup Themes
1 Open the current enterprisersquos theme Branding area and choose Purchaser Login Banner link then Image link Delete the original path in Image Path field and paste imageslogoslogo_sapXCLMgif
2 Choose Delete on Background Image field
3 Choose the Supplier Login Banner link then Image link Delete the original path in Image Path field and paste imageslogoslogo_sapXCLMBusinessPartnergif
4 Choose Delete on Background Image field
SAP Sourcing 90Configure Branding
PUBLICcopy Copyright 2015 SAP SE or an SAP affiliate company
All rights reserved 45
17 Configuring Supplier Workflow Management
By default supplier workflow management feature is disabled in SAP Sourcing To enable this feature you need to perform following general steps
1 Create Workflow Definitions
2 Create Supplier Configurable Phase Definition
3 CreateModify Supplier Type
4 Create Supplier Field Access Definition (optional)
5 Configure Security Templates
6 Assign Supplier Types to Suppliers
7 Configure Supplier UI Mapping
The following subsections provide details for each of these steps
Create Workflow Definitions
1 Click Setup in the toolbar at the top of the page and select Platform
2 In the Workflow section of System Setup click on Workflow Definitions
3 On the Workflow Definitions List page click New
4 On the Workflow Definition Summary page fill in the fields with workflow information For details see the Field Help for Workflow Definition Summary page
5 Click the Add New Version button to add a process template to the workflow definition For details see the Field Help for Process Template Dialog Box page
6 Click the Save button in the toolbar
7 Create another Workflow Definition if necessary
Create Supplier Configurable Phase Definition
Supplier phases determine the actions that can be performed on supplier registration and modification requests To create a supplier configurable phase definition
1 Click Setup in the toolbar at the top of the page and select Platform
2 In the Suppliers section of Document Setup click on Supplier Configurable Phase Definition
3 On the Supplier Configurable Phase Definition List page click New
4 On the Header page fill in the fields with phase information For details see the Field help for Supplier Configurable Phase Definition Header page
5 Click Add to add phases to the definition
6 In the dialog box that appears select each phase to include in the phase definition and click OK
7 (optional) Click the Edit icon for each phase to edit phase information including the sequence of phases in the workflow On this page you can assign workflow definition and supplier field access definition For details see the Field help for Supplier Configurable Phase Header page
8 Click the Save button in the toolbar
46
PUBLICcopy Copyright 2015 SAP SE or an SAP affiliate companyAll rights reserved
SAP Sourcing 90Configuring Supplier Workflow Management
9 Create another Supplier Configurable Phase Definition if necessary
CreateModify Supplier Type
Supplier types can be used to determine whioch workflow phase definition to enable in a supplier registration or modification requests The Configurable Phase Definition field of Supplier Type is responsible for defining whether registrationmodification requests will use workflow and which phases will have these requests If Configurable Phase Definition is empty then supplier registration and modification requests will not have configured phases and any supplier administrator will be able to approve or deny request of such type as it was in previous versions of SAP Sourcing To enable supplier workflow management some supplier-configurable phase definition must be assigned to supplier types
SAP Sourcing provides one default supplier type You can modify this type and create new ones
1 Click Setup in the toolbar at the top of the page and select Platform
2 In the Suppliers section of Document Setup select Supplier Type
3 On the Supplier Type List page click New for creating new type or select existing from the list for editing
4 On the Type page fill in necessary fields On this page you can assign Supplier Configurable Phase Definition to Supplier Type For details see the Field Help for Supplier Type page
Create Supplier Field Access Definition
This step is optional
Supplier Field Access Definition allows you to configure access rules foe approver on specific phase
To create a supplier field access definition
1 Click Setup in the toolbar at the top of the page and select Platform
2 In the Suppliers section of Document Setup select Supplier Field Access Definition
3 On the Supplier Field Access Definition List page click New
4 On the UI page fill in necessary fields For details see the Field Help for Supplier Field Access Definition page
5 Click the Save button in the toolbar
6 Open existing Supplier Configurable Phase Definition
7 Click Edit
8 Click the Edit icon for the phase where you want to configure access rights for approvers This should be the approval phase
9 Click the Lookup icon to select a supplier field access definition to associate with this phase
10 Save the Supplier Configurable Phase Definition
Configure Security Templates
This is a very important configuration step In the case of supplier registrationsmodifications without configured workflows requests can be viewed and approved by any Supplier Administrator But in the case of new functionality collaborator security is used to define access rights A document security template is a set of rules governing the way an SAP Sourcing document assigns collaborator roles You should configure collaborators defined by role and user type that are automatically added to a registration and modification requests
You must configure two security templates first for Workflow Supplier Registration and second for Workflow Supplier Modification The following must be configured in these templates
The document owner must be any specified buy-side user Otherwise automatic phase transitions will not work for sell-side and the phase will need to be changed manually by any buy-side user
SAP Sourcing 90Configuring Supplier Workflow Management
PUBLICcopy Copyright 2015 SAP SE or an SAP affiliate company
All rights reserved 47
Document creator (current user) must be added to collaborator list with a role that allows viewing editing and changing phases (eg Collaborator)
Supplier administrators should be included to collaborator list to be able view and manually complete registrationmodification requests in case automatic completion should fail for some reason
Assign Supplier Type to Supplier
After the upgrade procedure one default supplier type is created and assigned to all suppliers It will be used to recognize phases for supplier modifications via workflow The supplier type can be changed for any supplier as follows
1 Open the supplier whose supplier type you want to reassign
2 Press Edit
3 Click the Lookup icon under the Document Type field
4 Select a new supplier type
5 Click Ok
6 Click Save
NoteWhen the supplier is created via workflow the supplier type used for creation is assigned to created supplier
Configure Supplier UI Mapping
The supplier type can be mapped to any supplier-side self-registration form The Supplier Type UI includes a collection of Supplier registration UI Mappings This allows you to configure the mapping between supplier type and self-registration forms
1 Open any Supplier Type
2 Click Edit
3 Click Add under Sell-Side Supplier Registration UI Mapping to add the UI page that will be mapped to this type
4 Click Save
NoteThe self-registration form can be assigned to only one supplier type If no form is assigned to a supplier type the default supplier type will be used for registration
48
PUBLICcopy Copyright 2015 SAP SE or an SAP affiliate companyAll rights reserved
SAP Sourcing 90Configuring Supplier Workflow Management
Typographic Conventions
Table 15
Example Description
ltExamplegt Angle brackets indicate that you replace these words or characters with appropriate entries to make entries in the system for example ldquoEnter your ltUser Namegtrdquo
Example Example Arrows separating the parts of a navigation path for example menu options
Example Emphasized words or expressions
Example Words or characters that you enter in the system exactly as they appear in the documentation
wwwsapcom Textual cross-references to an internet address
example Quicklinks added to the internet address of a homepage to enable quick access to specific content on the Web
123456 Hyperlink to an SAP Note for example SAP Note 123456
Example Words or characters quoted from the screen These include field labels screen titles pushbutton labels menu names and menu options
Cross-references to other documentation or published works
Example Output on the screen following a user action for example messages
Source code or syntax quoted directly from a program
File and directory names and their paths names of variables and parameters and names of installation upgrade and database tools
EXAMPLE Technical names of system objects These include report names program names transaction codes database table names and key concepts of a programming language when they are surrounded by body text for example SELECT and INCLUDE
EXAMPLE Keys on the keyboard
SAP Sourcing 90Typographic Conventions
PUBLICcopy Copyright 2015 SAP SE or an SAP affiliate company
All rights reserved 49
wwwsapcom
copy Copyright 2015 SAP SE or an SAP affiliate company All rights reservedNo part of this publication may be reproduced or transmitted in any form or for any purpose without the express permission of SAP SE or an SAP affiliate companySAP and other SAP products and services mentioned herein as well as their respective logos are trademarks or registered trademarks of SAP SE (or an SAP affiliate company) in Germany and other countries Please see wwwsapcomcorporate-enlegalcopyrightindexepxtrademark for additional trademark information and noticesSome software products marketed by SAP SE and its distributors contain proprietary software components of other software vendors National product specifications may varyThese materials are provided by SAP SE or an SAP affiliate company for informational purposes only without representation or warranty of any kind and SAP SE or its affiliated companies shall not be liable for errors or omissions with respect to the materials The only warranties for SAP SE or SAP affiliate company products and services are those that are set forth in the express warranty statements accompanying such products and services if any Nothing herein should be construed as constituting an additional warrantyIn particular SAP SE or its affiliated companies have no obligation to pursue any course of business outlined in this document or any related presentation or to develop or release any functionality mentioned therein This document or any related presentation and SAP SEs or its affiliated companies strategy and possible future developments products andor platform directions and functionality are all subject to change and may be changed by SAP SE or its affiliated companies at any time for any reason without notice The information in this document is not a commitment promise or legal obligation to deliver any material code or functionality All forward-looking statements are subject to various risks and uncertainties that could cause actual results to differ materially from expectations Readers are cautioned not to place undue reliance on these forward-looking statements which speak only as of their dates and they should not be relied upon in making purchasing decisions
- SAP Sourcing 90
-
- Table of Contents
- 1 Introduction
- 2 Define System Properties
- 3 Set Up SMTP Server
- 4 Context Cluster and Directory Configuration
-
- 41 Manual Context Cluster and Directory Configuration
- 42 Create Cluster Template
- 43 Create Internal Directory Template
- 44 Create External Directory Template
- 45 Managing the SSL Certificate
- 46 Create Tenant Configuration
-
- 5 Master Data
-
- 51 Overview of Master Data
- 52 Create Master Data Manually
- 53 Import Master Data Using CSV File
- 54 Workbooks
-
- 541 Overview of Workbooks
- 542 Download and Customize Workbooks
- 543 Import Master Data Using Workbooks
-
- 6 Create and Verify Purchaser User
- 7 Create and Verify Supplier User
- 8 Install Company Logo
- 9 Specify Internal Address of SAP Sourcing Server
- 10 Update Master Time Zone
- 11 Install License Key
- 12 Change Session Timeout
- 13 Enable Contract Authoring
- 14 e-Signature
-
- 141 Set Up EchoSign Account and System Configuration
- 142 Check EchoSign Configuration Status
- 143 Set Up User Rights
- 144 Resolve e-Signature Errors
- 145 Set Up Scheduled Task to Retrieve e-Signature Status
-
- 15 Configure Workbench
- 16 Configure Branding
- 17 Configuring Supplier Workflow Management
- Copyright and Trademarks
-
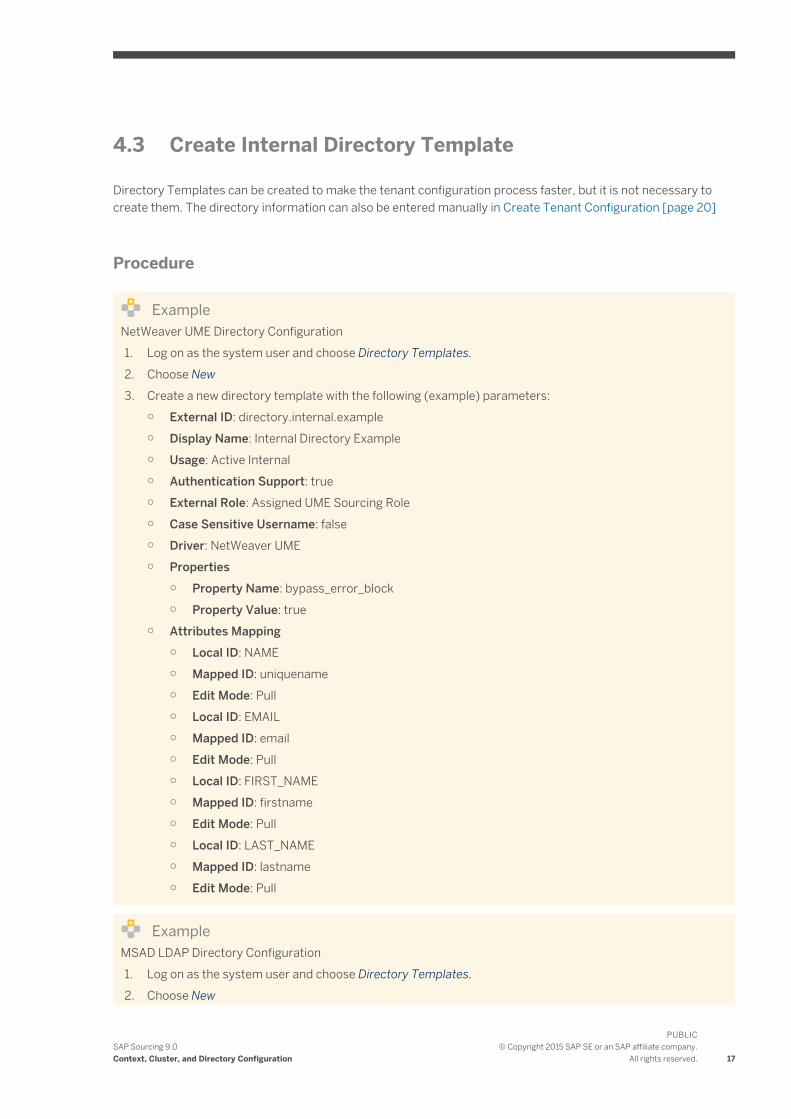
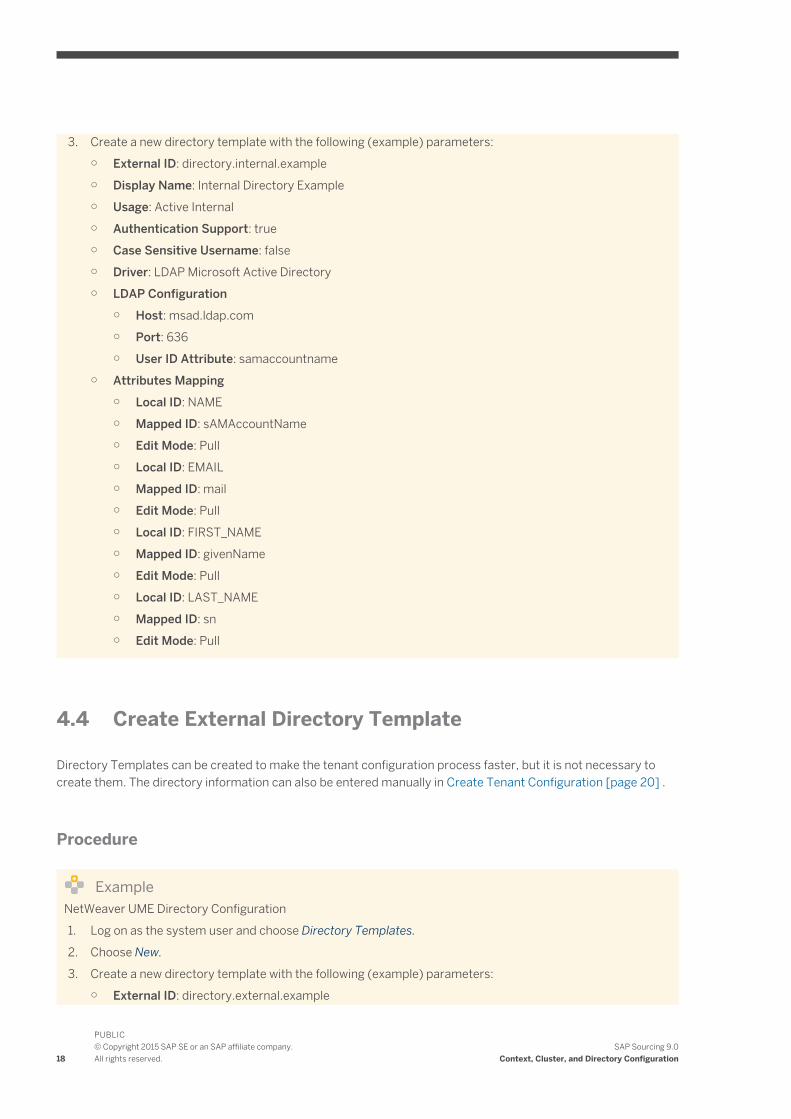
3 Create a new directory template with the following (example) parameters
External ID directoryinternalexample
Display Name Internal Directory Example
Usage Active Internal
Authentication Support true
Case Sensitive Username false
Driver LDAP Microsoft Active Directory
LDAP Configuration
Host msadldapcom
Port 636
User ID Attribute samaccountname
Attributes Mapping
Local ID NAME
Mapped ID sAMAccountName
Edit Mode Pull
Local ID EMAIL
Mapped ID mail
Edit Mode Pull
Local ID FIRST_NAME
Mapped ID givenName
Edit Mode Pull
Local ID LAST_NAME
Mapped ID sn
Edit Mode Pull
44 Create External Directory Template
Directory Templates can be created to make the tenant configuration process faster but it is not necessary to create them The directory information can also be entered manually in Create Tenant Configuration [page 20]
Procedure
ExampleNetWeaver UME Directory Configuration
1 Log on as the system user and choose Directory Templates
2 Choose New
3 Create a new directory template with the following (example) parameters
External ID directoryexternalexample
18
PUBLICcopy Copyright 2015 SAP SE or an SAP affiliate companyAll rights reserved
SAP Sourcing 90Context Cluster and Directory Configuration
Display Name External Directory Example
Usage Active External
Authentication Support true
External Role Assigned UME Sourcing Role
Case Sensitive Username false
Driver NetWeaver UME
Properties
Property Name bypass_error_block
Property Value true
Attributes Mapping
Local ID NAME
Mapped ID uniquename
Edit Mode Pull
Local ID EMAIL
Mapped ID email
Edit Mode Pull
Local ID FIRST_NAME
Mapped ID firstname
Edit Mode Pull
Local ID LAST_NAME
Mapped ID lastname
Edit Mode Pull
ExampleMSAD LDAP Directory Configuration
1 Log on as the system user and choose Directory Templates
2 Choose New
3 Create a new directory template with the following (example) parameters
External ID directoryexternalexample
Display Name External Directory Example
Usage Active External
Authentication Support true
Case Sensitive Username false
Driver LDAP Microsoft Active Directory
LDAP Configuration
Host msadldapcom
Port 636
User ID Attribute samaccountname
Attributes Mapping
Local ID NAME
Mapped ID sAMAccountName
SAP Sourcing 90Context Cluster and Directory Configuration
PUBLICcopy Copyright 2015 SAP SE or an SAP affiliate company
All rights reserved 19
Edit Mode Pull
Local ID EMAIL
Mapped ID mail
Edit Mode Pull
Local ID FIRST_NAME
Mapped ID givenName
Edit Mode Pull
Local ID LAST_NAME
Mapped ID sn
Edit Mode Pull
45 Managing the SSL Certificate
In order to write to an Active Directory Microsoft requires that communication to the LDAP is conducted over SSL
Getting SSL Working
In order to enable SSL communication you need to do the following
Change the communication port in the Directory Configuration from 389 (the default setting) to 636
Select the SSL checkbox in the Directory Configuration
Verify that the Certificate Authority (CA) that issued the server certificate is in the Java Keystore
When an intermediate CA is used to generate server certificates the intermediate CA certificate will need to be imported manually
If any Issuer CA certificates required to complete the server certificate chain are missing from the Java security repository on the application server install them manually into that repository
Use the following command to install the certificate
ltJAVA_HOMEgtbinkeytool -import -trustcacerts -keystore cacerts -file ltLocation_of_exported_Certificate xxxcrtgt -alias ltsome_aliasgtltJAVA_HOMEgt is the location of the SAPJVM For example sapmntltSIDgtexejvmlinuxx86_64sapjvm_51064sapjvm_5
For this ltJAVA_HOMEgt the cacerts file would be located at sapmntltSIDgtexejvmlinuxx86_64sapjvm_51064sapjvm_5jrelibsecurity
After performing these tasks restart NetWeaver and test by creating a new user in SAP Sourcing
46 Create Tenant Configuration
The creation of a tenant configuration will also create
a context
a cluster
20
PUBLICcopy Copyright 2015 SAP SE or an SAP affiliate companyAll rights reserved
SAP Sourcing 90Context Cluster and Directory Configuration
an internal directory
an external directory
The information necessary can be retrieved from cluster and directory templates or entered manually
NoteFor multiple landscape use all the configurations must have the same name If not migration will be affected
Procedure
1 Log on as the system user and choose Tenant Configuration
2 Choose New
3 Create a new tenant configuration with the following (example) parameters
Using Templates
External ID tenantexample
Display Name Tenant Example
Sys Admin Password
Sys Admin Password (again)
Cluster Cluster Example
Directory Internal Site Internal Directory Example
Directory External Site External Directory Example
No Templates
External ID tenantexample
Display Name Tenant Example
Sys Admin Password
Sys Admin Password (again)
Overwrite Templates Configurations
Cluster (checked)
Directory Internal Site (checked)
Directory External Site (checked)
Cluster Configuration [page 16] step
Internal Directory Configuration [page 17] step
External Directory Configuration [page 18] step
SAP Sourcing 90Context Cluster and Directory Configuration
PUBLICcopy Copyright 2015 SAP SE or an SAP affiliate company
All rights reserved 21
5 Master Data
Gathering Critical Information
For each deployment gather critical information including (but not limited to) the following
Purchaser organizational data Locations Companies Business Units Groups and Users
Supplier organizational data Suppliers and Contacts
Commodity Information Internal and External Categories
The current implementation methodology recommends defining these attributes before going live to maximize efficiency Data attributes may be modified or added throughout the life of the implementation using the Setup module
51 Overview of Master Data
SAP Sourcing provides the following means to install master data
Manual entry from Setup
Import from CSV file
Import from deployment workbook
Define the components of master data that exist within each context after contexts and clusters have been defined The following table lists the master data object types requiring definition for the enterprise The data classification Configurable indicates that default data is provided but can be customized for deployment The data classification Custom indicates that no default data is provided and the deployment must provide the data
Table 10
Contents Data Classification Description
Numbering table definitions for enterprise-level objects
Configurable Defines the format of IDs For example an RFP might follow the format RFP-nnnn where nnnn increments for each new rfp created
Default list of extendible enterprise-level objects
Configurable Lists those enterprise-level objects which can be extended
Default list of objects that can used referenced in an extension
Configurable One type of extension allows a reference to another type of object This list identifies the allowed kinds of references
Value List Types Configurable Default value list types
Value List Values Configurable Default value list values such as countries time zones and so on
22
PUBLICcopy Copyright 2015 SAP SE or an SAP affiliate companyAll rights reserved
SAP Sourcing 90Master Data
Contents Data Classification Description
Units of Measure Configurable Standard units of measure used throughout the system
Currencies Configurable A list of all currencies used by your organization
Currency Conversions Configurable Default values for any currency conversion rates
Document Link Definitions Configurable Lists the allowable kinds of document links
Scheduled Task Types Configurable Used to define categories of scheduled tasks
Scheduled Tasks Configurable Lists scheduled or background tasks
Metrics Configurable Used to define metrics for scorecards
Contract Terms Configurable Used to define terms on contracts
Contract Types Configurable Types define what set of contract features are available
Project Types Configurable Types define what set of Project features are available
RFx Types Configurable Types define what set of RFx features are available
Auction Types Configurable Types define what set of Auction features are available
DA Types Configurable Types define what set of Demand features are available
Security Profiles Configurable Identifies the security profiles installed with the system
Rights on security profiles Configurable Defines the rights for each security profile
Time Periods Configurable Defines information about quarters years and so on
Reporting Calendars Configurable Used for managing how data is reported with relation to the calendar
Collaborator Roles Configurable Defines the role (rights and responsibilities) of a persongroup on a specific document instance
Document Security Templates Configurable Sets up the default collaborators and security when new documents are created
SAP Sourcing 90Master Data
PUBLICcopy Copyright 2015 SAP SE or an SAP affiliate company
All rights reserved 23
Contents Data Classification Description
Shared Discussions Configurable A list of discussion forums available as a channel and not relating to a specific document
Workbench Channels Configurable Channels available on a users desktop
Workbench IFrames Configurable Data to create iFrames
Workbench Channel Configurations Configurable Channel configuration parameters
Workbench Pages Configurable Pre-defined desktop pages
Workbench Page Configurations Configurable Channel content and placement settings for predefined pages
Configuration Properties Configurable Various deployment settings including mail
Enterprise Extensions Custom Actual extensions on enterprise-level objects
Directory Configurations Custom Used for the LDAP directory configuration
Geographies Custom Used to represent the Geographic regions
Locations Custom Locations of plants companies and other organizational elements
Payment Terms Custom Terms of payment between the purchaser and supplier
External Categories Custom Typically this data set consists of industry standard category codes such as UN-SPSC or SIC codes if used by your organization
Internal Categories Custom All internal purchasing categories used by the purchaser
Vendors Custom Used in all components for various purchasing actions
Vendor Extensions in List Form Custom Actual extensions on enterprise-level objects
Companies Custom Used by all components of the system for purchasing actions such as Auctions and RFPs
Registration Categories Custom Defines mapping from arbitrary category names to actual internal or external categories Used during supplier self-registration
24
PUBLICcopy Copyright 2015 SAP SE or an SAP affiliate companyAll rights reserved
SAP Sourcing 90Master Data
Contents Data Classification Description
Organizational Units Custom Further definition of the organizational hierarchy Use to define departments business units and so on
Groups Custom Arbitrary groups of purchaser users
Contacts Custom Used for all suppliers to distinguish the various contacts at each supplier
Accounts Custom Handles all user accounts for the system
Terms Templates Custom Standard terms and conditions phrases to which a supplier must agree before accessing an event
Purchasing Organization Custom An organizational unit in SAP ERP subdividing an enterprise according to the requirements of purchasing
Purchasing Group Custom A key for a purchaser or group of purchasers in SAP ERP
Vendor Account Group Custom A classifying feature of supplier master records in SAP ERP
Business System Custom Represents a system in the landscape for example SAP Sourcing or SAP ERP
Text Id Custom Represents SAP ERP header and item texts
Transaction Type Custom Represents SAP ERP transation types
After configuring the enterprise master data you must next configure the company master data This data must be created once for each sub-context This example only uses a single context so this data must only be created once
Table 11
Contents Data Classification Description
UFNs System Metadata for RFx utility functions
System Answered Sources Configurable Defines the available sources of system answered questions
Company Extension Definitions Configurable List of company-scoped objects which have extensions
Document Security Templates Configurable Sets up the default collaborators and security when new documents are created
Contract Generation Phases Configurable Used to define Phases for Contract Generation library documents
SAP Sourcing 90Master Data
PUBLICcopy Copyright 2015 SAP SE or an SAP affiliate company
All rights reserved 25
Contents Data Classification Description
Contract Generation Tags Configurable Used to define Tags for Contract Generation
Company extensions Custom List of extensions on individual object types
masterdataActivity Custom Used for general accounting purposes
Cost Centers Custom Used for accounting purposes to assign cost on a center by center basis
Cost Center Groups Custom
Entities Custom Used for accounting purposes for purchasing by division
GL Accounts Custom Used for general accounting purposes
Plants Custom Plants or facilities
Materials Custom Standard materials for use in line items
Category Managers Custom Users who are responsible for certain categories
Master Data Security
When configuring and importing Master Data there are some things to remember about security
1 Each piece of importable master data has an Import right as part of its ACL list By default this right is only added for the System Administrator security profile and therefore only those users can import master data out of the box As always an admin can add Import rights to other security profiles on and object-by-object basis
ExampleIf Supplier Administrators need to import Supplier records then that can be enabled
2 When importing Master Data be it via CSV XLS XML etc the user running the imports must have Import right allowed for all objects in question The Enterprise user is considered trusted and can import any of these objects
52 Create Master Data Manually
Procedure
NoteThe user account being used to import the following must have Allow Import rights on these specific objects If you do not have Allow Import on these objects it must be added or the import will fail
1 Log on as the enterprise user
26
PUBLICcopy Copyright 2015 SAP SE or an SAP affiliate companyAll rights reserved
SAP Sourcing 90Master Data
2 Create objects from within the Setup module
3 Log on as a purchaser user with administrative rights to configure company master data
For more information see the SAP Sourcing help at helpsapcomsourcing To access the help system scroll to SAP Sourcing 90 Help for Purchasers and choose a language In the help choose Setup System Setup Master Data
53 Import Master Data Using CSV File
NoteThe user account being used to import the following must have Allow Import rights on these specific objects If you do not have Allow Import on these objects it must be added or the import will fail
You can import master data files with CSV XLS or XLSX format in two ways
Use the standard web user interface
Use a client application distributed with the system which allows data to be imported outside of the web environment
The following procedure describes how to import using the web-based UI
Procedure
1 If application users have already been created log on as a purchaser user with administrative rights If users have not been created log on as the enterprise user
2 Choose Setup System Administration Import Export Tools Import Data and then choose OK
3 Choose Create
The import wizard opens
4 Specify whether you want to upload the file to the server or whether the file is already located on the application server and choose Next
5 Choose Upload Import File and select the CSV or Deployment Workgroup file to import
6 For CSV files select the object type and choose Next
7 Indicate whether you want to wait for the import to finish or perform the import in the background and then choose Next
8 Choose Finish to view the results
SAP Sourcing 90Master Data
PUBLICcopy Copyright 2015 SAP SE or an SAP affiliate company
All rights reserved 27
54 Workbooks
541 Overview of Workbooks
NoteThere are many sheets in the workbooks that have the prefix eso While these sheets may appear as duplicates of other sheets the data in them is in fact different These sheets should be imported by default You may also add data to these sheets if you would like to augment the data provided in the sample workbooks
We recommend using the deployment workbook for initial deployment of the system to ensure that all required data is imported into the system
To facilitate the import of data SAP Sourcing provides an alternative to CSV files for import SAP Sourcing provides the ability to import Microsoft Excel files containing one or more master data imports The system processes these Excel files directly without the user having to export the data to a raw CSV file The Enterprise Deployment Workbook and Company Deployment Workbook are two sample deployment workbooks delivered with SAP Sourcing
Anyone with system administrator access rights can download the deployment workbooks from the web user interface The deployment workbooks are included in the online Reference Guide (RG)
When starting a new deployment project preserve the original workbook templates by making a copy of them and saving them with a new name Import data using your modified templates only By doing so you assure continuity if future additional deployments are required
NoteKeep the following in mind when using deployment workbooks
The Configuration Sheet controls the import process Refer to the Help Sheet for input specifications of Configuration Sheet columns
The system can import the workbooks directly but there are limitations to what Excel constructs are supported The Help Sheet describes the rules that must be observed
The same importing process supports both CSV files and Excel workbooks
There is a one to one relationship with the workbook configuration file and the worksheet tabs
542 Download and Customize Workbooks
The sample enterprise and company workbooks that you download from SAP Sourcing are designed for you to configure a base system using a sample enterprise context We recommend modifying the default deployment workbooks Choose the appropriate workbooks from this table
Table 12
System Workbooks
SAP Sourcing Enterprise Deployment Workbook
Company Deployment Workbook
Users setting up a base system should adjust the various settings in these workbooks prior to running them in the system For example the company data should be updated to reflect specifics about the company that is
28
PUBLICcopy Copyright 2015 SAP SE or an SAP affiliate companyAll rights reserved
SAP Sourcing 90Master Data
installing the system Similarly you should review other tabs to ensure that the configurations are consistent with the desired implementation For details on customizable fields see Master Data [page 22]
Procedure
1 Log on as the enterprise user and choose Reference Guide Download the sample enterprise and company workbooks appropriate for your system
NoteThe enterprise workbook should be run as the enterprise user The company workbook should be run as a system administrator associated with the company object intended to be configured
2 From the Enterprise Deployment workbook open the file and find the sheet labeled locations and edit this sheet as necessary
Only one location is required
3 Find each sheet review each sheet and the comments in the sheet and update the data accordingly
4 Provide at least one internal category
5 Find the sheet labeled companies and edit it as necessary
6 Repeat for org_units groups accounts and so on
Your are establishing a hierarchy To configure the hierarchy correctly you must ensure that the child references the parent correctly For example the PARENT column in the business_units page should include a valid EXTERNAL_ID from the companies sheet
NoteTo build all custom data in the user interface simply deactivate the import of the above data types in the deployment workbook See the Help page for instructions on how to skip a specific worksheet
7 Import the enterprise and company workbooks into SAP Sourcing by choosing Setup System Administration Import and Export Tools Import Data and then choose Create
543 Import Master Data Using Workbooks
Procedure
1 Log on as the user specified in this table and choose Setup
Table 13
Workbook Login User
Enterprise workbook
Enterprise user
Company workbook Purchaser user
2 From the Import and Export Tools dropdown chooseImport Data and then choose OK
The Import Data page appears
SAP Sourcing 90Master Data
PUBLICcopy Copyright 2015 SAP SE or an SAP affiliate company
All rights reserved 29
3 Choose Create to start a new import job
4 Choose Upload to the Server and then choose Next
5 Select the modified workbook and choose Next
6 Wait for the import to finish and choose Next
Typically running the enterprise workbook can take several minutes
30
PUBLICcopy Copyright 2015 SAP SE or an SAP affiliate companyAll rights reserved
SAP Sourcing 90Master Data
6 Create and Verify Purchaser User
Procedure
For the SAP NetWeaver UME driver users should be created in SAP Sourcing and the SAP NetWeaver UME with the same username
For LDAP drivers depending on how the LDAP was set up you must perform one of the following
Create the user in SAP Sourcing and supply the information FROM the LDAP
If you have access create the account and supply the information TO the LDAP
In either case an e-mail is generated giving the user a path to the application and his or her user name If the account is created a temporary password is also mailed A system property determines whether this information is delivered in the same e-mail or separate e-mails
1 Choose Setup WYSIWYG Page Customization User Account and create a purchaser user as follows
1 On the Account Properties tab enter required information
2 On the Account Management tab enter information as follows
Enable User to Login Select
Directory Select as needed
User ID Type userid
Create Directory Account Select
Generate a New Password Select
Send Notification Select
3 On the Security tab enter information as follows
Purchaser Select
Purchaser Manager Select
System Administrator Select
Supplier Administrator Select
Make sure this first user is given Administrator privileges to import the Company Workbook
2 Wait for the e-mail to be sent and received If you do not receive it check the following
To verify the mail was sent choose Setup System Administration Processed Messages
To check for stuck or failed messages choose Setup System Administration Queued Messages
3 To test the new account log on as a purchaser user using the credentials sent in the e-mail
4 Reset your password and choose OK
If you can successfully log into the new purchaser account the context cluster and directory are properly configured and the SMTP server is processing e-mail
SAP Sourcing 90Create and Verify Purchaser User
PUBLICcopy Copyright 2015 SAP SE or an SAP affiliate company
All rights reserved 31
7 Create and Verify Supplier User
Procedure
Create a supplier user to test the supplier portal A supplier user is a contact on a supplier record
1 Choose Supplier Management Create Supplier
2 Enter and save the required information
3 Choose the Contacts tab
4 Under Supplier Contacts choose Add
5 Enter and save the required information
6 Log on as a supplier user using the credentials provided in the test user e-mail
7 Reset the password as prompted and accept the usage terms
32
PUBLICcopy Copyright 2015 SAP SE or an SAP affiliate companyAll rights reserved
SAP Sourcing 90Create and Verify Supplier User
8 Install Company Logo
Procedure
NoteWe do not recommend installing an image larger than 200 x 29
1 Log on as the enterprise user
2 Attach the logo as follows
1 Choose Setup Organization and Accounting Information Companies
2 Select the enterprise company from the list and choose Edit Document
3 Attach your logo image to the company using the Logo Attachment field
3 Save your entries
Resize Company Logo
If you have uploaded a company logo in your source release you must resize the image to 200x29
1 Log on as a purchaser user with system administrator rights
2 Choose Setup
3 On the Master Data tab find the Organization and Accounting section and choose Companies
4 Choose the company
5 Choose Edit
6 In the Logo field upload the resized image
SAP Sourcing 90Install Company Logo
PUBLICcopy Copyright 2015 SAP SE or an SAP affiliate company
All rights reserved 33
9 Specify Internal Address of SAP Sourcing Server
Procedure
When SAP Sourcing is first installed or whenever a new server is added to an application cluster the Internet address that is used for internal communications within SAP Sourcing is initially set to the external host name of the server In many cases this will result in unexpected or delayed behavior in the application
If the application landscape includes a network firewall accessing the server through this name requires exiting the firewall and re-entering If the firewall blocks incoming traffic on SAP Sourcingrsquos notification ports this will result in failure to deliver notifications for some events To avoid this do the following
1 Log on as the system user
2 Open the System Information record for editing
3 Change the value in the Internal Address field to an internal IP address or host name
4 Save your changes
34
PUBLICcopy Copyright 2015 SAP SE or an SAP affiliate companyAll rights reserved
SAP Sourcing 90Specify Internal Address of SAP Sourcing Server
10 Update Master Time Zone
Procedure
This procedure is required to enable SAP Sourcing to normalize all dates and times that are used in sourcing events Normalizing allows time fields to be presented differently for each user according to his or her preferred time zone while maintaining a consistent reference to the same point in time
1 Log on as the system user
2 Choose Setup Configuration System Properties
3 Edit the systemmaster_timezone property in the system set This property value should be set to the Java time zone identifier that corresponds to the current database server time zone
NoteThe SAP Sourcing Time Zone Value List Type provides a relatively comprehensive list of java time zone identifiers To view this list log on as a purchaser user and navigate to Setup Master Data Value List Types and Values Time Zone The Alternate Name column of this list contains the java time zone identifier for the corresponding time zone
ExampleldquoAmericaNew_Yorkrdquo is the alternate name of the SAP Sourcing Timezone ValueListValue for ldquo(GMT-500) Eastern Standard Timerdquo
SAP Sourcing 90Update Master Time Zone
PUBLICcopy Copyright 2015 SAP SE or an SAP affiliate company
All rights reserved 35
11 Install License Key
Procedure
You must install a license key before the SAP Sourcing system can be used in production mode
1 Choose Setup System Administration System Management System Information
2 Note the installation ID from the Installation ID field on the Service Registration tab
3 Create OSS ticket this ID and a list of the requested modules to license (include the optimizer) to SAP Customer Support You will receive a csv file including all the license keys
NoteRequesting the optimizer key without installing an optimizer server will result in a high volume of irrelevant optimizer-related messages in your log files If you do not intend to install an optimizer server do not request an optimizer key
4 Log on as the enterprise user and choose Setup System Administration Import and Export ToolsImport Data
5 Use the import tool to import the licenses you received from Support as follows
1 On the Import Wizard Select a File screen type a description such as License Keys and choose Upload Import File to upload the csv file Choose Next
2 On the Import Wizard CSV Contents screen select Module License as the Object Type choose Next and follow any additional prompts to finish the process The successful file import is displayed on the File Import tab
6 Choose Setup System Administration System Management System Information
7 Choose the Components tab and verify that the appropriate licenses are checked under SRM Module Licenses
8 If you are installing the optimizer verify that a new Optimizer tab appears and displays an appropriate Status Queue value and JVM information (If the optimizer is not installed the Status Queue value is OFFLINE and the JVM Information is set to unknown)
36
PUBLICcopy Copyright 2015 SAP SE or an SAP affiliate companyAll rights reserved
SAP Sourcing 90Install License Key
12 Change Session Timeout
Procedure
NoteThis is optional
The deployment descriptor for the SAP Sourcing application defaults to a 30-minute session timeout or to the value that was set during installation
NoteThe above property should be set longer than the below two properties
To change this setting
1 Log on as the system user and set the following system property in SAP Sourcing
uppmeteringlogin_inactivity_timeout and set to the timeout that was chosen when running the configure utility
2 Property uppmeteringcleanup_interval defines the time between runs of the daemon which removes inactive sessions It is recommended that this value be set to a value that is slightly larger than the uppmeteringlogin_inactivity_timeout setting is set to
3 Set the time-out using the configure tool For information about the configure tool see the Installation Guide for SAP Sourcing 90 on the SAP Service Marketplace at servicesapcomeso SAP Sourcing On-Premise SAP Sourcing 90
NoteBoth internal property in SAP Sourcing and configuration tool in NetWeaver should be set to the same value
SAP Sourcing 90Change Session Timeout
PUBLICcopy Copyright 2015 SAP SE or an SAP affiliate company
All rights reserved 37
13 Enable Contract Authoring
Contracts amendments and clauses use the Word service This service must be referenced For more information see ldquoCreate OfficeAutomationUser Accountrdquo in the Installation Guide for SAP Sourcing 90 on SAP Service Marketplace at servicesapcomeso SAP Sourcing On-Premise SAP Sourcing 90
Procedure
Configure a path to the Word service in SAP Sourcing as follows
1 Choose Setup System Properties
2 From the Name dropdown list choose contractgenserviceurl
3 Set the value to ltprotocolgtlthostnamegtltvirtual directorygtwordserviceasmx
38
PUBLICcopy Copyright 2015 SAP SE or an SAP affiliate companyAll rights reserved
SAP Sourcing 90Enable Contract Authoring
14 e-Signature
To enable e-Signature functionality users first get user accounts from EchoSign EchoSign adds the users to the EchoSign SAP channel System administrators define the integrated system configuration and set up the management of customer and user accounts System administrators can schedule automated checks of contract document signature statuses System users can check the availability of e-Signature components
141 Set Up EchoSign Account and System Configuration
Procedure
Set Up EchoSign Account
Before a system administrator enables e-Signature features for a customer EchoSign adds the customer to the EchoSign SAP channel The customer gives the account key provided by EchoSign to the system administrator The system administrator then configures e-Signature to work with EchoSign
Set Up Integrated System Configuration
Adding an EchoSign account to SAP Sourcing configuration enables e-Signature functionality in SAP Sourcing To set up an EchoSign account for use with e-Signature a system administrator creates an integrated system configuration object for EchoSign integration
1 Log on as the enterprise user
2 Choose Setup Integrated System Configuration
3 On the subsequent screen choose New
4 On the subsequent screen select EchoSign for System Type and select Continue
5 Under EchoSign Properties the customer enters the EchoSign account key provided the customer by EchoSign and choose Done
Set Up Proxy Settings
To configure EchoSign on a NetWeaver-based system follow these steps
1 Configure the HTTP properties as described on the SAP Help Portal at helpsapcomsaphelp_nw73helpdataen48479b6163524bb9e10000000a42189bframesethtm
2 To add proxy parameters to JVM settings in NetWeaver navigate to [host][port]nwa ConfigurationInfrastructure Java System Properties Additional VM Properties and add the following parameters with the appropriate values
-DhttpproxyHost -DhttpproxyPort -DhttpsproxyHost -DhttpsproxyPort
SAP Sourcing 90e-Signature
PUBLICcopy Copyright 2015 SAP SE or an SAP affiliate company
All rights reserved 39
NoteIf your proxy server requires a username and password provide this information with the following parameters
-DhttpproxyUser -DhttpproxyPassword -DhttpsproxyUser -DhttpsproxyPassword
3 Import the SSL certificate file into the NetWeaver key storage as follows
1 Navigate to lthostgtltportgtnwa Security Certificates and Keys
2 Select the WebServiceSecurity keystore view
3 If you are updating or replacing the EchoSign certificate remove any previous certificates with the same Common Name
4 Choose Import Entry and select x509 certificate as the entry type
5 Get the EchoSign certificate from your browserrsquos certificate interface
NoteSpecific steps will vary from browser to browser but the general process should be similar Here are sample instructions for Firefox
1 Navigate to secureechosigncomservicesEchoSignDocumentService9
NoteYou can ignore the error message that says Invalid SOAP Request
2 Click on the lock icon next to the URL
3 Click More Information
4 Open the Security tab
5 Click View Certificate
6 Open the Details tab
7 Click Export
8 From the Save as Type dropdown list choose the SSL certificate for the version you require
9 If Windows does not recognize the exported file as a certificate add a cer or crt extension to the filename
6 Restart NetWeaver
Change EchoSign service URL
SAP Sourcing ships with the current EchoSign service URL Change the service URL value in System Properties only when EchoSign changes the service URL To change this value do the following
1 Log on as the system user
2 On the System Setup tab choose System Properties
3 Open contractgenesignature_url from the Properties list
4 Enter the new EchoSign service URL provided by EchoSign
40
PUBLICcopy Copyright 2015 SAP SE or an SAP affiliate companyAll rights reserved
SAP Sourcing 90e-Signature
NoteSet the URL property only if the EchoSign domain has changed The current URL is secureechosigncomservicesEchoSignDocumentService9 Note that the API version should be set to 9
Change the length of the EchoSign timeout
By default SAP Sourcing sets the length of the EchoSign timeout to 300000 milliseconds or five minutes Change the length of the EchoSign timeout only if the default timeout causes issues when you send documents to EchoSign
1 Log on as the system user
2 On the System Setup tab choose System Properties
3 Choose contractgenesignature_timeout from the Name dropdown menu
4 Enter a numeral specifying the desired length in milliseconds for the EchoSign timeout in the Value field The Value field requires no minimum nor maximum value nor number formatting
142 Check EchoSign Configuration Status
Procedure
1 Log on as the system user
2 Choose System Information Then on the subsequent screen choose the Audits tab
3 Choose the correct context for the customers location from the Context dropdown menu
4 In the Availability pane OK appears in the Status column next to EchoSign Availability if you configured SAP Sourcing correctly for EchoSign
143 Set Up User Rights
Procedure
Assign Right to Send Contract Documents for Signatures or to Resolve Errors
To enable a user to send contract documents for signatures a customer system administrator adds Contract e-Signature to the users security profiles
To assign the right to send contract documents out for signatures to a user a system administrator does the following
1 In Setup choose System Administration Internal User Accounts
2 Select the desired user account
3 Choose the Security tab Then choose Contract e-Signature or Contract e-Signature Admin
A system administrator can assign either of the following e-Signature rights to a user
SAP Sourcing 90e-Signature
PUBLICcopy Copyright 2015 SAP SE or an SAP affiliate company
All rights reserved 41
Table 14
Right Description
ESO_CONTRACT_ESIGNATURE Users with this right can send contract documents out for signatures using the e-Signature feature
ESO_CONTRACT_ESIGNATURE_ADMIN This right allows designated users to resolve errors Users with this right can change a contract document while it is out for signatures Users with this right can change the signature status of a contract document to Error and can thus allow the contract document author to unlock a frozen document System administrators assign this right only to other administrators not to standard users
4 Choose Done
144 Resolve e-Signature Errors
Procedure
Contract Document Status Frozen
Unexpected errors such as network or system errors can freeze the status of a contract document to Sending for e-Signature or Out for Signature A user with the right ESO_CONTRACT_ESIGNATURE_ADMIN can unfreeze the status of the contract document so that the contract author can cancel the e-Signature process A system administrator can assign the right ESO_CONTRACT_ESIGNATURE_ADMIN to a user
1 The contract author adds a user with the ESO_CONTRACT_ESIGNATURE_ADMIN right to the affected Master Agreement as a collaborator
2 The user with the ESO_CONTRACT_ESIGNATURE_ADMIN right manually changes the status of the frozen contract document to ERROR
3 The contract author logs in to EchoSign and manually cancels the e-Signature process for the contract document
Invalid Password Error
You may receive the following error message Error Invalid password for user sending a Contract Document to EchoSign for signature
This message indicates that the user sending a request for e-signatures via EchoSign is not properly set up in their EchoSign account Contact EchoSign for assistance in resolving this error
145 Set Up Scheduled Task to Retrieve e-Signature Status
Procedure
You can set SAP Sourcing to retrieve the e-Signature statuses of all contract documents at a frequency you specify automatically However an end user need not wait for these automated retrievals to see the current e-
42
PUBLICcopy Copyright 2015 SAP SE or an SAP affiliate companyAll rights reserved
SAP Sourcing 90e-Signature
Signature status of a contract document End users can get instant updates of the e-Signature status manually through the contract document user interface
1 Log on as the enterprise user
2 Choose Setup
3 On the System Setup tab choose Scheduled Tasks
4 On the subsequent page choose New then select the e-Signature Status radio button then choose Continue
5 Enter the display name and start date Set the frequency and end date as desired
NoteSAP recommends automatically retrieving e-Signature statuses daily and setting the retrievals to run at night
6 Choose Save
SAP Sourcing 90e-Signature
PUBLICcopy Copyright 2015 SAP SE or an SAP affiliate company
All rights reserved 43
15 Configure Workbench
The CLM system is delivered with a base workbench page that is available to all internal users Additionally the system is configured with a workbench page intended to be used by CLM contract managers
The workbench page is established in the system but requires additional configuration to make it available to the desired users This configuration is done by adding collaborators to the Contract Management Workbench page
Prerequisites
You must be logged on as the enterprise user
Procedure
Configure the Contract Management Workbench page with the individual users or user groups that should also have access to the page
To do this go to Setup System Setup Workbench Workbench Page All Workbench Pages Edit the Contract Management page and add collaborators
44
PUBLICcopy Copyright 2015 SAP SE or an SAP affiliate companyAll rights reserved
SAP Sourcing 90Configure Workbench
16 Configure Branding
The following procedures enable you to change the branding from the default SAP Sourcing to SAP CLM Four branding items are affected
Branding text in the title bar of the browser (for example SAP Sourcing)
SAP CLM logo image for the purchaser login page
SAP CLM Business Partner logo image for the supplier login page
Images on the login page
Images on the splash screen
Procedure
Change the Branding after Installation
1 Choose Setup System Properties
2 Change the value of systembrand_name to (for example) SAP CLM
Themes
NoteThe following two steps require editing of themes For futher information about themes see the SAP Sourcing help at helpsapcomsourcing To access the help system scroll to SAP Sourcing 90 Help for Purchasers and choose a language In the help choose Setup Themes
1 Open the current enterprisersquos theme Branding area and choose Purchaser Login Banner link then Image link Delete the original path in Image Path field and paste imageslogoslogo_sapXCLMgif
2 Choose Delete on Background Image field
3 Choose the Supplier Login Banner link then Image link Delete the original path in Image Path field and paste imageslogoslogo_sapXCLMBusinessPartnergif
4 Choose Delete on Background Image field
SAP Sourcing 90Configure Branding
PUBLICcopy Copyright 2015 SAP SE or an SAP affiliate company
All rights reserved 45
17 Configuring Supplier Workflow Management
By default supplier workflow management feature is disabled in SAP Sourcing To enable this feature you need to perform following general steps
1 Create Workflow Definitions
2 Create Supplier Configurable Phase Definition
3 CreateModify Supplier Type
4 Create Supplier Field Access Definition (optional)
5 Configure Security Templates
6 Assign Supplier Types to Suppliers
7 Configure Supplier UI Mapping
The following subsections provide details for each of these steps
Create Workflow Definitions
1 Click Setup in the toolbar at the top of the page and select Platform
2 In the Workflow section of System Setup click on Workflow Definitions
3 On the Workflow Definitions List page click New
4 On the Workflow Definition Summary page fill in the fields with workflow information For details see the Field Help for Workflow Definition Summary page
5 Click the Add New Version button to add a process template to the workflow definition For details see the Field Help for Process Template Dialog Box page
6 Click the Save button in the toolbar
7 Create another Workflow Definition if necessary
Create Supplier Configurable Phase Definition
Supplier phases determine the actions that can be performed on supplier registration and modification requests To create a supplier configurable phase definition
1 Click Setup in the toolbar at the top of the page and select Platform
2 In the Suppliers section of Document Setup click on Supplier Configurable Phase Definition
3 On the Supplier Configurable Phase Definition List page click New
4 On the Header page fill in the fields with phase information For details see the Field help for Supplier Configurable Phase Definition Header page
5 Click Add to add phases to the definition
6 In the dialog box that appears select each phase to include in the phase definition and click OK
7 (optional) Click the Edit icon for each phase to edit phase information including the sequence of phases in the workflow On this page you can assign workflow definition and supplier field access definition For details see the Field help for Supplier Configurable Phase Header page
8 Click the Save button in the toolbar
46
PUBLICcopy Copyright 2015 SAP SE or an SAP affiliate companyAll rights reserved
SAP Sourcing 90Configuring Supplier Workflow Management
9 Create another Supplier Configurable Phase Definition if necessary
CreateModify Supplier Type
Supplier types can be used to determine whioch workflow phase definition to enable in a supplier registration or modification requests The Configurable Phase Definition field of Supplier Type is responsible for defining whether registrationmodification requests will use workflow and which phases will have these requests If Configurable Phase Definition is empty then supplier registration and modification requests will not have configured phases and any supplier administrator will be able to approve or deny request of such type as it was in previous versions of SAP Sourcing To enable supplier workflow management some supplier-configurable phase definition must be assigned to supplier types
SAP Sourcing provides one default supplier type You can modify this type and create new ones
1 Click Setup in the toolbar at the top of the page and select Platform
2 In the Suppliers section of Document Setup select Supplier Type
3 On the Supplier Type List page click New for creating new type or select existing from the list for editing
4 On the Type page fill in necessary fields On this page you can assign Supplier Configurable Phase Definition to Supplier Type For details see the Field Help for Supplier Type page
Create Supplier Field Access Definition
This step is optional
Supplier Field Access Definition allows you to configure access rules foe approver on specific phase
To create a supplier field access definition
1 Click Setup in the toolbar at the top of the page and select Platform
2 In the Suppliers section of Document Setup select Supplier Field Access Definition
3 On the Supplier Field Access Definition List page click New
4 On the UI page fill in necessary fields For details see the Field Help for Supplier Field Access Definition page
5 Click the Save button in the toolbar
6 Open existing Supplier Configurable Phase Definition
7 Click Edit
8 Click the Edit icon for the phase where you want to configure access rights for approvers This should be the approval phase
9 Click the Lookup icon to select a supplier field access definition to associate with this phase
10 Save the Supplier Configurable Phase Definition
Configure Security Templates
This is a very important configuration step In the case of supplier registrationsmodifications without configured workflows requests can be viewed and approved by any Supplier Administrator But in the case of new functionality collaborator security is used to define access rights A document security template is a set of rules governing the way an SAP Sourcing document assigns collaborator roles You should configure collaborators defined by role and user type that are automatically added to a registration and modification requests
You must configure two security templates first for Workflow Supplier Registration and second for Workflow Supplier Modification The following must be configured in these templates
The document owner must be any specified buy-side user Otherwise automatic phase transitions will not work for sell-side and the phase will need to be changed manually by any buy-side user
SAP Sourcing 90Configuring Supplier Workflow Management
PUBLICcopy Copyright 2015 SAP SE or an SAP affiliate company
All rights reserved 47
Document creator (current user) must be added to collaborator list with a role that allows viewing editing and changing phases (eg Collaborator)
Supplier administrators should be included to collaborator list to be able view and manually complete registrationmodification requests in case automatic completion should fail for some reason
Assign Supplier Type to Supplier
After the upgrade procedure one default supplier type is created and assigned to all suppliers It will be used to recognize phases for supplier modifications via workflow The supplier type can be changed for any supplier as follows
1 Open the supplier whose supplier type you want to reassign
2 Press Edit
3 Click the Lookup icon under the Document Type field
4 Select a new supplier type
5 Click Ok
6 Click Save
NoteWhen the supplier is created via workflow the supplier type used for creation is assigned to created supplier
Configure Supplier UI Mapping
The supplier type can be mapped to any supplier-side self-registration form The Supplier Type UI includes a collection of Supplier registration UI Mappings This allows you to configure the mapping between supplier type and self-registration forms
1 Open any Supplier Type
2 Click Edit
3 Click Add under Sell-Side Supplier Registration UI Mapping to add the UI page that will be mapped to this type
4 Click Save
NoteThe self-registration form can be assigned to only one supplier type If no form is assigned to a supplier type the default supplier type will be used for registration
48
PUBLICcopy Copyright 2015 SAP SE or an SAP affiliate companyAll rights reserved
SAP Sourcing 90Configuring Supplier Workflow Management
Typographic Conventions
Table 15
Example Description
ltExamplegt Angle brackets indicate that you replace these words or characters with appropriate entries to make entries in the system for example ldquoEnter your ltUser Namegtrdquo
Example Example Arrows separating the parts of a navigation path for example menu options
Example Emphasized words or expressions
Example Words or characters that you enter in the system exactly as they appear in the documentation
wwwsapcom Textual cross-references to an internet address
example Quicklinks added to the internet address of a homepage to enable quick access to specific content on the Web
123456 Hyperlink to an SAP Note for example SAP Note 123456
Example Words or characters quoted from the screen These include field labels screen titles pushbutton labels menu names and menu options
Cross-references to other documentation or published works
Example Output on the screen following a user action for example messages
Source code or syntax quoted directly from a program
File and directory names and their paths names of variables and parameters and names of installation upgrade and database tools
EXAMPLE Technical names of system objects These include report names program names transaction codes database table names and key concepts of a programming language when they are surrounded by body text for example SELECT and INCLUDE
EXAMPLE Keys on the keyboard
SAP Sourcing 90Typographic Conventions
PUBLICcopy Copyright 2015 SAP SE or an SAP affiliate company
All rights reserved 49
wwwsapcom
copy Copyright 2015 SAP SE or an SAP affiliate company All rights reservedNo part of this publication may be reproduced or transmitted in any form or for any purpose without the express permission of SAP SE or an SAP affiliate companySAP and other SAP products and services mentioned herein as well as their respective logos are trademarks or registered trademarks of SAP SE (or an SAP affiliate company) in Germany and other countries Please see wwwsapcomcorporate-enlegalcopyrightindexepxtrademark for additional trademark information and noticesSome software products marketed by SAP SE and its distributors contain proprietary software components of other software vendors National product specifications may varyThese materials are provided by SAP SE or an SAP affiliate company for informational purposes only without representation or warranty of any kind and SAP SE or its affiliated companies shall not be liable for errors or omissions with respect to the materials The only warranties for SAP SE or SAP affiliate company products and services are those that are set forth in the express warranty statements accompanying such products and services if any Nothing herein should be construed as constituting an additional warrantyIn particular SAP SE or its affiliated companies have no obligation to pursue any course of business outlined in this document or any related presentation or to develop or release any functionality mentioned therein This document or any related presentation and SAP SEs or its affiliated companies strategy and possible future developments products andor platform directions and functionality are all subject to change and may be changed by SAP SE or its affiliated companies at any time for any reason without notice The information in this document is not a commitment promise or legal obligation to deliver any material code or functionality All forward-looking statements are subject to various risks and uncertainties that could cause actual results to differ materially from expectations Readers are cautioned not to place undue reliance on these forward-looking statements which speak only as of their dates and they should not be relied upon in making purchasing decisions
- SAP Sourcing 90
-
- Table of Contents
- 1 Introduction
- 2 Define System Properties
- 3 Set Up SMTP Server
- 4 Context Cluster and Directory Configuration
-
- 41 Manual Context Cluster and Directory Configuration
- 42 Create Cluster Template
- 43 Create Internal Directory Template
- 44 Create External Directory Template
- 45 Managing the SSL Certificate
- 46 Create Tenant Configuration
-
- 5 Master Data
-
- 51 Overview of Master Data
- 52 Create Master Data Manually
- 53 Import Master Data Using CSV File
- 54 Workbooks
-
- 541 Overview of Workbooks
- 542 Download and Customize Workbooks
- 543 Import Master Data Using Workbooks
-
- 6 Create and Verify Purchaser User
- 7 Create and Verify Supplier User
- 8 Install Company Logo
- 9 Specify Internal Address of SAP Sourcing Server
- 10 Update Master Time Zone
- 11 Install License Key
- 12 Change Session Timeout
- 13 Enable Contract Authoring
- 14 e-Signature
-
- 141 Set Up EchoSign Account and System Configuration
- 142 Check EchoSign Configuration Status
- 143 Set Up User Rights
- 144 Resolve e-Signature Errors
- 145 Set Up Scheduled Task to Retrieve e-Signature Status
-
- 15 Configure Workbench
- 16 Configure Branding
- 17 Configuring Supplier Workflow Management
- Copyright and Trademarks
-
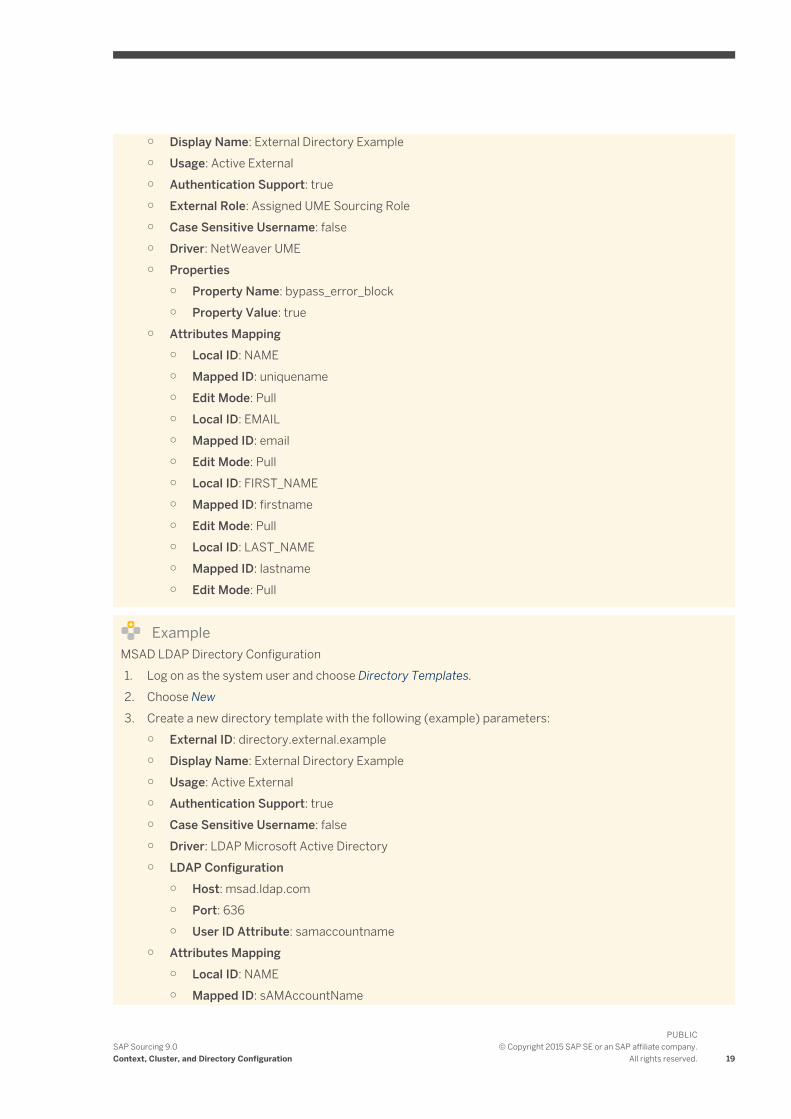
Display Name External Directory Example
Usage Active External
Authentication Support true
External Role Assigned UME Sourcing Role
Case Sensitive Username false
Driver NetWeaver UME
Properties
Property Name bypass_error_block
Property Value true
Attributes Mapping
Local ID NAME
Mapped ID uniquename
Edit Mode Pull
Local ID EMAIL
Mapped ID email
Edit Mode Pull
Local ID FIRST_NAME
Mapped ID firstname
Edit Mode Pull
Local ID LAST_NAME
Mapped ID lastname
Edit Mode Pull
ExampleMSAD LDAP Directory Configuration
1 Log on as the system user and choose Directory Templates
2 Choose New
3 Create a new directory template with the following (example) parameters
External ID directoryexternalexample
Display Name External Directory Example
Usage Active External
Authentication Support true
Case Sensitive Username false
Driver LDAP Microsoft Active Directory
LDAP Configuration
Host msadldapcom
Port 636
User ID Attribute samaccountname
Attributes Mapping
Local ID NAME
Mapped ID sAMAccountName
SAP Sourcing 90Context Cluster and Directory Configuration
PUBLICcopy Copyright 2015 SAP SE or an SAP affiliate company
All rights reserved 19
Edit Mode Pull
Local ID EMAIL
Mapped ID mail
Edit Mode Pull
Local ID FIRST_NAME
Mapped ID givenName
Edit Mode Pull
Local ID LAST_NAME
Mapped ID sn
Edit Mode Pull
45 Managing the SSL Certificate
In order to write to an Active Directory Microsoft requires that communication to the LDAP is conducted over SSL
Getting SSL Working
In order to enable SSL communication you need to do the following
Change the communication port in the Directory Configuration from 389 (the default setting) to 636
Select the SSL checkbox in the Directory Configuration
Verify that the Certificate Authority (CA) that issued the server certificate is in the Java Keystore
When an intermediate CA is used to generate server certificates the intermediate CA certificate will need to be imported manually
If any Issuer CA certificates required to complete the server certificate chain are missing from the Java security repository on the application server install them manually into that repository
Use the following command to install the certificate
ltJAVA_HOMEgtbinkeytool -import -trustcacerts -keystore cacerts -file ltLocation_of_exported_Certificate xxxcrtgt -alias ltsome_aliasgtltJAVA_HOMEgt is the location of the SAPJVM For example sapmntltSIDgtexejvmlinuxx86_64sapjvm_51064sapjvm_5
For this ltJAVA_HOMEgt the cacerts file would be located at sapmntltSIDgtexejvmlinuxx86_64sapjvm_51064sapjvm_5jrelibsecurity
After performing these tasks restart NetWeaver and test by creating a new user in SAP Sourcing
46 Create Tenant Configuration
The creation of a tenant configuration will also create
a context
a cluster
20
PUBLICcopy Copyright 2015 SAP SE or an SAP affiliate companyAll rights reserved
SAP Sourcing 90Context Cluster and Directory Configuration
an internal directory
an external directory
The information necessary can be retrieved from cluster and directory templates or entered manually
NoteFor multiple landscape use all the configurations must have the same name If not migration will be affected
Procedure
1 Log on as the system user and choose Tenant Configuration
2 Choose New
3 Create a new tenant configuration with the following (example) parameters
Using Templates
External ID tenantexample
Display Name Tenant Example
Sys Admin Password
Sys Admin Password (again)
Cluster Cluster Example
Directory Internal Site Internal Directory Example
Directory External Site External Directory Example
No Templates
External ID tenantexample
Display Name Tenant Example
Sys Admin Password
Sys Admin Password (again)
Overwrite Templates Configurations
Cluster (checked)
Directory Internal Site (checked)
Directory External Site (checked)
Cluster Configuration [page 16] step
Internal Directory Configuration [page 17] step
External Directory Configuration [page 18] step
SAP Sourcing 90Context Cluster and Directory Configuration
PUBLICcopy Copyright 2015 SAP SE or an SAP affiliate company
All rights reserved 21
5 Master Data
Gathering Critical Information
For each deployment gather critical information including (but not limited to) the following
Purchaser organizational data Locations Companies Business Units Groups and Users
Supplier organizational data Suppliers and Contacts
Commodity Information Internal and External Categories
The current implementation methodology recommends defining these attributes before going live to maximize efficiency Data attributes may be modified or added throughout the life of the implementation using the Setup module
51 Overview of Master Data
SAP Sourcing provides the following means to install master data
Manual entry from Setup
Import from CSV file
Import from deployment workbook
Define the components of master data that exist within each context after contexts and clusters have been defined The following table lists the master data object types requiring definition for the enterprise The data classification Configurable indicates that default data is provided but can be customized for deployment The data classification Custom indicates that no default data is provided and the deployment must provide the data
Table 10
Contents Data Classification Description
Numbering table definitions for enterprise-level objects
Configurable Defines the format of IDs For example an RFP might follow the format RFP-nnnn where nnnn increments for each new rfp created
Default list of extendible enterprise-level objects
Configurable Lists those enterprise-level objects which can be extended
Default list of objects that can used referenced in an extension
Configurable One type of extension allows a reference to another type of object This list identifies the allowed kinds of references
Value List Types Configurable Default value list types
Value List Values Configurable Default value list values such as countries time zones and so on
22
PUBLICcopy Copyright 2015 SAP SE or an SAP affiliate companyAll rights reserved
SAP Sourcing 90Master Data
Contents Data Classification Description
Units of Measure Configurable Standard units of measure used throughout the system
Currencies Configurable A list of all currencies used by your organization
Currency Conversions Configurable Default values for any currency conversion rates
Document Link Definitions Configurable Lists the allowable kinds of document links
Scheduled Task Types Configurable Used to define categories of scheduled tasks
Scheduled Tasks Configurable Lists scheduled or background tasks
Metrics Configurable Used to define metrics for scorecards
Contract Terms Configurable Used to define terms on contracts
Contract Types Configurable Types define what set of contract features are available
Project Types Configurable Types define what set of Project features are available
RFx Types Configurable Types define what set of RFx features are available
Auction Types Configurable Types define what set of Auction features are available
DA Types Configurable Types define what set of Demand features are available
Security Profiles Configurable Identifies the security profiles installed with the system
Rights on security profiles Configurable Defines the rights for each security profile
Time Periods Configurable Defines information about quarters years and so on
Reporting Calendars Configurable Used for managing how data is reported with relation to the calendar
Collaborator Roles Configurable Defines the role (rights and responsibilities) of a persongroup on a specific document instance
Document Security Templates Configurable Sets up the default collaborators and security when new documents are created
SAP Sourcing 90Master Data
PUBLICcopy Copyright 2015 SAP SE or an SAP affiliate company
All rights reserved 23
Contents Data Classification Description
Shared Discussions Configurable A list of discussion forums available as a channel and not relating to a specific document
Workbench Channels Configurable Channels available on a users desktop
Workbench IFrames Configurable Data to create iFrames
Workbench Channel Configurations Configurable Channel configuration parameters
Workbench Pages Configurable Pre-defined desktop pages
Workbench Page Configurations Configurable Channel content and placement settings for predefined pages
Configuration Properties Configurable Various deployment settings including mail
Enterprise Extensions Custom Actual extensions on enterprise-level objects
Directory Configurations Custom Used for the LDAP directory configuration
Geographies Custom Used to represent the Geographic regions
Locations Custom Locations of plants companies and other organizational elements
Payment Terms Custom Terms of payment between the purchaser and supplier
External Categories Custom Typically this data set consists of industry standard category codes such as UN-SPSC or SIC codes if used by your organization
Internal Categories Custom All internal purchasing categories used by the purchaser
Vendors Custom Used in all components for various purchasing actions
Vendor Extensions in List Form Custom Actual extensions on enterprise-level objects
Companies Custom Used by all components of the system for purchasing actions such as Auctions and RFPs
Registration Categories Custom Defines mapping from arbitrary category names to actual internal or external categories Used during supplier self-registration
24
PUBLICcopy Copyright 2015 SAP SE or an SAP affiliate companyAll rights reserved
SAP Sourcing 90Master Data
Contents Data Classification Description
Organizational Units Custom Further definition of the organizational hierarchy Use to define departments business units and so on
Groups Custom Arbitrary groups of purchaser users
Contacts Custom Used for all suppliers to distinguish the various contacts at each supplier
Accounts Custom Handles all user accounts for the system
Terms Templates Custom Standard terms and conditions phrases to which a supplier must agree before accessing an event
Purchasing Organization Custom An organizational unit in SAP ERP subdividing an enterprise according to the requirements of purchasing
Purchasing Group Custom A key for a purchaser or group of purchasers in SAP ERP
Vendor Account Group Custom A classifying feature of supplier master records in SAP ERP
Business System Custom Represents a system in the landscape for example SAP Sourcing or SAP ERP
Text Id Custom Represents SAP ERP header and item texts
Transaction Type Custom Represents SAP ERP transation types
After configuring the enterprise master data you must next configure the company master data This data must be created once for each sub-context This example only uses a single context so this data must only be created once
Table 11
Contents Data Classification Description
UFNs System Metadata for RFx utility functions
System Answered Sources Configurable Defines the available sources of system answered questions
Company Extension Definitions Configurable List of company-scoped objects which have extensions
Document Security Templates Configurable Sets up the default collaborators and security when new documents are created
Contract Generation Phases Configurable Used to define Phases for Contract Generation library documents
SAP Sourcing 90Master Data
PUBLICcopy Copyright 2015 SAP SE or an SAP affiliate company
All rights reserved 25
Contents Data Classification Description
Contract Generation Tags Configurable Used to define Tags for Contract Generation
Company extensions Custom List of extensions on individual object types
masterdataActivity Custom Used for general accounting purposes
Cost Centers Custom Used for accounting purposes to assign cost on a center by center basis
Cost Center Groups Custom
Entities Custom Used for accounting purposes for purchasing by division
GL Accounts Custom Used for general accounting purposes
Plants Custom Plants or facilities
Materials Custom Standard materials for use in line items
Category Managers Custom Users who are responsible for certain categories
Master Data Security
When configuring and importing Master Data there are some things to remember about security
1 Each piece of importable master data has an Import right as part of its ACL list By default this right is only added for the System Administrator security profile and therefore only those users can import master data out of the box As always an admin can add Import rights to other security profiles on and object-by-object basis
ExampleIf Supplier Administrators need to import Supplier records then that can be enabled
2 When importing Master Data be it via CSV XLS XML etc the user running the imports must have Import right allowed for all objects in question The Enterprise user is considered trusted and can import any of these objects
52 Create Master Data Manually
Procedure
NoteThe user account being used to import the following must have Allow Import rights on these specific objects If you do not have Allow Import on these objects it must be added or the import will fail
1 Log on as the enterprise user
26
PUBLICcopy Copyright 2015 SAP SE or an SAP affiliate companyAll rights reserved
SAP Sourcing 90Master Data
2 Create objects from within the Setup module
3 Log on as a purchaser user with administrative rights to configure company master data
For more information see the SAP Sourcing help at helpsapcomsourcing To access the help system scroll to SAP Sourcing 90 Help for Purchasers and choose a language In the help choose Setup System Setup Master Data
53 Import Master Data Using CSV File
NoteThe user account being used to import the following must have Allow Import rights on these specific objects If you do not have Allow Import on these objects it must be added or the import will fail
You can import master data files with CSV XLS or XLSX format in two ways
Use the standard web user interface
Use a client application distributed with the system which allows data to be imported outside of the web environment
The following procedure describes how to import using the web-based UI
Procedure
1 If application users have already been created log on as a purchaser user with administrative rights If users have not been created log on as the enterprise user
2 Choose Setup System Administration Import Export Tools Import Data and then choose OK
3 Choose Create
The import wizard opens
4 Specify whether you want to upload the file to the server or whether the file is already located on the application server and choose Next
5 Choose Upload Import File and select the CSV or Deployment Workgroup file to import
6 For CSV files select the object type and choose Next
7 Indicate whether you want to wait for the import to finish or perform the import in the background and then choose Next
8 Choose Finish to view the results
SAP Sourcing 90Master Data
PUBLICcopy Copyright 2015 SAP SE or an SAP affiliate company
All rights reserved 27
54 Workbooks
541 Overview of Workbooks
NoteThere are many sheets in the workbooks that have the prefix eso While these sheets may appear as duplicates of other sheets the data in them is in fact different These sheets should be imported by default You may also add data to these sheets if you would like to augment the data provided in the sample workbooks
We recommend using the deployment workbook for initial deployment of the system to ensure that all required data is imported into the system
To facilitate the import of data SAP Sourcing provides an alternative to CSV files for import SAP Sourcing provides the ability to import Microsoft Excel files containing one or more master data imports The system processes these Excel files directly without the user having to export the data to a raw CSV file The Enterprise Deployment Workbook and Company Deployment Workbook are two sample deployment workbooks delivered with SAP Sourcing
Anyone with system administrator access rights can download the deployment workbooks from the web user interface The deployment workbooks are included in the online Reference Guide (RG)
When starting a new deployment project preserve the original workbook templates by making a copy of them and saving them with a new name Import data using your modified templates only By doing so you assure continuity if future additional deployments are required
NoteKeep the following in mind when using deployment workbooks
The Configuration Sheet controls the import process Refer to the Help Sheet for input specifications of Configuration Sheet columns
The system can import the workbooks directly but there are limitations to what Excel constructs are supported The Help Sheet describes the rules that must be observed
The same importing process supports both CSV files and Excel workbooks
There is a one to one relationship with the workbook configuration file and the worksheet tabs
542 Download and Customize Workbooks
The sample enterprise and company workbooks that you download from SAP Sourcing are designed for you to configure a base system using a sample enterprise context We recommend modifying the default deployment workbooks Choose the appropriate workbooks from this table
Table 12
System Workbooks
SAP Sourcing Enterprise Deployment Workbook
Company Deployment Workbook
Users setting up a base system should adjust the various settings in these workbooks prior to running them in the system For example the company data should be updated to reflect specifics about the company that is
28
PUBLICcopy Copyright 2015 SAP SE or an SAP affiliate companyAll rights reserved
SAP Sourcing 90Master Data
installing the system Similarly you should review other tabs to ensure that the configurations are consistent with the desired implementation For details on customizable fields see Master Data [page 22]
Procedure
1 Log on as the enterprise user and choose Reference Guide Download the sample enterprise and company workbooks appropriate for your system
NoteThe enterprise workbook should be run as the enterprise user The company workbook should be run as a system administrator associated with the company object intended to be configured
2 From the Enterprise Deployment workbook open the file and find the sheet labeled locations and edit this sheet as necessary
Only one location is required
3 Find each sheet review each sheet and the comments in the sheet and update the data accordingly
4 Provide at least one internal category
5 Find the sheet labeled companies and edit it as necessary
6 Repeat for org_units groups accounts and so on
Your are establishing a hierarchy To configure the hierarchy correctly you must ensure that the child references the parent correctly For example the PARENT column in the business_units page should include a valid EXTERNAL_ID from the companies sheet
NoteTo build all custom data in the user interface simply deactivate the import of the above data types in the deployment workbook See the Help page for instructions on how to skip a specific worksheet
7 Import the enterprise and company workbooks into SAP Sourcing by choosing Setup System Administration Import and Export Tools Import Data and then choose Create
543 Import Master Data Using Workbooks
Procedure
1 Log on as the user specified in this table and choose Setup
Table 13
Workbook Login User
Enterprise workbook
Enterprise user
Company workbook Purchaser user
2 From the Import and Export Tools dropdown chooseImport Data and then choose OK
The Import Data page appears
SAP Sourcing 90Master Data
PUBLICcopy Copyright 2015 SAP SE or an SAP affiliate company
All rights reserved 29
3 Choose Create to start a new import job
4 Choose Upload to the Server and then choose Next
5 Select the modified workbook and choose Next
6 Wait for the import to finish and choose Next
Typically running the enterprise workbook can take several minutes
30
PUBLICcopy Copyright 2015 SAP SE or an SAP affiliate companyAll rights reserved
SAP Sourcing 90Master Data
6 Create and Verify Purchaser User
Procedure
For the SAP NetWeaver UME driver users should be created in SAP Sourcing and the SAP NetWeaver UME with the same username
For LDAP drivers depending on how the LDAP was set up you must perform one of the following
Create the user in SAP Sourcing and supply the information FROM the LDAP
If you have access create the account and supply the information TO the LDAP
In either case an e-mail is generated giving the user a path to the application and his or her user name If the account is created a temporary password is also mailed A system property determines whether this information is delivered in the same e-mail or separate e-mails
1 Choose Setup WYSIWYG Page Customization User Account and create a purchaser user as follows
1 On the Account Properties tab enter required information
2 On the Account Management tab enter information as follows
Enable User to Login Select
Directory Select as needed
User ID Type userid
Create Directory Account Select
Generate a New Password Select
Send Notification Select
3 On the Security tab enter information as follows
Purchaser Select
Purchaser Manager Select
System Administrator Select
Supplier Administrator Select
Make sure this first user is given Administrator privileges to import the Company Workbook
2 Wait for the e-mail to be sent and received If you do not receive it check the following
To verify the mail was sent choose Setup System Administration Processed Messages
To check for stuck or failed messages choose Setup System Administration Queued Messages
3 To test the new account log on as a purchaser user using the credentials sent in the e-mail
4 Reset your password and choose OK
If you can successfully log into the new purchaser account the context cluster and directory are properly configured and the SMTP server is processing e-mail
SAP Sourcing 90Create and Verify Purchaser User
PUBLICcopy Copyright 2015 SAP SE or an SAP affiliate company
All rights reserved 31
7 Create and Verify Supplier User
Procedure
Create a supplier user to test the supplier portal A supplier user is a contact on a supplier record
1 Choose Supplier Management Create Supplier
2 Enter and save the required information
3 Choose the Contacts tab
4 Under Supplier Contacts choose Add
5 Enter and save the required information
6 Log on as a supplier user using the credentials provided in the test user e-mail
7 Reset the password as prompted and accept the usage terms
32
PUBLICcopy Copyright 2015 SAP SE or an SAP affiliate companyAll rights reserved
SAP Sourcing 90Create and Verify Supplier User
8 Install Company Logo
Procedure
NoteWe do not recommend installing an image larger than 200 x 29
1 Log on as the enterprise user
2 Attach the logo as follows
1 Choose Setup Organization and Accounting Information Companies
2 Select the enterprise company from the list and choose Edit Document
3 Attach your logo image to the company using the Logo Attachment field
3 Save your entries
Resize Company Logo
If you have uploaded a company logo in your source release you must resize the image to 200x29
1 Log on as a purchaser user with system administrator rights
2 Choose Setup
3 On the Master Data tab find the Organization and Accounting section and choose Companies
4 Choose the company
5 Choose Edit
6 In the Logo field upload the resized image
SAP Sourcing 90Install Company Logo
PUBLICcopy Copyright 2015 SAP SE or an SAP affiliate company
All rights reserved 33
9 Specify Internal Address of SAP Sourcing Server
Procedure
When SAP Sourcing is first installed or whenever a new server is added to an application cluster the Internet address that is used for internal communications within SAP Sourcing is initially set to the external host name of the server In many cases this will result in unexpected or delayed behavior in the application
If the application landscape includes a network firewall accessing the server through this name requires exiting the firewall and re-entering If the firewall blocks incoming traffic on SAP Sourcingrsquos notification ports this will result in failure to deliver notifications for some events To avoid this do the following
1 Log on as the system user
2 Open the System Information record for editing
3 Change the value in the Internal Address field to an internal IP address or host name
4 Save your changes
34
PUBLICcopy Copyright 2015 SAP SE or an SAP affiliate companyAll rights reserved
SAP Sourcing 90Specify Internal Address of SAP Sourcing Server
10 Update Master Time Zone
Procedure
This procedure is required to enable SAP Sourcing to normalize all dates and times that are used in sourcing events Normalizing allows time fields to be presented differently for each user according to his or her preferred time zone while maintaining a consistent reference to the same point in time
1 Log on as the system user
2 Choose Setup Configuration System Properties
3 Edit the systemmaster_timezone property in the system set This property value should be set to the Java time zone identifier that corresponds to the current database server time zone
NoteThe SAP Sourcing Time Zone Value List Type provides a relatively comprehensive list of java time zone identifiers To view this list log on as a purchaser user and navigate to Setup Master Data Value List Types and Values Time Zone The Alternate Name column of this list contains the java time zone identifier for the corresponding time zone
ExampleldquoAmericaNew_Yorkrdquo is the alternate name of the SAP Sourcing Timezone ValueListValue for ldquo(GMT-500) Eastern Standard Timerdquo
SAP Sourcing 90Update Master Time Zone
PUBLICcopy Copyright 2015 SAP SE or an SAP affiliate company
All rights reserved 35
11 Install License Key
Procedure
You must install a license key before the SAP Sourcing system can be used in production mode
1 Choose Setup System Administration System Management System Information
2 Note the installation ID from the Installation ID field on the Service Registration tab
3 Create OSS ticket this ID and a list of the requested modules to license (include the optimizer) to SAP Customer Support You will receive a csv file including all the license keys
NoteRequesting the optimizer key without installing an optimizer server will result in a high volume of irrelevant optimizer-related messages in your log files If you do not intend to install an optimizer server do not request an optimizer key
4 Log on as the enterprise user and choose Setup System Administration Import and Export ToolsImport Data
5 Use the import tool to import the licenses you received from Support as follows
1 On the Import Wizard Select a File screen type a description such as License Keys and choose Upload Import File to upload the csv file Choose Next
2 On the Import Wizard CSV Contents screen select Module License as the Object Type choose Next and follow any additional prompts to finish the process The successful file import is displayed on the File Import tab
6 Choose Setup System Administration System Management System Information
7 Choose the Components tab and verify that the appropriate licenses are checked under SRM Module Licenses
8 If you are installing the optimizer verify that a new Optimizer tab appears and displays an appropriate Status Queue value and JVM information (If the optimizer is not installed the Status Queue value is OFFLINE and the JVM Information is set to unknown)
36
PUBLICcopy Copyright 2015 SAP SE or an SAP affiliate companyAll rights reserved
SAP Sourcing 90Install License Key
12 Change Session Timeout
Procedure
NoteThis is optional
The deployment descriptor for the SAP Sourcing application defaults to a 30-minute session timeout or to the value that was set during installation
NoteThe above property should be set longer than the below two properties
To change this setting
1 Log on as the system user and set the following system property in SAP Sourcing
uppmeteringlogin_inactivity_timeout and set to the timeout that was chosen when running the configure utility
2 Property uppmeteringcleanup_interval defines the time between runs of the daemon which removes inactive sessions It is recommended that this value be set to a value that is slightly larger than the uppmeteringlogin_inactivity_timeout setting is set to
3 Set the time-out using the configure tool For information about the configure tool see the Installation Guide for SAP Sourcing 90 on the SAP Service Marketplace at servicesapcomeso SAP Sourcing On-Premise SAP Sourcing 90
NoteBoth internal property in SAP Sourcing and configuration tool in NetWeaver should be set to the same value
SAP Sourcing 90Change Session Timeout
PUBLICcopy Copyright 2015 SAP SE or an SAP affiliate company
All rights reserved 37
13 Enable Contract Authoring
Contracts amendments and clauses use the Word service This service must be referenced For more information see ldquoCreate OfficeAutomationUser Accountrdquo in the Installation Guide for SAP Sourcing 90 on SAP Service Marketplace at servicesapcomeso SAP Sourcing On-Premise SAP Sourcing 90
Procedure
Configure a path to the Word service in SAP Sourcing as follows
1 Choose Setup System Properties
2 From the Name dropdown list choose contractgenserviceurl
3 Set the value to ltprotocolgtlthostnamegtltvirtual directorygtwordserviceasmx
38
PUBLICcopy Copyright 2015 SAP SE or an SAP affiliate companyAll rights reserved
SAP Sourcing 90Enable Contract Authoring
14 e-Signature
To enable e-Signature functionality users first get user accounts from EchoSign EchoSign adds the users to the EchoSign SAP channel System administrators define the integrated system configuration and set up the management of customer and user accounts System administrators can schedule automated checks of contract document signature statuses System users can check the availability of e-Signature components
141 Set Up EchoSign Account and System Configuration
Procedure
Set Up EchoSign Account
Before a system administrator enables e-Signature features for a customer EchoSign adds the customer to the EchoSign SAP channel The customer gives the account key provided by EchoSign to the system administrator The system administrator then configures e-Signature to work with EchoSign
Set Up Integrated System Configuration
Adding an EchoSign account to SAP Sourcing configuration enables e-Signature functionality in SAP Sourcing To set up an EchoSign account for use with e-Signature a system administrator creates an integrated system configuration object for EchoSign integration
1 Log on as the enterprise user
2 Choose Setup Integrated System Configuration
3 On the subsequent screen choose New
4 On the subsequent screen select EchoSign for System Type and select Continue
5 Under EchoSign Properties the customer enters the EchoSign account key provided the customer by EchoSign and choose Done
Set Up Proxy Settings
To configure EchoSign on a NetWeaver-based system follow these steps
1 Configure the HTTP properties as described on the SAP Help Portal at helpsapcomsaphelp_nw73helpdataen48479b6163524bb9e10000000a42189bframesethtm
2 To add proxy parameters to JVM settings in NetWeaver navigate to [host][port]nwa ConfigurationInfrastructure Java System Properties Additional VM Properties and add the following parameters with the appropriate values
-DhttpproxyHost -DhttpproxyPort -DhttpsproxyHost -DhttpsproxyPort
SAP Sourcing 90e-Signature
PUBLICcopy Copyright 2015 SAP SE or an SAP affiliate company
All rights reserved 39
NoteIf your proxy server requires a username and password provide this information with the following parameters
-DhttpproxyUser -DhttpproxyPassword -DhttpsproxyUser -DhttpsproxyPassword
3 Import the SSL certificate file into the NetWeaver key storage as follows
1 Navigate to lthostgtltportgtnwa Security Certificates and Keys
2 Select the WebServiceSecurity keystore view
3 If you are updating or replacing the EchoSign certificate remove any previous certificates with the same Common Name
4 Choose Import Entry and select x509 certificate as the entry type
5 Get the EchoSign certificate from your browserrsquos certificate interface
NoteSpecific steps will vary from browser to browser but the general process should be similar Here are sample instructions for Firefox
1 Navigate to secureechosigncomservicesEchoSignDocumentService9
NoteYou can ignore the error message that says Invalid SOAP Request
2 Click on the lock icon next to the URL
3 Click More Information
4 Open the Security tab
5 Click View Certificate
6 Open the Details tab
7 Click Export
8 From the Save as Type dropdown list choose the SSL certificate for the version you require
9 If Windows does not recognize the exported file as a certificate add a cer or crt extension to the filename
6 Restart NetWeaver
Change EchoSign service URL
SAP Sourcing ships with the current EchoSign service URL Change the service URL value in System Properties only when EchoSign changes the service URL To change this value do the following
1 Log on as the system user
2 On the System Setup tab choose System Properties
3 Open contractgenesignature_url from the Properties list
4 Enter the new EchoSign service URL provided by EchoSign
40
PUBLICcopy Copyright 2015 SAP SE or an SAP affiliate companyAll rights reserved
SAP Sourcing 90e-Signature
NoteSet the URL property only if the EchoSign domain has changed The current URL is secureechosigncomservicesEchoSignDocumentService9 Note that the API version should be set to 9
Change the length of the EchoSign timeout
By default SAP Sourcing sets the length of the EchoSign timeout to 300000 milliseconds or five minutes Change the length of the EchoSign timeout only if the default timeout causes issues when you send documents to EchoSign
1 Log on as the system user
2 On the System Setup tab choose System Properties
3 Choose contractgenesignature_timeout from the Name dropdown menu
4 Enter a numeral specifying the desired length in milliseconds for the EchoSign timeout in the Value field The Value field requires no minimum nor maximum value nor number formatting
142 Check EchoSign Configuration Status
Procedure
1 Log on as the system user
2 Choose System Information Then on the subsequent screen choose the Audits tab
3 Choose the correct context for the customers location from the Context dropdown menu
4 In the Availability pane OK appears in the Status column next to EchoSign Availability if you configured SAP Sourcing correctly for EchoSign
143 Set Up User Rights
Procedure
Assign Right to Send Contract Documents for Signatures or to Resolve Errors
To enable a user to send contract documents for signatures a customer system administrator adds Contract e-Signature to the users security profiles
To assign the right to send contract documents out for signatures to a user a system administrator does the following
1 In Setup choose System Administration Internal User Accounts
2 Select the desired user account
3 Choose the Security tab Then choose Contract e-Signature or Contract e-Signature Admin
A system administrator can assign either of the following e-Signature rights to a user
SAP Sourcing 90e-Signature
PUBLICcopy Copyright 2015 SAP SE or an SAP affiliate company
All rights reserved 41
Table 14
Right Description
ESO_CONTRACT_ESIGNATURE Users with this right can send contract documents out for signatures using the e-Signature feature
ESO_CONTRACT_ESIGNATURE_ADMIN This right allows designated users to resolve errors Users with this right can change a contract document while it is out for signatures Users with this right can change the signature status of a contract document to Error and can thus allow the contract document author to unlock a frozen document System administrators assign this right only to other administrators not to standard users
4 Choose Done
144 Resolve e-Signature Errors
Procedure
Contract Document Status Frozen
Unexpected errors such as network or system errors can freeze the status of a contract document to Sending for e-Signature or Out for Signature A user with the right ESO_CONTRACT_ESIGNATURE_ADMIN can unfreeze the status of the contract document so that the contract author can cancel the e-Signature process A system administrator can assign the right ESO_CONTRACT_ESIGNATURE_ADMIN to a user
1 The contract author adds a user with the ESO_CONTRACT_ESIGNATURE_ADMIN right to the affected Master Agreement as a collaborator
2 The user with the ESO_CONTRACT_ESIGNATURE_ADMIN right manually changes the status of the frozen contract document to ERROR
3 The contract author logs in to EchoSign and manually cancels the e-Signature process for the contract document
Invalid Password Error
You may receive the following error message Error Invalid password for user sending a Contract Document to EchoSign for signature
This message indicates that the user sending a request for e-signatures via EchoSign is not properly set up in their EchoSign account Contact EchoSign for assistance in resolving this error
145 Set Up Scheduled Task to Retrieve e-Signature Status
Procedure
You can set SAP Sourcing to retrieve the e-Signature statuses of all contract documents at a frequency you specify automatically However an end user need not wait for these automated retrievals to see the current e-
42
PUBLICcopy Copyright 2015 SAP SE or an SAP affiliate companyAll rights reserved
SAP Sourcing 90e-Signature
Signature status of a contract document End users can get instant updates of the e-Signature status manually through the contract document user interface
1 Log on as the enterprise user
2 Choose Setup
3 On the System Setup tab choose Scheduled Tasks
4 On the subsequent page choose New then select the e-Signature Status radio button then choose Continue
5 Enter the display name and start date Set the frequency and end date as desired
NoteSAP recommends automatically retrieving e-Signature statuses daily and setting the retrievals to run at night
6 Choose Save
SAP Sourcing 90e-Signature
PUBLICcopy Copyright 2015 SAP SE or an SAP affiliate company
All rights reserved 43
15 Configure Workbench
The CLM system is delivered with a base workbench page that is available to all internal users Additionally the system is configured with a workbench page intended to be used by CLM contract managers
The workbench page is established in the system but requires additional configuration to make it available to the desired users This configuration is done by adding collaborators to the Contract Management Workbench page
Prerequisites
You must be logged on as the enterprise user
Procedure
Configure the Contract Management Workbench page with the individual users or user groups that should also have access to the page
To do this go to Setup System Setup Workbench Workbench Page All Workbench Pages Edit the Contract Management page and add collaborators
44
PUBLICcopy Copyright 2015 SAP SE or an SAP affiliate companyAll rights reserved
SAP Sourcing 90Configure Workbench
16 Configure Branding
The following procedures enable you to change the branding from the default SAP Sourcing to SAP CLM Four branding items are affected
Branding text in the title bar of the browser (for example SAP Sourcing)
SAP CLM logo image for the purchaser login page
SAP CLM Business Partner logo image for the supplier login page
Images on the login page
Images on the splash screen
Procedure
Change the Branding after Installation
1 Choose Setup System Properties
2 Change the value of systembrand_name to (for example) SAP CLM
Themes
NoteThe following two steps require editing of themes For futher information about themes see the SAP Sourcing help at helpsapcomsourcing To access the help system scroll to SAP Sourcing 90 Help for Purchasers and choose a language In the help choose Setup Themes
1 Open the current enterprisersquos theme Branding area and choose Purchaser Login Banner link then Image link Delete the original path in Image Path field and paste imageslogoslogo_sapXCLMgif
2 Choose Delete on Background Image field
3 Choose the Supplier Login Banner link then Image link Delete the original path in Image Path field and paste imageslogoslogo_sapXCLMBusinessPartnergif
4 Choose Delete on Background Image field
SAP Sourcing 90Configure Branding
PUBLICcopy Copyright 2015 SAP SE or an SAP affiliate company
All rights reserved 45
17 Configuring Supplier Workflow Management
By default supplier workflow management feature is disabled in SAP Sourcing To enable this feature you need to perform following general steps
1 Create Workflow Definitions
2 Create Supplier Configurable Phase Definition
3 CreateModify Supplier Type
4 Create Supplier Field Access Definition (optional)
5 Configure Security Templates
6 Assign Supplier Types to Suppliers
7 Configure Supplier UI Mapping
The following subsections provide details for each of these steps
Create Workflow Definitions
1 Click Setup in the toolbar at the top of the page and select Platform
2 In the Workflow section of System Setup click on Workflow Definitions
3 On the Workflow Definitions List page click New
4 On the Workflow Definition Summary page fill in the fields with workflow information For details see the Field Help for Workflow Definition Summary page
5 Click the Add New Version button to add a process template to the workflow definition For details see the Field Help for Process Template Dialog Box page
6 Click the Save button in the toolbar
7 Create another Workflow Definition if necessary
Create Supplier Configurable Phase Definition
Supplier phases determine the actions that can be performed on supplier registration and modification requests To create a supplier configurable phase definition
1 Click Setup in the toolbar at the top of the page and select Platform
2 In the Suppliers section of Document Setup click on Supplier Configurable Phase Definition
3 On the Supplier Configurable Phase Definition List page click New
4 On the Header page fill in the fields with phase information For details see the Field help for Supplier Configurable Phase Definition Header page
5 Click Add to add phases to the definition
6 In the dialog box that appears select each phase to include in the phase definition and click OK
7 (optional) Click the Edit icon for each phase to edit phase information including the sequence of phases in the workflow On this page you can assign workflow definition and supplier field access definition For details see the Field help for Supplier Configurable Phase Header page
8 Click the Save button in the toolbar
46
PUBLICcopy Copyright 2015 SAP SE or an SAP affiliate companyAll rights reserved
SAP Sourcing 90Configuring Supplier Workflow Management
9 Create another Supplier Configurable Phase Definition if necessary
CreateModify Supplier Type
Supplier types can be used to determine whioch workflow phase definition to enable in a supplier registration or modification requests The Configurable Phase Definition field of Supplier Type is responsible for defining whether registrationmodification requests will use workflow and which phases will have these requests If Configurable Phase Definition is empty then supplier registration and modification requests will not have configured phases and any supplier administrator will be able to approve or deny request of such type as it was in previous versions of SAP Sourcing To enable supplier workflow management some supplier-configurable phase definition must be assigned to supplier types
SAP Sourcing provides one default supplier type You can modify this type and create new ones
1 Click Setup in the toolbar at the top of the page and select Platform
2 In the Suppliers section of Document Setup select Supplier Type
3 On the Supplier Type List page click New for creating new type or select existing from the list for editing
4 On the Type page fill in necessary fields On this page you can assign Supplier Configurable Phase Definition to Supplier Type For details see the Field Help for Supplier Type page
Create Supplier Field Access Definition
This step is optional
Supplier Field Access Definition allows you to configure access rules foe approver on specific phase
To create a supplier field access definition
1 Click Setup in the toolbar at the top of the page and select Platform
2 In the Suppliers section of Document Setup select Supplier Field Access Definition
3 On the Supplier Field Access Definition List page click New
4 On the UI page fill in necessary fields For details see the Field Help for Supplier Field Access Definition page
5 Click the Save button in the toolbar
6 Open existing Supplier Configurable Phase Definition
7 Click Edit
8 Click the Edit icon for the phase where you want to configure access rights for approvers This should be the approval phase
9 Click the Lookup icon to select a supplier field access definition to associate with this phase
10 Save the Supplier Configurable Phase Definition
Configure Security Templates
This is a very important configuration step In the case of supplier registrationsmodifications without configured workflows requests can be viewed and approved by any Supplier Administrator But in the case of new functionality collaborator security is used to define access rights A document security template is a set of rules governing the way an SAP Sourcing document assigns collaborator roles You should configure collaborators defined by role and user type that are automatically added to a registration and modification requests
You must configure two security templates first for Workflow Supplier Registration and second for Workflow Supplier Modification The following must be configured in these templates
The document owner must be any specified buy-side user Otherwise automatic phase transitions will not work for sell-side and the phase will need to be changed manually by any buy-side user
SAP Sourcing 90Configuring Supplier Workflow Management
PUBLICcopy Copyright 2015 SAP SE or an SAP affiliate company
All rights reserved 47
Document creator (current user) must be added to collaborator list with a role that allows viewing editing and changing phases (eg Collaborator)
Supplier administrators should be included to collaborator list to be able view and manually complete registrationmodification requests in case automatic completion should fail for some reason
Assign Supplier Type to Supplier
After the upgrade procedure one default supplier type is created and assigned to all suppliers It will be used to recognize phases for supplier modifications via workflow The supplier type can be changed for any supplier as follows
1 Open the supplier whose supplier type you want to reassign
2 Press Edit
3 Click the Lookup icon under the Document Type field
4 Select a new supplier type
5 Click Ok
6 Click Save
NoteWhen the supplier is created via workflow the supplier type used for creation is assigned to created supplier
Configure Supplier UI Mapping
The supplier type can be mapped to any supplier-side self-registration form The Supplier Type UI includes a collection of Supplier registration UI Mappings This allows you to configure the mapping between supplier type and self-registration forms
1 Open any Supplier Type
2 Click Edit
3 Click Add under Sell-Side Supplier Registration UI Mapping to add the UI page that will be mapped to this type
4 Click Save
NoteThe self-registration form can be assigned to only one supplier type If no form is assigned to a supplier type the default supplier type will be used for registration
48
PUBLICcopy Copyright 2015 SAP SE or an SAP affiliate companyAll rights reserved
SAP Sourcing 90Configuring Supplier Workflow Management
Typographic Conventions
Table 15
Example Description
ltExamplegt Angle brackets indicate that you replace these words or characters with appropriate entries to make entries in the system for example ldquoEnter your ltUser Namegtrdquo
Example Example Arrows separating the parts of a navigation path for example menu options
Example Emphasized words or expressions
Example Words or characters that you enter in the system exactly as they appear in the documentation
wwwsapcom Textual cross-references to an internet address
example Quicklinks added to the internet address of a homepage to enable quick access to specific content on the Web
123456 Hyperlink to an SAP Note for example SAP Note 123456
Example Words or characters quoted from the screen These include field labels screen titles pushbutton labels menu names and menu options
Cross-references to other documentation or published works
Example Output on the screen following a user action for example messages
Source code or syntax quoted directly from a program
File and directory names and their paths names of variables and parameters and names of installation upgrade and database tools
EXAMPLE Technical names of system objects These include report names program names transaction codes database table names and key concepts of a programming language when they are surrounded by body text for example SELECT and INCLUDE
EXAMPLE Keys on the keyboard
SAP Sourcing 90Typographic Conventions
PUBLICcopy Copyright 2015 SAP SE or an SAP affiliate company
All rights reserved 49
wwwsapcom
copy Copyright 2015 SAP SE or an SAP affiliate company All rights reservedNo part of this publication may be reproduced or transmitted in any form or for any purpose without the express permission of SAP SE or an SAP affiliate companySAP and other SAP products and services mentioned herein as well as their respective logos are trademarks or registered trademarks of SAP SE (or an SAP affiliate company) in Germany and other countries Please see wwwsapcomcorporate-enlegalcopyrightindexepxtrademark for additional trademark information and noticesSome software products marketed by SAP SE and its distributors contain proprietary software components of other software vendors National product specifications may varyThese materials are provided by SAP SE or an SAP affiliate company for informational purposes only without representation or warranty of any kind and SAP SE or its affiliated companies shall not be liable for errors or omissions with respect to the materials The only warranties for SAP SE or SAP affiliate company products and services are those that are set forth in the express warranty statements accompanying such products and services if any Nothing herein should be construed as constituting an additional warrantyIn particular SAP SE or its affiliated companies have no obligation to pursue any course of business outlined in this document or any related presentation or to develop or release any functionality mentioned therein This document or any related presentation and SAP SEs or its affiliated companies strategy and possible future developments products andor platform directions and functionality are all subject to change and may be changed by SAP SE or its affiliated companies at any time for any reason without notice The information in this document is not a commitment promise or legal obligation to deliver any material code or functionality All forward-looking statements are subject to various risks and uncertainties that could cause actual results to differ materially from expectations Readers are cautioned not to place undue reliance on these forward-looking statements which speak only as of their dates and they should not be relied upon in making purchasing decisions
- SAP Sourcing 90
-
- Table of Contents
- 1 Introduction
- 2 Define System Properties
- 3 Set Up SMTP Server
- 4 Context Cluster and Directory Configuration
-
- 41 Manual Context Cluster and Directory Configuration
- 42 Create Cluster Template
- 43 Create Internal Directory Template
- 44 Create External Directory Template
- 45 Managing the SSL Certificate
- 46 Create Tenant Configuration
-
- 5 Master Data
-
- 51 Overview of Master Data
- 52 Create Master Data Manually
- 53 Import Master Data Using CSV File
- 54 Workbooks
-
- 541 Overview of Workbooks
- 542 Download and Customize Workbooks
- 543 Import Master Data Using Workbooks
-
- 6 Create and Verify Purchaser User
- 7 Create and Verify Supplier User
- 8 Install Company Logo
- 9 Specify Internal Address of SAP Sourcing Server
- 10 Update Master Time Zone
- 11 Install License Key
- 12 Change Session Timeout
- 13 Enable Contract Authoring
- 14 e-Signature
-
- 141 Set Up EchoSign Account and System Configuration
- 142 Check EchoSign Configuration Status
- 143 Set Up User Rights
- 144 Resolve e-Signature Errors
- 145 Set Up Scheduled Task to Retrieve e-Signature Status
-
- 15 Configure Workbench
- 16 Configure Branding
- 17 Configuring Supplier Workflow Management
- Copyright and Trademarks
-
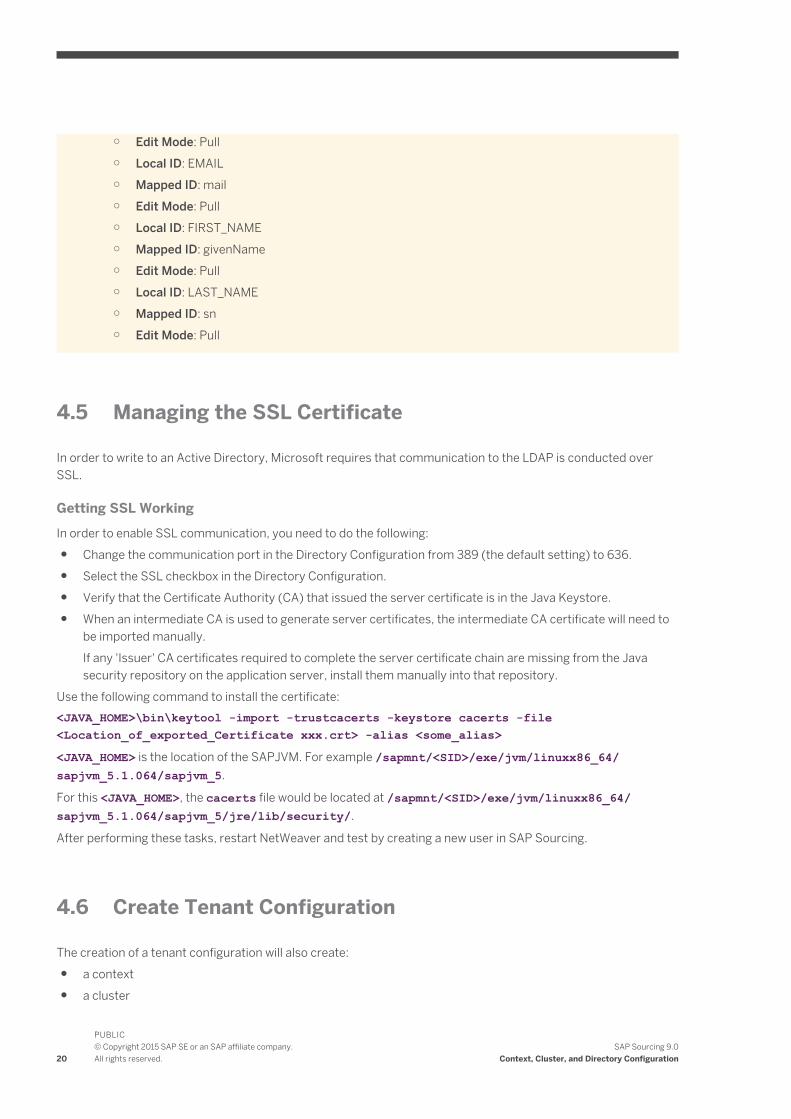
Edit Mode Pull
Local ID EMAIL
Mapped ID mail
Edit Mode Pull
Local ID FIRST_NAME
Mapped ID givenName
Edit Mode Pull
Local ID LAST_NAME
Mapped ID sn
Edit Mode Pull
45 Managing the SSL Certificate
In order to write to an Active Directory Microsoft requires that communication to the LDAP is conducted over SSL
Getting SSL Working
In order to enable SSL communication you need to do the following
Change the communication port in the Directory Configuration from 389 (the default setting) to 636
Select the SSL checkbox in the Directory Configuration
Verify that the Certificate Authority (CA) that issued the server certificate is in the Java Keystore
When an intermediate CA is used to generate server certificates the intermediate CA certificate will need to be imported manually
If any Issuer CA certificates required to complete the server certificate chain are missing from the Java security repository on the application server install them manually into that repository
Use the following command to install the certificate
ltJAVA_HOMEgtbinkeytool -import -trustcacerts -keystore cacerts -file ltLocation_of_exported_Certificate xxxcrtgt -alias ltsome_aliasgtltJAVA_HOMEgt is the location of the SAPJVM For example sapmntltSIDgtexejvmlinuxx86_64sapjvm_51064sapjvm_5
For this ltJAVA_HOMEgt the cacerts file would be located at sapmntltSIDgtexejvmlinuxx86_64sapjvm_51064sapjvm_5jrelibsecurity
After performing these tasks restart NetWeaver and test by creating a new user in SAP Sourcing
46 Create Tenant Configuration
The creation of a tenant configuration will also create
a context
a cluster
20
PUBLICcopy Copyright 2015 SAP SE or an SAP affiliate companyAll rights reserved
SAP Sourcing 90Context Cluster and Directory Configuration
an internal directory
an external directory
The information necessary can be retrieved from cluster and directory templates or entered manually
NoteFor multiple landscape use all the configurations must have the same name If not migration will be affected
Procedure
1 Log on as the system user and choose Tenant Configuration
2 Choose New
3 Create a new tenant configuration with the following (example) parameters
Using Templates
External ID tenantexample
Display Name Tenant Example
Sys Admin Password
Sys Admin Password (again)
Cluster Cluster Example
Directory Internal Site Internal Directory Example
Directory External Site External Directory Example
No Templates
External ID tenantexample
Display Name Tenant Example
Sys Admin Password
Sys Admin Password (again)
Overwrite Templates Configurations
Cluster (checked)
Directory Internal Site (checked)
Directory External Site (checked)
Cluster Configuration [page 16] step
Internal Directory Configuration [page 17] step
External Directory Configuration [page 18] step
SAP Sourcing 90Context Cluster and Directory Configuration
PUBLICcopy Copyright 2015 SAP SE or an SAP affiliate company
All rights reserved 21
5 Master Data
Gathering Critical Information
For each deployment gather critical information including (but not limited to) the following
Purchaser organizational data Locations Companies Business Units Groups and Users
Supplier organizational data Suppliers and Contacts
Commodity Information Internal and External Categories
The current implementation methodology recommends defining these attributes before going live to maximize efficiency Data attributes may be modified or added throughout the life of the implementation using the Setup module
51 Overview of Master Data
SAP Sourcing provides the following means to install master data
Manual entry from Setup
Import from CSV file
Import from deployment workbook
Define the components of master data that exist within each context after contexts and clusters have been defined The following table lists the master data object types requiring definition for the enterprise The data classification Configurable indicates that default data is provided but can be customized for deployment The data classification Custom indicates that no default data is provided and the deployment must provide the data
Table 10
Contents Data Classification Description
Numbering table definitions for enterprise-level objects
Configurable Defines the format of IDs For example an RFP might follow the format RFP-nnnn where nnnn increments for each new rfp created
Default list of extendible enterprise-level objects
Configurable Lists those enterprise-level objects which can be extended
Default list of objects that can used referenced in an extension
Configurable One type of extension allows a reference to another type of object This list identifies the allowed kinds of references
Value List Types Configurable Default value list types
Value List Values Configurable Default value list values such as countries time zones and so on
22
PUBLICcopy Copyright 2015 SAP SE or an SAP affiliate companyAll rights reserved
SAP Sourcing 90Master Data
Contents Data Classification Description
Units of Measure Configurable Standard units of measure used throughout the system
Currencies Configurable A list of all currencies used by your organization
Currency Conversions Configurable Default values for any currency conversion rates
Document Link Definitions Configurable Lists the allowable kinds of document links
Scheduled Task Types Configurable Used to define categories of scheduled tasks
Scheduled Tasks Configurable Lists scheduled or background tasks
Metrics Configurable Used to define metrics for scorecards
Contract Terms Configurable Used to define terms on contracts
Contract Types Configurable Types define what set of contract features are available
Project Types Configurable Types define what set of Project features are available
RFx Types Configurable Types define what set of RFx features are available
Auction Types Configurable Types define what set of Auction features are available
DA Types Configurable Types define what set of Demand features are available
Security Profiles Configurable Identifies the security profiles installed with the system
Rights on security profiles Configurable Defines the rights for each security profile
Time Periods Configurable Defines information about quarters years and so on
Reporting Calendars Configurable Used for managing how data is reported with relation to the calendar
Collaborator Roles Configurable Defines the role (rights and responsibilities) of a persongroup on a specific document instance
Document Security Templates Configurable Sets up the default collaborators and security when new documents are created
SAP Sourcing 90Master Data
PUBLICcopy Copyright 2015 SAP SE or an SAP affiliate company
All rights reserved 23
Contents Data Classification Description
Shared Discussions Configurable A list of discussion forums available as a channel and not relating to a specific document
Workbench Channels Configurable Channels available on a users desktop
Workbench IFrames Configurable Data to create iFrames
Workbench Channel Configurations Configurable Channel configuration parameters
Workbench Pages Configurable Pre-defined desktop pages
Workbench Page Configurations Configurable Channel content and placement settings for predefined pages
Configuration Properties Configurable Various deployment settings including mail
Enterprise Extensions Custom Actual extensions on enterprise-level objects
Directory Configurations Custom Used for the LDAP directory configuration
Geographies Custom Used to represent the Geographic regions
Locations Custom Locations of plants companies and other organizational elements
Payment Terms Custom Terms of payment between the purchaser and supplier
External Categories Custom Typically this data set consists of industry standard category codes such as UN-SPSC or SIC codes if used by your organization
Internal Categories Custom All internal purchasing categories used by the purchaser
Vendors Custom Used in all components for various purchasing actions
Vendor Extensions in List Form Custom Actual extensions on enterprise-level objects
Companies Custom Used by all components of the system for purchasing actions such as Auctions and RFPs
Registration Categories Custom Defines mapping from arbitrary category names to actual internal or external categories Used during supplier self-registration
24
PUBLICcopy Copyright 2015 SAP SE or an SAP affiliate companyAll rights reserved
SAP Sourcing 90Master Data
Contents Data Classification Description
Organizational Units Custom Further definition of the organizational hierarchy Use to define departments business units and so on
Groups Custom Arbitrary groups of purchaser users
Contacts Custom Used for all suppliers to distinguish the various contacts at each supplier
Accounts Custom Handles all user accounts for the system
Terms Templates Custom Standard terms and conditions phrases to which a supplier must agree before accessing an event
Purchasing Organization Custom An organizational unit in SAP ERP subdividing an enterprise according to the requirements of purchasing
Purchasing Group Custom A key for a purchaser or group of purchasers in SAP ERP
Vendor Account Group Custom A classifying feature of supplier master records in SAP ERP
Business System Custom Represents a system in the landscape for example SAP Sourcing or SAP ERP
Text Id Custom Represents SAP ERP header and item texts
Transaction Type Custom Represents SAP ERP transation types
After configuring the enterprise master data you must next configure the company master data This data must be created once for each sub-context This example only uses a single context so this data must only be created once
Table 11
Contents Data Classification Description
UFNs System Metadata for RFx utility functions
System Answered Sources Configurable Defines the available sources of system answered questions
Company Extension Definitions Configurable List of company-scoped objects which have extensions
Document Security Templates Configurable Sets up the default collaborators and security when new documents are created
Contract Generation Phases Configurable Used to define Phases for Contract Generation library documents
SAP Sourcing 90Master Data
PUBLICcopy Copyright 2015 SAP SE or an SAP affiliate company
All rights reserved 25
Contents Data Classification Description
Contract Generation Tags Configurable Used to define Tags for Contract Generation
Company extensions Custom List of extensions on individual object types
masterdataActivity Custom Used for general accounting purposes
Cost Centers Custom Used for accounting purposes to assign cost on a center by center basis
Cost Center Groups Custom
Entities Custom Used for accounting purposes for purchasing by division
GL Accounts Custom Used for general accounting purposes
Plants Custom Plants or facilities
Materials Custom Standard materials for use in line items
Category Managers Custom Users who are responsible for certain categories
Master Data Security
When configuring and importing Master Data there are some things to remember about security
1 Each piece of importable master data has an Import right as part of its ACL list By default this right is only added for the System Administrator security profile and therefore only those users can import master data out of the box As always an admin can add Import rights to other security profiles on and object-by-object basis
ExampleIf Supplier Administrators need to import Supplier records then that can be enabled
2 When importing Master Data be it via CSV XLS XML etc the user running the imports must have Import right allowed for all objects in question The Enterprise user is considered trusted and can import any of these objects
52 Create Master Data Manually
Procedure
NoteThe user account being used to import the following must have Allow Import rights on these specific objects If you do not have Allow Import on these objects it must be added or the import will fail
1 Log on as the enterprise user
26
PUBLICcopy Copyright 2015 SAP SE or an SAP affiliate companyAll rights reserved
SAP Sourcing 90Master Data
2 Create objects from within the Setup module
3 Log on as a purchaser user with administrative rights to configure company master data
For more information see the SAP Sourcing help at helpsapcomsourcing To access the help system scroll to SAP Sourcing 90 Help for Purchasers and choose a language In the help choose Setup System Setup Master Data
53 Import Master Data Using CSV File
NoteThe user account being used to import the following must have Allow Import rights on these specific objects If you do not have Allow Import on these objects it must be added or the import will fail
You can import master data files with CSV XLS or XLSX format in two ways
Use the standard web user interface
Use a client application distributed with the system which allows data to be imported outside of the web environment
The following procedure describes how to import using the web-based UI
Procedure
1 If application users have already been created log on as a purchaser user with administrative rights If users have not been created log on as the enterprise user
2 Choose Setup System Administration Import Export Tools Import Data and then choose OK
3 Choose Create
The import wizard opens
4 Specify whether you want to upload the file to the server or whether the file is already located on the application server and choose Next
5 Choose Upload Import File and select the CSV or Deployment Workgroup file to import
6 For CSV files select the object type and choose Next
7 Indicate whether you want to wait for the import to finish or perform the import in the background and then choose Next
8 Choose Finish to view the results
SAP Sourcing 90Master Data
PUBLICcopy Copyright 2015 SAP SE or an SAP affiliate company
All rights reserved 27
54 Workbooks
541 Overview of Workbooks
NoteThere are many sheets in the workbooks that have the prefix eso While these sheets may appear as duplicates of other sheets the data in them is in fact different These sheets should be imported by default You may also add data to these sheets if you would like to augment the data provided in the sample workbooks
We recommend using the deployment workbook for initial deployment of the system to ensure that all required data is imported into the system
To facilitate the import of data SAP Sourcing provides an alternative to CSV files for import SAP Sourcing provides the ability to import Microsoft Excel files containing one or more master data imports The system processes these Excel files directly without the user having to export the data to a raw CSV file The Enterprise Deployment Workbook and Company Deployment Workbook are two sample deployment workbooks delivered with SAP Sourcing
Anyone with system administrator access rights can download the deployment workbooks from the web user interface The deployment workbooks are included in the online Reference Guide (RG)
When starting a new deployment project preserve the original workbook templates by making a copy of them and saving them with a new name Import data using your modified templates only By doing so you assure continuity if future additional deployments are required
NoteKeep the following in mind when using deployment workbooks
The Configuration Sheet controls the import process Refer to the Help Sheet for input specifications of Configuration Sheet columns
The system can import the workbooks directly but there are limitations to what Excel constructs are supported The Help Sheet describes the rules that must be observed
The same importing process supports both CSV files and Excel workbooks
There is a one to one relationship with the workbook configuration file and the worksheet tabs
542 Download and Customize Workbooks
The sample enterprise and company workbooks that you download from SAP Sourcing are designed for you to configure a base system using a sample enterprise context We recommend modifying the default deployment workbooks Choose the appropriate workbooks from this table
Table 12
System Workbooks
SAP Sourcing Enterprise Deployment Workbook
Company Deployment Workbook
Users setting up a base system should adjust the various settings in these workbooks prior to running them in the system For example the company data should be updated to reflect specifics about the company that is
28
PUBLICcopy Copyright 2015 SAP SE or an SAP affiliate companyAll rights reserved
SAP Sourcing 90Master Data
installing the system Similarly you should review other tabs to ensure that the configurations are consistent with the desired implementation For details on customizable fields see Master Data [page 22]
Procedure
1 Log on as the enterprise user and choose Reference Guide Download the sample enterprise and company workbooks appropriate for your system
NoteThe enterprise workbook should be run as the enterprise user The company workbook should be run as a system administrator associated with the company object intended to be configured
2 From the Enterprise Deployment workbook open the file and find the sheet labeled locations and edit this sheet as necessary
Only one location is required
3 Find each sheet review each sheet and the comments in the sheet and update the data accordingly
4 Provide at least one internal category
5 Find the sheet labeled companies and edit it as necessary
6 Repeat for org_units groups accounts and so on
Your are establishing a hierarchy To configure the hierarchy correctly you must ensure that the child references the parent correctly For example the PARENT column in the business_units page should include a valid EXTERNAL_ID from the companies sheet
NoteTo build all custom data in the user interface simply deactivate the import of the above data types in the deployment workbook See the Help page for instructions on how to skip a specific worksheet
7 Import the enterprise and company workbooks into SAP Sourcing by choosing Setup System Administration Import and Export Tools Import Data and then choose Create
543 Import Master Data Using Workbooks
Procedure
1 Log on as the user specified in this table and choose Setup
Table 13
Workbook Login User
Enterprise workbook
Enterprise user
Company workbook Purchaser user
2 From the Import and Export Tools dropdown chooseImport Data and then choose OK
The Import Data page appears
SAP Sourcing 90Master Data
PUBLICcopy Copyright 2015 SAP SE or an SAP affiliate company
All rights reserved 29
3 Choose Create to start a new import job
4 Choose Upload to the Server and then choose Next
5 Select the modified workbook and choose Next
6 Wait for the import to finish and choose Next
Typically running the enterprise workbook can take several minutes
30
PUBLICcopy Copyright 2015 SAP SE or an SAP affiliate companyAll rights reserved
SAP Sourcing 90Master Data
6 Create and Verify Purchaser User
Procedure
For the SAP NetWeaver UME driver users should be created in SAP Sourcing and the SAP NetWeaver UME with the same username
For LDAP drivers depending on how the LDAP was set up you must perform one of the following
Create the user in SAP Sourcing and supply the information FROM the LDAP
If you have access create the account and supply the information TO the LDAP
In either case an e-mail is generated giving the user a path to the application and his or her user name If the account is created a temporary password is also mailed A system property determines whether this information is delivered in the same e-mail or separate e-mails
1 Choose Setup WYSIWYG Page Customization User Account and create a purchaser user as follows
1 On the Account Properties tab enter required information
2 On the Account Management tab enter information as follows
Enable User to Login Select
Directory Select as needed
User ID Type userid
Create Directory Account Select
Generate a New Password Select
Send Notification Select
3 On the Security tab enter information as follows
Purchaser Select
Purchaser Manager Select
System Administrator Select
Supplier Administrator Select
Make sure this first user is given Administrator privileges to import the Company Workbook
2 Wait for the e-mail to be sent and received If you do not receive it check the following
To verify the mail was sent choose Setup System Administration Processed Messages
To check for stuck or failed messages choose Setup System Administration Queued Messages
3 To test the new account log on as a purchaser user using the credentials sent in the e-mail
4 Reset your password and choose OK
If you can successfully log into the new purchaser account the context cluster and directory are properly configured and the SMTP server is processing e-mail
SAP Sourcing 90Create and Verify Purchaser User
PUBLICcopy Copyright 2015 SAP SE or an SAP affiliate company
All rights reserved 31
7 Create and Verify Supplier User
Procedure
Create a supplier user to test the supplier portal A supplier user is a contact on a supplier record
1 Choose Supplier Management Create Supplier
2 Enter and save the required information
3 Choose the Contacts tab
4 Under Supplier Contacts choose Add
5 Enter and save the required information
6 Log on as a supplier user using the credentials provided in the test user e-mail
7 Reset the password as prompted and accept the usage terms
32
PUBLICcopy Copyright 2015 SAP SE or an SAP affiliate companyAll rights reserved
SAP Sourcing 90Create and Verify Supplier User
8 Install Company Logo
Procedure
NoteWe do not recommend installing an image larger than 200 x 29
1 Log on as the enterprise user
2 Attach the logo as follows
1 Choose Setup Organization and Accounting Information Companies
2 Select the enterprise company from the list and choose Edit Document
3 Attach your logo image to the company using the Logo Attachment field
3 Save your entries
Resize Company Logo
If you have uploaded a company logo in your source release you must resize the image to 200x29
1 Log on as a purchaser user with system administrator rights
2 Choose Setup
3 On the Master Data tab find the Organization and Accounting section and choose Companies
4 Choose the company
5 Choose Edit
6 In the Logo field upload the resized image
SAP Sourcing 90Install Company Logo
PUBLICcopy Copyright 2015 SAP SE or an SAP affiliate company
All rights reserved 33
9 Specify Internal Address of SAP Sourcing Server
Procedure
When SAP Sourcing is first installed or whenever a new server is added to an application cluster the Internet address that is used for internal communications within SAP Sourcing is initially set to the external host name of the server In many cases this will result in unexpected or delayed behavior in the application
If the application landscape includes a network firewall accessing the server through this name requires exiting the firewall and re-entering If the firewall blocks incoming traffic on SAP Sourcingrsquos notification ports this will result in failure to deliver notifications for some events To avoid this do the following
1 Log on as the system user
2 Open the System Information record for editing
3 Change the value in the Internal Address field to an internal IP address or host name
4 Save your changes
34
PUBLICcopy Copyright 2015 SAP SE or an SAP affiliate companyAll rights reserved
SAP Sourcing 90Specify Internal Address of SAP Sourcing Server
10 Update Master Time Zone
Procedure
This procedure is required to enable SAP Sourcing to normalize all dates and times that are used in sourcing events Normalizing allows time fields to be presented differently for each user according to his or her preferred time zone while maintaining a consistent reference to the same point in time
1 Log on as the system user
2 Choose Setup Configuration System Properties
3 Edit the systemmaster_timezone property in the system set This property value should be set to the Java time zone identifier that corresponds to the current database server time zone
NoteThe SAP Sourcing Time Zone Value List Type provides a relatively comprehensive list of java time zone identifiers To view this list log on as a purchaser user and navigate to Setup Master Data Value List Types and Values Time Zone The Alternate Name column of this list contains the java time zone identifier for the corresponding time zone
ExampleldquoAmericaNew_Yorkrdquo is the alternate name of the SAP Sourcing Timezone ValueListValue for ldquo(GMT-500) Eastern Standard Timerdquo
SAP Sourcing 90Update Master Time Zone
PUBLICcopy Copyright 2015 SAP SE or an SAP affiliate company
All rights reserved 35
11 Install License Key
Procedure
You must install a license key before the SAP Sourcing system can be used in production mode
1 Choose Setup System Administration System Management System Information
2 Note the installation ID from the Installation ID field on the Service Registration tab
3 Create OSS ticket this ID and a list of the requested modules to license (include the optimizer) to SAP Customer Support You will receive a csv file including all the license keys
NoteRequesting the optimizer key without installing an optimizer server will result in a high volume of irrelevant optimizer-related messages in your log files If you do not intend to install an optimizer server do not request an optimizer key
4 Log on as the enterprise user and choose Setup System Administration Import and Export ToolsImport Data
5 Use the import tool to import the licenses you received from Support as follows
1 On the Import Wizard Select a File screen type a description such as License Keys and choose Upload Import File to upload the csv file Choose Next
2 On the Import Wizard CSV Contents screen select Module License as the Object Type choose Next and follow any additional prompts to finish the process The successful file import is displayed on the File Import tab
6 Choose Setup System Administration System Management System Information
7 Choose the Components tab and verify that the appropriate licenses are checked under SRM Module Licenses
8 If you are installing the optimizer verify that a new Optimizer tab appears and displays an appropriate Status Queue value and JVM information (If the optimizer is not installed the Status Queue value is OFFLINE and the JVM Information is set to unknown)
36
PUBLICcopy Copyright 2015 SAP SE or an SAP affiliate companyAll rights reserved
SAP Sourcing 90Install License Key
12 Change Session Timeout
Procedure
NoteThis is optional
The deployment descriptor for the SAP Sourcing application defaults to a 30-minute session timeout or to the value that was set during installation
NoteThe above property should be set longer than the below two properties
To change this setting
1 Log on as the system user and set the following system property in SAP Sourcing
uppmeteringlogin_inactivity_timeout and set to the timeout that was chosen when running the configure utility
2 Property uppmeteringcleanup_interval defines the time between runs of the daemon which removes inactive sessions It is recommended that this value be set to a value that is slightly larger than the uppmeteringlogin_inactivity_timeout setting is set to
3 Set the time-out using the configure tool For information about the configure tool see the Installation Guide for SAP Sourcing 90 on the SAP Service Marketplace at servicesapcomeso SAP Sourcing On-Premise SAP Sourcing 90
NoteBoth internal property in SAP Sourcing and configuration tool in NetWeaver should be set to the same value
SAP Sourcing 90Change Session Timeout
PUBLICcopy Copyright 2015 SAP SE or an SAP affiliate company
All rights reserved 37
13 Enable Contract Authoring
Contracts amendments and clauses use the Word service This service must be referenced For more information see ldquoCreate OfficeAutomationUser Accountrdquo in the Installation Guide for SAP Sourcing 90 on SAP Service Marketplace at servicesapcomeso SAP Sourcing On-Premise SAP Sourcing 90
Procedure
Configure a path to the Word service in SAP Sourcing as follows
1 Choose Setup System Properties
2 From the Name dropdown list choose contractgenserviceurl
3 Set the value to ltprotocolgtlthostnamegtltvirtual directorygtwordserviceasmx
38
PUBLICcopy Copyright 2015 SAP SE or an SAP affiliate companyAll rights reserved
SAP Sourcing 90Enable Contract Authoring
14 e-Signature
To enable e-Signature functionality users first get user accounts from EchoSign EchoSign adds the users to the EchoSign SAP channel System administrators define the integrated system configuration and set up the management of customer and user accounts System administrators can schedule automated checks of contract document signature statuses System users can check the availability of e-Signature components
141 Set Up EchoSign Account and System Configuration
Procedure
Set Up EchoSign Account
Before a system administrator enables e-Signature features for a customer EchoSign adds the customer to the EchoSign SAP channel The customer gives the account key provided by EchoSign to the system administrator The system administrator then configures e-Signature to work with EchoSign
Set Up Integrated System Configuration
Adding an EchoSign account to SAP Sourcing configuration enables e-Signature functionality in SAP Sourcing To set up an EchoSign account for use with e-Signature a system administrator creates an integrated system configuration object for EchoSign integration
1 Log on as the enterprise user
2 Choose Setup Integrated System Configuration
3 On the subsequent screen choose New
4 On the subsequent screen select EchoSign for System Type and select Continue
5 Under EchoSign Properties the customer enters the EchoSign account key provided the customer by EchoSign and choose Done
Set Up Proxy Settings
To configure EchoSign on a NetWeaver-based system follow these steps
1 Configure the HTTP properties as described on the SAP Help Portal at helpsapcomsaphelp_nw73helpdataen48479b6163524bb9e10000000a42189bframesethtm
2 To add proxy parameters to JVM settings in NetWeaver navigate to [host][port]nwa ConfigurationInfrastructure Java System Properties Additional VM Properties and add the following parameters with the appropriate values
-DhttpproxyHost -DhttpproxyPort -DhttpsproxyHost -DhttpsproxyPort
SAP Sourcing 90e-Signature
PUBLICcopy Copyright 2015 SAP SE or an SAP affiliate company
All rights reserved 39
NoteIf your proxy server requires a username and password provide this information with the following parameters
-DhttpproxyUser -DhttpproxyPassword -DhttpsproxyUser -DhttpsproxyPassword
3 Import the SSL certificate file into the NetWeaver key storage as follows
1 Navigate to lthostgtltportgtnwa Security Certificates and Keys
2 Select the WebServiceSecurity keystore view
3 If you are updating or replacing the EchoSign certificate remove any previous certificates with the same Common Name
4 Choose Import Entry and select x509 certificate as the entry type
5 Get the EchoSign certificate from your browserrsquos certificate interface
NoteSpecific steps will vary from browser to browser but the general process should be similar Here are sample instructions for Firefox
1 Navigate to secureechosigncomservicesEchoSignDocumentService9
NoteYou can ignore the error message that says Invalid SOAP Request
2 Click on the lock icon next to the URL
3 Click More Information
4 Open the Security tab
5 Click View Certificate
6 Open the Details tab
7 Click Export
8 From the Save as Type dropdown list choose the SSL certificate for the version you require
9 If Windows does not recognize the exported file as a certificate add a cer or crt extension to the filename
6 Restart NetWeaver
Change EchoSign service URL
SAP Sourcing ships with the current EchoSign service URL Change the service URL value in System Properties only when EchoSign changes the service URL To change this value do the following
1 Log on as the system user
2 On the System Setup tab choose System Properties
3 Open contractgenesignature_url from the Properties list
4 Enter the new EchoSign service URL provided by EchoSign
40
PUBLICcopy Copyright 2015 SAP SE or an SAP affiliate companyAll rights reserved
SAP Sourcing 90e-Signature
NoteSet the URL property only if the EchoSign domain has changed The current URL is secureechosigncomservicesEchoSignDocumentService9 Note that the API version should be set to 9
Change the length of the EchoSign timeout
By default SAP Sourcing sets the length of the EchoSign timeout to 300000 milliseconds or five minutes Change the length of the EchoSign timeout only if the default timeout causes issues when you send documents to EchoSign
1 Log on as the system user
2 On the System Setup tab choose System Properties
3 Choose contractgenesignature_timeout from the Name dropdown menu
4 Enter a numeral specifying the desired length in milliseconds for the EchoSign timeout in the Value field The Value field requires no minimum nor maximum value nor number formatting
142 Check EchoSign Configuration Status
Procedure
1 Log on as the system user
2 Choose System Information Then on the subsequent screen choose the Audits tab
3 Choose the correct context for the customers location from the Context dropdown menu
4 In the Availability pane OK appears in the Status column next to EchoSign Availability if you configured SAP Sourcing correctly for EchoSign
143 Set Up User Rights
Procedure
Assign Right to Send Contract Documents for Signatures or to Resolve Errors
To enable a user to send contract documents for signatures a customer system administrator adds Contract e-Signature to the users security profiles
To assign the right to send contract documents out for signatures to a user a system administrator does the following
1 In Setup choose System Administration Internal User Accounts
2 Select the desired user account
3 Choose the Security tab Then choose Contract e-Signature or Contract e-Signature Admin
A system administrator can assign either of the following e-Signature rights to a user
SAP Sourcing 90e-Signature
PUBLICcopy Copyright 2015 SAP SE or an SAP affiliate company
All rights reserved 41
Table 14
Right Description
ESO_CONTRACT_ESIGNATURE Users with this right can send contract documents out for signatures using the e-Signature feature
ESO_CONTRACT_ESIGNATURE_ADMIN This right allows designated users to resolve errors Users with this right can change a contract document while it is out for signatures Users with this right can change the signature status of a contract document to Error and can thus allow the contract document author to unlock a frozen document System administrators assign this right only to other administrators not to standard users
4 Choose Done
144 Resolve e-Signature Errors
Procedure
Contract Document Status Frozen
Unexpected errors such as network or system errors can freeze the status of a contract document to Sending for e-Signature or Out for Signature A user with the right ESO_CONTRACT_ESIGNATURE_ADMIN can unfreeze the status of the contract document so that the contract author can cancel the e-Signature process A system administrator can assign the right ESO_CONTRACT_ESIGNATURE_ADMIN to a user
1 The contract author adds a user with the ESO_CONTRACT_ESIGNATURE_ADMIN right to the affected Master Agreement as a collaborator
2 The user with the ESO_CONTRACT_ESIGNATURE_ADMIN right manually changes the status of the frozen contract document to ERROR
3 The contract author logs in to EchoSign and manually cancels the e-Signature process for the contract document
Invalid Password Error
You may receive the following error message Error Invalid password for user sending a Contract Document to EchoSign for signature
This message indicates that the user sending a request for e-signatures via EchoSign is not properly set up in their EchoSign account Contact EchoSign for assistance in resolving this error
145 Set Up Scheduled Task to Retrieve e-Signature Status
Procedure
You can set SAP Sourcing to retrieve the e-Signature statuses of all contract documents at a frequency you specify automatically However an end user need not wait for these automated retrievals to see the current e-
42
PUBLICcopy Copyright 2015 SAP SE or an SAP affiliate companyAll rights reserved
SAP Sourcing 90e-Signature
Signature status of a contract document End users can get instant updates of the e-Signature status manually through the contract document user interface
1 Log on as the enterprise user
2 Choose Setup
3 On the System Setup tab choose Scheduled Tasks
4 On the subsequent page choose New then select the e-Signature Status radio button then choose Continue
5 Enter the display name and start date Set the frequency and end date as desired
NoteSAP recommends automatically retrieving e-Signature statuses daily and setting the retrievals to run at night
6 Choose Save
SAP Sourcing 90e-Signature
PUBLICcopy Copyright 2015 SAP SE or an SAP affiliate company
All rights reserved 43
15 Configure Workbench
The CLM system is delivered with a base workbench page that is available to all internal users Additionally the system is configured with a workbench page intended to be used by CLM contract managers
The workbench page is established in the system but requires additional configuration to make it available to the desired users This configuration is done by adding collaborators to the Contract Management Workbench page
Prerequisites
You must be logged on as the enterprise user
Procedure
Configure the Contract Management Workbench page with the individual users or user groups that should also have access to the page
To do this go to Setup System Setup Workbench Workbench Page All Workbench Pages Edit the Contract Management page and add collaborators
44
PUBLICcopy Copyright 2015 SAP SE or an SAP affiliate companyAll rights reserved
SAP Sourcing 90Configure Workbench
16 Configure Branding
The following procedures enable you to change the branding from the default SAP Sourcing to SAP CLM Four branding items are affected
Branding text in the title bar of the browser (for example SAP Sourcing)
SAP CLM logo image for the purchaser login page
SAP CLM Business Partner logo image for the supplier login page
Images on the login page
Images on the splash screen
Procedure
Change the Branding after Installation
1 Choose Setup System Properties
2 Change the value of systembrand_name to (for example) SAP CLM
Themes
NoteThe following two steps require editing of themes For futher information about themes see the SAP Sourcing help at helpsapcomsourcing To access the help system scroll to SAP Sourcing 90 Help for Purchasers and choose a language In the help choose Setup Themes
1 Open the current enterprisersquos theme Branding area and choose Purchaser Login Banner link then Image link Delete the original path in Image Path field and paste imageslogoslogo_sapXCLMgif
2 Choose Delete on Background Image field
3 Choose the Supplier Login Banner link then Image link Delete the original path in Image Path field and paste imageslogoslogo_sapXCLMBusinessPartnergif
4 Choose Delete on Background Image field
SAP Sourcing 90Configure Branding
PUBLICcopy Copyright 2015 SAP SE or an SAP affiliate company
All rights reserved 45
17 Configuring Supplier Workflow Management
By default supplier workflow management feature is disabled in SAP Sourcing To enable this feature you need to perform following general steps
1 Create Workflow Definitions
2 Create Supplier Configurable Phase Definition
3 CreateModify Supplier Type
4 Create Supplier Field Access Definition (optional)
5 Configure Security Templates
6 Assign Supplier Types to Suppliers
7 Configure Supplier UI Mapping
The following subsections provide details for each of these steps
Create Workflow Definitions
1 Click Setup in the toolbar at the top of the page and select Platform
2 In the Workflow section of System Setup click on Workflow Definitions
3 On the Workflow Definitions List page click New
4 On the Workflow Definition Summary page fill in the fields with workflow information For details see the Field Help for Workflow Definition Summary page
5 Click the Add New Version button to add a process template to the workflow definition For details see the Field Help for Process Template Dialog Box page
6 Click the Save button in the toolbar
7 Create another Workflow Definition if necessary
Create Supplier Configurable Phase Definition
Supplier phases determine the actions that can be performed on supplier registration and modification requests To create a supplier configurable phase definition
1 Click Setup in the toolbar at the top of the page and select Platform
2 In the Suppliers section of Document Setup click on Supplier Configurable Phase Definition
3 On the Supplier Configurable Phase Definition List page click New
4 On the Header page fill in the fields with phase information For details see the Field help for Supplier Configurable Phase Definition Header page
5 Click Add to add phases to the definition
6 In the dialog box that appears select each phase to include in the phase definition and click OK
7 (optional) Click the Edit icon for each phase to edit phase information including the sequence of phases in the workflow On this page you can assign workflow definition and supplier field access definition For details see the Field help for Supplier Configurable Phase Header page
8 Click the Save button in the toolbar
46
PUBLICcopy Copyright 2015 SAP SE or an SAP affiliate companyAll rights reserved
SAP Sourcing 90Configuring Supplier Workflow Management
9 Create another Supplier Configurable Phase Definition if necessary
CreateModify Supplier Type
Supplier types can be used to determine whioch workflow phase definition to enable in a supplier registration or modification requests The Configurable Phase Definition field of Supplier Type is responsible for defining whether registrationmodification requests will use workflow and which phases will have these requests If Configurable Phase Definition is empty then supplier registration and modification requests will not have configured phases and any supplier administrator will be able to approve or deny request of such type as it was in previous versions of SAP Sourcing To enable supplier workflow management some supplier-configurable phase definition must be assigned to supplier types
SAP Sourcing provides one default supplier type You can modify this type and create new ones
1 Click Setup in the toolbar at the top of the page and select Platform
2 In the Suppliers section of Document Setup select Supplier Type
3 On the Supplier Type List page click New for creating new type or select existing from the list for editing
4 On the Type page fill in necessary fields On this page you can assign Supplier Configurable Phase Definition to Supplier Type For details see the Field Help for Supplier Type page
Create Supplier Field Access Definition
This step is optional
Supplier Field Access Definition allows you to configure access rules foe approver on specific phase
To create a supplier field access definition
1 Click Setup in the toolbar at the top of the page and select Platform
2 In the Suppliers section of Document Setup select Supplier Field Access Definition
3 On the Supplier Field Access Definition List page click New
4 On the UI page fill in necessary fields For details see the Field Help for Supplier Field Access Definition page
5 Click the Save button in the toolbar
6 Open existing Supplier Configurable Phase Definition
7 Click Edit
8 Click the Edit icon for the phase where you want to configure access rights for approvers This should be the approval phase
9 Click the Lookup icon to select a supplier field access definition to associate with this phase
10 Save the Supplier Configurable Phase Definition
Configure Security Templates
This is a very important configuration step In the case of supplier registrationsmodifications without configured workflows requests can be viewed and approved by any Supplier Administrator But in the case of new functionality collaborator security is used to define access rights A document security template is a set of rules governing the way an SAP Sourcing document assigns collaborator roles You should configure collaborators defined by role and user type that are automatically added to a registration and modification requests
You must configure two security templates first for Workflow Supplier Registration and second for Workflow Supplier Modification The following must be configured in these templates
The document owner must be any specified buy-side user Otherwise automatic phase transitions will not work for sell-side and the phase will need to be changed manually by any buy-side user
SAP Sourcing 90Configuring Supplier Workflow Management
PUBLICcopy Copyright 2015 SAP SE or an SAP affiliate company
All rights reserved 47
Document creator (current user) must be added to collaborator list with a role that allows viewing editing and changing phases (eg Collaborator)
Supplier administrators should be included to collaborator list to be able view and manually complete registrationmodification requests in case automatic completion should fail for some reason
Assign Supplier Type to Supplier
After the upgrade procedure one default supplier type is created and assigned to all suppliers It will be used to recognize phases for supplier modifications via workflow The supplier type can be changed for any supplier as follows
1 Open the supplier whose supplier type you want to reassign
2 Press Edit
3 Click the Lookup icon under the Document Type field
4 Select a new supplier type
5 Click Ok
6 Click Save
NoteWhen the supplier is created via workflow the supplier type used for creation is assigned to created supplier
Configure Supplier UI Mapping
The supplier type can be mapped to any supplier-side self-registration form The Supplier Type UI includes a collection of Supplier registration UI Mappings This allows you to configure the mapping between supplier type and self-registration forms
1 Open any Supplier Type
2 Click Edit
3 Click Add under Sell-Side Supplier Registration UI Mapping to add the UI page that will be mapped to this type
4 Click Save
NoteThe self-registration form can be assigned to only one supplier type If no form is assigned to a supplier type the default supplier type will be used for registration
48
PUBLICcopy Copyright 2015 SAP SE or an SAP affiliate companyAll rights reserved
SAP Sourcing 90Configuring Supplier Workflow Management
Typographic Conventions
Table 15
Example Description
ltExamplegt Angle brackets indicate that you replace these words or characters with appropriate entries to make entries in the system for example ldquoEnter your ltUser Namegtrdquo
Example Example Arrows separating the parts of a navigation path for example menu options
Example Emphasized words or expressions
Example Words or characters that you enter in the system exactly as they appear in the documentation
wwwsapcom Textual cross-references to an internet address
example Quicklinks added to the internet address of a homepage to enable quick access to specific content on the Web
123456 Hyperlink to an SAP Note for example SAP Note 123456
Example Words or characters quoted from the screen These include field labels screen titles pushbutton labels menu names and menu options
Cross-references to other documentation or published works
Example Output on the screen following a user action for example messages
Source code or syntax quoted directly from a program
File and directory names and their paths names of variables and parameters and names of installation upgrade and database tools
EXAMPLE Technical names of system objects These include report names program names transaction codes database table names and key concepts of a programming language when they are surrounded by body text for example SELECT and INCLUDE
EXAMPLE Keys on the keyboard
SAP Sourcing 90Typographic Conventions
PUBLICcopy Copyright 2015 SAP SE or an SAP affiliate company
All rights reserved 49
wwwsapcom
copy Copyright 2015 SAP SE or an SAP affiliate company All rights reservedNo part of this publication may be reproduced or transmitted in any form or for any purpose without the express permission of SAP SE or an SAP affiliate companySAP and other SAP products and services mentioned herein as well as their respective logos are trademarks or registered trademarks of SAP SE (or an SAP affiliate company) in Germany and other countries Please see wwwsapcomcorporate-enlegalcopyrightindexepxtrademark for additional trademark information and noticesSome software products marketed by SAP SE and its distributors contain proprietary software components of other software vendors National product specifications may varyThese materials are provided by SAP SE or an SAP affiliate company for informational purposes only without representation or warranty of any kind and SAP SE or its affiliated companies shall not be liable for errors or omissions with respect to the materials The only warranties for SAP SE or SAP affiliate company products and services are those that are set forth in the express warranty statements accompanying such products and services if any Nothing herein should be construed as constituting an additional warrantyIn particular SAP SE or its affiliated companies have no obligation to pursue any course of business outlined in this document or any related presentation or to develop or release any functionality mentioned therein This document or any related presentation and SAP SEs or its affiliated companies strategy and possible future developments products andor platform directions and functionality are all subject to change and may be changed by SAP SE or its affiliated companies at any time for any reason without notice The information in this document is not a commitment promise or legal obligation to deliver any material code or functionality All forward-looking statements are subject to various risks and uncertainties that could cause actual results to differ materially from expectations Readers are cautioned not to place undue reliance on these forward-looking statements which speak only as of their dates and they should not be relied upon in making purchasing decisions
- SAP Sourcing 90
-
- Table of Contents
- 1 Introduction
- 2 Define System Properties
- 3 Set Up SMTP Server
- 4 Context Cluster and Directory Configuration
-
- 41 Manual Context Cluster and Directory Configuration
- 42 Create Cluster Template
- 43 Create Internal Directory Template
- 44 Create External Directory Template
- 45 Managing the SSL Certificate
- 46 Create Tenant Configuration
-
- 5 Master Data
-
- 51 Overview of Master Data
- 52 Create Master Data Manually
- 53 Import Master Data Using CSV File
- 54 Workbooks
-
- 541 Overview of Workbooks
- 542 Download and Customize Workbooks
- 543 Import Master Data Using Workbooks
-
- 6 Create and Verify Purchaser User
- 7 Create and Verify Supplier User
- 8 Install Company Logo
- 9 Specify Internal Address of SAP Sourcing Server
- 10 Update Master Time Zone
- 11 Install License Key
- 12 Change Session Timeout
- 13 Enable Contract Authoring
- 14 e-Signature
-
- 141 Set Up EchoSign Account and System Configuration
- 142 Check EchoSign Configuration Status
- 143 Set Up User Rights
- 144 Resolve e-Signature Errors
- 145 Set Up Scheduled Task to Retrieve e-Signature Status
-
- 15 Configure Workbench
- 16 Configure Branding
- 17 Configuring Supplier Workflow Management
- Copyright and Trademarks
-
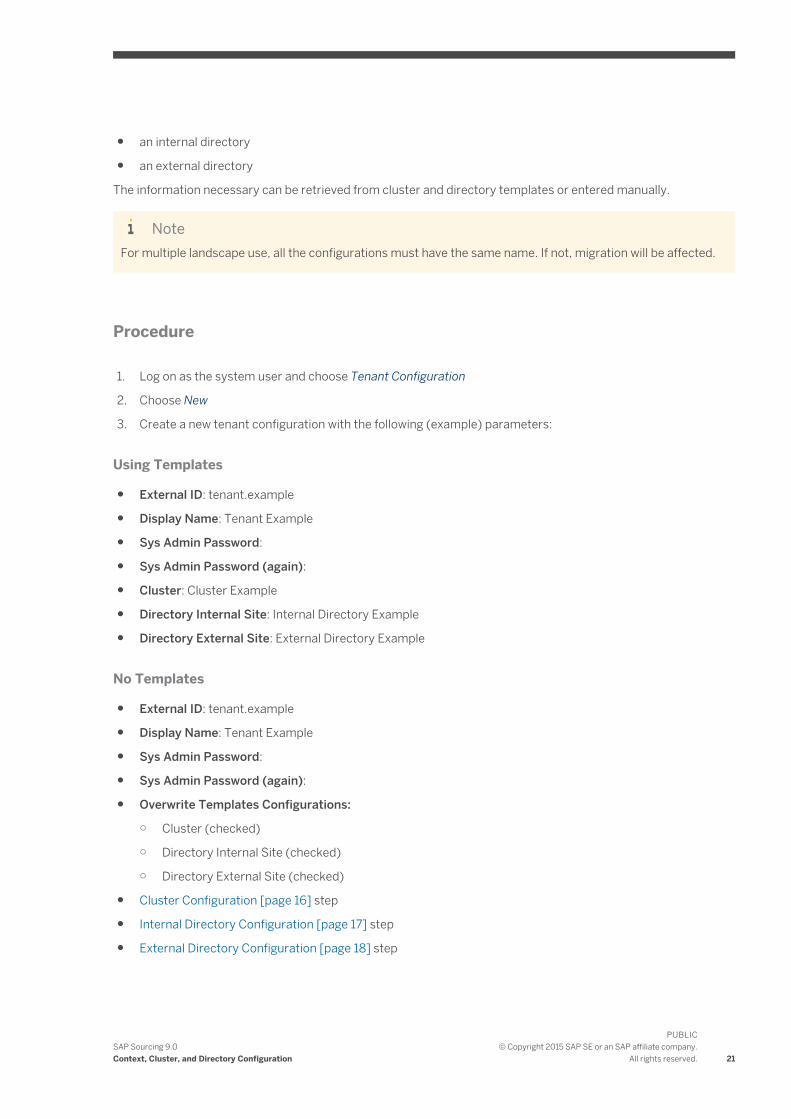
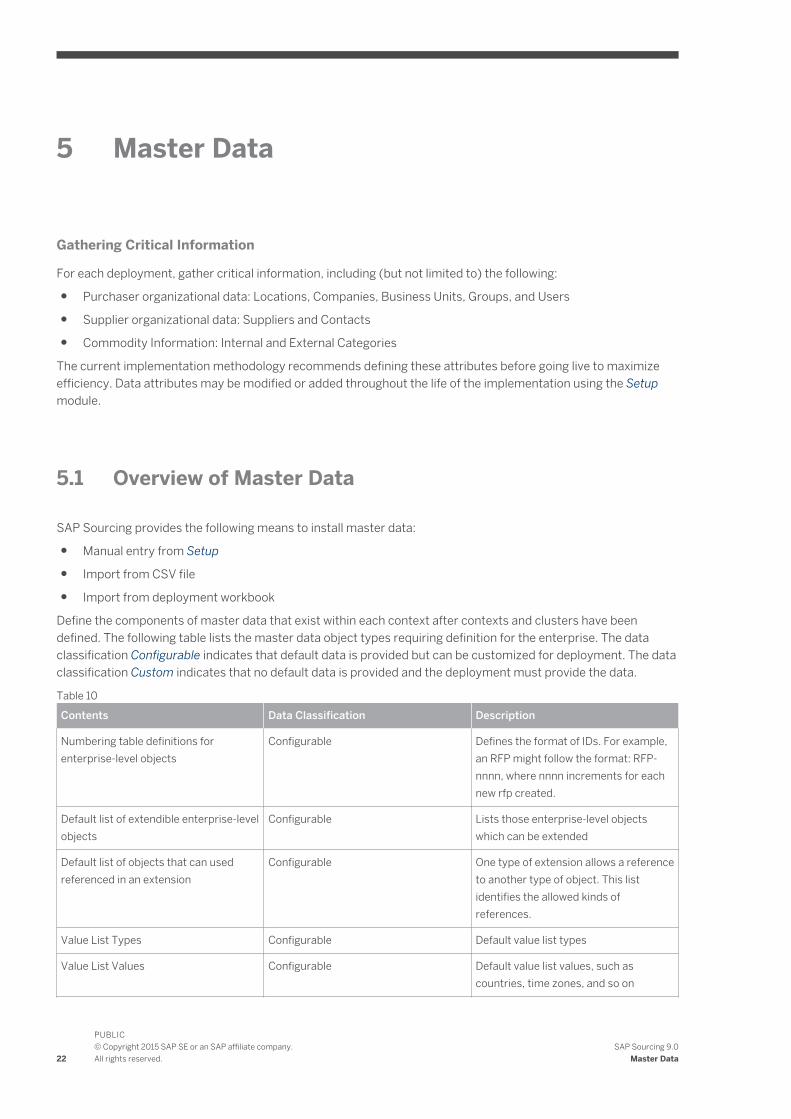
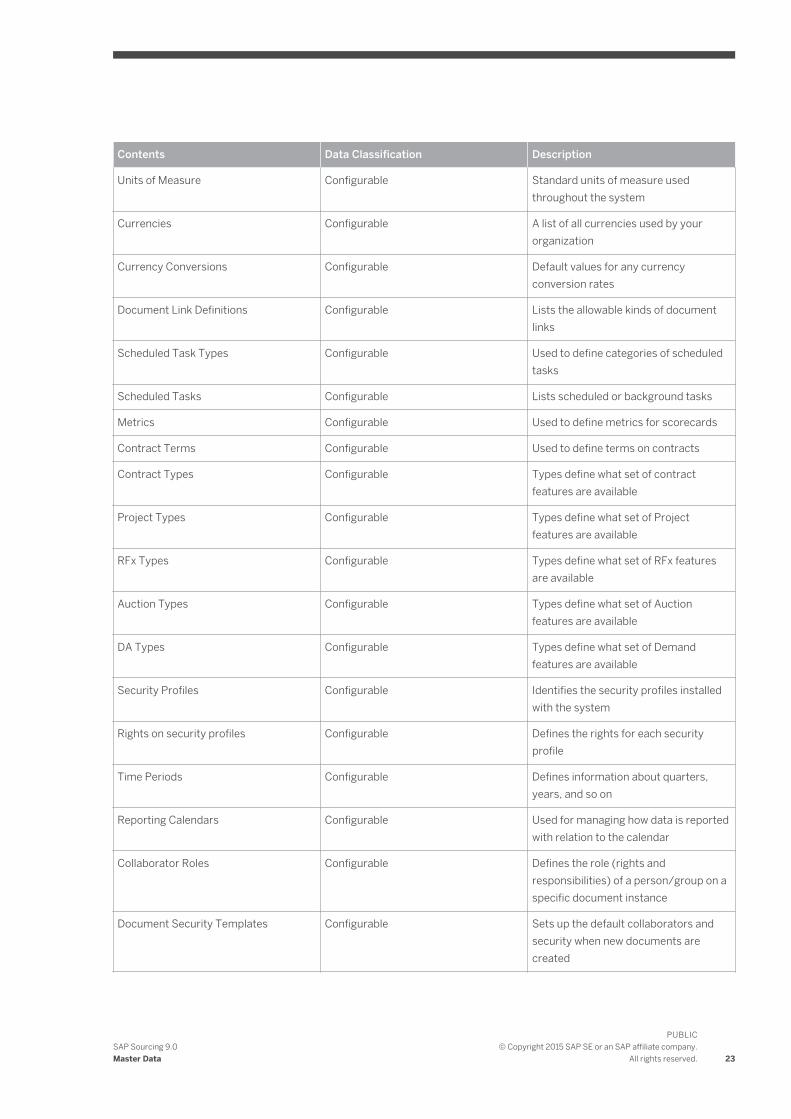
Contents Data Classification Description
Units of Measure Configurable Standard units of measure used throughout the system
Currencies Configurable A list of all currencies used by your organization
Currency Conversions Configurable Default values for any currency conversion rates
Document Link Definitions Configurable Lists the allowable kinds of document links
Scheduled Task Types Configurable Used to define categories of scheduled tasks
Scheduled Tasks Configurable Lists scheduled or background tasks
Metrics Configurable Used to define metrics for scorecards
Contract Terms Configurable Used to define terms on contracts
Contract Types Configurable Types define what set of contract features are available
Project Types Configurable Types define what set of Project features are available
RFx Types Configurable Types define what set of RFx features are available
Auction Types Configurable Types define what set of Auction features are available
DA Types Configurable Types define what set of Demand features are available
Security Profiles Configurable Identifies the security profiles installed with the system
Rights on security profiles Configurable Defines the rights for each security profile
Time Periods Configurable Defines information about quarters years and so on
Reporting Calendars Configurable Used for managing how data is reported with relation to the calendar
Collaborator Roles Configurable Defines the role (rights and responsibilities) of a persongroup on a specific document instance
Document Security Templates Configurable Sets up the default collaborators and security when new documents are created
SAP Sourcing 90Master Data
PUBLICcopy Copyright 2015 SAP SE or an SAP affiliate company
All rights reserved 23
Contents Data Classification Description
Shared Discussions Configurable A list of discussion forums available as a channel and not relating to a specific document
Workbench Channels Configurable Channels available on a users desktop
Workbench IFrames Configurable Data to create iFrames
Workbench Channel Configurations Configurable Channel configuration parameters
Workbench Pages Configurable Pre-defined desktop pages
Workbench Page Configurations Configurable Channel content and placement settings for predefined pages
Configuration Properties Configurable Various deployment settings including mail
Enterprise Extensions Custom Actual extensions on enterprise-level objects
Directory Configurations Custom Used for the LDAP directory configuration
Geographies Custom Used to represent the Geographic regions
Locations Custom Locations of plants companies and other organizational elements
Payment Terms Custom Terms of payment between the purchaser and supplier
External Categories Custom Typically this data set consists of industry standard category codes such as UN-SPSC or SIC codes if used by your organization
Internal Categories Custom All internal purchasing categories used by the purchaser
Vendors Custom Used in all components for various purchasing actions
Vendor Extensions in List Form Custom Actual extensions on enterprise-level objects
Companies Custom Used by all components of the system for purchasing actions such as Auctions and RFPs
Registration Categories Custom Defines mapping from arbitrary category names to actual internal or external categories Used during supplier self-registration
24
PUBLICcopy Copyright 2015 SAP SE or an SAP affiliate companyAll rights reserved
SAP Sourcing 90Master Data
Contents Data Classification Description
Organizational Units Custom Further definition of the organizational hierarchy Use to define departments business units and so on
Groups Custom Arbitrary groups of purchaser users
Contacts Custom Used for all suppliers to distinguish the various contacts at each supplier
Accounts Custom Handles all user accounts for the system
Terms Templates Custom Standard terms and conditions phrases to which a supplier must agree before accessing an event
Purchasing Organization Custom An organizational unit in SAP ERP subdividing an enterprise according to the requirements of purchasing
Purchasing Group Custom A key for a purchaser or group of purchasers in SAP ERP
Vendor Account Group Custom A classifying feature of supplier master records in SAP ERP
Business System Custom Represents a system in the landscape for example SAP Sourcing or SAP ERP
Text Id Custom Represents SAP ERP header and item texts
Transaction Type Custom Represents SAP ERP transation types
After configuring the enterprise master data you must next configure the company master data This data must be created once for each sub-context This example only uses a single context so this data must only be created once
Table 11
Contents Data Classification Description
UFNs System Metadata for RFx utility functions
System Answered Sources Configurable Defines the available sources of system answered questions
Company Extension Definitions Configurable List of company-scoped objects which have extensions
Document Security Templates Configurable Sets up the default collaborators and security when new documents are created
Contract Generation Phases Configurable Used to define Phases for Contract Generation library documents
SAP Sourcing 90Master Data
PUBLICcopy Copyright 2015 SAP SE or an SAP affiliate company
All rights reserved 25
Contents Data Classification Description
Contract Generation Tags Configurable Used to define Tags for Contract Generation
Company extensions Custom List of extensions on individual object types
masterdataActivity Custom Used for general accounting purposes
Cost Centers Custom Used for accounting purposes to assign cost on a center by center basis
Cost Center Groups Custom
Entities Custom Used for accounting purposes for purchasing by division
GL Accounts Custom Used for general accounting purposes
Plants Custom Plants or facilities
Materials Custom Standard materials for use in line items
Category Managers Custom Users who are responsible for certain categories
Master Data Security
When configuring and importing Master Data there are some things to remember about security
1 Each piece of importable master data has an Import right as part of its ACL list By default this right is only added for the System Administrator security profile and therefore only those users can import master data out of the box As always an admin can add Import rights to other security profiles on and object-by-object basis
ExampleIf Supplier Administrators need to import Supplier records then that can be enabled
2 When importing Master Data be it via CSV XLS XML etc the user running the imports must have Import right allowed for all objects in question The Enterprise user is considered trusted and can import any of these objects
52 Create Master Data Manually
Procedure
NoteThe user account being used to import the following must have Allow Import rights on these specific objects If you do not have Allow Import on these objects it must be added or the import will fail
1 Log on as the enterprise user
26
PUBLICcopy Copyright 2015 SAP SE or an SAP affiliate companyAll rights reserved
SAP Sourcing 90Master Data
2 Create objects from within the Setup module
3 Log on as a purchaser user with administrative rights to configure company master data
For more information see the SAP Sourcing help at helpsapcomsourcing To access the help system scroll to SAP Sourcing 90 Help for Purchasers and choose a language In the help choose Setup System Setup Master Data
53 Import Master Data Using CSV File
NoteThe user account being used to import the following must have Allow Import rights on these specific objects If you do not have Allow Import on these objects it must be added or the import will fail
You can import master data files with CSV XLS or XLSX format in two ways
Use the standard web user interface
Use a client application distributed with the system which allows data to be imported outside of the web environment
The following procedure describes how to import using the web-based UI
Procedure
1 If application users have already been created log on as a purchaser user with administrative rights If users have not been created log on as the enterprise user
2 Choose Setup System Administration Import Export Tools Import Data and then choose OK
3 Choose Create
The import wizard opens
4 Specify whether you want to upload the file to the server or whether the file is already located on the application server and choose Next
5 Choose Upload Import File and select the CSV or Deployment Workgroup file to import
6 For CSV files select the object type and choose Next
7 Indicate whether you want to wait for the import to finish or perform the import in the background and then choose Next
8 Choose Finish to view the results
SAP Sourcing 90Master Data
PUBLICcopy Copyright 2015 SAP SE or an SAP affiliate company
All rights reserved 27
54 Workbooks
541 Overview of Workbooks
NoteThere are many sheets in the workbooks that have the prefix eso While these sheets may appear as duplicates of other sheets the data in them is in fact different These sheets should be imported by default You may also add data to these sheets if you would like to augment the data provided in the sample workbooks
We recommend using the deployment workbook for initial deployment of the system to ensure that all required data is imported into the system
To facilitate the import of data SAP Sourcing provides an alternative to CSV files for import SAP Sourcing provides the ability to import Microsoft Excel files containing one or more master data imports The system processes these Excel files directly without the user having to export the data to a raw CSV file The Enterprise Deployment Workbook and Company Deployment Workbook are two sample deployment workbooks delivered with SAP Sourcing
Anyone with system administrator access rights can download the deployment workbooks from the web user interface The deployment workbooks are included in the online Reference Guide (RG)
When starting a new deployment project preserve the original workbook templates by making a copy of them and saving them with a new name Import data using your modified templates only By doing so you assure continuity if future additional deployments are required
NoteKeep the following in mind when using deployment workbooks
The Configuration Sheet controls the import process Refer to the Help Sheet for input specifications of Configuration Sheet columns
The system can import the workbooks directly but there are limitations to what Excel constructs are supported The Help Sheet describes the rules that must be observed
The same importing process supports both CSV files and Excel workbooks
There is a one to one relationship with the workbook configuration file and the worksheet tabs
542 Download and Customize Workbooks
The sample enterprise and company workbooks that you download from SAP Sourcing are designed for you to configure a base system using a sample enterprise context We recommend modifying the default deployment workbooks Choose the appropriate workbooks from this table
Table 12
System Workbooks
SAP Sourcing Enterprise Deployment Workbook
Company Deployment Workbook
Users setting up a base system should adjust the various settings in these workbooks prior to running them in the system For example the company data should be updated to reflect specifics about the company that is
28
PUBLICcopy Copyright 2015 SAP SE or an SAP affiliate companyAll rights reserved
SAP Sourcing 90Master Data
installing the system Similarly you should review other tabs to ensure that the configurations are consistent with the desired implementation For details on customizable fields see Master Data [page 22]
Procedure
1 Log on as the enterprise user and choose Reference Guide Download the sample enterprise and company workbooks appropriate for your system
NoteThe enterprise workbook should be run as the enterprise user The company workbook should be run as a system administrator associated with the company object intended to be configured
2 From the Enterprise Deployment workbook open the file and find the sheet labeled locations and edit this sheet as necessary
Only one location is required
3 Find each sheet review each sheet and the comments in the sheet and update the data accordingly
4 Provide at least one internal category
5 Find the sheet labeled companies and edit it as necessary
6 Repeat for org_units groups accounts and so on
Your are establishing a hierarchy To configure the hierarchy correctly you must ensure that the child references the parent correctly For example the PARENT column in the business_units page should include a valid EXTERNAL_ID from the companies sheet
NoteTo build all custom data in the user interface simply deactivate the import of the above data types in the deployment workbook See the Help page for instructions on how to skip a specific worksheet
7 Import the enterprise and company workbooks into SAP Sourcing by choosing Setup System Administration Import and Export Tools Import Data and then choose Create
543 Import Master Data Using Workbooks
Procedure
1 Log on as the user specified in this table and choose Setup
Table 13
Workbook Login User
Enterprise workbook
Enterprise user
Company workbook Purchaser user
2 From the Import and Export Tools dropdown chooseImport Data and then choose OK
The Import Data page appears
SAP Sourcing 90Master Data
PUBLICcopy Copyright 2015 SAP SE or an SAP affiliate company
All rights reserved 29
3 Choose Create to start a new import job
4 Choose Upload to the Server and then choose Next
5 Select the modified workbook and choose Next
6 Wait for the import to finish and choose Next
Typically running the enterprise workbook can take several minutes
30
PUBLICcopy Copyright 2015 SAP SE or an SAP affiliate companyAll rights reserved
SAP Sourcing 90Master Data
6 Create and Verify Purchaser User
Procedure
For the SAP NetWeaver UME driver users should be created in SAP Sourcing and the SAP NetWeaver UME with the same username
For LDAP drivers depending on how the LDAP was set up you must perform one of the following
Create the user in SAP Sourcing and supply the information FROM the LDAP
If you have access create the account and supply the information TO the LDAP
In either case an e-mail is generated giving the user a path to the application and his or her user name If the account is created a temporary password is also mailed A system property determines whether this information is delivered in the same e-mail or separate e-mails
1 Choose Setup WYSIWYG Page Customization User Account and create a purchaser user as follows
1 On the Account Properties tab enter required information
2 On the Account Management tab enter information as follows
Enable User to Login Select
Directory Select as needed
User ID Type userid
Create Directory Account Select
Generate a New Password Select
Send Notification Select
3 On the Security tab enter information as follows
Purchaser Select
Purchaser Manager Select
System Administrator Select
Supplier Administrator Select
Make sure this first user is given Administrator privileges to import the Company Workbook
2 Wait for the e-mail to be sent and received If you do not receive it check the following
To verify the mail was sent choose Setup System Administration Processed Messages
To check for stuck or failed messages choose Setup System Administration Queued Messages
3 To test the new account log on as a purchaser user using the credentials sent in the e-mail
4 Reset your password and choose OK
If you can successfully log into the new purchaser account the context cluster and directory are properly configured and the SMTP server is processing e-mail
SAP Sourcing 90Create and Verify Purchaser User
PUBLICcopy Copyright 2015 SAP SE or an SAP affiliate company
All rights reserved 31
7 Create and Verify Supplier User
Procedure
Create a supplier user to test the supplier portal A supplier user is a contact on a supplier record
1 Choose Supplier Management Create Supplier
2 Enter and save the required information
3 Choose the Contacts tab
4 Under Supplier Contacts choose Add
5 Enter and save the required information
6 Log on as a supplier user using the credentials provided in the test user e-mail
7 Reset the password as prompted and accept the usage terms
32
PUBLICcopy Copyright 2015 SAP SE or an SAP affiliate companyAll rights reserved
SAP Sourcing 90Create and Verify Supplier User
8 Install Company Logo
Procedure
NoteWe do not recommend installing an image larger than 200 x 29
1 Log on as the enterprise user
2 Attach the logo as follows
1 Choose Setup Organization and Accounting Information Companies
2 Select the enterprise company from the list and choose Edit Document
3 Attach your logo image to the company using the Logo Attachment field
3 Save your entries
Resize Company Logo
If you have uploaded a company logo in your source release you must resize the image to 200x29
1 Log on as a purchaser user with system administrator rights
2 Choose Setup
3 On the Master Data tab find the Organization and Accounting section and choose Companies
4 Choose the company
5 Choose Edit
6 In the Logo field upload the resized image
SAP Sourcing 90Install Company Logo
PUBLICcopy Copyright 2015 SAP SE or an SAP affiliate company
All rights reserved 33
9 Specify Internal Address of SAP Sourcing Server
Procedure
When SAP Sourcing is first installed or whenever a new server is added to an application cluster the Internet address that is used for internal communications within SAP Sourcing is initially set to the external host name of the server In many cases this will result in unexpected or delayed behavior in the application
If the application landscape includes a network firewall accessing the server through this name requires exiting the firewall and re-entering If the firewall blocks incoming traffic on SAP Sourcingrsquos notification ports this will result in failure to deliver notifications for some events To avoid this do the following
1 Log on as the system user
2 Open the System Information record for editing
3 Change the value in the Internal Address field to an internal IP address or host name
4 Save your changes
34
PUBLICcopy Copyright 2015 SAP SE or an SAP affiliate companyAll rights reserved
SAP Sourcing 90Specify Internal Address of SAP Sourcing Server
10 Update Master Time Zone
Procedure
This procedure is required to enable SAP Sourcing to normalize all dates and times that are used in sourcing events Normalizing allows time fields to be presented differently for each user according to his or her preferred time zone while maintaining a consistent reference to the same point in time
1 Log on as the system user
2 Choose Setup Configuration System Properties
3 Edit the systemmaster_timezone property in the system set This property value should be set to the Java time zone identifier that corresponds to the current database server time zone
NoteThe SAP Sourcing Time Zone Value List Type provides a relatively comprehensive list of java time zone identifiers To view this list log on as a purchaser user and navigate to Setup Master Data Value List Types and Values Time Zone The Alternate Name column of this list contains the java time zone identifier for the corresponding time zone
ExampleldquoAmericaNew_Yorkrdquo is the alternate name of the SAP Sourcing Timezone ValueListValue for ldquo(GMT-500) Eastern Standard Timerdquo
SAP Sourcing 90Update Master Time Zone
PUBLICcopy Copyright 2015 SAP SE or an SAP affiliate company
All rights reserved 35
11 Install License Key
Procedure
You must install a license key before the SAP Sourcing system can be used in production mode
1 Choose Setup System Administration System Management System Information
2 Note the installation ID from the Installation ID field on the Service Registration tab
3 Create OSS ticket this ID and a list of the requested modules to license (include the optimizer) to SAP Customer Support You will receive a csv file including all the license keys
NoteRequesting the optimizer key without installing an optimizer server will result in a high volume of irrelevant optimizer-related messages in your log files If you do not intend to install an optimizer server do not request an optimizer key
4 Log on as the enterprise user and choose Setup System Administration Import and Export ToolsImport Data
5 Use the import tool to import the licenses you received from Support as follows
1 On the Import Wizard Select a File screen type a description such as License Keys and choose Upload Import File to upload the csv file Choose Next
2 On the Import Wizard CSV Contents screen select Module License as the Object Type choose Next and follow any additional prompts to finish the process The successful file import is displayed on the File Import tab
6 Choose Setup System Administration System Management System Information
7 Choose the Components tab and verify that the appropriate licenses are checked under SRM Module Licenses
8 If you are installing the optimizer verify that a new Optimizer tab appears and displays an appropriate Status Queue value and JVM information (If the optimizer is not installed the Status Queue value is OFFLINE and the JVM Information is set to unknown)
36
PUBLICcopy Copyright 2015 SAP SE or an SAP affiliate companyAll rights reserved
SAP Sourcing 90Install License Key
12 Change Session Timeout
Procedure
NoteThis is optional
The deployment descriptor for the SAP Sourcing application defaults to a 30-minute session timeout or to the value that was set during installation
NoteThe above property should be set longer than the below two properties
To change this setting
1 Log on as the system user and set the following system property in SAP Sourcing
uppmeteringlogin_inactivity_timeout and set to the timeout that was chosen when running the configure utility
2 Property uppmeteringcleanup_interval defines the time between runs of the daemon which removes inactive sessions It is recommended that this value be set to a value that is slightly larger than the uppmeteringlogin_inactivity_timeout setting is set to
3 Set the time-out using the configure tool For information about the configure tool see the Installation Guide for SAP Sourcing 90 on the SAP Service Marketplace at servicesapcomeso SAP Sourcing On-Premise SAP Sourcing 90
NoteBoth internal property in SAP Sourcing and configuration tool in NetWeaver should be set to the same value
SAP Sourcing 90Change Session Timeout
PUBLICcopy Copyright 2015 SAP SE or an SAP affiliate company
All rights reserved 37
13 Enable Contract Authoring
Contracts amendments and clauses use the Word service This service must be referenced For more information see ldquoCreate OfficeAutomationUser Accountrdquo in the Installation Guide for SAP Sourcing 90 on SAP Service Marketplace at servicesapcomeso SAP Sourcing On-Premise SAP Sourcing 90
Procedure
Configure a path to the Word service in SAP Sourcing as follows
1 Choose Setup System Properties
2 From the Name dropdown list choose contractgenserviceurl
3 Set the value to ltprotocolgtlthostnamegtltvirtual directorygtwordserviceasmx
38
PUBLICcopy Copyright 2015 SAP SE or an SAP affiliate companyAll rights reserved
SAP Sourcing 90Enable Contract Authoring
14 e-Signature
To enable e-Signature functionality users first get user accounts from EchoSign EchoSign adds the users to the EchoSign SAP channel System administrators define the integrated system configuration and set up the management of customer and user accounts System administrators can schedule automated checks of contract document signature statuses System users can check the availability of e-Signature components
141 Set Up EchoSign Account and System Configuration
Procedure
Set Up EchoSign Account
Before a system administrator enables e-Signature features for a customer EchoSign adds the customer to the EchoSign SAP channel The customer gives the account key provided by EchoSign to the system administrator The system administrator then configures e-Signature to work with EchoSign
Set Up Integrated System Configuration
Adding an EchoSign account to SAP Sourcing configuration enables e-Signature functionality in SAP Sourcing To set up an EchoSign account for use with e-Signature a system administrator creates an integrated system configuration object for EchoSign integration
1 Log on as the enterprise user
2 Choose Setup Integrated System Configuration
3 On the subsequent screen choose New
4 On the subsequent screen select EchoSign for System Type and select Continue
5 Under EchoSign Properties the customer enters the EchoSign account key provided the customer by EchoSign and choose Done
Set Up Proxy Settings
To configure EchoSign on a NetWeaver-based system follow these steps
1 Configure the HTTP properties as described on the SAP Help Portal at helpsapcomsaphelp_nw73helpdataen48479b6163524bb9e10000000a42189bframesethtm
2 To add proxy parameters to JVM settings in NetWeaver navigate to [host][port]nwa ConfigurationInfrastructure Java System Properties Additional VM Properties and add the following parameters with the appropriate values
-DhttpproxyHost -DhttpproxyPort -DhttpsproxyHost -DhttpsproxyPort
SAP Sourcing 90e-Signature
PUBLICcopy Copyright 2015 SAP SE or an SAP affiliate company
All rights reserved 39
NoteIf your proxy server requires a username and password provide this information with the following parameters
-DhttpproxyUser -DhttpproxyPassword -DhttpsproxyUser -DhttpsproxyPassword
3 Import the SSL certificate file into the NetWeaver key storage as follows
1 Navigate to lthostgtltportgtnwa Security Certificates and Keys
2 Select the WebServiceSecurity keystore view
3 If you are updating or replacing the EchoSign certificate remove any previous certificates with the same Common Name
4 Choose Import Entry and select x509 certificate as the entry type
5 Get the EchoSign certificate from your browserrsquos certificate interface
NoteSpecific steps will vary from browser to browser but the general process should be similar Here are sample instructions for Firefox
1 Navigate to secureechosigncomservicesEchoSignDocumentService9
NoteYou can ignore the error message that says Invalid SOAP Request
2 Click on the lock icon next to the URL
3 Click More Information
4 Open the Security tab
5 Click View Certificate
6 Open the Details tab
7 Click Export
8 From the Save as Type dropdown list choose the SSL certificate for the version you require
9 If Windows does not recognize the exported file as a certificate add a cer or crt extension to the filename
6 Restart NetWeaver
Change EchoSign service URL
SAP Sourcing ships with the current EchoSign service URL Change the service URL value in System Properties only when EchoSign changes the service URL To change this value do the following
1 Log on as the system user
2 On the System Setup tab choose System Properties
3 Open contractgenesignature_url from the Properties list
4 Enter the new EchoSign service URL provided by EchoSign
40
PUBLICcopy Copyright 2015 SAP SE or an SAP affiliate companyAll rights reserved
SAP Sourcing 90e-Signature
NoteSet the URL property only if the EchoSign domain has changed The current URL is secureechosigncomservicesEchoSignDocumentService9 Note that the API version should be set to 9
Change the length of the EchoSign timeout
By default SAP Sourcing sets the length of the EchoSign timeout to 300000 milliseconds or five minutes Change the length of the EchoSign timeout only if the default timeout causes issues when you send documents to EchoSign
1 Log on as the system user
2 On the System Setup tab choose System Properties
3 Choose contractgenesignature_timeout from the Name dropdown menu
4 Enter a numeral specifying the desired length in milliseconds for the EchoSign timeout in the Value field The Value field requires no minimum nor maximum value nor number formatting
142 Check EchoSign Configuration Status
Procedure
1 Log on as the system user
2 Choose System Information Then on the subsequent screen choose the Audits tab
3 Choose the correct context for the customers location from the Context dropdown menu
4 In the Availability pane OK appears in the Status column next to EchoSign Availability if you configured SAP Sourcing correctly for EchoSign
143 Set Up User Rights
Procedure
Assign Right to Send Contract Documents for Signatures or to Resolve Errors
To enable a user to send contract documents for signatures a customer system administrator adds Contract e-Signature to the users security profiles
To assign the right to send contract documents out for signatures to a user a system administrator does the following
1 In Setup choose System Administration Internal User Accounts
2 Select the desired user account
3 Choose the Security tab Then choose Contract e-Signature or Contract e-Signature Admin
A system administrator can assign either of the following e-Signature rights to a user
SAP Sourcing 90e-Signature
PUBLICcopy Copyright 2015 SAP SE or an SAP affiliate company
All rights reserved 41
Table 14
Right Description
ESO_CONTRACT_ESIGNATURE Users with this right can send contract documents out for signatures using the e-Signature feature
ESO_CONTRACT_ESIGNATURE_ADMIN This right allows designated users to resolve errors Users with this right can change a contract document while it is out for signatures Users with this right can change the signature status of a contract document to Error and can thus allow the contract document author to unlock a frozen document System administrators assign this right only to other administrators not to standard users
4 Choose Done
144 Resolve e-Signature Errors
Procedure
Contract Document Status Frozen
Unexpected errors such as network or system errors can freeze the status of a contract document to Sending for e-Signature or Out for Signature A user with the right ESO_CONTRACT_ESIGNATURE_ADMIN can unfreeze the status of the contract document so that the contract author can cancel the e-Signature process A system administrator can assign the right ESO_CONTRACT_ESIGNATURE_ADMIN to a user
1 The contract author adds a user with the ESO_CONTRACT_ESIGNATURE_ADMIN right to the affected Master Agreement as a collaborator
2 The user with the ESO_CONTRACT_ESIGNATURE_ADMIN right manually changes the status of the frozen contract document to ERROR
3 The contract author logs in to EchoSign and manually cancels the e-Signature process for the contract document
Invalid Password Error
You may receive the following error message Error Invalid password for user sending a Contract Document to EchoSign for signature
This message indicates that the user sending a request for e-signatures via EchoSign is not properly set up in their EchoSign account Contact EchoSign for assistance in resolving this error
145 Set Up Scheduled Task to Retrieve e-Signature Status
Procedure
You can set SAP Sourcing to retrieve the e-Signature statuses of all contract documents at a frequency you specify automatically However an end user need not wait for these automated retrievals to see the current e-
42
PUBLICcopy Copyright 2015 SAP SE or an SAP affiliate companyAll rights reserved
SAP Sourcing 90e-Signature
Signature status of a contract document End users can get instant updates of the e-Signature status manually through the contract document user interface
1 Log on as the enterprise user
2 Choose Setup
3 On the System Setup tab choose Scheduled Tasks
4 On the subsequent page choose New then select the e-Signature Status radio button then choose Continue
5 Enter the display name and start date Set the frequency and end date as desired
NoteSAP recommends automatically retrieving e-Signature statuses daily and setting the retrievals to run at night
6 Choose Save
SAP Sourcing 90e-Signature
PUBLICcopy Copyright 2015 SAP SE or an SAP affiliate company
All rights reserved 43
15 Configure Workbench
The CLM system is delivered with a base workbench page that is available to all internal users Additionally the system is configured with a workbench page intended to be used by CLM contract managers
The workbench page is established in the system but requires additional configuration to make it available to the desired users This configuration is done by adding collaborators to the Contract Management Workbench page
Prerequisites
You must be logged on as the enterprise user
Procedure
Configure the Contract Management Workbench page with the individual users or user groups that should also have access to the page
To do this go to Setup System Setup Workbench Workbench Page All Workbench Pages Edit the Contract Management page and add collaborators
44
PUBLICcopy Copyright 2015 SAP SE or an SAP affiliate companyAll rights reserved
SAP Sourcing 90Configure Workbench
16 Configure Branding
The following procedures enable you to change the branding from the default SAP Sourcing to SAP CLM Four branding items are affected
Branding text in the title bar of the browser (for example SAP Sourcing)
SAP CLM logo image for the purchaser login page
SAP CLM Business Partner logo image for the supplier login page
Images on the login page
Images on the splash screen
Procedure
Change the Branding after Installation
1 Choose Setup System Properties
2 Change the value of systembrand_name to (for example) SAP CLM
Themes
NoteThe following two steps require editing of themes For futher information about themes see the SAP Sourcing help at helpsapcomsourcing To access the help system scroll to SAP Sourcing 90 Help for Purchasers and choose a language In the help choose Setup Themes
1 Open the current enterprisersquos theme Branding area and choose Purchaser Login Banner link then Image link Delete the original path in Image Path field and paste imageslogoslogo_sapXCLMgif
2 Choose Delete on Background Image field
3 Choose the Supplier Login Banner link then Image link Delete the original path in Image Path field and paste imageslogoslogo_sapXCLMBusinessPartnergif
4 Choose Delete on Background Image field
SAP Sourcing 90Configure Branding
PUBLICcopy Copyright 2015 SAP SE or an SAP affiliate company
All rights reserved 45
17 Configuring Supplier Workflow Management
By default supplier workflow management feature is disabled in SAP Sourcing To enable this feature you need to perform following general steps
1 Create Workflow Definitions
2 Create Supplier Configurable Phase Definition
3 CreateModify Supplier Type
4 Create Supplier Field Access Definition (optional)
5 Configure Security Templates
6 Assign Supplier Types to Suppliers
7 Configure Supplier UI Mapping
The following subsections provide details for each of these steps
Create Workflow Definitions
1 Click Setup in the toolbar at the top of the page and select Platform
2 In the Workflow section of System Setup click on Workflow Definitions
3 On the Workflow Definitions List page click New
4 On the Workflow Definition Summary page fill in the fields with workflow information For details see the Field Help for Workflow Definition Summary page
5 Click the Add New Version button to add a process template to the workflow definition For details see the Field Help for Process Template Dialog Box page
6 Click the Save button in the toolbar
7 Create another Workflow Definition if necessary
Create Supplier Configurable Phase Definition
Supplier phases determine the actions that can be performed on supplier registration and modification requests To create a supplier configurable phase definition
1 Click Setup in the toolbar at the top of the page and select Platform
2 In the Suppliers section of Document Setup click on Supplier Configurable Phase Definition
3 On the Supplier Configurable Phase Definition List page click New
4 On the Header page fill in the fields with phase information For details see the Field help for Supplier Configurable Phase Definition Header page
5 Click Add to add phases to the definition
6 In the dialog box that appears select each phase to include in the phase definition and click OK
7 (optional) Click the Edit icon for each phase to edit phase information including the sequence of phases in the workflow On this page you can assign workflow definition and supplier field access definition For details see the Field help for Supplier Configurable Phase Header page
8 Click the Save button in the toolbar
46
PUBLICcopy Copyright 2015 SAP SE or an SAP affiliate companyAll rights reserved
SAP Sourcing 90Configuring Supplier Workflow Management
9 Create another Supplier Configurable Phase Definition if necessary
CreateModify Supplier Type
Supplier types can be used to determine whioch workflow phase definition to enable in a supplier registration or modification requests The Configurable Phase Definition field of Supplier Type is responsible for defining whether registrationmodification requests will use workflow and which phases will have these requests If Configurable Phase Definition is empty then supplier registration and modification requests will not have configured phases and any supplier administrator will be able to approve or deny request of such type as it was in previous versions of SAP Sourcing To enable supplier workflow management some supplier-configurable phase definition must be assigned to supplier types
SAP Sourcing provides one default supplier type You can modify this type and create new ones
1 Click Setup in the toolbar at the top of the page and select Platform
2 In the Suppliers section of Document Setup select Supplier Type
3 On the Supplier Type List page click New for creating new type or select existing from the list for editing
4 On the Type page fill in necessary fields On this page you can assign Supplier Configurable Phase Definition to Supplier Type For details see the Field Help for Supplier Type page
Create Supplier Field Access Definition
This step is optional
Supplier Field Access Definition allows you to configure access rules foe approver on specific phase
To create a supplier field access definition
1 Click Setup in the toolbar at the top of the page and select Platform
2 In the Suppliers section of Document Setup select Supplier Field Access Definition
3 On the Supplier Field Access Definition List page click New
4 On the UI page fill in necessary fields For details see the Field Help for Supplier Field Access Definition page
5 Click the Save button in the toolbar
6 Open existing Supplier Configurable Phase Definition
7 Click Edit
8 Click the Edit icon for the phase where you want to configure access rights for approvers This should be the approval phase
9 Click the Lookup icon to select a supplier field access definition to associate with this phase
10 Save the Supplier Configurable Phase Definition
Configure Security Templates
This is a very important configuration step In the case of supplier registrationsmodifications without configured workflows requests can be viewed and approved by any Supplier Administrator But in the case of new functionality collaborator security is used to define access rights A document security template is a set of rules governing the way an SAP Sourcing document assigns collaborator roles You should configure collaborators defined by role and user type that are automatically added to a registration and modification requests
You must configure two security templates first for Workflow Supplier Registration and second for Workflow Supplier Modification The following must be configured in these templates
The document owner must be any specified buy-side user Otherwise automatic phase transitions will not work for sell-side and the phase will need to be changed manually by any buy-side user
SAP Sourcing 90Configuring Supplier Workflow Management
PUBLICcopy Copyright 2015 SAP SE or an SAP affiliate company
All rights reserved 47
Document creator (current user) must be added to collaborator list with a role that allows viewing editing and changing phases (eg Collaborator)
Supplier administrators should be included to collaborator list to be able view and manually complete registrationmodification requests in case automatic completion should fail for some reason
Assign Supplier Type to Supplier
After the upgrade procedure one default supplier type is created and assigned to all suppliers It will be used to recognize phases for supplier modifications via workflow The supplier type can be changed for any supplier as follows
1 Open the supplier whose supplier type you want to reassign
2 Press Edit
3 Click the Lookup icon under the Document Type field
4 Select a new supplier type
5 Click Ok
6 Click Save
NoteWhen the supplier is created via workflow the supplier type used for creation is assigned to created supplier
Configure Supplier UI Mapping
The supplier type can be mapped to any supplier-side self-registration form The Supplier Type UI includes a collection of Supplier registration UI Mappings This allows you to configure the mapping between supplier type and self-registration forms
1 Open any Supplier Type
2 Click Edit
3 Click Add under Sell-Side Supplier Registration UI Mapping to add the UI page that will be mapped to this type
4 Click Save
NoteThe self-registration form can be assigned to only one supplier type If no form is assigned to a supplier type the default supplier type will be used for registration
48
PUBLICcopy Copyright 2015 SAP SE or an SAP affiliate companyAll rights reserved
SAP Sourcing 90Configuring Supplier Workflow Management
Typographic Conventions
Table 15
Example Description
ltExamplegt Angle brackets indicate that you replace these words or characters with appropriate entries to make entries in the system for example ldquoEnter your ltUser Namegtrdquo
Example Example Arrows separating the parts of a navigation path for example menu options
Example Emphasized words or expressions
Example Words or characters that you enter in the system exactly as they appear in the documentation
wwwsapcom Textual cross-references to an internet address
example Quicklinks added to the internet address of a homepage to enable quick access to specific content on the Web
123456 Hyperlink to an SAP Note for example SAP Note 123456
Example Words or characters quoted from the screen These include field labels screen titles pushbutton labels menu names and menu options
Cross-references to other documentation or published works
Example Output on the screen following a user action for example messages
Source code or syntax quoted directly from a program
File and directory names and their paths names of variables and parameters and names of installation upgrade and database tools
EXAMPLE Technical names of system objects These include report names program names transaction codes database table names and key concepts of a programming language when they are surrounded by body text for example SELECT and INCLUDE
EXAMPLE Keys on the keyboard
SAP Sourcing 90Typographic Conventions
PUBLICcopy Copyright 2015 SAP SE or an SAP affiliate company
All rights reserved 49
wwwsapcom
copy Copyright 2015 SAP SE or an SAP affiliate company All rights reservedNo part of this publication may be reproduced or transmitted in any form or for any purpose without the express permission of SAP SE or an SAP affiliate companySAP and other SAP products and services mentioned herein as well as their respective logos are trademarks or registered trademarks of SAP SE (or an SAP affiliate company) in Germany and other countries Please see wwwsapcomcorporate-enlegalcopyrightindexepxtrademark for additional trademark information and noticesSome software products marketed by SAP SE and its distributors contain proprietary software components of other software vendors National product specifications may varyThese materials are provided by SAP SE or an SAP affiliate company for informational purposes only without representation or warranty of any kind and SAP SE or its affiliated companies shall not be liable for errors or omissions with respect to the materials The only warranties for SAP SE or SAP affiliate company products and services are those that are set forth in the express warranty statements accompanying such products and services if any Nothing herein should be construed as constituting an additional warrantyIn particular SAP SE or its affiliated companies have no obligation to pursue any course of business outlined in this document or any related presentation or to develop or release any functionality mentioned therein This document or any related presentation and SAP SEs or its affiliated companies strategy and possible future developments products andor platform directions and functionality are all subject to change and may be changed by SAP SE or its affiliated companies at any time for any reason without notice The information in this document is not a commitment promise or legal obligation to deliver any material code or functionality All forward-looking statements are subject to various risks and uncertainties that could cause actual results to differ materially from expectations Readers are cautioned not to place undue reliance on these forward-looking statements which speak only as of their dates and they should not be relied upon in making purchasing decisions
- SAP Sourcing 90
-
- Table of Contents
- 1 Introduction
- 2 Define System Properties
- 3 Set Up SMTP Server
- 4 Context Cluster and Directory Configuration
-
- 41 Manual Context Cluster and Directory Configuration
- 42 Create Cluster Template
- 43 Create Internal Directory Template
- 44 Create External Directory Template
- 45 Managing the SSL Certificate
- 46 Create Tenant Configuration
-
- 5 Master Data
-
- 51 Overview of Master Data
- 52 Create Master Data Manually
- 53 Import Master Data Using CSV File
- 54 Workbooks
-
- 541 Overview of Workbooks
- 542 Download and Customize Workbooks
- 543 Import Master Data Using Workbooks
-
- 6 Create and Verify Purchaser User
- 7 Create and Verify Supplier User
- 8 Install Company Logo
- 9 Specify Internal Address of SAP Sourcing Server
- 10 Update Master Time Zone
- 11 Install License Key
- 12 Change Session Timeout
- 13 Enable Contract Authoring
- 14 e-Signature
-
- 141 Set Up EchoSign Account and System Configuration
- 142 Check EchoSign Configuration Status
- 143 Set Up User Rights
- 144 Resolve e-Signature Errors
- 145 Set Up Scheduled Task to Retrieve e-Signature Status
-
- 15 Configure Workbench
- 16 Configure Branding
- 17 Configuring Supplier Workflow Management
- Copyright and Trademarks
-
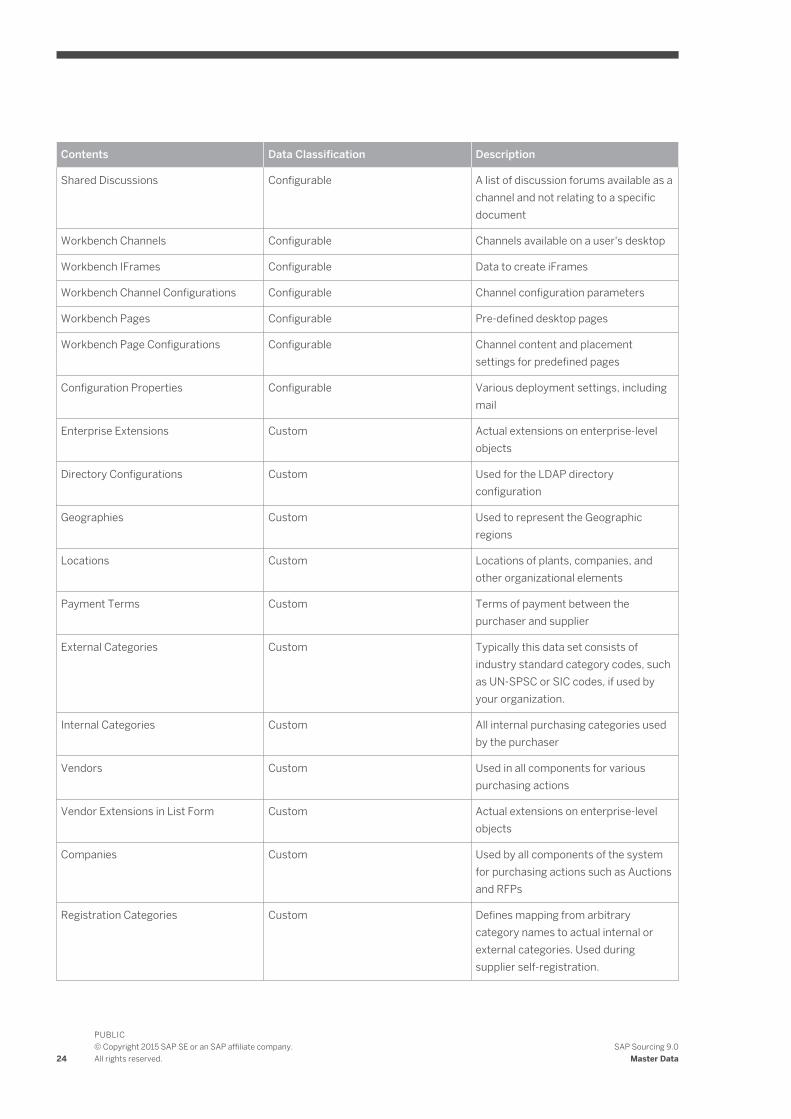
Contents Data Classification Description
Shared Discussions Configurable A list of discussion forums available as a channel and not relating to a specific document
Workbench Channels Configurable Channels available on a users desktop
Workbench IFrames Configurable Data to create iFrames
Workbench Channel Configurations Configurable Channel configuration parameters
Workbench Pages Configurable Pre-defined desktop pages
Workbench Page Configurations Configurable Channel content and placement settings for predefined pages
Configuration Properties Configurable Various deployment settings including mail
Enterprise Extensions Custom Actual extensions on enterprise-level objects
Directory Configurations Custom Used for the LDAP directory configuration
Geographies Custom Used to represent the Geographic regions
Locations Custom Locations of plants companies and other organizational elements
Payment Terms Custom Terms of payment between the purchaser and supplier
External Categories Custom Typically this data set consists of industry standard category codes such as UN-SPSC or SIC codes if used by your organization
Internal Categories Custom All internal purchasing categories used by the purchaser
Vendors Custom Used in all components for various purchasing actions
Vendor Extensions in List Form Custom Actual extensions on enterprise-level objects
Companies Custom Used by all components of the system for purchasing actions such as Auctions and RFPs
Registration Categories Custom Defines mapping from arbitrary category names to actual internal or external categories Used during supplier self-registration
24
PUBLICcopy Copyright 2015 SAP SE or an SAP affiliate companyAll rights reserved
SAP Sourcing 90Master Data
Contents Data Classification Description
Organizational Units Custom Further definition of the organizational hierarchy Use to define departments business units and so on
Groups Custom Arbitrary groups of purchaser users
Contacts Custom Used for all suppliers to distinguish the various contacts at each supplier
Accounts Custom Handles all user accounts for the system
Terms Templates Custom Standard terms and conditions phrases to which a supplier must agree before accessing an event
Purchasing Organization Custom An organizational unit in SAP ERP subdividing an enterprise according to the requirements of purchasing
Purchasing Group Custom A key for a purchaser or group of purchasers in SAP ERP
Vendor Account Group Custom A classifying feature of supplier master records in SAP ERP
Business System Custom Represents a system in the landscape for example SAP Sourcing or SAP ERP
Text Id Custom Represents SAP ERP header and item texts
Transaction Type Custom Represents SAP ERP transation types
After configuring the enterprise master data you must next configure the company master data This data must be created once for each sub-context This example only uses a single context so this data must only be created once
Table 11
Contents Data Classification Description
UFNs System Metadata for RFx utility functions
System Answered Sources Configurable Defines the available sources of system answered questions
Company Extension Definitions Configurable List of company-scoped objects which have extensions
Document Security Templates Configurable Sets up the default collaborators and security when new documents are created
Contract Generation Phases Configurable Used to define Phases for Contract Generation library documents
SAP Sourcing 90Master Data
PUBLICcopy Copyright 2015 SAP SE or an SAP affiliate company
All rights reserved 25
Contents Data Classification Description
Contract Generation Tags Configurable Used to define Tags for Contract Generation
Company extensions Custom List of extensions on individual object types
masterdataActivity Custom Used for general accounting purposes
Cost Centers Custom Used for accounting purposes to assign cost on a center by center basis
Cost Center Groups Custom
Entities Custom Used for accounting purposes for purchasing by division
GL Accounts Custom Used for general accounting purposes
Plants Custom Plants or facilities
Materials Custom Standard materials for use in line items
Category Managers Custom Users who are responsible for certain categories
Master Data Security
When configuring and importing Master Data there are some things to remember about security
1 Each piece of importable master data has an Import right as part of its ACL list By default this right is only added for the System Administrator security profile and therefore only those users can import master data out of the box As always an admin can add Import rights to other security profiles on and object-by-object basis
ExampleIf Supplier Administrators need to import Supplier records then that can be enabled
2 When importing Master Data be it via CSV XLS XML etc the user running the imports must have Import right allowed for all objects in question The Enterprise user is considered trusted and can import any of these objects
52 Create Master Data Manually
Procedure
NoteThe user account being used to import the following must have Allow Import rights on these specific objects If you do not have Allow Import on these objects it must be added or the import will fail
1 Log on as the enterprise user
26
PUBLICcopy Copyright 2015 SAP SE or an SAP affiliate companyAll rights reserved
SAP Sourcing 90Master Data
2 Create objects from within the Setup module
3 Log on as a purchaser user with administrative rights to configure company master data
For more information see the SAP Sourcing help at helpsapcomsourcing To access the help system scroll to SAP Sourcing 90 Help for Purchasers and choose a language In the help choose Setup System Setup Master Data
53 Import Master Data Using CSV File
NoteThe user account being used to import the following must have Allow Import rights on these specific objects If you do not have Allow Import on these objects it must be added or the import will fail
You can import master data files with CSV XLS or XLSX format in two ways
Use the standard web user interface
Use a client application distributed with the system which allows data to be imported outside of the web environment
The following procedure describes how to import using the web-based UI
Procedure
1 If application users have already been created log on as a purchaser user with administrative rights If users have not been created log on as the enterprise user
2 Choose Setup System Administration Import Export Tools Import Data and then choose OK
3 Choose Create
The import wizard opens
4 Specify whether you want to upload the file to the server or whether the file is already located on the application server and choose Next
5 Choose Upload Import File and select the CSV or Deployment Workgroup file to import
6 For CSV files select the object type and choose Next
7 Indicate whether you want to wait for the import to finish or perform the import in the background and then choose Next
8 Choose Finish to view the results
SAP Sourcing 90Master Data
PUBLICcopy Copyright 2015 SAP SE or an SAP affiliate company
All rights reserved 27
54 Workbooks
541 Overview of Workbooks
NoteThere are many sheets in the workbooks that have the prefix eso While these sheets may appear as duplicates of other sheets the data in them is in fact different These sheets should be imported by default You may also add data to these sheets if you would like to augment the data provided in the sample workbooks
We recommend using the deployment workbook for initial deployment of the system to ensure that all required data is imported into the system
To facilitate the import of data SAP Sourcing provides an alternative to CSV files for import SAP Sourcing provides the ability to import Microsoft Excel files containing one or more master data imports The system processes these Excel files directly without the user having to export the data to a raw CSV file The Enterprise Deployment Workbook and Company Deployment Workbook are two sample deployment workbooks delivered with SAP Sourcing
Anyone with system administrator access rights can download the deployment workbooks from the web user interface The deployment workbooks are included in the online Reference Guide (RG)
When starting a new deployment project preserve the original workbook templates by making a copy of them and saving them with a new name Import data using your modified templates only By doing so you assure continuity if future additional deployments are required
NoteKeep the following in mind when using deployment workbooks
The Configuration Sheet controls the import process Refer to the Help Sheet for input specifications of Configuration Sheet columns
The system can import the workbooks directly but there are limitations to what Excel constructs are supported The Help Sheet describes the rules that must be observed
The same importing process supports both CSV files and Excel workbooks
There is a one to one relationship with the workbook configuration file and the worksheet tabs
542 Download and Customize Workbooks
The sample enterprise and company workbooks that you download from SAP Sourcing are designed for you to configure a base system using a sample enterprise context We recommend modifying the default deployment workbooks Choose the appropriate workbooks from this table
Table 12
System Workbooks
SAP Sourcing Enterprise Deployment Workbook
Company Deployment Workbook
Users setting up a base system should adjust the various settings in these workbooks prior to running them in the system For example the company data should be updated to reflect specifics about the company that is
28
PUBLICcopy Copyright 2015 SAP SE or an SAP affiliate companyAll rights reserved
SAP Sourcing 90Master Data
installing the system Similarly you should review other tabs to ensure that the configurations are consistent with the desired implementation For details on customizable fields see Master Data [page 22]
Procedure
1 Log on as the enterprise user and choose Reference Guide Download the sample enterprise and company workbooks appropriate for your system
NoteThe enterprise workbook should be run as the enterprise user The company workbook should be run as a system administrator associated with the company object intended to be configured
2 From the Enterprise Deployment workbook open the file and find the sheet labeled locations and edit this sheet as necessary
Only one location is required
3 Find each sheet review each sheet and the comments in the sheet and update the data accordingly
4 Provide at least one internal category
5 Find the sheet labeled companies and edit it as necessary
6 Repeat for org_units groups accounts and so on
Your are establishing a hierarchy To configure the hierarchy correctly you must ensure that the child references the parent correctly For example the PARENT column in the business_units page should include a valid EXTERNAL_ID from the companies sheet
NoteTo build all custom data in the user interface simply deactivate the import of the above data types in the deployment workbook See the Help page for instructions on how to skip a specific worksheet
7 Import the enterprise and company workbooks into SAP Sourcing by choosing Setup System Administration Import and Export Tools Import Data and then choose Create
543 Import Master Data Using Workbooks
Procedure
1 Log on as the user specified in this table and choose Setup
Table 13
Workbook Login User
Enterprise workbook
Enterprise user
Company workbook Purchaser user
2 From the Import and Export Tools dropdown chooseImport Data and then choose OK
The Import Data page appears
SAP Sourcing 90Master Data
PUBLICcopy Copyright 2015 SAP SE or an SAP affiliate company
All rights reserved 29
3 Choose Create to start a new import job
4 Choose Upload to the Server and then choose Next
5 Select the modified workbook and choose Next
6 Wait for the import to finish and choose Next
Typically running the enterprise workbook can take several minutes
30
PUBLICcopy Copyright 2015 SAP SE or an SAP affiliate companyAll rights reserved
SAP Sourcing 90Master Data
6 Create and Verify Purchaser User
Procedure
For the SAP NetWeaver UME driver users should be created in SAP Sourcing and the SAP NetWeaver UME with the same username
For LDAP drivers depending on how the LDAP was set up you must perform one of the following
Create the user in SAP Sourcing and supply the information FROM the LDAP
If you have access create the account and supply the information TO the LDAP
In either case an e-mail is generated giving the user a path to the application and his or her user name If the account is created a temporary password is also mailed A system property determines whether this information is delivered in the same e-mail or separate e-mails
1 Choose Setup WYSIWYG Page Customization User Account and create a purchaser user as follows
1 On the Account Properties tab enter required information
2 On the Account Management tab enter information as follows
Enable User to Login Select
Directory Select as needed
User ID Type userid
Create Directory Account Select
Generate a New Password Select
Send Notification Select
3 On the Security tab enter information as follows
Purchaser Select
Purchaser Manager Select
System Administrator Select
Supplier Administrator Select
Make sure this first user is given Administrator privileges to import the Company Workbook
2 Wait for the e-mail to be sent and received If you do not receive it check the following
To verify the mail was sent choose Setup System Administration Processed Messages
To check for stuck or failed messages choose Setup System Administration Queued Messages
3 To test the new account log on as a purchaser user using the credentials sent in the e-mail
4 Reset your password and choose OK
If you can successfully log into the new purchaser account the context cluster and directory are properly configured and the SMTP server is processing e-mail
SAP Sourcing 90Create and Verify Purchaser User
PUBLICcopy Copyright 2015 SAP SE or an SAP affiliate company
All rights reserved 31
7 Create and Verify Supplier User
Procedure
Create a supplier user to test the supplier portal A supplier user is a contact on a supplier record
1 Choose Supplier Management Create Supplier
2 Enter and save the required information
3 Choose the Contacts tab
4 Under Supplier Contacts choose Add
5 Enter and save the required information
6 Log on as a supplier user using the credentials provided in the test user e-mail
7 Reset the password as prompted and accept the usage terms
32
PUBLICcopy Copyright 2015 SAP SE or an SAP affiliate companyAll rights reserved
SAP Sourcing 90Create and Verify Supplier User
8 Install Company Logo
Procedure
NoteWe do not recommend installing an image larger than 200 x 29
1 Log on as the enterprise user
2 Attach the logo as follows
1 Choose Setup Organization and Accounting Information Companies
2 Select the enterprise company from the list and choose Edit Document
3 Attach your logo image to the company using the Logo Attachment field
3 Save your entries
Resize Company Logo
If you have uploaded a company logo in your source release you must resize the image to 200x29
1 Log on as a purchaser user with system administrator rights
2 Choose Setup
3 On the Master Data tab find the Organization and Accounting section and choose Companies
4 Choose the company
5 Choose Edit
6 In the Logo field upload the resized image
SAP Sourcing 90Install Company Logo
PUBLICcopy Copyright 2015 SAP SE or an SAP affiliate company
All rights reserved 33
9 Specify Internal Address of SAP Sourcing Server
Procedure
When SAP Sourcing is first installed or whenever a new server is added to an application cluster the Internet address that is used for internal communications within SAP Sourcing is initially set to the external host name of the server In many cases this will result in unexpected or delayed behavior in the application
If the application landscape includes a network firewall accessing the server through this name requires exiting the firewall and re-entering If the firewall blocks incoming traffic on SAP Sourcingrsquos notification ports this will result in failure to deliver notifications for some events To avoid this do the following
1 Log on as the system user
2 Open the System Information record for editing
3 Change the value in the Internal Address field to an internal IP address or host name
4 Save your changes
34
PUBLICcopy Copyright 2015 SAP SE or an SAP affiliate companyAll rights reserved
SAP Sourcing 90Specify Internal Address of SAP Sourcing Server
10 Update Master Time Zone
Procedure
This procedure is required to enable SAP Sourcing to normalize all dates and times that are used in sourcing events Normalizing allows time fields to be presented differently for each user according to his or her preferred time zone while maintaining a consistent reference to the same point in time
1 Log on as the system user
2 Choose Setup Configuration System Properties
3 Edit the systemmaster_timezone property in the system set This property value should be set to the Java time zone identifier that corresponds to the current database server time zone
NoteThe SAP Sourcing Time Zone Value List Type provides a relatively comprehensive list of java time zone identifiers To view this list log on as a purchaser user and navigate to Setup Master Data Value List Types and Values Time Zone The Alternate Name column of this list contains the java time zone identifier for the corresponding time zone
ExampleldquoAmericaNew_Yorkrdquo is the alternate name of the SAP Sourcing Timezone ValueListValue for ldquo(GMT-500) Eastern Standard Timerdquo
SAP Sourcing 90Update Master Time Zone
PUBLICcopy Copyright 2015 SAP SE or an SAP affiliate company
All rights reserved 35
11 Install License Key
Procedure
You must install a license key before the SAP Sourcing system can be used in production mode
1 Choose Setup System Administration System Management System Information
2 Note the installation ID from the Installation ID field on the Service Registration tab
3 Create OSS ticket this ID and a list of the requested modules to license (include the optimizer) to SAP Customer Support You will receive a csv file including all the license keys
NoteRequesting the optimizer key without installing an optimizer server will result in a high volume of irrelevant optimizer-related messages in your log files If you do not intend to install an optimizer server do not request an optimizer key
4 Log on as the enterprise user and choose Setup System Administration Import and Export ToolsImport Data
5 Use the import tool to import the licenses you received from Support as follows
1 On the Import Wizard Select a File screen type a description such as License Keys and choose Upload Import File to upload the csv file Choose Next
2 On the Import Wizard CSV Contents screen select Module License as the Object Type choose Next and follow any additional prompts to finish the process The successful file import is displayed on the File Import tab
6 Choose Setup System Administration System Management System Information
7 Choose the Components tab and verify that the appropriate licenses are checked under SRM Module Licenses
8 If you are installing the optimizer verify that a new Optimizer tab appears and displays an appropriate Status Queue value and JVM information (If the optimizer is not installed the Status Queue value is OFFLINE and the JVM Information is set to unknown)
36
PUBLICcopy Copyright 2015 SAP SE or an SAP affiliate companyAll rights reserved
SAP Sourcing 90Install License Key
12 Change Session Timeout
Procedure
NoteThis is optional
The deployment descriptor for the SAP Sourcing application defaults to a 30-minute session timeout or to the value that was set during installation
NoteThe above property should be set longer than the below two properties
To change this setting
1 Log on as the system user and set the following system property in SAP Sourcing
uppmeteringlogin_inactivity_timeout and set to the timeout that was chosen when running the configure utility
2 Property uppmeteringcleanup_interval defines the time between runs of the daemon which removes inactive sessions It is recommended that this value be set to a value that is slightly larger than the uppmeteringlogin_inactivity_timeout setting is set to
3 Set the time-out using the configure tool For information about the configure tool see the Installation Guide for SAP Sourcing 90 on the SAP Service Marketplace at servicesapcomeso SAP Sourcing On-Premise SAP Sourcing 90
NoteBoth internal property in SAP Sourcing and configuration tool in NetWeaver should be set to the same value
SAP Sourcing 90Change Session Timeout
PUBLICcopy Copyright 2015 SAP SE or an SAP affiliate company
All rights reserved 37
13 Enable Contract Authoring
Contracts amendments and clauses use the Word service This service must be referenced For more information see ldquoCreate OfficeAutomationUser Accountrdquo in the Installation Guide for SAP Sourcing 90 on SAP Service Marketplace at servicesapcomeso SAP Sourcing On-Premise SAP Sourcing 90
Procedure
Configure a path to the Word service in SAP Sourcing as follows
1 Choose Setup System Properties
2 From the Name dropdown list choose contractgenserviceurl
3 Set the value to ltprotocolgtlthostnamegtltvirtual directorygtwordserviceasmx
38
PUBLICcopy Copyright 2015 SAP SE or an SAP affiliate companyAll rights reserved
SAP Sourcing 90Enable Contract Authoring
14 e-Signature
To enable e-Signature functionality users first get user accounts from EchoSign EchoSign adds the users to the EchoSign SAP channel System administrators define the integrated system configuration and set up the management of customer and user accounts System administrators can schedule automated checks of contract document signature statuses System users can check the availability of e-Signature components
141 Set Up EchoSign Account and System Configuration
Procedure
Set Up EchoSign Account
Before a system administrator enables e-Signature features for a customer EchoSign adds the customer to the EchoSign SAP channel The customer gives the account key provided by EchoSign to the system administrator The system administrator then configures e-Signature to work with EchoSign
Set Up Integrated System Configuration
Adding an EchoSign account to SAP Sourcing configuration enables e-Signature functionality in SAP Sourcing To set up an EchoSign account for use with e-Signature a system administrator creates an integrated system configuration object for EchoSign integration
1 Log on as the enterprise user
2 Choose Setup Integrated System Configuration
3 On the subsequent screen choose New
4 On the subsequent screen select EchoSign for System Type and select Continue
5 Under EchoSign Properties the customer enters the EchoSign account key provided the customer by EchoSign and choose Done
Set Up Proxy Settings
To configure EchoSign on a NetWeaver-based system follow these steps
1 Configure the HTTP properties as described on the SAP Help Portal at helpsapcomsaphelp_nw73helpdataen48479b6163524bb9e10000000a42189bframesethtm
2 To add proxy parameters to JVM settings in NetWeaver navigate to [host][port]nwa ConfigurationInfrastructure Java System Properties Additional VM Properties and add the following parameters with the appropriate values
-DhttpproxyHost -DhttpproxyPort -DhttpsproxyHost -DhttpsproxyPort
SAP Sourcing 90e-Signature
PUBLICcopy Copyright 2015 SAP SE or an SAP affiliate company
All rights reserved 39
NoteIf your proxy server requires a username and password provide this information with the following parameters
-DhttpproxyUser -DhttpproxyPassword -DhttpsproxyUser -DhttpsproxyPassword
3 Import the SSL certificate file into the NetWeaver key storage as follows
1 Navigate to lthostgtltportgtnwa Security Certificates and Keys
2 Select the WebServiceSecurity keystore view
3 If you are updating or replacing the EchoSign certificate remove any previous certificates with the same Common Name
4 Choose Import Entry and select x509 certificate as the entry type
5 Get the EchoSign certificate from your browserrsquos certificate interface
NoteSpecific steps will vary from browser to browser but the general process should be similar Here are sample instructions for Firefox
1 Navigate to secureechosigncomservicesEchoSignDocumentService9
NoteYou can ignore the error message that says Invalid SOAP Request
2 Click on the lock icon next to the URL
3 Click More Information
4 Open the Security tab
5 Click View Certificate
6 Open the Details tab
7 Click Export
8 From the Save as Type dropdown list choose the SSL certificate for the version you require
9 If Windows does not recognize the exported file as a certificate add a cer or crt extension to the filename
6 Restart NetWeaver
Change EchoSign service URL
SAP Sourcing ships with the current EchoSign service URL Change the service URL value in System Properties only when EchoSign changes the service URL To change this value do the following
1 Log on as the system user
2 On the System Setup tab choose System Properties
3 Open contractgenesignature_url from the Properties list
4 Enter the new EchoSign service URL provided by EchoSign
40
PUBLICcopy Copyright 2015 SAP SE or an SAP affiliate companyAll rights reserved
SAP Sourcing 90e-Signature
NoteSet the URL property only if the EchoSign domain has changed The current URL is secureechosigncomservicesEchoSignDocumentService9 Note that the API version should be set to 9
Change the length of the EchoSign timeout
By default SAP Sourcing sets the length of the EchoSign timeout to 300000 milliseconds or five minutes Change the length of the EchoSign timeout only if the default timeout causes issues when you send documents to EchoSign
1 Log on as the system user
2 On the System Setup tab choose System Properties
3 Choose contractgenesignature_timeout from the Name dropdown menu
4 Enter a numeral specifying the desired length in milliseconds for the EchoSign timeout in the Value field The Value field requires no minimum nor maximum value nor number formatting
142 Check EchoSign Configuration Status
Procedure
1 Log on as the system user
2 Choose System Information Then on the subsequent screen choose the Audits tab
3 Choose the correct context for the customers location from the Context dropdown menu
4 In the Availability pane OK appears in the Status column next to EchoSign Availability if you configured SAP Sourcing correctly for EchoSign
143 Set Up User Rights
Procedure
Assign Right to Send Contract Documents for Signatures or to Resolve Errors
To enable a user to send contract documents for signatures a customer system administrator adds Contract e-Signature to the users security profiles
To assign the right to send contract documents out for signatures to a user a system administrator does the following
1 In Setup choose System Administration Internal User Accounts
2 Select the desired user account
3 Choose the Security tab Then choose Contract e-Signature or Contract e-Signature Admin
A system administrator can assign either of the following e-Signature rights to a user
SAP Sourcing 90e-Signature
PUBLICcopy Copyright 2015 SAP SE or an SAP affiliate company
All rights reserved 41
Table 14
Right Description
ESO_CONTRACT_ESIGNATURE Users with this right can send contract documents out for signatures using the e-Signature feature
ESO_CONTRACT_ESIGNATURE_ADMIN This right allows designated users to resolve errors Users with this right can change a contract document while it is out for signatures Users with this right can change the signature status of a contract document to Error and can thus allow the contract document author to unlock a frozen document System administrators assign this right only to other administrators not to standard users
4 Choose Done
144 Resolve e-Signature Errors
Procedure
Contract Document Status Frozen
Unexpected errors such as network or system errors can freeze the status of a contract document to Sending for e-Signature or Out for Signature A user with the right ESO_CONTRACT_ESIGNATURE_ADMIN can unfreeze the status of the contract document so that the contract author can cancel the e-Signature process A system administrator can assign the right ESO_CONTRACT_ESIGNATURE_ADMIN to a user
1 The contract author adds a user with the ESO_CONTRACT_ESIGNATURE_ADMIN right to the affected Master Agreement as a collaborator
2 The user with the ESO_CONTRACT_ESIGNATURE_ADMIN right manually changes the status of the frozen contract document to ERROR
3 The contract author logs in to EchoSign and manually cancels the e-Signature process for the contract document
Invalid Password Error
You may receive the following error message Error Invalid password for user sending a Contract Document to EchoSign for signature
This message indicates that the user sending a request for e-signatures via EchoSign is not properly set up in their EchoSign account Contact EchoSign for assistance in resolving this error
145 Set Up Scheduled Task to Retrieve e-Signature Status
Procedure
You can set SAP Sourcing to retrieve the e-Signature statuses of all contract documents at a frequency you specify automatically However an end user need not wait for these automated retrievals to see the current e-
42
PUBLICcopy Copyright 2015 SAP SE or an SAP affiliate companyAll rights reserved
SAP Sourcing 90e-Signature
Signature status of a contract document End users can get instant updates of the e-Signature status manually through the contract document user interface
1 Log on as the enterprise user
2 Choose Setup
3 On the System Setup tab choose Scheduled Tasks
4 On the subsequent page choose New then select the e-Signature Status radio button then choose Continue
5 Enter the display name and start date Set the frequency and end date as desired
NoteSAP recommends automatically retrieving e-Signature statuses daily and setting the retrievals to run at night
6 Choose Save
SAP Sourcing 90e-Signature
PUBLICcopy Copyright 2015 SAP SE or an SAP affiliate company
All rights reserved 43
15 Configure Workbench
The CLM system is delivered with a base workbench page that is available to all internal users Additionally the system is configured with a workbench page intended to be used by CLM contract managers
The workbench page is established in the system but requires additional configuration to make it available to the desired users This configuration is done by adding collaborators to the Contract Management Workbench page
Prerequisites
You must be logged on as the enterprise user
Procedure
Configure the Contract Management Workbench page with the individual users or user groups that should also have access to the page
To do this go to Setup System Setup Workbench Workbench Page All Workbench Pages Edit the Contract Management page and add collaborators
44
PUBLICcopy Copyright 2015 SAP SE or an SAP affiliate companyAll rights reserved
SAP Sourcing 90Configure Workbench
16 Configure Branding
The following procedures enable you to change the branding from the default SAP Sourcing to SAP CLM Four branding items are affected
Branding text in the title bar of the browser (for example SAP Sourcing)
SAP CLM logo image for the purchaser login page
SAP CLM Business Partner logo image for the supplier login page
Images on the login page
Images on the splash screen
Procedure
Change the Branding after Installation
1 Choose Setup System Properties
2 Change the value of systembrand_name to (for example) SAP CLM
Themes
NoteThe following two steps require editing of themes For futher information about themes see the SAP Sourcing help at helpsapcomsourcing To access the help system scroll to SAP Sourcing 90 Help for Purchasers and choose a language In the help choose Setup Themes
1 Open the current enterprisersquos theme Branding area and choose Purchaser Login Banner link then Image link Delete the original path in Image Path field and paste imageslogoslogo_sapXCLMgif
2 Choose Delete on Background Image field
3 Choose the Supplier Login Banner link then Image link Delete the original path in Image Path field and paste imageslogoslogo_sapXCLMBusinessPartnergif
4 Choose Delete on Background Image field
SAP Sourcing 90Configure Branding
PUBLICcopy Copyright 2015 SAP SE or an SAP affiliate company
All rights reserved 45
17 Configuring Supplier Workflow Management
By default supplier workflow management feature is disabled in SAP Sourcing To enable this feature you need to perform following general steps
1 Create Workflow Definitions
2 Create Supplier Configurable Phase Definition
3 CreateModify Supplier Type
4 Create Supplier Field Access Definition (optional)
5 Configure Security Templates
6 Assign Supplier Types to Suppliers
7 Configure Supplier UI Mapping
The following subsections provide details for each of these steps
Create Workflow Definitions
1 Click Setup in the toolbar at the top of the page and select Platform
2 In the Workflow section of System Setup click on Workflow Definitions
3 On the Workflow Definitions List page click New
4 On the Workflow Definition Summary page fill in the fields with workflow information For details see the Field Help for Workflow Definition Summary page
5 Click the Add New Version button to add a process template to the workflow definition For details see the Field Help for Process Template Dialog Box page
6 Click the Save button in the toolbar
7 Create another Workflow Definition if necessary
Create Supplier Configurable Phase Definition
Supplier phases determine the actions that can be performed on supplier registration and modification requests To create a supplier configurable phase definition
1 Click Setup in the toolbar at the top of the page and select Platform
2 In the Suppliers section of Document Setup click on Supplier Configurable Phase Definition
3 On the Supplier Configurable Phase Definition List page click New
4 On the Header page fill in the fields with phase information For details see the Field help for Supplier Configurable Phase Definition Header page
5 Click Add to add phases to the definition
6 In the dialog box that appears select each phase to include in the phase definition and click OK
7 (optional) Click the Edit icon for each phase to edit phase information including the sequence of phases in the workflow On this page you can assign workflow definition and supplier field access definition For details see the Field help for Supplier Configurable Phase Header page
8 Click the Save button in the toolbar
46
PUBLICcopy Copyright 2015 SAP SE or an SAP affiliate companyAll rights reserved
SAP Sourcing 90Configuring Supplier Workflow Management
9 Create another Supplier Configurable Phase Definition if necessary
CreateModify Supplier Type
Supplier types can be used to determine whioch workflow phase definition to enable in a supplier registration or modification requests The Configurable Phase Definition field of Supplier Type is responsible for defining whether registrationmodification requests will use workflow and which phases will have these requests If Configurable Phase Definition is empty then supplier registration and modification requests will not have configured phases and any supplier administrator will be able to approve or deny request of such type as it was in previous versions of SAP Sourcing To enable supplier workflow management some supplier-configurable phase definition must be assigned to supplier types
SAP Sourcing provides one default supplier type You can modify this type and create new ones
1 Click Setup in the toolbar at the top of the page and select Platform
2 In the Suppliers section of Document Setup select Supplier Type
3 On the Supplier Type List page click New for creating new type or select existing from the list for editing
4 On the Type page fill in necessary fields On this page you can assign Supplier Configurable Phase Definition to Supplier Type For details see the Field Help for Supplier Type page
Create Supplier Field Access Definition
This step is optional
Supplier Field Access Definition allows you to configure access rules foe approver on specific phase
To create a supplier field access definition
1 Click Setup in the toolbar at the top of the page and select Platform
2 In the Suppliers section of Document Setup select Supplier Field Access Definition
3 On the Supplier Field Access Definition List page click New
4 On the UI page fill in necessary fields For details see the Field Help for Supplier Field Access Definition page
5 Click the Save button in the toolbar
6 Open existing Supplier Configurable Phase Definition
7 Click Edit
8 Click the Edit icon for the phase where you want to configure access rights for approvers This should be the approval phase
9 Click the Lookup icon to select a supplier field access definition to associate with this phase
10 Save the Supplier Configurable Phase Definition
Configure Security Templates
This is a very important configuration step In the case of supplier registrationsmodifications without configured workflows requests can be viewed and approved by any Supplier Administrator But in the case of new functionality collaborator security is used to define access rights A document security template is a set of rules governing the way an SAP Sourcing document assigns collaborator roles You should configure collaborators defined by role and user type that are automatically added to a registration and modification requests
You must configure two security templates first for Workflow Supplier Registration and second for Workflow Supplier Modification The following must be configured in these templates
The document owner must be any specified buy-side user Otherwise automatic phase transitions will not work for sell-side and the phase will need to be changed manually by any buy-side user
SAP Sourcing 90Configuring Supplier Workflow Management
PUBLICcopy Copyright 2015 SAP SE or an SAP affiliate company
All rights reserved 47
Document creator (current user) must be added to collaborator list with a role that allows viewing editing and changing phases (eg Collaborator)
Supplier administrators should be included to collaborator list to be able view and manually complete registrationmodification requests in case automatic completion should fail for some reason
Assign Supplier Type to Supplier
After the upgrade procedure one default supplier type is created and assigned to all suppliers It will be used to recognize phases for supplier modifications via workflow The supplier type can be changed for any supplier as follows
1 Open the supplier whose supplier type you want to reassign
2 Press Edit
3 Click the Lookup icon under the Document Type field
4 Select a new supplier type
5 Click Ok
6 Click Save
NoteWhen the supplier is created via workflow the supplier type used for creation is assigned to created supplier
Configure Supplier UI Mapping
The supplier type can be mapped to any supplier-side self-registration form The Supplier Type UI includes a collection of Supplier registration UI Mappings This allows you to configure the mapping between supplier type and self-registration forms
1 Open any Supplier Type
2 Click Edit
3 Click Add under Sell-Side Supplier Registration UI Mapping to add the UI page that will be mapped to this type
4 Click Save
NoteThe self-registration form can be assigned to only one supplier type If no form is assigned to a supplier type the default supplier type will be used for registration
48
PUBLICcopy Copyright 2015 SAP SE or an SAP affiliate companyAll rights reserved
SAP Sourcing 90Configuring Supplier Workflow Management
Typographic Conventions
Table 15
Example Description
ltExamplegt Angle brackets indicate that you replace these words or characters with appropriate entries to make entries in the system for example ldquoEnter your ltUser Namegtrdquo
Example Example Arrows separating the parts of a navigation path for example menu options
Example Emphasized words or expressions
Example Words or characters that you enter in the system exactly as they appear in the documentation
wwwsapcom Textual cross-references to an internet address
example Quicklinks added to the internet address of a homepage to enable quick access to specific content on the Web
123456 Hyperlink to an SAP Note for example SAP Note 123456
Example Words or characters quoted from the screen These include field labels screen titles pushbutton labels menu names and menu options
Cross-references to other documentation or published works
Example Output on the screen following a user action for example messages
Source code or syntax quoted directly from a program
File and directory names and their paths names of variables and parameters and names of installation upgrade and database tools
EXAMPLE Technical names of system objects These include report names program names transaction codes database table names and key concepts of a programming language when they are surrounded by body text for example SELECT and INCLUDE
EXAMPLE Keys on the keyboard
SAP Sourcing 90Typographic Conventions
PUBLICcopy Copyright 2015 SAP SE or an SAP affiliate company
All rights reserved 49
wwwsapcom
copy Copyright 2015 SAP SE or an SAP affiliate company All rights reservedNo part of this publication may be reproduced or transmitted in any form or for any purpose without the express permission of SAP SE or an SAP affiliate companySAP and other SAP products and services mentioned herein as well as their respective logos are trademarks or registered trademarks of SAP SE (or an SAP affiliate company) in Germany and other countries Please see wwwsapcomcorporate-enlegalcopyrightindexepxtrademark for additional trademark information and noticesSome software products marketed by SAP SE and its distributors contain proprietary software components of other software vendors National product specifications may varyThese materials are provided by SAP SE or an SAP affiliate company for informational purposes only without representation or warranty of any kind and SAP SE or its affiliated companies shall not be liable for errors or omissions with respect to the materials The only warranties for SAP SE or SAP affiliate company products and services are those that are set forth in the express warranty statements accompanying such products and services if any Nothing herein should be construed as constituting an additional warrantyIn particular SAP SE or its affiliated companies have no obligation to pursue any course of business outlined in this document or any related presentation or to develop or release any functionality mentioned therein This document or any related presentation and SAP SEs or its affiliated companies strategy and possible future developments products andor platform directions and functionality are all subject to change and may be changed by SAP SE or its affiliated companies at any time for any reason without notice The information in this document is not a commitment promise or legal obligation to deliver any material code or functionality All forward-looking statements are subject to various risks and uncertainties that could cause actual results to differ materially from expectations Readers are cautioned not to place undue reliance on these forward-looking statements which speak only as of their dates and they should not be relied upon in making purchasing decisions
- SAP Sourcing 90
-
- Table of Contents
- 1 Introduction
- 2 Define System Properties
- 3 Set Up SMTP Server
- 4 Context Cluster and Directory Configuration
-
- 41 Manual Context Cluster and Directory Configuration
- 42 Create Cluster Template
- 43 Create Internal Directory Template
- 44 Create External Directory Template
- 45 Managing the SSL Certificate
- 46 Create Tenant Configuration
-
- 5 Master Data
-
- 51 Overview of Master Data
- 52 Create Master Data Manually
- 53 Import Master Data Using CSV File
- 54 Workbooks
-
- 541 Overview of Workbooks
- 542 Download and Customize Workbooks
- 543 Import Master Data Using Workbooks
-
- 6 Create and Verify Purchaser User
- 7 Create and Verify Supplier User
- 8 Install Company Logo
- 9 Specify Internal Address of SAP Sourcing Server
- 10 Update Master Time Zone
- 11 Install License Key
- 12 Change Session Timeout
- 13 Enable Contract Authoring
- 14 e-Signature
-
- 141 Set Up EchoSign Account and System Configuration
- 142 Check EchoSign Configuration Status
- 143 Set Up User Rights
- 144 Resolve e-Signature Errors
- 145 Set Up Scheduled Task to Retrieve e-Signature Status
-
- 15 Configure Workbench
- 16 Configure Branding
- 17 Configuring Supplier Workflow Management
- Copyright and Trademarks
-
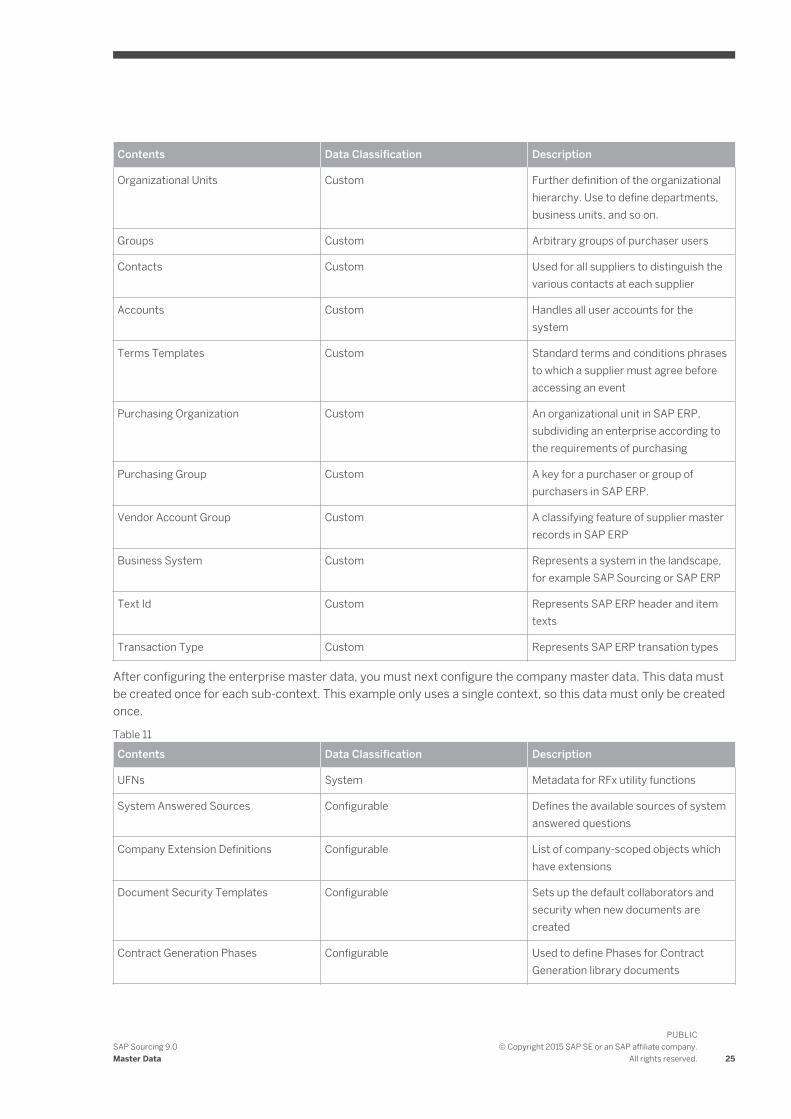
Contents Data Classification Description
Contract Generation Tags Configurable Used to define Tags for Contract Generation
Company extensions Custom List of extensions on individual object types
masterdataActivity Custom Used for general accounting purposes
Cost Centers Custom Used for accounting purposes to assign cost on a center by center basis
Cost Center Groups Custom
Entities Custom Used for accounting purposes for purchasing by division
GL Accounts Custom Used for general accounting purposes
Plants Custom Plants or facilities
Materials Custom Standard materials for use in line items
Category Managers Custom Users who are responsible for certain categories
Master Data Security
When configuring and importing Master Data there are some things to remember about security
1 Each piece of importable master data has an Import right as part of its ACL list By default this right is only added for the System Administrator security profile and therefore only those users can import master data out of the box As always an admin can add Import rights to other security profiles on and object-by-object basis
ExampleIf Supplier Administrators need to import Supplier records then that can be enabled
2 When importing Master Data be it via CSV XLS XML etc the user running the imports must have Import right allowed for all objects in question The Enterprise user is considered trusted and can import any of these objects
52 Create Master Data Manually
Procedure
NoteThe user account being used to import the following must have Allow Import rights on these specific objects If you do not have Allow Import on these objects it must be added or the import will fail
1 Log on as the enterprise user
26
PUBLICcopy Copyright 2015 SAP SE or an SAP affiliate companyAll rights reserved
SAP Sourcing 90Master Data
2 Create objects from within the Setup module
3 Log on as a purchaser user with administrative rights to configure company master data
For more information see the SAP Sourcing help at helpsapcomsourcing To access the help system scroll to SAP Sourcing 90 Help for Purchasers and choose a language In the help choose Setup System Setup Master Data
53 Import Master Data Using CSV File
NoteThe user account being used to import the following must have Allow Import rights on these specific objects If you do not have Allow Import on these objects it must be added or the import will fail
You can import master data files with CSV XLS or XLSX format in two ways
Use the standard web user interface
Use a client application distributed with the system which allows data to be imported outside of the web environment
The following procedure describes how to import using the web-based UI
Procedure
1 If application users have already been created log on as a purchaser user with administrative rights If users have not been created log on as the enterprise user
2 Choose Setup System Administration Import Export Tools Import Data and then choose OK
3 Choose Create
The import wizard opens
4 Specify whether you want to upload the file to the server or whether the file is already located on the application server and choose Next
5 Choose Upload Import File and select the CSV or Deployment Workgroup file to import
6 For CSV files select the object type and choose Next
7 Indicate whether you want to wait for the import to finish or perform the import in the background and then choose Next
8 Choose Finish to view the results
SAP Sourcing 90Master Data
PUBLICcopy Copyright 2015 SAP SE or an SAP affiliate company
All rights reserved 27
54 Workbooks
541 Overview of Workbooks
NoteThere are many sheets in the workbooks that have the prefix eso While these sheets may appear as duplicates of other sheets the data in them is in fact different These sheets should be imported by default You may also add data to these sheets if you would like to augment the data provided in the sample workbooks
We recommend using the deployment workbook for initial deployment of the system to ensure that all required data is imported into the system
To facilitate the import of data SAP Sourcing provides an alternative to CSV files for import SAP Sourcing provides the ability to import Microsoft Excel files containing one or more master data imports The system processes these Excel files directly without the user having to export the data to a raw CSV file The Enterprise Deployment Workbook and Company Deployment Workbook are two sample deployment workbooks delivered with SAP Sourcing
Anyone with system administrator access rights can download the deployment workbooks from the web user interface The deployment workbooks are included in the online Reference Guide (RG)
When starting a new deployment project preserve the original workbook templates by making a copy of them and saving them with a new name Import data using your modified templates only By doing so you assure continuity if future additional deployments are required
NoteKeep the following in mind when using deployment workbooks
The Configuration Sheet controls the import process Refer to the Help Sheet for input specifications of Configuration Sheet columns
The system can import the workbooks directly but there are limitations to what Excel constructs are supported The Help Sheet describes the rules that must be observed
The same importing process supports both CSV files and Excel workbooks
There is a one to one relationship with the workbook configuration file and the worksheet tabs
542 Download and Customize Workbooks
The sample enterprise and company workbooks that you download from SAP Sourcing are designed for you to configure a base system using a sample enterprise context We recommend modifying the default deployment workbooks Choose the appropriate workbooks from this table
Table 12
System Workbooks
SAP Sourcing Enterprise Deployment Workbook
Company Deployment Workbook
Users setting up a base system should adjust the various settings in these workbooks prior to running them in the system For example the company data should be updated to reflect specifics about the company that is
28
PUBLICcopy Copyright 2015 SAP SE or an SAP affiliate companyAll rights reserved
SAP Sourcing 90Master Data
installing the system Similarly you should review other tabs to ensure that the configurations are consistent with the desired implementation For details on customizable fields see Master Data [page 22]
Procedure
1 Log on as the enterprise user and choose Reference Guide Download the sample enterprise and company workbooks appropriate for your system
NoteThe enterprise workbook should be run as the enterprise user The company workbook should be run as a system administrator associated with the company object intended to be configured
2 From the Enterprise Deployment workbook open the file and find the sheet labeled locations and edit this sheet as necessary
Only one location is required
3 Find each sheet review each sheet and the comments in the sheet and update the data accordingly
4 Provide at least one internal category
5 Find the sheet labeled companies and edit it as necessary
6 Repeat for org_units groups accounts and so on
Your are establishing a hierarchy To configure the hierarchy correctly you must ensure that the child references the parent correctly For example the PARENT column in the business_units page should include a valid EXTERNAL_ID from the companies sheet
NoteTo build all custom data in the user interface simply deactivate the import of the above data types in the deployment workbook See the Help page for instructions on how to skip a specific worksheet
7 Import the enterprise and company workbooks into SAP Sourcing by choosing Setup System Administration Import and Export Tools Import Data and then choose Create
543 Import Master Data Using Workbooks
Procedure
1 Log on as the user specified in this table and choose Setup
Table 13
Workbook Login User
Enterprise workbook
Enterprise user
Company workbook Purchaser user
2 From the Import and Export Tools dropdown chooseImport Data and then choose OK
The Import Data page appears
SAP Sourcing 90Master Data
PUBLICcopy Copyright 2015 SAP SE or an SAP affiliate company
All rights reserved 29
3 Choose Create to start a new import job
4 Choose Upload to the Server and then choose Next
5 Select the modified workbook and choose Next
6 Wait for the import to finish and choose Next
Typically running the enterprise workbook can take several minutes
30
PUBLICcopy Copyright 2015 SAP SE or an SAP affiliate companyAll rights reserved
SAP Sourcing 90Master Data
6 Create and Verify Purchaser User
Procedure
For the SAP NetWeaver UME driver users should be created in SAP Sourcing and the SAP NetWeaver UME with the same username
For LDAP drivers depending on how the LDAP was set up you must perform one of the following
Create the user in SAP Sourcing and supply the information FROM the LDAP
If you have access create the account and supply the information TO the LDAP
In either case an e-mail is generated giving the user a path to the application and his or her user name If the account is created a temporary password is also mailed A system property determines whether this information is delivered in the same e-mail or separate e-mails
1 Choose Setup WYSIWYG Page Customization User Account and create a purchaser user as follows
1 On the Account Properties tab enter required information
2 On the Account Management tab enter information as follows
Enable User to Login Select
Directory Select as needed
User ID Type userid
Create Directory Account Select
Generate a New Password Select
Send Notification Select
3 On the Security tab enter information as follows
Purchaser Select
Purchaser Manager Select
System Administrator Select
Supplier Administrator Select
Make sure this first user is given Administrator privileges to import the Company Workbook
2 Wait for the e-mail to be sent and received If you do not receive it check the following
To verify the mail was sent choose Setup System Administration Processed Messages
To check for stuck or failed messages choose Setup System Administration Queued Messages
3 To test the new account log on as a purchaser user using the credentials sent in the e-mail
4 Reset your password and choose OK
If you can successfully log into the new purchaser account the context cluster and directory are properly configured and the SMTP server is processing e-mail
SAP Sourcing 90Create and Verify Purchaser User
PUBLICcopy Copyright 2015 SAP SE or an SAP affiliate company
All rights reserved 31
7 Create and Verify Supplier User
Procedure
Create a supplier user to test the supplier portal A supplier user is a contact on a supplier record
1 Choose Supplier Management Create Supplier
2 Enter and save the required information
3 Choose the Contacts tab
4 Under Supplier Contacts choose Add
5 Enter and save the required information
6 Log on as a supplier user using the credentials provided in the test user e-mail
7 Reset the password as prompted and accept the usage terms
32
PUBLICcopy Copyright 2015 SAP SE or an SAP affiliate companyAll rights reserved
SAP Sourcing 90Create and Verify Supplier User
8 Install Company Logo
Procedure
NoteWe do not recommend installing an image larger than 200 x 29
1 Log on as the enterprise user
2 Attach the logo as follows
1 Choose Setup Organization and Accounting Information Companies
2 Select the enterprise company from the list and choose Edit Document
3 Attach your logo image to the company using the Logo Attachment field
3 Save your entries
Resize Company Logo
If you have uploaded a company logo in your source release you must resize the image to 200x29
1 Log on as a purchaser user with system administrator rights
2 Choose Setup
3 On the Master Data tab find the Organization and Accounting section and choose Companies
4 Choose the company
5 Choose Edit
6 In the Logo field upload the resized image
SAP Sourcing 90Install Company Logo
PUBLICcopy Copyright 2015 SAP SE or an SAP affiliate company
All rights reserved 33
9 Specify Internal Address of SAP Sourcing Server
Procedure
When SAP Sourcing is first installed or whenever a new server is added to an application cluster the Internet address that is used for internal communications within SAP Sourcing is initially set to the external host name of the server In many cases this will result in unexpected or delayed behavior in the application
If the application landscape includes a network firewall accessing the server through this name requires exiting the firewall and re-entering If the firewall blocks incoming traffic on SAP Sourcingrsquos notification ports this will result in failure to deliver notifications for some events To avoid this do the following
1 Log on as the system user
2 Open the System Information record for editing
3 Change the value in the Internal Address field to an internal IP address or host name
4 Save your changes
34
PUBLICcopy Copyright 2015 SAP SE or an SAP affiliate companyAll rights reserved
SAP Sourcing 90Specify Internal Address of SAP Sourcing Server
10 Update Master Time Zone
Procedure
This procedure is required to enable SAP Sourcing to normalize all dates and times that are used in sourcing events Normalizing allows time fields to be presented differently for each user according to his or her preferred time zone while maintaining a consistent reference to the same point in time
1 Log on as the system user
2 Choose Setup Configuration System Properties
3 Edit the systemmaster_timezone property in the system set This property value should be set to the Java time zone identifier that corresponds to the current database server time zone
NoteThe SAP Sourcing Time Zone Value List Type provides a relatively comprehensive list of java time zone identifiers To view this list log on as a purchaser user and navigate to Setup Master Data Value List Types and Values Time Zone The Alternate Name column of this list contains the java time zone identifier for the corresponding time zone
ExampleldquoAmericaNew_Yorkrdquo is the alternate name of the SAP Sourcing Timezone ValueListValue for ldquo(GMT-500) Eastern Standard Timerdquo
SAP Sourcing 90Update Master Time Zone
PUBLICcopy Copyright 2015 SAP SE or an SAP affiliate company
All rights reserved 35
11 Install License Key
Procedure
You must install a license key before the SAP Sourcing system can be used in production mode
1 Choose Setup System Administration System Management System Information
2 Note the installation ID from the Installation ID field on the Service Registration tab
3 Create OSS ticket this ID and a list of the requested modules to license (include the optimizer) to SAP Customer Support You will receive a csv file including all the license keys
NoteRequesting the optimizer key without installing an optimizer server will result in a high volume of irrelevant optimizer-related messages in your log files If you do not intend to install an optimizer server do not request an optimizer key
4 Log on as the enterprise user and choose Setup System Administration Import and Export ToolsImport Data
5 Use the import tool to import the licenses you received from Support as follows
1 On the Import Wizard Select a File screen type a description such as License Keys and choose Upload Import File to upload the csv file Choose Next
2 On the Import Wizard CSV Contents screen select Module License as the Object Type choose Next and follow any additional prompts to finish the process The successful file import is displayed on the File Import tab
6 Choose Setup System Administration System Management System Information
7 Choose the Components tab and verify that the appropriate licenses are checked under SRM Module Licenses
8 If you are installing the optimizer verify that a new Optimizer tab appears and displays an appropriate Status Queue value and JVM information (If the optimizer is not installed the Status Queue value is OFFLINE and the JVM Information is set to unknown)
36
PUBLICcopy Copyright 2015 SAP SE or an SAP affiliate companyAll rights reserved
SAP Sourcing 90Install License Key
12 Change Session Timeout
Procedure
NoteThis is optional
The deployment descriptor for the SAP Sourcing application defaults to a 30-minute session timeout or to the value that was set during installation
NoteThe above property should be set longer than the below two properties
To change this setting
1 Log on as the system user and set the following system property in SAP Sourcing
uppmeteringlogin_inactivity_timeout and set to the timeout that was chosen when running the configure utility
2 Property uppmeteringcleanup_interval defines the time between runs of the daemon which removes inactive sessions It is recommended that this value be set to a value that is slightly larger than the uppmeteringlogin_inactivity_timeout setting is set to
3 Set the time-out using the configure tool For information about the configure tool see the Installation Guide for SAP Sourcing 90 on the SAP Service Marketplace at servicesapcomeso SAP Sourcing On-Premise SAP Sourcing 90
NoteBoth internal property in SAP Sourcing and configuration tool in NetWeaver should be set to the same value
SAP Sourcing 90Change Session Timeout
PUBLICcopy Copyright 2015 SAP SE or an SAP affiliate company
All rights reserved 37
13 Enable Contract Authoring
Contracts amendments and clauses use the Word service This service must be referenced For more information see ldquoCreate OfficeAutomationUser Accountrdquo in the Installation Guide for SAP Sourcing 90 on SAP Service Marketplace at servicesapcomeso SAP Sourcing On-Premise SAP Sourcing 90
Procedure
Configure a path to the Word service in SAP Sourcing as follows
1 Choose Setup System Properties
2 From the Name dropdown list choose contractgenserviceurl
3 Set the value to ltprotocolgtlthostnamegtltvirtual directorygtwordserviceasmx
38
PUBLICcopy Copyright 2015 SAP SE or an SAP affiliate companyAll rights reserved
SAP Sourcing 90Enable Contract Authoring
14 e-Signature
To enable e-Signature functionality users first get user accounts from EchoSign EchoSign adds the users to the EchoSign SAP channel System administrators define the integrated system configuration and set up the management of customer and user accounts System administrators can schedule automated checks of contract document signature statuses System users can check the availability of e-Signature components
141 Set Up EchoSign Account and System Configuration
Procedure
Set Up EchoSign Account
Before a system administrator enables e-Signature features for a customer EchoSign adds the customer to the EchoSign SAP channel The customer gives the account key provided by EchoSign to the system administrator The system administrator then configures e-Signature to work with EchoSign
Set Up Integrated System Configuration
Adding an EchoSign account to SAP Sourcing configuration enables e-Signature functionality in SAP Sourcing To set up an EchoSign account for use with e-Signature a system administrator creates an integrated system configuration object for EchoSign integration
1 Log on as the enterprise user
2 Choose Setup Integrated System Configuration
3 On the subsequent screen choose New
4 On the subsequent screen select EchoSign for System Type and select Continue
5 Under EchoSign Properties the customer enters the EchoSign account key provided the customer by EchoSign and choose Done
Set Up Proxy Settings
To configure EchoSign on a NetWeaver-based system follow these steps
1 Configure the HTTP properties as described on the SAP Help Portal at helpsapcomsaphelp_nw73helpdataen48479b6163524bb9e10000000a42189bframesethtm
2 To add proxy parameters to JVM settings in NetWeaver navigate to [host][port]nwa ConfigurationInfrastructure Java System Properties Additional VM Properties and add the following parameters with the appropriate values
-DhttpproxyHost -DhttpproxyPort -DhttpsproxyHost -DhttpsproxyPort
SAP Sourcing 90e-Signature
PUBLICcopy Copyright 2015 SAP SE or an SAP affiliate company
All rights reserved 39
NoteIf your proxy server requires a username and password provide this information with the following parameters
-DhttpproxyUser -DhttpproxyPassword -DhttpsproxyUser -DhttpsproxyPassword
3 Import the SSL certificate file into the NetWeaver key storage as follows
1 Navigate to lthostgtltportgtnwa Security Certificates and Keys
2 Select the WebServiceSecurity keystore view
3 If you are updating or replacing the EchoSign certificate remove any previous certificates with the same Common Name
4 Choose Import Entry and select x509 certificate as the entry type
5 Get the EchoSign certificate from your browserrsquos certificate interface
NoteSpecific steps will vary from browser to browser but the general process should be similar Here are sample instructions for Firefox
1 Navigate to secureechosigncomservicesEchoSignDocumentService9
NoteYou can ignore the error message that says Invalid SOAP Request
2 Click on the lock icon next to the URL
3 Click More Information
4 Open the Security tab
5 Click View Certificate
6 Open the Details tab
7 Click Export
8 From the Save as Type dropdown list choose the SSL certificate for the version you require
9 If Windows does not recognize the exported file as a certificate add a cer or crt extension to the filename
6 Restart NetWeaver
Change EchoSign service URL
SAP Sourcing ships with the current EchoSign service URL Change the service URL value in System Properties only when EchoSign changes the service URL To change this value do the following
1 Log on as the system user
2 On the System Setup tab choose System Properties
3 Open contractgenesignature_url from the Properties list
4 Enter the new EchoSign service URL provided by EchoSign
40
PUBLICcopy Copyright 2015 SAP SE or an SAP affiliate companyAll rights reserved
SAP Sourcing 90e-Signature
NoteSet the URL property only if the EchoSign domain has changed The current URL is secureechosigncomservicesEchoSignDocumentService9 Note that the API version should be set to 9
Change the length of the EchoSign timeout
By default SAP Sourcing sets the length of the EchoSign timeout to 300000 milliseconds or five minutes Change the length of the EchoSign timeout only if the default timeout causes issues when you send documents to EchoSign
1 Log on as the system user
2 On the System Setup tab choose System Properties
3 Choose contractgenesignature_timeout from the Name dropdown menu
4 Enter a numeral specifying the desired length in milliseconds for the EchoSign timeout in the Value field The Value field requires no minimum nor maximum value nor number formatting
142 Check EchoSign Configuration Status
Procedure
1 Log on as the system user
2 Choose System Information Then on the subsequent screen choose the Audits tab
3 Choose the correct context for the customers location from the Context dropdown menu
4 In the Availability pane OK appears in the Status column next to EchoSign Availability if you configured SAP Sourcing correctly for EchoSign
143 Set Up User Rights
Procedure
Assign Right to Send Contract Documents for Signatures or to Resolve Errors
To enable a user to send contract documents for signatures a customer system administrator adds Contract e-Signature to the users security profiles
To assign the right to send contract documents out for signatures to a user a system administrator does the following
1 In Setup choose System Administration Internal User Accounts
2 Select the desired user account
3 Choose the Security tab Then choose Contract e-Signature or Contract e-Signature Admin
A system administrator can assign either of the following e-Signature rights to a user
SAP Sourcing 90e-Signature
PUBLICcopy Copyright 2015 SAP SE or an SAP affiliate company
All rights reserved 41
Table 14
Right Description
ESO_CONTRACT_ESIGNATURE Users with this right can send contract documents out for signatures using the e-Signature feature
ESO_CONTRACT_ESIGNATURE_ADMIN This right allows designated users to resolve errors Users with this right can change a contract document while it is out for signatures Users with this right can change the signature status of a contract document to Error and can thus allow the contract document author to unlock a frozen document System administrators assign this right only to other administrators not to standard users
4 Choose Done
144 Resolve e-Signature Errors
Procedure
Contract Document Status Frozen
Unexpected errors such as network or system errors can freeze the status of a contract document to Sending for e-Signature or Out for Signature A user with the right ESO_CONTRACT_ESIGNATURE_ADMIN can unfreeze the status of the contract document so that the contract author can cancel the e-Signature process A system administrator can assign the right ESO_CONTRACT_ESIGNATURE_ADMIN to a user
1 The contract author adds a user with the ESO_CONTRACT_ESIGNATURE_ADMIN right to the affected Master Agreement as a collaborator
2 The user with the ESO_CONTRACT_ESIGNATURE_ADMIN right manually changes the status of the frozen contract document to ERROR
3 The contract author logs in to EchoSign and manually cancels the e-Signature process for the contract document
Invalid Password Error
You may receive the following error message Error Invalid password for user sending a Contract Document to EchoSign for signature
This message indicates that the user sending a request for e-signatures via EchoSign is not properly set up in their EchoSign account Contact EchoSign for assistance in resolving this error
145 Set Up Scheduled Task to Retrieve e-Signature Status
Procedure
You can set SAP Sourcing to retrieve the e-Signature statuses of all contract documents at a frequency you specify automatically However an end user need not wait for these automated retrievals to see the current e-
42
PUBLICcopy Copyright 2015 SAP SE or an SAP affiliate companyAll rights reserved
SAP Sourcing 90e-Signature
Signature status of a contract document End users can get instant updates of the e-Signature status manually through the contract document user interface
1 Log on as the enterprise user
2 Choose Setup
3 On the System Setup tab choose Scheduled Tasks
4 On the subsequent page choose New then select the e-Signature Status radio button then choose Continue
5 Enter the display name and start date Set the frequency and end date as desired
NoteSAP recommends automatically retrieving e-Signature statuses daily and setting the retrievals to run at night
6 Choose Save
SAP Sourcing 90e-Signature
PUBLICcopy Copyright 2015 SAP SE or an SAP affiliate company
All rights reserved 43
15 Configure Workbench
The CLM system is delivered with a base workbench page that is available to all internal users Additionally the system is configured with a workbench page intended to be used by CLM contract managers
The workbench page is established in the system but requires additional configuration to make it available to the desired users This configuration is done by adding collaborators to the Contract Management Workbench page
Prerequisites
You must be logged on as the enterprise user
Procedure
Configure the Contract Management Workbench page with the individual users or user groups that should also have access to the page
To do this go to Setup System Setup Workbench Workbench Page All Workbench Pages Edit the Contract Management page and add collaborators
44
PUBLICcopy Copyright 2015 SAP SE or an SAP affiliate companyAll rights reserved
SAP Sourcing 90Configure Workbench
16 Configure Branding
The following procedures enable you to change the branding from the default SAP Sourcing to SAP CLM Four branding items are affected
Branding text in the title bar of the browser (for example SAP Sourcing)
SAP CLM logo image for the purchaser login page
SAP CLM Business Partner logo image for the supplier login page
Images on the login page
Images on the splash screen
Procedure
Change the Branding after Installation
1 Choose Setup System Properties
2 Change the value of systembrand_name to (for example) SAP CLM
Themes
NoteThe following two steps require editing of themes For futher information about themes see the SAP Sourcing help at helpsapcomsourcing To access the help system scroll to SAP Sourcing 90 Help for Purchasers and choose a language In the help choose Setup Themes
1 Open the current enterprisersquos theme Branding area and choose Purchaser Login Banner link then Image link Delete the original path in Image Path field and paste imageslogoslogo_sapXCLMgif
2 Choose Delete on Background Image field
3 Choose the Supplier Login Banner link then Image link Delete the original path in Image Path field and paste imageslogoslogo_sapXCLMBusinessPartnergif
4 Choose Delete on Background Image field
SAP Sourcing 90Configure Branding
PUBLICcopy Copyright 2015 SAP SE or an SAP affiliate company
All rights reserved 45
17 Configuring Supplier Workflow Management
By default supplier workflow management feature is disabled in SAP Sourcing To enable this feature you need to perform following general steps
1 Create Workflow Definitions
2 Create Supplier Configurable Phase Definition
3 CreateModify Supplier Type
4 Create Supplier Field Access Definition (optional)
5 Configure Security Templates
6 Assign Supplier Types to Suppliers
7 Configure Supplier UI Mapping
The following subsections provide details for each of these steps
Create Workflow Definitions
1 Click Setup in the toolbar at the top of the page and select Platform
2 In the Workflow section of System Setup click on Workflow Definitions
3 On the Workflow Definitions List page click New
4 On the Workflow Definition Summary page fill in the fields with workflow information For details see the Field Help for Workflow Definition Summary page
5 Click the Add New Version button to add a process template to the workflow definition For details see the Field Help for Process Template Dialog Box page
6 Click the Save button in the toolbar
7 Create another Workflow Definition if necessary
Create Supplier Configurable Phase Definition
Supplier phases determine the actions that can be performed on supplier registration and modification requests To create a supplier configurable phase definition
1 Click Setup in the toolbar at the top of the page and select Platform
2 In the Suppliers section of Document Setup click on Supplier Configurable Phase Definition
3 On the Supplier Configurable Phase Definition List page click New
4 On the Header page fill in the fields with phase information For details see the Field help for Supplier Configurable Phase Definition Header page
5 Click Add to add phases to the definition
6 In the dialog box that appears select each phase to include in the phase definition and click OK
7 (optional) Click the Edit icon for each phase to edit phase information including the sequence of phases in the workflow On this page you can assign workflow definition and supplier field access definition For details see the Field help for Supplier Configurable Phase Header page
8 Click the Save button in the toolbar
46
PUBLICcopy Copyright 2015 SAP SE or an SAP affiliate companyAll rights reserved
SAP Sourcing 90Configuring Supplier Workflow Management
9 Create another Supplier Configurable Phase Definition if necessary
CreateModify Supplier Type
Supplier types can be used to determine whioch workflow phase definition to enable in a supplier registration or modification requests The Configurable Phase Definition field of Supplier Type is responsible for defining whether registrationmodification requests will use workflow and which phases will have these requests If Configurable Phase Definition is empty then supplier registration and modification requests will not have configured phases and any supplier administrator will be able to approve or deny request of such type as it was in previous versions of SAP Sourcing To enable supplier workflow management some supplier-configurable phase definition must be assigned to supplier types
SAP Sourcing provides one default supplier type You can modify this type and create new ones
1 Click Setup in the toolbar at the top of the page and select Platform
2 In the Suppliers section of Document Setup select Supplier Type
3 On the Supplier Type List page click New for creating new type or select existing from the list for editing
4 On the Type page fill in necessary fields On this page you can assign Supplier Configurable Phase Definition to Supplier Type For details see the Field Help for Supplier Type page
Create Supplier Field Access Definition
This step is optional
Supplier Field Access Definition allows you to configure access rules foe approver on specific phase
To create a supplier field access definition
1 Click Setup in the toolbar at the top of the page and select Platform
2 In the Suppliers section of Document Setup select Supplier Field Access Definition
3 On the Supplier Field Access Definition List page click New
4 On the UI page fill in necessary fields For details see the Field Help for Supplier Field Access Definition page
5 Click the Save button in the toolbar
6 Open existing Supplier Configurable Phase Definition
7 Click Edit
8 Click the Edit icon for the phase where you want to configure access rights for approvers This should be the approval phase
9 Click the Lookup icon to select a supplier field access definition to associate with this phase
10 Save the Supplier Configurable Phase Definition
Configure Security Templates
This is a very important configuration step In the case of supplier registrationsmodifications without configured workflows requests can be viewed and approved by any Supplier Administrator But in the case of new functionality collaborator security is used to define access rights A document security template is a set of rules governing the way an SAP Sourcing document assigns collaborator roles You should configure collaborators defined by role and user type that are automatically added to a registration and modification requests
You must configure two security templates first for Workflow Supplier Registration and second for Workflow Supplier Modification The following must be configured in these templates
The document owner must be any specified buy-side user Otherwise automatic phase transitions will not work for sell-side and the phase will need to be changed manually by any buy-side user
SAP Sourcing 90Configuring Supplier Workflow Management
PUBLICcopy Copyright 2015 SAP SE or an SAP affiliate company
All rights reserved 47
Document creator (current user) must be added to collaborator list with a role that allows viewing editing and changing phases (eg Collaborator)
Supplier administrators should be included to collaborator list to be able view and manually complete registrationmodification requests in case automatic completion should fail for some reason
Assign Supplier Type to Supplier
After the upgrade procedure one default supplier type is created and assigned to all suppliers It will be used to recognize phases for supplier modifications via workflow The supplier type can be changed for any supplier as follows
1 Open the supplier whose supplier type you want to reassign
2 Press Edit
3 Click the Lookup icon under the Document Type field
4 Select a new supplier type
5 Click Ok
6 Click Save
NoteWhen the supplier is created via workflow the supplier type used for creation is assigned to created supplier
Configure Supplier UI Mapping
The supplier type can be mapped to any supplier-side self-registration form The Supplier Type UI includes a collection of Supplier registration UI Mappings This allows you to configure the mapping between supplier type and self-registration forms
1 Open any Supplier Type
2 Click Edit
3 Click Add under Sell-Side Supplier Registration UI Mapping to add the UI page that will be mapped to this type
4 Click Save
NoteThe self-registration form can be assigned to only one supplier type If no form is assigned to a supplier type the default supplier type will be used for registration
48
PUBLICcopy Copyright 2015 SAP SE or an SAP affiliate companyAll rights reserved
SAP Sourcing 90Configuring Supplier Workflow Management
Typographic Conventions
Table 15
Example Description
ltExamplegt Angle brackets indicate that you replace these words or characters with appropriate entries to make entries in the system for example ldquoEnter your ltUser Namegtrdquo
Example Example Arrows separating the parts of a navigation path for example menu options
Example Emphasized words or expressions
Example Words or characters that you enter in the system exactly as they appear in the documentation
wwwsapcom Textual cross-references to an internet address
example Quicklinks added to the internet address of a homepage to enable quick access to specific content on the Web
123456 Hyperlink to an SAP Note for example SAP Note 123456
Example Words or characters quoted from the screen These include field labels screen titles pushbutton labels menu names and menu options
Cross-references to other documentation or published works
Example Output on the screen following a user action for example messages
Source code or syntax quoted directly from a program
File and directory names and their paths names of variables and parameters and names of installation upgrade and database tools
EXAMPLE Technical names of system objects These include report names program names transaction codes database table names and key concepts of a programming language when they are surrounded by body text for example SELECT and INCLUDE
EXAMPLE Keys on the keyboard
SAP Sourcing 90Typographic Conventions
PUBLICcopy Copyright 2015 SAP SE or an SAP affiliate company
All rights reserved 49
wwwsapcom
copy Copyright 2015 SAP SE or an SAP affiliate company All rights reservedNo part of this publication may be reproduced or transmitted in any form or for any purpose without the express permission of SAP SE or an SAP affiliate companySAP and other SAP products and services mentioned herein as well as their respective logos are trademarks or registered trademarks of SAP SE (or an SAP affiliate company) in Germany and other countries Please see wwwsapcomcorporate-enlegalcopyrightindexepxtrademark for additional trademark information and noticesSome software products marketed by SAP SE and its distributors contain proprietary software components of other software vendors National product specifications may varyThese materials are provided by SAP SE or an SAP affiliate company for informational purposes only without representation or warranty of any kind and SAP SE or its affiliated companies shall not be liable for errors or omissions with respect to the materials The only warranties for SAP SE or SAP affiliate company products and services are those that are set forth in the express warranty statements accompanying such products and services if any Nothing herein should be construed as constituting an additional warrantyIn particular SAP SE or its affiliated companies have no obligation to pursue any course of business outlined in this document or any related presentation or to develop or release any functionality mentioned therein This document or any related presentation and SAP SEs or its affiliated companies strategy and possible future developments products andor platform directions and functionality are all subject to change and may be changed by SAP SE or its affiliated companies at any time for any reason without notice The information in this document is not a commitment promise or legal obligation to deliver any material code or functionality All forward-looking statements are subject to various risks and uncertainties that could cause actual results to differ materially from expectations Readers are cautioned not to place undue reliance on these forward-looking statements which speak only as of their dates and they should not be relied upon in making purchasing decisions
- SAP Sourcing 90
-
- Table of Contents
- 1 Introduction
- 2 Define System Properties
- 3 Set Up SMTP Server
- 4 Context Cluster and Directory Configuration
-
- 41 Manual Context Cluster and Directory Configuration
- 42 Create Cluster Template
- 43 Create Internal Directory Template
- 44 Create External Directory Template
- 45 Managing the SSL Certificate
- 46 Create Tenant Configuration
-
- 5 Master Data
-
- 51 Overview of Master Data
- 52 Create Master Data Manually
- 53 Import Master Data Using CSV File
- 54 Workbooks
-
- 541 Overview of Workbooks
- 542 Download and Customize Workbooks
- 543 Import Master Data Using Workbooks
-
- 6 Create and Verify Purchaser User
- 7 Create and Verify Supplier User
- 8 Install Company Logo
- 9 Specify Internal Address of SAP Sourcing Server
- 10 Update Master Time Zone
- 11 Install License Key
- 12 Change Session Timeout
- 13 Enable Contract Authoring
- 14 e-Signature
-
- 141 Set Up EchoSign Account and System Configuration
- 142 Check EchoSign Configuration Status
- 143 Set Up User Rights
- 144 Resolve e-Signature Errors
- 145 Set Up Scheduled Task to Retrieve e-Signature Status
-
- 15 Configure Workbench
- 16 Configure Branding
- 17 Configuring Supplier Workflow Management
- Copyright and Trademarks
-
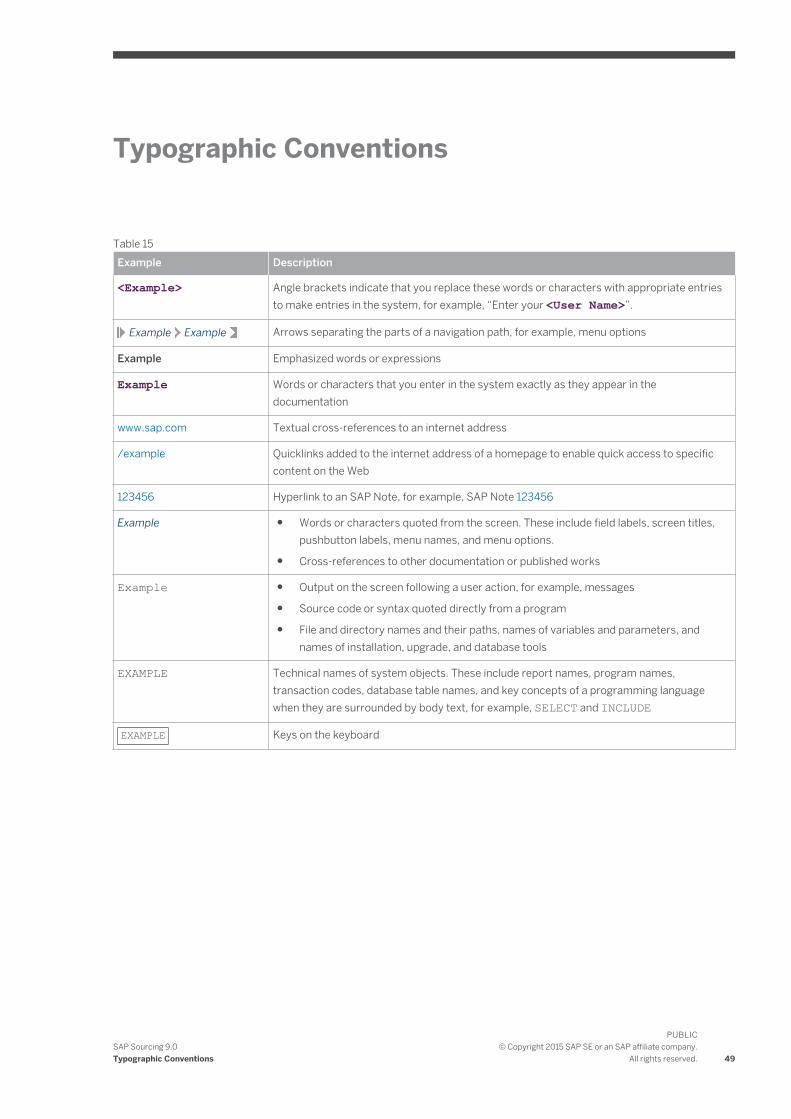