installation guide sap sourcing 7.0 sp05 and higher
TRANSCRIPT
Installation GuideSAP Sourcing 7.0 SP05 and HigherFor Deployment on SAP NetWeaver Composition Environment 7.1 Including Enhancement Package 1 with Database Oracle
Target Audience ■ System administrators ■ Technology consultants
PUBLICDocument version: 1.3SP – 2014-03-14
Document History
CAUTION
Before you start the installation, make sure that you have the latest version of this document.
The latest version is on SAP Service Marketplace at http://service.sap.com/eso.
The following table provides an overview of the most important document changes.
Version Date Description
1.0 2013-05-23 Initial version
1.1 2013-11-15 Fixed Contract Generation
1.2 2013-11-21 Removed references to obsolete Windows Server 2003
1.3SP 2014-03-11 Contract Generation updated
2/48 PUBLIC 2014-03-14

Table of Contents
Chapter 1 Introduction . . . . . . . . . . . . . . . . . . . . . . . . . . . . . . . . . . . . . . . . . . . . . . . . . . 5
1.1 About This Document . . . . . . . . . . . . . . . . . . . . . . . . . . . . . . . . . . . . . . . . . . . . 7
1.2 New Features . . . . . . . . . . . . . . . . . . . . . . . . . . . . . . . . . . . . . . . . . . . . . . . . . . . 7
1.3 Before You Start . . . . . . . . . . . . . . . . . . . . . . . . . . . . . . . . . . . . . . . . . . . . . . . . . 7
1.3.1 Naming Conventions . . . . . . . . . . . . . . . . . . . . . . . . . . . . . . . . . . . . . . . . . . . . . 8
Chapter 2 Planning . . . . . . . . . . . . . . . . . . . . . . . . . . . . . . . . . . . . . . . . . . . . . . . . . . . . . . 9
2.1 Server Hardware Requirements . . . . . . . . . . . . . . . . . . . . . . . . . . . . . . . . . . . . . 9
2.2 Server Software Requirements . . . . . . . . . . . . . . . . . . . . . . . . . . . . . . . . . . . . . . 9
2.3 Client Hardware Requirements . . . . . . . . . . . . . . . . . . . . . . . . . . . . . . . . . . . . 10
2.4 Client Software Requirements . . . . . . . . . . . . . . . . . . . . . . . . . . . . . . . . . . . . . 11
2.5 Sizing Guidelines . . . . . . . . . . . . . . . . . . . . . . . . . . . . . . . . . . . . . . . . . . . . . . . 11
Chapter 3 Preparation . . . . . . . . . . . . . . . . . . . . . . . . . . . . . . . . . . . . . . . . . . . . . . . . . . . 15
3.1 Complete Checklist . . . . . . . . . . . . . . . . . . . . . . . . . . . . . . . . . . . . . . . . . . . . . 15
3.2 Add Java Parameter . . . . . . . . . . . . . . . . . . . . . . . . . . . . . . . . . . . . . . . . . . . . . 17
3.3 Java Message Service Queues . . . . . . . . . . . . . . . . . . . . . . . . . . . . . . . . . . . . . . 18
3.4 Copy SAP Sourcing Media . . . . . . . . . . . . . . . . . . . . . . . . . . . . . . . . . . . . . . . . 18
3.5 Prepare Database Server . . . . . . . . . . . . . . . . . . . . . . . . . . . . . . . . . . . . . . . . . . 18
3.5.1 Identify Server . . . . . . . . . . . . . . . . . . . . . . . . . . . . . . . . . . . . . . . . . . . . . . . . . 18
3.5.2 Create Tablespaces . . . . . . . . . . . . . . . . . . . . . . . . . . . . . . . . . . . . . . . . . . . . . . 18
3.5.3 Install Oracle Text Search . . . . . . . . . . . . . . . . . . . . . . . . . . . . . . . . . . . . . . . . . 19
3.5.4 Create Oracle Service Account . . . . . . . . . . . . . . . . . . . . . . . . . . . . . . . . . . . . . 19
3.5.5 Connect Schema . . . . . . . . . . . . . . . . . . . . . . . . . . . . . . . . . . . . . . . . . . . . . . . 20
3.5.6 Install Obfuscation Toolkit . . . . . . . . . . . . . . . . . . . . . . . . . . . . . . . . . . . . . . . . 20
3.5.7 Copy JDBC Driver . . . . . . . . . . . . . . . . . . . . . . . . . . . . . . . . . . . . . . . . . . . . . . 21
3.5.8 Verify Settings for SAP Sourcing . . . . . . . . . . . . . . . . . . . . . . . . . . . . . . . . . . . 21
3.6 Set Up LDAP Directory . . . . . . . . . . . . . . . . . . . . . . . . . . . . . . . . . . . . . . . . . . . 22
Chapter 4 Installation . . . . . . . . . . . . . . . . . . . . . . . . . . . . . . . . . . . . . . . . . . . . . . . . . . . 23
4.1 Install SAP Sourcing Binary Files . . . . . . . . . . . . . . . . . . . . . . . . . . . . . . . . . . . 23
4.2 Configure Software for Deployment . . . . . . . . . . . . . . . . . . . . . . . . . . . . . . . . 24
2014-03-14 PUBLIC 3/48
4.2.1 Execute Configure Utility Manually . . . . . . . . . . . . . . . . . . . . . . . . . . . . . . . . . 24
4.2.2 Specify Location of SAP NetWeaver Home Directory . . . . . . . . . . . . . . . . . . . . 25
4.2.3 Update Java Home Directory . . . . . . . . . . . . . . . . . . . . . . . . . . . . . . . . . . . . . . 26
4.2.4 Include Custom JAR Files . . . . . . . . . . . . . . . . . . . . . . . . . . . . . . . . . . . . . . . . . 26
4.2.5 Update WAR, EAR, and SCA Files . . . . . . . . . . . . . . . . . . . . . . . . . . . . . . . . . . 26
4.2.6 Change Session Timeout . . . . . . . . . . . . . . . . . . . . . . . . . . . . . . . . . . . . . . . . . 27
4.2.7 Define Application Context . . . . . . . . . . . . . . . . . . . . . . . . . . . . . . . . . . . . . . . 27
4.2.8 Maintain Database Connection Information . . . . . . . . . . . . . . . . . . . . . . . . . . 27
Chapter 5 Post-Installation . . . . . . . . . . . . . . . . . . . . . . . . . . . . . . . . . . . . . . . . . . . . . . 29
5.1 Install Baseline Database . . . . . . . . . . . . . . . . . . . . . . . . . . . . . . . . . . . . . . . . . . 29
5.2 Define J2EE System Properties . . . . . . . . . . . . . . . . . . . . . . . . . . . . . . . . . . . . . 30
5.3 Install Language Packs . . . . . . . . . . . . . . . . . . . . . . . . . . . . . . . . . . . . . . . . . . . 32
5.4 Define Initial and Maximum Java Heap Size . . . . . . . . . . . . . . . . . . . . . . . . . . . 33
5.5 Deploy SAP Sourcing SCA File to Application Server . . . . . . . . . . . . . . . . . . . . 34
5.6 Starting and Stopping SAP Sourcing . . . . . . . . . . . . . . . . . . . . . . . . . . . . . . . . 35
5.7 Install Optimizer . . . . . . . . . . . . . . . . . . . . . . . . . . . . . . . . . . . . . . . . . . . . . . . 35
5.7.1 Java Message Service Queues . . . . . . . . . . . . . . . . . . . . . . . . . . . . . . . . . . . . . . 37
5.7.2 Install Optimizer License . . . . . . . . . . . . . . . . . . . . . . . . . . . . . . . . . . . . . . . . . 37
5.7.3 Import System Properties . . . . . . . . . . . . . . . . . . . . . . . . . . . . . . . . . . . . . . . . . 38
5.7.4 Deploy Optimizer SCA File to Optimizer Application Server . . . . . . . . . . . . . . 38
5.7.5 Verify Installation . . . . . . . . . . . . . . . . . . . . . . . . . . . . . . . . . . . . . . . . . . . . . . . 39
5.8 Install Contract Generation . . . . . . . . . . . . . . . . . . . . . . . . . . . . . . . . . . . . . . . 39
5.8.1 Enable JAVA-Based SAP Sourcing DOCX Generation Service . . . . . . . . . . . . . 40
Chapter 6 Additional Information . . . . . . . . . . . . . . . . . . . . . . . . . . . . . . . . . . . . . . . . 41
6.1 Uninstalling and Reinstalling SAP Sourcing . . . . . . . . . . . . . . . . . . . . . . . . . . . 41
6.2 Undeploying SCA Files . . . . . . . . . . . . . . . . . . . . . . . . . . . . . . . . . . . . . . . . . . . 41
6.3 Troubleshooting . . . . . . . . . . . . . . . . . . . . . . . . . . . . . . . . . . . . . . . . . . . . . . . 42
4/48 PUBLIC 2014-03-14
1 Introduction
SAP Sourcing covers the entire strategic source to contract process across all categories of spend. It
consists of a suite of the following solutions:
■ SAP Strategic Sourcing
■ SAP Contract Lifecycle Management (SAP CLM)
■ SAP Supplier Management
The key features of each of these solutions are listed below. For more information, see SAP Library for
SAP Sourcing on SAP Help Portal at http://help.sap.com SAP Business Suite SAP Sourcing .
SAP Strategic Sourcing
SAP Strategic Sourcing lets you drive sustainable cost savings while ensuring sustainable sourcing
processes.
This solution provides the following key features:
■ Project management
Bring internal stakeholders together using a shared, online project plan. Keep team members up-
to-date using status reports and alerts. Track opportunities for savings. Leverage preconfigured
business process templates to reduce cycle time and help ensure that best practices are repeated
throughout your organization.
■ Collaborative, multiround sourcing processes
Enable multiple rounds to identify qualified suppliers and negotiate pricing while leveraging
collaborative scoring and bid optimization features. Carry key data forward into a comprehensive
request for proposal or auction.
■ Requests for information, proposals, and quotations
Conduct simple or complex sourcing activities for direct, indirect, and service categories by
automating the creation of requests for information, proposals, and quotations.
■ Robust reporting
Analyze supplier responses using side-by-side comparisons, pricing, and potential savings reports.
Help ensure that diverse suppliers are being invited to participate in sourcing events. Evaluate
award decisions over time to understand what key criteria are being used in awarding business to
suppliers.
■ Effective auctions
Create competitive bidding environments using reverse, forward, and Dutch auctions. Interact
with suppliers in real time, using instant messaging, bidding consoles with real-time updates, and
1 Introduction
2014-03-14 PUBLIC 5/48
graphical representations of auction activities. Easily manage bidding and disclosure rules, such as
bid and rank visibility, automatic extensions, weighted-bidding cost factors, staggered start and
end times for individual items, and reserve prices.
■ Integrated sourcing and procurement execution
Integrate sourcing and procurement processes with SAP ERP to drive compliance and realize
savings.
SAP Contract Lifecycle Management
SAP Contract Lifecycle Management (SAP CLM) lets you optimize corporate contracts by automating
contract creation, enhancing visibility, improving compliance, and delivering rapid time to value. By
managing the entire contract lifecycle consistently across the enterprise, you can realize the full value
of your contracts, resulting in higher profits and lower legal and financial risk.
This solution provides the following key features:
■ Standardized, automated contract creation from clause libraries and templates
Streamline the approval process with consistent, preapproved language, controlled edits, and
appropriate approvals.
■ Fully searchable repository
■ Contract performance management
Encourage purchasing under contract terms, track accruals against contracts, and streamline
activities by quickly reporting on outstanding commitments and contracts.
■ Integration with back-end systems and processes
Improve compliance by integrating contract information into back-end systems.
■ Management of expirations and contract audits
Optimize contract negotiations by initiating timely renewals and leveraging the full contract
history to negotiate better terms and conditions.
SAP Supplier Management
SAP Supplier Management lets you optimize supplier onboarding, information management,
evaluation, and performance management. With full supplier visibility, you can make more-informed,
collaborative supply decisions that boost profitability.
This solution provides the following key features:
■ Supplier onboarding and qualification
Automate supplier onboarding processes with supplier self-service and identify the right suppliers
easily by streamlining the process for gathering additional information.
■ Supplier development
Drive improved performance with centralized monitoring and administration of supplier
development.
■ Supplier performance management
Manage scorecards and alerts related to key supplier performance indicators.
■ Supplier information management
1 Introduction
6/48 PUBLIC 2014-03-14
Capture, centralize, and share the most up-to-date supplier data across the enterprise, enabling
more-informed, collaborative supply decisions.
1.1 About This Document
This guide describes how to install SAP Sourcing 7.0 on SAP NetWeaver Composition Environment 7.1
(SAP NetWeaver CE 7.1) including enhancement package 1, with database Oracle.
The audience for this guide is anyone involved in the installation of SAP Sourcing and SAP CLM.
More Information
Troubleshooting [page 42]
For information about architecture and landscape, see the master guide on SAP Service Marketplace
at http://service.sap.com/eso.
For information about configuring SAP Sourcing, see the configuration guide on SAP Service
Marketplace at http://service.sap.com/eso.
1.2 New Features
The following table contains important or helpful information that is new for this release.
Feature Description
Automatic creation of EAR, SDA, and SCA files
The installer automatically creates the EAR, SDA, and SCA files that are required by SAP NetWeaver CE 7.1 including enhancement package 1. Previously, the installer created only the EAR files automatically.
Automatic setup of Java Message Service (JMS) queues
SAP Sourcing uses JMS to facilitate communication between the SAP Sourcing server and the optimizer server. The JMS queues are set up by the installer automatically for deployment on SAP NetWeaver CE 7.1 including enhancement package 1. No manual setup is required because the jms-resources.xml file has already been included in the esoserver.sca file.
Java Support Package Manager (JSPM)
The Visual Administrator is no longer supported in SAP NetWeaver CE 7.1 including enhancement package 1. Instead, the JSPM is used to deploy the application.
Separate URL for system logon
To log on to SAP Sourcing as the system user, you must use the /fssystem servlet and not the /fsbuyer servlet. This is an enhanced security feature that allows for restricting access to the system account from outside the firewall.https://<hostname>/fssystem/portal/login
1.3 Before You Start
You should have at least some basic familiarity with the SAP Sourcing application or have a strong IT
background. The following are key skillsets for success:
■ Basic understanding of the target application server platform
1 Introduction
1.1 About This Document
2014-03-14 PUBLIC 7/48
■ Familiarity with the target database and a basic understanding of how to set up a JDBC connection
and how to debug failures
■ Basic working knowledge of the target operating system and a basic understanding of the different
file systems, security schemes, and available tools in the target operating system
1.3.1 Naming Conventions
In this guide, the following naming conventions apply.
Variables
The following table explains the variables that are used in this guide.
Variable Description
<SAPSID> SAP system ID in uppercase letters
<sapsid> SAP system ID in lowercase letters
<host_name> Name of the corresponding host
<user_home> Home directory of the user performing the deployment
<DBSID> Database system ID in uppercase letters
<dbsid> Database system ID in lowercase letters
<INSTDIR> Installation directory for the SAP system
<CD-DIR> Directory on which a CD is mounted
<DVD-DIR> Directory on which a DVD is mounted
<OS> Operating system name within a path
1 Introduction
1.3 Before You Start
8/48 PUBLIC 2014-03-14
2 Planning
2.1 Server Hardware Requirements
See Sizing Guidelines [page 11]. For more information, see Hardware and Software Requirements in the
installation guide for SAP NetWeaver CE 7.1 including enhancement package 1 on SAP Service
Marketplace at http://service.sap.com/instguidesnwce711.
2.2 Server Software Requirements
SAP Sourcing 7.0 must be installed on SAP NetWeaver Composition Environment 7.1 (SAP
NetWeaver CE 7.1) including enhancement package 1. You can find the installation guide for SAP
NetWeaver CE 7.1 including enhancement package 1 on SAP Service Marketplace at http://
service.sap.com/instguidesnwce711.
Supported Database Platforms and Operating Systems
For the supported database platforms and operating systems for SAP Sourcing and for the optimizer,
see the Product Availability Matrix on SAP Service Marketplace at http://service.sap.com/pam.
Database Considerations
The spend and compliance module is supported only on Oracle.
For search-related functions to work correctly, Oracle 10g R2 10.2.0.4 is the minimum required version
on 64-bit platforms.
Global search supports Microsoft Office 2007 documents only on Oracle 11g R2 11.2.0.1, not on Oracle
10g R2 10.2.0.4. For information about global search, see SAP Library for SAP Sourcing on SAP Help
Portal at http://help.sap.com SAP Business Suite SAP Sourcing Getting Started General Functions
Global Search .
Application Server Considerations
If you are installing on SAP NetWeaver 7.1, be sure that the Java Development Kit (JDK) that you specify
during the installation of SAP Sourcing (SAP JVM) is the same that is used by the application server.
The application server must have full access to the following folders in the SAP Sourcing installation:
■ logs
This is required to write logs of the SAP Sourcing application.
■ tmp
This is for use as a temporary folder for attached documents, generated reports, and so on.
2 Planning
2.1 Server Hardware Requirements
2014-03-14 PUBLIC 9/48
Supported LDAP Directories
The following Lightweight Directory Access Protocol (LDAP) directories are supported by SAP Sourcing
for the operating system/application server combinations:
■ Sun ONE Directory Server 5.2
■ Microsoft Active Directory 2003
Although SAP User Management Engine is not necessarily an LDAP directory, it can connect to an
LDAP as a repository. We recommend using SAP User Management Engine instead of direct LDAP
support.
Supported Virus Scan Engines
The following virus scan engines are supported by SAP Sourcing:
■ Symantec Scan Engine 5.1
■ Symantec Scan Engine 5.2
More Information
Product availability matrix on SAP Service Marketplace at http://service.sap.com/pam
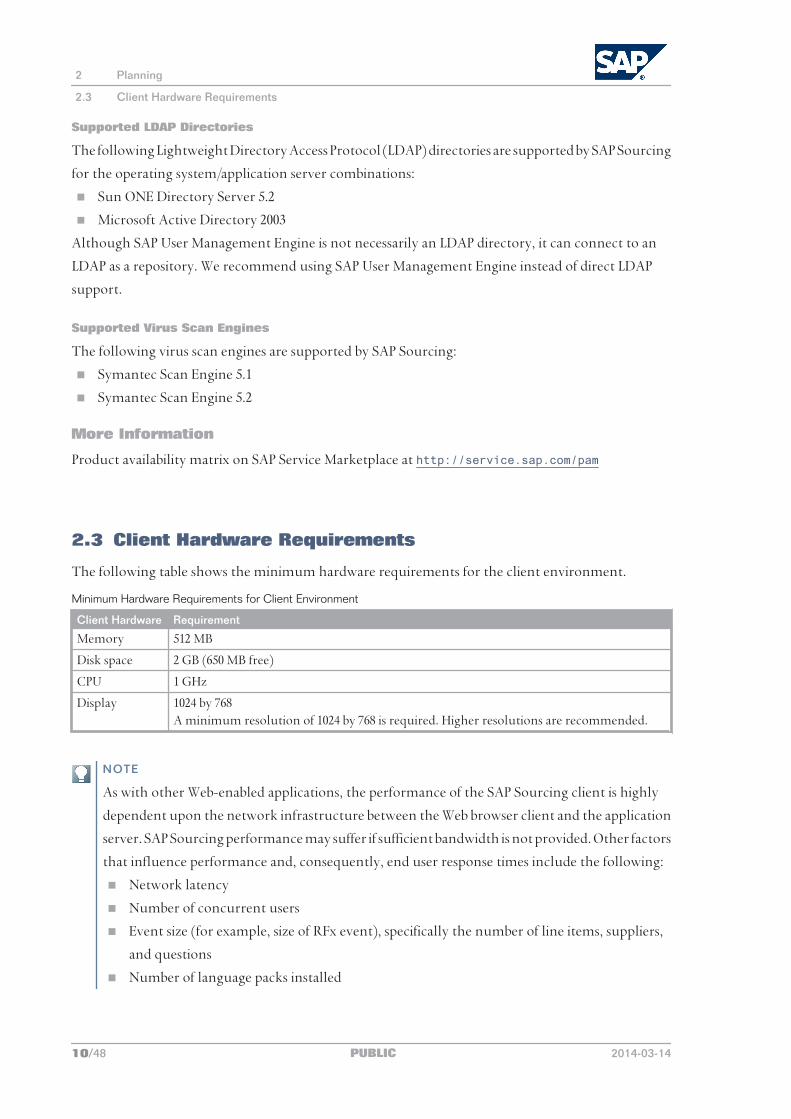
2.3 Client Hardware Requirements
The following table shows the minimum hardware requirements for the client environment.
Minimum Hardware Requirements for Client Environment
Client Hardware Requirement
Memory 512 MB
Disk space 2 GB (650 MB free)
CPU 1 GHz
Display 1024 by 768A minimum resolution of 1024 by 768 is required. Higher resolutions are recommended.
NOTE
As with other Web-enabled applications, the performance of the SAP Sourcing client is highly
dependent upon the network infrastructure between the Web browser client and the application
server. SAP Sourcing performance may suffer if sufficient bandwidth is not provided. Other factors
that influence performance and, consequently, end user response times include the following:
■ Network latency
■ Number of concurrent users
■ Event size (for example, size of RFx event), specifically the number of line items, suppliers,
and questions
■ Number of language packs installed
2 Planning
2.3 Client Hardware Requirements
10/48 PUBLIC 2014-03-14
2.4 Client Software Requirements
Your Windows operating system must support the following client software:
■ Microsoft Internet Explorer 6 SP2, Microsoft Internet Explorer 7, or Microsoft Internet Explorer 8
NOTE
Charts are supported in Adobe Flash format and JPEG. Dashboards are supported only in
Flash format. Charts and dashboards in Flash format are supported only on 32-bit Java
environment and 32-bit browsers, and are disabled on 64-bit browsers. If you run SAP Sourcing
on 64-bit Java environment, you must set the chart format to JPEG.
■ Microsoft Office 2007
(SAP Sourcing also supports Microsoft Office 2003.)
■ Adobe Reader 9.3 or higher
■ Java 2 Platform Standard Edition 5.0 (also known as 1.5.0)
This is an optional component that can be installed in the client browser. It is required to use the
real-time auction monitor applet.
■ Adobe Flash Player 10 or higher
This can be used to generate report charts. You can configure Flash report output. If you enable
Flash, all users will require the Flash Player.
More InformationProduct availability matrix on SAP Service Marketplace at http://service.sap.com/pam
2.5 Sizing Guidelines
The sizing guidelines are based on a simplistic sizing model for a small and large installation. When the
number of concurrent SAP Sourcing users is less than 50, it is considered a small installation; when the
number of concurrent SAP Sourcing users is greater than 50, it is considered a large installation.
In addition, the sizing guidelines are based on the following assumptions:
■ Each server is configured with the minimum recommended hardware configuration and has only
a single J2EE instance with neither hardware nor software clustering enabled.
■ Each deployed instance uses only out-of-box functionality with no custom modifications or
customizations.
■ All benchmarks are based on standard and most-used transactions and processes.
Sizing Guidelines for Core SAP Sourcing Application
A production installation employs a dual hardware strategy (two separate boxes) to support failover
for a small installation. For optimal performance, a large installation may employ additional boxes to
enable a user load balancing of approximately 50 concurrent SAP users per box.
If SAP CLM is installed and contract generation (IIS server) is enabled, contract generation should reside
on a separate server.
2 Planning
2.4 Client Software Requirements
2014-03-14 PUBLIC 11/48
If SAP CLM is installed and RFx bid optimization is enabled, the optimizer should reside on a separate
server.
SAP Sourcing Server
The minimum hardware requirements are as follows:
■ Quad-core processor (for example, AMD Opteron 852 / 2.6GHz or equivalent)
■ 16GB RAM, 70GB disk
■ 64-bit server
The recommended JVM settings are as follows:
■ -XX:MaxPermSize=1024m
■ -XX:NewRatio=6
■ -Xms4G
■ -Xmx4G
■ -Dfile.encoding=UTF-8
Database Server
The minimum hardware requirements are as follows:
■ Quad-core processor (for example, AMD Opteron 852 / 2.6GHz or equivalent)
■ 16GB RAM
■ 64-bit server
For information about scaling up the database server, see your database vendor's documentation on
scalability.
Database sizing – specifically for the hard disk – involves two aspects, one of which is fixed and can be
considered the baseline size. The other aspect is variable and based on the size of data growth in the
application. The following examples are approximate metrics to provide a guideline for sizing. The
actual required disk sizes can be obtained by assessing the anticipated rate of growth.
A baseline install of the SAP Sourcing application generates a database that is between 100MB and 150MB.
The average database sizes for active customer installations tend to be 19GB, with some customer
databases as large as 150GB and some as small as 500MB. For any given customer, the growth of the
database is highly usage-dependent and is relative to the number and size of the attachments.
Sizing Guidelines for Optional Components
Optimizer
The minimum hardware requirements are as follows:
■ Quad-core processor (for example, AMD Opteron 852 / 2.6GHz or equivalent)
■ 16GB RAM, 70GB disk
■ 64-bit server
The recommended JVM settings are as follows:
■ -XX:MaxPermSize=1024m
2 Planning
2.5 Sizing Guidelines
12/48 PUBLIC 2014-03-14
■ -XX:NewRatio=6
■ -Xms4G
■ -Xmx4G
Contract Generation
The minimum hardware requirements are as follows:
■ Quad-core processor (for example, AMD Opteron 852 / 2.6GHz or equivalent)
■ 16GB RAM, 70GB disk
■ 64-bit server
SAP NetWeaver PI
To derive the appropriate hardware sizing, use the Quick Sizer on SAP Service Marketplace at http://
service.sap.com/quicksizing.
2 Planning
2.5 Sizing Guidelines
2014-03-14 PUBLIC 13/48

This page is left blank for documents that are printed on both sides.
3 Preparation
Process Flow
You must complete the following tasks before installing the SAP Sourcing software.
1. Complete checklist [page 15].
2. Add Java parameter [page 17].
3. Copy SAP Sourcing media [page 18].
4. Prepare database server [page 18].
5. Set up LDAP directory [page 22] (optional).
More Information
Troubleshooting [page 42]
3.1 Complete Checklist
Be sure to complete the following checklist, as the installer could otherwise fail.
Procedure
1. Check whether make_sda.bat (Windows) or make_SDA.sh (UNIX) is present in the scripts folder
(for example, C:\usr\sap\CE1\J00\j2ee\deployment\scripts).
This tool is used to convert .ear format to .sda format. If the file is not present, ask your SAP
NetWeaver system administrator to verify that the application server for SAP NetWeaver CE 7.1
including enhancement package 1 is installed correctly.
2. Check whether dctool.bat (Windows) or dctool.sh (UNIX) is present in the SAP NetWeaver CE
directory. This tool is used to convert .sda format to .sca format.
EXAMPLE
If your SAP NetWeaver instance is in C:\usr\sap\CE1, check whether the di_cmd_tools.zip
file in C:\usr\sap\CE1\SYS\global is unzipped. After you unzip this file, dctool.bat (Windows)
or dctool.sh (UNIX) should be available at C:\usr\sap\CE1\SYS\global\di_cmd_tools\dc.
If the file is not present, ask your SAP NetWeaver system administrator to verify that SAP NetWeaver
CE 7.1 including enhancement package 1 is installed correctly.
NOTE
If you intend to use Linux or another Unix-based operating system, you must convert the
dctool.sh file from Windows format to Unix format.
3 Preparation
3.1 Complete Checklist
2014-03-14 PUBLIC 15/48
3. Check that the following environment variables are set correctly; otherwise, you will not be able
to launch the dctool successfully, and the installer will fail to create the SCA files.
■ JAVA_HOME
■ FCI_HOME
The value of this environment variable should be the base installation directory for SAP
Sourcing.
■ NWDITOOLLIB
The environment variable NWDITOOLLIB must refer to the lib directory of the dctool. Note
that you must use the absolute path of the lib directory. Also edit the dctool.bat (Windows)
or dctool.sh (UNIX) to set the value of NWDITOOLLIB in the script.
■ PATH
Make sure that the path to the Java binary file is at the beginning of the PATH environment
variable.
Before using the installer, verify that you can launch the dctool successfully by entering
dctool.bat (Windows) or dctool.sh (UNIX) in a DOS prompt or shell. If the dctool is launched
successfully, you will see the following prompt:
dc>
For an example of a successfully running dctool, including the changes that were applied to the
dctool.bat file to make the dctool work properly, see below. The changes are in bold and assume
a system ID of CE1.
EXAMPLE
/**********DCTOOL.BAT**********/
@echo off
REM **********
REM *
REM * Batch file to launch new DC command line tool.
REM * This batch takes the Jars from directory lib.
REM * Environment variable NWDITOOLLIB must point to the absolute path of the lib
REM * directory.
REM *
REM * SAP AG 2008
REM *
REM **********
REM default value for lib directory, user should set the absolute path
REM set NWDITOOLLIB=../lib
set NWDITOOLLIB=C:\usr\sap\CE1\SYS\global\di_cmd_tools\lib
set JAVA_HOME=C:\usr\sap\<SID>\SYS\exe\jvm\NTI386\sapjvm_X.X\sapjvm_X
\jre
3 Preparation
3.1 Complete Checklist
16/48 PUBLIC 2014-03-14
if "%NWDITOOLLIB%"=="../lib" echo Warning: it is strongly recommended to use an
absolute path as value for environment variable NWDITOOLLIB
if "%NWDITOOLLIB%"=="" goto usage
if "%JAVA_HOME%"=="" goto usage
set APPL=com.sap.tc.di.cmdline.ApplicationLauncher
set startup=%NWDITOOLLIB%\tc~di~cl~application_launcher_api.jar
set PARAM_JDK=-Ddctool.JDK_PATH="%JAVA_HOME%"
SET RETURNCODE=0
REM use system property -Xmx to increase the size for the virtual memory
REM use system property -Xss to increase the stack size
call "%JAVA_HOME%\bin\java" -classpath "%startup%" -Xmx256m -Xss20m -Dappl.jars="%
NWDITOOLLIB%" -Dappl.classname=com.sap.tc.cetool.DcConsoleApplication -
Ddctool.JDK_PROPERTY_NAME="default" %PARAM_JDK% %APPL% %* SET
RETURNCODE=%errorlevel%
goto :end
:usage
echo Incorrect usage, the following environment variables must be set:
echo.
echo NWDITOOLLIB: must point to the "lib" folder that contains required Jars.
echo JAVA_HOME: must point to the installation folder of a Java SDK installation
echo.
goto end
:end
EXIT /B %RETURNCODE%
REM this is the end
/**********DCTOOL.BAT**********/
For more information about the dctool, see the readme.txt file in the same folder as the
dctool.
3.2 Add Java Parameter
Procedure
1. Launch the J2EE Engine configuration tool.
Only valid for: Windows |
For example, navigate to C:\usr\sap\XXX\JC00\j2ee\configtool and launch configtool.bat.End of: Windows |
3 Preparation
3.2 Add Java Parameter
2014-03-14 PUBLIC 17/48
Only valid for: UNIX |
For example, navigate to /usr/sap/XXX/JC00/j2ee/configtool and launch configtool.sh.End of: UNIX |
2. Navigate to Cluster Data <Instance> VM Parameters Additional .
3. In Java Parameters, add the following line if it does not already exist:
-Djava.awt.headless=true
3.3 Java Message Service Queues
SAP Sourcing uses Java Message Service (JMS) to facilitate communication between the SAP Sourcing
server and the optimizer server. The JMS queues are set up by the installer automatically for deployment
on SAP NetWeaver CE 7.1 including enhancement package 1. No manual setup is required because the
jms-resources.xml file has already been included in the esoserver.sca file.
3.4 Copy SAP Sourcing Media
Procedure
1. Download the SAP Sourcing media from SAP Software Download Center at http://
service.sap.com/swdc.
2. Copy the downloaded SAP Sourcing media to the application server.
3.5 Prepare Database Server
The tasks in Prepare Database Server must be carried out by an experienced database administrator.
3.5.1 Identify Server
Procedure
Identify the Oracle server to create an application database schema. The schema should be configured
for a minimum of 5G. Actual database storage requirements can vary with use. The database server
must be configured for UTF-8 data encoding to support alternate/multiple languages.
3.5.2 Create Tablespaces
Procedure
SAP Sourcing supports up to three tablespaces to contain tables, indexes, and blobs, respectively. You
should create at least one tablespace. You can create two additional tablespaces if you want to maintain
your tables, indexes, and blobs in individual tablespaces.
3 Preparation
3.3 Java Message Service Queues
18/48 PUBLIC 2014-03-14
3.5.3 Install Oracle Text Search
Procedure
NOTE
This process is required only if you have not already installed Oracle Text Search.
Install Oracle Text Search on the database management system (DBMS) as described below. This is
required for the platform to be installed successfully. It is also required if you want to use global search.
For information about global search, see SAP Library for SAP Sourcing on SAP Help Portal at http://
help.sap.com SAP Business Suite SAP Sourcing Getting Started General Functions Global Search .
1. In a command prompt, change the directory to the ctx admin directory by entering the following
command, where c:\oracle\product\10.2.0\db_1 is the location of your Oracle home directory.
cd c:\oracle\product\10.2.0\db_1\ctx\admin
2. In a command prompt, log on to SQL*Plus by entering the following command:
sqlplus system;
3. Enter the password for the system user.
4. In the SQL prompt, enter the following command:
connect SYS as SYSDBA;
5. In the SQL prompt, enter the following command, where <password_for_ctxsys_user> is the
desired password for the ctxsys user, <default_tablespace> is the default tablespace for the search
(for example, MYUSER), and <default_temp_tablespace> is the default temp space for the search
(for example, TEMP). The last part of the command can be LOCK or NOLOCK; it specifies whether
the ctxsys user account is locked or not.
@catctx.sql "<password_for_ctxsys_user>” “<default_tablespace>”
“<default_temp_tablespace>” “NOLOCK”
3.5.4 Create Oracle Service Account
The Oracle service account enables SAP Sourcing to connect to the database.
Procedure
1. Identify and create an Oracle service account. This may be the schema owner account.
2. Grant the following privileges to the Oracle service account:
■ CONNECT
■ RESOURCE
■ CTXAPP
■ UNLIMITED TABLESPACE
■ CREATE DIMENSION
■ CREATE VIEW
3 Preparation
3.5 Prepare Database Server
2014-03-14 PUBLIC 19/48
3. Assign the following default roles to the Oracle service account:
■ CONNECT
■ RESOURCE
■ CTXAPP
EXAMPLE
CREATE USER <MYUSER> IDENTIFIED BY <mypassword>
DEFAULT TABLESPACE <MYTABLESPACE> TEMPORARY TABLESPACE TEMP
PROFILE DEFAULT ACCOUNT UNLOCK;
GRANT CONNECT TO <MYUSER>;
GRANT RESOURCE TO <MYUSER>;
GRANT CTXAPP TO <MYUSER>;
ALTER USER <MYUSER> DEFAULT ROLE CONNECT,RESOURCE,CTXAPP;
GRANT UNLIMITED TABLESPACE TO <MYUSER>;
GRANT CREATE VIEW TO <MYUSER>;
3.5.5 Connect Schema
Procedure
Obtain the connection information for the Oracle schema from your database administrator. To
configure the application, you need:
■ Server host name
■ System ID (SID)
■ Port number
■ Oracle user name
■ Oracle password
■ Database owner
3.5.6 Install Obfuscation Toolkit
Procedure
Verify and install Oracle toolkit DBMS_OBFUSCATION_TOOLKIT as described below. This toolkit supports
Data Encryption Standard (DES) encryption, which is required by the application to encrypt sensitive
data stored in the database. This toolkit is part of your Oracle installation media.
1. On the server machine, open a command window and change the directory to the following,
where C:\oracle\product\10.2.0\db_1 is the location of your Oracle home directory:
C:\oracle\product\10.2.0\db_1\rdbms\admin
2. Connect using SQLPLUS as SYS and run dbmsobtk.sql and prvtobtk.plb.
3. Execute the following GRANT command:
3 Preparation
3.5 Prepare Database Server
20/48 PUBLIC 2014-03-14
grant execute on dbms_obfuscation_toolkit to public;
4. Exit SQLPLUS.
3.5.7 Copy JDBC Driver
Procedure
Before copying the JDBC driver, check the version number. It has to be 11.2.0.2.0 or the DBImport will
throw a JDBC driver not supported error. For more details, see SAP Note 1642326.
Find the Oracle JDBC driver (ojdbc5.jar) in the following location and copy the driver to the
application server, where it can be referenced during the SAP Sourcing installation process:
<Oracle home directory>/product/11.2.0/dbhome_1/jdbc/lib
NOTE
The installer copies the JDBC driver to the <SAP Sourcing home directory>\lib directory as
oracle.jar.
3.5.8 Verify Settings for SAP Sourcing
Procedure
To support SAP Sourcing analytics, check that your Oracle server is set to the values in the following
table. You can display the current settings and set the parameters using SQL*Plus; log on as the SYS
user. Alternatively, you can use the Oracle Enterprise Manager Database Control or Oracle Enterprise
Manager Grid Control if you have installed it.
Oracle Server Settings
Setting Value Comments
COMPATIBLE 8.1.0 (or greater) Optional
GLOBAL_NAMES TRUE
OPEN_CURSORS 500 500 is the minimum value. It can be higher if needed.
OPTIMIZER_MODE CHOOSE
PARALLEL_MAX_SERVERS 12 (or greater)
QUERY_REWRITE_ENABLED FALSE
QUERY_REWRITE_INTEGRITY TRUSTED
SQL92_SECURITY TRUE Optional
STAR_TRANSFORMATION_ENABLED
TRUE
If you change any database configuration settings, restart the database.
3 Preparation
3.5 Prepare Database Server
2014-03-14 PUBLIC 21/48
3.6 Set Up LDAP Directory
Procedure
This is optional.
If you use Lightweight Directory Access Protocol (LDAP) rather than Single Sign-On (SSO), install the
supported LDAP directory for end users of the application. You can configure the application to support
multiple directories. The setup for LDAP is complex and requires LDAP-specific knowledge. It also
depends on the type and structure of your LDAP server and on how you want to use it. For example,
some companies put all of their users in one container, while other companies put them in several.
Some companies do not want to store the credentials of a service account or do not want the directory
searched. When configuring SAP Sourcing, you specify where the end user information is derived.
For information about directory configuration, including sample directory configurations, see SAP
Library for SAP Sourcing on SAP Help Portal at http://help.sap.com SAP Business Suite SAP Sourcing
Setup System Setup Configuration Directory Configuration .
3 Preparation
3.6 Set Up LDAP Directory
22/48 PUBLIC 2014-03-14
4 Installation
Process Flow
The two primary steps of the installation procedure are:
1. Install SAP Sourcing binary files [page 23].
2. Configure software for deployment [page 24].
NOTE
SAP Sourcing should be installed in the SAP NetWeaver CE server instance directory using the
SAP NetWeaver Administrator user (<sapsid>adm). The SAP NetWeaver Administrator user
must have complete access to the SAP NetWeaver CE and SAP Sourcing installation directories.
More Information
Troubleshooting [page 42]
4.1 Install SAP Sourcing Binary Files
Prerequisites
Ensure that the database administrator has prepared the database server. For more information, see
Prepare Database Server [page 18].
To indicate to the installer that your application server is SAP NetWeaver, create the environment
variable APPSERVER with the value NETWEAVER as follows:
1. Right-click My Computer and choose Properties.
2. On the Advanced tab, choose Environment Variables.
3. Under System Variables, choose New and enter the variable name APPSERVER and value NETWEAVER.
4. Choose OK.
Procedure
1. Run the setup command for your operating system:
Windows setup.exe
SolarisAIXHP-UXLinux
chmod 755 setup.bin
setup.bin
The SAP Sourcing installation wizard appears.
4 Installation
4.1 Install SAP Sourcing Binary Files
2014-03-14 PUBLIC 23/48
NOTE
If the installer does not launch automatically, add the Java executable to your current path.
2. Deploy the software binaries as follows:
1. Accept the license terms of the software.
2. Specify the directory location for the SAP Sourcing software. This will be the SAP Sourcing
home directory.
RECOMMENDATION
We recommend using lowercase characters for the SAP Sourcing home directory because
there have been instances with Linux and UNIX where mixed-case characters have caused
the installation to fail.
We recommend not using 00 at the end of the installation folder because it may conflict
with other SAP NetWeaver CE instances.
3. Click Install.
4.2 Configure Software for Deployment
After successful installation of the SAP Sourcing binary files, choose Done to launch the configure utility.
If it does not start automatically, start it manually by launching the configure utility from the bin folder
in the SAP Sourcing home directory. For more information, see Execute Configure Utility Manually [page
24].
Whenever you change any of the following parameters, you must select the update WAR, EAR, and
SCA files option (see below) to rebuild the SCA file. You must then redeploy the SCA file as described
in Deploy SAP Sourcing SCA File to Application Server [page 34].
4.2.1 Execute Configure Utility Manually
This is required only if:
■ The configuration tool is not launched automatically after successful installation of the SAP
Sourcing binary files.
■ You want to run the configuration tool to reconfigure the application after the initial installation
of SAP Sourcing.
This is often done to rebuild the EAR and SCA files after the inclusion of custom jar files or the
application of a software patch.
ProcedureOnly valid for: Windows |
Go to <SAP Sourcing home directory>\bin and double-click configure.exe.End of: Windows |
4 Installation
4.2 Configure Software for Deployment
24/48 PUBLIC 2014-03-14
Only valid for: Solaris |
1. Open a command prompt and enter the following command to change the permissions of the
configureSolaris.bin file so that it can be executed:
chmod 755 configureSolaris.bin
2. Run:
<SAP Sourcing home directory>/bin/configureSolaris.binEnd of: Solaris |
Only valid for: Linux |
1. Open a command prompt and enter the following command to change the permissions of the
configureLinux.bin file so that it can be executed:
chmod 755 configureLinux.bin
2. Run:
<SAP Sourcing home directory>/bin/configureLinux.binEnd of: Linux |
Only valid for: AIX |
1. Open a command prompt and enter the following command to change the permissions of the
configureAIX.bin file so that it can be executed:
chmod 755 configureAIX.bin
2. Run:
<SAP Sourcing home directory>/bin/configureAIX.binEnd of: AIX |
Only valid for: HP-UX |
1. Open a command prompt and enter the following command to change the permissions of the
configureHPUX.bin file so that it can be executed:
chmod 755 configureHPUX.bin
2. Run:
<SAP Sourcing home directory>/bin/configureHPUX.binEnd of: HP-UX |
Result
The configure utility guides you through the sequence of tasks you need to perform, based on your
particular configuration.
4.2.2 Specify Location of SAP NetWeaver Home Directory
Procedure
Specify the location of the SAP NetWeaver home directory by entering the path to the J00 (or instance
name) folder, for example, C:\usr\sap\ce1\J00 if the SAP NetWeaver home directory is directly on
your C: drive. Do not enter the path beyond the J00 (or instance name) folder.
4 Installation
4.2 Configure Software for Deployment
2014-03-14 PUBLIC 25/48
4.2.3 Update Java Home Directory
Procedure
The configuration tool provides a default Java home directory. You can select a different Java directory
to be used by the SAP Sourcing standalone tools. The Java home directory used by the application is
defined by the J2EE application server.
We recommend that you specify the Java Virtual Machine (JVM) that is used to run your application
server here. This is because a keystore is installed into the database using Java Cryptography Extension
(JCE). The application will not start up if the JVM that built your database and the JVM that starts the
application do not contain the same version of JCE. We provide a mechanism for reinstalling the
keystore if this occurs. For more information, see SAP Note 1304005.
EXAMPLE
Only valid for: Windows |
D:\usr\sap\<SID>\SYS\exe\jvm\NTI386\sapjvm_X.X\sapjvm_X\jreEnd of: Windows |
Only valid for: UNIX |
/usr/sap/<SID>/SYS/exe/jvm/linuxx86_64/sapjvm_X.X/sapjvm_XEnd of: UNIX |
4.2.4 Include Custom JAR Files
Procedure
This is required only if you are including custom JAR code in your deployment.
If you select the include custom JAR files option, you must also select the update WAR, EAR, and SCA
files option. The tool allows you to provide up to five custom JAR files in the following directory:
<SAP Sourcing home directory>/custom
On the Specify Custom JAR Files screen, you enter a custom JAR file by clicking Choose and browsing to
the file. To replace an existing entry with a different file, click Choose and browse to the new file. The
existing entry is overwritten. To remove an existing entry, click Restore Default.
The files are included in the generated EAR file automatically.
In very rare cases, if you have more than five custom JAR files, you can copy them to the <SAP Sourcing
home directory>/custom directory manually, and run the update WAR, EAR, and SCA files option
again.
4.2.5 Update WAR, EAR, and SCA Files
Procedure
This is required if you are configuring the system for the first time, and whenever you change any of
the other parameters.
4 Installation
4.2 Configure Software for Deployment
26/48 PUBLIC 2014-03-14
The SAP EAR, SDA, and SCA files are built and stored in the <SAP Sourcing home directory>/fsapp
directory.
4.2.6 Change Session Timeout
Procedure
This is optional.
The deployment descriptor for the SAP Sourcing application defaults to a 30-minute session timeout.
To change this setting, choose the change session timeout option.
4.2.7 Define Application Context
Procedure
The default context is /, meaning that the application responds to servlet requests that come in as
http://webserver/servlet. If you run in a non-default context, for example, /sourcing, the application
responds only to requests that come in as http://webserver/sourcing/servlet.
You must create a unique application context under / because the default context / is reserved by SAP
NetWeaver CE.
4.2.8 Maintain Database Connection Information
Procedure
1. Select the appropriate database.
2. Provide the JAR file.
The JAR file name depends on your database version and JVM version.
3. Enter the database connection information as shown in the following table.
Database Connection Information
Field Description
Database Driver Class
Requiredoracle.jdbc.driver.OracleDriver
Database URL
RequiredThe URL is required to connect to the database, and the user name and password to connect to the database schema. Modify the URL to include the host name, port, and system ID (SID) for your server. Your database administrator can provide you with the port number and SID. The URL must be in the following format:jdbc:oracle:thin:@<host_name>:<port>:<SID>For example:jdbc:oracle:thin:@localhost:1521:XE
4 Installation
4.2 Configure Software for Deployment
2014-03-14 PUBLIC 27/48
Field Description
User Name, Database Password
RequiredThe user ID and password of the Oracle account that is used by the application to access the database. This is the connection information that you obtained during Preparation [page 15]. Your database administrator can provide you with this information.
Database Owner
RequiredThis is typically the user name.
Database Table Space, Database Index Space, Database Blob Space
OptionalNames of custom database tablespaces that are used for storing tables, indexes, and blobs. If you leave these fields blank, the default Oracle settings are used.
4 Installation
4.2 Configure Software for Deployment
28/48 PUBLIC 2014-03-14
5 Post-Installation
Process Flow
After installing SAP Sourcing, carry out the following post-installation tasks:
1. Install baseline database [page 29].
2. Define J2EE system properties [page 30].
3. Install language packs [page 32] (optional).
4. Define initial and maximum Java heap size [page 33].
5. Deploy SAP Sourcing SCA file to application server [page 34].
6. Install optimizer [page 35].
7. Install contract generation [page 39].
Starting and Stopping SAP Sourcing
For information about starting and stopping SAP Sourcing during deployment, see Starting and Stopping
SAP Sourcing [page 35].
More Information
Troubleshooting [page 42]
5.1 Install Baseline Database
If this is a new installation and you do not have a baseline database, install it by running the DB Importer
as described below. The DB Importer is used for initial database creation, database upgrades, language
pack installation, and various database scripts provided with the software.
Prerequisites
You have installed Oracle Text Search. The installation will fail if this is not installed properly. For
more information, see Install Oracle Text Search [page 19].
Procedure
1. Launch the DB Importer. It is located at:
Only valid for: Windows |
<SAP Sourcing home directory>/bin/dbimport.batEnd of: Windows |
Only valid for: UNIX |
<SAP Sourcing home directory>\bin\dbimport.shEnd of: UNIX |
5 Post-Installation
5.1 Install Baseline Database
2014-03-14 PUBLIC 29/48
2. On the Setup tab of the DB Importer, use the file picker to browse to and choose the following file:
fcieso.jar/com/sap/eso/odp/install/scripts/product/install_root.xml
3. Leave the system context blank.
4. Enter the user name system and password manager.
NOTE
After logging on to the application, change this password immediately, and secure it properly.
5. Run the script by choosing Run.
6. On the Script tab, verify successful installation. A successful script run is indicated by a green
checkmark. An unsuccessful script run is indicated by a red cross. If the script run was unsuccessful,
click the Errors tab to troubleshoot. Resolve the errors and rerun the script. The failure must be
resolved before the system can be used.
Troubleshooting
The following table contains troubleshooting tips.
Troubleshooting
Problem Solution
You are unable to connect to the database in dbimport.
Run the configure utility and verify or reset the database connection string, user name, and password.
The script does not start properly. Ensure that you have selected the JAR file from the dropdown rather than browsing to it.
Some creation steps fail. Verify that the database user has been created according to the SAP-recommended setup.
Result
The default database install provides enough information to create the system context for further
configuration. The system context is only for creating and configuring the enterprise context(s).
5.2 Define J2EE System Properties
A dbimport script automates the process of setting the J2EE system properties.
Procedure
For more information about the following procedure, see SAP Note 1158487.
1. Start the DB Importer.
2. Select the system context using user name system and password manager.
3. In the DB Importer, use the file picker to browse to and select fciinstall.jar/scripts/dev/
import_netweaver_system_properties.xml and choose Open.
4. On the Setup tab, choose Run.
Successful results are indicated with a green checkmark on the Script tab.
5 Post-Installation
5.2 Define J2EE System Properties
30/48 PUBLIC 2014-03-14
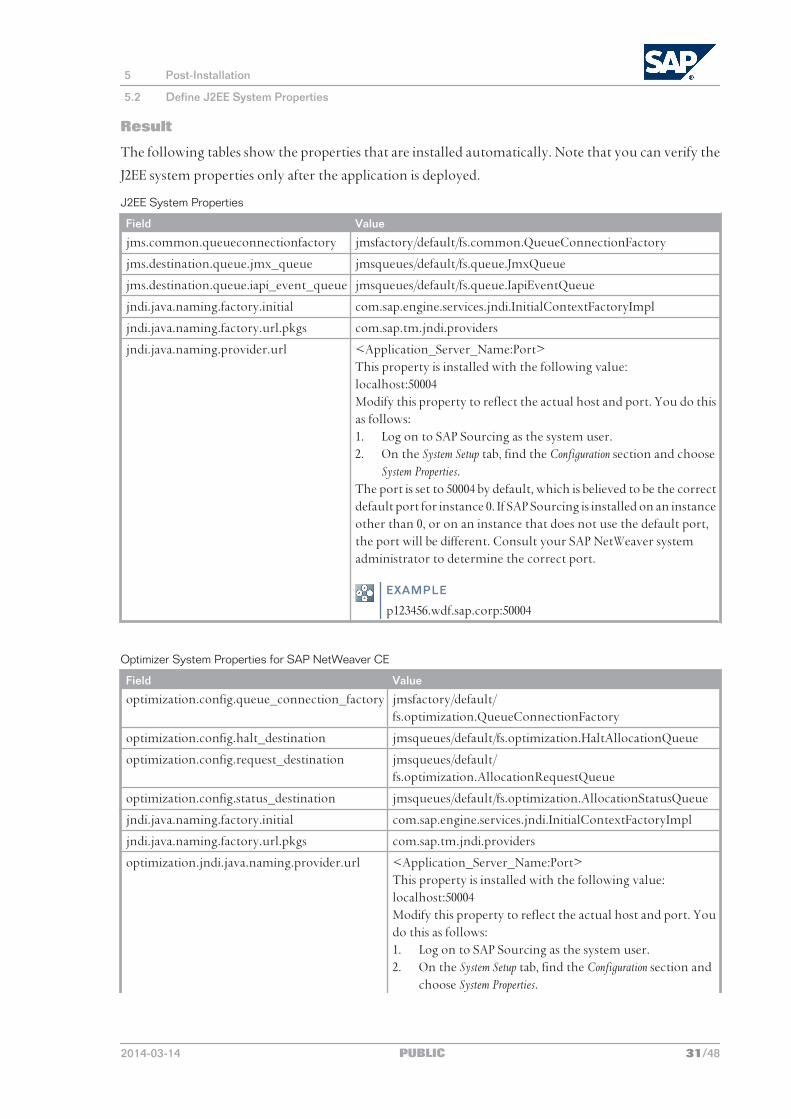
Result
The following tables show the properties that are installed automatically. Note that you can verify the
J2EE system properties only after the application is deployed.
J2EE System Properties
Field Value
jms.common.queueconnectionfactory jmsfactory/default/fs.common.QueueConnectionFactory
jms.destination.queue.jmx_queue jmsqueues/default/fs.queue.JmxQueue
jms.destination.queue.iapi_event_queue jmsqueues/default/fs.queue.IapiEventQueue
jndi.java.naming.factory.initial com.sap.engine.services.jndi.InitialContextFactoryImpl
jndi.java.naming.factory.url.pkgs com.sap.tm.jndi.providers
jndi.java.naming.provider.url <Application_Server_Name:Port>This property is installed with the following value:localhost:50004Modify this property to reflect the actual host and port. You do this as follows:1. Log on to SAP Sourcing as the system user.2. On the System Setup tab, find the Configuration section and choose
System Properties.The port is set to 50004 by default, which is believed to be the correct default port for instance 0. If SAP Sourcing is installed on an instance other than 0, or on an instance that does not use the default port, the port will be different. Consult your SAP NetWeaver system administrator to determine the correct port.
EXAMPLE
p123456.wdf.sap.corp:50004
Optimizer System Properties for SAP NetWeaver CE
Field Value
optimization.config.queue_connection_factory jmsfactory/default/fs.optimization.QueueConnectionFactory
optimization.config.halt_destination jmsqueues/default/fs.optimization.HaltAllocationQueue
optimization.config.request_destination jmsqueues/default/fs.optimization.AllocationRequestQueue
optimization.config.status_destination jmsqueues/default/fs.optimization.AllocationStatusQueue
jndi.java.naming.factory.initial com.sap.engine.services.jndi.InitialContextFactoryImpl
jndi.java.naming.factory.url.pkgs com.sap.tm.jndi.providers
optimization.jndi.java.naming.provider.url <Application_Server_Name:Port>This property is installed with the following value:localhost:50004Modify this property to reflect the actual host and port. You do this as follows:1. Log on to SAP Sourcing as the system user.2. On the System Setup tab, find the Configuration section and
choose System Properties.
5 Post-Installation
5.2 Define J2EE System Properties
2014-03-14 PUBLIC 31/48
Field ValueThe port is set to 50004 by default, which is believed to be the correct default port for instance 0. If the optimizer is installed on an instance other than 0, or on an instance that does not use the default port, the port will be different. Consult your SAP NetWeaver system administrator to determine the correct port.
EXAMPLE
p123456.wdf.sap.corp:50004
NOTE
When using a SAP NetWeaver application server and deploying the optimizer on a server that is
remote from the SAP Sourcing server, you must conditionally initialize the system property
optimization.jndi.force_remote = TRUE as follows:
1. Log on to SAP Sourcing as the system user.
2. On the System Setup tab, find the Configuration section and choose System Properties.
3. Choose New.
4. In the Set field, choose optimization from the dropdown.
5. In the Name field, choose optimization.jndi.force_remote from the dropdown.
6. In the Value field, enter TRUE.
7. Save your entries.
5.3 Install Language Packs
This is optional.
SAP Sourcing supports the following languages:
■ English
■ Chinese, Simplified
■ Czech
■ Danish
■ Dutch
■ Finnish
■ French
■ German
■ Hungarian
■ Italian
■ Japanese
■ Korean
■ Polish
5 Post-Installation
5.3 Install Language Packs
32/48 PUBLIC 2014-03-14
■ Portuguese (Brazilian)
■ Russian
■ Slovak
■ Spanish
■ Swedish
■ Turkish
By default, only English is installed.
Procedure
1. From a command prompt, go to the /bin installation directory and enter dbimport to start the
DB Importer utility.
2. On the Setup tab, select the fci<language>.jar file (where <language> is the language that you
want to install).
3. Navigate to the /i18n/ODP/<xx> directory (where <xx> is the language that you want to install)
and select the install_language.xml script file.
4. Back on the Setup tab, open the input help for the Context field and choose System Context.
5. As user name, enter the system manager user system and enter the appropriate password.
6. Choose Run.
7. On the Script tab, verify whether the script run was successful (green checkmarks) or whether there
were any errors (red crosses). You can try the following to identify and remove errors:
■ Check and address any warnings or errors on the Errors tab.
■ Check the log files under the /logs folder in the home directory. Warnings are not saved to
the error log.
After resolving the errors, rerun the script file.
8. On the Setup tab, select the fci<language>_eso.jar file (where <language> is the language that
you want to install).
9. Navigate to the /i18n/ESO/<xx> directory (where <xx> is the language that you want to install)
and select the install_language.xml script file.
10. Carry out steps 4 to 7 above.
11. Repeat as required for additional languages.
5.4 Define Initial and Maximum Java Heap Size
Procedure
1. In the Application Server (AS) Java configuration tool, select the relevant instance.
2. On the VM Parameters tab, define the initial and maximum Java heap size.
An initial recommendation is:
■ Initial Java heap size 1.5 GB
5 Post-Installation
5.4 Define Initial and Maximum Java Heap Size
2014-03-14 PUBLIC 33/48
■ Maximum Java heap size 3.5 GB
If the default SAP NetWeaver CE settings are within this range, you do not need to change them.
3. Restart the J2EE Engine.
5.5 Deploy SAP Sourcing SCA File to Application Server
Prerequisites
You are familiar with the Java Support Package Manager (JSPM). For information about the JSPM, see
SAP Help Portal at http://help.sap.com SAP NetWeaver SAP NetWeaver CE SAP NetWeaver
Composition Environment 7.1 Including Enhancement Package 1 Administrator's Guide Administration of SAP NetWeaver
CE General System Administration Software Lifecycle Management Java Support Package Manager .
Procedure
NOTE
Step 1 is necessary only if you copy the SCA files. If you point the JSPM to the directory with the
SCA files instead of copying them, you can skip step 1.
1. Copy esoserver.sca from <SAP Sourcing home directory>/fsapp/ to, for example, <Drive>\usr
\sap\trans\EPS\in (Windows) or \usr\sap\trans\EPS\in (UNIX).
This is the folder from which the JSPM reads the software components for deployment to the SAP
NetWeaver CE application server.
2. This step depends on whether you have copied the SCA files in step 1, or whether you want to
point the JSPM to the directory with the SCA files.
■ If you have copied the SCA files in step 1, use the JSPM to deploy the SCA files to SAP NetWeaver
CE as follows:
1. Navigate to <Drive>\usr\sap\<SID>\J00\j2ee\JSPM (Windows) or \usr\sap\<SID>\J00
\j2ee\JSPM (UNIX) and launch the JSPM from go.bat (Windows) or go (UNIX).
2. Log on to the JSPM using the SAP NetWeaver Administrator and password.
3. In the Select Package Type step, select New Software Components and choose Next.
4. In the Specify Queue step, select esoserver and then choose Next.
5. In the Check Queue step, choose Start.
■ If you want to point the JSPM to the directory with the SCA files, run the go script file as
follows when you start the JSPM.
Only valid for: Windows |
go.bat “-config=\jspm\inbox=<path_to_sca_files>”
End of: Windows |
Only valid for: UNIX |
go '-config=/jspm/inbox=<path_to_sca_files>'
End of: UNIX |
5 Post-Installation
5.5 Deploy SAP Sourcing SCA File to Application Server
34/48 PUBLIC 2014-03-14
Only valid for: UNIX |
EXAMPLE
go '-config=/jspm/inbox=/usr/sap/<SID>/esourcing/fsapp'
End of: UNIX |
3. Start the SAP Sourcing application from the SAP NetWeaver Administrator. For more information,
see Starting and Stopping SAP Sourcing [page 35].
Launch the following URL and verify that the application is running:
http://<host_name>:<port>/<context>/fssystem/portal/login
ResultSAP Sourcing is deployed on SAP NetWeaver CE 7.1 including enhancement package 1.
More InformationUndeploying SCA Files [page 41]
5.6 Starting and Stopping SAP Sourcing
ProcedureIf you need to start or stop SAP Sourcing during deployment, you can do so as follows:
1. Launch the SAP NetWeaver Administrator.
2. On the Operation Management tab, choose Systems Start & Stop Java EE Applications .
3. Use the filter to find E-Sourcing.
4. Select the application that you want to start or stop, and choose Start or Stop.
5.7 Install Optimizer
The optimizer is an optional tool that performs complex calculations and comparisons to automatically
determine an award scenario based on your specified priorities, goals (such as achieving the lowest cost
or the highest quality), and rules. The optimizer generates the best possible solutions to meet your goal
based on the specified rules.
You must install the optimizer on a machine that is physically separate from the SAP Sourcing server.
Technically, the system will still function if you run the optimizer on the same machine in a different
Java Virtual Machine (JVM), but this is strongly discouraged.
You must run the optimizer server with the same version and vendor for JVM software as the SAP
Sourcing server. Otherwise, the optimizer will not function.
NOTE
You can install the optimizer independent of the SAP Sourcing installation. However, you can
complete the optimizer installation only after a working SAP Sourcing application has been
installed and a context has been created. Typically, the optimizer is installed just after the SAP
Sourcing installation.
5 Post-Installation
5.6 Starting and Stopping SAP Sourcing
2014-03-14 PUBLIC 35/48
To install the optimizer, you run the same setup executable and configure executable as for the SAP
Sourcing server. You should define the same application context and maintain the same database
connection information. The optimizer does not need its own database. The SAP Sourcing database
connection information is a mandatory input for the installer’s configuration utility when it is run for
the first time.
NOTE
If you want to install the optimizer on a different operating system than the one on which SAP
Sourcing is installed (for example, Windows instead of UNIX), you must download the appropriate
setup executable for that operating system.
The installer creates both the esoserver.sca and esooptimizer.sca files.
To deploy the optimizer, you upload the esooptimizer.sca file to the SAP NetWeaver CE application
server. For more information, see Deploy Optimizer SCA File to Optimizer Application Server [page 38].
Prerequisites
The Java Development Kit (JDK), SAP NetWeaver CE, and SAP Sourcing must be installed on the server.
Recommended Server Topology
The figure below shows the recommended server topology.
5 Post-Installation
5.7 Install Optimizer
36/48 PUBLIC 2014-03-14
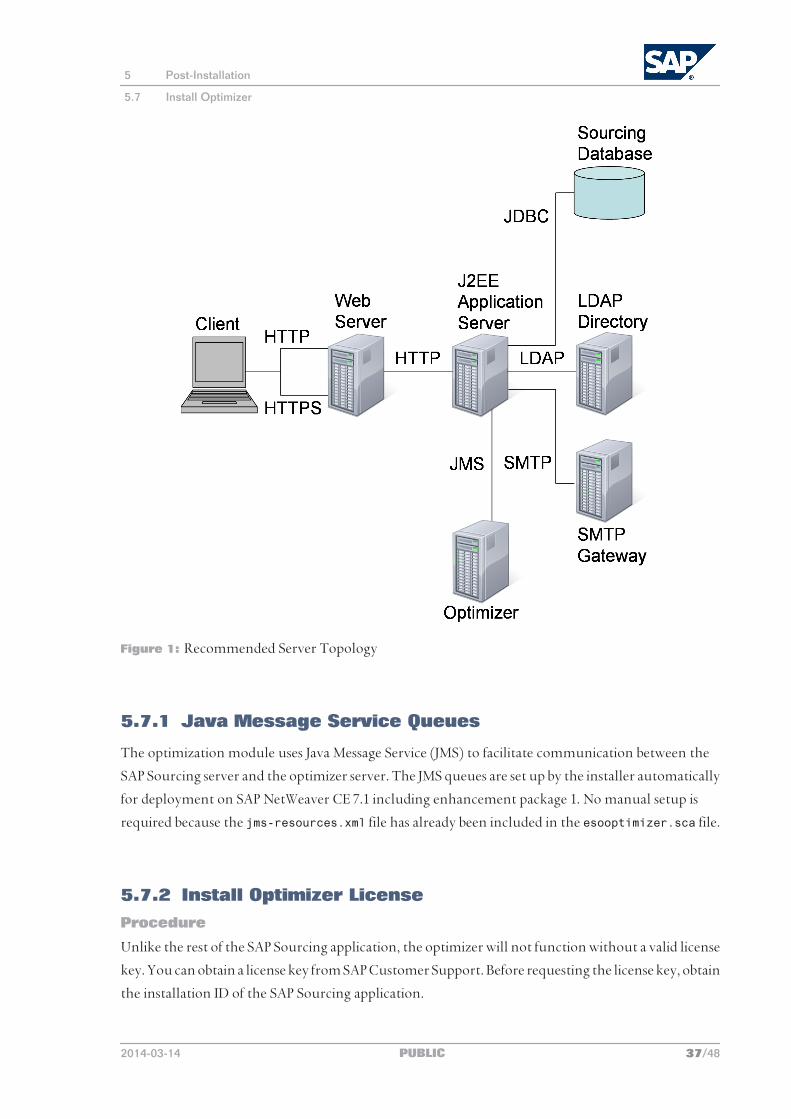
Figure 1: Recommended Server Topology
5.7.1 Java Message Service Queues
The optimization module uses Java Message Service (JMS) to facilitate communication between the
SAP Sourcing server and the optimizer server. The JMS queues are set up by the installer automatically
for deployment on SAP NetWeaver CE 7.1 including enhancement package 1. No manual setup is
required because the jms-resources.xml file has already been included in the esooptimizer.sca file.
5.7.2 Install Optimizer License
Procedure
Unlike the rest of the SAP Sourcing application, the optimizer will not function without a valid license
key. You can obtain a license key from SAP Customer Support. Before requesting the license key, obtain
the installation ID of the SAP Sourcing application.
5 Post-Installation
5.7 Install Optimizer
2014-03-14 PUBLIC 37/48
For more information, see Install License Key in the configuration guide for SAP Sourcing on SAP Service
Marketplace at http://service.sap.com/eso.
5.7.3 Import System Properties
Procedure
1. Start the DB Importer. It is located at:
Only valid for: Windows |
<SAP Sourcing home directory>/bin/dbimport.batEnd of: Windows |
Only valid for: UNIX |
<SAP Sourcing home directory>/bin/dbimport.shEnd of: UNIX |
2. Log on to SAP Sourcing using the system account (/fssystem/portal/login) or the enterprise account
for a single-context installation.
3. In the DB Importer, use the file picker to browse to and select fciinstall.jar/scripts/dev/
import_netweaver_system_properties.xml and choose Open.
4. On the Setup tab, choose Run.
5. On the Script tab, verify successful installation. A successful script run is indicated by a green
checkmark.
More Information
For the properties that are imported, see Define J2EE System Properties [page 30].
5.7.4 Deploy Optimizer SCA File to Optimizer Application Server
Prerequisites
You are familiar with the Java Support Package Manager (JSPM). For information about the JSPM, see
SAP Help Portal at http://help.sap.com SAP NetWeaver SAP NetWeaver CE SAP NetWeaver
Composition Environment 7.1 Including Enhancement Package 1 Administrator's Guide Administration of SAP NetWeaver
CE General System Administration Software Lifecycle Management Java Support Package Manager .
Procedure
1. Copy esooptimizer.sca from <SAP Sourcing home directory>/fsapp/ to <Drive>\usr\sap\trans
\EPS\in (Windows) or \usr\sap\trans\EPS\in (UNIX).
This is the folder from which the JSPM reads the software components for deployment to the SAP
NetWeaver CE application server.
2. Using the JSPM, deploy the SCA file to SAP NetWeaver CE as follows:
5 Post-Installation
5.7 Install Optimizer
38/48 PUBLIC 2014-03-14

1. Navigate to <Drive>\usr\sap\<SID>\J00\j2ee\JSPM (Windows) or \usr\sap\<SID>\J00\j2ee
\JSPM (UNIX) and launch the JSPM from go.bat (Windows) or go (UNIX).
2. Log on to the JSPM using the SAP NetWeaver Administrator and password.
3. In the Select Package Type step, select New Software Components and choose Next.
4. In the Specify Queue step, select esooptimizer and then choose Next.
5. In the Check Queue step, choose Start.
ResultThe optimizer is deployed on SAP NetWeaver CE 7.1 including enhancement package 1. The optimizer
will be started automatically. For more information, see Starting and Stopping SAP Sourcing [page 35].
More InformationUndeploying SCA Files [page 41]
5.7.5 Verify Installation
PrerequisitesThe system user has maintained the following system property. For more information, see Define J2EE
System Properties [page 30].
optimization.jndi.java.naming.provider.url
ProcedureTo check that the optimizer is installed correctly:
1. In SAP Sourcing, choose Setup.
2. On the System Administration tab, find the System Management section and choose System Information.
3. On the Optimizer tab:
■ Check that the state of all queues is active.
■ Check that all Java Virtual Machine (JVM) information is read back from the optimizer.
■ Check that the JVM version is the same as that shown on the Service Registration tab.
■ In the Version Information table, check that the following fields all have the same value:
● Local Request Payload Version
● Remote Request Payload Version
● Local Response Payload Version
● Remote Response Payload Version
4. Check that no errors are returned in the SAP Sourcing and optimizer log files.
5.8 Install Contract Generation
Contract generation is an optional service that enables user to generate a contract from an RFx, auction,
or master agreement. Each contract is based on a contract document template, which consists of clauses
5 Post-Installation
5.8 Install Contract Generation
2014-03-14 PUBLIC 39/48

and sections of standard legal terms. Clauses can contain variables that are automatically replaced with
terms and other detailed information that is taken directly from a sourcing event such as an RFx or
auction, or from a specific agreement. The contract document is a Microsoft Word file that is attached
to the sourcing event from which it is created. After the contract is generated, you can edit it in Microsoft
Word and use it for negotiation with the supplier.
More Information
Troubleshooting [page 42]
5.8.1 Enable JAVA-Based SAP Sourcing DOCX Generation Service
The SAP Sourcing DOCX Generation Service generates and works with documents only in .docx
and .dotx formats. For example, you cannot upload .doc or .dot files as Clause, Contract Document
Template, or Collection Variable Template.
To enable the SAP Sourcing DOCX Generation Service, follow these steps:
1. Log on as a member of the administrator group.
2. Select Setup System Properties Contractgen.wordservice.enabled .
3. Select Edit. In the Value field, type FALSE.
4. Save your changes.
5 Post-Installation
5.8 Install Contract Generation
40/48 PUBLIC 2014-03-14
6 Additional Information
6.1 Uninstalling and Reinstalling SAP Sourcing
Procedure
Uninstalling SAP Sourcing
Launch the SAP Sourcing uninstaller in the _uninst directory and uninstall the SAP Sourcing software.
The SAP Sourcing uninstaller utility does not remove data from the database. If required, you must
do this manually.
NOTE
Before manually removing the directory containing the earlier installation, back up the directory.
If the SAP Sourcing uninstaller utility is not available, manually remove the directory containing the
earlier installation. On UNIX-based systems, you can use the rm command to delete the install directory.
Reinstalling SAP Sourcing
1. Launch the setup installer for your operating system.
After the installation is completed successfully, the configuration tool is launched automatically.
If the configuration tool is not launched automatically, start it manually. For more information,
see Execute Configure Utility Manually [page 24].
2. Using the configuration tool, configure the software for deployment.
For more information, see Configure Software for Deployment [page 24].
3. Carry out the post-installation steps.
For more information, see Post-Installation [page 29].
4. Deploy and perform additional configurations.
For more information, see the configuration guide for SAP Sourcing on SAP Service Marketplace
at http://service.sap.com/eso.
6.2 Undeploying SCA Files
There is generally no need to undeploy SCA files because the Java Support Package Manager (JSPM)
supports the update of SCA files without undeployment. The following procedure is only for situations
where you need to remove SCA files from SAP NetWeaver for some other reason.
6 Additional Information
6.1 Uninstalling and Reinstalling SAP Sourcing
2014-03-14 PUBLIC 41/48
Procedure
1. Open a command prompt and launch telnet using the following command, where NWhostname is
the name of the server running SAP NetWeaver, and JNr is the instance number, for example 00
or 01. You can find the instance number from your SAP NetWeaver installation folder, for example,
C:\usr\sap\CE1\J00.
Telnet <NWhostname> 50<JNr>8
EXAMPLE
Telnet localhost 50008
2. Log on using the SAP NetWeaver Administrator and password.
3. To undeploy the SAP Sourcing SCA file, enter the following command:
UNDEPLOY name=E-Sourcing-Server vendor=sap.com on_undeploy_error=stop
To undeploy the optimizer SCA file, enter the following command:
UNDEPLOY name=E-Sourcing-Optimizer vendor=sap.com on_undeploy_error=stop
6.3 Troubleshooting
Procedure
The following tables contain tips for troubleshooting SAP Sourcing and contract generation.
Troubleshooting SAP Sourcing
Issue Solution
You have trouble running dbimport and get the error “Unable to connect to the database.”
Check the install logs for the following: error:java.lang.RuntimeException: Error checking JDBC Driver version. Edtail: Error: found unsupported
JDBC Driver name.
This error can be caused by using an unsupported driver. See SAP Note 2444116 for details about what is needed.
You are unable to connect to the database.
Check that you have correctly specified the user ID, password, driver class, and database URL.
EXAMPLE
user=esdevpassword=orcldriverClass=oracle.jdbc.driver.OracleDriverurl=jdbc:oracle:thin:@10.48.82.95:1521:ORCL
The configure utility does not start automatically.
See Execute Configure Utility Manually [page 24].
You get an error message that the configure utility is not in a valid SAP Sourcing home directory.
Check that the JAVA_HOME environment variable is set to the SAP NetWeaver CE JDK directory. The following examples use export and setenv, depending on the shell.Only valid for: UNIX |
EXAMPLE
export JAVA_HOME=/usr/sap/<SAP NetWeaver SID>/SYS/exe/jvm/sun_64/sapjvm_5.1.024/sapjvm_5
6 Additional Information
6.3 Troubleshooting
42/48 PUBLIC 2014-03-14
Issue Solutionsetenv JAVA_HOME /usr/sap/<SAP NetWeaver SID>/SYS/exe/jvm/sun_64/sapjvm_5.1.024/sapjvm_5
End of: UNIX |
Check that the bin directory of the SAP NetWeaver CE JDK directory is added at the beginning of the PATH environment variable. The following examples use export and setenv, depending on the shell.Only valid for: UNIX |
EXAMPLE
export PATH=/usr/sap/<SAP NetWeaver SID>/SYS/exe/jvm/sun_64/sapjvm_5.1.024/sapjvm_5/bin:$PATHsetenv PATH /usr/sap/<SAP NetWeaver SID>/SYS/exe/jvm/sun_64/sapjvm_5.1.024/sapjvm_5/bin:$PATH
End of: UNIX |
Only valid for: UNIX |
Create the directory for the SAP Sourcing installation with the root user, and use the chown command to change the owner of this directory to the SAP NetWeaver Administrator user (<sapsid>adm) before running the SAP Sourcing setup<Operating System>.bin (for example, setupSolaris.bin) as the SAP NetWeaver Administrator user.End of: UNIX |
The Oracle JAR file is not specified.
Specify the JDBC driver for Oracle. For more information, see Copy JDBC Driver [page 21].
install_root.xml stalls when it is run.
1. Stop the process to close the halted DB Importer.2. Rerun the dbimport.bat (Windows) or dbimport.sh (UNIX) file, select the
install_root.xml, and run the scripts.
You are unable to log on after running install_root.xml.
Check the log files at:<SAP Sourcing home directory>/logs/install<date>.logs
The keystore could not be initialized when you start the system or when you start the DB Importer.A JCE exception appears in the logs.In this situation, the following issues arise: ■ Directory configuration
passwords do not function properly.
■ License keys are deactivated.
■ Historical proxy bids in auctions are lost and cannot be recovered.
Reinstall the SAP Sourcing keystore. For more information, see SAP Note 1304005.
The make_SDA tool was not found.
Check whether make_sda.bat (Windows) or make_SDA.sh (UNIX) is present in the folder specified in the error message. If the file is not present, check that the
6 Additional Information
6.3 Troubleshooting
2014-03-14 PUBLIC 43/48
Issue Solutionapplication server for SAP NetWeaver CE 7.1 including enhancement package 1 is installed correctly.
The dctool was not found. Check whether dctool.bat (Windows) or dctool.sh (UNIX) is present in the folder specified in the error message. If the file is not present, ask your SAP NetWeaver system administrator to verify that SAP NetWeaver CE 7.1 including enhancement package 1 is installed correctly.
The SCA files were not created.
First try the solutions to the following issues: ■ The make_SDA tool was not found. ■ The dctool was not found.If the problem persists, check that the environment variables JAVA_HOME and NWDITOOLLIB are set correctly. For more information (including an example of a successfully running dctool), see Complete Checklist [page 15].Check that the environment variable APPSERVER is set to NETWEAVER. For more information, see Install SAP Sourcing Binary Files [page 23].
The WAR, EAR, and SCA file update failed.
Check whether the EAR file is created in the <installation directory>/fsapp folder. If yes, check whether the settings for the dctool.bat (Windows) or dctool.sh (UNIX) file have been made. For more information, see Complete Checklist [page 15].Only valid for: Solaris |
1. Using the SAP NetWeaver Administrator user (<sapsid>adm), switch to the Bash shell by entering bash.
2. Set the environment variables for PATH and JAVA_HOME.
EXAMPLE
export PATH=/usr/sap/<SAP NetWeaver SID>/SYS/exe/jvm/sun_64/sapjvm_5.1.024/sapjvm_5/bin:$PATHexport JAVA_HOME=/usr/sap/<SAP NetWeaver SID>/SYS/exe/jvm/sun_64/sapjvm_5.1.024/sapjvm_5
3. Increase the stack size for the duration of the installation by entering ulimit -s 20480.
4. Modify the content of dctool.sh. The file content should appear as follows (with adjusted paths for NWDITOOLLIB and JAVA_HOME):NWDITOOLLIB=/usr/sap/QO1/SYS/global/di_cmd_tools/libJAVA_HOME=/usr/sap/QO1/SYS/exe/jvm/sun_64/sapjvm_5.1.024/sapjvm_5APPL=com.sap.tc.di.cmdline.ApplicationLauncherstartup=$NWDITOOLLIB/tc~di~cl~application_launcher_api.jarPARAM_JDK=-Ddctool.JDK_PATH="$JAVA_HOME""$JAVA_HOME/bin/java" -cp "$startup" -Xmx256m -Xss20m-Dappl.jars="$NWDITOOLLIB" -Dappl.classname=com.sap.tc.cetool.DcConsoleApplication -Ddctool.JDK_PROPERTY_NAME="default" $PARAM_JDK$APPL $*
End of: Solaris |
6 Additional Information
6.3 Troubleshooting
44/48 PUBLIC 2014-03-14
Typographic Conventions
Example Description
<Example> Angle brackets indicate that you replace these words or characters with appropriate entries to make entries in the system, for example, “Enter your <User Name>”.
ExampleExample
Arrows separating the parts of a navigation path, for example, menu options
Example Emphasized words or expressions
Example Words or characters that you enter in the system exactly as they appear in the documentation
http://www.sap.com Textual cross-references to an internet address
/example Quicklinks added to the internet address of a homepage to enable quick access to specific content on the Web
123456 Hyperlink to an SAP Note, for example, SAP Note 123456
Example ■ Words or characters quoted from the screen. These include field labels, screen titles, pushbutton labels, menu names, and menu options.
■ Cross-references to other documentation or published works
Example ■ Output on the screen following a user action, for example, messages ■ Source code or syntax quoted directly from a program ■ File and directory names and their paths, names of variables and parameters, and
names of installation, upgrade, and database tools
EXAMPLE Technical names of system objects. These include report names, program names, transaction codes, database table names, and key concepts of a programming language when they are surrounded by body text, for example, SELECT and INCLUDE
EXAMPLE Keys on the keyboard
2014-03-14 PUBLIC 45/48
SAP AGDietmar-Hopp-Allee 16
69190 WalldorfGermany
T +49/18 05/34 34 34F +49/18 05/34 34 20
www.sap.com
© Copyright 2014 SAP AG. All rights reserved.
No part of this publication may be reproduced or transmitted in any form or for any purpose without the express permission of SAP AG. The information contained herein may be changed without prior notice.
Some software products marketed by SAP AG and its distributors contain proprietary software components of other software vendors. National product specifications may vary.These materials are provided by SAP AG and its affiliated companies (“SAP Group”) for informational purposes only, without representation or warranty of any kind, and SAP Group shall not be liable for errors or omissions with respect to the materials. The only warranties for SAP Group products and services are those that are set forth in the express warranty statements accompanying such products and services, if any. Nothing herein should be construed as constituting an additional warranty.SAP and other SAP products and services mentioned herein as well as their respective logos are trademarks or registered trademarks of SAP AG in Germany and other countries.Please see http://www.sap.com/corporate-en/legal/copyright/index.epx#trademark for additional trademark information and notices.
DisclaimerPlease see http://www.sap.com/corporate-en/legal/copyright/index.epx for disclaimer information and notices.
46/48 PUBLIC 2014-03-14

SAP AGDietmar-Hopp-Allee 1669190 WalldorfGermanyT +49/18 05/34 34 34F +49/18 05/34 34 20www.sap.com
© Copyright 2014 SAP AG. All rights reserved.No part of this publication may be reproduced or transmitted in any form or for any purpose without the express permission of SAP AG. The information contained herein may be changed without prior notice.