sales automation - pega community
TRANSCRIPT
SALES AUTOMATION
Pega Sales AutomationImplementation Guide
8.1
©2018 Pegasystems Inc., Cambridge, MA. All rights reserved.
Trademarks
For Pegasystems Inc. trademarks and registered trademarks, all rights reserved. All other trademarks orservice marks are property of their respective holders.
For information about the third-party software that is delivered with the product, refer to the third-partylicense file on your installation media that is specific to your release.
Notices
This publication describes and/or represents products and services of Pegasystems Inc. It may containtrade secrets and proprietary information that are protected by various federal, state, and internationallaws, and distributed under licenses restricting their use, copying, modification, distribution, or transmittalin any form without prior written authorization of Pegasystems Inc.
This publication is current as of the date of publication only. Changes to the publication may bemade from time to time at the discretion of Pegasystems Inc. This publication remains the propertyof Pegasystems Inc. and must be returned to it upon request. This publication does not imply anycommitment to offer or deliver the products or services described herein.
This publication may include references to Pegasystems Inc. product features that have not been licensedby you or your company. If you have questions about whether a particular capability is included in yourinstallation, please consult your Pegasystems Inc. services consultant.
Although Pegasystems Inc. strives for accuracy in its publications, any publication may containinaccuracies or typographical errors, as well as technical inaccuracies. Pegasystems Inc. shall not be liablefor technical or editorial errors or omissions contained herein. Pegasystems Inc. may make improvementsand/or changes to the publication at any time without notice.
Any references in this publication to non-Pegasystems websites are provided for convenience only anddo not serve as an endorsement of these websites. The materials at these websites are not part of thematerial for Pegasystems products, and use of those websites is at your own risk.
Information concerning non-Pegasystems products was obtained from the suppliers of those products,their publications, or other publicly available sources. Address questions about non-Pegasystemsproducts to the suppliers of those products.
This publication may contain examples used in daily business operations that include the names ofpeople, companies, products, and other third-party publications. Such examples are fictitious and anysimilarity to the names or other data used by an actual business enterprise or individual is coincidental.
This document is the property of:
Pegasystems Inc.One Rogers StreetCambridge, MA 02142-1209, USAPhone: 617-374-9600 Fax: 617-374-9620
www.pega.com
Document: Pega Sales Automation 8.1 Implementation Guide
Publication date: August 19, 2019
Feedback
If you have comments for how we can improve our materials, send an email to [email protected].

Contents
Contents
Overview..................................................................................................................................................................................................... 6Pega Sales Automation.............................................................................................................................................................................. 6Pega Sales Automation application stack.............................................................................................................................................. 6
Preparing for the implementation..........................................................................................................................................................7Creating your application.......................................................................................................................................................................... 7Optional: Configuring your Pega applications to support shared features........................................................................................8
Adding shared rulesets................................................................................................................................................................ 9Creating integration rulesets.....................................................................................................................................................10Enabling shared features...........................................................................................................................................................10Configuring the integration between Pega Sales Automation and Pega Marketing......................................................... 11Testing the Pega Sales Automation integration with Pega Marketing local campaigns....................................................11Testing the Pega Sales Automation integration with Pega Marketing next best offers.................................................... 12
Building the application......................................................................................................................................................................... 13Managing your application data with the Integration Designer........................................................................................................ 13Defining requirements............................................................................................................................................................................. 13
Application data model..............................................................................................................................................................13Mapping your application data.................................................................................................................................. 14Mapping case type or data type classes to a database table................................................................................ 14
Connecting to customer data................................................................................................................................................... 15Sales team structure.................................................................................................................................................... 15
Territories.........................................................................................................................................................15Operators.........................................................................................................................................................16Partners............................................................................................................................................................16Defining the sales team structure............................................................................................................... 16
Prospect and customer data requirements..............................................................................................................17Prospect and customer data types..............................................................................................................17Defining prospect and customer data requirements................................................................................18
Customizing your application................................................................................................................................................... 18Defining the sales methodology................................................................................................................................ 19
Lead and opportunity case types................................................................................................................ 19Defining products and competitors...........................................................................................................................20Forecast management requirements........................................................................................................................ 20Defining requirements for activity and task management.....................................................................................20Defining requirements for sales goals management..............................................................................................21Defining reporting requirements................................................................................................................................21
Reviewing existing reports............................................................................................................................ 21Portal dashboards........................................................................................................................................................ 22
Defining the dashboard layouts for portals............................................................................................... 22Implementing the Pega Sales Automation mobile app.......................................................................................... 22Engagement maps requirements...............................................................................................................................23Defining organization trend requirements............................................................................................................... 23Defining Pega Co-Browse requirements................................................................................................................... 23Defining settings for Pega Pulse................................................................................................................................ 24Defining computer telephony integration (CTI) requirements with Pega Call......................................................24Pega Knowledge integration....................................................................................................................................... 25
Pega Sales Automation Implementation Guide | iii

Contents
Pega Workforce Intelligence integration................................................................................................................... 25Additional Pega components......................................................................................................................................26
Artificial intelligence insights.........................................................................................................................26Local campaigns............................................................................................................................................. 26Next-best-offer recommendations...............................................................................................................26Next-best-action strategies............................................................................................................................27
Defining integration requirements.............................................................................................................................27Defining the security model......................................................................................................................................................28
Authentication schemes.............................................................................................................................................. 28Defining your authentication scheme......................................................................................................... 28
Authorization model.....................................................................................................................................................29Defining your authorization model..............................................................................................................29Operator privileges.........................................................................................................................................29Territory permissions..................................................................................................................................... 30Work object permissions...............................................................................................................................30Partner access.................................................................................................................................................31Attribute Based Control (ABAC)....................................................................................................................31Client-based access control (CBAC)..............................................................................................................31
Customizing the user experience.............................................................................................................................................31Determining which part of the user interface to modify....................................................................................... 31Designing portals..........................................................................................................................................................31Designing an application skin and styles..................................................................................................................32Designing for screen performance............................................................................................................................ 32
Configuring features.................................................................................................................................................................................32Activating application features................................................................................................................................................. 32Connecting to customer data................................................................................................................................................... 33
Importing prospect and customer data....................................................................................................................34Setting up the sales team and implementing your authorization model.............................................................34
Adding territories............................................................................................................................................35Adding operators............................................................................................................................................35Adding partners.............................................................................................................................................. 36
Customizing your application................................................................................................................................................... 36Implementing the sales methodology.......................................................................................................................37Modifying an opportunity case type..........................................................................................................................37
Adding stages to an opportunity case type................................................................................................38Specifying a field value for a new opportunity stage................................................................................38Adding steps to an opportunity stage.........................................................................................................38
Setting up products......................................................................................................................................................39Configuring an external product data source............................................................................................ 39
Setting up competitors................................................................................................................................................ 39Setting up time periods for sales goals management............................................................................................ 40Reports........................................................................................................................................................................... 40Customizing dashboards............................................................................................................................................. 40Building the Pega Sales Automation mobile app.................................................................................................... 41
Setting up optical character recognition (OCR) scanning..........................................................................41Distributing the mobile app..........................................................................................................................42
Enabling local campaigns and next-best-offer recommendations........................................................................ 42Mapping data for organization trends...................................................................................................................... 42Configuring Pega Co-Browse.......................................................................................................................................43Configuring Pulse..........................................................................................................................................................44Configuring computer telephony integration using Pega Call............................................................................... 44Adding Pega Knowledge records................................................................................................................................44Configuring Workforce Intelligence............................................................................................................................45
Configuring settings for Workforce Intelligence.........................................................................................45Configuring authorization for Workforce Intelligence...............................................................................46Updating the access group for the agent schedule.................................................................................. 46
Pega Sales Automation Implementation Guide | iv

Contents
Configuring Pega Sales Automation operators for Workforce Intelligence............................................ 46Pega Sales Automation integration with Microsoft Exchange................................................................................47Configuring Pega Sales Automation to Microsoft Exchange calendar integration.............................................. 47Configuring Microsoft Exchange to Pega Sales Automation calendar integration.............................................. 47Configuring Pega for Outlook VSTO and Pega for Outlook Office.........................................................................47Configuring listener accounts for emails and appointments.................................................................................48
Creating the access group, operator, and email accounts....................................................................... 48Creating new email and appointment classes in the implementation layer.......................................... 49Configuring associations with other application objects.......................................................................... 49Updating the user interface..........................................................................................................................49
Configuring Twitter integration...................................................................................................................................50Setting up a Twitter account and application............................................................................................ 50Configuring settings for Twitter integration............................................................................................... 50
Configuring Facebook integration.............................................................................................................................. 51Setting up a Facebook account and application........................................................................................51Configuring settings for Facebook integration...........................................................................................52
Configuring LinkedIn integration................................................................................................................................52Registering your application with LinkedIn.................................................................................................52Configuring JavaScript SDK domains........................................................................................................... 53Enabling LinkedIn Navigator in Pega Sales Automation........................................................................... 53
Configuring Partner Relationship Management.......................................................................................................53Modifying the user interface.....................................................................................................................................................54
Locating the user interface element to change.......................................................................................................54Adding properties to sections.................................................................................................................................... 54Adding sections.............................................................................................................................................................54Changing section visibility........................................................................................................................................... 55Updating the skin......................................................................................................................................................... 55
Testing a new application........................................................................................................................................................................55Testing your application in the Build environment............................................................................................................... 56Testing in the Test or Production environments....................................................................................................................56Testing in the UAT environment...............................................................................................................................................57
Packaging a new application...................................................................................................................................................................57Merging application changes.................................................................................................................................................... 58Packaging an application for migration.................................................................................................................................. 58Importing the packaged application........................................................................................................................................58Multitenancy deployment considerations...............................................................................................................................58
Production maintenance and monitoring............................................................................................................................................59Business rule maintenance in the Production environment..............................................................................................................59Application health monitoring................................................................................................................................................................ 59Identifying and reporting issues.............................................................................................................................................................59
Pega Sales Automation Implementation Guide | v

OverviewBefore implementing Pega Sales Automation, it's helpful to understand the application business uses, thePega implementation methodology, and the application stack.
• Pega Sales Automation
• Pega Sales Automation application stack
Pega Sales AutomationPega Sales Automation combines analytics, business process management, and model-driven capabilitiesto provide intelligent, real-time sales guidance, process automation from lead to fulfillment, and theagility to quickly adapt existing sales processes to keep up with changes in the market. With PegaSales Automation, you can standardize and optimize the sales process across multiple business units,products, team members, territories, accounts, and channels, and dynamically adapt to each specializedcircumstance.
Pega Sales Automation application stack
A new Pega Sales Automation installation includes Pega Customer Service, but Pega Customer Service isenabled only if licensed. If you are using Pega Marketing, you must install that application separately.
Preparing for the implementation
Preparing for the implementationThe implementation team builds out the environment for the application.
Preparing for an implementation includes the following tasks:
• Creating your application
• Optional: Configuring your Pega applications to support shared features
Creating your applicationRun the New Application wizard to create your application.
Before you begin: Access the Organization landing page and create a customer organizationalstructure. You will assign this structure to the new operator that you create during the followingprocedure, so that the new application will have the appropriate class structure. For moreinformation, see the Organization chart tab on the Organization landing page.
1. To create a new operator ID for running the New Application wizard, complete the following steps:
a) Log in to Dev Studio by using the operator ID [email protected] and the password thatyou specified for that operator.
b) Save a copy of the existing [email protected] operator, and give it a name that identifies it asan Application Setup operator.
c) Add the PegaCRM-SFA:AppSetup access group to the new operator record, and click the optionbutton to the left of the access group to select this group as the default access group. When thisaccess group is selected as the default, the New Application wizard opens immediately when thisoperator logs in.
d) On the Work tab, update the organizational unit to point to the organizational structure created aspart of the prerequisite steps.
e) Save the new Application Setup operator.
2. Log in as the Application Setup operator.
3. Follow the New Application wizard instructions.
4. Click Go to app.
The New Application wizard creates a set of access groups for the application. An access groupdetermines which workspaces and features an operator can access. Create your own operators, and thenapply the appropriate access groups. The Application Wizard creates one administrator operator for youso that you can log into the application after you complete the wizard.
The New Application wizard creates the application class structure for you. For more information, seeClass layers and class hierarchy and inheritance.
What to do next: After you create your application, enable and extend features to meet yourbusiness needs. To learn more about your application, in the top-right corner of the screen, clickResources.
Pega Sales Automation Implementation Guide | 7
Preparing for the implementation
Optional: Configuring your Pega applications tosupport shared featuresThese procedures are required only if you will use the Pega Customer Relationship Management features to share data and service cases across the Pega Customer Service, Pega Sales Automation, and PegaMarketing applications. These procedures involve configuration across multiple applications, andtherefore include links to multiple application implementation guides.
Before you begin:
• Your Pega Customer Service, Pega Sales Automation, and Pega Marketing applications mustalready be created as described in Creating your application.
If you have installed industry-specific applications on top of Pega Customer Service and Pega SalesAutomation, complete these configuration steps in the industry applications, and not in the PegaCustomer Service or Pega Sales Automation applications. For instructions, see the implementation guidefor the industry application on the Pega Community.
To configure your Pega applications to support shared features, complete the following steps:
1. For environments that include both Pega Customer Service and Pega Sales Automation, complete thefollowing steps:
a) Add the Pega Sales Automation implementation rulesets to your Pega Customer Service application,and add the Pega Customer Service implementation rulesets to your Pega Sales Automationapplication. See Adding shared rulesets.
b) Create an integration ruleset for your Pega Customer Service and Pega Sales Automationapplications, and then add the integration ruleset to the top of the ruleset stack for eachapplication. See Creating integration rulesets.
c) Enable the Pega Customer Relationship Management features. See Enabling shared features.
d) In your Pega Customer Service application, update the operator access groups to include theCustomerService:CSRSalesAccess role that is required to access the shared features. See"Updating access groups to have shared access" in the Pega Customer Service Implementation Guide on the Pega Customer Service product page.
2. For environments that also include Pega Marketing, complete these additional steps.
a) Configure your Pega Customer Service application to support Pega Customer Decision Hub.
1. Enable Pega Customer Decision Hub. See "Configuring application settings" in the Pega CustomerService Implementation Guide on the Pega Customer Service product page.
2. Configure Customer Decision Hub settings. For each setting, copy the rule to the highestruleset shared by Pega Customer Service and Pega Sales Automation, and save your changesin that ruleset. See "Configuring Pega Customer Decision Hub" in the Pega Customer ServiceImplementation Guide on the Pega Customer Service product page.
b) In Pega Marketing, configure the application to support the Pega Customer RelationshipManagement features. See "Configuring Pega Marketing to support the Pega CustomerRelationship Management features" on the Pega Marketing Implementation Guide on the PegaMarketing product page.
c) In your Pega Sales Automation application, configure the integration between Pega SalesAutomation and Pega Marketing. See Configuring the integration between Pega Sales Automationand Pega Marketing.
Pega Sales Automation Implementation Guide | 8
Preparing for the implementation
d) In your Pega Sales Automation application, test the integration with Pega Marketing localcampaigns. See Testing the integration with local campaigns.
e) In Pega Marketing, train the adaptive model for sales offers. See "Configuring Adaptive DecisionManager for sales offers" in the Pega Marketing Implementation Guide on the Pega Marketing productpage.
f) In Pega Marketing, run a Marketing campaign for batch evaluation. See "Running a marketingcampaign for batch evaluation" in the Pega Marketing Implementation Guide on the Pega Marketingproduct page.
g) In your Pega Sales Automation application, test the integration with Pega Marketing next bestoffers. See Testing the integration with next best offers.
• Adding shared rulesets
• Creating integration rulesets
• Enabling shared features
• Configuring the integration between Pega Sales Automation and Pega Marketing
• Testing the Pega Sales Automation integration with Pega Marketing local campaigns
• Testing the Pega Sales Automation integration with Pega Marketing next best offers
Adding shared rulesetsTo enable sharing of data between your Pega Customer Service and Pega Sales Automation applications,add the implementation rulesets from one application to the other. The implementation rulesets arecreated by the New Application wizard for a new application.
This procedure is required only if you are sharing data and service requests between two or moreapplications in the Pega Customer Relationship Management suite.
Add only the rulesets that you want to expose in the other application. The lead system architect (LSA) orproject architect can provide guidance on what functionality is included in each ruleset.
Add these rulesets at the bottom of the ruleset stack so that you do not overwrite your application'simplementation rulesets. When you want to overwrite your application's rulesets, use an integrationruleset as described in Creating integration rulesets.
1. View the implementation rulesets created for each of your applications.
a) Log in to each of your applications in Dev Studio.
b) Click Application menu > Definition.
c) In the Application rulesets section, note the implementation rulesets created for each application.
2. Add the implementation rulesets from your Pega Sales Automation application to the bottom of theruleset stack for your Pega Customer Service application.
a) Log in to your Pega Customer Service application in Dev Studio.
b) Click Application menu > Definition.
c) In the Application rulesets section, click Add ruleset to add Pega Sales Automation rulesets to thebottom of the ruleset stack, and then click Save.
3. Add the implementation rulesets from your Pega Customer Service application to the bottom of theruleset stack for the Pega Sales Automation application.
a) Log in to the Pega Sales Automation implementation application in Dev Studio.
b) Click Application menu > Definition.
Pega Sales Automation Implementation Guide | 9
Preparing for the implementation
c) In the Application rulesets section, click Add ruleset to add Pega Customer Service rulesets to thebottom of the ruleset stack, and then click Save.
Creating integration rulesetsWhen using a Pega Customer Relationship Management configuration that includes both Pega CustomerService and Pega Sales Automation, you must sometimes override the rules in one application to exposefunctionality from the other application. To support this, create an integration ruleset in both applications,and then save the override rules to the integration ruleset.
For example, if the Pega Customer Service application will show Pega Sales Automation Lead case servicecases, you want the service case header and footer to look the same as the other Pega Customer Serviceservices cases. In that case, save the perform harness rule for the service case into the integration rulesetfor the Pega Customer Service application. Doing so overrides the Pega Sales Automation header andfooter for that service case.
This procedure is required only if you are sharing data and service requests between two or moreapplications in the Pega Customer Relationship Management suite.
The applications include a sample integration ruleset that you can copy or use as a model for a newintegration ruleset. The sample integration ruleset for Pega Customer Service is SAforCS, and the sampleintegration ruleset for Pega Sales Automation is CSforSA.
Complete the following steps to configure the integration rulesets:
1. Log in to your Pega Customer Service application in Dev Studio.
2. Click Application menu > Definition.
3. In the Application rulesets section, click Add ruleset.
4. Type a name for the new integration ruleset that identifies its purpose. For example, MyAppCRMIntegration, where MyApp is your application prefix.
5. Click the Open icon to the right of the ruleset field.
6. Review the default Ruleset Name, Version, and Description values, and modify the values if needed.
7. Click Create and Open, and then click Save.
8. In the ruleset field, identify which version of the ruleset to use by appending the major and minor ruleversion to the end of the integration ruleset name in this format: :NN-NN. For example, to select thefirst version of the ruleset, append :01-01 to the end of the ruleset name.
9. Move the new integration ruleset to the top of the ruleset stack by dragging the number to the left ofthe ruleset name to the top of the stack.
10. Click Save.
11. Repeat this procedure for your Pega Sales Automation application.
Enabling shared featuresTo share data and service cases across Pega Customer Service and Pega Sales Automation, enablethe shared features. For more information, see Pega Customer Relationship Management suite ofapplications.
1. Open your Pega Customer Service application.
2. In the navigation panel of App Studio, click Settings and then click Behaviors.
Pega Sales Automation Implementation Guide | 10

Preparing for the implementation
3. To enable your application to use the pre-integrated Pega Sales Automation features, select the EnableSales Automation check box.
4. Open your Pega Sales Automation application.
5. In the navigation panel of App Studio, click Settings > Application settings.
6. Select the Enable CRM mode check box.
7. Click Save.
Configuring the integration between Pega Sales Automation and PegaMarketingThe Pega Customer Relationship Management suite includes sample marketing artifacts that you canimport to demonstrate the next-best-offer and local campaigns features in Pega Sales Automation.
To use these artifacts in Pega Sales Automation you must configure the integration between Pega SalesAutomation and Pega Marketing.
For more information about the next-best-action and local campaigns features, see Additional Pegacomponents.
For information about the integration steps you must complete in the Pega Marketing application, seeOptional: Configuring your Pega applications to support shared features.
1. Open the prgateway URL (http://< hostname >:< port >/prgateway/) and test the hostconfiguration named NBAA.
2. In App Studio, click Settings > Application Settings and select the Local campaigns check box on thePega Marketing tab.
3. Log out of the application and log back in.
Testing the Pega Sales Automation integration with Pega Marketinglocal campaignsAfter you complete the steps required to configure the integration between Pega Sales Automation andPega Marketing, verify that you can access the sample marketing artifacts for local campaigns in PegaSales Automation.
1. Log in to Pega Sales Automation by entering the credentials for the Sales Rep operator who has PegaSA:MarketReps as their secondary access group.
2. In the header of Dev Studio, click Launch web interface > SA for Sales Rep.
3. On the navigation menu, click Campaigns > New Campaign.
4. Verify that you can select the following template offers for the campaign:
• B2CEmailOffer
• B2BEmailOffer
• B2BSMSOffer
• B2CSMSOffer
5. Verify that you can add Pega Sales Automation contacts to the campaign.
Pega Sales Automation Implementation Guide | 11
Testing the Pega Sales Automation integration with Pega Marketingnext best offersAfter you complete the steps required to configure the integration between Pega Sales Automationand Pega Marketing, verify that you can access the sample marketing artifacts for next-best-offeropportunities in Pega Sales Automation.
1. Log in to Pega Sales Automation by entering the credentials for the Sales Rep operator who hasPegaSA:MarketReps as their secondary access group.
2. In the header of Dev Studio, click Launch web interface > SA for Sales Rep.
3. Verify that the Next-best-offer widget displays on the dashboard. With sample data uploaded, thewidget shows realistic offers with different rankings for each contact.
4. Complete the following steps to test your integration:
a) Click a contact to qualify the contact for an opportunity.
b) Open a contact to display the top three offers for the contact, ranked highest to lowest.
c) Click an offer to qualify the contact for an opportunity to receive the offer.

Building the application
Building the applicationThe implementation team determines which features to enable or extend, and then configures and teststhe application.
Building an application includes the following tasks:
• Managing your application data with the Integration Designer
• Defining requirements
• Configuring features
• Testing a new application
• Packaging a new application
Managing your application data with the IntegrationDesignerUse the Integration Designer to manage data at the application level. In the Integration Designer, you canaccess a comprehensive view of all business objects in your application and their associated data, such asreferences, data sources, and data views. You can easily create and modify data objects and connect todata sources.
1. In App Studio, click Data.
2. Locate each data type that is marked SIMULATED, and click the FIX NOW link to configure that datatype to connect to real data.For additional information, see Managing application data with the Integration Designer.
Defining requirementsThe implementation team determines which features to enable or extend to meet your businessrequirements.
To define requirements, review the topics in the following sections:
• Application data model
• Connecting to customer data
• Customizing your application
• Defining the security model
• Customizing the user experience
Application data modelThe application provides a set of data types, data pages, and sample data to begin implementing yourapplication.
Data modeling involves relating a conceptual model of how data items relate to each other in anapplication. The data model in the Pega Platform refers to a set of rules that work together to populate
Pega Sales Automation Implementation Guide | 13
Building the application
the data in your application. This data is displayed on the user interface to help the user processinformation and can help automate decisions in your sales processes. The following rule types constituteyour data model:
Data types
The data type is another name for a class in your application. It holds data that the application uses. Adata type has one or more data pages and several property definitions associated with it.
Properties
Properties define the format and visual presentation of data in your application.
Data pages
Data pages define the content of a clipboard page and control the loading of the data.
When planning your data model, work with the data modeling resource at your site to understand theattributes of the data types that need to be supported by your application.
Note: For more information about the data model, see the Pega Sales Automation Product Overviewon the Pega Sales Automation.
The following topics describe how to plan and map the data model:
• Mapping your application data
• Mapping case type or data type classes to a database table
Mapping your application dataThe application data types provide a default set of properties for your use. You can add or removeproperties from these data types depending on your requirements. You can also add new data types.
1. In the navigation panel of Dev Studio, click Data types.
2. Click the data type that you want to modify.
3. On the Data model tab, determine the properties to add, remove, or leave unchanged. For moreinformation about data types, see Viewing data type details. Repeat these steps for any other datatypes, as necessary.
Mapping case type or data type classes to a database tableWhen you run the New Application wizard to create your initial case types and data types, the systemcreates a default class group mapping for each case type and data type. The wizard also createsassociated database tables. The wizard maps the new implementation class to the appropriate databasetable.
Mapping a class to a physical database table affects data storage and security decisions. For example, ifyou expect the volume of the case types to be low, consider sharing the table with other case types.
To update the default database table to a user-specified database table, perform the following steps:
1. Expand the SysAdmin category and then click Database Table.
2. Open the class that you want to modify.
3. Review the default database name and the table name that the class points to.
4. To point the chosen database table to your specific class, edit the database name and table name.
5. To confirm your changes, click Save.
Pega Sales Automation Implementation Guide | 14

Building the application
6. Click Test connectivity to check if the configuration succeeded. If the test results display errors, forexample, missing properties, review the data and correct them.
7. Update the class to point to the table specified above:
a) In the navigation panel of Dev Studio, click App.
b) Right-click the class name that you referred to in the steps above and select Definition.
c) On the General tab, click Test connection to check if the configuration succeeded.
8. Perform the steps above for the other case type or data type classes, if needed.
Connecting to customer dataBefore you begin your implementation, review and define the requirements for your sales team’s sellingmodel, organizational structure, and prospect and customer data types.
For information and instructions on how to define the sales team requirements for your implementation,see the following topics:
• Sales team structure
• Prospect and customer data requirements
Sales team structureIn Pega Sales Automation, you define the organizational structure of your sales team using territories,operators, and Partners.
• Territories
• Operators
• Partners
• Defining the sales team structure
TerritoriesA territory is a hierarchical unit that is used to organize your sales team into groups, for example, ageographic location, a department, or a product line. Territories are used to manage the individualmembers of your sales organization and grant access to the accounts, contacts, leads, opportunities,organizations, and households in the Pega Sales Automation application.
The following diagram shows a territory structure based on geographic locations:
Pega Sales Automation Implementation Guide | 15

Building the application
When populating a new implementation layer, you add the territory structure first, and then addoperators to the territories. Each territory has an owner or forecast manager operator attribute. If youcreate operators after you create your territory structure, you must update each territory to assign anowner.
OperatorsAn operator is an individual user of the Pega Sales Automation application, either a member of your salesteam, a partner's sales team, or an administrator.
PartnersWith Pega Sales Automation, you can work directly with by granting them access to your localimplementation.
Note: The partner management feature is optional and you must activate it for yourimplementation if you plan to use it. For more information, see Activating application features.
Defining the sales team structureIn Pega Sales Automation, the organizational structure of your sales team is comprised of territories,operators, and partners.
Your security authorization model is based on the territory structure, operator IDs, and partners that youdefine for your sales team. As a result, you can define and implement your authorization model at thesame time that you define and set up the sales team structure. For more information, see Authorizationmodel and Setting up the sales team and implementing your authorization model.
1. Define and evaluate the territory model for your Pega Sales Automation implementation before youpopulate territories into the application.
2. Define and evaluate who will use the Pega Sales Automation application and determine operatorID requirements before you create or assign operator IDs.
Pega Sales Automation Implementation Guide | 16

Building the application
3. Define and evaluate which partners will use the Pega Sales Automation application and determineoperator ID requirements before you create or assign operator IDs for the partner.
4. Determine if you need to import existing territory, operator, and partner data.
5. Determine the type and source of existing territory, operator, and partner data that you need toimport.
Prospect and customer data requirementsThe Pega Sales Automation application is the system of record for the prospects and potentially thecustomer data that is used by the sales team, including Organization, accounts, households, and contacts.To import existing prospect and customer data, see Pega Sales Automation data import.
• Prospect and customer data types
• Defining prospect and customer data requirements
Prospect and customer data typesThe types of prospect and customer data that are required for your implementation depend on the sellingmodel that you select. Prospect and customer data can include information about the following entities:
Organization
A n organization is a specific business, holding company, corporation, or association. The organizationrepresents the top level of a business hierarchy that contains one or more child entities in the form ofaccounts. Organizations are used only in the business-to-business (B2B) selling mode.
Accounts
An account is an economic decision making unit that represents the logical or physical group to whichproducts or services are sold. Accounts are used in both the business-to-business (B2B) and business-to-consumer (B2C) selling modes.
Contacts
A contact (person) is a prospect or a customer.
• In the business-to-business (B2B) selling mode, a contact is usually an employee of or somehowaffiliated with the organization to which you are selling.
• In the business-to-consumer (B2C) selling mode, a contact is the person interested in making apurchase.
You can associate a contact with an account, organization, or another contact in the application tofacilitate cross selling and communication. The following relationship type codes are available fordefining contact relationships in the application:
• C2A - Indicates a contact-to-account relationship.
• C2O - Indicates a contact-to- organization relationship.
• P2P - Indicates a contact-to-contact relationship.
You can further define the nature of these relationship types. For example, a P2P relationship can be arelationship between colleagues in a n organization or between family members in a household.
Pega Sales Automation Implementation Guide | 17
Building the application
Households
A household is a grouping of contacts in which one of the contacts is designated the head of household.A household usually represents members of a family, or contacts living at the same address. Ahousehold can also be used to group any set of contacts that share a commonality and have a primarycontact person. Households are used only in the business-to-consumer (B2C) selling mode.
Note: The household data type is optional. If you plan to use household data, you must activatethe data type for your implementation. For more information, see Activating application features.
Defining prospect and customer data requirementsComplete the following steps to define your prospect and customer data requirements.
1. Identify the types of data that are needed, based on your selling model.
2. Identify the sources of the required data.
Customizing your applicationPega Sales Automation includes a set of core and optional features that you can implement to supportyour sales team. Each of these features requires planning for a successful implementation.
1. Review the components provided with each feature.
2. Determine which features are required for your implementation.
For additional information, see the Pega Sales Automation Product Overview on the Pega SalesAutomation.
3. Optional: For information and instructions on how to define the requirements for yourimplementation, see the following topics:
• Defining the sales methodology
• Defining products and competitors
• Forecast management requirements
• Defining requirements for activity and task management
• Defining requirements for sales goals management
• Defining reporting requirements
• Portal dashboards
• Implementing the Pega Sales Automation mobile app
• Engagement maps requirements
• Defining organization trend requirements
• Defining Pega Co-Browse requirements
• Defining settings for Pega Pulse
• Defining computer telephony integration (CTI) requirements with Pega Call
• Pega Knowledge integration
• Pega Workforce Intelligence integration
• Additional Pega components
Pega Sales Automation Implementation Guide | 18
Building the application
• Defining integration requirements
Defining the sales methodologyIn Pega Sales Automation, you use Pega's case life cycle management tools to model your salesmethodology and guide sales representatives through each stage of the sales process.
Pega Sales Automation includes several predefined case types that represent the processes and workobjects that drive your organization's sales life cycle. Select the case types to include in your applicationwhen you build your implementation layer. If you need additional case types not provided in theapplication, create them during your implementation.
For information about case life cycle management, see Defining a life cycle for a case.
1. Review the sales processes for your organization.
a) Define requirements for managing leads.
b) Define requirements for managing opportunities.
2. Map the lead and opportunity requirements to stages and steps in the lead and opportunity casetypes.
3. Determine if you need to import existing lead and opportunity data.
4. Determine the type and source of the existing lead and opportunity data that you need to import.
• Lead and opportunity case types
Lead and opportunity case typesThe two main case types that you use to implement your sales methodology are the lead and opportunitycase types.
Lead
A lead is a prospect (customer or non-customer) that your sales team evaluates to determine if theyare qualified to advance to the probability of a sale. When you qualify a lead, it is converted to anopportunity.
When you create the implementation layer, the lead case type contains no stages. You can customizethe lead case type by adding stages to reflect the processes your sales team follows to qualify a lead.You can further divide your lead case type stages into steps that define the tasks or activities that yoursales representatives perform within each stage, such as managing campaign responses, creating leadprofiles, or scheduling appointments.
Opportunity
An opportunity is a qualified deal, or a potential sale that you track, nurture, and manage. Opportunitiesare the foundation of your sales pipeline, goal attainment, and sales forecast.
When you create the implementation layer, the opportunity case types (B2B Sales Opportunity andB2C Sales Opportunity) each contain a set of pre-configured stages and steps.
You can customize the opportunity case types by modifying the Pega-provided stages or adding yourown stages and steps to reflect the processes your sales team follows to move an opportunity throughthe sales pipeline. You can also modify the Pega-provided steps or add your own steps to definethe tasks or activities that your sales representatives perform within each stage, such as identifyingcompetitors, developing proposals, and scheduling appointments.
Pega Sales Automation Implementation Guide | 19

Building the application
Defining products and competitorsYour products are the goods and services that you sell to your customers. Your competitors are otherorganizations that sell similar products to the same base of customers. Enter product and competitorinformation in the application to align opportunities with product offerings and to identify yourcompetitors so that you can differentiate your products when you make a sales pitch. Pega SalesAutomation supports Categories, Families, Groups, and Products hierarchy.
Before you begin: Before you enter product information in the application, define your producthierarchy.
1. Define product categories, for example Life Insurance and Health Insurance.
2. Define product families, for example Individual Life and Individual Health.
3. Define product groups, for example Term Life and Supplemental Health.
4. Define products, for example 5-year Renewable Term and Individual Accident.
5. Define the selling mode for your products: Business (B2B), Individual (B2C), or All.
6. Define competitor and data import requirement.
a) Identify competitors who are selling similar products.
b) Determine if you need to import existing product and competitor data.
c) Determine the type and source of the existing product and competitor data that you need toimport.
What to do next:
If your products are maintained in an external system of record, determine how you will connect tothe external system. For more information, see Setting up products.
Forecast management requirementsForecast management provides a summary of your sales pipeline for the year, broken down by fiscalquarter and forecast category. You can use forecast management to review pipeline status for an entireterritory or for an individual operator.
The basic features of forecast management are ready for use with Pega Sales Automation and do notrequire additional configuration during implementation. However, if you want to use the close planfeature with forecast management, you must activate it for your implementation. For more information,see Activating application features.
Defining requirements for activity and task managementAn activity is any meaningful communication between a sales representative and a contact that isdesigned to drive a sale or develop a professional relationship. Activities have a purpose, an outcome,and an interaction date, and can have follow-up tasks. Activities are used in both the business-to-business(B2B) and business-to-consumer (B2C) selling models.
To manage activities and tasks in Pega Sales Automation, you must define your activity data model andimport requirements.
1. Determine if you need to import existing activity and task data.
Pega Sales Automation Implementation Guide | 20

Building the application
2. Determine the type and source of the activity and task data that you need to import.
Defining requirements for sales goals managementSales goals give sales managers the ability to plan quarterly or monthly goals for sales representativesbased on a variety of metrics. Goals, by default, are based on revenue but can be driven by other metricssuch as activities, number of opportunities closed, or number of leads created. You can track goalachievement by using the Quota Attainment widget on the dashboard. You can view sales goals for youroperators in the Sales Ops portal.
Sales Ops operators can enter sales goals for sales representatives when setting up operator IDs or whenupdating the Sales Goals tab in existing operaotr records.
1. Determine the start and end date of the fiscal year for your sales organization.
2. Determine the sales goals reporting periods for your sales organization.
3. Determine if you need to import existing sales goals data.
4. Determine the type and source of the existing sales goals data that you need to import.
Defining reporting requirementsBased on your login and portal, Pega Sales Automation provides numerous pre-configured reports tomonitor sales activity and to monitor workforce productivity. These standard reports are driven by thecase lifecycle and work object infrastructure, as well as rules for goals and deadlines used in managingleads and opportunities.
Before you begin:
Consider your reporting requirements early in the planning process.
For more information about the reporting capabilities in Pega Sales Automation, see Reporting.
1. Review the description of each application-provided report, identify the expected volume of data, anddetermine how often you expect to run each report.
2. Identify any required metrics that are not already provided by the application.
• Reviewing existing reports
Reviewing existing reportsThe application includes numerous reports. Identify the application-provided reports that meet yourbusiness needs.
Note: Pega Sales Automation includes the standard Pega Sales Automation reports to helpyou monitor and analyze your sales activity. For descriptions of each report, see Pega SalesAutomation reports.
1. In the header of Dev Studio, click Launch web interface > SA for Sales Ops.
2. In the navigation pane, click Reports.
3. Review each of the reports in the Public categories section.
4. Determine which operator roles need the report, what it contains, and when and why it's needed.
Pega Sales Automation Implementation Guide | 21
Building the application
Portal dashboardsPega Sales Automation provides custom portals and configurable dashboards for supported operators.
Portals provide a comprehensive workspace while dashboards centralize key information managed in theportal. Access to portals and their corresponding dashboards is determined by the user's access groupand operator ID.
Determine the appropriate dashboard information to display for each of the following Pega SalesAutomation portals:
• SA for Sales Ops
• SA for Sales Rep
• SA Sales Manager
• Defining the dashboard layouts for portals
Defining the dashboard layouts for portalsThe application includes configurable, role-based dashboards for each portal. A Sales Ops operatorcan publish default dashboard layouts for Sales Operations, Sales Manager, and Sales Representativeoperators. Individual operators can modify the default dashboard layouts, as needed.
To identify the default dashboard components that meet your business needs, perform the followingsteps:
1. In the header of Dev Studio, click Launch web interface > SA for Sales Ops.
2. In the navigation pane, click Tools and select a dashboard that you want to modify.
3. In the upper right corner of the dashboard, click the Personalize the dashboard icon.
a) Review the available templates for the dashboard.
b) In any slot, click Add widget(s) and review the available widgets for the dashboard.
4. Determine which template and widgets to use for the dashboard display.
Implementing the Pega Sales Automation mobile appThe Pega Mobile Client is a service that enables the quick building of mobile apps from the Pega Platformapplication. You need a license for the Pega Mobile Client.
To implement the Pega Sales Automation mobile app, review the following items:
1. Verify that Pega Platform settings are complete.These settings are configured during the system configuration phase by the Pega Platformadministrator in your organization. If they are not configured, contact the administrator to verify thatyour organization has been licensed to use the Pega Mobile Client app building feature. If you do nothave a license, contact your account executive.
2. Determine if the organization needs to customize the mobile app.
For information about the Pega Mobile Client API, see Pega Mobile Client API reference and Using thePega Mobile Client API within a Pega application.
If you are planning to build a mobile app, consider configuring your mobile app’s functionality withsupport of device-specific features, such as a barcode scanner.
3. Make sure that you have a certificate set for the Android or iOS mobile platform. A certificate setdefines various settings which identify the Android or iOS application that you are creating.
Pega Sales Automation Implementation Guide | 22
Building the application
For information about the certificate set for the Android platform, see Creating an Android certificateset.
You need to generate the iOS certificate set in the Apple Developer Portal ahead of time. SeeGenerating mobile certificates for the iOS platform.
4. Determine if the organization wants to brand the mobile app.
You can customize the branding of your mobile app to serve the organization's specific requirementsand needs. You can upload your own images for the splash screen and menu icon to the Pega Platformduring the app customization process. If you do not provide custom assets, a default Pega Platformbranding is applied. For additional information, see Preparing custom branding assets.
For more information, see Building the Pega Sales Automation mobile app.
Engagement maps requirementsEngagement maps are account and territory planning tools that provide a visual map of your productpenetration levels. Engagement maps can help you to identify territories and accounts where yourproduct penetration level is low.
Before you begin:
Before you can view engagement maps, you must set up a product hierarchy in Pega SalesAutomation. For more information, see Defining products and competitors.
Note: The optional engagement maps feature is disabled by default and therefore not visible inthe user portals. To use this feature, you must activate it in your application. For more information,see Activating application features.
Defining organization trend requirementsOrganization trends provide visibility into your interactions with customers across multiple channels,including web activity, email traffic, interactions with contacts, and contact growth. You can source data foryour trend reports from Pega Sales Automation tables or from external databases or data warehouses.Organization trend data is displayed in the corresponding organization record in Pega Sales Automation.
Before you begin:
If you plan to track organization trends, you must map the application to the source of the trend data.
1. Determine the source of trend data.
2. Map the customer engagement data class to the table containing the desired data. For moreinformation, see Mapping data for organization trends.
Defining Pega Co-Browse requirementsWith Pega Co-Browse, your customers and prospects can collaborate with sales representatives by sharinga web browser session on their PC, tablet, or mobile phone .
1. Determine which web pages that you would like Pega Co-Browse to work on.
2. Determine which website fields require masking.
Pega Sales Automation Implementation Guide | 23
Building the application
3. Determine whether the Pega Co-Browse window must be customized to match branding standards atyour site.
4. Define a message that you want to appear before the viewer connects with the presenter.
5. Determine whether to enable remote control. Remote control allows the viewer to take control of thepresenter's screen.
Defining settings for Pega PulsePega Pulse adds social activity stream capabilities to your user interface. With Pega Pulse, applicationusers can collaborate in real time, share comments, files, and URLs with other users, and take actiondirectly from an activity stream.
Pega Pulse offers contextual behavior so that its scope depends upon where you use it in the Pega SalesAutomation application. You can broadcast to an entire sales team or share information only with userswho have access to a specific lead or opportunity.
For more information about the Pega Pulse feature, see Communicating with users by using Pulse.
1. Define which Pega Pulse actions will be available in various contexts, such as the actions available to asales representative working on an opportunity.
2. Determine whether you want Pega Pulse to automatically post messages or override the contents onthe header section of your activity stream.
3. Determine the default values for privacy and attachments.
Defining computer telephony integration (CTI) requirements with PegaCallPega Call provides robust computer telephony integration (CTI) support for Pega Sales Automation users,including click-to-dial functionality for outgoing calls and adaptive screen pops for incoming calls.
Before you begin:
After you install and configure Pega Call, you must activate CTI functionality for the applicationand then add the PegaCTI:CSR access role to all the access groups for which you are providingCTI access. For more information, see Activating application features.
To plan the connectivity to your telephony infrasturucture, perform the followng:
1. Understand which telephony vendor that your site uses.
2. Review the Pega Call CTI Implementation materials to understand the configuration for your vendor.
3. Meet with the technical resources responsible for configuration and maintenance of the ContactCenter Telephony and CTI infrastructure at your site to get an understanding of the currentconfiguration and desired call flows and customer experience. Ensure that a resource from thetelephony team is available to work with the implementation team.
4. Share the information related to the way Pega Call gets connected to the CTI environment with thetelephony expert. The telephony expert is required to configure the CTI environment to allow Pega Callto connect and share the configuration details with the Pega Call implementation team.
Pega Sales Automation Implementation Guide | 24

Building the application
Pega Knowledge integrationPega Knowledge is a standalone application that is integrated with Pega Sales Automation. PegaKnowledge supports the creation and organization of rich content that can be suggested to salesrepresentatives in the context of the selling activities that they are performing.
Before you begin: Integration with Pega Knowledge is optional. If you plan to use this feature, youmust activate it for your implementation. For more information, see Activating application features.
Planning your application to support Pega Knowledge involves the following tasks:
1. Identifying the case types that need content. You can add knowledge content to the following casetypes:
• Organization
• Account
• Contact
• Opportunity
• Lead
2. Developing relevant content to support specific case types.
When planning, focus on the content that is necessary to support your sales processes. Write thecontent concisely and limit the number of Pega Knowledge articles so that your sales representativesdo not have a large number of search results.
For additional information, see the Pega Knowledge User Guide on the Pega Knowledge product page.
Pega Workforce Intelligence integrationWorkforce Intelligence is a standalone application that is integrated with Pega Sales Automation.Workforce Intelligence delivers insight into your sales team's daily desktop usage patterns by collecting,aggregating, and synthesizing application utilization across the organization. You can use this data toanalyze how work gets done across the enterprise—by humans and robots—and optimize applicationusage across all applications running on the desktop.
Before you begin: Integration with Workforce Intelligence is optional. If you plan to use this feature,you must activate it for your implementation. For more information, see Activating applicationfeatures.
To configure the Pega Sales Automation integration with Workforce Intelligence, you need the followinginformation:
• The URL address, access token, and keystore file for the Workforce Intelligence server. This is used toestablish the connection between Pega Sales Automation and Workforce Intelligence.
• The network ID for each Pega Sales Automation sales representative. Pega Sales Automation uses thisID to retrieve data from the Workforce Intelligence server.
• The email address for each Pega Sales Automation sales manager. Pega Sales Automation usesthe sales manager's email address to determine which sales representatives to include in the datadelivered to the sales manager.For more information about Workforce Intelligence, see the Workforce Intelligence product page.
Pega Sales Automation Implementation Guide | 25
Building the application
Additional Pega componentsReview the description of each feature to determine whether to configure the feature for use in yourimplementation.
Your Pega Sales Automation implementation can include additional Pega components that support thefollowing sales features:
• Artificial intelligence insights
• Local campaigns
• Next-best-offer recommendations
• Next-best-action strategies
Artificial intelligence insightsPega Sales Automation artificial intelligence capabilities use predictive analytics, automated decisioning,and configurable business rules to provide insights and recommendations to sales representatives andsales managers throughout the sales cycle.
The following predictive tools are available in the application:
• Opportunity insights
For more information, see Pega Sales Automation artificial intelligence-based opportunity insights.
• Lead ranking
For more information, see Pega Sales Automation artificial intelligence-based lead ranking.
• Sales coaching
For more information see, Pega Sales Automation artificial intelligence-based sales coach.
You must activate the artificial intelligence feature in Pega Sales Automation and then train the adaptivemodels for opportunity insights, lead ranking, and sales coaching.
For more information, see Activating and training Pega Sales Automation adaptive models for artificialintelligence.
Local campaignsSales representatives and sales managers can use the local campaigns feature to create and sendpersonalized email and SMS campaigns to contacts in the Pega Sales Automation application. When acontact accepts a campaign offer, a lead is automatically generated in the application.
Local campaigns are supported for both business-to-business (B2B) and business-to-consumer(B2C) selling models.
To implement local campaigns in Pega Sales Automation, you must first integrate Pega Sales Automationwith Pega Marketing. You can then activate the feature in Pega Sales Automation.
• For information about integrating Pega Sales Automation with Pega Marketing, see Configuring yourapplications for Pega Customer Relationship Management.
• For information about activating local campaigns in Pega Sales Automation, see Enabling localcampaigns and next-best-offer recommendations.
Next-best-offer recommendationsPega Sales Automation uses Pega Customer Decision Hub to identify the top sales offer across a salesrepresentative's book of business. Adaptive models guide sales representatives and sales managers to
Pega Sales Automation Implementation Guide | 26
Building the application
the offers that have the highest propensity to close. When a prospect accepts an offer, an opportunity isautomatically generated.
To implement next-best-offer recommendations in Pega Sales Automation, you must first integrate PegaSales Automation with Pega Marketing. You can then activate the feature in Pega Sales Automation.
• For information about integrating Pega Sales Automation with Pega Marketing, see Configuring yourapplications for Pega Customer Relationship Management.
• For information about activating next-best-offer recommendations in Pega Sales Automation, seeEnabling local campaigns and next-best-offer recommendations.
Next-best-action strategiesPega Sales Automation uses Pega Customer Decision Hub and Decision Management capabilities toidentify the next best action for every opportunity in the application, rank the top actions, and display theresults in the Next best actions widget on the sales representative's dashboard.
Next-best-action strategies use predictors such as digital activity, service activity, products sold, and salesrepresentative activity to determine the next best action for every opportunity.
• For information about the use cases for next-best-action strategies in Pega Sales Automation, see PegaSales Automation next-best-action use cases.
• For information about configuring next-best-action strategies for Pega Sales Automation, seeConfiguring next-best-action strategies for Pega Sales Automation and Pega Sales Automation next-best-action technical implementation.
Defining integration requirementsYou can integrate Pega Sales Automation with third party applications to extend the functionality of theapplication. Inventory the external applications that exist at your site and plan how to connect to them.
Some common integration points for Pega Sales Automation include interfaces to the following systems:
• Microsoft Exchange
• Microsoft Outlook (Pega for Outlook VSTO and Pega for Outlook Office)
• Social media
• Customer applications
For information on integrating with customer applications, see Integrating your application withexternal resources.
• Claims system
• Provider system
• Call center
• Product data
• Member data
1. Identify all integration points for your application.
2. Determine whether an interface already exists and how to connect to it.
Pega Sales Automation Implementation Guide | 27
Building the application
Defining the security modelSecurity planning involves defining authentication and authorization strategies for your application:
Authentication
Validates your identity.
Authorization
Determines the work objects you can access and the application functions you can perform.
For information about defining authentication and authorization strategies for your application, see thefollowing topics:
• Authentication schemes
• Authorization model
Authentication schemesThe Pega Platform offers the following authentication types:
PRBasic
Based on passwords in the Operator ID data instances and the login form. This is defined by the [email protected] rule, which your application can override.
PRSecuredBasic
Similar to PRBasic, but passes credentials by using Secure Sockets Layer (SSL) with Basic HTTPauthentication. The login form is defined by the HTML @baseclass.Web-Login-SecuredBasic rule,which your application can override.
PRCustom
Supports access to an external LDAP directory or a custom authentication scheme.
PRExtAssign
Supports external assignments (Directed Web Access).
J2EEContext
Specifies that the application server in which the Pega Platform is deployed uses JAAS to authenticateusers.
• Defining your authentication scheme
Defining your authentication schemeYour site can use a centralized, automated means of maintaining operator data instead of maintaining itmanually in your application.
1. Discuss Authentication schemes with your site's security and application server teams.
2. Determine the appropriate authentication type.
For more information on authentication scheme planning, see Authentication in Pega Platform.
Pega Sales Automation Implementation Guide | 28
Building the application
Authorization modelYour authorization model determines user access privileges and work object permissions for the PegaSales Automation application.
User authorization is based on both the operator ID privileges and Pega Sales Automation territorypermissions.
Access to portals and work objects in the application is determined by operator ID privileges.
The ability to read, update, and create specific work objects is determined by the territory to which thework objects belong.
• Defining your authorization model
• Operator privileges
• Territory permissions
• Work object permissions
• Partner access
• Attribute Based Control (ABAC)
• Client-based access control (CBAC)
Defining your authorization modelEstablish your authorization scheme by defining operator privileges, territory and work objectpermissions, and partner access for your users.
Your security authorization model is based on the territory structure, operator IDs, and partners that youdefine for your sales team. As a result, you can define and implement your authorization model at thesame time that you define and set up your sales team structure. For more information, see Defining thesales team structure and Setting up the sales team and implementing your authorization model.
1. Determine who the Pega Sales Automation operators are and what roles to assign them. For moreinformation, see Operator privileges.
2. Determine the territory structure and which territory (or territories) to assign to each operator. Formore information, see Territory permissions.
3. Determine each operator's access to the work objects in each assigned territory. For more information,see Work object permissions.
4. Determine the level of access to provide to each partner. For more information, see Partner access.
Operator privilegesAn operator is an individual user of the Pega Sales Automation application. The operator role typedetermines which portals and work objects the operator can access.
Operator role Description Default portal
Developer Manages the application.Modifies functionality and canlaunch any of the portals.
Dev Studio, SA for Sales Ops, SA Sales Manager, SAfor Sales Rep
Pega Sales Automation Implementation Guide | 29
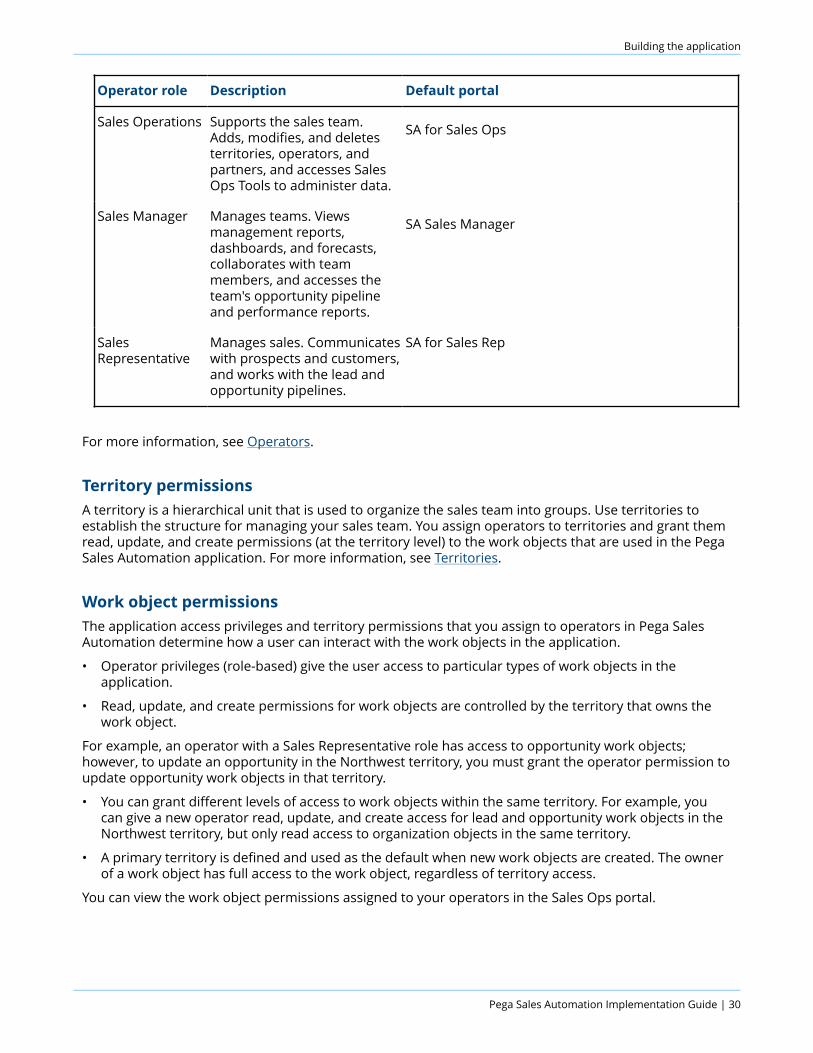
Building the application
Operator role Description Default portal
Sales Operations Supports the sales team.Adds, modifies, and deletesterritories, operators, andpartners, and accesses SalesOps Tools to administer data.
SA for Sales Ops
Sales Manager Manages teams. Viewsmanagement reports,dashboards, and forecasts,collaborates with teammembers, and accesses theteam's opportunity pipelineand performance reports.
SA Sales Manager
SalesRepresentative
Manages sales. Communicateswith prospects and customers,and works with the lead andopportunity pipelines.
SA for Sales Rep
For more information, see Operators.
Territory permissionsA territory is a hierarchical unit that is used to organize the sales team into groups. Use territories toestablish the structure for managing your sales team. You assign operators to territories and grant themread, update, and create permissions (at the territory level) to the work objects that are used in the PegaSales Automation application. For more information, see Territories.
Work object permissionsThe application access privileges and territory permissions that you assign to operators in Pega SalesAutomation determine how a user can interact with the work objects in the application.
• Operator privileges (role-based) give the user access to particular types of work objects in theapplication.
• Read, update, and create permissions for work objects are controlled by the territory that owns thework object.
For example, an operator with a Sales Representative role has access to opportunity work objects;however, to update an opportunity in the Northwest territory, you must grant the operator permission toupdate opportunity work objects in that territory.
• You can grant different levels of access to work objects within the same territory. For example, youcan give a new operator read, update, and create access for lead and opportunity work objects in theNorthwest territory, but only read access to organization objects in the same territory.
• A primary territory is defined and used as the default when new work objects are created. The ownerof a work object has full access to the work object, regardless of territory access.
You can view the work object permissions assigned to your operators in the Sales Ops portal.
Pega Sales Automation Implementation Guide | 30
Building the application
Partner accessPartner management uses the existing territory and operator security model to ensure that each partnerhas access only to their data.
For more information, see Partners.
Attribute Based Control (ABAC)Attribute Based Access Control (ABAC) controls row-level or column-level security through security policyrules available as part of the Pega Platform's ABAC feature.
For more information, see Attribute-based access control and Sales Automation Attribute Access Controlupgrade.
Client-based access control (CBAC)Implementing client-based access control (CBAC) helps you satisfy the data privacy requirements of theEuropean Union (EU) General Data Protection Regulation (GDPR) and similar regulations.
For more information about GDPR and CBAC, see Supporting EU GDPR data privacy rights in Pega Infinitywith client-based access control.
For more information about configuring CBAC in Pega Sales Automation, see CBAC section in the PegaSales Automation Release Notes on the Pega Sales Automation product page.
Customizing the user experienceWhile Pega Sales Automation is fully functional immediately after installation, you may change portions ofthe user experience (UX) to meet the needs of the users at your site.
To design the user experience, complete the steps in the following topics:
• Determining which part of the user interface to modify
• Designing portals
• Designing an application skin and styles
• Designing for screen performance
Determining which part of the user interface to modifyWhen you first access your application portal, you see the dashboard, which typically contains anavigation panel on the left. The content of the dashboard is customizable and displays any data that youintegrate into your application.
Designing portalsReview the content of your application's portals to ensure that only relevant data is presented.
1. In the header of Dev Studio, click Launch web interface > SA for Sales Ops.
2. Review each of the portal sections.
3. Repeat this process for the SA for Sales Rep and SA Sales Manager portals.
Pega Sales Automation Implementation Guide | 31
Building the application
Designing an application skin and stylesYour site very likely has user experience (UX) standards for the appearance of your applications. Your taskis to determine which styles have to change to adhere to those standards.
1. In the header of Dev Studio, click Configure > User Interface > Skins, interfaces, & templates.
2. On the Skins tab, double-click the pyEndUser skin.
3. Click the Component styles tab.
4. Review each component.
Note: As you plan your application styles, consider using mixins to provide incremental stylechanges. For more information, see Using mixins in the skin to drive consistency and efficiency.
Designing for screen performanceYou want your application to respond immediately as your end users interact with customers. As youdesign your user interface, complete the following steps:
1. Review transactional service level agreements. For example, the customer details must be available inone second or less while a representative is on the phone with the customer.
2. Review service performance, such as how long it takes back end systems to gather the data needed todisplay customer details.
3. Review data requirements to determine which fields contain the information that the representativesabsolutely need for the task that they need to perform.
4. Determine if any network configuration could cause latency, for example, if there are representativeslogged in through a corporate VPN or in a remote location.
Configuring featuresThe implementation team enables or extends features to meet your business requirements.
To configure application features, review the topics in the following sections:
• Activating application features
• Connecting to customer data
• Customizing your application
• Modifying the user interface
Activating application featuresUse App Studio to activate optional features in Pega Sales Automation. After you activate features inthe application, you may need to complete additional set up steps to configure the features for yourimplementation.
1. In the navigation panel of App Studio, click Settings.
2. On the Features tab, verify the Selling mode that you specified when you created your application.You can change the selling mode by clicking one of the available selling mode options.
3. Review the following list of available features and activate features that match your businessrequirements:
Pega Sales Automation Implementation Guide | 32
Building the application
• To activate artificial intelligence insights, select the Artificial intelligence insights - opportunityinsights, lead ranking, and sales coach check box.
For more information about artificial intelligence capabilities in Pega Sales Automation, see Artificialintelligence insights.
• To activate the engagement maps feature, click the Engagement maps check box.
For more information, see Engagement maps requirements.
• To activate integration with Pega Knowledge, click the Knowledge management check box.
For more information, see Pega Knowledge integration.
• If your organization works with external agencies, resellers , and sales partners to sell yourproducts, click the Partner relationship management (PRM) check box to activate partnermanagement functionality.
For more information, see Partners and Adding Partners.
• To activate the household data type, click Households check box.
For more information, see Prospect and customer data requirements.
• To activate integration with Pega Call, click the Computer telephony integration check box.
For more information, see Defining computer telephony integration (CTI) requirements with PegaCall.
• If you are using the forecast management feature, click the Close plans check box to activatequalitative forecasting.
For more information, see Forecast management requirements.
• To activate integration with Workforce Intelligence, click the Workforce Intelligence check box.
For more information, see Workforce Intelligence integration.
• To activate geolocation services using Google Maps, click the Google Maps & address geo-coding -separate license required from Google check box and then enter your Google Maps API key in theGoogle key field.
For more information, see Using the Address Map control.
• To activate the pre-integrated Pega Customer Relationship Managment features, select Enable CRMmode. For more information, see Optional: Configuring your Pega applications to support sharedfeatures.
• To activate Dun and Bradstreet Direct 2.0 Data so that you can stream and integrate D&B Data usingthe D&B Direct API, select Enable D&B.
For more information, see Hoover's Dun & Bradstreet Direct 2.0 Data and Integrating Pega SalesAutomation with Hoover's Dun & Bradstreet Direct 2.0 Data connector.
Connecting to customer dataYou start building your application by setting up the sales team, configuring organizational data, andimporting prospect and customer data.
Note: Whether you import data or enter it manually, the order in which you enter data in theapplication is important. Setting up your sales team and configuring organizational data, suchas product hierarchies and competitor information, before importing or creating leads andopportunities ensures that the appropriate data components are automatically associated with thework objects in your application.
Pega Sales Automation Implementation Guide | 33
Building the application
For information and instructions on how to build your sales team and import prospect and customer data,see the following topics:
• Importing prospect and customer data
• Setting up the sales team and implementing your authorization model
Importing prospect and customer dataYou can populate your new implementation with existing prospect and customer data by using the DataImport wizard.
The types of prospect and customer data that you import depend on the selling model that you select foryour implementation.
• If you select the business-to-business (B2B) selling model, import the following data types:
• Organizations
• Accounts
• Contacts
• If you select the business-to-consumer (B2C) selling model, import the following data types:
• Accounts
• Contacts
• Households
• If you select the business-to-business and business-to-consumer (B2B_B2C) selling model, import thefollowing data types:
• Organizations
• Accounts
• Contacts
• Households
For more information, see Pega Sales Automation data import.
Setting up the sales team and implementing your authorization modelYou build the organizational structure of your sales team in Pega Sales Automation by using territories,operators, and partners . Your authorization model is based on the territory structure, operatorIDs, permissions, and partners that you define for your sales team. As a result, you implement yourauthorization model as you set up your sales team.
You can set up your sales team and implement your authorization model by importing existing territory,operator, and partner data, or by entering that data manually.
For information on importing existing sales team data, see Pega Sales Automation data import.
To add sales team data manually, follow the steps in these topics:
• Adding territories
• Adding operators
• Adding partners
Pega Sales Automation Implementation Guide | 34
Building the application
Adding territoriesTerritories establish the structure for managing your sales team, implementing your security model, andtracking the work objects in the application.
A Global Sales Ops operator can view and edit the entire territory tree structure. A Local Sales Opsoperator can view and edit their primary territory and any children under that territory.
1. In the header of Dev Studio, click Launch web interface > SA for Sales Ops.
2. In the navigation pane, click Territories.
3. Click Create territory.
4. Complete the required fields and enter optional information as needed for your implementation:
a) Optional: If you are setting up a territory for one of your partners, select Reserved for partner.
5. Repeat steps 3 and 4 for each territory in your sales team's organizational structure.
Adding operatorsOperators are the individual users of the application. Users can be members of your sales team or salesagents at partner organizations.
A Global Sales Operations operator can add operators and grant read, update, and create permissionsto work objects belonging to any territory. A Local Sales Ops operator can add operators and grant read,update, and create permissions to work objects belonging to their primary territory and any childrenunder that territory.
1. In the header of Dev Studio, click Launch web interface > SA for Sales Ops.
2. In the navigation pane, click Operators.
3. Click Create operator.
4. On the Operator Details form, complete the required fields and enter optional information as neededfor your implementation:
a) Optional: Enter a value in the Partner field if you are setting up an operator for a partner.
b) Click Password to enter a password for the operator and then click Submit.
c) Click Next.
5. On the Operator Access form, accept or clear the Use default operator access option and then clickNext.
• If you accept this option, select an Operator Type and a Default Territory. The new operatorderives access and permission rights from the default territory.
• If you clear this option, select an Operator Type and a Primary Territory. You can then definethe new operator's access and permission rights for the primary territory. You can also assignthe operator to additional territories and define access and permission rights for each additionalterritory assigned.
6. Optional: On the Sales Goals form, enter sales goals for the operator and click Next.If you enter sales goals, then real-time dashboards and charts provide visibility into sales performance.You can add goals during operator creation, or a Sales Operations operator can add goals after theoperator is created.
7. Optional: Enter HR details and click Finish.
Pega Sales Automation Implementation Guide | 35
Building the application
Adding partnersA Global Sales Operations operator can set up and administer each partner and delegate user (operator)administration to a Local Sales Operations operator at the partner organization. A partner is an externalagency with whom you work.
1. In the header of Dev Studio, click Launch web interface > SA for Sales Ops.
2. In the navigation pane, click Partners.
3. Click Create Partner.
4. Complete the required fields and enter optional information as needed for your implementation.
5. Optional: To give the partner access to the application and assign the partner to a territory, selectOperator Access Required.
6. Click Create.
Customizing your applicationPega Sales Automation includes a set of core and optional features that you can implement to supportyour sales team.
For information and instructions on how to implement the features required for your implementation, seethe following topics:
• Implementing the sales methodology
• Modifying an opportunity case type
• Setting up products
• Setting up competitors
• Setting up time periods for sales goals management
• Reports
• Customizing dashboards
• Building the Pega Sales Automation mobile app
• Enabling local campaigns and next-best-offer recommendations
• Mapping data for organization trends
• Configuring Pega Co-Browse
• Configuring Pulse
• Configuring computer telephony integration using Pega Call
• Adding Pega Knowledge records
• Configuring Workforce Intelligence
• Pega Sales Automation integration with Microsoft Exchange
• Configuring Pega Sales Automation to Microsoft Exchange calendar integration
• Configuring Microsoft Exchange to Pega Sales Automation calendar integration
• Configuring Pega for Outlook VSTO and Pega for Outlook Office
• Configuring listener accounts for emails and appointments
• Configuring Twitter integration
Pega Sales Automation Implementation Guide | 36
Building the application
• Configuring Facebook integration
• Configuring LinkedIn integration
• Configuring Partner Relationship Management
Implementing the sales methodologyUse the lead and opportunity case types in Pega Sales Automation to implement your organization's salesmethodology.
The Lead stage comes with following pre-configured set of stages: Assigned, Marketing Qualified, SalesQualified, and Closed.
What to do next:
After you configure the opportunity case type, it is used to guide your sales representatives throughevery step of the sales process for each opportunity you create in the application.
Modifying an opportunity case typeYou can modify an opportunity case type to reflect the stages and steps in your sales methodology.
The Pega-provided sales methodology for Pega Sales Automation does not force sales representativesto follow processes in a fixed sequence. As a result, all the processes within the different stagesof an opportunity are modeled as optional processes. You can update the case type rule for yourimplementation to use optional processes or a combination of automatically launched and optionallylaunched processes within each stage.
The stage a case is on and the recommended processes for each stage are shown in the chevron view inthe Review harness. Each of the recommended processes within a stage is shown as a link.
• For automatically launched processes, clicking a stage link launches the associated assignment
• For optional processes, clicking a stage link launches the processes for the user to perform therecommended action.
The section StageChevronView renders the overall case life cycle and includes a section crmDisplayStages that displays the stages and processes within a stage. This section is parameterizedto enable or disable links for optional processes from completed stages.
Mandatory processes are modeled as automatically launched processes. When you try to move the casefrom one stage to another, a validation rule checks if all mandatory processes in the current stage arecompleted.
• B2B Sales Opportunity - To add a stage to a B2B Sales Opportunity case type, modify the PegaCRM -Work-SFA-Opportunity.pyDefault case type rule.
• B2C Sales Opportunity - To add a stage to a B2C Sales Opportunity case type, modify the PegaCRM_Work-SFA-Opportunity-Ind.pyDefault case type rule.
Complete the following steps to add stages and steps to a B2B Sales Opportunity or B2C SalesOpportunity case type:
• Adding stages to an opportunity case type
• Specifying a field value for a new opportunity stage
• Adding steps to an opportunity stage
Pega Sales Automation Implementation Guide | 37

Building the application
Adding stages to an opportunity case typeA stage represents a unique phase in your sales methodology, for example, the qualification or proposalphase.
1. In the navigation panel of Dev Studio, click Case types.
2. Right-click a case type that you want to add stages to and click Open.
3. Open the Stages tab.
4. In the Primary Stages section, complete one of the following steps:
• To insert a stage after the last stage in the list, click add primary stage.
• To insert a stage after an existing stage in the list, click the existing stage name and click addprimary stage.
The order of the stages in the Primary Stages section determines the order in which the stages displayin the application. You can drag and drop stages in the Primary Stages section to change their order.
5. Click Save as.
Specifying a field value for a new opportunity stageSpecify the field value for a new opportunity stage to support the localization of the stage name in portaldisplays, reports, and user forms.
1. In the navigation panel of Dev Studio, click Records.
2. Expand Data Model and right-click Field Value.
3. Click Create.
4. Complete the fields on the Create Field Value form:
• In the Label field, enter the stage name.
• In the Field Name field, enter OpportunityStage.
• In the Apply to field, enter the implementation class.
5. Click Create and Open.
6. Verify that the To field displays the name of the stage as it should appear in the user interface.
7. Click Save.
Adding steps to an opportunity stageA step is a unit of work in a stage, for example, the development or delivery of a proposal in the proposalstage.
1. In the navigation panel of Dev Studio, click Case types.
2. Right-click a case type that you want to add steps to and click Open.
3. Open the Stages tab.
4. In the Primary Stages section, click the stage for which you want to add a step.
5. In the Optional Processes section, click Add process and enter the name of the process that you wantto launch when the step is selected.You can select an existing process flow or create a new one. If you create a new process flow, you mustsave it before you save the case type rule.
6. Click Save as.
Pega Sales Automation Implementation Guide | 38

Building the application
Setting up productsProducts are the goods and services that you sell to your customers. A Sales Ops operator sets up andmanages your products in the Pega Sales Automation application. You can set up your products byimporting existing product data, or by entering the product data manually.
To set up products manually, complete the following steps:
1. In the header of Dev Studio, click Launch web interface > SA for Sales Ops.
2. In the navigation pane, click Tools.
3. Click Products > Create product.
4. Complete the nesessary fields and click Submit.
5. Repeat steps 3 and 4 for each level of your product hierarchy.
• Configuring an external product data source
Configuring an external product data sourceIf your products are maintained in an external system of record, you must update the crmAppExtModeldata transform and the D_InterfaceProductListFromExternal data page for your implementation.
1. In the header of Dev Studio, search for and select the crmAppExtModel data transform.
2. Locate the .IsProductSORExternal Target and enter true in the Source field for the target.
3. Click Save.
4. In the Dev Studio header search text field, search for and select theD_InterfaceProductListFromExternal data page.
5. In the Data sources section, configure the external system of record for your products.Review the crmBuildSampleInterfaceData and ConstructSampleProductInstance datatransforms to see a sample interface data model. For more information, see Data page rules - Usingthe Definition tab.
6. Click Save.
Setting up competitorsCompetitors are other organizations that are selling products similar to yours. A Sales Ops operator setsup and manages your competitors in the Pega Sales Automation application.
You can set up your competitors by importing existing competitor data, or by entering the competitordata manually.
To set up competitors manually, complete the following steps:
1. In the header of Dev Studio, click Launch web interface > SA for Sales Ops.
2. In the navigation pane, click Tools.
3. Click Competitors > Create competitors.
4. Complete the fields on the Create competitor form.
5. Click Submit.
Pega Sales Automation Implementation Guide | 39
Building the application
Setting up time periods for sales goals managementTime periods are required if you plan to create and monitor sales goals. Pega Sales Automation uses thetime periods you set up to track progress toward meeting sales goals.
1. In the header of Dev Studio, click Launch web interface > SA for Sales Ops.
2. In the navigation pane, click Tools.
3. Click Time periods > Create time period.
4. Complete the fields on the Time period form.
Note: Create the fiscal year time period first and then create the quarters as children to thefiscal year. If you measure by month, you can add months as children to each quarter.
5. Click Submit.
ReportsIn addition to the library of Pega Platform reports, Pega Sales Automation provides several pre-configuredreports that are customized for the various work objects, cases, and business processes used in theapplication. These reports provide you with real-time insights into case inventories and aging so thatyou can respond with the agility that is needed to comply with your internal and external service levelagreements as well as compliance mandates.
In addition to the library of Pega Platform reports, Pega Sales Automation provides several pre-configuredreports that are customized for the various work objects, cases, and business processes used in theapplication. These reports provide you with real-time insights into your sales activities so that you canrespond with the agility that is needed to manage the sales pipeline and meet your sales goals.
To create other reports, see Reporting.
Customizing dashboardsA Sales Ops operator can publish default dashboard layouts for Sales Operations, Sales Manager, andSales Representative operators. Individual operators can modify the default dashboard layouts, asneeded.
1. In the header of Dev Studio, click Launch web interface > SA for Sales Ops.
2. In the navigation pane, click Tools and select the dashboard that you want to modify.
3. In the upper right corner of the dashboard, click the Gear icon.
4. Click Switch template and select a template for the dashboard.
5. Click Add widget(s) in any slot in the template.
a) Select the widgets that you want to display on the dashboard.
b) Click Add selected.
6. Drag and drop widgets from one slot to another to change their position on the dashboard.
7. Click Publish.
8. Repeat steps 3 through 7 for other dashboards, if necessary.
For more information about customizing dashboards, see Pega Sales Automation dashboardcustomization.
Pega Sales Automation Implementation Guide | 40

Building the application
Building the Pega Sales Automation mobile appAfter you determine the organization's needs in the Implementing Pega Sales Automation the mobile appsection, you can build your mobile app.
1. Configure and upload certificates.
2. Optional: Prepare your assets for branding the mobile app. See Uploading branding assets andcustom modules.
3. Optional: Upload custom modules. See Pega Mobile Client API reference and Using the Pega MobileClient API within a Pega application.
4. If you do not use Pega Sales Automation as shipped, and you extend the application, ensure that thecases and work objects are available and enabled for mobile.
5. Build your mobile app:
• For the Android platform, see Building an Android app.
• For the iOS platform, see Building an iOS app.
• Setting up optical character recognition (OCR) scanning
• Distributing the mobile app
Setting up optical character recognition (OCR) scanningWith the Pega Sales Automation mobile app you can scan a business card to create a contact in theapplication.
After you set up the OCR integration, you can click Scan card on a contact form in the app to use yourmobile device's camera to take a picture of a business card. The app receives the business card image andsends it to a third-party OCR software vendor, where it is parsed into a standard output, such as XML orJSON. The result is then mapped back to Pega Sales Automation to create a new contact record.
Follow these steps to set up the OCR integration for your implementation:
1. In Dev Studio, complete one of the following steps:
• Identify an existing ruleset and ruleset version for the OCR integration.
• Create a ruleset and ruleset version for the OCR integration and then add the ruleset and rulesetversion to the application stack.
For information about creating and saving rulesets, see Creating a ruleset and ruleset version.
2. Create a data model in the selected ruleset that reflects the data package result from the third-partysoftware used in the PegaCRM-Int-BusinessCard- class:
• If the third-party software uses an XML object, create a data structure to hold the XML structure.
• If the third-party software uses a JSON object, create a data structure to hold the JSON object.
For more information about creating data models, see Adding fields to your data model.
3. Save the following extension point rules to the OCR ruleset:
• The GetCardData activity, which parses the business card data for the OCR vendor.
• The MapBusinessCardDetails data transform, which maps the data received from theOCR vendor to the contact in Pega Sales Automation.
4. Open the ScanBusinessCard activity and save it to the OCR ruleset:
a) Click the Pages & Classes tab.
b) In the Class field for BusinessCardParsedData, enter the newly created class name.
Pega Sales Automation Implementation Guide | 41
Building the application
c) Click Save as.
Distributing the mobile appAfter you build the mobile app, you can distribute it. See Distributing mobile apps with Pega Mobile Client.
Enabling local campaigns and next-best-offer recommendationsTo implement local campaigns and next-best-offer recommendations in Pega Sales Automation, you mustfirst integrate Pega Sales Automation with Pega Marketing. You can then activate the features in PegaSales Automation.
1. In the navigation panel of App Studio, click Settings.
2. Click the Pega Marketing tab.
3. To activate local campaigns, click the Local campaigns check box.
4. To activate next best offers, click the Next best offers check box.
5. In the Marketing URL field, enter the URL for your Pega Marketing implementation, for example,http://NN.NN.N.NNN:8080/prweb/PRSOAPServlet.
6. In the Customer lifetime value (CLV) fields, enter the maximum, average, and minimum CLV valuesfor your organization.Customer lifetime value (CLV) is a prediction of the net profit that is generated as a result of anorganization's entire future relationship with a customer. Pega Marketing uses CLV values to identifycustomers with the potential to grow, which allows you to more effectively target your marketingefforts. Customer lifetime value is applicable to both business-to-business (B2B) and business-to-consumer (B2C) customers.
7. Click Save.
Mapping data for organization trendsOrganization trends provide visibility into your interactions with customers across multiple channels,including web activity, email traffic, and interactions with contacts.
Before you begin:
You can source data for your trend reports from Pega Sales Automation tables or from externaldatabases or data warehouses.
You must map the customer engagement data class in the application to the table containing thedesired data.
1. In the Dev Studio header search text field, search for and select the PegaCRM-Int-CED-Aggregateddata class.
2. Map to the desired database table:
• For an external table, map to the external database or data warehouse table.
• For an internal table, map to the Pega Sales Automation CED_SAMPLE_DATA sample table.
3. Click Save.
Pega Sales Automation Implementation Guide | 42

Building the application
For more information about completing the fields on the PegaCRM-Int-CED-Aggregated data classform, see Database Class Mappings tab.
Configuring Pega Co-BrowseWith Pega Co-Browse, your customers and prospects can collaborate with sales representatives by sharinga web browser session on their PC, tablet, or mobile phone .
You can activate co-browse functionality for your implementation by logging in to the Pega Co-Browsewebsite (authorization required). The JavaScript on the site's Install tab must be included in your websiteto allow co-browsing. For more information about how to activate co-browse functionality, see the PegaCo-Browse Implementation Guide on the Pega Co-Browse product page.
You must include the following rules in your implementation application to use Pega Co-Browse:
Rule name Description
crmSessionCode This property is used to store the URL for websitesthat have been enabled for co-browse. The usercan be sent to different parts of the website, basedon need.
crmWorkMenu This navigation rule is used to allow the user toenter the session code or to initiate a new co-browse session.
crmCoBrowseSessionCode This flow captures the session code and displaysthe co-browse screens. It also creates an activity oncompletion to track the session.
crmCoBrowseEmailLink This flow captures the customer email and thedestination URL for the co-browse enabled website.It also creates an activity on completion to track thesession.
crmCoBrowseEmailLink This rule captures the customers email and thedestination URL.
crmCoBrowseEmail This rule contains the body of the email being sentto the customer.
crmCoBrowseSessionCode This rule captures the session code from thecustomer.
crmCoBrowseAttributes This rule sets up values for creating an activity onthe conclusion of the co-browse session.
Pega Sales Automation Implementation Guide | 43
Building the application
Rule name Description
crmCoBrowsePost For an Email Link co-browse session, this ruleinitiates the crmCoBrowseTypeSetValues datatransform.
For an Enter Session co-browse session, this rulebuilds the destination URL.
crmCoBrowseTypeSetValues This rule sets up the Email and Session code forthe Email Link session type and clears all values forEnter Session Code sessions.
crmStartCoBrowse This control holds the code to display the co-browse session.
For information about how to configure the rules required for Pega Co-Browse integration, see Rulesdevelopment.
Configuring PulsePulse adds social activity stream capabilities to your user interface. With Pulse, application users cancollaborate in real time, share comments, files, and URLs with other users, and take action directly froman activity stream.
For information about configuring Pulse for your implementation, see Configuring Pulse emailnotifications.
Configuring computer telephony integration using Pega CallTo configure computer telephony integration (CTI) for Pega Sales Automation, you must enable theCTI functionality in the application and then add the PegaCTI:CSR access role to all the access groups forwhich you are providing CTI access.
Note: You must install and configure Pega Call to use CTI functionality in Pega Sales Automation.For more information, see the Pega Call product page.
To configure your Pega Sales Automation implementation for CTI, complete the following steps:
1. In the header of Dev Studio, click Configure > Org & Security > Groups & Roles > Access Roles.
2. Select an access group.
3. On the Definition tab, in the Available roles section, click Add role and enter PegaCTI:CSR.
4. Click Save.
5. Repeat steps 2 through 4 for each access group for which you are providing CTI access.
Adding Pega Knowledge recordsYou can add knowledge records to support the display of Pega Knowledge content to assist your salesrepresentatives at any stage of the sales process. Pega Sales Automation includes a set of relevant
Pega Sales Automation Implementation Guide | 44
Building the application
knowledge records that the application automatically recognize when you associate knowledge articleswith existing case types.
1. In the header of Dev Studio, click Configure > Application > Inventory > Relevant Records.
2. In the Class name field, select a case type to which you want to add a knowledge record.
3. Click Add records.
4. In the Add KM Relevant Records dialog box, enter the Property name and Source class for theknowledge record. The following property modes are supported:
• STRING
• PAGE
• PAGE-LIST
• PAGE-GROUP
5. Click Submit.
Configuring Workforce IntelligenceWorkforce Intelligence is a standalone application that is integrated with Pega Sales Automation.
To enable the Workforce Intelligence integration with Pega Sales Automation, complete the followingsteps:
• Configuring settings for Workforce Intelligence
• Configuring authorization for Workforce Intelligence
• Updating the access group for the agent schedule
• Configuring Pega Sales Automation operators for Workforce Intelligence
Configuring settings for Workforce IntelligenceTo set up your Workforce Intelligence integration, you must enable the integration and then configurePega Sales Automation to connect to your Workforce Intelligence URL.
1. In the Dev Studio header search text field, search for and select the EnableWFI dynamic systemsetting.
2. In the Value field, enter true.
3. Click Save.
4. In the Dev Studio header search text field, search for and select the ConnectWFI URL dynamic systemsetting.
5. In the Value field, enter your Workforce Intelligence system URL.
6. Click Save.
7. In the Dev Studio header search text field, search for and select the D_WFIConfig data page.
8. Click Actions > Run.
Pega Sales Automation Implementation Guide | 45
Building the application
Configuring authorization for Workforce IntelligenceTo set up your Workforce Intelligence integration, you must configure authorization protocols for PegaSales Automation.
1. In the Dev Studio header search text field, search for and select the SAWFIAccessTokenauthentication profile.
2. In the Client information section, enter the Identifier and Secret received from the WorkforceIntelligence server.
3. In the Dev Studio header search text field, search for and select the SAWFI_OAuth OAuth 2.0 provider.
4. Enter the Access token endpoint URL for your Workforce Intelligence authentication profile.
5. In the Dev Studio header search text field, search for and select the SAWFIAPI keystore.
6. Click Upload File > Choose File to browse for and select your Workforce Intelligence keystore file.
7. Click Save.
Updating the access group for the agent scheduleTo set up your Workforce Intelligence integration, you must update the PegaSA-WFI agent schedule touse the access group of your implementation layer application administrator.
1. In the navigation panel of Dev Studio, click Records.
2. Expand SysAdmin and click Agent Schedule.
3. Search for and select the PegaSA-WFI agent schedule.
4. Click the Security tab.
5. In the Access group field, enter the access group for your implementation layer applicationadministrator, for example, SAPlus:SysAdmin.
6. Click Save.
Configuring Pega Sales Automation operators for Workforce IntelligenceTo set up your Workforce Intelligence integration, you must add Pega Sales Automation operators asusers in Workforce Intelligence. You can then add Workforce Intelligence network IDs to your operatorprofiles in Pega Sales Automation. This allows the application to associate events and data with the correctoperators.
For information about adding users in Workforce Intelligence, see the Workforce Intelligence AdministrationGuide on the Workforce Intelligence product page.
After you add operators as users in Workforce Intelligence, complete the following steps:
1. In the header of Dev Studio, click Launch web interface > SA for Sales Ops.
2. In the navigation pane, click Operators.
3. Select the operator record that you want to update.
4. Click Actions > Update Operator Profile.
a) In the WFI Network ID field, enter the network ID from the user record in Workforce Intelligence.
b) In the Email field, verify that the email address matches the email address that you entered for theuser in Workforce Intelligence.
5. Click Submit.
Pega Sales Automation Implementation Guide | 46
Building the application
Pega Sales Automation integration with Microsoft ExchangePega Sales Automation provides bi-directional calendar synchronization with Microsoft Exchange.
• To synchronize your Pega Sales Automation calendar to your Microsoft Exchange calendar, seeConfiguring Pega Sales Automation to Microsoft Exchange calendar integration.
• To synchronize your Microsoft Exchange calendar to your Pega Sales Automation calendar, seeConfiguring Microsoft Exchange to Pega Sales Automation calendar integration.
Note: You must complete the steps required for configuring the Pega Sales Automation toMicrosoft Exchange calendar integration before you can configure the Microsoft Exchange to PegaSales Automation calendar integration.
Configuring Pega Sales Automation to Microsoft Exchange calendarintegrationPega Sales Automation to Microsoft Exchange calendar integration is a background process thatsynchronizes your Pega Sales Automation to your Microsoft Exchange calendar. With this integration, youcan create, update, and cancel appointments in the Pega Sales Automation application and synchronizethem in real time to your Microsoft Exchange server.
For more information, see Configuring Pega Sales Automation to Microsoft Exchange calendar integration.
Configuring Microsoft Exchange to Pega Sales Automation calendarintegrationMicrosoft Exchange to Pega Sales Automation calendar integration is a background process thatsynchronizes your Microsoft Exchange calendar to your Pega Sales Automation calendar.
With this integration, new, updated, and canceled appointments on the Microsoft Exchange server aresynchronized in real time to the Pega Sales Automation application.
You have the following options for synchronizing your Microsoft Exchange calendar to Pega SalesAutomation:
1. Push mechanism (recommended) - The push mechanism listens for Exchange Web Services (EWS)notifications to identify new, updated, and canceled appointments on the Microsoft Exchange serverand then synchronizes the appointments to your Pega Sales Automation calendar.For more information, see Configuring the push mechanism for Microsoft Exchange to Pega SalesAutomation calendar integration.
2. Polling mechanism - The polling mechanism checks for new, updated, and canceled appointments onthe Microsoft Exchange server and then synchronizes the appointments to your Pega Sales Automationcalendar.For more information, see Configuring the polling mechanism for Microsoft Exchange to Pega SalesAutomation calendar integration.
Note: You must complete the steps required for configuring the Pega Sales Automation toMicrosoft Exchange calendar integration before you can configure the Microsoft Exchange toPega Sales Automation calendar integration.
Configuring Pega for Outlook VSTO and Pega for Outlook OfficePega Sales Automation provides two add-ins that you can use to integrate the application with MicrosoftOutlook. The Pega for Outlook VSTO and Pega for Office Outlook add-ins support email integration
Pega Sales Automation Implementation Guide | 47
Building the application
between Microsoft Outlook and Pega Sales Automation and selective appointment integration betweenMicrosoft Outlook and Pega Sales Automation.
Note: The Pega Sales Automation application installation includes the PegaFW-Outlook rulesetand SFAOutlookPortal.
Both add-ins provide real-time, context-specific insight into your Pega Sales Automation contacts, leads,opportunities, accounts, and organizations directly from Microsoft Outlook.
You can configure either Pega for Outlook VSTO or Pega for Outlook Office, but to leverage latest add-intechnology, it is recommended to use Office add-in.
For more information, see Using Pega for Outlook in Pega Sales Automation.
Configuring listener accounts for emails and appointmentsWith Pega Sales Automation, you can push emails and appointments from Microsoft Outlook (or anotherdefault mail client) to the Pega Platform. When an email or appointment is received, an email listeneraccount identifies the recipients and maps the email or appointment to the appropriate operator.
You can associate incoming emails and appointments with contacts, organizations, and accounts in theapplication, and you can use Microsoft Outlook's vCard functionality to create a Pega Sales Automationcontact from an Outlook contact.
Follow these steps to configure listener accounts for emails and appointments:
• Creating the access group, operator, and email accounts
• Creating new email and appointment classes in the implementation layer
• Configuring associations with other application objects
• Updating the user interface
Creating the access group, operator, and email accountsTo set up your listener account, you must create an access group and an operator ID, and configure emailaccounts to accept incoming emails and send bounce-back notifications.
1. In Dev Studio, create an access group. The default access group is PegaCRM-SFA:Services with thefollowing attributes:
• PegaRULES:User4 role
• Open, modify, search, and execute activity access to PegaCRM-Document-EmailIf you do not use the default access group, you must change the Service access group on theFWEmailCollector service class. For more information, see Access groups.
2. Create an operator role with the newly created access group. Enter this operator in the RequestorLogin section for the email listener. For information, see Operator IDs.
3. Configure the SyncEmailCalendar email account.This is the account that the email listener uses to import emails and appointments. You can link thisaccount to any email address. For more information, see About Email Account data instances.
Note: For Exchange integration, enter your Exchange server information when you configurethe SyncEmailCalendar email account.
4. Configure the SyncEmailCalendar email listener.
5. Create or modify the default email account with the type Notify. Pega Sales Automation uses thisaccount to send a bounce-back email if the incoming message cannot be associated with any object inthe application. Configure the Notify email account to look like it is an official communication comingfrom the application.
Pega Sales Automation Implementation Guide | 48
Building the application
Creating new email and appointment classes in the implementation layerYou must create new email and appointment classes in your implementation layer for the integration towork properly.
1. In Dev Studio, create new classes for emails and appointments:
a. Set the direct inheritance for the email class to PegaCRM-Document-Email.
b. Set the direct inheritance for the appointment class to PegaCRM-Work-Appointment.For more information, see Classes.
2. Update the PegaCRM-Document-Email.getAppointmentClass decision table to default to your newappointment class.
3. Create a new service package using the FWEmailCollector service as a guide.
4. Update the service email rule to set the page class to your new email class.
Configuring associations with other application objectsYou can associate emails and appointments with other objects in the application, such as organizations,accounts, and contacts. Because your implementation uses classes inheriting from Pega Sales Automationclasses, you need to be sure that the email integration is associating emails and appointments withimplementation layer objects.
For Emails, this association is configured through activities called from PegaCRM-Embed-Recipient.lookupRecipient. For appointments, this association is configured through activities calledfrom PegaCRM-Embed-Recipient.DoRecipientAssociations.
1. To update contact associations, in Dev Studio, perform the following steps:
a) Override @baseclass.crmFindContactByEmail.
b) Replace references to the PegaCRM-Entity-Contact class in the obj-browse calls, pages, andclasses to refer to your contact implementation class.
2. To update organization associations, perform the following steps:
a) Create an implementation class for PegaCRM-Index-OrgDomains.
b) Update the class references in @baseclass.crmFindOrgByDomain.
Updating the user interfaceEmails and appointments appear in several places in the Pega Sales Automation user interface. You mustupdate application rules to change class references to your implementation classes.
1. In Dev Studio, update the following rules for appointments:
a. Data-Portal.SFAPortal_MyCalendar - Modify the configuration of the pxCalendar control toupdate the class reference on the Appointments tab.
b. @baseclass.crmPopulateAppointmentEvents - Modify step 1 to update the report class.
c. crmRelatedAppointments - Override this rule in your implementation class to update the classreference to the report definition. Update both the repeating grid and the Open Report icon. Thereare versions in PegaCRM-Entity-Contact and PegaCRM-Entity-Org.
2. Copy the following report definitions from PegaCRM-Work-Appointment to your implementationclass:
• crmAppointmentsByContact
Pega Sales Automation Implementation Guide | 49
Building the application
• crmAppointmentsByOperator
• crmAppointmentsByOrg
3. Update the following rules for emails:
• crmRelatedEmails - Override this rule in your implementation classes to update the classreference to the report definition. Update both the repeating grid and the Open Report icon. Thereare versions in PegaCRM-, PegaCRM-Entity-Contact, and PegaCRM-Entity-Org.
4. Copy the following report definitions from PegaCRM-Document-Email to your implementation class:
• crmEmailsByLinkedID
• crmEmailsByOperatorID
• crmEmailsByContact
Configuring Twitter integrationPega Sales Automation includes an integration with a Twitter API that retrieves information related to yourorganizations, leads, accounts, and contacts using a Twitter authorization profile.
Before you begin:
As part of this integration, you can call the REST APIs provided by Twitter using the XML responseformat. All the APIs used in the integration support Authentication, but they use only theAuthenticated mode of requests. You must give users authorization to access Twitter from Pega SalesAutomation. For Authentication, the application uses the Oath library.
Complete the following steps to configure your Pega Sales Automation integration with Twitter:
• Setting up a Twitter account and application
• Configuring settings for Twitter integration
Setting up a Twitter account and applicationThe Pega Sales Automation integration with Twitter requires an active Twitter account and application. Fordetailed information about how to complete each step, see the Twitter developer documentation.
1. Create a Twitter account.
2. Create a Twitter application to gather trend information.
3. Grant the Twitter application access to your Pega Platform application.
Configuring settings for Twitter integrationBefore your sales representatives can use Twitter with Pega Sales Automation, you must configure yourTwitter settings in App Studio. The settings required are provided when you set up your Twitter accountand application.
1. In the navigation panel of App Studio, click Settings.
2. Click the Social media tab.
3. In the Twitter integration section, enter your Twitter settings as shown in the following table:
Pega Sales Automation Implementation Guide | 50
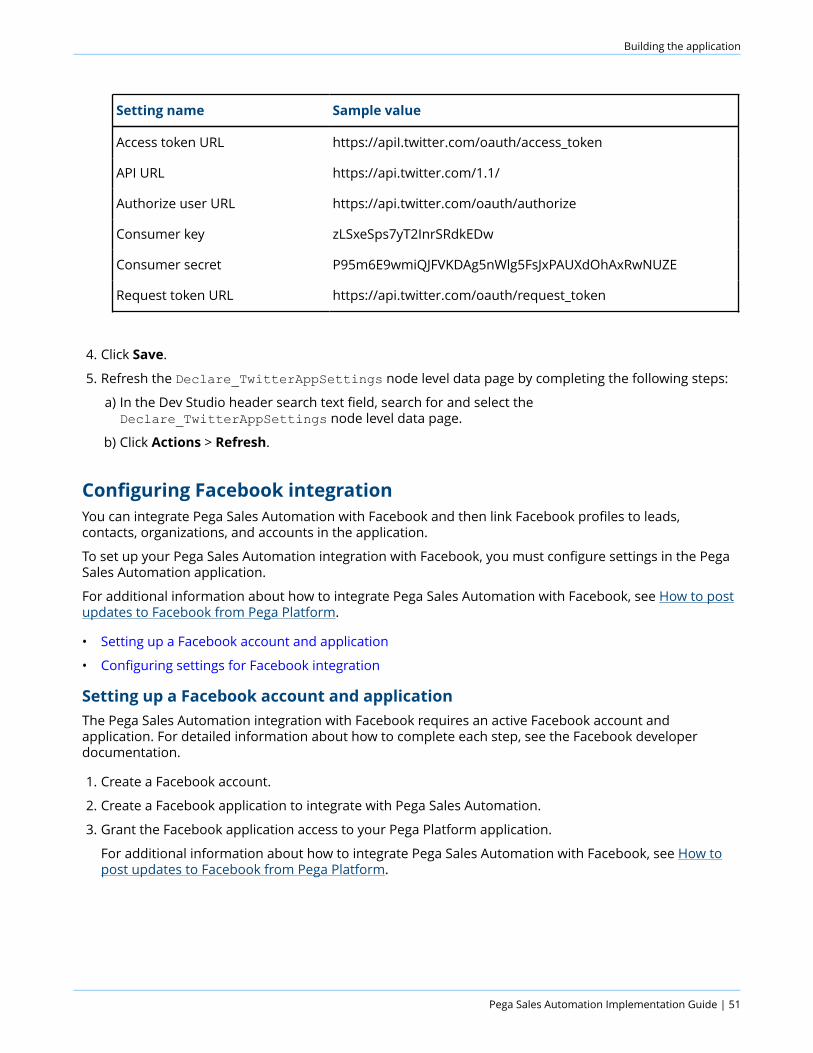
Building the application
Setting name Sample value
Access token URL https://apiI.twitter.com/oauth/access_token
API URL https://api.twitter.com/1.1/
Authorize user URL https://api.twitter.com/oauth/authorize
Consumer key zLSxeSps7yT2InrSRdkEDw
Consumer secret P95m6E9wmiQJFVKDAg5nWlg5FsJxPAUXdOhAxRwNUZE
Request token URL https://api.twitter.com/oauth/request_token
4. Click Save.
5. Refresh the Declare_TwitterAppSettings node level data page by completing the following steps:
a) In the Dev Studio header search text field, search for and select theDeclare_TwitterAppSettings node level data page.
b) Click Actions > Refresh.
Configuring Facebook integrationYou can integrate Pega Sales Automation with Facebook and then link Facebook profiles to leads,contacts, organizations, and accounts in the application.
To set up your Pega Sales Automation integration with Facebook, you must configure settings in the PegaSales Automation application.
For additional information about how to integrate Pega Sales Automation with Facebook, see How to postupdates to Facebook from Pega Platform.
• Setting up a Facebook account and application
• Configuring settings for Facebook integration
Setting up a Facebook account and applicationThe Pega Sales Automation integration with Facebook requires an active Facebook account andapplication. For detailed information about how to complete each step, see the Facebook developerdocumentation.
1. Create a Facebook account.
2. Create a Facebook application to integrate with Pega Sales Automation.
3. Grant the Facebook application access to your Pega Platform application.
For additional information about how to integrate Pega Sales Automation with Facebook, see How topost updates to Facebook from Pega Platform.
Pega Sales Automation Implementation Guide | 51
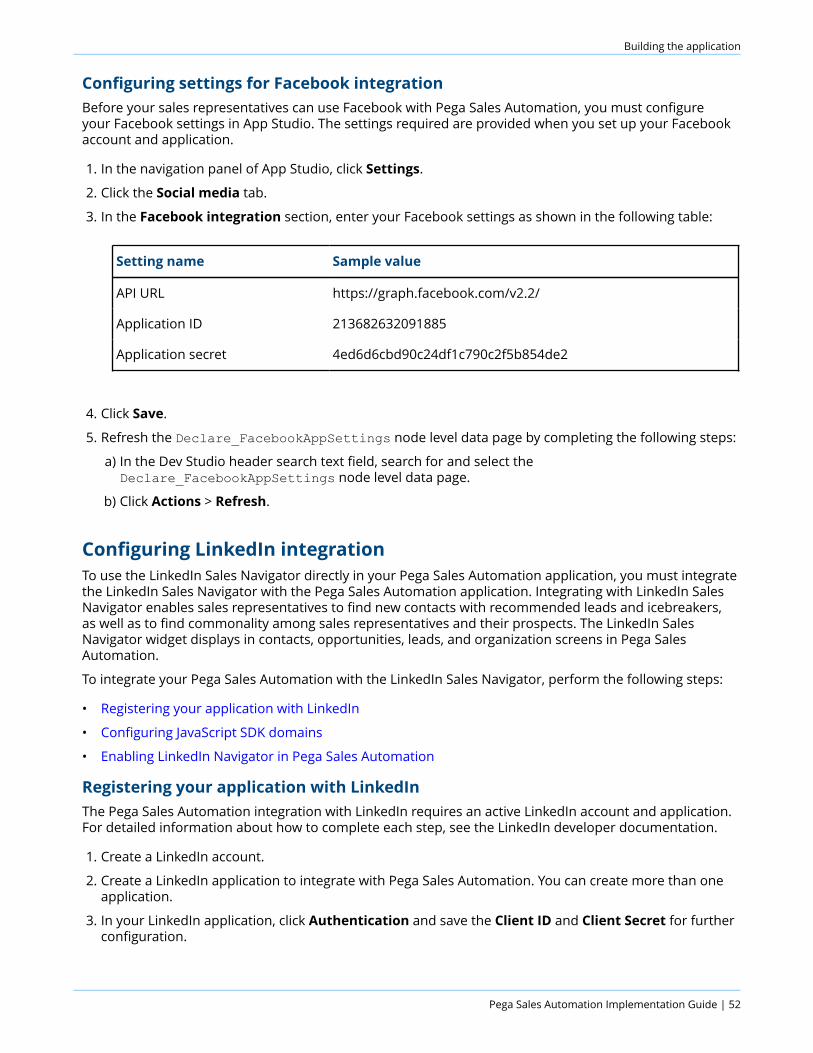
Building the application
Configuring settings for Facebook integrationBefore your sales representatives can use Facebook with Pega Sales Automation, you must configureyour Facebook settings in App Studio. The settings required are provided when you set up your Facebookaccount and application.
1. In the navigation panel of App Studio, click Settings.
2. Click the Social media tab.
3. In the Facebook integration section, enter your Facebook settings as shown in the following table:
Setting name Sample value
API URL https://graph.facebook.com/v2.2/
Application ID 213682632091885
Application secret 4ed6d6cbd90c24df1c790c2f5b854de2
4. Click Save.
5. Refresh the Declare_FacebookAppSettings node level data page by completing the following steps:
a) In the Dev Studio header search text field, search for and select theDeclare_FacebookAppSettings node level data page.
b) Click Actions > Refresh.
Configuring LinkedIn integrationTo use the LinkedIn Sales Navigator directly in your Pega Sales Automation application, you must integratethe LinkedIn Sales Navigator with the Pega Sales Automation application. Integrating with LinkedIn SalesNavigator enables sales representatives to find new contacts with recommended leads and icebreakers,as well as to find commonality among sales representatives and their prospects. The LinkedIn SalesNavigator widget displays in contacts, opportunities, leads, and organization screens in Pega SalesAutomation.
To integrate your Pega Sales Automation with the LinkedIn Sales Navigator, perform the following steps:
• Registering your application with LinkedIn
• Configuring JavaScript SDK domains
• Enabling LinkedIn Navigator in Pega Sales Automation
Registering your application with LinkedInThe Pega Sales Automation integration with LinkedIn requires an active LinkedIn account and application.For detailed information about how to complete each step, see the LinkedIn developer documentation.
1. Create a LinkedIn account.
2. Create a LinkedIn application to integrate with Pega Sales Automation. You can create more than oneapplication.
3. In your LinkedIn application, click Authentication and save the Client ID and Client Secret for furtherconfiguration.
Pega Sales Automation Implementation Guide | 52
Building the application
For on-premises installations, each customer needs to create their own application key and provide itto the LinkedIn representative.
Configuring JavaScript SDK domainsTo make sure that the integration between a LinkedIn account and your Pega Sales Automationapplication is safe, you must configure valid SDK domains. By doing this, you ensure that otherapplications cannot fraudulently represent themselves as your own application using the JavaScript SDK.
Before you begin: Before you configure JavaScript domains, add https://www.linkedin.com as a validSDK domain. This is required for the widget and sign in button to render.
1. In your LinkedIn application, click JavaScript.
2. Under Valid SDK Domains add your domain(s) and the protocol.Failure to configure a JavaScript domain results in the following error: javascript console errorError: You must specify a valid JavaScript API Domain as part of this key'sconfiguration.
Enabling LinkedIn Navigator in Pega Sales AutomationBefore your sales representatives can use LinkedIn Sales Navigator with Pega Sales Automation, you mustenable LinkedIn Sales Navigator in your Pega Sales Automation.
1. In the navigation panel of App Studio, click Settings.
2. Click the Social media tab.
3. In the LinkedIn integration section, perform the folloiwng steps:
a) Enter the Organization ID that you used to create your LinkedIn application.
b) Enter the Client ID that was generated as part of the Registering your application with LinkedIntask.
c) Enter the Client Secret that was generated as part of the Registering your application with LinkedIntask.
4. Click Save.
Configuring Partner Relationship ManagementTo configure Partner Relationship Management, perform the following steps in your implementation layer:
1. Set the UsePartnerAdministation Dynamic System Setting to true.
2. Create a Channel Manager profile and configure it to have access to Partner and Parent territories.
3. Create Partner organizations.
a) As a Channel Manager, log into Channel Manager portal and create partners by clicking Create newPartner in the Partner tab.
b) Assign onboarding articles to your Partner organization.
4. Create Partner operators within the Partner organization created above.
5. To set up collateral, set EnableKM DSS to true.
Pega Sales Automation Implementation Guide | 53

Building the application
6. Update OnboardingCategories DDS with your onboarding categories to allow Channel Managers toadd articles from these categories to the onboarding content.
Modifying the user interfaceTo modify the user interface, complete the steps in the following topics:
• Locating the user interface element to change
• Adding properties to sections
• Adding sections
• Changing section visibility
• Updating the skin
Locating the user interface element to changeTo determine which user interface element to modify to implement your change, use the Live UI featureof the Pega Platform.
1. In Dev Studio, launch a portal.
2. Click the Open runtime toolbar in the bottom right corner.
3. Click the Live UI icon.
4. Select an element to observe and click the Display info panel for this item icon.
5. To update the rule, click the Open rule in Dev Studio icon and make your changes.
Adding properties to sectionsPega Sales Automation uses standard Pega Platform user interface components, so the update process isthe same as any Pega Platform application.
1. In Dev Studio, launch a portal.
2. Click the Open runtime toolbar in the bottom right corner.
3. Click the Live UI icon.
4. Select the section that you want to modify.
5. To open the rule in Dev Studio, click the Open rule in Dev Studio icon.
6. In the navigation panel of Dev Studio, click App. Locate the property that you want to add to thesection and drag it into that section.
7. Click Save as and then save the ruleset to your application.
Adding sectionsPega Sales Automation uses standard Pega Platform user interface components, so whether you areupdating the dashboard, portals, or the composite, you do so in the same way as any Pega Platformapplication.
1. In Dev Studio, launch a portal.
2. Click the Open runtime toolbar in the bottom right corner.
Pega Sales Automation Implementation Guide | 54

Building the application
3. Click the Live UI icon.
4. Locate the area where you want to add the section.
5. In the navigation panel of Dev Studio, click App. Locate the section that you want to add and drag itinto your specified section.
6. Click Save as to save the rule to the ruleset for your application.
Changing section visibilityUse When rules to determine which layouts and sections are visible. For example, if you are a manager,modify the visibility of a section to ensure that only a manager can see the content of the section.
1. In Dev Studio, access the section for which you want to change visibility.
2. Click anywhere inside the section and then click the View properties icon.
3. From the Visibility drop-down list, select Condition.
4. Enter a When rule or a conditional expression.
5. Click OK and then click Save.
Updating the skinYou can update the look and feel of Pega Sales Automation to reflect the color scheme of yourorganization. The application uses the standard Pega Platform skinning features in your application.
To access Pega-provided formats from Pega Platform releases, the SAEndUser skin rule for Pega SalesAutomation inherits from the pyEndUser skin rule from the Pega UI Kit.
For more information about skins, see Creating a skin and Skin inheritance.
1. In Dev Studio, click Application Name > Skin.
2. Update the options as needed, and then click Save as.
3. If you give your skin a different name, update the application to reflect it by performing the followingsteps:
a) In Dev Studio, click Application Name > Definition.
b) Change the value in the Skin field to the name of the skin that you created.
4. Click Save.
Testing a new applicationTesting a new application includes the following procedures:
• Testing your application in the Build environment
• Testing in the Test or Production environments
• Testing in the UAT environment
Pega Sales Automation Implementation Guide | 55
Building the application
Testing your application in the Build environmentTest a new application in the Build environment before migrating the new application to a Test orProduction environment. Testing in the Build environment enables you to verify that basic functionalityand interfaces work correctly and also that performance is acceptable.
1. Run functional tests to test specific features from the end-user perspective.
2. Use the Performance tool to measure the performance of the application. For information about thePerformance tool, see About the Performance tool.
• Prior to extending your site-specific Pega implementation, establish a performance benchmark(baseline) by using the Performance tool. This allows subsequent, iterative performance testsagainst the established baseline to help identify any degradation in performance resulting fromdevelopment efforts.
• Use the Performance tool to check the performance of the following features:
• Search
• Account selection
• Loading of components
• Kickoff of all service intents. For this unit testing, automated scripts are recommended but notrequired.
• Save the test results so that you can compare them to future test results to determine whether anapplication update has a performance impact.
3. Verify that the Pega-provided reports and your custom reports run successfully, and that they showyour implementation layer data, rather than the default demonstration data. This can be an automatedtest.
4. Test all integrations, both independently and with associated integrations.
Test integrations for any optional Pega Sales Automation components and other applications that youplan to use. See the product documentation for the component or application to determine whichproduct components to test.
5. Test security. Test the most common roles to ensure that the required access groups are configuredand point to the correct software version.
Testing in the Test or Production environmentsAfter you import the application to a Test or Production environment, test the application in the newenvironment to verify that it works correctly in that environment.
Note: For a multitenancy configuration, run tests in each tenant region. The testing performed inthe Test environment should include usability testing to ensure that the application meets the UIstandard.
1. Verify that the source and the destination files are the same.
2. Run functional tests to test specific features from the end-user perspective.
3. In the Test or Production environment, run the Application Guardrails Compliance Score to ensure thatthe application meets guardrails.
4. Verify that the Pega-provided reports and your custom reports run successfully, and that they showyour implementation layer data, rather than the default demonstration data. This can be an automatedtest.
5. Test all integrations, both independently and with associated integrations.
Pega Sales Automation Implementation Guide | 56
Building the application
Test integrations for any optional Pega Sales Automation components and other applications that youplan to use. See the product documentation for the component or application to determine whichproduct components to test.
6. Verify that the integrations point to the correct system of record, and not to the system of record forthe Build environment.
7. Test security. Test the most common roles to ensure that the required access groups are configuredand point to the correct software version. Use these common roles in your smoke tests (see next step).
8. Run a smoke test to compare the source and destination environments. Verify that all tests that passin the Build environment also pass in the Test or Production environment. If anything fails, comparethe environments to determine whether a difference in environment could cause the test to fail. Ifthe environment caused the failure, either fix the issue that caused the failure or adjust the test asappropriate for the new environment.
9. Run performance tests to verify that performance meets expectations. Pega recommends automatedperformance testing. Save the results so that you can compare them to future performance test resultsto determine whether an application update has a performance impact.
Testing in the UAT environmentAfter you complete testing in a Test environment, it is common to perform User Acceptance Testing (UAT)in a designated UAT environment, which could be a pre-production environment. UAT ensures that endusers will be able to successfully complete work and meet business objectives.
Note: Organizations that use Scrum for application development will complete less formal UAT aspart of each sprint cycle.
1. Verify the integrity of the UAT environment.
2. Have the end-users (or business analysts acting the role of end-users) run scripts to test all scenariosincluding boundary and exception testing. The end-users (that is, the trainers, managers, anddirectors), perform the following steps during UAT:
a) Verify that there are no major issues.
b) Review changes in order to better understand the features.
Packaging a new applicationTo migrate a new application to a different environment, you must first package the application so that itcan be imported to the new environment.
Packaging and importing a new application includes the following procedures:
• Merging application changes
• Packaging an application for migration
• Importing the packaged application
• Multitenancy deployment considerations
Pega Sales Automation Implementation Guide | 57
Merging application changesIf you developed your application features in separate branches, use the Merge Branches wizard to mergethe branches before you package the application. The wizard shows any merge conflicts so that you cancorrect them before you merge the branches.
Packaging an application for migrationBefore you can migrate a new application to a different environment, you must package the relevant datainstances and rulesets into a product rule. The product rule is an instance of Rule-Admin-Product, andit is referred to as the RAP file.
1. In the header of Dev Studio, click Configure > Application > Distribution > Package to start theApplication Packaging wizard. For information about using the wizard, see Application Packagingwizard.
2. Complete each page of the Application Packaging wizard.
3. On the last page of the wizard, click Preview.
4. Review the contents of the generated RAP file.
5. On the last page of the wizard, click Modify to make any changes.
6. When the RAP file is complete, click Export. The wizard creates a .ZIP file in the ServiceExportdirectory on the current application server node.
Importing the packaged applicationTo deploy a new application to a different environment, import the .ZIP file that contains the packagedapplication to the new environment.
1. In the header of Dev Studio, click Configure > Application > Distribution > Import.
2. Use the Import wizard to import the target .ZIP file. For more information, see Import wizard landingpage.
For information about how to swap the database connection pointers to your Production databaseafter an import to a Production environment, see the Pega Platform Upgrade Guide at DeploymentGuides.
Multitenancy deployment considerationsIn a multitenancy environment, the shared application components are deployed only to the sharedenvironment, and the tenant-specific components are deployed only to the tenant region.
For information about how to package and deploy a shared application or a tenant-specific application,see the Multitenancy Administration Guide.
A deployment to a multitenancy environment has the following requirements.
• The package for the tenant layer should include production rule sets for that tenant. The package forthe shared layer should not include production rule sets.
• The package for the tenant layer should include the table definitions for that tenant.
Note: Multitenancy is not supported for Pega Social.
Production maintenance and monitoring
Production maintenance and monitoringProduction maintenance and monitoring include the following procedures:
• Business rule maintenance in the Production environment
• Application health monitoring
• Identifying and reporting issues
Business rule maintenance in the ProductionenvironmentAs a manager, you can update Dialogs, and Coaching Tips in the Production environment by usingthe Tools > Configuration option available in each process action of the case type. This feature allowsmanagers to change these options without having to wait for a rule deployment. Managers must have thesame privileges associated with the PegaCA:Manager role in order to maintain these rules.
You can give managers the ability to update other rule types in the Production environment. For example,managers can update the Goals and Deadline for a certain case type. These rules must be delegated inDev Studio first. For more information on rule delegation, see Delegating a rule or data type.
Application health monitoringPega Autonomic Event Services is an application that automatically monitors, retrieves, and organizes thealert data from one or more clustered systems throughout the enterprise. Pega also provides the PegaPredictive Diagnostic Cloud, which allows you to benefit from Pega Autonomic Event Services withoutinstalling it locally. Pega Predictive Diagnostic Cloud is a Software as a Service offering of Pega AutonomicEvent Services.
Implementing the following best practices in your application can help to ensure optimal response timesand overall application health:
• Segment application agent processing to a dedicated JVM (Java Virtual Machine). This configurationensures that end users do not have to share resources with background processes.
• Monitor integration response time. Over time, slow integration points can cause average handle timesto increase. When queues start to grow, it becomes very difficult to recover, which might require usageof offline services or a backup application.
Identifying and reporting issuesAs with any application, your users will encounter issues that they need to report as they begin to usethe application. When deploying your application to the production environment, complete the followingsteps:
1. Identify operational staff who will be responsible for responding to issues reported in the productionenvironment.
2. Establish procedures with those resources to triage, respond to, and escalate issues.
3. Determine procedures for delivery of changes to the production environment.
Pega Sales Automation Implementation Guide | 59
