safety manual
TRANSCRIPT

Safety Manual
Software Version: 1.68.6800 or newer
I625-E-02 Original Instruction

Safety Manual 2
This Manual contains information of the Techman Robot product series (hereinafter referred to as the TM Robot). The
information contained herein is the property of Techman Robot Inc. (hereinafter referred to as the Corporation) and
shall not be reproduced in whole or in part without prior authorization from the Corporation. No information contained
herein shall be considered an offer or commitment. The information herein is subject to change without notice. The
document is periodically reviewed and revised. The Corporation assumes no responsibility for any errors or omissions
in the documentation.
logo is registered trademark of TECHMAN ROBOT INC. in Taiwan and other countries and the company
reserves the ownership of this manual and its copy and its copyrights.

Safety Manual 3
Terms and Conditions Agreement
Warranty Limitations of Liability
Warranties
Exclusive Warranty
Omron’s exclusive warranty is that the Products will be free from defects in materials and workmanship for a
period of twelve months from the date of sale by Omron (or such other period expressed in writing by Omron).
Omron disclaims all other warranties, express or implied.
Limitations
OMRON MAKES NO WARRANTY OR REPRESENTATION, EXPRESS OR IMPLIED, ABOUT
NON-INFRINGEMENT, MERCHANTABILITY OR FITNESS FOR A PARTICULAR PURPOSE OF
THE PRODUCTS. BUYER ACKNOWLEDGES THAT IT ALONE HAS DETERMINED THAT THE
PRODUCTS WILL SUITABLY MEET THE REQUIREMENTS OF THEIR INTENDED USE.
Omron further disclaims all warranties and responsibility of any type for claims or expenses based
on infringement by the Products or otherwise of any intellectual property right.
Buyer Remedy
Omron’s sole obligation hereunder shall be, at Omron’s election, to (i) replace (in the form originally shipped
with Buyer responsible for labor charges for removal or replacement thereof) the on-complying Product, (ii)
repair the non-complying Product, or (iii) repay or credit Buyer an amount equal to the purchase price of the
non-complying Product; provided that in no event shall Omron be responsible for warranty, repair, indemnity
or any other claims or expenses regarding the Products unless Omron’s analysis confirms that the Products
were properly handled, stored, installed and maintained and not subject to contamination, abuse, misuse or
inappropriate modification. Return of any Products by Buyer must be approved in writing by Omron before
shipment. Omron Companies shall not be liable for the suitability or unsuitability or the results from the use of
Products in combination with any electrical or electronic components, circuits, system assemblies or any
other materials or substances or environments. Any advice, recommendations or information given orally or in
writing, are not to be construed as an amendment or addition to the above warranty.
See http://www.omron.com/global/ or contact your Omron representative for published information.

Safety Manual 4
Limitation of Liability; Etc
OMRON COMPANIES SHALL NOT BE LIABLE FOR SPECIAL, INDIRECT, INCIDENTAL, OR
CONSEQUENTIAL DAMAGES, LOSS OF PROFITS OR PRODUCTION OR COMMERCIAL LOSS IN ANY
WAY CONNECTED WITH THE PRODUCTS, WHETHER SUCH CLAIM IS BASED IN CONTRACT,
WARRANTY, NEGLIGENCE OR STRICT LIABILITY.
Further, in no event shall liability of Omron Companies exceed the individual price of the Product on which
liability is asserted.
Application Considerations
Suitability of Use
Omron Companies shall not be responsible for conformity with any standards, codes or regulations which apply
to the combination of the Product in the Buyer’s application or use of the Product. At Buyer’s request, Omron
will provide applicable third party certification documents identifying ratings and limitations of use which apply to
the Product. This information by itself is not sufficient for a complete determination of the suitability of the
Product in combination with the end product, machine, system, or other application or use. Buyer shall be solely
responsible for determining appropriateness of the particular Product with respect to Buyer’s application,
product or system. Buyer shall take application responsibility in all cases.
NEVER USE THE PRODUCT FOR AN APPLICATION INVOLVING SERIOUS RISK TO LIFE OR
PROPERTY WITHOUT ENSURING THAT THE SYSTEM AS A WHOLE HAS BEEN DESIGNED TO
ADDRESS THE RISKS, AND THAT THE OMRON PRODUCT(S) IS PROPERLY RATED AND
INSTALLED FOR THE INTENDED USE WITHIN THE OVERALL EQUIPMENT OR SYSTEM.
Programmable Products
Omron Companies shall not be responsible for the user’s programming of a programmable Product, or any
consequence thereof.
Disclaimers
Performance Date
Data presented in Omron Company websites, catalogs and other materials is provided as a guide for the user
in determining suitability and does not constitute a warranty. It may represent the result of Omron’s test
conditions and the user must correlate it to actual application requirements. Actual performance is subject to
the Omron’s Warranty and Limitations of Liability.

Safety Manual 5
Change in Specifications
Product specifications and accessories may be changed at any time based on improvements and other
reasons. It is our practice to change part numbers when published ratings or features are changed, or when
significant construction changes are made. However, some specifications of the Product may be changed
without any notice. When in doubt, special part numbers may be assigned to fix or establish key specifications
for your application. Please consult with your Omron’s representative at any time to confirm actual
specifications of purchased Product.
Errors and Omissions
Information presented by Omron Companies has been checked and is believed to be accurate; however,
no responsibility is assumed for clerical, typographical or proofreading errors or omissions.

Safety Manual 6
1. Comprehensive Information .......................................................................................................................................... 9 Overview .............................................................................................................................................................. 9 Applicable Product Version .................................................................................................................................. 9
1.3 Safety Warning Symbols ...................................................................................................................................... 9 1.4 Safety Precautions ............................................................................................................................................. 10
Validation and Responsibility ............................................................................................................................. 10 Limitation of Liability ........................................................................................................................................... 11 Overall Safety Warning ...................................................................................................................................... 11 Risk Assessment ................................................................................................................................................ 14
2. Safety Function ........................................................................................................................................................... 16 Overview ............................................................................................................................................................ 16 General Information ........................................................................................................................................... 16
Safety Function Definition ........................................................................................................................... 16 Stopping Time and Stopping Distance in the Safety System ...................................................................... 17 Software Safety Setting Permissions .......................................................................................................... 17
Explanation of Safety Functions ........................................................................................................................ 17 SF0 Emergency Stop and SF1 External Emergency Stop ......................................................................... 17 SF2 Encoder Standstill ................................................................................................................................ 18 SF3 External Safeguard and SF9 External Triggered Collaborative Mode ................................................ 19 SF4~SF8 Defined Safety Function ............................................................................................................. 19
3. Safety Related Operation ............................................................................................................................................ 21 Joint Movement without Drive Power ................................................................................................................ 21
During an Emergency Stop Procedure ....................................................................................................... 21 Extending the Robot from the Packing Pose .............................................................................................. 21 Power Loss .................................................................................................................................................. 22
Operation Mode and Mode Switching ................................................................................................................ 22 Auto Mode ................................................................................................................................................... 22 Manual Mode ............................................................................................................................................... 22
3.2.2.1 Manual Control Mode (Manual Reduced Speed) ................................................................................. 22 3.2.2.2 Hand Guide Mode................................................................................................................................. 23 3.2.2.3 Manual Trial Run Mode (Manual High Speed) ..................................................................................... 23
Switching Between Operation Modes ......................................................................................................... 23 Hold to Run ........................................................................................................................................................ 23
Contents

Safety Manual 7
Singularity Point ................................................................................................................................................. 24 4. Compliance of Safety Regulations .............................................................................................................................. 28
Compliance ........................................................................................................................................................ 28 Requirement of Enabling Device ................................................................................................................. 28 Access of Safety Setting ............................................................................................................................. 28
5. Declaration of Incorporation ........................................................................................................................................ 29 Appendix A. TM Robot Stopping Time and Distance for all Series Product Models ....................................................... 32

Safety Manual 8
Revision History Table
Revision Date Revised Content
01 October 2018 Original Release
02 December 2018 Added alert statements in section 2.3.1, 3.1.1, 3.2.2, 3.2.2.3 and 3.2.3.
Updated Chapter 4. Minor text fixes. Removed appendix for Declaration.

Safety Manual 9
1. Comprehensive Information Overview
This chapter describes the comprehensive important safety information of TM Robot. The user and system
integrator of TM Robot must read and fully understand this chapter before using this robot.
Applicable Product Version
This document is only applicable to the combination of the following software and hardware versions of TM Robot.
Users can check the hardware version and software version on “Techman Robot Product Brief Information” sheet
in the control box carton, or through these methods: checking the hardware version on the product label on the
control box and checking the software version from the software information button in the UI of TMflow. If the
software version of the robot has been upgraded and is different from the original out-of-the-box one, users should
only check the software version from the UI of TMflow.
Hardware version HW 3.00
Software version SW 1.68.6800 or newer
Users shall confirm whether the software and hardware version of the TM Robot is consistent with the applicable
product version of this Safety Manual. OMRON is not responsible for any safety issues caused by referring to the
safety instruction of an incorrect version.
1.3 Safety Warning Symbols
The following table defines the safety warning level symbols that are marked in each paragraph in this Manual.
Read carefully and comply with each paragraph to avoid harm to people or equipment.
DANGER:
Identifies an imminently hazardous situation which, if not avoided, is likely to result in serious
injury, and might result in death or severe property damage.
WARNING:
Identifies a potentially hazardous situation which, if not avoided, will result in minor or moderate
injury, and might result in serious injury, death, or significant property damage.
CAUTION:
Identifies a potentially hazardous situation which, if not avoided, might result in minor injury,
moderate injury, or property damage.
WARNING: ELECTROCUTION RISK
This identifies a hazardous electrical situation.

Safety Manual 10
1.4 Safety Precautions
DANGER: This product can cause serious injury or death, or damage to itself and other equipment, if the following safety precautions are not observed.
All personnel who install, operate, teach, program, or maintain the system must read the “Hardware
installation Manual”, “Software Manual”, and “Safety Manual” according to the software and hardware
version of this product, and complete a training course for their responsibilities in regard to the robot.
All personnel who design the robot system must read the “Hardware installation Manual”, “Software Manual”,
and “Safety Manual” according to the software and hardware version of this product, and must comply with
all local and national safety regulations for the location in which the robot is installed.
Observing the “Intended Use” section in “Safety Manual”
If the installation and application does not observe human-robot collaboration regulations of the safety
regulations, the user is responsible for providing safety barriers around the robot to prevent anyone from
accidentally coming into contact with the robot when it is in motion.
If any local or national electrical regulation requires, power to the robot and its power supply must be locked
out and tagged out, or have means to control hazardous energy or implement energy isolation before any
maintenance is performed.
Dispose of the product in accordance with the relevant rules and regulations of the country or area where the product is used.
Validation and Responsibility
The information provided in this Manual does not include how to design, install and operate a complete arm
application, nor does it include the peripheral devices that will affect the overall system safety. The design and
installation of the complete system must comply with the standards and regulations for safety requirements in the
country located. The robot integrator needs to understand safety laws and safety regulations in the local countries,
in order to avoid major risks existing in the entire system.
Read Manual and Impact Warning labels

Safety Manual 11
This includes but is not limited to:
Perform a risk assessment of the whole system
Adding other machines and additional safety mechanisms based on the results of the risk assessment
Building appropriate safety mechanisms in the software
Ensuring the user will not modify any safety-related measures
Ensuring all systems are correctly designed and installed
Specifying instructions for use
Clearly marking the installation of the robot and the contact information of the integrator
Collecting all documents into the technology folder, including the risk assessment, and this Manual
CAUTION: This product is a partly completed machinery. The design and installation of the complete system must comply with the safety standards and regulations in the country of use. The user and integrators of the robot should understand the safety laws and regulations in their countries and prevent major hazards from occurring in the complete system.
Limitation of Liability
Even if the safety instructions are followed, any safety-related information in the Manual shall not be considered as
a guarantee that the product will not cause any personal injury or damage.
Overall Safety Warning
The following lists the overall safety warnings. Pay attention that in addition to the contents described in this section,
there are still relevant safety warnings for this section in the rest of chapters in this Manual. Read them in detail.

Safety Manual 12
DANGER:
1. Before transporting, installing, operating, maintaining and repairing this product, make sure to read the product
specification and operation manual in detail. Confirm that all the conditions comply with the requirements of the
specification and the Manual, to avoid unintended accidents (for example: improper operation or conditions of
use that exceed the product specification) that resulted in harm to the people or this product.
2. Before installing and using this product, the installer must perform the necessary risk assessment according to
the conditions of use to prevent accidents from happening during the operation of the machinery (for example:
collision of machinery and people during operation) that resulted in serious injury to the people due to improper
condition setting.
3. In case of emergency or abnormal situation, the users shall create a procedure to secure safety and
operation of the robot system.
4. Before using this product, make sure that the machinery has at least one emergency stop device capable of
stopping the motion of robot in the event of an accident, and must confirm that there is no abnormality in the
function and operation of the device.
WARNING:
1. Before disassembling or repairing this product, make sure that the power has been turned off and disconnected
first before proceeding with the subsequent operations to avoid injury to people or damage to machinery caused
by inadvertent short circuit or electric shock.
2. When operating this product, the operator shall avoid wearing loose clothing or wearing other accessories (such
as: necklaces, ties, bracelets, etc.) to avoid injury caused by clothing or accessories being entangled in the
machine during operation of the implement.
3. If the product malfunctions, follow the correct procedures and channel in contact with the appropriate people for
proper condition elimination and maintenance. Do not attempt to repair the product yourself, to avoid damage to
the machinery due to improper assembly and disassembly.
4. Before the robot is in operation, make sure that each part has been completely mounted to avoid any possibility
of accidents due to poor fixation during the operation.
5. Before starting the operation of the robot, confirm that there are no persons or obstacles that may intrude into
the operating area during operation. If the operating environment uses human-robot cooperative operation, be
sure to complete the due risk assessment before starting the operation.
Safety Manual 13
6. It is forbidden for any unauthorized person to operate this product in order to avoid any possibility of injury to the
person or damage to the machinery due to improper operation.
7. Do not install or operate this product in a hazardous area (for example: strong magnetic field, hazardous gas,
fire source, or flammable product) In order to prevent the machinery from causing danger during operation
resulted from the impact of external conditions.
CAUTION:
1. When the person is near the robot or operate the robot, confirm the prompt of machinery warning light before
performing the subsequent operations.
2. After completing editing the task flow, operate in the Manual Mode first, and confirm that all the movements in
the operation process are correct before switching the operation mode to Auto Mode.
3. During the operation of machinery, do not turn off the power supply if it is not necessary to prevent possible
damage to the system.
4. For the robot noise levels and related environmental conditions, refer to the “Hardware Installation Manual” for
the corresponding hardware version.
Intended Use
The TM Robot is designed so the hazards can be reduced to tolerable levels when applied as specified and
operated under normal and intended use.TM robots have been designed and constructed in accordance with
relevant safety standards. TM robots are intended for use in parts assembly and material handling for payloads
(including end-effector and workpiece) up to the “Maximum Payload” specification of each model.
The TM Robot focuses on the safety of human-robot cooperative operation during design, but the cooperative
operation is only for application procedures that have undergone a risk assessment including robots, related
peripheral equipment and working environment.
Any use or application should consider the risk assessment. If the use is different from the intended application,
OMRON will not bear any responsibility. OMRON clearly specifies but not limited to the following contents that are
not suitable for the TM Robot.
• Use in a potentially hazardous environment
• Use in any applications that may threaten human lives
• Use in any application that may cause personal injuries
• Use before completion of the risk assessment and implementation of risk reduction measures
• Use for life support
• Use when the rated performance cannot be reached
• Use when the reaction time of safety functions is insufficient

Safety Manual 14
• Use with inappropriate parameters for operations
• Applications which may cause damage to the robot itself
• Restricted movement of persons
• Loss of stability/ overturning of machinery
• Excessive oscillations when moving
• Without proper design of earthquake-prevention mounting when installed in earthquake zones
• Fall of persons during access to (or at/from) the work station
• Exhaust gases/lack of oxygen at the work position
• Fire (flammability of the cabinet, lack of extinguishing means)
• Mechanical hazards at the work position: a) rollover; b) fall of objects, penetration by objects; c) break-up of
parts rotating at high speed; d) contact of persons with machine parts or tools (pedestrian controlled
machines)
• Insufficient visibility from the work positions
• Inadequate lighting
• Inadequate seating
• Insufficient means for escape or entrapment avoidance
• Inadequate location of manual controls
• Inadequate design of manual controls and their mode of operation
Risk Assessment
Before installing and using this product, the user must first perform a risk assessments based on the conditions of
use. Risk assessments can be in reference to the specifications of ISO 10218-2, ISO 12100 and ISO/TS 15066
documentations. The purpose of a risk assessment is to anticipate any accidents that may occur during the
operation process and by means of appropriate protective measures to reduce the occurrence of accidents or to
reduce the severity of injury to persons in the event of an accident. Therefore, the risk assessment needs to include
any operational actions of the machinery within the scope of the assessment. After the risk assessment is
completed, the user can use external related components (i.e. sensing components, emergency stop devices,
fences or railings, etc.) as well as the parameter settings of safety functions in the operating system, to reduce
possible occurrence of accidents. Additional safety-related components must be installed in accordance with the
manufacturer's specifications for the required risk reduction. For operating system safety settings and other safety
components usage, read and understand this Manual, the "Software Manual" and the "Hardware Installation
Manual" of corresponding versions.

Safety Manual 15
Potential hazards requiring additional risk reduction measures may include but are not limited to:
1. Finger(s) (especially in the case of hand guiding) caught between the rear end of the camera module and the
joint module(s).
2. The palm or finger injured by the motion of the robot or the hand guide teaching, if caught between the robot
end-effector (including the workpiece) and the robot body.
3. Being hit by a robot and injured.
4. Entrapment between a robot and a fixed surface.
5. Injury caused by the loosened screws of the base of the robot.
6. Incorrect human-robot collaborative workspace setup, parameter settings or project operation.
WARNING: Ensure compliance with all local and national safety and electrical codes for the installation and operation of the robot system.
WARNING: Provide appropriately-sized Branch Circuit Protection and Lockout/Tagout Capability in accordance with the National Electrical Code and any local codes.
WARNING: ELECTROCUTION RISK AC power installation must be performed by a skilled and instructed person. During installation, unauthorized third parties must be prevented from turning on power through the use of lockout/tagout measures. Failure to use appropriate power can lead to malfunction or failures of the robot or hazardous situations.
Safety Manual 16
2. Safety Function Overview
TM Robot incorporates multiple safety functions, and provides interfaces for additional external protective devices.
General Information
The following describes common information of the TM Robot system safety functions:
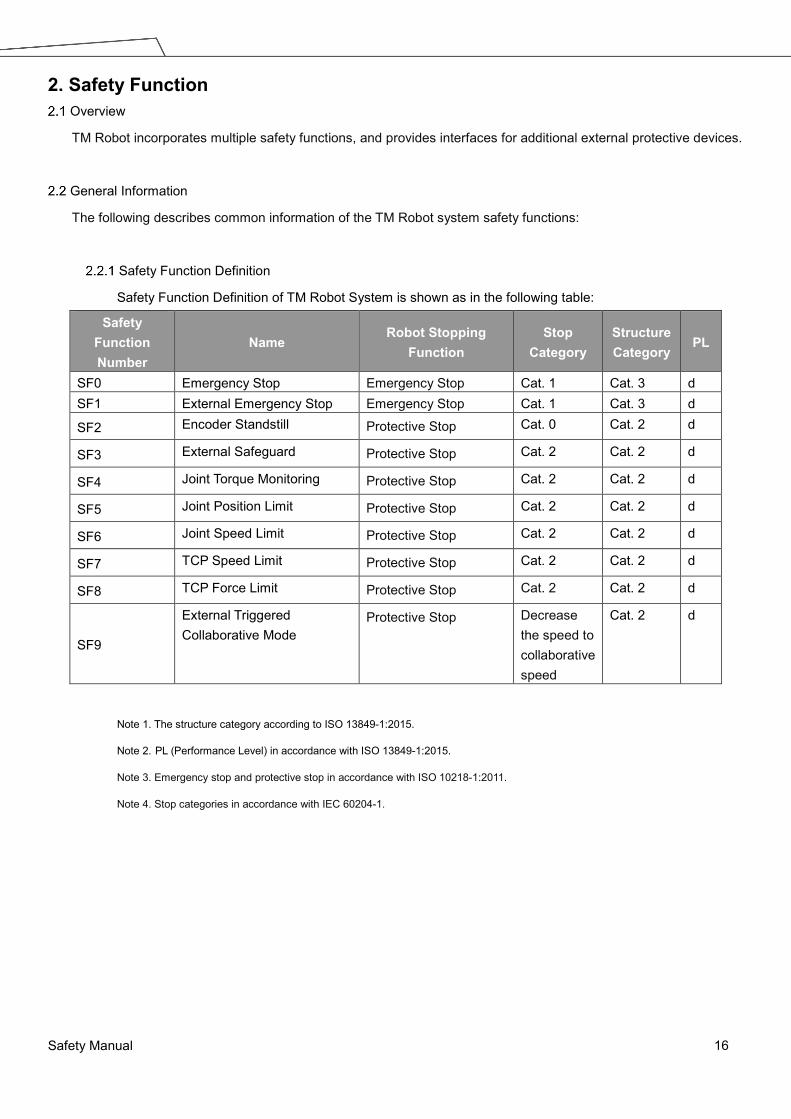
Safety Function Definition
Safety Function Definition of TM Robot System is shown as in the following table:
Safety Function Number
Name Robot Stopping
Function Stop
Category Structure Category
PL
SF0 Emergency Stop Emergency Stop Cat. 1 Cat. 3 d SF1 External Emergency Stop Emergency Stop Cat. 1 Cat. 3 d
SF2 Encoder Standstill Protective Stop Cat. 0 Cat. 2 d
SF3 External Safeguard Protective Stop Cat. 2 Cat. 2 d
SF4 Joint Torque Monitoring Protective Stop Cat. 2 Cat. 2 d
SF5 Joint Position Limit Protective Stop Cat. 2 Cat. 2 d
SF6 Joint Speed Limit Protective Stop Cat. 2 Cat. 2 d
SF7 TCP Speed Limit Protective Stop Cat. 2 Cat. 2 d
SF8 TCP Force Limit Protective Stop Cat. 2 Cat. 2 d
SF9
External Triggered Collaborative Mode
Protective Stop Decrease the speed to collaborative speed
Cat. 2 d
Note 1. The structure category according to ISO 13849-1:2015.
Note 2. PL (Performance Level) in accordance with ISO 13849-1:2015.
Note 3. Emergency stop and protective stop in accordance with ISO 10218-1:2011.
Note 4. Stop categories in accordance with IEC 60204-1.

Safety Manual 17
Stopping Time and Stopping Distance in the Safety System
Safe stopping time is the time required from when an emergency stop or protective device (i.e. internal or
external) is activated and hazardous motion stops. In this system, activating the emergency stop button will
apply Cat. 1 safety stop. Activation of a safety function or external safety protective device will be a Cat. 2
stop. It may be necessary for the user or system integrator to take these stop times into consideration when
implementing risk reduction measures. The robot has speed during this time, which can transmit energy
and present additional risk. Refer to Appendix A for stopping time and stopping distance.
Software Safety Setting Permissions
A change management process should be in place listing known acceptable setting and potential hazards.
Changes are made in the permissions management function. The authorized user must log in with
Administrator permission and set all levels of permissions appropriately. Cyber security measure should be
implemented when using on a network connection. OMRON is not liable for the possible harm caused by
malicious attacks or intrusion of network to modify the permissions management system or safety setup.
Explanation of Safety Functions
SF0 Emergency Stop and SF1 External Emergency Stop
The SF0 Emergency Stop refers to the built-in Emergency Switch on the Robot Stick of the TM Robot, and
the SF1 External Emergency Stop refers to the Emergency Stop Port on the control box, which can be used
to connect additional emergency switches.
The user can stop movement by pressing the emergency switch. After movement of the robot has ceased,
the user must confirm that all hazardous conditions have been eliminated before manually releasing the
emergency switch to allow reactivation of the robot. The Emergency Stop should only be used when a
critical condition occurs. To stop the action of robot under normal operation, use the Stop Button on the
Robot Stick.
If the risk assessment requires additional Emergency Stop Devices, the selected device must comply with
the requirements of the ISO 60204-1. Additional Emergency Stop Devices connected to the Emergency
Stop Port (SF1) shall be installed so they do not diminish the overall performance level of the Emergency
Stop.
Activation of an emergency stop initiates a Cat. 1 stop. The Indication Light Ring of the robot will not display
light and the three lights from the Robot Stick will be constantly blinking. The operation steps to reset the
emergency stop state are as follows:
1. Rotate the Emergency Switch to the pop-up state. At this time, the robot arm will be re-powered. The
Indication Light Ring will have the light blue light on to indicate the Safe Start up Mode.
2. Press the Stop Button on the Robot Stick for about three seconds. The robot will perform the calibration

Safety Manual 18
action of the start-up process and return to the previous operating mode.
WARNING: The power of the robot arm will be cut and the joint brake will be activated, if the Emergency Stop is triggered. The Indication Light Ring of robot’s end module will not show light and the three lights from the robot stick will be constantly blinking. In this case, although each of the joint will be automatically locked through the breaking device on joints, the robot body will still drop slightly, before it completely stops. Pay attention to the existing risk that the end part of the robot may pinch human body or collide with other objects.
WARNING: During an Emergency Stop, power to the end effector will be cut. If the system was integrated with power I/O enabled end effector, the emergency stop condition may cause the workpiece to be dropped. This shall be taken into consideration when the user integrates the system and perform appropriate design in compliance with risk assessment. To prevent the unexpected dropping of work pieces, user can choose an end-effector with self-maintaining function, using pneumatic logic configuration of reverse logic, using the power supply/IO of control box, or connecting extra power supply. The user should be responsible for a correct integration.
CAUTION: Person should be outside of the robot’s operational space (areas that robot can reach) when recovering from emergency stop.
SF2 Encoder Standstill
This safety function is automatically activated after every Cat. 2 Stop. Encoders of each joint are monitored
continuously to check if there is any unintended motion until the user acknowledges and manually resets
the robot from Cat. 2 Stop status. If there is any unintended motion, this safety function will trigger a Cat. 0
Stop.

Safety Manual 19
SF3 External Safeguard and SF9 External Triggered Collaborative Mode
These two safety inputs are provided on the Safeguard Port of the robot control box. For the related
connection and usage, refer to the "Hardware Installation Manual". Resuming from the SF3 External
Safeguard protective stop can be manual or auto. Refer to the relevant contents in the "Software Manual".
Resuming from the SF9 External Triggered Collaborative Mode is automatic, which means the robot will be
back to the original project speed.
SF4~SF8 Defined Safety Function
The name and description of SF4 to SF8 safety functions are shown below:
Safety Function
Name Description
SF4 Joint Torque Monitoring Each joint’s torque limit condition can be set. When the robot exceeds its set value, it will trigger a Category 2 stop.
SF5 Joint Position Limit Each joint’s motion angle limit can be set. When the robot exceeds its set value, it will trigger a Category 2 stop.
SF6 Joint Speed Limit Each joint’s motion speed range can be set. When the robot exceeds its set value, it will trigger a Category 2 stop.
SF7 TCP Speed Limit The tool center point speed limit can be set. When the robot exceeds its set value, it will trigger a Category 2 stop.
SF8 TCP Force Limit The tool center point force limit can be set. When the robot exceeds its set value, it will trigger a Category 2 stop. The tool center point force is the external force at the tool center point.
Refer to the relevant contents in the "Software Manual" for the setting of each item. Users can use any
method listed below to manually reset the robot from SF4 to SF8:
1. pressing the STOP button on robot stick
2. any operation on the icons in the left sidebar of the TMflow (except Shutdown)
3. pressing the FREE button in the end module of TM Robot
4. changing the mode on robot stick.
DANGER: Pay attention that the "TCP Force” (Tool Center Point Force) is the external force at the tool center point estimated through the model by the robot system, not the protection value of the external force at the tool center point on the robot system. When the robot system exceeds the external force value at the tool center point, the robot will perform a category 2 stop. In this condition, applied forces will exceed this value. Therefore, clearly understand the amount of the external force applied before the robot comes to a complete stop. The degree that this value will be exceeded will increase as the robot speed increases. This cannot be the primary risk mitigation for human-robot collision.
Safety Manual 20
CAUTION: When the motion of TM Robot is passing the area near singular point, due to the nature of singularity, the TCP force may be over-estimated and triggers TCP Force Stop Criteria. Users can set the robot's motion properly, e.g. do not set the motion too close to the singular point, to avoid this situation.

Safety Manual 21
3. Safety Related Operation These are the operating instructions for Safety-related robot functions and designs.
Joint Movement without Drive Power
The conditions of robot without driving force are emergency stop, start up from the packing pose, and loss of power.
The first two can enter Safe Start up Mode when the emergency switch resets, and the latter is the situation when
the robot loses external power entirely. The following describes how to operate it:
During an Emergency Stop Procedure
The brake of each joint axis will automatically lock the joint, to avoid unlimited sagging of the robot's joints
due to gravity. If you need to move the robot to resolve the condition, follow the steps listed below:
1. Releasing the Emergency Switch energizes the power to the robot.
2. Wait 10 seconds to enter the Safe Start Up Mode. The Indication Light Ring will turn light blue.
3. The FREE button can be continuously pressed to release the joint axis brake and move the robot.
4. After the situation is resolved, press the stop button on the Robot Stick for about three seconds, the
robot will perform the calibration startup process and return to the original operating mode.
CAUTION: Person should be outside of the robot’s operational space (areas that robot can reach) when recovering from emergency stop.
Extending the Robot from the Packing Pose
Refer to the "Software Manual" for the operation of extending the robot from the Packing Pose. Emergency
stop reset method is found in Section 2.3.1.
DANGER: When using the FREE button to release brakes without motor power, the robot may sag due to gravity. Be prepared to support the robot system. If it is found that it is not possible to support the robot system, release the FREE button immediately, which will lock the robot joint brakes.

Safety Manual 22
Power Loss
If power loss to an end-effector can result in a hazardous condition (e.g. dropping of a workpiece), possible
methods to reduce the risk may include but are not limited to:
• Use the 24V electrical output provided by the control box to supply the power to end effector instead
of using the End Module of robot to supply power.
• Install independent power supply for the end effector.
• If the end effector is a pneumatic control design, the external design can be low potential actuation
design.
• Select the end effector with self-maintaining function / mechanical design.
If it is necessary to manually move the arm joint:
1. Remove the joint module protective cover screw and the joint module protective cover
2. Press the brake solenoid valve to release the brake
Refer to the brake release illustration in the "Hardware Installation Manual".
Operation Mode and Mode Switching
TM Robot has two operation modes: Manual Mode (reduced speed and high speed) and Auto Mode. The modes
are visually distinguished by the color of the mode indicator of Robot Stick and the Indication Light Ring on robot’s
end module . The robot is in Auto Mode when starting up.
Auto Mode
In Auto Mode the Indication Light Ring on the end module displays blue light and the Mode Indicator on
Robot Stick is in Auto position. The user can press the Robot Stick Play/Pause button to play/pause the
robot program. The robot speed plays according to the project speed. In Auto Mode, the FREE button on
the end module does not actuate, and cannot perform Hand Guiding operation.
Manual Mode
In Manual Mode the Indication Light Ring on the end module displays green light and the Mode Indicator on
Robot Stick is in Manual position. In Manual Mode, it can be divided into Manual Control Mode (Manual
Reduced Speed), Manual Trial Run Mode (Manual High Speed), and Hand Guide Mode.
WARNING: Wherever possible, the manual mode of operation shall be performed with all persons outside the safeguarded space.
3.2.2.1 Manual Control Mode (Manual Reduced Speed)
In Manual Control Mode, the user can jog the robot with controller UI in TMflow or the Robot Stick. All robot

Safety Manual 23
motion will be limited to 250 mm/sec or less. If the robot speed exceeds 250 mm/sec, it will enter an error
stop state. Hand Guiding Mode can only be activated from Manual Control Mode. Pressing the FREE
button on the End Module will allow manual movement of the robot.
3.2.2.2 Hand Guide Mode
Hand Guide Mode can only be activated from Manual Control Mode. Press and hold the FREE button on
the End Module to enter Hand Guide Mode, and release the FREE button to return to Manual Control
Mode.
3.2.2.3 Manual Trial Run Mode (Manual High Speed)
In Manual Trial Run Mode, the user can test the robot program by going to the project editing page of
TMflow and pressing the Play/Pause button on the Robot Stick. The initial project speed will be reduced to
10% during each trial run, forcing the path motion of the robot lower than 250mm/s in nature. The
Add/Subtract buttons on the Robot Stick can be used to adjust the project run speed. Each button press
increases or decreases project run speed by 5%.
WARNING: Person should be outside of the safeguarded space when using Manual Trial Run Mode.
Switching Between Operation Modes
When switching from Auto Mode to Manual Mode, first press the Stop Button to stop robot operation, if the
project is running. Then press the Mode Switch Button on the robot Stick.
When switching from Manual Mode (including Manual Control and Manual Trial Run Mode) to Auto Mode,
first hold the Mode Switching Button for a few seconds. When the two Mode Indicators on the Robot Stick
start blinking, press the Plus/Minus Button in the sequence of "Plus-Minus-Plus-Plus-Minus".
When the robot is in Manual Trial Run Mode, and when switched to Auto Mode, the Project Speed will be
set to the last trial run speed. That is, without being modified again by another trial run, the Project Speed in
Auto Mode is then recorded.
DANGER: Prior to selecting automatic operation, any suspended safeguards shall be returned to full
functionality.
Hold to Run
When the TM Robot is in Manual Control Mode the functions include:
• joint angle movement
• robot base end movement
Safety Manual 24
• tool base end movement
• self-defined base end movement
• move to visual initial position
• visual servo action
• step run
• move to point
• hand guiding
• other functions
Hold to Run has two categories:
• Jog the robot by continuously pressing the Plus / Minus Button of the Robot Stick.
• Jog the robot by continuously pressing the Plus / Minus Button in TMflow software.
Once the Plus / Minus Button is released, the robot will stop operation immediately, and will continue operation
when pressed again.
If TMflow is connected to the robot through Ethernet or Wi-Fi, the robot will automatically issue a protective stop
when releasing the Plus / Minus Button or the connection is broken. Depending on the quality of connection, there
may be a maximum detection delay of 800ms for loss of communication.
Singularity Point
The motion of articulated robot is often limited by the kinematic design, and cannot perform Cartesian motion
control under all joint positions. The joint position that will cause the robot unable to perform Cartesian control is a
singularity point. When the robot encounters a singularity point, it will stop motion and initiate a warning.
Three types of singularity point for TM Robot:
• Internal Singularity Point in Space
• Extensible Singularity Point in Space.
• Wrist Singularity Point in Space.

Safety Manual 25
Internal Singularity Point in Space:
The distance from the intersection of the rotational axes of the fifth joint and the sixth joint to the extended line of
the rotational axis of the first joint is defined as Roffset. The cylindrical space that formed by Roffset as radius and
centered on the extended line of the rotational axis of the first joint is the Internal Singularity Point in Space. As
soon as the robotic arm approaches the Internal Singularity Point in Space, the arm will stop and issue a warning.
The Roffset value of each product series is shown in the following table:
Main model Roffset
TM5 Series 122.3 mm
TM12/14 Series 156.3 mm
The definition of Roffset.
Roffset

Safety Manual 26
Extensible Singularity Point in Space:
When the third joint is almost at its zero degree, which means the robot is almost at the maximum working radius.
The space exceeded this radius is the Extensible Singularity Point in Space. In this space, the robot will stop and
report a warning due to exceeding the motion range of the robot..
Wrist Singularity Point in Space:
When the rotational axes of the fourth and the sixth joint are in parallel, the robot will enter Wrist Singularity Point in
Space. At this time, the motion of arm will cause a large-angle displacement of the fourth joint, but it will be stopped
due to stop criteria of motion speed. Once the robot enters the Wrist Singularity Point in Space, it will stop and
report an error.
Maximum workspace area
Extensible Singularity Point in Space
The maximum working range can be achieved when the third joint is almost at zero degrees
When the fourth and sixth joint are nearly parallel, is the robot is about to entering the
Wrist Singularity Point in Space.

Safety Manual 27
The Solution when Encountering Singularity Point in Space:
When the robot reports singularity, confirm the posture of the robot. If the tool end path crosses the internal cylinder
as shown in the figure below, check the first point description. If the rotational axes of fourth and sixth joints of the
robot are in parallel, check the second point description below.
1. When the arm reports a warning due to the Internal Singularity Point in Space, press the FREE button to release
it from the posture. Re-consider the point position or change the motion type to PTP between the points to avoid
the arm path between the points crossing the Internal Singularity Point in Space, as shown in the figure below.
2. When the robot reports a warning because entering the Wrist Singularity Point in Space, press the FREE button
to release it. When the rotational axes of the fourth and the sixth joint are in parallel, if users still try to perform
Cartesian motion, the Wrist Singularity Point in Space will be encountered. At this time, the method in the
following figure can be referred, to avoid the rotational axes of the fourth and the sixth joint being parallel.
When the path crossing the Internal Singularity Point in Space, singularity will be triggered. Adjust the path
and confirm it will not cross the Internal Singularity Point in Space.
This example demonstrates how to avoid the rotational axes of the fourth and sixth joint being parallel, when the user
need to move the robot according to tool Z-axis.

Safety Manual 28
4. Compliance of Safety Regulations This section describes the compliance and certification of this product to international safety regulations.
This product complies with to the following international safety regulations:
ISO 10218-1:2011
ISO/TS 15066
ISO 13849-1:2015
Certification: New Third-party certification will be added by beginning of February, 2019
Compliance
This product complies with the combined scope of ISO 10218-1:2011 and ISO/TS-15066.
The relevant design and corresponding provisions in safety regulations of this part are listed in the following sections.
Requirement of Enabling Device
The power and force limiting functions provide the alternative measures for the requirement of an enabling
device per ISO/TS 15066:2016.
Means are provided for connection of an Enabling device when required by the risk assessment.
Access of Safety Setting
TM Robot's safety setting has been integrated with the user's permission system of the entire product.
WARNING: If the risk assessment indicates that the work cell should be designed as below: if there is an Emergency Stop to the robot, other work cell devices, such as PLCs or conveyors, should also be Emergency Stopped, user can achieve this through system integration of safety related components, such as safety controller.

Safety Manual 29
5. Declaration of Incorporation The following is based on the Declaration of Incorporation in application of 2006/42/EG, Annex II, No. 1 B
The robot product of the Corporation is a partly completed machinery. When it is put into automation applications, it
needs to be integrated with other equipment, and appropriately installed with the safety related measures and design
before it can be used. When the semi-finished products are to put on the market, the following requirements need to be
achieved. It must be noted that since the TM Robot product is easy to use, the “system integrator” here refers to the
end user who uses the product directly through simple installation.
A: Not related
B: Satisfied by machinery equipment provider
C: Must be responsible by the system integrator
Attention: in the following tables:
Items marked as A: The scope of use of this product has been exceeded, and is not included into the
consideration, or it is not directly related to this product.
Items marked as B solely: The items that are to be satisfied by the machinery equipment provider, meaning the
machinery provider has satisfied or has specified in each of the Software and Hardware / Safety Manual. In the
latter case, the system integrator is still responsible for the full compliance with specification of machinery
equipment provider. In addition, in the entire system, the satisfaction of machinery equipment belonging to the
system but not belonging to this product is not included here, and the system integrator must be responsible for it.
Items marked as C solely: The item cannot be satisfied by this product. The system integrator must implement
additional measures.
Items marked as both B and C:
1. When the item can be satisfied in using this product itself, the machinery equipment provider of this product
shall satisfy it.
2. When the system integrator replaces the related functions of this product through system integration, the
system integrator shall satisfy it. For example:
Replacing the emergency switch of the Robot Stick with an external emergency switch connected to the
Emergency Switch Port
Replacing the Play/Stop Button of the Robot Stick with user-defined IO or the functions of equivalent
functions.
Safety Manual 30
When this type of design replaces the original function of this product, the system integrator shall be
responsible for the equivalence of the replacement.
3. The machinery equipment provider satisfies this item in normal condition, but in extraordinary conditions, the
satisfying of this item is the responsibility of the system integrator. For example:
The product does not have any concern of being cracked broken in normal operation without collision,
but the situation that causes the robot to be cracked broken / tilted / even fallen in strong collision
environment due to incorrect programming setup and safety setting during operation.
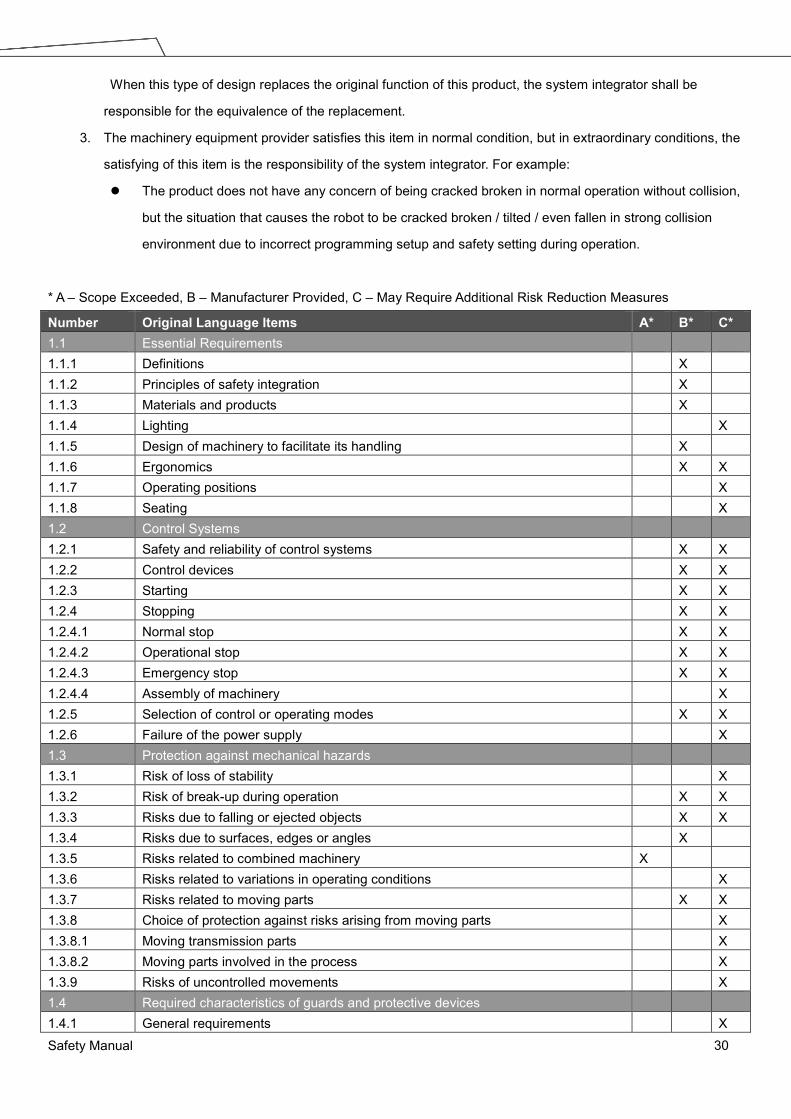
* A – Scope Exceeded, B – Manufacturer Provided, C – May Require Additional Risk Reduction Measures
Number Original Language Items A* B* C* 1.1 Essential Requirements 1.1.1 Definitions X 1.1.2 Principles of safety integration X 1.1.3 Materials and products X 1.1.4 Lighting X 1.1.5 Design of machinery to facilitate its handling X 1.1.6 Ergonomics X X 1.1.7 Operating positions X 1.1.8 Seating X 1.2 Control Systems 1.2.1 Safety and reliability of control systems X X 1.2.2 Control devices X X 1.2.3 Starting X X 1.2.4 Stopping X X 1.2.4.1 Normal stop X X 1.2.4.2 Operational stop X X 1.2.4.3 Emergency stop X X 1.2.4.4 Assembly of machinery X 1.2.5 Selection of control or operating modes X X 1.2.6 Failure of the power supply X 1.3 Protection against mechanical hazards 1.3.1 Risk of loss of stability X 1.3.2 Risk of break-up during operation X X 1.3.3 Risks due to falling or ejected objects X X 1.3.4 Risks due to surfaces, edges or angles X 1.3.5 Risks related to combined machinery X 1.3.6 Risks related to variations in operating conditions X 1.3.7 Risks related to moving parts X X 1.3.8 Choice of protection against risks arising from moving parts X 1.3.8.1 Moving transmission parts X 1.3.8.2 Moving parts involved in the process X 1.3.9 Risks of uncontrolled movements X 1.4 Required characteristics of guards and protective devices 1.4.1 General requirements X

Safety Manual 31
1.4.2 Special requirements for guards X 1.4.2.1 Fixed guards X 1.4.2.2 Interlocking movable guards X 1.4.2.3 Adjustable guards restricting access X 1.4.3 Special requirements for protective devices X 1.5 Risks due to other hazards 1.5.1 Electricity supply X 1.5.2 Static electricity X 1.5.3 Energy supply other than electricity X 1.5.4 Errors of fitting X 1.5.5 Extreme temperatures X 1.5.6 Fire X 1.5.7 Explosion X 1.5.8 Noise X X 1.5.9 Vibrations X 1.5.10 Radiation X 1.5.11 External radiation X 1.5.12 Laser radiation X 1.5.13 Emissions of hazardous materials and substances X X 1.5.14 Risk of being trapped in a machine X 1.5.15 Risk of slipping, tripping or falling X 1.5.16 Lightning X 1.6 Maintenance 1.6.1 Machinery maintenance X 1.6.2 Access to operating positions and servicing points X 1.6.3 Isolation of energy sources X 1.6.4 Operator intervention X 1.6.5 Cleaning of internal parts X 1.7 Information 1.7.1 Information and warnings on the machinery X 1.7.1.1 Information and information devices X X 1.7.1.2 Warning devices X X 1.7.2 Warning of residual risks X 1.7.3 Marking of machinery X 1.7.4 Instructions X 1.7.4.1 General principles for the drafting of instructions X 1.7.4.2 Contents of the instructions X 1.7.4.3 Sales collateral X

Safety Manual 32
Appendix A. TM Robot Stopping Time and Distance for all Series Product Models The stopping time and stopping distance of the Cat.1 stop functions of this product in different speeds and different end
payloads are shown below.
WARNING: Any moving robot requires some distance to stop. When stopping a robot, make sure that there is no interference with other equipment. This requires more distance at high operating speeds or heavier payloads.
TM5-700 Series
Stop Time and Stop Distance Table
Percentage of Maximum
Payload(%) Extension(%) Speed(%)
First joint Second joint Third joint
Stop Time (ms)
Stop Distance (deg)
Stop Time (ms)
Stop Distance (deg)
Stop Time (ms)
Stop Distance (deg)
33
33
33 364 9.00 600 9.29 442 8.97 66 377 17.96 516 18.15 466 17.91 100 381 26.55 657 27.13 486 26.92
66
33 455 8.99 567 9.17 422 8.96 66 531 17.95 594 18.08 457 17.94 100 610 26.34 528 27.72 457 23.41
100
33 367 8.98 534 9.30 432 9.00 66 396 17.94 501 18.19 530 18.02 100 427 26.76 526 27.80 541 28.81
66
33
33 378 9.01 531 9.23 475 8.99 66 401 17.95 547 18.12 478 17.97 100 575 26.75 551 26.99 570 26.91
66
33 496 8.96 529 9.29 433 8.97 66 545 17.96 506 18.14 526 17.98 100 563 26.46 526 28.36 583 27.73
100
33 517 8.94 568 9.38 636 9.08 66 598 17.90 524 18.10 545 18.16 100 614 26.58 575 28.53 527 28.75
100
33
33 565 8.96 585 9.26 567 9.12 66 570 17.92 585 18.16 675 18.28 100 579 26.33 356 30.98 666 27.40
66
33 566 8.95 588 9.34 625 9.28 66 576 17.92 578 18.26 656 18.26 100 570 26.88 343 31.10 550 27.56
100
33 597 8.94 576 9.34 681 9.34 66 593 17.86 516 18.14 555 18.09 100 596 26.00 544 26.45 528 28.80

Safety Manual 33
TM5-900 Series
Stop Time and Stop Distance Table
Percentage of Maximum
Payload(%) Extension(%) Speed(%)
First joint Second joint Third joint
Stop Time (ms)
Stop Distance (deg)
Stop Time (ms)
Stop Distance (deg)
Stop Time (ms)
Stop Distance (deg)
33
33
33 519 8.96 626 9.24 457 8.99
66 512 17.95 555 18.03 475 17.93
100 466 25.68 563 27.20 476 27.09
66
33 374 8.97 598 9.32 444 8.96
66 719 17.95 510 18.11 636 18.12
100 664 26.33 521 27.34 650 27.41
100
33 366 8.98 524 9.25 428 8.97 66 412 17.93 518 18.23 510 18.04 100 442 26.57 508 24.20 498 28.66
66
33
33 508 8.98 660 9.19 629 9.23
66 589 17.97 666 18.20 536 18.09
100 476 26.86 575 27.62 635 27.06
66
33 635 8.93 633 9.27 518 9.00
66 645 18.00 640 18.16 647 18.19
100 668 26.73 569 28.14 676 27.73
100
33 366 9.02 506 9.22 565 8.96 66 479 17.96 522 18.16 514 16.93 100 503 26.58 517 23.61 485 28.62
100
33
33 474 8.99 572 9.15 662 9.21
66 571 18.02 573 18.22 640 18.18
100 568 26.94 563 28.00 637 27.36
66
33 508 9.00 691 9.31 627 9.18
66 566 18.10 641 18.23 652 18.26
100 583 26.72 534 28.45 680 27.56
100
33 549 9.04 542 9.28 436 8.97 66 645 18.16 551 18.11 520 18.13 100 594 26.60 569 23.15 499 28.78

Safety Manual 34
TM14 Series
Stop Time and Stop Distance Table
Percentage of Maximum
Payload(%) Extension(%) Speed(%)
First joint Second joint Third joint
Stop Time (ms)
Stop Distance (deg)
Stop Time (ms)
Stop Distance (deg)
Stop Time (ms)
Stop Distance (deg)
33
33
33 416 6.01 554 6.18 511 8.83
66 662 12.00 650 12.33 621 17.84
100 482 18.24 635 18.58 510 26.32
66
33 374 5.99 637 6.41 527 8.94
66 643 11.99 641 12.34 689 17.66
100 644 18.18 654 18.65 545 26.54
100
33 482 6.04 530 6.27 453 8.42 66 531 11.90 657 12.37 589 18.28 100 624 18.17 626 17.64 575 28.86
66
33
33 680 6.00 623 6.36 598 9.17
66 684 11.98 605 12.20 632 18.91
100 690 18.13 595 18.54 631 27.19
66
33 595 5.99 576 6.35 635 9.28
66 597 11.96 557 12.42 600 18.33
100 581 18.13 557 18.51 599 27.50
100
33 548 5.98 530 6.38 432 8.52 66 568 11.84 576 12.41 567 18.32 100 568 18.25 589 17.75 531 28.77
100
33
33 591 5.99 574 6.34 529 9.10
66 608 11.97 575 12.38 557 18.22
100 582 18.15 585 18.89 556 27.27
66
33 611 5.99 594 6.48 575 9.12
66 615 11.99 616 12.26 671 18.30
100 618 18.23 604 18.98 571 27.34
100
33 570 6.06 568 6.29 575 8.95 66 567 12.06 552 12.34 587 18.20 100 568 18.39 591 17.61 544 28.87

Safety Manual 35
TM12 Series
Stop Time and Stop Distance Table
Percentage of Maximum
Payload(%) Extension(%) Speed(%)
First joint Second joint Third joint
Stop Time (ms)
Stop Distance (deg)
Stop Time (ms)
Stop Distance (deg)
Stop Time (ms)
Stop Distance (deg)
33
33
33 365 6.02 634 6.27 674 9.35
66 364 12.00 557 12.18 588 18.12
100 473 18.20 559 18.48 615 27.26
66
33 368 6.01 563 6.27 584 9.19
66 634 12.01 531 12.24 653 18.30
100 621 18.17 541 18.45 552 27.73
100
33 541 5.98 597 5.22 544 8.94
66 564 12.01 587 12.21 532 18.14
100 591 18.17 592 17.80 569 28.90
66
33
33 662 6.02 644 6.16 632 9.20
66 657 12.01 645 12.26 657 18.10
100 659 18.16 666 18.67 695 27.08
66
33 501 6.03 664 6.12 680 9.36
66 661 12.00 601 12.33 676 18.30
100 661 18.16 588 18.91 570 27.50
100
33 539 6.02 545 6.38 513 9.10
66 543 12.01 545 12.36 520 18.15
100 530 18.40 565 17.88 591 28.82
100
33
33 584 5.99 540 6.19 606 9.17
66 596 11.99 560 12.52 592 18.01
100 603 18.14 535 18.88 572 27.07
66
33 579 6.06 549 6.26 613 9.33
66 581 12.09 564 12.52 606 18.12
100 585 18.27 556 19.24 582 27.75
100
33 580 6.06 558 5.36 608 9.34
66 548 12.12 537 12.39 547 18.15
100 564 18.41 518 18.14 611 27.50

Safety Manual 36
I625-E-02
19888-300 B
1218 (1018)