red hat linux 6.0 - irix7.com
TRANSCRIPT

Red Hat Linux 6.0The Official Red Hat Linux Installation Guide
Red Hat Software, Inc.Durham, North Carolina

Copyright c 1995, 1996, 1997, 1998, 1999 Red Hat Software, Inc.
Red Hat is a registered trademark and the Red Hat Shadow Man logo, RPM, the RPM logo, and Glintare trademarks of Red Hat Software, Inc.Linux is a registered trademark of Linus Torvalds.
Motif and UNIX are registered trademarks of The Open Group.
Alpha is a trademark of Digital Equipment Corporation.
SPARC is a registered trademark of SPARC International, Inc. Products bearing the SPARC trade-marks are based on an architecture developed by Sun Microsystems, Inc.
Netscape is a registered trademark of Netscape Communications Corporation in the United Statesand other countries.TrueType is a registered trademark of Apple Computer, Inc.
Windows is a registered trademark of Microsoft Corporation.
All other trademarks and copyrights referred to are the property of their respective owners.
ISBN: 1-888172-28-2Revision: Inst-6.0-Print-RHS (04/99)
Red Hat Software, Inc.2600 Meridian ParkwayDurham, NC 27713P. O. Box 13588Research Triangle Park, NC 27709(919) 547-0012http://www.redhat.com
While every precaution has been taken in the preparation of this book, the publisher assumes noresponsibility for errors or omissions, or for damages resulting from the use of the information con-tained herein.
The Official Red Hat Linux Installation Guide may be reproduced and distributed in whole or in part,in any medium, physical or electronic, so long as this copyright notice remains intact and unchangedon all copies. Commercial redistribution is permitted and encouraged, but you may not redistributeit, in whole or in part, under terms more restrictive than those under which you received it.
Printed in Canada

Contents
1 New Features of Red Hat Linux 6.0 1
1.1 Installation-Related Enhancements . . . . . . . . . . . . . . . . . . . . . . . . . . . . . 1
1.2 Desktop and Window Managers . . . . . . . . . . . . . . . . . . . . . . . . . . . . . . . 3
1.3 Miscellaneous New Features . . . . . . . . . . . . . . . . . . . . . . . . . . . . . . . . . 4
2 Before You Begin 5
2.1 Getting Documentation . . . . . . . . . . . . . . . . . . . . . . . . . . . . . . . . . . . . 6
2.2 Getting the Right Red Hat Linux Components . . . . . . . . . . . . . . . . . . . . . . . 6
2.3 Things You Should Know . . . . . . . . . . . . . . . . . . . . . . . . . . . . . . . . . . . 10
2.4 Installation Methods . . . . . . . . . . . . . . . . . . . . . . . . . . . . . . . . . . . . . . 14
2.5 Need a Network Boot Disk? . . . . . . . . . . . . . . . . . . . . . . . . . . . . . . . . . 18
2.6 Need a PCMCIA Support Diskette? . . . . . . . . . . . . . . . . . . . . . . . . . . . . . 18
2.7 Installation Classes . . . . . . . . . . . . . . . . . . . . . . . . . . . . . . . . . . . . . . 19
2.8 Disk Partitions . . . . . . . . . . . . . . . . . . . . . . . . . . . . . . . . . . . . . . . . . 21
2.9 A Note About Kernel Drivers . . . . . . . . . . . . . . . . . . . . . . . . . . . . . . . . 31
2.10 If You Have Problems. . . . . . . . . . . . . . . . . . . . . . . . . . . . . . . . . . . . . . 32
2.11 One Last Note . . . . . . . . . . . . . . . . . . . . . . . . . . . . . . . . . . . . . . . . . 32
3 Starting the Installation 33
3.1 The Installation Program User Interface . . . . . . . . . . . . . . . . . . . . . . . . . . . 33
3.2 Starting the Installation Program . . . . . . . . . . . . . . . . . . . . . . . . . . . . . . . 36
3.3 Beginning the Installation . . . . . . . . . . . . . . . . . . . . . . . . . . . . . . . . . . . 39

iv CONTENTS
3.4 Selecting an Installation Method . . . . . . . . . . . . . . . . . . . . . . . . . . . . . . . 41
4 Local Media Installations 43
4.1 Selecting an Installation Method . . . . . . . . . . . . . . . . . . . . . . . . . . . . . . . 43
4.2 Installing from CD-ROM . . . . . . . . . . . . . . . . . . . . . . . . . . . . . . . . . . . 43
4.3 Installing from a Hard Drive . . . . . . . . . . . . . . . . . . . . . . . . . . . . . . . . . 45
4.4 Upgrading or Installing . . . . . . . . . . . . . . . . . . . . . . . . . . . . . . . . . . . . 45
4.5 Installation Class . . . . . . . . . . . . . . . . . . . . . . . . . . . . . . . . . . . . . . . . 46
4.6 SCSI Support . . . . . . . . . . . . . . . . . . . . . . . . . . . . . . . . . . . . . . . . . . 47
4.7 Creating Partitions for Red Hat Linux . . . . . . . . . . . . . . . . . . . . . . . . . . . . 48
4.8 Initializing Swap Space . . . . . . . . . . . . . . . . . . . . . . . . . . . . . . . . . . . . 58
4.9 For Hard Drive Installations Only. . . . . . . . . . . . . . . . . . . . . . . . . . . . . . . 58
4.10 Formatting Partitions . . . . . . . . . . . . . . . . . . . . . . . . . . . . . . . . . . . . . 60
4.11 Selecting and Installing Packages . . . . . . . . . . . . . . . . . . . . . . . . . . . . . . 60
5 Network Installations 65
5.1 Selecting an Installation Method . . . . . . . . . . . . . . . . . . . . . . . . . . . . . . . 65
5.2 Installing via NFS . . . . . . . . . . . . . . . . . . . . . . . . . . . . . . . . . . . . . . . 68
5.3 Installing via FTP . . . . . . . . . . . . . . . . . . . . . . . . . . . . . . . . . . . . . . . 69
5.4 Installing via HTTP . . . . . . . . . . . . . . . . . . . . . . . . . . . . . . . . . . . . . . 69
5.5 Upgrading or Installing . . . . . . . . . . . . . . . . . . . . . . . . . . . . . . . . . . . . 70
5.6 Installation Class . . . . . . . . . . . . . . . . . . . . . . . . . . . . . . . . . . . . . . . . 72
5.7 SCSI Support . . . . . . . . . . . . . . . . . . . . . . . . . . . . . . . . . . . . . . . . . . 74
5.8 Creating Partitions for Red Hat Linux . . . . . . . . . . . . . . . . . . . . . . . . . . . . 74
5.9 Initializing Swap Space . . . . . . . . . . . . . . . . . . . . . . . . . . . . . . . . . . . . 85
5.10 Formatting Partitions . . . . . . . . . . . . . . . . . . . . . . . . . . . . . . . . . . . . . 85
5.11 Selecting and Installing Packages . . . . . . . . . . . . . . . . . . . . . . . . . . . . . . 86
6 Finishing the Installation 91
6.1 Configuring a Mouse . . . . . . . . . . . . . . . . . . . . . . . . . . . . . . . . . . . . . 91

CONTENTS v
6.2 Configuring Networking . . . . . . . . . . . . . . . . . . . . . . . . . . . . . . . . . . . 92
6.3 Configuring the Time Zone . . . . . . . . . . . . . . . . . . . . . . . . . . . . . . . . . . 95
6.4 Selecting Services for Start on Reboot . . . . . . . . . . . . . . . . . . . . . . . . . . . . 95
6.5 Configuring a Printer . . . . . . . . . . . . . . . . . . . . . . . . . . . . . . . . . . . . . 96
6.6 Setting a Root Password . . . . . . . . . . . . . . . . . . . . . . . . . . . . . . . . . . . 102
6.7 Authentication Configuration . . . . . . . . . . . . . . . . . . . . . . . . . . . . . . . . 103
6.8 Creating a Boot Diskette . . . . . . . . . . . . . . . . . . . . . . . . . . . . . . . . . . . 104
6.9 Installing LILO . . . . . . . . . . . . . . . . . . . . . . . . . . . . . . . . . . . . . . . . . 105
6.10 Configuring the X Window System . . . . . . . . . . . . . . . . . . . . . . . . . . . . . 108
6.11 Finishing Up. . . . . . . . . . . . . . . . . . . . . . . . . . . . . . . . . . . . . . . . . . . 109
7 Finding Documentation 111
7.1 On Line Help . . . . . . . . . . . . . . . . . . . . . . . . . . . . . . . . . . . . . . . . . . 111
7.2 Help from the Internet Community . . . . . . . . . . . . . . . . . . . . . . . . . . . . . 117
8 System Configuration 119
8.1 System Configuration With Linuxconf . . . . . . . . . . . . . . . . . . . . . . . . . . . 120
8.2 System Configuration with the Control Panel . . . . . . . . . . . . . . . . . . . . . . . 158
9 Package Management with RPM 173
9.1 RPM Design Goals . . . . . . . . . . . . . . . . . . . . . . . . . . . . . . . . . . . . . . . 174
9.2 Using RPM . . . . . . . . . . . . . . . . . . . . . . . . . . . . . . . . . . . . . . . . . . . 174
9.3 Impressing Your Friends with RPM . . . . . . . . . . . . . . . . . . . . . . . . . . . . . 180
9.4 Other RPM Resources . . . . . . . . . . . . . . . . . . . . . . . . . . . . . . . . . . . . . 182
10 GnoRPM 183
10.1 Starting GnoRPM . . . . . . . . . . . . . . . . . . . . . . . . . . . . . . . . . . . . . . . 184
10.2 The Package Display . . . . . . . . . . . . . . . . . . . . . . . . . . . . . . . . . . . . . 185
10.3 Installing New Packages . . . . . . . . . . . . . . . . . . . . . . . . . . . . . . . . . . . 187
10.4 Configuration . . . . . . . . . . . . . . . . . . . . . . . . . . . . . . . . . . . . . . . . . 188

vi CONTENTS
10.5 Package Manipulation . . . . . . . . . . . . . . . . . . . . . . . . . . . . . . . . . . . . . 191
11 System Administration 195
11.1 Filesystem Structure . . . . . . . . . . . . . . . . . . . . . . . . . . . . . . . . . . . . . . 195
11.2 Special Red Hat File Locations . . . . . . . . . . . . . . . . . . . . . . . . . . . . . . . . 199
11.3 Users, Groups and User-Private Groups . . . . . . . . . . . . . . . . . . . . . . . . . . 199
11.4 Configuring Console Access . . . . . . . . . . . . . . . . . . . . . . . . . . . . . . . . . 203
11.5 The floppy Group . . . . . . . . . . . . . . . . . . . . . . . . . . . . . . . . . . . . . . 205
11.6 User Authentication with PAM . . . . . . . . . . . . . . . . . . . . . . . . . . . . . . . . 206
11.7 Shadow Utilities . . . . . . . . . . . . . . . . . . . . . . . . . . . . . . . . . . . . . . . . 209
11.8 Building a Custom Kernel . . . . . . . . . . . . . . . . . . . . . . . . . . . . . . . . . . 210
11.9 Sendmail . . . . . . . . . . . . . . . . . . . . . . . . . . . . . . . . . . . . . . . . . . . . 214
11.10Controlling Access to Services . . . . . . . . . . . . . . . . . . . . . . . . . . . . . . . . 215
11.11 Anonymous FTP . . . . . . . . . . . . . . . . . . . . . . . . . . . . . . . . . . . . . . . . 215
11.12NFS Configuration . . . . . . . . . . . . . . . . . . . . . . . . . . . . . . . . . . . . . . . 216
11.13The Boot Process, Init, and Shutdown . . . . . . . . . . . . . . . . . . . . . . . . . . . . 217
11.14Rescue Modes . . . . . . . . . . . . . . . . . . . . . . . . . . . . . . . . . . . . . . . . . 228
A Getting Technical Support 229
A.1 An Overview of Our Support Policy . . . . . . . . . . . . . . . . . . . . . . . . . . . . . 229
A.2 Getting Support . . . . . . . . . . . . . . . . . . . . . . . . . . . . . . . . . . . . . . . . 231
A.3 Support FAQ (Frequently Asked Questions) . . . . . . . . . . . . . . . . . . . . . . . . 234
B Making Installation Diskettes 237
B.1 Making a Diskette Under MS-DOS . . . . . . . . . . . . . . . . . . . . . . . . . . . . . 238
B.2 Making a Diskette Under a Linux-like O/S . . . . . . . . . . . . . . . . . . . . . . . . . 238
C An Introduction to Disk Partitions 239
C.1 Hard Disk Basic Concepts . . . . . . . . . . . . . . . . . . . . . . . . . . . . . . . . . . 239
D Package List 247
D.1 Amusements . . . . . . . . . . . . . . . . . . . . . . . . . . . . . . . . . . . . . . . . . . 249

CONTENTS vii
D.2 Applications . . . . . . . . . . . . . . . . . . . . . . . . . . . . . . . . . . . . . . . . . . 252
D.3 Development . . . . . . . . . . . . . . . . . . . . . . . . . . . . . . . . . . . . . . . . . . 288
D.4 Documentation . . . . . . . . . . . . . . . . . . . . . . . . . . . . . . . . . . . . . . . . . 306
D.5 System Environment . . . . . . . . . . . . . . . . . . . . . . . . . . . . . . . . . . . . . 312
D.6 User Interface . . . . . . . . . . . . . . . . . . . . . . . . . . . . . . . . . . . . . . . . . 339
E General Parameters and Modules 351
E.1 CD-ROM parameters . . . . . . . . . . . . . . . . . . . . . . . . . . . . . . . . . . . . . 352
E.2 SCSI parameters . . . . . . . . . . . . . . . . . . . . . . . . . . . . . . . . . . . . . . . . 353
E.3 Ethernet parameters . . . . . . . . . . . . . . . . . . . . . . . . . . . . . . . . . . . . . . 355
F Information Specific to Red Hat Linux/SPARC 361
F.1 Supported Hardware . . . . . . . . . . . . . . . . . . . . . . . . . . . . . . . . . . . . . 361
F.2 Installation Overview . . . . . . . . . . . . . . . . . . . . . . . . . . . . . . . . . . . . . 362
F.3 Console Commands . . . . . . . . . . . . . . . . . . . . . . . . . . . . . . . . . . . . . . 363
F.4 Ramdisk-based Installation Criteria . . . . . . . . . . . . . . . . . . . . . . . . . . . . . 363
F.5 Choosing a Boot Method . . . . . . . . . . . . . . . . . . . . . . . . . . . . . . . . . . . 364
F.6 Choosing an Installation Method . . . . . . . . . . . . . . . . . . . . . . . . . . . . . . 368
F.7 Installation Using a Serial Terminal . . . . . . . . . . . . . . . . . . . . . . . . . . . . . 369
F.8 SILO Configuration . . . . . . . . . . . . . . . . . . . . . . . . . . . . . . . . . . . . . . 369
F.9 Partitioning . . . . . . . . . . . . . . . . . . . . . . . . . . . . . . . . . . . . . . . . . . . 369
G Glossary 371
H Kickstart Installations 381
H.1 Where to Put A Kickstart File . . . . . . . . . . . . . . . . . . . . . . . . . . . . . . . . . 381
H.2 Starting a Kickstart Installation . . . . . . . . . . . . . . . . . . . . . . . . . . . . . . . . 383
H.3 The Kickstart File . . . . . . . . . . . . . . . . . . . . . . . . . . . . . . . . . . . . . . . 383
Index 395
Index of Packages 405

viii CONTENTS

Preface
Welcome! And thanks for your interest in Red Hat Linux. We have what we think is the best Linuxdistribution on the market today, and we work hard to keep it that way. Red Hat Linux 6.0 is thelatest in a long line of software from Red Hat Software. We hope you like it, and that you enjoy usingRed Hat Linux as much as we’ve enjoyed making it for you.
While Linux is popular and well-known by a certain segment of the computer-using population,there are many people out there that are only now hearing about Linux. For this group of people,the following section should provide enough background to help you get acquainted with Linux andRed Hat Software.
What is Linux?
Back in August of 1991, a student from Finland began a post to the comp.os.minix newsgroupwith the words:
Hello everybody out there using minix -
I’m doing a (free) operating system (just a hobby,won’t be big and professional like gnu) for386(486) AT clones.
The student was Linus Torvalds, and the “hobby” he spoke of eventually became what we knowtoday as Linux.
A full-featured POSIX-like operating system, Linux has been developed not just by Linus, but byhundreds of programmers around the world. The interesting thing about this is that this massive,world-wide development effort is largely uncoordinated. Sure, Linus calls the shots where the kernelis concerned, but Linux is more than just the kernel. There’s no management infrastructure; a studentin Russia gets a new motherboard, and writes a driver to support a neat feature the motherboard has.A system administrator in Maryland needs backup software, writes it, and gives it away to anyonethat needs it. The right things just seem to happen at the right time.

x Preface
Another interesting thing is that Linux can be obtained for absolutely no money. That’s right, mostof the software is available (at no charge) to anyone with the time and inclination to download it. Butnot everyone has that much time. . .
What is Red Hat Linux?
Enter a group of programmers based in North Carolina. Their goal was to make it easier for peopleto give Linux a try. Like many other such groups, their approach was to bundle all the necessary bitsand pieces into a cohesive distribution, relieving “newbies” from some of the more esoteric aspects ofbootstrapping a new operating system on their PCs.
However, unlike other distributions, this one was fundamentally different. The difference? Insteadof being a snapshot of a hard disk that had a working copy of Linux on it, or a set of diskettesfrom which different parts of the operating system could be dumped, this distribution was based onpackages.
Software development in the Linux world is fast-paced, so new versions of old software come outcontinually. With other distributions, upgrading software was painful – a complete upgrade usuallymeant deleting everything on your hard drive and starting over.
Each package provided a different piece of software, fully tested, configured, and ready to run. Wantto try a new editor? Download the package and install it. In seconds, you can give it a try. Don’t likeit? Issue a single command, and the package is removed.
If that was all there was to it, this distribution would be pretty nifty. But being package-based meantthere was one additional advantage:
This Linux distribution could be easily upgraded.
By now you’ve probably guessed that the group of programmers in North Carolina is Red Hat Soft-ware, and the package-based distribution is Red Hat Linux.
Since Red Hat Linux’s introduction in the summer of 1994, Linux and Red Hat Software have grownby leaps and bounds. Much has changed; support for more esoteric hardware, huge increases inreliability, and the growing use of Linux by companies around the world.
But much still remains the same. Linux is still developed by people world-wide; Linus is still in-volved. Red Hat Software is still located in North Carolina; still trying to make Linux easier forpeople to use.
And Red Hat Linux is still package-based; always has been, always will be.
Since the release of version 4.0, Red Hat Linux runs on three leading computing platforms: Intelcompatible PCs, Digital Alpha computers, and Sun SPARC equipment. Our unified source tree andthe benefits of RPM (Red Hat Package Management) technology enable us to deploy Red Hat Linuxfor each platform with a minimum of effort. This in turn enables our users to manage and portsoftware between these platforms as easily as possible.
We make Red Hat Linux available by unrestricted FTP from our site and many mirror sites on the

Preface xi
Internet. Red Hat Linux is also available on CD-ROM. For current information on our product offer-ings and links to other Linux resources please check Red Hat Software’s web site athttp://www.redhat.com.
On most systems, Red Hat Linux is easy to install; the installation program can walk you throughthe process in as little as 15 minutes. The system itself is very flexible. With RPM, you can install anduninstall individual software packages with minimal effort. Because of RPM, Red Hat Linux is alsoeasy to maintain – package installations can be verified and corrected, and packages can be installedand uninstalled simply and reliably. Furthermore, Red Hat Linux is easy to administer. Includedare a rich set of administrative tools which reduce the hassle of everyday system administration.Complete source code is provided for the freely distributable components of the system.
An Overview of This Manual
This manual is organized to guide you through the process of installing Red Hat Linux quickly andeasily. Toward that goal, let’s take a quick look at each chapter to help you get acclimated:
Chapter 1, New Features Of Red Hat Linux 6.0 contains information concerning new functional-ity that has been added to Red Hat Linux 6.0.
Chapter 2, Before You Begin contains information on tasks you should perform prior to startingthe Red Hat Linux installation.
Chapter 3, Starting the Installation contains detailed instructions for startingthe Red Hat Linux installation process.
Chapter 4, Local Media Installations contains instructions on installing Red Hat Linux from aCD-ROM or hard drive.
Chapter 5, Network Installations contains instructions on installing Red Hat Linux via NFS, FTP,or HTTP.
Chapter 6, Finishing the Installation contains instructions on the last steps required to completethe installation process.
Chapters 7 – 11 explain how to find documentation on your system, and how to use the varioussystem management and administration tools which accompany Red Hat Linux. They alsoinclude an explanation of what’s special about your Red Hat Linux system, including wherespecial files live and more.
Appendixes contain extra information about Red Hat Linux, including an explanation of Red HatSoftware’s support offerings, packages lists, and more.

xii Preface
Quick Start Information
Those of you that have installed Red Hat Linux/Intel before and are in a hurry to get started needonly boot from a boot diskette (or the Red Hat Linux/Intel CD-ROM, if your computer supportsbooting directly from CD-ROM). There are two separate boot disks, one for CD-ROM and hard driveinstallations and another for NFS, FTP, and HTTP installations1. Next, select the desired installationmethod. If you will be using a PCMCIA device during the installation, you will need to use thePCMCIA support disk2.
If you are attempting to install Red Hat Linux for either the Alpha or the SPARC, you really shouldread Chapter 2 on page 5. It will refer you to information specific to your non-Intel-based system.
Upgrading from a Prior Version of Red Hat Linux
The installation process for Red Hat Linux 6.0 includes the ability to upgrade from prior versionsof Red Hat Linux (2.0 through 5.2, inclusive) which are based on RPM technology. Upgrading yoursystem installs the modular 2.2.x kernel as well as updated versions of the packages that are installedon your machine. The upgrade process preserves existing configuration files using a .rpmsaveextension (e.g., sendmail.cf.rpmsave) and leaves a log telling what actions it took in/tmp/upgrade.log. As software evolves, configuration file formats can change, so you shouldcarefully compare your original configuration files to the new files before integrating your changes.
A Word From the Developers
We would like to thank all our beta testers for entrusting their systems to early versions of Red HatLinux and for taking the time to submit bug reports from the front, especially those of you who havebeen with Red Hat since the “Halloween” release and earlier. We would also like to thank LinusTorvalds and the hundreds of developers around the world for creating, truly, one of the wonders ofdistributed development.
And, again, we’d like to thank you for your interest in Red Hat Linux!
The Red Hat Development Team
1If you need a boot disk for network type installations, you will have to create one. See section 2.5 on page 18for that informtaion
2If you will be using a PCMCIA device during the install you will need to create a PCMCIA support disk.Section 2.6 on page 18 will describe how that disk is made

Preface xiii
Notes from the Editor
Our evolutionary process of expanding the scope of this Installation Guide continues. As before,we’ve updated the chapters related to the actual installation process. We’ve also updated the NewFeatures chapter to reflect all the good stuff that’s been added to Red Hat Linux 6.0. We consider thisto be “business as usual.”
We’ve also made some changes as a direct result of customer feedback. Some people have ex-pressed confusion over all the different terms, abbreviations and acronyms that seem to surroundcomputer technology in general, and Linux in particular. For those people, we’ve added a glossary.While it’s not our goal to include a complete data processing dictionary with every copy of RedHat Linux, if you think a particular word should be present but is not, feel free to let us know [email protected].
As the linuxconf system configuration tool continues to mature, we’ve created a new system con-figuration chapter containing task-based linuxconf documentation, as well as those vestiges of thecontrol-panel tools that still remain. Our goal is to continue adding linuxconf documentation; whatyou see here is just a first step in that process.
The package list has proven to be quite popular; this time we’ve improved it by adding icons showingwhether a given package is part of a pre-defined set of packages.
All of this has resulted in the Installation Guide putting on a little weight. This is a trend that weexpect to continue, which leads us right into the next subject. . .
We Need Feedback!
If you spot a typo in the Installation Guide, or if you’ve thought of a way to make this manual better,we’d love to hear from you! Be sure to mention the manual’s identifier:
Inst-6.0-Print-RHS (04/99)
That way we’ll know exactly which version of the guide you have.
Please send mail to:
If you have a suggestion, try to be as specific as possible when describing it. If you’ve found an error,please include the section number and some of the surrounding text so we can find it easily. We maynot be able to respond to every message sent to us, but you can be sure that we’ll be reading themall!

xiv Preface
I Couldn’t Have Done it Without. . .
Many thanks go out to the past authors of this manual. A great deal of their work is still here.Thanks also go out to the developers and testers who have patiently listened to my questions andeven more patiently given me answers. Without their help, I wouldn’t have been able to put thismanual together.
A ”BIG” thank you also goes out to two of the members of the documentation team. Paul Gallagher,our editor, has done a wonderful job of proof reading and editing this manual. He has also writtenthe GnoRPM chapter of this book and the Official Red Hat Linux Getting Started Guide. EdwardBailey, “fearless leader” and head of the documentation team, has done a fabulous job at keepingme up to speed and helping me go in the right direction. He is also credited with the new partitionappendix in this Installation Guide. Without his leadership and guidance, this would have been animpossible task for me. You both have been wonderful to work with and I just can’t say thank youenough.
Thanks are also due to all the readers of past Installation Guides. Without their corrections, sug-gestions and even occassional praises, I wouldn’t know if I were on the right track. Your feedbackhas been incorporated as much as possible (pagecount and deadlines permitting). Please keep thefeedback coming.
Many thanks to Cynthia Dale for updating the Frequently Asked Questions chapter and Jeff Goldinfor correlating it for publication. Unfortuntaly, we could not print it due to lack of space in themanual. However, you can find the most up-to-date FAQ athttp://www.redhat.com/knowledgebase/index.html.
Finally, thanks goes out to the support group at Red Hat Software. They have given many insightfulsuggestions regarding this manual, based on extensive experience with thousands of Red Hat Linuxcustomers. If you find yourself going through this Installation Guide with greater ease, a large partof that is due to all of their effort.
Thank you to everyone at Red Hat Software for your help and support.
Sandra A. Moore

1New Features of Red Hat Linux6.0
This chapter describes features that are new to Red Hat Linux 6.0.
1.1 Installation-Related Enhancements
Here is a list of the many changes which have been made in order to make the Red Hat Linuxinstallation process even easier:
� New HTTP Installation Method
� “Out-of-the-Box” Processor Optimized Kernel Support
� New Boot Disks
� Improved Package Selection Screen
� New Authentication Configuration Screen
� Xconfigurator Now Part of Install
Let’s take a look at each one in a bit more detail.

2 New Features of Red Hat Linux 6.0
New HTTP Installation Method
The Red Hat Linux 6.0 installation program has added HTTP to its available list of network-classinstallations. Similar to the way you would perform an FTP installation, you are now able to log into a website and install Linux.
For more information on network-class installations, please refer to Chapter 5 on page 65.
‘Out-of-the-Box’ Processor Optimized Kernel Support
Optimized kernels for the Pentium Pro, Pentium II, and Pentium III processors and APM enabled ker-nels are now supported. Additionally, the Red Hat Linux 6.0 installation now has SMP motherboardsupport. The installation process will probe your system and if more than one processor is detected,an SMP enabled kernel will be automatically installed.
New Boot Disks
There are now two boot disks for Red Hat Linux. One is for installing from local media (CD-ROMinstalls, hard drive installs) and the other is for network based installs (NFS, FTP, or HTTP).
Additionally, the supplemental disk has been replaced by the PCMCIA support disk. All installmethods now require only one disk, unless you need PCMCIA support during the install. If needed,you will be prompted for the PCMCIA support disk.
Improved Package Selection Screen
Individual package selection has been improved, with collapsible and expandable tree menus toallow easy selection of packages during the installation process.
New Authentication Configuration Screen
The Authentication Configuration screen gives you the option of enabling three different types ofpasswords:
� Enable NIS – allows you to run a group of computers in the same Network InformationService domain with a common password and group file. There are two options here to choosefrom:
– NIS Domain – this option allows you to specify which domain or group of computersyour system will belong to.
– NIS Server – this option causes your computer to use a specific NIS server, rather than“broadcasting” a message to the local area network asking for any available server tohost your system.

1.2 Desktop and Window Managers 3
� Enable Shadow Passwords – provides a very secure method of retaining passwords for you.
� Enable MD5 Passwords – allows passwords up to 256 characters, rather than the standardeight.
Xconfigurator Now Part of the Install
Xconfigurator is now run at the very end of the install, after all filesystem components have beeninstalled. In the past, if Xconfigurator were to hang, you would likely have to start the installationover. Now it is possible to boot Red Hat Linux and configure X after the installation has completed.
Additionally, Xconfigurator tests X during the installation to make sure it is configured correctlyfor your system. Xconfigurator also offers you the option of booting into the X Window Systemimmediately after the installation.
1.2 Desktop and Window Managers
Red Hat Linux 6.0 provides additional choices in graphical user interfaces.
� GNOME with Enlightenment Included
� KDE Included
GNOME with Enlightenment Included
GNOME is now included in Red Hat Linux 6.0 as the default desktop manager. GNOME featuresa graphical interface which enables users to easily use and configure their systems. GNOME alsosupports Drag and Drop protocols which help you use applications that are not GNOME-compliant.
Enlightenment is included as the default window manager. Enlightenment provides a window man-ager with a great graphical interface, and is designed to allow the user to manipulate it in any wayfashionable.
KDE Included
Red Hat Linux 6.0 also includes KDE. A very popular and powerful desktop environment, KDEoffers a great graphical interface, window manager, file manager and much more.

4 New Features of Red Hat Linux 6.0
1.3 Miscellaneous New Features
Other miscellaneous features of Red Hat Linux 6.0 are:
� Enhanced Font Support
� Enhanced Initscripts
� Switchdesk Feature
� Latest Stable 2.2 Kernel Included
Enhanced Font Support
TrueType fonts are now supported in Red Hat Linux 6.0.
Dynamic font loading is now supported and can be used as a font-server on a local machine.
Please Note: Those of you who upgrade will not have this feature until you edit your fontpaths. Todo this you must edit the /etc/X11/XF86Config file. Scroll down until you see fontpaths listed.Replace them all with FontPath ‘‘tcp/localhost:7100’’. You must also verify that xfs, theX Font Server, is running. By issuing the command /sbin/chkconfig --add xfs you will insurethat it starts at system boot time.
Enhanced Initscripts
While booting and shutting down the system, Red Hat Linux 6.0 users are now able to easily see if aservice has failed by displaying OK, PASSED or FAILED at the right-hand side of the screen.
Switchdesk Feature
Switchdesk, just as the name implies, allows you to easily switch between different desktop environ-ments such as GNOME, AnotherLevel or KDE. Simply run “switchdesk” and choose your desiredinterface.
Latest Stable 2.2 Kernel Included
Red Hat Linux 6.0 includes the latest stable version of the 2.2 Linux kernel.

2Before You Begin
While installing Red Hat Linux is a straightforward process, taking some time prior to starting theinstallation can make things go much more smoothly. In this chapter, we’ll discuss the steps thatshould be performed before you start the installation.
Please Note: If you are currently running a version 2.0 (or greater) Red Hat Linux system, you canperform an upgrade. Skim this chapter to review the basic issues relating to installation, and readthe following chapters in order, following the directions as you go. The upgrade procedure startsout identically to the installation procedure; you will be directed to choose an installation or upgradeafter booting the installation program and answering a few questions.
There are five things you should do prior to installing Red Hat Linux:
1. Make sure you have sufficient documentation to effectively use your Red Hat Linux systemafter the installation.
2. Make sure you have access to the Red Hat Linux components required for installation.
3. Make sure you know your computer’s hardware configuration and networking information.
4. Decide, based on the first two tasks, what method you will use to install Red Hat Linux.
5. Determine where on your hard drive(s) Red Hat Linux will reside.
Let’s start by making sure you have the documentation you’ll need after you install Red Hat Linux.

6 Before You Begin
2.1 Getting Documentation
Red Hat Linux is a powerful, full-featured operating system. Unless you’re a Linux wizard, you’regoing to need additional documentation to make the most of your Red Hat Linux system. Westrongly suggest reading over the Official Red Hat Linux Getting Started Guide to see what it canoffer you in terms of both use and support. It has been written guide you through using Red HatLinux once the installation has been completed.
Everyone should review the Official Red Hat Linux Getting Started Guide for more information onavailable Linux documentation as well as using Red Hat Linux 6.0 to its full potential. While manypeople will find the resources described in the Getting Started Guide to be very helpful, people whoare just starting to use Linux will likely need additional information. The information that will bemost helpful to you depends on your level of Linux expertise:
New To Linux – If this is your first time using Linux (or any Linux-like operating system, forthat matter), you’ll need solid introductory information on basic UNIX concepts. For exam-ple, O’Reilly and Associates (http://www.ora.com/) produce a wide variety of Linux andUNIX-related books. Give their more general titles a try.
Some Linux Experience – If you’ve used other Linux distributions (or a Linux-like operatingsystem), you’ll probably find what you’re looking for in some of the more in-depth referencematerial available. For example O’Reilly’s more specialized titles are valuable when you needa lot of information on a particular subject.
Old Timer – If you’re a long-time Red Hat Linux user, you probably don’t need us telling you whatdocumentation to read. Thanks for reading this far!
2.2 Getting the Right Red Hat Linux Components
If you’ve purchased the Red Hat Linux boxed set, you’re ready to go! However, mistakes occasion-ally happen, so now is a good time to double-check the contents of your boxed set. If you haven’tpurchased a Red Hat Linux boxed set, skip to Section 2.2.3 on page 9.
2.2.1 Contents of the Red Hat Linux Boxed Set
The Red Hat Linux boxed set contains the following items:
� The Official Red Hat Linux Installation Guide
� Official Red Hat Linux Getting Started Guide
ALPHA
� The Alpha Installation Addendum.

2.2 Getting the Right Red Hat Linux Components 7
� Red Hat Linux CDs 1 and 2.
INTEL
� The Linux Applications CD Pack.
� INTELBoot diskette.
� License and Registration information, located on the insert in the jewel case.
Let’s take a quick look at each item:
Installation Guide
The Official Red Hat Linux Installation Guide is what you’re currently reading. It contains the infor-mation necessary to install Red Hat Linux. In addition, it contains information about aspects of theoperating system that are unique to Red Hat Linux.
Official Red Hat Linux Getting Started Guide
The Official Red Hat Linux Getting Started Guide contains information on what to do after the in-stallation has taken place. It will be referred to on many occasions in this text. We believe it is bothwell written and informative, and will guide you through the necessary steps of actually using yoursystem once the install is in place.
The Official Red Hat Linux Getting Started Guide covers topics ranging from the learning the basicsof your system to navigating your system to Gnome.
Alpha Installation Addendum
ALPHAThe Red Hat Linux Alpha Installation Addendum contains additional information of interest toowners of Alpha-based computer systems. It contains information that will make installation ofRed Hat Linux more straightforward. (The Alpha Installation Addendum is only included in RedHat Linux/Alpha boxed sets.)
CDs 1 and 2
These two Compact Discs contain the entire Red Hat Linux distribution, including source code. CD1 contains all the binary packages built for the type of computer (Intel, Alpha, or SPARC) that you

8 Before You Begin
have . CD 2 contains the source packages that were used to build the binary packages on CD 1.
Linux Applications CD Pack
INTELThis Compact Disc pack contains demonstration versions of a number of commercial Linux soft-ware products. For more information, please refer to the README file in this pack.Please Note: This CD-ROM pack and its contents are completely unsupported by Red Hat Software.All questions and issues concerning any software in this pack should be directed to the responsiblecompany, and not Red Hat Software.
Boot Diskette
INTELThis diskette is used to start the installation process for Red Hat Linux/Intel. Depending on yourcomputer’s configuration and the type of installation you select, you may or may not need theboot diskette. In addition, you may require a support diskette, again depending on your system’shardware configuration, and the installation method you choose. When we discuss the differentinstallation methods later in this chapter, we’ll explain which diskettes are needed for each type ofinstallation, and give you instructions for producing any diskettes you require.
ALPHAAlpha owners should refer to the Red Hat Linux Alpha Installation Addendum for information onwhich diskettes are required.
SPARCSPARC owners should turn to Section F.5.1 on page 365 for information on their diskette needs.
License and Registration Information
The CD-ROM jewel case insert includes the license terms for Red Hat Linux, in addition to the licenseterms for any commercial software that may be included on the Red Hat Linux CD.
In addition, information about registering your copy of Red Hat Linux with Red Hat Software canbe found here. Once registered, you can receive installation support. Red Hat Software’s installationsupport program is discussed in Appendix A on page 229.
Please Note: There is an alphanumeric registration string printed on the CD-ROM case. It is usedto register you for Red Hat Software’s installation support. Please make sure you don’t lose yourregistration string – you won’t be able to get installation support without it!

2.2 Getting the Right Red Hat Linux Components 9
2.2.2 Missing Something?
If you’ve purchased the Official Red Hat Linux boxed set from Red Hat Software, (or one of itsdistributors) and you’re missing one or more of the items listed above, please let us know!
One thing to keep in mind is that Red Hat Software partners with companies (international anddomestic) so that we can make Red Hat Linux available to you in the most convenient form. Becauseof this, you might find that your Red Hat Linux boxed set may not have been actually produced byRed Hat Software.
Not sure how to identify our official boxed set? Here’s how: The bottom of our box has an ISBNnumber next to one of the bar codes. That ISBN number should be in the form:
1-888172-xx-y
(Where xx and y may vary.) If your box has an ISBN number in this form, and you’re missing some-thing, feel free to call us at 1-888-733-4281 (+1-919-547-0012 outside the USA), or to send mail [email protected].
If your box has a different ISBN number (or none at all), you’ll need to contact the company thatproduced your boxed set. Normally, third-party producers will include their logo and/or contactinformation on the outside of the box; an official Red Hat Linux boxed set has only our name andcontact info on the outside. . .
If your Red Hat Linux boxed set is complete, please skip ahead to section 2.2.4 on the next page.
2.2.3 No Boxed Set? No Problem!
Of course, not everyone purchases a Red Hat Linux boxed set. It’s entirely possible to install RedHat Linux using a CD created by another company, or even via FTP. In these cases, you may need tocreate one or more diskettes to get started.
INTELFor people installing Red Hat Linux/Intel, you’ll need a boot diskette, and if using a PCMCIAdevice during the installation, a PCMCIA support diskette. It may also be possible to start theinstallation directly from the CD, under certain conditions. We’ll discuss this in more detail whenwe outline the various installation methods available.
ALPHAPeople with Alpha-based systems should refer to the Red Hat Linux Alpha Installation Addendumfor additional information on the diskettes they may need.
SPARCSPARC owners should refer to section F.5.1 on page 365 for information on which diskettes they’llneed.

10 Before You Begin
2.2.4 Checking for Updated Diskette Images
From time to time, we find that the installation may fail, and that a revised diskette image is requiredin order for the installation to work properly. In these cases, we make special images available viathe Red Hat Linux Errata.
Since this is a relatively rare occurrence, you will in general save time if you try to use the standarddiskette images first, and then review the Errata only if you experience any problems completing theinstallation.
There are two ways to review the Errata:
1. World Wide Web – By pointing your web browser at http://www.redhat.com/errata,you can read the Errata on-line, and download diskette images easily.
2. Electronic Mail – By sending an empty mail message to [email protected], you will re-ceive a mail message containing the complete Errata. Also included are URLs to each updatedpackage and diskette image in the Errata. By using these URLs, you can then download anynecessary diskette images. Remember to use binary mode when transferring a diskette image!
For now, concentrate only on the Errata entries that include new diskette images (the filenames al-ways end in .img). If you find an entry that seems to apply to your problem, get a copy of thediskette images, and create them using the instructions in Appendix B on page 237.
2.3 Things You Should Know
In order to prevent any surprises during the installation, you should collect some information beforeattempting to install Red Hat Linux. You can find most of this information in the documentation thatcame with your system, or from the system’s vendor or manufacturer.
Please Note: The most recent list of hardware supported by Red Hat Linux can be found at RedHat Software’s World Wide Web site at http://www.redhat.com/hardware. It’s a good idea tocheck your hardware against this list before proceeding.
2.3.1 Basic Hardware Configuration
You should have a basic understanding of the hardware installed in your computer, including:
� hard drive(s) – Specifically, the number, size, and type. If you have more than one, it’s helpfulto know which one is first, second, and so on. It is also good to know if your drives are IDEor SCSI. If you have IDE drives, you should check your computer’s BIOS to see if you areaccessing them in LBA mode. Please refer to your computer’s documentation for the properkey sequence to access the BIOS. Note that your computer’s BIOS may refer to LBA mode by

2.3 Things You Should Know 11
other names, such as “large disk mode”. Again, your computer’s documentation should beconsulted for clarification.
� memory – The amount of RAM installed in your computer.
� CD-ROM – Most importantly, the unit’s interface type (IDE, SCSI, or other interface) and, fornon-IDE, non-SCSI CD-ROMs, the make and model number. IDE CD-ROMs (also known asATAPI) are the most common type in recently manufactured, PC-compatible computers.
� SCSI adapter (if one is present) – The adapter’s make and model number.
� network card (if one is present) – The card’s make and model number.
� mouse – The mouse’s type (serial, PS/2, or bus mouse), protocol (Microsoft, Logitech, Mouse-Man, etc.), and number of buttons; also, for serial mice, the serial port it is connected to.
On many newer systems, the installation program is able to automatically identify most hardware.However, it’s a good idea to collect this information anyway, just to be sure.
ALPHAIn addition to the latest hardware compatibility list on Red Hat Software’s website, owners ofAlpha-based systems should refer to the Red Hat Linux Alpha Installation Addendum for moreinformation on supported hardware configurations.
SPARCIn addition to the latest hardware compatibility list on Red Hat Software’s website, SPARC ownersshould refer to Section F.1 on page 361 for a list of supported hardware.
Learning About Your Hardware With Windows R
If your computer is already running Windows 9x, you can use the following procedure to get addi-tional configuration information:
� With Windows running, click on the “My Computer” icon using the secondary (normally theright) mouse button. A pop-up menu should appear.
� Select “Properties.” The “System Properties” window should appear (see Figure 2.1 on thenext page). Note the information listed under “Computer:” – in particular the amount ofRAM listed.
� Click on the “Device Manager” tab. You will then see a graphical representation of your com-puter’s hardware configuration. Make sure the “View devices by type” button is selected.
At this point, you can either double-click on the icons (or single-click on the plus sign�
�
�
�+ ) to look
at each entry in more detail (see Figure 2.2 on page 13). Look under the following icons for moreinformation:

12 Before You Begin
Figure 2.1: Windows System Properties Window
� Disk drives – You will find the type (IDE or SCSI) of hard drive here. (IDE drives will normallyinclude the word “IDE,” while SCSI drives won’t.)
� Hard disk controllers – You can get more information about your hard drive controller here.
� CDROM – Here is where you’ll find out about any CD-ROM drives connected to your com-puter.
Please Note: In some cases, there may be no CD-ROM icon, yet your computer has a func-tioning CD-ROM drive. This is normal, depending on how Windows was originally installed.In this case, you may be able to learn additional information by looking at the CD-ROM driverloaded in your computer’s config.sys file.
� Mouse – The type of mouse present on your computer can be found here.
� Display adapters – If you’re interested in running the X Window System, you should writedown the information you find here.
� Sound, video and game controllers – If your computer has sound capabilities, you’ll findmore information about that here.
� Network adapters – Here you’ll find additional info on your computer’s network card (if youhave one).

2.3 Things You Should Know 13
Figure 2.2: Device Manager Under Windows 95
� SCSI controllers – If your computer uses SCSI peripherals, you’ll find additional info on theSCSI controller here.
While this method is not a complete substitute for opening your computer’s case and physicallyexamining each component, in many cases it can provide sufficient information to continue with theinstallation.
Please Note: This information can also be printed by clicking on the “Print. . . ” button. A secondwindow will appear, allowing you to choose the printer, as well as the type of report (the “All Devicesand System Summary” report type is the most complete).
2.3.2 Video Configuration
If you will be installing the X Window System, you should also be familiar with the following:
� your video card – The card’s make and model number (or the video chipset it uses), andthe amount of video RAM it has. (Most PCI-based cards are auto-detected by the installationprogram.)

14 Before You Begin
� your monitor – The unit’s make and model number, along with allowable ranges for horizon-tal and vertical refresh rates.
2.3.3 Network-related Information
If you will be connected to a network, be sure you know your:
� IP address – Usually represented as a set of four numbers separated by dots, such as10.0.2.15.
� netmask – Another set of four numbers separated by dots. An example netmask would be255.255.248.0.
� gateway IP address – Yet another set of four dot-separated numbers. For instance,10.0.2.254.
� one or more name server IP addresses – One or more sets of dot-separated numbers.10.0.2.1 might be the address of a name server.
� domain name – The name given to your organization. For instance, Red Hat Software has adomain name of redhat.com.
� hostname – The name of your computer. A computer might be named pooh, for instance.
Please Note: The information given above is an example only! Do not use it when you install RedHat Linux! If you don’t know the proper values for your network, ask your network administrator.
2.4 Installation Methods
ALPHAAlpha owners should take a moment to review the Red Hat Linux Alpha Installation Addendum,particularly the first chapter. It covers aspects of the installation process that differ from a typicalRed Hat Linux/Intel installation.
SPARCPeople with SPARC systems should take a moment to read Appendix F on page 361. This appendixcovers aspects of the installation process that differ from a typical Red Hat Linux/Intel installation.
You can install or upgrade Red Hat Linux via any of several different methods. Each method worksbest in different situations, and has different requirements. But before we discuss each installationmethod, let’s take a look at an issue that may affect some of you.

2.4 Installation Methods 15
2.4.1 PCMCIA Support During the Installation
INTELThis section is specific to Intel-based computers only
Most Intel-based laptop computers support PCMCIA (also known as PC Card). Computers thatsupport PCMCIA devices contain a controller having one or more slots in which a PCMCIA devicecan be installed. These devices may be modems, LAN adapters, SCSI adapters, and so on.
When installing Red Hat Linux/Intel on a PCMCIA-capable computer, it is important to note if aPCMCIA device will be used during installation. For example, if you want to install Red Hat Linux/-Intel from a CD-ROM, and your CD-ROM drive is connected to a PCMCIA adapter, the installationprogram will require PCMCIA support. Likewise, if you are going to use one of the network-basedinstallation methods, you will need PCMCIA support if your network adapter is PCMCIA-based.
Please Note: You don’t need install-time PCMCIA support if you’re installing Red Hat Linux on alaptop, and using the laptop’s built-in CD-ROM drive.
PCMCIA support is dependent on two things:
1. The type of PCMCIA controller in your computer system.
2. The type of PCMCIA device that you wish to use during the installation.
While nearly every PCMCIA controller and most popular PCMCIA devices are supported, there aresome exceptions. For more information, please consult the Red Hat Linux Hardware CompatibilityList at http://www.redhat.com/hardware.
The main thing to keep in mind is that if you require install-time PCMCIA support, you will need asupport diskette. We’ll show you how to do this after you’ve determined which installation methodis best for you.
ALPHAPCMCIA support is not available for the Alpha.
SPARCPCMCIA support is not available for the SPARC.
2.4.2 Installing From a CD-ROM
If you have a Red Hat Linux CD-ROM, and your computer has a supported CD-ROM drive, youshould consider this installation method. Installing directly from CD-ROM is the most straightfor-ward approach. When installing from CD-ROM, the packages you select are read from the CD-ROM,and are installed on your hard drive.

16 Before You Begin
How To Do It
As the name implies, you’ll need a Red Hat Linux CD-ROM, a supported CD-ROM drive, and ameans of starting the installation program.
INTELIntel systems will need to use the boot diskette (and the PCMCIA support diskette if a PCMCIAdevice is used during the install). There is an alternate method of installing from CD-ROM that usesno diskettes, but requires that the system be running DOS. We’ll discuss this approach (known asautoboot) in Section 3.2.1 on page 38. For now, note that PCMCIA support is not available whenusing autoboot.Please Note: The Red Hat Linux/Intel CD-ROM can also be booted by newer computers thatsupport bootable CD-ROMs. Not all computers support this feature, so if yours can’t boot fromCD-ROM, you’ll have to use a boot diskette (or autoboot from DOS) to get things started. Note thatyou may need to change BIOS settings in your computer to enable this feature.
If you’ve determined that this installation method is most applicable to your situation, please skipahead to Section 2.6 on page 18.
2.4.3 Installing From an FTP Site
If you don’t have a Red Hat Linux CD-ROM or a CD-ROM drive, but you do have network access,then an FTP installation may be for you. When installing via FTP, the Red Hat Linux packages youselect are downloaded (using FTP) across the network to your computer, and are installed on yourhard drive.
How To Do It
When doing an FTP install, you’ll need LAN-based access to a network; a dialup connection viamodem won’t cut it. If your Local Area Network has Internet access, you can use one of the manyFTP sites that mirror Red Hat Linux. You can find a list of mirror sites athttp://www.redhat.com/mirrors.html.
If your LAN doesn’t have Internet access, all is not lost. If there is a computer on your LAN that canaccept anonymous FTP requests, simply put a copy of the Red Hat Linux distribution on that system,and you’re ready to go.
Please Note: Your FTP server must be able to handle long filenames.
INTELFor an FTP installation, you must use the network installation boot diskette specific to, and a PCM-CIA support diskette if using a PCMCIA device during the installation. You will need to have avalid nameserver configured or you must specify the IP address of the FTP server you will be using.You will also need the path to the Red Hat Linux directory on the FTP server.

2.4 Installation Methods 17
If you’ve determined that this installation method is most applicable to your situation, please skipahead to Section 2.6 on the following page.
2.4.4 Installing From an HTTP Site
If you don’t have a Red Hat Linux CD-ROM or a CD-ROM drive, but you do have network access,then an HTTP installation may be for you. When installing via HTTP, the Red Hat Linux packagesyou select are downloaded (using HTTP) across the network to your computer, and are installed onyour hard drive.
How To Do It
INTELFor an HTTP installation, you must use the network installation boot disk and if you are using aPCMCIA device during the installation, a PCMCIA support diskette. You will need to have a validnameserver configured or you must specify the IP address of the HTTP server you will be using.You will also need the path to the Red Hat Linux directory on the HTTP server.
If you’ve determined that this installation method is most applicable to your situation, please skipahead to Section 2.6 on the next page.
2.4.5 Installing From an NFS Server
If your system doesn’t have a CD-ROM drive, but you do have network access, then an NFS installa-tion may be for you. When installing via NFS, the Red Hat Linux packages you select are NFS-servedto your computer from an NFS server system. The packages are then installed on your hard drive.
How To Do It
If you wish to perform an NFS installation, you will need to mount the Red Hat Linux CD-ROMon a machine that supports ISO-9660 file systems with Rock Ridge extensions. The machine mustalso support NFS. Export the CD-ROM file system via NFS. You will need to have a nameserverconfigured, or know the NFS server’s IP address, as well as the path to the exported CD-ROM.
Please Note: Your NFS server must be able to handle long filenames.
INTELFor an NFS installation, you’ll need a boot diskette only.
If you’ve determined that this installation method is most applicable to your situation, please skipahead to Section 2.6 on the following page.

18 Before You Begin
2.4.6 Installing From a Hard Drive
If none of the other installation methods will work for you, but you have some means of gettingthe Red Hat Linux package files written to your system’s hard drive, you can install from your harddrive. In this installation method, the Red Hat Linux packages you select are read from one partitionon a hard drive, and are installed on another partition (or set of partitions).
How To Do It
The hard drive installation method requires a bit of up-front effort on your part, as you must copyall the necessary files to a partition before starting the Red Hat Linux installation program. You mustfirst create a RedHat directory at the top level of your directory tree. Everything you will installshould be placed in that directory. First copy the base subdirectory and its contents.
Next, copy the packages you want to install to another subdirectory called RPMS. You can use avail-able space on an existing DOS partition or a Linux partition that is not required in the install proce-dure (for example, a partition that would be used for data storage on the installed system).
INTELIf you are using a DOS filesystem, you will not be able to use the full Linux filenames for the RPMpackages. The installation process does not care what the filenames look like, but it is a good ideathat you keep track of them.You’ll need a boot diskette, and if using a PCMCIA device during the installation, a PCMCIAsupport diskette, when installing from a hard drive.
2.5 Need a Network Boot Disk?
If you are performing an installation via FTP, HTTP, or NFS you will need to create your own networkboot diskette. The network boot diskette image file is bootnet.img, and is located in the imagesdirectory on your Red Hat Linux/Intel CD. Please turn to Appendix B on page 237 and follow theinstructions there. Then, return here, and read on.
2.6 Need a PCMCIA Support Diskette?
INTELThis section is specific to Intel-based computers only. If you are using an Alpha or SPARC computer,please skip ahead to 2.8 on page 21.
Here’s a checklist that you can use to see if you’ll need to create a PCMCIA support diskette:

2.7 Installation Classes 19
� Installing From a PCMCIA-Connected CD-ROM – If you’ll be installing Red Hat Linux froma CD-ROM, and your CD-ROM drive is attached to your computer through a PCMCIA card,you’ll need a support diskette.
� Installing using a PCMCIA Network Card – If you will be using a PCMCIA network adapterduring the installation, you’ll need a support diskette.
If you have determined you will need a support diskette, you will have to make one. The PCMCIAsupport diskette image file is pcmcia.img, and is located in the images directory on yourRed Hat Linux/Intel CD. Please turn to Appendix B on page 237 and follow the instructions there.Then, return here, and read on.
2.7 Installation Classes
Red Hat Linux includes defines three different classes, or types of installations. They are:
� Workstation
� Server
� Custom
These classes give you the option of simplifying the installation process (with some loss of configu-ration flexibility), or retaining complete flexibility with a slightly more complex installation process.Let’s take a look at each class in more detail, so you can see which one is right for you.
Only the custom-class install allows you complete flexibility. The workstation-class and server-classinstalls automatically goes through the installation process for you and omits certain steps.
2.7.1 The Workstation-Class Installation
A workstation-class installation is most appropriate for you if you’re new to the world of Linux, andwould like to give it a try. By answering very few installation questions, you can be up and runningRed Hat Linux in no time!
What Does It Do?
A workstation-class installation removes any linux-related partitions on all installed hard drives (anduses all free unpartitioned disk space) to create the following partitions:

20 Before You Begin
� A 64MB swap partition.
INTEL
� A 16MB partition (mounted as /boot) in which the Linux kernel and related files reside.
ALPHA
� A 2MB partition (mounted as /dos) in which the MILO boot loader is located.
� A variable-sized (the exact size is dependent on available disk space) partition (mounted as /)in which all other files are stored.
This approach to disk partitioning results in the simplest filesystem configuration possible.
Please Note: You will need approximately 600MB of free disk space in order to perform a workstation-class installation.
If your system already runs Windows, a workstation-class installation will automatically configureyour system to dual-boot using LILO.
Please Note: A workstation-class installation will remove any existing Linux partition on any harddrive on your system. It will also attempt to set up a dual boot environment automatically on yoursystem.
2.7.2 The Server-Class Installation
A server-class installation is most appropriate for you if you’d like your system to function as aLinux-based server, and you don’t want to heavily customize your system configuration.
What Does It Do?
A server-class installation removes all existing partitions on all installed hard drives, so choose thisinstallation class only if you’re sure you have nothing you want saved! When the installation iscomplete, you’ll find the following partitions:
� A 64MB swap partition.
INTEL
� A 16MB partition (mounted as /boot) in which the Linux kernel and related files are kept.
ALPHA
� A 2MB partition (mounted as /dos) in which the MILO boot loader is kept.

2.8 Disk Partitions 21
� A 256MB partition (mounted as /).
� A partition of at least 512MB (mounted as /usr).
� A partition of at least 512MB (mounted as /home).
� A 256MB partition (mounted as /var).
This approach to disk partitioning results in a reasonably flexible filesystem configuration for mostserver-class tasks.
Please Note: You will need approximately 1.6GB of free disk space in order to perform a server-classinstallation.
Please Note: A server-class installation will remove any existing partitions of any type on all exist-ing hard drives of your system. All drives will be erased of all information and existing operatingsystems, regardless if they are Linux partitions or not.
2.7.3 The Custom-Class Installation
As you might guess from the name, a custom-class installation puts the emphasis on flexibility. Dur-ing a custom-class installation, it is up to you how disk space should be partitioned. You have com-plete control over the packages that will be installed on your system. You can also determine whetheryou’ll use LILO to boot your system.
For those of you with prior Red Hat Linux installation experience, you’ve already done a custom-class installation – it is the same installation procedure we’ve used in past versions of Red Hat Linux.
2.8 Disk Partitions
Nearly every modern-day operating system uses disk partitions, and Red Hat Linux is no exception.When installing Red Hat Linux, it will be necessary to work with disk partitions. If you have notworked with disk partitions before (or would like a quick review of the basic concepts) please readAppendix C on page 239 before proceeding.
Please Note: If you intend to perform a workstation- or server-class installation, and you alreadyhave sufficient unpartitioned disk space, you do not need to read this section, and may turn to Sec-tion 2.9 on page 31. Otherwise, please read this section in order to determine the best approach tofreeing disk space for your Red Hat Linux installation.
In order to install Red Hat Linux, you must make disk space available for it. This disk space needsto be separate from the disk space used by other operating systems you may have installed on yourcomputer, such as Windows, OS/2, or even a different version of Linux. This is done by dedicatingone or more partitions to Red Hat Linux.
Before you start the installation process, one of the following conditions must be met:

22 Before You Begin
� Your computer must have enough unpartitioned disk space available to install Red Hat Linux.
� Your computer must have one or more partitions that may be deleted, thereby freeing upenough disk space to install Red Hat Linux.
Let’s look at how this can be done.
2.8.1 Making Room For Red Hat Linux
There are three possible scenarios you may face when attempting to repartition your hard disk:
� Unpartitioned free space is available.
� An unused partition is available.
� Free space in an actively used partition is available.
Let’s look at each scenario in order.
Please Note: The figures in this section are based on those used in Appendix C on page 239, andrepresent the sequence of events necessary to free disk space for Red Hat Linux. If these figures donot make sense to you, you should read Appendix C before proceeding any further. Keep in mindthat these illustrations are simplified in the interest of clarity, and do not reflect the exact partitionlayout that you will encounter when actually installing Red Hat Linux.
Using Unpartitioned Free Space
In this situation, the partitions already defined do not span the entire hard disk, leaving unallocatedspace that is not part of any defined partition. Figure 2.3 on the next page shows what this mightlook like.
If you think about it, an unused hard disk also falls into this category; the only difference is that allthe space is not part of any defined partition.
In any case, you can simply create the necessary partitions from the unused space. Unfortunately,this scenario, although very simple, is not very likely (unless you’ve just purchased a new disk justfor Red Hat Linux).
Let’s move on to a slightly more common situation.
Using Space From An Unused Partition
In this case, maybe you have one or more partitions that you just don’t use any longer. Perhapsyou’ve dabbled with another operating system in the past, and the partition(s) you’ve dedicated toit never seem to be used anymore. Figure 2.4 on the facing page illustrates such a situation.

2.8 Disk Partitions 23
Figure 2.3: Disk Drive with Unpartitioned Free Space
Figure 2.4: Disk Drive With an Unused Partition

24 Before You Begin
If you find yourself in this situation, you can use the space allocated to the unused partition. You’llfirst need to delete the partition, and then create the appropriate Linux partition(s) in its place. Youcan either delete the partition using DOS fdisk, or you’ll be given the opportunity to do so duringa custom-class installation.
Using Free Space From An Active Partition
This is the most common situation. It is also, unfortunately, the hardest to work with. The mainproblem is that, even if you have enough free space, it’s presently allocated to a partition that is inuse. If you purchased a computer with pre-installed software, the hard disk most likely has onemassive partition holding the operating system and data.
Aside from adding a new hard drive to your system, you have two choices:
Destructive Repartitioning – Basically, you delete the single large partition, and create severalsmaller ones. As you might imagine, any data you had in the original partition is destroyed.This means that making a complete backup is necessary. For your own sake, make two back-ups, use verification (if available in your backup software), and try to read data from yourbackup before you delete the partition. Note also that if there was an operating system of sometype installed on that partition, it will need to be reinstalled as well.
After creating a smaller partition for your existing software, you can reinstall any software,restore your data, and continue with your Red Hat Linux installation. Figure 2.5 shows thisbeing done.
Figure 2.5: Disk Drive Being Destructively Repartitioned
2.8 Disk Partitions 25
Please Note: As Figure 2.5 on the facing page shows, any data present in the original partitionwill be lost without proper backup!
Non-Destructive Repartitioning – Here, you run a program that does the seemingly impossible:it makes a big partition smaller without losing any of the files stored in that partition. Manypeople have found this method to be reliable and trouble-free. What software should you useto perform this feat? There are several disk management software products on the market;you’ll have to do some research to find the one that is best for your situation.
While the process of non-destructive repartitioning is rather straightforward, there are a num-ber of steps involved:
� Compress existing data� Resize partition
� Create new partition(s)
Let’s take a look at each step in a bit more detail.
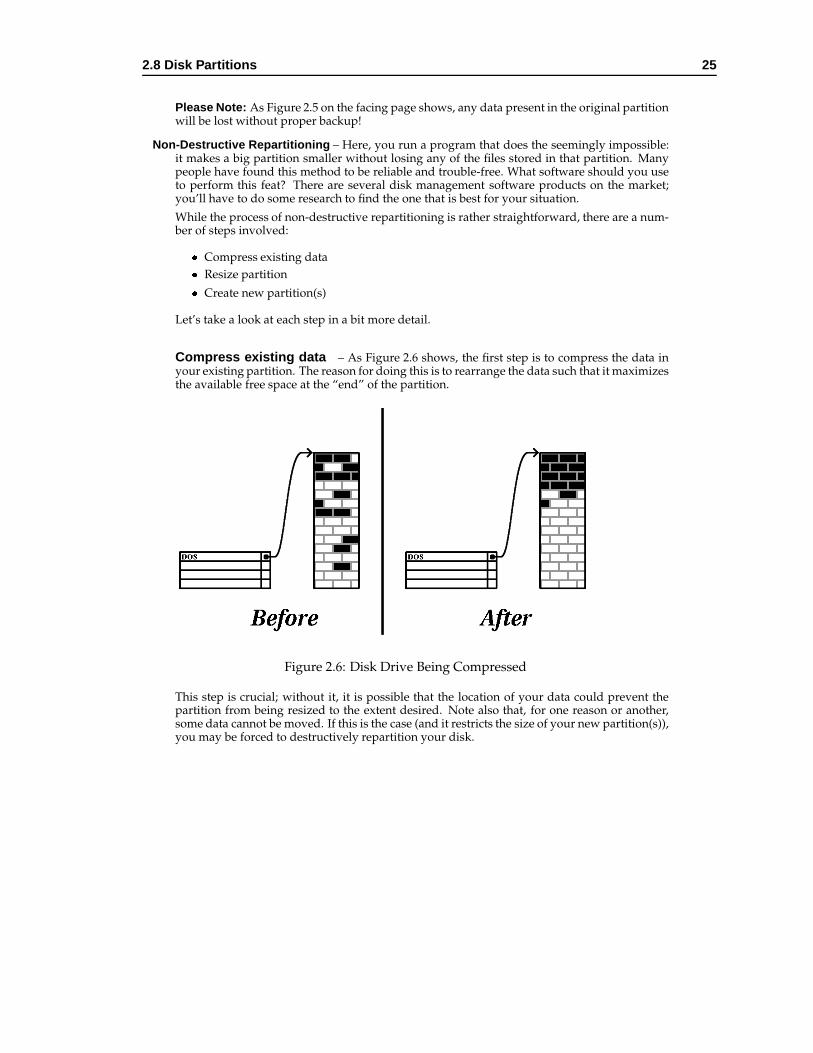
Compress existing data – As Figure 2.6 shows, the first step is to compress the data inyour existing partition. The reason for doing this is to rearrange the data such that it maximizesthe available free space at the “end” of the partition.
Figure 2.6: Disk Drive Being Compressed
This step is crucial; without it, it is possible that the location of your data could prevent thepartition from being resized to the extent desired. Note also that, for one reason or another,some data cannot be moved. If this is the case (and it restricts the size of your new partition(s)),you may be forced to destructively repartition your disk.

26 Before You Begin
Resize partition – Figure 2.7 shows the actual resizing process. While the actual end-product of the resizing operation varies depending on the software used, in most cases thenewly freed space is used to create an unformatted partition of the same type as the originalpartition.
Figure 2.7: Disk Drive with Partition Resized
It’s important to understand what the resizing software you use does with the newly freedspace, so that you can take the appropriate steps. In the case we’ve illustrated, it would be bestto simply delete the new DOS partition, and create the appropriate Linux partition(s).
Create new partition(s) – As the previous step implied, it may or may not be necessaryto create new partitions. However, unless your resizing software is Linux-aware, it is likelyyou’ll need to delete the partition that was created during the resizing process. Figure 2.8 onthe next page shows this being done.
INTELThe following information is specific to Intel-based computers only.
As a convenience to our customers, we provide the fips utility. This is a freely availableprogram that can resize FAT (File Allocation Table) partitions. It’s included on the Red HatLinux/Intel CD-ROM in the dosutils directory.
Please Note: Many people have successfully used fips to repartition their hard drives. How-ever, because of the nature of the operations carried out by fips, and the wide variety ofhardware and software configurations under which it must run, Red Hat Software cannotguarantee that fips will work properly on your system. Therefore, no installation supportwhatsoever is available for fips; use it at your own risk.
2.8 Disk Partitions 27
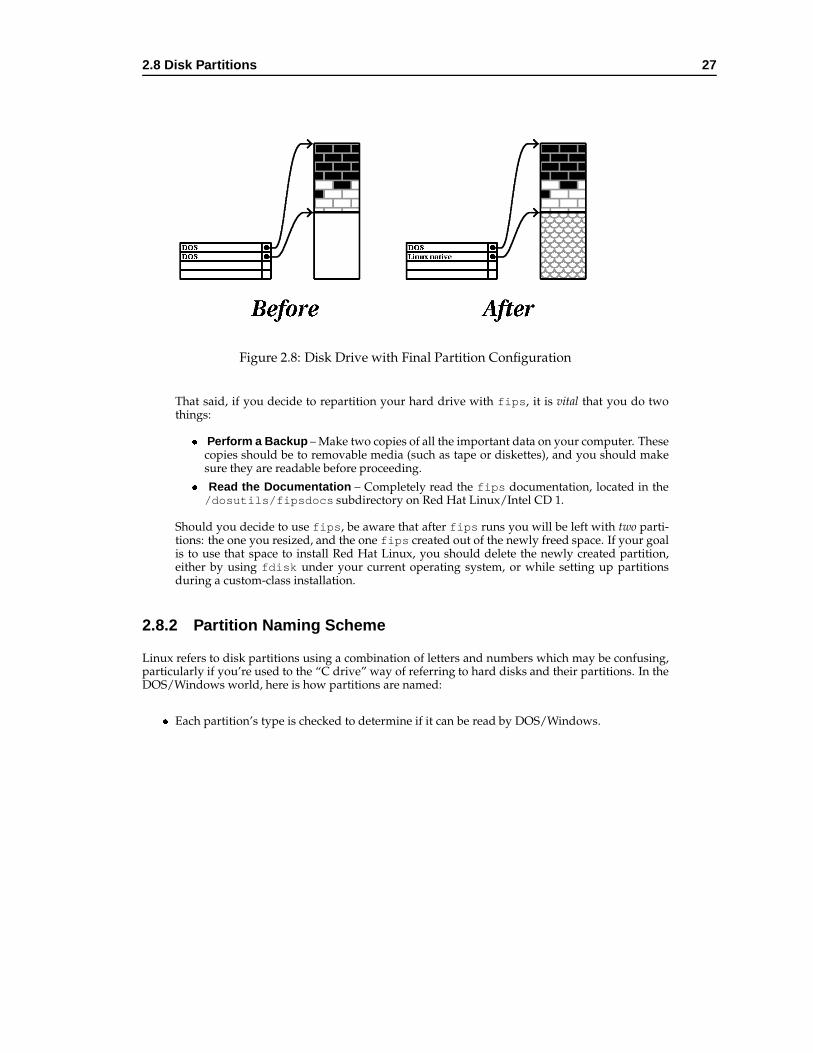
Figure 2.8: Disk Drive with Final Partition Configuration
That said, if you decide to repartition your hard drive with fips, it is vital that you do twothings:
� Perform a Backup – Make two copies of all the important data on your computer. Thesecopies should be to removable media (such as tape or diskettes), and you should makesure they are readable before proceeding.
� Read the Documentation – Completely read the fips documentation, located in the/dosutils/fipsdocs subdirectory on Red Hat Linux/Intel CD 1.
Should you decide to use fips, be aware that after fips runs you will be left with two parti-tions: the one you resized, and the one fips created out of the newly freed space. If your goalis to use that space to install Red Hat Linux, you should delete the newly created partition,either by using fdisk under your current operating system, or while setting up partitionsduring a custom-class installation.
2.8.2 Partition Naming Scheme
Linux refers to disk partitions using a combination of letters and numbers which may be confusing,particularly if you’re used to the “C drive” way of referring to hard disks and their partitions. In theDOS/Windows world, here is how partitions are named:
� Each partition’s type is checked to determine if it can be read by DOS/Windows.

28 Before You Begin
� If the partition’s type is compatible, it is assigned a “drive letter.” The drive letters start with“C”.
� The drive letter can then be used to refer to that partition as well as the filesystem containedon that partition.
Red Hat Linux uses a naming scheme that is more flexible and conveys more information than theapproach used by other operating systems.
The naming scheme is file-based, with filenames in the form:
/dev/xxyN
Here’s how to decipher the partition naming scheme:
/dev/ – This string is the name of the directory in which all device files reside. Since partitionsreside on hard disks, and hard disks are devices, the files representing all possible partitionsreside in /dev/.
xx – The first two letters of the partition name indicate the type of device on which the partitionresides. You’ll normally see either hd (for IDE disks), or sd (for SCSI disks).
y – This letter indicates which device the partition is on. For example,/dev/hda (the first IDE hard disk) or /dev/sdb (the second SCSI disk).
N – The final number denotes the partition. The first four (primary or extended) partitions arenumbered 1 through 4. Logical partitions start at 5. E.g., /dev/hda3 is the third primary orextended partition on the first IDE hard disk; /dev/sdb6 is the second logical partition on thesecond SCSI hard disk.
Please Note: There is no part of this naming convention that is based on partition type; unlikeDOS/Windows, all partitions can be identified under Red Hat Linux. Of course, this doesn’t meanthat Red Hat Linux can access data on every type of partition, but in many cases it is possible toaccess data on a partition dedicated to another operating system.
Keep this information in mind; it will make things easier to understand when you’re setting up thepartitions Red Hat Linux requires.
2.8.3 Disk Partitions and Other Operating Systems
If your Red Hat Linux partitions will be sharing a hard disk with partitions used by other operat-ing systems, most of the time you’ll have no problems. However, there are certain combinations ofLinux and other operating systems that require extra care. Information on creating disk partitions

2.8 Disk Partitions 29
compatible with other operating systems is available in several HOWTOs and Mini-HOWTOs, avail-able on the Red Hat Linux CD in the doc/HOWTO and doc/HOWTO/mini directories. In particular,the Mini-HOWTOs whose names start with Linux+ are quite helpful.
INTELIf Red Hat Linux/Intel will coexist on your machine with OS/2, you must create your disk parti-tions with the OS/2 partitioning software—otherwise, OS/2 may not recognize the disk partitions.During the installation, do not create any new partitions, but do set the proper partition types foryour Linux partitions using the Linux fdisk.
2.8.4 Disk Partitions and Mount Points
One area that many people new to Linux find confusing is the matter of how partitions are used andaccessed by the Linux operating system. In DOS/Windows, it is relatively simple: If you have morethan one partition, each partition gets a “drive letter.” You then use the drive letter to refer to filesand directories on a given partition.
This is entirely different from how Red Hat Linux deals with partitions and, for that matter, withdisk storage in general. The main difference is that each partition is used to form part of the storagenecessary to support a single set of files and directories. This is done by associating a partition witha directory through a process known as mounting. Mounting a partition makes its storage availablestarting at the specified directory (known as a mount point).
For example, if partition /dev/hda5 were mounted on /usr, that would mean that all files and di-rectories under /usrwould physically reside on /dev/hda5. So the file /usr/doc/FAQ/txt/Linux-FAQ would be stored on /dev/hda5, while the file /etc/X11/gdm/Sessions/Gnomewould not.
Continuing our example, it is also possible that one or more directories below /usr would bemount points for other partitions. For instance, a partition (say, /dev/hda7) could be mountedon /usr/local, meaning that, for example, /usr/local/man/whatis would then reside on/dev/hda7 rather than /dev/hda5.
2.8.5 How Many Partitions?
At this point in the process of preparing to install Red Hat Linux, you will need to give some con-sideration to the number and size of the partitions to be used by your new operating system. Thequestion of “how many partitions” continues to spark debate within the Linux community and, with-out any end to the debate in sight, it’s safe to say that there are probably as many partition layouts asthere are people debating the issue.
Keeping this in mind, we recommend that, unless you have a reason for doing otherwise, you shouldcreate the following partitions:
� A swap partition – Swap partitions are used to support virtual memory. If your computerhas 16 MB of RAM or less, you must create a swap partition. Even if you have more memory,

30 Before You Begin
a swap partition is still recommended. The minimum size of your swap partition should beequal to your computer’s RAM, or 16 MB (whichever is larger). The largest useable swappartition is roughly 127 MB, so making a swap partition larger than that will result in wastedspace. Note, however, that you can create and use more than one swap partition if your systemrequires more than 127MB of swap.
INTELThe following partition is specific to Red Hat Linux/Intel installations.
� A /boot partition – The partition mounted on /boot contains the operating system kernel,along with a few other files used during the bootstrap process. Due to the limitations of mostPC BIOSes, creating a small partition to hold these files is a good idea. This partition shouldbe no larger than 16MB.
Please Note: Make sure you read Section 2.8.6 – the information there applies to the /bootpartition!
ALPHAThe following partition is specific to Red Hat Linux/Alpha installations.
� A MILO partition – Alpha owners that will be using MILO to boot their systems shouldcreate a 2MB DOS partition where MILO can be copied after the installation is complete. Werecommend using /dos as the mount point.
� A root partition – The root partition is where / (the root directory) resides. In this partitioninglayout, all files (except those stored in /boot) reside on the root partition. Because of this, it’sin your best interest to maximize the size of your root partition. A 500MB root partition willpermit the equivalent of a workstation-class installation (with very little free space), while a1GB root partition will let you install every package.
2.8.6 One Last Wrinkle: Using LILO
INTELLILO (the LInux LOader) is the most commonly used method to boot Red Hat Linux on Intel-basedsystems. An operating system loader, LILO operates “outside” of any operating system, usingonly the Basic I/O System (or BIOS) built into the computer hardware itself. This section describesLILO’s interactions with PC BIOSes, and is specific to Intel-compatible computers.
ALPHAAlpha owners may skip ahead to Section 2.9 on the next page.
SPARCSPARC owners may skip ahead to Section 2.9 on the facing page.

2.9 A Note About Kernel Drivers 31
BIOS-Related Limitations Impacting LILO
LILO is subject to some limitations imposed by the BIOS in most Intel-based computers. Specifically,most BIOSes can’t access more than two hard drives and they can’t access any data stored beyondcylinder 1023 of any drive. Note that some recent BIOSes do not have these limitations, but this is byno means universal.
All the data LILO needs to access at boot time (including the Linux kernel) are located in the /bootdirectory. If you follow the partition layout recommended above, or you are performing a workstation-or server-class install, the /boot directory will be in a small, separate partition. Otherwise, it willreside in the root partition. In either case, the partition in which /boot resides must conform to thefollowing guidelines if you are going to use LILO to boot your Red Hat Linux system:
On First Two IDE Drives – If you have 2 IDE (or EIDE) drives, /boot must be located on one ofthem. Note that this two-drive limit also includes any IDE CD-ROM drives on your primaryIDE controller. So, if you have one IDE hard drive, and one IDE CD-ROM on your primarycontroller, /boot must be located on the first hard drive only, even if you have other harddrives on your secondary IDE controller.
On First IDE or First SCSI Drive – If you have one IDE (or EIDE) drive and one or more SCSIdrives, /boot must be located either on the IDE drive or the SCSI drive at ID 0. No other SCSIIDs will work.
On First Two SCSI Drives – If you have only SCSI hard drives, /boot must be located on a driveat ID 0 or ID 1. No other SCSI IDs will work.
Partition Completely Below Cylinder 1023 – No matter which of the above configurations apply,the partition that holds /boot must be located entirely below cylinder 1023. If the partitionholding /boot straddles cylinder 1023, you may face a situation where LILO will work ini-tially (because all the necessary information is below cylinder 1023), but will fail if a new kernelis to be loaded, and that kernel resides above cylinder 1023.
As mentioned earlier, it is possible that some of the newer BIOSes may permit LILO to work withconfigurations that don’t meet our guidelines. Likewise, some of LILO’s more esoteric features maybe used to get a Linux system started, even if the configuration doesn’t meet our guidelines. How-ever, due to the number of variables involved, Red Hat Software cannot support such extraordinaryefforts.
Please Note: Disk Druid as well as the workstation- and server-class installs take these BIOS-relatedlimitations into account. However, if you decide to use fdisk instead, it is your responsibility toensure that you keep these limitations in mind.
2.9 A Note About Kernel Drivers
During installation of Red Hat Linux, there are some limits placed on the filesystems and otherdrivers supported by the kernel. However, after installation there is support for all filesystems avail-able under Linux. At install time the modularized kernel has support for (E)IDE devices, (including

32 Before You Begin
ATAPI CD-ROM drives), SCSI adapters, and network cards. Additionally, all mice, SLIP, CSLIP, PPP,PLIP, FPU emulation, console selection, ELF, SysV IPC, IP forwarding, firewalling and accounting,reverse ARP, QIC tape and parallel printers, are supported.
Please Note: Because Red Hat Linux supports installation on many different types of hardware,many drivers (including those for SCSI adapters, network cards, and many CD-ROMs) are not builtinto the Linux kernel used during installation; rather, they are available as modules and loaded as youneed them during the installation process. If necessary, you will have the chance to specify optionsfor these modules at the time they are loaded, and in fact these drivers will ignore any options youspecify for them at the boot: prompt.
After the installation is complete you may want to rebuild a kernel that includes support for your spe-cific hardware configuration. See Section 11.8 on page 210 for information on building a customizedkernel. Note that, in most cases, a custom-built kernel is not necessary.
2.10 If You Have Problems. . .
If you have problems before, during, or after the installation, check the list of Red Hat Linux Fre-quently Asked Questions. You can find the FAQ at:
http://www.redhat.com/knowledgebase/index.html
In many cases, a quick check of the FAQ can quickly get you back in action.
2.11 One Last Note
Please read all of the installation instructions before starting; this will prepare you for any decisionsyou need to make and should eliminate potential surprises.

3Starting the Installation
This chapter explains how to start the Red Hat Linux 6.0 installation process. We’ll cover the follow-ing areas in this chapter:
� Getting familiar with the installation program’s user interface;
� Starting the installation program;
� Selecting an installation method.
By the end of this chapter, the installation program will be running on your system, and the appro-priate installation method will have been selected.
3.1 The Installation Program User Interface
The Red Hat Linux installation program uses a screen-based interface that includes most of the on-screen “widgets” commonly found on graphical user interfaces. They may look a little different thantheir more graphical counterparts; Figures 3.1 on page 35 and 3.2 on page 36 are included here tomake them easier to identify. Here’s a list of the most important widgets:
� Window – Windows (also referred to as dialog boxes in this manual) will appear on your screenthroughout the installation process. At times, one window may overlay another; in these cases,

34 Starting the Installation
you may only interact with the window on top. When finished with that window, it willdisappear, allowing you to continue with the window that was underneath.
� Text Input – Text input lines are regions where you can enter information required by theinstallation program. When the cursor rests on a text input line, you may enter and/or editinformation on that line.
� Check Box – Check boxes allow you to select or deselect a particular feature offered to youby the installation program. When the cursor rests within a check box, pressing
�
�
�
�
Space causesthe check box to toggle between a selected and unselected state.
� Text Widget – Text widgets are regions of the screen that are devoted to the display of text. Attimes, text widgets may also contain other widgets, such as check boxes. It is possible that atext widget may contain more information than could be displayed at one time. In these cases,the text widget will have a scroll bar next to it; if you position the cursor within the text widget,you can then use the
�
�
�
�
" and�
�
�
�
# keys to scroll through all the information available.
� Scroll Bar – Scroll bars provide a visual indication of your relative position in the informationbeing displayed in a text widget. Your current position is shown by a # character, which willmove up and down the scroll bar as you scroll back and forth.
� Button Widget – Button widgets are the primary method of interacting with the installationprogram. By “pressing” these buttons, you will progress through the series of windows thatmake up the installation process. Buttons may be pressed when they are highlighted by thecursor.
� Cursor – Although not a widget, the cursor is used to select (and interact) with a particularwidget. As the cursor is moved from widget to widget, it may cause the widget to changecolor, or you may only see the cursor itself positioned in or next to the widget. In Figure 3.1on the facing page, the cursor is positioned on the Ok button. Figure 3.2 on page 36 shows thecursor on the first line of the text widget at the top of the window.
As you might have guessed by our description of these widgets, the installation program is character-based, and does not use a mouse. This is due to the fact that the installation program must run ona wide variety of computers, some of which may not even have a mouse. The following sectiondescribes the keystrokes necessary to interact with the installation program.
3.1.1 Using the Keyboard to Navigate
You can navigate around the installation dialogs using a simple set of keystrokes. You will need tomove the cursor around by using various keys such as �
�
�
� , �
�
�
�! ,
�
�
�
�
" , and�
�
�
�
# . You can also use�
�
�
�Tab ,
and�
�
�
�Alt -
�
�
�
�Tab to cycle forward or backward through each widget on the screen. In most cases, there
is a summary of available function keys presented at the bottom of each screen.
To “press” a button, position the cursor over the button (using�
�
�
�Tab , for instance) and press
�
�
�
�
Space
(or�
�
�
�Enter ). To select an item from a list of items, move the cursor to the item you wish to select and

3.1 The Installation Program User Interface 35
Figure 3.1: Installation Program Widgets
press�
�
�
�Enter . To select an item with a check box, move the cursor to the check box and press
�
�
�
�
Space toselect an item. To deselect, press
�
�
�
�
Space a second time.
Pressing�
�
�
�F12 accepts the current values and proceeds to the next dialog; it is usually equivalent to
pressing the Ok button.
Please Note: Unless a dialog box is waiting for your input, do not press any keys during the instal-lation process – it may result in unpredictable behavior.
3.1.2 A Note about Virtual Consoles
There is more to the Red Hat Linux installation program than the dialog boxes it presents as it guidesyou through the installation process.
In fact, the installation program makes several different kinds of diagnostic messages available toyou, in addition to giving you a way to enter commands from a shell prompt. It presents this infor-mation on five virtual consoles which you can switch between using a single keystroke.
These virtual consoles can be very helpful if you encounter a problem while installing Red Hat Linux.

36 Starting the Installation
Figure 3.2: More Installation Program Widgets
Messages displayed on the install or system consoles can help pinpoint the problem. Please seeFigure 3.3 on the facing page for a listing of the virtual consoles, the keystrokes to switch to them,and their contents.
In general, there should be no reason to leave virtual console #1 unless you are attempting to diagnoseinstallation problems. But if you are the curious type, feel free to look around.
3.2 Starting the Installation Program
Now it’s time to start installing Red Hat Linux. To start the installation, it is first necessary to bootthe installation program. Before we start, please make sure you have all the resources you’ll need forthe installation. If you’ve already read through Chapter 2, and followed the instructions, you shouldbe ready.

3.2 Starting the Installation Program 37
Console Keystroke Contents1
�
�
�
�Alt -
�
�
�
�F1 installation dialog
2�
�
�
�Alt -
�
�
�
�F2 shell prompt
3�
�
�
�Alt -
�
�
�
�F3 install log (messages from install program)
4�
�
�
�Alt -
�
�
�
�F4 system log (messages from kernel, etc.)
5�
�
�
�Alt -
�
�
�
�F5 other messages
Figure 3.3: Virtual Console Information
ALPHAIf you haven’t created your diskettes yet, please refer to the first chapter of the Red Hat Linux AlphaInstallation Addendum, and create them now. After you’ve created the necessary diskettes, pleasefinish reading the first chapter of the Red Hat Linux Alpha Installation Addendum for informationon starting the installation.
SPARCIf you haven’t prepared for the installation yet, please read Sections F.2 on page 362 through F.5.Determine how you will boot the installation program, and issue the boot command that will startthe installation.
3.2.1 Booting the Installation Program
To start installing Red Hat Linux, insert the boot diskette into your computer’s first diskette driveand reboot (or boot from the Red Hat Linux CD-ROM, if your computer supports it). Your BIOSsettings may need to be changed to allow you to boot from the diskette or CD-ROM.
After a short delay, a screen containing the boot: prompt should appear. The screen contains infor-mation on a variety of boot options. Each boot option also has one or more help screens associatedwith it. To access a given help screen, press the appropriate function key as listed in the line at thebottom of the screen.
You should keep two things in mind:
� The initial screen will automatically start the installation program if you take no action withinthe first minute. To disable this feature, press one of the help screen function keys.
� If you press a help screen function key, there will be a slight delay as the help screen is readfrom diskette.
Normally, you’ll only need to press�
�
�
�Enter to boot. Watch the boot messages to see whether the Linux
kernel detects your hardware. If it does not properly detect your hardware, you may need to restartthe installation in “expert” mode.
38 Starting the Installation
Expert mode disables most hardware probing, and gives you the option of entering options for thedrivers loaded during the installation. Expert mode can be entered using the following boot com-mand:
boot: expert
Please Note: The initial boot messages will not contain any references to SCSI or network cards.These devices are supported by modules that are loaded during the installation process.
Options can also be passed to the kernel. For example, to instruct the kernel to use all the RAM in a128 MB system, enter:
boot: linux mem=128M
However, with most computers, there is no need to pass this argument to the kernel. The kernel willdetect the amount of memory your system has in most cases. To be sure that all of your memory hasbeen detected, at a shell prompt type:
cat /proc/meminfo
This will display the amount of memory detected by the kernel in the form of total, used, free, etc.
If MemTotal is not correct for your system, you will need to modify your lilo.conf to pass that amountof memory to the kernel at boot time. Such as, if your computer has 96 megabytes of RAM, you willadd:
append="mem=96M"
After entering any options, press�
�
�
�Enter to boot using those options. If you do need to specify boot
options to identify your hardware, please make note of them – they will be needed later.
INTELInstalling Without Using a Boot Diskette The Red Hat Linux/Intel CD-ROM can also be booted
by newer computers that support bootable CD-ROMs. Not all computers support this feature, so ifyours can’t boot from the CD-ROM, there is one other way to start the installation without using aboot diskette. The following method is specific to Intel-based computers only.
If you have MS-DOS installed on your computer, you can boot the installation system directly fromthe CD without using any diskettes.
To do this (assuming your CD is drive d:),, use the following commands:
C:n> d:D:n> cd ndosutilsD:ndosutils> autoboot.bat

3.3 Beginning the Installation 39
Note that this method will not work if run in a DOS window – the autoboot.bat file must beexecuted with DOS as the only operating system. In other words, Windows cannot be running.
If your computer can’t boot directly from CD-ROM (and you can’t use a DOS-based autoboot), you’llhave to use a boot diskette to get things started.
3.3 Beginning the Installation
After booting, the installation program begins by displaying a welcome message. Press�
�
�
�Enter to
begin the installation. If you wish to abort the installation process at this time, simply eject the bootdiskette now and reboot your machine.
3.3.1 Choosing a Language
After the welcome dialog, the installation program asks you to select the language to be used duringthe installation process (see Figure 3.4). Using the
�
�
�
�
" and�
�
�
�
# keys, select the appropriate language. Ascroll bar may appear to the right of the languages – if present, it indicates that there are more entriesthan can be displayed at one time. You’ll be seeing scroll bars like this throughout the installationprogram.
Figure 3.4: Selecting a Language

40 Starting the Installation
3.3.2 Selecting a Keyboard Type
Next, the installation program gives you an opportunity to select a keyboard type (see Figure 3.5).You may navigate this dialog box the same way you did with the language selection dialog.
After selecting the appropriate keyboard type, press�
�
�
�Enter ; the keyboard type you select will be
loaded automatically both for the remainder of the installation process and each time you boot yourRed Hat Linux system.
If you wish to change your keyboard type after you have installed your Red Hat Linux system, youmay use the /usr/sbin/kbdconfig command or you may type setup at the root prompt.
Figure 3.5: Selecting a Keyboard Type
3.3.3 PCMCIA Support
Next, the installation program will probe your system to determine if your system requires PCMCIA(also known as PC Card) support. If a PCMCIA controller is found, you’ll be asked if you requirePCMCIA support during the installation. If you will be using a PCMCIA device during the installa-tion (for example, you have a PCMCIA ethernet card and you’ll be installing via NFS, or you have aPCMCIA SCSI card and will be installing from a SCSI CD), you should select Yes.
Please Note: This question applies only to PCMCIA support during the actual installation. Yourinstalled Red Hat Linux system will still support PCMCIA, even if you say No here (assuming thatyou do not deselect the kernel-pcmcia-cs package during the subsequent installation).
If you require PCMCIA support, you will then be asked to insert the PCMCIA support diskette.Select Ok when you’ve done so.
The installation program will then display a progress bar as the support diskette is loaded.
3.4 Selecting an Installation Method 41
3.4 Selecting an Installation Method
Next, you will be asked what type of installation method you wish to use. You can install Red HatLinux via any of five basic methods (see Section 2.4 on page 14), which require the use of a supportdiskette if you are using a PCMCIA device during the install. To summarize, you can install Red HatLinux from:
CD-ROM – If you have a CD-ROM drive and the Red Hat Linux CD-ROM. Requires a PCMCIAsupport disk only if you will be using a PCMCIA device during the install. Please refer toSection 4.2 on page 43 to select the CD-ROM installation method.
Hard Drive – If you copied the Red Hat Linux files to a local hard drive. Requires a PCMCIAsupport disk only if you will be using a PCMCIA device during the install. Please refer toSection 4.3 on page 45 to select the hard drive installation method.
NFS Image – If you are installing from an NFS Image server which is exporting the Red Hat LinuxCD-ROM or a mirror image of Red Hat Linux. Requires a PCMCIA support disk only if youwill be using a PCMCIA device during the install. Requires a network boot disk. Please referto Section 5.2 on page 68 to select the NFS installation method.
FTP – If you are installing directly from an FTP server. Requires a PCMCIA support disk only ifyou will be using a PCMCIA device during the install. Requires a network boot disk. Pleaserefer to Section 5.3 on page 69 to select the FTP installation method.
HTTP – If you are installing directly from an HTTP Web server. Requires a PCMCIA support diskonly if you will be using a PCMCIA device during the install. Requires a network boot disk.Please refer to Section 5.4 on page 69 to select the HTTP installation method.
If you choose to perform a CD-ROM or a hard drive install, please refer to Chapter 4 on page 43 forthose installation instructions.
If you choose to perform a network-based install (NFS, FTP, or HTTP), please refer to Chapter 5 onpage 65 for those installation instructions.

42 Starting the Installation
4Local Media Installations
4.1 Selecting an Installation Method
Now you must decide what type of installation method you wish to use (see Figure 4.1 on the fol-lowing page). Highlight the appropriate choice and select Ok, or press
�
�
�
�Enter .
If you are not performing a local media type installation (CD-ROM or hard drive), then please skipahead to Chapter 5 on page 65 for network type installations.
If you are planning to do a local media type installation, please read on.
4.2 Installing from CD-ROM
If you are going to install Red Hat Linux from CD-ROM, choose “CD-ROM,” and select Ok. Theinstallation program will then prompt you to insert your Red Hat Linux CD-ROM into your CD-ROMdrive. When you’ve done so, select Ok, and press
�
�
�
�Enter . The installation program will then probe
your system and attempt to identify your CD-ROM drive. It will start by looking for an IDE (alsoknown as ATAPI) CD-ROM drive. If one is found, the installation will continue. If the installationprogram cannot automatically detect your CD-ROM drive, you will be asked what type of CD-ROMyou have. You can choose from the following types:

44 Local Media Installations
Figure 4.1: Selecting an Installation Method
SCSI Select this if your CD-ROM is attached to a supported SCSI adapter; the installation programwill then ask you to choose a SCSI driver. Choose the driver that most closely resembles youradapter. You may specify options for the driver if necessary; however, most drivers will detectyour SCSI adapter automatically.
Other If your CD-ROM is neither an IDE nor a SCSI CD-ROM, it’s an “other.” Sound cards withproprietary CD-ROM interfaces are good examples of this CD-ROM type. The installationprogram presents a list of drivers for supported CD-ROMs – choose a driver and, if necessary,specify any driver options.
Please Note:A partial list of optional parameters for CD-ROMs can be found in Appendix E onpage 351. If you have an ATAPI CD-ROM and the installation program fails to find it (in otherwords, it asks you what type of CD-ROM you have), you must restart the installation, and enterlinux hdX=cdrom. Replace the X with one of the following letters, depending on the interface theunit is connected to, and whether it is configured as master or slave:
� a – First IDE controller, master
� b – First IDE controller, slave
� c – Second IDE controller, master
� d – Second IDE controller, slave
(If you have a third and/or fourth controller, simply continue assigning letters in alphabetical order,going from controller to controller, and master to slave.)

4.3 Installing from a Hard Drive 45
Once your CD-ROM drive has been identified, you will be asked to insert the Red Hat Linux CD-ROM into your CD-ROM drive. Select Ok when you have done so. After a short delay, the nextdialog box will appear. Continue to section 4.4 for upgrade or full-installation instructions.
4.3 Installing from a Hard Drive
If you are going to install Red Hat Linux from a locally-attached hard drive, highlight “hard drive”and select Ok.
Before you started the installation program, you must first have copied all the necessary files to apartition on a locally-attached hard drive. If you haven’t done this yet, please refer to Section 2.4.6on page 18. Continue to section 4.4 for upgrade or full-installation instructions.
4.4 Upgrading or Installing
After you choose an installation method, the installation program prompts you to either install orupgrade (see Figure 4.2).
Figure 4.2: Upgrading or Installing
4.4.1 Installing
You usually install Red Hat Linux on a clean disk partition or set of partitions, or over another instal-lation of Linux.

46 Local Media Installations
Please Note: Installing Red Hat Linux over another installation of Linux (including Red Hat Linux)does not preserve any information (files or data) from the prior installation. Make sure you save anyimportant files! If you are worried about saving the current data on your existing system (withoutmaking a backup on your own), you should consider performing an upgrade instead.
If you wish to perform a full install, choose Install, and skip to section 4.5.
4.4.2 Upgrading
The installation process for Red Hat Linux 6.0 includes the ability to upgrade from prior versions ofRed Hat Linux (version 2.0 and later) which are based on RPM technology.
Upgrading your system installs the modular 2.2.x kernel as well as updated versions of the packageswhich are currently installed on your machine. The upgrade process preserves existing configurationfiles by renaming them using a .rpmsave extension (e.g., sendmail.cf.rpmsave) and leaves a logtelling what actions it took in /tmp/upgrade.log. As software evolves, configuration file formatscan change, so you should carefully compare your original configuration files to the new files beforeintegrating your changes.
If you wish to upgrade your Red Hat Linux system, choose Upgrade.
Please Note: Some upgraded packages may require that other packages are also installed for properoperation. The upgrade procedure takes care of these dependencies, but it may need to install addi-tional packages which are not on your existing system.
Please Note: If you already have the X Window System (and possibly an older version of GNOME)on your machine you may see a screen that prompts you to install the latest version of GNOMEincluded in this release.
4.5 Installation Class
If you chose to perform a full install, the installation program will ask you to choose an installationclass (see Figure 4.3 on the facing page). You will not see this screen if you chose to perform anupgrade. You may choose from the following installation classes:
� Workstation – A workstation-class installation will automatically erase all Linux partitionsfrom your computer’s hard drive(s). This installation type will also attempt to set up a dualboot environment automatically.
� Server – A server-class installation will automatically erase all partitions (Linux or others) fromyour computer’s hard drive(s).
� Custom – A custom-class installation gives you complete control over partitioning-relatedissues. If you have installed Red Hat Linux in the past, the custom-class installation is mostsimilar to past installations.

4.6 SCSI Support 47
Figure 4.3: Installation Class
Please Note: If you choose either Workstation or Server, part (or all) of your computer’s storeddata on all drives will be erased! You will be asked to confirm your decision; however, please keep inmind that once the installation program receives your confirmation, the erasure is irrevocable.
Please Note: WARNING – If you choose to perform a workstation-class or server-class installation,data erasure will be irrevocable. The severity of erased data varies according to type of installation:
� Workstation-class – Data on any existing Linux partition on any hard drive on your systemwill be erased.
� Server-class – Data on all partitions of all drives will be completely erased, regardless if it ison an existing Linux partition or not.
If you choose a workstation- or server-class installation, you will be able to skip over some of thesteps that the custom-class install requires.
For a hard drive installation, please keep reading. For the CD-ROM workstation- or server-classinstallation, you should turn to Chapter 6 on page 91 to continue with the install..
4.6 SCSI Support
Next the installation program will probe your system for SCSI adapters. In some cases, the installa-tion program will ask you whether you have any SCSI adapters.
If you choose Yes, the next dialog presents a list of SCSI drivers. Choose the driver that most closelyresembles your SCSI adapter. The installation program then gives you an opportunity to specify op-

48 Local Media Installations
tions for the SCSI driver you selected; most SCSI drivers should detect your hardware automatically,however.
4.7 Creating Partitions for Red Hat Linux
At this point, it’s necessary to let the installation program know where it should install Red HatLinux. This is done by defining mount points for one or more disk partitions in which Red Hat Linuxwill be installed. You may also need to create and/or delete partitions at this time.
Please Note: If you have not yet planned how you will set up your partitions, please turn to Sec-tion 2.8 on page 21, and review everything up to Section 2.9 on page 31. As a bare minimum, you’llneed an appropriately-sized root partition, and a swap partition of at least 16 MB.
If you’re still unsure on how to set up your partitions, please refer to Appendix C on page 239.
The installation program then presents a dialog box that allows you to choose from two disk parti-tioning tools (see Figure 4.4). The choices you have are:
� Disk Druid – This is Red Hat Linux’s install-time disk management utility. It can create anddelete disk partitions according to user-supplied requirements, in addition to managing mountpoints for each partition.
� fdisk – This is the traditional Linux disk partitioning tool. While it is somewhat more flexiblethan Disk Druid, the downside is that fdisk assumes you have some experience with diskpartitioning, and are comfortable with its somewhat terse user interface.
Figure 4.4: Selecting Disk Setup Method

4.7 Creating Partitions for Red Hat Linux 49
With the exception of certain esoteric situations, Disk Druid can handle the partitioning requirementsfor a typical Red Hat Linux installation.
SPARCNote that there are some points you should be aware of if you decide to use Disk Druid under RedHat Linux/SPARC. Please refer to Appendix F on page 361 for more information.
ALPHANote that there are some points you should be aware of if you decide to use Disk Druid under RedHat Linux/Alpha. Please refer to the Alpha Installation Addendum for more information.
Select the disk partitioning tool you’d like to use, and press�
�
�
�Enter . If you choose Disk Druid, con-
tinue reading. If you’d rather use fdisk, please turn to Section 4.7.3 on page 54.
4.7.1 Using Disk Druid
If you selected Disk Druid, you will be presented with a screen that looks like figure 4.5. While itmay look overwhelming at first, it really isn’t. Let’s go over each of Disk Druid’s three sections.
Figure 4.5: Disk Druid Main Screen
The “Current Disk Partitions” Section
Each line in the “Current Disk Partitions” section represents a disk partition. You’ll note that thissection has a scroll bar to the right, which means that there might be more partitions than can be

50 Local Media Installations
displayed at one time. If you use the�
�
�
�
" and�
�
�
�
# keys, you can see if there are any additional partitions.Each line in this section has five different fields:
Mount Point – This field indicates where the partition will be mounted when Red Hat Linux isinstalled and running.
Device – This field displays the partition’s device name.
Requested – The “Requested” field shows the minimum size requested when the partition wasdefined.
Actual – The “Actual” field shows the space currently allocated to the partition.
Type – This field shows the partition’s type.
Another Type of Partition As you scroll through the “Current Disk Partitions” section, youmight see an “Unallocated Requested Partitions” title bar, followed by one or more partitions. As thetitle implies, these are partitions that have been requested but, for one reason or another, have notbeen allocated. A common reason for having an unallocated partition is a lack of sufficient free spacefor the partition. In any case, the reason the partition remains unallocated will be displayed after thepartition’s mount point.
The “Drive Summaries” Section
Each line in the “Drive Summaries” section represents a hard disk on your system. Each line has thefollowing fields:
Drive – This field shows the hard disk’s device name.
Geom [C/H/S] – This field shows the hard disk’s geometry. The geometry consists of three numbersrepresenting the number of cylinders, heads and sectors as reported by the hard disk.
Total – The “Total” field shows the total available space on the hard disk.
Used – This field shows how much of the hard disk’s space is currently allocated to partitions.
Free – The “Free” field shows how much of the hard disk’s space is still unallocated.
Bar Graph – This field presents a visual representation of the space currently used on the harddisk. The more pound signs there are between the square braces, the less free space there is. InFigure 4.5 on the page before, the bar graph shows no free space.
Please Note: The “Drive Summaries” section is displayed only to indicate your computer’s diskconfiguration. It is not meant to be used as a means of specifying the target hard drive for a givenpartition. This is described more completely in the Adding a Partition, Section 4.7.1 on page 52.

4.7 Creating Partitions for Red Hat Linux 51
Disk Druid’s Buttons
These buttons control Disk Druid’s actions. They are used to add and delete partitions, and to changepartition attributes. In addition, there are buttons that are used to accept the changes you’ve made,or to exit Disk Druid entirely. Let’s take a look at each button in order.
Add – The “Add” button is used to request a new partition. When selected, a dialog box will appearcontaining fields that must be filled in.
Edit – The “Edit” button is used to modify attributes of the partition currently highlighted in the“Current Disk Partitions” section. Selecting this button will cause a dialog box to appear. Someor all of the fields in the “Edit Partition” dialog box may be changed, depending on whetherthe partition information has already been written to disk or not.
Delete – The “Delete” button is used to delete the partition currently highlighted in the “CurrentDisk Partitions” section. Selecting this button will cause a dialog box to appear asking you toconfirm the deletion.
Ok – The “Ok” button causes any changes made to your system’s partitions to be written to disk.You will be asked to confirm your changes before Disk Druid rewrites your hard disk partitiontable(s). In addition, any mount points you’ve defined are passed to the installation program,and will eventually be used by your Red Hat Linux system to define the filesystem layout.
Back – This button causes Disk Druid to abort without saving any changes you’ve made. Whenthis button is selected, the installation program will take you back to the previous screen, soyou can start over.
Handy Function Keys
While there is some overlap between Disk Druid’s buttons and the available functions keys, there aretwo function keys that have no corresponding buttons:
��
�
�
�F2 (Add NFS) – This function key is used to add a read-only NFS-served filesystem to the
set of mount points on your Red Hat Linux system. When selected, a dialog box will appearcontaining fields that must be filled in.
��
�
�
�F5 (Reset) – This function key is used to discard all changes you may have made while
in Disk Druid, and return the list of partitions to those read from the partition table(s) onyour hard disk(s). When selected, you’ll be asked to confirm whether you want to discardthe changes. Note that any mount points you’ve specified will be lost, and will need to bereentered.
Please Note: You will need to dedicate at least one partition to Red Hat Linux, and optionally more.This is discussed more completely in Section 2.8.5 on page 29.
Now let’s see how Disk Druid is used to set up partitions for your Red Hat Linux system.

52 Local Media Installations
Adding a Partition
To Add a new partition, select the Add button, and press�
�
�
�
Space or�
�
�
�Enter . A dialog box entitled
“Edit New Partition” will appear (see Figure 4.6). It contains the following fields:
Figure 4.6: Creating a New Partition
� Mount Point – Highlight this field and enter the partition’s mount point. For example, if thispartition should be the root partition, enter /; enter /usr for the usr partition, and so on.
� Size (Megs) – In this field, enter the size (in megabytes) of the partition. Note that this fieldstarts with a “1” in it, meaning that unless you change it, you’ll end up with a 1 MB partition.Delete it using the
�
�
�
�
Backspace key, and enter the desired partition size.
� Growable? – This check box indicates whether the size you entered in the previous field isto be considered the partition’s exact size, or its minimum size. Press
�
�
�
�
Space to check anduncheck the box. When checked, the partition will grow to fill all available space on the harddisk. In this case, the partition’s size will expand and contract as other partitions are modified.Note that you can make more than one partition growable; if you do so, the additional freespace will be shared between all growable partitions.
� Type – This field contains a list of different partition types. Select the appropriate partitiontype by using the
�
�
�
�
" and�
�
�
�
# keys.
� Allowable Drives – This field contains a list of the hard disks installed on your system, witha check box for each. If a hard disk’s box is checked, then this partition may be created on thathard disk. If the box is not checked, then the partition will never be created on that hard disk.By using different check box settings, you can direct Disk Druid to place partitions as you seefit, or let Disk Druid decide where partitions should go.

4.7 Creating Partitions for Red Hat Linux 53
� Ok – Select this button and press�
�
�
�
Space when you are satisfied with the partition’s settings,and wish to create it.
� Cancel – Select this button and press�
�
�
�
Space when you don’t want to create the partition.
4.7.2 Problems When Adding a Partition
Please Note: If you are having problems adding a partition, you may want to reference Appendix Con page 239 to get more information.
If you attempt to add a partition and Disk Druid can’t carry out your request, you’ll see a dialog boxlike the one in Figure 4.7. In the box are listed any partitions that are currently unallocated, alongwith the reason they could not be allocated. Select the Ok button, and press
�
�
�
�
Space to continue.Note that the unallocated partition(s) are also displayed on Disk Druid’s main screen (though youmay have to scroll the “Current Disk Partitions” section to see them).
Figure 4.7: Unallocated Partition Warning
Deleting a Partition
To delete a partition, highlight the partition in the “Current Disk Partitions” section, select the Deletebutton, and press
�
�
�
�
Space . You will be asked to confirm the deletion.

54 Local Media Installations
Editing a Partition
To change a partition’s settings, highlight the partition in the “Current Disk Partitions” section, selectthe Edit button, and press
�
�
�
�
Space . You will be presented with a dialog box very similar to the oneshown in Figure 4.6 on page 52. Make the appropriate changes, select Ok, and press
�
�
�
�
Space .
Please Note: If the partition already existed on your hard disk, you will only be able to change thepartition’s mount point. If you want to make any other changes, you will need to delete the partitionand recreate it.
Adding an NFS Mount
To add a read-only NFS-served filesystem, press�
�
�
�F2 . If you have not selected a network-related in-
stallation method, you will be presented with several dialog boxes concerning network configuration(turn to Section 5.1.1 on page 65 for more information). Fill in the boxes appropriately. You will thensee a dialog box entitled, “Edit Network Mount Point” (similar to the one in Figure 4.12 on page 58).In this dialog box you will need to enter the NFS server name, the path to the exported filesystem,and the mount point for the filesystem. Select the Ok or Cancel button as appropriate, and press�
�
�
�
Space .
Starting Over
If you’d like to abandon any changes you’ve made while in Disk Druid, and would rather use fdiskinstead, you can select the Back button, and press
�
�
�
�
Space . If you want to continue using Disk Druid,but would like to start over, press
�
�
�
�F5 , and Disk Druid will be reset to its initial state.
When You’re Finished. . .
Once you’ve finished configuring partitions and entering mount points, your screen should looksomething like the one in Figure 4.8 on the facing page. Select Ok, and press
�
�
�
�
Space . Then turn toSection 4.8 on page 58.
4.7.3 Using fdisk
If you’d rather use fdisk to manage partitions, this is the section for you. Once you’ve selectedfdisk, you’ll be presented with a dialog box entitled “Partition Disks” (see Figure 4.9 on the facingpage). In this box is a list of every disk on your computer. Move the highlight to the disk you’d liketo partition, select Edit, and press
�
�
�
�
Space . You will then enter fdisk and can partition the disk youselected. Repeat this process for each disk you want to partition. When you’re done, select “Done.”

4.7 Creating Partitions for Red Hat Linux 55
Figure 4.8: Partitions and Mount Points Defined
Figure 4.9: Selecting a Disk for Partitioning

56 Local Media Installations
An Overview of fdisk
fdisk includes online help which is terse but useful. Here are a few tips:
� The command for help is m.
� To list the current partition table, use the p command (see Figure 4.10).
� To add a new partition, use n.
� Linux fdisk creates partitions of type Linux native by default. When you create a swappartition, don’t forget to change it to type Linux swap using the t command. The value forthe Linux swap type is 82. For other partition types, use the l command to see a list ofpartition types and values.
� Linux allows up to four (4) partitions on one disk. If you wish to create more than that, one(and only one) of the four may be an extended partition, which acts as a container for one ormore logical partitions. Since it acts as a container, the extended partition must be at least aslarge as the total size of all the logical partitions it is to contain.
� It’s a good idea to write down which partitions (e.g., /dev/hda2) are meant for which filesys-tems (e.g., /usr) as you create each one.
� Please Note: None of the changes you make take effect until you save them and exit fdiskusing the w command. You may quit fdisk at any time without saving changes by using theq command.
Figure 4.10: Sample Output From fdisk

4.7 Creating Partitions for Red Hat Linux 57
Changing the Partition Table
When you are finished partitioning your disks, press Done; you may see a message indicating thatthe installation program needs to reboot. This is a normal occurrence after changing a disk’s partitiondata; it usually happens if you created, changed or deleted any extended partitions. After you pressOk, your machine will reboot. Follow the same installation steps you did up until PartitioningDisks; then simply choose Done.
4.7.4 Filesystem Configuration
The next dialog box contains a list of all disk partitions with filesystems readable by Red Hat Linux,including partitions for MS-DOS or Windows. This gives you the opportunity to assign these parti-tions to different parts of your Red Hat Linux filesystem. The partitions you assign will be automat-ically mounted when your Red Hat Linux system boots. Select the partition you wish to assign andpress
�
�
�
�Enter (or choose Edit); then enter the mount point for that partition, e.g., /usr (see Figure 4.11).
Figure 4.11: Filesystem Configuration
If you are performing an upgrade, the installation program tries to find your root partition automat-ically; if it does, it obtains all this information automatically, and goes on to the next step.
Adding an NFS Mount
Red Hat Linux also allows you to mount read-only NFS volumes when your system boots; this allowsdirectory trees to be shared across a network. To do so, press
�
�
�
�F2 . If you have not selected a network-
related installation method, you will be presented with several dialog boxes concerning networkconfiguration (turn to Section 5.1.2 on page 66 for more information). Fill them in appropriately. You

58 Local Media Installations
will then see a dialog box entitled “Edit Network Mount Point.” Enter the NFS server’s hostname,the path to the NFS volume, and the local mount point for that volume (see Figure 4.12).
Figure 4.12: Adding an NFS Mount
4.8 Initializing Swap Space
Now the installation program will look for swap partitions (see Figure 4.13 on the next page). If itfinds any, it asks whether you want to initialize them. Select the partition(s) you wish to initialize asswap space using
�
�
�
�
Space ; if you wish to check the partitions for bad blocks, select the Check for badblocks during format box. Choose Ok, and press
�
�
�
�
Space .
If the installation program can’t find a swap partition and you’re sure one exists, make sure you haveset the partition type to Linux swap; see Section 4.7 on page 48 for information on how this is donewith Disk Druid or fdisk.
4.9 For Hard Drive Installations Only. . .
If you are not performing a hard drive installation, please skip ahead to Section 4.10 on page 60.Otherwise, read on.
At this point, a dialog box entitled “Select Partition” is displayed (see Figure 4.14 on the facing page).Enter the device name of the partition holding the RedHat directory tree. There is also a field la-belled “Directory.” If the RedHat directory is not in the root directory of that partition (for example,/test/new/RedHat), enter the path to the RedHat directory (in our example, /test/new).

4.9 For Hard Drive Installations Only. . . 59
Figure 4.13: Initializing Swap Space
Figure 4.14: Selecting Partition for Hard Drive Install

60 Local Media Installations
If the installation program was unable to find the necessary files on the partition and directory you’vespecified, you’ll be returned to the “Select Partition” dialog box to make the necessary corrections.
If everything has been specified properly, you should see a message box indicating that the packagesare being scanned.
If you are doing a workstation- or server-class installation, please turn to Chapter 6 on page 91. Moveon to the next section to continue the custom installation of Red Hat Linux.
4.10 Formatting Partitions
The next dialog box presents a list of partitions to format (see Figure 4.15). All newly-created parti-tions should be formatted. In addition, any existing partitions that contain old data you no longerneed should be formatted. However, partitions such as /home or /usr/local must not be format-ted if they contain data you wish to keep. Select each partition to format and press
�
�
�
�
Space . If youwish to check for bad blocks while formatting each filesystem, select Check for bad blocks duringformat. Select Ok, and press
�
�
�
�
Space .
Figure 4.15: Formatting Partitions
4.11 Selecting and Installing Packages
After your partitions have been configured and selected for formatting, you are ready to select pack-ages for installation. You can select components, which group packages together according to function,individual packages, or a combination of the two.

4.11 Selecting and Installing Packages 61
4.11.1 Selecting Components
Components group packages together according to the functionality they provide. For example, CDevelopment, Networked Workstation, or Web Server. Select each component you wish to installand press
�
�
�
�
Space . Selecting Everything (which can be found at the end of the component list) installsall packages included with Red Hat Linux (see Figure 4.16). Selecting every package will require closeto 1 GIG of free disk space.
Figure 4.16: Selecting System Components
If you wish to select or deselect individual packages, check the Select individual packages checkbox.
4.11.2 Selecting Individual Packages
After selecting the components you wish to install, you may select or deselect individual packages.The installation program presents a list of the package groups available; using the arrow keys, select agroup to examine and press
�
�
�
�Enter or
�
�
�
�
Space . The installation program presents a list of the packagesin that group, which you may select or deselect by using the arrow keys to highlight a package, andpressing
�
�
�
�
Space (see Figure 4.17 on the following page).
Please Note: Some packages (such as the kernel and certain libraries) are required for every RedHat Linux system and are not available to select or deselect.
Quick Keys
� [o] – shows that at least one of the packages in that component group has been selected.

62 Local Media Installations
� [*] – shows that all the packages of a component group has been selected.
� [–] – removes all packages in a component group.
� [*] – selects all packages in a component group.
Please Note: In the upper right-hand corner of the screen you will see the approximate system sizeof the components you have selected to install.
Figure 4.17: Selecting Packages
When you are finished selecting individual packages, press Ok in the Select Group dialog box.
Getting Information about a Package
You may view a detailed description of the currently-highlighted package by pressing�
�
�
�F1 . A dialog
box will appear containing a description of the package. You can use the arrow keys to scroll throughthe description if it cannot fit on the screen. When you’re done reading the description, press Ok,and the box will disappear. You can then continue selecting packages.
Please Note: If you’d rather read the package descriptions on paper, please turn to Appendix D onpage 247.
4.11.3 Package Dependencies
Many software packages, in order to work correctly, depend on other software packages or librariesthat must be installed on your system. For example, many of the graphical Red Hat system admin-istration tools require the python and pythonlib packages. To make sure your system has all the

4.11 Selecting and Installing Packages 63
Figure 4.18: Selecting Packages – Expanded View
Figure 4.19: Unresolved Dependencies

64 Local Media Installations
packages it needs in order to be fully functional, Red Hat Linux checks these package dependencieseach time you install or remove software packages.
After you have finished selecting packages to install, the installation program checks the list of se-lected packages for dependencies. If any package requires another package which you have not se-lected to install, the program presents a list of these unresolved dependencies and gives you the oppor-tunity to resolve them (see Figure 4.19 on the preceding page). If you simply press Ok, the programwill resolve them automatically by adding all required packages to the list of selected packages.
4.11.4 Package Installation
After all package dependencies have been resolved, the installation program presents a dialog boxtelling you that a log file containing a list of all packages installed will be written to/tmp/install.log on your Red Hat Linux system. Select Ok and press
�
�
�
�
Space to continue.
At this point, the installation program will format every partition you selected for formatting. Thiscan take several minutes (and will take even longer if you directed the installation program to checkfor bad blocks).
Once all partitions have been formatted, the installation program starts to install packages. A win-dow entitled “Install Status” is displayed with the following information:
Package – The name of the package currently being installed.
Size – The size of the package (in kilobytes).
Summary – A short description of the package.
Package Installation Progress Bar – A bar showing how complete the current package installa-tion is.
Statistics Section – This section has three rows labeled “Total,” “Completed,” and “Remaining.”As you might guess, these rows contain statistics on the total number of packages that willbe installed, statistics on the number of packages that have been completely installed, andstatistics on the packages that have not yet been installed. The information tracked on thesethree rows includes:
Packages – The number of packages.Bytes – The size.Time – The amount of time.
Overall Progress Bar – This bar changes color showing how close to completion the entire instal-lation is.
At this point there’s nothing left for you to do until all the packages have been installed. How quicklythis happens depends on the number of packages you’ve selected, and your computer’s speed.
Once all the packages have been installed, please turn to Chapter 6 on page 91 to finish your instal-lation of Red Hat Linux.

5Network Installations
5.1 Selecting an Installation Method
Now you must decide what type of installation method you wish to use (see Figure 5.1 on the fol-lowing page). Highlight the appropriate choice and select Ok, or press
�
�
�
�Enter .
If you are not performing a network type installation (NFS, FTP, or HTTP) then please skip ahead toChapter 6 on page 91 to finish the installation process, or back to Chapter 4 on page 43 if you need toperform a CD-ROM or hard drive installation.
If you are planning to do a network type installation, please read on.
5.1.1 Network Driver Configuration
Next, the installation program will probe your system and attempt to identify your network card.Most of the time, the driver can locate the card automatically. If it is not able to identify your networkcard, you’ll be asked to choose the driver that supports your network card and to specify any optionsnecessary for the driver to locate and recognize it.

66 Network Installations
Figure 5.1: Selecting an Installation Method
5.1.2 Configuring TCP/IP Networking
After the installation program has configured your network card, it presents several dialogs for con-figuring your system’s TCP/IP networking. The first screen (shown in Figure 5.2 on the next page)allows you to select from one of three approaches to network configuration:
� Static IP address – You must supply all the necessary network-related information manually.
� BOOTP – The necessary network-related information is automatically provided using a bootprequest.
� DHCP – The necessary network-related information is automatically provided using a dhcprequest.
Please Note: The BOOTP and DHCP selections require an active, properly configured bootp (ordhcp) server running on your local area network.
If you choose BOOTP or DHCP, your network configuration will be set automatically, and you canskip the rest of this section.
If you’ve selected Static IP address, you’ll need to specify all the networking information yourself.Figure 5.3 on the facing page contains an example of networking information similar to what you’llbe needing.
Please Note: The information in figure 5.3 on the next page is a sample only! You should obtain theproper information for your network from your network administrator.
The first dialog asks you for IP and other network addresses (see Figure 5.4 on page 68). Enter theIP address you are using during installation and press
�
�
�
�Enter . The installation program attempts to

5.1 Selecting an Installation Method 67
Figure 5.2: Selecting Method of Network Configuration
Field Example ValueIP Address 10.0.2.15Netmask 255.255.255.0Default Gateway 10.0.2.254Primary Nameserver 10.0.2.1Domain Name redhat.comHostname pooh.redhat.com
Figure 5.3: Sample Networking Information
guess your Netmask based on your IP address; you may change the netmask if it is incorrect. Press�
�
�
�Enter . The installation program guesses the Default gateway and Primary nameserver addressesfrom your IP address and netmask; you may change them if they are incorrect.
Choose Ok to continue.
After the first dialog box, you may see a second one. It will prompt you for a domain name, ahostname, and other networking information (see Figure 5.5 on page 69). Enter the Domain namefor your system and press
�
�
�
�Enter ; the installation program carries the domain name down to the Host
name field. Enter the hostname you are using in front of the domain name to form a fully-qualifieddomain name (FQDN). If your network has more than one nameserver, you may enter IP addressesfor additional nameservers in the Secondary nameserver and Tertiary nameserver fields. ChooseOk to continue.
Please Note: If you’re performing an FTP installation, go to Section 5.3 on page 69 and continuefrom there. If you’re doing an NFS installation, read on.

68 Network Installations
Figure 5.4: Configuring TCP/IP
5.2 Installing via NFS
If you are installing Red Hat Linux 6.0 via NFS, you will now need to configure your NFS serverinformation.
5.2.1 NFS Server Information
The next dialog requests information about the NFS server (see Figure 5.6 on page 70). Enter thename (which must be a fully-qualified domain name) or IP address of your NFS server, and thename of the exported directory that contains the Red Hat Linux CD. For example, if the NFS serverhas the Red Hat Linux CD mounted on /mnt/cdrom, enter /mnt/cdrom in the Red Hat directoryfield. If the NFS server is exporting a mirror of the Red Hat Linux installation tree instead of a CD,enter the directory which contains the RedHat directory. For example, if your NFS server containsthe directory /mirrors/redhat/i386/RedHat,enter /mirrors/redhat/i386.
After a short delay, the next dialog box will appear.
Please Note: An NFS install does not require a support diskette in the installation process, unlessyou are using a PCMCIA device to complete the installation. If so, you will need to use the PCMCIAsupport disk when prompted.

5.3 Installing via FTP 69
Figure 5.5: Configuring Networking
5.3 Installing via FTP
You should now be looking at the “FTP Setup” dialog box. Here’s where you point the installationprogram at the FTP site of your choice (see Figure 5.7 on page 71). Enter the name or IP address ofthe FTP site you are installing from, and the name of the directory there which contains the RedHatdirectory for your architecture. For example, if the FTP site contains the directory/pub/mirrors/redhat/i386/RedHat, enter /pub/mirrors/redhat/i386. If you are not us-ing anonymous FTP, or if you need to use a proxy FTP server (if you’re behind a firewall, for exam-ple), check the check box, and another dialog box will request the FTP account and proxy informa-tion.
If everything has been specified properly, you should see a message box indicating thatbase/hdlist is being retrieved.
Continue to section 5.5 on the next page for upgrade or full-installation instructions.
5.4 Installing via HTTP
You should now be looking at the “HTTP Setup” dialog box. Here’s where you point the installationprogram at the HTTP site of your choice. Enter the name or IP address of the HTTP site you areinstalling from, and the name of the directory there which contains the RedHat directory for yourarchitecture. For example, if the HTTP site contains the directory/pub/mirrors/redhat/i386/RedHat, enter /pub/mirrors/redhat/i386. If you are not us-ing anonymous HTTP, or if you need to use a proxy HTTP server (if you’re behind a firewall, forexample), check the check box, and another dialog box will request the HTTP account and proxy

70 Network Installations
Figure 5.6: Installing via NFS
information.
If everything has been specified properly, you should see a message box indicating thatbase/hdlist is being retrieved.
Continue to section 5.5 for upgrade or full-installation instructions.
5.5 Upgrading or Installing
After you choose an installation method, the installation program prompts you to either install orupgrade (see Figure 5.9 on page 72).
5.5.1 Installing
You usually install Red Hat Linux on a clean disk partition or set of partitions, or over another instal-lation of Linux.
Please Note: Installing Red Hat Linux over another installation of Linux (including Red Hat Linux)does not preserve any information (files or data) from the prior installation. Make sure you save anyimportant files! If you are worried about saving the current data on your existing system (withoutmaking a backup on your own), you should consider performing an upgrade instead.
If you wish to perform a full install, choose Install, and skip to section 5.6 on page 72.

5.5 Upgrading or Installing 71
Figure 5.7: Installing via FTP
Figure 5.8: Installing via HTTP

72 Network Installations
Figure 5.9: Upgrading or Installing
5.5.2 Upgrading
The installation process for Red Hat Linux 6.0 includes the ability to upgrade from prior versions ofRed Hat Linux (version 2.0 and later) which are based on RPM technology. Upgrading your systeminstalls the modular 2.2.x kernel as well as updated versions of the packages which are currentlyinstalled on your machine. The upgrade process preserves existing configuration files by renamingthem using an .rpmsave extension (e.g., sendmail.cf.rpmsave) and leaves a log telling whatactions it took in /tmp/upgrade.log. As software evolves, configuration file formats can change,so you should carefully compare your original configuration files to the new files before integratingyour changes.
If you wish to upgrade your Red Hat Linux system, choose Upgrade.
Please Note: Some upgraded packages may require that other packages are also installed for properoperation. The upgrade procedure takes care of these dependencies, but it may need to install addi-tional packages.
Please Note: If you already have the X Window System (and possibly an older version of GNOME)on you machine you may see a screen that prompts you to install the latest version of GNOMEincluded in this release.
5.6 Installation Class
If you chose to perform a full install, the installation program will ask you to choose an installationclass (see Figure 5.10 on the next page). You will not see this screen if you chose to perform anupgrade. You may choose from the following installation classes:

5.6 Installation Class 73
Figure 5.10: Installation Class
� Workstation – A workstation-class installation will automatically erase all Linux partitionsfrom your computer’s hard drive(s). This type of installation will attempt to set up a dual bootenvironment automatically.
� Server – A server-class installation will automatically erase all partitions from your computer’shard drive(s).
� Custom – A custom-class installation gives you complete control over partitioning-relatedissues. If you have installed Red Hat Linux in the past, the custom-class installation is mostsimilar to past installations.
Please Note: If you choose either Workstation or Server, part (or all) of your computer’s storeddata on all drives will be erased! You will be asked to confirm your decision; however, please keep inmind that once the installation program receives your confirmation, the erasure is irrevocable.
Please Note: WARNING – If you choose to perform a workstation-class or server-class installation,data erasure will be irrevocable. The severity of erased data varies according to type of installation:
� Workstation-class – Data on any existing Linux partition on any hard drive on your systemwill be erased.
� Server-class – Data on all partitions of all drives will be completely erased, regardless if it ison an existing Linux partition or not.
If you choose a workstation- or server-class installation, you will be able to skip over some of thesteps that the custom-class install requires.

74 Network Installations
5.7 SCSI Support
After you choose the appropriate installation class, the installation program will probe your sys-tem for SCSI adapters. In some cases, the installation program will ask you whether you have anySCSI adapters. If you choose Yes, the following dialog presents a list of SCSI drivers. Choose thedriver that most closely resembles your SCSI adapter. The installation program then gives you anopportunity to specify options for the SCSI driver you selected; most SCSI drivers should detect yourhardware automatically, however.
For either the workstation- or server-class installation, you should turn Chapter 6 on page 91 to finishthe installation process.
5.8 Creating Partitions for Red Hat Linux
At this point, it’s necessary to let the installation program know where it should install Red HatLinux. This is done by defining mount points for one or more disk partitions in which Red Hat Linuxwill be installed. You may also need to create and/or delete partitions at this time.
Please Note: If you have not yet planned how you will set up your partitions, please turn to Sec-tion 2.8 on page 21, and review everything up to Section 2.9 on page 31. As a bare minimum, you’llneed an appropriately-sized root partition, and a swap partition of at least 16 MB.
If you are still unsure about how to set up your partitions, please refer to Appendix C on page 239for more information.
The installation program then presents a dialog box that allows you to choose from two disk parti-tioning tools (see Figure 5.11 on the facing page). The two choices you have are:
� Disk Druid – This is Red Hat Linux’s install-time disk management utility. It can create anddelete disk partitions according to user-supplied requirements, in addition to managing mountpoints for each partition.
� fdisk – This is the traditional Linux disk partitioning tool. While it is somewhat more flexiblethan Disk Druid, the downside is that fdisk assumes you have some experience with diskpartitioning, and are comfortable with its somewhat terse user interface.
With the exception of certain esoteric situations, Disk Druid can handle the partitioning requirementsfor a typical Red Hat Linux installation.
SPARCNote that there are some points you should be aware of if you decide to use Disk Druid under RedHat Linux/SPARC. Please refer to Appendix F on page 361 for more information.

5.8 Creating Partitions for Red Hat Linux 75
Figure 5.11: Selecting Disk Setup Method
ALPHANote that there are some points you should be aware of if you decide to use Disk Druid under RedHat Linux/Alpha. Please refer to the Alpha Installation Addendum for more information.
Select the disk partitioning tool you’d like to use, and press�
�
�
�Enter . If you choose Disk Druid, con-
tinue reading. If you’d rather use fdisk, please turn to Section 5.8.3 on page 81.
5.8.1 Using Disk Druid
If you selected Disk Druid, you will be presented with a screen that looks like figure 5.12 on the nextpage. While it may look overwhelming at first, it really isn’t. Let’s go over each of Disk Druid’s threesections.
The “Current Disk Partitions” Section
Each line in the “Current Disk Partitions” section represents a disk partition. You’ll note that thissection has a scroll bar to the right, which means that there might be more partitions than can bedisplayed at one time. If you use the
�
�
�
�
" and�
�
�
�
# keys, you can see if there are any additional partitionsthere. Each line in this section has five different fields:
Mount Point – This field indicates where the partition will be mounted when Red Hat Linux isinstalled and running.
Device – This field displays the partition’s device name.

76 Network Installations
Figure 5.12: Disk Druid Main Screen
Requested – The “Requested” field shows the minimum size requested when the partition wasdefined.
Actual – The “Actual” field shows the space currently allocated to the partition.
Type – This field shows the partition’s type.
Another Type of Partition – As you scroll through the “Current Disk Partitions” section, youmight see an “Unallocated Requested Partitions” title bar, followed by one or more partitions. As thetitle implies, these are partitions that have been requested but, for one reason or another, have notbeen allocated. A common reason for having an unallocated partition is a lack of sufficient free spacefor the partition. In any case, the reason the partition remains unallocated will be displayed after thepartition’s mount point.
The “Drive Summaries” Section
Each line in the “Drive Summaries” section represents a hard disk on your system. Each line has thefollowing fields:
Drive – This field shows the hard disk’s device name.
Geom [C/H/S] – This field shows the hard disk’s geometry. The geometry consists of three numbersrepresenting the number of cylinders, heads, and sectors as reported by the hard disk.
Total – The “Total” field shows the total available space on the hard disk.

5.8 Creating Partitions for Red Hat Linux 77
Used – This field shows how much of the hard disk’s space is currently allocated to partitions.
Free – The “Free” field shows how much of the hard disk’s space is still unallocated.
Bar Graph – This field presents a visual representation of the space currently used on the harddisk. The more pound signs there are between the square braces, the less free space there is. InFigure 5.12 on the facing page, the bar graph shows no free space.
Please Note: The “Drive Summaries” section is displayed only to indicate your computer’s diskconfiguration. It is not meant to be used as a means of specifying the target hard drive for a givenpartition. This is described more completely in Adding a Partition later in this section.
Disk Druid’s Buttons
These buttons control Disk Druid’s actions. They are used to add and delete partitions, and to changepartition attributes. In addition, there are buttons that are used to accept the changes you’ve made,or to exit Disk Druid entirely. Let’s take a look at each button in order.
Add – The “Add” button is used to request a new partition. When selected, a dialog box will appearcontaining fields that must be filled in.
Edit – The “Edit” button is used to modify attributes of the partition currently highlighted in the“Current Disk Partitions” section. Selecting this button will cause a dialog box to appear. Someor all of the fields in the “Edit Partition” dialog box may be changed, depending on whetherthe partition information has already been written to the disk.
Delete – The “Delete” button is used to delete the partition currently highlighted in the “CurrentDisk Partitions” section. Selecting this button will cause a dialog box to appear asking you toconfirm the deletion.
Ok – The “Ok” button causes any changes made to your system’s partitions to be written to disk.You will be asked to confirm your changes before Disk Druid rewrites your hard disk partitiontable(s). In addition, any mount points you’ve defined are passed to the installation program,and will eventually be used by your Red Hat Linux system to define the filesystem layout.
Back – This button causes Disk Druid to abort without saving any changes you’ve made. Whenthis button is selected, the installation program will take you back to the previous screen, soyou can start over.
Handy Function Keys
While there is some overlap between Disk Druid’s buttons and the available functions keys, there aretwo function keys that have no corresponding buttons:

78 Network Installations
��
�
�
�F2 (Add NFS) – This function key is used to add a read-only NFS-served filesystem to the
set of mount points on your Red Hat Linux system. When selected, a dialog box will appearcontaining fields that must be filled in.
��
�
�
�F5 (Reset) – This function key is used to discard all changes you may have made while
in Disk Druid, and return the list of partitions to those read from the partition table(s) onyour hard disk(s). When selected, you’ll be asked to confirm whether you want the changesdiscarded or not. Note that any mount points you’ve specified will be lost, and will need to bereentered.
Please Note: You will need to dedicate at least one partition to Red Hat Linux, and optionally more.This is discussed more completely in Section 2.8.5 on page 29.
Now let’s see how Disk Druid is used to set up partitions for your Red Hat Linux system.
Adding a Partition
To Add a new partition, select the Add button, and press�
�
�
�
Space or�
�
�
�Enter . A dialog box entitled
“Edit New Partition” will appear (see Figure 5.13). It contains the following fields:
Figure 5.13: Creating a New Partition
� Mount Point – Highlight this field, and enter the partition’s mount point. For example, if thispartition should be the root partition, enter /; enter /usr for the usr partition, and so on.
� Size (Megs) – In this field, enter the size (in megabytes) of the partition. Note that this fieldstarts with a “1” in it, meaning that unless you change it, you’ll end up with a 1 MB partition.Delete it using the
�
�
�
�
Backspace key, and enter the desired partition size.
5.8 Creating Partitions for Red Hat Linux 79
� Growable? – This check box indicates whether the size you entered in the previous field isto be considered the partition’s exact size, or its minimum size. Press
�
�
�
�
Space to check anduncheck the box. When checked, the partition will grow to fill all available space on the harddisk. In this case, the partition’s size will expand and contract as other partitions are modified.Note that you can make more than one partition growable; if you do so, the additional freespace will be shared between all growable partitions.
� Type – This field contains a list of different partition types. Select the appropriate partitiontype by using the
�
�
�
�
" and�
�
�
�
# keys.
� Allowable Drives – This field contains a list of the hard disks installed on your system, witha check box for each. If a hard disk’s box is checked, then this partition may be created on thathard disk. If the box is not checked, then the partition will never be created on that hard disk.By using different check box settings, you can direct Disk Druid to place partitions as you seefit, or let Disk Druid decide where partitions should go.
� Ok – Select this button and press�
�
�
�
Space when you are satisfied with the partition’s settings,and wish to create it.
� Cancel – Select this button and press�
�
�
�
Space when you don’t want to create the partition.
5.8.2 Problems When Adding a Partition
Please Note: If you are having problems setting up your partitions, please refer to Appendix C onpage 239 for more information.
If you attempt to add a partition and Disk Druid can’t carry out your request, you’ll see a dialogbox like the one in Figure 5.14 on the following page. In the box are listed any partitions that arecurrently unallocated, along with the reason they could not be allocated. Select the Ok button, andpress
�
�
�
�
Space to continue. Note that the unallocated partition(s) are also displayed on Disk Druid’smain screen (though you may have to scroll the “Current Disk Partitions” section to see them).
Deleting a Partition
To delete a partition, highlight the partition in the “Current Disk Partitions” section, select the Deletebutton, and press
�
�
�
�
Space . You will be asked to confirm the deletion.
Editing a Partition
To change a partition’s settings, highlight the partition in the “Current Disk Partitions” section, selectthe Edit button, and press
�
�
�
�
Space . You will be presented with a dialog box very similar to the oneshown in Figure 5.13 on the preceding page. Make the appropriate changes, select Ok, and press�
�
�
�
Space .

80 Network Installations
Figure 5.14: Unallocated Partition Warning
Please Note: If the partition already existed on your hard disk, you will only be able to change thepartition’s mount point. If you want to make any other changes, you will need to delete the partitionand recreate it.
Adding an NFS Mount
To add a read-only NFS-served filesystem, press�
�
�
�F2 . If you have not selected a network-related in-
stallation method, you will be presented with several dialog boxes concerning network configuration(turn to Section 5.1.1 on page 65 for more information). Fill in the boxes appropriately. You will thensee a dialog box entitled, “Edit Network Mount Point” (similar to the one in Figure 5.19 on page 84).In this dialog box you will need to enter the NFS server name, the path to the exported filesystem,and the mount point for the filesystem. Select the Ok or Cancel button as appropriate, and press�
�
�
�
Space .
Starting Over
If you’d like to abandon any changes you’ve made while in Disk Druid, and would rather use fdiskinstead, you can select the Back button, and press
�
�
�
�
Space . If you want to continue using Disk Druid,but would like to start over, press
�
�
�
�F5 , and Disk Druid will be reset to its initial state.

5.8 Creating Partitions for Red Hat Linux 81
When You’re Finished. . .
Once you’ve finished configuring partitions and entering mount points, your screen should looksomething like the one in Figure 5.15. Select Ok, and press
�
�
�
�
Space . Then turn to Section 4.8 onpage 58.
Figure 5.15: Partitions and Mount Points Defined
5.8.3 Using fdisk
If you’d rather use fdisk to manage partitions, this is the section for you. Once you’ve selectedfdisk, you’ll be presented with a dialog box entitled “Partition Disks” (see Figure 5.16 on the fol-lowing page). In this box is a list of every disk on your computer. Move the highlight to the diskyou’d like to partition, select Edit, and press
�
�
�
�
Space . You will then enter fdisk and can partitionthe disk you selected. Repeat this process for each disk you want to partition. When you’re done,select “Done.”
An Overview of fdisk
fdisk includes online help which is terse but useful. Here are a few tips:
� The command for help is m.
� To list the current partition table, use the p command (see Figure 5.17 on page 83).
� To add a new partition, use n.

82 Network Installations
Figure 5.16: Selecting a Disk for Partitioning
� Linux fdisk creates partitions of type Linux native by default. When you create a swappartition, don’t forget to change it to type Linux swap using the t command. The value forthe Linux swap type is 82. For other partition types, use the l command to see a list ofpartition types and values.
� Linux allows up to four (4) partitions on one disk. If you wish to create more than that, one(and only one) of the four may be an extended partition, which acts as a container for one ormore logical partitions. Since it acts as a container, the extended partition must be at least aslarge as the total size of all the logical partitions it is to contain.
� It’s a good idea to write down which partitions (e.g., /dev/hda2) are meant for which filesys-tems (e.g., /usr) as you create each one.
� Please Note: None of the changes you make take effect until you save them and exit fdiskusing the w command. You may quit fdisk at any time without saving changes by using theq command.
Changing the Partition Table
When you are finished partitioning your disks, press Done; you may see a message indicating thatthe installation program needs to reboot. This is a normal occurrence after changing a disk’s partitiondata; it usually happens if you created, changed, or deleted any extended partitions. After you pressOk, your machine will reboot. Follow the same installation steps you did up until PartitioningDisks; then simply choose Done.

5.8 Creating Partitions for Red Hat Linux 83
Figure 5.17: Sample Output from fdisk
5.8.4 Filesystem Configuration
The next dialog box contains a list of all disk partitions with filesystems readable by Red Hat Linux,including partitions for MS-DOS or Windows. This gives you the opportunity to assign these parti-tions to different parts of your Red Hat Linux filesystem. The partitions you assign will be automat-ically mounted when your Red Hat Linux system boots. Select the partition you wish to assign andpress
�
�
�
�Enter (or choose Edit); then enter the mount point for that partition, e.g., /usr (see Figure 5.18
on the following page).
If you are performing an upgrade, the installation program tries to find your root partition automat-ically; if it does, it obtains all this information automatically, and goes on to the next step.
Adding an NFS Mount
Red Hat Linux also allows you to mount read-only NFS volumes when your system boots; this allowsdirectory trees to be shared across a network. To do so, press
�
�
�
�F2 . If you have not selected a network-
related installation method, you will be presented with several dialog boxes concerning networkconfiguration (turn to Section 5.1.2 on page 66 for more information). Fill them in appropriately. Youwill then see a dialog box entitled “Edit Network Mount Point.” Enter the NFS server’s hostname, thepath to the NFS volume, and the local mount point for that volume (see Figure 5.19 on the followingpage).

84 Network Installations
Figure 5.18: Filesystem Configuration
Figure 5.19: Adding an NFS Mount

5.9 Initializing Swap Space 85
5.9 Initializing Swap Space
After you’ve created partitions for Red Hat Linux, the installation program looks for swap partitions(see Figure 5.20). If it finds any, it asks whether you want to initialize them. Select the partition(s)you wish to initialize as swap space using
�
�
�
�
Space ; if you wish to check the partitions for bad blocks,make sure the Check for bad blocks during format box is checked. Choose Ok, and press
�
�
�
�
Space .
Figure 5.20: Initializing Swap Space
If the installation program can’t find a swap partition and you’re sure one exists, make sure you haveset the partition type to Linux swap; see Section 5.8 on page 74 for information on how this is donewith Disk Druid or fdisk.
5.10 Formatting Partitions
The next dialog box presents a list of partitions to format (see Figure 5.21 on the next page). All newlycreated partitions should be formatted. In addition, any existing partitions that contain old data youno longer need should be formatted. However, partitions such as /home or /usr/local must notbe formatted if they contain data you wish to keep. Select each partition to format and press
�
�
�
�
Space .If you wish to check for bad blocks while formatting each filesystem, select Check for bad blocksduring format. Select Ok, and press
�
�
�
�
Space .

86 Network Installations
Figure 5.21: Formatting Partitions
5.11 Selecting and Installing Packages
After your partitions have been configured and selected for formatting, you are ready to select pack-ages for installation. You can select components, which group packages together according to function,individual packages, or a combination of the two.
5.11.1 Selecting Components
Components group packages together according to the functionality they provide. For example, CDevelopment, Networked Workstation, or Web Server. Select each component you wish to installand press
�
�
�
�
Space . Selecting Everything (which can be found at the end of the component list) installsall packages included with Red Hat Linux (see Figure 5.22 on the facing page). Selecting everypackage will require close to 1 GIG of free disk space.
If you wish to select or deselect individual packages, check the Select individual packages checkbox.
5.11.2 Selecting Individual Packages
After selecting the components you wish to install, you may select or deselect individual packages.The installation program presents a list of the package groups available; using the arrow keys, select agroup to examine and press
�
�
�
�Enter or
�
�
�
�
Space . The installation program presents a list of the packagesin that group, which you may select or deselect by using the arrow keys to highlight a package, and

5.11 Selecting and Installing Packages 87
Figure 5.22: Selecting System Components
pressing�
�
�
�
Space (see Figure 5.23 on the next page).
Please Note: Some packages (such as the kernel and certain libraries) are required for every RedHat Linux system and are not available to select or deselect.
Quick Keys
� [o] – shows that at least one of the packages in that component group has been selected.
� [*] – shows that all the packages of a component group have been selected.
� [–] – removes all packages in a component group.
� [*] – selects all packages in a component group.
Please Note: In the upper right-hand corner of the screen you will see the approximate system sizeof the components you have selected to install.
When you are finished selecting individual packages, press Ok in the Select Group dialog box.
Getting Information about a Package
You may view a detailed description of the currently highlighted package by pressing�
�
�
�F1 . A dialog
box will appear containing a description of the package. You can use the arrow keys to scroll throughthe description if there is more than can fit on the screen. When you’re done reading the description,

88 Network Installations
Figure 5.23: Selecting Packages
Figure 5.24: Selecting Packages – Expanded View
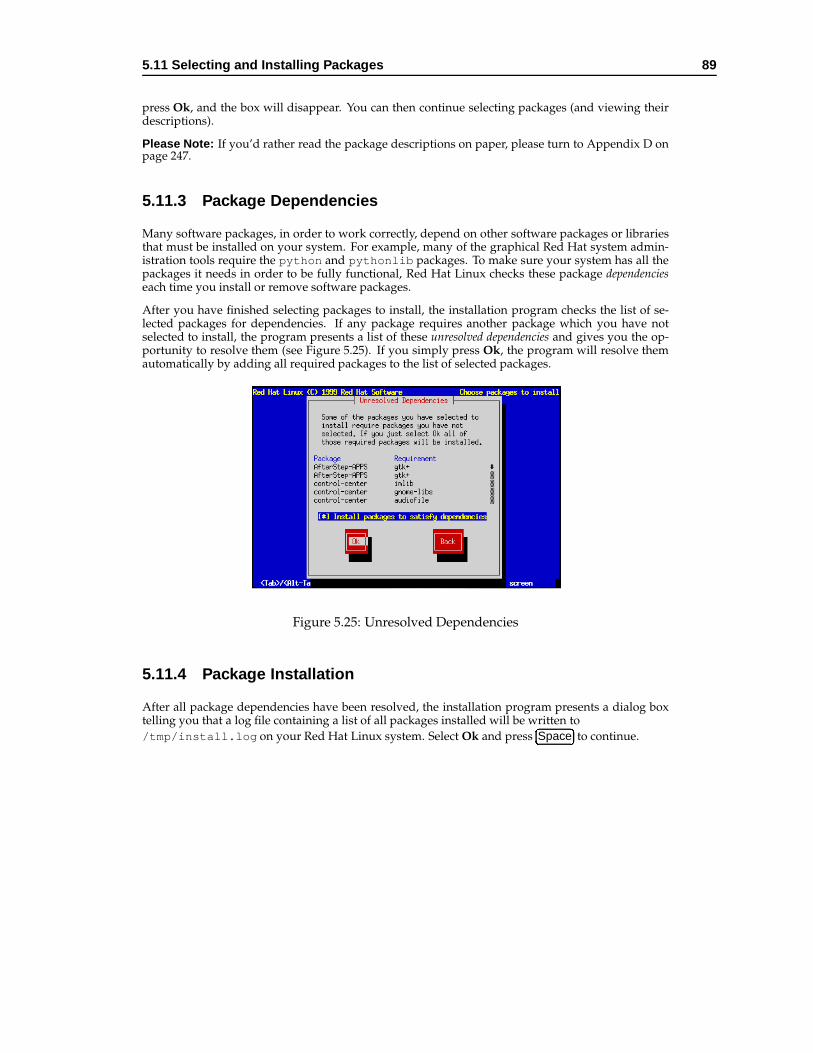
5.11 Selecting and Installing Packages 89
press Ok, and the box will disappear. You can then continue selecting packages (and viewing theirdescriptions).
Please Note: If you’d rather read the package descriptions on paper, please turn to Appendix D onpage 247.
5.11.3 Package Dependencies
Many software packages, in order to work correctly, depend on other software packages or librariesthat must be installed on your system. For example, many of the graphical Red Hat system admin-istration tools require the python and pythonlib packages. To make sure your system has all thepackages it needs in order to be fully functional, Red Hat Linux checks these package dependencieseach time you install or remove software packages.
After you have finished selecting packages to install, the installation program checks the list of se-lected packages for dependencies. If any package requires another package which you have notselected to install, the program presents a list of these unresolved dependencies and gives you the op-portunity to resolve them (see Figure 5.25). If you simply press Ok, the program will resolve themautomatically by adding all required packages to the list of selected packages.
Figure 5.25: Unresolved Dependencies
5.11.4 Package Installation
After all package dependencies have been resolved, the installation program presents a dialog boxtelling you that a log file containing a list of all packages installed will be written to/tmp/install.log on your Red Hat Linux system. Select Ok and press
�
�
�
�
Space to continue.

90 Network Installations
At this point, the installation program will format every partition you selected for formatting. Thiscan take several minutes (and will take even longer if you directed the installation program to checkfor bad blocks).
Once all partitions have been formatted, the installation program starts to install packages. A win-dow entitled “Install Status” is displayed with the following information:
Package – The name of the package currently being installed.
Size – The size of the package (in kilobytes).
Summary – A short description of the package.
Package Installation Progress Bar – A bar showing how complete the current package installa-tion is.
Statistics Section – This section has three rows labeled “Total,” “Completed,” and “Remaining.”As you might guess, these rows contain statistics on the total number of packages that willbe installed, statistics on the number of packages that have been completely installed, andstatistics on the packages that have not yet been installed. The information tracked on thesethree rows includes:
Packages – The number of packages.
Bytes – The size.Time – The amount of time.
Overall Progress Bar – This bar changes color showing how close to completion the entire instal-lation is.
Please Note: If you’re doing an FTP or HTTP installation, a message box will pop up as each packageis retrieved from the site.
At this point there’s nothing left for you to do until all the packages have been installed. Howquickly this happens depends on the number of packages you’ve selected, and your computer’sspeed. Once all the packages have been installed, please turn to Chapter 6 on the facing page tofinish your installation of Red Hat Linux.

6Finishing the Installation
6.1 Configuring a Mouse
Next, your system will be probed to find a mouse. Some mice may be detected automatically; in thiscase, a dialog box is displayed showing the port on which the mouse was found. You may then beasked to give additional information, such as whether you have a two-button mouse, and would likeit to emulate a three-button mouse. Make the appropriate selections, and continue to the next section.
More commonly, you will see a screen similar to the one in Figure 6.1 on the next page.
The installation program’s “best guess” as to your system’s mouse type will be highlighted. If themouse type is not accurate, use the
�
�
�
�
" and�
�
�
�
# keys to scroll through the different mouse types. Ingeneral, you should use the following approach to selecting your system’s mouse type:
� If you find an exact match for your mouse in the list, highlight that entry.
� If you find a mouse that you are certain1 is compatible with your mouse, highlight that entry.
� Otherwise, select one of the Generic entries, based on your mouse’s number of buttons, andits interface. To determine your mouse’s interface, follow the mouse cable back to where itplugs into your system. If the connector at the end of the mouse cable plugs into a rectangular
1No guessing allowed!

92 Finishing the Installation
Figure 6.1: Mouse Configuration
connector, you have a serial mouse. On the other hand, if the connector is round, you havea PS/2 mouse. If you are installing Red Hat Linux on a laptop computer, in most cases thepointing device will be PS/2 compatible.
The Emulate 3 Buttons check box allows you to use a two-button mouse as if it had three buttons. Ingeneral, it’s easiest to use the X Window System if you have a three-button mouse. If you select thischeck box, you can emulate a third, “middle” button by pressing both mouse buttons simultaneously.
If you’ve selected a mouse with a serial interface, you will then see a screen similar to the one shownin Figure 6.2 on the facing page. Simply highlight the appropriate serial port for your mouse, selectOk, and press
�
�
�
�
Space .
If you wish to change your mouse configuration after you have booted your Red Hat Linux system,you may use the /usr/sbin/mouseconfig command.
If wish to configure your mouse as a left-handed mouse, you can reset the order of the mouse buttons.This may be done after you have booted your Red Hat Linux system, by typing gpm -B 321.
6.2 Configuring Networking
Next, the installation program gives you an opportunity to configure (or reconfigure) networking.If you are installing from CD-ROM or from a local hard disk, the installation program asks if youwant to configure networking. If you choose No, your Red Hat Linux system will be a standaloneworkstation. If you choose Yes, you may configure networking as described below.
If you are installing via network media you have already entered temporary networking information

6.2 Configuring Networking 93
Figure 6.2: Serial Mouse Port Selection
that was used during the installation. The install program offers you three choices (see Figure6.3 and6.4):
� Keep this setup – Keeps the network configuration you used during the installation. Allthe networking information you entered previously becomes part of your system’s permanentconfiguration.
� Reconfigure network now – The installation program presents the network configurationdialogs in Section 5.1.1 on page 65. The values you used during installation will be filled in asdefaults. Choose this if your system will be installed on a network other than the one you usedto install Red Hat Linux.
� Don’t setup networking – Don’t set up networking at all. Your system will not have network-ing configured. Choose this if you installed your system over a network, but it will be used asa standalone workstation.
6.2.1 Network Configuration Dialogs
If you elected to configure networking at this time, you will be presented with a series of dialogboxes. Please turn to Section 5.1.2 on page 66 for more information.

94 Finishing the Installation
Figure 6.3: Network Configuration Options – Local Media Install
Figure 6.4: Network Configuration Options – Network Install

6.3 Configuring the Time Zone 95
6.3 Configuring the Time Zone
Next, the installation program presents a dialog to help you configure your system’s time zone (seeFigure 6.5).
If you wish to set the hardware (CMOS) clock to GMT (Greenwich Mean Time, also known as UTC,or Coordinated Universal Time), select Hardware clock set to GMT. Setting it to GMT means yoursystem will properly handle daylight-saving time, if your time zone uses it. Most networks use GMT.
Please Note: If your computer runs another operating system from time to time, setting the clockto GMT may cause the other operating system to display the incorrect time. Also keep in mind thatif more than one operating system is allowed to automatically change the time to compensate fordaylight-saving time, it is likely that the time will be improperly set.
Figure 6.5: Configuring Time Zones
Select the time zone your system will be operating in froom the list, and press�
�
�
�Enter .
If you wish to change your time zone configuration after you have booted your Red Hat Linux sys-tem, you may use the /usr/sbin/timeconfig command.
6.4 Selecting Services for Start on Reboot
Please Note: If you’re performing a workstation- or server-class installation, this part of the instal-lation is automatically done for you. Please skip ahead to Section 6.5 on the following page.
Next you’ll see a dialog box entitled “Services” (see Figure 6.6 on the next page). Displayed in thisbox is a list of services with a check box by each. Scroll through this list, and check every service that

96 Finishing the Installation
you would like automatically started every time your Red Hat Linux system boots. If you’re not surewhat a particular service is, move the highlight to it and press
�
�
�
�F1 . You’ll then get a brief description
of the service.
Figure 6.6: Selecting Services
Note that you can run /usr/sbin/ntsysv or /sbin/chkconfig after the installation to changewhich services automatically start on reboot.
6.5 Configuring a Printer
Next you will be asked if you want to configure a printer. If you choose Yes, a dialog box will askyou to indicate how the printer is connected to your computer (see Figure 6.7 on the facing page).
Here is a brief description of the three types of printer connections available:
Local – The printer is directly connected to your computer.
Remote lpd – The printer is connected to your local area network (either through another com-puter, or directly), and is capable of communicating via lpr/lpd.
SMB/Windows 95/NT – The printer is connected to another computer which shares the printer viaSMB networking, such as a printer shared by a Windows 95 or Windows NT computer.
Netware – The printer is connected to another computer which shares the printer via Novell Net-Ware.

6.5 Configuring a Printer 97
Figure 6.7: Selecting Printer Type
After selecting a printer type, you’ll be presented with a dialog box entitled “Standard Printer Op-tions” (see Figure 6.8 on the next page). Enter the name of the queue and the spool directory you’dlike to use, or accept the default information.
The dialog box you’ll see next depends on the printer connection type you selected.
6.5.1 Locally Attached Printers
If you selected “Local” as your printer’s connection type, you’ll see a dialog box similar to the one inFigure 6.9 on the following page.
Enter the printer device name in the field provided. As a convenience, the installation programattempts to determine which printer ports are available on your computer. Select Next, and press�
�
�
�
Space . Now turn to Section 6.5.5 on page 99 to continue.
6.5.2 Remote lpd Printers
If you selected “Remote lpd” as your printer’s connection type, you’ll see a dialog box similar to theone in Figure 6.10 on page 99.
Enter the name of the computer to which the printer is directly connected in the “Remote hostname”field. The name of the queue on the remote computer that is associated with the remote printer goesin the “remote queue” field. Select Next, and press
�
�
�
�
Space . Now turn to Section 6.5.5 on page 99 tocontinue.

98 Finishing the Installation
Figure 6.8: Standard Printer Options
Figure 6.9: Local Printer Device

6.5 Configuring a Printer 99
Figure 6.10: Remote lpd Printer Options
6.5.3 SMB, Windows 95/NT Printers
If you selected “SMB, Windows 95/NT” as your printer’s connection type, you’ll see a dialog boxsimilar to the one in Figure 6.11 on the following page. Enter the necessary information in the fieldsprovided. Select Next, and press
�
�
�
�
Space .
6.5.4 NetWare Printers
If you selected “NetWare” as your printer’s connection type, you’ll see a dialog box similar to theone in Figure 6.12 on the next page. Enter the necessary information in the fields provided. SelectNext, and press
�
�
�
�
Space .
6.5.5 Finalizing Printer Setup
Next, you’ll see a dialog box entitled “Configure Printer” (see Figure 6.13 on page 101). Select theprinter type that most closely matches your printer. Select Next, and press
�
�
�
�
Space to continue.
After selecting the printer type, you will see a dialog box similar to the one in Figure 6.14 on page 101.Set the paper size and resolution appropriately. The Fix stair-stepping of text check box should bechecked if your printer does not automatically perform a carriage return after each line.
If your printer supports it, you will see a dialog box in which you can configure the color optionsof your printer, or a similar one, in which you can configure the color and resolutions options of theuniprint driver your printer uses. Set these options appropriately.

100 Finishing the Installation
Figure 6.11: SMB and Windows95/NT Printer Options
Figure 6.12: Netware Printer Options

6.5 Configuring a Printer 101
Figure 6.13: Configure Printer
Figure 6.14: Printer Settings

102 Finishing the Installation
Finally, you’ll see a dialog box that contains all the information pertaining to your printer (see Fig-ure 6.15). Verify that the information is correct. If everything looks OK, select Done. If you need tomake changes, select Edit. You can also select Cancel if you’d rather not configure a printer at thistime.
Figure 6.15: Verifying Printer Information
If you select Done, you will be given the option to configure another printer, or you may continuewith the installation.
6.6 Setting a Root Password
The installation program will next prompt you to set a root password for your system (see Figure 6.16on the next page). You’ll use the root password to log into your Red Hat Linux system for the firsttime.
The root password must be at least six characters long; the password you type is not echoed to thescreen. You must enter the password twice; if the two passwords do not match, the installationprogram will ask you to enter them again.
You ought to make the root password something you can remember, but not something that is easyfor someone else to guess. Your name, your phone number, qwerty, password, root, 123456,and anteater are all examples of poor passwords. Good passwords mix numerals with upper andlower case letters and do not contain dictionary words: Aard387vark or 420BMttNT, for example.Remember that the password is case-sensitive. Write down this password and keep it in a secureplace.
Please Note: The root user (also known as the superuser) has complete access to the entire system;for this reason, logging in as the root user is best done only to perform system maintenance or admin-

6.7 Authentication Configuration 103
Figure 6.16: Root Password
istration. Please see Chapter 8 on page 119 for instructions on how to add a user account for yourselfafter you reboot your system. A more basic method of creating a new user account can also be foundin the Official Red Hat Linux Getting Started Guide in the Welcome to Linux chapter.
6.7 Authentication Configuration
After you have set up your root password, you will have the option of setting up different networkpassword authentications:
� Enable NIS – allows you to run a group of computers in the same Network InformationService domain with a common password and group file. There are two options here to choosefrom:
– NIS Domain – this option allows you to specify which domain or group of computersyour system will belong to.
– NIS Server – this option causes your computer to use a specific NIS server, rather than“broadcasting” a message to the local area network asking for any available server tohost your system.
� Enable Shadow Passwords – provides a very secure method of retaining passwords for you.The /etc/psswd file is replaced by /etc/shadow which is only readable by root.
� MD5 Passwordallows a long password to be used up to 256 characters, instead of the stan-dard eight letters or less.

104 Finishing the Installation
Please Note:To configure the NIS option, you must be connected to an NIS network. If you areunsure whether or not you are connected to an NIS network, please ask you system administrator.
Unless you are setting up a NIS password, you will notice that both Shadow password and MD5 areselected. We recommend you use both to make your machine as secure as possible (see Figure 6.17).
Figure 6.17: Authentication Configuration
6.8 Creating a Boot Diskette
Next, you’ll be given the opportunity to create a customized boot diskette for your Red Hat Linuxsystem (see Figure 6.18 on the facing page).
A boot diskette can be handy for a number of reasons:
� Use It Instead of LILO – You can use a boot diskette instead of LILO. This is handy if you’retrying Red Hat Linux for the first time, and you’d feel more comfortable if the boot process foryour other operating system is left unchanged. With a boot diskette, going back to your otheroperating system is as easy as removing the boot diskette and rebooting.
� Use It In Emergencies – The boot diskette can also be used in conjunction with a rescue disk,which will give you the tools necessary to get an ailing system back on its feet again2.
� Use It When Another Operating System Overwrites LILO – Other operating systems maynot be as flexible as Red Hat Linux when it comes to supported boot methods. Quite often,
2To do this, you’ll need to create a rescue diskette from the rescue.img image contained in the imagesdirectory of your Red Hat Linux CD-ROM. Appendix B on page 237 explains how to do this.

6.9 Installing LILO 105
Figure 6.18: Creating a Boot Diskette
installing or updating another operating system can cause the master boot record (originallycontaining LILO) to be overwritten, making it impossible to boot your Red Hat Linux installa-tion. The boot diskette can then be used to boot Red Hat Linux so you can reinstall LILO.
Given these reasons to create a boot diskette, you should seriously consider doing so. Select Yes andpress
�
�
�
�
Space to create a boot diskette. Next, you’ll see a dialog box directing you to insert a blankdiskette in your computer’s diskette drive. Select Ok, and press
�
�
�
�
Space when you’ve done so.
After a short delay, your boot diskette will be done. After removing it from your diskette drive, labelit clearly. Note that if you would like to create a boot diskette after the installation, you’ll be ableto do so. If you boot your system with the boot diskette (instead of LILO), make sure you createa new boot diskette if you make any changes to your kernel. For more information, please see themkbootdisk man page, by typing man mkbootdisk at the shell prompt.
6.9 Installing LILO
Please Note: If you are performing a custom-class installation, please keep reading. If you areperforming a workstation-class or server-class installation, this part of the installation process is au-tomatically done for you. Please skip ahead to Section 6.10 on page 108.
In order to be able to boot your Red Hat Linux system, you usually need to install LILO (the LInuxLOader). You may install LILO in one of two places:
The Master Boot Record (MBR) is the recommended place to install LILO, unless the MBR al-ready starts another operating system loader, such System Commander or OS/2’s Boot Man-

106 Finishing the Installation
ager. The master boot record is a special area on your hard drive that is automatically loadedby your computer’s BIOS, and is the earliest point at which LILO can take control of the bootprocess. If you install LILO in the MBR, when your machine boots, LILO will present a boot:prompt; you can then boot Red Hat Linux or any other operating system you configure LILOto boot (see below).
The first sector of your root partition is recommended if you are already using another boot loaderon your system (such as OS/2’s Boot Manager). In this case, your other boot loader will takecontrol first. You can then configure that boot loader to start LILO (which will then boot RedHat Linux).
A dialog box will appear that will let you select the type of LILO installation you desire (see Fig-ure 6.19). Select the location where you wish to install LILO and press Ok. If you do not wish toinstall LILO, press Skip.
Figure 6.19: Installing LILO
Please Note: If you choose Skip, you will not be able to boot your Red Hat Linux system directly,and will need to use another boot method (such as a boot diskette). Use this option only if you knowyou have another way of booting your Red Hat Linux system!
6.9.1 SMP Motherboards and LILO
This section is specific to SMP motherboards only. If the installer detects a SMP motherboard on yoursystem, it will automatically create two lilo.conf entries as opposed to the usual single entry.
One entry will be called smp and the other will be called linux. The smp will boot by default.However, if you have trouble with the smp kernel, you can elect to boot the linux entry instead.You will retain all the functionality as before, but you will only be operating with a single processor.

6.9 Installing LILO 107
6.9.2 Adding Options to the LILO Boot Command Line
Next, the installation program will ask if you wish to add default options to the LILO boot command(see Figure 6.20). Any options you enter will be passed to the Linux kernel every time it boots.When you reviewed your computer’s BIOS settings in Section 2.3.1 on page 10, if you found yourcomputer accesses a hard drive in LBA mode, check Use linear mode. Select Ok and press
�
�
�
�
Spacewhen finished.
Figure 6.20: LILO options
Finally, the installation program will display a screen similar to the one in Figure 6.21 on the followingpage. Every partition that may be bootable is listed, including partitions used by other operatingsystems. The “Boot label” column will be filled in with the word linux on the partition holdingyour Red Hat Linux system’s root filesystem. Other partitions may also have boot labels. If youwould like to add boot labels for other partitions (or change an existing boot label), use the arrowkeys to highlight the desired partition. Then use the
�
�
�
�Tab key to select the Edit button, and press
�
�
�
�
Space . You’ll then see a small dialog box permitting you to enter/modify the partition’s boot label.Press Ok when done.
Please Note: The contents of the “Boot label” column will be what you will need to enter at LILO’sBoot: prompt in order to boot the desired operating system. However, if you forget the boot labelsdefined on your system, you can always press
�
�
�
�? at LILO’s Boot: prompt to display a list of defined
boot labels.
There is also a column labeled “Default.” Only one partition will contain an asterisk under thatcolumn. The partition marked as the default will be the partition LILO will boot if there is no userinput during the boot process. Initially the root partition for your Red Hat Linux installation willbe selected as the default. If you’d like to change this, use the arrow keys to highlight the partitionyou’d like to make the default, and press
�
�
�
�F2 . The asterisk should move to the selected partition.
When you’ve finished, select Ok, and press�
�
�
�
Space .

108 Finishing the Installation
Figure 6.21: Selecting Bootable Partitions
6.9.3 Alternatives to LILO
If you do not wish to use LILO to boot your Red Hat Linux system, there are a few alternatives:
Boot Diskette You can use the boot diskette created by the installation program (if you elected tocreate one).
LOADLIN can load Linux from MS-DOS; unfortunately, it requires a copy of the Linux kernel (andan initial RAM disk, if you have a SCSI adapter) to be available on an MS-DOS partition. Theonly way to accomplish this is to boot your Red Hat Linux system using some other method(e.g., from LILO on a diskette) and then copy the kernel to an MS-DOS partition. LOADLIN isavailable fromftp://metalab.unc.edu/pub/Linux/system/boot/dualboot/and associated mirrorsites.
SYSLINUX is an MS-DOS program very similar to LOADLIN; it is also available fromftp://metalab.unc.edu/pub/Linux/system/boot/loaders/ and associated mirrorsites.
Some commercial bootloaders, such as System Commander, are able to boot Linux (but stillrequire LILO to be installed in your Linux root partition).
6.10 Configuring the X Window System
If you decided to install the X Window System packages, you now will have the opportunity toconfigure X server for your system. If you did not choose to install the X Window System packages,you may skip ahead to Section 6.11 on the next page.

6.11 Finishing Up. . . 109
6.10.1 Configuring an XFree86 Server
If you wish to use XFree86, the installation program launches the Xconfigurator utility.
Xconfigurator first probes your system in an attempt to determine what type of video card youhave. Failing that, Xconfigurator will present a list of video cards. Select your video card fromthe list and press
�
�
�
�Enter . If your video card does not appear on the list, XFree86 may not support
it. However, if you have technical knowledge about your card, you may choose Unlisted Card andattempt to configure it by matching your card’s video chipset with one of the available X servers.
Once you have selected your video card, the installation program installs the appropriate XFree86server, and Xconfigurator presents a list of monitors. If your monitor appears on the list, select itand press
�
�
�
�Enter . Otherwise, select Custom. If you do select Custom, Xconfigurator prompts you
to select the horizontal sync range and vertical sync range of your monitor (these values are generallyavailable in the documentation which accompanies your monitor, or from your monitor’s vendor ormanufacturer).
Caution: It is not recommended to select a monitor “similar” to your monitor unless you are certainthat the monitor you are selecting does not exceed the capabilities of your monitor. If you do so, it ispossible you may overclock your monitor and damage or destroy it.
Next, Xconfigurator prompts you for the amount of video memory installed on your video card.If you are not sure, please consult the documentation accompanying your video card. It will notdamage your video card by choosing more memory than is available, but the XFree86 server maynot start correctly if you do.
If the video card you selected might have a video clockchip, Xconfigurator presents a list ofclockchips. The recommended choice is No Clockchip Setting, since XFree86 can automaticallydetect the proper clockchip in most cases.
Next, Xconfigurator prompts you to select the video modes you wish to use; select one or moremodes by pressing
�
�
�
�
Space . Xconfigurator then writes a configuration file containing all of yourchoices to /etc/X11/XF86Config.
Finally, you will see a screen which gives you the option of running the X Windows System whenyou reboot. If you choose to have X run, GNOME will be the default desktop manager you see.
6.11 Finishing Up. . .
After you have configured the X Windows System, the installation program will prompt you to pre-pare your system for reboot (see Figure 6.22 on the following page). Don’t forget to remove anydiskette that might be in the diskette drive, or CD that might be in the CD-ROM drive if your sys-tem is able to boot from the CD-ROM (unless you decided to skip the standard LILO installation, inwhich case you’ll need to use the boot diskette created during the installation).
After your computer’s normal power-up sequence has completed, you should see LILO’s standardprompt, which is boot:. At the boot: prompt, you can do any of the following things:

110 Finishing the Installation
Figure 6.22: Ready for Reboot
� Pressing�
�
�
�Enter – Causes LILO’s default boot entry (as defined by the dialog box shown in
Figure 6.21 on page 108) to be booted.
� Entering a Boot Label, followed by�
�
�
�Enter – Causes LILO to boot the operating system
corresponding to the entered boot label.
� Doing Nothing – After LILO’s timeout period, (which, by default, is five seconds) LILO willautomatically boot the default boot entry.
Do whatever is appropriate to boot Red Hat Linux. You should see one or more screens worth ofmessages scroll by. Eventually, you should see a login: prompt.
Congratulations! Your Red Hat Linux installation is complete!
If you’re not sure what to do next, we suggest you begin with the Official Red Hat Linux GettingStarted Guide as an introduction to using Linux. The Official Red Hat Linux Getting Started Guidecovers topics such as “learning the basics of your system” to “navigating your system” and muchmore.

7Finding Documentation
Red Hat Linux includes thousands of pages of online documentation to help you learn how to use thesystem. The man pages, info documents, and plain text files included provide information on almostevery aspect of Linux. If you’ve installed it, Red Hat Linux also includes documentation producedby the Linux Documentation Project.
7.1 On Line Help
When you are looking for general help on commands and error messages, the best place to start isright on your system. There are several different sources of information at your fingertips:
� Man Pages – Authoritative reference material for commands, file formats, and system calls.
� Package Documentation – Many packages include additional documentation; RPM can helpyou find it.
� HOWTOs and FAQs – Helpful information from the Linux Documentation Project.
� The locate Command – A command that can help bridge the gap between a command andits documentation.
� info Pages – Hypertext documentation without the Web.

112 Finding Documentation
Let’s take a look at each information source.
7.1.1 Man Pages
Almost every command on your system has an associated “man” page. This is documentation thatyou can get to instantly should you have questions or problems. For example, if you were havingtrouble with the ls command, you could use man to get more information by entering man ls. Thiswill bring up the man page for ls.
The man page is viewed through the less program (which makes it easy to page forward and back-ward screen by screen), so all of the options to less will work while in a man page. The moreimportant keystrokes for less are:
��
�
�
�
q to quit
��
�
�
�Enter to page down line by line
��
�
�
�
Space to page down page by page
��
�
�
�b to page back up by one page
��
�
�
�/ followed by a string and
�
�
�
�Enter to search for a string
��
�
�
�n to find the next occurrence of the previous search
There are times when it’s just a lot more convenient to read something from a sheet of paper. Pro-viding you have a working printer, you can print man pages as well. If you don’t have Postscriptprinting capability and just want to print ASCII, you can print man pages with:
man COMMAND | lpr
If you do have a postscript printer, you will probably want to print with:
man -t COMMAND | lpr
In both of those commands substitute “COMMAND” for the command you are trying to get help for.
Sometimes you’ll find that certain system components have more than one man page. Here is a tableshowing the sections that are used to divide man pages:

7.1 On Line Help 113
Section Contents1 user commands8 system commands2 system calls3 library calls4 devices5 file formats6 games7 miscellaneous9 kernel internalsn Tcl/Tk commands
This is also the order in which the sections are searched. This can be important; here’s an example:
Let’s say that you want to see the man page for the swapon system call. So, you type man swapon.You will actually get the man page for swapon(8), which is the command used to control swapping.Using the chart above, you can see that what you want is a “system call” and is located in section2. You can then type man 2 swapon. All of this is because man searches the man directories inthe order shown above, which means that the swapon(8) man page would be found before theswapon(2) man page.
You can also search the man pages for strings. You do this usingman -k string to search for. This won’t work, however, unless the makewhatis database hasbeen created. Under Red Hat Linux, this is done by a cron job overnight. If you don’t leave your sys-tem running overnight the database won’t get created. If that is the case, run the following commandas the root user:
/etc/cron.weekly/makewhatis.cron
Once you’ve done that (note that it might take a while), you could enter man -k swapon. Thatcommand would return:
# man -k swaponswapon, swapoff (2) - start/stop swapping to file/deviceswapon, swapoff (8) - enable/disable devices and files for
paging and swapping
So you can see that there are pages in section 2 and 8 both referring to swapon (and swapoff in thiscase).
How to Read a Man Page
Man pages provide a great deal of information in very little space. Because of this, they can bedifficult to read. Here’s a quick overview of the major sections in most man pages:

114 Finding Documentation
� Name – The name of the program or programs documented in the man page. There may bemore than one name, if the programs are closely related.
� Synopsis – An overview of the program’s command syntax, showing all options and argu-ments.
� Description – A short description of the program’s function.
� Options – A list of all options, with a short description of each (often combined with theprevious section).
� See Also – If present, lists the names of other programs that are related in some way to thisprogram.
� Files – If present, contains a list of files that are used and/or modified by the program.
� History – If present, indicates important milestones in the program’s development.
� Authors – The people that wrote the program.
If you are new to Linux, don’t expect to be able to use man pages as tutorials; they are meant asconcise reference material. Trying to learn about Linux using the man pages is similar to trying tolearn how to speak English from reading a dictionary. But there are other sources of informationthat may be more useful to those people just starting out with Linux; let’s continue our search fordocumentation. . .
7.1.2 Package Documentation
Many packages have README files and other documentation as part of the source package. Pack-ages built for Red Hat Linux define a standard place to install those documents so that you don’thave to search through the sources to find the documents. Every package containing documentation(other than man pages, and files that need to be in specific locations) places their documentation in asubdirectory of /usr/doc.
The name of the subdirectory depends on the package name and version number. For example, thetin package might be at version 1.22. Therefore, the path to its documentation would be/usr/doc/tin-1.22.
For the most part, the documents in /usr/doc are in ASCII. You can view them with more file-name or less filename.
Having this special documentation area can be handy, but what if you’re looking for documentationon a specific command (or file), and you don’t know what package that command came from? Noproblem! Take, for example, the file /usr/bin/rtin. You’re not sure what package it’s part of, butyou’d like to learn a bit more about it. Simply enter:
rpm -qdf /usr/bin/rtin

7.1 On Line Help 115
This command will return a listing of all the documentation (including man pages) from the packagecontaining the file /usr/bin/rtin. RPM is capable of a lot more than this simple example. Formore information on RPM, turn to Chapter 9 on page 173.
Of course, maybe this kind of information is not exactly what you’re looking for. Maybe you’re moreinterested in task-oriented documentation. If so, read on. . .
7.1.3 HOWTOs and FAQs
If you elected to install it, most of the contents of the Linux Documentation Project (LDP) are availablein /usr/doc on your system.
The directory /usr/doc/HOWTO contains the ASCII versions of all the available HOWTOs at thetime your Red Hat Linux CD-ROM was mastered. These files are viewable by using the less com-mand.
less Installation-HOWTO
You may also encounter files that end with .gz. They are compressed with gzip to save space, soyou’ll need to decompress them before reading. One way of reading compressed HOWTOs withoutcluttering your disk with uncompressed versions is to use zless:
zless 3Dfx-HOWTO.gz
The zless command uses the same keystrokes as less, so you can easily move back and forththrough a HOWTO.
/usr/doc/HOWTO/mini contains the ASCII versions of all the available mini-HOWTOs. They arenot compressed and can be viewed with more or less./usr/doc/HOWTO/other-formats/html contains the HTML versions of all the HOWTOs andthe Linux Installation and Getting Started guide. To view things here, just use the web browser of yourchoice.
/usr/doc/FAQ contains ASCII versions (and some HTML versions) of some popular FAQs, includ-ing the RedHat-FAQ. They can be viewed using more or less, or (in the case of HTML files) withthe web browser of your choice.
7.1.4 The “locate” Command
When you don’t know the full name of a command or file, but need to find it, you can usually findit with locate. locate uses a database to find all files on your system. Normally, this databasegets built from a cron job every night. This won’t happen, however, if your machine isn’t booted intoLinux all the time. So, if that is the case, you may occasionally want to run the following command:

116 Finding Documentation
/etc/cron.daily/updatedb.cron
You will need to be root on your system when doing that. That will allow locate to work properly.
So, if you know you need to find all the “finger” files, you could run:
locate finger
It should return something like:
/usr/bin/finger/usr/lib/irc/script/finger/usr/man/man1/finger.1/usr/man/man8/in.fingerd.8/usr/sbin/in.fingerd
One thing to note, however, is that locate not only returns hits based on file name, but also on pathname. So if you have a /home/djb/finger/ directory on your system, it would get returned alongwith all files in the directory.
7.1.5 “info” Pages
While man is the most ubiquitous documentation format, info is much more powerful. It provideshypertext links to make reading large documents much easier and many features for the documenta-tion writer. There are some very complete info documents on various aspects of Red Hat (especiallythe portions from the GNU project).
To read info documentation, use the info program without any arguments. It will present youwith a list of available documentation. If it can’t find something, it’s probably because you don’thave the package installed that includes that documentation. Install it with RPM and try again.
If you’re comfortable using emacs, it has a built in browser for info documentation. Use the�
�
�
�Ctrl-h
�
�
�
�i key sequence to see it.
The info system is a hypertext based system. Any highlighted text that appears is a link leadingto more information. Use
�
�
�
�Tab to move the cursor to the link, and press
�
�
�
�Enter to follow the link.
Pressing�
�
�
�
p returns you to the previous page,�
�
�
�n moves you to the next page, and
�
�
�
�u goes up one
level of documentation. To exit info, press�
�
�
�Ctrl-x
�
�
�
�Ctrl-c (control-x followed by control-c).
The best way to learn how to use info is to read the info documentation on it. If you read the firstscreen that info presents you’ll be able to get started.

7.2 Help from the Internet Community 117
7.2 Help from the Internet Community
7.2.1 Red Hat Mailing Lists
If you can’t find help for your problem on line and you have WWW access, you should seehttp://www.redhat.com/support/mailing-lists/. Here you can search the archives of theredhat-list. Many questions have already been answered there.
The subscription addresses for our lists follow this format:
<list-name>[email protected]
Simply replace <list-name> with one of the following:
apollo-listapplixware-listaxp-listblinux-listcde-listgnome-announcegtk-listhurricane-listlinux-alertlinux-securitym68k-listpam-listredhat-announce-listredhat-devel-listredhat-install-listredhat-listredhat-ppp-listrpm-listsound-listsparc-list
To subscribe, send mail to the address of the list you want to subscribe to with subscribe in theSubject: line.
To unsubscribe, send mail to the address of the list you want to unsubscribe from withunsubscribe in the Subject: line.
Then to send mail to the list, you just send it to the address above without the -request in the name.
7.2.2 USENET Newsgroups
Another good source of help is the comp.os.linux hierarchy on USENET. If you are familiar withnews, you should check it out.

118 Finding Documentation
Red Hat-Specific Newsgroups
Red Hat Software currently hosts a number of newgroups specifically for users of our software. Youcan either read these groups directly from news.redhat.com, or ask your news admin to add theredhat.* hierarchy to their news server.

8System Configuration
After installing your Red Hat Linux system, it’s easy to think that the decisions you made during theinstallation are engraved in granite, never to be changed again. Nothing could be further from thetruth!
One of the main strengths of Linux is that the operating system can be configured to do just aboutanything. Here at Red Hat Software, we try to make system configuration as easy and accessible aspossible. To that end, we’ve worked hard on two fronts:
� By developing system configuration tools in-house;
� By working with outside developers of world-class system configuration tools.
Anyone familiar with Red Hat Linux over the years has probably seen what we call our “controlpanel” system configuration tools. These tools have been developed by Red Hat Software to makesystem configuration easier. And while these tools do make life easier for the Red Hat Linux user, webegan a search for a system configuration tool with even more flexibility and power.
Our search ended with the inclusion of Linuxconf into Red Hat Linux 5.1 in June 1998. Now, withthis version of Red Hat Linux, we’ve been able to more fully document the popular aspects of systemconfiguration using Linuxconf.
Note that we said “popular aspects.” One of Linuxconf’s greatest strengths – the incredible rangeof configuration options under its control – is actually a liability when it comes time to document
120 System Configuration
them all. Rest assured, however, that we will continue to expand Linuxconf documentation as newversions of Red Hat Linux are released.
But what about the control panel tools? They’re still there. While Linuxconf at present can do nearlyeverything the control panel tools can, there are two areas in which the control panel still holds theupper hand:
� Printer configuration
� Kernel daemon control
To that end, we’ve left the control panel documentation in this manual as the second half of thischapter.
But now, let’s take a look at Linuxconf. . .
8.1 System Configuration With Linuxconf
Linuxconf is a utility that allows you to configure and control various aspects of your system, and iscapable of handling a wide range of programs and tasks. Fully documenting Linuxconf could be aseparate book in its own right and certainly more than we can cover in this chapter. So we’ll focus onthose areas that address common tasks such as adding new users and getting connected to a network.
More information on Linuxconf, including its status, most recent release, and more can be found atthe Linuxconf Project homepage:
http://www.solucorp.qc.ca/linuxconf/
This website includes fairly extensive information on Linuxconf including description, rationale, his-tory, list of contacts and a lot of other information in addition to the software itself. It is maintained byLinuxconf’s creator, Jacques Gelinas, so it’s the best source of Linuxconf information on the Internet.
Notation
Accurately describing the location of specific screens within Linuxconf is easy, but lengthy givenLinuxconf’s hierarchical nature. If the structure was a family tree, most of the data entry screens arein the fourth generation. To describe the path to the screen where you would add new users to yoursystem, we could write this out as:
“Select the Config option from the main screen, then the users accounts option off ofthat; on the users accounts screen that appears, select the normal option and then selectthe user accounts option.”
Rather lengthy and not immediately accessible. Given the structural similarity to a family tree, wecould write it as:

8.1 System Configuration With Linuxconf 121
“main window beget Users accounts tab, beget Normal tab. . . ”
But that’s an awful lot of begets. Instead, we’ll use the following format:�
�
�
�
Config )�
�
�
�Users accounts )
�
�
�
�Normal )
�
�
�
�User accounts
It’s much more concise and clear. It assumes as its base the Linuxconf entry screen. The other advan-tage to this approach is that it’s not interface specific, so regardless of which interface you’re using,you know exactly where the information is. You’re happy, we’re happy, and the trees which lobbiedagainst lengthy descriptions are happy. What could be better?
8.1.1 Running Linuxconf
To run Linuxconf you must have root access. If you are logged in as something other than root, thereis an easy way to handle this situation. Use the su command to become root.
In case you aren’t familiar with it yet, type su at the shell prompt and hit�
�
�
�Enter . The password it
asks you for is the root account’s. Once you’ve entered that correctly you’ll have phenomenal cosmicpower! Well, complete control of your system at any rate1. Anyway, type linuxconf at the shellprompt to begin the program. Linuxconf has the following user interfaces:
� Command line – Linuxconf’s command-line mode is handy for manipulating your system’sconfiguration in scripts.
� Character-Cell – Using the same user interface style as the Red Hat Linux installation pro-gram, the character-cell interface makes it easy to navigate your way through Linuxconf, evenif you aren’t running X.
� X Window-Based – Linuxconf can take advantage of X, and give you an easy-to-use “pointand click” tree menu interface. This form of navigation is new in Linuxconf! Please see theTree Menu Interface subsection of section 8.1.1 on the next page for more information. This isthe interface we’ll use for illustrations throughout this chapter.
� Web-Based – A Web-based interface makes remote system administration a breeze. The Webinterface will even play nice with the Lynx character-cell Web browser!
Linuxconf will normally start in either character-cell or X mode, depending on the DISPLAY environ-ment variable. The first time you run Linuxconf, an introductory message will be shown; although itis only displayed once, accessing help from the main screen will give you the same basic information.
Linuxconf has context-specific help available. For information on any specific aspect of Linuxconf,please select Help from the screen you’d like help with. Note that not all help screens are completeat this time; as help screens are updated, they will be included in subsequent versions of Linuxconf.
1One could argue that it’s pretty much the same thing.

122 System Configuration
Tree Menu Interface
The new version of Linuxconf comes complete with a tree menu interface.
Figure 8.1: Linuxconf Entry Screen
Finding the appropriate panel should be simple and fast. You can collapse and expand sections byclicking on the menu item icons. Click the icon once to activate it for that particular sub-menu. Asingle click will then collapse it; another single click will expand it again.
Selected entries will appear as tabs in the right-hand panel and will remain there until closed. Thiswill greatly reduce the clutter of windows on your desktop that Linuxconf has typically caused. Ifyou end up with more tabs open than you like, just hit Cancel on the bottom of each tab to close itwithout making any changes, or Accept to implement them.
Please Note: If you’ve grown fond of your previous X Window System interface, it’s still available.To return to it:
1. Start Linuxconf by typing linuxconf at the shell prompt
2. Open�
�
�
�Control )
�
�
�
�
Control files and systems )�
�
�
�Linuxconf modules
3. De-select the This module is active check box for the treemenu module.

8.1 System Configuration With Linuxconf 123
4. Click Accept
5. Click Quit
6. Restart Linuxconf
Enabling Web-Based Linuxconf Access
For security reasons, Web-based access to Linuxconf is disabled by default. Before attempting toaccess Linuxconf with a Web browser, you’ll need to enable access. Here’s how to do it from thetext-mode interface:
1. Start Linuxconf by typing linuxconf at the shell prompt
2. Open�
�
�
�
Config )�
�
�
�
Networking )�
�
�
�Misc )
�
�
�
�Linuxconf network access
3. In the Linuxconf html access control dialog box, enter the hostname of any computers thatshould be allowed access to Linuxconf. This would also include your own system, if you wishto use the Web-based interface locally. Web accesses related to Linuxconf may be logged toyour system’s htmlaccess.log file by selecting the check box shown.
4. Select the Accept button and press�
�
�
�
Space . Then select the Quit buttons on each dialog box toback out of the menu hierarchy. When you come to a dialog box labeled Status of the system,press
�
�
�
�Enter to take the default action, which is to apply the changes you’ve made.
At this point, Web-based access has been enabled. To test it out, go to one of the systems that youadded to the access control list. Launch your Web browser, and enter the following URL:
http://<host>:98/
(Replacing <host> with your system’s hostname, of course.) You should see the main Linuxconfpage. Note that you will need to enter your system’s root password to gain access beyond the firstpage.
Adding a User Account – Quick Reference
1. Start Linuxconf by typing linuxconf at the shell prompt
2. Open�
�
�
�
Config )�
�
�
�Users accounts )
�
�
�
�Normal )
�
�
�
�User accounts
3. Select Add
4. Enter the account’s login and full names

124 System Configuration
5. Enter information in other fields only as necessary
6. Select Accept
7. Enter the initial password for the account
8. Reenter the initial password for the account in the Confirmation field
9. Select Accept
Adding a User Account – General Overview
Adding a user is one of the most basic tasks you will encounter in administering your system. Toadd a user:
� Start Linuxconf by typing linuxconf at the shell prompt.
� Open�
�
�
�
Config )�
�
�
�Users accounts )
�
�
�
�Normal )
�
�
�
�User accounts This will open the Users ac-
counts tab (see figure 8.3 on page 126).
� If you have more than 15 accounts on the system, Linuxconf will provide you with a filterscreen (see figure 8.2 on the next page). You can use this to select a smaller range of accountsthan the full list. To get the full list, select Accept without changing any of the parameters. Fordetailed information on the various filters, select the Help button on the Filter control screen.
� Select Add. This will open the User account creation tab (see figure 8.4 on page 127).
The User account creation tab is where you enter all the information on the new account. There area number of fields you should be aware of, some required, some optional.
Required Fields:
� Login name – the name of the account. Usually all lowercase letters. First or last names,initials or some combination thereof are fairly common login names. For a user named John T.Smith, “smith,” “john,” “jts,” or “jsmith” would be common user names. Of course “spike” orsomething else works just fine, too. You can also use numbers, so “jts2” would be fine if youhad a second person with the same initials. There is no default for this field.
Optional Fields:
� Full name – this is the name of the user or the account. For an individual, it would be theirname, “John T. Smith” for example. If the account represents a position rather than a person,the full name might be the title. So an account called “webmaster” might have a full name of“Red Hat Webmaster” or just “Webmaster.” There is no default for this field.

8.1 System Configuration With Linuxconf 125
Figure 8.2: Filter Control Screen
� group – here you can specify the group associated with the account. The default is a groupthat’s the same as the login name. So “jsmith” would have the group “jsmith.”
� Supplementary groups – here is where you can specify any additional groups. We suggestthat if you want to add a user to a group or groups, you do so here, rather than changing thegroup field. Group names should be separated by spaces. The default for this field is blank,meaning no supplementary groups.
� Home directory – specifies the home or login directory for the account. The default is/home/login, where login is replaced by the login name. A home directory is your startingpoint in the directory structure when you log in, or if in X, for each xterm window opened.This is also where account specific preference files are stored.
� Command interpreter – specifies the location of the command interpreter. Command inter-preters are usually referred to as shells. The default is displayed in the drop down box.
� User ID – the number associated with each user account. This is automatically generated bythe system when the account is created.
The User account creation screen has a number of fields; only the login name is required, thoughfilling in the Full name field is strongly recommended. Once you have entered the login name and

126 System Configuration
Figure 8.3: Users Accounts Screen
any other desired information select the Accept button at the bottom of the screen. If you decideagainst creating a new user, hit Cancel instead.
Upon hitting Accept Linuxconf will prompt you to enter the password. There is also a field calledConfirmation where you will need to type the password again. This is to prevent you from mistypingthe password. Passwords must be at least 6 characters in length. They may contain numbers as wellas a mix of lowercase and uppercase letters. Hit Accept when finished.
Modifying a User Account – Quick Reference
Please Note:Although you can change the settings in any user account, it is usually a bad idea tochange the settings in a pre-created account. It is best to change settings and explore options in anaccount that you have created yourself.
1. Start Linuxconf by typing linuxconf at the shell prompt.
2. Open�
�
�
�
Config )�
�
�
�Users accounts )
�
�
�
�Normal )
�
�
�
�User accounts .
3. Select the user account.

8.1 System Configuration With Linuxconf 127
Figure 8.4: User Account Creation
4. Modify entries as desired.
5. Select Accept.
Modifying a User Account – General Overview
� Start Linuxconf by typing linuxconf at the shell prompt.
� Open�
�
�
�
Config )�
�
�
�Users accounts )
�
�
�
�Normal )
�
�
�
�User accounts . This will open the Users
accounts tab (see figure 8.3 on the preceding page).
� If you have more than 15 accounts on the system, Linuxconf will provide you with a filterscreen (see figure 8.2 on page 125). You can use this to select a smaller range of accounts thanthe full list. To get the full list, select Accept without changing any of the parameters. Fordetailed information on the various filters, select the Help button on the Filter control screen.
� Select the account you wish to modify. This will open the User information tab.

128 System Configuration
Figure 8.5: Change Password Screen
On the User information screen, the information can be changed as desired. To implement thechanges select Accept. If you decide against making any changes select Cancel. This guaranteesthat no changes are made.
Changing a User’s Password – Quick Reference
1. Start Linuxconf by typing linuxconf at the shell prompt.
2. Open�
�
�
�
Config )�
�
�
�Users accounts )
�
�
�
�Normal )
�
�
�
�User accounts .
3. Select the user account.
4. Select Passwd.
5. Enter the user’s new password.
6. Reenter the user’s new password in the Confirmation field.
7. Select Accept.

8.1 System Configuration With Linuxconf 129
Figure 8.6: User Information Screen
Changing a User’s Password – General Overview
� Start Linuxconf by typing linuxconf at the shell prompt.
� Open�
�
�
�
Config )�
�
�
�Users accounts )
�
�
�
�Normal )
�
�
�
�User accounts . This will open the Users
accounts tab (see figure 8.3 on page 126).
� If you have more than 15 accounts on the system, Linuxconf will provide you with a filterscreen (see figure 8.2 on page 125). You can use this to select a smaller range of accounts thanthe full list. To get the full list, select Accept without changing any of the parameters. Fordetailed information on the various filters, select the Help button on the Filter control screen.
� Select the account whose password you wish to change. This will open the User informationtab (see figure 8.6).
� Select Passwd from the options at the bottom of the screen.
Linuxconf will then prompt you to enter the new password. There is also a field called Confirmationwhere you will need to type the password again. This is to prevent you from mistyping the password.Passwords must be at least 6 characters in length. They may contain numbers as well as a mix of

130 System Configuration
lowercase and uppercase letters. If you decide against changing the password, just hit Cancel. Onceyou have entered the new password select Accept.
Changing the root Password – Quick Reference
1. Start Linuxconf by typing linuxconf at the shell prompt.
2. Open�
�
�
�
Config )�
�
�
�Users accounts )
�
�
�
�Normal )
�
�
�
�
Change root password .
3. Enter the current root password.
4. Select Accept.
5. Enter the new root password.
6. Reenter the new root password in the Confirmation field.
7. Select Accept.
Changing the root Password – General Overview
Changing the roots password isn’t handled in the same manner as changing a user’s password. Be-cause of both the importance and security considerations surrounding root access, Linuxconf requiresyou to verify that you currently have access to the root account.
� Start Linuxconf by typing linuxconf at the shell prompt.
� Open�
�
�
�
Config )�
�
�
�Users accounts )
�
�
�
�Normal )
�
�
�
�
Change root password .
The screen is a little confusing because neither the title, nor the description really explains the screen’spurpose. Linuxconf seems to be asking for the new password, which isn’t actually the case. Instead,Linuxconf wants the current root password to verify access to the root account. Linuxconf doesrequire root access to run, but once running there’s nothing to keep anyone from sitting down at thecomputer if the person using Linuxconf steps out for a minute. The potential pitfalls are extensive!If the person who was originally using Linuxconf logs out of root, they won’t be able to get back intoit. A lack of validation would also give free reign over the computer to whoever had changed root’spassword.
Once you have entered root’s current password, it will prompt you for a new password. Thereis also a field called Confirmation where you will need to type the password again (see figure 8.5on page 128). This is to prevent you from mistyping the password. Passwords must be at least 6characters in length. They may contain numbers as well as a mix of lowercase and uppercase letters.If you decide against changing the root password, just hit Cancel. Once you have entered the newpassword select Accept. The change takes place immediately and is effective not only for logging inas root, but also for becoming root using the su command.

8.1 System Configuration With Linuxconf 131
Figure 8.7: Root Password Verification Screen
Disabling a User Account – Quick Reference
1. Start Linuxconf by typing linuxconf at the shell prompt.
2. Open�
�
�
�
Config )�
�
�
�Users accounts )
�
�
�
�Normal )
�
�
�
�User accounts .
3. Select the account.
4. De-select the account is enabled check box.
5. Select Accept.
Disabling a User Account – General Overview
Why disable an account? Good question! There’s no single answer, but we can provide some reasonswhy this option is available. The biggest reason is security. For example, you may have created aspecial account to be used by clients, co-workers, or friends to access specific files on your system.This account gets used from time to time, but should only be used when you know there’s a need.Leaving an unused account around is a target for people who’d want to break into your system.

132 System Configuration
Deleting it requires you to recreate it every time you want to use it. Disabling an account solves bothproblems by allowing you to simply select or de-select a check-box.
To disable an account:
� Start Linuxconf by typing linuxconf at the shell prompt.
� Open�
�
�
�
Config )�
�
�
�Users accounts )
�
�
�
�Normal )
�
�
�
�User accounts .
� De-select the check-box that states that The account is enabled. Select the Accept button at thebottom of the window and you’re all set.
The account is disabled and can be enabled later using a similar method.
Enabling a User Account
By default, all newly created user accounts are enabled. If you need to enable an account, you canuse Linuxconf to do it.
� Start Linuxconf by typing linuxconf at the shell prompt.
� Open�
�
�
�
Config )�
�
�
�Users accounts )
�
�
�
�Normal )
�
�
�
�User accounts .
� Select the account you want to enable.
� Select the The account is enabled check-box and then select Accept at the bottom of the screen.
Deleting a User Account – Quick Reference
1. Start Linuxconf by typing linuxconf at the shell prompt.
2. Open�
�
�
�
Config )�
�
�
�Users accounts )
�
�
�
�User accounts .
3. Select the account you wish to delete.
4. On the User information screen select Del.
5. On the Deleting account. . . screen, choose the appropriate option for the account’s data.
6. Select Accept.

8.1 System Configuration With Linuxconf 133
Deleting a User Account – General Overview
Please Note: While there are a couple options that let you retain files associated with an account,any information or files deleted are gone and effectively unrecoverable. Take care when using thisoption!
To delete an account:
� Start Linuxconf by typing linuxconf at the shell prompt.
� Open�
�
�
�
Config )�
�
�
�Users accounts )
�
�
�
�User accounts .
� On the User accounts screen (see figure 8.3 on page 126) select the account you wish to delete.
� At the bottom of the User information screen (see figure 8.6 on page 129) select Del to deletethe account.
Linuxconf will then prompt you with a list of options.
Figure 8.8: Deleting Account Screen
The default option is to archive the account’s data. The archive option has the following effects:

134 System Configuration
1. Removes the user from the user accounts list;
2. Takes everything contained in the user’s home directory and archives it (using tar and gzipcompression), storing the resulting file in a directory called oldaccounts. For an accountnamed useraccount the file name would be similar to:
useraccount-1999-10-10-497.tar.gz
The date indicates when the account was deleted, and the number following it is the ID ofthe process that actually performed the deletion. The oldaccounts directory is created inthe same place as all of your user directories, and is created automatically the first time youremove a user account using this option.
3. Files not contained in the user’s home directory, but owned by that user remain. The file isowned by the deleted account’s user ID (UID). If you create a new account and specificallyassign it the UID of a deleted account, it will then become the owner of any remaining files.
Selecting Delete the account’s data on the Deleting account <accountname> screen (see figure 8.8on the page before) will:
1. Remove the user from the user accounts list;
2. Remove the user’s home directory and all its contents.
Please Note: Files not contained in the user’s home directory, but owned by that user will remainon the system. The file will still be owned by the deleted account’s user ID (UID). If you create a newaccount and specifically assign it the UID of a deleted account, it will then become the owner of anysuch “orphaned” files.
Selecting Leave the account’s data in place on the Deleting account <accountname> screen (seefigure 8.8 on the preceding page) will:
1. Remove the user from the user accounts list;
2. Leave the user’s home directory (with all its files) in place.
Please Note: Files and directories owned by the deleted account’s user ID (UID) will remain on thesystem. If you create a new account and specifically assign it the UID of a deleted account, it willthen become the owner of these “orphaned” files.
8.1.2 Groups
All users belong to one or more groups. Just as each file has a specific owner, each file belongs toa particular group as well. The group might be specific to the owner of the file, or may be a groupshared by all users. The ability to read, write or execute a file can be assigned to a group; this isseparate from the owner’s rights. For example, the owner of a file will be able to write to a document,while other group members may only be able to read it.

8.1 System Configuration With Linuxconf 135
Creating a Group – Quick Reference
1. Start Linuxconf by typing linuxconf at the shell prompt.
2. Open�
�
�
�
Config )�
�
�
�Users accounts )
�
�
�
�Normal )
�
�
�
�
Group definition .
3. Select Add.
4. Enter the Group name, and optionally alternate members.
5. Select Accept.
Creating a Group – General Overview
To create a new group:
� Start Linuxconf by typing linuxconf at the shell prompt.
� Open�
�
�
�
Config )�
�
�
�Users accounts )
�
�
�
�Normal )
�
�
�
�
Group definition .
If you have more than 15 groups, you will be given the option to select the groups by providing aprefix.
You may add a group directly from this screen, or move on to the User groups screen. To move onselect choiceAccept with or without a prefix, to add a new group, hit choiceAdd.
Select Add at the bottom of the User groups screen.
Enter a group name. You may also wish to specify members of the group and can do so in theAlternate members field. The list of users should be space delimited, meaning that each usernamemust have a space between it and the next one. When you’re finished, select Accept and the groupwill be created.
Deleting a Group – Quick Reference
1. Start Linuxconf by typing linuxconf at the shell prompt.
2. Open�
�
�
�
Config )�
�
�
�Users accounts )
�
�
�
�Normal )
�
�
�
�
Group definitions .
3. Select the group you wish to delete.
4. Select Del.
5. Confirm deletion.

136 System Configuration
Figure 8.9: Group Filter Screen
Deleting a Group – General Overview
To delete a group:
� Start Linuxconf by typing linuxconf at the shell prompt.
� Open�
�
�
�
Config )�
�
�
�Users accounts )
�
�
�
�Normal )
�
�
�
�
Group definitions .
If you have more than 15 groups, you will be given a filter screen (see figure 8.9) to narrow yourchoice of groups by specifying a prefix.
� With or without a prefix select Accept at the bottom of the screen.
� On the User groups screen (see figure 8.10 on the facing page) select the group you wish todelete.
� You’ll be presented with the Group specification screen (see figure 8.11 on page 138).
� Select Del to delete the group. Linuxconf will then prompt you to confirm the deletion. Chooseyes to delete the group.

8.1 System Configuration With Linuxconf 137
Figure 8.10: User Groups Screen
The group’s files will still remain and their respective owners will still have sole control over them.The group name will be replaced with the deleted group’s ID. The files may be assigned to a newgroup by using the chgrp command. More information on chgrp can be found by typing the com-mand info chgrp or man chgrp at the shell prompt. If a new group is created and the deletedgroup’s ID is specified then the new group will have access to the deleted group’s files. Don’t worry,Linuxconf doesn’t recycle old group numbers any more than it does old user IDs, so it won’t happenby accident.
Modifying Group Membership
There are two ways to modify the list of users that belong to a group. You can either update eachuser account itself, or you can update the group definitions. In general, the fastest way is to updateeach of the group definitions. If you’re planning on changing more information for each user thanjust the group information, then updating each user account may prove easier.

138 System Configuration
Figure 8.11: Group Specification Screen
Modifying Group Membership – Quick Reference
- Under Groups
1. Start Linuxconf by typing linuxconf at the shell prompt.
2. Open�
�
�
�
Config )�
�
�
�Users accounts )
�
�
�
�Normal )
�
�
�
�
Group definitions .
3. Select the group to which you wish to add or remove users.
4. Add or remove new users to the Alternate members(opt) field; make sure all user names areseparated with a space “ ” character.
5. Select Accept.

8.1 System Configuration With Linuxconf 139
Modifying Group Membership – Quick Reference
- Under Users
1. Start Linuxconf by typing linuxconf at the shell prompt.
2. Open�
�
�
�
Config )�
�
�
�Users accounts )
�
�
�
�Normal )
�
�
�
�User accounts .
3. Select a user to which you wish to add or remove groups.
Adjust the Supplementary groups field accordingly; make sure all the group names are sepa-rated with a space “ ” character.
4. Select Accept.
5. Repeat steps 3 through 5 for each additional user to be added.
Modifying Group Membership – General Overview
We’ll start by detailing the group definitions method.
� Start Linuxconf by typing linuxconf at the shell prompt.
� Open�
�
�
�
Config )�
�
�
�Users accounts )
�
�
�
�Normal )
�
�
�
�
Group definitions .
If you have more than 15 groups, you will be given a filter screen (see figure 8.9 on page 136) tonarrow your choice of groups by specifying a prefix.
� With or without a prefix, select Accept at the bottom of the screen.
� Select the group you wish to modify. This will open the Group specification screen (see fig-ure 8.11 on the preceding page).
� Add or remove each user from the Alternate members field. Make sure that all of the usernames are separated by a space “ ” character.
� Once you’ve done this select Accept which can be found at the bottom of the screen.
This will automatically update each user account with the group showing up in the Supplementarygroups field if added or absent if removed.
Adding and removing groups can also be done by modifying each individual user account.
� Start Linuxconf by typing linuxconf at the shell prompt.

140 System Configuration
� Open�
�
�
�
Config )�
�
�
�Users accounts )
�
�
�
�Normal )
�
�
�
�User accounts .
If you have more than 15 accounts on the system, Linuxconf will provide you with a filter screen (seefigure 8.2 on page 125).
� On the User accounts screen (see figure 8.3 on page 126), select a user that you wish to update.You will be presented with the User information screen (see figure 8.6 on page 129).
� Add or remove the desired groups from the, Supplementary groups field. Each group shouldbe separated by a space “ ” character.
� Once you’ve made all the changes you’d like, select Accept at the bottom of the screen.
This will automatically update the group definitions. Repeat the process for each user.
8.1.3 CD-ROMs, Diskettes, Hard Drives and Filesystems – the InsideTrack
A filesystem is composed of files and directories, all starting from a single root directory. The rootdirectory may contain any number of files and other directories, with each directory in turn followingsuit. The average filesystem often looks like an inverted tree with the directories as branches and thefiles as leaves. Filesystems reside on mass storage devices such as diskette drives, hard drives, andCD-ROMs.
For example, a diskette drive on DOS and Windows machines is typically referenced by A:n. Thisdescribes both the device (A:), and the root directory on that device (n). The primary hard drive onthe same systems is typically referred to as the “C” drive because the device specification for the firsthard drive is C:. To specify the root directory on the C drive, you would use C:n.
Under this arrangement, there are two filesystems – the one on A:, and the one on C:. In order tospecify any file on a DOS/Windows filesystem, you must either explicitly specify the device on whichthe file resides, or it must be on the system’s default drive (which is where DOS’ infamous C promptcomes from – that’s the default drive in a system with a single hard drive).
Under Linux, it is possible to link the filesystems on several mass storage devices together into asingle, larger, filesystem. This is done by placing one device’s filesystem “under” a directory onanother device’s filesystem. So while the root directory of a diskette drive on a DOS machine may bereferred to as A:n, the same drive on a Linux system may be accessible as /mnt/floppy.
The process of merging filesystems in this way is known as mounting. When a device is mounted, itis then accessible to the system’s users. The directory “under” which a mounted device’s filesystembecomes accessible is known as the mount point. In the previous paragraph’s example, /mnt/floppywas the diskette drive’s mount point. Note that there are no restrictions (other than common con-ventions) as to the naming of mount points. We could have just as easily mounted the floppy to/long/path/to/the/floppy/drive.

8.1 System Configuration With Linuxconf 141
One thing to keep in mind is that all of a device’s files and directories are relative to its mount point.Consider the following example:
� A Linux System
– / — system root directory– /foo — mount point for the CD-ROM
� A CD-ROM
– / — CD-ROM’s root directory– /images — a directory of images on the CD-ROM– /images/old — a directory of old images
So, if the above describes the individual filesystems, and you mount the CD-ROM at /foo, the newoperating system directory structure would be:
� A Linux System (with the CD-ROM mounted)
– / — system root directory– /foo — CD-ROM root directory– /foo/images — a directory of images on the CD-ROM– /foo/images/old — a directory of old images
To mount a filesystem make sure to be logged in as root, or become root using the su command. Forthe latter, type su at the shell prompt and then enter the root password. Once you are root, typemount followed by the device and then the mount point. For example, to mount the first diskettedrive on /mnt/floppy, you would type the command mount /dev/fd0 /mnt/floppy.
At installation, Red Hat Linux will create /etc/fstab. This file contains information on devicesand associated mount points. The advantage to this file is that it allows you to shorten your mountcommands2. Using the information in /etc/fstab, you can type mount and then either the mountpoint or the device. The mount command will look for the rest of the information in /etc/fstab.It’s possible to modify this file by hand, or by using Linuxconf. To use Linuxconf, please see SectionReviewing Your Current Filesystem immediately following.
Reviewing Your Current Filesystem – Quick Reference
1. Start Linuxconf by typing linuxconf at the shell prompt.
2. Open�
�
�
�
Config )�
�
�
�
File systems )�
�
�
�Access local drive or to look at your network environment:
Open�
�
�
�
Config )�
�
�
�
File systems )�
�
�
�Access nfs volume .
2It also controls which filesystems are automatically mounted when the system is booted.

142 System Configuration
Reviewing Your Current Filesystem – General Overview
We’ll start by looking at your current directory structure.
� Start Linuxconf by typing linuxconf at the shell prompt.
� Open�
�
�
�
Config )�
�
�
�
File systems )�
�
�
�Access local drive .
Figure 8.12: Local Volume Screen
The fields are:
� Source – The physical hardware; hd indicates an IDE hard drive, fd indicates a diskette drive,and cdrom typically indicates a CD-ROM drive. If your system has a SCSI drive, you will seean sd instead. More than one drive of a type are listed by letters, so hda represents the firstIDE drive, while hdb would be the second. In some cases, you’ll see numbers following theseletters; on hard drives, the numbers represent the partitions on that drive, while for diskettedrives, this number refers to the actual unit.
� Mount point – This is where in the system the drive is to be mapped when mounted.

8.1 System Configuration With Linuxconf 143
� FsType – This is where the type of filesystem is indicated. A standard Linux partition uses theext2 filesystem type. A filesystem type of vfat indicates a DOS filesystem with long filenamesupport, while a fat filesystem type is for DOS filesystems supporting traditional 8.3 filenames.The iso9660 filesystem type indicates a CD-ROM drive, as seen in figure 8.12 on the precedingpage.
Please Note: Red Hat Linux 6.0 can access FAT32 filesystems using the vfat filesystem type.
� Size – Size indicates the size of the filesystem in megabytes (M). For removable media devicessuch as diskette and CD-ROM drives the stated size is listed as zero.
� Partition type – A description of the filesystem used on that partition.
Filesystems from other machines on a network may also be available. These can range from singlesmall directories to entire volumes. No information on Size or Partition type is available for thesepartitions, either. Additional information on these filesystems (should you have any available) willbe contained under:�
�
�
�
Config )�
�
�
�
File systems )�
�
�
�Access nfs volume
Figure 8.13: NFS Volume Screen
The screen is similar to the Local volume screen (see figure 8.12 on the facing page), with somenotable differences in the information provided for each entry:

144 System Configuration
� Source – This will be the name of the machine serving the filesystem, followed by the re-mote directory. For example: foo:/var/spool/mail where foo is the machine serving thedirectory, and /var/spool/mail is the directory being served.
� FsType – This will always be “nfs.”
Adding NFS Mounts – Quick Reference
1. Start Linuxconf by typing linuxconf at the shell prompt.
2. Open�
�
�
�
Config )�
�
�
�
File systems )�
�
�
�Access nfs volume .
3. Select Add.
4. Enter the host name where the filesystem resides.
5. Enter the path to the remote filesystem in the Volume field. For example, /var/spool/mail.
6. Specify the mount point on your system. For example, /mnt/foo.
Select Accept.
Adding NFS Mounts – General Overview
NFS stands for Network FileSystem. It is a way for computers to share sections of their local filesys-tem across a network. These sections may be as small as a single directory, or include thousands offiles in a vast hierarchy of directories. For example, many companies will have a single mail serverwith individuals’ mail files served as an NFS mount to each users’ local systems.
To add an NFS mount:
� Start Linuxconf by typing linuxconf at the shell prompt.
� Open�
�
�
�
Config )�
�
�
�
File systems )�
�
�
�Access nfs volume .
� On the NFS volume screen (see figure 8.13 on the page before), select Add.
The three fields on the Base tab are what you’ll need to concern yourself with.
� Server – The host name of the machine the desired filesystem resides on. For example,foo.bar.com.
� Volume – The filesystem you wish to add. For example, /var/spool/mail.
� Mount point – Where in your system you want the remote file system accessible from. Forexample, /mnt/mail.

8.1 System Configuration With Linuxconf 145
Figure 8.14: Volume Specification Screen
This is all you need to get the mount created. Linuxconf will update your /etc/fstab file ac-cordingly. If you are aware of additional requirements, please read the help file on the Volumespecification screen and see the mount man page for more information.
Once you have entered the information, select Accept.
8.1.4 Getting Connected (Network Configuration)
The first thing to determine when getting hooked up is whether you’re connecting to a local areanetwork, such as a group of computers in an office, or a wide area network, such as the Internet.Before continuing, it’s important to know what hardware you have and how you intend to connect.If you’re going to dial into another computer, then make sure your modem is installed and thatthe cables are arranged properly. If you’re using a network card, make sure it is installed properlyand that the cables are correctly connected. Regardless of what network configuration you specify,if every phone line or cable is not in place, you’ll never get connected. We’ll start with modemconnections and then move on to using network cards.

146 System Configuration
Adding Modem/PPP/SLIP connections – Quick Reference
1. Start Linuxconf by typing linuxconf at the shell prompt.
2. Open�
�
�
�
Config )�
�
�
�
Networking )�
�
�
�PPP/SLIP/PLIP .
3. Select Add.
4. Select the type of connection.
5. Enter the Phone number, login name and password.
6. Select Use PAP authentication only if necessary (only available for PPP accounts).
7. Select Accept.
Adding Modem/PPP/SLIP connections – General Overview
There are several pieces of information you will need to get from your ISP (Internet Service Provider)or systems administrator before getting your PPP or SLIP account working. In the case of someproviders, you may have to sort through directions on how to set up a PPP connection on a Linuxsystem. Some ISPs are ill-equipped to handle individuals using Linux. Don’t worry, you can still getconnected; you just need some additional information from your ISP. The following is what you needfor a connection with Red Hat Linux. The ISP representatives may respond that you don’t need thisinformation, or may suggest that you need more than this. Red Hat has streamlined the informationneeded using intelligent defaults and tools such as Linuxconf to simplify this process for you. Unlessthey have a document specifically for Red Hat Linux, just request the information below and go fromthere. Specifically, you’ll need:
� the IP address for a domain nameserver (DNS);
� the telephone number to dial;
� your login and password;
� an IP address for your machine if the network you are connecting to isn’t going to provide youwith a dynamic one;
� whether or not your ISP uses an authentication method such as PAP, CHAP or MS-CHAP. Ifso, you will need a ”secret” to enable authentication. The secret will be a word or sequence ofcharacters. CHAP and MS-CHAP are not currently supported using Linuxconf, and are rarelyused.
Additional information which may be helpful, but isn’t necessary includes a secondary nameserveraddress, and a search domain. Once you have all this information, you’re ready to get connected.
� Start Linuxconf by typing linuxconf at the shell prompt.

8.1 System Configuration With Linuxconf 147
� Open�
�
�
�
Config )�
�
�
�
Networking )�
�
�
�PPP/SLIP/PLIP .
� Select Add.
Figure 8.15: PPP/SLIP/PLIP Configurations Screen
Initially there won’t be any configurations specified. When you select Add you will be given a choicebetween PPP, SLIP and PLIP.
PPP is the most commonly used interface and is the default. To set up a PPP connection select PPPand hit Accept.
You’ll see the following fields:
� Phone number - number used to access to remote system;
� Modem port - indicates where your modem is. Should already be set.
� Use PAP authentication (check box) - check if you know that the system you are dialing intorequires this;
� Login name - your login name for the PPP account;
� Password - your password for the PPP account.

148 System Configuration
Figure 8.16: Type of Interface Screen
Notice that the title bar is PPP interface ppp0. ppp0 is the first PPP interface, ppp1 would be thesecond and so on. It’s important to keep track of which interface you’re using if you have more thanone. SLIP connections use sl instead of ppp for their interface prefix. With the exception of a PAPauthentication option, the entry screens for adding a PPP or a SLIP account are identical.
Enter the complete phone number for the remote machine, and make sure to include any numbersrequired to access outside lines. For example, if you need to dial “9” and then the number, and thecomputer you’re connecting to has a telephone number of “555-0111”, then you’d enter “95550111”.The next thing it asks you for is the modem port. This is a drop down box of available ports. Ifyou’re using a dual-boot Linux/Windows system and you know the COM port your modem is on,the following map may be of use:
Map to Windows COM ports are as follows:
� cua0 – COM1: under MS-DOS;
� cua1 – COM2: under MS-DOS;
� cua2 – COM3: under MS-DOS;
� cua3 – COM4: under MS-DOS.

8.1 System Configuration With Linuxconf 149
Figure 8.17: PPP Interface Screen
The login name is the one for the PPP account. The password you enter will be shown in plain text,so be careful who you have around when you enter it! If you will be using PAP authentication, checkthe box; when you’ve entered the other required information, select the Customize button at thebottom of the screen. All the other information is provided on the various tabs and can be set withinthe Customize screen, but it’s easier to find the information all in one place on the primary screen.
Select the PAP tab and enter your username and then the secret the ISP has provided you in the Secretfield. The other defaults should be sufficient, but if you need to, you can edit the initial settings usingthe Customize option.
Modifying a PPP or SLIP Configuration – Quick Reference
1. Start Linuxconf by typing linuxconf at the shell prompt.
2. Open�
�
�
�
Config )�
�
�
�
Networking )�
�
�
�PPP/SLIP/PLIP .
3. Select the configuration to modify.
4. Change the desired settings; most are on the Communications tab.

150 System Configuration
Figure 8.18: SLIP Interface Screen
5. Select Accept.
Modifying a PPP or SLIP Configuration – General Overview
You can edit an existing configuration as well as delete it by selecting it from the list on thePPP/SLIP/PLIP configurations screen.
� Start Linuxconf by typing linuxconf at the shell prompt.
� Open�
�
�
�
Config )�
�
�
�
Networking )�
�
�
�PPP/SLIP/PLIP .
� You will then be presented with the PPP/SLIP/PLIP configurations screen (see figure 8.15 onpage 147). Select the configuration you would like to modify or delete.
This will open the appropriate interface screen for your configuration. If you wish to delete theconfiguration, the handy Del button is there at the bottom of the screen. The Modem port is on theHardware tab and is a drop down menu. If you want to change the other settings you entered whenyou originally created the configuration, select the Communication tab. The first Send field contains

8.1 System Configuration With Linuxconf 151
Figure 8.19: PPP Interface Customization Screen
your login, and the next Send field contains your password. The Expect fields correspond to thelogin: and password: prompts, which explains the ogin: and ord: entries.
Please Note: The ogin: and ord: entries may not be the same for your system. Different ISP/PPPservers may use different text and should be changed to fit the needs of whatever server type you arelogging in to. Instead, you may see such prompts as User ID and authentification.
Once you have made your changes, you can test to see if your configuration is working. Select Con-nect from the bottom of the screen. This will attempt to connect you to the remote system using theinformation you’ve entered. Once you’ve finished configuring and testing your setup, we recom-mend using the usernet utility to control your dial-up networking connection on a daily basis. Seethe usernet man page for more information.

152 System Configuration
Figure 8.20: SLIP Interface Customization Screen
Other Network Connections – Quick Reference
Due to the number of possible choices and sub-choices, no quick reference is available for this section.
Other Network Connections – General Overview
Setting up a network connection over ethernet requires an entirely different type of setup. Networkconnections to token ring or arcnet networks follow a similar procedure, but will not be discussedhere.
� First you will need to have an Ethernet card installed.
� Start Linuxconf by typing linuxconf at the shell prompt.
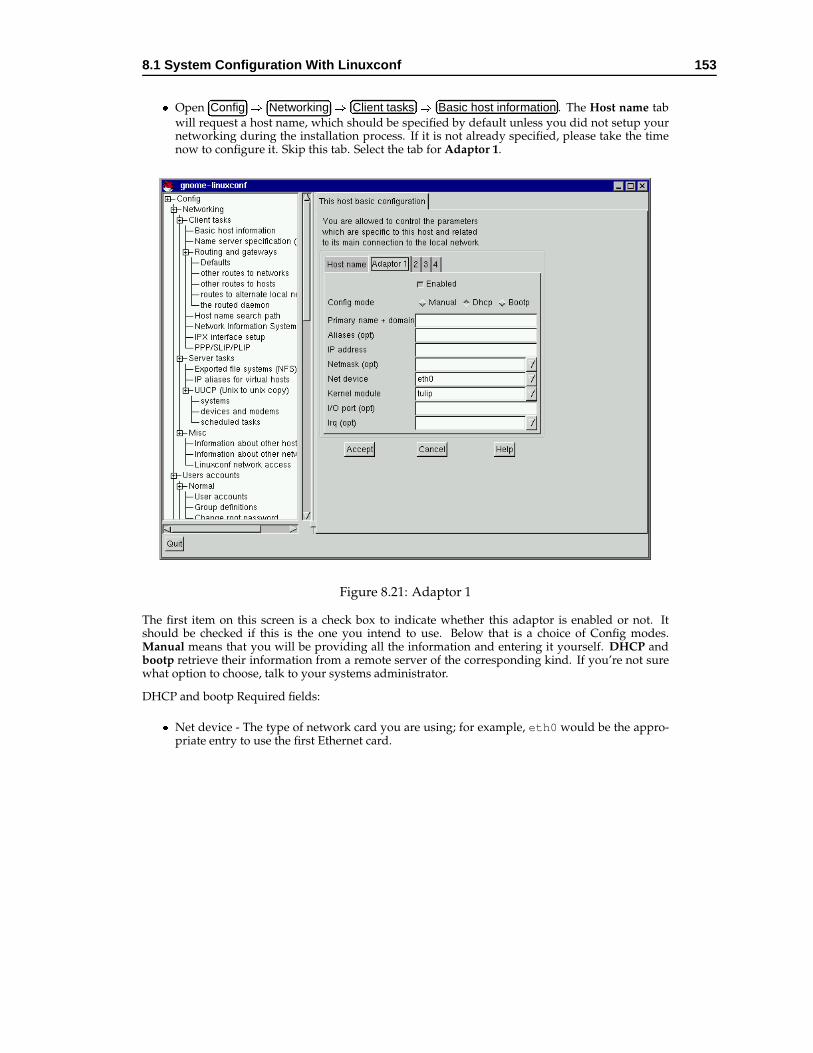
8.1 System Configuration With Linuxconf 153
� Open�
�
�
�
Config )�
�
�
�
Networking )�
�
�
�Client tasks )
�
�
�
�Basic host information . The Host name tab
will request a host name, which should be specified by default unless you did not setup yournetworking during the installation process. If it is not already specified, please take the timenow to configure it. Skip this tab. Select the tab for Adaptor 1.
Figure 8.21: Adaptor 1
The first item on this screen is a check box to indicate whether this adaptor is enabled or not. Itshould be checked if this is the one you intend to use. Below that is a choice of Config modes.Manual means that you will be providing all the information and entering it yourself. DHCP andbootp retrieve their information from a remote server of the corresponding kind. If you’re not surewhat option to choose, talk to your systems administrator.
DHCP and bootp Required fields:
� Net device - The type of network card you are using; for example, eth0 would be the appro-priate entry to use the first Ethernet card.

154 System Configuration
� Kernel module - The correct module based on your network card; for further information seethe list below.
For DHCP and bootp configurations you only need to specify the Net device and the Kernel module.For the Net device, you will choose from a list where the eth prefix represents ethernet cards, thearc specifies an arcnet card and the tr specifies token ring cards. A complete list of network cardsand their respective modules can be found in Section E.3 on page 355. For the most recent up-to-datelist, please see our website at:
http://www.redhat.com
The netmask information will be set by default, although depending on what kind of network youare setting up, or becoming a part of, you may need to specify this. If you are connecting to an ISP,ask them for the information. Most likely it will be 255.255.255.0 (the default).
Required fields for Manual Configuration:
� Primary name + domain – the primary name is the name of your computer, while the domainis how your network is specified. For example, foo.bar.com; foo is the primary name andbar.com is the domain.
� IP address – this is the address of the machine and will follow the pattern of x.x.x.x. Forexample, 192.168.0.13.
� Net device – type of network card you are using; eth0 would be the appropriate entry to usethe first ethernet card.
� Kernel module – the correct module based on your network card.
Information on net devices and kernel modules is described above. The appropriate primary name +domain and IP address will depend on whether you are adding the computer to an existing networkor creating a new network. For connecting to an existing network, contact your systems administra-tor for the information. Getting a network connected to the Internet is beyond the scope of this book,and we recommend the following starting point:
TCP/IP Network Administration, 2nd Edition, by Craig Hunt (O’Reilly and Associates).
If you’re setting up a private network that won’t ever be connected to the Internet, then you canchoose any primary name + domain name you would like and have several choices for IP addresses(See Figure 8.22 on the facing page).
The three sets of numbers above correspond to class a, b, and c networks respectively. The classesare used to describe the number of IP addresses available as well as the range of numbers used todescribed each. The numbers above have been set aside for private networks.
Please Note: You should not use these IP addresses if you connect to the Internet since 192.168.0.*and 192.168.255.* are not reliably considered private. If you want your network to be connected tothe Internet, or think you might want to at some point in the future, do yourself a favor and getyourself non-private addresses now.

8.1 System Configuration With Linuxconf 155
Addresses available Examples10.0.0.0 - 10.255.255.255 10.5.12.14
172.16.0.0 - 172.31.255.255 172.16.9.1, 172.28.2.5192.168.0.0 - 192.168.255.255 192.168.0.13
Figure 8.22: Private Address Ranges
Nameserver Specification
A nameserver and default domain are also needed to establish a network connection. The name-server is used to translate host names such as private.network.com to their corresponding IP ad-dress such as 192.168.7.3. The default domain tells the computer where to look if a fully qualifiedhostname isn’t specified. Fully qualified means that the full address is given, so foo.redhat.comis the fully qualified hostname, while the hostname is simply foo. If you specified your default do-main as redhat.com, then you could use just the hostname to connect successfully. For exampleftp foo would be sufficient if your search domain is redhat.com, while ftp foo.redhat.comwould be required if it wasn’t.
To specify the nameserver, open�
�
�
�
Config )�
�
�
�
Networking )�
�
�
�
Name server specification (DNS) .
Nameservers are ranked according to the order in which they are accessed, so it’s not unusual to seenameservers referred to as primary, secondary, tertiary and so on down the list if more than one isspecified. Each of these must be an IP address and not a name. The computer has no way to re-solve the name until it connects to a nameserver. Screamingly obvious when stated, but occasionallyoverlooked when people are simply asked to supply an address for a computer.
In addition to a default domain, you can also specify search domains. Search domains work differ-ently; they progress from one to six in a similar manner to the nameserver. However, they all takeprecedence over the default domain! Keep this in mind when specifying search domains. Searchdomains are not commonly used.
The one item not yet covered is the check box for DNS usage. If you are running a small private net-work with no Internet connection, then using /etc/hosts files and keeping them all synchronizedwill work. As you add more and more machines, the complexity increases until it is easier to have asingle machine run a DNS than to continue to sync /etc/hosts files.
There is another reason for not using DNS, and that is if your network is going to use NIS instead.Note that NIS can be used in conjunction with DNS. So to sum it all up, unless you know why using/etc/hosts or NIS would be best for your situation, DNS is probably going to be your best choice.
You can add, modify, or delete entries from the /etc/hosts file using Linuxconf. Open�
�
�
�
Config )�
�
�
�
Networking )�
�
�
�Misc )
�
�
�
�Information about other hosts .
To modify or delete an entry select it. To delete the entry, select Del at the bottom of the host/networkdefinition screen.

156 System Configuration
Figure 8.23: Resolver Configuration Screen
To modify it, change the information as necessary. To add a new entry, select Add at the bottom ofthe /etc/hosts screen. This will also open the host/network definition screen.
Required Fields:
� Primary name + domain – the primary name is the name of the computer, while the domainis how the network it is attached to is specified. For example, given foo.bar.com, foo is theprimary name and bar.com is the domain.
� IP number – also referred to as IP address; this is the address of the machine and will followthe pattern of x.x.x.x. For example, 192.168.0.13

8.1 System Configuration With Linuxconf 157
Figure 8.24: /etc/hosts Screen
Optional Fields:
� Alias – A shorthand for the fully qualified domain name. This is often the same as the primaryname. So, for example, if the fully qualified domain name is foo.bar.com, you could selectfoo as the alias.
� Comment – a comment on the machine. For example, “The remote nameserver.”
You will need to specify both the primary name + domain and the IP number. The other fields areoptional. Once finished, select Accept.
Date and Time
To get to the date & time control panel:
� Start Linuxconf by typing linuxconf at the shell prompt.

158 System Configuration
Figure 8.25: Host/Network Definition Screen
� Enter root’s password when prompted (if not already root).
� Open�
�
�
�Control )
�
�
�
�Date & Time .
The zone field is a pull-down list that is long and extensive. It is often designated by a large regionand then a city or zone within it. Examples include Europe/Vienna and US/Eastern. There is acheck box to Store date in CMOS in GMT format. Hours are specified from 0 (midnight) to 23 (11PM). Months are specified by number as well. For the year, please specify all four digits. All otherfields should be self-explanatory.
8.2 System Configuration with the Control Panel
Please Note: Most of what can be done with the control panel applications can also be done usingLinuxconf. In addition, Linuxconf supports both character-cell and graphical user interfaces. Pleaserefer to Section 8.1 on page 120 for an introduction to Linuxconf.
The control panel is a launching pad for a number of different system administration tools (see Fig-ure 8.27 on page 160). These tools make your life easier by letting you configure things without

8.2 System Configuration with the Control Panel 159
Figure 8.26: Workstation Date & Time
remembering configuration file formats and awkward command line options.
To start the control-panel, start the X Window System as root with startx and typecontrol-panel in an xterm. You will need to be root to run the control-panel tools successfully.You can do this as well if you already have X running as a normal user. Just type su -c control-panel and then type the root password when prompted. If you plan to do other tasks as root, youcould type su followed by the root password when prompted.
Please Note: If you are not running X as root, you may need to give root access to your system’s Xserver. To do this, enter the following command on a non-root terminal window:
xhost +localhost
After starting the control panel, simply clicking on an icon starts up a tool. Please note that you arenot prevented from starting two instances of any tool, but doing so is a very bad idea because youmay try to edit the same files in two places and end up overwriting your own changes. If you doaccidentally start a second copy of a tool, you should quit it immediately. Also, do not manually editany files managed by the control-panel tools while the tools are running. Similarly, do not run anyother programs (such as Linuxconf) that may change those files while the tools are running.

160 System Configuration
Figure 8.27: The Control Panel
8.2.1 Printer Configuration
The printer configuration tool (printtool) maintains the /etc/printcap file, print spool direc-tories, and print filters. The filters allow you to print many different types of files, including:
� plain text (ASCII) files
� PostScript files
� TEX .dvi files
� GIF, JPEG, TIFF, and other graphics formats
� RPMs
In other words, simply printing a GIF or RPM file using the lpr command will result in the printerdoing “the right thing.”
In order to create a new print queue, choose Add. Then, select what type of printer is being added.There are four types of print queues which can be configured with printtool:
� Local print queues are for printers attached to a printer or serial port on your Red Hat Linuxsystem.
� Remote print queues are attached to a different system which you can access over a TCP/IPnetwork.
� SMB print queues are attached to a different system which uses LAN-Manager-type (SMB)networking.
� NCP print queues are attached to a different system which uses Novell’s NetWare networktechnology.

8.2 System Configuration with the Control Panel 161
Figure 8.28: Print Tool
Figure 8.29: Selecting a Printer Type
After choosing the printer type, a dialog box requests further information about the print queue (seeFigure 8.30 on the next page). All types of print queues require the following information:
� Queue Name: What the queue will be called. Multiple names can be specifed with the |(pipe) character separating entries.
� Spool Directory: This is the directory on the local machine where files are stored beforeprinting occurs. Be careful to not have more than one printer queue use a given spool directory.
� File Limit: Maximum size print job accepted, in kilobytes (1 kb = 1024 bytes). A size of 0indicates no limit should be imposed.
� Input Filter: Filters convert printed files into a format the printer can handle. Press Select tochoose the filter which best matches your printer (see Figure 8.31 on the following page).
In addition to configuring print queues able to print graphical and PostScript output, youcan configure a text-only printer, which will only print plain ASCII text. Most printer driversare also able to print ASCII text without converting it to PostScript first; simply choose Fasttext printing when you configure the filter. Please Note: This only works for non-PostScriptprinters.

162 System Configuration
� Suppress Headers: Check this if you don’t want a header page printed at the beginning ofeach print job.
For local printers, the following information is also required:
� Printer Device: Usually /dev/lp1; the name of the port which the printer is attached to. Se-rial printers are usually on /dev/ttyS? ports. Note that you will need to manually configureserial parameters.
Figure 8.30: Adding a Local Printer
Figure 8.31: Configuring a Print Filter

8.2 System Configuration with the Control Panel 163
For remote printers, the dialog box contains additional fields; fill in the following information:
� Remote Host: Hostname of the remote machine hosting the printer.
� Remote Queue: Name of the queue to print to on the remote machine.
The remote machine must be configured to allow the local machine to print on the desired queue.Typically /etc/hosts.lpd controls this.
Figure 8.32: Adding a Remote Printer
Figure 8.33: Adding an NCP Printer
For SMB and NCP printers, fill in the following information:
� Hostname of Printer Server: Name of the machine to which the printer you want to use isattached.
� IP number of Server: The IP address of the machine to which the printer you want to use isattached; this is optional and only relevant for SMB printers.
� Printer Name: Name of the printer on which you want to print.

164 System Configuration
Figure 8.34: Adding an SMB Printer
� User: Name of user you must login as to access the printer (typically guest for Windowsservers, or nobody for samba servers).
� Password: Password (if required) to use the printer (typically blank). Someone should beable to tell you this if you do not already know it.
Please Note: If you need to use a username and password for an SMB (LAN Manager) or NCP(NetWare) print queue, they are stored unencrypted in a local script. Thus, it is possible for anotherperson to learn the username and password. It is therefore recommended that the username andpassword for use of the printer to be different than that for a user account on the local Red Hat Linuxsystem, so that the only possible security compromise would be unauthorized use of the printer. Ifthere are file shares from the SMB server, it is recommended that they also use a different passwordthan the one for the print queue.
After you have added your print queue, you may need to restart the printer daemon (lpd). To do so,choose Restart lpd from the lpd menu.
You may print a test page for any print queue you have configured. Select the type of test page youwould like to print from the Tests menu.
Figure 8.35: Printing a Test Page

8.2 System Configuration with the Control Panel 165
8.2.2 Kernel Daemon Configuration
Red Hat Linux includes kerneld, the Kernel Daemon, which automatically loads some softwareand hardware support into memory as it is needed, and unloads it when it is no longer being used.
The tool shown in Figure 8.36 manages the configuration file for kerneld. While kerneld can loadsome things, such as filesystems, without explicit configuration, it needs to be told what hardwaresupport to load when it is presented with a generic hardware request.
Figure 8.36: Kernel Module Management
For instance, when the kernel wants to load support for ethernet, kerneld needs to know whichethernet card you have, and if your ethernet card requires special configuration, it needs to knowabout that, too.
Changing Module Options
To change the options being given to a module when it is loaded, click on the line to select it, thenclick the Edit button. kernelcfg will bring up a window which looks like Figure 8.37 on the followingpage. The options kernelcfg knows about (normally all available options) will each have their ownfield. Normally, you will want to ignore the Other arguments field. Some modules normally takeno arguments; just in case, they have an Arguments field which allows you to enter configurationinformation.
Changing Modules
To change which module gets invoked to provide a generic service, such as an ethernet card or SCSIhost adapter module, you need to delete the old one and add a new one. To delete a module, selectit by clicking on it, then click on Remove. Then click on Add to add the new module, as explained inthe following section.

166 System Configuration
Figure 8.37: Editing Module Options
If you have changed your SCSI controller (scsi hostadapter), remember to make a new initialramdisk with the /sbin/mkinitrd command as documented in section 11.8.2 on page 213.
Adding Modules
To add a module of any type, click on the Add button. You will be presented with a dialog box(Figure 8.38) asking you to choose a module type. Ethernet is eth, Token Ring is tr, SCSI controllersare scsi hostadapter, and so on. Click Ok to continue to the next dialog box.
Figure 8.38: Adding a module
If there is more than one module which can be used for the module type you have chosen, you willbe presented with a dialog box (Figure 8.39 on the next page) which asks which module you want touse, and may also ask for specifics about the type of module; for ethernet, for example, you need tochoose from eth0, eth1, etc. When you are done, click Ok again to continue to specify any moduleoptions in the next dialog box (Figure 8.39 on the facing page), which is the same as the dialog forediting a module.
Restarting Kerneld
The changes that you make with the Kernel Daemon Configuration tool will be made in the/etc/conf.modulesfile, which kerneld reads whenever it is started. Once you have made changes,

8.2 System Configuration with the Control Panel 167
Figure 8.39: Selecting From Available Modules
you can restart kerneld by clicking on the Restart kerneld button. This will not cause any moduleswhich are currently in use to be reloaded, it will only notify kerneld to use the configuration when itloads more modules in the future.
8.2.3 Network Configuration
Please Note: Documentation on network configuration using Linuxconf can be found in Section 8.1.4on page 145.
The network configuration tool (netcfg) shown in Figure 8.40 is designed to allow easy manipu-lation of parameters such as IP address, gateway address, and network address, as well as nameservers and /etc/hosts.
Figure 8.40: Network Configuration Panel

168 System Configuration
Network devices can be added, removed, configured, activated, deactivated and aliased. Ethernet,arcnet, token ring, pocket (ATP), PPP, SLIP, PLIP and loopback devices are supported. PPP/SLIP/PLIPsupport works well on most hardware, but some hardware setups may exhibit unpredictable behav-ior. When using the Network Configuration Tool click Save to write your changes to disk, to quitwithout making any changes select Quit.
Managing Names
The Names panel of the Network Configuration tool serves two primary purposes: setting the host-name and domain of the computer, and determining which name server will be used to look up otherhosts on the network. The Network tool is not capable of configuring a machine as a nameserver. Toedit a field or add information to a field simply click on the field with the left mouse button and typethe new information.
Figure 8.41: Adding/Editing Hosts
Managing Hosts
In the Hosts management panel you have the ability to add, edit, or remove hosts from the/etc/hosts file. Adding or editing an entry involves identical actions. An edit dialog box willappear, simply type the new information and click Done when you are finished. See Figure 8.41 foran example.

8.2 System Configuration with the Control Panel 169
Adding a Networking Interface
If you have added a networking interface to your machine since installing Red Hat Linux, or youdidn’t configure your ethernet card at install time, you can configure it with a few clicks of a mouse.
Please Note: You may need to configure kerneld to load a driver for the network interface you areadding (e.g., eth0); see Section 8.2.2 on page 165 for more information.
Begin adding an interface by clicking on Interfaces in the main panel. This will bring up a windowof configured devices with a row of available options, see Figure 8.42.
Figure 8.42: Configured Interfaces
To add a device, first click the Add button then select the type of interface you want to configurefrom the box that appears (See Figure 8.43 on the following page).
Please Note: There is now a clone button available in netcfg. This button can be used to create a“clone” of an already-existing interface. By using clone interfaces, it is possible for a laptop to haveone Ethernet interface defined for a work LAN, and a clone Ethernet device defined for a home LAN.
PPP Interface – Adding a PPP interface can be as simple as supplying the phone number, loginname and password in the Create PPP Interface dialog shown in Figure 8.44 on the next page. Ifyou need to use PAP authentication for your PPP connection, choose Use PAP authentication. Inmany cases some degree of customization will be needed to establish a PPP connection. Choosing theCustomize button will allow you to make changes to the hardware, communication, and networkingsettings for the PPP interface.

170 System Configuration
Figure 8.43: Choose Interface Type
Figure 8.44: Create PPP Interface

8.2 System Configuration with the Control Panel 171
SLIP Interface In order to configure a SLIP interface you must first supply a phone number, loginname, and password. This will supply the initial parameters for the chat script needed to establisha SLIP connection. When you choose Done, a dialog titled Edit SLIP Interface appears that enablesyou to further customize the hardware, communication and networking parameters for your SLIPinterface.
PLIP Interface To add a PLIP interface to your system you only have to supply the IP address,the remote IP address, and the Netmask. You can also select if you want to activate the interface atboot time.
Ethernet, Arcnet, Token Ring and Pocket Adaptor Interfaces If you are adding an eth-ernet, arcnet, token ring or pocket adapter to your computer you will need to supply the followinginformation:
� Device: This is determined by netconfig based on the devices already configured.
� IP Address: Enter an IP address for your network device.
� Netmask: Enter the network mask for your network device.
The network and broadcast addresses are calculated automatically based on the IP addressand netmask you enter.
� Activate interface at boot time: If you want the device to be configured automatically whenyour machine boots select this by clicking on the box.
� Allow any user to (de)activate interface: Check this if you want any user to be able toactivate or deactivate the interface.
� Interface configuration protocol: If you have a BOOTP or DHCP server on your networkand would like to use it to configure the interface, choose the appropriate option; otherwise,choose none.
After providing the configuration information for your new device, click Done. The device shouldappear in your Interfaces list as an inactive device. (The active column should have a label of no.)To activate the new device, first select it with a mouse click and then choose on the Activate button.If it does not come up properly, you may need to reconfigure it by choosing on Edit.
Managing Routes
In the Routes management screen you have the ability to add, edit, or remove static networkingroutes. Adding or editing an entry involves identical actions, just like the Hosts panel. An editdialog box will appear; simply type the new information and click Done when you are finished. SeeFigure 8.45 on the following page for an example.

172 System Configuration
Figure 8.45: Adding/Editing Routes
8.2.4 Time and Date
Please Note: Documentation on setting your system’s time and date using Linuxconf can be foundin Section 8.1.4 on page 157.
The time machine allows you to change the time and date by clicking on the appropriate part of thetime and date display and clicking on the arrows to change the value.
The system clock is not changed until you click on the Set System Clock button.
Click on Reset Time to set the time machine time back to that of the system.
Please Note: Changing the time can seriously confuse programs that depend on the normal pro-gression of time, and could possibly cause problems. Try to quit as many applications and processesas possible before changing the time or date.

9Package Management with RPM
The Red Hat Package Manager (RPM), is an open packaging system available for anyone to use, andworks on Red Hat Linux as well as other Linux and UNIX systems. Red Hat Software encouragesother vendors to take the time to look at RPM and use it for their own products. RPM is distributableunder the terms of the GPL.
For the end user, RPM provides many features that make maintaining a system far easier than it hasever been. Installing, uninstalling, and upgrading RPM packages are all one line commands, and allthe messy details have been taken care of for you. RPM maintains a database of installed packagesand their files, which allows you to perform powerful queries and verification of your system. Duringupgrades RPM handles configuration files specially, so that you never lose your customizations – afeature that is impossible with straight .tar.gz files.
For the developer, RPM allows you to take source code for software and package it into source andbinary packages for end users. This process is quite simple and is driven from a single file andoptional patches that you create. This clear delineation of “pristine” sources and your patches andbuild instructions eases the maintenance of the package as new versions of the software are released.
Please Note:Although it does not hurt to understand the concepts behind RPM, there is an alter-native for installing, uninstalling and upgrading packages. For those of you that prefer a graphicalinterface to the command line, we suggest you use GnoRPM. Please see Chapter 10 on page 183 formore information.

174 Package Management with RPM
9.1 RPM Design Goals
Before trying to understand how to use RPM, it helps to have an idea of what the design goals are.
Upgradability With RPM you can upgrade individual components of your system without com-pletely reinstalling. When you get a new release of an operating system based on RPM (suchas Red Hat Linux), you don’t need to reinstall on your machine (as you do with operatingsystems based on other packaging systems). RPM allows intelligent, fully-automated, in-placeupgrades of your system. Configuration files in packages are preserved across upgrades, soyou won’t lose your customizations.
Powerful Querying RPM is also designed to have powerful querying options. You can do searchesthrough your entire database for packages or just certain files. You can also easily find outwhat package a file belongs to and where it came from. The files an RPM package contains arein a compressed archive, with a custom binary header containing useful information about thepackage and its contents, allowing you to query individual packages quickly and easily.
System Verification Another powerful feature is the ability to verify packages. If you are worriedthat you deleted an important file for some package, simply verify the package. You willbe notified of any anomalies. At that point, you can reinstall the package if necessary. Anyconfiguration files that you modified are preserved during reinstallation.
Pristine Sources A crucial design goal was to allow the use of “pristine” software sources, as dis-tributed by the original authors of the software. With RPM, you have the pristine sources alongwith any patches that were used, plus complete build instructions. This is a big advantage forseveral reasons. For instance, if a new version of a program comes out, you don’t necessarilyhave to start from scratch to get it to compile. You can look at the patch to see what you mightneed to do. All the compiled-in defaults, and all of the changes that were made to get thesoftware to build properly are easily visible this way.
This goal may only seem important for developers, but it results in higher quality software forend users too. We would like to thank the folks from the BOGUS distribution for originatingthe pristine source concept.
9.2 Using RPM
RPM has five basic modes of operation (not counting package building): installing, uninstalling,upgrading, querying, and verifying. This section contains an overview of each mode. For completedetails and options try rpm --help, or turn to Section 9.4 on page 182 for more information onRPM.

9.2 Using RPM 175
9.2.1 Installing
RPM packages typically have file names like foo-1.0-1.i386.rpm, which includes the packagename (foo), version (1.0), release (1), and architecture (i386). Installing a package is as simple as:
# rpm -ivh foo-1.0-1.i386.rpmfoo #####################################
As you can see, RPM prints out the name of the package (which is not necessarily the same as the filename, which could have been 1.rpm), and then prints a succession of hash marks as the package isinstalled, as a sort of progress meter.
Installing packages is designed to be simple, but you can get a few errors:
Package Already Installed
If the package is already installed, you will see:
# rpm -ivh foo-1.0-1.i386.rpmfoo package foo-1.0-1 is already installederror: foo-1.0-1.i386.rpm cannot be installed#
If you really want to install the package anyway, you can use --replacepkgs on the command line,which tells RPM to ignore the error:
# rpm -ivh --replacepkgs foo-1.0-1.i386.rpmfoo #####################################
Conflicting Files
If you attempt to install a package that contains a file that has already been installed by anotherpackage, you’ll see:
# rpm -ivh foo-1.0-1.i386.rpmfoo /usr/bin/foo conflicts with file from bar-1.0-1error: foo-1.0-1.i386.rpm cannot be installed#

176 Package Management with RPM
To cause RPM to ignore that error, use --replacefiles on the command line:
# rpm -ivh --replacefiles foo-1.0-1.i386.rpmfoo #####################################
Unresolved Dependency
RPM packages can “depend” on other packages, which means that they require other packages to beinstalled in order to run properly. If you try to install a package for which there is such an unresolveddependency, you’ll see:
# rpm -ivh bar-1.0-1.i386.rpmfailed dependencies:
foo is needed by bar-1.0-1#
To handle this error you should install the requested packages. If you want to force the installa-tion anyway (a bad idea since the package probably will not run correctly), use --nodeps on thecommand line.
9.2.2 Uninstalling
Uninstalling a package is just as simple as installing:
# rpm -e foo#
Notice that we used the package name “foo,” not the name of the original package file“foo-1.0-1.i386.rpm”.
You can encounter a dependency error when uninstalling a package if some other installed packagedepends on the one you are trying to remove. For example:
# rpm -e fooremoving these packages would break dependencies:
foo is needed by bar-1.0-1#
To cause RPM to ignore that error and uninstall the package anyway (which is also a bad idea sincethe package that depends on it will probably fail to work properly), use --nodeps on the commandline.

9.2 Using RPM 177
9.2.3 Upgrading
Upgrading a package is almost just like installing.
# rpm -Uvh foo-2.0-1.i386.rpmfoo #####################################
What you don’t see above is that RPM automatically uninstalled any old versions of the foo package.In fact you may want to always use -U to install packages, since it works fine even when there are noprevious versions of the package installed.
Since RPM performs intelligent upgrading of packages with configuration files, you may see a mes-sage like:
saving /etc/foo.conf as /etc/foo.conf.rpmsave
This means that your changes to the configuration file may not be “forward compatible” with thenew configuration file in the package, so RPM saved your original file, and installed a new one. Youshould investigate and resolve the differences between the two files as soon as possible to ensure thatyour system continues to function properly.
Since upgrading is really a combination of uninstalling and installing, you can encounter any errorsfrom those modes, plus one more: If RPM thinks you are trying to upgrade to a package with an olderversion number, you will see:
# rpm -Uvh foo-1.0-1.i386.rpmfoo package foo-2.0-1 (which is newer) is already installederror: foo-1.0-1.i386.rpm cannot be installed#
To cause RPM to “upgrade” anyway, use --oldpackage on the command line:
# rpm -Uvh --oldpackage foo-1.0-1.i386.rpmfoo #####################################
9.2.4 Freshening
Freshening a package is similar to upgrading:

178 Package Management with RPM
# rpm -Fvh foo-1.2-1.i386.rpmfoo #####################################
RPM’s freshen option checks the versions of the packages specified on the command line against theversions of packages that have already been installed on your system. When a newer version of analready-installed package is processed by RPM’s freshen option, it will be upgraded to the newerversion. However, RPM’s freshen option will not install a package if no previously-installed packageof the same name exists. This differs from RPM’s upgrade option, as an upgrade will install packages,whether or not an older version of the package was already installed.
RPM’s freshen option works well with single packages or with a group of packages. It’s especiallyhandy if you’ve just downloaded a large number of different packages, and you only want to upgradethose packages that are already installed on your system. Using the freshen option means that youwon’t have to pick through the downloaded packages, deleting any unwanted ones before usingRPM.
In this case, you can simply issue the following command:
# rpm -Fvh *.rpm
RPM will automatically upgrade only those packages that have already been installed.
9.2.5 Querying
Querying the database of installed packages is accomplished with rpm -q. A simple use is rpm -qfoo which will print the package name, version, and release number of the installed package foo:
# rpm -q foofoo-2.0-1#
Instead of specifying the package name, you can use the following options with -q to specify whatpackage(s) you want to query. These are called Package Specification Options.
� -a queries all currently installed packages.
� -f <file> will query the package owning <file>.
� -p <packagefile> queries the package <packagefile>.
There are a number of ways to specify what information to display about queried packages. Thefollowing options are used to select the information you are interested in. These are called InformationSelection Options.

9.2 Using RPM 179
� -i displays package information such as name, description, release, size, build date, installdate, vendor, and other miscellaneous information.
� -l displays the list of files that the package “owns”.
� -s displays the state of all the files in the package.
� -d displays a list of files marked as documentation (man pages, info pages, README’s, etc).
� -c displays a list of files marked as configuration files. These are the files you change afterinstallation to adapt the package to your system (sendmail.cf, passwd, inittab, etc).
For those options that display file lists, you can add -v to your command line to get the lists in afamiliar ls -l format.
9.2.6 Verifying
Verifying a package compares information about files installed from a package with the same in-formation from the original package. Among other things, verifying compares the size, MD5 sum,permissions, type, owner and group of each file.
rpm -V verifies a package. You can use any of the Package Selection Options listed for querying tospecify the packages you wish to verify. A simple use is rpm -V foo which verifies that all the filesin the foo package are as they were when they were originally installed. For example:
� To verify a package containing particular file:
rpm -Vf /bin/vi
� To verify ALL installed packages:
rpm -Va
� To verify an installed package against an RPM package file:
rpm -Vp foo-1.0-1.i386.rpm
This can be useful if you suspect that your RPM databases are corrupt.
If everything verified properly there will be no output. If there are any discrepancies they will bedisplayed. The format of the output is a string of 8 characters, a possible “c” denoting a configurationfile, and then the file name. Each of the 8 characters denotes the result of a comparison of one attributeof the file to the value of that attribute recorded in the RPM database. A single “.” (period) meansthe test passed. The following characters denote failure of certain tests:
5 MD5 checksum

180 Package Management with RPM
S File size
L Symbolic link
T File modification time
D Device
U User
G Group
M Mode (includes permissions and file type)
If you see any output, use your best judgment to determine if you should remove or reinstall thepackage, or somehow fix the problem.
9.3 Impressing Your Friends with RPM
RPM is a very useful tool for both managing your system and diagnosing and fixing problems. Thebest way to make sense of all the options is to look at some examples.
� Let’s say you delete some files by accident, but you aren’t sure what you deleted. If you wantto verify your entire system and see what might be missing, you would enter:
rpm -Va
If some files are missing, or appear to have been corrupted, you should probably either re-install the package or uninstall, then re-install the package.
� Let’s say you run across a file that you don’t recognize. To find out which package owns it,you would enter:
rpm -qf /usr/X11R6/bin/xjewel
The output would look like:
xjewel-1.6-1
� We can combine the above two examples in the following scenario. Say you are having prob-lems with /usr/bin/paste. You would like to verify the package that owns that programbut you don’t know which package that is. Simply enter:
rpm -Vf /usr/bin/paste
and the appropriate package will be verified.

9.3 Impressing Your Friends with RPM 181
� If you are using a program and want to find out more information about it, you can enter thefollowing to find out what documentation came with the package that “owns” that program(in this case ispell):
rpm -qdf /usr/bin/ispell
The output would be:
/usr/man/man4/ispell.4/usr/man/man4/english.4/usr/man/man1/unsq.1/usr/man/man1/tryaffix.1/usr/man/man1/sq.1/usr/man/man1/munchlist.1/usr/man/man1/ispell.1/usr/man/man1/findaffix.1/usr/man/man1/buildhash.1/usr/info/ispell.info.gz/usr/doc/ispell-3.1.18-1/README
� You find a new koules RPM, but you don’t know what it is. To find out some information onit, enter:
rpm -qip koules-1.2-2.i386.rpm
The output would be:
Name : koules Distribution: Red Hat Linux ColgateVersion : 1.2 Vendor: Red Hat SoftwareRelease : 2 Build Date: Mon Sep 02 11:59:12 1996Install date: (none) Build Host: porky.redhat.comGroup : Games Source RPM: koules-1.2-2.src.rpmSize : 614939Summary : SVGAlib action game; multiplayer, networkDescription :This arcade-style game is novel in conception andexcellent in execution. No shooting, no blood, no guts,no gore. The play is simple, but you still must developskill to play. This version uses SVGAlib to run on agraphics console.
� Now you want to see what files the koules RPM installs. You would enter:
rpm -qlp koules-1.2-2.i386.rpm
The output is:

182 Package Management with RPM
/usr/man/man6/koules.6/usr/lib/games/kouleslib/start.raw/usr/lib/games/kouleslib/end.raw/usr/lib/games/kouleslib/destroy2.raw/usr/lib/games/kouleslib/destroy1.raw/usr/lib/games/kouleslib/creator2.raw/usr/lib/games/kouleslib/creator1.raw/usr/lib/games/kouleslib/colize.raw/usr/lib/games/kouleslib/usr/games/koules
These are just several examples. As you use the system you will find many more uses for RPM.
9.4 Other RPM Resources
For more information on RPM, check out the man page, the help screen (rpm --help), and the RPMdocuments available at
http://www.rpm.org/
There is also an RPM book available. It’s called Maximum RPM , and it is available from Red HatSoftware and your local bookstore. It contains a wealth of information about RPM for both the end-user and the package builder. An on-line version of the book is available at http://www.rpm.org/.
There is also a mailing list for discussion of RPM related issues, [email protected]. The list is archived onhttp://www.redhat.com/support/mailing-lists/. To subscribe, sendmail to [email protected] the word subscribe in the subject line.

10GnoRPM
New to Red Hat Linux 6.0 is GnoRPM, a graphical tool which runs under the X Window System.Written by James Henstridge ([email protected]), GnoRPM replaces GLINT. Although GnoRPMshares some similarities with GLINT, it is faster, more powerful and holds a more user-friendly in-terface.
GnoRPM is “GNOME-compliant,” meaning that it seamlessly integrates into GNOME, the X Win-dow System desktop environment.
With GnoRPM, you can easily
� install RPM packages
� uninstall RPM packages
� upgrade RPM packages
� find new RPM packages
� query RPM packages
� verify RPM packages
The interface features a menu, a toolbar, a tree and a display window of currently installed packages.
Operations are performed in GnoRPM by finding and selecting packages, then choosing the type ofoperation to perform via push-button on the toolbar or through the menu.

184 GnoRPM
� Installing a package places all of the components of that package on your system in the correctlocations.
� Uninstalling one removes all traces of the package except for configuration files you have mod-ified.
� Upgrading a package installs the newly available version and uninstalls all other versions thatwere previously installed. This allows quick upgrading to the latest releases of packages. Referto Section 10.4 on page 188 for information about how to alter the default settings for installingand uninstalling packages.
You can also use the Web find option to search the Internet for newly released packages. You candirect GnoRPM to search for particular distributions when you want to look for new packages. (Ifyou have a slow connection, this option can take some time to fully execute.) See Section 10.4 onpage 188 for more information about this feature.
Please Note: Exercise caution if you choose to use the Web find option, since there is no way toverify the integrity of the many packages which are available at numerous repositories. Before in-stalling packages, you should perform a query on that package to help you determine whether it canbe trusted. Packages not produced by Red Hat Software are not supported in any way by Red HatSoftware.
Using GnoRPM to perform all of these and many other operations is the same as using rpm fromthe shell prompt. However, the graphical nature of GnoRPM often makes these operations easier toperform.
The normal way to handle GnoRPM is to display the available packages, select the package(s) youwant to operate on, and then select an option from the toolbar or menu which performs the operation.
For instance, you can install, upgrade or uninstall several packages with a few button clicks. Simi-larly, you can query and verify more than one package at a time.
10.1 Starting GnoRPM
You can start GnoRPM from either an X terminal window or from the GNOME desktop panel, underSystem.
To start GnoRPM from an X terminal window, at the shell prompt, simply type
gnorpm &
That will bring up the main GnoRPM window (as shown in Figure 10.1).
Please Note: If you would like to install, upgrade or uninstall packages, you must be in root. Theeasiest way to do this is to type su root and then the root password at a shell prompt. However,you do not need to be in root to query and verify packages.
There are several parts to the GnoRPM interface.

10.2 The Package Display 185
� Package Panel - On the left; allows you to browse and select packages on your system.
� Display window - To the right of the package panel; shows you contents from folders in thepanel.
� Toolbar - Above the display and panel; a graphical display of package tools.
� Menu - Above the toolbar; contains text-based commands, as well as help info, preferencesand other settings.
� Status bar - Beneath the panel and display windows; shows the total number of selectedpackages.
Figure 10.1: Main GnoRPM Window
10.2 The Package Display
Each folder icon in the tree view at left represents a group of packages. Each group can containsubgroups. Groups are used to place packages that perform similar functions in similar locations.For example, the folder Editors contains text editors such as ed, vim and GXedit. From the tree viewon the left, you might find another folder beneath Editors called Emacs, which would contain bothemacs and emacs-X11.

186 GnoRPM
The tree view is also arranged in an expandable and collapsible manner, which helps you to easilynavigate through the packages. A folder which appears with a + next to it indicates that there aresubfolders within that category.
To view the packages and subgroups within a group, click once on a folder or a + with your leftmouse button. The display window will then show you the contents of that folder. By default, youwill be presented with icons to represent the packages. You can change that view to a list view byselecting View as list from the Interface tab you’ll find under Operations) Preferences.
In this manner, you can move about the tree view, opening and expanding folders containing appli-cations, games, tools and more. The contents of each folder will be displayed at the right.
10.2.1 Selecting Packages
To select a single package, click on it with the left mouse button. You’ll notice that highlighting willappear around the package’s title (as shown in Figure 10.2) which shows that it’s currently selected.To unselect it, either click on an empty space in the display panel with the left mouse button, orclick on the Unselect button on the toolbar. When you unselect a package, the highlighting willdisappear.
Figure 10.2: Selecting Packages in GnoRPM
You can select and unselect more than one package at a time, in more than one folder in the tree panel.To select more than one package incrementally, left-click with your mouse button, while holdingdown the Control key; you’ll see highlighting around each additional selection.

10.3 Installing New Packages 187
To select more than one package “globally,” that is, make larger selections within a folder, left-clickone package, then, while holding down the Shift key, left-click on the final package you wish to select.By doing so, you’ll notice that individual packages between your starting and ending selections willalso be highlighted for selection. Using this option makes selecting groups of packages much quickerthan selecting each package individually.
The status bar at the bottom of GnoRPM will display the total number of packages you have selected.
10.3 Installing New Packages
To install new packages, choose Install from the toolbar. A new window will open, revealing a spacefor new packages to be installed. Remember, however, that you must be logged in as root to install,upgrade and uninstall.
Choose the Add button. By default, GnoRPM will search in /mnt/cdrom/RedHat/RPMS for newpackages. (You can find this option in the Interface tab of the Preferences dialog. See the Con-figuration section for more information on this feature.) If no packages are available in the defaultpath, you’ll be presented with an Add Packages window from which you can select the appropriatelocation of your new package.
To choose an item, double-click on it with your left mouse button, or click on the Add button. Theselected package(s) will be added to the Install window. You can also install more than one packagein the same manner; each selection will be added to the Install window.
In addition to choosing to install the packages from within the Install window, you can install afterperforming a query on the selected package. Click on Query, which will open the Package Infowindow. Here, you can find a variety of details about the file(s) you’ve selected to install. Informationwill include the origination of the package, the date it was built, its size and more.
Within this Package Info window, you have the option of installing or upgrading packages: If thepackage has not been installed on your system, you’ll find an Install button at the bottom of thewindow.
If the package already exists on your system and you’re querying a newer release, the Package Infowindow provides an Upgrade button, which will perform an upgrade to newer releases.
You can also “drag and drop” packages from GNOME Midnight Commander File Manager and placethem into the Install window. To accomplish this, open the file manager (for example, by going tothe GNOME Panel, clicking on the GNOME footprint and opening the File Manager menu). Locatethe directory in which your packages can be found, click on the directory in the tree menu on theleft. In the display window to the right, left-click on the package name and, when it’s highlighted,“drag” the file by keeping your finger pressed on the mouse button, releasing the pressure (and thepackage) once you’re over the Install window.
You’ll see a progress indicator when your package is being installed.

188 GnoRPM
10.4 Configuration
GnoRPM offers a wide selection of choices for installing and uninstalling packages, documentationand other features. You can customize GnoRPM through the Preferences dialog, which you canaccess from Operations) Preferences on the menu. To make selections in the Preferences dialog,select the check boxes next to the options.
Under the Behavior tab, you’ll find a number of options for configuring the way GnoRPM installs,uninstalls and upgrades packages. The Behavior tab is split into five sections: Install, Upgrade, Other,Database and Architecture. Note that by default these boxes not checked.
Under Install Options, you have the following choices:
� No dependency checks - When selected, this will install or upgrade a package without check-ing for other types of files on which the program may be dependent in order to work. How-ever, unless you know what you’re doing we strongly suggest you not use this option as somepackages may depend on other packages for files, libraries or programs to function correctly.
� No reordering - This option is useful if RPM is unable to change the installation order of somepackages to satisfy dependencies.
� Don’t run scripts - Pre- and post-install scripts are sequences of commands that are sometimesincluded in packages to assist with installation. This check box is similar to the --noscriptsoption when installing from the shell prompt.
Under Upgrade Options, you can select the following:
� Allow replacement of packages - Replaces a package with a new copy of itself. Similar to the --replacepkgs option from the shell prompt. This option can be useful if an already-installedpackage has become damaged or may require other repair to function correctly.
� Allow replacement of files - Allows the replacement of files which are owned by anotherpackage. The shell prompt equivalent for this RPM option is --replacefiles. This optioncan sometimes be useful when there are two packages with the same file name but differentcontents.
� Allow upgrade to old version - Like the shell prompt RPM option equivalent --oldpackage,this option allows you to “upgrade” to an earlier package. It can sometimes be useful if thelatest version of a package doesn’t function correctly for your system.
� Keep packages made obsolete - Prevents packages listed in an Obsoletes header from beingremoved.
In Other Options, you can select:
� Don’t install documentation - Like --excludedocs, this option can save on disk space byexcluding documentation such as man pages or other information related to the package.

10.4 Configuration 189
� Install all files - Installs all files in the package.
The choices available in Database Options and Architecture Options allow you to decide, amongother things, whether you want to perform a “test” installation (which will check for file conflictswithout actually performing an install), or whether you want to exclude packages for other operatingsystems or system architectures.
In the Interface tab, you’ll find a choice of displays for your packages: either as icons, which willbe graphically-based, or as a list, which is not graphical but can provide more information aboutthe packages.
Beneath these choices, you can specify the path through which GnoRPM can find new RPMs on yoursystem. When you’re using your Red Hat Linux CD-ROM, this will probably be
/mnt/cdrom/RedHat/RPMS
which is set as the default path for GnoRPM. If you download new RPMs from the Internet or wantto install RPMs via a NFS mounted CD-ROM this path will be different for you.
Figure 10.3: Interface Window
To change this path, type the full path to the RPMs you’d like to work with. Choosing the Apply orOK buttons will save this path, making it the default for future sessions.

190 GnoRPM
After changing this path and closing the dialog box, you can use the Install button to view thepackages available in the new location.
Optionally, if the path for your RPMs doesn’t match the default path in your preferences, you’ll bepresented with a browser window, which will allow you to select the correct path for your newRPMs.
In addition to using the file dialog to add files to your install list, you can “drag” files from theGNOME Midnight Commander File Manager to add them to the list.
In the Rpmfind tab, you’ll find settings and options which correspond to the Web find feature. TheMetadata server sets the server to be used for searches. The Download dir: entry allows you tospecify where you want the files to be stored. The Local Hostname: entry allows you to set yourhostname (so that Rpmfind can guess the closest mirror).
Additionally, you can specify the vendor, distribution name and whether to find sources and/or thelatest files.
Figure 10.4: Distribution Settings in Preferences
In the Distribution Settings tab, you can set the options for choosing the most appropriate packageout of the selections Rpmfind returns, as well as which mirror you would like to use. The higher therating you indicate for your selection (as shown in Figure 10.4) the higher the priority it will receive;the lower rating, such as -1, will specify that packages not be recommended.

10.5 Package Manipulation 191
10.5 Package Manipulation
10.5.1 Querying Packages
The easiest way to query packages is to use the Query option from the menu at the top. If you wantto query more than one package, make all your selections then press the Query button on the menu.
You’ll be presented with a window like the one shown in Figure 10.5. The more packages you’vequeried, the more “tabs” you’ll find within the Query box, each tab representing a Query windowfor a package.
Figure 10.5: Query Window
The name of the package is centered at the top of the box. Below, the box is divided into two columnsof listed information; below this information, you’ll see a display area showing package files.
In the left column in the information list, you’ll find the size of the file, the machine on which the fileis found, the name of the package distribution and the group to which its function belongs.
In the right column, you’ll find the date of the package’s installation on your machine, the date thepackage was built, the name of the vendor and the name of the group who packaged the software. Ifthe package has not been installed on your machine, that space will simply read, “not installed.”
Below the description is a list of the files contained in the package. If a D appears in its related columnto the left of the path, that file is a documentation file and would be a good thing to read for help onusing the application. If a C appears in its respective column, the file is a configuration file. Underthe S column, you can view the “state” of the package; here, you’ll receive information if any filesare reported as “missing” from the package (and therefore probably mean there’s a problem with the

192 GnoRPM
package).
If you’re querying a package that’s already installed, you’ll also find two additional buttons beneathat the bottom of this window: Verify and Uninstall. If you’re performing a query on a package thathasn’t been installed yet, the buttons on the bottom will be labeled Install, Upgrade and Check Sig.
To close the query window without performing any action, left-click on the X at the top right of thewindow bar.
10.5.2 Verifying Packages
Verifying a package checks all of the files in the package to ensure they match the ones present onyour system. The checksum, file size, permissions, and owner attributes are all checked againstthe database. This check can be used when you suspect that one of the program’s files has becomecorrupted for some reason.
Choosing the packages to verify is like choosing the packages to query. Select the packages in thedisplay window and use the Verify button on the toolbar or from Packages) Verify on the menu.A window opens like the one in Figure 10.6.
Figure 10.6: Verify Window
As the package is being checked, you’ll see the progress in the Verify window. If there are anyproblems discovered during the verify process, they’ll be described in the main display area.
10.5.3 Uninstalling Packages
Uninstalling a package removes the application and associated files from your machine. When apackage is uninstalled, any files it uses that are not needed by other packages on your system arealso removed. Changed configuration files are copied to <filename>.rpmsave so you can reusethem later.

10.5 Package Manipulation 193
Please Note: Remember that you must be root to uninstall packages.
If uninstalling a package would break “dependencies” (which could hobble other applications thatrequire one or more of the removed files in the package), a dialog will pop up, asking you to con-firm the deletion. This will occur if you haven’t selected the “No dependency checks” box from thePreferences menu (as shown in Figure 10.7).
Figure 10.7: The Behavior Tab in Preferences
There are a variety of methods through which you can remove a selected package: from the menu,under Packages; from the toolbar and from the Query function. If you decide to remove more thanone package at a time, you can choose either an incremental or global selection in the same way asyou would when installing, querying or verifying. The total of your selections will be reflected in thestatus bar on the bottom of the main window. Because you can remove more than one package at atime, use caution to select only those which you wish to remove.
Once you’ve begun the uninstall, GnoRPM asks for confirmation, showing a window like the one inFigure 10.8. All of the packages that are about to be uninstalled are listed. You should look at themall to ensure you’re not about to remove something you want to keep. Clicking the Yes button willstart the uninstallation process. After it completes, the packages and groups that have been removedwill disappear from any windows they were in.

194 GnoRPM
Figure 10.8: Uninstall Window
Upgrading Packages
When a new version of a package has been released, it is easy to install it on your system. Select thepackages from the window of available packages in the same way you select packages for installation.Both the Upgrade button on the toolbar and, from the menu, under Operations ) Upgrade willbegin the process. You simply Add packages in the same manner as you would a new packageinstallation.
During the upgrade, you’ll see a progress indicator like the one for installing packages. When it’sfinished, any old versions of the packages will be removed, unless you specify otherwise (refer toSection 10.4 on page 188 for more information).
It is much better to use the upgrade option than to uninstall the old versions of a package and theninstall the new one. Using upgrade ensures that any changes you made to package configurationfiles are preserved properly, while uninstalling and then reinstalling a new package could causethose changes to be lost.
If you run out of disk space during an installation, the install will fail. However, the package whichwas being installed when the error occurred may leave some files around. To clean this up, reinstallthe package after you’ve made more disk space available.

11System Administration
This chapter is an overview of the Red Hat Linux system. It will illustrate things that you may notknow about the system and things that are somewhat different from other UNIX systems.
11.1 Filesystem Structure
Red Hat Software is committed to the Linux File System Standard, a collaborative document thatdefines the names and locations of many files and directories. We will continue to track the standardto keep Red Hat compliant.
While compliance with the standard means many things, the two most important are compatibilitywith other compliant systems, and the ability to mount the /usr partition read-only. The /usrpartition contains common executables and is not meant to be changed by users. Because of this, the/usr partition can be mounted from the CD-ROM or from another machine via read-only NFS. Thecurrent Linux Filesystem Standard (FSSTND) document is the authoritative reference to any FSSTNDcompliant filesystem, but the standard leaves many areas undefined or extensible. In this section weprovide an overview of the standard and a description of the parts of the filesystem not covered bythe standard.
The complete standard can be viewed at:
http://www.pathname.com/fhs/

196 System Administration
11.1.1 Overview of the FSSTND
The directories and files noted here are a small subset of those specified by the FSSTND document.Check the latest FSSTND document for the most up-to-date and complete information.
The /dev Directory The /dev directory contains file system entries that represent devices thatare attached to the system. These files are essential for the system to function properly.
The /etc Directory The /etc directory is reserved for configuration files that are local to yourmachine. No binaries are to be put in /etc. Binaries that were in the past put in /etc should nowgo into /sbin or possibly /bin.
The X11 and skel directories should be subdirectories of /etc:
/etc|- X11+- skel
The X11 directory is for X11 configuration files such as XF86Config. The skel directory is for“skeleton” user files, which are files used to populate a home directory when a user is first created.
The /lib Directory The /lib directory should contain only those libraries that are needed toexecute the binaries in /bin and /sbin.
The /proc Directory The /proc directory contains special files that either extract informationor send information to the kernel. It is an easy method of accessing information about the operatingsystem using the cat command.
The /sbin Directory The /sbin directory is for executables used only by the root user, andonly those executables needed to boot and mount /usr and perform system recovery operations.The FSSTND says:
“/sbin typically contains files essential for booting the system in addition to the binariesin /bin. Anything executed after /usr is known to be mounted (when there are noproblems) should be placed in /usr/sbin. Local-only system administration binariesshould be placed into /usr/local/sbin.”
At a minimum, the following programs should be in /sbin:
clock, getty, init, update, mkswap, swapon, swapoff, halt,reboot, shutdown, fdisk, fsck.*, mkfs.*, lilo, arp, ifconfig,route

11.1 Filesystem Structure 197
The /usr Directory The /usr directory is for files that are shareable across a whole site. The/usr directory usually has its own partition, and it should be mountable read only. The followingdirectories should be subdirectories of /usr:
/usr|- X11R6|- bin|- dict|- doc|- etc|- games|- include|- info|- lib|- local|- man|- sbin|- share+- src
The X11R6 directory is for the X Window System (XFree86 on Red Hat Linux), bin is for executables,doc is for random non-man-page documentation, etc is for site-wide configuration files, includeis for C header files, info is for GNU info files, lib is for libraries, man is for man pages, sbin is forsystem administration binaries (those that do not belong in /sbin), and src is for source code.
The /usr/local Directory The FSSTND says:
“The /usr/local hierarchy is for use by the system administrator when installing soft-ware locally. It needs to be safe from being overwritten when the system software isupdated. It may be used for programs and data that are shareable amongst a group ofmachines, but not found in /usr.”
The /usr/local directory is similar in structure to the /usr directory. It has the following subdi-rectories, which are similar in purpose to those in the /usr directory:
/usr/local|- bin|- doc|- etc|- games|- include|- info

198 System Administration
|- lib|- man|- sbin+- src
The /var Directory Since the FSSTND requires that you be able to mount /usr read-only, anyprograms that write log files or need spool or lock directories probably should write them to the/var directory. The FSSTND states /var is for
“... variable data files. This includes spool directories and files, administrative and log-ging data, and transient and temporary files.”
The following directories should be subdirectories of /var:
/var|- log|- catman|- lib|- local|- named|- nis|- preserve|- run|- lock|- tmp+- spool
|- at|- cron|- lpd|- mail|- mqueue|- rwho|- smail|- uucp+- news
System log files such as wtmp and lastlog go in /var/log. The /var/lib directory also con-tains the RPM system databases. Formatted man pages go in /var/catman, and lock files go in/var/lock. The /var/spool directory has subdirectories for various systems that need to storedata files.

11.2 Special Red Hat File Locations 199
11.1.2 /usr/local in Red Hat Linux
In Red Hat Linux, the intended use for /usr/local is slightly different from that specified by theFSSTND. The FSSTND says that /usr/local should be where you store software that is to remainsafe from system software upgrades. Since system upgrades from Red Hat Software are done safelywith the RPM system and GnoRPM, you don’t need to protect files by putting them in /usr/local.Instead, we recommend you use /usr/local for software that is local to your machine.
For instance, let’s say you have mounted /usr via read-only NFS from beavis. If there is a packageor program you would like to install, but you are not allowed to write to beavis, you should installit under /usr/local. Later perhaps, if you’ve managed to convince the system administrator ofbeavis to install the program on /usr, you can uninstall it from /usr/local.
11.2 Special Red Hat File Locations
In addition to the files pertaining to the RPM system that reside in /var/lib/rpm (see Chapter 9),there are two other special locations that are reserved for Red Hat Linux configuration and operation.
The control-panel and related tools put lots of stuff in /usr/lib/rhs. There is probably nothinghere that you would want to edit. It is mostly small scripts, bitmaps and text files.
The other location, /etc/sysconfig, stores configuration information. The major users of the filesin this directory are the scripts that run at boot time. It is possible to edit these by hand, but it wouldbe better to use the proper control-panel tool.
11.3 Users, Groups and User-Private Groups
Managing users and groups has traditionally been tedious. Red Hat Linux has a few tools and con-ventions that make user and groups easier to manage, and more useful.
The easiest way to manage users and groups is through Linuxconf (see Chapter 8). However, youcan also use adduser to create a new user from the command line.
11.3.1 Standard Users
Table 11.3.1 lists the standard users set up by the installation process (this is essentially the/etc/passwd file). The group id (GID) in this table is the primary group for the user. See Section11.3.3 for details on how groups are used.

200 System Administration
User UID GID Home Directory Shellroot 0 0 /root /bin/bashbin 1 1 /bindaemon 2 2 /sbinadm 3 4 /var/admlp 4 7 /var/spool/lpdsync 5 0 /sbin /bin/syncshutdown 6 0 /sbin /sbin/shutdownhalt 7 0 /sbin /sbin/haltmail 8 12 /var/spool/mailnews 9 13 /var/spool/newsuucp 10 14 /var/spool/uucpoperator 11 0 /rootgames 12 100 /usr/gamesgopher 13 30 /usr/lib/gopher-dataftp 14 50 /home/ftpnobody 99 99 /
Figure 11.1: Standard Users
11.3.2 Standard Groups
Table 11.3.2 lists the standard groups as set up by the installation process (this is essentially the/etc/group file).
11.3.3 User Private Groups
Red Hat Linux uses a user private group (UPG) scheme, which makes UNIX groups much easierto use. The UPG scheme does not add or change anything in the standard UNIX way of handlinggroups. It simply offers a new convention for handling groups. Whenever you create a new user, bydefault, he or she has a unique group. The scheme works as follows:
User Private Group Each user has its own primary group, of which only it is a member.
umask = 002 The traditional UNIX umask is 022, which prevents other users and other members of auser’s primary group from modifying a user’s files. Since every user has their own private groupin the UPG scheme, this “group protection” is not needed. A umask of 002 will prevent usersfrom modifying other users’ private files. The umask is set in /etc/profile.
setgid bit on Directories If you set the setgid bit on a directory (with chmod g+s directory), filescreated in that directory will have their group set to the directory’s group.

11.3 Users, Groups and User-Private Groups 201
Group GID Membersroot 0 rootbin 1 root,bin,daemondaemon 2 root,bin,daemonsys 3 root,bin,admadm 4 root,adm,daemontty 5disk 6 rootlp 7 daemon,lpmem 8kmem 9wheel 10 rootmail 12 mailnews 13 newsuucp 14 uucpman 15games 20gopher 30dip 40ftp 50nobody 99users 100floppy 19
Figure 11.2: Standard Groups

202 System Administration
Most computing sites like to create a group for each major project and assign people to the groupsthey need to be in. Managing files traditionally has been difficult, though, because when someonecreates a file it is owned by the primary group he or she belongs to. When a single person works onmultiple projects, it becomes hard to make the files owned by the group that is associated with thatproject. In the UPG scheme, groups are automatically assigned to files on a project-by-project basis,which makes managing group projects very simple.
Let’s say you have a big project called devel, with many people editing the devel files in a develdirectory. Make a group called devel, chgrp the devel directory to devel, and add the all thedevel users to the devel group. Now, all devel users will be able to edit the devel files and createnew files in the devel directory, and these files will always retain their devel group. Thus, theywill always be edit-able by other devel users.
If you have multiple projects like devel, and users who are working on multiple projects, these userswill never have to change their umask or group when they move from project to project. The setgidbit on each project’s main directory “selects” the proper group.
Since each user’s HOME directory is owned by the user and their private group, it is safe to set thesetgid bit on the HOME directory. However, by default, files are created with the primary group ofthe user, so the setgid bit would be redundant.
User Private Group Rationale
Although UPG is not new to Red Hat Linux 6.0, many people still have questions about it, such aswhy UPG is necessary. The following is the rationale for the scheme.
� You’d like to have a group of people work on a set of files in say, the/usr/lib/emacs/site-lispdirectory. You trust a few people to mess around in there, butcertainly not everyone.
� So you enter:
chown -R root.emacs /usr/lib/emacs/site-lisp
and you add the proper users to the group.
� To allow the users to actually create files in the directory you enter:
chmod 775 /usr/lib/emacs/site-lisp
� But when a user creates a new file it is assigned the group of the user’s default group (usuallyusers). To prevent this you enter
chmod 2775 /usr/lib/emacs/site-lisp
which causes everything in the directory to be created with the “emacs” group.

11.4 Configuring Console Access 203
� But the new file needs to be mode 664 for another user in the emacs group to be able to edit it.To do this you make the default umask 002.
� Well, this all works fine, except that if your default group is “users,” every file you create inyour home directory will be writable by everybody in “users” (usually everyone).
� To fix this, you make each user have a “private group” as their default group.
At this point, by making the default umask 002 and giving everyone a private default group, you caneasily set up groups that users can take advantage of without doing any magic. Just create the group,add the users, and do the above chown and chmod on the group’s directories.
11.4 Configuring Console Access
When normal (non-root) users log in to a computer locally, they are given two types of special per-mission; they can run certain programs that they would not otherwise be able to run, and they canaccess certain files (normally special device files used to access diskettes, CD-ROMS, etc.) that theywould not otherwise be able to access.
Since there are multiple consoles on a single computer, and multiple users can be logged into thecomputer locally at the same time, one of the users has to “win” the fight to access the files. The firstuser to log in at the console owns those files. Once the first user logs out, the next user who logs inwill own the files.
In contrast, every user who logs in on the console will be allowed to run programs normally restrictedto the root user. By default, those programs will ask for the user’s password. This will be donegraphically if X is running which makes it possible to make these actions menu items from withina graphical user interface. As shipped, the console-accessible programs are shutdown, halt, andreboot.
Disabling Console Program Access In environments where the console is otherwise secured(BIOS and LILO passwords are set, control-alt-delete is disabled, the power and reset switches aredisabled, etc.), it may not be desirable to allow arbitrary users at the console to run shutdown, halt,and reboot.
In order to disable all access by console users to console programs, you should run the command:
rm -f /etc/security/console.apps/*
Disabling All Console Access In order to disable all console access, including program andfile access, in the /etc/pam.d/ directory, comment out all lines that refer to pam console.so. Thefollowing script will do the trick:

204 System Administration
cd /etc/pam.dfor i in * ; do
sed ’/[ˆ#].*pam_console.so/s/ˆ/#/’ < $i > foo && mv foo $idone
Defining the Console The /etc/security/console.perms file defines the console group.The syntax of that file is very flexible, so it’s possible to edit that file so that these instructions nolonger apply. However, the default file has a line that looks like this:
<console>=tty[0-9][0-9]* :[0-9].[0-9] :[0-9]
When users log in, they are attached to some sort of named terminal, either an X server with aname like :0 or mymachine.example.com:1.0; or a device like /dev/tty0 or /dev/pts/2.The default is to define that local virtual consoles and local X servers are considered local, but if youwant to consider the serial terminal next to you on port /dev/ttyS1 to also be local, you can changethat line to read:
<console>=tty[0-9][0-9]* :[0-9].[0-9] :[0-9] /dev/ttyS1
Making Files Console-Accessible In /etc/security/console.perms, there is a sectionwith lines like:
<cdrom>=/dev/cdrom
You can also add your own lines:
<scanner>=/dev/sga
(of course, make sure that /dev/sga is really your scanner and not, say, your hard drive).
That’s the first part. The second part is to define what is done with those files. Look in the last sectionof /etc/security/console.perms for lines similar to
<console> 0600 <cdrom> 0600 root
and add a line like
<console> 0600 <scanner> 0600 root
Then when you log in at the console, you will be given ownership of the /dev/sga device and thepermissions will be 0600 (readable and writable by you only). When you log out, the device will beowned by root and still have 0600 (now: readable and writable by root only) permissions.

11.5 The floppy Group 205
Enabling Console Access for Other Applications If you wish to make other applicationsbesides shutdown, reboot, and halt accessible to console users, you will have to do just a little bitmore work.
First of all, console access only works for applications which reside in /sbin or /usr/sbin, so theapplication that you wish to run must be there.
Create a link from the name of your application to the /usr/bin/consolehelper application:
cd /usr/binln -s consolehelper foo
Create the file /etc/security/console.apps/foo
touch /etc/security/console.apps/foo
Create a PAM configuration file for the foo service in /etc/pam.d/. We suggest that you start witha copy of the shutdown service, then change it if you want to change the behavior:
cp /etc/pam.d/shutdown /etc/pam.d/foo
Now, when you run /usr/bin/foo, it will call consolehelper, which with the help of/usr/sbin/userhelperwill authenticate the user (asking for the users password if /etc/pam.d/foois a copy of /etc/pam.d/shutdown; otherwise, it will do precisely what is specified in/etc/pam.d/foo) and then run /usr/sbin/foo with root permissions.
11.5 The floppy Group
If, for whatever reason, console access is not appropriate for you, and you need to give non-rootusers access to your system’s diskette drive, this can be done using the floppy group. Simply addthe user(s) to the floppy group using the tool of your choice. Here’s an example showing howgpasswd can be used to add user fred to the floppy group:
[root@bigdog root]# gpasswd -a fred floppyAdding user fred to group floppy[root@bigdog root]#
User fred will now be able to access the system’s diskette drive (using the mtools utility programs,for instance).

206 System Administration
11.6 User Authentication with PAM
Programs which give users access to privileges of any sort need to be able to authenticate the users.When you log into a system, you provide your name and password, and the login process uses thoseto authenticate the login – to verify that you are who you say you are. Other forms of authenticationthan passwords are possible, and it is possible for the passwords to be stored in different ways.
PAM, which stands for “Pluggable Authentication Modules,” is a way of allowing the system admin-istrator to set authentication policy without having to recompile programs which do authentication.With PAM, you control how the modules are plugged into the programs by editing a configurationfile.
Most Red Hat Linux users will never need to touch this configuration file. When you use RPM toinstall programs that need to do authentication, they automatically make the changes that are neededto do normal password authentication. However, you may want to customize your configuration, inwhich case you need to understand the configuration file.
11.6.1 PAM Modules
There are four types of modules defined by the PAM standard. auth modules provide the actualauthentication, perhaps asking for and checking a password, and set “credentials” such as groupmembership or kerberos “tickets.” account modules check to make sure that the authentication isallowed (the account has not expired, the user is allowed to log in at this time of day, etc.). passwordmodules are used to set passwords. session modules are used once a user has been authenticatedto make it possible for them to use their account, perhaps mounting the user’s home directory ormaking their mailbox available.
These modules may be stacked, so that multiple modules are used. For instance, rlogin normallymakes use of at least two authentication methods: if “rhosts” authentication succeeds, it is sufficientto allow the connection; if it fails, then standard password authentication is done.
New modules can be added at any time, and PAM-aware applications can then be made to use them.For instance, if you have a one-time-password calculator system, and you can write a module to sup-port it (documentation on writing modules is included with the system), PAM-aware programs canuse the new module and work with the new one-time-password calculators without being recom-piled or otherwise modified in any way.
11.6.2 Services
Each program using PAM defines its own “service” name. The login program defines the servicetype login, ftpd defines the service type ftp, etc. In general, the service type is the name of theprogram used to access the service, not (if there is a difference) the program used to provide theservice.

11.6 User Authentication with PAM 207
11.6.3 The Configuration Files
The directory /etc/pam.d is used to configure all PAM applications. (This used to be/etc/pam.conf in earlier PAM versions; while the pam.conf file is still read if no/etc/pam.d/ entry is found, its use is deprecated.) Each application (really, each service) has itsown file. A file looks like this:
#%PAM-1.0auth required /lib/security/pam_securetty.soauth required /lib/security/pam_pwdb.so shadow nullokauth required /lib/security/pam_nologin.soaccount required /lib/security/pam_pwdb.sopassword required /lib/security/pam_cracklib.sopassword required /lib/security/pam_pwdb.so shadow -
nullok use_authtoksession required /lib/security/pam_pwdb.so
The first line is a comment. Any line that starts with a # character is a comment. Lines two throughfour stack up three modules to use for login authorization. Line two makes sure that if the user istrying to log in as root, the tty on which they are logging in is listed in the /etc/securetty fileif that file exists. Line three causes the user to be asked for a password and the password checked.Line four checks to see if the file /etc/nologin exists, and if it does, displays the contents of thefile, and if the user is not root, does not let him or her log in.
Note that all three modules are checked, even if the first module fails. This is a security decision—it isdesigned to not let the user know why their authentication was disallowed, because knowing whyit was disallowed might allow them to break the authentication more easily. You can change thisbehavior by changing required to requisite; if any requisite module returns failure, PAMfails immediately without calling any other modules.
The fifth line causes any necessary accounting to be done. For example, if shadow passwords havebeen enabled, the pam pwdb.so module will check to see if the account has expired, or if the userhas not changed his or her password and the grace period for changing the password has expired.
The sixth line subjects a newly changed password to a series of tests to ensure that it cannot, forexample, be easily determined by a dictionary-based password cracking program.
The seventh line (which we’ve had to wrap) specifies that if the login program changes the user’spassword, it should use the pam pwdb.so module to do so. (It will do so only if an auth modulehas determined that the password needs to be changed—ie, if a shadow password has expired.)
The eighth and final line specifies that the pam pwdb.so module should be used to manage the ses-sion. Currently, that module doesn’t do anything; it could be replaced (or supplemented by stacking)by any necessary module.
Note that the order of the lines within each file matters. While it doesn’t really matter much in whichorder requiredmodules are called, there are other control flags available. While optional is rarely

208 System Administration
used, and never used by default on a Red Hat Linux system, sufficient and requisite causeorder to become important.
Let’s look at the auth configuration for rlogin:
auth required /lib/security/pam_securetty.soauth sufficient /lib/security/pam_rhosts_auth.soauth required /lib/security/pam_pwdb.so shadow nullokauth required /lib/security/pam_nologin.so
That looks almost like the login entry, but there’s an extra line specifying an extra module, and themodules are specified in a different order.
First, pam securetty.so keeps root logins from happening on insecure terminals. This effectivelydisallows all root rlogin attempts. If you wish to allow them (in which case we recommend that youeither not be internet-connected or be behind a good firewall), you can simply remove that line.
Second, pam nologin.so checks /etc/nologin, as specified above.
Third, if pam rhosts auth.so authenticates the user, PAM immediately returns success to rloginwithout any password checking being done. If pam rhosts auth.so fails to authenticate the user,that failed authentication is ignored.
Finally (if pam rhosts auth.so has failed to authenticate the user), the pam pwdb.somodule per-forms normal password authentication.
Note that if you do not want to prompt for a password if the securetty check fails, you can changethe pam securetty.so module from required to requisite
11.6.4 Shadow Passwords
The pam pwdb.somodule will automatically detect that you are using shadow passwords and makeall necessary adjustments. Please refer to Section 11.7 on the next page for more information.
11.6.5 Rexec and PAM
For security reasons, rexec is not enabled in Red Hat Linux 6.0. Should you wish to enable it, youwill need to comment out one line in the file /etc/pam.d/rexec. Here is a sample of the file (notethat your file may differ slightly):
#%PAM-1.0auth required /lib/security/pam_pwdb.so shadow nullokauth required /lib/security/pam_nologin.soaccount required /lib/security/pam_pwdb.so

11.7 Shadow Utilities 209
To enable rexec, the line referring to the pam nologin.so module must be commented out:
#%PAM-1.0auth required /lib/security/pam_pwdb.so shadow nullok#auth required /lib/security/pam_nologin.soaccount required /lib/security/pam_pwdb.so
After this file is modified, rexec will be enabled.
Please Note: If your /etc/pam.d/rexec file contains a line referring to the pam securetty.somodule, you will not be able to rexec as root. To do so, you must also comment out the line referringto the pam securetty.so module.
More Information This is just an introduction to PAM. More information is included in the/usr/doc/pam* directory, including a System Administrators’ Guide, a Module Writers’ Manual, anApplication Developers’ Manual, and the PAM standard, DCE-RFC 86.0. In addition, documentation isavailable from the Red Hat website, at http://www.redhat.com/linux-info/pam/.
11.7 Shadow Utilities
Support for shadow passwords has been enhanced significantly for Red Hat Linux 6.0. Shadow pass-words are a method of improving system security by moving the encrypted passwords (normallyfound in /etc/passwd) to another file with more restrictive file access permissions. During theinstallation, you were given the option of setting up shadow password protection on your system.
The shadow-utils package contains a number of utilities that support:
� Conversion from normal to shadowed passwords and back (pwconv, pwunconv).
� Verification of the password, group, and associated shadow files (pwck,grpck).
� Industry-standard methods of adding, deleting and modifying user accounts (useradd,usermod, and userdel).
� Industry-standard methods of adding, deleting, and modifying user groups (groupadd,groupmod, and groupdel).
� Industry-standard method of administering the /etc/group file (gpasswd).
Please Note: There are a few additional points of interest concerning these utilities:
� The utilities will work properly whether shadowing is enabled or not.

210 System Administration
� The utilities have been slightly modified to support Red Hat Software’s user private groupscheme. For a description of the modifications, please see the useradd man page. For moreinformation on user private groups, please turn to Section 11.3.3 on page 200.
� The adduser script has been replaced with a symlink to/usr/sbin/useradd.
11.8 Building a Custom Kernel
With the introduction of modularization in the Linux 2.2.x kernel there have been some significantchanges in building customized kernels. In the past you were required to compile support into yourkernel if you wanted to access a particular hardware or filesystem component. For some hardwareconfigurations the size of the kernel could quickly reach a critical level. To require ready supportfor items that were only occasionally used was an inefficient use of system resources. With the ca-pabilities of the 2.2.x kernel, if there are certain hardware components or filesystems that are usedinfrequently, driver modules for them can be loaded on demand. For information on handling kernelmodules see Chapter 8.2, Section 8.2.2.
Many people new to Linux often ask, “why should I build my own kernel?” Given the advancesthat have been made in the use of kernel modules, the most accurate response to that question is,“unless you know why you need to build your own kernel, you probably don’t.” So unless you havea specific reason to build a customized kernel (or you’re just the curious sort), you may skip aheadto Section 11.9 on page 214.
11.8.1 Building a modularized kernel
These instructions provide you with the knowledge needed to take advantage of the power and flex-ibility available through kernel modularization. If you do not wish to take advantage of modulariza-tion, please see Section 11.8.3 for an explanation of the different aspects of building and installing amonolithic kernel. It’s assumed that you’ve already installed the kernel-headers and kernel-source packages and that you issue all commands from the /usr/src/linux directory.
It is important to begin a kernel build with the source tree in a known condition. Therefore, it isrecommended that you begin with the command make mrproper. This will remove any configu-ration files along with the remains of any previous builds that may be scattered around the sourcetree. Now you must create a configuration file that will determine which components to include inyour new kernel. Depending upon your hardware and personal preferences there are three methodsavailable to configure the kernel.
� make config – An interactive text program. Components are presented and you answerwith Y (yes), N (no), or M (module).
� make menuconfig – A graphic, menu driven program. Components are presented in a menuof categories, you select the desired components in the same manner used in the Red Hat Linux

11.8 Building a Custom Kernel 211
installation program. Toggle the tag corresponding to the item you want included; Y (yes), N(no), or M (module).
� make xconfig – An X Windows program. Components are listed in different levels of menus,components are selected using a mouse. Again, select Y (yes), N (no), or M (module).
Please Note: In order to use kerneld (see Section 8.2.2 for details) and kernel modules you mustanswer Yes to kerneld support and module version (CONFIG MODVERSIONS) support in theconfiguration.
Please Note: If you are building a Linux/Intel kernel on (or for) a machine that uses a “clone”processor (for example, one made by Cyrix or AMD), it is recommended to choose a Processor typeof 386.
If you wish to build a kernel with a configuration file (/usr/src/linux/.config) that you havealready created with one of the above methods, you can omit the make mrproper and make con-fig commands and use the command make dep followed by make clean to prepare the sourcetree for the build.
The next step consists of the actual compilation of the source code components into a working pro-gram that your machine can use to boot. The method described here is the easiest to recover from inthe event of a mishap. If you are interested in other possibilities, details can be found in the Kernel-HOWTO or in the Makefile in /usr/src/linux on your Linux system.
� Build the kernel with make boot.
� Build any modules you configured with make modules.
� Move the old set of modules out of the way with:
rm -rf /lib/modules/2.0.36-oldmv /lib/modules/2.0.36 /lib/modules/2.0.36-old
Of course, if you have upgraded your kernel, replace 2.0.36 with the version you are using.
� Install the new modules (even if you didn’t build any) withmake modules install.
If you have a SCSI adapter and made your SCSI driver modular, build a new initrd image (seeSection 11.8.2; note that there are few practical reasons to make the SCSI driver modular in a customkernel).
In order to provide a redundant boot source to protect from a possible error in a new kernel youshould keep the original kernel available. Adding a kernel to the LILO menu is as simple as re-naming the original kernel in /boot, copying the new kernel to /boot, adding a few lines in/etc/lilo.conf and running /sbin/lilo. Here is an example of the default /etc/lilo.conffile shipped with Red Hat Linux:

212 System Administration
boot=/dev/hdamap=/boot/mapinstall=/boot/boot.bprompttimeout=100image=/boot/vmlinuz
label=linuxroot=/dev/hda1read-only
Now you must update /etc/lilo.conf. If you built a new initrd image you must tell LILO touse it. In this example of /etc/lilo.conf we have added four lines in the middle of the file toindicate another kernel to boot from. We have renamed /boot/vmlinuz to /boot/vmlinuz.oldand changed its label to old. We have also added an initrd line for the new kernel:
boot=/dev/hdamap=/boot/mapinstall=/boot/boot.bprompttimeout=100image=/boot/vmlinuz
label=linuxinitrd=/boot/initrdroot=/dev/hda1read-only
image=/boot/vmlinuz.oldlabel=oldroot=/dev/hda1read-only
Now when the system boots and you press�
�
�
�Tab at the LILO boot: prompt two choices will be
shown;
LILO boot:linux old
To boot the new kernel (linux) simply press�
�
�
�Enter , or wait for LILO to time out. If you want to
boot the old kernel (old), type old and press�
�
�
�Enter .
Here is a summary of the steps:
� mv /boot/vmlinuz /boot/vmlinuz.old
� cp /usr/src/linux/arch/i386/boot/zImage /boot/vmlinuz

11.8 Building a Custom Kernel 213
� edit /etc/lilo.conf
� run /sbin/lilo
You can begin testing your new kernel by rebooting your computer and watching the messages toensure your hardware is detected properly.
11.8.2 Making an initrd image
An initrd image is needed for loading your SCSI module at boot time. The shell script/sbin/mkinitrd can build a proper initrd image for your machine if the following conditionsare met:
� The loopback block device is available.
� The /etc/conf.modules file has a line for your SCSI adapter; for example:
alias scsi_hostadapter BusLogic
To build the new initrd image, run /sbin/mkinitrd with parameters such as this:
/sbin/mkinitrd /boot/newinitrd-image 2.0.36
where /boot/newinitrd-image is the file to use for your new image, and 2.0.36 is the kernelwhose modules (from /lib/modules) should be used in the initrd image (not necessarily thesame as the version number of the currently running kernel).
11.8.3 Building a monolithic kernel
To build a monolithic kernel you follow the same steps as building a modularized kernel with a fewexceptions.
� When configuring the kernel only answer Yes and No to the questions (don’t make anythingmodular).
� Omit the steps:
make modulesmake modules_install
� Edit the file /etc/rc.d/rc.sysinit and comment out the line depmod -a by inserting a“#” at the beginning of the line.

214 System Administration
11.9 Sendmail
A default sendmail.cf file will be installed in /etc. The default configuration should work formost SMTP-only sites. It will not work for UUCP sites; you will need to generate a new send-mail.cf if you must use UUCP mail transfers. To generate a new sendmail.cf, you will needto install m4 and the sendmail source package. Read the README file in the sendmail sources formore details on creating sendmail configuration files. Also, O’Reilly & Associates publishes a goodsendmail reference entitled sendmail, by Bryan Costales.
One common sendmail configuration is to have a single machine act as a mail gateway for all the ma-chines on your network. For instance, at Red Hat Software we have a machine mail.redhat.comthat does all our mail. On that machine we simply need to add the names of machines for whichmail.redhat.com will handle mail to /etc/sendmail.cw. Here is an example:
# sendmail.cw - include all aliases for your machine# here.torgo.redhat.compoodle.redhat.comdevel.redhat.com
Then on the other machines, torgo, poodle, and devel, we need to edit/etc/sendmail.cf to “masquerade” as mail.redhat.com when sending mail, and to forwardany local mail processing to redhat.com. Find the DH and DM lines in/etc/sendmail.cf and edit them thusly:
# who I send unqualified names to# (null means deliver locally)DRmail.redhat.com
# who gets all local email trafficDHmail.redhat.com
# who I masquerade as (null for no masquerading)DMredhat.com
With this type of configuration, all mail sent will appear as if it were sent from redhat.com, andany mail sent to torgo.redhat.com or the other hosts will be delivered to mail.redhat.com.
Please be aware that if you configure your system to masquerade as another any e-mail sent fromyour system to your system will be sent to the machine you are masquerading as. For example, inthe above illustration, log files that are periodically sent to [email protected] the crondaemon would be sent to [email protected].

11.10 Controlling Access to Services 215
11.10 Controlling Access to Services
As a security measure, most network services are managed by a protective program called a TCPwrapper. The protected services are those listed in/etc/inetd.conf that specify /usr/sbin/tcpd. tcpd can allow or deny access to a servicebased on the origin of the request, and the configuration in/etc/hosts.allow and /etc/hosts.deny. By default Red Hat Linux allows all service re-quests. To disable or limit services you can edit /etc/hosts.allow. Here is an example/etc/hosts.allow file:
ALL: redhat.com .redhat.comin.talkd: ALLin.ntalkd: ALLin.fingerd: ALLin.ftpd: ALL
This configuration allows all connections from redhat.com and *.redhat.com machines. It alsoallows talk, finger, and ftp requests from all machines.
tcpd allows much more sophisticated access control, using a combination of/etc/hosts.allow and /etc/hosts.deny. Read the tcpd(8) and hosts access(5) man pages forcomplete details.
11.11 Anonymous FTP
Setting up anonymous FTP is simple. All you need to do is install the anon-ftp rpm package(which you may have already done at install time). Once it is installed, anonymous FTP will be upand running.
There are a few files you might wish to edit to configure your FTP server.
/etc/ftpaccess – This file defines most of the access control for your ftp server. Some of thethings that you can do are: set up logical “groups” to control access from different sites, limitthe number of simultaneous FTP connections, configure transfer logging, and much more.Read the ftpaccess man page for complete details.
/etc/ftphosts – The ftphosts file is used to allow or deny access to certain accounts from varioushosts. Read the ftphosts man page for details.
/etc/ftpusers – This file lists all the users that are not allowed to ftp into your machine. Forexample, root is listed in /etc/ftpusers by default. That means that you can not ftp toyour machine and log in as root. This is a good security measure, but some administratorsprefer to remove root from this file.

216 System Administration
11.12 NFS Configuration
NFS stands for Network File System, and is a way to share files between machines as if they were onyour local hard drive. Linux can be both an NFS server and an NFS client, which means that it canexport filesystems to other systems, and mount filesystems exported from other machines.
Mounting NFS Filesystems Use the mount command to mount an NFS filesystem from an-other machine:
mkdir /mnt/local # Only required if /mnt/local doesn’t existmount bigdog:/mnt/export /mnt/local
In this command, bigdog is the hostname of the NFS fileserver, /mnt/export is the filesystemthat bigdog is exporting, and /mnt/local is a directory on my local machine where we want tomount the filesystem. After the mount command runs (and if we have the proper permissions frombigdog) we can enter ls /mnt/local and get a listing of the files in /mnt/export on bigdog.
Exporting NFS Filesystems The file that controls what filesystems you wish to export is/etc/exports. Its format is:
directory hostname(options)
the (options) are optional. For example:
/mnt/export speedy.redhat.com
would allow speedy.redhat.com to mount /mnt/export, but:
/mnt/export speedy.redhat.com(ro)
would just allow speedy to mount /mnt/export read-only.
Each time you change /etc/exports, you must tell the NFS daemons to examine it for new infor-mation. One simple way to accomplish this is to just stop and start the daemons:
/etc/rc.d/init.d/nfs stop/etc/rc.d/init.d/nfs start
The following will also work:

11.13 The Boot Process, Init, and Shutdown 217
killall -HUP rpc.nfsd rpc.mountd
See the following man pages for more details: nfsd(8), mountd(8), and exports(5). Another goodreference is Managing NFS and NIS Services, by Hal Stern, published by O’Reilly & Associates.
11.13 The Boot Process, Init, and Shutdown
This section contains information on what happens when a Red Hat Linux system is booted and shutdown. Let’s start with information on the files in /etc/sysconfig.
11.13.1 Sysconfig Information
The following information outlines the various files in /etc/sysconfig, their function, and theircontents.
Files in /etc/sysconfig
The following files are normally found in /etc/sysconfig:
� /etc/sysconfig/clock
� /etc/sysconfig/keyboard
� /etc/sysconfig/mouse
� /etc/sysconfig/network
� /etc/sysconfig/pcmcia
� /etc/sysconfig/amd
� /etc/sysconfig/tape
Let’s take a look at each one.
/etc/sysconfig/clock – The /etc/sysconfig/clock file controls the interpretation of valuesread from the system clock. Earlier releases of Red Hat Linux used the following values (which isdeprecated):
� CLOCKMODE=mode, where mode is one of the following:

218 System Administration
– GMT – indicates that the clock is set to UTC.– ARC – on Alpha only indicates the ARC console’s 42-year time offset is in effect.
Currently, the correct values are:
� UTC=boolean, where boolean is one of the following:
– true – indicates that the clock is set to UTC. Any other value indicates that it is set tolocal time.
� ARC=boolean, where boolean is one of the following:
– true – (for Alpha-based systems only) Indicates the ARC console’s 42-year time offset isin effect. Any other value indicates that the normal UNIX epoch is assumed.
/etc/sysconfig/keyboard – The /etc/sysconfig/keyboardfiles controls the behavior of thekeyboard. The following values may be used:
� KEYTABLE=file, where file is the name of a keytable file. For example:KEYTABLE="/usr/lib/kbd/keytables/us.map"
/etc/sysconfig/mouse – The /etc/sysconfig/mousefile is used to specify information aboutthe available mouse. The following values may be used:
� MOUSETYPE=type, where type is one of the following:
– microsoft – A Microsoft mouse.– mouseman – A MouseMan mouse.– mousesystems – A Mouse Systems mouse.– ps/2 – A PS/2 mouse.– msbm – A Microsoft bus mouse.– logibm – A Logitech bus mouse.– atibm – An ATI bus mouse.– logitech – A Logitech mouse.– mmseries – An older MouseMan mouse.– mmhittab – An mmhittab mouse.
� XEMU3=emulation, where emulation is one of the following:
– yes – Three mouse buttons should be emulated.– no – The mouse already has three buttons.
In addition, /dev/mouse is a symlink that points to the actual mouse device.

11.13 The Boot Process, Init, and Shutdown 219
/etc/sysconfig/network – The /etc/sysconfig/network file is used to specify informationabout the desired network configuration. The following values may be used:
� NETWORKING=answer , where answer is one of the following:
– yes – Networking should be configured.
– no – Networking should not be configured.
� HOSTNAME=hostname, where hostname should be the FQDN (Fully Qualified DomainName), but can be whatever hostname you want.
Please Note: For compatibility with older software that people might install (such as trn),the /etc/HOSTNAME file should contain the same value as here.
� FORWARD IPV4=answer , where answer is one of the following:
– yes – Perform IP forwarding.
– no – Do not perform IP forwarding.
(The current Red Hat Linux installation sets this to “no” by default (for RFC compliance), but ifFORWARD IPV4 is not set at all, forwarding is enabled for compatibility with the configurationfiles used on Red Hat Linux versions 4.2 and earlier.)
� GATEWAY=gw-ip, where gw-ip is the IP address of the network’s gateway.
� GATEWAYDEV=gw-dev , where gw-dev is the gateway device (e.g. eth0).
� NISDOMAIN=dom-name, where dom-name is the NIS domain name.
/etc/sysconfig/pcmcia – The /etc/sysconfig/pcmcia file is used to specify PCMCIA con-figuration information. The following values may be used:
� PCMCIA=answer , where answer is one of the following:
– yes – PCMCIA support should be enabled.
– no – PCMCIA support should not be enabled.
� PCIC=pcic-type, where pcic-type is one of the following:
– i82365 – The computer has an i82365-style PCMCIA socket chipset.
– tcic – The computer has a tcic-style PCMCIA socket chipset.
� PCIC OPTS=option, where option is the socket driver (i82365 or tcic) timing parameters.
� CORE OPTS=option, where option is the list of pcmcia core options.
� CARDMGR OPTS=option, where option is the list of options for the PCMCIA cardmgr.

220 System Administration
/etc/sysconfig/amd – The /etc/sysconfig/amdfile is used to specify operational parametersfor amd. The following values may be used:
� ADIR=path, where path is the amd directory. It should be “/.automount.” and is normallynever changed.
� MOUNTPTS=mountpts, where mountpts is, for example, “/net /etc/amd.conf”
� AMDOPTS=options, where options are any extra options for AMD.
/etc/sysconfig/tape – The /etc/sysconfig/tape file is used to specify tape-related configu-ration information. The following values may be used:
� DEV=devnam, where devnam is the tape device (for example, “/dev/nst0).” Use the non-rewinding device for these scripts.
For SCSI tapes this is “/dev/nst#,” where “#” is the number of the tape drive you want touse. If you only have one, then use “/dev/nst0.”
For IDE tapes you use “/dev/ht#,” where “#” is the number of the tape drive you want touse. If you only have one, then use “/dev/ht0.”
For floppy tape drives use “/dev/ftape.”
� ADMIN=account , where account is the user account to send mail to if the backup fails forany reason. Normally set to “root.”
� SLEEP=time, where time is the time to sleep between tape operations. Some drives need abit more than others, but “5” seems to work for 8mm, 4mm, and DLT.
� BLOCKSIZE=size, where size is the tape drive’s optimal block size. A value of “32768”worked fine for 8mm, then 4mm, and now DLT. An optimal setting is probably however muchdata your drive writes at one time.
� SHORTDATE=date, where date is a string that evaluates to a short date string, to be used inbackup log filenames. The default setting is: “$(date +%y:%m:%d:%H:%M).”
� DAY=date, where date is a string that evaluates to a date string, to be used for the log filedirectory. The default setting is: “$(date +log-%y:%m:%d).”
� DATE=date, where date is a string that evaluates to a regular date string, to be used in logfiles. The default setting is: “$(date).”
� LOGROOT=path, where path is the root of the logging directory.
� LIST=file, where file is the file name the incremental backup will use to store the incrementallist. It will be followed by a sequence number.
� DOTCOUNT=count , where count is the name of a file used for counting as you go, to knowwhich incremental list to use.

11.13 The Boot Process, Init, and Shutdown 221
� COUNTER=count-file, where count-file is used for rewinding when done.
� BACKUPTAB=file, where file is the name of the file in which we keep our list of backup(s)we want to make.
Files in /etc/sysconfig/network-scripts/
The following files are normally found in /etc/sysconfig/network-scripts:
� /etc/sysconfig/network-scripts/ifup
� /etc/sysconfig/network-scripts/ifdown
� /etc/sysconfig/network-scripts/network-functions
� /etc/sysconfig/network-scripts/ifcfg-<interface-name>
� /etc/sysconfig/network-scripts/ifcfg-<interface-name>-<clone-name>
� /etc/sysconfig/network-scripts/chat-<interface-name>
� /etc/sysconfig/network-scripts/dip-<interface-name>
� /etc/sysconfig/network-scripts/ifup-post
� /etc/sysconfig/network-scripts/ifdhcpc-done
Let’s take a look at each one.
/etc/sysconfig/network-scripts/ifup, /etc/sysconfig/network-scripts/ifdown – Symlinksto /sbin/ifup and /sbin/ifdown, respectively. These are the only two scripts in this directorythat should be called directly; these two scripts call all the other scripts as needed. These sym-links are here for legacy purposes only – they will probably be removed in future versions, so only/sbin/ifup and /sbin/ifdown should currently be used.
These scripts take one argument normally: the name of the device (e.g. “eth0”). They are calledwith a second argument of “boot” during the boot sequence so that devices that are not meant to bebrought up on boot (ONBOOT=no, [see below]) can be ignored at that time.
/etc/sysconfig/network-scripts/network-functions – Not really a public file. Contains func-tions which the scripts use for bringing interfaces up and down. In particular, it contains most of thecode for handling alternative interface configurations and interface change notification through ne-treport.

222 System Administration
/etc/sysconfig/network-scripts/ifcfg-<interface-name>,/etc/sysconfig/network-scripts/ifcfg-<interface-name>-<clone-name> – The firstfile defines an interface, while the second file contains only the parts of the definition that are differentin a ”clone” (or alternative) interface. For example, the network numbers might be different, buteverything else might be the same, so only the network numbers would be in the clone file, while allthe device information would be in the base ifcfg file.
The items that can be defined in an ifcfg file depend on the interface type.
The following values are common to all base files:
� DEVICE=name, where name is the name of the physical device (except dynamically-allocatedPPP devices where it is the ”logical name”).
� IPADDR=addr , where addr is the IP address.
� NETMASK=mask , where mask is the netmask value.
� NETWORK=addr , where addr is the network address.
� BROADCAST=addr , where addr is the broadcast address.
� GATEWAY=addr , where addr is the gateway address.
� ONBOOT=answer , where answer is one of the following:
– yes – This device should be activated at boot-time.– no – This device should not be activated at boot-time.
� USERCTL=answer , where answer is one of the following:
– yes – Non-root users are allowed to control this device.– no – Non-root users are not allowed to control this device.
� BOOTPROTO=proto, where proto is one of the following:
– none – No boot-time protocol should be used.
– bootp – The bootp protocol should be used.
– dhcp – The dhcp protocol should be used.
The following values are common to all PPP and SLIP files:
� PERSIST=answer , where answer is one of the following:
– yes – This device should be kept active at all times, even if deactivated after a modemhangup.
– no – This device should not be kept active at all times.

11.13 The Boot Process, Init, and Shutdown 223
� MODEMPORT=port , where port is the modem port’s device name (for exmaple,“/dev/modem”).
� LINESPEED=baud , where baud is the modem’s linespeed (for example, “115200”).
� DEFABORT=answer , where answer is one of the following:
– yes – Insert default abort strings when creating/editing the script for this interface.
– no – Do not insert default abort strings when creating/editing the script for this inter-face.
The following values are common to all PPP files:
� DEFROUTE=answer , where answer is one of the following:
– yes – Set this interface as the default route.– no – Do not set this interface as the default route.
� ESCAPECHARS=answer , where answer is one of the following:
– yes – Use the pre-defined asyncmap.
– no – Do not use the pre-defined asyncmap.
(This represents a simplified interface; it doesn’t let people specify which characters to escape.However, almost everyone can use an asyncmap of 00000000 anyway, and it’s possible to setPPPOPTIONS to use an arbitrary asyncmap if so desired.)
� HARDFLOWCTL=answer , where answer is one of the following:
– yes – Use hardware flow control.– no – Do not use hardware flow control.
� PPPOPTIONS=options, where options is an arbitrary option string. It is placed last onthe command line so it can override other options (such as asyncmap) that were specifiedpreviously.
� PAPNAME=name, where name is used as part of "name $PAPNAME" on the pppd commandline.Note that the “remotename” option is always specified as the logical PPP device name, like“ppp0” (which might perhaps be the physical device ppp1 if some other PPP device wasbrought up earlier...), which makes it easy to manage pap/chap files – name/password pairsare associated with the logical PPP device name so that they can be managed together.
In principle, there shouldn’t anything that would keep the logical PPP device names frombeing “worldnet” or “myISP” instead of “ppp0” – “pppN.”
� REMIP=addr , where addr is the remote ip address (which is normally unspecified).

224 System Administration
� MTU=value, where value is the value to be used as MTU.
� MRU=value, where value is the value to be used as MRU.
� DISCONNECTTIMEOUT=value, where value represents the number of seconds to wait be-fore re-establishing the connection after a successfully-connected session terminated.
� RETRYTIMEOUT=value, where value represents the number of seconds to wait before re-attempting to establish a connection after a previous attempt has failed.
/etc/sysconfig/network-scripts/chat-<interface-name> – This file is a chat script for PPPor SLIP connections, and is intended to establish the connection. For SLIP devices, a DIP script iswritten from the chat script; for PPP devices, the chat script is used directly.
/etc/sysconfig/network-scripts/dip-<interface-name> – This write-only script is createdfrom the chat script by netcfg. Do not modify this file. In the future, this file may disappear andinstead will be created on-the-fly from the chat script.
/etc/sysconfig/network-scripts/ifup-post – This file is called when any network device (ex-cept a SLIP device) comes up. Calls/etc/sysconfig/network-scripts/ifup-routes to bringup static routes that depend on that device. Brings up aliases for that device. Sets the hostname if it isnot already set and a hostname can be found for the IP for that device. Sends SIGIO to any programsthat have requested notification of network events.
Could be extended to fix up nameservice configuration, call arbitrary scripts, and more, as needed.
/etc/sysconfig/network-scripts/ifdhcpc-done – This file is called by dhcpcd once dhcp con-figuration is complete; sets up /etc/resolv.conf from the version dhcpcd dropped in/etc/dhcpc/resolv.conf.
11.13.2 System V Init
This section is a brief description of the internals of the boot process. It basically covers in detail howthe machine boots using SysV init, as well as the differences between the init used in older Linuxreleases, and SysV init.
Init is the program that gets run by the kernel at boot time. It is in charge of starting all the normalprocesses that need to run at boot time. These include the getty processes that allow you to log in,NFS daemons, FTP daemons, and anything else you want to run when your machine boots.
SysV init is fast becoming the standard in the Linux world to control the startup of software at boottime. This is because it is easier to use and more powerful and flexible than the traditional BSD init.

11.13 The Boot Process, Init, and Shutdown 225
SysV init also differs from BSD init in that the config files are in a subdirectory of /etc instead ofresiding directly in /etc. This directory is called rc.d. In there you will find rc.sysinit and thefollowing directories:
init.drc0.drc1.drc2.drc3.drc4.drc5.drc6.d
init.d contains a bunch of scripts. Basically, you reqiire one script for each service you may needto start at boot time or when entering another runlevel. Services include things like networking, nfs,sendmail, httpd, etc. Services do not include things like setserial that must only be run once and thenexited. Things like that should go in rc.local or rc.serial.
If you want rc.local, it should be in /etc/rc.d. Most systems include one even though it doesn’tdo much. You can also include an rc.serial in /etc/rc.d if you need to do serial port specific thingsat boot time.
The chain of events is as follows:
� The kernel looks in several places for init and runs the first one it finds
� init runs /etc/rc.d/rc.sysinit
� rc.sysinit does a bunch of necessary things and then runs rc.serial (if it exists)
� init runs all the scripts for the default runlevel.
� init runs rc.local
The default runlevel is decided in /etc/inittab. You should have a line close to the top like:
id:3:initdefault:
From this, you’d look in the second column and see that the default runlevel is 3, as should be thecase for most systems. If you want to change it, you can edit /etc/inittab by hand and changethe 3. Be very careful when you are messing with the inittab. If you do mess up, you can fix it byrebooting and doing:
LILO boot: linux single

226 System Administration
This should allow you to boot into single user mode so you can fix inittab.
Now, how does it run all the right scripts? If you enter ls -l on rc3.d, you might see somethinglike:
lrwxrwxrwx 1 root root 17 3:11 S10network -> ../init.d/networklrwxrwxrwx 1 root root 16 3:11 S30syslog -> ../init.d/sysloglrwxrwxrwx 1 root root 14 3:32 S40cron -> ../init.d/cronlrwxrwxrwx 1 root root 14 3:11 S50inet -> ../init.d/inetlrwxrwxrwx 1 root root 13 3:11 S60nfs -> ../init.d/nfslrwxrwxrwx 1 root root 15 3:11 S70nfsfs -> ../init.d/nfsfslrwxrwxrwx 1 root root 18 3:11 S90lpd -> ../init.d/lpd.initlrwxrwxrwx 1 root root 11 3:11 S99local -> ../rc.local
What you’ll notice is that there are no real “files” in the directory. Everything there is a link to one ofthe scripts in the init.d directory. The links also have an “S” and a number at the beginning. The “S”means to start this particular script and a “K” would mean to stop it. The number is there just forordering purposes. Init will start all the services based on the order in which they appear. You canduplicate numbers, but it will only confuse you somewhat. You only need to use a two digit number,along with an upper case “S” or “K” to start or stop the services you require to.
How does init start and stop services? Simple. Each of the scripts is written to accept an argumentwhich can be “start” and “stop.” You can execute those scripts by hand, in fact, with a command like:
/etc/rc.d/init.d/httpd.init stop
to stop the httpd server. Init just reads the name and if it has a “K,” it calls the script with the “stop”argument. If it has an “S” it calls the script with a “start” argument.
Why all these runlevels? Some people want an easy way to set up machines to be multi-purpose.You could have a “server” runlevel that just runs httpd, sendmail, networking, etc. Then you couldhave a “user” runlevel that runs xdm, networking, etc.
11.13.3 Init Runlevels
Generally, Red Hat Linux operates in run level 3—full multiuser mode. The following runlevels aredefined in Red Hat Linux:
0 Halt1 Single user mode2 Multiuser mode, without NFS3 Full multiuser mode4 Not used

11.13 The Boot Process, Init, and Shutdown 227
5 Full multiuser mode (with an X-based login screen)6 Reboot
If your machine gets into a state where it will not boot due to a bad /etc/inittab, or will not letyou log in because you have a corrupted /etc/passwd or have simply forgotten your password,boot into single user mode by typing linux 1 at the LILO boot prompt. A very bare system willcome up and you will be given a shell from which you can fix things.
11.13.4 Initscript Utilities
The chkconfig utility provides a simple command-line tool for maintaining the /etc/rc.d direc-tory hierarchy. It relieves system administrators from having to directly manipulate the numeroussymlinks in /etc/rc.d.
In addition, there is the ntsysv utility, that provides a screen-oriented interface, versuschkconfig’s command-line interface.
Please see the chkconfig and ntsysv man pages for more information.
11.13.5 Running Programs at Boot Time
The file /etc/rc.d/rc.local is executed at boot time, after all other initialization is complete, andwhenever you change runlevels. You can add additional initialization commands here. For instance,you may want to start up additional daemons, or initialize a printer. In addition, if you require serialport setup, you can edit /etc/rc.d/rc.serial, and it will be executed automatically at boot time.
The default /etc/rc.d/rc.local simply creates a nice login banner with your kernel version andmachine type.
11.13.6 Shutting Down
To shut down Red Hat Linux, issue the shutdown command. You can read the shutdown man pagefor complete details, but the two most common usages are:
shutdown -h nowshutdown -r now
Each will cleanly shutdown the system. After shutting everything down, the first will halt the ma-chine, and the second will reboot.
Although the reboot and halt commands are now “smart” enough to invoke shutdown if runwhile the system is in runlevels 1-5, it is a bad habit to get into, as not all Linux-like operatingsystems have this feature.

228 System Administration
11.14 Rescue Modes
When things go wrong, there are several ways to work on fixing them. However, they require thatyou understand the system well. This manual can’t teach you what to do, but we will present theways that you can use our products to get into rescue modes where you can use your own knowledgeto rescue the system.
Through LILO If your system boots, but does not allow you to log in when it has completedbooting, you can use the single or emergency boot option. At the LILO boot: prompt, typelinux single in order to boot in single-user mode. In single-user mode, your local filesystemswill be mounted, but your network will not be activated. In emergency mode, almost nothing willbe set up. Only the root filesystem will be mounted, and it will be mounted read-only.
Emergency Boot Diskettes The boot diskette created during installation of Red Hat Linux 6.0may be used as part of a rescue diskette set. For more information, please read the file rescue.txtin the /doc on your Red Hat Linux 6.0 CD-ROM or refer to the Official Red Hat Linux Getting StartedGuide.
A Handy Trick
Have you ever rebuilt a kernel and, eager to try out your new handiwork, rebooted before runningLILO? And you didn’t have an entry for an older kernel in lilo.conf? Read on. . .
Here’s a handy trick. In many cases, it’s possible to boot your Red Hat Linux/Intel from the Red HatLinux boot diskette with your root filesystem mounted and ready to go. Here’s how:
Enter the following command at the boot diskette’s boot: prompt:
linux single root=/dev/hdXX initrd=
(Replace the XX in /dev/hdXX with the appropriate letter and number for your root partition.)
What does this do? First, it starts the boot in single-user mode, with the root partition set to yourroot partition. The empty initrd specification bypasses the installation-related image on the bootdiskette, which will cause you to enter single-user mode immediately.
Is there a downside to this trick? Unfortunately, yes. Because the kernel on the Red Hat Linux bootdiskette only has support for IDE built-in, those of you with SCSI-based systems won’t be able to usethis trick. In that case, you’ll have to use the boot/rescue diskette combination mentioned above.

AGetting Technical Support
This chapter discusses Red Hat Software’s support:
� What it is
� How to get it
� Frequently asked questions
A.1 An Overview of Our Support Policy
Red Hat Software provides 90-day installation support for people that have purchased the OfficialRed Hat Linux product.
Red Hat will provide support to registered purchasers of the Red Hat Linux Boxed Set. This supportwill be provided by means of electronic mail. In the case that the user doesn’t have access to e-mail,fax support will be provided for those requests submitted with complete registration numbers.
In order to receive support it is necessary to register the product via the World Wide Web athttp://www.redhat.com/support/registeror by sending mail including the registration num-ber to [email protected].

230 Getting Technical Support
After registering successfully, support may be obtained by sending a specially formatted message [email protected]. The message format is described in the support HOW-TO, located at:
http://www.redhat.com/support/register/support-how2.html
This e-mail will then be delivered to Red Hat Software support where it will be distributed to a RedHat Support Engineer.
As the name implies, installation support centers on helping you successfully install Red Hat Linuxon your computer. This includes support in three distinct areas:
� Answering questions you may have prior to installation, such as:
– Hardware compatibility issues.
– Basic approaches to partitioning your hard drive.
� Helping you get through the installation process:
– Getting any supported hardware necessary for installation recognized by the installationprogram.(See http://www.redhat.com/hardware)
– Assisting with the creation of a root and swap partition using the free space available onyour hard drive.
– Using the installation program to configure LILO to boot Red Hat Linux, and one otheroperating system (such as DOS, Windows 95, or Windows NT) already residing on yourhard drive.
� Assisting with final configuration tasks, such as:
– The successful configuration of the X window system on supported hardware, usingeither the Metro-X or XFree86 software. (Additional configuration, such as automaticallystarting X on reboot, or changing/customizing window managers is your responsibility.)
– Configuring a printer connected directly to the Red Hat Linux system, enabling it to printtext.
– Setting up a mouse to be used with the text-based console, or with the X window system.
– Getting access to the CD-ROM, so that information can be read from it.
Naturally, although our installation support service will get your system running Red Hat Linux,there are many other optional tasks that you might want to undertake, such as compiling a cus-tomized kernel, adding support for devices not included in the installation process, and so on.
For assistance with these tasks, please consider the many books on Linux at your local bookstore,or various on-line resources. A starting point in your on-line search for Linux information shouldalways be:
http://www.redhat.com/support/
for information specific to Red Hat Linux, or:

A.2 Getting Support 231
http://www.redhat.com/linuxindex/index.html
for more general Linux information. Another good resource is http://www.linux.org/.
Red Hat Software can only support customers that have purchased the official Red Hat Linux Boxset. If you have obtained Red Hat from any other publisher, you must contact them for support.Examples of other publishers would be:
� Macmillan/Sams
� Cheapbytes
� Pacific Hi-Tech (PHT)
� Infomagic
� Linux Systems Labs (LSL)
� ADRAS Computing
Also, RHL-Intel obtained via any of the following methods does not qualify for support from RedHat Software:
� Red Hat Linux PowerTools Archive
� Downloaded via FTP on the Internet.
� Included in a package such as Applixware or Motif.
� Copied or installed from another user’s CD.
A.2 Getting Support
As of August 1997, Red Hat Software put a new Technical Support system online. The supportsystem automatically routes questions to support technicians. This document describes how to usethe Red Hat Software technical support system.
A.2.1 Registration
In order to receive technical support for your Red Hat Software product, you have to register it.Every official Red Hat product comes with registration material located on the insert in the CD-ROMjewel case. The product registration number uniquely identifies a product which you have purchased(such as Red Hat Linux) that includes 90 days of free installation technical support by fax or email.

232 Getting Technical Support
Registering via the Web
Registering via the Web
You can register your Red Hat Software product online at Red Hat’s World Wide Web site athttp://www.redhat.com/support/register/. Choose Register a Product. Please enter allapplicable information, and please be accurate with the system information. This information willaid in solving problems and answering questions more quickly and easily, and incorrect informationbenefits neither us nor our customers. Also, make sure the electronic mail address you give is correct.All support correspondence will be sent to that address. If this should change, please login to theregistration pages and edit this information.
Registration has changed. There will be no more annoying support ID numbers to remember. Ifyou don’t have a current login to the support database, you will need to create one. Simply entera name at the Support Login and click on the Create Login button to begin registration of yourproduct. If you were already registered for support before August 14, 1997 you can login by usingyour email address as your Support Login and your former support/customer ID as the password.The password can be changed once logged in. If you don’t remember it, follow the steps as if younever had a login, and re-enter the registration numbers and information.
Registering via Email
If you don’t have access to the World Wide Web, but you do have access to Internet mail, you cansend registration details to [email protected]. Please include the following information:
� Contact Information: name, address, city, state/province, country, zip/postal code, and tele-phone and fax numbers; also, your support ID if you have one;
� Product Information: name of product you are registering, product registration number (veryimportant!), architecture you’re using the product on (Intel, Alpha/AXP, or Sparc), and whatyou’re using the product for (File Server, Internet Server, Workstation, Home Computer, orOther);
� System Information: CPU (i386, i486, i586, i686/PentiumPro, AXP21164,AXP21064, Sparc4C, Sparc4M), CPU speed (MHz), amount of RAM (MB), hard drives (num-ber, size, type, partitions), video card, CD-ROM drive, any network card, and other hardwarecomponents (SCSI or ISDN adaptors, etc.).
Registering via Fax or Snail Mail
We do not recommend registering via fax or snail mail, if you have access to either the World WideWeb or Internet mail. If you do so, your registration is likely to be delayed considerably. If you dowish to register via fax, fax a copy of your registration card to Red Hat Software at +1-919-547-0024.

A.2 Getting Support 233
A.2.2 Support Questions
Technical support is a black art: in most cases, support technicians rely solely on communication withthe customer to solve installation problems on hardware the technicians have never physically seen.It is extremely important, therefore, to state your question clearly and concisely, including detailedinformation such as:
� symptoms of the problem (“Red Hat Linux 6.0 doesn’t recognize my CD-ROM drive”);
� when the problem began (“It stopped working yesterday ...”);
� what changes you have made to your system around the time of the problem (“... after Idisconnected it from the IDE controller.”);
� any diagnostic output specifically related to the problem (“In the bootup messages, it says‘Cannot find /dev/hdb; device disconnected’.”). However, this can be taken overboard; don’tsend us your system logs unless we ask you for them;
� other relevant information (“I’m using the floppy installation method, from the CD.”).
How to Send Them
Red Hat’s support system is email-based and is partially automated; for this reason, it is important tomake sure you send support questions in the correct format, so that your message will be recognizedand routed to an appropriate support technician. In order to receive technical support for your RedHat Software product, you must first register it.
Submitting trouble tickets can be performed in the traditional email way, or can be initiated via theWorld Wide Web. After providing the information for the registration, you will have a new menuallowing you to edit your registration information or open a trouble ticket. Hurry and login now toopen a ticket on the Web! http://www.redhat.com/support/register/
To open a support ticket via email, all you need to do is send the support system a message witha Subject: of [registration #nnnn nnnn nnnn nnnn], where nnnn nnnn nnnn nnnn is theregistration number of the product for which you are requesting support. For example, if your regis-tration number is fffe 0fff ff00 ff00, the subject line should read:
Subject: [registration #fffe 0fff ff00 ff00]
The square brackets, the number sign, and the word ‘registration’ must be present. If you wish, youmay add explanatory text to the subject line:
Subject: [registration #fffe 0fff ff00 ff00] CD-ROM problem
Once you’ve opened a ticket, support responses come to you with the support ticket number in thesubject line:

234 Getting Technical Support
Subject: [ticket #12015] CD-ROM problem
To correspond about the same problem, simply send a reply with the same subject:
Subject: Re: [ticket #12015] CD-ROM problem
If you feel that the problem has been solved the ticket can also be closed by you. Simply add closeto the same subject:
Subject: Re: [close ticket #12015] CD-ROM problem
Once your problem is solved or your question answered, the technician handling your support ticketcan close the ticket. This can also be done by you via the website. Either method will result in a mes-sage from the support system stating the ticket is closed and will contain a summary of the problemand the solution. You can open a new ticket for your next support question. All past correspondencewill be saved in the database under the old ticket number and can be accessed with your account atany time.
Where to Send Them
The address for Red Hat’s Technical Support System is [email protected]; all support ques-tions should go there. There are also several related addresses:
� For a copy of the Red Hat FAQ (Frequently Asked Questions, with answers), send mail [email protected].
� For a copy of the Red Hat PPP Tips (tips on setting up a PPP connection), send mail to [email protected].
A.3 Support FAQ (Frequently Asked Questions)
Here are a few questions that the Red Hat Support Staff see frequently, along with the answers:
Question – I’ve sent several messages to the Red Hat Support System, and I’ve gotten absolutelyno response. Is anybody there?
Answer – Check your registration information to make sure your email address is correct. You cancheck it by logging in athttp://www.redhat.com/support/register/.
Question – I know I have already registered, but I keep getting a message from the support systemtelling me I’m not registered. Is the system broken?

A.3 Support FAQ (Frequently Asked Questions) 235
Answer – Make sure to register via the World Wide Web athttp://www.redhat.com/support/register/. If you did not, please do so, by first ac-cessing the registration page. Next, input a login name and click on Create Login. After thisyou will be prompted to input some personal information. When finished click on the Submitbutton and then enter your registration number which should look something like fffe 0fffff00 ff00. Then be sure to enter all the information about your system. This informationcan be maintained by logging in and accessing your registration information fromhttp://www.redhat.com/support/register/.
Question – But I registered via email. Why isn’t the support system working?
Answer – When you register via email, your message goes to an actual human who registers youmanually. Depending on the backlog of people sending in registrations via this method, thiscan delay your registration anywhere from several hours to several days.
Question – I’ve done everything perfectly for my registration, but I’m still getting messages tellingme I have an invalid registration number.
Answer – Please make sure you’re using a valid product registration number. If you have notpurchased the official box set from Red Hat Software or a vendor that sells the official version(it will say “Official” on the box) you will not be able to register, as Red Hat Software cannotsupport products packaged and sold by other software publishers.
Question – I see this thing on the registration page that asks me what my login is? What is mylogin anyway?
Answer – If you are a first-time user of the the support system or accessed the support system afterAugust 15, 1997 then the Login can be whatever you want it to be. It must be all one wordand if there is already a duplicate you will be warned of an error. If you accessed the systembefore this time and have a valid registration, your login will be the email address you hadwhen registering and the password will be the old Support ID number. You can change thepassword if you like; however the login cannot be changed.
Question – I’ve tried entering a login and password but the system won’t accept it. Why won’t thesystem accept the password I’m trying to enter?
Answer – The password must be a minimum of 5 alphanumeric characters long and no more than8. Make sure you typed in the exact same password both times for both password fields on theregistration page.
Question – I hear that it’s possible to change my registration information and view all my oldtickets and the past correspondence. How do I do that?
Answer – Simply login to the registration page athttp://www.redhat.com/support/register and all these options will be available toyou. If you need to reference an old trouble ticket, change your system information, or justcheck up on the status of a trouble ticket, visit this page. You can also open a trouble ticketwith valid registration numbers directly from the web from these pages.

236 Getting Technical Support

BMaking Installation Diskettes
It is sometimes necessary to create a diskette from an image file (for example, you might need to useupdated diskette images obtained from the Red Hat Linux Errata).
As the name implies, an image file is a file that contains an exact copy (or image) of a diskette’scontents. Since a diskette contains filesystem information in addition to the data contained in files,the image file is not usable until it has been written to a diskette.
To start, you’ll need a blank, formatted, high-density (1.44 MB), 3.5-inch diskette. You’ll need accessto a computer with a 3.5-inch diskette drive, and capable of running a DOS program, or the dd utilityprogram found on most Linux-like operating systems.
The image files are found in the following directories on your Red Hat Linux CD:
� images – Contains the boot and PCMCIA support images for Red Hat Linux/Intel, and thevarious kernel and ramdisk images for Red Hat Linux/Alpha.On the Red Hat Linux/SPARC CD, this directory contains the boot image, and an image fornetwork booting.
� milo – Contains the various images for the Red Hat Linux/Alpha miniloader, MILO. Thisdirectory exists only on Red Hat Linux/Alpha CDs.
Once you’ve selected the proper image, it’s time to transfer the image file onto a diskette. As men-tioned previously, this can be done on a DOS-capable system, or on a system running a Linux-likeoperating system.

238 Making Installation Diskettes
B.1 Making a Diskette Under MS-DOS
To make a diskette under MS-DOS, use the rawrite utility included on the Red Hat Linux CD inthe dosutils directory. First, label a blank, formatted 3.5-inch diskette appropriately (eg. “BootDiskette,” “Supplemental Diskette,” etc). Insert it into the diskette drive. Then, use the followingcommands (assuming your CD is drive d:):
C:n> d:D:n> cd ndosutilsD:ndosutils> rawriteEnter disk image source file name: ..nimagesnboot.imgEnter target diskette drive: a:Please insert a formatted diskette into drive A: andpress --ENTER-- :
�
�
�
�Enter
D:ndosutils>
rawrite first asks you for the filename of a diskette image; enter the directory and name of theimage you wish to write (for example, ..nimagesnboot.img). Then rawrite asks for a diskettedrive to write the image to; enter a:. Finally, rawrite asks for confirmation that a formatted disketteis in the drive you’ve selected. After pressing
�
�
�
�Enter to confirm, rawrite copies the image file onto
the diskette. If you need to make another diskette, label another diskette, and run rawrite again,specifying the appropriate image file.
B.2 Making a Diskette Under a Linux-like O/S
To make a diskette under Linux (or any other Linux-like operating system), you must have permis-sion to write to the device representing a 3.5-inch diskette drive (known as /dev/fd0 under Linux).First, label a blank, formatted diskette appropriately (eg. “Boot Diskette,” “Supplemental Diskette,”etc.). Insert it into the diskette drive (but don’t issue a mount command). After mounting the Red HatLinux CD, change directory to the directory containing the desired image file, and use the followingcommand (changing the name of the image file and diskette device as appropriate):
# dd if=boot.img of=/dev/fd0 bs=1440k
If you need to make another diskette, label another diskette, and run dd again, specifying the appro-priate image file.

CAn Introduction to Disk Partitions
Disk partitions are a standard part of the personal computer landscape, and have been for quitesome time. However, with so many people purchasing computers featuring preinstalled operatingsystems, relatively few people understand how partitions work. This chapter attempts to explainhow disk partitions work so you’ll find your Red Hat Linux installation is as simple as possible.
C.1 Hard Disk Basic Concepts
Hard disks perform a very simple function – they store data and reliably retrieve it on command.
When discussing issues such as disk partitioning, it’s important to know a bit about the underlyinghardware; unfortunately, it’s easy to become bogged down in details. Therefore, let’s use a simpli-fied diagram of a disk drive to help us explain what goes on “under the hood.” Figure C.1 on thefollowing page shows a brand-new, unused disk drive.
Not much to look at, is it? But if we’re talking about disk drives on a basic level, it will do. Let’ssay that we’d like to store some data on this drive. As things stand now, it won’t work. There’ssomething we need to do first. . .

240 An Introduction to Disk Partitions
Figure C.1: An Unused Disk Drive
C.1.1 It’s Not What You Write, it’s How You Write It
The old-timers in the audience probably got this one of the first try. We need to format the drive.Formatting (usually known as “making a filesystem” in Linux parlance) writes information to thedrive, creating order out of the empty space in an unformatted drive.
As Figure C.2 on the next page implies, the order imposed by a filesystem involves some tradeoffs:
� A small percentage of the drive’s available space is used to store filesystem-related data, andcan be considered as overhead.
� A filesystem splits the remaining space into small, consistently-sized segments. In the Linuxworld, these segments are known as inodes1.
Given that filesystems make things like directories and files possible, these tradeoffs are usually seenas a small price to pay.
It’s also worth noting that there is no single, universal filesystem; as Figure C.3 on the facing pageshows, a disk drive may have one of many different filesystems written on it. As you might guess,different filesystems tend to be incompatible; that is, an operating system that supports one filesys-tem (or a handful of related filesystem types) may not support another. This last statement is nota hard-and-fast rule, however. For example, Red Hat Linux supports a wide variety of filesystems(including many commonly used by other operating systems), making data interchange easy.
1Inodes really are consistently-sized, unlike our illustrations. Also, keep in mind that an average disk drivecontains thousands of inodes. But for the purposes of this discussion, please ignore these minor discrepancies.

C.1 Hard Disk Basic Concepts 241
Figure C.2: Disk Drive with a Filesystem
Figure C.3: Disk Drive with a Different Filesystem

242 An Introduction to Disk Partitions
Of course, writing a filesystem to disk is only the beginning. The goal of this process is to actuallystore and retrieve data. Let’s take a look at our drive after some files have been written to it.
Figure C.4: Disk Drive with Data Written to It
As Figure C.4 shows, 14 of the previously-empty inodes are now holding data. We cannot determinehow many files reside on this drive; it may be as few as one or as many as 14, as all files use as leastone inode. Another important point to note is that the used inodes do not have to form a contiguousregion; used and unused inodes may be interspersed. This is known as fragmentation. Fragmentationcan play a part when attempting to resize an existing partition.
As with most computer-related technologies, disk drives continued to change over time. In partic-ular, they changed in one specific way – they got bigger. Not bigger in size, but bigger in capacity.And it was this additional capacity that drove a change in the way disk drives were used.
C.1.2 Partitions – Turning One Drive Into Many
As disk drive capacities soared, some people started wondering if having all that space in one bigchunk wasn’t such a great idea. This line of thinking was driven by several issues, some philosophi-cal, some technical. On the philosophical side, above a certain size, it just seemed that the additionalspace provided by a larger drive made for more clutter. On the technical side, some filesystemswere never designed to support larger drives. Or the filesystems could support larger drives, but theoverhead imposed by the filesystem became excessive.
The solution to this problem was to divide disks into partitions. Each partition can be accessed as if itwas a separate disk. This is done through the addition of a partition table.
Please Note: While the diagrams in this chapter show the partition table as being separate from the

C.1 Hard Disk Basic Concepts 243
actual disk drive, this is not entirely accurate. In reality, the partition table is stored at the very startof the disk, before any filesystem or user data. But for clarity, we’ll keep it separate in our diagrams.
Figure C.5: Disk Drive with Partition Table
As Figure C.5 shows, the partition table is divided into four sections. Each section can hold theinformation necessary to define a single partition, meaning that the partition table can define nomore than four partitions.
Each partition table entry contains several important characteristics of the partition:
� The points on the disk where the partition starts and ends;
� Whether the partition is “active”;
� The partition’s type.
Let’s take a closer look at each of these characteristics. The starting and ending points actually definethe partition’s size and location on the disk. The “active” flag is used by some operating systems’boot loaders. In other words, the operating system in the partition that is marked “active” will bebooted.
The partition’s type can be a bit confusing. The type is a number that identifies the partition’s antic-ipated usage. If that statement sounds a bit vague, that’s because the meaning of the partition typeis a bit vague. Some operating systems use the partition type to denote a specific filesystem type, toflag the partition as being associated with a particular operating system, to indicate that the partitioncontains a bootable operating system, or some combination of the three.
Figure C.6 on the next page contains a listing of some popular (and obscure) partition types, alongwith their numeric values.

244 An Introduction to Disk Partitions
Partition Type Value Partition Type Value
Empty 00 Novell Netware 386 65DOS 12-bit FAT 01 PC/IX 75XENIX root 02 Old MINIX 80XENIX usr 03 Linux/MINIX 81DOS 16-bit <=32M 04 Linux swap 82Extended 05 Linux native 83DOS 16-bit >=32M 06 Linux extended 85OS/2 HPFS 07 Amoeba 93AIX 08 Amoeba BBT 94AIX bootable 09 BSD/386 a5OS/2 Boot Manager 0a OpenBSD a6Win95 FAT32 0b NEXTSTEP a7Win95 FAT32 (LBA) 0c BSDI fs b7Win95 FAT16 (LBA) 0e BSDI swap b8Win95 Extended (LBA) 0f Syrinx c7Venix 80286 40 CP/M dbNovell? 51 DOS access e1Microport 52 DOS R/O e3GNU HURD 63 DOS secondary f2Novell Netware 286 64 BBT ff
Figure C.6: Partition Types
Now you might be wondering how all this additional complexity is normally used. See Figure C.7on the facing page for an example.
That’s right – in many cases there is but a single partition spanning the entire disk, essentially du-plicating the pre-partitioned days of yore. The partition table has only one entry used, and it pointsto the start of the partition. We’ve labeled this partition as being of type “DOS,” although as youcan see from Figure C.6, that’s a bit simplistic, but adequate for the purposes of this discussion. Thisis a typical partition layout for most newly purchased computers with some version of Windowspre-installed.
C.1.3 Partitions within Partitions – An Overview ofExtended Partitions
Of course, in time it became obvious that four partitions would not be enough. As disk drives con-tinued to grow, it became more and more likely that a person could configure four reasonably-sized

C.1 Hard Disk Basic Concepts 245
Figure C.7: Disk Drive With Single Partition
partitions and still have disk space left over. There needed to be some way of creating more parti-tions.
Enter the extended partition. As you may have noticed in Figure C.6 on the facing page, there is an“Extended” partition type; it is this partition type that is at the heart of extended partitions. Here’show it works.
When a partition is created and its type is set to “Extended,” an extended partition table is created.In essence, the extended partition is like a disk drive in its own right – it has a partition table thatpoints to one or more partitions (now called logical partitions, as opposed to the four primary partitions)contained entirely within the extended partition itself. Figure C.8 on the next page shows a disk drivewith one primary partition, and one extended partition containing two logical partitions (along withsome unpartitioned free space).
As this figure implies, there is a difference between primary and logical partitions – there can onlybe four primary partitions, but there is no fixed limit to the number of logical partitions that canexist. (However, in reality it is probably not a good idea to try to define and use more than 12 logicalpartitions on a single disk drive.)

246 An Introduction to Disk Partitions
Figure C.8: Disk Drive With Extended Partition

DPackage List
This appendix lists the packages that make up Red Hat Linux. In each entry, you’ll find the followinginformation:
� The name of the package
� The packaged software’s version number
� The size of the packaged software, in kilobytes
� A short description of the software
In addition, some packages will have one or more of the following icons alongside the package name:
�
�
�
�B This package is part of the Red Hat Linux base, meaning that it is always installed.
�
�
�
�W Workstation-class installations include this package.�
�
�
�S Server-class installations include this package.
Please Note: This package list was automatically generated right before Red Hat Linux 6.0 went intoproduction. Because of the short timeframes involved, you might find minor typesetting problems

248 Package List
in the package lists. However, we felt that an up-to-date package list was more important than apicture-perfect package list. We hope you’ll agree. . .
You may also notice that some packages have different versions, and that packages listed here arenot mentioned in the installation program (and vice versa). Any differences in package versionsare normally due to the normal bug fixing process. It’s possible that “missing” or “extra” packagesare the result of last-minute changes prior to pressing CDROMs. Also note that all the packages inthe “Base” group (and subgroups) are always installed, therefore you will not see them mentionedexplicitly during the installation process.
Using the Package List After Installation This list can come in handy even after you’veinstalled Red Hat Linux. You can use it search for documentation. Here’s how:
1. Find the package in this list.
2. Note the package name (The very first thing listed in bold at the start of each package descrip-tion).
3. Enter the following command, taking care to enter the package name exactly as it is shown inthe list (the package name is case-sensitive):
rpm -qd package-name
(Replacing package-name with the actual name of the package, of course.)
If you installed the package, you should get a list of filenames. Each file contains documentationrelating to the package you specified. Here are some of the types of filenames you’ll see:
� /usr/man. . . something.n – This is a man page. You can view it by using the man command(for example, man something. You might also need to include the file’s ending number inthe man command (as in man n something.
� /usr/X11R6/man. . . something.nx – This is a man page for part of the X Window System.View these files the same way as a regular man page.
� /usr/doc/something. . . – Files under /usr/doc can be in any number of different formats.Sometimes the end of the filename can provide a clue as to how it should be viewed:
– .html – An HTML file. View with the web browser of your choice.– .txt – A text file. View with cat or less.– .ps – A Postscript file. You can print it to a Postscript printer, or you can view it with gv.– .gz – A file compressed with gzip. If you make a copy of the original file, you can usegunzip to decompress it (you’ll probably want to keep the original file compressed tosave space). You can then view the file as you would normally. The zless commandcombines gunzip and less, and makes it possible to read compressed text files withoutmaking interim copies. There are other, more elegant ways to work with compressedfiles, but this approach will work for those just starting to use Linux.

D.1 Amusements 249
In general, most of the documentation files you’ll find will be one of those listed above. If indoubt, it’s a good bet that the file is text. You can always try the file command to see if thefile’s contents can be identified.
� /usr/info. . . – Files in /usr/info are meant to be viewed using the info (or Emacs’ Infomode). If you use Emacs, press
�
�
�
�Ctrl -
�
�
�
�I , followed by
�
�
�
�I to view the main Info screen.
D.1 Amusements
This section lists the packages that provide fun and entertainment to Red Hat Linux system owners the worldover.
D.1.1 Games
This section lists packages that contain a variety of games.
cxhextris – (Version 1.0, 39K)
CXHextris is a color version of the popular xhextris game, which is a Tetris-like game that uses hexagon shapesinstead of square shapes. CXHextris runs within the X Window System.
Install cxhextris if you enjoy playing Tetris or Tetris-like games and you’d like to play one on your system. You’llneed to have X installed in order to play CXHextris.
fortune-mod – (Version 1.0, 2,342K)
Fortune-mod contains the ever-popular fortune program. Want a little bit of random wisdom revealed to youwhen you log in? Fortune’s your program. Fun-loving system administrators can add fortune to users’ .loginfiles, so that the users get their dose of wisdom each time they log in.
Install fortune if you want a program which will bestow these random bits o’ wit.
gnome-games – (Version 1.0.2, 3,342K)�
�
�
�W
GNOME is the GNU Network Object Model Environment. That’s a fancy name, but really GNOME is a nice GUIdesktop environment. Its powerful, friendly and easy-to-configure interface makes using your computer easy.
This package installs some GNOME games on your system, such as gnothello, solitaire, tetris and others.
gnuchess – (Version 4.0.pl79, 1,428K)
The gnuchess package contains the GNU chess program. By default, GNUchess uses a curses text-based interface.Alternatively, GNUchess can be used in conjunction with the xboard user interface and the X Window System fora graphical chessboard.
You should install the gnuchess package if you would like to play chess on your computer. You’ll also need toinstall the curses package. If you’d like to use a graphical interface with GNUchess, you’ll also need to install thexboard package and the X Window System.

250 Package List
kdegames – (Version 1.1.1pre2, 4,962K)
Games for the K Desktop Environment. Included with this package are: kabalone, kasteroids, kblackbox,kmahjongg, kmines, konquest, kpat, kpoker, kreversi, ksame, kshisen, ksokoban, ksmiletris, ksnake, ksirtet.
trojka – (Version 1.1, 16K)
The game of Trojka involves a set of falling blocks. The point is to move the blocks around as they fall, so thatthree of the same blocks end up next to each other, either horizontally or diagonally. Once the blocks fill up theentire game area, the game is over.
Install the trojka package if you want to play a non-X game of falling blocks.
xbill – (Version 2.0, 183K)
The xbill game tests your reflexes as you seek out and destroy all forms of Bill, establish new operating systemsand boldly go where no geek has gone before. Xbill has become an increasingly attractive option as the LinuxAge progresses, and it is very popular at Red Hat.
xboard – (Version 4.0.0, 601K)
Xboard is an X Window System based graphical chessboard which can be used with the GNUchess and Craftychess programs, with Internet Chess Servers (ICSs), with chess via email, or with your own saved games.
Install the xboard package if you need a graphical chessboard.
xboing – (Version 2.4, 1,043K)
Xboing is an X Window System based game like the Breakout arcade game. The object of the game is to keep aball bouncing on the bricks until you’ve broken through all of them.
xgammon – (Version 0.98, 3,282K)
Xgammon is an X Window System based backgammon game. Xgammon allows you to play against the computer,or you can play against another person. Xgammon also supports playing a game against another person on aremote X terminal, and will display a second board there for their use.
xjewel – (Version 1.6, 52K)
Xjewel is an X Window System game much like Domain/Jewelbox, Sega’s Columns and/or Tetris. The point ofthe game is to move or rotate the blocks as they fall, to get jewels in patterns of three when they come to rest.
xpat2 – (Version 1.04, 456K)
Xpat2 is a generic patience or Solitaire game for the X Window System. Xpat2 can be used with different rulessets, so it can be used to play Spider, Klondike, and other card games.
xpilot – (Version 3.6.2, 1,617K)
Xpilot is an X Window System based multiplayer game of aerial combat. The object of the game is to shoot eachother down, or you can use the race mode to just fly around. Xpilot resembles the Commodore 64 Thrust game,which is similar to Atari’s Gravitar and Asteriods (note: this is not misspelled). Unless you already have an xpilotserver on your network, you’ll need to set up the server on one machine, and then set up xpilot clients on all ofthe players’ machines.

D.1 Amusements 251
xpuzzles – (Version 5.4.1, 469K)
A set of geometric puzzles and toys for the X Window System. Xpuzzles includes a version of Rubik’s cube andvarious other geometric Rubik’s cube style puzzles.
xtrojka – (Version 1.2.3, 216K)
The xtrojka game is an X Window System game of falling blocks, like Xjewel or Tetris.
D.1.2 Graphics
This section lists packages that provide graphics that are fun to look at.
mxp – (Version 1.0, 55K)
The mxp (Mandelbrot explorer) program is an X Window System application for computing and exploring Man-delbrot sets. Mxp supports zoom/un-zoom, dynamic resizing of drawing windows, setup save/load, asyn-chronous image generation, GIF outputs, animation, nine color schemes, color rotation, color change options,and detailed statistics.
Install the mxp package if you need a Mandelbrot set generator for the X Window System.
xbanner – (Version 1.31, 366K)�
�
�
�W
�
�
�
�S
The XBanner program allows the display of text, patterns and images in the root window, so users can customizethe XDM style login screen and/or the normal X background.
Install XBanner if you’d like to change the look of your X login screen and/or X background.
xdaliclock – (Version 2.14, 80K)
The xdaliclock program displays a digital clock, with digits that merge into the new digits as the time changes.Xdaliclock can display the time in 12 or 24 hour modes and can will display the date if you hold your mousebutton down over it. Xdaliclock has two large fonts built in, but is capable of animating other fonts.
Install the xdaliclock package if you want a fairly large clock, with a melting special effect, for your system.
xearth – (Version 1.0, 192K)
Xearth is an X Window System based graphic that shows a globe of the Earth, including markers for major citiesand Red Hat Software. The Earth is correctly shaded for the current position of the sun, and the displayed imageis updated every five minutes.
xfishtank – (Version 2.0, 388K)
The xfishtank program displays an animated aquarium background on your screen. Xfishtank works with the XWindow System.
xloadimage – (Version 4.1, 255K)
The xloadimage utility displays images in an X Window System window, loads images into the root window, orwrites images into a file. Xloadimage supports many images types (GIF, TIFF, JPEG, XPM, XBM, etc.).

252 Package List
Install the xloadimage package if you need a utility for displaying images or loading images into the root window.
xlockmore – (Version 4.13, 759K)
The xlockmore utility is an enhanced version of the standard xlock program, which allows you to lock an X sessionso that other users can’t access it. Xlockmore runs a provided screensaver until you type in your password.
Install the xlockmore package if you need a locking program to secure X sessions.
xmorph – (Version 1996.07.12, 127K)�
�
�
�W
Xmorph is a digital image warping (aka morphing) program. Xmorph provides the tools needed and comprehen-sible instructions for you to create morphs: changing one image into another. Xmorph runs under the X WindowSystem.
Install the xmorph package if you need a program that will create morphed images.
xscreensaver – (Version 3.09, 3,325K)�
�
�
�W
The xscreensaver package contains a variety of screensavers for your mind-numbing, ambition-eroding, time-wasting, hypnotized viewing pleasure.
Install the xscreensaver package if you need screensavers for use with the X Window System.
xwpick – (Version 2.20, 50K)
The xwpick program allows you to choose an image or a rectangular piece of an image from an X Window Systemwindow and then write the image to a file in a variety of formats, incuding PostScript(TM), GIF, and PICT.
Install the xwpick program if you need to take screenshots from X Window System screens and write them tofiles.
D.2 Applications
This section contains packages that contain various applications for Red Hat Linux.
D.2.1 Archiving
This section contains packages that are associated with the efficient storing and/or copying of files.
cpio – (Version 2.4.2, 70K)�
�
�
�B
GNU cpio copies files into or out of a cpio or tar archive. Archives are files which contain a collection of other filesplus information about them, such as their file name, owner, timestamps, and access permissions. The archivecan be another file on the disk, a magnetic tape, or a pipe. GNU cpio supports the following archive formats:binary, old ASCII, new ASCII, crc, HPUX binary, HPUX old ASCII, old tar and POSIX.1 tar. By default, cpiocreates binary format archives, so that they are compatible with older cpio programs. When it is extracting filesfrom archives, cpio automatically recognizes which kind of archive it is reading and can read archives created onmachines with a different byte-order.
D.2 Applications 253
Install cpio if you need a program to manage file archives.
dump – (Version 0.4b4, 153K)
The dump package contains both dump and restore. Dump examines files in a filesystem, determines which onesneed to be backed up, and copies those files to a specified disk, tape or other storage medium. The restore com-mand performs the inverse function of dump; it can restore a full backup of a filesystem. Subsequent incrementalbackups can then be layered on top of the full backup. Single files and directory subtrees may also be restoredfrom full or partial backups.
Install dump if you need a system for both backing up filesystems and restoring filesystems after backups.
lha – (Version 1.00, 56K)�
�
�
�W
LHA is an archiving and compression utility for LHarc format archives. LHA is mostly used in the DOS world,but can be used under Linux to extract DOS files from LHA archives.
Install the lha package if you need to extract DOS files from LHA archives.
ncompress – (Version 4.2.4, 31K)�
�
�
�B
The ncompress package contains the compress and uncompress file compression and decompression utilities,which are compatible with the original UNIX compress utility (.Z file extensions). These utilities can’t handlegzipped (.gz file extensions) files, but gzip can handle compressed files.
rmt – (Version 0.4b4, 12K)�
�
�
�B
The rmt utility provides remote access to tape devices for programs like dump (a filesystem backup program),restore (a program for restoring files from a backup) and tar (an archiving program).
sharutils – (Version 4.2, 221K)�
�
�
�W
�
�
�
�S
The sharutils package contains the GNU shar utilities, a set of tools for encoding and decoding packages of files(in binary or text format) in a special plain text format called shell archives (shar). This format can be sent throughemail (which can be problematic for regular binary files). The shar utility supports a wide range of capabilities(compressing, uuencoding, splitting long files for multi-part mailings, providing checksums), which make it veryflexible at creating shar files. After the files have been sent, the unshar tool scans mail messages looking for sharfiles. Unshar automatically strips off mail headers and introductory text and then unpacks the shar files.
Install sharutils if you send binary files through email very often.
taper – (Version 6.9, 847K)
Taper is a backup and restoration program with a friendly user interface. Files may be backed up to a tapedrive or to a hard disk. The interface for selecting files to be backed up/restored is very similar to the MidnightCommander interface, and allows easy traversal of directories. Taper supports recursive selection of directories.Taper also supports backing up SCSI, ftape, zftape and removable drives. By default, taper is set for incrementalbackups and automatic most recent restore.
Install the taper package if you need a user friendly file backup and restoration program.
tar – (Version 1.12, 474K)�
�
�
�B
The GNU tar program saves many files together into one archive and can restore individual files (or all of the

254 Package List
files) from the archive. Tar can also be used to add supplemental files to an archive and to update or list files inthe archive.
Tar includes multivolume support, automatic archive compression/ decompression, the ability to perform remotearchives and the ability to perform incremental and full backups.
If you want to use Tar for remote backups, you’ll also need to install the rmt package.
You should install the tar package, because you’ll find its compression and decompression utilities essential forworking with files.
unarj – (Version 2.41a, 26K)
The UNARJ program is used to uncompress .arj format archives. The .arj format archive was mostly used on DOSmachines.
Install the unarj package if you need to uncompress .arj format archives.
unzip – (Version 5.31, 370K)�
�
�
�W
The unzip utility is used to list, test, or extract files from a zip archive. Zip archives are commonly found on MS-DOS systems. The zip utility, included in the zip package, creates zip archives. Zip and unzip are both compatiblewith archives created by PKWARE(R)’s PKZIP for MS-DOS, but the programs’ options and default behaviors dodiffer in some respects.
Install the unzip package if you need to list, test or extract files from a zip archive.
zip – (Version 2.1, 217K)�
�
�
�W
The zip program is a compression and file packaging utility. Zip is analogous to a combination of the UNIX tarand compress commands and is compatible with PKZIP (a compression and file packaging utility for MS-DOSsystems).
Install the zip package if you need to compress files using the zip program.
D.2.2 Communications
This section contains packages that are associated with communications.
dip – (Version 3.3.7o, 88K)�
�
�
�W
�
�
�
�S
Dip is a modem dialer. Dip handles the connections needed for dialup IP links like SLIP or PPP. Dip can handleboth incoming and outgoing connections, using password security for incoming connections. Dip is useful forsetting up PPP and SLIP connections, but isn’t required for either. Netcfg uses dip for setting up SLIP connections.
Install dip if you need a utility which will handle dialup IP connections.
efax – (Version 0.8a, 205K)
Efax is a small ANSI C/POSIX program that sends and receives faxes using any Class 1, 2 or 2.0 fax modem.
You need to install efax if you want to send faxes and you have a Class 1, 2 or 2.0 fax modem.

D.2 Applications 255
getty ps – (Version 2.0.7j, 127K)�
�
�
�B
The getty ps package contains the getty and uugetty programs, basic programs for accomplishing the login pro-cess on a Red Hat Linux system. Getty and uugetty are used to accept logins on the console or a terminal. Gettyis invoked by the init process to open tty lines and set their modes, to print the login prompt and get the user’sname, and to initiate a login process for the user. Uugetty works just like getty, except that uugetty creates anduses lock files to prevent two or more processes from conflicting in their use of a tty line. Getty and uugetty canalso handle answer a modem for dialup connections, but mgetty is recommended for that purpose.
kpilot – (Version 3.1b8 pgb, 878K)
KPilot allows you to synchronize your PalmPilot with your desktop. It allows you to backup and restore the var-ious databases (Addressbook, ToDo List, Memos, etc.) as well as install applications to the pilot. Two ”conduits”for the third party application KOrganizer are included which will let you sync your ToDo list and Calendar withthat program.
lrzsz – (Version 0.12.20, 391K)�
�
�
�W
�
�
�
�S
Lrzsz (consisting of lrz and lsz) is a cosmetically modified zmodem/ymodem/xmodem package built from thepublic-domain version of the rzsz package. Lrzsz was created to provide a working GNU copylefted Zmodemsolution for Linux systems.
You should install lrzsz if you’re also installing a Zmodem communications program that uses lrzsz. If you’reinstalling minicom, you need to install lrzsz.
mgetty – (Version 1.1.14, 842K)
The mgetty package contains a ”smart” getty which allows logins over a serial line (i.e., through a modem). Ifyou’re using a Class 2 or 2.0 modem, mgetty can receive faxes. If you also need to send faxes, you’ll need to installthe sendfax program.
If you’ll be dialing in to your system using a modem, you should install the mgetty package. If you’d like to sendfaxes using mgetty and your modem, you’ll need to install the mgetty-sendfax program. If you need a viewer forfaxes, you’ll also need to install the mgetty-viewfax package.
mgetty-sendfax – (Version 1.1.14, 269K)
Sendfax is a standalone backend program for sending fax files. The mgetty program (a getty replacement forhandling logins over a serial line) plus sendfax will allow you to send faxes through a Class 2 modem.
If you’d like to send faxes over a Class 2 modem, you’ll need to install the mgetty-sendfax and the mgetty pack-ages.
mgetty-viewfax – (Version 1.1.14, 93K)
Viewfax displays the fax files received using mgetty in an X11 window. Viewfax is capable of zooming in and outon the displayed fax.
If you’re installing the mgetty-viewfax package, you’ll also need to install mgetty.
mgetty-voice – (Version 1.1.14, 638K)
The mgetty-voice package contains the vgetty system, which enables mgetty and your modem to support voicecapabilities. In simple terms, vgetty lets your modem act as an answering machine. How well the system will

256 Package List
work depends upon your modem, which may or may not be able to handle this kind of implementation.
Install mgetty-voice along with mgetty if you’d like to try having your modem act as an answering machine.
minicom – (Version 1.82, 302K)�
�
�
�W
�
�
�
�S
Minicom is a simple text-based modem control and terminal emulation program somewhat similar to MSDOSTelix. Minicom includes a dialing directory, full ANSI and VT100 emulation, an (external) scripting language,and other features.
Minicom should be installed if you need a simple modem control program or terminal emulator.
pilot-link – (Version 0.9.0, 770K)
This suite of tools allows you to upload and download programs and data files between a *nix machine and theUSR Pilot. It has a few extra utils that will allow for things like syncing the Pilot’s calendar app with Ical. Notethat you might still need to consult the sources for pilot-link if you would like the Python, Tcl, or Perl bindings.
sliplogin – (Version 2.1.1, 54K)
The sliplogin utility turns the terminal line on standard input into a SLIP (Serial Line Internet Protocol) link to aremote host. Sliplogin is usually used to allow dial-in SLIP connections.
Install the sliplogin package if you need to support dial-in SLIP connections.
uucp – (Version 1.06.1, 2,079K)�
�
�
�W
�
�
�
�S
The uucp command copies files between systems. Uucp is primarily used by remote machines downloading anduploading email and news files to local machines.
Install the uucp package if you need to use uucp to transfer files between machines.
D.2.3 Databases
This section contains packages that are associated with databases.
postgresql – (Version 6.4.2, 6,918K)�
�
�
�S
Postgresql includes the programs needed to create and run a PostgreSQL server, which will in turn allow you tocreate and maintain PostgreSQL databases. PostgreSQL is an advanced Object-Relational database managementsystem (DBMS) that supports almost all SQL constructs (including transactions, subselects and user-defined typesand functions).
You should install postgresql if you want to create and maintain your own PostgreSQL databases and/or yourown PostgreSQL server. If you are installing postgresql, you should also install postgresql-data, which will helpyou get started with PostgreSQL.
postgresql-clients – (Version 6.4.2, 938K)�
�
�
�S
Postgresql-clients includes the client programs and client libraries that you’ll need to access a PostgreSQL databasemanagement system server. This package contains the client libraries for C, C++ and PERL, as well as command-line utilities for managing PostgreSQL databases on a remote server. If you just want to connect to an existing

D.2 Applications 257
remote PostgreSQL server, this package is all you need.
You should install postgresql-clients if you’re installing postgresql. You should also install postgresql-clients ifyou’re not installing postgresql, but you want to access PostgreSQL databases on a remote PostgreSQL server.
D.2.4 Editors
This section contains packages that are associated with editing text files.
GXedit – (Version 1.23, 570K)
Here is a fast, easy-to-use editor which is both network- oriented and very secure. GXedit is a graphical text editorwhich features a toolbar, network bar and tooltips, spell checking, inline help, the ability to send text as e-mail,macros and more. GXedit was designed to balance these and many other features without becoming too bloated.
You’ll need GTK+ to use GXedit.
emacs – (Version 20.3, 17,395K)�
�
�
�W
�
�
�
�S
Emacs is a powerful, customizable, self-documenting, modeless text editor. Emacs contains special code editingfeatures, a scripting language (elisp), and the capability to read mail, news and more without leaving the editor.
This package includes the libraries you need to run the Emacs editor, so you need to install this package if youintend to use Emacs. You also need to install the actual Emacs program package (emacs-nox or emacs-X11). Installemacs-nox if you are not going to use the X Window System; install emacs-X11 if you will be using X.
emacs-X11 – (Version 20.3, 6,638K)�
�
�
�W
Emacs-X11 includes the Emacs text editor program for use with the X Window System (it provides support forthe mouse and other GUI elements). Emacs-X11 will also run Emacs outside of X, but it has a larger memoryfootprint than the ’non-X’ Emacs package (emacs-nox).
Install emacs-X11 if you’re going to use Emacs with the X Window System. You should also install emacs-X11 ifyou’re going to run Emacs both with and without X (it will work fine both ways). You’ll also need to install theemacs package in order to run Emacs.
emacs-el – (Version 20.3, 21,631K)
Emacs-el contains the emacs-elisp sources for many of the elisp programs included with the main Emacs texteditor package.
You need to install emacs-el only if you intend to modify any of the Emacs packages or see some elisp examples.
emacs-leim – (Version 20.3, 4,216K)
The Emacs Lisp code for input methods for various international character scripts.
emacs-nox – (Version 20.3, 2,786K)�
�
�
�W
�
�
�
�S
Emacs-nox is the Emacs text editor program without support for the X Window System.
You need to install this package only if you plan on exclusively using Emacs without the X Window System

258 Package List
(emacs-X11 will work both in X and out of X, but emacs-nox will only work outside of X). You’ll also need toinstall the emacs package in order to run Emacs.
gedit – (Version 0.5.1, 340K)�
�
�
�W
gEdit is a small but powerful text editor designed expressly for GNOME.
It includes such features as split-screen mode, a plugin API, which allows gEdit to be extended to support manyfeatures while remaining small at its core, multiple document editing through the use of a ’tabbed’ notebook andmany more functions.
GNOME is required to use gEdit (Gnome-Libs and Gtk+).
gnotepad+ – (Version 1.1.3, 182K)�
�
�
�W
gnotepad+ is an easy-to-use, yet fairly feature-rich, simple text editor for systems running X11 and using GTK+.It is designed for as little bloat as possible, while still providing many of the common features found in a modernGUI-based text editor.
jed – (Version 0.98.7, 140K)
Jed is a fast, compact editor based on the slang screen library. Jed features include emulation of the Emacs, EDT,WordStar and Brief editors; support for extensive customization with slang macros, colors, keybindings, etc.; anda variety of programming modes with syntax highlighting.
You should install jed if you’ve used it before and you like it, or if you haven’t used any text editors before andyou’re still deciding what you’d like to use. You’ll also need to have slang installed.
jed-common – (Version 0.98.7, 1,502K)
The jed-common package contains files (such as .sl files) that are needed by any jed binary in order to run.
jed-xjed – (Version 0.98.7, 166K)
Xjed is a version of the Jed text editor that will work with the X Window System.
You should install xjed if you like Jed and you’d like to use it with X. You’ll also need to have the X WindowSystem installed.
joe – (Version 2.8, 276K)
Joe is an easy to use, modeless text editor which would be very appropriate for novices. Joe uses the sameWordStar keybindings used in Borland’s development environment.
You should install joe if you’ve used it before and you liked it, or if you’re still deciding what text editor you’dlike to use, or if you have a fondness for WordStar. If you’re just starting out, you should probably install joebecause it is very easy to use.
vim-X11 – (Version 5.3, 1,395K)
VIM (VIsual editor iMproved) is an updated and improved version of the vi editor. Vi was the first real screen-based editor for UNIX, and is still very popular. VIM improves on vi by adding new features: multiple windows,multi-level undo, block highlighting and more. VIM-X11 is a version of the VIM editor which will run within theX Window System. If you install this package, you can run VIM as an X application with a full GUI interface and

D.2 Applications 259
mouse support.
Install the vim-X11 package if you’d like to try out a version of vi with graphics and mouse capabilities. You’llalso need to install the vim-common package.
vim-common – (Version 5.3, 4,355K)�
�
�
�B
VIM (VIsual editor iMproved) is an updated and improved version of the vi editor. Vi was the first real screen-based editor for UNIX, and is still very popular. VIM improves on vi by adding new features: multiple windows,multi-level undo, block highlighting and more. The vim-common package contains files which every VIM binarywill need in order to run.
If you are installing any version of the VIM editor, you’ll also need to the vim-common package installed.
vim-enhanced – (Version 5.3, 1,297K)
VIM (VIsual editor iMproved) is an updated and improved version of the vi editor. Vi was the first real screen-based editor for UNIX, and is still very popular. VIM improves on vi by adding new features: multiple windows,multi-level undo, block highlighting and more. The vim-enhanced package contains a version of VIM with extra,recently introduced features like Python and Perl interpreters.
Install the vim-enhanced package if you’d like to use a version of the VIM editor which includes recently addedenhancements like interpreters for the Python and Perl scripting languages. You’ll also need to install the vim-common package.
vim-minimal – (Version 5.3, 445K)�
�
�
�B
VIM (VIsual editor iMproved) is an updated and improved version of the vi editor. Vi was the first real screen-based editor for UNIX, and is still very popular. VIM improves on vi by adding new features: multiple windows,multi-level undo, block highlighting and more. The vim-minimal package includes a minimal version of VIM,which is installed into /bin/vi for use when only the root partition is present.
D.2.5 Emulators
This section contains packages associated with the emulation of other operating systems.
dosemu – (Version 0.99.10, 1,812K)�
�
�
�W
Dosemu is a DOS emulator. Once you’ve installed dosemu, start the DOS emulator by typing in the dos command.
You need to install dosemu if you use DOS programs and you want to be able to run them on your Red Hat Linuxsystem. You may also need to install the dosemu-freedos package.
dosemu-freedos – (Version 0.99.10, 8,194K)
Generally, the dosemu DOS emulator requires either that your system have some version of DOS available orthat your system’s partitions were formatted and installed with DOS. If your system does not meet either of theprevious requirements, you can instead use the dosemu- freedos package, which contains an hdimage file whichwill be installed in teh /var/lib/dosemu directory. The hdimage file is already bootable with FreeDOS.
You will need to edit your /etc/dosemu.conf file to add the image to the list of disk ’drives’ used by dosemu.
260 Package List
Install dosemu-freedos if you are installing the dosemu package and you don’t have a version of DOS availableon your system, and your system’s partitions were not formatted and installed with DOS.
xdosemu – (Version 0.99.10, 26K)�
�
�
�W
Xdosemu is a version of the dosemu DOS emulator that runs with the X ]Window System. Xdosemu providesVGA graphics and mouse support.
Install xdosemu if you need to run DOS programs on your system, and you’d like to do so with the convenienceof graphics support and mouse capabilities.
D.2.6 Engineering
This section contains packages that are associated with the engineering arts.
bc – (Version 1.05a, 128K)�
�
�
�B
The bc package includes bc and dc. Bc is an arbitrary precision numeric processing arithmetic language. Dc is aninteractive arbitrary precision stack based calculator, which can be used as a text mode calculator.
Install the bc package if you need its number handling capabilities or if you would like to use its text modecalculator.
gnuplot – (Version 3.7, 918K)
Gnuplot is a command-line driven, interactive function plotting program especially suited for scientific datarepresentation. Gnuplot can be used to plot functions and data points in both two and three dimensions and inmany different formats.
Install gnuplot if you need a graphics package for scientific data representation.
units – (Version 1.0, 25K)
Units converts an amount from one unit to another, or tells you what mathematical operation you need to performto convert from one unit to another. Units can only handle multiplicative scale changes (i.e., it can’t tell you how toconvert from Celsius to Fahrenheit, which requires an additive step in addition to the multiplicative conversion).
Units is a handy little program which contains a large number of conversions, from au’s to parsecs and table-spoons to cups. You probably don’t need to install it, but it comes in handy sometimes.
xlispstat – (Version 3.52.9, 2,871K)
The xlispstat package contains XLISP-PLUS, an implementation of the Lisp programming language for the XWindow System. XLISP-PLUS also includes extensions for performing advanced statistical computations.
Install the xlispstat package if you need a version of the Lisp programming language for X with statistics exten-sions.

D.2 Applications 261
D.2.7 File
This section contains packages that are associated with file manipulation.
bzip2 – (Version 0.9.0c, 232K)
Bzip2 is a freely available, patent-free, high quality data compressor. Bzip2 compresses files to within 10 to15 percent of the capabilities of the best techniques available. However, bzip2 has the added benefit of beingapproximately two times faster at compression and six times faster at decompression than those techniques.Bzip2 is not the fastest compression utility, but it does strike a balance between speed and compression capability.
Install bzip2 if you need a high quality compression utility.
file – (Version 3.26, 206K)�
�
�
�B
The file command is used to identify a particular file according to the type of data contained by the file. File canidentify many different file types, including ELF binaries, system libraries, RPM packages, and different graphicsformats.
You should install the file package, since the file command is such a useful utility.
fileutils – (Version 4.0, 1,283K)�
�
�
�B
The fileutils package includes a number of GNU versions of common and popular file management utilities.Fileutils includes the following tools: chgrp (changes a file’s group ownership), chown (changes a file’s owner-ship), chmod (changes a file’s permissions), cp (copies files), dd (copies and converts files), df (shows a filesys-tem’s disk usage), dir (gives a brief directory listing), dircolors (the setup program for the color version of thels command), du (shows disk usage), install (copies files and sets permissions), ln (creates file links), ls (listsdirectory contents in color), mkdir (creates directories), mkfifo (creates FIFOs, which are named pipes), mknod(creates special files), mv (renames files), rm (removes/deletes files), rmdir (removes empty directories), sync(synchronizes memory and disk), touch (changes file timestamps), and vdir (provides long directory listings).
You should install the fileutils package, because it includes many file management utilities that you’ll use fre-quently.
findutils – (Version 4.1, 118K)�
�
�
�B
The findutils package contains programs which will help you locate files on your system. The find utility searchesthrough a hierarchy of directories looking for files which match a certain set of criteria (such as a filename pat-tern). The locate utility searches a database (create by updatedb) to quickly find a file matching a given pattern.The xargs utility builds and executes command lines from standard input arguments (usually lists of file namesgenerated by the find command).
You should install findutils because it includes tools that are very useful for finding things on your system.
git – (Version 4.3.17, 715K)�
�
�
�W
GIT (GNU Interactive Tools) provides an extensible file system browser, an ASCII/hexadecimal file viewer, aprocess viewer/killer and other related utilities and shell scripts. GIT can be used to increase the speed andefficiency of copying and moving files and directories, invoking editors, compressing and uncompressing files,creating and expanding archives, compiling programs, sending mail and more. GIT uses standard ANSI colorsequences, if they are available.

262 Package List
You should install the git package if you are interested in using its file management capabilities.
gzip – (Version 1.2.4, 242K)�
�
�
�B
The gzip package contains the popular GNU gzip data compression program. Gzipped files have a .gz extension.
Gzip should be installed on your Red Hat Linux system, because it is a very commonly used data compressionprogram.
slocate – (Version 1.4, 19K)�
�
�
�B
slocate searches through a central database (updated nightly) for files which match a given glob pattern. Thisallows you to quickly find files anywhere on your system.
stat – (Version 1.5, 6K)�
�
�
�B
The stat utility prints out filesystem level information about a specified file, including size, permissions, linkcount, inode, etc.
tree – (Version 1.2, 19K)
The tree utility recursively displays the contents of directories in a tree-like format. Tree is basically a UNIX portof the tree DOS utility.
Install tree if you think it would be useful to view the contents of specified directories in a tree-like format.
D.2.8 Internet
This section contains packages that are associated with the Internet.
elm – (Version 2.5.0, 616K)�
�
�
�W
�
�
�
�S
Elm is a popular terminal mode email user agent. Elm includes all standard mailhandling features, includingMIME support via metamail.
Elm is still used by some people, but is no longer in development. If you’ve used Elm before and you’re devotedto it, you should install the elm package. If you would like to use metamail’s MIME support, you’ll also need toinstall the metamail package.
exmh – (Version 2.0.2, 1,814K)�
�
�
�W
�
�
�
�S
Exmh provides an X interface for MH/nmh mail, a feature-rich email handling system. Exmh supports almost all(but not all) of MH’s features: viewing the messages in a folder, reading/deleting/refiling messages, and sortingarriving mail into different folders before the messages are read. Exmh highlights which folders have new mail,and indicates which messages have not been read (so you don’t lose the sorted, unread mail).
If you like MH/nmh mail, you should install exmh, because it makes the MH/nmh mail system much more userfriendly. You may also want to use exmh if you prefer a graphical user interface for your mail client. Note thatyou will also have to install the nmh package.
faces – (Version 1.6.1, 141K)

D.2 Applications 263
Faces is a program for visually monitoring a list (typically a list of incoming mail messages, a list of jobs in a printqueue or a list of system users). Faces operates in five different modes: monitoring for new mail, monitoringan entire mail file, monitoring a specified print queue, monitoring users on a machine and custom monitoring.Faces also includes a utility for including a face image (a compressed, scanned image) with mail messages. Theimage has to be compressed in a certain way, which can then be uncompressed and displayed on-the-fly in themail program. This feature of faces is typically used with the exmh mail handling system.
Install faces if you’d like to use its list monitoring capability or its face image inclusion capability. If you wouldlike to include face images in email, you’ll also need to install the faces-xface package. If you would like todevelop xface applications, you’ll need to also install faces-devel.
faces-xface – (Version 1.6.1, 20K)
Faces-xface includes the utilities that mail user agent programs need to handle X-Face mail headers. When anemail program reads the X-face header line in an email message, it calls these utilities to display the face imageincluded in the message.
You’ll need to install faces-xface if you want your mail program to display Faces’ X-face images.
fetchmail – (Version 5.0.0, 552K)�
�
�
�W
�
�
�
�S
Fetchmail is a remote mail retrieval and forwarding utility intended for use over on-demand TCP/IP links, likeSLIP or PPP connections. Fetchmail supports every remote-mail protocol currently in use on the Internet (POP2,POP3, RPOP, APOP, KPOP, all IMAPs, ESMTP ETRN) for retrieval. Then Fetchmail forwards the mail throughSMTP, so you can read it through your normal mail client.
Install fetchmail if you need to retrieve mail over SLIP or PPP connections.
fetchmailconf – (Version 5.0.0, 62K)
Fetchmailconf is a tcl/tk application for graphically configuring your .fetchmailrc preferences file. Fetchmail hasmany options which can be daunting to the new user. This utility takes some of the guesswork and hassle out ofsetting up fetchmail.
finger – (Version 0.10, 32K)�
�
�
�W
�
�
�
�S
Finger is a utility which allows users to see information about system users (login name, home directory, name,how long they’ve been logged in to the system, etc.). The finger package includes a standard finger client andserver. The server daemon (fingerd) runs from /etc/inetd.conf, which must be modified to disable finger requests.
You should install finger if your system is used by multiple users and you’d like finger information to be available.
ftp – (Version 0.10, 89K)�
�
�
�W
�
�
�
�S
The ftp package provides the standard UNIX command-line FTP client. FTP is the file transfer protocol, which isa widely used Internet protocol for transferring files and for archiving files.
If your system is on a network, you should install ftp in order to do file transfers.
fwhois – (Version 1.00, 8K)�
�
�
�W
�
�
�
�S
The fwhois program is a different style of the whois program. Both fwhois and whois query Internet whoisdatabases to find information about system users. Fwhois is smaller and more compact than whois, and runs in adifferent manner.

264 Package List
Install fwhois if you or your system’s users need a program for querying whois databases. You may also want toinstall whois, and then decide for yourself which program you prefer.
gftp – (Version 1.13, 552K)�
�
�
�W
gFTP is a multithreaded FTP client for X Windows written using Gtk. It allows to have simultaneous down-loads, resuming of interrupted file transfers, file transfer queues, a very nice connection manager and many morefeatures.
ircii – (Version 4.4, 997K)
IrcII is a popular Internet Relay Chat (IRC) client. IRC clients communicate with IRC servers, enabling users to”chat” via the Internet.
Install ircii if you want to participate in chat rooms.
kdenetwork – (Version 1.1.1pre2, 7,466K)
Network applications for the K Desktop Environment.
Includes: karchie (ftp archive searcher); kbiff (mail delivery notification) kfinger (”finger” utility); kmail (mailclient); knu (network utilities); korn (mailbox monitor tool); kppp (easy PPP connection configuration); krn (newsreader); ktalkd (talk daemon); ksirc (irc client).
kpppload – (Version 1.04, 88K)
Monitors the load on your PPP connection. Looks a lot like xload.
lynx – (Version 2.8.1, 2,011K)�
�
�
�W
�
�
�
�S
Lynx is a text-based Web browser. Lynx does not display any images, but it does support frames, tables andmost other HTML tags. Lynx’s advantage over graphical browsers is its speed: Lynx starts and exits quickly andswiftly displays Web pages.
Install lynx if you would like to try this fast, non-graphical browser (you may come to appreciate its strengths).
mailx – (Version 8.1.1, 89K)�
�
�
�B
The mailx package installs the /bin/mail program, which is used to send quick email messages (i.e., withoutopening up a full-featured mail user agent). Mail is often used in shell scripts.
You should install mailx because of its quick email sending ability, which is especially useful if you’re planningon writing any shell scripts.
metamail – (Version 2.7, 341K)�
�
�
�W
�
�
�
�S
Metamail is a system for handling multimedia mail, using the mailcap file. Metamail reads the mailcap file,which tells Metamail what helper program to call in order to handle a particular type of non-text mail. Note thatmetamail can also add multimedia support to certain non-mail programs.
Metamail should be installed if you need to add multimedia support to mail programs and some other programs,using the mailcap file.
mutt – (Version 0.95.4us, 1,369K)�
�
�
�W
�
�
�
�S

D.2 Applications 265
Mutt is a text mode mail user agent. Mutt supports color, threading, arbitrary key remapping, and a lot ofcustomization.
You should install mutt if you’ve used mutt in the past and you prefer it, or if you’re new to mail programs andyou haven’t decided which one you’re going to use.
nc – (Version 1.10, 105K)
The nc package contains Netcat (the program is actually nc), a simple utility for reading and writing data acrossnetwork connections, using the TCP or UDP protocols. Netcat is intended to be a reliable back-end tool which canbe used directly or easily driven by other programs and scripts. Netcat is also a feature-rich network debuggingand exploration tool, since it can create many different connections and has many built-in capabilities.
You may want to install the netcat package if you are administering a network and you’d like to use its debuggingand network exploration capabilities.
ncftp – (Version 3.0beta18, 725K)�
�
�
�W
�
�
�
�S
Ncftp is an improved FTP client. Ncftp’s improvements include support for command line editing, commandhistories, recursive gets, automatic anonymous logins and more.
Install ncftp if you use FTP to transfer files and you’d like to try some of ncftp’s additional features.
netscape-common – (Version 4.51, 7,128K)�
�
�
�W
�
�
�
�S
This package contains the files that are shared between the Netscape Navigator Web browser and the NetscapeCommunicator suite of tools (the Navigator Web browser, an e-mail client, a news reader and Web page editor).
Install the netscape-common package if you’re installing the netscape-navigator and/or the netscape-communicatorprogram.
netscape-communicator – (Version 4.51, 13,522K)�
�
�
�W
�
�
�
�S
Netscape Communicator is the industry-leading Web browser. It supports the latest HTML standards, Java,JavaScript and some style sheets. It also includes a full-featured Usenet news reader as well as a complete e-mailclient.
Information on the Netscape Communicator license may be fund in the file/usr/doc/netscape-common-4.51/LICENSE.
netscape-navigator – (Version 4.51, 7,242K)
Netscape Navigator is the industry-leading Web browser. It supports the latest HTML standards, Java, JavaScriptand some style sheets.
Information on the Netscape Navigator license may be found in the file /usr/doc/netscape-common-4.51/LICENSE.
This will install the basic Netscape Navigator Web browser. If you want additional features, such as the Usenetnews reader and HTML editor, you should install the netscape-communicator package.
nmh – (Version 0.27, 4,646K)�
�
�
�W
�
�
�
�S
Nmh is an email system based on the MH email system and is intended to be a (mostly) compatible drop-inreplacement for MH. Nmh isn’t a single comprehensive program. Instead, it consists of a number of fairly simple

266 Package List
single-purpose programs for sending, receiving, saving, retrieving and otherwise manipulating email messages.You can freely intersperse nmh commands with other shell commands or write custom scripts which utilize nmhcommands. If you want to use nmh as a true email user agent, you’ll want to also install exmh to provide a userinterface for it–nmh only has a command line interface.
If you’d like to use nmh commands in shell scripts, or if you’d like to use nmh and exmh together as your emailuser agent, you should install nmh.
pine – (Version 4.10, 3,427K)�
�
�
�W
�
�
�
�S
Pine is a very popular, easy to use, full-featured email user agent which includes a simple text editor called pico.Pine supports MIME extensions and can also be used to read news. Pine also supports IMAP, mail and MH stylefolders.
Pine should be installed because Pine is a very commonly used email user agent and it is currently in develop-ment.
rsh – (Version 0.10, 116K)�
�
�
�W
�
�
�
�S
The rsh package contains a set of programs which allow users to run commmands on remote machines, login toother machines and copy files between machines (rsh, rlogin and rcp). All three of these commands use rhostsstyle authentication. This package contains the clients and servers needed for all of these services. It also containsa server for rexec, an alternate method of executing remote commands. All of these servers are run by inetd andconfigured using /etc/inetd.conf and PAM. The rexecd server is disabled by default, but the other servers areenabled.
The rsh package should be installed to enable remote access to other machines.
rsync – (Version 2.3.1, 218K)
Rsync uses a quick and reliable algorithm to very quickly bring remote and host files into sync. Rsync is fastbecause it just sends the differences in the files over the network (instead of sending the complete files). Rsync isoften used as a very powerful mirroring process or just as a more capable replacement for the rcp command. Atechnical report which describes the rsync algorithm is included in this package.
Install rsync if you need a powerful mirroring program.
slrn – (Version 0.9.5.4, 413K)�
�
�
�W
�
�
�
�S
SLRN is a powerful, easy to use, threaded Internet news reader. SLRN is highly customizable and allows you todesign complex filters to sort or kill news articles. SLRN works well over slow network connections, and includesa utility for reading news off-line.
Install slrn if you need a full-featured news reader, if you have a slow network connection, or if you’d like to saveon-line time by reading your news off-line.
slrn-pull – (Version 0.9.5.4, 64K)
This package provides slrnpull, which allows set up of a small news spool for offline news reading.
talk – (Version 0.11, 36K)�
�
�
�W
�
�
�
�S
The ntalk package provides client and daemon programs for the Internet talk protocol, which allows you to chatwith other users on different systems. Talk is a communication program which copies lines from one terminal to

D.2 Applications 267
the terminal of another user.
Install ntalk if you’d like to use talk for chatting with users on different systems.
tcpdump – (Version 3.4, 214K)�
�
�
�W
�
�
�
�S
Tcpdump is a command-line tool for monitoring network traffic. Tcpdump can capture and display the packetheaders on a particular network interface or on all interfaces. Tcpdump can display all of the packet headers, orjust the ones that match particular criteria.
Install tcpdump if you need a program to monitor network traffic.
telnet – (Version 0.10, 137K)�
�
�
�W
�
�
�
�S
Telnet is a popular protocol for logging into remote systems over the Internet. The telnet package provides acommand line telnet client as well as a telnet daemon, which will support remote logins into the host machine.The telnet daemon is enabled by default. You may disable the telnet daemon by editing /etc/inetd.conf.
Install the telnet package if you want to telnet to remote machines and/or support remote logins to your ownmachine.
tin – (Version 1.4 990216, 1,193K)�
�
�
�W
�
�
�
�S
Tin is a basic, easy to use Internet news reader. Tin can read news locally or remotely via an NNTP (NetworkNews Transport Protocol) server.
Install tin if you need a basic news reader.
traceroute – (Version 1.4a5, 27K)�
�
�
�W
�
�
�
�S
The traceroute utility displays the route used by IP packets on their way to a specified network (or Internet)host. Traceroute displays the IP number and host name (if possible) of the machines along the route taken bythe packets. Traceroute is used as a network debugging tool. If you’re having network connectivity problems,traceroute will show you where the trouble is coming from along the route.
Install traceroute if you need a tool for diagnosing network connectivity problems.
trn – (Version 3.6, 446K)�
�
�
�W
�
�
�
�S
Trn is a basic news reader that supports threading. This version is configured to read news from an NNTP newsserver.
Install trn if you need a basic news reader that shows you newsgroup postings in threaded format.
urlview – (Version 0.7, 37K)
urlview extracts URLs from a given text file, and presents a menu of URLs to view using a user specified com-mand.
w3c-libwww-apps – (Version 5.2.8, 49K)
Web applications built using Libwww: Robot, Command line tool, line mode browser. The Robot can crawl websites faster, and with lower load, than any other web walker that we know of, due to its extensive pipelining anduse of HTTP/1.1.

268 Package List
The command line tool (w3c) is very useful for manipulation of Web sites that implement more than just HTTPGET (e.g. PUT, POST, etc.).
The line mode browser is a minimal line mode web browser; often useful to convert to ascii text. Currentlyunavailable until someone updates it to some new interfaces. (hint, hint...)
wget – (Version 1.5.3, 335K)
GNU Wget is a file retrieval utility which can use either the HTTP or FTP protocols. Wget features include theability to work in the background while you’re logged out, recursive retrieval of directories, file name wildcardmatching, remote file timestamp storage and comparison, use of Rest with FTP servers and Range with HTTPservers to retrieve files over slow or unstable connections, support for Proxy servers, and configurability.
Install wget if you need to retrieve large numbers of files with HTTP or FTP, or if you need a utility for mirroringweb sites or FTP directories.
xchat – (Version 0.9.4, 196K)�
�
�
�W
X-Chat is yet another IRC client for the X Window System, using the Gtk+ toolkit. It is pretty easy to use comparedto the other Gtk+ IRC clients and the interface is quite nicely designed.
xmailbox – (Version 2.5, 33K)�
�
�
�W
�
�
�
�S
The xmailbox program is an X Window System program which notifies you when mail arrives. Xmailbox issimilar to the xbiff program, but it offers more features and notification options.
Install the xmailbox package if you’d like a graphical program for X which will notify you when new mail arrives.
xrn – (Version 9.01, 253K)�
�
�
�W
�
�
�
�S
A simple Usenet News reader for the X Window System. Xrn allows you to point and click your way throughreading, replying and posting news messages.
Install the xrn package if you need a simple news reader for X.
ytalk – (Version 3.1, 68K)
The YTalk program is essentially a chat program for multiple users. YTalk works just like the UNIX talk pro-gram and even communicates with the same talk daemon(s), but YTalk allows for multiple connections (unlikeUNIX talk). YTalk also supports redirection of program output to other users as well as an easy-to-use menu ofcommands.
Install the ytalk package if you need a chat program for multiple users.
D.2.9 Multimedia
This section contains packages that are associated with multimedia.
ImageMagick – (Version 4.2.2, 3,025K)�
�
�
�W
�
�
�
�S
ImageMagick is a powerful image display, coversion and manipulation tool. It runs in an X session. With thistool, you can view, edit and display a variety of image formats.

D.2 Applications 269
This package installs the necessary files to run ImageMagick.
aktion – (Version 0.3.3, 314K)
Movie player for the K Desktop Environment. Requires ’xanim’ to function.
aumix – (Version 1.18.2, 65K)�
�
�
�W
Aumix is a tty based, interactive method of controlling a sound card mixer. It lets you adjust the input levels fromthe CD, microphone, and on board synthesizers, as well as the output volume. Aumix can adjust audio mixersfrom the command line, from a script, or interactively at the console or terminal with a full-screen ncurses-basedinterface.
Install aumix if you need to control an audio mixer. If you install aumix, you will also need to install ncurses(since aumix’s interface is based on ncurses) and gpm (for mouse support).
awesfx – (Version 0.4.3a, 299K)�
�
�
�W
The awesfx package contains necessary utilities for the AWE32 sound driver.
If you must use an AWE32 sound driver, you should install this package.
cdp – (Version 0.33, 39K)�
�
�
�W
The cdp program plays audio CDs in your computer’s CD-ROM drive. Cdp includes a full-screen interfaceversion and a command line version.
Install cdp to play audio CDs on your system.
desktop-backgrounds – (Version 1.0.0, 10,198K)�
�
�
�W
If you use a desktop environment like GNOME you can use these images to spruce up your background.
ee – (Version 0.3.8, 450K)�
�
�
�W
The ee package contains the Electric Eyes image viewer for the GNOME desktop environment. Electric Eyes isprimary an image viewer, but it also allows many types of image manipulations. Electric Eyes can handle almostany type of image.
Install the ee package if you need an image viewer.
giftrans – (Version 1.12.2, 22K)
Giftrans will convert an existing GIF87 file to GIF89 format. In other words, Giftrans can make one color in a .gifimage (normally the background) transparent.
Install the giftrans package if you need a quick, small, one-purpose graphics program to make transparent .gifsout of existing .gifs.
gimp – (Version 1.0.4, 6,508K)�
�
�
�W
The GIMP is an image manipulation program suitable for photo retouching, image composition and image au-thoring. Many people find it extremely useful in creating logos and other graphics for web pages. The GIMPhas many of the tools and filters you would expect to find in similar commercial offerings, and some interesting

270 Package List
extras as well.
The GIMP provides a large image manipulation toolbox, including channel operations and layers, effects, sub-pixel imaging and anti-aliasing, and conversions, all with multi-level undo.
This version of The GIMP includes a scripting facility, but many of the included scripts rely on fonts that wecannot distribute. The GIMP ftp site has a package of fonts that you can install by yourself, which includesall the fonts needed to run the included scripts. Some of the fonts have unusual licensing requirements; allthe licenses are documented in the package. Get ftp://ftp.gimp.org/pub/gimp/fonts/freefonts-0.10.tar.gz andftp://ftp.gimp.org/pub/gimp/fonts/sharefonts-0.10.tar.gz if you are so inclined. Alternatively, choose fontswhich exist on your system before running the scripts.
gimp-data-extras – (Version 1.0.0, 7,825K)
Patterns, gradients etc. for gimp. This package isn’t required, but contains lots of goodies for gimp.
gnome-audio – (Version 1.0.0, 828K)�
�
�
�W
�
�
�
�S
If you use the GNOME desktop environment, you may want to install this package of complementary sounds.
gnome-media – (Version 1.0.1, 291K)�
�
�
�W
GNOME (GNU Network Object Model Environment) is a user-friendly set of applications and desktop tools tobe used in conjunction with a window manager for the X Window System. GNOME is similar in purpose andscope to CDE and KDE, but GNOME is based completely on Open Source software.
GNOME’s powerful environment is pleasing on the eye, easy to configure and use.
This package will install such media features as the GNOME CD player.
kdegraphics – (Version 1.1.1pre2, 2,784K)
Graphics applications for the K Desktop Environment.
Includes: kdvi (displays TeX .dvi files); kfax (displays fax files); kfract (a fractal generator); kghostview (displayspostscript files); kiconedit (icon editor); kpaint (a simple drawing program); ksnapshot (screen capture utility);kview (image viewer for GIF, JPEG, TIFF, etc.).
kdemultimedia – (Version 1.1.1pre2, 2,366K)
Multimedia applications for the K Desktop Environment. Included: kmedia (media player); kmid (midi/karaokeplayer); kmidi (midi-to-wav player/converter); kmix (mixer); kscd (CD audio player)
libgr-progs – (Version 2.0.13, 1,580K)�
�
�
�W
�
�
�
�S
The libgr-progs package contains a group of scripts for manipulating the graphics files in formats which aresupported by the libgr library. For example, libgr-progs includes the rasttopnm script, which will convert a Sunrasterfile into a portable anymap. Libgr-progs contains many other scripts for converting from one graphics fileformat to another.
If you need to use these conversion scripts, you should install libgr-progs. You’ll also need to install the libgrpackage.
libungif-progs – (Version 4.1.0, 336K)

D.2 Applications 271
The libungif-progs package contains various programs for manipulating GIF format image files.
Install this package if you need to manipulate GIF format image files. You’ll also need to install the libungifpackage.
mikmod – (Version 3.1.5, 784K)�
�
�
�W
MikMod is one of the best and most well known MOD music file players for UNIX-like systems. This particulardistribution is intended to compile fairly painlessly in a Linux environment. MikMod uses the OSS /dev/dspdriver including all recent kernels for output, and will also write .wav files. Supported file formats include MOD,STM, S3M, MTM, XM, ULT, and IT. The player uses ncurses for console output and supports transparent loadingfrom gzip/pkzip/zoo archives and the loading/saving of playlists.
Install the mikmod package if you need a MOD music file player.
mpg123 – (Version 0.59q, 206K)�
�
�
�W
Mpg123 is a fast, free and portable MPEG audio player for Unix. It supports MPEG 1.0/2.0 layers 1, 2 and 3(”mp3” files). For full CD quality playback (44 kHz, 16 bit, stereo) a Pentium CPU is required. Mono and/orreduced quality playback (22 kHz or 11 kHz) is possible on 486 CPUs.
For information on the MP3 License, please visit: http://www.mpeg.org/
multimedia – (Version 2.1, 344K)�
�
�
�W
The multimedia package contains several X Window System utilities for handling multimedia files: xplaycd,xmixer and xgetfile. Xplaycd is a CD player for playing audio CDs on your machine’s CD-ROM drive. Xmixercontrols the volume settings on your machine’s sound card. Xgetfile is a versatile file browser, intended for usein shell scripts.
Install the multimedia package if you need an audio CD player, a sound card volume controller, or a file browserfor use in shell scripts.
playmidi – (Version 2.4, 133K)�
�
�
�W
Playmidi plays MIDI (Musicial Instrument Digital Interface) sound files through a sound card synthesizer. Thispackage includes basic drum samples for use with simple FM synthesizers.
Install playmidi if you want to play MIDI files using your computer’s sound card.
playmidi-X11 – (Version 2.4, 39K)�
�
�
�W
Playmidi-X11 provides an X Window System interface for playing MIDI (Musical Instrument Digital Interface)sound files through a sound card synthesizer. This package includes basic drum samples for use with simple FMsynthesizers.
Install playmidi-X11 if you want to use an X interface to play MIDI sound files using your computer’s sound card.
rhsound – (Version 1.8, 11K)�
�
�
�W
The rhsound package provides a script which can save and restore the mixer settings and volume level of thestandard kernel sound drivers. These mixer settings are preserved through shutdowns and restarts.
Install the rhsound package if you need to preserve the kernel sound driver module’s mixer settings through

272 Package List
shutdowns and reboots.
sndconfig – (Version 0.33, 306K)�
�
�
�W
Sndconfig is a text based tool which sets up the configuration files you’ll need to use a sound card with a RedHat Linux system. Sndconfig can be used to set the proper sound type for programs which use the /dev/dsp,/dev/audio and /dev/mixer devices. The sound settings are saved by the aumix and sysV runlevel scripts.
Install sndconfig if you need to configure your sound card.
sox – (Version 12.15, 233K)�
�
�
�W
SoX (Sound eXchange) is a sound file format converter for Linux, UNIX and DOS PCs. The self-described ’SwissArmy knife of sound tools,’ SoX can convert between many different digitized sound formats and perform simplesound manipulation functions, including sound effects.
Install the sox package if you’d like to convert sound file formats or manipulate some sounds.
transfig – (Version 3.2.1, 292K)
The transfig utility creates a makefile which translates FIG (created by xfig) or PIC figures into a specified LaTeXgraphics language (for example, PostScript(TM)). Transfig is used to create TeX documents which are portable(i.e., they can be printed in a wide variety of environments).
x11amp – (Version 0.9 alpha3, 1,342K)�
�
�
�W
X11amp is a X Windows based mp3 player with a nice interface borrowed from WinAMP.
For information on the MP3 License, please visit: http://www.mpeg.org/
xanim – (Version 27070, 847K)�
�
�
�W
The XAnim program is an animation/video/audio viewer for the X Window System. XAnim can display a largevariety of animation, audio and video formats.
Install the xanim package if you need a viewer for an animation, video or audio file.
xfig – (Version 3.2.2, 2,545K)
Xfig is an X Window System tool for creating basic vector graphics, including bezier curves, lines, rulers and more.The resulting graphics can be saved, printed on PostScript printers or converted to a variety of other formats (e.g.,X11 bitmaps, Encapsulated PostScript, LaTeX).
You should install xfig if you need a simple program to create vector graphics.
xpaint – (Version 2.4.9, 448K)�
�
�
�W
XPaint is an X Window System color image editing program which supports most standard paint program op-tions. XPaint also supports advanced features like image processing algorithms. XPaint allows you to edit multi-ple images simultaneously and supports a variety of image formats, including PPM, XBM, TIFF, JPEG, etc.
Install the xpaint package if you need a paint program for X.
zgv – (Version 3.0, 175K)

D.2 Applications 273
Zgv is an image viewer which can display graphics in GIF, JPEG/JFIF, PNG, PBM/PGM/PPM, BMP, TGA, PCXand MRF formats on VGA and SVGA displays. Zgv can also display thumbnails of the images. Zgv is based onsvgalib, which you will need to have on your system in order to use zgv.
Install zgv if you need an image viewer.
D.2.10 Productivity
This section contains packages that are associated with increasing productivity.
gnome-pim – (Version 1.0.7, 666K)�
�
�
�W
The GNOME Personal Information Manager consists of applications to make keeping up with your busy lifeeasier.
Currently these apps are present:
- gnomecal : personal calendar and todo list - gnomecard: contact list of friends and business associates
gnumeric – (Version 0.23, 5,036K)�
�
�
�W
GNOME is the GNU Network Object Model Environment. This powerful environment is both easy to use andeasy to configure.
This package will install Gnumeric the GNOME spreadsheet program. This program is intended to be a replace-ment for a commercial spreadsheet, so quite a bit of work has gone into the program.
Install this package if you want to use the GNOME spreadsheet Gnumeric.
ical – (Version 2.2, 790K)�
�
�
�W
�
�
�
�S
Ical is an X Window System based calendar program. Ical will easily create/edit/delete entries, create repeatingentries, remind you about upcoming appointments, print and list item occurrences, and allow shared calendarsbetween different users.
Install ical if you need a calendar program to track your schedule. You’ll need to have the X Window Systeminstalled in order to use ical.
korganizer – (Version 1.1.1pre2, 1,477K)
KOrganizer is a complete calendar and scheduling program for KDE. It allows interchange with other calendarapplications through the industry standard vCalendar file format.
D.2.11 Publishing
This section contains packages that are associated with publishing.
enscript – (Version 1.6.1, 1,515K)
Enscript is a print filter. It can take ASCII input and format it into PostScript output. At the same time, it can also

274 Package List
do nice transformations like putting two ASCII pages on one physical page (side by side) or changing fonts.
ghostscript – (Version 5.10, 3,330K)�
�
�
�W
�
�
�
�S
Ghostscript is a set of software that provides a PostScript(TM) interpreter, a set of C procedures (the Ghostscriptlibrary, which implements the graphics capabilities in the PostScript language) and an interpreter for PortableDocument Format (PDF) files. Ghostscript translates PostScript code into many common, bitmapped formats,like those understood by your printer or screen. Ghostscript is normally used to display PostScript files and toprint PostScript files to non-PostScript printers.
If you need to display PostScript files or print them to non-PostScript printers, you should install ghostscript. Ifyou install ghostscript, you also need to install the ghostscript-fonts package.
ghostscript-fonts – (Version 5.10, 1,490K)�
�
�
�W
�
�
�
�S
These fonts can be used by the GhostScript interpreter during text rendering. They are in addition to the sharedfonts between GhostScript and X11.
groff – (Version 1.11a, 2,842K)�
�
�
�B
Groff is a document formatting system. Groff takes standard text and formatting commands as input and pro-duces formatted output. The created documents can be shown on a display or printed on a printer. Groff’sformatting commands allow you to specify font type and size, bold type, italic type, the number and size ofcolumns on a page, and more.
You should install groff if you want to use it as a document formatting system. Groff can also be used to formatman pages. If you are going to use groff with the X Window System, you’ll also need to install the groff-gxditviewpackage.
groff-gxditview – (Version 1.11a, 73K)
Gxditview displays the groff text processor’s output on an X Window System display.
If you are going to use groff as a text processor, you should install gxditview so that you preview your processedtext files in X. You’ll also need to install the groff package and the X Window System.
gv – (Version 3.5.8, 424K)�
�
�
�W
�
�
�
�S
Gv provides a user interface for the ghostscript PostScript(TM) interpreter. Derived from the ghostview program,gv can display PostScript and PDF documents using the X Window System.
Install the gv package if you’d like to view PostScript and PDF documents on your system. You’ll also need tohave the ghostscript package installed, as well as the X Window System.
lout – (Version 3.08, 3,452K)
Lout is a high-level language for document formatting. Lout reads a high-level description of a document (similarin style to LaTeX) and can produce a PostScript(TM) file for printing or produce plain text. Lout supports thetypesetting of documents which contain floating figures, table, diagrams, rotated and scaled text or graphics,footnotes, running headers, footers, an index, a table of contents and bibliography, cross-references, mathematicalequations and statistical graphs. Lout can be extended with definitions that should be easier to write than otherlanguages, since Lout is a high-level language. Lout supports (with hyphenation) a variety of languages: Czech,Danish, Dutch, English, Finnish, French, German, Norwegian, Russian, Slovenian, Spanish and Swedish.

D.2 Applications 275
Install the lout package if you’d like to try the Lout document formatting system. Unless you’re already a Loutexpert, you’ll probably want to also install the lout-doc package, which contains the documentation for Lout.
lout-doc – (Version 3.08, 2,069K)
The lout-doc package includes all of the documentation for the Lout document formatting language. The doc-umentation includes manuals for regular users and for experts, written in Lout and available as PostScript(TM)files. The documentation provides good examples for how to write large documents with Lout.
If you’re installing the lout package, you should install the lout-doc package.
mpage – (Version 2.4, 90K)�
�
�
�W
�
�
�
�S
The mpage utility takes plain text files or PostScript(TM) documents as input, reduces the size of the text, andprints the files on a PostScript printer with several pages on each sheet of paper. Mpage is very useful for viewinglarge printouts without using up tons of paper. Mpage supports many different layout options for the printedpages.
Mpage should be installed if you need a useful utility for viewing long text documents without wasting paper.
printtool – (Version 3.40, 113K)�
�
�
�W
�
�
�
�S
The printtool is a printer configuration tool with a graphical user interface. Printtool can manage both local andremote printers, including Windows (SMB) and NetWare (NCP) printers.
Printtool should be installed so that you can manage local and remote printers.
rhs-printfilters – (Version 1.51, 92K)�
�
�
�W
�
�
�
�S
The rhs-printfilters package contains a set of print filters which are primarily meant to be used with the Red Hatprinttool. These print filters provide an easy way for users to handle printing numerous file formats.
sgml-tools – (Version 1.0.9, 1,877K)
SGMLtools is a text formatting package based on SGML (Standard Generalized Markup Language). SGMLtoolsallows you to produce LaTeX, HTML, GNU info, LyX, RTF, plain text (via groff), and other format outputs from asingle source. SGMLtools is intended for writing technical software documentation.
Install SGMLTools if you need a text formatting program that can produce a variety of different formats from asingle source file. You should probably also install and try SGMLTtools if you’re going to write technical softwaredocumentation.
tetex – (Version 0.9, 40,085K)�
�
�
�W
TeTeX is an implementation of TeX for Linux or UNIX systems. TeX takes a text file and a set of formattingcommands as input and creates a typesetter independent .dvi (DeVice Independent) file as output. Usually, TeXis used in conjunction with a higher level formatting package like LaTeX or PlainTeX, since TeX by itself is notvery user-friendly.
Install tetex if you want to use the TeX text formatting system. If you are installing tetex, you will also need toinstall tetex-afm (a PostScript(TM) font converter for TeX), tetex-dvilj (for converting .dvi files to HP PCL formatfor printing on HP and HP compatible printers), tetex-dvips (for converting .dvi files to PostScript format forprinting on PostScript printers), tetex-latex (a higher level formatting package which provides an easier-to-useinterface for TeX) and tetex-xdvi (for previewing .dvi files in X). Unless you’re an expert at using TeX, you’ll also

276 Package List
want to install the tetex-doc package, which includes the documentation for TeX.
tetex-afm – (Version 0.9, 2,029K)�
�
�
�W
Tetex-afm provides afm2tfm, a converter for PostScript font metric files. PostScript fonts are accompanied by .afmfont metric files which describe the characteristics of each font. To use PostScript fonts with TeX, TeX needs .tfmfiles that contain similar information. Afm2tfm will convert .afm files to .tfm files.
If you are installing tetex in order to use the TeX text formatting system, you will need to install tetex-afm. You willalso need to install tetex-dvilj (for converting .dvi files to HP PCL format for printing on HP and HP compatibleprinters), tetex-dvips (for converting .dvi files to PostScript format for printing on PostScript printers), tetex-latex (a higher level formatting package which provides an easier-to-use interface for TeX) and tetex-xdvi (forpreviewing .dvi files in X). Unless you’re an expert at using TeX, you’ll probably also want to install the tetex-docpackage, which includes documentation for TeX.
tetex-doc – (Version 0.9, 34,933K)
The tetex-doc package contains documentation for the TeX text formatting system.
If you want to use TeX and you’re not an expert at it, you should install the tetex-doc package. You’ll alsoneed to install the tetex package, tetex-afm (a PostScript font converter for TeX), tetex-dvilj (for converting .dvifiles to HP PCL format for printing on HP and HP compatible printers), tetex-dvips (for converting .dvi filesto PostScript format for printing on PostScript printers), tetex-latex (a higher level formatting package whichprovides an easier-to-use interface for TeX) and tetex-xdvi (for previewing .dvi files).
tetex-dvilj – (Version 0.9, 336K)�
�
�
�W
Dvilj and dvilj’s siblings (included in this package) will convert TeX text formatting system output .dvi files toHP PCL (HP Printer Control Language) commands. Using dvilj, you can print TeX files to HP LaserJet+ and fullycompatible printers. With dvilj2p, you can print to HP LaserJet IIP and fully compatible printers. And with dvilj4,you can print to HP LaserJet4 and fully compatible printers.
If you are installing tetex, so that you can use the TeX text formatting system, you will also need to install tetex-dvilj. In addition, you will need to install tetex-afm (for converting PostScript font description files), tetex-dvips(for converting .dvi files to PostScript format for printing on PostScript printers), tetex-latex (a higher level for-matting package which provides an easier-to-use interface for TeX) and tetex-xdvi (for previewing .dvi files inX). If you’re installing TeX and you’re not a TeX expert, you’ll also want to install the tetex-doc package, whichcontains documentation for TeX.
tetex-dvips – (Version 0.9, 839K)�
�
�
�W
Dvips converts .dvi files produced by the TeX text formatting system (or by another processor like GFtoDVI) toPostScript(TM) format. Normally the PostScript file is sent directly to your printer.
If you are installing tetex, so that you can use the TeX text formatting system, you will also need to install tetex-dvips. In addition, you will need to install tetex-afm (for converting PostScript font description files), tetex-dvilj(for converting .dvi files to HP PCL format for printing on HP and HP compatible printers), tetex-latex (a higherlevel formatting package which provides an easier-to-use interface for TeX) and tetex-xdvi (for previewing .dvifiles in X). If you’re installing TeX and you’re not an expert at it, you’ll also want to install the tetex-doc package,which contains documentation for the TeX system.
tetex-latex – (Version 0.9, 8,332K)�
�
�
�W

D.2 Applications 277
LaTeX is a front end for the TeX text formatting system. Easier to use than TeX, LaTeX is essentially a set of TeXmacros which provide convenient, predefined document formats for users.
If you are installing tetex, so that you can use the TeX text formatting system, you will also need to install tetex-latex. In addition, you will need to install tetex-afm (for converting PostScript font description files), tetex-dvilj(for converting .dvi files to HP PCL format for printing on HP and HP compatible printers), tetex-dvips (forconverting .dvi files to PostScript format for printing on PostScript printers) and tetex-xdvi (for previewing .dvifiles in X). If you’re not an expert at TeX, you’ll probably also want to install the tetex-doc package, which containsdocumentation for TeX.
tetex-xdvi – (Version 0.9, 964K)�
�
�
�W
�
�
�
�S
Xdvi allows you to preview the TeX text formatting system’s output .dvi files on an X Window System.
If you are installing tetex, so that you can use the TeX text formatting system, you will also need to install tetex-xdvi. In addition, you will need to install tetex-afm (a PostScript font converter for TeX), tetex-dvilj (for converting.dvi files to HP PCL format for printing on HP and HP compatible printers), tetex-dvips (for converting .dvi filesto PostScript format for printing on PostScript printers), and tetex-latex (a higher level formatting package whichprovides an easier-to-use interface for TeX). If you’re not a TeX expert, you’ll probably also want to install thetetex-doc package, which contains documentation for the TeX text formatting system.
texinfo – (Version 3.12f, 799K)�
�
�
�W
�
�
�
�S
Texinfo is a documentation system that can produce both online information and printed output from a singlesource file. Normally, you’d have to write two separate documents: one for online help or other online informa-tion and the other for a typeset manual or other printed work. Using Texinfo, you only need to write one sourcedocument. Then when the work needs revision, you only have to revise one source document. The GNU Projectuses the Texinfo file format for most of its documentation.
Install texinfo if you want a documentation system for producing both online and print documentation from thesame source file and/or if you are going to write documentation for the GNU Project.
xpdf – (Version 0.80, 1,351K)
Xpdf is an X Window System based viewer for Portable Document Format (PDF) files. PDF files are sometimescalled Acrobat files, after Adobe Acrobat (Adobe’s PDF viewer). Xpdf is a small and efficient program which usesstandard X fonts.
Install the xpdf package if you need a viewer for PDF files.
D.2.12 System
This section contains packages that are associated with system-level operations.
SVGATextMode – (Version 1.8, 852K)
SVGATextMode is a utility for reprogramming (S)VGA hardware, which can improve the appearance of textconsoles. You should install SVGATextMode if you want to alter the appearance of your text consoles. The utilityuses a configuration file (Xconfig or XF86Config) to set up textmodes with higher resolution, larger fonts, higherdisplay refresh rates, etc.

278 Package List
Although SVGATextMode can be used to program any text mode size, your results will depend on your VGAcard.
arpwatch – (Version 2.1a4, 104K)
The arpwatch package contains arpwatch and arpsnmp. Arpwatch and arpsnmp are both network monitoringtools. Both utilities monitor Ethernet or FDDI network traffic and build databases of Ethernet/IP address pairs,and can report certain changes via email.
Install the arpwatch package if you need networking monitoring devices which will automatically keep traffic ofthe IP addresses on your network.
bind-utils – (Version 8.2, 1,320K)�
�
�
�W
�
�
�
�S
Bind-utils contains a collection of utilities for querying DNS (Domain Name Service) name servers to find outinformation about Internet hosts. These tools will provide you with the IP addresses for given host names, aswell as other information about registered domains and network addresses.
You should install bind-utils if you need to get information from DNS name servers.
comanche – (Version 990405, 375K)
Comanche (COnfiguration MANager for apaCHE) is a front-end for the Apache Web server, the most popularWeb server used on the Internet. Comanche aims to to make it easier to manage and configure Apache.
Install the commanche package if you need a configuration manager for the Apache Web server. You’ll also needto install the apache package.
console-tools – (Version 19990302, 1,460K)�
�
�
�B
This package contains utilities to load console fonts and keyboard maps. It also includes a number of differentfonts and keyboard maps.
dialog – (Version 0.6, 88K)�
�
�
�W
Dialog is a utility that allows you to show dialog boxes (containing questions or messages) in TTY (text mode)interfaces. Dialog is called from within a shell script. The following dialog boxes are implemented: yes/no, menu,input, message, text, info, checklist, radiolist, and gauge.
Install dialog if you would like to create TTY dialog boxes.
ext2ed – (Version 0.1, 288K)
Ext2ed is a program which provides a text and window interface for examining and editing an ext2 filesystem.Ext2ed is supposed to be easier to use than debugfs, but debugfs is more powerful. Note that this program shouldonly be used by someone who is very experienced at hacking filesystems.
Install ext2ed if you want to examine and/or edit your ext2 filesystem, and you know what you’re doing.
fbset – (Version 2.0.19990118, 34K)
fbset is a utility for querying and changing video modes of fbcon consoles.
gnome-linuxconf – (Version 0.22, 320K)�
�
�
�W
�
�
�
�S

D.2 Applications 279
GNOME (GNU Network Object Model Environment) is a user-friendly set of applications and desktop tools to beused in conjunction with a window manager for the X Window System. The gnome-linuxconf package includesGNOME’s front end for the linuxconf system configuration utility.
gnome-utils – (Version 1.0.1, 767K)�
�
�
�W
GNOME is the GNU Network Object Model Environment. This powerful environment is both easy to use andeasy to configure.
This package will install some GNOME utilities, such as the calendar and calculator.
gnorpm – (Version 0.8, 394K)�
�
�
�W
�
�
�
�S
Gnome RPM is a graphical front end to RPM, similar to Glint, but written with the GTK widget set and theGNOME libraries. It is currently under development, so there are some features missing, but you can currentlyquery packages in the filesystem and database, install upgrade, uninstall and verify packages.
gtop – (Version 1.0.1, 267K)�
�
�
�W
GNOME is the GNU Network Object Model Environment. This powerful environment is both easy to use andeasy to configure.
This package will install the GNOME system monitor gtop, which shows memory graphs and processes.
hdparm – (Version 3.3, 37K)�
�
�
�B
Hdparm is a useful system utility for setting (E)IDE hard drive parameters. For example, hdparm can be used totweak hard drive performance and to spin down hard drives for power conservation.
ipxutils – (Version 2.2.0.12, 53K)�
�
�
�S
The ipxutils package includes utilities (ipx configure, ipx internal net, ipx interface, ipx route) necessary for con-figuring and debugging IPX interfaces and networks under Linux. IPX is the low-level protocol used by Novell’sNetWare file server system to transfer data.
Install ipxutils if you need to configure IPX networking on your network.
isicom – (Version 1.0, 38K)
Binary images and loader for Multitech IntelligentSerialInternal (ISI) data files.
kdeadmin – (Version 1.1.1pre2, 1,465K)
System Administration tools for the K Desktop Environment.
Included with this package are: kdat (tape backup); ksysv (sysV init editor); kuser (user administration tool)
kdeutils – (Version 1.1.1pre2, 3,375K)
Utilities for the K Desktop Environment. Includes: ark (tar/gzip archive manager); kab (address book); karm(personal time tracker); kcalc (scientific calculator); kedit (simple text editor); kfloppy (floppy formatting tool);khexedit (hex editor); kjots (note taker); klipper (clipboard tool); kljettool(HP printer configuration tool); klpq(print queue manager) knotes (post-it notes for the desktop); kpm (process manager similar to ’top’, but moreadvanced);kwrite (improved text editor).

280 Package List
kernelcfg – (Version 0.5, 58K)�
�
�
�W
�
�
�
�S
The kernelcfg package contains an X Window System based graphical user interface tool for configuring thekernel daemon (kerneld). Kerneld automatically loads some hardware and software support into memory asneeded and unloads the support when it is no longer being used. The kernel configurator tool can be used to tellkerneld what hardware support to load when it is presented with a generic hardware request.
Kernelcfg should be installed because it is a useful utility for managing the kernel daemon.
knfsd-clients – (Version 1.2.2, 10K)
The nfs-server-clients package contains the showmount program. Showmount queries the mount daemon ona remote host for information about the NFS (Network File System) server on the remote host. For example,showmount can display the clients which are mounted on that host. This package is not needed to mount NFSvolumes.
Install nfs-server-clients if you’d like to use the showmount tool for querying NFS servers.
linuxconf – (Version 1.14r4, 11,306K)�
�
�
�B
Linuxconf is an extremely capable system configuration tool. Linuxconf provides four different interfaces foryou to choose from: command line, character-cell (like the installation program), an X Window System basedGUI and a web-based interface. Linuxconf can manage a large proportion of your system’s operations, includingnetworking, user accounts, file systems, boot parameters, and more.
Linuxconf will simplify the process of configuring your system. Unless you are completely happy with configur-ing your system manually, you should install the linuxconf package and use linuxconf instead.
macutils – (Version 2.0b3, 218K)
The macutils package includes a set of utilities for manipulating files that are commonly used by Macintoshmachines. Macutils includes utilities like binhex, hexbin, macunpack, etc.
Install macutils if you need to manipulate files that are commonly used by Macintosh machines.
mkdosfs-ygg – (Version 0.3b, 17K)�
�
�
�W
The mkdosfs program is used to create an MS-DOS FAT file system on a Linux system device, usually a diskpartition.
The mkdosfs package should be installed if your machine needs to support MS-DOS style file systems.
mkisofs – (Version 1.12b5, 153K)
The mkisofs program is used as a pre-mastering program; i.e., it generates the ISO9660 filesystem. Mkisofs takesa snapshot of a given directory tree and generates a binary image of the tree which will correspond to an ISO9660filesystem when written to a block device. Mkisofs is used for writing CD-ROMs, and includes support forcreating bootable El Torito CD-ROMs.
Install the mkisofs package if you need a program for writing CD-ROMs.
mkxauth – (Version 1.7, 15K)�
�
�
�W
�
�
�
�S
The mkxauth utility helps create and maintain X authentication databases (.Xauthority files). Mkxauth is used

D.2 Applications 281
to create an .Xauthority file or to merge keys from another local or remote .Xauthority file. .Xauthority files areused by the xauth user-oriented access control program, which grants or denies access to X servers based on thecontents of the .Xauthority file.
The mkxauth package should be installed if you’re going to use user-oriented access control to provide securityfor your X Window System (a good idea).
modemtool – (Version 1.21, 15K)�
�
�
�W
�
�
�
�S
The modemtool is a simple graphical configuration tool for selecting the serial port to which your modem isconnected.
Install modemtool if you use a modem.
mt-st – (Version 0.5b, 67K)�
�
�
�B
The mt-st package contains the mt and st tape drive management programs. Mt (for magnetic tape drives) and st(for SCSI tape devices) can control rewinding, ejecting, skipping files and blocks and more.
This package can help you manage tape drives.
mtools – (Version 3.9.1, 486K)�
�
�
�W
Mtools is a collection of utilities for accessing MS-DOS files. Mtools allow you to read, write and move aroundMS-DOS filesystem files (normally on MS-DOS floppy disks). Mtools supports Windows95 style long file names,OS/2 Xdf disks, and 2m disks.
Mtools should be installed if you need to use MS-DOS disks.
ncpfs – (Version 2.2.0.12, 553K)�
�
�
�S
Ncpfs is a filesystem which understands the Novell NetWare(TM) NCP protocol. Functionally, NCP is used forNetWare the way NFS is used in the TCP/IP world. For a Linux system to mount a NetWare filesystem, it needs aspecial mount program. The ncpfs package contains such a mount program plus other tools for configuring andusing the ncpfs filesystem.
Install the ncpfs package if you need to use the ncpfs filesystem to use Novell NetWare files or services.
netcfg – (Version 2.20, 165K)�
�
�
�W
�
�
�
�S
A Red Hat Linux tool which provides a graphical user interface for setting up and configuring networking foryour machine.
open – (Version 1.4, 13K)
The open command starts a specified command with the first available virtual console, or on a virtual consolethat you specify.
Install the open package if you regularly use virtual consoles to run programs.
pciutils – (Version 1.99.5, 121K)
This package contains various utilities for inspecting and setting devices connected to the PCI bus.

282 Package List
It requires kernel version 2.1.82 or newer (supporting the /proc/bus/pci interface).
procinfo – (Version 16, 54K)
The procinfo command gets system data from the /proc directory (the kernel filesystem), formats it and displaysit on standard output. You can use procinfo to acquire information about your system from the kernel as it isrunning.
Install procinfo if you’d like to use it to gather and display system data.
procps – (Version 2.0.2, 298K)�
�
�
�B
The procps package contains a set of system utilities which provide system information. Procps includes ps, free,skill, snice, tload, top, uptime, vmstat, w, and watch. The ps command displays a snapshot of running processes.The top command provides a repetitive update of the statuses of running processes. The free command displaysthe amounts of free and used memory on your system. The skill command sends a terminate command (oranother specified signal) to a specified set of processes. The snice command is used to change the schedulingpriority of specified processes. The tload command prints a graph of the current system load average to a specifiedtty. The uptime command displays the current time, how long the system has been running, how many users arelogged on and system load averages for the past one, five and fifteen minutes. The w command displays a list ofthe users who are currently logged on and what they’re running. The watch program watches a running program.The vmstat command displays virtual memory statistics about processes, memory, paging, block I/O, traps andCPU activity.
procps-X11 – (Version 2.0.2, 0K)
The procps-X11 package contains the XConsole shell script, a backwards compatibility wrapper for the xconsoleprogram.
psacct – (Version 6.3, 87K)
The psacct package contains several utilities for monitoring process activities, including ac, lastcomm, accton andsa. The ac command displays statistics about how long users have been logged on. The lastcomm commanddisplays information about previous executed commands. The accton command turns process accounting on oroff. The sa command summarizes information about previously executed commmands.
Install the psacct package if you’d like to use its utilities for monitoring process activities on your system.
psmisc – (Version 18, 46K)�
�
�
�B
The psmisc package contains utilities for managing processes on your system: pstree, killall and fuser. The pstreecommand displays a tree structure of all of the running processes on your system. The killall command sends aspecified signal (SIGTERM if nothing is specified) to processes identified by name. The fuser command identifiesthe PIDs of processes that are using specified files or filesystems.
rdate – (Version 0.960923, 5K)�
�
�
�W
�
�
�
�S
The rdate utility retrieves the date and time from another machine on your network, using the protocol describedin RFC 868. If you run rdate as root, it will set your machine’s local time to the time of the machine that youqueried. Note that rdate isn’t scrupulously accurate. If you are worried about milliseconds, get the xntpd programinstead.
rdist – (Version 6.1.5, 141K)�
�
�
�W
�
�
�
�S

D.2 Applications 283
The rdist program maintains identical copies of files on multiple hosts. If possible, rdist will preserve the owner,group, mode and mtime of files and it can update programs that are executing.
rhmask – (Version 1.0, 8K)
The rhmask utility creates mask files from original and updated files. The mask files, which may be the latest newversions of software, can then be freely distributed on public Internet servers. The mask files are only useful forpeople who who already have a copy of the original package. The rhmask utility uses a simple XOR scheme forcreating the file mask and uses file size and md5 sums to ensure the integrity of the result.
Install the rhmask package if you need a utility for creating file masks.
rhs-hwdiag – (Version 0.36, 75K)�
�
�
�B
The rhs-hwdiag package contains the Red Hat Hardware Discovery Tools. These tools probe the serial and par-allel ports on your system, and are useful for finding and reporting hardware errors to Red Hat support if you’rehaving problems. These tools could cause adverse side-effects in some situations, so you should use them care-fully.
screen – (Version 3.7.6, 360K)
The screen utility allows you to have multiple logins on just one terminal. Screen is useful for users who telnetinto a machine or are connected via a dumb terminal, but want to use more than just one login.
Install the screen package if you need a screen manager that can support multiple logins on one terminal.
setconsole – (Version 1.0, 3K)�
�
�
�B
Setconsole is a basic system utility for setting up the /etc/inittab, /dev/systty and /dev/console files to handlea new console. The console can be either the local terminal (i.e., directly attached to the system via a video card)or a serial console.
setserial – (Version 2.15, 37K)�
�
�
�B
Setserial is a basic system utility for displaying or setting serial port information. Setserial can reveal and allowyou to alter the I/O port and IRQ that a particular serial device is using, and more.
You should install setserial because you may find it useful for detecting and/or altering device information.
setuptool – (Version 1.2, 7K)�
�
�
�B
Setuptool is a user-friendly text mode menu utility which allows you to access all of the text mode configurationprograms included in the Red Hat Linx operating system.
You should install the setuptool package because you will find yourself using its features for essential systemadministration.
statserial – (Version 1.1, 289K)�
�
�
�W
�
�
�
�S
The statserial utility displays a table of the signals on a standard 9-pin or 25-pin serial port and indicates the statusof the handshaking lines. Statserial is useful for debugging serial port and/or modem problems.
Install the statserial package if you need a tool to help debug serial port or modem problems.

284 Package List
swatch – (Version 2.2, 129K)
The Swatch utility monitors system log files, filters out unwanted data and takes specified actions (i.e., sendingemail, executing a script, etc.) based upon what it finds in the log files.
Install the swatch package if you need a program that will monitor log files and alert you in certain situations.
symlinks – (Version 1.2, 212K)
The symlinks utility performs maintenance on symbolic links. Symlinks checks for symlink problems, includingdangling symlinks which point to nonexistent files. Symlinks can also automatically convert absolute symlinksto relative symlinks.
Install the symlinks package if you need a program for maintaining symlinks on your system.
time – (Version 1.7, 18K)�
�
�
�B
The GNU time utility runs another program, collects information about the resources used by that program whileit is running and displays the results.
Time can help developers optimize their programs.
timetool – (Version 2.5, 22K)�
�
�
�W
�
�
�
�S
The timetool utility provides a graphical user interface for setting the current date and time on your system.
tksysv – (Version 1.0, 35K)�
�
�
�W
�
�
�
�S
Tksysv is an X Window System based graphical interface for editing the services provided by different runlevels.Tksysv is used to set which services are stopped and which services are started in the different runlevels on yoursystem.
Install the tksysv package if you’d like to use a graphical tool for editing runlevel services.
tunelp – (Version 1.3, 9K)
The tunelp utility sets various parameters for lp devices (/dev/lp0, /dev/lp1, /dev/lp2). Tunelp can set param-eters like the lp device’s interrupt usage, polling rate, etc.
Install the tunelp package if you need a utility for setting lp device parameters.
ucd-snmp-utils – (Version 3.6.1, 252K)�
�
�
�W
�
�
�
�S
The ucd-snmp package contains various utilities for use with the UCD-SNMP network management project.
Install this package if you need utilities for managing your network using the SNMP protocol. You’ll also need toinstall the ucd-snmp package.
usermode – (Version 1.9, 98K)�
�
�
�W
�
�
�
�S
The usermode package contains several graphical tools for users: userinfo, usermount and userpasswd. Userinfoallows users to change their finger information. Usermount lets users mount, unmount, and format filesystems.Userpasswd allows users to change their passwords.
Install the usermode package if you would like to provide users with graphical tools for certain account manage-

D.2 Applications 285
ment tasks.
usernet – (Version 1.0.9, 24K)�
�
�
�W
�
�
�
�S
The usernet utility provides a graphical interface for manipulating network interfaces (bringing them up or downand viewing their status). Users can only manipulate interfaces that are user-controllable. The superuser cancontrol all interfaces.
Install the usernet package if you’d like to provide a graphical utility for manipulating network interfaces.
vlock – (Version 1.3, 9K)
The vlock program locks one or more sessions on the console. Vlock can lock the current terminal (local orremote) or the entire virtual console system, which completely disables all console access. The vlock programunlocks when either the password of the user who started vlock or the root password is typed.
Install vlock if you need to disable access to one console or to all virtual consoles.
which – (Version 1.0, 7K)�
�
�
�B
The which command shows the full pathname of a specified program, if the specified program is in your PATH.
xcpustate – (Version 2.5, 33K)
The xcpustate utility is an X Window System based monitor which shows the amount of time that the CPU isspending in different states. On a Linux system, xcpustate displays a bar that indicates the amounts of idle, user,nice and system time (from left to right) used by the CPU.
Install the xcpustate package if you’d like to use a horizontal bar style CPU state monitor.
xosview – (Version 1.7.1, 109K)
The xosview utility displays a set of bar graphs which show the current system state, including memory usage,CPU usage, system load, etc. Xosview runs under the X Window System.
Install the xosview package if you need a graphical tool for monitoring your system’s performance.
xsysinfo – (Version 1.6, 22K)
Xsysinfo is a graphic kernel monitoring tool for the X Window System. Xsysinfo displays vertical bars for certainkernel parameters: CPU load average, CPU load, memory and swap sizes.
Install the xsysinfo package if you’d like to use a graphical kernel monitoring tool.
xtoolwait – (Version 1.2, 10K)
Xtoolwait is a utility which starts an X client in the background, waits for a window to be mapped on the rootwindow, and then exits. Xtoolwait can improve performance for users who start a bunch of X clients automatically(for example, xterm, xlock, xconsole, whatever) when the X session starts.
Install xtoolwait if you’d like to try to speed up the startup time for X sessions.

286 Package List
D.2.13 Text
This section contains packages that are associated with the manipulation of text.
diffutils – (Version 2.7, 161K)�
�
�
�B
Diffutils includes four utilities: diff, cmp, diff3 and sdiff. Diff compares two files and shows the differences,line by line. The cmp command shows the offset and line numbers where two files differ, or cmp can show thecharacters that differ between the two files. The diff3 command shows the differences between three files. Diff3can be used when two people have made independent changes to a common original; diff3 can produce a mergedfile that contains both persons’ changes and warnings about conflicts. The sdiff command can be used to mergetwo files interactively.
Install diffutils if you need to compare text files.
ed – (Version 0.2, 102K)�
�
�
�B
Ed is a line-oriented text editor, used to create, display, and modify text files (both interactively and via shellscripts). For most purposes, ed has been replaced in normal usage by full-screen editors (emacs and vi, forexample).
Ed was the original UNIX editor, and may be used by some programs. In general, however, you probably don’tneed to install it and you probably won’t use it much.
gawk – (Version 3.0.3, 2,280K)�
�
�
�B
The gawk packages contains the GNU version of awk, a text processing utility. Awk interprets a special-purposeprogramming language to do quick and easy text pattern matching and reformatting jobs. Gawk should beupwardly compatible with the Bell Labs research version of awk and is almost completely compliant with the1993 POSIX 1003.2 standard for awk.
Install the gawk package if you need a text processing utility. Gawk is considered to be a standard Linux tool forprocessing text.
grep – (Version 2.3, 287K)�
�
�
�B
The GNU versions of commonly used grep utilities. Grep searches one or more input files for lines which containa match to a specified pattern and then prints the matching lines. GNU’s grep utilities include grep, egrep andfgrep.
You should install grep on your system, because it is a very useful utility for searching through text files, forsystem administration tasks, etc.
indent – (Version 1.9.1, 81K)
Indent is a GNU program for beautifying C code, so that it is easier to read. Indent can also convert from one Cwriting style to a different one. Indent understands correct C syntax and tries to handle incorrect C syntax.
Install the indent package if you are developing applications in C and you’d like to format your code automati-cally.
ispell – (Version 3.1.20, 4,049K)�
�
�
�W
�
�
�
�S

D.2 Applications 287
Ispell is the GNU interactive spelling checker. Ispell will check a text file for spelling and typographical errors.When it finds a word that is not in the dictionary, it will suggest correctly spelled words for the misspelled word.
You should install ispell if you need a program for spell checking (and who doesn’t...).
less – (Version 332, 142K)�
�
�
�B
The less utility is a text file browser that resembles more, but has more capabilities. Less allows you to movebackwards in the file as well as forwards. Since less doesn’t have to read the entire input file before it starts, lessstarts up more quickly than text editors (for example, vi).
You should install less because it is a basic utility for viewing text files, and you’ll use it frequently.
m4 – (Version 1.4, 120K)�
�
�
�W
�
�
�
�S
A GNU implementation of the traditional UNIX macro processor. M4 is useful for writing text files which canbe logically parsed, and is used by many programs as part of their build process. M4 has built-in functions forincluding files, running shell commands, doing arithmetic, etc. The autoconf program needs m4 for generatingconfigure scripts, but not for running configure scripts.
Install m4 if you need a macro processor.
mawk – (Version 1.2.2, 131K)
Mawk is a version of the awk programming language. Awk interprets a special-purpose programming languageto do quick text pattern matching and reformatting. Mawk improves on awk in certain ways and can some-times outperform gawk, the standard awk program for Linux. Mawk conforms to the POSIX 1003.2 (draft 11.3)definition of awk.
You should install mawk if you use awk.
rgrep – (Version 0.98.7, 17K)
The rgrep utility can recursively descend through directories as it greps for the specified pattern. Note that thisability does take a toll on rgrep’s performance, which is somewhat slow. Rgrep will also highlight the matchingexpression.
Install the rgrep package if you need a recursive grep which can highlight the matching expression.
sed – (Version 3.02, 68K)�
�
�
�B
The sed (Stream EDitor) editor is a stream or batch (non-interactive) editor. Sed takes text as input, performsan operation or set of operations on the text and outputs the modified text. The operations that sed performs(substitutions, deletions, insertions, etc.) can be specified in a script file or from the command line.
textutils – (Version 1.22, 694K)�
�
�
�B
A set of GNU utilities for modifying the contents of files, including programs for splitting, joining, comparingand modifying files.

288 Package List
D.3 Development
This section contains packages that are associated with the development of software under Red Hat Linux.
D.3.1 Debuggers
This section contains packages that are associated with debugging programs under Red Hat Linux.
gdb – (Version 4.17.0.11, 1,136K)�
�
�
�W
�
�
�
�S
Gdb is a full featured, command driven debugger. Gdb allows you to trace the execution of programs and exam-ine their internal state at any time. Gdb works for C and C++ compiled with the GNU C compiler gcc.
If you are going to develop C and/or C++ programs and use the GNU gcc compiler, you may want to install gdbto help you debug your programs.
lslk – (Version 1.19, 35K)
Lslk is a lock file lister. Lslk attempts to list all of the locks on the executing system’s local files (i.e., on the activeinodes).
Install lslk if you need a utility for listing file locks.
lsof – (Version 4.42, 549K)
Lsof’s name stands for LiSt Open Files, and it does just that. It lists information about files that are open by theprocesses running on a UNIX system.
ltrace – (Version 0.3.6, 75K)
Ltrace is a debugging program which runs a specified command until the command exits. While the commandis executing, ltrace intercepts and records both the dynamic library calls called by the executed process and thesignals received by the executed process. Ltrace can also intercept and print system calls executed by the process.
You should install ltrace if you need a sysadmin tool for tracking the execution of processes.
strace – (Version 3.1, 100K)�
�
�
�W
�
�
�
�S
The strace program intercepts and records the system calls called and received by a running process. Strace canprint a record of each system call, its arguments and its return value. Strace is useful for diagnosing problemsand debugging, as well as for instructional purposes.
Install strace if you need a tool to track the system calls made and received by a process.
xxgdb – (Version 1.12, 103K)�
�
�
�W
Xxgdb is an X Window System graphical interface to the GNU gdb debugger. Xxgdb provides visual feedbackand supports a mouse interface for the user who wants to perform debugging tasks like the following: controllingprogram execution through breakpoints, examining and traversing the function call stack, displaying values ofvariables and data structures, and browsing source files and functions.

D.3 Development 289
Install the xxgdb package if you’d like to use a graphical interface with the GNU gdb debugger. You’ll also needto have the gdb package installed.
D.3.2 Languages
This section contains packages that are associated with the programming languages available under Red HatLinux.
compat-egcs – (Version 5.2, 2,096K)
This package includes a compiler that can be used to generated binaries that will run on older Red Hat Linuxsystems (namely Red Hat Linux 5.2, or glibc 2.0.X based systems). This package includes the C compiler andrequired compiler libraries for those systems.
compat-egcs-c++ – (Version 5.2, 3,219K)
This package includes a compiler that can be used to generated binaries that will run on older Red Hat Linuxsystems (namely Red Hat Linux 5.2, or glibc 2.0.X based systems). This packge includes the C++ compiler andlibraries for those older systems.
compat-egcs-g77 – (Version 5.2, 2,104K)
This package includes a compiler that can be used to generated binaries that will run on older Red Hat Linuxsystems (namely Red Hat Linux 5.2, or glibc 2.0.X based systems). This packge includes the Fortran 77 compilerand libraries for those older systems.
compat-egcs-objc – (Version 5.2, 1,490K)
This package includes a compiler that can be used to generated binaries that will run on older Red Hat Linuxsystems (namely Red Hat Linux 5.2, or glibc 2.0.X based systems). This packge includes the Objective C compilerand libraries for those older systems.
cpp – (Version 1.1.2, 135K)�
�
�
�W
�
�
�
�S
The C preprocessor is a ’macro processor’ which is used automatically by the C compiler to transform yourprogram before actual compilation. It is called a macro processor because it allows you to define ’macros,’ whichare abbreviations for longer constructs.
The C preprocessor provides four separate facilities that you can use as you see fit:
* Inclusion of header files. These are files of declarations that can be substituted into your program. * Macroexpansion. You can define ’macros,’ which are abbreviations for arbitrary fragments of C code, and then the Cpreprocessor will replace the macros with their definitions throughout the program. * Conditional compilation.Using special preprocessing directives, you can include or exclude parts of the program according to variousconditions. * Line control. If you use a program to combine or rearrange source files into an intermediate filewhich is then compiled, you can use line control to inform the compiler about where each source line originated.
You should install this package if you are a programmer who is searching for such a macro processor.
egcs – (Version 1.1.2, 3,525K)�
�
�
�W
�
�
�
�S

290 Package List
EGCS is a free software project that intends to further the development of GNU compilers using an open de-velopment environment. The egcs package contains the egcs compiler, a compiler aimed at integrating all theoptimizations and features necessary for a high-performance and stable development environment.
Install egcs if you’d like to use an experimental GNU compiler.
egcs-c++ – (Version 1.1.2, 5,912K)�
�
�
�W
This package adds C++ support to the GNU C compiler. It includes support for most of the current C++ spec-ification, including templates and exception handling. It does include the static standard C++ library and C++header files; the library for dynamically linking programs is available separately.
egcs-g77 – (Version 1.1.2, 4,631K)
The egcs-g77 package provides support for compiling Fortran 77 programs with the GNU gcc compiler.
You should install egcs-g77 if you are going to do Fortran development and you would like to use the gcc compiler.You will also need to install the gcc package.
egcs-objc – (Version 1.1.2, 1,969K)
Egcs-objc provides Objective C support for the GNU C compiler (gcc). Mainly used on systems running NeXTSTEP,Objective C is an object-oriented derivative of the C language.
Install egcs-objc if you are going to do Objective C development and you would like to use the gcc compiler. Youwill also need to install the gcc package.
expect – (Version 5.28, 739K)�
�
�
�W
�
�
�
�S
Expect is a tcl extension for automating interactive applications such as telnet, ftp, passwd, fsck, rlogin, tip, etc.Expect is also useful for testing the named applications. Expect makes it easy for a script to control anotherprogram and interact with it.
Install the expect package if you’d like to develop scripts which interact with interactive applications. You’ll alsoneed to install the tcl package.
gnome-objc – (Version 1.0.2, 653K)
This package installs basic libraries you must have to use GNOME programs that are built with Objective C.
GNOME is the GNU Network Object Model Environment. It’s a powerful, pleasing, easy to use and configureenvironment for your computer.
guavac – (Version 1.2, 2,157K)
The guavac package includes guavac and guavad. Guavac is a stand-alone compiler for the Java programminglanguage. Guavac was written entirely in C++ and it should be portable to any platform supporting GNU’s C++(gcc) or a similar compiler. Guavad is guavac’s disassembler.
Install guavac if you need a Java compiler on your system.
guile – (Version 1.3, 1,029K)�
�
�
�W
GUILE (GNU’s Ubiquitous Intelligent Language for Extension) is a library implementation of the Scheme pro-

D.3 Development 291
gramming language, written in C. GUILE provides a machine-independent execution platform that can be linkedin as a library during the building of extensible programs.
Install the guile package if you’d like to add extensibility to programs that you are developing. You’ll also needto install the guile-devel package.
itcl – (Version 3.0.1, 4,251K)
[incr Tcl] is an object-oriented extension of the Tcl language. It was created to support more structured program-ming in Tcl. Tcl scripts that grow beyond a few thousand lines become extremely difficult to maintain. This isbecause the building blocks of vanilla Tcl are procedures and global variables, and all of these building blocksmust reside in a single global namespace. There is no support for protection or encapsulation.
[incr Tcl] introduces the notion of objects. Each object is a bag of data with a set of procedures or ”methods”that are used to manipulate it. Objects are organized into ”classes” with identical characteristics, and classes caninherit functionality from one another. This object-oriented paradigm adds another level of organization on topof the basic variable/procedure elements, and the resulting code is easier to understand and maintain.
kaffe – (Version 1.0.b4, 1,977K)
Kaffe is a free virtual machine designed to execute Java(TM) bytecode. Kaffe can be configured in two modes.In the first mode, it operates as a pure bytecode interpreter (not unlike Javasoft’s machine). In the second mode,it performs ”just-in-time” code conversion from the abstract code to the host machine’s native code. The secondmode will ultimately allow execution of Java code at the same speed as standard compiled code, while alsomaintaining the advantages and flexibility of code independence.
Install the kaffe package if you need a Java virtual machine.
p2c – (Version 1.22, 697K)
P2c is a system for translating Pascal programs into the C language. P2c accepts input source files in certain Pascaldialects: HP Pascal, Turbo/UCSD Pascal, DEC VAX Pascal, Oregon Software Pascal/2, Macintosh Programmer’sWorkshop Pascal and Sun/Berkeley Pascal. P2c outputs a set of .c and .h files which make up a C programequivalent to the original Pascal program. The C program can then be compiled using a standard C compiler,such as gcc.
Install the p2c package if you need a program for translating Pascal code into C code.
p2c-devel – (Version 1.22, 25K)
The p2c-devel package contains the files necessary for development of the p2c Pascal to C translation system.
Install the p2c-devel package if you want to do p2c development.
perl – (Version 5.00503, 15,777K)�
�
�
�B
Perl is a high-level programming language with roots in C, sed, awk and shell scripting. Perl is good at handlingprocesses and files, and is especially good at handling text. Perl’s hallmarks are practicality and efficiency. Whileit is used to do a lot of different things, Perl’s most common applications (and what it excels at) are probablysystem administration utilities and web programming. A large proportion of the CGI scripts on the web arewritten in Perl. You need the perl package installed on your system so that your system can handle Perl scripts.
perl-MD5 – (Version 1.7, 30K)�
�
�
�S

292 Package List
The perl-MD5 package provides the MD5 module for the Perl programming language. MD5 is a Perl interface tothe RSA Data Security Inc. Message Digest Algorithm, which allows Perl programs to use the algorithm.
The perl-MD5 package should be installed if any Perl programs on your system are going to use RSA’s MessageDigest Algorithm.
pygnome – (Version 1.0.1, 1,650K)
PyGNOME is an extension module for python that gives you access to the base GNOME libraries. This meansyou have access to more widgets, simple configuration interface, metadata support and many other features.
pygtk – (Version 0.5.12, 2,259K)
PyGTK is an extension module for python that gives you access to the GTK+ widget set. Just about anything youcan write in C with GTK+ you can write in python with PyGTK (within reason), but with all of python’s benefits.
python – (Version 1.5.1, 5,829K)�
�
�
�W
�
�
�
�S
Python is an interpreted, interactive, object-oriented programming language often compared to Tcl, Perl, Schemeor Java. Python includes modules, classes, exceptions, very high level dynamic data types and dynamic typing.Python supports interfaces to many system calls and libraries, as well as to various windowing systems (X11,Motif, Tk, Mac and MFC).
Programmers can write new built-in modules for Python in C or C++. Python can be used as an extensionlanguage for applications that need a programmable interface. This package contains most of the standard Pythonmodules, as well as modules for interfacing to the Tix widget set for Tk and RPM.
Note that documentation for Python is provided in the python-docs package.
tcl – (Version 8.0.4, 5,516K)�
�
�
�W
�
�
�
�S
Tcl is a simple scripting language designed to be embedded into other applications. Tcl is designed to be usedwith Tk, a widget set, which is provided in the tk package. This package also includes tclsh, a simple example ofa Tcl application.
If you’re installing the tcl package and you want to use Tcl for development, you should also install the tk andtclx packages.
tclx – (Version 8.0.4, 1,954K)�
�
�
�W
�
�
�
�S
TclX is a set of extensions which make it easier to use the Tcl scripting language for common UNIX/Linux pro-gramming tasks. TclX enhances Tcl support for files, network access, debugging, math, lists, and message cata-logs. TclX can be used with both Tcl and Tcl/Tk applications.
Install TclX if you are developing applications with Tcl/Tk. You’ll also need to install the tcl and tk packages.
tix – (Version 4.1.0.6, 2,732K)�
�
�
�W
�
�
�
�S
Tix (Tk Interface Extension), an add-on for the Tk widget set, is an extensive set of over 40 widgets. In general, Tixwidgets are more complex and more capable than the widgets provided in Tk. Tix widgets include a ComboBox,a Motif-style FileSelectBox, an MS Windows-style FileSelectBox, a PanedWindow, a NoteBook, a hierarchical list,a directory tree and a file manager.
Install the tix package if you want to try out more complicated widgets for Tk. You’ll also need to have the tcl and

D.3 Development 293
tk packages installed.
tk – (Version 8.0.4, 5,289K)�
�
�
�W
�
�
�
�S
Tk is a X Windows widget set designed to work closely with the tcl scripting language. It allows you to writesimple programs with full featured GUI’s in only a little more time then it takes to write a text based interface.Tcl/Tk applications can also be run on Windows and Macintosh platforms.
tkinter – (Version 1.5.1, 643K)�
�
�
�W
�
�
�
�S
The Tkinter (Tk interface) program is an graphical user interface for the Python scripting language.
You should install the tkinter package if you’d like to use a graphical user interface for Python programming.
umb-scheme – (Version 3.2, 1,211K)�
�
�
�W
UMB Scheme is a public domain implementation of the Scheme programming language. Scheme is a staticallyscoped and properly tail-recursive dialect of the Lisp programming language, designed with clear and simplesemantics and a minimal number of ways to form expressions.
Install the umb-scheme package if you need an implementation of the Scheme programming language.
D.3.3 Libraries
This section contains packages that are associated with the libraries used during the development of softwareunder Red Hat Linux.
ImageMagick-devel – (Version 4.2.2, 1,584K)
If you want to create applications that will use ImageMagick code or APIs, you’ll need to install these packagesas well as ImageMagick. These additional packages aren’t necessary if you simply want to use ImageMagick,however.
ImageMagick-devel is an addition to ImageMagick which includes static libraries and header files necessary todevelop applications.
ORBit-devel – (Version 0.4.3, 1,219K)
ORBit is a high-performance CORBA ORB (object request broker) with support for the C language. It allows pro-grams to send requests and receive replies from other programs, regardless of the locations of the two programs.
This package contains the header files, libraries and utilities necessary to write programs that use CORBA tech-nology.
XFree86-devel – (Version 3.3.3.1, 7,796K)�
�
�
�W
XFree86-devel includes the libraries, header files and documentation you’ll need to develop programs which runin X clients. XFree86 includes the base Xlib library as well as the Xt and Xaw widget sets.
For guidance on programming with these libraries, O’Reilly & Associates produces a series on X programmingwhich you might find useful.

294 Package List
Install XFree86-devel if you are going to develop programs which will run as X clients.
Xaw3d-devel – (Version 1.3, 657K)�
�
�
�W
Xaw3d is an enhanced version of the MIT Athena widget set for the X Window System. Xaw3d adds a three-dimensional look to those applications with minimal or no source code changes. Xaw3d-devel includes the headerfiles and static libraries for developing programs that take full advantage of Xaw3d’s features.
You should install Xaw3d-devel if you are going to develop applications using the Xaw3d widget set. You’ll alsoneed to install the Xaw3d package.
apache-devel – (Version 1.3.6, 269K)
The apache-devel package contains the source code for the Apache 1.3.1 Web server and the APXS binary you’llneed to build Dynamic Shared Objects (DSOs) for Apache.
If you are installing the Apache Web server version 1.3.1, and you want to be able to compile or develop additionalmodules for Apache, you’ll need to install this package.
audiofile-devel – (Version 0.1.6, 99K)
Libraries, include files and other resources you can use to develop audiofile applications.
bind-devel – (Version 8.2, 1,294K)
The bind-devel package contains all the include files and the library required for DNS (Domain Name Service)development for bind versions 8.x.x.
You should install bind-devel if you want to develop bind DNS applications. If you install bind-devel, you’ll needto install bind, as well.
compat-glibc – (Version 5.2, 4,331K)
This package contains the version 2.0.7 of the GNU C library for compiling binaries that will run on Red HatLinux 2.0 and other glibc 2.0.x Linux based systems. This package includes the runtime libraries.
compat-libs – (Version 5.2, 2,282K)
This package includes a number of run-time libraries that are compiled on Red Hat Linux 5.2. This package isrequired if you want to do development for Red Hat Linux 5.2 and other glibc 2.0 based systems.
control-center-devel – (Version 1.0.5, 38K)
If you’re interested in developing panels for the GNOME control center, you’ll want to install this package.
Control-center-devel helps you create the ’capplets’ which are used in the control center.
e2fsprogs-devel – (Version 1.14, 260K)
E2fsprogs-devel contains the libraries and header files needed to develop second extended (ext2) filesystem-specific programs.
You should install e2fsprogs-devel if you want to develop ext2 filesystem-specific programs. If you install e2fsprogs-devel, you’ll also want to install e2fsprogs.

D.3 Development 295
esound-devel – (Version 0.2.12, 48K)
Libraries, include files and other resources you can use to develoop EsounD applications.
faces-devel – (Version 1.6.1, 22K)�
�
�
�W
Faces-devel contains the faces program development environment, (i.e., the static libraries and header files).
If you want to develop Faces applications, you’ll need to install faces-devel. You’ll also need to install the facespackage.
fnlib-devel – (Version 0.4, 34K)
Headers, static libraries and documentation for Fnlib.
freetype-devel – (Version 1.2, 511K)
This package is only needed if you intend to develop or compile applications which rely on the FreeType library.If you simply want to run existing applications, you won’t need this package.
gd-devel – (Version 1.3, 7K)�
�
�
�W
These are the development libraries and header files for gd, the .gif graphics library.
If you’re installing the gd graphics library, you must install gd-devel.
gdbm-devel – (Version 1.7.3, 72K)�
�
�
�W
Gdbm-devel contains the development libraries and header files for gdbm, the GNU database system. Theselibraries and header files are necessary if you plan to do development using the gdbm database.
Install gdbm-devel if you are developing C programs which will use the gdbm database library. You’ll also needto install the gdbm package.
gedit-devel – (Version 0.5.1, 8K)
gEdit is a small but powerful text editor for GTK+ and/or GNOME. This package allows you to develop pluginsthat work within gEdit. Plugins can create new documents and manipulate documents in arbitrary ways.
gimp-devel – (Version 1.0.4, 253K)
Static libraries and header files for writing GIMP plugins and extensions.
glib-devel – (Version 1.2.1, 303K)�
�
�
�W
Static libraries and header files for the support library for the GIMP’s X libraries, which are available as publiclibraries. GLIB includes generally useful data structures.
glibc-devel – (Version 2.1.1, 32,869K)�
�
�
�W
�
�
�
�S
To develop programs which use the standard C libraries (which nearly all programs do), the system needs to havethese standard header files and object files available for creating the executables.
glibc-profile – (Version 2.1.1, 30,464K)

296 Package List
When programs are being profiled used gprof, they must use these libraries instrad of the standard C libraries forgprof to be able to profile them correctly.
gmp-devel – (Version 2.0.2, 319K)
The static libraries, header files and documentation for using the GNU MP arbitrary precision library in applica-tions.
If you want to develop applications which will use the GNU MP library, you’ll need to install the gmp-develpackage. You’ll also need to install the gmp package.
gnome-core-devel – (Version 1.0.4, 127K)
Panel libraries and header files for creating GNOME panels.
gnome-games-devel – (Version 1.0.2, 42K)
This packages installs the libraries and files needed to develop some GNOME games.
gnome-libs-devel – (Version 1.0.8, 7,449K)
GNOME (GNU Network Object Model Environment) is a user-friendly set of applications and desktop tools to beused in conjunction with a window manager for the X Window System. GNOME is similar in purpose and scopeto CDE and KDE, but GNOME is based completely on Open Source software. The gnome-libs-devel packageincludes the libraries and include files that you will need to develop GNOME applications.
You should install the gnome-libs-devel package if you would like to develop GNOME applications. You don’tneed to install gnome-libs-devel if you just want to use the GNOME desktop environment. If you are going todevelop GNOME applications and/or you’re going to use the GNOME desktop environment, you’ll also need toinstall the gnome-core and gnome-libs packages. If you want to use linuxconf with a GNOME front end, you’llalso need to install the gnome-linuxconf package.
gnome-objc-devel – (Version 1.0.2, 886K)
Libraries, include files and other files you can use to develop Objective C GNOME applications.
If you’re interested in developing GNOME applications, you should install this package.
gnome-pim-devel – (Version 1.0.7, 36K)
Files needed to develop apps which interact with gnome-pim applications via CORBA.
gpm-devel – (Version 1.17.5, 27K)�
�
�
�W
The gpm-devel program contains the libraries and header files needed for development of mouse driven pro-grams. This package allows you to develop text-mode programs which use the mouse.
Install gpm-devel if you need to develop text-mode programs which will use the mouse. You’ll also need to installthe gpm package.
gtk+-devel – (Version 1.2.1, 2,422K)�
�
�
�W
The gtk+-devel package contains the static libraries and header files needed for developing GTK+ (GIMP ToolKit)applications. The gtk+-devel package contains glib (a collection of routines for simplifying the development of

D.3 Development 297
GTK+ applications), GDK (the General Drawing Kit, which simplifies the interface for writing GTK+ widgets andusing GTK+ widgets in applications), and GTK+ (the widget set).
Install gtk+-devel if you need to develop GTK+ applications. You’ll also need to install the gtk+ package.
guile-devel – (Version 1.3, 963K)
The guile-devel package includes the libraries, header files, etc., that you’ll need to develop applications that arelinked with the GUILE extensibility library.
You need to install the guile-devel package if you want to develop applications that will be linked to GUILE.You’ll also need to install the guile package.
imlib-devel – (Version 1.9.5, 544K)
The header files, static libraries and documentation needed for developing Imlib applications. Imlib is an imageloading and rendering library for X11R6.
Install the imlib-devel package if you want to develop Imlib applications. You’ll also need to install the imlib andimlib cfgeditor packages.
inn-devel – (Version 2.2, 1,737K)
The inn-devel package contains the INN (InterNetNews) library, which several programs that interface with INNneed in order to work (for example, newsgate and tin).
If you are installing a program which must interface with the INN news system, you should install inn-devel.
libghttp-devel – (Version 1.0.2, 42K)
Libraries and includes files you can use for libghttp development
libgr-devel – (Version 2.0.13, 320K)�
�
�
�W
The libgr-devel package contains the header files and static libraries, etc., for developing programs which canhandle the various graphics file formats supported by the libgr library.
Install libgr-devel if you want to develop programs for handling the graphics file formats supported by the libgrlibrary. You’ll also need to have the libgr package installed.
libgtop-devel – (Version 1.0.1, 326K)
GNOME (GNU Network Object Model Environment) is a user-friendly set of applications and desktop tools to beused in conjunction with a window manager for the X Window System. GNOME is similar in purpose and scopeto CDE and KDE, but GNOME is based completely on Open Source software. The gnome-libs-devel packageincludes the libraries and include files that you will need to develop GNOME applications.
You should install the gnome-libs-devel package if you would like to develop GNOME applications. You don’tneed to install gnome-libs-devel if you just want to use the GNOME desktop environment. If you are going todevelop GNOME applications and/or you’re going to use the GNOME desktop environment, you’ll also need toinstall the gnome-core and gnome-libs packages. If you want to use linuxconf with a GNOME front end, you’llalso need to install the gnome-linuxconf package.
libjpeg-devel – (Version 6b, 233K)�
�
�
�W

298 Package List
The libjpeg-devel package includes the header files and static libraries necessary for developing programs whichwill manipulate JPEG files using the libjpeg library.
If you are going to develop programs which will manipulate JPEG images, you should install libjpeg-devel. You’llalso need to have the libjpeg package installed.
libpcap – (Version 0.4, 121K)
Libpcap provides a portable framework for low-level network monitoring. Libpcap can provide network statisticscollection, security monitoring and network debugging. Since almost every system vendor provides a differentinterface for packet capture, the libpcap authors created this system-independent API to ease in porting and toalleviate the need for several system-dependent packet capture modules in each application.
Install libpcap if you need to do low-level network traffic monitoring on your network.
libpng-devel – (Version 1.0.3, 485K)�
�
�
�W
The libpng-devel package contains the header files and static libraries necessary for developing programs usingthe PNG (Portable Network Graphics) library.
If you want to develop programs which will manipulate PNG image format files, you should install libpng-devel.You’ll also need to install the libpng package.
libtermcap-devel – (Version 2.0.8, 12K)�
�
�
�W
This package includes the libraries and header files necessary for developing programs which will access thetermcap database.
If you need to develop programs which will access the termcap database, you’ll need to install this package. You’llalso need to install the libtermcap package.
libtiff-devel – (Version 3.4, 1,614K)�
�
�
�W
This package contains the header files and static libraries for developing programs which will manipulate TIFFformat image files using the libtiff library.
If you need to develop programs which will manipulate TIFF format image files, you should install this package.You’ll also need to install the libtiff package.
libungif-devel – (Version 4.1.0, 271K)�
�
�
�W
This package contains the static libraries, header files and documentation necessary for development of programsthat will use the libungif library to load and save GIF format image files.
You should install this package if you need to develop programs which will use the libungif library functions forloading and saving GIF format image files. You’ll also need to install the libungif package.
libxml-devel – (Version 1.0.0, 127K)
This packages contains the libraries, include and other files you can use to develop libxml applications.
linuxconf-devel – (Version 1.14r4, 3,742K)�
�
�
�W
Linuxconf is an extremely capable system configuration tool. It provides a variety of interfaces through which

D.3 Development 299
you can configure your Linux system and manage a large proportion of the system’s operations.
This package provides the components necessary for developing Linuxconf modules outside of the linuxconfsource tree and/or developing stand-alone utilities using the linuxconf interface toolkit.
Install linuxconf-devel if you want to develop Linuxconf modules. You must also have linuxconf installed.
ncurses-devel – (Version 4.2, 7,108K)�
�
�
�W
The header files and libraries for developing applications that use the ncurses CRT screen handling and optimiza-tion package.
Install the ncurses-devel package if you want to develop applications which will use ncurses.
newt-devel – (Version 0.40, 118K)�
�
�
�W
The newt-devel package contains the header files and libraries necessary for developing applications which usenewt. Newt is a development library for text mode user interfaces. Newt is based on the slang library.
Install newt-devel if you want to develop applications which will use newt.
pilot-link-devel – (Version 0.9.0, 1,635K)
This package contains the development headers that are used to build the pilot-link package. It also includes thestatic libraries necessary to build static pilot apps.
postgresql-devel – (Version 6.4.2, 662K)�
�
�
�S
This package contains the header files and libraries needed to compile applications which will directly interactwith a PostgreSQL server.
Install this package if you want to develop applications which will interact with a PostgreSQL server.
python-devel – (Version 1.5.1, 3,499K)
The Python programming language’s interpreter can be extended with dynamically loaded extensions and canbe embedded in other programs. This package contains the header files and libraries needed to do these types oftasks.
Install python-devel if you want to develop Python extensions. The python package will also need to be installed.You’ll probably also want to install the python-docs package, which contains Python documentation.
qt-devel – (Version 1.44, 12,155K)
Contains the files necessary to develop applications using Qt: header files, the Qt meta object compiler, manpages, HTML documentation and example programs. See http://www.troll.no for more information about Qt,or file:/usr/lib/qt/html/index.html for Qt documentation in HTML.
readline-devel – (Version 2.2.1, 250K)�
�
�
�W
The readline library will read a line from the terminal and return it. Use of the readline library allows program-mers to provide an easy to use and more intuitive interface for users.
If you want to develop programs which will use the readline library, you’ll need to have the readline-devel

300 Package List
package installed. You’ll also need to have the readline package installed.
rpm-devel – (Version 3.0, 330K)�
�
�
�W
This package contains the RPM C library and header files. These development files will simplify the process ofwriting programs which manipulate RPM packages and databases and are intended to make it easier to creategraphical package managers or any other tools that need an intimate knowledge of RPM packages in order tofunction.
This package should be installed if you want to develop programs that will manipulate RPM packages anddatabases.
slang-devel – (Version 1.2.2, 1,192K)�
�
�
�W
This package contains the S-Lang extension language static libraries and header files which you’ll need if youwant to develop S-Lang based applications. Documentation which may help you write S-Lang based applicationsis also included.
Install the slang-devel package if you want to develop applications based on the S-Lang extension language.
sox-devel – (Version 12.15, 855K)
This package contains the library needed for compiling applications which will use the SoX sound file formatconverter.
Install sox-devel if you want to develop applications which will use SoX.
svgalib-devel – (Version 1.3.1, 785K)�
�
�
�W
The svgalib-devel package contains the libraries and header files needed to build programs which will use theSVGAlib low-level graphics library.
Install the svgalib-devel package if you want to develop applications which will use the SVGAlib library.
ucd-snmp-devel – (Version 3.6.1, 269K)
The ucd-snmp-devel package contains the development libraries and header files for use with the UCD-SNMPproject’s network management tools.
Install the ucd-snmp-devel package if you would like to develop applications for use with the UCD-SNMPproject’s network management tools. You’ll also need to have the ucd-snmp and ucd-snmp-utils packages in-stalled.
w3c-libwww-devel – (Version 5.2.8, 1,620K)
Static libraries and header files for libwww, which are available as public libraries.
x11amp-devel – (Version 0.9 alpha3, 13K)
Static libraries and header files for building x11amp plugins.
xpm-devel – (Version 3.4j, 221K)�
�
�
�W
The xpm-devel package contains the development libraries and header files necessary for developing applications

D.3 Development 301
which will use the XPM library. The XPM library is used by many programs for displaying pixmaps in the XWindow System.
Install the xpm-devel package if you want to develop applications using the XPM pixmap library. You’ll also needto install the xpm package.
zlib-devel – (Version 1.1.3, 165K)�
�
�
�W
The zlib-devel package contains the header files and libraries needed to develop programs that use the zlib com-pression and decompression library.
Install the zlib-devel package if you want to develop applications that will use the zlib library.
D.3.4 System
This section contains packages that are associated with building system-level software under Red Hat Linux.
kernel-headers – (Version 2.2.5, 2,700K)�
�
�
�W
�
�
�
�S
Kernel-headers includes the C header files for the Linux kernel. The header files define structures and constantsthat are needed for building most standard programs. The header files are also needed for rebuilding the kernel.
kernel-source – (Version 2.2.5, 46,352K)
The kernel-source package contains the source code files for the Linux kernel. These source files are needed tobuild most C programs, since they depend on the constants defined in the source code. The source files can alsobe used to build a custom kernel that is better tuned to your particular hardware, if you are so inclined (and youknow what you’re doing).
D.3.5 Tools
This section contains packages that are associated with the various tools needed to develop software under RedHat Linux.
ElectricFence – (Version 2.1, 44K)�
�
�
�W
�
�
�
�S
If you know what malloc() violations are, you’ll be interested in ElectricFence. ElectricFence is a tool whichcan be used for C programming and debugging. It uses the virtual memory hardware of your system to detectwhen software overruns malloc() buffer boundaries, and/or to detect any accesses of memory released by free().ElectricFence will then stop the program on the first instruction that caused a bounds violation and you can useyour favorite debugger to display the offending statement.
This package will install ElectricFence, which you can use if you’re searching for a debugger to find malloc()violations.
autoconf – (Version 2.13, 580K)�
�
�
�W
�
�
�
�S
GNU’s Autoconf is a tool for configuring source code and Makefiles. Using Autoconf, programmers can createportable and configurable packages, since the person building the package is allowed to specify various configu-

302 Package List
ration options.
You should install Autoconf if you are developing software and you’d like to use it to create shell scripts whichwill configure your source code packages. If you are installing Autoconf, you will also need to install the GNUm4 package.
Note that the Autoconf package is not required for the end user who may be configuring software with anAutoconf-generated script; Autoconf is only required for the generation of the scripts, not their use.
automake – (Version 1.4, 867K)�
�
�
�W
�
�
�
�S
Automake is an experimental Makefile generator. Automake was inspired by the 4.4BSD make and include files,but aims to be portable and to conform to the GNU standards for Makefile variables and targets.
You should install Automake if you are developing software and would like to use its capabilities of automaticallygenerating GNU standard Makefiles. if you install Automake, you will also need to install GNU’s Autoconfpackage.
bin86 – (Version 0.4, 73K)�
�
�
�W
�
�
�
�S
The bin86 package provides an assembler and linker for real mode 80x86 instructions. You’ll need to have thispackage installed in order to build programs that run in real mode, including LILO and the kernel’s bootstrappingcode, from their sources.
You should install bin86 if you intend to build programs that run in real mode from their source code.
binutils – (Version 2.9.1.0.23, 5,168K)�
�
�
�B
�
�
�
�W
�
�
�
�S
Binutils is a collection of binary utilities, including ar (for creating, modifying and extracting from archives), nm(for listing symbols from object files), objcopy (for copying and translating object files), objdump (for displayinginformation from object files), ranlib (for generating an index for the contents of an archive), size (for listing thesection sizes of an object or archive file), strings (for listing printable strings from files), strip (for discardingsymbols), c++filt (a filter for demangling encoded C++ symbols), addr2line (for converting addresses to file andline), and nbnconv (for converting object code into an NLM).
Install binutils if you need to perform any of these types of actions on binary files. Most programmers will wantto install binutils.
bison – (Version 1.27, 153K)�
�
�
�W
�
�
�
�S
Bison is a general purpose parser generator which converts a grammar description for an LALR context-freegrammar into a C program to parse that grammar. Bison can be used to develop a wide range of language parsers,from ones used in simple desk calculators to complex programming languages. Bison is upwardly compatiblewith Yacc, so any correctly written Yacc grammar should work with Bison without any changes. If you knowYacc, you shouldn’t have any trouble using Bison (but you do need to be very proficient in C programming to beable to use Bison). Many programs use Bison as part of their build process. Bison is only needed on systems thatare used for development.
If your system will be used for C development, you should install Bison since it is used to build many C programs.
blt – (Version 2.4g, 3,966K)
BLT is an extension to the Tk toolkit. BLT’s most useful feature is the provision of more widgets for Tk, but italso provides more geometry managers and miscellaneous other commands. Note that you won’t need to do any

D.3 Development 303
patching of the Tcl or Tk source files to use BLT, but you will need to have Tcl/Tk installed in order to use BLT.
If you are programming with the Tk toolkit, you should install BLT. You will need to have Tcl/Tk installed.
byacc – (Version 1.9, 54K)�
�
�
�W
�
�
�
�S
Byacc (Berkeley Yacc) is a public domain LALR parser generator which is used by many programs during theirbuild process.
If you are going to do development on your system, you will want to install this package.
cdecl – (Version 2.5, 80K)�
�
�
�W
�
�
�
�S
The cdecl package includes the cdecl and c++decl utilities, which are used to translate English to C or C++ func-tion declarations and vice versa.
You should install the cdecl package if you intend to do C and/or C++ programming.
compat-binutils – (Version 5.2, 3,566K)
This package includes the binutils required by the Red HAt Linux 5.2 backwards compatibility kit. Binutils is acollection of binary utilities, including ar (for creating, modifying and extracting from archives), nm (for listingsymbols from object files), objcopy (for copying and translating object files), objdump (for displaying informationfrom object files), ranlib (for generating an index for the contents of an archive), size (for listing the section sizesof an object or archive file), strings (for listing printable strings from files), strip (for discarding symbols), c++filt(a filter for demangling encoded C++ symbols), addr2line (for converting addresses to file and line), and nbnconv(for converting object code into an NLM).
Install this package if you will be developing programs that need to run on Red Hat Linux 5.2 or other glibc 2.0.xbased systems.
cproto – (Version 4.6, 85K)�
�
�
�W
�
�
�
�S
Cproto generates function prototypes and variable declarations from C source code. Cproto can also convertfunction definitions between the old style and the ANSI C style. This conversion will overwrite the original files,however, so be sure to make a backup copy of your original files in case something goes wrong. Since cproto usesa Yacc generated parser, it shouldn’t be confused by complex function definitions as much as other prototypegenerators) because it uses a Yacc generated parser.
Cproto will be useful for C programmers, so install cproto if you are going to do any C programming.
ctags – (Version 3.2, 146K)�
�
�
�W
�
�
�
�S
Ctags generates an index (or tag) file of C language objects found in C source and header files. The index makesit easy for text editors or other utilities to locate the indexed items. Ctags can also generate a cross referencefile which lists information about the various objects found in a set of C language files in human readable form.Exuberant Ctags improves on ctags because it can find all types of C language tags, including macro definitions,enumerated values (values inside enum...), function and method definitions, enum/struct/union tags, externalfunction prototypes, typedef names and variable declarations. Exuberant Ctags is far less likely to be fooled bycode containing #if preprocessor conditional constructs than ctags. Exuberant ctags supports output of emacsstyle TAGS files and can be used to print out a list of selected objects found in source files.
Install ctags if you are going to use your system for C programming.

304 Package List
cvs – (Version 1.10.5, 3,088K)�
�
�
�W
�
�
�
�S
CVS means Concurrent Version System; it is a version control system which can record the history of your files(usually, but not always, source code). CVS only stores the differences between versions, instead of every versionof every file you’ve ever created. CVS also keeps a log of who, when and why changes occurred, among otheraspects.
CVS is very helpful for managing releases and controlling the concurrent editing of source files among multipleauthors. Instead of providing version control for a collection of files in a single directory, CVS provides versioncontrol for a hierarchical collection of directories consisting of revision controlled files.
These directories and files can then be combined together to form a software release.
Install the cvs package if you need to use a version control system.
diffstat – (Version 1.25, 11K)
The diff command compares files line by line. Diffstat reads the output of the diff command and displays ahistogram of the insertions, deletions and modifications in each file. Diffstat is commonly used to provide asummary of the changes in large, complex patch files.
Install diffstat if you need a program which provides a summary of the diff command’s output. You’ll need toalso install diffutils.
flex – (Version 2.5.4a, 302K)�
�
�
�W
�
�
�
�S
The flex program generates scanners. Scanners are programs which can recognize lexical patterns in text. Flextakes pairs of regular expressions and C code as input and generates a C source file as output. The output fileis compiled and linked with a library to produce an executable. The executable searches through its input foroccurrences of the regular expressions. When a match is found, it executes the corresponding C code. Flex wasdesigned to work with both Yacc and Bison, and is used by many programs as part of their build process.
You should install flex if you are going to use your system for application development.
gettext – (Version 0.10.35, 889K)�
�
�
�W
�
�
�
�S
The GNU gettext package provides a set of tools and documentation for producing multi-lingual messages inprograms. Tools include a set of conventions about how programs should be written to support message catalogs,a directory and file naming organization for the message catalogs, a runtime library which supports the retrievalof translated messages, and stand-alone programs for handling the translatable and the already translated strings.Gettext provides an easy to use library and tools for creating, using, and modifying natural language catalogs andis a powerful and simple method for internationalizing programs.
If you would like to internationalize or incorporate multi-lingual messages into programs that you’re developing,you should install gettext.
gperf – (Version 2.7, 122K)
Gperf is a perfect hash function generator written in C++. Simply stated, a perfect hash function is a hash functionand a data structure that allows recognition of a key word in a set of words using exactly one probe into the datastructure.
Install gperf if you need a program that generates perfect hash functions.

D.3 Development 305
libtool – (Version 1.2f, 973K)
The libtool package contains the GNU libtool, a set of shell scripts which automatically configure UNIX andUNIX-like architectures to generically build shared libraries. Libtool provides a consistent, portable interfacewhich simplifies the process of using shared libraries.
If you are developing programs which will use shared libraries, you should install libtool.
make – (Version 3.77, 259K)�
�
�
�W
�
�
�
�S
A GNU tool for controlling the generation of executables and other non-source files of a program from the pro-gram’s source files. Make allows users to build and install packages without any significant knowledge aboutthe details of the build process. The details about how the program should be built are provided for make in theprogram’s makefile.
The GNU make tool should be installed on your system because it is commonly used to simplify the process ofinstalling programs.
patch – (Version 2.5, 99K)�
�
�
�W
�
�
�
�S
The patch program applies diff files to originals. The diff command is used to compare an original to a changedfile. Diff lists the changes made to the file. A person who has the original file can then use the patch commandwith the diff file to add the changes to their original file (patching the file).
Patch should be installed because it is a common way of upgrading applications.
pmake – (Version 2.1.33, 1,031K)�
�
�
�W
�
�
�
�S
Make is a GNU tool which allows users to build and install programs without any significant knowledge of thebuild process. Details about how the program should be built are included in the program’s Makefile. Pmake is aparticular version (BSD 4.4) of make. Pmake supports some additional syntax which is not in the standard makeprogram. Some Berkeley programs have Makefiles written for pmake.
Pmake should be installed on your system so that you will be able to build programs which require using pmakeinstead of make.
pmake-customs – (Version 2.1.33, 982K)
Customs is a remote execution facility for PMake. Customs is designed to run on a network of machines witha consistent, shared filesystem. Customs requires Sun RPC in order to use XDR (eXternal Data Representation)routines for logging functions.
A single server is designated as the master agent and is additionally responsible for noting when a machinegoes down, from which machines any given machine will accept jobs and parcelling out available machines torequesting clients. The job of master is not given to any one machine but, rather, is decided among the activeagents whenever the previous master dies.
Clients are provided to: - alter the availability criteria for the local machine (importquota) - find the status of allregistered hosts on the net (reginfo). - abort, restart or ping any customs agent on the network (cctrl). - export acommand from the shell (export). - accept log information from all hosts on the net (logd).
rcs – (Version 5.7, 536K)�
�
�
�W
�
�
�
�S
The Revision Control System (RCS) is a system for managing multiple versions of files. RCS automates the

306 Package List
storage, retrieval, logging, identification and merging of file revisions. RCS is useful for text files that are revisedfrequently (for example, programs, documentation, graphics, papers and form letters).
The rcs package should be installed if you need a system for managing different versions of files.
D.4 Documentation
This section contains packages that are associated with documentation for Linux in general and Red Hat Linux inparticular.
XFree86-doc – (Version 3.3.3.1, 9,678K)
XFree86-doc provides a great deal of extensive PostScript documentation on the various X APIs, libraries, andother interfaces. If you need low level X documentation, you will find it here. Topics include the X protocol, theICCCM window manager standard, ICE session management, the font server API, etc.
bash2-doc – (Version 2.03, 2,275K)
This is a separate documentation package for the GNU Bourne Again shell.
faq – (Version 6.0, 1,164K)
The faq package includes the text of the Frequently Asked Questions (FAQ) about Linux from the SunSITE web-site (http://sunsite.unc.edu/pub/Linux/docs/faqs/linux-faq/Linux-FAQ). The Linux FAQ is a great source ofinformation about Linux.
Install faq if you’d like to read the Linux FAQ off your own machine.
gimp-manual – (Version 1.0.0, 17,979K)
The gimp-manual package contains the GIMP (GNU Image Manipulation Program) User Manual (GUM) inHTML format. Please note that the HTML version of the GUM is not as good a quality as the other versions,which can be obtained from the GUM website at http://manual.gimp.org/pub/manual. On the GUM website,The manual is provided in HTML (for viewing the GUM online), in PostScript(TM) and PDF formats (for print-ing) as well as in FM (FrameMaker) source code. The FrameMaker source code is provided for people who wouldlike to contribute to the Graphic Documentation Project. Submissions to the GUM are covered by the manual’slicense agreement and terms, included in the file COPYING.
The GUM is a complete guide for using the GIMP. This version of the GUM includes improvements over previousversions. Be sure to check out the new Gallery chapter, which provides a good overview of what the GIMP cando. The Gallery displays cool images and give you hints on how to create them with the GIMP.
For more information about the GUM, check the GUM website at http://manual.gimp.org/.
gnome-users-guide – (Version 1.0.5, 7,135K)�
�
�
�W
This package will install the users’ guide for the GNOME Desktop Environment on your computer.
You should install this package if you are going to use GNOME and you want a quick, handy reference.
helptool – (Version 2.4, 23K)�
�
�
�W
�
�
�
�S

D.4 Documentation 307
The helptool provides a unified graphical user interface for searching through many of the help sources available(including man pages and GNU texinfo documents).
Install helptool if you’d like to use it to search for help files. You’ll need to have the X Window System installedto use the helptool.
howto – (Version 6.0, 11,103K)
Linux HOWTOs are detailed documents which describe a specific aspect of configuring or using Linux. LinuxHOWTOs are a great source of practical information about your system. The latest versions of these documentsare located at http://sunsite.unc.edu/linux.
Install the howto package if you’d like to be able to access the Linux HOWTO documentation from your ownsystem.
howto-chinese – (Version 6.0, 13,445K)
The howto-chinese package contains the Linux HOWTO documents that have been translated into Chinese. LinuxHOWTOs are detailed documents describing a specific aspect of configuring or using Linux.
Install the howto-chinese package if you’d like to use the Linux HOWTO documentation in Chinese. Please notethat not all of the HOWTOs have been translated. If you need to have a complete set of HOWTOs, you’ll need toinstall the English version (the howto package).
howto-croatian – (Version 6.0, 1,897K)
The howto-chinese package contains the Linux HOWTO documents that have been translated into Croatian.Linux HOWTOs are detailed documents which describe a specific aspect of configuring or using Linux.
Install the howto-croatian package if you’d like to use the Linux HOWTO documentation in Croatian. Please notethat not all of the HOWTOs have been translated. If you need to have a complete set of HOWTOs, you’ll need toinstall the English version (the howto package).
howto-french – (Version 6.0, 29,195K)
This package contains the Linux HOWTO documents that have been translated into French. Linux HOWTOs aredetailed documents which describe a specific aspect of configuring or using Linux.
Install the howto-french package if you’d like to use the Linux HOWTOs in French. Please note that not all of theHOWTOs have been translated. If you need to have a complete set of HOWTOs, you’ll need to install the Englishversion (the howto package).
howto-german – (Version 6.0, 22,361K)
This package contains the Linux HOWTO documents that have been translated into German. Linux HOWTOsare detailed documents which describe a specific aspect of configuring or using Linux.
Install the howto-german package if you’d like to use the Linux HOWTOs in German. Please note that not allof the HOWTOs have been translated. If you need to have a complete set of HOWTOs, you’ll need to install theEnglish version (the howto package).
howto-greek – (Version 6.0, 7,712K)
This package contains the Linux HOWTO documents that have been translated into Greek. Linux HOWTOs are

308 Package List
detailed documents which describe a specific aspect of configuring or using Linux.
Install the howto-greek package if you’d like to use the Linux HOWTOs in Greek. Please note that not all of theHOWTOs have been translated. If you need to have a complete set of HOWTOs, you’ll need to install the Englishversion (the howto package).
howto-html – (Version 6.0, 12,824K)
This package contains the Linux HOWTO documents in HTML format, so they can be viewed with a web browser.Linux HOWTOs are detailed documents which describe a specific aspect of configuring or using Linux.
Install the howto-html package if you’d like to view the Linux HOWTOs with your web browser off your ownmachine, or if you’d like to provide the HTML HOWTOs from your web server.
howto-indonesian – (Version 6.0, 8,491K)
This package contains the Linux HOWTO documents that have been translated into Indonesian. Linux HOWTOsare detailed documents which describe a specific aspect of configuring or using Linux.
Install the howto-indonesian package if you’d like to use the Linux HOWTOs in Indonesian. Please note that notall of the HOWTOs have been translated. If you need to have a complete set of HOWTOs, you’ll need to installthe English version (the howto package).
howto-italian – (Version 6.0, 21,596K)
This package contains the Linux HOWTO documents that have been translated into Italian. Linux HOWTOs aredetailed documents which describe a specific aspect of configuring or using Linux.
Install the howto-italian package if you’d like to use the Linux HOWTOs in Italian. Please note that not all of theHOWTOs have been translated. If you need to have a complete set of HOWTOs, you’ll need to install the Englishversion (the howto package).
howto-japanese – (Version 6.0, 11,888K)
This package contains the Linux HOWTO documents that have been translated into Japanese. Linux HOWTOsare detailed documents which describe a specific aspect of configuring or using Linux.
Install the howto-japanese package if you’d like to use the Linux HOWTOs in Japanese. Please note that not allof the HOWTOs have been translated. If you need to have a complete set of HOWTOs, you’ll need to install theEnglish version (the howto package).
howto-korean – (Version 6.0, 19,242K)
This package contains the Linux HOWTO documents that have been translated into Korean. Linux HOWTOs aredetailed documents which describe a specific aspect of configuring or using Linux.
Install the howto-korean package if you’d like to use the Linux HOWTOs in Korean. Please note that not all of theHOWTOs have been translated. If you need to have a complete set of HOWTOs, you’ll need to install the Englishversion (the howto package).
howto-polish – (Version 6.0, 9,474K)
This package contains the Linux HOWTO documents that have been translated into Polish. Linux HOWTOs aredetailed documents which describe a specific aspect of configuring or using Linux.

D.4 Documentation 309
Install the howto-polish package if you’d like to use the Linux HOWTOs in Polish. Please note that not all of theHOWTOs have been translated. If you need to have a complete set of HOWTOs, you’ll need to install the Englishversion (the howto package).
howto-serbian – (Version 6.0, 37K)
This package contains the Linux HOWTO documents that have been translated into Serbian. Linux HOWTOs aredetailed documents which describe a specific aspect of configuring or using Linux.
Install the howto-serbian package if you’d like to use the Linux HOWTOs in Serbian. Please note that not all ofthe HOWTOs have been translated. If you need to have a complete set of HOWTOs, you’ll need to install theEnglish version (the howto package).
howto-sgml – (Version 6.0, 9,767K)
The howto-sgml package contains the Linux HOWTO documents in SGML format. The SGML format documentsare the “source” files. Other file formats (text, PostScript(TM), DVI, HTML) are translated from the SGML docu-ments. Linux HOWTOs are detailed documents which describe a specific aspect of configuring or using Linux.
Install the howto-sgml package if you’d like to use the Linux HOWTO documents in SGML format.
howto-slovenian – (Version 6.0, 3,791K)
This package contains the Linux HOWTO documents that have been translated into Slovenian. Linux HOWTOsare detailed documents which describe a specific aspect of configuring or using Linux.
Install the howto-slovenian package if you’d like to use the Linux HOWTOs in Slovenian. Please note that not allof the HOWTOs have been translated. If you need to have a complete set of HOWTOs, you’ll need to install theEnglish version (the howto package).
howto-spanish – (Version 6.0, 7,739K)
This package contains the Linux HOWTO documents that have been translated into Spanish. Linux HOWTOsare detailed documents which describe a specific aspect of configuring or using Linux.
Install the howto-spanish package if you’d like to use the Linux HOWTOs in Spanish. Please note that not all ofthe HOWTOs have been translated. If you need to have a complete set of HOWTOs, you’ll need to install theEnglish version (the howto package).
howto-swedish – (Version 6.0, 4,009K)
This package contains the Linux HOWTO documents that have been translated into Swedish. Linux HOWTOsare detailed documents which describe a specific aspect of configuring or using Linux.
Install the howto-swedish package if you’d like to use the Linux HOWTOs in Swedish. Please note that not allof the HOWTOs have been translated. If you need to have a complete set of HOWTOs, you’ll need to install theEnglish version (the howto package).
howto-turkish – (Version 6.0, 816K)
This package contains the Linux HOWTO documents that have been translated into Turkish. Linux HOWTOs aredetailed documents which describe a specific aspect of configuring or using Linux.
Install the howto-turkish package if you’d like to use the Linux HOWTOs in Turkish. Please note that not all of

310 Package List
the HOWTOs have been translated. If you need to have a complete set of HOWTOs, you’ll need to install theEnglish version (the howto package).
indexhtml – (Version 6.0, 17K)�
�
�
�W
�
�
�
�S
The indexhtml package contains the HTML page and graphics for a welcome page shown by your Web browser,which you’ll see after you’ve successfully installed Red Hat Linux.
The Web page provided by indexhtml tells you how to register your Red Hat software and how to get any supportthat you might need.
install-guide – (Version 3.2, 1,373K)
The install-guide contains the Linux Documentation Project (LDP) Getting Started Guide in HTML format. TheLDP Getting Started Guide is intended to be an installation manual and an entry-level guide to Linux. If you’reinstalling the Red Hat Linux operating system, you should ignore the installation instructions included here andinstead use Red Hat’s Installation Guide.
You should install the install-guide package if you’d like to use the LDP’s Getting Started Guide in HTML formatusing your web browser off your own machine, or if you’d like to provide the LDP’s Getting Started Guide onyour web server.
kernel-doc – (Version 2.2.5, 2,307K)
This package contains documentation files form the kernel source. Various bits of information about the Linuxkernel and the device drivers shipped with it are documented in these files. You also might want install thispackage if you need a reference to the options that can be passed to Linux kernel modules at load time.
lpg – (Version 0.4, 1,739K)
The lpg package includes a generic guide for programming on Linux systems, in HTML format. You may wantto check the Linux Documentation Project’s website at http://sunsite.unc.edu/LDP/ for more information andpossible updates to the programming guide.
If you’d like to view the Linux programming guide using your web browser from files on your own machine, orif you’d like to provide it from your web server, you should install the lpg package.
man-pages – (Version 1.23, 1,795K)�
�
�
�W
�
�
�
�S
A large collection of man pages (reference material) from the Linux Documentation Project (LDP). The man pagesare organized into the following sections:
Section 1: User commands (intro only) Section 2: System calls Section 3: Libc calls Section 4: Devices (e.g., hd,sd) Section 5: File formats and protocols (e.g., wtmp, /etc/passwd, nfs) Section 6: Games (intro only) Section 7:Conventions, macro packages, etc. (e.g., nroff, ascii) Section 8: System administration (intro only)
nag – (Version 1.0, 1,217K)
The nag package contains the Linux Documentation Project’s Network Administrators’ Guide. The NAG coversthe wide world of Linux networking, including TCP/IP, UUCP, SLIP, DNS, mail systems, NNTP and news sys-tems, and NFS. Be sure to check the LDP’s website at http://sunsite.unc.edu/linux/ldp.html for possible updatesto the NAG.
Install the nag package if you’d like to use the LDP’s Network Administrators’ Guide off your own machine.

D.4 Documentation 311
python-docs – (Version 1.5.1, 2,611K)
The python-docs package contains documentation on the Python programming language and interpreter. Thedocumentation is provided in ASCII text files and in LaTeX source files.
Install the python-docs package if you’d like to use the documentation for the Python language.
rhl-alpha-install-addend-en – (Version 6.0, 200K)
The rhl-alpha-install-addend-en package contains the Red Hat Linux 6.0 Alpha Installation Addendum documentin HTML format.
Install the rhl-alpha-install-addend-en package if you’d like to use an HTML version of the Alpha InstallationAddendum loaded on your own machine.
rhl-getting-started-guide-en – (Version 6.0, 709K)
The rhl-getting-started-guide-en contains the Red Hat Linux 6.0 Getting Started Guide document in HTML for-mat.
Install the rhl-getting-started-guide-en package if you’d like to use an HTML version of the Getting Started Guideloaded on your own machine.
rhl-install-guide-en – (Version 6.0, 2,428K)
The rhl-install-guide-en package contains the Red Hat Linux 6.0 Installation Guide in HTML format. An on-line copy of the Red Hat Linux 6.0 Installation Guide is available from the Red Hat Software web page athttp://www.redhat.com.
Install the rhl-install-guide-en package if you would like to use an HTML version of the Installation Guide fromyour own machine.
sag – (Version 0.6, 644K)
The Linux Documentation Project’s System Administrators’ Guide, provided in HTML format. This documentprovides a generic guide to Linux system administration. Check the Linux Documentation Project’s website athttp://sunsite.unc.edu/LDP/ldp.html for other formats of this document or for any updates.
Install the sag package if you’d like to use the HTML version of the LDP’s System Administrators’ Guide on yourown machine.
sendmail-doc – (Version 8.9.3, 1,360K)
The sendmail-doc package contains documentation about the Sendmail Mail Transport Agent (MTA) program,including release notes, the Sendmail FAQ and a few papers written about Sendmail. The papers are provided inPostScript(TM) and troff formats.
Install the sendmail-doc package if you need documentation about Sendmail.
specspo – (Version 6.0, 859K)
The specspo package contains the portable object catalogues used to internationalize Red Hat packages.

312 Package List
D.5 System Environment
This section contains packages that are required to provide the Red Hat Linux system environment.
D.5.1 Base
This section contains packages that are required for the basic system environment.
MAKEDEV – (Version 2.5, 34K)�
�
�
�B
The /dev directory contains important files which correspond to the hardware on your system, such as soundcards, serial or printer ports, tape and CD-ROM drives and more. MAKEDEV is a script which helps you createand maintain the files in your /dev directory.
These are the files needed to install MAKEDEV.
SysVinit – (Version 2.74, 151K)�
�
�
�B
The SysVinit package contains a group of processes that control the very basic functions of your system. SysVinitis the first program started by the Linux kernel when the system boots, controlling the startup, running andshutdown of all other programs.
adjtimex – (Version 1.3, 23K)
Adjtimex is a kernel clock management program, which the superuser may use to correct any drift in the system’sclock. Users can use adjtimex to view the time variables.
authconfig – (Version 1.8, 27K)�
�
�
�B
Authconfig is a terminal mode program for setting up Network Information Service (NIS) and shadow (moresecure) passwords on your system. Authconfig also configures the system to automatically turn on NIS at systemstartup.
basesystem – (Version 6.0, 0K)�
�
�
�B
Basesystem defines the components of a basic Red Hat Linux system (for example, the package installation orderto use during bootstrapping). Basesystem should be the first package installed on a system, and it should neverbe removed.
chkconfig – (Version 1.0.6, 82K)�
�
�
�B
Chkconfig is a basic system utility. It updates and queries runlevel information for system services. Chkconfigmanipulates the numerous symbolic links in /etc/rc.d, so system administrators don’t have to manually edit thesymbolic links as often.
chkfontpath – (Version 1.4.1, 18K)�
�
�
�W
�
�
�
�S
This is a simple terminal mode program for adding, removing and listing the directories contained in the Xfont server’s path. It is mostly intended to be used ’internally’ by RPM when packages with fonts are added orremoved, but it may be useful as a stand-alone utility in some instances.
D.5 System Environment 313
control-panel – (Version 3.11, 175K)�
�
�
�W
�
�
�
�S
The Red Hat control panel is an X program launcher for the X Window System. Both convenient and pleasing,the Red Hat control panel allows you easy access to numerous X-based system administration tools included inyour Red Hat Linux system.
Eventually, you’ll want to work with many of your system administration tools; this package helps you locateand launch many of them.
crontabs – (Version 1.7, 4K)�
�
�
�B
The crontabs package contains root crontab files. Crontab is the program used to install, uninstall or list the tablesused to drive the cron daemon. The cron daemon checks the crontab files to see when particular commands arescheduled to be executed. If commands are scheduled, it executes them.
Crontabs handles a basic system function, so it should be installed on your system.
dev – (Version 2.7.7, 45K)�
�
�
�B
The Red Hat Linux operating system uses file system entries to represent devices (CD-ROMs, floppy drives, etc.)attached to the machine. All of these entries are in the /dev tree (although they don’t have to be). This packagecontains the most commonly used /dev entries.
The dev package is a basic part of your Red Hat Linux system and it needs to be installed.
e2fsprogs – (Version 1.14, 1,134K)�
�
�
�B
The e2fsprogs package contains a number of utilities for creating, checking, modifying and correcting any incon-sistencies in second extended (ext2) filesystems. E2fsprogs contains e2fsck (used to repair filesystem inconsis-tencies after an unclean shutdown), mke2fs (used to initialize a partition to contain an empty ext2 filesystem),debugfs (used to examine the internal structure of a filesystem, to manually repair a corrupted filesystem or tocreate test cases for e2fsck), tune2fs (used to modify filesystem parameters) and most of the other core ext2fsfilesystem utilities.
You should install the e2fsprogs package if you need to manage the performance of an ext2 filesystem.
eject – (Version 2.0.2, 46K)�
�
�
�B
The eject program allows the user to eject removable media (typically CD-ROMs, floppy disks or Iomega Jaz orZip disks) using software control. Eject can also control some multi- disk CD changers and even some devices’auto-eject features.
Install eject if you’d like to eject removable media using software control.
etcskel – (Version 2.0, 2K)�
�
�
�B
The etcskel package is part of the basic Red Hat system. Etcskel provides the /etc/skel directory’s files. Thesefiles (.Xdefaults, .bash logout, .bash profile, .bashrc) are then placed in every new user’s home directory whennew accounts are created.
filesystem – (Version 1.3.4, 80K)�
�
�
�B
The filesystem package is one of the basic packages that is installed on a Red Hat Linux system. Filesystem con-tains the basic directory layout for a Linux operating system, including the correct permissions for the directories.

314 Package List
genromfs – (Version 0.3, 12K)
Genromfs is a tool for creating romfs filesystems, which are lightweight, read-only filesystems supported by theLinux kernel.
info – (Version 3.12f, 245K)�
�
�
�B
The GNU project uses the texinfo file format for much of its documentation. The info package provides a stan-dalone TTY-based browser program for viewing texinfo files.
You should install info, because GNU’s texinfo documentation is a valuable source of information about thesoftware on your system.
initscripts – (Version 4.16, 152K)�
�
�
�B
The initscripts package contains the basic system scripts used to boot your Red Hat system, change run levels,and shut the system down cleanly. Initscripts also contains the scripts that activate and deactivate most networkinterfaces.
ipchains – (Version 1.3.8, 316K)�
�
�
�W
�
�
�
�S
Linux IP Firewalling Chains is an update to (and hopefully an improvement upon) the normal Linux Firewallingcode, for 2.0 and 2.1 kernels. It lets you do things like firewalls, IP masquerading, etc.
isapnptools – (Version 1.18, 237K)�
�
�
�B
The isapnptools package contains utilities for configuring ISA Plug-and-Play (PnP) cards/boards which are incompliance with the PnP ISA Specification Version 1.0a. ISA PnP cards use registers instead of jumpers for settingthe board address and interrupt assignments. The cards also contain descriptions of the resources which need tobe allocated. The BIOS on your system, or isapnptools, uses a protocol described in the specification to find all ofthe PnP boards and allocate the resources so that none of them conflict.
Note that the BIOS doesn’t do a very good job of allocating resources. So isapnptools is suitable for all systems,whether or not they include a PnP BIOS. In fact, a PnP BIOS adds some complications. A PnP BIOS may alreadyactivate some cards so that the drivers can find them. Then these tools can unconfigure them or change theirsettings, causing all sorts of nasty effects. If you have PnP network cards that already work, you should readthrough the documentation files very carefully before you use isapnptools.
Install isapnptools if you need utilities for configuring ISA PnP cards.
kbdconfig – (Version 1.9.2, 58K)�
�
�
�B
The kbdconfig utility is a terminal mode program for setting the keyboard map for your system. Keyboard mapsare necessary for using any keyboard besides the US default keyboard. Kbdconfig will load the selected keymapbefore exiting and configure your machine to use that keymap automatically after rebooting.
You should install kbdconfig if you need a utility for changing your keyboard map.
ld.so – (Version 1.9.5, 247K)�
�
�
�B
This package contains the shared library configuration tool, ldconfig, which is required by many packages. It alsoincludes the shared library loader and dynamic loader for Linux libc 5.
ldconfig – (Version 1.9.5, 223K)�
�
�
�B

D.5 System Environment 315
Ldconfig is a basic system program which determines run-time link bindings between ld.so and shared libraries.Ldconfig scans a running system and sets up the symbolic links that are used to load shared libraries properly. Italso creates a cache (/etc/ld.so.cache) which speeds the loading of programs which use shared libraries.
lilo – (Version 0.21, 1,095K)�
�
�
�B
LILO (LInux LOader) is a basic system program which boots your Linux system. LILO loads the Linux kernelfrom a floppy or a hard drive, boots the kernel and passes control of the system to the kernel. LILO can also bootother operating systems.
logrotate – (Version 3.2, 50K)�
�
�
�B
The logrotate utility is designed to simplify the administration of log files on a system which generates a lot of logfiles. Logrotate allows for the automatic rotation compression, removal and mailing of log files. Logrotate can beset to handle a log file daily, weekly, monthly or when the log file gets to a certain size. Normally, logrotate runsas a daily cron job.
Install the logrotate package if you need a utility to deal with the log files on your system.
losetup – (Version 2.9o, 9K)�
�
�
�B
Linux supports a special block device called the loop device, which maps a normal file onto a virtual block device.This allows for the file to be used as a ”virtual file system” inside another file. Losetup is used to associate loopdevices with regular files or block devices, to detach loop devices and to query the status of a loop device.
mailcap – (Version 2.0.1, 34K)�
�
�
�B
The mailcap file is used by the metamail program. Metamail reads the mailcap file to determine how it shoulddisplay non-text or multimedia material. Basically, mailcap associates a particular type of file with a particularprogram that a mail agent or other program can call in order to handle the file.
Mailcap should be installed to allow certain programs to be able to handle non-text files.
man – (Version 1.5g, 215K)�
�
�
�B
The man package includes three tools for finding information and/or documentation about your Linux system:man, apropos and whatis. The man system formats and displays on-line manual pages about commands or func-tions on your system. Apropos searches the whatis database (containing short descriptions of system commands)for a string. Whatis searches its own database for a complete word.
The man package should be installed on your system because it is the primary way for finding documentation.
mingetty – (Version 0.9.4, 32K)�
�
�
�B
The mingetty program is a lightweight, minimalist getty program for use only on virtual consoles. Mingetty isnot suitable for serial lines (you should use the mgetty program instead for that purpose).
mkbootdisk – (Version 1.2, 5K)�
�
�
�B
The mkbootdisk program creates a standalone boot floppy disk for booting the running system. The created bootdisk will look for the root filesystem on the device mentioned in /etc/fstab and includes an initial ramdisk imagewhich will load any necessary SCSI modules for the system.

316 Package List
mkinitrd – (Version 2.0, 7K)�
�
�
�B
Mkinitrd creates filesystem images for use as initial ramdisk (initrd) images. These ramdisk images are often usedto preload the block device modules (SCSI or RAID) needed to access the root filesystem.
In other words, generic kernels can be built without drivers for any SCSI adapters which load the SCSI driver asa module. Since the kernel needs to read those modules, but in this case it isn’t able to address the SCSI adapter,an initial ramdisk is used. The initial ramdisk is loaded by the operating system loader (normally LILO) and isavailable to the kernel as soon as the ramdisk is loaded. The ramdisk image loads the proper SCSI adapter andallows the kernel to mount the root filesystem. The mkinitrd program creates such a ramdisk using informationfound in the /etc/conf.modules file.
mkkickstart – (Version 1.2, 5K)
The mkkickstart program writes a kickstart description from the host machine. The kickstart description can thenbe used, during a CD-ROM or NFS installation, to automatically build that machine’s configuration of Red HatLinux on one or more other machines.
Install mkkickstart if you want to use the kickstart method to automatically install Red Hat Linux.
mktemp – (Version 1.5, 8K)�
�
�
�B
The mktemp utility takes a given file name template and overwrites a portion of it to create a unique file name.This allows shell scripts and other programs to safely create and use /tmp files.
Install the mktemp package if you need to use shell scripts or other programs which will create and use unique/tmp files.
mount – (Version 2.9o, 132K)�
�
�
�B
The mount package contains the mount, umount, swapon and swapoff programs. Accessible files on your systemare arranged in one big tree or hierarchy. These files can be spread out over several devices. The mount commandattaches a filesystem on some device to your system’s file tree. The umount command detaches a filesystem fromthe tree. Swapon and swapoff, respectively, specify and disable devices and files for paging and swapping.
mouseconfig – (Version 3.9, 184K)�
�
�
�B
Mouseconfig is a text-based mouse configuration tool. Mouseconfig sets up the files and links needed for config-uring and using a mouse on a Red Hat Linux system. The mouseconfig tool can be used to set the correct mousetype for programs like gpm, and can be used with Xconfigurator to set up the mouse for the X Window System.
net-tools – (Version 1.51, 395K)�
�
�
�B
The net-tools package contains the basic tools needed for setting up networking: arp, rarp, ifconfig, netstat, ethersand route.
ntsysv – (Version 1.0.6, 23K)�
�
�
�B
ntsysv updates and queries runlevel information for system services. ntsysv relieves system administrators ofhaving to directly manipulate the numerous symbolic links in /etc/rc.d.
pam – (Version 0.66, 1,898K)�
�
�
�B
PAM (Pluggable Authentication Modules) is a system security tool which allows system administrators to set

D.5 System Environment 317
authentication policy without having to recompile programs which do authentication.
passwd – (Version 0.58, 15K)�
�
�
�B
The passwd package contains a system utility (passwd) which sets and/or changes passwords, using PAM (Plug-gable Authentication Modules).
To use passwd, you should have PAM installed on your system.
pwdb – (Version 0.58, 424K)�
�
�
�B
The pwdb package contains libpwdb, the password database library. Libpwdb is a library which implementsa generic user information database. Libpwdb was specifically designed to work with Linux’s PAM (Plug-gable Authentication Modules). Libpwdb allows configurable access to and management of security tools like/etc/passwd, /etc/shadow and network authentication systems including NIS and Radius.
quota – (Version 1.66, 77K)�
�
�
�B
The quota package contains system administration tools for monitoring and limiting users’ and or groups’ diskusage, per filesystem.
raidtools – (Version 0.90, 135K)
This package includes the tools you need to set up and maintain a software RAID device under Linux. It onlyworks with Linux 2.2 kernels and later, or 2.0 kernel specifically patched with newer raid support.
redhat-logos – (Version 1.0.5, 512K)�
�
�
�B
redhat-logos (the ”Package”) contains files of the Red Hat ”Shadow Man” logo and the RPM logo (the ”Logos”).Red Hat, the Red Hat ”Shadow Man” logo, RPM, and the RPM logo are trademarks or registered trademarks ofRed Hat Software, Inc. in the United States and other countries.
Red Hat Software, Inc. grants you the right to use the Package during the normal operation of other softwareprograms that call upon the Package. Red Hat Software, Inc. grants to you the right and license to copy andredistribute the Package, but only in conjunction with copying or redistributing additional software packagesthat call upon the Package during the normal course of operation. Such rights are granted to you without fee,provided that:
1. The above copyright notice and this license are included with each copy you make, and they remain intact andare not altered, deleted, or modified in any way; 2. You do not modify the Package, or the appearance of any orall of the Logos in any manner; and 3. You do not use any or all of the Logos as, or as part of, a trademark, tradename, or trade identifier; or in any other fashion except as set forth in this license.
NO WARRANTY. THIS PACKAGE IS PROVIDED ”AS IS” AND ANY EXPRESS OR IMPLIED WARRANTIES,INCLUDING, BUT NOT LIMITED TO, THE IMPLIED WARRANTIES OF MERCHANTABILITY AND FITNESSFOR A PARTICULAR PURPOSE ARE DISCLAIMED. IN NO EVENT SHALL RED HAT SOFTWARE, INC. BELIABLE FOR ANY DIRECT, INDIRECT, INCIDENTAL, SPECIAL, EXEMPLARY, OR CONSEQUENTIAL DAM-AGES (INCLUDING, BUT NOT LIMITED TO, PROCUREMENT OF SUBSTITUTE GOODS OR SERVICES; LOSSOF USE, DATA OR PROFITS; OR BUSINESS INTERRUPTION) HOWEVER CAUSED AND ON ANY THEORYOF LIABILITY, WHETHER IN CONTRACT, STRICT LIABILITY, OR TORT (INCLUDING NEGLIGENCE OROTHERWISE) ARISING IN ANY WAY OUT OF THE USE OF THIS PACKAGE, EVEN IF ADVISED OF THEPOSSIBILITY OF SUCH DAMAGE.

318 Package List
redhat-release – (Version 6.0, 0K)�
�
�
�B
Red Hat Linux release file
rootfiles – (Version 5.2, 1K)�
�
�
�B
The rootfiles package contains basic required files that are placed in the root user’s account. These files arebasically the same as the files found in the etcskel package, which are placed in regular users’ home directories.
rpm – (Version 3.0, 1,659K)�
�
�
�B
The Red Hat Package Manager (RPM) is a powerful command line driven package management system capableof installing, uninstalling, verifying, querying, and updating software packages. Each software package consistsof an archive of files along with information about the package like its version, a description, etc.
setup – (Version 2.0.2, 15K)�
�
�
�B
The setup package contains a set of very important system configuration and setup files, such as passwd, group,profile and more.
You should install the setup package because you will find yourself using its many features for system adminis-tration.
shadow-utils – (Version 980403, 584K)�
�
�
�B
The shadow-utils package includes the necessary programs for converting UNIX password files to the shadowpassword format, plus programs for managing user and group accounts. The pwconv command converts pass-words to the shadow password format. The pwunconv command unconverts shadow passwords and generatesan npasswd file (a standard UNIX password file). The pwck command checks the integrity of password andshadow files. The lastlog command prints out the last login times for all users. The useradd, userdel and user-mod commands are used for managing user accounts. The groupadd, groupdel and groupmod commands areused for managing group accounts.
shapecfg – (Version 2.0.36, 6K)
The Shapecfg program configures and adjusts traffic shaper bandwidth limiters. Traffic shaping means settingparameters to which traffic should conform - setting the standards for bandwidth consumption.
To use Shapecfg, you must have also installed the kernel which supports the shaper module (kernel versions2.0.36 or later and late 2.1.x kernels).
Install the shapecfg package if you want to set traffic bandwidth parameters, and if you have the appropriatekernel.
termcap – (Version 9.12.6, 424K)�
�
�
�B
The termcap package provides the /etc/termcap file. /etc/termcap is a database which defines the capabilities ofvarious terminals and terminal emulators. Certain programs use the /etc/termcap file to access various featuresof terminals (the bell, colors, and graphics, etc.).
timeconfig – (Version 2.7, 388K)�
�
�
�B
The timeconfig package contains two utilities: timeconfig and setclock. Timeconfig provides a simple text modetool for configuring the time parameters in /etc/sysconfig/clock and /etc/localtime. The setclock tool sets the

D.5 System Environment 319
hardware clock on the system to the current time stored in the system clock.
tmpwatch – (Version 1.7, 9K)�
�
�
�B
The tmpwatch utility recursively searches through specified directories and removes files which have not beenaccessed in a specified period of time. Tmpwatch is normally used to clean up directories which are used fortemporarily holding files (for example, /tmp). Tmpwatch ignores symlinks, won’t switch filesystems and onlyremoves empty directories and regular files.
utempter – (Version 0.5, 21K)�
�
�
�B
Utempter is a utility which allows programs to log information to a privledged file (/var/run/utmp), withoutcompromising system security. It accomplishes this task by acting as a buffer between root and the programs.
util-linux – (Version 2.9o, 960K)�
�
�
�B
The util-linux package contains a large variety of low-level system utilities that are necessary for a Linux systemto function. Among many features, Util-linux contains the fdisk configuration tool and login program.
You should install util-linux for its essential system tools.
vixie-cron – (Version 3.0.1, 57K)�
�
�
�B
The vixie-cron package contains the Vixie version of cron. Cron is a standard UNIX daemon that runs specifiedprograms at scheduled times. Vixie cron adds better security and more powerful configuration options to thestandard version of cron.
yp-tools – (Version 2.2, 160K)�
�
�
�W
�
�
�
�S
The Network Information Service (NIS) is a system which provides network information (login names, pass-words, home directories, group information) to all of the machines on a network. NIS can enable users to loginon any machine on the network, as long as the machine has the NIS client programs running and the user’spassword is recorded in the NIS passwd database. NIS was formerly known as Sun Yellow Pages (YP).
This package’s NIS implementation is based on FreeBSD’s YP and is a special port for glibc 2.x and libc versions5.4.21 and later. This package only provides the NIS client programs. In order to use the clients, you’ll need toalready have an NIS server running on your network. An NIS server is provided in the ypserv package.
Install the yp-tools package if you need NIS client programs for machines on your network. You will also need toinstall the ypbind package on every machine running NIS client programs. If you need an NIS server, you’ll needto install the ypserv package on one machine on the network.
D.5.2 Daemons
This section contains packages associated with the daemon processes that run under Red Hat Linux.
ORBit – (Version 0.4.3, 871K)�
�
�
�W
�
�
�
�S
ORBit is a high-performance CORBA ORB (object request broker). It allows programs to send requests and receivereplies from other programs, regardless of the locations of the two programs.
You will need to install this package and the related header files, libraries and utilities if you want to write

320 Package List
programs that use CORBA technology.
XFree86-xfs – (Version 3.3.3.1, 485K)�
�
�
�W
�
�
�
�S
This is a font server for XFree86. You can serve fonts to other X servers remotely with this package, and theremote system will be able to use all fonts installed on the font server, even if they are not installed on the remotecomputer.
am-utils – (Version 6.0, 1,945K)
Am-utils includes an updated version of Amd, the popular BSD automounter. An automounter is a programwhich maintains a cache of mounted filesystems. Filesystems are mounted when they are first referenced by theuser and unmounted after a certain period of inactivity. Amd supports a variety of filesystems, including NFS,UFS, CD-ROMS and local drives.
You should install am-utils if you need a program for automatically mounting and unmounting filesystems.
anonftp – (Version 2.8, 1,540K)�
�
�
�S
The anonftp package contains the files you need in order to allow anonymous FTP access to your machine.Anonymous FTP access allows anyone to download files from your machine without having a user account.Anonymous FTP is a popular way of making programs available via the Internet.
You should install anonftp if you would like to enable anonymous FTP downloads from your machine.
apache – (Version 1.3.6, 2,056K)�
�
�
�S
Apache is a powerful, full-featured, efficient and freely-available Web server. Apache is also the most popularWeb server on the Internet.
This package will install the Apache Web server on your machine.
apmd – (Version 3.0beta5, 54K)�
�
�
�B
This is a Advanced Power Management daemon and utilities. It can watch your notebook’s battery and warn allusers when the battery is low.
Patches to Rik Faith’s original version have been added for shutting down the PCMCIA sockets before a suspend.
at – (Version 3.1.7, 64K)�
�
�
�B
At and batch read commands from standard input or from a specified file. At allows you to specify that a com-mand will be run at a particular time (now or a specified time in the future). Batch will execute commands whenthe system load levels drop to a particular level. Both commands use /bin/sh to run the commands.
You should install the at package if you need a utility that will do time-oriented job control. Note: you should usecrontab instead, if it is a recurring job that will need to be repeated at the same time every day/week/etc.
autofs – (Version 3.1.3, 127K)
Autofs controls the operation of the automount daemons. The automount daemons automatically mount filesys-tems when you use them and unmount them after a period of inactivity. Filesystems can include network filesys-tems, CD-ROMs, floppies and others.

D.5 System Environment 321
Install this package if you want a program for automatically mounting and unmounting filesystems. If your RedHat Linux machine is on a network, you should install autofs.
bdflush – (Version 1.5, 10K)�
�
�
�B
The bdflush process starts the kernel daemon which flushes dirty buffers back to disk (i.e., writes all unwrittendata to disk). This helps to prevent the buffers from growing too stale.
Bdflush is a basic system process that must run for your system to operate properly.
bind – (Version 8.2, 4,370K)�
�
�
�S
Bind includes the named name server, which resolves host names to IP addresses (and vice versa), and a resolverlibrary (a set of routines in a system library that provide the interface for programs to use when accessing domainname services). A name server is a network service which enables clients to name resources or objects and sharethis information with other network machines. The named name server can be used on workstations as a cachingname server, but is generally only needed on one machine for an entire network. Note that the configuration filesfor making bind act as a simple caching nameserver are included in the caching-nameserver package.
Install the bind package if you need a name server for your network. If you want bind to act a caching nameserver, you will also need to install the caching-nameserver package.
bootparamd – (Version 0.10, 18K)
The bootparamd process provides bootparamd, a server process which provides the information needed by disk-less clients in order for them to successfully boot. Bootparamd looks first in /etc/bootparams for an entry for thatparticular client; if a local bootparams file doesn’t exist, it looks at the appropriate Network Information Service(NIS) map. Some network boot loaders (notably Sun’s) rely on special boot server code on the server, in additionto the rarp and tftp servers. This bootparamd server process is compatible with SunOS bootparam clients andservers which need that boot server code.
You should install bootparamd if you need to provide boot information to diskless clients on your network.
caching-nameserver – (Version 6.0, 3K)�
�
�
�S
The caching-nameserver package includes the configuration files which will make bind, the DNS name server,act as a simple caching nameserver. Many users on dialup connections use this package along with bind for sucha purpose.
If you would like to set up a caching name server, you’ll need to install the caching-nameserver package; you’llalso need to install bind.
cleanfeed – (Version 0.95.7b, 107K)�
�
�
�S
Cleanfeed is an automatic spam filter for Usenet news servers and routers (INN, Cyclone, Typhoon, Breeze andNNTPRelay). Cleanfeed is highly configurable, easily modified and very fast. It can be configured to block binaryposts to non-binary newsgroups, to cancel already-rejected articles, and to reject some spamming from local users.
Install the cleanfeed package if you need a spam filter for a Usenet news server.
comsat – (Version 0.10, 17K)
The biff client and comsat server are an antiquated method of asynchronous mail notification. Although they arestill supported, most users use their shell’s MAIL variable (or csh shell’s mail variable) to check for mail, or a

322 Package List
dedicated application like xbiff or xmailbox. If the comsat service is not enabled, biff won’t work and you’ll needto use either the MAIL or mail variable.
You may want to install biff if you’d like to be notified when mail arrives. However, you should probably checkout the more modern methodologies of mail notification (xbiff or xmailbox) instead.
dhcp – (Version 2.0b1pl6, 217K)
DHCP (Dynamic Host Configuration Protocol) is a protocol which allows individual devices on an IP networkto get their own network configuration information (IP address, subnetmask, broadcast address, etc.) from aDHCP server. The overall purpose of DHCP is to make it easier to administer a large network. The dhcp packageincludes the DHCP server and a DHCP relay agent.
You should install dhcp if you want to set up a DHCP server on your network. You will also need to install thedhcpcd package, which provides the DHCP client daemon, on client machines.
dhcpcd – (Version 1.3.17pl2, 332K)
dhcpcd is an implementation of the DHCP client specified in draft-ietf-dhc-dhcp-09 (when -r option is not speci-fied) and RFC1541 (when -r option is specified).
It gets the host information (IP address, netmask, broad- cast address, etc.) from a DHCP server and configuresthe network interface of the machine on which it is running. It also tries to renew the lease time according toRFC1541 or draft-ietf-dhc-dhcp-09.
esound – (Version 0.2.12, 183K)�
�
�
�W
�
�
�
�S
EsounD – the Enlightened Sound Daemon – is a server process that allows multiple applications to share a singlesound card. For example, when you’re listening to music from your CD and you receive a sound-related eventfrom ICQ, your applications won’t have to jockey for the attention of your sound card.
EsounD mixes several audio streams for playback by a single audio device.
Install esound if you’d like to allow for such event sharing by your audio device.
gated – (Version 3.5.10, 2,434K)
GateD is a modular software program consisting of core services, a routing database, and protocol moduleswhich support multiple routing protocols (RIP versions 1 and 2, DCN HELLO, OSPF version 2, EGP version 2,BGP versions 2 through 4). GateD is designed to handle dynamic routing with a routing database built from theinformation exchanged by routing protocols.
Install gated if you need a routing daemon.
gpm – (Version 1.17.5, 258K)�
�
�
�B
Gpm provides mouse support to text-based Linux applications like the emacs editor, the Midnight Commanderfile management system, and other programs. Gpm also provides console cut-and-paste operations using themouse and includes a program to allow pop-up menus to appear at the click of a mouse button.
Gpm should be installed if you intend to use a mouse with your Red Hat Linux system.
imap – (Version 4.5, 1,447K)

D.5 System Environment 323
The imap package provides server daemons for both the IMAP (Internet Message Access Protocol) and POP (PostOffice Protocol) mail access protocols. The POP protocol uses a ”post office” machine to collect mail for usersand allows users to download their mail to their local machine for reading. The IMAP protocol provides thefunctionality of POP, but allows a user to read mail on a remote machine without downloading it to their localmachine.
Install the imap package if you need a server to support the IMAP or the POP mail access protocols.
inews – (Version 2.2, 74K)
The inews program is used by some news programs (for example, inn and trn) to post Usenet news articles tolocal news servers. Inews reads an article from a file or standard input, adds headers, performs some consistencychecks and then sends the article to the local news server specified in the inn.conf file.
Install inews if you need a program for posting Usenet articles to local news servers.
inn – (Version 2.2, 6,262K)�
�
�
�S
INN (InterNetNews) is a complete system for serving Usenet news and/or private newsfeeds. INN includesinnd, an NNTP (NetNews Transport Protocol) server, and nnrpd, a newsreader that is spawned for each client.Both innd and nnrpd vary slightly from the NNTP protocol, but not in ways that are easily noticed.
Install the inn package if you need a complete system for serving and reading Usenet news. You may also needto install inn-devel, if you are going to use a separate program which interfaces to INN, like newsgate or tin.
intimed – (Version 1.10, 210K)
The intimed package contains a server (in.timed), which keeps networked machines’ clocks correctly synchro-nized to the server’s time.
Install intimed if you need a network time server.
knfsd – (Version 1.2.2, 158K)�
�
�
�W
�
�
�
�S
This is the *new* kernel NFS server and related tools. It provides a much higher level of performance than thetraditional Linux user-land NFS server.
lpr – (Version 0.35, 180K)�
�
�
�W
�
�
�
�S
The lpr package provides the basic system utility for managing printing services. Lpr manages print queues,sends print jobs to local and remote printers and accepts print jobs from remote clients.
If you will be printing from your system, you’ll need to install the lpr package.
mars-nwe – (Version 0.99pl15, 657K)�
�
�
�S
The mars nwe (MARtin Stover’s NetWare Emulator) package enables Linux to provide both file and print servicesfor NetWare clients (i.e., providing the services of a Novell NetWare file server). Mars nwe allows the sharing offiles between Linux machines and Novell NetWare clients, using NetWare’s native IPX protocol suite.
Install the mars nwe package if you need a Novell NetWare file server on your Red Hat Linux system.
mcserv – (Version 4.5.30, 19K)

324 Package List
The Midnight Commander file management system will allow you to manipulate the files on a remote machineas if they were local. This is only possible if the remote machine is running the mcserv server program. Mcservprovides clients running Midnight Commander with access to the host’s file systems.
Install mcserv on machines if you want to access their file systems remotely using the Midnight Commander filemanagement system.
mod perl – (Version 1.19, 1,557K)
Mod perl incorporates a Perl interpreter into the Apache web server, so that the Apache web server can directlyexecute Perl code. Mod perl links the Perl runtime library into the Apache web server and provides an object-oriented Perl interface for Apache’s C language API. The end result is a quicker CGI script turnaround process,since no external Perl interpreter has to be started.
Install mod perl if you’re installing the Apache web server and you’d like for it to directly incorporate a Perlinterpreter.
mod php – (Version 2.0.1, 676K)
PHP is an HTML-embedded scripting language. PHP attempts to make it easy for developers to write dy-namically generated web pages. PHP also offers built-in database integration for several commercial and non-commercial database management systems, so writing a database-enabled web page with PHP is fairly simple.The most common use of PHP coding is probably as a replacement for CGI scripts. The mod php module enablesthe Apache web server to understand and process the embedded PHP language in web pages.
This package contains PHP/FI, or PHP version 2.01. Unless you use applications which specifically rely onPHP/FI, you should instead install the mod php3 package, which contains PHP3. PHP3 is an improved andmore capable update to PHP/FI.
mod php3 – (Version 3.0.7, 3,903K)
PHP is an HTML-embedded scripting language. PHP attempts to make it easy for developers to write dy-namically generated web pages. PHP also offers built-in database integration for several commercial and non-commercial database management systems, so writing a database-enabled web page with PHP is fairly simple.The most common use of PHP coding is probably as a replacement for CGI scripts. The mod php module enablesthe Apache web server to understand and process the embedded PHP language in web pages.
This package contains PHP3, or PHP version 3.05. If you use applications which specifically rely on PHP/FI, youshould instead install the PHP/FI module contained in the mod php package. If you’re just starting with PHP,you should install this package. You’ll also need to install the Apache web server.
netkit-base – (Version 0.10, 60K)�
�
�
�W
�
�
�
�S
The netkit-base package contains the basic networking tools ping and inetd. The ping command sends a series ofICMP protocol ECHO REQUEST packets to a specified network host and can tell you if that machine is alive andreceiving network traffic. Inetd listens on certain Internet sockets for connection requests, decides what programshould receive each request, and starts up that program.
The netkit-base package should be installed on any machine that is on a network.
nscd – (Version 2.1.1, 33K)
nscd caches name service lookups; it can dramatically improve performance with NIS+, and may help with DNS

D.5 System Environment 325
as well.
You cannot use nscd with 2.0 kernels, due to bugs in the kernel-side thread support. nscd happens to hit thesebugs particularly hard.
pidentd – (Version 2.8.5, 129K)�
�
�
�W
�
�
�
�S
The pidentd package contains identd, which implements the RFC1413 identification server. Identd looks upspecific TCP/IP connections and returns either the user name or other information about the process that ownsthe connection.
portmap – (Version 4.0, 49K)�
�
�
�W
�
�
�
�S
The portmapper program is a security tool which prevents theft of NIS (YP), NFS and other sensitive informationvia the portmapper. A portmapper manages RPC connections, which are used by protocols like NFS and NIS.
The portmap package should be installed on any machine which acts as a server for protocols using RPC.
ppp – (Version 2.3.7, 300K)�
�
�
�W
�
�
�
�S
The ppp package contains the PPP (Point-to-Point Protocol) daemon and documentation for PPP support. ThePPP protocol provides a method for transmitting datagrams over serial point-to-point links.
The ppp package should be installed if your machine need to support the PPP protocol.
procmail – (Version 3.13.1, 201K)�
�
�
�B
The procmail program is used by Red Hat Linux for all local mail delivery. In addition to just delivering mail,procmail can be used for automatic filtering, presorting and other mail handling jobs. Procmail is also the basisfor the SmartList mailing list processor.
pump – (Version 0.6.4, 30K)�
�
�
�B
DHCP (Dynamic Host Configuration Protocol) and BOOTP (Boot Protocol) are protocols which allow individualdevices on an IP network to get their own network configuration information (IP address, subnetmask, broadcastaddress, etc.) from network servers. The overall purpose of DHCP and BOOTP is to make it easier to administera large network.
Pump is a combined BOOTP and DHCP client daemon, which allows your machine to retrieve configurationinformation from a server. You should install this package if you are on a network which uses BOOTP or DHCP.
routed – (Version 0.10, 39K)�
�
�
�W
�
�
�
�S
The routed routing daemon handles incoming RIP traffic and broadcasts outgoing RIP traffic about network trafficroutes, in order to maintain current routing tables. These routing tables are essential for a networked computer,so that it knows where packets need to be sent.
The routed package should be installed on any networked machine.
rusers – (Version 0.10, 54K)�
�
�
�W
�
�
�
�S
The rusers program allows users to find out who is logged into various machines on the local network. Therusers command produces output similar to who, but for the specified list of hosts or for all machines on the localnetwork.

326 Package List
Install rusers if you need to keep track of who is logged into your local network.
rwall – (Version 0.10, 18K)
The rwall command sends a message to all of the users logged into a specified host. Actually, your machine’srwall client sends the message to the rwall daemon running on the specified host, and the rwall daemon relaysthe message to all of the users logged in to that host. The rwall daemon is run from /etc/inetd.conf and is disabledby default on Red Hat Linux systems (it can be very annoying to keep getting all those messages when you’retrying to play Quake–I mean trying to get some work done).
Install rwall if you’d like the ability to send messages to users logged in to a specified host machine.
rwho – (Version 0.10, 33K)�
�
�
�W
�
�
�
�S
The rwho command displays output similar to the output of the who command (it shows who is logged in) forall machines on the local network running the rwho daemon.
Install the rwho command if you need to keep track of the users who are logged in to your local network.
samba – (Version 2.0.3, 6,339K)�
�
�
�S
Samba provides an SMB server which can be used to provide network services to SMB (sometimes called ”LanManager”) clients, including various versions of MS Windows, OS/2, and other Linux machines. Samba alsoprovides some SMB clients, which complement the built-in SMB filesystem in Linux. Samba uses NetBIOS overTCP/IP (NetBT) protocols and does NOT need NetBEUI (Microsoft Raw NetBIOS frame) protocol.
Samba-2 features an almost working NT Domain Control capability and includes the new SWAT (Samba WebAdministration Tool) that allows samba’s smb.conf file to be remotely managed using your favourite web browser.For the time being this is being enabled on TCP port 901 via inetd.
Please refer to the WHATSNEW.txt document for fixup information. This binary release includes encryptedpassword support. Please read the smb.conf file and ENCRYPTION.txt in the docs directory for implementationdetails.
NOTE: Red Hat Linux 5.X Uses PAM which has integrated support for Shadow passwords. Do NOT recompilewith the SHADOW PWD option enabled. Red Hat Linux has built in support for quotas in PAM.
sendmail – (Version 8.9.3, 506K)�
�
�
�B
The Sendmail program is a very widely used Mail Transport Agent (MTA). MTAs send mail from one machineto another. Sendmail is not a client program, which you use to read your email. Sendmail is a behind-the-scenesprogram which actually moves your email over networks or the Internet to where you want it to go.
If you ever need to reconfigure Sendmail, you’ll also need to have the sendmail.cf package installed. If you needdocumentation on Sendmail, you can install the sendmail-doc package.
sendmail-cf – (Version 8.9.3, 502K)
This package includes the configuration files which you’d need to generate the sendmail.cf file distributed withthe sendmail package. You’ll need the sendmail-cf package if you ever need to reconfigure and rebuild yoursendmail.cf file. For example, the default sendmail.cf file is not configured for UUCP. If someday you needed tosend and receive mail over UUCP, you’d need to install the sendmail-cf package to help you reconfigure Sendmail.
Install the sendmail-cf package if you need to reconfigure your sendmail.cf file.

D.5 System Environment 327
squid – (Version 2.2.STABLE1, 1,825K)
Squid is a high-performance proxy caching server for web clients, supporting FTP, gopher, and HTTP data objects.Unlike traditional caching software, Squid handles all requests in a single, non-blocking, I/O-driven process.
Squid keeps meta data and especially hot objects cached in RAM, caches DNS lookups, supports non-blockingDNS lookups, and implements negative caching of failed requests.
Squid supports SSL, extensive access controls, and full request logging. By using the lightweight Internet CacheProtocol, Squid caches can be arranged in a hierarchy or mesh for additional bandwidth savings.
Squid consists of a main server program squid, a Domain Name System lookup program dnsserver, a programfor retrieving FTP data ftpget, and some management and client tools. When squid starts up, it spawns a config-urable number of dnsserver processes, each of which can perform a single, blocking Domain Name System (DNS)lookup. This reduces the amount of time the cache waits for DNS lookups.
Squid is derived from the ARPA-funded Harvest project.
sysklogd – (Version 1.3.31, 111K)�
�
�
�B
The sysklogd package contains two system utilities (syslogd and klogd) which provide support for system log-ging. Syslogd and klogd run as daemons (background processes) and log system messages to different places,like sendmail logs, security logs, error logs, etc.
tcp wrappers – (Version 7.6, 270K)�
�
�
�W
�
�
�
�S
The tcp wrappers package provides small daemon programs which can monitor and filter incoming requests forsystat, finger, ftp, telnet, rlogin, rsh, exec, tftp, talk and other network services.
Install the tcp wrappers program if you need a security tool for filtering incoming network services requests.
tftp – (Version 0.10, 33K)�
�
�
�W
�
�
�
�S
The Trivial File Transfer Protocol (TFTP) is normally used only for booting diskless workstations. The tftp packageprovides the user interface for TFTP, which allows users to transfer files to and from a remote machine. Thisprogram, and TFTP, provide very little security, and should not be enabled unless it is expressly needed. TheTFTP server is run from /etc/inetd.conf, and is disabled by default on Red Hat Linux systems.
timed – (Version 0.10, 71K)�
�
�
�W
�
�
�
�S
The timed package contains the timed daemon and the timedc program for controlling the timed program. Timedsynchronizes its host machine’s time with the time on other local network machines. The timedc program is usedto control and configure the operation of timed.
Install the timed package if you need a system for keeping networked machines’ times in synchronization.
ucd-snmp – (Version 3.6.1, 1,491K)�
�
�
�W
�
�
�
�S
SNMP (Simple Network Management Protocol) is a protocol used for network management (hence the name).The UCD-SNMP project includes various SNMP tools: an extensible agent, an SNMP library, tools for requestingor setting information from SNMP agents, tools for generating and handling SNMP traps, a version of the netstatcommand which uses SNMP, and a Tk/Perl mib browser. This package contains the snmpd and snmptrapddaemons, documentation, etc.

328 Package List
Install the ucd-snmp package if you need network management tools. You will probably also want to install theucd-snmp-utils package, which contains UCD-SNMP utilities.
wu-ftpd – (Version 2.4.2vr17, 394K)�
�
�
�S
The wu-ftpd package contains the wu-ftpd FTP (File Transfer Protocol) server daemon. The FTP protocol is amethod of transferring files between machines on a network and/or over the Internet. Wu-ftpd’s features includelogging of transfers, logging of commands, on the fly compression and archiving, classification of users’ typeand location, per class limits, per directory upload permissions, restricted guest accounts, system wide and perdirectory messages, directory alias, cdpath, filename filter and virtual host support.
Install the wu-ftpd package if you need to provide FTP service to remote users.
xntp3 – (Version 5.93, 963K)
The Network Time Protocol (NTP) is used to synchronize a computer’s time with another reference time source.The xntp3 package contains utilities and daemons which will synchronize your computer’s time to CoordinatedUniversal Time (UTC) via the NTP protocol and NTP servers. Xntp3 includes ntpdate (a program for retrievingthe date and time from remote machines via a network) and xntpd (a daemon which continuously adjusts systemtime).
Install the xntp3 package if you need tools for keeping your system’s time synchronized via the NTP protocol.
ypbind – (Version 3.3, 33K)�
�
�
�W
�
�
�
�S
The Network Information Service (NIS) is a system which provides network information (login names, pass-words, home directories, group information) to all of the machines on a network. NIS can enable users to loginon any machine on the network, as long as the machine has the NIS client programs running and the user’spassword is recorded in the NIS passwd database. NIS was formerly known as Sun Yellow Pages (YP).
This package provides the ypbind daemon. The ypbind daemon binds NIS clients to an NIS domain. Ypbindmust be running on any machines which are running NIS client programs.
Install the ypbind package on any machines which are running NIS client programs (included in the yp-toolspackage). If you need an NIS server, you’ll also need to install the ypserv package to a machine on your network.
ypserv – (Version 1.3.6.91, 289K)
The Network Information Service (NIS) is a system which provides network information (login names, pass-words, home directories, group information) to all of the machines on a network. NIS can enable users to loginon any machine on the network, as long as the machine has the NIS client programs running and the user’spassword is recorded in the NIS passwd database. NIS was formerly known as Sun Yellow Pages (YP).
This package provides the NIS server, which will need to be running on your network. NIS clients do not need tobe running the server.
Install ypserv if you need an NIS server for your network. You’ll also need to install the yp-tools and ypbindpackages onto any NIS client machines.

D.5 System Environment 329
D.5.3 Kernel
This section contains packages that are related to the Linux kernel on which Red Hat Linux is based.
kernel – (Version 2.2.5, 9,913K)�
�
�
�B
The kernel package contains the Linux kernel (vmlinuz), the core of your Red Hat Linux operating system. Thekernel handles the basic functions of the operating system: memory allocation, process allocation, device inputand output, etc.
kernel-BOOT – (Version 2.2.5, 5,908K)
This package includes a trimmed down version of the Linux 2.2.5 kernel. This kernel is used on the installationboot disks only and should not be used for an installed system, as many features in this kernel are turned offbecause of the size constraints.
kernel-ibcs – (Version 2.2.5, 61K)
This package allows you to run programs in the iBCS2 (Intel Binary Compatibility Standard, version 2) and relatedexecutable formats. iBCS is a standard for binary portability between UNIX and UNIX-like systems.
kernel-pcmcia-cs – (Version 2.2.5, 561K)�
�
�
�B
Many laptop machines (and some non-laptops) support PCMCIA cards for expansion. Also known as ”creditcard adapters,” PCMCIA cards are small cards for everything from SCSI support to modems. PCMCIA cards arehot swappable (i.e., they can be exchanged without rebooting the system) and quite convenient to use. The kernel-pcmcia-cs package contains a set of loadable kernel modules that implement an applications program interface, aset of client drivers for specific cards and a card manager daemon that can respond to card insertion and removalevents by loading and unloading drivers on demand. The daemon also supports hot swapping, so that the cardscan be safely inserted and ejected at any time.
Install the kernel-pcmcia-cs package if your system uses PCMCIA cards.
kernel-smp – (Version 2.2.5, 9,586K)
This package includes a SMP version of the Linux 2.2.5 kernel. It is required only on machines with two or moreCPUs, although it should work fine on single-CPU boxes.
modutils – (Version 2.1.121, 835K)�
�
�
�B
The modutils packages includes the kerneld program for automatic loading of modules under 2.0 kernels andunloading of modules under 2.0 and 2.2 kernels, as well as other module management programs.
Loaded and unloaded modules are device drivers and filesystems, as well as other things.
D.5.4 Libraries
This section contains the packages associated with the libraries that are required to run programs under Red HatLinux.
XFree86-libs – (Version 3.3.3.1, 1,991K)�
�
�
�W
�
�
�
�S
330 Package List
XFree86-libs contains the shared libraries that most X programs need to run properly. These shared libraries arein a separate package in order to reduce the disk space needed to run X applications on a machine without an Xserver (i.e, over a network).
If you are installing the X Window System on your machine, you will need to install XFree86-libs. You willalso need to install the XFree86 package, the XFree86-75dpi-fonts package or the XFree86-100dpi-fonts package(depending upon your monitor’s resolution), the Xconfigurator package and the X11R6-contrib package. And,finally, if you are going to be developing applications that run as X clients, you will also need to install XFree86-devel.
Xaw3d – (Version 1.3, 292K)�
�
�
�W
�
�
�
�S
Xaw3d is an enhanced version of the MIT Athena Widget set for the X Window System. Xaw3d adds a three-dimensional look to applications with minimal or no source code changes.
You should install Xaw3d if you are using applications which incorporate the MIT Athena widget set and you’dlike to incorporate a 3D look into those applications.
audiofile – (Version 0.1.6, 180K)�
�
�
�W
�
�
�
�S
Library to handle various audio file formats. Used by the esound daemon.
cracklib – (Version 2.7, 74K)�
�
�
�B
CrackLib tests passwords to determine whether they match certain security-oriented characteristics. You can useCrackLib to stop users from choosing passwords which would be easy to guess. CrackLib performs certain tests:
* It tries to generate words from a username and gecos entry and checks those words against the password; * Itchecks for simplistic patterns in passwords; * It checks for the password in a dictionary.
CrackLib is actually a library containing a particular C function which is used to check the password, as well asother C functions. CrackLib is not a replacement for a passwd program; it must be used in conjunction with anexisting passwd program.
Install the cracklib package if you need a program to check users’ passwords to see if they are at least minimallysecure. If you install CrackLib, you’ll also want to install the cracklib-dicts package.
cracklib-dicts – (Version 2.7, 226K)�
�
�
�B
The cracklib-dicts package includes the CrackLib dictionaries. CrackLib will need to use the dictionary appropri-ate to your system, which is normally put in /usr/dict/words. Cracklib-dicts also contains the utilities necessaryfor the creation of new dictionaries.
If you are installing CrackLib, you should also install cracklib-dicts.
fnlib – (Version 0.4, 352K)�
�
�
�W
Fnlib is a library that provides full, scalable 24-bit color font rendering abilities for X.
freetype – (Version 1.2, 937K)�
�
�
�W
�
�
�
�S
The FreeType engine is a free and portable TrueType font rendering engine. It has been developed to provideTT support to a great variety of platforms and environments. Note that FreeType is a library, not a stand-aloneapplication, though some utility applications are included.

D.5 System Environment 331
gd – (Version 1.3, 314K)�
�
�
�B
Gd is a graphics library for drawing .gif files. Gd allows your code to quickly draw images (lines, arcs, text,multiple colors, cutting and pasting from other images, flood fills) and write out the result as a .gif file. Gd isparticularly useful in web applications, where .gifs are commonly used as inline images. Note, however, that gdis not a paint program.
Install gd if you are developing applications which need to draw .gif files. If you install gd, you’ll also need toinstall the gd-devel package.
gdbm – (Version 1.7.3, 28K)�
�
�
�B
Gdbm is a GNU database indexing library, including routines which use extensible hashing. Gdbm works in asimilar way to standard UNIX dbm routines. Gdbm is useful for developers who write C applications and needaccess to a simple and efficient database or who are building C applications which will use such a database.
If you’re a C developer and your programs need access to simple database routines, you should install gdbm.You’ll also need to install gdbm-devel.
gimp-libgimp – (Version 1.0.4, 168K)�
�
�
�W
Libraries used to communicate between The GIMP and other programs which may function as ”GIMP plugins”.
glib – (Version 1.2.1, 310K)�
�
�
�B
�
�
�
�W
Glib is a handy library of utility functions. This C library is designed to solve some portability problems andprovide other useful functionality which most programs require.
Glib is used by GDK, GTK+ and many applications. You should install Glib because many of your applicationswill depend on this library.
glib10 – (Version 1.0.6, 54K)�
�
�
�W
�
�
�
�S
The glib package contains a useful library of utility functions, which are necessary for the successful operation ofmany different programs on your Red Hat Linux system.
glibc – (Version 2.1.1, 26,192K)�
�
�
�B
Contains the standard libraries that are used by multiple programs on the system. In order to save disk space andmemory, as well as to ease upgrades, common system code is kept in one place and shared between programs.This package contains the most important sets of shared libraries, the standard C library and the standard mathlibrary. Without these, a Linux system will not function. It also contains national language (locale) support andtimezone databases.
gmp – (Version 2.0.2, 117K)�
�
�
�B
The gmp package contains GNU MP, a library for arbitrary precision arithmetic, signed integers operations, ratio-nal numbers and floating point numbers. GNU MP is designed for speed, for both small and very large operands.GNU MP is fast for several reasons: It uses fullwords as the basic arithmetic type, it uses fast algorithms, it care-fully optimizes assembly code for many CPUs’ most common inner loops and it generally emphasizes speed oversimplicity/elegance in its operations.
Install the gmp package if you need a fast arbitrary precision library.

332 Package List
gnome-audio-extra – (Version 1.0.0, 2,659K)�
�
�
�W
This package contains extra sound files useful for customizing the sounds that the GNOME desktop environmentmakes.
gnome-libs – (Version 1.0.8, 2,205K)�
�
�
�W
�
�
�
�S
GNOME (GNU Network Object Model Environment) is a user-friendly set of applications and desktop tools to beused in conjunction with a window manager for the X Window System. GNOME is similar in purpose and scopeto CDE and KDE, but GNOME is based completely on Open Source software. The gnome-libs package includeslibraries that are needed by GNOME.
You should install the gnome-libs package if you would like to use the GNOME desktop environment. You’ll alsoneed to install the gnome-core package. If you would like to develop GNOME applications, you’ll also need toinstall gnome-libs-devel. If you want to use linuxconf with a GNOME front end, you’ll also need to install thegnome-linuxconf package.
gsl – (Version 0.3f, 868K)
The gsl package includes the GNU Scientific Library (GSL). The GSL is a collection of routines for numericalanalysis, written in C. The GSL is in alpha development. It now includes a random number suite, an FFT package,simulated annealing and root finding. In the future, it will include numerical and Monte Carlo integration andspecial functions. Linking against the GSL allows programs to access functions which can handle many of theproblems encountered in scientific computing.
Install the gsl package if you need a library for high-level scientific numerical analysis.
gtk+ – (Version 1.2.1, 1,942K)�
�
�
�W
�
�
�
�S
The gtk+ package contains the GIMP ToolKit (GTK+), a library for creating graphical user interfaces for the X Win-dow System. GTK+ was originally written for the GIMP (GNU Image Manipulation Program) image processingprogram, but is now used by several other programs as well.
If you are planning on using the GIMP or another program that uses GTK+, you’ll need to have the gtk+ packageinstalled.
gtk+10 – (Version 1.0.6, 1,140K)�
�
�
�W
�
�
�
�S
The X libraries originally written for the GIMP, which are now used by several other programs as well.
This RPM is a set of compatibility libraries needed to run applications linked against the 1.0 series of gtk+ andglib.
gtk-engines – (Version 0.5, 2,234K)�
�
�
�W
These are the graphical engines for the various GTK+ toolkit themes. Included themes are:
- Notif - Redmond95 - Pixmap - Metal (swing-like)
imlib – (Version 1.9.5, 423K)�
�
�
�W
�
�
�
�S
Imlib is a display depth independent image loading and rendering library. Imlib is designed to simplify andspeed up the process of loading images and obtaining X Window System drawables. Imlib provides many simplemanipulation routines which can be used for common operations.

D.5 System Environment 333
Install imlib if you need an image loading and rendering library for X11R6. You may also want to install theimlib-cfgeditor package, which will help you configure Imlib.
imlib-cfgeditor – (Version 1.9.5, 333K)�
�
�
�W
The imlib-cfgeditor package contains the imlib config program, which you can use to configure the Imlib imageloading and rendering library. Imlib config can be used to control how Imlib uses color and handles gammacorrections, etc.
If you’re installing the imlib package, you should also install imlib cfgeditor.
kdelibs – (Version 1.1.1pre2, 5,680K)
Libraries for the K Desktop Environment: KDE Libraries included: kdecore (KDE core library), kdeui (user inter-face), kfm (file manager), khtmlw (HTML widget), kfile (file access), kspell (spelling checker), jscript (javascript),kab (addressbook), kimgio (image manipulation), mediatool (sound, mixing and animation).
kdesupport – (Version 1.1.1pre2, 2,134K)
Support Libraries for the K Desktop Environment, but not part of it.
Libraries included: QwSpriteField, js (javascript), uulib, mimelib, rdb; depending on the Red Hat release, librariesgdbm jpeg and gif are either also included, or the versions supplied by Red Hat are required.
This package also provides extra KDE support for Red Hat Linux: a script ”usekde” that users can run to setup KDE as their default desktop (which is also done automatically when a new user is created), and scripts foractivating the KDE X Display Manager ”kdm” to replace ”xdm”.
libPropList – (Version 0.8.3, 111K)
The purpose of PL is to closely mimic the behavior of the property lists used in the GNUstep/OPENSTEP (they’reformed with the NSString, NSData, NSArray and NSDictionary classes) and to be duly compatible.
PL enables programs that use configuration or preference3 files to make these compatible with GNUstep/OPENSTEP’suser defaults handling mechanism, without needing to use Objective-C or GNUstep/ OPENSTEP themselves.
libc – (Version 5.3.12, 5,365K)�
�
�
�B
Older Linux systems (including all Red Hat Linux releases between 2.0 and 4.2, inclusive) were based on libcversion 5. The libc package includes the libc5 libraries and other libraries based on libc5. With these librariesinstalled, old applications which need them will be able to run on your glibc (libc version 6) based system.
The libc package should be installed so that you can run older applications which need libc version 5.
libelf – (Version 0.6.4, 76K)
The libelf package contains a library for accessing ELF object files. Libelf allows you to access the internals of theELF object file format, so you can see the different sections of an ELF file.
Libelf should be installed if you need access to ELF object file internals.
libghttp – (Version 1.0.2, 85K)�
�
�
�W
�
�
�
�S
Library for making HTTP 1.1 requests.

334 Package List
libgr – (Version 2.0.13, 235K)�
�
�
�W
�
�
�
�S
The libgr package contains a library of functions which support programs for handling various graphics fileformats, including .pbm (portable pitmaps), .pgm (portable graymaps), .pnm (portable anymaps), .ppm (portablepixmaps) and others.
libgtop – (Version 1.0.1, 431K)�
�
�
�W
A library that fetches information about the running system such as CPU and memory useage, active processesand more.
On Linux systems, this information is taken directly from the /proc filesystem while on other systems a server isused to read that information from other /dev/kmem, among others.
libgtop-examples – (Version 1.0.1, 937K)
These are examples for LibGTop, a library which retrieves information about your system, such as CPU andmemory usage.
libjpeg – (Version 6b, 239K)�
�
�
�W
�
�
�
�S
The libjpeg package contains a library of functions for manipulating JPEG images, as well as simple client pro-grams for accessing the libjpeg functions. Libjpeg client programs include cjpeg, djpeg, jpegtran, rdjpgcom andwrjpgcom. Cjpeg compresses an image file into JPEG format. Djpeg decompresses a JPEG file into a regular imagefile. Jpegtran can perform various useful transformations on JPEG files. Rdjpgcom displays any text commentsincluded in a JPEG file. Wrjpgcom inserts text comments into a JPEG file.
libjpeg6a – (Version 6a, 137K)
This package is a library of functions that manipulate jpeg images, along with simple clients for manipulatingjpeg images.
This version of the package includes only a library that is needed for preserving the backwards compatibility withprevious releases of Red Hat Linux.
libpng – (Version 1.0.3, 270K)�
�
�
�W
�
�
�
�S
The libpng package contains a library of functions for creating and manipulating PNG (Portable Network Graph-ics) image format files. PNG is a bit-mapped graphics format similar to the GIF format. PNG was created toreplace the GIF format, since GIF uses a patented data compression algorithm.
Libpng should be installed if you need to manipulate PNG format image files.
libstdc++ – (Version 2.9.0, 3,421K)�
�
�
�B
EGCS is a free software project that intends to further the development of GNU compilers using an open de-velopment environment. The egcs package contains the egcs compiler, a compiler aimed at integrating all theoptimizations and features necessary for a high-performance and stable development environment. EGCS in-cludes the shared libraries necessary for running C++ appplications, along with additional GNU tools.
Install egcs if you’d like to use an experimental GNU compiler.
libtermcap – (Version 2.0.8, 58K)�
�
�
�B

D.5 System Environment 335
The libtermcap package contains a basic system library needed to access the termcap database. The termcaplibrary supports easy access to the termcap database, so that programs can output character-based displays in aterminal-independent manner.
libtiff – (Version 3.4, 568K)�
�
�
�W
�
�
�
�S
The libtiff package contains a library of functions for manipulating TIFF (Tagged Image File Format) image formatfiles. TIFF is a widely used file format for bitmapped images. TIFF files usually end in the .tif extension and theyare often quite large.
The libtiff package should be installed if you need to manipulate TIFF format image files.
libungif – (Version 4.1.0, 80K)�
�
�
�W
�
�
�
�S
The libungif package contains a shared library of functions for loading and saving GIF format image files. Thelibungif library can load any GIF file, but it will save GIFs only in uncompressed format (i.e., it won’t use thepatented LZW compression used to save ”normal” compressed GIF files).
Install the libungif package if you need to manipulate GIF files. You should also install the libungif-progs package.
libxml – (Version 1.0.0, 154K)�
�
�
�W
�
�
�
�S
This library allows you to manipulate XML files.
ncurses – (Version 4.2, 2,616K)�
�
�
�B
The curses library routines are a terminal-independent method of updating character screens with reasonableoptimization. The ncurses (new curses) library is a freely distributable replacement for the discontinued 4.4BSDclassic curses library.
ncurses3 – (Version 1.9.9e, 330K)
The curses library routines are a terminal-independent method of updating character screens with reasonableoptimization. The ncurses (new curses) library is a freely distributable replacement for the discontinued 4.4BSDclassic curses library.
newt – (Version 0.40, 125K)�
�
�
�B
Newt is a programming library for color text mode, widget based user interfaces. Newt can be used to addstacked windows, entry widgets, checkboxes, radio buttons, labels, plain text fields, scrollbars, etc., to text modeuser interfaces. This package also contains the shared library needed by programs built with newt, as well as a/usr/bin/dialog replacement called whiptail. Newt is based on the slang library.
popt – (Version 1.3, 53K)
Popt is a C library for parsing command line parameters. Popt was heavily influenced by the getopt() andgetopt long() functions, but it improves on them by allowing more powerful argument expansion. Popt canparse arbitrary argv[] style arrays and automatically set variables based on command line arguments. Popt al-lows command line arguments to be aliased via configuration files and includes utility functions for parsingarbitrary strings into argv[] arrays using shell-like rules.
Install popt if you’re a C programmer and you’d like to use its capabilities.

336 Package List
pythonlib – (Version 1.22, 236K)�
�
�
�W
�
�
�
�S
The pythonlib package contains Python code used by a variety of Red Hat Linux programs. Pythonlib includescode needed for multifield listboxes and entry widgets with non-standard keybindings, among other things.
qt – (Version 1.44, 2,103K)
Qt is a GUI software toolkit. Qt simplifies the task of writing and maintaining GUI (graphical user interface)applications for X Windows.
Qt is written in C++ and is fully object-oriented. It has everything you need to create professional GUI applica-tions. And it enables you to create them quickly.
Qt is a multi-platform toolkit. When developing software with Qt, you can run it on the X Window System(Unix/X11) or Microsoft Windows NT and Windows 95/98. Simply recompile your source code on the platformyou want.
This package contains the shared library needed to run Qt applications, as well as the README files for Qt.
readline – (Version 2.2.1, 251K)�
�
�
�B
The readline library reads a line from the terminal and returns it, allowing the user to edit the line with stan-dard emacs editing keys. The readline library allows programmers to provide an easy to use and more intuitiveinterface for users.
If you want to develop programs that will use the readline library, you’ll also need to install the readline-develpackage.
slang – (Version 1.2.2, 250K)�
�
�
�B
S-Lang is an interpreted language and a programming library. The S-Lang language was designed so that it canbe easily embedded into a program to provide the program with a powerful extension language. The S-Langlibrary, provided in this package, provides the S-Lang extension language. S-Lang’s syntax resembles C, whichmakes it easy to recode S-Lang procedures in C if you need to.
svgalib – (Version 1.3.1, 753K)�
�
�
�W
The svgalib package provides the SVGAlib low-level graphics library for Linux. SVGAlib is a library whichallows applications to use full screen graphics on a variety of hardware platforms. Many games and utilities useSVGAlib for their graphics.
You’ll need to have the svgalib package installed if you use any of the programs which rely on SVGAlib for theirgraphics support.
w3c-libwww – (Version 5.2.8, 2,155K)
Libwww is a general-purpose Web API written in C for Unix and Windows (Win32). With a highly extensible andlayered API, it can accommodate many different types of applications including clients, robots, etc. The purposeof libwww is to provide a highly optimized HTTP sample implementation as well as other Internet protocols andto serve as a testbed for protocol experiments.
words – (Version 2, 411K)�
�
�
�B
The words file is a dictionary of English words for the /usr/dict directory. Programs like ispell use this database

D.5 System Environment 337
of words to check spelling.
xpm – (Version 3.4j, 60K)�
�
�
�W
�
�
�
�S
The xpm package contains the XPM pixmap library for the X Window System. The XPM library allows applica-tions to display color, pixmapped images, and is used by many popular X programs.
zlib – (Version 1.1.3, 61K)�
�
�
�B
The zlib compression library provides in-memory compression and decompression functions, including integritychecks of the uncompressed data. This version of the library supports only one compression method (deflation),but other algorithms may be added later, which will have the same stream interface. The zlib library is used bymany different system programs.
D.5.5 Shells
This section contains packages that are associated with the shells that provide the command-line user interfaceon Red Hat Linux.
ash – (Version 0.2, 361K)�
�
�
�B
The ash shell is a clone of Berkeley’s Bourne shell. Ash supports all of the standard sh shell commands, but isconsiderably smaller than bash. The ash shell lacks some features (for example, command-line histories), butneeds a lot less memory.
You should install ash if you need a lightweight shell with many of the same capabilities as the bash shell.
bash – (Version 1.14.7, 545K)�
�
�
�B
Bash is a GNU project sh-compatible shell or command language interpreter. Bash (Bourne Again shell) incorpo-rates useful features from the Korn shell (ksh) and the C shell (csh). Most sh scripts can be run by bash withoutmodification.
Bash offers several improvements over sh, including command line editing, unlimited size command history, jobcontrol, shell functions and aliases, indexed arrays of unlimited size and integer arithmetic in any base from twoto 64. Bash is ultimately intended to conform to the IEEE POSIX P1003.2/ISO 9945.2 Shell and Tools standard.
Bash is the default shell for Red Hat Linux. You should install bash because of its popularity and power. You’llprobably end up using it.
bash2 – (Version 2.03, 1,168K)
Bash is a GNU project sh-compatible shell or command language interpreter. Bash (Bourne Again shell) incorpo-rates useful features from the Korn shell (ksh) and the C shell (csh). Most sh scripts can be run by bash withoutmodification.
Bash offers several improvements over sh, including command line editing, unlimited size command history, jobcontrol, shell functions and aliases, indexed arrays of unlimited size and integer arithmetic in any base from twoto 64. Bash is ultimately intended to conform to the IEEE POSIX P1003.2/ISO 9945.2 Shell and Tools standard.
mc – (Version 4.5.30, 903K)�
�
�
�W

338 Package List
Midnight Commander is a visual shell much like a file manager, only with way more features. It is text mode,but also includes mouse support if you are running GPM. Its coolest feature is the ability to ftp, view tar, zip files,and poke into RPMs for specific files. :-)
pdksh – (Version 5.2.13, 402K)
The pdksh package contains PD-ksh, a clone of the Korn shell (ksh). The ksh shell is a command interpreterintended for both interactive and shell script use. Ksh’s command language is a superset of the sh shell language.
Install the pdksh package if you want to use a version of the ksh shell.
sash – (Version 2.1, 402K)�
�
�
�B
Sash is a simple, standalone, statically linked shell which includes simplified versions of built-in commands likels, dd and gzip. Sash is statically linked so that it can work without shared libraries, so it is particularly usefulfor recovering from certain types of system failures. Sash can also be used to safely upgrade to new versions ofshared libraries.
sh-utils – (Version 1.16, 351K)�
�
�
�B
The GNU shell utilities are a set of useful system utilities which are often used in shell scripts. The sh-utils packageincludes basename (to remove the path prefix from a specified pathname), chroot (to change the root directory),date (to print/set the system time and date), dirname (to remove the last level or the filename from a given path),echo (to print a line of text), env (to display/modify the environment), expr (to evaluate expressions), factor (toprint prime factors), false (to return an unsuccessful exit status), groups (to print the groups a specified user is amember of), id (to print the real/effective uid/gid), logname (to print the current login name), nice (to modifya scheduling priority), nohup (to allow a command to continue running after logging out), pathchk (to check afile name’s portability), printenv (to print environment variables), printf (to format and print data), pwd (to printthe current directory), seq (to print numeric sequences), sleep (to suspend execution for a specified time), stty(to print/change terminal settings), su (to become another user or the superuser), tee (to send output to multiplefiles), test (to evaluate an expression), true (to return a successful exit status), tty (to print the terminal name),uname (to print system information), users (to print current users’ names), who (to print a list of the users whoare currently logged in), whoami (to print the effective user id), and yes (to print a string indefinitely).
tcsh – (Version 6.08.00, 488K)�
�
�
�B
Tcsh is an enhanced but completely compatible version of csh, the C shell. Tcsh is a command language interpreterwhich can be used both as an interactive login shell and as a shell script command processor. Tcsh includes acommand line editor, programmable word completion, spelling correction, a history mechanism, job control anda C language like syntax.
zsh – (Version 3.0.5, 956K)
The zsh shell is a command interpreter usable as an interactive login shell and as a shell script command processor.Zsh resembles the ksh shell (the Korn shell), but includes many enhancements. Zsh supports command lineediting, built-in spelling correction, programmable command completion, shell functions (with autoloading), ahistory mechanism and more.
Install the zsh package if you’d like to try out a different shell.

D.6 User Interface 339
D.6 User Interface
This section contains packages that are associated with providing a user interface on Red Hat Linux.
D.6.1 Desktops
This section contains packages that are associated with the desktop environments available on Red Hat Linux.
AfterStep – (Version 1.7.90, 4,148K)�
�
�
�W
�
�
�
�S
AfterStep is a continuation of the BowMan window manager which was originally put together by Bo Yang.BowMan was based on the fvwm window manager, written by Robert Nation. Fvwm was based on code fromtwm. And so on... It was originally designed to emulate some of the look and feel of the NEXTSTEP user interface,but has since taken steps towards adding more useful, requested, and neat features especially in 1.4 version !The changes which comprise AfterStep’s personality were originally part of bowman development, but due to adesire to move past simple emulation and into a niche as its own valuable window manager, AfterStep designersdecided to change the project name and move on.
Important features of AfterStep include:
1. Wharf: a free-floating application loader which can ”Swallow” running programs and also can contain ”Fold-ers” of more applications. 2. Gradient filled TitleBars with 5 button : help/zap, action/tasks, iconize/maximise,shade/stick & close/destroy buttons 3. Gradient filled root window PopUp menus which can be configured toaccomodate different tastes and styles of management 4. NEXTSTEP style icons which give a consistent look tothe entire desktop 5. Pixmapped Pager with desktop pixmmaping 6. Easy to use look files, to share you desktopappearance with your friends 7. Start menu entries in a hierarchy of directories 8. WinList : a tasklist which canbe horizontal or vertical 9. Many modules & asapps to give a good look to your X window station
AfterStep-APPS – (Version 990329, 1,078K)�
�
�
�W
�
�
�
�S
What’s a cool window manager without some cool applets? Well... it’s still cool, but these applets which can beused in the Wharf module for AfterStep or Window Maker can add both spice and productivity to your preferredwindow manager, such as a handy clock and information about system resources.
If you’ve installed the AfterStep packages, you should also install these packages. Enjoy!
AnotherLevel – (Version 0.9, 288K)�
�
�
�W
�
�
�
�S
AnotherLevel is a custom configuration of the popular fvwm2 window manager. Fvwm stands for (?) virtualwindow manager. You can fill in the blank for the ’f’: fast, flexible, friendly and fabulous all could apply. Thiswindow manager is based on TheNextLevel desktop configuration, created by Greg J. Badros, which won the1996 Red Hat Desktop Contest.
AnotherLevel is designed to be easily configured by the user.
WindowMaker – (Version 0.52.0, 3,654K)
Window Maker is an X11 window manager which emulates the look and feel of the NeXTSTEP (TM) graphicaluser interface. It is relatively fast, feature rich and easy to configure and use. Window Maker is part of the officialGNU project, which means that Window Maker can interoperate with other GNU projects, such as GNOME.

340 Package List
Window Maker allows users to switch themes ’on the fly,’ to place favorite applications on either an applica-tion dock, similar to AfterStep’s Wharf or on a workspace dock, a ’clip’ which extends the application dock’susefulness.
You should install the WindowMaker package if you use Window Maker as your window manager or if you’dlike to try using it. If you do install the WindowMaker package, you may also want to install the AfterStep-APPSpackage, which includes applets that will work with both AfterStep and Window Maker window managers.
control-center – (Version 1.0.5, 985K)�
�
�
�W
Control-center is a configuration tool for easily setting up your GNOME environment.
GNOME is the GNU Network Object Model Environment. That’s a fancy name, but really GNOME is a nice GUIdesktop environment.
It’s a powerful, easy to configure environment which helps to make your computer easy to use.
enlightenment – (Version 0.15.5, 3,835K)�
�
�
�W
Enlightenment is a window manager for the X Window System that is designed to be powerful, extensible, con-figurable and pretty darned good looking! It is one of the more graphically intense window managers.
Enlightenment goes beyond managing windows by providing a useful and appealing graphical shell from whichto work. It is open in design and instead of dictating a policy, allows the user to define their own policy, down toevery last detail.
This package will install the Enlightenment window manager.
enlightenment-conf – (Version 0.15, 384K)�
�
�
�W
A Configuration tool for easily setting up Enlightenment
fvwm – (Version 1.24r, 573K)�
�
�
�W
�
�
�
�S
FVWM (the F stands for whatever you want, but the VWM stands for Virtual Window Manager) is a windowmanager for the X Window System. FVWM was derived from the twm window manager. FVWM is designedto minimize memory consumption, to provide window frames with a 3D look, and to provide a simple virtualdesktop. FVWM can be configured to look like Motif.
Install the fvwm package if you’d like to use the FVWM window manager. If you install fvwm, you’ll also needto install fvwm2-icons.
fvwm2 – (Version 2.2, 1,730K)�
�
�
�W
�
�
�
�S
FVWM2 (the F stands for whatever you want, but the VWM stands for Virtual Window Manager) is an improvedversion of the FVWM window manager for the X Window System and shares the same characteristics as FVWM.
Install the fvwm2 package if you’d like to use the FVWM2 window manager. If you install fvwm2, you’ll alsoneed to install fvwm2-icons.
fvwm2-icons – (Version 2.2, 445K)�
�
�
�W
�
�
�
�S
The fvwm2-icons package contains icons, bitmaps and pixmaps used by the FVWM and FVWM2 X WindowSystem window managers.

D.6 User Interface 341
You’ll need to install fvwm2-icons if you are installing fvwm and/or fvwm2.
gmc – (Version 4.5.30, 2,257K)�
�
�
�W
Midnight Commander is a visual shell much like a file manager, only with way more features. This is the GNOMEversion. It’s coolest feature is the ability to ftp, view tar, zip files and poke into RPMs for specific files. TheGNOME version of Midnight Commander is not yet finished though. :-(
gnome-core – (Version 1.0.4, 2,889K)�
�
�
�W
GNOME (GNU Network Object Model Environment) is a user-friendly set of applications and desktop tools to beused in conjunction with a window manager for the X Window System. GNOME is similar in purpose and scopeto CDE and KDE, but GNOME is based completely on Open Source software. The gnome-core package includesthe basic programs and libraries that are needed to install GNOME.
You should install the gnome-core package if you would like to use the GNOME desktop environment. You’llalso need to install the gnome-libs package. If you want to use linuxconf with a GNOME front end, you’ll alsoneed to install the gnome-linuxconf package.
kdebase – (Version 1.1.1pre2, 12,022K)
Core applications for the K Desktop Environment. Included are: kdm (replacement for xdm), kwm (windowmanager), kfm (filemanager, web browser, ftp client, ...), konsole (xterm replacement), kpanel (application starterand desktop pager), kaudio (audio server), kdehelp (viewer for kde help files, info and man pages), plus otherKDE components (kcheckpass, kikbd, kvt, kscreensaver, kcontrol, kfind, kfontmanager, kmenuedit, kappfinder).
PAM password authentication is supported via PAM service: kde.
switchdesk – (Version 1.7.0, 90K)�
�
�
�W
The Desktop Switcher is a tool which enables users to easily switch between various desktop environments thatthey have installed. The tool includes support for GNOME, KDE, and AnotherLevel. Support for different envi-ronments on different computers is available, as well as setting a ”global default.”
switchdesk-gnome – (Version 1.7.0, 11K)�
�
�
�W
Provides the desktop switching tool with a GNOME look and feel.
switchdesk-kde – (Version 1.7.0, 22K)
Provides the desktop switching Tool with a KDE look and feel.
wmakerconf – (Version 1.99.1, 1,012K)
Wmakerconf is a GTK+ based graphical user interface configuration tool for the Window Maker window man-ager. Wmakerconf supports all Window Maker attributes. Wmakerconf provides a font selection browser, apixmap preview browser, a color selection dialog, a shortcut dialog, and a file selection dialog. Wmakerconf alsoprovides tooltips in multiple languages.
If you use the Window Maker window manager, you should probably install the wmakerconf package, becauseit will make configuration a little easier.
wmconfig – (Version 0.9.5, 52K)�
�
�
�W
�
�
�
�S

342 Package List
The wmconfig program is a helper program which provides output for use in configuring window managers.Wmconfig will produce a list of menu definitions for a specified X window manager (currently, FVWM2, FVWM95,AfterStep, MWM, IceWM and KDE are supported). Wmconfig’s output can be placed into your .rc file or you canuse the output for other configuration purposes.
xfm – (Version 1.3.2, 706K)�
�
�
�W
Xfm is a file manager for the X Window System. Xfm supports moving around the directory tree, multiplewindows, moving/copying/deleting files, and launching programs.
Install xfm if you would like to use a graphical file manager program.
D.6.2 X Hardware Support
This section contains packages that are associated with providing hardware support for specific video cards underRed Hat Linux.
XFree86-3DLabs – (Version 3.3.3.1, 2,169K)
X server for cards built around 3D Labs GLINT and Permedia chipsets, including GLINT 500TX with IBM RGB526RAMDAC, GLINT MX with IBM RGB526 and IBM RGB640 RAMDAC, Permedia with IBM RGB526 RAMDACand the Permedia 2 (classic, 2a, 2v).
XFree86-8514 – (Version 3.3.3.1, 1,702K)
If you are installing the X Window System and the video card in your system is an older IBM 8514 or a compatiblefrom a company such as ATI, you should install XFree86-8514.
To install the X Window System, you will need to install the XFree86 package, one or more of the XFree86 fontspackages, the X11R6-contrib package, the Xconfigurator package and the XFree86-libs package.
If you are going to develop applications that run as X clients, you will also need to install the XFree86-develpackage.
XFree86-AGX – (Version 3.3.3.1, 1,883K)
This is the X server for AGX-based cards, such as the Boca Vortex, Orchid Celsius, Spider Black Widow andHercules Graphite.
If you are installing the X Window System and the video card in your system is an AGX, you’ll need to installXFree86-AGX. To install the X Window System, you will need to install the XFree86 package, one or more of theXFree86 fonts packages, the X11R6-contrib package, the Xconfigurator package and the XFree86-libs package.
Finally, if you are going to develop applications that run as X clients, you will also need to install the XFree86-devel package.
XFree86-FBDev – (Version 3.3.3.1, 1,960K)
This is the X server for the generic frame buffer device used on Amiga, Atari and Macintosh/m68k machines.
Support for Intel and Alpha architectures is included in the Linux 2.2 kernel, as well.

D.6 User Interface 343
XFree86-I128 – (Version 3.3.3.1, 2,141K)
This is the X server for the #9 Imagine 128 and similar video boards.
XFree86-Mach32 – (Version 3.3.3.1, 1,845K)
XFree86-Mach32 is the X server package for video cards built around ATI’s Mach32 chip, including the ATI Graph-ics Ultra Pro and Ultra Plus.
If you are installing the X Window System and the video card in your system is based on the Mach32 chip, youneed to install XFree86-Mach32. You will also need to install the XFree86 package, one or more of the XFree86fonts packages, the X11R6-contrib package, the Xconfigurator package and the XFree86-libs package. And, finally,if you are going to develop applications that run as X clients, you will also need to install XFree86-devel.
XFree86-Mach64 – (Version 3.3.3.1, 1,966K)
XFree86-Mach64 is the server package for cards based on ATI’s Mach64 chip, such as the Graphics Xpression,GUP Turbo, and WinTurbo cards. Note that this server is known to have problems with some Mach64 cards.Check http://www.xfree86.org for current information on updating this server.
If you are installing the X Window System and the video card in your system is based on the Mach64 chip, youneed to install XFree86-Mach64. You will also need to install the XFree86 package, one or more of the XFree86fonts packages, the X11R6-contrib package, the Xconfigurator package and the XFree86-libs package. And, finally,if you are going to be developing applications that run as X clients, you will also need to install XFree86-devel.
XFree86-Mach8 – (Version 3.3.3.1, 1,713K)
XFree86-Mach 8 is the X server for video cards built around ATI’s Mach8 chip, including the ATI 8514 Ultra andGraphics Ultra.
If you are installing the X Window System and the video card in your system is based on the Mach8 chip, youneed to install XFree86-Mach8. You will also need to install the XFree86 package, one or more of the XFree86 fontspackages, the X11R6-contrib package, the Xconfigurator package and the XFree86-libs package. And, finally, ifyou are going to be developing applications that run as X clients, you will also need to install XFree86-devel.
XFree86-Mono – (Version 3.3.3.1, 2,006K)
XFree86-Mono is a generic monochrome (2 color) server for VGA cards. XFree86-Mono will work for nearly allVGA compatible cards, but will only support a monochrome display.
If you are installing the X Window System and your VGA card is not currently supported, you should installand try either XFree86-Mono or XFree86-VGA16, depending upon the capabilities of your display. You will alsoneed to install the XFree86 package, one or more of the XFree86 fonts packages, the X11R6-contrib package, theXconfigurator package and the XFree86-libs package. And, finally, if you are going to develop applications thatrun as X clients, you will also need to install XFree86-devel.
XFree86-P9000 – (Version 3.3.3.1, 1,904K)
XFree86-P9000 is the X server for video cards built around the Weitek P9000 chip, such as most Diamond Vipercards and the Orchid P9000 card.
If you are installing the X Window System and you have a Weitek P9000 based video card, you should installXFree86-P9000. You will also need to install the XFree86 package, one or more of the XFree86 fonts packages, theX11R6-contrib package, the Xconfigurator package and the XFree86-libs package. And, finally, if you are going to

344 Package List
develop applications that run as X clients, you will also need to install XFree86-devel.
XFree86-S3 – (Version 3.3.3.1, 2,388K)
XFree86-S3 is the X server for video cards based on S3 chips, including most #9 cards, many Diamond Stealthcards, Orchid Farenheits, Mirco Crystal 8S, most STB cards, and some motherboards with built-in graphics ac-celerators (such as the IBM ValuePoint line). Note that if you have an S3 ViRGE based video card, you’ll needXFree86-S3V instead of XFree86-S3.
If you are installing the X Window System and you have a video card based on an S3 chip, you should installXFree86-S3. You will also need to install the XFree86 package, one or more XFree86 fonts packages, the X11R6-contrib package, the Xconfigurator package and the XFree86-libs package. And, finally, if you are going to developapplications that run as X clients, you will also need to install XFree86-devel.
XFree86-S3V – (Version 3.3.3.1, 2,118K)
XFree86-S3V is the X server for video cards based on the S3 ViRGE chipset.
If you are installing the X Window System and you have a video card based on an S3 ViRGE chip, you shouldinstall XFree86-S3V. You will also need to install the XFree86 package, one or more of the XFree86 fonts packages,the X11R6-contrib package, the Xconfigurator package and the XFree86-libs package. And, finally, if you are goingto develop applications that run as X clients, you will also need to install XFree86-devel.
XFree86-SVGA – (Version 3.3.3.1, 3,044K)
X server for most simple framebuffer SVGA devices, including cards built from ET4000 chips, Cirrus Logic chips,Chips and Technologies laptop chips, Trident 8900 and 9000 chips, and Matrox chips. It works for DiamondSpeedstar, Orchid Kelvins, STB Nitros and Horizons, Genoa 8500VL, most Actix boards, the Spider VLB Plus, etc.It also works for many other chips and cards, so try this server if you are having problems.
XFree86-VGA16 – (Version 3.3.3.1, 1,898K)
XFree86-VGA16 is a generic 16 color server for VGA boards. XFree86-VGA16 will work on nearly all VGA stylegraphics boards, but will only support a low resolution, 16 color display.
If you are installing the X Window System and your VGA video card is not specifically supported by another Xserver package, you should install either XFree86-Mono or XFree86-VGA16, depending upon the capabilities ofyour display. You will also need to install the XFree86 package, one or more of the XFree86 fonts packages, theX11R6-contrib package, the Xconfigurator package and the XFree86-libs package. And, finally, if you are going tobe develop applications that run as X clients, you will also need to install XFree86-devel.
XFree86-W32 – (Version 3.3.3.1, 1,750K)
XFree86-W32 is the X server for cards built around ET4000/W32 chips, including the Genoa 8900 Phantom 32i,the Hercules Dynamite, the LeadTek WinFast S200, the Sigma Concorde, the STB LightSpeed, the TechWorksThunderbolt, and the ViewTop PCI.
If you are installing the X Window System and your VGA video card is based on the ET4000/W32 chipset, youshould install XFree86-W32. You will also need to install the XFree86 package, one or more of the XFree86 fontspackages, the X11R6-contrib package, the Xconfigurator package and the XFree86-libs package. And, finally, ifyou are going to develop applications that run as X clients, you will also need to install XFree86-devel.
XFree86-XF86Setup – (Version 3.3.3.1, 588K)

D.6 User Interface 345
XF86Setup is a graphical user interface configuration tool for setting up and configuring XFree86 servers. XF86Setupcan configure video settings, keyboard layouts, mouse types, etc. XF86Setup can’t be used with non-VGA com-patible video cards, with fixed-frequency monitors, or with OS/2.
Install XF86Setup if you have used it before and prefer to keep using it to configure your X server. If you donot have a preference for XF86Setup, you should instead install and use Xconfigurator, Red Hat’s graphical userinterface configuration tool for the X Window System.
XFree86-Xnest – (Version 3.3.3.1, 2,181K)
Xnest is an X Window System server which runs in an X window. Xnest is a ’nested’ window server, actually aclient of the real X server, which manages windows and graphics requests for Xnest, while Xnest manages thewindows and graphics requests for its own clients.
You will need to install Xnest if you require an X server which will run as a client of your real X server (perhapsfor testing purposes).
XFree86-Xvfb – (Version 3.3.3.1, 2,648K)
Xvfb (X Virtual Frame Buffer) is an X Windows System server that is capable of running on machines with nodisplay hardware and no physical input devices. Xvfb emulates a dumb framebuffer using virtual memory. Xvfbdoesn’t open any devices, but behaves otherwise as an X display. Xvfb is normally used for testing servers. UsingXvfb, the mfb or cfb code for any depth can be exercised without using real hardware that supports the desireddepths. Xvfb has also been used to test X clients against unusual depths and screen configurations, to do batchprocessing with Xvfb as a background rendering engine, to do load testing, to help with porting an X server toa new platform, and to provide an unobtrusive way of running applications which really don’t need an X serverbut insist on having one.
If you need to test your X server or your X clients, you may want to install Xvfb for that purpose.
Xconfigurator – (Version 4.2.3, 561K)�
�
�
�W
�
�
�
�S
Xconfigurator is a full-screen, menu-driven program which walks you through setting up your X server. Xconfig-urator is based on the sources for xf86config, a utility from XFree86.
You should install Xconfigurator if you are installing the X Window System.
D.6.3 X
This section contains packages associated with the X Window System graphical user interface.
X11R6-contrib – (Version 3.3.2, 474K)�
�
�
�W
�
�
�
�S
If you want to use the X Window System, you should install X11R6-contrib. This package holds many usefulprograms from the X Window System, version 11, release 6 contrib tape. The programs, contributed by varioususers, include listres, xbiff, xedit, xeyes, xcalc, xload and xman, among others.
You will also need to install the XFree86 package, the XFree86 package which corresponds to your video card,one or more of the XFree86 fonts packages, the Xconfigurator package and the XFree86-libs package.
Finally, if you are going to develop applications that run as X clients, you will also need to install XFree86-devel.

346 Package List
XFree86-100dpi-fonts – (Version 3.3.3.1, 1,228K)
If you’re going to use the X Window System and you have a high resolution monitor capable of 100 dpi, youshould install XFree86-100dpi-fonts. This package contains a set of 100 dpi fonts used on most Linux systems.
If you are installing the X Window System, you will also need to install the XFree86 package, the XFree86 packagecorresponding to your video card, the X11R6- contrib package, the Xconfigurator package and the XFree86-libspackage. If you need to display certain fonts, you may also need to install other XFree86 fonts packages.
And finally, if you are going to develop applications that run as X clients, you will also need to install the XFree86-devel package.
XFree86 – (Version 3.3.3.1, 14,268K)�
�
�
�W
�
�
�
�S
If you want to install the X Window System (TM) on your machine, you’ll need to install XFree86.
The X Window System provides the base technology for developing graphical user interfaces. Simply stated, Xdraws the elements of the GUI on the user’s screen and builds methods for sending user interactions back tothe application. X also supports remote application deployment–running an application on another computerwhile viewing the input/output on your machine. X is a powerful environment which supports many differentapplications, such as games, programming tools, graphics programs, text editors, etc. XFree86 is the version of Xwhich runs on Linux, as well as other platforms.
This package contains the basic fonts, programs and documentation for an X workstation. However, this packagedoesn’t provide the program which you will need to drive your video hardware. To control your video card,you’ll need the particular X server package which corresponds to your computer’s video card.
In addition to installing this package, you will need to install the XFree86 package which corresponds to yourvideo card, the X11R6-contrib package, the Xconfigurator package and the XFree86-libs package. You may alsoneed to install one of the XFree86 fonts packages.
And finally, if you are going to develop applications that run as X clients, you will also need to install XFree86-devel.
XFree86-75dpi-fonts – (Version 3.3.3.1, 1,060K)�
�
�
�W
�
�
�
�S
XFree86-75dpi-fonts contains the 75 dpi fonts used on most X Window Systems. If you’re going to use the XWindow System, you should install this package, unless you have a monitor which can support 100 dpi resolution.In that case, you may prefer the 100dpi fonts available in the XFree86-100dpi-fonts package.
You may also need to install other XFree86 font packages.
To install the X Window System, you will need to install the XFree86 package, the XFree86 package correspondingto your video card, the X11R6-contrib package, the Xconfigurator package and the XFree86-libs package.
Finally, if you are going to develop applications that run as X clients, you will also need to install the XFree86-devel package.
XFree86-ISO8859-2 – (Version 1.0, 77K)
If you use the X Window System and you want to display Central European fonts, you should install the XFree86-ISO8859-2 package.
This package contains a full set of Central European fonts, in compliance with the ISO 8859-2 standard. The

D.6 User Interface 347
fonts included in this package are distributed free of charge and can be used freely, subject to the accompanyingcopyright:
Copyright (c) 1996, 1997 BIZNET Poland, Inc. All Rights Reserved. BIZNET is a registered trademark of BIZNETPoland, Inc.
You may also need to install one or more other XFree86 fonts packages.
To install the X Window System, you will need to install the XFree86 package, the XFree86 package which corre-sponds to your video card, the X11R6-contrib package, the Xconfigurator package and the XFree86-libs package.
Finally, if you are going to develop applications that run as X clients, you will also need to install XFree86-devel.
XFree86-ISO8859-2-100dpi-fonts – (Version 1.0, 1,003K)
The XFree86-ISO8859-2-100dpi-fonts package includes Central European (ISO 8859-2) fonts, in 100 dpi resolution,for the X Window System.
If you need to display the special characters used by Central European languages on your X Window System, andyour monitor can support 100 dpi resolution, you should install the XFree86-ISO8859-2-100dpi-fonts package.You may need to install one or more of the other XFree86 fonts packages, as well. To install the X WindowSystem, you will need to install the XFree86 package, the XFree86 video card package which corresponds to yourvideo card, the X11R6-contrib package, the Xconfigurator package and the XFree86-libs package. If you’re goingto develop applications which run as X clients, you’ll also need to install XFree86-devel.
XFree86-ISO8859-2-75dpi-fonts – (Version 1.0, 877K)
The XFree86-ISO8859-2-75dpi-fonts package contains a set of Central European language fonts in 75 dpi resolu-tion for the X Window System. If you have a high resolution monitor capable of supporting 100 dpi, you shouldinstall the 100 dpi version of this package instead.
If you are installing the X Window System and you need to display Central European language characters in 75dpi resolution, you should install this package. You may also need to install one or more of the other XFree86fonts packages as well. To install the X Window System, you will need to install the XFree86 package, the XFree86video card package that corresponds to your video card, the X11R6-contrib package, the Xconfigurator packageand the XFree86-libs package. If you are going to develop applications that will run as X clients, you will alsoneed to install XFree86-devel.
XFree86-ISO8859-2-Type1-fonts – (Version 1.0, 1,905K)
The XFree86-ISO8859-2-Type1-fonts package contains Central European Type 1 fonts for the X Window System.This set of fonts is known as the ulT1mo (or ultimo) collection. All of the included fonts are copyrighted to theirauthors and freeware. Original fonts were taken from the Internet or CDs.
If you need to display Central European language fonts on your X Window System, you should install theXFree86-ISO8859-2-Type1-fonts package. You may need to also install one or more of the other XFree86 fontspackages. To install the X Window System, you will need to install the XFree86 package, the XFree86 video cardpackage which corresponds to your video card, the X11R6-contrib package, the Xconfigurator package and theXFree86-libs package. Finally, if you are going to develop applications that will run as X clients, you’ll need toinstall XFree86-devel.
XFree86-ISO8859-9-100dpi-fonts – (Version 2.1.2, 1,142K)
The XFree86-ISO8859-9-100dpi-fonts package contains a set of Turkish language fonts in 100 dpi resolution and

348 Package List
in accordance with the ISO8859-9 standard for the X Window System.
If you need to display Turkish language fonts for the X Window System, and your monitor is capable of sup-porting 100 dpi resolution, you should install this package. You may also need to install one or more of theother XFree86 fonts packages. To install the X Window System, you will need to install the XFree86 package, theXFree86 video card package which corresponds to your video card, the X11R6-contrib package, the Xconfiguratorpackage and the XFree86-libs package.
If you are going to develop applications that will run as X clients, you will also need to install XFree86-devel.
XFree86-ISO8859-9 – (Version 2.1.2, 85K)
The XFree86-ISO8859-9 package contains Turkish language (ISO8859-9) terminal fonts, modmaps for the Q and Fstyle of Turkish keyboard mappings and a simple utility for changing the modmap.
If you need to display Turkish language fonts on your X Window System, or if you need a to use the Q and Fstyle keyboard mappings, you should install the XFree86-ISO8859-9 package. You may also need to install otherXFree86 font packages. If you’re installing the X Window System, you’ll need to install the XFree86 package, theXFree86 video card package which corresponds to your video card, the X11R6-contrib package, the Xconfiguratorpackage and the XFree86-libs package. If you’re going to develop applications that run as X clients, you will alsoneed to install XFree86-devel.
XFree86-ISO8859-9-75dpi-fonts – (Version 2.1.2, 1,032K)
The XFree86-ISO8859-9-75dpi-fonts package contains a set of Turkish language (ISO8859-9) fonts in 75 dpi reso-lution for the X Window System.
If you need to display Turkish language fonts on your X Window System, you should install this package. If yourmonitor is capable of supporting 100 dpi resolution, you should instead install the 100 dpi font package. You mayalso need to install one or more of the other XFree86 fonts packages. If you’re installing the X Window System,you need to install the XFree86 package, the XFree86 video card package which corresponds to your video card,the X11R6-contrib package, the Xconfigurator package and the XFree86-libs package. Finally, if you are going todevelop applications that will run as X clients, you will also need to install XFree86-devel.
XFree86-cyrillic-fonts – (Version 3.3.3.1, 301K)
The Cyrillic fonts included with XFree86 3.3.2 and higher. Those who use a language requiring the Cyrillic char-acter set should install this package.
gdm – (Version 1.0.0, 244K)�
�
�
�W
GNOME Display Manager allows you to log into your system with the X Window System running. It is highlyconfigurable, allowing you to run several different X sessions at once on your local machine, and can managelogin connections from remote machines as well.
gqview – (Version 0.6.0, 186K)�
�
�
�W
GQview is a browser for graphics files. Offering single click viewing of your graphics files. Includes thumbnailview, zoom and filtering features. And external editor support.
kterm – (Version 6.2.0, 154K)
The kterm package provides a terminal emulator for the Kanji Japanese character set.

D.6 User Interface 349
Install kterm if you need a Kanji character set terminal emulator. You’ll also need to have the X Window Systeminstalled.
rxvt – (Version 2.6.PRE2, 490K)�
�
�
�W
�
�
�
�S
Rxvt is a color VT102 terminal emulator for the X Window System. Rxvt is intended to be an xterm replacementfor users who don’t need the more esoteric features of xterm, like Tektronix 4014 emulation, session logging andtoolkit style configurability. Since it doesn’t support those features, rxvt uses much less swap space than xtermuses. This is a significant advantage on a machine which is serving a large number of X sessions.
The rxvt package should be installed on any machine which serves a large number of X sessions, if you’d like toimprove that machine’s performance.
urw-fonts – (Version 1.1, 2,160K)�
�
�
�W
�
�
�
�S
Free versions of the 35 standard PostScript fonts. With newer releases of ghostscript quality versions of thestandard 35 Type 1 PostScript fonts are shipped. They were donated and licenced under the GPL by URW. Thefonts.dir was specially made to match the original Adobe names of the fonts, e.g. Times, Helvetica etc. With X,LaTeX, or Ghostscript, these fonts are a must to have!
x3270 – (Version 3.1.1.6, 561K)
The x3270 program opens a window in the X Window System which emulates the actual look of an IBM 3278/3279terminal, commonly used with mainframe applications. x3270 also allows you to telnet to an IBM host from thex3270 window.
Install the x3270 package if you need to access IBM hosts using an IBM 3278/3279 terminal emulator.
xinitrc – (Version 2.3, 9K)�
�
�
�W
�
�
�
�S
The xinitrc package contains the xinitrc file, a script which is used to configure your X Window System session orto start a window manager.
The xinitrc package should be installed if you use the X Window System.

350 Package List

EGeneral Parameters and Modules
This appendix is provided to illustrate some of the possible parameters that may be needed by certaindrivers. It should be noted that, in most cases, these additional parameters are unnecessary. Alsoincluded is a list of network hardware and the associated modules required by that hardware.
Please keep in mind that if a device you are attempting to use requires one of these parameters,and support for that device is not compiled into the kernel, the traditional method of adding theparameter to the LILO boot command will not work. Drivers loaded as modules require that theseparameters are specified when the module is loaded. The Red Hat Linux installation program givesyou the option to specify module parameters when a driver is loaded.
For more information concerning the device support compiled into the kernel used by the Red HatLinux installation program, please refer to Section 2.9 on page 31.
Please Note: Not all of the cards that are listed are supported. Please check the hardware compati-bility list on Red Hat Software’s World Wide Web site athttp://www.redhat.com/support/docs/hardware.html to make sure your card is supported.
One of the more commonly used parameters, the hdX=cdrom parameter, can be entered at the bootprompt, as it deals with support for IDE/ATAPI CD-ROMs, which is part of the kernel.
In the tables below, most modules without any parameters listed are either able to auto-probe to findthe hardware, or require you to manually change settings in the module source code, and recompile.

352G
eneralP
arameters
and
Mo
du
les
E.1 CD-ROM parameters
Hardware Module ParametersATAPI/IDE CD-ROM Drives hdX=cdromAztech CD268-01A, Orchid CD-3110, aztcd.o aztcd=io portOkano/Wearnes CDD110,Conrad TXC, CyCDROM CR520CyCDROM CR540 (non-IDE)Sony CDU 31A or 33A CD-ROM cdu31a.o cdu31a=io port,IRQ[,PAS]
cdu31a port=base addrcdu31a irq=irq
Philips/LMS CDROM drive 206 cm206.o cm206=io port,IRQwith cm260 host adapter cardGoldstar R420 CD-ROM gscd.o gscd=io portISP16, MAD16, or Mozart sound card isp16.o isp16=io port,IRQ,dma,drive typeCD-ROM interface (OPTi 82C928 and isp16 cdrom base=io portOPTi 82C929) with Sanyo/Panasonic, isp16 cdrom irq=IRQSony, or Mitsumi drives isp16 cdrom dma=dma
isp16 cdrom type=drive typeMitsumi CD-ROM, Standard mcd.o mcd=io port,IRQMitsumi CD-ROM, Experimental mcdx.o mcdx=io port 1,IRQ 1,io port n,IRQ nOptics storage 8000 AT CD-ROM optcd.o optcd =io port“Dolphin” drive; Lasermate CR328ASB Pro 16 compatible sbpcd.o sbpcd=io port,sb pro SettingSanyo CDR-H94A sjcd.o sjcd=io port
sjcd base=io portSony CDU-535 & 531 sonycd535.o sonycd535=io port(some Procomm drives)
Here are some examples of these modules in use:
Configuration ExampleATAPI CD-ROM, jumpered as master on hdc=cdrom2nd IDE channelnon-IDE Mitsumi CD-ROM on port 340, IRQ 11 mcd=0x340,11Three non-IDE Mitsumi CD-ROM drives using the mcdx=0x300,5,0x304,10,0x320,11experimental driver, io ports 300, 304, and 320 withIRQs 5, 10 and 11Sony CDU 31 or 33 at port 340, no IRQ cdu31=0x340,0

E.2
SC
SIp
arameters
353
Configuration Example(module arguments for above) cdu31 port=0x340 cdu31a irq=0Aztech CD-ROM at port 220 aztcd=0x220Panasonic-type CD-ROM on a SoundBlaster sbpcd=0x230,1interface at port 220Phillips/LMS cm206 and cm260 at IO 340 cm206=0x340,11and IRQ 11Goldstar R420 at IO 300 gscd=0x300Mitsumi drive on a MAD16 soundcard at IO Addr 330 isp16=0x330,11,0,Mitsumiand IRQ 1, probing DMASony CDU 531 at IO address 320 sonycd535=0x320
Please Note: Most newer Sound Blaster cards come with IDE interfaces. For these cards, you do not need to use sbpcd parameters, onlyuse hdx parameters.
E.2 SCSI parameters
Hardware Module ParametersNCR53c810/820/720, NCR53c700/710/700-66 53c7,8xx.oAM53/79C974 PC-SCSI Driver AM53C974.o AM53C974=host-scsi-id,Qlogic PCI-Basic target-scsi-id,max-rate,
max-offsetMost Buslogic (now Mylex) BusLogic.o BusLogic Options=option,option,...cards with “BT” part number (See /usr/src/linux/drivers/scsi/README.BusLogic)
NCR53c406a.o ncr53c406a=io port[,IRQ[,FASTPIO]]ncr53c406a io=io port irq=IRQ fastpio=FASTPIO
Advansys SCSI Cards advansys.oAdaptec AHA 152x aha152x.o aha152x=io base,IRQ,scsi id,reconnect,parityAdaptec AHA 1542 aha1542.o aha1542=io base,buson,busoff,dmaspeedAdaptec AHA 1740 aha1740.oAdaptec AHA-274x, AHA-284x, aic7xxx.o aic7xxx=stringAHA-29xx, AHA-394x, AHA-398x,AHA-274x, AHA-274xT, AHA-2842,AHA-2910B, AHA-2920C, AHA-2930/U/U2,AHA-2940/W/U/UW/AU/U2W/U2/U2B/,U2BOEM, AHA-2944D/WD/UD/UWD,

354G
eneralP
arameters
and
Mo
du
les
Hardware Module ParametersAHA-2950U2/W/B, AHA-3940/U/W/UW/,AUW/U2W/U2B, AHA-3950U2D,AHA-3985/U/W/UW, AIC-777x, AIC-785x,AIC-786x, AIC-787x, AIC-788x , AIC-789x,AIC-3860Data Technology Corp DTC3180/3280 dtc.oDTP SCSI host adapters (EATA/DMA) eata.o eata=port0,port1,port2,...optionsPM2011B/9X ISA, PM2021A/9X ISA, PM2012A, eata io port=port0,port1,port2,...option=valuePM2012B, PM2022A/9X EISA, PM2122A/9X,PM2322A/9X, SmartRAID PM3021, PM3222,PM3224DTP SCSI Adapters PM2011, PM2021, PM2041, eata dma.oPM3021, PM2012B, PM2022, PM2122, PM2322,PM2042, PM3122, PM3222, PM3332, PM2024,PM2124, PM2044, PM2144, PM3224, PM3334DTP EATA-PIO boards eata pio.oFuture Domain TMC-16x0- based cards fdomain.o fdomain=io base,IRQ[,ADAPTER ID]TMC-1800, TMC-18C50, TMC-18C30,TMC-36C70, Future Domain TMC-1650,TMC-1660, TMC-1670, TMC-1680,TMC-1610M/MER/MEX, TMC-3260 (PCI),Quantum ISA-200S, ISA-250MGAdaptec AHA-2920A (PCI) (NOT AHA-2920C)NCR5380 and NCR53c400 cards g NCR5380.o ncr5380=io port,IRQ,dma ncr53c400=io port,IRQ
ncr5380 io=io port irq=IRQ dma=dmancr53c400 io=io port irq=IRQ
GDT ISA/EISA/PCI Disk Array Controller gdth.o gdth=IRQ0,IRQ1,IRQ2,...options:valuesIOMEGA MatchMaker parallel port SCSI adapter imm.oAlways IN2000 ISA SCSI card in2000.o in2000=setup string:value
in2000 setup string=valueInitio INI-9X00U/UW SCSI host adapters initio.oAMI MegaRAID 418, 428, 438, 466, 762 megaraid.oNCR SCSI controllers with 810/810A/815/ ncr53c8xx.o ncr53c8xx=option1:value1,option2:value2,...825/825A/860/875/876/895 chipsets ncr53c8xx="option1:value1 option2:value2..."Pro Audio Spectrum/Studio 16 pas16.o pas16=port,irqIOMEGA PPA3 parallel port SCSI host adapter ppa.o

E.3
Eth
ernet
param
eters355
Hardware Module ParametersPerceptive Solutions PSI-240I EIDE psi240i.oQLogic Fast SCSI FASXXX ISA/VLB/PCMCIA qlogicfas.oQLogic ISP2100 SCSI-FCP qlogicfc.oQLogic ISP1020 Intelligent SCSI cards qlogicisp.oIQ-PCI, IQ-PCI-10, IQ-PCI-DSeagate ST01/ST02 seagate.o controller type=1 base address=base addr irq=irqFuture Domain TMC-885, TMC-950 seagate.o controller type=2 base address=base addr irq=irqCards with the sym53c416 chipset sym53c416.o sym53c416=PORTBASE[,IRQ]
sym53c416 io=PORTBASE irq=IRQTrantor T128/T128F/T228 SCSI Host Adapter t128.oTekram DC390 and other AMD53C974A tmscsim.o tmscsim=ID,SPEEDbased PCI SCSI adaptersUltraStor 14F/34F SCSI host adapters u14-34f.o u14-34f=io port1,io port2,...io port10(14F, 24F, 34F) u14-34f io port=io port1,io port2,...io port10UltraStor 14F, 24F, and 34F ultrastor.oWD7000-FASST2,WD7000-ASC, wd7000.o wd7000=IRQ,dma,io portWD7000-AX/MX/EX wd7000 io=io port irq=IRQ dma=dma
Here are some examples of these modules in use:
Configuration ExampleAdaptec AHA1522 at port 330, IRQ 11,SCSI ID 7
aha152x=0x330,11,7
Adaptec AHA1542 at port 330 bases=0x330Future Domain TMC-800 at CA000, IRQ10
controller type=2 base address=0xca000irq=10
When a parameter has commas, make sure you do not put a space after a comma.
E.3 Ethernet parameters
Hardware Module Parameters3Com 3c501 3c501.o 3c501=io port,IRQ3Com 3c503 and 3c503/16 3c503.o 3c503=io port,IRQ

356G
eneralP
arameters
and
Mo
du
les
Hardware Module Parameters3c503 io=io port 1,io port n irq=IRQ 1,IRQ n
3Com EtherLink Plus (3c505) 3c505.o 3c505=io port,IRQ,DMA3c505 io=io port 1,io port n irq=IRQ 1,IRQ 2dma=dma 1,dma n
3Com EtherLink 16 3c507.o 3c507=io port,IRQ3c507 io=io port irq=IRQ
3Com EtherLink III 3c509.o 3c509=IRQ3Com ISA EtherLink XL 3c515.o“Corkscrew”3Com EtherLink PCI III/XL 3c59x.oVortex (3c590, 3c592, 3c595, 3c597)Boomerang (3c900, 3c905, 3c595)Apricot 680x0 VME, 82596 chipset 82596.o 82596=IRQ
82596 irq=IRQAnsel Communications AC3200 EISA ac3200.o ac3200=io port,IRQ
ac3200 io=io port 1,io port n irq=IRQ 1,IRQ nAlteon AceNIC acenic.o acenic=trace,linkGigabit Ethernet driver acenic trace=trace link=valAllied Telesis AT1700 at1700.o at1700=io port,IRQ
at1700 io=io port irq=IRQTangent ATB-II, Novel NL-10000, cops.o cops=io port,IRQDaystar Digital LT-200, Dayna DL2000, cops io=io port irq=IRQDaynaTalk PC (HL), COPS LT-95,Farallon PhoneNET PC II, IIIModular driver for the COSA or cosa.o cosa=io port,IRQ,dmaSRP synchronous serial cardCrystal LAN CS8900/CS8920 cs89x0.o cs89x0=io port,IRQ,MEDIA TYPE
cs89x0 io=io port irq=IRQ media=TYPEEtherWORKS DE425 TP/COAX EISA, de4x5.o de4x5=io portDE434 TP PCI, DE435/450 TP/COAX/AUI PCI de4x5 io=io portDE500 10/100 PCI de4x5 args=’ethX[fdx] autosense=MEDIA STRING’Kingston, LinkSys, SMC8432, SMC9332,Znyx31[45], and Znyx346 10/100 cardswith DC21040 (no SROM), DC21041[A],DC21140[A], DC21142, DC21143 chipsetsD-Link DE-600 Ethernet Pocket Adapter de600.o

E.3
Eth
ernet
param
eters357
Hardware Module ParametersD-Link DE-620 Ethernet Pocket Adapter de620.o
de620 io=io port irq=IRQ bnc=1 utp=1DIGITAL DEPCA & EtherWORKS depca.o depca=io port,IRQDEPCA, DE100, DE101, DE200 Turbo, DE201Turbo depca io=io port irq=IRQDE202 Turbo TP/BNC, DE210, DE422 EISADigi Intl. RightSwitch SE-X EISA and PCI dgrs.oCabletron E2100 series ethercards e2100.o e2100=io port,IRQ
e2100 io=io port irq=IRQIntel i82595 ISA eepro.o eepro=io port,IRQ,memEtherExpressPro10/10+ driver eepro io=io port irq=IRQ mem=memIntel i82557/i82558 PCI eepro100.oEtherExpressPro driverIntel EtherExpress 16 (i82586) eexpress.o eexpress=io port,IRQ
eexpress io=io port irq=IRQSMC EtherPower II 9432 PCI epic100.o(83c170/175 EPIC series)Racal-Interlan ES3210 EISA Network Adapter es3210.o es3210=io port,IRQ,mem
es3210 io=io port irq=IRQ mem=memICL EtherTeam 16i/32 eth16i.o eth16i=io port,mediatype
eth16i ioaddr=io port mediatype=typeEtherWORKS 3 (DE203, DE204 and DE205) ewrk3.o ewrk=io port,IRQ
ewrk io=io port irq=IRQFujitsu FMV-181/182/183/184 fmv18x.o fmv18x=io port,IRQ
fmv18x io=io port irq=IRQModular driver for the Comtrol hostess sv11.o hostess sv11=io port,IRQ,DMABITHostess SV11 hostess sv11 io=io port irq=IRQ dma=DMABITHP PCLAN/plus hp-plus.o hp-plus=io port,IRQ
hp-plus io=io port irq=IRQHP LAN Ethernet hp.o hp=io port,IRQ
hp io=io port irq=IRQ100VG-AnyLan Network Adapters hp100.o hp100=io port,nameHP J2585B, J2585A, J2970, J2973, J2573 hp100 hp100 port=io port hp100 name=nameCompex ReadyLink ENET100-VG4,FreedomLine 100/VGIBM Token Ring 16/4 ibmtr.o ibmtr=io port,IRQ,mem
ibmtr io=io port irq=IRQ mem=mem

358G
eneralP
arameters
and
Mo
du
les
Hardware Module ParametersAMD LANCE/PCnet lance.o lance=io port,IRQ,dmaAllied Telesis AT1500, HP J2405A, NE2100, NE2500 lance io=io port 1,io port n irq=IRQ 1,IRQ 2
dma=dma 1,dma nMylex LNE390 EISA cards (LNE390A, LNE390B) lne390.o lne390=io port,IRQ,mem
lne390 io=io port irq=IRQ mem=memltpc.o ltpc=io port,IRQ
ltpc io=io port irq=IRQNE1000 / NE2000 (non-pci) ne.o ne=io port,IRQ
ne io=io port irq=IRQPCI NE2000 cards ne2k-pci.oRealTEk RTL-8029, Winbond 89C940,Compex RL2000, KTI ET32P2, NetVin,NV5000SC, Via 82C926, SureCom NE34,Novell NE3210 EISA Network Adapter ne3210.o ne3210=io port,IRQ,mem
ne3210 io=io port irq=IRQ mem=memMiCom-Interlan NI5010 ethercard ni5010.o ni5010=io port,IRQ
ni5010 io=io port irq=IRQNI5210 card (i82586 Ethernet chip) ni52.o ni52=io port,IRQ
ni52 io=io port irq=IRQNI6510, ni6510 EtherBlaster ni65.o ni65=io port,IRQ,dma
ni65 io=io port irq=IRQ dma=dmaAMD PCnet32 and AMD PCnetPCI pcnet32.oRedCreek Communications PCI rcpci.oRealTek cards using RTL8129 rtl8139.oor RTL8139 Fast Ethernet chipsetsSangoma S502/S508 multi-protocol FR sdla.oSangoma S502A, ES502A, S502E, S503, sdladrv.oS507, S508, S509SysKonnect Token Ring ISA/PCI Adapter, sktr.o sktr=io port,IRQ,memTR4/16(+) ISA or PCI, TR4/16 PCI, and sktr io=io port irq=IRQ mem=memolder SK NET TR4/16 ISA cardsSMC Ultra and SMC EtherEZ ISA ethercard smc-ultra.o smc-ultra=io port,IRQ(8K, 83c790) smc-ultra io=io port irq=IRQSMC Ultra32 EISA Ethernet card (32K) smc-ultra32.oSMC 9000 series of Ethernet cards smc9194.o smc9194=io port,IRQ
smc9194 io=io port irq=IRQ ifport=[0,1,2]

E.3
Eth
ernet
param
eters359
Hardware Module ParametersCompaq Netelligent 10/100 TX PCI UTP tlan.o tlan=io port,IRQ,aui,debugCompaq Netelligent 10 T PCI UTP tlan io=io port irq=IRQCompaq Integrated NetFlex 3/P Other Module Options:Compaq Netelligent Dual 10/100 TX PCI UTP speed=10Mbs,100MbsCompaq Netelligent Integrated 10/100 TX UTP debug=0x0[1,2,4,8]Compaq Netelligent 10/100 TX Embedded UTP aui=1Compaq Netelligent 10 T/2 PCI UTP/Coax duplex=[1,2]Compaq Netelligent 10/100 TX UTPCompaq NetFlex 3/POlicom OC-2325, OC-2183, OC-2326Digital 21x4x Tulip PCI Ethernet cards tulip.oSMC EtherPower 10 PCI(8432T/8432BT)SMC EtherPower 10/100 PCI(9332DST)DEC EtherWorks 100/10 PCI(DE500-XA)DEC EtherWorks 10 PCI(DE450)DEC QSILVER’s, Znyx 312 etherarrayAllied Telesis LA100PCI-TDanpex EN-9400, Cogent EM110VIA Rhine PCI Fast Ethernet cards with either via-rhine.othe VIA VT86c100A Rhine-II PCI or 3043 Rhine-ID-Link DFE-930-TX PCI 10/100AT&T GIS (nee NCR) WaveLan ISA Card wavelan.o wavelan=[IRQ,0],io port,NWIDWD8003 and WD8013 ”compatible” ethercards wd.o wd=io port,IRQ,mem,mem end
wd io=io port irq=IRQ mem=mem mem end=endPacket Engines Yellowfin yellowfin.oG-NIC PCI Gigabit Ethernet adapterZ8530 based HDLC cards for AX.25 z85230.o
Here are some examples of these modules in use:
Configuration ExampleNE2000 ISA card at IO address 300 and IRQ 11 ne=0x300,11
ether=0x300,11,eth0Wavelan card at IO 390, autoprobe for IRQ, and use the wavelan=0,0x390,0x4321NWID to 0x4321 ether=0,0x390,0x4321,eth0

360 General Parameters and Modules
E.3.1 Using Multiple Ethernet Cards
You can use multiple Ethernet cards in one machine. If each card uses a different driver (e.g., a3c509 and a DE425), you simply need to add alias (and possibly options) lines for each card to/etc/conf.modules. See Section 8.2.2 on page 165 for more information.
If any two Ethernet cards use the same driver (e.g., two 3c509’s or a 3c595 and a 3c905), you will needto either give the two card addresses on the driver’s options line (in the case of ISA cards), or (forPCI cards) simply add one alias line for each card.
For more information about using more than one Ethernet card, see the Linux Ethernet-HOWTO.If you installed the howto package when you installed Red Hat Linux, you can find it in the file/usr/doc/HOWTO/Ethernet-HOWTO.

FInformation Specific to Red HatLinux/SPARC
This appendix describes the differences between Red Hat Linux/SPARC and Red Hat Linux/Intelinstallations. While it provides a good overview of these differences, you will find it easier to readchapters 2, 3, 4, 5 and 6 in order. These chapters will refer you to the appropriate parts of thisappendix at the appropriate time.
In addition, there is a Linux/SPARC homepage athttp://www.ultralinux.org. It has a wealth of information for people considering Red HatLinux/SPARC, and is a great resource.
F.1 Supported Hardware
Red Hat Linux/SPARC supports a variety of hardware based on the SPARC architecture. The mostrecent list of hardware supported by Red Hat Linux/SPARC can be found at Red Hat Software’sWorld Wide Web site athttp://www.redhat.com/hardware.
The following list is current as of the time this manual was produced:
� sun4c architecture machines (IPC, SS1, etc)

362 Information Specific to Red Hat Linux/SPARC
� sun4m architecture machines (Classic, SS5, SS10, etc)� sun4u (UltraSparc1, UltraSparc2, EnterPrise UltraSparc servers)� bwtwo, cg3, cg6, TCX framebuffers (24 bit on the TCX)� cg14 framebuffer (in cg3 mode)� SCSI and Ethernet on all of the above� type 4 and type 5 keyboards and mice� external SCSI drives� CD-ROM drives (external and internal)� SCSI/Ether SBUS expansion cards� Any original equipment Sun monitor for the above framebuffers
Unsupported Hardware – The following list contains hardware that is currently unsupported:
� VME based sun4m machines, such as the 4/690� SPARC 5 Model 170 machines� sun4d (SS1000, SS2000)� sun4 architecture� Eurocard sun4c machines, called the ”sun4e” under Solaris2.4 and others, are not supported.
These are VME-bus sun4c machines, to which the kernel has not been ported yet.� The following types of CD-ROMs are unsupported (for more information on CD-ROM com-
patibility issues, please visithttp://saturn.tlug.org/suncdfaq):
– All NEC models– Some Toshiba XM-4101B revisions– Toshiba XM-3201B– AppleCD 300 Plus on older SPARC PROM– Apple CD600i
F.2 Installation Overview
Installing Red Hat Linux on a SPARC system is slightly more complex than installing Red HatLinux/Intel, mostly due to differences in machine architecture. In general, the main steps to a suc-cessful installation are:
1. Determine which console commands your SPARC systems supports.2. Determine whether you have sufficient memory to use a ramdisk-based installation.3. Determine how you will boot the installation program.4. Determine what installation method you will use.5. Determine whether you will install Red Hat Linux/SPARC from a serial terminal.6. Load and run the Red Hat Linux installation program.
Let’s look at each of these steps in more detail.

F.3 Console Commands 363
F.3 Console Commands
SPARC systems have two different types of boot commands available, depending on the version ofthe system’s console PROM. Systems with a PROM version less than 2.0 use what is known as the“old” style boot command, while systems whose PROM is at version 2.0 or greater can use eitherthe old or the new style boot commands. If your SPARC system’s console prompt is “ok,” then yoursystem is in new command mode, and can use the new style boot command.
In general, it’s preferable to use the new style boot command if your system supports it. Of course,it’s possible to use the old style boot command, but you’ll need to know a bit more about yourhardware configuration. An excellent reference on older Sun hardware in general (and the old-styleboot commands in particular) can be found in The Sun Hardware Reference, by James W. Birdsall. Itcan be found at ftp://ftp.picarefy.com/pub/Sun-Hardware-Ref/parts/. The file part2contains an in-depth description of the various “ROM monitors” present in older Sun Systems.
In general, the new style boot command is boot, followed by a descriptive device name (such asfloppy, cdrom, or net).
The old style boot command is b, followed by a device specifier in the form:
xx(a,b,c)
Where xx is used to specify the device type (such as sd for SCSI disks), a is the controller number, b,is the device’s unit number, and c is the partition number. Please refer to The Sun Hardware Referenceif you have an older SPARC system, and require additional information on its boot command syntax.
F.4 Ramdisk-based Installation Criteria
When the Red Hat Linux/SPARC installation starts, normally a ramdisk is loaded into memory. Thisramdisk contains data and programs required to perform the installation, and is approximately 4 MBin size. Since the ramdisk takes memory away from the Red Hat Linux/SPARC installation program,your SPARC system must have at least 12 MB of memory in order to sucessfully use a ramdisk-basedinstallation.
For SPARC systems with less than 12 MB of RAM, another approach is available. It is known asan NFS-mounted root. As the name implies, instead of using a ramdisk to hold parts of the Red HatLinux/SPARC installation program, an NFS server is used to export the necessary files to the SPARCsystem. While this approach uses less memory, it is somewhat more complex to set up.
Please Note:Red Hat Linux/SPARC may also be installed by booting from the Red Hat Linux/-SPARC CD-ROM. This method uses neither a ramdisk or an NFS-mounted root, as the necessaryfiles are already present on theRed Hat Linux/SPARC CD-ROM. We will discuss booting from CD-ROM in Section F.5.2 on page 365.

364 Information Specific to Red Hat Linux/SPARC
F.4.1 Preparing to Use an NFS-Mounted Root
If you will be using an NFS-mounted root for the installation program, you’ll need a network con-nection for your SPARC system, an NFS server capable of exporting the Red Hat Linux/SPARC CD-ROM (or equivalent files), and the ability to respond to rarp requests, so that your SPARC systemcan obtain its IP address. The necessary commands for rarp would be:
rarp -s ip.address.of.sparc hw:address:of:sparcarp -s ip.address.of.sparc hw:address:of:sparc
As you might surmise, replace ip.address.of.sparc with the IP address of your SPARC sys-tem, and replace hw:address:of:sparc with the MAC address of your SPARC system’s networkadapter. The IP address is assigned by your network administrator, and the MAC address is dis-played on your SPARC system’s console at power-up.
To use an NFS-mounted root during the installation, add the following argument to your boot com-mand:
linux nfsroot=nfs.server.ip.address:/path/to/RH/image
The word linux should always be included in a boot command that includes one or more argu-ments, and must precede the first argument. Replacenfs.server.ip.addresswith the NFS server’s IP address, and/path/to/RH/image with the path to the exported directory containing the appropriate Red HatLinux/SPARC files.
F.5 Choosing a Boot Method
This section describes how to start (or boot) the installation program. Once the installation programis running, you will be able to choose from several installation methods. You can choose from thefollowing installation methods: CD-ROM, hard disk, NFS, FTP and HTTP. (Note that if the installa-tion program is booted directly from CD-ROM, the installation will automatically proceed from thatCD-ROM.)
There are three different ways a Red Hat Linux/SPARC installation can be started:
Boot From Diskette – The installation program is read from a diskette.
Boot From CD-ROM – The installation program is read directly from the Red Hat Linux/SPARCCD-ROM.
Boot From the Network – The installation program is read from a TFTP server.

F.5 Choosing a Boot Method 365
F.5.1 Booting From Diskette
If your SPARC system has a diskette drive, you can boot the Red Hat Linux/SPARC installationprogram from a diskette. The boot diskette image (known as boot32.img for Sun4c and Sun4m;and bootimg64.img for UltraSparc) is located in the images/ directory on your Red Hat Linux/-SPARC CD-ROM. A ramdisk diskette image (known as ramdisk.img) is also available. Please referto Appendix B on page 237 for instructions on writing the image file to a diskette. Make sure youlabel the boot and ramdisk diskettes appropriately.
Diskette Boot Commands
For SPARC systems with a PROM version of 2.0 or greater, the proper boot command (when in newcommand mode) is:
boot floppy
On the other hand, SPARC systems with PROM versions less than 2.0 should use the followingcommand at the > prompt:
b fd()
Please Note:There have been reports that some systems with pre-2.0 PROMs cannot boot the RedHat Linux/SPARC installation program from diskette. If you find this to be the case with your SPARCsystem, you will need to use another boot method.
F.5.2 Booting From CD-ROM
If your SPARC system has a fully Sun-supported CD-ROM drive, you can boot directly from theRed Hat Linux/SPARC CD-ROM. For SPARC systems with a PROM version of 2.0 or better, use thefollowing command when in new command mode:
boot cdrom
SPARC systems with PROM versions less than 2.0 may not be able to boot from a CD-ROM at all,although we’ve received reports that at least some PROM 1.3 systems have been able to boot fromCD-ROM. If your SPARC system has a CD-ROM at SCSI id 6, the following command should bootthe Red Hat Linux/SPARC installation program:
b sd(0,6,0)
Note that using an NFS-mounted root after booting from CD-ROM is not supported, as the filesys-tem on the Red Hat Linux/SPARC CD-ROM performs the same function as an NFS-mounted root.Therefore, no additional boot command arguments should be given for CD-ROM boots.

366 Information Specific to Red Hat Linux/SPARC
F.5.3 Booting From the Network
There are two types of network boots supported by the Red Hat Linux/SPARC installation program:
1. Network boot with NFS-mounted root. This method is required for SPARC systems with lessthan 16 MB of RAM.
2. Network boot with network-loaded ramdisk. This method can be used by systems with atleast 16 MB of RAM.
While booting your SPARC system from the network is fairly straightforward, there are several re-quirements:
� Your SPARC system must have a network connection.
� Your network must be able to give your SPARC system its IP address via a rarp.
� You must have a TFTP server that can download the Red Hat Linux/SPARC kernel and instal-lation program to your SPARC system.
� If you are going to use an NFS-mounted root, an NFS server capable of exporting the Red HatLinux/SPARC CD-ROM (or equivalent files).
Setting up RARP If you are going to use rarp, please refer to Section F.4.1 on page 364.
TFTP Server Setup If you are going to set up a TFTP server on a Red Hat Linux system, simplyinstall the latest tftp package using RPM, and make sure the line in inetd.conf that will runtftp is uncommented. Don’t forget to kill -HUP inetd if you needed to make any changes toinetd.conf.
Next, you’ll need to make a symlink describing the SPARC system to be booted, and pointing to thefile from which it should boot. The name of the symlink contains two items:
1. The IP address of the system to be booted, in hexadecimal.
2. A string describing the architecture of the system to be booted.
To convert the more common “dotted decimal” IP address into its hex equivalent, convert each of theaddress’ four groups of numbers into hex. If the resulting hex number is only one digit, add a leadingzero to it. Then append all four hex numbers together. For example, take the IP address 10.0.2.254.Convert each set of four numbers into hex, and add a leading zero where necessary:
10 = A or 0A0 = 0 or 002 = 2 or 02
254 = FE or FE

F.5 Choosing a Boot Method 367
Therefore, the IP address 10.0.2.254 in hex is: 0A0002FE.
If you have perl available on a system, you can use the following command (modified to includeyour system’s IP address, of course) to have your IP address converted for you:
Here we’ve had perl convert 10.0.2.254 for us.
The second part of the symlink name is the SPARC system’s architecture. For our example, we’ll useSUN4M. The IP address and architecture are separated by a dot, resulting in this symlink name:
0A0002FE.SUN4M
The last step is figuring out what this symlink should point to. There are two choices. If you want touse an NFS-mounted root, use the file:
/kernels/vmlinux32 -- for Sun4c and Sun4m/kernels/vmlinux64 -- for UltraSparc
If you would rather use a ramdisk, use the file
/images/tftp32.img -- for Sun4c and Sun4m/images/tftp64.img -- for UltraSparc
Place the appropriate file in the TFTP server’s directory, and create the symlink. In this example,we’re using the image that includes a ramdisk:
ln -s tftp32.img 0A0002FE.SUN4M orln -s tftp64.img 0A0002FE.SUN4U
Network Boot Commands
You’re now ready to boot. If you’re going to boot tftp32.img or tftp64.img, simply use thefollowing command (in new command mode):
boot net
On the other hand, if you’re going boot from vmlinux32 or vmlinux64 and use an NFS-mountedroot, use this command:
boot net linux nfsroot=nfs.server.IP.address:/path/to/RH/image
Replace nfs.server.ip.addresswith the NFS server’s IP address, and/path/to/RH/image with the path to the exported directory containing the appropriate Red HatLinux/SPARC files.
SPARC systems with PROM versions less than 2.0 should use this boot command, appending theusual NFS root argument if required:

368 Information Specific to Red Hat Linux/SPARC
b le()
F.6 Choosing an Installation Method
Once your SPARC systems has booted, and the installation program is running, you’ll be asked tochoose an installation method (unless you’ve booted directly from CD-ROM, in which case a CD-ROM installation method is assumed). Red Hat Linux/SPARC can be installed by any of the follow-ing methods:
� Installing packages from CD-ROM.
� Installing packages from an FTP site.
� Installing packages from an NFS server.
� Installing packages from a locally-attached hard disk.
� Installing packages from an HTTP site.
F.6.1 CD-ROM Installation
This is the most straightforward method. It requires a Red Hat Linux/SPARC CD-ROM, and a Sun-supported CD-ROM connected to your SPARC system.
F.6.2 FTP Installation
This installation method requires a local area network connection and access to an FTP site with theRed Hat Linux/SPARC CD-ROM (or equivalent files).
F.6.3 NFS Installation
Installing via NFS requires a local area network connection and access to an NFS server that canexport the contents of the Red Hat Linux/SPARC CD-ROM (or equivalent files).
F.6.4 Hard Disk Installation
This installation method requires that the contents of the Red Hat Linux/SPARC CD-ROM (or equiv-alent files) have been copied to a hard disk directly attached to your SPARC system. It is importantto note that the partition holding these files cannot be used for any other purpose during the instal-lation (ie, it cannot be given a mount point during the installation). In addition, the partition must bein ext2 format.

F.7 Installation Using a Serial Terminal 369
F.6.5 HTTP Installation
This installation method requires a local area network connection and access to an HTTP site withthe Red Hat Linux/SPARC CD-ROM (or equivalent files).
F.7 Installation Using a Serial Terminal
You can also install Red Hat Linux/SPARC using a serial terminal attached to your SPARC system.Any terminal which can emulate a VT100 (or a computer with terminal emulation software) willwork fine. Boot as you would normally, and at the SILO prompt enter:
linux serial
The installation program runs on the first serial port at 9600 baud, 8 bits, no parity, 1 stop bit (oftencalled 9600,8,N,1). The installation program can run in color, if your serial terminal supports color.Note that a computer running kermit and connected to your SPARC system will display in color.
At any prompt dialog during a serial installation (any dialog with an Ok button), you can press�
�
�
�Ctrl -
�
�
�
�Z to start a subshell. To return to the installation program, enter exit at the shell prompt.
When the installation is complete, simply boot normally, and Red Hat Linux should come up on yourserial terminal.
Please Note: If you want to have a “headless” installation, you must use a serial terminal to performthe installation, and make sure you disable GPM.
F.8 SILO Configuration
SILO configuration is nearly identical to LILO configuration. See Section 6.9 on page 105 for moredetails.
Please Note:Unlike LILO, SILO cannot be configured to boot other operating systems during theinstallation. However, information on configuring SILO to boot other operating systems is available.Please read the file README in/usr/doc/silo*/docs after installation.
F.9 Partitioning
Please Note: If you decide to use Disk Druid to partition your system’s hard drive, be aware that,at this time, Disk Druid cannot initialize disk labels on the SPARC. Therefore, the drive must have a

370 Information Specific to Red Hat Linux/SPARC
valid disk label on it prior to attempting to use Disk Druid. A disk label can be written using fdisk– after that, Disk Druid should work normally.
There is one additional step required when partitioning a hard drive for Red Hat Linux/SPARC. Youmust create the third partition of every disk as type Whole Disk spanning from cylinder 0 to theend of the disk. It shouldn’t be used in any way, but it must exist. You can still create other partitionsas you normally would.
Note that this partition will already exist on any disk that has been used under SunOS or Solaris. Ifyou are partitioning a new disk, you can use fdisk’s “s” command to create a standard disk label(which includes the whole-disk partition). If you don’t care for the size of the other partitions createdby “s”, you can delete those partitions and recreate them with the sizes you want.

GGlossary
Alpha A RISC (Reduced Instruction Set Computer) architecture developed by Digital Equipment Corporation.
ATAPI An abbreviation for AT Attachement Packet Interface. ATAPI is the protocol by which CD-ROM drivescommunicate with a computer system over an IDE interface.
Binary Although the base two-numbering system used by computers is known as binary, the word oftenrefers to the executable form of a program. Contrast with “source code.”
BIOS An abbreviation for Basic Input/Output System. On PC-compatible systems, the BIOS is used to per-form all necessary functions to properly initialize the system’s hardware when power is first applied. The BIOSalso controls the boot process, provides low-level input/output routines (hence its name) and (usually) allowsthe user to modify details of the system’s hardware configuration.
Boot Short for “bootstrap.” The process by which a computer starts running an operating system when poweris applied.
Boot Diskette A diskette used to start many Red Hat Linux installations.
Bootstrap See “Boot.”

372 Glossary
CISC An abbreviation for Complex Instruction Set Computer. A design philosophy for computers wherebythe processor is designed to execute a relatively large number of different instructions, each taking a differentamount of time to execute (depending on the complexity of the instruction). Contrast with RISC.
CMOS Originally an abbreviation for Complementary Metal Oxide Semiconductor – a semiconductor technol-ogy used in many integrated circuits. Now often used to describe the low-level hardware that contains a personalcomputer’s BIOS setting, and the computer’s hardware clock.
Cylinder When referring to disk drives, the number of different positions the disk drive’s read/write headscan take over the unit’s disk platters. When viewed from above the platters, each head position describes animaginary circle of different diameters on the platter’s surface, but when viewed from the side, these circles canbe thought of as a series of cylinders nested within each other, hence the term. See also Geometry.
Daemon A daemon is a program that runs, without human intervention, to accomplish a given task. Forexample, lpd is a daemon that controls the flow of print jobs to a printer.
Dependencies When referring to packages, dependencies are requirements that exist between packages.For example, package foo may require files that are installed by package bar. In this example, bar must beinstalled, or else foowill have unresolved dependencies. RPM will not normally allow packages with unresolveddependencies to be installed.
Device Driver Software that controls a device that is connected to, or part of, a computer.
Disk Drive See Hard Disk.
Disk Druid Disk Druid is a component of the Red Hat Linux installation program that is used to partitiondisk drives during the installation process.
Diskette A small mass storage device in a removable cartridge, meant to be read/written to, in a compatibledrive.
Distribution An operating system (usually Linux) that has been packaged so as to be easily installed.
Domain Name A domain name is used to identify computers as belonging to a particular organization.Domain names are hierarchical in nature, with each level in the hierarchy being separated from other levels witha period (pronounced “dot”). For example, Foo Incorporated’s Finance department might use the domain name“finance.foo.com.”
Driver See Device Driver.

Glossary 373
Dual Boot The act of configuring a computer system to boot more than one operating system. The name issomething of a misnomer, as it is possible to boot more than the two operating systems the word “dual” implies.
EIDE An abbreviation for Enhanced Integrated Drive Electronics, which is a newer version of the IDE interfacestandard and another term for a particular implementation for IDE interfaces. EIDE makes larger and faster diskdrives possible; most systems sold today use EIDE.
Errata Errata is Latin for “Ooops.”1 When software is found to have bugs, quite often the software is fixed, andreleased as errata. Red Hat Linux is no exception to the rule; we have an Errata web page at http://www.redhat.com/errata.
Extended Partition A segment of a disk drive that contains other partitions. See Partition.
FAQ An abbreviation for Frequently Asked Questions. Linux information is often presented in the form of listsof questions and answers called FAQs.
fdisk fdisk is a utility program that is used to create, delete or modify partitions on a disk drive.
Filesystem A filesystem is the method by which information is stored on disk drives. Different operatingsystems normally use different filesystems, making it difficult to share the contents of a disk drive between twooperating systems. However, Linux supports multiple filesystems, making it possible, for example, to read/writea partition dedicated to Windows.
Floppy A somewhat historical term for a small mass storage device in a removable cartridge, meant to beread/written to in a compatible drive. See “diskette.”
Formatting The act of writing a filesystem on a disk drive.
FQDN An abbreviation for Fully Qualified Domain Name. An FQDN is the human-readable name that in-cludes a computer’s hostname and associated domain name. For example, given a hostname of “foo,” and adomain name of “bar.com,” the FQDN would be “foo.bar.com.”
FTP An abbreviation for File Transfer Protocol. Also the name of a program that, as the name implies, permitsthe copying of files from one system on a network to another.
Gateway In networking terms, refers to a device that connects one or more computers on a network to othernetworks. The device may be specialized hardware (such as a router), or may be a general-purpose computersystem configured to act as a gateway.
1Well, it should be. . .

374 Glossary
Geometry When referring to disk drives, the physical characteristics of the disk drive’s internal organization.Note that a disk drive may report a “logical geometry” that is different from its “physical geometry,” normally toget around BIOS-related limitations. See also Cylinder, Head and Sector.
GID Short for Group ID. The means by which a user’s membership in a group is identified to various parts ofRed Hat Linux. GIDs are numeric, although human-readable names are stored in the /etc/group file.
Group Groups are a way of assigning specific access rights to certain classes of users. For example, all usersworking on Project X could be added to group xproj. System resources (such as disk space) devoted to ProjectX could then be configured to permit only members of xproj full access.
Hard Disk A hard disk contains rotating magnetic media (in the shape of disks) that spin rapidly. Small headsfloat over the surface of each disk, and are used to write to and read from the disk as it rotates.
Head When referring to disk drives, the number of read/write heads within a disk drive. For each platter ina disk drive, there are normally two heads for each platter – one for each surface – although one surface may gounused. See also Geometry.
Hostname A hostname is a human-readable string of characters used to identify a particular computer sys-tem.
I18n See Internationalization.
IDE An abbreviation for Integrated Drive Electronics, which is the name of a standard interface used to connectprimarily disk and CD-ROM drives to a computer system. See also “EIDE” and “ATAPI.”
Intel Company responsible for producing the microprocessors that most commonly appear in PC-compatiblepersonal computers. These processors include the 80386, 80486, Pentium, Pentium Pro, and Pentium II.
Internationalization The practice of designing and writing programs that can be easily configured to in-teract with the user in more than one language. Often referred to as “i18n,” due to the number of letters betweenthe starting “i” and the ending “n.”
IP Address IP addresses are the method by which individual computer systems (or from a more strictlyaccurate interpretation, the network interfaces on those computer systems) are identified on a TCP/IP network.All IP addresses consist of four number blocks, each ranging from 0 to 255, and separated by periods.
Kernel The central part of an operating system upon which the rest of the operating system is based.

Glossary 375
Library When speaking of computers, refers to a collection of routines that perform operations which arecommonly required by programs. Libraries may be shared, meaning that the library routines reside in a fileseparate from the programs that use them. Library routines may also be “statically linked” to a program, meaningthat copies of the library routines required by that program are physically added to the program. Such staticallylinked binaries do not require the existence of any library files in order to execute. Programs linked against sharedlibraries will not execute unless the required libraries have been installed.
LILO A commonly-used bootstrap loader for Linux systems based on an Intel-compatible processor.
Linus Torvalds Created Linux in 1991 while a university student.
Linuxconf A versatile system configuration program written by Jacques Gelinas. Linuxconf provides amenu-based approach to system configuration via several different user interfaces.
Linux A full-featured, robust, freely-available operating system originally developed by Linus Torvalds.
Logical Partition A partition that exists within an extended partition. See also “partition” and “extendedpartition.”
Master Boot Record The master boot record (or MBR) is a section of a disk drive’s storage space that isset aside for the purpose of saving information necessary to begin the bootstrap process on a personal computer.
MBR See “Master Boot Record.”
Memory When referring to computers, memory (in general) is any hardware that can store data for laterretrieval. In this context, memory usually specifically refers to RAM.
MILO A commonly-used bootstrap loader for Linux systems based on the Alpha processor.
Module In Linux, a module is a collection of routines that perform a system-level function, and may be dy-namically loaded and unloaded from the running kernel as required. Often containing device drivers, modulesare tightly bound to the version of the kernel; most modules built from one version of a kernel will not loadproperly on a system running another kernel version.
Mount Point The directory under which a filesystem is accessible after being mounted.
Mount The act of making a filesystem accessible to a system’s users.

376 Glossary
Nameserver In TCP/IP networking terms, a nameserver is a computer that can translate a human-readablename (such as “foo.bar.com”) into a numeric address (such as “10.0.2.14”).
Netmask A netmask is a set of four number blocks separated by periods. Each number is normally repre-sented as the decimal equivalent of an eight-bit binary number, which means that each number may take anyvalue between 0 (all eight bits cleared) and 255 (all eight bits set). Every IP address consist of two parts (the net-work address and the host number). The netmask is used to determine the size of these two parts. The positionsof the bits that are set in the netmask are considered to represent the space reserved for the network address,while the bits that are cleared are considered to represent the space set aside for the host number.
NFS An abbreviation for Network File System, NFS is a method of making the filesystem on a remote systemaccessible on the local system. From a user’s perspective, an NFS-mounted filesystem is indistinguishable from afilesystem on a directly-attached disk drive.
Operating System A collection of software that controls various resources of a computer.
Packages Files that contain software, and written in a particular format that enables the software to be easilyinstalled and removed.
PAM An acronym for Pluggable Authentication Modules. PAM is an authentication system that controls accessto Red Hat Linux.
Partition A segment of a disk drive’s storage space that can be accessed as if it was a complete disk drive.
Partition Table The partition table is a section of a disk drive’s storage space set aside to define the partitionsthat exist on that disk drive.
Partition Type Partitions contain a field that is used to define the type of filesystem the partition is expectedto contain. The partition type is actually a number, although many times the partition type is referred to by name.For example, the “Linux Native” partition type is 82. Note that this number is hexadecimal.
PC Card See PCMCIA.
PCMCIA Acronym for Personal Computer Memory Card International Association. This organization pro-duced a series of standards that define the physical, electrical and software characteristics of small, credit card-sized devices that can contain memory, modems, network adapters and more. Also known as PC Cards, thesedevices are mainly used in laptop computers (although some desktop systems can use PCMCIA cards, too).

Glossary 377
PCMCIA Support Diskette A diskette required for Red Hat Linux installations that require the use of aPCMCIA device during the install.
Permissions The set of identifiers that control access to files. Permissions consist of three fields: user, group,and world. The user field controls access by the user owning the file, while the group field controls access byanyone matching the file’s group specification. As the name implies, the world field controls access by everyoneelse. Each field contains the same set of bits that specify operations that may or may not be performed, such asreading, writing and executing.
PLIP An abbreviation for Parallel Line Internet Protocol. PLIP is a protocol that permits TCP/IP communica-tion over a computer’s parallel port using a specially-designed cable.
POSIX A somewhat mangled abbreviation for Portable Operating System Interface. A set of standards thatgrew out of the UNIX operating system.
Process A process (in somewhat simplistic terms) is one instance of a running program on a Linux system.
PS/2 Mouse A PS/2 mouse gets its name from the original computer in which this type of mouse was firstused – the IBM PS/2. A PS/2 mouse can be easily identified by the small, round connector at the end of its cable.
RAM An acronym for Random Access Memory. RAM is used to hold programs while they are being exe-cuted, and data while it is being processed. RAM is also volatile, meaning that information written to RAM willdisappear when the computer’s power is turned off.
Reboot To restart the boot process. See also “Boot.”
Red Hat Software A North Carolina software company. Produces and markets sofware for the Linuxoperating system, including Red Hat Linux.
Rescue Diskette A diskette containing a rudimentary system environment. As the name implies, a rescuediskette is normally used in an attempt to “rescue” an ailing system from the necessity of re-installing the entireoperating system.
RISC An abbreviation for Reduced Instruction Set Computer. A design philosophy for computers wherebythe processor is optimized to execute a relatively small number of different instructions in a predictably smallamount of time. Contrast with CISC.

378 Glossary
ROM An abbreviation for Read Only Memory. ROM is used to hold programs and data that must survivewhen the computer is turned off. Because ROM is non-volatile; data in ROM will remain unchanged the nexttime the computer is turned back on. As the name implies, data cannot be easily written to ROM; dependingon the technology used in the ROM, writing may require special hardware, or may be impossible. A computer’sBIOS may be stored in ROM.
Root The name of the login account given full and complete access to all system resources. Also used todescribe the directory named “/”as in, “the root directory.”
RPM An abbreviation that stands for Red Hat Package Manager. RPM is also the name of a program thatenables the installation, upgrading and removal of packages.
SCSI An abbreviation for Small Computer System Interface, SCSI is a standard interface for connecting a widevariety of devices to a computer. Although the most popular SCSI devices are disk drives, SCSI tape drives andscanners are also common.
Sector When referring to disk drives, the number of fixed-size (normally 512 byte) areas that can be accessedby one of the disk drive’s read/write heads, in one rotation of the disk, without that head changing position. SeeAlso Geometry.
Serial Mouse A serial mouse is a mouse that is designed to be connected to a computer’s serial port. Aserial mouse can be easily identified by the rectangular-shaped connector at the end of its cable.
setgid A system call that can be used to set the GID of a process. Programs can be written using setgid suchthat they can assume the group ID of any group on the system.
setuid A system call that can be used to set the UID of a process. Programs can be written using setuid suchthat they can assume the user ID of any process on the system. This is considered a possible security problem if aprogram is “setuid root.”
Shadow Password Normally, each user’s password is stored, encrypted, in the file /etc/passwd. Thisfile must be readable by all users so that certain system functions will operate correctly. However, this meansthat copies of user’s encrypted passwords are easily obtained, making it possible to run an automated password-guessing program against them. Shadow passwords, on the other hand, store the encrypted passwords in aseparate highly-protected file, making it much more difficult to crack passwords.
SILO A commonly-used bootstrap loader for Linux systems based on the SPARC processor.
SLIP An acronym for Serial Line Internet Protocol. SLIP is a protocol that permits TCP/IP communicationover serial line (typically over a dial-up modem connection).

Glossary 379
source code The human-readable form of instructions that comprise a program. Also known as “sources.”Without a program’s source code, it is very difficult to modify the program.
SPARC A RISC (Reduced Instruction Set Computer) architecture developed by Sun Microsystems.
Swap Also known as “swap space.” When a program requires more memory than is physically available inthe computer, currently-unused information can be written to a temporary buffer on the hard disk, called swap,thereby freeing memory. Some operating systems support swapping to a specific file, but Linux normally swapsto a dedicated swap partition. A misnomer, the term swap in Linux is used to define damand paging.
System Call A system call is a routine that accomplishes a system-level function on behalf of a process.
TCP/IP An abbreviation for Transmission Control Protocol/Internet Protocol, TCP/IP is the name given tothe networking standard commonly used on the Internet today.
Torvalds, Linus See Linus Torvalds.
UID Short for User ID. The means by which a user is identified to various parts of Red Hat Linux. UIDs arenumeric, although human-readable names are stored in the /etc/passwd file.
UNIX A set of Linux-like operating systems that grew out of an original version written by some guys at aphone company.2
Unmount The act of revoking access to a filesystem. (Note that the program that unmounts filesystems iscalled umount.)
Virtual Console Virtual consoles provides multiple “screens” on which a user may log in and run pro-grams. One screen is displayed on the computer’s monitor at any given time; a key sequence is used to switchbetween virtual consoles.
Widget A standardized on-screen representation of a control that may be manipulated by the user. Scroll bars,buttons, and text boxes are all examples of widgets.
X Window System Also known as “X,” this graphical user interface provides the well-known “windowson a desktop” metaphor common to most computer systems today. Under X, application programs act as clients,accessing the X server, which manages all screen activity. In addition, client applications may be on a differentsystem than the X server, permitting the remote display of the applications graphical user interface.
2Just kidding – thank you Ken Thompson and Dennis Ritchie of Bell Telephone Laboratories for your inspiredoperating system design!

380 Glossary
XFree86 A free implementation of the X Window System.

HKickstart Installations
Due to the need for automated installation, Red Hat Software has created the kickstart installationmethod. With this method, a system administrator can create a single file containing the answersto all the questions that would normally be asked during a typical Red Hat Linux installation. Thekickstart installation method is powerful enough that often a single kickstart file can be used to installRed Hat Linux on multiple machines.
Please Note: Kickstart installations can only be performed using the CD-ROM and NFS installationmethods. FTP, HTTP, SMB, or local hard disk installations cannot be automated using kickstart mode.
H.1 Where to Put A Kickstart File
To use kickstart mode, you must first create a kickstart file, and make it available to the Red HatLinux installation program. Normally this is done by copying the kickstart file to the boot diskette,or making it available on the network. The network-based approach is most commonly used, asmost kickstart installations tend to be performed on networked computers. This also makes it easierto install Red Hat Linux on many computers, as the kickstart files can be kept on single server system,and read by the individual computers during the installation.
Let’s take a more in-depth look at the locations where the kickstart file may be placed.

382 Kickstart Installations
H.1.1 On Diskette
To perform a diskette-based kickstart installation, the kickstart file must be named ks.cfg, andreside in the boot diskette’s top-level directory. Note that the Red Hat Linux boot diskettes are inMS-DOS format, making it easy to copy the kickstart file under Linux using the mcopy command(or, if you insist, you can also use Windows). Although there’s no technological requirement for it,most diskette-based kickstart installations install Red Hat Linux from CD-ROM.
H.1.2 On the Network
Network installations using kickstart are quite common, because system administrators can easilyautomate the installation of many networked computers quickly and painlessly. In general, the ap-proach most commonly used is for the administrator to have both a BOOTP/DHCP server and anNFS server on the local network. The BOOTP/DHCP server is used to give the client system its net-working information, while the NFS server serves the actual files used during the installation. Oftenthese two servers run on the same physical machine, but there is no requirement for this.
To do a network-based kickstart installation, you must have a BOOTP/DHCP server on your net-work, and it must include configuration information for the machine you are attempting to install.The BOOTP/DHCP server will be used to give the client its networking information as well as thelocation of the kickstart file.
If a kickstart file is specified by the BOOTP/DHCP server, the client system will attempt an NFSmount of the file’s path, and will copy the specified file to the client, using it as the kickstart file. Theexact settings required vary depending on the BOOTP/DHCP server you use.
Here’s an example for the DHCP server shipped with Red Hat Linux:
filename "/usr/new-machine/kickstart/";next-server blarg.redhat.com;
Note that you should use filename for the kickstart file’s name (or the directory in which the kicstartfile resides) and next-server to set the NFS server name.
If the filename returned by the BOOTP/DHCP server ends with a slash (“/”), then it is interpreted asa path only. In this case, the client system mounts that path using NFS, and searches for a specially-named file. The filename the client searches for is:
<ip-addr>-kickstart
The <ip-addr> section of the filename should be replaced with the client’s IP address in dotteddecimal notation. For example, the filename for a computer with an IP address of 10.10.0.1 would be10.10.0.1-kickstart.
Note that if you don’t specify a server name, then the client system will attempt to use the server thatanswered the BOOTP/DHCP request as its NFS server. If you don’t specify a path or filename, theclient system will try to mount /kickstart from the BOOTP/DHCP server, and will try to find thekickstart file using the same <ip-addr>-kickstart filename as described above.

H.2 Starting a Kickstart Installation 383
H.2 Starting a Kickstart Installation
To begin a kickstart installation, you must boot the system from a Red Hat Linux boot diskette, andenter a special boot command at the boot prompt. If the kickstart file resides on the boot diskette, theproper boot command would be:
boot: linux ks=floppy
If, on the other hand, the kickstart file resides on a server, the appropriate boot command would be:
boot: linux ks
H.3 The Kickstart File
Now that you have some background information on kickstart installations, let’s take a look at thekickstart file itself. The kickstart file is a simple text file, containing a list of items, each identified bya keyword. You can create it by editing a copy of the README.ks file found in the docs/ directoryof a Red Hat Linux CD-ROM, or you can create it from scratch. You should be able to edit it with anytext editor or word processor that can save files as ASCII text.
First, some ground rules to keep in mind while creating your kickstart file:
� Items must be specified in order. It is not a good idea to try to change the order of the requireditems.
� Items that aren’t required can be omitted.
� For kickstart upgrades, the following items are required:
– language
– installation method– device specification– keyboard setup
– the upgrade keyword
– LILO configuration
If any other items are specified for an upgrade, those items will be ignored (note that thisincludes package selection).
� Omitting any required item will result in the installation process prompting the user for ananswer to that question, just as during a normal installation. If this happens, once the answeris given the installation will continue unattended (unless it comes across another missing item).
� Lines starting with a pound sign (”#”) are treated as comments, and are ignored.
Let’s take a look at each item in order.

384 Kickstart Installations
H.3.1 lang – Language Setting
The first item that must appear is the language setting. The language you specify will be used duringthe installation as well as to configure any language-specific aspect of the installed system. Thelanguage specification must be a two letter ISO language code, such as en for English, de for German,fr for French, and so on. For example, to set the language to English, the kickstart file should containthe following line:
lang en
H.3.2 network – Networking Configuration
The next item is the network configuration information. This line is used to tell the system how itshould configure networking for itself. It is optional, and if omitted, the system will be configuredfor stand-alone operation.
There are three different methods of network configuration:
� DHCP� BOOTP� static
The DHCP method uses a DHCP server system to obtain its networking configuration. As you mightguess, the BOOTP method is similar, requiring a BOOTP server to supply the networking configura-tion.
The static method requires that you enter all the required networking information in the kickstartfile. As the name implies, this information is static, and will be used during the installation, and afterthe installation as well.
To direct a system to use DHCP to obtain its networking configuration, use the following line:
network --bootproto dhcp
To direct a machine to use BOOTP to obtain its networking configuration, use the following line inthe kickstart file:
network --bootproto bootp
The line for static networking is more complex, as you must include all network configuration infor-mation on one line. You’ll need to specify:
� IP address� netmask� gateway IP address

H.3 The Kickstart File 385
� nameserver IP address
Here’s an example static line:
network --bootproto static ---ip 10.0.2.15 ---netmask 255.255.255.0 ---gateway 10.0.2.254 ---nameserver 10.0.2.1
Please Note: The entire network configuration must appear on one line! We’ve wrapped it here tomake it easier to read.
There are two restrictions you must keep in mind should you use the static method:
� All static networking configuration information must be specified on one line; you cannot wraplines using a backslash, for example.
� You can only specify one nameserver here. However, you can use the kickstart file’s %postsection (described in Section H.3.22 on page 394) to add more nameservers, if needed.
H.3.3 Installation Methods
The next required item is the installation method. This item directs the installation program for therest of the files required to install Red Hat Linux. There are two choices: NFS or CD-ROM. Let’s lookat both, starting with NFS.
H.3.4 nfs – The NFS Installation Method
For the NFS installation method, you must include the NFS server’s name and the directory to bemounted. Here’s an example:
nfs --server hostname.of.server --dir /path/to/RH/CD/image
H.3.5 cdrom – The CD-ROM Installation Method
For a CD-ROM-based kickstart installation, simply use the following line:
cdrom

386 Kickstart Installations
H.3.6 device – Optional Hardware Information
The next set of items in the kickstart file is used to specify optional hardware information. For mostPCI-based hardware you can omit this step, as this information can be obtained directly from thehardware. Note that IDE hard disks and common PCI cards fall into this category. Any other hard-ware may need to be specified here.
To specify a device, start with the device keyword, followed by the type of device:
� ethernet (for Ethernet cards)� scsi (for SCSI cards)� cdrom (for non-SCSI, non-IDE CD-ROM drives; usually sound cards with proprietary CD-
ROM interfaces)
If a kernel module is required to support the device, the module name follows the device type.
Finally, if there are any parameters that are required by a device, they can be specified by using the--opts option. Enclose the parameters in quotes after --opts. We’ll show you some examplesbelow.
Note that you can specify more than one type of device in a given kickstart file. For example, if youknow the machines you’ll be kickstart-installing have either an Adaptec 1542 or a Buslogic SCSI card,you can enter both in the kickstart file. But be aware that the installation program uses only the firstcard found, so order the device entries appropriately.
An example for an ISA 3com Ethernet card would be:
device ethernet 3c509 --opts "io=0x330, irq=7"
Here’s an example line for an Adaptec 1542 SCSI card:
device scsi aha154x
An example of a SoundBlaster CD-ROM might look like this:
device cdrom --opts "io=0x240"
H.3.7 keyboard – Keyboard Type
The next item you’ll need to specify is the correct code for your keyboard type. For US keyboards, thetype is us. For the others, please run the /usr/sbin/kbdconfig program on an already-installedRed Hat Linux system. (An alternative approach would be to set the keyboard type to us and runkbdconfig on the installed system to set it properly after the installation completes.)
An example of this would be:
keyboard us

H.3 The Kickstart File 387
H.3.8 noprobe
If you do not want your system device controllers to be automatically probed then you can issue thecommand:
noprobe
By configuring this command, your system will not probe for any device controllers, SCSI or other-wise. This is to be used only if you wish to manually specify the devices that are on your system.
Please Note:You will not be prompted to enter devices at any point. You will have to manually enterthem into the kickstart configuration file or else you will not be able to continue with the installation.
H.3.9 device --continue
Your system is normally set up to take or find one device of a type. Without changes, the kickstartconfiguration will load the modules for one type of device, such as loading the module for one SCSIadapter type. Beyond that, the program will not load further modules for that type of device.
In order to load modules for more than 1 adapter type, (for example, two different SCSI adapters)you will need to add the command
device --continue
So, if you need to have modules for a Adaptec and a BusLogic adapter, then you will need to haveboth of these specified in the configuration file and you will need to have --continue after the firstone in the configuration file:
device scsi aic7xxx --continuedevice scsi BusLogic
However, if you have multiple adapters of the same type, then you will not need to be concerned withthis line, as the single module insertion is enough to control all adapters of that type. For example, ifyou have three Adaptec adapters, then the single line
device scsi aic7xxx
will load and allow all three adapters to function.
H.3.10 Partitioning
The hard drive in the machine must be partitioned before Red Hat Linux can be installed. In thissection, we will describe how to specify disk partitioning in the kickstart file.

388 Kickstart Installations
H.3.11 zerombr – Partition table initialization
First, if you are installing Red Hat Linux on a new machine, you should use the zerombr keywordto clear the current partition information. This is a good idea, because the partition table on new harddrives is usually bogus. Here’s an example of zerombr on a new system:
zerombr yes
On the other hand, if you are installing machines that have a valid partition table, even if you wantto change part (or all) of it, you should use zerombr this way:
zerombr no
H.3.12 clearpart – Removing partitions based on partition type
The next command is optional, but can come in handy. If you’d like to remove all partitions, or justany Linux-related partitions, you can use clearpart. For example, to clear all partitions of type”Linux native” and ”Linux swap,” you could add this line:
clearpart --linux
To clear all partitions from a disk, this line would do the trick:
clearpart --all
The only options clearpart supports are --linux and --all.
H.3.13 part – Partition definition
The next step is to specify the partitions you want to create. These will only be created using thesystem’s unpartitioned free space. (In other words, if the machine had Windows-related partitions,and you had done clearpart --linux those Windows partitions would remain untouched.) Youmust enter one partition per line using the following format:
part <mntpt> --size <size in megs> [--grow] -[--maxsize <size in megs>]
(This part line was broken to make it more readable.)
<mntpt> is the location you are going to mount that partition in your installed system (for example,the root partition would have a mount point of /, while you may decide that another partition shouldhave a mount point of /home).

H.3 The Kickstart File 389
<size in megs> is the size of the partition in megabytes. You can optionally specify that thepartition is growable by adding the --grow option. Note that making a partition growable does notmean that you can later increase its size. Instead, a growable partition will be automatically resizedto use all available unpartitioned free space (after all fixed-size partitions have been created).
Since the amount of unpartitioned free space can vary, and you probably want to use it all, by taggingpartitions as growable you can easily make sure no space is wasted. If you have multiple partitionstagged as growable, the free space is split evenly among them.
Note that you can also limit the size of growable partitions with the optional --maxsize argument.
Here’s an example of kickstart partitioning in action. Let’s say you know the smallest disk out ofa set of machines you plan to kickstart-install is 1GB. You’d like to use the same kickstart file. Youcould use the following partitioning scheme:
zerombr noclearpart --allpart / --size 250part swap --size 50part /usr --size 500 --grow --maxsize 800part /tmp --size 100 --grow
When defined this way, the installation program will first clear all partitions. It will then set up a250MB root filesystem, followed by a 50MB swap partition. Next the installation program will createa /usr partition of at least 500MB (remember, it’s growable), but it cannot grow beyond 800MB.Finally, the last line will create a /tmp partition of at least 100MB (again, it’s growable).
So for that 1GB system, you would end up with a 250MB root, a 50MB swap, a 550MB /usr, anda 150MB /tmp partition. If another system has a 2GB drive, you would get a 250MB root, a 50MBswap, a 800MB /usr, and a 900MB /tmp.
H.3.14 install and upgrade – Install/Upgrade Selection
The next item to specify is whether you are doing a fresh install, or an upgrade of an already-installedsystem. For a fresh install, use:
install
For an upgrade of an existing system, use:
upgrade
Keep in mind that for upgrades, the only items that matter are:
� installation media (CD-ROM or NFS)� device specification (if necessary)

390 Kickstart Installations
� keyboard setup� install/upgrade specification (which should be upgrade, of course!)� LILO configuration
H.3.15 mouse – Mouse Configuration
To define the type of mouse your system has, you must use the mouse keyword. Run mouseconfig--help on an already-installed Red Hat Linux for a list of mouse types.
Depending on the type of mouse, you may also need to specify the device to which the mouse isattached. The default device is correctly set for bus mice. For serial mice, the default device is/dev/cua0, but can be overridden with the --device option followed by the device name, such ascua1.
For example, for a three-button PS/2 mouse, you would use:
mouse --kickstart generic3ps/2
For a two-button PS/2 mouse, use:
mouse --kickstart genericps/2
For a two-button Microsoft mouse on your second serial port, use:
mouse --kickstart microsoft --device cua1
H.3.16 timezone – Timezone Definition
Red Hat Linux is timezone-aware, so you’ll need to specify the timezone in which the machine willoperate. This is done using the timezone keyword. There are many different timezones; the bestway to find yours is to run /usr/sbin/timeconfigon an already-installed Red Hat Linux system.
If you would like to have your system’s hardware clock set to use GMT/UTC, add the --utc optionto your timezone line. Here’s an example that defines the timezone as US Eastern with the systemclock set to GMT:
timezone --utc US/Eastern
H.3.17 xconfig – X Window Setup
The next item is the X Window setup line. The installation program will normally find commonPCI video hardware and will know which X server to install. The keyword for X configuration isxconfig.

H.3 The Kickstart File 391
If your video card isn’t autoprobed properly, you can use the --card option to explicitly specifythe card. You can use Xconfigurator --help on a running Red Hat Linux system to get a list ofsupported cards to choose from.
If your card isn’t in the list but is supported by one of the existing servers, you can simply install theproper server by using the --server option. Again, use Xconfigurator --help to get the listof server names.
You also need to specify a monitor type. If you don’t, the installation will assume a generic monitorcapable of 640x480@60hz. Use the --monitor option to specify something other than the default.Again, Xconfigurator --help will list all valid monitor types.
If your monitor isn’t listed, you can enter the actual monitor specifications by using the --hsyncand --vsync options for horizontal and vertical sync rates, respectively. The rates may be singlenumbers (representing kilohertz and megahertz, as appropriate), groups of numbers separated bycommas, or two numbers separated by a dash (signifying a range). For example:
xconfig --hsync "31.5,35.5,50-65" --vsync "50-70"
An example for a machine where the video card can be autoprobed properly would be:
xconfig --monitor "tatung cm14uhe"
An example for a machine where nothing is probed and the monitor isn’t in the list might be:
xconfig --server "Mach64" --hsync "31.5,35.5,50-65" --vsync "50-70"
H.3.18 rootpw – Setting the Root Password
You can put the root passwd in a kickstart file in the clear (in which case it would go over the networkin the clear on an NFS install) or you can specify that an encrypted password is to be used. To specifyan unencrypted password in the kickstart file, use the rootpw keyword, followed by the cleartextpassword:
rootpw mypasswd
If you would rather use an encrypted password, grab it out of /etc/passwd (or wherever you havethe encrypted version stored), and add the --iscrypted option:
rootpw --iscrypted encryptedpasswdstring
H.3.19 authconfig – Setting up Authentication Configuration
After you have set the root password, you have the ability to set up different network passwordauthentications:

392 Kickstart Installations
� Enable NIS – allows you to run a group of computers in the same Network InformationService domain with a common password and group file. There are two options here to choosefrom:
– NIS Domain – this option allows you to specify which domain or group of computersyour system will belong to.
– NIS Server – this option causes your computer to use a specific NIS server, rather than“broadcasting” a message to the local area network asking for any available server tohost your system.
� Enable Shadow Passwords – provides a very secure method of retaining passwords for you.
� MD5 Passwordallows a long password to be used up to 256 characters, instead of the stan-dard eight letters or less.
The authconfig format for kickstart looks similiar to:
auth --enablenis --nisdomain foo.redhat.com --nisserverserver.foo.redhat.com [--useshadow] [--enablemd5]
Please Note:The commands in the square brackets are optional. If you choose to set them up, youdo not need to use the brackets.
You are able to change authconfig using these commands to set up the different password options:
--enablenis enable nis by default--nisdomain <domain> default NIS domain--nisserver <server> default NIS server--useshadow use shadow passwords--enablemd5 enable MD5 passwords
H.3.20 lilo – LILO Configuration
For machines that use LILO (Intel-based systems), you can specify the LILO configuration using thelilo keyword. The default line can be as simple as this:
lilo
This will install LILO in the hard drive’s master boot record (MBR), and automatically configure bootentries for your Linux installation as well as a DOS or Windows installation (if one is present).
If you don’t want LILO installed in the MBR, you can do so with by using the --location option.There are three possible places where LILO can be installed:
� mbr - put LILO on the master boot record (default)
� partition - put LILO on the beginning of the root partition

H.3 The Kickstart File 393
� none - don’t install LILO at all (in which case you’ll need your own method of booting theinstalled system)
You can also use the --append option to add an append= line to the Linux boot entry. This is handyif you need to do things like set memory sizes, etc. For example, to install LILO on the MBR on amachine with 128MB of RAM, you would add the following lilo line:
lilo --append "mem=128M" --location mbr
(Due to the new kernel in Red Hat Linux 6.0, the mem boot-time option shouldn’t be necessary, butwe needed an example.)
H.3.21 %packages – Package Selection
You can use the %packages keyword to start the beginning of a kickstart file section that lists thepackages you’d like to install (note that this is for installs only, as package selection during upgradesis not supported).
Packages can be specified by component or by individual package name. The installation programdefines several components that group together related packages. See the RedHat/base/comps fileon any Red Hat Linux CD-ROM for a list of components. The components are defined by the linesthat begin with a number followed by a space, and then the component name. Each of the packagesin that component are then listed, line-by-line, until the end keyword. Individual packages lack theleading number found in front of component lines.
In most cases, it’s only necessary to list the desired components and not individual packages. Notethat the Base component is always selected by default, so it’s not necessary to specify it in the%packages section.
Here’s an example %packages section:
%packages@ Networked Workstation@ C Development@ Web Server@ X Window Systembsd-games
As you can see, components are specified, one to a line, starting with an ”@” symbol, a space, and thenthe full component name as given in the comps file. Specify individual packages with no additionalcharacters (the bsd-games line in the example above is an individual package).
Please Note: You can also direct the kickstart install to use the workstation- and server-class intalla-tion methods. To do this, simply add one of the following lines to the %packages section:
@ Workstation@ Server

394 Kickstart Installations
H.3.22 %post – Post-Installation Configuration Section
You have the option of adding commands to be run on the installed system after the installation iscomplete. This section must be at the end of the kickstart file and must start with the %post keyword.Note that you can access the network in the %post section; however, nameservice has not yet beenconfigured at this point, so only IP addresses will work. Here’s an example %post section:
%post
# add comment to /etc/motdecho "Kickstart-installed Red Hat Linux ‘/bin/date‘" > /etc/motd
# add another nameserverecho "nameserver 10.10.0.2" >> /etc/resolv.conf
This section creates a message-of-the-day file containing the date the kickstart installation took place,and gets around the network keyword’s one-nameserver-only limitation by adding another name-server to /etc/resolv.conf.

Index
Symbols/dev directory . . . . . . . . . . . . . . . . . . . . . . . . . . . . . . . . . 196/etc directory . . . . . . . . . . . . . . . . . . . . . . . . . . . . . . . . . . 196/etc/hosts file, managing . . . . . . . . . . . . . . . . . . . . . . 168/etc/sysconfig, files in . . . . . . . . . . . . . . . . . . . . . . . . . 217/lib directory . . . . . . . . . . . . . . . . . . . . . . . . . . . . . . . . . . 196/proc directory . . . . . . . . . . . . . . . . . . . . . . . . . . . . . . . . 196/sbin directory . . . . . . . . . . . . . . . . . . . . . . . . . . . . . . . . 196/usr directory . . . . . . . . . . . . . . . . . . . . . . . . . . . . . . . . . 196/usr/local directory . . . . . . . . . . . . . . . . . . . . . . . 197, 199/var directory . . . . . . . . . . . . . . . . . . . . . . . . . . . . . . . . . 198/etc/pam.conf . . . . . . . . . . . . . . . . . . . . . . . . . . . . . . 207/etc/pam.d . . . . . . . . . . . . . . . . . . . . . . . . . . . . . . . . . . 207
Aaccount management. . . . . . . . . . . . . . . . . . . . . .123, 124account modification . . . . . . . . . . . . . . . . . . . . . . 126, 127acknowledgments . . . . . . . . . . . . . . . . . . . . . . . . . . . . . . xiiaddendum, Alpha . . . . . . . . . . . . . . . . . . . . . . . . . . . . . . . 7administration, system. . . . . . . . . . . . . . . . . . . . . . . . .195Alpha addendum . . . . . . . . . . . . . . . . . . . . . . . . . . . . . . . . 7Alpha computer . . . . . . . . . . . . . . . . . . . . . . . . . . . . . . . . . xAlpha-specific information6–9, 11, 14, 15, 20, 30, 37,
49, 75AMD . . . . . . . . . . . . . . . . . . . . . . . . . . . . . . . . . . . . . . . . . . 211anonymous FTP . . . . . . . . . . . . . . . . . . . . . . . . . . . . . . . 215ATAPI CD-ROM
unrecognized, problems with. . . . . . . . . . . . . .44authentication configuration . . . . . . . . . . . . . . . . . . . 103
kickstart . . . . . . . . . . . . . . . . . . . . . . . . . . . . . . . . . 391MD5 Password . . . . . . . . . . . . . . . . . . . . . . . . . . 103NIS . . . . . . . . . . . . . . . . . . . . . . . . . . . . . . . . . . . . . . 103Shadow Password . . . . . . . . . . . . . . . . . . . . . . . 103
autoboot . . . . . . . . . . . . . . . . . . . . . . . . . . . . . . . . . . . . . . . . 38autostart, selecting services for . . . . . . . . . . . . . . . . . . 95
BBIOS, issues related to LILO . . . . . . . . . . . . . . . . . . . . 31
boot diskette . . . . . . . . . . . . . . . . . . . . . . . . . . . . . . . . . . . 104boot method selection for SPARC . . . . . . . . . . . . . . 364boot process . . . . . . . . . . . . . . . . . . . . . . . . . . . . . . . . . . . 217bootable CD-ROM . . . . . . . . . . . . . . . . . . . . . . . . . . . . . . 38booting
rescue mode . . . . . . . . . . . . . . . . . . . . . . . . . . . . . 228a trick . . . . . . . . . . . . . . . . . . . . . . . . . . . . . . . . . 228using diskettes . . . . . . . . . . . . . . . . . . . . . . . . 228using LILO. . . . . . . . . . . . . . . . . . . . . . . . . . . .228
single user . . . . . . . . . . . . . . . . . . . . . . . . . . . . . . . 225booting from diskette for SPARC. . . . . . . . . . . . . . . 365booting installation program . . . . . . . . . . . . . . . . . . . . 37
CCD-ROM
ATAPI . . . . . . . . . . . . . . . . . . . . . . . . . . . . . . . . . . . . 43ATAPI, unrecognized, problems with . . . . . . 44bootable . . . . . . . . . . . . . . . . . . . . . . . . . . . . . . . . . . 38IDE . . . . . . . . . . . . . . . . . . . . . . . . . . . . . . . . . . . . . . . 43IDE, unrecognized, problems with . . . . . . . . 44other . . . . . . . . . . . . . . . . . . . . . . . . . . . . . . . . . . . . . . 44SCSI . . . . . . . . . . . . . . . . . . . . . . . . . . . . . . . . . . . . . . 43
CD-ROM boot commands, SPARC . . . . . . . . . . . . . 365CD-ROM Installation . . . . . . . . . . . . . . . . . . . . . . . . . . . 15
for SPARC . . . . . . . . . . . . . . . . . . . . . . . . . . . . . . . 368CD-ROM installation . . . . . . . . . . . . . . . . . . . . . . . . . . . 43CD-ROM module parameters . . . . . . . . . . . . . . . . . . 352changing passwords . . . . . . . . . . . . . . . . . . . . . . 128, 129changing root password . . . . . . . . . . . . . . . . . . . . . . . 130changing time/date . . . . . . . . . . . . . . . . . . . . . . . . . . . 172chkconfig utility . . . . . . . . . . . . . . . . . . . . . . . . . . . . . . . 227class
installation . . . . . . . . . . . . . . . . . . . . . . . . . 19, 46, 72clock. . . . . . . . . . . . . . . . . . . . . . . . . . . . . . . . . . . . . . . . . . . .95clone network devices . . . . . . . . . . . . . . . . . . . . . . . . . 169comp.os.linux. . . . . . . . . . . . . . . . . . . . . . . . . . . . . . . . . .117Compact Discs
Linux Applications Pack . . . . . . . . . . . . . . . . . . . 8Compact Discs, Red Hat Linux . . . . . . . . . . . . . . . . . . . 7
396 INDEX
componentsmissing . . . . . . . . . . . . . . . . . . . . . . . . . . . . . . . . . . . . 9selecting . . . . . . . . . . . . . . . . . . . . . . . . . . . . . . . 61, 86
configurationsystem . . . . . . . . . . . . . . . . . . . . . . . . . see Linuxconfanonymous FTP . . . . . . . . . . . . . . . . . . . . . . . . . 215clock . . . . . . . . . . . . . . . . . . . . . . . . . . . . . . . . . . . . . . 95ethernet . . . . . . . . . . . . . . . . . . . . . . . . . . . . . . . . . . 171GnoRPM. . . . . . . . . . . . . . . . . . . . . . . . . . . . . . . . .188hosts . . . . . . . . . . . . . . . . . . . . . . . . . . . . . . . . . . . . . 168kerneld . . . . . . . . . . . . . . . . . . . . . . . . . . . . . . . . . . 165
adding modules . . . . . . . . . . . . . . . . . . . . . . . 166changing modules . . . . . . . . . . . . . . . . . . . . 165module options . . . . . . . . . . . . . . . . . . . . . . . 165restarting . . . . . . . . . . . . . . . . . . . . . . . . . . . . . 166
LAN manager printer . . . . . . . . . . . . . . . . . . . . 163local printer . . . . . . . . . . . . . . . . . . . . . . . . . . . . . . 162NCP printer . . . . . . . . . . . . . . . . . . . . . . . . . . . . . 163NetWare printer . . . . . . . . . . . . . . . . . . . . . . . . . 163network . . . . . . . . . . . . . . . . . . . . . . . . . . . . . . 92, 167network device, adding . . . . . . . . . . . . . . . . . . 169network dialogs . . . . . . . . . . . . . . . . . . . . . . . . . . . 93network routes . . . . . . . . . . . . . . . . . . . . . . . . . . . 171NFS. . . . . . . . . . . . . . . . . . . . . . . . . . . . . . . . . . . . . .216PLIP . . . . . . . . . . . . . . . . . . . . . . . . . . . . . . . . . . . . . 171pocket network adapters . . . . . . . . . . . . . . . . . 171PPP . . . . . . . . . . . . . . . . . . . . . . . . . . . . . . . . . . . . . . 169printer. . . . . . . . . . . . . . . . . . . . . . . . . . . . . . . .96, 160printer test page . . . . . . . . . . . . . . . . . . . . . . . . . 164remote printer . . . . . . . . . . . . . . . . . . . . . . . . . . . 163selecting nameservers . . . . . . . . . . . . . . . . . . . . 168SILO . . . . . . . . . . . . . . . . . . . . . . . . . . . . . . . . . . . . . 369SLIP . . . . . . . . . . . . . . . . . . . . . . . . . . . . . . . . . . . . . 169SMB printer . . . . . . . . . . . . . . . . . . . . . . . . . . . . . . 163system . . . . . . . . . . . . . . . . . . . . . . . . . . . . . . . . . . . 119time. . . . . . . . . . . . . . . . . . . . . . . . . . . . . . . . . . . . . . .95time zone . . . . . . . . . . . . . . . . . . . . . . . . . . . . . . . . . 95token ring. . . . . . . . . . . . . . . . . . . . . . . . . . . . . . . .171X Window System . . . . . . . . . . . . . . . . . . . . . . . 108XFree86 . . . . . . . . . . . . . . . . . . . . . . . . . . . . . . . . . . 109
configuration, hardware . . . . . . . . . . . . . . . . . . . . . . . . 10finding with Windows . . . . . . . . . . . . . . . . . . . . 11
configuration, video . . . . . . . . . . . . . . . . . . . . . . . . . . . . 13configuring console access . . . . . . . . . . . . . . . . . . . . . 203console access
configuring . . . . . . . . . . . . . . . . . . . . . . . . . . . . . . 203defining . . . . . . . . . . . . . . . . . . . . . . . . . . . . . . . . . 204disabling. . . . . . . . . . . . . . . . . . . . . . . . . . . . . . . . .203disabling all . . . . . . . . . . . . . . . . . . . . . . . . . . . . . .203enabling . . . . . . . . . . . . . . . . . . . . . . . . . . . . . . . . . 205making files accessible . . . . . . . . . . . . . . . . . . . 204
console commands for SPARC . . . . . . . . . . . . . . . . . 363consoles, virtual . . . . . . . . . . . . . . . . . . . . . . . . . . . . . . . . 35control panel . . . . . . . . . . . . . . . . . . . . . . see controlpanelcontrolpanel . . . . . . . . . . . . . . . . . . . . . . . . . . . . . . . . . . . 158Copyright . . . . . . . . . . . . . . . . . . . . . . . . . . . . . . . . . . . . . . . iiCostales, Bryan . . . . . . . . . . . . . . . . . . . . . . . . . . . . . . . . 214CSLIP . . . . . . . . . . . . . . . . . . . . . . . . . . . . . . . . . . . . . . . . . . 32Cyrix . . . . . . . . . . . . . . . . . . . . . . . . . . . . . . . . . . . . . . . . . . 211
Ddaemon, kernel . . . . . . . . . . . . . . . . . . . . . . . . . . . . . . . . 165date
setting . . . . . . . . . . . . . . . . . . . . . . . . . . . . . . . . . . . 172dd, creating installation diskette with . . . . . . . . . . 238deleting accounts . . . . . . . . . . . . . . . . . . . . . . . . . 132, 133deleting groups . . . . . . . . . . . . . . . . . . . . . . . . . . . 135, 136dependencies, packages . . . . . . . . . . . . . . . . . . . . . 62, 89destructive partitioning . . . . . . . . . . . . . . . . . . . . . . . . . 24devices
network, clone . . . . . . . . . . . . . . . . . . . . . . . . . . . 169directories
/dev . . . . . . . . . . . . . . . . . . . . . . . . . . . . . . . . . . . . . 196/etc . . . . . . . . . . . . . . . . . . . . . . . . . . . . . . . . . . . . . . 196/lib . . . . . . . . . . . . . . . . . . . . . . . . . . . . . . . . . . . . . . 196/proc . . . . . . . . . . . . . . . . . . . . . . . . . . . . . . . . . . . . 196/sbin . . . . . . . . . . . . . . . . . . . . . . . . . . . . . . . . . . . . 196/usr . . . . . . . . . . . . . . . . . . . . . . . . . . . . . . . . . . . . . 196/usr/local . . . . . . . . . . . . . . . . . . . . . . . . . . . 197, 199/var . . . . . . . . . . . . . . . . . . . . . . . . . . . . . . . . . . . . . 198
disabling accounts . . . . . . . . . . . . . . . . . . . . . . . . . . . . . 131Disk Druid . . . . . . . . . . . . . . . . . . . . . . . . . . . . . . . . . . 48, 74
aborting . . . . . . . . . . . . . . . . . . . . . . . . . . . . . . . 54, 80adding NFS with . . . . . . . . . . . . . . . . . . . . . . 54, 80adding partitions with . . . . . . . . . . . . . . . . . 52, 78buttons . . . . . . . . . . . . . . . . . . . . . . . . . . . . . . . . 51, 77current partitions screen . . . . . . . . . . . . . . . 49, 75deleting partitions with . . . . . . . . . . . . . . . . 53, 79drive summary screen . . . . . . . . . . . . . . . . . 50, 76editing partitions with . . . . . . . . . . . . . . . . . 54, 79function keys . . . . . . . . . . . . . . . . . . . . . . . . . . 51, 77problems adding partitions . . . . . . . . . . . . 53, 79starting over . . . . . . . . . . . . . . . . . . . . . . . . . . . 54, 80using . . . . . . . . . . . . . . . . . . . . . . . . . . . . . . . . . . 49, 75when finished with . . . . . . . . . . . . . . . . . . . . 54, 81
disk partitioning, SPARC . . . . . . . . . . . . . . . . . . . . . . 369disk, partitioning . . . . . . . . . . . . . . . . . . . . . . . . . . . . . . . 21disk-based installation for SPARC. . . . . . . . . . . . . . 368diskette
boot . . . . . . . . . . . . . . . . . . . . . . . . . . . . . . . . . . . . . 104boot, creating . . . . . . . . . . . . . . . . . . . . . . . . . . . . 237

INDEX 397
network boot, creating . . . . . . . . . . . . . . . . . . . 237PCMCIA support, creating . . . . . . . . . . . . . . . 237
diskette boot commands, SPARC. . . . . . . . . . . . . . .365diskette, making under Linux-like O/S . . . . . . . . 238diskette, making with MS-DOS . . . . . . . . . . . . . . . . 238diskettes . . . . . . . . . . . . . . . . . . . . . . . . . . . . . . . . . . . . . .8, 18
boot . . . . . . . . . . . . . . . . . . . . . . . . . . . . . . . . . . . . . . . . 8images, updated . . . . . . . . . . . . . . . . . . . . . . . . . . 10network boot . . . . . . . . . . . . . . . . . . . . . . . . . . . . . .18support . . . . . . . . . . . . . . . . . . . . . . . . . . . . . . . . . 8, 18
documentation. . . . . . . . . . . . . . . . . . . . . . . . . . . . . . . . .111FAQs . . . . . . . . . . . . . . . . . . . . . . . . . . . . . . . . . . . . 115finding . . . . . . . . . . . . . . . . . . . . . . . . . . . . . . . . . . . 114HOWTOs . . . . . . . . . . . . . . . . . . . . . . . . . . . . . . . . 115HTML . . . . . . . . . . . . . . . . . . . . . . . . . . . . . . . . . . . 115info pages . . . . . . . . . . . . . . . . . . . . . . . . . . . . . . . . 116locate command . . . . . . . . . . . . . . . . . . . . . . . . . 115makewhatis, searching with . . . . . . . . . . . . . . 113man pages . . . . . . . . . . . . . . . . . . . . . . . . . . . . . . . 112
printing . . . . . . . . . . . . . . . . . . . . . . . . . . . . . . . 112searching. . . . . . . . . . . . . . . . . . . . . . . . . . . . . .113section . . . . . . . . . . . . . . . . . . . . . . . . . . . . . . . . 112
on-line . . . . . . . . . . . . . . . . . . . . . . . . . . . . . . . . . . . 111package documentation . . . . . . . . . . . . . . . . . . 114PAM . . . . . . . . . . . . . . . . . . . . . . . . . . . . . . . . . . . . . 209READMEs . . . . . . . . . . . . . . . . . . . . . . . . . . . . . . . 114
documentation, how to improve . . . . . . . . . . . . . . . xiiidocumentation, obtaining additional . . . . . . . . . . . . . 6drivers, kernel . . . . . . . . . . . . . . . . . . . . . . . . . . . . . . . . . . 31
Eeditor’s acknowledgements . . . . . . . . . . . . . . . . . . . . xiveditor’s notes . . . . . . . . . . . . . . . . . . . . . . . . . . . . . . . . . . xiiiemacs. . . . . . . . . . . . . . . . . . . . . . . . . . . . . . . . . . . . . . . . . .116enabling accounts. . . . . . . . . . . . . . . . . . . . . . . . . . . . . .132errata . . . . . . . . . . . . . . . . . . . . . . . . . . . . . . . . . . . . . . . . . . . 10ethernet . . . . . . . . . . . . . . . . . . . . . . . . . . . . . . . . . . . . . . . 171Ethernet module parameters . . . . . . . . . . . . . . . . . . . 355Ethernet, supporting multiple cards . . . . . . . . . . . . 360expert installation mode . . . . . . . . . . . . . . . . . . . . . . . . 37exporting NFS filesystems . . . . . . . . . . . . . . . . . . . . . 216extended partitions . . . . . . . . . . . . . . . . . . . . . . . . . . . . 244
FFAQ
ATAPI CD-ROMunrecognized, problems with . . . . . . . . . . . 44
IDE CD-ROMunrecognized, problems with . . . . . . . . . . . 44
technical support . . . . . . . . . . . . . . . . . . . . . . . . 234FAQs . . . . . . . . . . . . . . . . . . . . . . . . . . . . . . . . . . . . . . . . . . 115FAT32 filesystems, accessing . . . . . . . . . . . . . . . . . . . 143fdisk . . . . . . . . . . . . . . . . . . . . . . . . . . . . . . . . . . . . . . . . 48, 74
overview of . . . . . . . . . . . . . . . . . . . . . . . . . . . . 56, 81using . . . . . . . . . . . . . . . . . . . . . . . . . . . . . . . . . . 54, 81
features, new to 6.0 . . . . . . . . . . . . . . . . . . . . . . . . . . . . . . 1feedback, how to give . . . . . . . . . . . . . . . . . . . . . . . . . . xiiifilesystem
how to review . . . . . . . . . . . . . . . . . . . . . . . 141, 142overview of . . . . . . . . . . . . . . . . . . . . . . . . . . . . . . 140standard . . . . . . . . . . . . . . . . . . . . . . . . . . . . . . . . . 196structure . . . . . . . . . . . . . . . . . . . . . . . . . . . . . . . . . 195
filesystem configuration . . . . . . . . . . . . . . . . . . . . . 57, 83other partitions . . . . . . . . . . . . . . . . . . . . . . . . 57, 83root partition . . . . . . . . . . . . . . . . . . . . . . . . . . 57, 83
filesystem formats, overview of . . . . . . . . . . . . . . . . 240filesystems
NFS, exporting of . . . . . . . . . . . . . . . . . . . . . . . . 216NFS, mounting of . . . . . . . . . . . . . . . . . . . . . . . . 216
finishing installation . . . . . . . . . . . . . . . . . . . . . . . . . . . . 91fips partitioning utility . . . . . . . . . . . . . . . . . . . . . . . . . . 26floppy group, use of . . . . . . . . . . . . . . . . . . . . . . . . . . . 205formatting partitions . . . . . . . . . . . . . . . . . . . . . . . . 60, 85Frequently Asked Questions . . . . . . . . . . . . . see FAQsfriends, impressing with RPM . . . . . . . . . . . . . . . . . 180FSSTND . . . . . . . . . . . . . . . . . . . . . . . . . . . . . . . . . . . . . . . 196FTP
anonymous . . . . . . . . . . . . . . . . . . . . . . . . . . . . . . 215ftpaccess . . . . . . . . . . . . . . . . . . . . . . . . . . . . . . . . . 215ftphosts . . . . . . . . . . . . . . . . . . . . . . . . . . . . . . . . . . 215ftpusers . . . . . . . . . . . . . . . . . . . . . . . . . . . . . . . . . . 215
FTP Installation . . . . . . . . . . . . . . . . . . . . . . . . . . 16, 65, 69for SPARC . . . . . . . . . . . . . . . . . . . . . . . . . . . . . . . 368
Ggetting started . . . . . . . . . . . . . . . . . . . . . . . . . . . . . . . . . . xiiGetting Started Guide . . . . . . . . . . . . . . . . . . . . . . . . . . . . 7GLINT . . . . . . . . . . . . . . . . . . . . . . . . . . . . . . . see GnoRPMglossary . . . . . . . . . . . . . . . . . . . . . . . . . . . . . . . . . . . . . . . 371GnoRPM . . . . . . . . . . . . . . . . . . . . . . . . . . . . . . . . . . . . . . 183
configuration . . . . . . . . . . . . . . . . . . . . . . . . . . . . 188installing packages . . . . . . . . . . . . . . . . . . . . . . . 187package display . . . . . . . . . . . . . . . . . . . . . . . . . . 185package manipulation . . . . . . . . . . . . . . . . . . . 191querying packages . . . . . . . . . . . . . . . . . . . . . . . 191removing packages with . . . . . . . . . . . . . . . . . 192selecting packages . . . . . . . . . . . . . . . . . . . . . . . 186starting . . . . . . . . . . . . . . . . . . . . . . . . . . . . . . . . . . 184uninstalling packages with . . . . . . . . . . . . . . . 192

398 INDEX
upgrading packages with . . . . . . . . . . . . . . . . 194verifying packages . . . . . . . . . . . . . . . . . . . . . . . 192
group creation . . . . . . . . . . . . . . . . . . . . . . . . . . . . . . . . . 135group management . . . . . . . . . . . . . . . . . . . . . . . . . . . . 134group modification. . . . . . . . . . . . . . . . . . . . . . . .137–139groups. . . . . . . . . . . . . . . . . . . . . . . . . . . . . . . . . . . . . . . . .199
floppy, use of . . . . . . . . . . . . . . . . . . . . . . . . . . . . 205standard . . . . . . . . . . . . . . . . . . . . . . . . . . . . . . . . . 200user-private . . . . . . . . . . . . . . . . . . . . . . . . . 199, 200
rationale . . . . . . . . . . . . . . . . . . . . . . . . . . . . . . 202
Hhalt . . . . . . . . . . . . . . . . . . . . . . . . . . . . . . . . . . . . . . . 196, 227hard disk
basic concepts . . . . . . . . . . . . . . . . . . . . . . . . . . . .239extended partitions . . . . . . . . . . . . . . . . . . . . . . 244filesystem formats . . . . . . . . . . . . . . . . . . . . . . . 240partition introduction . . . . . . . . . . . . . . . . . . . . 242partition types . . . . . . . . . . . . . . . . . . . . . . . . . . . 244partitioning of . . . . . . . . . . . . . . . . . . . . . . . . . . . 239
hard disk installationfor SPARC . . . . . . . . . . . . . . . . . . . . . . . . . . . . . . . 368
hard drive installation . . . . . . . . . . . . . . . . . . . . . . . 18, 45hardware configuration . . . . . . . . . . . . . . . . . . . . . . . . . 10
finding with Windows . . . . . . . . . . . . . . . . . . . . 11hardware supported by SPARC . . . . . . . . . . . . . . . . 361hostname . . . . . . . . . . . . . . . . . . . . . . . . . . . . . . . . . . . . . . 168hosts, managing . . . . . . . . . . . . . . . . . . . . . . . . . . . . . . . 168hosts.allow . . . . . . . . . . . . . . . . . . . . . . . . . . . . . . . . . . . . 215
example . . . . . . . . . . . . . . . . . . . . . . . . . . . . . . . . . 215hosts.deny . . . . . . . . . . . . . . . . . . . . . . . . . . . . . . . . . . . . . 215HOWTOs. . . . . . . . . . . . . . . . . . . . . . . . . . . . . . . . . . . . . . 115HTTP Installation . . . . . . . . . . . . . . . . . . . . . . . . 17, 65, 69
for SPARC . . . . . . . . . . . . . . . . . . . . . . . . . . . . . . . 369HTTP installation, method . . . . . . . . . . . . . . . . . . . . . . . 2
IIDE CD-ROM
unrecognized, problems with. . . . . . . . . . . . . .44info pages . . . . . . . . . . . . . . . . . . . . . . . . . . . . . . . . . . . . . 116information
Alpha-specific 6–9, 11, 14, 15, 20, 30, 37, 49, 75Intel-specific . . . . . 7–9, 15–18, 20, 26, 29, 30, 38license . . . . . . . . . . . . . . . . . . . . . . . . . . . . . . . . . . . . . 8registration. . . . . . . . . . . . . . . . . . . . . . . . . . . . . . . . .8SPARC-specific . . . 8, 9, 11, 14, 15, 30, 37, 49, 74
information, network . . . . . . . . . . . . . . . . . . . . . . . . . . . 14information, pre-installation . . . . . . . . . . . . . . . . . . . . 10init, SysV-style . . . . . . . . . . . . . . . . . . . . . . . . . . . . . . . . . 224
initrd . . . . . . . . . . . . . . . . . . . . . . . . . . . . . . . . . . . . . . . . . . 213initscript utilities . . . . . . . . . . . . . . . . . . . . . . . . . . . . . . 227install
CD-ROM. . . . . . . . . . . . . . . . . . . . . . . . . . . 15, 41, 43component selection . . . . . . . . . . . . . . . . . . . 61, 86finishing. . . . . . . . . . . . . . . . . . . . . . . . . . . . . . 91, 109FTP. . . . . . . . . . . . . . . . . . . . . . . . . . . . . . . . . . . . 16, 41getting Red Hat Linux . . . . . . . . . . . . . . . . . . . . . . 6Hard Drive . . . . . . . . . . . . . . . . . . . . . . . . . . . . 18, 41hard drive . . . . . . . . . . . . . . . . . . . . . . . . . . . . . . . . 45HTTP. . . . . . . . . . . . . . . . . . . . . . . . . . . . . . . . . .17, 41NFS . . . . . . . . . . . . . . . . . . . . . . . . . . . . . . . . . . . 17, 68NFS Image . . . . . . . . . . . . . . . . . . . . . . . . . . . . . . . . 41NFS server information . . . . . . . . . . . . . . . . . . . 68package information . . . . . . . . . . . . . . . . . . . 62, 87package selection . . . . . . . . . . . . . . . . . . . 60, 61, 86PCMCIA support . . . . . . . . . . . . . . . . . . . . . . 15, 40preparing for . . . . . . . . . . . . . . . . . . . . . . . . . . . . . . . 5selecting network drivers . . . . . . . . . . . . . . . . . 65TCP/IP networking . . . . . . . . . . . . . . . . . . . . . . . 66upgrade . . . . . . . . . . . . . . . . . . . . . . . . . . . . . . . 45, 70
installationclass . . . . . . . . . . . . . . . . . . . . . . . . . . . . . . . . . . . . . . 19kickstart . . . . . . . . . . . . see kickstart installationslanguage, selecting . . . . . . . . . . . . . . . . . . . . . . . . 39printer . . . . . . . . . . . . . . . . . . . . . . . . . . . . . . . . . . . . 96
installation class . . . . . . . . . . . . . . . . . . . . . . . . . . . . . 46, 72installation guide . . . . . . . . . . . . . . . . . . . . . . . . . . . . . . . . 7installation method
CD-ROM . . . . . . . . . . . . . . . . . . . . . . . . . . . . . . 41, 43FTP . . . . . . . . . . . . . . . . . . . . . . . . . . . . . . . . . . . . . . . 41hard drive . . . . . . . . . . . . . . . . . . . . . . . . . . . . . 41, 45HTTP . . . . . . . . . . . . . . . . . . . . . . . . . . . . . . . . . . . . . 41NFS Image . . . . . . . . . . . . . . . . . . . . . . . . . . . . . . . . 41selecting . . . . . . . . . . . . . . . . . . . . . . . . . . . 41, 43, 65
installation method, choosing for SPARC. . . . . . .368installation methods . . . . . . . . . . . . . . . . . . . . . . . . . . . . 14installation mode, expert . . . . . . . . . . . . . . . . . . . . . . . . 37installation overview for SPARC . . . . . . . . . . . . . . . 362installation problems
IDE CD-ROM related . . . . . . . . . . . . . . . . . . . . . 44installation program
booting . . . . . . . . . . . . . . . . . . . . . . . . . . . . . . . . . . . 37booting without diskette . . . . . . . . . . . . . . . . . . 38keyboard navigation . . . . . . . . . . . . . . . . . . . . . . 34starting . . . . . . . . . . . . . . . . . . . . . . . . . . . . . . . . . . . 36user interface . . . . . . . . . . . . . . . . . . . . . . . . . . . . . 33virtual consoles . . . . . . . . . . . . . . . . . . . . . . . . . . . 35
installation, starting . . . . . . . . . . . . . . . . . . . . . . . . . 33, 39installing packages . . . . . . . . . . . . . . . . . . . . . . . . . . 60, 86Intel . . . . . . . . . . . . . . . . . . . . . . . . . . . . . . . . . . . . . . . . . . . 211

INDEX 399
Intel-specific information . 7–9, 15–18, 20, 26, 29, 30,38
Kkernel . . . . . . . . . . . . . . . . . . . . . . . . . . . . . . . . . . . . . . . . . . 32
building . . . . . . . . . . . . . . . . . . . . . . . . . . . . . 210, 213custom . . . . . . . . . . . . . . . . . . . . . . . . . . . . . . 210, 213initrd image for . . . . . . . . . . . . . . . . . . . . . . . . . . 213modular . . . . . . . . . . . . . . . . . . . . . . . . . . . . . . . . . 210monolithic . . . . . . . . . . . . . . . . . . . . . . . . . . . . . . . 213
kernel daemon. . . . . . . . . . . . . . . . . . . . . . . . . . . . . . . . .165kernel drivers . . . . . . . . . . . . . . . . . . . . . . . . . . . . . . . . . . . 31kernel options . . . . . . . . . . . . . . . . . . . . . . . . . . . . . . . . . . 38kerneld . . . . . . . . . . . . . . . . . . . . . . . . . . . . . . . . . . . . . . . . 165
adding modules . . . . . . . . . . . . . . . . . . . . . . . . . 166changing modules . . . . . . . . . . . . . . . . . . . . . . . 165module options . . . . . . . . . . . . . . . . . . . . . . . . . . 165restarting . . . . . . . . . . . . . . . . . . . . . . . . . . . . . . . . 166
keyboard navigation, installation program . . . . . . 34keyboard type, selecting . . . . . . . . . . . . . . . . . . . . . . . . 40keymap . . . . . . . . . . . . . . . see keyboard type, selectingkickstart file
authconfig . . . . . . . . . . . . . . . . . . . . . . . . . . . . . . . 391cdrom keyword . . . . . . . . . . . . . . . . . . . . . . . . . . 385clearpart keyword . . . . . . . . . . . . . . . . . . . . . . . 388device keyword . . . . . . . . . . . . . . . . . . . . . . . . . . 386diskette-based . . . . . . . . . . . . . . . . . . . . . . . . . . . 382format of . . . . . . . . . . . . . . . . . . . . . . . . . . . . . . . . .383install keyword . . . . . . . . . . . . . . . . . . . . . . . . . . 389keyboard keyword . . . . . . . . . . . . . . . . . . . . . . . 386lang keyword . . . . . . . . . . . . . . . . . . . . . . . . . . . . 384lilo keyword . . . . . . . . . . . . . . . . . . . . . . . . . . . . . 392MD5 . . . . . . . . . . . . . . . . . . . . . . . . . . . . . . . . . . . . . 391mouse keyword . . . . . . . . . . . . . . . . . . . . . . . . . . 390network keyword . . . . . . . . . . . . . . . . . . . . . . . . 384network-based . . . . . . . . . . . . . . . . . . . . . . . . . . . 382nfs keyword . . . . . . . . . . . . . . . . . . . . . . . . . . . . . 385NIS . . . . . . . . . . . . . . . . . . . . . . . . . . . . . . . . . . . . . . 391package selection specification . . . . . . . . . . . 393part keyword . . . . . . . . . . . . . . . . . . . . . . . . . . . . 388post-installation configuration . . . . . . . . . . . 394rootpw keyword . . . . . . . . . . . . . . . . . . . . . . . . . 391Shadow Password . . . . . . . . . . . . . . . . . . . . . . . 391timezone keyword . . . . . . . . . . . . . . . . . . . . . . . 390upgrade keyword . . . . . . . . . . . . . . . . . . . . . . . . 389xconfig keyword . . . . . . . . . . . . . . . . . . . . . . . . . 390zerombr keyword . . . . . . . . . . . . . . . . . . . . . . . . 388
kickstart installations . . . . . . . . . . . . . . . . . . . . . . . . . . 381--continue . . . . . . . . . . . . . . . . . . . . . . . . . . . . 387noprobe . . . . . . . . . . . . . . . . . . . . . . . . . . . . . . . . 387
disk partitions . . . . . . . . . . . . . . . . . . . . . . . . . . . 387diskette-based . . . . . . . . . . . . . . . . . . . . . . . . . . . 382file format . . . . . . . . . . . . . . . . . . . . . . . . . . . . . . . 383file locations . . . . . . . . . . . . . . . . . . . . . . . . . . . . . 381network-based . . . . . . . . . . . . . . . . . . . . . . . . . . . 382partitions . . . . . . . . . . . . . . . . . . . . . . . . . . . . . . . . 387starting . . . . . . . . . . . . . . . . . . . . . . . . . . . . . . . . . . 383
Llanguage
selecting . . . . . . . . . . . . . . . . . . . . . . . . . . . . . . . . . . 39LDP . . . . . . . . . . . . . . . . . . . . . . . . . . . . . . . . . . . . . . . 111, 115license information. . . . . . . . . . . . . . . . . . . . . . . . . . . . . . .8LILO . . . . . . . . . . . . . . . . . . . . . . . . . . . . . . . . . . . . . . 105, 196
/etc/lilo.conf . . . . . . . . . . . . . . . . . . . . . . . . . . . . 212Adding options to . . . . . . . . . . . . . . . . . . . . . . . 107alternatives to . . . . . . . . . . . . . . . . . . . . . . . . . . . . 108
commercial products . . . . . . . . . . . . . . . . . . 108LOADLIN . . . . . . . . . . . . . . . . . . . . . . . . . . . . 108SYSLINUX . . . . . . . . . . . . . . . . . . . . . . . . . . . . 108
installing. . . . . . . . . . . . . . . . . . . . . . . . . . . . . . . . .105MBR, installing on . . . . . . . . . . . . . . . . . . . . . . . 105root partition, installing on . . . . . . . . . . . . . . . 106SMP Motherboards . . . . . . . . . . . . . . . . . . . . . . 106
LILO, BIOS-related issues . . . . . . . . . . . . . . . . . . . . . . . 31LILO, partition-related issues . . . . . . . . . . . . . . . . . . . 30Linux
defined . . . . . . . . . . . . . . . . . . . . . . . . . . . . . . . . . . . . ixLinux Applications CD Pack . . . . . . . . . . . . . . . . . . . . . 8Linux Documentation Project . . . . . . . . . . see LDP, 115Linux-like O/S
creating installation diskette with . . . . . . . . 238Linuxconf . . . . . . . . . . . . . . . . . . . . . . . . . . . . . . . . . . . . . 120
with Linuxconf . . . . . . . . . . . . . . . . . . . . . . . . . . 157account management with . . . . . . . . . . . 123, 124account modification with . . . . . . . . . . . 126, 127changing password with . . . . . . . . . . . . 128, 129changing root password with . . . . . . . . . . . . 130deleting account with. . . . . . . . . . . . . . . .132, 133deleting group with . . . . . . . . . . . . . . . . . 135, 136disabling account with . . . . . . . . . . . . . . . . . . . 131enabling account with. . . . . . . . . . . . . . . . . . . . 132filesystem review with. . . . . . . . . . . . . . .141, 142group creation with . . . . . . . . . . . . . . . . . . . . . . 135group management with . . . . . . . . . . . . . . . . . 134group modification with . . . . . . . . . . . . . 137–139modem configuration with . . . . . . . . . . . . . . . 146nameserver specification with . . . . . . . . . . . . 155network configuration with. . . . . . . . . .145, 152NFS mount addition with . . . . . . . . . . . . . . . . 144

400 INDEX
overview of . . . . . . . . . . . . . . . . . . . . . . . . . . . . . . 120PPP configuration modification . . . . . . 149, 150PPP configuration with . . . . . . . . . . . . . . . . . . 146running . . . . . . . . . . . . . . . . . . . . . . . . . . . . . . . . . . 121SLIP configuration modification . . . . . 149, 150SLIP configuration with . . . . . . . . . . . . . . . . . . 146time setting with . . . . . . . . . . . . . . . . . . . . . . . . . 157tree menu . . . . . . . . . . . . . . . . . . . . . . . . . . . . . . . . 122users, adding with. . . . . . . . . . . . . . . . . . .123, 124web access . . . . . . . . . . . . . . . . . . . . . . . . . . . . . . . 123
LOADLIN . . . . . . . . . . . . . . . . . . . . . . . . . . . . . . . . . . . . . 108local media installations . . . . . . . . . . . . . . . . . . . . . . . . 43
CD-ROM . . . . . . . . . . . . . . . . . . . . . . . . . . . . . . . . . 43hard drive . . . . . . . . . . . . . . . . . . . . . . . . . . . . . . . . 45
local printer, configuring . . . . . . . . . . . . . . . . . . . . 96, 97locate command, finding documentation with . . 115lpd printer, configuring . . . . . . . . . . . . . . . . . . . . . . 96, 97
Mmailing lists
apollo-list . . . . . . . . . . . . . . . . . . . . . . . . . . . . . . . . 117applixware-list . . . . . . . . . . . . . . . . . . . . . . . . . . . 117axp-list . . . . . . . . . . . . . . . . . . . . . . . . . . . . . . . . . . . 117blinux-list . . . . . . . . . . . . . . . . . . . . . . . . . . . . . . . . 117cde-list . . . . . . . . . . . . . . . . . . . . . . . . . . . . . . . . . . . 117gnome-announce. . . . . . . . . . . . . . . . . . . . . . . . .117gtk-list . . . . . . . . . . . . . . . . . . . . . . . . . . . . . . . . . . . 117hurricane-list . . . . . . . . . . . . . . . . . . . . . . . . . . . . .117linux-alert . . . . . . . . . . . . . . . . . . . . . . . . . . . . . . . .117linux-security . . . . . . . . . . . . . . . . . . . . . . . . . . . . 117m68k-list . . . . . . . . . . . . . . . . . . . . . . . . . . . . . . . . . 117pam-list . . . . . . . . . . . . . . . . . . . . . . . . . . . . . . . . . . 117redhat-announce-list . . . . . . . . . . . . . . . . . . . . . 117redhat-devel-list . . . . . . . . . . . . . . . . . . . . . . . . . 117redhat-install-list . . . . . . . . . . . . . . . . . . . . . . . . . 117redhat-list . . . . . . . . . . . . . . . . . . . . . . . . . . . . . . . . 117redhat-ppp-list . . . . . . . . . . . . . . . . . . . . . . . . . . . 117rpm-list . . . . . . . . . . . . . . . . . . . . . . . . . . . . . . . . . . 117sound-list . . . . . . . . . . . . . . . . . . . . . . . . . . . . . . . . 117sparc-list . . . . . . . . . . . . . . . . . . . . . . . . . . . . . . . . . 117support from . . . . . . . . . . . . . . . . . . . . . . . . . . . . . 117
makewhatis . . . . . . . . . . . . . . . . . . . . . . . . . . . . . . . . . . . 113man pages . . . . . . . . . . . . . . . . . . . . . . . . . . . . . . . . . . . . . 112
how to read . . . . . . . . . . . . . . . . . . . . . . . . . . . . . . 113printing . . . . . . . . . . . . . . . . . . . . . . . . . . . . . . . . . . 112searching . . . . . . . . . . . . . . . . . . . . . . . . . . . . . . . . 113sections . . . . . . . . . . . . . . . . . . . . . . . . . . . . . . . . . . 112
master boot record . . . . . . . . . . . . . . . . . . . . . . . . see MBRMaximum RPM . . . . . . . . . . . . . . . . . . . . . . . . . . . . . . . 182MBR, installing LILO on . . . . . . . . . . . . . . . . . . . . . . . 105
methods, installation. . . . . . . . . . . . . . . . . . . . . . . . . . . .14missing components . . . . . . . . . . . . . . . . . . . . . . . . . . . . . 9mkswap . . . . . . . . . . . . . . . . . . . . . . . . . . . . . . . . . . . . . . . 196modem configuration . . . . . . . . . . . . . . . . . . . . . . . . . . 146module parameters . . . . . . . . . . . . . . . . . . . . . . . . . . . . 351modules
PAM . . . . . . . . . . . . . . . . . . . . . . . . . . . . . . . . . . . . . 206mount points and partitions . . . . . . . . . . . . . . . . . . . . 29mounting NFS filesystems . . . . . . . . . . . . . . . . . . . . . 216mouse, configuring . . . . . . . . . . . . . . . . . . . . . . . . . . . . . 91MS-DOS
creating installation diskette with . . . . . . . . 238mtools and the floppy group . . . . . . . . . . . . . . . . . . . 205
Nnameserver
selecting . . . . . . . . . . . . . . . . . . . . . . . . . . . . . . . . . 168nameservers, specifying . . . . . . . . . . . . . . . . . . . . . . . 155netnews, support from . . . . . . . . . . . . . . . . . . . . . . . . . 117NetWare printer, configuration . . . . . . . . . . . . . . . . . . 99Netware printer, configuration . . . . . . . . . . . . . . . . . . 96network
interfacealiasing . . . . . . . . . . . . . . . . . . . . . . . . . . . . . . . 168
network adapters, pocket . . . . . . . . . . . . . . . . . . . . . . 171network boot commands, SPARC . . . . . . . . . . . . . . 366network boot commands, SPARC install . . . . . . . 367network boot diskette . . . . . . . . . . . . . . . . . . . . . . . . . . . 18network configuration . . . . . . . . . . . . 92, 145, 152, 167
adding device . . . . . . . . . . . . . . . . . . . . . . . . . . . . 169network configuration dialogs . . . . . . . . . . . . . . . . . . 93network devices, clone . . . . . . . . . . . . . . . . . . . . . . . . . 169network information . . . . . . . . . . . . . . . . . . . . . . . . . . . . 14network installations . . . . . . . . . . . . . . . . . . . . . . . . . . . 65
FTP . . . . . . . . . . . . . . . . . . . . . . . . . . . . . . . . . . . . . . . 69HTTP . . . . . . . . . . . . . . . . . . . . . . . . . . . . . . . . . . . . . 69NFS . . . . . . . . . . . . . . . . . . . . . . . . . . . . . . . . . . . . . . . 68
network routes, managing . . . . . . . . . . . . . . . . . . . . . 171networking . . . . . . . . . . . . . . . . . . . . . . . . . . . . . . . . . . . . 169new features . . . . . . . . . . . . . . . . . . . . . . . . . . . . . . . . . . . . . 1
2.2 kernel . . . . . . . . . . . . . . . . . . . . . . . . . . . . . . . . . . 4APM enabled kernel . . . . . . . . . . . . . . . . . . . . . . . 2Authentication Configuration . . . . . . . . . . . . . . 2Enlightenment . . . . . . . . . . . . . . . . . . . . . . . . . . . . . 3font support . . . . . . . . . . . . . . . . . . . . . . . . . . . . . . . . 4GNOME . . . . . . . . . . . . . . . . . . . . . . . . . . . . . . . . . . . 3Initscripts . . . . . . . . . . . . . . . . . . . . . . . . . . . . . . . . . . 4installation method. . . . . . . . . . . . . . . . . . . . . . . . .2installation-related . . . . . . . . . . . . . . . . . . . . . . . . . 1KDE . . . . . . . . . . . . . . . . . . . . . . . . . . . . . . . . . . . . . . . 3

INDEX 401
miscellaneous . . . . . . . . . . . . . . . . . . . . . . . . . . . . . . 4new boot disks . . . . . . . . . . . . . . . . . . . . . . . . . . . . . 2Optimized kernels . . . . . . . . . . . . . . . . . . . . . . . . . 2package selection. . . . . . . . . . . . . . . . . . . . . . . . . . .2pcmcia support disk . . . . . . . . . . . . . . . . . . . . . . . . 2SMP Motherboard support . . . . . . . . . . . . . . . . . 2switchdesk . . . . . . . . . . . . . . . . . . . . . . . . . . . . . . . . . 4TrueType font support . . . . . . . . . . . . . . . . . . . . . . 4Xconfigurator . . . . . . . . . . . . . . . . . . . . . . . . . . . . . . 3
NFSconfiguration . . . . . . . . . . . . . . . . . . . . . . . . . . . . 216exporting . . . . . . . . . . . . . . . . . . . . . . . . . . . . . . . . 216mounting . . . . . . . . . . . . . . . . . . . . . . . . . . . . . . . . 216
NFS Installation . . . . . . . . . . . . . . . . . . . . . . . . . . 17, 65, 68for SPARC . . . . . . . . . . . . . . . . . . . . . . . . . . . . . . . 368
NFS mount, adding . . . . . . . . . . . . . . . . . . . . . . . . . 57, 83NFS mounts, adding . . . . . . . . . . . . . . . . . . . . . . . . . . . 144NFS-mounted root, SPARC install using . . . . . . . 364non-destructive partitioning . . . . . . . . . . . . . . . . . . . . 25notes, editor’s . . . . . . . . . . . . . . . . . . . . . . . . . . . . . . . . . .xiiintsysv utility . . . . . . . . . . . . . . . . . . . . . . . . . . . . . . . . . . 227
OO’Reilly & Associates . . . . . . . . . . . . . . . . . . . . . 214, 217on-line documentation . . . . . . . . . . . . . . . . . . . . . . . . . 111options, kernel . . . . . . . . . . . . . . . . . . . . . . . . . . . . . . . . . . 38OS/2 . . . . . . . . . . . . . . . . . . . . . . . . . . . . . . . . . . . . . . . 29, 105overview . . . . . . . . . . . . . . . . . . . . . . . . . . . . . . . . . . . . . . . . xi
Ppackage
installation screen . . . . . . . . . . . . . . . . . . . . . 64, 89package list index. . . . . . . . . . . . . . . . . . . . . . . . . . . . . .405package manipulation with GnoRPM . . . . . . . . . . 191packages
dependencies . . . . . . . . . . . . . . . . . . . . . 62, 89, 176determining file ownership . . . . . . . . . . . . . . 180documentation . . . . . . . . . . . . . . . . . . . . . . . . . . . 114finding deleted files from . . . . . . . . . . . . . . . . 180freshening with RPM . . . . . . . . . . . . . . . . . . . . 177handy hints . . . . . . . . . . . . . . . . . . . . . . . . . . . . . . 180installing . . . . . . . . . . . . . . . . . . . . . . . . . . 60, 86, 175keys for viewing packages . . . . . . . . . . . . . 61, 87list of . . . . . . . . . . . . . . . . . . . . . . . . . . . . . . . . . . . . 247locating documentation for. . . . . . . . . . . . . . .181obtaining information on . . . . . . . . . . . . . . 62, 87obtaining list of files . . . . . . . . . . . . . . . . . . . . . 181preserving config files . . . . . . . . . . . . . . . . . . . . 177querying . . . . . . . . . . . . . . . . . . . . . . . . . . . . . . . . . 178
querying uninstalled . . . . . . . . . . . . . . . . . . . . . 181removing . . . . . . . . . . . . . . . . . . . . . . . . . . . . . . . . 176removing with glint . . . . . . . . . . . . . . . . . . . . . . 192selecting . . . . . . . . . . . . . . . . . . . . . . . . . . . . . . . 60, 86selecting individual . . . . . . . . . . . . . . . . . . . . 61, 86uninstalling with GnoRPM . . . . . . . . . . . . . . . 192upgrading . . . . . . . . . . . . . . . . . . . . . . . . . . . . . . . 177upgrading with GnoRPM . . . . . . . . . . . . . . . . 194verifying . . . . . . . . . . . . . . . . . . . . . . . . . . . . . . . . . 179verifying with GnoRPM . . . . . . . . . . . . . 191, 192
packages, GnoRPM . . . . . . . . . . . . . . . . . . . . . . . . . . . . 187PAM . . . . . . . . . . . . . . . . . . . . . . . . . . . . . . . . . . . . . . . . . . 206
additional information . . . . . . . . . . . . . . . . . . . 209configuration files . . . . . . . . . . . . . . . . . . . . . . . . 207modules . . . . . . . . . . . . . . . . . . . . . . . . . . . . . . . . . 206rexec, access to . . . . . . . . . . . . . . . . . . . . . . . . . . . 208services . . . . . . . . . . . . . . . . . . . . . . . . . . . . . . . . . . 206
parameters, CD-ROM modules . . . . . . . . . . . . . . . . 352parameters, Ethernet modules . . . . . . . . . . . . . . . . . 355parameters, module . . . . . . . . . . . . . . . . . . . . . . . . . . . 351partition
/boot . . . . . . . . . . . . . . . . . . . . . . . . . . . . . . . . . . . . . 30MILO . . . . . . . . . . . . . . . . . . . . . . . . . . . . . . . . . . . . . 30root . . . . . . . . . . . . . . . . . . . . . . . . . . . . . . . . . . . . . . . 30swap . . . . . . . . . . . . . . . . . . . . . . . . . . . . . . . . . . . . . . 29
partitioning . . . . . . . . . . . . . . . . . . . . . . . . . . . . . . . . . . . . . 21basic concepts . . . . . . . . . . . . . . . . . . . . . . . . . . . .239destructive . . . . . . . . . . . . . . . . . . . . . . . . . . . . . . . . 24introduction to . . . . . . . . . . . . . . . . . . . . . . . . . . . 242LILO issues related to . . . . . . . . . . . . . . . . . . . . . 30non-destructive . . . . . . . . . . . . . . . . . . . . . . . . . . . 25other operating systems . . . . . . . . . . . . . . . . . . . 28using free space . . . . . . . . . . . . . . . . . . . . . . . . . . . 22using in-use partition . . . . . . . . . . . . . . . . . . . . . 24using unused partition . . . . . . . . . . . . . . . . . . . . 22
partitionsbasic concepts . . . . . . . . . . . . . . . . . . . . . . . . . . . .239changing table of . . . . . . . . . . . . . . . . . . . . . . 57, 82creating. . . . . . . . . . . . . . . . . . . . . . . . . . . . . . . .48, 74extended . . . . . . . . . . . . . . . . . . . . . . . . . . . . . . . . . 244formatting . . . . . . . . . . . . . . . . . . . . . . . . . . . . . 60, 85how many . . . . . . . . . . . . . . . . . . . . . . . . . . . . . . . . 29introduction to . . . . . . . . . . . . . . . . . . . . . . . . . . . 242making room for . . . . . . . . . . . . . . . . . . . . . . . . . . 22mount points relation with . . . . . . . . . . . . . . . . 29naming of . . . . . . . . . . . . . . . . . . . . . . . . . . . . . . . . . 27numbering of . . . . . . . . . . . . . . . . . . . . . . . . . . . . . 27types of . . . . . . . . . . . . . . . . . . . . . . . . . . . . . . . . . . 244
passwordroot, setting . . . . . . . . . . . . . . . . . . . . . . . . . . . . . . 102
passwords

402 INDEX
shadow . . . . . . . . . . . . . . . . . . . . . . . . . . . . . . . . . . 208PCMCIA support . . . . . . . . . . . . . . . . . . . . . . . . . . . . . . . 40PCMCIA, support during installation . . . . . . . . . . . 15PLIP . . . . . . . . . . . . . . . . . . . . . . . . . . . . . . . . . . . . . . . 32, 171plip . . . . . . . . . . . . . . . . . . . . . . . . . . . . . . . . . . . . . . . see PLIPpluggable authentication modules . . . . . . . . see PAMpocket network adapters . . . . . . . . . . . . . . . . . . . . . . .171PPP . . . . . . . . . . . . . . . . . . . . . . . . . . . . . . . . . . . . . . . . 32, 169ppp. . . . . . . . . . . . . . . . . . . . . . . . . . . . . . . . . . . . . . . .see PPPPPP configuration . . . . . . . . . . . . . . . . . . . . . . . . . . . . . 146
modification of . . . . . . . . . . . . . . . . . . . . . . 149, 150pre-installation information . . . . . . . . . . . . . . . . . . . . . 10printer configuration . . . . . . . . . . . . . . . . . . . . . . . 96, 160
finalizing . . . . . . . . . . . . . . . . . . . . . . . . . . . . . . . . . 99LAN manager . . . . . . . . . . . . . . . . . . . . . . . . . . . 163local . . . . . . . . . . . . . . . . . . . . . . . . . . . . . . 96, 97, 162NCP . . . . . . . . . . . . . . . . . . . . . . . . . . . . . . . . . . . . . 163NetWare . . . . . . . . . . . . . . . . . . . . . . . . . . . . . . 99, 163netware . . . . . . . . . . . . . . . . . . . . . . . . . . . . . . . . . . . 96remote . . . . . . . . . . . . . . . . . . . . . . . . . . . . . . . . . . . 163remote lpd . . . . . . . . . . . . . . . . . . . . . . . . . . . . . 96, 97SMB . . . . . . . . . . . . . . . . . . . . . . . . . . . . . . . . . . . . . 163SMB, Windows 95/NT. . . . . . . . . . . . . . . . . 96, 99test page . . . . . . . . . . . . . . . . . . . . . . . . . . . . . . . . . 164verifying . . . . . . . . . . . . . . . . . . . . . . . . . . . . . . . . . 102
processorAMD . . . . . . . . . . . . . . . . . . . . . . . . . . . . . . . . . . . . 211Cyrix . . . . . . . . . . . . . . . . . . . . . . . . . . . . . . . . . . . . 211Intel . . . . . . . . . . . . . . . . . . . . . . . . . . . . . . . . . . . . . 211
programs, running at boot time . . . . . . . . . . . . . . . . 227
Qquerying packages with GnoRPM. . . . . . . . . . . . . .191quick start . . . . . . . . . . . . . . . . . . . . . . . . . . . . . . . . . . . . . . xii
Rramdisk, criteria for use on SPARC. . . . . . . . . . . . . 363RARP commands, SPARC install . . . . . . . . . . . . . . . 366rawrite, creating installation diskette with. . . . . .238rc.local, modifying . . . . . . . . . . . . . . . . . . . . . . . . . . . . . 227reading man pages. . . . . . . . . . . . . . . . . . . . . . . . . . . . . 113README files . . . . . . . . . . . . . . . . . . . . . . . . . . . . . . . . . 114recursion . . . . . . . . . . . . . . . . . . . . . . . . . . . . . see recursionRed Hat Linux
what it is . . . . . . . . . . . . . . . . . . . . . . . . . . . . . . . . . . . xRed Hat Linux boxed set, contents of . . . . . . . . . . . . . 6Red Hat Linux CDs . . . . . . . . . . . . . . . . . . . . . . . . . . . . . . 7Red Hat Linux, methods of installing . . . . . . . . . . . 14Red Hat newsgroups . . . . . . . . . . . . . . . . . . . . . . . . . . 118
Red Hat Package Manager . . . . . . . . . . . . . . . . see RPMRed Hat Software
mailing lists . . . . . . . . . . . . . . . . . . . . . . . . . . . . . . 117apollo-list . . . . . . . . . . . . . . . . . . . . . . . . . . . . . 117applixware-list . . . . . . . . . . . . . . . . . . . . . . . . 117axp-list . . . . . . . . . . . . . . . . . . . . . . . . . . . . . . . . 117blinux-list . . . . . . . . . . . . . . . . . . . . . . . . . . . . . 117cde-list . . . . . . . . . . . . . . . . . . . . . . . . . . . . . . . . 117gnome-announce . . . . . . . . . . . . . . . . . . . . . . 117gtk-list . . . . . . . . . . . . . . . . . . . . . . . . . . . . . . . . 117hurricane-list . . . . . . . . . . . . . . . . . . . . . . . . . . 117linux-alert . . . . . . . . . . . . . . . . . . . . . . . . . . . . . 117linux-security . . . . . . . . . . . . . . . . . . . . . . . . . 117m68k-list . . . . . . . . . . . . . . . . . . . . . . . . . . . . . . 117pam-list . . . . . . . . . . . . . . . . . . . . . . . . . . . . . . . 117redhat-announce-list . . . . . . . . . . . . . . . . . . 117redhat-devel-list . . . . . . . . . . . . . . . . . . . . . . . 117redhat-install-list . . . . . . . . . . . . . . . . . . . . . . 117redhat-list . . . . . . . . . . . . . . . . . . . . . . . . . . . . . 117redhat-ppp-list . . . . . . . . . . . . . . . . . . . . . . . . 117rpm-list . . . . . . . . . . . . . . . . . . . . . . . . . . . . . . . 117sound-list . . . . . . . . . . . . . . . . . . . . . . . . . . . . . 117sparc-list . . . . . . . . . . . . . . . . . . . . . . . . . . . . . . 117
WWW . . . . . . . . . . . . . . . . . . . . . . . . . . . . . . . . . . . 117Red Hat-specific file locations . . . . . . . . . . . . . . . . . . 199registration information . . . . . . . . . . . . . . . . . . . . . . . . . . 8remote lpd printer, configuring . . . . . . . . . . . . . . 96, 97removing packages with GnoRPM . . . . . . . . . . . . . 192rescue mode . . . . . . . . . . . . . . . . . . . . . . . . . . . . . . . . . . . 228
using a trick . . . . . . . . . . . . . . . . . . . . . . . . . . . . . 228using diskettes . . . . . . . . . . . . . . . . . . . . . . . . . . . 228using LILO . . . . . . . . . . . . . . . . . . . . . . . . . . . . . . 228
restarting kerneld . . . . . . . . . . . . . . . . . . . . . . . . . . . . . . 166rexec, access to. . . . . . . . . . . . . . . . . . . . . . . . . . . . . . . . .208root password . . . . . . . . . . . . . . . . . . . . . . . . . . . . . . . . . 102root password, changing . . . . . . . . . . . . . . . . . . . . . . . 130routes, managing . . . . . . . . . . . . . . . . . . . . . . . . . . . . . . 171RPM . . . . . . . . . . . . . . . . . . . . . . . . . . . . . . . . . . . . . . see rpmrpm . . . . . . . . . . . . . . . . . . . . . . . . . . . . . . . . . . . . . . . . . . . 173
book written about . . . . . . . . . . . . . . . . . . . . . . . 182dependencies . . . . . . . . . . . . . . . . . . . . . . . . . . . . 176design goals . . . . . . . . . . . . . . . . . . . . . . . . . . . . . 174determining file ownership with . . . . . . . . . 180file conflicts, resolving . . . . . . . . . . . . . . . . . . . 175finding deleted files with . . . . . . . . . . . . . . . . . 180freshen . . . . . . . . . . . . . . . . . . . . . . . . . . . . . . . . . . 177freshening . . . . . . . . . . . . . . . . . . . . . . . . . . . . . . . 177handy hints . . . . . . . . . . . . . . . . . . . . . . . . . . . . . . 180installing. . . . . . . . . . . . . . . . . . . . . . . . . . . . . . . . .175locating documentation with . . . . . . . . . . . . . 181mailing list devoted to . . . . . . . . . . . . . . . . . . . 182

INDEX 403
other resources. . . . . . . . . . . . . . . . . . . . . . . . . . . 182preserving config files . . . . . . . . . . . . . . . . . . . . 177querying . . . . . . . . . . . . . . . . . . . . . . . . . . . . . . . . . 178querying for file list . . . . . . . . . . . . . . . . . . . . . . 181querying uninstalled packages . . . . . . . . . . . 181uninstalling . . . . . . . . . . . . . . . . . . . . . . . . . . . . . . 176upgrading . . . . . . . . . . . . . . . . . . . . . . . . . . . . . . . 177using . . . . . . . . . . . . . . . . . . . . . . . . . . . . . . . . . . . . 174verifying . . . . . . . . . . . . . . . . . . . . . . . . . . . . . . . . . 179web site devoted to . . . . . . . . . . . . . . . . . . . . . . 182
SSCSI . . . . . . . . . . . . . . . . . . . . . . . . . . . . . . . . . . . . . . . . . . . . 32SCSI support . . . . . . . . . . . . . . . . . . . . . . . . . . . . . . . . 47, 74selecting components . . . . . . . . . . . . . . . . . . . . . . . . 61, 86selecting packages . . . . . . . . . . . . . . . . . . . . . . . . . . . 60, 86selecting packages with GnoRPM . . . . . . . . . . . . . . 186sendmail . . . . . . . . . . . . . . . . . . . . . . . . . . . . . . . . . . . . . . 214
aliases . . . . . . . . . . . . . . . . . . . . . . . . . . . . . . . . . . . 214masquerading . . . . . . . . . . . . . . . . . . . . . . . . . . . 214with UUCP . . . . . . . . . . . . . . . . . . . . . . . . . . . . . . 214
serial terminal installation for SPARC . . . . . . . . . . 369services
PAM . . . . . . . . . . . . . . . . . . . . . . . . . . . . . . . . . . . . . 206services, controlling access to . . . . . . . . . . . . . . . . . . 215services, selecting for autostart . . . . . . . . . . . . . . . . . . 95shadow passwords . . . . . . . . . . . . . . . . . . . . . . . . . . . . 208shadow utilities. . . . . . . . . . . . . . . . . . . . . . . . . . . . . . . .209shutdown . . . . . . . . . . . . . . . . . . . . . . . . . . . . . . . . . 196, 227SILO configuration . . . . . . . . . . . . . . . . . . . . . . . . . . . . 369SLIP . . . . . . . . . . . . . . . . . . . . . . . . . . . . . . . . . . . . . . . 32, 169slip . . . . . . . . . . . . . . . . . . . . . . . . . . . . . . . . . . . . . . . see SLIPSLIP configuration . . . . . . . . . . . . . . . . . . . . . . . . . . . . . 146
modification of . . . . . . . . . . . . . . . . . . . . . . 149, 150SMB, Windows 95/NT printer, configuring . . 96, 99SMP Motherboards
LILO. . . . . . . . . . . . . . . . . . . . . . . . . . . . . . . . . . . . . 106SPARC
boot method, choosing . . . . . . . . . . . . . . . . . . . 364booting
from diskette . . . . . . . . . . . . . . . . . . . . . . . . . . 365CD-ROM boot commands . . . . . . . . . . . . . . . . 365CD-ROM installation . . . . . . . . . . . . . . . . . . . . 368choosing installation method . . . . . . . . . . . . . 368console commands . . . . . . . . . . . . . . . . . . . . . . . 363disk partitioning . . . . . . . . . . . . . . . . . . . . . . . . . 369diskette boot commands . . . . . . . . . . . . . . . . . 365FTP installation . . . . . . . . . . . . . . . . . . . . . . . . . . 368hard disk installation. . . . . . . . . . . . . . . . . . . . .368HTTP installation . . . . . . . . . . . . . . . . . . . . . . . . 369
installation overview. . . . . . . . . . . . . . . . . . . . . 362installation with serial terminal . . . . . . . . . . 369network boot commands . . . . . . . . . . . . . . . . . 366NFS installation . . . . . . . . . . . . . . . . . . . . . . . . . . 368NFS-mounted root, installation using . . . . 364overview of information specific to . . . . . . . 361ramdisk criteria . . . . . . . . . . . . . . . . . . . . . . . . . . 363SILO configuration . . . . . . . . . . . . . . . . . . . . . . . 369supported hardware . . . . . . . . . . . . . . . . . . . . . 361unsupported CD-ROMs. . . . . . . . . . . . . . . . . . 362unsupported hardware. . . . . . . . . . . . . . . . . . .362using network boot commands . . . . . . . . . . . 367using RARP during install . . . . . . . . . . . . . . . 366using TFTP during install . . . . . . . . . . . . . . . . 366
SPARC computer . . . . . . . . . . . . . . . . . . . . . . . . . . . . . . . . xSPARC-specific information . . 8, 9, 11, 14, 15, 30, 37,
49, 74, 361standard groups . . . . . . . . . . . . . . . . . . . . . . . . . . . . . . . 200standard users . . . . . . . . . . . . . . . . . . . . . . . . . . . . . . . . . 199starting installation . . . . . . . . . . . . . . . . . . . . . . . . . . . . . 39starting installation program . . . . . . . . . . . . . . . . . . . . 36structure, filesystem . . . . . . . . . . . . . . . . . . . . . . . . . . . 195support from mailing lists . . . . . . . . . . . . . . . . . . . . . 117support from Usenet . . . . . . . . . . . . . . . . . . . . . . . . . . . 117support, technical . . . . . . . . . . . . . . . . . . . . . . . . . . . . . .229swap space, initializing . . . . . . . . . . . . . . . . . . . . . . 58, 85swapoff . . . . . . . . . . . . . . . . . . . . . . . . . . . . . . . . . . . 113, 196swapon . . . . . . . . . . . . . . . . . . . . . . . . . . . . . . . . . . . 113, 196sysconfig information . . . . . . . . . . . . . . . . . . . . . . . . . . 217SYSLINUX . . . . . . . . . . . . . . . . . . . . . . . . . . . . . . . . . . . . 108system administration . . . . . . . . . . . . . . . . . . . . . . . . . 195System Commander . . . . . . . . . . . . . . . . . . . . . . . . . . . 108system configuration . . . . . . . . . . . . 119, see Linuxconfsystem shutdown . . . . . . . . . . . . . . . . . . . . . . . . . . . . . . 227SysV init . . . . . . . . . . . . . . . . . . . . . . . . . . . . . . . . . . . . . . .224
directories used by . . . . . . . . . . . . . . . . . . . . . . . 225runlevels used by . . . . . . . . . . . . . . . . . . . . . . . . 226
TTCP wrapper . . . . . . . . . . . . . . . . . . . . . . . . . . . . . . . . . . 215tcpd . . . . . . . . . . . . . . . . . . . . . . . . . . . . . . . . . . . . . . . . . . . 215technical support . . . . . . . . . . . . . . . . . . . . . . . . . . . . . . 229
FAQ . . . . . . . . . . . . . . . . . . . . . . . . . . . . . . . . . . . . . 234how to send questions for . . . . . . . . . . . . . . . . 233how to state problem for . . . . . . . . . . . . . . . . . 233obtaining . . . . . . . . . . . . . . . . . . . . . . . . . . . . . . . . 231overview . . . . . . . . . . . . . . . . . . . . . . . . . . . . . . . . 229registering . . . . . . . . . . . . . . . . . . . . . . . . . . . . . . . 231
via email . . . . . . . . . . . . . . . . . . . . . . . . . . . . . . 232via fax . . . . . . . . . . . . . . . . . . . . . . . . . . . . . . . . 232

404 INDEX
via snail mail . . . . . . . . . . . . . . . . . . . . . . . . . . 232via WWW. . . . . . . . . . . . . . . . . . . . . . . . . . . . . 232
where to send support request . . . . . . . . . . . 234test page, printer. . . . . . . . . . . . . . . . . . . . . . . . . . . . . . .164TFTP setup, SPARC install . . . . . . . . . . . . . . . . . . . . . 366time
setting . . . . . . . . . . . . . . . . . . . . . . . . . . . . . . . . . . . 172time zone, setting . . . . . . . . . . . . . . . . . . . . . . . . . . . . . . . 95time, setting . . . . . . . . . . . . . . . . . . . . . . . . . . . . . . . . . . . 157token ring . . . . . . . . . . . . . . . . . . . . . . . . . . . . . . . . . . . . . 171Torvalds, Linus . . . . . . . . . . . . . . . . . . . . . . . . . . . . . . ix, xii
Uuninstalling packages with GnoRPM. . . . . . . . . . . 192upgrade . . . . . . . . . . . . . . . . . . . . . . . . . . . . . . . . . . . . . . . . . xupgrade, description of . . . . . . . . . . . . . . . . . . . . . . 46, 72upgrade, performing . . . . . . . . . . . . . . . . . . . . . . . . 45, 70upgrading packages with GnoRPM . . . . . . . . . . . . 194upgrading, how to . . . . . . . . . . . . . . . . . . . . . . . . . . . . . . xiiUsenet . . . . . . . . . . . . . . . . . . . . . . . . . . . . . . . . . . . . . . . . . 117
Red Hat-specific groups . . . . . . . . . . . . . . . . . . 118user interface, installation program . . . . . . . . . . . . . 33user-private groups . . . . . . . . . . . . . . . . . . . . . . . 199, 200user-private groups, rationale behind . . . . . . . . . . 202users . . . . . . . . . . . . . . . . . . . . . . . . . . . . . . . . . . . . . . . . . . 199
standard . . . . . . . . . . . . . . . . . . . . . . . . . . . . . . . . . 199users, adding . . . . . . . . . . . . . . . . . . . . . . . . . . . . . 123, 124utilities
shadow . . . . . . . . . . . . . . . . . . . . . . . . . . . . . . . . . . 209
Vverifying packages with GnoRPM . . . . . . . . . . . . . 192video configuration . . . . . . . . . . . . . . . . . . . . . . . . . . . . . 13virtual consoles . . . . . . . . . . . . . . . . . . . . . . . . . . . . . . . . . 35
WWindows
finding hardware configuration with . . . . . . 11with Linuxconf . . . . . . . . . . . . . . . . . . . . . . . . . . . . . . . . 157
XX Windows, configuring . . . . . . . . . . . . . . . . . . . . . . . 108Xconfigurator. . . . . . . . . . . . . . . . . . . . . . . . . . . . . . . . . .109XFree86
configuration . . . . . . . . . . . . . . . . . . . . . . . . . . . . 109

Index of Packages
Aadjtimex . . . . . . . . . . . . . . . . . . . . . . . . . . . . . . . . . . . . . . . 312AfterStep . . . . . . . . . . . . . . . . . . . . . . . . . . . . . . . . . . . . . . 339AfterStep-APPS . . . . . . . . . . . . . . . . . . . . . . . . . . . . . . . 339aktion . . . . . . . . . . . . . . . . . . . . . . . . . . . . . . . . . . . . . . . . . 269am-utils . . . . . . . . . . . . . . . . . . . . . . . . . . . . . . . . . . . . . . . 320anonftp . . . . . . . . . . . . . . . . . . . . . . . . . . . . . . . . . . . . . . . . 320AnotherLevel . . . . . . . . . . . . . . . . . . . . . . . . . . . . . . . . . . 339apache. . . . . . . . . . . . . . . . . . . . . . . . . . . . . . . . . . . . . . . . .320apache-devel . . . . . . . . . . . . . . . . . . . . . . . . . . . . . . . . . . 294apmd . . . . . . . . . . . . . . . . . . . . . . . . . . . . . . . . . . . . . . . . . . 320arpwatch . . . . . . . . . . . . . . . . . . . . . . . . . . . . . . . . . . . . . . 278ash . . . . . . . . . . . . . . . . . . . . . . . . . . . . . . . . . . . . . . . . . . . . 337at . . . . . . . . . . . . . . . . . . . . . . . . . . . . . . . . . . . . . . . . . . . . . . 320audiofile . . . . . . . . . . . . . . . . . . . . . . . . . . . . . . . . . . . . . . . 330audiofile-devel . . . . . . . . . . . . . . . . . . . . . . . . . . . . . . . . 294aumix . . . . . . . . . . . . . . . . . . . . . . . . . . . . . . . . . . . . . . . . . 269authconfig . . . . . . . . . . . . . . . . . . . . . . . . . . . . . . . . . . . . . 312autoconf . . . . . . . . . . . . . . . . . . . . . . . . . . . . . . . . . . . . . . . 301autofs . . . . . . . . . . . . . . . . . . . . . . . . . . . . . . . . . . . . . . . . . 320automake. . . . . . . . . . . . . . . . . . . . . . . . . . . . . . . . . . . . . . 302awesfx. . . . . . . . . . . . . . . . . . . . . . . . . . . . . . . . . . . . . . . . . 269
Bbasesystem . . . . . . . . . . . . . . . . . . . . . . . . . . . . . . . . . . . . 312bash . . . . . . . . . . . . . . . . . . . . . . . . . . . . . . . . . . . . . . . . . . . 337bash2 . . . . . . . . . . . . . . . . . . . . . . . . . . . . . . . . . . . . . . . . . . 337bash2-doc . . . . . . . . . . . . . . . . . . . . . . . . . . . . . . . . . . . . . 306bc . . . . . . . . . . . . . . . . . . . . . . . . . . . . . . . . . . . . . . . . . . . . . 260bdflush . . . . . . . . . . . . . . . . . . . . . . . . . . . . . . . . . . . . . . . . 321bin86 . . . . . . . . . . . . . . . . . . . . . . . . . . . . . . . . . . . . . . . . . . 302bind . . . . . . . . . . . . . . . . . . . . . . . . . . . . . . . . . . . . . . . . . . . 321bind-devel . . . . . . . . . . . . . . . . . . . . . . . . . . . . . . . . . . . . . 294bind-utils . . . . . . . . . . . . . . . . . . . . . . . . . . . . . . . . . . . . . . 278binutils . . . . . . . . . . . . . . . . . . . . . . . . . . . . . . . . . . . . . . . . 302bison . . . . . . . . . . . . . . . . . . . . . . . . . . . . . . . . . . . . . . . . . . 302blt . . . . . . . . . . . . . . . . . . . . . . . . . . . . . . . . . . . . . . . . . . . . . 302bootparamd . . . . . . . . . . . . . . . . . . . . . . . . . . . . . . . . . . . 321
byacc . . . . . . . . . . . . . . . . . . . . . . . . . . . . . . . . . . . . . . . . . . 303bzip2 . . . . . . . . . . . . . . . . . . . . . . . . . . . . . . . . . . . . . . . . . . 261
Ccaching-nameserver . . . . . . . . . . . . . . . . . . . . . . . . . . . 321cdecl . . . . . . . . . . . . . . . . . . . . . . . . . . . . . . . . . . . . . . . . . . 303cdp . . . . . . . . . . . . . . . . . . . . . . . . . . . . . . . . . . . . . . . . . . . . 269chkconfig . . . . . . . . . . . . . . . . . . . . . . . . . . . . . . . . . . . . . . 312chkfontpath . . . . . . . . . . . . . . . . . . . . . . . . . . . . . . . . . . . 312cleanfeed . . . . . . . . . . . . . . . . . . . . . . . . . . . . . . . . . . . . . . 321comanche . . . . . . . . . . . . . . . . . . . . . . . . . . . . . . . . . . . . . 278compat-binutils . . . . . . . . . . . . . . . . . . . . . . . . . . . . . . . . 303compat-egcs . . . . . . . . . . . . . . . . . . . . . . . . . . . . . . . . . . . 289compat-egcs-c++ . . . . . . . . . . . . . . . . . . . . . . . . . . . . . . 289compat-egcs-g77 . . . . . . . . . . . . . . . . . . . . . . . . . . . . . . . 289compat-egcs-objc . . . . . . . . . . . . . . . . . . . . . . . . . . . . . . 289compat-glibc . . . . . . . . . . . . . . . . . . . . . . . . . . . . . . . . . . 294compat-libs . . . . . . . . . . . . . . . . . . . . . . . . . . . . . . . . . . . . 294comsat . . . . . . . . . . . . . . . . . . . . . . . . . . . . . . . . . . . . . . . . 321console-tools . . . . . . . . . . . . . . . . . . . . . . . . . . . . . . . . . . 278control-center . . . . . . . . . . . . . . . . . . . . . . . . . . . . . . . . . . 340control-center-devel . . . . . . . . . . . . . . . . . . . . . . . . . . . 294control-panel . . . . . . . . . . . . . . . . . . . . . . . . . . . . . . . . . . 313cpio . . . . . . . . . . . . . . . . . . . . . . . . . . . . . . . . . . . . . . . . . . . 252cpp . . . . . . . . . . . . . . . . . . . . . . . . . . . . . . . . . . . . . . . . . . . . 289cproto . . . . . . . . . . . . . . . . . . . . . . . . . . . . . . . . . . . . . . . . . 303cracklib . . . . . . . . . . . . . . . . . . . . . . . . . . . . . . . . . . . . . . . . 330cracklib-dicts . . . . . . . . . . . . . . . . . . . . . . . . . . . . . . . . . . 330crontabs . . . . . . . . . . . . . . . . . . . . . . . . . . . . . . . . . . . . . . . 313ctags . . . . . . . . . . . . . . . . . . . . . . . . . . . . . . . . . . . . . . . . . . 303cvs . . . . . . . . . . . . . . . . . . . . . . . . . . . . . . . . . . . . . . . . . . . . 304cxhextris . . . . . . . . . . . . . . . . . . . . . . . . . . . . . . . . . . . . . . .249
Ddesktop-backgrounds . . . . . . . . . . . . . . . . . . . . . . . . . . 269dev . . . . . . . . . . . . . . . . . . . . . . . . . . . . . . . . . . . . . . . . . . . . 313dhcp . . . . . . . . . . . . . . . . . . . . . . . . . . . . . . . . . . . . . . . . . . 322

406 INDEX OF PACKAGES
dhcpcd . . . . . . . . . . . . . . . . . . . . . . . . . . . . . . . . . . . . . . . . 322dialog . . . . . . . . . . . . . . . . . . . . . . . . . . . . . . . . . . . . . . . . . 278diffstat . . . . . . . . . . . . . . . . . . . . . . . . . . . . . . . . . . . . . . . . 304diffutils . . . . . . . . . . . . . . . . . . . . . . . . . . . . . . . . . . . . . . . . 286dip . . . . . . . . . . . . . . . . . . . . . . . . . . . . . . . . . . . . . . . . . . . . 254dosemu. . . . . . . . . . . . . . . . . . . . . . . . . . . . . . . . . . . . . . . .259dosemu-freedos . . . . . . . . . . . . . . . . . . . . . . . . . . . . . . . 259dump . . . . . . . . . . . . . . . . . . . . . . . . . . . . . . . . . . . . . . . . . 253
Ee2fsprogs . . . . . . . . . . . . . . . . . . . . . . . . . . . . . . . . . . . . . . 313e2fsprogs-devel . . . . . . . . . . . . . . . . . . . . . . . . . . . . . . . . 294ed . . . . . . . . . . . . . . . . . . . . . . . . . . . . . . . . . . . . . . . . . . . . . 286ee . . . . . . . . . . . . . . . . . . . . . . . . . . . . . . . . . . . . . . . . . . . . . 269efax . . . . . . . . . . . . . . . . . . . . . . . . . . . . . . . . . . . . . . . . . . . 254egcs . . . . . . . . . . . . . . . . . . . . . . . . . . . . . . . . . . . . . . . . . . . 289egcs-c++ . . . . . . . . . . . . . . . . . . . . . . . . . . . . . . . . . . . . . . . 290egcs-g77 . . . . . . . . . . . . . . . . . . . . . . . . . . . . . . . . . . . . . . . 290egcs-objc . . . . . . . . . . . . . . . . . . . . . . . . . . . . . . . . . . . . . . 290eject . . . . . . . . . . . . . . . . . . . . . . . . . . . . . . . . . . . . . . . . . . . 313ElectricFence . . . . . . . . . . . . . . . . . . . . . . . . . . . . . . . . . . 301elm . . . . . . . . . . . . . . . . . . . . . . . . . . . . . . . . . . . . . . . . . . . . 262emacs . . . . . . . . . . . . . . . . . . . . . . . . . . . . . . . . . . . . . . . . . 257emacs-el . . . . . . . . . . . . . . . . . . . . . . . . . . . . . . . . . . . . . . . 257emacs-leim . . . . . . . . . . . . . . . . . . . . . . . . . . . . . . . . . . . . 257emacs-nox . . . . . . . . . . . . . . . . . . . . . . . . . . . . . . . . . . . . . 257emacs-X11 . . . . . . . . . . . . . . . . . . . . . . . . . . . . . . . . . . . . . 257enlightenment . . . . . . . . . . . . . . . . . . . . . . . . . . . . . . . . . 340enlightenment-conf . . . . . . . . . . . . . . . . . . . . . . . . . . . . 340enscript. . . . . . . . . . . . . . . . . . . . . . . . . . . . . . . . . . . . . . . .273esound . . . . . . . . . . . . . . . . . . . . . . . . . . . . . . . . . . . . . . . . 322esound-devel . . . . . . . . . . . . . . . . . . . . . . . . . . . . . . . . . . 295etcskel . . . . . . . . . . . . . . . . . . . . . . . . . . . . . . . . . . . . . . . . . 313exmh . . . . . . . . . . . . . . . . . . . . . . . . . . . . . . . . . . . . . . . . . . 262expect . . . . . . . . . . . . . . . . . . . . . . . . . . . . . . . . . . . . . . . . . 290ext2ed . . . . . . . . . . . . . . . . . . . . . . . . . . . . . . . . . . . . . . . . . 278
Ffaces . . . . . . . . . . . . . . . . . . . . . . . . . . . . . . . . . . . . . . . . . . . 262faces-devel . . . . . . . . . . . . . . . . . . . . . . . . . . . . . . . . . . . . 295faces-xface . . . . . . . . . . . . . . . . . . . . . . . . . . . . . . . . . . . . . 263faq . . . . . . . . . . . . . . . . . . . . . . . . . . . . . . . . . . . . . . . . . . . . 306fbset . . . . . . . . . . . . . . . . . . . . . . . . . . . . . . . . . . . . . . . . . . . 278fetchmail . . . . . . . . . . . . . . . . . . . . . . . . . . . . . . . . . . . . . . 263fetchmailconf . . . . . . . . . . . . . . . . . . . . . . . . . . . . . . . . . . 263file . . . . . . . . . . . . . . . . . . . . . . . . . . . . . . . . . . . . . . . . . . . . 261filesystem . . . . . . . . . . . . . . . . . . . . . . . . . . . . . . . . . . . . . 313fileutils . . . . . . . . . . . . . . . . . . . . . . . . . . . . . . . . . . . . . . . . 261findutils . . . . . . . . . . . . . . . . . . . . . . . . . . . . . . . . . . . . . . . 261
finger . . . . . . . . . . . . . . . . . . . . . . . . . . . . . . . . . . . . . . . . . . 263flex . . . . . . . . . . . . . . . . . . . . . . . . . . . . . . . . . . . . . . . . . . . . 304fnlib . . . . . . . . . . . . . . . . . . . . . . . . . . . . . . . . . . . . . . . . . . . 330fnlib-devel . . . . . . . . . . . . . . . . . . . . . . . . . . . . . . . . . . . . . 295fortune-mod . . . . . . . . . . . . . . . . . . . . . . . . . . . . . . . . . . . 249freetype . . . . . . . . . . . . . . . . . . . . . . . . . . . . . . . . . . . . . . . 330freetype-devel . . . . . . . . . . . . . . . . . . . . . . . . . . . . . . . . . 295ftp . . . . . . . . . . . . . . . . . . . . . . . . . . . . . . . . . . . . . . . . . . . . . 263fvwm . . . . . . . . . . . . . . . . . . . . . . . . . . . . . . . . . . . . . . . . . . 340fvwm2. . . . . . . . . . . . . . . . . . . . . . . . . . . . . . . . . . . . . . . . .340fvwm2-icons. . . . . . . . . . . . . . . . . . . . . . . . . . . . . . . . . . .340fwhois . . . . . . . . . . . . . . . . . . . . . . . . . . . . . . . . . . . . . . . . . 263
Ggated . . . . . . . . . . . . . . . . . . . . . . . . . . . . . . . . . . . . . . . . . . 322gawk . . . . . . . . . . . . . . . . . . . . . . . . . . . . . . . . . . . . . . . . . . 286gd . . . . . . . . . . . . . . . . . . . . . . . . . . . . . . . . . . . . . . . . . . . . . 331gd-devel . . . . . . . . . . . . . . . . . . . . . . . . . . . . . . . . . . . . . . . 295gdb . . . . . . . . . . . . . . . . . . . . . . . . . . . . . . . . . . . . . . . . . . . . 288gdbm . . . . . . . . . . . . . . . . . . . . . . . . . . . . . . . . . . . . . . . . . . 331gdbm-devel . . . . . . . . . . . . . . . . . . . . . . . . . . . . . . . . . . . 295gdm . . . . . . . . . . . . . . . . . . . . . . . . . . . . . . . . . . . . . . . . . . . 348gedit . . . . . . . . . . . . . . . . . . . . . . . . . . . . . . . . . . . . . . . . . . 258gedit-devel . . . . . . . . . . . . . . . . . . . . . . . . . . . . . . . . . . . . 295genromfs . . . . . . . . . . . . . . . . . . . . . . . . . . . . . . . . . . . . . . 314gettext . . . . . . . . . . . . . . . . . . . . . . . . . . . . . . . . . . . . . . . . . 304getty ps . . . . . . . . . . . . . . . . . . . . . . . . . . . . . . . . . . . . . . . 255gftp . . . . . . . . . . . . . . . . . . . . . . . . . . . . . . . . . . . . . . . . . . . 264ghostscript . . . . . . . . . . . . . . . . . . . . . . . . . . . . . . . . . . . . 274ghostscript-fonts . . . . . . . . . . . . . . . . . . . . . . . . . . . . . . . 274giftrans . . . . . . . . . . . . . . . . . . . . . . . . . . . . . . . . . . . . . . . . 269gimp . . . . . . . . . . . . . . . . . . . . . . . . . . . . . . . . . . . . . . . . . . 269gimp-data-extras . . . . . . . . . . . . . . . . . . . . . . . . . . . . . . 270gimp-devel . . . . . . . . . . . . . . . . . . . . . . . . . . . . . . . . . . . . 295gimp-libgimp. . . . . . . . . . . . . . . . . . . . . . . . . . . . . . . . . . 331gimp-manual . . . . . . . . . . . . . . . . . . . . . . . . . . . . . . . . . . 306git . . . . . . . . . . . . . . . . . . . . . . . . . . . . . . . . . . . . . . . . . . . . . 261glib . . . . . . . . . . . . . . . . . . . . . . . . . . . . . . . . . . . . . . . . . . . . 331glib-devel . . . . . . . . . . . . . . . . . . . . . . . . . . . . . . . . . . . . . 295glib10 . . . . . . . . . . . . . . . . . . . . . . . . . . . . . . . . . . . . . . . . . 331glibc . . . . . . . . . . . . . . . . . . . . . . . . . . . . . . . . . . . . . . . . . . . 331glibc-devel . . . . . . . . . . . . . . . . . . . . . . . . . . . . . . . . . . . . 295glibc-profile . . . . . . . . . . . . . . . . . . . . . . . . . . . . . . . . . . . 295gmc . . . . . . . . . . . . . . . . . . . . . . . . . . . . . . . . . . . . . . . . . . . 341gmp . . . . . . . . . . . . . . . . . . . . . . . . . . . . . . . . . . . . . . . . . . . 331gmp-devel . . . . . . . . . . . . . . . . . . . . . . . . . . . . . . . . . . . . . 296gnome-audio . . . . . . . . . . . . . . . . . . . . . . . . . . . . . . . . . . 270gnome-audio-extra . . . . . . . . . . . . . . . . . . . . . . . . . . . . 332gnome-core . . . . . . . . . . . . . . . . . . . . . . . . . . . . . . . . . . . . 341gnome-core-devel . . . . . . . . . . . . . . . . . . . . . . . . . . . . . 296

INDEX OF PACKAGES 407
gnome-games . . . . . . . . . . . . . . . . . . . . . . . . . . . . . . . . . 249gnome-games-devel . . . . . . . . . . . . . . . . . . . . . . . . . . . 296gnome-libs . . . . . . . . . . . . . . . . . . . . . . . . . . . . . . . . . . . . 332gnome-libs-devel . . . . . . . . . . . . . . . . . . . . . . . . . . . . . . 296gnome-linuxconf . . . . . . . . . . . . . . . . . . . . . . . . . . . . . . 278gnome-media . . . . . . . . . . . . . . . . . . . . . . . . . . . . . . . . . . 270gnome-objc . . . . . . . . . . . . . . . . . . . . . . . . . . . . . . . . . . . . 290gnome-objc-devel . . . . . . . . . . . . . . . . . . . . . . . . . . . . . . 296gnome-pim . . . . . . . . . . . . . . . . . . . . . . . . . . . . . . . . . . . . 273gnome-pim-devel . . . . . . . . . . . . . . . . . . . . . . . . . . . . . . 296gnome-users-guide . . . . . . . . . . . . . . . . . . . . . . . . . . . . 306gnome-utils. . . . . . . . . . . . . . . . . . . . . . . . . . . . . . . . . . . .279gnorpm . . . . . . . . . . . . . . . . . . . . . . . . . . . . . . . . . . . . . . . 279gnotepad+. . . . . . . . . . . . . . . . . . . . . . . . . . . . . . . . . . . . . 258gnuchess . . . . . . . . . . . . . . . . . . . . . . . . . . . . . . . . . . . . . . 249gnumeric . . . . . . . . . . . . . . . . . . . . . . . . . . . . . . . . . . . . . . 273gnuplot . . . . . . . . . . . . . . . . . . . . . . . . . . . . . . . . . . . . . . . . 260gperf . . . . . . . . . . . . . . . . . . . . . . . . . . . . . . . . . . . . . . . . . . 304gpm . . . . . . . . . . . . . . . . . . . . . . . . . . . . . . . . . . . . . . . . . . . 322gpm-devel . . . . . . . . . . . . . . . . . . . . . . . . . . . . . . . . . . . . . 296gqview . . . . . . . . . . . . . . . . . . . . . . . . . . . . . . . . . . . . . . . . 348grep . . . . . . . . . . . . . . . . . . . . . . . . . . . . . . . . . . . . . . . . . . . 286groff . . . . . . . . . . . . . . . . . . . . . . . . . . . . . . . . . . . . . . . . . . . 274groff-gxditview . . . . . . . . . . . . . . . . . . . . . . . . . . . . . . . . 274gsl . . . . . . . . . . . . . . . . . . . . . . . . . . . . . . . . . . . . . . . . . . . . . 332gtk+ . . . . . . . . . . . . . . . . . . . . . . . . . . . . . . . . . . . . . . . . . . . 332gtk+-devel . . . . . . . . . . . . . . . . . . . . . . . . . . . . . . . . . . . . . 296gtk+10 . . . . . . . . . . . . . . . . . . . . . . . . . . . . . . . . . . . . . . . . . 332gtk-engines . . . . . . . . . . . . . . . . . . . . . . . . . . . . . . . . . . . . 332gtop . . . . . . . . . . . . . . . . . . . . . . . . . . . . . . . . . . . . . . . . . . . 279guavac . . . . . . . . . . . . . . . . . . . . . . . . . . . . . . . . . . . . . . . . 290guile . . . . . . . . . . . . . . . . . . . . . . . . . . . . . . . . . . . . . . . . . . .290guile-devel . . . . . . . . . . . . . . . . . . . . . . . . . . . . . . . . . . . . 297gv . . . . . . . . . . . . . . . . . . . . . . . . . . . . . . . . . . . . . . . . . . . . . 274GXedit . . . . . . . . . . . . . . . . . . . . . . . . . . . . . . . . . . . . . . . . 257gzip . . . . . . . . . . . . . . . . . . . . . . . . . . . . . . . . . . . . . . . . . . . 262
Hhdparm . . . . . . . . . . . . . . . . . . . . . . . . . . . . . . . . . . . . . . . 279helptool . . . . . . . . . . . . . . . . . . . . . . . . . . . . . . . . . . . . . . . 306howto . . . . . . . . . . . . . . . . . . . . . . . . . . . . . . . . . . . . . . . . . 307howto-chinese . . . . . . . . . . . . . . . . . . . . . . . . . . . . . . . . . 307howto-croatian . . . . . . . . . . . . . . . . . . . . . . . . . . . . . . . . 307howto-french . . . . . . . . . . . . . . . . . . . . . . . . . . . . . . . . . . 307howto-german . . . . . . . . . . . . . . . . . . . . . . . . . . . . . . . . . 307howto-greek . . . . . . . . . . . . . . . . . . . . . . . . . . . . . . . . . . . 307howto-html . . . . . . . . . . . . . . . . . . . . . . . . . . . . . . . . . . . . 308howto-indonesian . . . . . . . . . . . . . . . . . . . . . . . . . . . . . 308howto-italian . . . . . . . . . . . . . . . . . . . . . . . . . . . . . . . . . . 308howto-japanese . . . . . . . . . . . . . . . . . . . . . . . . . . . . . . . . 308
howto-korean . . . . . . . . . . . . . . . . . . . . . . . . . . . . . . . . . 308howto-polish . . . . . . . . . . . . . . . . . . . . . . . . . . . . . . . . . . 308howto-serbian . . . . . . . . . . . . . . . . . . . . . . . . . . . . . . . . . 309howto-sgml . . . . . . . . . . . . . . . . . . . . . . . . . . . . . . . . . . . 309howto-slovenian . . . . . . . . . . . . . . . . . . . . . . . . . . . . . . . 309howto-spanish . . . . . . . . . . . . . . . . . . . . . . . . . . . . . . . . . 309howto-swedish . . . . . . . . . . . . . . . . . . . . . . . . . . . . . . . . 309howto-turkish . . . . . . . . . . . . . . . . . . . . . . . . . . . . . . . . . 309
Iical . . . . . . . . . . . . . . . . . . . . . . . . . . . . . . . . . . . . . . . . . . . . 273ImageMagick . . . . . . . . . . . . . . . . . . . . . . . . . . . . . . . . . . 268ImageMagick-devel . . . . . . . . . . . . . . . . . . . . . . . . . . . .293imap . . . . . . . . . . . . . . . . . . . . . . . . . . . . . . . . . . . . . . . . . . 322imlib . . . . . . . . . . . . . . . . . . . . . . . . . . . . . . . . . . . . . . . . . . 332imlib-cfgeditor. . . . . . . . . . . . . . . . . . . . . . . . . . . . . . . . .333imlib-devel . . . . . . . . . . . . . . . . . . . . . . . . . . . . . . . . . . . . 297indent . . . . . . . . . . . . . . . . . . . . . . . . . . . . . . . . . . . . . . . . . 286indexhtml . . . . . . . . . . . . . . . . . . . . . . . . . . . . . . . . . . . . . 310inews. . . . . . . . . . . . . . . . . . . . . . . . . . . . . . . . . . . . . . . . . . 323info. . . . . . . . . . . . . . . . . . . . . . . . . . . . . . . . . . . . . . . . . . . . 314initscripts . . . . . . . . . . . . . . . . . . . . . . . . . . . . . . . . . . . . . . 314inn . . . . . . . . . . . . . . . . . . . . . . . . . . . . . . . . . . . . . . . . . . . . 323inn-devel . . . . . . . . . . . . . . . . . . . . . . . . . . . . . . . . . . . . . . 297install-guide . . . . . . . . . . . . . . . . . . . . . . . . . . . . . . . . . . . 310intimed . . . . . . . . . . . . . . . . . . . . . . . . . . . . . . . . . . . . . . . . 323ipchains . . . . . . . . . . . . . . . . . . . . . . . . . . . . . . . . . . . . . . . 314ipxutils . . . . . . . . . . . . . . . . . . . . . . . . . . . . . . . . . . . . . . . . 279ircii . . . . . . . . . . . . . . . . . . . . . . . . . . . . . . . . . . . . . . . . . . . . 264isapnptools . . . . . . . . . . . . . . . . . . . . . . . . . . . . . . . . . . . . 314isicom . . . . . . . . . . . . . . . . . . . . . . . . . . . . . . . . . . . . . . . . . 279ispell . . . . . . . . . . . . . . . . . . . . . . . . . . . . . . . . . . . . . . . . . . 286itcl. . . . . . . . . . . . . . . . . . . . . . . . . . . . . . . . . . . . . . . . . . . . .291
Jjed . . . . . . . . . . . . . . . . . . . . . . . . . . . . . . . . . . . . . . . . . . . . .258jed-common . . . . . . . . . . . . . . . . . . . . . . . . . . . . . . . . . . . 258jed-xjed . . . . . . . . . . . . . . . . . . . . . . . . . . . . . . . . . . . . . . . . 258joe . . . . . . . . . . . . . . . . . . . . . . . . . . . . . . . . . . . . . . . . . . . . . 258
Kkaffe . . . . . . . . . . . . . . . . . . . . . . . . . . . . . . . . . . . . . . . . . . . 291kbdconfig . . . . . . . . . . . . . . . . . . . . . . . . . . . . . . . . . . . . . 314kdeadmin . . . . . . . . . . . . . . . . . . . . . . . . . . . . . . . . . . . . . 279kdebase . . . . . . . . . . . . . . . . . . . . . . . . . . . . . . . . . . . . . . . 341kdegames . . . . . . . . . . . . . . . . . . . . . . . . . . . . . . . . . . . . . 250kdegraphics . . . . . . . . . . . . . . . . . . . . . . . . . . . . . . . . . . . 270kdelibs . . . . . . . . . . . . . . . . . . . . . . . . . . . . . . . . . . . . . . . . 333kdemultimedia . . . . . . . . . . . . . . . . . . . . . . . . . . . . . . . . 270

408 INDEX OF PACKAGES
kdenetwork . . . . . . . . . . . . . . . . . . . . . . . . . . . . . . . . . . . 264kdesupport . . . . . . . . . . . . . . . . . . . . . . . . . . . . . . . . . . . . 333kdeutils . . . . . . . . . . . . . . . . . . . . . . . . . . . . . . . . . . . . . . . 279kernel . . . . . . . . . . . . . . . . . . . . . . . . . . . . . . . . . . . . . . . . . 329kernel-BOOT . . . . . . . . . . . . . . . . . . . . . . . . . . . . . . . . . . 329kernel-doc . . . . . . . . . . . . . . . . . . . . . . . . . . . . . . . . . . . . . 310kernel-headers . . . . . . . . . . . . . . . . . . . . . . . . . . . . . . . . . 301kernel-ibcs . . . . . . . . . . . . . . . . . . . . . . . . . . . . . . . . . . . . . 329kernel-pcmcia-cs . . . . . . . . . . . . . . . . . . . . . . . . . . . . . . .329kernel-smp . . . . . . . . . . . . . . . . . . . . . . . . . . . . . . . . . . . . 329kernel-source . . . . . . . . . . . . . . . . . . . . . . . . . . . . . . . . . . 301kernelcfg . . . . . . . . . . . . . . . . . . . . . . . . . . . . . . . . . . . . . . 280knfsd . . . . . . . . . . . . . . . . . . . . . . . . . . . . . . . . . . . . . . . . . . 323knfsd-clients . . . . . . . . . . . . . . . . . . . . . . . . . . . . . . . . . . . 280korganizer . . . . . . . . . . . . . . . . . . . . . . . . . . . . . . . . . . . . . 273kpilot . . . . . . . . . . . . . . . . . . . . . . . . . . . . . . . . . . . . . . . . . . 255kpppload . . . . . . . . . . . . . . . . . . . . . . . . . . . . . . . . . . . . . . 264kterm. . . . . . . . . . . . . . . . . . . . . . . . . . . . . . . . . . . . . . . . . .348
Lld.so . . . . . . . . . . . . . . . . . . . . . . . . . . . . . . . . . . . . . . . . . . . 314ldconfig . . . . . . . . . . . . . . . . . . . . . . . . . . . . . . . . . . . . . . . 314less . . . . . . . . . . . . . . . . . . . . . . . . . . . . . . . . . . . . . . . . . . . . 287lha . . . . . . . . . . . . . . . . . . . . . . . . . . . . . . . . . . . . . . . . . . . . 253libc . . . . . . . . . . . . . . . . . . . . . . . . . . . . . . . . . . . . . . . . . . . . 333libelf . . . . . . . . . . . . . . . . . . . . . . . . . . . . . . . . . . . . . . . . . . 333libghttp. . . . . . . . . . . . . . . . . . . . . . . . . . . . . . . . . . . . . . . .333libghttp-devel . . . . . . . . . . . . . . . . . . . . . . . . . . . . . . . . . 297libgr . . . . . . . . . . . . . . . . . . . . . . . . . . . . . . . . . . . . . . . . . . . 334libgr-devel . . . . . . . . . . . . . . . . . . . . . . . . . . . . . . . . . . . . . 297libgr-progs . . . . . . . . . . . . . . . . . . . . . . . . . . . . . . . . . . . . 270libgtop . . . . . . . . . . . . . . . . . . . . . . . . . . . . . . . . . . . . . . . . 334libgtop-devel . . . . . . . . . . . . . . . . . . . . . . . . . . . . . . . . . . 297libgtop-examples . . . . . . . . . . . . . . . . . . . . . . . . . . . . . . 334libjpeg . . . . . . . . . . . . . . . . . . . . . . . . . . . . . . . . . . . . . . . . . 334libjpeg-devel . . . . . . . . . . . . . . . . . . . . . . . . . . . . . . . . . . 297libjpeg6a . . . . . . . . . . . . . . . . . . . . . . . . . . . . . . . . . . . . . . 334libpcap . . . . . . . . . . . . . . . . . . . . . . . . . . . . . . . . . . . . . . . . 298libpng . . . . . . . . . . . . . . . . . . . . . . . . . . . . . . . . . . . . . . . . . 334libpng-devel . . . . . . . . . . . . . . . . . . . . . . . . . . . . . . . . . . . 298libPropList . . . . . . . . . . . . . . . . . . . . . . . . . . . . . . . . . . . . 333libstdc++ . . . . . . . . . . . . . . . . . . . . . . . . . . . . . . . . . . . . . . 334libtermcap . . . . . . . . . . . . . . . . . . . . . . . . . . . . . . . . . . . . . 334libtermcap-devel . . . . . . . . . . . . . . . . . . . . . . . . . . . . . . 298libtiff . . . . . . . . . . . . . . . . . . . . . . . . . . . . . . . . . . . . . . . . . . 335libtiff-devel . . . . . . . . . . . . . . . . . . . . . . . . . . . . . . . . . . . . 298libtool . . . . . . . . . . . . . . . . . . . . . . . . . . . . . . . . . . . . . . . . . 305libungif . . . . . . . . . . . . . . . . . . . . . . . . . . . . . . . . . . . . . . . . 335libungif-devel . . . . . . . . . . . . . . . . . . . . . . . . . . . . . . . . . 298libungif-progs . . . . . . . . . . . . . . . . . . . . . . . . . . . . . . . . . 270
libxml . . . . . . . . . . . . . . . . . . . . . . . . . . . . . . . . . . . . . . . . . 335libxml-devel . . . . . . . . . . . . . . . . . . . . . . . . . . . . . . . . . . . 298lilo . . . . . . . . . . . . . . . . . . . . . . . . . . . . . . . . . . . . . . . . . . . . 315linuxconf . . . . . . . . . . . . . . . . . . . . . . . . . . . . . . . . . . . . . . 280linuxconf-devel . . . . . . . . . . . . . . . . . . . . . . . . . . . . . . . . 298logrotate . . . . . . . . . . . . . . . . . . . . . . . . . . . . . . . . . . . . . . . 315losetup . . . . . . . . . . . . . . . . . . . . . . . . . . . . . . . . . . . . . . . . 315lout . . . . . . . . . . . . . . . . . . . . . . . . . . . . . . . . . . . . . . . . . . . .274lout-doc . . . . . . . . . . . . . . . . . . . . . . . . . . . . . . . . . . . . . . . 275lpg . . . . . . . . . . . . . . . . . . . . . . . . . . . . . . . . . . . . . . . . . . . . 310lpr . . . . . . . . . . . . . . . . . . . . . . . . . . . . . . . . . . . . . . . . . . . . . 323lrzsz . . . . . . . . . . . . . . . . . . . . . . . . . . . . . . . . . . . . . . . . . . . 255lslk . . . . . . . . . . . . . . . . . . . . . . . . . . . . . . . . . . . . . . . . . . . . 288lsof . . . . . . . . . . . . . . . . . . . . . . . . . . . . . . . . . . . . . . . . . . . . 288ltrace . . . . . . . . . . . . . . . . . . . . . . . . . . . . . . . . . . . . . . . . . . 288lynx . . . . . . . . . . . . . . . . . . . . . . . . . . . . . . . . . . . . . . . . . . . 264
Mm4 . . . . . . . . . . . . . . . . . . . . . . . . . . . . . . . . . . . . . . . . . . . . 287macutils . . . . . . . . . . . . . . . . . . . . . . . . . . . . . . . . . . . . . . . 280mailcap . . . . . . . . . . . . . . . . . . . . . . . . . . . . . . . . . . . . . . . .315mailx . . . . . . . . . . . . . . . . . . . . . . . . . . . . . . . . . . . . . . . . . . 264make . . . . . . . . . . . . . . . . . . . . . . . . . . . . . . . . . . . . . . . . . . 305MAKEDEV . . . . . . . . . . . . . . . . . . . . . . . . . . . . . . . . . . . . 312man . . . . . . . . . . . . . . . . . . . . . . . . . . . . . . . . . . . . . . . . . . . 315man-pages. . . . . . . . . . . . . . . . . . . . . . . . . . . . . . . . . . . . .310mars-nwe. . . . . . . . . . . . . . . . . . . . . . . . . . . . . . . . . . . . . .323mawk . . . . . . . . . . . . . . . . . . . . . . . . . . . . . . . . . . . . . . . . . 287mc. . . . . . . . . . . . . . . . . . . . . . . . . . . . . . . . . . . . . . . . . . . . .337mcserv . . . . . . . . . . . . . . . . . . . . . . . . . . . . . . . . . . . . . . . . 323metamail . . . . . . . . . . . . . . . . . . . . . . . . . . . . . . . . . . . . . . 264mgetty . . . . . . . . . . . . . . . . . . . . . . . . . . . . . . . . . . . . . . . . 255mgetty-sendfax . . . . . . . . . . . . . . . . . . . . . . . . . . . . . . . . 255mgetty-viewfax . . . . . . . . . . . . . . . . . . . . . . . . . . . . . . . . 255mgetty-voice . . . . . . . . . . . . . . . . . . . . . . . . . . . . . . . . . . 255mikmod . . . . . . . . . . . . . . . . . . . . . . . . . . . . . . . . . . . . . . . 271mingetty . . . . . . . . . . . . . . . . . . . . . . . . . . . . . . . . . . . . . . 315minicom . . . . . . . . . . . . . . . . . . . . . . . . . . . . . . . . . . . . . . . 256mkbootdisk. . . . . . . . . . . . . . . . . . . . . . . . . . . . . . . . . . . .315mkdosfs-ygg . . . . . . . . . . . . . . . . . . . . . . . . . . . . . . . . . . 280mkinitrd . . . . . . . . . . . . . . . . . . . . . . . . . . . . . . . . . . . . . . . 316mkisofs . . . . . . . . . . . . . . . . . . . . . . . . . . . . . . . . . . . . . . . . 280mkkickstart . . . . . . . . . . . . . . . . . . . . . . . . . . . . . . . . . . . . 316mktemp . . . . . . . . . . . . . . . . . . . . . . . . . . . . . . . . . . . . . . . 316mkxauth. . . . . . . . . . . . . . . . . . . . . . . . . . . . . . . . . . . . . . .280mod perl . . . . . . . . . . . . . . . . . . . . . . . . . . . . . . . . . . . . . . 324mod php . . . . . . . . . . . . . . . . . . . . . . . . . . . . . . . . . . . . . . 324mod php3 . . . . . . . . . . . . . . . . . . . . . . . . . . . . . . . . . . . . . 324modemtool . . . . . . . . . . . . . . . . . . . . . . . . . . . . . . . . . . . . 281modutils . . . . . . . . . . . . . . . . . . . . . . . . . . . . . . . . . . . . . . .329

INDEX OF PACKAGES 409
mount . . . . . . . . . . . . . . . . . . . . . . . . . . . . . . . . . . . . . . . . . 316mouseconfig . . . . . . . . . . . . . . . . . . . . . . . . . . . . . . . . . . . 316mpage . . . . . . . . . . . . . . . . . . . . . . . . . . . . . . . . . . . . . . . . . 275mpg123. . . . . . . . . . . . . . . . . . . . . . . . . . . . . . . . . . . . . . . .271mt-st . . . . . . . . . . . . . . . . . . . . . . . . . . . . . . . . . . . . . . . . . . 281mtools . . . . . . . . . . . . . . . . . . . . . . . . . . . . . . . . . . . . . . . . . 281multimedia . . . . . . . . . . . . . . . . . . . . . . . . . . . . . . . . . . . . 271mutt . . . . . . . . . . . . . . . . . . . . . . . . . . . . . . . . . . . . . . . . . . . 264mxp . . . . . . . . . . . . . . . . . . . . . . . . . . . . . . . . . . . . . . . . . . . 251
Nnag . . . . . . . . . . . . . . . . . . . . . . . . . . . . . . . . . . . . . . . . . . . . 310nc . . . . . . . . . . . . . . . . . . . . . . . . . . . . . . . . . . . . . . . . . . . . . 265ncftp . . . . . . . . . . . . . . . . . . . . . . . . . . . . . . . . . . . . . . . . . . 265ncompress . . . . . . . . . . . . . . . . . . . . . . . . . . . . . . . . . . . . . 253ncpfs . . . . . . . . . . . . . . . . . . . . . . . . . . . . . . . . . . . . . . . . . . 281ncurses . . . . . . . . . . . . . . . . . . . . . . . . . . . . . . . . . . . . . . . . 335ncurses-devel . . . . . . . . . . . . . . . . . . . . . . . . . . . . . . . . . . 299ncurses3 . . . . . . . . . . . . . . . . . . . . . . . . . . . . . . . . . . . . . . . 335net-tools . . . . . . . . . . . . . . . . . . . . . . . . . . . . . . . . . . . . . . . 316netcfg . . . . . . . . . . . . . . . . . . . . . . . . . . . . . . . . . . . . . . . . . 281netkit-base . . . . . . . . . . . . . . . . . . . . . . . . . . . . . . . . . . . . .324netscape-common . . . . . . . . . . . . . . . . . . . . . . . . . . . . . 265netscape-communicator . . . . . . . . . . . . . . . . . . . . . . . 265netscape-navigator . . . . . . . . . . . . . . . . . . . . . . . . . . . . 265newt. . . . . . . . . . . . . . . . . . . . . . . . . . . . . . . . . . . . . . . . . . .335newt-devel . . . . . . . . . . . . . . . . . . . . . . . . . . . . . . . . . . . . 299nmh . . . . . . . . . . . . . . . . . . . . . . . . . . . . . . . . . . . . . . . . . . . 265nscd . . . . . . . . . . . . . . . . . . . . . . . . . . . . . . . . . . . . . . . . . . . 324ntsysv . . . . . . . . . . . . . . . . . . . . . . . . . . . . . . . . . . . . . . . . . 316
Oopen. . . . . . . . . . . . . . . . . . . . . . . . . . . . . . . . . . . . . . . . . . .281ORBit . . . . . . . . . . . . . . . . . . . . . . . . . . . . . . . . . . . . . . . . . 319ORBit-devel . . . . . . . . . . . . . . . . . . . . . . . . . . . . . . . . . . . 293
Pp2c . . . . . . . . . . . . . . . . . . . . . . . . . . . . . . . . . . . . . . . . . . . . 291p2c-devel . . . . . . . . . . . . . . . . . . . . . . . . . . . . . . . . . . . . . . 291pam . . . . . . . . . . . . . . . . . . . . . . . . . . . . . . . . . . . . . . . . . . . 316passwd . . . . . . . . . . . . . . . . . . . . . . . . . . . . . . . . . . . . . . . . 317patch . . . . . . . . . . . . . . . . . . . . . . . . . . . . . . . . . . . . . . . . . . 305pciutils . . . . . . . . . . . . . . . . . . . . . . . . . . . . . . . . . . . . . . . . 281pdksh . . . . . . . . . . . . . . . . . . . . . . . . . . . . . . . . . . . . . . . . . 338perl . . . . . . . . . . . . . . . . . . . . . . . . . . . . . . . . . . . . . . . . . . . . 291perl-MD5 . . . . . . . . . . . . . . . . . . . . . . . . . . . . . . . . . . . . . . 291pidentd . . . . . . . . . . . . . . . . . . . . . . . . . . . . . . . . . . . . . . . . 325pilot-link . . . . . . . . . . . . . . . . . . . . . . . . . . . . . . . . . . . . . . 256
pilot-link-devel . . . . . . . . . . . . . . . . . . . . . . . . . . . . . . . . 299pine . . . . . . . . . . . . . . . . . . . . . . . . . . . . . . . . . . . . . . . . . . . 266playmidi . . . . . . . . . . . . . . . . . . . . . . . . . . . . . . . . . . . . . . 271playmidi-X11 . . . . . . . . . . . . . . . . . . . . . . . . . . . . . . . . . . 271pmake . . . . . . . . . . . . . . . . . . . . . . . . . . . . . . . . . . . . . . . . . 305pmake-customs. . . . . . . . . . . . . . . . . . . . . . . . . . . . . . . . 305popt . . . . . . . . . . . . . . . . . . . . . . . . . . . . . . . . . . . . . . . . . . . 335portmap . . . . . . . . . . . . . . . . . . . . . . . . . . . . . . . . . . . . . . . 325postgresql . . . . . . . . . . . . . . . . . . . . . . . . . . . . . . . . . . . . . 256postgresql-clients . . . . . . . . . . . . . . . . . . . . . . . . . . . . . . 256postgresql-devel . . . . . . . . . . . . . . . . . . . . . . . . . . . . . . . 299ppp . . . . . . . . . . . . . . . . . . . . . . . . . . . . . . . . . . . . . . . . . . . 325printtool . . . . . . . . . . . . . . . . . . . . . . . . . . . . . . . . . . . . . . . 275procinfo . . . . . . . . . . . . . . . . . . . . . . . . . . . . . . . . . . . . . . . 282procmail . . . . . . . . . . . . . . . . . . . . . . . . . . . . . . . . . . . . . . . 325procps . . . . . . . . . . . . . . . . . . . . . . . . . . . . . . . . . . . . . . . . . 282procps-X11 . . . . . . . . . . . . . . . . . . . . . . . . . . . . . . . . . . . . 282psacct . . . . . . . . . . . . . . . . . . . . . . . . . . . . . . . . . . . . . . . . . 282psmisc . . . . . . . . . . . . . . . . . . . . . . . . . . . . . . . . . . . . . . . . . 282pump . . . . . . . . . . . . . . . . . . . . . . . . . . . . . . . . . . . . . . . . . 325pwdb . . . . . . . . . . . . . . . . . . . . . . . . . . . . . . . . . . . . . . . . . . 317pygnome . . . . . . . . . . . . . . . . . . . . . . . . . . . . . . . . . . . . . . 292pygtk . . . . . . . . . . . . . . . . . . . . . . . . . . . . . . . . . . . . . . . . . . 292python . . . . . . . . . . . . . . . . . . . . . . . . . . . . . . . . . . . . . . . . 292python-devel . . . . . . . . . . . . . . . . . . . . . . . . . . . . . . . . . . 299python-docs . . . . . . . . . . . . . . . . . . . . . . . . . . . . . . . . . . . 311pythonlib . . . . . . . . . . . . . . . . . . . . . . . . . . . . . . . . . . . . . . 336
Qqt . . . . . . . . . . . . . . . . . . . . . . . . . . . . . . . . . . . . . . . . . . . . . .336qt-devel . . . . . . . . . . . . . . . . . . . . . . . . . . . . . . . . . . . . . . . 299quota . . . . . . . . . . . . . . . . . . . . . . . . . . . . . . . . . . . . . . . . . . 317
Rraidtools . . . . . . . . . . . . . . . . . . . . . . . . . . . . . . . . . . . . . . . 317rcs . . . . . . . . . . . . . . . . . . . . . . . . . . . . . . . . . . . . . . . . . . . . . 305rdate . . . . . . . . . . . . . . . . . . . . . . . . . . . . . . . . . . . . . . . . . . 282rdist . . . . . . . . . . . . . . . . . . . . . . . . . . . . . . . . . . . . . . . . . . . 282readline . . . . . . . . . . . . . . . . . . . . . . . . . . . . . . . . . . . . . . . 336readline-devel . . . . . . . . . . . . . . . . . . . . . . . . . . . . . . . . . 299redhat-logos . . . . . . . . . . . . . . . . . . . . . . . . . . . . . . . . . . . 317redhat-release . . . . . . . . . . . . . . . . . . . . . . . . . . . . . . . . . 318rgrep . . . . . . . . . . . . . . . . . . . . . . . . . . . . . . . . . . . . . . . . . . 287rhl-alpha-install-addend-en . . . . . . . . . . . . . . . . . . . . 311rhl-getting-started-guide-en . . . . . . . . . . . . . . . . . . . . 311rhl-install-guide-en . . . . . . . . . . . . . . . . . . . . . . . . . . . . 311rhmask . . . . . . . . . . . . . . . . . . . . . . . . . . . . . . . . . . . . . . . . 283rhs-hwdiag . . . . . . . . . . . . . . . . . . . . . . . . . . . . . . . . . . . . 283rhs-printfilters . . . . . . . . . . . . . . . . . . . . . . . . . . . . . . . . . 275

410 INDEX OF PACKAGES
rhsound . . . . . . . . . . . . . . . . . . . . . . . . . . . . . . . . . . . . . . . 271rmt . . . . . . . . . . . . . . . . . . . . . . . . . . . . . . . . . . . . . . . . . . . . 253rootfiles . . . . . . . . . . . . . . . . . . . . . . . . . . . . . . . . . . . . . . . 318routed . . . . . . . . . . . . . . . . . . . . . . . . . . . . . . . . . . . . . . . . . 325rpm . . . . . . . . . . . . . . . . . . . . . . . . . . . . . . . . . . . . . . . . . . . 318rpm-devel . . . . . . . . . . . . . . . . . . . . . . . . . . . . . . . . . . . . . 300rsh . . . . . . . . . . . . . . . . . . . . . . . . . . . . . . . . . . . . . . . . . . . . 266rsync . . . . . . . . . . . . . . . . . . . . . . . . . . . . . . . . . . . . . . . . . . 266rusers . . . . . . . . . . . . . . . . . . . . . . . . . . . . . . . . . . . . . . . . . 325rwall . . . . . . . . . . . . . . . . . . . . . . . . . . . . . . . . . . . . . . . . . . 326rwho . . . . . . . . . . . . . . . . . . . . . . . . . . . . . . . . . . . . . . . . . . 326rxvt . . . . . . . . . . . . . . . . . . . . . . . . . . . . . . . . . . . . . . . . . . . 349
Ssag . . . . . . . . . . . . . . . . . . . . . . . . . . . . . . . . . . . . . . . . . . . . 311samba . . . . . . . . . . . . . . . . . . . . . . . . . . . . . . . . . . . . . . . . . 326sash . . . . . . . . . . . . . . . . . . . . . . . . . . . . . . . . . . . . . . . . . . . 338screen . . . . . . . . . . . . . . . . . . . . . . . . . . . . . . . . . . . . . . . . . 283sed . . . . . . . . . . . . . . . . . . . . . . . . . . . . . . . . . . . . . . . . . . . . 287sendmail . . . . . . . . . . . . . . . . . . . . . . . . . . . . . . . . . . . . . . 326sendmail-cf . . . . . . . . . . . . . . . . . . . . . . . . . . . . . . . . . . . . 326sendmail-doc . . . . . . . . . . . . . . . . . . . . . . . . . . . . . . . . . . 311setconsole . . . . . . . . . . . . . . . . . . . . . . . . . . . . . . . . . . . . . 283setserial . . . . . . . . . . . . . . . . . . . . . . . . . . . . . . . . . . . . . . . 283setup . . . . . . . . . . . . . . . . . . . . . . . . . . . . . . . . . . . . . . . . . . 318setuptool . . . . . . . . . . . . . . . . . . . . . . . . . . . . . . . . . . . . . . 283sgml-tools . . . . . . . . . . . . . . . . . . . . . . . . . . . . . . . . . . . . . 275sh-utils . . . . . . . . . . . . . . . . . . . . . . . . . . . . . . . . . . . . . . . . 338shadow-utils . . . . . . . . . . . . . . . . . . . . . . . . . . . . . . . . . . 318shapecfg . . . . . . . . . . . . . . . . . . . . . . . . . . . . . . . . . . . . . . . 318sharutils . . . . . . . . . . . . . . . . . . . . . . . . . . . . . . . . . . . . . . . 253slang . . . . . . . . . . . . . . . . . . . . . . . . . . . . . . . . . . . . . . . . . . 336slang-devel . . . . . . . . . . . . . . . . . . . . . . . . . . . . . . . . . . . . 300sliplogin . . . . . . . . . . . . . . . . . . . . . . . . . . . . . . . . . . . . . . . 256slocate . . . . . . . . . . . . . . . . . . . . . . . . . . . . . . . . . . . . . . . . . 262slrn . . . . . . . . . . . . . . . . . . . . . . . . . . . . . . . . . . . . . . . . . . . . 266slrn-pull . . . . . . . . . . . . . . . . . . . . . . . . . . . . . . . . . . . . . . . 266sndconfig . . . . . . . . . . . . . . . . . . . . . . . . . . . . . . . . . . . . . . 272sox . . . . . . . . . . . . . . . . . . . . . . . . . . . . . . . . . . . . . . . . . . . . 272sox-devel . . . . . . . . . . . . . . . . . . . . . . . . . . . . . . . . . . . . . . 300specspo . . . . . . . . . . . . . . . . . . . . . . . . . . . . . . . . . . . . . . . . 311squid . . . . . . . . . . . . . . . . . . . . . . . . . . . . . . . . . . . . . . . . . . 327stat . . . . . . . . . . . . . . . . . . . . . . . . . . . . . . . . . . . . . . . . . . . . 262statserial . . . . . . . . . . . . . . . . . . . . . . . . . . . . . . . . . . . . . . . 283strace . . . . . . . . . . . . . . . . . . . . . . . . . . . . . . . . . . . . . . . . . . 288svgalib . . . . . . . . . . . . . . . . . . . . . . . . . . . . . . . . . . . . . . . . 336svgalib-devel . . . . . . . . . . . . . . . . . . . . . . . . . . . . . . . . . . 300SVGATextMode . . . . . . . . . . . . . . . . . . . . . . . . . . . . . . . 277swatch. . . . . . . . . . . . . . . . . . . . . . . . . . . . . . . . . . . . . . . . .284switchdesk . . . . . . . . . . . . . . . . . . . . . . . . . . . . . . . . . . . . 341
switchdesk-gnome. . . . . . . . . . . . . . . . . . . . . . . . . . . . .341switchdesk-kde . . . . . . . . . . . . . . . . . . . . . . . . . . . . . . . . 341symlinks . . . . . . . . . . . . . . . . . . . . . . . . . . . . . . . . . . . . . . 284sysklogd. . . . . . . . . . . . . . . . . . . . . . . . . . . . . . . . . . . . . . .327SysVinit . . . . . . . . . . . . . . . . . . . . . . . . . . . . . . . . . . . . . . . 312
Ttalk . . . . . . . . . . . . . . . . . . . . . . . . . . . . . . . . . . . . . . . . . . . . 266taper . . . . . . . . . . . . . . . . . . . . . . . . . . . . . . . . . . . . . . . . . . 253tar . . . . . . . . . . . . . . . . . . . . . . . . . . . . . . . . . . . . . . . . . . . . . 253tcl . . . . . . . . . . . . . . . . . . . . . . . . . . . . . . . . . . . . . . . . . . . . . 292tclx . . . . . . . . . . . . . . . . . . . . . . . . . . . . . . . . . . . . . . . . . . . . 292tcp wrappers . . . . . . . . . . . . . . . . . . . . . . . . . . . . . . . . . . 327tcpdump . . . . . . . . . . . . . . . . . . . . . . . . . . . . . . . . . . . . . . 267tcsh. . . . . . . . . . . . . . . . . . . . . . . . . . . . . . . . . . . . . . . . . . . .338telnet . . . . . . . . . . . . . . . . . . . . . . . . . . . . . . . . . . . . . . . . . . 267termcap . . . . . . . . . . . . . . . . . . . . . . . . . . . . . . . . . . . . . . . 318tetex . . . . . . . . . . . . . . . . . . . . . . . . . . . . . . . . . . . . . . . . . . . 275tetex-afm . . . . . . . . . . . . . . . . . . . . . . . . . . . . . . . . . . . . . . 276tetex-doc . . . . . . . . . . . . . . . . . . . . . . . . . . . . . . . . . . . . . . 276tetex-dvilj . . . . . . . . . . . . . . . . . . . . . . . . . . . . . . . . . . . . . 276tetex-dvips . . . . . . . . . . . . . . . . . . . . . . . . . . . . . . . . . . . . 276tetex-latex . . . . . . . . . . . . . . . . . . . . . . . . . . . . . . . . . . . . . 276tetex-xdvi . . . . . . . . . . . . . . . . . . . . . . . . . . . . . . . . . . . . . 277texinfo. . . . . . . . . . . . . . . . . . . . . . . . . . . . . . . . . . . . . . . . .277textutils . . . . . . . . . . . . . . . . . . . . . . . . . . . . . . . . . . . . . . . 287tftp . . . . . . . . . . . . . . . . . . . . . . . . . . . . . . . . . . . . . . . . . . . . 327time . . . . . . . . . . . . . . . . . . . . . . . . . . . . . . . . . . . . . . . . . . . 284timeconfig . . . . . . . . . . . . . . . . . . . . . . . . . . . . . . . . . . . . . 318timed . . . . . . . . . . . . . . . . . . . . . . . . . . . . . . . . . . . . . . . . . . 327timetool . . . . . . . . . . . . . . . . . . . . . . . . . . . . . . . . . . . . . . . 284tin . . . . . . . . . . . . . . . . . . . . . . . . . . . . . . . . . . . . . . . . . . . . . 267tix . . . . . . . . . . . . . . . . . . . . . . . . . . . . . . . . . . . . . . . . . . . . . 292tk. . . . . . . . . . . . . . . . . . . . . . . . . . . . . . . . . . . . . . . . . . . . . .293tkinter . . . . . . . . . . . . . . . . . . . . . . . . . . . . . . . . . . . . . . . . . 293tksysv . . . . . . . . . . . . . . . . . . . . . . . . . . . . . . . . . . . . . . . . . 284tmpwatch . . . . . . . . . . . . . . . . . . . . . . . . . . . . . . . . . . . . . 319traceroute . . . . . . . . . . . . . . . . . . . . . . . . . . . . . . . . . . . . . 267transfig . . . . . . . . . . . . . . . . . . . . . . . . . . . . . . . . . . . . . . . . 272tree . . . . . . . . . . . . . . . . . . . . . . . . . . . . . . . . . . . . . . . . . . . . 262trn . . . . . . . . . . . . . . . . . . . . . . . . . . . . . . . . . . . . . . . . . . . . . 267trojka . . . . . . . . . . . . . . . . . . . . . . . . . . . . . . . . . . . . . . . . . . 250tunelp . . . . . . . . . . . . . . . . . . . . . . . . . . . . . . . . . . . . . . . . . 284
Uucd-snmp . . . . . . . . . . . . . . . . . . . . . . . . . . . . . . . . . . . . . 327ucd-snmp-devel . . . . . . . . . . . . . . . . . . . . . . . . . . . . . . . 300ucd-snmp-utils . . . . . . . . . . . . . . . . . . . . . . . . . . . . . . . . 284umb-scheme . . . . . . . . . . . . . . . . . . . . . . . . . . . . . . . . . . . 293

INDEX OF PACKAGES 411
unarj . . . . . . . . . . . . . . . . . . . . . . . . . . . . . . . . . . . . . . . . . . 254units. . . . . . . . . . . . . . . . . . . . . . . . . . . . . . . . . . . . . . . . . . .260unzip . . . . . . . . . . . . . . . . . . . . . . . . . . . . . . . . . . . . . . . . . . 254urlview . . . . . . . . . . . . . . . . . . . . . . . . . . . . . . . . . . . . . . . . 267urw-fonts . . . . . . . . . . . . . . . . . . . . . . . . . . . . . . . . . . . . . . 349usermode. . . . . . . . . . . . . . . . . . . . . . . . . . . . . . . . . . . . . .284usernet . . . . . . . . . . . . . . . . . . . . . . . . . . . . . . . . . . . . . . . . 285utempter . . . . . . . . . . . . . . . . . . . . . . . . . . . . . . . . . . . . . . 319util-linux . . . . . . . . . . . . . . . . . . . . . . . . . . . . . . . . . . . . . . 319uucp . . . . . . . . . . . . . . . . . . . . . . . . . . . . . . . . . . . . . . . . . . 256
Vvim-common . . . . . . . . . . . . . . . . . . . . . . . . . . . . . . . . . . 259vim-enhanced . . . . . . . . . . . . . . . . . . . . . . . . . . . . . . . . . 259vim-minimal . . . . . . . . . . . . . . . . . . . . . . . . . . . . . . . . . . 259vim-X11 . . . . . . . . . . . . . . . . . . . . . . . . . . . . . . . . . . . . . . . 258vixie-cron. . . . . . . . . . . . . . . . . . . . . . . . . . . . . . . . . . . . . .319vlock . . . . . . . . . . . . . . . . . . . . . . . . . . . . . . . . . . . . . . . . . . 285
Ww3c-libwww. . . . . . . . . . . . . . . . . . . . . . . . . . . . . . . . . . .336w3c-libwww-apps . . . . . . . . . . . . . . . . . . . . . . . . . . . . . 267w3c-libwww-devel . . . . . . . . . . . . . . . . . . . . . . . . . . . . 300wget . . . . . . . . . . . . . . . . . . . . . . . . . . . . . . . . . . . . . . . . . . . 268which . . . . . . . . . . . . . . . . . . . . . . . . . . . . . . . . . . . . . . . . . 285WindowMaker . . . . . . . . . . . . . . . . . . . . . . . . . . . . . . . . 339wmakerconf . . . . . . . . . . . . . . . . . . . . . . . . . . . . . . . . . . . 341wmconfig . . . . . . . . . . . . . . . . . . . . . . . . . . . . . . . . . . . . . 341words . . . . . . . . . . . . . . . . . . . . . . . . . . . . . . . . . . . . . . . . . 336wu-ftpd . . . . . . . . . . . . . . . . . . . . . . . . . . . . . . . . . . . . . . . 328
Xx11amp . . . . . . . . . . . . . . . . . . . . . . . . . . . . . . . . . . . . . . . . 272x11amp-devel . . . . . . . . . . . . . . . . . . . . . . . . . . . . . . . . . 300X11R6-contrib . . . . . . . . . . . . . . . . . . . . . . . . . . . . . . . . . 345x3270 . . . . . . . . . . . . . . . . . . . . . . . . . . . . . . . . . . . . . . . . . . 349xanim . . . . . . . . . . . . . . . . . . . . . . . . . . . . . . . . . . . . . . . . . 272Xaw3d. . . . . . . . . . . . . . . . . . . . . . . . . . . . . . . . . . . . . . . . .330Xaw3d-devel . . . . . . . . . . . . . . . . . . . . . . . . . . . . . . . . . . 294xbanner . . . . . . . . . . . . . . . . . . . . . . . . . . . . . . . . . . . . . . . 251xbill . . . . . . . . . . . . . . . . . . . . . . . . . . . . . . . . . . . . . . . . . . . 250xboard. . . . . . . . . . . . . . . . . . . . . . . . . . . . . . . . . . . . . . . . .250xboing . . . . . . . . . . . . . . . . . . . . . . . . . . . . . . . . . . . . . . . . . 250xchat . . . . . . . . . . . . . . . . . . . . . . . . . . . . . . . . . . . . . . . . . . 268Xconfigurator. . . . . . . . . . . . . . . . . . . . . . . . . . . . . . . . . . 345xcpustate . . . . . . . . . . . . . . . . . . . . . . . . . . . . . . . . . . . . . . 285xdaliclock . . . . . . . . . . . . . . . . . . . . . . . . . . . . . . . . . . . . . 251xdosemu . . . . . . . . . . . . . . . . . . . . . . . . . . . . . . . . . . . . . . 260
xearth . . . . . . . . . . . . . . . . . . . . . . . . . . . . . . . . . . . . . . . . . 251xfig . . . . . . . . . . . . . . . . . . . . . . . . . . . . . . . . . . . . . . . . . . . . 272xfishtank . . . . . . . . . . . . . . . . . . . . . . . . . . . . . . . . . . . . . . 251xfm . . . . . . . . . . . . . . . . . . . . . . . . . . . . . . . . . . . . . . . . . . . . 342XFree86 . . . . . . . . . . . . . . . . . . . . . . . . . . . . . . . . . . . . . . . 346XFree86-100dpi-fonts . . . . . . . . . . . . . . . . . . . . . . . . . . 346XFree86-3DLabs . . . . . . . . . . . . . . . . . . . . . . . . . . . . . . . 342XFree86-75dpi-fonts . . . . . . . . . . . . . . . . . . . . . . . . . . . 346XFree86-8514 . . . . . . . . . . . . . . . . . . . . . . . . . . . . . . . . . . 342XFree86-AGX . . . . . . . . . . . . . . . . . . . . . . . . . . . . . . . . . . 342XFree86-cyrillic-fonts . . . . . . . . . . . . . . . . . . . . . . . . . . 348XFree86-devel . . . . . . . . . . . . . . . . . . . . . . . . . . . . . . . . . 293XFree86-doc . . . . . . . . . . . . . . . . . . . . . . . . . . . . . . . . . . . 306XFree86-FBDev . . . . . . . . . . . . . . . . . . . . . . . . . . . . . . . . 342XFree86-I128. . . . . . . . . . . . . . . . . . . . . . . . . . . . . . . . . . .343XFree86-ISO8859-2. . . . . . . . . . . . . . . . . . . . . . . . . . . . .346XFree86-ISO8859-2-100dpi-fonts . . . . . . . . . . . . . . . 347XFree86-ISO8859-2-75dpi-fonts . . . . . . . . . . . . . . . . 347XFree86-ISO8859-2-Type1-fonts . . . . . . . . . . . . . . . . 347XFree86-ISO8859-9. . . . . . . . . . . . . . . . . . . . . . . . . . . . .348XFree86-ISO8859-9-100dpi-fonts . . . . . . . . . . . . . . . 347XFree86-ISO8859-9-75dpi-fonts . . . . . . . . . . . . . . . . 348XFree86-libs . . . . . . . . . . . . . . . . . . . . . . . . . . . . . . . . . . . 329XFree86-Mach32 . . . . . . . . . . . . . . . . . . . . . . . . . . . . . . . 343XFree86-Mach64 . . . . . . . . . . . . . . . . . . . . . . . . . . . . . . . 343XFree86-Mach8 . . . . . . . . . . . . . . . . . . . . . . . . . . . . . . . . 343XFree86-Mono . . . . . . . . . . . . . . . . . . . . . . . . . . . . . . . . . 343XFree86-P9000 . . . . . . . . . . . . . . . . . . . . . . . . . . . . . . . . . 343XFree86-S3 . . . . . . . . . . . . . . . . . . . . . . . . . . . . . . . . . . . . 344XFree86-S3V . . . . . . . . . . . . . . . . . . . . . . . . . . . . . . . . . . . 344XFree86-SVGA . . . . . . . . . . . . . . . . . . . . . . . . . . . . . . . . 344XFree86-VGA16 . . . . . . . . . . . . . . . . . . . . . . . . . . . . . . . 344XFree86-W32 . . . . . . . . . . . . . . . . . . . . . . . . . . . . . . . . . . 344XFree86-XF86Setup . . . . . . . . . . . . . . . . . . . . . . . . . . . . 344XFree86-xfs . . . . . . . . . . . . . . . . . . . . . . . . . . . . . . . . . . . . 320XFree86-Xnest . . . . . . . . . . . . . . . . . . . . . . . . . . . . . . . . . 345XFree86-Xvfb . . . . . . . . . . . . . . . . . . . . . . . . . . . . . . . . . . 345xgammon . . . . . . . . . . . . . . . . . . . . . . . . . . . . . . . . . . . . . 250xinitrc . . . . . . . . . . . . . . . . . . . . . . . . . . . . . . . . . . . . . . . . . 349xjewel . . . . . . . . . . . . . . . . . . . . . . . . . . . . . . . . . . . . . . . . . 250xlispstat . . . . . . . . . . . . . . . . . . . . . . . . . . . . . . . . . . . . . . . 260xloadimage . . . . . . . . . . . . . . . . . . . . . . . . . . . . . . . . . . . . 251xlockmore . . . . . . . . . . . . . . . . . . . . . . . . . . . . . . . . . . . . . 252xmailbox . . . . . . . . . . . . . . . . . . . . . . . . . . . . . . . . . . . . . . 268xmorph. . . . . . . . . . . . . . . . . . . . . . . . . . . . . . . . . . . . . . . .252xntp3 . . . . . . . . . . . . . . . . . . . . . . . . . . . . . . . . . . . . . . . . . . 328xosview . . . . . . . . . . . . . . . . . . . . . . . . . . . . . . . . . . . . . . . 285xpaint . . . . . . . . . . . . . . . . . . . . . . . . . . . . . . . . . . . . . . . . . 272xpat2 . . . . . . . . . . . . . . . . . . . . . . . . . . . . . . . . . . . . . . . . . . 250xpdf . . . . . . . . . . . . . . . . . . . . . . . . . . . . . . . . . . . . . . . . . . . 277xpilot . . . . . . . . . . . . . . . . . . . . . . . . . . . . . . . . . . . . . . . . . . 250

412 INDEX OF PACKAGES
xpm . . . . . . . . . . . . . . . . . . . . . . . . . . . . . . . . . . . . . . . . . . . 337xpm-devel . . . . . . . . . . . . . . . . . . . . . . . . . . . . . . . . . . . . . 300xpuzzles . . . . . . . . . . . . . . . . . . . . . . . . . . . . . . . . . . . . . . . 251xrn . . . . . . . . . . . . . . . . . . . . . . . . . . . . . . . . . . . . . . . . . . . . 268xscreensaver . . . . . . . . . . . . . . . . . . . . . . . . . . . . . . . . . . . 252xsysinfo . . . . . . . . . . . . . . . . . . . . . . . . . . . . . . . . . . . . . . . 285xtoolwait . . . . . . . . . . . . . . . . . . . . . . . . . . . . . . . . . . . . . . 285xtrojka . . . . . . . . . . . . . . . . . . . . . . . . . . . . . . . . . . . . . . . . . 251xwpick . . . . . . . . . . . . . . . . . . . . . . . . . . . . . . . . . . . . . . . . 252xxgdb . . . . . . . . . . . . . . . . . . . . . . . . . . . . . . . . . . . . . . . . . 288
Yyp-tools . . . . . . . . . . . . . . . . . . . . . . . . . . . . . . . . . . . . . . . 319ypbind . . . . . . . . . . . . . . . . . . . . . . . . . . . . . . . . . . . . . . . . 328ypserv . . . . . . . . . . . . . . . . . . . . . . . . . . . . . . . . . . . . . . . . . 328ytalk. . . . . . . . . . . . . . . . . . . . . . . . . . . . . . . . . . . . . . . . . . .268
Zzgv . . . . . . . . . . . . . . . . . . . . . . . . . . . . . . . . . . . . . . . . . . . . 272zip . . . . . . . . . . . . . . . . . . . . . . . . . . . . . . . . . . . . . . . . . . . . 254zlib . . . . . . . . . . . . . . . . . . . . . . . . . . . . . . . . . . . . . . . . . . . . 337zlib-devel . . . . . . . . . . . . . . . . . . . . . . . . . . . . . . . . . . . . . . 301zsh . . . . . . . . . . . . . . . . . . . . . . . . . . . . . . . . . . . . . . . . . . . . 338