red hat enterprise linux 9 managing certificates in idm
TRANSCRIPT
Red Hat Enterprise Linux 9
Managing certificates in IdM
Issuing certificates, configuring certificate-based authentication, and controllingcertificate validity in Identity Management in Red Hat Enterprise Linux 9
Last Updated: 2022-05-18

Red Hat Enterprise Linux 9 Managing certificates in IdM
Issuing certificates, configuring certificate-based authentication, and controlling certificate validityin Identity Management in Red Hat Enterprise Linux 9
Legal Notice
Copyright © 2022 Red Hat, Inc.
The text of and illustrations in this document are licensed by Red Hat under a Creative CommonsAttribution–Share Alike 3.0 Unported license ("CC-BY-SA"). An explanation of CC-BY-SA isavailable athttp://creativecommons.org/licenses/by-sa/3.0/. In accordance with CC-BY-SA, if you distribute this document or an adaptation of it, you mustprovide the URL for the original version.
Red Hat, as the licensor of this document, waives the right to enforce, and agrees not to assert,Section 4d of CC-BY-SA to the fullest extent permitted by applicable law.
Red Hat, Red Hat Enterprise Linux, the Shadowman logo, the Red Hat logo, JBoss, OpenShift,Fedora, the Infinity logo, and RHCE are trademarks of Red Hat, Inc., registered in the United Statesand other countries.
Linux ® is the registered trademark of Linus Torvalds in the United States and other countries.
Java ® is a registered trademark of Oracle and/or its affiliates.
XFS ® is a trademark of Silicon Graphics International Corp. or its subsidiaries in the United Statesand/or other countries.
MySQL ® is a registered trademark of MySQL AB in the United States, the European Union andother countries.
Node.js ® is an official trademark of Joyent. Red Hat is not formally related to or endorsed by theofficial Joyent Node.js open source or commercial project.
The OpenStack ® Word Mark and OpenStack logo are either registered trademarks/service marksor trademarks/service marks of the OpenStack Foundation, in the United States and othercountries and are used with the OpenStack Foundation's permission. We are not affiliated with,endorsed or sponsored by the OpenStack Foundation, or the OpenStack community.
All other trademarks are the property of their respective owners.
Abstract
This documentation covers managing certificates issued by the IdM Certificate Authority,configuring user accounts to use certificates for authentication, and certificate maintenance inIdentity Management on Red Hat Enterprise Linux 9.
. . . . . . . . . . . . . . . . . . . . . . . . . . . . . . . . . . . . . . . . . . . . . . . . . . . . . . . . . . . . . . . . . . . . . . . . . . . . . . . . . . . . . . . . . . . . . . . . . . . . . . . . . . . . . . . . . . . . . . . . . . . . . . . . . . . . . . . . . . . . . . . . . . . . . . . . . . . . . . . . . . . . . . . . . . . . . . . . . . . . . . . . . . . . . . . . . . . . . . . . . . . . . . . . . . . . . . . . . . . . . . . . . . . . . . . . . . . . . . . . . . . . . . . . . . . . . . . . . . . . . . . . . . . . . . . . . . . . . . . .
. . . . . . . . . . . . . . . . . . . . . . . . . . . . . . . . . . . . . . . . . . . . . . . . . . . . . . . . . . . . . . . . . . . . . . . . . . . . . . . . . . . . . . . . . . . . . . . . . . . . . . . . . . . . . . . . . . . . . . . . . . . . . . . . . . . . . . . . . . . . . . . . . . . . . . . . . . . . . . . . . . . . . . . . . . . . . . . . . . . . . . . . . . . . . . . . . . . . . . . . . . . . . . . . . . . . . . . . . . . . . . . . . . . . . . . . . . . . . . . . . . . . . . . . . . . . . . . . . . . . . . . . . . . . . . . . . . . . . . . .
. . . . . . . . . . . . . . . . . . . . . . . . . . . . . . . . . . . . . . . . . . . . . . . . . . . . . . . . . . . . . . . . . . . . . . . . . . . . . . . . . . . . . . . . . . . . . . . . . . . . . . . . . . . . . . . . . . . . . . . . . . . . . . . . . . . . . . . . . . . . . . . . . . . . . . . . . . . . . . . . . . . . . . . . . . . . . . . . . . . . . . . . . . . . . . . . . . . . . . . . . . . . . . . . . . . . . . . . . . . . . . . . . . . . . . . . . . . . . . . . . . . . . . . . . . . . . . . . . . . . . . . . . . . . . . . . . . . . . . . .
. . . . . . . . . . . . . . . . . . . . . . . . . . . . . . . . . . . . . . . . . . . . . . . . . . . . . . . . . . . . . . . . . . . . . . . . . . . . . . . . . . . . . . . . . . . . . . . . . . . . . . . . . . . . . . . . . . . . . . . . . . . . . . . . . . . . . . . . . . . . . . . . . . . . . . . . . . . . . . . . . . . . . . . . . . . . . . . . . . . . . . . . . . . . . . . . . . . . . . . . . . . . . . . . . . . . . . . . . . . . . . . . . . . . . . . . . . . . . . . . . . . . . . . . . . . . . . . . . . . . . . . . . . . . . . . . . . . . . . . .
. . . . . . . . . . . . . . . . . . . . . . . . . . . . . . . . . . . . . . . . . . . . . . . . . . . . . . . . . . . . . . . . . . . . . . . . . . . . . . . . . . . . . . . . . . . . . . . . . . . . . . . . . . . . . . . . . . . . . . . . . . . . . . . . . . . . . . . . . . . . . . . . . . . . . . . . . . . . . . . . . . . . . . . . . . . . . . . . . . . . . . . . . . . . . . . . . . . . . . . . . . . . . . . . . . . . . . . . . . . . . . . . . . . . . . . . . . . . . . . . . . . . . . . . . . . . . . . . . . . . . . . . . . . . . . . . . . . . . . . .
. . . . . . . . . . . . . . . . . . . . . . . . . . . . . . . . . . . . . . . . . . . . . . . . . . . . . . . . . . . . . . . . . . . . . . . . . . . . . . . . . . . . . . . . . . . . . . . . . . . . . . . . . . . . . . . . . . . . . . . . . . . . . . . . . . . . . . . . . . . . . . . . . . . . . . . . . . . . . . . . . . . . . . . . . . . . . . . . . . . . . . . . . . . . . . . . . . . . . . . . . . . . . . . . . . . . . . . . . . . . . . . . . . . . . . . . . . . . . . . . . . . . . . . . . . . . . . . . . . . . . . . . . . . . . . . . . . . . . . . .
. . . . . . . . . . . . . . . . . . . . . . . . . . . . . . . . . . . . . . . . . . . . . . . . . . . . . . . . . . . . . . . . . . . . . . . . . . . . . . . . . . . . . . . . . . . . . . . . . . . . . . . . . . . . . . . . . . . . . . . . . . . . . . . . . . . . . . . . . . . . . . . . . . . . . . . . . . . . . . . . . . . . . . . . . . . . . . . . . . . . . . . . . . . . . . . . . . . . . . . . . . . . . . . . . . . . . . . . . . . . . . . . . . . . . . . . . . . . . . . . . . . . . . . . . . . . . . . . . . . . . . . . . . . . . . . . . . . . . . . .
. . . . . . . . . . . . . . . . . . . . . . . . . . . . . . . . . . . . . . . . . . . . . . . . . . . . . . . . . . . . . . . . . . . . . . . . . . . . . . . . . . . . . . . . . . . . . . . . . . . . . . . . . . . . . . . . . . . . . . . . . . . . . . . . . . . . . . . . . . . . . . . . . . . . . . . . . . . . . . . . . . . . . . . . . . . . . . . . . . . . . . . . . . . . . . . . . . . . . . . . . . . . . . . . . . . . . . . . . . . . . . . . . . . . . . . . . . . . . . . . . . . . . . . . . . . . . . . . . . . . . . . . . . . . . . . . . . . . . . . .
Table of Contents
MAKING OPEN SOURCE MORE INCLUSIVE
PROVIDING FEEDBACK ON RED HAT DOCUMENTATION
CHAPTER 1. PUBLIC KEY CERTIFICATES IN IDENTITY MANAGEMENT1.1. CERTIFICATE AUTHORITIES IN IDM1.2. COMPARISON OF CERTIFICATES AND KERBEROS1.3. THE PROS AND CONS OF USING CERTIFICATES TO AUTHENTICATE USERS IN IDM
CHAPTER 2. MANAGING CERTIFICATES FOR USERS, HOSTS, AND SERVICES USING THE INTEGRATED IDMCA
2.1. REQUESTING NEW CERTIFICATES FOR A USER, HOST, OR SERVICE USING IDM WEB UI2.2. REQUESTING NEW CERTIFICATES FOR A USER, HOST, OR SERVICE FROM IDM CA USING CERTUTIL
2.3. REQUESTING NEW CERTIFICATES FOR A USER, HOST, OR SERVICE FROM IDM CA USING OPENSSL
2.4. ADDITIONAL RESOURCES
CHAPTER 3. MANAGING EXTERNALLY SIGNED CERTIFICATES FOR IDM USERS, HOSTS, AND SERVICES
3.1. ADDING A CERTIFICATE ISSUED BY AN EXTERNAL CA TO AN IDM USER, HOST, OR SERVICE BY USINGTHE IDM CLI3.2. ADDING A CERTIFICATE ISSUED BY AN EXTERNAL CA TO AN IDM USER, HOST, OR SERVICE BY USINGTHE IDM WEB UI3.3. REMOVING A CERTIFICATE ISSUED BY AN EXTERNAL CA FROM AN IDM USER, HOST, OR SERVICEACCOUNT BY USING THE IDM CLI3.4. REMOVING A CERTIFICATE ISSUED BY AN EXTERNAL CA FROM AN IDM USER, HOST, OR SERVICEACCOUNT BY USING THE IDM WEB UI3.5. ADDITIONAL RESOURCES
CHAPTER 4. CONVERTING CERTIFICATE FORMATS TO WORK WITH IDM4.1. CERTIFICATE FORMATS AND ENCODINGS IN IDM4.2. CONVERTING AN EXTERNAL CERTIFICATE TO LOAD INTO AN IDM USER ACCOUNT
4.2.1. Prerequisites4.2.2. Converting an external certificate in the IdM CLI and loading it into an IdM user account4.2.3. Converting an external certificate in the IdM web UI for loading into an IdM user account
4.3. PREPARING TO LOAD A CERTIFICATE INTO THE BROWSER4.3.1. Exporting a certificate and private key from an NSS database into a PKCS #12 file4.3.2. Combining certificate and private key PEM files into a PKCS #12 file
4.4. CERTIFICATE-RELATED COMMANDS AND FORMATS IN IDM
CHAPTER 5. CREATING AND MANAGING CERTIFICATE PROFILES IN IDENTITY MANAGEMENT5.1. WHAT IS A CERTIFICATE PROFILE?5.2. CREATING A CERTIFICATE PROFILE5.3. WHAT IS A CA ACCESS CONTROL LIST?5.4. DEFINING A CA ACL TO CONTROL ACCESS TO CERTIFICATE PROFILES5.5. USING CERTIFICATE PROFILES AND CA ACLS TO ISSUE CERTIFICATES5.6. MODIFYING A CERTIFICATE PROFILE5.7. CERTIFICATE PROFILE CONFIGURATION PARAMETERS
CHAPTER 6. MANAGING THE VALIDITY OF CERTIFICATES IN IDM6.1. MANAGING THE VALIDITY OF AN EXISTING CERTIFICATE THAT WAS ISSUED BY IDM CA6.2. MANAGING THE VALIDITY OF FUTURE CERTIFICATES ISSUED BY IDM CA6.3. VIEWING THE EXPIRY DATE OF A CERTIFICATE IN IDM WEBUI
6
7
8899
1112
13
1415
16
16
17
17
1819
20202222222324242425
2727282930323334
38383838
Table of Contents
1

. . . . . . . . . . . . . . . . . . . . . . . . . . . . . . . . . . . . . . . . . . . . . . . . . . . . . . . . . . . . . . . . . . . . . . . . . . . . . . . . . . . . . . . . . . . . . . . . . . . . . . . . . . . . . . . . . . . . . . . . . . . . . . . . . . . . . . . . . . . . . . . . . . . . . . . . . . . . . . . . . . . . . . . . . . . . . . . . . . . . . . . . . . . . . . . . . . . . . . . . . . . . . . . . . . . . . . . . . . . . . . . . . . . . . . . . . . . . . . . . . . . . . . . . . . . . . . . . . . . . . . . . . . . . . . . . . . . . . . . .
. . . . . . . . . . . . . . . . . . . . . . . . . . . . . . . . . . . . . . . . . . . . . . . . . . . . . . . . . . . . . . . . . . . . . . . . . . . . . . . . . . . . . . . . . . . . . . . . . . . . . . . . . . . . . . . . . . . . . . . . . . . . . . . . . . . . . . . . . . . . . . . . . . . . . . . . . . . . . . . . . . . . . . . . . . . . . . . . . . . . . . . . . . . . . . . . . . . . . . . . . . . . . . . . . . . . . . . . . . . . . . . . . . . . . . . . . . . . . . . . . . . . . . . . . . . . . . . . . . . . . . . . . . . . . . . . . . . . . . . .
. . . . . . . . . . . . . . . . . . . . . . . . . . . . . . . . . . . . . . . . . . . . . . . . . . . . . . . . . . . . . . . . . . . . . . . . . . . . . . . . . . . . . . . . . . . . . . . . . . . . . . . . . . . . . . . . . . . . . . . . . . . . . . . . . . . . . . . . . . . . . . . . . . . . . . . . . . . . . . . . . . . . . . . . . . . . . . . . . . . . . . . . . . . . . . . . . . . . . . . . . . . . . . . . . . . . . . . . . . . . . . . . . . . . . . . . . . . . . . . . . . . . . . . . . . . . . . . . . . . . . . . . . . . . . . . . . . . . . . . .
6.4. VIEWING THE EXPIRY DATE OF A CERTIFICATE IN THE CLI6.5. REVOKING CERTIFICATES WITH THE INTEGRATED IDM CAS
6.5.1. Certificate revocation reasons6.5.2. Revoking certificates with the integrated IdM CAs using IdM WebUI6.5.3. Revoking certificates with the integrated IdM CAs using IdM CLI
6.6. RESTORING CERTIFICATES WITH THE INTEGRATED IDM CAS6.6.1. Restoring certificates with the integrated IdM CAs using IdM WebUI6.6.2. Restoring certificates with the integrated IdM CAs using IdM CLI
CHAPTER 7. CONFIGURING IDENTITY MANAGEMENT FOR SMART CARD AUTHENTICATION7.1. CONFIGURING THE IDM SERVER FOR SMART CARD AUTHENTICATION7.2. CONFIGURING THE IDM CLIENT FOR SMART CARD AUTHENTICATION7.3. ADDING A CERTIFICATE TO A USER ENTRY IN THE IDM WEB UI7.4. ADDING A CERTIFICATE TO A USER ENTRY IN THE IDM CLI7.5. INSTALLING TOOLS FOR MANAGING AND USING SMART CARDS7.6. STORING A CERTIFICATE ON A SMART CARD7.7. LOGGING IN TO IDM WITH SMART CARDS7.8. CONFIGURING GDM ACCESS USING SMART CARD AUTHENTICATION7.9. CONFIGURING SU ACCESS USING SMART CARD AUTHENTICATION
CHAPTER 8. CONFIGURING CERTIFICATES ISSUED BY ADCS FOR SMART CARD AUTHENTICATION IN IDM
8.1. SMART CARD AUTHENTICATION8.2. WINDOWS SERVER SETTINGS REQUIRED FOR TRUST CONFIGURATION AND CERTIFICATE USAGE8.3. COPYING CERTIFICATES FROM ACTIVE DIRECTORY USING SFTP8.4. CONFIGURING THE IDM SERVER AND CLIENTS FOR SMART CARD AUTHENTICATION USING ADCSCERTIFICATES8.5. CONVERTING THE PFX FILE8.6. INSTALLING TOOLS FOR MANAGING AND USING SMART CARDS8.7. STORING A CERTIFICATE ON A SMART CARD8.8. CONFIGURING TIMEOUTS IN SSSD.CONF8.9. CREATING CERTIFICATE MAPPING RULES FOR SMART CARD AUTHENTICATION
CHAPTER 9. CONFIGURING CERTIFICATE MAPPING RULES IN IDENTITY MANAGEMENT9.1. CERTIFICATE MAPPING RULES FOR CONFIGURING AUTHENTICATION ON SMART CARDS
9.1.1. Certificate mapping rules for trusts with Active Directory domains9.1.2. Components of an identity mapping rule in IdM9.1.3. Obtaining the issuer from a certificate for use in a matching rule9.1.4. Additional resources
9.2. CONFIGURING CERTIFICATE MAPPING FOR USERS STORED IN IDM9.2.1. Adding a certificate mapping rule in the IdM web UI9.2.2. Adding a certificate mapping rule in the IdM CLI9.2.3. Adding certificate mapping data to a user entry in the IdM web UI9.2.4. Adding certificate mapping data to a user entry in the IdM CLI
9.3. CONFIGURING CERTIFICATE MAPPING FOR USERS WHOSE AD USER ENTRY CONTAINS THE WHOLECERTIFICATE
9.3.1. Adding a certificate mapping rule in the IdM web UI9.3.2. Adding a certificate mapping rule in the IdM CLI
9.4. CONFIGURING CERTIFICATE MAPPING IF AD IS CONFIGURED TO MAP USER CERTIFICATES TO USERACCOUNTS
9.4.1. Adding a certificate mapping rule in the IdM web UI9.4.2. Adding a certificate mapping rule in the IdM CLI9.4.3. Checking certificate mapping data on the AD side
9.5. CONFIGURING CERTIFICATE MAPPING IF AD USER ENTRY CONTAINS NO CERTIFICATE OR MAPPING
39393940414141
42
4343454748495051
5353
55555656
5758596061
62
6363636465666666676870
717172
73737474
Red Hat Enterprise Linux 9 Managing certificates in IdM
2

. . . . . . . . . . . . . . . . . . . . . . . . . . . . . . . . . . . . . . . . . . . . . . . . . . . . . . . . . . . . . . . . . . . . . . . . . . . . . . . . . . . . . . . . . . . . . . . . . . . . . . . . . . . . . . . . . . . . . . . . . . . . . . . . . . . . . . . . . . . . . . . . . . . . . . . . . . . . . . . . . . . . . . . . . . . . . . . . . . . . . . . . . . . . . . . . . . . . . . . . . . . . . . . . . . . . . . . . . . . . . . . . . . . . . . . . . . . . . . . . . . . . . . . . . . . . . . . . . . . . . . . . . . . . . . . . . . . . . . . .
. . . . . . . . . . . . . . . . . . . . . . . . . . . . . . . . . . . . . . . . . . . . . . . . . . . . . . . . . . . . . . . . . . . . . . . . . . . . . . . . . . . . . . . . . . . . . . . . . . . . . . . . . . . . . . . . . . . . . . . . . . . . . . . . . . . . . . . . . . . . . . . . . . . . . . . . . . . . . . . . . . . . . . . . . . . . . . . . . . . . . . . . . . . . . . . . . . . . . . . . . . . . . . . . . . . . . . . . . . . . . . . . . . . . . . . . . . . . . . . . . . . . . . . . . . . . . . . . . . . . . . . . . . . . . . . . . . . . . . . .
. . . . . . . . . . . . . . . . . . . . . . . . . . . . . . . . . . . . . . . . . . . . . . . . . . . . . . . . . . . . . . . . . . . . . . . . . . . . . . . . . . . . . . . . . . . . . . . . . . . . . . . . . . . . . . . . . . . . . . . . . . . . . . . . . . . . . . . . . . . . . . . . . . . . . . . . . . . . . . . . . . . . . . . . . . . . . . . . . . . . . . . . . . . . . . . . . . . . . . . . . . . . . . . . . . . . . . . . . . . . . . . . . . . . . . . . . . . . . . . . . . . . . . . . . . . . . . . . . . . . . . . . . . . . . . . . . . . . . . . .
. . . . . . . . . . . . . . . . . . . . . . . . . . . . . . . . . . . . . . . . . . . . . . . . . . . . . . . . . . . . . . . . . . . . . . . . . . . . . . . . . . . . . . . . . . . . . . . . . . . . . . . . . . . . . . . . . . . . . . . . . . . . . . . . . . . . . . . . . . . . . . . . . . . . . . . . . . . . . . . . . . . . . . . . . . . . . . . . . . . . . . . . . . . . . . . . . . . . . . . . . . . . . . . . . . . . . . . . . . . . . . . . . . . . . . . . . . . . . . . . . . . . . . . . . . . . . . . . . . . . . . . . . . . . . . . . . . . . . . . .
. . . . . . . . . . . . . . . . . . . . . . . . . . . . . . . . . . . . . . . . . . . . . . . . . . . . . . . . . . . . . . . . . . . . . . . . . . . . . . . . . . . . . . . . . . . . . . . . . . . . . . . . . . . . . . . . . . . . . . . . . . . . . . . . . . . . . . . . . . . . . . . . . . . . . . . . . . . . . . . . . . . . . . . . . . . . . . . . . . . . . . . . . . . . . . . . . . . . . . . . . . . . . . . . . . . . . . . . . . . . . . . . . . . . . . . . . . . . . . . . . . . . . . . . . . . . . . . . . . . . . . . . . . . . . . . . . . . . . . . .
. . . . . . . . . . . . . . . . . . . . . . . . . . . . . . . . . . . . . . . . . . . . . . . . . . . . . . . . . . . . . . . . . . . . . . . . . . . . . . . . . . . . . . . . . . . . . . . . . . . . . . . . . . . . . . . . . . . . . . . . . . . . . . . . . . . . . . . . . . . . . . . . . . . . . . . . . . . . . . . . . . . . . . . . . . . . . . . . . . . . . . . . . . . . . . . . . . . . . . . . . . . . . . . . . . . . . . . . . . . . . . . . . . . . . . . . . . . . . . . . . . . . . . . . . . . . . . . . . . . . . . . . . . . . . . . . . . . . . . . .
. . . . . . . . . . . . . . . . . . . . . . . . . . . . . . . . . . . . . . . . . . . . . . . . . . . . . . . . . . . . . . . . . . . . . . . . . . . . . . . . . . . . . . . . . . . . . . . . . . . . . . . . . . . . . . . . . . . . . . . . . . . . . . . . . . . . . . . . . . . . . . . . . . . . . . . . . . . . . . . . . . . . . . . . . . . . . . . . . . . . . . . . . . . . . . . . . . . . . . . . . . . . . . . . . . . . . . . . . . . . . . . . . . . . . . . . . . . . . . . . . . . . . . . . . . . . . . . . . . . . . . . . . . . . . . . . . . . . . . . .
. . . . . . . . . . . . . . . . . . . . . . . . . . . . . . . . . . . . . . . . . . . . . . . . . . . . . . . . . . . . . . . . . . . . . . . . . . . . . . . . . . . . . . . . . . . . . . . . . . . . . . . . . . . . . . . . . . . . . . . . . . . . . . . . . . . . . . . . . . . . . . . . . . . . . . . . . . . . . . . . . . . . . . . . . . . . . . . . . . . . . . . . . . . . . . . . . . . . . . . . . . . . . . . . . . . . . . . . . . . . . . . . . . . . . . . . . . . . . . . . . . . . . . . . . . . . . . . . . . . . . . . . . . . . . . . . . . . . . . . .
DATA9.5.1. Adding a certificate mapping rule in the IdM web UI9.5.2. Adding a certificate mapping rule in the IdM CLI9.5.3. Adding a certificate to an AD user’s ID override in the IdM web UI9.5.4. Adding a certificate to an AD user’s ID override in the IdM CLI
9.6. COMBINING SEVERAL IDENTITY MAPPING RULES INTO ONE
CHAPTER 10. CONFIGURING AUTHENTICATION WITH A CERTIFICATE STORED ON THE DESKTOP OF ANIDM CLIENT
10.1. CONFIGURING THE IDENTITY MANAGEMENT SERVER FOR CERTIFICATE AUTHENTICATION IN THEWEB UI10.2. REQUESTING A NEW USER CERTIFICATE AND EXPORTING IT TO THE CLIENT10.3. MAKING SURE THE CERTIFICATE AND USER ARE LINKED TOGETHER10.4. CONFIGURING A BROWSER TO ENABLE CERTIFICATE AUTHENTICATION10.5. AUTHENTICATING TO THE IDENTITY MANAGEMENT WEB UI WITH A CERTIFICATE AS AN IDENTITYMANAGEMENT USER10.6. CONFIGURING AN IDM CLIENT TO ENABLE AUTHENTICATING TO THE CLI USING A CERTIFICATE
CHAPTER 11. USING IDM CA RENEWAL SERVER11.1. EXPLANATION OF IDM CA RENEWAL SERVER11.2. CHANGING AND RESETTING IDM CA RENEWAL SERVER11.3. SWITCHING FROM AN EXTERNALLY TO SELF-SIGNED CA IN IDM11.4. RENEWING THE IDM CA RENEWAL SERVER WITH AN EXTERNALLY-SIGNED CERTIFICATE
CHAPTER 12. RENEWING EXPIRED SYSTEM CERTIFICATES WHEN IDM IS OFFLINE12.1. RENEWING EXPIRED SYSTEM CERTIFICATES ON A CA RENEWAL SERVER12.2. VERIFYING OTHER IDM SERVERS IN THE IDM DOMAIN AFTER RENEWAL12.3. REPLACING THE WEB SERVER AND LDAP SERVER CERTIFICATES
CHAPTER 13. GENERATING CRL ON THE IDM CA SERVER13.1. STOPPING CRL GENERATION ON AN IDM SERVER13.2. STARTING CRL GENERATION ON AN IDM REPLICA SERVER
CHAPTER 14. DECOMMISSIONING A SERVER THAT PERFORMS THE CA RENEWAL SERVER AND CRLPUBLISHER ROLES
CHAPTER 15. OBTAINING AN IDM CERTIFICATE FOR A SERVICE USING CERTMONGER15.1. CERTMONGER OVERVIEW15.2. OBTAINING AN IDM CERTIFICATE FOR A SERVICE USING CERTMONGER15.3. COMMUNICATION FLOW FOR CERTMONGER REQUESTING A SERVICE CERTIFICATE15.4. VIEWING THE DETAILS OF A CERTIFICATE REQUEST TRACKED BY CERTMONGER15.5. STARTING AND STOPPING CERTIFICATE TRACKING15.6. RENEWING A CERTIFICATE MANUALLY15.7. MAKING CERTMONGER RESUME TRACKING OF IDM CERTIFICATES ON A CA REPLICA
CHAPTER 16. REQUESTING CERTIFICATES USING RHEL SYSTEM ROLES16.1. THE CERTIFICATE ISSUANCE AND RENEWAL SYSTEM ROLE16.2. REQUESTING A NEW SELF-SIGNED CERTIFICATE USING THE CERTIFICATE ISSUANCE AND RENEWALSYSTEM ROLE16.3. REQUESTING A NEW CERTIFICATE FROM IDM CA USING THE CERTIFICATE ISSUANCE AND RENEWALSYSTEM ROLE16.4. SPECIFYING COMMANDS TO RUN BEFORE OR AFTER CERTIFICATE ISSUANCE USING THECERTIFICATE ISSUANCE AND RENEWAL SYSTEM ROLE
CHAPTER 17. RESTRICTING AN APPLICATION TO TRUST ONLY A SUBSET OF CERTIFICATES17.1. MANAGING LIGHTWEIGHT SUB-CAS
757576777979
81
81828484
8788
89899091
93
96969798
101101102
103
107107108109112113114115
117117
117
119
120
123123
Table of Contents
3
. . . . . . . . . . . . . . . . . . . . . . . . . . . . . . . . . . . . . . . . . . . . . . . . . . . . . . . . . . . . . . . . . . . . . . . . . . . . . . . . . . . . . . . . . . . . . . . . . . . . . . . . . . . . . . . . . . . . . . . . . . . . . . . . . . . . . . . . . . . . . . . . . . . . . . . . . . . . . . . . . . . . . . . . . . . . . . . . . . . . . . . . . . . . . . . . . . . . . . . . . . . . . . . . . . . . . . . . . . . . . . . . . . . . . . . . . . . . . . . . . . . . . . . . . . . . . . . . . . . . . . . . . . . . . . . . . . . . . . . .
. . . . . . . . . . . . . . . . . . . . . . . . . . . . . . . . . . . . . . . . . . . . . . . . . . . . . . . . . . . . . . . . . . . . . . . . . . . . . . . . . . . . . . . . . . . . . . . . . . . . . . . . . . . . . . . . . . . . . . . . . . . . . . . . . . . . . . . . . . . . . . . . . . . . . . . . . . . . . . . . . . . . . . . . . . . . . . . . . . . . . . . . . . . . . . . . . . . . . . . . . . . . . . . . . . . . . . . . . . . . . . . . . . . . . . . . . . . . . . . . . . . . . . . . . . . . . . . . . . . . . . . . . . . . . . . . . . . . . . . .
. . . . . . . . . . . . . . . . . . . . . . . . . . . . . . . . . . . . . . . . . . . . . . . . . . . . . . . . . . . . . . . . . . . . . . . . . . . . . . . . . . . . . . . . . . . . . . . . . . . . . . . . . . . . . . . . . . . . . . . . . . . . . . . . . . . . . . . . . . . . . . . . . . . . . . . . . . . . . . . . . . . . . . . . . . . . . . . . . . . . . . . . . . . . . . . . . . . . . . . . . . . . . . . . . . . . . . . . . . . . . . . . . . . . . . . . . . . . . . . . . . . . . . . . . . . . . . . . . . . . . . . . . . . . . . . . . . . . . . . .
17.1.1. Creating a sub-CA from the IdM WebUI17.1.2. Deleting a sub-CA from the IdM WebUI17.1.3. Creating a sub-CA from the IdM CLI17.1.4. Disabling a sub-CA from the IdM CLI17.1.5. Deleting a sub-CA from the IdM CLI
17.2. DOWNLOADING THE SUB-CA CERTIFICATE FROM IDM WEBUI17.3. CREATING CA ACLS FOR WEB SERVER AND CLIENT AUTHENTICATION
17.3.1. Viewing CA ACLs in IdM CLI17.3.2. Creating a CA ACL for web servers authenticating to web clients using certificates issued by webserver-ca17.3.3. Creating a CA ACL for user web browsers authenticating to web servers using certificates issued bywebclient-ca
17.4. OBTAINING AN IDM CERTIFICATE FOR A SERVICE USING CERTMONGER17.5. COMMUNICATION FLOW FOR CERTMONGER REQUESTING A SERVICE CERTIFICATE17.6. SETTING UP A SINGLE-INSTANCE APACHE HTTP SERVER17.7. ADDING TLS ENCRYPTION TO AN APACHE HTTP SERVER17.8. SETTING THE SUPPORTED TLS PROTOCOL VERSIONS ON AN APACHE HTTP SERVER17.9. SETTING THE SUPPORTED CIPHERS ON AN APACHE HTTP SERVER17.10. CONFIGURING TLS CLIENT CERTIFICATE AUTHENTICATION17.11. REQUESTING A NEW USER CERTIFICATE AND EXPORTING IT TO THE CLIENT17.12. CONFIGURING A BROWSER TO ENABLE CERTIFICATE AUTHENTICATION
CHAPTER 18. INVALIDATING A SPECIFIC GROUP OF RELATED CERTIFICATES QUICKLY18.1. DISABLING CA ACLS IN IDM CLI18.2. DISABLING AN IDM SUB-CA
CHAPTER 19. VERIFYING CERTIFICATES USING IDM HEALTHCHECK19.1. IDM CERTIFICATES HEALTHCHECK TESTS19.2. SCREENING CERTIFICATES USING THE HEALTHCHECK TOOL
CHAPTER 20. VERIFYING SYSTEM CERTIFICATES USING IDM HEALTHCHECK20.1. SYSTEM CERTIFICATES HEALTHCHECK TESTS20.2. SCREENING SYSTEM CERTIFICATES USING HEALTHCHECK
124125126127128130130130
131
133134136139140142143144145147
150150151
153153154
156156157
Red Hat Enterprise Linux 9 Managing certificates in IdM
4

Table of Contents
5
MAKING OPEN SOURCE MORE INCLUSIVERed Hat is committed to replacing problematic language in our code, documentation, and webproperties. We are beginning with these four terms: master, slave, blacklist, and whitelist. Because of theenormity of this endeavor, these changes will be implemented gradually over several upcoming releases.For more details, see our CTO Chris Wright’s message .
Red Hat Enterprise Linux 9 Managing certificates in IdM
6
PROVIDING FEEDBACK ON RED HAT DOCUMENTATIONWe appreciate your input on our documentation. Please let us know how we could make it better.
For simple comments on specific passages:
1. Make sure you are viewing the documentation in the Multi-page HTML format. In addition,ensure you see the Feedback button in the upper right corner of the document.
2. Use your mouse cursor to highlight the part of text that you want to comment on.
3. Click the Add Feedback pop-up that appears below the highlighted text.
4. Follow the displayed instructions.
For submitting feedback via Bugzilla, create a new ticket:
1. Go to the Bugzilla website.
2. As the Component, use Documentation.
3. Fill in the Description field with your suggestion for improvement. Include a link to therelevant part(s) of documentation.
4. Click Submit Bug.
PROVIDING FEEDBACK ON RED HAT DOCUMENTATION
7
CHAPTER 1. PUBLIC KEY CERTIFICATES IN IDENTITYMANAGEMENT
This chapter describes X.509 public key certificates, which are used to authenticate users, hosts andservices in Identity Management (IdM). In addition to authentication, X.509 certificates also enabledigital signing and encryption to provide privacy, integrity and non-repudiation.
A certificate contains the following information:
The subject that the certificate authenticates.
The issuer, that is the CA that has signed the certificate.
The start and end date of the validity of the certificate.
The valid uses of the certificate.
The public key of the subject.
A message encrypted by the public key can only be decrypted by a corresponding private key. While acertificate and the public key it includes can be made publicly available, the user, host or service mustkeep their private key secret.
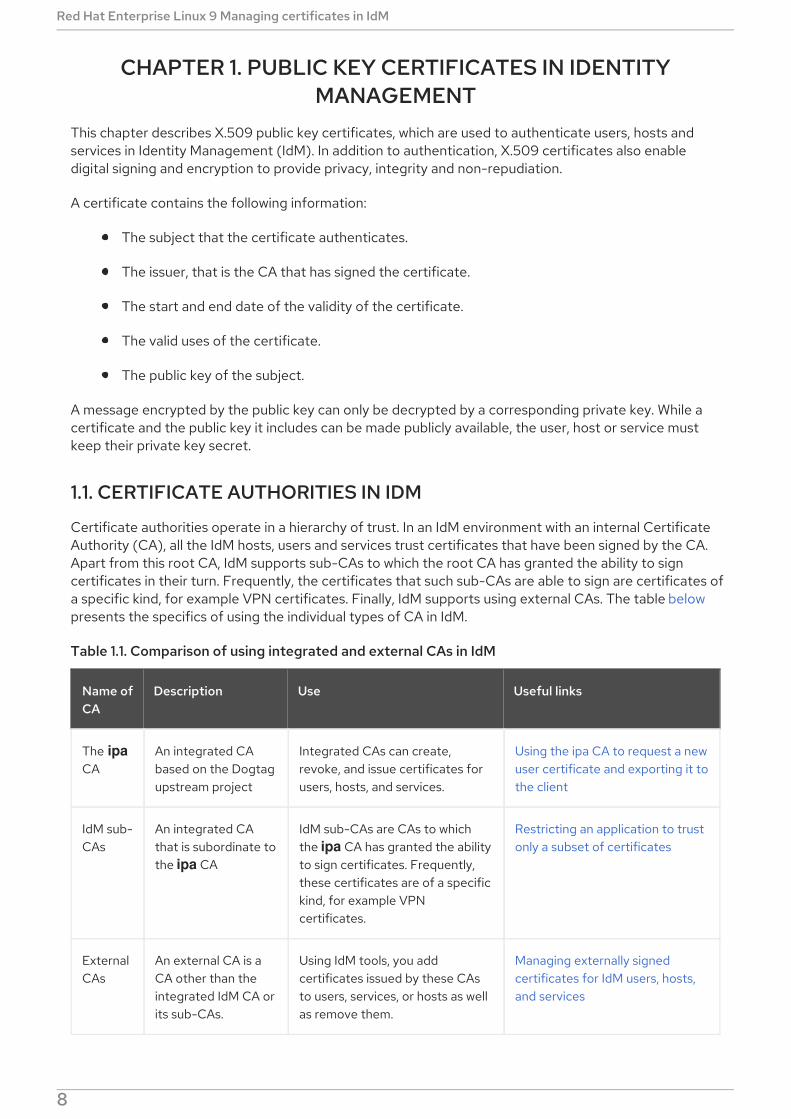
1.1. CERTIFICATE AUTHORITIES IN IDM
Certificate authorities operate in a hierarchy of trust. In an IdM environment with an internal CertificateAuthority (CA), all the IdM hosts, users and services trust certificates that have been signed by the CA.Apart from this root CA, IdM supports sub-CAs to which the root CA has granted the ability to signcertificates in their turn. Frequently, the certificates that such sub-CAs are able to sign are certificates ofa specific kind, for example VPN certificates. Finally, IdM supports using external CAs. The table belowpresents the specifics of using the individual types of CA in IdM.
Table 1.1. Comparison of using integrated and external CAs in IdM
Name ofCA
Description Use Useful links
The ipaCA
An integrated CAbased on the Dogtagupstream project
Integrated CAs can create,revoke, and issue certificates forusers, hosts, and services.
Using the ipa CA to request a newuser certificate and exporting it tothe client
IdM sub-CAs
An integrated CAthat is subordinate tothe ipa CA
IdM sub-CAs are CAs to whichthe ipa CA has granted the abilityto sign certificates. Frequently,these certificates are of a specifickind, for example VPNcertificates.
Restricting an application to trustonly a subset of certificates
ExternalCAs
An external CA is aCA other than theintegrated IdM CA orits sub-CAs.
Using IdM tools, you addcertificates issued by these CAsto users, services, or hosts as wellas remove them.
Managing externally signedcertificates for IdM users, hosts,and services
From the certificate point of view, there is no difference between being signed by a self-signed IdM CA
Red Hat Enterprise Linux 9 Managing certificates in IdM
8
From the certificate point of view, there is no difference between being signed by a self-signed IdM CAand being signed externally.
The role of the CA includes the following purposes:
It issues digital certificates.
By signing a certificate, it certifies that the subject named in the certificate owns a public key.The subject can be a user, host or service.
It can revoke certificates, and provides revocation status via Certificate Revocation Lists(CRLs) and Online Certificate Status Protocol (OCSP).
Additional resources
See Planning your CA services .
1.2. COMPARISON OF CERTIFICATES AND KERBEROS
Certificates perform a similar function to that performed by Kerberos tickets. Kerberos is a computernetwork authentication protocol that works on the basis of tickets to allow nodes communicating over anon-secure network to prove their identity to one another in a secure manner. The following table showsa comparison of Kerberos and X.509 certificates:
Table 1.2. Comparison of certificates and Kerberos
Characteristic Kerberos X.509
Authentication Yes Yes
Privacy Optional Yes
Integrity Optional Yes
Type of cryptography involved
Symmetrical Asymmetrical
Default validity Short (1 day) Long(2 years)
By default, Kerberos in Identity Management only ensures the identity of the communicating parties.
1.3. THE PROS AND CONS OF USING CERTIFICATES TOAUTHENTICATE USERS IN IDM
The advantages of using certificates to authenticate users in IdM include the following points:
A PIN that protects the private key on a smart card is typically less complex and easier toremember than a regular password.
Depending on the device, a private key stored on a smart card cannot be exported. Thisprovides additional security.
Smart cards can make logout automatic: IdM can be configured to log out users when they
CHAPTER 1. PUBLIC KEY CERTIFICATES IN IDENTITY MANAGEMENT
9
Smart cards can make logout automatic: IdM can be configured to log out users when theyremove the smart card from the reader.
Stealing the private key requires actual physical access to a smart card, making smart cardssecure against hacking attacks.
Smart card authentication is an example of two-factor authentication: it requires bothsomething you have (the card) and something you know (the PIN).
Smart cards are more flexible than passwords because they provide the keys that can be usedfor other purposes, such as encrypting email.
Using smart cards use on shared machines that are IdM clients does not typically pose additionalconfiguration problems for system administrators. In fact, smart card authentication is an idealchoice for shared machines.
The disadvantages of using certificates to authenticate users in IdM include the following points:
Users might lose or forget to bring their smart card or certificate and be effectively locked out.
Mistyping a PIN multiple times might result in a card becoming locked.
There is generally an intermediate step between request and authorization by some sort ofsecurity officer or approver. In IdM, the security officer or administrator must run the ipa cert-request command.
Smart cards and readers tend to be vendor and driver specific: although a lot of readers can beused for different cards, a smart card of a specific vendor might not work in the reader ofanother vendor or in the type of a reader for which it was not designed.
Certificates and smart cards have a steep learning curve for administrators.
Red Hat Enterprise Linux 9 Managing certificates in IdM
10
CHAPTER 2. MANAGING CERTIFICATES FOR USERS, HOSTS,AND SERVICES USING THE INTEGRATED IDM CA
This chapter describes how to manage certificates in Identity Management (IdM) using the integratedCA, the ipa CA, and its sub-CAs.
This chapter contains the following sections:
Requesting new certificates for a user, host, or service using the IdM Web UI .
Requesting new certificates for a user, host, or service from the IdM CA using the IdM CLI:
Requesting new certificates for a user, host, or service from IdM CA using certutil
For a specific example of requesting a new user certificate from the IdM CA using the certutil utility and exporting it to an IdM client, see Requesting a new user certificateand exporting it to the client.
Requesting new certificates for a user, host, or service from IdM CA using openssl
You can also request new certificates for a service from the IdM CA using the certmonger utility. Formore information, see Requesting new certificates for a service from IdM CA using certmonger .
Prerequisites
Your IdM deployment contains an integrated CA:
For information on how to plan your CA services in IdM, see Planning your CA services .
For information on how to install an IdM server with integrated DNS and integrated CA asthe root CA, see Installing an IdM server: With integrated DNS, with an integrated CA as theroot CA
For information on how to install an IdM server with integrated DNS and an external CA asthe root CA, see Installing an IdM server: With integrated DNS, with an external CA as theroot CA
For information on how to install an IdM server without integrated DNS and with anintegrated CA as the root CA, see Installing an IdM server: Without integrated DNS, with anintegrated CA as the root CA.
[Optional] Your IdM deployment supports users authenticating with a certificate:
For information on how to configure your IdM deployment to support userauthentication with a certificate stored in the IdM client filesystem, see Configuringauthentication with a certificate stored on the desktop of an IdM client.
For information on how to configure your IdM deployment to support userauthentication with a certificate stored on a smart card inserted into an IdM client, seeConfiguring Identity Management for smart card authentication .
For information on how to configure your IdM deployment to support userauthentication with smart cards issued by an Active Directory certificate system, seeConfiguring certificates issued by ADCS for smart card authentication in IdM .
2.1. REQUESTING NEW CERTIFICATES FOR A USER, HOST, OR
CHAPTER 2. MANAGING CERTIFICATES FOR USERS, HOSTS, AND SERVICES USING THE INTEGRATED IDM CA
11
2.1. REQUESTING NEW CERTIFICATES FOR A USER, HOST, ORSERVICE USING IDM WEB UI
This section describes how to use the Identity Management (IdM) Web UI to request a new certificatefor any IdM entity from the integrated IdM certificate authorities (CAs): the ipa CA or any of its sub-CAs.
IdM entities include:
Users
Hosts
Services
IMPORTANT
Services typically run on dedicated service nodes on which the private keys are stored.Copying a service’s private key to the IdM server is considered insecure. Therefore, whenrequesting a certificate for a service, create the certificate signing request (CSR) on theservice node.
Prerequisites
Your IdM deployment contains an integrated CA.
You are logged into the IdM Web UI as the IdM administrator.
Procedure
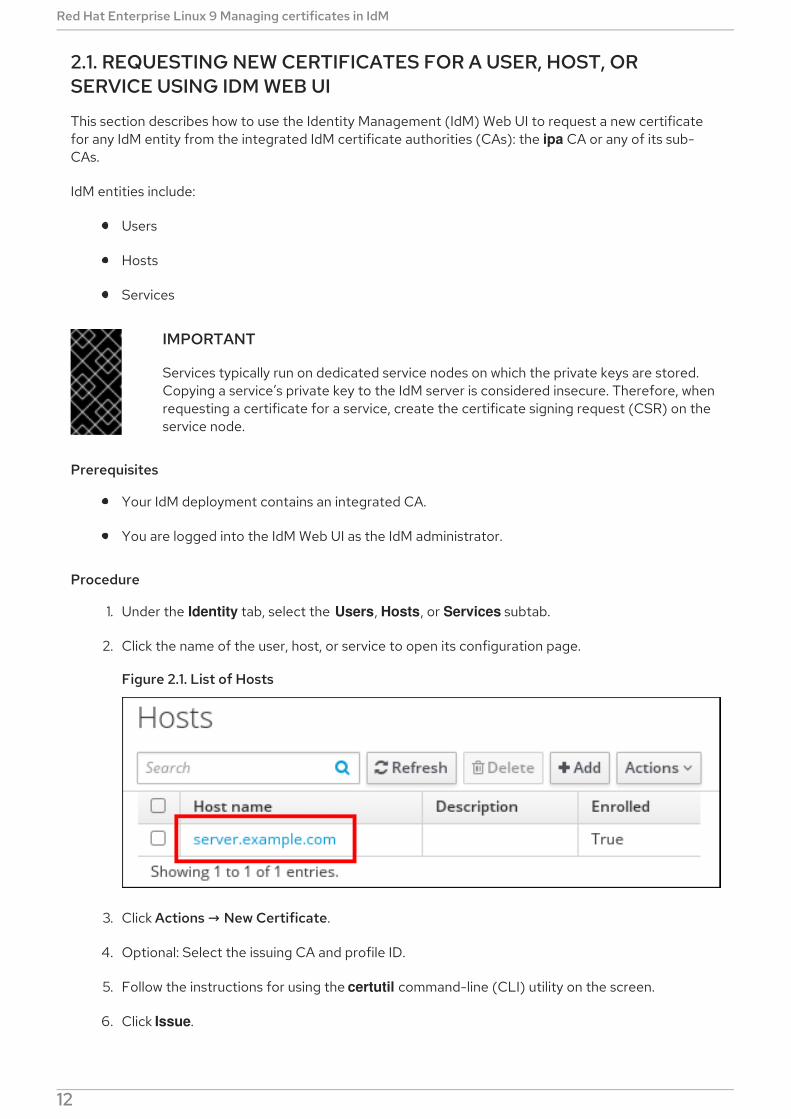
1. Under the Identity tab, select the Users, Hosts, or Services subtab.
2. Click the name of the user, host, or service to open its configuration page.
Figure 2.1. List of Hosts
3. Click Actions → New Certificate.
4. Optional: Select the issuing CA and profile ID.
5. Follow the instructions for using the certutil command-line (CLI) utility on the screen.
6. Click Issue.
Red Hat Enterprise Linux 9 Managing certificates in IdM
12
2.2. REQUESTING NEW CERTIFICATES FOR A USER, HOST, ORSERVICE FROM IDM CA USING CERTUTIL
You can use the certutil utility to request a certificate for an Identity Management (IdM) user, host orservice in standard IdM situations. To ensure that a host or service Kerberos alias can use a certificate,use the openssl utility to request a certificate instead.
This section describes how to request a certificate for an IdM user, host, or service from ipa, the IdMcertificate authority (CA), using certutil.
IMPORTANT
Services typically run on dedicated service nodes on which the private keys are stored.Copying a service’s private key to the IdM server is considered insecure. Therefore, whenrequesting a certificate for a service, create the certificate signing request (CSR) on theservice node.
Prerequisites
Your IdM deployment contains an integrated CA.
You are logged into the IdM command-line interface (CLI) as the IdM administrator.
Procedure
1. Create a temporary directory for the certificate database:
# mkdir ~/certdb/
2. Create a new temporary certificate database, for example:
# certutil -N -d ~/certdb/
3. Create the CSR and redirect the output to a file. For example, to create a CSR for a 4096 bitcertificate and to set the subject to CN=server.example.com,O=EXAMPLE.COM:
# certutil -R -d ~/certdb/ -a -g 4096 -s "CN=server.example.com,O=EXAMPLE.COM" -8 server.example.com > certificate_request.csr
4. Submit the certificate request file to the CA running on the IdM server. Specify the Kerberosprincipal to associate with the newly-issued certificate:
# ipa cert-request certificate_request.csr --principal=host/server.example.com
The ipa cert-request command in IdM uses the following defaults:
The caIPAserviceCert certificate profileTo select a custom profile, use the --profile-id option.
The integrated IdM root CA, ipaTo select a sub-CA, use the --ca option.
Additional resources
CHAPTER 2. MANAGING CERTIFICATES FOR USERS, HOSTS, AND SERVICES USING THE INTEGRATED IDM CA
13
See the output of the ipa cert-request --help command.
See Creating and managing certificate profiles in Identity Management .
2.3. REQUESTING NEW CERTIFICATES FOR A USER, HOST, ORSERVICE FROM IDM CA USING OPENSSL
You can use the openssl utility to request a certificate for an Identity Management (IdM) host orservice if you want to ensure that the Kerberos alias of the host or service can use the certificate. Instandard situations, consider requesting a new certificate using the certutil utility instead.
This section describes how to request a certificate for an IdM host, or service from ipa, the IdMcertificate authority, using openssl.
IMPORTANT
Services typically run on dedicated service nodes on which the private keys are stored.Copying a service’s private key to the IdM server is considered insecure. Therefore, whenrequesting a certificate for a service, create the certificate signing request (CSR) on theservice node.
Prerequisites
Your IdM deployment contains an integrated CA.
You are logged into the IdM command-line interface (CLI) as the IdM administrator.
Procedure
1. Create one or more aliases for your Kerberos principal test/server.example.com. For example,test1/server.example.com and test2/server.example.com.
2. In the CSR, add a subjectAltName for dnsName (server.example.com) and otherName(test2/server.example.com). To do this, configure the openssl.conf file to include the followingline specifying the UPN otherName and subjectAltName:
otherName=1.3.6.1.4.1.311.20.2.3;UTF8:test2/[email protected] = server.example.com
3. Create a certificate request using openssl:
openssl req -new -newkey rsa:2048 -keyout test2service.key -sha256 -nodes -out certificate_request.csr -config openssl.conf
4. Submit the certificate request file to the CA running on the IdM server. Specify the Kerberosprincipal to associate with the newly-issued certificate:
# ipa cert-request certificate_request.csr --principal=host/server.example.com
The ipa cert-request command in IdM uses the following defaults:
The caIPAserviceCert certificate profileTo select a custom profile, use the --profile-id option.
Red Hat Enterprise Linux 9 Managing certificates in IdM
14
The integrated IdM root CA, ipaTo select a sub-CA, use the --ca option.
Additional resources
See the output of the ipa cert-request --help command.
See Creating and managing certificate profiles in Identity Management .
2.4. ADDITIONAL RESOURCES
See Revoking certificates with the integrated IdM CAs.
See Restoring certificates with the integrated IdM CAs .
See Restricting an application to trust only a subset of certificates .
CHAPTER 2. MANAGING CERTIFICATES FOR USERS, HOSTS, AND SERVICES USING THE INTEGRATED IDM CA
15
CHAPTER 3. MANAGING EXTERNALLY SIGNEDCERTIFICATES FOR IDM USERS, HOSTS, AND SERVICES
This chapter describes how to use the Identity Management (IdM) command-line interface (CLI) andthe IdM Web UI to add or remove user, host, or service certificates that were issued by an externalcertificate authority (CA).
3.1. ADDING A CERTIFICATE ISSUED BY AN EXTERNAL CA TO AN IDMUSER, HOST, OR SERVICE BY USING THE IDM CLI
As an Identity Management (IdM) administrator, you can add an externally signed certificate to theaccount of an IdM user, host, or service by using the Identity Management (IdM) CLI.
Prerequisites
You have obtained the ticket-granting ticket of an administrative user.
Procedure
To add a certificate to an IdM user, enter:
$ ipa user-add-cert user --certificate=MIQTPrajQAwg...
The command requires you to specify the following information:
The name of the user
The Base64-encoded DER certificate
NOTE
Instead of copying and pasting the certificate contents into the command line, you canconvert the certificate to the DER format and then re-encode it to Base64. For example,to add the user_cert.pem certificate to user, enter:
$ ipa user-add-cert user --certificate="$(openssl x509 -outform der -in user_cert.pem | base64 -w 0)"
You can run the ipa user-add-cert command interactively by executing it without adding any options.
To add a certificate to an IdM host, enter:
ipa host-add-cert
To add a certificate to an IdM service, enter:
ipa service-add-cert
Additional resources
Managing certificates for users, hosts, and services using the integrated IdM CA
Red Hat Enterprise Linux 9 Managing certificates in IdM
16
3.2. ADDING A CERTIFICATE ISSUED BY AN EXTERNAL CA TO AN IDMUSER, HOST, OR SERVICE BY USING THE IDM WEB UI
As an Identity Management (IdM) administrator, you can add an externally signed certificate to theaccount of an IdM user, host, or service by using the Identity Management (IdM) Web UI.
Prerequisites
You are logged in to the Identity Management (IdM) Web UI as an administrative user.
Procedure
1. Open the Identity tab, and select the Users, Hosts, or Services subtab.
2. Click the name of the user, host, or service to open its configuration page.
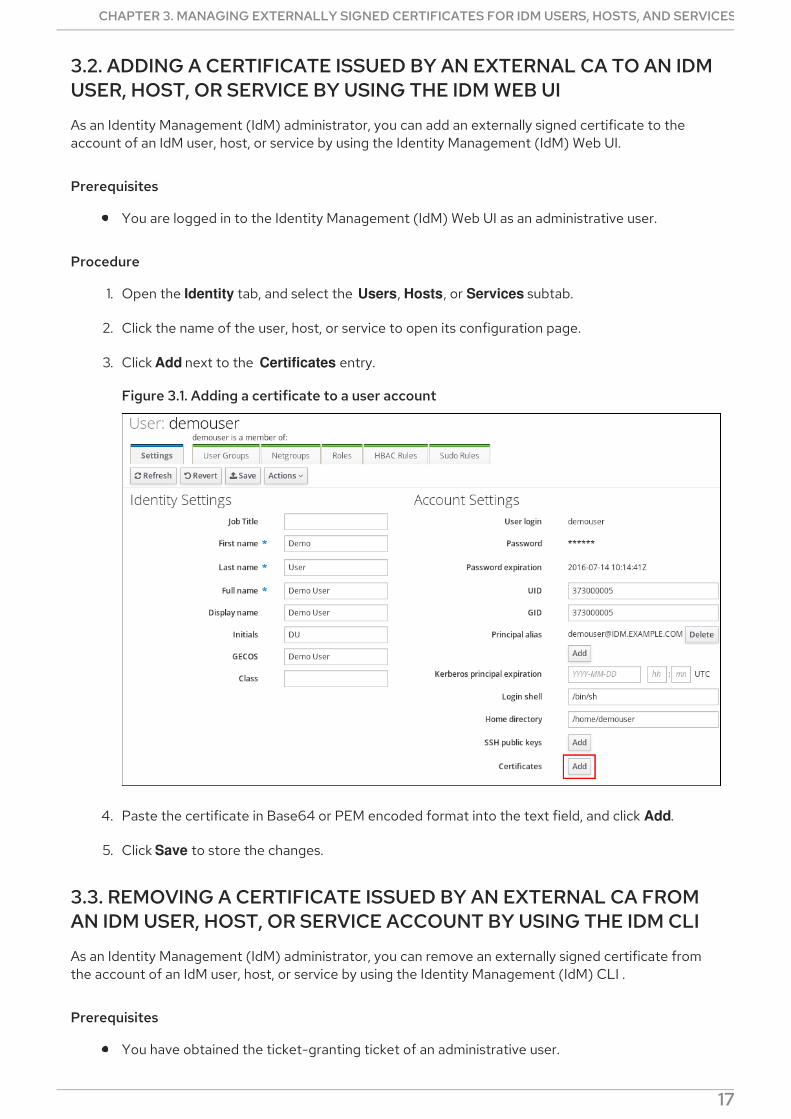
3. Click Add next to the Certificates entry.
Figure 3.1. Adding a certificate to a user account
4. Paste the certificate in Base64 or PEM encoded format into the text field, and click Add.
5. Click Save to store the changes.
3.3. REMOVING A CERTIFICATE ISSUED BY AN EXTERNAL CA FROMAN IDM USER, HOST, OR SERVICE ACCOUNT BY USING THE IDM CLI
As an Identity Management (IdM) administrator, you can remove an externally signed certificate fromthe account of an IdM user, host, or service by using the Identity Management (IdM) CLI .
Prerequisites
You have obtained the ticket-granting ticket of an administrative user.
CHAPTER 3. MANAGING EXTERNALLY SIGNED CERTIFICATES FOR IDM USERS, HOSTS, AND SERVICES
17
Procedure
To remove a certificate from an IdM user, enter:
$ ipa user-remove-cert user --certificate=MIQTPrajQAwg...
The command requires you to specify the following information:
The name of the user
The Base64-encoded DER certificate
NOTE
Instead of copying and pasting the certificate contents into the command line, you canconvert the certificate to the DER format and then re-encode it to Base64. For example,to remove the user_cert.pem certificate from user, enter:
$ ipa user-remove-cert user --certificate="$(openssl x509 -outform der -in user_cert.pem | base64 -w 0)"
You can run the ipa user-remove-cert command interactively by executing it without adding anyoptions.
To remove a certificate from an IdM host, enter:
ipa host-remove-cert
To remove a certificate from an IdM service, enter:
ipa service-remove-cert
Additional resources
Managing certificates for users, hosts, and services using the integrated IdM CA
3.4. REMOVING A CERTIFICATE ISSUED BY AN EXTERNAL CA FROMAN IDM USER, HOST, OR SERVICE ACCOUNT BY USING THE IDM WEBUI
As an Identity Management (IdM) administrator, you can remove an externally signed certificate fromthe account of an IdM user, host, or service by using the Identity Management (IdM) Web UI.
Prerequisites
You are logged in to the Identity Management (IdM) Web UI as an administrative user.
Procedure
1. Open the Identity tab, and select the Users, Hosts, or Services subtab.
2. Click the name of the user, host, or service to open its configuration page.
Red Hat Enterprise Linux 9 Managing certificates in IdM
18
3. Click the Actions next to the certificate to delete, and select Delete.
4. Click Save to store the changes.
3.5. ADDITIONAL RESOURCES
[role="_additional-resources"]
Ensuring the presence of an externally signed certificate in an IdM service entry using an Ansibleplaybook
CHAPTER 3. MANAGING EXTERNALLY SIGNED CERTIFICATES FOR IDM USERS, HOSTS, AND SERVICES
19

CHAPTER 4. CONVERTING CERTIFICATE FORMATS TO WORKWITH IDM
This user story describes how to make sure that you as an IdM system administrator are using the correctformat of a certificate with specific IdM commands. This is useful, for example, in the followingsituations:
You are loading an external certificate into a user profile. For details, see Converting an externalcertificate to load into an IdM user account.
You are using an external CA certificate when configuring the IdM server for smart cardauthentication or configuring the IdM client for smart card authentication so that users canauthenticate to IdM using smart cards with certificates on them that have been issued by theexternal certificate authority.
You are exporting a certificate from an NSS database into a pkcs #12 format that includes boththe certificate and the private key. For details, see Exporting a certificate and private key froman NSS database into a PKCS #12 file.
4.1. CERTIFICATE FORMATS AND ENCODINGS IN IDM
Certificate authentication including smart card authentication in IdM proceeds by comparing thecertificate that the user presents with the certificate, or certificate data, that are stored in the user’s IdMprofile.
System configuration
What is stored in the IdM profile is only the certificate, not the corresponding private key. Duringauthentication, the user must also show that he is in possession of the corresponding private key. Theuser does that by either presenting a PKCS #12 file that contains both the certificate and the private keyor by presenting two files: one that contains the certificate and the other containing the private key.
Therefore, processes such as loading a certificate into a user profile only accept certificate files that donot contain the private key.
Similarly, when a system administrator provides you with an external CA certificate, he will provide onlythe public data: the certificate without the private key. The ipa-advise utility for configuring the IdMserver or the IdM client for smart card authentication expects the input file to contain the certificate ofthe external CA but not the private key.
Certificate encodings
There are two common certificate encodings: Privacy-enhanced Electronic Mail (PEM) andDistinguished Encoding Rules (DER). The base64 format is almost identical to the PEM format but itdoes not contain the -----BEGIN CERTIFICATE-----/-----END CERTIFICATE----- header and footer.
A certificate that has been encoded using DER is a binary X509 digital certificate file. As a binary file,the certificate is not human-readable. DER files sometimes use the .der filename extension, but fileswith the .crt and .cer filename extensions also sometimes contain DER certificates. DER files containingkeys can be named .key.
A certificate that has been encoded using PEM Base64 is a human-readable file. The file contains ASCII(Base64) armored data prefixed with a “-----BEGIN …” line. PEM files sometimes use the .pemfilename extension, but files with the .crt and .cer filename extensions also sometimes contain PEMcertificates. PEM files containing keys can be named .key.
Different ipa commands have different limitations regarding the types of certificates that they accept.
Red Hat Enterprise Linux 9 Managing certificates in IdM
20
Different ipa commands have different limitations regarding the types of certificates that they accept.For example, the ipa user-add-cert command only accepts certificates encoded in the base64 formatbut ipa-server-certinstall accepts PEM, DER, PKCS #7, PKCS #8 and PKCS #12 certificates.
Table 4.1. Certificate encodings
Encoding format Human-readable Common filenameextensions
Sample IdM commandsaccepting the encodingformat
PEM/base64 Yes .pem, .crt, .cer ipa user-add-cert, ipa-server-certinstall, …
DER No .der, .crt, .cer ipa-server-certinstall, …
Certificate-related commands and formats in IdM lists further ipa commands with the certificateformats that the commands accept.
User authentication
When using the web UI to access IdM, the user proves that he is in possession of the private keycorresponding to the certificate by having both stored in the browser’s database.
When using the CLI to access IdM, the user proves that he is in possession of the private keycorresponding to the certificate by one of the following methods:
The user adds, as the value of the X509_user_identity parameter of the kinit -X command, thepath to the smart card module that is connected to the smart card that contains both thecertificate and the key:
$ kinit -X X509_user_identity='PKCS11:opensc-pkcs11.so' idm_user
The user adds two files as the values of the X509_user_identity parameter of the kinit -Xcommand, one containing the certificate and the other the private key:
$ kinit -X X509_user_identity='FILE:`/path/to/cert.pem,/path/to/cert.key`' idm_user
Useful certificate commands
To view the certificate data, such as the subject and the issuer:
$ openssl x509 -noout -text -in ca.pem
To compare in which lines two certificates differ:
$ diff cert1.crt cert2.crt
To compare in which lines two certificates differ with the output displayed in two columns:
$ diff cert1.crt cert2.crt -y
4.2. CONVERTING AN EXTERNAL CERTIFICATE TO LOAD INTO AN
CHAPTER 4. CONVERTING CERTIFICATE FORMATS TO WORK WITH IDM
21
4.2. CONVERTING AN EXTERNAL CERTIFICATE TO LOAD INTO ANIDM USER ACCOUNT
This section describes how to make sure that an external certificate is correctly encoded and formattedbefore adding it to a user entry.
4.2.1. Prerequisites
If your certificate was issued by an Active Directory certificate authority and uses the PEMencoding, make sure that the PEM file has been converted into the UNIX format. To convert afile, use the dos2unix utility provided by the eponymous package.
4.2.2. Converting an external certificate in the IdM CLI and loading it into an IdMuser account
The IdM CLI only accepts a PEM certificate from which the first and last lines (-----BEGINCERTIFICATE----- and -----END CERTIFICATE-----) have been removed.
Follow this procedure to convert an external certificate to PEM format and add it to an IdM user accountusing the IdM CLI.
Procedure
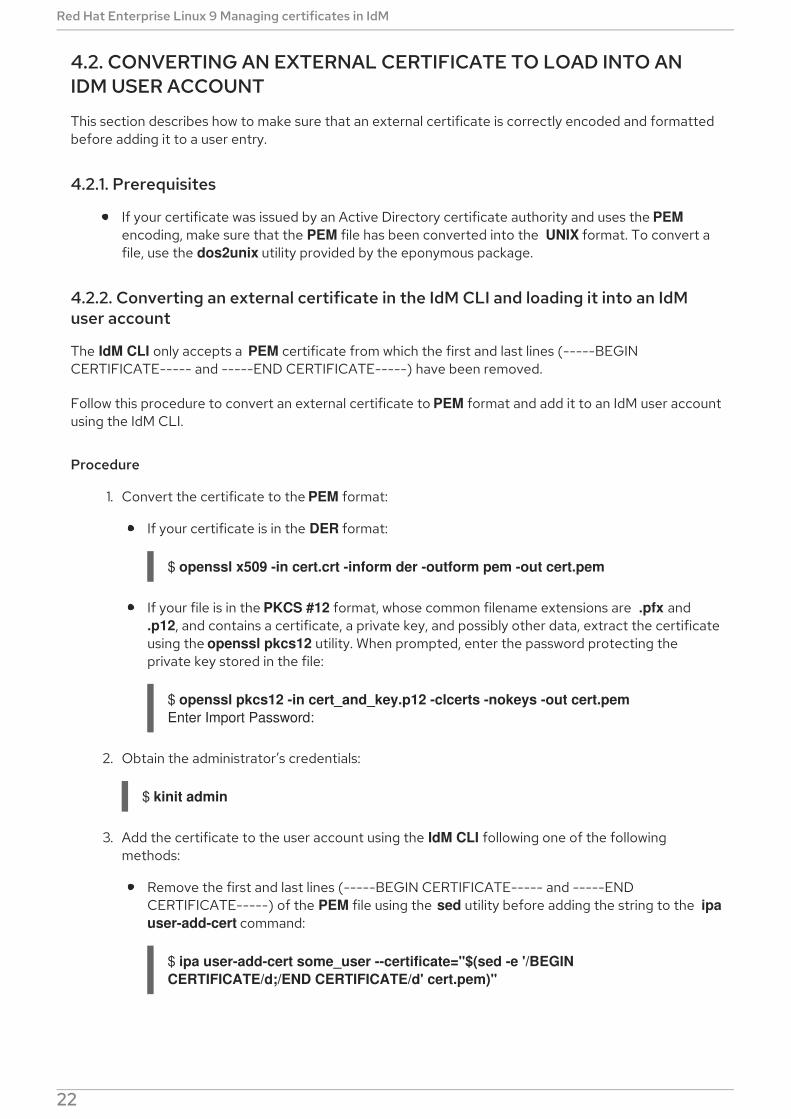
1. Convert the certificate to the PEM format:
If your certificate is in the DER format:
$ openssl x509 -in cert.crt -inform der -outform pem -out cert.pem
If your file is in the PKCS #12 format, whose common filename extensions are .pfx and .p12, and contains a certificate, a private key, and possibly other data, extract the certificateusing the openssl pkcs12 utility. When prompted, enter the password protecting theprivate key stored in the file:
$ openssl pkcs12 -in cert_and_key.p12 -clcerts -nokeys -out cert.pemEnter Import Password:
2. Obtain the administrator’s credentials:
$ kinit admin
3. Add the certificate to the user account using the IdM CLI following one of the followingmethods:
Remove the first and last lines (-----BEGIN CERTIFICATE----- and -----ENDCERTIFICATE-----) of the PEM file using the sed utility before adding the string to the ipa user-add-cert command:
$ ipa user-add-cert some_user --certificate="$(sed -e '/BEGIN CERTIFICATE/d;/END CERTIFICATE/d' cert.pem)"
Copy and paste the contents of the certificate file without the first and last lines (-----
Red Hat Enterprise Linux 9 Managing certificates in IdM
22
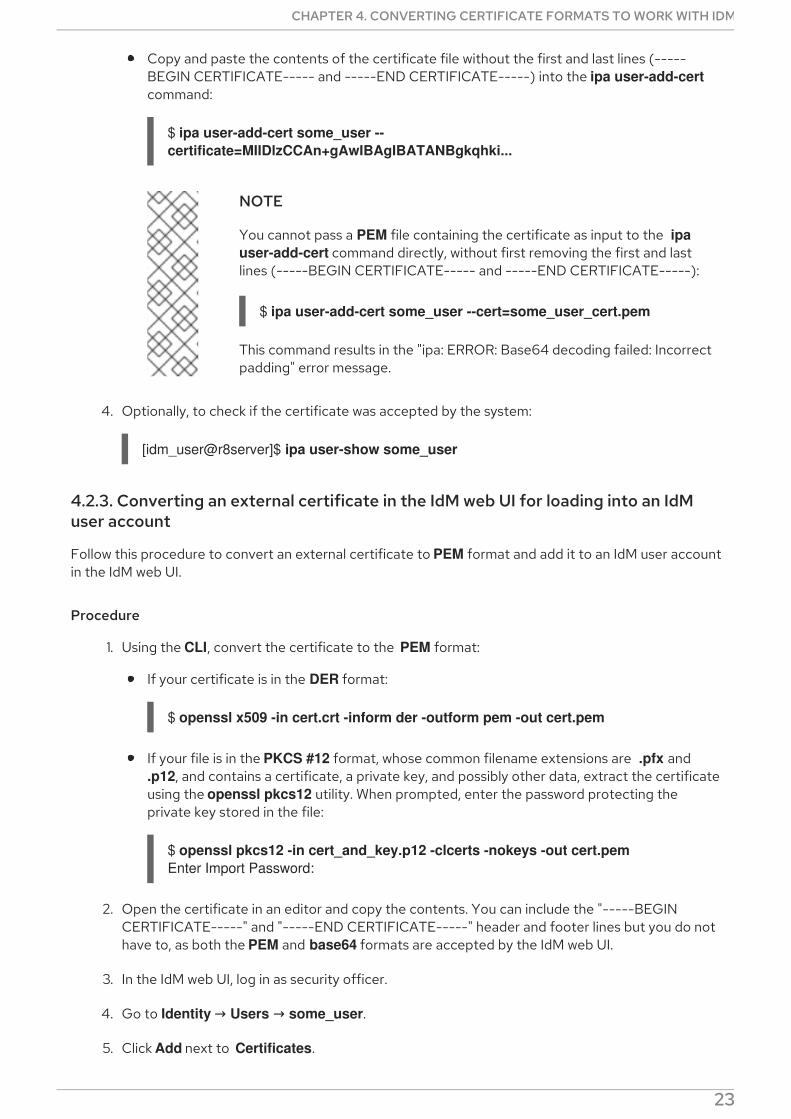
Copy and paste the contents of the certificate file without the first and last lines (-----BEGIN CERTIFICATE----- and -----END CERTIFICATE-----) into the ipa user-add-certcommand:
$ ipa user-add-cert some_user --certificate=MIIDlzCCAn+gAwIBAgIBATANBgkqhki...
NOTE
You cannot pass a PEM file containing the certificate as input to the ipa user-add-cert command directly, without first removing the first and lastlines (-----BEGIN CERTIFICATE----- and -----END CERTIFICATE-----):
$ ipa user-add-cert some_user --cert=some_user_cert.pem
This command results in the "ipa: ERROR: Base64 decoding failed: Incorrectpadding" error message.
4. Optionally, to check if the certificate was accepted by the system:
[idm_user@r8server]$ ipa user-show some_user
4.2.3. Converting an external certificate in the IdM web UI for loading into an IdMuser account
Follow this procedure to convert an external certificate to PEM format and add it to an IdM user accountin the IdM web UI.
Procedure
1. Using the CLI, convert the certificate to the PEM format:
If your certificate is in the DER format:
$ openssl x509 -in cert.crt -inform der -outform pem -out cert.pem
If your file is in the PKCS #12 format, whose common filename extensions are .pfx and .p12, and contains a certificate, a private key, and possibly other data, extract the certificateusing the openssl pkcs12 utility. When prompted, enter the password protecting theprivate key stored in the file:
$ openssl pkcs12 -in cert_and_key.p12 -clcerts -nokeys -out cert.pemEnter Import Password:
2. Open the certificate in an editor and copy the contents. You can include the "-----BEGINCERTIFICATE-----" and "-----END CERTIFICATE-----" header and footer lines but you do nothave to, as both the PEM and base64 formats are accepted by the IdM web UI.
3. In the IdM web UI, log in as security officer.
4. Go to Identity → Users → some_user.
5. Click Add next to Certificates.
CHAPTER 4. CONVERTING CERTIFICATE FORMATS TO WORK WITH IDM
23
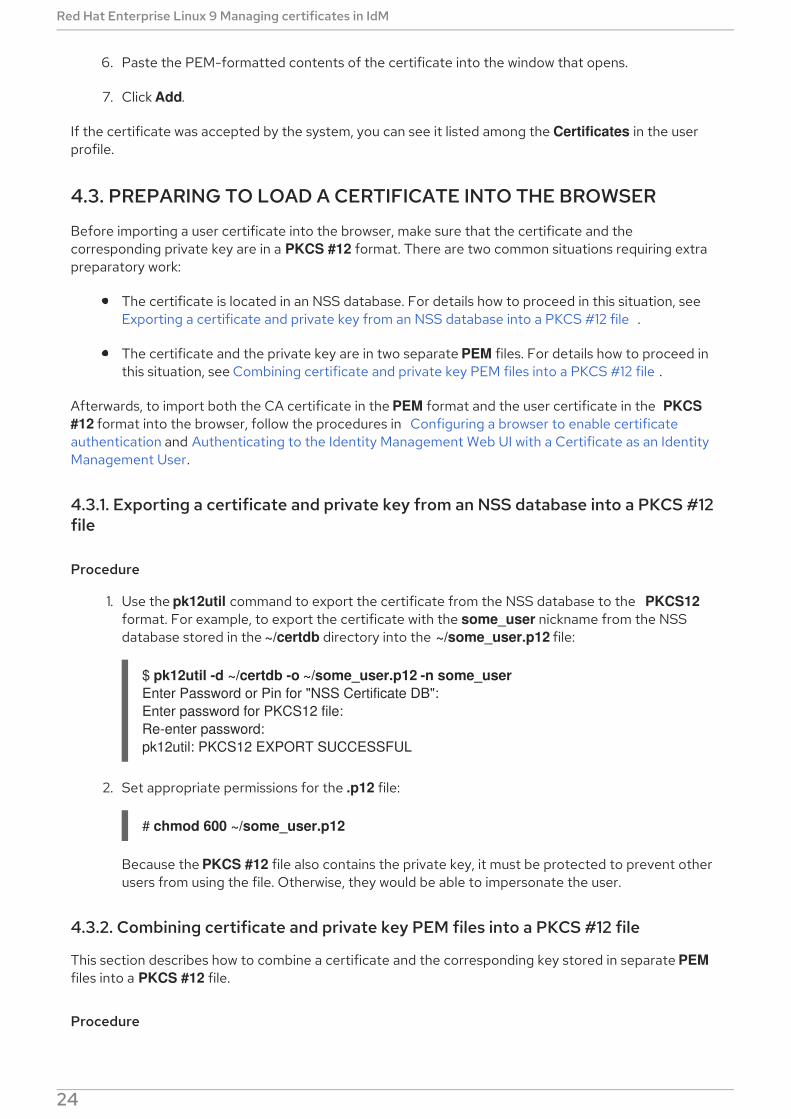
6. Paste the PEM-formatted contents of the certificate into the window that opens.
7. Click Add.
If the certificate was accepted by the system, you can see it listed among the Certificates in the userprofile.
4.3. PREPARING TO LOAD A CERTIFICATE INTO THE BROWSER
Before importing a user certificate into the browser, make sure that the certificate and thecorresponding private key are in a PKCS #12 format. There are two common situations requiring extrapreparatory work:
The certificate is located in an NSS database. For details how to proceed in this situation, seeExporting a certificate and private key from an NSS database into a PKCS #12 file .
The certificate and the private key are in two separate PEM files. For details how to proceed inthis situation, see Combining certificate and private key PEM files into a PKCS #12 file .
Afterwards, to import both the CA certificate in the PEM format and the user certificate in the PKCS #12 format into the browser, follow the procedures in Configuring a browser to enable certificateauthentication and Authenticating to the Identity Management Web UI with a Certificate as an IdentityManagement User.
4.3.1. Exporting a certificate and private key from an NSS database into a PKCS #12file
Procedure
1. Use the pk12util command to export the certificate from the NSS database to the PKCS12format. For example, to export the certificate with the some_user nickname from the NSSdatabase stored in the ~/certdb directory into the ~/some_user.p12 file:
$ pk12util -d ~/certdb -o ~/some_user.p12 -n some_userEnter Password or Pin for "NSS Certificate DB":Enter password for PKCS12 file:Re-enter password:pk12util: PKCS12 EXPORT SUCCESSFUL
2. Set appropriate permissions for the .p12 file:
# chmod 600 ~/some_user.p12
Because the PKCS #12 file also contains the private key, it must be protected to prevent otherusers from using the file. Otherwise, they would be able to impersonate the user.
4.3.2. Combining certificate and private key PEM files into a PKCS #12 file
This section describes how to combine a certificate and the corresponding key stored in separate PEMfiles into a PKCS #12 file.
Procedure
To combine a certificate stored in certfile.cer and a key stored in certfile.key into a certfile.p12
Red Hat Enterprise Linux 9 Managing certificates in IdM
24
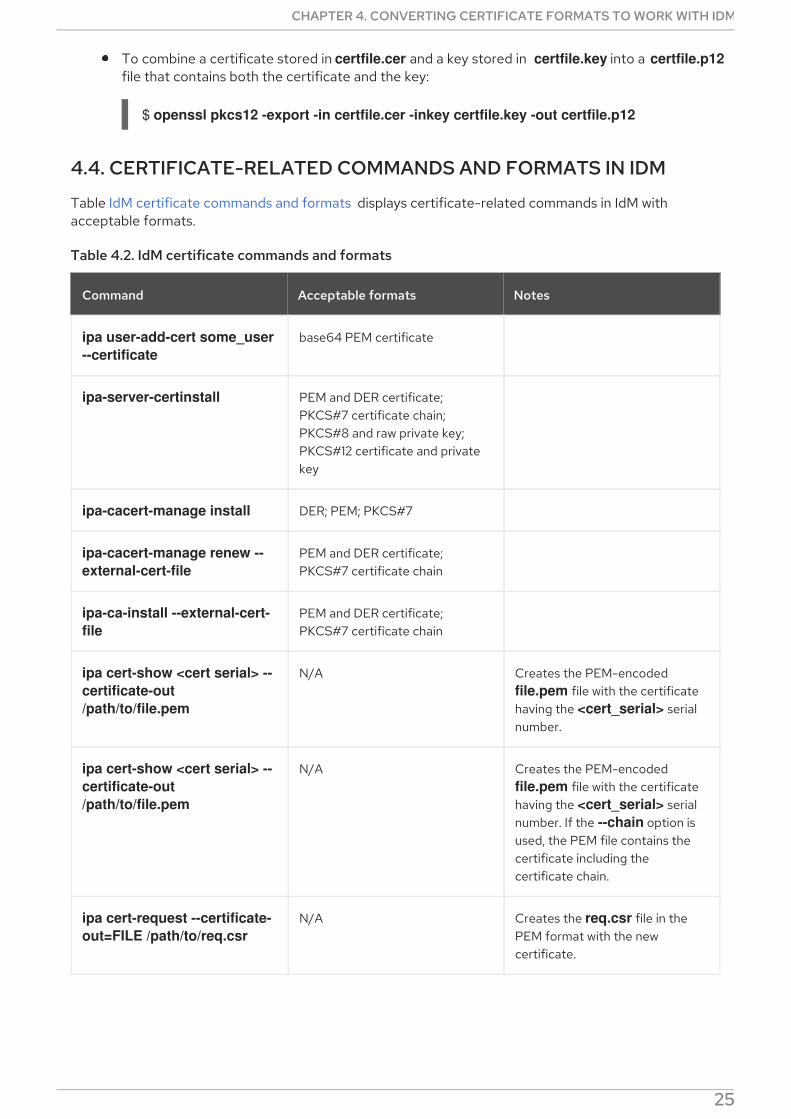
To combine a certificate stored in certfile.cer and a key stored in certfile.key into a certfile.p12file that contains both the certificate and the key:
$ openssl pkcs12 -export -in certfile.cer -inkey certfile.key -out certfile.p12
4.4. CERTIFICATE-RELATED COMMANDS AND FORMATS IN IDM
Table IdM certificate commands and formats displays certificate-related commands in IdM withacceptable formats.
Table 4.2. IdM certificate commands and formats
Command Acceptable formats Notes
ipa user-add-cert some_user --certificate
base64 PEM certificate
ipa-server-certinstall PEM and DER certificate;PKCS#7 certificate chain;PKCS#8 and raw private key;PKCS#12 certificate and privatekey
ipa-cacert-manage install DER; PEM; PKCS#7
ipa-cacert-manage renew --external-cert-file
PEM and DER certificate;PKCS#7 certificate chain
ipa-ca-install --external-cert-file
PEM and DER certificate;PKCS#7 certificate chain
ipa cert-show <cert serial> --certificate-out /path/to/file.pem
N/A Creates the PEM-encoded file.pem file with the certificatehaving the <cert_serial> serialnumber.
ipa cert-show <cert serial> --certificate-out /path/to/file.pem
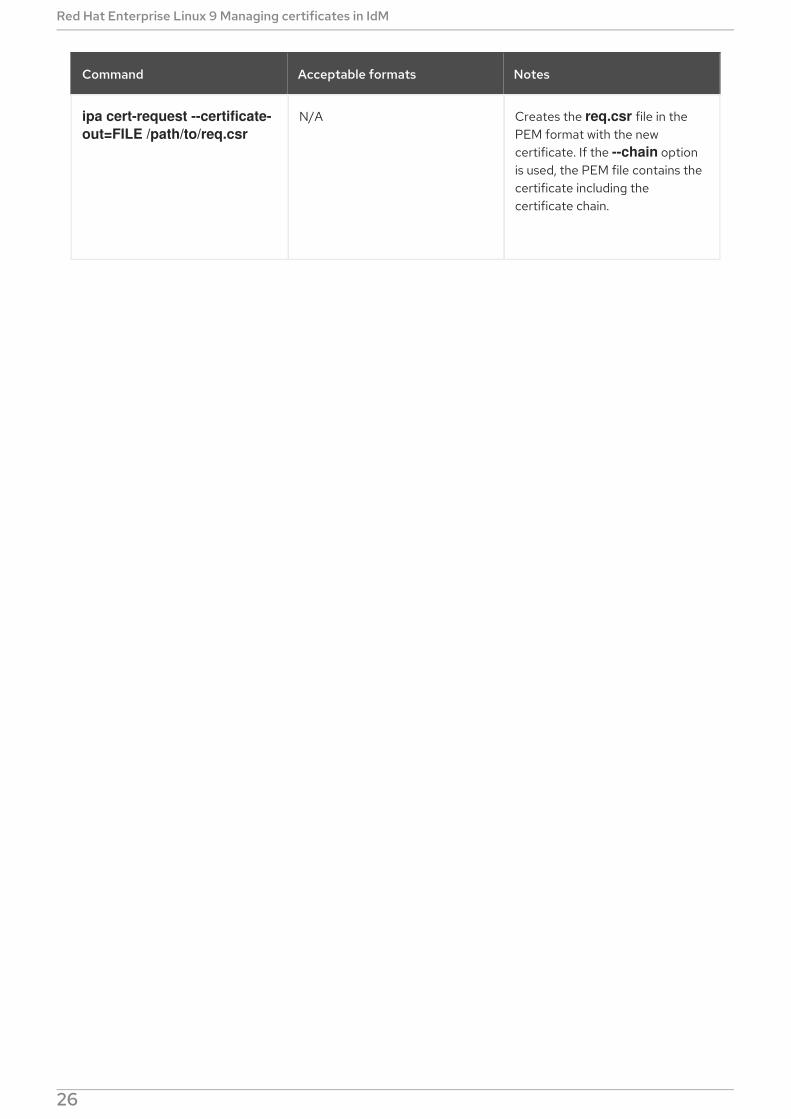
N/A Creates the PEM-encoded file.pem file with the certificatehaving the <cert_serial> serialnumber. If the --chain option isused, the PEM file contains thecertificate including thecertificate chain.
ipa cert-request --certificate-out=FILE /path/to/req.csr
N/A Creates the req.csr file in thePEM format with the newcertificate.
CHAPTER 4. CONVERTING CERTIFICATE FORMATS TO WORK WITH IDM
25
ipa cert-request --certificate-out=FILE /path/to/req.csr
N/A Creates the req.csr file in thePEM format with the newcertificate. If the --chain optionis used, the PEM file contains thecertificate including thecertificate chain.
Command Acceptable formats Notes
Red Hat Enterprise Linux 9 Managing certificates in IdM
26

CHAPTER 5. CREATING AND MANAGING CERTIFICATEPROFILES IN IDENTITY MANAGEMENT
Certificate profiles are used by the Certificate Authority (CA) when signing certificates to determine if acertificate signing request (CSR) is acceptable, and if so what features and extensions are present onthe certificate. A certificate profile is associated with issuing a particular type of certificate. Bycombining certificate profiles and CA access control lists (ACLs), you can define and control access tocustom certificate profiles.
In describing how to create certificate profiles, the procedures use S/MIME certificates as an example.Some email programs support digitally signed and encrypted email using the Secure MultipurposeInternet Mail Extension (S/MIME) protocol. Using S/MIME to sign or encrypt email messages requiresthe sender of the message to have an S/MIME certificate.
What is a certificate profile
Creating a certificate profile
What is a CA access control list
Defining a CA ACL to control access to certificate profiles
Using certificate profiles and CA ACLs to issue certificates
Modifying a certificate profile
Certificate profile configuration parameters
5.1. WHAT IS A CERTIFICATE PROFILE?
You can use certificate profiles to determine the content of certificates, as well as constraints for issuingthe certificates, such as the following:
The signing algorithm to use to encipher the certificate signing request.
The default validity of the certificate.
The revocation reasons that can be used to revoke a certificate.
If the common name of the principal is copied to the subject alternative name field.
The features and extensions that should be present on the certificate.
A single certificate profile is associated with issuing a particular type of certificate. You can definedifferent certificate profiles for users, services, and hosts in IdM. IdM includes the following certificateprofiles by default:
caIPAserviceCert
IECUserRoles
KDCs_PKINIT_Certs (used internally)
In addition, you can create and import custom profiles, which allow you to issue certificates for specificpurposes. For example, you can restrict the use of a particular profile to only one user or one group,preventing other users and groups from using that profile to issue a certificate for authentication. To
CHAPTER 5. CREATING AND MANAGING CERTIFICATE PROFILES IN IDENTITY MANAGEMENT
27
create custom certificate profiles, use the ipa certprofile command.
Additional resources
See the ipa help certprofile command.
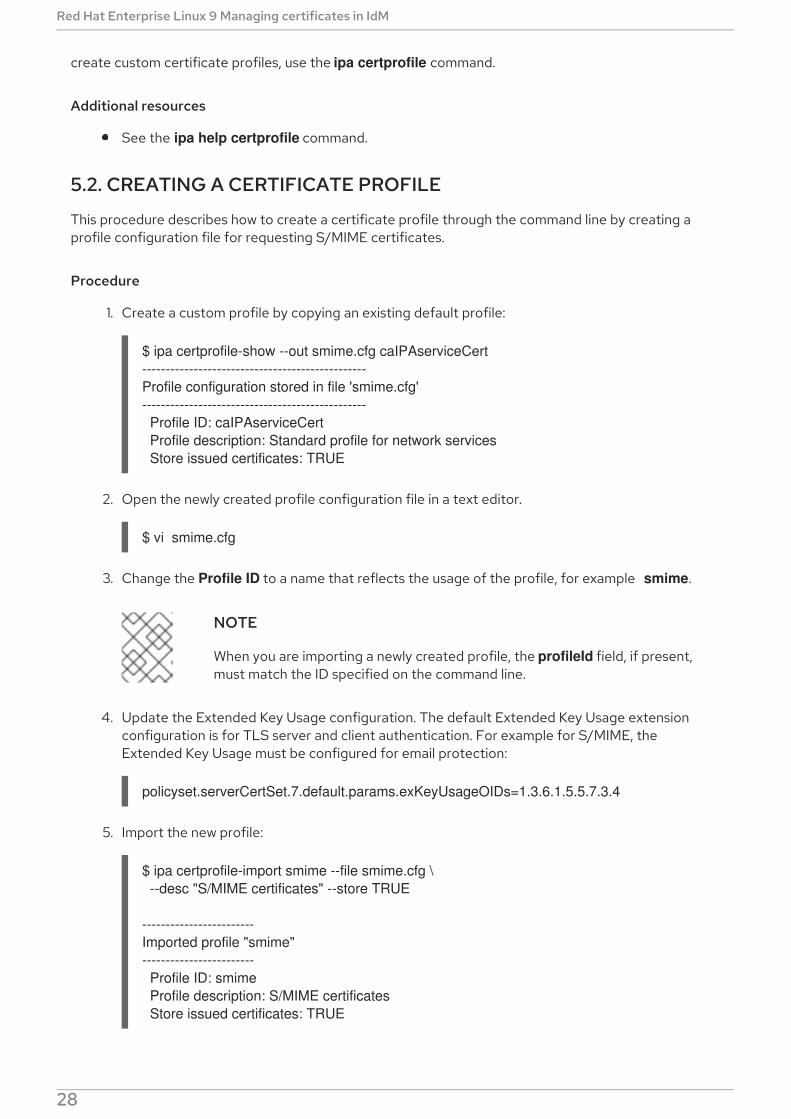
5.2. CREATING A CERTIFICATE PROFILE
This procedure describes how to create a certificate profile through the command line by creating aprofile configuration file for requesting S/MIME certificates.
Procedure
1. Create a custom profile by copying an existing default profile:
$ ipa certprofile-show --out smime.cfg caIPAserviceCert------------------------------------------------Profile configuration stored in file 'smime.cfg'------------------------------------------------ Profile ID: caIPAserviceCert Profile description: Standard profile for network services Store issued certificates: TRUE
2. Open the newly created profile configuration file in a text editor.
$ vi smime.cfg
3. Change the Profile ID to a name that reflects the usage of the profile, for example smime.
NOTE
When you are importing a newly created profile, the profileId field, if present,must match the ID specified on the command line.
4. Update the Extended Key Usage configuration. The default Extended Key Usage extensionconfiguration is for TLS server and client authentication. For example for S/MIME, theExtended Key Usage must be configured for email protection:
policyset.serverCertSet.7.default.params.exKeyUsageOIDs=1.3.6.1.5.5.7.3.4
5. Import the new profile:
$ ipa certprofile-import smime --file smime.cfg \ --desc "S/MIME certificates" --store TRUE
------------------------Imported profile "smime"------------------------ Profile ID: smime Profile description: S/MIME certificates Store issued certificates: TRUE
Red Hat Enterprise Linux 9 Managing certificates in IdM
28
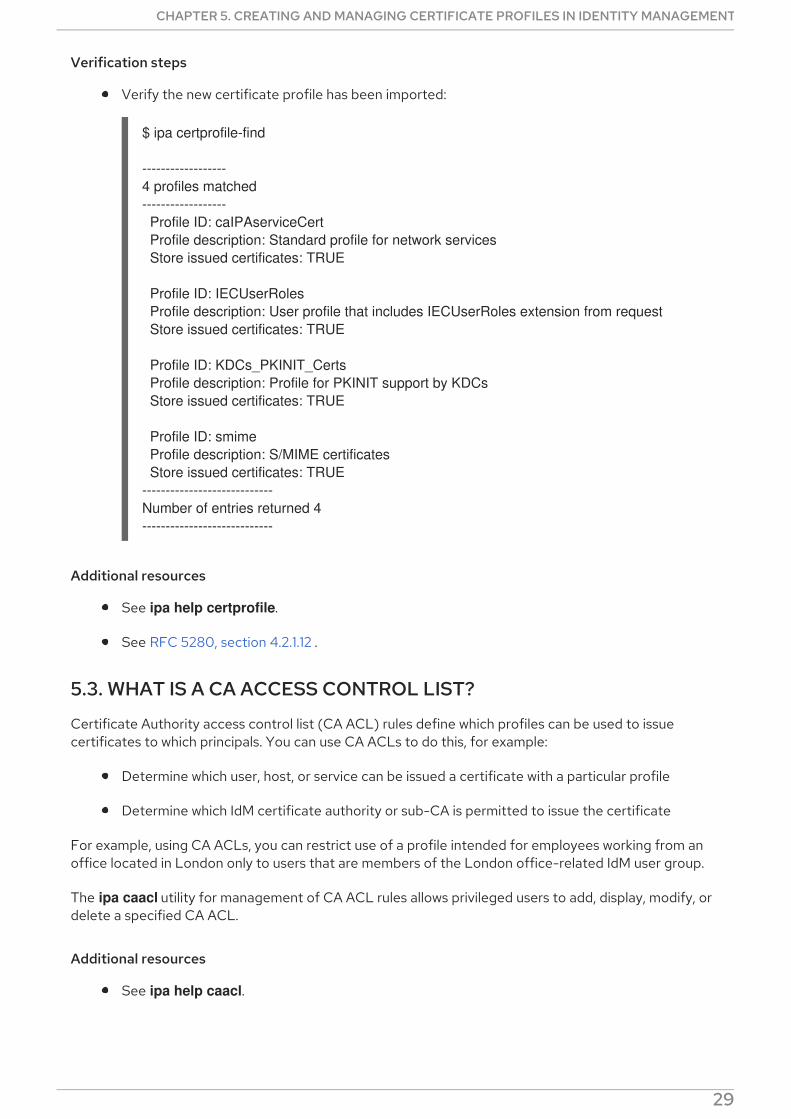
Verification steps
Verify the new certificate profile has been imported:
$ ipa certprofile-find
------------------4 profiles matched------------------ Profile ID: caIPAserviceCert Profile description: Standard profile for network services Store issued certificates: TRUE
Profile ID: IECUserRoles Profile description: User profile that includes IECUserRoles extension from request Store issued certificates: TRUE
Profile ID: KDCs_PKINIT_Certs Profile description: Profile for PKINIT support by KDCs Store issued certificates: TRUE
Profile ID: smime Profile description: S/MIME certificates Store issued certificates: TRUE----------------------------Number of entries returned 4----------------------------
Additional resources
See ipa help certprofile.
See RFC 5280, section 4.2.1.12 .
5.3. WHAT IS A CA ACCESS CONTROL LIST?
Certificate Authority access control list (CA ACL) rules define which profiles can be used to issuecertificates to which principals. You can use CA ACLs to do this, for example:
Determine which user, host, or service can be issued a certificate with a particular profile
Determine which IdM certificate authority or sub-CA is permitted to issue the certificate
For example, using CA ACLs, you can restrict use of a profile intended for employees working from anoffice located in London only to users that are members of the London office-related IdM user group.
The ipa caacl utility for management of CA ACL rules allows privileged users to add, display, modify, ordelete a specified CA ACL.
Additional resources
See ipa help caacl.
5.4. DEFINING A CA ACL TO CONTROL ACCESS TO CERTIFICATE
CHAPTER 5. CREATING AND MANAGING CERTIFICATE PROFILES IN IDENTITY MANAGEMENT
29
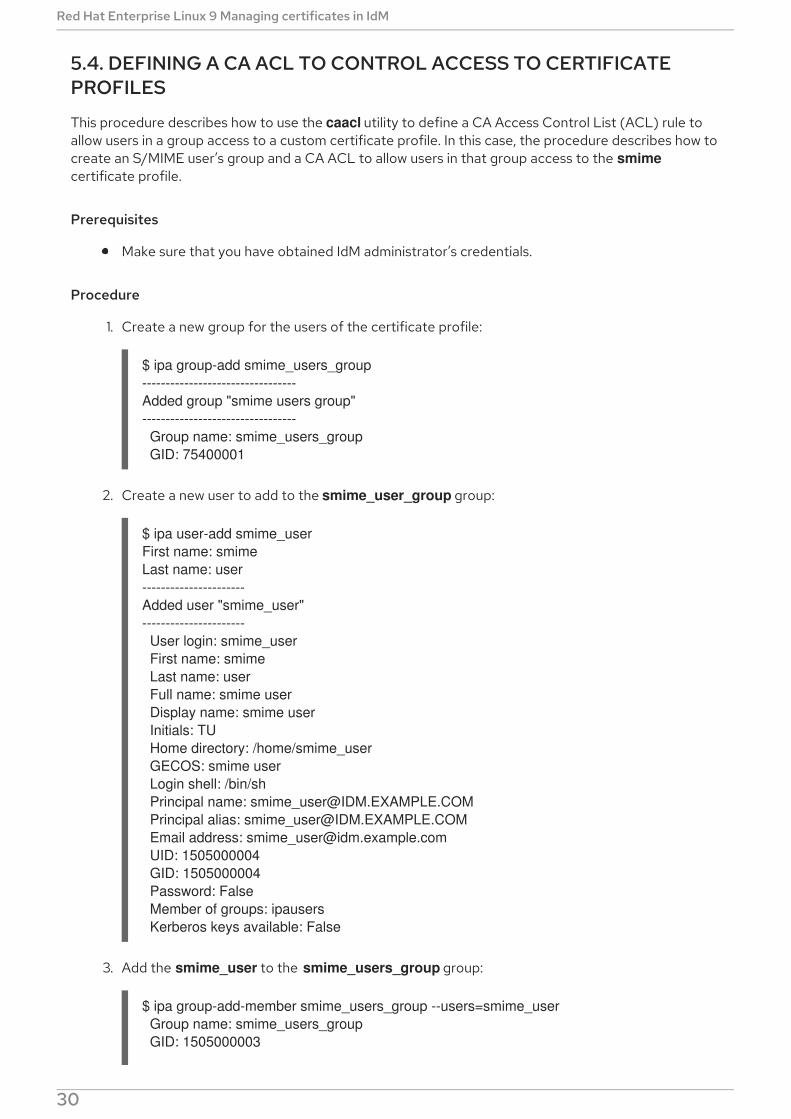
5.4. DEFINING A CA ACL TO CONTROL ACCESS TO CERTIFICATEPROFILES
This procedure describes how to use the caacl utility to define a CA Access Control List (ACL) rule toallow users in a group access to a custom certificate profile. In this case, the procedure describes how tocreate an S/MIME user’s group and a CA ACL to allow users in that group access to the smimecertificate profile.
Prerequisites
Make sure that you have obtained IdM administrator’s credentials.
Procedure
1. Create a new group for the users of the certificate profile:
$ ipa group-add smime_users_group---------------------------------Added group "smime users group"--------------------------------- Group name: smime_users_group GID: 75400001
2. Create a new user to add to the smime_user_group group:
$ ipa user-add smime_userFirst name: smimeLast name: user----------------------Added user "smime_user"---------------------- User login: smime_user First name: smime Last name: user Full name: smime user Display name: smime user Initials: TU Home directory: /home/smime_user GECOS: smime user Login shell: /bin/sh Principal name: [email protected] Principal alias: [email protected] Email address: [email protected] UID: 1505000004 GID: 1505000004 Password: False Member of groups: ipausers Kerberos keys available: False
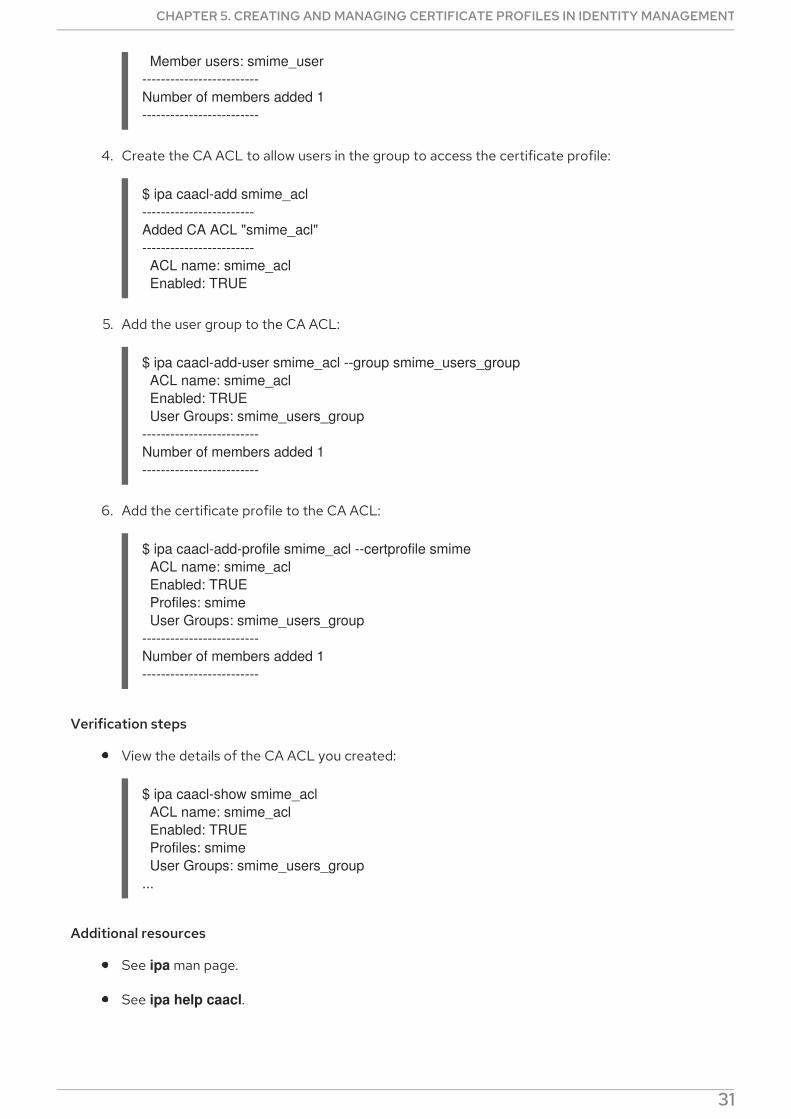
3. Add the smime_user to the smime_users_group group:
$ ipa group-add-member smime_users_group --users=smime_user Group name: smime_users_group GID: 1505000003
Red Hat Enterprise Linux 9 Managing certificates in IdM
30
Member users: smime_user-------------------------Number of members added 1-------------------------
4. Create the CA ACL to allow users in the group to access the certificate profile:
$ ipa caacl-add smime_acl------------------------Added CA ACL "smime_acl"------------------------ ACL name: smime_acl Enabled: TRUE
5. Add the user group to the CA ACL:
$ ipa caacl-add-user smime_acl --group smime_users_group ACL name: smime_acl Enabled: TRUE User Groups: smime_users_group-------------------------Number of members added 1-------------------------
6. Add the certificate profile to the CA ACL:
$ ipa caacl-add-profile smime_acl --certprofile smime ACL name: smime_acl Enabled: TRUE Profiles: smime User Groups: smime_users_group-------------------------Number of members added 1-------------------------
Verification steps
View the details of the CA ACL you created:
$ ipa caacl-show smime_acl ACL name: smime_acl Enabled: TRUE Profiles: smime User Groups: smime_users_group...
Additional resources
See ipa man page.
See ipa help caacl.
5.5. USING CERTIFICATE PROFILES AND CA ACLS TO ISSUE
CHAPTER 5. CREATING AND MANAGING CERTIFICATE PROFILES IN IDENTITY MANAGEMENT
31
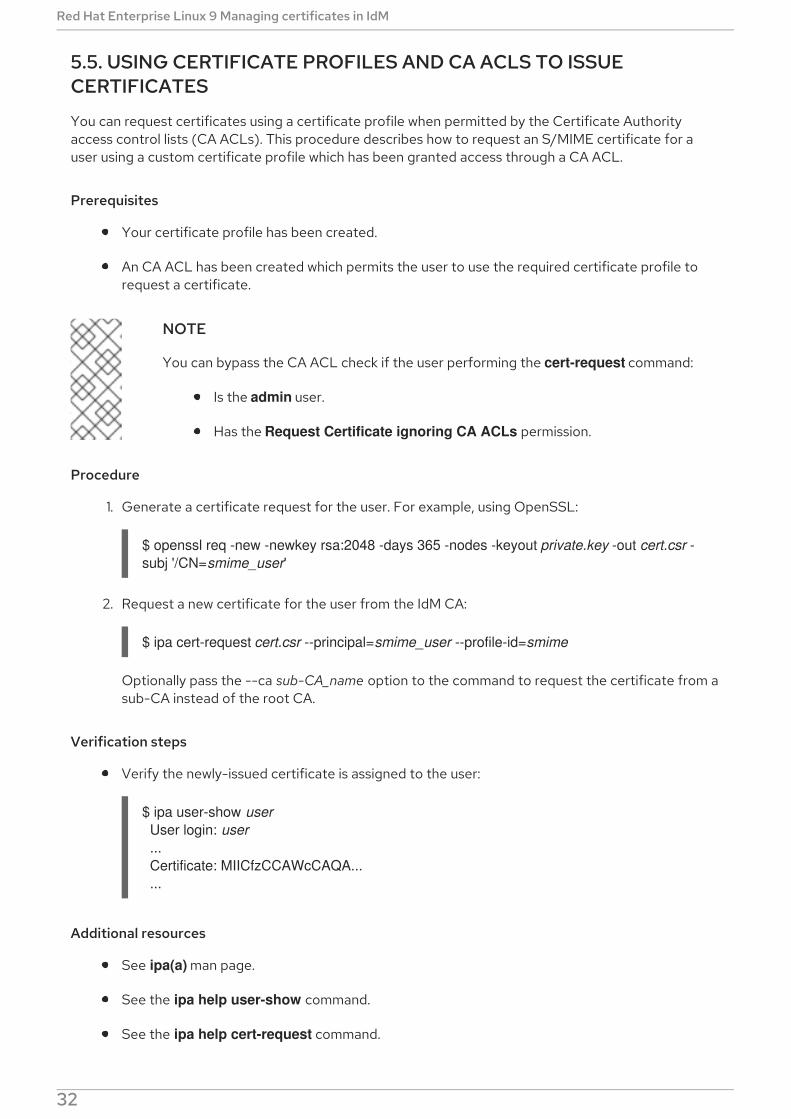
5.5. USING CERTIFICATE PROFILES AND CA ACLS TO ISSUECERTIFICATES
You can request certificates using a certificate profile when permitted by the Certificate Authorityaccess control lists (CA ACLs). This procedure describes how to request an S/MIME certificate for auser using a custom certificate profile which has been granted access through a CA ACL.
Prerequisites
Your certificate profile has been created.
An CA ACL has been created which permits the user to use the required certificate profile torequest a certificate.
NOTE
You can bypass the CA ACL check if the user performing the cert-request command:
Is the admin user.
Has the Request Certificate ignoring CA ACLs permission.
Procedure
1. Generate a certificate request for the user. For example, using OpenSSL:
$ openssl req -new -newkey rsa:2048 -days 365 -nodes -keyout private.key -out cert.csr -subj '/CN=smime_user'
2. Request a new certificate for the user from the IdM CA:
$ ipa cert-request cert.csr --principal=smime_user --profile-id=smime
Optionally pass the --ca sub-CA_name option to the command to request the certificate from asub-CA instead of the root CA.
Verification steps
Verify the newly-issued certificate is assigned to the user:
$ ipa user-show user User login: user ... Certificate: MIICfzCCAWcCAQA... ...
Additional resources
See ipa(a) man page.
See the ipa help user-show command.
See the ipa help cert-request command.
Red Hat Enterprise Linux 9 Managing certificates in IdM
32
See openssl(lssl) man page.
5.6. MODIFYING A CERTIFICATE PROFILE
This procedure describes how to modify certificate profiles directly through the command line using the ipa certprofile-mod command.
Procedure
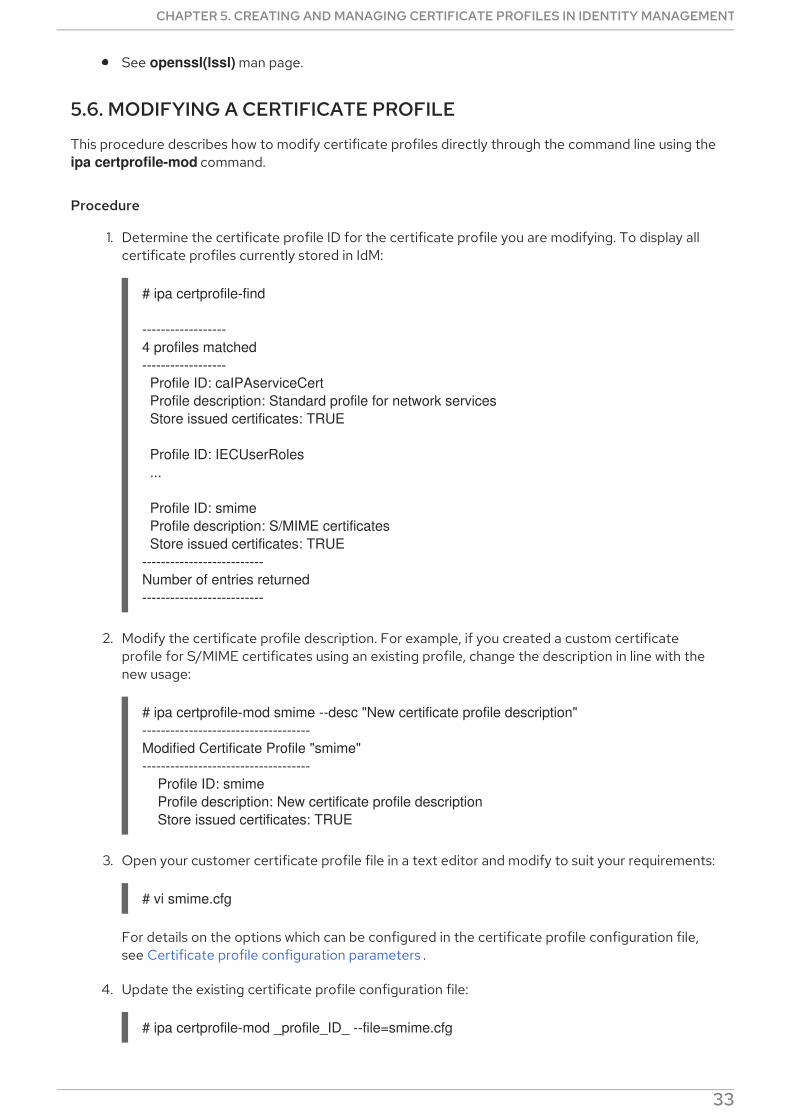
1. Determine the certificate profile ID for the certificate profile you are modifying. To display allcertificate profiles currently stored in IdM:
# ipa certprofile-find
------------------4 profiles matched------------------ Profile ID: caIPAserviceCert Profile description: Standard profile for network services Store issued certificates: TRUE
Profile ID: IECUserRoles ...
Profile ID: smime Profile description: S/MIME certificates Store issued certificates: TRUE--------------------------Number of entries returned--------------------------
2. Modify the certificate profile description. For example, if you created a custom certificateprofile for S/MIME certificates using an existing profile, change the description in line with thenew usage:
# ipa certprofile-mod smime --desc "New certificate profile description"------------------------------------Modified Certificate Profile "smime"------------------------------------ Profile ID: smime Profile description: New certificate profile description Store issued certificates: TRUE
3. Open your customer certificate profile file in a text editor and modify to suit your requirements:
# vi smime.cfg
For details on the options which can be configured in the certificate profile configuration file,see Certificate profile configuration parameters .
4. Update the existing certificate profile configuration file:
# ipa certprofile-mod _profile_ID_ --file=smime.cfg
CHAPTER 5. CREATING AND MANAGING CERTIFICATE PROFILES IN IDENTITY MANAGEMENT
33
Verification steps
Verify the certificate profile has been updated:
$ ipa certprofile-show smime Profile ID: smime Profile description: New certificate profile description Store issued certificates: TRUE
Additional resources
See ipa(a) man page.
See ipa help certprofile-mod.
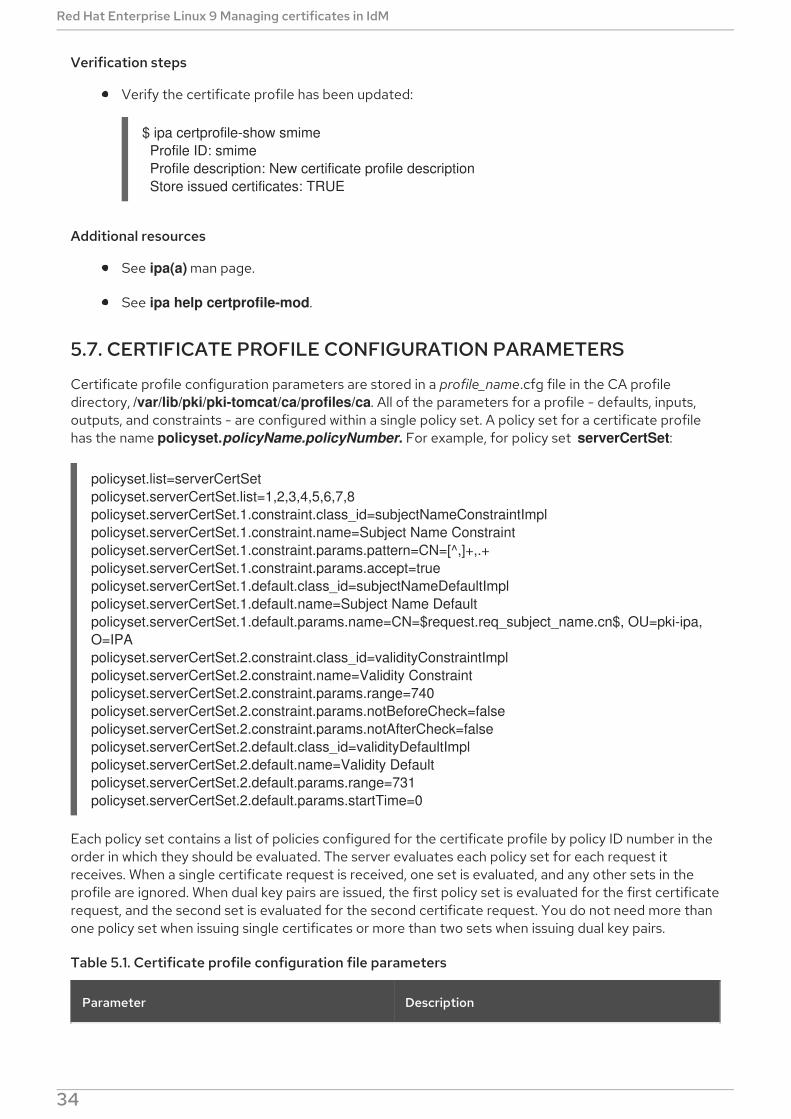
5.7. CERTIFICATE PROFILE CONFIGURATION PARAMETERS
Certificate profile configuration parameters are stored in a profile_name.cfg file in the CA profiledirectory, /var/lib/pki/pki-tomcat/ca/profiles/ca. All of the parameters for a profile - defaults, inputs,outputs, and constraints - are configured within a single policy set. A policy set for a certificate profilehas the name policyset.policyName.policyNumber. For example, for policy set serverCertSet:
policyset.list=serverCertSetpolicyset.serverCertSet.list=1,2,3,4,5,6,7,8policyset.serverCertSet.1.constraint.class_id=subjectNameConstraintImplpolicyset.serverCertSet.1.constraint.name=Subject Name Constraintpolicyset.serverCertSet.1.constraint.params.pattern=CN=[^,]+,.+policyset.serverCertSet.1.constraint.params.accept=truepolicyset.serverCertSet.1.default.class_id=subjectNameDefaultImplpolicyset.serverCertSet.1.default.name=Subject Name Defaultpolicyset.serverCertSet.1.default.params.name=CN=$request.req_subject_name.cn$, OU=pki-ipa, O=IPApolicyset.serverCertSet.2.constraint.class_id=validityConstraintImplpolicyset.serverCertSet.2.constraint.name=Validity Constraintpolicyset.serverCertSet.2.constraint.params.range=740policyset.serverCertSet.2.constraint.params.notBeforeCheck=falsepolicyset.serverCertSet.2.constraint.params.notAfterCheck=falsepolicyset.serverCertSet.2.default.class_id=validityDefaultImplpolicyset.serverCertSet.2.default.name=Validity Defaultpolicyset.serverCertSet.2.default.params.range=731policyset.serverCertSet.2.default.params.startTime=0
Each policy set contains a list of policies configured for the certificate profile by policy ID number in theorder in which they should be evaluated. The server evaluates each policy set for each request itreceives. When a single certificate request is received, one set is evaluated, and any other sets in theprofile are ignored. When dual key pairs are issued, the first policy set is evaluated for the first certificaterequest, and the second set is evaluated for the second certificate request. You do not need more thanone policy set when issuing single certificates or more than two sets when issuing dual key pairs.
Table 5.1. Certificate profile configuration file parameters
Parameter Description
Red Hat Enterprise Linux 9 Managing certificates in IdM
34
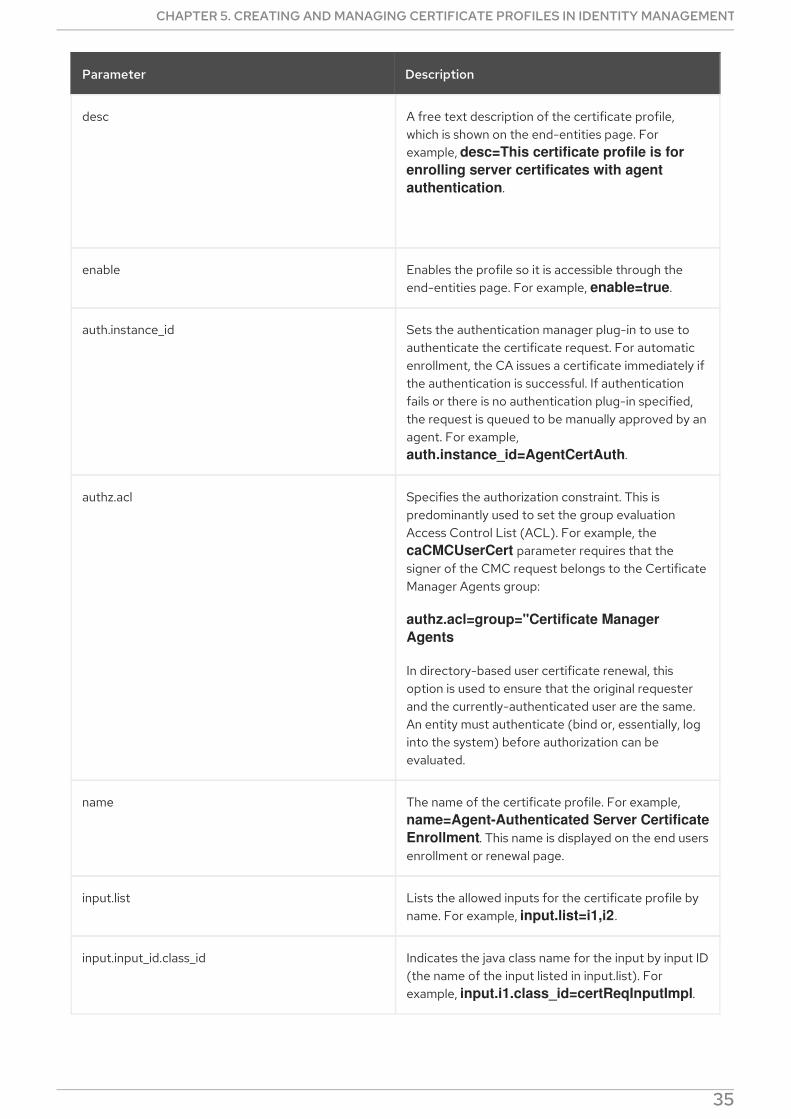
desc A free text description of the certificate profile,which is shown on the end-entities page. Forexample, desc=This certificate profile is for enrolling server certificates with agent authentication.
enable Enables the profile so it is accessible through theend-entities page. For example, enable=true.
auth.instance_id Sets the authentication manager plug-in to use toauthenticate the certificate request. For automaticenrollment, the CA issues a certificate immediately ifthe authentication is successful. If authenticationfails or there is no authentication plug-in specified,the request is queued to be manually approved by anagent. For example, auth.instance_id=AgentCertAuth.
authz.acl Specifies the authorization constraint. This ispredominantly used to set the group evaluationAccess Control List (ACL). For example, the caCMCUserCert parameter requires that thesigner of the CMC request belongs to the CertificateManager Agents group:
authz.acl=group="Certificate Manager Agents
In directory-based user certificate renewal, thisoption is used to ensure that the original requesterand the currently-authenticated user are the same.An entity must authenticate (bind or, essentially, loginto the system) before authorization can beevaluated.
name The name of the certificate profile. For example, name=Agent-Authenticated Server Certificate Enrollment. This name is displayed on the end usersenrollment or renewal page.
input.list Lists the allowed inputs for the certificate profile byname. For example, input.list=i1,i2.
input.input_id.class_id Indicates the java class name for the input by input ID(the name of the input listed in input.list). Forexample, input.i1.class_id=certReqInputImpl.
Parameter Description
CHAPTER 5. CREATING AND MANAGING CERTIFICATE PROFILES IN IDENTITY MANAGEMENT
35
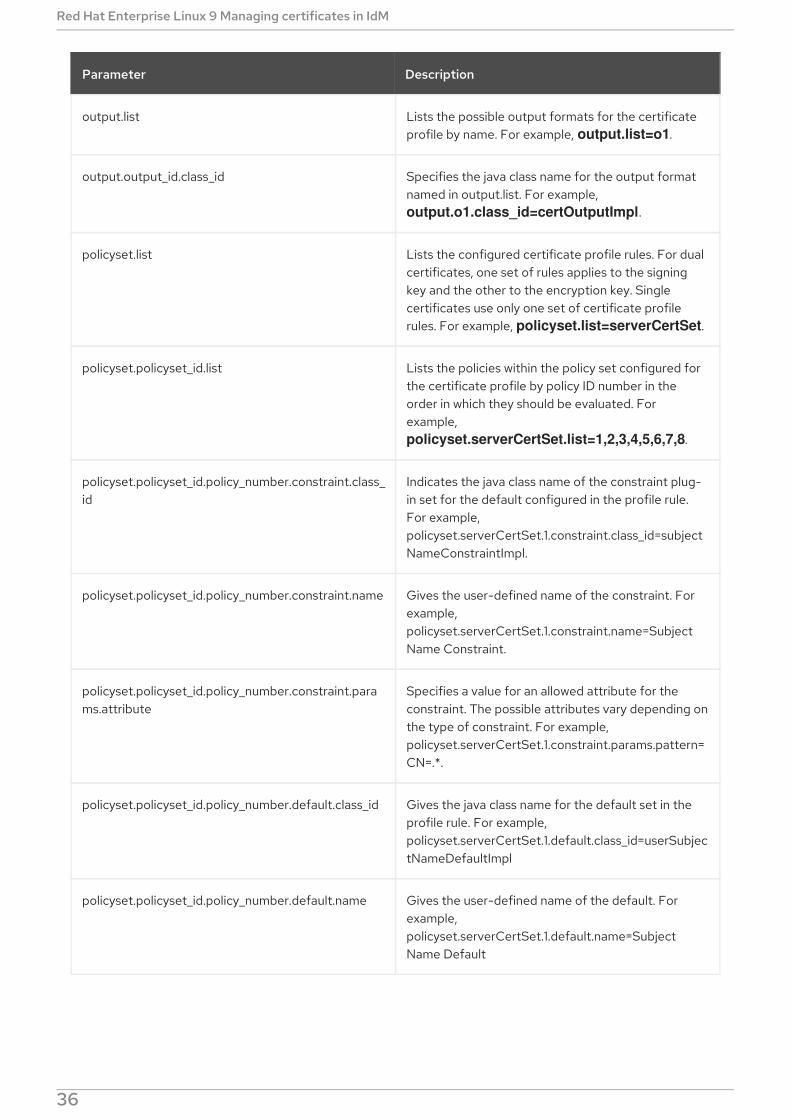
output.list Lists the possible output formats for the certificateprofile by name. For example, output.list=o1.
output.output_id.class_id Specifies the java class name for the output formatnamed in output.list. For example, output.o1.class_id=certOutputImpl.
policyset.list Lists the configured certificate profile rules. For dualcertificates, one set of rules applies to the signingkey and the other to the encryption key. Singlecertificates use only one set of certificate profilerules. For example, policyset.list=serverCertSet.
policyset.policyset_id.list Lists the policies within the policy set configured forthe certificate profile by policy ID number in theorder in which they should be evaluated. Forexample, policyset.serverCertSet.list=1,2,3,4,5,6,7,8.
policyset.policyset_id.policy_number.constraint.class_id
Indicates the java class name of the constraint plug-in set for the default configured in the profile rule.For example,policyset.serverCertSet.1.constraint.class_id=subjectNameConstraintImpl.
policyset.policyset_id.policy_number.constraint.name Gives the user-defined name of the constraint. Forexample,policyset.serverCertSet.1.constraint.name=SubjectName Constraint.
policyset.policyset_id.policy_number.constraint.params.attribute
Specifies a value for an allowed attribute for theconstraint. The possible attributes vary depending onthe type of constraint. For example,policyset.serverCertSet.1.constraint.params.pattern=CN=.*.
policyset.policyset_id.policy_number.default.class_id Gives the java class name for the default set in theprofile rule. For example,policyset.serverCertSet.1.default.class_id=userSubjectNameDefaultImpl
policyset.policyset_id.policy_number.default.name Gives the user-defined name of the default. Forexample,policyset.serverCertSet.1.default.name=SubjectName Default
Parameter Description
Red Hat Enterprise Linux 9 Managing certificates in IdM
36
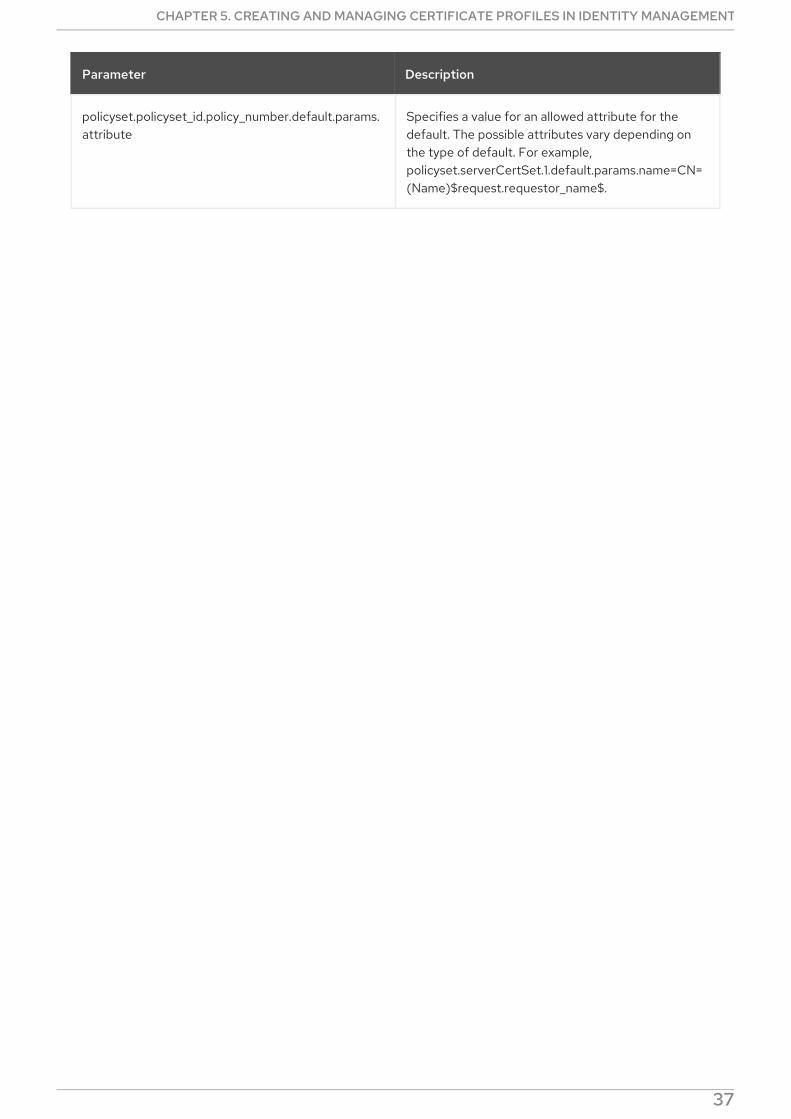
policyset.policyset_id.policy_number.default.params.attribute
Specifies a value for an allowed attribute for thedefault. The possible attributes vary depending onthe type of default. For example,policyset.serverCertSet.1.default.params.name=CN=(Name)$request.requestor_name$.
Parameter Description
CHAPTER 5. CREATING AND MANAGING CERTIFICATE PROFILES IN IDENTITY MANAGEMENT
37
CHAPTER 6. MANAGING THE VALIDITY OF CERTIFICATES INIDM
In Identity Management (IdM), you can manage the validity of both already existing certificates andcertificates you want to issue in the future, but the methods are different.
6.1. MANAGING THE VALIDITY OF AN EXISTING CERTIFICATE THATWAS ISSUED BY IDM CA
In IdM, the following methods of viewing the expiry date of a certificate are available:
Viewing the expiry date in IdM WebUI .
Viewing the expiry date in the CLI .
You can manage the validity of an already existing certificate that was issued by IdM CA in the followingways:
Renew a certificate by requesting a new certificate using either the original certificate signingrequest (CSR) or a new CSR generated from the private key. You can request a new certificateusing the following utilities:
certmonger
You can use certmonger to request a service certificate. Before the certificate is due toexpire, certmonger will automatically renew the certificate, thereby ensuring a continuingvalidity of the service certificate. For details, see Obtaining an IdM certificate for a serviceusing certmonger;
certutil
You can use certutil to renew user, host, and service certificates. For details on requesting auser certificate, see Requesting a new user certificate and exporting it to the client ;
openssl
You can use openssl to renew user, host, and service certificates.
Revoke a certificate. For details, see:
Revoking certificates with the integrated IdM CAs using IdM WebUI ;
Revoking certificates with the integrated IdM CAs using IdM CLI ;
Restore a certificate if it has been temporarily revoked. For details, see:
Restoring certificates with the integrated IdM CAs using IdM WebUI ;
Restoring certificates with the integrated IdM CAs using IdM CLI .
6.2. MANAGING THE VALIDITY OF FUTURE CERTIFICATES ISSUED BYIDM CA
To manage the validity of future certificates issued by IdM CA, modify, import, or create a certificateprofile. For details, see Creating and managing certificate profiles in Identity Management .
6.3. VIEWING THE EXPIRY DATE OF A CERTIFICATE IN IDM WEBUI
Red Hat Enterprise Linux 9 Managing certificates in IdM
38
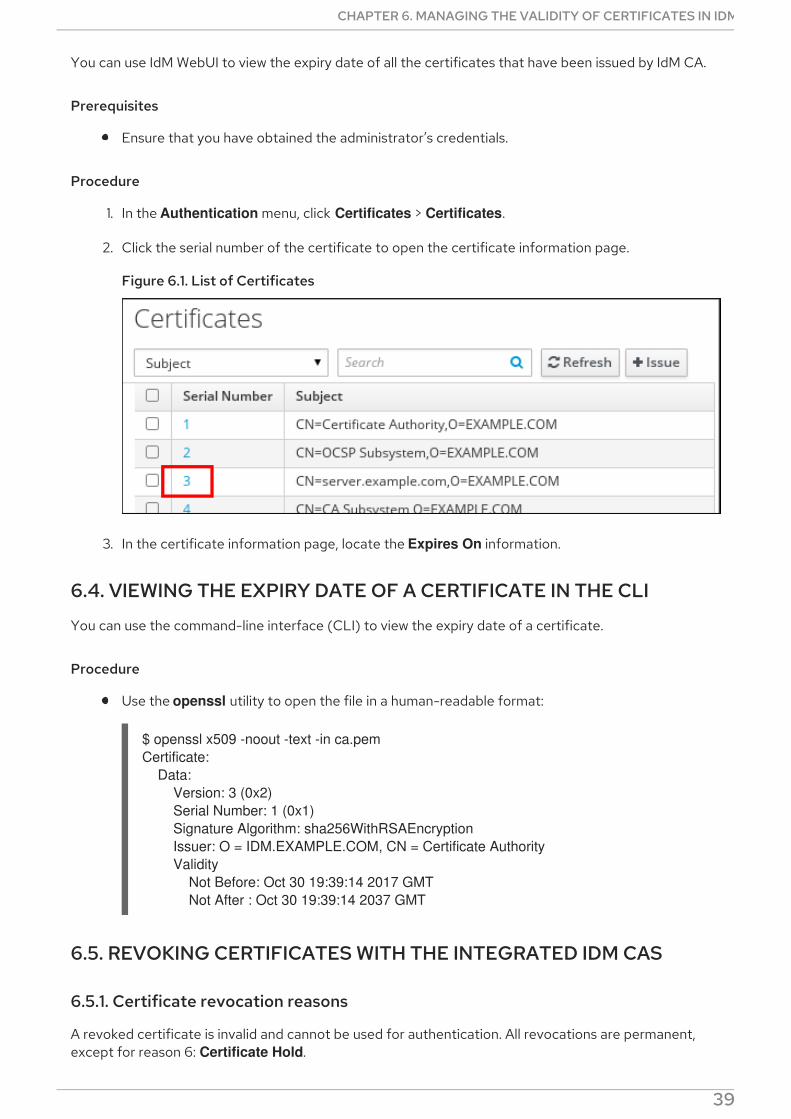
You can use IdM WebUI to view the expiry date of all the certificates that have been issued by IdM CA.
Prerequisites
Ensure that you have obtained the administrator’s credentials.
Procedure
1. In the Authentication menu, click Certificates > Certificates.
2. Click the serial number of the certificate to open the certificate information page.
Figure 6.1. List of Certificates
3. In the certificate information page, locate the Expires On information.
6.4. VIEWING THE EXPIRY DATE OF A CERTIFICATE IN THE CLI
You can use the command-line interface (CLI) to view the expiry date of a certificate.
Procedure
Use the openssl utility to open the file in a human-readable format:
$ openssl x509 -noout -text -in ca.pemCertificate: Data: Version: 3 (0x2) Serial Number: 1 (0x1) Signature Algorithm: sha256WithRSAEncryption Issuer: O = IDM.EXAMPLE.COM, CN = Certificate Authority Validity Not Before: Oct 30 19:39:14 2017 GMT Not After : Oct 30 19:39:14 2037 GMT
6.5. REVOKING CERTIFICATES WITH THE INTEGRATED IDM CAS
6.5.1. Certificate revocation reasons
A revoked certificate is invalid and cannot be used for authentication. All revocations are permanent,except for reason 6: Certificate Hold.
CHAPTER 6. MANAGING THE VALIDITY OF CERTIFICATES IN IDM
39
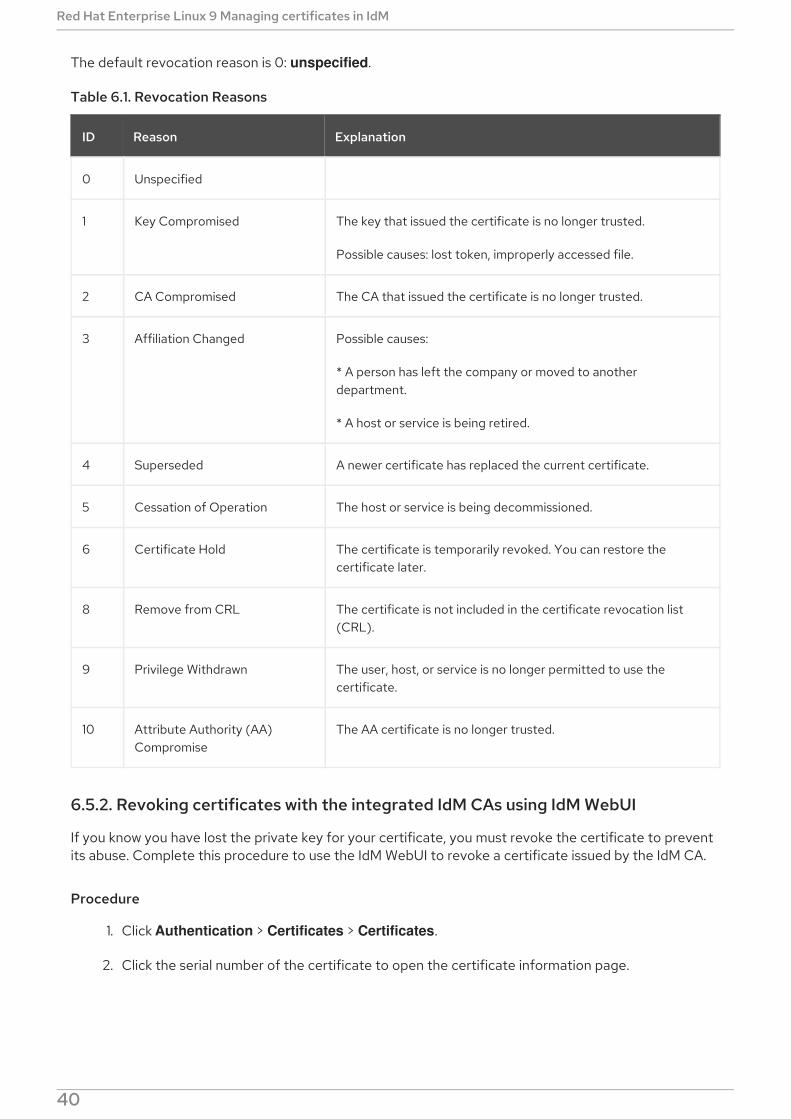
The default revocation reason is 0: unspecified.
Table 6.1. Revocation Reasons
ID Reason Explanation
0 Unspecified
1 Key Compromised The key that issued the certificate is no longer trusted.
Possible causes: lost token, improperly accessed file.
2 CA Compromised The CA that issued the certificate is no longer trusted.
3 Affiliation Changed Possible causes:
* A person has left the company or moved to anotherdepartment.
* A host or service is being retired.
4 Superseded A newer certificate has replaced the current certificate.
5 Cessation of Operation The host or service is being decommissioned.
6 Certificate Hold The certificate is temporarily revoked. You can restore thecertificate later.
8 Remove from CRL The certificate is not included in the certificate revocation list(CRL).
9 Privilege Withdrawn The user, host, or service is no longer permitted to use thecertificate.
10 Attribute Authority (AA)Compromise
The AA certificate is no longer trusted.
6.5.2. Revoking certificates with the integrated IdM CAs using IdM WebUI
If you know you have lost the private key for your certificate, you must revoke the certificate to preventits abuse. Complete this procedure to use the IdM WebUI to revoke a certificate issued by the IdM CA.
Procedure
1. Click Authentication > Certificates > Certificates.
2. Click the serial number of the certificate to open the certificate information page.
Figure 6.2. List of Certificates
Red Hat Enterprise Linux 9 Managing certificates in IdM
40
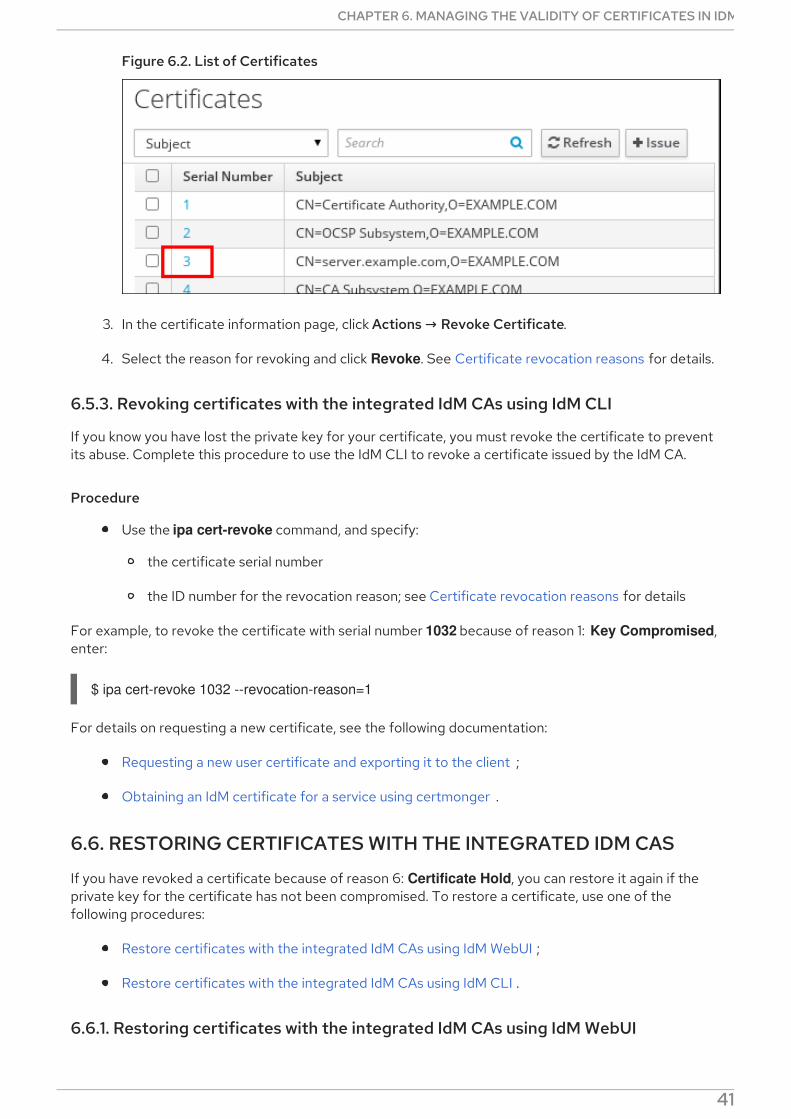
Figure 6.2. List of Certificates
3. In the certificate information page, click Actions → Revoke Certificate.
4. Select the reason for revoking and click Revoke. See Certificate revocation reasons for details.
6.5.3. Revoking certificates with the integrated IdM CAs using IdM CLI
If you know you have lost the private key for your certificate, you must revoke the certificate to preventits abuse. Complete this procedure to use the IdM CLI to revoke a certificate issued by the IdM CA.
Procedure
Use the ipa cert-revoke command, and specify:
the certificate serial number
the ID number for the revocation reason; see Certificate revocation reasons for details
For example, to revoke the certificate with serial number 1032 because of reason 1: Key Compromised,enter:
$ ipa cert-revoke 1032 --revocation-reason=1
For details on requesting a new certificate, see the following documentation:
Requesting a new user certificate and exporting it to the client ;
Obtaining an IdM certificate for a service using certmonger .
6.6. RESTORING CERTIFICATES WITH THE INTEGRATED IDM CAS
If you have revoked a certificate because of reason 6: Certificate Hold, you can restore it again if theprivate key for the certificate has not been compromised. To restore a certificate, use one of thefollowing procedures:
Restore certificates with the integrated IdM CAs using IdM WebUI ;
Restore certificates with the integrated IdM CAs using IdM CLI .
6.6.1. Restoring certificates with the integrated IdM CAs using IdM WebUI
Complete this procedure to use the IdM WebUI to restore an IdM certificate that has been revoked
CHAPTER 6. MANAGING THE VALIDITY OF CERTIFICATES IN IDM
41
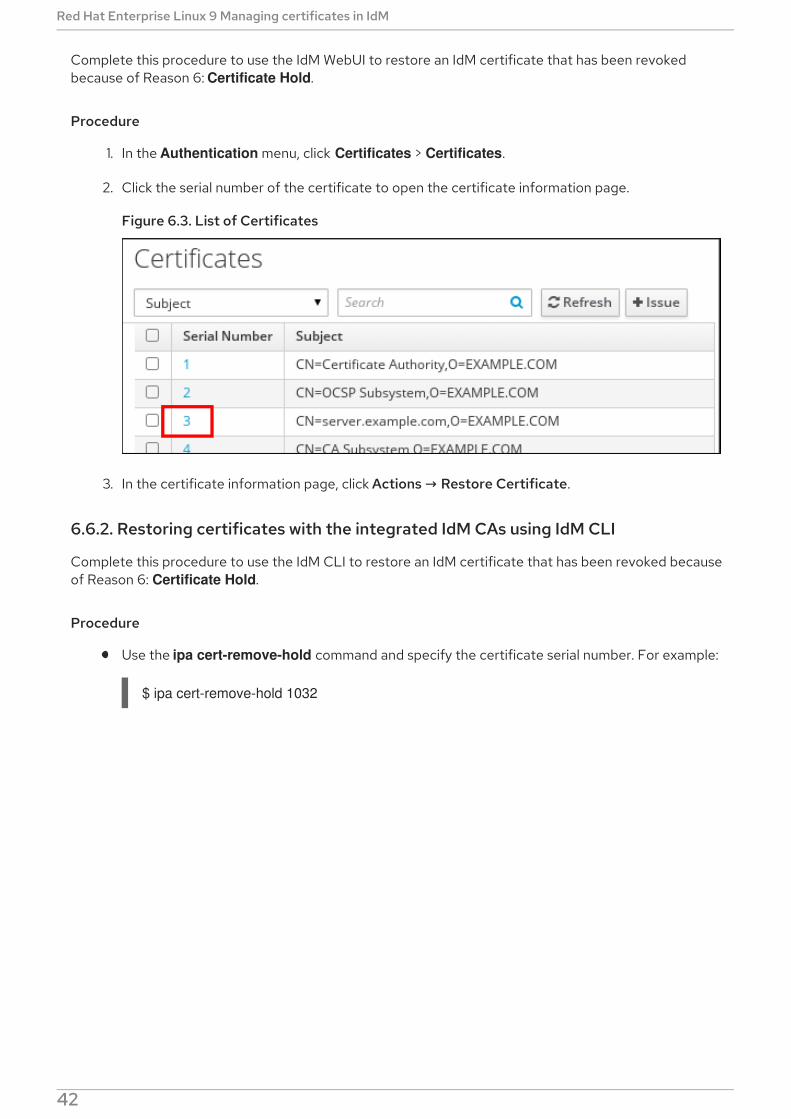
Complete this procedure to use the IdM WebUI to restore an IdM certificate that has been revokedbecause of Reason 6: Certificate Hold.
Procedure
1. In the Authentication menu, click Certificates > Certificates.
2. Click the serial number of the certificate to open the certificate information page.
Figure 6.3. List of Certificates
3. In the certificate information page, click Actions → Restore Certificate.
6.6.2. Restoring certificates with the integrated IdM CAs using IdM CLI
Complete this procedure to use the IdM CLI to restore an IdM certificate that has been revoked becauseof Reason 6: Certificate Hold.
Procedure
Use the ipa cert-remove-hold command and specify the certificate serial number. For example:
$ ipa cert-remove-hold 1032
Red Hat Enterprise Linux 9 Managing certificates in IdM
42
CHAPTER 7. CONFIGURING IDENTITY MANAGEMENT FORSMART CARD AUTHENTICATION
Authentication based on smart cards is an alternative to passwords. You can store user credentials on asmart card in the form of a private key and a certificate, and special software and hardware is used toaccess them. Place the smart card into a reader or a USB port and supply the PIN code for the smartcard instead of providing your password.
Identity Management (IdM) supports smart card authentication with:
User certificates issued by the IdM certificate authority
User certificates issued by an external certificate authority
This user story shows how to set up smart card authentication in IdM for both types of certificates. Inthe user story, the smartcard_ca.pem CA certificate is the file containing the certificate of a trustedexternal certificate authority.
The user story contains the following modules:
Configuring the IdM server for smart card authentication
Configuring the IdM client for smart card authentication
Adding a certificate to a user entry in the IdM Web UI
Adding a certificate to a user entry in the IdM CLI
Installing tools for managing and using smart cards
Storing a certificate on a smart card
Logging in to IdM with smart cards
Configuring GDM access using smart card authentication
Configuring su access using smart card authentication
7.1. CONFIGURING THE IDM SERVER FOR SMART CARDAUTHENTICATION
If you want to enable smart card authentication for users whose certificates have been issued by thecertificate authority of the EXAMPLE.ORG domain, whose LDAP distinguished name (DN) is CN=Certificate Authority,DC=EXAMPLE,DC=ORG, then you need to obtain the certificate of theauthority so that you can run it with the script configuring the IdM server. You can, for example,download the certificate from a web page whose certificate has been issued by the authority. Fordetails, see Steps 1 - 4a in Configuring a browser to enable certificate authentication .
To enable smart card authentication for IdM users who have been issued a certificate by the IdMCertificate Authority, obtain the CA certificate from the /etc/ipa/ca.crt file on the IdM server on whichthe IdM CA is running.
This section describes how to configure an IdM server for smart card authentication. First, obtain fileswith the CA certificates in the PEM format, then run the in-built ipa-advise script. Finally, reload thesystem configuration.
CHAPTER 7. CONFIGURING IDENTITY MANAGEMENT FOR SMART CARD AUTHENTICATION
43
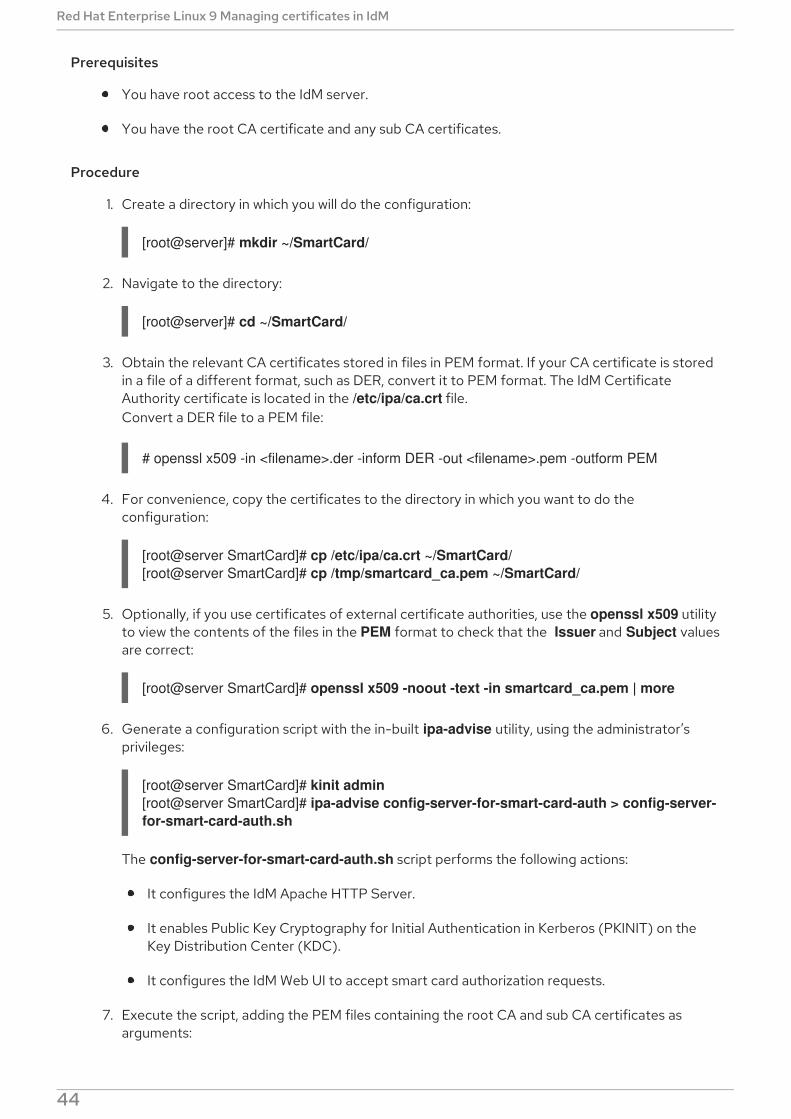
Prerequisites
You have root access to the IdM server.
You have the root CA certificate and any sub CA certificates.
Procedure
1. Create a directory in which you will do the configuration:
[root@server]# mkdir ~/SmartCard/
2. Navigate to the directory:
[root@server]# cd ~/SmartCard/
3. Obtain the relevant CA certificates stored in files in PEM format. If your CA certificate is storedin a file of a different format, such as DER, convert it to PEM format. The IdM CertificateAuthority certificate is located in the /etc/ipa/ca.crt file.Convert a DER file to a PEM file:
# openssl x509 -in <filename>.der -inform DER -out <filename>.pem -outform PEM
4. For convenience, copy the certificates to the directory in which you want to do theconfiguration:
[root@server SmartCard]# cp /etc/ipa/ca.crt ~/SmartCard/[root@server SmartCard]# cp /tmp/smartcard_ca.pem ~/SmartCard/
5. Optionally, if you use certificates of external certificate authorities, use the openssl x509 utilityto view the contents of the files in the PEM format to check that the Issuer and Subject valuesare correct:
[root@server SmartCard]# openssl x509 -noout -text -in smartcard_ca.pem | more
6. Generate a configuration script with the in-built ipa-advise utility, using the administrator’sprivileges:
[root@server SmartCard]# kinit admin[root@server SmartCard]# ipa-advise config-server-for-smart-card-auth > config-server-for-smart-card-auth.sh
The config-server-for-smart-card-auth.sh script performs the following actions:
It configures the IdM Apache HTTP Server.
It enables Public Key Cryptography for Initial Authentication in Kerberos (PKINIT) on theKey Distribution Center (KDC).
It configures the IdM Web UI to accept smart card authorization requests.
7. Execute the script, adding the PEM files containing the root CA and sub CA certificates asarguments:
Red Hat Enterprise Linux 9 Managing certificates in IdM
44
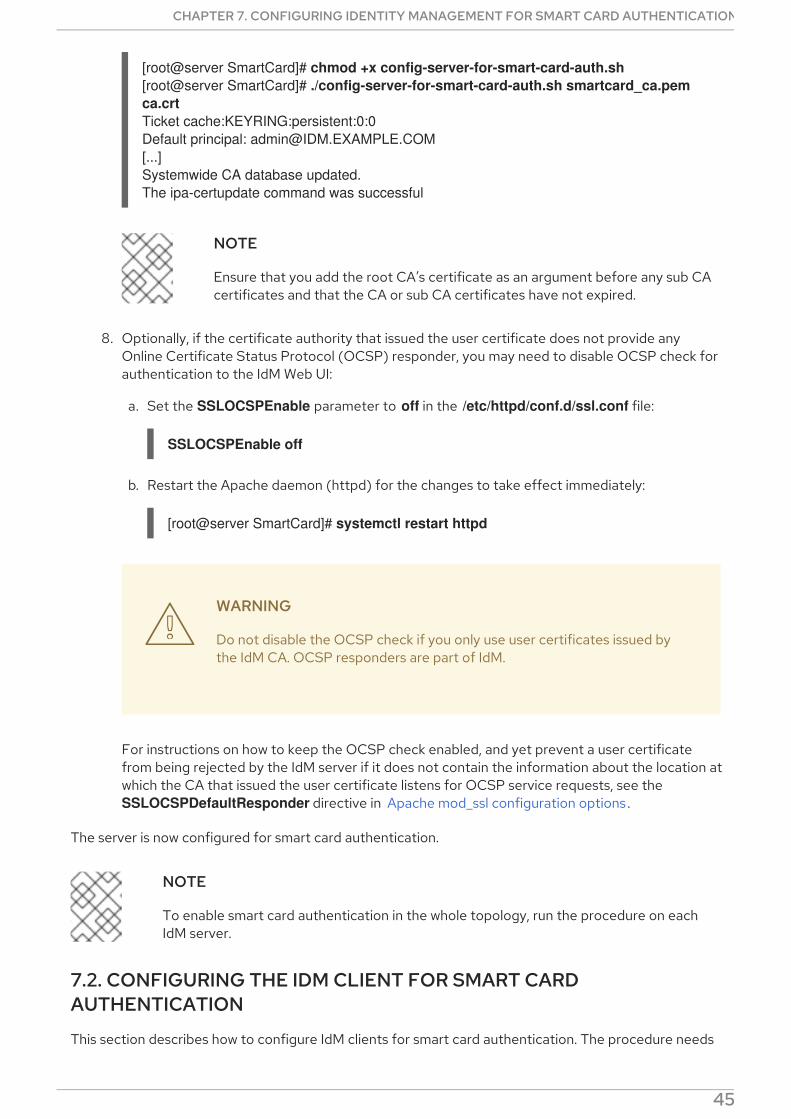
[root@server SmartCard]# chmod +x config-server-for-smart-card-auth.sh[root@server SmartCard]# ./config-server-for-smart-card-auth.sh smartcard_ca.pem ca.crtTicket cache:KEYRING:persistent:0:0Default principal: [email protected][...]Systemwide CA database updated.The ipa-certupdate command was successful
NOTE
Ensure that you add the root CA’s certificate as an argument before any sub CAcertificates and that the CA or sub CA certificates have not expired.
8. Optionally, if the certificate authority that issued the user certificate does not provide anyOnline Certificate Status Protocol (OCSP) responder, you may need to disable OCSP check forauthentication to the IdM Web UI:
a. Set the SSLOCSPEnable parameter to off in the /etc/httpd/conf.d/ssl.conf file:
SSLOCSPEnable off
b. Restart the Apache daemon (httpd) for the changes to take effect immediately:
[root@server SmartCard]# systemctl restart httpd
WARNING
Do not disable the OCSP check if you only use user certificates issued bythe IdM CA. OCSP responders are part of IdM.
For instructions on how to keep the OCSP check enabled, and yet prevent a user certificatefrom being rejected by the IdM server if it does not contain the information about the location atwhich the CA that issued the user certificate listens for OCSP service requests, see the SSLOCSPDefaultResponder directive in Apache mod_ssl configuration options .
The server is now configured for smart card authentication.
NOTE
To enable smart card authentication in the whole topology, run the procedure on eachIdM server.
7.2. CONFIGURING THE IDM CLIENT FOR SMART CARDAUTHENTICATION
This section describes how to configure IdM clients for smart card authentication. The procedure needs
CHAPTER 7. CONFIGURING IDENTITY MANAGEMENT FOR SMART CARD AUTHENTICATION
45
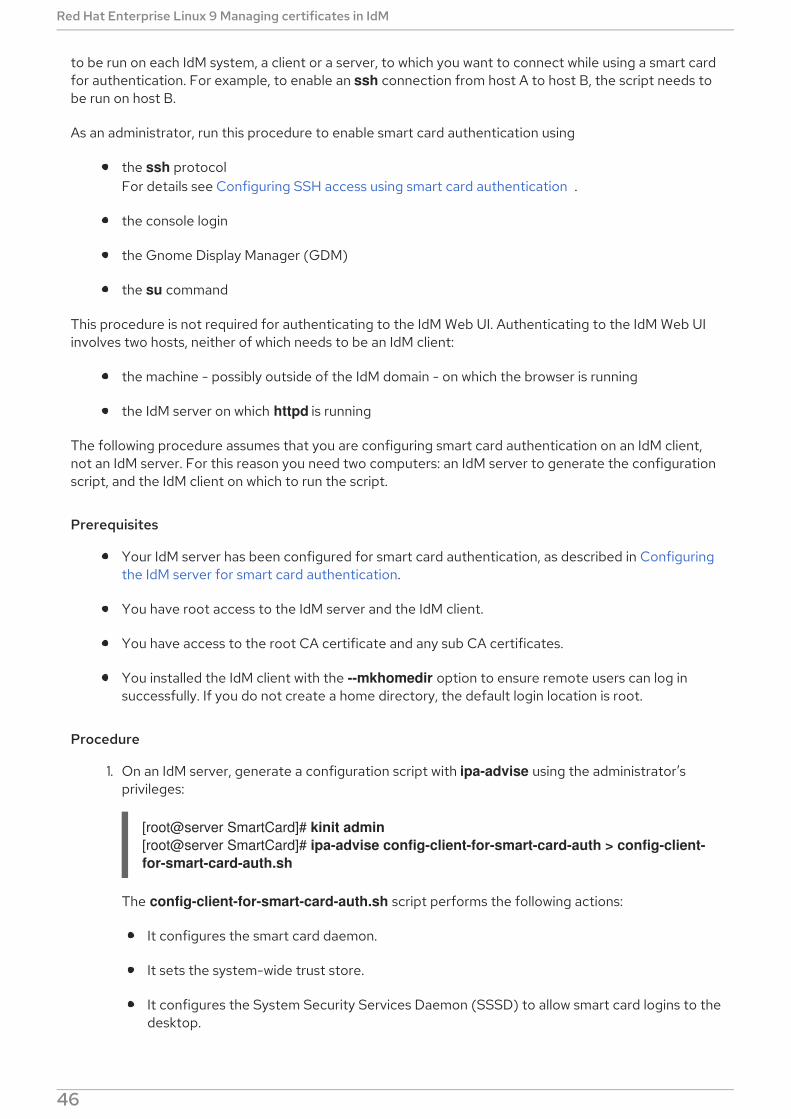
to be run on each IdM system, a client or a server, to which you want to connect while using a smart cardfor authentication. For example, to enable an ssh connection from host A to host B, the script needs tobe run on host B.
As an administrator, run this procedure to enable smart card authentication using
the ssh protocolFor details see Configuring SSH access using smart card authentication .
the console login
the Gnome Display Manager (GDM)
the su command
This procedure is not required for authenticating to the IdM Web UI. Authenticating to the IdM Web UIinvolves two hosts, neither of which needs to be an IdM client:
the machine - possibly outside of the IdM domain - on which the browser is running
the IdM server on which httpd is running
The following procedure assumes that you are configuring smart card authentication on an IdM client,not an IdM server. For this reason you need two computers: an IdM server to generate the configurationscript, and the IdM client on which to run the script.
Prerequisites
Your IdM server has been configured for smart card authentication, as described in Configuringthe IdM server for smart card authentication.
You have root access to the IdM server and the IdM client.
You have access to the root CA certificate and any sub CA certificates.
You installed the IdM client with the --mkhomedir option to ensure remote users can log insuccessfully. If you do not create a home directory, the default login location is root.
Procedure
1. On an IdM server, generate a configuration script with ipa-advise using the administrator’sprivileges:
[root@server SmartCard]# kinit admin[root@server SmartCard]# ipa-advise config-client-for-smart-card-auth > config-client-for-smart-card-auth.sh
The config-client-for-smart-card-auth.sh script performs the following actions:
It configures the smart card daemon.
It sets the system-wide trust store.
It configures the System Security Services Daemon (SSSD) to allow smart card logins to thedesktop.
Red Hat Enterprise Linux 9 Managing certificates in IdM
46
2. From the IdM server, copy the script to a directory of your choice on the IdM client machine:
[root@server SmartCard]# scp config-client-for-smart-card-auth.sh [email protected]:/root/SmartCard/Password:config-client-for-smart-card-auth.sh 100% 2419 3.5MB/s 00:00
3. From the IdM server, copy the CA certificate files in the PEM format for convenience to thesame directory on the IdM client machine as used in the previous step:
[root@server SmartCard]# scp {smartcard_ca.pem,ca.crt} [email protected]:/root/SmartCard/Password:smartcard_ca.pem 100% 1237 9.6KB/s 00:00ca.crt 100% 2514 19.6KB/s 00:00
4. On the client machine, execute the script, adding the PEM files containing the CA certificates asarguments:
[root@client SmartCard]# kinit admin[root@client SmartCard]# chmod +x config-client-for-smart-card-auth.sh[root@client SmartCard]# ./config-client-for-smart-card-auth.sh smartcard_ca.pem ca.crtTicket cache:KEYRING:persistent:0:0Default principal: [email protected][...]Systemwide CA database updated.The ipa-certupdate command was successful
NOTE
Ensure that you add the root CA’s certificate as an argument before any sub CAcertificates and that the CA or sub CA certificates have not expired.
The client is now configured for smart card authentication.
7.3. ADDING A CERTIFICATE TO A USER ENTRY IN THE IDM WEB UI
This procedure describes how to add an external certificate to a user entry in IdM Web UI.
Instead of uploading the whole certificate, it is also possible to upload certificate mapping data to a userentry in IdM. User entries containing either full certificates or certificate mapping data can be used inconjunction with corresponding certificate mapping rules to facilitate the configuration of smart cardauthentication for system administrators. For details, see Certificate mapping rules for configuringauthentication on smart cards
NOTE
If the user’s certificate has been issued by the IdM Certificate Authority, the certificate isalready stored in the user entry, and you can skip this section.
Prerequisites
You have the certificate that you want to add to the user entry at your disposal.
CHAPTER 7. CONFIGURING IDENTITY MANAGEMENT FOR SMART CARD AUTHENTICATION
47
Procedure
1. Log into the IdM Web UI as an administrator if you want to add a certificate to another user. Foradding a certificate to your own profile, you do not need the administrator’s credentials.
2. Navigate to Users → Active users → sc_user.
3. Find the Certificate option and click Add.
4. In the Command-Line Interface, display the certificate in the PEM format using the cat utilityor a text editor:
[user@client SmartCard]$ cat testuser.crt
5. Copy and paste the certificate from the CLI into the window that has opened in the Web UI.
6. Click Add.
Figure 7.1. Adding a new certificate in the IdM Web UI
The sc_user entry now contains an external certificate.
7.4. ADDING A CERTIFICATE TO A USER ENTRY IN THE IDM CLI
This procedure describes how to add an external certificate to a user entry in IdM CLI.
Instead of uploading the whole certificate, it is also possible to upload certificate mapping data to a userentry in IdM. User entries containing either full certificates or certificate mapping data can be used inconjunction with corresponding certificate mapping rules to facilitate the configuration of smart card
Red Hat Enterprise Linux 9 Managing certificates in IdM
48
authentication for system administrators. For details, see Certificate mapping rules for configuringauthentication on smart cards.
NOTE
If the user’s certificate has been issued by the IdM Certificate Authority, the certificate isalready stored in the user entry, and you can skip this section.
Prerequisites
You have the certificate that you want to add to the user entry at your disposal.
Procedure
1. Log into the IdM CLI as an administrator if you want to add a certificate to another user:
[user@client SmartCard]$ kinit admin
For adding a certificate to your own profile, you do not need the administrator’s credentials:
[user@client SmartCard]$ kinit sc_user
2. Create an environment variable containing the certificate with the header and footer removedand concatenated into a single line, which is the format expected by the ipa user-add-certcommand:
[user@client SmartCard]$ export CERT=`openssl x509 -outform der -in testuser.crt | base64 -w0 -`
Note that certificate in the testuser.crt file must be in the PEM format.
3. Add the certificate to the profile of sc_user using the ipa user-add-cert command:
[user@client SmartCard]$ ipa user-add-cert sc_user --certificate=$CERT
The sc_user entry now contains an external certificate.
7.5. INSTALLING TOOLS FOR MANAGING AND USING SMART CARDS
To configure your smart card, you need tools which can generate certificates and store them on a smartcard.
You must:
Install the gnutls-utils package which helps you to manage certificates.
Install the opensc package which provides a set of libraries and utilities to work with smartcards.
Start the pcscd service which communicates with the smart card reader.
Procedure
CHAPTER 7. CONFIGURING IDENTITY MANAGEMENT FOR SMART CARD AUTHENTICATION
49
1. Install the opensc and gnutls-utils packages:
# dnf -y install opensc gnutls-utils
2. Start the pcscd service.
# systemctl start pcscd
Verify that the pcscd service is up and running.
7.6. STORING A CERTIFICATE ON A SMART CARD
This section describes smart card configuration with the pkcs15-init tool, which helps you to configure:
Erasing your smart card
Setting new PINs and optional PIN Unblocking Keys (PUKs)
Creating a new slot on the smart card
Storing the certificate, private key, and public key in the slot
Locking the smart card settings (some smart cards require this type of finalization)
Prerequisites
The opensc package, which includes the pkcs15-init tool is installed.For details, see Installing tools for managing and using smart cards .
The card is inserted in the reader and connected to the computer.
You have the private key, public key, and certificate to store on the smart card. In thisprocedure, testuser.key, testuserpublic.key, and testuser.crt are the names used for theprivate key, public key, and the certificate.
Your current smart card user PIN and Security Officer PIN (SO-PIN)
Procedure
1. Erase your smart card and authenticate yourself with your PIN:
$ pkcs15-init --erase-card --use-default-transport-keysUsing reader with a card: Reader namePIN [Security Officer PIN] required.Please enter PIN [Security Officer PIN]:
The card has been erased.
2. Initialize your smart card, set your user PIN and PUK, and your Security Officer PIN and PUK:
$ pkcs15-init --create-pkcs15 --use-default-transport-keys \ --pin 963214 --puk 321478 --so-pin 65498714 --so-puk 784123Using reader with a card: Reader name
Red Hat Enterprise Linux 9 Managing certificates in IdM
50
The pcks15-init tool creates a new slot on the smart card.
3. Set the label and the authentication ID for the slot:
$ pkcs15-init --store-pin --label testuser \ --auth-id 01 --so-pin 65498714 --pin 963214 --puk 321478Using reader with a card: Reader name
The label is set to a human-readable value, in this case, testuser. The auth-id must be twohexadecimal values, in this case it is set to 01.
4. Store and label the private key in the new slot on the smart card:
$ pkcs15-init --store-private-key testuser.key --label testuser_key \ --auth-id 01 --id 01 --pin 963214Using reader with a card: Reader name
NOTE
The value you specify for --id must be the same when storing your private key,and certificate. If you do not specify a value for --id, a more complicated value iscalculated by the tool and it is therefore easier to define your own value.
5. Store and label the certificate in the new slot on the smart card:
$ pkcs15-init --store-certificate testuser.crt --label testuser_crt \ --auth-id 01 --id 01 --format pem --pin 963214Using reader with a card: Reader name
6. (Optional) Store and label the public key in the new slot on the smart card:
$ pkcs15-init --store-public-key testuserpublic.key --label testuserpublic_key --auth-id 01 --id 01 --pin 963214Using reader with a card: Reader name
NOTE
If the public key corresponds to a private key and/or certificate, you shouldspecify the same ID as that private key and/or certificate.
7. (Optional) Some smart cards require you to finalize the card by locking the settings:
$ pkcs15-init -F
At this stage, your smart card includes the certificate, private key, and public key in the newlycreated slot. You have also created your user PIN and PUK and the Security Officer PIN andPUK.
7.7. LOGGING IN TO IDM WITH SMART CARDS
This section provides information about using smart cards for logging in to IdM Web UI.
Prerequisites
CHAPTER 7. CONFIGURING IDENTITY MANAGEMENT FOR SMART CARD AUTHENTICATION
51
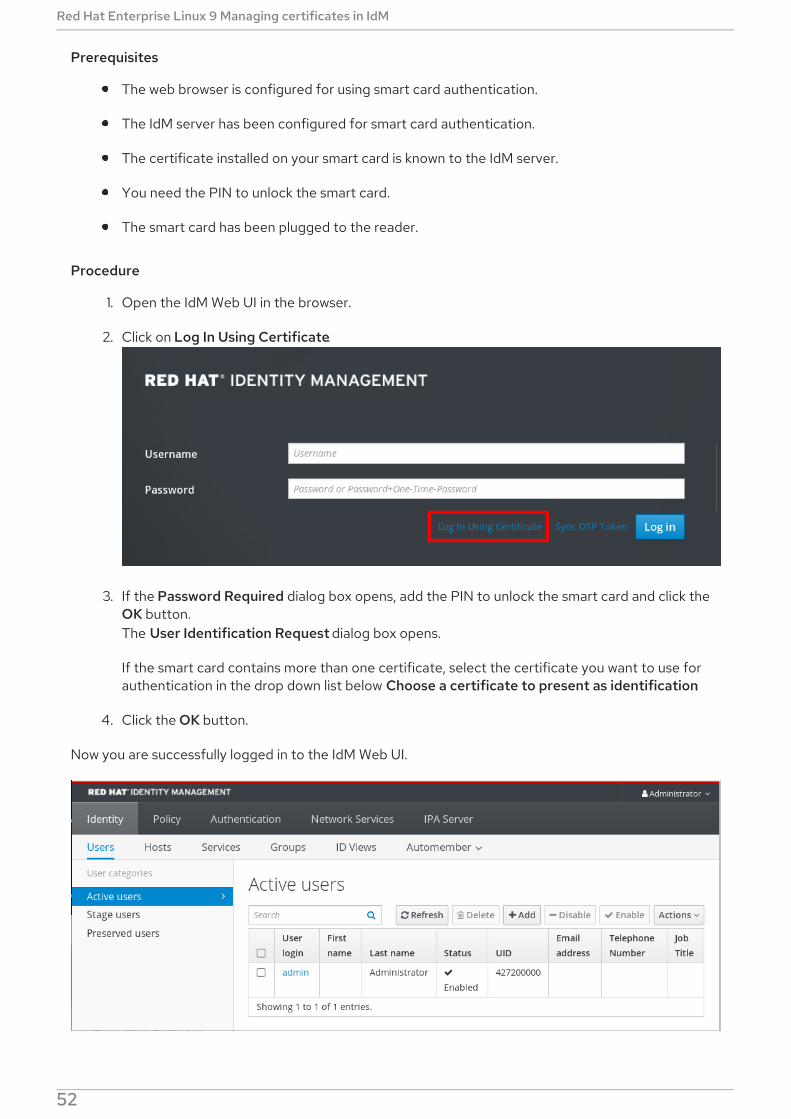
Prerequisites
The web browser is configured for using smart card authentication.
The IdM server has been configured for smart card authentication.
The certificate installed on your smart card is known to the IdM server.
You need the PIN to unlock the smart card.
The smart card has been plugged to the reader.
Procedure
1. Open the IdM Web UI in the browser.
2. Click on Log In Using Certificate.
3. If the Password Required dialog box opens, add the PIN to unlock the smart card and click theOK button.The User Identification Request dialog box opens.
If the smart card contains more than one certificate, select the certificate you want to use forauthentication in the drop down list below Choose a certificate to present as identification.
4. Click the OK button.
Now you are successfully logged in to the IdM Web UI.
Red Hat Enterprise Linux 9 Managing certificates in IdM
52
7.8. CONFIGURING GDM ACCESS USING SMART CARDAUTHENTICATION
The Gnome Desktop Manager (GDM) requires authentication. You can use your password, however, youcan also use a smart card for authentication.
This section describes smart card authentication to access GDM.
The advantage of using smart card authentication is that if the user account is part of the IdentityManagement domain, you also get a ticket-granting ticket (TGT).
Prerequisites
The smart card contains your certificate and private key.
The user account is a member of the IdM domain.
The certificate on the smart card maps to the user entry through:
Assigning the certificate to a particular user entry. For details, see, Adding a certificate to auser entry in the IdM Web UI or Adding a certificate to a user entry in the IdM CLI .
The certificate mapping data being applied to the account. For details, see Certificatemapping rules for configuring authentication on smart cards.
Procedure
1. Insert the smart card in the reader.
2. Enter the smart card PIN.
3. Click Sign In.
You are successfully logged in to the RHEL system and you have a TGT provided by the IdM server.
Verification steps
In the Terminal window, enter klist and check the result:
$ klistTicket cache: KEYRING:persistent:1358900015:krb_cache_TObtNMdDefault principal: [email protected]
Valid starting Expires Service principal04/20/2020 13:58:24 04/20/2020 23:58:24 krbtgt/[email protected] renew until 04/27/2020 08:58:15
7.9. CONFIGURING SU ACCESS USING SMART CARDAUTHENTICATION
Changing to a different user requires authentication. You can use a password or a certificate. Thissection describes using your smart card with the su command. It means that after entering the sucommand, you are prompted for the smart card PIN.
Prerequisites
CHAPTER 7. CONFIGURING IDENTITY MANAGEMENT FOR SMART CARD AUTHENTICATION
53
Prerequisites
The smart card contains your certificate and private key.
The card is inserted in the reader and connected to the computer.
Procedure
In a terminal window, change to a different user with the su command:
$ su - example.userPIN for smart_card
If the configuration is successful, you are prompted to enter the smart card PIN.
Red Hat Enterprise Linux 9 Managing certificates in IdM
54
CHAPTER 8. CONFIGURING CERTIFICATES ISSUED BY ADCSFOR SMART CARD AUTHENTICATION IN IDM
This scenario describes the following situation:
Your deployment is based on cross-forest trust between Identity Management (IdM) and ActiveDirectory (AD).
You want to allow smart card authentication for users whose accounts are stored in AD.
Certificates are created and stored in Active Directory Certificate Services (ADCS).
Configuration will be accomplished in the following steps:
Copying CA and user certificates from Active Directory to the IdM server and client
Configuring the IdM server and clients for smart card authentication using ADCS certificates
Converting a PFX (PKCS#12) file to be able to store the certificate and private key into thesmart card
Configuring timeouts in the sssd.conf file
Creating certificate mapping rules for smart card authentication
Prerequisites
Identity Management (IdM) and Active Directory (AD) trust is installedFor details, see Installing trust between IdM and AD .
Active Directory Certificate Services (ADCS) is installed and certificates for users are generated
8.1. SMART CARD AUTHENTICATION
A smart card is a physical device which can provide personal authentication using certificates stored onthe card. Personal authentication means that you can use smart cards in the same way as userpasswords.
You can store user credentials on the smart card in the form of a private key and a certificate, andspecial software and hardware is used to access them. You place the smart card into a reader or a USBsocket and supply the PIN code for the smart card instead of providing your password.
You can configure how you want smart card authentication to work in a particular IdM client:
Users can authenticate with the user name and password or with their smart cards
Users can authenticate with their smart cards, and passwords are not allowed
Users can use the smart card for logout with a function lock on removal, and passwords are notallowed
Identity Management (IdM) supports smart card authentication with:
User certificates issued by the IdM certificate authority. For details, see Configuring IdentityManagement for smart card authentication.
CHAPTER 8. CONFIGURING CERTIFICATES ISSUED BY ADCS FOR SMART CARD AUTHENTICATION IN IDM
55

User certificates issued by the ADCS certificate authority. For details, see Configuringcertificates issued by ADCS for smart card authentication in IdM.
User certificates issued by local certification authority generated on a RHEL system. For details,see Configuring and importing local certificates to a smart card .
User certificates issued by an external certificate authority.
NOTE
If you want to start to use smart card authentication, see the hardware requirements:Smart Card support in RHEL9 .
8.2. WINDOWS SERVER SETTINGS REQUIRED FOR TRUSTCONFIGURATION AND CERTIFICATE USAGE
This section summarizes what must be configured on Windows Server:
Active Directory Certificate Services (ADCS) is installed
Certificate Authority is created
[Optional] If you are using Certificate Authority Web Enrollment, the Internet InformationServices (IIS) must be configured
Export the certificate:
Key must have 2048 bits or more
Include a private key
You will need a certificate in the following format: Personal Information Exchange — PKCS #12(.PFX)
Enable certificate privacy
8.3. COPYING CERTIFICATES FROM ACTIVE DIRECTORY USING SFTP
To be able to use smart card authetication, you need to copy the following certificate files:
A root CA certificate in the CER format: adcs-winserver-ca.cer on your IdM server.
A user certificate with a private key in the PFX format: aduser1.pfx on an IdM client.
NOTE
This procedure expects SSH access is allowed. If SSH is unavailable the user must copythe file from the AD Server to the IdM server and client.
Procedure
1. Connect from the IdM server and copy the adcs-winserver-ca.cer root certificate to the IdMserver:
root@idmserver ~]# sftp [email protected]
Red Hat Enterprise Linux 9 Managing certificates in IdM
56
[email protected]'s password:Connected to [email protected]> cd <Path to certificates>sftp> lsadcs-winserver-ca.cer aduser1.pfxsftp>sftp> get adcs-winserver-ca.cerFetching <Path to certificates>/adcs-winserver-ca.cer to adcs-winserver-ca.cer<Path to certificates>/adcs-winserver-ca.cer 100% 1254 15KB/s 00:00sftp quit
2. Connect from the IdM client and copy the aduser1.pfx user certificate to the client:
[root@client1 ~]# sftp [email protected]@winserver.ad.example.com's password:Connected to [email protected]> cd /<Path to certificates>sftp> get aduser1.pfxFetching <Path to certificates>/aduser1.pfx to aduser1.pfx<Path to certificates>/aduser1.pfx 100% 1254 15KB/s 00:00sftp quit
Now the CA certificate is stored in the IdM server and the user certificates is stored on the clientmachine.
8.4. CONFIGURING THE IDM SERVER AND CLIENTS FOR SMART CARDAUTHENTICATION USING ADCS CERTIFICATES
You must configure the IdM (Identity Management) server and clients to be able to use smart cardauthentication in the IdM environment. IdM includes the ipa-advise scripts which makes all necessarychanges:
install necessary packages
it configures IdM server and clients
copy the CA certificates into expected locations
You can run ipa-advise on your IdM server.
This procedure describes:
On an IdM server: Preparing the ipa-advise script to configure your IdM server for smart cardauthentication.
On an IdM server: Preparing the ipa-advise script to configure your IdM client for smart cardauthentication.
On an IdM server: Applying the the ipa-advise server script on the IdM server using the ADcertificate.
Moving the client script to the IdM client machine.
On an IdM client: Applying the the ipa-advise client script on the IdM client using the ADcertificate.
CHAPTER 8. CONFIGURING CERTIFICATES ISSUED BY ADCS FOR SMART CARD AUTHENTICATION IN IDM
57
Prerequisites
The certificate has been copied to the IdM server.
Obtain the Kerberos ticket.
Log in as a user with administration rights.
Procedure
1. On the IdM server, use the ipa-advise script for configuring a client:
[root@idmserver ~]# ipa-advise config-client-for-smart-card-auth > sc_client.sh
2. On the IdM server, use the ipa-advise script for configuring a server:
[root@idmserver ~]# ipa-advise config-server-for-smart-card-auth > sc_server.sh
3. On the IdM server, execute the script:
[root@idmserver ~]# sh -x sc_server.sh adcs-winserver-ca.cer
It configures the IdM Apache HTTP Server.
It enables Public Key Cryptography for Initial Authentication in Kerberos (PKINIT) on theKey Distribution Center (KDC).
It configures the IdM Web UI to accept smart card authorization requests.
4. Copy the sc_client.sh script to the client system:
[root@idmserver ~]# scp sc_client.sh [email protected]:/rootPassword:sc_client.sh 100% 2857 1.6MB/s 00:00
5. Copy the Windows certificate to the client system:
[root@idmserver ~]# scp adcs-winserver-ca.cer [email protected]:/rootPassword:adcs-winserver-ca.cer 100% 1254 952.0KB/s 00:00
6. On the client system, run the client script:
[root@idmclient1 ~]# sh -x sc_client.sh adcs-winserver-ca.cer
The CA certificate is installed in the correct format on the IdM server and client systems and next step isto copy the user certificates onto the smart card itself.
8.5. CONVERTING THE PFX FILE
Before you store the PFX (PKCS#12) file into the smart card, you must:
convert the file to the PEM format
Red Hat Enterprise Linux 9 Managing certificates in IdM
58
extract the private key and the certificate to two different files
Prerequisites
The PFX file is copied into the IdM client machine.
Procedure
1. On the IdM client, into the PEM format:
[root@idmclient1 ~]# openssl pkcs12 -in aduser1.pfx -out aduser1_cert_only.pem -clcerts -nodesEnter Import Password:
2. Extract the key into the separate file:
[root@idmclient1 ~]# openssl pkcs12 -in adduser1.pfx -nocerts -out adduser1.pem > aduser1.key
3. Extract the public certificate into the separate file:
[root@idmclient1 ~]# openssl pkcs12 -in adduser1.pfx -clcerts -nokeys -out aduser1_cert_only.pem > aduser1.crt
At this point, you can store the aduser1.key and aduser1.crt into the smart card.
8.6. INSTALLING TOOLS FOR MANAGING AND USING SMART CARDS
To configure your smart card, you need tools which can generate certificates and store them on a smartcard.
You must:
Install the gnutls-utils package which helps you to manage certificates.
Install the opensc package which provides a set of libraries and utilities to work with smartcards.
Start the pcscd service which communicates with the smart card reader.
Procedure
1. Install the opensc and gnutls-utils packages:
# dnf -y install opensc gnutls-utils
2. Start the pcscd service.
# systemctl start pcscd
Verify that the pcscd service is up and running.
CHAPTER 8. CONFIGURING CERTIFICATES ISSUED BY ADCS FOR SMART CARD AUTHENTICATION IN IDM
59
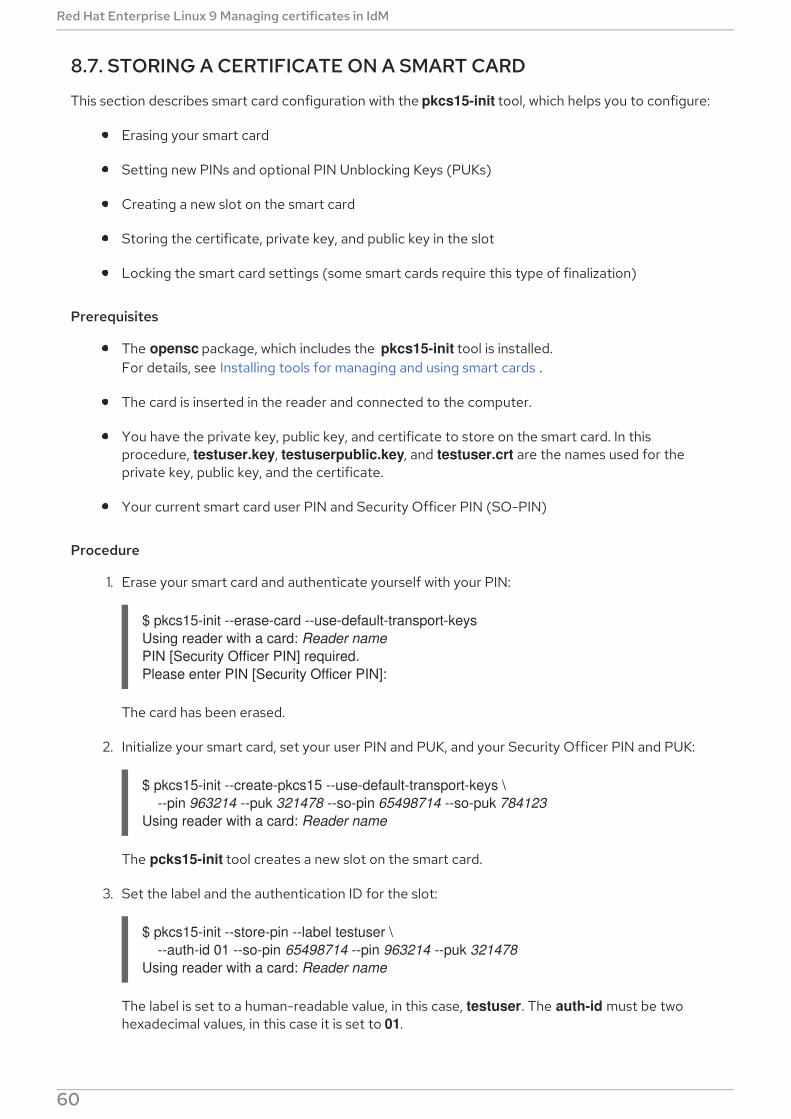
8.7. STORING A CERTIFICATE ON A SMART CARD
This section describes smart card configuration with the pkcs15-init tool, which helps you to configure:
Erasing your smart card
Setting new PINs and optional PIN Unblocking Keys (PUKs)
Creating a new slot on the smart card
Storing the certificate, private key, and public key in the slot
Locking the smart card settings (some smart cards require this type of finalization)
Prerequisites
The opensc package, which includes the pkcs15-init tool is installed.For details, see Installing tools for managing and using smart cards .
The card is inserted in the reader and connected to the computer.
You have the private key, public key, and certificate to store on the smart card. In thisprocedure, testuser.key, testuserpublic.key, and testuser.crt are the names used for theprivate key, public key, and the certificate.
Your current smart card user PIN and Security Officer PIN (SO-PIN)
Procedure
1. Erase your smart card and authenticate yourself with your PIN:
$ pkcs15-init --erase-card --use-default-transport-keysUsing reader with a card: Reader namePIN [Security Officer PIN] required.Please enter PIN [Security Officer PIN]:
The card has been erased.
2. Initialize your smart card, set your user PIN and PUK, and your Security Officer PIN and PUK:
$ pkcs15-init --create-pkcs15 --use-default-transport-keys \ --pin 963214 --puk 321478 --so-pin 65498714 --so-puk 784123Using reader with a card: Reader name
The pcks15-init tool creates a new slot on the smart card.
3. Set the label and the authentication ID for the slot:
$ pkcs15-init --store-pin --label testuser \ --auth-id 01 --so-pin 65498714 --pin 963214 --puk 321478Using reader with a card: Reader name
The label is set to a human-readable value, in this case, testuser. The auth-id must be twohexadecimal values, in this case it is set to 01.
Red Hat Enterprise Linux 9 Managing certificates in IdM
60
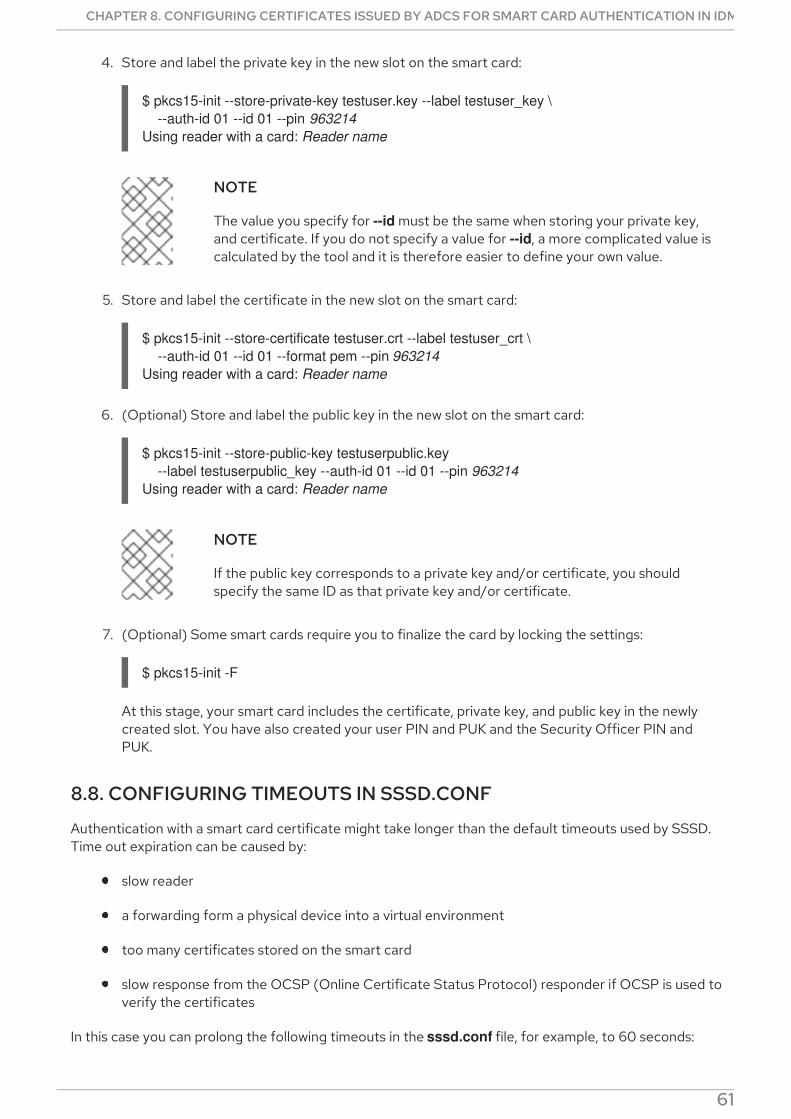
4. Store and label the private key in the new slot on the smart card:
$ pkcs15-init --store-private-key testuser.key --label testuser_key \ --auth-id 01 --id 01 --pin 963214Using reader with a card: Reader name
NOTE
The value you specify for --id must be the same when storing your private key,and certificate. If you do not specify a value for --id, a more complicated value iscalculated by the tool and it is therefore easier to define your own value.
5. Store and label the certificate in the new slot on the smart card:
$ pkcs15-init --store-certificate testuser.crt --label testuser_crt \ --auth-id 01 --id 01 --format pem --pin 963214Using reader with a card: Reader name
6. (Optional) Store and label the public key in the new slot on the smart card:
$ pkcs15-init --store-public-key testuserpublic.key --label testuserpublic_key --auth-id 01 --id 01 --pin 963214Using reader with a card: Reader name
NOTE
If the public key corresponds to a private key and/or certificate, you shouldspecify the same ID as that private key and/or certificate.
7. (Optional) Some smart cards require you to finalize the card by locking the settings:
$ pkcs15-init -F
At this stage, your smart card includes the certificate, private key, and public key in the newlycreated slot. You have also created your user PIN and PUK and the Security Officer PIN andPUK.
8.8. CONFIGURING TIMEOUTS IN SSSD.CONF
Authentication with a smart card certificate might take longer than the default timeouts used by SSSD.Time out expiration can be caused by:
slow reader
a forwarding form a physical device into a virtual environment
too many certificates stored on the smart card
slow response from the OCSP (Online Certificate Status Protocol) responder if OCSP is used toverify the certificates
In this case you can prolong the following timeouts in the sssd.conf file, for example, to 60 seconds:
CHAPTER 8. CONFIGURING CERTIFICATES ISSUED BY ADCS FOR SMART CARD AUTHENTICATION IN IDM
61
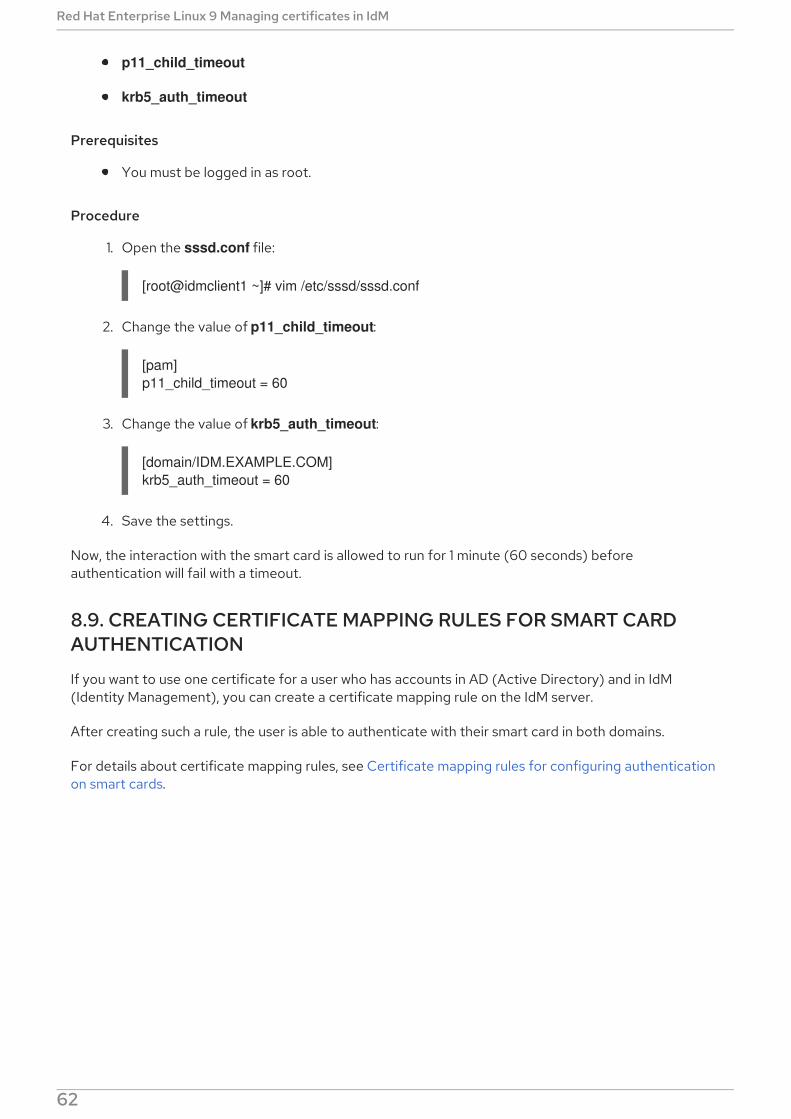
p11_child_timeout
krb5_auth_timeout
Prerequisites
You must be logged in as root.
Procedure
1. Open the sssd.conf file:
[root@idmclient1 ~]# vim /etc/sssd/sssd.conf
2. Change the value of p11_child_timeout:
[pam]p11_child_timeout = 60
3. Change the value of krb5_auth_timeout:
[domain/IDM.EXAMPLE.COM]krb5_auth_timeout = 60
4. Save the settings.
Now, the interaction with the smart card is allowed to run for 1 minute (60 seconds) beforeauthentication will fail with a timeout.
8.9. CREATING CERTIFICATE MAPPING RULES FOR SMART CARDAUTHENTICATION
If you want to use one certificate for a user who has accounts in AD (Active Directory) and in IdM(Identity Management), you can create a certificate mapping rule on the IdM server.
After creating such a rule, the user is able to authenticate with their smart card in both domains.
For details about certificate mapping rules, see Certificate mapping rules for configuring authenticationon smart cards.
Red Hat Enterprise Linux 9 Managing certificates in IdM
62
CHAPTER 9. CONFIGURING CERTIFICATE MAPPING RULES INIDENTITY MANAGEMENT
9.1. CERTIFICATE MAPPING RULES FOR CONFIGURINGAUTHENTICATION ON SMART CARDS
Certificate mapping rules are a convenient way of allowing users to authenticate using certificates inscenarios when the Identity Management (IdM) administrator does not have access to certain users'certificates. This lack of access is typically caused by the fact that the certificates have been issued byan external certificate authority. A special use case is represented by certificates issued by theCertificate System of an Active Directory (AD) with which the IdM domain is in a trust relationship.
Certificate mapping rules are also convenient if the IdM environment is large with a lot of users usingsmart cards. In this situation, adding full certificates can be complicated. The subject and issuer arepredictable in most scenarios and thus easier to add ahead of time than the full certificate. As a systemadministrator, you can create a certificate mapping rule and add certificate mapping data to a user entryeven before a certificate is issued to a particular user. Once the certificate is issued, the user can log inusing the certificate even though the full certificate has not yet been uploaded to the user entry.
In addition, as certificates have to be renewed at regular intervals, certificate mapping rules reduceadministrative overhead. When a user’s certificate gets renewed, the administrator does not have toupdate the user entry. For example, if the mapping is based on the Subject and Issuer values, and if thenew certificate has the same subject and issuer as the old one, the mapping still applies. If, in contrast,the full certificate was used, then the administrator would have to upload the new certificate to the userentry to replace the old one.
To set up certificate mapping:
1. An administrator has to load the certificate mapping data (typically the issuer and subject) orthe full certificate into a user account.
2. An administrator has to create a certificate mapping rule to allow successful logging into IdM fora user
a. whose account contains a certificate mapping data entry
b. whose certificate mapping data entry matches the information on the certificate
For details on the individual components that make up a mapping rule and how to obtain anduse them, see Components of an identity mapping rule in IdM and Obtaining the issuer from acertificate for use in a matching rule .
Afterwards, when the end-user presents the certificate, stored either in the filesystem or on a smartcard, authentication is successful.
9.1.1. Certificate mapping rules for trusts with Active Directory domains
This section outlines the different certificate mapping use cases that are possible if an IdM deploymentis in a trust relationship with an Active Directory (AD) domain.
Certificate mapping rules are a convenient way to enable access to IdM resources for users who havesmart card certificates that were issued by the trusted AD Certificate System. Depending on the ADconfiguration, the following scenarios are possible:
If the certificate is issued by AD but the user and the certificate are stored in IdM, the mapping
CHAPTER 9. CONFIGURING CERTIFICATE MAPPING RULES IN IDENTITY MANAGEMENT
63
If the certificate is issued by AD but the user and the certificate are stored in IdM, the mappingand the whole processing of the authentication request takes place on the IdM side. For detailsof configuring this scenario, see Configuring certificate mapping for users stored in IdM
If the user is stored in AD, the processing of the authentication request takes place in AD. Thereare three different subcases:
The AD user entry contains the whole certificate. For details how to configure IdM in thisscenario, see Configuring certificate mapping for users whose AD user entry contains thewhole certificate.
AD is configured to map user certificates to user accounts. In this case, the AD user entrydoes not contain the whole certificate but instead contains an attribute called altSecurityIdentities. For details how to configure IdM in this scenario, see Configuringcertificate mapping if AD is configured to map user certificates to user accounts.
The AD user entry contains neither the whole certificate nor the mapping data. In this case,the only solution is to use the ipa idoverrideuser-add command to add the wholecertificate to the AD user’s ID override in IdM. For details, see Configuring certificatemapping if AD user entry contains no certificate or mapping data .
9.1.2. Components of an identity mapping rule in IdM
This section describes the components of an identity mapping rule in IdM and how to configure them.Each component has a default value that you can override. You can define the components in either theweb UI or the CLI. In the CLI, the identity mapping rule is created using the ipa certmaprule-addcommand.
Mapping rule
The mapping rule component associates (or maps) a certificate with one or more user accounts. Therule defines an LDAP search filter that associates a certificate with the intended user account.Certificates issued by different certificate authorities (CAs) might have different properties andmight be used in different domains. Therefore, IdM does not apply mapping rules unconditionally, butonly to the appropriate certificates. The appropriate certificates are defined using matching rules.
Note that if you leave the mapping rule option empty, the certificates are searched in the userCertificate attribute as a DER encoded binary file.
Define the mapping rule in the CLI using the --maprule option.
Matching rule
The matching rule component selects a certificate to which you want to apply the mapping rule. Thedefault matching rule matches certificates with the digitalSignature key usage and clientAuth extended key usage.Define the matching rule in the CLI using the --matchrule option.
Domain list
The domain list specifies the identity domains in which you want IdM to search the users whenprocessing identity mapping rules. If you leave the option unspecified, IdM searches the users only inthe local domain to which the IdM client belongs.Define the domain in the CLI using the --domain option.
Priority
When multiple rules are applicable to a certificate, the rule with the highest priority takes precedence.
Red Hat Enterprise Linux 9 Managing certificates in IdM
64
When multiple rules are applicable to a certificate, the rule with the highest priority takes precedence.All other rules are ignored.
The lower the numerical value, the higher the priority of the identity mapping rule. Forexample, a rule with a priority 1 has higher priority than a rule with a priority 2.
If a rule has no priority value defined, it has the lowest priority.
Define the mapping rule priority in the CLI using the --priority option.
Certificate mapping rule example
To define, using the CLI, a certificate mapping rule called simple_rule that allows authentication for acertificate issued by the Smart Card CA of the EXAMPLE.ORG organisation as long as the Subject onthat certificate matches a certmapdata entry in a user account in IdM:
# ipa certmaprule-add simple_rule --matchrule '<ISSUER>CN=Smart Card CA,O=EXAMPLE.ORG' --maprule '(ipacertmapdata=X509:<I>{issuer_dn!nss_x500}<S>{subject_dn!nss_x500})'
9.1.3. Obtaining the issuer from a certificate for use in a matching rule
This procedure describes how to obtain the issuer information from a certificate so that you can copyand paste it into the matching rule of a certificate mapping rule. To get the issuer format required by amatching rule, use the openssl x509 utility.
Prerequisites
You have the user certificate in a .pem or .crt format
Procedure
1. Obtain the user information from the certificate. Use the openssl x509 certificate display andsigning utility with:
the -noout option to prevent the output of an encoded version of the request
the -issuer option to output the issuer name
the -in option to specify the input file name to read the certificate from
the -nameopt option with the RFC2253 value to display the output with the most specificrelative distinguished name (RDN) firstIf the input file contains an Identity Management certificate, the output of the commandshows that the Issuer is defined using the Organisation information:
# openssl x509 -noout -issuer -in idm_user.crt -nameopt RFC2253issuer=CN=Certificate Authority,O=REALM.EXAMPLE.COM
If the input file contains an Active Directory certificate, the output of the command showsthat the Issuer is defined using the Domain Component information:
# openssl x509 -noout -issuer -in ad_user.crt -nameopt RFC2253issuer=CN=AD-WIN2012R2-CA,DC=AD,DC=EXAMPLE,DC=COM
CHAPTER 9. CONFIGURING CERTIFICATE MAPPING RULES IN IDENTITY MANAGEMENT
65

2. Optionally, to create a new mapping rule in the CLI based on a matching rule which specifies thatthe certificate issuer must be the extracted AD-WIN2012R2-CA of the ad.example.comdomain and the subject on the certificate must match the certmapdata entry in a user accountin IdM:
# ipa certmaprule-add simple_rule --matchrule '<ISSUER>CN=AD-WIN2012R2-CA,DC=AD,DC=EXAMPLE,DC=COM' --maprule '(ipacertmapdata=X509:<I>{issuer_dn!nss_x500}<S>{subject_dn!nss_x500})'
9.1.4. Additional resources
See the sss-certmap(5) man page.
9.2. CONFIGURING CERTIFICATE MAPPING FOR USERS STORED INIDM
This user story describes the steps a system administrator must take to enable certificate mapping inIdM if the user for whom certificate authentication is being configured is stored in IdM. This sectiondescribes the following:
How to set up a certificate mapping rule so that IdM users with certificates that match theconditions specified in the mapping rule and in their certificate mapping data entries canauthenticate to IdM.
How to enter certificate mapping data to an IdM user entry so that the user can authenticateusing multiple certificates as long as they all contain the values specified in the certificatemapping data entry.
Prerequisites
The user has an account in IdM.
The administrator has either the whole certificate or the certificate mapping data to add to theuser entry.
9.2.1. Adding a certificate mapping rule in the IdM web UI
1. Log in to the IdM web UI as an administrator.
2. Navigate to Authentication → Certificate Identity Mapping Rules → Certificate Identity Mapping Rules.
3. Click Add.
Figure 9.1. Adding a new certificate mapping rule in the IdM web UI
4. Enter the rule name.
Red Hat Enterprise Linux 9 Managing certificates in IdM
66
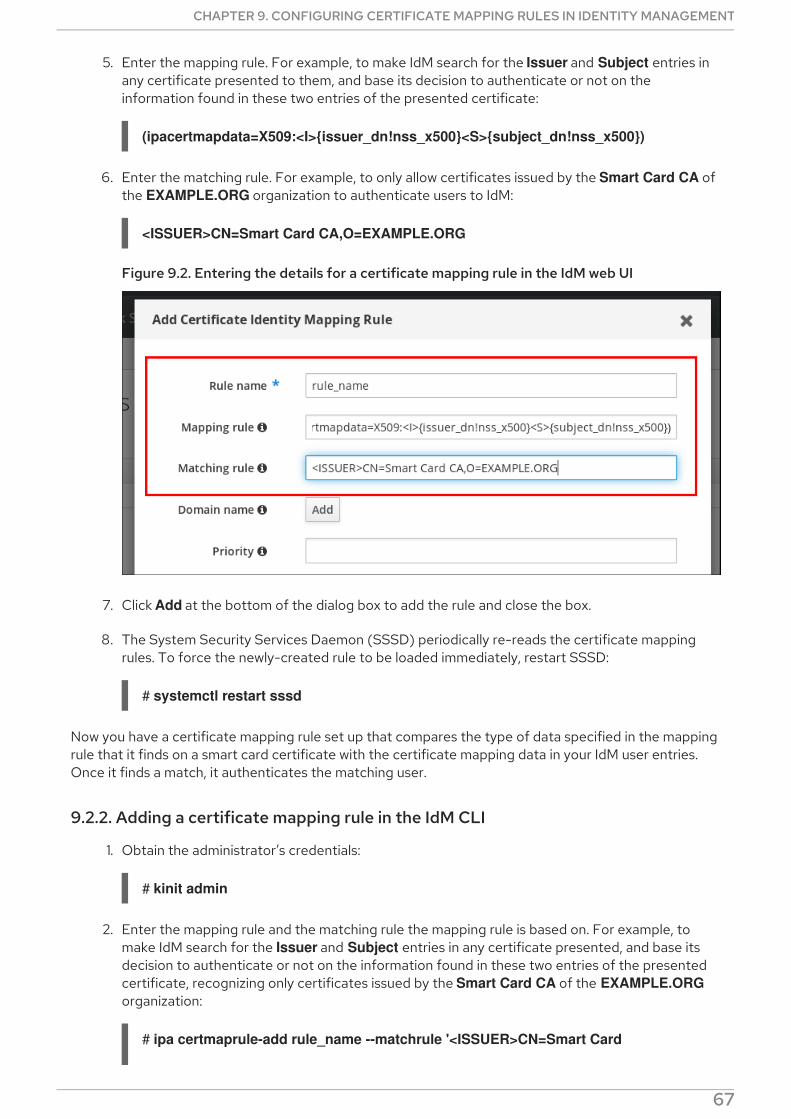
5. Enter the mapping rule. For example, to make IdM search for the Issuer and Subject entries inany certificate presented to them, and base its decision to authenticate or not on theinformation found in these two entries of the presented certificate:
(ipacertmapdata=X509:<I>{issuer_dn!nss_x500}<S>{subject_dn!nss_x500})
6. Enter the matching rule. For example, to only allow certificates issued by the Smart Card CA ofthe EXAMPLE.ORG organization to authenticate users to IdM:
<ISSUER>CN=Smart Card CA,O=EXAMPLE.ORG
Figure 9.2. Entering the details for a certificate mapping rule in the IdM web UI
7. Click Add at the bottom of the dialog box to add the rule and close the box.
8. The System Security Services Daemon (SSSD) periodically re-reads the certificate mappingrules. To force the newly-created rule to be loaded immediately, restart SSSD:
# systemctl restart sssd
Now you have a certificate mapping rule set up that compares the type of data specified in the mappingrule that it finds on a smart card certificate with the certificate mapping data in your IdM user entries.Once it finds a match, it authenticates the matching user.
9.2.2. Adding a certificate mapping rule in the IdM CLI
1. Obtain the administrator’s credentials:
# kinit admin
2. Enter the mapping rule and the matching rule the mapping rule is based on. For example, tomake IdM search for the Issuer and Subject entries in any certificate presented, and base itsdecision to authenticate or not on the information found in these two entries of the presentedcertificate, recognizing only certificates issued by the Smart Card CA of the EXAMPLE.ORGorganization:
# ipa certmaprule-add rule_name --matchrule '<ISSUER>CN=Smart Card
CHAPTER 9. CONFIGURING CERTIFICATE MAPPING RULES IN IDENTITY MANAGEMENT
67
CA,O=EXAMPLE.ORG' --maprule '(ipacertmapdata=X509:<I>{issuer_dn!nss_x500}<S>{subject_dn!nss_x500})'-------------------------------------------------------Added Certificate Identity Mapping Rule "rule_name"------------------------------------------------------- Rule name: rule_name Mapping rule: (ipacertmapdata=X509:<I>{issuer_dn!nss_x500}<S>{subject_dn!nss_x500}) Matching rule: <ISSUER>CN=Smart Card CA,O=EXAMPLE.ORG Enabled: TRUE
3. The System Security Services Daemon (SSSD) periodically re-reads the certificate mappingrules. To force the newly-created rule to be loaded immediately, restart SSSD:
# systemctl restart sssd
Now you have a certificate mapping rule set up that compares the type of data specified in the mappingrule that it finds on a smart card certificate with the certificate mapping data in your IdM user entries.Once it finds a match, it authenticates the matching user.
9.2.3. Adding certificate mapping data to a user entry in the IdM web UI
1. Log into the IdM web UI as an administrator.
2. Navigate to Users → Active users → idm_user.
3. Find the Certificate mapping data option and click Add.
4. If you have the certificate of idm_user at your disposal:
a. In the Command-Line Interface, display the certificate using the cat utility or a text editor:
[root@server ~]# cat idm_user_certificate.pem-----BEGIN CERTIFICATE-----MIIFFTCCA/2gAwIBAgIBEjANBgkqhkiG9w0BAQsFADA6MRgwFgYDVQQKDA9JRE0uRVhBTVBMRS5DT00xHjAcBgNVBAMMFUNlcnRpZmljYXRlIEF1dGhvcml0eTAeFw0xODA5MDIxODE1MzlaFw0yMDA5MDIxODE1MzlaMCwxGDAWBgNVBAoMD0lETS5FWEFN[...output truncated...]
b. Copy the certificate.
c. In the IdM web UI, click Add next to Certificate and paste the certificate into the windowthat opens up.
Figure 9.3. Adding a user’s certificate mapping data: certificate
Red Hat Enterprise Linux 9 Managing certificates in IdM
68
Figure 9.3. Adding a user’s certificate mapping data: certificate
Alternatively, if you do not have the certificate of idm_user at your disposal but know the Issuer and the Subject of the certificate, check the radio button of Issuer and subject andenter the values in the two respective boxes.
Figure 9.4. Adding a user’s certificate mapping data: issuer and subject
5. Click Add.
6. Optionally, if you have access to the whole certificate in the .pem format, verify that the userand certificate are linked:
a. Use the sss_cache utility to invalidate the record of idm_user in the SSSD cache andforce a reload of the idm_user information:
# sss_cache -u idm_user
CHAPTER 9. CONFIGURING CERTIFICATE MAPPING RULES IN IDENTITY MANAGEMENT
69
b. Run the ipa certmap-match command with the name of the file containing the certificateof the IdM user:
# ipa certmap-match idm_user_cert.pem--------------1 user matched-------------- Domain: IDM.EXAMPLE.COM User logins: idm_user----------------------------Number of entries returned 1----------------------------
The output confirms that now you have certificate mapping data added to idm_user andthat a corresponding mapping rule exists. This means that you can use any certificate thatmatches the defined certificate mapping data to authenticate as idm_user.
9.2.4. Adding certificate mapping data to a user entry in the IdM CLI
1. Obtain the administrator’s credentials:
# kinit admin
2. If you have the certificate of idm_user at your disposal, add the certificate to the user accountusing the ipa user-add-cert command:
# CERT=`cat idm_user_cert.pem | tail -n +2| head -n -1 | tr -d '\r\n'\`# ipa user-add-certmapdata idm_user --certificate $CERT
Alternatively, if you do not have the certificate of idm_user at your disposal but know the Issuer and the Subject of idm_user’s certificate:
# ipa user-add-certmapdata idm_user --subject "O=EXAMPLE.ORG,CN=test" --issuer "CN=Smart Card CA,O=EXAMPLE.ORG"--------------------------------------------Added certificate mappings to user "idm_user"-------------------------------------------- User login: idm_user Certificate mapping data: X509:<I>O=EXAMPLE.ORG,CN=Smart Card CA<S>CN=test,O=EXAMPLE.ORG
3. Optionally, if you have access to the whole certificate in the .pem format, verify that the userand certificate are linked:
a. Use the sss_cache utility to invalidate the record of idm_user in the SSSD cache andforce a reload of the idm_user information:
# sss_cache -u idm_user
b. Run the ipa certmap-match command with the name of the file containing the certificateof the IdM user:
# ipa certmap-match idm_user_cert.pem--------------
Red Hat Enterprise Linux 9 Managing certificates in IdM
70
1 user matched-------------- Domain: IDM.EXAMPLE.COM User logins: idm_user----------------------------Number of entries returned 1----------------------------
The output confirms that now you have certificate mapping data added to idm_user andthat a corresponding mapping rule exists. This means that you can use any certificate thatmatches the defined certificate mapping data to authenticate as idm_user.
/include::modules/identity-management/proc_add-certmapdata-to-user.adoc[leveloffset=+1]
9.3. CONFIGURING CERTIFICATE MAPPING FOR USERS WHOSE ADUSER ENTRY CONTAINS THE WHOLE CERTIFICATE
This user story describes the steps necessary for enabling certificate mapping in IdM if the IdMdeployment is in trust with Active Directory (AD), the user is stored in AD and the user entry in ADcontains the whole certificate.
Prerequisites
The user does not have an account in IdM.
The user has an account in AD which contains a certificate.
The IdM administrator has access to data on which the IdM certificate mapping rule can bebased.
9.3.1. Adding a certificate mapping rule in the IdM web UI
1. Log into the IdM web UI as an administrator.
2. Navigate to Authentication → Certificate Identity Mapping Rules → Certificate Identity Mapping Rules.
3. Click Add.
Figure 9.5. Adding a new certificate mapping rule in the IdM web UI
4. Enter the rule name.
5. Enter the mapping rule. To have the whole certificate that is presented to IdM forauthentication compared to what is available in AD:
(userCertificate;binary={cert!bin})
6. Enter the matching rule. For example, to only allow certificates issued by the AD-ROOT-CA of
CHAPTER 9. CONFIGURING CERTIFICATE MAPPING RULES IN IDENTITY MANAGEMENT
71
6. Enter the matching rule. For example, to only allow certificates issued by the AD-ROOT-CA ofthe AD.EXAMPLE.COM domain to authenticate:
<ISSUER>CN=AD-ROOT-CA,DC=ad,DC=example,DC=com
Figure 9.6. Certificate mapping rule for a user with a certificate stored in AD
7. Click Add.
8. The System Security Services Daemon (SSSD) periodically re-reads the certificate mappingrules. To force the newly-created rule to be loaded immediately, restart SSSD in the CLI::
# systemctl restart sssd
9.3.2. Adding a certificate mapping rule in the IdM CLI
1. Obtain the administrator’s credentials:
# kinit admin
2. Enter the mapping rule and the matching rule the mapping rule is based on. To have the wholecertificate that is presented for authentication compared to what is available in AD, only allowingcertificates issued by the AD-ROOT-CA of the AD.EXAMPLE.COM domain to authenticate:
# ipa certmaprule-add simpleADrule --matchrule '<ISSUER>CN=AD-ROOT-CA,DC=ad,DC=example,DC=com' --maprule '(userCertificate;binary={cert!bin})' --domain ad.example.com-------------------------------------------------------Added Certificate Identity Mapping Rule "simpleADrule"------------------------------------------------------- Rule name: simpleADrule Mapping rule: (userCertificate;binary={cert!bin}) Matching rule: <ISSUER>CN=AD-ROOT-CA,DC=ad,DC=example,DC=com Domain name: ad.example.com Enabled: TRUE
3. The System Security Services Daemon (SSSD) periodically re-reads the certificate mappingrules. To force the newly-created rule to be loaded immediately, restart SSSD:
Red Hat Enterprise Linux 9 Managing certificates in IdM
72
# systemctl restart sssd
9.4. CONFIGURING CERTIFICATE MAPPING IF AD IS CONFIGURED TOMAP USER CERTIFICATES TO USER ACCOUNTS
This user story describes the steps necessary for enabling certificate mapping in IdM if the IdMdeployment is in trust with Active Directory (AD), the user is stored in AD and the user entry in ADcontains certificate mapping data.
Prerequisites
The user does not have an account in IdM.
The user has an account in AD which contains the altSecurityIdentities attribute, the ADequivalent of the IdM certmapdata attribute.
The IdM administrator has access to data on which the IdM certificate mapping rule can bebased.
9.4.1. Adding a certificate mapping rule in the IdM web UI
1. Log into the IdM web UI as an administrator.
2. Navigate to Authentication → Certificate Identity Mapping Rules → Certificate Identity Mapping Rules.
3. Click Add.
Figure 9.7. Adding a new certificate mapping rule in the IdM web UI
4. Enter the rule name.
5. Enter the mapping rule. For example, to make AD DC search for the Issuer and Subject entriesin any certificate presented, and base its decision to authenticate or not on the informationfound in these two entries of the presented certificate:
(altSecurityIdentities=X509:<I>{issuer_dn!ad_x500}<S>{subject_dn!ad_x500})
6. Enter the matching rule. For example, to only allow certificates issued by the AD-ROOT-CA ofthe AD.EXAMPLE.COM domain to authenticate users to IdM:
<ISSUER>CN=AD-ROOT-CA,DC=ad,DC=example,DC=com
7. Enter the domain:
ad.example.com
Figure 9.8. Certificate mapping rule if AD is configured for mapping
CHAPTER 9. CONFIGURING CERTIFICATE MAPPING RULES IN IDENTITY MANAGEMENT
73

Figure 9.8. Certificate mapping rule if AD is configured for mapping
8. Click Add.
9. The System Security Services Daemon (SSSD) periodically re-reads the certificate mappingrules. To force the newly-created rule to be loaded immediately, restart SSSD in the CLI::
# systemctl restart sssd
9.4.2. Adding a certificate mapping rule in the IdM CLI
1. Obtain the administrator’s credentials:
# kinit admin
2. Enter the mapping rule and the matching rule the mapping rule is based on. For example, tomake AD search for the Issuer and Subject entries in any certificate presented, and only allowcertificates issued by the AD-ROOT-CA of the AD.EXAMPLE.COM domain:
# ipa certmaprule-add ad_configured_for_mapping_rule --matchrule '<ISSUER>CN=AD-ROOT-CA,DC=ad,DC=example,DC=com' --maprule '(altSecurityIdentities=X509:<I>{issuer_dn!ad_x500}<S>{subject_dn!ad_x500})' --domain=ad.example.com-------------------------------------------------------Added Certificate Identity Mapping Rule "ad_configured_for_mapping_rule"------------------------------------------------------- Rule name: ad_configured_for_mapping_rule Mapping rule: (altSecurityIdentities=X509:<I>{issuer_dn!ad_x500}<S>{subject_dn!ad_x500}) Matching rule: <ISSUER>CN=AD-ROOT-CA,DC=ad,DC=example,DC=com Domain name: ad.example.com Enabled: TRUE
3. The System Security Services Daemon (SSSD) periodically re-reads the certificate mappingrules. To force the newly-created rule to be loaded immediately, restart SSSD:
# systemctl restart sssd
9.4.3. Checking certificate mapping data on the AD side
Red Hat Enterprise Linux 9 Managing certificates in IdM
74
The altSecurityIdentities attribute is the Active Directory (AD) equivalent of certmapdata userattribute in IdM. When configuring certificate mapping in IdM in the scenario when a trusted AD domainis configured to map user certificates to user accounts, the IdM system administrator needs to checkthat the altSecurityIdentities attribute is set correctly in the user entries in AD.
To check that AD contains the right information for the user stored in AD, use the ldapsearchcommand.
For example, enter the command below to check with the adserver.ad.example.com serverthat the following conditions apply:
The altSecurityIdentities attribute is set in the user entry of ad_user.
The matchrule stipulates that the following conditions apply:
The certificate that ad_user uses to authenticate to AD was issued by AD-ROOT-CAof the ad.example.com domain.
The subject is <S>DC=com,DC=example,DC=ad,CN=Users,CN=ad_user:
$ ldapsearch -o ldif-wrap=no -LLL -h adserver.ad.example.com \-p 389 -D cn=Administrator,cn=users,dc=ad,dc=example,dc=com \-W -b cn=users,dc=ad,dc=example,dc=com "(cn=ad_user)" \altSecurityIdentitiesEnter LDAP Password:dn: CN=ad_user,CN=Users,DC=ad,DC=example,DC=comaltSecurityIdentities: X509:<I>DC=com,DC=example,DC=ad,CN=AD-ROOT-CA<S>DC=com,DC=example,DC=ad,CN=Users,CN=ad_user
9.5. CONFIGURING CERTIFICATE MAPPING IF AD USER ENTRYCONTAINS NO CERTIFICATE OR MAPPING DATA
This user story describes the steps necessary for enabling certificate mapping in IdM if the IdMdeployment is in trust with Active Directory (AD), the user is stored in AD and the user entry in ADcontains neither the whole certificate nor certificate mapping data.
Prerequisites
The user does not have an account in IdM.
The user has an account in AD which contains neither the whole certificate nor the altSecurityIdentities attribute, the AD equivalent of the IdM certmapdata attribute.
The IdM administrator has the whole AD user certificate to add to the AD user’s user ID override in IdM.
9.5.1. Adding a certificate mapping rule in the IdM web UI
1. Log into the IdM web UI as an administrator.
2. Navigate to Authentication → Certificate Identity Mapping Rules → Certificate Identity Mapping Rules.
3. Click Add.
Figure 9.9. Adding a new certificate mapping rule in the IdM web UI
CHAPTER 9. CONFIGURING CERTIFICATE MAPPING RULES IN IDENTITY MANAGEMENT
75
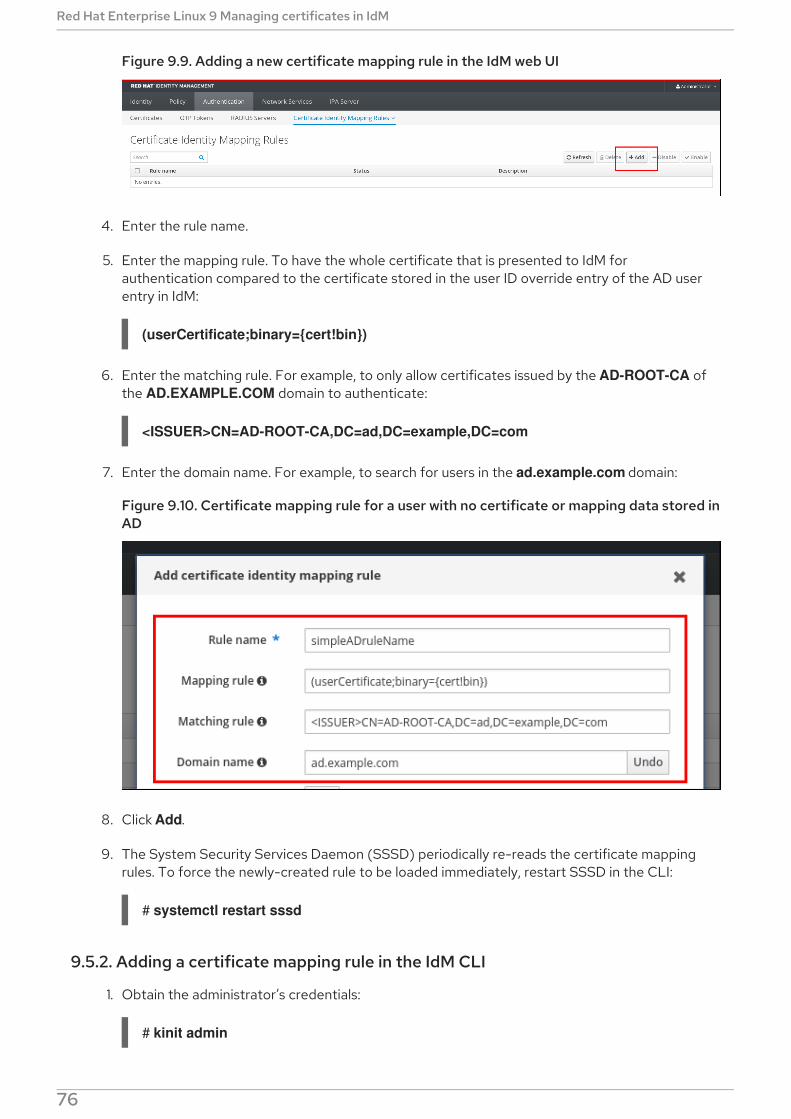
Figure 9.9. Adding a new certificate mapping rule in the IdM web UI
4. Enter the rule name.
5. Enter the mapping rule. To have the whole certificate that is presented to IdM forauthentication compared to the certificate stored in the user ID override entry of the AD userentry in IdM:
(userCertificate;binary={cert!bin})
6. Enter the matching rule. For example, to only allow certificates issued by the AD-ROOT-CA ofthe AD.EXAMPLE.COM domain to authenticate:
<ISSUER>CN=AD-ROOT-CA,DC=ad,DC=example,DC=com
7. Enter the domain name. For example, to search for users in the ad.example.com domain:
Figure 9.10. Certificate mapping rule for a user with no certificate or mapping data stored inAD
8. Click Add.
9. The System Security Services Daemon (SSSD) periodically re-reads the certificate mappingrules. To force the newly-created rule to be loaded immediately, restart SSSD in the CLI:
# systemctl restart sssd
9.5.2. Adding a certificate mapping rule in the IdM CLI
1. Obtain the administrator’s credentials:
# kinit admin
Red Hat Enterprise Linux 9 Managing certificates in IdM
76
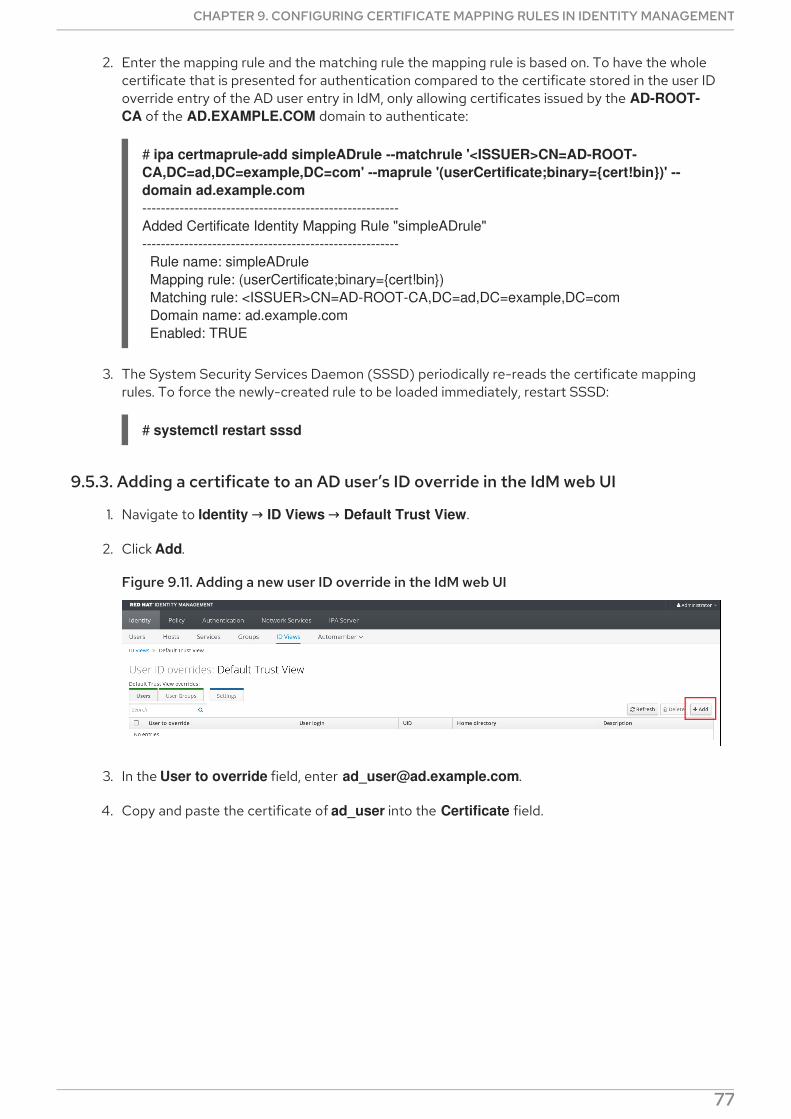
2. Enter the mapping rule and the matching rule the mapping rule is based on. To have the wholecertificate that is presented for authentication compared to the certificate stored in the user IDoverride entry of the AD user entry in IdM, only allowing certificates issued by the AD-ROOT-CA of the AD.EXAMPLE.COM domain to authenticate:
# ipa certmaprule-add simpleADrule --matchrule '<ISSUER>CN=AD-ROOT-CA,DC=ad,DC=example,DC=com' --maprule '(userCertificate;binary={cert!bin})' --domain ad.example.com-------------------------------------------------------Added Certificate Identity Mapping Rule "simpleADrule"------------------------------------------------------- Rule name: simpleADrule Mapping rule: (userCertificate;binary={cert!bin}) Matching rule: <ISSUER>CN=AD-ROOT-CA,DC=ad,DC=example,DC=com Domain name: ad.example.com Enabled: TRUE
3. The System Security Services Daemon (SSSD) periodically re-reads the certificate mappingrules. To force the newly-created rule to be loaded immediately, restart SSSD:
# systemctl restart sssd
9.5.3. Adding a certificate to an AD user’s ID override in the IdM web UI
1. Navigate to Identity → ID Views → Default Trust View.
2. Click Add.
Figure 9.11. Adding a new user ID override in the IdM web UI
3. In the User to override field, enter [email protected].
4. Copy and paste the certificate of ad_user into the Certificate field.
Figure 9.12. Configuring the User ID override for an AD user
CHAPTER 9. CONFIGURING CERTIFICATE MAPPING RULES IN IDENTITY MANAGEMENT
77
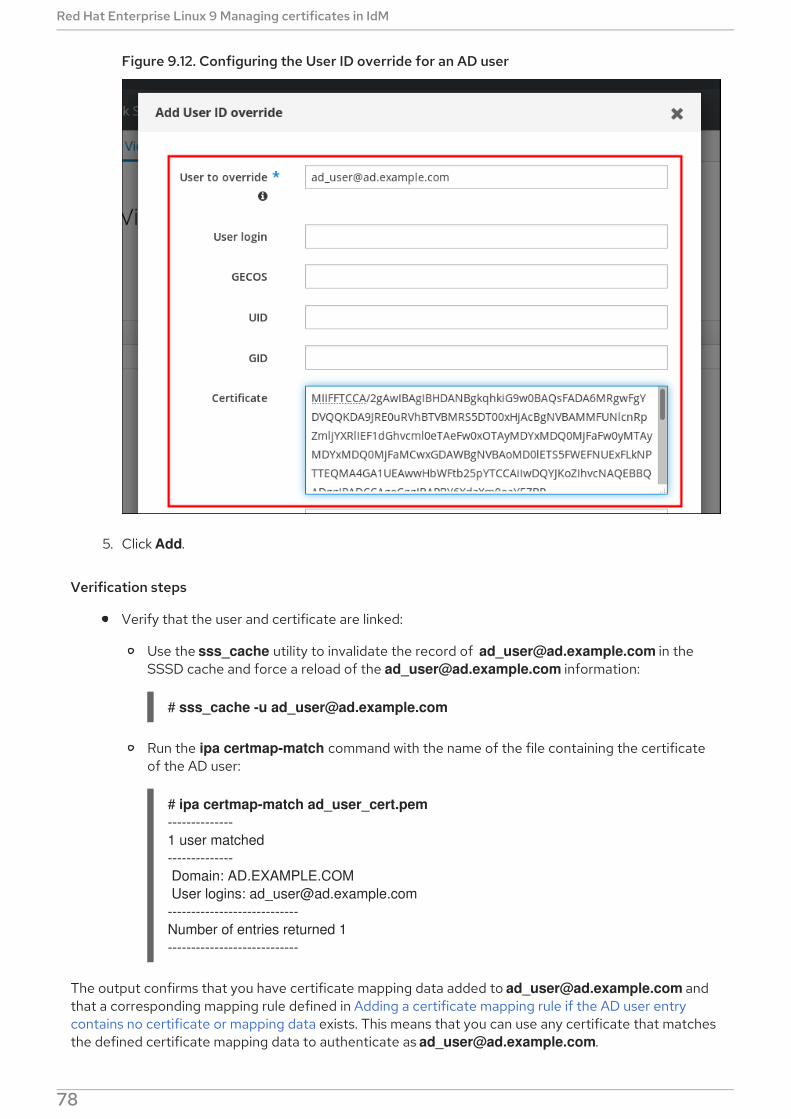
Figure 9.12. Configuring the User ID override for an AD user
5. Click Add.
Verification steps
Verify that the user and certificate are linked:
Use the sss_cache utility to invalidate the record of [email protected] in theSSSD cache and force a reload of the [email protected] information:
# sss_cache -u [email protected]
Run the ipa certmap-match command with the name of the file containing the certificateof the AD user:
# ipa certmap-match ad_user_cert.pem--------------1 user matched-------------- Domain: AD.EXAMPLE.COM User logins: [email protected] of entries returned 1----------------------------
The output confirms that you have certificate mapping data added to [email protected] andthat a corresponding mapping rule defined in Adding a certificate mapping rule if the AD user entrycontains no certificate or mapping data exists. This means that you can use any certificate that matchesthe defined certificate mapping data to authenticate as [email protected].
Red Hat Enterprise Linux 9 Managing certificates in IdM
78
9.5.4. Adding a certificate to an AD user’s ID override in the IdM CLI
Additional resources
1. Obtain the administrator’s credentials:
# kinit admin
2. Store the certificate blob in a new variable called CERT:
# CERT=`cat ad_user_cert.pem | tail -n +2| head -n -1 | tr -d '\r\n'\`
3. Add the certificate of [email protected] to the user account using the ipa idoverrideuser-add-cert command:
# ipa idoverrideuser-add-cert [email protected] --certificate $CERT
Verification steps
Verify that the user and certificate are linked:
Use the sss_cache utility to invalidate the record of [email protected] in theSSSD cache and force a reload of the [email protected] information:
# sss_cache -u [email protected]
Run the ipa certmap-match command with the name of the file containing the certificateof the AD user:
# ipa certmap-match ad_user_cert.pem--------------1 user matched-------------- Domain: AD.EXAMPLE.COM User logins: [email protected] of entries returned 1----------------------------
The output confirms that you have certificate mapping data added to [email protected] andthat a corresponding mapping rule defined in Adding a certificate mapping rule if the AD user entrycontains no certificate or mapping data exists. This means that you can use any certificate that matchesthe defined certificate mapping data to authenticate as [email protected].
9.6. COMBINING SEVERAL IDENTITY MAPPING RULES INTO ONE
Additional resources
To combine several identity mapping rules into one combined rule, use the | (or) character to precedethe individual mapping rules, and separate them using () brackets, for example:
Certificate mapping filter example 1
CHAPTER 9. CONFIGURING CERTIFICATE MAPPING RULES IN IDENTITY MANAGEMENT
79
$ ipa certmaprule-add ad_cert_for_ipa_and_ad_users \ --maprule='(|(ipacertmapdata=X509:<I>{issuer_dn!nss_x500}<S>{subject_dn!nss_x500})(altSecurityIdentities=X509:<I>{issuer_dn!ad_x500}<S>{subject_dn!ad_x500}))' \ --matchrule='<ISSUER>CN=AD-ROOT-CA,DC=ad,DC=example,DC=com' \ --domain=ad.example.com
In the above example, the filter definition in the --maprule option includes these criteria:
ipacertmapdata=X509:<I>{issuer_dn!nss_x500}<S>{subject_dn!nss_x500} is a filter thatlinks the subject and issuer from a smart card certificate to the value of the ipacertmapdataattribute in an IdM user account, as described in Adding a certificate mapping rule in IdM
altSecurityIdentities=X509:<I>{issuer_dn!ad_x500}<S>{subject_dn!ad_x500} is a filter thatlinks the subject and issuer from a smart card certificate to the value of the altSecurityIdentities attribute in an AD user account, as described in Adding a certificatemapping rule if the trusted AD domain is configured to map user certificates
The addition of the --domain=ad.example.com option means that users mapped to a givencertificate are not only searched in the local idm.example.com domain but also in the ad.example.com domain
The filter definition in the --maprule option accepts the logical operator | (or), so that you can specifymultiple criteria. In this case, the rule maps all user accounts that meet at least one of the criteria.
Certificate mapping filter example 2
$ ipa certmaprule-add ipa_cert_for_ad_users \ --maprule='(|(userCertificate;binary={cert!bin})(ipacertmapdata=X509:<I>{issuer_dn!nss_x500}<S>{subject_dn!nss_x500})(altSecurityIdentities=X509:<I>{issuer_dn!ad_x500}<S>{subject_dn!ad_x500}))' \ --matchrule='<ISSUER>CN=Certificate Authority,O=REALM.EXAMPLE.COM' \ --domain=idm.example.com --domain=ad.example.com
In the above example, the filter definition in the --maprule option includes these criteria:
userCertificate;binary={cert!bin} is a filter that returns user entries that include the wholecertificate. For AD users, creating this type of filter is described in detail in Adding a certificatemapping rule if the AD user entry contains no certificate or mapping data.
ipacertmapdata=X509:<I>{issuer_dn!nss_x500}<S>{subject_dn!nss_x500} is a filter thatlinks the subject and issuer from a smart card certificate to the value of the ipacertmapdataattribute in an IdM user account, as described in Adding a certificate mapping rule in IdM .
altSecurityIdentities=X509:<I>{issuer_dn!ad_x500}<S>{subject_dn!ad_x500} is a filter thatlinks the subject and issuer from a smart card certificate to the value of the altSecurityIdentities attribute in an AD user account, as described in Adding a certificatemapping rule if the trusted AD domain is configured to map user certificates.
The filter definition in the --maprule option accepts the logical operator | (or), so that you can specifymultiple criteria. In this case, the rule maps all user accounts that meet at least one of the criteria.
Red Hat Enterprise Linux 9 Managing certificates in IdM
80

CHAPTER 10. CONFIGURING AUTHENTICATION WITH ACERTIFICATE STORED ON THE DESKTOP OF AN IDM CLIENT
By configuring Identity Management (IdM), IdM system administrators can enable users to authenticateto the IdM web UI and command-line interface (CLI) using a certificate that a Certificate Authority (CA)has issued to the users.
The web browser can run on a system that is not part of the IdM domain.
This user story provides instructions on how to effectively configure and test logging into IdentityManagement web UI and CLI with a certificate stored on the desktop of an IdM client. In following thisuser story,
you can skip Requesting a new user certificate and exporting it to the client if the user you wantto authenticate using a certificate already has a certificate;
you can skip Making sure the certificate and user are linked together if the user’s certificate hasbeen issued by the IdM CA.
NOTE
Only Identity Management users can log into the web UI using a certificate. ActiveDirectory users can log in with their user name and password.
10.1. CONFIGURING THE IDENTITY MANAGEMENT SERVER FORCERTIFICATE AUTHENTICATION IN THE WEB UI
As an Identity Management (IdM) administrator, you can allow users to use certificates to authenticateto your IdM environment.
Procedure
As the Identity Management administrator:
1. On an Identity Management server, obtain administrator privileges and create a shell script toconfigure the server.
a. Run the ipa-advise config-server-for-smart-card-auth command, and save its output to afile, for example server_certificate_script.sh:
# kinit admin# ipa-advise config-server-for-smart-card-auth > server_certificate_script.sh
b. Add execute permissions to the file using the chmod utility:
# chmod +x server_certificate_script.sh
2. On all the servers in the Identity Management domain, run the server_certificate_script.shscript
a. with the path of the IdM Certificate Authority certificate, /etc/ipa/ca.crt, as input if the IdMCA is the only certificate authority that has issued the certificates of the users you want toenable certificate authentication for:
CHAPTER 10. CONFIGURING AUTHENTICATION WITH A CERTIFICATE STORED ON THE DESKTOP OF AN IDM CLIENT
81
# ./server_certificate_script.sh /etc/ipa/ca.crt
b. with the paths leading to the relevant CA certificates as input if different external CAssigned the certificates of the users who you want to enable certificate authentication for:
# ./server_certificate_script.sh /tmp/ca1.pem /tmp/ca2.pem
NOTE
Do not forget to run the script on each new replica that you add to the system in thefuture if you want to have certificate authentication for users enabled in the wholetopology.
10.2. REQUESTING A NEW USER CERTIFICATE AND EXPORTING IT TOTHE CLIENT
As an Identity Management (IdM) administrator, you can create certificates for users in your IdMenvironment and export them to the IdM clients on which you want to enable certificate authenticationfor users.
NOTE
You can skip this section if the user you want to authenticate using a certificate alreadyhas a certificate.
Procedure
1. Optionally, create a new directory, for example ~/certdb/, and make it a temporary certificatedatabase. When asked, create an NSS Certificate DB password to encrypt the keys to thecertificate to be generated in a subsequent step:
# mkdir ~/certdb/# certutil -N -d ~/certdb/Enter a password which will be used to encrypt your keys.The password should be at least 8 characters long,and should contain at least one non-alphabetic character.
Enter new password:Re-enter password:
2. Create the certificate signing request (CSR) and redirect the output to a file. For example, tocreate a CSR with the name certificate_request.csr for a 4096 bit certificate for the idm_useruser in the IDM.EXAMPLE.COM realm, setting the nickname of the certificate private keys to idm_user for easy findability, and setting the subject to CN=idm_user,O=IDM.EXAMPLE.COM:
# certutil -R -d ~/certdb/ -a -g 4096 -n idm_user -s "CN=idm_user,O=IDM.EXAMPLE.COM" > certificate_request.csr
3. When prompted, enter the same password that you entered when using certutil to create thetemporary database. Then continue typing randlomly until told to stop:
Red Hat Enterprise Linux 9 Managing certificates in IdM
82
Enter Password or Pin for "NSS Certificate DB":
A random seed must be generated that will be used in thecreation of your key. One of the easiest ways to create arandom seed is to use the timing of keystrokes on a keyboard.
To begin, type keys on the keyboard until this progress meteris full. DO NOT USE THE AUTOREPEAT FUNCTION ON YOUR KEYBOARD!
Continue typing until the progress meter is full:
4. Submit the certificate request file to the server. Specify the Kerberos principal to associate withthe newly-issued certificate, the output file to store the certificate, and optionally the certificateprofile. For example, to obtain a certificate of the IECUserRoles profile, a profile with addeduser roles extension, for the [email protected] principal, and save it in the ~/idm_user.pem file:
# ipa cert-request certificate_request.csr [email protected] --profile-id=IECUserRoles --certificate-out=~/idm_user.pem
5. Add the certificate to the NSS database. Use the -n option to set the same nickname that youused when creating the CSR previously so that the certificate matches the private key in theNSS database. The -t option sets the trust level. For details, see the certutil(1) man page. The -ioption specifies the input certificate file. For example, to add to the NSS database a certificatewith the idm_user nickname that is stored in the ~/idm_user.pem file in the ~/certdb/database:
# certutil -A -d ~/certdb/ -n idm_user -t "P,," -i ~/idm_user.pem
6. Verify that the key in the NSS database does not show (orphan) as its nickname. For example,to verify that the certificate stored in the ~/certdb/ database is not orphaned:
# certutil -K -d ~/certdb/< 0> rsa 5ad14d41463b87a095b1896cf0068ccc467df395 NSS Certificate DB:idm_user
7. Use the pk12util command to export the certificate from the NSS database to the PKCS12format. For example, to export the certificate with the idm_user nickname from the /root/certdb NSS database into the ~/idm_user.p12 file:
# pk12util -d ~/certdb -o ~/idm_user.p12 -n idm_userEnter Password or Pin for "NSS Certificate DB":Enter password for PKCS12 file:Re-enter password:pk12util: PKCS12 EXPORT SUCCESSFUL
8. Transfer the certificate to the host on which you want the certificate authentication for idm_user to be enabled:
# scp ~/idm_user.p12 [email protected]:/home/idm_user/
9. On the host to which the certificate has been transferred, make the directory in which the
CHAPTER 10. CONFIGURING AUTHENTICATION WITH A CERTIFICATE STORED ON THE DESKTOP OF AN IDM CLIENT
83
9. On the host to which the certificate has been transferred, make the directory in which the.pkcs12 file is stored inaccessible to the 'other' group for security reasons:
# chmod o-rwx /home/idm_user/
10. For security reasons, remove the temporary NSS database and the .pkcs12 file from the server:
# rm ~/certdb/# rm ~/idm_user.p12
10.3. MAKING SURE THE CERTIFICATE AND USER ARE LINKEDTOGETHER
NOTE
You can skip this section if the user’s certificate has been issued by the IdM CA.
For certificate authentication to work, you need to make sure that the certificate is linked to the userthat will use it to authenticate to Identity Management (IdM).
If the certificate is provided by a Certificate Authority that is not part of yourIdentity Management environment, link the user and the certificate following the proceduredescribed in Linking User Accounts to Certificates .
If the certificate is provided by Identity Management CA, the certificate is already automaticallyadded in the user entry and you do not have to link the certificate to the user account. Fordetails on creating a new certificate in IdM, see Requesting a new user certificate and exportingit to the client.
10.4. CONFIGURING A BROWSER TO ENABLE CERTIFICATEAUTHENTICATION
To be able to authenticate with a certificate when using the WebUI to log into Identity Management(IdM), you need to import the user and the relevant certificate authority (CA) certificates into theMozilla Firefox or Google Chrome browser. The host itself on which the browser is running does not haveto be part of the IdM domain.
IdM supports the following browsers for connecting to the WebUI:
Mozilla Firefox 38 and later
Google Chrome 46 and later
The following procedure shows how to configure the Mozilla Firefox 57.0.1 browser.
Prerequisites
You have the user certificate that you want to import to the browser at your disposal in thePKCS#12 format.
Procedure
Red Hat Enterprise Linux 9 Managing certificates in IdM
84
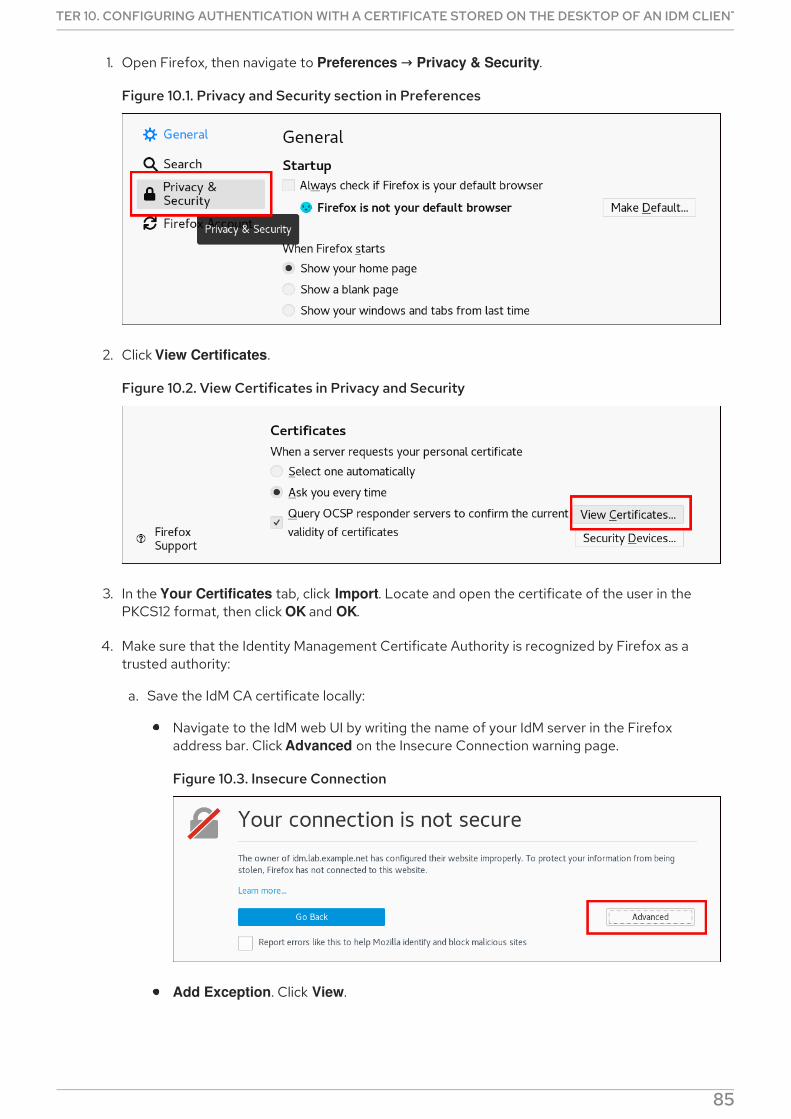
1. Open Firefox, then navigate to Preferences → Privacy & Security.
Figure 10.1. Privacy and Security section in Preferences
2. Click View Certificates.
Figure 10.2. View Certificates in Privacy and Security
3. In the Your Certificates tab, click Import. Locate and open the certificate of the user in thePKCS12 format, then click OK and OK.
4. Make sure that the Identity Management Certificate Authority is recognized by Firefox as atrusted authority:
a. Save the IdM CA certificate locally:
Navigate to the IdM web UI by writing the name of your IdM server in the Firefoxaddress bar. Click Advanced on the Insecure Connection warning page.
Figure 10.3. Insecure Connection
Add Exception. Click View.
Figure 10.4. View the Details of a Certificate
CHAPTER 10. CONFIGURING AUTHENTICATION WITH A CERTIFICATE STORED ON THE DESKTOP OF AN IDM CLIENT
85
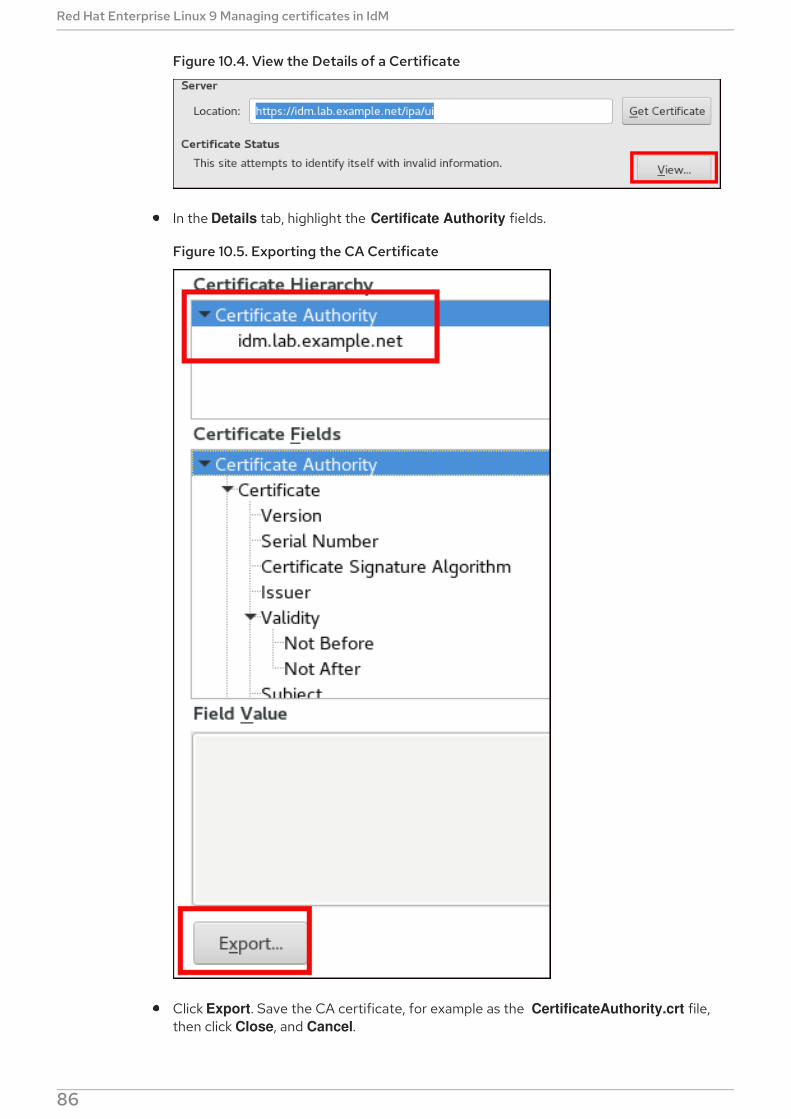
Figure 10.4. View the Details of a Certificate
In the Details tab, highlight the Certificate Authority fields.
Figure 10.5. Exporting the CA Certificate
Click Export. Save the CA certificate, for example as the CertificateAuthority.crt file,then click Close, and Cancel.
Red Hat Enterprise Linux 9 Managing certificates in IdM
86
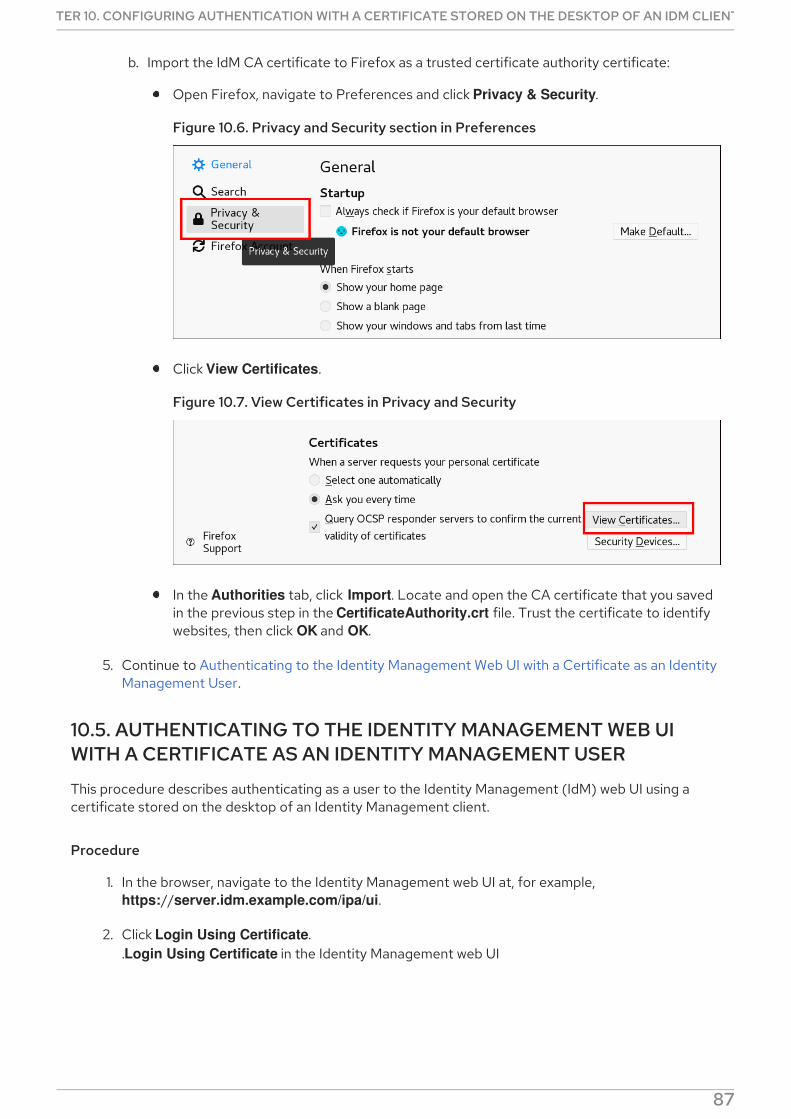
b. Import the IdM CA certificate to Firefox as a trusted certificate authority certificate:
Open Firefox, navigate to Preferences and click Privacy & Security.
Figure 10.6. Privacy and Security section in Preferences
Click View Certificates.
Figure 10.7. View Certificates in Privacy and Security
In the Authorities tab, click Import. Locate and open the CA certificate that you savedin the previous step in the CertificateAuthority.crt file. Trust the certificate to identifywebsites, then click OK and OK.
5. Continue to Authenticating to the Identity Management Web UI with a Certificate as an IdentityManagement User.
10.5. AUTHENTICATING TO THE IDENTITY MANAGEMENT WEB UIWITH A CERTIFICATE AS AN IDENTITY MANAGEMENT USER
This procedure describes authenticating as a user to the Identity Management (IdM) web UI using acertificate stored on the desktop of an Identity Management client.
Procedure
1. In the browser, navigate to the Identity Management web UI at, for example, https://server.idm.example.com/ipa/ui.
2. Click Login Using Certificate..Login Using Certificate in the Identity Management web UI
CHAPTER 10. CONFIGURING AUTHENTICATION WITH A CERTIFICATE STORED ON THE DESKTOP OF AN IDM CLIENT
87
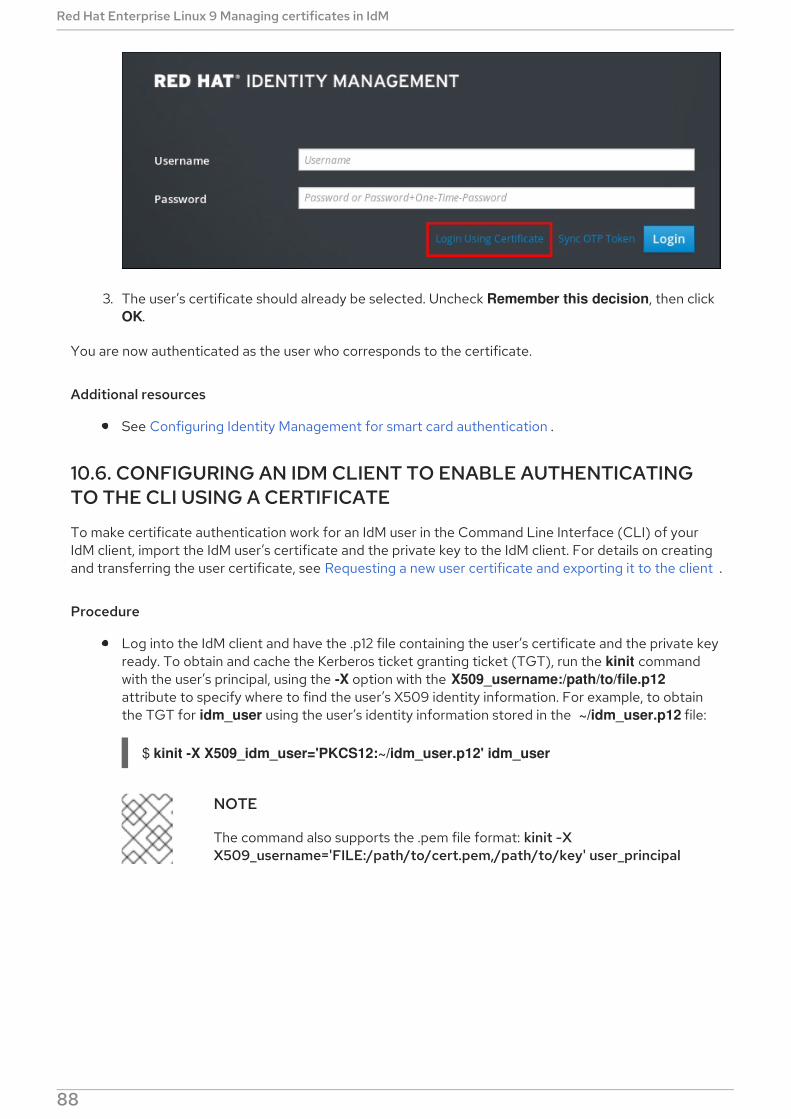
3. The user’s certificate should already be selected. Uncheck Remember this decision, then click OK.
You are now authenticated as the user who corresponds to the certificate.
Additional resources
See Configuring Identity Management for smart card authentication .
10.6. CONFIGURING AN IDM CLIENT TO ENABLE AUTHENTICATINGTO THE CLI USING A CERTIFICATE
To make certificate authentication work for an IdM user in the Command Line Interface (CLI) of yourIdM client, import the IdM user’s certificate and the private key to the IdM client. For details on creatingand transferring the user certificate, see Requesting a new user certificate and exporting it to the client .
Procedure
Log into the IdM client and have the .p12 file containing the user’s certificate and the private keyready. To obtain and cache the Kerberos ticket granting ticket (TGT), run the kinit commandwith the user’s principal, using the -X option with the X509_username:/path/to/file.p12attribute to specify where to find the user’s X509 identity information. For example, to obtainthe TGT for idm_user using the user’s identity information stored in the ~/idm_user.p12 file:
$ kinit -X X509_idm_user='PKCS12:~/idm_user.p12' idm_user
NOTE
The command also supports the .pem file format: kinit -XX509_username='FILE:/path/to/cert.pem,/path/to/key' user_principal
Red Hat Enterprise Linux 9 Managing certificates in IdM
88
CHAPTER 11. USING IDM CA RENEWAL SERVER
11.1. EXPLANATION OF IDM CA RENEWAL SERVER
In an Identity Management (IdM) deployment that uses an embedded certificate authority (CA), the CArenewal server maintains and renews IdM system certificates. It ensures robust IdM deployments.
IdM system certificates include:
IdM CA certificate
OCSP signing certificate
IdM CA subsystem certificates
IdM CA audit signing certificate
IdM renewal agent (RA) certificate
KRA transport and storage certificates
What characterizes system certificates is that their keys are shared by all CA replicas. In contrast, theIdM service certificates (for example, LDAP, HTTP and PKINIT certificates), have different keypairs andsubject names on different IdM CA servers.
In IdM topology, by default, the first IdM CA server is the CA renewal server.
NOTE
In upstream documentation, the IdM CA is called Dogtag.
The role of the CA renewal server
The IdM CA, IdM CA subsystem, and IdM RA certificates are crucial for IdM deployment. Eachcertificate is stored in an NSS database in the /etc/pki/pki-tomcat/ directory and also as an LDAPdatabase entry. The certificate stored in LDAP must match the certificate stored in the NSS database. Ifthey do not match, authentication failures occur between the IdM framework and IdM CA, and betweenIdM CA and LDAP.
All IdM CA replicas have tracking requests for every system certificate. If an IdM deployment withintegrated CA does not contain a CA renewal server, each IdM CA server requests the renewal of systemcertificates independently. This results in different CA replicas having various system certificates andauthentication failures occurring.
Appointing one CA replica as the renewal server allows the system certificates to be renewed exactlyonce, when required, and thus prevents authentication failures.
The role of the certmonger service on CA replicas
The certmonger service running on all IdM CA replicas uses the dogtag-ipa-ca-renew-agent renewalhelper to keep track of IdM system certificates. The renewal helper program reads the CA renewalserver configuration. On each CA replica that is not the CA renewal server, the renewal helper retrievesthe latest system certificates from the ca_renewal LDAP entries. Due to non-determinism in whenexactly certmonger renewal attempts occur, the dogtag-ipa-ca-renew-agent helper sometimesattempts to update a system certificate before the CA renewal server has actually renewed thecertificate. If this happens, the old, soon-to-expire certificate is returned to the certmonger service on
CHAPTER 11. USING IDM CA RENEWAL SERVER
89
the CA replica. The certmonger service, realizing it is the same certificate that is already stored in itsdatabase, keeps attempting to renew the certificate with some delay between individual attempts untilit can retrieve the updated certificate from the CA renewal server.
The correct functioning of IdM CA renewal server
An IdM deployment with an embedded CA is an IdM deployment that was installed with an IdM CA - orwhose IdM CA server was installed later. An IdM deployment with an embedded CA must at all timeshave exactly one CA replica configured as the renewal server. The renewal server must be online andfully functional, and must replicate properly with the other servers.
If the current CA renewal server is being deleted using the ipa server-del, ipa-replica-manage del, ipa-csreplica-manage del or ipa-server-install --uninstall commands, another CA replica is automaticallyassigned as the CA renewal server. This policy ensures that the renewal server configuration remainsvalid.
This policy does not cover the following situations:
Offline renewal serverIf the renewal server is offline for an extended duration, it may miss a renewal window. In thissituation, all nonrenewal CA servers keep reinstalling the current system certificates until thecertificates expire. When this occurs, the IdM deployment is disrupted because even one expiredcertificate can cause renewal failures for other certificates.
Replication problemsIf replication problems exist between the renewal server and other CA replicas, renewal mightsucceed, but the other CA replicas might not be able to retrieve the updated certificates beforethey expire.
To prevent this situation, make sure that your replication agreements are working correctly. Fordetails, see general or specific replication troubleshooting guidelines in the RHEL 7 LinuxDomain Identity, Authentication, and Policy Guide.
11.2. CHANGING AND RESETTING IDM CA RENEWAL SERVER
When a certificate authority (CA) renewal server is being decommissioned, Identity Management (IdM)automatically selects a new CA renewal server from the list of IdM CA servers. The system administratorcannot influence the selection.
To be able to select the new IdM CA renewal server, the system administrator must perform thereplacement manually. Choose the new CA renewal server before starting the process ofdecommissioning the current renewal server.
If the current CA renewal server configuration is invalid, reset the IdM CA renewal server.
Complete this procedure to change or reset the CA renewal server.
Prerequisites
You have the IdM administrator credentials.
Procedure
1. Obtain the IdM administrator credentials:
Red Hat Enterprise Linux 9 Managing certificates in IdM
90
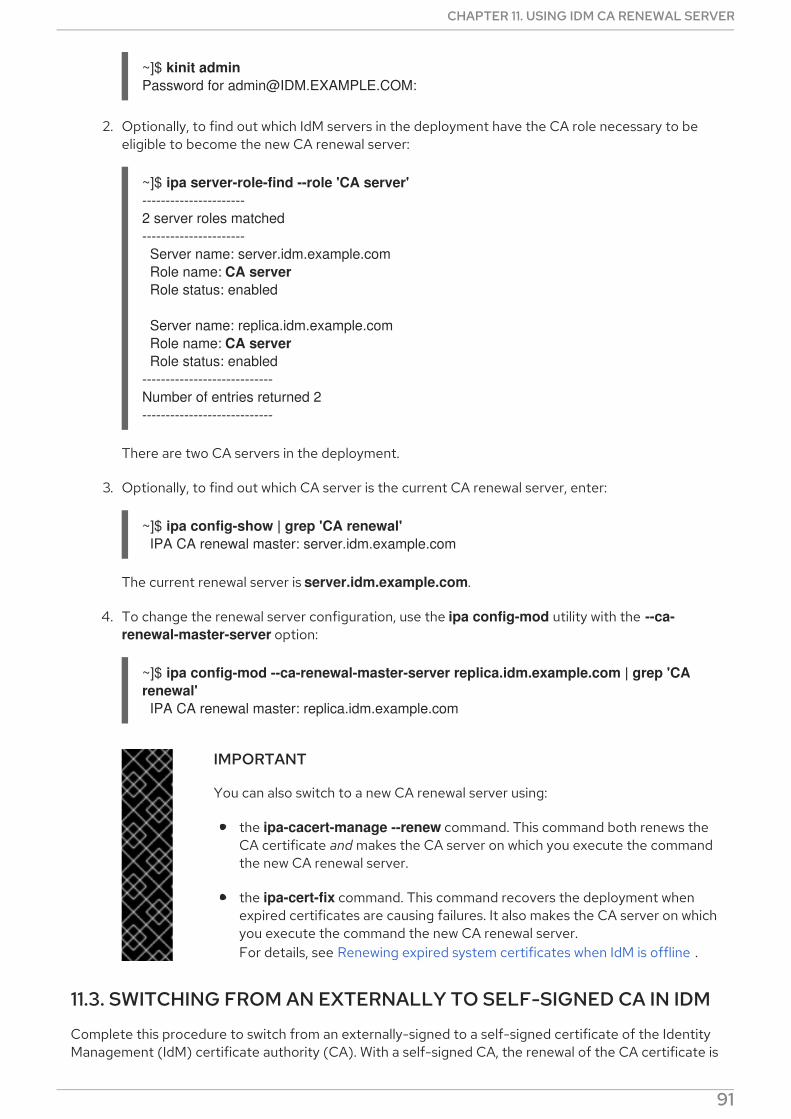
~]$ kinit adminPassword for [email protected]:
2. Optionally, to find out which IdM servers in the deployment have the CA role necessary to beeligible to become the new CA renewal server:
~]$ ipa server-role-find --role 'CA server'----------------------2 server roles matched---------------------- Server name: server.idm.example.com Role name: CA server Role status: enabled
Server name: replica.idm.example.com Role name: CA server Role status: enabled----------------------------Number of entries returned 2----------------------------
There are two CA servers in the deployment.
3. Optionally, to find out which CA server is the current CA renewal server, enter:
~]$ ipa config-show | grep 'CA renewal' IPA CA renewal master: server.idm.example.com
The current renewal server is server.idm.example.com.
4. To change the renewal server configuration, use the ipa config-mod utility with the --ca-renewal-master-server option:
~]$ ipa config-mod --ca-renewal-master-server replica.idm.example.com | grep 'CA renewal' IPA CA renewal master: replica.idm.example.com
IMPORTANT
You can also switch to a new CA renewal server using:
the ipa-cacert-manage --renew command. This command both renews theCA certificate and makes the CA server on which you execute the commandthe new CA renewal server.
the ipa-cert-fix command. This command recovers the deployment whenexpired certificates are causing failures. It also makes the CA server on whichyou execute the command the new CA renewal server.For details, see Renewing expired system certificates when IdM is offline .
11.3. SWITCHING FROM AN EXTERNALLY TO SELF-SIGNED CA IN IDM
Complete this procedure to switch from an externally-signed to a self-signed certificate of the IdentityManagement (IdM) certificate authority (CA). With a self-signed CA, the renewal of the CA certificate is
CHAPTER 11. USING IDM CA RENEWAL SERVER
91
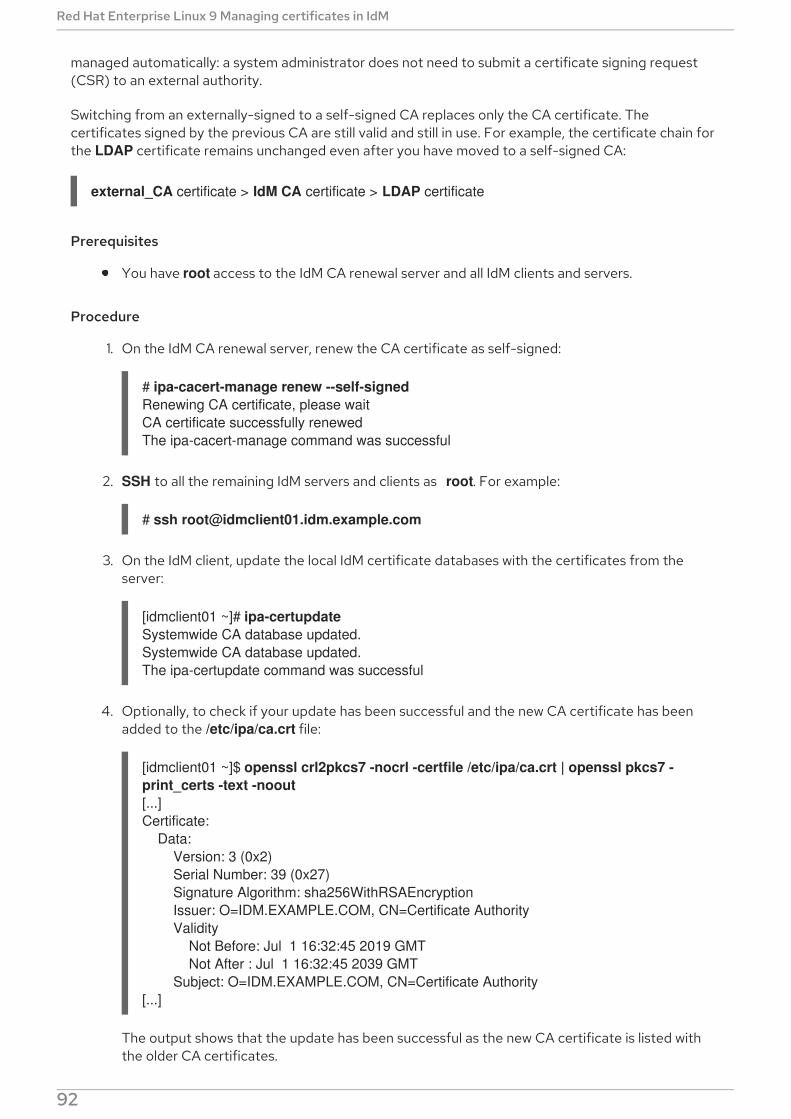
managed automatically: a system administrator does not need to submit a certificate signing request(CSR) to an external authority.
Switching from an externally-signed to a self-signed CA replaces only the CA certificate. Thecertificates signed by the previous CA are still valid and still in use. For example, the certificate chain forthe LDAP certificate remains unchanged even after you have moved to a self-signed CA:
external_CA certificate > IdM CA certificate > LDAP certificate
Prerequisites
You have root access to the IdM CA renewal server and all IdM clients and servers.
Procedure
1. On the IdM CA renewal server, renew the CA certificate as self-signed:
# ipa-cacert-manage renew --self-signedRenewing CA certificate, please waitCA certificate successfully renewedThe ipa-cacert-manage command was successful
2. SSH to all the remaining IdM servers and clients as root. For example:
# ssh [email protected]
3. On the IdM client, update the local IdM certificate databases with the certificates from theserver:
[idmclient01 ~]# ipa-certupdateSystemwide CA database updated.Systemwide CA database updated.The ipa-certupdate command was successful
4. Optionally, to check if your update has been successful and the new CA certificate has beenadded to the /etc/ipa/ca.crt file:
[idmclient01 ~]$ openssl crl2pkcs7 -nocrl -certfile /etc/ipa/ca.crt | openssl pkcs7 -print_certs -text -noout[...]Certificate: Data: Version: 3 (0x2) Serial Number: 39 (0x27) Signature Algorithm: sha256WithRSAEncryption Issuer: O=IDM.EXAMPLE.COM, CN=Certificate Authority Validity Not Before: Jul 1 16:32:45 2019 GMT Not After : Jul 1 16:32:45 2039 GMT Subject: O=IDM.EXAMPLE.COM, CN=Certificate Authority[...]
The output shows that the update has been successful as the new CA certificate is listed withthe older CA certificates.
Red Hat Enterprise Linux 9 Managing certificates in IdM
92
11.4. RENEWING THE IDM CA RENEWAL SERVER WITH ANEXTERNALLY-SIGNED CERTIFICATE
This section describes how to renew the Identity Management (IdM) certificate authority (CA)certificate using an external CA to sign the certificate signing request (CSR). In this configuration, yourIdM CA server is a subCA of the external CA. The external CA can, but does not have to, be an ActiveDirectory Certificate Server (AD CS).
If the external certificate authority is AD CS, you can specify the template you want for the IdM CAcertificate in the CSR. A certificate template defines the policies and rules that a CA uses when acertificate request is received. Certificate templates in AD correspond to certificate profiles in IdM.
You can define a specific AD CS template by its Object Identifier (OID). OIDs are unique numeric valuesissued by various issuing authorities to uniquely identify data elements, syntaxes, and other parts ofdistributed applications.
Alternatively, you can define a specific AD CS template by its name. For example, the name of thedefault profile used in a CSR submitted by an IdM CA to an AD CS is subCA.
To define a profile by specifying its OID or name in the CSR, use the external-ca-profile option. Fordetails, see the ipa-cacert-manage man page.
Apart from using a ready-made certificate template, you can also create a custom certificate template inthe AD CS, and use it in the CSR.
Prerequisites
You have root access to the IdM CA renewal server.
Procedure
Complete this procedure to renew the certificate of the IdM CA with external signing, regardless ofwhether current CA certificate is self-signed or externally-signed.
1. Create a CSR to be submitted to the external CA:
If the external CA is an AD CS, use the --external-ca-type=ms-cs option. If you want adifferent template than the default subCA template, specify it using the --external-ca-profile option:
~]# ipa-cacert-manage renew --external-ca --external-ca-type=ms-cs [--external-ca-profile=PROFILE]Exporting CA certificate signing request, please waitThe next step is to get /var/lib/ipa/ca.csr signed by your CA and re-run ipa-cacert-manage as:ipa-cacert-manage renew --external-cert-file=/path/to/signed_certificate --external-cert-file=/path/to/external_ca_certificateThe ipa-cacert-manage command was successful
If the external CA is not an AD CS:
~]# ipa-cacert-manage renew --external-caExporting CA certificate signing request, please waitThe next step is to get /var/lib/ipa/ca.csr signed by your CA and re-run ipa-cacert-manage as:
CHAPTER 11. USING IDM CA RENEWAL SERVER
93
ipa-cacert-manage renew --external-cert-file=/path/to/signed_certificate --external-cert-file=/path/to/external_ca_certificateThe ipa-cacert-manage command was successful
The output shows that a CSR has been created and is stored in the /var/lib/ipa/ca.csr file.
2. Submit the CSR located in /var/lib/ipa/ca.csr to the external CA. The process differs dependingon the service to be used as the external CA.
3. Retrieve the issued certificate and the CA certificate chain for the issuing CA in a base 64-encoded blob, which is:
a PEM file if the external CA is not an AD CS.
a Base_64 certificate if the external CA is an AD CS.The process differs for every certificate service. Usually, a download link on a web page or inthe notification email allows the administrator to download all the required certificates.
If the external CA is an AD CS and you have submitted the CSR with a known templatethrough the Microsoft Windows Certification Authority management window, the AD CSissues the certificate immediately and the Save Certificate dialog appears in the AD CS webinterface, asking where to save the issued certificate.
4. Run the ipa-cacert-manage renew command again, adding all the CA certificate files requiredto supply a full certificate chain. Specify as many files as you need, using the --external-cert-fileoption multiple times:
~]# ipa-cacert-manage renew --external-cert-file=/path/to/signed_certificate --external-cert-file=/path/to/external_ca_certificate_1 --external-cert-file=/path/to/external_ca_certificate_2
5. On all the IdM servers and clients, update the local IdM certificate databases with thecertificates from the server:
[client ~]$ ipa-certupdateSystemwide CA database updated.Systemwide CA database updated.The ipa-certupdate command was successful
6. Optionally, to check if your update has been successful and the new CA certificate has beenadded to the /etc/ipa/ca.crt file:
[client ~]$ openssl crl2pkcs7 -nocrl -certfile /etc/ipa/ca.crt | openssl pkcs7 -print_certs -text -noout[...]Certificate: Data: Version: 3 (0x2) Serial Number: 39 (0x27) Signature Algorithm: sha256WithRSAEncryption Issuer: O=IDM.EXAMPLE.COM, CN=Certificate Authority Validity Not Before: Jul 1 16:32:45 2019 GMT Not After : Jul 1 16:32:45 2039 GMT Subject: O=IDM.EXAMPLE.COM, CN=Certificate Authority[...]
Red Hat Enterprise Linux 9 Managing certificates in IdM
94
The output shows that the update has been successful as the new CA certificate is listed withthe older CA certificates.
CHAPTER 11. USING IDM CA RENEWAL SERVER
95
CHAPTER 12. RENEWING EXPIRED SYSTEM CERTIFICATESWHEN IDM IS OFFLINE
When a system certificate has expired, Identity Management (IdM) fails to start. IdM supports renewingsystem certificates when IdM is offline using the ipa-cert-fix tool.
12.1. RENEWING EXPIRED SYSTEM CERTIFICATES ON A CA RENEWALSERVER
This section describes how to apply the ipa-cert-fix tool on expired IdM certificates.
IMPORTANT
If you run the ipa-cert-fix tool on a CA (Certificate Authority) host that is not the CArenewal server, and the utility renews shared certificates, that host automaticallybecomes the new CA renewal server in the domain. There must always be only one CArenewal server in the domain to avoid inconsistencies.
Prerequisites
Log in to the server with administration rights
Procedure
1. Start the ipa-cert-fix tool to analyze the system and list expired certificates that requirerenewal:
# ipa-cert-fix...The following certificates will be renewed:
Dogtag sslserver certificate: Subject: CN=ca1.example.com,O=EXAMPLE.COM 201905222205 Serial: 13 Expires: 2019-05-12 05:55:47...Enter "yes" to proceed:
2. Enter yes to start the renewal process:
Enter "yes" to proceed: yesProceeding.Renewed Dogtag sslserver certificate: Subject: CN=ca1.example.com,O=EXAMPLE.COM 201905222205 Serial: 268369925 Expires: 2021-08-14 02:19:33...
Becoming renewal master.The ipa-cert-fix command was successful
It can take up to one minute before ipa-cert-fix renews all expired certificates.
Red Hat Enterprise Linux 9 Managing certificates in IdM
96
3. Optionally, verify that all services are now running:
# ipactl statusDirectory Service: RUNNINGkrb5kdc Service: RUNNINGkadmin Service: RUNNINGhttpd Service: RUNNINGipa-custodia Service: RUNNINGpki-tomcatd Service: RUNNINGipa-otpd Service: RUNNINGipa: INFO: The ipactl command was successful
At this point, certificates have been renewed and services are running. The next step is to check otherservers in the IdM domain.
NOTE
If you need to repair certificates across multiple CA servers:
1. After ensuring that LDAP replication is working across the topology, first run ipa-cert-fix on one CA server, according to the above procedure.
2. Before you run ipa-cert-fix on another CA server, trigger Certmonger renewalsfor shared certificates via getcert-resubmit (on the other CA server), to avoidunnecessary renewal of shared certificates.
12.2. VERIFYING OTHER IDM SERVERS IN THE IDM DOMAIN AFTERRENEWAL
After the renewing the CA renewal server’s certificates with the ipa-cert-fix tool, you must:
Restart all other Identity Management (IdM) servers in the domain.
Check if certmonger renewed certificates.
If there are other Certificate Authority (CA) replicas with expired system certificates, renewthose certificates with the ipa-cert-fix tool as well.
Prerequisites
Log in to the server with administration rights.
Procedure
1. Restart IdM with the --force parameter:
# ipactl restart --force
With the --force parameter, the ipactl utility ignores individual service startup failures. Forexample, if the server is also a CA with expired certificates, the pki-tomcat service fails to start.This is expected and ignored because of using the --force parameter.
2. After the restart, verify that the certmonger service renewed the certificates (certificate statussays MONITORING):
CHAPTER 12. RENEWING EXPIRED SYSTEM CERTIFICATES WHEN IDM IS OFFLINE
97
# getcert list | egrep '^Request|status:|subject:'Request ID '20190522120745': status: MONITORING subject: CN=IPA RA,O=EXAMPLE.COM 201905222205Request ID '20190522120834': status: MONITORING subject: CN=Certificate Authority,O=EXAMPLE.COM 201905222205...
It can take some time before certmonger renews the shared certificates on the replica.
3. If the server is also a CA, the previous command reports CA_UNREACHABLE for thecertificate the pki-tomcat service uses:
Request ID '20190522120835': status: CA_UNREACHABLE subject: CN=ca2.example.com,O=EXAMPLE.COM 201905222205...
4. To renew this certificate, use the ipa-cert-fix utility:
# ipa-cert-fixDogtag sslserver certificate: Subject: CN=ca2.example.com,O=EXAMPLE.COM Serial: 3 Expires: 2019-05-11 12:07:11
Enter "yes" to proceed: yesProceeding.Renewed Dogtag sslserver certificate: Subject: CN=ca2.example.com,O=EXAMPLE.COM 201905222205 Serial: 15 Expires: 2019-08-14 04:25:05
The ipa-cert-fix command was successful
Now, all IdM certificates have been renewed and work correctly.
12.3. REPLACING THE WEB SERVER AND LDAP SERVERCERTIFICATES
As an Identity Management (IdM) system administrator, you can manually replace the certificates forthe web (or httpd) and LDAP (or Directory) services running on an IdM server. For example, this mightbe necessary if the certmonger utility is not configured to renew the certificates automatically, or if thecertificates are signed by an external certificate authority (CA).
The example installs the certificates for the services running on the server.idm.example.com IdMserver. You obtain the certificates from an external CA.
NOTE
The HTTP and LDAP service certificates have different keypairs and subject names ondifferent IdM servers and so you must renew the certificates on each IdM serverindividually.
Red Hat Enterprise Linux 9 Managing certificates in IdM
98
Prerequisites
You have root access to the IdM server.
You know the Directory Manager password.
You have access to a file storing the CA certificate chain of the external CA,ca_certificate_chain_file.crt.
Procedure
1. Install the certificates contained in ca_certificate_chain_file.crt as additional CA certificates toIdM:
# ipa-cacert-manage install
2. Update the local IdM certificate databases with certificates from ca_certicate_chain_file.crt:
# ipa-certupdate
3. Generate a private key and a certificate signing request (CSR) using the OpenSSL utility:
$ openssl req -new -newkey rsa:2048 -days 365 -nodes -keyout new.key -out new.csr -addext "subjectAltName = DNS:ipa-ca.idm.example.test" -subj '/CN=server.idm.example.com,O=IDM.EXAMPLE.COM'
Submit the CSR to the external CA. The process differs depending on the service to be used asthe external CA. After the CA signs the certificate, import the certificate to the IdM server.
4. On the IdM server, replace the Apache web server’s old private key and certificate with the newkey and the newly-signed certificate:
# ipa-server-certinstall -w --pin=password new.key new.crt
In the command above:
The -w option specifies that you are installing a certificate into the web server.
The --pin option specifies the password protecting the private key.
5. When prompted, enter the Directory Manager password.
6. Replace the LDAP server’s old private key and certificate with the new key and the newly-signed certificate:
# ipa-server-certinstall -d --pin=password new.key new.cert
In the command above:
The -d option specifies that you are installing a certificate into the LDAP server.
The --pin option specifies the password protecting the private key.
7. When prompted, enter the Directory Manager password.
CHAPTER 12. RENEWING EXPIRED SYSTEM CERTIFICATES WHEN IDM IS OFFLINE
99
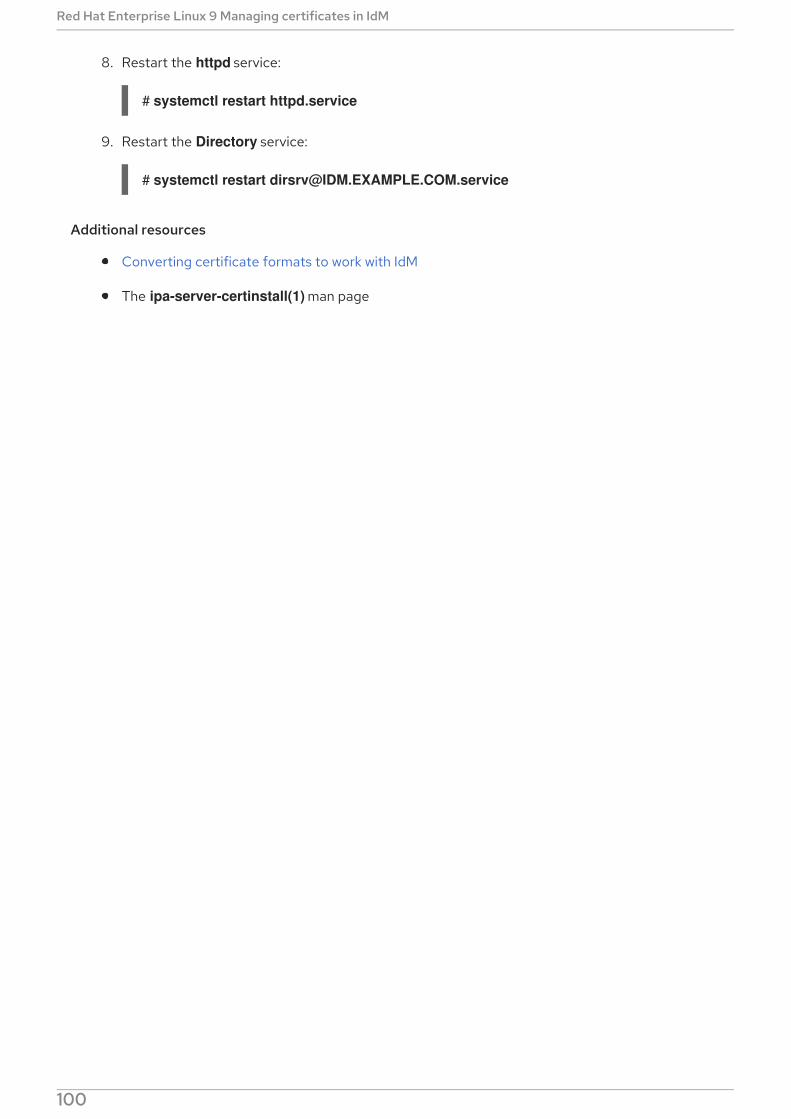
8. Restart the httpd service:
# systemctl restart httpd.service
9. Restart the Directory service:
# systemctl restart [email protected]
Additional resources
Converting certificate formats to work with IdM
The ipa-server-certinstall(1) man page
Red Hat Enterprise Linux 9 Managing certificates in IdM
100
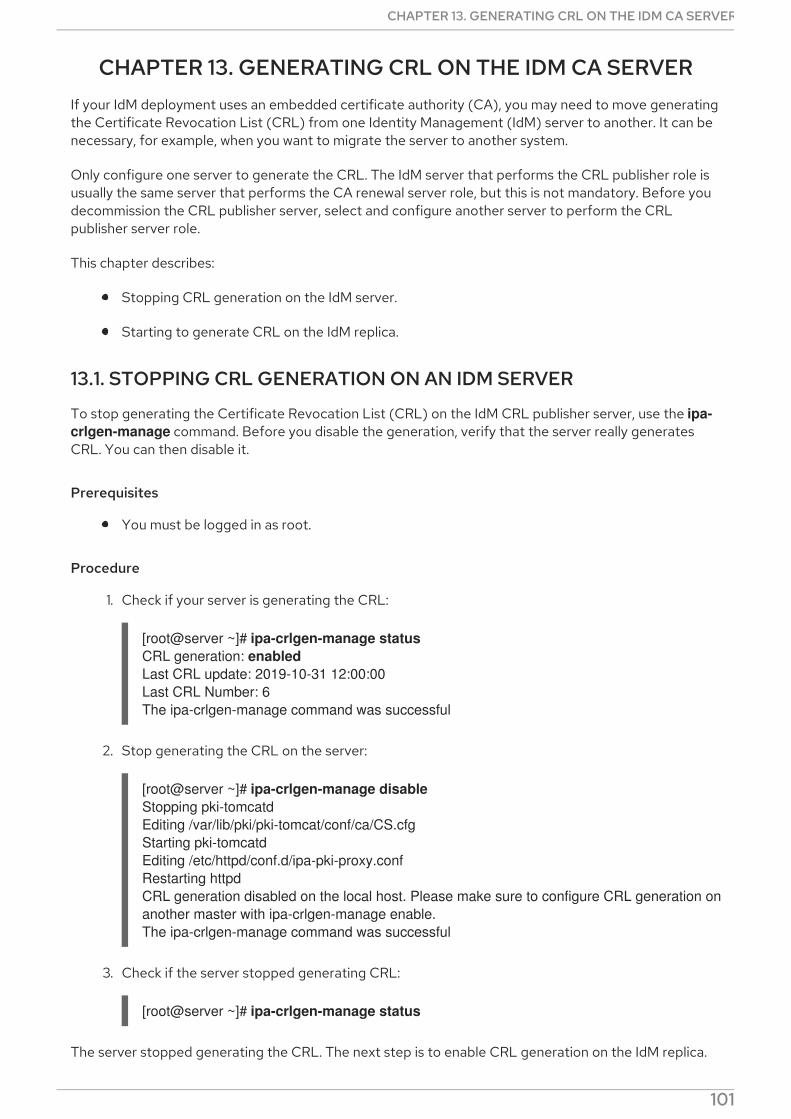
CHAPTER 13. GENERATING CRL ON THE IDM CA SERVERIf your IdM deployment uses an embedded certificate authority (CA), you may need to move generatingthe Certificate Revocation List (CRL) from one Identity Management (IdM) server to another. It can benecessary, for example, when you want to migrate the server to another system.
Only configure one server to generate the CRL. The IdM server that performs the CRL publisher role isusually the same server that performs the CA renewal server role, but this is not mandatory. Before youdecommission the CRL publisher server, select and configure another server to perform the CRLpublisher server role.
This chapter describes:
Stopping CRL generation on the IdM server.
Starting to generate CRL on the IdM replica.
13.1. STOPPING CRL GENERATION ON AN IDM SERVER
To stop generating the Certificate Revocation List (CRL) on the IdM CRL publisher server, use the ipa-crlgen-manage command. Before you disable the generation, verify that the server really generatesCRL. You can then disable it.
Prerequisites
You must be logged in as root.
Procedure
1. Check if your server is generating the CRL:
[root@server ~]# ipa-crlgen-manage statusCRL generation: enabledLast CRL update: 2019-10-31 12:00:00Last CRL Number: 6The ipa-crlgen-manage command was successful
2. Stop generating the CRL on the server:
[root@server ~]# ipa-crlgen-manage disableStopping pki-tomcatdEditing /var/lib/pki/pki-tomcat/conf/ca/CS.cfgStarting pki-tomcatdEditing /etc/httpd/conf.d/ipa-pki-proxy.confRestarting httpdCRL generation disabled on the local host. Please make sure to configure CRL generation on another master with ipa-crlgen-manage enable.The ipa-crlgen-manage command was successful
3. Check if the server stopped generating CRL:
[root@server ~]# ipa-crlgen-manage status
The server stopped generating the CRL. The next step is to enable CRL generation on the IdM replica.
CHAPTER 13. GENERATING CRL ON THE IDM CA SERVER
101
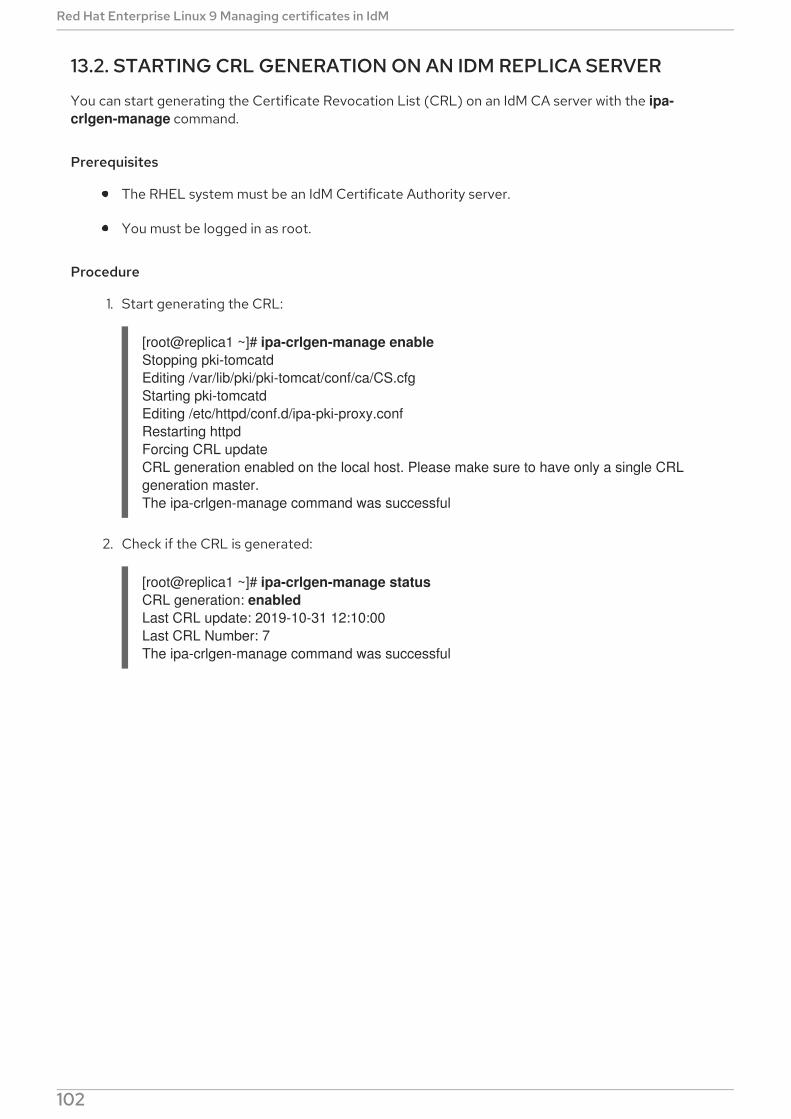
13.2. STARTING CRL GENERATION ON AN IDM REPLICA SERVER
You can start generating the Certificate Revocation List (CRL) on an IdM CA server with the ipa-crlgen-manage command.
Prerequisites
The RHEL system must be an IdM Certificate Authority server.
You must be logged in as root.
Procedure
1. Start generating the CRL:
[root@replica1 ~]# ipa-crlgen-manage enableStopping pki-tomcatdEditing /var/lib/pki/pki-tomcat/conf/ca/CS.cfgStarting pki-tomcatdEditing /etc/httpd/conf.d/ipa-pki-proxy.confRestarting httpdForcing CRL updateCRL generation enabled on the local host. Please make sure to have only a single CRL generation master.The ipa-crlgen-manage command was successful
2. Check if the CRL is generated:
[root@replica1 ~]# ipa-crlgen-manage statusCRL generation: enabledLast CRL update: 2019-10-31 12:10:00Last CRL Number: 7The ipa-crlgen-manage command was successful
Red Hat Enterprise Linux 9 Managing certificates in IdM
102
CHAPTER 14. DECOMMISSIONING A SERVER THATPERFORMS THE CA RENEWAL SERVER AND CRL PUBLISHER
ROLESYou might have one server performing both the Certificate Authority (CA) renewal server role and theCertificate Revocation List (CRL) publisher role. If you need to take this server offline or decommissionit, select and configure another CA server to perform these roles.
In this example, the host server.idm.example.com, which fulfills the CA renewal server and CRLpublisher roles, must be decommissioned. This procedure transfers the CA renewal server and CRLpublisher roles to the host replica.idm.example.com and removes server.idm.example.com from theIdM environment.
NOTE
You do not need to configure the same server to perform both CA renewal server andCRL publisher roles.
Prerequisites
You have the IdM administrator credentials.
You have the root password for the server you are decommissioning.
You have at least two CA replicas in your IdM environment.
Procedure
1. Obtain the IdM administrator credentials:
[user@server ~]$ kinit adminPassword for [email protected]:
2. (Optional) If you are not sure which servers perform the the CA renewal server and CRLpublisher roles:
a. Display the current CA renewal server. You can run the following command from any IdMserver:
[user@server ~]$ ipa config-show | grep 'CA renewal' IPA CA renewal master: server.idm.example.com
b. Test if a host is the current CRL publisher.
[user@server ~]$ ipa-crlgen-manage statusCRL generation: enabledLast CRL update: 2019-10-31 12:00:00Last CRL Number: 6The ipa-crlgen-manage command was successful
A CA server that does not generate the CRL displays CRL generation: disabled.
CHAPTER 14. DECOMMISSIONING A SERVER THAT PERFORMS THE CA RENEWAL SERVER AND CRL PUBLISHER ROLES
103
[user@replica ~]$ ipa-crlgen-manage statusCRL generation: disabledThe ipa-crlgen-manage command was successful
Continue entering this command on CA servers until you find the CRL publisher server.
c. Display all other CA servers you can promote to fulfill these roles. This environment has twoCA servers.
[user@server ~]$ ipa server-role-find --role 'CA server'----------------------2 server roles matched---------------------- Server name: server.idm.example.com Role name: CA server Role status: enabled Server name: replica.idm.example.com Role name: CA server Role status: enabled----------------------------Number of entries returned 2----------------------------
3. Set replica.idm.example.com as the CA renewal server.
[user@server ~]$ ipa config-mod --ca-renewal-master-server replica.idm.example.com
4. On server.idm.example.com:
a. Disable the certificate updater task:
[root@server ~]# pki-server ca-config-set ca.certStatusUpdateInterval 0
b. Restart IdM services:
[user@server ~]$ ipactl restart
5. On replica.idm.example.com:
a. Enable the certificate updater task:
[root@server ~]# pki-server ca-config-unset ca.certStatusUpdateInterval
b. Restart IdM services:
[user@replica ~]$ ipactl restart
6. On server.idm.example.com, stop generating the CRL.
[user@server ~]$ ipa-crlgen-manage disableStopping pki-tomcatdEditing /var/lib/pki/pki-tomcat/conf/ca/CS.cfgStarting pki-tomcatd
Red Hat Enterprise Linux 9 Managing certificates in IdM
104
Editing /etc/httpd/conf.d/ipa-pki-proxy.confRestarting httpdCRL generation disabled on the local host. Please make sure to configure CRL generation on another master with ipa-crlgen-manage enable.The ipa-crlgen-manage command was successful
7. On replica.idm.example.com, start generating the CRL.
[user@replica ~]$ ipa-crlgen-manage enableStopping pki-tomcatdEditing /var/lib/pki/pki-tomcat/conf/ca/CS.cfgStarting pki-tomcatdEditing /etc/httpd/conf.d/ipa-pki-proxy.confRestarting httpdForcing CRL updateCRL generation enabled on the local host. Please make sure to have only a single CRL generation master.The ipa-crlgen-manage command was successful
8. Stop IdM services on server.idm.example.com:
[user@server ~]$ ipactl stop
9. On replica.idm.example.com, delete server.idm.example.com from the IdM environment.
[user@replica ~]$ ipa server-del server.idm.example.com
10. On server.idm.example.com, use the ipa-server-install --uninstall command as the rootaccount:
[root@server ~]# ipa-server-install --uninstall...Are you sure you want to continue with the uninstall procedure? [no]: yes
Verification steps
Display the current CA renewal server.
[user@replica ~]$ ipa config-show | grep 'CA renewal' IPA CA renewal master: replica.idm.example.com
Confirm that the replica.idm.example.com host is generating the CRL.
[user@replica ~]$ ipa-crlgen-manage statusCRL generation: enabledLast CRL update: 2019-10-31 12:10:00Last CRL Number: 7The ipa-crlgen-manage command was successful
Additional resources
Changing and resetting IdM CA renewal server
CHAPTER 14. DECOMMISSIONING A SERVER THAT PERFORMS THE CA RENEWAL SERVER AND CRL PUBLISHER ROLES
105
Generating CRL on the IdM CA server
Uninstalling an IdM replica
Red Hat Enterprise Linux 9 Managing certificates in IdM
106
CHAPTER 15. OBTAINING AN IDM CERTIFICATE FOR ASERVICE USING CERTMONGER
15.1. CERTMONGER OVERVIEW
When Identity Management (IdM) is installed with an integrated IdM Certificate Authority (CA), it usesthe certmonger service to track and renew system and service certificates. When the certificate isreaching its expiration date, certmonger manages the renewal process by:
regenerating a certificate-signing request (CSR) using the options provided in the originalrequest.
submitting the CSR to the IdM CA using the IdM API cert-request command.
receiving the certificate from the IdM CA.
executing a pre-save command if specified by the original request.
installing the new certificate in the location specified in the renewal request: either in an NSSdatabase or in a file.
executing a post-save command if specified by the original request. For example, the post-savecommand can instruct certmonger to restart a relevant service, so that the service picks up thenew certificate.
Types of certificates certmonger tracks
Certificates can be divided into system and service certificates.
Unlike service certificates (for example, for HTTP, LDAP and PKINIT), which have different keypairs andsubject names on different servers, IdM system certificates and their keys are shared by all CA replicas.The IdM system certificates include:
IdM CA certificate
OCSP signing certificate
IdM CA subsystem certificates
IdM CA audit signing certificate
IdM renewal agent (RA) certificate
KRA transport and storage certificates
The certmonger service tracks the IdM system and service certificates that were requested during theinstallation of IdM environment with an integrated CA. Certmonger also tracks certificates that havebeen requested manually by the system administrator for other services running on the IdM host. Certmonger does not track external CA certificates or user certificates.
Certmonger components
The certmonger service consists of two main components:
The certmonger daemon, which is the engine tracking the list of certificates and launchingrenewal commands
CHAPTER 15. OBTAINING AN IDM CERTIFICATE FOR A SERVICE USING CERTMONGER
107
The getcert utility for the command-line interface (CLI), which allows the systemadministrator to actively send commands to the certmonger daemon.
More specifically, the system administrator can use the getcert utility to:
Request a new certificate
View the list of certificates that certmonger tracks
Start or stop tracking a certificate
Renew a certificate
15.2. OBTAINING AN IDM CERTIFICATE FOR A SERVICE USINGCERTMONGER
To ensure that communication between browsers and the web service running on your IdentityManagement (IdM) client is secure and encrypted, use a TLS certificate. Obtain the TLS certificate foryour web service from the IdM Certificate Authority (CA).
This section describes how to use certmonger to obtain an IdM certificate for a service(HTTP/[email protected]) running on an IdM client.
Using certmonger to request the certificate automatically means that certmonger manages andrenews the certificate when it is due for a renewal.
For a visual representation of what happens when certmonger requests a service certificate, seeSection 15.3, “Communication flow for certmonger requesting a service certificate” .
Prerequisites
The web server is enrolled as an IdM client.
You have root access to the IdM client on which you are running the procedure.
The service for which you are requesting a certificate does not have to pre-exist in IdM.
Procedure
1. On the my_company.idm.example.com IdM client on which the HTTP service is running,request a certificate for the service corresponding to the HTTP/[email protected] principal, and specify that
The certificate is to be stored in the local /etc/pki/tls/certs/httpd.pem file
The private key is to be stored in the local /etc/pki/tls/private/httpd.key file
That an extensionRequest for a SubjectAltName be added to the signing request with theDNS name of my_company.idm.example.com:
# ipa-getcert request -K HTTP/my_company.idm.example.com -k /etc/pki/tls/private/httpd.key -f /etc/pki/tls/certs/httpd.pem -g 2048 -D my_company.idm.example.com -C "systemctl restart httpd"New signing request "20190604065735" added.
In the command above:
Red Hat Enterprise Linux 9 Managing certificates in IdM
108
The ipa-getcert request command specifies that the certificate is to be obtained fromthe IdM CA. The ipa-getcert request command is a shortcut for getcert request -c IPA.
The -g option specifies the size of key to be generated if one is not already in place.
The -D option specifies the SubjectAltName DNS value to be added to the request.
The -C option instructs certmonger to restart the httpd service after obtaining thecertificate.
To specify that the certificate be issued with a particular profile, use the -T option.
To request a certificate using the named issuer from the specified CA, use the -X ISSUER option.
2. Optionally, to check the status of your request:
# ipa-getcert list -f /etc/pki/tls/certs/httpd.pemNumber of certificates and requests being tracked: 3.Request ID '20190604065735': status: MONITORING stuck: no key pair storage: type=FILE,location='/etc/pki/tls/private/httpd.key' certificate: type=FILE,location='/etc/pki/tls/certs/httpd.crt' CA: IPA[...]
The output shows that the request is in the MONITORING status, which means that a certificatehas been obtained. The locations of the key pair and the certificate are those requested.
15.3. COMMUNICATION FLOW FOR CERTMONGER REQUESTING ASERVICE CERTIFICATE
The diagrams in this section show the stages of what happens when certmonger requests a servicecertificate from Identity Management (IdM) certificate authority (CA) server. The sequence consists ofthese diagrams:
Unencrypted communication
Certmonger requesting a service certificate
IdM CA issuing the service certificate
Certmonger applying the service certificate
Certmonger requesting a new certificate when the old one is nearing expiration
Unencrypted communication shows the initial situation: without an HTTPS certificate, thecommunication between the web server and the browser is unencrypted.
Figure 15.1. Unencrypted communication
CHAPTER 15. OBTAINING AN IDM CERTIFICATE FOR A SERVICE USING CERTMONGER
109
Figure 15.1. Unencrypted communication
Certmonger requesting a service certificate shows the system administrator using certmonger tomanually request an HTTPS certificate for the Apache web server. Note that when requesting a webserver certificate, certmonger does not communicate directly with the CA. It proxies through IdM.
Figure 15.2. Certmonger requesting a service certificate
IdM CA issuing the service certificate shows an IdM CA issuing an HTTPS certificate for the web server.
Figure 15.3. IdM CA issuing the service certificate
Red Hat Enterprise Linux 9 Managing certificates in IdM
110
Figure 15.3. IdM CA issuing the service certificate
Certmonger applying the service certificate shows certmonger placing the HTTPS certificate inappropriate locations on the IdM client and, if instructed to do so, restarting the httpd service. TheApache server subsequently uses the HTTPS certificate to encrypt the traffic between itself and thebrowser.
Figure 15.4. Certmonger applying the service certificate
Certmonger requesting a new certificate when the old one is nearing expiration shows certmonger
CHAPTER 15. OBTAINING AN IDM CERTIFICATE FOR A SERVICE USING CERTMONGER
111
Certmonger requesting a new certificate when the old one is nearing expiration shows certmongerautomatically requesting a renewal of the service certificate from the IdM CA before the expiration ofthe certificate. The IdM CA issues a new certificate.
Figure 15.5. Certmonger requesting a new certificate when the old one is nearing expiration
15.4. VIEWING THE DETAILS OF A CERTIFICATE REQUEST TRACKEDBY CERTMONGER
The certmonger service monitors certificate requests. When a request for a certificate is successfullysigned, it results in a certificate. Certmonger manages certificate requests including the resultingcertificates. This section describes how to view the details of a particular certificate request managed bycertmonger.
Procedure
If you know how to specify the certificate request, list the details of only that particularcertificate request. You can, for example, specify:
The request ID
The location of the certificate
The certificate nicknameFor example, to view the details of the certificate whose request ID is 20190408143846,using the -v option to view all the details of errors in case your request for a certificate wasunsuccessful:
# getcert list -i 20190408143846 -vNumber of certificates and requests being tracked: 16.
Red Hat Enterprise Linux 9 Managing certificates in IdM
112
Request ID '20190408143846': status: MONITORING stuck: no key pair storage: type=NSSDB,location='/etc/dirsrv/slapd-IDM-EXAMPLE-COM',nickname='Server-Cert',token='NSS Certificate DB',pinfile='/etc/dirsrv/slapd-IDM-EXAMPLE-COM/pwdfile.txt' certificate: type=NSSDB,location='/etc/dirsrv/slapd-IDM-EXAMPLE-COM',nickname='Server-Cert',token='NSS Certificate DB' CA: IPA issuer: CN=Certificate Authority,O=IDM.EXAMPLE.COM subject: CN=r8server.idm.example.com,O=IDM.EXAMPLE.COM expires: 2021-04-08 16:38:47 CEST dns: r8server.idm.example.com principal name: ldap/[email protected] key usage: digitalSignature,nonRepudiation,keyEncipherment,dataEncipherment eku: id-kp-serverAuth,id-kp-clientAuth pre-save command: post-save command: /usr/libexec/ipa/certmonger/restart_dirsrv IDM-EXAMPLE-COM track: yes auto-renew: yes
The output displays several pieces of information about the certificate, for example:
the certificate location; in the example above, it is the NSS database in the /etc/dirsrv/slapd-IDM-EXAMPLE-COM directory
the certificate nickname; in the example above, it is Server-Cert
the file storing the pin; in the example above, it is /etc/dirsrv/slapd-IDM-EXAMPLE-COM/pwdfile.txt
the Certificate Authority (CA) that will be used to renew the certificate; in the exampleabove, it is the IPA CA
the expiration date; in the example above, it is 2021-04-08 16:38:47 CEST
the status of the certificate; in the example above, the MONITORING status means that thecertificate is valid and it is being tracked
the post-save command; in the example above, it is the restart of the LDAP service
If you do not know how to specify the certificate request, list the details of all the certificatesthat certmonger is monitoring or attempting to obtain:
# getcert list
Additional resources
See the getcert list man page.
15.5. STARTING AND STOPPING CERTIFICATE TRACKING
This section describes how you can use the getcert stop-tracking and getcert start-trackingcommands to monitor certificates. The two commands are provided by the certmonger service.Enabling certificate tracking is especially useful if you have imported a certificate issued by the Identity
CHAPTER 15. OBTAINING AN IDM CERTIFICATE FOR A SERVICE USING CERTMONGER
113

Management (IdM) certificate authority (CA) onto the machine from a different IdM client. Enablingcertificate tracking can also be the final step of the following provisioning scenario:
1. On the IdM server, you create a certificate for a system that does not exist yet.
2. You create the new system.
3. You enroll the new system as an IdM client.
4. You import the certificate and the key from the IdM server on to the IdM client.
5. You start tracking the certificate using certmonger to ensure that it gets renewed when it is dueto expire.
Procedure
To disable the monitoring of a certificate with the Request ID of 20190408143846:
# getcert stop-tracking -i 20190408143846
For more options, see the getcert stop-tracking man page.
To enable the monitoring of a certificate stored in the /tmp/some_cert.crt file, whose privatekey is stored in the /tmp/some_key.key file:
# getcert start-tracking -c IPA -f /tmp/some_cert.crt -k /tmp/some_key.key
Certmonger cannot automatically identify the CA type that issued the certificate. For thisreason, add the -c option with the IPA value to the getcert start-tracking command if thecertificate was issued by the IdM CA. Omitting to add the -c option results in certmongerentering the NEED_CA state.
For more options, see the getcert start-tracking man page.
NOTE
The two commands do not manipulate the certificate. For example, getcert stop-tracking does not delete the certificate or remove it from the NSS database or from thefilesystem but simply removes the certificate from the list of monitored certificates.Similarly, getcert start-tracking only adds a certificate to the list of monitoredcertificates.
15.6. RENEWING A CERTIFICATE MANUALLY
When a certificate is near its expiration date, the certmonger daemon automatically issues a renewalcommand using the certificate authority (CA) helper, obtains a renewed certificate and replaces theprevious certificate with the new one.
It is also possible to manually renew a certificate in advance by using the getcert resubmit command.This way, you can update the information the certificate contains, e.g. by adding a Subject AlternativeName (SAN).
This section describes how to renew a certificate manually.
Procedure
Red Hat Enterprise Linux 9 Managing certificates in IdM
114
To renew a certificate with the Request ID of 20190408143846:
# getcert resubmit -i 20190408143846
To obtain the Request ID for a specific certificate, use the getcert list command. For details,see the getcert list man page.
15.7. MAKING CERTMONGER RESUME TRACKING OF IDMCERTIFICATES ON A CA REPLICA
This procedure shows how to make certmonger resume the tracking of Identity Management (IdM)system certificates that are crucial for an IdM deployment with an integrated certificate authority afterthe tracking of certificates was interrupted. The interruption may have been caused by the IdM hostbeing unenrolled from IdM during the renewal of the system certificates or by replication topology notworking properly. The procedure also shows how to make certmonger resume the tracking of the IdMservice certificates, namely the HTTP, LDAP and PKINIT certificates.
Prerequisites
The host on which you want to resume tracking system certificates is an IdM server that is alsoan IdM certificate authority (CA) but not the IdM CA renewal server.
Procedure
1. Get the PIN for the subsystem CA certificates:
# grep 'internal=' /var/lib/pki/pki-tomcat/conf/password.conf
2. Add tracking to the subsystem CA certificates, replacing [internal PIN] in the commands belowwith the PIN obtained in the previous step:
# getcert start-tracking -d /etc/pki/pki-tomcat/alias -n "caSigningCert cert-pki-ca" -c 'dogtag-ipa-ca-renew-agent' -P [internal PIN] -B /usr/libexec/ipa/certmonger/stop_pkicad -C '/usr/libexec/ipa/certmonger/renew_ca_cert -T caCACert "caSigningCert cert-pki-ca"'
# getcert start-tracking -d /etc/pki/pki-tomcat/alias -n "auditSigningCert cert-pki-ca" -c 'dogtag-ipa-ca-renew-agent' -P [internal PIN] -B /usr/libexec/ipa/certmonger/stop_pkicad -C '/usr/libexec/ipa/certmonger/renew_ca_cert -T caSignedLogCert "auditSigningCert cert-pki-ca"'
# getcert start-tracking -d /etc/pki/pki-tomcat/alias -n "ocspSigningCert cert-pki-ca" -c 'dogtag-ipa-ca-renew-agent' -P [internal PIN] -B /usr/libexec/ipa/certmonger/stop_pkicad -C '/usr/libexec/ipa/certmonger/renew_ca_cert -T caOCSPCert "ocspSigningCert cert-pki-ca"'
# getcert start-tracking -d /etc/pki/pki-tomcat/alias -n "subsystemCert cert-pki-ca" -c 'dogtag-ipa-ca-renew-agent' -P [internal PIN] -B /usr/libexec/ipa/certmonger/stop_pkicad -C '/usr/libexec/ipa/certmonger/renew_ca_cert -T caSubsystemCert "subsystemCert cert-pki-ca"'
# getcert start-tracking -d /etc/pki/pki-tomcat/alias -n "Server-Cert cert-pki-ca" -c
CHAPTER 15. OBTAINING AN IDM CERTIFICATE FOR A SERVICE USING CERTMONGER
115
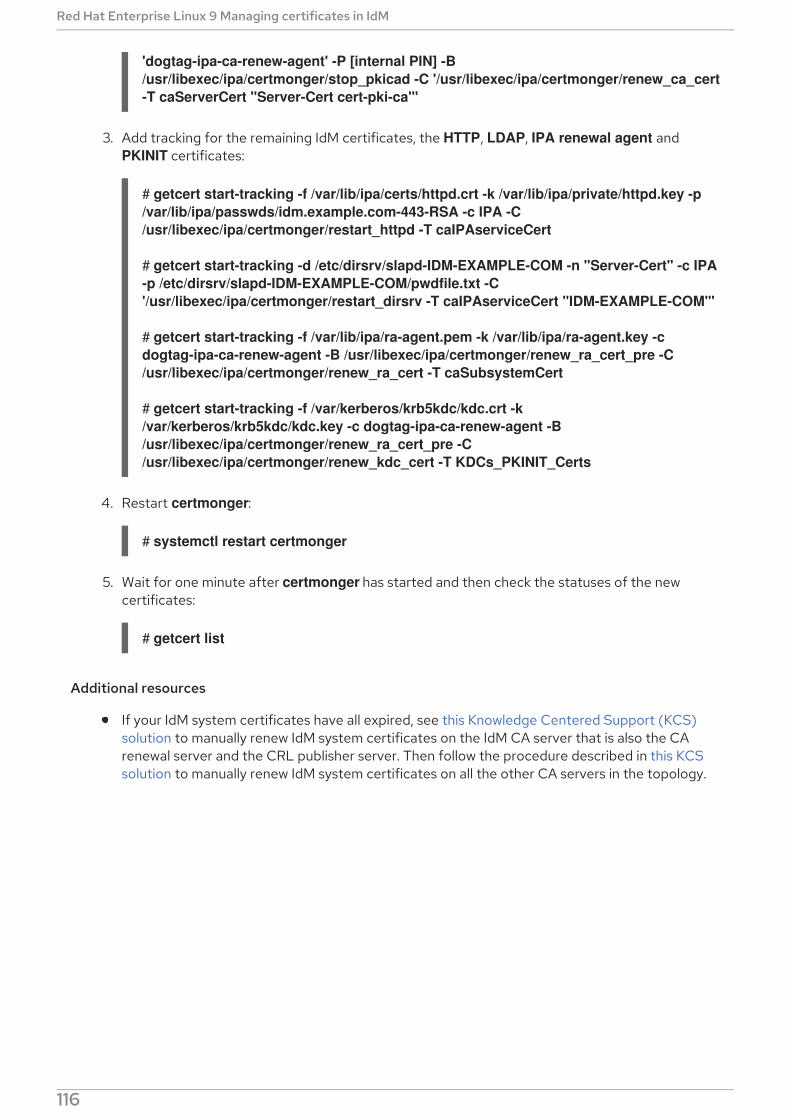
'dogtag-ipa-ca-renew-agent' -P [internal PIN] -B /usr/libexec/ipa/certmonger/stop_pkicad -C '/usr/libexec/ipa/certmonger/renew_ca_cert -T caServerCert "Server-Cert cert-pki-ca"'
3. Add tracking for the remaining IdM certificates, the HTTP, LDAP, IPA renewal agent and PKINIT certificates:
# getcert start-tracking -f /var/lib/ipa/certs/httpd.crt -k /var/lib/ipa/private/httpd.key -p /var/lib/ipa/passwds/idm.example.com-443-RSA -c IPA -C /usr/libexec/ipa/certmonger/restart_httpd -T caIPAserviceCert
# getcert start-tracking -d /etc/dirsrv/slapd-IDM-EXAMPLE-COM -n "Server-Cert" -c IPA -p /etc/dirsrv/slapd-IDM-EXAMPLE-COM/pwdfile.txt -C '/usr/libexec/ipa/certmonger/restart_dirsrv -T caIPAserviceCert "IDM-EXAMPLE-COM"'
# getcert start-tracking -f /var/lib/ipa/ra-agent.pem -k /var/lib/ipa/ra-agent.key -c dogtag-ipa-ca-renew-agent -B /usr/libexec/ipa/certmonger/renew_ra_cert_pre -C /usr/libexec/ipa/certmonger/renew_ra_cert -T caSubsystemCert
# getcert start-tracking -f /var/kerberos/krb5kdc/kdc.crt -k /var/kerberos/krb5kdc/kdc.key -c dogtag-ipa-ca-renew-agent -B /usr/libexec/ipa/certmonger/renew_ra_cert_pre -C /usr/libexec/ipa/certmonger/renew_kdc_cert -T KDCs_PKINIT_Certs
4. Restart certmonger:
# systemctl restart certmonger
5. Wait for one minute after certmonger has started and then check the statuses of the newcertificates:
# getcert list
Additional resources
If your IdM system certificates have all expired, see this Knowledge Centered Support (KCS)solution to manually renew IdM system certificates on the IdM CA server that is also the CArenewal server and the CRL publisher server. Then follow the procedure described in this KCSsolution to manually renew IdM system certificates on all the other CA servers in the topology.
Red Hat Enterprise Linux 9 Managing certificates in IdM
116
CHAPTER 16. REQUESTING CERTIFICATES USINGRHEL SYSTEM ROLES
You can use the Certificate Issuance and Renewal System Role to issue and manage certificates.
This chapter covers the following topics:
The Certificate System Role
Requesting a new self-signed certificate using the Certificate System Role
Requesting a new certificate from IdM CA using the Certificate System Role
16.1. THE CERTIFICATE ISSUANCE AND RENEWAL SYSTEM ROLE
Using the Certificate Issuance and Renewal System Role, you can manage issuing and renewing TLS andSSL certificates using Ansible Core.
The role uses certmonger as the certificate provider, and currently supports issuing and renewing self-signed certificates and using the IdM integrated certificate authority (CA).
You can use the following variables in your Ansible playbook with the Certificate Issuance and RenewalSystem Role:
certificate_wait
to specify if the task should wait for the certificate to be issued.
certificate_requests
to represent each certificate to be issued and its parameters.
Additional resources
See the /usr/share/ansible/roles/rhel-system-roles.certificate/README.md file.
See Getting started with RHEL System Roles .
16.2. REQUESTING A NEW SELF-SIGNED CERTIFICATE USING THECERTIFICATE ISSUANCE AND RENEWAL SYSTEM ROLE
With the Certificate Issuance and Renewal System Role, you can use Ansible Core to issue self-signedcertificates.
This process uses the certmonger provider and requests the certificate through the getcert command.
NOTE
By default, certmonger automatically tries to renew the certificate before it expires. Youcan disable this by setting the auto_renew parameter in the Ansible playbook to no.
Prerequisites
The Ansible Core package is installed on the control machine.
You have the rhel-system-roles package installed on the system from which you want to run
CHAPTER 16. REQUESTING CERTIFICATES USING RHEL SYSTEM ROLES
117
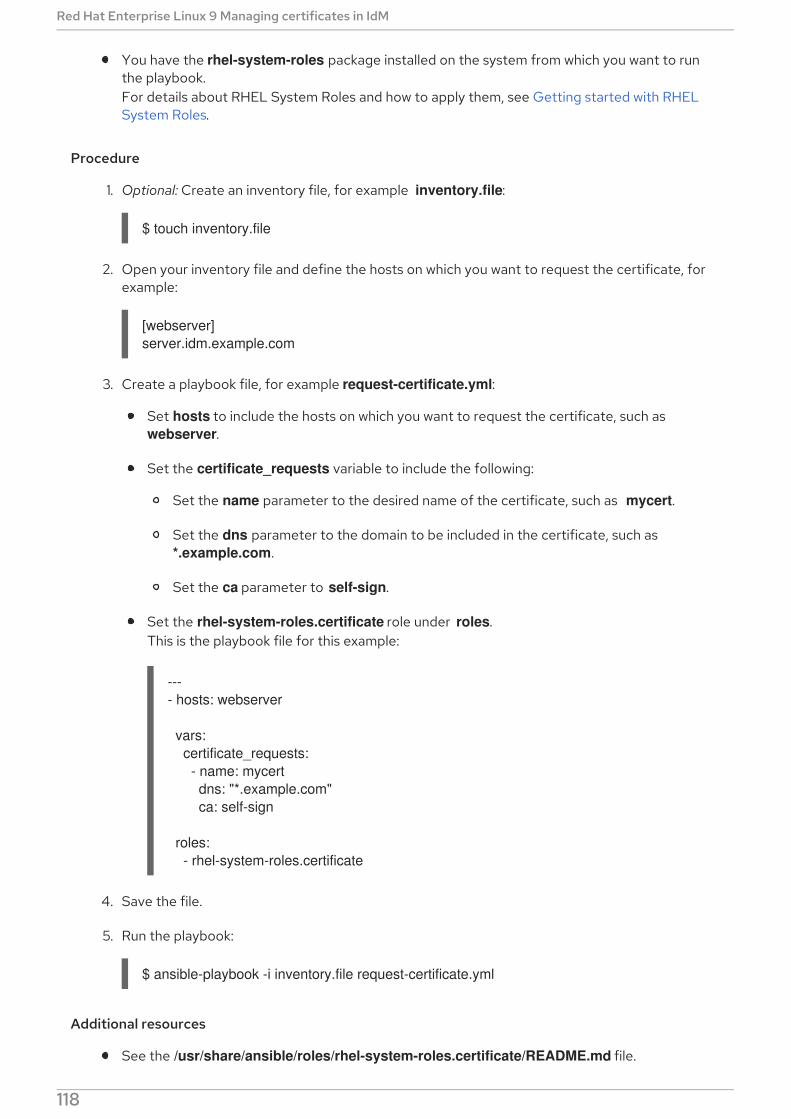
You have the rhel-system-roles package installed on the system from which you want to runthe playbook.For details about RHEL System Roles and how to apply them, see Getting started with RHELSystem Roles.
Procedure
1. Optional: Create an inventory file, for example inventory.file:
$ touch inventory.file
2. Open your inventory file and define the hosts on which you want to request the certificate, forexample:
[webserver]server.idm.example.com
3. Create a playbook file, for example request-certificate.yml:
Set hosts to include the hosts on which you want to request the certificate, such as webserver.
Set the certificate_requests variable to include the following:
Set the name parameter to the desired name of the certificate, such as mycert.
Set the dns parameter to the domain to be included in the certificate, such as *.example.com.
Set the ca parameter to self-sign.
Set the rhel-system-roles.certificate role under roles.This is the playbook file for this example:
---- hosts: webserver
vars: certificate_requests: - name: mycert dns: "*.example.com" ca: self-sign
roles: - rhel-system-roles.certificate
4. Save the file.
5. Run the playbook:
$ ansible-playbook -i inventory.file request-certificate.yml
Additional resources
See the /usr/share/ansible/roles/rhel-system-roles.certificate/README.md file.
Red Hat Enterprise Linux 9 Managing certificates in IdM
118
See the ansible-playbook(1) man page.
16.3. REQUESTING A NEW CERTIFICATE FROM IDM CA USING THECERTIFICATE ISSUANCE AND RENEWAL SYSTEM ROLE
With the Certificate Issuance and Renewal System Role, you can use anible-core to issue certificateswhile using an IdM server with an integrated certificate authority (CA). Therefore, you can efficiently andconsistently manage the certificate trust chain for multiple systems when using IdM as the CA.
This process uses the certmonger provider and requests the certificate through the getcert command.
NOTE
By default, certmonger automatically tries to renew the certificate before it expires. Youcan disable this by setting the auto_renew parameter in the Ansible playbook to no.
Prerequisites
The Ansible Core package is installed on the control machine.
You have the rhel-system-roles package installed on the system from which you want to runthe playbook.For details about RHEL System Roles and how to apply them, see Getting started with RHELSystem Roles.
Procedure
1. Optional: Create an inventory file, for example inventory.file:
$ touch inventory.file
2. Open your inventory file and define the hosts on which you want to request the certificate, forexample:
[webserver]server.idm.example.com
3. Create a playbook file, for example request-certificate.yml:
Set hosts to include the hosts on which you want to request the certificate, such as webserver.
Set the certificate_requests variable to include the following:
Set the name parameter to the desired name of the certificate, such as mycert.
Set the dns parameter to the domain to be included in the certificate, such as www.example.com.
Set the principal parameter to specify the Kerberos principal, such as HTTP/[email protected].
Set the ca parameter to ipa.
CHAPTER 16. REQUESTING CERTIFICATES USING RHEL SYSTEM ROLES
119
Set the rhel-system-roles.certificate role under roles.This is the playbook file for this example:
---- hosts: webserver vars: certificate_requests: - name: mycert dns: www.example.com principal: HTTP/[email protected] ca: ipa
roles: - rhel-system-roles.certificate
4. Save the file.
5. Run the playbook:
$ ansible-playbook -i inventory.file request-certificate.yml
Additional resources
See the /usr/share/ansible/roles/rhel-system-roles.certificate/README.md file.
See the ansible-playbook(1) man page.
16.4. SPECIFYING COMMANDS TO RUN BEFORE OR AFTERCERTIFICATE ISSUANCE USING THE CERTIFICATE ISSUANCE ANDRENEWAL SYSTEM ROLE
With the Certificate System Issuance and Renewal Role, you can use Ansible Core to execute acommand before and after a certificate is issued or renewed.
In the following example, the administrator ensures stopping the httpd service before a self-signedcertificate for www.example.com is issued or renewed, and restarting it afterwards.
NOTE
By default, certmonger automatically tries to renew the certificate before it expires. Youcan disable this by setting the auto_renew parameter in the Ansible playbook to no.
Prerequisites
The Ansible Core package is installed on the control machine.
You have the rhel-system-roles package installed on the system from which you want to runthe playbook.For details about RHEL System Roles and how to apply them, see Getting started with RHELSystem Roles.
Procedure
Red Hat Enterprise Linux 9 Managing certificates in IdM
120
1. Optional: Create an inventory file, for example inventory.file:
$ touch inventory.file
2. Open your inventory file and define the hosts on which you want to request the certificate, forexample:
[webserver]server.idm.example.com
3. Create a playbook file, for example request-certificate.yml:
Set hosts to include the hosts on which you want to request the certificate, such as webserver.
Set the certificate_requests variable to include the following:
Set the name parameter to the desired name of the certificate, such as mycert.
Set the dns parameter to the domain to be included in the certificate, such as www.example.com.
Set the ca parameter to the CA you want to use to issue the certificate, such as self-sign.
Set the run_before parameter to the command you want to execute before thiscertificate is issued or renewed, such as systemctl stop httpd.service.
Set the run_after parameter to the command you want to execute after this certificateis issued or renewed, such as systemctl start httpd.service.
Set the rhel-system-roles.certificate role under roles.This is the playbook file for this example:
---- hosts: webserver vars: certificate_requests: - name: mycert dns: www.example.com ca: self-sign run_before: systemctl stop httpd.service run_after: systemctl start httpd.service
roles: - rhel-system-roles.certificate
4. Save the file.
5. Run the playbook:
$ ansible-playbook -i inventory.file request-certificate.yml
Additional resources
CHAPTER 16. REQUESTING CERTIFICATES USING RHEL SYSTEM ROLES
121
See the /usr/share/ansible/roles/rhel-system-roles.certificate/README.md file.
See the ansible-playbook(1) man page.
Red Hat Enterprise Linux 9 Managing certificates in IdM
122
CHAPTER 17. RESTRICTING AN APPLICATION TO TRUSTONLY A SUBSET OF CERTIFICATES
If your Identity Management (IdM) installation is configured with the integrated Certificate System (CS)certificate authority (CA), you are able to create lightweight sub-CAs. All sub-CAs you create aresubordinated to the primary CA of the certificate system, the ipa CA.
A lightweight sub-CA in this context means a sub-CA issuing certificates for a specific purpose . Forexample, a lightweight sub-CA enables you to configure a service, such as a virtual private network(VPN) gateway and a web browser, to accept only certificates issued by sub-CA A. By configuring otherservices to accept certificates only issued by sub-CA B, you prevent them from accepting certificatesissued by sub-CA A, the primary CA, that is the ipa CA, and any intermediate sub-CA between the two.
If you revoke the intermediate certificate of a sub-CA, all certificates issued by this sub-CA areautomatically considered invalid by correctly configured clients. All the other certificates issued directlyby the root CA, ipa, or another sub-CA, remain valid.
This section uses the example of the Apache web server to illustrate how to restrict an application totrust only a subset of certificates. Complete this section to restrict the web server running on your IdMclient to use a certificate issued by the webserver-ca IdM sub-CA, and to require the users toauthenticate to the web server using user certificates issued by the webclient-ca IdM sub-CA.
The steps you need to take are:
1. Create an IdM sub-CA
2. Download the sub-CA certificate from IdM WebUI
3. Create a CA ACL specifying the correct combination of users, services and CAs, and thecertificate profile used
4. Request a certificate for the web service running on an IdM client from the IdM sub-CA
5. Set up a single-instance Apache HTTP Server
6. Add TLS encryption to the Apache HTTP Server
7. Set the supported TLS protocol versions on an Apache HTTP Server
8. Set the supported ciphers on the Apache HTTP Server
9. Configure TLS client certificate authentication on the web server
10. Request a certificate for the user from the IdM sub-CA and export it to the client
11. Import the user certificate into the browser and configure the browser to trust the sub-CAcertificate
17.1. MANAGING LIGHTWEIGHT SUB-CAS
This section describes how to manage lightweight subordinate certificate authorities (sub-CAs). All sub-CAs you create are subordinated to the primary CA of the certificate system, the ipa CA. You can alsodisable and delete sub-CAs.
NOTE
CHAPTER 17. RESTRICTING AN APPLICATION TO TRUST ONLY A SUBSET OF CERTIFICATES
123
NOTE
If you delete a sub-CA, revocation checking for that sub-CA will no longer work.Only delete a sub-CA when there are no more certificates that were issued bythat sub-CA whose notAfter expiration time is in the future.
You should only disable sub-CAs while there are still non-expired certificates thatwere issued by that sub-CA. If all certificates that were issued by a sub-CA haveexpired, you can delete that sub-CA.
You cannot disable or delete the IdM CA.
For details on managing sub-CAs, see:
Creating a sub-CA from the IdM WebUI
Deleting a sub-CA from the IdM WebUI
Creating a sub-CA from the IdM CLI
Disabling a sub-CA from the IdM CLI
Deleting a sub-CA from the IdM CLI
17.1.1. Creating a sub-CA from the IdM WebUI
This procedure describes how to use the IdM WebUI to create new sub-CAs named webserver-ca andwebclient-ca.
Prerequisites
Make sure you have obtained the administrator’s credentials.
Procedure
1. In the Authentication menu, click Certificates.
2. Select Certificate Authorities and click Add.
3. Enter the name of the webserver-ca sub-CA. Enter the Subject DN, for exampleCN=WEBSERVER,O=IDM.EXAMPLE.COM, in the Subject DN field. Note that the Subject DNmust be unique in the IdM CA infrastructure.
4. Enter the name of the webclient-ca sub-CA. Enter the Subject DNCN=WEBCLIENT,O=IDM.EXAMPLE.COM in the Subject DN field.
5. In the command-line interface, run the ipa-certupdate command to create a certmongertracking request for the webserver-ca and webclient-ca sub-CA certificates:
[root@ipaserver ~]# ipa-certupdate
IMPORTANT
Red Hat Enterprise Linux 9 Managing certificates in IdM
124

IMPORTANT
Forgetting to run the ipa-certupdate command after creating a sub-CA meansthat if the sub-CA certificate expires, end-entity certificates issued by the sub-CA are considered invalid even if the end-entity certificate has not expired.
Verification
Verify that the signing certificate of the new sub-CA has been added to the IdM database:
[root@ipaserver ~]# certutil -d /etc/pki/pki-tomcat/alias/ -L
Certificate Nickname Trust Attributes SSL,S/MIME,JAR/XPI
caSigningCert cert-pki-ca CTu,Cu,CuServer-Cert cert-pki-ca u,u,uauditSigningCert cert-pki-ca u,u,PucaSigningCert cert-pki-ca ba83f324-5e50-4114-b109-acca05d6f1dc u,u,uocspSigningCert cert-pki-ca u,u,usubsystemCert cert-pki-ca u,u,u
NOTE
The new sub-CA certificate is automatically transferred to all the replicas thathave a certificate system instance installed.
17.1.2. Deleting a sub-CA from the IdM WebUI
This procedure describes how to delete lightweight sub-CAs in the IdM WebUI.
NOTE
If you delete a sub-CA, revocation checking for that sub-CA will no longer work.Only delete a sub-CA when there are no more certificates that were issued bythat sub-CA whose notAfter expiration time is in the future.
You should only disable sub-CAs while there are still non-expired certificates thatwere issued by that sub-CA. If all certificates that were issued by a sub-CA haveexpired, you can delete that sub-CA.
You cannot disable or delete the IdM CA.
Prerequisites
Make sure you have obtained the administrator’s credentials.
You have disabled the sub-CA in the IdM CLI. See Disabling a sub-CA from the IdM CLI
Procedure
1. In the IdM WebUI, open the Authentication tab, and select the Certificates subtab.
2. Select Certificate Authorities.
CHAPTER 17. RESTRICTING AN APPLICATION TO TRUST ONLY A SUBSET OF CERTIFICATES
125
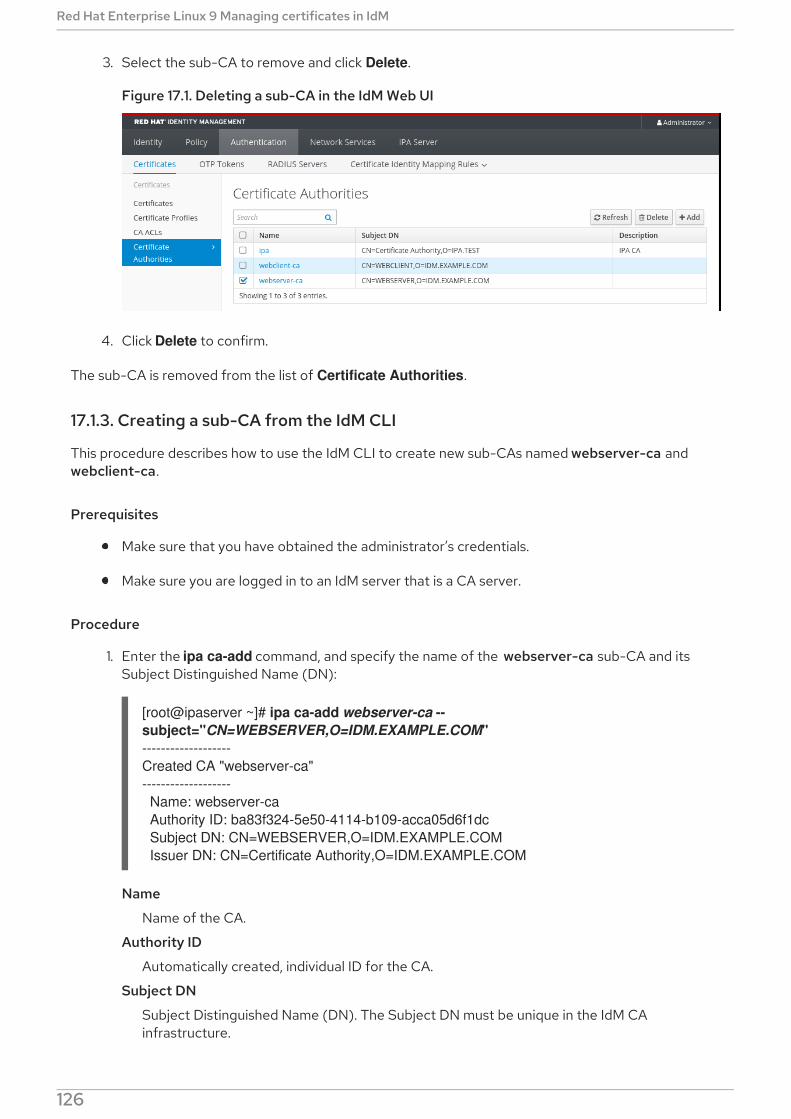
3. Select the sub-CA to remove and click Delete.
Figure 17.1. Deleting a sub-CA in the IdM Web UI
4. Click Delete to confirm.
The sub-CA is removed from the list of Certificate Authorities.
17.1.3. Creating a sub-CA from the IdM CLI
This procedure describes how to use the IdM CLI to create new sub-CAs named webserver-ca andwebclient-ca.
Prerequisites
Make sure that you have obtained the administrator’s credentials.
Make sure you are logged in to an IdM server that is a CA server.
Procedure
1. Enter the ipa ca-add command, and specify the name of the webserver-ca sub-CA and itsSubject Distinguished Name (DN):
[root@ipaserver ~]# ipa ca-add webserver-ca --subject="CN=WEBSERVER,O=IDM.EXAMPLE.COM"-------------------Created CA "webserver-ca"------------------- Name: webserver-ca Authority ID: ba83f324-5e50-4114-b109-acca05d6f1dc Subject DN: CN=WEBSERVER,O=IDM.EXAMPLE.COM Issuer DN: CN=Certificate Authority,O=IDM.EXAMPLE.COM
Name
Name of the CA.
Authority ID
Automatically created, individual ID for the CA.
Subject DN
Subject Distinguished Name (DN). The Subject DN must be unique in the IdM CAinfrastructure.
Red Hat Enterprise Linux 9 Managing certificates in IdM
126
Issuer DN
Parent CA that issued the sub-CA certificate. All sub-CAs are created as a child of the IdMroot CA.
2. Create the webclient-ca sub-CA for issuing certificates to web clients:
[root@ipaserver ~]# ipa ca-add webclient-ca --subject="CN=WEBCLIENT,O=IDM.EXAMPLE.COM"-------------------Created CA "webclient-ca"------------------- Name: webclient-ca Authority ID: 8a479f3a-0454-4a4d-8ade-fd3b5a54ab2e Subject DN: CN=WEBCLIENT,O=IDM.EXAMPLE.COM Issuer DN: CN=Certificate Authority,O=IDM.EXAMPLE.COM
3. Run the ipa-certupdate command to create a certmonger tracking request for thewebserver-ca and webclient-ca sub-CAs certificates:
[root@ipaserver ~]# ipa-certupdate
IMPORTANT
If you forget to run the ipa-certupdate command after creating a sub-CA andthe sub-CA certificate expires, end-entity certificates issued by that sub-CA areconsidered invalid even though the end-entity certificate has not expired.
Verification steps
Verify that the signing certificate of the new sub-CA has been added to the IdM database:
[root@ipaserver ~]# certutil -d /etc/pki/pki-tomcat/alias/ -L
Certificate Nickname Trust Attributes SSL,S/MIME,JAR/XPI
caSigningCert cert-pki-ca CTu,Cu,CuServer-Cert cert-pki-ca u,u,uauditSigningCert cert-pki-ca u,u,PucaSigningCert cert-pki-ca ba83f324-5e50-4114-b109-acca05d6f1dc u,u,uocspSigningCert cert-pki-ca u,u,usubsystemCert cert-pki-ca u,u,u
NOTE
The new sub-CA certificate is automatically transferred to all the replicas thathave a certificate system instance installed.
17.1.4. Disabling a sub-CA from the IdM CLI
This procedure describes how to disable a sub-CA from the IdM CLI. If there are still non-expiredcertificates that were issued by a sub-CA, you should not delete it but you can disable it. If you deletethe sub-CA, revocation checking for that sub-CA will no longer work.
CHAPTER 17. RESTRICTING AN APPLICATION TO TRUST ONLY A SUBSET OF CERTIFICATES
127
Prerequisites
Make sure you have obtained the administrator’s credentials.
Procedure
1. Run the ipa ca-find command to determine the name of the sub-CA you are deleting:
[root@ipaserver ~]# ipa ca-find-------------3 CAs matched------------- Name: ipa Description: IPA CA Authority ID: 5195deaf-3b61-4aab-b608-317aff38497c Subject DN: CN=Certificate Authority,O=IPA.TEST Issuer DN: CN=Certificate Authority,O=IPA.TEST
Name: webclient-ca Authority ID: 605a472c-9c6e-425e-b959-f1955209b092 Subject DN: CN=WEBCLIENT,O=IDM.EXAMPLE.COM Issuer DN: CN=Certificate Authority,O=IPA.TEST
Name: webserver-ca Authority ID: 02d537f9-c178-4433-98ea-53aa92126fc3 Subject DN: CN=WEBSERVER,O=IDM.EXAMPLE.COM Issuer DN: CN=Certificate Authority,O=IPA.TEST----------------------------Number of entries returned 3----------------------------
2. Run the ipa ca-disable command to disable your sub-CA, in this example, the webserver-ca:
ipa ca-disable webserver-ca--------------------------Disabled CA "webserver-ca"--------------------------
17.1.5. Deleting a sub-CA from the IdM CLI
This procedure describes how to delete lightweight sub-CAs from the IdM CLI.
NOTE
If you delete a sub-CA, revocation checking for that sub-CA will no longer work.Only delete a sub-CA when there are no more certificates that were issued bythat sub-CA whose notAfter expiration time is in the future.
You should only disable sub-CAs while there are still non-expired certificates thatwere issued by that sub-CA. If all certificates that were issued by a sub-CA haveexpired, you can delete that sub-CA.
You cannot disable or delete the IdM CA.
Red Hat Enterprise Linux 9 Managing certificates in IdM
128
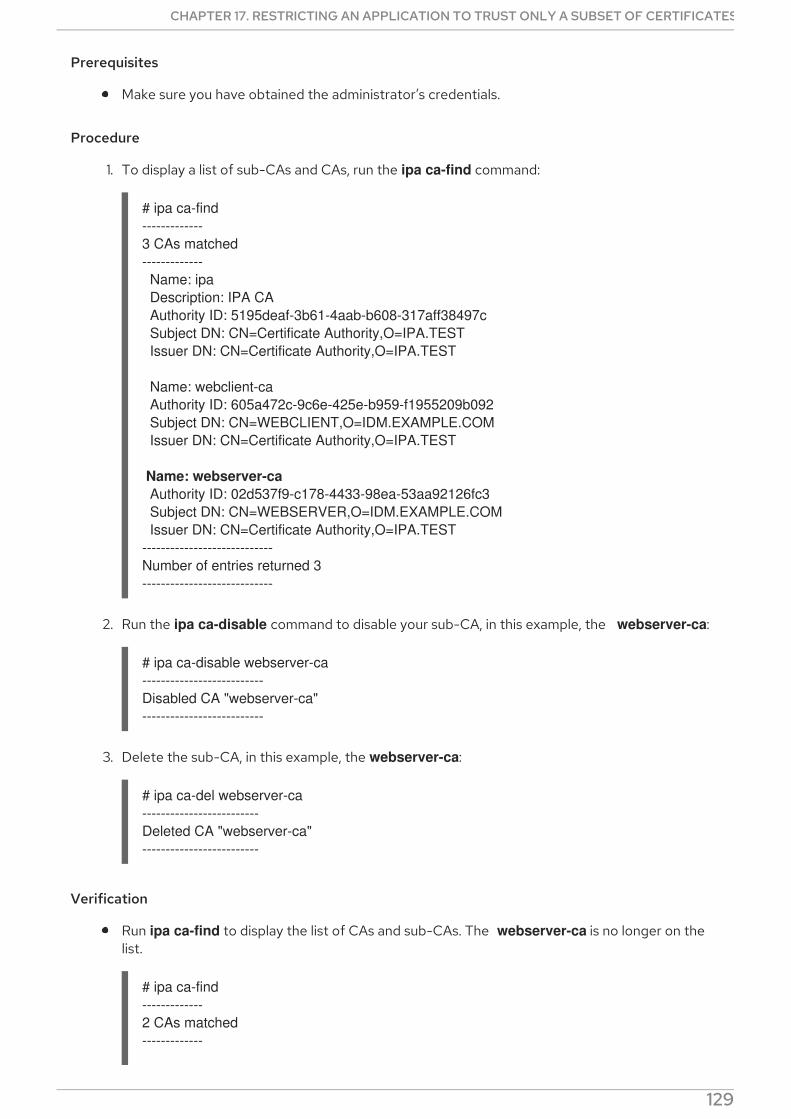
Prerequisites
Make sure you have obtained the administrator’s credentials.
Procedure
1. To display a list of sub-CAs and CAs, run the ipa ca-find command:
# ipa ca-find-------------3 CAs matched------------- Name: ipa Description: IPA CA Authority ID: 5195deaf-3b61-4aab-b608-317aff38497c Subject DN: CN=Certificate Authority,O=IPA.TEST Issuer DN: CN=Certificate Authority,O=IPA.TEST
Name: webclient-ca Authority ID: 605a472c-9c6e-425e-b959-f1955209b092 Subject DN: CN=WEBCLIENT,O=IDM.EXAMPLE.COM Issuer DN: CN=Certificate Authority,O=IPA.TEST
Name: webserver-ca Authority ID: 02d537f9-c178-4433-98ea-53aa92126fc3 Subject DN: CN=WEBSERVER,O=IDM.EXAMPLE.COM Issuer DN: CN=Certificate Authority,O=IPA.TEST----------------------------Number of entries returned 3----------------------------
2. Run the ipa ca-disable command to disable your sub-CA, in this example, the webserver-ca:
# ipa ca-disable webserver-ca--------------------------Disabled CA "webserver-ca"--------------------------
3. Delete the sub-CA, in this example, the webserver-ca:
# ipa ca-del webserver-ca-------------------------Deleted CA "webserver-ca"-------------------------
Verification
Run ipa ca-find to display the list of CAs and sub-CAs. The webserver-ca is no longer on thelist.
# ipa ca-find-------------2 CAs matched-------------
CHAPTER 17. RESTRICTING AN APPLICATION TO TRUST ONLY A SUBSET OF CERTIFICATES
129
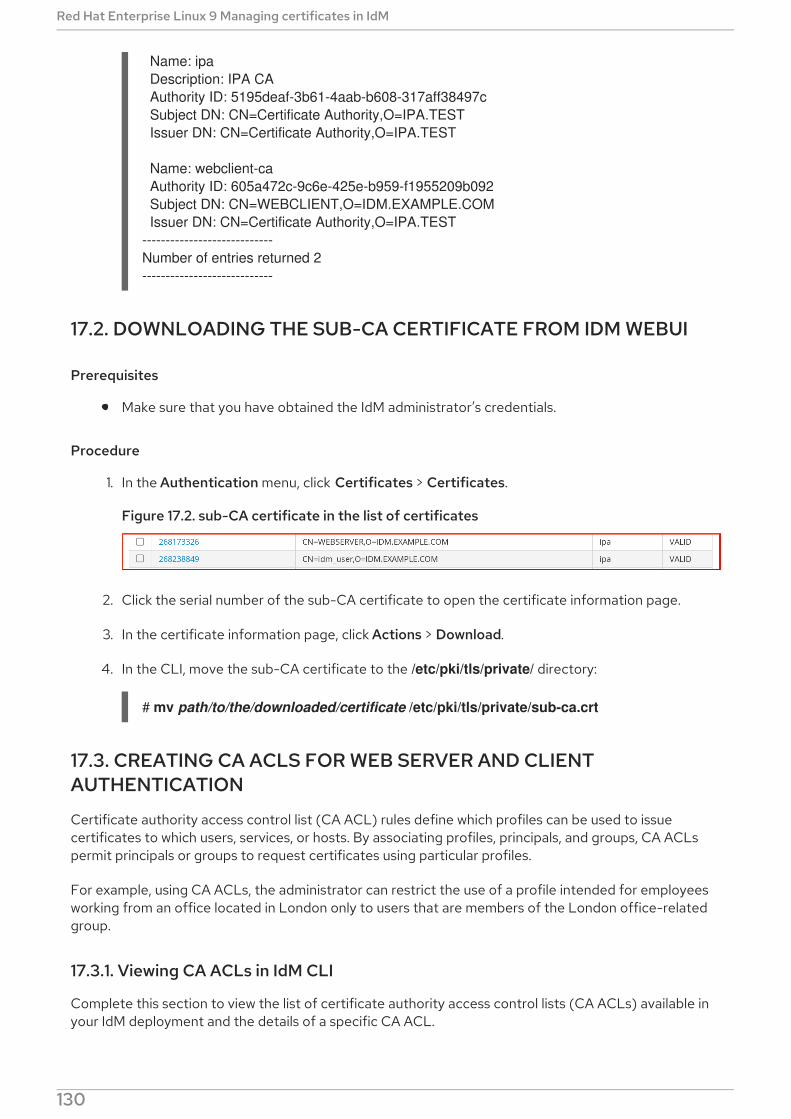
Name: ipa Description: IPA CA Authority ID: 5195deaf-3b61-4aab-b608-317aff38497c Subject DN: CN=Certificate Authority,O=IPA.TEST Issuer DN: CN=Certificate Authority,O=IPA.TEST
Name: webclient-ca Authority ID: 605a472c-9c6e-425e-b959-f1955209b092 Subject DN: CN=WEBCLIENT,O=IDM.EXAMPLE.COM Issuer DN: CN=Certificate Authority,O=IPA.TEST----------------------------Number of entries returned 2----------------------------
17.2. DOWNLOADING THE SUB-CA CERTIFICATE FROM IDM WEBUI
Prerequisites
Make sure that you have obtained the IdM administrator’s credentials.
Procedure
1. In the Authentication menu, click Certificates > Certificates.
Figure 17.2. sub-CA certificate in the list of certificates
2. Click the serial number of the sub-CA certificate to open the certificate information page.
3. In the certificate information page, click Actions > Download.
4. In the CLI, move the sub-CA certificate to the /etc/pki/tls/private/ directory:
# mv path/to/the/downloaded/certificate /etc/pki/tls/private/sub-ca.crt
17.3. CREATING CA ACLS FOR WEB SERVER AND CLIENTAUTHENTICATION
Certificate authority access control list (CA ACL) rules define which profiles can be used to issuecertificates to which users, services, or hosts. By associating profiles, principals, and groups, CA ACLspermit principals or groups to request certificates using particular profiles.
For example, using CA ACLs, the administrator can restrict the use of a profile intended for employeesworking from an office located in London only to users that are members of the London office-relatedgroup.
17.3.1. Viewing CA ACLs in IdM CLI
Complete this section to view the list of certificate authority access control lists (CA ACLs) available inyour IdM deployment and the details of a specific CA ACL.
Red Hat Enterprise Linux 9 Managing certificates in IdM
130
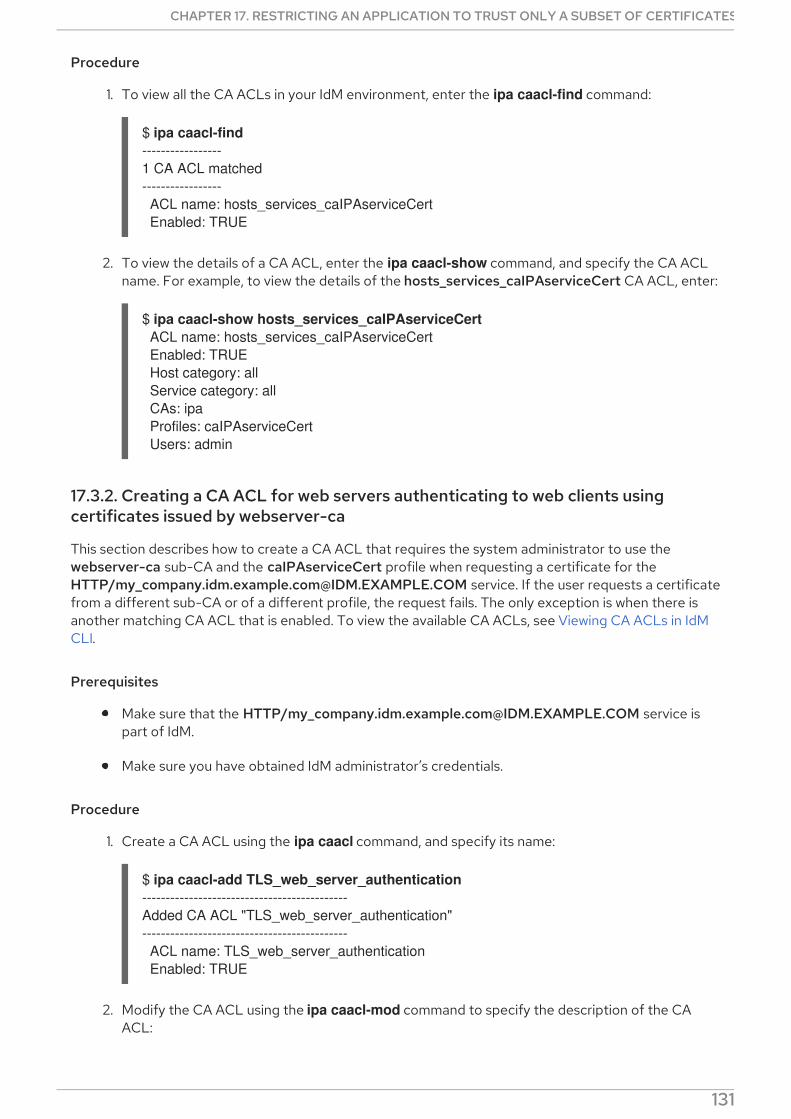
Procedure
1. To view all the CA ACLs in your IdM environment, enter the ipa caacl-find command:
$ ipa caacl-find-----------------1 CA ACL matched----------------- ACL name: hosts_services_caIPAserviceCert Enabled: TRUE
2. To view the details of a CA ACL, enter the ipa caacl-show command, and specify the CA ACLname. For example, to view the details of the hosts_services_caIPAserviceCert CA ACL, enter:
$ ipa caacl-show hosts_services_caIPAserviceCert ACL name: hosts_services_caIPAserviceCert Enabled: TRUE Host category: all Service category: all CAs: ipa Profiles: caIPAserviceCert Users: admin
17.3.2. Creating a CA ACL for web servers authenticating to web clients usingcertificates issued by webserver-ca
This section describes how to create a CA ACL that requires the system administrator to use thewebserver-ca sub-CA and the caIPAserviceCert profile when requesting a certificate for theHTTP/[email protected] service. If the user requests a certificatefrom a different sub-CA or of a different profile, the request fails. The only exception is when there isanother matching CA ACL that is enabled. To view the available CA ACLs, see Viewing CA ACLs in IdMCLI.
Prerequisites
Make sure that the HTTP/[email protected] service ispart of IdM.
Make sure you have obtained IdM administrator’s credentials.
Procedure
1. Create a CA ACL using the ipa caacl command, and specify its name:
$ ipa caacl-add TLS_web_server_authentication--------------------------------------------Added CA ACL "TLS_web_server_authentication"-------------------------------------------- ACL name: TLS_web_server_authentication Enabled: TRUE
2. Modify the CA ACL using the ipa caacl-mod command to specify the description of the CAACL:
CHAPTER 17. RESTRICTING AN APPLICATION TO TRUST ONLY A SUBSET OF CERTIFICATES
131
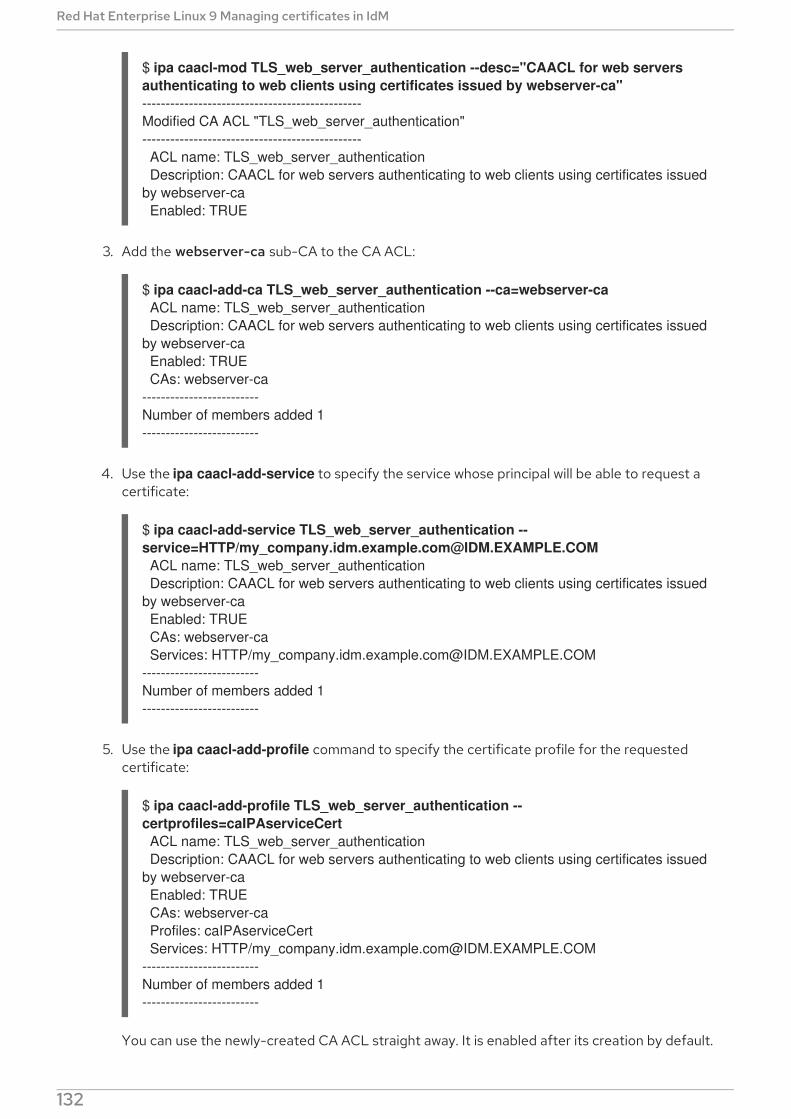
$ ipa caacl-mod TLS_web_server_authentication --desc="CAACL for web servers authenticating to web clients using certificates issued by webserver-ca"-----------------------------------------------Modified CA ACL "TLS_web_server_authentication"----------------------------------------------- ACL name: TLS_web_server_authentication Description: CAACL for web servers authenticating to web clients using certificates issued by webserver-ca Enabled: TRUE
3. Add the webserver-ca sub-CA to the CA ACL:
$ ipa caacl-add-ca TLS_web_server_authentication --ca=webserver-ca ACL name: TLS_web_server_authentication Description: CAACL for web servers authenticating to web clients using certificates issued by webserver-ca Enabled: TRUE CAs: webserver-ca-------------------------Number of members added 1-------------------------
4. Use the ipa caacl-add-service to specify the service whose principal will be able to request acertificate:
$ ipa caacl-add-service TLS_web_server_authentication --service=HTTP/[email protected] ACL name: TLS_web_server_authentication Description: CAACL for web servers authenticating to web clients using certificates issued by webserver-ca Enabled: TRUE CAs: webserver-ca Services: HTTP/my_company.idm.example.com@IDM.EXAMPLE.COM-------------------------Number of members added 1-------------------------
5. Use the ipa caacl-add-profile command to specify the certificate profile for the requestedcertificate:
$ ipa caacl-add-profile TLS_web_server_authentication --certprofiles=caIPAserviceCert ACL name: TLS_web_server_authentication Description: CAACL for web servers authenticating to web clients using certificates issued by webserver-ca Enabled: TRUE CAs: webserver-ca Profiles: caIPAserviceCert Services: HTTP/my_company.idm.example.com@IDM.EXAMPLE.COM-------------------------Number of members added 1-------------------------
You can use the newly-created CA ACL straight away. It is enabled after its creation by default.
NOTE
Red Hat Enterprise Linux 9 Managing certificates in IdM
132
NOTE
The point of CA ACLs is to specify which CA and profile combinations are allowed forrequests coming from particular principals or groups. CA ACLs do not affect certificatevalidation or trust. They do not affect how the issued certificates will be used.
17.3.3. Creating a CA ACL for user web browsers authenticating to web servers usingcertificates issued by webclient-ca
This section describes how to create a CA ACL that requires the system administrator to use thewebclient-ca sub-CA and the IECUserRoles profile when requesting a certificate. If the user requests acertificate from a different sub-CA or of a different profile, the request fails. The only exception is whenthere is another matching CA ACL that is enabled. To view the available CA ACLs, see Viewing CA ACLsin IdM CLI.
Prerequisites
Make sure that you have obtained IdM administrator’s credentials.
Procedure
1. Create a CA ACL using the ipa caacl command and specify its name:
$ ipa caacl-add TLS_web_client_authentication--------------------------------------------Added CA ACL "TLS_web_client_authentication"-------------------------------------------- ACL name: TLS_web_client_authentication Enabled: TRUE
2. Modify the CA ACL using the ipa caacl-mod command to specify the description of the CAACL:
$ ipa caacl-mod TLS_web_client_authentication --desc="CAACL for user web browsers authenticating to web servers using certificates issued by webclient-ca"-----------------------------------------------Modified CA ACL "TLS_web_client_authentication"----------------------------------------------- ACL name: TLS_web_client_authentication Description: CAACL for user web browsers authenticating to web servers using certificates issued by webclient-ca Enabled: TRUE
3. Add the webclient-ca sub-CA to the CA ACL:
$ ipa caacl-add-ca TLS_web_client_authentication --ca=webclient-ca ACL name: TLS_web_client_authentication Description: CAACL for user web browsers authenticating to web servers using certificates issued by webclient-ca Enabled: TRUE CAs: webclient-ca-------------------------Number of members added 1-------------------------
CHAPTER 17. RESTRICTING AN APPLICATION TO TRUST ONLY A SUBSET OF CERTIFICATES
133
4. Use the ipa caacl-add-profile command to specify the certificate profile for the requestedcertificate:
$ ipa caacl-add-profile TLS_web_client_authentication --certprofiles=IECUserRoles ACL name: TLS_web_client_authentication Description: CAACL for user web browsers authenticating to web servers using certificates issued by webclient-ca Enabled: TRUE CAs: webclient-ca Profiles: IECUserRoles-------------------------Number of members added 1-------------------------
5. Modify the CA ACL using the ipa caacl-mod command to specify that the CA ACL applies to allIdM users:
$ ipa caacl-mod TLS_web_client_authentication --usercat=all-----------------------------------------------Modified CA ACL "TLS_web_client_authentication"----------------------------------------------- ACL name: TLS_web_client_authentication Description: CAACL for user web browsers authenticating to web servers using certificates issued by webclient-ca Enabled: TRUE User category: all CAs: webclient-ca Profiles: IECUserRoles
You can use the newly-created CA ACL straight away. It is enabled after its creation by default.
NOTE
The point of CA ACLs is to specify which CA and profile combinations are allowed forrequests coming from particular principals or groups. CA ACLs do not affect certificatevalidation or trust. They do not affect how the issued certificates will be used.
17.4. OBTAINING AN IDM CERTIFICATE FOR A SERVICE USINGCERTMONGER
To ensure that communication between browsers and the web service running on your IdM client issecure and encrypted, use a TLS certificate. If you want to restrict web browsers to trust certificatesissued by the webserver-ca sub-CA but no other IdM sub-CA, obtain the TLS certificate for your webservice from the webserver-ca sub-CA.
This section describes how to use certmonger to obtain an IdM certificate for a service(HTTP/[email protected]) running on an IdM client.
Using certmonger to request the certificate automatically means that certmonger manages andrenews the certificate when it is due for a renewal.
For a visual representation of what happens when certmonger requests a service certificate, seeSection 17.5, “Communication flow for certmonger requesting a service certificate” .
Red Hat Enterprise Linux 9 Managing certificates in IdM
134
Prerequisites
The web server is enrolled as an IdM client.
You have root access to the IdM client on which you are running the procedure.
The service for which you are requesting a certificate does not have to pre-exist in IdM.
Procedure
1. On the my_company.idm.example.com IdM client on which the HTTP service is running,request a certificate for the service corresponding to the HTTP/[email protected] principal, and specify that
The certificate is to be stored in the local /etc/pki/tls/certs/httpd.pem file
The private key is to be stored in the local /etc/pki/tls/private/httpd.key file
The webserver-ca sub-CA is to be the issuing certificate authority
That an extensionRequest for a SubjectAltName be added to the signing request with theDNS name of my_company.idm.example.com:
# ipa-getcert request -K HTTP/my_company.idm.example.com -k /etc/pki/tls/private/httpd.key -f /etc/pki/tls/certs/httpd.pem -g 2048 -D my_company.idm.example.com -X webserver-ca -C "systemctl restart httpd"New signing request "20190604065735" added.
In the command above:
The ipa-getcert request command specifies that the certificate is to be obtained fromthe IdM CA. The ipa-getcert request command is a shortcut for getcert request -c IPA.
The -g option specifies the size of key to be generated if one is not already in place.
The -D option specifies the SubjectAltName DNS value to be added to the request.
The -X option specifies that the issuer of the certificate must be webserver-ca, not ipa.
The -C option instructs certmonger to restart the httpd service after obtaining thecertificate.
To specify that the certificate be issued with a particular profile, use the -T option.
2. Optionally, to check the status of your request:
# ipa-getcert list -f /etc/pki/tls/certs/httpd.pemNumber of certificates and requests being tracked: 3.Request ID '20190604065735': status: MONITORING stuck: no key pair storage: type=FILE,location='/etc/pki/tls/private/httpd.key' certificate: type=FILE,location='/etc/pki/tls/certs/httpd.crt' CA: IPA
CHAPTER 17. RESTRICTING AN APPLICATION TO TRUST ONLY A SUBSET OF CERTIFICATES
135
issuer: CN=WEBSERVER,O=IDM.EXAMPLE.COM
[...]
The output shows that the request is in the MONITORING status, which means that a certificatehas been obtained. The locations of the key pair and the certificate are those requested.
17.5. COMMUNICATION FLOW FOR CERTMONGER REQUESTING ASERVICE CERTIFICATE
The diagrams in this section show the stages of what happens when certmonger requests a servicecertificate from Identity Management (IdM) certificate authority (CA) server. The sequence consists ofthese diagrams:
Unencrypted communication
Certmonger requesting a service certificate
IdM CA issuing the service certificate
Certmonger applying the service certificate
Certmonger requesting a new certificate when the old one is nearing expiration
In the diagrams, the webserver-ca sub-CA is represented by the generic IdM CA server.
Unencrypted communication shows the initial situation: without an HTTPS certificate, thecommunication between the web server and the browser is unencrypted.
Figure 17.3. Unencrypted communication
Certmonger requesting a service certificate shows the system administrator using certmonger to
Red Hat Enterprise Linux 9 Managing certificates in IdM
136

Certmonger requesting a service certificate shows the system administrator using certmonger tomanually request an HTTPS certificate for the Apache web server. Note that when requesting a webserver certificate, certmonger does not communicate directly with the CA. It proxies through IdM.
Figure 17.4. Certmonger requesting a service certificate
IdM CA issuing the service certificate shows an IdM CA issuing an HTTPS certificate for the web server.
Figure 17.5. IdM CA issuing the service certificate
Certmonger applying the service certificate shows certmonger placing the HTTPS certificate in
CHAPTER 17. RESTRICTING AN APPLICATION TO TRUST ONLY A SUBSET OF CERTIFICATES
137
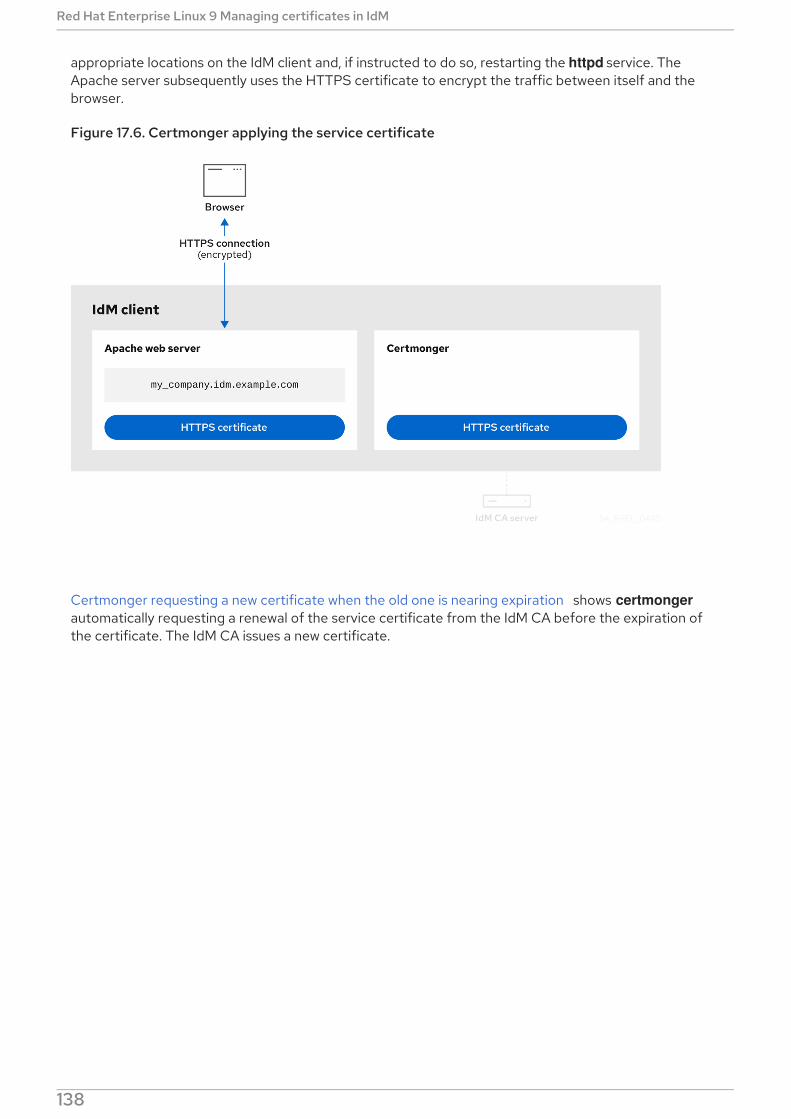
appropriate locations on the IdM client and, if instructed to do so, restarting the httpd service. TheApache server subsequently uses the HTTPS certificate to encrypt the traffic between itself and thebrowser.
Figure 17.6. Certmonger applying the service certificate
Certmonger requesting a new certificate when the old one is nearing expiration shows certmongerautomatically requesting a renewal of the service certificate from the IdM CA before the expiration ofthe certificate. The IdM CA issues a new certificate.
Figure 17.7. Certmonger requesting a new certificate when the old one is nearing expiration
Red Hat Enterprise Linux 9 Managing certificates in IdM
138
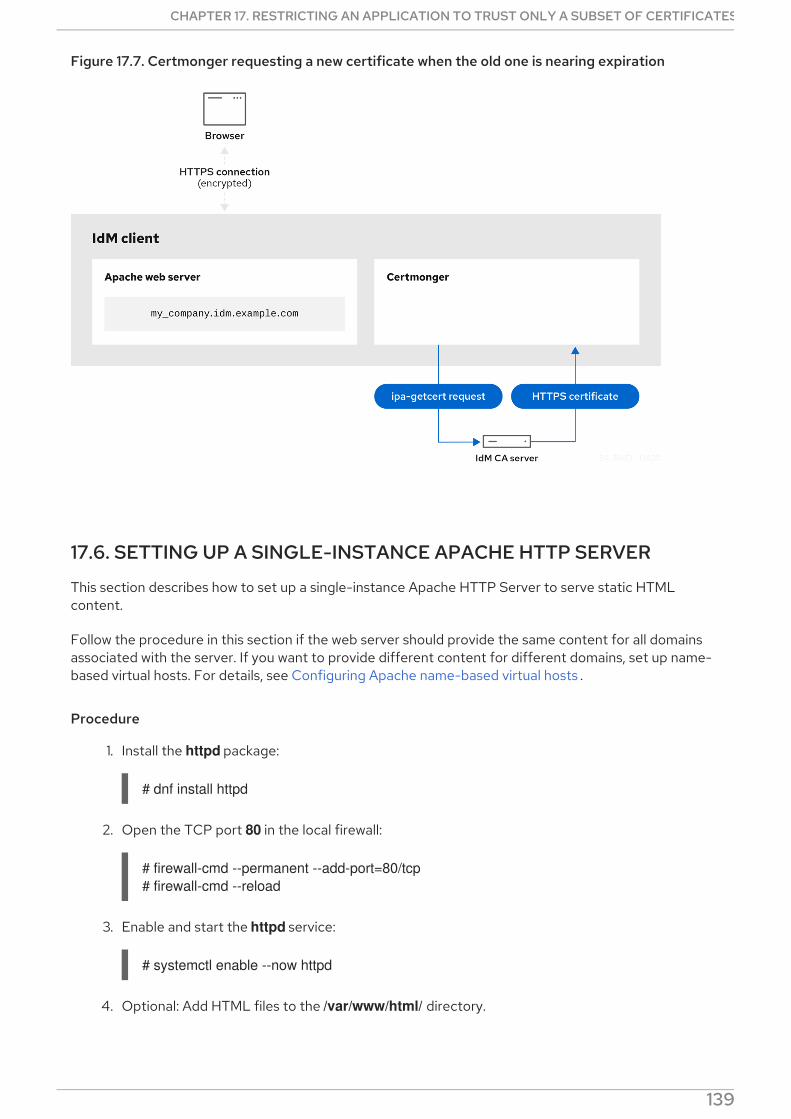
Figure 17.7. Certmonger requesting a new certificate when the old one is nearing expiration
17.6. SETTING UP A SINGLE-INSTANCE APACHE HTTP SERVER
This section describes how to set up a single-instance Apache HTTP Server to serve static HTMLcontent.
Follow the procedure in this section if the web server should provide the same content for all domainsassociated with the server. If you want to provide different content for different domains, set up name-based virtual hosts. For details, see Configuring Apache name-based virtual hosts .
Procedure
1. Install the httpd package:
# dnf install httpd
2. Open the TCP port 80 in the local firewall:
# firewall-cmd --permanent --add-port=80/tcp# firewall-cmd --reload
3. Enable and start the httpd service:
# systemctl enable --now httpd
4. Optional: Add HTML files to the /var/www/html/ directory.
NOTE
CHAPTER 17. RESTRICTING AN APPLICATION TO TRUST ONLY A SUBSET OF CERTIFICATES
139
NOTE
When adding content to /var/www/html/, files and directories must be readableby the user under which httpd runs by default. The content owner can be theeither the root user and root user group, or another user or group of theadministrator’s choice. If the content owner is the root user and root user group,the files must be readable by other users. The SELinux context for all the filesand directories must be httpd_sys_content_t, which is applied by default to allcontent within the /var/www directory.
Verification steps
Connect with a web browser to http://my_company.idm.example.com/ or http://server_IP/.If the /var/www/html/ directory is empty or does not contain an index.html or index.htm file,Apache displays the Red Hat Enterprise Linux Test Page. If /var/www/html/ contains HTMLfiles with a different name, you can load them by entering the URL to that file, such as http://server_IP/example.html or http://my_company.idm.example.com/example.html.
Additional resources
Refer to the Apache manual. See Installing the Apache HTTP Server manual .
See the httpd.service(8) man page.
17.7. ADDING TLS ENCRYPTION TO AN APACHE HTTP SERVER
This section describes how to enable TLS encryption on the my_company.idm.example.com ApacheHTTP Server for the idm.example.com domain.
Prerequisites
The my_company.idm.example.com Apache HTTP Server is installed and running.
You have obtained the TLS certificate from the webserver-ca sub-CA, and stored it in the /etc/pki/tls/certs/httpd.pem file as described in Section 17.4, “Obtaining an IdM certificate for aservice using certmonger”. If you use a different path, adapt the corresponding steps of theprocedure.
The corresponding private key is stored in the /etc/pki/tls/private/httpd.key file. If you use adifferent path, adapt the corresponding steps of the procedure.
The webserver-ca CA certificate is stored in the /etc/pki/tls/private/sub-ca.crt file. If you use adifferent path, adapt the corresponding steps of the procedure.
Clients and the my_company.idm.example.com web server resolve the host name of the serverto the IP address of the web server.
Procedure
1. Install the mod_ssl package:
# dnf install mod_ssl
2. Edit the /etc/httpd/conf.d/ssl.conf file and add the following settings to the <VirtualHost _default_:443> directive:a. Set the server name:
Red Hat Enterprise Linux 9 Managing certificates in IdM
140

a. Set the server name:
ServerName my_company.idm.example.com
IMPORTANT
The server name must match the entry set in the Common Name field of thecertificate.
b. Optional: If the certificate contains additional host names in the Subject Alt Names (SAN)field, you can configure mod_ssl to provide TLS encryption also for these host names. Toconfigure this, add the ServerAliases parameter with corresponding names:
ServerAlias www.my_company.idm.example.com server.my_company.idm.example.com
c. Set the paths to the private key, the server certificate, and the CA certificate:
SSLCertificateKeyFile "/etc/pki/tls/private/httpd.key"SSLCertificateFile "/etc/pki/tls/certs/httpd.pem"SSLCACertificateFile "/etc/pki/tls/certs/ca.crt"
3. For security reasons, configure that only the root user can access the private key file:
# chown root:root /etc/pki/tls/private/httpd.key# chmod 600 //etc/pki/tls/private/httpd.key
WARNING
If the private key was accessed by unauthorized users, revoke thecertificate, create a new private key, and request a new certificate.Otherwise, the TLS connection is no longer secure.
4. Open port 443 in the local firewall:
# firewall-cmd --permanent --add-port=443/tcp# firewall-cmd --reload
5. Restart the httpd service:
# systemctl restart httpd
NOTE
If you protected the private key file with a password, you must enter thispassword each time when the httpd service starts.
Use a browser and connect to https://my_company.idm.example.com.
CHAPTER 17. RESTRICTING AN APPLICATION TO TRUST ONLY A SUBSET OF CERTIFICATES
141
Additional resources
Refer to the SSL/TLS Encryption documentation in the Apache manual.
See Installing the Apache HTTP Server manual .
Security considerations for TLS in RHEL 8
17.8. SETTING THE SUPPORTED TLS PROTOCOL VERSIONS ON ANAPACHE HTTP SERVER
By default, the Apache HTTP Server on RHEL uses the system-wide crypto policy that defines safedefault values, which are also compatible with recent browsers. For example, the DEFAULT policydefines that only the TLSv1.2 and TLSv1.3 protocol versions are enabled in apache.
This section describes how to manually configure which TLS protocol versions yourmy_company.idm.example.com Apache HTTP Server supports. Follow the procedure if yourenvironment requires to enable only specific TLS protocol versions, for example:
If your environment requires that clients can also use the weak TLS1 (TLSv1.0) or TLS1.1protocol.
If you want to configure that Apache only supports the TLSv1.2 or TLSv1.3 protocol.
Prerequisites
TLS encryption is enabled on the my_company.idm.example.com server as described inAdding TLS encryption to an Apache HTTP Server .
Procedure
1. Edit the /etc/httpd/conf/httpd.conf file, and add the following setting to the <VirtualHost>directive for which you want to set the TLS protocol version. For example, to enable only the TLSv1.3 protocol:
SSLProtocol -All TLSv1.3
2. Restart the httpd service:
# systemctl restart httpd
Verification steps
1. Use the following command to verify that the server supports TLSv1.3:
# openssl s_client -connect example.com:443 -tls1_3
2. Use the following command to verify that the server does not support TLSv1.2:
# openssl s_client -connect example.com:443 -tls1_2
If the server does not support the protocol, the command returns an error:
Red Hat Enterprise Linux 9 Managing certificates in IdM
142
140111600609088:error:1409442E:SSL routines:ssl3_read_bytes:tlsv1 alert protocol version:ssl/record/rec_layer_s3.c:1543:SSL alert number 70
3. Optional: Repeat the command for other TLS protocol versions.
Additional resources
See the update-crypto-policies(8) man page.
See Using system-wide cryptographic policies .
For details about the SSLProtocol parameter, see the mod_ssl documentation in the Apachemanual.
See Installing the Apache HTTP Server manual .
17.9. SETTING THE SUPPORTED CIPHERS ON AN APACHE HTTPSERVER
By default, the Apache HTTP Server uses the system-wide crypto policy that defines safe defaultvalues, which are also compatible with recent browsers. For the list of ciphers the system-wide cryptoallows, see the /etc/crypto-policies/back-ends/openssl.config file.
This section describes how to manually configure which ciphers the my_company.idm.example.comApache HTTP server supports. Follow the procedure if your environment requires specific ciphers.
Prerequisites
TLS encryption is enabled on the my_company.idm.example.com server as described inAdding TLS encryption to an Apache HTTP Server .
Procedure
1. Edit the /etc/httpd/conf/httpd.conf file, and add the SSLCipherSuite parameter to the <VirtualHost> directive for which you want to set the TLS ciphers:
SSLCipherSuite "EECDH+AESGCM:EDH+AESGCM:AES256+EECDH:AES256+EDH:!SHA1:!SHA256"
This example enables only the EECDH+AESGCM, EDH+AESGCM, AES256+EECDH, and AES256+EDH ciphers and disables all ciphers which use the SHA1 and SHA256 messageauthentication code (MAC).
2. Restart the httpd service:
# systemctl restart httpd
Verification steps
1. To display the list of ciphers the Apache HTTP Server supports:
a. Install the nmap package:
CHAPTER 17. RESTRICTING AN APPLICATION TO TRUST ONLY A SUBSET OF CERTIFICATES
143
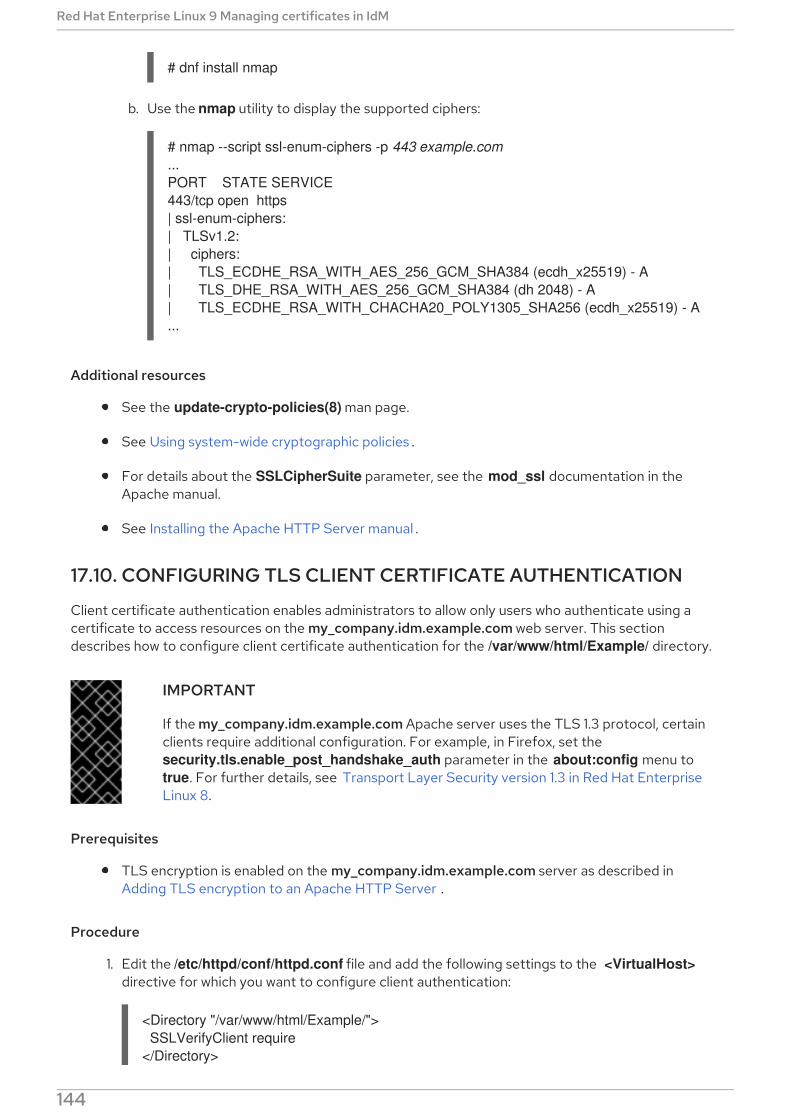
# dnf install nmap
b. Use the nmap utility to display the supported ciphers:
# nmap --script ssl-enum-ciphers -p 443 example.com...PORT STATE SERVICE443/tcp open https| ssl-enum-ciphers:| TLSv1.2:| ciphers:| TLS_ECDHE_RSA_WITH_AES_256_GCM_SHA384 (ecdh_x25519) - A| TLS_DHE_RSA_WITH_AES_256_GCM_SHA384 (dh 2048) - A| TLS_ECDHE_RSA_WITH_CHACHA20_POLY1305_SHA256 (ecdh_x25519) - A...
Additional resources
See the update-crypto-policies(8) man page.
See Using system-wide cryptographic policies .
For details about the SSLCipherSuite parameter, see the mod_ssl documentation in theApache manual.
See Installing the Apache HTTP Server manual .
17.10. CONFIGURING TLS CLIENT CERTIFICATE AUTHENTICATION
Client certificate authentication enables administrators to allow only users who authenticate using acertificate to access resources on the my_company.idm.example.com web server. This sectiondescribes how to configure client certificate authentication for the /var/www/html/Example/ directory.
IMPORTANT
If the my_company.idm.example.com Apache server uses the TLS 1.3 protocol, certainclients require additional configuration. For example, in Firefox, set the security.tls.enable_post_handshake_auth parameter in the about:config menu to true. For further details, see Transport Layer Security version 1.3 in Red Hat EnterpriseLinux 8.
Prerequisites
TLS encryption is enabled on the my_company.idm.example.com server as described inAdding TLS encryption to an Apache HTTP Server .
Procedure
1. Edit the /etc/httpd/conf/httpd.conf file and add the following settings to the <VirtualHost>directive for which you want to configure client authentication:
<Directory "/var/www/html/Example/"> SSLVerifyClient require</Directory>
Red Hat Enterprise Linux 9 Managing certificates in IdM
144

The SSLVerifyClient require setting defines that the server must successfully validate theclient certificate before the client can access the content in the /var/www/html/Example/directory.
2. Restart the httpd service:
# systemctl restart httpd
Verification steps
1. Use the curl utility to access the https://my_company.idm.example.com/Example/ URLwithout client authentication:
$ curl https://my_company.idm.example.com/Example/curl: (56) OpenSSL SSL_read: error:1409445C:SSL routines:ssl3_read_bytes:tlsv13 **alert certificate required**, errno 0
The error indicates that the my_company.idm.example.com web server requires a clientcertificate authentication.
2. Pass the client private key and certificate, as well as the CA certificate to curl to access thesame URL with client authentication:
$ curl --cacert ca.crt --key client.key --cert client.crt https://my_company.idm.example.com/Example/
If the request succeeds, curl displays the index.html file stored in the /var/www/html/Example/directory.
Additional resources
See the mod_ssl Configuration How-To documentation in the Apache manual.
See Installing the Apache HTTP Server manual .
17.11. REQUESTING A NEW USER CERTIFICATE AND EXPORTING IT TOTHE CLIENT
As an Identity Management (IdM) administrator, you can configure a web server running on an IdM clientto request users that use web browsers to access the server to authenticate with certificates issued by aspecific IdM sub-CA. Complete this section to request a user certificate from a specific IdM sub-CA andto export the certificate and the corresponding private key on to the host from which the user wants toaccess the web server using a web browser. Afterwards, import the certificate and the private key intothe browser.
Procedure
1. Optionally, create a new directory, for example ~/certdb/, and make it a temporary certificatedatabase. When asked, create an NSS Certificate DB password to encrypt the keys to thecertificate to be generated in a subsequent step:
# mkdir ~/certdb/# certutil -N -d ~/certdb/
CHAPTER 17. RESTRICTING AN APPLICATION TO TRUST ONLY A SUBSET OF CERTIFICATES
145
Enter a password which will be used to encrypt your keys.The password should be at least 8 characters long,and should contain at least one non-alphabetic character.
Enter new password:Re-enter password:
2. Create the certificate signing request (CSR) and redirect the output to a file. For example, tocreate a CSR with the name certificate_request.csr for a 4096 bit certificate for the idm_useruser in the IDM.EXAMPLE.COM realm, setting the nickname of the certificate private keys to idm_user for easy findability, and setting the subject to CN=idm_user,O=IDM.EXAMPLE.COM:
# certutil -R -d ~/certdb/ -a -g 4096 -n idm_user -s "CN=idm_user,O=IDM.EXAMPLE.COM" > certificate_request.csr
3. When prompted, enter the same password that you entered when using certutil to create thetemporary database. Then continue typing randlomly until told to stop:
Enter Password or Pin for "NSS Certificate DB":
A random seed must be generated that will be used in thecreation of your key. One of the easiest ways to create arandom seed is to use the timing of keystrokes on a keyboard.
To begin, type keys on the keyboard until this progress meteris full. DO NOT USE THE AUTOREPEAT FUNCTION ON YOUR KEYBOARD!
Continue typing until the progress meter is full:
4. Submit the certificate request file to the server. Specify the Kerberos principal to associate withthe newly-issued certificate, the output file to store the certificate, and optionally the certificateprofile. Specify the IdM sub-CA that you want to issue the certificate. For example, to obtain acertificate of the IECUserRoles profile, a profile with added user roles extension, for the [email protected] principal from webclient-ca, and save the certificate in the ~/idm_user.pem file:
# ipa cert-request certificate_request.csr [email protected] --profile-id=IECUserRoles --ca=webclient-ca --certificate-out=~/idm_user.pem
5. Add the certificate to the NSS database. Use the -n option to set the same nickname that youused when creating the CSR previously so that the certificate matches the private key in theNSS database. The -t option sets the trust level. For details, see the certutil(1) man page. The -ioption specifies the input certificate file. For example, to add to the NSS database a certificatewith the idm_user nickname that is stored in the ~/idm_user.pem file in the ~/certdb/database:
# certutil -A -d ~/certdb/ -n idm_user -t "P,," -i ~/idm_user.pem
6. Verify that the key in the NSS database does not show (orphan) as its nickname. For example,to verify that the certificate stored in the ~/certdb/ database is not orphaned:
Red Hat Enterprise Linux 9 Managing certificates in IdM
146

# certutil -K -d ~/certdb/< 0> rsa 5ad14d41463b87a095b1896cf0068ccc467df395 NSS Certificate DB:idm_user
7. Use the pk12util command to export the certificate from the NSS database to the PKCS12format. For example, to export the certificate with the idm_user nickname from the /root/certdb NSS database into the ~/idm_user.p12 file:
# pk12util -d ~/certdb -o ~/idm_user.p12 -n idm_userEnter Password or Pin for "NSS Certificate DB":Enter password for PKCS12 file:Re-enter password:pk12util: PKCS12 EXPORT SUCCESSFUL
8. Transfer the certificate to the host on which you want the certificate authentication for idm_user to be enabled:
# scp ~/idm_user.p12 [email protected]:/home/idm_user/
9. On the host to which the certificate has been transferred, make the directory in which the.pkcs12 file is stored inaccessible to the 'other' group for security reasons:
# chmod o-rwx /home/idm_user/
10. For security reasons, remove the temporary NSS database and the .pkcs12 file from the server:
# rm ~/certdb/# rm ~/idm_user.p12
17.12. CONFIGURING A BROWSER TO ENABLE CERTIFICATEAUTHENTICATION
To be able to authenticate with a certificate when using the WebUI to log into Identity Management(IdM), you need to import the user and the relevant certificate authority (CA) certificates into theMozilla Firefox or Google Chrome browser. The host itself on which the browser is running does not haveto be part of the IdM domain.
IdM supports the following browsers for connecting to the WebUI:
Mozilla Firefox 38 and later
Google Chrome 46 and later
The following procedure shows how to configure the Mozilla Firefox 57.0.1 browser.
Prerequisites
You have the user certificate that you want to import to the browser at your disposal in thePKCS#12 format.
You have downloaded the sub-CA certificate and have it at your disposal in the PEM format.
Procedure
CHAPTER 17. RESTRICTING AN APPLICATION TO TRUST ONLY A SUBSET OF CERTIFICATES
147
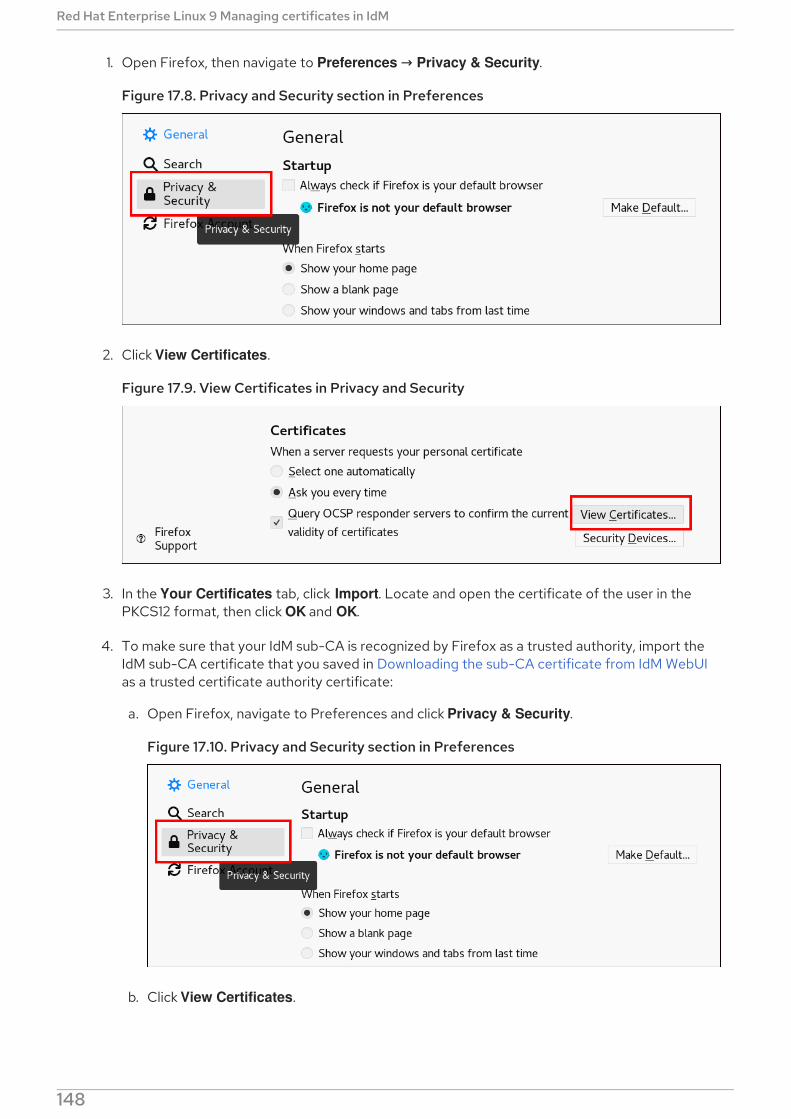
1. Open Firefox, then navigate to Preferences → Privacy & Security.
Figure 17.8. Privacy and Security section in Preferences
2. Click View Certificates.
Figure 17.9. View Certificates in Privacy and Security
3. In the Your Certificates tab, click Import. Locate and open the certificate of the user in thePKCS12 format, then click OK and OK.
4. To make sure that your IdM sub-CA is recognized by Firefox as a trusted authority, import theIdM sub-CA certificate that you saved in Downloading the sub-CA certificate from IdM WebUIas a trusted certificate authority certificate:
a. Open Firefox, navigate to Preferences and click Privacy & Security.
Figure 17.10. Privacy and Security section in Preferences
b. Click View Certificates.
Figure 17.11. View Certificates in Privacy and Security
Red Hat Enterprise Linux 9 Managing certificates in IdM
148
Figure 17.11. View Certificates in Privacy and Security
c. In the Authorities tab, click Import. Locate and open the sub-CA certificate. Trust thecertificate to identify websites, then click OK and OK.
CHAPTER 17. RESTRICTING AN APPLICATION TO TRUST ONLY A SUBSET OF CERTIFICATES
149
CHAPTER 18. INVALIDATING A SPECIFIC GROUP OF RELATEDCERTIFICATES QUICKLY
As a system administrator, if you want to be able to invalidate a specific group of related certificatesquickly:
Design your applications so that they only trust certificates that were issued by a specificlightweight Identity Management (IdM) sub-CA. Afterwards, you will be able to invalidate allthese certificates by only revoking the certificate of the Identity Management (IdM) sub-CAthat issued these certificates. For details on how to create and use a lightweight sub-CA in IdM,see Invalidating a specific group of related certificates quickly .
To ensure that all the certificates that have been issued by the to-be-revoked IdM sub-CA areimmediately invalid, configure applications that rely on such certificates to use the IdM OCSPresponders. For example, to configure the Firefox browser to use OCSP responders, make surethat the Query OCSP responder servers to confirm the current validity of certificatescheckbox is checked in Firefox Preferences.In IdM, the certificate revocation list (CRL) is updated every four hours. d To invalidate all thecertificates issued by an IdM sub-CA, revoke the IdM sub-CA certificate. In addition, disable therelevant CA ACLs, and consider disabling the IdM sub-CA. Disabling the sub-CA prevents thesub-CA from issuing new certificates, but allows Online Certificate Status Protocol (OCSP)responses to be produced for previously issued certificates because the sub-CA’s signing keysare retained.
IMPORTANT
Do not delete the sub-CA if you use OCSP in your environment. Deleting the sub-CAdeletes the signing keys of the sub-CA, preventing production of OCSP responses forcertificates issued by that sub-CA.
The only scenario when deleting a sub-CA is preferable to disabling it is when you want tocreate a new sub-CA with the same Subject distinguished name (DN) but a new signingkey.
18.1. DISABLING CA ACLS IN IDM CLI
When you want to retire an IdM service or a group of IdM services, consider disabling any existingcorresponding CA ACLs.
Complete this section to disable the TLS_web_server_authentication CA ACL that restricts the webserver running on your IdM client to request a certificate to be issued by the webserver-ca IdM sub-CA,and to disable the TLS_web_client_authentication CA ACL that restricts IdM users to request a usercertificate to be issued by the webclient-ca IdM sub-CA.
Procedure
1. Optionally, to view all the CA ACLs in your IdM environment, enter the ipa caacl-find command:
$ ipa caacl-find-----------------3 CA ACLs matched----------------- ACL name: hosts_services_caIPAserviceCert Enabled: TRUE
Red Hat Enterprise Linux 9 Managing certificates in IdM
150
ACL name: TLS_web_server_authentication Enabled: TRUE
ACL name: TLS_web_client_authentication Enabled: TRUE
2. Optionally, to view the details of a CA ACL, enter the ipa caacl-show command, and specifythe CA ACL name:
$ ipa caacl-show TLS_web_server_authentication ACL name: TLS_web_server_authentication Description: CAACL for web servers authenticating to web clients using certificates issued by webserver-ca Enabled: TRUE CAs: webserver-ca Profiles: caIPAserviceCert Services: HTTP/[email protected]
3. To disable a CA ACL, enter the ipa caacl-disable command, and specify the CA ACL name.
To disable the TLS_web_server_authentication CA ACL, enter:
$ ipa caacl-disable TLS_web_server_authentication-------------------------------------------------Disabled CA ACL "TLS_web_server_authentication"-------------------------------------------------
To disable the TLS_web_client_authentication CA ACL, enter:
$ ipa caacl-disable TLS_web_client_authentication-------------------------------------------------Disabled CA ACL "TLS_web_client_authentication"-------------------------------------------------
The only enabled CA ACL now is the hosts_services_caIPAserviceCert CA ACL.
IMPORTANT
Be extremely careful about disabling the hosts_services_caIPAserviceCert CAACL. Disabling hosts_services_caIPAserviceCert, without another CA ACLgranting IdM servers use of the ipa CA with the caIPAserviceCert profile meansthat certificate renewal of the IdM HTTP and LDAP certificates will fail. Theexpired IdM HTTP and LDAP certificates will eventually cause IdM systemfailure.
18.2. DISABLING AN IDM SUB-CA
After revoking the CA certificate of an IdM sub-CA in order to invalidate all the certificates issued bythat sub-CA, consider disabling the IdM sub-CA if you no longer need it. You can re-enable the sub-CAat a later time.
Disabling the sub-CA prevents the sub-CA from issuing new certificates, but allows Online Certificate
CHAPTER 18. INVALIDATING A SPECIFIC GROUP OF RELATED CERTIFICATES QUICKLY
151
Disabling the sub-CA prevents the sub-CA from issuing new certificates, but allows Online CertificateStatus Protocol (OCSP) responses to be produced for previously issued certificates because the sub-CA’s signing keys are retained.
Prerequisites
You are logged in as IdM administrator.
Procedure
Enter the ipa ca-disable command and specify the name of the sub-CA:
$ ipa ca-disable webserver-CA--------------------Disabled CA "webserver-CA"--------------------
Red Hat Enterprise Linux 9 Managing certificates in IdM
152
CHAPTER 19. VERIFYING CERTIFICATES USING IDMHEALTHCHECK
This section helps in understanding and using the Healthcheck tool in Identity management (IdM) toidentify issues with IPA certificates maintained by certmonger.
For details, see Healthcheck in IdM .
19.1. IDM CERTIFICATES HEALTHCHECK TESTS
The Healthcheck tool includes several tests for verifying the status of certificates maintained bycertmonger in Identity Management (IdM). For details about certmonger, see Obtaining an IdMcertificate for a service using certmonger.
This suite of tests checks expiration, validation, trust and other issues. Multiple errors may be thrown forthe same underlying issue.
To see all certificate tests, run the ipa-healthcheck with the --list-sources option:
# ipa-healthcheck --list-sources
You can find all tests under the ipahealthcheck.ipa.certs source:
IPACertmongerExpirationCheck
This test checks expirations in certmonger.If an error is reported, the certificate has expired.
If a warning appears, the certificate will expire soon. By default, this test applies within 28 days orfewer days before certificate expiration.
You can configure the number of days in the /etc/ipahealthcheck/ipahealthcheck.conf file. Afteropening the file, change the cert_expiration_days option located in the default section.
NOTE
Certmonger loads and maintains its own view of the certificate expiration. This checkdoes not validate the on-disk certificate.
IPACertfileExpirationCheck
This test checks if the certificate file or NSS database cannot be opened. This test also checksexpiration. Therefore, carefully read the msg attribute in the error or warning output. The messagespecifies the problem.
NOTE
This test checks the on-disk certificate. If a certificate is missing, unreadable, etc aseparate error can also be raised.
IPACertNSSTrust
This test compares the trust for certificates stored in NSS databases. For the expected tracked
CHAPTER 19. VERIFYING CERTIFICATES USING IDM HEALTHCHECK
153
This test compares the trust for certificates stored in NSS databases. For the expected trackedcertificates in NSS databases the trust is compared to an expected value and an error raised on anon-match.
IPANSSChainValidation
This test validates the certificate chain of the NSS certificates. The test executes: certutil -V -u V -e -d [dbdir] -n [nickname]
IPAOpenSSLChainValidation
This test validates the certificate chain of the OpenSSL certificates. To be comparable to the NSSChain validation here is the OpenSSL command we execute:
openssl verify -verbose -show_chain -CAfile /etc/ipa/ca.crt [cert file]
IPARAAgent
This test compares the certificate on disk with the equivalent record in LDAP in uid=ipara,ou=People,o=ipaca.
IPACertRevocation
This test uses certmonger to verify that certificates have not been revoked. Therefore, the test canfind issues connected with certificates maintained by certmonger only.
IPACertmongerCA
This test verifies the certmonger Certificate Authority (CA) configuration. IdM cannot issuecertificates without CA.Certmonger maintains a set of CA helpers. In IdM, there is a CA named IPA which issues certificatesthrough IdM, authenticating as a host or user principal, for host or service certs.
There are also dogtag-ipa-ca-renew-agent and dogtag-ipa-ca-renew-agent-reuse which renew theCA subsystem certificates.
NOTE
Run these tests on all IdM servers when trying to check for issues.
19.2. SCREENING CERTIFICATES USING THE HEALTHCHECK TOOL
This section describes a standalone manual test of an Identity Management (IdM) certificate healthcheck using the Healthcheck tool.
The Healthcheck tool includes many tests, therefore, you can shorten the results with:
excluding all successful test: --failures-only
including only certificate tests: --source=ipahealthcheck.ipa.certs
Prerequisites
Healthcheck tests must be performed as the root user.
Procedure
To run Healthcheck with warnings, errors and critical issues regarding certificates, enter:
Red Hat Enterprise Linux 9 Managing certificates in IdM
154
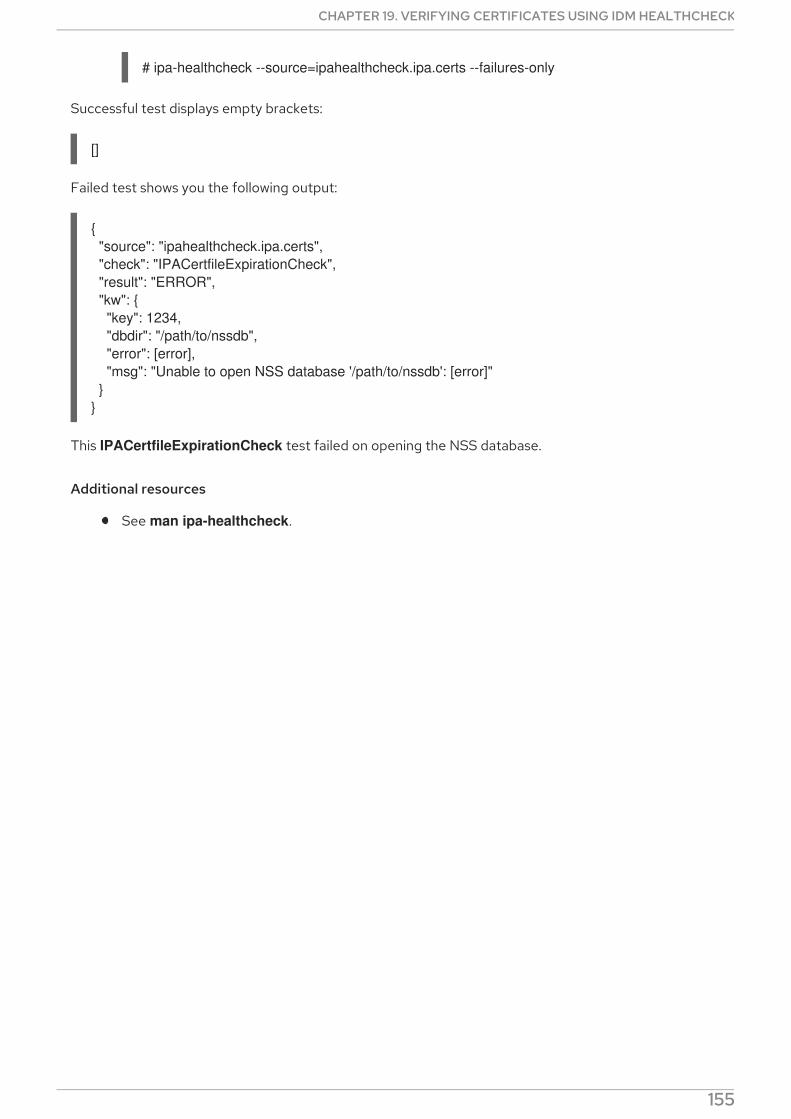
# ipa-healthcheck --source=ipahealthcheck.ipa.certs --failures-only
Successful test displays empty brackets:
[]
Failed test shows you the following output:
{ "source": "ipahealthcheck.ipa.certs", "check": "IPACertfileExpirationCheck", "result": "ERROR", "kw": { "key": 1234, "dbdir": "/path/to/nssdb", "error": [error], "msg": "Unable to open NSS database '/path/to/nssdb': [error]" }}
This IPACertfileExpirationCheck test failed on opening the NSS database.
Additional resources
See man ipa-healthcheck.
CHAPTER 19. VERIFYING CERTIFICATES USING IDM HEALTHCHECK
155
CHAPTER 20. VERIFYING SYSTEM CERTIFICATES USING IDMHEALTHCHECK
This section describes a Healthcheck tool in Identity Management (IdM) to identify issues with systemcertificates.
For details, see Healthcheck in IdM .
20.1. SYSTEM CERTIFICATES HEALTHCHECK TESTS
The Healthcheck tool includes several tests for verifying system (DogTag) certificates.
To see all tests, run the ipa-healthcheck with the --list-sources option:
# ipa-healthcheck --list-sources
You can find all tests under the ipahealthcheck.dogtag.ca source:
DogtagCertsConfigCheck
This test compares the CA (Certificate Authority) certificates in its NSS database to the same valuesstored in CS.cfg. If they don’t match, CA fails to start.Specifically, it checks:
auditSigningCert cert-pki-ca against ca.audit_signing.cert
ocspSigningCert cert-pki-ca against ca.ocsp_signing.cert
caSigningCert cert-pki-ca against ca.signing.cert
subsystemCert cert-pki-ca against ca.subsystem.cert
Server-Cert cert-pki-ca against ca.sslserver.cert
If Key Recovery Authority (KRA) is installed:
transportCert cert-pki-kra against ca.connector.KRA.transportCert
DogtagCertsConnectivityCheck
This test verifies connectivity. This test is equivalent to the ipa cert-show 1 command which checks:
The PKI proxy configuration in Apache
IdM being able to find a CA
The RA agent client certificate
Correctness of CA replies to requests
Note that the test checks a certificate with serial #1 because you want to verify that a cert-show canbe executed and get back an expected result from CA (either the certificate or a not found).
NOTE
Red Hat Enterprise Linux 9 Managing certificates in IdM
156
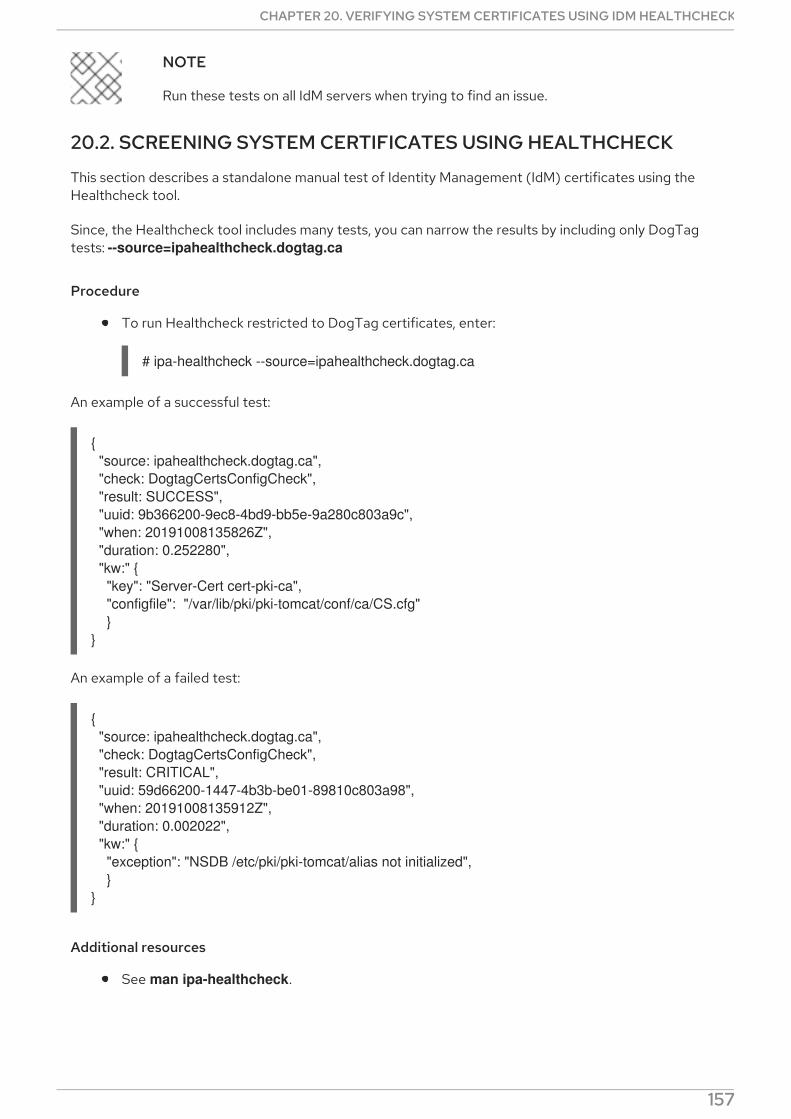
NOTE
Run these tests on all IdM servers when trying to find an issue.
20.2. SCREENING SYSTEM CERTIFICATES USING HEALTHCHECK
This section describes a standalone manual test of Identity Management (IdM) certificates using theHealthcheck tool.
Since, the Healthcheck tool includes many tests, you can narrow the results by including only DogTagtests: --source=ipahealthcheck.dogtag.ca
Procedure
To run Healthcheck restricted to DogTag certificates, enter:
# ipa-healthcheck --source=ipahealthcheck.dogtag.ca
An example of a successful test:
{ "source: ipahealthcheck.dogtag.ca", "check: DogtagCertsConfigCheck", "result: SUCCESS", "uuid: 9b366200-9ec8-4bd9-bb5e-9a280c803a9c", "when: 20191008135826Z", "duration: 0.252280", "kw:" { "key": "Server-Cert cert-pki-ca", "configfile": "/var/lib/pki/pki-tomcat/conf/ca/CS.cfg" }}
An example of a failed test:
{ "source: ipahealthcheck.dogtag.ca", "check: DogtagCertsConfigCheck", "result: CRITICAL", "uuid: 59d66200-1447-4b3b-be01-89810c803a98", "when: 20191008135912Z", "duration: 0.002022", "kw:" { "exception": "NSDB /etc/pki/pki-tomcat/alias not initialized", }}
Additional resources
See man ipa-healthcheck.
CHAPTER 20. VERIFYING SYSTEM CERTIFICATES USING IDM HEALTHCHECK
157

Red Hat Enterprise Linux 9 Managing certificates in IdM
158