rapid gui programming with python and qt
TRANSCRIPT

Rapid GUI Programmingwith Python and Qt
Prentice Hall Open Source Software Development Series
Arnold Robbins, Series Editor
“Real world code from real world applications”Open Source technology has revolutionized the computing world. Many large-scale projects are in production use worldwide, such as Apache, MySQL, and Postgres, with programmers writing applications in a variety of languages including Perl, Python, and PHP. These technologies are in use on many different systems, ranging from proprietary systems, to Linux systems, to traditional UNIX systems, to mainframes.
The Prentice Hall Open Source Software Development Series is designed to bring you the best of these Open Source technologies. Not only will you learn how to use them for your projects, but you will learn from them. By seeing real code from real applications, you will learn the best practices of Open Source developers the world over.
Titles currently in the series include:
Linux® Debugging and Performance TuningSteve Best0131492470, Paper, ©2006
The Defi nitive Guide to the Xen HypervisorDavid Chisnall013234971X, Hard, ©2008
Understanding AJAXJoshua Eichorn0132216353, Paper, ©2007
The Linux Programmer’s ToolboxJohn Fusco0132198576, Paper, ©2007
Embedded Linux PrimerChristopher Hallinan0131679848, Paper, ©2007
The Apache Modules BookNick Kew0132409674, Paper, © 2007
SELinux by ExampleFrank Mayer, David Caplan, Karl MacMillan0131963694, Paper, ©2007
UNIX to Linux® PortingAlfredo Mendoza, Chakarat Skawratananond, Artis Walker0131871099, Paper, ©2006
Rapid Web Applications with TurboGearsMark Ramm, Kevin Dangoor, Gigi Sayfan0132433885, Paper, © 2007
Linux Programming by ExampleArnold Robbins0131429647, Paper, ©2004
The Linux® Kernel PrimerClaudia Salzberg, Gordon Fischer, Steven Smolski0131181637, Paper, ©2006
Rapid GUI Programming with Python and QtMark Summerfi eld0132354187, Hard, © 2008
New to the series: Digital Short CutsShort Cuts are short, concise, PDF documents designed specifi cally for busy technical professionals like you. Each Short Cut is tightly focused on a specifi c technology or technical problem. Written by industry experts and best selling authors, Short Cuts are published with you in mind — getting you the technical information that you need — now.
Understanding AJAX: Consuming the Sent Data with XML and JSON Joshua Eichorn 0132337932, Adobe Acrobat PDF, © 2007
Debugging Embedded LinuxChristopher Hallinan0131580132, Adobe Acrobat PDF, © 2007
Using BusyBoxChristopher Hallinan0132335921, Adobe Acrobat PDF, © 2007

Rapid GUI Programmingwith Python and Qt
The Definitive Guide to PyQt Programming
Mark Summerfield
Upper Saddle River, NJ · Boston · Indianapolis · San FranciscoNew York · Toronto · Montreal · London · Munich · Paris · MadridCapetown · Sydney · Tokyo · Singapore · Mexico City
Many of the designations used by manufacturers and sellers to distinguish their products are claimed astrademarks. Where those designations appear in this book, and the publisher was aware of a trademarkclaim, the designations have been printed with initial capital letters or in all capitals.
The author and publisher have taken care in the preparation of this book, but make no expressed or impliedwarranty of any kind and assume no responsibility for errors or omissions. No liability is assumed forincidental or consequential damages in connection with or arising out of the use of the information orprograms contained herein.
The publisher offers excellent discounts on this book when ordered in quantity for bulk purchases orspecial sales, which may include electronic versions and/or custom covers and content particular to yourbusiness, training goals, marketing focus, and branding interests. For more information, please contact:
U.S. Corporate and Government Sales (800) 382-3419 [email protected]
For sales outside the United States, please contact:
International Sales [email protected]
Visit us on the Web: www.prenhallprofessional.com
Library of Congress Cataloging-in-Publication Data
Summerfield, Mark Rapid GUI programming with Python and Qt : the definitive guide to PyQt programming / MarkSummerfield. p. cm. Includes bibliographical references and index. ISBN 978-0-13-235418-9 (hardcover : alk. paper)1. Qt (Electronic resource) 2. Graphical user interfaces (Computer systems) 3. Python (Computerprogram language) I. Title.
QA76.9.U83S89 2007 005.1’2—dc22
2007034852
Copyright © 2008 Pearson Education, Inc.
All rights reserved. Printed in the United States of America.
Trolltech®, Qt® and the Trolltech logo are registered trademarks of Trolltech ASA.
ISBN-13: 978-0-13-235418-9
ISBN-10: 0-13-235418-7
Text printed in the United States on recycled paper at Edwards Brothers in Ann Arbor, Michigan.
First printing, October 2007

This book is dedicated to
Andrea Summerfield

This page intentionally left blank
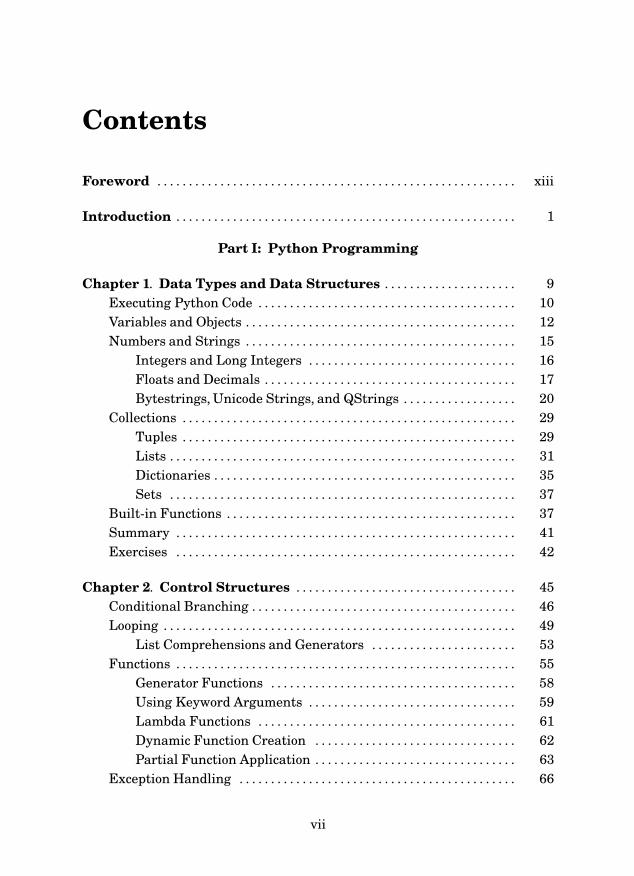
Contents
Foreword . . . . . . . . . . . . . . . . . . . . . . . . . . . . . . . . . . . . . . . . . . . . . . . . . . . . . . . . . xiii
Introduction . . . . . . . . . . . . . . . . . . . . . . . . . . . . . . . . . . . . . . . . . . . . . . . . . . . . . . 1
Part I: Python Programming
Chapter 1. Data Types and Data Structures . . . . . . . . . . . . . . . . . . . . . 9Executing Python Code . . . . . . . . . . . . . . . . . . . . . . . . . . . . . . . . . . . . . . . . . 10Variables and Objects . . . . . . . . . . . . . . . . . . . . . . . . . . . . . . . . . . . . . . . . . . . 12Numbers and Strings . . . . . . . . . . . . . . . . . . . . . . . . . . . . . . . . . . . . . . . . . . . 15
Integers and Long Integers . . . . . . . . . . . . . . . . . . . . . . . . . . . . . . . . . 16Floats and Decimals . . . . . . . . . . . . . . . . . . . . . . . . . . . . . . . . . . . . . . . . 17Bytestrings, Unicode Strings, and QStrings . . . . . . . . . . . . . . . . . . 20
Collections . . . . . . . . . . . . . . . . . . . . . . . . . . . . . . . . . . . . . . . . . . . . . . . . . . . . . 29Tuples . . . . . . . . . . . . . . . . . . . . . . . . . . . . . . . . . . . . . . . . . . . . . . . . . . . . . 29Lists . . . . . . . . . . . . . . . . . . . . . . . . . . . . . . . . . . . . . . . . . . . . . . . . . . . . . . . 31Dictionaries . . . . . . . . . . . . . . . . . . . . . . . . . . . . . . . . . . . . . . . . . . . . . . . . 35Sets . . . . . . . . . . . . . . . . . . . . . . . . . . . . . . . . . . . . . . . . . . . . . . . . . . . . . . . 37
Built-in Functions . . . . . . . . . . . . . . . . . . . . . . . . . . . . . . . . . . . . . . . . . . . . . . 37Summary . . . . . . . . . . . . . . . . . . . . . . . . . . . . . . . . . . . . . . . . . . . . . . . . . . . . . . 41Exercises . . . . . . . . . . . . . . . . . . . . . . . . . . . . . . . . . . . . . . . . . . . . . . . . . . . . . . 42
Chapter 2. Control Structures . . . . . . . . . . . . . . . . . . . . . . . . . . . . . . . . . . . 45Conditional Branching . . . . . . . . . . . . . . . . . . . . . . . . . . . . . . . . . . . . . . . . . . 46Looping . . . . . . . . . . . . . . . . . . . . . . . . . . . . . . . . . . . . . . . . . . . . . . . . . . . . . . . . 49
List Comprehensions and Generators . . . . . . . . . . . . . . . . . . . . . . . 53Functions . . . . . . . . . . . . . . . . . . . . . . . . . . . . . . . . . . . . . . . . . . . . . . . . . . . . . . 55
Generator Functions . . . . . . . . . . . . . . . . . . . . . . . . . . . . . . . . . . . . . . . 58Using Keyword Arguments . . . . . . . . . . . . . . . . . . . . . . . . . . . . . . . . . 59Lambda Functions . . . . . . . . . . . . . . . . . . . . . . . . . . . . . . . . . . . . . . . . . 61Dynamic Function Creation . . . . . . . . . . . . . . . . . . . . . . . . . . . . . . . . 62Partial Function Application . . . . . . . . . . . . . . . . . . . . . . . . . . . . . . . . 63
Exception Handling . . . . . . . . . . . . . . . . . . . . . . . . . . . . . . . . . . . . . . . . . . . . 66
vii
Summary . . . . . . . . . . . . . . . . . . . . . . . . . . . . . . . . . . . . . . . . . . . . . . . . . . . . . . 72Exercises . . . . . . . . . . . . . . . . . . . . . . . . . . . . . . . . . . . . . . . . . . . . . . . . . . . . . . 72
Chapter 3. Classes and Modules . . . . . . . . . . . . . . . . . . . . . . . . . . . . . . . . . 75Creating Instances . . . . . . . . . . . . . . . . . . . . . . . . . . . . . . . . . . . . . . . . . . . . . 77Methods and Special Methods . . . . . . . . . . . . . . . . . . . . . . . . . . . . . . . . . . . 79
Static Data, and Static Methods and Decorators . . . . . . . . . . . . . 85Example: The Length Class . . . . . . . . . . . . . . . . . . . . . . . . . . . . . . . . . 86Collection Classes . . . . . . . . . . . . . . . . . . . . . . . . . . . . . . . . . . . . . . . . . . 92Example: The OrderedDict Class . . . . . . . . . . . . . . . . . . . . . . . . . . . . 92
Inheritance and Polymorphism . . . . . . . . . . . . . . . . . . . . . . . . . . . . . . . . . . 99Modules and Multifile Applications . . . . . . . . . . . . . . . . . . . . . . . . . . . . . . 104
Using the doctest Module . . . . . . . . . . . . . . . . . . . . . . . . . . . . . . . . . . . 105Summary . . . . . . . . . . . . . . . . . . . . . . . . . . . . . . . . . . . . . . . . . . . . . . . . . . . . . . 107Exercises . . . . . . . . . . . . . . . . . . . . . . . . . . . . . . . . . . . . . . . . . . . . . . . . . . . . . . 108
Part II: Basic GUI Programming
Chapter 4. Introduction to GUI Programming . . . . . . . . . . . . . . . . . . 111A Pop-Up Alert in 25 Lines . . . . . . . . . . . . . . . . . . . . . . . . . . . . . . . . . . . . . . 112An Expression Evaluator in 30 Lines . . . . . . . . . . . . . . . . . . . . . . . . . . . . 116A Currency Converter in 70 Lines . . . . . . . . . . . . . . . . . . . . . . . . . . . . . . . 121Signals and Slots . . . . . . . . . . . . . . . . . . . . . . . . . . . . . . . . . . . . . . . . . . . . . . . 127Summary . . . . . . . . . . . . . . . . . . . . . . . . . . . . . . . . . . . . . . . . . . . . . . . . . . . . . . 136Exercise . . . . . . . . . . . . . . . . . . . . . . . . . . . . . . . . . . . . . . . . . . . . . . . . . . . . . . . 137
Chapter 5. Dialogs . . . . . . . . . . . . . . . . . . . . . . . . . . . . . . . . . . . . . . . . . . . . . . . 139Dumb Dialogs . . . . . . . . . . . . . . . . . . . . . . . . . . . . . . . . . . . . . . . . . . . . . . . . . . 141Standard Dialogs . . . . . . . . . . . . . . . . . . . . . . . . . . . . . . . . . . . . . . . . . . . . . . . 147
Modal OK/Cancel-Style Dialogs . . . . . . . . . . . . . . . . . . . . . . . . . . . . . 148Smart Dialogs . . . . . . . . . . . . . . . . . . . . . . . . . . . . . . . . . . . . . . . . . . . . . . . . . . 154
Modeless Apply/Close-Style Dialogs . . . . . . . . . . . . . . . . . . . . . . . . . 155Modeless “Live” Dialogs . . . . . . . . . . . . . . . . . . . . . . . . . . . . . . . . . . . . 159
Summary . . . . . . . . . . . . . . . . . . . . . . . . . . . . . . . . . . . . . . . . . . . . . . . . . . . . . . 162Exercise . . . . . . . . . . . . . . . . . . . . . . . . . . . . . . . . . . . . . . . . . . . . . . . . . . . . . . . 163
Chapter 6. Main Windows . . . . . . . . . . . . . . . . . . . . . . . . . . . . . . . . . . . . . . . . 165Creating a Main Window . . . . . . . . . . . . . . . . . . . . . . . . . . . . . . . . . . . . . . . 166
Actions and Key Sequences . . . . . . . . . . . . . . . . . . . . . . . . . . . . . . . . . 171Resource Files . . . . . . . . . . . . . . . . . . . . . . . . . . . . . . . . . . . . . . . . . . . . . 172
viii
Creating and Using Actions . . . . . . . . . . . . . . . . . . . . . . . . . . . . . . . . . 174Restoring and Saving the Main Window’s State . . . . . . . . . . . . . . 181
Handling User Actions . . . . . . . . . . . . . . . . . . . . . . . . . . . . . . . . . . . . . . . . . 190Handling File Actions . . . . . . . . . . . . . . . . . . . . . . . . . . . . . . . . . . . . . . 191Handling Edit Actions . . . . . . . . . . . . . . . . . . . . . . . . . . . . . . . . . . . . . . 197Handling Help Actions . . . . . . . . . . . . . . . . . . . . . . . . . . . . . . . . . . . . . 200
Summary . . . . . . . . . . . . . . . . . . . . . . . . . . . . . . . . . . . . . . . . . . . . . . . . . . . . . . 201Exercise . . . . . . . . . . . . . . . . . . . . . . . . . . . . . . . . . . . . . . . . . . . . . . . . . . . . . . . 202
Chapter 7. Using Qt Designer . . . . . . . . . . . . . . . . . . . . . . . . . . . . . . . . . . . . 205Designing User Interfaces . . . . . . . . . . . . . . . . . . . . . . . . . . . . . . . . . . . . . . 208Implementing Dialogs . . . . . . . . . . . . . . . . . . . . . . . . . . . . . . . . . . . . . . . . . . 216Testing Dialogs . . . . . . . . . . . . . . . . . . . . . . . . . . . . . . . . . . . . . . . . . . . . . . . . . 221Summary . . . . . . . . . . . . . . . . . . . . . . . . . . . . . . . . . . . . . . . . . . . . . . . . . . . . . . 223Exercise . . . . . . . . . . . . . . . . . . . . . . . . . . . . . . . . . . . . . . . . . . . . . . . . . . . . . . . 224
Chapter 8. Data Handling and Custom File Formats . . . . . . . . . . . . 227Main Window Responsibilities . . . . . . . . . . . . . . . . . . . . . . . . . . . . . . . . . . 229Data Container Responsibilities . . . . . . . . . . . . . . . . . . . . . . . . . . . . . . . . . 235Saving and Loading Binary Files . . . . . . . . . . . . . . . . . . . . . . . . . . . . . . . . 240
Writing and Reading Using QDataStream . . . . . . . . . . . . . . . . . . . 240Writing and Reading Using the pickle Module . . . . . . . . . . . . . . . 246
Saving and Loading Text Files . . . . . . . . . . . . . . . . . . . . . . . . . . . . . . . . . . 249Writing and Reading Using QTextStream . . . . . . . . . . . . . . . . . . . 250Writing and Reading Using the codecs Module . . . . . . . . . . . . . . . 255
Saving and Loading XML Files . . . . . . . . . . . . . . . . . . . . . . . . . . . . . . . . . . 256Writing XML . . . . . . . . . . . . . . . . . . . . . . . . . . . . . . . . . . . . . . . . . . . . . . 256Reading and Parsing XML with PyQt’s DOM Classes . . . . . . . . 259Reading and Parsing XML with PyQt’s SAX Classes . . . . . . . . . 262
Summary . . . . . . . . . . . . . . . . . . . . . . . . . . . . . . . . . . . . . . . . . . . . . . . . . . . . . . 265Exercise . . . . . . . . . . . . . . . . . . . . . . . . . . . . . . . . . . . . . . . . . . . . . . . . . . . . . . . 266
Part III: Intermediate GUI Programming
Chapter 9. Layouts and Multiple Documents . . . . . . . . . . . . . . . . . . . . 269Layout Policies . . . . . . . . . . . . . . . . . . . . . . . . . . . . . . . . . . . . . . . . . . . . . . . . . 270Tab Widgets and Stacked Widgets . . . . . . . . . . . . . . . . . . . . . . . . . . . . . . . 272
Extension Dialogs . . . . . . . . . . . . . . . . . . . . . . . . . . . . . . . . . . . . . . . . . . 276Splitters . . . . . . . . . . . . . . . . . . . . . . . . . . . . . . . . . . . . . . . . . . . . . . . . . . . . . . . 280Single Document Interface (SDI) . . . . . . . . . . . . . . . . . . . . . . . . . . . . . . . . 283
ix
Multiple Document Interface (MDI) . . . . . . . . . . . . . . . . . . . . . . . . . . . . . 290Summary . . . . . . . . . . . . . . . . . . . . . . . . . . . . . . . . . . . . . . . . . . . . . . . . . . . . . . 300Exercise . . . . . . . . . . . . . . . . . . . . . . . . . . . . . . . . . . . . . . . . . . . . . . . . . . . . . . . 301
Chapter 10. Events, the Clipboard, and Drag and Drop . . . . . . . . . 303The Event-Handling Mechanism . . . . . . . . . . . . . . . . . . . . . . . . . . . . . . . . 303Reimplementing Event Handlers . . . . . . . . . . . . . . . . . . . . . . . . . . . . . . . . 305Using the Clipboard . . . . . . . . . . . . . . . . . . . . . . . . . . . . . . . . . . . . . . . . . . . . 310Drag and Drop . . . . . . . . . . . . . . . . . . . . . . . . . . . . . . . . . . . . . . . . . . . . . . . . . 312
Handling Custom Data . . . . . . . . . . . . . . . . . . . . . . . . . . . . . . . . . . . . . 313Summary . . . . . . . . . . . . . . . . . . . . . . . . . . . . . . . . . . . . . . . . . . . . . . . . . . . . . . 317Exercise . . . . . . . . . . . . . . . . . . . . . . . . . . . . . . . . . . . . . . . . . . . . . . . . . . . . . . . 318
Chapter 11. Custom Widgets . . . . . . . . . . . . . . . . . . . . . . . . . . . . . . . . . . . . . 321Using Widget Style Sheets . . . . . . . . . . . . . . . . . . . . . . . . . . . . . . . . . . . . . . 322Creating Composite Widgets . . . . . . . . . . . . . . . . . . . . . . . . . . . . . . . . . . . . 325Subclassing Built-in Widgets . . . . . . . . . . . . . . . . . . . . . . . . . . . . . . . . . . . . 326Subclassing QWidget . . . . . . . . . . . . . . . . . . . . . . . . . . . . . . . . . . . . . . . . . . . 328
Example: A Fraction Slider . . . . . . . . . . . . . . . . . . . . . . . . . . . . . . . . . 331Example: A Flow-Mixing Widget . . . . . . . . . . . . . . . . . . . . . . . . . . . 339
Summary . . . . . . . . . . . . . . . . . . . . . . . . . . . . . . . . . . . . . . . . . . . . . . . . . . . . . . 345Exercise . . . . . . . . . . . . . . . . . . . . . . . . . . . . . . . . . . . . . . . . . . . . . . . . . . . . . . . 346
Chapter 12. Item-Based Graphics . . . . . . . . . . . . . . . . . . . . . . . . . . . . . . . . 349Custom and Interactive Graphics Items . . . . . . . . . . . . . . . . . . . . . . . . . 351Animation and Complex Shapes . . . . . . . . . . . . . . . . . . . . . . . . . . . . . . . . . 368Summary . . . . . . . . . . . . . . . . . . . . . . . . . . . . . . . . . . . . . . . . . . . . . . . . . . . . . . 378Exercise . . . . . . . . . . . . . . . . . . . . . . . . . . . . . . . . . . . . . . . . . . . . . . . . . . . . . . . 379
Chapter 13. Rich Text and Printing . . . . . . . . . . . . . . . . . . . . . . . . . . . . . 381Rich Text Editing . . . . . . . . . . . . . . . . . . . . . . . . . . . . . . . . . . . . . . . . . . . . . . . 382
Using QSyntaxHighlighter . . . . . . . . . . . . . . . . . . . . . . . . . . . . . . . . . 382A Rich Text Line Edit . . . . . . . . . . . . . . . . . . . . . . . . . . . . . . . . . . . . . . 389
Printing Documents . . . . . . . . . . . . . . . . . . . . . . . . . . . . . . . . . . . . . . . . . . . . 398Printing Images . . . . . . . . . . . . . . . . . . . . . . . . . . . . . . . . . . . . . . . . . . . . 400Printing Documents Using HTML and QTextDocument . . . . . . 401Printing Documents Using QTextCursor and QTextDocument 403Printing Documents Using QPainter . . . . . . . . . . . . . . . . . . . . . . . . 407
Summary . . . . . . . . . . . . . . . . . . . . . . . . . . . . . . . . . . . . . . . . . . . . . . . . . . . . . . 411Exercise . . . . . . . . . . . . . . . . . . . . . . . . . . . . . . . . . . . . . . . . . . . . . . . . . . . . . . . 412
x
Chapter 14. Model/View Programming . . . . . . . . . . . . . . . . . . . . . . . . . . 413Using the Convenience Item Widgets . . . . . . . . . . . . . . . . . . . . . . . . . . . . 415Creating Custom Models . . . . . . . . . . . . . . . . . . . . . . . . . . . . . . . . . . . . . . . . 423
Implementing the View Logic . . . . . . . . . . . . . . . . . . . . . . . . . . . . . . . 424Implementing the Custom Model . . . . . . . . . . . . . . . . . . . . . . . . . . . 427
Creating Custom Delegates . . . . . . . . . . . . . . . . . . . . . . . . . . . . . . . . . . . . . 436Summary . . . . . . . . . . . . . . . . . . . . . . . . . . . . . . . . . . . . . . . . . . . . . . . . . . . . . . 442Exercise . . . . . . . . . . . . . . . . . . . . . . . . . . . . . . . . . . . . . . . . . . . . . . . . . . . . . . . 443
Chapter 15. Databases . . . . . . . . . . . . . . . . . . . . . . . . . . . . . . . . . . . . . . . . . . . 445Connecting to the Database . . . . . . . . . . . . . . . . . . . . . . . . . . . . . . . . . . . . . 446Executing SQL Queries . . . . . . . . . . . . . . . . . . . . . . . . . . . . . . . . . . . . . . . . . 446Using Database Form Views . . . . . . . . . . . . . . . . . . . . . . . . . . . . . . . . . . . . 451Using Database Table Views . . . . . . . . . . . . . . . . . . . . . . . . . . . . . . . . . . . . 457Summary . . . . . . . . . . . . . . . . . . . . . . . . . . . . . . . . . . . . . . . . . . . . . . . . . . . . . . 470Exercise . . . . . . . . . . . . . . . . . . . . . . . . . . . . . . . . . . . . . . . . . . . . . . . . . . . . . . . 471
Part IV: Advanced GUI Programming
Chapter 16. Advanced Model/View Programming . . . . . . . . . . . . . . . 475Custom Views . . . . . . . . . . . . . . . . . . . . . . . . . . . . . . . . . . . . . . . . . . . . . . . . . . 476Generic Delegates . . . . . . . . . . . . . . . . . . . . . . . . . . . . . . . . . . . . . . . . . . . . . . 483Representing Tabular Data in Trees . . . . . . . . . . . . . . . . . . . . . . . . . . . . . 492Summary . . . . . . . . . . . . . . . . . . . . . . . . . . . . . . . . . . . . . . . . . . . . . . . . . . . . . . 505Exercise . . . . . . . . . . . . . . . . . . . . . . . . . . . . . . . . . . . . . . . . . . . . . . . . . . . . . . . 505
Chapter 17. Online Help and Internationalization . . . . . . . . . . . . . . 509Online Help . . . . . . . . . . . . . . . . . . . . . . . . . . . . . . . . . . . . . . . . . . . . . . . . . . . . 510Internationalization . . . . . . . . . . . . . . . . . . . . . . . . . . . . . . . . . . . . . . . . . . . . 512Summary . . . . . . . . . . . . . . . . . . . . . . . . . . . . . . . . . . . . . . . . . . . . . . . . . . . . . . 519Exercise . . . . . . . . . . . . . . . . . . . . . . . . . . . . . . . . . . . . . . . . . . . . . . . . . . . . . . . 520
Chapter 18. Networking . . . . . . . . . . . . . . . . . . . . . . . . . . . . . . . . . . . . . . . . . 521Creating a TCP Client . . . . . . . . . . . . . . . . . . . . . . . . . . . . . . . . . . . . . . . . . . 523Creating a TCP Server . . . . . . . . . . . . . . . . . . . . . . . . . . . . . . . . . . . . . . . . . 529Summary . . . . . . . . . . . . . . . . . . . . . . . . . . . . . . . . . . . . . . . . . . . . . . . . . . . . . . 534Exercise . . . . . . . . . . . . . . . . . . . . . . . . . . . . . . . . . . . . . . . . . . . . . . . . . . . . . . . 534
xi
Chapter 19. Multithreading . . . . . . . . . . . . . . . . . . . . . . . . . . . . . . . . . . . . . . 537Creating a Threaded Server . . . . . . . . . . . . . . . . . . . . . . . . . . . . . . . . . . . . 539Creating and Managing Secondary Threads . . . . . . . . . . . . . . . . . . . . . 544Implementing a Secondary Thread . . . . . . . . . . . . . . . . . . . . . . . . . . . . . . 552Summary . . . . . . . . . . . . . . . . . . . . . . . . . . . . . . . . . . . . . . . . . . . . . . . . . . . . . . 557Exercise . . . . . . . . . . . . . . . . . . . . . . . . . . . . . . . . . . . . . . . . . . . . . . . . . . . . . . . 558This Is Not Quite the End . . . . . . . . . . . . . . . . . . . . . . . . . . . . . . . . . . . . . . . 559
Appendix A. Installing . . . . . . . . . . . . . . . . . . . . . . . . . . . . . . . . . . . . . . . . . . . 561Installing on Windows . . . . . . . . . . . . . . . . . . . . . . . . . . . . . . . . . . . . . . . . . . 561Installing on Mac OS X . . . . . . . . . . . . . . . . . . . . . . . . . . . . . . . . . . . . . . . . . 566Installing on Linux and Unix . . . . . . . . . . . . . . . . . . . . . . . . . . . . . . . . . . . 570
Appendix B. Selected PyQt Widgets . . . . . . . . . . . . . . . . . . . . . . . . . . . . . 575
Appendix C. Selected PyQt Class Hierarchies . . . . . . . . . . . . . . . . . . . 581
Index . . . . . . . . . . . . . . . . . . . . . . . . . . . . . . . . . . . . . . . . . . . . . . . . . . . . . . . . . . . . . . 585
xii
Foreword
As PyQt’s creator, I’m delighted to see that this book has been written. Al-though I served as one of the book’s technical reviewers, I’m happy to confessthat I learned a few things myself.
The PyQt documentation covers the APIs of all the PyQt classes. This bookshows you how to use all those classes, how to combine them to create dialogs,main windows, and entire applications—all of which look good and work well,with no arbitrary limits, and using a programming language that is a joyto use.
What I particularly like about the book is that the examples aren’t trivial onesdesigned to illustrate a simple point, but are potentially useful in their ownright. The way that different approachesare considered will reward the readerwho wants to develop a deeper understanding of how to apply PyQt to thedevelopment of large scale, production quality applications.
I began the PyQt story back in the late 1990s. I had been using Tcl/Tk forsome time, but I felt that Tk applications looked ugly, especially when I sawwhat had been achieved with the first version of KDE. I had wanted to switchto Python, and so I thought I would combine the change of language with achange of GUI library.
Initially I used some wrappers that had been written using SWIG, but I con-cluded that I could produce a more suitable wrapper tool myself. I set to workcreating SIP, and released PyQt 0.1 supporting Qt 1.41 in November 1998.Development has continued regularly ever since, both to keep up with new re-leases of Qt and to broaden the scope of PyQt with, for example, the additionof support tools and improved documentation. By 2000, PyQt 2.0 supportedQt 2.2 on both Linux and Windows. Qt 3 support appeared in 2001, andMac OS X support in 2002. The PyQt4 series began with PyQt 4.0 in June 2006with support for Qt 4.
My primary goal has always been to allow Python and Qt to work together ina way that feels natural to Python programmers, while allowing them to doanything they want in Python that can be done in C++. The key to achievingthis was the development of SIP. This gave me a specialized code generatorover which I had complete control and ensures that Python and Qt will alwaysfit snugly together.
The essential process of developing and maintaining PyQt is now well estab-lished. Much of the work is now automated,which means that keeping up with
xiii
new releases of Qt from Trolltech is no longer the problem it once was, and en-surs that PyQt will continue for years to come.
It’s been very gratifying to watch the growth of the PyQt community over theyears. If this book is part of your introduction to PyQt, then welcome!
— Phil ThompsonWimborne, Dorset, U.K.
August 25, 2007
xiv
Introduction
This book teaches how to write GUI applications using the Python program-ming language and the Qt application development framework. The onlyessential prior knowledge is that you can program in some object-oriented pro-gramming language, such as C++, C#, Java, or of course, Python itself. For therich text chapter, some familiarity with HTML and with regular expressions isassumed, and the databases and threading chapters assume some basic knowl-edge of those topics. A knowledge of GUI programming is not required, sinceall the key concepts are covered.
The book will be useful to people who program professionally as part of theirjob, whether as full-time software developers, or those from other disciplines,including scientists and engineers, who need to do some programming in sup-port of their work. It is also suitable for undergraduate and post-graduate stu-dents, particularly those doing courses or research that includes a substantialcomputing element. The exercises (with solutions) are provided especially tohelp students.
Python is probably the easiest to learn and nicest scripting language inwidespread use, and Qt is probably the best library for developing GUI applica-tions. The combination of Python and Qt, “PyQt”, makes it possible to developapplications on any supported platform and run them unchanged on all thesupported platforms—for example, all modern versions of Windows, Linux,Mac OS X, and most Unix-based systems. No compilation is required thanksto Python being interpreted, and no source code changes to adapt to differentoperating systems are required thanks to Qt abstracting away the platform-specific details. We only have to copy the source file or files to a target machinethat has both Python and PyQt installed and the application will run.
If you are new to Python: Welcome! You are about to discover a language thatis clear to read and write, and that is concise without being cryptic. Pythonsupports many programming paradigms, but because our focus is on GUIprogramming, we will take an object-oriented approach everywhere except inthe very early chapters.
Python is a very expressive language, which means that we can usually writefar fewer lines of Python code than would be required for an equivalent appli-cation written in, say, C++ or Java. This makes it possible to show some smallbut complete examples throughout the text, and makes PyQt an ideal tool forrapidly and easily developing GUI applications, whether for prototyping or forproduction use.
1
2 Introduction
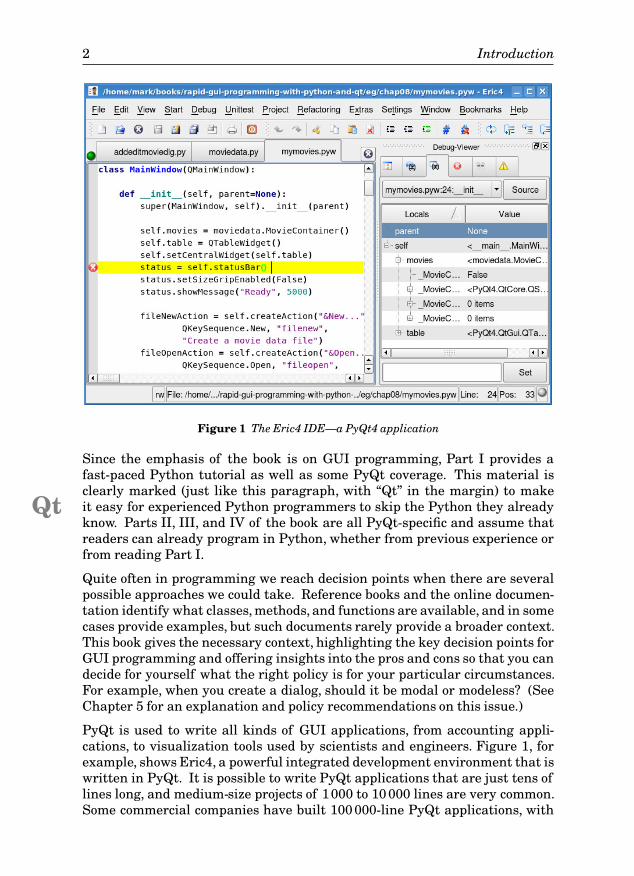
Figure 1 The Eric4 IDE—a PyQt4 application
Since the emphasis of the book is on GUI programming, Part I provides afast-paced Python tutorial as well as some PyQt coverage. This material isclearly marked (just like this paragraph, with “Qt” in the margin) to makeit easy for experienced PythonQt programmers to skip the Python they alreadyknow. Parts II, III, and IV of the book are all PyQt-specific and assume thatreaders can already program in Python, whether from previous experience orfrom reading Part I.
Quite often in programming we reach decision points when there are severalpossible approaches we could take. Reference books and the online documen-tation identify what classes, methods, and functions are available, and in somecases provide examples, but such documents rarely provide a broader context.This book gives the necessary context, highlighting the key decision points forGUI programming and offering insights into the pros and cons so that you candecide for yourself what the right policy is for your particular circumstances.For example, when you create a dialog, should it be modal or modeless? (SeeChapter 5 for an explanation and policy recommendations on this issue.)
PyQt is used to write all kinds of GUI applications, from accounting appli-cations, to visualization tools used by scientists and engineers. Figure 1, forexample, shows Eric4, a powerful integrated development environment that iswritten in PyQt. It is possible to write PyQt applications that are just tens oflines long, and medium-size projects of 1000 to 10000 lines are very common.Some commercial companies have built 100000-line PyQt applications, with
Introduction 3
programming teams varying in size from just one person to more than a dozenpeople. Many in-house tools are written using PyQt, but because these are of-ten used to gain competitive advantage, the companies involved generally donot permit their use of PyQt to be made public. PyQt is also widely used in theopen source world, with games, utilities, visualization tools, and IDEs all writ-ten using it.
This book is specifically about PyQt4, the Python bindings for the Qt 4 C++application development framework.★ PyQt4 is provided in the form of tenPython modules which between them contain around 400 classes and about6000 methods and functions. All the example programs have been tested onWindows, Linux, and Mac OS X, using Python 2.5, Qt 4.2, and PyQt 4.2, andadditionally on Windows and Linux using Qt 4.3 and PyQt 4.3. Backporting toearlier versions is possible in some cases, but we recommend using the mostup-to-date versions of Python, Qt, and PyQt.
Python, PyQt, and Qt can be used free of charge for noncommercial purposes,but the license used by Python is different from that used by PyQt and Qt.Python is available with a very liberal license that allows it to be used to de-velop both commercial and noncommercial applications. Both PyQt and Qt aredual-licensed: This essentially allows them to be used to develop noncommer-cial applications—which must in turn be licensed using an acceptable opensource license such as the GNU General Public License (GPL); or to be used todevelop commercial applications—in this case, a commercial PyQt license anda commercial Qt license must be purchased.
The Structure of the Book
The book is divided into four parts. Part I is primarily a rapid conversion courseaimed at non-Python programmers who are familiar with an object-orientedlanguage, although it also has some (clearly marked) PyQt content. Becausethe core Python language is mostly simple and is quite small, these chapterscan teach the basics of Python to a sufficient extent that real Python applica-tions can be written.
If you think that you can pick up the Python syntax simply through readingit, you might be tempted to skip Part I and dive straight into the GUI pro-gramming that begins in Part II. The early chapters in Part II include back-references to the relevant pages in Part I to support readers who choose thisapproach. However, even for readers familiar with Python, we recommendreading about QString in Chapter 1. If you are unfamiliar with partial functionapplication (currying), it is important to read the subsection that covers this inChapter 2, since this technique is sometimes used in GUI programming.
★There are also Python bindings for the older Qt 3 library, but there is no reason to use that libraryfor new projects, especially since Qt 4 offers far more functionality and is easier to use.
4 Introduction
Part II begins by showing three tiny PyQt GUI applications to give an initialimpression of what PyQt programming is like. It also explains some of thefundamental concepts involved in GUI programming, including PyQt’s high-level signals and slots communication mechanism. Chapter 5 shows how tocreate dialogs and how to create and lay out widgets (“controls” in Windows-speak—the graphical elements that make up a user interface such as buttons,listboxes, and such) in a dialog. Dialogs are central to GUI programming:MostGUI applications have a single main window, and dozens or scores of dialogs,so this topic is covered in depth.
After the dialogs chapter comes Chapter 6, which covers main windows,including menus, toolbars, dock windows, and keyboard shortcuts, as well asloading and saving application settings. Part II’s final chapters show how tocreate dialogs using Qt Designer, Qt’s visual design tool, and how to save datain binary, text, and XML formats.
Part III gives deeper coverage of some of the topics covered in Part II, and in-troduces many new topics. Chapter 9 shows how to lay out widgets in quitesophisticated ways, and how to handle multiple documents. Chapter 10 coverslow-level event handlers,and how to use the clipboard as well as drag and drop,text, HTML, and binary data. Chapter 11 shows how to modify and subclassexisting widgets, and how to create entirely new widgets from scratch, withcomplete control over their appearance and behavior. This chapter also showshow to do basic graphics. Chapter 12 shows how to use Qt 4.2’s new graphicsview architecture,which is particularly suited to handling large numbers of in-dependent graphical objects. Qt’s HTML-capable rich text engine is covered inChapter 13. This chapter also covers printing both to paper and to PDF files.
Part III concludes with two chapters on model/view programming: Chapter 14introduces the subject and shows how to use Qt’s built-in views and how tocreate custom data models and custom delegates, and Chapter 15 shows howto use the model/view architecture to perform database programming.
Part IV continues the model/view theme, with coverage of three differentadvanced model/view topics in Chapter 16. The first section of Chapter 17describes the techniques that can be used for providing online help, and thesecond section explains how to internationalize an application, including howto use Qt’s translation tools to create translation files. The Python standardlibrary provides its own classes for networking and for threading, but in thelast two chapters of Part IV we show how to do networking and threading us-ing PyQt’s classes.
Appendix A explains where Python, PyQt, and Qt can be obtained, and how toinstall them on Windows, Mac OS X, and Linux. PyQt is much easier to learnif you install it and try out some of the exercises, and if you inspect some ofthe example code. Appendix B presents screenshots and brief descriptionsof selected PyQt widgets; this is helpful for those new to GUI programming.Appendix C presents diagrams of some of PyQt’s key class hierarchies; this
Introduction 5
is useful for getting to know what classes PyQt has to offer and how theyare related.
If you have never used Python before, you should begin by reading Chapters1–6 in order. If you already know Python, at least read the string policy (inbullet points on page 28), and skim the material in Chapter 2 (apart from thefirst section, which you’ll know well). Make sure that you are comfortable withlambda and partial function application,both of which are covered in Chapter 2.It is probably also worth skimming Chapter 3 as well. Then read Chapters 4,5, and 6 in order.
Once you have covered the first six chapters, you have covered the essentialsof Python and the fundamentals of PyQt.
Chapter 7 is useful if you want to know how to create dialogs using a visualdesign tool rather than purely by hand coding, something that can save a lotof time. For file handling, at least read the first three sections of Chapter 8. Ifyou plan to write and read text files, also read Chapter 8’s fourth section, andsimilarly the fifth section if you are going to use XML files.
For Part III, at the least read Chapter 10’s first section, on event handling, andall of Chapter 11. Chapter 12 and the first section of Chapter 13 assume thatyou have read about PyQt’s event handling,and that you have read Chapter 11.Chapters 9 and 14 can be read stand-alone in this part,but Chapter 15 assumesthat you have read Chapter 14.
In Part IV, Chapter 16 assumes that you have read Chapters 14 and 15, but theother chapters can be read independently.
If you find errors in the text or in the examples, or have other comments,please write to [email protected] quoting “PyQt book” in the subject line. Thebook’s home page, where any corrections will be published, and from where theexamples and exercise solutions can be downloaded, is http://www.qtrac.eu/
pyqtbook.html.
If you want to participate in the PyQt community, it is worthwhile joining themailing list. Go to http://www.riverbankcomputing.com/mailman/listinfo/pyqt tofind a link to the archive, so that you can see what the mailing list is like, andalso for a form for joining. Python also has mailing lists and other communityactivities. For these, go to http://www.python.org/community.
Acknowledgments
I have many people to thank, and I will begin with those who have beenintimately involved with the book.
Jasmin Blanchette is a senior software developer at Trolltech, a Qt expert, anda fine editor and writer in his own right. I have cowritten two C++/Qt bookswith him. Jasmin has made a huge number of suggestions and criticisms thathave immensely improved the quality of this book.
6 Introduction
David Boddie, Trolltech’s documentation manager, is an active PyQt opensource developer who has made many contributions to PyQt itself. His inputhas helped ensure that I have covered everything necessary, and done so in asensible order.
Richard Chamberlain is cofounder and chief technology officer of Jadu Ltd., acontent management company. His feedback and insights have helped ensurethat the book is as broadly accessible as possible. He has also helped refine andimprove the code used in the examples and exercises.
Trenton Schulz is a Trolltech developer who has been a valuable reviewer ofmy previous books. For this book, he has brought his Python and Qt knowledgeto bear, giving considerable feedback on the manuscript. Along with Richard,he also ensured that Mac OS X users were never forgotten. In addition, hespotted many subtle errors that I had missed.
Phil Thompson is PyQt’s creator and maintainer. He has been supportive ofthe book from the start, even adding features and improvements to PyQt asa direct result of discussions we have had regarding the book. He has madenumerous suggestions for the book’s improvement, and corrected manymistakes and misunderstandings.
Special thanks to Samuel Rolland, who let me loose on his Mac laptop, to installPyQt, test the examples, and take screenshots.
Thanks are also due to Guido van Rossum, creator of Python, as well as to thewider Python community who have contributed so much to make Python, andespecially its libraries, so useful and enjoyable to use.
Thanks also to Trolltech, for developing and maintaining Qt, and in particularto the Trolltech developers both past and present, many of whom I have hadthe pleasure of working with,and who ensure that Qt is the best cross-platformGUI development framework in existence.
Particular thanks to Jeff Kingston, creator of the Lout typesetting language.I use Lout for all my books and for most of my other writing projects. Overthe years, Jeff has made many improvements and added numerous features toLout in response to feedback from users, including many that I have asked formyself. Thanks also to James Cloos who created the condensed version of theDejaVu Sans Mono font (itself derived from Jim Lyles’ Vera font) from whichthis book’s monospaced font is derived.
The publisher, in the person of Editor-in-Chief Karen Gettman,was supportiveof this book from the very beginning. And special thanks to my editor, DebraWilliams-Cauley, for her support, and for making the entire process as smoothas possible. Thanks also to Lara Wysong who managed the production processso well, and to the proofreader, Audrey Doyle, who did such fine work.
Last but not least, I want to acknowledge my wife, Andrea. Her love, loyalty,and support always give me strength and hope.
Part I
Python Programming

This page intentionally left blank
Data Types and Data Structures
11 ● Executing Python Code
● Variables and Objects
● Numbers and Strings
● Collections
● Built-in Functions
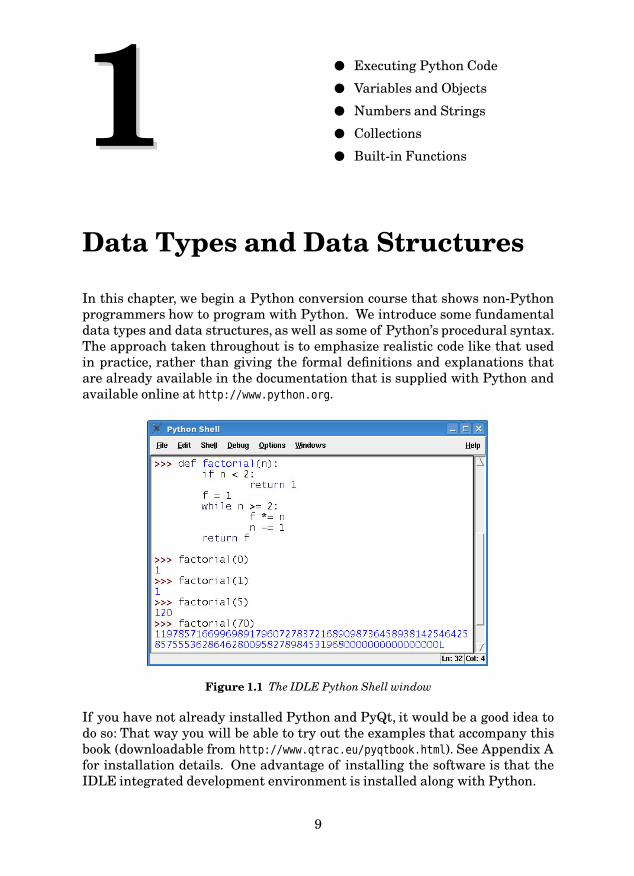
In this chapter, we begin a Python conversion course that shows non-Pythonprogrammers how to program with Python. We introduce some fundamentaldata types and data structures, as well as some of Python’s procedural syntax.The approach taken throughout is to emphasize realistic code like that usedin practice, rather than giving the formal definitions and explanations thatare already available in the documentation that is supplied with Python andavailable online at http://www.python.org.
Figure 1.1 The IDLE Python Shell window
If you have not already installed Python and PyQt, it would be a good idea todo so: That way you will be able to try out the examples that accompany thisbook (downloadable from http://www.qtrac.eu/pyqtbook.html). See Appendix Afor installation details. One advantage of installing the software is that theIDLE integrated development environment is installed along with Python.
9
10 Introduction
The IDLE Development Environment
The full installation of Python includes IDLE, a basic but very use-ful integrated development environment. When IDLE is launched (clickStart→All Programs→Python 2.x→IDLE on Windows, or click Finder→Applica-tions→MacPython 2.x→IDLE on Mac OS X, or run idle & in a console on Linux),it presents its Python Shell window.
As the screenshot in Figure 1.1 shows, IDLE has a rather retro Windows 95look. This is because it is written in Tkinter rather than in PyQt. We’vechosen to use IDLE because IDLE comes as standard with Python and isvery simple to learn and use. If you want to use a much more powerful andmodern-looking IDE, you might prefer Eric4 which is written in PyQt, orone of the other Python IDEs that are available. However, if you are new toPython, we recommend that you start out with the simpler IDLE, and onceyou are more experienced with PyQt, then trying the other IDEs to see if youprefer one of them. And of course, you could simply use a plain text editorand debug using print statements and not use an IDE at all.
IDLE provides three key facilities: the ability to enter Python expressionsand code and to see the results directly in the Python Shell; a code editorthat provides Python-specific color syntax highlighting; and a debuggerthat can be used to step through code to help identify and kill bugs. ThePython Shell is especially useful for trying out simple algorithms, snippetsof code,and regular expressions,and can also be used as a very powerful andflexible calculator.
Executing Python Code
Before we can really explore the Python language we need to know how toexecute Python code. We will show this by reviewing a tiny example programthat is just one line long.
Chapter 1. Data Types and Data Structures
We must use a plain text editor for working with Python files.★ On Windows itis possible to use Notepad,but IDLE includes a suitable Python editor designedspecifically for editing Python code:Simply start IDLE and then click File→NewWindow.
We will type the following line into a file, called hello.py:
print "Hello World"
Note that no semicolon is necessary: In Python newline acts as a statementseparator. Also, we do not need a newline, “\n”, in the string, since print
automatically adds a newline unless we suppress it with a trailing comma.
★The programs in this book are written using ASCII characters, with escape sequences where Uni-code is required. It is possible to use Latin-1, UTF-8, or other encodings for strings and commentsin Python programs, as explained in the documentation under “Encoding declarations”.
Executing Python Code 11
Assuming that we have saved the code in the file hello.py (in the directoryC:\pyqt\chap01 if using Windows), we can start up a console (click Start→All Pro-grams→Accessories→Console on Windows XP—sometimesConsole is called Com-mand Prompt; or run Terminal.app from /Applications/Utilities on Mac OS X),change to that directory, and execute the program like this:
C:\>cd c:\pyqt\chap01
C:\pyqt\chap01>hello.py
As long as Python is correctly installed, Windows will recognize the .py fileextension and give the file to python.exe to execute. The program will print“Hello World” on the console as we would expect.★
On Mac OS X and Linux we must explicitly run the interpreter by typing itsname and the file’s name at the console’s prompt, like this:
% python hello.py
This will work providing that Python is installed and in your PATH. Alternative-ly, for Linux and Mac OS X, we can add an additional “shebang” (shell execute)comment line which tells the operating system to use a Python interpreter,making the hello.py file two lines long:
#!/usr/bin/env python
print "Hello World"
For this to work on Mac OS X and Linux, the file’s permissions must be setcorrectly. For example, at the console prompt in the same directory as the file,enter chmod +x hello.py to make the file executable.
Python comments start with “#” and continue until the end of the line. Thismeans that it is perfectly safe to add the “shebang” line to all Python programs,since the comment is ignored on Windows but on Linux it tells the operatingsystem to execute the file using a Python interpreter. Appendix A shows howto associate the Python interpreter with .py and .pyw files on Mac OS X.
When we speak of executing a Python program, what happens behind thescenes is that Python reads the .py (or .pyw) file into memory, and parses it, toget a bytecode program that it then goes on to execute. For each module that isimported by the program, Python first checks to see whether there is a precom-piled bytecode version (in a .pyo or .pyc file) that has a timestamp which corre-sponds to its .py file. If there is, Python uses the bytecode version; otherwise, itparses the module’s .py file, saves it into a .pyc file, and uses the bytecode it justgenerated. So, unlike Java, we don’t have to explicitly bytecode-compile anymodules, whether they are supplied with Python or are ones we have writtenourselves. And in most Python installations, the supplied modules are com-
★Mac OS X users note that whenever we refer to a console, this is the same as a Mac Terminal.
12 Chapter 1. Data Types and Data Structures
piled as part of the installation process so as to avoid having to compile themwhenever a Python application that uses them is run.
Variables and Objects
In most programming languages, including C++ and Java, we must declareeach variable, specifying its type, before it can be used. This is called statictyping, because the compiler knows at compile time what type each variable is.Python, like most very high level languages, uses a different approach: Vari-ables have no type restrictions (dynamic typing), and they don’t need to bedeclared.
We could learn about Python’s variables and identifiers by creating andexecuting a file, as we did with hello.py in the preceding section. But for tryingout small code snippets we don’t need to create a file at all. We can just enterthe lines directly in the IDLE Python Shell window at the >>> prompt:
>>> x = 71>>> y = "Dove"
The whitespace around the assignment operator = is optional but is includedbecause it makes the code easier to read. As a matter of style we will alwaysput one space before and after binary operators. On the other hand, it isimportant that each statement occupies its own line and has no extraneousleading whitespace. This is because Python uses indentation and line breaksto signify its block structure, rather than the braces and semicolons used bymany other programming languages.
Now we are ready to review what the two lines actually do. The first linecreates an object of type int and binds the name x to it.★ The second line createsan object of type str (an 8-bit string type) and binds the name y to it.
Some Python programmers refer to names (such as the x and y used earlier),as object references since they refer to objects rather than being objects in theirown right. For basic data types like int and str it makes no difference whetherwe see their variables as “objects” or as “object references”; they behave in thesame way as they do in other programming languages:
>>> x = 82>>> x += 7>>> x89
Later on we will see cases where the fact that Python variables are Lists
☞ 31
objectreferences makes a difference.
★This is similar to the Java assignment, Integer x = new Integer(71); for C++ a near-equivalentwould be int xd = 71; int &x = xd;.
Variables and Objects 13
Functions, Methods, and Operators Terminology
The term function is used to refer to a subroutine that can be executedindependently, and the term method is used to refer to a function that canonly be executed when bound to an object, that is, called on an instance of aparticular class.
An operator may be independent or it may be bound to an object, but unlikefunctions and methods, operators do not use parentheses. Operators thatare represented by symbols such as +, *, and < are rather obviously calledoperators, but operators that have names such as del and print are oftencalled statements.Python functions do not have to be pure in the mathematical sense: Theydo not have to return a value and they can modify their arguments. Pythonfunctions are like C and C++ functions, or like Pascal functions that take varparameters. Python methods are like C++ or Java member functions.
Python has two ways of comparing objects: by “identity” and by “value”. Anobject’s identity is effectively its address in memory, and this is what an objectreference holds. If we use comparison operators, such as == and <, we getvalue comparison. For example, two strings are equal using == if they bothcontain the same text. If we use is we get identity comparison, which is fastbecause we are just comparing two addresses and don’t have to look at theobjects themselves. An object’s identity can be obtained by calling id() on anobject reference.
Python has a special object called None. This can be assigned to any variableand it means that the variable has no value. There is only ever one instance ofthe None object, so we can always use the fast is and is not comparisons whentesting for it.
Notice that we wrote x on its own at the >>> prompt. If we write an expressionor variable in IDLE, its value is automatically printed. In a program, we mustuse an explicit print statement to print an expression. For example:
print x
Python’s print statement is an operator, not a function, and for this reasonit is invoked without using parentheses (just as we use + and other operatorswithout them).
Earlier we said that Python uses dynamic typing. There are two factorsinvolved in this. First, we can assign any object to any variable; for example,we could write:
x = 47
x = "Heron"
14 Chapter 1. Data Types and Data Structures
After the first line x’s type is int, and after the second line x’s type is str, soclearly the type associated with the name x is determined by what the name isbound to, and not by any intrinsic property of its own. For this reason , we donot need to associate a particular type with a particular name.
The second aspect of Python’s dynamic typing is that the typing isstrong: Python does not permit operations between incompatible types, as thefollowing example, typed into IDLE, shows:
>>> x = 41>>> y = "Flamingo">>> x + y
Traceback (most recent call last):
File <pyshell#2>, line 1, in <module>x + y
TypeError: unsupported operand type(s) for +: 'int' and 'str'
When we attempted to apply the binary + operator, Python raised a TypeError
exception and refused to perform the operation.★ (Exceptions are covered inChapter 2.)
If we were to assign to y a type compatible with x’s type, such as an int or float,the addition would work fine:
>>> x = 41>>> y = 8.5>>> x + y
49.5
Although x and y are of different types (int and float), Python provides thesame kind of automatic type promotion that other languages use, so the x isconverted to a float and the calculation performed is actually 41.0 + 8.5.
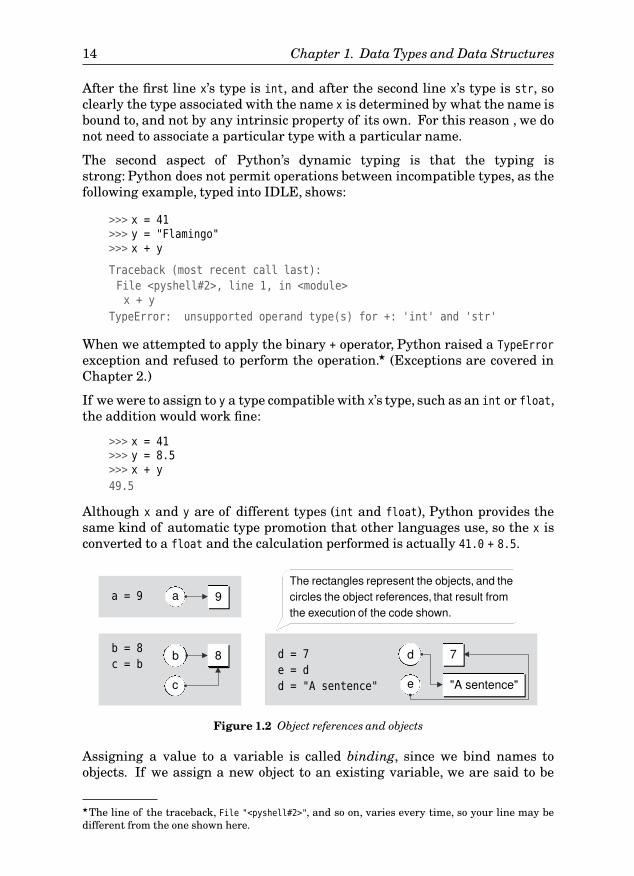
a = 9 a 9The rectangles represent the objects, and thecircles the object references, that result fromthe execution of the code shown.
b = 8
c = bb 8
c
d 7d = 7
e = d
d = "A sentence" e "A sentence"
Figure 1.2 Object references and objects
Assigning a value to a variable is called binding, since we bind names toobjects. If we assign a new object to an existing variable, we are said to be
★The line of the traceback, File "<pyshell#2>", and so on, varies every time, so your line may bedifferent from the one shown here.
Variables and Objects 15
rebinding the name. This is illustrated in Figure 1.2. When we do this, whathappens to the object the name was originally bound to? For example:
>>> x = "Sparrow"
>>> x = 9.8
What has happened to the str object that holds the text “Sparrow”? Once anobject has no names bound to it, it is scheduled for garbage collection, and indue course it may be deleted from memory. This is very similar to how thingswork in Java.
Python variable names consist of ASCII letters, digits, and underscores (_).Variable names should begin with a letter, and they are case-sensitive (rowan,Rowan, and roWan are three different variables). No Python variable should begiven the name of any of Python’s keywords (see Table 1.1), nor of Python’sbuilt-in constants such as None, True, or False.
Numbers and Strings
Python provides several numeric types and two string types. What all thesetypes have in common is that they are immutable. This means that in Python,numbers and strings cannot be changed. This sounds rather limiting, butthanks to Python’s augmented assignment operators (+=, *=, etc.), it simply isnot a problem.
Before looking at the specific data types we will look at one important conse-quence of the immutability. Let us type some simple expressions into IDLE:
>>> x = 5>>> y = x>>> x, y
(5, 5)
Here we have created an object of type int with the value 5 and bound thename x to it. We have then assigned x to y which has the effect of bindingy to the same object that x is bound to. So, when we print them in IDLE (ina program we would have to write print x, y, but in IDLE we just write anexpression and IDLE Tuples
☞ 29
automatically prints it), IDLE outputs the values as atuple—essentially a read-only list of values.
Now let us increment y:
>>> y += 1>>> x, y
(5, 6)
We might have expected both x and y to have the value 6 since both referredto the same integer object. But because Python numbers (and strings) areimmutable, this does not happen. The augmented assignment operators whenapplied to immutable objects are mere syntactic sugar: They do not change
16 Chapter 1. Data Types and Data Structures
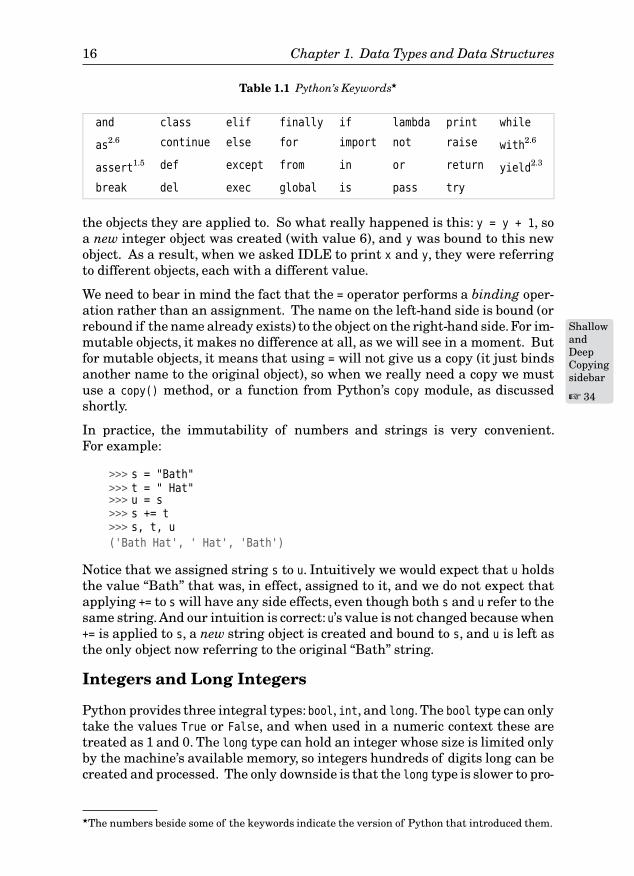
Table 1.1 Python’s Keywords★
and class elif finally if lambda print while
as2.6 continue else for import not raise with2.6
assert1.5 def except from in or return yield2.3
break del exec global is pass try
the objects they are applied to. So what really happened is this: y = y + 1, soa new integer object was created (with value 6), and y was bound to this newobject. As a result, when we asked IDLE to print x and y, they were referringto different objects, each with a different value.
We need to bear in mind the fact that the = operator performs a binding oper-ation rather than an assignment. The name on the left-hand side is bound (orrebound if the name already Shallow
andDeepCopyingsidebar
☞ 34
exists) to the object on the right-hand side.For im-mutable objects, it makes no difference at all, as we will see in a moment. Butfor mutable objects, it means that using = will not give us a copy (it just bindsanother name to the original object), so when we really need a copy we mustuse a copy() method, or a function from Python’s copy module, as discussedshortly.
In practice, the immutability of numbers and strings is very convenient.For example:
>>> s = "Bath">>> t = " Hat">>> u = s>>> s += t>>> s, t, u
('Bath Hat', ' Hat', 'Bath')
Notice that we assigned string s to u. Intuitively we would expect that u holdsthe value “Bath” that was, in effect, assigned to it, and we do not expect thatapplying += to s will have any side effects, even though both s and u refer to thesame string.And our intuition is correct:u’s value is not changed because when+= is applied to s, a new string object is created and bound to s, and u is left asthe only object now referring to the original “Bath” string.
Integers and Long Integers
Python provides three integral types:bool, int, and long. The bool type can onlytake the values True or False, and when used in a numeric context these aretreated as 1 and 0. The long type can hold an integer whose size is limited onlyby the machine’s available memory, so integers hundreds of digits long can becreated and processed. The only downside is that the long type is slower to pro-
★The numbers beside some of the keywords indicate the version of Python that introduced them.
Numbers and Strings 17
cess than the int type. The int type is the same signed integer type provided bymost programming languages;however, if an operation is applied to an int thatwould make its value exceed its range (for example, a value greater than 231 - 1or less than -231 on some machines), the int is automatically type promoted intoa long.
Python uses the suffix L to signify a long, and we can do the same in code whennecessary. For example:
>>> p = 5 ** 35
>>> q = 7L
>>> r = 2 + q>>> p, q, r
(2910383045673370361328125L, 7L, 9L)
Integer literals are assumed to be base 10 (decimal) numbers, except those thatstart with a 0x, which are treated as hexadecimal (base 16), for example, 0x3F,which is decimal 63, and those that start with 0 which are treated as octal (base8). Any kind of integer literal can have L appended to it to make it into a long.
Python supports the common operators that we would expect for numbers,including +, -, *, /, %, and their augmented cousins, +=, -=, *=, /=, and %=. Pythonalso provides ** for raising a number to a power.
By default, Python’s / division operator performs truncating division whenboth operands are of type int. For example, 5 / 3, produces 1. This is the normin most programming languages, but it can be inconvenient in Python sincedynamic typing means that a variable might be an int or a float at differenttimes. The solution is to tell Python to always do “true division”, which pro-duces floating-point results whenever necessary, and to use the // operatorwhen we really want truncation to occur. We will see how to do this in Chap-ter 4.
Floats and Decimals
Python provides three kinds of floating-point values: float, Decimal, andcomplex. Type float holds double-precision floating-point numbers whose rangedepends on the C (or Java) compiler Python was built with; they have limitedprecision and cannot be reliably compared for equality. Numbers of type float
are written with a decimal point, or using scientific notation, for example, 0.0,5.7, 8.9e-4. It is salutary to type these into IDLE:
>>> 0.0, 5.7, 8.9e-4
(0.0, 5.7000000000000002, 0.00088999999999999995)
The inaccuracy is not a Python-specific problem:Computers represent floating-point numbers using base 2, which can represent some decimals exactly (suchas 0.5) but others only approximately (such as 0.1). Furthermore, the represen-tation uses a fixed number of bits, so there is a limit to the number of digitsthat can be held.
18 Chapter 1. Data Types and Data Structures
In practice this is rarely a problem since most floating-point numbers use 64bits which is more than sufficient in most cases. But if we need high precision,Python’s Decimal numbers from the decimal module can be used. These performcalculations that are accurate to the level of precision we specify (by default,to 28 decimal places) and can represent periodic numbers like 0.1 exactly; butprocessing is a lot slower than with normal floats. Because of their accuracy,Decimal numbers are suitable for financial calculations.
Before Decimal numbers can be used, the decimal module must be imported.Thesyntax for doing this is the same whether we are writing code in a .py file, ortyping in IDLE as we are here:
>>> import decimal
Here we have imported the decimal module into our IDLE Shell window. (Theimport semantics are explained in the Importing Objects sidebar.) Integerliterals can be passed to the Decimal constructor, but because Decimals arehigh-precision and floats are not, we cannot pass floats; instead, we mustprovide floating-point values as strings. For example:
>>> decimal.Decimal(19), decimal.Decimal("5.1"),
decimal.Decimal("8.9e-4")
(Decimal("19"), Decimal("5.1"), Decimal("0.00089"))
The number decimal.Decimal("5.1") is held exactly; as a float it would proba-bly be something like 5.0999999999999996.Similarly,decimal.Decimal("0.00089")would be something like 0.00088999999999999995. We can easily convert fromDecimal to float, although we may lose precision by doing so:
>>> d = decimal.Decimal("1.1")
>>> f = float(d)
>>> f1.1000000000000001
Python also provides complex numbers as a built-in data type. These numbersconsist of a real and an imaginary component, the latter indicated by the suffixj.★ For example:
>>> c = 5.4+0.8j
>>> type(c)
<type 'complex'>
Here we have entered a complex number (with the syntax real_part+imagin-
ary_partj), and used Python’s type() function to tell us what type the c isbound to.
★Mathematicians use i for imaginary numbers, whereas engineers, and Python, use j.
Numbers and Strings 19
Importing Objects
Python has a large and comprehensive library of modules that provides ahuge amount of predefined functionality. We can use this functionality byimporting the constants, variables, functions, and classes that we want. Thegeneral syntax for importing is:
import moduleName
We can then access objects inside the module using the dot operator. Forexample, the random module provides the randint() function, which can beimported and used like this:
import random
x = random.randint(1, 10)
Note that it is common to put import statements at the beginning of .py files,but they can be put elsewhere—for example, inside a function definition.
One benefit of Python’s module system is that each module acts as a names-pace, so we avoid name collisions effortlessly. For example, we may have de-fined our own randint() function, but there is no name conflict because theimported one in the example is accessed using the fully qualified name ran-
dom.randint(). And as we will see in Chapter 3, we can create our own mod-ules and import our own objects.
Modules themselves can contain other modules, and for very large modules,it is more convenient to import objects directly into the current namespace.Python provides a syntax for this. For example:
from PyQt4.QtCore import *x = QString()
y = QDate()
Here we have imported every object, that is, all the classes from the PyQt4
module’s QtCore module, and this allows us to use their unqualified names.Using this syntax is frowned on by some developers, but since we know thatalmost all of the PyQt objects begin with a capital “Q”, providing we don’tcreate any of our own objects with names beginning with “Q”, we will not getany name collisions and can type far less. However, for those who prefer touse fully qualified names in all cases, the plain import syntax can be used:
import PyQt4
x = PyQt4.QtCore.QString()
y = PyQt4.QtCore.QDate()
For the sake of brevity we will use the from … import syntax for the PyQt4
modules, although we will use the plain import syntax for everything else.
20 Chapter 1. Data Types and Data Structures
Python’s floating-point numbers provide the same basic operations as its in-tegral numbers, with integers being promoted to floating-point when numerictypes are mixed in the same expression.
Bytestrings, Unicode Strings, and QStrings
There are two built-in string types in Python: str which holds bytes, and uni-
code which holds Unicode characters. Both types support a common set ofstring-processing operations. Like numbers, Python strings are immutable.They are also sequences, so they can be passed to functions that acceptsequences and can use Python’s sequence QString
☞ 28
operations, for example, the len()
function which returns the length of a sequence. PyQt provides a third stringtype, QString.
If we only deal with 7-bit ASCII characters, that is, characters in the range0–127, and if we want to save some memory, we can use strs. However, if weuse an 8-bit character set, we must be careful that we know which codec we areusing. In Western Europe, for example, 8-bit strings are often encoded usingthe Latin-1 encoding. In general, it is not always possible simply by examiningthe bytes to determine which 8-bit encoding is used for a particular string (orfile). Modern GUI libraries, including Qt, use Unicode strings, so the safestroute is to use strs for 7-bit ASCII and for raw binary 8-bit bytes, and unicode
or QString otherwise.
Python strings are created by using quotes:
>>> g = "Green"
>>> t = ' trees'>>> g + t
'Green trees'
Python does not mind whether we use double or single quotes as long as we usethe same kind at both ends.
To force a string literal to be of type unicode, we precede its initial quotewith u:
>>> bird = "Sparrow"
>>> beast = u"Unicorn">>> type(bird), type(beast), type(bird + beast)
(<type 'str'>, <type 'unicode'>, <type 'unicode'>)
Notice that we can use binary + to concatenate strings, and that if we involvestr and unicode objects in the same operation the str operands are promotedto unicode and the resultant object is of type unicode. (If the str containscharacters outside the 7-bit ASCII range, Python raises a UnicodeEncodeError
exception; exceptions are covered in Chapter 2.)
In Python there is no separate “character” type: A single character is a stringof length 1. We can get a character from a byte value using chr(), which
Numbers and Strings 21
accepts an integer value in the range 0–255. The Python documentation doesnot specify which encoding is used for values outside the ASCII range, (i.e.,above 127). For Unicode, we can use unichr(), which accepts an integer in therange 0–65535.★ To convert the other way, from a character to its integer value(ASCII value or Unicode code point), we can use ord(). For example:
>>> euro = unichr(8364)
>>> print euro
>>> ord(euro)8364
Why did we use print instead of letting IDLE output the result? Because IDLEshows non-ASCII characters in strings using hexadecimal escapes, so withoutprint IDLE will output u'\u20ac'.
It is also possible to access Unicode characters by name:
>>> euro = u"\N{euro sign}"
>>> print euro
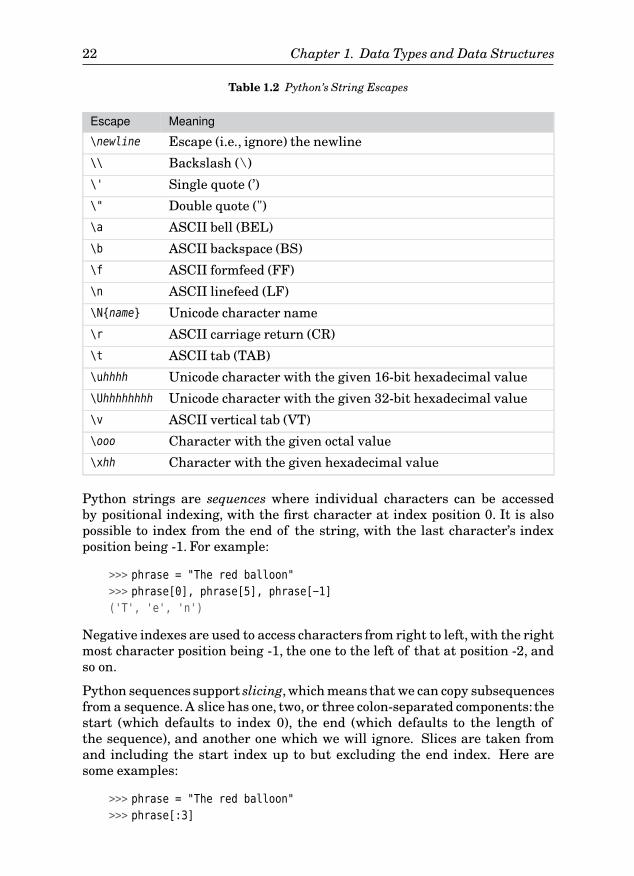
If we need to include special characters in a string we can escape them usinga backslash, (“\”). Table 1.2 shows the escapes available; the Unicode ones onlymake sense inside unicode strings.
Here are two examples that show how to escape quotes:
"He said \"No you don't!\" again."
'What\'s up with him?'
We don’t need to escape single quotes inside strings delimited by doublequotes, and we don’t need to escape double quotes inside strings delimited bysingle quotes.
For multiline strings we can use “triple” quotes:
'''This string has three lines in it, with a 'quote',
another "quote", and with just one embedded newline \
since we have escaped one of them.'''
These kinds of strings can include escaped characters just like normal strings,and can be delimited by three single quotes as shown, or by three doublequotes. Newlines in triple-quoted strings, and in Python code, can be escapedby preceding them with a backslash. (This works correctly on Windows too,even though Windows uses two characters at the end of lines rather thanone.)
★The range extends to 1114111 if Python was configured to use the UCS-4 representation.
22 Chapter 1. Data Types and Data Structures
Table 1.2 Python’s String Escapes
Escape Meaning
\newline Escape (i.e., ignore) the newline
\\ Backslash (\)
\' Single quote (’)
\" Double quote (")
\a ASCII bell (BEL)
\b ASCII backspace (BS)
\f ASCII formfeed (FF)
\n ASCII linefeed (LF)
\N{name} Unicode character name
\r ASCII carriage return (CR)
\t ASCII tab (TAB)
\uhhhh Unicode character with the given 16-bit hexadecimal value
\Uhhhhhhhh Unicode character with the given 32-bit hexadecimal value
\v ASCII vertical tab (VT)
\ooo Character with the given octal value
\xhh Character with the given hexadecimal value
Python strings are sequences where individual characters can be accessedby positional indexing, with the first character at index position 0. It is alsopossible to index from the end of the string, with the last character’s indexposition being -1. For example:
>>> phrase = "The red balloon"
>>> phrase[0], phrase[5], phrase[-1]
('T', 'e', 'n')
Negative indexes are used to access characters from right to left, with the rightmost character position being -1, the one to the left of that at position -2, andso on.
Python sequences support slicing, which means that we can copy subsequencesfrom a sequence. A slice has one, two, or three colon-separated components: thestart (which defaults to index 0), the end (which defaults to the length ofthe sequence), and another one which we will ignore. Slices are taken fromand including the start index up to but excluding the end index. Here aresome examples:
>>> phrase = "The red balloon"
>>> phrase[:3]
Numbers and Strings 23
'The'>>> phrase[-3:]
'oon'>>> phrase[4:7]
'red'
Since Python strings are immutable it is not possible to assign to a characteror slice inside a string:
>>> p = "pad"
>>> p[1] = "o" # WRONG
Traceback (most recent call last):
File <pyshell#64>, line 1, in <module>
p[1] = o
TypeError: object does not support item assignment
The easiest way to insert a character into a string is by using the slicingsyntax:
>>> p = "pad"
>>> p = p[:1] + "o" + p[2:]>>> p
'pod'
It may appear annoying that we have to specify literal numbers, but inpractical programming we normally get the indexes using method calls—forexample, using the find() method.
Other approaches are possible. For example:
>>> p = "pad"
>>> p = "o".join((p[:1], p[2:]))>>> p
'pod'
Programmers from a Pascal or C++ background who are used to mutablestrings may find the immutability of strings awkward at first. Python does, ofcourse, offer mutable strings; they are provided by the StringIO module and the(faster) cStringIO module. PyQt’s QString class is also mutable. But with prac-tice, the Python way of working with immutable strings, and in particular, theidiom shown above, concatenating using the join() method,will soon be secondnature. We will look at another idiom, used for “composing” strings, shortly.
Python strings have many useful methods, but we will concentrate on the mostcommonly used ones. In Python, methods are invoked on object references byusing the dot . operator to access the method, and parentheses () to signifythat we are performing a method (member function) call.★ For example:
★As noted earlier, parentheses are not used with operators such as + and print.
24 Chapter 1. Data Types and Data Structures
>>> line = "The quick brown fox."
>>> line.find("q")
4
The find() method returns the index position of the leftmost occurrence of thestring it is given as an argument, inside the string it is applied to. It returns -1on failure.
Python also provides an index() method that has identical usage, but whichraises a ValueError exception on failure. Other sequence classes (such as lists)also have an index() method, so having one for strings gives consistency.
Since we can use either find() or index() on strings, is there any reason toprefer one over the other? For one-off searches, it is often convenient to usefind() and just check the return value. Excep-
tions vs.testingforerrors
☞ 68
But if we have a block of code wherewe are performing lots of searches, using find() forces us to check the returnvalue of every search, whereas using index() allows us to assume the result isalways valid, and if it isn’t, to handle any errors in a single exception handler.Of course, if we don’t catch the exception, it will be passed up the call stack,andif it isn’t caught anywhere it will cause the application to terminate. We useboth approaches throughout the book, using whichever one is most appropriateon a case-by-case basis.
String methods can be applied both to string objects and to string literals:
>>> "malthusian catastrophe".title()
'Malthusian Catastrophe'
The title() method returns a string that is a copy of the string it is appliedto, but with the first letter of every word capitalized. Python provides stringformatting of data types using a syntax that is very similar to the C library’sprintf() function.
To achieve formatting we use the binary % operator,which takes a format stringleft-hand argument and a right-hand object (often a Tuples
☞ 29
tuple of objects),which areto be formatted. For example:
>>> "There are %i items" % 5'There are 5 items'
The %i in the string is replaced by the number 5. The letter following the % ina string format specifies the type of object that is expected, with %i signifyingan integer.
Here is an example that shows three different types being replaced, witharrows showing which % item is replaced by which tuple element:
>>> "The %i %s cost %f dollars" % (3, "fish", 17.49)
'The 3 fish cost 17.490000 dollars'

Numbers and Strings 25
Table 1.3 Selected String Methods and Functions
Syntax Description
x in s Returns True if string x is a substring of string s
x not in s Returns True if x is not a substring of string s
x + s Returns the concatenation of strings x and s
s * i Returns a string consisting of int i concatenations ofstring s. For example, "Abc" * 3 produces "AbcAbcAbc".
len(s) Returns the length of string s; this is a byte count if s isof type str and a character count if s is of type unicode
s.count(x) Returns the number of times string x occurs in string s.This method, and several others, can take optional startand end arguments to restrict the search to a slice of thestring they are called on.
s.endswith(x) Returns True if string s ends with string x
s.startswith(x) Returns True if string s starts with string x
s.find(x) Returns the index position of the leftmost occurrence of x
in s; returns -1 if x is not founds.rfind(x) Like find(), but searches from right to lefts.index(x) Returns the index position of the leftmost occurrence of x
in s; raises a ValueError exception if no x is founds.rindex(x) Like index(), but searches from right to lefts.isdigit() Returns True if the string is not empty and the character
or characters it contains are all digitss.isalpha() Like isdigit(), but checks for letterss.join((x,…)) Returns a string which is the concatenation of the given
sequence delimited by the string on which the method iscalled. For example,":".join(("A", "BB", "CCC")) returns"A:BB:CCC". The delimiter can be empty.
s.lower() Returns a lower-cased copy of string s
s.upper() Returns an upper-cased copy of string s
s.replace(x, y) Returns a copy of string s with any occurrences of stringx replaced by copies of string y
s.split() Returns a list of strings, splitting on whitespace. Forexample, "ab\tc d e".split() returns ["ab", "c", "d",
"e"]. This method can be given a first argument which isa string to split on, and a second argument which is themaximum number of splits to make.
s.strip() Returns a copy of the string with leading and trailingwhitespace removed. Accepts an optional string argu-ment specifying which characters should be removed.
26 Chapter 1. Data Types and Data Structures
The % items are called format specifiers, and format strings contain at leastone. Format specifiers consist of a percent (%) symbol followed by a formattingcharacter. The percent symbol itself is specified by using %%. In the example,we used %i which is the format specifier for an int, %s which is the specifier fora string, and %f which is the specifier for a float.
Earlier we looked at how to insert a substring into a string. We showed howto do this using slicing, and the more Pythonic way using the string join()
method. Here is a third way, using format specifiers:
>>> p = "pad"
>>> p = "%so%s" % (p[:1], p[2:])>>> p
'pod'
Here we create a new string which consists of a string (which comes from thefirst slice of p), “o”, and another string (from the second slice of p). The join()
approach shown earlier is used for concatenating strings; this approach is usedfor “composing” strings.
We can exercise some control over the formatting of % items by putting someinformation between the % and the letter. For example, to show only two digitsafter the decimal place for a float we can use the specifier %.2f:
>>> "The length is %.2f meters" % 72.8958
'The length is 72.90 meters'
Here are a few more examples, two of which show the use of the % operator inconjunction with the print statement:
>>> print "An integer", 5, "and a float", 65.3
An integer 5 and a float 65.3
>>> print "An integer %i and a float %f" % (5, 65.3)
An integer 5 and a float 65.300000
>>> print "An integer %i and a float %.1f" % (5, 65.3)
An integer 5 and a float 65.3
In many cases, %i (and its synonym, %d), %f, and %s suffice. The full details ofwhat format specifiers are available and how they can be modified to give spe-cific results are given in the Python documentation; in this case, look for “StringFormatting Operations”. Other approaches to string formatting are also possi-ble with Python, for example,Perl-like interpolation is provided by the Template
class in the string module. It is even possible to use a C++-like syntax; see therecipe “Using a C++-like iostream Syntax”, in the Python Cookbook. (See thePython Documentation sidebar.)
Notice that the print statement automatically outputs a space between eachargument it prints. It is possible to avoid this using sys.stdout.write() insteadof print; more coverage of write() is given in Chapter 6.
Numbers and Strings 27
Python Documentation
Python is supplied with a large amount of documentation. Most of the doc-umentation is of good quality, but there are a few areas where the coverageis rather thin. Navigating the documentation using the HTML version takespractice because it is organized more like a physical book than an online doc-ument and has far too few cross-reference links between pages.
Windows users are fortunate here because for them the documentationis supplied in Windows help file format. Click Start→All Programs→Python2.x→Python Manuals to launch the Windows help browser. This tool has bothan Index and a Search function that makes finding documentation easy. Forexample, to find the information about string format specifiers, simply enter“formatting” in the Index line edit and the entry “formatting, string (%)”will appear.
It is well worth skimming through the documentation. We suggest that youlook at the “Library Reference” page (lib.html) to see what Python’s stan-dard library offers, and clicking through to the documentation of whichevertopics are of interest. This should provide an initial impression of what isavailable and should also help you to establish a mental picture of whereyou can find the documentation you are interested in.
Note that some topics are covered under more than one heading. For exam-ple, to read about strings, see “Sequence Types”, “String Methods”, “StringFormatting Operations”, and “String Services”. Similarly, for files and direc-tories, see “File and Directory Access”, “Data Compression and Archiving”,and “Files and Directories”.For those who prefer printed information, the following books are worth con-sidering.
• Core PYTHON Programming by Wesley Chun. This is a Pythontutorial that may be suitable if you are completely new to Python andwant a slower pace than Part I of this book provides.
• Python in a Nutshell by Alex Martelli. This is an excellent referencebook that gives detailed and accurate coverage of the Python languageand Python’s standard library.
• Python Cookbook 2nd Edition, edited by Alex Martelli, Anna Martel-li Ravenscroft, and David Ascher. This book provides lots of smallpractical functions, classes, snippets, and ideas, and will help broad-en any Python programmer’s awareness of what can be donewith Python. The recipes are also available online at http://aspn.
activestate.com/ASPN/Python/Cookbook.
For online Python information, the starting point is http://www.python.org.This site is also home to the Python wiki. PyQt-specific information isprovided at http://www.riverbankcomputing.co.uk.The PyQt wiki is at http://www.diotavelli.net/PyQtWiki.
28 Chapter 1. Data Types and Data Structures
When using PyQt we have access to an additional string type, QString. UnlikePython’s str and unicode, QString is mutable; this means that we can changeQStrings in place, inserting and removing substrings, and changing individualcharacters.Qt QString has a rather different API from that provided by str andunicode. (Qt provides QString because Qt is written in C++, which does not yethave built-in Unicode support.)
QString holds Unicode characters, but depending on which version of Pythonwe are using, the internal representation may be different from Python’s Uni-code representation; this doesn’t really matter, since PyQt can easily convertbetween unicode and QString. For example:
>>> from PyQt4.QtCore import *>>> a = QString("apple")
>>> b = unicode("baker")
>>> print a + b
applebaker
>>> type(a + b)
<class 'PyQt4.QtCore.QString'>
Here we import all the classes from the QtCore module, made available to usthrough the PyQt4 module. When we perform operations involving QStringsand Python strings, the resultant strings are always QStrings as the type()
function reveals.
When using PyQt, Qt methods that take string arguments can be given str,unicode, or QString types, and PyQt will perform any necessary conversionautomatically. Qt methods that return strings always return QStrings. In viewof Python’s dynamic typing, we can easily become confused and not be surewhether we have a QString or a Python string. For this reason, it is wise todecide on a policy for string usage so that we always know where we stand.
The policy we use with PyQt is as follows:
• Use type str only when working with strictly 7-bit ASCII strings or withraw 8-bit data, that is, with raw bytes.
• For strings that will be used only by PyQt functions, for example, stringsthat are returned by one PyQt function only to be passed at some point toanother PyQt function—do not convert such strings. Simply keep them asQStrings.
• In all other cases, use unicode strings, converting QStrings to unicode assoon as possible. In other words, as soon as a QString has been returnedfrom a Qt function, always immediately convert it to type unicode.
This policy means that we avoid making incorrect assumptions about 8-bitstring encodings (because we use Unicode). It also ensures that the strings wepass to Python functions have the methods that Python expects: QStrings havedifferent methods from str and unicode, so passing them to Python functions
Numbers and Strings 29
can lead to errors. PyQt uses QString rather than unicode because when PyQtwas first created, Python’s Unicode support was nowhere near as good as itis today.
CollectionsOnce we have variables, that is, individual named object references to objectsof particular types, it is natural to want to have entire collections of objectreferences. Python’s standard collection types hold object references, so theycan, in effect, hold collections of any type of object. Another consequence ofcollections using object references is that they can refer to objects of differenttypes: They are not restricted to holding items that are all of a single type.
The built-in collection types are tuple, list, dict (dictionary),set, and frozenset.All except tuple and frozenset are mutable, so items can be added and deletedfrom lists, dictionaries, and sets. Some additional mutable collection types areprovided in the collections module.★
Python has one collection type in its standard library that does not hold objectreferences; instead, it holds numbers of a specified type. This is the array typeand it is used in situations where large numbers of numbers need to be storedand processed as efficiently as possible.
In this section, we will look at Python’s built-in collection types.
Tuples
A tuple is an ordered sequence of zero or more object references.Stringslicing
22 ☞
Like strings(and as we will see shortly, like lists), tuples support sequence functions suchas len() as well as the same slicing syntax that we saw earlier. This makes itreally easy to extract items from a tuple. However, tuples are immutable sowe cannot replace or delete any of their items. If we want to be able to modifyan ordered sequence, we simply use a list instead of a tuple; or if we alreadyhave a tuple but want to modify it, we just convert it to a list and then applyour changes.
We have already had some informal exposure to tuples; for example, some ofour interactions in IDLE produced results that were wrapped up as tuples, andwe also used tuples to provide multiple arguments to the % operator.
Here are some examples that show how to construct tuples:
>>> empty = ()
>>> type(empty)
<type 'tuple'>
>>> one = ("Canary")
★The Qt library provides its own rich set of container classes for C++, but these are not availablein PyQt, and in any case, Python’s own collection classes are perfectly good to use.
30 Chapter 1. Data Types and Data Structures
>>> type(one)
<type 'str'>
>>> one = ("Canary",)
>>> type(one)
<type 'tuple'>
Creating an empty tuple is simple, but for a one item tuple, we must use acomma to distinguish it from a parenthesized expression:
>>> things = ("Parrot", 3.5, u"\u20AC")
>>> type(things)
<type 'tuple'>
Tuples can hold items of any type; here we have str, float, and unicode items.It is also possible to drop the parentheses for tuples that have at least two itemsand where the meaning is unambiguous:
>>> items = "Dog", 99, "Cow", 28
>>> type(items)
<type 'tuple'>
Tuples can be arbitrarily nested and can be sliced, as these examples show:
>>> names = "Albert", "Brenda", "Cecil", "Donna"
>>> names[:3]
('Albert', 'Brenda', 'Cecil')
>>> names[1]
'Brenda'
We create a tuple of names, then take a slice of the first three items, and thenlook at the item at index position 1. Like all Python sequences, the first item isat position 0:
>>>names = names[0], names[1], "Bernadette", names[2], names[3]>>> names('Albert', 'Brenda', 'Bernadette', 'Cecil', 'Donna')
Now we have changed the names tuple to refer to a new tuple with an extra itemin the middle. It might be tempting to write names[:1] instead of names[0],
names[1], and similarly names[2:] for the last two names, but if we did so wewould end up with a three-item tuple:
(('Albert', 'Brenda'), 'Bernadette', ('Cecil', 'Donna'))
This is because when we use slicing on a tuple the slices are always tuplesthemselves.
>>> names('Albert', 'Brenda', 'Bernadette', 'Cecil', 'Donna')
>>> names = names[:4]
Collections 31
>>> names('Albert', 'Brenda', 'Bernadette', 'Cecil')
Here, we have, in effect, chopped off the last name by taking a tuple of thefirst 4 items, that is, those with index positions 0, 1, 2, and 3. In slicing, the firstnumber is the first index and this item is included in the result, and the secondnumber is the last index and this item is excluded from the result.
>>> names('Albert', 'Brenda', 'Bernadette', 'Cecil')
>>> names = names[:-1]>>> names('Albert', 'Brenda', 'Bernadette')
Another way of chopping off the last item is to index from the end; this way wedon’t have to know what the length of the tuple is. But if we want to know thelength we can use the len() function:
>>> pets = (("Dog", 2), ("Cat", 3), ("Hamster", 14))
>>> len(pets)
3>>> pets
(('Dog', 2), ('Cat', 3), ('Hamster', 14))
>>> pets[2][1]
14>>> pets[1][0:2]
('Cat', 3)
>>> pets[1]
('Cat', 3)
Tuples can be nested and items accessed using as many square bracketsas necessary.
Any sequence can be given to the tuple constructor to create a tuple. For ex-ample:
>>> tuple("some text")
('s', 'o', 'm', 'e', ' ', 't', 'e', 'x', 't')
Tuples are useful when we need fixed ordered collections of objects. They arealso used as Python
2.5arguments to some functions and methods. For example, starting
with Python 2.5, the str.endswith() method accepts either a single stringargument (e.g., ".png") or a tuple of strings (e.g., (".png", ".jpg", ".jpeg")).
Lists
The list type is an ordered sequence type similar to the tuple type. All thesequence functions and the slicing that we have seen working with strings andtuples work in exactly the same way for lists. What distinguishes tuples fromlists is that lists are mutable and have methods that we can use to modify them.
32 Chapter 1. Data Types and Data Structures
And whereas tuples are created using parentheses, lists are created usingsquare brackets (or by using the list() constructor).
Let us look at some slicing examples that extract parts of a list:
>>> fruit = ["Apple", "Hawthorn", "Loquat", "Medlar", "Pear", "Quince"]
>>> fruit[:2]
['Apple', 'Hawthorn']
>>> fruit[-1]
'Quince'
>>> fruit[2:5]
['Loquat', 'Medlar', 'Pear']
Here, we have used the familiar slicing syntax that we have already used forstrings and tuples.
Because lists are mutable we can insert and delete list items. This is achievedby using method calls, or by using the slicing syntax where slices are used onboth sides of the assignment operator. First we will look at the method calls:
>>> fruit.insert(4, "Rowan")
>>> fruit['Apple', 'Hawthorn', 'Loquat', 'Medlar', 'Rowan', 'Pear',
'Quince']
>>> del fruit[4]
>>> fruit['Apple', 'Hawthorn', 'Loquat', 'Medlar', 'Pear', 'Quince']
We have inserted a new item and then deleted it, using a method call and anoperator. The del statement is used to remove an item at a particular indexposition, whereas the remove() method is used to remove an item that matchesremove()’s parameter. So, in this example, we could also have less efficientlydeleted using fruit.remove("Rowan").
Now we will do the same thing using slicing:
>>> fruit[4:4] = ["Rowan"]
>>> fruit['Apple', 'Hawthorn', 'Loquat', 'Medlar', 'Rowan', 'Pear',
'Quince']
>>> fruit[4:5] = []
>>> fruit['Apple', 'Hawthorn', 'Loquat', 'Medlar', 'Pear', 'Quince']
When we assigned “Rowan” we used square brackets because we were insert-ing a list slice (a one-item list) into a list slice. If we had omitted the brackets,Python would have treated the word “Rowan” as a list in its own right, andwould have inserted “R”, “o”, and so on, as separate items.

Collections 33
Table 1.4 Selected List Methods and Functions
Syntax Description
x in L Returns True if item x is in list L
x not in L Returns True if item x is not in list L
L + m Returns a list containing all the items of list L and of listm; the extend() method does the same but more efficiently
len(L) Returns the length of list L
L.count(x) Returns the number of times item x occurs in list L
L.index(x) Returns the index position of the leftmost occurrence ofitem x in list L, or raises a ValueError exception
L.append(x) Appends item x to the end of list L
L.extend(m) Appends all list m’s items to the end of list L
L.insert(i, x) Inserts item x into list L at index position int i
L.remove(x) Removes the leftmost occurrence of item x from list L, orraises a ValueError exception if no x is found
L.pop() Returns and removes the rightmost item of list L
L.pop(i) Returns and removes the item at index position int i in L
L.reverse() Reverses list L in-place
L.sort() Sorts list L in-place; this method accepts optional argu-ments such as a comparison function or a “key” to facilitateDSU (decorate, sort, undecorate) sorting
When inserting using slices, the source and target slices can be of differentlengths. If the target slice is of zero length, such as fruit[4:4], only insertiontakes place; but if the target’s length is greater than zero, the number of itemsin the target slice are replaced by the items in the slice that is inserted. Inthis example, we replaced a one-item slice with a zero-item slice, effectivelydeleting the one item.
Here are a few more examples:
>>> fruit[2:3] = ["Plum", "Peach"]
>>> fruit['Apple', 'Hawthorn', 'Plum', 'Peach', 'Medlar', 'Quince']
>>> fruit[4:4] = ["Apricot", "Cherry", "Greengage"]
>>> fruit['Apple', 'Hawthorn', 'Plum', 'Peach', 'Apricot', 'Cherry',
'Greengage', 'Medlar', 'Quince']
>>> bag = fruit[:]
>>> bag
['Apple', 'Hawthorn', 'Plum', 'Peach', 'Apricot', 'Cherry',
'Greengage', 'Medlar', 'Quince']

34 Chapter 1. Data Types and Data Structures
Shallow and Deep Copying
We saw earlier (on page 16) that if we have two variables referring tothe same string and we change one of them, for example using += toappend—Python creates a new string. This occurs because Python stringsare immutable. For mutable types such as lists (and dictionaries, coveredshortly), the situation is different.
For example, if we create a list with two variables referring to it, and wechange the list through one of the variables, both variables now refer to thesame changed list:
>>> seaweed = ["Aonori", "Carola", "Dulse"]
>>> macroalgae = seaweed
>>> seaweed, macroalgae
(['Aonori', 'Carola', 'Dulse'], ['Aonori', 'Carola', 'Dulse'])
>>> macroalgae[2] = "Hijiki"
>>> seaweed, macroalgae
(['Aonori', 'Carola', 'Hijiki'], ['Aonori', 'Carola', 'Hijiki'])
This is because by default, Python uses shallow copying when copyingmutable data. We can force Python to do a deep copy by taking a slice thatconsists of the entire list:
>>> seaweed = ["Aonori", "Carola", "Dulse"]
>>> macroalgae = seaweed[:]
>>> seaweed, macroalgae
(['Aonori', 'Carola', 'Dulse'], ['Aonori', 'Carola', 'Dulse'])
>>> macroalgae[2] = "Hijiki"
>>> seaweed, macroalgae
(['Aonori', 'Carola', 'Dulse'], ['Aonori', 'Carola', 'Hijiki'])
Slices always copy the items sliced, whether we slice a part of a list, or thewhole list as we have done here. However, this works only one level deep,so if we had a list of lists, the sublists would only be shallow-copied. Someother collection types—for example, dict—provide a copy() method which istheir equivalent of [:].
For deep copying that works to any depth we must import the copy moduleand use the deepcopy() function. In practice though, this is very rarely aproblem, and when it does trip us up, using deepcopy() sorts it out for us.
We have replaced a slice of length one, fruit[2:3] (“Loquat”), with a slice oflength two. We have also inserted a slice of three items without removing any.In the last example we copied all of fruit’s items to bag; this could have beendone using bag = fruit, but with subtly different semantics; see the Shallow andDeep Copying sidebar for more about copying lists.
Collections 35
Multiple consecutive items can be deleted using del on a slice, or by assigninga zero-length slice to a slice. To insert multiple items we can use slicing, orwe can slice with operator +, and to add at the end we can use extend(). SeeTable 1.4 for a summary of the methods and functions applicable to lists.
Dictionaries
The dict type is a data dictionary, also known as an associative array. Adictionary holds a set of unordered key–value pairs and provides very fast keylookup. Keys are unique and must be of an immutable type, such as a Pythonstring, a number, or a tuple; the value can be of any type including collectiontypes, so it is possible to create arbitrarily nested data structures. Althoughdictionaries are not sequences, we can get sequences of their keys and values,as we will see in the next chapter.
Similar data structures exist in other languages—for example, Perl’s hash,Java’s HashMap, and C++’s unordered_map.
Notice that a tuple can be a dictionary key, but a list cannot, since a dictionary’skeys must be immutable. In languages that offer only simple keys like stringsand numbers, programmers who want multi-item keys must resort to con-verting their items into a string, but thanks to tuples this kind of hack is notnecessary in Python.
Here are some examples that show how to create a dictionary and access itemsin it:
>>> insects = {"Dragonfly": 5000, "Praying Mantis": 2000,
"Fly": 120000, "Beetle": 350000}
>>> insects{'Fly': 120000, 'Dragonfly': 5000, 'Praying Mantis': 2000,
'Beetle': 350000}
>>> insects["Dragonfly"]
5000>>> insects["Grasshopper"] = 20000
>>> insects{'Fly': 120000, 'Dragonfly': 5000, 'Praying Mantis': 2000,
'Grasshopper': 20000, 'Beetle': 350000}
Items can be deleted from a dictionary in the same way they can be deletedfrom a list. For example:
>>> del insects["Fly"]
>>> insects{'Dragonfly': 5000, 'Praying Mantis': 2000, 'Grasshopper': 20000,
'Beetle': 350000}
>>> insects.pop("Beetle")
350000>>> insects{'Dragonfly': 5000, 'Praying Mantis': 2000, 'Grasshopper': 20000}
36 Chapter 1. Data Types and Data Structures
Table 1.5 Selected Dictionary Methods and Functions
Syntax Description
x in d Returns True if item x is in dict d
x not in d Returns True if x is not in dict d
len(d) Returns the number of items in dict d
d.clear() Removes all items from dict d
d.copy() Returns a shallow copy of dict d
d.keys() Returns a list of all the keys in dict d
d.values() Returns a list of all the values in dict d
d.items() Returns a list of tuples of all the (key, value) pairs indict d
d.get(k) Returns the value with key k, or None
d.get(k, x) Returns the value with key k if k is in dict d; otherwise,returns x
d.setdefault(k, x) The same as the get() method, except that if the key isnot in dict d, a new item is inserted with the given keyand a value of None or x if x is given
d.pop(k) Returns and removes the item with key k; raises aKeyError exception if there is no such key in dict d
d.pop(k, x) Returns and removes the item with key k if k is in dict
d; otherwise, returns x
Dictionaries can be constructed using the dict() constructor, and if the keyshappen to be valid identifiers (i.e., alphanumeric beginning with an alphabeticcharacter and with no whitespace), we can use a more convenient syntax:
>>> vitamins = dict(B12=1000, B6=250, A=380, C=5000, D3=400)
>>> vitamins{'A': 380, 'C': 5000, 'B12': 1000, 'D3': 400, 'B6': 250}
We mentioned earlier that dictionary keys can be tuples; here is one lastexample to show this in action:
>>> points3d = {(3, 7, -2): "Green", (4, -1, 11): "Blue",
(8, 15, 6): "Yellow"}
>>> points3d
{(4, -1, 11): 'Blue', (8, 15, 6): 'Yellow', (3, 7, -2): 'Green'}
>>> points3d[(8, 15, 6)]
'Yellow'
In Chapter 2 we will see how to iterate over dictionaries in their “natural”arbitrary order, and also in key order.
Collections 37
Sets
Python provides two set types: set and frozenset. Both are unordered, soneither is a sequence. Sets are mutable, so items can be added and removed.Frozensets are immutable and cannot be changed; however, this means thatthey are suitable for use as dictionary keys.
Every item in a set is unique; if we try to add an item that is already in aset the add() call does nothing. Two sets are equal if they contain the sameitems, no matter what order those items were inserted in. Sets are similar todictionaries that have only keys and no values. Lists, on the other hand keep,their items in insertion order (unless they are sorted), and allow duplicates.
A frozenset is constructed with a single sequence parameter—for example atuple or a list. A set can be constructed in the same way. For example:
>>> unicorns = set(("Narwhal", "Oryx", "Eland"))
>>> "Mutant Goat" in unicornsFalse>>> "Oryx" in unicorns
True
Since we created a set rather than a frozenset we can add and remove items.For example:
>>> unicorns.add("Mutant Goat")
>>> unicornsset(['Oryx', 'Mutant Goat', 'Eland', 'Narwhal'])
>>> unicorns.add("Eland")
>>> unicornsset(['Oryx', 'Mutant Goat', 'Eland', 'Narwhal'])
>>> unicorns.remove("Narwhal")
>>> unicornsset(['Oryx', 'Mutant Goat', 'Eland'])
The set classes also support the standard set operations—for example, union,intersection, and difference—and for some operations provide both methodsand operators, as Table 1.6 shows.
Built-in FunctionsAs we have already seen, Python has a number of built-in functions andoperators: for example, del, print, len(), and type(). Tables 1.7–1.9 show someothers that are useful, some of which we will discuss here.
In IDLE, or when using the Python interpreter directly, we can use the help()
function to get information about an object, or to enter Python’s interactivehelp system. For example:
>>> help(str)
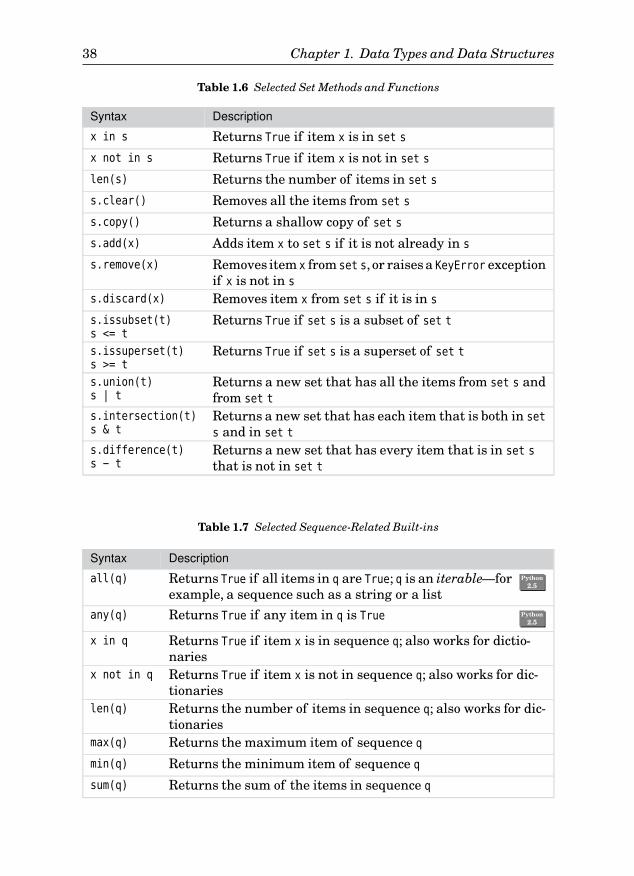
38 Chapter 1. Data Types and Data Structures
Table 1.6 Selected Set Methods and Functions
Syntax Description
x in s Returns True if item x is in set s
x not in s Returns True if item x is not in set s
len(s) Returns the number of items in set s
s.clear() Removes all the items from set s
s.copy() Returns a shallow copy of set s
s.add(x) Adds item x to set s if it is not already in s
s.remove(x) Removes item x from set s, or raisesa KeyError exceptionif x is not in s
s.discard(x) Removes item x from set s if it is in s
s.issubset(t)s <= t
Returns True if set s is a subset of set t
s.issuperset(t)s >= t
Returns True if set s is a superset of set t
s.union(t)s | t
Returns a new set that has all the items from set s andfrom set t
s.intersection(t)s & t
Returns a new set that has each item that is both in set
s and in set t
s.difference(t)s - t
Returns a new set that has every item that is in set s
that is not in set t
Table 1.7 Selected Sequence-Related Built-ins
Syntax Description
all(q) Returns True if all items in q are True; q is an iterable—forexample, a sequence such as a string or a list
Python2.5
any(q) Returns True if any item in q is True Python2.5
x in q Returns True if item x is in sequence q; also works for dictio-naries
x not in q Returns True if item x is not in sequence q; also works for dic-tionaries
len(q) Returns the number of items in sequence q; also works for dic-tionaries
max(q) Returns the maximum item of sequence q
min(q) Returns the minimum item of sequence q
sum(q) Returns the sum of the items in sequence q

Built-in Functions 39
Table 1.8 Some Useful Built-ins
Syntax Description
chr(i) Returns a one-character str whose ASCII value is givenby int i
unichr(i) Returns a one-character unicode string whose Unicodecode point is given by int i
ord(c) Returns the int that is the byte value (0–255) if c is aone-character str string, or the int for the Unicode codepoint if c is a one-character unicode string
dir(x) Returns a list of most of object x’s attributes, includingall its method names
help(x) In IDLE, prints a brief description of object x’s type anda list of its attributes including all its methods
hasattr(x, a) Returns True if the object x has the attribute called a
id(x) Returns the unique ID of the object that object referencex refers to
isinstance(x, C) Returns True if x is an instance of class C or a subclass ofclass C
type(x) Returns the type of x; isinstance() is preferred sinceit accounts for inheritance; type() is most often usedfor debugging
eval(s) Returns the result of evaluating the string s which cancontain an arbitrary Python expression
open(f, m) Opens the file named in string f using mode m, and re-turns the file handle; covered in Chapter 6
range(i) Returns a list of int i range()
ex-amples
☞ 50
ints numbered from 0 to i - 1; ad-ditional arguments specify start, end, and step values
This will display all the str class’s methods with a brief explanation of each.Quite a lot of information is provided, so we often have to scroll up using thePageUp key or using the scrollbar.
>>> help()
With no arguments the help() function takes us into the interactive helpsystem. Type quit to return to normal IDLE interaction.
Once we are familiar with Python’s classes and we need just a quick reminder,we can use dir() to get a bare list of a class’s methods, for example:
>>> dir(str)
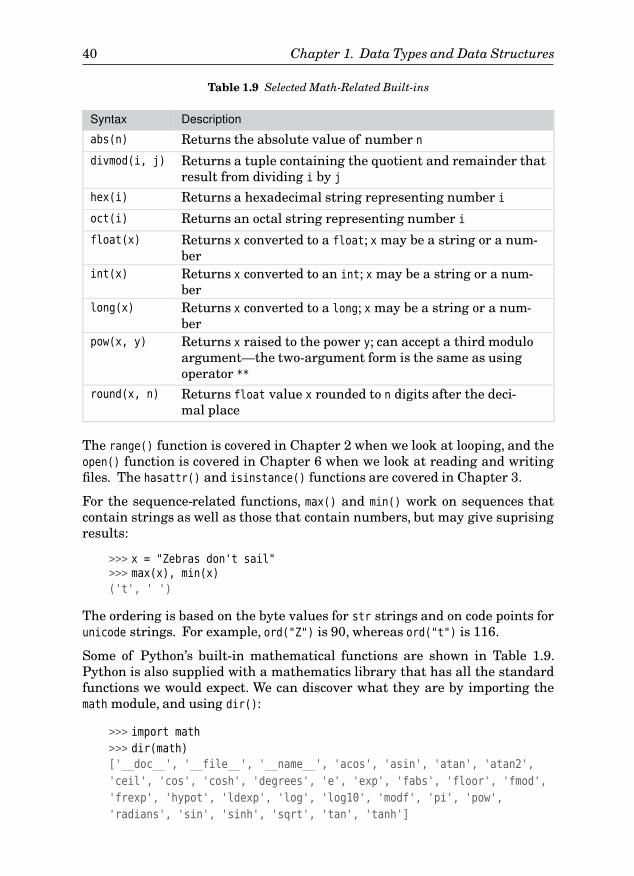
40 Chapter 1. Data Types and Data Structures
Table 1.9 Selected Math-Related Built-ins
Syntax Description
abs(n) Returns the absolute value of number n
divmod(i, j) Returns a tuple containing the quotient and remainder thatresult from dividing i by j
hex(i) Returns a hexadecimal string representing number i
oct(i) Returns an octal string representing number i
float(x) Returns x converted to a float; x may be a string or a num-ber
int(x) Returns x converted to an int; x may be a string or a num-ber
long(x) Returns x converted to a long; x may be a string or a num-ber
pow(x, y) Returns x raised to the power y; can accept a third moduloargument—the two-argument form is the same as usingoperator **
round(x, n) Returns float value x rounded to n digits after the deci-mal place
The range() function is covered in Chapter 2 when we look at looping, and theopen() function is covered in Chapter 6 when we look at reading and writingfiles. The hasattr() and isinstance() functions are covered in Chapter 3.
For the sequence-related functions, max() and min() work on sequences thatcontain strings as well as those that contain numbers, but may give suprisingresults:
>>> x = "Zebras don't sail">>> max(x), min(x)
('t', ' ')
The ordering is based on the byte values for str strings and on code points forunicode strings. For example, ord("Z") is 90, whereas ord("t") is 116.
Some of Python’s built-in mathematical functions are shown in Table 1.9.Python is also supplied with a mathematics library that has all the standardfunctions we would expect. We can discover what they are by importing themath module, and using dir():
>>> import math
>>> dir(math)
['__doc__', '__file__', '__name__', 'acos', 'asin', 'atan', 'atan2',
'ceil', 'cos', 'cosh', 'degrees', 'e', 'exp', 'fabs', 'floor', 'fmod',
'frexp', 'hypot', 'ldexp', 'log', 'log10', 'modf', 'pi', 'pow',
'radians', 'sin', 'sinh', 'sqrt', 'tan', 'tanh']
Built-in Functions 41
The first three items are special methods (indicated by leading and trailingdouble underscores); we will learn more about special methods in Chapter 3.All the rest are functions, except for math.e and math.pi, which are constants.We can find out what type an item is interactively. For example:
>>> import math
>>> type(math.pi), type(math.sin)
(<type 'float'>, <type 'builtin_function_or_method'>)
>>> math.pi, math.sin
(3.1415926535897931, <built-in function sin>)
>>> math.sin(math.pi)
1.2246063538223773e-16★
At first it is quite useful to explore what Python offers in this interactiveway, but reading the documentation, particularly skimming the “LibraryReference”, will provide a broad overview of what Python’s standard librarieshave to offer.
Summary
In this chapter, we saw the use of the assignment using operator =, numericaddition using + (with type-promotion of an int to a float), and augmented as-signment with +=. We also saw the print operator and learned that since IDLEautomatically prints expressions, we use print much less often when usingIDLE. We also saw that comments are introduced by a # and continue until theend of the line. In fact Python can separate statements with semicolons but itis very unusual to do this:In Python,a statement occupiesa single line;newlineis the statement separator.
We have learned how Python strings are created by using quotes, and howstrings can be sliced and concatenated using the [] and + operators. We alsosummarized some of the key methods that Python strings provide: We will seenumerous examples of their use in working code throughout the book. We sawthat QString is a distinct Unicode string type and that we need to have a policygoverning our use of QStrings and Python strings (normally unicode strings)when programming using PyQt.
The chapter introduced Python’s major collection types. Tuples provide a niceway of grouping items together and can be used as dictionary keys. Lists areordered and can hold duplicates. They provide fast insertions and deletions,and fast index-based lookup. Dictionaries are unordered and have uniquekeys. Like lists, they provide fast insertions and deletions. They also providefast key-based lookup. Sets can be thought of as dictionaries that don’t holdvalues. We will make great use of all these types in the rest of the book.
★The value 0.00000000000000012246063538223773 is close to 0 as expected.
42 Chapter 1. Data Types and Data Structures
Finally, we had a quick glimpse at some of Python’s built-in functionality andat one of its mathematics modules. In Chapter 3, we will see how to createour own modules. But before that, we need to learn about Python’s controlstructures so that we can branch, loop, call our own functions, and handleexceptions—all of which are the subject of the next chapter.
ExercisesThe purpose of the exercises here, and throughout the book, is to encourageyou to try out Python, and from Part II onward, PyQt, to get some hands-onexperience. The exercises are designed to require as little typing as possible,and they are graded from least to most challenging.
The exercises for this chapter can all be tried out directly in IDLE; fromChapter 2 onward, they are slightly longer and will need to be typed into files,as we will explain.
1. Run IDLE, and type in the following:
one = [9, 36, 16, 25, 4, 1]
two = dict(india=9, golf=17, juliet=5, foxtrot=61, hotel=8)
three = {11: "lima", 13: "kilo", 12: "mike"}
Try to predict what the len(), max(), min(), and sum() functions will producefor each of the three collections, and then apply the functions and see theresults. Do they do what you expected?
2. Continuing in IDLE, assign a dictionary’s keys to two variables, and thenchange one of them like this:
d = dict(november=11, oscar=12, papa=13, quebec=14)
v1 = v2 = d.keys()
v1, v2 # This will show the contents of the lists
v1[3] = "X"
After this, do you expect v1 and v2 to be the same or different? Why? Printout v1 and v2 to see. Now try assigning to v1 and v2 separately, and againchange one:
v1 = d.keys()
v2 = d.keys()
v1[3] = "X"
Will v1 and v2 be the same as before? Print them out to see. If any of thisis mysterious, try rereading the sidebar on page 34.
3. In the documentation, string-related methods and functions are coveredin several places—find and read or skim these pages: “Sequence types”,“String methods”, “String formatting operations”, and “String constants”.
Exercises 43
If you are comfortable with regular expressions, also look at the “Regularexpression operations” pages.
Still in IDLE, create two floating-point values:
f = -34.814
g = 723.126
Based on your reading of the string-formatting documentation, create asingle format string that when used with the % operator will produce thestring < -34.81> when applied to f and <+723.13> when applied to g.
Solutions to the exercises, and all the source code for the examples, is availableonline from the author’s Web site at http://www.qtrac.eu/pyqtbook.html. Inthe pyqtbook.zip file (and in the pyqtbook.tar.gz file) there are subdirectories,chap01, chap02, and so on, and in these are the relevant examples and answers.This chapter’s answers are in chap01/answers.txt.

This page intentionally left blank
Control Structures
22 ● Conditional Branching
● Looping
● Functions
● Exception Handling
To write programs we need data types, with variables and data structures inwhich to store them, and we need control structures such as branches and loopsto provide control of program flow and iteration. In this chapter, we will learnhow to use Python’s if statement and how to loop using for and while loops.Exceptions can affect the flow of control, so we also cover both handling andcreating exceptions.
One fundamental way of encapsulating functionality is to put it into functionsand methods. This chapter shows how to define functions,and the next chaptershows how to define classes and methods. Programmers coming from a C++or similar background are used to functions being defined just once. The sameis true in Python, but with an additional possibility: In Python, we can createfunctions at runtime in a way that reflects the current circumstances, as wewill see later in this chapter.
In the preceding chapter, we used IDLE to experiment with snippets of Pythoncode. In this chapter,we will almost always simply show the code as it would bewritten in a file as part of a program. However, it is perfectly possible to typethe snippets used in this chapter into IDLE to see the results “live”, and this iscertainly worth doing for anything covered that you are not sure about.
Some of Python’s functions and operators work on Boolean values. For exam-ple, the binary operator in returns True if its left-hand operand is in its right-hand operand. Similarly, the if and while statements evaluate the expressionsthey are given, as we will see shortly.
In Python, a value evaluates to False if it is the predefined constant False, thenumber 0, the special object None, an empty sequence (e.g., an empty string orlist), or an empty collection; otherwise, the value is True.
In PyQt an empty QString and any “null” object, that is, any object of a PyQtdata type that has an isNull() method (and where QtisNull() returns True), eval-uates to False.For example, an empty QStringList, a null QDate, a null QDateTime,
45
46 Chapter 2. Control Structures
and a null QTime are all False. Correspondingly, nonempty and non-null PyQtobjects are True.
We can test any object to see its Boolean value by converting it to a bool type.For example:
from PyQt4.QtCore import *now = QDate.currentDate()
never = QDate()
print bool(now), bool(never) # Prints "True False"
The QDate() constructor with no arguments creates a null date; the QDate.
currentDate() static method returns today’s date which, of course, is not null.
Conditional Branching
Python provides an if statement with the same semantics as languages likeC++ and Java, although with its own sparse syntax:
if expression1:
suite1elif expression2:
suite2else:
suite3
The first thing that stands out to programmers used to C++ or Java is thatthere are no parentheses and no braces. The other thing to notice is thecolon: This is part of the syntax and is easy to forget when starting out. Colonsare used with else, elif, and in many other places to indicate that a block ofcode (a suite in Python-speak) is to follow. As we would expect, there can be anynumber of elifs (including none), and optionally, there can be a single else atthe end.
Unlike most other programming languages, Python uses indentation to signifyits block structure.Some programmersdon’t like this, at least at first,and someget quite emotional about the issue. But it takes just a few days to get used to,and after a few months, brace-free code seems much nicer and less cluttered toread than code that uses braces.
Since suites are indicated using indentation, the question that naturally arisesis, “What kind of indentation?”. The Python style guidelines recommend fourspaces per level of indentation, and only spaces (no tabs).Most modern text ed-itors can be set up to handle this automatically (IDLE’s editor does, of course).Python will work fine with any number of spaces or with tabs, providing thatthe indentation used is consistent. In this book, we will follow the officialPython guidelines.
Let’s begin with a very simple example:
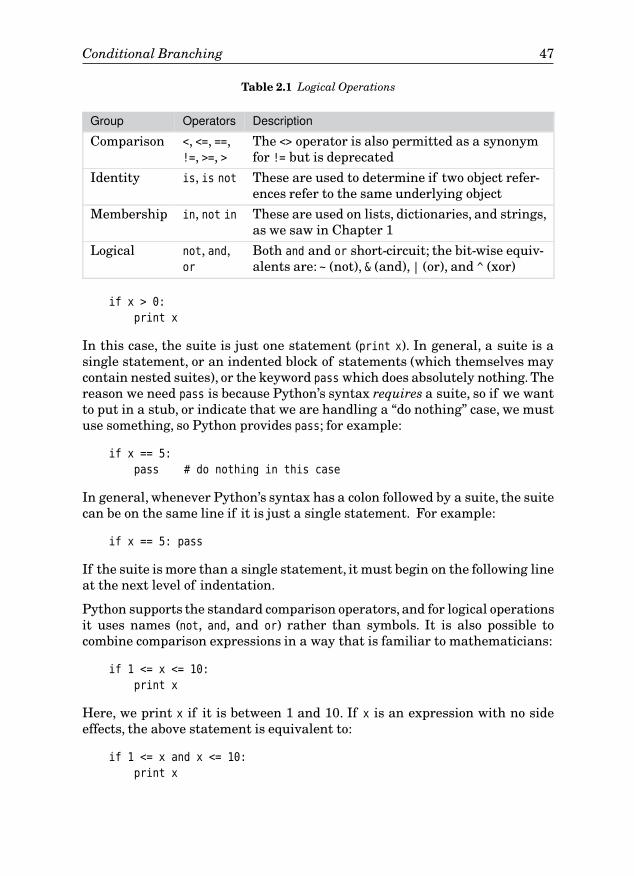
Conditional Branching 47
Table 2.1 Logical Operations
Group Operators Description
Comparison <, <=, ==,!=, >=, >
The <> operator is also permitted as a synonymfor != but is deprecated
Identity is, is not These are used to determine if two object refer-ences refer to the same underlying object
Membership in, not in These are used on lists, dictionaries, and strings,as we saw in Chapter 1
Logical not, and,or
Both and and or short-circuit; the bit-wise equiv-alents are: ~ (not), & (and), | (or), and ^ (xor)
if x > 0:
print x
In this case, the suite is just one statement (print x). In general, a suite is asingle statement, or an indented block of statements (which themselves maycontain nested suites), or the keyword pass which does absolutely nothing. Thereason we need pass is because Python’s syntax requires a suite, so if we wantto put in a stub, or indicate that we are handling a “do nothing” case, we mustuse something, so Python provides pass; for example:
if x == 5:
pass # do nothing in this case
In general, whenever Python’s syntax has a colon followed by a suite, the suitecan be on the same line if it is just a single statement. For example:
if x == 5: pass
If the suite is more than a single statement, it must begin on the following lineat the next level of indentation.
Python supports the standard comparison operators, and for logical operationsit uses names (not, and, and or) rather than symbols. It is also possible tocombine comparison expressions in a way that is familiar to mathematicians:
if 1 <= x <= 10:
print x
Here, we print x if it is between 1 and 10. If x is an expression with no sideeffects, the above statement is equivalent to:
if 1 <= x and x <= 10:
print x
48 Chapter 2. Control Structures
No Dangling Else Trap
One additional benefit of using indentation is that the “dangling elseambiguity” is impossible in Python. For example, here is some C++ code:
if (x > 0)
if (y > 0)
z = 1;
else
z = 5;
The code sets z to 1 if both x and y are greater than 0, and it looks like itwill set z to 5 if x is less than or equal to 0. But in fact, it sets z to 5 only ifx is greater than 0 and if y is less than or equal to 0. Here is what it meansin Python:
if x > 0:
if y > 0:
z = 1
else:
z = 5
And if we really want z set to 5 if x is less than or equal to 0, we wouldwrite this:
if x > 0:
if y > 0:
z = 1
else:
z = 5
Thanks to Python’s indentation-based block structure, we avoid the“dangling else” trap.
The first form is preferred: It is clearer and simpler, it is more efficient (sincex may be a complex expression involving some overhead to evaluate), and it iseasier to maintain (again because the x is used only once rather than twice).
Python provides multiway branching using elif and else; there is no case (orswitch) statement.
if x < 10:
print "small"
elif x < 100:
print "medium"
elif x < 1000:
print "large"
else:
print "huge"
Conditional Branching 49
Python 2.5 introduced a conditional expression. It is a kind of if Python
2.5statement
that can be used in expressions, and it is equivalent to the ternary operatorsused by some other languages. The Python syntax is quite different fromC++’s and Java’s, which use ? : for their ternary operators, and it has the formtrueResult if expression else falseResult; so the expression is in the middle:
print "x is zero or positive" if x >= 0 else "x is negative"
This will print “x is zero or positive” if x >= 0 evaluates to True; otherwise, it willprint “x is negative”.★
Looping
Python provides two loop constructs. One is the while loop, whose basicsyntax is:
while expression:
suite
Here is an example:
count = 10
while count != 0:
print count,
count -= 1
This will print “10 9 8 7 6 5 4 3 2 1”—all on one line, due to the print statement’strailing comma. Notice that we must have a colon before the indented suite.
Loops can be broken out of prematurely, using the break statement. This isparticularly helpful in loops which will not otherwise terminate, that is,because their conditional expression is always true:
while True:
item = getNextItem()
if not item:
break
processItem(item)
Python’s while loop can also have an associated else statement using thefollowing syntax:
while expression:
suite1else:
suite2
★Andrew Kuchling, author of the “What’s New in Python” documents, recommends always usingparentheses with conditional expressions. In this book, we use them only when necessary.
50 Chapter 2. Control Structures
The else clause (with its associated suite) is optional. It is executed if the loopterminates at the condition, rather than due to a break statement. It is notoften used, but can be useful in some situations:
i = 0
while i < len(mylist):
if mylist[i] == item:
print "Found the item"
break
i += 1
else:
print "Didn't find the item"
The while loop is very versatile, but since it is so common to want to loop overall the items in a list, or to loop a specific number of times, Python provides anadditional loop construct that is more convenient in such cases. This is the for
loop, whose syntax is:
for variable in iterable:suite1
else:suite2
The else works the same as in the while loop, that is, its suite is executed ifthe for loop completes, but not if it was terminated by a break statement. Aniterable is an object that can be iterated over, such as a string, a tuple, a list, adictionary, or an iterator (such as a generator, covered later). In the case of adictionary, it is the keys that are iterated over.
Here, we iterate over a string, that is, over each character in the string:
for char in "aeiou":
print "%s=%d" % (char, ord(char)),
This prints “a=97 e=101 i=105 o=111 u=117”. The variable char takes eachvalue from the iterable in turn (in this case “a”, then “e”, and so on up to “u”),and for each iteration executes the associated suite.
The range() built-in function returns a list of integers that can conveniently beused in for loops. For example:
for i in range(10):
print i,
This prints “0 1 2 3 4 5 6 7 8 9”. By default, the range() function returns a listof integers starting at 0, increasing by 1, up to but excluding the given value.It also has two- and three-argument forms:
range(3, 7) # Returns [3, 4, 5, 6]
range(-4, 12, 3) # Returns [-4, -1, 2, 5, 8, 11]
Looping 51
Python also provides an xrange() function with the same semantics, but whichis more memory-efficient in a for loop, because it evaluates lazily rather thangenerating the entire list of integers in one go. We will normally use range()
and substitute it with xrange() only if it makes a significant difference to per-formance.
If the for loop’s iterable is mutable (e.g., a list or a dictionary), it must notbe changed inside the loop. If we want to change a list or dictionary as weiterate over it, we must iterate over a list of the list’s indexes or a list of thedictionary’s keys, or use a shallow copy, rather than working directly on thecollections themselves. For example:
presidents = dict(Washington=(1789, 1797), Adams=(1797, 1801),
Jefferson=(1801, 1809), Madison=(1809, 1817))
for key in presidents.keys():
if key == "Adams":
del presidents[key]
else:
print president, presidents[key]
This removes the “Adams” key (and its associated value) from the presidents
dictionary, and prints:
Madison (1809, 1817)
Jefferson (1801, 1809)
Washington (1789, 1797)
Notice that although Python normally uses newline as a statement separator,this does not occur inside parentheses. The same is true when we create listsin square brackets or dictionaries in braces. This is why we can spread theconstruction of the presidents dictionary over a couple of lines without havingto escape the intervening newline with a backslash (\).
Since dictionaries hold pairs of keys and values, Python provides methods foriterating over the keys, the values, and the pairs. And as a convenience, if wesimply iterate over a dictionary, we don’t even have to call the keys() methodto get the keys:
presidents = dict(Washington=(1789, 1797), Adams=(1797, 1801),
Jefferson=(1801, 1809), Madison=(1809, 1817))
for key in presidents:
print "%s: %d-%d" % (key, presidents[key][0], presidents[key][1])
This prints (not necessarily in this order):
Madison: 1809-1817
Jefferson: 1801-1809
Washington: 1789-1797
Adams: 1797-1801
52 Chapter 2. Control Structures
When we iterate over a dictionary in a for loop the variable is set to eachdictionary key in turn.★ Dictionaries are unordered, so their keys are returnedin an undefined order.
To get the values rather than the keys we can use the values() method—forexample, for dates in presidents.values(): and to get pairs we can use theitems() method. For example:
for item in presidents.items():
print "%s: %d-%d" % (item[0], item[1][0], item[1][1])
This produces the same output as the previous example, as does the following:
for president, dates in presidents.items():
print "%s: %d-%d" % (president, dates[0], dates[1])
Here we have unpacked each pair returned by the items() method, the dates
being the two-element tuple of dates.
If we want to iterate in order, we must explicitly sort the list before we iterateon it. For example, to iterate in name order we can do this:
for key in sorted(presidents):
print "%s: %d-%d" % (key, presidents[key][0], presidents[key][1])
Both for loops and the sorted() function can work on sequences or on iterators.Iterators are objects that support Python’s iterator protocol, which means thatthey provide a next() method, and raise a StopIteration exception when theyhave no more items. Not surprisingly, lists and strings implement the proto-col: A list iterator returns each item in the list in turn, and a string iteratorreturns each character of the string in turn. Dictionaries also support the pro-tocol: They return each of their keys in turn (in an arbitrary order). So, whenwe use a for loop or call sorted() on a dictionary, we actually operate on thedictionary’s keys. For example:
names = list(presidents)
# names == ['Madison', 'Jefferson', 'Washington', 'Adams']
So in the for loop, we effectively called sorted(list(presidents)) which is thesame as sorted(presidents.keys()). If we want to be more explicit, we couldbreak things down into steps:
keys = presidents.keys() # Or: keys = list(presidents)
keys.sort()
for key in keys:
print "%s: %d-%d" % (key, presidents[key][0], presidents[key][1])
★Note for C++/Qt programmers: Python’s for loop iterates over a dictionary’s keys, whereas Qt’sforeach loop iterates over a QMap’s values.
Looping 53
Python’s sort() method and sorted() function can take additional arguments.So, for example, we could sort the presidents dictionary by dates.
In addition to the keys(), values(), and items() methods, dictionaries alsoprovide iterkeys(), itervalues(), and iteritems() methods. These additionalmethods can be used just like the plain versions, and they provide better per-formance. However, they cannot be used to iterate over a dictionary whose keyswill change during the iteration.
Just like while loops, we can use break to leave a for loop before the iterationsare complete. We can also use continue in both kinds of loop to immediatelyjump to the next iteration. For example:
for x in range(-5, 6):
if x == 0:
continue # goes directly to the next iteration
print 1.0 / x,
This will produce output like this: “-0.2 -0.25 -0.333333333333 -0.5 -1.0 1.0 0.50.333333333333 0.25 0.2”. Without the continue, we would eventually attemptdivision by zero and get an exception.
As mentioned earlier, Python’s loops can have an optional else clause that isexecuted only if the loop completed, that is, the else clause will not be executedif break was called inside the loop. An example will make this clearer; here isan inefficient way of generating a list of primes:
primes = [2]
for x in range(2, 50):
if x % 2:
for p in primes:
if x % p == 0:
break # exits the loop and skips the else
else:
primes.append(x)
When we saw the % operator earlier,%
operator
24 ☞
it was used with string operands andproduced a formatted string as its result. Here, we use the % operator withinteger operands, and in this context it performs the modulus (remainder)operation, and produces an integer as its result.
At the end, the primes list is [2, 3, 5, 7, 11, 13, 17, 19, 23, 29, 31, 37, 41,
43, 47]. The append() method is called only if the iteration over the primes listcompletes, that is, if x is not divisible by any previous prime.
List Comprehensions and Generators
Producing lists using a for loop in conjunction with range() is easy. In addition,Python provides an alternative approach called list comprehensions—these areexpressions that generate lists. (Note that this and other advanced sections in
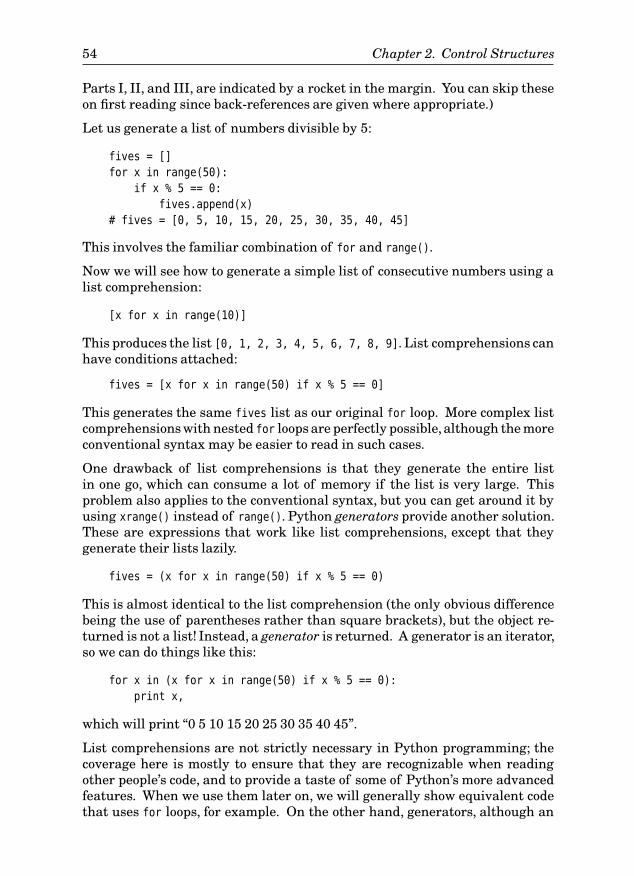
54 Chapter 2. Control Structures
Parts I, II, and III, are indicated by a rocket in the margin. You can skip theseon first reading since back-references are given where appropriate.)
Let us generate a list of numbers divisible by 5:
fives = []
for x in range(50):
if x % 5 == 0:
fives.append(x)
# fives = [0, 5, 10, 15, 20, 25, 30, 35, 40, 45]
This involves the familiar combination of for and range().
Now we will see how to generate a simple list of consecutive numbers using alist comprehension:
[x for x in range(10)]
This produces the list [0, 1, 2, 3, 4, 5, 6, 7, 8, 9]. List comprehensions canhave conditions attached:
fives = [x for x in range(50) if x % 5 == 0]
This generates the same fives list as our original for loop. More complex listcomprehensions with nested for loops are perfectly possible,although the moreconventional syntax may be easier to read in such cases.
One drawback of list comprehensions is that they generate the entire listin one go, which can consume a lot of memory if the list is very large. Thisproblem also applies to the conventional syntax, but you can get around it byusing xrange() instead of range(). Python generators provide another solution.These are expressions that work like list comprehensions, except that theygenerate their lists lazily.
fives = (x for x in range(50) if x % 5 == 0)
This is almost identical to the list comprehension (the only obvious differencebeing the use of parentheses rather than square brackets), but the object re-turned is not a list! Instead, a generator is returned. A generator is an iterator,so we can do things like this:
for x in (x for x in range(50) if x % 5 == 0):
print x,
which will print “0 5 10 15 20 25 30 35 40 45”.
List comprehensions are not strictly necessary in Python programming; thecoverage here is mostly to ensure that they are recognizable when readingother people’s code, and to provide a taste of some of Python’s more advancedfeatures. When we use them later on, we will generally show equivalent codethat uses for loops, for example. On the other hand, generators, although an
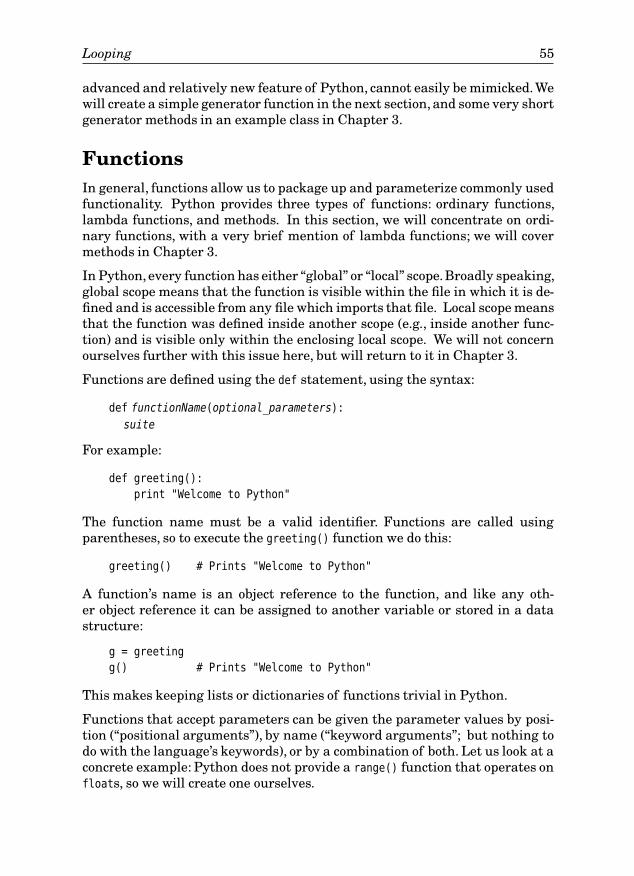
Looping 55
advanced and relatively new feature of Python, cannot easily be mimicked.Wewill create a simple generator function in the next section, and some very shortgenerator methods in an example class in Chapter 3.
FunctionsIn general, functions allow us to package up and parameterize commonly usedfunctionality. Python provides three types of functions: ordinary functions,lambda functions, and methods. In this section, we will concentrate on ordi-nary functions, with a very brief mention of lambda functions; we will covermethods in Chapter 3.
In Python, every function has either “global” or “local” scope.Broadly speaking,global scope means that the function is visible within the file in which it is de-fined and is accessible from any file which imports that file. Local scope meansthat the function was defined inside another scope (e.g., inside another func-tion) and is visible only within the enclosing local scope. We will not concernourselves further with this issue here, but will return to it in Chapter 3.
Functions are defined using the def statement, using the syntax:
def functionName(optional_parameters):
suite
For example:
def greeting():
print "Welcome to Python"
The function name must be a valid identifier. Functions are called usingparentheses, so to execute the greeting() function we do this:
greeting() # Prints "Welcome to Python"
A function’s name is an object reference to the function, and like any oth-er object reference it can be assigned to another variable or stored in a datastructure:
g = greeting
g() # Prints "Welcome to Python"
This makes keeping lists or dictionaries of functions trivial in Python.
Functions that accept parameters can be given the parameter values by posi-tion (“positional arguments”), by name (“keyword arguments”; but nothing todo with the language’s keywords), or by a combination of both. Let us look at aconcrete example: Python does not provide a range() function that operates onfloats, so we will create one ourselves.
56 Chapter 2. Control Structures
def frange(start, stop, inc):
result = []
while start < stop:
result.append(start)
start += inc
return result
If we call this function as frange(0, 5, 0.5) the list we get back is [0, 0.5, 1.0,
1.5, 2.0, 2.5, 3.0, 3.5, 4.0, 4.5], as we expect.
Like normal Python variables, we do not specify types for our parameters.And since we have not given any default arguments, every parameter mustbe specified, otherwise we will get a TypeError exception. For those unfamiliarwith default arguments, Python allows us to give values to parameters in afunction’s signature. Each such value is a “default argument”, and it is used ifthe corresponding argument is not given when the function is called.
In many cases we create functions where one or more arguments will almostalways have the same values. Python allows us to provide default argumentsfor such situations, and we have taken advantage of this to provide a defaultargument for the third parameter, as this revised def line shows:
def frange(start, stop, inc=1.0):
This works fine; for example, we can now call frange(0, 5) to get [0, 1.0, 2.0,
3.0, 4.0] since the increment defaults to 1.0. In common with other languagesthat allow default arguments, Python does not permit a parameter without adefault argument to follow one that has a default argument; so we could nothave frange(start=0, 5). Nor does Python allow overloaded functions. Neitherof these restrictions is ever a problem in practice, as we will see shortly whenwe discuss keyword arguments.
Unfortunately, our frange() function does not provide the same argumentlogic as range() provides. For range(), if one argument is given it is the upperbound, if two are given they are the lower and upper bounds, and if three aregiven they are the bounds and the step size. So we will create a final frange()function, which more carefully mimics range()’s behavior:★
def frange(arg0, arg1=None, arg2=None):
"""Returns a list of floats using range-like syntax
frange(start, stop, inc) # start = arg0 stop = arg1 inc = arg2
frange(start, stop) # start = arg0 stop = arg1 inc = 1.0
frange(stop) # start = 0.0 stop = arg0 inc = 1.0
"""
start = 0.0
★For a more sophisticated frange(), see “Writing a range-like Function with Float Increments” inthe Python Cookbook.
Functions 57
inc = 1.0
if arg2 is not None: # 3 arguments given
start = arg0
stop = arg1
inc = arg2
elif arg1 is not None: # 2 arguments given
start = arg0
stop = arg1
else: # 1 argument given
stop = arg0
# Build and return a list
result = []
while start < (stop - (inc / 2.0)):
result.append(start)
start += inc
return result
For example,frange(5) returns[0.0, 1.0, 2.0, 3.0, 4.0],frange(5, 10) returns[5, 6.0, 7.0, 8.0, 9.0], and frange(2, 5, 0.5) returns [2, 2.5, 3.0, 3.5, 4.0,
4.5].
The loop condition is different from the one we used earlier. It is designed toprevent you from accidentally reaching the stop value due to floating-pointrounding errors.
After the def line, we have a triple-quoted string—and the string is notassigned to anything. An unassigned string that follows a def statement—orthat is the first thing in a .py or .pyw file or that follows a class statement, aswe will see later on in Part I—is called a “docstring”. It is the natural place todocument functions. By convention, the first line is a brief summary,separatedfrom the rest by a blank line.
In most of the examples shown in the rest of the book, we will omit the doc-strings to save space. They are included in the source code that accompaniesthe book where appropriate.
The use of None is a more convenient default than, say, 0 since 0 might be alegitimate upper bound. We could have compared to None using the syntaxarg2 != None, but using is not is more efficient and better Python style. This isbecause if we use is we get identity comparison rather than value comparison,which is fast because we are just comparing two addresses and don’t have tolook at the objects themselves. Python has one global None object, so comparingwith it using is or is not is very fast.
The parameters passed to Python functions are always object references. Inthe case of references to immutable objects like strings and numbers, we cantreat the parameters as though they were passed by value. This is becauseif an immutable parameter is “changed” inside a function, the parameter issimply bound to a new object, and the original object it referred to is left intact.
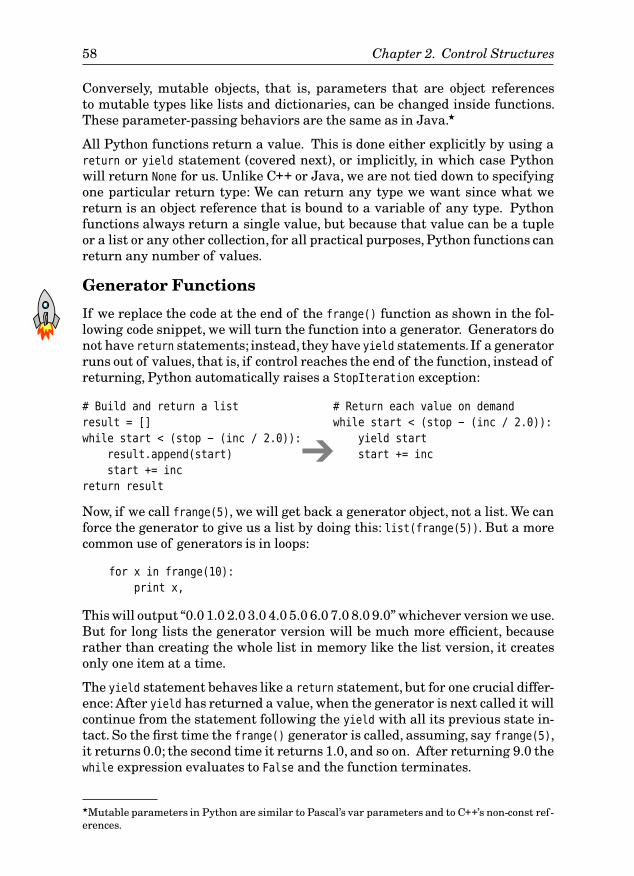
58 Chapter 2. Control Structures
Conversely, mutable objects, that is, parameters that are object referencesto mutable types like lists and dictionaries, can be changed inside functions.These parameter-passing behaviors are the same as in Java.★
All Python functions return a value. This is done either explicitly by using areturn or yield statement (covered next), or implicitly, in which case Pythonwill return None for us. Unlike C++ or Java, we are not tied down to specifyingone particular return type: We can return any type we want since what wereturn is an object reference that is bound to a variable of any type. Pythonfunctions always return a single value, but because that value can be a tupleor a list or any other collection, for all practical purposes, Python functions canreturn any number of values.
Generator Functions
If we replace the code at the end of the frange() function as shown in the fol-lowing code snippet, we will turn the function into a generator. Generators donot have return statements; instead, they have yield statements.If a generatorruns out of values, that is, if control reaches the end of the function, instead ofreturning, Python automatically raises a StopIteration exception:
# Build and return a list
result = []
while start < (stop - (inc / 2.0)):
result.append(start)
start += inc
return result
➔
# Return each value on demand
while start < (stop - (inc / 2.0)):
yield start
start += inc
Now, if we call frange(5), we will get back a generator object, not a list. We canforce the generator to give us a list by doing this: list(frange(5)). But a morecommon use of generators is in loops:
for x in frange(10):
print x,
This will output “0.0 1.0 2.0 3.0 4.0 5.0 6.0 7.0 8.0 9.0” whichever version we use.But for long lists the generator version will be much more efficient, becauserather than creating the whole list in memory like the list version, it createsonly one item at a time.
The yield statement behaves like a return statement, but for one crucial differ-ence: After yield has returned a value, when the generator is next called it willcontinue from the statement following the yield with all its previous state in-tact. So the first time the frange() generator is called, assuming, say frange(5),it returns 0.0; the second time it returns 1.0, and so on. After returning 9.0 thewhile expression evaluates to False and the function terminates.
★Mutable parameters in Python are similar to Pascal’s var parameters and to C++’s non-const ref-erences.
Functions 59
Because the function is a generator (and this is the case purely because wehave used yield), when it finishes it does not return a value, but insteadraises a StopIteration exception. In the context of a for loop, the for gracefullyhandles this particular exception, taking it not as an error, but as an indicationthat the iteration has completed, so the for loop ends and the flow of controlmoves to the for loop’s else suite, or to the statement following the for loop’ssuite, if there is no else. Similarly, if we coerce a generator into a list, the listconstructor will automatically handle the StopIteration exception.
A generator is an object that has a next() function, so we can explore thebehavior of our frange() generator interactively if we wish:
>>> list(frange(1, 3, 0.75))
[1, 1.75, 2.5]
>>> gen = frange(1, 3, 0.75)
>>> gen.next()
1>>> gen.next()
1.75>>> gen.next()
2.5>>> gen.next()
Traceback (most recent call last):
File <pyshell#126>, line 1, in -toplevel-
gen.next()
StopIteration
We generated the whole three-item list using list(), and then we used thegenerator returned by frange() to produce each successive value in the sameway that a for loop does.
Using Keyword Arguments
Python’s argument-handling abilities are very versatile. So far we haveprovided parametersusing positional syntax. For example, the first parameterwe gave to our frange() function always went to arg0, the second to arg1, andthe third to arg2. We have also used default arguments so that some argumentscould be omitted. But what happens if we want to pass, say, the first and thirdarguments, but accept the default second argument? In the next example, wewill see how we can achieve this.
Python provides a strip() method for stripping whitespace (or other unwantedcharacters) from the ends of a string, but it does not provide a function forcleaning up the whitespace inside a string; something that we often need to dowhen we get strings from users. Here is a function that strips whitespace fromboth ends of a string and replaces each sequence of internal whitespace witha single space:
60 Chapter 2. Control Structures
Experimenting with Functions in Files
Both frange() and a generator version, gfrange(), are in the file chap02/
frange.py. If we want to try these or any other functions interactively,we canstart up IDLE, and append the path where the file we want to use is locatedto the paths it searches; for example:
>>> import sys
>>> sys.path.append("C:/pyqt/chap02")
Now the relevant module can be loaded into IDLE:
>>> import frange
The file we wish to import from must have a .py extension, and we must notinclude the extension in the import statement. Now we can use frange() andgfrange() inside IDLE:
>>> frange.frange(3, 5, 0.25)
[3, 3.25, 3.5, 3.75, 4.0, 4.25, 4.5, 4.75]
The first name frange is the module name, and within that module weImport-ingObjectssidebar
19 ☞
wishto access the frange function, which is why we write frange.frange(). Wedid the same thing a moment ago, when we imported the sys module andaccessed its path list using sys.path.
Although we prefer to use IDLE, it is also possible to directly use the Pythoninterpreter when experimenting interactively. If we simply run the Pythonexecutable itself (python.exe, for example) in a console, we will get thefamiliar >>> prompt and be able to use the interpreter interactively.
def simplify(text, space=" \t\r\n\f", delete=""):
result = []
word = ""
for char in text:
if char in delete:
continue
elif char in space:
if word:
result.append(word)
word = ""
else:
word += char
if word:
result.append(word)
return " ".join(result)
Functions 61
The function iterates over every character in the text string. If the character isin the delete string (which, by default, is empty), we ignore it. If it is a “space”(i.e., it is in the space string), we append the word we have been building up toour list of words, and set the next word to be empty. Otherwise, we append thecharacter to the word we are building up. At the end, we tack on the last wordto our list of words. Finally, we return the list of words as a single string witheach word separated by a single space, using the string join() method.★
Now let us look at how we can use the function:
simplify(" this and\n that\t too") # Returns "this and that too"
simplify(" Washington D.C.\n",
delete=",;:.") # Returns "Washington DC"
simplify(delete="aeiou", text=" disemvoweled ") # Returns "dsmvwld"
In the first case, we use the default arguments for the space and delete param-eters. In the second case, we use Python’s keyword argument syntax to specifythe third parameter while accepting the default for the second parameter. Inthe last case, we use keyword syntax for both of the arguments we want to use.Notice that if we use keyword syntax, the order of the keyword arguments isup to us—providing that if we also use positional arguments, these precede thekeyword arguments, as the second call shows.
The code we have used for simplify() is not as Pythonic as it could be. Forexample, we should really store word as a list of characters rather than as astring, and we don’t need the space parameter since we could use the stringobject’s isspace() method instead. The file chap02/simplified.py contains thesimplify() shown here and a similar function, simplified(), which uses themore Pythonic approach. And as noted earlier, although we usually don’t showthe docstrings in the book, they are in the files.
Python’s argument passing is even more sophisticated than we have shown sofar. In addition to named arguments,Python functions can be given signaturesthat accept a variable number of positional arguments and a variable numberof keyword arguments. This is a much more versatile and powerful version ofC++’s and Java’s variable argument lists, but it is rarely needed, so we will notcover it.
Lambda Functions
So far, we’ve always defined functions using def, but Python provides a secondway of creating functions:
cube = lambda x: pow(x, 3)
The lambda keyword is used to create simple anonymous functions. Lambdafunctions cannot contain control structures (no branches or loops), nor do theyhave a return statement: The value returned is simply whatever the expression
★The QString.simplified()method is like our simplify() function called with just one argument.
62 Chapter 2. Control Structures
evaluates to. Lambda functions can be closures, a topic covered later. Clo-sures
☞ 64
In thisexample, we have assigned the lambda function to the variable cube, which wecan now use, for example: cube(3) which will return 27.
Some Python programmers dislike lambda; certainly it is not needed since def
can be used to create any function we want. However, when we start on GUIprogramming we will see one context where lambda can be useful, although wewill also show alternatives that don’t use it.
Dynamic Function Creation
The Python interpreter starts reading from the top of the .py or .pyw file. Whenthe interpreter encounters a def statement it executes the statement, therebycreating the function and binding the name following the def to it. Any codethat is not inside a def statement (or inside a class statement, as we will see inthe next chapter) is executed directly.
Python cannot call functions or use objects that have not been defined. SoPython programs that occupy a single file tend to have a Pascal-like structurewith lots of function definitions from the top down, and at the end a call to oneof them to start the processing off.
Unlike C++ and Java, Python programs do not have a fixed entry point, andthe name “main” is not special. The Python interpreter simply executes thecode it encounters from the first line down. For example, here is a completePython program:
#!/usr/bin/env python
def hello():
print "Hello"
def world():
print "World"
def main():
hello()
world()
main()
The interpreter executes def hello(), that is, it creates the hello() function,then creates the world() function, and then creates the main() function. Finallythe interpreter reaches a function call, to main() in this case, so the interpreterexecutes the function call, at which point what we normally think of asprogram execution commences.
Python programmers usually put only one statement at the top level, a call tothe first function they want to execute. They usually call this function main(),and call their other functions from it, resulting in a structure similar to thatused by C++ and Java.
Functions 63
Since def statements are executed at runtime, it is possible to use differentdefinitions depending on the situation. This is especially useful when we wantto use functionality in one version of Python that is not available in an earlierone, without forcing our users to upgrade.
For example, Python 2.4 introduced the sorted() function. What if we hadsome code that needed sorted(), but some of our users were using Python 2.3and some were using 2.4 or later? We could simply rely on the sorted() methodfor 2.4 or later, and provide our own equivalent function for older Pythons:
import sys
if sys.version_info[:2] < (2, 4):
def sorted(items):
items = list(items)
items.sort()
return items
We begin by importing the sys module, which provides the version_info tuple.Then we use this tuple to get the major and minor version numbers. Only ifthe version is lower than 2.4 do we define our own sorted() function.Notice alsothat we can compare tuples: Python can compare data structures, includingnested ones, providing all the types they contain can be compared.
Partial Function Application
As we will see when we begin GUI programming,we sometimes have situationswhere we need to call a particular function, but we actually know what one ofthe parameters will be when we are writing the code. For example, we mighthave several buttons that all need to invoke the same function, but parameter-ized in some way by which particular button is the cause of the invocation.
In the simplest case we want to store a function (i.e., an object reference to afunction) that we can then call later. A function stored like this is known as acallback. Here is a trivial example:
def hello(who):
print "Hello", who
def goodbye(who):
print "Goodbye", who
funclist = [hello, goodbye]
# Some time later
for func in funclist:
func("Me")
This prints “Hello Me”, and then “Goodbye Me”. Here, we have stored two func-tions and then called them later on. Notice that we passed the same argument,"Me", each time we called func(). Since we know what the argument is in ad-
64 Chapter 2. Control Structures
vance, it would be nice to be able to somehow package up both the function tobe called and the parameter we want to use into a single callable object.
A solution to this is partial function application (also known as “currying”),which simply means that we take a function and zero, one, or more parametersfor it, and wrap them up into a new function which, when invoked, will call theoriginal function with the parameters we wrapped, and with any others thatare passed at call time. Such wrapped functions are called closures becausethey encapsulate some of their calling context when they are created.
To get a flavor for how this works, let us imagine a very simple GUI programwhere we have two buttons that, when pressed, will call the same action()
function. (We won’t worry about how we transform button presses into functioncalls right now; it is very easy, and fully explained in Chapter 4.)
def action(button):
print "You pressed button", button
Now when we create our buttons, naturally we know which ones they are, sowe want to tell the first button to make the call action("One") and the second tocall action("Two").But this presents us with a problem. We know what we wantcalled, but we don’t want the call to take place until a button is pressed. So, forexample, we want to give the first button a function which wraps action() andthe parameter "One", so that when the first button is pressed it can call action()with the right parameter.
So, what we need is a function that will take a function and an argument andreturn a function, that when, called will call the original function with theoriginal argument. InPython
2.5Python 2.5, this is easy assuming our previous definition
of action():
import functools
buttonOneFunc = functools.partial(action, "One")
buttonTwoFunc = functools.partial(action, "Two")
The functools.partial() function takes a function as the first argument, andthen any number of other arguments, and returns a function that, whencalled, will call the passed function with the passed arguments, and with anyadditional arguments that are given at call time.
So, when buttonOneFunc() is called, it will simply call action("One") just as wewant. As we mentioned earlier, a function’s name is simply an object referencethat happens to refer to a function, so it can be passed as a parameter like anyother object reference.
But where does this leave users of earlier versions of Python? We could provideour own very simple and less powerful version of partial(). For example:
Functions 65
def partial(func, arg):
def callme():
return func(arg)
return callme
Inside the partial() function we create an inner function, callme(), that, whencalled, will call the function and argument that were passed to the partial()
function. After creating the callme() function, we then return an objectreference to it so that it can be called later.
This means that we can now write:
buttonOneFunc = partial(action, "One")
buttonTwoFunc = partial(action, "Two")
Ideally, it would be nice to use functools.partial() when it is available, and fallback on our own simple partial() function otherwise. Well, since we can definefunctions at runtime, this is perfectly possible:
import sys
if sys.version_info[:2] < (2, 5):
def partial(func, arg):
def callme():
return func(arg)
return callme
else:
from functools import partial
The if statement ensures that if we are using a version of Python older than2.5 we create a partial() function that takes a function and a single argumentand returns a function that, when called, will call the function passed inwith the argument. But if we are using a later version of Python, we use thefunctools.partial() function, so in our code we can always call partial(), andwhichever version was created will be the one used.
Now, just as before, we can write:
buttonOneFunc = partial(action, "One")
buttonTwoFunc = partial(action, "Two")
Only this time the code will work with both old and new versions of Python.
The partial() function we have defined is just about the simplest possible. Itis also possible to create much more sophisticated wrappers that can take po-sitional and keyword arguments at the time they are wrapped, and additionalpositional and keyword arguments at the time they are called; functionalitythat functools.partial() already provides. We use partial() in several placesfrom Part II onward, but in each case the simple partial() function shown inthis section could be used if Python 2.5 or later was not available.
66 Chapter 2. Control Structures
In the next section, we will continue to take a fairly high-level view of func-tions, and look at the possibilities that are available to us for the notificationand handling of error conditions.
Exception Handling
Many primers push exception handling quite far back, often after coveringobject-oriented programming. We put them here in the control structureschapter because exception handling is relevant in both procedural and object-oriented programming, and because exception handling can cause the flow ofexecution to change dramatically, which certainly qualifies exception handlersas a kind of control structure.
An exception is an object that is “raised” (or “thrown”) under some specific cir-cumstances. When an exception is raised, the normal flow of execution ceasesand the interpreter looks for a suitable exception handler to pass the exceptionto. It begins by looking at the enclosing block and works its way out. If no suit-able exception handler is found in the current function, the interpreter will goup the call stack, looking for a handler in the function’s caller, and if that failsin the caller’s caller, and so on.
As the interpreter searches for a suitable exception handler, it may encounterfinally blocks; any such blocks are executed, after which the search for anexception handler is resumed. (We use finally blocks for cleaning up—forexample, to ensure that a file is closed, as we will see shortly.)
If a handler is found, the interpreter passes control to the handler, andexecution continues from there. If, having gone all the way up the call stack tothe top level, no handler is found, the application will terminate and report theexception that was the cause.
In Python, exceptions can be raised by built-in or library functions andmethods, or by us in our code. The exceptions that are raised can be of any ofthe built-in exception types or our own custom exception types.
Exception handlers are blocks with the general syntax:
try:
suite1except exceptions:
suite2else:
suite3
Here, the code in suite1 is executed, and if an exception occurs, control willpass to the except statement. If the except statement is suitable, suite2 willbe executed; we will discuss what happens otherwise shortly. If no exceptionoccurs, suite3 is executed after suite1 is finished.
The except statement has more than one syntax; here are some examples:
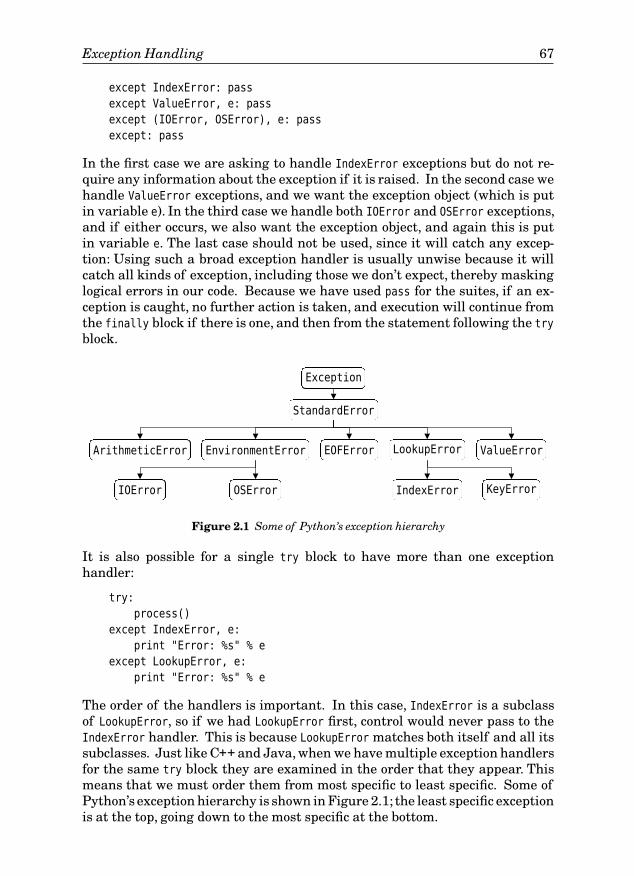
Exception Handling 67
except IndexError: pass
except ValueError, e: pass
except (IOError, OSError), e: pass
except: pass
In the first case we are asking to handle IndexError exceptions but do not re-quire any information about the exception if it is raised. In the second case wehandle ValueError exceptions, and we want the exception object (which is putin variable e). In the third case we handle both IOError and OSError exceptions,and if either occurs, we also want the exception object, and again this is putin variable e. The last case should not be used, since it will catch any excep-tion: Using such a broad exception handler is usually unwise because it willcatch all kinds of exception, including those we don’t expect, thereby maskinglogical errors in our code. Because we have used pass for the suites, if an ex-ception is caught, no further action is taken, and execution will continue fromthe finally block if there is one, and then from the statement following the try
block.
Exception
StandardError
ArithmeticError EnvironmentError EOFError LookupError ValueError
IOError OSError IndexError KeyError
Figure 2.1 Some of Python’s exception hierarchy
It is also possible for a single try block to have more than one exceptionhandler:
try:
process()
except IndexError, e:
print "Error: %s" % e
except LookupError, e:
print "Error: %s" % e
The order of the handlers is important. In this case, IndexError is a subclassof LookupError, so if we had LookupError first, control would never pass to theIndexError handler. This is because LookupError matches both itself and all itssubclasses. Just like C++ and Java, when we have multiple exception handlersfor the same try block they are examined in the order that they appear. Thismeans that we must order them from most specific to least specific. Some ofPython’s exception hierarchy is shown in Figure 2.1; the least specific exceptionis at the top, going down to the most specific at the bottom.
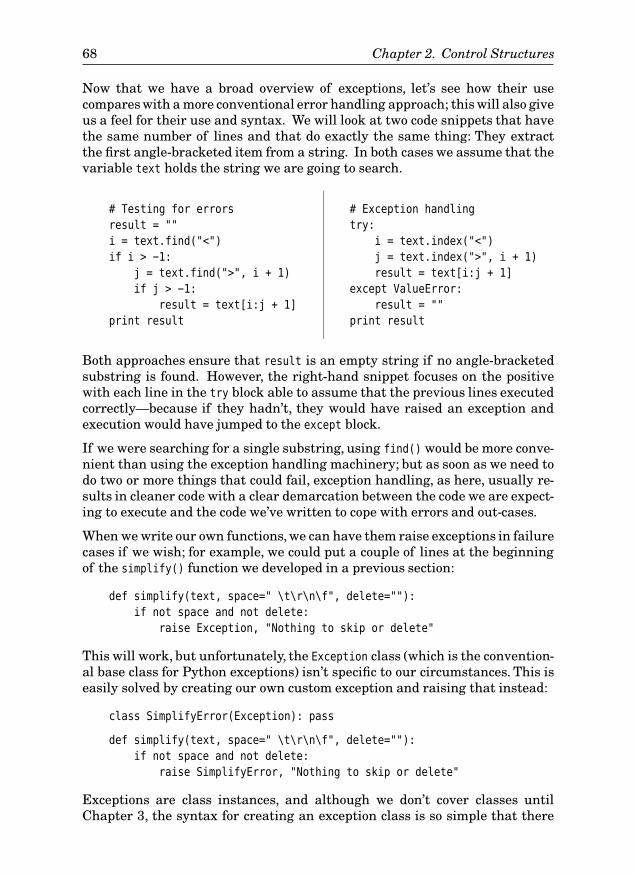
68 Chapter 2. Control Structures
Now that we have a broad overview of exceptions, let’s see how their usecompares with a more conventional error handling approach; this will also giveus a feel for their use and syntax. We will look at two code snippets that havethe same number of lines and that do exactly the same thing: They extractthe first angle-bracketed item from a string. In both cases we assume that thevariable text holds the string we are going to search.
# Testing for errors
result = ""
i = text.find("<")
if i > -1:
j = text.find(">", i + 1)
if j > -1:
result = text[i:j + 1]
print result
# Exception handling
try:
i = text.index("<")
j = text.index(">", i + 1)
result = text[i:j + 1]
except ValueError:
result = ""
print result
Both approaches ensure that result is an empty string if no angle-bracketedsubstring is found. However, the right-hand snippet focuses on the positivewith each line in the try block able to assume that the previous lines executedcorrectly—because if they hadn’t, they would have raised an exception andexecution would have jumped to the except block.
If we were searching for a single substring, using find() would be more conve-nient than using the exception handling machinery; but as soon as we need todo two or more things that could fail, exception handling, as here, usually re-sults in cleaner code with a clear demarcation between the code we are expect-ing to execute and the code we’ve written to cope with errors and out-cases.
When we write our own functions, we can have them raise exceptions in failurecases if we wish; for example, we could put a couple of lines at the beginningof the simplify() function we developed in a previous section:
def simplify(text, space=" \t\r\n\f", delete=""):
if not space and not delete:
raise Exception, "Nothing to skip or delete"
This will work, but unfortunately, the Exception class (which is the convention-al base class for Python exceptions) isn’t specific to our circumstances. This iseasily solved by creating our own custom exception and raising that instead:
class SimplifyError(Exception): pass
def simplify(text, space=" \t\r\n\f", delete=""):
if not space and not delete:
raise SimplifyError, "Nothing to skip or delete"
Exceptions are class instances, and although we don’t cover classes untilChapter 3, the syntax for creating an exception class is so simple that there
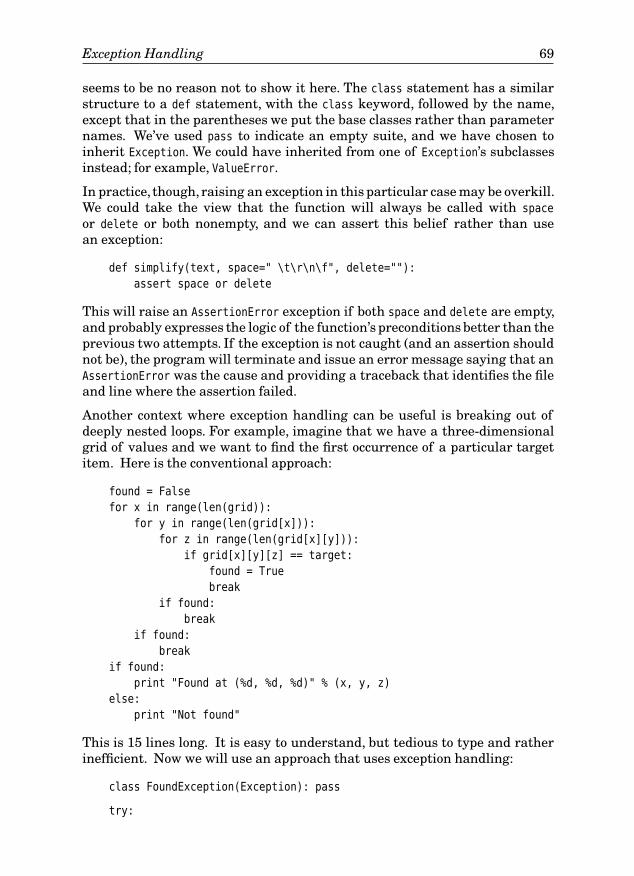
Exception Handling 69
seems to be no reason not to show it here. The class statement has a similarstructure to a def statement, with the class keyword, followed by the name,except that in the parentheses we put the base classes rather than parameternames. We’ve used pass to indicate an empty suite, and we have chosen toinherit Exception. We could have inherited from one of Exception’s subclassesinstead; for example, ValueError.
In practice, though, raising an exception in this particular case may be overkill.We could take the view that the function will always be called with space
or delete or both nonempty, and we can assert this belief rather than usean exception:
def simplify(text, space=" \t\r\n\f", delete=""):
assert space or delete
This will raise an AssertionError exception if both space and delete are empty,and probably expresses the logic of the function’s preconditions better than theprevious two attempts. If the exception is not caught (and an assertion shouldnot be), the program will terminate and issue an error message saying that anAssertionError was the cause and providing a traceback that identifies the fileand line where the assertion failed.
Another context where exception handling can be useful is breaking out ofdeeply nested loops. For example, imagine that we have a three-dimensionalgrid of values and we want to find the first occurrence of a particular targetitem. Here is the conventional approach:
found = False
for x in range(len(grid)):
for y in range(len(grid[x])):
for z in range(len(grid[x][y])):
if grid[x][y][z] == target:
found = True
break
if found:
break
if found:
break
if found:
print "Found at (%d, %d, %d)" % (x, y, z)
else:
print "Not found"
This is 15 lines long. It is easy to understand, but tedious to type and ratherinefficient. Now we will use an approach that uses exception handling:
class FoundException(Exception): pass
try:
70 Chapter 2. Control Structures
for x in range(len(grid)):
for y in range(len(grid[x])):
for z in range(len(grid[x][y])):
if grid[x][y][z] == target:
raise FoundException
except FoundException:
print "Found at (%d, %d, %d)" % (x, y, z)
else:
print "Not found"
This version is only 11 lines long. If the target is found, we raise the exceptionand handle that situation. If no exception is raised, the try block’s else suiteis executed.
In some situations, we want some cleanup code to be called no matter what.For example, we may want to guarantee that we close a file or a network ordatabase connection even if our code has a bug. This is achieved using a try …finally block, as the next example shows:
filehandle = open(filename)
try:
for line in filehandle:
process(line)
finally:
filehandle.close()
Here we open a file with the given filename and get a file handle. We theniterate over the file handle—which is a generator and gives us one line at atime in the context of a for loop. If any exception occurs, the interpreter looksfor the except or finally that is nearest in scope. In this case, it does not findan except, but it does find a finally, so the interpreter switches control to thefinally suite and executes it. If no exception occurs, the finally block will beexecuted after the try suite has finished. So either way, the file will be closed.
Python versions prior to 2.5 do not support try … except … finally blocks. Soif we need both except and finally we must use two blocks, a try … except
and a try … finally, with one nested inside the other. For example, in Pythonversions up to 2.4, the most robust way to open and process a file is like this:
fh = None
try:
try:
fh = open(fname)
process(fh)
except IOError, e:
print "I/O error: %s" % e
finally:
if fh:
fh.close()
Exception Handling 71
This code makes use of things we have already discussed, but to make sure wehave a firm grip on exception handling, we will consider the code in detail.
If the file can’t be opened in the first place, the except block is executed andthen the finally block—which will do nothing since the file handle will stillbe None because the file could not be opened. On the other hand, if the file isopened and processing commences, there might be an I/O error. If this hap-pens, the except block is executed, and again control will then pass to the fi-
nally block, and the file will be closed.
If an exception occurs that is not an IOError, or an IOError subclass, for exam-ple, perhaps a ValueError occurs in our process() function—the interpreterwill consider the except block to be unsuitable and will look for the nearest en-closing exception handler that is suitable. As it looks, the interpreter will firstencounter the finally block which it will then execute, after which, (i.e., afterclosing the file), it will then look for a suitable exception handler.
If the file is opened and processing completes with no exception being raised,the except block is skipped, but the finally block is still executed since finally
blocks are executed no matter what happens. So, in all cases, apart from theinterpreter being killed by the user (or, in very rare cases, crashing), if the filewas opened, it will be closed.
In Python 2.5 and later, we can use a simpler approach that has the samesemantics Python
2.5because we can have try … except … finally blocks:
fh = None
try:
fh = open(fname)
process(fh)
except IOError, e:
print "I/O error: %s" % e
finally:
if fh:
fh.close()
Using this syntax, it is still possible to have an else block for when no exceptionoccurred; it is placed after the last except block and before the one and onlyfinally block. We will revisit this topic in the context of files in Chapter 6.
No matter what version of Python we use, finally blocks are always executedwhether an exception occurs or not, exactly once, either when the try suite isfinished, or when an exception is raised that shifts the flow of control outsidethe try block.
Python 2.6 (and Python 2.5 with a from __future__ import Python
2.6with_statement state-
ment) offers another approach entirely: “context managers”. For file handling,we prefer the try … finally approach, but in other cases, we prefer contextmanagers. For example, we show how to use context managers for locking andunlocking read/write locks used by threads in Chapter 19.
72 Chapter 2. Control Structures
Summary
In this chapter we saw how to branch using if, and how to create multiwaybranches using if with elifs and, optionally, with else. We also saw how to loopusing while and for, and how to generate lists of integers using range(). Welearned about the dictionary methods that provide a dictionary’s keys, values,and key–value pairs (items), and we took a brief look at sorting. We also hada glimpse at how to use Python’s list comprehensions and generators.
We saw how to create functions using def (and with lambda). We used positionaland keyword arguments, and we developed two useful functions, frange() andsimplify(). We saw how Python creates functions dynamically as it reads a.py file, and how we can use this dynamism to provide similar functionalityin older Python versions to that which is available in newer versions. And wesaw how to use partial function application to create wrapper functions thatencapsulate a function with its arguments (closures).
We also learned how to raise exceptions, how to create custom exceptions, andhow to handle exceptions. We saw how to use finally to guarantee cleanup,and we discussed some of the more complex exception-handling possibilitiesthat Python offers. We also saw that exception handling can lead to cleanercode when we have suites where multiple exceptions could occur, and how theycan be used to cleanly exit a set of deeply nested loops.
Creating custom exceptions led us on to creating simple classes; classes thathave no attributes (no member data) and no methods. In the next chapter wewill look more formally at classes,and learn how to create them and instantiateinstances of them, with any attributes and methods we wish.
ExercisesIn Chapter 1, the exercises were short enough to be typed into IDLE.From nowon we recommend that you type your solutions into a file with a .py extension,and add some test calls at the end. For example, you might write a file withthis structure:
#!/usr/bin/env python
def mysolution(arg0, arg1):
pass # Whatever code is needed
mysolution(1, 2) # Call with one set of parameters
mysolution("a", "b") # Call with another set of parameters
# Additional calls to make sure all boundary cases are tested
If you are using Windows, make sure that you run your test programs inside aconsole window; similarly, Mac OS X users should use a Terminal. You may alsoneed to include print statements so that you can see the results. (Exercisesinvolving GUI applications begin in Part II.)
Exercises 73
If you look at the book’s source code, including this chapter’sanswers.py file, youwill find that the code often has long docstrings, in many cases occupying farmore lines than the code itself. This is because the docstrings usually includeusage examples which do double duty as unit tests, as we will see in Chapter 3’s“Using the doctest Module” subsection.
1. Write a function with signature:
valid(text, chars="ABCDEFGHIJKLMNOPQRSTUVWXYZ0123456789")
The function should return a (possibly empty) string which is a copy oftext that only contains characters in chars. For example:
valid("Barking!") # Returns "B"
valid("KL754", "0123456789") # Returns "754"
valid("BEAN", "abcdefghijklmnopqrstuvwxyz") # Returns ""
It can be done in half a dozen lines, using a for loop and an if statement,not counting the docstring, which should also be written.
2. Write a function with signature:
charcount(text)
This should return a dictionary with 28 keys, “a”, “b”, …, “z”, plus“whitespace” and “others”. For every lowercase character in text, if thecharacter is alphabetic, increment the corresponding key; if the characteris whitespace, increment the “whitespace” key; otherwise, increment the“others” key. For example, the call:
stats = charcount("Exceedingly Edible")
will mean that stats is a dictionary with the following contents:
{'whitespace': 1, 'others': 0, 'a': 0, 'c': 1, 'b': 1, 'e': 5,
'd': 2, 'g': 1, 'f': 0, 'i': 2, 'h': 0, 'k': 0, 'j': 0, 'm': 0,
'l': 2, 'o': 0, 'n': 1, 'q': 0, 'p': 0, 's': 0, 'r': 0, 'u': 0,
't': 0, 'w': 0, 'v': 0, 'y': 1, 'x': 1, 'z': 0}
Using a dictionary and a for loop, it can be done in slightly more than adozen lines of code.
3. Create a function with signature:
integer(number)
The number parameter is either a number or a string that can be convertedto a number. The function should return the number as type int, roundingit if the number passed in is a float. If the conversion fails, catch theValueError exception, and return 0. Make sure it works for both stringsand literal numbers, such as 4.5, 32, “23”, and “-15.1”, and that it correctly
74 Chapter 2. Control Structures
returns zero for invalid numbers like “tonsils”. This can be done in half adozen lines. (Hint: To work with all the cases you’ll always need to convertto type float first, that is, by calling float() on the input.)
4. Now write a function with signature:
incrementString(text="AAAA")
The function must “increment” the given string. Here are some ex-amples:
incrementString("A") # Returns "B"
incrementString("Z") # Returns "AA"
incrementString("AM") # Returns "AN"
incrementString("AZ") # Returns "BA"
incrementString("BA") # Returns "BB"
incrementString("BZ") # Returns "CA"
incrementString("ZZA") # Returns "ZZB"
incrementString("ZZZ") # Returns "AAAA"
incrementString("AAAA") # Returns "AAAB"
incrementString("AAAZ") # Returns "AABA"
incrementString("ABC2") # Raises a ValueError
The characters in text must be A–Z (or a–z, in which case the functionmust upper-case them); otherwise the function should raise a ValueError
exception.
This is a bit more challenging than the previous exercises. The code canbe written in less than 20 lines if you use a couple of list comprehensions,although it can also be written without them. It is a bit tricky to get right.(Hint: The reversed() function returns a sequence in reverse order.)
5. If you read the section on function generators, try writing a generatorwith signature:
leapyears(yearlist)
The yearlist parameter is a sequence of year numbers—for example,[1600, 1604, 1700, 1704, 1800, 1900, 1996, 2000, 2004]. Given this input,the output would be the years 1600, 1604, 1704, 1996, 2000, and 2004, oneat a time. This can be done in about half a dozen lines. (Hint: Leap yearsare divisible by 4, but if they are divisible by 100, must also be divisibleby 400.)
Model answers for this chapter’s exercises are in the file chap02/answers.py.
Classes and Modules
33 ● Creating Instances
● Methods and Special Methods
● Inheritance and Polymorphism
● Modules and Multifile Applications
Python fully supports procedural and object-oriented programming,and leavesus free to use either approach,or to combine the two. So far we have done proce-dural programming, although we have already used some Python classes—forexample, the str string class. What we have not yet done is defined our ownclasses. In this chapter we will learn how to create classes and methods, andhow to do object-oriented programming with Python. And in all subsequentchapters, we will almost always use an object-oriented approach in the pro-grams we write.
We assume that you are familiar with object-oriented programming—forexample using C++ or Java—but will take the opportunity to clarify our ter-minology. We use the term “object”, and occasionally the term “instance”, torefer to an instance of a particular class. We use the terms “class”, “type”,and “data type”, interchangeably. Variables that belong to a specific instanceare called “attributes” or “instance variables”. Variables that are used insidemethods that are not instance variables are called “local variables”, or simply“variables”. We use the term “base class” to refer to a class that is inheritedfrom; a base class may be the immediate ancestor, or may be further up theinheritance tree. Some people use the term “super class” for this concept. Weuse the terms “subclass” and “derived class” for a class that inherits from an-other class.
In Python, any method can be overridden (reimplemented) in a subclass; thisis the same as Java (apart from Java’s “final” methods).★ Overloading, thatis, having methods with the same name but with different parameter lists inthe same class, is not supported, although this is not a limitation in practicebecause of Python’s versatile argument-handling capabilities. In fact, theunderlying Qt C++ API makes Qtextensive use of overloading, but PyQt handlesthis seamlessly behind the scenes, so in practice, we can call any “overloaded”Qt method and rely on PyQt to do the right thing.
★In C++ terminology, all Python methods are virtual.
75
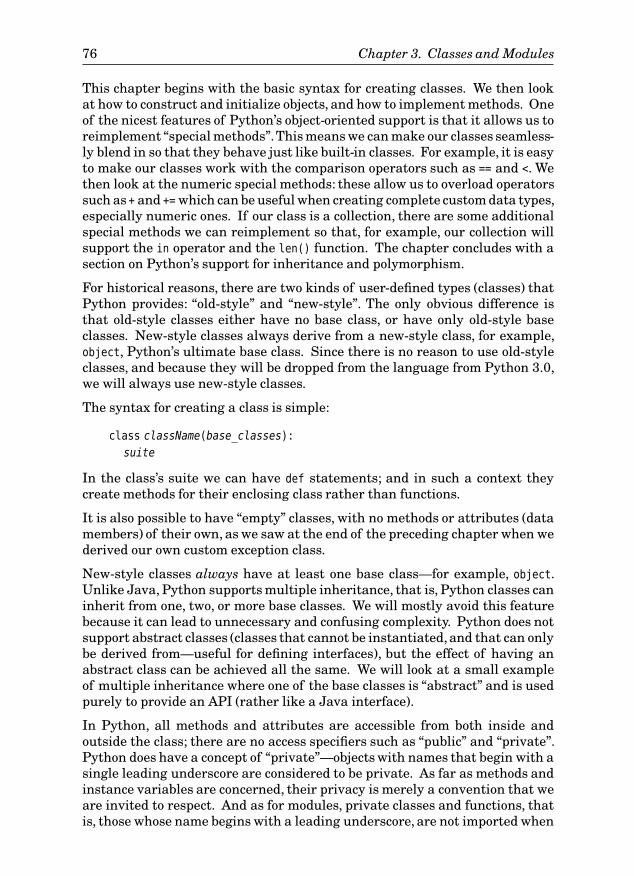
76 Chapter 3. Classes and Modules
This chapter begins with the basic syntax for creating classes. We then lookat how to construct and initialize objects, and how to implement methods. Oneof the nicest features of Python’s object-oriented support is that it allows us toreimplement “special methods”.This means we can make our classes seamless-ly blend in so that they behave just like built-in classes. For example, it is easyto make our classes work with the comparison operators such as == and <. Wethen look at the numeric special methods: these allow us to overload operatorssuch as + and += which can be useful when creating complete custom data types,especially numeric ones. If our class is a collection, there are some additionalspecial methods we can reimplement so that, for example, our collection willsupport the in operator and the len() function. The chapter concludes with asection on Python’s support for inheritance and polymorphism.
For historical reasons, there are two kinds of user-defined types (classes) thatPython provides: “old-style” and “new-style”. The only obvious difference isthat old-style classes either have no base class, or have only old-style baseclasses. New-style classes always derive from a new-style class, for example,object, Python’s ultimate base class. Since there is no reason to use old-styleclasses, and because they will be dropped from the language from Python 3.0,we will always use new-style classes.
The syntax for creating a class is simple:
class className(base_classes):
suite
In the class’s suite we can have def statements; and in such a context theycreate methods for their enclosing class rather than functions.
It is also possible to have “empty” classes, with no methods or attributes (datamembers) of their own, as we saw at the end of the preceding chapter when wederived our own custom exception class.
New-style classes always have at least one base class—for example, object.Unlike Java, Python supports multiple inheritance, that is, Python classes caninherit from one, two, or more base classes. We will mostly avoid this featurebecause it can lead to unnecessary and confusing complexity. Python does notsupport abstract classes (classes that cannot be instantiated, and that can onlybe derived from—useful for defining interfaces), but the effect of having anabstract class can be achieved all the same. We will look at a small exampleof multiple inheritance where one of the base classes is “abstract” and is usedpurely to provide an API (rather like a Java interface).
In Python, all methods and attributes are accessible from both inside andoutside the class; there are no access specifiers such as “public” and “private”.Python does have a concept of “private”—objects with names that begin with asingle leading underscore are considered to be private. As far as methods andinstance variables are concerned, their privacy is merely a convention that weare invited to respect. And as for modules, private classes and functions, thatis, those whose name begins with a leading underscore, are not imported when
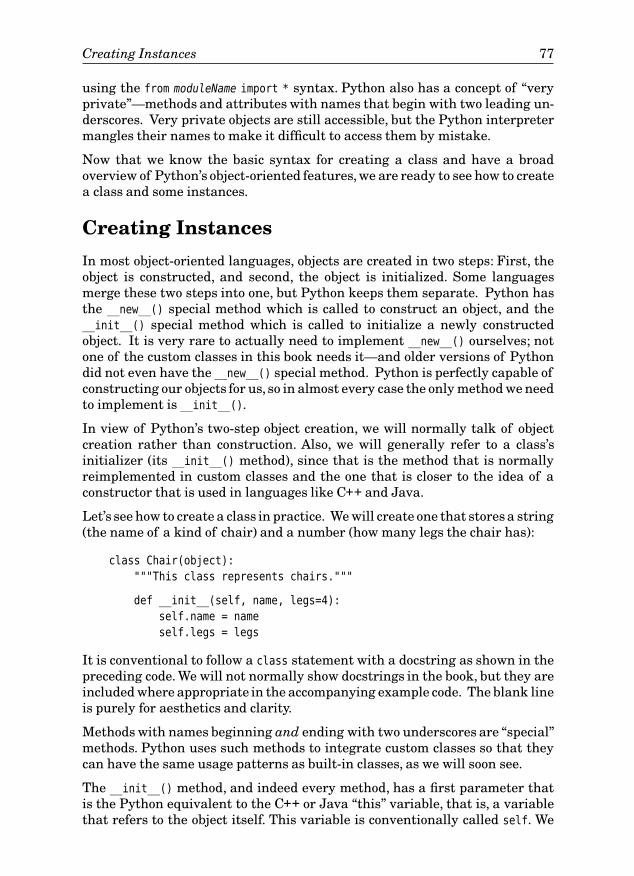
Creating Instances 77
using the from moduleName import * syntax. Python also has a concept of “veryprivate”—methods and attributes with names that begin with two leading un-derscores. Very private objects are still accessible, but the Python interpretermangles their names to make it difficult to access them by mistake.
Now that we know the basic syntax for creating a class and have a broadoverview of Python’s object-oriented features, we are ready to see how to createa class and some instances.
Creating Instances
In most object-oriented languages, objects are created in two steps: First, theobject is constructed, and second, the object is initialized. Some languagesmerge these two steps into one, but Python keeps them separate. Python hasthe __new__() special method which is called to construct an object, and the__init__() special method which is called to initialize a newly constructedobject. It is very rare to actually need to implement __new__() ourselves; notone of the custom classes in this book needs it—and older versions of Pythondid not even have the __new__() special method. Python is perfectly capable ofconstructing our objects for us, so in almost every case the only method we needto implement is __init__().
In view of Python’s two-step object creation, we will normally talk of objectcreation rather than construction. Also, we will generally refer to a class’sinitializer (its __init__() method), since that is the method that is normallyreimplemented in custom classes and the one that is closer to the idea of aconstructor that is used in languages like C++ and Java.
Let’s see how to create a class in practice. We will create one that stores a string(the name of a kind of chair) and a number (how many legs the chair has):
class Chair(object):
"""This class represents chairs."""
def __init__(self, name, legs=4):
self.name = name
self.legs = legs
It is conventional to follow a class statement with a docstring as shown in thepreceding code. We will not normally show docstrings in the book, but they areincluded where appropriate in the accompanying example code. The blank lineis purely for aesthetics and clarity.
Methods with names beginning and ending with two underscores are “special”methods. Python uses such methods to integrate custom classes so that theycan have the same usage patterns as built-in classes, as we will soon see.
The __init__() method, and indeed every method, has a first parameter thatis the Python equivalent to the C++ or Java “this” variable, that is, a variablethat refers to the object itself. This variable is conventionally called self. We
78 Chapter 3. Classes and Modules
must put self as the first item of every (nonstatic★) method’s parameter list,although we never need to pass it since Python will do that for us.
Although the name “self” is merely conventional, we will always use it. Insidethe object, we must use self explicitly when we want to refer to instance meth-ods or attributes. For example, in the Chair class’s initializer, we have createdtwo data attributes using self. Thanks to Python’s dynamic nature, it is possi-ble to create additional attributes in other methods, and even to add additionalattributes to particular instances if we wish; but we will take a more conserva-tive line that is sufficient for the GUI programming we are working toward.
To create an instance of a class, we use the following syntax:
instance = className(arguments)
The parentheses are mandatory, even if we don’t pass any arguments. Behindthe scenes, Python constructs the object by calling the class’s static __new__()
method (which is inherited from object, or in rare cases is implemented byus), and then calls __init__() on the newly constructed object. The resultinginitialized object is returned.
In the case of our Chair class, we must pass either one or two arguments(Python passes the first self argument automatically for us); for example:
chair1 = Chair("Barcelona")
chair2 = Chair("Bar Stool", 1)
Since the attributes are public, they can be read or assigned to using the dot (.)operator; for example: print chair2.name will print “Bar Stool”, and chair1.legs
= 2 will change chair1’s legs attribute’s value from 4 to 2.
Object-oriented purists will no doubt be uncomfortable with this kind of directaccess to attributes from outside the instance, whereas those with a taste forextreme programming may be perfectly happy with it since we can always addaccessor methods later.
Now that we have seen how construction and initialization are handled, weneed to consider object destruction. C++ programmers are used to using de-structors and relying on the fact that they can delete objects at a time of theirown choosing. Java and Python programmers do not have that particularluxury. Instead, they have automatic garbage collection, which makes pro-gramming much easier in general but with the one drawback of not giving finecontrol over exactly when objects are deleted. If resources need to be protect-ed, the solution is normally to use a try … finally block to guarantee cleanup.When an object is about to be garbage-collected its __del__() special method iscalled, with self as its only argument. As is common practice in Python (and inJava regarding the finalize() method),we very rarely use this particular special
★A static method is one that can be called on a class or an instance and has no self parameter.Nor-mal methods are non-static, that is, they have a self parameter and must be called on instances.
Creating Instances 79
method. To put this in perspective, out of more than 170 classes in this book’sexamples and exercise solutions, not one reimplements __del__().
We have now learned how to create and initialize an object of a custom class.Next, we will see how to provide additional methods to give our class distinctivebehavior. We will also learn how to ensure that our classes smoothly integratewith the rest of Python, and act just like built-in classes where that is appro-priate.
Methods and Special Methods
We will begin by looking at a class that uses accessor methods to get and setthe value of attributes, rather than using direct attribute access.
class Rectangle(object):
def __init__(self, width, height):
self.width = width
self.height = height
def getWidth(self):
return self.width
def setWidth(self, width):
self.width = width
def getHeight(self):
return self.height
def setHeight(self, height):
self.height = height
def area(self):
return self.getWidth() * self.getHeight()
We have chosen to use a Java-style naming convention for both getters andsetters. Now we can write code like this:
rect = Rectangle(50, 10)
print rect.area() # Prints "500"
rect.setWidth(20)
We could just as easily have implemented the area() method like this:
def area(self):
return self.width * self.height
Writing trivial accessor methods as we have done here is the right approach forlanguages like C++ because it provides maximum flexibility, and no overheadin the compiled code. And if at a later stage we needed to perform some com-putation in an accessor, we can simply add in the functionality without requir-
80 Chapter 3. Classes and Modules
ing users of our class to change their code. But in Python, it is not necessaryto write such accessors. Instead, we can directly read and write attributes, andif at a later stage we need to perform some computation, we can use Python’sproperty() function. This function allows us to create named properties thatcan replace attributes. Properties are accessed just like attributes, but behindthe scenes they call the methods that we specify to get and set the value.
Here is a second version of the Rectangle class, this time using direct attributeaccess for the width and height, and a property for the area:
class Rectangle(object):
def __init__(self, width, height):
self.width = width
self.height = height
def _area(self):
return self.width * self.height
area = property(fget=_area)
This allows us to write code like this:
rect = Rectangle(5, 4)
print rect.width, rect.height, rect.area # Prints (5, 4, 20)
rect.width = 6
Python’s property() function can be used to specify a getter, a setter, a deletionmethod, and a docstring. Since we specified only a getter, the area property isread-only. If later on we needed to perform some computation when the widthwas accessed, we could simply turn it into a property, like this:
def _width(self):
return self.__width
def _setWidth(self, width):
# Perform some computation
self.__width = width
width = property(fget=_width, fset=_setWidth)
Notice that we have changed the name of the instance variable from width to__width to avoid a name collision with the width property. In general, propertieswhose values are held in instance Discus-
sion ofprivatenames
☞ 88
variables use private names (names withtwo leading underscores) for the instance variables, to avoid name collisionswith the property name that the class’s user uses. For example, users of theRectangle class with the width property, can get and set the width attributeexactly the same as before, only now, the _width() and _setWidth() methods areused behind the scenes to perform these operations, and the attribute’s data isheld in the __width instance variable.
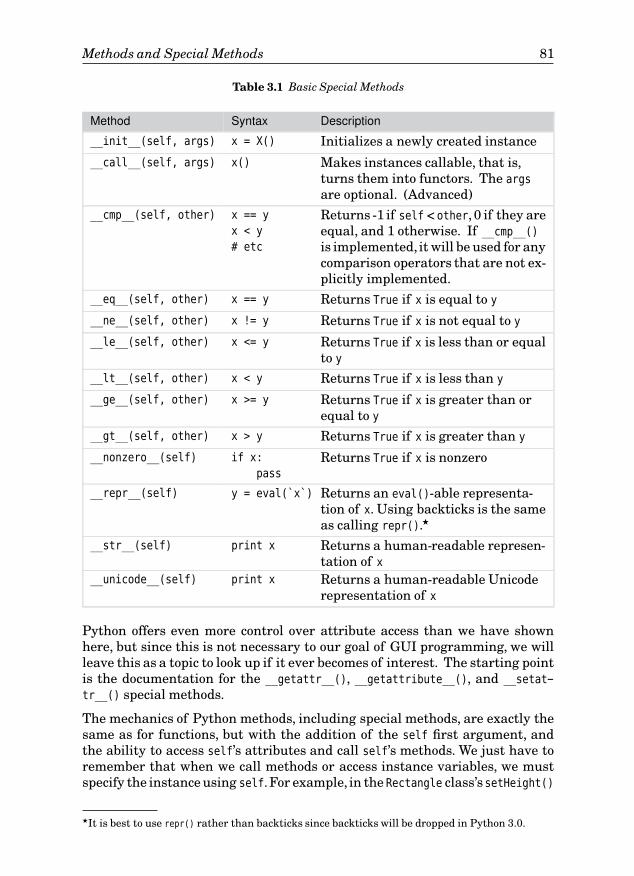
Methods and Special Methods 81
Table 3.1 Basic Special Methods
Method Syntax Description
__init__(self, args) x = X() Initializes a newly created instance
__call__(self, args) x() Makes instances callable, that is,turns them into functors. The args
are optional. (Advanced)__cmp__(self, other) x == y
x < y
# etc
Returns -1 if self < other, 0 if they areequal, and 1 otherwise. If __cmp__()
is implemented, it will be used for anycomparison operators that are not ex-plicitly implemented.
__eq__(self, other) x == y Returns True if x is equal to y
__ne__(self, other) x != y Returns True if x is not equal to y
__le__(self, other) x <= y Returns True if x is less than or equalto y
__lt__(self, other) x < y Returns True if x is less than y
__ge__(self, other) x >= y Returns True if x is greater than orequal to y
__gt__(self, other) x > y Returns True if x is greater than y
__nonzero__(self) if x:
passReturns True if x is nonzero
__repr__(self) y = eval(`x`) Returns an eval()-able representa-tion of x. Using backticks is the sameas calling repr().★
__str__(self) print x Returns a human-readable represen-tation of x
__unicode__(self) print x Returns a human-readable Unicoderepresentation of x
Python offers even more control over attribute access than we have shownhere, but since this is not necessary to our goal of GUI programming, we willleave this as a topic to look up if it ever becomes of interest. The starting pointis the documentation for the __getattr__(), __getattribute__(), and __setat-
tr__() special methods.
The mechanics of Python methods, including special methods, are exactly thesame as for functions, but with the addition of the self first argument, andthe ability to access self’s attributes and call self’s methods. We just have toremember that when we call methods or access instance variables, we mustspecify the instance using self.For example, in the Rectangle class’ssetHeight()
★It is best to use repr() rather than backticks since backticks will be dropped in Python 3.0.
82 Chapter 3. Classes and Modules
method, we used self.height to refer to the instance variable and plain height
to refer to the parameter, that is, to a local variable. Similarly, in the area()
method, we call two Rectangle methods, again using self. This is quite differentfrom C++ and Java, where the instance is assumed.
In C++ it is possible to implement operators, that is, to provide our own im-plementations of operators for our data types. The C++ syntax uses the key-word operator followed by the operator itself—for example, operator+()—butin Python every operator has a name, so to implement a class’s + operator inPython we would implement an __add__() method. All the Python methods forimplementing operators are special methods, and this is signified by them hav-ing names that begin and end with two underscores.
To better integrate our custom classes into Python, there are some additionalgeneral special methods which may be worth implementing. For example, wemight want to provide support for the comparison operators,and a Boolean val-ue for instances of our class. We will add a few more methods to the Rectangle
class to show the possibilities in action,but for brevity we won’t repeat the class
statement and the methods we have already implemented. We will start withcomparisons:
def __cmp__(self, other):
return cmp(self.area(), other.area())
If we want we can implement a special method for every one of the comparisonoperators.For example, if we implement __lt__() “less than”, we will be able tocompare instances of our class with the < operator. However, if we don’t wantto implement the comparison operators individually, we can simply implement__cmp__() as we have done here. Python will use the specific special methodfor comparisons if it has been implemented, but will fall back on __cmp__() oth-erwise. So just by implementing this one special method, all the comparisonoperators (<, <=, ==, !=, >=, >) will work with Rectangle objects:
rectA = Rectangle(4, 4)
rectB = Rectangle(8, 2)
rectA == rectB # True because both have the same area
rectA < rectB # False
We used the built-in cmp() function to implement __cmp__(). The cmp() functiontakes two objects and returns -1 if the first is less than the second, 0 if they areequal, and 1 otherwise. We used the rectangles’ areas as the basis for compar-ison, which is why we got the rather surprising True result in our example. Astricter, and perhaps better implementation might be:
def __cmp__(self, other):
if (self.width != other.width):
return cmp(self.width, other.width)
return cmp(self.height, other.height)
Methods and Special Methods 83
Here we return the result of comparing the heights if the widths are the same;otherwise, we return the result of comparing the widths.
If we do not reimplement any comparison special methods, in most casesPython will happily perform comparisons for us, although not necessarily inthe way we would want. If we are creating a class where comparisons makesense, we ought to implement __cmp__(). For other classes, the safest thing todo is to implement __cmp__() with a body of return NotImplementedError.
def __nonzero__(self):
return self.width or self.height
This special method is used when the object is in a Boolean context; forexample, bool(rectA), or if rectB: and returns True if the object is “nonzero”.
def __repr__(self):
return "Rectangle(%d, %d)" % (self.width, self.height)
The “representation” special method must return a string which, if evaluated(e.g., using eval()), will result in the construction of an object with the sameproperties as the object it is called on. Some objects are too complex to supportthis, and for some objects, such as a window or a button in a GUI, it doesn’tmake sense; so such classes don’t provide a __repr__() implementation. Ina string % operator’s format string we use %r to get the result of this specialmethod; we can also use the repr() function or the backticks `` operator. Back-ticks are just a syntactic alternative to using repr(). For example, repr(x) and`x` both return identical results: the representation of object x as returned byx’s __repr__() method.
There is also a __str__() special method that must return a string represen-tation of the object it is called on (like Java’s toString() method), but unlike__repr__(), the representation is meant to be human-readable and does nothave to be eval()-able. If, as in this case, the __str__() method is not implement-ed, Python will use the __repr__() method instead. For example:
rect = Rectangle(8, 9)
print rect # Prints "Rectangle(8, 9)" using __repr__()
If we want a human-readable Unicode string representation of our class, wecan implement __unicode__().
There are a few more general special methods that we could implement, butwhich are not appropriate for the Rectangle class. All the commonly implement-ed general special methods are listed in Table 3.1.
At this point, C++ programmers might be wondering where the copy construc-tor and assignment operators are, and Java programmers might be wonder-ing about the clone() method. Python does not use a copy constructor andreimplementing the assignment operator is not necessary. If we want to doan assignment we just use = and Python will bind a new name to our existing
84 Chapter 3. Classes and Modules
Table 3.2 Selected Numeric Special Methods
Method Syntax Method Syntax
__float__(self) float(x) __int__(self) int(x)
__abs__(self) abs(x) __neg__(self) -x
__add__(self, other) x + y __sub__(self, other) x - y
__iadd__(self, other) x += y __isub__(self, other) x -= y
__radd__(self, other) y + x __rsub__(self, other) y - x
__mul__(self, other) x * y __mod__(self, other) x % y
__imul__(self, other) x *= y __imod__(self, other) x %= y
__rmul__(self, other) y * x __rmod__(self, other) y % x
__floordiv__(self, other) x // y __truediv__(self, other) x / y
__ifloordiv__(self, other) x //= y __itruediv__(self, other) x /= y
__rfloordiv__(self, other) y // x __rtruediv__(self, other) y / x
object. If we really do need a copy of our object, we can use the copy() or deep-
copy() function from the copy module, the first for objects that don’t have nestedattributes or when a shallow copy suffices, and the second for objects that mustbe copied in full. Alternatively, we can provide our own copy method, which weusually call copy() since this is conventional Python practice.
For numerical classes, it is often convenient to provide functionality to supportthe standard numeric operators, such as + and +=. This is achieved in Python’susual way, by implementing various special methods. If we implement only +,Python will use it to provide +=, but it is often best to implement both since thatgives us finer control and makes it easier to optimize the operations.
The most commonly implemented numeric special methods are listed inTable 3.2. Those not listed include bit-shifting operators and hexadecimal andoctal conversion operators.
The reason for two different division operators is that Python can performeither integer or floating-point division, as explained on page 17.
Some special methods have two or three versions; for example, __add__(),__radd__(), and __iadd__(). The “r” versions (e.g., __radd__()), are for situationswhere the left-hand operand does not have a suitable method, but the right-hand operand does. For example, if we have the expression x + y, with x andy of types X and Y, Python will first try to evaluate the expression by callingX.__add__(x, y). But if type X does not have this method, Python will then tryY.__radd__(x, y). If Y has no such method, an exception will be raised.
In the “i” versions, the “i” stands for “in-place”. They are used for augmentedassignment operators such as +=. We will shortly see an example that showsmany of these methods in practice, but first we must learn how to create staticdata and static methods.
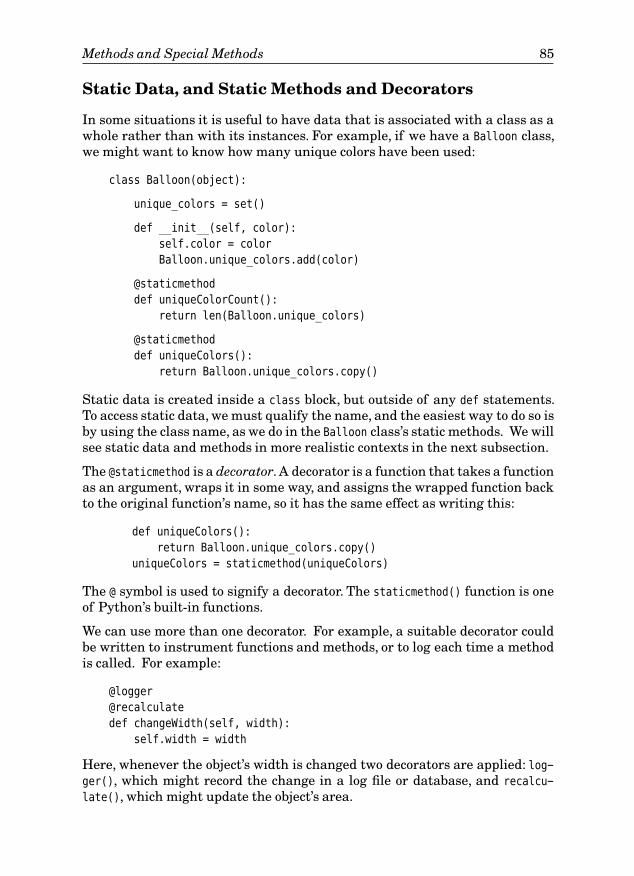
Methods and Special Methods 85
Static Data, and Static Methods and Decorators
In some situations it is useful to have data that is associated with a class as awhole rather than with its instances. For example, if we have a Balloon class,we might want to know how many unique colors have been used:
class Balloon(object):
unique_colors = set()
def __init__(self, color):
self.color = color
Balloon.unique_colors.add(color)
@staticmethod
def uniqueColorCount():
return len(Balloon.unique_colors)
@staticmethod
def uniqueColors():
return Balloon.unique_colors.copy()
Static data is created inside a class block, but outside of any def statements.To access static data, we must qualify the name, and the easiest way to do so isby using the class name, as we do in the Balloon class’s static methods. We willsee static data and methods in more realistic contexts in the next subsection.
The @staticmethod is a decorator. A decorator is a function that takes a functionas an argument, wraps it in some way, and assigns the wrapped function backto the original function’s name, so it has the same effect as writing this:
def uniqueColors():
return Balloon.unique_colors.copy()
uniqueColors = staticmethod(uniqueColors)
The @ symbol is used to signify a decorator. The staticmethod() function is oneof Python’s built-in functions.
We can use more than one decorator. For example, a suitable decorator couldbe written to instrument functions and methods, or to log each time a methodis called. For example:
@logger
@recalculate
def changeWidth(self, width):
self.width = width
Here, whenever the object’s width is changed two decorators are applied: log-ger(), which might record the change in a log file or database, and recalcu-
late(), which might update the object’s area.
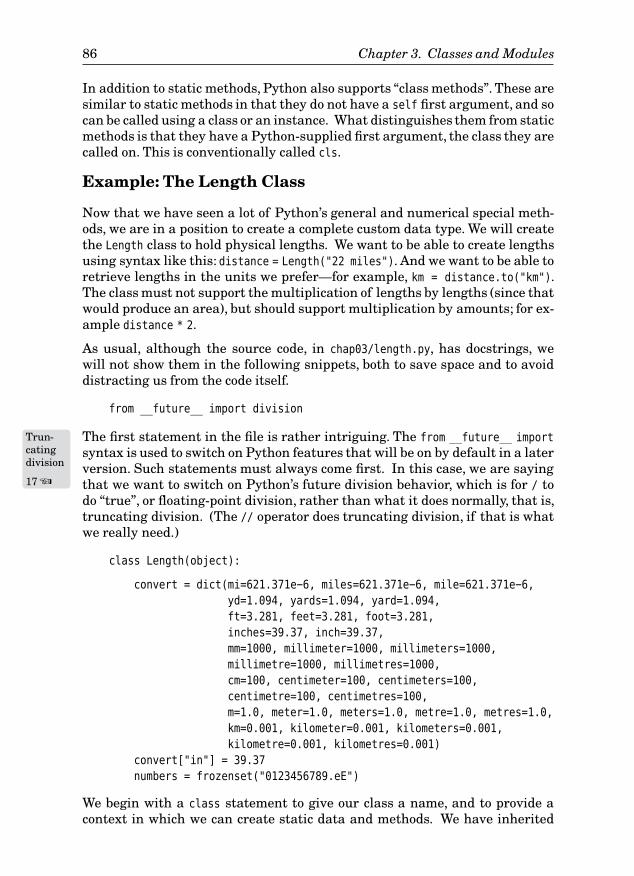
86 Chapter 3. Classes and Modules
In addition to static methods, Python also supports “class methods”. These aresimilar to static methods in that they do not have a self first argument, and socan be called using a class or an instance. What distinguishes them from staticmethods is that they have a Python-supplied first argument, the class they arecalled on. This is conventionally called cls.
Example: The Length Class
Now that we have seen a lot of Python’s general and numerical special meth-ods, we are in a position to create a complete custom data type. We will createthe Length class to hold physical lengths. We want to be able to create lengthsusing syntax like this: distance = Length("22 miles"). And we want to be able toretrieve lengths in the units we prefer—for example, km = distance.to("km").The class must not support the multiplication of lengths by lengths (since thatwould produce an area), but should support multiplication by amounts; for ex-ample distance * 2.
As usual, although the source code, in chap03/length.py, has docstrings, wewill not show them in the following snippets, both to save space and to avoiddistracting us from the code itself.
from __future__ import division
The first statement in the file is rather intriguing.Trun-catingdivision
17 ☞
The from __future__ import
syntax is used to switch on Python features that will be on by default in a laterversion. Such statements must always come first. In this case, we are sayingthat we want to switch on Python’s future division behavior, which is for / todo “true”, or floating-point division, rather than what it does normally, that is,truncating division. (The // operator does truncating division, if that is whatwe really need.)
class Length(object):
convert = dict(mi=621.371e-6, miles=621.371e-6, mile=621.371e-6,
yd=1.094, yards=1.094, yard=1.094,
ft=3.281, feet=3.281, foot=3.281,
inches=39.37, inch=39.37,
mm=1000, millimeter=1000, millimeters=1000,
millimetre=1000, millimetres=1000,
cm=100, centimeter=100, centimeters=100,
centimetre=100, centimetres=100,
m=1.0, meter=1.0, meters=1.0, metre=1.0, metres=1.0,
km=0.001, kilometer=0.001, kilometers=0.001,
kilometre=0.001, kilometres=0.001)
convert["in"] = 39.37
numbers = frozenset("0123456789.eE")
We begin with a class statement to give our class a name, and to provide acontext in which we can create static data and methods. We have inherited
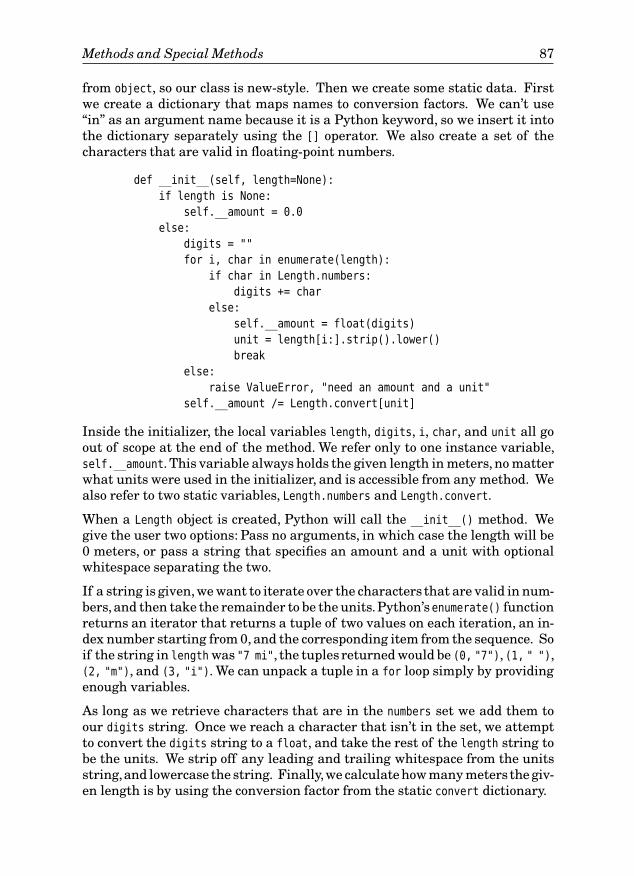
Methods and Special Methods 87
from object, so our class is new-style. Then we create some static data. Firstwe create a dictionary that maps names to conversion factors. We can’t use“in” as an argument name because it is a Python keyword, so we insert it intothe dictionary separately using the [] operator. We also create a set of thecharacters that are valid in floating-point numbers.
def __init__(self, length=None):
if length is None:
self.__amount = 0.0
else:
digits = ""
for i, char in enumerate(length):
if char in Length.numbers:
digits += char
else:
self.__amount = float(digits)
unit = length[i:].strip().lower()
break
else:
raise ValueError, "need an amount and a unit"
self.__amount /= Length.convert[unit]
Inside the initializer, the local variables length, digits, i, char, and unit all goout of scope at the end of the method. We refer only to one instance variable,self.__amount. This variable always holds the given length in meters, no matterwhat units were used in the initializer, and is accessible from any method. Wealso refer to two static variables, Length.numbers and Length.convert.
When a Length object is created, Python will call the __init__() method. Wegive the user two options: Pass no arguments, in which case the length will be0 meters, or pass a string that specifies an amount and a unit with optionalwhitespace separating the two.
If a string is given,we want to iterate over the characters that are valid in num-bers,and then take the remainder to be the units.Python’s enumerate() functionreturns an iterator that returns a tuple of two values on each iteration, an in-dex number starting from 0, and the corresponding item from the sequence. Soif the string in length was "7 mi", the tuples returned would be (0, "7"),(1, " "),(2, "m"), and (3, "i"). We can unpack a tuple in a for loop simply by providingenough variables.
As long as we retrieve characters that are in the numbers set we add them toour digits string. Once we reach a character that isn’t in the set, we attemptto convert the digits string to a float, and take the rest of the length string tobe the units. We strip off any leading and trailing whitespace from the unitsstring,and lowercase the string. Finally,we calculate how many meters the giv-en length is by using the conversion factor from the static convert dictionary.

88 Chapter 3. Classes and Modules
We called our data attribute __amount, rather than, say, amount, because we wantthis data to be private. Python will name-mangle any name in a class thatbegins with two underscores (and which does not end in two underscores) tobe preceded by an underscore and the class name to make the attribute’s nameunique. In this case, __amount will be mangled to be _Length__amount. When welook at some of the special methods, we will see a practical reason why thisis beneficial.
Clearly many things could go wrong. The floating-point conversion could fail,there may be no units given (in which case we raise an exception, along witha “reason” string), or the units may not match any in the convert dictionary.In this method, we have chosen to let the possible exceptions be raised, docu-menting them in the method’s docstring so that users of the class know whatto expect.
def set(self, length):
self.__init__(length)
We want our lengths to be mutable, so we have provided a set() method. Ittakes the same argument as __init__(), and because __init__() is an initializerrather than a constructor, we can safely pass the work on to it.
def to(self, unit):
return self.__amount * Length.convert[unit]
We store lengths inside the class as meters. This means that we need tomaintain only a single floating-point value, rather than, say, a value and a unit.But just as we can specify our preferred units when we create a length, we alsowant to be able to retrieve a length as a value in the units of our choice. Thisis what the to() method achieves. It uses the convert dictionary to convert themeters value to the units specified.
def copy(self):
other = Length()
other.__amount = self.__amount
return other
As we know, if we use the = operator, we will simply bind (or rebind) a name,so if we want a genuine copy of a length we need some means of doing it. Herewe have chosen to provide a copy() method. But we did not have to: Instead,we could have simply relied on the copy module. For example:
import copy
import length
x = length.Length("3 km")
y = copy.copy(x)
We have imported both the standard copy module and our own length module,(assuming that chap03 is in sys.path, and that the module is called length.py).
Methods and Special Methods 89
Then we created two independent lengths. If, instead, we had done y = x andthen changed x using the set() method, y would have changed too. Of course,since we have implemented our own copy() method, we could also have copiedby writing y = x.copy().
We could have implemented the copy() method differently. For example:
def copy(self): # Alternative #1
import copy
return copy.copy(self)
def copy(self): # Alternative #2
return eval(repr(self))
The first of these uses Python’s standard copy module to implement the copy()
function. The second uses the repr() method to provide an eval()-able stringversion of the length—for example, Length('3000.000000m')—and then useseval() to evaluate this code; in this case, it constructs a new length of the samesize as the original.
@staticmethod
def units():
return Length.convert.keys()
We have provided this static method to give users of our class access to thenames of the units we support. By using keys(), we ensure that a list of unitnames is returned, rather than an object reference to our static dictionary.
With the exception of the __init__() initialization method,none of the methodswe have looked at so far has been a special method. But we want our Length
class to work like a standard Python class, so that it can be used with operatorslike * and *=, compared, and converted to suitable compatible types. All thesethings are achievable by implementing special methods. We will begin withcomparisons.
def __cmp__(self, other):
return cmp(self.__amount, other.__amount)
This method is easy to implement since we can just compare how long eachlength is.
The other object could be an object of any type. Thanks to Python’s namemangling, the actual comparison is made between self._Length__amount andother._Length__amount. If the other object does not have a _Length__amount at-tribute, that is, if it is not a length, Python will raise an AttributeError whichis what we want. This is true of all the other methods that take a length argu-ment in addition to self.
Without the name mangling, there is a small risk of the other object not beinga length, yet happening to have an __amount attribute. To prevent this risk
90 Chapter 3. Classes and Modules
we might have used type testing, even though this is often poor practice inobject-oriented programming.
def __repr__(self):
return "Length('%.6fm')" % self.__amount
def __str__(self):
return "%.3fm" % self.__amount
Python’s floating-point accuracy depends on the compiler it was built with, butit is very likely to be accurate to much more than the six decimal places we havechosen to use for our “representation” method.
For the string representation, we don’t need to be as accurate, nor do weneed to return a string that can be eval()’d, so we just return the raw lengthand the meters unit. If users of our Length class want a string represen-tation with a different unit, they can use to()—for example, "%s miles" %
length.Length("200 ft").to("miles").
def __add__(self, other):
return Length("%fm" % (self.__amount + other.__amount))
def __iadd__(self, other):
self.__amount += other.__amount
return self
We have used two special methods to support addition. The first supports bina-ry + with a length operand on either side. It constructsand returnsa new Length
object. The second supports += for incrementing a length by another length.
They allow us to write code like this:
x = length.Length("30ft")
y = length.Length("250cm")
z = x + y # z == Length('11.643554m')
x += y # x == Length('11.643554m')
It is also possible to implement __radd__() for mixed-type arithmetic, but wehave not done so because it does not make sense for the Length class.
We will omit the code that provides support for subtraction since it is almostidentical to the code for addition (and is in the source file).
def __mul__(self, other):
if isinstance(other, Length):
raise ValueError, \
"Length * Length produces an area not a Length"
return Length("%fm" % (self.__amount * other))
Methods and Special Methods 91
def __rmul__(self, other):
return Length("%fm" % (other * self.__amount))
def __imul__(self, other):
self.__amount *= other
return self
For the multiplication methods, we provide support for multiplying a lengthby a number. If we assume that x is a length, __mul__() supports uses like x *
5, and __rmul__() supports uses like 5 * x. We must explicitly disallow multi-plying lengths together in __mul__() since the result would be an area and nota length. We do not need to do this in __rmul__() because __mul__() is alwaystried first, and if it raises an exception, Python does not try __rmul__(). The__imul__() method supports in-place (augmented)multiplication—for example,x *= 5.
def __truediv__(self, other):
return Length("%fm" % (self.__amount / other))
def __itruediv__(self, other):
self.__amount /= other
return self
The implementation of the division special methods has a similar structureto the other arithmetic methods. One reason for showing them is to remindourselves that the reason the / and /= operators perform floating-point divisionis because of the from __future__ import division directive at the beginning ofthe length.py file. It is also possible to reimplement truncating division, butthat isn’t appropriate for the Length class.
Another reason for showing them is that they are subtly different from theaddition methods we have just seen. Although addition and subtractionoperate only on lengths, multiplication and division operate on a length anda number.
def __float__(self):
return self.__amount
def __int__(self):
return int(round(self.__amount))
We have chosen to support two type conversions, both of which are easy towrite and understand.The __str__() method implemented earlier is also a typeconversion (to type str).
Now that we have seen how to implement a custom data type, we will turn ourattention to implementing a custom collection class.
92 Chapter 3. Classes and Modules
Collection Classes
In Python, collections are sequences such as lists and strings, mappings suchas dictionaries, or sets. If we implement our own collection classes we can usespecial methods to make our collections usable with the same syntax andsemantics as the built-in collection types. Table 3.3 lists the special methodscommon to collections, and in this section we discuss some of the specifics ofeach kind of collection.
In the case of sequences, it is common to implement __add__() and __radd__()
to support concatenation with +, and in the case of a mutable collection, toimplement __iadd__(), for +=, too. Similarly, the __mul__() methods should beimplemented to support * for repeating the collection. If an invalid index isgiven, we should raise an IndexError exception. In addition to special methods,a custom sequence collection ought to implement append(), count(), index(),insert(), extend(), pop(), remove(), reverse(), and sort().
For mappings, we should raise KeyError if an invalid key is given, and in ad-dition to the special methods, we should at least implement copy() and get(),along with items(), keys(), and values(), and their iterator versions, such asiteritems().Genera-
torfunc-tions
58 ☞
A Python iterator is a function or method that returns successivevalues—for example, each character in a string, or each item in a list or dictio-nary. They are often implemented by generators.
For sets, we should also raise KeyError if an invalid key is used; for example,when calling remove(). Set collections should implement issubset(), issuper-set(), union(), intersection(), difference(), symmetric_difference(), and copy().For mutable sets, additional methods should be provided, including add(), re-move(), and discard().
Example: The OrderedDict Class
A rare omission from Python’s standard library is an ordered dictionary. Plaindictionariesprovide very fast lookup,but do not provide ordering. For example,if we wanted to iterate over a dictionary’s values in key order, we would copythe keys to a list, sort the list, and iterate over the list, using the list’s elementsto access the dictionary’s values. For small dictionaries, or where we do thisrarely, sorting may be fine,but when the dictionary is large or sorted frequently,sorting every time may be computationally expensive.
An obvious solution is to create an ordered dictionary, and that is what we willdo here.
Understanding the OrderedDict example is not necessary for learning GUIprogramming, but we do use the techniques and methods explained here insome of the programs that we will cover later on. For now, though, you couldsafely skip to the next section, starting on page 99, and then return here tounderstand the techniques when you encounter them in later chapters.
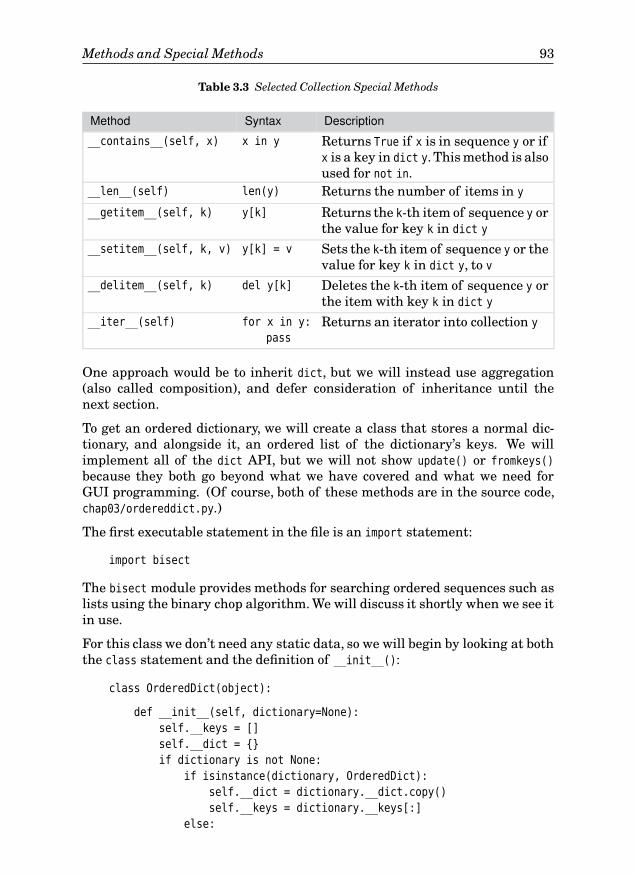
Methods and Special Methods 93
Table 3.3 Selected Collection Special Methods
Method Syntax Description
__contains__(self, x) x in y Returns True if x is in sequence y or ifx is a key in dict y. This method is alsoused for not in.
__len__(self) len(y) Returns the number of items in y
__getitem__(self, k) y[k] Returns the k-th item of sequence y orthe value for key k in dict y
__setitem__(self, k, v) y[k] = v Sets the k-th item of sequence y or thevalue for key k in dict y, to v
__delitem__(self, k) del y[k] Deletes the k-th item of sequence y orthe item with key k in dict y
__iter__(self) for x in y:
passReturns an iterator into collection y
One approach would be to inherit dict, but we will instead use aggregation(also called composition), and defer consideration of inheritance until thenext section.
To get an ordered dictionary, we will create a class that stores a normal dic-tionary, and alongside it, an ordered list of the dictionary’s keys. We willimplement all of the dict API, but we will not show update() or fromkeys()
because they both go beyond what we have covered and what we need forGUI programming. (Of course, both of these methods are in the source code,chap03/ordereddict.py.)
The first executable statement in the file is an import statement:
import bisect
The bisect module provides methods for searching ordered sequences such aslists using the binary chop algorithm. We will discuss it shortly when we see itin use.
For this class we don’t need any static data, so we will begin by looking at boththe class statement and the definition of __init__():
class OrderedDict(object):
def __init__(self, dictionary=None):
self.__keys = []
self.__dict = {}
if dictionary is not None:
if isinstance(dictionary, OrderedDict):
self.__dict = dictionary.__dict.copy()
self.__keys = dictionary.__keys[:]
else:
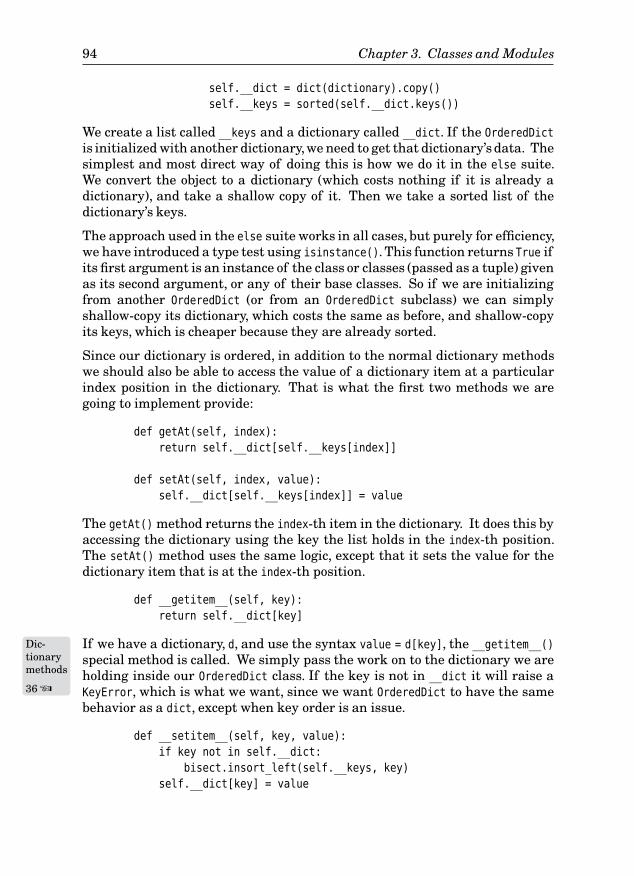
94 Chapter 3. Classes and Modules
self.__dict = dict(dictionary).copy()
self.__keys = sorted(self.__dict.keys())
We create a list called __keys and a dictionary called __dict. If the OrderedDict
is initialized with another dictionary,we need to get that dictionary’sdata. Thesimplest and most direct way of doing this is how we do it in the else suite.We convert the object to a dictionary (which costs nothing if it is already adictionary), and take a shallow copy of it. Then we take a sorted list of thedictionary’s keys.
The approach used in the else suite works in all cases, but purely for efficiency,we have introduced a type test using isinstance(). This function returns True ifits first argument is an instance of the class or classes (passed as a tuple) givenas its second argument, or any of their base classes. So if we are initializingfrom another OrderedDict (or from an OrderedDict subclass) we can simplyshallow-copy its dictionary, which costs the same as before, and shallow-copyits keys, which is cheaper because they are already sorted.
Since our dictionary is ordered, in addition to the normal dictionary methodswe should also be able to access the value of a dictionary item at a particularindex position in the dictionary. That is what the first two methods we aregoing to implement provide:
def getAt(self, index):
return self.__dict[self.__keys[index]]
def setAt(self, index, value):
self.__dict[self.__keys[index]] = value
The getAt() method returns the index-th item in the dictionary. It does this byaccessing the dictionary using the key the list holds in the index-th position.The setAt() method uses the same logic, except that it sets the value for thedictionary item that is at the index-th position.
def __getitem__(self, key):
return self.__dict[key]
If we have a dictionary,Dic-tionarymethods
36 ☞
d, and use the syntax value = d[key], the __getitem__()
special method is called. We simply pass the work on to the dictionary we areholding inside our OrderedDict class. If the key is not in __dict it will raise aKeyError, which is what we want, since we want OrderedDict to have the samebehavior as a dict, except when key order is an issue.
def __setitem__(self, key, value):
if key not in self.__dict:
bisect.insort_left(self.__keys, key)
self.__dict[key] = value
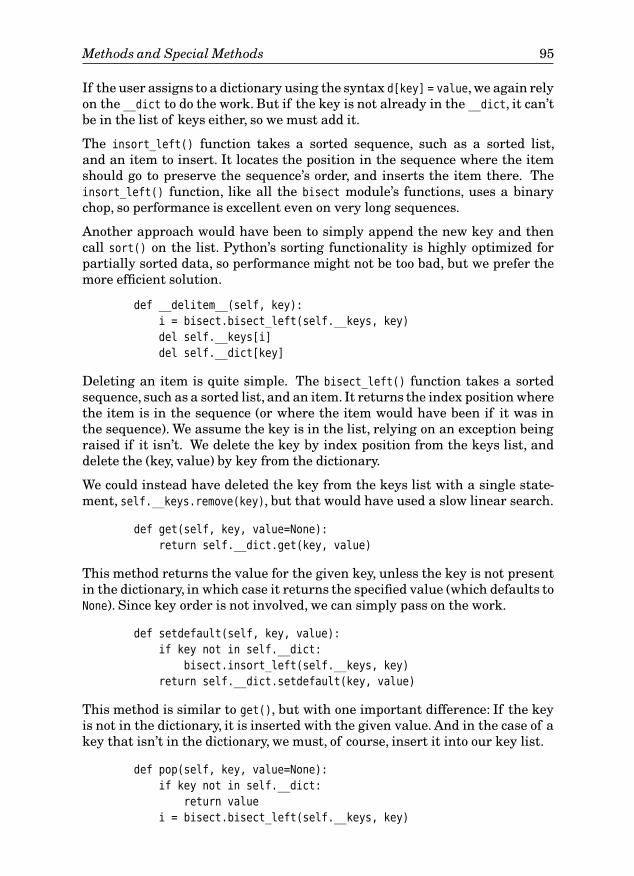
Methods and Special Methods 95
If the user assigns to a dictionary using the syntax d[key] = value, we again relyon the __dict to do the work. But if the key is not already in the __dict, it can’tbe in the list of keys either, so we must add it.
The insort_left() function takes a sorted sequence, such as a sorted list,and an item to insert. It locates the position in the sequence where the itemshould go to preserve the sequence’s order, and inserts the item there. Theinsort_left() function, like all the bisect module’s functions, uses a binarychop, so performance is excellent even on very long sequences.
Another approach would have been to simply append the new key and thencall sort() on the list. Python’s sorting functionality is highly optimized forpartially sorted data, so performance might not be too bad, but we prefer themore efficient solution.
def __delitem__(self, key):
i = bisect.bisect_left(self.__keys, key)
del self.__keys[i]
del self.__dict[key]
Deleting an item is quite simple. The bisect_left() function takes a sortedsequence, such as a sorted list, and an item. It returns the index position wherethe item is in the sequence (or where the item would have been if it was inthe sequence). We assume the key is in the list, relying on an exception beingraised if it isn’t. We delete the key by index position from the keys list, anddelete the (key, value) by key from the dictionary.
We could instead have deleted the key from the keys list with a single state-ment, self.__keys.remove(key), but that would have used a slow linear search.
def get(self, key, value=None):
return self.__dict.get(key, value)
This method returns the value for the given key, unless the key is not presentin the dictionary, in which case it returns the specified value (which defaults toNone). Since key order is not involved, we can simply pass on the work.
def setdefault(self, key, value):
if key not in self.__dict:
bisect.insort_left(self.__keys, key)
return self.__dict.setdefault(key, value)
This method is similar to get(), but with one important difference: If the keyis not in the dictionary, it is inserted with the given value. And in the case of akey that isn’t in the dictionary, we must, of course, insert it into our key list.
def pop(self, key, value=None):
if key not in self.__dict:
return value
i = bisect.bisect_left(self.__keys, key)
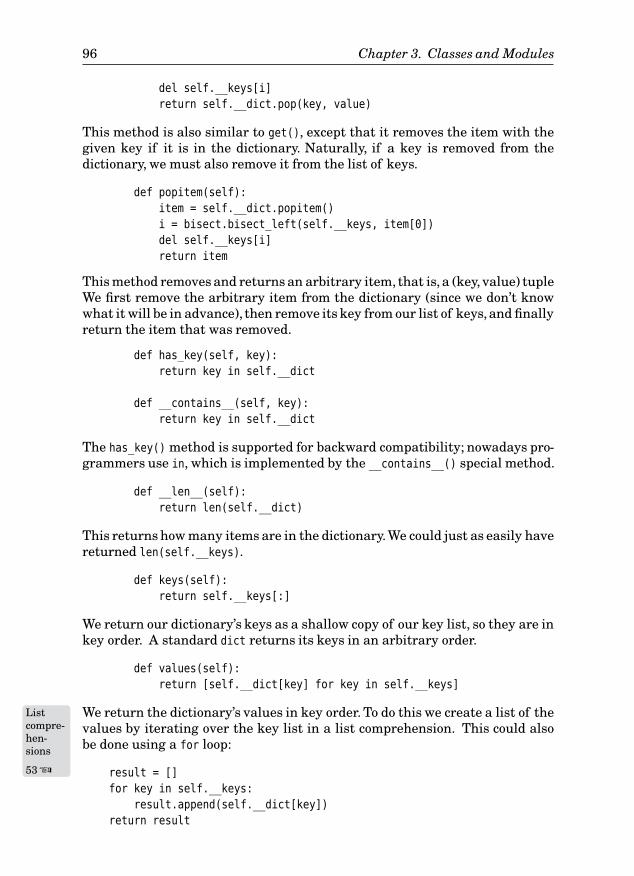
96 Chapter 3. Classes and Modules
del self.__keys[i]
return self.__dict.pop(key, value)
This method is also similar to get(), except that it removes the item with thegiven key if it is in the dictionary. Naturally, if a key is removed from thedictionary, we must also remove it from the list of keys.
def popitem(self):
item = self.__dict.popitem()
i = bisect.bisect_left(self.__keys, item[0])
del self.__keys[i]
return item
This method removes and returns an arbitrary item, that is, a (key, value) tupleWe first remove the arbitrary item from the dictionary (since we don’t knowwhat it will be in advance), then remove its key from our list of keys,and finallyreturn the item that was removed.
def has_key(self, key):
return key in self.__dict
def __contains__(self, key):
return key in self.__dict
The has_key() method is supported for backward compatibility; nowadays pro-grammers use in, which is implemented by the __contains__() special method.
def __len__(self):
return len(self.__dict)
This returns how many items are in the dictionary.We could just as easily havereturned len(self.__keys).
def keys(self):
return self.__keys[:]
We return our dictionary’s keys as a shallow copy of our key list, so they are inkey order. A standard dict returns its keys in an arbitrary order.
def values(self):
return [self.__dict[key] for key in self.__keys]
WeListcompre-hen-sions
53 ☞
return the dictionary’s values in key order. To do this we create a list of thevalues by iterating over the key list in a list comprehension. This could alsobe done using a for loop:
result = []
for key in self.__keys:
result.append(self.__dict[key])
return result
Methods and Special Methods 97
Writing one line of code rather than four obviously makes the list comprehen-sion more appealing, although the syntax can take some getting used to.
def items(self):
return [(key, self.__dict[key]) for key in self.__keys]
We use a similar approach for returning items, as (key, value) tuples, and againwe could use a conventional loop instead:
result = []
for key in self.__keys:
result.append((key, self.__dict[key]))
return result
By now, though, list comprehensions should start to become more familiar.
def __iter__(self):
return iter(self.__keys)
def iterkeys(self):
return iter(self.__keys)
An iterator is a “callable object” (typically a function or method) that returnsthe “next” item each time it is called. (Such objects have a next() function whichis what Python calls.)
An iterator for a sequence such as a string, list, or tuple, can be obtained by us-ing the iter() function, which is what we do here. For dictionaries, when an it-erator is requested,an iterator to the dictionary’skeys is returned,although forconsistency, the dict API also provides an iterkeys() method, since it also pro-vides itervalues() and iteritems() methods. If iter() is called on a dictionary,such as an OrderedDict instance, Python uses the __iter__() special method.
def itervalues(self):
for key in self.__keys:
yield self.__dict[key]
If itervalues() is called, we must return a generator that returns the dictio-nary’s values.For a plain dict, the generator returns each value in an arbitraryorder, but for the OrderedDict we want to return the values in key order.
Any function or method that contains a yield statement is aGenera-torfunc-tions
58 ☞
generator. Theyield statement behaves like a return statement, except that after the yield
has returned a value, when the generator is next called it will continue fromthe statement following the yield with all its previous state intact. So in thismethod, after each dictionary value is returned, the next iteration of the for
loop takes place, until all the values have been returned.
def iteritems(self):
for key in self.__keys:
98 Chapter 3. Classes and Modules
yield key, self.__dict[key]
This is almost identical to itervalues(), except that we return a (key, value)tuple. (We don’t need to use parentheses to signify a tuple here, because thereis no ambiguity.)
def copy(self):
dictionary = OrderedDict()
dictionary.__keys = self.__keys[:]
dictionary.__dict = self.__dict.copy()
return dictionary
For copying, we perform a shallow copy of the keys list and of the internaldictionary, so the cost is proportional to the dictionary’s size.
def clear(self):
self.__keys = []
self.__dict = {}
This is the easiest function. We could have used list() and dict() rather than[] and {}.
def __repr__(self):
pieces = []
for key in self.__keys:
pieces.append("%r: %r" % (key, self.__dict[key]))
return "OrderedDict({%s})" % ", ".join(pieces)
We have chosen to provide an eval()-able form of our dictionary. (And sincewe have not implemented __str__(), this will also be used when the dictionaryis required as a string—for example, in a print statement.) For each (key,value) pair, we use the %r “representation” format so, for example, strings willbe quoted, but numbers will not be. Here are two examples that show repr()
in action:
d = OrderedDict(dict(s=1, a=2, n=3, i=4, t=5))
print repr(d)
# Prints "OrderedDict({'a': 2, 'i': 4, 'n': 3, 's': 1, 't': 5})"
d = OrderedDict({2: 'a', 3: 'm', 1: 'x'})
print `d` # Same as print repr(d)
# Prints "OrderedDict({1: 'x', 2: 'a', 3: 'm'})"
Naturally, this method could have been implemented using a list comprehen-sion, but in this case a for loop seems to be easier to understand.
We have now completed our review of the OrderedDict class. One piece offunctionality that may appear to be missing from this and the other Pythoncollections is the ability to load and save to a file. In fact, Python has the abilityto load and save collections, including nested collections, to bytestrings and to
Methods and Special Methods 99
files, providing they contain objects that can be represented, such as Booleans,numbers, strings, and collections of such objects. (Actually, Python can evenload and save functions, classes, and in some cases, instances.) We will learnabout this functionality in Chapter 8.
Inheritance and Polymorphism
Just as we would expect from a language that supports object-oriented pro-gramming, Python supports inheritance and polymorphism. We have alreadyused inheritance because the classes we have created so far have inherited ob-
ject, but in this section we will go into more depth. All Python methods are vir-tual, so if we reimplement a method in a base class the reimplemented methodwill be the one that is called. We will see shortly how we can access base classmethods, for example, when we want to use them as part of a reimplement-ed method.
Let us begin with a simple class that holds some basic information about awork of art:
class Item(object):
def __init__(self, artist, title, year=None):
self.__artist = artist
self.__title = title
self.__year = year
We have inherited the object base class and given our class three private dataattributes. Since we have made the attributes private, we must either provideaccessors for them, or create properties through which we can access them. Inthis example, we have chosen to use accessors:
def artist(self):
return self.__artist
def setArtist(self, artist):
self.__artist = artist
The accessors for the __title and __year attributes are structurally the sameas those for the __artist attribute, so we have not shown them.
def __str__(self):
year = ""
if self.__year is not None:
year = " in %d" % self.__year
return "%s by %s%s" % (self.__title, self.__artist, year)
If a string representation is required, we return a string in the form “title byartist” if __year is None, and “title by artist in year” otherwise.
100 Chapter 3. Classes and Modules
Now that we can encapsulate some basic information about a work of art, wecan create a Painting subclass to hold information on paintings:
class Painting(Item):
def __init__(self, artist, title, year=None):
super(Painting, self).__init__(artist, title, year)
The preceding code is the entire subclass. We have not added any data at-tributes or new methods,so we just use the super() built-in function to initializethe Item base class. The super() function takes a class and returns the class’sbase class. If the function is also passed an instance (as we do here), the re-turned base class object is bound to the instance we passed in, which means wecan call (base class) methods on the instance.
It is also possible to call the base class by naming it explicitly—for example,Item.__init__(self, artist, title, year); notice that we must pass the self
parameter ourselves if we use this approach.
We don’t have to call the base class __init__() at all—for example, if the baseclass has no data attributes. And if we do call it, the super() call does not haveto be the first call we make, although it usually is in __init__() implemen-tations.
Now we will look at a slightly more elaborate subclass:
class Sculpture(Item):
def __init__(self, artist, title, year=None, material=None):
super(Sculpture, self).__init__(artist, title, year)
self.__material = material
The Sculpture class has an additional attribute, so after initializing throughthe base class we also initialize the extra attribute.
We won’t show the accessors since they are structurally the same as those usedfor the artist’s name.
def __str__(self):
materialString = ""
if self.__material is not None:
materialString = " (%s)" % self.__material
return "%s%s" % (super(Sculpture, self).__str__(),
materialString)
The __str__() method uses the base class’s __str__() method, and if the ma-terial is known, it tacks it on to the end of the resultant string. We cannot callstr(self) because that would lead to an infinite recursion (calling __str__()
again and again), but there is no problem calling a special method explicitlywhen necessary, as we do here.
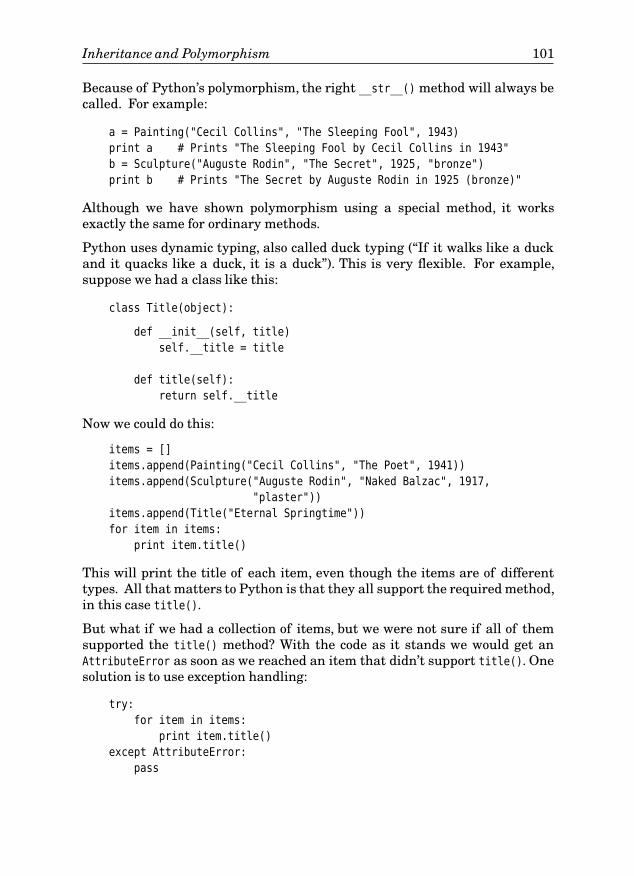
Inheritance and Polymorphism 101
Because of Python’s polymorphism, the right __str__() method will always becalled. For example:
a = Painting("Cecil Collins", "The Sleeping Fool", 1943)
print a # Prints "The Sleeping Fool by Cecil Collins in 1943"
b = Sculpture("Auguste Rodin", "The Secret", 1925, "bronze")
print b # Prints "The Secret by Auguste Rodin in 1925 (bronze)"
Although we have shown polymorphism using a special method, it worksexactly the same for ordinary methods.
Python uses dynamic typing, also called duck typing (“If it walks like a duckand it quacks like a duck, it is a duck”). This is very flexible. For example,suppose we had a class like this:
class Title(object):
def __init__(self, title)
self.__title = title
def title(self):
return self.__title
Now we could do this:
items = []
items.append(Painting("Cecil Collins", "The Poet", 1941))
items.append(Sculpture("Auguste Rodin", "Naked Balzac", 1917,
"plaster"))
items.append(Title("Eternal Springtime"))
for item in items:
print item.title()
This will print the title of each item, even though the items are of differenttypes. All that matters to Python is that they all support the required method,in this case title().
But what if we had a collection of items, but we were not sure if all of themsupported the title() method? With the code as it stands we would get anAttributeError as soon as we reached an item that didn’t support title(). Onesolution is to use exception handling:
try:
for item in items:
print item.title()
except AttributeError:
pass
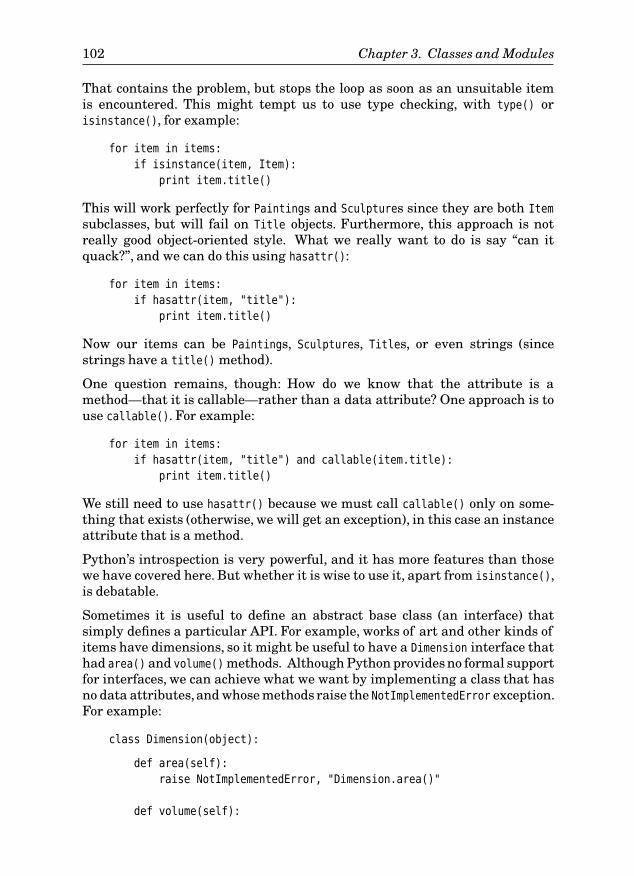
102 Chapter 3. Classes and Modules
That contains the problem, but stops the loop as soon as an unsuitable itemis encountered. This might tempt us to use type checking, with type() orisinstance(), for example:
for item in items:
if isinstance(item, Item):
print item.title()
This will work perfectly for Paintings and Sculptures since they are both Item
subclasses, but will fail on Title objects. Furthermore, this approach is notreally good object-oriented style. What we really want to do is say “can itquack?”, and we can do this using hasattr():
for item in items:
if hasattr(item, "title"):
print item.title()
Now our items can be Paintings, Sculptures, Titles, or even strings (sincestrings have a title() method).
One question remains, though: How do we know that the attribute is amethod—that it is callable—rather than a data attribute? One approach is touse callable(). For example:
for item in items:
if hasattr(item, "title") and callable(item.title):
print item.title()
We still need to use hasattr() because we must call callable() only on some-thing that exists (otherwise, we will get an exception), in this case an instanceattribute that is a method.
Python’s introspection is very powerful, and it has more features than thosewe have covered here. But whether it is wise to use it, apart from isinstance(),is debatable.
Sometimes it is useful to define an abstract base class (an interface) thatsimply defines a particular API. For example, works of art and other kinds ofitems have dimensions, so it might be useful to have a Dimension interface thathad area() and volume() methods. Although Python provides no formal supportfor interfaces, we can achieve what we want by implementing a class that hasno data attributes,and whose methods raise the NotImplementedError exception.For example:
class Dimension(object):
def area(self):
raise NotImplementedError, "Dimension.area()"
def volume(self):
Inheritance and Polymorphism 103
raise NotImplementedError, "Dimension.volume()"
This defines the Dimension interface as having the two methods we want. If wemultiply-inherit Dimension and forget to reimplement the methods, we will geta NotImplementedError exception if we try to use them. Here is a new version ofthe Painting class that makes use of the interface:
class Painting(Item, Dimension):
def __init__(self, artist, title, year=None, width=None,
height=None):
super(Painting, self).__init__(artist, title, year)
self.__width = width
self.__height = height
To calculate a painting’s area we need its width and height, so we add these tothe constructor, and assign them to suitable attributes:
def area(self):
if self.__width is None or self.__height is None:
return None
return self.__width * self.__height
def volume(self):
return None
We must implement area() and volume(). Although the volume() method doesnot make sense for a painting, we must provide an implementation anyway(since the interface requires one), so we do so and return None. An alternativewould have been to have raised an exception—for example, ValueError.
It would be natural to rework the Sculpture class to accept width, height, anddepth arguments,and to provide a volume() implementation. But an area() im-plementation may or may not make sense for a sculpture. We might mean theoverall area of the total volume, or the area of a face from a particular view-point. Since there is ambiguity, we could either pass an additional argument todisambiguate, or give up and either return None or raise an exception.
Multiply inheriting just involves listing two or more base classes in the class
statement. The order in which the base classes appear does not matter in ourexample, but can matter in more complex hierarchies.
Python’s object-oriented functionality goes beyond what we have covered inthis chapter. For instances that need to store a fixed set of attributes as com-pactly as possible, it is possible to use the __slots__ class attribute. Signals
andslots
☞ 127
We mentionthis only to highlight the fact that this is completely different from the PyQtslots (which are functions and more commonly methods) that we will encounterin the GUI chapters. It is also possible to create meta-classes, but again this isbeyond the scope of what we need for GUI programming, so we do not need tocover the topic here.

104 Chapter 3. Classes and Modules
Modules and Multifile Applications
Object-oriented programming allows us to package up functionality (e.g.,meth-ods and data attributes), into classes. Python modules allow us to package upfunctionality at a higher level—for example, entire sets of classes,Import-
ingObjectssidebar
19 ☞
functions,and instance variables. A module is simply a file with a .py extension. Modulesmay have code that is executed when they are imported, but more commonlythey simply provide functions and classes which are instantiated when theyare imported. We have already seen examples of this: The Length class is in afile called length.py, and is therefore accessible as the length module. When im-porting a module, we specify the name of the module file without the extension.For example:
import length
a = length.Length("4.5 yd")
Only modules that are in the current directory, or in Python’s sys.path list, canbe imported. If we need access to modules that are elsewhere in the filesystem,we can add additional paths to sys.path. In addition to a file, a module can be anentire directory of files. In these cases, the directory must contain a file called__init__.py. This file can be (and often is) empty; it is simply used as a markerto tell Python that the directory contains .py files and that the directory nameis the top-level module name. For example, we might create a directory calledmylibrary and put length.py, ordereddict.py, and an empty __init__.py in it. Aslong as we add the directory that contains the mylibrary directory to Python’spath, we could do this:
import mylibrary.length
a = mylibrary.length.Length("14.3 km")
In practice, we might prefer to alias mylibrary.length to something shorter.For example:
import mylibrary.length as length
a = length.Length("948mm")
Python’s module handling is a lot more sophisticated than we have shown,but what we have covered is sufficient for the GUI programming which is ourmain concern.★ Python and PyQt applications can be written in a single fileor can be spread over multiple files. We will show both approaches in thecoming chapters.
★The module import semantics are due to change in Python 2.7, with imports becoming absoluterather than relative. See http://www.python.org/dev/peps/pep-0328for details.

Modules and Multifile Applications 105
Using the doctest Module
Python has considerable support for testing, with the doctest and unittest
modules for unit testing and the test module for regression testing. PyQt alsoprovides unit-testing functionality with the QtTest module.
When we create modules, such as the length and ordereddict modules we wroteearlier, they are designed to be imported and the objects they provide (e.g., theLength and OrderedDict classes), used by the importing application. But since.py files can also be executables, we can easily include unit-testing code: Whenthe module is imported the unit-testing code is simply ignored; but when themodule is run the unit tests are executed. This approach is supported by thedoctest module.
The doctest module makes unit testing as simple and painless as possible.To use it all we need to do is add examples to our docstrings, showing whatwe would type into the interactive Python interpreter (or IDLE) and whatresponse we expect back. For example, here is the OrderedDict class’s get()
method in full:
def get(self, key, value=None):
"""Returns the value associated with key or value if key isn't
in the dictionary
>>> d = OrderedDict(dict(s=1, a=2, n=3, i=4, t=5, y=6))
>>> d.get("X", 21)
21
>>> d.get("i")
4
"""
return self.__dict.get(key, value)
The docstring contains a brief description of the method’s purpose, and thensome examples written as though they were typed into the interpreter. Webegin by creating an OrderedDict object; we don’t need to import or qualify sincewe are inside the ordereddict module. We then write a call to the method we aretesting and what the interpreter (or IDLE) is expected to respond. And thenwe do another call and response.
The doctest module uses this syntax because it is so familiar to Python pro-grammers through their use of the interactive Python interpreter or of IDLE,or of any other Python IDE, such as Eric4, that embeds a Python interpreter.When the tests are run, the doctest module will import the module itself,then read every docstring (using Python’s introspection capabilities) and thenexecute each statement that begins with the >>> prompt. It then checks theresult against the expected output (which may be nothing), and will report anyfailures.
106 Chapter 3. Classes and Modules
To make a module able to use doctest like this we just need to add three linesat the end of the module:
if __name__ == "__main__":
import doctest
doctest.testmod()
Whether a module is imported by being the subject of an import statement, oris invoked on the command line, all the module’s code is executed. This causesthe module’s functions and classes to be created ready for use.
We can tell whether a module was imported because in this case its __name__
attribute is set to the module’s name. On the other hand, if a module is invokedits __name__ attribute is set to __main__.
As shown earlier, we can use an if statement to see whether the module wasimported, in which case we do nothing else. But if the module was invokedon the command line, we import the doctest module and execute the testmod()
function which performs all our tests.
We can perform a test run from inside a console window. For example:
C:\>cd c:\pyqt\chap03
C:\pyqt\chap03>ordereddict.py
If there are no test failures, the module will run silently. If there are anyerrors, these will be output to the console. We can force the doctest module tobe more verbose by using the -v flag:
C:\pyqt\chap03>ordereddict.py -v
This shows every single test that is performed, and a summary at the end.
It is also possible to test for expected failures, for example, out-cases where weexpect an exception to be raised. For these we just write the first and last linesof the expected output (because the traceback in the middle may vary) and usean ellipsis, …, to indicate the traceback. For example, here is the OrderedDict
class’s setAt() method in full:
def setAt(self, index, value):
"""Sets the index-th item's value to the given value
>>> d = OrderedDict(dict(s=1, a=2, n=3, i=4, t=5, y=6))
>>> d.getAt(5)
6
>>> d.setAt(5, 99)
>>> d.getAt(5)
99
>>> d.setAt(19, 42)
Traceback (most recent call last):
...

Modules and Multifile Applications 107
IndexError: list index out of range
"""
self.__dict[self.__keys[index]] = value
We created an OrderedDict of six items, but in the last test attempted to setthe nonexistent twentieth item’s value. This causes the dictionary to raise anIndexError, so we write what the interactive Python interpreter would output,and the doctest module understands this and will pass the test if the exceptionwas correctly raised.
The doctest module is less sophisticated than the unittest module, but it isboth easy to use and unobtrusive. We have used it in all the examples shownso far, as can be seen by looking at the book’s source code.
Summary
This chapter took us from being users of classes to being creators of classes.We saw how to initialize newly created instances using the __init__() specialmethod, and how to implement many of the other special methods so that ourcustom data types (classes) can behave just like Python’s built-in classes. Wealso learned how to create both ordinary methods and static methods, and howto store and access both per-instance and static data.
We reviewed two complete examples. The Length class, a numeric data type,and the OrderedDict class, a collection class. We also made use of much ofthe knowledge gained from the previous chapters, including some of Python’sadvanced features, such as list comprehensions and generator methods.
This chapter also showned how to do both single and multiple inheritance,and gave an example of how to create a simple interface class. We learnedmore about using isinstance() for type testing, and about hasattr() and ducktyping.
We concluded the chapter with an overview of how Python modules andmultifile applications work. We also looked at the doctest module and saw howeasy it is to create unit tests that look like examples in our docstrings.
We now know the Python language fundamentals. We can create variables,usecollections, and create our own data types and collection types. We can branch,loop, call functions and methods, and raise and handle exceptions. Clearly,there is a lot more to learn, but we can cover everything else we require as theneed arises. We are now ready to start GUI application programming, a topicthat begins in the next chapter and which occupies the rest of the book.

108 Chapter 3. Classes and Modules
Exercises
1. Implement a Tribool data type. This is a data type that can have one ofthree values: True, False, or unknown (for which you should use None). Inaddition to __init__(), implement __str__(), __repr__(), and __cmp__();also, implement __nonzero__() for conversion to bool(), __invert__() forlogical not (~), __and__() for logical and (&), and __or__() for logical or (|).There are two possible logics that can be used: propagating, where any ex-pression involving unknown (i.e., None) is unknown, and nonpropagating,where any expression involving unknown that can be evaluated is evalu-ated. Use nonpropagating logic so that your Tribools match the truth ta-ble shown here, and where t is Tribool(True), f is Tribool(False), and n isTribool(None) (for unknown):
Expression Result Expression Result Expression Result
~t False ~f True ~n None
t & t True t & f False t & n None
f & f False f & n False n & n None
t | t True t | f True t | n True
f | f False f | n None n | n None
For example, with nonpropagating logic, True | None is True, because as longas one operand to logical or is true, the expression is true. But False | None
is None (unknown), because we cannot determine the result.
Most of the methods can be implemented in just a few lines of code.Make sure that you use the doctest module and write unit tests for allthe methods.
2. Implement a Stack class and an EmptyStackError exception class. The Stack
class should use a list to store its items, and should provide pop() to returnand remove the item at the top of the stack (the rightmost item), top() toreturn the item at the top of the stack, and push() to push a new item ontothe stack. Also provide special methods so that len() and str() will worksensibly. Make sure that pop() and top() raise EmptyStackError if the stackis empty when they are called. The methods can be written using very fewlines of code. Make sure that you use the doctest module and write unittests for all the methods.
The model answers are provided in the files chap03/tribool.py and chap03/
stack.py.
Part II
Basic GUI Programming

This page intentionally left blank
Introduction to GUIProgramming
44 ● A Pop-Up Alert in 25 Lines
● An Expression Evaluator in 30 Lines
● A Currency Converter in 70 Lines
● Signals and Slots
In this chapter we begin with brief reviews of three tiny yet useful GUI appli-cations written in PyQt. We will take the opportunity to highlight some of theissues involved in GUI programming, but we will defer most of the details tolater chapters. Once we have a feel for PyQt GUI programming,we will discussPyQt’s “signals and slots” mechanism—this is a high-level communicationmechanism for responding to user interaction that allows us to ignore irrele-vant detail.
Although PyQt is used commercially to build applicationsthat vary in size fromhundreds of lines of code to more than 100000 lines of code, the applicationswe will build in this chapter are all less than 100 lines, and they show just howmuch can be done with very little code.
In this chapter we will design our user interfaces purely by writing code, but inChapter 7, we will learn how to create user interfaces using Qt’s visual designtool, Qt Designer.
Python console applications and Python module files always have a .py exten-sion, but for Python GUI applications we use a .pyw extension. Both .py and.pyw are fine on Linux, but on Windows, .pyw ensures that Windows uses thepythonw.exe interpreter instead of python.exe, and this in turn ensures thatwhen we execute a Python GUI application, no unnecessary console windowwill appear.★ On Mac OS X, it is essential to use the .pyw extension.
The PyQt documentation is provided as a set of HTML files, independent ofthe Python documentation. The most commonly referred to documents arethose covering the PyQt API. These files have been converted from the originalC++/Qt documentation files, and their index page is called classes.html; Win-
★If you use Windows and an error message box titled, “pythonw.exe - Unable To Locate Component”pops up, it almost certainly means that you have not set your path correctly. See Appendix A,page 564, for how to fix this.
111
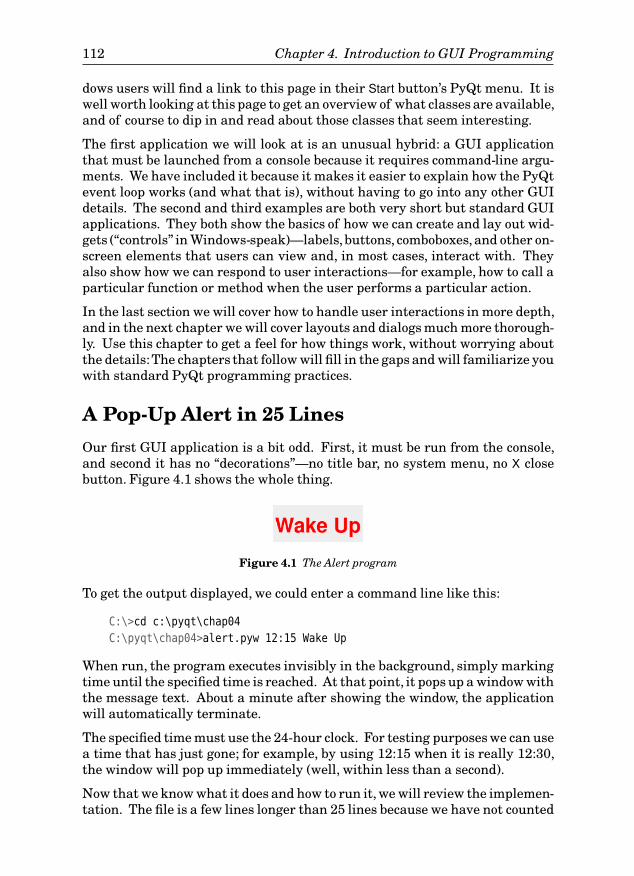
112 Chapter 4. Introduction to GUI Programming
dows users will find a link to this page in their Start button’s PyQt menu. It iswell worth looking at this page to get an overview of what classes are available,and of course to dip in and read about those classes that seem interesting.
The first application we will look at is an unusual hybrid: a GUI applicationthat must be launched from a console because it requires command-line argu-ments. We have included it because it makes it easier to explain how the PyQtevent loop works (and what that is), without having to go into any other GUIdetails. The second and third examples are both very short but standard GUIapplications. They both show the basics of how we can create and lay out wid-gets (“controls” in Windows-speak)—labels,buttons, comboboxes,and other on-screen elements that users can view and, in most cases, interact with. Theyalso show how we can respond to user interactions—for example, how to call aparticular function or method when the user performs a particular action.
In the last section we will cover how to handle user interactions in more depth,and in the next chapter we will cover layouts and dialogs much more thorough-ly. Use this chapter to get a feel for how things work, without worrying aboutthe details:The chapters that follow will fill in the gaps and will familiarize youwith standard PyQt programming practices.
A Pop-Up Alert in 25 Lines
Our first GUI application is a bit odd. First, it must be run from the console,and second it has no “decorations”—no title bar, no system menu, no X closebutton. Figure 4.1 shows the whole thing.
Figure 4.1 The Alert program
To get the output displayed, we could enter a command line like this:
C:\>cd c:\pyqt\chap04
C:\pyqt\chap04>alert.pyw 12:15 Wake Up
When run, the program executes invisibly in the background, simply markingtime until the specified time is reached. At that point, it pops up a window withthe message text. About a minute after showing the window, the applicationwill automatically terminate.
The specified time must use the 24-hour clock. For testing purposes we can usea time that has just gone; for example, by using 12:15 when it is really 12:30,the window will pop up immediately (well, within less than a second).
Now that we know what it does and how to run it, we will review the implemen-tation. The file is a few lines longer than 25 lines because we have not counted
A Pop-Up Alert in 25 Lines 113
comment lines and blank lines in the total—but there are only 25 lines of exe-cutable code. We will begin with the imports.
import sys
import time
from PyQt4.QtCore import *from PyQt4.QtGui import *
We import the sys module because we want to access the command-linearguments it holds in the sys.argv list. The time module is imported becausewe need its sleep() function, and we need the PyQt modules for the GUI andfor the QTime class.
app = QApplication(sys.argv)
We begin by creating a QApplication object. Every PyQt GUI application musthave a QApplication object. This object provides access to global-like informa-tion such as the application’s directory, the screen size (and which screen theapplication is on, in a multihead system), and so on. This object also providesthe event loop, discussed shortly.
When we create a QApplication object we pass it the command-line arguments;this is because PyQt recognizes some command-line arguments of its own,such as -geometry and -style, so we ought to give it the chance to read them.If QApplication recognizes any of the arguments, it acts on them, and removesthem from the list it was given. The list of arguments that QApplication
recognizes is given in the QApplication’s initializer’s documentation.
try:
due = QTime.currentTime()
message = "Alert!"
if len(sys.argv) < 2:
raise ValueError
hours, mins = sys.argv[1].split(":")
due = QTime(int(hours), int(mins))
if not due.isValid():
raise ValueError
if len(sys.argv) > 2:
message = " ".join(sys.argv[2:])
except ValueError:
message = "Usage: alert.pyw HH:MM [optional message]" # 24hr clock
At the very least, the application requires a time, so we set the due variableto the time right now. We also provide a default message. If the user hasnot given at least one command-line argument (a time), we raise a ValueError
exception. This will result in the time being now and the message being the“usage” error message.
114 Chapter 4. Introduction to GUI Programming
If the first argument does not contain a colon, a ValueError will be raised whenwe attempt to unpack two items from the split() call. If the hours or minutesare not a valid number, a ValueError will be raised by int(), and if the hours orminutes are out of range, due will be an invalid QTime, and we raise a ValueError
ourselves. Although Python provides its own date and time classes, the PyQtdate and time classes are often more convenient (and in some respects morepowerful), so we tend to prefer them.
If the time is valid, we set the message to be the space-separated concatenationof the other command-line arguments if there are any; otherwise,we leave it asthe default “Alert!” that we set at the beginning. (When a program is executedon the command line, it is given a list of arguments, the first being the invokingname, and the rest being each sequence of nonwhitespace characters, that is,each “word”, entered on the command line. The words may be changed by theshell—for example, by applying wildcard expansion. Python puts the words itis actually given in the sys.argv list.)
Now we know when the message must be shown and what the message is.
while QTime.currentTime() < due:
time.sleep(20) # 20 seconds
We loop continuously, comparing the current time with the target time. Theloop will terminate if the current time is later than the target time. We couldhave simply put a pass statement inside the loop, but if we did that Pythonwould loop as quickly as possible, gobbling up processor cycles for no goodreason. The time.sleep() command tells Python to suspend processing forthe specified number of seconds, 20 in this case. This gives other programsmore opportunity to run and makes sense since we don’t want to actually doanything while we wait for the due time to arrive.
Apart from creating the QApplication object, what we have done so far isstandard console programming.
label = QLabel("<font color=red size=72><b>" + message + "</b></font>")
label.setWindowFlags(Qt.SplashScreen)
label.show()
QTimer.singleShot(60000, app.quit) # 1 minute
app.exec_()
We have created a QApplication object, we have a message, and the due timehas arrived, so now we can begin to create our application. A GUI applicationneeds widgets, and in this case we need a label to show the message. A QLabel
can accept HTML text, so we give it an HTML string that tells it to display boldred text of size 72 points.★
★The supported HTML tags are listed at http://doc.trolltech.com/richtext-html-subset.html.

A Pop-Up Alert in 25 Lines 115
In PyQt, any widget can be used as a top-level window, even a button or a label.When a widget is used like this, PyQt automatically gives it a title bar. Wedon’t want a title bar for this application, so we set the label’s window flags tothose used for splash screens since they have no title bar. Once we have set upthe label that will be our window, we call show() on it. At this point, the labelwindow is not shown! The call to show() merely schedules a “paint event”, thatis, it adds a new event to the QApplication object’s event queue that is a requestto paint the specified widget.
Next, we set up a single-shot timer. Whereas the Python library’s time.sleep()function takes a number of seconds, the QTimer.singleShot() function takes anumber of milliseconds. We give the singleShot() method two arguments: howlong until it should time out (one minute in this case), and a function or methodfor it to call when it times out.
In PyQt terminology, the function or method we have given is called a Signalsandslots
☞ 127
“slot”,although in the PyQt documentation the terms “callable”, “Python slot”, and“Qt slot” are used to distinguish slots from Python’s __slots__, a feature ofnew-style classes that is described in the Python Language Reference. In thisbook we will use the PyQt terminology, since we never use __slots__.
So now we have two events scheduled: A paint event that wants to takeplace immediately, and a timer timeout event that wants to take place in aminute’s time.
The call to app.exec_() starts off the QApplication object’s event loop.★ The firstevent it gets is the paint event, so the label window pops up on-screen withthe given message. About one minute later the timer timeout event occursand the QApplication.quit() method is called. This method performs a cleantermination of the GUI application. It closes any open windows, frees up anyresources it has acquired, and exits.
Event loops are used by all GUI applications. In pseudocode, an event looplooks like this:
while True:
event = getNextEvent()
if event:
if event == Terminate:
break
processEvent(event)
When the user interacts with the application, or when certain other thingsoccur, such as a timer timing out or the application’s window being uncovered(maybe because another application was closed), an event is generated insidePyQt and added to the event queue. The application’s event loop continuously
★PyQt uses exec_() rather than exec() to avoid conflicting with Python’s built-in exec statement.
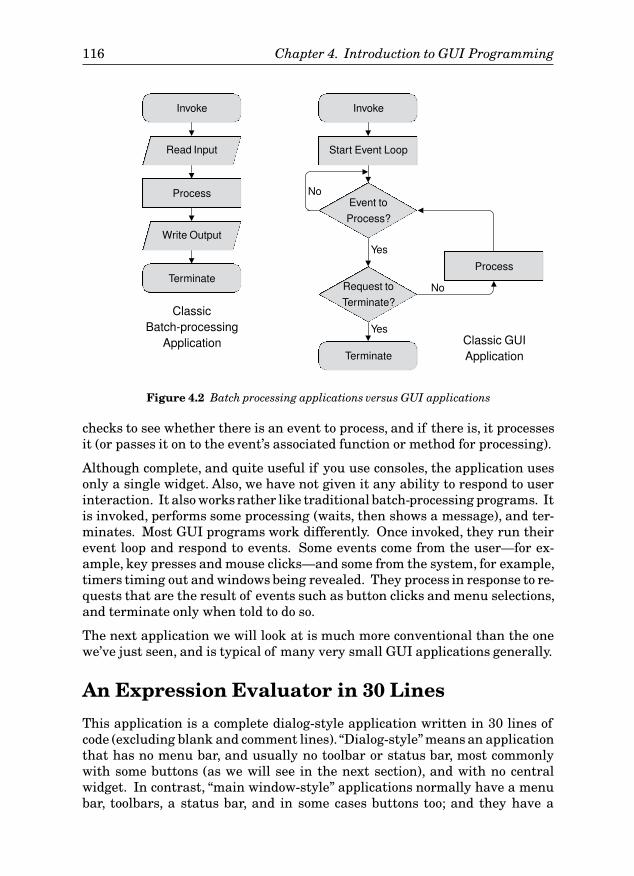
116 Chapter 4. Introduction to GUI Programming
Invoke
Read Input
Process
Write Output
Terminate
ClassicBatch-processingApplication
Invoke
Start Event Loop
Event to
Process?
Request to
Terminate?
Process
TerminateClassic GUIApplication
Yes
Yes
No
No
Figure 4.2 Batch processing applications versus GUI applications
checks to see whether there is an event to process, and if there is, it processesit (or passes it on to the event’s associated function or method for processing).
Although complete, and quite useful if you use consoles, the application usesonly a single widget. Also, we have not given it any ability to respond to userinteraction. It also works rather like traditional batch-processing programs. Itis invoked, performs some processing (waits, then shows a message), and ter-minates. Most GUI programs work differently. Once invoked, they run theirevent loop and respond to events. Some events come from the user—for ex-ample, key presses and mouse clicks—and some from the system, for example,timers timing out and windows being revealed. They process in response to re-quests that are the result of events such as button clicks and menu selections,and terminate only when told to do so.
The next application we will look at is much more conventional than the onewe’ve just seen, and is typical of many very small GUI applications generally.
An Expression Evaluator in 30 Lines
This application is a complete dialog-style application written in 30 lines ofcode (excluding blank and comment lines). “Dialog-style” means an applicationthat has no menu bar, and usually no toolbar or status bar, most commonlywith some buttons (as we will see in the next section), and with no centralwidget. In contrast, “main window-style” applications normally have a menubar, toolbars, a status bar, and in some cases buttons too; and they have a
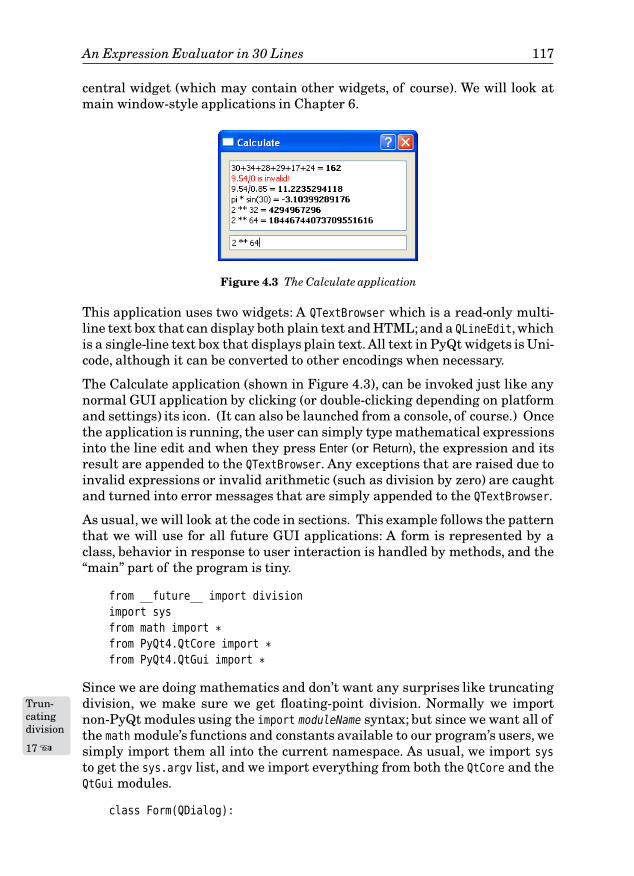
An Expression Evaluator in 30 Lines 117
central widget (which may contain other widgets, of course). We will look atmain window-style applications in Chapter 6.
Figure 4.3 The Calculate application
This application uses two widgets: A QTextBrowser which is a read-only multi-line text box that can display both plain text and HTML;and a QLineEdit, whichis a single-line text box that displays plain text. All text in PyQt widgets is Uni-code, although it can be converted to other encodings when necessary.
The Calculate application (shown in Figure 4.3), can be invoked just like anynormal GUI application by clicking (or double-clicking depending on platformand settings) its icon. (It can also be launched from a console, of course.) Oncethe application is running, the user can simply type mathematical expressionsinto the line edit and when they press Enter (or Return), the expression and itsresult are appended to the QTextBrowser. Any exceptions that are raised due toinvalid expressions or invalid arithmetic (such as division by zero) are caughtand turned into error messages that are simply appended to the QTextBrowser.
As usual, we will look at the code in sections. This example follows the patternthat we will use for all future GUI applications: A form is represented by aclass, behavior in response to user interaction is handled by methods, and the“main” part of the program is tiny.
from __future__ import division
import sys
from math import *from PyQt4.QtCore import *from PyQt4.QtGui import *
Since we are doing mathematics and don’t want any surprises like truncatingdivision, we make sure we get floating-point division.Trun-
catingdivision
17 ☞
Normally we importnon-PyQt modules using the import moduleName syntax; but since we want all ofthe math module’s functions and constants available to our program’s users, wesimply import them all into the current namespace. As usual, we import sys
to get the sys.argv list, and we import everything from both the QtCore and theQtGui modules.
class Form(QDialog):
118 Chapter 4. Introduction to GUI Programming
def __init__(self, parent=None):
super(Form, self).__init__(parent)
self.browser = QTextBrowser()
self.lineedit = QLineEdit("Type an expression and press Enter")
self.lineedit.selectAll()
layout = QVBoxLayout()
layout.addWidget(self.browser)
layout.addWidget(self.lineedit)
self.setLayout(layout)
self.lineedit.setFocus()
self.connect(self.lineedit, SIGNAL("returnPressed()"),
self.updateUi)
self.setWindowTitle("Calculate")
As we have seen, any widget can be used as a top-level window. But in mostcases when we create a top-level window we subclass QDialog, or QMainWindow,or occasionally, QWidget. Both QDialog and QMainWindow, and indeed all of PyQt’swidgets, are derived from QWidget, and all are new-style classes. By inheritingQDialog we get a blank form, that is, a gray rectangle, and some convenientbehaviors and methods. For example, if the user clicks the close X button, thedialog will close. By default, when a widget is closed it is merely hidden; wecan, of course, change this behavior, as we will see in the next chapter.
We give our Form class’s __init__() method a default parent of None, and usesuper() to initialize it. A widget that has no parent becomes a top-level win-dow, which is what we want for our form. We then create the two widgets weneed and keep references to them so that we can access them later, outsideof __init__(). Since we did not give these widgets parents, it would seem thatthey will become top-level windows—which would not make sense. We will seeshortly that they get parents later on in the initializer. We give the QLineEdit
some initial text to show, and select it all. This will ensure that as soon as theuser starts typing, the text we gave will be overwritten.
We want the widgets to appear vertically, one above the other, in the window.This is achieved by creating a QVBoxLayout and adding our two widgets to it, andthen setting the layout on the form. If you run the application and resize it,you will find that any extra vertical space is given to the QTextBrowser, and thatboth widgets will grow horizontally. This is all handled automatically by thelayout manager, and can be fine-tuned by setting layout policies.
One important side effect of using layouts is that PyQt automatically repar-ents the widgets that are laid out. So although we did not give our widgets aparent of self (the Form instance),when we call setLayout() the layout managergives ownership of the widgets and of itself to the form,and takes ownership ofany nested layouts itself. This means that none of the widgets that are laid outis a top-level window, and all of them have parents, which is what we want. Sowhen the form is deleted, all its child widgets and layouts will be deleted withit, in the correct order.
An Expression Evaluator in 30 Lines 119
Object Ownership
All PyQt classes that derive from QObject—and this includes all the widgets,since QWidget is a QObject subclass—can have a “parent”. The parent–childrelationship is used for two complementary purposes. A widget that has noparent is a top-level window, and a widget that has a parent (always anotherwidget) is contained (displayed) within its parent. The relationship alsodefines ownership, with parents owning their children.
PyQt uses the parent–child ownership model to ensure that if a parent—forexample, a top-level window—is deleted, all its children, for example, all thewidgets the window contains, are automatically deleted as well. To avoidmemory leaks, we should always make sure that any QObject, including allQWidgets, has a parent, the sole exception being top-level windows.
Most PyQt QObject subclasses have constructors that take a parent objectas their last (optional) argument. But for widgets we generally do not (andneed not) pass this argument. This is because widgets used in dialogs arelaid out with layout managers, and when this occurs they are automaticallyreparented to the widget in which they are laid out, so they end up with thecorrect parent without requiring us to take any special action.
There are some cases where we must explicitly pass a parent—for example,when constructing QObject subclass objects that are not widgets, or that arewidgets but which will not be laid out (such as dock widgets); we will seeseveral examples of such cases in later chapters.
One final point is that it is possible to get situations where a Python variableis referring to an underlying PyQt object that no longer exists. This issue iscovered in Chapter 9, in the “aliveness” discussion starting on page 287.
The widgets on a form can be laid out using a variety of techniques. We can usethe resize() and move() methods to give them absolute sizes and positions; wecan reimplement the resizeEvent() method and calculate their sizes and posi-tions dynamically, or we can use PyQt’s layout managers. Using absolute sizesand positions is very inconvenient. For one thing, we have to perform lots ofmanual calculations, and for another, if we change the layout we have to redothe calculations. Calculating the sizes and positions dynamically is a betterapproach, but still requires us to write quite a lot of tedious calculating code.
Using layout managers makes things a lot easier. And layout managers arequite smart: They automatically adapt to resize events and to content changes.Anyone used to dialogs in many versions of Windows will appreciate the bene-fits of having dialogs that can be resized (and that do so sensibly), rather thanbeing forced to use small, nonresizable dialogs which can be very inconvenientwhen their contents are too large to fit. Layout managers also make life easierfor internationalized programs since they adapt to content, so translated labelswill not be “chopped off” if the target language is more verbose than the origi-nal language.
120 Chapter 4. Introduction to GUI Programming
PyQt provides three layout managers: one for vertical layouts, one for horizon-tal layouts, and one for grid layouts. Layouts can be nested, so quite sophisti-cated layoutsare possible. And there are other ways of laying out widgets,suchas using splittersor tab widgets.All of these approachesare considered in moredepth in Chapter 9.
As a courtesy to our users, we want the focus to start in the QLineEdit; we callsetFocus() to achieve this. We must do this after setting the layout.
The connect() call is something we will look at in depth Signalsandslots
☞ 127
later in this chapter.Suffice it to say that every widget (and some other QObjects) announce statechanges by emitting “signals”. These signals (which are nothing to do withUnix signals) are usually ignored. However, we can choose to take notice ofany signals we are interested in, and we do this by identifying the QObject thatwe want to know about, the signal it emits that we are interested in, and thefunction or method we want called when the signal is emitted.
So in this case, when the user presses Enter (or Return) in the QLineEdit, thereturnPressed() signal will be emitted as usual, but because of our connect()
call, when this occurs, our updateUi() method will be called. We will see whathappens then in a moment.
The last thing we do in __init__() is set the window’s title.
As we will see shortly, the form is created and show() is called on it. Once theevent loop begins, the form is shown—and nothing more appears to happen.The application is simply running the event loop, waiting for the user toclick the mouse or press a key. Once the user starts interacting, the resultsof their interaction are processed. So if the user types in an expression, theQLineEdit will take care of displaying what they type, and if they press Enter,our updateUi() method will be called.
def updateUi(self):
try:
text = unicode(self.lineedit.text())
self.browser.append("%s = <b>%s</b>" % (text, eval(text)))
except:
self.browser.append(
"<font color=red>%s is invalid!</font>" % text)
When updateUi() is called it retrieves the text from thePyQtstringpolicy
28 ☞
QLineEdit, immediatelyconverting it to a unicode object. We then use Python’s eval() function toevaluate the string as an expression. If this is successful, we append a stringto the QTextBrowser that has the expression text, an equals sign, and then theresult in bold. Although we normally convert QStrings to unicode as soon aspossible, we can pass QStrings, unicodes, and strs to PyQt methods that expecta QString, and PyQt will automatically perform any necessary conversion. Ifany exception occurs, we append an error message instead. Using a catch-allexcept block like this is not good general practice, but for a 30-line program itseems reasonable.
An Expression Evaluator in 30 Lines 121
By using eval() we avoid all the work of parsing and error checking that wewould have to do ourselves if we were using a compiled language.
app = QApplication(sys.argv)
form = Form()
form.show()
app.exec_()
Now that we have defined our Form class, at the end of the calculate.pyw file, wecreate the QApplication object, instantiate an instance of our form, schedule itto be painted, and start off the event loop.
And that is the complete application. But it isn’t quite the end of the story. Wehave not said how the user can terminate the application. Because our formderives from QDialog, it inherits some behavior. For example, if the user clicksthe close button X, or if they press the Esc key, the form will close. When a formcloses, it is hidden. When the form is hidden PyQt will detect that the applica-tion has no visible windows and that no further interaction is possible. It willtherefore delete the form and perform a clean termination of the application.
In some cases, we want an application to continue even if it is not visible—forexample, a server. For these cases, we can call QApplication.setQuitOnLast-
WindowClosed(False). It is also possible, although rarely necessary, to be notifiedwhen the last window is closed.
On Mac OS X, and some X Windows window managers, like twm, an applica-tion like this will not have a close button, and on the Mac, choosing Quit on themenu bar will not work. In such cases, pressing Esc will terminate the appli-cation, and in addition on the Mac, Command+.will also work. In view of this,for applications that are likely to be used on the Mac or with twm or similar,it is best to provide a Quit button. Adding buttons to dialogs is covered in thischapter’s last section.
We are now ready to look at the last small, complete example that we willpresent in this chapter. It has more custom behavior, has a more complexlayout, and does more sophisticated processing, but its fundamental structureis very similar to the Calculate application, and indeed to that of many otherPyQt dialogs.
A Currency Converter in 70 Lines
One small utility that is often useful is a currency converter. But since ex-change rates frequently change, we cannot simply create a static dictionary ofconversion rates as we did for the units of length in the Length class we createdin the previous chapter. Fortunately, the Bank of Canada provides exchangerates in a file that is accessible over the Internet, and which uses an easy-to-parse format. The rates are sometimes a few days old, but they are good
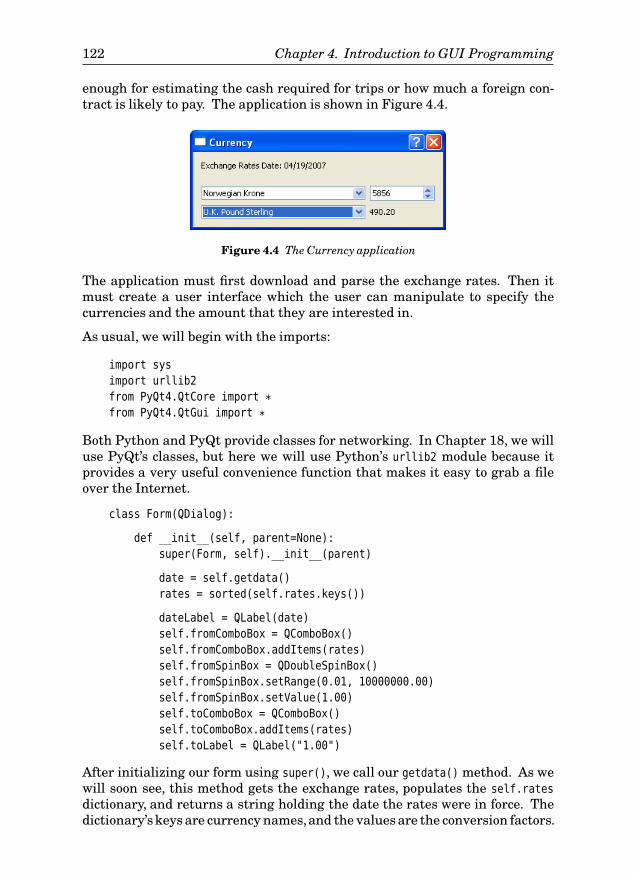
122 Chapter 4. Introduction to GUI Programming
enough for estimating the cash required for trips or how much a foreign con-tract is likely to pay. The application is shown in Figure 4.4.
Figure 4.4 The Currency application
The application must first download and parse the exchange rates. Then itmust create a user interface which the user can manipulate to specify thecurrencies and the amount that they are interested in.
As usual, we will begin with the imports:
import sys
import urllib2
from PyQt4.QtCore import *from PyQt4.QtGui import *
Both Python and PyQt provide classes for networking. In Chapter 18, we willuse PyQt’s classes, but here we will use Python’s urllib2 module because itprovides a very useful convenience function that makes it easy to grab a fileover the Internet.
class Form(QDialog):
def __init__(self, parent=None):
super(Form, self).__init__(parent)
date = self.getdata()
rates = sorted(self.rates.keys())
dateLabel = QLabel(date)
self.fromComboBox = QComboBox()
self.fromComboBox.addItems(rates)
self.fromSpinBox = QDoubleSpinBox()
self.fromSpinBox.setRange(0.01, 10000000.00)
self.fromSpinBox.setValue(1.00)
self.toComboBox = QComboBox()
self.toComboBox.addItems(rates)
self.toLabel = QLabel("1.00")
After initializing our form using super(), we call our getdata() method. As wewill soon see, this method gets the exchange rates, populates the self.rates
dictionary, and returns a string holding the date the rates were in force. Thedictionary’skeys are currency names,and the values are the conversion factors.
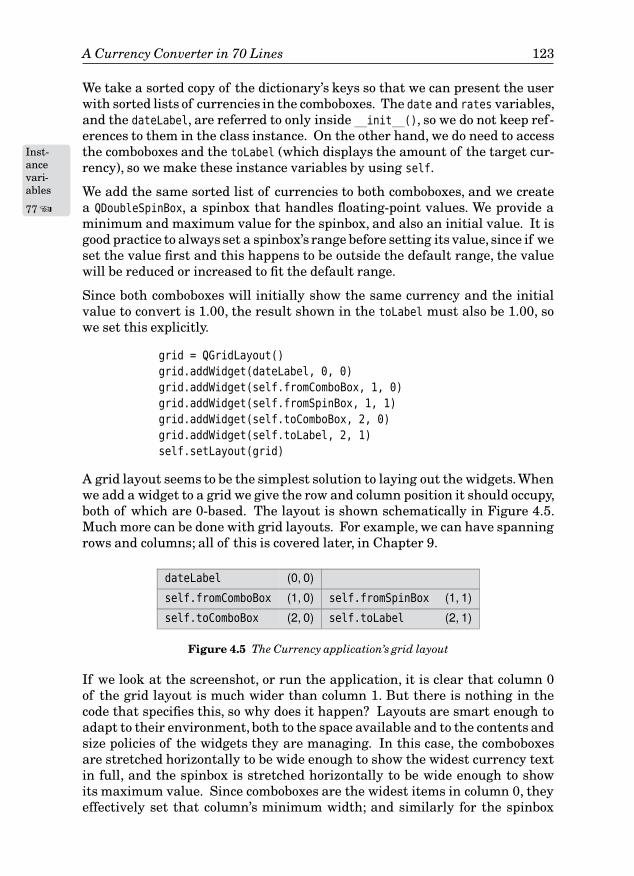
A Currency Converter in 70 Lines 123
We take a sorted copy of the dictionary’s keys so that we can present the userwith sorted lists of currencies in the comboboxes. The date and rates variables,and the dateLabel, are referred to only inside __init__(), so we do not keep ref-erences to them in the class instance. On the other hand, we do need to accessthe comboboxes and theInst-
ancevari-ables
77 ☞
toLabel (which displays the amount of the target cur-rency), so we make these instance variables by using self.
We add the same sorted list of currencies to both comboboxes, and we createa QDoubleSpinBox, a spinbox that handles floating-point values. We provide aminimum and maximum value for the spinbox, and also an initial value. It isgood practice to always set a spinbox’s range before setting its value, since if weset the value first and this happens to be outside the default range, the valuewill be reduced or increased to fit the default range.
Since both comboboxes will initially show the same currency and the initialvalue to convert is 1.00, the result shown in the toLabel must also be 1.00, sowe set this explicitly.
grid = QGridLayout()
grid.addWidget(dateLabel, 0, 0)
grid.addWidget(self.fromComboBox, 1, 0)
grid.addWidget(self.fromSpinBox, 1, 1)
grid.addWidget(self.toComboBox, 2, 0)
grid.addWidget(self.toLabel, 2, 1)
self.setLayout(grid)
A grid layout seems to be the simplest solution to laying out the widgets.Whenwe add a widget to a grid we give the row and column position it should occupy,both of which are 0-based. The layout is shown schematically in Figure 4.5.Much more can be done with grid layouts. For example, we can have spanningrows and columns; all of this is covered later, in Chapter 9.
dateLabel (0, 0)
self.fromComboBox (1, 0) self.fromSpinBox (1, 1)
self.toComboBox (2, 0) self.toLabel (2, 1)
Figure 4.5 The Currency application’s grid layout
If we look at the screenshot, or run the application, it is clear that column 0of the grid layout is much wider than column 1. But there is nothing in thecode that specifies this, so why does it happen? Layouts are smart enough toadapt to their environment, both to the space available and to the contents andsize policies of the widgets they are managing. In this case, the comboboxesare stretched horizontally to be wide enough to show the widest currency textin full, and the spinbox is stretched horizontally to be wide enough to showits maximum value. Since comboboxes are the widest items in column 0, theyeffectively set that column’s minimum width; and similarly for the spinbox
124 Chapter 4. Introduction to GUI Programming
in column 1. If we run the application and try to make the window narrower,nothing will happen because it is already at its minimum width. But we canmake the window wider and both columns will stretch to occupy the extraspace. It is, of course,possible to bias the layout so that it gives more horizontalspace to, say, column 0, when extra space is available.
None of the widgets is initially stretched vertically because that is not neces-sary for any of them. But if we increase the window’s height, all of the extraspace will go to the dateLabel because that is the only widget on the form thatlikes to grow in every direction and has no other widgets to constrain it.
Now that we have created, populated, and laid out the widgets, it is time to setup the form’s behavior.
self.connect(self.fromComboBox,
SIGNAL("currentIndexChanged(int)"), self.updateUi)
self.connect(self.toComboBox,
SIGNAL("currentIndexChanged(int)"), self.updateUi)
self.connect(self.fromSpinBox,
SIGNAL("valueChanged(double)"), self.updateUi)
self.setWindowTitle("Currency")
If the user changes the current item in one of the comboboxes, the relevantcombobox will emit a currentIndexChanged() signal with the index positionof the new current item. Similarly, if the user changes the value held by thespinbox, a valueChanged() signal will be emitted with the new value. We haveconnected all these signals to just one Python slot: updateUi(). This does nothave to be the case, as we will see in the next section, but it happens to be asensible choice for this application.
And at the end of __init__() we set the window’s title.
def updateUi(self):
to = unicode(self.toComboBox.currentText())
from_ = unicode(self.fromComboBox.currentText())
amount = (self.rates[from_] / self.rates[to]) * \
self.fromSpinBox.value()
self.toLabel.setText("%0.2f" % amount)
This method is called in response to the currentIndexChanged() signal emittedby the comboboxes, and in response to the valueChanged() signal emitted by thespinbox. All the signals involved also pass a parameter. As we will see in thenext section, we can ignore signal parameters, as we do here.
No matter which signal was involved, we go through the same process. Weextract the “to” and “from” currencies, calculate the “to” amount, and set thetoLabel’s text accordingly. We have given the “from” text’s variable the namefrom_ because from is a Python keyword and therefore not available to us. Wehad to escape a newline when calculating the amount to make the line narrow
A Currency Converter in 70 Lines 125
enough to fit on the page; and in any case, we prefer to limit line lengths tomake it easier to read two files side by side on the screen.
def getdata(self): # Idea taken from the Python Cookbook
self.rates = {}
try:
date = "Unknown"
fh = urllib2.urlopen("http://www.bankofcanada.ca"
"/en/markets/csv/exchange_eng.csv")
for line in fh:
if not line or line.startswith(("#", "Closing ")):
continue
fields = line.split(",")
if line.startswith("Date "):
date = fields[-1]
else:
try:
value = float(fields[-1])
self.rates[unicode(fields[0])] = value
except ValueError:
pass
return "Exchange Rates Date: " + date
except Exception, e:
return "Failed to download:\n%s" % e
This method is where we get the data that drives the application. We beginby creating a new instance attribute, self.rates. Unlike C++, Java, and similarlanguages, Python allows us to create instance attributes as and when weneed them—for example, in the constructor, in the initializer, or in any othermethod. We can even add attributes to specific instances on the fly.
Since a lot can go wrong with network connections—for example, the networkmight be down, the host might be down, the URL may have changed, and soon, we need to make the application more robust than in the previous two ex-amples. Another possible problem is that we may get an invalid floating-pointvalue such as the “NA” (Not Available) that the currency data sometimes con-tains. We have an inner try … except block that catches invalid numbers. Soif we fail to convert a currency value to a floating-point number, we simply skipthat particular currency and continue.
We handle every other possibility by wrapping almost the entire method in anouter try …except block. (This is too general for most applications,but it seemsacceptable for a tiny 70-line application.) If a problem occurs, we catch theexception raised and return it as a string to the caller, __init__(). The stringthat is returned by getdata() is shown in the dateLabel, so normally this labelwill show the date applicable to the exchange rates, but in an error situation itwill show the error message instead.
126 Chapter 4. Introduction to GUI Programming
Notice that we have split the URL string into two strings over two linesbecause it is so long—and we did not need to escape the newline. This worksbecause the strings are within parentheses. If that wasn’t the case, we wouldeither have to escape the newline or concatenate them using + (and still escapethe newline).
We initialize the date variable with a string indicating that we don’t know whatdates the rates were calculated. We then use the urllib2.urlopen() functionto give us a file handle to the file we are interested in. The file handle can beused to read the entire file in one go using its read() method, but in this casewe prefer to read line by line using readlines().
Here is the data from the exchange_eng.csv file on one particular day. Somecolumns, and most rows, have been omitted; these are indicated by ellipses.
...
#
Date (<m>/<d>/<year>),01/05/2007,...,01/12/2007,01/15/2007
Closing Can/US Exchange Rate,1.1725,...,1.1688,1.1667
U.S. Dollar (Noon),1.1755,...,1.1702,1.1681
Argentina Peso (Floating Rate),0.3797,...,0.3773,0.3767
Australian Dollar,0.9164,...,0.9157,0.9153
...
Vietnamese Dong,0.000073,...,0.000073,0.000073
The exchange_eng.csv file’s format uses several different kinds of lines. Com-ment lines begin with “#”, and there may also be blank lines; we ignore allthese. The exchange rates are listed by name, followed by rates, all comma-separated. The rates are those applying on particular dates, with the last oneon each line being the most recent. We split each of these lines on commas andtake the first item to be the currency name, and the last item to be the exchangerate. There is also a line that begins with “Date”; this lists the dates applyingto each column. When we encounter this line we take the last date, since thatis the one that corresponds with the exchange rates we are using. There is alsoa line that begins “Closing”; we ignore it.
For each exchange rate line we insert an item into the self.rates dictionary,using the currency’s name for the key and the exchange rate as the value. Wehave assumed that the file’s text is either 7-bit ASCII or Unicode; if it isn’tone of these we may get an encoding error. If we knew the encoding, we couldspecify it as a second argument when we call unicode().
app = QApplication(sys.argv)
form = Form()
form.show()
app.exec_()

A Currency Converter in 70 Lines 127
We have used exactly the same code as the previous example to create theQApplication object, instantiate the Currency application’s form, and start offthe event loop.
As for program termination, just like the previous example, because we havesubclassed QDialog, if the user clicks the close X button or presses Esc, thewindow will close and then PyQt will terminate the application. In Chapter 6,we will see how to provide more explicit means of termination, and how toensure that the user has the opportunity to save any unsaved changes andprogram settings.
By now it should be clear that using PyQt for GUI programming is straightfor-ward. Although we will see more complex layouts later on, they are not intrin-sically difficult, and because the layout managers are smart, in most cases they“just work”. Naturally, there is a lot more to be covered—for example, creatingmain window-style applications, creating dialogs that the user can pop-up forinteraction,and so on. But we will begin with something fundamental to PyQt,that so far we have glossed over: the signals and slots communication mecha-nism, which is the subject of the next section.
Signals and Slots
Every GUI library provides the details of events that take place, such as mouseclicks and key presses. For example, if we have a button with the text Click Me,and the user clicks it, all kinds of information becomes available. The GUIlibrary can tell us the coordinates of the mouse click relative to the button,relative to the button’s parent widget, and relative to the screen; it can tell usthe state of the Shift, Ctrl, Alt, and NumLock keys at the time of the click; and theprecise time of the click and of the release; and so on. Similar information canbe provided if the user “clicked” the button without using the mouse. The usermay have pressed the Tab key enough times to move the focus to the buttonand then pressed Spacebar, or maybe they pressed Alt+C. Although the outcomeis the same in all these cases, each different means of clicking the buttonproduces different events and different information.
The Qt library was the first to recognize that in almost every case, program-mers don’t need or even want all the low-level details: They don’t care how thebutton was pressed, they just want to know that it was pressed so that they canrespond appropriately. For this reason Qt, and therefore PyQt, provides twocommunication mechanisms: a low-level event-handling mechanism which issimilar to those provided by all the other GUI libraries, and a high-level mech-anism which Trolltech (makers of Qt) have called “signals and slots”. We willlook at the low-level mechanism in Chapter 10, and again in Chapter 11, butin this section we will focus on the high-level mechanism.
Every QObject—including all of PyQt’s widgets since they derive from QWidget,a QObject subclass—supports the signals and slots mechanism. In particular,they are capable of announcing state changes, such as when a checkbox
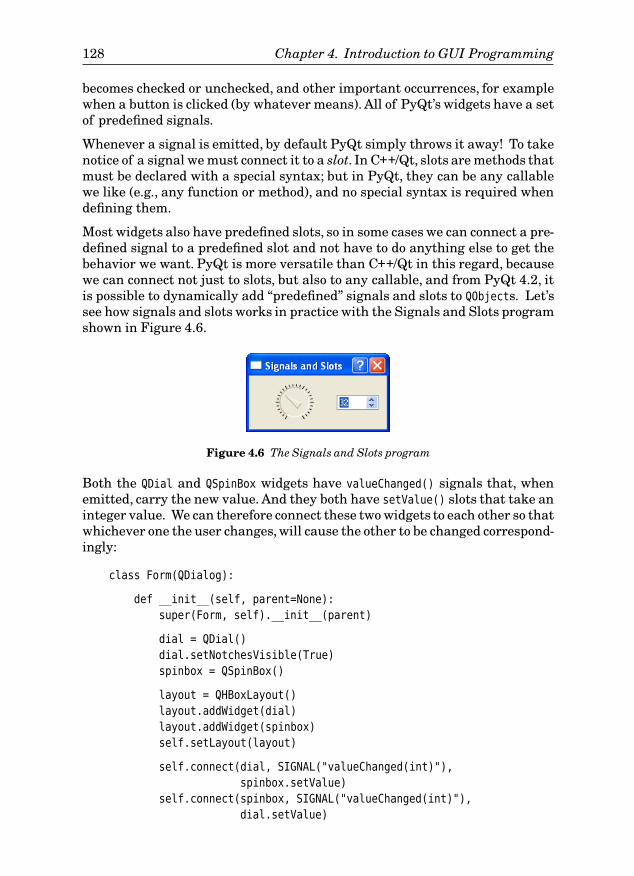
128 Chapter 4. Introduction to GUI Programming
becomes checked or unchecked, and other important occurrences, for examplewhen a button is clicked (by whatever means). All of PyQt’s widgets have a setof predefined signals.
Whenever a signal is emitted, by default PyQt simply throws it away! To takenotice of a signal we must connect it to a slot. In C++/Qt, slots are methods thatmust be declared with a special syntax; but in PyQt, they can be any callablewe like (e.g., any function or method), and no special syntax is required whendefining them.
Most widgets also have predefined slots, so in some cases we can connect a pre-defined signal to a predefined slot and not have to do anything else to get thebehavior we want. PyQt is more versatile than C++/Qt in this regard, becausewe can connect not just to slots, but also to any callable, and from PyQt 4.2, itis possible to dynamically add “predefined” signals and slots to QObjects. Let’ssee how signals and slots works in practice with the Signals and Slots programshown in Figure 4.6.
Figure 4.6 The Signals and Slots program
Both the QDial and QSpinBox widgets have valueChanged() signals that, whenemitted, carry the new value. And they both have setValue() slots that take aninteger value. We can therefore connect these two widgets to each other so thatwhichever one the user changes, will cause the other to be changed correspond-ingly:
class Form(QDialog):
def __init__(self, parent=None):
super(Form, self).__init__(parent)
dial = QDial()
dial.setNotchesVisible(True)
spinbox = QSpinBox()
layout = QHBoxLayout()
layout.addWidget(dial)
layout.addWidget(spinbox)
self.setLayout(layout)
self.connect(dial, SIGNAL("valueChanged(int)"),
spinbox.setValue)
self.connect(spinbox, SIGNAL("valueChanged(int)"),
dial.setValue)
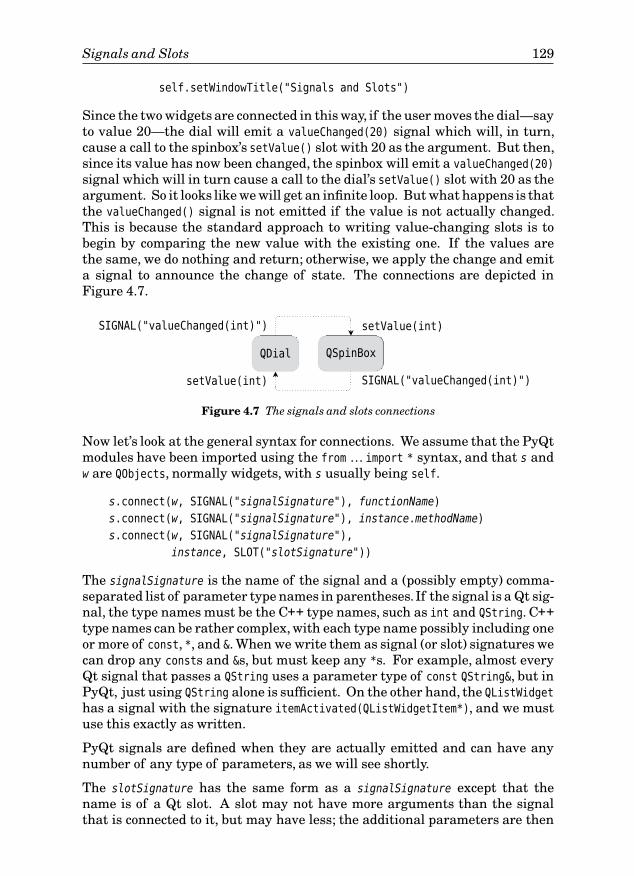
Signals and Slots 129
self.setWindowTitle("Signals and Slots")
Since the two widgets are connected in this way, if the user moves the dial—sayto value 20—the dial will emit a valueChanged(20) signal which will, in turn,cause a call to the spinbox’s setValue() slot with 20 as the argument. But then,since its value has now been changed, the spinbox will emit a valueChanged(20)
signal which will in turn cause a call to the dial’s setValue() slot with 20 as theargument. So it looks like we will get an infinite loop. But what happens is thatthe valueChanged() signal is not emitted if the value is not actually changed.This is because the standard approach to writing value-changing slots is tobegin by comparing the new value with the existing one. If the values arethe same, we do nothing and return; otherwise, we apply the change and emita signal to announce the change of state. The connections are depicted inFigure 4.7.
QDial QSpinBox
SIGNAL("valueChanged(int)")
setValue(int)
setValue(int)
SIGNAL("valueChanged(int)")
Figure 4.7 The signals and slots connections
Now let’s look at the general syntax for connections. We assume that the PyQtmodules have been imported using the from … import * syntax, and that s andw are QObjects, normally widgets, with s usually being self.
s.connect(w, SIGNAL("signalSignature"), functionName)
s.connect(w, SIGNAL("signalSignature"), instance.methodName)
s.connect(w, SIGNAL("signalSignature"),
instance, SLOT("slotSignature"))
The signalSignature is the name of the signal and a (possibly empty) comma-separated list of parameter type names in parentheses. If the signal is a Qt sig-nal, the type names must be the C++ type names, such as int and QString. C++type names can be rather complex, with each type name possibly including oneor more of const, *, and &. When we write them as signal (or slot) signatures wecan drop any consts and &s, but must keep any *s. For example, almost everyQt signal that passes a QString uses a parameter type of const QString&, but inPyQt, just using QString alone is sufficient. On the other hand, the QListWidget
has a signal with the signature itemActivated(QListWidgetItem*), and we mustuse this exactly as written.
PyQt signals are defined when they are actually emitted and can have anynumber of any type of parameters, as we will see shortly.
The slotSignature has the same form as a signalSignature except that thename is of a Qt slot. A slot may not have more arguments than the signalthat is connected to it, but may have less; the additional parameters are then
130 Chapter 4. Introduction to GUI Programming
discarded. Corresponding signal and slot arguments must have the sametypes, so for example, we could not connect a QDial’s valueChanged(int) signal toa QLineEdit’s setText(QString) slot.
In our dial and spinbox example we used the instance.methodName syntax as wedid with the example applications shown earlier in the chapter. But when theslot is actually a Qt slot rather than a Python method, it is more efficient to usethe SLOT() syntax:
self.connect(dial, SIGNAL("valueChanged(int)"),
spinbox, SLOT("setValue(int)"))
self.connect(spinbox, SIGNAL("valueChanged(int)"),
dial, SLOT("setValue(int)"))
We have already seen that it is possible to connect multiple signals to the sameslot. It is also possible to connect a single signal to multiple slots. Althoughrare, we can also connect a signal to another signal: In such cases, when thefirst signal is emitted, it will cause the signal it is connected to, to be emitted.
Connections are made using QObject.connect(); they can be broken using QOb-
ject.disconnect(). In practice, we rarely need to break connections ourselvessince, for example, PyQt will automatically disconnect any connections involv-ing an object that has been deleted.
So far we have seen how to connect to signals, and how to write slots—whichare ordinary functions or methods. And we know that signals are emitted tosignify state changes or other important occurrences. But what if we want tocreate a component that emits its own signals? This is easily achieved usingQObject.emit(). For example, here is a complete QSpinBox subclass that emits itsown custom atzero signal, and that also passes a number:
class ZeroSpinBox(QSpinBox):
zeros = 0
def __init__(self, parent=None):
super(ZeroSpinBox, self).__init__(parent)
self.connect(self, SIGNAL("valueChanged(int)"), self.checkzero)
def checkzero(self):
if self.value() == 0:
self.zeros += 1
self.emit(SIGNAL("atzero"), self.zeros)
We connect to the spinbox’s own valueChanged() signal and have it call ourcheckzero() slot. If the value happens to be 0, the checkzero() slot emits theatzero signal, along with a count of how many times it has been zero; passingadditional data like this is optional. The lack of parentheses for the signal isimportant: It tells PyQt that this is a “short-circuit” signal.
Signals and Slots 131
A signal with no arguments (and therefore no parentheses) is a short-circuitPython signal. When such a signal is emitted, any data can be passed asadditional arguments to the emit() method, and they are passed as Pythonobjects. This avoids the overhead of converting the arguments to and from C++data types, and also means that arbitrary Python objects can be passed, evenones which cannot be converted to and from C++ data types. A signal with atleast one argument is either a Qt signal or a non-short-circuit Python signal.In these cases, PyQt will check to see whether the signal is a Qt signal, and ifit is not will assume that it is a Python signal. In either case, the argumentsare converted to C++ data types.
Here is how we connect to the signal in the form’s __init__() method:
zerospinbox = ZeroSpinBox()...
self.connect(zerospinbox, SIGNAL("atzero"), self.announce)
Again, we must not use parentheses because it is a short-circuit signal. Andfor completeness, here is the slot it connects to in the form:
def announce(self, zeros):
print "ZeroSpinBox has been at zero %d times" % zeros
If we use the SIGNAL() function with an identifier but no parentheses, we arespecifying a short-circuit signal as described earlier. We can use this syntaxboth to emit short-circuit signals, and to connect to them. Both uses are shownin the example.
If we use the SIGNAL() function with a signalSignature (a possibly empty paren-thesized list of comma-separated PyQt types), we are specifying either aPython or a Qt signal. (A Python signal is one that is emitted in Python code; aQt signal is one emitted from an underlying C++ object.) We can use this syntaxboth to emit Python and Qt signals, and to connect to them. These signals canbe connected to any callable, that is, to any function or method, including Qtslots; they can also be connected using the SLOT() syntax, with a slotSignature.PyQt checks to see whether the signal is a Qt signal, and if it is not it assumesit is a Python signal. If we use parentheses, even for Python signals, the argu-ments must be convertible to C++ data types.
We will now look at another example, a tiny custom non-GUI class that has asignal and a slot and which shows that the mechanism is not limited to GUIclasses—any QObject subclass can use signals and slots.
class TaxRate(QObject):
def __init__(self):
super(TaxRate, self).__init__()
self.__rate = 17.5
132 Chapter 4. Introduction to GUI Programming
def rate(self):
return self.__rate
def setRate(self, rate):
if rate != self.__rate:
self.__rate = rate
self.emit(SIGNAL("rateChanged"), self.__rate)
Both the rate() and the setRate() methods can be connected to, since anyPython callable can be used as a slot. If the rate is changed, we update the pri-vate __rate value and emit a custom rateChanged signal, giving the new rate asa parameter. We have also used the faster short-circuit syntax. If we wanted touse the standard syntax, the only difference would be that the signal would bewritten as SIGNAL("rateChanged(float)"). If we connect the rateChanged signal tothe setRate() slot, because of the if statement, no infinite loop will occur. Letus look at the class in use. First we will declare a function to be called whenthe rate changes:
def rateChanged(value):
print "TaxRate changed to %.2f%%" % value
And now we will try it out:
vat = TaxRate()
vat.connect(vat, SIGNAL("rateChanged"), rateChanged)
vat.setRate(17.5) # No change will occur (new rate is the same)
vat.setRate(8.5) # A change will occur (new rate is different)
This will cause just one line to be output to the console: “TaxRate changedto 8.50%”.
In earlier examples where we connected multiple signals to the same slot, wedid not care who emitted the signal. But sometimes we want to connect two ormore signals to the same slot, and have the slot behave differently dependingon who called it. In this section’s last example we will address this issue.
Figure 4.8 The Connections program
The Connections program shown in Figure 4.8, has five buttons and a label.When one of the buttons is clicked the signals and slots mechanism is usedto update the label’s text. Here is how the first button is created in the form’s__init__() method:
button1 = QPushButton("One")
Signals and Slots 133
All the other buttons are created in the same way, differing only in theirvariable name and the text that is passed to them.
We will start with the simplest connection, which is used by button1. Here isthe __init__() method’s connect() call:
self.connect(button1, SIGNAL("clicked()"), self.one)
We have used a dedicated method for this button:
def one(self):
self.label.setText("You clicked button 'One'")
Connecting a button’s clicked() signal to a single method that respondsappropriately is probably the most common connection scenario.
But what if most of the processing was the same, with just some parameteri-zation depending on which particular button was pressed? In such cases, it isusually best to connect each button to the same slot.Partial
functionapplica-tion
63 ☞
There are two approachesto doing this. One is to use partial function application to wrap a slot with aparameter so that when the slot is invoked it is parameterized with the buttonthat called it. The other is to ask PyQt to tell us which button called the slot.We will show both approaches, starting with partial function application.
Back on page 65 we created a wrapper function which used Python 2.5’sfunctools.partial() function or our own simple partial() function:
import sys
if sys.version_info[:2] < (2, 5):
def partial(func, arg):
def callme():
return func(arg)
return callme
else:
from functools import partial
Using partial() we can now wrap a slot and a button name together. So wemight be tempted to do this:
self.connect(button2, SIGNAL("clicked()"),
partial(self.anyButton, "Two")) # WRONG for PyQt 4.0-4.2
Unfortunately,this won’t work for PyQt versionsprior to 4.3.The wrapper func-tion is created in the connect() call, but as soon as the connect() call completes,the wrapper goes out of scope and is garbage-collected. PyQt
4.3
From PyQt 4.3, wrap-pers made with functools.partial() are treated specially when they are usedfor connections like this. This means that the function connected to will not begarbage-collected, so the code shown earlier will work correctly.
134 Chapter 4. Introduction to GUI Programming
For PyQt 4.0, 4.1, and 4.2, we can still use partial(): We just need to keep areference to the wrapper—we will not use the reference except for the connect()
call, but the fact that it is an attribute of the form instance will ensure thatthe wrapper function will not go out of scope while the form exists, and willtherefore work. So the connection is actually made like this:
self.button2callback = partial(self.anyButton, "Two")
self.connect(button2, SIGNAL("clicked()"),
self.button2callback)
When button2 is clicked, the anyButton() method will be called with a stringparameter containing the text “Two”. Here is what this method looks like:
def anyButton(self, who):
self.label.setText("You clicked button '%s'" % who)
We could have used this slot for all the buttons using the partial() functionthat we have just shown. And in fact, we could avoid using partial() at all andget the same results:
self.button3callback = lambda who="Three": self.anyButton(who)
self.connect(button3, SIGNAL("clicked()"),
self.button3callback)
Here we’ve created a lambda function that is parameterized by theLambdafunc-tions
61 ☞
button’sname. It works the same as the partial() technique, and calls the same anyBut-
ton() method, only with lambda being used to create the wrapper.
Both button2callback() and button3callback() call anyButton(); the onlydifference between them is that the first passes “Two” as its parameter and thesecond passes “Three”.
If we are using PyQt 4.1.1 or later, and we use lambda callbacks, we don’t haveto keep a reference to them ourselves. This is because PyQtPyQt
4.1.1
treats lambda spe-cially when used to create wrappers in a connection. (This is the same specialtreatment that is expected to be extended to functools.partial() in PyQt 4.3.)For this reason we can use lambda directly in connect() calls. For example:
self.connect(button3, SIGNAL("clicked()"),
lambda who="Three": self.anyButton(who))
The wrapping technique works perfectly well, but there is an alternativeapproach that is slightly more involved, but which may be useful in some cases,particularly when we don’t want to wrap our calls. This other technique is usedto respond to button4 and to button5. Here are their connections:
self.connect(button4, SIGNAL("clicked()"), self.clicked)
self.connect(button5, SIGNAL("clicked()"), self.clicked)
Signals and Slots 135
Notice that we do not wrap the clicked() method that they are both connectedto, so at first sight it looks like there is no way to tell which button called theclicked() method.★ However, the implementation makes clear that we candistinguish if we want to:
def clicked(self):
button = self.sender()
if button is None or not isinstance(button, QPushButton):
return
self.label.setText("You clicked button '%s'" % button.text())
Inside a slot we can always call sender() to discover which QObject the invokingsignal came from. (This could be None if the slot was called using a normalmethod call.) Although we know that we have connected only buttons to thisslot, we still take care to check. We have used isinstance(), but we could haveused hasattr(button, "text") instead. If we had connected all the buttons tothis slot, it would have worked correctly for them all.
Some programmers don’t like using sender() because they feel that it isn’t goodobject-oriented style, so they tend to use partial function application whenneeds like this arise.
There is actually one other technique that can be used to get the effect QSig-
nal-
Mapper
☞ 297
ofwrapping a function and a parameter. It makes use of the QSignalMapper class,and an example of its use is shown in Chapter 9.
It is possible in some situations for a slot to be called as the result of a signal,and the processing performed in the slot, directly or indirectly, causes thesignal that originally called the slot to be called again, leading to an infinitecycle. Such cycles are rare in practice. Two factors help reduce the possibilityof cycles. First, some signals are emitted only if a real change takes place. Forexample, if the value of a QSpinBox is changed by the user, or programmaticallyby a setValue() call, it emits its valueChanged() signal only if the new value isdifferent from the current value. Second, some signals are emitted only as theresult of user actions. For example,QLineEdit emits its textEdited() signal onlywhen the text is changed by the user, and not when it is changed in code by asetText() call.
If a signal–slot cycle does seem to have occurred, naturally, the first thing tocheck is that the code’s logic is correct:Are we actually doing the processing wethought we were? If the logic is right, and we still have a cycle, we might beable to break the cycle by changing the signals that we connect to—for exam-ple, replacing signals that are emitted as a result of programmatic changes,with those that are emitted only as a result of user interaction. If the prob-lem persists, we could stop signals being emitted at certain places in our codeusing QObject.blockSignals(), which is inherited by all QWidget classes and is
★ It is conventional PyQt programming style to give a slot the same name as the signal thatconnects to it.
136 Chapter 4. Introduction to GUI Programming
passed a Boolean—True to stop the object emitting signals and False to resumesignalling.
This completes our formal coverage of the signals and slots mechanism. Wewill see many more examples of signals and slots in practice in almost all theexamples shown in the rest of the book. Most other GUI libraries have copiedthe mechanism in some form or other. This is because the signals and slotsmechanism is very useful and powerful, and leaves programmers free to focuson the logic of their applications rather than having to concern themselveswith the details of how the user invoked a particular operation.
Summary
In this chapter, we saw that it is possible to create hybrid console–GUI applica-tions. This can actually be taken much further—for example, by including allthe GUI code within the scope of an if block and executing it only if PyQt isinstalled. This would allow us to create a GUI application that could fall backto “console mode” if some of our users did not have PyQt.
We also saw that unlike conventional batch-processing programs, GUI applica-tions have an event loop that runs continuously, checking for user events likemouse clicks and key presses, and system events like timers timing out or win-dows being revealed, and terminating only when requested to do so.
The Calculate application showed us a very simple but structurally typicaldialog __init__() method. The widgets are created, laid out, and connected,and one or more other methods are used to respond to user interaction. TheCurrency application used the same approach, only with a more sophisticatedinterface, and more complex behavior and processing. The Currency applica-tion also showed that we can connect multiple signals to a single slot withoutformality.
PyQt’s signals and slots mechanism allows us to handle user interaction at amuch higher level of abstraction than the specific details of mouse clicks andkey presses. It lets us focus on what users want to do rather than on how theyasked to do it. All the PyQt widgets emit signals to announce state changesand other important occurrences; and most of the time we can ignore the sig-nals. But for those signals that we are interested in, it is easy to use QOb-
ject.connect() to ensure that the function or method of our choice is calledwhen the signal is emitted so that we can respond to it. Unlike C++/Qt, whichmust designate certain methods specially as slots, in PyQt we are free to useany callable, that is, any function or method, as a slot.
We also saw how to connect multiple signals to a single slot, and how to usepartial function application or the sender() method so that the slot can respondappropriately depending on which widget signalled it.
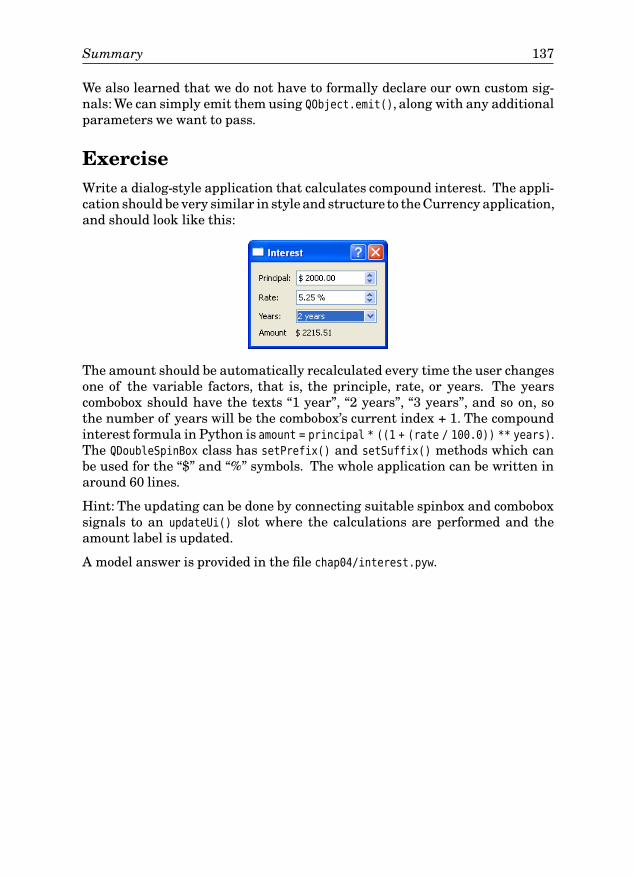
Summary 137
We also learned that we do not have to formally declare our own custom sig-nals: We can simply emit them using QObject.emit(), along with any additionalparameters we want to pass.
ExerciseWrite a dialog-style application that calculates compound interest. The appli-cation should be very similar in style and structure to the Currency application,and should look like this:
The amount should be automatically recalculated every time the user changesone of the variable factors, that is, the principle, rate, or years. The yearscombobox should have the texts “1 year”, “2 years”, “3 years”, and so on, sothe number of years will be the combobox’s current index + 1. The compoundinterest formula in Python is amount = principal * ((1 + (rate / 100.0)) ** years).The QDoubleSpinBox class has setPrefix() and setSuffix() methods which canbe used for the “$” and “%” symbols. The whole application can be written inaround 60 lines.
Hint: The updating can be done by connecting suitable spinbox and comboboxsignals to an updateUi() slot where the calculations are performed and theamount label is updated.
A model answer is provided in the file chap04/interest.pyw.

This page intentionally left blank
Dialogs
55 ● Dumb Dialogs
● Standard Dialogs
● Smart Dialogs
Almost every GUI application has at least one dialog, and the majority of GUIapplications have one main window with dozens or scores of dialogs. Dialogscan be used to make announcements that are too important to put in the statusbar or into a log file. In such cases, they typically just have a label for the textand an OK button for the user to press when they’ve read the message. Mostly,dialogs are used to ask users questions. Some are simple and need just a yesor no answer. Others ask users to make another kind of choice—for example,what file, folder, color, or font do they want to use. For all these, PyQt providesbuilt-in dialogs.
Our focus in this chapter is on creating custom dialogs so that we can askusers for their requirements and preferences when none of the built-in dialogsis suitable.
One question that we do not address, concerns which widget is suitable for aparticular purpose. For example, if we want a user to make a choice betweenthree options, we might provide three radio buttons, or a three-item list widgetor combobox. Or we might use a tri-state checkbox. And these are not theonly possibilities. For those new to GUI programming, Appendix B providesscreenshots and brief descriptions of selected PyQt widgets which may behelpful when making these decisions.
Qt is supplied with Qt Designer, a visual design tool that makes it easy to“draw” dialogs without having to write any code for creating and laying outtheir widgets. It can also be used to set up some of a dialog’s behavior. We coverQt Designer later, in Chapter 7. In this chapter we will create all the dialogs incode. Some developers make all their dialogs this way, and others prefer to useQt Designer. This book shows both approaches so that you can decide which isbest to use on a case-by-case basis.
One way to classify dialogs is by their “intelligence”, where they may be“dumb”, “standard”, or “smart”, depending on how much knowledge about theapplication’s data is built into them. These classifications affect how we im-plement and instantiate (create instances of) dialogs, and for each one we have
139
140 Chapter 5. Dialogs
devoted a section of this chapter. Each of these sections begins with an expla-nation of what the classification means,and explains the pros and cons througha worked example.
In addition to an intelligence classification, dialogs can also be categorized bytheir modality. An application modal dialog is a dialog that, once invoked, isthe only part of an application that the user can interact with. Until the usercloses the dialog, they cannot use the rest of the application. The user is, ofcourse, free to interact with other applications, for example, by clicking one togive it the focus.
A window modal dialog is one that works in a similar way to an applicationmodal dialog, except that it only prevents interaction with its parent window,parent’s parent window, and so on up to the top-level parent, as well as theparent windows’ sibling windows. For applications that have a single top-levelwindow there is no practical difference between application modality andwindow modality. When referring to a “modal” window without specifyingwhich kind, window modality is assumed.
The opposite of a modal dialog is a modeless dialog. When a modeless dialogis invoked, the user can interact with the dialog, and with the rest of theapplication. This has implications for how we design our code, since it maybe that the user can affect program state both in the main window and in themodeless dialog, which then has an effect on the other.
Another important aspect of writing dialogs is how we handle validation.Wherever possible we try to choose suitable widgets and set their properties toavoid having to write any validation code ourselves. For example, if we need aninteger we could use a QSpinBox and use its setRange() method to constrain therange to the values that are acceptable to us. We call validation that appliesto individual widgets “widget-level” validation; database programmers oftencall this “field-level” validation. Sometimes we need to go further than widget-level validation, particularly when there are interdependencies. For example,a theater booking system might have two comboboxes, one to select a floor andthe other to select a seat row. If the ground floor had seat rows A–R, and thefirst floor had seat rows M–T, then clearly only some floor and seat row com-binations are valid. For these cases, we must perform “form-level” validation;database programmers often call this “record-level” validation.
Another validation issue concerns when the validation takes place. Ideal-ly we don’t want users to be able to enter invalid data at all, but sometimesthis can be quite tricky to prevent. We break validation into two broad cate-gories: “post-mortem”, which is validation that takes place at the point whenthe user wants to have their settings accepted, and “preventative”,which takesplace as the user manipulates editing widgets.
Since dialogs can have different levels of intelligence, three kinds of modality,and a variety of validation strategies, it would appear that there are manypossible combinations to choose from. In practice, the combinations we use
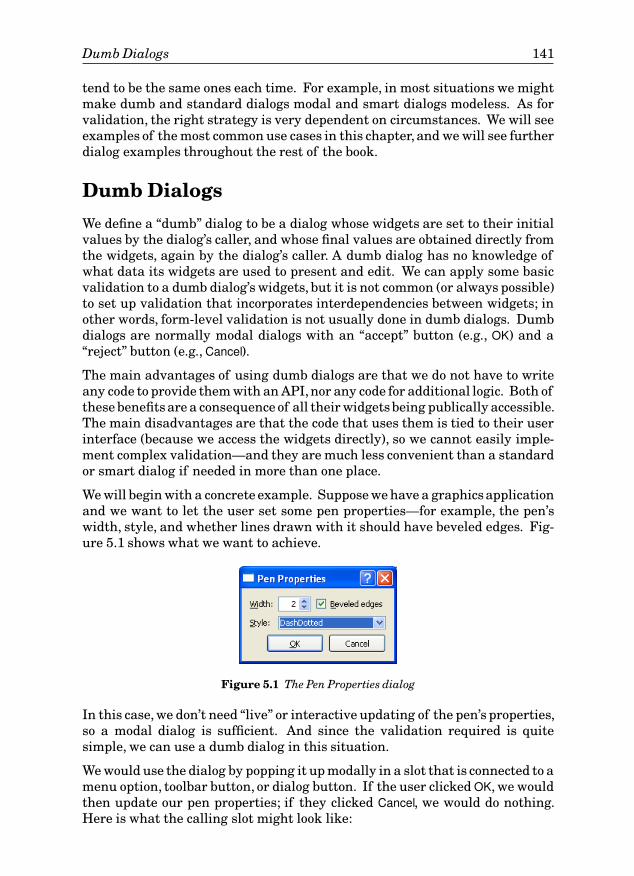
Dumb Dialogs 141
tend to be the same ones each time. For example, in most situations we mightmake dumb and standard dialogs modal and smart dialogs modeless. As forvalidation, the right strategy is very dependent on circumstances. We will seeexamples of the most common use cases in this chapter, and we will see furtherdialog examples throughout the rest of the book.
Dumb Dialogs
We define a “dumb” dialog to be a dialog whose widgets are set to their initialvalues by the dialog’s caller, and whose final values are obtained directly fromthe widgets, again by the dialog’s caller. A dumb dialog has no knowledge ofwhat data its widgets are used to present and edit. We can apply some basicvalidation to a dumb dialog’s widgets, but it is not common (or always possible)to set up validation that incorporates interdependencies between widgets; inother words, form-level validation is not usually done in dumb dialogs. Dumbdialogs are normally modal dialogs with an “accept” button (e.g., OK) and a“reject” button (e.g., Cancel).
The main advantages of using dumb dialogs are that we do not have to writeany code to provide them with an API,nor any code for additional logic. Both ofthese benefits are a consequence of all their widgetsbeing publically accessible.The main disadvantages are that the code that uses them is tied to their userinterface (because we access the widgets directly), so we cannot easily imple-ment complex validation—and they are much less convenient than a standardor smart dialog if needed in more than one place.
We will begin with a concrete example. Suppose we have a graphicsapplicationand we want to let the user set some pen properties—for example, the pen’swidth, style, and whether lines drawn with it should have beveled edges. Fig-ure 5.1 shows what we want to achieve.
Figure 5.1 The Pen Properties dialog
In this case, we don’t need “live” or interactive updating of the pen’s properties,so a modal dialog is sufficient. And since the validation required is quitesimple, we can use a dumb dialog in this situation.
We would use the dialog by popping it up modally in a slot that is connected to amenu option, toolbar button, or dialog button. If the user clickedOK, we wouldthen update our pen properties; if they clicked Cancel, we would do nothing.Here is what the calling slot might look like:
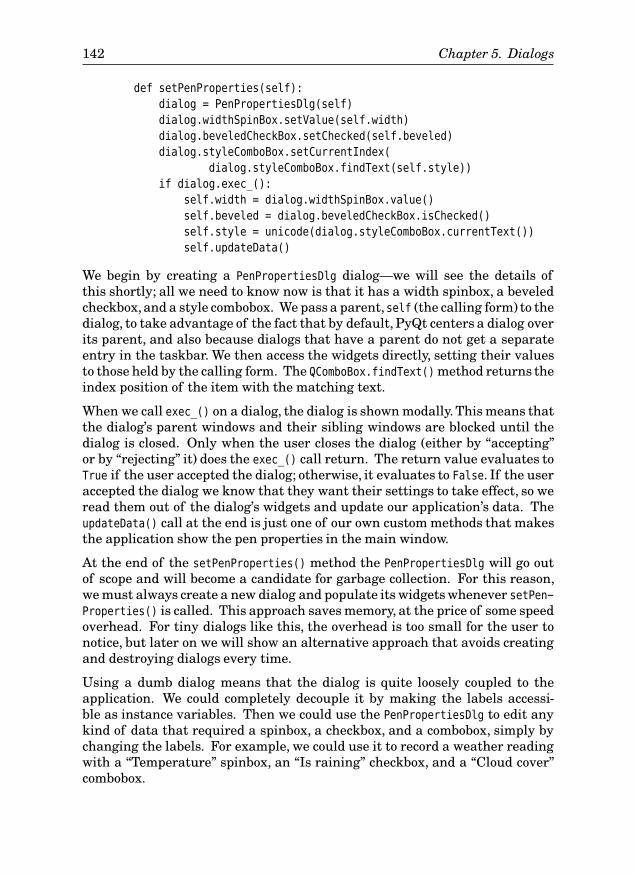
142 Chapter 5. Dialogs
def setPenProperties(self):
dialog = PenPropertiesDlg(self)
dialog.widthSpinBox.setValue(self.width)
dialog.beveledCheckBox.setChecked(self.beveled)
dialog.styleComboBox.setCurrentIndex(
dialog.styleComboBox.findText(self.style))
if dialog.exec_():
self.width = dialog.widthSpinBox.value()
self.beveled = dialog.beveledCheckBox.isChecked()
self.style = unicode(dialog.styleComboBox.currentText())
self.updateData()
We begin by creating a PenPropertiesDlg dialog—we will see the details ofthis shortly; all we need to know now is that it has a width spinbox, a beveledcheckbox,and a style combobox. We pass a parent,self (the calling form) to thedialog, to take advantage of the fact that by default, PyQt centers a dialog overits parent, and also because dialogs that have a parent do not get a separateentry in the taskbar. We then access the widgets directly, setting their valuesto those held by the calling form. The QComboBox.findText() method returns theindex position of the item with the matching text.
When we call exec_() on a dialog, the dialog is shown modally. This means thatthe dialog’s parent windows and their sibling windows are blocked until thedialog is closed. Only when the user closes the dialog (either by “accepting”or by “rejecting” it) does the exec_() call return. The return value evaluates toTrue if the user accepted the dialog; otherwise, it evaluates to False. If the useraccepted the dialog we know that they want their settings to take effect, so weread them out of the dialog’s widgets and update our application’s data. TheupdateData() call at the end is just one of our own custom methods that makesthe application show the pen properties in the main window.
At the end of the setPenProperties() method the PenPropertiesDlg will go outof scope and will become a candidate for garbage collection. For this reason,we must always create a new dialog and populate its widgets whenever setPen-Properties() is called. This approach saves memory, at the price of some speedoverhead. For tiny dialogs like this, the overhead is too small for the user tonotice, but later on we will show an alternative approach that avoids creatingand destroying dialogs every time.
Using a dumb dialog means that the dialog is quite loosely coupled to theapplication. We could completely decouple it by making the labels accessi-ble as instance variables. Then we could use the PenPropertiesDlg to edit anykind of data that required a spinbox, a checkbox, and a combobox, simply bychanging the labels. For example, we could use it to record a weather readingwith a “Temperature” spinbox, an “Is raining” checkbox, and a “Cloud cover”combobox.
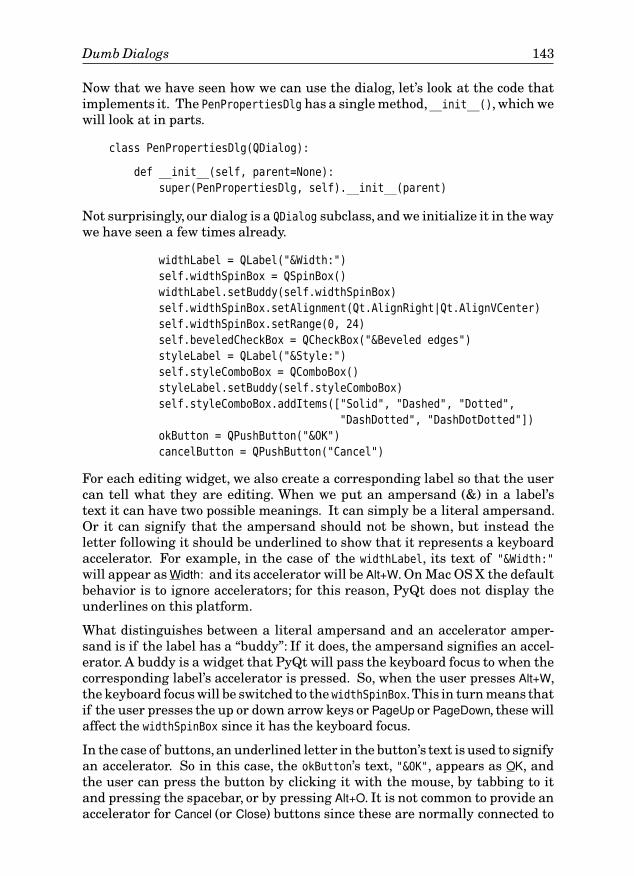
Dumb Dialogs 143
Now that we have seen how we can use the dialog, let’s look at the code thatimplements it. The PenPropertiesDlg has a single method, __init__(), which wewill look at in parts.
class PenPropertiesDlg(QDialog):
def __init__(self, parent=None):
super(PenPropertiesDlg, self).__init__(parent)
Not surprisingly, our dialog is a QDialog subclass, and we initialize it in the waywe have seen a few times already.
widthLabel = QLabel("&Width:")
self.widthSpinBox = QSpinBox()
widthLabel.setBuddy(self.widthSpinBox)
self.widthSpinBox.setAlignment(Qt.AlignRight|Qt.AlignVCenter)
self.widthSpinBox.setRange(0, 24)
self.beveledCheckBox = QCheckBox("&Beveled edges")
styleLabel = QLabel("&Style:")
self.styleComboBox = QComboBox()
styleLabel.setBuddy(self.styleComboBox)
self.styleComboBox.addItems(["Solid", "Dashed", "Dotted",
"DashDotted", "DashDotDotted"])
okButton = QPushButton("&OK")
cancelButton = QPushButton("Cancel")
For each editing widget, we also create a corresponding label so that the usercan tell what they are editing. When we put an ampersand (&) in a label’stext it can have two possible meanings. It can simply be a literal ampersand.Or it can signify that the ampersand should not be shown, but instead theletter following it should be underlined to show that it represents a keyboardaccelerator. For example, in the case of the widthLabel, its text of "&Width:"
will appear asWidth: and its accelerator will be Alt+W. On Mac OS X the defaultbehavior is to ignore accelerators; for this reason, PyQt does not display theunderlines on this platform.
What distinguishes between a literal ampersand and an accelerator amper-sand is if the label has a “buddy”: If it does, the ampersand signifies an accel-erator. A buddy is a widget that PyQt will pass the keyboard focus to when thecorresponding label’s accelerator is pressed. So, when the user presses Alt+W,the keyboard focus will be switched to the widthSpinBox.This in turn means thatif the user presses the up or down arrow keys or PageUp or PageDown, these willaffect the widthSpinBox since it has the keyboard focus.
In the case of buttons,an underlined letter in the button’s text is used to signifyan accelerator. So in this case, the okButton’s text, "&OK", appears as OK, andthe user can press the button by clicking it with the mouse, by tabbing to itand pressing the spacebar, or by pressing Alt+O. It is not common to provide anaccelerator for Cancel (or Close) buttons since these are normally connected to
144 Chapter 5. Dialogs
the dialog’s reject() slot, and QDialog provides a keyboard shortcut for that,the Esc key.★ Checkboxes and radio buttons are somewhat similar to buttonsin that they have text that can have an accelerator. For example, the beveledcheckbox has an underlined “B”, so the user can toggle the checkbox’s checkedstate by pressing Alt+B.
One disadvantage of creating buttons like this is that when we come to laythem out we will do so in one particular order. For example, we might put OKto the left of Cancel. But on some windowing systems this order is wrong. PyQthas a solution for this, covered in the Dialog Button Layout sidebar.
We have aligned the spinbox’s number to the right, vertically centered, andset its valid range to be 0–24. In PyQt, a pen width (i.e., a line width) of 0 isallowed and signifies a 1-pixel-wide width regardless of any transformations.Pen widths of 1 and above are drawn at the given width, and respect anytransformations, such as scaling, that are in force.
By using a spinbox and setting a range for it, we avoid the possibility of invalidpen widths that might have been entered had we used, for example, a lineedit. Very often, simply choosing the right widget and setting its propertiesappropriately provides all the widget-level validation that is needed. Thisis also shown by our use of the beveled checkbox: Either the pen draws lineswith beveled edges or it doesn’t. And the same is true again with our use of acombobox of line styles—the user can choose only a valid style, that is, a stylefrom a list that we have provided.
buttonLayout = QHBoxLayout()
buttonLayout.addStretch()
buttonLayout.addWidget(okButton)
buttonLayout.addWidget(cancelButton)
layout = QGridLayout()
layout.addWidget(widthLabel, 0, 0)
layout.addWidget(self.widthSpinBox, 0, 1)
layout.addWidget(self.beveledCheckBox, 0, 2)
layout.addWidget(styleLabel, 1, 0)
layout.addWidget(self.styleComboBox, 1, 1, 1, 2)
layout.addLayout(buttonLayout, 2, 0, 1, 3)
self.setLayout(layout)
We have used two layouts, one nested inside the other, to get the layout wewant. We begin by laying out the buttons horizontally, beginning with a“stretch”. The stretch will consume as much space as possible,which has the ef-fect of pushing the two buttons as far to the right as they can go, and still fit.
★We use the terms “keyboard accelerator” and “accelerator” for the Alt+Letter key sequences thatcan be used to click buttons and switch focus in dialogs, and to pop up menus. We use the term“keyboard shortcut” for any other kind of key sequence—for example, the key sequence Ctrl+S,which is often used to save files. We will see how to create keyboard shortcuts in Chapter 6.
Dumb Dialogs 145
Dialog Button Layout
In some of our early examples, we have put the buttons on the right ofthe dialogs, with the OK button first and then the Cancel button next. Thisis the most common layout on Windows, but it is not always correct. Forexample, for Mac OS X or for the GNOME desktop environment, they shouldbe swapped.
If we want our applications to have the most native look and feel Qt
4.2
possibleand expect to deploy them on different platforms, issues like button orderingand positioning will matter to us. Qt 4.2 (PyQt 4.1)
PyQt
4.1
provides a solution forthis particular problem: the QDialogButtonBox class.
Instead of creating OK and Cancel buttons directly, we create a QDialogBut-
tonBox. For example:
buttonBox = QDialogButtonBox(QDialogButtonBox.Ok|
QDialogButtonBox.Cancel)
To make a button the “default” button, that is, the one that is pressed whenthe user presses Enter (assuming that the widget with keyboard focus doesnot handle Enter key presses itself), we can do this:
buttonBox.button(QDialogButtonBox.Ok).setDefault(True)
Since a button box is a single widget (although it contains other widgets),wecan add it directly to the dialog’s existing layout, rather than putting it inits own layout and nesting that inside the dialog’s layout. Here is what wewould do in the PenPropertiesDlg example’s grid layout:
layout.addWidget(buttonBox, 3, 0, 1, 3)
And instead of connecting from the buttons’ clicked() signals, we can makeconnections from the button box, which has its own signals that correspondto user actions:
self.connect(buttonBox, SIGNAL("accepted()"),
self, SLOT("accept()"))
self.connect(buttonBox, SIGNAL("rejected()"),
self, SLOT("reject()"))
We are still free to connect to individual buttons’ clicked() signals, though,and often do so for dialogs that have many buttons.
The QDialogButtonBox defaults to using a horizontal layout, but can be set touse a vertical layout by passing Qt.Vertical to its constructor, or by callingsetOrientation().
We use QDialogButtonBox for most of the examples, but it could always be re-placed by individual QPushButtons if backward compatibility was an issue.
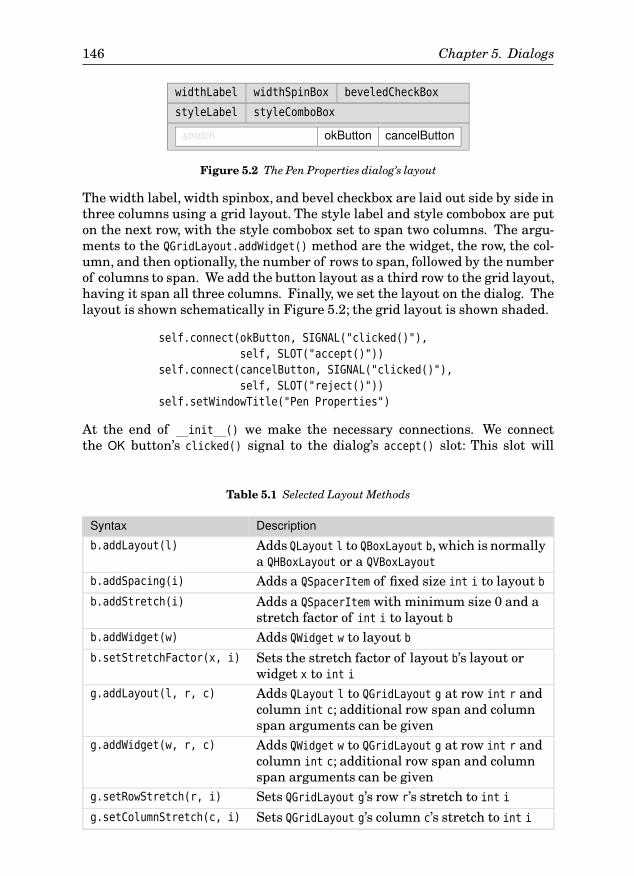
146 Chapter 5. Dialogs
widthLabel widthSpinBox beveledCheckBox
styleLabel styleComboBox
stretch okButton cancelButton
Figure 5.2 The Pen Properties dialog’s layout
The width label, width spinbox, and bevel checkbox are laid out side by side inthree columns using a grid layout. The style label and style combobox are puton the next row, with the style combobox set to span two columns. The argu-ments to the QGridLayout.addWidget() method are the widget, the row, the col-umn, and then optionally, the number of rows to span, followed by the numberof columns to span. We add the button layout as a third row to the grid layout,having it span all three columns. Finally, we set the layout on the dialog. Thelayout is shown schematically in Figure 5.2; the grid layout is shown shaded.
self.connect(okButton, SIGNAL("clicked()"),
self, SLOT("accept()"))
self.connect(cancelButton, SIGNAL("clicked()"),
self, SLOT("reject()"))
self.setWindowTitle("Pen Properties")
At the end of __init__() we make the necessary connections. We connectthe OK button’s clicked() signal to the dialog’s accept() slot: This slot will
Table 5.1 Selected Layout Methods
Syntax Description
b.addLayout(l) Adds QLayout l to QBoxLayout b, which is normallya QHBoxLayout or a QVBoxLayout
b.addSpacing(i) Adds a QSpacerItem of fixed size int i to layout bb.addStretch(i) Adds a QSpacerItem with minimum size 0 and a
stretch factor of int i to layout bb.addWidget(w) Adds QWidget w to layout bb.setStretchFactor(x, i) Sets the stretch factor of layout b’s layout or
widget x to int i
g.addLayout(l, r, c) Adds QLayout l to QGridLayout g at row int r andcolumn int c; additional row span and columnspan arguments can be given
g.addWidget(w, r, c) Adds QWidget w to QGridLayout g at row int r andcolumn int c; additional row span and columnspan arguments can be given
g.setRowStretch(r, i) Sets QGridLayout g’s row r’s stretch to int i
g.setColumnStretch(c, i) Sets QGridLayout g’s column c’s stretch to int i
Dumb Dialogs 147
close the dialog and return a True value. The Cancel button is connected in acorresponding way. Finally, we set the window’s title.
For small dumb dialogs that are only ever called from one place, it is possibleto avoid creating a dialog class at all. Instead, we can simply create all thewidgets in the invoking method, lay them out, connect them, and call exec_().If exec_() returns True, we can then extract the values from the widgets andwe are done. The file chap05/pen.pyw contains the Pen Properties dialog and adummy program with two buttons, one to invoke the PenPropertiesDlg we havejust reviewed and another that does everything inline. Creating dialogs inlineis not an approach that we would recommend, so we will not review the codefor doing it, but it is mentioned and provided in the example’s setPenInline()
method for completeness.
Dumb dialogs are easy to understand and use, but setting and getting valuesusing a dialog’s widgets is not recommended except for the very simplestdialogs, where only one, two, or at most, a few values are involved. We haveshown them primarily as a gentle introduction to dialogs, since creating, layingout, and connecting the widgets is the same in any kind of dialog. In the nextsection, we will look at standard dialogs, both modal and modeless ones.
Standard Dialogs
We consider a dialog to be a “standard” dialog if it initializes its widgets inaccordance with the values set through its initializer or through its meth-ods, and whose final values are obtained by method calls or from instancevariables—not directly from the dialog’s widgets. A standard dialog can haveboth widget-level and form-level validation. Standard dialogsare either modal,with “accept” and “reject” buttons, or (less commonly) modeless, in which casethey have “apply” and “close” buttons and notify state changes through signaland slot connections.
One key advantage of standard dialogs is that the caller does not need toknow about their implementation, only how to set the initial values, and howto get the resultant values if the user clicked OK. Another advantage, at leastfor modal standard dialogs, is that the user cannot interact with the dialog’sparent windows and their sibling windows, so the relevant parts of the ap-plication’s state will probably not change behind the dialog’s back. The maindrawback of using a standard dialog is most apparent when it must handle lotsof different data items, since all the items must be fed into the dialog and theresults retrieved on each invocation, and this may involve many lines of code.
As with the previous section, we will explain by means of an example. In thiscase, the example will be used both in this section and in the next section sothat we can see the different approaches and trade-offs between standard andsmart dialogs more clearly.
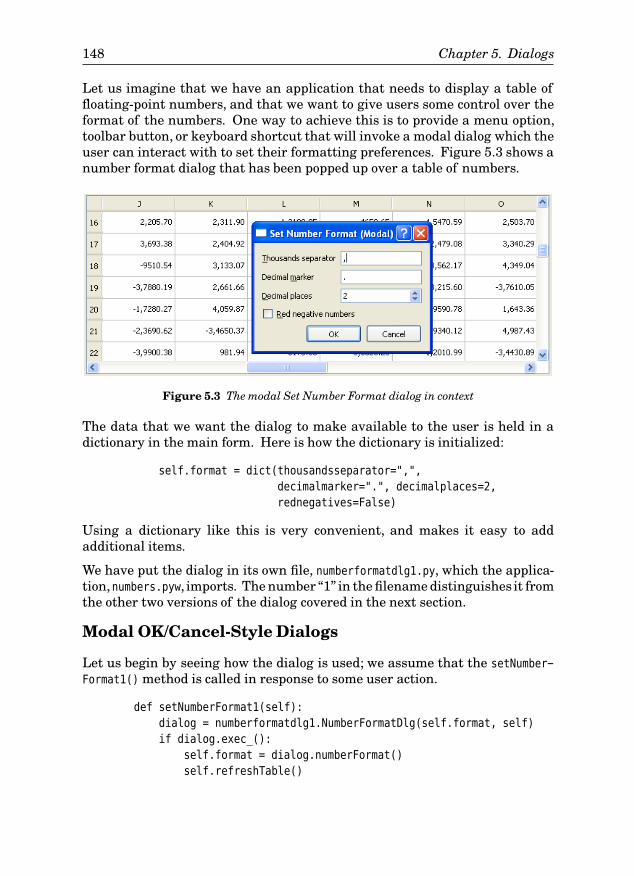
148 Chapter 5. Dialogs
Let us imagine that we have an application that needs to display a table offloating-point numbers, and that we want to give users some control over theformat of the numbers. One way to achieve this is to provide a menu option,toolbar button, or keyboard shortcut that will invoke a modal dialog which theuser can interact with to set their formatting preferences. Figure 5.3 shows anumber format dialog that has been popped up over a table of numbers.
Figure 5.3 The modal Set Number Format dialog in context
The data that we want the dialog to make available to the user is held in adictionary in the main form. Here is how the dictionary is initialized:
self.format = dict(thousandsseparator=",",
decimalmarker=".", decimalplaces=2,
rednegatives=False)
Using a dictionary like this is very convenient, and makes it easy to addadditional items.
We have put the dialog in its own file, numberformatdlg1.py, which the applica-tion,numbers.pyw, imports. The number “1” in the filename distinguishes it fromthe other two versions of the dialog covered in the next section.
Modal OK/Cancel-Style Dialogs
Let us begin by seeing how the dialog is used; we assume that the setNumber-
Format1() method is called in response to some user action.
def setNumberFormat1(self):
dialog = numberformatdlg1.NumberFormatDlg(self.format, self)
if dialog.exec_():
self.format = dialog.numberFormat()
self.refreshTable()
Standard Dialogs 149
We start by creating the dialog and passing it the format dictionary from whichthe dialog will initialize itself, and self so that the dialog is tied to the callingform—centered over it and not having its own taskbar entry.
As we mentioned earlier, calling exec_() pops up the dialog it is called on as amodal dialog, so the user must either accept or reject the dialog before they caninteract with the dialog’s parents and their siblings. In the next section, wewill use modeless versions of the dialog that don’t impose this restriction.
If the user clicksOK, we set the format dictionary to have the values set in thedialog, and update the table so that the numbers are displayed with the newformat. If the user cancels,we do nothing. At the end of the method, the dialoggoes out of scope and is therefore scheduled for garbage collection.
To save space, and to avoid needless repetition, from now on we will not showany import statements, unless their presence is not obvious. So, for example,we will no longer show from PyQt4.QtCore import * or the PyQt4.QtGui import.
We are now ready to see the implementation of the dialog itself.
class NumberFormatDlg(QDialog):
def __init__(self, format, parent=None):
super(NumberFormatDlg, self).__init__(parent)
The __init__() method begins in the same way as all the other dialogs we haveseen so far.
thousandsLabel = QLabel("&Thousands separator")
self.thousandsEdit = QLineEdit(format["thousandsseparator"])
thousandsLabel.setBuddy(self.thousandsEdit)
decimalMarkerLabel = QLabel("Decimal &marker")
self.decimalMarkerEdit = QLineEdit(format["decimalmarker"])
decimalMarkerLabel.setBuddy(self.decimalMarkerEdit)
decimalPlacesLabel = QLabel("&Decimal places")
self.decimalPlacesSpinBox = QSpinBox()
decimalPlacesLabel.setBuddy(self.decimalPlacesSpinBox)
self.decimalPlacesSpinBox.setRange(0, 6)
self.decimalPlacesSpinBox.setValue(format["decimalplaces"])
self.redNegativesCheckBox = QCheckBox("&Red negative numbers")
self.redNegativesCheckBox.setChecked(format["rednegatives"])
buttonBox = QDialogButtonBox(QDialogButtonBox.Ok|
QDialogButtonBox.Cancel)
For each aspect of the format that we want the user to be able to change wecreate a label so that they know what they are editing, and a suitable editingwidget. Since the format argument is mandatory, we assume that it has allthe values we need, so we use it to initialize the editing widgets.Buddies
143 ☞
We also usesetBuddy() calls to support keyboard users since not all users are able to use themouse.
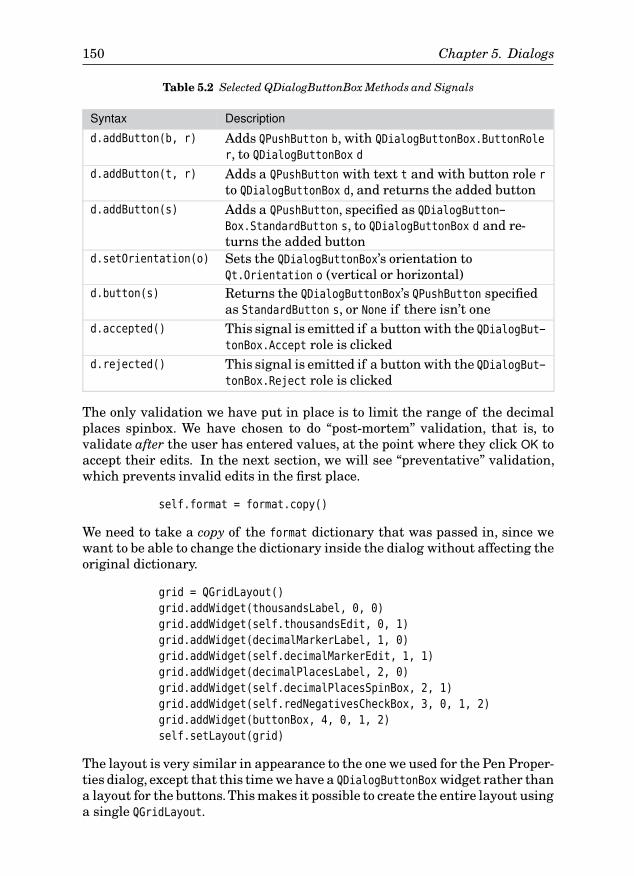
150 Chapter 5. Dialogs
Table 5.2 Selected QDialogButtonBox Methods and Signals
Syntax Description
d.addButton(b, r) Adds QPushButton b, with QDialogButtonBox.ButtonRole
r, to QDialogButtonBox d
d.addButton(t, r) Adds a QPushButton with text t and with button role r
to QDialogButtonBox d, and returns the added buttond.addButton(s) Adds a QPushButton, specified as QDialogButton-
Box.StandardButton s, to QDialogButtonBox d and re-turns the added button
d.setOrientation(o) Sets the QDialogButtonBox’s orientation toQt.Orientation o (vertical or horizontal)
d.button(s) Returns the QDialogButtonBox’s QPushButton specifiedas StandardButton s, or None if there isn’t one
d.accepted() This signal is emitted if a button with the QDialogBut-
tonBox.Accept role is clickedd.rejected() This signal is emitted if a button with the QDialogBut-
tonBox.Reject role is clicked
The only validation we have put in place is to limit the range of the decimalplaces spinbox. We have chosen to do “post-mortem” validation, that is, tovalidate after the user has entered values, at the point where they click OK toaccept their edits. In the next section, we will see “preventative” validation,which prevents invalid edits in the first place.
self.format = format.copy()
We need to take a copy of the format dictionary that was passed in, since wewant to be able to change the dictionary inside the dialog without affecting theoriginal dictionary.
grid = QGridLayout()
grid.addWidget(thousandsLabel, 0, 0)
grid.addWidget(self.thousandsEdit, 0, 1)
grid.addWidget(decimalMarkerLabel, 1, 0)
grid.addWidget(self.decimalMarkerEdit, 1, 1)
grid.addWidget(decimalPlacesLabel, 2, 0)
grid.addWidget(self.decimalPlacesSpinBox, 2, 1)
grid.addWidget(self.redNegativesCheckBox, 3, 0, 1, 2)
grid.addWidget(buttonBox, 4, 0, 1, 2)
self.setLayout(grid)
The layout is very similar in appearance to the one we used for the Pen Proper-ties dialog, except that this time we have a QDialogButtonBox widget rather thana layout for the buttons.This makes it possible to create the entire layout usinga single QGridLayout.
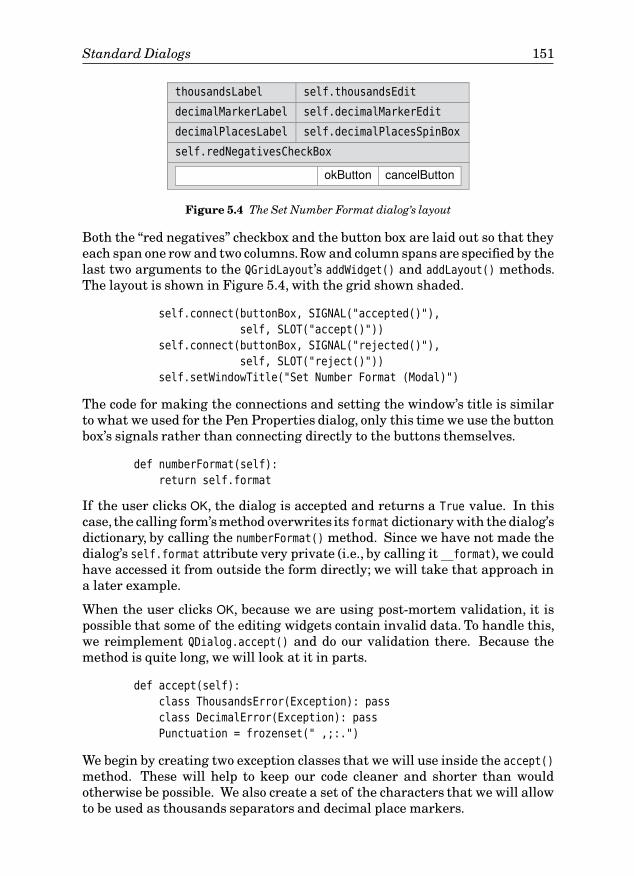
Standard Dialogs 151
thousandsLabel self.thousandsEdit
decimalMarkerLabel self.decimalMarkerEdit
decimalPlacesLabel self.decimalPlacesSpinBox
self.redNegativesCheckBox
okButton cancelButton
Figure 5.4 The Set Number Format dialog’s layout
Both the “red negatives” checkbox and the button box are laid out so that theyeach span one row and two columns.Row and column spans are specified by thelast two arguments to the QGridLayout’s addWidget() and addLayout() methods.The layout is shown in Figure 5.4, with the grid shown shaded.
self.connect(buttonBox, SIGNAL("accepted()"),
self, SLOT("accept()"))
self.connect(buttonBox, SIGNAL("rejected()"),
self, SLOT("reject()"))
self.setWindowTitle("Set Number Format (Modal)")
The code for making the connections and setting the window’s title is similarto what we used for the Pen Properties dialog, only this time we use the buttonbox’s signals rather than connecting directly to the buttons themselves.
def numberFormat(self):
return self.format
If the user clicks OK, the dialog is accepted and returns a True value. In thiscase, the calling form’smethod overwrites its format dictionary with the dialog’sdictionary, by calling the numberFormat() method. Since we have not made thedialog’s self.format attribute very private (i.e., by calling it __format), we couldhave accessed it from outside the form directly; we will take that approach ina later example.
When the user clicks OK, because we are using post-mortem validation, it ispossible that some of the editing widgets contain invalid data. To handle this,we reimplement QDialog.accept() and do our validation there. Because themethod is quite long, we will look at it in parts.
def accept(self):
class ThousandsError(Exception): pass
class DecimalError(Exception): pass
Punctuation = frozenset(" ,;:.")
We begin by creating two exception classes that we will use inside the accept()
method. These will help to keep our code cleaner and shorter than wouldotherwise be possible. We also create a set of the characters that we will allowto be used as thousands separators and decimal place markers.
152 Chapter 5. Dialogs
The only editing widgets we are concerned with validating are the two lineedits. This is because the decimal places spinbox is already limited to avalid range, and because the “red negatives” checkbox can only be checked orunchecked, both of which are valid.
thousands = unicode(self.thousandsEdit.text())
decimal = unicode(self.decimalMarkerEdit.text())
try:
if len(decimal) == 0:
raise DecimalError, ("The decimal marker may not be "
"empty.")
if len(thousands) > 1:
raise ThousandsError, ("The thousands separator may "
"only be empty or one character.")
if len(decimal) > 1:
raise DecimalError, ("The decimal marker must be "
"one character.")
if thousands == decimal:
raise ThousandsError, ("The thousands separator and "
"the decimal marker must be different.")
if thousands and thousands not in Punctuation:
raise ThousandsError, ("The thousands separator must "
"be a punctuation symbol.")
if decimal not in Punctuation:
raise DecimalError, ("The decimal marker must be a "
"punctuation symbol.")
except ThousandsError, e:
QMessageBox.warning(self, "Thousands Separator Error",
unicode(e))
self.thousandsEdit.selectAll()
self.thousandsEdit.setFocus()
return
except DecimalError, e:
QMessageBox.warning(self, "Decimal Marker Error",
unicode(e))
self.decimalMarkerEdit.selectAll()
self.decimalMarkerEdit.setFocus()
return
We begin by getting the text from the two line edits. Although it is acceptableto have no thousands separator, a decimal marker must be present, so we beginby checking that the decimalMarkerEdit has at least one character. If it doesn’t,we raise our custom DecimalError with suitable error text. We also raiseexceptions if either of the texts is longer than one character, or if they are thesame character, or if either contains a character that is not in our Punctuation
set. The if statements differ regarding punctuation because the thousandsseparator is allowed to be empty, but the decimal place marker is not.
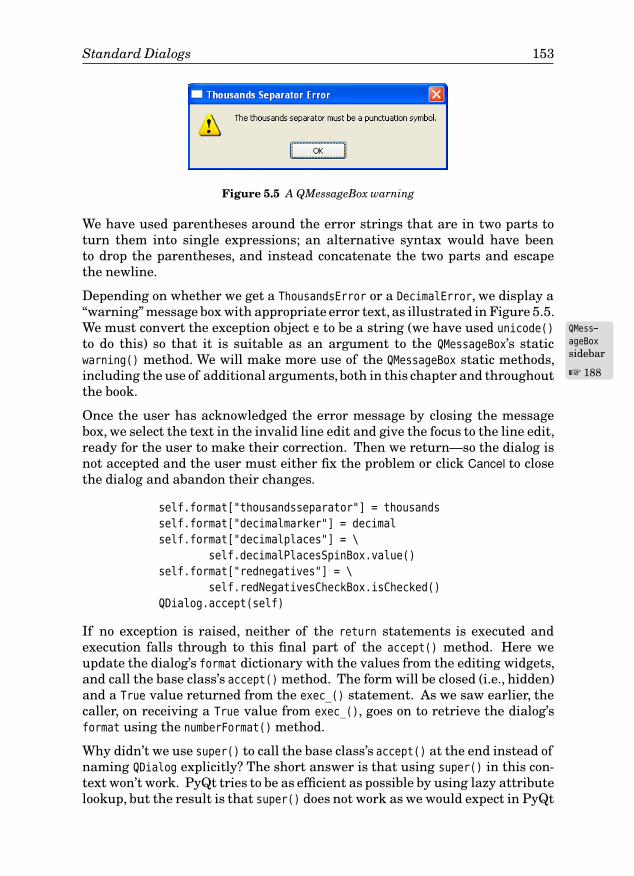
Standard Dialogs 153
Figure 5.5 A QMessageBox warning
We have used parentheses around the error strings that are in two parts toturn them into single expressions; an alternative syntax would have beento drop the parentheses, and instead concatenate the two parts and escapethe newline.
Depending on whether we get a ThousandsError or a DecimalError, we display a“warning” message box with appropriate error text,as illustrated in Figure 5.5.We QMess-
ageBox
sidebar
☞ 188
must convert the exception object e to be a string (we have used unicode()
to do this) so that it is suitable as an argument to the QMessageBox’s staticwarning() method. We will make more use of the QMessageBox static methods,including the use of additional arguments,both in this chapter and throughoutthe book.
Once the user has acknowledged the error message by closing the messagebox, we select the text in the invalid line edit and give the focus to the line edit,ready for the user to make their correction. Then we return—so the dialog isnot accepted and the user must either fix the problem or click Cancel to closethe dialog and abandon their changes.
self.format["thousandsseparator"] = thousands
self.format["decimalmarker"] = decimal
self.format["decimalplaces"] = \
self.decimalPlacesSpinBox.value()
self.format["rednegatives"] = \
self.redNegativesCheckBox.isChecked()
QDialog.accept(self)
If no exception is raised, neither of the return statements is executed andexecution falls through to this final part of the accept() method. Here weupdate the dialog’s format dictionary with the values from the editing widgets,and call the base class’s accept() method. The form will be closed (i.e., hidden)and a True value returned from the exec_() statement. As we saw earlier, thecaller, on receiving a True value from exec_(), goes on to retrieve the dialog’sformat using the numberFormat() method.
Why didn’t we use super() to call the base class’s accept() at the end instead ofnaming QDialog explicitly? The short answer is that using super() in this con-text won’t work. PyQt tries to be as efficient as possible by using lazy attributelookup, but the result is that super() does not work as we would expect in PyQt
154 Chapter 5. Dialogs
subclasses. (For an explanation, see the PyQt pyqt4ref.html documentation,under “super and PyQt classes”.)
Although the dialog is hidden only when it is accepted (or rejected), once it goesout of scope, that is, at the end of the caller’s setNumberFormat1() method, thedialog is scheduled for garbage collection.
Creating modal dialogs like this one is usually straightforward. The onlycomplications involved concern whether we have layouts and validation thatrequire some care to get right, as we do here.
In some cases the user will want to be able to see the results of their choices,perhaps changing their choices a few times until they are satisfied. For thesesituations modal dialogs can be inconvenient since the user must invoke thedialog, perform their edits, accept, see the results, and then repeat the cycleuntil they are happy. If the dialog was modeless and was able to update theapplication’sstate without being closed, the user could simply invoke the dialogonce, perform their edits, see the effects, and then do more edits, and so on: amuch faster cycle. We will see how to achieve this in the next section; we willalso look at a much simpler and more active validation strategy—preventativevalidation.
Smart Dialogs
We define a “smart” dialog to be one that initializes its widgets in accordancewith data references or data structures that are passed to its initializer, andwhich is capable of updating the data directly in response to user interaction.Smart dialogs can have both widget-level and form-level validation. Smartdialogs are usually modeless, with “apply” and “close” buttons, although theycan also be “live”, in which case they may have no buttons, with changes towidgets reflected directly into the data they have access to. Smart modeless
Table 5.3 Selected QDialog Methods
Syntax Description
d.accept() Closes (hides) QDialog d, stops its event loop, and causesexec_() to return with a True value. The dialog is deletedif Qt.WA_DeleteOnClose is set
d.reject() Closes (hides) QDialog d, stops its event loop, and causesexec_() to return with a False value
d.done(i) Closes (hides) QDialog d, stops its event loop, and causesexec_() to return int i
d.exec_() Shows QDialog d modally, blocking until it is closedd.show() Shows QDialog d modelessly; inherited from QWidget
d.setSizeGrip-
Enabled(b)Shows or hides QDialog d’s size grip depending on bool b
Smart Dialogs 155
dialogs that have “apply” buttons notify state changes through signal andslot connections.
The main benefit of using a smart modeless dialog is seen at the point of use.When the dialog is created, it is given references to the calling form’s datastructures so that the dialog can update the data structures directly with nofurther code required at the call point. The downsides are that the dialog musthave knowledge of the calling form’s data structures so that it correctly reflectsthe data values into its widgets and only applies changes that are valid, andthat, being modeless, there is a risk of the data the dialog depends on beingchanged from under it if the user interacts with some other part of the appli-cation.
In this section we are going to continue with the theme of number formatdialogs so that we can compare the various approaches.
Modeless Apply/Close-Style Dialogs
If we want our users to be able to repeatedly change the number format andsee the results, it will be much more convenient for them if they could do sowithout having to keep invoking and accepting the number format dialog. Thesolution is to use a modeless dialog which allows them to interact with thenumber format widgets and to apply their changes and to see the effect, asoften as they like. Dialogs like this usually have an Apply button and a Closebutton. Unlike a modal OK/Cancel-style dialog, which can be canceled, leavingeverything as it was before, once Apply has been clicked the user cannot reverttheir changes. Of course we could provide a Revert button or a Defaults button,but this would require more work.
Superficially, the only difference between the modeless and the modal versionsof the dialog is the button text. However, there are two other important differ-ences:The calling form’s method creates and invokes the dialog differently,andthe dialog must make sure it is deleted, not just hidden, when it is closed. Letus begin by looking at how the dialog is invoked.
def setNumberFormat2(self):
dialog = numberformatdlg2.NumberFormatDlg(self.format, self)
self.connect(dialog, SIGNAL("changed"), self.refreshTable)
dialog.show()
We create the dialog in the same way we created the modal version earlier; it isshown in Figure 5.6. We then connect the dialog’s changed Python signal to thecalling form’s refreshTable() method, and then we just call show() on the dialog.When we call show(), the dialog is popped up as a modeless dialog. Applicationexecution continues concurrently with the dialog, and the user can interactwith both the dialog and other windows in the application.
Whenever the dialog emits its changed signal, the main form’s refreshTable()
method is called, and this will reformat all the numbers in the table using
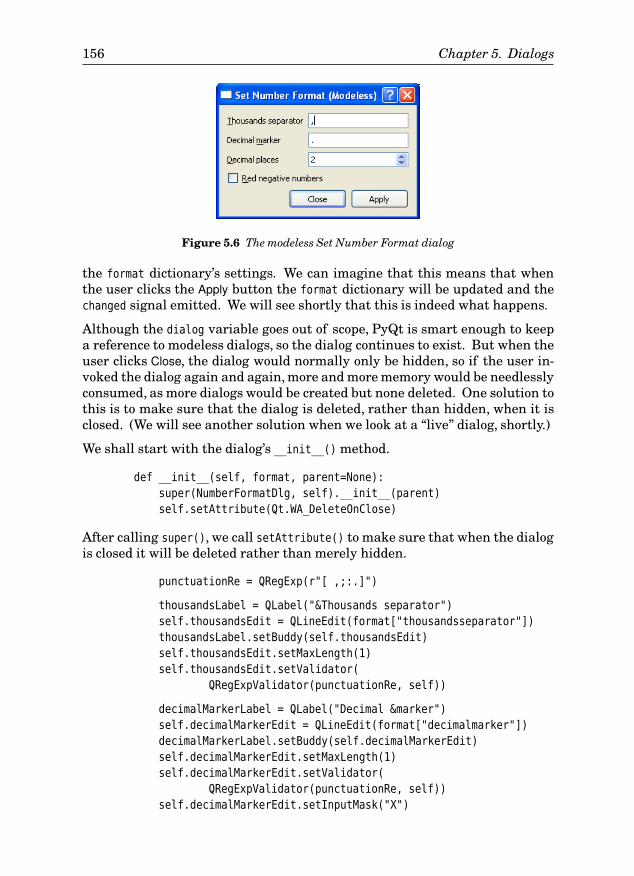
156 Chapter 5. Dialogs
Figure 5.6 The modeless Set Number Format dialog
the format dictionary’s settings. We can imagine that this means that whenthe user clicks the Apply button the format dictionary will be updated and thechanged signal emitted. We will see shortly that this is indeed what happens.
Although the dialog variable goes out of scope, PyQt is smart enough to keepa reference to modeless dialogs, so the dialog continues to exist. But when theuser clicks Close, the dialog would normally only be hidden, so if the user in-voked the dialog again and again, more and more memory would be needlesslyconsumed, as more dialogs would be created but none deleted. One solution tothis is to make sure that the dialog is deleted, rather than hidden, when it isclosed. (We will see another solution when we look at a “live” dialog, shortly.)
We shall start with the dialog’s __init__() method.
def __init__(self, format, parent=None):
super(NumberFormatDlg, self).__init__(parent)
self.setAttribute(Qt.WA_DeleteOnClose)
After calling super(), we call setAttribute() to make sure that when the dialogis closed it will be deleted rather than merely hidden.
punctuationRe = QRegExp(r"[ ,;:.]")
thousandsLabel = QLabel("&Thousands separator")
self.thousandsEdit = QLineEdit(format["thousandsseparator"])
thousandsLabel.setBuddy(self.thousandsEdit)
self.thousandsEdit.setMaxLength(1)
self.thousandsEdit.setValidator(
QRegExpValidator(punctuationRe, self))
decimalMarkerLabel = QLabel("Decimal &marker")
self.decimalMarkerEdit = QLineEdit(format["decimalmarker"])
decimalMarkerLabel.setBuddy(self.decimalMarkerEdit)
self.decimalMarkerEdit.setMaxLength(1)
self.decimalMarkerEdit.setValidator(
QRegExpValidator(punctuationRe, self))
self.decimalMarkerEdit.setInputMask("X")
Smart Dialogs 157
decimalPlacesLabel = QLabel("&Decimal places")
self.decimalPlacesSpinBox = QSpinBox()
decimalPlacesLabel.setBuddy(self.decimalPlacesSpinBox)
self.decimalPlacesSpinBox.setRange(0, 6)
self.decimalPlacesSpinBox.setValue(format["decimalplaces"])
self.redNegativesCheckBox = QCheckBox("&Red negative numbers")
self.redNegativesCheckBox.setChecked(format["rednegatives"])
buttonBox = QDialogButtonBox(QDialogButtonBox.Apply|
QDialogButtonBox.Close)
The creation of the form’s widgets is very similar to what we did before, butthis time we are using preventative validation almost exclusively.We set a one-character maximum length on the thousands separator and decimal markerline edits, and in both cases we also set a QRegExpValidator. A validator will onlyallow the user to enter valid characters, and in the case of a regular expres-sion validator, only characters that match the regular expression.★ PyQt uses aregular expression syntax that is essentially a subset of the syntax offered byPython’s re module.
The QRegExpValidator’s initializer requires both a regular expression and a par-ent, which is why we have passed self in addition to the regular expression.
In this case, we have set the validation regular expression to be “[ ,;:.]”. This isa character class and means that the only characters that are valid are thosecontained in the square brackets, that is, space, comma, semicolon, colon,and period. Notice that the regular expression string is preceded by “r”. Thissignifies a “raw” string and means that (almost) all of the characters inside thestring are to be taken as literals. This considerably reduces the need to escaperegular expression special characters such as “\”, although here it does notmatter. Nonetheless, we always use “r” with regular expression strings as amatter of good practice.
Although we are happy to accept an empty thousands separator, we require adecimal marker. For this reason we have used an input mask. A mask of “X”says that one character of any kind is required—we don’t have to concern our-selves with what the character will be because the regular expression valida-tor will ensure that it is valid. Format masks are explained in the QLineEd-
it.inputMask property’s documentation.✪
The only other difference to the way we created the widgets in the modalversion of the dialog is that we create Apply and Close buttons rather than OKand Cancel buttons.
★ The QRegExp documentation provides a brief introduction to regular expressions. For in-depthcoverage, see Mastering Regular Expressions by Jeffrey E. Friedl.✪ Every PyQt QObject and QWidget has “properties”. These are similar in principle to Pythonproperties, except that they can be accessed using the property() and setProperty() methods.
158 Chapter 5. Dialogs
self.format = format
In the modal dialog we took a copy of the caller’s format dictionary; here wetake a reference to it, so that we can change it directly from within the dialog.
We will not show the dialog’s layout since it is identical to the layout used inthe modal dialog shown earlier.
self.connect(buttonBox.button(QDialogButtonBox.Apply),
SIGNAL("clicked()"), self.apply)
self.connect(buttonBox, SIGNAL("rejected()"),
self, SLOT("reject()"))
self.setWindowTitle("Set Number Format (Modeless)")
We create two signal–slot connections. The first one is between the Applybutton’s clicked() signal and the apply() method. To make this connection, wemust retrieve a reference to the button from the button box using its button()
method, passing the same argument, QDialogButtonBox.Apply, that we used tocreate the button in the first place.
The connection to reject() will cause the dialog to close, and because of theQt.WA_DeleteOnClose attribute, the dialog will be deleted rather than hidden.There is no connection to the dialog’s accept() slot, so the only way to get ridof the dialog is to close it. If the user clicks the Apply button, the apply() slot,shown next, will be called. Naturally, we also set a window title.
The final method in this class is apply(), which we will review in two parts.
def apply(self):
thousands = unicode(self.thousandsEdit.text())
decimal = unicode(self.decimalMarkerEdit.text())
if thousands == decimal:
QMessageBox.warning(self, "Format Error",
"The thousands separator and the decimal marker "
"must be different.")
self.thousandsEdit.selectAll()
self.thousandsEdit.setFocus()
return
if len(decimal) == 0:
QMessageBox.warning(self, "Format Error",
"The decimal marker may not be empty.")
self.decimalMarkerEdit.selectAll()
self.decimalMarkerEdit.setFocus()
return
Form-level validation is normally necessary when two or more widgets’ valuesare interdependent.In this example,we do not want to allow the thousandssep-arator to be the same as the decimal place marker, so we check for this situationin the apply() method, and if it has occurred we notify the user, put the focus inthe thousands separator line edit, and return without applying the user’s edits.
Smart Dialogs 159
We could have avoided this by connecting both line edits’ textEdited() signalsto a “check and fix” slot—we will do this in the next example.
We must also check that the decimal marker isn’t empty. Although the decimalplace marker’s line edit regular expression validator wants a single character,it allows the line edit to be empty. This is because an empty string is a validprefix for a string that has a valid character. After all, the line edit may havebeen empty when the user switched the focus into it.
self.format["thousandsseparator"] = thousands
self.format["decimalmarker"] = decimal
self.format["decimalplaces"] = \
self.decimalPlacesSpinBox.value()
self.format["rednegatives"] = \
self.redNegativesCheckBox.isChecked()
self.emit(SIGNAL("changed"))
If there are no validation problems, neither of the return statements is exe-cuted and we fall through to the end of the accept() slot. Here we update theformat dictionary. The self.format variable is a reference to the caller’s format
dictionary, so the changes are applied directly to the caller’s data structure.Finally, we emit a changed signal, and as we have seen, this causes the caller’srefreshTable() method to be called, which in turn formats all the numbers inthe table using the caller’s format dictionary.
This dialog is smarter than the standard one we created in the precedingsection. It works directly on the caller’s data structure (the format dictionary),and notifies the caller when the data structure has changed so that the changescan be applied. We could have made it smarter still and given it a referenceto the caller’s refreshTable() method and had the dialog execute it directly: Wewill use this approach in the next example.
In situations where the user wants to repeatedly apply changes, it may beinconvenient for them to keep having to click an Apply button. They may justwant to manipulate a dialog’s widgets and see the effects immediately. We willsee how to do this next.
Modeless “Live” Dialogs
For our last number format example, we will review a smart modeless “live”dialog—a dialog that works very similarly to the one we have just seen, butwhich has no buttons, and where changes are applied automatically andimmediately. The dialog is shown in Figure 5.7.
In the modal version of the dialog we used post-mortem validation, and in thesmart modeless version we used a mixture of post-mortem and preventativevalidation. In this example, we will use preventative validation exclusively.Also, instead of creating a signal–slot connection so that the dialog can notify

160 Chapter 5. Dialogs
Figure 5.7 The “live” Set Number Format dialog
the caller of changes, we give the dialog the method to call when there arechanges to be applied so that it can call this method whenever necessary.
We could create this dialog in exactly the same way as the previous dialog, butwe will instead demonstrate a different approach. Rather than creating thedialog when it is needed and then destroying it, creating and destroying onevery use, we will create it just once, the first time it is needed, and then hideit when the user is finished with it, showing and hiding on every use.
def setNumberFormat3(self):
if self.numberFormatDlg is None:
self.numberFormatDlg = numberformatdlg3.NumberFormatDlg(
self.format, self.refreshTable, self)
self.numberFormatDlg.show()
self.numberFormatDlg.raise_()
self.numberFormatDlg.activateWindow()
In the calling form’s initializer, we have the statement self.numberFormatDlg =
None. This ensures that the first time this method is called the dialog is created.Then, we show the dialog as before. But in this case, when the dialog is closedit is merely hidden (because we do not set the Qt.WA_DeleteOnClose widgetattribute). So when this method is called, we may be creating and showing thedialog for the first time, or we may be showing a dialog that was created earlierand subsequently hidden. To account for the second possibility, we must bothraise (put the dialog on top of all the other windows in the application) andactivate (give the focus to the dialog); doing these the first time is harmless.★
Also, we have made the dialog even smarter than the previous one, and insteadof setting up a signal–slot connection, we pass the bound refreshTable()
method to the dialog as an additional parameter.
The __init__() method is almost the same as before,with just three differences.First, it does not set the Qt.WA_DeleteOnClose attribute so that when the dialogis closed, it will be hidden, not deleted. Second, it keeps a copy of the method itis passed (i.e., it keeps a reference to self.refreshTable() in self.callback), and
★PyQt uses raise_() rather than raise() to avoid conflict with the built-in raise statement.
Smart Dialogs 161
third, its signal and slot connections are slightly different than before. Hereare the connection calls:
self.connect(self.thousandsEdit,
SIGNAL("textEdited(QString)"), self.checkAndFix)
self.connect(self.decimalMarkerEdit,
SIGNAL("textEdited(QString)"), self.checkAndFix)
self.connect(self.decimalPlacesSpinBox,
SIGNAL("valueChanged(int)"), self.apply)
self.connect(self.redNegativesCheckBox,
SIGNAL("toggled(bool)"), self.apply)
As before, we can rely on the decimal places spinbox to ensure that only a validnumber of decimal places is set, and similarly the “red negatives” checkbox canonly be in a valid state, so changes to either of these can be applied immedi-ately.
But for the line edits, we now connect their textEdited() signals. These signalsare emitted whenever the user types in a character or deletes a character fromthem. The checkAndFix() slot will both ensure that the line edits hold valid textand apply the change immediately. There are no buttons in this dialog: Theuser can close it by pressing Esc, which will then hide it. The dialog will bedeleted only when its calling form is deleted, because at that point the caller’sself.numberFormatDlg instance variable will go out of scope, and with no otherreference to the dialog, it will be scheduled for garbage collection.
def apply(self):
self.format["thousandsseparator"] = \
unicode(self.thousandsEdit.text())
self.format["decimalmarker"] = \
unicode(self.decimalMarkerEdit.text())
self.format["decimalplaces"] = \
self.decimalPlacesSpinBox.value()
self.format["rednegatives"] = \
self.redNegativesCheckBox.isChecked()
self.callback()
The apply() method is the simplest we have seen so far. This is becauseit is called only when all the editing widgets hold valid data, so no post-mortem validation is required. It no longer emits a signal to announce a statechange—instead, it calls the method it was given and this applies the changesdirectly to the caller’s form.
def checkAndFix(self):
thousands = unicode(self.thousandsEdit.text())
decimal = unicode(self.decimalMarkerEdit.text())
if thousands == decimal:
self.thousandsEdit.clear()
self.thousandsEdit.setFocus()
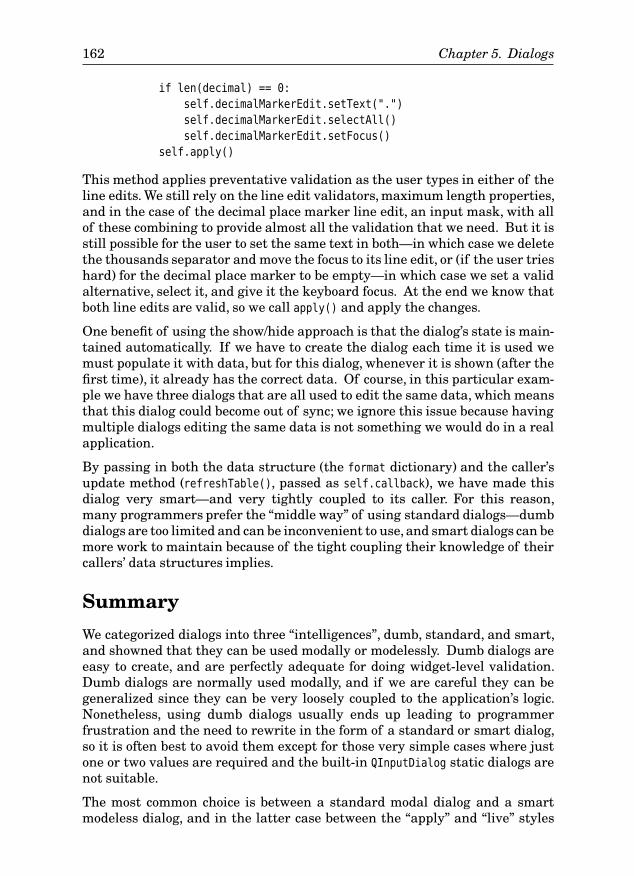
162 Chapter 5. Dialogs
if len(decimal) == 0:
self.decimalMarkerEdit.setText(".")
self.decimalMarkerEdit.selectAll()
self.decimalMarkerEdit.setFocus()
self.apply()
This method applies preventative validation as the user types in either of theline edits. We still rely on the line edit validators, maximum length properties,and in the case of the decimal place marker line edit, an input mask, with allof these combining to provide almost all the validation that we need. But it isstill possible for the user to set the same text in both—in which case we deletethe thousands separator and move the focus to its line edit, or (if the user trieshard) for the decimal place marker to be empty—in which case we set a validalternative, select it, and give it the keyboard focus. At the end we know thatboth line edits are valid, so we call apply() and apply the changes.
One benefit of using the show/hide approach is that the dialog’s state is main-tained automatically. If we have to create the dialog each time it is used wemust populate it with data, but for this dialog, whenever it is shown (after thefirst time), it already has the correct data. Of course, in this particular exam-ple we have three dialogs that are all used to edit the same data, which meansthat this dialog could become out of sync; we ignore this issue because havingmultiple dialogs editing the same data is not something we would do in a realapplication.
By passing in both the data structure (the format dictionary) and the caller’supdate method (refreshTable(), passed as self.callback), we have made thisdialog very smart—and very tightly coupled to its caller. For this reason,many programmers prefer the “middle way” of using standard dialogs—dumbdialogs are too limited and can be inconvenient to use, and smart dialogs can bemore work to maintain because of the tight coupling their knowledge of theircallers’ data structures implies.
Summary
We categorized dialogs into three “intelligences”, dumb, standard, and smart,and showned that they can be used modally or modelessly. Dumb dialogs areeasy to create, and are perfectly adequate for doing widget-level validation.Dumb dialogs are normally used modally, and if we are careful they can begeneralized since they can be very loosely coupled to the application’s logic.Nonetheless, using dumb dialogs usually ends up leading to programmerfrustration and the need to rewrite in the form of a standard or smart dialog,so it is often best to avoid them except for those very simple cases where justone or two values are required and the built-in QInputDialog static dialogs arenot suitable.
The most common choice is between a standard modal dialog and a smartmodeless dialog, and in the latter case between the “apply” and “live” styles
Summary 163
of updating. Modal dialogs are the easiest to program because they block anyother interaction with the dialog’s parent windows and their sibling windows,thereby reducing the risk that the data they are working on is changed fromunder them. But modeless dialogs are preferred by some users, and are par-ticularly convenient when users want to try out various options before decidingwhich ones they want. Modal dialogs can also be used for this purpose if theyprovide some kind of preview; for example, font dialogs are often modal, andshow sample text that reflects the user’s font settings as they change them.
The two validation strategies that we have looked at, post-mortem and pre-ventative, can be used on their own or in combination. From a usability pointof view, preventative is often considered to be superior, although it can leadto user frustration. For example, a user might complain (“I want to set this tofive but it won’t let me”) when the setting is invalid because of another settingelsewhere on the form.
It is possible to design a dialog so that it can be used both for adding and forediting items. These add/edit dialogs are no different from other kinds ofdialogs when it comes to the creation, layout, and connection of their widgets.The key difference is that they may need to behave in different ways depend-ing on whether they are adding or editing. When editing, the widgets are pop-ulated from the item passed in, and when adding, the widgets are populatedwith default values. If the dialog is accepted, it may simply provide accessorsthrough which the values set can be retrieved, leaving the work to the caller, orit may be smart, able to update edited items directly, and to create new items ifthe user is adding. See the AddEditMovieDlg class in chap08/additemmoviedlg.py
(its user interface design is in chap08/additemmoviedlg.ui), and the TextItemDlg
class in chap12/pagedesigner.pwy, for examples of add/edit item dialogs.
Another possibility is to avoid using a dialog at all and to allow the user to editdata in-place—for example, in a list or table. This approach is covered in thechapters on model/view programming.
ExerciseWrite a stand-alone string list editing dialog. The dialog should use if __name__
== "__main__": so that it can be run and tested independently. It should looklike the dialog shown in Figure 5.8.
The strings should be held in a QListWidget. The Sort button is easy to im-plement since we can connect its clicked() signal directly to the QListWid-
get.sortItems() method.
The dialog should work on its own string list, either a copy of one passed in,or one it creates itself, and when accepted should emit a signal containingthe list (as a QStringList), and also have a publically accessible data attribute,stringlist.
The reject() slot should be implemented like this:
164 Chapter 5. Dialogs
Figure 5.8 The String List dialog with an item being added
def reject(self):
self.accept()
For testing purposes put the following code at the end of the file:
if __name__ == "__main__":
fruit = ["Banana", "Apple", "Elderberry", "Clementine", "Fig",
"Guava", "Mango", "Honeydew Melon", "Date", "Watermelon",
"Tangerine", "Ugli Fruit", "Juniperberry", "Kiwi",
"Lemon", "Nectarine", "Plum", "Raspberry", "Strawberry",
"Orange"]
app = QApplication(sys.argv)
form = StringListDlg("Fruit", fruit)
form.exec_()
print "\n".join([unicode(x) for x in form.stringlist])
This creates a StringListDlg instance, with a string that names the kind ofthings in the list, and a list of strings, and then calls it modally. When the usercloses the dialog we print the list of strings on the console so that we can seethe effects of our edits.
You will need to read the documentation for QListWidget, and for QInputDia-
log.getText() which can be used for getting a string to be added and for editingan existing string. This exercise can be done in about 120 lines of code.
A model answer is provided by the file chap05/stringlistdlg.py. The programcan be tested by running it. (On Windows, it should be run from a console; onMac OS X, from a Terminal.)

Main Windows
66 ● Creating a Main Window
● Handling User Actions
Most applications are main-window-style applications, that is, they have amenu bar, toolbars, a status bar, a central area, and possibly dock windows, toprovide the user with a rich yet navigable and comprehensible user interface.In this chapter, we will see how to create a main-window-style applicationwhich demonstrates how to create and use all of these features.
Figure 6.1 The Image Changer application
We will use the Image Changer application shown in Figure 6.1 to demonstratehow to create a main-window-style application. Like most such applications ithas menus, toolbars, and a status bar; it also has a dock window. In additionto seeing how to create all these user interface elements, we will cover howto relate user interactions with them, to methods that perform the relevantactions.
165
166 Chapter 6. Main Windows
This chapter also explains how to handle the creation of new files and the open-ing of existing files, including keeping the user interface synchronized withthe application’s state. Also covered is how to give the user the opportunity tosave unsaved changes, and how to manage a recently used files list. We willalso show how to save and restore user preferences, including the sizes andpositions of the main window and of the toolbars and dock windows.
Most applications have a data structure for holding their data, and use oneor more widgets through which users can view and edit the data. The ImageChanger application holds its data in a single QImage object, and uses a QLabel
widget as its data viewer. In Chapter 8, we will see a main-window-style ap-plication that is used to present and edit lots of data items, and in Chapter 9,we will see how to create main window applications that can handle multipledocuments.
Before looking at how to create the application, we will discuss some of thestate that a user interface must maintain. Quite often, some menu optionsand toolbar buttons are “checkable”, that is, they can be in one of two states.For example, in a word processor, a toolbar button for toggling italic textcould be “on” (pushed down) or “off”. If there is also an italic menu option, wemust make sure that the menu option and the toolbar button are kept in sync.Fortunately, PyQt makes it easy to automate such synchronization.
Some options may be interdependent. For example, we can have text left-aligned, centered, or right-aligned, but only one of these can be “on” at any onetime. So if the user switched on centered alignment, the left and right align-ment toolbar buttons and menu options must be switched off. Again, PyQtmakes it straightforward to synchronize such interdependent options. In thischapter, we will cover options that are noncheckable, such as “file open”, andboth independent and interdependent checkable options.
Although some menu and toolbar options can have an immediate effect on theapplication’s data, others are used to invoke dialogs through which users canspecify precisely what they want done. Since we have given so much coverageto dialogs in the preceding two chapters, here we will concentrate on how theyare used rather than on how they are created. In this chapter we will see howto invoke custom dialogs, and also how to use many of PyQt’s built-in dialogs,including dialogs for choosing a filename, the print dialog, and dialogs forasking the user for an item of data, such as a string or a number.
Creating a Main Window
For most main-window-style applications, the creation of the main windowfollows a similar pattern. We begin by creating and initializing some datastructures, then we create a “central widget” which will occupy the main win-dow’s central area, and then we create and set up any dock windows. Next, wecreate “actions” and insert them into menus and toolbars. It is quite commonto also read in the application’s settings, and for applications that restore the
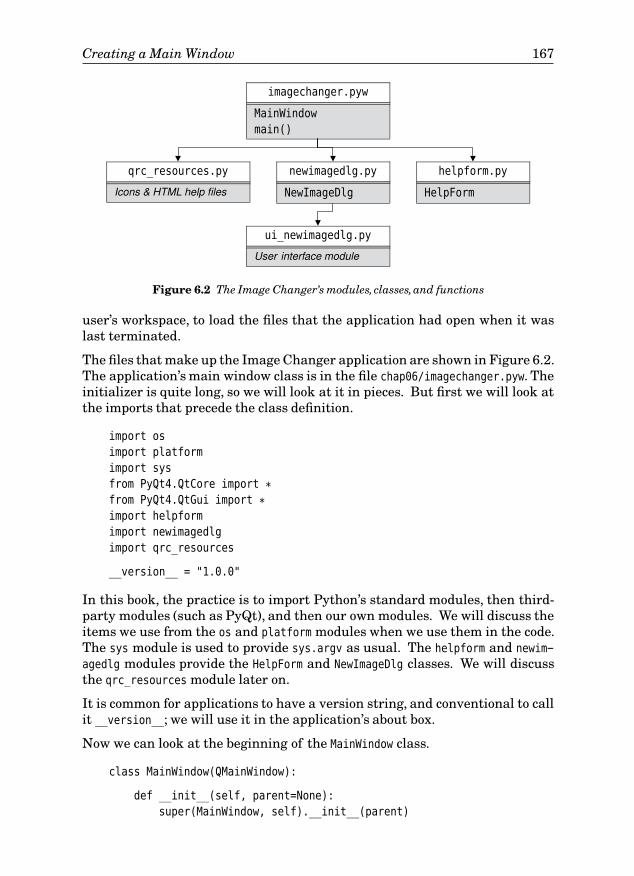
Creating a Main Window 167
imagechanger.pyw
MainWindow
main()
qrc_resources.py
Icons & HTML help files
newimagedlg.py
NewImageDlg
helpform.py
HelpForm
ui_newimagedlg.py
User interface module
Figure 6.2 The Image Changer’s modules, classes,and functions
user’s workspace, to load the files that the application had open when it waslast terminated.
The files that make up the Image Changer application are shown in Figure 6.2.The application’s main window class is in the file chap06/imagechanger.pyw. Theinitializer is quite long, so we will look at it in pieces. But first we will look atthe imports that precede the class definition.
import os
import platform
import sys
from PyQt4.QtCore import *from PyQt4.QtGui import *import helpform
import newimagedlg
import qrc_resources
__version__ = "1.0.0"
In this book, the practice is to import Python’s standard modules, then third-party modules (such as PyQt), and then our own modules. We will discuss theitems we use from the os and platform modules when we use them in the code.The sys module is used to provide sys.argv as usual. The helpform and newim-
agedlg modules provide the HelpForm and NewImageDlg classes. We will discussthe qrc_resources module later on.
It is common for applications to have a version string, and conventional to callit __version__; we will use it in the application’s about box.
Now we can look at the beginning of the MainWindow class.
class MainWindow(QMainWindow):
def __init__(self, parent=None):
super(MainWindow, self).__init__(parent)

168 Chapter 6. Main Windows
self.image = QImage()
self.dirty = False
self.filename = None
self.mirroredvertically = False
self.mirroredhorizontally = False
The initializer begins conventionally with the super() call. Next, we createa null QImage that we will use to hold the image the user loads or creates. AQImage is not a QObject subclass, so it does not need a parent; instead, we canleave its deletion to Python’s normal garbage collection when the applicationterminates. We also create some instance variables. We use dirty as a Booleanflag to indicate whether the image has unsaved changes. The filename isinitially set to None, which we use to signify that either there is no image, orthere is a newly created image that has never been saved.
PyQt provides various mirroring capabilities, but for this example applicationwe have limited ourselves to just three possibilities:having the image mirroredvertically, horizontally, or not at all. We need to keep track of the mirroredstate so that we can keep the user interface in sync, as we will see when wediscuss the mirroring actions.
self.imageLabel = QLabel()
self.imageLabel.setMinimumSize(200, 200)
self.imageLabel.setAlignment(Qt.AlignCenter)
self.imageLabel.setContextMenuPolicy(Qt.ActionsContextMenu)
self.setCentralWidget(self.imageLabel)
In some applications the central widget is a composite widget (a widget that iscomposed of other widgets, laid out just like those in a dialog), or an item-basedwidget (such as a list or table), but here a single QLabel is sufficient. A QLabel
can display plain text, or HTML, or an image in any of the image formats thatPyQt supports; later on we will see how to discover what these formats are,since they can vary. We have set a minimum size because initially the label hasnothing to show, and would therefore take up no space, which would look pecu-liar. We have chosen to align our images vertically and horizontally centered.
PyQt offers many ways of creating context menus, but we are going to use theeasiest and most common approach.First, we must set the context menu policyfor the widget which we want to have a context menu. Then, we must addsome actions to the widget—something we will do further on. When the userinvokes the context menu, the menu will pop up, displaying the actions thatwere added.
Unlike dialogs, where we use layouts, in a main-window-style application weonly ever have one central widget—although this widget could beObject
Owner-shipsidebar
119 ☞
composite, sothere is no limitation in practice. We only need to call setCentralWidget() andwe are done.This method both lays out the widget in the main window’s centralarea, and reparents the widget so that the main window takes ownershipof it.
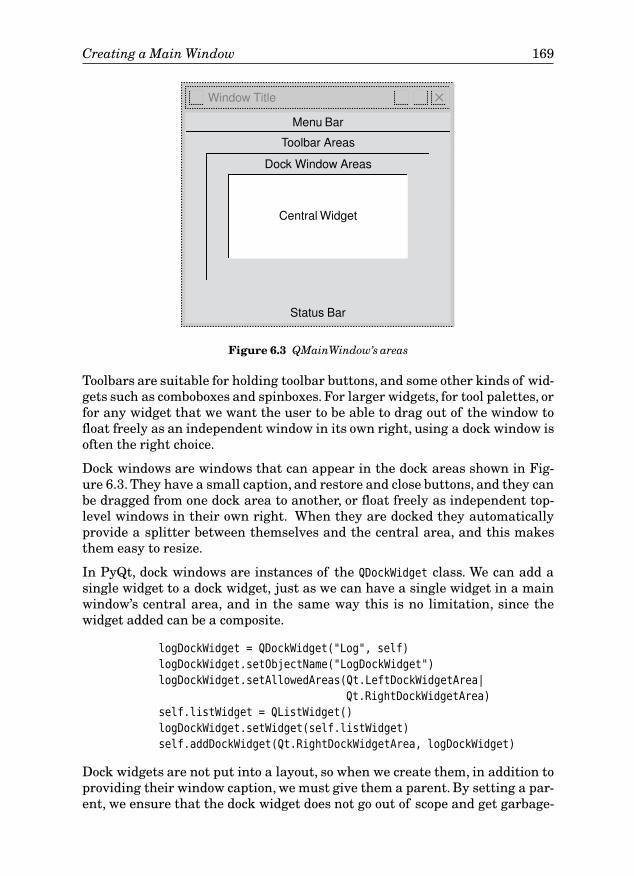
Creating a Main Window 169
Window Title ✕
Menu Bar
Toolbar Areas
Dock Window Areas
Central Widget
Status Bar
Figure 6.3 QMainWindow’s areas
Toolbars are suitable for holding toolbar buttons, and some other kinds of wid-gets such as comboboxes and spinboxes. For larger widgets, for tool palettes, orfor any widget that we want the user to be able to drag out of the window tofloat freely as an independent window in its own right, using a dock window isoften the right choice.
Dock windows are windows that can appear in the dock areas shown in Fig-ure 6.3. They have a small caption, and restore and close buttons, and they canbe dragged from one dock area to another, or float freely as independent top-level windows in their own right. When they are docked they automaticallyprovide a splitter between themselves and the central area, and this makesthem easy to resize.
In PyQt, dock windows are instances of the QDockWidget class. We can add asingle widget to a dock widget, just as we can have a single widget in a mainwindow’s central area, and in the same way this is no limitation, since thewidget added can be a composite.
logDockWidget = QDockWidget("Log", self)
logDockWidget.setObjectName("LogDockWidget")
logDockWidget.setAllowedAreas(Qt.LeftDockWidgetArea|
Qt.RightDockWidgetArea)
self.listWidget = QListWidget()
logDockWidget.setWidget(self.listWidget)
self.addDockWidget(Qt.RightDockWidgetArea, logDockWidget)
Dock widgets are not put into a layout, so when we create them, in addition toproviding their window caption, we must give them a parent. By setting a par-ent, we ensure that the dock widget does not go out of scope and get garbage-
170 Chapter 6. Main Windows
collected by Python at the wrong time. Instead,ObjectOwner-shipsidebar
119 ☞
the dock widget will be deletedwhen its parent, the top-level window (the main window), is deleted.
Every PyQt object can be given an object name, although up to now we havenever done so. Object names can sometimes be useful in debugging, but wehave set one here because we want PyQt to save and restore the dock widget’ssize and position, and since there could be any number of dock widgets, PyQtuses the object name to distinguish between them.
By default, dock widgets can be dragged into any dock area and are movable,floatable, and closable. Since our dock widget is going to be used to store alist—a widget that is usually tall and narrow—it only makes sense for it to bein the left or right dock areas (or to float), so we use setAllowedAreas() to restrictthe areas. Dock widgets also have a setFeatures() method which is used tocontrol whether the dock widget can be moved, floated, or closed, but we do notneed to use it here because the defaults are fine.
Once the dock widget has been set up, we create the widget it will hold, in thiscase a list widget. Then we add the widget to the dock widget, and the dockwidget to the main window. We did not have to give the list widget a parentbecause when it is added to the dock widget the dock widget takes ownershipof it.
self.printer = None
We want users to be able to print out their images. To do this we need tocreate a QPrinter object. We could create the printer whenever we need it andleave it to be garbage-collected afterward. But we prefer to keep an instancevariable, initially set to None. The first time the user asks to print we will createa QPrinter and assign it to our printer variable. This has two benefits. First,wecreate the printer object only when it is needed, and second, because we keepa reference to it, it stays around—and keeps all its previous state such as theuser’s choice of printer, paper size, and so on.
self.sizeLabel = QLabel()
self.sizeLabel.setFrameStyle(QFrame.StyledPanel|QFrame.Sunken)
status = self.statusBar()
status.setSizeGripEnabled(False)
status.addPermanentWidget(self.sizeLabel)
status.showMessage("Ready", 5000)
For the application’sstatusbar,we want the usual message area on the left,anda status indicator showing the width and height of the current image. We dothis by creating a QLabel widget and adding it to the status bar. We also switchoff the status bar’s size grip since that seems inappropriate when we have anindicator label that shows the image’s dimensions. The status bar itself is cre-ated for us the first time we call the QMainWindow’s statusBar() method. If we callthe status bar’s showMessage() method with a string, the string will be displayedin the status bar, and will remain on display until either another showMessage()

Creating a Main Window 171
call supplants it or until clearMessage() is called. We have used the two-argu-ment form, where the second argument is the number of milliseconds (5000,i.e., 5 seconds), that the message should be shown for; after this time the statusbar will clear itself.
So far we have seen how to create the main window’s central widget, create adock widget, and set up the status bar. Now we are almost ready to create themenus and toolbars, but first we must understand what PyQt actions are, andthen take a brief detour to learn about resources.
Actions and Key Sequences
Qt’s designers recognized that user interfaces often provide several differentways for the user to achieve the same thing. For example, creating a new filein many applications can be done via the File→Newmenu option, or by clickingthe New File toolbar button, , or by using the Ctrl+N keyboard shortcut. Ingeneral, we do not care how the user asked to perform the action, we only carewhat action they asked to be done. PyQt encapsulates user actions using theQAction class. So, for example, to create a “file new” action we could write codelike this:
fileNewAction = QAction(QIcon("images/filenew.png"), "&New", self)
fileNewAction.setShortcut(QKeySequence.New)
helpText = "Create a new image"
fileNewAction.setToolTip(helpText)
fileNewAction.setStatusTip(helpText)
self.connect(fileNewAction, SIGNAL("triggered()"), self.fileNew)
This assumes that we have a suitable icon and a fileNew() method. The am-persand in the menu item’s text means that the menu item will appear as New(except on Mac OS X or unless the windowing system is set to suppress un-derlines), and that keyboard users will be able to invoke it by pressing Alt+F,N,assuming that the Filemenu’s text is "&File" so that it appears as File. Alterna-tively, the user could use the shortcut that was created by setShortcut(), andsimply press Ctrl+N instead.
Many key sequences are standardized, some even across different windowingsystems. For example, Windows, KDE, and GNOME all use Qt
4.2
Ctrl+N for “new”and Ctrl+S for “save”. Mac OS X is similar, with Command+N and Command+Sfor these actions. The QKeySequence class in PyQt 4.2 provides constants for thestandardized key sequences, such as QKeySequence.New. This is especially usefulwhen the standardized key sequences differ across windowing systems, orwhere more than one key sequence is associated with an action. For example,if we set a shortcut to QKeySequence.Paste, PyQt will trigger a “paste” action inresponse to Ctrl+V or Shift+Ins on Windows; Ctrl+V, Shift+Ins, or F18 on KDE andGNOME; and Command+V on Mac OS X.
For key sequences that are not standardized (or if we want backward com-patibility with earlier PyQt releases), we can provide the shortcut as a string;
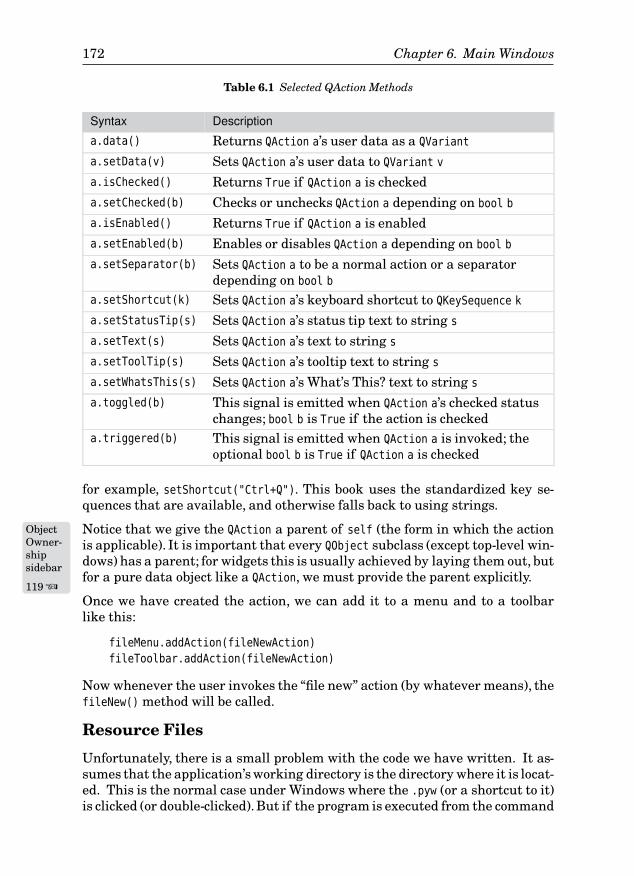
172 Chapter 6. Main Windows
Table 6.1 Selected QAction Methods
Syntax Description
a.data() Returns QAction a’s user data as a QVariant
a.setData(v) Sets QAction a’s user data to QVariant v
a.isChecked() Returns True if QAction a is checkeda.setChecked(b) Checks or unchecks QAction a depending on bool b
a.isEnabled() Returns True if QAction a is enableda.setEnabled(b) Enables or disables QAction a depending on bool b
a.setSeparator(b) Sets QAction a to be a normal action or a separatordepending on bool b
a.setShortcut(k) Sets QAction a’s keyboard shortcut to QKeySequence k
a.setStatusTip(s) Sets QAction a’s status tip text to string s
a.setText(s) Sets QAction a’s text to string s
a.setToolTip(s) Sets QAction a’s tooltip text to string s
a.setWhatsThis(s) Sets QAction a’s What’s This? text to string s
a.toggled(b) This signal is emitted when QAction a’s checked statuschanges; bool b is True if the action is checked
a.triggered(b) This signal is emitted when QAction a is invoked; theoptional bool b is True if QAction a is checked
for example, setShortcut("Ctrl+Q"). This book uses the standardized key se-quences that are available, and otherwise falls back to using strings.
Notice that we give the QAction a parent of self (the form inObjectOwner-shipsidebar
119 ☞
which the actionis applicable). It is important that every QObject subclass (except top-level win-dows) has a parent; for widgets this is usually achieved by laying them out, butfor a pure data object like a QAction, we must provide the parent explicitly.
Once we have created the action, we can add it to a menu and to a toolbarlike this:
fileMenu.addAction(fileNewAction)
fileToolbar.addAction(fileNewAction)
Now whenever the user invokes the “file new” action (by whatever means), thefileNew() method will be called.
Resource Files
Unfortunately, there is a small problem with the code we have written. It as-sumes that the application’s working directory is the directory where it is locat-ed. This is the normal case under Windows where the .pyw (or a shortcut to it)is clicked (or double-clicked).But if the program is executed from the command
Creating a Main Window 173
line from a different directory—for example, ./chap06/imagechanger.pyw—noneof the icons will appear. This is because we gave the icon’s path as images, thatis, a path relative to the application’s working directory, so when invoked fromelsewhere, the icons were looked for in the ./images directory (which might noteven exist), when in fact they are in the ./chap06/images directory.
We might be tempted to try to solve the problem using Python’s os.getcwd()
function; but this returns the directory where we invoked the application,which as we have noted, may not be the directory where the application actu-ally resides. Nor does PyQt’s QApplication.applicationDirPath() method help,since this returns the path to the Python executable, not to our application it-self. One solution is to use os.path.dirname(__file__) to provide a prefix for theicon filenames, since the __file__ variable holds the full name and path of thecurrent .py or .pyw file.
Another solution is to put all our icons (and help files, and any other smallresources) into a single .py module and access them all from there. This notonly solves the path problem (because Python knows how to look for a moduleto be imported), but also means that instead of having dozens of icons, helpfiles, and similar, some of which could easily become lost, we have a singlemodule containing them all.
To produce a resource module we must do two things. First, we must create a.qrc file that contains details of the resources we want included, and then wemust run pyrcc4 which reads a .qrc file and produces a resource module. The.qrc file is in a simple XML format that is easy to write by hand. Here is anextract from the resources.qrc file used by the Image Changer application:
<!DOCTYPE RCC><RCC version="1.0">
<qresource>
<file alias="filenew.png">images/filenew.png</file>
<file alias="fileopen.png">images/fileopen.png</file>
···<file alias="icon.png">images/icon.png</file>
<file>help/editmenu.html</file>
<file>help/filemenu.html</file>
<file>help/index.html</file>
</qresource>
</RCC>
The ellipsis represents many lines that have been omitted to save spacebecause they are all very similar. Each <file> entry must contain a filename,with its relative path if it is in a subdirectory. Now, if we want to use the “filenew” action’s image, we could write QIcon(":/images/filenew.png"). But thanksto the alias, we can shorten this to QIcon(":/filenew.png"). The leading :/ tellsPyQt that the file is a resource. Resource files can be treated just like normal(read-only) files in the filesystem, the only difference being that they have the
174 Chapter 6. Main Windows
special path prefix. But before we can use resources, we must make sure wegenerate the resource module and import it into our application.
Earlier we showed the imports for the Image Changer application, and the lastone was import qrc_resources. The qrc_resources.py module was generated bypyrcc4 using the following command line:
C:\pyqt\chap06>pyrcc4 -o qrc_resources.py resources.qrc
We must run this command whenever we change the resources.qrc file.
As a convenience for readers, two small Python programs are provided with theexamples to make using pyrcc4, and some other PyQt command-line programs,much easier. One is mkpyqt.py, itself a command-line program, mk-
pyqt.py
andMakePyQtsidebar
☞ 207
and the other isMake PyQt, a GUI application written in PyQt4. This means, for example, thatinstead of running pyrcc4 ourselves, we can simply type this:
C:\pyqt\chap06>mkpyqt.py
Both mkpyqt.py and Make PyQt do the same thing: They run pyuic4 and otherPyQt tools, and for each one they automatically use the correct command-linearguments; they are described in the next chapter.
Creating and Using Actions
The code we saw earlier for creating a “file new” action required six lines tocreate and set up the action. Most main-window-style applications have scoresof actions, so typing six lines for each one would soon become very tedious. Forthis reason, we have created a helper method which allows us to reduce thecode for creating actions to just two or three lines. We will look at the helper,and then see how it is used in the main window’s initializer.
def createAction(self, text, slot=None, shortcut=None, icon=None,
tip=None, checkable=False, signal="triggered()"):
action = QAction(text, self)
if icon is not None:
action.setIcon(QIcon(":/%s.png" % icon))
if shortcut is not None:
action.setShortcut(shortcut)
if tip is not None:
action.setToolTip(tip)
action.setStatusTip(tip)
if slot is not None:
self.connect(action, SIGNAL(signal), slot)
if checkable:
action.setCheckable(True)
return action

Creating a Main Window 175
This method does everything that we did by hand for the “file new” action. Inaddition, it handles cases where there is no icon, as well as “checkable” actions.Icons are optional, although for actions that will be added to a toolbar it isconventional to provide one. An action is checkable if it can have “on” and “off”states like the Bold or Italic actions that word processors normally provide.
Notice that the last argument to the QAction constructor is self; this is theaction’s parent (the main window) and it ensures that the action will not begarbage-collected when it goes out of the initializer’s scope. In some cases, wemake actions instance variables so that we can access them outside the form’sinitializer, something we don’t need to do in this particular example.
Here is how we can create the “file new” action using the createAction()
helper method:
fileNewAction = self.createAction("&New...", self.fileNew,
QKeySequence.New, "filenew", "Create an image file")
With the exception of the “file quit” action (and “file save as”, for which we don’tprovide a shortcut), the other file actions are created in the same way, so wewon’t waste space by showing them.
fileQuitAction = self.createAction("&Quit", self.close,
"Ctrl+Q", "filequit", "Close the application")
The QKeySequence class does not have a standardized shortcut for applicationtermination, so we have chosen one ourselves and specified it as a string.We could have just as easily used a different shortcut—for example, Alt+X orAlt+F4.
The close() slot is inherited from QMainWindow. If the main window is closedby invoking the “file quit” action (which we have just connected to the close()
slot), for example, by clicking File→Quit or by pressing Ctrl+Q, the base class’sclose() method will be called. But if the user clicks the application’s closebutton, X, the close() method is not called.
The only way we can be sure we are intercepting attempts to close the windowis to reimplement the close event handler. Whether the application is closed bythe close() method or via the close button, the close event handler is alwayscalled. So, by reimplementing this event handler we can give the user theopportunity to save any unsaved changes, and we can save the application’ssettings.
In general, we can implement an application’s behavior purely through thehigh-level signals and slots mechanism,but in this one important case we mustuse the lower-level event-handling mechanism. However, reimplementing theclose event is no different from reimplementing any other method, and it is notdifficult, as we will see when we cover it further on. (Event handling is coveredin Chapter 10.)
176 Chapter 6. Main Windows
The editing actions are created in a similar way, but we will look at a few ofthem because of subtle differences.
editZoomAction = self.createAction("&Zoom...", self.editZoom,
"Alt+Z", "editzoom", "Zoom the image")
It is convenient for users to be able to zoom in and out to see an image in moreor less detail. We have provided a spinbox in the toolbar to allow mouse usersto change the zoom factor (and which we will come to shortly), but we must alsosupport keyboard users, so for them we create an “edit zoom” action which willbe added to theEditmenu. When triggered, the method connected to this actionwill pop up a dialog box where the user can enter a zoom percentage.
There are standardized key sequences for zoom in and for zoom out, but thereis not one for zooming generally, so we have chosen to use Alt+Z in this case.(We did not use Ctrl+Z, since that is the standardized key sequence for undo onmost platforms.)
editInvertAction = self.createAction("&Invert",
self.editInvert, "Ctrl+I", "editinvert",
"Invert the image's colors", True, "toggled(bool)")
The “edit invert” action is a toggle action. We could still use the triggered()
signal, but then we would need to call isChecked() on the action to find outits state. It is more convenient for us to use the toggled(bool) signal sincethat not only tells us that the action has been invoked, but also whether it ischecked. Actions also have a triggered(bool) signal that is emitted only foruser changes, but that is not suitable here because whether the checked statusof the invert action is changed by the user or programmatically, we want to acton it.
The “edit swap red and blue” action is similar to the “edit invert” action, so wewon’t show it.
Like the “edit invert” action and the “edit swap red and blue” action, the mir-ror actions are also checkable, but unlike the “invert” and “swap red and blue”actions which are independent, we have chosen to make the mirror actionsmutually exclusive, allowing only one to be “on” at any one time. To get thisbehavior we create the mirror actions in the normal way, but add each of themto an “action group”. An action group is a class which manages a set of check-able actions and ensures that if one of the actions it manages is set to “on”, theothers are all set to “off”.
mirrorGroup = QActionGroup(self)
An action group is a QObject subclass that is neither a top-levelObjectOwner-shipsidebar
119 ☞
window nor awidget that is laid out, so we must give it an explicit parent to ensure that it isdeleted by PyQt at the right time.
Creating a Main Window 177
Once we have created the action group, we create the actions in the same wayas before, only now we add each one to the action group.
editUnMirrorAction = self.createAction("&Unmirror",
self.editUnMirror, "Ctrl+U", "editunmirror",
"Unmirror the image", True, "toggled(bool)")
mirrorGroup.addAction(editUnMirrorAction)
We have not shown the code for the “edit mirror vertically” or “edit mirrorhorizontally” actions since it is almost identical to the code shown earlier.
editUnMirrorAction.setChecked(True)
Checkable actions default to being “off”, but when we have a group like thiswhere exactly one must be “on” at a time, we must choose one to be on in thefirst place. In this case, the “edit unmirror” action is the most sensible to switchon initially. Checking the action will cause it to emit its toggled() signal, butat this stage the QImage is null, and as we will see, no change is applied to anull image.
We create two more actions, “help about”, and “help help”, with code verysimilar to what we have already seen.
Although the actions are all in existence, none of them actually works! This isbecause they become operational only when they have been added to a menu,a toolbar, or both.
Figure 6.4 The Edit menu and the Mirror submenu
Menus in the menu bar are created by accessing the main window’s menu bar(which is created the first time menuBar() is called, just like the status bar).Here is the code for creating the Editmenu:
editMenu = self.menuBar().addMenu("&Edit")
self.addActions(editMenu, (editInvertAction,
editSwapRedAndBlueAction, editZoomAction))
We have created the Editmenu, and then used addActions() to add some actionsto it. This is sufficient to produce the Editmenu shown in Figure 6.4, apart fromthe Mirror option, which we will look at in a moment.
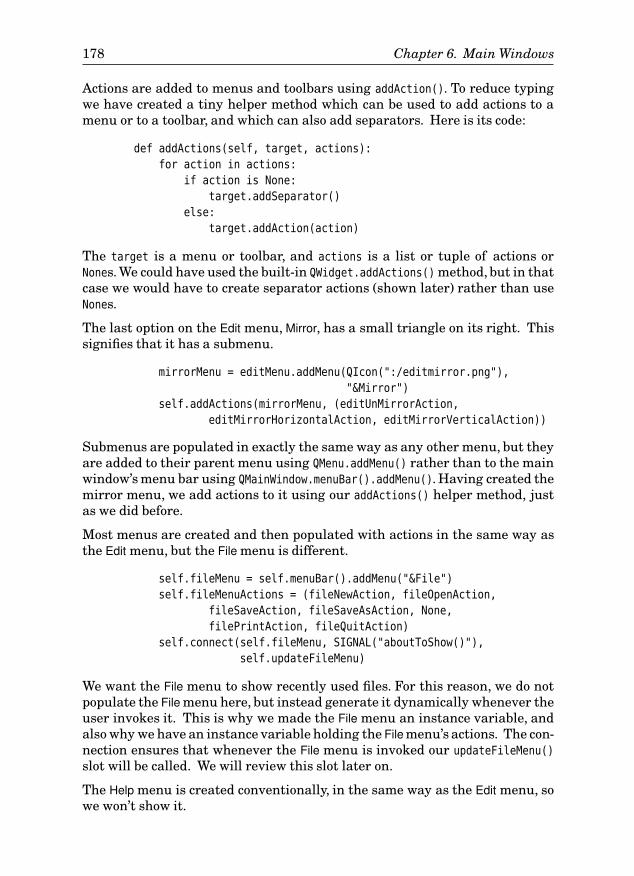
178 Chapter 6. Main Windows
Actions are added to menus and toolbars using addAction(). To reduce typingwe have created a tiny helper method which can be used to add actions to amenu or to a toolbar, and which can also add separators. Here is its code:
def addActions(self, target, actions):
for action in actions:
if action is None:
target.addSeparator()
else:
target.addAction(action)
The target is a menu or toolbar, and actions is a list or tuple of actions orNones. We could have used the built-in QWidget.addActions() method, but in thatcase we would have to create separator actions (shown later) rather than useNones.
The last option on the Edit menu, Mirror, has a small triangle on its right. Thissignifies that it has a submenu.
mirrorMenu = editMenu.addMenu(QIcon(":/editmirror.png"),
"&Mirror")
self.addActions(mirrorMenu, (editUnMirrorAction,
editMirrorHorizontalAction, editMirrorVerticalAction))
Submenus are populated in exactly the same way as any other menu, but theyare added to their parent menu using QMenu.addMenu() rather than to the mainwindow’s menu bar using QMainWindow.menuBar().addMenu(). Having created themirror menu, we add actions to it using our addActions() helper method, justas we did before.
Most menus are created and then populated with actions in the same way asthe Editmenu, but the Filemenu is different.
self.fileMenu = self.menuBar().addMenu("&File")
self.fileMenuActions = (fileNewAction, fileOpenAction,
fileSaveAction, fileSaveAsAction, None,
filePrintAction, fileQuitAction)
self.connect(self.fileMenu, SIGNAL("aboutToShow()"),
self.updateFileMenu)
We want the File menu to show recently used files. For this reason, we do notpopulate the Filemenu here, but instead generate it dynamically whenever theuser invokes it. This is why we made the Filemenu an instance variable, andalso why we have an instance variable holding the Filemenu’s actions. The con-nection ensures that whenever the File menu is invoked our updateFileMenu()
slot will be called. We will review this slot later on.
The Helpmenu is created conventionally, in the same way as the Edit menu, sowe won’t show it.
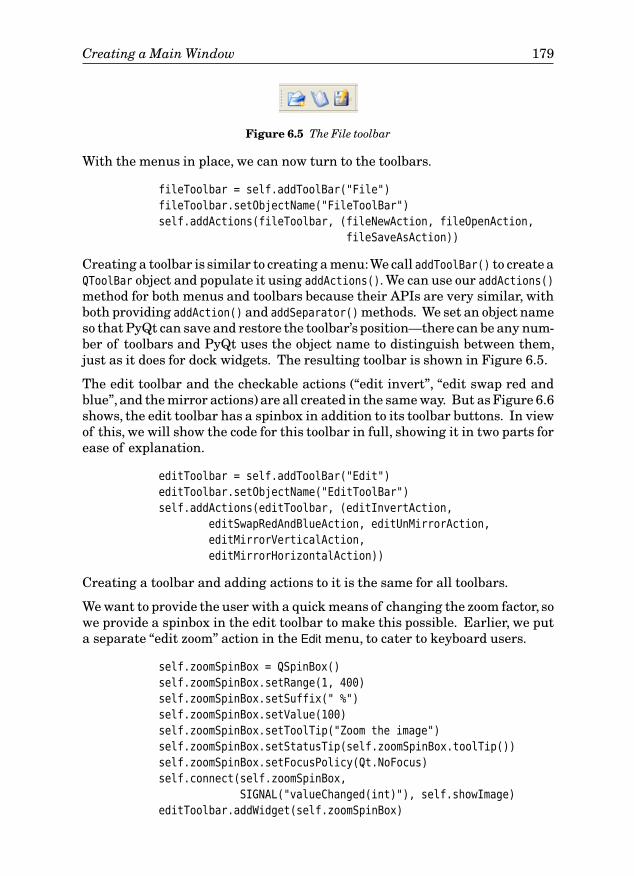
Creating a Main Window 179
Figure 6.5 The File toolbar
With the menus in place, we can now turn to the toolbars.
fileToolbar = self.addToolBar("File")
fileToolbar.setObjectName("FileToolBar")
self.addActions(fileToolbar, (fileNewAction, fileOpenAction,
fileSaveAsAction))
Creating a toolbar is similar to creating a menu:We call addToolBar() to create aQToolBar object and populate it using addActions(). We can use our addActions()
method for both menus and toolbars because their APIs are very similar, withboth providing addAction() and addSeparator() methods. We set an object nameso that PyQt can save and restore the toolbar’s position—there can be any num-ber of toolbars and PyQt uses the object name to distinguish between them,just as it does for dock widgets. The resulting toolbar is shown in Figure 6.5.
The edit toolbar and the checkable actions (“edit invert”, “edit swap red andblue”, and the mirror actions) are all created in the same way. But as Figure 6.6shows, the edit toolbar has a spinbox in addition to its toolbar buttons. In viewof this, we will show the code for this toolbar in full, showing it in two parts forease of explanation.
editToolbar = self.addToolBar("Edit")
editToolbar.setObjectName("EditToolBar")
self.addActions(editToolbar, (editInvertAction,
editSwapRedAndBlueAction, editUnMirrorAction,
editMirrorVerticalAction,
editMirrorHorizontalAction))
Creating a toolbar and adding actions to it is the same for all toolbars.
We want to provide the user with a quick means of changing the zoom factor, sowe provide a spinbox in the edit toolbar to make this possible. Earlier, we puta separate “edit zoom” action in the Editmenu, to cater to keyboard users.
self.zoomSpinBox = QSpinBox()
self.zoomSpinBox.setRange(1, 400)
self.zoomSpinBox.setSuffix(" %")
self.zoomSpinBox.setValue(100)
self.zoomSpinBox.setToolTip("Zoom the image")
self.zoomSpinBox.setStatusTip(self.zoomSpinBox.toolTip())
self.zoomSpinBox.setFocusPolicy(Qt.NoFocus)
self.connect(self.zoomSpinBox,
SIGNAL("valueChanged(int)"), self.showImage)
editToolbar.addWidget(self.zoomSpinBox)
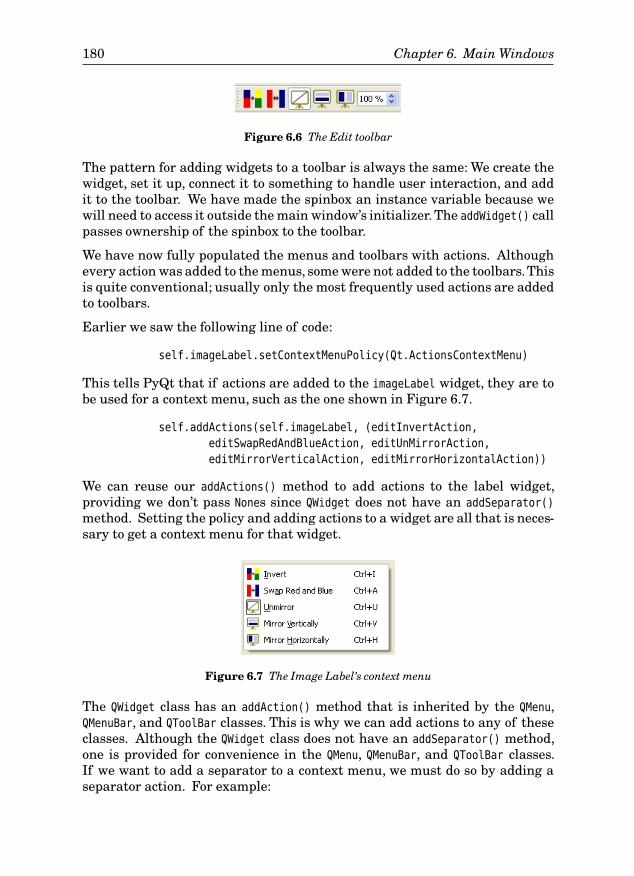
180 Chapter 6. Main Windows
Figure 6.6 The Edit toolbar
The pattern for adding widgets to a toolbar is always the same: We create thewidget, set it up, connect it to something to handle user interaction, and addit to the toolbar. We have made the spinbox an instance variable because wewill need to access it outside the main window’s initializer. The addWidget() callpasses ownership of the spinbox to the toolbar.
We have now fully populated the menus and toolbars with actions. Althoughevery action was added to the menus, some were not added to the toolbars.Thisis quite conventional; usually only the most frequently used actions are addedto toolbars.
Earlier we saw the following line of code:
self.imageLabel.setContextMenuPolicy(Qt.ActionsContextMenu)
This tells PyQt that if actions are added to the imageLabel widget, they are tobe used for a context menu, such as the one shown in Figure 6.7.
self.addActions(self.imageLabel, (editInvertAction,
editSwapRedAndBlueAction, editUnMirrorAction,
editMirrorVerticalAction, editMirrorHorizontalAction))
We can reuse our addActions() method to add actions to the label widget,providing we don’t pass Nones since QWidget does not have an addSeparator()
method. Setting the policy and adding actions to a widget are all that is neces-sary to get a context menu for that widget.
Figure 6.7 The Image Label’s context menu
The QWidget class has an addAction() method that is inherited by the QMenu,QMenuBar, and QToolBar classes. This is why we can add actions to any of theseclasses. Although the QWidget class does not have an addSeparator() method,one is provided for convenience in the QMenu, QMenuBar, and QToolBar classes.If we want to add a separator to a context menu, we must do so by adding aseparator action. For example:
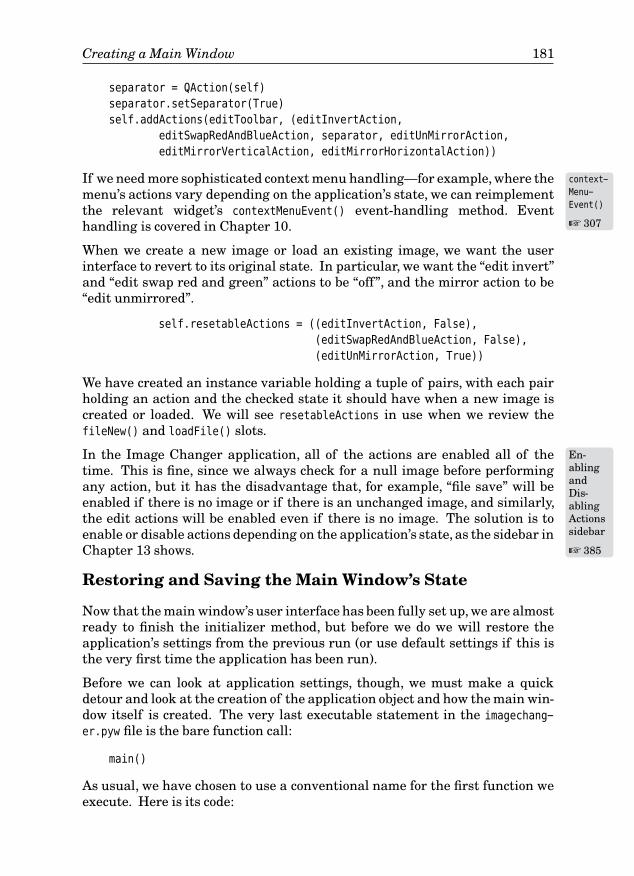
Creating a Main Window 181
separator = QAction(self)
separator.setSeparator(True)
self.addActions(editToolbar, (editInvertAction,
editSwapRedAndBlueAction, separator, editUnMirrorAction,
editMirrorVerticalAction, editMirrorHorizontalAction))
If we need more sophisticated context menu handling—for example, where context-
Menu-
Event()
☞ 307
themenu’s actions vary depending on the application’s state, we can reimplementthe relevant widget’s contextMenuEvent() event-handling method. Eventhandling is covered in Chapter 10.
When we create a new image or load an existing image, we want the userinterface to revert to its original state. In particular, we want the “edit invert”and “edit swap red and green” actions to be “off”, and the mirror action to be“edit unmirrored”.
self.resetableActions = ((editInvertAction, False),
(editSwapRedAndBlueAction, False),
(editUnMirrorAction, True))
We have created an instance variable holding a tuple of pairs, with each pairholding an action and the checked state it should have when a new image iscreated or loaded. We will see resetableActions in use when we review thefileNew() and loadFile() slots.
In the Image Changer application, all of the actions are enabled all of En-ablingandDis-ablingActionssidebar
☞ 385
thetime. This is fine, since we always check for a null image before performingany action, but it has the disadvantage that, for example, “file save” will beenabled if there is no image or if there is an unchanged image, and similarly,the edit actions will be enabled even if there is no image. The solution is toenable or disable actions depending on the application’s state, as the sidebar inChapter 13 shows.
Restoring and Saving the Main Window’s State
Now that the main window’s user interface has been fully set up, we are almostready to finish the initializer method, but before we do we will restore theapplication’s settings from the previous run (or use default settings if this isthe very first time the application has been run).
Before we can look at application settings, though, we must make a quickdetour and look at the creation of the application object and how the main win-dow itself is created. The very last executable statement in the imagechang-
er.pyw file is the bare function call:
main()
As usual, we have chosen to use a conventional name for the first function weexecute. Here is its code:
182 Chapter 6. Main Windows
def main():
app = QApplication(sys.argv)
app.setOrganizationName("Qtrac Ltd.")
app.setOrganizationDomain("qtrac.eu")
app.setApplicationName("Image Changer")
app.setWindowIcon(QIcon(":/icon.png"))
form = MainWindow()
form.show()
app.exec_()
The function’s first line is one we have seen many times before. The next threelines are new. Our primary use of them is for loading and saving applicationsettings. If we create a QSettings object without passing any arguments, itwill use the organization name or domain (depending on platform), and theapplication name that we have set here. So, by setting these once on theapplication object, we don’t have to remember to pass them whenever we needa QSettings instance.
But what do these names mean? They are used by PyQt to save the applica-tion’s settings in the most appropriate place—for example, in the Windowsregistry, or in a directory under $HOME/.config on Linux, or in $HOME/Library/
Preferences on Mac OS X. The registry keys or file and directory names are de-rived from the names we give to the application object.
We can tell that the icon file is loaded from the qrc_resources module becauseits path begins with :/.
After we have set up the application object, we create the main window, showit, and start off the event loop, in the same way as we have done in examplesin previous chapters.
Now we can return to where we got up to in the MainWindow.__init__() method,and see how it restores system settings.
settings = QSettings()
self.recentFiles = settings.value("RecentFiles").toStringList()
size = settings.value("MainWindow/Size",
QVariant(QSize(600, 500))).toSize()
self.resize(size)
position = settings.value("MainWindow/Position",
QVariant(QPoint(0, 0))).toPoint()
self.move(position)
self.restoreState(
settings.value("MainWindow/State").toByteArray())
self.setWindowTitle("Image Changer")
self.updateFileMenu()
QTimer.singleShot(0, self.loadInitialFile)

Creating a Main Window 183
We begin by creating a QSettings object. Since we passed no arguments, thenames held by the application object are used to locate the settings informa-tion. We begin by retrieving the recently used files list. The QSettings.value()
method always returns a QVariant, so we must convert it to the data type we areexpecting.
Next, we use the two-argument form of value(), where the second argument isa default value.This means that the very first time the application is run, it hasno settings at all, so we will get a QSize() object with a width of 600 pixels anda height of 500 pixels.★ On subsequent runs, the size returned will be whateverthe size of the main window was when the application was terminated—solong as we remember to save the size when the application terminates. Oncewe have a size, we resize the main window to the given size. After gettingthe previous (or default) size, we retrieve and set the position in exactly thesame way.
There is no flickering, because the resizing and positioning are done in themain window’s initializer, before the window is actually shown to the user.
Qt 4.2 introduced two new QWidget methods for saving and restoring a top-levelwindow’s geometry. Unfortunately, a bug meant that they were Qt
4.3
not reliablein all situations on X11-based systems, and for this reason we have restoredthe window’s size and position as separate items. Qt 4.3 has fixed the bug, sowith Qt 4.3 (e.g., with PyQt 4.3), instead of retrieving the size and position andcalling resize() and move(), everything can be done using a single line:
self.restoreGeometry(settings.value("Geometry").toByteArray())
This assumes that the geometry was saved when the application was close-
Event()
☞ 185
terminat-ed, as we will see when we look at the closeEvent().
The QMainWindow class provides a restoreState() method and a saveState()
method; these methods restore from and save to a QByteArray. The data theysave and restore are the dock window sizes and positions, and the toolbarpositions—but they work only for dock widgets and toolbars that have uniqueobject names.
After setting the window’s title,we call updateFileMenu() to create the Filemenu.Unlike the other menus, the File menu is generated dynamically; this is sothat it can show any recently used files. The connection from the File menu’saboutToShow() signal to the updateFileMenu() method means that the Filemenuis created afresh whenever the user clicks File in the menu bar, or presses Alt+F.But until this method has been called for the first time, the Filemenu does notexist—which means that the keyboard shortcuts for actions that have not beenadded to a toolbar, such as Ctrl+Q for “file quit”, will not work. In view of this,we explicitly call updateFileMenu() to create an initial Filemenu and to activatethe keyboard shortcuts.
★PyQt’s documentation rarely gives units of measurement because it is assumed that the unitsare pixels, except for QPrinter, which uses points.
184 Chapter 6. Main Windows
Doing Lots of Processing at Start-Up
If we need to do lots of processing at start-up—for example, if we need toload in lots of large files, we always do so in a separate loading method. Atthe end of the main form’s constructor, the loading method is called througha zero-timeout single-shot timer.
What would happen if we didn’t use a single-shot timer? Imagine, for ex-ample, that the method was loadInitialFiles() and that it loaded lots ofmultimegabyte files. The file loading would be done when the main windowwas being created, that is, before the show() call, and before the event loop(exec_()) had been started. This means that the user might experience along delay between launching the application and actually seeing the ap-plication’s window appear on-screen. Also, if the file loading might resultin message boxes being popped up—for example, to report errors—it makesmore sense to have these appear after the main window is shown, and whenthe event loop is running.
We want the main window to appear as quickly as possible so that theuser knows that the launch was successful, and so that they can see anylong-running processes, like loading large files, through the main window’suser interface. This is achieved by using a single-shot timer as we did in theImage Changer example.
This works because a single-shot timer with a timeout of zero does notexecute the slot it is given immediately. Instead, it puts the slot to be calledin the event queue and then simply returns. At this point, the end of themain window’s initializer is reached and the initialization is complete. Thevery next statement (in main()) is a show() call on the main window, and thisdoes nothing except add a show event to the event queue. So, now the eventqueue has a timer event and a show event. A timer event with a timeout ofzero is taken to mean “do this when the event queue has nothing else to do”,so when the next statement,exec_(), is reached and starts off the event loop,it always chooses to handle the show event first, so the form appears, andthen, with no other events left, the single-shot timer’s event is processed,and the loadInitialFiles() call is made.
The initializer’s last line looks rather peculiar. A single-shot timer takes atimeout argument (in milliseconds), and a method to call when the timeout oc-curs. So, it looks as though the line could have been written like this instead:
self.loadInitialFile()
In this application, where we load at most only one initial file, and where thatfile is very unlikely to be as big even as 1MB, we could use either approachwithout noticing any difference. Nonetheless, calling the method directly isnot the same as using a single-shot timer with a zero timeout,as the Doing Lotsof Processing at Start-Up sidebar explains.
Creating a Main Window 185
We have finished reviewing the code for initializing the main window, so nowwe can begin looking at the other methods that must be implemented to pro-vide the application’s functionality. Although the Image Changer application isjust one specific example, to the greatest extent possible we have made the codeeither generic or easily adaptable so that it could be used as the basis for othermain-window-style applications, even ones that are completely different.
In view of the discussions we have just had, it seems appropriate to begin ourcoverage with the loadInitialFile() method.
def loadInitialFile(self):
settings = QSettings()
fname = unicode(settings.value("LastFile").toString())
if fname and QFile.exists(fname):
self.loadFile(fname)
This method uses a QSettings object to get the last image that the applicationused. If there was such an image, and it still exists, the program attempts toload it. We will review loadFile() when we cover the file actions.
We could just as easily have written if fname and os.access(fname, os.F_OK): Itmakes no noticable difference here, but for multiperson projects, it may be wiseto have a policy of preferring PyQt over the standard Python libraries or viceversa in cases like this, just to keep things as simple and clear as possible.
We discussed restoring the application’s state a little earlier, so it seemsappropriate to cover the close event, since that is where we save the applica-tion’s state.
def closeEvent(self, event):
if self.okToContinue():
settings = QSettings()
filename = QVariant(QString(self.filename)) \
if self.filename is not None else QVariant()
settings.setValue("LastFile", filename)
recentFiles = QVariant(self.recentFiles) \
if self.recentFiles else QVariant()
settings.setValue("RecentFiles", recentFiles)
settings.setValue("MainWindow/Size", QVariant(self.size()))
settings.setValue("MainWindow/Position",
QVariant(self.pos()))
settings.setValue("MainWindow/State",
QVariant(self.saveState()))
else:
event.ignore()
If the user attempts to close the application, by whatever means (apart fromkilling or crashing it), the closeEvent() method is called. We begin by callingour own custom okToContinue() method; this returns True if the user really
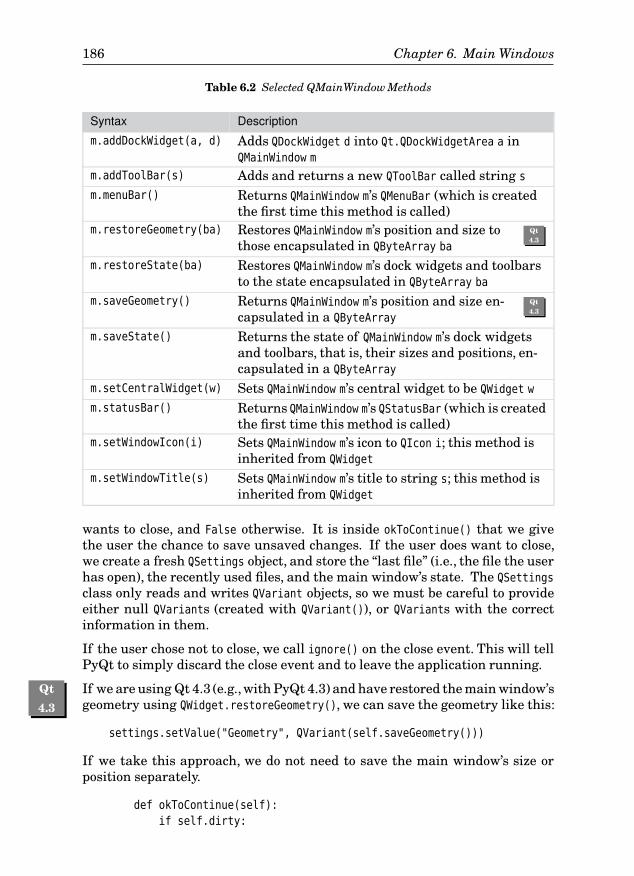
186 Chapter 6. Main Windows
Table 6.2 Selected QMainWindow Methods
Syntax Description
m.addDockWidget(a, d) Adds QDockWidget d into Qt.QDockWidgetArea a inQMainWindow m
m.addToolBar(s) Adds and returns a new QToolBar called string s
m.menuBar() Returns QMainWindow m’s QMenuBar (which is createdthe first time this method is called)
m.restoreGeometry(ba) Restores QMainWindow m’s position and size tothose encapsulated in QByteArray ba
Qt 4.3
m.restoreState(ba) Restores QMainWindow m’s dock widgets and toolbarsto the state encapsulated in QByteArray ba
m.saveGeometry() Returns QMainWindow m’s position and size en-capsulated in a QByteArray
Qt 4.3
m.saveState() Returns the state of QMainWindow m’s dock widgetsand toolbars, that is, their sizes and positions, en-capsulated in a QByteArray
m.setCentralWidget(w) Sets QMainWindow m’s central widget to be QWidget w
m.statusBar() Returns QMainWindow m’s QStatusBar (which is createdthe first time this method is called)
m.setWindowIcon(i) Sets QMainWindow m’s icon to QIcon i; this method isinherited from QWidget
m.setWindowTitle(s) Sets QMainWindow m’s title to string s; this method isinherited from QWidget
wants to close, and False otherwise. It is inside okToContinue() that we givethe user the chance to save unsaved changes. If the user does want to close,we create a fresh QSettings object, and store the “last file” (i.e., the file the userhas open), the recently used files, and the main window’s state. The QSettings
class only reads and writes QVariant objects, so we must be careful to provideeither null QVariants (created with QVariant()), or QVariants with the correctinformation in them.
If the user chose not to close, we call ignore() on the close event. This will tellPyQt to simply discard the close event and to leave the application running.
If we are using Qt 4.3 (e.g.,with PyQt 4.3) and have restored the main window’s Qt
4.3 geometry using QWidget.restoreGeometry(), we can save the geometry like this:
settings.setValue("Geometry", QVariant(self.saveGeometry()))
If we take this approach, we do not need to save the main window’s size orposition separately.
def okToContinue(self):
if self.dirty:
Creating a Main Window 187
reply = QMessageBox.question(self,
"Image Changer - Unsaved Changes",
"Save unsaved changes?",
QMessageBox.Yes|QMessageBox.No|
QMessageBox.Cancel)
if reply == QMessageBox.Cancel:
return False
elif reply == QMessageBox.Yes:
self.fileSave()
return True
This method is used by the closeEvent(), and by the “file new” and “file open”actions. If the image is “dirty”, that is, if it has unsaved changes, we pop up amessage box and ask the user what they want to do. If they click Yes, we savethe image to disk and return True. If they click No, we simply return True, so theunsaved changes will be lost. If they clickCancel, we return False, which meansthat the unsaved changes are not saved, but the current image will remaincurrent, so it could be saved later.
All the examples in the book use yes/no or yes/no/cancel message boxes to givethe user the opportunity to save unsaved changes. An alternative favored bysome developers is to use Save and Discard buttons (using the QMessageBox.Save
and QMessageBox.Discard button specifiers), instead.
The recently used files list is part of the application’s state that must not onlybe saved and restored when the application is terminated and executed, butalso kept current at runtime. Earlier we connected the fileMenu’s aboutToShow()signal to a custom updateFileMenu() slot. So, when the user presses Alt+F orclicks the Filemenu, this slot is called before the Filemenu is shown.
def updateFileMenu(self):
self.fileMenu.clear()
self.addActions(self.fileMenu, self.fileMenuActions[:-1])
current = QString(self.filename) \
if self.filename is not None else None
recentFiles = []
for fname in self.recentFiles:
if fname != current and QFile.exists(fname):
recentFiles.append(fname)
if recentFiles:
self.fileMenu.addSeparator()
for i, fname in enumerate(recentFiles):
action = QAction(QIcon(":/icon.png"), "&%d %s" % (
i + 1, QFileInfo(fname).fileName()), self)
action.setData(QVariant(fname))
self.connect(action, SIGNAL("triggered()"),
self.loadFile)
self.fileMenu.addAction(action)
188 Chapter 6. Main Windows
The Static QMessageBox Methods
The QMessageBox class offers several static convenience methods that popup a modal dialog with a suitable icon and buttons. They are useful foroffering users dialogs that have a single OK button, or Yes and No buttons,and similar.The most commonly used QMessageBox static methods are critical(), infor-mation(), question(), and warning(). The methods take a parent widget (overwhich they center themselves),window title text,message text (which can beplain text or HTML), and zero or more button specifications. If no buttonsare specified, a single OK button is provided.
The buttons can be specified using constants, or we can provide our own text.In Qt 4.0 and Qt 4.1, it was very common to bitwise OR QMessageBox.Default
with OK or Yes buttons—this means the button will be pressed if the userpresses Enter, and to bitwise OR QMessageBox.Escape with the Cancel or Nobuttons, which will then be pressed if the user presses Esc. For example:
reply = QMessageBox.question(self,
"Image Changer - Unsaved Changes", "Save unsaved changes?",
QMessageBox.Yes|QMessageBox.Default,
QMessageBox.No|QMessageBox.Escape)
The methods return the constant of the button that was pressed.
From Qt 4.2, the QMessageBox API has been simplified so that instead Qt
4.2
ofspecifying buttons and using bitwise ORs, we can just use buttons. Forexample, for a yes/no/cancel dialog we could write:
reply = QMessageBox.question(self,
"Image Changer - Unsaved Changes", "Save unsaved changes?",
QMessageBox.Yes|QMessageBox.No|QMessageBox.Cancel)
In this case,PyQt will automatically make theYes (accept)button the defaultbutton,activated by the user pressing Enter, and theCancel (reject)button theescape button, activated by the user pressing Esc. The QMessageBox methodsalso make sure that the buttons are shown in the correct order for the plat-form. We use the Qt 4.2 syntax for the examples in this book.
The message box is closed by the user clicking the “accept” button (oftenYes or OK) or the “reject” button (often No or Cancel). The user can also, ineffect, press the “reject” button by clicking the window’s close button, X, orby pressing Esc.
If we want to create a customized message box—for example, using cus-tom button texts and a custom icon—we can create a QMessageBox instance.We can then use methods such as QMessageBox.addButton() and QMessage-
Box.setIcon(), and pop up the message box by calling QMessageBox.exec_().
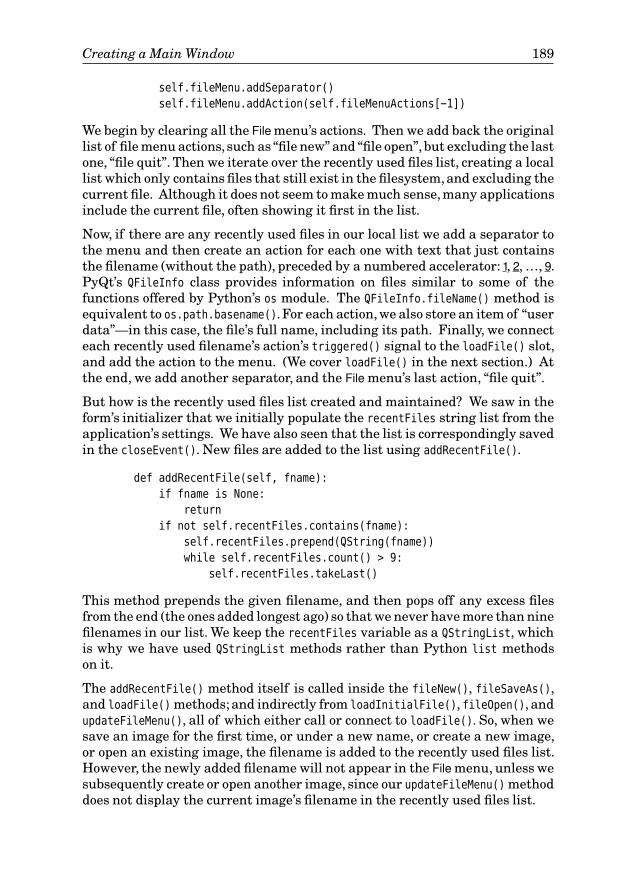
Creating a Main Window 189
self.fileMenu.addSeparator()
self.fileMenu.addAction(self.fileMenuActions[-1])
We begin by clearing all the Filemenu’s actions. Then we add back the originallist of file menu actions, such as “file new” and “file open”,but excluding the lastone, “file quit”. Then we iterate over the recently used files list, creating a locallist which only contains files that still exist in the filesystem, and excluding thecurrent file. Although it does not seem to make much sense, many applicationsinclude the current file, often showing it first in the list.
Now, if there are any recently used files in our local list we add a separator tothe menu and then create an action for each one with text that just containsthe filename (without the path), preceded by a numbered accelerator:1, 2, …, 9.PyQt’s QFileInfo class provides information on files similar to some of thefunctions offered by Python’s os module. The QFileInfo.fileName() method isequivalent to os.path.basename().For each action, we also store an item of “userdata”—in this case, the file’s full name, including its path. Finally, we connecteach recently used filename’s action’s triggered() signal to the loadFile() slot,and add the action to the menu. (We cover loadFile() in the next section.) Atthe end, we add another separator, and the Filemenu’s last action, “file quit”.
But how is the recently used files list created and maintained? We saw in theform’s initializer that we initially populate the recentFiles string list from theapplication’s settings. We have also seen that the list is correspondingly savedin the closeEvent(). New files are added to the list using addRecentFile().
def addRecentFile(self, fname):
if fname is None:
return
if not self.recentFiles.contains(fname):
self.recentFiles.prepend(QString(fname))
while self.recentFiles.count() > 9:
self.recentFiles.takeLast()
This method prepends the given filename, and then pops off any excess filesfrom the end (the ones added longest ago) so that we never have more than ninefilenames in our list. We keep the recentFiles variable as a QStringList, whichis why we have used QStringList methods rather than Python list methodson it.
The addRecentFile() method itself is called inside the fileNew(), fileSaveAs(),and loadFile() methods; and indirectly from loadInitialFile(), fileOpen(), andupdateFileMenu(), all of which either call or connect to loadFile(). So, when wesave an image for the first time, or under a new name, or create a new image,or open an existing image, the filename is added to the recently used files list.However, the newly added filename will not appear in the Filemenu, unless wesubsequently create or open another image, since our updateFileMenu() methoddoes not display the current image’s filename in the recently used files list.
190 Chapter 6. Main Windows
Figure 6.8 The File menu with some recently used files
The approach to handling recently used files that we have taken here is justone of many possibilities. An alternative is to create the File menu just once,with a set of actions at the end for recently used files. When the menu isupdated, instead of being cleared and re-created, the actions set aside forrecently used files are simply hidden or shown, in the latter case having hadtheir filenames updated to reflect the current set of recently used files. Fromthe user’s point of view, there is no discernable difference whichever approachwe take under the hood, so in either case the Filemenu will look similar to theone shown in Figure 6.8.
Both approaches can be used to implement recently used files in a File menu,adding the list at the end as we have done in the Image Changer application,just before the Quit option. They can also both be used to implement the OpenRecent File menu option that has all the recent files as a submenu, as used byOpenOffice.org and some other applications. The benefits of using a separateOpen Recent File option is that the Filemenu is always the same, and full pathscan be shown in the submenu—something we avoid when putting recentlyused files directly in the File menu so that it doesn’t become extremely wide(and therefore, ugly).
Handling User Actions
In the preceding section, we created the appearance of our main-window-styleapplication and provided its behavioral infrastructure by creating a set ofactions. We also saw how to save and restore application settings, and how tomanage a recently used files list.
Some of an application’s behavior is automatically handled by PyQt—forexample, window minimizing, maximizing, and resizing—so we do not have todo this ourselves. Some other behaviors can be implemented purely throughsignals and slots connections. In this section we are concerned with the actions
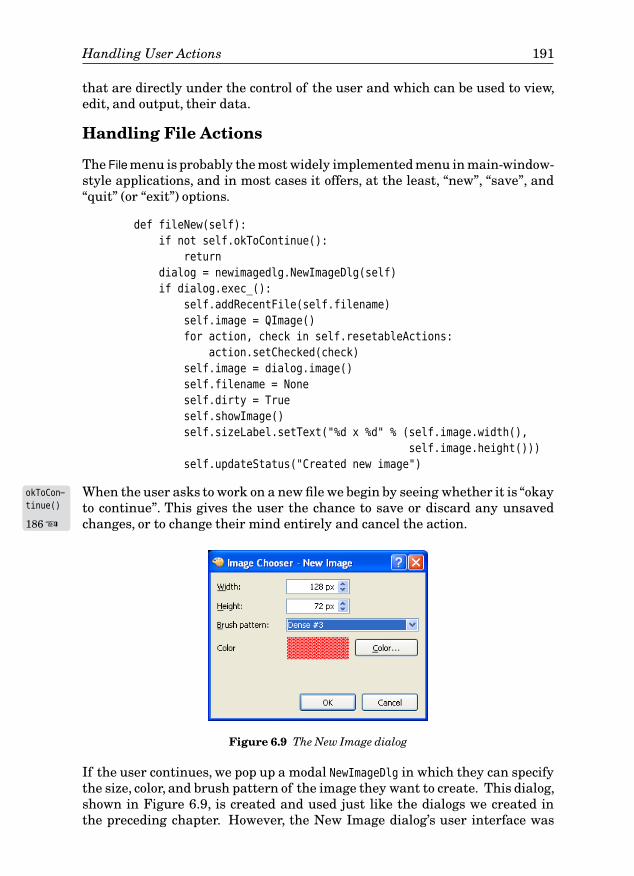
Handling User Actions 191
that are directly under the control of the user and which can be used to view,edit, and output, their data.
Handling File Actions
The Filemenu is probably the most widely implemented menu in main-window-style applications, and in most cases it offers, at the least, “new”, “save”, and“quit” (or “exit”) options.
def fileNew(self):
if not self.okToContinue():
return
dialog = newimagedlg.NewImageDlg(self)
if dialog.exec_():
self.addRecentFile(self.filename)
self.image = QImage()
for action, check in self.resetableActions:
action.setChecked(check)
self.image = dialog.image()
self.filename = None
self.dirty = True
self.showImage()
self.sizeLabel.setText("%d x %d" % (self.image.width(),
self.image.height()))
self.updateStatus("Created new image")
When the user asks to work on a new file we begin by seeing whether it isokToCon-
tinue()
186 ☞
“okayto continue”. This gives the user the chance to save or discard any unsavedchanges, or to change their mind entirely and cancel the action.
Figure 6.9 The New Image dialog
If the user continues, we pop up a modal NewImageDlg in which they can specifythe size, color, and brush pattern of the image they want to create. This dialog,shown in Figure 6.9, is created and used just like the dialogs we created inthe preceding chapter. However, the New Image dialog’s user interface was
192 Chapter 6. Main Windows
created using Qt Designer, and the user interface file must be convertedinto a module file, using pyuic4, for the dialog to be usable. This can be donedirectly by running pyuic4, or by running either mkpyqt.py or mk-
pyqt.py
andMakePyQtsidebar
☞ 207
Make PyQt, bothof which are easier since they work out the correct command-line argumentsautomatically. We will cover all of these matters in the next chapter.
If the user accepts the dialog, we add the current filename (if any) to therecently used files list. Then we set the current image to be a null image, toensure that any changes to checkable actions have no effect on the image. Nextwe go through the actions that we want to be reset when a new image is createdor loaded, setting each one to our preferred default value. Now we can safelyset the image to the one created by the dialog.
We set the filename to be None and the dirty flag to be True to ensure thatthe user will be prompted to save the image and asked for a filename, if theyterminate the application or attempt to create or load another image.
We then call showImage() which displays the image in the imageLabel, scaledaccording to the zoom factor. Finally, we update the size label in the status bar,and call updateStatus().
def updateStatus(self, message):
self.statusBar().showMessage(message, 5000)
self.listWidget.addItem(message)
if self.filename is not None:
self.setWindowTitle("Image Changer - %s[*]" % \
os.path.basename(self.filename))
elif not self.image.isNull():
self.setWindowTitle("Image Changer - Unnamed[*]")
else:
self.setWindowTitle("Image Changer[*]")
self.setWindowModified(self.dirty)
We begin by showing the message that has been passed, with a timeout of fiveseconds.We also add the message to the log widget to keep a log of every actionthat has taken place.
If the user has opened an existing file, or has saved the current file, we willhave a filename. We put the filename in the window’s title using Python’sos.path.basename() function to get the filename without the path. We could justas easily have written QFileInfo(fname).fileName() instead, as we did earlier.If there is no filename and the image variable is not a null image, it meansthat the user has created a new image, but has not yet saved it; so we use afake filename of “Unnamed”. The last case is where no file has been openedor created.
Regardless of what we set the window title to be, we include the string "[*]"
somewhere inside it. This string is never displayed as it is: Instead it is usedto indicate whether the file is dirty. On Linux and Windows this means that
Handling User Actions 193
the filename will be shown unadorned if it has no unsaved changes, andwith an asterisk (*) replacing the "[*]" string otherwise. On Mac OS X, theclose button will be shown with a dot in it if there are unsaved changes. Themechanism depends on the window modified status, so we make sure we setthat to the state of the dirty flag.
def fileOpen(self):
if not self.okToContinue():
return
dir = os.path.dirname(self.filename) \
if self.filename is not None else "."
formats = ["*.%s" % unicode(format).lower() \
for format in QImageReader.supportedImageFormats()]
fname = unicode(QFileDialog.getOpenFileName(self,
"Image Changer - Choose Image", dir,
"Image files (%s)" % " ".join(formats)))
if fname:
self.loadFile(fname)
If the user asks to open an existing image, we first make sure that theyhave had the chance to save or discard any unsaved changes, or to cancel theaction entirely.
If the user has decided to continue, as a courtesy, we want to pop up a file opendialog set to a sensible directory. If we already have an image filename, weuse its path; otherwise, we use “.”, the current directory. We have also chosento pass in a file filter string that limits the image file types the file open dialogcan show. Such file types are defined by their extensions, and are passed asa string. The string may specify multiple extensions for a single type, andmultiple types. For example, a text editor might pass a string of:
"Text files (*.txt)\nHTML files (*.htm *.html)"
If there is more than one type, we must separate them with newlines. If a typecan handle more than one extension, we must separate the extensions withspaces. The string shown will produce a file type combobox with two items,“Text files” and “HTML files”, and will ensure that the only file types shown inthe dialog are those that have an extension of .txt, .htm, or .html.
In the case of the Image Changer application, we use the list of image typeextensions for the image types that can be read by the version of PyQt that theapplication is using. At the very least, this is likely to include .bmp, .jpg (and.jpeg, the same as .jpg), and .png.List
compre-hen-sions
53 ☞
The list comprehension iterates over thereadable image extensions and creates a list of strings of the form “*.bmp”,“*.jpg”, and so on; these are joined, space-separated, into a single string by thestring join() method.
194 Chapter 6. Main Windows
The QFileDialog.getOpenFileName() method returns a QString which eitherholds a filename (with the full path), or is empty (if the user canceled). If theuser chose a filename, we call loadFile() to load it.
Here, and throughout the program, when we have needed the application’sname we have simply written it. But since we set the name in the applicationobject in main() to simplify our QSettings usage, we could instead retrievethe name whenever it was required. In this case, the relevant code wouldthen become:
fname = unicode(QFileDialog.getOpenFileName(self,
"%s - Choose Image" % QApplication.applicationName(),
dir, "Image files (%s)" % " ".join(formats)))
It is surprising how frequently the name of the application is used. The fileimagechanger.pyw is less than 500 lines, but it uses the application’s namea dozen times. Some developers prefer to use the method call to guaranteeconsistency. We will discuss string handling further in Chapter 17, when wecover internationalization.
If the user opens a file, the loadFile() method is called to actually perform theloading. We will look at this method in two parts.
def loadFile(self, fname=None):
if fname is None:
action = self.sender()
if isinstance(action, QAction):
fname = unicode(action.data().toString())
if not self.okToContinue():
return
else:
return
If the method is called from the fileOpen() method or from the loadInitial-
File() method, it is passed the filename to open. But if it is called from arecently used file action, no filename is passed. We can use this difference todistinguish the two cases. If a recently used file action was invoked,we retrievethe sending object. This should be a QAction, but we check to be safe, and thenextract the action’s user data, in which we stored the recently used file’s fullname including its path. User data is held as a QVariant, so we must convert itto a suitable type. At this point, we check to see whether it is okay to continue.We do not have to make this test in the “file open” case, because there, the checkis made before the user is even asked for the name of a file to open. So now, ifthe method has not returned, we know that we have a filename in fname thatwe must try to load.
if fname:
self.filename = None
image = QImage(fname)
Handling User Actions 195
if image.isNull():
message = "Failed to read %s" % fname
else:
self.addRecentFile(fname)
self.image = QImage()
for action, check in self.resetableActions:
action.setChecked(check)
self.image = image
self.filename = fname
self.showImage()
self.dirty = False
self.sizeLabel.setText("%d x %d" % (
image.width(), image.height()))
message = "Loaded %s" % os.path.basename(fname)
self.updateStatus(message)
We begin by making the current filename None and then we attempt to readthe image into a local variable. PyQt does not use exception handling, so errorsmust always be discovered indirectly. In this case, a null image means that forsome reason we failed to load the image. Ifadd-
Recent-
File()
189 ☞
the load was successful we add thenew filename to the recently used files list, where it will appear only if anotherfile is subsequently opened, or if this one is saved under another name. Next,we set the instance image variable to be a null image: This means that we arefree to reset the checkable actions to our preferred defaults without any sideeffects. This works because when the checkable actions are changed, althoughthe relevant methods will be called due to the signal–slot connections, themethods do nothing if the image is null.
After the preliminaries, we assign the local image to the image instancevariable and the local filename to the filename instance variable. Next, we callshowImage() to show the image at the current zoom factor, clear the dirty flag,and update the size label. Finally, we call updateStatus() to show the messagein the status bar, and to update the log widget.
def fileSave(self):
if self.image.isNull():
return
if self.filename is None:
self.fileSaveAs()
else:
if self.image.save(self.filename, None):
self.updateStatus("Saved as %s" % self.filename)
self.dirty = False
else:
self.updateStatus("Failed to save %s" % self.filename)
The fileSave() method,and many others,act on the application’s data (a QImage
instance), but make no sense if there is no image data. For this reason, many
196 Chapter 6. Main Windows
of the methods do nothing and return immediately if there is no image datafor them to work on.
If there is image data, and the filename is None, the user must have invoked the“file new” action, and is now saving their image for the first time. For this case,we pass on the work to the fileSaveAs() method.
If we have a filename, we attempt to save the image using QImage.save(). Thismethod returns a Boolean success/failure flag, in response to which we updatethe status accordingly. (We have deferred coverage of loading and savingcustom file formats to Chapter 8, since we are concentrating purely on mainwindow functionality in this chapter.)
def fileSaveAs(self):
if self.image.isNull():
return
fname = self.filename if self.filename is not None else "."
formats = ["*.%s" % unicode(format).lower() \
for format in QImageWriter.supportedImageFormats()]
fname = unicode(QFileDialog.getSaveFileName(self,
"Image Changer - Save Image", fname,
"Image files (%s)" % " ".join(formats)))
if fname:
if "." not in fname:
fname += ".png"
self.addRecentFile(fname)
self.filename = fname
self.fileSave()
When the “file save as” action is triggered we begin by retrieving the currentfilename. If the filename is None, we set it to be “.”, the current directory. Wethen use the QFileDialog.getSaveFileName() dialog to prompt the user to giveus a filename to save under. If the current filename is not None, we use that asthe default name—the file save dialog takes care of giving a warning yes/nodialog if the user chooses the name of a file that already exists. We use thesame technique for setting the file filters string as we used for the “file open”action, but this time using the list of image formats that this version of PyQtcan write (which may be different from the list of formats it can read).
If the user entered a filename that does not include a dot, that is, it has noextension, we set the extension to be .png. Next, we add the filename to therecently used files list (so that it will appear if a different file is subsequentlyopened, or if this one is saved under a new name), set the filename instancevariable to the name, and pass the work of saving to the fileSave() methodthat we have just reviewed.
The last file action we must consider is “file print”. When this action is invokedthe filePrint() method is called. This method paints the image on a printer.Since the method uses techniques that we have not covered yet, we will defer
Handling User Actions 197
discussion of it until later. The technique it Print-ingImagessidebar
☞ 363
uses is shown in the PrintingImages sidebar, and coverage of the filePrint() method itself is in Chapter 13(from page 400), where we also discuss approaches to printing documentsin general.
The only file action we have not reviewed is the “file quit” action. This actionis connected to the main window’s close() method, which in turn causes aclose event to be put on the event queue. Weclose-
Event()
185 ☞
provided a reimplementation ofthe closeEvent() handler in which we made sure the user had the chance tosave unsaved changes, using a call to okToContinue(), and where we saved theapplication’s settings.
Handling Edit Actions
Most of the functionality of the file actions was provided by the MainWindow
subclass itself. The only work passed on was the image loading and saving,which the QImage instance variable was required to do. This particular divisionof responsibilities between a main window and the data structure that holdsthe data is very common. The main window handles the high-level file new,open, save, and recently used files functionality,and the data structure handlesloading and saving.
It is also common for most, or even all, of the editing functionality to be provid-ed either by the view widget or by the data structure. In the Image Changerapplication, all the data manipulation is handled by the data structure (the im-
age QImage), and the presentation of the data is handled by the data viewer (theimageLabel QLabel). Again, this is a very common separation of responsibilities.
In this section, we will review most of the edit actions, omitting a couple thatare almost identical to ones that are shown. We will be quite brief here, sincethe functionality is specific to the Image Changer application.
def editInvert(self, on):
if self.image.isNull():
return
self.image.invertPixels()
self.showImage()
self.dirty = True
self.updateStatus("Inverted" if on else "Uninverted")
If the user invokes the “edit invert” action, it will be checked (or unchecked). Ineither case,we simply invert the image’spixelsusing the functionality providedby QImage, show the changed image, set the dirty flag, and call updateStatus()so that the status bar briefly shows the action that was performed, and an ad-ditional item is added to the log.
The editSwapRedAndBlue() method (not shown) is the same except that it usesthe QImage.rgbSwapped() method, and it has different status text.
198 Chapter 6. Main Windows
def editMirrorHorizontal(self, on):
if self.image.isNull():
return
self.image = self.image.mirrored(True, False)
self.showImage()
self.mirroredhorizontally = not self.mirroredhorizontally
self.dirty = True
self.updateStatus("Mirrored Horizontally" \
if on else "Unmirrored Horizontally")
This method is structurally the same as editInvert() and editSwapRedAndBlue().The QImage.mirrored() method takes two Boolean flags, the first for horizontalmirroring and the second for vertical mirroring. In the Image Changerapplication,we have deliberately restricted what mirroring is allowed, so userscan only have no mirroring, vertical mirroring, or horizontal mirroring, but nota combination of vertical and horizontal. We also keep an instance variablethat keeps track of whether the image is horizontally mirrored.
The editMirrorVertical() method, not shown, is virtually identical.
def editUnMirror(self, on):
if self.image.isNull():
return
if self.mirroredhorizontally:
self.editMirrorHorizontal(False)
if self.mirroredvertically:
self.editMirrorVertical(False)
This method switches off whichever mirroring is in force, or does nothing ifthe image is not mirrored. It does not set the dirty flag or update the status: Itleaves that for editMirrorHorizontal() or editMirrorVertical(), if it calls eitherof them.
The application provides two means by which the user can change the zoom fac-tor. They can interact with the zoom spinbox in the toolbar—its valueChanged()signal is connected to the showImage() slot that we will review shortly—or theycan invoke the “edit zoom” action in the Editmenu. If they use the “edit zoom”action, the editZoom() method is called.
def editZoom(self):
if self.image.isNull():
return
percent, ok = QInputDialog.getInteger(self,
"Image Changer - Zoom", "Percent:",
self.zoomSpinBox.value(), 1, 400)
if ok:
self.zoomSpinBox.setValue(percent)
Handling User Actions 199
We begin by using one of the QInputDialog class’s static methods to obtain azoom factor.The getInteger() method takes a parent (over which the dialog willcenter itself), a caption, text describing what data is wanted, an initial value,and, optionally, minimum and maximum values.
The QInputDialog provides some other static convenience methods, includinggetDouble() to get a floating-point value, getItem() to choose a string from a list,and getText() to get a string. For all of them, the return value is a two-tuple,containing the value and a Boolean flag indicating whether the user enteredand accepted a valid value.
If the user clicked OK, we set the zoom spinbox’s value to the given integer.If this value is different from the current value, the spinbox will emit a val-
ueChanged() signal. This signal is connected to the showImage() slot, so the slotwill be called if the user chose a new zoom percentage value.
def showImage(self, percent=None):
if self.image.isNull():
return
if percent is None:
percent = self.zoomSpinBox.value()
factor = percent / 100.0
width = self.image.width() * factor
height = self.image.height() * factor
image = self.image.scaled(width, height, Qt.KeepAspectRatio)
self.imageLabel.setPixmap(QPixmap.fromImage(image))
This slot is called when a new image is created or loaded, whenever a transfor-mation is applied, and in response to the zoom spinbox’s valueChanged() signal.This signal is emitted whenever the user changes the toolbar zoom spinbox’svalue, either directly using the mouse, or indirectly through the “edit zoom”action described earlier.
We retrieve the percentage and turn it into a zoom factor that we can use toproduce the image’s new width and height. We then create a copy of the imagescaled to the new size and preserving the aspect ratio, and set the imageLabel
to display this image. The label requires an image as a QPixmap, so we use thestatic QPixmap.fromImage() method to convert the QImage to a QPixmap.
Notice that zooming the image in this way has no effect on the original image;it is purely a change in view, not an edit. This is why the dirty flag does notneed to be set.
According to PyQt’s documentation, QPixmaps are optimized for on-screendisplay (so they are fast to draw), and QImages are optimized for editing (whichis why we have used them to hold the image data).
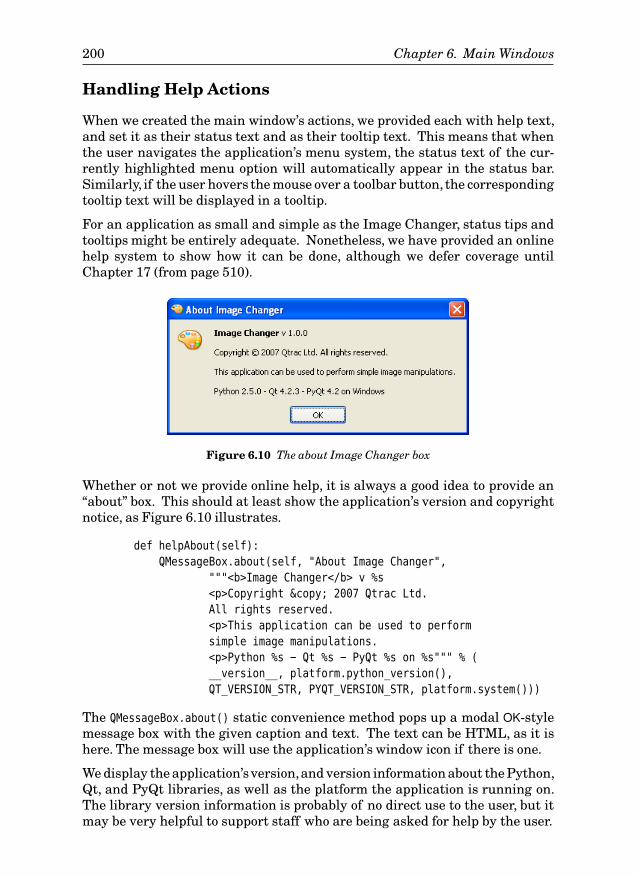
200 Chapter 6. Main Windows
Handling Help Actions
When we created the main window’s actions, we provided each with help text,and set it as their status text and as their tooltip text. This means that whenthe user navigates the application’s menu system, the status text of the cur-rently highlighted menu option will automatically appear in the status bar.Similarly, if the user hovers the mouse over a toolbar button, the correspondingtooltip text will be displayed in a tooltip.
For an application as small and simple as the Image Changer, status tips andtooltips might be entirely adequate. Nonetheless, we have provided an onlinehelp system to show how it can be done, although we defer coverage untilChapter 17 (from page 510).
Figure 6.10 The about Image Changer box
Whether or not we provide online help, it is always a good idea to provide an“about” box. This should at least show the application’s version and copyrightnotice, as Figure 6.10 illustrates.
def helpAbout(self):
QMessageBox.about(self, "About Image Changer",
"""<b>Image Changer</b> v %s
<p>Copyright © 2007 Qtrac Ltd.
All rights reserved.
<p>This application can be used to perform
simple image manipulations.
<p>Python %s - Qt %s - PyQt %s on %s""" % (
__version__, platform.python_version(),
QT_VERSION_STR, PYQT_VERSION_STR, platform.system()))
The QMessageBox.about() static convenience method pops up a modal OK-stylemessage box with the given caption and text. The text can be HTML, as it ishere. The message box will use the application’s window icon if there is one.
We display the application’sversion,and version information about the Python,Qt, and PyQt libraries, as well as the platform the application is running on.The library version information is probably of no direct use to the user, but itmay be very helpful to support staff who are being asked for help by the user.
Summary 201
Summary
Main-window-style applications are created by subclassing QMainWindow. Thewindow has a single widget (which may be composite and so contain otherwidgets) as its central widget.
Actions are used to represent the functionality the application provides toits users. These actions are held as QAction objects which have text (used inmenus), icons (used in both menus and toolbars), tooltips and status tips, andthat are connected to slots, which, when invoked, will perform the appropriateaction. Usually, all the actions are added to the main window’s menus, and themost commonly used ones are added to toolbars. To support keyboard users,weprovide keyboard shortcuts for frequently used actions, and menu acceleratorsto make menu navigation as quick and convenient as possible.
Some actions are checkable, and some groups of checkable actions may bemutually exclusive, that is, one and only one may be checked at any onetime. PyQt supports checkable actions by the setting of a single property, andsupports mutually exclusive groups of actions through QActionGroup objects.
Dock windows are represented by dock widgets and are easy to create and setup. Arbitrary widgets can be added to dock widgets and to toolbars, althoughin practice we only usually add small or letterbox-shaped widgets to toolbars.
Actions, action groups, and dock windows must all be given a parentexplicitly—the main window, for example—to ensure that they are deleted atthe right time. This is not necessary for the application’s other widgets andQObjects because they are all owned either by the main window or by one of themain window’s children. The application’s non-QObject objects can be left to bedeleted by Python’s garbage collector.
Applications often use resources (small files, such as icons, and data files), andPyQt’s resource mechanism makes accessing and using them quite easy. Theydo require an extra build step, though, either using PyQt’s pyrcc4 console ap-plication, or the mkpyqt.py or Make PyQt programs supplied with the book’sexamples.
Dialogs can be created entirely in code as we did in the preceding chapter, orusing Qt Designer, as we will see in the next chapter. If we need to incorporateQt Designer user interface files in our application, like resources they requirean extra build step, either using PyQt’s pyuic4 console application, or again,using mkpyqt.py or Make PyQt.
Once the main window’s visual appearance has been created by setting itscentral widget and by creating menus, toolbars, and perhaps dock windows,we can concern ourselves with loading and saving application settings. Manysettings are commonly loaded in the main window’s initializer, and settings arenormally saved (and the user given the chance to save unsaved changes) in areimplementation of the closeEvent() method.
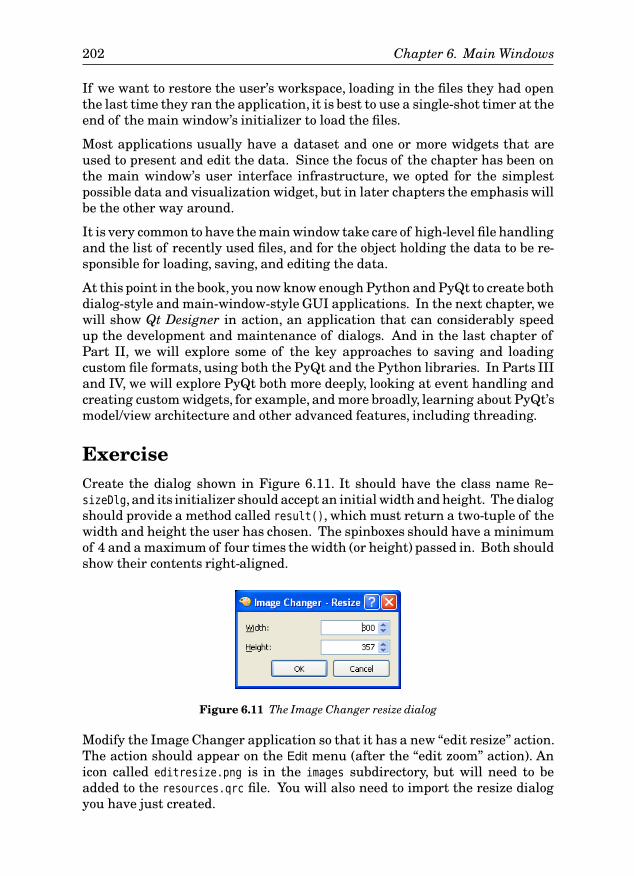
202 Chapter 6. Main Windows
If we want to restore the user’s workspace, loading in the files they had openthe last time they ran the application, it is best to use a single-shot timer at theend of the main window’s initializer to load the files.
Most applications usually have a dataset and one or more widgets that areused to present and edit the data. Since the focus of the chapter has been onthe main window’s user interface infrastructure, we opted for the simplestpossible data and visualization widget, but in later chapters the emphasis willbe the other way around.
It is very common to have the main window take care of high-level file handlingand the list of recently used files, and for the object holding the data to be re-sponsible for loading, saving, and editing the data.
At this point in the book, you now know enough Python and PyQt to create bothdialog-style and main-window-style GUI applications. In the next chapter, wewill show Qt Designer in action, an application that can considerably speedup the development and maintenance of dialogs. And in the last chapter ofPart II, we will explore some of the key approaches to saving and loadingcustom file formats, using both the PyQt and the Python libraries. In Parts IIIand IV, we will explore PyQt both more deeply, looking at event handling andcreating custom widgets, for example, and more broadly, learning about PyQt’smodel/view architecture and other advanced features, including threading.
ExerciseCreate the dialog shown in Figure 6.11. It should have the class name Re-
sizeDlg, and its initializer should accept an initial width and height. The dialogshould provide a method called result(), which must return a two-tuple of thewidth and height the user has chosen. The spinboxes should have a minimumof 4 and a maximum of four times the width (or height) passed in. Both shouldshow their contents right-aligned.
Figure 6.11 The Image Changer resize dialog
Modify the Image Changer application so that it has a new “edit resize” action.The action should appear on the Edit menu (after the “edit zoom” action). Anicon called editresize.png is in the images subdirectory, but will need to beadded to the resources.qrc file. You will also need to import the resize dialogyou have just created.
Exercise 203
The resize dialog should be used in an editResize() slot that the “edit resize”action should be connected to. The dialog is used like this:
form = resizedlg.ResizeDlg(self.image.width(),
self.image.height(), self)
if form.exec_():
width, height = form.result()
Unlike the editZoom() slot, the image itself should be changed, so the size label,status bar, and dirty status must all be changed if the size is changed. On theother hand, if the “new” size is the same as the original size, no resizing shouldtake place.
The resize dialog can be written in less than 50 lines, and the resize slot in lessthan 20 lines, with the new action just requiring an extra one or two lines in acouple of places in the main window’s initializer.
A model solution is in the files chap06/imagechanger_ans.pyw and chap06/resize-
dlg.py.

This page intentionally left blank
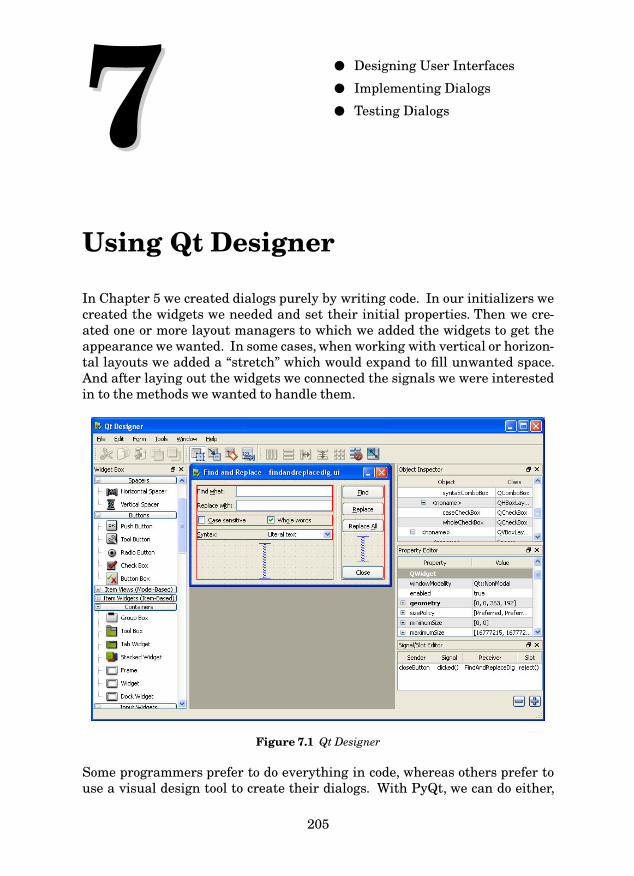
Using Qt Designer
77 ● Designing User Interfaces
● Implementing Dialogs
● Testing Dialogs
In Chapter 5 we created dialogs purely by writing code. In our initializers wecreated the widgets we needed and set their initial properties. Then we cre-ated one or more layout managers to which we added the widgets to get theappearance we wanted. In some cases, when working with vertical or horizon-tal layouts we added a “stretch” which would expand to fill unwanted space.And after laying out the widgets we connected the signals we were interestedin to the methods we wanted to handle them.
Figure 7.1 Qt Designer
Some programmers prefer to do everything in code, whereas others prefer touse a visual design tool to create their dialogs. With PyQt, we can do either,
205

206 Introduction
or even both. The Image Changer application from the preceding chapterhad two custom dialogs: the ResizeDlg, which was created purely in code (inthe exercise), and the NewImageDlg, which was created using Qt Designer. Weshowed how to do things in code first so that you would get a strong senseof how the layout managers work. But in this chapter we are going to createdialogs using Qt Designer, which is shown in Figure 7.1.
Qt Designer can be used to create user interfaces for dialogs, custom widgets,and main windows. We will only cover dialogs; custom widgets are almostthe same, only they are based on the “Widget” template rather than one ofthe “Dialog” templates. Using Qt Designer for main windows offers feweradvantages, apart from the convenience of a visual QAction editor. Qt Designercan also be used to create and edit resource files.
The user interfaces are stored in .ui files, and include details of a form’s wid-gets and layouts. In addition, Qt Designer can be used to associate labels withtheir “buddies”, and to set theBuddies
143 ☞
tab-order, that is, the order in which widgets getthe keyboard focus when the user presses the Tab key. This can also be donein code with QWidget.setTabOrder(), but it is rarely necessary for hand-codedforms, since the default is the order of widget creation, which is usually whatwe want. Qt Designer can also be used to make signal–slot connections, butonly between built-in signals and slots.
Chapter 7. Using Qt Designer
Once a user interface has been designed and saved in a .ui file, it must be con-verted into code before it can be used. This is done using the pyuic4 command-line program. For example:
C:\pyqt\chap07>pyuic4 -o ui_findandreplacedlg.py findandreplacedlg.ui
As mentioned in the previous chapter, we can use either mkpyqt.py or mk-
pyqt.py
andMakePyQtsidebar
☞ 207
MakePyQt to run pyuic4 for us. However, generating a Python module (a .py file)from a .ui file is not enough to make the user interface usable.★ Note that thegenerated code (in the ui_*.py files) should never be hand-edited because anychanges will be overwritten the next time pyuic4 is run.
From the end-user’s perspective, it makes no difference whether a dialog’suser interface is hand-coded or created with Qt Designer. However, there is asignificant difference in the implementation of a dialog’s initializer, since wemust create, lay out, and connect the dialog’s widgets if hand coding, but onlyneed to call a particular method to achieve the same thing with a dialog thatuses a Qt Designer user interface.
One great benefit of using Qt Designer, in addition to the convenience of design-ing dialogs visually, is that if we change the design, we only have to regeneratethe user interface module (using pyuic4 directly,or via mkpyqt.py or Make PyQt),and we do not need to change our code. The only time that we must change ourcode is if we add, delete, or rename widgets that we refer to in our code. This
★It is possible, though uncommon, to load and use the .ui file directly using PyQt4.uic.loadUi().
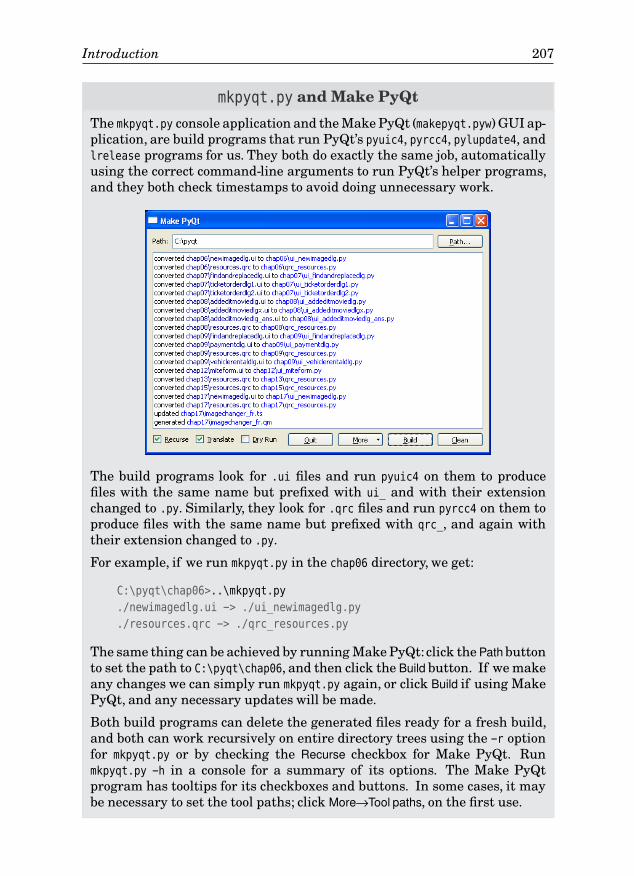
Introduction 207
mkpyqt.py and Make PyQt
The mkpyqt.py console application and the Make PyQt (makepyqt.pyw) GUI ap-plication, are build programs that run PyQt’s pyuic4, pyrcc4, pylupdate4, andlrelease programs for us. They both do exactly the same job, automaticallyusing the correct command-line arguments to run PyQt’s helper programs,and they both check timestamps to avoid doing unnecessary work.
The build programs look for .ui files and run pyuic4 on them to producefiles with the same name but prefixed with ui_ and with their extensionchanged to .py. Similarly, they look for .qrc files and run pyrcc4 on them toproduce files with the same name but prefixed with qrc_, and again withtheir extension changed to .py.
For example, if we run mkpyqt.py in the chap06 directory, we get:
C:\pyqt\chap06>..\mkpyqt.py
./newimagedlg.ui -> ./ui_newimagedlg.py
./resources.qrc -> ./qrc_resources.py
The same thing can be achieved by running Make PyQt:click thePathbuttonto set the path to C:\pyqt\chap06, and then click the Build button. If we makeany changes we can simply run mkpyqt.py again, or click Build if using MakePyQt, and any necessary updates will be made.
Both build programs can delete the generated files ready for a fresh build,and both can work recursively on entire directory trees using the -r optionfor mkpyqt.py or by checking the Recurse checkbox for Make PyQt. Runmkpyqt.py -h in a console for a summary of its options. The Make PyQtprogram has tooltips for its checkboxes and buttons. In some cases, it maybe necessary to set the tool paths; click More→Tool paths, on the first use.
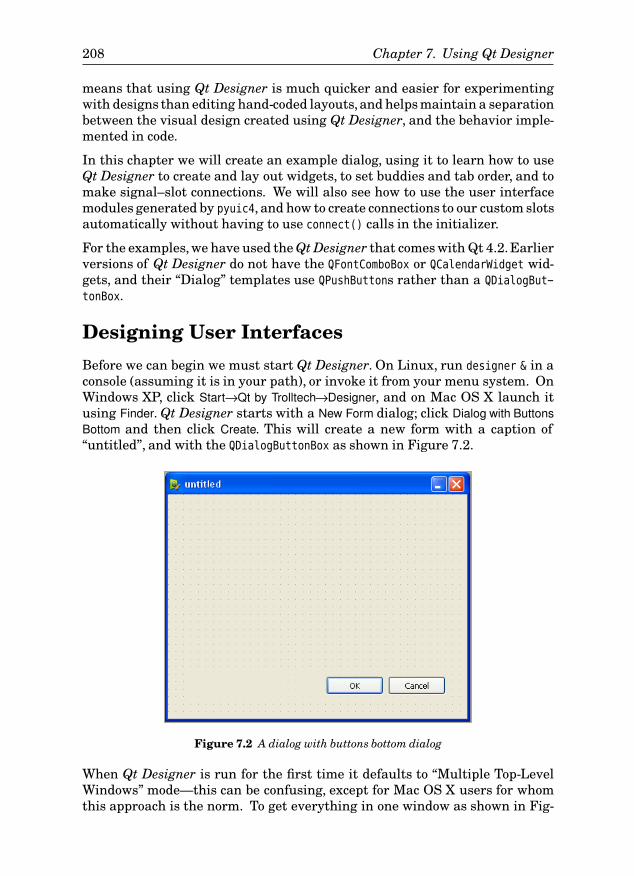
208 Chapter 7. Using Qt Designer
means that using Qt Designer is much quicker and easier for experimentingwith designs than editing hand-coded layouts,and helps maintain a separationbetween the visual design created using Qt Designer, and the behavior imple-mented in code.
In this chapter we will create an example dialog, using it to learn how to useQt Designer to create and lay out widgets, to set buddies and tab order, and tomake signal–slot connections. We will also see how to use the user interfacemodules generated by pyuic4, and how to create connections to our custom slotsautomatically without having to use connect() calls in the initializer.
For the examples, we have used the Qt Designer that comes with Qt 4.2.Earlierversions of Qt Designer do not have the QFontComboBox or QCalendarWidget wid-gets, and their “Dialog” templates use QPushButtons rather than a QDialogBut-
tonBox.
Designing User Interfaces
Before we can begin we must start Qt Designer. On Linux, run designer & in aconsole (assuming it is in your path), or invoke it from your menu system. OnWindows XP, click Start→Qt by Trolltech→Designer, and on Mac OS X launch itusing Finder. Qt Designer starts with a New Form dialog; click Dialog with ButtonsBottom and then click Create. This will create a new form with a caption of“untitled”, and with the QDialogButtonBox as shown in Figure 7.2.
Figure 7.2 A dialog with buttons bottom dialog
When Qt Designer is run for the first time it defaults to “Multiple Top-LevelWindows” mode—this can be confusing, except for Mac OS X users for whomthis approach is the norm. To get everything in one window as shown in Fig-
Designing User Interfaces 209
ure 7.1, click Edit→User InterfaceMode→DockedWindow.★ Qt Designer will remem-ber this setting, so it needs to be done only once.
Qt Designer is not difficult to use, but it does take some initial practice. Onething that helps is to do things in a particular order, as shown in the followinglist of steps. For steps 1 and 2, always work from “back” to “front”, that is,always start with containers (group boxes, tab widgets, frames), and then goon to the normal widgets that belong inside, that is, on top of them. We willgo through an example step-by-step in a moment, but first here is a generaldescription of how to create a dialog using Qt Designer.
1. Drag a widget onto the form and place it in approximately the rightposition; there is no need to place it exactly, and normally only containerwidgets need to be resized.
2. Set the widget’s properties if necessary; if the widget will be referred toin code, at least give it a sensible name.
3. Repeat steps 1 and 2 until all the required widgets are on the form.
4. If there are large gaps, drag in horizontal or vertical spacers (theseappear as blue springs) to fill them; sometimes, when gaps are obvious,spacers are added during steps 1 and 2.
5. Select two or more widgets (or spacers or layouts) to be laid out (Shift+Clickeach one), and then lay them out using a layout manager or a splitter.
6. Repeat step 5 until all the widgets and spacers are in layouts.
7. Click the form (to deselect everything) and lay out the form by using oneof the layout managers.
8. Create buddies for the form’s labels.
9. Set the form’s tab order if the order is wrong.
10. Create signal–slot connections between built-in signals and slots whereappropriate.
11. Preview the form and check that everything works as intended.
12. Set the form’s object name (this is used in its class name), and the form’stitle, and save it so that it has a filename. For example, if the object nameis “PaymentDlg”, we would probably give it a title of “Payment” and afilename of paymentdlg.ui.
If the layout is wrong, use undo to go back to where you think you could startlaying things out again, and have another go. If that is not possible or doesnot work, or if the layout is being changed some time after it was originallycreated, simply break the layouts that need changing and then redo them.Usually, it is necessary to break the form’s layout (click the form, then the Break
★From Qt 4.3 this option is available by clicking Edit→Preferences.
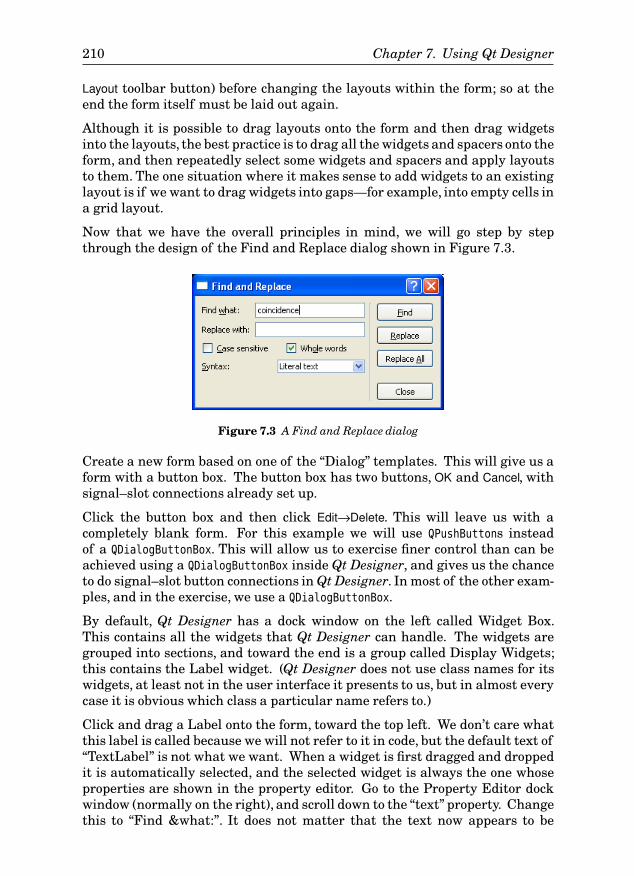
210 Chapter 7. Using Qt Designer
Layout toolbar button) before changing the layouts within the form; so at theend the form itself must be laid out again.
Although it is possible to drag layouts onto the form and then drag widgetsinto the layouts, the best practice is to drag all the widgets and spacers onto theform, and then repeatedly select some widgets and spacers and apply layoutsto them. The one situation where it makes sense to add widgets to an existinglayout is if we want to drag widgets into gaps—for example, into empty cells ina grid layout.
Now that we have the overall principles in mind, we will go step by stepthrough the design of the Find and Replace dialog shown in Figure 7.3.
Figure 7.3 A Find and Replace dialog
Create a new form based on one of the “Dialog” templates. This will give us aform with a button box. The button box has two buttons, OK and Cancel, withsignal–slot connections already set up.
Click the button box and then click Edit→Delete. This will leave us with acompletely blank form. For this example we will use QPushButtons insteadof a QDialogButtonBox. This will allow us to exercise finer control than can beachieved using a QDialogButtonBox inside Qt Designer, and gives us the chanceto do signal–slot button connections in Qt Designer. In most of the other exam-ples, and in the exercise, we use a QDialogButtonBox.
By default, Qt Designer has a dock window on the left called Widget Box.This contains all the widgets that Qt Designer can handle. The widgets aregrouped into sections, and toward the end is a group called Display Widgets;this contains the Label widget. (Qt Designer does not use class names for itswidgets, at least not in the user interface it presents to us, but in almost everycase it is obvious which class a particular name refers to.)
Click and drag a Label onto the form, toward the top left. We don’t care whatthis label is called because we will not refer to it in code, but the default text of“TextLabel” is not what we want. When a widget is first dragged and droppedit is automatically selected, and the selected widget is always the one whoseproperties are shown in the property editor. Go to the Property Editor dockwindow (normally on the right), and scroll down to the “text” property. Changethis to “Find &what:”. It does not matter that the text now appears to be
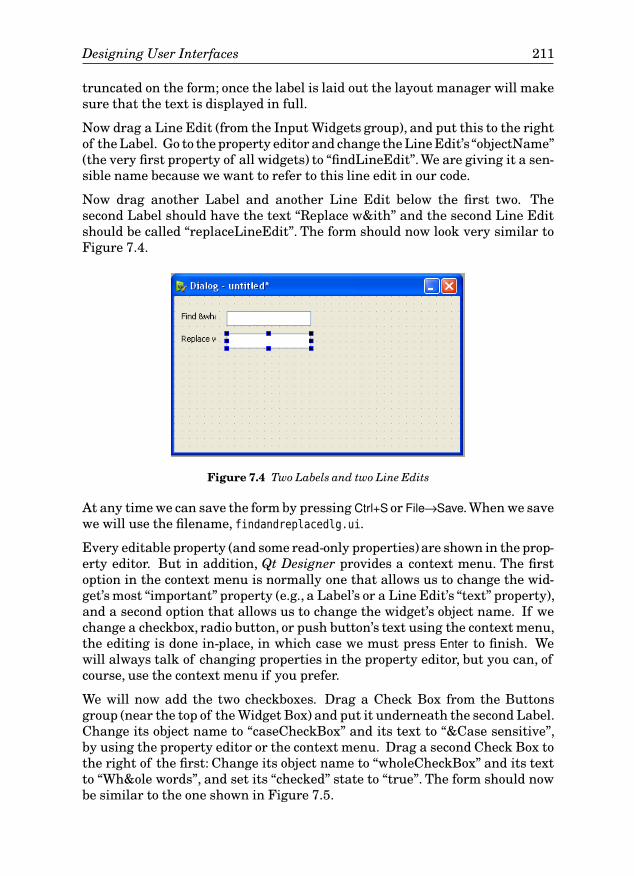
Designing User Interfaces 211
truncated on the form; once the label is laid out the layout manager will makesure that the text is displayed in full.
Now drag a Line Edit (from the Input Widgets group), and put this to the rightof the Label. Go to the property editor and change the Line Edit’s “objectName”(the very first property of all widgets) to “findLineEdit”. We are giving it a sen-sible name because we want to refer to this line edit in our code.
Now drag another Label and another Line Edit below the first two. Thesecond Label should have the text “Replace w&ith” and the second Line Editshould be called “replaceLineEdit”. The form should now look very similar toFigure 7.4.
Figure 7.4 Two Labels and two Line Edits
At any time we can save the form by pressing Ctrl+S or File→Save. When we savewe will use the filename, findandreplacedlg.ui.
Every editable property (and some read-only properties) are shown in the prop-erty editor. But in addition, Qt Designer provides a context menu. The firstoption in the context menu is normally one that allows us to change the wid-get’s most “important” property (e.g., a Label’s or a Line Edit’s “text” property),and a second option that allows us to change the widget’s object name. If wechange a checkbox, radio button, or push button’s text using the context menu,the editing is done in-place, in which case we must press Enter to finish. Wewill always talk of changing properties in the property editor, but you can, ofcourse, use the context menu if you prefer.
We will now add the two checkboxes. Drag a Check Box from the Buttonsgroup (near the top of the Widget Box) and put it underneath the second Label.Change its object name to “caseCheckBox” and its text to “&Case sensitive”,by using the property editor or the context menu. Drag a second Check Box tothe right of the first: Change its object name to “wholeCheckBox” and its textto “Wh&ole words”, and set its “checked” state to “true”. The form should nowbe similar to the one shown in Figure 7.5.
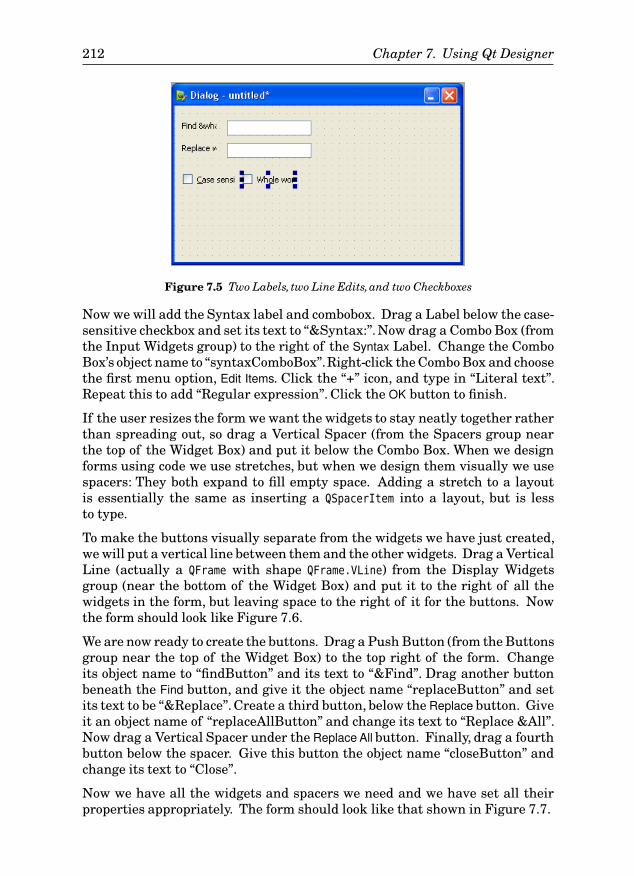
212 Chapter 7. Using Qt Designer
Figure 7.5 Two Labels, two Line Edits,and two Checkboxes
Now we will add the Syntax label and combobox. Drag a Label below the case-sensitive checkbox and set its text to “&Syntax:”.Now drag a Combo Box (fromthe Input Widgets group) to the right of the Syntax Label. Change the ComboBox’s object name to “syntaxComboBox”.Right-click the Combo Box and choosethe first menu option, Edit Items. Click the “+” icon, and type in “Literal text”.Repeat this to add “Regular expression”. Click the OK button to finish.
If the user resizes the form we want the widgets to stay neatly together ratherthan spreading out, so drag a Vertical Spacer (from the Spacers group nearthe top of the Widget Box) and put it below the Combo Box. When we designforms using code we use stretches, but when we design them visually we usespacers: They both expand to fill empty space. Adding a stretch to a layoutis essentially the same as inserting a QSpacerItem into a layout, but is lessto type.
To make the buttons visually separate from the widgets we have just created,we will put a vertical line between them and the other widgets. Drag a VerticalLine (actually a QFrame with shape QFrame.VLine) from the Display Widgetsgroup (near the bottom of the Widget Box) and put it to the right of all thewidgets in the form, but leaving space to the right of it for the buttons. Nowthe form should look like Figure 7.6.
We are now ready to create the buttons. Drag a Push Button (from the Buttonsgroup near the top of the Widget Box) to the top right of the form. Changeits object name to “findButton” and its text to “&Find”. Drag another buttonbeneath the Find button, and give it the object name “replaceButton” and setits text to be “&Replace”. Create a third button, below the Replace button. Giveit an object name of “replaceAllButton” and change its text to “Replace &All”.Now drag a Vertical Spacer under the Replace All button. Finally, drag a fourthbutton below the spacer. Give this button the object name “closeButton” andchange its text to “Close”.
Now we have all the widgets and spacers we need and we have set all theirproperties appropriately. The form should look like that shown in Figure 7.7.
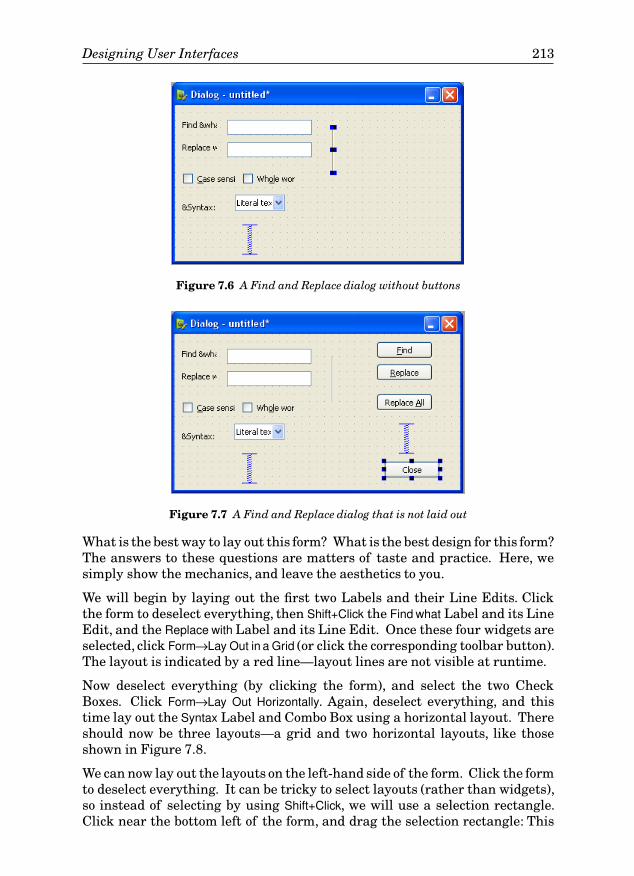
Designing User Interfaces 213
Figure 7.6 A Find and Replace dialog without buttons
Figure 7.7 A Find and Replace dialog that is not laid out
What is the best way to lay out this form? What is the best design for this form?The answers to these questions are matters of taste and practice. Here, wesimply show the mechanics, and leave the aesthetics to you.
We will begin by laying out the first two Labels and their Line Edits. Clickthe form to deselect everything, then Shift+Click the Find what Label and its LineEdit, and the Replace with Label and its Line Edit. Once these four widgets areselected, click Form→Lay Out in a Grid (or click the corresponding toolbar button).The layout is indicated by a red line—layout lines are not visible at runtime.
Now deselect everything (by clicking the form), and select the two CheckBoxes. Click Form→Lay Out Horizontally. Again, deselect everything, and thistime lay out the Syntax Label and Combo Box using a horizontal layout. Thereshould now be three layouts—a grid and two horizontal layouts, like thoseshown in Figure 7.8.
We can now lay out the layouts on the left-hand side of the form. Click the formto deselect everything. It can be tricky to select layouts (rather than widgets),so instead of selecting by using Shift+Click, we will use a selection rectangle.Click near the bottom left of the form, and drag the selection rectangle: This
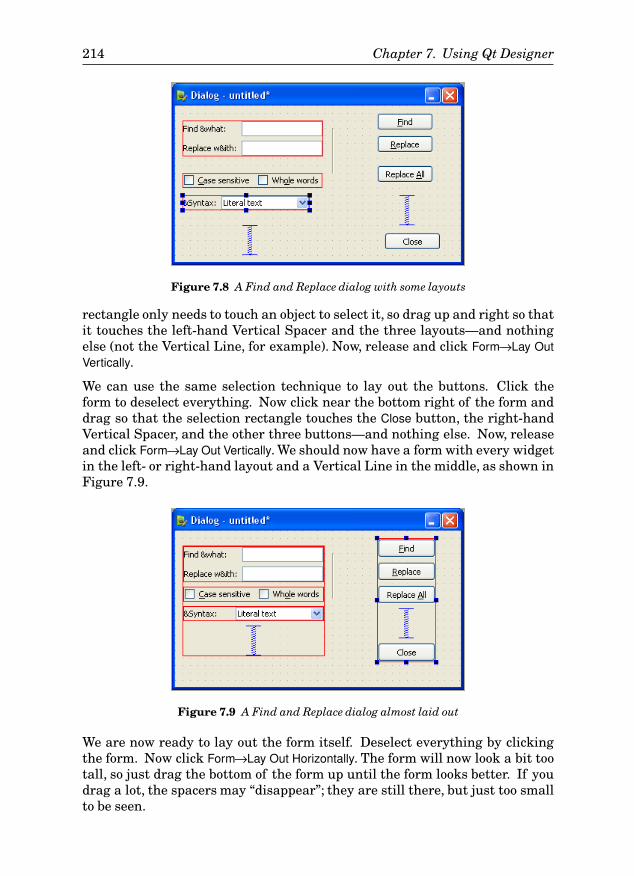
214 Chapter 7. Using Qt Designer
Figure 7.8 A Find and Replace dialog with some layouts
rectangle only needs to touch an object to select it, so drag up and right so thatit touches the left-hand Vertical Spacer and the three layouts—and nothingelse (not the Vertical Line, for example). Now, release and click Form→Lay OutVertically.
We can use the same selection technique to lay out the buttons. Click theform to deselect everything. Now click near the bottom right of the form anddrag so that the selection rectangle touches the Close button, the right-handVertical Spacer, and the other three buttons—and nothing else. Now, releaseand click Form→Lay Out Vertically. We should now have a form with every widgetin the left- or right-hand layout and a Vertical Line in the middle, as shown inFigure 7.9.
Figure 7.9 A Find and Replace dialog almost laid out
We are now ready to lay out the form itself. Deselect everything by clickingthe form. Now click Form→Lay Out Horizontally. The form will now look a bit tootall, so just drag the bottom of the form up until the form looks better. If youdrag a lot, the spacers may “disappear”; they are still there, but just too smallto be seen.
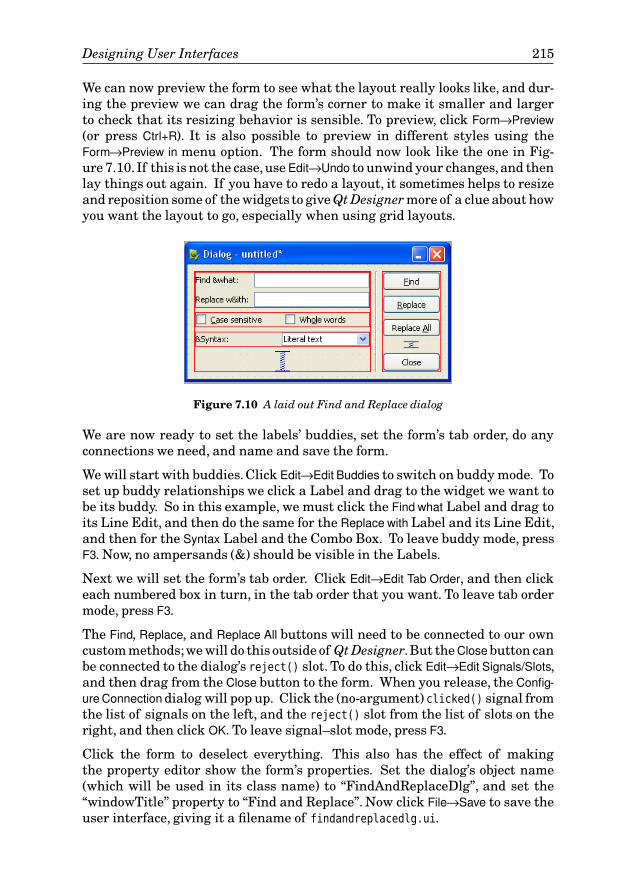
Designing User Interfaces 215
We can now preview the form to see what the layout really looks like, and dur-ing the preview we can drag the form’s corner to make it smaller and largerto check that its resizing behavior is sensible. To preview, click Form→Preview(or press Ctrl+R). It is also possible to preview in different styles using theForm→Preview in menu option. The form should now look like the one in Fig-ure 7.10. If this is not the case,useEdit→Undo to unwind your changes,and thenlay things out again. If you have to redo a layout, it sometimes helps to resizeand reposition some of the widgets to give Qt Designer more of a clue about howyou want the layout to go, especially when using grid layouts.
Figure 7.10 A laid out Find and Replace dialog
We are now ready to set the labels’ buddies, set the form’s tab order, do anyconnections we need, and name and save the form.
We will start with buddies.Click Edit→Edit Buddies to switch on buddy mode. Toset up buddy relationships we click a Label and drag to the widget we want tobe its buddy. So in this example, we must click the Find what Label and drag toits Line Edit, and then do the same for the Replace withLabel and its Line Edit,and then for the Syntax Label and the Combo Box. To leave buddy mode, pressF3. Now, no ampersands (&) should be visible in the Labels.
Next we will set the form’s tab order. Click Edit→Edit Tab Order, and then clickeach numbered box in turn, in the tab order that you want. To leave tab ordermode, press F3.
The Find, Replace, and Replace All buttons will need to be connected to our owncustom methods;we will do this outside of Qt Designer.But theClosebutton canbe connected to the dialog’s reject() slot. To do this, click Edit→Edit Signals/Slots,and then drag from the Close button to the form. When you release, the Config-ureConnectiondialog will pop up. Click the (no-argument) clicked() signal fromthe list of signals on the left, and the reject() slot from the list of slots on theright, and then click OK. To leave signal–slot mode, press F3.
Click the form to deselect everything. This also has the effect of makingthe property editor show the form’s properties. Set the dialog’s object name(which will be used in its class name) to “FindAndReplaceDlg”, and set the“windowTitle” property to “Find and Replace”. Now click File→Save to save theuser interface, giving it a filename of findandreplacedlg.ui.
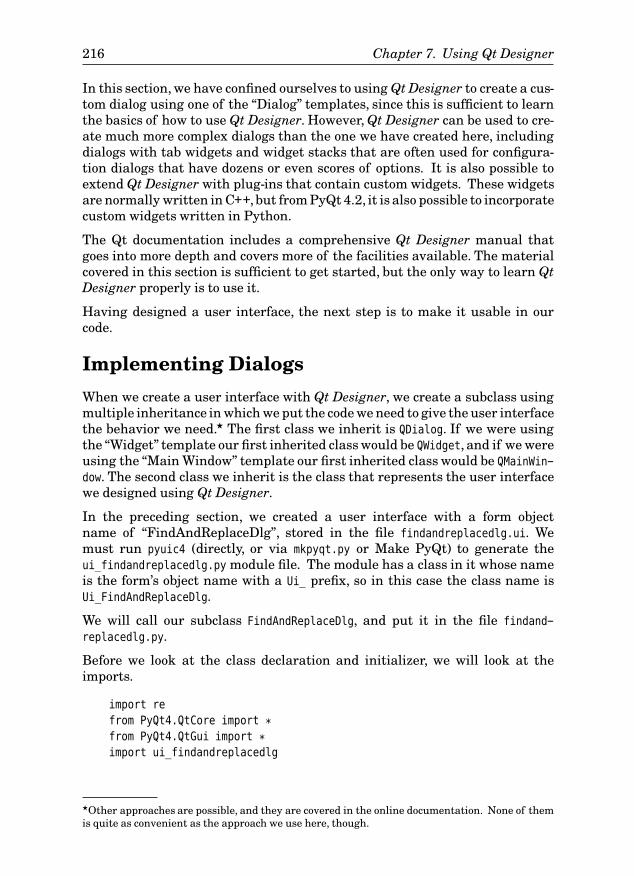
216 Chapter 7. Using Qt Designer
In this section, we have confined ourselves to using Qt Designer to create a cus-tom dialog using one of the “Dialog” templates, since this is sufficient to learnthe basics of how to use Qt Designer. However, Qt Designer can be used to cre-ate much more complex dialogs than the one we have created here, includingdialogs with tab widgets and widget stacks that are often used for configura-tion dialogs that have dozens or even scores of options. It is also possible toextend Qt Designer with plug-ins that contain custom widgets. These widgetsare normally written in C++, but from PyQt 4.2, it is also possible to incorporatecustom widgets written in Python.
The Qt documentation includes a comprehensive Qt Designer manual thatgoes into more depth and covers more of the facilities available. The materialcovered in this section is sufficient to get started, but the only way to learn QtDesigner properly is to use it.
Having designed a user interface, the next step is to make it usable in ourcode.
Implementing Dialogs
When we create a user interface with Qt Designer, we create a subclass usingmultiple inheritance in which we put the code we need to give the user interfacethe behavior we need.★ The first class we inherit is QDialog. If we were usingthe “Widget” template our first inherited class would be QWidget, and if we wereusing the “Main Window” template our first inherited class would be QMainWin-
dow. The second class we inherit is the class that represents the user interfacewe designed using Qt Designer.
In the preceding section, we created a user interface with a form objectname of “FindAndReplaceDlg”, stored in the file findandreplacedlg.ui. Wemust run pyuic4 (directly, or via mkpyqt.py or Make PyQt) to generate theui_findandreplacedlg.py module file. The module has a class in it whose nameis the form’s object name with a Ui_ prefix, so in this case the class name isUi_FindAndReplaceDlg.
We will call our subclass FindAndReplaceDlg, and put it in the file findand-
replacedlg.py.
Before we look at the class declaration and initializer, we will look at theimports.
import re
from PyQt4.QtCore import *from PyQt4.QtGui import *import ui_findandreplacedlg
★Other approaches are possible, and they are covered in the online documentation. None of themis quite as convenient as the approach we use here, though.
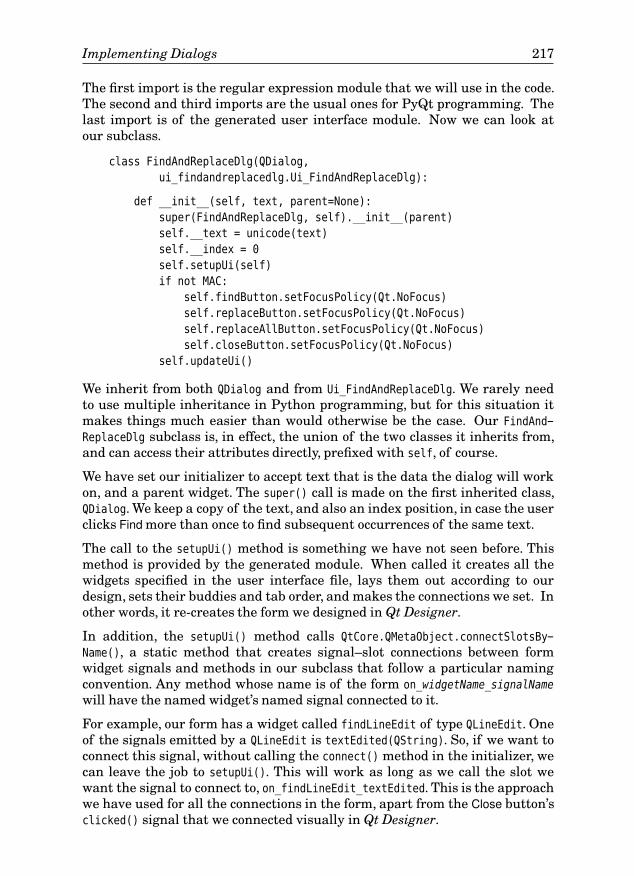
Implementing Dialogs 217
The first import is the regular expression module that we will use in the code.The second and third imports are the usual ones for PyQt programming. Thelast import is of the generated user interface module. Now we can look atour subclass.
class FindAndReplaceDlg(QDialog,
ui_findandreplacedlg.Ui_FindAndReplaceDlg):
def __init__(self, text, parent=None):
super(FindAndReplaceDlg, self).__init__(parent)
self.__text = unicode(text)
self.__index = 0
self.setupUi(self)
if not MAC:
self.findButton.setFocusPolicy(Qt.NoFocus)
self.replaceButton.setFocusPolicy(Qt.NoFocus)
self.replaceAllButton.setFocusPolicy(Qt.NoFocus)
self.closeButton.setFocusPolicy(Qt.NoFocus)
self.updateUi()
We inherit from both QDialog and from Ui_FindAndReplaceDlg. We rarely needto use multiple inheritance in Python programming, but for this situation itmakes things much easier than would otherwise be the case. Our FindAnd-
ReplaceDlg subclass is, in effect, the union of the two classes it inherits from,and can access their attributes directly, prefixed with self, of course.
We have set our initializer to accept text that is the data the dialog will workon, and a parent widget. The super() call is made on the first inherited class,QDialog. We keep a copy of the text, and also an index position, in case the userclicks Findmore than once to find subsequent occurrences of the same text.
The call to the setupUi() method is something we have not seen before. Thismethod is provided by the generated module. When called it creates all thewidgets specified in the user interface file, lays them out according to ourdesign, sets their buddies and tab order, and makes the connections we set. Inother words, it re-creates the form we designed in Qt Designer.
In addition, the setupUi() method calls QtCore.QMetaObject.connectSlotsBy-
Name(), a static method that creates signal–slot connections between formwidget signals and methods in our subclass that follow a particular namingconvention. Any method whose name is of the form on_widgetName_signalName
will have the named widget’s named signal connected to it.
For example, our form has a widget called findLineEdit of type QLineEdit. Oneof the signals emitted by a QLineEdit is textEdited(QString). So, if we want toconnect this signal, without calling the connect() method in the initializer, wecan leave the job to setupUi(). This will work as long as we call the slot wewant the signal to connect to, on_findLineEdit_textEdited. This is the approachwe have used for all the connections in the form, apart from the Close button’sclicked() signal that we connected visually in Qt Designer.
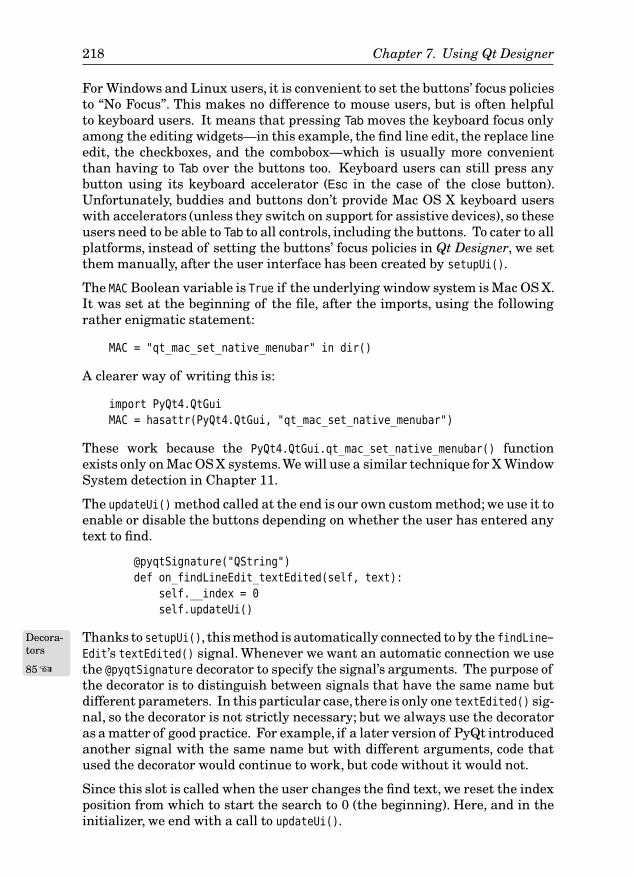
218 Chapter 7. Using Qt Designer
For Windows and Linux users, it is convenient to set the buttons’ focus policiesto “No Focus”. This makes no difference to mouse users, but is often helpfulto keyboard users. It means that pressing Tab moves the keyboard focus onlyamong the editing widgets—in this example, the find line edit, the replace lineedit, the checkboxes, and the combobox—which is usually more convenientthan having to Tab over the buttons too. Keyboard users can still press anybutton using its keyboard accelerator (Esc in the case of the close button).Unfortunately, buddies and buttons don’t provide Mac OS X keyboard userswith accelerators (unless they switch on support for assistive devices), so theseusers need to be able to Tab to all controls, including the buttons. To cater to allplatforms, instead of setting the buttons’ focus policies in Qt Designer, we setthem manually, after the user interface has been created by setupUi().
The MAC Boolean variable is True if the underlying window system is Mac OS X.It was set at the beginning of the file, after the imports, using the followingrather enigmatic statement:
MAC = "qt_mac_set_native_menubar" in dir()
A clearer way of writing this is:
import PyQt4.QtGui
MAC = hasattr(PyQt4.QtGui, "qt_mac_set_native_menubar")
These work because the PyQt4.QtGui.qt_mac_set_native_menubar() functionexists only on Mac OS X systems.We will use a similar technique for X WindowSystem detection in Chapter 11.
The updateUi() method called at the end is our own custom method; we use it toenable or disable the buttons depending on whether the user has entered anytext to find.
@pyqtSignature("QString")
def on_findLineEdit_textEdited(self, text):
self.__index = 0
self.updateUi()
Thanks to setupUi(), this method is automatically connected to byDecora-tors
85 ☞
the findLine-
Edit’s textEdited() signal. Whenever we want an automatic connection we usethe @pyqtSignature decorator to specify the signal’s arguments. The purpose ofthe decorator is to distinguish between signals that have the same name butdifferent parameters. In this particular case, there is only one textEdited() sig-nal, so the decorator is not strictly necessary; but we always use the decoratoras a matter of good practice. For example, if a later version of PyQt introducedanother signal with the same name but with different arguments, code thatused the decorator would continue to work, but code without it would not.
Since this slot is called when the user changes the find text, we reset the indexposition from which to start the search to 0 (the beginning). Here, and in theinitializer, we end with a call to updateUi().
Implementing Dialogs 219
def updateUi(self):
enable = not self.findLineEdit.text().isEmpty()
self.findButton.setEnabled(enable)
self.replaceButton.setEnabled(enable)
self.replaceAllButton.setEnabled(enable)
We have already seen many examples of a method of this kind.Here, we enablethe Find, Replace, and Replace All buttons, if the user has entered a find text. Itdoes not matter whether there is any replace text, since it is perfectly valid toreplace something with nothing, that is, to delete the text that is found. Thismethod is the reason why the form starts with every button except the Closebutton disabled.
When the user closes the form, the text it holds (which may be different fromthe original text if the user has used replace or replace all) is accessible usingthe text() method.
def text(self):
return self.__text
Some Python programmers would not provide a method for this; instead, theywould have a self.text variable (rather than self.__text), and access thevariable directly.
The rest of the dialog’s functionality is implemented in methods that are in-voked as a result of the user pressing one of the buttons (other than the Closebutton), plus a helper method. Their implementation is not specifically rele-vant to using Qt Designer, but we will briefly review them for completeness.
@pyqtSignature("")
def on_findButton_clicked(self):
regex = self.makeRegex()
match = regex.search(self.__text, self.__index)
if match is not None:
self.__index = match.end()
self.emit(SIGNAL("found"), match.start())
else:
self.emit(SIGNAL("notfound"))
A button’s clicked() signal has an optional Boolean argument that we arenot interested in, so we specify an empty parameter list for the @pyqtSignature
decorator. In contrast, we could not have used an empty parameter list for theon_findLineEdit_textEdited() slot’s decorator, because the textEdited() signal’sargument is not optional, so it must be included.
To perform the search, we create a regular expression to specify the find textand some of the search’s characteristics. Then we search the text using theregular expression, from the current index position. If a match was found weupdate the index position to be at the match’s end, ready for a subsequent
220 Chapter 7. Using Qt Designer
search, and emit a signal with the position in the text where the find textwas found.
def makeRegex(self):
findText = unicode(self.findLineEdit.text())
if unicode(self.syntaxComboBox.currentText()) == "Literal":
findText = re.escape(findText)
flags = re.MULTILINE|re.DOTALL|re.UNICODE
if not self.caseCheckBox.isChecked():
flags |= re.IGNORECASE
if self.wholeCheckBox.isChecked():
findText = r"\b%s\b" % findText
return re.compile(findText, flags)
We begin by getting the find text that the user has entered. We know that itcannot be empty because the buttons (apart from the Close button) are enabledonly if there is some find text. If the user has chosen a literal text search, weuse the re.escape() function to escape any regular expression meta-characters(like “\”) that may be in the user’s find text. Then we initialize our searchflags. We supplement the flags with the re.IGNORECASE flag if the caseCheckBox isunchecked. If the user has asked to search for whole words, we put a \b beforeand after the find text: This is a token in Python’s (and QRegExp’s) regular ex-pression language that specifies a word boundary. The r inRaw
strings
157 ☞
front of the stringliteral indicates a “raw” string in which we can write characters like “\” un-escaped. Finally we return the regular expression in compiled (ready-to-use)form.★
If we knew that the text to be searched was normally going to be a QString
rather than a unicode, it might be preferable to use the PyQt QRegExp classrather than the Python standard library’s re class.
@pyqtSignature("")
def on_replaceButton_clicked(self):
regex = self.makeRegex()
self.__text = regex.sub(unicode(self.replaceLineEdit.text()),
self.__text, 1)
This method is quite simple because it passes on its preparation work to themakeRegex() method. We use the sub method (“substitute”) to replace the firstoccurrence of the find text with the replacement text. The replacement textcould be empty. The 1 is the maximum number of replacements to make.
@pyqtSignature("")
def on_replaceAllButton_clicked(self):
regex = self.makeRegex()
★The QRegExp documentation provides a brief introduction to regular expressions. Python’s regularexpression engine is covered in the re module documentation. For in-depth coverage see MasteringRegular Expressions by Jeffrey E. Friedl.

Implementing Dialogs 221
self.__text = regex.sub(unicode(self.replaceLineEdit.text()),
self.__text)
This method is almost identical to the one earlier. The only difference is thatwe do not specify a maximum number of replacements, so sub() will replace asmany (nonoverlapping) occurrences of the find text as it finds.
We have now implemented the FindAndReplaceDlg. The implementation of thedialog’s methods is not really any different from what we have done before,except for our use of the decorator and setupUi() to provide automatic con-nections.
To use the dialog in an application we must make sure that theui_findandreplacedlg.py module file is generated,and we must import the find-
andreplacedlg module we have just written. We will see how the form is createdand used in the next section.
Testing Dialogs
Since any PyQt widget, including any dialog, can be used as a top-level windowin its own right, it is easy to test a dialog by instantiating it and starting theevent loop.★ Often, though, we need to do a bit more. For example, we may needto set up some initial data, or provide methods to receive the dialog’s signals sothat we can see that they are working correctly.
In the case of the Find and Replace dialog, we need some initial text, andwe need to check that the connections work and that the find and replacemethods work.
So, at the end of the findandreplacedlg.py file, we have added some extracode. This code is executed only if the file is run stand-alone, so it does notaffect performance or interfere with the use of the dialog when it is used inan application.
if __name__ == "__main__":
import sys
text = """US experience shows that, unlike traditional patents,
software patents do not encourage innovation and R&D, quite the
contrary. In particular they hurt small and medium-sized enterprises
and generally newcomers in the market. They will just weaken the market
and increase spending on patents and litigation, at the expense of
technological innovation and research. Especially dangerous are
attempts to abuse the patent system by preventing interoperability as a
means of avoiding competition with technological ability.
--- Extract quoted from Linus Torvalds and Alan Cox's letter
★When using pyuic4 we can specify a command-line option of -x to get the dialog generated with abit of extra code so that it can be tested stand-alone.

222 Chapter 7. Using Qt Designer
to the President of the European Parliament
http://www.effi.org/patentit/patents_torvalds_cox.html"""
def found(where):
print "Found at %d" % where
def nomore():
print "No more found"
app = QApplication(sys.argv)
form = FindAndReplaceDlg(text)
form.connect(form, SIGNAL("found"), found)
form.connect(form, SIGNAL("notfound"), nomore)
form.show()
app.exec_()
print form.text()
We begin by importing the sys module, and then we create a piece of text towork on. Next, we create a couple of simple functions for the dialog’s signals tobe connected to.
We create the QApplication object in the normal way, and then we create aninstance of our dialog, passing it our test text. We connect the dialog’s twosignals to our slots, and call show(). Then we start off the event loop. When theevent loop terminates we print the dialog’s text: This will be different from theoriginal text if the user replaced some text.
The dialog can now be run from a console and tested.
C:\pyqt\chap07>python findandreplacedlg.py
Unless using automated testing tools, it is often helpful to add testing function-ality to dialogs. It does not take too much time or effort to write them, and run-ning them whenever a change is made to the dialog’s logic will help minimizethe introduction of bugs.
Sometimes we pass complex objects to dialogs that may appear to make testingimpossible. But thanks to Python’s duck typing we can always create a fakeclass that simulates enough behavior to be usable for testing. For example,in Chapter 12, we use a property editor dialog. This dialog operates on “Node”objects, so in the testing code we create a FakeNode class that provides the meth-ods for setting and getting a node’s properties that the dialog makes use of.(The relevant files are chap12/propertiesdlg.ui, from which ui_propertiesdlg.py
is generated, and chap12/propertiesdlg.py where the PropertiesDlg is imple-mented.)
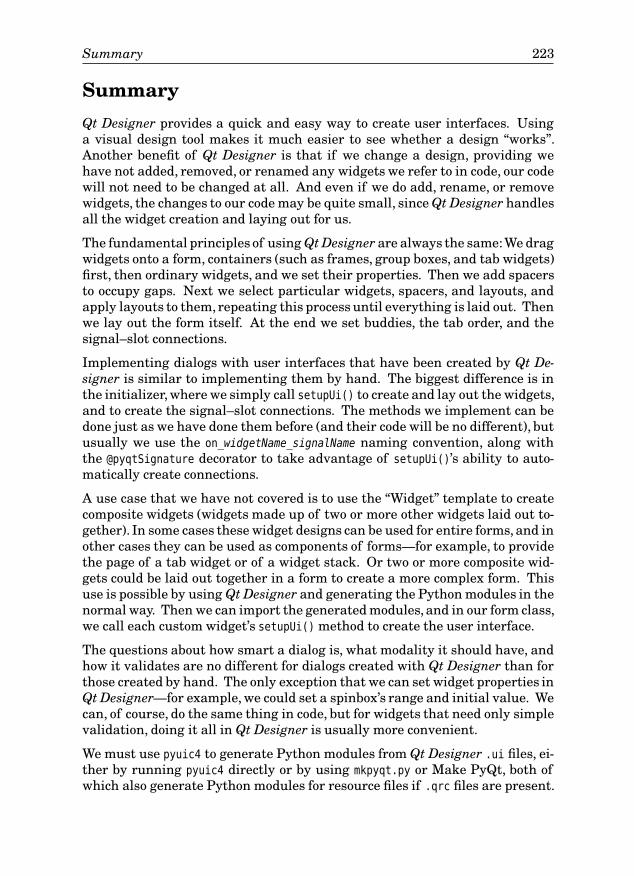
Summary 223
Summary
Qt Designer provides a quick and easy way to create user interfaces. Usinga visual design tool makes it much easier to see whether a design “works”.Another benefit of Qt Designer is that if we change a design, providing wehave not added, removed, or renamed any widgets we refer to in code, our codewill not need to be changed at all. And even if we do add, rename, or removewidgets, the changes to our code may be quite small, since Qt Designer handlesall the widget creation and laying out for us.
The fundamental principles of using Qt Designer are always the same:We dragwidgets onto a form, containers (such as frames, group boxes, and tab widgets)first, then ordinary widgets, and we set their properties. Then we add spacersto occupy gaps. Next we select particular widgets, spacers, and layouts, andapply layouts to them, repeating this process until everything is laid out. Thenwe lay out the form itself. At the end we set buddies, the tab order, and thesignal–slot connections.
Implementing dialogs with user interfaces that have been created by Qt De-signer is similar to implementing them by hand. The biggest difference is inthe initializer, where we simply call setupUi() to create and lay out the widgets,and to create the signal–slot connections. The methods we implement can bedone just as we have done them before (and their code will be no different), butusually we use the on_widgetName_signalName naming convention, along withthe @pyqtSignature decorator to take advantage of setupUi()’s ability to auto-matically create connections.
A use case that we have not covered is to use the “Widget” template to createcomposite widgets (widgets made up of two or more other widgets laid out to-gether). In some cases these widget designs can be used for entire forms, and inother cases they can be used as components of forms—for example, to providethe page of a tab widget or of a widget stack. Or two or more composite wid-gets could be laid out together in a form to create a more complex form. Thisuse is possible by using Qt Designer and generating the Python modules in thenormal way. Then we can import the generated modules, and in our form class,we call each custom widget’s setupUi() method to create the user interface.
The questions about how smart a dialog is, what modality it should have, andhow it validates are no different for dialogs created with Qt Designer than forthose created by hand. The only exception that we can set widget properties inQt Designer—for example, we could set a spinbox’s range and initial value. Wecan, of course, do the same thing in code, but for widgets that need only simplevalidation, doing it all in Qt Designer is usually more convenient.
We must use pyuic4 to generate Python modules from Qt Designer .ui files, ei-ther by running pyuic4 directly or by using mkpyqt.py or Make PyQt, both ofwhich also generate Python modules for resource files if .qrc files are present.
224 Chapter 7. Using Qt Designer
If we are not using testing tools, adding testing code that is executed only if theform is run stand-alone does not affect the performance of our dialogs, and canbe very convenient both during development and when maintaining a dialog.If complex objects that the dialog depends on are not available, we can oftencreate a “fake” class that provides the same methods as the complex object, andpass an instance of the fake class for testing purposes.
All PyQt programs can be written entirely by hand; there is never any need touse Qt Designer. However, designing dialogs with a visual design tool can bevery helpful, since the results can be seen immediately, and changes to designscan be made quickly and easily. Another benefit of using Qt Designer is that alot of fairly repetitive code for creating, laying out, and connecting widgets canbe automatically generated rather than written by hand. Qt Designer was usedto create a dialog in both this chapter,and the preceding one. We will see manymore examples of dialogs created with Qt Designer in the following chapters.
ExerciseUse Qt Designer to create a user interface with one of the designs shown inFigure 7.11, or with a design of your own. You will probably need to use a GridLayout, as well as Vertical and Horizontal Layouts. For grid layouts, you mayhave to try a few times, perhaps resizing and positioning widgets to help QtDesigner create the grid you want. Use QDialogButtonBoxes for the buttons.
Figure 7.11 A dialog with two different designs
The price spinbox should have a range of 0.00–5000.00, be right-aligned, andhave a prefix of “$ ”, as shown in Figure 7.11. The quantity spinbox shouldhave a range of 1–50 and also be right-aligned. Set the date format to bewhatever you prefer if you don’t like the default.
The widgets you will refer to in code should have sensible names—for example,customerLineEdit and priceSpinBox.
Make the appropriate buddies, that is, from the “customer” Label to its LineEdit, from the “when” Label to the Date Time Edit, and so on. Also make surethat the Tab order is customer, when date, price, quantity, button box.
Exercise 225
Create a subclass to use the user interface. The code should ensure that theOK button is enabled only if the customer Line Edit is not empty and theamount is greater than zero. To access a button in a QDialogButtonBox, use thebutton() method with the button’s constant as the argument—for example,buttonBox.button(QDialogButtonBox.Ok).
The amount should be recalculated and shown in the amount label everytime the user changes one of the spinbox values. Set the when date’s rangeto be from tomorrow, until next year. Provide a result() method that returnsa four-tuple (unicode, datetime.datetime, float, int) for the customer, whendate, price, and quantity. (If you are using a PyQt version prior to 4.1, returnthe date as a QDateTime; otherwise, use the QDateTime.toPyDateTime() method toget a datetime.datetime.)
Include enough test code at the end to create and show a TicketOrderDlg sothat you can interact with it. After the event loop has finished print the tuplereturned by the result() method on the console.
The subclass, including the test code, can be written in about 60 lines. Ifthis is the first time you have used Qt Designer it may take 15–20 minutesto get the design right, but with practice a dialog like this should take just afew minutes.
Model solutions are provided in chap07/ticketorderdlg1.ui and chap07/ticket-
orderdlg2.ui, with a test program in chap07/ticketorderdlg.py.

This page intentionally left blank
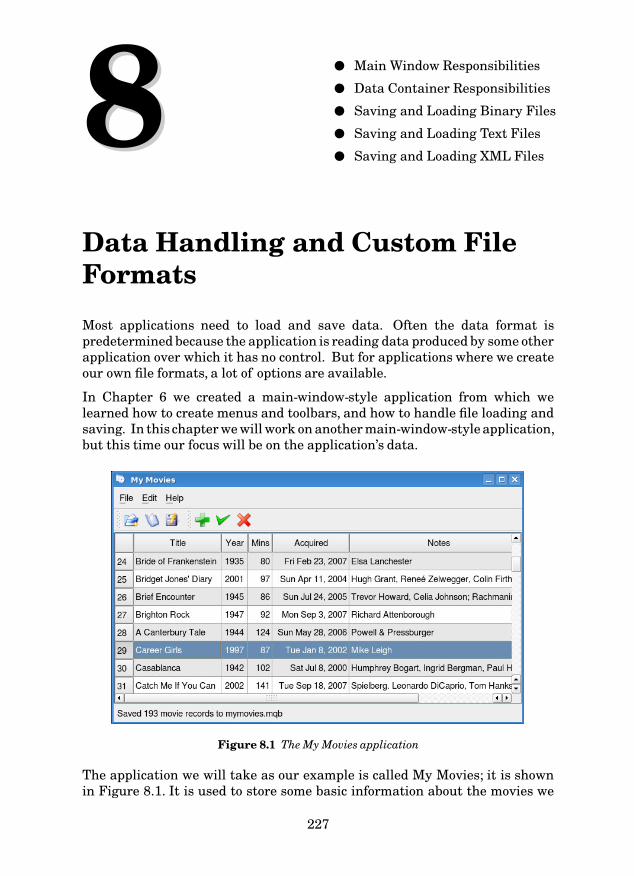
Data Handling and Custom FileFormats
88 ● Main Window Responsibilities
● Data Container Responsibilities
● Saving and Loading Binary Files
● Saving and Loading Text Files
● Saving and Loading XML Files
Most applications need to load and save data. Often the data format ispredetermined because the application is reading data produced by some otherapplication over which it has no control. But for applications where we createour own file formats, a lot of options are available.
In Chapter 6 we created a main-window-style application from which welearned how to create menus and toolbars, and how to handle file loading andsaving. In thischapter we will work on another main-window-style application,but this time our focus will be on the application’s data.
Figure 8.1 The My Movies application
The application we will take as our example is called My Movies; it is shownin Figure 8.1. It is used to store some basic information about the movies we
227
228 Chapter 8. Data Handling and Custom File Formats
might have in our collection. The application will allow us to view and edit acollection of custom Movie objects (or movie records as we will call them), andto load and save these records from and to disk in a variety of formats.
If you just want to dive straight into file handling, you can jump ahead tothe relevant sections. Coverage of saving and loading binary files beginson page 240, of text files on page 249, and of XML files on page 256. You canalways come back to the first two sections to cover the relationship between theGUI and file handling.
In all the previous examples we usually kept as much data as possible inPython data types and converted to and from PyQt types only when necessary.And for strings in particular, we proposed a policy thatString
policy
28 ☞
meant that we alwaysconverted QStrings to unicodes as soon as possible and always operated on uni-
code strings. But in this chapter we are going to take the opposite approach,and keep all our data in PyQt types, converting to Python types only whennecessary. One reason for doing this is that PyQt provides excellent supportfor binary data, and uses the same binary formats as C++/Qt, which is usefulwhen working with files that must be accessed by both C++ and Python pro-grams. Another reason is that this will also provide a contrast that will help usunderstand the pros and cons of each approach so that we can make the rightdecisions in applications we work on later.
One immediate benefit of holding data in PyQt types is that we do not haveto keep converting data that we give to or get from the widgets we use forviewing and editing. When dealing with a large collection of data, this couldbe a significant saving of processing overhead.
When we have custom data to load and save five options are available to us.We can use binary, plain text, or XML files, or we can use QSettings objects withan explicit filename, or we can use a database. In this chapter we will coverthe first three options, and briefly mention the fourth, QSettings, here. We willdefer coverage of databases until Chapter 15.
All the options apart from QSettings can be implemented using either Python’sstandard library or PyQt. In this chapter, we will discuss loading and savingboth binary and text formats using both libraries so that we can compare andcontrast them. For XML, we will use PyQt for loading and parsing, and we willdo the saving ourselves. Python’s standard library also provides considerableXML support, but covering it would not show anything that cannot be donewith PyQt’s XML classes.
In Chapter 6, we saw how to use a QSettings object to save and load usersettings, such as the main window’s size and position, and a list of recentlyused files. The class stores all data as QVariants, but this is perfectly accept-able for small amounts of data. We can use this class to store custom databy creating a QSettings instance with a filename—for example, iniFile =
QSettings("curvedata.ini", QSettings.IniFormat). Now we can use the iniFile
Main Window Responsibilities 229
object to write data using setValue() and to read data using value(), in bothcases converting between QVariant and the relevant type.
In the following section we will look at the high-level file handling and datapresentation that are performed by the application’s main window subclass.In the second section, we will look at the application’s data module, includingthe implementation of individual data items, and of the data item container inwhich the application’s data is held.
Then, in the subsequent sections, we will look at saving and loading data invarious formats. In the section on binary files, we will look at how to use PyQt’sQDataStream class and also the standard Python library’s cPickle module to loadand save our collection of movie records. In the section on text files, we will seehow to load and save our movie records in plain text using PyQt’s QTextStream
and the Python standard library’s codecs module. And in the last section wewill write the code to save the records as XML by hand, and see how to use bothDOM and SAX parsers to read back the XML data.
Main Window Responsibilities
The main window is usually given responsibility for offering the user the high-level file-handling actions, and for presenting the application’s data. In thissection, we will focus particularly on the file actions, since they differ fromwhat we did in Chapter 6’s Image Changer application and they are more rep-resentative of what happens in larger applications. We will also look at howthe data is presented to the user. In the My Movies application, the data is heldin a “container” (a MovieContainer), and all the work of saving and loading (andexporting and importing) is passed on to the container by the main window. Wewill look at the container in the next section, and at the container’s saving andloading code in the sections that follow that.
The source code is in the chap08 directory, and it includes a Qt Designer-de-signed user interface for adding and editing movie records. Figure 8.2 showsthe application’s Python modules.
We have chosen to make a distinction between saving and exporting, andbetween loading and importing. When we load a file, the filename we usedbecomes the application’s current filename for when we save. If we save a file,we use the application’s current filename, so subsequent saves will be to thesame file. We can change the current filename by using the “save as” action.When we import a file, we clear the current filename; this means that the datamust be given a new filename if the user wants to save it. If the user exportsthe data, they are asked for a new filename, and the current filename is notaffected.
Now we are ready to look at the main window’s file-handling functionality.We will begin by looking at the start of the main window’s initializer, to see
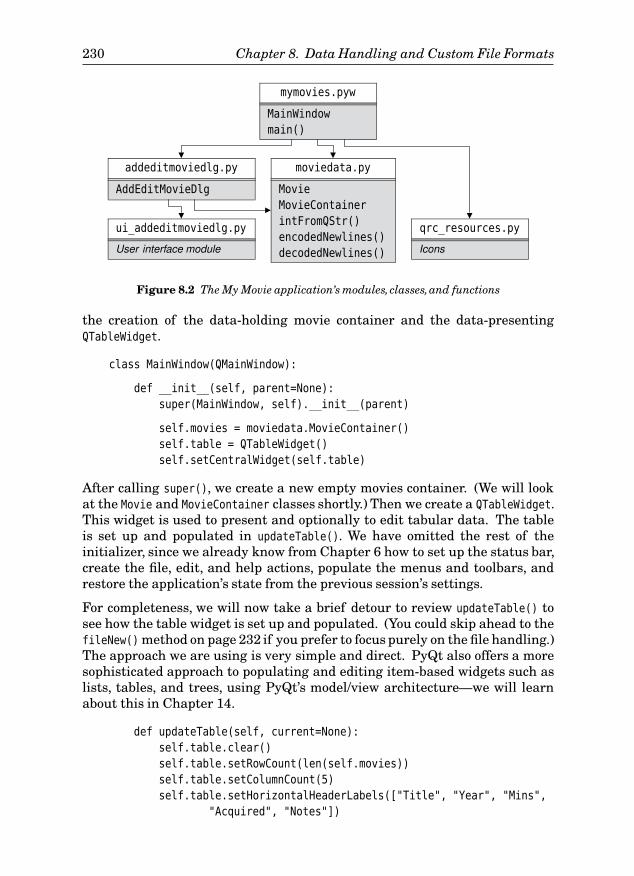
230 Chapter 8. Data Handling and Custom File Formats
mymovies.pyw
MainWindow
main()
addeditmoviedlg.py
AddEditMovieDlg
ui_addeditmoviedlg.py
User interface module
moviedata.py
Movie
MovieContainer
intFromQStr()
encodedNewlines()
decodedNewlines()
qrc_resources.py
Icons
Figure 8.2 The My Movie application’s modules, classes,and functions
the creation of the data-holding movie container and the data-presentingQTableWidget.
class MainWindow(QMainWindow):
def __init__(self, parent=None):
super(MainWindow, self).__init__(parent)
self.movies = moviedata.MovieContainer()
self.table = QTableWidget()
self.setCentralWidget(self.table)
After calling super(), we create a new empty movies container. (We will lookat the Movie and MovieContainer classes shortly.) Then we create a QTableWidget.This widget is used to present and optionally to edit tabular data. The tableis set up and populated in updateTable(). We have omitted the rest of theinitializer, since we already know from Chapter 6 how to set up the status bar,create the file, edit, and help actions, populate the menus and toolbars, andrestore the application’s state from the previous session’s settings.
For completeness, we will now take a brief detour to review updateTable() tosee how the table widget is set up and populated. (You could skip ahead to thefileNew() method on page 232 if you prefer to focus purely on the file handling.)The approach we are using is very simple and direct. PyQt also offers a moresophisticated approach to populating and editing item-based widgets such aslists, tables, and trees, using PyQt’s model/view architecture—we will learnabout this in Chapter 14.
def updateTable(self, current=None):
self.table.clear()
self.table.setRowCount(len(self.movies))
self.table.setColumnCount(5)
self.table.setHorizontalHeaderLabels(["Title", "Year", "Mins",
"Acquired", "Notes"])
Main Window Responsibilities 231
self.table.setAlternatingRowColors(True)
self.table.setEditTriggers(QTableWidget.NoEditTriggers)
self.table.setSelectionBehavior(QTableWidget.SelectRows)
self.table.setSelectionMode(QTableWidget.SingleSelection)
selected = None
This method is quite long, so we will review it in three parts. It can be calledwith no argument, in which case it simply populates the table; or it can becalled with the id() of the current Movie, in which case it makes the specifiedmovie’s row selected and visible (scrolling if necessary), after populating thetable. A current movie is passed if a movie has just been added or edited.
We begin by clearing the table; this gets rid of both the data and the headings.Next, we set the row and column counts, and the column headers. We setthe table’s properties so that the user cannot edit anything in-place, since weprefer to use a separate add/edit dialog in this particular application. We alsoensure that users can select only a single row at a time. The selected variableholds the QTableWidgetItem that holds the title and id() of the current movie, ifthere is one.
for row, movie in enumerate(self.movies):
item = QTableWidgetItem(movie.title)
if current is not None and current == id(movie):
selected = item
item.setData(Qt.UserRole, QVariant(long(id(movie))))
self.table.setItem(row, 0, item)
year = movie.year
if year != movie.UNKNOWNYEAR:
item = QTableWidgetItem("%d" % year)
item.setTextAlignment(Qt.AlignCenter)
self.table.setItem(row, 1, item)
minutes = movie.minutes
if minutes != movie.UNKNOWNMINUTES:
item = QTableWidgetItem("%d" % minutes)
item.setTextAlignment(Qt.AlignRight|Qt.AlignVCenter)
self.table.setItem(row, 2, item)
item = QTableWidgetItem(movie.acquired.toString(
moviedata.DATEFORMAT))
item.setTextAlignment(Qt.AlignRight|Qt.AlignVCenter)
self.table.setItem(row, 3, item)
notes = movie.notes
if notes.length() > 40:
notes = notes.left(39) + "..."
self.table.setItem(row, 4, QTableWidgetItem(notes))
Each cell in a QTableWidget is represented by a QTableWidgetItem. These itemscan hold displayable text as well as “user” data. We iterate over every moviein the movie container, creating one row of items for each one. We store the
232 Chapter 8. Data Handling and Custom File Formats
movie’s title in the first cell (item) of each row, and set this item’s user data tohold the movie’s id(). We must convert the ID to be a long, to ensure that it isheld correctly inside the QVariant. Once the item has been created and set up,we put it in the table at the appropriate row and column.
We only populate the year and minutes cells if we have data for them. For thenotes, we truncate and add an ellipsis if the data is long, since notes could bemany paragraphs in size.
self.table.resizeColumnsToContents()
if selected is not None:
selected.setSelected(True)
self.table.setCurrentItem(selected)
self.table.scrollToItem(selected)
Once all the table items have been added, we resize the table’s columns tomatch their contents.
When we iterate over the movies in the movie container, the movies are re-turned in alphabetical order (but ignoring leading “A”, “An”, and “The”, words).If the user adds a new movie or edits an existing movie, we want to ensure thatthe movie they have just added or edited is both selected and visible. This isachieved by calling updateTable() after the add or edit, with the ID of the moviethey added or edited. At the end of updateTable(), if a movie ID was passed in,the selected variable will hold the item corresponding to the movie’s title cell,and this item (and therefore the item’s row) will be made both current and se-lected, and if necessary the table widget will scroll to make sure that the rowis visible to the user.
def fileNew(self):
if not self.okToContinue():
return
self.movies.clear()
self.statusBar().clearMessage()
self.updateTable()
This method is similar to the method of the same name used for the ImageChanger application.The key difference is that instead of the main window be-ing responsible for the data, the work is delegated to the movie container heldin self.movies. When updateTable() is called, there will be no movie records, sothe widget will just show the column headers and nothing else.
The okToContinue() method is almost the same as the one we used in the ImageChanger application.The only difference is that instead of the condition check-ing self.dirty (since the Image Changer’s main window held the application’sdata) it calls self.movies.isDirty() because in this application, the movies con-tainer holds the data.
def fileOpen(self):
if not self.okToContinue():
Main Window Responsibilities 233
return
path = QFileInfo(self.movies.filename()).path() \
if not self.movies.filename().isEmpty() else "."
fname = QFileDialog.getOpenFileName(self,
"My Movies - Load Movie Data", path,
"My Movies data files (%s)" % \
self.movies.formats())
if not fname.isEmpty():
ok, msg = self.movies.load(fname)
self.statusBar().showMessage(msg, 5000)
self.updateTable()
The file open method is structurally the same as we have seen before. Themovie container holds the current filename as a QString. Normally, an appli-cation has just one custom file format, but for the sake of illustration the MyMovies application supports several, so we have provided a formats() methodto return the extensions that can be used.
The main window subclass passes on the work of loading to the moviescontainer. We have designed our movie container’s load and save methods toreturn a Boolean success/failure flag and a message. The message is either anerror message, or a report of how many movie records were loaded or saved. Inthe My Movies application, we use only the message.
If the load is successful, the movie container will contain the new movie recordsand updateTable() will display them. If the load failed, the movie container willbe empty, and updateTable() will show only the column headers.
def fileSave(self):
if self.movies.filename().isEmpty():
self.fileSaveAs()
else:
ok, msg = self.movies.save()
self.statusBar().showMessage(msg, 5000)
Again, the logic for this method is the same as we have seen before. The codeused for saving and loading depends on the filename extension, as we willsee later.
We will skip the code for fileSaveAs(); it is the same as for the Image Chang-er application, except that we use QString rather than unicode methods withthe filename, and we use a default extension of .mqb (My Movies in Qt binaryformat).
def fileImportDOM(self):
self.fileImport("dom")
def fileImportSAX(self):
self.fileImport("sax")
234 Chapter 8. Data Handling and Custom File Formats
def fileImport(self, format):
if not self.okToContinue():
return
path = QFileInfo(self.movies.filename()).path() \
if not self.movies.filename().isEmpty() else "."
fname = QFileDialog.getOpenFileName(self,
"My Movies - Import Movie Data", path,
"My Movies XML files (*.xml)")
if not fname.isEmpty():
if format == "dom":
ok, msg = self.movies.importDOM(fname)
else:
ok, msg = self.movies.importSAX(fname)
self.statusBar().showMessage(msg, 5000)
self.updateTable()
Normally we would provide a single import method and use either a SAX or aDOM parser. Here we have chosen to show both parsers in use, so we providetwo separate import actions. Both produce the same results.
The file action code for importing is very similar to the “file open” action, onlywe use the import parser specified by the user. And as with all the file-handlingcode, we pass on the work to the movie container.
def fileExportXml(self):
fname = self.movies.filename()
if fname.isEmpty():
fname = "."
else:
i = fname.lastIndexOf(".")
if i > 0:
fname = fname.left(i)
fname += ".xml"
fname = QFileDialog.getSaveFileName(self,
"My Movies - Export Movie Data", fname,
"My Movies XML files (*.xml)")
if not fname.isEmpty():
if not fname.contains("."):
fname += ".xml"
ok, msg = self.movies.exportXml(fname)
self.statusBar().showMessage(msg, 5000)
We provide only one XML export method. The code is similar to the “filesave as” action. Notice that we must use QString methods to ensure that thefilename has the .xml extension, rather than the unicode methods we used inthe Image Changer application, because the filename is held as a QString.

Data Container Responsibilities 235
Data Container Responsibilities
The application’s data container is responsible for holding all the dataitems, that is, the movie records, and for saving and loading them to andfrom disk. We saw in the preceding section when we looked at the MainWin-
dow.updateTable() method how the container could be iterated over using a for
loop to get all the movies so that they could be displayed in the application’sQTableWidget. In this section, we will look at the functionality provided by themoviedata module, including the data structures used to hold the movie data,how we provide support for ordered iteration, and other aspects, but excludingthe actual saving and loading code since that is covered in the sections thatfollow.
Why use a custom data container at all? After all, we could simply use oneof Python’s built-in data structures, such as a list or a dictionary. We prefer totake an approach where we wrap a standard data structure in a custom con-tainer class. This ensures that accesses to the data are controlled by our class,which helps to maintain data integrity. It also makes it easier to extend thecontainer’s functionality,and to replace the underlying data structure in the fu-ture, without affecting existing code. In other words, this is an object-orientedapproach that avoids the disadvantages of simply using, say, a list, with someglobal functions.
We will begin with the moviedata module’s imports and constants.
import bisect
import codecs
import copy_reg
import cPickle
import gzip
from PyQt4.QtCore import *from PyQt4.QtXml import *
We store the movies in canonicalized title order, ignoring case, and ignoringleading “A”, “An”, and “The” words. To minimizeOrdered-
Dict
92 ☞
insertion and lookup timeswe maintain the order using the bisect module, using the same techniques weused for the OrderedDict we implemented in Chapter 3.
The codecs module is necessary for reading and writing Python text files usinga specific text codec. The copy_reg and cPickle modules are used for saving andloading Python “pickles”—these are files that contain arbitrary Python datastructures.The gzip module is used to compress data; we will use it to compressand decompress our pickled data. The PyQt4.QtCore import is familiar, but wemust also import the PyQt4.QtXml module to give us access to PyQt’s SAX andDOM parsers. We will see all of these modules in use in the following sections.Note that we do not need the PyQt4.QtGui module, since the moviedata module isa pure data-handling module with no GUI functionality.
CODEC = "UTF-8"
236 Chapter 8. Data Handling and Custom File Formats
NEWPARA = unichr(0x2029)
NEWLINE = unichr(0x2028)
We want to use the UTF-8 codec for text files. This is an 8-bit Unicode encodingthat uses one byte for each ASCII character, and two or more bytes for anyother character.It is probably the most widely used Unicode text encoding usedin files. By using Unicode we can store text written in just about any humanlanguage in use today.
Although \n is a valid Unicode character, we will need to use the Unicode-spe-cific paragraph break and line break characters when we use XML. This is be-cause XML parsers do not normally distinguish between one ASCII whitespacecharacter, such as newline, and another, such as space, which is not convenientif we want to preserve the user’s line and paragraphs breaks.
class Movie(object):
UNKNOWNYEAR = 1890
UNKNOWNMINUTES = 0
def __init__(self, title=None, year=UNKNOWNYEAR,
minutes=UNKNOWNMINUTES, acquired=None, notes=None):
self.title = title
self.year = year
self.minutes = minutes
self.acquired = acquired \
if acquired is not None else QDate.currentDate()
self.notes = notes
The Movie class is used to hold the data about one movie. We use instancevariables directly rather than providing simple getters and setters. The titleand notes are stored as QStrings, and the date acquired as a QDate. The year themovie was released and its duration in minutes are held as ints. We providetwo static constants to indicate that we do not know when the movie wasreleased or how long it is.
We are now ready to look at the movie container class. This class holds anordered list of movies, and provides functionality for saving and loading (andexporting and importing) movies in a variety of formats.
class MovieContainer(object):
MAGIC_NUMBER = 0x3051E
FILE_VERSION = 100
def __init__(self):
self.__fname = QString()
self.__movies = []
self.__movieFromId = {}
self.__dirty = False
Data Container Responsibilities 237
The MAGIC_NUMBER and FILE_VERSION are used for saving and loading files usingPyQt’s QDataStream class.
The filename is held as a QString. Each element of the __moviesid()
function
13 ☞
list is itself atwo-element list, the first element being a sort key and the second a Movie. Thisis the class’s main data structure,and it is used to hold the movies in order. The__movieFromId dictionary’s keys are the id()s of Movie objects, and the valuesare Movies. As we saw in Chapter 1,Object
refer-ences
12 ☞
every Python object very conveniently hasa unique ID, available by calling id() on it. This dictionary is used to providefast movie lookup when a movie’s ID is known. For example, the main windowstores movie IDs as “user” data in its first column of QTableWidgetItems. Thereis no duplication of data, of course, since the two data structures really holdreferences to Movie objects rather than Movie objects themselves.
def __iter__(self):
for pair in iter(self.__movies):
yield pair[1]
When the MainWindow.updateTable() method iterated over the movie containerusing a for loop, Python used the container’s __iter__() method. Here we cansee that we iterate over the ordered list of [key, movie] lists, returning just themovie item each time.
def __len__(self):
return len(self.__movies)
This method allows us to use the len() function on movie containers.
In the following sections we will see the code for loading and saving the moviesheld in a movie container in various formats. But first we will look at howthe container is cleared, and how movies are added, deleted, and updated, sothat we can get a feel for how the container works, particularly regarding or-dering.
def clear(self, clearFilename=True):
self.__movies = []
self.__movieFromId = {}
if clearFilename:
self.__fname = QString()
self.__dirty = False
This method is used to clear all the data, possibly including the filename. Itis called from MainWindow.fileNew(), which does clear the filename, and fromthe various save and load methods, which leave the filename untouched. Themovie container maintains a dirty flag so that it always knows whether thereare unsaved changes.
def add(self, movie):
if id(movie) in self.__movieFromId:
238 Chapter 8. Data Handling and Custom File Formats
return False
key = self.key(movie.title, movie.year)
bisect.insort_left(self.__movies, [key, movie])
self.__movieFromId[id(movie)] = movie
self.__dirty = True
return True
The first if statement ensures that we don’t add the same movie twice. Weuse the key() method to generate a suitable order key, and then use the bisect
module’s insort_left() function to insert the two-element [key, movie] listinto the __movies list. This is very fast because the bisect module uses thebinary chop algorithm. We also make sure that the __movieFromId dictionary isup-to-date, and set the container to be dirty.
def key(self, title, year):
text = unicode(title).lower()
if text.startswith("a "):
text = text[2:]
elif text.startswith("an "):
text = text[3:]
elif text.startswith("the "):
text = text[4:]
parts = text.split(" ", 1)
if parts[0].isdigit():
text = "%08d " % int(parts[0])
if len(parts) > 1:
text += parts[1]
return u"%s\t%d" % (text.replace(" ", ""), year)
This method generates a key string suitable for ordering our movie data. Wedo not guarantee key uniqueness (although it would not be difficult to do),because the ordered data structure is a list in which duplicate keys are not aproblem. The code is English-specific, eliminating the definite and indefinitearticles from movie titles. If the movie’s title begins with a number, we pad thenumber with leading zeros so that, for example, “20” will come before “100”.Wedo not need to pad the year,because years are always exactly four digits. All theother data is stored using PyQt data types, but we have chosen to use unicode
for the key strings.
def delete(self, movie):
if id(movie) not in self.__movieFromId:
return False
key = self.key(movie.title, movie.year)
i = bisect.bisect_left(self.__movies, [key, movie])
del self.__movies[i]
del self.__movieFromId[id(movie)]
self.__dirty = True
return True
Data Container Responsibilities 239
To delete a movie we must remove it from both data structures, and in the caseof the __movies list, we must first find the movie’s index position.
def updateMovie(self, movie, title, year, minutes=None,
notes=None):
if minutes is not None:
movie.minutes = minutes
if notes is not None:
movie.notes = notes
if title != movie.title or year != movie.year:
key = self.key(movie.title, movie.year)
i = bisect.bisect_left(self.__movies, [key, movie])
self.__movies[i][0] = self.key(title, year)
movie.title = title
movie.year = year
self.__movies.sort()
self.__dirty = True
If the user edits a movie, the application always calls this method with theuser’s changes. If the minutes or notes are passed as None, we take that to meanthat they have not been changed. If the movie’s title or year has changed, themovie may now be in the wrong position in the __movies list. In these cases,we find the movie using its original title and year, set the new title and year,and then re-sort the list. This is not as expensive in practice as it may at firstappear. The list will contain, at most, one incorrectly sorted item, and Python’ssort algorithm is highly optimized for partially sorted data.
If we ever found that we had a performance problem here, we could alwaysreimplement updateMovie() using delete() and add() instead.
@staticmethod
def formats():
return "*.mqb *.mpb *.mqt *.mpt"
Normally, we would provide one, or at most two, custom data formats for anapplication, but for the purposes of illustration we provide three formats usingfour extensions. Extension .mqb is Qt binary format, and it uses the QDataStream
class, and extension .mpb is Python pickle format (using gzip compression). Ex-tension .mqt is Qt text format, and it uses the QTextStream class, and extension.mpt is Python text format. Both text formats are identical, but by using dif-ferent extensions we can use different save and load code for the purposes ofcomparison.
def save(self, fname=QString()):
if not fname.isEmpty():
self.__fname = fname
if self.__fname.endsWith(".mqb"):
return self.saveQDataStream()
240 Chapter 8. Data Handling and Custom File Formats
elif self.__fname.endsWith(".mpb"):
return self.savePickle()
elif self.__fname.endsWith(".mqt"):
return self.saveQTextStream()
elif self.__fname.endsWith(".mpt"):
return self.saveText()
return False, "Failed to save: invalid file extension"
When the user invokes the “file save” action we would expect the data contain-er’s save() method to be invoked. This is indeed what happens in My Moviesand is the normal practice. However,here, instead of performing the save itself,the save() method hands the work to a method that is specific to the filename’sextension. This is purely so that we can show how to save in the different for-mats; in a real application we would normally use only one format.
There is a corresponding load() method, that has the same Ap-proach-es toFileErrorHan-dlingsidebar
☞ 244
logic as the save()
method and passes its work to load methods that are extension-specific. All theload and save methods return a two-element tuple, the first element a Booleansuccess/failure flag and the second a message, either an error message or areport of what successfully occurred.
We have now seen the application’s infrastructure for file handling, and thecontainer’s data structures that hold the data in memory. In the followingsections, we will look at the code that performs the saving and loading of thecontainer’s data to and from disk.
Saving and Loading Binary Files
Both PyQt and the Python standard library provide facilities for writingand reading binary files. PyQt uses the QDataStream class, and the Pythonstandard library uses the file class, either directly or in conjunction with thepickle module.
Binary formats are not human-readable, but they are the easiest to code andthe fastest to write and read to and from disk. No parsing is necessary: Num-bers, dates, and many PyQt types, including images, can be read and writtenwithout formality. PyQt’s support for binary files is very strong: PyQt ensuresthat binary files are platform-independent, and it isn’t difficult to version ourbinary file types so that we can extend our file format when required. ThePython standard library’s pickle module (and its faster cPickle counterpart)also provide fast platform-independent loading and saving, but may not beas efficient as PyQt’s QDataStream for handling complex PyQt types, such asimages.
Writing and Reading Using QDataStream
The QDataStream class can read and write Python Boolean and numeric types,and PyQt types, including images, in binary format. Files written by QData-
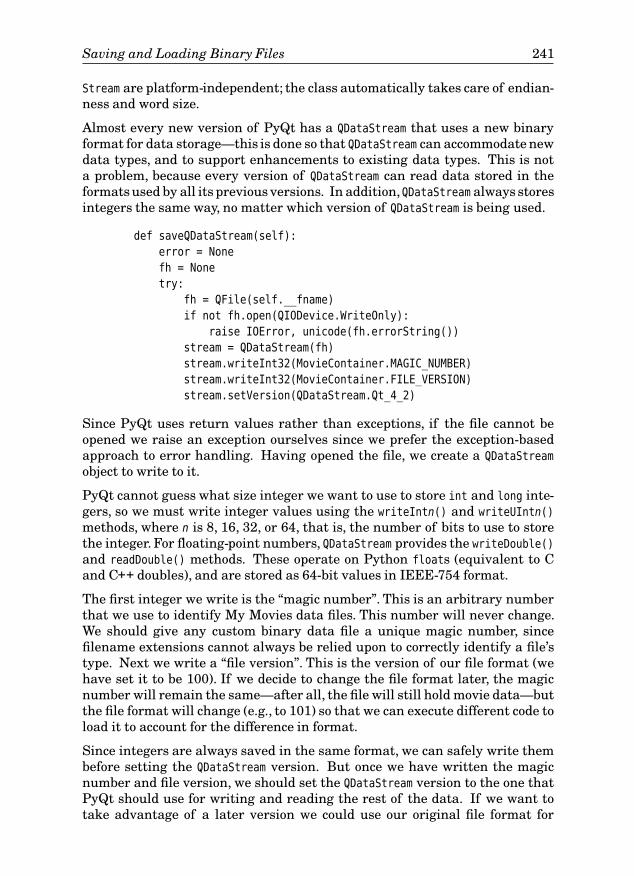
Saving and Loading Binary Files 241
Stream are platform-independent; the class automatically takes care of endian-ness and word size.
Almost every new version of PyQt has a QDataStream that uses a new binaryformat for data storage—this is done so that QDataStream can accommodate newdata types, and to support enhancements to existing data types. This is nota problem, because every version of QDataStream can read data stored in theformats used by all its previous versions. In addition,QDataStream always storesintegers the same way, no matter which version of QDataStream is being used.
def saveQDataStream(self):
error = None
fh = None
try:
fh = QFile(self.__fname)
if not fh.open(QIODevice.WriteOnly):
raise IOError, unicode(fh.errorString())
stream = QDataStream(fh)
stream.writeInt32(MovieContainer.MAGIC_NUMBER)
stream.writeInt32(MovieContainer.FILE_VERSION)
stream.setVersion(QDataStream.Qt_4_2)
Since PyQt uses return values rather than exceptions, if the file cannot beopened we raise an exception ourselves since we prefer the exception-basedapproach to error handling. Having opened the file, we create a QDataStream
object to write to it.
PyQt cannot guess what size integer we want to use to store int and long inte-gers, so we must write integer values using the writeIntn() and writeUIntn()
methods, where n is 8, 16, 32, or 64, that is, the number of bits to use to storethe integer. For floating-point numbers, QDataStream provides the writeDouble()
and readDouble() methods. These operate on Python floats (equivalent to Cand C++ doubles), and are stored as 64-bit values in IEEE-754 format.
The first integer we write is the “magic number”. This is an arbitrary numberthat we use to identify My Movies data files. This number will never change.We should give any custom binary data file a unique magic number, sincefilename extensions cannot always be relied upon to correctly identify a file’stype. Next we write a “file version”. This is the version of our file format (wehave set it to be 100). If we decide to change the file format later, the magicnumber will remain the same—after all, the file will still hold movie data—butthe file format will change (e.g., to 101) so that we can execute different code toload it to account for the difference in format.
Since integers are always saved in the same format, we can safely write thembefore setting the QDataStream version. But once we have written the magicnumber and file version, we should set the QDataStream version to the one thatPyQt should use for writing and reading the rest of the data. If we want totake advantage of a later version we could use our original file format for
242 Chapter 8. Data Handling and Custom File Formats
version Qt_4_2, and another file format for the later version. Then, when wecome to load the data, we could set the QDataStream version depending on ourfile format number.
Setting the QDataStream version is very important, since it will ensure thatany PyQt data type is saved and loaded correctly. The only situation whereit does not matter is if we are only saving and loading integers, since theirrepresentation never changes.
for key, movie in self.__movies:
stream << movie.title
stream.writeInt16(movie.year)
stream.writeInt16(movie.minutes)
stream << movie.acquired << movie.notes
Now we iterate over the movie data, writing each movie’s data to the datastream. The data’s format is illustrated in Figure 8.3. The QDataStream classoverloads the << operator for many PyQt classes, including, for example,QString, QDate, and QImage, so we must use a C++-like streaming syntax to writeour data. The << operator writes its right operand to the data stream that is itsleft operand. It can be applied repeatedly to the same stream, since it returnsthe stream it is applied to, but for integers, we must use the writeIntn() andwriteUIntn() methods.
int32 int32 Movie #1 Movie #2 … Movie #n
QString int16 int16 QDate QString
Figure 8.3 The QDataStream My Movies file format
Since we are writing binary data, we do not have to do any formatting. We justhave to ensure that when we load the data back, we use the same QDataStream
version, and that we load in the same data types in the same order as we saved.So, in this case, we will load back two integers (the magic and file versionnumbers), and then any number of movie records, each comprising a string,two integers, a date, and a string.
except (IOError, OSError), e:
error = "Failed to save: %s" % e
finally:
if fh is not None:
fh.close()
if error is not None:
return False, error
self.__dirty = False
Saving and Loading Binary Files 243
return True, "Saved %d movie records to %s" % (
len(self.__movies),
QFileInfo(self.__fname).fileName())
If there are any errors, we simply give up and return a failure flag and an errormessage. Otherwise, we clear the dirty flag and return a success flag and amessage indicating how many records were saved.
The corresponding load method is just as straightforward, although it doeshave to do more error handling.
def loadQDataStream(self):
error = None
fh = None
try:
fh = QFile(self.__fname)
if not fh.open(QIODevice.ReadOnly):
raise IOError, unicode(fh.errorString())
stream = QDataStream(fh)
magic = stream.readInt32()
if magic != MovieContainer.MAGIC_NUMBER:
raise IOError, "unrecognized file type"
version = stream.readInt32()
if version < MovieContainer.FILE_VERSION:
raise IOError, "old and unreadable file format"
elif version > MovieContainer.FILE_VERSION:
raise IOError, "new and unreadable file format"
stream.setVersion(QDataStream.Qt_4_2)
self.clear(False)
We create the QFile object and QDataStream object the same as before, except thistime using ReadOnly rather than WriteOnly mode. Then we read in the magicnumber. If this is not the unique My Movies data file number, we raise anexception. Next we read the file version, and make sure it is one that we canhandle. At this point, we would branch depending on the file version, if we hadmore than one version of this file format in use. Then we set the QDataStream
version.
The next step is to clear the movies data structures. We do this as late aspossible so that if an exception was raised earlier, the original data will beleft intact. The False argument tells the clear() method to clear __movies and__movieFromId, but not the filename.
while not stream.atEnd():
title = QString()
acquired = QDate()
notes = QString()
stream >> title
year = stream.readInt16()
244 Chapter 8. Data Handling and Custom File Formats
Approaches to File Error Handling
The approach used for handling file errors in this chapter has the structureshown here on the left. Another equally valid approach, used, for example,in chap09/textedit.py and chap14/ships.py, is shown here on the right.
error = None
fh = None
try:
# open file and read data
except (IOError, OSError), e:
error = unicode(e)
finally:
if fh is not None:
fh.close()
if error is not None:
return False, error
return True, "Success"
exception = None
fh = None
try:
# open file and read data
except (IOError, OSError), e:
exception = e
finally:
if fh is not None:
fh.close()
if exception is not None:
raise exception
At the call point, and assuming we are dealing with a load() method, wemight use code like this for the left-hand approach:
ok, msg = load(args)
if not ok:
QMessageBox.warning(self, "File Error", msg)
And for the right-hand approach we could use code like this:
try:
load(args)
except (IOError, OSError), e:
QMessageBox.warning(self, "File Error", unicode(e))
Another approach, used in chap09/sditexteditor.pyw and chap12/pagedesign-
er.pyw, is to do all the error handling inside the file-handling method itself:
fh = None
try:
# open file and read data
except (IOError, OSError), e:
QMessageBox.warning(self, "File Error", unicode(e))
finally:
if fh is not None:
fh.close()
At the call point we simply call load(args), leaving the load() method itselfto report any problems to the user.
Saving and Loading Binary Files 245
Table 8.1 Selected QDataStream Methods
Syntax Description
s.atEnd() Returns True if the end of QDataStream s has beenreached
s.setVersion(v) Sets QDataStream s’s version to v, where v is one of Qt_1_0,Qt_2_0, …, Qt_4_2, or Qt_4_3
s << x Writes object x to QDataStream s; x can be of type QBrush,QColor, QDate, QDateTime, QFont, QIcon, QImage, QMatrix,QPainterPath, QPen, QPixmap, QSize, QString, QVariant, etc.
s.readBool() Reads a bool from QDataStream s
s.readDouble() Reads a float from QDataStream s
s.readInt16() Reads a 16-bit int from QDataStream s. There is also areadUInt16() method.
s.readInt32() Reads a 32-bit int from QDataStream s. There is also areadUInt32() method.
s.readInt64() Reads a 64-bit long from QDataStream s. There is also areadUInt64() method.
x = QString()
s >> xReads object x from QDataStream s; x must already exist (sothat the data stream knows what data type to read), andcan be any of the types writable by <<
s.writeBool(b) Writes bool b to QDataStream s
s.write-
Double(f)Writes float f to QDataStream s
s.writeInt16(i) Writes int i as a 16-bit int to QDataStream s. There is alsoa writeUInt16() method.
s.writeInt32(i) Writes int i as a 32-bit int to QDataStream s. There is alsoa writeUInt32() method.
s.writeInt64(l) Writes long l as a 64-bit int to QDataStream s. There is alsoa writeUInt64() method.
minutes = stream.readInt16()
stream >> acquired >> notes
self.add(Movie(title, year, minutes, acquired, notes))
We could have stored the number of movies at the beginning of the file, afterthe file version. But instead we simply iterate over the data stream until wereach the end. For non-numeric data types we must create variables that holdempty values of the correct type. Then we use the >> operator, which takesa data stream as its left operand and a variable as its right operand; it readsa value of the right operand’s type from the stream and puts it into the rightoperand. The operator returns the file stream, so it can be applied repeatedly.
246 Chapter 8. Data Handling and Custom File Formats
For integers we must always read using the readIntn() and readUIntn()
methods with the same number of bits as we specified when writing.
Once we have read in a single movie’s data, we create a new Movie object andimmediately add it to the container’s data structures using the add() methodwe reviewed in the preceding section.
except (IOError, OSError), e:
error = "Failed to load: %s" % e
finally:
if fh is not None:
fh.close()
if error is not None:
return False, error
self.__dirty = False
return True, "Loaded %d movie records from %s" % (
len(self.__movies),
QFileInfo(self.__fname).fileName())
The error handling and the final return statement are structurally the same aswe used for the save method.
Using the PyQt QDataStream class to write binary data is not very different inprinciple from using Python’s file class. We must be careful to use the correctQDataStream version, and we ought to use a magic number and file version,or some equivalent approach. The use of the << and >> operators is not veryPythonic, but it is easy to understand.
We could have put code for writing a movie in the Movie class itself, perhapswith a method that took a QDataStream argument and wrote the movie’s data toit. In practice it is usually more convenient, and almost always more flexible,to have the data container do the file handling rather than the individualdata items.
Writing and Reading Using the pickle Module
Python’s standard pickle module, and its faster cPickle counterpart, can savearbitrary Python data structures to disk and load them back again. Thesemodules provide exactly the same functions and functionality. The only differ-ence between them is that the pickle module is implemented purely in Python,and the cPickle module is implemented in C. These modules only understandthe data types in the Python standard library, and classes that are built fromthem. If we want to pickle PyQt-specific data types with PyQt versions priorto PyQt 4.3, we must tell the pickle (or cPickle) module how to handle them.
def _pickleQDate(date):
return QDate, (date.year(), date.month(), date.day())
def _pickleQString(qstr):
return QString, (unicode(qstr),)
Saving and Loading Binary Files 247
copy_reg.pickle(QDate, _pickleQDate)
copy_reg.pickle(QString, _pickleQString)
The copy_reg module is used to specify how to read and write nonstandarddata types. The information is provided by calling copy_reg.pickle() with twoarguments. The first argument is the new-style class that we want to be able topickle, and the second is a function. The function must take a single argument,an instance of the class we want to pickle,and should return a two-tuple,whosefirst element is the class and whose second element is a tuple of standardPython types that can be fed into the class’s constructor to create an instancethat has the same value as the instance passed in.
With this information the pickle module can store instances of our class bystoring the class name as text and the arguments as a tuple of standard Pythontypes. Then, when we want to unpickle (load) the data back, Python can useeval() to re-create our instances.
PyQt 4.3 includes support for pickling basic Qt data types, including QByte-
Array, QChar, QColor, QDate, PyQt
4.3
QDateTime, QKeySequence, QLine, QLineF, QMatrix, QPoint,QPointF, QPolygon, QRect, QRectF, QSize, QSizeF, QString, QTime, and all PyQtenums. This means that we can “pickle” any of these types without having towrite and register our own pickling functions.
def savePickle(self):
error = None
fh = None
try:
fh = gzip.open(unicode(self.__fname), "wb")
cPickle.dump(self.__movies, fh, 2)
except (IOError, OSError), e:
error = "Failed to save: %s" % e
finally:
if fh is not None:
fh.close()
if error is not None:
return False, error
self.__dirty = False
return True, "Saved %d movie records to %s" % (
len(self.__movies),
QFileInfo(self.__fname).fileName())
We can easily save any Python data structure, including recursive data struc-tures, as a pickle. We do this by opening a file in binary mode and using thedump() function. In this example, we have chosen to save our pickle compressed(which may reduce file size by around 50 percent), but we could have avoidedusing compression like this:
fh = open(unicode(self.__fname), "wb")
248 Chapter 8. Data Handling and Custom File Formats
We must convert the filename to unicode because it is held as a QString. The wb
argument to open() means “write binary”. The dump() function takes a Pythondata structure, in this case our list of [key, movie] lists, a file handle, and aformat code. We always use format code 2, which means pickle binary format.
Since the keys are generated by the key() method, we really need to save onlythe Movie instances, rather than the [key, movie] lists. If disk space was at apremium we might do this, but it would require us to regenerate the keys whenthe data was loaded, so it represents a trade-off between disk space and speedof saving and loading. We have opted to sacrifice disk space for the sake offaster and easier saving and loading.
def loadPickle(self):
error = None
fh = None
try:
fh = gzip.open(unicode(self.__fname), "rb")
self.clear(False)
self.__movies = cPickle.load(fh)
for key, movie in self.__movies:
self.__movieFromId[id(movie)] = movie
except (IOError, OSError), e:
error = "Failed to load: %s" % e
finally:
if fh is not None:
fh.close()
if error is not None:
return False, error
self.__dirty = False
return True, "Loaded %d movie records from %s" % (
len(self.__movies),
QFileInfo(self.__fname).fileName())
Unpickling is almost as easy as pickling. We must remember to open the fileusing gzip so that it gets uncompressed. The rb argument to open() means“read binary”. We use the pickle load() function to retrieve the data; it takes afile handle and returns the entire data structure. We assign the data structuredirectly to our __movies list. Then we iterate over the movies to populate the__movieFromId dictionary: This cannot be saved because it depends on Movie
id()s which will vary every time the application is run.
Pickling and unpickling is the easiest approach to saving and loading binarydata, and is ideal for situations when our data is held in standard Python datatypes. If we hold our data as PyQt data types, it is usually best to use QData-
Stream. This class is more efficient than the pickle module at storing complexPyQt data types like images (because there is none of the conversion overheadthat is required when pickling), and it produces more compact files than thepickle module produces (unless the pickled data is compressed). It also makes
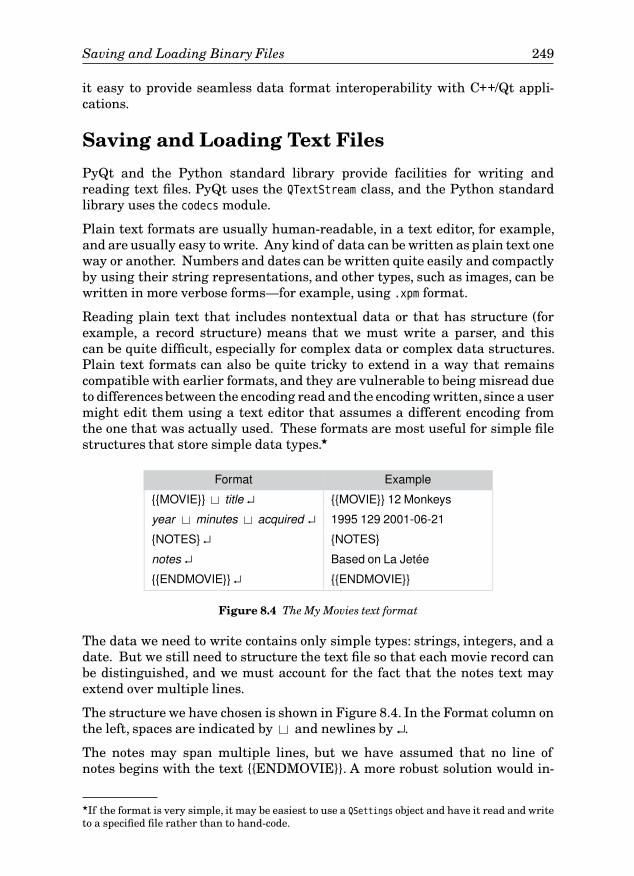
Saving and Loading Binary Files 249
it easy to provide seamless data format interoperability with C++/Qt appli-cations.
Saving and Loading Text Files
PyQt and the Python standard library provide facilities for writing andreading text files. PyQt uses the QTextStream class, and the Python standardlibrary uses the codecs module.
Plain text formats are usually human-readable, in a text editor, for example,and are usually easy to write. Any kind of data can be written as plain text oneway or another. Numbers and dates can be written quite easily and compactlyby using their string representations, and other types, such as images, can bewritten in more verbose forms—for example, using .xpm format.
Reading plain text that includes nontextual data or that has structure (forexample, a record structure) means that we must write a parser, and thiscan be quite difficult, especially for complex data or complex data structures.Plain text formats can also be quite tricky to extend in a way that remainscompatible with earlier formats, and they are vulnerable to being misread dueto differences between the encoding read and the encoding written,since a usermight edit them using a text editor that assumes a different encoding fromthe one that was actually used. These formats are most useful for simple filestructures that store simple data types.★
Format Example
{{MOVIE}} title ↵ {{MOVIE}} 12 Monkeys
year minutes acquired ↵ 1995 129 2001-06-21
{NOTES} ↵ {NOTES}
notes ↵ Based on La Jetée
{{ENDMOVIE}} ↵ {{ENDMOVIE}}
Figure 8.4 The My Movies text format
The data we need to write contains only simple types: strings, integers, and adate. But we still need to structure the text file so that each movie record canbe distinguished, and we must account for the fact that the notes text mayextend over multiple lines.
The structure we have chosen is shown in Figure 8.4. In the Format column onthe left, spaces are indicated by and newlines by ↵.
The notes may span multiple lines, but we have assumed that no line ofnotes begins with the text {{ENDMOVIE}}. A more robust solution would in-
★If the format is very simple, it may be easiest to use a QSettings object and have it read and writeto a specified file rather than to hand-code.
250 Chapter 8. Data Handling and Custom File Formats
volve escaping. For example, we could assume that for any line that beginswith, say, \, we ignore the \ and take the rest of the line as literal text. Thiswould allow us to include a line with the text {{ENDMOVIE}}”, by writing itas \{{ENDMOVIE}}.
Writing and Reading Using QTextStream
The code for writing in text format using QTextStream is very similar to the codewe used for writing using QDataStream.
def saveQTextStream(self):
error = None
fh = None
try:
fh = QFile(self.__fname)
if not fh.open(QIODevice.WriteOnly):
raise IOError, unicode(fh.errorString())
stream = QTextStream(fh)
stream.setCodec(CODEC)
for key, movie in self.__movies:
stream << "{{MOVIE}} " << movie.title << "\n" \
<< movie.year << " " << movie.minutes << " " \
<< movie.acquired.toString(Qt.ISODate) \
<< "\n{NOTES}"
if not movie.notes.isEmpty():
stream << "\n" << movie.notes
stream << "\n{{ENDMOVIE}}\n"
There are two crucial points to note. First we must specify the encoding wewant to use. We are using UTF-8 in all cases; (CODEC holds the text UTF-8). Ifwe do not do this, PyQt will use the local 8-bit encoding, which could be any ofASCII, Latin-1, or UTF-8 in the United States, Latin-1 or UTF-8 in WesternEurope, and EUC-JP, JIS, Shift-JIS, or UTF-8 in Japan. By specifying theencoding, we ensure that we always write and read using the encoding we havespecified so that characters are not misinterpreted. Unfortunately, we cannotguarantee that users will edit our text file using the correct encoding. If thefiles are likely to be edited, we could write the encoding on the first line inASCII—for example, as encoding="UTF-8" in a similar way to XML—to at leastprovide a hint to the editor. This problem should diminish in the coming yearssince UTF-8 is becoming the de facto global standard for encoding text files.
The second point should be obvious: All data must be written as text.QTextStream overloads operator << to handle Booleans, numbers, and QStringsautomatically, but other data types must be converted to their string represen-tations. For dates we have chosen to use ISO (YYYY-MM-DD) format. We havealso chosen to avoid having a blank line after the {NOTES} marker if the notesare empty.

Saving and Loading Text Files 251
We have omitted the code for the except and finally blocks since it is the sameas we have seen a few times before—for example, in the saveQDataStream()
method.
Although writing in text format is straightforward, reading it back is notso easy. For one thing, we will have to read each integer (year, minutes, andcomponents of the acquired date) as text and convert it to the integer the textrepresents. But the main issue is that we must correctly parse the file to pickout each movie’s record attributes.
Handling integers is not too difficult since QString provides a toInt() method;but the method returns a success/failure flag rather than raising an exception,and checking for this every time we handle a number will mean that we needthree lines of code per number instead of one. For this reason, we have createda more Pythonic wrapper function for reading integers.
def intFromQStr(qstr):
i, ok = qstr.toInt()
if not ok:
raise ValueError, unicode(qstr)
return i
This function simply calls QString.toInt() and raises an exception on failure,or returns the integer on success.
start TITLE NUMBERS NOTES END finish
{{MOVIE}}… numbers… {NOTES}
text…
{{ENDMOVIE}}
Figure 8.5 The My Movies text format’s finite state automaton for each movie
To parse our movies text file we will use a finite state automaton to gather eachmovie’s data. The automaton for parsing a single movie is illustrated in Fig-ure 8.5. This just means that before we read each line, we have an expectationof what the line will contain. If the expectation is not met, we have an error;otherwise, we read the expected data and set the expectation for what the nextline should contain.
def loadQTextStream(self):
error = None
fh = None
try:
fh = QFile(self.__fname)
if not fh.open(QIODevice.ReadOnly):
raise IOError, unicode(fh.errorString())
stream = QTextStream(fh)
stream.setCodec(CODEC)
self.clear(False)
lino = 0
252 Chapter 8. Data Handling and Custom File Formats
The method begins familiarly enough. Once we have opened the file, createdthe QTextStream, and set the codec, we clear the existing movie data, and areready to read in the data from disk.
For each movie we first expect a “title” line containing {{MOVIE}} followedby a space and the movie’s title, then a “numbers” line that will have the year,minutes, and acquired date, then a “notes” line that just contains {NOTES},then zero or more lines of notes text, and finally an “end” line containing just{{ENDMOVIE}}. We begin by expecting a “title” line.
To help the user find format errors we keep track of the current line numberin the lino variable, which we will use in error messages.
The body of the while loop that we use to read through the file is quite long, sowe will look at it in parts.
while not stream.atEnd():
title = year = minutes = acquired = notes = None
line = stream.readLine()
lino += 1
if not line.startsWith("{{MOVIE}}"):
raise ValueError, "no movie record found"
else:
title = line.mid(len("{{MOVIE}}")).trimmed()
We begin by initializing the variables that will hold one movie’s attributes toNone so that it is easy to tell whether we have read them all.
We iterate over each line in the file. Unlike the Python standard library’sfile.readline() method, PyQt’s QTextStream.readLine() strips off the line’strailing newline. Each time we read a line we increment lino.
The first line we expect for any movie is one beginning with the {{MOVIE}}marker. If the line is wrong we raise an exception with an error message; theexception handler will add the line number in the message passed up to theuser. If we have a correct line, we extract the movie’s title by reading the textthat follows the {{MOVIE}} marker at the beginning of the line, stripping offany leading and trailing whitespace.
The QString.mid(n) method is the equivalent of unicode[n:], and QString.
trimmed() is the same as unicode.strip().
Now we are ready to read the “numbers” line.
if stream.atEnd():
raise ValueError, "premature end of file"
line = stream.readLine()
lino += 1
parts = line.split(" ")
if parts.count() != 3:
raise ValueError, "invalid numeric data"
Saving and Loading Text Files 253
year = intFromQStr(parts[0])
minutes = intFromQStr(parts[1])
ymd = parts[2].split("-")
if ymd.count() != 3:
raise ValueError, "invalid acquired date"
acquired = QDate(intFromQStr(ymd[0]),
intFromQStr(ymd[1]),
intFromQStr(ymd[2]))
We begin by checking that we haven’t prematurely reached the end of the file,and if we have, we raise an exception. Otherwise, we read in the “numbers”line. This line should have an integer (the year), a space, an integer (the min-utes),a space,and the acquired date in YYYY-MM-DD format. We initially splitthe line on the space character and this should give us three strings, year, min-utes, and acquired date. We use our intFromQStr() function to convert the textto the integer it represents; if any conversion fails an exception is raised andhandled in this method’s exception handler. We convert the year and minutesdirectly, but for the acquired date we must split the string again, this time onthe hyphen character, and then construct a QDate using the integer values ex-tracted from each part.
Now we are ready to read the {NOTES} marker, optionally followed by lines ofnotes, and finally the {{ENDMOVIE}} marker.
if stream.atEnd():
raise ValueError, "premature end of file"
line = stream.readLine()
lino += 1
if line != "{NOTES}":
raise ValueError, "notes expected"
notes = QString()
while not stream.atEnd():
line = stream.readLine()
lino += 1
if line == "{{ENDMOVIE}}":
if title is None or year is None or \
minutes is None or acquired is None or \
notes is None:
raise ValueError, "incomplete record"
self.add(Movie(title, year, minutes,
acquired, notes.trimmed()))
break
else:
notes += line + "\n"
else:
raise ValueError, "missing endmovie marker"
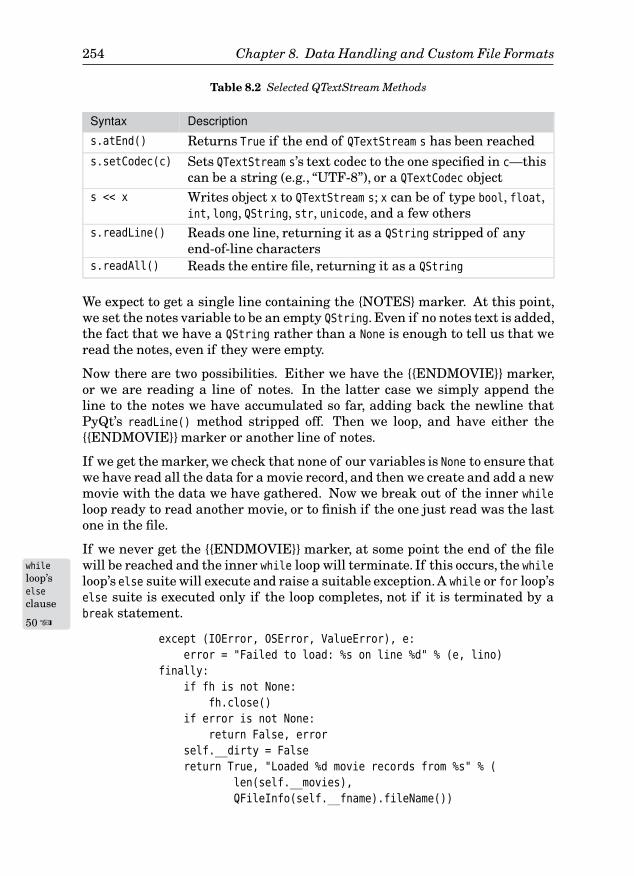
254 Chapter 8. Data Handling and Custom File Formats
Table 8.2 Selected QTextStream Methods
Syntax Description
s.atEnd() Returns True if the end of QTextStream s has been reacheds.setCodec(c) Sets QTextStream s’s text codec to the one specified in c—this
can be a string (e.g., “UTF-8”), or a QTextCodec objects << x Writes object x to QTextStream s; x can be of type bool, float,
int, long, QString, str, unicode, and a few otherss.readLine() Reads one line, returning it as a QString stripped of any
end-of-line characterss.readAll() Reads the entire file, returning it as a QString
We expect to get a single line containing the {NOTES} marker. At this point,we set the notes variable to be an empty QString. Even if no notes text is added,the fact that we have a QString rather than a None is enough to tell us that weread the notes, even if they were empty.
Now there are two possibilities. Either we have the {{ENDMOVIE}} marker,or we are reading a line of notes. In the latter case we simply append theline to the notes we have accumulated so far, adding back the newline thatPyQt’s readLine() method stripped off. Then we loop, and have either the{{ENDMOVIE}} marker or another line of notes.
If we get the marker, we check that none of our variables is None to ensure thatwe have read all the data for a movie record, and then we create and add a newmovie with the data we have gathered. Now we break out of the inner while
loop ready to read another movie, or to finish if the one just read was the lastone in the file.
If we never get the {{ENDMOVIE}} marker, at some point the end of the filewill be reached and the inner while loop will terminate.while
loop’selse
clause
50 ☞
If this occurs, the while
loop’s else suite will execute and raise a suitable exception.A while or for loop’selse suite is executed only if the loop completes, not if it is terminated by abreak statement.
except (IOError, OSError, ValueError), e:
error = "Failed to load: %s on line %d" % (e, lino)
finally:
if fh is not None:
fh.close()
if error is not None:
return False, error
self.__dirty = False
return True, "Loaded %d movie records from %s" % (
len(self.__movies),
QFileInfo(self.__fname).fileName())
Saving and Loading Text Files 255
The error handling is almost identical to what we have seen before, only thistime we include the line number where the error occurred.
Writing and Reading Using the codecs Module
An alternative to using the PyQt classes is to use Python’s built-in andstandard library classes for writing and reading text files. Files can be writtenand read directly using the file class, but if we want to specify the encoding,we must use the codecs module instead.
def saveText(self):
error = None
fh = None
try:
fh = codecs.open(unicode(self.__fname), "w", CODEC)
for key, movie in self.__movies:
fh.write(u"{{MOVIE}} %s\n" % unicode(movie.title))
fh.write(u"%d %d %s\n" % (movie.year, movie.minutes,
movie.acquired.toString(Qt.ISODate)))
fh.write(u"{NOTES}")
if not movie.notes.isEmpty():
fh.write(u"\n%s" % unicode(movie.notes))
fh.write(u"\n{{ENDMOVIE}}\n")
We have used exactly the same text format as we used when writing with aQTextStream, so the code is very similar to saveQTextStream(). We open the fileusing the codecs.open() function rather than the open() function; we do nothave to specify a “binary” flag. We have omitted the code from the except blockto the end since it is the same as we have seen before.
def loadText(self):
error = None
fh = None
try:
fh = codecs.open(unicode(self.__fname), "rU", CODEC)
self.clear(False)
lino = 0
while True:
title = year = minutes = acquired = notes = None
line = fh.readline()
if not line:
break
lino += 1
if not line.startswith("{{MOVIE}}"):
raise ValueError, "no movie record found"
else:
title = QString(line[len("{{MOVIE}}"):].strip())
256 Chapter 8. Data Handling and Custom File Formats
We have shown only the first few lines of the loadText() method that corre-sponds to saveText(). This is because the method uses the same algorithm andalmost the same code as the loadQTextStream() method. The only significantdifferences are due to the fact that we read in the lines as Python unicodes, sowe must convert the title and notes to QStrings. Also, Python keeps the new-lines rather than discarding them, and returns an empty string to signify thatthe end of the file has been reached, so we must slightly modify the code toaccount for this. For the integers we can use Python’s int() function ratherthan the intFromQStr() function we needed for QStrings.
We have chosen to read back in rU mode, which stands for “read universalnewlines”, rather than plain r mode, which stands for “read”. This just meansthat the lines will be read correctly even if written on, say, Linux, and readback on say, Windows, even though the two operating systems use differentline-ending conventions.
Saving and Loading XML Files
Both PyQt and the Python standard library can read and write XML files.PyQt provides two parsers for reading, and can write XML using its QDomDocu-
ment class. PyQt 4.3 adds two new XML classes. The QXmlStreamReader class islightweight like SAX, but easier to use, and the QXmlStreamWriter class is mucheasier and more efficient for writing than writing by hand or using DOM. ThePython standard library also provides extensive XML support, but in this sec-tion we will confine ourselves to the functionality offered by the PyQt library,since Python’s XML classes are well covered by Python’s documentation and insuch books as Python and XML and XML Processing in Python.
XML formats tend to be a lot more verbose than plain text formats, and not soeasy for humans to read. On the other hand, encoding issues are taken careof, so hand editing can be more reliable than with plain text, and the parsingof the overall file structure is usually a lot easier using a suitable XML librarythan for plain text files. XML formats are generally simpler to extend thaneither binary or plain text formats, although care must be taken when writingXML to ensure that data does not contain XML meta-characters. WritingXML is straightforward, but reading it requires the use of a parser. There aretwo very different and widely used XML parser APIs: DOM (Document ObjectModel), which loads entire XML documents into memory and is well suited toediting a document’s structure, and SAX (Simple API for XML), which worksincrementally, so is less resource-hungry and is suitable for searching andprocessing XML documents. We will show both parsers in action.
Writing XML
If we have read an XML document into a QDomDocument, or if we have createdand populated a QDomDocument in code, the easiest way to save the document todisk is to use QDomDocument.toString() to get a QString of the entire document
Saving and Loading XML Files 257
in XML format, and to save the string to disk. In practice, though, we oftenuse XML only as a data-interchange format, and hold our data in custom datastructures. In these cases, we need to write the XML ourselves, and that iswhat we will look at in a moment.
In XML, sequences of “whitespace” characters, such as newlines, tabs, andspaces, are usually treated as a single space. This is often convenient, butnot in the case of our movie notes, since for the notes we want to preserve thenewlines and paragraph breaks that the user has inserted.
def encodedNewlines(text):
return text.replace("\n\n", NEWPARA).replace("\n", NEWLINE)
def decodedNewlines(text):
return text.replace(NEWPARA, "\n\n").replace(NEWLINE, "\n")
The preceding two functions can be used to preserve the users’ paragraphbreaks and newlines. The first function encodes paragraph breaks and new-lines into the Unicode character that represents them, and the second onedecodes Unicode paragraph breaks and newlines back to the familiar \n char-acter.
With these two functions available, we are ready to see how to export our moviedata in XML format. Let us begin by looking at the format we are aimingto produce:
<?xml version='1.0' encoding='UTF-8'?>
<!DOCTYPE MOVIES>
<MOVIES VERSION='1.0'>
...
<MOVIE YEAR='1951' MINUTES='100' ACQUIRED='2002-02-07'>
<TITLE>The African Queen</TITLE>
<NOTES>
Katherine Hepburn, Humphrey Bogart
</NOTES>
</MOVIE>
...
</MOVIES>
The ellipses represent movie records that have been omitted to save space andare not part of the format. Although we will always write the <MOVIE> tag’sattributes in the same order, as far as the XML parsers are concerned the orderis arbitrary. Attribute values should not contain single or double quotes, orthe XML meta-characters, <, >, or &.★ This means that for attribute values, weshould either escape them, or ensure that we only use values that we know donot contain these characters—for example, numbers, dates and times in ISO
★To escape XML text we must convert < to <, > to >, and & to &. In attribute values, inaddition to these conversions, we must convert ' to ' and " to ".
258 Chapter 8. Data Handling and Custom File Formats
format, and Booleans. For character data such as the title and notes, we caninclude quotes, since only the meta-characters are not permitted.
def exportXml(self, fname):
error = None
fh = None
try:
fh = QFile(fname)
if not fh.open(QIODevice.WriteOnly):
raise IOError, unicode(fh.errorString())
stream = QTextStream(fh)
stream.setCodec(CODEC)
stream << ("<?xml version='1.0' encoding='%s'?>\n"
"<!DOCTYPE MOVIES>\n"
"<MOVIES VERSION='1.0'>\n" % CODEC)
We have chosen to use PyQt’s QTextStream to write our XML file; wePyQt
4.1
could justas easily have used the codecs module, although in that case we would need toconvert the QStrings to unicodes.★
The method starts off in the now familiar way. Once the QTextStream has beencreated, we set its codec to UTF-8 as usual, and then we output the first threelines—these are always the same.
for key, movie in self.__movies:
stream << ("<MOVIE YEAR='%d' MINUTES='%d' "
"ACQUIRED='%s'>\n" % (
movie.year, movie.minutes,
movie.acquired.toString(Qt.ISODate))) \
<< "<TITLE>" << Qt.escape(movie.title) \
<< "</TITLE>\n<NOTES>"
if not movie.notes.isEmpty():
stream << "\n" << Qt.escape(
encodedNewlines(movie.notes))
stream << "\n</NOTES>\n</MOVIE>\n"
stream << "</MOVIES>\n"
We iterate over our movie data in the same way as we have done previously.The Qt.escape() function takes a QString and returns it with any XML meta-characters properly escaped. And we use our encodedNewlines() function to con-vert any paragraph and line breaks in the notes to their Unicode equivalents.We do not perform any escaping on the attributes because we know that theycannot contain any unacceptable characters. We have omitted the end of themethod since the exception handling and return are structurally the same asthose we have seen before.
★PyQt 4.0 has a bug that prevents QTextStream from writing correctly, so for PyQt 4.0 we must usethe codecs module. The problem does not exist in PyQt 4.1 and later versions.
Saving and Loading XML Files 259
Reading and Parsing XML with PyQt’s DOM Classes
PyQt’s QDomDocument class can be used to read in an entire (well-formed) XMLdocument in one go. But once we have a QDomDocument, we must be able to useit. Some applications reflect the document into a widget, often a QTreeWidget,whereas others, like My Movies, which use XML purely as a data-interchangeformat, traverse the document, populating their data structures as they go.
def importDOM(self, fname):
dom = QDomDocument()
error = None
fh = None
try:
fh = QFile(fname)
if not fh.open(QIODevice.ReadOnly):
raise IOError, unicode(fh.errorString())
if not dom.setContent(fh):
raise ValueError, "could not parse XML"
except (IOError, OSError, ValueError), e:
error = "Failed to import: %s" % e
finally:
if fh is not None:
fh.close()
if error is not None:
return False, error
try:
self.populateFromDOM(dom)
except ValueError, e:
return False, "Failed to import: %s" % e
self.__fname = QString()
self.__dirty = True
return True, "Imported %d movie records from %s" % (
len(self.__movies), QFileInfo(fname).fileName())
The first part of the load method should appear familiar, but notice thatthe entire file is read when we call QDomDocument.setContent(). If this methodsucceeds (returns True), we know that the XML was successfully parsed.
Once we have a QDomDocument, we need to extract our data from it, and that iswhat the populateFromDOM() method does.
The end of the method is different from what we have seen before. We clearthe filename and set the dirty flag to True. This will ensure that if the user triesto save the XML movie data they have just imported, or if they try to quit theapplication, they will be given a “save as” dialog so that they get the chance tosave the data in one of the application’s binary or text formats.
260 Chapter 8. Data Handling and Custom File Formats
Earlier we mentioned that a QDomDocument could easily be written to a file. Hereis how we could do it, assuming that dom is a QDomDocument and filename is a validfilename, but with no error checking:
codecs.open(filename, "w", "utf-8").write(unicode(dom.toString()))
This will produce a file that is slightly different from the one produced by theexportXml() method. For example, the QDomDocument.toString() method indentsnested tags, uses double quotes rather than single quotes for attributes,and may order the attributes differently. Nonetheless, the XML documentproduced is canonically identical to the one produced by exportXml().
Once the QDomDocument has read in the XML file we need to traverse its contentsto populate the application’s data structures, and to do this we begin by callingpopulateFromDOM() on the document.
def populateFromDOM(self, dom):
root = dom.documentElement()
if root.tagName() != "MOVIES":
raise ValueError, "not a Movies XML file"
self.clear(False)
node = root.firstChild()
while not node.isNull():
if node.toElement().tagName() == "MOVIE":
self.readMovieNode(node.toElement())
node = node.nextSibling()
We start by checking that the XML file we read is indeed a movies XML file.If it is not we raise an exception, and if it is, we clear our data structures sothat they are ready to be populated by the data extracted from the DOM doc-ument.
DOM documents are composed of “nodes”, each of which represents an XMLtag or the text between tags. A node may have children and it may havesiblings. In the case of the movies XML format, we have sibling <MOVIE> nodesthat have <TITLE> and <NOTES> child nodes, and these child nodes in turn havechild text nodes. So to extract our data we iterate over the <MOVIE> nodes,and for each one we encounter, we extract its attributes and the data from itschild nodes.
def readMovieNode(self, element):
def getText(node):
child = node.firstChild()
text = QString()
while not child.isNull():
if child.nodeType() == QDomNode.TextNode:
text += child.toText().data()
child = child.nextSibling()
return text.trimmed()

Saving and Loading XML Files 261
The readMovieNode() begins with a nested function definition. The getText()
function takes a node as an argument—for example, a <TITLE> or <NOTES>
opening tag—and iterates over its child text nodes, accumulating their text.Finally, it returns the text, with whitespace stripped from either end. As notedearlier, the QString.trimmed() method does the same job as unicode.strip().
year = intFromQStr(element.attribute("YEAR"))
minutes = intFromQStr(element.attribute("MINUTES"))
ymd = element.attribute("ACQUIRED").split("-")
if ymd.count() != 3:
raise ValueError, "invalid acquired date %s" % \
unicode(element.attribute("ACQUIRED"))
acquired = QDate(intFromQStr(ymd[0]), intFromQStr(ymd[1]),
intFromQStr(ymd[2]))
The readMovieNode() method itself begins by extracting the <MOVIE> tag’sattribute data and converting it from text into ints for the year and minutes,and into a QDate for the date acquired.
We could have avoided having to handle the details of the acquired date our-selves, and pushed the work onto the parser. For example, instead of havinga single ACQUIRED attribute, we could have had ACQUIREDYEAR, ACQUIREDMONTH, andACQUIREDDAY, each with an integer value. With these three attributes we wouldnot need to do the split on hyphens, but the format would have been moreverbose.
title = notes = None
node = element.firstChild()
while title is None or notes is None:
if node.isNull():
raise ValueError, "missing title or notes"
if node.toElement().tagName() == "TITLE":
title = getText(node)
elif node.toElement().tagName() == "NOTES":
notes = getText(node)
node = node.nextSibling()
if title.isEmpty():
raise ValueError, "missing title"
self.add(Movie(title, year, minutes, acquired,
decodedNewlines(notes)))
Each <MOVIE> node has two child nodes, <TITLE> and <NOTES>. Although wealways write them in the same order in the exportXml() method, we don’t wantto force the child nodes to have a particular order. For this reason, we iterateover the child nodes and use the nested getText() method to gather the text forwhichever child node we encounter.
At the end, providing the movie has a title, we create a new Movie object andimmediately add it to our data structures using add().

262 Chapter 8. Data Handling and Custom File Formats
Using a DOM parser for importing XML into custom data structures worksfine, although we often need to write small helper functions like getText().DOM is best used in situations where we want to hold and manipulate theXML data inside a QDomDocument itself, rather than converting it into otherdata structures.
Reading and Parsing XML with PyQt’s SAX Classes
Importing XML using a SAX parser works quite differently than using a DOMparser. With SAX, we define a handler class that implements just the methodsthat we are interested in, and then give an instance of the handler to the SAXparser to use as it parses the XML. Parsing is not done in one go as it is withDOM, but rather piece by piece, with our handler’s methods being called whenthe data they handle is encountered. Any methods that we do not implementare provided by the base class, and in all cases they safely do nothing.
def importSAX(self, fname):
error = None
fh = None
try:
handler = SaxMovieHandler(self)
parser = QXmlSimpleReader()
parser.setContentHandler(handler)
parser.setErrorHandler(handler)
fh = QFile(fname)
input = QXmlInputSource(fh)
self.clear(False)
if not parser.parse(input):
raise ValueError, handler.error
except (IOError, OSError, ValueError), e:
error = "Failed to import: %s" % e
finally:
if fh is not None:
fh.close()
if error is not None:
return False, error
self.__fname = QString()
self.__dirty = True
return True, "Imported %d movie records from %s" % (
len(self.__movies), QFileInfo(fname).fileName())
We begin by creating an instance of a custom SaxMovieHandler and of a SAXXML parser. The parser can be given a content handler, an error handler,and some other handlers; we have chosen to create just one handler, one thatcan handle both content and errors, so we set this same handler for thesetwo purposes.
Saving and Loading XML Files 263
We get a QFile file handle and turn this into an XML “input source”. At thispoint we clear our data structures, again as late as possible, and then we tellthe parser to parse the XML file. The parser returns True on success and False
on failure.
There is no separate phase for populating our data structures since we handleall of this inside our SaxMovieHandler class as parsing progresses. At the endwe clear the filename and set the dirty flag to True, just as we did at the end ofthe importDOM() method.
The SaxMovieHandler class is a QXmlDefaultHandler subclass. For content han-dling it would normally implement at least startElement(), endElement(), andcharacters() to handle start tags with their attributes, end tags, and the textbetween tags. If we use the same handler for handling errors as we do here, wemust also at least implement the fatalError() method.
class SaxMovieHandler(QXmlDefaultHandler):
def __init__(self, movies):
super(SaxMovieHandler, self).__init__()
self.movies = movies
self.text = QString()
self.error = None
The super() call ensures that the base class is properly initialized. The movies
parameter is the movie container itself. The text instance variable is usedto hold between tags text—for example, the title or notes text—and the error
variable will be given an error message if something goes wrong.
def clear(self):
self.year = None
self.minutes = None
self.acquired = None
self.title = None
self.notes = None
The first time this method is called it creates an instance variable for each of amovie’s attributes. Every time it is called it sets the variables to None; this willmake it easy to test whether we have read all of a movie’s attributes.
def startElement(self, namespaceURI, localName, qName, attributes):
if qName == "MOVIE":
self.clear()
self.year = intFromQStr(attributes.value("YEAR"))
self.minutes = intFromQStr(attributes.value("MINUTES"))
ymd = attributes.value("ACQUIRED").split("-")
if ymd.count() != 3:
raise ValueError, "invalid acquired date %s" % \
unicode(attributes.value("ACQUIRED"))
self.acquired = QDate(intFromQStr(ymd[0]),
264 Chapter 8. Data Handling and Custom File Formats
intFromQStr(ymd[1]),
intFromQStr(ymd[2]))
elif qName in ("TITLE", "NOTES"):
self.text = QString()
return True
This method is reimplemented from the base class, and for this reason we mustuse the same signature. We are interested in only the last two parameters: theqName (qualified name) that holds the tag’s name, and attributes that hold’sthe tag’s attribute data. This method is called whenever a new start tagis encountered.
If a new <MOVIE> tag is encountered we clear the corresponding instancevariables, then populate the year, minutes, and acquired date from the tag’sattribute data. This leaves the title and notes variables set to None.
If the tag is a <TITLE> or <NOTES> tag, we can expect to get its corresponding text(if there is any), so we set the text variable to be an empty string, ready to beappended to.
Every reimplemented method must return True on success or False on failure;so we return True at the end.
def characters(self, text):
self.text += text
return True
Whenever text is encountered between tags, the characters() method is called.We simply append the text to the text variable. The end tag will tell uswhether we are accumulating title or note text.
def endElement(self, namespaceURI, localName, qName):
if qName == "MOVIE":
if self.year is None or self.minutes is None or \
self.acquired is None or self.title is None or \
self.notes is None or self.title.isEmpty():
raise ValueError, "incomplete movie record"
self.movies.add(Movie(self.title, self.year,
self.minutes, self.acquired,
decodedNewlines(self.notes)))
self.clear()
elif qName == "TITLE":
self.title = self.text.trimmed()
elif qName == "NOTES":
self.notes = self.text.trimmed()
return True
This method is called whenever an end tag is reached. The tag’s name is in theqName parameter. If the end tag is </MOVIE>, none of the movie data instancevariables should be None (although the title or notes could be empty QStrings).
Saving and Loading XML Files 265
If none of the variables is None, and providing the movie has a title, we createa new Movie object and immediately add it to the movies container.
If we have reached a title or notes end tag, we know that the text that hasbeen accumulated in the text QString has the text between the correspondingstart and end tags, so we assign this text accordingly. If there was no text, theassignment will be of an empty QString.
def fatalError(self, exception):
self.error = "parse error at line %d column %d: %s" % (
exception.lineNumber(), exception.columnNumber(),
exception.message())
return False
If a parsing error occurs, the fatalError() method is called. We reimplement itto populate the handler’s error text, and return False to indicate failure. Thiswill cause the parser to finish parsing and to return False to its caller.
Using PyQt’s SAX parser requires us to create at least one separate handlersubclass. This is not difficult, especially since we need to reimplement only themethods we want to use. Parsing with SAX is also less memory-hungry thanusing DOM, since SAX works incrementally,and is noticeably faster, especiallyfor larger documents.
Summary
With all the choices available, which is the best format to use, and should weuse the Python or the PyQt classes?
Using a binary format is best for performance and platform independence, andit is also the simplest to implement. Using a plain text format is appropriatefor small files that typically hold only simple values like strings, numbers, anddates, and that are intended to be hand-edited. Even so, there is a risk that theuser’s text editor will assume a different encoding from the one we have used.We recommend using UTF-8 for all plain text formats, since it is becomingthe de facto standard encoding. Reading and writing XML is a lot slower thanreading and writing binary files (except for small files, that is, less than ~1MB),but it is worth offering, at least as export and import formats. After all, if ourusers can export and import their data in XML format, it gives them the abilityto export their data, process it with some other tool, and then import back theprocessed data, without having to know or care about the details of the binaryformat our application normally uses.
As for whether we use the Python or PyQt classes, it probably does not matterat all for small files holding simple data types. If we want to minimize our pro-gramming effort, using the cPickle module is probably the easiest route. Butif we have large files (multimegabytes) or if we use complex PyQt types likeQBrush, QCursor, QFont, QIcon, QImage, and so on, it is easiest and most efficientto use QDataStream since it can read and write all these types directly. The one
266 Chapter 8. Data Handling and Custom File Formats
drawback of using a binary format is that if we want to change our format,we must at least change our load method so that it can load both our new andour old formats. This is not a problem in practice, as long as we include a fileversion at the start of our data after the magic number, since we can use thisto determine which loading code to use.
At this stage we have covered the fundamentals of GUI programming. We cancreate main window applications,with menus, toolbars,and dock windows,andwe can create and pop up any kind of dialog we like. We have also learned howto use Qt Designer to simplify and speed up dialog design, and we saw how toload and save application data in various formats. In Part III we will both deep-en and broaden our GUI programming knowledge, learning how to handle mul-tiple documents and how to create complex dialogs that are manageable for theuser. We will also explore some of PyQt’s major architectural features, from itslow-level event-handling mechanism to the creation of custom widgets, includ-ing coverage of 2D graphics, as well as higher-level features including item-based graphics, rich text (HTML) handling, and model/view programming.
ExerciseModify the My Movies application so that each Movie object can store an extrapiece of information: a QString called “location”, which is where the movie islocated—for example, the room and shelf. Provide only saving and loading ofbinary Qt format .mqb files and export and import of XML files, so remove thecode for saving and loading pickles and text files. Make sure that your new MyMovies application can still read the original application’s .mqb and .xml files,that is, files that do not have location data.
The moviedata module’s Movie class will need an extra QString attribute, called“location”. The MovieContainer class will need several small changes. You willneed to have both an old and a current file version number so you know whichkind you are dealing with. The formats() method should now return only thestring *.mqb, or could be eliminated entirely. The save() and load() methodsneed to handle only .mqb files, and must account for the location and thedifferent file versions. Similarly the exportXml() method and the two importXML methods must also account for the possible presence of <LOCATION> tags.The changes to the user interface should be obvious, so we won’t list them.
None of these changes involves many lines of code, but some are subtle andwill take a bit of care to get right. Make sure that you test your changes. Forexample, load in an old file in .mqb format, and import a file in the old .xml
format. Add some locations and save the data in a new .mqb file and export asXML. Read both of these back in to check that everything works properly.
A model solution is provided in the files, chap08/mymovies_ans.pyw, chap08/
moviedata_ans.pyw, chap08/addeditmoviedlg_ans.ui, and chap08/addeditmoviedlg-
_ans.py.

Part III
Intermediate GUI Programming

This page intentionally left blank
Layouts and Multiple Documents
99 ● Layout Policies
● Tab Widgets and Stacked Widgets
● Splitters
● Single Document Interface (SDI)
● Multiple Document Interface (MDI)
In every dialog we have created so far, all the widgets have been visible atthe same time. But in some cases, such as, complex configuration dialogs orproperty editors, so many widgets are required that showing them all at oncecould confuse the user. For such situations we can use tab widgets or stackedwidgets that allow us to group related widgets together, and show only therelevant group, or we can use extension dialogs that can show extra options ondemand. These techniques can help make dialogs smaller and easier for usersto navigate and use; we will cover them in this chapter’s second section.
In the main-window-style applications we have created, we had one centralwidget. But in some situations, we need to show two or more widgets in thecentral area, and often want to give the user some control over their relativesizes. One way to achieve this is to use a single central widget with dock win-dows; we saw this approach in Chapter 6. Another approach is to use splitters,the subject of this chapter’s third section.
Another issue that arises with main-window-style applications is how we dealwith multiple documents. There are four main approachesto this. One is to usemultiple instances of the application. In this approach, the user launches oneinstance of the application for each document they wish to work on. In theorythis requires no programming effort at all, but in practice, we might want toimplement some kind of file-locking scheme or use interprocesscommunicationto ensure that the user does not start the application two or more times on thesame document. All the applications we have created so far are of this kind,although none of them has used file locking.★
A second approach is to use SDI (Single Document Interface). This means thatthe user is expected to run only one instance of the application, but can usethat application instance to create as many main windows as they need tohandle all the documents they wish to work on. (It is possible to ensure thatthe user can only have one instance of an application running at the same
★For file-locking code, see “File Locking Using a Cross-Platform API” in the Python Cookbook.
269
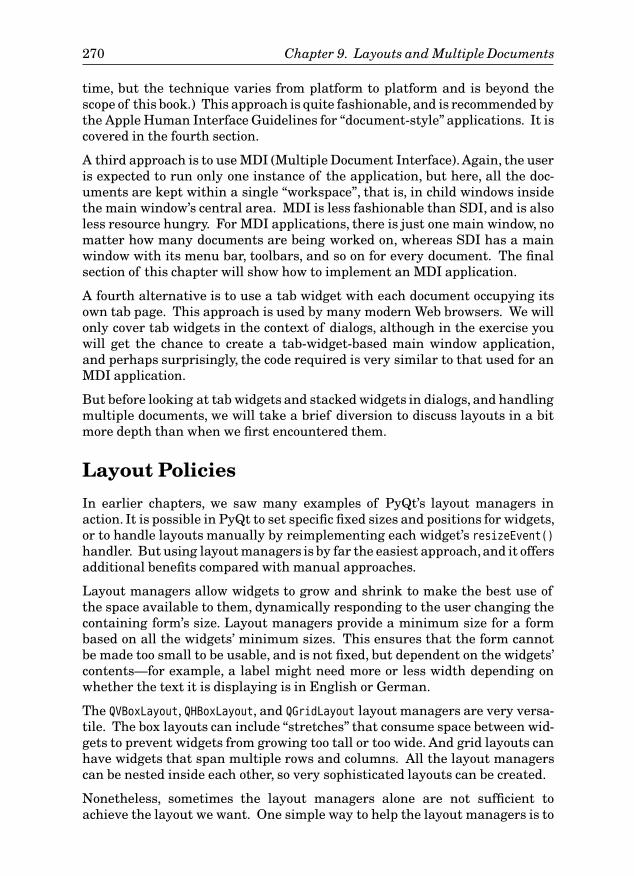
270 Chapter 9. Layouts and Multiple Documents
time, but the technique varies from platform to platform and is beyond thescope of this book.) This approach is quite fashionable, and is recommended bythe Apple Human Interface Guidelines for “document-style” applications. It iscovered in the fourth section.
A third approach is to use MDI (Multiple Document Interface). Again, the useris expected to run only one instance of the application, but here, all the doc-uments are kept within a single “workspace”, that is, in child windows insidethe main window’s central area. MDI is less fashionable than SDI, and is alsoless resource hungry. For MDI applications, there is just one main window, nomatter how many documents are being worked on, whereas SDI has a mainwindow with its menu bar, toolbars, and so on for every document. The finalsection of this chapter will show how to implement an MDI application.
A fourth alternative is to use a tab widget with each document occupying itsown tab page. This approach is used by many modern Web browsers. We willonly cover tab widgets in the context of dialogs, although in the exercise youwill get the chance to create a tab-widget-based main window application,and perhaps surprisingly, the code required is very similar to that used for anMDI application.
But before looking at tab widgets and stacked widgets in dialogs, and handlingmultiple documents, we will take a brief diversion to discuss layouts in a bitmore depth than when we first encountered them.
Layout Policies
In earlier chapters, we saw many examples of PyQt’s layout managers inaction. It is possible in PyQt to set specific fixed sizes and positions for widgets,or to handle layouts manually by reimplementing each widget’s resizeEvent()
handler. But using layout managers is by far the easiest approach,and it offersadditional benefits compared with manual approaches.
Layout managers allow widgets to grow and shrink to make the best use ofthe space available to them, dynamically responding to the user changing thecontaining form’s size. Layout managers provide a minimum size for a formbased on all the widgets’ minimum sizes. This ensures that the form cannotbe made too small to be usable, and is not fixed, but dependent on the widgets’contents—for example, a label might need more or less width depending onwhether the text it is displaying is in English or German.
The QVBoxLayout, QHBoxLayout, and QGridLayout layout managers are very versa-tile. The box layouts can include “stretches” that consume space between wid-gets to prevent widgets from growing too tall or too wide. And grid layouts canhave widgets that span multiple rows and columns. All the layout managerscan be nested inside each other, so very sophisticated layouts can be created.
Nonetheless, sometimes the layout managers alone are not sufficient toachieve the layout we want. One simple way to help the layout managers is to
Layout Policies 271
Table 9.1 PyQt’s Size Policies
Policy Effect
FixedThe widget has the size specified by its size hint andnever changes size
MinimumThe widget’s size hint is its minimum size; it cannot beshrunk smaller than this, but it can grow bigger
MaximumThe widget’s size hint is its maximum size; it cannotgrow bigger than this, but it can shrink down to itsminimum size hint
Preferred
The widget’s size hint is its preferred size; it can beshrunk down to its minimum size hint, or it can growbigger than its size hint
Expanding
The widget can be shrunk down to its minimum sizehint, or it can grow bigger than its size hint, but itprefers to grow bigger
set the size policies of those widgets that are not being laid out satisfactorily.Every widget has vertical and horizontal size policies that can be set indepen-dently. (Every widget can also have a fixed minimum and maximum size, butusing size policies usually provides better resizing behavior.) In addition, twosizes are associated with every widget: a size hint and a minimum size hint.The former is the widget’s preferred size, and the latter is the smallest size thewidget can be shrunk to. The sizes are used by the size policies as shown inTable 9.1.
For example, a QLineEdit might have a default horizontal policy of Expanding
and a vertical policy of Fixed. This would mean that the line edit will take up asmuch horizontal space as it can get, but will always have the same vertical size.Every built-in PyQt widget has sensible size hints and size policies already set,so normally we need to change them for only one or two widgets when tweakinga layout.
Size policies also store a “stretch factor” in addition to a policy. This is usedto indicate how layout managers should share space between widgets. Forexample, if we had a QVBoxLayout that contained two QListWidgets, both wouldwant to grow in both directions. But if we wanted the bottom one to grow fasterthan the top one, we could give the top one a stretch factor of 1 and the bottomone a stretch factor of 3. This will ensure that if the user resizes, the extraspace will be distributed between the two widgets in a proportion of 1:3.
If setting size policies and stretch factors is still not enough, we can always cre-ate a subclass and reimplement the sizeHint() and minimumSizeHint() methodsto return the size we want. We will see examples of this in Chapter 11.

272 Chapter 9. Layouts and Multiple Documents
Tab Widgets and Stacked Widgets
Some dialogs require so many widgets to present all the options that theymake available that they become difficult for the user to understand. The mostobvious way to deal with this is to create two or more dialogs and to divide theoptions between them. This is a good approach when it is possible since it min-imizes the demands made on the user, and may also be easier from a mainte-nance point of view than a single complex dialog. But often we need to use asingle dialog because the options we are presenting to the user are related andneed to be presented together.
When we must use a single dialog, there are two kinds of groups of optionsthat we must consider. One kind is simply a group of related options. Thisis most easily handled by using a QTabWidget. A tab widget can have as many“pages” (child widgets and tab captions) as necessary, each one laid out withthe widgets that are needed to present the relevant options. Figure 9.1 showsa PaymentDlg, an example of a three-page tab widget that was created using QtDesigner.
Figure 9.1 A dialog that uses a tab widget for choosing a payment method
In Qt Designer’s Widget Box’s Containers section there is a Tab Widget. Thiscan be dragged onto a form like any other widget. Like most container widgets,and unlike most other widgets, we normally have to manually resize thetab widget after dropping it on the form, to roughly the size we want. In QtDesigner, the tab widget has context menu options for deleting and addingpages. The current page can be set by clicking the relevant tab or by settingthe “currentIndex” property. The current page’s tab text can be set by settingthe “currentTabText” property.
Once a tab widget has been dragged onto a form and resized, we can dragother widgets onto its pages. These widgets can be laid out in the normalway, and each tab page can be laid out in a similar way to the form itself: bydeselecting all the widgets, then clicking the tab page, and then applying alayout manager.
Thanks to their labelled tabs, tab widgets make it obvious to the user that thereare more options on other tab pages, and provide an easy means by which the
Tab Widgets and Stacked Widgets 273
user can navigate between pages. Tab widgets can have rounded or angled tabcorners, and can have the tabs at the top, bottom, left, or right.
Although using Qt Designer is quicker and easier than creating the dialog byhand, it is interesting and useful to know how to achieve the same thing purelyin code. We won’t show the creation of the ordinary widgets, since we haveseen that enough times by now; instead, we will focus on the tab widget andthe form’s overall layout. The following extracts are all from the PaymentDlg
class’s initializer in chap09/paymentdlg.pyw. (The Qt Designer version is in thefiles paymentdlg.ui and paymentdlg.py.)
tabWidget = QTabWidget()
cashWidget = QWidget()
cashLayout = QHBoxLayout()
cashLayout.addWidget(self.paidCheckBox)
cashWidget.setLayout(cashLayout)
tabWidget.addTab(cashWidget, "Cas&h")
We create the tab widget just like any other widget. Each page in a tab widgetmust contain a widget, so we create a new widget, cashWidget, and create a lay-out for it. Then we add the relevant widgets—in this case, just one, paidCheck-Box—to the layout, and then set the layout on the containing widget. Finally,we add the containing widget as a new tab to the tab widget, along with thetab’s label text.★
checkWidget = QWidget()
checkLayout = QGridLayout()
checkLayout.addWidget(checkNumLabel, 0, 0)
checkLayout.addWidget(self.checkNumLineEdit, 0, 1)
checkLayout.addWidget(bankLabel, 0, 2)
checkLayout.addWidget(self.bankLineEdit, 0, 3)
checkLayout.addWidget(accountNumLabel, 1, 0)
checkLayout.addWidget(self.accountNumLineEdit, 1, 1)
checkLayout.addWidget(sortCodeLabel, 1, 2)
checkLayout.addWidget(self.sortCodeLineEdit, 1, 3)
checkWidget.setLayout(checkLayout)
tabWidget.addTab(checkWidget, "Chec&k")
This tab is created in exactly the same way as the first one. The only differ-ences are that we have used a grid layout, and we have more widgets to put inthe layout.
We won’t show the code for the third tab, because it is structurally the same asthe ones we have already seen.
★In the PyQt documentation, and to some extent, the QTabWidget’s API, the term “tab” is used torefer to a tab’s label alone, and to a tab’s label and page together.
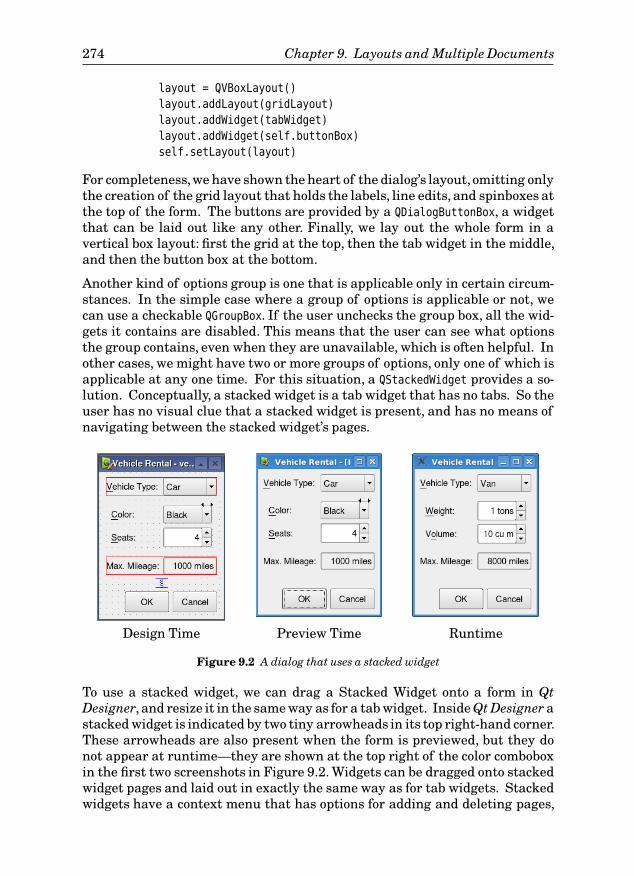
274 Chapter 9. Layouts and Multiple Documents
layout = QVBoxLayout()
layout.addLayout(gridLayout)
layout.addWidget(tabWidget)
layout.addWidget(self.buttonBox)
self.setLayout(layout)
For completeness,we have shown the heart of the dialog’s layout, omitting onlythe creation of the grid layout that holds the labels, line edits, and spinboxes atthe top of the form. The buttons are provided by a QDialogButtonBox, a widgetthat can be laid out like any other. Finally, we lay out the whole form in avertical box layout: first the grid at the top, then the tab widget in the middle,and then the button box at the bottom.
Another kind of options group is one that is applicable only in certain circum-stances. In the simple case where a group of options is applicable or not, wecan use a checkable QGroupBox. If the user unchecks the group box, all the wid-gets it contains are disabled. This means that the user can see what optionsthe group contains, even when they are unavailable, which is often helpful. Inother cases, we might have two or more groups of options, only one of which isapplicable at any one time. For this situation, a QStackedWidget provides a so-lution. Conceptually, a stacked widget is a tab widget that has no tabs. So theuser has no visual clue that a stacked widget is present, and has no means ofnavigating between the stacked widget’s pages.
Design Time Preview Time Runtime
Figure 9.2 A dialog that uses a stacked widget
To use a stacked widget, we can drag a Stacked Widget onto a form in QtDesigner, and resize it in the same way as for a tab widget. Inside Qt Designer astacked widget is indicated by two tiny arrowheads in its top right-hand corner.These arrowheads are also present when the form is previewed, but they donot appear at runtime—they are shown at the top right of the color comboboxin the first two screenshots in Figure 9.2. Widgets can be dragged onto stackedwidget pages and laid out in exactly the same way as for tab widgets. Stackedwidgets have a context menu that has options for adding and deleting pages,
Tab Widgets and Stacked Widgets 275
just like a tab widget, and additional options for navigating between pages andfor changing the page order.
Since stacked widgets have no tabs, we must provide the user with a meansof navigating between pages. In the VehicleRentalDlg shown in Figure 9.2, thevehicle type combobox is used as a page selector. To make this work, in Qt De-signer we have connected the combobox’scurrentIndexChanged(int) signal to thestacked widget’s setCurrentIndex(int) slot. Another commonly used approachthat lets users see all the pages available is to use a QListWidget containingthe name of each page, and connecting its currentRowChanged(int) signal in thesame way we connected the combobox’s signal.
We will now see how to create a stacked widget in code. The following extractsare from the VehicleRentalDlg class’s initializer in chap09/vehiclerentaldlg.pyw.(The Qt Designer version is in the files vehiclerentaldlg.ui and vehicle-
rentaldlg.py.)
self.stackedWidget = QStackedWidget()
carWidget = QWidget()
carLayout = QGridLayout()
carLayout.addWidget(colorLabel, 0, 0)
carLayout.addWidget(self.colorComboBox, 0, 1)
carLayout.addWidget(seatsLabel, 1, 0)
carLayout.addWidget(self.seatsSpinBox, 1, 1)
carWidget.setLayout(carLayout)
self.stackedWidget.addWidget(carWidget)
Adding a “page” to a stacked widget is very similar to adding a tab to a tabwidget. We begin by creating a plain widget, and then create a layout for itand lay out the widgets we want. Then we set the layout on the plain widgetand add this widget to the widget stack. We have not shown the code for thevanWidget, because it is structurally identical.
topLayout = QHBoxLayout()
topLayout.addWidget(vehicleLabel)
topLayout.addWidget(self.vehicleComboBox)
bottomLayout = QHBoxLayout()
bottomLayout.addWidget(mileageLabel)
bottomLayout.addWidget(self.mileageLabel)
layout = QVBoxLayout()
layout.addLayout(topLayout)
layout.addWidget(self.stackedWidget)
layout.addLayout(bottomLayout)
layout.addWidget(self.buttonBox)
self.setLayout(layout)
Once again, for completeness we have shown the whole dialog’s layout. Webegin with a top layout that has the combobox that is used to set the stacked
276 Chapter 9. Layouts and Multiple Documents
widget’s current widget. Then we create a bottom layout of the mileage labels,and then a button layout for the buttons. Next, we add all of these layouts, andthe stacked widget itself, to a vertical box layout.
self.connect(self.buttonBox, SIGNAL("accepted()"), self.accept)
self.connect(self.buttonBox, SIGNAL("rejected()"), self.reject)
self.connect(self.vehicleComboBox,
SIGNAL("currentIndexChanged(QString)"),
self.setWidgetStack)
self.connect(self.weightSpinBox, SIGNAL("valueChanged(int)"),
self.weightChanged)
We must provide the user with a navigation mechanism, and we do this byconnecting the vehicle combobox’s currentIndexChanged() signal to a customsetWidgetStack() slot. The last slot is simply part of the form’s validation;it is there to set the maximum mileage, which is fixed for cars but for vans isdependent on their weight.
def setWidgetStack(self, text):
if text == "Car":
self.stackedWidget.setCurrentIndex(0)
self.mileageLabel.setText("1000 miles")
else:
self.stackedWidget.setCurrentIndex(1)
self.weightChanged(self.weightSpinBox.value())
def weightChanged(self, amount):
self.mileageLabel.setText("%d miles" % (8000 / amount))
The setWidgetStack() slot makes the appropriate widget visible, and handlespart of the mileage setting since this varies depending on whether the vehicleis a car or a van.
We have used the combobox’s current text to determine which widget to makevisible. A possibly more robust approach would be to associate a data item witheach combobox item (using the two-argument QComboBox.addItem() method),and use the current item’s data item to choose which widget to show.
Extension Dialogs
There is another approach that we can take for complex dialogs: extensiondialogs. These are typically used for cases where the dialog has “simple” and“advanced” options. Initially the dialog is shown with the simple options, buta toggle button is provided to show or hide the advanced options.
The extension dialog shown in Figure 9.3 shows the extra checkboxes whenthe More toggle button is depressed. Any QPushButton can be made into atoggle button by calling setCheckable(True) on it, or by setting its “checkable”property to True in Qt Designer.
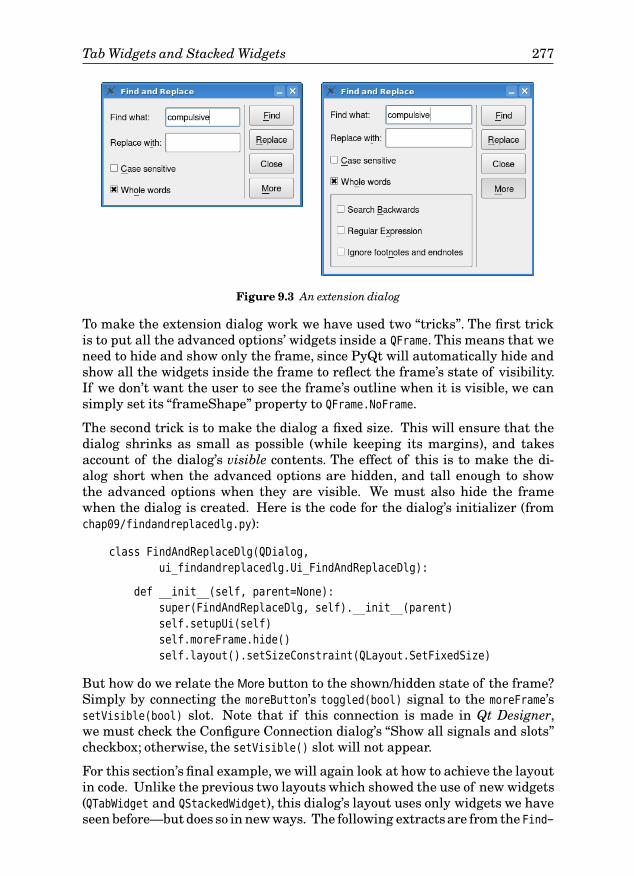
Tab Widgets and Stacked Widgets 277
Figure 9.3 An extension dialog
To make the extension dialog work we have used two “tricks”. The first trickis to put all the advanced options’ widgets inside a QFrame. This means that weneed to hide and show only the frame, since PyQt will automatically hide andshow all the widgets inside the frame to reflect the frame’s state of visibility.If we don’t want the user to see the frame’s outline when it is visible, we cansimply set its “frameShape” property to QFrame.NoFrame.
The second trick is to make the dialog a fixed size. This will ensure that thedialog shrinks as small as possible (while keeping its margins), and takesaccount of the dialog’s visible contents. The effect of this is to make the di-alog short when the advanced options are hidden, and tall enough to showthe advanced options when they are visible. We must also hide the framewhen the dialog is created. Here is the code for the dialog’s initializer (fromchap09/findandreplacedlg.py):
class FindAndReplaceDlg(QDialog,
ui_findandreplacedlg.Ui_FindAndReplaceDlg):
def __init__(self, parent=None):
super(FindAndReplaceDlg, self).__init__(parent)
self.setupUi(self)
self.moreFrame.hide()
self.layout().setSizeConstraint(QLayout.SetFixedSize)
But how do we relate the More button to the shown/hidden state of the frame?Simply by connecting the moreButton’s toggled(bool) signal to the moreFrame’ssetVisible(bool) slot. Note that if this connection is made in Qt Designer,we must check the Configure Connection dialog’s “Show all signals and slots”checkbox; otherwise, the setVisible() slot will not appear.
For this section’s final example, we will again look at how to achieve the layoutin code. Unlike the previous two layouts which showed the use of new widgets(QTabWidget and QStackedWidget), this dialog’s layout uses only widgets we haveseen before—but does so in new ways. The following extractsare from the Find-
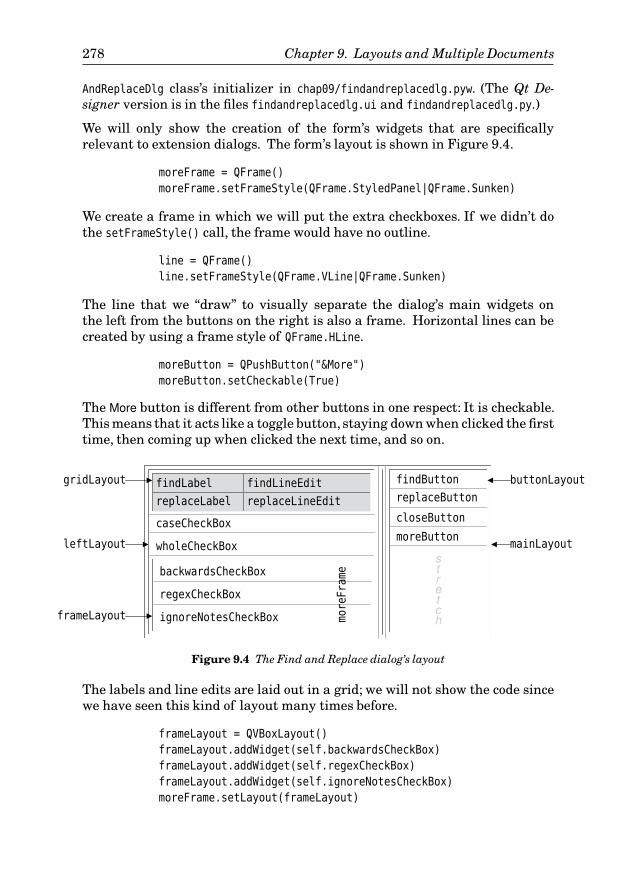
278 Chapter 9. Layouts and Multiple Documents
AndReplaceDlg class’s initializer in chap09/findandreplacedlg.pyw. (The Qt De-signer version is in the files findandreplacedlg.ui and findandreplacedlg.py.)
We will only show the creation of the form’s widgets that are specificallyrelevant to extension dialogs. The form’s layout is shown in Figure 9.4.
moreFrame = QFrame()
moreFrame.setFrameStyle(QFrame.StyledPanel|QFrame.Sunken)
We create a frame in which we will put the extra checkboxes. If we didn’t dothe setFrameStyle() call, the frame would have no outline.
line = QFrame()
line.setFrameStyle(QFrame.VLine|QFrame.Sunken)
The line that we “draw” to visually separate the dialog’s main widgets onthe left from the buttons on the right is also a frame. Horizontal lines can becreated by using a frame style of QFrame.HLine.
moreButton = QPushButton("&More")
moreButton.setCheckable(True)
The More button is different from other buttons in one respect: It is checkable.This means that it acts like a toggle button, staying down when clicked the firsttime, then coming up when clicked the next time, and so on.
findLabel findLineEdit
replaceLabel replaceLineEdit
caseCheckBox
wholeCheckBox
backwardsCheckBox g
regexCheckBox
ignoreNotesCheckBox
findButton
replaceButton
closeButton
moreButton
stretch
gridLayout
frameLayout moreFrame
leftLayout
buttonLayout
mainLayout
Figure 9.4 The Find and Replace dialog’s layout
The labels and line edits are laid out in a grid; we will not show the code sincewe have seen this kind of layout many times before.
frameLayout = QVBoxLayout()
frameLayout.addWidget(self.backwardsCheckBox)
frameLayout.addWidget(self.regexCheckBox)
frameLayout.addWidget(self.ignoreNotesCheckBox)
moreFrame.setLayout(frameLayout)
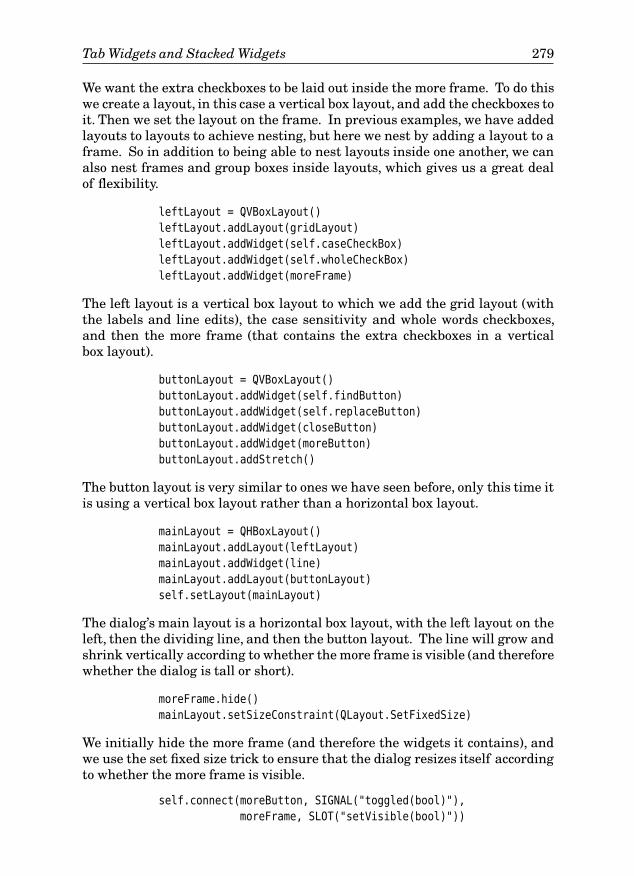
Tab Widgets and Stacked Widgets 279
We want the extra checkboxes to be laid out inside the more frame. To do thiswe create a layout, in this case a vertical box layout, and add the checkboxes toit. Then we set the layout on the frame. In previous examples, we have addedlayouts to layouts to achieve nesting, but here we nest by adding a layout to aframe. So in addition to being able to nest layouts inside one another, we canalso nest frames and group boxes inside layouts, which gives us a great dealof flexibility.
leftLayout = QVBoxLayout()
leftLayout.addLayout(gridLayout)
leftLayout.addWidget(self.caseCheckBox)
leftLayout.addWidget(self.wholeCheckBox)
leftLayout.addWidget(moreFrame)
The left layout is a vertical box layout to which we add the grid layout (withthe labels and line edits), the case sensitivity and whole words checkboxes,and then the more frame (that contains the extra checkboxes in a verticalbox layout).
buttonLayout = QVBoxLayout()
buttonLayout.addWidget(self.findButton)
buttonLayout.addWidget(self.replaceButton)
buttonLayout.addWidget(closeButton)
buttonLayout.addWidget(moreButton)
buttonLayout.addStretch()
The button layout is very similar to ones we have seen before, only this time itis using a vertical box layout rather than a horizontal box layout.
mainLayout = QHBoxLayout()
mainLayout.addLayout(leftLayout)
mainLayout.addWidget(line)
mainLayout.addLayout(buttonLayout)
self.setLayout(mainLayout)
The dialog’s main layout is a horizontal box layout, with the left layout on theleft, then the dividing line, and then the button layout. The line will grow andshrink vertically according to whether the more frame is visible (and thereforewhether the dialog is tall or short).
moreFrame.hide()
mainLayout.setSizeConstraint(QLayout.SetFixedSize)
We initially hide the more frame (and therefore the widgets it contains), andwe use the set fixed size trick to ensure that the dialog resizes itself accordingto whether the more frame is visible.
self.connect(moreButton, SIGNAL("toggled(bool)"),
moreFrame, SLOT("setVisible(bool)"))
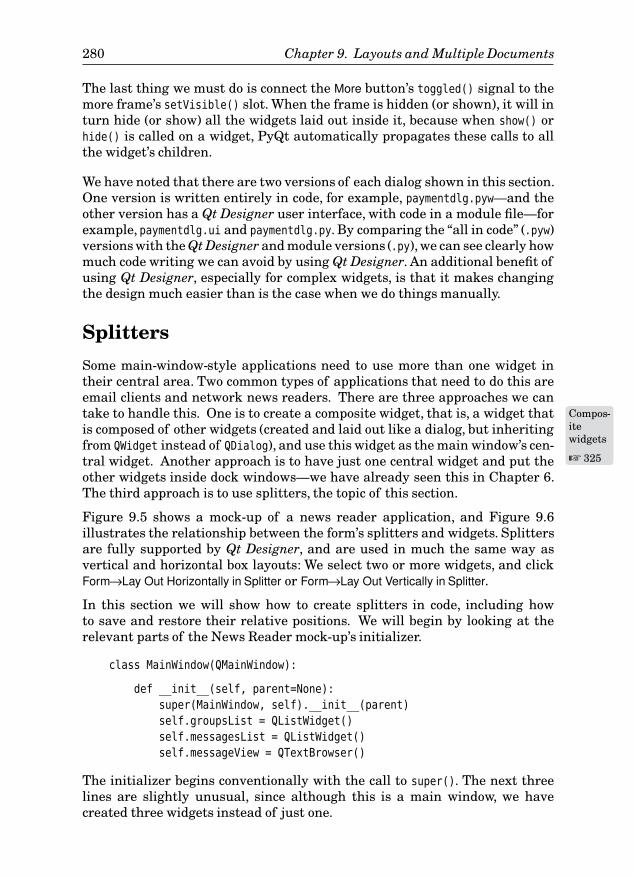
280 Chapter 9. Layouts and Multiple Documents
The last thing we must do is connect the More button’s toggled() signal to themore frame’s setVisible() slot. When the frame is hidden (or shown), it will inturn hide (or show) all the widgets laid out inside it, because when show() orhide() is called on a widget, PyQt automatically propagates these calls to allthe widget’s children.
We have noted that there are two versions of each dialog shown in this section.One version is written entirely in code, for example, paymentdlg.pyw—and theother version has a Qt Designer user interface, with code in a module file—forexample, paymentdlg.ui and paymentdlg.py. By comparing the “all in code” (.pyw)versions with the Qt Designer and module versions (.py), we can see clearly howmuch code writing we can avoid by using Qt Designer. An additional benefit ofusing Qt Designer, especially for complex widgets, is that it makes changingthe design much easier than is the case when we do things manually.
Splitters
Some main-window-style applications need to use more than one widget intheir central area. Two common types of applications that need to do this areemail clients and network news readers. There are three approaches we cantake to handle this. One is to create a composite Compos-
itewidgets
☞ 325
widget, that is, a widget thatis composed of other widgets (created and laid out like a dialog, but inheritingfrom QWidget instead of QDialog), and use this widget as the main window’s cen-tral widget. Another approach is to have just one central widget and put theother widgets inside dock windows—we have already seen this in Chapter 6.The third approach is to use splitters, the topic of this section.
Figure 9.5 shows a mock-up of a news reader application, and Figure 9.6illustrates the relationship between the form’s splitters and widgets. Splittersare fully supported by Qt Designer, and are used in much the same way asvertical and horizontal box layouts: We select two or more widgets, and clickForm→Lay Out Horizontally in Splitter or Form→Lay Out Vertically in Splitter.
In this section we will show how to create splitters in code, including howto save and restore their relative positions. We will begin by looking at therelevant parts of the News Reader mock-up’s initializer.
class MainWindow(QMainWindow):
def __init__(self, parent=None):
super(MainWindow, self).__init__(parent)
self.groupsList = QListWidget()
self.messagesList = QListWidget()
self.messageView = QTextBrowser()
The initializer begins conventionally with the call to super(). The next threelines are slightly unusual, since although this is a main window, we havecreated three widgets instead of just one.
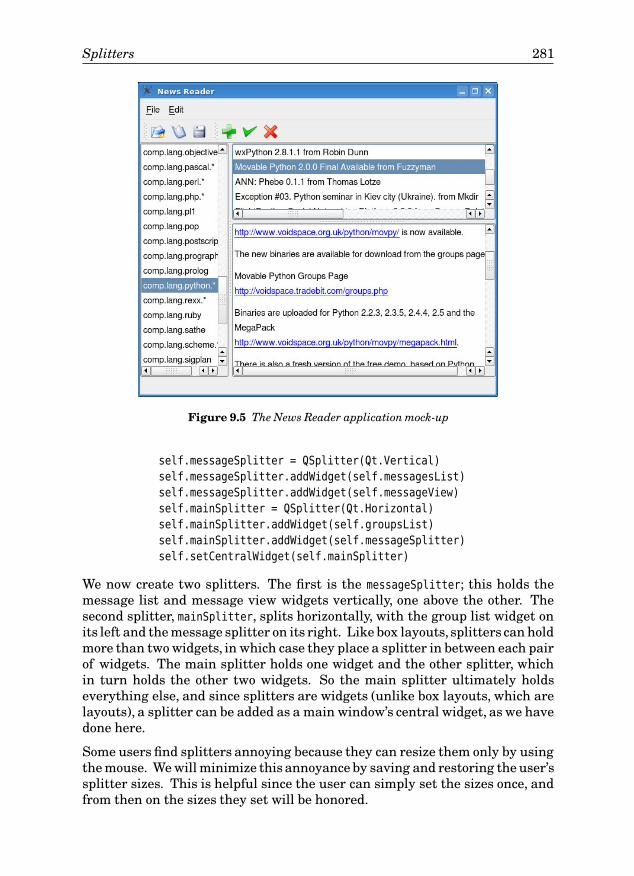
Splitters 281
Figure 9.5 The News Reader application mock-up
self.messageSplitter = QSplitter(Qt.Vertical)
self.messageSplitter.addWidget(self.messagesList)
self.messageSplitter.addWidget(self.messageView)
self.mainSplitter = QSplitter(Qt.Horizontal)
self.mainSplitter.addWidget(self.groupsList)
self.mainSplitter.addWidget(self.messageSplitter)
self.setCentralWidget(self.mainSplitter)
We now create two splitters. The first is the messageSplitter; this holds themessage list and message view widgets vertically, one above the other. Thesecond splitter, mainSplitter, splits horizontally, with the group list widget onits left and the message splitter on its right. Like box layouts, splitters can holdmore than two widgets, in which case they place a splitter in between each pairof widgets. The main splitter holds one widget and the other splitter, whichin turn holds the other two widgets. So the main splitter ultimately holdseverything else, and since splitters are widgets (unlike box layouts, which arelayouts), a splitter can be added as a main window’s central widget, as we havedone here.
Some users find splitters annoying because they can resize them only by usingthe mouse. We will minimize this annoyance by saving and restoring the user’ssplitter sizes. This is helpful since the user can simply set the sizes once, andfrom then on the sizes they set will be honored.
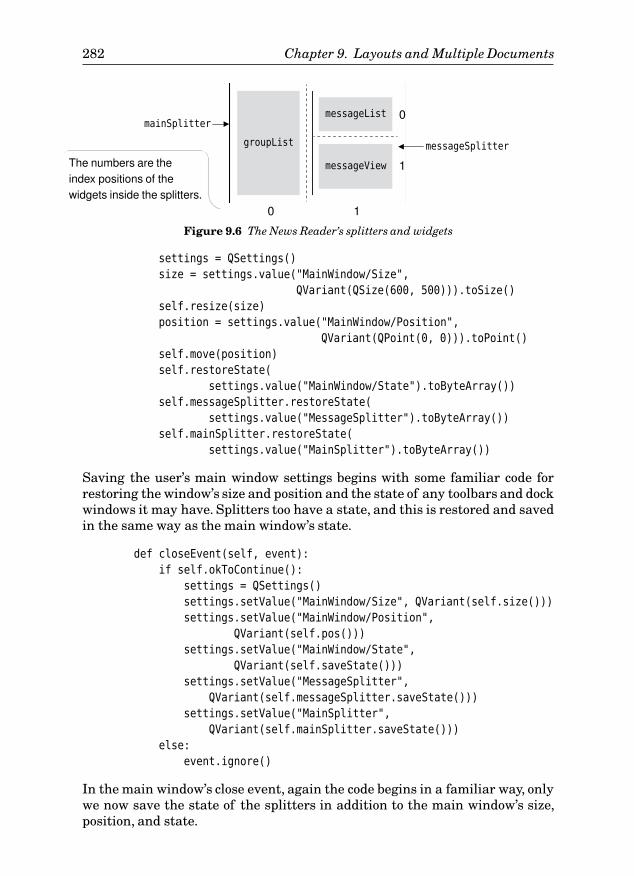
282 Chapter 9. Layouts and Multiple Documents
groupList
messageList
messageView
mainSplitter
messageSplitter
0 1
0
1The numbers are theindex positions of thewidgets inside the splitters.
Figure 9.6 The News Reader’s splitters and widgets
settings = QSettings()
size = settings.value("MainWindow/Size",
QVariant(QSize(600, 500))).toSize()
self.resize(size)
position = settings.value("MainWindow/Position",
QVariant(QPoint(0, 0))).toPoint()
self.move(position)
self.restoreState(
settings.value("MainWindow/State").toByteArray())
self.messageSplitter.restoreState(
settings.value("MessageSplitter").toByteArray())
self.mainSplitter.restoreState(
settings.value("MainSplitter").toByteArray())
Saving the user’s main window settings begins with some familiar code forrestoring the window’s size and position and the state of any toolbars and dockwindows it may have. Splitters too have a state, and this is restored and savedin the same way as the main window’s state.
def closeEvent(self, event):
if self.okToContinue():
settings = QSettings()
settings.setValue("MainWindow/Size", QVariant(self.size()))
settings.setValue("MainWindow/Position",
QVariant(self.pos()))
settings.setValue("MainWindow/State",
QVariant(self.saveState()))
settings.setValue("MessageSplitter",
QVariant(self.messageSplitter.saveState()))
settings.setValue("MainSplitter",
QVariant(self.mainSplitter.saveState()))
else:
event.ignore()
In the main window’s close event, again the code begins in a familiar way, onlywe now save the state of the splitters in addition to the main window’s size,position, and state.
Splitters 283
When the News Reader application is run for the very first time, by default themain splitter gives exactly half its width to the group list widget, and half tothe message splitter. Similarly, the message splitter gives half its height to themessage list widget and half to the message view widget. We want to changethese proportions, making the group list narrower and the message viewertaller, and we can do so by applying stretch factors. For example:
self.mainSplitter.setStretchFactor(0, 1)
self.mainSplitter.setStretchFactor(1, 3)
self.messageSplitter.setStretchFactor(0, 1)
self.messageSplitter.setStretchFactor(1, 2)
The first argument to setStretchFactor() is the 0-based index position of thewidget (from left to right, or from top to bottom), and the second argumentis the stretch factor to be applied. In this case, we have said that the zero-thwidget (the group list widget) should have a stretch factor of 1 and the firstwidget (the message splitter) should have a stretch factor of 3, thus dividingthe horizontal space in a proportion of 1:3. Similarly, for the message splitterwe split the vertical space in a proportion of 1:2 in favor of the message viewwidget. Since we save and restore the splitters’ sizes, the stretch factors havean effect only the first time the application is run.
Single Document Interface (SDI)
For some applications, users want to be able to handle multiple documents.This can usually be achieved simply by running more than one instance of anapplication, but this can consume a lot of resources. Another disadvantageof using multiple instances is that it is not easy to provide a common Windowmenu that the user can use to navigate between their various documents.
There are three commonly used solutions to this. One is to use a single mainwindow with a tab widget, and with each tab holding one document. Thisapproach is fashionable for Web browsers,but it can be inconvenient when edit-ing documents since it isn’t possible to see two or more documents at once. Wewill not show this approach since the coverage of tab widgets in this chapter’ssecond section is sufficient,and because you’ll have the chance to try it for your-self in the exercise. The other two approaches are SDI, which we will cover inthis section, and MDI, which we will cover in the next section.
The key to creating an SDI application is to create a window subclass thathandles everything itself, including loading, saving, and cleanup, reducing theapplication to be essentially a collection of one or more such windows.
We will begin by looking at some extracts from the SDI Text Editor’s initializer;the application itself is shown in Figure 9.7.
class MainWindow(QMainWindow):
NextId = 1

284 Chapter 9. Layouts and Multiple Documents
Figure 9.7 SDI Text Editor with three documents
Instances = set()
def __init__(self, filename=QString(), parent=None):
super(MainWindow, self).__init__(parent)
self.setAttribute(Qt.WA_DeleteOnClose)
MainWindow.Instances.add(self)
The NextId static variable is used to provide numbers for new empty win-dows: “Unnamed-1.txt”, “Unnamed-2.txt”, and so on.
The application consists of one or more MainWindow instances, each of whichmust be able to act independently. However, there are three common situationswhere we need to access all of the instances from inside any one of them. Oneis to provide a “save all” option, another is to provide a Window menu throughwhich the user can switch between the window instances, and another is toprovide a “quit” option that the user can use to terminate the application, andwhich must implicitly close every window. The Instances static variable iswhat we use to keep track of all the instances.
When a new window instance is created, we set it to delete itself when closed.This means that windows can be closed directly by the user or indirectlyby other instances (when the application is terminated, for example). Oneimplication of using Qt.WA_DeleteOnClose is that the window should take careof saving unsaved changes and cleaning up itself. We also add the window tothe static set of window instances so that any window instance can gain accessto all the other windows. We will look into all of these matters further on.
Single Document Interface (SDI) 285
self.editor = QTextEdit()
self.setCentralWidget(self.editor)
The QTextEdit is the ideal widget for our central widget, with some actionsbeing able to be passed directly to it, as we will see in acreate-
Action()
175 ☞
moment. We will nowlook at just a few of the actions, skipping the createAction() method that wehave seen before.
fileSaveAllAction = self.createAction("Save A&ll",
self.fileSaveAll, icon="filesave",
tip="Save all the files")
This action is similar to almost all the other file actions, with a connection toone of the MainWindow subclass’s methods.
fileCloseAction = self.createAction("&Close", self.close,
QKeySequence.Close, "fileclose",
"Close this text editor")
The “close” action is similar to those we have seen before. As usual, we do notreimplement the close() method, but instead reimplement the closeEvent()
handler so that we can intercept any clean closure of the window. What isdifferent is that this action closes the only current window, not the application(unless this is the application’s only window).
fileQuitAction = self.createAction("&Quit", self.fileQuit,
"Ctrl+Q", "filequit", "Close the application")
The “quit” action terminates the application, and does so by closing eachof the SDI Text Editor’s windows, as we will see when we review the file-
Quit() method.
editCopyAction = self.createAction("&Copy", self.editor.copy,
QKeySequence.Copy, "editcopy",
"Copy text to the clipboard")
This action connects to the QTextEdit’s relevant slot. The same is true of the“cut” and “paste” actions.
The menus, toolbars, and status bar are all created in ways that we have seenpreviously, except for theWindowmenu, which we will look at now.
self.windowMenu = self.menuBar().addMenu("&Window")
self.connect(self.windowMenu, SIGNAL("aboutToShow()"),
self.updateWindowMenu)
We do not add any actions to the Window menu at all. Instead, we simplyconnect the menu’s aboutToShow() method to our custom updateWindowMenu()
method which, as we will see, populates the menu with all the SDI Text Editorwindows.
286 Chapter 9. Layouts and Multiple Documents
self.connect(self, SIGNAL("destroyed(QObject*)"),
MainWindow.updateInstances)
When the user closes a window, thanks to the Qt.WA_DeleteOnClose flag, thewindow will be deleted. But because we have a reference to the window in thestatic Instances set, the window cannot be garbage-collected. For this reasonwe connect the window’s destroyed() signal to a slot that updates the Instances
by removing any windows that have been closed. We will discuss this in moredetail when we look at the updateInstances() method.
Since each window is responsible for a single file, we can have a single filenameassociated with each window. The filename can be passed to the window’sinitializer, and it defaults to an empty QString. The last lines of the initializerhandle the filename.
self.filename = filename
if self.filename.isEmpty():
self.filename = QString("Unnamed-%d.txt" % \
MainWindow.NextId)
MainWindow.NextId += 1
self.editor.document().setModified(False)
self.setWindowTitle("SDI Text Editor - %s" % self.filename)
else:
self.loadFile()
If the window has no filename, either because the application has just beenstarted or because the user has invoked the “file new” action, we create asuitable window title; otherwise, we load the given file.
The closeEvent(), loadFile(), fileSave(), and fileSaveAs() methods are verysimilar to ones we have seen before, so we will not describe them here. (Theyare in the source code in chap09/sditexteditor.pyw, of course.) Instead, we willfocus on those things that are special for an SDI application.
def fileNew(self):
MainWindow().show()
When the user invokes the “file new” action, this method is called. Anotherinstance of this class is created, and show() is called on it (so it is shown mode-lessly).At the end of the method,we would expect the window to go out of scopeand be destroyed since it does not have a PyQt parent and it is not an instancevariable. But inside the main window’s initializer, the window adds itself tothe static Instances set, so an object reference to the window still exists, andtherefore, the window is not destroyed.
def fileOpen(self):
filename = QFileDialog.getOpenFileName(self,
"SDI Text Editor -- Open File")
if not filename.isEmpty():
Single Document Interface (SDI) 287
if not self.editor.document().isModified() and \
self.filename.startsWith("Unnamed"):
self.filename = filename
self.loadFile()
else:
MainWindow(filename).show()
This method is slightly different from similar ones we have seen before. Ifthe user gives a filename, and the current document is both unmodified andunnamed (i.e., a new empty document), we load the file into the existingwindow; otherwise, we create a new window, passing it the filename to load.
def fileSaveAll(self):
count = 0
for window in MainWindow.Instances:
if isAlive(window) and \
window.editor.document().isModified():
if window.fileSave():
count += 1
self.statusBar().showMessage("Saved %d of %d files" % (
count, len(MainWindow.Instances)), 5000)
As a courtesy to users, we provide a Save Allmenu option. When it is invokedwe iterate over every window in the Instances set, and for each window that is“alive” and modified, we save it.
A window is alive if it has not been deleted. Unfortunately, this is not quiteas simple as it seems. There are two lifetimes associated with a QWidget: thelifetime of the Python variable that refers to the widget (in this case, the Main-
Window instances in the Instances set), and the lifetime of the underlying PyQtobject that is the widget as far as the computer’s window system is concerned.
Normally, the lifetimes of a PyQt object and its Python variable are exactly thesame. But here they may not be. For example, suppose we started the applica-tion and clicked File→New a couple of times so that we had three windows, andthen we navigated to one of them and closed it. At this point the window thatis closed (thanks to the Qt.WA_DeleteOnClose attribute) will be deleted.
Under the hood, PyQt actually calls the deleteLater() method on the deletedwindow. This gives the window the chance to finish anything it is in the middleof doing, so that it can be cleanly deleted. This will normally be all over in lessthan a millisecond, at which point the underlying PyQt object is deleted frommemory and no longer exists. But the Python reference in the Instances setwill still be in place, only now referring to a PyQt object that has gone. For thisreason, we must always check any window in the Instances set for alivenessbefore accessing it.
def isAlive(qobj):
import sip
288 Chapter 9. Layouts and Multiple Documents
try:
sip.unwrapinstance(qobj)
except RuntimeError:
return False
return True
The sip module is one of PyQt’s supporting modules that we do not normallyneed to access directly. But in cases where we need to dig a bit deeper, it can beuseful. Here, the method tries to access a variable’s underlying PyQt object.If the object has been deleted, a RuntimeError exception is raised, in which casewe return False; otherwise, the object still exists and we return True.★ By per-forming this check, we ensure that a window that has been closed and deletedis not inadvertently accessed, even if we have not yet deleted the variable thatrefers to the window.
@staticmethod
def updateInstances(qobj):
MainWindow.Instances = set([window for window \
in MainWindow.Instances if isAlive(window)])
Whenever a window is closed (and therefore deleted), it emits a destroyed()
signal, which we connected to the updateInstances() method in the initializer.This method overwrites the Instances set with a set that contains only thosewindow instances that are still alive.
So why do we need to check for aliveness when we iterate over theinstances—for example, in the fileSaveAll() method—since this method en-sures that the Instances set is kept up-to-date and is holding only live windows?The reason is that it is theoretically possible that between the time when a win-dow is closed and the Instances set is updated, the window is iterated over insome other method.
Whenever the user clicks the Window menu in any SDI Text Editor window,a menu listing all the current windows appears. This occurs because thewindowMenu’s aboutToShow() signal is connected to the updateWindowMenu() slotthat populates the menu.
def updateWindowMenu(self):
self.windowMenu.clear()
for window in MainWindow.Instances:
if isAlive(window):
self.windowMenu.addAction(window.windowTitle(),
self.raiseWindow)
First any existing menu entries are cleared; there will always be at least one,the current window. Next we iterate over all the window instances and add an
★The isAlive() function is based on Giovanni Bajo’s PyQt (then PyKDE) mailing list posting, “Howto detect if an object has been deleted”. The list is used for both PyQt and PyKDE.
Single Document Interface (SDI) 289
action for any that are alive. The action has text that is simply the window’stitle (the filename) and a slot—raiseWindow()—to be called when the menuoption is invoked by the user.
def raiseWindow(self):
action = self.sender()
if not isinstance(action, QAction):
return
for window in MainWindow.Instances:
if isAlive(window) and \
window.windowTitle() == action.text():
window.activateWindow()
window.raise_()
break
This method could be called by any of the Window menu’s entries. We beginwith a sanity check, and then we iterate over the window instances to seewhich one has a title whose text matches the action’s text. If we find a match,we make the window concerned the “active” window (the application’s top-levelwindow that has the keyboard focus), and raise it to be on top of all otherwindows so that the user can see it.
In the MDI section that follows we will see how to create a more sophisticatedWindowmenu, with accelerators and some additional menu options.
def fileQuit(self):
QApplication.closeAllWindows()
PyQt provides a convenient method for closing all of an application’s top-levelwindows. This method calls close() on all the windows, which in turn causeseach window to get a closeEvent(). In this event (not shown), we check to seewhether the QTextEdit’s text has unsaved changes, and if it has we pop up amessage box asking the user if they want to save.
app = QApplication(sys.argv)
app.setWindowIcon(QIcon(":/icon.png"))
MainWindow().show()
app.exec_()
At the end of the sditexteditor.pyw file, we create a QApplication instance anda single MainWindow instance and then start off the event loop.
Using the SDI approach is very fashionable, but it has some drawbacks. Sinceeach main window has its own menu bar, toolbar, and possibly dock windows,there is more resource overhead than for a single main window.★ Also, althoughit is easy to switch between windows using the Window menu, if we wanted
★On Mac OS X there is only one menu bar, at the top of the screen. It changes to reflect whicheverwindow currently has the focus.
290 Chapter 9. Layouts and Multiple Documents
more control over window sizing and positioning, we would have to write thecode ourselves. These problems can be solved by using the less fashionableMDI approach that we cover in the next section.
Multiple Document Interface (MDI)
MDI offers many benefits compared with SDI or with running multiple appli-cation instances. MDI applications are less resource-hungry, and they make itmuch easier to offer the user the ability to lay out their document windowsin relation to each other. One drawback, however, is that you cannot switchbetween MDI windows using Alt+Tab (Command+Tabon Mac OS X),although thisis rarely a problem in practice since for MDI applications, programmers invari-ably implement a Windowmenu for navigating between windows.
The key to creating MDI applications is to create a widget subclass that handleseverything itself, including loading, saving, and cleanup, with the applicationholding these widgets in an MDI “workspace”, and passing on to them anywidget-specific actions.
In this section, we will create a text editor that offers the same kind of function-ality as the SDI Text Editor from the preceding section, except that this timewe will make it an MDI application. The application is shown in Figure 9.8.
Each document is presented and edited using an instance of a custom TextEdit
widget, a QTextEdit subclass. The widget has the Qt.WA_DeleteOnClose attributeset, has a filename instance variable, and loads and saves the filename it is giv-en. If the widget is closed (and therefore deleted), its close event handler givesthe user the opportunity to save any unsaved changes. The TextEdit implemen-tation is straightforward, and it is quite similar to code we have seen before, sowe will not review it here; its source code is in the module chap09/textedit.py.
The code for the application proper is in the file chap09/texteditor.pyw. Wewill review the code for this, starting with some extracts from the MainWindow
subclass’s initializer.
class MainWindow(QMainWindow):
def __init__(self, parent=None):
super(MainWindow, self).__init__(parent)
self.mdi = QWorkspace()
self.setCentralWidget(self.mdi)
PyQt’s MDI widget is called QWorkspace.★ Like a tab widget or a stacked widget,a QWorkspace can have widgets added to it. These widgets are laid out by theworkspace, rather like a miniature desktop, with the widgets tiled, cascaded,iconized, or dragged and resized by the user within the workspace’s area.
★From Qt 4.3, MDI is provided by the QMdiArea class with an API similar to QWorkspace.
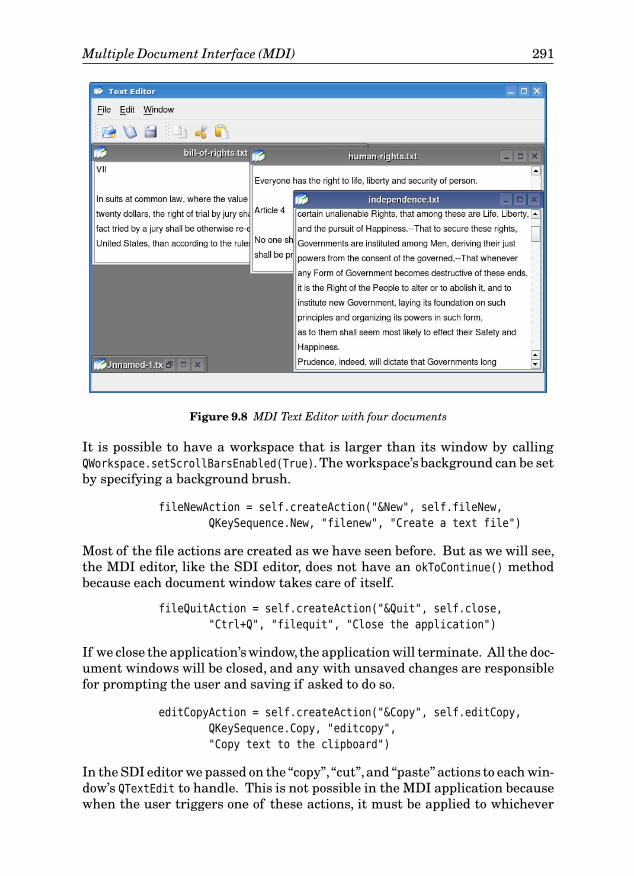
Multiple Document Interface (MDI) 291
Figure 9.8 MDI Text Editor with four documents
It is possible to have a workspace that is larger than its window by callingQWorkspace.setScrollBarsEnabled(True). The workspace’s background can be setby specifying a background brush.
fileNewAction = self.createAction("&New", self.fileNew,
QKeySequence.New, "filenew", "Create a text file")
Most of the file actions are created as we have seen before. But as we will see,the MDI editor, like the SDI editor, does not have an okToContinue() methodbecause each document window takes care of itself.
fileQuitAction = self.createAction("&Quit", self.close,
"Ctrl+Q", "filequit", "Close the application")
If we close the application’swindow, the application will terminate. All the doc-ument windows will be closed, and any with unsaved changes are responsiblefor prompting the user and saving if asked to do so.
editCopyAction = self.createAction("&Copy", self.editCopy,
QKeySequence.Copy, "editcopy",
"Copy text to the clipboard")
In the SDI editor we passed on the “copy”, “cut”,and “paste” actions to each win-dow’s QTextEdit to handle. This is not possible in the MDI application becausewhen the user triggers one of these actions, it must be applied to whichever
292 Chapter 9. Layouts and Multiple Documents
TextEdit window is active. For this reason the main window must do some workitself, as we will see when we review the implementation of these actions.
We have not shown the code for the other file and edit actions, because they allfollow the same pattern as those shown earlier.
self.windowNextAction = self.createAction("&Next",
self.mdi.activateNextWindow, QKeySequence.NextChild)
self.windowPrevAction = self.createAction("&Previous",
self.mdi.activatePreviousWindow,
QKeySequence.PreviousChild)
self.windowCascadeAction = self.createAction("Casca&de",
self.mdi.cascade)
self.windowTileAction = self.createAction("&Tile",
self.mdi.tile)
self.windowRestoreAction = self.createAction("&Restore All",
self.windowRestoreAll)
self.windowMinimizeAction = self.createAction("&Iconize All",
self.windowMinimizeAll)
self.windowArrangeIconsAction = self.createAction(
"&Arrange Icons", self.mdi.arrangeIcons)
self.windowCloseAction = self.createAction("&Close",
self.mdi.closeActiveWindow, QKeySequence.Close)
All the window actions are created as instance variables because we will beaccessing them in another method. For some of the actions we can pass thework directly onto the mdi workspace instance, but minimizing and restoringall the MDI windows we must handle ourselves.
self.windowMapper = QSignalMapper(self)
self.connect(self.windowMapper, SIGNAL("mapped(QWidget*)"),
self.mdi, SLOT("setActiveWindow(QWidget*)"))
In the Window menu that we will create, we need some way of makingthe window that the user chooses the active window. We saw a very sim-ple solution to this problem in the preceding section. Another approachis to use partial function application, connecting each window action toQWorkspace.setActiveWindow() with the relevant TextEdit as argument. Here wehave taken a pure PyQt approach, and we have used the QSignalMapper class.We will explain its use when we review the updateWindowMenu() method.
self.windowMenu = self.menuBar().addMenu("&Window")
self.connect(self.windowMenu, SIGNAL("aboutToShow()"),
self.updateWindowMenu)
The connection to aboutToShow() ensures that our updateWindowMenu() method iscalled before the menu is shown.
Multiple Document Interface (MDI) 293
self.updateWindowMenu()
self.setWindowTitle("Text Editor")
QTimer.singleShot(0, self.loadFiles)
At the end of the constructor we call updateWindowMenu() to force the Windowmenu to be created. This may seem strange; after all, it will be created anywaywhen the user tries to use it, so why do so now? The reason is that if we auto-matically load in some documents at startup, the user might want to navigatebetween them using our keyboard shortcuts (F6 and Shift+F6), but the shortcutswill become active only after the menu has been created.
def closeEvent(self, event):
failures = []
for textEdit in self.mdi.windowList():
if textEdit.isModified():
try:
textEdit.save()
except IOError, e:
failures.append(str(e))
if failures and \
QMessageBox.warning(self, "Text Editor -- Save Error",
"Failed to save%s\nQuit anyway?" % \
"\n\t".join(failures),
QMessageBox.Yes|QMessageBox.No) == QMessageBox.No:
event.ignore()
return
settings = QSettings()
settings.setValue("MainWindow/Size", QVariant(self.size()))
settings.setValue("MainWindow/Position",
QVariant(self.pos()))
settings.setValue("MainWindow/State",
QVariant(self.saveState()))
files = QStringList()
for textEdit in self.mdi.windowList():
if not textEdit.filename.startsWith("Unnamed"):
files.append(textEdit.filename)
settings.setValue("CurrentFiles", QVariant(files))
self.mdi.closeAllWindows()
When the application is terminated we give the user the opportunity to saveany unsaved changes. Then we save the main window’s size, position, andstate. We also save a list of all the filenames from all the MDI windows. Atthe end we call QWorkspace.closeAllWindows(), which will result in each windowreceiving a close event.
If any save fails, we take note, and after all the files have been processed, ifthere were errors we pop up a message box informing the user and give themthe chance to cancel terminating the application.
294 Chapter 9. Layouts and Multiple Documents
In the TextEdit’s close event there is code to give the user the chance to save anyunsaved changes, but at this point there can’t be any because we have alreadyhandled this by saving unsaved changes at the beginning of this method.We have the code in the TextEdit’s close event because the user can close anywindow at any time, so each window must be able to cope with being closed.But we do not use this when the application is terminated, and instead callsave() for modified files, because we want to keep a current files list, and to dothat every file must have a proper filename before we reach the code for savingthe current files list, and calling save() earlier achieves this.
def loadFiles(self):
if len(sys.argv) > 1:
for filename in sys.argv[1:31]: # Load at most 30 files
filename = QString(filename)
if QFileInfo(filename).isFile():
self.loadFile(filename)
QApplication.processEvents()
else:
settings = QSettings()
files = settings.value("CurrentFiles").toStringList()
for filename in files:
filename = QString(filename)
if QFile.exists(filename):
self.loadFile(filename)
QApplication.processEvents()
We have designed this application so that it will load back all the files that wereopen the last time the application was run. However, if the user specifies one ormore files on the command line, we ignore the previously opened files, and openjust those the user has specified. In this case, we have chosen to arbitrarilylimit the number of files to 30, to protect the user from inadvertently giving afile specification of *.* in a directory with hundreds or thousands of files.
The QApplication.processEvents() calls temporarily yield control to the eventloop so that any events that have accumulated—such as paint events—can behandled. Then processing resumes from the next statement. The effect in thisapplication is that an editor window willDoing
Lots ofProcess-ing atStart-Upsidebar
184 ☞
pop up immediately after each file hasbeen loaded, rather than the windows appearing only after all the files havebeen loaded. This makes it clear to the user that the application is doing some-thing, whereas a long delay at the beginning might make the user think thatthe application has crashed. Another benefit of using processEvents() is thatthe user’s mouse and keyboard events will get some processor time,keeping theapplication responsive even if a lot of other processing is taking place.
Using processEvents() to keep an application responsive during long-runningoperations is much easier than using threading. Nonetheless, this methodmust be used with care because it could lead to events being handled thatcause problems for the long-running operations themselves. One way to help

Multiple Document Interface (MDI) 295
reduce the risk is to pass extra parameters—for example, a flag that limitsthe kinds of events that should be processed, and a maximum time to be spentprocessing events. We will see another example of the use of processEvents()
in Chapter 12; threading is the subject of Chapter 19.
def loadFile(self, filename):
textEdit = textedit.TextEdit(filename)
try:
textEdit.load()
except (IOError, OSError), e:
QMessageBox.warning(self, "Text Editor -- Load Error",
"Failed to load %s: %s" % (filename, e))
textEdit.close()
del textEdit
else:
self.mdi.addWindow(textEdit)
textEdit.show()
When a file is loaded, as a result of either loadFiles() or fileOpen(), it createsa new TextEdit, with the given filename, and tells the editor to load the file. Ifloading fails, the user is informed in a message box, and the editor is closed anddeleted. If loading succeeds, the editor is added to the workspace and shown.We do not need a static instances variable to keep the TextEdit instances alive,since QWorkspace takes care of this automatically for us.
def fileNew(self):
textEdit = textedit.TextEdit()
self.mdi.addWindow(textEdit)
textEdit.show()
This method simply creates a new editor,adds it to the workspace,and shows it.The editor’s window title will be “Unnamed-n.txt”, where n is an incrementinginteger starting from one. If the user types in any text and attempts to closeor save the editor, they will be prompted to choose a proper filename.
def fileOpen(self):
filename = QFileDialog.getOpenFileName(self,
"Text Editor -- Open File")
if not filename.isEmpty():
for textEdit in self.mdi.windowList():
if textEdit.filename == filename:
self.mdi.setActiveWindow(textEdit)
break
else:
self.loadFile(filename)
If the user chooses to open a file, we check to see whether it is already in one ofthe workspace’s editors. If it is we simply make that editor’s window the active
296 Chapter 9. Layouts and Multiple Documents
window. Otherwise we load the file into a new editor window. If our userswanted to be able to load the same file more than once—for example, to look atdifferent parts of a long file—we could simply call loadFile() every time andnot bother to see whether the file is in an existing editor.
def fileSave(self):
textEdit = self.mdi.activeWindow()
if textEdit is None or not isinstance(textEdit, QTextEdit):
return
try:
textEdit.save()
except (IOError, OSError), e:
QMessageBox.warning(self, "Text Editor -- Save Error",
"Failed to save %s: %s" % (textEdit.filename, e))
When the user triggers the “file save” action,we determine which file they wantto save by calling QWorkspace.activeWindow(). If this returns a TextEdit, we callsave() on it.
def fileSaveAll(self):
errors = []
for textEdit in self.mdi.windowList():
if textEdit.isModified():
try:
textEdit.save()
except (IOError, OSError), e:
errors.append("%s: %s" % (textEdit.filename, e))
if errors:
QMessageBox.warning(self, "Text Editor -- Save All Error",
"Failed to save\n%s" % "\n".join(errors))
As a convenience, we have provided a “save all” action. Since there might be alot of windows, and if there is a problem saving one (for example, lack of diskspace), the problem might affect many windows. So instead of giving errormessages when each save() fails, we accumulate the errors in a list and showthem all at the end, if there are any to show.
def editCopy(self):
textEdit = self.mdi.activeWindow()
if textEdit is None or not isinstance(textEdit, QTextEdit):
return
cursor = textEdit.textCursor()
text = cursor.selectedText()
if not text.isEmpty():
clipboard = QApplication.clipboard()
clipboard.setText(text)
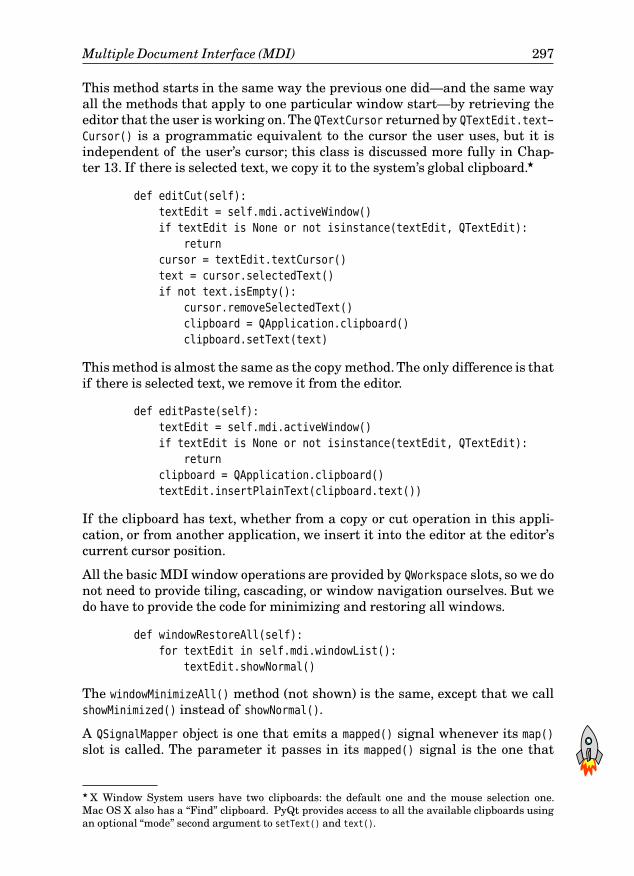
Multiple Document Interface (MDI) 297
This method starts in the same way the previous one did—and the same wayall the methods that apply to one particular window start—by retrieving theeditor that the user is working on. The QTextCursor returned by QTextEdit.text-
Cursor() is a programmatic equivalent to the cursor the user uses, but it isindependent of the user’s cursor; this class is discussed more fully in Chap-ter 13. If there is selected text, we copy it to the system’s global clipboard.★
def editCut(self):
textEdit = self.mdi.activeWindow()
if textEdit is None or not isinstance(textEdit, QTextEdit):
return
cursor = textEdit.textCursor()
text = cursor.selectedText()
if not text.isEmpty():
cursor.removeSelectedText()
clipboard = QApplication.clipboard()
clipboard.setText(text)
This method is almost the same as the copy method. The only difference is thatif there is selected text, we remove it from the editor.
def editPaste(self):
textEdit = self.mdi.activeWindow()
if textEdit is None or not isinstance(textEdit, QTextEdit):
return
clipboard = QApplication.clipboard()
textEdit.insertPlainText(clipboard.text())
If the clipboard has text, whether from a copy or cut operation in this appli-cation, or from another application, we insert it into the editor at the editor’scurrent cursor position.
All the basic MDI window operations are provided by QWorkspace slots, so we donot need to provide tiling, cascading, or window navigation ourselves. But wedo have to provide the code for minimizing and restoring all windows.
def windowRestoreAll(self):
for textEdit in self.mdi.windowList():
textEdit.showNormal()
The windowMinimizeAll() method (not shown) is the same, except that we callshowMinimized() instead of showNormal().
A QSignalMapper object is one that emits a mapped() signal whenever its map()
slot is called. The parameter it passes in its mapped() signal is the one that
★ X Window System users have two clipboards: the default one and the mouse selection one.Mac OS X also has a “Find” clipboard. PyQt provides access to all the available clipboards usingan optional “mode” second argument to setText() and text().
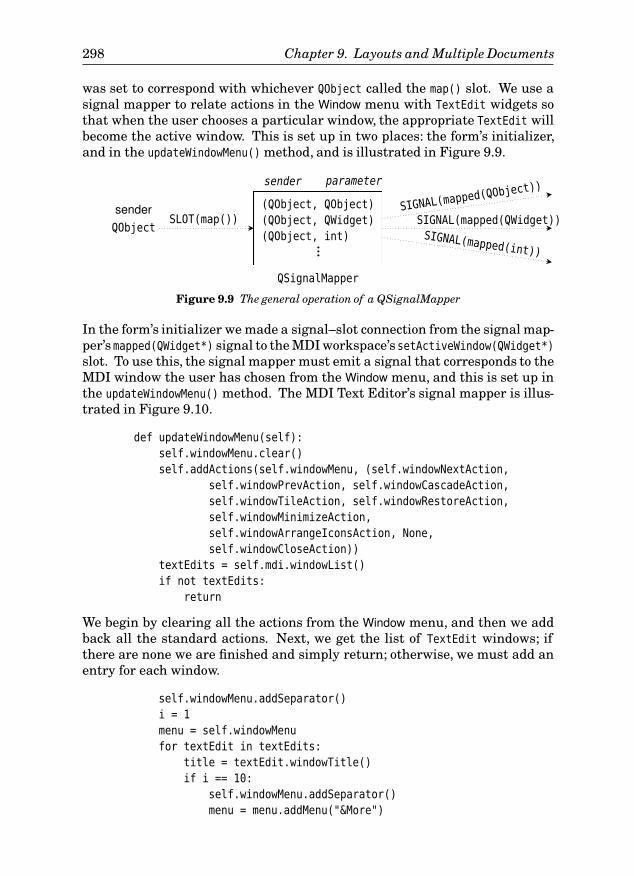
298 Chapter 9. Layouts and Multiple Documents
was set to correspond with whichever QObject called the map() slot. We use asignal mapper to relate actions in the Window menu with TextEdit widgets sothat when the user chooses a particular window, the appropriate TextEdit willbecome the active window. This is set up in two places: the form’s initializer,and in the updateWindowMenu() method, and is illustrated in Figure 9.9.
(QObject, QObject)
(QObject, QWidget)
(QObject, int)
…
sender parameter
sender
QSignalMapper
QObjectSLOT(map())
SIGNAL(mapped(
QObject))
SIGNAL(mapped(QWidget))SIGNAL(mapped(int))
Figure 9.9 The general operation of a QSignalMapper
In the form’s initializer we made a signal–slot connection from the signal map-per’s mapped(QWidget*) signal to the MDI workspace’ssetActiveWindow(QWidget*)slot. To use this, the signal mapper must emit a signal that corresponds to theMDI window the user has chosen from the Window menu, and this is set up inthe updateWindowMenu() method. The MDI Text Editor’s signal mapper is illus-trated in Figure 9.10.
def updateWindowMenu(self):
self.windowMenu.clear()
self.addActions(self.windowMenu, (self.windowNextAction,
self.windowPrevAction, self.windowCascadeAction,
self.windowTileAction, self.windowRestoreAction,
self.windowMinimizeAction,
self.windowArrangeIconsAction, None,
self.windowCloseAction))
textEdits = self.mdi.windowList()
if not textEdits:
return
We begin by clearing all the actions from the Window menu, and then we addback all the standard actions. Next, we get the list of TextEdit windows; ifthere are none we are finished and simply return; otherwise, we must add anentry for each window.
self.windowMenu.addSeparator()
i = 1
menu = self.windowMenu
for textEdit in textEdits:
title = textEdit.windowTitle()
if i == 10:
self.windowMenu.addSeparator()
menu = menu.addMenu("&More")
Multiple Document Interface (MDI) 299
accel = ""
if i < 10:
accel = "&%d " % i
elif i < 36:
accel = "&%c " % chr(i + ord("@") - 9)
We iterate over all the windows. For the first nine,we create an “accel” string of&1, &2, and so on, to produce 1,2, …,9. If there are ten or more windows,we createa submenu with the text “More”, and add the tenth and subsequent windows tothis submenu. For the tenth to thirty-sixth windows, we create accel strings of&A, &B, …, &Z; for any other windows we do not provide an accel string. (The %c
format string is used to specify a single character.) The More submenu’s accel-erators are English-specific; other languages may need different treatment.
action = menu.addAction("%s%s" % (accel, title))
self.connect(action, SIGNAL("triggered()"),
self.windowMapper, SLOT("map()"))
self.windowMapper.setMapping(action, textEdit)
i += 1
We create a new action with the (possibly empty) accel text and the titletext—the window’s title, which is the filename without the path. Then weconnect the action’s triggered() signal to the signal mapper’s map() slot. Thismeans that whenever the user chooses a window from the Window menu, thesignal mapper’s map() slot will be called. Notice that neither the signal nor theslot has parameters; it is up to the signal mapper to figure out which actiontriggered it—it could use sender(), for example. After the signal–slot connec-tion, we set up a mapping inside the signal mapper from the action to the cor-responding TextEdit.
actionN
(action1, textEdit1)(action2, textEdit2)
…
SLOT(mdi.activateWindow(textEditN))
SLOT(map())
SIGNAL(mapped(textEditN))
windowMapper
Figure 9.10 The MDI Editor’s signal mapper
When the signal mapper’s map() slot is called, the signal mapper will find outwhich action called it, and use the mapping to determine which TextEdit to passas a parameter. Then the signal mapper will emit its own mapped(QWidget*)
signal, with the parameter. We connected the mapped() signal to the MDI
300 Chapter 9. Layouts and Multiple Documents
workspace’s setActiveWindow() slot, so this slot is in turn called, and the Text-
Edit passed as a parameter will become the active window.
That completes our review of the MDI Text Editor. We have skipped the codefor creating the application object and the main window since it is the same asmany code examples we have seen in previous examples.
Summary
When we have dialogs with lots of options, we can often make things moremanageable for the user by using tab widgets and stacked widgets. Tab wid-gets are especially useful for when we want the user to be able to view and editall the available options. Stacked widgets are suitable for when we want theuser to see only the currently relevant page of options. For stacked widgets wemust provide a means by which the user can select the current page—for exam-ple, a combobox or a list widget of page names. When some of a dialog’s optionsare “advanced” or infrequently needed, we can use an extension dialog, hidingthe extra options unless the user asks to see them. Checked group boxes can beused to enable or disable the widgets they contain; this is useful if we want theuser to be able to see the options available, even when they are disabled. Forsome dialogs, all of these approaches can be used in combination, although insuch complex cases, the validation logic might become rather convoluted.
Splitters are very useful for creating multiple-widget main windows and givethe user control over the relative sizes of the widgets. An alternative approachis to have a single central widget, and to put the other widgets in dock windows.Dock windows automatically put a splitter between themselves and thecentral widget when docked, and can be dragged from one dock area to anotheror floated free.
SDI makes it easy for users to open multiple documents inside the same appli-cation. SDI also makes possible some interaction across the windows, such ashaving “save all” and “quit” actions and aWindowmenu, that are not very easilyachieved using a separate application instance for each document. The SDI ap-proach is very fashionable, and although it is more resource-hungry than MDI,it is probably easier for very inexperienced users to understand than MDI.
MDI provides the same benefits as SDI, except that the document windows areconstrained to appear within a single main window’s central area. This avoidsduplicating menus and toolbars, and it makes it easier to arrange windows inrelation to one another. One drawback of MDI is that some users find it moredifficult to understand than SDI, at least at first. MDI is not limited to havingwindows of just one widget type, although most modern MDI applications thatuse more than one widget type in the main window have one type for documentwindows, and the other types are put in dock windows.
In both the SDI and MDI example applications, all of the actions are enabledall of the time. This is not a problem since any actions that don’t make sense
Summary 301
harmlessly do nothing. However, to avoid En-ablingandDis-ablingActionssidebar
☞ 385
confusing some users, it might bebetter to enable or disable actions depending on the application’s state; thesidebar in Chapter 13 shows how this can be done.
Layouts, splitters, tab widgets, stacked widgets, dock windows, SDI, and MDItogether provide a wide range of user interface design options. In addition,it is possible to create our own layouts in code, or to create our own layoutmanagers, so the possibilities really are limitless.
ExerciseModify the MDI Text Editor application (texteditor.pyw) so that instead ofusing MDI it uses a QTabWidget and becomes a tabbed editor.
TheWindowmenu will not be required, so all the code associated with it can beremoved. A new “file close tab” action will be needed, as will a correspondingmethod to handle it. Instead of using QWorkspace.windowList(), use a for loopto iterate from 0 to QTabWidget.count(), and use QTabWidget.widget() to accesseach window in turn.
The closeEvent() will need changing, and it is probably the trickiest to getright. Change loadFiles() to limit the number of files loaded on the commandline to 10. fileNew() will need to create a TextEdit as before, and then add itto the tab widget using QTabWidget.addTab(), giving the widget and its win-dow title as parameters. Instead of calling show() on the widget, use QTabWid-
get.setCurrentWidget(). The fileOpen(), loadFile(), fileSave(), fileSaveAs(),and fileSaveAll() methods will need small changes. The edit methods need tochange only their first line of code to use QTabWidget.currentWidget() instead ofQWorkspace.activeWindow().
Once everything is working, add two keyboard shortcuts, one for QKey-
Sequence.PreviousChild and the other for QKeySequence.NextChild, along withsuitable methods, prevTab() and nextTab(), to make them work.
The changes amount to about a dozen lines, plus an extra twenty lines or sofor the shortcuts and their methods; as always the emphasis is on thought andunderstanding rather than on typing.
A model solution is provided in the file chap09/tabbededitor.pyw.

This page intentionally left blank
Events, the Clipboard, and Dragand Drop
1010 ● The Event-Handling Mechanism
● Reimplementing Event Handlers
● Using the Clipboard
● Drag and Drop
In this short chapter we begin by describing the key concepts involved in eventhandling. In the second section we build on this knowledge to show how tocontrol a widget’s behavior and appearance by reimplementing low-level eventhandlers. Later chaptersbuild on the material covered in the first two sections,particularly Chapter 11, which shows how to create custom widgets.
The chapter’s third section shows how to use the clipboard, and in particularhow to pass and retrieve plain text, HTML, and images to and from thesystem’s global clipboard. The last section shows how to implement drag anddrop, both by using PyQt’s easy-to-use built-in functionality, and by handlingit ourselves to drag and drop custom data. The exercise builds on the coverageof dragging and dropping custom data to allow the user to choose whether tomove or copy when dropping.
The Event-Handling Mechanism
PyQt provides two mechanisms for dealing with events: the high-level signalsand slots mechanism, and low-level event handlers. The signalsSignals
andslots
127 ☞
and slotsapproach is ideal when we are concerned with what actions the user wants toperform, without getting bogged down in the details of how specifically theyasked. Signals and slots can also be used to customize some aspects of howwidgets behave. But when we need to go deeper, particularly when creatingcustom widgets, we need to use low-level event handlers.
PyQt provides a rich variety of event handlers, some concerned with widgetbehavior, such as those that handle key presses and mouse events, and othersconcerned with widget appearance, such as those that handle paint events andresize events.
PyQt’s event-handling mechanism works in the logical way we would expect.For example, if the user clicks the mouse or presses a key on a widget with key-
303
304 Chapter 10. Events, the Clipboard,and Drag and Drop
board focus, the widget is given the event. If the widget handles the event, thatis the end of the story. But if the widget does not handle the event, the eventis propagated to the widget’s parent—another benefit of PyQt’s parent–childhierarchy. This passing of unhandled events from child to parent continuesright up to the top-level widget, and if that doesn’t handle the event, the eventis simply thrown away.
PyQt provides five different ways of intercepting and handling events. Thefirst two approaches are the most heavily used, with the others needed rarely,if ever.
The simplest approach is to reimplement a specific event handler. So far,we have seen just one example of this: the reimplementation of a widget’scloseEvent(). As we will see in this chapter and in subsequent chapters, wecan control a widget’s behavior by reimplementing other event handlers—forexample, keyPressEvent(), mousePressEvent(), and mouseReleaseEvent(). Wecan also control a widget’s appearance by reimplementing resizeEvent() andpaintEvent(). When we reimplement these events we often don’t call the baseclass implementation since we want our own code executed only as a result ofthe event handler being called.
Before any specific event handler is called, the event() event handler is called.Reimplementing this method allows us to handle events that cannot be han-dled properly in the specific event handlers (in particular, overriding the Tabkey’s keyboard focus changing behavior), or to implement events for which nospecific handler exists, such as QEvent.ToolBarChange. When we reimplementthis handler,we call the base class implementation for any events we don’t han-dle ourselves.
The third and fourth approaches use event filters. We can call installEvent-Filter() on any QObject. This will mean that all events for the QObject arepassed to our event filter first: We can discard or modify any of the eventsbefore they reach the target object. An even more powerful version of this ap-proach is to install an event filter on the QApplication object, although its onlypractical uses are for debugging and for handling mouse events sent to disabledwidgets. It is possible to install multiple event filters on an object or on QAp-
plication, in which case they are executed in order from most to least recentlyinstalled.
Event filters provide a very powerful means of handling events, and new-comers to PyQt programming are often tempted to use them. But we recom-mend avoiding the use of event filters, at least until you have a lot of PyQtprogramming experience. If very large numbers of event filters are installed,application performance can suffer; also, they can considerably increase codecomplexity compared with simply reimplementing specific event handlers, orthe event() handler. We will not look at any event filter examples, since theyshould be avoided in general PyQt programming—they are really relevant onlywhen creating custom widgets—and even then they are rarely necessary.

The Event-Handling Mechanism 305
The fifth approach is to subclass QApplication and reimplement its notify()
method. This method is called before any event filter or event handler, soit provides the ultimate in control. In practice, this would be done only fordebugging, and even then, using event filters is probably more flexible.
Reimplementing Event Handlers
The screenshot in Figure 10.1 shows a QWidget subclass that has some reimple-mented event handlers. The Events application in chap10/events.pyw reportscertain events and conditions, and we will use it to see how event handling isdone in PyQt. Later chapters use the same techniques that we describe hereto do much more sophisticated and realistic event handling. We will begin bylooking at an extract from the application’s initializer to see its instance data.
Figure 10.1 Testing custom event handlers
class Widget(QWidget):
def __init__(self, parent=None):
super(Widget, self).__init__(parent)
self.justDoubleClicked = False
self.key = QString()
self.text = QString()
self.message = QString()
We hold the text of the most recent key press in key, the text to be painted—forexample, “The mouse is at…”—in text, and a message text in message. We alsokeep track of whether the user has just done a double-click.
The first event handler we will consider is the paint event. We will defer aproper discussion of painting to Chapter 11.
def paintEvent(self, event):
text = self.text
i = text.indexOf("\n\n")
if i >= 0:
text = text.left(i)
if not self.key.isEmpty():
text += "\n\nYou pressed: %s" % self.key
painter = QPainter(self)
painter.setRenderHint(QPainter.TextAntialiasing)
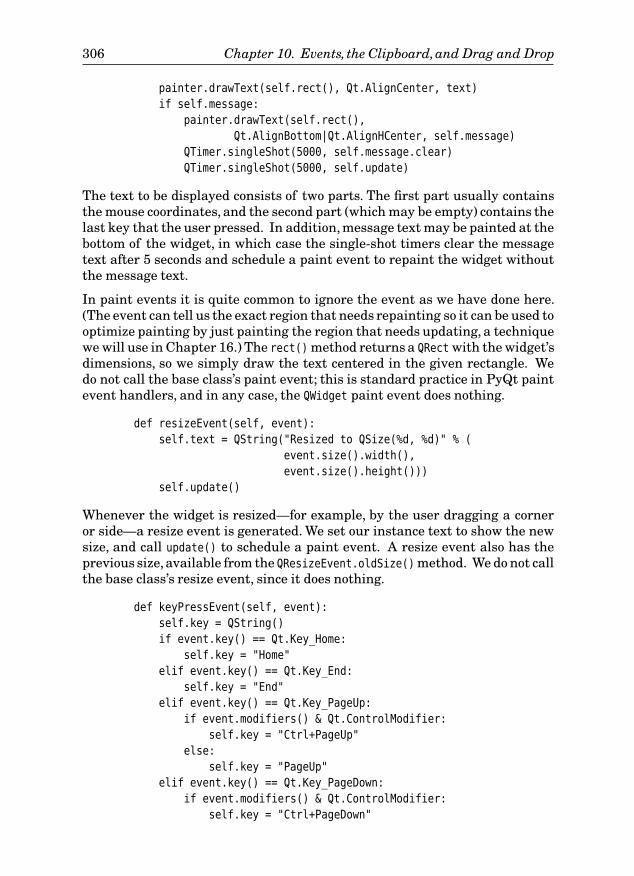
306 Chapter 10. Events, the Clipboard,and Drag and Drop
painter.drawText(self.rect(), Qt.AlignCenter, text)
if self.message:
painter.drawText(self.rect(),
Qt.AlignBottom|Qt.AlignHCenter, self.message)
QTimer.singleShot(5000, self.message.clear)
QTimer.singleShot(5000, self.update)
The text to be displayed consists of two parts. The first part usually containsthe mouse coordinates, and the second part (which may be empty) contains thelast key that the user pressed. In addition, message text may be painted at thebottom of the widget, in which case the single-shot timers clear the messagetext after 5 seconds and schedule a paint event to repaint the widget withoutthe message text.
In paint events it is quite common to ignore the event as we have done here.(The event can tell us the exact region that needs repainting so it can be used tooptimize painting by just painting the region that needs updating, a techniquewe will use in Chapter 16.) The rect() method returns a QRect with the widget’sdimensions, so we simply draw the text centered in the given rectangle. Wedo not call the base class’s paint event; this is standard practice in PyQt paintevent handlers, and in any case, the QWidget paint event does nothing.
def resizeEvent(self, event):
self.text = QString("Resized to QSize(%d, %d)" % (
event.size().width(),
event.size().height()))
self.update()
Whenever the widget is resized—for example, by the user dragging a corneror side—a resize event is generated. We set our instance text to show the newsize, and call update() to schedule a paint event. A resize event also has theprevious size,available from the QResizeEvent.oldSize() method. We do not callthe base class’s resize event, since it does nothing.
def keyPressEvent(self, event):
self.key = QString()
if event.key() == Qt.Key_Home:
self.key = "Home"
elif event.key() == Qt.Key_End:
self.key = "End"
elif event.key() == Qt.Key_PageUp:
if event.modifiers() & Qt.ControlModifier:
self.key = "Ctrl+PageUp"
else:
self.key = "PageUp"
elif event.key() == Qt.Key_PageDown:
if event.modifiers() & Qt.ControlModifier:
self.key = "Ctrl+PageDown"
Reimplementing Event Handlers 307
else:
self.key = "PageDown"
elif Qt.Key_A <= event.key() <= Qt.Key_Z:
if event.modifiers() & Qt.ShiftModifier:
self.key = "Shift+"
self.key += event.text()
if self.key:
self.key = QString(self.key)
self.update()
else:
QWidget.keyPressEvent(self, event)
If the user presses a key, we are informed through the keyPressEvent(). Thereis also a corresponding keyReleaseEvent(), but that is rarely reimplemented.The QKeyEvent parameter provides several useful methods, including key(),which returns the key code for the key that was pressed,and modifiers(), whichreturns a bit flag indicating the state of the Shift, Ctrl, and Alt keys.
We have chosen to handle the Home, End, PageUp, Ctrl+PageUp, PageDown,and Ctrl+PageDown key sequences, and the alphabetic keys A…Z as well asShift+A…Shift+Z. We store a textual representation of what was pressed in thekey variable and call update() to schedule a paint event. If the user pressed akey that we do not handle, we pass on the key press to the base class implemen-tation, a practice that is common when handling key events.
def contextMenuEvent(self, event):
menu = QMenu(self)
oneAction = menu.addAction("&One")
twoAction = menu.addAction("&Two")
self.connect(oneAction, SIGNAL("triggered()"), self.one)
self.connect(twoAction, SIGNAL("triggered()"), self.two)
if not self.message:
menu.addSeparator()
threeAction = menu.addAction("Thre&e")
self.connect(threeAction, SIGNAL("triggered()"),
self.three)
menu.exec_(event.globalPos())
The easiest way to create a context menu is to add actions to a widget usingQWidget.addAction(), and to set the widget’s context menu policy to Qt.Actions-
ContextMenu; we saw how this was done in Chapter 6 on page 180. But if wewant fine control over what happens as a result of a context menu event—forexample, offering different options depending on the application’s state—wecan reimplement the context menu event handler as we have done here.
The globalPos() method returns the mouse position at the time the contextmenu was invoked; we pass the position to QMenu.exec_() to ensure that themenu is popped up where the user expects it.
308 Chapter 10. Events, the Clipboard,and Drag and Drop
def mouseDoubleClickEvent(self, event):
self.justDoubleClicked = True
self.text = QString("Double-clicked.")
self.update()
If the user double-clicks, this event handler is called. In this example, we needto keep track of whether the user has just double-clicked because we are alsoreimplementing the mouse release and mouse move events. A mouse releaseevent will occur as the result of a double-click, and a mouse move event isalmost certain to occur on a double-click because the user’s hand is unlikely tobe perfectly steady.
We take the same approach as we have done in the other event handlers: Weset the text and schedule a repaint to show it. It is quite common not to call thebase class for mouse events that we handle ourselves.
def mouseReleaseEvent(self, event):
if self.justDoubleClicked:
self.justDoubleClicked = False
else:
self.setMouseTracking(not self.hasMouseTracking())
if self.hasMouseTracking():
self.text = QString("Mouse tracking is on.\n"
"Try moving the mouse!\n"
"Single click to switch it off")
else:
self.text = QString("Mouse tracking is off.\n"
"Single click to switch it on")
self.update()
If the user has just released the mouse, except just after a double-click, we tog-gle mouse tracking. When tracking is on, mouse move events are produced forall mouse movements; when tracking is off, mouse move events are producedonly when the mouse is dragged. By default, mouse tracking is off. Here weuse a mouse click (i.e., the release after a click) to toggle mouse tracking on oroff. As before, we set the text, and schedule a paint event to show it.
def mouseMoveEvent(self, event):
if not self.justDoubleClicked:
globalPos = self.mapToGlobal(event.pos())
self.text = QString("The mouse is at\nQPoint(%d, %d) "
"in widget coords, and\n"
"QPoint(%d, %d) in screen coords" % (
event.pos().x(), event.pos().y(),
globalPos.x(), globalPos.y()))
self.update()
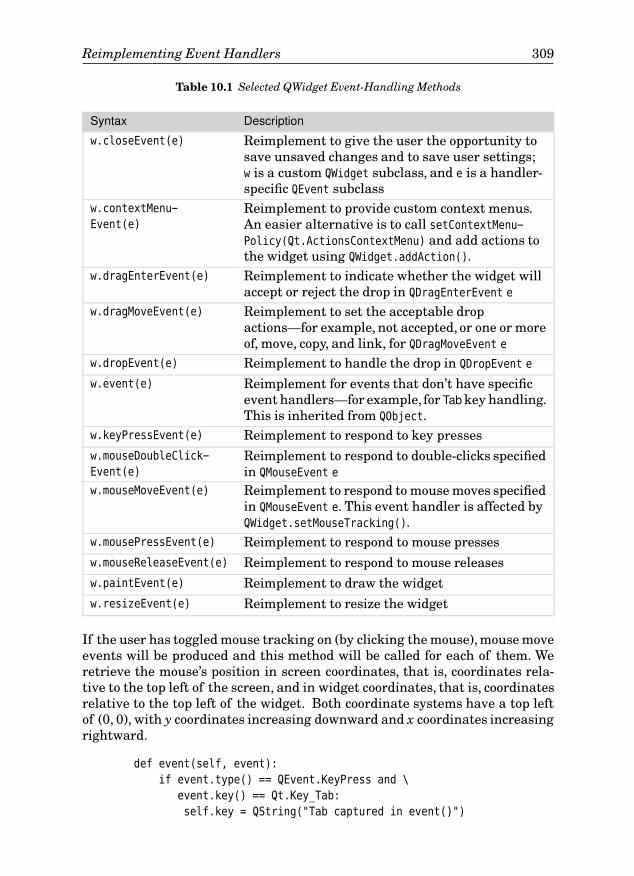
Reimplementing Event Handlers 309
Table 10.1 Selected QWidget Event-Handling Methods
Syntax Description
w.closeEvent(e) Reimplement to give the user the opportunity tosave unsaved changes and to save user settings;w is a custom QWidget subclass, and e is a handler-specific QEvent subclass
w.contextMenu-
Event(e)Reimplement to provide custom context menus.An easier alternative is to call setContextMenu-Policy(Qt.ActionsContextMenu) and add actions tothe widget using QWidget.addAction().
w.dragEnterEvent(e) Reimplement to indicate whether the widget willaccept or reject the drop in QDragEnterEvent e
w.dragMoveEvent(e) Reimplement to set the acceptable dropactions—for example, not accepted, or one or moreof, move, copy, and link, for QDragMoveEvent e
w.dropEvent(e) Reimplement to handle the drop in QDropEvent e
w.event(e) Reimplement for events that don’t have specificevent handlers—for example, for Tabkey handling.This is inherited from QObject.
w.keyPressEvent(e) Reimplement to respond to key pressesw.mouseDoubleClick-
Event(e)Reimplement to respond to double-clicks specifiedin QMouseEvent e
w.mouseMoveEvent(e) Reimplement to respond to mouse moves specifiedin QMouseEvent e. This event handler is affected byQWidget.setMouseTracking().
w.mousePressEvent(e) Reimplement to respond to mouse pressesw.mouseReleaseEvent(e) Reimplement to respond to mouse releasesw.paintEvent(e) Reimplement to draw the widgetw.resizeEvent(e) Reimplement to resize the widget
If the user has toggled mouse tracking on (by clicking the mouse), mouse moveevents will be produced and this method will be called for each of them. Weretrieve the mouse’s position in screen coordinates, that is, coordinates rela-tive to the top left of the screen, and in widget coordinates, that is, coordinatesrelative to the top left of the widget. Both coordinate systems have a top leftof (0, 0), with y coordinates increasing downward and x coordinates increasingrightward.
def event(self, event):
if event.type() == QEvent.KeyPress and \
event.key() == Qt.Key_Tab:
self.key = QString("Tab captured in event()")
310 Chapter 10. Events, the Clipboard,and Drag and Drop
self.update()
return True
return QWidget.event(self, event)
When an event is passed to a widget the widget’s event() method is called first.This method returns True if it handled the event, and False otherwise. In thecase of returning False, PyQt will send the event to the widget’s parent, andthen to the parent’s parent, until one of the handlers returns True, or until itreaches the top level (no parent), in which case the event is thrown away. Theevent() method may handle the event itself, or may delegate the work to aspecific event handler like paintEvent() or mousePressEvent().
When the user presses Tab, in almost every case, the widget with the keyboardfocus’s event() method will call setFocus() on the next widget in the tab orderand will return True without passing the event to any of the key handlers. (TheQTextEdit class reimplements the event handler to insert literal tabs into thetext, but can be told to revert to the normal focus-switching behavior.)
We cannot stop Tab from changing keyboard focus by reimplementing a keyevent handler, because the key press is never passed onto them. So we mustinstead reimplement the event() method and handle Tab presses there.
In this example, if the user presses Tab, we simply update the text that isdisplayed. We also return True indicating that we have handled the event. Thisprevents the event from being propagated any further. For all other events, wecall the base class implementation.
Realistic event handlers are often more sophisticated than the ones shownhere, but our purpose at the moment is just to see how the event-handlingmechanism works. In the next chapter and in subsequent chapters, we willoften reimplement event handlers including paintEvent() and resizeEvent(),as well as contextMenuEvent(), wheelEvent(), keyPressEvent(), and mousePressEv-
ent(), all in realistic contexts. And in the last section of this chapter we willreimplement some of the drag-and-drop-related events.
Using the Clipboard
PyQt provides clipboard support for text in QTextEdit, QLineEdit, QTableWidget,and the other widgets where textual data can be edited. PyQt’s clipboardand drag-and-drop systems use data in MIME (Multipurpose Internet MailExtensions) format, a format that can be used to store any arbitrary data.
Occasionally, it is convenient to pass data to the clipboard or retrieve data fromthe clipboard directly in code. PyQt makes this easy. The QApplication classprovides a static method that returns a QClipboard object, and we can set or gettext, images, or other data to or from the clipboard through this object.
Using the Clipboard 311
The clipboard holds only one object at a time, so if we set, say, a string, andthen we set an image, only the image will be available because the string willbe deleted when we set the image.
Here is how we set text on the clipboard:
clipboard = QApplication.clipboard()
clipboard.setText("I've been clipped!")
The text is set as plain text; we will see how to handle HTML shortly.
clipboard = QApplication.clipboard()
clipboard.setPixmap(QPixmap(os.path.join(
os.path.dirname(__file__), "images/gvim.png")))
Image data can be set on the clipboard using setImage() for QImages, or set-
Pixmap() for pixmaps,as we have done here.Both QImage and QPixmap can handlea wide variety of standard image formats.
Retrieving data from the clipboard is just as easy:
clipboard = QApplication.clipboard()
self.textLabel.setText(clipboard.text())
If the clipboard has no text—for example, if it has an image, or some customdata type—QClipboard.text() will return an empty string.
clipboard = QApplication.clipboard()
self.imageLabel.setPixmap(clipboard.pixmap())
If the clipboard has no image—for example, if it has text, or some custom datatype—QClipboard.pixmap() will return a null image.
In addition to handling plain text and images we can handle some other kindsof data. For example, here is how we would copy HTML text to the clipboard:
mimeData = QMimeData()
mimeData.setHtml(
"<b>Bold and <font color=red>Red</font></b>")
clipboard = QApplication.clipboard()
clipboard.setMimeData(mimeData)
If we want to retrieve HTML text, including HTML wrapped in a QMimeData
object, we can use QClipboard.text("html"). This will return an empty stringif there is no text, or if the text is not in HTML format—for example, if it isplain text. Here is the generic way to retrieve data that has been wrapped ina QMimeData object:
clipboard = QApplication.clipboard()
mimeData = clipboard.mimeData()
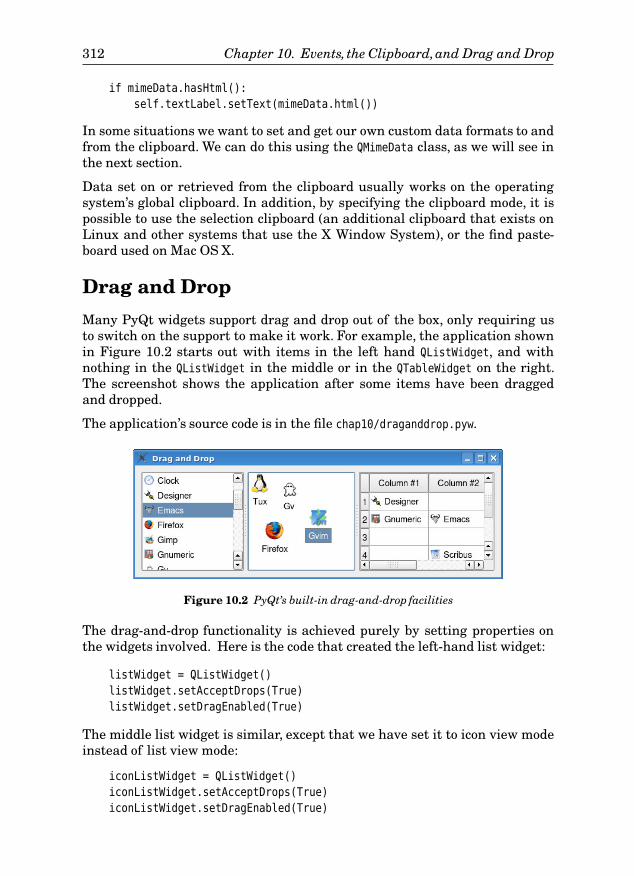
312 Chapter 10. Events, the Clipboard,and Drag and Drop
if mimeData.hasHtml():
self.textLabel.setText(mimeData.html())
In some situations we want to set and get our own custom data formats to andfrom the clipboard. We can do this using the QMimeData class, as we will see inthe next section.
Data set on or retrieved from the clipboard usually works on the operatingsystem’s global clipboard. In addition, by specifying the clipboard mode, it ispossible to use the selection clipboard (an additional clipboard that exists onLinux and other systems that use the X Window System), or the find paste-board used on Mac OS X.
Drag and Drop
Many PyQt widgets support drag and drop out of the box, only requiring usto switch on the support to make it work. For example, the application shownin Figure 10.2 starts out with items in the left hand QListWidget, and withnothing in the QListWidget in the middle or in the QTableWidget on the right.The screenshot shows the application after some items have been draggedand dropped.
The application’s source code is in the file chap10/draganddrop.pyw.
Figure 10.2 PyQt’s built-in drag-and-drop facilities
The drag-and-drop functionality is achieved purely by setting properties onthe widgets involved. Here is the code that created the left-hand list widget:
listWidget = QListWidget()
listWidget.setAcceptDrops(True)
listWidget.setDragEnabled(True)
The middle list widget is similar, except that we have set it to icon view modeinstead of list view mode:
iconListWidget = QListWidget()
iconListWidget.setAcceptDrops(True)
iconListWidget.setDragEnabled(True)
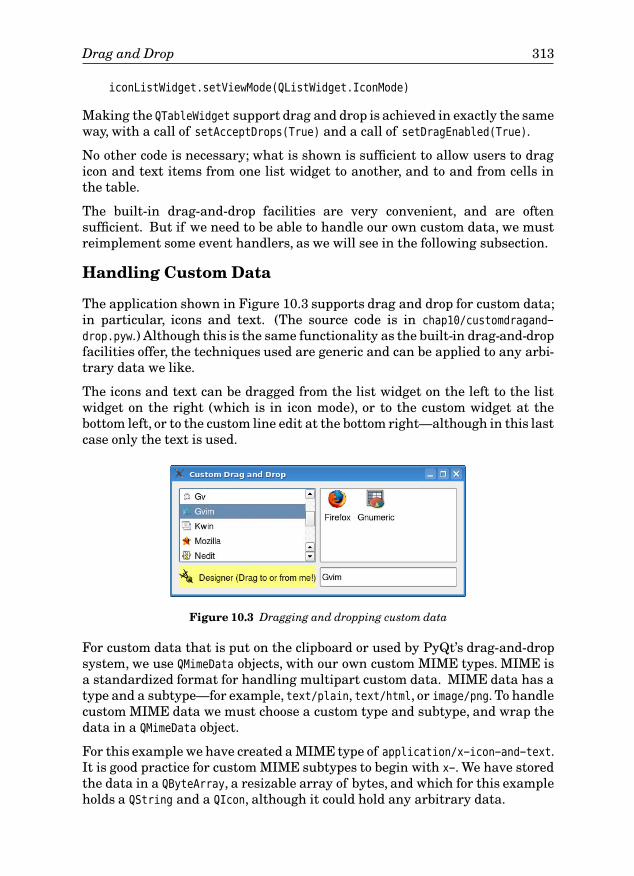
Drag and Drop 313
iconListWidget.setViewMode(QListWidget.IconMode)
Making the QTableWidget support drag and drop is achieved in exactly the sameway, with a call of setAcceptDrops(True) and a call of setDragEnabled(True).
No other code is necessary; what is shown is sufficient to allow users to dragicon and text items from one list widget to another, and to and from cells inthe table.
The built-in drag-and-drop facilities are very convenient, and are oftensufficient. But if we need to be able to handle our own custom data, we mustreimplement some event handlers, as we will see in the following subsection.
Handling Custom Data
The application shown in Figure 10.3 supports drag and drop for custom data;in particular, icons and text. (The source code is in chap10/customdragand-
drop.pyw.) Although this is the same functionality as the built-in drag-and-dropfacilities offer, the techniques used are generic and can be applied to any arbi-trary data we like.
The icons and text can be dragged from the list widget on the left to the listwidget on the right (which is in icon mode), or to the custom widget at thebottom left, or to the custom line edit at the bottom right—although in this lastcase only the text is used.
Figure 10.3 Dragging and dropping custom data
For custom data that is put on the clipboard or used by PyQt’s drag-and-dropsystem, we use QMimeData objects, with our own custom MIME types. MIME isa standardized format for handling multipart custom data. MIME data has atype and a subtype—for example, text/plain, text/html, or image/png. To handlecustom MIME data we must choose a custom type and subtype, and wrap thedata in a QMimeData object.
For this example we have created a MIME type of application/x-icon-and-text.It is good practice for custom MIME subtypes to begin with x-. We have storedthe data in a QByteArray, a resizable array of bytes, and which for this exampleholds a QString and a QIcon, although it could hold any arbitrary data.
314 Chapter 10. Events, the Clipboard,and Drag and Drop
We will begin by seeing how to make a QLineEdit subclass that can acceptdrops of MIME type application/x-icon-and-text, making use of the text andignoring the icon.
class DropLineEdit(QLineEdit):
def __init__(self, parent=None):
super(DropLineEdit, self).__init__(parent)
self.setAcceptDrops(True)
The initializer simply sets the line edit to accept drops.
def dragEnterEvent(self, event):
if event.mimeData().hasFormat("application/x-icon-and-text"):
event.accept()
else:
event.ignore()
When the user drags over the line edit we want to display an icon if the MIMEdata being dragged is a type that we can handle; otherwise the line edit willdisplay the “no drop” icon (which often appears as ). By accepting the dragenter event we signify that we can accept drops of the type of MIME data onoffer; by ignoring we say that we cannot accept such data. The icon used foracceptable data is set when the drag is initiated as we will see later on.
The drag-related event handlers are called automatically by PyQt whennecessary because we set accept drops in the initializer.
def dragMoveEvent(self, event):
if event.mimeData().hasFormat("application/x-icon-and-text"):
event.setDropAction(Qt.CopyAction)
event.accept()
else:
event.ignore()
As the user drags over the widget dragMoveEvent()s occur; we want the data tobe copied (rather than moved), so we set the drop action accordingly.
def dropEvent(self, event):
if event.mimeData().hasFormat("application/x-icon-and-text"):
data = event.mimeData().data("application/x-icon-and-text")
stream = QDataStream(data, QIODevice.ReadOnly)
text = QString()
stream >> text
self.setText(text)
event.setDropAction(Qt.CopyAction)
event.accept()
else:
event.ignore()
Drag and Drop 315
If the user drops the data on the widget we must handle it. We do thisStream-ing toQData-
Stream
242 ☞
PyQt
4.1
byextracting the data (a QByteArray), and then creating a QDataStream to readthe data. The QDataStream class can read and write from and to any QIODevice
including files, network sockets, external processes, and byte arrays. Sincewe are only interested in the string, that is all that we extract from the bytearray. Note that to be able to stream QIcons to or from a QDataStream we mustuse PyQt 4.1 or later.
The DropLineEdit only supports dropping, so for our next example, we willcreate a QListWidget subclass which supports both dragging and dropping.
class DnDListWidget(QListWidget):
def __init__(self, parent=None):
super(DnDListWidget, self).__init__(parent)
self.setAcceptDrops(True)
self.setDragEnabled(True)
The initializer is similar to what we used before, except that we enable bothdragging and dropping.
def dragMoveEvent(self, event):
if event.mimeData().hasFormat("application/x-icon-and-text"):
event.setDropAction(Qt.MoveAction)
event.accept()
else:
event.ignore()
This is almost identical to the DropLineEdit’s dragMoveEvent(); the difference isthat here we set the drop action to be Qt.MoveAction rather than Qt.CopyAction.The code for the dragEnterEvent() is not shown: It is the same as for theDropLineEdit.
def dropEvent(self, event):
if event.mimeData().hasFormat("application/x-icon-and-text"):
data = event.mimeData().data("application/x-icon-and-text")
stream = QDataStream(data, QIODevice.ReadOnly)
text = QString()
icon = QIcon()
stream >> text >> icon
item = QListWidgetItem(text, self)
item.setIcon(icon)
event.setDropAction(Qt.MoveAction)
event.accept()
else:
event.ignore()
316 Chapter 10. Events, the Clipboard,and Drag and Drop
This code is again similar to the DropLineEdit, only now we want theStream-ing fromQData-
Stream
245 ☞
iconas well as the text. To add an item to a QListWidget we must create a newQListWidgetItem and pass the list widget (self) as the item’s parent.
def startDrag(self, dropActions):
item = self.currentItem()
icon = item.icon()
data = QByteArray()
stream = QDataStream(data, QIODevice.WriteOnly)
stream << item.text() << icon
mimeData = QMimeData()
mimeData.setData("application/x-icon-and-text", data)
drag = QDrag(self)
drag.setMimeData(mimeData)
pixmap = icon.pixmap(24, 24)
drag.setHotSpot(QPoint(12, 12))
drag.setPixmap(pixmap)
if drag.start(Qt.MoveAction) == Qt.MoveAction:
self.takeItem(self.row(item))
This is the only method that is not in the DropLineEdit, and it is the one thatmakes it possible to drag from DnDListWidgets.We don’t have to check the returnvalue of currentItem() because only items can be dragged, so we know that ifstartDrag() is called there will be an item to drag. The startDrag() method iscalled automatically by PyQt when needed because we set drag enabled in theinitializer.
We create a new empty byte array, and use QDataStream to populate it withthe QListWidgetItem’s icon and text. There is no need to call setVersion() onQDataStream when we use it purely for handling in-memory data that existsonly during the runtime of the application and that is not exchanged withany other application. Once we have populated the byte array, we wrap it ina QMimeData object. Then we create a QDrag object, and give it the MIME data.We have chosen to use the data’s icon as the icon to be used for the drag: If wehad not done so, PyQt would provide a default icon. We have also set the drag’s“hotspot” to be the center of the icon. The mouse’s hotspot will always coincidewith the icon’s hotspot.
The call to QDrag.start() initiates the drag; we give as a parameter the actionor actions that we will accept. If the drag succeeds, that is, if the data is suc-cessfully dropped, the start() method returns the action that occurred—forexample, copy or move. If the action was move, we remove the dragged QList-
WidgetItem from this list widget. Qt
4.3
From Qt 4.3, QDrag.exec_() should be used in-stead of QDrag.start().
The setAcceptDrops() method is inherited from QWidget, but setDragEnabled()
is not, so by default it is available in only certain widgets. If we want to createa custom widget that supports drops, we can simply call setAcceptDrops(True)and reimplement dragEnterEvent(), dragMoveEvent(), and dropEvent(), as we
Drag and Drop 317
have done in the preceding examples. If we also want the custom widget tosupport drags, and the widget inherits QWidget or some QWidget subclass thatdoes not have setDragEnabled(), we must do two things to make the widgetsupport dragging. One is to provide a startDrag() method so that a QDrag objectcan be created, and another is to make sure the startDrag() method is called atan appropriate time. The easiest way to ensure that startDrag() is called is toreimplement the mouseMoveEvent():
def mouseMoveEvent(self, event):
self.startDrag()
QWidget.mouseMoveEvent(self, event)
The widget at the bottom left of the example application is a direct QWidget
subclass and uses this technique. Its startDrag() method is very similar tothe one we have just seen, and only a tiny bit simpler because it initiates copydrags rather than move drags, so we don’t have to do anything regardless ofwhether the drag is dropped successfully.
Summary
When we use existing widgets, PyQt’s signals and slots mechanism is often allwe need to get the behaviors we want. But when we create custom widgets—forexample, to exercise fine control over the appearance and behavior of awidget—we must reimplement low-level event handlers.
For appearance, reimplementing paintEvent() is often sufficient, although insome cases we may also need to reimplement resizeEvent(). We normally don’tcall the base class implementation for these events. For behavior it is commonto reimplement keyPressEvent() and some of the mouse events such as mouse-
PressEvent() or mouseMoveEvent(). We often don’t call the base class implemen-tation for mouse events, although it is usually harmless to do so. If we exerciselower-level control by reimplementing QWidget.event(), we must return True forthose events that we handle ourselves,and we must return the result of callingthe base class implementation for those events that we don’t handle.
We don’t often need to handle the clipboard in our own code, since most ofPyQt’s text editing widgets automatically interact with the clipboard in theway we would expect. But if we do want to work with the clipboard in code, set-ting and getting text and image data is straightforward, using the QClipboard
object returned by QApplication.clipboard(). Setting HTML data is slightlymore involved since we must wrap the HTML in a QMimeData object, althoughretrieving HTML is easy. When we use MIME data with the clipboard we arenot limited to HTML; we can store and retrieve any kind of data by using thesame techniques we used to handle drag-and-drop data.
The built-in drag-and-drop support provided by the standard PyQt widgets isvery easy to set up and use. In some cases though,we need to drag and drop ourown custom data types. The code required to do so is not difficult to write, and
318 Chapter 10. Events, the Clipboard,and Drag and Drop
using QByteArray ensures that we can drag and drop any amount of data of anyC++ or PyQt data type. However, if the amount of data is very large, it may befaster and less memory demanding to pass a token to stand for the data (say,an index position in a data structure), rather than the data itself, and actuallycopy data only when necessary.
It is also possible to bypass PyQt’s drag-and-drop facilities entirely, andimplement our own drag-and-drop system by reimplementing the mouse eventhandlers. This is not as difficult as it sounds, but it is clearly less convenientthan using what PyQt already provides.
PyQt’s event-handling system is very powerful, and yet quite easy to use. Inmost cases using the higher-level signals and slots mechanism is much easierand is more appropriate. But when we need fine control and customization,reimplementing event handlers will let us get the precise appearance andbehavior we want—and we will see this in action in the next chapter, when weimplement some custom widgets.
ExerciseModify the DnDListWidget class so that when the user drops they get a pop-upmenu at the mouse position with two options, Copy and Move. Modify thedragMoveEvent() to have a drop action of move rather than copy. The menu willneed to go in the dropEvent(), before creating the new list item.
The QMenu.exec_() method takes a QPoint argument which tells it where topop up; the QCursor.pos() method provides the current mouse position. Thedrop event’s drop action must be set to copy or move depending on what theuser chose.
The startDrag() method will need to be modified slightly: The start() call mustbe given both move and copy actions as acceptable actions, and should removethe item only if the user chose to move.
The trickiest part is deciding how to respond to the menu actions. You coulduse functools.partial() or lambda functions for example. In the model solution,we simply use an instance variable that holds the drop action and have twomethods, one that sets the drop action to be move and the other to be copy, andsimply connect the menu actions to these methods.
A subtler approach is also possible. Instead of using a pop-up menu, in thedrag move event examine the keyboard modifiers and set the drop action tomove by default, or to copy if theCtrlkey is pressed. Similarly, in the drop eventset the drop action depending on the state of the Ctrl key. This is less intrusivethan a pop-up menu, but also less obvious for casual or naive users.
In the solution, we have created two QListWidget subclasses, DnDMenuListWidgetand DndCtrlListWidget, to show both of these approaches. Only about 25 linesneed to be added or changed (once you have copyied/pasted DndListWidget
Exercise 319
and renamed each of the two versions) to implement both of the approachesdescribed here.
A model solution is provided in the file chap10/customdraganddrop_ans.pyw.

This page intentionally left blank
Custom Widgets
1111 ● Using Widget Style Sheets
● Creating Composite Widgets
● Subclassing Built-in Widgets
● Subclassing QWidget
One of PyQt’s greatest and longest-standing strengths is the ease with which itis possible to create custom widgets. The custom widgets we create with PyQtare made the same way as the standard built-in widgets, so they integrateseamlessly and have no arbitrary restrictions on their appearance or behavior.Creating custom widgets in PyQt is not a matter of “one size fits all”. Rather,we can choose from a number of approaches that give us increasing levels ofcontrol over our widgets’ behavior and appearance.
The most basic level of customization is to simply set some of the propertiesof an existing widget. We have already done this a number of times in ear-lier chapters. For example, in the preceding chapter we enabled PyQt’s de-fault drag-and-drop behavior simply by calling setAcceptDrops(True) andsetDragEnabled(True) on our widgets. For spinboxes, we can constrain theirbehavior—for example, by calling setRange() to set a minimum and maximumvalue—and can affect their appearance by using setPrefix() and setSuffix().We will not show examples of this approach in this chapter because we havealready seen it in action many times before.
If setting the properties of an existing widget is insufficient, we can use a stylesheet to customize the widget’s appearance and some aspects Qt
4.2
of its behavior.The ability to set style sheets on widgets was introduced with Qt 4.2, and wewill see a simple example to give a taste of what is possible in this chapter.
Sometimes we need not so much to customize a particular widget, but to createa composite widget that combines two or more other widgets. We will look ata simple example of how this can be done.
If we need to change the behavior of an existing widget beyond what can beachieved by setting properties, we can subclass the widget and reimplementwhichever event handlers are necessary to achieve the control we want.
But in some cases, we need a widget that is different from any of the standardbuilt-in widgets. For these situations we can subclass QWidget directly and cancompletely define the behavior and appearance of the widget ourselves. We
321
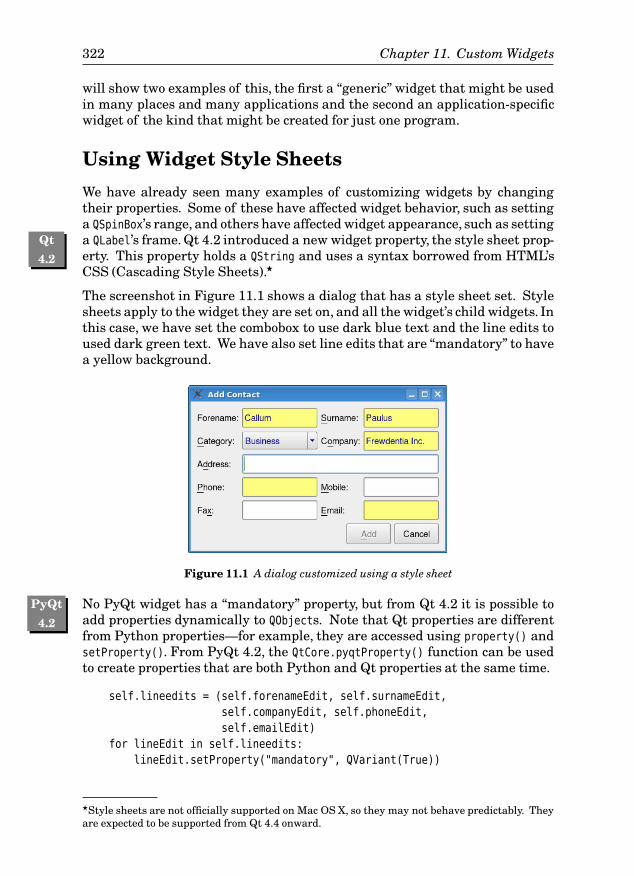
322 Chapter 11. Custom Widgets
will show two examples of this, the first a “generic” widget that might be usedin many places and many applications and the second an application-specificwidget of the kind that might be created for just one program.
Using Widget Style Sheets
We have already seen many examples of customizing widgets by changingtheir properties. Some of these have affected widget behavior, such as settinga QSpinBox’s range, and others have affected widget appearance, such as settinga QLabel’s frame. Qt 4.2 introduced a new Qt
4.2
widget property, the style sheet prop-erty. This property holds a QString and uses a syntax borrowed from HTML’sCSS (Cascading Style Sheets).★
The screenshot in Figure 11.1 shows a dialog that has a style sheet set. Stylesheets apply to the widget they are set on, and all the widget’s child widgets. Inthis case, we have set the combobox to use dark blue text and the line edits toused dark green text. We have also set line edits that are “mandatory” to havea yellow background.
Figure 11.1 A dialog customized using a style sheet
No PyQt widget has a “mandatory” property, but from Qt 4.2 it isPyQt
4.2
possible toadd properties dynamically to QObjects. Note that Qt properties are differentfrom Python properties—for example, they are accessed using property() andsetProperty(). From PyQt 4.2, the QtCore.pyqtProperty() function can be usedto create properties that are both Python and Qt properties at the same time.
self.lineedits = (self.forenameEdit, self.surnameEdit,
self.companyEdit, self.phoneEdit,
self.emailEdit)
for lineEdit in self.lineedits:
lineEdit.setProperty("mandatory", QVariant(True))
★Style sheets are not officially supported on Mac OS X, so they may not behave predictably. Theyare expected to be supported from Qt 4.4 onward.
Using Widget Style Sheets 323
self.connect(lineEdit, SIGNAL("textEdited(QString)"),
self.updateUi)
The preceding code is from the form’s initializer.It addsa “mandatory” propertyto those line edits that we do not want the user to be able to leave blank. AllQt properties are held as QVariants. The signal–slot connections are discussedshortly.
We have created a style sheet for the widget as a class static variable, andset it on the form toward the end of the constructor. We could just as easilyhave read the style sheet from a file (since it is simply plain text), or from aPyQt resource.
StyleSheet = """
QComboBox { color: darkblue; }
QLineEdit { color: darkgreen; }
QLineEdit[mandatory="true"] {
background-color: rgb(255, 255, 127);
color: darkblue;
}
"""
···self.setStyleSheet(ContactDlg.StyleSheet)
The style sheet syntax essentially consists of “selectors” and property name:value pairs. In the preceding snippet, the first line has a selector of QComboBox,which means that its property values will apply to any QComboBox or QComboBox
subclass that is a child of the widget on which the style sheet is set. In thiscase, the effect is to set the text color to dark blue. The second selector is aQLineEdit, and this works similarly.
The third selector is more specific: It specifies both a class, and a property ofthat class whose state must be matched. In other words, this third selector willapply only to QLineEdit and QLineEdit subclasses that have a “mandatory” prop-erty, and where that property’s value is True. For such cases, the backgroundcolor is set to yellow (specified as an RGB triple), and the text color is set todark blue.
The dialog is slightly subtler than it may at first appear. This is becausethe company line edit is mandatory only if the category combobox is set to“Business”. To achieve this we need the signal–slot connections shown earlier,and one other connection:
self.connect(self.categoryComboBox, SIGNAL("activated(int)"),
self.updateUi)
All the connections are to the updateUi() method:
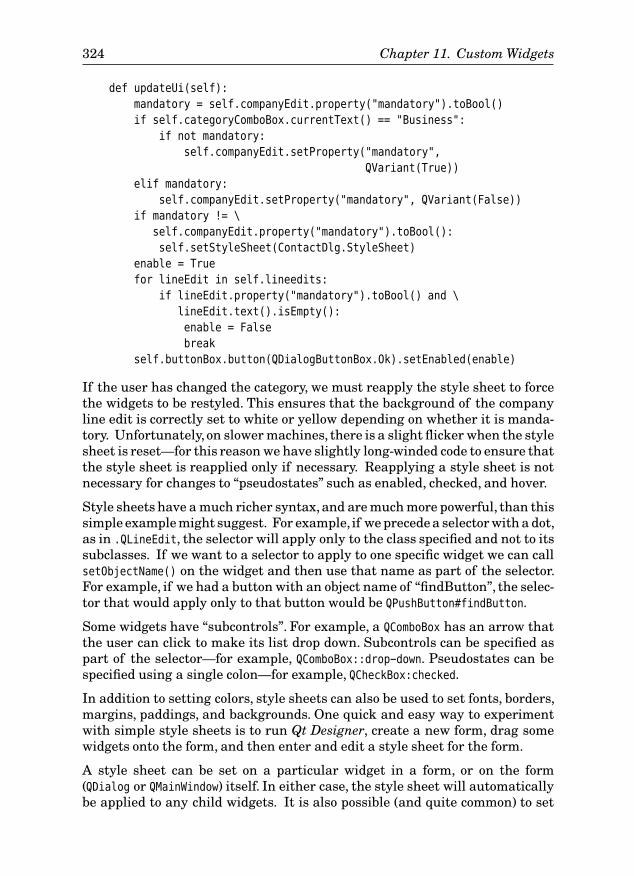
324 Chapter 11. Custom Widgets
def updateUi(self):
mandatory = self.companyEdit.property("mandatory").toBool()
if self.categoryComboBox.currentText() == "Business":
if not mandatory:
self.companyEdit.setProperty("mandatory",
QVariant(True))
elif mandatory:
self.companyEdit.setProperty("mandatory", QVariant(False))
if mandatory != \
self.companyEdit.property("mandatory").toBool():
self.setStyleSheet(ContactDlg.StyleSheet)
enable = True
for lineEdit in self.lineedits:
if lineEdit.property("mandatory").toBool() and \
lineEdit.text().isEmpty():
enable = False
break
self.buttonBox.button(QDialogButtonBox.Ok).setEnabled(enable)
If the user has changed the category, we must reapply the style sheet to forcethe widgets to be restyled. This ensures that the background of the companyline edit is correctly set to white or yellow depending on whether it is manda-tory. Unfortunately, on slower machines, there is a slight flicker when the stylesheet is reset—for this reason we have slightly long-winded code to ensure thatthe style sheet is reapplied only if necessary. Reapplying a style sheet is notnecessary for changes to “pseudostates” such as enabled, checked, and hover.
Style sheets have a much richer syntax,and are much more powerful, than thissimple example might suggest. For example, if we precede a selector with a dot,as in .QLineEdit, the selector will apply only to the class specified and not to itssubclasses. If we want to a selector to apply to one specific widget we can callsetObjectName() on the widget and then use that name as part of the selector.For example, if we had a button with an object name of “findButton”, the selec-tor that would apply only to that button would be QPushButton#findButton.
Some widgets have “subcontrols”. For example, a QComboBox has an arrow thatthe user can click to make its list drop down. Subcontrols can be specified aspart of the selector—for example, QComboBox::drop-down. Pseudostates can bespecified using a single colon—for example, QCheckBox:checked.
In addition to setting colors, style sheets can also be used to set fonts, borders,margins, paddings, and backgrounds. One quick and easy way to experimentwith simple style sheets is to run Qt Designer, create a new form, drag somewidgets onto the form, and then enter and edit a style sheet for the form.
A style sheet can be set on a particular widget in a form, or on the form(QDialog or QMainWindow) itself. In either case, the style sheet will automaticallybe applied to any child widgets. It is also possible (and quite common) to set
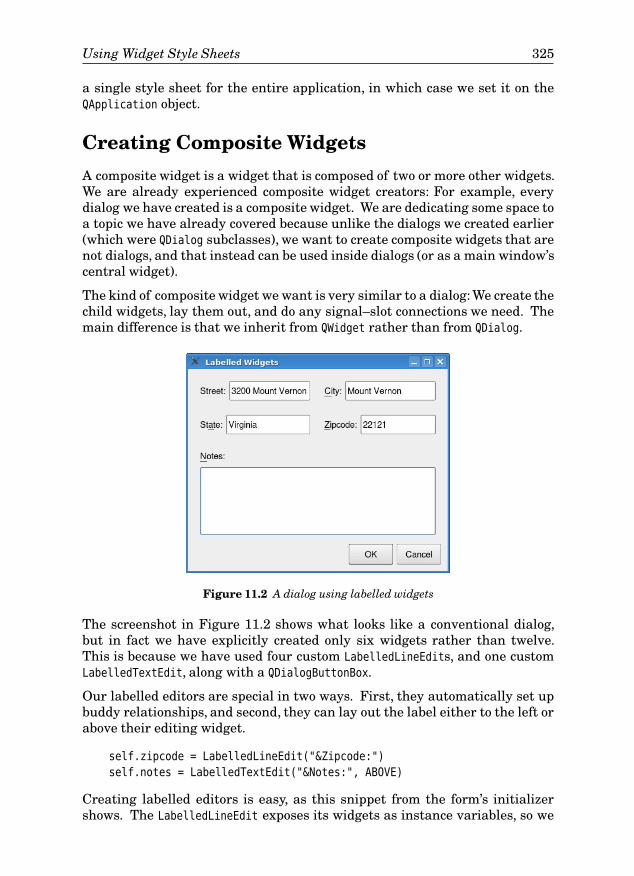
Using Widget Style Sheets 325
a single style sheet for the entire application, in which case we set it on theQApplication object.
Creating Composite Widgets
A composite widget is a widget that is composed of two or more other widgets.We are already experienced composite widget creators: For example, everydialog we have created is a composite widget. We are dedicating some space toa topic we have already covered because unlike the dialogs we created earlier(which were QDialog subclasses), we want to create composite widgets that arenot dialogs, and that instead can be used inside dialogs (or as a main window’scentral widget).
The kind of composite widget we want is very similar to a dialog: We create thechild widgets, lay them out, and do any signal–slot connections we need. Themain difference is that we inherit from QWidget rather than from QDialog.
Figure 11.2 A dialog using labelled widgets
The screenshot in Figure 11.2 shows what looks like a conventional dialog,but in fact we have explicitly created only six widgets rather than twelve.This is because we have used four custom LabelledLineEdits, and one customLabelledTextEdit, along with a QDialogButtonBox.
Our labelled editors are special in two ways. First, they automatically set upbuddy relationships, and second, they can lay out the label either to the left orabove their editing widget.
self.zipcode = LabelledLineEdit("&Zipcode:")
self.notes = LabelledTextEdit("&Notes:", ABOVE)
Creating labelled editors is easy, as this snippet from the form’s initializershows. The LabelledLineEdit exposes its widgets as instance variables, so we
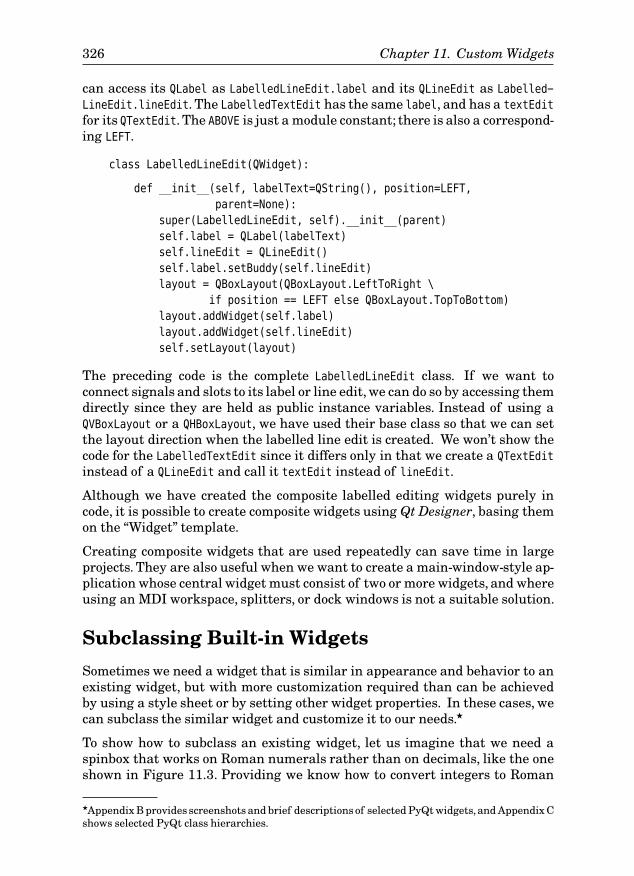
326 Chapter 11. Custom Widgets
can access its QLabel as LabelledLineEdit.label and its QLineEdit as Labelled-
LineEdit.lineEdit. The LabelledTextEdit has the same label, and has a textEdit
for its QTextEdit. The ABOVE is just a module constant; there is also a correspond-ing LEFT.
class LabelledLineEdit(QWidget):
def __init__(self, labelText=QString(), position=LEFT,
parent=None):
super(LabelledLineEdit, self).__init__(parent)
self.label = QLabel(labelText)
self.lineEdit = QLineEdit()
self.label.setBuddy(self.lineEdit)
layout = QBoxLayout(QBoxLayout.LeftToRight \
if position == LEFT else QBoxLayout.TopToBottom)
layout.addWidget(self.label)
layout.addWidget(self.lineEdit)
self.setLayout(layout)
The preceding code is the complete LabelledLineEdit class. If we want toconnect signals and slots to its label or line edit, we can do so by accessing themdirectly since they are held as public instance variables. Instead of using aQVBoxLayout or a QHBoxLayout, we have used their base class so that we can setthe layout direction when the labelled line edit is created. We won’t show thecode for the LabelledTextEdit since it differs only in that we create a QTextEdit
instead of a QLineEdit and call it textEdit instead of lineEdit.
Although we have created the composite labelled editing widgets purely incode, it is possible to create composite widgets using Qt Designer, basing themon the “Widget” template.
Creating composite widgets that are used repeatedly can save time in largeprojects. They are also useful when we want to create a main-window-style ap-plication whose central widget must consist of two or more widgets, and whereusing an MDI workspace, splitters, or dock windows is not a suitable solution.
Subclassing Built-in Widgets
Sometimes we need a widget that is similar in appearance and behavior to anexisting widget, but with more customization required than can be achievedby using a style sheet or by setting other widget properties. In these cases, wecan subclass the similar widget and customize it to our needs.★
To show how to subclass an existing widget, let us imagine that we need aspinbox that works on Roman numerals rather than on decimals, like the oneshown in Figure 11.3. Providing we know how to convert integers to Roman
★Appendix B provides screenshots and brief descriptions of selected PyQt widgets,and Appendix Cshows selected PyQt class hierarchies.
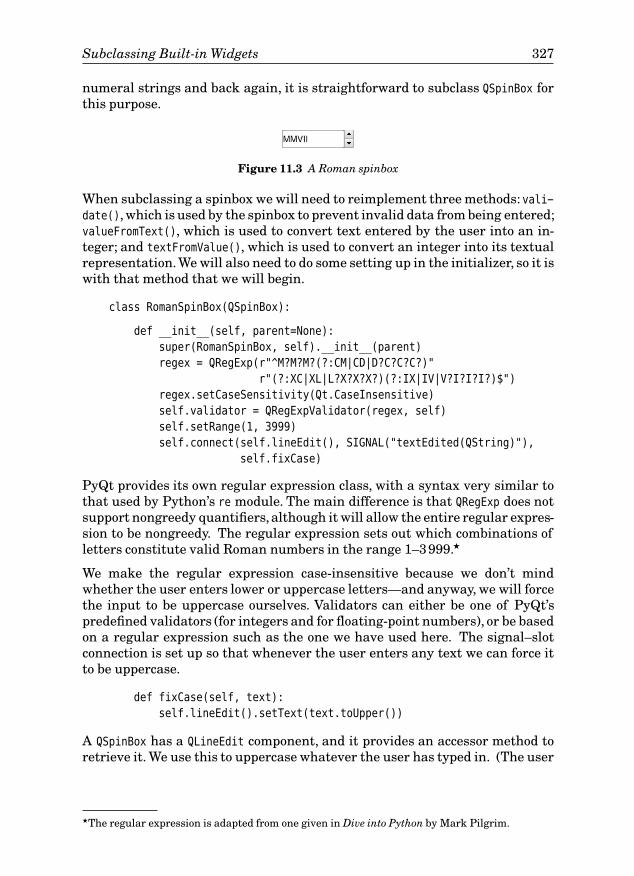
Subclassing Built-in Widgets 327
numeral strings and back again, it is straightforward to subclass QSpinBox forthis purpose.
Figure 11.3 A Roman spinbox
When subclassing a spinbox we will need to reimplement three methods: vali-date(), which is used by the spinbox to prevent invalid data from being entered;valueFromText(), which is used to convert text entered by the user into an in-teger; and textFromValue(), which is used to convert an integer into its textualrepresentation.We will also need to do some setting up in the initializer, so it iswith that method that we will begin.
class RomanSpinBox(QSpinBox):
def __init__(self, parent=None):
super(RomanSpinBox, self).__init__(parent)
regex = QRegExp(r"^M?M?M?(?:CM|CD|D?C?C?C?)"
r"(?:XC|XL|L?X?X?X?)(?:IX|IV|V?I?I?I?)$")
regex.setCaseSensitivity(Qt.CaseInsensitive)
self.validator = QRegExpValidator(regex, self)
self.setRange(1, 3999)
self.connect(self.lineEdit(), SIGNAL("textEdited(QString)"),
self.fixCase)
PyQt provides its own regular expression class, with a syntax very similar tothat used by Python’s re module. The main difference is that QRegExp does notsupport nongreedy quantifiers,although it will allow the entire regular expres-sion to be nongreedy. The regular expression sets out which combinations ofletters constitute valid Roman numbers in the range 1–3999.★
We make the regular expression case-insensitive because we don’t mindwhether the user enters lower or uppercase letters—and anyway, we will forcethe input to be uppercase ourselves. Validators can either be one of PyQt’spredefined validators (for integers and for floating-point numbers), or be basedon a regular expression such as the one we have used here. The signal–slotconnection is set up so that whenever the user enters any text we can force itto be uppercase.
def fixCase(self, text):
self.lineEdit().setText(text.toUpper())
A QSpinBox has a QLineEdit component, and it provides an accessor method toretrieve it. We use this to uppercase whatever the user has typed in. (The user
★The regular expression is adapted from one given in Dive into Python by Mark Pilgrim.
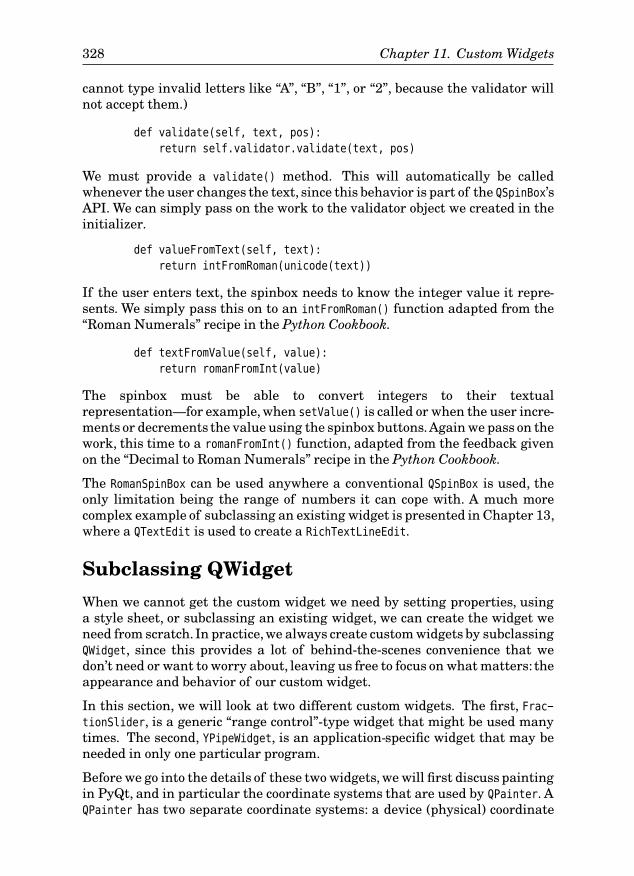
328 Chapter 11. Custom Widgets
cannot type invalid letters like “A”, “B”, “1”, or “2”, because the validator willnot accept them.)
def validate(self, text, pos):
return self.validator.validate(text, pos)
We must provide a validate() method. This will automatically be calledwhenever the user changes the text, since this behavior is part of the QSpinBox’sAPI. We can simply pass on the work to the validator object we created in theinitializer.
def valueFromText(self, text):
return intFromRoman(unicode(text))
If the user enters text, the spinbox needs to know the integer value it repre-sents. We simply pass this on to an intFromRoman() function adapted from the“Roman Numerals” recipe in the Python Cookbook.
def textFromValue(self, value):
return romanFromInt(value)
The spinbox must be able to convert integers to their textualrepresentation—for example, when setValue() is called or when the user incre-ments or decrements the value using the spinbox buttons.Again we pass on thework, this time to a romanFromInt() function, adapted from the feedback givenon the “Decimal to Roman Numerals” recipe in the Python Cookbook.
The RomanSpinBox can be used anywhere a conventional QSpinBox is used, theonly limitation being the range of numbers it can cope with. A much morecomplex example of subclassing an existing widget is presented in Chapter 13,where a QTextEdit is used to create a RichTextLineEdit.
Subclassing QWidget
When we cannot get the custom widget we need by setting properties, usinga style sheet, or subclassing an existing widget, we can create the widget weneed from scratch. In practice, we always create custom widgets by subclassingQWidget, since this provides a lot of behind-the-scenes convenience that wedon’t need or want to worry about, leaving us free to focus on what matters: theappearance and behavior of our custom widget.
In this section, we will look at two different custom widgets. The first, Frac-tionSlider, is a generic “range control”-type widget that might be used manytimes. The second, YPipeWidget, is an application-specific widget that may beneeded in only one particular program.
Before we go into the details of these two widgets, we will first discuss paintingin PyQt, and in particular the coordinate systems that are used by QPainter. AQPainter has two separate coordinate systems: a device (physical) coordinate
Subclassing QWidget 329
system that matches the pixels in the widget’s area, and a logical coordinatesystem. By default, the logical coordinate system is set to exactly match thephysical coordinate system.
In fact, the physical coordinates are not necessarily pixels since they depend onthe underlying paint device. This can be a QGLPixelBuffer (for 2D and 3D paint-ing), a QImage, a QPicture, a QPixmap, a QPrinter (in which case the coordinatesare points, 1
72"), a QSvgGenerator (introduced with Qt 4.3), or a QWidget.
In PyQt terminology the physical coordinate system is called the “viewport”,and confusingly, the logical coordinate system is called the “window”.
(150, 200)
(420, 320)
(-37.5, -20)
(3, 4)
(0, 0)
(800, 600)
(-60, -60)
(60, 60)Viewport Window
Figure 11.4 The viewport and window coordinate systems
In Figure 11.4, we have a physical widget size of 800 × 600. By calling setWin-
dow(-60, -60, 120, 120) we can create a “window” with a top-left coordinate of(-60, -60), a width of 120, a height of 120, and centered at point (0, 0). Thewindow’s coordinate system is a logical coordinate system that QPainter auto-matically maps to the underlying physical device. After the setWindow() call,all our painting takes place using the logical (window) coordinate system.
In this case, the widget is rectangular, but our window has the same width andheight. This means that the items we paint will be stretched out horizontally,since coordinates in the y-axis will be scaled by QPainter in the ratio 120:600(1:5), whereas those in the x-axis will be scaled in the ratio 120:800 (1:6 2
3).
For most widgets, a rectangular region works perfectly well, but in somecases—for example, if we really want our logical window to be square—wecan change the viewport so that we operate on only a proportion of the wid-get’s area.
side = min(self.width(), self.height())
painter.setViewport((self.width() - side) / 2,
(self.height() - side) / 2, side, side)
This code, executed inside a widget’s paintEvent(), changes the widget’sviewport to be the largest centered square region that will fit. In the exampleearlier, this will produce a viewport of 600 × 600 pixels with no top or bottommargins, but with a 100-pixel margin on the left and on the right. The windowwill now be an exact square, and the aspect ratio of anything we paint in it willbe preserved.
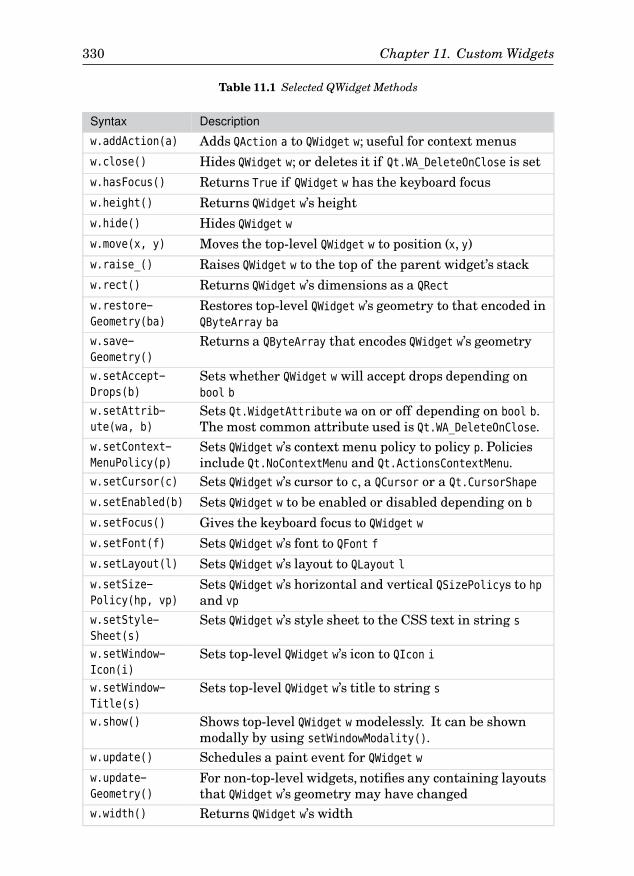
330 Chapter 11. Custom Widgets
Table 11.1 Selected QWidget Methods
Syntax Description
w.addAction(a) Adds QAction a to QWidget w; useful for context menusw.close() Hides QWidget w; or deletes it if Qt.WA_DeleteOnClose is setw.hasFocus() Returns True if QWidget w has the keyboard focusw.height() Returns QWidget w’s heightw.hide() Hides QWidget w
w.move(x, y) Moves the top-level QWidget w to position (x, y)w.raise_() Raises QWidget w to the top of the parent widget’s stackw.rect() Returns QWidget w’s dimensions as a QRect
w.restore-
Geometry(ba)Restores top-level QWidget w’s geometry to that encoded inQByteArray ba
w.save-
Geometry()Returns a QByteArray that encodes QWidget w’s geometry
w.setAccept-
Drops(b)Sets whether QWidget w will accept drops depending onbool b
w.setAttrib-
ute(wa, b)Sets Qt.WidgetAttribute wa on or off depending on bool b.The most common attribute used is Qt.WA_DeleteOnClose.
w.setContext-
MenuPolicy(p)Sets QWidget w’s context menu policy to policy p. Policiesinclude Qt.NoContextMenu and Qt.ActionsContextMenu.
w.setCursor(c) Sets QWidget w’s cursor to c, a QCursor or a Qt.CursorShape
w.setEnabled(b) Sets QWidget w to be enabled or disabled depending on b
w.setFocus() Gives the keyboard focus to QWidget w
w.setFont(f) Sets QWidget w’s font to QFont f
w.setLayout(l) Sets QWidget w’s layout to QLayout l
w.setSize-
Policy(hp, vp)Sets QWidget w’s horizontal and vertical QSizePolicys to hp
and vp
w.setStyle-
Sheet(s)Sets QWidget w’s style sheet to the CSS text in string s
w.setWindow-
Icon(i)Sets top-level QWidget w’s icon to QIcon i
w.setWindow-
Title(s)Sets top-level QWidget w’s title to string s
w.show() Shows top-level QWidget w modelessly. It can be shownmodally by using setWindowModality().
w.update() Schedules a paint event for QWidget w
w.update-
Geometry()For non-top-level widgets, notifies any containing layoutsthat QWidget w’s geometry may have changed
w.width() Returns QWidget w’s width
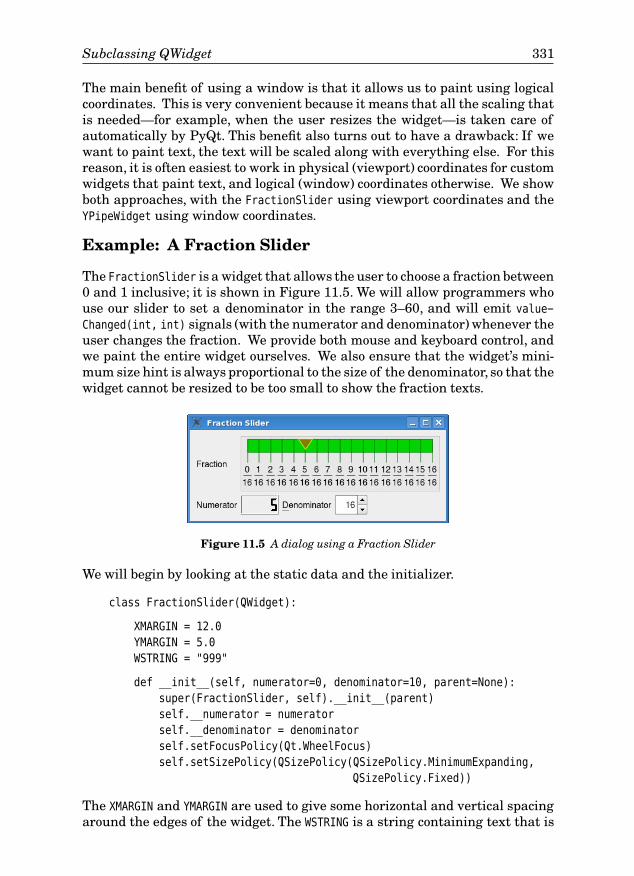
Subclassing QWidget 331
The main benefit of using a window is that it allows us to paint using logicalcoordinates. This is very convenient because it means that all the scaling thatis needed—for example, when the user resizes the widget—is taken care ofautomatically by PyQt. This benefit also turns out to have a drawback: If wewant to paint text, the text will be scaled along with everything else. For thisreason, it is often easiest to work in physical (viewport) coordinates for customwidgets that paint text, and logical (window) coordinates otherwise. We showboth approaches, with the FractionSlider using viewport coordinates and theYPipeWidget using window coordinates.
Example: A Fraction Slider
The FractionSlider is a widget that allows the user to choose a fraction between0 and 1 inclusive; it is shown in Figure 11.5. We will allow programmers whouse our slider to set a denominator in the range 3–60, and will emit value-
Changed(int, int) signals (with the numerator and denominator) whenever theuser changes the fraction. We provide both mouse and keyboard control, andwe paint the entire widget ourselves. We also ensure that the widget’s mini-mum size hint is always proportional to the size of the denominator, so that thewidget cannot be resized to be too small to show the fraction texts.
Figure 11.5 A dialog using a Fraction Slider
We will begin by looking at the static data and the initializer.
class FractionSlider(QWidget):
XMARGIN = 12.0
YMARGIN = 5.0
WSTRING = "999"
def __init__(self, numerator=0, denominator=10, parent=None):
super(FractionSlider, self).__init__(parent)
self.__numerator = numerator
self.__denominator = denominator
self.setFocusPolicy(Qt.WheelFocus)
self.setSizePolicy(QSizePolicy(QSizePolicy.MinimumExpanding,
QSizePolicy.Fixed))
The XMARGIN and YMARGIN are used to give some horizontal and vertical spacingaround the edges of the widget. The WSTRING is a string containing text that is
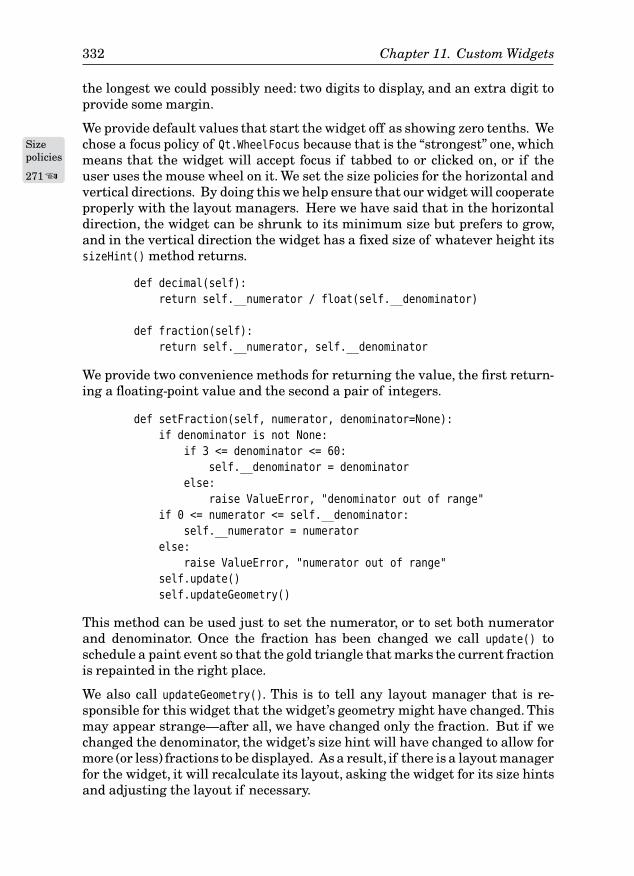
332 Chapter 11. Custom Widgets
the longest we could possibly need: two digits to display, and an extra digit toprovide some margin.
We provide default values that start the widget off as showing zero tenths. Wechose a focus policy of Qt.WheelFocus because that isSize
policies
271 ☞
the “strongest” one, whichmeans that the widget will accept focus if tabbed to or clicked on, or if theuser uses the mouse wheel on it. We set the size policies for the horizontal andvertical directions. By doing this we help ensure that our widget will cooperateproperly with the layout managers. Here we have said that in the horizontaldirection, the widget can be shrunk to its minimum size but prefers to grow,and in the vertical direction the widget has a fixed size of whatever height itssizeHint() method returns.
def decimal(self):
return self.__numerator / float(self.__denominator)
def fraction(self):
return self.__numerator, self.__denominator
We provide two convenience methods for returning the value, the first return-ing a floating-point value and the second a pair of integers.
def setFraction(self, numerator, denominator=None):
if denominator is not None:
if 3 <= denominator <= 60:
self.__denominator = denominator
else:
raise ValueError, "denominator out of range"
if 0 <= numerator <= self.__denominator:
self.__numerator = numerator
else:
raise ValueError, "numerator out of range"
self.update()
self.updateGeometry()
This method can be used just to set the numerator, or to set both numeratorand denominator. Once the fraction has been changed we call update() toschedule a paint event so that the gold triangle that marks the current fractionis repainted in the right place.
We also call updateGeometry(). This is to tell any layout manager that is re-sponsible for this widget that the widget’s geometry might have changed. Thismay appear strange—after all, we have changed only the fraction. But if wechanged the denominator, the widget’s size hint will have changed to allow formore (or less) fractions to be displayed. As a result, if there is a layout managerfor the widget, it will recalculate its layout, asking the widget for its size hintsand adjusting the layout if necessary.
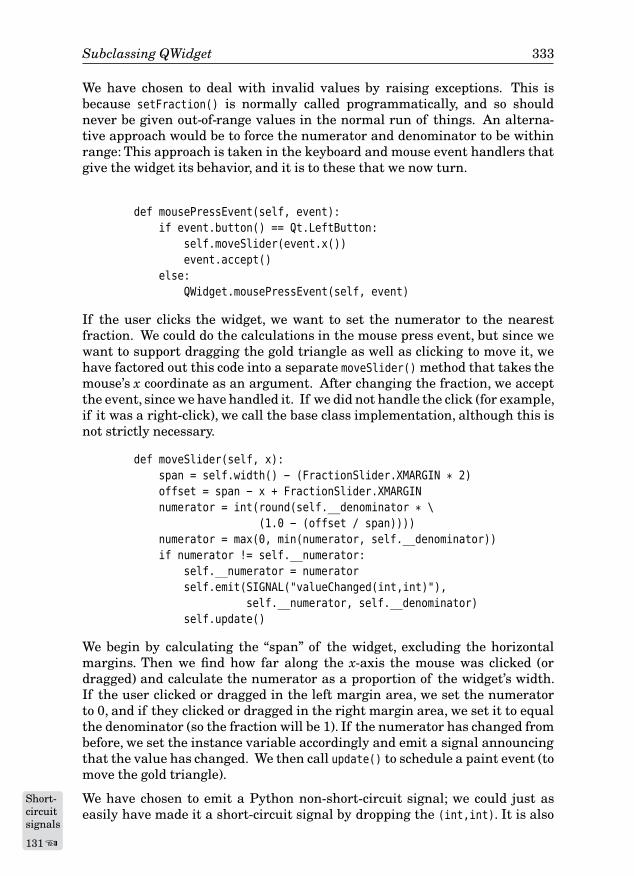
Subclassing QWidget 333
We have chosen to deal with invalid values by raising exceptions. This isbecause setFraction() is normally called programmatically, and so shouldnever be given out-of-range values in the normal run of things. An alterna-tive approach would be to force the numerator and denominator to be withinrange: This approach is taken in the keyboard and mouse event handlers thatgive the widget its behavior, and it is to these that we now turn.
def mousePressEvent(self, event):
if event.button() == Qt.LeftButton:
self.moveSlider(event.x())
event.accept()
else:
QWidget.mousePressEvent(self, event)
If the user clicks the widget, we want to set the numerator to the nearestfraction. We could do the calculations in the mouse press event, but since wewant to support dragging the gold triangle as well as clicking to move it, wehave factored out this code into a separate moveSlider() method that takes themouse’s x coordinate as an argument. After changing the fraction, we acceptthe event, since we have handled it. If we did not handle the click (for example,if it was a right-click), we call the base class implementation, although this isnot strictly necessary.
def moveSlider(self, x):
span = self.width() - (FractionSlider.XMARGIN * 2)
offset = span - x + FractionSlider.XMARGIN
numerator = int(round(self.__denominator * \
(1.0 - (offset / span))))
numerator = max(0, min(numerator, self.__denominator))
if numerator != self.__numerator:
self.__numerator = numerator
self.emit(SIGNAL("valueChanged(int,int)"),
self.__numerator, self.__denominator)
self.update()
We begin by calculating the “span” of the widget, excluding the horizontalmargins. Then we find how far along the x-axis the mouse was clicked (ordragged) and calculate the numerator as a proportion of the widget’s width.If the user clicked or dragged in the left margin area, we set the numeratorto 0, and if they clicked or dragged in the right margin area, we set it to equalthe denominator (so the fraction will be 1). If the numerator has changed frombefore, we set the instance variable accordingly and emit a signal announcingthat the value has changed. We then call update() to schedule a paint event (tomove the gold triangle).
We have chosen to emit a Python non-short-circuit signal; we could justShort-circuitsignals
131 ☞
aseasily have made it a short-circuit signal by dropping the (int,int). It is also
334 Chapter 11. Custom Widgets
possible to define signals using the __pyqtSignals__ class attribute, althoughthis is really useful only for custom widgets written in PyQt that are to beintegrated with Qt Designer.★
def mouseMoveEvent(self, event):
self.moveSlider(event.x())
This tiny method is all that we need to support dragging the gold triangle tochange the fraction. This method is called only if the mouse is being dragged,that is, if the left mouse button is pressed at the same time the mouse is beingmoved. This is QWidget’s standard behavior—we can have mouse move eventsgenerated for all mouse moves, regardless of the mouse buttons, by callingQWidget.setMouseTracking(True), if we wish.
def keyPressEvent(self, event):
change = 0
if event.key() == Qt.Key_Home:
change = -self.__denominator
elif event.key() in (Qt.Key_Up, Qt.Key_Right):
change = 1
elif event.key() == Qt.Key_PageUp:
change = (self.__denominator // 10) + 1
elif event.key() in (Qt.Key_Down, Qt.Key_Left):
change = -1
elif event.key() == Qt.Key_PageDown:
change = -((self.__denominator // 10) + 1)
elif event.key() == Qt.Key_End:
change = self.__denominator
if change:
numerator = self.__numerator
numerator += change
numerator = max(0, min(numerator, self.__denominator))
if numerator != self.__numerator:
self.__numerator = numerator
self.emit(SIGNAL("valueChanged(int,int)"),
self.__numerator, self.__denominator)
self.update()
event.accept()
else:
QWidget.keyPressEvent(self, event)
For keyboard support, we want Home to set the fraction to 0,End to set it to 1, upor right arrow keys to move to the next fraction up, and down or left arrow keysto move to the next fraction down. We have also set PageUp to move one-tenthof the way up and PageDown to move one-tenth of the way down.
★See the PyQt pyqt4ref.html documentation, under “Writing Qt Designer Plugins”.
Subclassing QWidget 335
The code for ensuring that the numerator is in range, and for setting theinstance variable, and so on, is identical to what we did in the mouse pressevent handler. And again we pass on unhandled key presses to the base classimplementation—which does nothing, just as the base class mouse click han-dler does nothing.
def sizeHint(self):
return self.minimumSizeHint()
We have decided that the widget’s preferred size is its minimum size. Strictlyspeaking we did not have to reimplement this method,but by doing so we makeour intention clear. Thanks to the size policies we set in the initializer, the wid-get can grow horizontally to occupy as much horizontal space as is available.
def minimumSizeHint(self):
font = QFont(self.font())
font.setPointSize(font.pointSize() - 1)
fm = QFontMetricsF(font)
return QSize(fm.width(FractionSlider.WSTRING) * \
self.__denominator,
(fm.height() * 4) + FractionSlider.YMARGIN)
A QFontMetricsF object is initialized by a QFont object, in this case the widget’sdefault font.★ This font is inherited from the widget’s parent, which in turninherits from its parent, and so on, with top-level widgets inheriting theirfonts (and color schemes and other user settings) from the QApplication object,which itself takes them from the user preferences reported by the underlyingwindowing system. We can of course ignore the users’ preferences and set anexplicit font in any widget.
The QFontMetricsF object provides the real metrics, i.e., those of the font actu-ally used—and this may be different from the font that was specified. For ex-ample, if the Helvetica font is used, it will almost certainly be found and usedon Linux or Mac OS X, but on Windows, Ariel is likely to be used in its place.We have chosen to use a font size one less than the user’s preferred font size toshow the fractions, which is why we call setPointSize().
We set the widget’s minimum width to be the width necessary to display all thefractions, assuming that each one is three digits wide, i.e., two digits plus someempty margin either side. The overall width is actually slightly less than thisbecause we don’t include the horizontal margins. We set the widget’s minimumheight to be four times the height of one character, i.e., enough vertical spacefor the fraction “segments” (the rectangles that signify each fraction), thevertical lines, the numerator, and the denominator. And just as for the width,the actual height is slightly less than this, because we only account for half ofthe vertical margin.
★PyQt also has a QFontMetrics class which gives integer rather than floating-point values. SimilarlyPyQt has QLine, QLineF, QPoint, QPointF, QPolygon, QPolygonF, QRect, QRectF, and some others.
336 Chapter 11. Custom Widgets
Having implemented the key and mouse event handlers, set the size policies,and implemented the size hint methods, we have made the widget have appro-priate behavior for user interaction and in relation to any layout manager thatmight be asked to lay out the widget. There is only one thing left to do:We mustpaint the widget when required to do so. The paintEvent() is rather long, so wewill look at it in pieces.
def paintEvent(self, event=None):
font = QFont(self.font())
font.setPointSize(font.pointSize() - 1)
fm = QFontMetricsF(font)
fracWidth = fm.width(FractionSlider.WSTRING)
indent = fm.boundingRect("9").width() / 2.0
if not X11:
fracWidth *= 1.5
span = self.width() - (FractionSlider.XMARGIN * 2)
value = self.__numerator / float(self.__denominator)
We begin by getting the font we want to use, as well as its font metrics. Thenwe calculate fracWidth, the width of one fraction, as well as an indent for eachfraction’s dividing line. The if statement is used to compensate for differencesbetween the font metrics on the X Window System and other window systemssuch as Windows and Mac OS X. The span is the width of the widget exclud-ing the horizontal margins, and the value is the floating-point value of thefraction.
The X11 Boolean variable is True if the underlying window system is theX Window System, as it normally is on Linux, BSD, Solaris, and similar, andFalse otherwise—for example, on Windows and Mac OS X. It was set at thebeginning of the file, after the imports, using the following statement:
X11 = "qt_x11_wait_for_window_manager" in dir()
We could write it more clearly as:
import PyQt4.QtGui
X11 = hasattr(PyQt4.QtGui, "qt_x11_wait_for_window_manager")
These work because the PyQt4.QtGui.qt_x11_wait_for_window_manager() func-tion exists only on systems that are using the X Window System. We used asimilar technique for Mac OS X detection in Chapter 7.
painter = QPainter(self)
painter.setRenderHint(QPainter.Antialiasing)
painter.setRenderHint(QPainter.TextAntialiasing)
painter.setPen(self.palette().color(QPalette.Mid))
painter.setBrush(self.palette().brush(QPalette.AlternateBase))
painter.drawRect(self.rect())
Subclassing QWidget 337
We create a QPainter and set its render hints to give us antialiased drawing.Then we set the pen (which is used for shape outlines and for drawing text) andthe brush (which is used for fills), and draw a rectangle over the entire widget.Because we used different shades for the pen and brush, this has the effect ofgiving the widget a border and a slightly indented look.
The QApplication object has a QPalette that contains colors for various purposes,such as text foreground and background colors, button colors, and so on. Thecolors are identified by their roles, such as QPalette.Text or QPalette.Highlight,although we have used rather more obscure roles in this example. There are,in fact, three sets of these colors, one for each of the widget states: “active”,“disabled”, and “inactive”. Every QWidget also has a QPalette, with colors inher-ited from the QApplication palette—which in turn is initialized with colors fromthe underlying window system and therefore reflects the user’s preferences.PyQt tries very hard to ensure that the colors in a palette work well together,providing good contrast, for example. As programmers,we are free to use what-ever colors we like, but especially for standard requirements such as text colorsand backgrounds, it is best to use the palette.
segColor = QColor(Qt.green).dark(120)
segLineColor = segColor.dark()
painter.setPen(segLineColor)
painter.setBrush(segColor)
painter.drawRect(FractionSlider.XMARGIN,
FractionSlider.YMARGIN, span, fm.height())
We create a dark green color for the segments,and an even darker green for thevertical lines that mark them out. Then we draw a rectangle that encompassesall the segments.
textColor = self.palette().color(QPalette.Text)
segWidth = span / self.__denominator
segHeight = fm.height() * 2
nRect = fm.boundingRect(FractionSlider.WSTRING)
x = FractionSlider.XMARGIN
yOffset = segHeight + fm.height()
Here, we set the text color to use based on the user’s palette. Then we workout the width and height of each segment, and set an initial x position and ayOffset. The nRect is a rectangle large enough to contain a number with someleft and right margin space.
for i in range(self.__denominator + 1):
painter.setPen(segLineColor)
painter.drawLine(x, FractionSlider.YMARGIN, x, segHeight)
painter.setPen(textColor)
y = segHeight
rect = QRectF(nRect)
338 Chapter 11. Custom Widgets
rect.moveCenter(QPointF(x, y + fm.height() / 2.0))
painter.drawText(rect, Qt.AlignCenter, QString.number(i))
y = yOffset
rect.moveCenter(QPointF(x, y + fm.height() / 2.0))
painter.drawText(rect, Qt.AlignCenter,
QString.number(self.__denominator))
painter.drawLine(QPointF(rect.left() + indent, y),
QPointF(rect.right() - indent, y))
x += segWidth
In this loop we draw the vertical lines that mark out each segment, the numer-ator below each segment, and the denominator below each numerator, alongwith the dividing line between them. For the drawText() calls we provide arectangle in which the text should be drawn, and by using Qt.AlignCenter, weensure that the text is vertically and horizontally centered inside the specifiedrectangle. We use the same rectangle, but indented at the left and right, tocalculate the end points of the dividing line, which we then draw. The y offsetsare fixed for every line, numerator, and denominator, but the x offsets increaseby one segment width after drawing each fraction.
span = int(span)
y = FractionSlider.YMARGIN - 0.5
triangle = [QPointF(value * span, y),
QPointF((value * span) + \
(2 * FractionSlider.XMARGIN), y),
QPointF((value * span) + \
FractionSlider.XMARGIN, fm.height())]
painter.setPen(Qt.yellow)
painter.setBrush(Qt.darkYellow)
painter.drawPolygon(QPolygonF(triangle))
At the end we draw the gold triangle that shows the user which fraction isselected. We specify polygons by providing a list of points. We don’t have toduplicate the first point at the end, since if we use drawPolygon(), PyQt willautomatically join the first and last points and fill the enclosed area. In thenext chapter we will see more advanced drawing techniques, including the useof the very versatile QPainterPath class.
We have now completed the generic FractionSlider widget. It has both key-board and mouse support, looks reasonable on all platforms,and interactsprop-erly with the layout managers.
The QPainter class offers many more possibilities than we have needed forthis widget, but in the next subsection we will see more of what can be done,including drawing unfilled polygons and polygons that use gradient fills. Wewill also see how to include other widgets inside a custom widget.
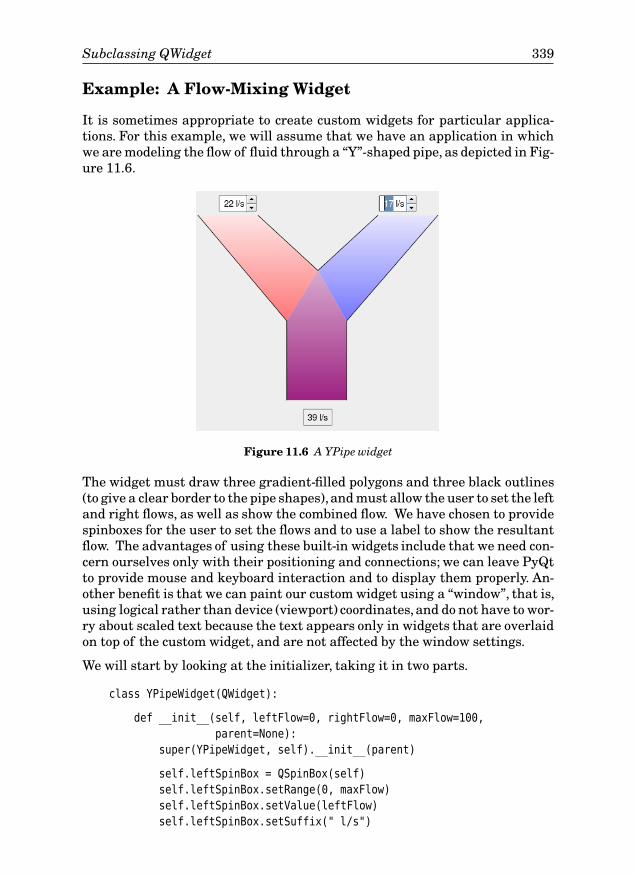
Subclassing QWidget 339
Example: A Flow-Mixing Widget
It is sometimes appropriate to create custom widgets for particular applica-tions. For this example, we will assume that we have an application in whichwe are modeling the flow of fluid through a “Y”-shaped pipe, as depicted in Fig-ure 11.6.
Figure 11.6 A YPipe widget
The widget must draw three gradient-filled polygons and three black outlines(to give a clear border to the pipe shapes),and must allow the user to set the leftand right flows, as well as show the combined flow. We have chosen to providespinboxes for the user to set the flows and to use a label to show the resultantflow. The advantages of using these built-in widgets include that we need con-cern ourselves only with their positioning and connections; we can leave PyQtto provide mouse and keyboard interaction and to display them properly. An-other benefit is that we can paint our custom widget using a “window”, that is,using logical rather than device (viewport) coordinates, and do not have to wor-ry about scaled text because the text appears only in widgets that are overlaidon top of the custom widget, and are not affected by the window settings.
We will start by looking at the initializer, taking it in two parts.
class YPipeWidget(QWidget):
def __init__(self, leftFlow=0, rightFlow=0, maxFlow=100,
parent=None):
super(YPipeWidget, self).__init__(parent)
self.leftSpinBox = QSpinBox(self)
self.leftSpinBox.setRange(0, maxFlow)
self.leftSpinBox.setValue(leftFlow)
self.leftSpinBox.setSuffix(" l/s")
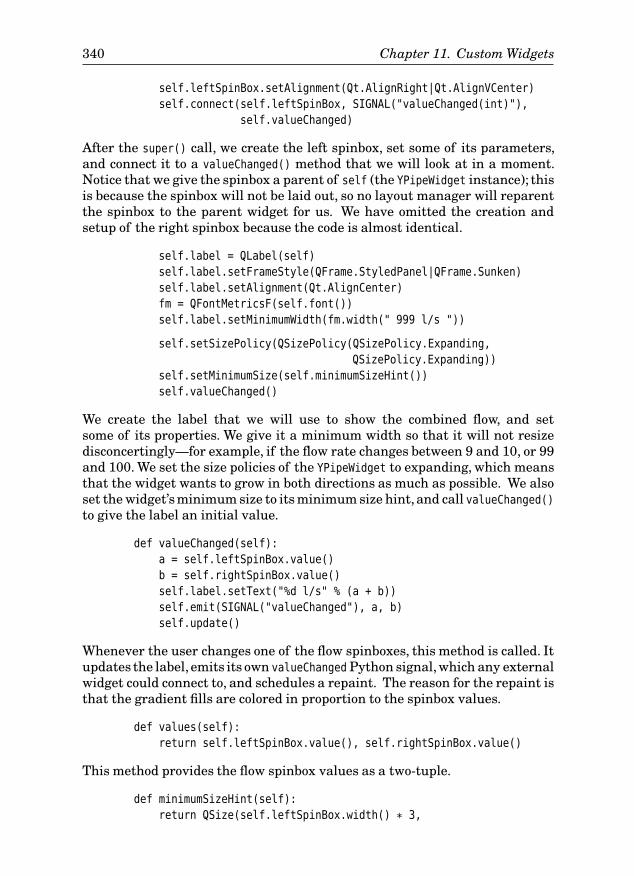
340 Chapter 11. Custom Widgets
self.leftSpinBox.setAlignment(Qt.AlignRight|Qt.AlignVCenter)
self.connect(self.leftSpinBox, SIGNAL("valueChanged(int)"),
self.valueChanged)
After the super() call, we create the left spinbox, set some of its parameters,and connect it to a valueChanged() method that we will look at in a moment.Notice that we give the spinbox a parent of self (the YPipeWidget instance); thisis because the spinbox will not be laid out, so no layout manager will reparentthe spinbox to the parent widget for us. We have omitted the creation andsetup of the right spinbox because the code is almost identical.
self.label = QLabel(self)
self.label.setFrameStyle(QFrame.StyledPanel|QFrame.Sunken)
self.label.setAlignment(Qt.AlignCenter)
fm = QFontMetricsF(self.font())
self.label.setMinimumWidth(fm.width(" 999 l/s "))
self.setSizePolicy(QSizePolicy(QSizePolicy.Expanding,
QSizePolicy.Expanding))
self.setMinimumSize(self.minimumSizeHint())
self.valueChanged()
We create the label that we will use to show the combined flow, and setsome of its properties. We give it a minimum width so that it will not resizedisconcertingly—for example, if the flow rate changes between 9 and 10, or 99and 100. We set the size policies of the YPipeWidget to expanding, which meansthat the widget wants to grow in both directions as much as possible. We alsoset the widget’s minimum size to its minimum size hint, and call valueChanged()to give the label an initial value.
def valueChanged(self):
a = self.leftSpinBox.value()
b = self.rightSpinBox.value()
self.label.setText("%d l/s" % (a + b))
self.emit(SIGNAL("valueChanged"), a, b)
self.update()
Whenever the user changes one of the flow spinboxes, this method is called. Itupdates the label, emits its own valueChanged Python signal,which any externalwidget could connect to, and schedules a repaint. The reason for the repaint isthat the gradient fills are colored in proportion to the spinbox values.
def values(self):
return self.leftSpinBox.value(), self.rightSpinBox.value()
This method provides the flow spinbox values as a two-tuple.
def minimumSizeHint(self):
return QSize(self.leftSpinBox.width() * 3,
Subclassing QWidget 341
self.leftSpinBox.height() * 5)
We have made the widget’s minimum width and height proportional to thespinboxes. This ensures that the “Y” shape never becomes too small to be un-derstandable.
def resizeEvent(self, event=None):
fm = QFontMetricsF(self.font())
x = (self.width() - self.label.width()) / 2
y = self.height() - (fm.height() * 1.5)
self.label.move(x, y)
y = self.height() / 60.0
x = (self.width() / 4.0) - self.leftSpinBox.width()
self.leftSpinBox.move(x, y)
x = self.width() - (self.width() / 4.0)
self.rightSpinBox.move(x, y)
The resize event is particularly important for widgets that contain otherwidgets and that do not have a layout. This is because we use this event toposition the child widgets. A resize event is always called before a widget isfirst shown, so we automatically get the chance to position the child widgetsbefore the widget is seen by the user for the first time.
The label is horizontally centered, and drawn near the bottom of the wid-get. (The y coordinates increase downward, so self.height() returns thegreatest—bottommost—y value.) The two spinboxes are drawn near the top, 1
60
of the height below the least—topmost—y value, and 14 of the widget’s width in
from the left or right edge.
Because we have used QSpinBoxes and a QLabel, along with a couple ofsignal–slot connections, all the user interaction is taken care of, so we need toconcern ourselves only with resizing and painting. Although the painting issimplified by having the spinboxes and label drawn by PyQt, it is still a littleinvolved, so we will look at the paint event in pieces.
def paintEvent(self, event=None):
LogicalSize = 100.0
def logicalFromPhysical(length, side):
return (length / side) * LogicalSize
fm = QFontMetricsF(self.font())
ymargin = (LogicalSize / 30.0) + \
logicalFromPhysical(self.leftSpinBox.height(),
self.height())
ymax = LogicalSize - \
logicalFromPhysical(fm.height() * 2, self.height())
width = LogicalSize / 4.0
cx, cy = LogicalSize / 2.0, LogicalSize / 3.0
342 Chapter 11. Custom Widgets
ax, ay = cx - (2 * width), ymargin
bx, by = cx - width, ay
dx, dy = cx + width, ay
ex, ey = cx + (2 * width), ymargin
fx, fy = cx + (width / 2), cx + (LogicalSize / 24.0)
gx, gy = fx, ymax
hx, hy = cx - (width / 2), ymax
ix, iy = hx, fy
Rather than work in device (physical) coordinates and have to scale all thecoordinates ourselves, we have created a logical coordinate system, with a topleft of (0, 0) and a width and height of 100 (LogicalSize). We have defined a tinyhelper function used to calculate a y margin above which the spinboxes aredrawn, and a maximum y below which the label is drawn.
a b d e
c
i f
h g
Figure 11.7 The YPipe’s coordinate points
As Figure 11.7 indicates, we do all our painting in terms of the points needed todraw the “Y” shape. For each point in the figure, we calculate an x coordinateand a y coordinate. For example, the top-left point is a, so its coordinates inthe code are ax and ay. Most of the calculations are done in terms of point c, (cx,cy).
painter = QPainter(self)
painter.setRenderHint(QPainter.Antialiasing)
side = min(self.width(), self.height())
painter.setViewport((self.width() - side) / 2,
(self.height() - side) / 2, side, side)
painter.setWindow(0, 0, LogicalSize, LogicalSize)
We create the painter and set its viewport to be the largest centered squarearea that will fit inside its rectangle. We then set a window, that is, imposeour own logical coordinate system, leaving PyQt to take care of transforminglogical to physical coordinates.
painter.setPen(Qt.NoPen)
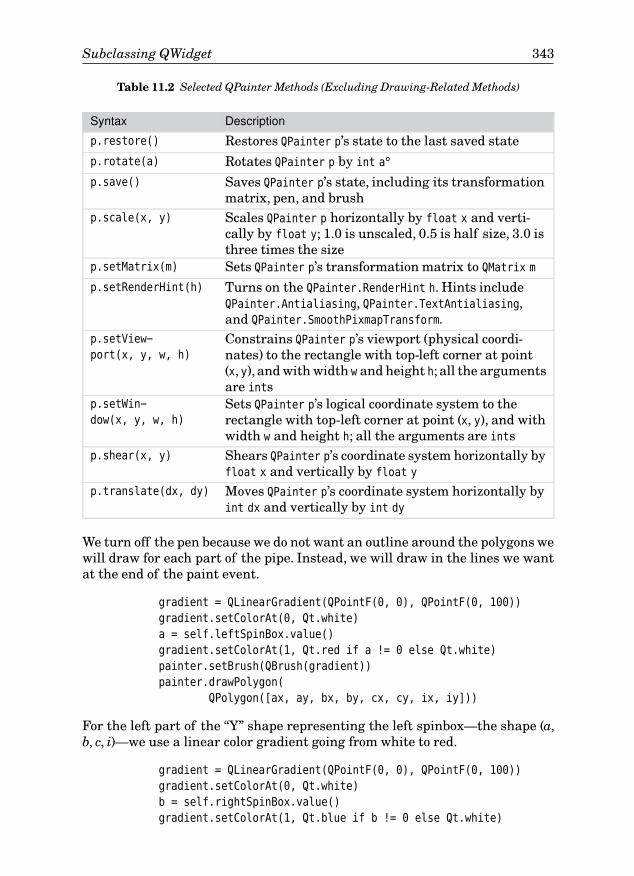
Subclassing QWidget 343
Table 11.2 Selected QPainter Methods (Excluding Drawing-Related Methods)
Syntax Description
p.restore() Restores QPainter p’s state to the last saved statep.rotate(a) Rotates QPainter p by int a°
p.save() Saves QPainter p’s state, including its transformationmatrix, pen, and brush
p.scale(x, y) Scales QPainter p horizontally by float x and verti-cally by float y; 1.0 is unscaled, 0.5 is half size, 3.0 isthree times the size
p.setMatrix(m) Sets QPainter p’s transformation matrix to QMatrix m
p.setRenderHint(h) Turns on the QPainter.RenderHint h. Hints includeQPainter.Antialiasing, QPainter.TextAntialiasing,and QPainter.SmoothPixmapTransform.
p.setView-
port(x, y, w, h)Constrains QPainter p’s viewport (physical coordi-nates) to the rectangle with top-left corner at point(x, y), and with width w and height h; all the argumentsare ints
p.setWin-
dow(x, y, w, h)Sets QPainter p’s logical coordinate system to therectangle with top-left corner at point (x, y), and withwidth w and height h; all the arguments are ints
p.shear(x, y) Shears QPainter p’s coordinate system horizontally byfloat x and vertically by float y
p.translate(dx, dy) Moves QPainter p’s coordinate system horizontally byint dx and vertically by int dy
We turn off the pen because we do not want an outline around the polygons wewill draw for each part of the pipe. Instead, we will draw in the lines we wantat the end of the paint event.
gradient = QLinearGradient(QPointF(0, 0), QPointF(0, 100))
gradient.setColorAt(0, Qt.white)
a = self.leftSpinBox.value()
gradient.setColorAt(1, Qt.red if a != 0 else Qt.white)
painter.setBrush(QBrush(gradient))
painter.drawPolygon(
QPolygon([ax, ay, bx, by, cx, cy, ix, iy]))
For the left part of the “Y” shape representing the left spinbox—the shape (a,b, c, i)—we use a linear color gradient going from white to red.
gradient = QLinearGradient(QPointF(0, 0), QPointF(0, 100))
gradient.setColorAt(0, Qt.white)
b = self.rightSpinBox.value()
gradient.setColorAt(1, Qt.blue if b != 0 else Qt.white)
344 Chapter 11. Custom Widgets
Table 11.3 Selected QPainter Drawing-Related Methods
Syntax Description
p.drawArc(r, a, s) Draws an arc on QPainter p in the circle bounded byQRect r, starting at angle int a°, and spanning s
16°
p.drawChord(r, a, s) Draws a chord on QPainter p in the circle bounded byQRect r, starting at angle int a°, and spanning s
16°
p.drawConvex-
Polygon(pl)Draws a convex polygon on QPainter p connecting thelist of QPoints in pl, and connects the last point backto the first
p.drawEllipse(r) Draws an ellipse on QPainter p bounded by QRect r;draws a circle if r is square
p.drawImage(pt, i) Draws QImage i at QPoint pt on QPainter p; differentarguments allow drawing just part of the image
p.drawLine(p1, p2) Draws a line between QPoints p1 and p2 on QPainter
p. Many argument variations are possible; there arealso drawLines() methods.
p.drawPath(pp) Draws the QPainterPath pp on QPainter p
p.drawPie(r, a, s) Draws a pie segment in the circle bounded by QRect
r, starting at angle int a°, and spanning s16°
p.drawPixmap(pt, px) Draws QPixmap px at QPoint pt on QPainter p; differentarguments allow drawing just part of the pixmap
p.drawPoint(pt) Draws QPoint pt on QPainter p; there are also draw-
Points() methodsp.drawPolygon(pl) Draws a polygon on QPainter p connecting the list
of QPoints in pl, and connects the last point back tothe first
p.drawPolyline(pl) Draws a polyline on QPainter p connecting the list
of QPoints in pl; does not connect the last point tothe first
p.drawRect(r) Draws a QRect r on QPainter p
p.drawRound-
Rect(r, x, y)Draws a rounded rectangle on QPainter p bounded byQRect r, and using rounding factors ints x and y
p.drawText(r, s, o) Draws string s on QPainter p bounded by QRect r, andusing the optional QTextOption o
p.drawText(x, y, s) Draws string s on QPainter p at point (x, y)p.fillPath(pp, b) Fills QPainterPath pp with QBrush b on QPainter p
p.fillRect(r, b) Fills QRect r with QBrush b on QPainter p
p.setBrush(b) Sets the brush for filled shapes to QBrush b
p.setPen(pn) Sets the pen for lines and outlines to QPen pn
p.setFont(f) Sets QPainter p’s text font to QFont f
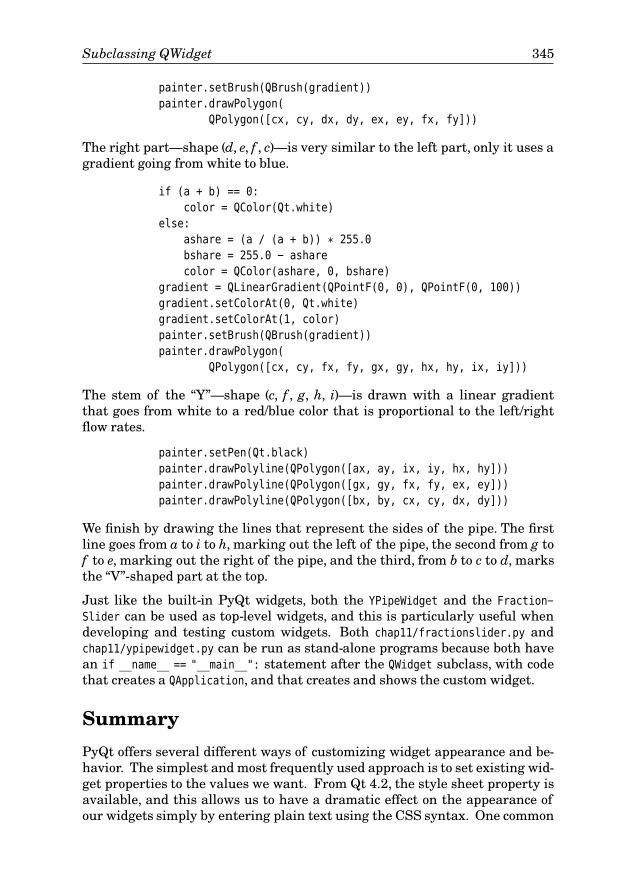
Subclassing QWidget 345
painter.setBrush(QBrush(gradient))
painter.drawPolygon(
QPolygon([cx, cy, dx, dy, ex, ey, fx, fy]))
The right part—shape (d, e, f , c)—is very similar to the left part, only it uses agradient going from white to blue.
if (a + b) == 0:
color = QColor(Qt.white)
else:
ashare = (a / (a + b)) * 255.0
bshare = 255.0 - ashare
color = QColor(ashare, 0, bshare)
gradient = QLinearGradient(QPointF(0, 0), QPointF(0, 100))
gradient.setColorAt(0, Qt.white)
gradient.setColorAt(1, color)
painter.setBrush(QBrush(gradient))
painter.drawPolygon(
QPolygon([cx, cy, fx, fy, gx, gy, hx, hy, ix, iy]))
The stem of the “Y”—shape (c, f , g, h, i)—is drawn with a linear gradientthat goes from white to a red/blue color that is proportional to the left/rightflow rates.
painter.setPen(Qt.black)
painter.drawPolyline(QPolygon([ax, ay, ix, iy, hx, hy]))
painter.drawPolyline(QPolygon([gx, gy, fx, fy, ex, ey]))
painter.drawPolyline(QPolygon([bx, by, cx, cy, dx, dy]))
We finish by drawing the lines that represent the sides of the pipe. The firstline goes from a to i to h, marking out the left of the pipe, the second from g tof to e, marking out the right of the pipe, and the third, from b to c to d, marksthe “V”-shaped part at the top.
Just like the built-in PyQt widgets, both the YPipeWidget and the Fraction-
Slider can be used as top-level widgets, and this is particularly useful whendeveloping and testing custom widgets. Both chap11/fractionslider.py andchap11/ypipewidget.py can be run as stand-alone programs because both havean if __name__ == "__main__": statement after the QWidget subclass, with codethat creates a QApplication, and that creates and shows the custom widget.
Summary
PyQt offers several different ways of customizing widget appearance and be-havior. The simplest and most frequently used approach is to set existing wid-get properties to the values we want. From Qt 4.2, the style sheet property isavailable, and this allows us to have a dramatic effect on the appearance ofour widgets simply by entering plain text using the CSS syntax. One common

346 Chapter 11. Custom Widgets
and very easy use of style sheets is to set the background color of mandatorywidgets.
Composite widgets allow us to lay out two or more widgets together and tothen treat the resultant widget as a single widget. This can save time if thecomposite widget is used a lot, and also provides a way of having more than onewidget in a main window-style application’s central area. Some programmersmake the constituent widgets private and forward their signals and slots, butin many cases the simplest approach is to leave the constituent widgets aspublic instance variables and to access and connect to them directly.
Subclassing existing widgets to adapt their appearance and especially their be-havior is a lot easier than creating a QWidget subclass and doing everything our-selves. This approach works well with almost every PyQt widget, since mostof them are designed to be subclassed. The only limitation of this approach isthat it can be applied only to widgets that are similar enough to the widget wewant, to make the adaptation feasible.
If we need to create a widget unlike any other, or if we want complete controlover the appearance and behavior of our custom widget, we can subclass QWid-get. Our subclass must reimplement paintEvent(), sizeHint(), and minimumSize-
Hint(), and will almost always reimplement keyPressEvent() and some of themouse event handlers. Most of the built-in widgets are created in this way,with the rest being subclasses of other built-in widgets.
All the widgets we have customized or created in this chapter, and indeedthroughout the book, are quite conventional in their appearance and behavior.PyQt does not enforce such conservatism, and we are free to create widgetswith any appearance and any behaviors we can imagine.
ExerciseCreate the Counters custom widget shown in Figure 11.8. The widget shouldshow a 3 × 3 grid, with each square either blank (showing just the backgroundcolor) or with a red or yellow ellipse. The state of any grid square shouldchange from blank to red to yellow and back to blank in an endless cycle.Changes of state should occur when the user clicks a square or presses thespacebar on a square. The keyboard focus should be shown by drawing thesquare with a thick blue pen instead of the normal thin black pen used for theother squares. The user should be able to change the focused square by click-ing a square or by using the up, down, left, and right arrow keys to move thefocus.
Make sure that you provide a size hint and minimum size hint so that thewidget has good resizing behavior and cannot be shrunk too small. The paintevent is quite short, but slightly subtle; you will probably need to save andrestore the painter’s state, using QPainter.save() and QPainter.restore(), sothat pen and brush colors intended for one square don’t propagate to others.
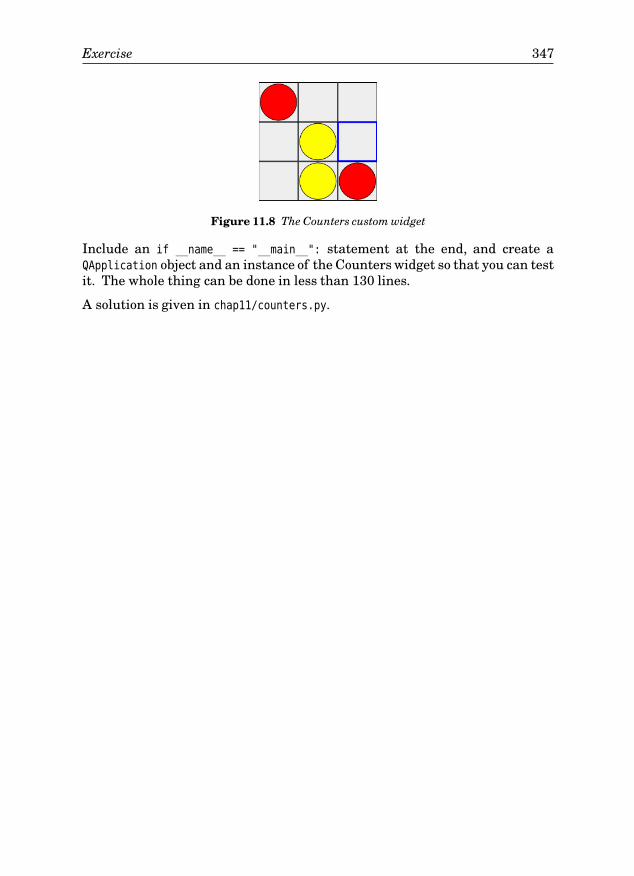
Exercise 347
Figure 11.8 The Counters custom widget
Include an if __name__ == "__main__": statement at the end, and create aQApplication object and an instance of the Counters widget so that you can testit. The whole thing can be done in less than 130 lines.
A solution is given in chap11/counters.py.

This page intentionally left blank
Item-Based Graphics
1212 ● Custom and Interactive GraphicsItems
● Animation and Complex Shapes
If we create a custom widget and reimplement its paint event, we can draw anygraphics we like. This approach was shown in the preceding chapter, and it isideal for drawing custom widgets, for drawing graphs, and for drawing smallnumbers of items. But if we need to draw lots of independent items, anythingfrom dozens to tens of thousands of them, or if we need to draw items thatthe user can interact with individually—for example, clicking, dragging, andselecting them—or if we need to animate items, PyQt’s graphics view classesare a much better choice than reimplementing a custom widget’s paint event.
The graphics view classes—QGraphicsView, QGraphicsScene, and Qt
4.2
QGraphics-
Item—along with the QGraphicsItem subclasses, were introduced
PyQt
4.1
with Qt 4.2, sothe examples in this chapter will work only with a version of PyQt that hasbindings to Qt 4.2 or later, such as PyQt 4.1. However, we strongly recommendthat you use PyQt 4.2 or later for graphics-view-based applications.
To use the graphics view classes we must create a scene, represented by aQGraphicsScene object. Scenes are pure data, and they can be visualized onlyby associating them with one or more QGraphicsView objects. The items that aredrawn in a scene are QGraphicsItem subclasses. PyQt provides several prede-fined subclasses, including QGraphicsLineItem, QGraphicsPixmapItem, QGraphics-SimpleTextItem (plain text), and QGraphicsTextItem (HTML). It is also possible tocreate custom graphics item subclasses, as we will see later in this chapter.
Once a scene has been created, and has had items added to it, it can be visual-ized using a QGraphicsView. One powerful feature of graphics views is that wecan apply transformations to them, such as scaling and rotation, that changehow the scene appears, but without changing any of the scene’s items them-selves. It is also possible to associate more than one graphics view with a par-ticular scene, to allow different parts of the scene to be viewed, and with eachview having its own independent transformations.
The graphics view classes are essentially two-dimensional; nonetheless, everyitem has a z value, with higher z-valued items being drawn on top of those withlower z values. Collision detection is based on item (x, y) positions. In addition
349
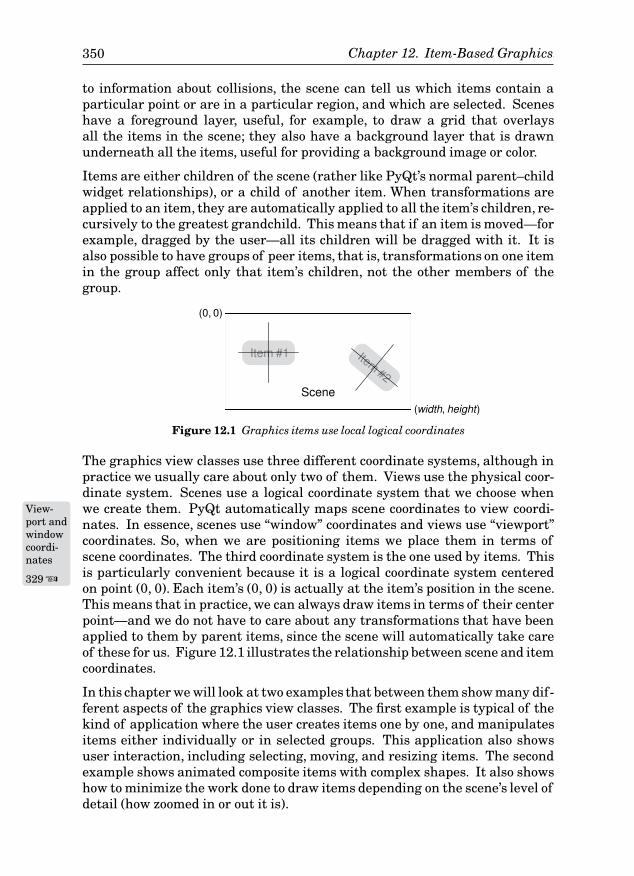
350 Introduction
to information about collisions, the scene can tell us which items contain aparticular point or are in a particular region, and which are selected. Sceneshave a foreground layer, useful, for example, to draw a grid that overlaysall the items in the scene; they also have a background layer that is drawnunderneath all the items, useful for providing a background image or color.
Chapter 12. Item-Based Graphics
Items are either children of the scene (rather like PyQt’s normal parent–childwidget relationships), or a child of another item. When transformations areapplied to an item, they are automatically applied to all the item’s children, re-cursively to the greatest grandchild. This means that if an item is moved—forexample, dragged by the user—all its children will be dragged with it. It isalso possible to have groups of peer items, that is, transformations on one itemin the group affect only that item’s children, not the other members of thegroup.
Item #1 Item#2
(0, 0)
(width, height)
Scene
Figure 12.1 Graphics items use local logical coordinates
The graphics view classes use three different coordinate systems, although inpractice we usually care about only two of them. Views use the physical coor-dinate system. Scenes use a logical coordinate system that we choose whenwe create them. PyQt automatically maps sceneView-
port andwindowcoordi-nates
329 ☞
coordinates to view coordi-nates. In essence, scenes use “window” coordinates and views use “viewport”coordinates. So, when we are positioning items we place them in terms ofscene coordinates. The third coordinate system is the one used by items. Thisis particularly convenient because it is a logical coordinate system centeredon point (0, 0). Each item’s (0, 0) is actually at the item’s position in the scene.This means that in practice, we can always draw items in terms of their centerpoint—and we do not have to care about any transformations that have beenapplied to them by parent items, since the scene will automatically take careof these for us. Figure 12.1 illustrates the relationship between scene and itemcoordinates.
In this chapter we will look at two examples that between them show many dif-ferent aspects of the graphics view classes. The first example is typical of thekind of application where the user creates items one by one, and manipulatesitems either individually or in selected groups. This application also showsuser interaction, including selecting, moving, and resizing items. The secondexample shows animated composite items with complex shapes. It also showshow to minimize the work done to draw items depending on the scene’s level ofdetail (how zoomed in or out it is).
Custom and Interactive Graphics Items 351
Custom and Interactive Graphics Items
The predefined graphics items can be made movable, selectable, and focusableby calling setFlags() on them with suitable constants. Users can drag movableitems with the mouse, and they can select selectable items by clicking them,and by using Ctrl+Click to select multiple items. Focusable items will receivekey events, but will ignore them unless we create an item subclass with a keyevent handler. Similarly, we can make items responsive to mouse events bysubclassing and implementing appropriate mouse event handlers.
In this section, we will use two of the predefined graphics items, and createtwo custom graphics item subclasses to show how to use graphics items, andhow to control their behavior and appearance. We will also see how to load andsave scenes, and how to print them. To do these things we will look at the PageDesigner application shown in Figure 12.2. This program allows the user tocreate a page that can contain text, images, and boxes. Users can also createlines—these are just boxes that are 1 pixel wide or high. The images createdby the user can be saved and loaded as .pgd files, a custom file format specificto this application, and they can be printed (or saved as PDF files) using aprint dialog.
For the text items, a QGraphicsTextItem subclass is used, extended to allow theuser to set the item’s font and text by double-clicking. For the box (and line)items a QGraphicsItem subclass is used. This has a context menu, plus keyboardsupport for resizing, and it handles all its own drawing. The pixmap itemssimply use the built-in QGraphicsPixmapItem class, and the page and marginguidelines use the built-in QGraphicsRectItem class. The view that shows thescene is a QGraphicsView subclass that supports rubber-band selection andmouse-wheel scaling.
We will begin by looking at the QGraphicsView subclass. Then we will review themain form, and finally we will review the custom QGraphicsItem subclasses.
class GraphicsView(QGraphicsView):
def __init__(self, parent=None):
super(GraphicsView, self).__init__(parent)
self.setDragMode(QGraphicsView.RubberBandDrag)
self.setRenderHint(QPainter.Antialiasing)
self.setRenderHint(QPainter.TextAntialiasing)
def wheelEvent(self, event):
factor = 1.41 ** (-event.delta() / 240.0)
self.scale(factor, factor)
The preceding code is the complete GraphicsView subclass. In the initializerwe set the drag mode: This means that dragging on the view will cause PyQtto give us a rubber band, and every item touched by the rubber band will be

352 Chapter 12. Item-Based Graphics
Figure 12.2 The Page Designer application
selected.The render hints are propagated to any item that is painted inside theview, so we do not need to set the hints for each individual graphics item.
The wheel event is called whenever the user rolls the mouse wheel, and it willcause the view to scale smaller or larger depending on which way the wheelis rolled. The effect of this is to change the apparent size of the page—theunderlying scene is not changed at all. The math used in this event handleris rather tricky, but this isn’t a problem since the method can be copied andpasted “as is”.
Near the top of chap12/pagedesigner.pyw we have some global declarations.
PageSize = (612, 792)
PointSize = 10
MagicNumber = 0x70616765
FileVersion = 1
Dirty = False
Custom and Interactive Graphics Items 353
The page size is in points for U.S. Letter-size paper. (The source code also hasthe A4 page size, commented out.) The magic number and file version are usedby QDataStream, as we have seen in Chapter 8 and elsewhere. We also have aglobal dirty flag.
We have not shown the imports, but they include functools. This isPartialfunctionapplica-tion
63 ☞
neededbecause in the context menu we use the functools.partial() function to wrapthe methods to call with a suitable argument.
The main form’s initializer is quite long, so we will look at it in parts but omitcode that is similar to what we have seen elsewhere—for example, where wecreate and lay out the form’s buttons.
class MainForm(QDialog):
def __init__(self, parent=None):
super(MainForm, self).__init__(parent)
self.filename = QString()
self.copiedItem = QByteArray()
self.pasteOffset = 5
self.prevPoint = QPoint()
self.addOffset = 5
self.borders = []
self.printer = QPrinter(QPrinter.HighResolution)
self.printer.setPageSize(QPrinter.Letter)
The copied item is essentially a lump of binary data that describes the mostrecent item to be cut or copied. We store this data inside the application ratherthan on the clipboard because it is of no use to any other application. The pasteoffset is used when the user repeatedly pastes the same item, and the previouspoint and add offset are used when the user repeatedly adds the same itemtype. In both cases the newly added items are added at offset positions ratherthan exactly on top of the previous item. This makes it easier for the user tosee where they are.
The borders list will contain two graphics items, both yellow rectangles: onegiving the page outline and the other giving an outline inside the page allowingfor some margin space. They are used as guidelines and are not saved orprinted.
Although it is possible to create a QPrinter object when it is needed, by creatingone and keeping it as an instance variable, we ensure that the user’s settings,such as page size, are preserved between uses in the same session.
self.view = GraphicsView()
self.scene = QGraphicsScene(self)
self.scene.setSceneRect(0, 0, PageSize[0], PageSize[1])
self.addBorders()
self.view.setScene(self.scene)
354 Chapter 12. Item-Based Graphics
Table 12.1 Selected QGraphicsScene Methods
Syntax Description
s.addEllipse(r, pn, b) Adds an ellipse bounded by QRectF r, outlinedby QPen pn and filled with QBrush b, to QGraphics-
Scene s
s.addItem(g) Adds QGraphicsItem g to QGraphicsScene s. The oth-er add*() methods are conveniences for creatingand adding some of the built-in graphics items.
s.addLine(l, pn) Adds QLineF l, drawn with QPen pn, to s
s.addPath(pp, pn, b) Adds QPainterPath pp, outlined by QPen pn andfilled with QBrush b, to QGraphicsScene s
s.addPixmap(px) Adds QPixmap px to QGraphicsScene s
s.addPolygon(pg, pn, b) Adds QPolygon pg, outlined by QPen pn and filledwith QBrush b, to QGraphicsScene s
s.addRect(r, pn, b) Adds QRect r, outlined by QPen pn and filled withQBrush b, to QGraphicsScene s
s.addText(t, f) Adds text t using QFont f, to QGraphicsScene s
s.collidingItems(g) Returns a (possibly empty) list of the QGraphics-
Items that QGraphicsItem g collides withs.items() Returns all the QGraphicsItems in QGraphicsScene
s; using different arguments, those items thatare at a particular point, or that are within orthat intersect with a given rectangle, polygon, orpainter path, can be returned
s.removeItem(g) Removes QGraphicsItem g from QGraphicsScene s;ownership passes to the caller
s.render(p) Renders QGraphicsScene s on QPainter p; additionalarguments can be used to control the source anddestination rectangle
s.setBackgroundBrush(b) Sets QGraphicsScene s’s background to QBrush b
s.setScene-
Rect(x, y, w, h)Sets QGraphicsScene s’s rectangle to position (x, y),with width w and height h; the arguments arefloats
s.update() Schedules a paint event for QGraphicsScene s
s.views() Returns a (possibly empty) list of QGraphicsViewsthat are showing QGraphicsScene s
We create an instance of our custom GraphicsView class, as well as a standardQGraphicsScene. The rectangle we set on the scene is the “window”, that is, thelogical coordinate system that the scene will use—in this case, a rectangle with
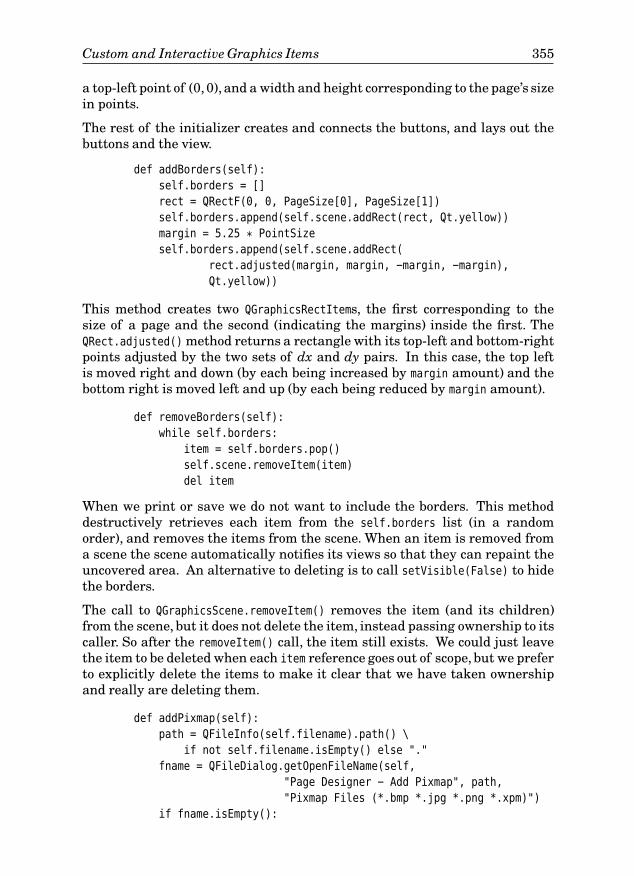
Custom and Interactive Graphics Items 355
a top-left point of (0, 0), and a width and height corresponding to the page’s sizein points.
The rest of the initializer creates and connects the buttons, and lays out thebuttons and the view.
def addBorders(self):
self.borders = []
rect = QRectF(0, 0, PageSize[0], PageSize[1])
self.borders.append(self.scene.addRect(rect, Qt.yellow))
margin = 5.25 * PointSize
self.borders.append(self.scene.addRect(
rect.adjusted(margin, margin, -margin, -margin),
Qt.yellow))
This method creates two QGraphicsRectItems, the first corresponding to thesize of a page and the second (indicating the margins) inside the first. TheQRect.adjusted() method returns a rectangle with its top-left and bottom-rightpoints adjusted by the two sets of dx and dy pairs. In this case, the top leftis moved right and down (by each being increased by margin amount) and thebottom right is moved left and up (by each being reduced by margin amount).
def removeBorders(self):
while self.borders:
item = self.borders.pop()
self.scene.removeItem(item)
del item
When we print or save we do not want to include the borders. This methoddestructively retrieves each item from the self.borders list (in a randomorder), and removes the items from the scene. When an item is removed froma scene the scene automatically notifies its views so that they can repaint theuncovered area. An alternative to deleting is to call setVisible(False) to hidethe borders.
The call to QGraphicsScene.removeItem() removes the item (and its children)from the scene, but it does not delete the item, instead passing ownership to itscaller. So after the removeItem() call, the item still exists. We could just leavethe item to be deleted when each item reference goes out of scope, but we preferto explicitly delete the items to make it clear that we have taken ownershipand really are deleting them.
def addPixmap(self):
path = QFileInfo(self.filename).path() \
if not self.filename.isEmpty() else "."
fname = QFileDialog.getOpenFileName(self,
"Page Designer - Add Pixmap", path,
"Pixmap Files (*.bmp *.jpg *.png *.xpm)")
if fname.isEmpty():
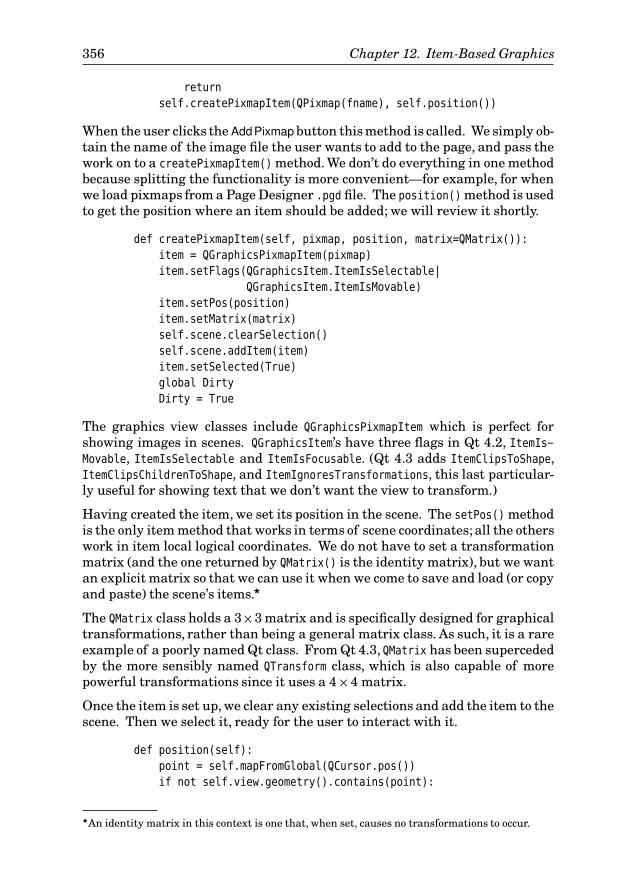
356 Chapter 12. Item-Based Graphics
return
self.createPixmapItem(QPixmap(fname), self.position())
When the user clicks theAddPixmapbutton this method is called. We simply ob-tain the name of the image file the user wants to add to the page, and pass thework on to a createPixmapItem() method. We don’t do everything in one methodbecause splitting the functionality is more convenient—for example, for whenwe load pixmaps from a Page Designer .pgd file. The position() method is usedto get the position where an item should be added; we will review it shortly.
def createPixmapItem(self, pixmap, position, matrix=QMatrix()):
item = QGraphicsPixmapItem(pixmap)
item.setFlags(QGraphicsItem.ItemIsSelectable|
QGraphicsItem.ItemIsMovable)
item.setPos(position)
item.setMatrix(matrix)
self.scene.clearSelection()
self.scene.addItem(item)
item.setSelected(True)
global Dirty
Dirty = True
The graphics view classes include QGraphicsPixmapItem which is perfect forshowing images in scenes. QGraphicsItem’s have three flags in Qt 4.2, ItemIs-Movable, ItemIsSelectable and ItemIsFocusable. (Qt 4.3 adds ItemClipsToShape,ItemClipsChildrenToShape, and ItemIgnoresTransformations, this last particular-ly useful for showing text that we don’t want the view to transform.)
Having created the item, we set its position in the scene. The setPos() methodis the only item method that works in terms of scene coordinates; all the otherswork in item local logical coordinates. We do not have to set a transformationmatrix (and the one returned by QMatrix() is the identity matrix), but we wantan explicit matrix so that we can use it when we come to save and load (or copyand paste) the scene’s items.★
The QMatrix class holds a 3 × 3 matrix and is specifically designed for graphicaltransformations, rather than being a general matrix class. As such, it is a rareexample of a poorly named Qt class. From Qt 4.3, QMatrix has been supercededby the more sensibly named QTransform class, which is also capable of morepowerful transformations since it uses a 4 × 4 matrix.
Once the item is set up, we clear any existing selections and add the item to thescene. Then we select it, ready for the user to interact with it.
def position(self):
point = self.mapFromGlobal(QCursor.pos())
if not self.view.geometry().contains(point):
★An identity matrix in this context is one that, when set, causes no transformations to occur.
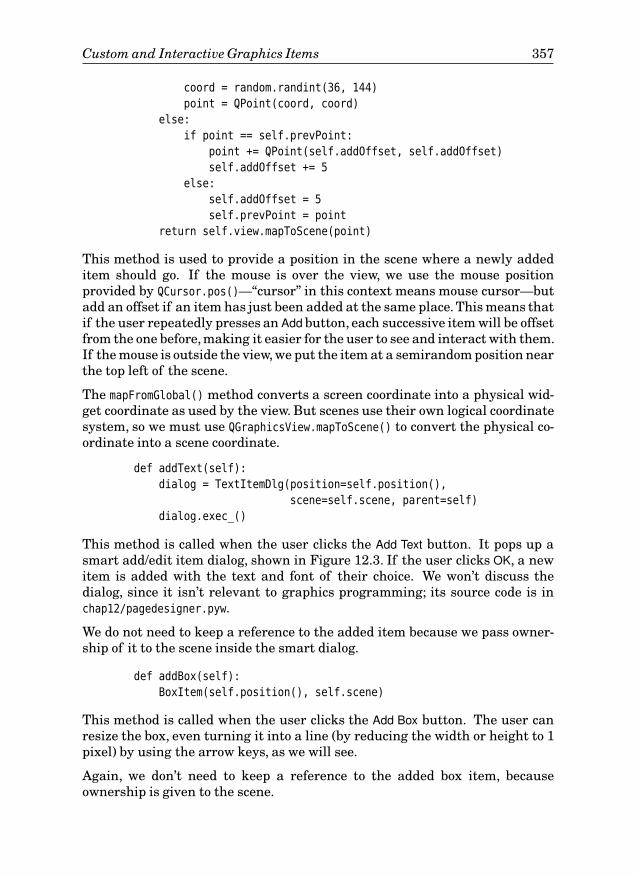
Custom and Interactive Graphics Items 357
coord = random.randint(36, 144)
point = QPoint(coord, coord)
else:
if point == self.prevPoint:
point += QPoint(self.addOffset, self.addOffset)
self.addOffset += 5
else:
self.addOffset = 5
self.prevPoint = point
return self.view.mapToScene(point)
This method is used to provide a position in the scene where a newly addeditem should go. If the mouse is over the view, we use the mouse positionprovided by QCursor.pos()—“cursor” in this context means mouse cursor—butadd an offset if an item has just been added at the same place. This means thatif the user repeatedly presses an Add button, each successive item will be offsetfrom the one before, making it easier for the user to see and interact with them.If the mouse is outside the view, we put the item at a semirandom position nearthe top left of the scene.
The mapFromGlobal() method converts a screen coordinate into a physical wid-get coordinate as used by the view. But scenes use their own logical coordinatesystem, so we must use QGraphicsView.mapToScene() to convert the physical co-ordinate into a scene coordinate.
def addText(self):
dialog = TextItemDlg(position=self.position(),
scene=self.scene, parent=self)
dialog.exec_()
This method is called when the user clicks the Add Text button. It pops up asmart add/edit item dialog, shown in Figure 12.3. If the user clicks OK, a newitem is added with the text and font of their choice. We won’t discuss thedialog, since it isn’t relevant to graphics programming; its source code is inchap12/pagedesigner.pyw.
We do not need to keep a reference to the added item because we pass owner-ship of it to the scene inside the smart dialog.
def addBox(self):
BoxItem(self.position(), self.scene)
This method is called when the user clicks the Add Box button. The user canresize the box, even turning it into a line (by reducing the width or height to 1pixel) by using the arrow keys, as we will see.
Again, we don’t need to keep a reference to the added box item, becauseownership is given to the scene.
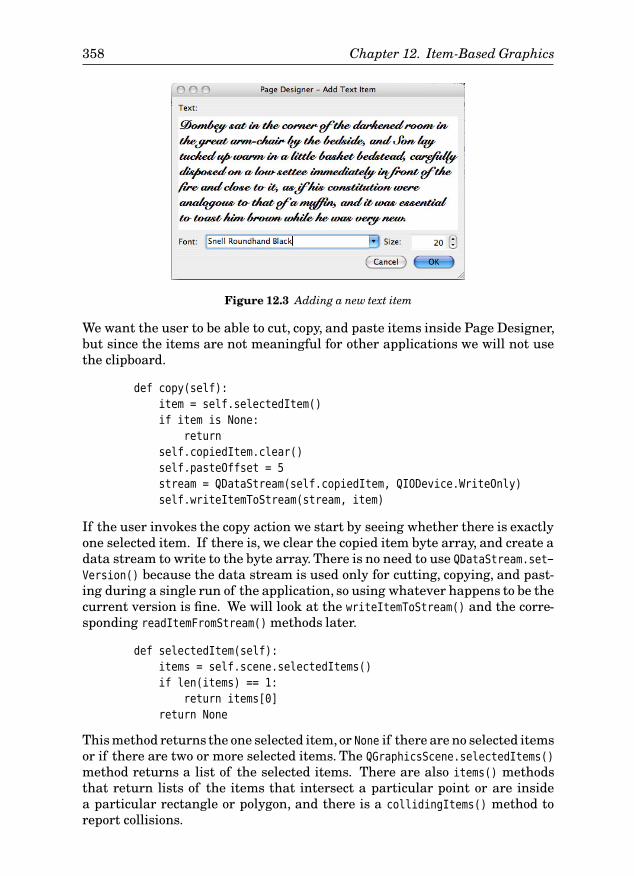
358 Chapter 12. Item-Based Graphics
Figure 12.3 Adding a new text item
We want the user to be able to cut, copy, and paste items inside Page Designer,but since the items are not meaningful for other applications we will not usethe clipboard.
def copy(self):
item = self.selectedItem()
if item is None:
return
self.copiedItem.clear()
self.pasteOffset = 5
stream = QDataStream(self.copiedItem, QIODevice.WriteOnly)
self.writeItemToStream(stream, item)
If the user invokes the copy action we start by seeing whether there is exactlyone selected item. If there is, we clear the copied item byte array, and create adata stream to write to the byte array. There is no need to use QDataStream.set-
Version() because the data stream is used only for cutting, copying, and past-ing during a single run of the application, so using whatever happens to be thecurrent version is fine. We will look at the writeItemToStream() and the corre-sponding readItemFromStream() methods later.
def selectedItem(self):
items = self.scene.selectedItems()
if len(items) == 1:
return items[0]
return None
This method returns the one selected item,or None if there are no selected itemsor if there are two or more selected items. The QGraphicsScene.selectedItems()
method returns a list of the selected items. There are also items() methodsthat return lists of the items that intersect a particular point or are insidea particular rectangle or polygon, and there is a collidingItems() method toreport collisions.
Custom and Interactive Graphics Items 359
def cut(self):
item = self.selectedItem()
if item is None:
return
self.copy()
self.scene.removeItem(item)
del item
This method copies the selected item using copy(), and then removes it fromthe scene. As mentioned when we discussed removing the border rectangles,removeItem() only removes an item from the scene; it does not delete the item.We could leave the item to be deleted when the item reference goes out ofscope, but we prefer to explicitly delete it to make it clear that we have takenownership and are really deleting the item.
def paste(self):
if self.copiedItem.isEmpty():
return
stream = QDataStream(self.copiedItem, QIODevice.ReadOnly)
self.readItemFromStream(stream, self.pasteOffset)
If an item has been cut or copied to the copied item, we simply create a datastream and read the item’s data from the copied item byte array. The read-
ItemFromStream() method takes care of creating the item and adding it tothe scene.
def writeItemToStream(self, stream, item):
if isinstance(item, QGraphicsTextItem):
stream << QString("Text") << item.pos() << item.matrix() \
<< item.toPlainText() << item.font()
elif isinstance(item, QGraphicsPixmapItem):
stream << QString("Pixmap") << item.pos() \
<< item.matrix() << item.pixmap()
elif isinstance(item, BoxItem):
stream << QString("Box") << item.pos() << item.matrix() \
<< item.rect
stream.writeInt16(item.style)
This method is used by copy(), cut() (indirectly), and save(). For each itemit writes a string that describes the item’s type, then the item’s position andtransformation matrix, and then any extra item-specific data. For text items,the extra data is the item’s text and font; for pixmap items, the extra data isthe pixmap itself—which means that the .pgd file could be quite large; and forboxes, the extra data is the box’s rectangle and line style.
def readItemFromStream(self, stream, offset=0):
type = QString()
position = QPointF()
360 Chapter 12. Item-Based Graphics
matrix = QMatrix()
stream >> type >> position >> matrix
if offset:
position += QPointF(offset, offset)
if type == "Text":
text = QString()
font = QFont()
stream >> text >> font
TextItem(text, position, self.scene, font, matrix)
elif type == "Box":
rect = QRectF()
stream >> rect
style = Qt.PenStyle(stream.readInt16())
BoxItem(position, self.scene, style, rect, matrix)
elif type == "Pixmap":
pixmap = QPixmap()
stream >> pixmap
self.createPixmapItem(pixmap, position, matrix)
This method is used both by paste() and by open() (which loads a .pgd file). Itbegins by reading in the type, position, and matrix which are stored for everytype of item. Then, it adjusts the position by the offset—this is used only if theitem is being pasted. Next, the item-specific data is read and a suitable itemcreated using the data that has been gathered.
The TextItem and BoxItem initializers, and the createPixmapItem() method, allcreate the appropriate graphics items and pass ownership to the scene.
def rotate(self):
for item in self.scene.selectedItems():
item.rotate(30)
If the user clicks Rotate, any selected items are rotated by 30°. There are nochild items used in this application, but if any of the rotated items had childitems, these too would be rotated.
def delete(self):
items = self.scene.selectedItems()
if len(items) and QMessageBox.question(self,
"Page Designer - Delete",
"Delete %d item%s?" % (len(items),
"s" if len(items) != 1 else ""),
QMessageBox.Yes|QMessageBox.No) == QMessageBox.Yes:
while items:
item = items.pop()
self.scene.removeItem(item)
del item
global Dirty
Custom and Interactive Graphics Items 361
Dirty = True
If the user clicks Delete and there is at least one selected item, they are askedwhether they want to delete the selected items, and if they do, each selecteditem is deleted.
def print_(self):
dialog = QPrintDialog(self.printer)
if dialog.exec_():
painter = QPainter(self.printer)
painter.setRenderHint(QPainter.Antialiasing)
painter.setRenderHint(QPainter.TextAntialiasing)
self.scene.clearSelection()
self.removeBorders()
self.scene.render(painter)
self.addBorders()
A QPrinter is a paint device, just like a QWidget or a QImage, so we can easily paintonto a printer. Here we have taken advantage of the QGraphicsScene.render()
convenience method, which paints the entire scene (or a selected portion of it)onto a paint device. Before painting, we remove the borders (the yellow rect-angles), and after painting we restore the borders. We also clear the selec-tion before painting, since some items may be rendered differently if they areselected. A similar QGraphicsView.render() method can be used to render thescene (or a selected portion of it) as seen.
We will omit the code for saving and loading .pgd files, since it is very similarto what we have seen before when working with binary files. For saving, wecreate a QDataStream, call setVersion() on it, and write a magic number and afile version. Then we iterate over all the items in the scene, calling writeIt-
emToStream() parameterized by the data stream and by the item for each call.For loading, we also create a QDataStream. Then we read in the magic numberand file version, and if they are correct, we delete all the existing items. Aslong as the file has data in it,we call readItemFromStream() parameterized by thestream. This method reads the item data and creates the items, adding themto the scene as it goes.
We have seen how the application works as a whole, and how to create and useitems of two of the predefined graphics item classes, namely, QGraphicsRectItemand QGraphicsPixmapItem. Now we will turn our attention to custom graphicsview items. We will begin by looking at the TextItem subclass; this extends theQGraphicsTextItem class with additional behavior, but leaves all the drawing tothe base class. Then we will look at the BoxItem class; this class has code forboth behavior and drawing.
class TextItem(QGraphicsTextItem):
def __init__(self, text, position, scene,
font=QFont("Times", PointSize), matrix=QMatrix()):
362 Chapter 12. Item-Based Graphics
super(TextItem, self).__init__(text)
self.setFlags(QGraphicsItem.ItemIsSelectable|
QGraphicsItem.ItemIsMovable)
self.setFont(font)
self.setPos(position)
self.setMatrix(matrix)
scene.clearSelection()
scene.addItem(self)
self.setSelected(True)
global Dirty
Dirty = True
The TextItem’s initializer is very similar to the createPixmapItem() method thatcreates and initializes QGraphicsPixmapItems. We provide a default font and adefault matrix (the identity matrix) if none is supplied to the initializer.
def parentWidget(self):
return self.scene().views()[0]
An item’s parent is either another item or a scene. But sometimes we needto know the visible widget in which the item appears, that is, the item’s view.The scene is available to items and can return a list of the views that areshowing the scene. For convenience, we have assumed that there is always atleast one view showing our scene and that we consider the first view to be the“parent” view.
def itemChange(self, change, variant):
if change != QGraphicsItem.ItemSelectedChange:
global Dirty
Dirty = True
return QGraphicsTextItem.itemChange(self, change, variant)
If the user interacts with an item—for example, moving or selecting it—thismethod is called. If the interaction is not merely a change in selection status,we set the global dirty flag.
Two caveats apply to itemChange() reimplementations. First, we must alwaysreturn the result of calling the base class implementation,and second,we mustnever do anything inside this method that will lead to another (recursive) item-Change() call. In particular, we must never call setPos() inside itemChange().
def mouseDoubleClickEvent(self, event):
dialog = TextItemDlg(self, self.parentWidget())
dialog.exec_()
If the user double-clicks the item, we pop up a smart dialog through which theuser can change the item’s text and font. This is the same dialog that we usedfor adding a text item.
Custom and Interactive Graphics Items 363
Printing Images
Printing images in general is just as simple as printing scenes. Here is aprintImage() method that will print any QImage or QPixmap (both of which canload .bmp, .png, .jpg, and various other graphics file types) on a single page,assuming that printer is a QPrinter:
def printImage(image, printer, scaleToFillPage=False):
dialog = QPrintDialog(printer)
if dialog.exec_():
painter = QPainter(printer)
painter.setRenderHint(QPainter.Antialiasing)
rect = painter.viewport()
size = image.size()
size.scale(rect.size(), Qt.KeepAspectRatio)
painter.setViewport(rect.x(), rect.y(),
size.width(), size.height())
if scaleToFillPage:
painter.setWindow(image.rect())
if isinstance(image, QPixmap):
painter.drawPixmap(0, 0, image)
else:
painter.drawImage(0, 0, image)
Printing a QPicture is very similar, except that we must calculate the sizeourselves based on the picture’s bounding rectangle, and call QPainter.draw-Picture() to do the drawing.
SVG images can also be printed. The approach is very similar to that usedfor drawing QGraphicsScenes. The QSvgRenderer class can load in an SVGimage and has a render() method that can paint the image on any paintdevice, including a QPrinter.And with Qt 4.3, it is now possible to create SVGimages by painting using the QSvgGenerator class, which is a paint device.★
This completes the text item class. It is quite small because we were concernedonly with changing its behavior. For the BoxItem class that we will look at next,we provide code to govern both its behavior and its appearance.
class BoxItem(QGraphicsItem):
def __init__(self, position, scene, style=Qt.SolidLine,
rect=None, matrix=QMatrix()):
super(BoxItem, self).__init__()
self.setFlags(QGraphicsItem.ItemIsSelectable|
QGraphicsItem.ItemIsMovable|
QGraphicsItem.ItemIsFocusable)
★Printing documents, including images, is covered in the next chapter.
364 Chapter 12. Item-Based Graphics
if rect is None:
rect = QRectF(-10 * PointSize, -PointSize,
20 * PointSize, 2 * PointSize)
self.rect = rect
self.style = style
self.setPos(position)
self.setMatrix(matrix)
scene.clearSelection()
scene.addItem(self)
self.setSelected(True)
self.setFocus()
global Dirty
Dirty = True
Box items must be able to receive keyboard focus, because we want users to beable to resize boxes by using the arrow keys. If no explicit size is given—for ex-ample when the user clicksAdd Box, rather than when a box is being re-createdfrom file or being pasted from the copied item—we provide a default size whichgives a letterbox shape. We also provide a default line style of a solid line, and adefault identity matrix. The rest of the initializer is the same as we used beforefor text items.
We will omit the code for parentWidget() and itemChange() because theirimplementations are the same as the ones we used for the TextItem class.
def setStyle(self, style):
self.style = style
self.update()
global Dirty
Dirty = True
This method is used to set the box’s line style. It notifies the scene that the itemneeds repainting, and it sets the dirty flag since we record box line styles whenwe save into .pgd files.
def contextMenuEvent(self, event):
wrapped = []
menu = QMenu(self.parentWidget())
for text, param in (
("&Solid", Qt.SolidLine),
("&Dashed", Qt.DashLine),
("D&otted", Qt.DotLine),
("D&ashDotted", Qt.DashDotLine),
("DashDo&tDotted", Qt.DashDotDotLine)):
wrapper = functools.partial(self.setStyle, param)
wrapped.append(wrapper)
menu.addAction(text, wrapper)
menu.exec_(event.screenPos())
Custom and Interactive Graphics Items 365
If the user invokes the context menu on the item (for example,by right-clickingon some platforms), this method will be called.★ This context menu uses partialfunction application to wrap a method to be called, setStyle(), and a parameterto call it with, one of PyQt’s built-in line styles. The wrappers must stay alivelong enough for the menu to finish, since it is only at that point that one ofthem will be called. For this reason we keep a local list of the wrappers; thelist will go out of scope only after the menu’s exec_() call has finished, when thecontextMenuEvent() itself completes.
def keyPressEvent(self, event):
factor = PointSize / 4
changed = False
if event.modifiers() & Qt.ShiftModifier:
if event.key() == Qt.Key_Left:
self.rect.setRight(self.rect.right() - factor)
changed = True
elif event.key() == Qt.Key_Right:
self.rect.setRight(self.rect.right() + factor)
changed = True
elif event.key() == Qt.Key_Up:
self.rect.setBottom(self.rect.bottom() - factor)
changed = True
elif event.key() == Qt.Key_Down:
self.rect.setBottom(self.rect.bottom() + factor)
changed = True
if changed:
self.update()
global Dirty
Dirty = True
else:
QGraphicsItem.keyPressEvent(self, event)
If the user presses the arrow keys and the view has scrollbars, the view willscroll appropriately. This method intercepts arrow key presses that occur witha Shift key press when the item has the keyboard focus, to give the user a meansof resizing the box. The QRect.setRight() and QRect.setBottom() methodschange the size of the rectangle because they change the width and height. Ifwe handled the key press event, we call update() to schedule a paint event, andmark the page as dirty; otherwise, we call the base class implementation.
Now that we have seen how the box’s behavior is implemented, we are readyto turn our attention to how the box is drawn. When subclassing QGraphicsItem
we must at least provide implementations of the boundingRect() and paint()
methods. It is also common to reimplement shape(), but we will defer that tothe example in the next section.
★ Note that this method will not be called if the view has been told to handle context menuevents—for example, by having its context menu policy set to Qt.ActionsContextMenu.
366 Chapter 12. Item-Based Graphics
Table 12.2 Selected QGraphicsItem Methods #1
Syntax Description
g.boundingRect() Returns QGraphicsItem g’s bounding QRectF; subclassesshould reimplement this
g.collidesWith-
Path(pp)Returns True if QGraphicsItem g collides with QPainter-
Path pp
g.collidingItems() Returns a (possibly empty) list of the QGraphicsItemsthat QGraphicsItem g collides with
g.contains(pt) Returns True if QGraphicsItem g contains QPointF pt
g.isObscured() Returns True if QGraphicsItem g is obscured by its collid-ing items, providing their z values are larger
g.isSelected() Returns True if QGraphicsItem g is selectedg.itemChange(c, v) Does nothing;subclassescan reimplement this method
to detect changes—for example, in selected status orposition. Do not call QGraphicsItem.setPos() directly orindirectly in this method.
g.moveBy(dx, dy) Moves QGraphicsItem g by float dx horizontally and byfloat dy vertically in scene coordinates
g.paint(p, o) Does nothing; subclasses should reimplement this todraw themselves on QPainter p and with the optionQStyleOptionGraphicsItem o; painting is done in locallogical coordinates, by default centered at (0, 0)
g.pos() Returns QGraphicsItem g’s position as a QPointF. If g is achild of another QGraphicsItem, the point is in terms ofthe parent item’s local logical coordinates; otherwise,it is in terms of scene coordinates.
g.resetMatrix() Resets QGraphicsItem g’s transformation matrix tothe identity matrix; for PyQt 4.3, use resetTrans-
form() instead
PyQt
4.3
g.rotate(a) Rotates QGraphicsItem g by float a°
g.scale(x, y) Scales QGraphicsItem g horizontally by float x andvertically by float y; 1.0 is unscaled, 0.5 is half size,and 3.0 is three times the size
g.scene() Returns QGraphicsItem g’s QGraphicsScene, or None if ithas not been added to a scene
g.sceneBounding-
Rect()Returns QGraphicsItem g’s bounding QRectF in scenecoordinates—this accounts for transformations
g.setCursor(c) Sets g’s cursor to c, a QCursor or a Qt.CursorShape
g.setEnabled(b) Sets g to be enabled or disabled depending on b
g.setFocus() Gives the keyboard focus to QGraphicsItem g
g.setFlag(f) Sets the given QGraphicsItem.ItemFlag f on g
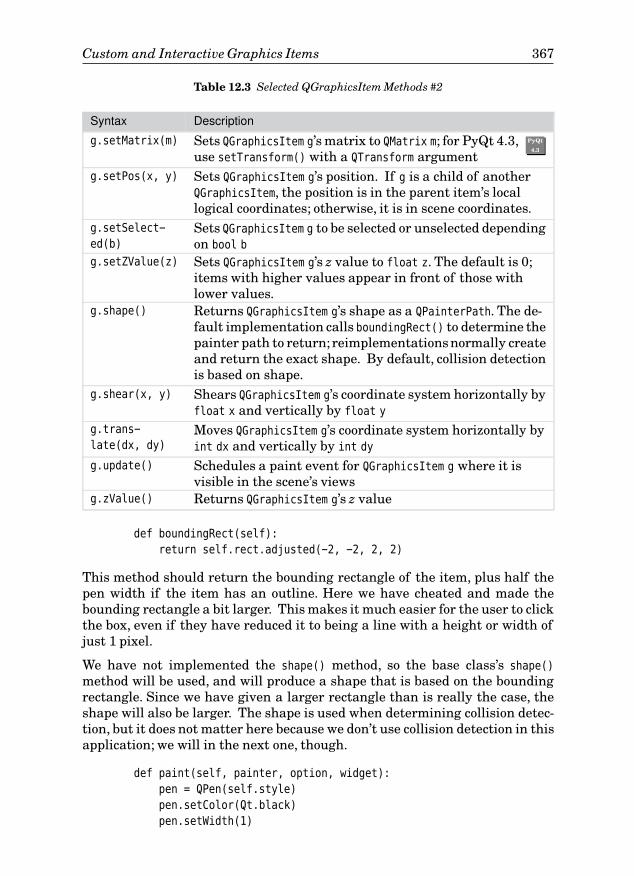
Custom and Interactive Graphics Items 367
Table 12.3 Selected QGraphicsItem Methods #2
Syntax Description
g.setMatrix(m) Sets QGraphicsItem g’s matrix to QMatrix m; for PyQt 4.3,use setTransform() with a QTransform argument
PyQt
4.3
g.setPos(x, y) Sets QGraphicsItem g’s position. If g is a child of anotherQGraphicsItem, the position is in the parent item’s locallogical coordinates; otherwise, it is in scene coordinates.
g.setSelect-
ed(b)Sets QGraphicsItem g to be selected or unselected dependingon bool b
g.setZValue(z) Sets QGraphicsItem g’s z value to float z. The default is 0;items with higher values appear in front of those withlower values.
g.shape() Returns QGraphicsItem g’s shape as a QPainterPath. The de-fault implementation calls boundingRect() to determine thepainter path to return; reimplementations normally createand return the exact shape. By default, collision detectionis based on shape.
g.shear(x, y) Shears QGraphicsItem g’s coordinate system horizontally byfloat x and vertically by float y
g.trans-
late(dx, dy)Moves QGraphicsItem g’s coordinate system horizontally byint dx and vertically by int dy
g.update() Schedules a paint event for QGraphicsItem g where it isvisible in the scene’s views
g.zValue() Returns QGraphicsItem g’s z value
def boundingRect(self):
return self.rect.adjusted(-2, -2, 2, 2)
This method should return the bounding rectangle of the item, plus half thepen width if the item has an outline. Here we have cheated and made thebounding rectangle a bit larger. This makes it much easier for the user to clickthe box, even if they have reduced it to being a line with a height or width ofjust 1 pixel.
We have not implemented the shape() method, so the base class’s shape()
method will be used, and will produce a shape that is based on the boundingrectangle. Since we have given a larger rectangle than is really the case, theshape will also be larger. The shape is used when determining collision detec-tion, but it does not matter here because we don’t use collision detection in thisapplication; we will in the next one, though.
def paint(self, painter, option, widget):
pen = QPen(self.style)
pen.setColor(Qt.black)
pen.setWidth(1)
368 Chapter 12. Item-Based Graphics
if option.state & QStyle.State_Selected:
pen.setColor(Qt.blue)
painter.setPen(pen)
painter.drawRect(self.rect)
Painting the box is quite easy. We begin by creating a pen with the line stylethe user has set, and with a fixed width of 1 logical unit. We change the pen’scolor if the rectangle is selected, and then we set the pen and draw the rect-angle.
Using the graphics view classes and painting graphics items is often easierthan reimplementing paint events. This is because each item has its ownpaint() method, and because the items use a local logical coordinate systemwhose center is (0, 0), which is especially convenient for rotation.
In this section, we have seen the use of predefined graphics items, and customitems, both of which provide custom behavior and the second of which, BoxItem,also does custom drawing. In the example covered in the next section, we willsee more sophisticated item painting,as well as collision detection and a simpleform of animation.
Animation and Complex Shapes
In the preceding section,we looked at a graphics view application in which userinteraction was central. In this section, we will look at a very different kindof application, one where we simulate a population of creatures, “multipedes”,by visualizing each member of the population using a set of graphics items, asshown in Figure 12.4. Each multipede has internal timers. At each time inter-val the multipede moves, and if it has collisions, its coloring is changed slightly,and eventually it disappears.
We will begin by looking at an extract from the main form’s initializer. Then wewill review the form’s populate() method, which is used to create and positionthe multipedes. Next we will look at the action of the Pause/Resume button andat the implementation of the zoom slider. Then we will look at the form’s timerevent, a kind of event handler we have not used before. Once we can see howthe application works as a whole, we will look at the implementations of thegraphics item subclasses that are used to visualize the multipedes.
class MainForm(QDialog):
def __init__(self, parent=None):
super(MainForm, self).__init__(parent)
self.scene = QGraphicsScene(self)
self.scene.setSceneRect(0, 0, SCENESIZE, SCENESIZE)
self.view = QGraphicsView()
self.view.setRenderHint(QPainter.Antialiasing)
self.view.setScene(self.scene)
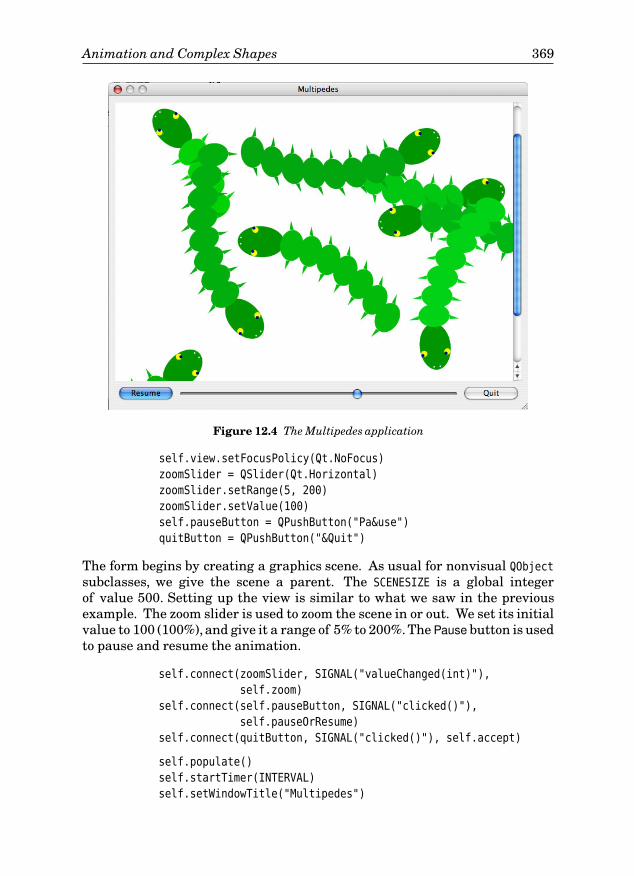
Animation and Complex Shapes 369
Figure 12.4 The Multipedes application
self.view.setFocusPolicy(Qt.NoFocus)
zoomSlider = QSlider(Qt.Horizontal)
zoomSlider.setRange(5, 200)
zoomSlider.setValue(100)
self.pauseButton = QPushButton("Pa&use")
quitButton = QPushButton("&Quit")
The form begins by creating a graphics scene. As usual for nonvisual QObjectsubclasses, we give the scene a parent. The SCENESIZE is a global integerof value 500. Setting up the view is similar to what we saw in the previousexample. The zoom slider is used to zoom the scene in or out. We set its initialvalue to 100 (100%), and give it a range of 5% to 200%. The Pause button is usedto pause and resume the animation.
self.connect(zoomSlider, SIGNAL("valueChanged(int)"),
self.zoom)
self.connect(self.pauseButton, SIGNAL("clicked()"),
self.pauseOrResume)
self.connect(quitButton, SIGNAL("clicked()"), self.accept)
self.populate()
self.startTimer(INTERVAL)
self.setWindowTitle("Multipedes")
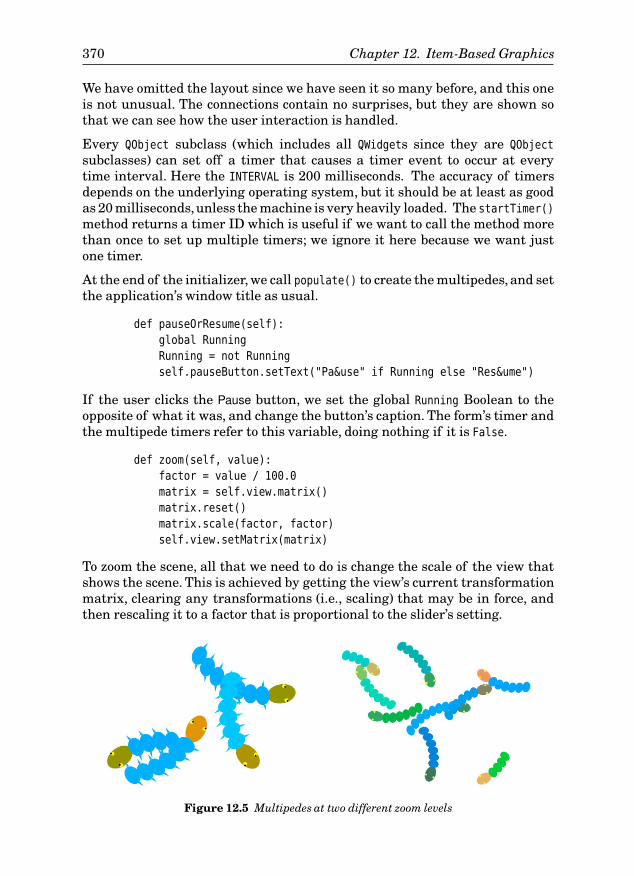
370 Chapter 12. Item-Based Graphics
We have omitted the layout since we have seen it so many before, and this oneis not unusual. The connections contain no surprises, but they are shown sothat we can see how the user interaction is handled.
Every QObject subclass (which includes all QWidgets since they are QObject
subclasses) can set off a timer that causes a timer event to occur at everytime interval. Here the INTERVAL is 200 milliseconds. The accuracy of timersdepends on the underlying operating system, but it should be at least as goodas 20 milliseconds,unless the machine is very heavily loaded. The startTimer()
method returns a timer ID which is useful if we want to call the method morethan once to set up multiple timers; we ignore it here because we want justone timer.
At the end of the initializer, we call populate() to create the multipedes, and setthe application’s window title as usual.
def pauseOrResume(self):
global Running
Running = not Running
self.pauseButton.setText("Pa&use" if Running else "Res&ume")
If the user clicks the Pause button, we set the global Running Boolean to theopposite of what it was, and change the button’s caption. The form’s timer andthe multipede timers refer to this variable, doing nothing if it is False.
def zoom(self, value):
factor = value / 100.0
matrix = self.view.matrix()
matrix.reset()
matrix.scale(factor, factor)
self.view.setMatrix(matrix)
To zoom the scene, all that we need to do is change the scale of the view thatshows the scene. This is achieved by getting the view’s current transformationmatrix, clearing any transformations (i.e., scaling) that may be in force, andthen rescaling it to a factor that is proportional to the slider’s setting.
Figure 12.5 Multipedes at two different zoom levels
Animation and Complex Shapes 371
Zooming has a significant effect on how the multipedes are drawn. This isbecause in the QGraphicsItem.paint() method, we can find out how zoomed inor out a scene is and can use this information to determine how much detailto draw. This means, for example, that we can draw in a faster and more sim-plified way if the scene is zoomed out with users unable to discern the detailsanyway, and that we can draw in increasing detail as users zoom in. The effectof zooming is shown in Figure 12.5.
def populate(self):
red, green, blue = 0, 150, 0
for i in range(random.randint(6, 10)):
angle = random.randint(0, 360)
offset = random.randint(0, SCENESIZE // 2)
half = SCENESIZE / 2
x = half + (offset * math.sin(math.radians(angle)))
y = half + (offset * math.cos(math.radians(angle)))
color = QColor(red, green, blue)
head = Head(color, angle, QPointF(x, y))
color = QColor(red, green + random.randint(10, 60), blue)
offset = 25
segment = Segment(color, offset, head)
for j in range(random.randint(3, 7)):
offset += 25
segment = Segment(color, offset, segment)
head.rotate(random.randint(0, 360))
self.scene.addItem(head)
global Running
Running = True
This method is used to generate a random population of 6–10 multipedes. Eachmultipede is made up of a head,and between four and eight body segments.Foreach multipede, the head is created first, with a semirandom color, with a ran-dom angle of direction, and at a random position inside a circle with its centerin the middle of the scene. Then the multipede’s first segment is created, withthe head being its parent. This means that whatever transformation is appliedto the head, for example, moving or rotating it, will also be applied to the firstsegment. Next, 3–7 additional segments are created. Each one is made a childof its preceding segment. The effect of this is that if the head is transformed,the first segment is transformed correspondingly, and so is the first segment’schild segment, and so on, for all the multipede’s segments.
Once the head and segments have been created, we rotate the head and addit to the scene. Adding a graphics item to a scene automatically adds all theitem’s children recursively, so by adding just the head, the entire multipedeis added.
372 Chapter 12. Item-Based Graphics
At the end, we set the global Running Boolean to True. In addition to the form’stimer, each multipede part has a timer, and as long as Running is True, the partwill move at each time interval.
The red color we have used is significant for head items. The red color compo-nent is set to 0 for all multipedes when they are first created. If the red col-or component of a multipede’s head reaches the maximum (255)—which canoccur as the result of collisions—the multipede will “die”, that is, it will beremoved. The culling is done in the timer event.
def timerEvent(self, event):
if not Running:
return
dead = set()
items = self.scene.items()
if len(items) == 0:
self.populate()
return
heads = set()
for item in items:
if isinstance(item, Head):
heads.add(item)
if item.color.red() == 255:
dead.add(item)
if len(heads) == 1:
dead = heads
del heads
while dead:
item = dead.pop()
self.scene.removeItem(item)
del item
At every time interval the form’s timerEvent() method is called. If the Running
Boolean is False, the method does nothing and returns immediately. If thereare no items in the scene (they all died), we call populate() and begin a freshrun. Otherwise we iterate over all the items in the scene, populating twosets: one the set of head items that have a red color component with value 255,and the other with the set of all head items in the scene.
If there is just one head item, we overwrite the dead set with the heads set con-taining the one remaining head. This ensures that if there is just one multi-pede left, it will be killed off. We then delete the heads set so that there are noreferences that could keep items alive. Finally, we iterate over the dead items,removing each one from the scene at random and, since ownership passes tous,deleting each one that we remove.Thanks to the parent–child relationships,when we delete a multipede’s head, the head’s child (the first segment) is delet-ed, and in turn the first segment’s child (the second segment) is deleted, and so
Animation and Complex Shapes 373
on, to the greatest grandchild so that simply by deleting a multipede’s head, wedelete all the segments too.
We have now seen how the application works, so we can turn our attention tothe implementation of the multipedes themselves. As the population() methodshows, multipedes are made up of one Head and at least four Segments—both ofthese classes are QGraphicsItem subclasses, and both are smart enough to drawonly the amount of detail that makes sense for the current zoom level. We willlook at the Head first, and then at the Segment.
class Head(QGraphicsItem):
Rect = QRectF(-30, -20, 60, 40)
def __init__(self, color, angle, position):
super(Head, self).__init__()
self.color = color
self.angle = angle
self.setPos(position)
self.timer = QTimer()
QObject.connect(self.timer, SIGNAL("timeout()"), self.timeout)
self.timer.start(INTERVAL)
All heads have the same shape: an ellipse that fits inside the static Rect
rectangle.When the head is initialized we record its color and angle in instancevariables and move it to the given position in the scene.
The QGraphicsItem class is not a QObject subclass and does not provide built-intimers. This is not a problem since we can simply use a QTimer as we havedone here.★ A QTimer’s timeouts do not result in timer events, but instead aresignified by timeout() signals being emitted. Here we create a timer which willtime out every INTERVAL (200) milliseconds, that is, five times per second. Wehave connected the timer’s timeout() signal to our own timeout() method; wewill review this method shortly.
def boundingRect(self):
return Head.Rect
The bounding rectangle is easy—it is simply the static Rect rectangle thatserves as the basic shape for all multipede heads.
def shape(self):
path = QPainterPath()
path.addEllipse(Head.Rect)
return path
★C++/Qt programmers might be tempted to multiply-inherit from QGraphicsItem and QObject, butPyQt permits inheritance only from a single Qt class.

374 Chapter 12. Item-Based Graphics
This method is the default one used for collision detection, unless we specifya coarser-grained approach that uses just the bounding rectangle. A painterpath is a series of rectangles, ellipses, arcs, and other shapes (including painterpaths) that together completely describe an item’s shape. In this case, the pathis just one ellipse.
Using a painter path for a graphics item’s shape ensures that collisions aredetected accurately. For example, two multipede heads may cross at thecorners of their rectangles without colliding, since their ellipses don’t occupythe corners.
def paint(self, painter, option, widget=None):
painter.setPen(Qt.NoPen)
painter.setBrush(QBrush(self.color))
painter.drawEllipse(Head.Rect)
if option.levelOfDetail > 0.5:
painter.setBrush(QBrush(Qt.yellow)) # Outer eyes
painter.drawEllipse(-12, -19, 8, 8)
painter.drawEllipse(-12, 11, 8, 8)
if option.levelOfDetail > 0.9:
painter.setBrush(QBrush(Qt.darkBlue)) # Inner eyes
painter.drawEllipse(-12, -19, 4, 4)
painter.drawEllipse(-12, 11, 4, 4)
if option.levelOfDetail > 1.3:
painter.setBrush(QBrush(Qt.white)) # Nostrils
painter.drawEllipse(-27, -5, 2, 2)
painter.drawEllipse(-27, 3, 2, 2)
The head in full detail is an ellipse, two eyes, each of which is two ellipses,one inside the other, and two tiny nostrils, again ellipses. The paint() methodbegins by getting rid of the pen and by setting a solid brush to the multipede’scolor. Then the basic head shape is drawn.
The option variable is of type QStyleOptionGraphicsItem, and it holds varioususeful information, including the item’s transformation matrix, font metrics,palette, and state (selected, “on”, “off”, and many others). It also holds the “levelof detail”, a measure of how zoomed in or out the scene is. If the scene is notzoomed at all, the level of detail is 1.0; if it is zoomed in to be twice the size,the level of detail will be 2.0, and if it is zoomed out to half the size, the levelof detail will be 0.5.
If the scene is being shown at 50% of its natural size or larger,we draw the mul-tipede’s yellow outer eyes. We can hard-code the coordinates because graphicsitems use their own local logical coordinate system and any externally appliedtransformations are taken care of automatically for us. If the scene is beingshow at 90% of its natural size or larger, we also draw the inner eyes, and ifthe scene is zoomed in enough to be viewed at 130% or larger, we also draw themultipedes’ tiny nostrils.

Animation and Complex Shapes 375
The last method we must consider is the timeout() method that is called everyINTERVAL milliseconds by the timer. We will look at the method in two parts,since there are two aspects to what it does.
def timeout(self):
if not Running:
return
angle = self.angle
while True:
angle += random.randint(-9, 9)
offset = random.randint(3, 15)
x = self.x() + (offset * math.sin(math.radians(angle)))
y = self.y() + (offset * math.cos(math.radians(angle)))
if 0 <= x <= SCENESIZE and 0 <= y <= SCENESIZE:
break
self.angle = angle
self.rotate(random.randint(-5, 5))
self.setPos(QPointF(x, y))
If the global Running Boolean is False, we do nothing and return. Otherwise,we calculate a new position for the head based on a small random change to itsangle of direction (±9°), and a small movement (3–15 logical units).To avoid themultipede wandering out of the scene, we keep moving and turning it until itsnew (x, y) position is within the scene’s boundaries.
Once we have the new coordinates, we record the angle that was used, rotatethe head slightly, and set the head’s position. At this point, collisions may haveoccurred as a result of the movement.
for item in self.scene().collidingItems(self):
if isinstance(item, Head):
self.color.setRed(min(255, self.color.red() + 1))
else:
item.color.setBlue(min(255, item.color.blue() + 1))
We ask the scene for all the items that the head has collided with. If it has hitanother head, we make this head a bit redder, and if it has hit a segment, wemake the segment it has hit a bit bluer. If a head’s red color component reaches255, the head (and therefore the entire multipede, including all the segments)will be removed from the scene. The removals take place in the form’s timerevent, as we saw earlier (page 372).
Now we will look at the Segment implementation. Its initializer is a bit longerthan the Head’s initializer, but the boundingRect(), shape(), and paint() methodsare much simpler as a result.
class Segment(QGraphicsItem):
def __init__(self, color, offset, parent):
376 Chapter 12. Item-Based Graphics
super(Segment, self).__init__(parent)
self.color = color
self.rect = QRectF(offset, -20, 30, 40)
self.path = QPainterPath()
self.path.addEllipse(self.rect)
x = offset + 15
y = -20
self.path.addPolygon(QPolygonF([QPointF(x, y),
QPointF(x - 5, y - 12), QPointF(x - 5, y)]))
self.path.closeSubpath()
y = 20
self.path.addPolygon(QPolygonF([QPointF(x, y),
QPointF(x - 5, y + 12), QPointF(x - 5, y)]))
self.path.closeSubpath()
self.change = 1
self.angle = 0
self.timer = QTimer()
QObject.connect(self.timer, SIGNAL("timeout()"), self.timeout)
self.timer.start(INTERVAL)
The first thing to notice is that we accept a parent parameter and pass it on tothe base class. We did not do this for the Head because when an item is addedto a scene, the scene automatically takes ownership of the item, so there wasno need. But segments are not explicitly added to the scene since they are allchildren of other items. The first segment’s parent is the multipede’s head, thesecond segment’s parent is the first segment, the third segment’s parent is thesecond segment, and so on. When the head is added to the scene the segmentsare added too; but the scene takes ownership of only the head. Althoughwe could have given the segments no parent and added them directly to thescene, it is much more convenient to make them child items. In particular,the parent–child relationship between graphics items is used to propagatetransformations from parent to child.
The offset is an x offset relative to the head, no matter which segment we areinitializing. The rectangle is used to draw the segment’s ellipse, but unlike thehead, it does not encompass the entire shape because segments have protrud-ing legs. Because the segment’s shape isn’t simple, we create it using a painterpath. We begin with the segment’s “body”, a simple ellipse. Then we draw oneleg (a very flat triangle),and then the other leg. The addPolygon() method takesa QPolygonF(), which itself is constructed with a list of QPointF objects. Aftereach leg is added, we call closeSubpath(); alternatively, we could simply haveadded an extra point at the end, a copy of the first point. The change and angle
instance variables are used for movement; we will cover them in the time-
out() event.
def boundingRect(self):
return self.path.boundingRect()
Animation and Complex Shapes 377
The bounding rectangle must account for the entire shape, including the legs,but is it easy to obtain using QPainterPath.boundingRect().
def shape(self):
return self.path
The shape isn’t straightforward,but thanks to the path being calculated in theinitializer, this method is simple.
def paint(self, painter, option, widget=None):
painter.setPen(Qt.NoPen)
painter.setBrush(QBrush(self.color))
if option.levelOfDetail < 0.9:
painter.drawEllipse(self.rect)
else:
painter.drawPath(self.path)
Thanks to precalculating the rectangle and painter path, the paint() methodis much easier and faster than it would otherwise have been. If the scene iszoomed in to 90% or less, we just draw an ellipse; otherwise, we draw the shapein full detail using the painter path.
def timeout(self):
if not Running:
return
matrix = self.matrix()
matrix.reset()
self.setMatrix(matrix)
self.angle += self.change
if self.angle > 5:
self.change = -1
self.angle -= 1
elif self.angle < -5:
self.change = 1
self.angle += 1
self.rotate(self.angle)
When a multipede’s head moves, its first (child) segment moves with it, andthat segment’s child segment moves with it, and so on. This is fine, but it meansthat the multipede’s shape is rigid. We want the segments to gently sway fromside to side as the multipede moves, and for this reason we have given thesegments their own timers.
We retrieve the segment’s transformation matrix, clear any transformations(rotations) that have been applied, and then rotate the segment. The change
variable starts out as 1 and the rotation angle starts out at 0°. At every timeinterval, the change is added to the angle. If the angle reaches 6 (or -6), wemake it 5 (or -5) and negate the change value. This means that the angle has
378 Chapter 12. Item-Based Graphics
the sequence 1, 2, 3, 4, 5, 4, 3, 2, 1, 0, -1, -2, -3, -4, -5, -4, -3, -2, -1, 0, 1, 2, and soon, which produces a nice swaying effect.
This completes our review of animating complex shapes. Using painter paths,shapes of arbitrary complexity can be created, and by storing the paths asstatic or as instance variables, a lot of calculation can be done one-off ratherthan in every call to a paint method. The approach we have used to achieveanimation is not the only one possible. For example, we could use QGraphics-
ItemAnimation items in conjunction with a QTimeLine. Another approach wouldbe to take the timers out of the items themselves and instead keep a set of ref-erences to them. Then, a timer in the form could be used, and at each intervaleach item in the set could be moved and collisions could be resolved from theform’s timeout handler. There is no one and only right approach; rather, thebest approach will depend on the needs of the application itself.
Summary
The graphics view classes are ideal for situations where we have lots of individ-ual items to draw, from dozens to hundreds of thousands. They are also perfectfor when we want to allow the user to interact with items—for example, click-ing, dragging, and selecting them—as well as being ideal for doing animation.
Scenes use their own logical coordinate system and contain graphics items.Scenes are viewed using QGraphicsView, and more than one view can be associ-ated with a scene if we want the user to be able to view the scene using two ormore different transformations (for example, at different zoom levels or rota-tion angles).
The graphics view classes include a number of useful predefined items that canbe used “as is”. We can also subclass QGraphicsItem or one of its subclasses toprovide custom behavior (for example context menus and key event handling)as well as custom painting so that we can draw any shapes we like.
If we want to save and load scenes to and from files, one simple approach is tomake sure that every item has a transformation matrix, and to save an itemdescription, the item’s position in the scene, the item’s matrix, and any addi-tional item-specific data that may be necessary. Doing this using QDataStream
is very easy.
Any scene can be drawn on any paint device, including a printer, a PDF file,or a QImage (for example, to save as a .png file), by using the render() methodsprovided by the scene and view classes. And from Qt 4.3, scenes can also berendered in SVG format using the QSvgGenerator paint device class.
Painting graphics view items is made as easy as possible because of the con-venient local coordinate system that allows us to ignore any externally appliedtransformations—for example, from parent items. The QPainter class offersmany convenient drawing methods for drawing such things as arcs, chords,ellipses, polygons, lines, polylines, rectangles, images, and text. In addition,

Summary 379
complex shapes can be created using QPainterPath objects, and these can bepainted directly using QPainter.drawPath().
Even more complex shapes can be created by composing two or more itemstogether using parent–child relationships. Such relationships ensure thattransformations applied to a parent item are automatically applied to the childitems, down to the furthest grandchild. This, in conjunction with the use oflocal logical coordinates, makes animating complex shapes much easier thanhaving to orchestrate all the transformations manually ourselves.
Simulations, games, and the visualization of time series data can be doneusing the graphics view classes. One simple approach to animation is to giveeach item its own timer and to move it whenever the timer times out, althoughseveral other approaches are possible. For painting, using pre-calculatedshapes can save time in the paint methods, as can using the view’s level ofdetail to decide how much detail to draw.
For graphing, creating a custom widget and reimplementing its paint event,as described in the preceding chapter, is probably the best approach. Forgeneral scientific and engineering applications, the PyQwt library (Qt Wid-gets for Technical Applications) provides a lot of functionality out of thebox, including 2D plotting, whereas the PyQwt3D bindings extend PyQwtto include 3D plotting. To get the best out of these add-ons, and for fastnumerical processing, installing the NumPy package is also recommended.See http://pyqwt.sourceforge.net and http://numpy.scipy.org for more infor-mation.
PyQt’s graphics view classes have even more to offer than we have had thespace to cover here. In addition to many more features offered by the graphicsview classes, it is also possible to do both 2D and 3D graphics using the QtOpenGL
module. In addition, this module can be used in conjunction with PyQt’s othergraphics classes. For example, we can use a QGLWidget instead of a QWidget forpainting on by calling QGraphicsView.setViewport(QGLWidget()), and we can useQPainter to overlay a QGLWidget with annotations.
ExerciseEnhance the Page Designer application by adding a new button, Align, whichhas a pop-up menu of Align Left, Align Right, Align Top, and Align Bottom. Providea single method, setAlignment(), that takes an alignment argument. Be sureto keep an instance variable with the wrappers so they don’t get garbage-col-lected. To perform the alignment there must be at least two items selected(because items are aligned with respect to each other).
The algorithm in the solution has two phases: First it finds the item to alignevery other item in relation to; for example, if doing Align Left, it finds theleftmost item. Note that this must be done in terms of the sceneBoundingRect(),not the boundingRect() (which is different if the item is rotated). Second, itworks out the x or y difference to be applied to the other items and then applies
380 Chapter 12. Item-Based Graphics
it. Adding the extra button and its menu will take less than 15 lines of code,and setAlignment() can be written in less than 45 lines, so the whole thing canbe done in about 60 lines.
A solution is provided in chap12/pagedesigner_ans.pyw.

Rich Text and Printing
1313 ● Rich Text Editing
● Printing Documents
PyQt supports rich text, essentially a subset of HTML that also includes somesupport for CSS (cascading style sheets).★ This means that in practice, wecan pass strings that contain HTML markup to many of PyQt’s text-handlingclasses and rely on PyQt to render the HTML properly in the user interface.
We have already seen examplesof passing HTML to QLabels. The graphics itemclass QGraphicsTextItem can also accept HTML. The QTextBrowser class supportsbasic HTML display including hyperlinks, and although it is by no means afull-blown Web browser, many developers find it sufficient for displaying helptext. For editing HTML, PyQt provides the QTextEdit class. Although this classcan render all the PyQt-supported HTML tags, it does not provide users withthe means to create or edit some of the tags—for example, it can show HTMLtables, but it does not provide a means of inserting or editing them. These defi-ciencies can, of course, be remedied by subclassing and providing the function-ality ourselves.
Another use case for QTextEdit is to provide source code editing, with syntaxhighlighting provided by custom QSyntaxHighlighter subclasses. A dedicatedopen source component, specifically designed for source code editing, is alsoavailable. This component is called Scintilla (http://www.scintilla.org), andthe Qt port of it, QScintilla, can also be used with PyQt.
All of the widgets that can handle rich text store the text internally in aQTextDocument. This pure data class is also available for our use.
In this chapter, we will explore some of the features of QTextEdit, including itsuse as a source code editor using QSyntaxHighlighter. Although PyQt providesa set of widgets that covers most situations, from simple labels and framesall the way to tab widgets, tree views, and more, it does not include a one-lineHTML text-editing widget. We will create our own widget for this purpose bysubclassing QTextEdit; this will deepen our knowledge of QTextEdit and QText-
★The list of supported HTML tags and CSS properties is available at http://doc.trolltech.com/
richtext-html-subset.html.
381
382 Chapter 13. Rich Text and Printing
Document, and it will be a useful widget in later chapters when we want to pro-vide the ability for users to edit single lines of HTML text in database-typeapplications.
This chapter’s second section is devoted to printing. We have already seen howto print images and graphics scenes on a page, but in thisPrint-
ingimagessidebar
363 ☞
section we will seehow to print multiple page documents, including ones with embedded images.PyQt provides three different techniques for printing documents: one basedon composing and printing HTML, another based on creating and printingQTextDocuments, and another based on using QPainter to paint directly onto theprinter’s pages. We will show and discuss all three approaches.
Rich Text Editing
In this section we will look at rich text editing from two different perspectives.In the first subsection we will create a plain text editor that uses QSyntaxHigh-
lighter to provide syntax highlighting for Python source code. In the secondsubsection we will create a single-line rich text editor similar to QLineEdit, thathas pop-up menus, and that supports various formatting shortcuts such asCtrl+B and Ctrl+I to toggle bold and italic on and off. In both cases, we use QText-
Edit as the foundation on which we build.
Using QSyntaxHighlighter
If we want a Python-savvy text editor with syntax highlighting, we need notcreate one ourselves. The Tkinter-based IDLE application provides both a“sandbox” in which we can experiment with Python code, and a perfectly goodPython code editor. And for more power, we can use Eric4, itself written inPyQt and using QScintilla for its text editing. However, no off-the-shelf editorwill necessarily work in just the way we want, and since creating our own isinstructive and revealing of what is involved, we will create a simple PythonEditor to learn how to use QTextEdit and QSyntaxHighlighter. As the screenshotin Figure 13.1 shows, the Python Editor is a simple main-window-style applica-tion with two menus and toolbars. Since we have covered the creation of suchapplications before, we will focus just on those parts that are relevant to richtext editing, starting with the beginning of the main window’s initializer.
class MainWindow(QMainWindow):
def __init__(self, filename=None, parent=None):
super(MainWindow, self).__init__(parent)
font = QFont("Courier", 11)
font.setFixedPitch(True)
self.editor = TextEdit()
self.editor.setFont(font)
self.highlighter = PythonHighlighter(self.editor.document())
self.setCentralWidget(self.editor)
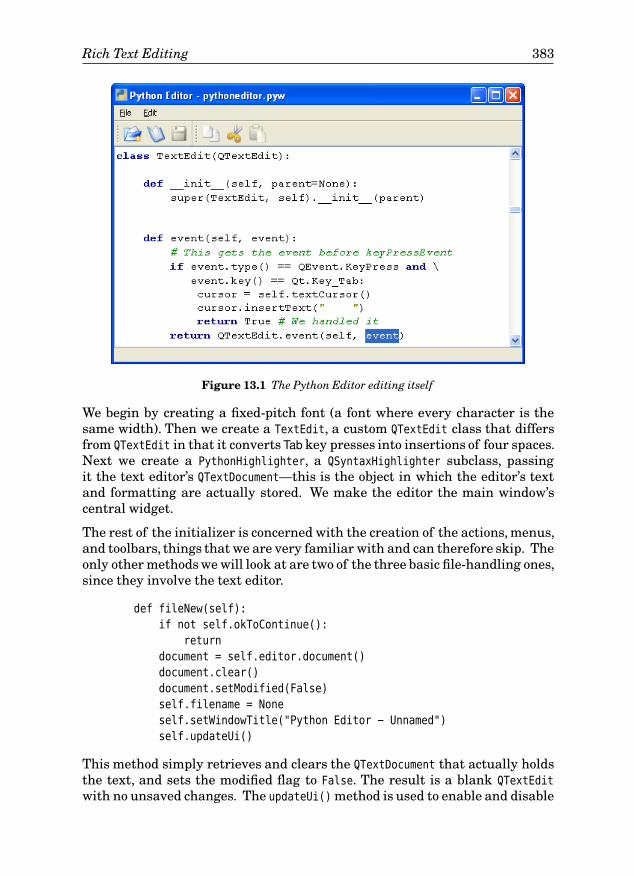
Rich Text Editing 383
Figure 13.1 The Python Editor editing itself
We begin by creating a fixed-pitch font (a font where every character is thesame width). Then we create a TextEdit, a custom QTextEdit class that differsfrom QTextEdit in that it converts Tab key presses into insertions of four spaces.Next we create a PythonHighlighter, a QSyntaxHighlighter subclass, passingit the text editor’s QTextDocument—this is the object in which the editor’s textand formatting are actually stored. We make the editor the main window’scentral widget.
The rest of the initializer is concerned with the creation of the actions, menus,and toolbars, things that we are very familiar with and can therefore skip. Theonly other methods we will look at are two of the three basic file-handling ones,since they involve the text editor.
def fileNew(self):
if not self.okToContinue():
return
document = self.editor.document()
document.clear()
document.setModified(False)
self.filename = None
self.setWindowTitle("Python Editor - Unnamed")
self.updateUi()
This method simply retrieves and clears the QTextDocument that actually holdsthe text, and sets the modified flag to False. The result is a blank QTextEdit
with no unsaved changes. The updateUi() method is used to enable and disable
384 Chapter 13. Rich Text and Printing
actions depending on the application’s state; see the Enabling and DisablingActions sidebar on page 385.
def loadFile(self):
fh = None
try:
fh = QFile(self.filename)
if not fh.open(QIODevice.ReadOnly):
raise IOError, unicode(fh.errorString())
stream = QTextStream(fh)
stream.setCodec("UTF-8")
self.editor.setPlainText(stream.readAll())
self.editor.document().setModified(False)
self.setWindowTitle("Python Editor - %s" % \
QFileInfo(self.filename).fileName())
except (IOError, OSError), e:
QMessageBox.warning(self, "Python Editor -- Load Error",
"Failed to load %s: %s" % (self.filename, e))
finally:
if fh is not None:
fh.close()
If a file is loaded—for example,by the user invoking the File→Openaction—thismethod is called. The file-handling code is similar to what we have seen before;the only real difference is that we set the QTextDocument’s modified flag toFalse.
The code for saving (not shown) is very similar to that for loading. We getthe file handle, create a QTextStream, set the encoding to UTF-8, and outputthe entire text using QTextEdit.toPlainText(). We also set the QTextDocument’smodified flag to False.
class TextEdit(QTextEdit):
def __init__(self, parent=None):
super(TextEdit, self).__init__(parent)
def event(self, event):
if event.type() == QEvent.KeyPress and \
event.key() == Qt.Key_Tab:
cursor = self.textCursor()
cursor.insertText(" ")
return True
return QTextEdit.event(self, event)
The preceding code shows the complete TextEdit subclass. Every QTextDocument
can be manipulated through a QTextCursor object, which is the programmaticequivalent of a user interacting with the document using key presses andmouse actions.
Rich Text Editing 385
Enabling and Disabling Actions
Sometimes particular actions are applicable only in certain circumstances.For example, it doesn’t make much sense to allow “file save” on a documentwith no unsaved changes, or, arguably, to allow “file save as” on an emptydocument. Similarly, neither “edit copy” nor “edit cut” makes sense if thereis no selected text. One way to deal with this is to leave all the actionsenabled all the time, but to make sure that they do nothing in cases wherethey don’t make sense; for example, if we call QTextEdit.cut(), it will safelydo nothing if there is no selected text.
Another solution is to enable and disable actions depending on the appli-cation’s state. This can be achieved by doing three things: First, making ac-tions that will be enabled and disabled into instance variables so that theycan be accessed outside of the initializer; second, creating a method (e.g.,updateUi()) that enables and disables actions depending on the application’sstate; and third, making application-specific signal–slot connections toupdateUi() so that it is called whenever the application’s state changes.
Using the Python Editor as an example, we need these connections:
self.connect(self.editor,
SIGNAL("selectionChanged()"), self.updateUi)
self.connect(self.editor.document(),
SIGNAL("modificationChanged(bool)"), self.updateUi)
self.connect(QApplication.clipboard(),
SIGNAL("dataChanged()"), self.updateUi)
These connections mean that if the editor’s selection changes, or if thedocument is modified, or if the clipboard’s data changes, we can enable ordisable the relevant actions.
def updateUi(self, arg=None):
self.fileSaveAction.setEnabled(
self.editor.document().isModified())
self.fileSaveAsAction.setEnabled(
not self.editor.document().isEmpty())
enable = self.editor.textCursor().hasSelection()
self.editCopyAction.setEnabled(enable)
self.editCutAction.setEnabled(enable)
self.editPasteAction.setEnabled(self.editor.canPaste())
This method is called in response to the signal–slot connections earlier.It is also called explicitly at the end of the initializer to set the user in-terface’s initial state, and at Qt
4.2
the end of the fileNew() method. The QText-
Edit.canPaste() method was introduced with Qt 4.2; for earlier versions,use not QApplication.clipboard().text().isEmpty(). The text cursor and textdocument classes are covered later in this chapter.

386 Chapter 13. Rich Text and Printing
The event() handler is called before any of the specific key and mouse eventhandlers, and it is the only place where we can intercept andQWidget.
event()
310 ☞
handle Tab keypresses. If the user pressed Tab we get a Insert-
ing textwithQText-
Cursor
☞ 404
QTextCursor from the QTextEdit; thisallows us to programmatically interact with the underlying QTextDocument
that holds the text. By default, the text cursor returned by a text edit is at thecurrent insertion point (also called the cursor position), so we can simply insertfour spaces. Then we return True to tell the event-handling system that wehave handled the Tab key press and that no further action (such as changingfocus) should take place.
To provide syntax highlighting we must create a QSyntaxHighlighter subclass,reimplement the highlightBlock() method, and create an instance of ourhighlighter with the QTextDocument we want it to apply to as an argument.We did the last part in the MainWindow’s initializer, so now we will turn to ourQSyntaxHighlighter subclass.
The QSyntaxHighlighter works on a line-by-line basis and provides a simplemeans of keeping track of state across multiple lines.For the Python Editor wewill use regular expressions to identify the Python keywords, comments, andstrings, including triple-quoted strings that span multiple lines, so that we canapply highlighting to them. We begin by setting up the regular expressions inthe subclass’s initializer, which we will look at in two parts.
class PythonHighlighter(QSyntaxHighlighter):
Rules = []
def __init__(self, parent=None):
super(PythonHighlighter, self).__init__(parent)
keywordFormat = QTextCharFormat()
keywordFormat.setForeground(Qt.darkBlue)
keywordFormat.setFontWeight(QFont.Bold)
for pattern in ((r"\band\b", r"\bas\b", r"\bassert\b",
···r"\byield\b")):
PythonHighlighter.Rules.append((QRegExp(pattern),
keywordFormat))
The Rules static list holds a list of pairs. The first element of each pair is aregular expression (a QRegExp) that is used to match a syntactic construct thatcan occupy only a single line (such as a Python keyword). The second elementis a QTextCharFormat, an object that can hold information regarding how a pieceof text should be formatted, such as its font and the pen that should be used topaint it.
We have created a rule for each Python keyword, giving each one the samekeywordFormat format. (Most of the keywords are not shown in the snippet asindicated by the ellipsis.) Each keyword has a \b before and after it; this is aregular expression symbol that does not match any text, but rather matches at
Rich Text Editing 387
a word boundary. This means, for example, that in the expression a and b, andwill be recognized as a keyword, whereas in the expression a = sand, the and insand will (correctly) not be recognized.
commentFormat = QTextCharFormat()
commentFormat.setForeground(QColor(0, 127, 0))
commentFormat.setFontItalic(True)
PythonHighlighter.Rules.append((QRegExp(r"#.*"),
commentFormat))
self.stringFormat = QTextCharFormat()
self.stringFormat.setForeground(Qt.darkYellow)
stringRe = QRegExp(r"""(?:'[^']*'|"[^"]*")""")
stringRe.setMinimal(True)
PythonHighlighter.Rules.append((stringRe, self.stringFormat))
self.stringRe = QRegExp(r"""(:?"["]".*"["]"|'''.*''')""")
self.stringRe.setMinimal(True)
PythonHighlighter.Rules.append((self.stringRe,
self.stringFormat))
self.tripleSingleRe = QRegExp(r"""'''(?!")""")
self.tripleDoubleRe = QRegExp(r'''"""(?!')''')
After the keywords, we create a format and regular expression for handlingPython comments.The regular expression is not perfect; it does not account forquoted # characters for example.
For strings, we keep the string format as an instance variable since we willneed it in the highlightBlock() method when we handle multiline strings.Single-line strings are handled by naive (but fast) regular expressions set upin the initializer and added to the Rules list. At the end we create two moreregular expressions. These both use negative lookahead; for example, (?!")means “not followed by "”. They are for use in the highlightBlock() method,which we will review next in two parts.
def highlightBlock(self, text):
NORMAL, TRIPLESINGLE, TRIPLEDOUBLE = range(3)
for regex, format in PythonHighlighter.Rules:
i = text.indexOf(regex)
while i >= 0:
length = regex.matchedLength()
self.setFormat(i, length, format)
i = text.indexOf(regex, i + length)
The highlightBlock() method is called for every line that is displayed with theline in the QString text argument.
We begin by setting three possible states: normal, inside a triple-quoted string,and inside a triple double-quoted string. Then we iterate over every rule andwherever we find a match to the rule’s regular expression, we set the text’s

388 Chapter 13. Rich Text and Printing
format to the corresponding format for the length of the regular expression’smatch. The combination of a list of regular expression and format pairs andthe for loop shown in the preceding code is sufficient for all syntax highlightingwhere each syntactic component only ever occupies a single line and whereeach is capable of being represented by a regular expression.
self.setCurrentBlockState(NORMAL)
if text.indexOf(self.stringRe) != -1:
return
for i, state in ((text.indexOf(self.tripleSingleRe),
TRIPLESINGLE),
(text.indexOf(self.tripleDoubleRe),
TRIPLEDOUBLE)):
if self.previousBlockState() == state:
if i == -1:
i = text.length()
self.setCurrentBlockState(state)
self.setFormat(0, i + 3, self.stringFormat)
elif i > -1:
self.setCurrentBlockState(state)
self.setFormat(i, text.length(), self.stringFormat)
Next we set the current block’s state to normal. The state is an integer of ourchoice that the QSyntaxHighlighter will associate with the current line. We thentest to see whether we have a complete triple quoted string, that is, one thatbegins and ends in the line; if we do, we have already formatted it, so we arefinished and can return.
In PyQt’s text-handling classes such as QTextDocument, QTextEdit, and QSyntax-
Highlighter, a block of text is essentially a sequence of characters delimitedby a newline. For word processor-type documents this equates to a paragraph(since the text-handling class does the line wrapping), but for source code weinsert newlines manually, so in this case each block is effectively a single lineof code.
We now have three cases to deal with. We are either in a triple-quoted stringthat began on a previous line and that has not finished in this line; or we havethe beginning or end of a triple-quoted string in this line.
If the previous line was in a triple-quoted string and there is no triple quote inthis line, this entire line is still in a triple-quoted string, so we set the currentblock state to the same value as the previous line and format the entire line astriple-quoted. If the previous line’s state is triple-quoted and we have a triplequote, it must be the closing triple quote, so we format triple-quoted up to andincluding the triple quote. In this case we leave the state as normal since thatwill apply from the end of the triple-quoted string onward. On the other hand,if the previous line’s state was not triple-quoted and we find triple quotes,we set the state to triple-quoted and format from these quotes to the end ofthe line.
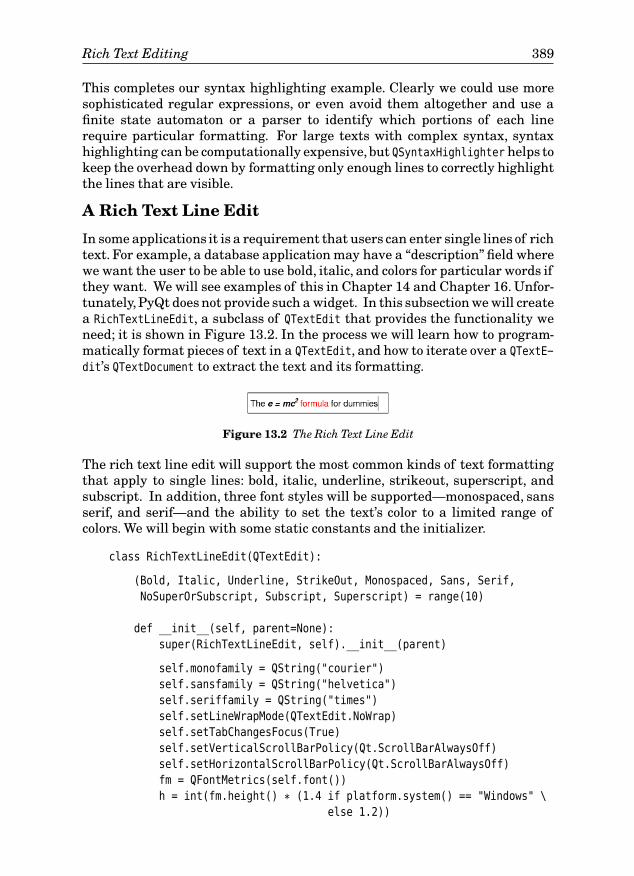
Rich Text Editing 389
This completes our syntax highlighting example. Clearly we could use moresophisticated regular expressions, or even avoid them altogether and use afinite state automaton or a parser to identify which portions of each linerequire particular formatting. For large texts with complex syntax, syntaxhighlighting can be computationally expensive,but QSyntaxHighlighter helps tokeep the overhead down by formatting only enough lines to correctly highlightthe lines that are visible.
A Rich Text Line Edit
In some applications it is a requirement that users can enter single lines of richtext. For example, a database application may have a “description” field wherewe want the user to be able to use bold, italic, and colors for particular words ifthey want. We will see examples of this in Chapter 14 and Chapter 16. Unfor-tunately,PyQt does not provide such a widget. In this subsection we will createa RichTextLineEdit, a subclass of QTextEdit that provides the functionality weneed; it is shown in Figure 13.2. In the process we will learn how to program-matically format pieces of text in a QTextEdit, and how to iterate over a QTextE-
dit’s QTextDocument to extract the text and its formatting.
Figure 13.2 The Rich Text Line Edit
The rich text line edit will support the most common kinds of text formattingthat apply to single lines: bold, italic, underline, strikeout, superscript, andsubscript. In addition, three font styles will be supported—monospaced, sansserif, and serif—and the ability to set the text’s color to a limited range ofcolors. We will begin with some static constants and the initializer.
class RichTextLineEdit(QTextEdit):
(Bold, Italic, Underline, StrikeOut, Monospaced, Sans, Serif,
NoSuperOrSubscript, Subscript, Superscript) = range(10)
def __init__(self, parent=None):
super(RichTextLineEdit, self).__init__(parent)
self.monofamily = QString("courier")
self.sansfamily = QString("helvetica")
self.seriffamily = QString("times")
self.setLineWrapMode(QTextEdit.NoWrap)
self.setTabChangesFocus(True)
self.setVerticalScrollBarPolicy(Qt.ScrollBarAlwaysOff)
self.setHorizontalScrollBarPolicy(Qt.ScrollBarAlwaysOff)
fm = QFontMetrics(self.font())
h = int(fm.height() * (1.4 if platform.system() == "Windows" \
else 1.2))
390 Chapter 13. Rich Text and Printing
self.setMinimumHeight(h)
self.setMaximumHeight(int(h * 1.2))
self.setToolTip("Press <b>Ctrl+M</b> for the text effects "
"menu and <b>Ctrl+K</b> for the color menu")
We begin by setting some default font families. Nowadays, every platform canbe expected to provide Courier, Helvetica, and Times fonts (or fonts for whichthese names are aliases). Since the widget is a single line, we switch off linewrapping and scrollbars. We also ensure that Tab causes a change of focusrather than the insertion of a Tab character. Calculating a minimum and max-imum height will help when we implement the size hint methods, but it is com-plicated slightly by differences in font metrics across platforms. The tooltip isthere to give users a hint that the widget has some special key presses.
Notice that the conditional expression is enclosed in parentheses. They areessential in this case, since without them, on non-Windows platforms, h wouldalways be set to 1 instead of the 20 or 30 or so that we would expect.
def sizeHint(self):
return QSize(self.document().idealWidth() + 5,
self.maximumHeight())
The preferred size is the “ideal” width of the text (taking into account fontsizes and attributes like bold and italic), with a bit of Qt
4.2
padding to give a littlemargin, and the maximum height.The QTextDocument.idealWidth() method wasintroduced with Qt 4.2.
def minimumSizeHint(self):
fm = QFontMetrics(self.font())
return QSize(fm.width("WWWW"), self.minimumHeight())
For the minimum size, we take the width of four “W” characters in the widget’sdefault font. Alternatively, we could have simply used an arbitrary amount,say, 40 pixels.
One thing that distinguishes the RichTextLineEdit from a QLineEdit is the user’sability to change the format and color of words and characters. To supportthis we must provide some means by which the user can apply such changes.We have done this by providing a text effects menu and a color menu, and bysupporting some key sequences for formatting. Both menus are invoked byparticular key sequences, and the text effects menu is also popped up when acontext menu event occurs.
def contextMenuEvent(self, event):
self.textEffectMenu()
A context menu event occurs when the user right-clicks on some platforms, orpresses a particular key or key sequence on others. In this case, we simply callthe custom textEffectMenu() method, which will pop up a suitable menu. By
Rich Text Editing 391
default, QTextEdit provides its own context menu, but by reimplementing thecontext menu event handler, our code takes precedence.
def keyPressEvent(self, event):
if event.modifiers() & Qt.ControlModifier:
handled = False
if event.key() == Qt.Key_B:
self.toggleBold()
handled = True
elif event.key() == Qt.Key_I:
self.toggleItalic()
handled = True
elif event.key() == Qt.Key_K:
self.colorMenu()
handled = True
elif event.key() == Qt.Key_M:
self.textEffectMenu()
handled = True
elif event.key() == Qt.Key_U:
self.toggleUnderline()
handled = True
if handled:
event.accept()
return
if event.key() in (Qt.Key_Enter, Qt.Key_Return):
self.emit(SIGNAL("returnPressed()"))
event.accept()
else:
QTextEdit.keyPressEvent(self, event)
Since users are typing in text, it is natural to provide a keyboard interfacefor changing the text’s format. We have set Ctrl+B to toggle bold, Ctrl+I to tog-gle italic, and Ctrl+U to toggle underlining. In addition, Ctrl+K invokes the colormenu, and Ctrl+M invokes the text effects menu (in addition to being invokedby a context menu event).By calling accept() on the key presses we handle our-selves, we are indicating that no further event handling of these key presses isnecessary.
If the user presses Return we emit a returnPressed() signal since this can beuseful; no newline is inserted into the text. Any other key presses are passedon to the base class. The QTextEdit class supports its own key sequences—forexample, Ctrl+Left Arrow for move left one word, Ctrl+Del for delete the word tothe right,Ctrl+C to copy any selected text to the clipboard,and, of course, simpleletters, such as a, b, Shift+A, and Shift+B, that are inserted literally.
def toggleBold(self):
self.setFontWeight(QFont.Normal \
if self.fontWeight() > QFont.Normal else QFont.Bold)
392 Chapter 13. Rich Text and Printing
PyQt supports several levels of boldness, but we have chosen to take a simplebold on or off approach. The QTextEdit.fontWeight() method returns thefont weight at the current insertion point, and similarly the setFontWeight()
method is applied at the current insertion point or to the selected text. TheQTextEdit is quite smart about formatting, at least on Linux. For example, iftext is selected the formatting is applied only to the selection, whereas if thereis no selection and the insertion point is at the end of the text, the formattingis applied from that point onward, and if there is no selection and the insertionpoint is in the middle of a word the formatting is applied to the whole word.
def toggleItalic(self):
self.setFontItalic(not self.fontItalic())
def toggleUnderline(self):
self.setFontUnderline(not self.fontUnderline())
Both italic and underline are simple on/off settings, and on Linux, togglingthem works in the same smart way as applying bold or other formatting.
def colorMenu(self):
pixmap = QPixmap(22, 22)
menu = QMenu("Colour")
for text, color in (("&Black", Qt.black), ("B&lue", Qt.blue),
("Dark Bl&ue", Qt.darkBlue), ("&Cyan", Qt.cyan),
("Dar&k Cyan", Qt.darkCyan), ("&Green", Qt.green),
("Dark Gr&een", Qt.darkGreen),
("M&agenta", Qt.magenta),
("Dark Mage&nta", Qt.darkMagenta),
("&Red", Qt.red), ("&Dark Red", Qt.darkRed)):
color = QColor(color)
pixmap.fill(color)
action = menu.addAction(QIcon(pixmap), text, self.setColor)
action.setData(QVariant(color))
self.ensureCursorVisible()
menu.exec_(self.viewport().mapToGlobal(
self.cursorRect().center()))
The color menu is invoked by Ctrl+K. To create the menu we iterate over a listof text and color constants, adding a new menu option for each one. We set thedata for each action to be the relevant color; we use this in the setColor() im-plementation.
We want the menu to pop up at the insertion point, that is, at the text cursorposition. This is not necessarily straightforward, because it is possible for theRichTextLineEdit to have more text than it is wide enough to show, and theinsertion point could be outside the visible area.
We solve this problem by doing two things. First, we call the base class’sQTextEdit.ensureCursorVisible() method; this has the effect of scrolling the ed-

Rich Text Editing 393
itor so that the insertion point is in the visible area—and it does nothing if theinsertion point is already visible. Second, we pop up the menu at the center ofthe insertion point’s rectangle. The cursorRect() method returns a QRect that isin widget coordinates, so we must convert the coordinates of the QPoint we getfrom QRect.center() accordingly. We do this by calling viewport(), which effec-tively returns a widget that has the exact dimensions of the visible area, andthat knows what region of the editor it represents. We then use the viewportwidget’s mapToGlobal() method to convert the point from the widget coordinatesystem to the global (screen) coordinate system that is used by QMenu.exec_() toposition itself.
def setColor(self):
action = self.sender()
if action is not None and isinstance(action, QAction):
color = QColor(action.data())
if color.isValid():
self.setTextColor(color)
If the user chooses a color the setColor() method is called. We retrieve thecolor that was stored in the calling action’s user data, and apply that color tothe text. Again, the same logic used for bold, italic, and underlining is used toapply the color to the selected text, or to the current word, or from the end ofthe text onward.
def textEffectMenu(self):
format = self.currentCharFormat()
menu = QMenu("Text Effect")
for text, shortcut, data, checked in (
("&Bold", "Ctrl+B", RichTextLineEdit.Bold,
self.fontWeight() > QFont.Normal),
("&Italic", "Ctrl+I", RichTextLineEdit.Italic,
self.fontItalic()),
···("Subs&cript", None, RichTextLineEdit.Subscript,
format.verticalAlignment() == \
QTextCharFormat.AlignSubScript)):
action = menu.addAction(text, self.setTextEffect)
if shortcut is not None:
action.setShortcut(QKeySequence(shortcut))
action.setData(QVariant(data))
action.setCheckable(True)
action.setChecked(checked)
self.ensureCursorVisible()
menu.exec_(self.viewport().mapToGlobal(
self.cursorRect().center()))
The text effects menu method, invoked by Ctrl+M or by a context menu event,is similar in structure to the color menu method, but slightly more involved.

394 Chapter 13. Rich Text and Printing
We begin by retrieving the text formatting that is currently in force, sincewe need this information to determine whether to check the various menuoptions. Then we create a menu made from a list of quadruples (text, shortcut,constant, checked status). The menu is shown in Figure 13.3.
Figure 13.3 The text effects menu
We have set keyboard shortcuts for some of the actions—for example, Ctrl+Bfor bold. We have not used standardized key sequences because we havehard-coded the key presses in the key press event handler shown earlier andso we must be sure to match the key presses that the handler is expecting.
In fact, these shortcuts have no effect in practice because they exist only forthe lifetime of the actions they are associated with and the actions exist onlywhile the menu exists, that is, for the duration of the textEffectMenu() method.But this does not matter since we have reimplemented the key event handlerto provide these shortcuts ourselves. Shortcuts in menus are useful only forpermanent menus such as those added to a main window’s menu bar. So, whydo we bother with shortcuts in the menu at all? Because adding the shortcutsmakes them appear in the menu, which helps the user to learn them. It doesn’tsolve the problem of how the user finds out about the Ctrl+M and Ctrl+K menusin the first place, but hopefully they will see the tooltip or read about them inthe application’s manual.
The menu itself is created and popped up in exactly the same way as the colormenu. If the user clicks any of the text effects options, the setTextEffect()
method is called. We will look at this method in two parts.
def setTextEffect(self):
action = self.sender()
if action is not None and isinstance(action, QAction):
what = action.data().toInt()[0]
if what == RichTextLineEdit.Bold:
self.toggleBold()
return
Rich Text Editing 395
if what == RichTextLineEdit.Italic:
self.toggleItalic()
return
if what == RichTextLineEdit.Underline:
self.toggleUnderline()
return
Each text effect menu action had a constant stored in its user data; this con-stant is retrieved and held in the what variable. For the simple toggle actions,we only need to call the appropriate toggle method and we are finished.
format = self.currentCharFormat()
if what == RichTextLineEdit.Monospaced:
format.setFontFamily(self.monofamily)
elif what == RichTextLineEdit.Serif:
format.setFontFamily(self.seriffamily)
elif what == RichTextLineEdit.Sans:
format.setFontFamily(self.sansfamily)
if what == RichTextLineEdit.StrikeOut:
format.setFontStrikeOut(not format.fontStrikeOut())
if what == RichTextLineEdit.NoSuperOrSubscript:
format.setVerticalAlignment(
QTextCharFormat.AlignNormal)
elif what == RichTextLineEdit.Superscript:
format.setVerticalAlignment(
QTextCharFormat.AlignSuperScript)
elif what == RichTextLineEdit.Subscript:
format.setVerticalAlignment(
QTextCharFormat.AlignSubScript)
self.mergeCurrentCharFormat(format)
To change the font family, strikeout format, or vertical alignment, we mustretrieve the current formatting, apply the change that the user has askedfor, and then merge the updated format with the current format to make ittake effect.
We have now covered all the formatting options that the rich text line editsupports. Once the user has entered their rich text we will no doubt want toretrieve it so that we can store it, search it, or manipulate it. We could use theQTextEdit.toPlainText() method—but that will strip out all the HTML, leavingus no better off than if we had used a QLineEdit. A more suitable alternativeis to use QTextEdit.toHtml(), but the HTML returned by this method is quiteverbose since it must be general enough to cater for all the PyQt-supportedHTML tags.
To put this in perspective, if we have the text “The bold cat.” (13 characters),where the word “bold” is in bold and the word “cat” is colored red, the toHtml()
method returns 503 characters:
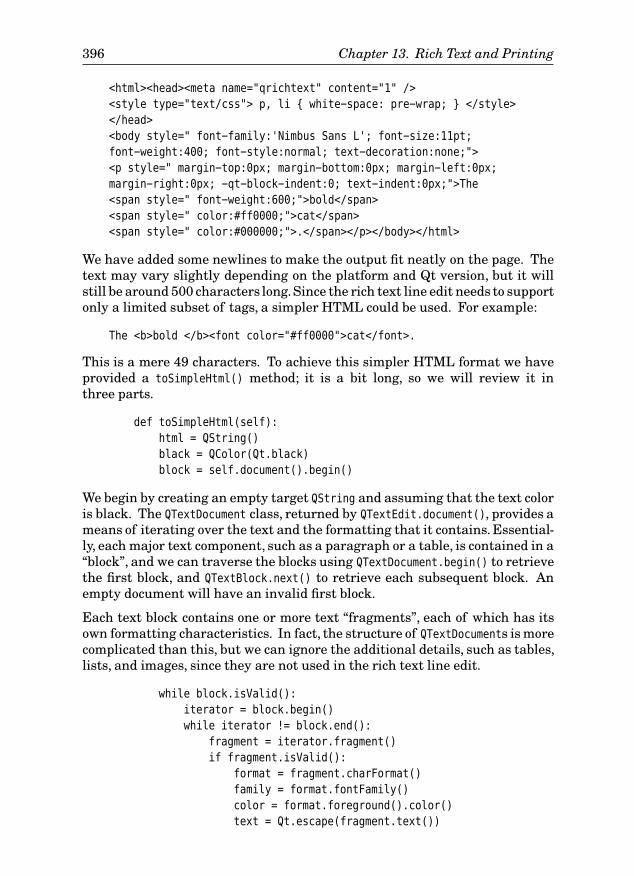
396 Chapter 13. Rich Text and Printing
<html><head><meta name="qrichtext" content="1" />
<style type="text/css"> p, li { white-space: pre-wrap; } </style>
</head>
<body style=" font-family:'Nimbus Sans L'; font-size:11pt;
font-weight:400; font-style:normal; text-decoration:none;">
<p style=" margin-top:0px; margin-bottom:0px; margin-left:0px;
margin-right:0px; -qt-block-indent:0; text-indent:0px;">The
<span style=" font-weight:600;">bold</span>
<span style=" color:#ff0000;">cat</span>
<span style=" color:#000000;">.</span></p></body></html>
We have added some newlines to make the output fit neatly on the page. Thetext may vary slightly depending on the platform and Qt version, but it willstill be around 500 characters long.Since the rich text line edit needs to supportonly a limited subset of tags, a simpler HTML could be used. For example:
The <b>bold </b><font color="#ff0000">cat</font>.
This is a mere 49 characters. To achieve this simpler HTML format we haveprovided a toSimpleHtml() method; it is a bit long, so we will review it inthree parts.
def toSimpleHtml(self):
html = QString()
black = QColor(Qt.black)
block = self.document().begin()
We begin by creating an empty target QString and assuming that the text coloris black. The QTextDocument class, returned by QTextEdit.document(), provides ameans of iterating over the text and the formatting that it contains. Essential-ly, each major text component, such as a paragraph or a table, is contained in a“block”, and we can traverse the blocks using QTextDocument.begin() to retrievethe first block, and QTextBlock.next() to retrieve each subsequent block. Anempty document will have an invalid first block.
Each text block contains one or more text “fragments”, each of which has itsown formatting characteristics. In fact, the structure of QTextDocuments is morecomplicated than this, but we can ignore the additional details, such as tables,lists, and images, since they are not used in the rich text line edit.
while block.isValid():
iterator = block.begin()
while iterator != block.end():
fragment = iterator.fragment()
if fragment.isValid():
format = fragment.charFormat()
family = format.fontFamily()
color = format.foreground().color()
text = Qt.escape(fragment.text())
Rich Text Editing 397
if format.verticalAlignment() == \
QTextCharFormat.AlignSubScript:
text = QString("<sub>%1</sub>").arg(text)
elif format.verticalAlignment() == \
QTextCharFormat.AlignSuperScript:
text = QString("<sup>%1</sup>").arg(text)
if format.fontUnderline():
text = QString("<u>%1</u>").arg(text)
if format.fontItalic():
text = QString("<i>%1</i>").arg(text)
if format.fontWeight() > QFont.Normal:
text = QString("<b>%1</b>").arg(text)
if format.fontStrikeOut():
text = QString("<s>%1</s>").arg(text)
For each text fragment in the current block, we extract the character format-ting, font family, and text color. Then we extract the text itself with any HTMLcharacters (“&”, “<”, and “>”) converted to the appropriate entities (“&”,“<”, and “>”) by the Qt.escape() function. We then check to see whetherthe fragment is a subscript or superscript, surrounding the text with appropri-ate HTML tags if necessary. Then, similar tests are done for other formattingcharacteristics—specifically, underlining, italics, bold, and strikeout—and ineach case the text has the appropriate HTML tags added to it.
if color != black or not family.isEmpty():
attribs = ""
if color != black:
attribs += ' color="%s"' % color.name()
if not family.isEmpty():
attribs += ' face="%s"' % family
text = QString("<font%1>%2</font>")\
.arg(attribs).arg(text)
html += text
iterator += 1
block = block.next()
return html
If the font family is not empty or if the color is not black, we must use a <font>
tag with the face or color (or both) attributes. At the end of the fragment weappend the text that represents the fragment to the html string that holds theentire line of rich text. Since each block may contain one or more fragments,we increment the iterator, dropping out of the inner while loop when it equalsQTextBlock.end(), that is, after we have processed the last fragment in theblock. Then we call QTextBlock.next() and process the next block’s fragments,finally dropping out of the outer while loop when we reach an invalid blockwhich signifies that all the blocks have been processed. And at the very end we
398 Chapter 13. Rich Text and Printing
return the html string that contains the valid (but minimal) HTML necessaryto represent the rich text line edit’s line of rich text.
This concludes the RichTextLineEdit class. We will use it in a couple of laterchapters. Although this subclass provides only a single line HTML editor, thetechniques we have seen can easily be applied to a QTextEdit subclass that isdesigned to edit entire HTML documents. In such cases, we would probablystill provide some additional keyboard support, such asCtrl+B and Ctrl+I for boldand italic, and perhaps even the text effects context menu. But the other texteffects, colors, and formatting that are more appropriate to larger documentssuch as lists and tables, we would provide through menu options and toolbarbuttons like any conventional HTML editor or word processor.
Printing Documents
Getting printed output from PyQt applications can be achieved in a numberof ways. One approach is to produce output in a form that another programcan print, such as producing HTML for a Web browser to print or SVG for anSVG-savvy drawing program to print.
From Qt 4.1, users can produce PDF documents through the Print dialog bychecking the “print to file” option. It is also possible to produce PDF Qt
4.1
documentsprogrammatically. For example, assuming that document is a QTextDocument:
printer = QPrinter()
printer.setPageSize(QPrinter.Letter)
printer.setOutputFormat(QPrinter.PdfFormat)
printer.setOutputFileName(filename)
document.print_(printer)
These approaches are not as convenient for users as having a printing facilitywithin the application itself, and to do this PyQt offers three main choices.
1. We can generate HTML, give it to a QTextDocument, and use QTextDocu-
ment.print_() passing in a QPrinter, or QTextDocument.drawContents(), pass-ing in a QPainter to render the document.
2. We can create a QTextDocument and retrieve a QTextCursor from it throughwhich we can generate the document programmatically, and again usingthe print_() or drawContents() methods to render it.
3. We can create a QPainter to paint directly onto a QPrinter, that is, ontothe printed pages. This is the most tedious approach, but it provides thegreatest level of control.
The example application covered in this section shows all three techniques.It prints customer statements, with each Statement object holding a companyname, contact name, address, and list of transactions, each of which is a (QDate,float) tuple. The Statement class also provides a balance() method that returns
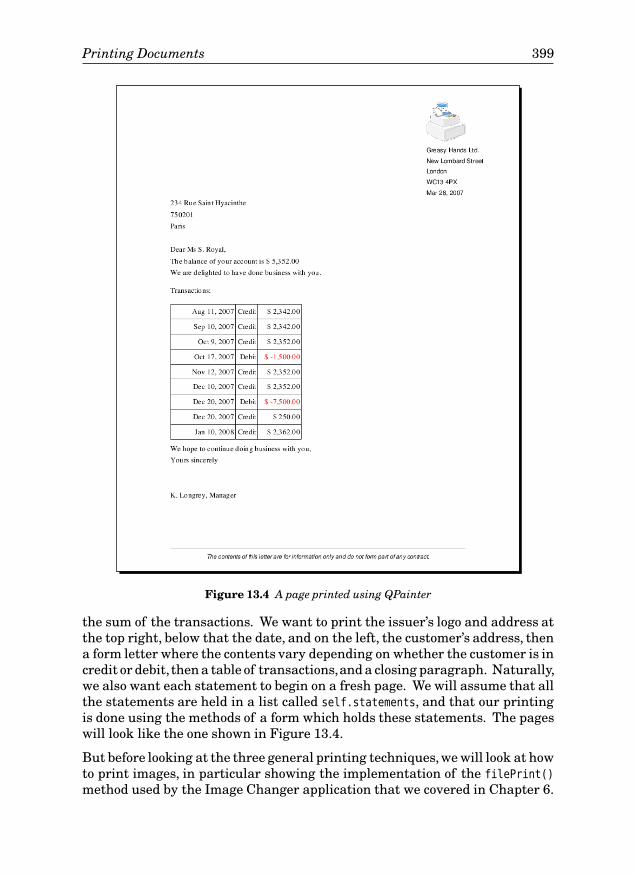
Printing Documents 399
Figure 13.4 A page printed using QPainter
the sum of the transactions. We want to print the issuer’s logo and address atthe top right, below that the date, and on the left, the customer’s address, thena form letter where the contents vary depending on whether the customer is incredit or debit, then a table of transactions,and a closing paragraph. Naturally,we also want each statement to begin on a fresh page. We will assume that allthe statements are held in a list called self.statements, and that our printingis done using the methods of a form which holds these statements. The pageswill look like the one shown in Figure 13.4.
But before looking at the three general printing techniques,we will look at howto print images, in particular showing the implementation of the filePrint()
method used by the Image Changer application that we covered in Chapter 6.
400 Chapter 13. Rich Text and Printing
Printing Images
Back in Chapter 6, we had a MainWindow.filePrint() method for printing animage, but we did not look at its implementation at that point because we hadnot covered QPainter. Now that we have seen QPainter in Chapter 11, and haveseen aPrint-
ingImagessidebar
363 ☞
generic “print image” function,we can look at the implementation of thefilePrint() method used by the Image Changer application. (The source codeis in chap06/imagechanger.pyw.)
def filePrint(self):
if self.image.isNull():
return
if self.printer is None:
self.printer = QPrinter(QPrinter.HighResolution)
self.printer.setPageSize(QPrinter.Letter)
form = QPrintDialog(self.printer, self)
if form.exec_():
painter = QPainter(self.printer)
rect = painter.viewport()
size = self.image.size()
size.scale(rect.size(), Qt.KeepAspectRatio)
painter.setViewport(rect.x(), rect.y(), size.width(),
size.height())
painter.drawImage(0, 0, self.image)
If this is the first time the user has tried to print an image the printer instancevariable will be None, so we instantiate it and provide a sensible default for thepage size. (The default page size is QPrinter.A4.) Once we have a printer object,we create and pop up a modal QPrintDialog; the user can use this to choosethe printer they want to print on and various other print-related options.This dialog varies from system to system since PyQt uses the system’s nativeprint dialog if one is available. If the user clicks Print, we are able to printthe image.
PyQt has a notion of a “paint device”, something on which lines, text, shapes,and images can be painted. As we have seen in earlier chapters, a widget isa paint device—its appearance is drawn, with the illusions of depth achievedby drawing shadows and highlights. A QImage is a paint device, and so is aQPrinter. All paint devices can be drawn on using a QPainter, so we create a newQPainter primed to paint on the QPrinter.
We get the rectangle that represents the painter’s viewport. The viewport isthe painter’s drawing area, and in the case of a painterView-
port andwindowcoordi-nates
329 ☞
that is tied to a printer,this means the area of the page that can actually be drawn on. (Many printerscannot draw right up to the edges of the paper.) We then obtain the image’s sizeas a QSize object, and then scale that object to fit inside the printer’s viewportrectangle while preserving the size’s aspect ratio. This has no effect if theimage is already small enough to fit. Next, we change the printer’s viewport
Printing Documents 401
rectangle to match our scaled rectangle, preserving its original origin, but withthe scaled width and height. Finally we draw the image at the painter’s originand we are done.
If the user wants a PDF file, they can invoke the “print” action and choose the“print to file” option. On some platforms it is also possible to get PostScriptoutput by changing the “print to file” filename’s extension to .ps.
Printing Documents Using HTML and QTextDocument
The first approach we will show involves creating a string containing HTML,and using a QTextDocument to render the HTML to a QPrinter. The printVia-
Html() method is quite long, so we will look at it in three parts.
def printViaHtml(self):
html = u""
for statement in self.statements:
date = QDate.currentDate().toString(DATE_FORMAT)
address = Qt.escape(statement.address).replace(",", "<br>")
contact = Qt.escape(statement.contact)
balance = statement.balance()
html += ("<p align=right><img src=':/logo.png'></p>"
"<p align=right>Greasy Hands Ltd."
"<br>New Lombard Street"
"<br>London<br>WC13 4PX<br>%s</p>"
"<p>%s</p><p>Dear %s,</p>"
"<p>The balance of your account is %s.") % (
date, address, contact,
QString("$ %L1").arg(float(balance), 0, "f", 2))
if balance < 0:
html += (" <p><font color=red><b>Please remit the "
"amount owing immediately.</b></font>")
else:
html += (" We are delighted to have done business "
"with you.")
html += ("</p><p> </p><p>"
"<table border=1 cellpadding=2 "
"cellspacing=2><tr><td colspan=3>"
"Transactions</td></tr>")
We create an empty unicode variable called html. Then we iterate over all thestatements. The contact and address contain text, so we take the precautionof escaping any HTML characters. The address is stored as a single line withcommas separating each part; we replace commas with line breaks. The logo isin a resource file, as indicated by the :/ prefix; it could have been any file in thefilesystem, and it could be in any of the image formats that PyQt supports.
402 Chapter 13. Rich Text and Printing
Up to now we have formatted strings using Python’s % operator. But in somecases, using PyQt’s string formatting is advantageous. The QString class hasan arg() method that can be given an object, usually a string or a number, withsome optional parameters. Each arg() call replaces the leftmost %n item in theQString with suitable text. For example:
QString("Copied %1 bytes to %2").arg(5387).arg("log.txt")
results in the string:
Copied 5387 bytes to log.txt
The %n items have no formatting syntax like Python’s % operator,but formattingcan be achieved by passing additional arguments to the arg() method. It is alsopossible to localize the formatting by using %Ln. For example:
QString("Copied %L1 bytes to %2").arg(5387).arg("log.txt")
results in the string:
Copied 5,387 bytes to log.txt
in the United States and the United Kingdom, with the number coming out as5.387 in some other countries.
In the case of our example, we want to print the amounts using two decimaldigits, and with the whole number part having its digits grouped in threes.This can be achieved by using arg() with four arguments—the amount as afloat, the minimum number of characters for the number to occupy, the outputformat (“f” for normal floating-point numbers and “e” or “E” for scientificnotation) and the number of digits after the decimal place. It is also possible togive a fifth argument,a padding character, if a minimum number of charactersis specified.
In the example we have used:
QString("$ %L1").arg(float(balance), 0, "f", 2))
A balance of 64 325.852 would be output as the string $ 64,325.85 in theUnited States.
Returning to the code, we add some text that varies depending on whether thecustomer is in debit or credit. Then we create the head of an HTML table withthree columns, with the first row spanning all the columns and containing thetitle “Transactions”. The is an HTML entity that signifies a nonbreak-ing space.
for date, amount in statement.transactions:
color, status = "black", "Credit"
if amount < 0:
color, status = "red", "Debit"
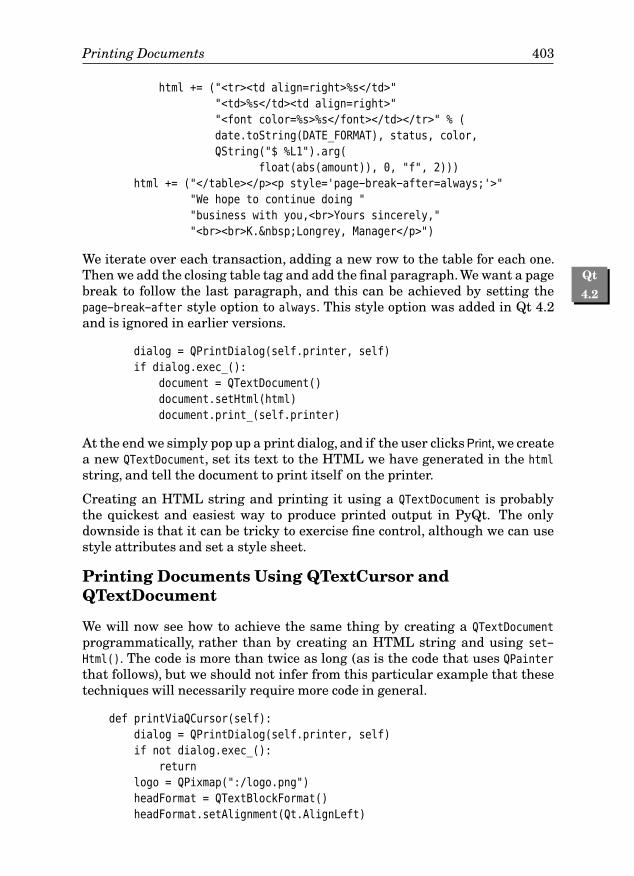
Printing Documents 403
html += ("<tr><td align=right>%s</td>"
"<td>%s</td><td align=right>"
"<font color=%s>%s</font></td></tr>" % (
date.toString(DATE_FORMAT), status, color,
QString("$ %L1").arg(
float(abs(amount)), 0, "f", 2)))
html += ("</table></p><p style='page-break-after=always;'>"
"We hope to continue doing "
"business with you,<br>Yours sincerely,"
"<br><br>K. Longrey, Manager</p>")
We iterate over each transaction, adding a new row to the table for each one.Then we add the closing table tag and add the final paragraph. Qt
4.2
We want a pagebreak to follow the last paragraph, and this can be achieved by setting thepage-break-after style option to always. This style option was added in Qt 4.2and is ignored in earlier versions.
dialog = QPrintDialog(self.printer, self)
if dialog.exec_():
document = QTextDocument()
document.setHtml(html)
document.print_(self.printer)
At the end we simply pop up a print dialog, and if the user clicksPrint, we createa new QTextDocument, set its text to the HTML we have generated in the html
string, and tell the document to print itself on the printer.
Creating an HTML string and printing it using a QTextDocument is probablythe quickest and easiest way to produce printed output in PyQt. The onlydownside is that it can be tricky to exercise fine control, although we can usestyle attributes and set a style sheet.
Printing Documents Using QTextCursor andQTextDocument
We will now see how to achieve the same thing by creating a QTextDocument
programmatically, rather than by creating an HTML string and using set-
Html(). The code is more than twice as long (as is the code that uses QPainter
that follows), but we should not infer from this particular example that thesetechniques will necessarily require more code in general.
def printViaQCursor(self):
dialog = QPrintDialog(self.printer, self)
if not dialog.exec_():
return
logo = QPixmap(":/logo.png")
headFormat = QTextBlockFormat()
headFormat.setAlignment(Qt.AlignLeft)
404 Chapter 13. Rich Text and Printing
headFormat.setTextIndent(
self.printer.pageRect().width() - logo.width() - 216)
bodyFormat = QTextBlockFormat()
bodyFormat.setAlignment(Qt.AlignJustify)
lastParaBodyFormat = QTextBlockFormat(bodyFormat)
lastParaBodyFormat.setPageBreakPolicy(
QTextFormat.PageBreak_AlwaysAfter)
rightBodyFormat = QTextBlockFormat()
rightBodyFormat.setAlignment(Qt.AlignRight)
headCharFormat = QTextCharFormat()
headCharFormat.setFont(QFont("Helvetica", 10))
bodyCharFormat = QTextCharFormat()
bodyCharFormat.setFont(QFont("Times", 11))
redBodyCharFormat = QTextCharFormat(bodyCharFormat)
redBodyCharFormat.setForeground(Qt.red)
tableFormat = QTextTableFormat()
tableFormat.setBorder(1)
tableFormat.setCellPadding(2)
We have chosen to create the document only if the user clicks Print in the Printdialog, rather than creating it and only asking them at the end, as we did be-fore. We create a set of text formats—some are QTextBlockFormats that haveattributes which are applicable to entire paragraphs,and others are QTextChar-
Formats with attributes that are applicable to fragments of paragraphs, such asphrases,words,and individual characters. We use the paragraph formats to setup text alignments, and the character formats to set up fonts and colors. Thevalue, 216, is just an offset in points, 216
72 ", that is, 3 inches, by which the logo andaddress text will be indented.
The programmatic equivalent of setting the page-break-after style option in anHTML <p> tag is to use the QTextBlockFormat.setPageBreakPolicy() method on aparagraph format, Qt
4.2
but this is available only from Qt 4.2. In addition to the textand table formats used in this example, there are also formats for lists, frames,and images.
document = QTextDocument()
cursor = QTextCursor(document)
mainFrame = cursor.currentFrame()
page = 1
Once we have the formats ready, we create a QTextDocument. Then we create aQTextCursor for the document that gives us the programmatic equivalent of theuser’s insertion point in a QTextEdit.
Earlier we mentioned that QTextDocuments consist of a series of blocks; in fact,they consist of a root frame that itself contains a series of items which can beblocks (e.g., text blocks and table blocks), or frames, in a potentially recursivestructure. In our case, we have a document with a single root frame that
Printing Documents 405
contains a series of text blocks and tables. Each cell in our tables holds a textblock, and when we have finished inserting the cells in a table we need to goback up the document’s hierarchy to the point that follows the table (but is notinside the table) so that we can insert the text that follows each table. For thisreason we keep a reference to the currentFrame(), the one frame we are using,in the mainFrame variable.
for statement in self.statements:
cursor.insertBlock(headFormat, headCharFormat)
cursor.insertImage(":/logo.png")
for text in ("Greasy Hands Ltd.", "New Lombard Street",
"London", "WC13 4PX",
QDate.currentDate().toString(DATE_FORMAT)):
cursor.insertBlock(headFormat, headCharFormat)
cursor.insertText(text)
for line in statement.address.split(", "):
cursor.insertBlock(bodyFormat, bodyCharFormat)
cursor.insertText(line)
cursor.insertBlock(bodyFormat)
cursor.insertBlock(bodyFormat, bodyCharFormat)
cursor.insertText("Dear %s," % statement.contact)
cursor.insertBlock(bodyFormat)
cursor.insertBlock(bodyFormat, bodyCharFormat)
balance = statement.balance()
cursor.insertText(QString(
"The balance of your account is $ %L1.").arg(
float(balance), 0, "f", 2))
if balance < 0:
cursor.insertBlock(bodyFormat, redBodyCharFormat)
cursor.insertText("Please remit the amount owing "
"immediately.")
else:
cursor.insertBlock(bodyFormat, bodyCharFormat)
cursor.insertText("We are delighted to have done "
"business with you.")
cursor.insertBlock(bodyFormat, bodyCharFormat)
cursor.insertText("Transactions:")
table = cursor.insertTable(len(statement.transactions), 3,
tableFormat)
Once the document is set up and we have a QTextCursor through which wecan insert items into the document, we are ready to iterate over each of thestatements.
For each paragraph we want to insert, we insert a new block with a paragraphand a character format. We then insert the text or image we want the para-graph to contain. We can insert empty paragraphs (to consume vertical space)by inserting a block without inserting anything into it.
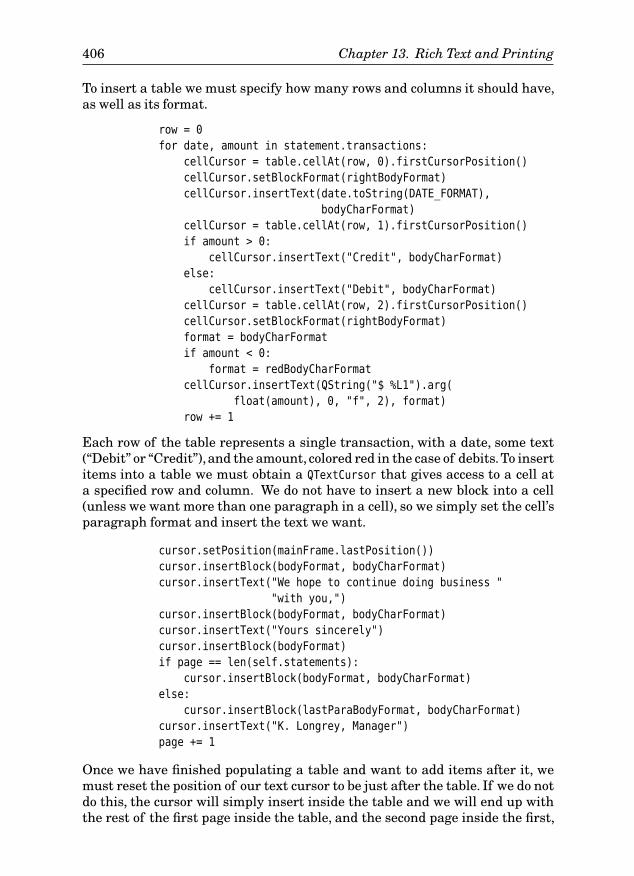
406 Chapter 13. Rich Text and Printing
To insert a table we must specify how many rows and columns it should have,as well as its format.
row = 0
for date, amount in statement.transactions:
cellCursor = table.cellAt(row, 0).firstCursorPosition()
cellCursor.setBlockFormat(rightBodyFormat)
cellCursor.insertText(date.toString(DATE_FORMAT),
bodyCharFormat)
cellCursor = table.cellAt(row, 1).firstCursorPosition()
if amount > 0:
cellCursor.insertText("Credit", bodyCharFormat)
else:
cellCursor.insertText("Debit", bodyCharFormat)
cellCursor = table.cellAt(row, 2).firstCursorPosition()
cellCursor.setBlockFormat(rightBodyFormat)
format = bodyCharFormat
if amount < 0:
format = redBodyCharFormat
cellCursor.insertText(QString("$ %L1").arg(
float(amount), 0, "f", 2), format)
row += 1
Each row of the table represents a single transaction, with a date, some text(“Debit” or “Credit”),and the amount, colored red in the case of debits.To insertitems into a table we must obtain a QTextCursor that gives access to a cell ata specified row and column. We do not have to insert a new block into a cell(unless we want more than one paragraph in a cell), so we simply set the cell’sparagraph format and insert the text we want.
cursor.setPosition(mainFrame.lastPosition())
cursor.insertBlock(bodyFormat, bodyCharFormat)
cursor.insertText("We hope to continue doing business "
"with you,")
cursor.insertBlock(bodyFormat, bodyCharFormat)
cursor.insertText("Yours sincerely")
cursor.insertBlock(bodyFormat)
if page == len(self.statements):
cursor.insertBlock(bodyFormat, bodyCharFormat)
else:
cursor.insertBlock(lastParaBodyFormat, bodyCharFormat)
cursor.insertText("K. Longrey, Manager")
page += 1
Once we have finished populating a table and want to add items after it, wemust reset the position of our text cursor to be just after the table. If we do notdo this, the cursor will simply insert inside the table and we will end up withthe rest of the first page inside the table, and the second page inside the first,
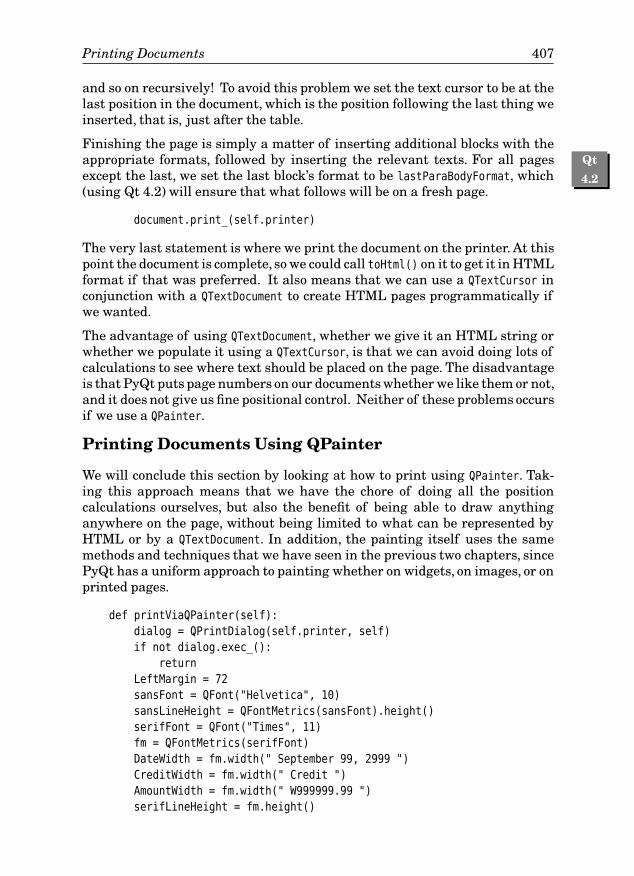
Printing Documents 407
and so on recursively! To avoid this problem we set the text cursor to be at thelast position in the document, which is the position following the last thing weinserted, that is, just after the table.
Finishing the page is simply a matter of inserting additional blocks with theappropriate formats, followed by inserting the relevant texts. Qt
4.2
For all pagesexcept the last, we set the last block’s format to be lastParaBodyFormat, which(using Qt 4.2) will ensure that what follows will be on a fresh page.
document.print_(self.printer)
The very last statement is where we print the document on the printer. At thispoint the document is complete, so we could call toHtml() on it to get it in HTMLformat if that was preferred. It also means that we can use a QTextCursor inconjunction with a QTextDocument to create HTML pages programmatically ifwe wanted.
The advantage of using QTextDocument, whether we give it an HTML string orwhether we populate it using a QTextCursor, is that we can avoid doing lots ofcalculations to see where text should be placed on the page. The disadvantageis that PyQt puts page numbers on our documents whether we like them or not,and it does not give us fine positional control. Neither of these problems occursif we use a QPainter.
Printing Documents Using QPainter
We will conclude this section by looking at how to print using QPainter. Tak-ing this approach means that we have the chore of doing all the positioncalculations ourselves, but also the benefit of being able to draw anythinganywhere on the page, without being limited to what can be represented byHTML or by a QTextDocument. In addition, the painting itself uses the samemethods and techniques that we have seen in the previous two chapters, sincePyQt has a uniform approach to painting whether on widgets, on images, or onprinted pages.
def printViaQPainter(self):
dialog = QPrintDialog(self.printer, self)
if not dialog.exec_():
return
LeftMargin = 72
sansFont = QFont("Helvetica", 10)
sansLineHeight = QFontMetrics(sansFont).height()
serifFont = QFont("Times", 11)
fm = QFontMetrics(serifFont)
DateWidth = fm.width(" September 99, 2999 ")
CreditWidth = fm.width(" Credit ")
AmountWidth = fm.width(" W999999.99 ")
serifLineHeight = fm.height()
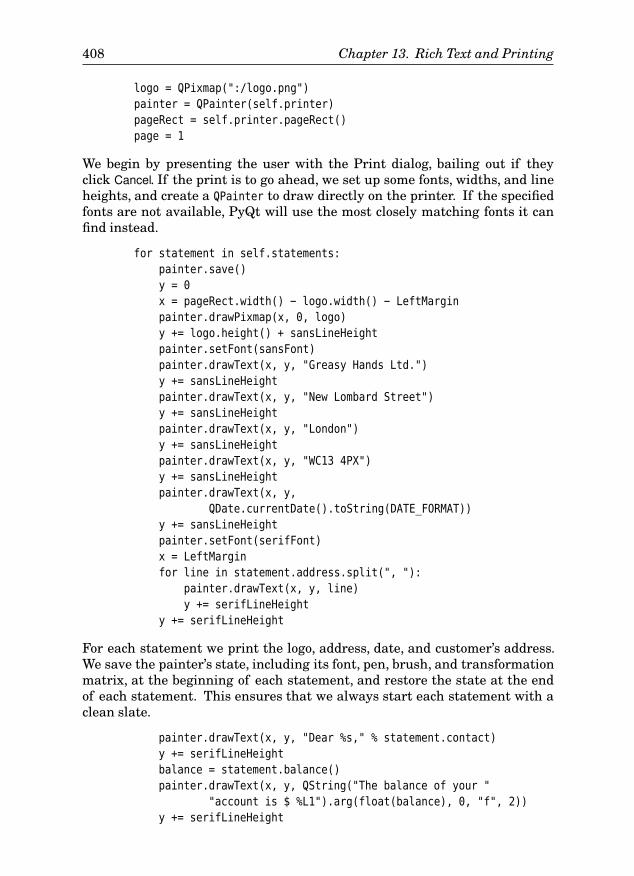
408 Chapter 13. Rich Text and Printing
logo = QPixmap(":/logo.png")
painter = QPainter(self.printer)
pageRect = self.printer.pageRect()
page = 1
We begin by presenting the user with the Print dialog, bailing out if theyclick Cancel. If the print is to go ahead, we set up some fonts, widths, and lineheights, and create a QPainter to draw directly on the printer. If the specifiedfonts are not available, PyQt will use the most closely matching fonts it canfind instead.
for statement in self.statements:
painter.save()
y = 0
x = pageRect.width() - logo.width() - LeftMargin
painter.drawPixmap(x, 0, logo)
y += logo.height() + sansLineHeight
painter.setFont(sansFont)
painter.drawText(x, y, "Greasy Hands Ltd.")
y += sansLineHeight
painter.drawText(x, y, "New Lombard Street")
y += sansLineHeight
painter.drawText(x, y, "London")
y += sansLineHeight
painter.drawText(x, y, "WC13 4PX")
y += sansLineHeight
painter.drawText(x, y,
QDate.currentDate().toString(DATE_FORMAT))
y += sansLineHeight
painter.setFont(serifFont)
x = LeftMargin
for line in statement.address.split(", "):
painter.drawText(x, y, line)
y += serifLineHeight
y += serifLineHeight
For each statement we print the logo, address, date, and customer’s address.We save the painter’s state, including its font, pen, brush, and transformationmatrix, at the beginning of each statement, and restore the state at the endof each statement. This ensures that we always start each statement with aclean slate.
painter.drawText(x, y, "Dear %s," % statement.contact)
y += serifLineHeight
balance = statement.balance()
painter.drawText(x, y, QString("The balance of your "
"account is $ %L1").arg(float(balance), 0, "f", 2))
y += serifLineHeight
Printing Documents 409
if balance < 0:
painter.setPen(Qt.red)
text = "Please remit the amount owing immediately."
else:
text = ("We are delighted to have done business "
"with you.")
painter.drawText(x, y, text)
After the addresses we print the form letter with its text depending on the stateof the account as usual.
painter.setPen(Qt.black)
y += int(serifLineHeight * 1.5)
painter.drawText(x, y, "Transactions:")
y += serifLineHeight
option = QTextOption(Qt.AlignRight|Qt.AlignVCenter)
For the table of transactions we begin by writing the table’s title and then wecreate a QTextOption object. These objects can be used to specify a variety oftext-formatting options, including alignment and word wrapping.
for date, amount in statement.transactions:
x = LeftMargin
h = int(fm.height() * 1.3)
painter.drawRect(x, y, DateWidth, h)
painter.drawText(
QRectF(x + 3, y + 3, DateWidth - 6, h - 6),
date.toString(DATE_FORMAT), option)
x += DateWidth
painter.drawRect(x, y, CreditWidth, h)
text = "Credit"
if amount < 0:
text = "Debit"
painter.drawText(
QRectF(x + 3, y + 3, CreditWidth - 6, h - 6),
text, option)
x += CreditWidth
painter.drawRect(x, y, AmountWidth, h)
if amount < 0:
painter.setPen(Qt.red)
painter.drawText(
QRectF(x + 3, y + 3, AmountWidth - 6, h - 6),
QString("$ %L1").arg(float(amount), 0, "f", 2),
option)
painter.setPen(Qt.black)
y += h
410 Chapter 13. Rich Text and Printing
To draw the transactions table we must draw both the text and the linesourselves. We have cheated slightly by drawing a rectangle for each of thetable’s cells rather than just drawing the lines that separate the cells. Thismeans that rectangles that share common lines—for example, the right edgeof one rectangle and the left edge of the rectangle beside it—will overstrike oneanother—but visually this is not noticeable.
y += serifLineHeight
x = LeftMargin
painter.drawText(x, y, "We hope to continue doing "
"business with you,")
y += serifLineHeight
painter.drawText(x, y, "Yours sincerely")
y += serifLineHeight * 3
painter.drawText(x, y, "K. Longrey, Manager")
The final paragraph is the same as the one in the previous two methods, butthis time we will add a disclaimer at the bottom of the page.
x = LeftMargin
y = pageRect.height() - 72
painter.drawLine(x, y, pageRect.width() - LeftMargin, y)
y += 2
font = QFont("Helvetica", 9)
font.setItalic(True)
painter.setFont(font)
option = QTextOption(Qt.AlignCenter)
option.setWrapMode(QTextOption.WordWrap)
painter.drawText(
QRectF(x, y,
pageRect.width() - 2 * LeftMargin, 31),
"The contents of this letter are for information "
"only and do not form part of any contract.",
option)
It is much easier adding footers when using a QPainter because we knowexactly what the page’s dimensions are and can paint at any (x, y) positionwe like.
page += 1
if page <= len(self.statements):
self.printer.newPage()
painter.restore()
Finally, we switch to a new page after every statement except the last one. Thisworks with all Qt 4 versions, unlike the previous two approaches which canpaginate properly only with Qt 4.2 or later.
Printing Documents 411
Although printing using a QPainter requires more care and calculation thanusing a QTextDocument, it does give us complete control over the output.
Summary
Using QSyntaxHighlighter to provide syntax highlighting for plain text thathas a regular syntax, such as source code, is quite straightforward. Handlingmultiline constructs can also be done quite easily. The hardest part is handlingambiguous and some special cases, such as quotes inside quoted strings orstart-of-comment symbols that are inside quotes or other constructs that canceltheir syntactic meaning. An alternative is to use the QScintilla editor.
The QTextEdit class is very powerful and versatile. Out of the box it can beused to edit both plain text and HTML. It is not difficult to create QTextEdit
subclasses that provide key and context menu event handlers to give the userbasic formatting options, and the techniques can easily be extended to providemenus and toolbars through which users could add, edit, and delete lists,tables, and images, and could apply formatting whether at the character level,such as underlining and strikeout, or at the paragraph level, such as aligningleft, right, centered, or justified.
The HTML returned by QTextEdit.toHtml() is rather verbose because it mustsupport a wide range of HTML tags. We can provide our own methods to tra-verse a QTextDocument’s structure and output our own format. In the examplewe output a much simpler and shorter HTML, but the same approach could beused to output XML or other kinds of markup.
Applying most simple formatting to the underlying QTextDocument used byQTextEdit, QTextBrowser, QLabel, and QGraphicsTextItem is quite straightforward.Applying more advanced formatting, such as tables can be trickier because wemust be careful not to keep nesting blocks inside each other.
Printed documents can be produced indirectly by outputting HTML or SVG,or directly by using a QPrinter to print on a physical printer, or from Qt 4.1 tooutput PDF files. Printed documents can be produced by creating an HTMLstring and giving it to a QTextDocument, or by programmatically inserting itemsinto a blank QTextDocument. In both cases, the QTextDocument can be asked toprint itself on a printer, or to draw itself on a QPainter.
Using HTML is the easiest approach for those familiar with HTML tags, anda fair amount of control can be achieved by using style attributes and a stylesheet. Using a QTextCursor to insert into a QTextDocument makes finer controlquite easy to achieve, especially for those unfamiliar with style sheets. Thegreatest control over page appearance is achieved by using a QPainter directly.This is also the easiest approach for those who are comfortable using theQPainter API, or who want to reuse the same code for painting and for printing.Such code reuse can also be achieved using a QTextDocument, since they can berendered in QLabels and other widgets that use QTextDocuments. They can also
412 Chapter 13. Rich Text and Printing
be drawn onto arbitrary paint devices, such as widgets, using a QPainter, andthey can be printed.
ExerciseAdd two new actions, Indent and Unindent, with the shortcuts Ctrl+] and Ctrl+[.Suitable icons are provided in the images subdirectory, and are already in theresources.qrc file. Both actions should be added to theEditmenu and to the edittoolbar. Implement the methods editIndent() and editUnindent(). They shouldindent or unindent the current line by inserting or removing four spaces at thebeginning of the line, no matter where the insertion point is in the line. At theend, the insertion point should be at the same relative position as it was beforethe indent or unindent. The actions should be instance variables and shouldbe enabled only if the document is not empty.
Make sure that you use QTextCursor.beginEditBlock() and QTextCursor.endEdit-
Block() so that the indent or unindent can be undone as a single action—QText-
Edit supports Ctrl+Z for undo. The two methods can be written in a total ofabout 20 lines.
If you want to achieve something more ambitious, try extending the twomethods so that if there is a selection, the indent or unindent is applied to allthe lines in the selection. This will add about another 40 lines, and it is slightlytricky. Make sure that at the end the original selection is in place.
You will need to read the documentation for QTextCursor and, especially, theanchor(), position(), setPosition(), and movePosition() methods.
A solution is provided in chap13/pythoneditor_ans.pyw.
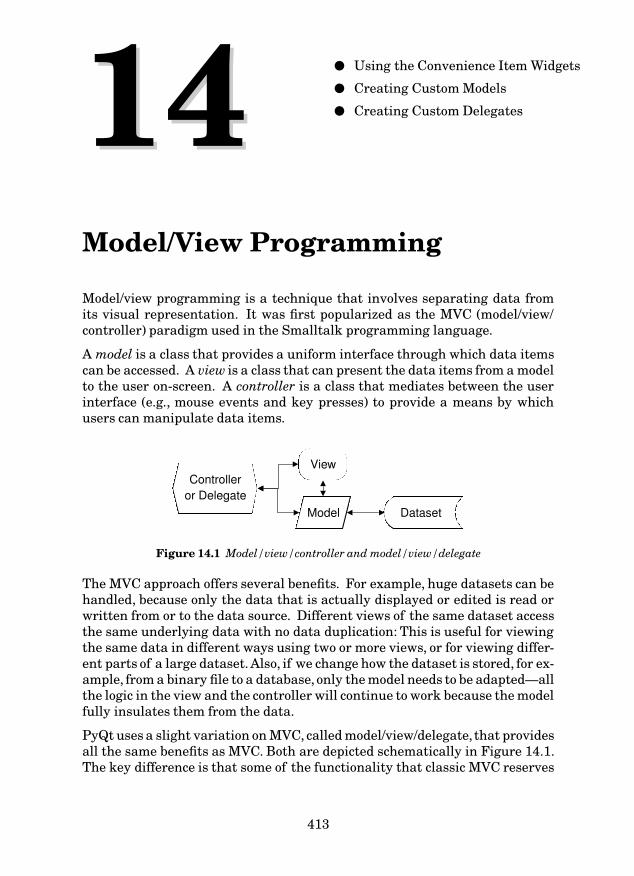
Model/View Programming
1414 ● Using the Convenience Item Widgets
● Creating Custom Models
● Creating Custom Delegates
Model/view programming is a technique that involves separating data fromits visual representation. It was first popularized as the MVC (model/view/controller) paradigm used in the Smalltalk programming language.
A model is a class that provides a uniform interface through which data itemscan be accessed. A view is a class that can present the data items from a modelto the user on-screen. A controller is a class that mediates between the userinterface (e.g., mouse events and key presses) to provide a means by whichusers can manipulate data items.
ViewControlleror Delegate
Model Dataset
Figure 14.1 Model/view/controller and model/view/delegate
The MVC approach offers several benefits. For example, huge datasets can behandled, because only the data that is actually displayed or edited is read orwritten from or to the data source. Different views of the same dataset accessthe same underlying data with no data duplication: This is useful for viewingthe same data in different ways using two or more views, or for viewing differ-ent parts of a large dataset.Also, if we change how the dataset is stored, for ex-ample, from a binary file to a database, only the model needs to be adapted—allthe logic in the view and the controller will continue to work because the modelfully insulates them from the data.
PyQt uses a slight variation on MVC, called model/view/delegate, that providesall the same benefits as MVC. Both are depicted schematically in Figure 14.1.The key difference is that some of the functionality that classic MVC reserves
413
414 Chapter 14. Model/View Programming
for the controller can be implemented either in the delegate or in the modelwith the model/view/delegate approach.
Conceptually, the model/view/delegate approach works like this: The data isread and written from and to the data source by the model. The view asks themodel for the data items that the view wants to display, that is, those items thatare visible in the user interface. For each item that the view displays, it givesthe item and a painter to the delegate, and asks the delegate to paint the item.Similarly, if the user initiates editing, the view asks the delegate to provide asuitable editor, and if the user accepts their edit (i.e., if the user does not pressEsc to cancel), the updated data is passed back to the model. An editor canbe any widget, and it is drawn in-place exactly on top of the item, giving theapplication’s user the illusion that the item has become editable.
Every data item in the model (and therefore implicitly every item of data inthe dataset), can be identified by a unique QModelIndex. Each model index hasthree important attributes: a row, a column, and a parent.
1. For one-dimensional models (e.g., lists) only the row is used.
2. For two-dimensional models (e.g., tables, including database tables) onlythe row and column are used.
3. For hierarchical models (e.g., trees) all three attributes are used.
Although QModelIndexes can refer to any data item in any model, we need tobear in mind that conceptually there are really two kinds of model. The firstkind are tables, which include lists since these are just tables with a singlecolumn. When we work with tables we work in terms of rows and columns.The second kind are trees. For trees we work in terms of parents and children.(It is possible to take a rows-and-columns approach with trees, but this goesagainst the grain and will lead to code that is slow and difficult to maintain.)
No matter what the underlying dataset, whether the data is in memory,databases, or files, PyQt models provide the same uniform interface fordata access—in particular, the QAbstractItemModel.data() and QAbstractItem-
Model.setData() methods. It is also possible to create custom models that con-tain the dataset inside themselves, such as a model that is a wrapper arounda dictionary or a list.
All data held in a model is stored as QVariants. This does not mean that all thedataset’s data must be QVariants—the model is an interface to a dataset and inany given session may only ever access a small portion of the entire dataset,so only those data items that are actually used will be stored as QVariants, andthen only in the model. The model is responsible for converting from the under-lying dataset’s data types to and from the QVariants the model uses internally.
Some PyQt widgets, including QListWidget, QTableWidget, and QTreeWidget,are views with models and delegates aggregated inside them. These are theconvenience item view widgets and they are especially useful for small and adhoc datasets. We will see them in use in this chapter’s first section.
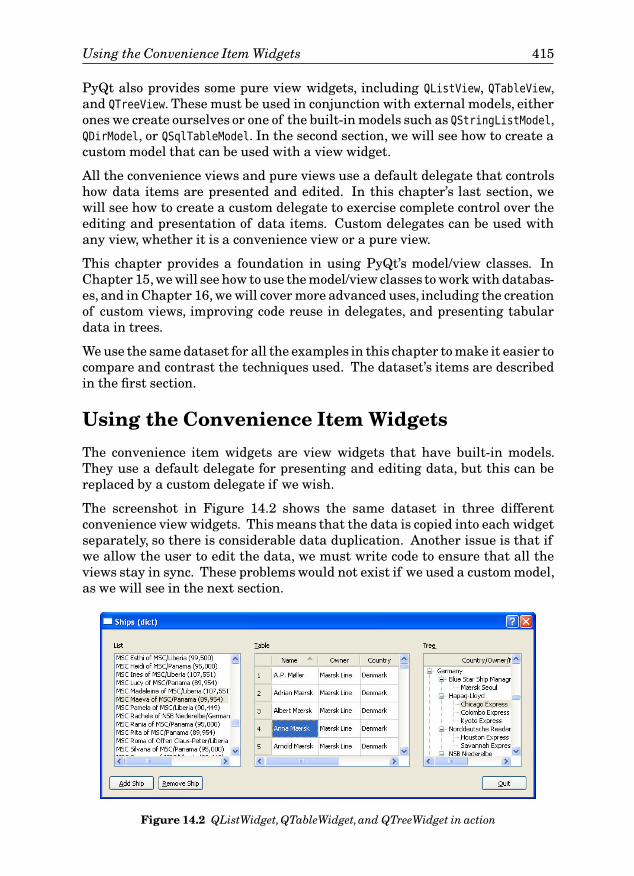
Using the Convenience Item Widgets 415
PyQt also provides some pure view widgets, including QListView, QTableView,and QTreeView. These must be used in conjunction with external models, eitherones we create ourselves or one of the built-in models such as QStringListModel,QDirModel, or QSqlTableModel. In the second section, we will see how to create acustom model that can be used with a view widget.
All the convenience views and pure views use a default delegate that controlshow data items are presented and edited. In this chapter’s last section, wewill see how to create a custom delegate to exercise complete control over theediting and presentation of data items. Custom delegates can be used withany view, whether it is a convenience view or a pure view.
This chapter provides a foundation in using PyQt’s model/view classes. InChapter 15, we will see how to use the model/view classes to work with databas-es, and in Chapter 16, we will cover more advanced uses, including the creationof custom views, improving code reuse in delegates, and presenting tabulardata in trees.
We use the same dataset for all the examples in this chapter to make it easier tocompare and contrast the techniques used. The dataset’s items are describedin the first section.
Using the Convenience Item Widgets
The convenience item widgets are view widgets that have built-in models.They use a default delegate for presenting and editing data, but this can bereplaced by a custom delegate if we wish.
The screenshot in Figure 14.2 shows the same dataset in three differentconvenience view widgets. This means that the data is copied into each widgetseparately, so there is considerable data duplication. Another issue is that ifwe allow the user to edit the data, we must write code to ensure that all theviews stay in sync. These problems would not exist if we used a custom model,as we will see in the next section.
Figure 14.2 QListWidget,QTableWidget,and QTreeWidget in action
416 Chapter 14. Model/View Programming
The dataset we are using is a set of information about container ships. Eachship is represented by a Ship object, defined in the chap14/ships.py module.
class Ship(object):
def __init__(self, name, owner, country, teu=0, description=""):
self.name = QString(name)
self.owner = QString(owner)
self.country = QString(country)
self.teu = teu
self.description = QString(description)
def __cmp__(self, other):
return QString.localeAwareCompare(self.name.toLower(),
other.name.toLower())
The preceding code is the complete Ship class. The integer teu attribute standsfor “twenty-foot equivalent units”, that is, how many 20-foot containers theship can hold. (Nowadays most containers are 40 feet, so each counts as 2TEUs.) The name, owner, and country attributes are all plain text, but thedescription attribute holds one line of HTML.
The __cmp__() special method provides a means of comparison for the purposeof sorting. The QString.localeAwareCompare() method does string comparisonsin a locale-sensitive way—for example, correctly handling accented char-acters.
Since we are using convenience views with no custom delegates, we have onlylimited control over the editing of the data items. For example, we cannot offerdrop-down comboboxes for editing owners and countries, or use spinboxes forediting TEUs. Also, the description text is shown raw, rather than being inter-preted as HTML. We will, of course, solve all of these problems as the chapterprogresses, but for now we will just focus on using the convenience views.
For the list, table, and tree items that are used with the convenience view wid-gets, it is possible to set their font, text alignment, text color, and backgroundcolor, and to give them an icon or make them checkable. For the pure view wid-gets, we can exercise similar control over the appearance of items through thecustom model; or exercise complete control over both the appearance and theediting of items by using a custom delegate.
The code for this section’s example is in chap14/ships-dict.pyw. The data is heldin a Python dictionary that itself is wrapped in the ships.ShipContainer class.We will discuss only the code that is relevant to model/view programminghere—the rest of the code uses ideas and idioms that we already saw earlier inthe book—for example, in Chapter 8—and is not hard to follow.
class MainForm(QDialog):
def __init__(self, parent=None):
Using the Convenience Item Widgets 417
super(MainForm, self).__init__(parent)
listLabel = QLabel("&List")
self.listWidget = QListWidget()
listLabel.setBuddy(self.listWidget)
tableLabel = QLabel("&Table")
self.tableWidget = QTableWidget()
tableLabel.setBuddy(self.tableWidget)
treeLabel = QLabel("Tre&e")
self.treeWidget = QTreeWidget()
treeLabel.setBuddy(self.treeWidget)
For each convenience view we create a label and set up a buddy to make key-board navigation easier.The layout code is similar to what we have seen before,so we have omitted it and will concern ourselves only with the connections andwith creating the data structure.
self.connect(self.tableWidget,
SIGNAL("itemChanged(QTableWidgetItem*)"),
self.tableItemChanged)
self.connect(addShipButton, SIGNAL("clicked()"), self.addShip)
self.connect(removeShipButton, SIGNAL("clicked()"),
self.removeShip)
self.connect(quitButton, SIGNAL("clicked()"), self.accept)
self.ships = ships.ShipContainer(QString("ships.dat"))
self.setWindowTitle("Ships (dict)")
By default, list widgets are not editable, so all users can do is select an item.This is also true of tree widgets. But table widgets are editable by default,withusers able to initiate editing by pressing F2 or by double-clicking a cell. We canexercise full control over whether a view widget is editable using QAbstract-
ItemView.setEditTriggers(); so, for example, we can make tables read-only orlists editable.
This application allows users to edit ship data in the table, and to add andremove ships. It also keeps all three views up-to-date by repopulating themafter the data is loaded, and whenever a change occurs.
def populateList(self, selectedShip=None):
selected = None
self.listWidget.clear()
for ship in self.ships.inOrder():
item = QListWidgetItem(QString("%1 of %2/%3 (%L4)") \
.arg(ship.name).arg(ship.owner).arg(ship.country) \
.arg(ship.teu))
self.listWidget.addItem(item)
if selectedShip is not None and selectedShip == id(ship):

418 Chapter 14. Model/View Programming
selected = item
if selected is not None:
selected.setSelected(True)
self.listWidget.setCurrentItem(selected)
This method, like the other populating methods, is used both to populate thewidget and to select the item that corresponds to the selectedShip—a Ship’sid()—if one is passed in.
We begin by clearing the widget. Then we iterate over every ship in the shipscontainer. The inOrder() method is provided by our custom ShipContainer class.For each ship we create a single list widgetQString
.arg()
402 ☞
item that holds a single string. Weuse QString.arg() so that we can use %L to show the TEUs with the appropriatedigit separators (e.g., commas).
If we reach a list widget item that is showing the selected ship, we keep areference to the item in selected, and after the list widget has been populated,we make the selected item both current and selected.
def populateTable(self, selectedShip=None):
selected = None
self.tableWidget.clear()
self.tableWidget.setSortingEnabled(False)
self.tableWidget.setRowCount(len(self.ships))
headers = ["Name", "Owner", "Country", "Description", "TEU"]
self.tableWidget.setColumnCount(len(headers))
self.tableWidget.setHorizontalHeaderLabels(headers)
The populate table method is quite similar to the populate list method. Webegin by clearing the table—this clears both the cells and the vertical andhorizontal headers (the row numbers and column titles). We then set thenumber of rows and columns, as well as the column titles.
We want users to be able to click a column to have the table sort by thatcolumn’s contents. This functionality is built into QTableWidget, but it must beswitched off before populating the table.★ We will switch sorting back on oncethe table is populated.
for row, ship in enumerate(self.ships):
item = QTableWidgetItem(ship.name)
item.setData(Qt.UserRole, QVariant(long(id(ship))))
if selectedShip is not None and selectedShip == id(ship):
selected = item
self.tableWidget.setItem(row, ships.NAME, item)
self.tableWidget.setItem(row, ships.OWNER,
QTableWidgetItem(ship.owner))
★In Qt 4.0 and 4.1, forgetting to switch off sorting before repopulating a table is harmless, but fromQt 4.2 it must be done.

Using the Convenience Item Widgets 419
self.tableWidget.setItem(row, ships.COUNTRY,
QTableWidgetItem(ship.country))
self.tableWidget.setItem(row, ships.DESCRIPTION,
QTableWidgetItem(ship.description))
item = QTableWidgetItem(QString("%L1") \
.arg(ship.teu, 8, 10, QChar(" ")))
item.setTextAlignment(Qt.AlignRight|Qt.AlignVCenter)
self.tableWidget.setItem(row, ships.TEU, item)
self.tableWidget.setSortingEnabled(True)
self.tableWidget.resizeColumnsToContents()
if selected is not None:
selected.setSelected(True)
self.tableWidget.setCurrentItem(selected)
For each ship we must create a separate table item for each cell in the row thatis used to show its data. The column indexes, NAME, OWNER, and so on, are integersfrom the ships module.
In the first item of each row we set the text (the ship’s name) and, as user data,the ship’s ID. Storing the ID gives us a means of going from a table item to theship that the item’s row represents. This works because the ShipContainer is adictionary whose keys are ship IDs and whose values are ships.
For simple text items we can usually create the item and insert it into the tablein a single statement:We have done this for the owner, country, and descriptionattributes. But if we want to format the item or store user data in it, we mustcreate the item separately, then call its methods, and finally put it in the tablewith setItem(). We used this second approach to store the ships’ IDs as userdata, and to right-align the TEU values.
The TEU values are integers, and the QString.arg() method used takes fourarguments:an integer, a minimum field width, a number base, and a characterto pad with, should padding be necessary to reach the minimum field width.
Once the table is populated we switch sorting back on, resize each columnto the width of its widest cell, and make the selected item (if any) currentand selected.
Populating lists and tables is very similar because they both use a rows-and-columns approach. Populating trees is quite different because we must usea parents-and-children approach. The tree view of the ships data has twocolumns. The first column is the tree with the root items being countries, thenext level items being owners,and the bottom-level items being the ships them-selves. The second column shows just the TEUs. We could have added a thirdcolumn to show the descriptions, but doing so does not make any difference interms of understanding how the tree widget works.
def populateTree(self, selectedShip=None):
selected = None
self.treeWidget.clear()
420 Chapter 14. Model/View Programming
self.treeWidget.setColumnCount(2)
self.treeWidget.setHeaderLabels(["Country/Owner/Name", "TEU"])
self.treeWidget.setItemsExpandable(True)
parentFromCountry = {}
parentFromCountryOwner = {}
We start off in a similar way to before, clearing the tree and setting up itscolumns and column titles. We also set the tree’s items to be expandable. Wewill explain the two dictionaries in a moment.
for ship in self.ships.inCountryOwnerOrder():
ancestor = parentFromCountry.get(ship.country)
if ancestor is None:
ancestor = QTreeWidgetItem(self.treeWidget,
[ship.country])
parentFromCountry[ship.country] = ancestor
countryowner = ship.country + "/" + ship.owner
parent = parentFromCountryOwner.get(countryowner)
if parent is None:
parent = QTreeWidgetItem(ancestor, [ship.owner])
parentFromCountryOwner[countryowner] = parent
item = QTreeWidgetItem(parent, [ship.name,
QString("%L1").arg(ship.teu)])
item.setTextAlignment(1, Qt.AlignRight|Qt.AlignVCenter)
if selectedShip is not None and selectedShip == id(ship):
selected = item
self.treeWidget.expandItem(parent)
self.treeWidget.expandItem(ancestor)
Each ship must have an owner parent in the tree, and each owner must havea country parent in the tree.
For each ship we check to see whether there is an item in the tree for the ship’scountry. We do this by looking in the parentFromCountry dictionary. If there isnot, we create a new country item with the tree widget as its parent, and keepa reference to the item in the dictionary. At this point, we have either retrievedor created the country (ancestor) item.
Then we check to see whether there is an item for the ship’s owner in the tree.We look in the parentFromCountryOwner dictionary for this. Again, if there is not,we create a new owner item, with a parent of the country (ancestor) item wejust found or created, and keep a reference to the owner item in the dictionary.At this point, we have either retrieved or created the owner (parent) item. Nowwe create a new item for the ship with the owner as its parent.
We have a parentFromCountryOwner rather than a parentFromOwner dictionarybecause a particular owner may operate in more than one country.
Using the Convenience Item Widgets 421
Tree widget items can have multiple columns, which is why we pass them alist in addition to their parent when we create them. We use the additionalcolumns for ships, just one extra column in fact, to store the ships’ TEUs. Weright align the TEU number by calling QTreeWidgetItem.setTextAlignment()
passing the column number as its first argument.
When adding items to convenience view widgets,we can either create the itemswith no parent and then add them, for example, using QTableWidget.setItem(),or we can create them with a parent, in which case PyQt will add them for us.We have chosen this second approach for populating the tree.
We have opted to expand every item so that the tree is fully expanded fromthe start. This is fine for relatively small trees, but not recommended forlarge ones.
self.treeWidget.resizeColumnToContents(0)
self.treeWidget.resizeColumnToContents(1)
if selected is not None:
selected.setSelected(True)
self.treeWidget.setCurrentItem(selected)
We finish by resizing the two columns and making the selected item (if any)current and selected.
We have left the list and tree views in their default read-only state. This meansthat the data can be changed only if the user edits items in the table, or if theyadd or remove ships; so in these cases, we must make sure that we keep theviews in sync. In the case of editing, the tableItemChanged() method is calledwhenever an edit is completed. Users complete an edit by changing focus, forexample, clicking outside the item or by pressing Tab, or by pressing Enter; theycancel an edit by pressing Esc.
def tableItemChanged(self, item):
ship = self.currentTableShip()
if ship is None:
return
column = self.tableWidget.currentColumn()
if column == ships.NAME:
ship.name = item.text().trimmed()
elif column == ships.OWNER:
ship.owner = item.text().trimmed()
elif column == ships.COUNTRY:
ship.country = item.text().trimmed()
elif column == ships.DESCRIPTION:
ship.description = item.text().trimmed()
elif column == ships.TEU:
ship.teu = item.text().toInt()[0]
self.ships.dirty = True
self.populateList()
422 Chapter 14. Model/View Programming
self.populateTree()
If the user edits an item in the table, we retrieve the corresponding ship andupdate the appropriate attribute. We use QString.trimmed() to get rid of anyleading and trailing whitespace.★ We don’t have to do anything to the tableitself since the edit has already updated it, so we simply repopulate the list andthe tree. Repopulating like this is fine for small datasets (up to hundreds ofitems),but for larger datasets it can be noticably slow. The solution is to updateonly those items that have been changed and that are visible in the widget.This is done automatically if we use a custom model with a view widget, as wewill see in the next section.
def currentTableShip(self):
item = self.tableWidget.item(self.tableWidget.currentRow(), 0)
if item is None:
return None
return self.ships.ship(item.data(Qt.UserRole).toLongLong()[0])
The QTableWidget.item() method returns the table item for the given row andcolumn. We always want the item for the current row and the first columnsince it is in these items that we store each row’s corresponding ship ID.
We then use the ShipContainer.ship() method to retrieve the ship with thegiven ID. This is fast because the ships are held in a dictionary whose keys aretheir IDs.
def addShip(self):
ship = ships.Ship(" Unknown", " Unknown", " Unknown")
self.ships.addShip(ship)
self.populateList()
self.populateTree()
self.populateTable(id(ship))
self.tableWidget.setFocus()
self.tableWidget.editItem(self.tableWidget.currentItem())
Adding a new ship is comparatively easy, in part because we don’t do any val-idation. We simply create a new ship with “unknown” values (the leadingspaces are to make the values stand out), and add the ship to the ships dictio-nary. Then we repopulate the list, tree, and table, all of which will retrieve allthe ships, including the one we have just created. We pass the new ship’s ID tothe populate table method to make sure that its first column is the current andselected table item, and give it the keyboard focus. The editItem() call is theprogrammatic equivalent of the user pressing F2 or double-clicking to initiateediting,and it results in the first field, the ship’s name,being editable. The usercan edit the remaining fields just by pressing Tab, since the editing state will bepreserved until they leave the row or press Enter (or cancel by pressing Esc).
★ The QString.simplified() method is also very handy. It removes whitespace from the ends andreduces each internal sequence of one or more whitespace characters to a single space.
Using the Convenience Item Widgets 423
def removeShip(self):
ship = self.currentTableShip()
if ship is None:
return
if QMessageBox.question(self, "Ships - Remove",
QString("Remove %1 of %2/%3?").arg(ship.name) \
.arg(ship.owner).arg(ship.country),
QMessageBox.Yes|QMessageBox.No) == QMessageBox.No:
return
self.ships.removeShip(ship)
self.populateList()
self.populateTree()
self.populateTable()
Removing ships is even easier than adding them. We retrieve the current shipand then pop up a message box asking the user if they are sure they want toremove the ship. If they click Yes, we remove the ship from the ShipContainer
and repopulate the view widgets.
Although using three different views as we have done here is unconventional,the techniques we have used, particularly with the QTableWidget are perfectlygeneral.
The convenience widgets are very useful for small and ad hoc datasets, and canbe used without necessarily having a separate dataset—showing, editing, andstoring the data themselves. We chose to separate out the data in this exampleto prepare the ground for using the model/view techniques and in particular,custom models, the subject of the next section.
Creating Custom Models
In this section, we will create a custom model to hold the ship data, and displaythe same model in two different table views. An application that makes use ofthe model is shown in Figure 14.3.The user can scroll the tables independently,and can edit the data in either of them, safe in the knowledge that any changeswill be automatically reflected in both views.
We will begin by showing extracts from the application’s main form. This willshow us some of the model/view API in use. Then we will look at the implemen-tation of the model itself. One important benefit of PyQt’s model/view archi-tecture is that the same coding patterns are used again and again, so once weknow how to create one table model, we know how to create any table (or list)model.
The model is provided by class ShipTableModel in chap14/ships.py and the appli-cation is in chap14/ships-model.pyw. We have improved the appearance of thedata in the view by setting background and foreground colors, but these couldhave been done in the convenience views by calling the appropriate methods on
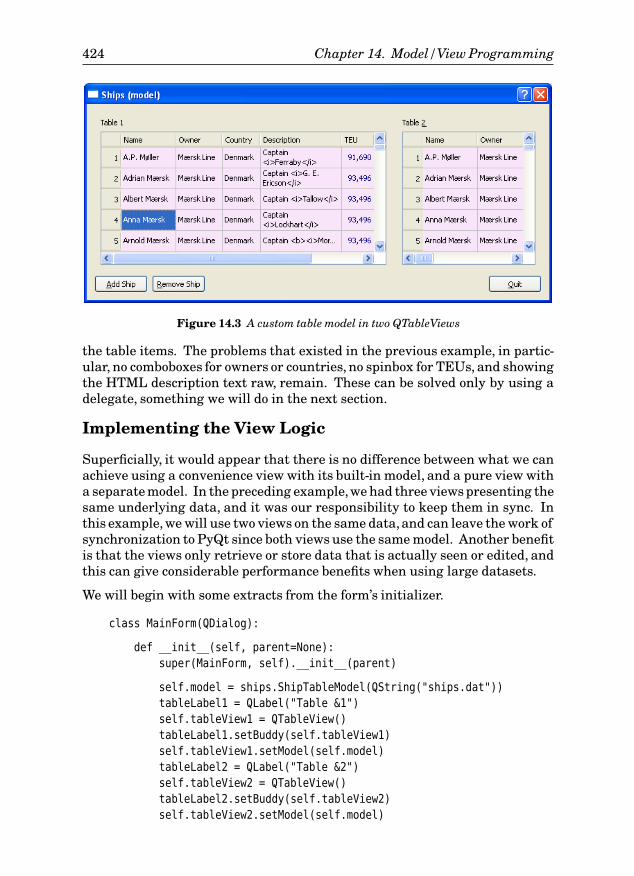
424 Chapter 14. Model/View Programming
Figure 14.3 A custom table model in two QTableViews
the table items. The problems that existed in the previous example, in partic-ular, no comboboxes for owners or countries, no spinbox for TEUs, and showingthe HTML description text raw, remain. These can be solved only by using adelegate, something we will do in the next section.
Implementing the View Logic
Superficially, it would appear that there is no difference between what we canachieve using a convenience view with its built-in model, and a pure view witha separate model. In the preceding example,we had three views presenting thesame underlying data, and it was our responsibility to keep them in sync. Inthis example, we will use two views on the same data,and can leave the work ofsynchronization to PyQt since both views use the same model. Another benefitis that the views only retrieve or store data that is actually seen or edited, andthis can give considerable performance benefits when using large datasets.
We will begin with some extracts from the form’s initializer.
class MainForm(QDialog):
def __init__(self, parent=None):
super(MainForm, self).__init__(parent)
self.model = ships.ShipTableModel(QString("ships.dat"))
tableLabel1 = QLabel("Table &1")
self.tableView1 = QTableView()
tableLabel1.setBuddy(self.tableView1)
self.tableView1.setModel(self.model)
tableLabel2 = QLabel("Table &2")
self.tableView2 = QTableView()
tableLabel2.setBuddy(self.tableView2)
self.tableView2.setModel(self.model)
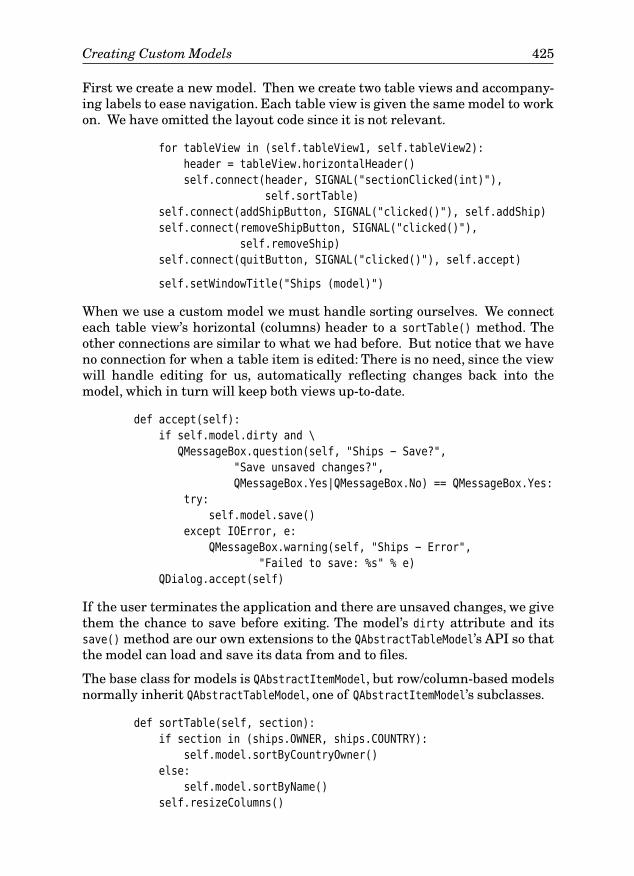
Creating Custom Models 425
First we create a new model. Then we create two table views and accompany-ing labels to ease navigation. Each table view is given the same model to workon. We have omitted the layout code since it is not relevant.
for tableView in (self.tableView1, self.tableView2):
header = tableView.horizontalHeader()
self.connect(header, SIGNAL("sectionClicked(int)"),
self.sortTable)
self.connect(addShipButton, SIGNAL("clicked()"), self.addShip)
self.connect(removeShipButton, SIGNAL("clicked()"),
self.removeShip)
self.connect(quitButton, SIGNAL("clicked()"), self.accept)
self.setWindowTitle("Ships (model)")
When we use a custom model we must handle sorting ourselves. We connecteach table view’s horizontal (columns) header to a sortTable() method. Theother connections are similar to what we had before. But notice that we haveno connection for when a table item is edited: There is no need, since the viewwill handle editing for us, automatically reflecting changes back into themodel, which in turn will keep both views up-to-date.
def accept(self):
if self.model.dirty and \
QMessageBox.question(self, "Ships - Save?",
"Save unsaved changes?",
QMessageBox.Yes|QMessageBox.No) == QMessageBox.Yes:
try:
self.model.save()
except IOError, e:
QMessageBox.warning(self, "Ships - Error",
"Failed to save: %s" % e)
QDialog.accept(self)
If the user terminates the application and there are unsaved changes, we givethem the chance to save before exiting. The model’s dirty attribute and itssave() method are our own extensions to the QAbstractTableModel’s API so thatthe model can load and save its data from and to files.
The base class for models is QAbstractItemModel, but row/column-based modelsnormally inherit QAbstractTableModel, one of QAbstractItemModel’s subclasses.
def sortTable(self, section):
if section in (ships.OWNER, ships.COUNTRY):
self.model.sortByCountryOwner()
else:
self.model.sortByName()
self.resizeColumns()
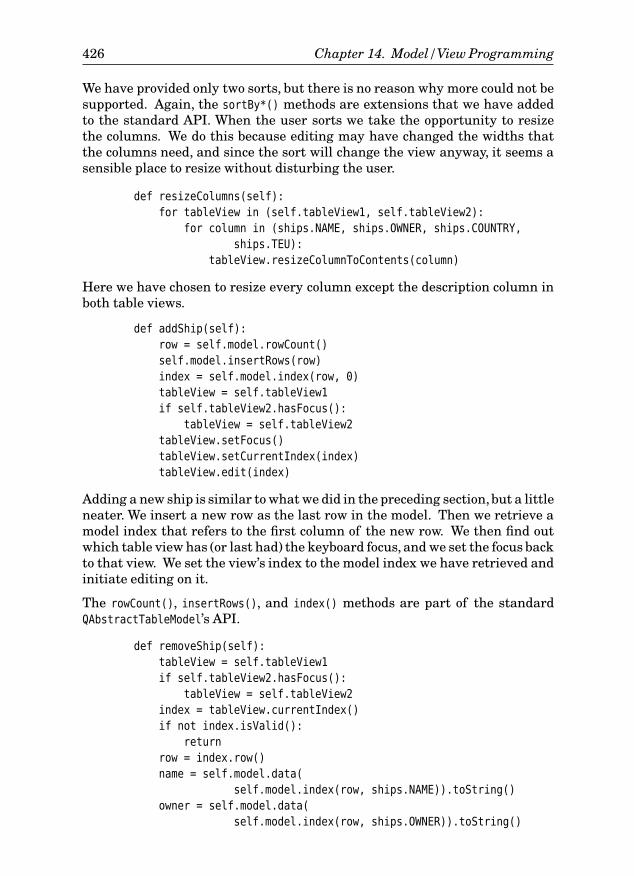
426 Chapter 14. Model/View Programming
We have provided only two sorts, but there is no reason why more could not besupported. Again, the sortBy*() methods are extensions that we have addedto the standard API. When the user sorts we take the opportunity to resizethe columns. We do this because editing may have changed the widths thatthe columns need, and since the sort will change the view anyway, it seems asensible place to resize without disturbing the user.
def resizeColumns(self):
for tableView in (self.tableView1, self.tableView2):
for column in (ships.NAME, ships.OWNER, ships.COUNTRY,
ships.TEU):
tableView.resizeColumnToContents(column)
Here we have chosen to resize every column except the description column inboth table views.
def addShip(self):
row = self.model.rowCount()
self.model.insertRows(row)
index = self.model.index(row, 0)
tableView = self.tableView1
if self.tableView2.hasFocus():
tableView = self.tableView2
tableView.setFocus()
tableView.setCurrentIndex(index)
tableView.edit(index)
Adding a new ship is similar to what we did in the preceding section,but a littleneater. We insert a new row as the last row in the model. Then we retrieve amodel index that refers to the first column of the new row. We then find outwhich table view has (or last had) the keyboard focus, and we set the focus backto that view. We set the view’s index to the model index we have retrieved andinitiate editing on it.
The rowCount(), insertRows(), and index() methods are part of the standardQAbstractTableModel’s API.
def removeShip(self):
tableView = self.tableView1
if self.tableView2.hasFocus():
tableView = self.tableView2
index = tableView.currentIndex()
if not index.isValid():
return
row = index.row()
name = self.model.data(
self.model.index(row, ships.NAME)).toString()
owner = self.model.data(
self.model.index(row, ships.OWNER)).toString()
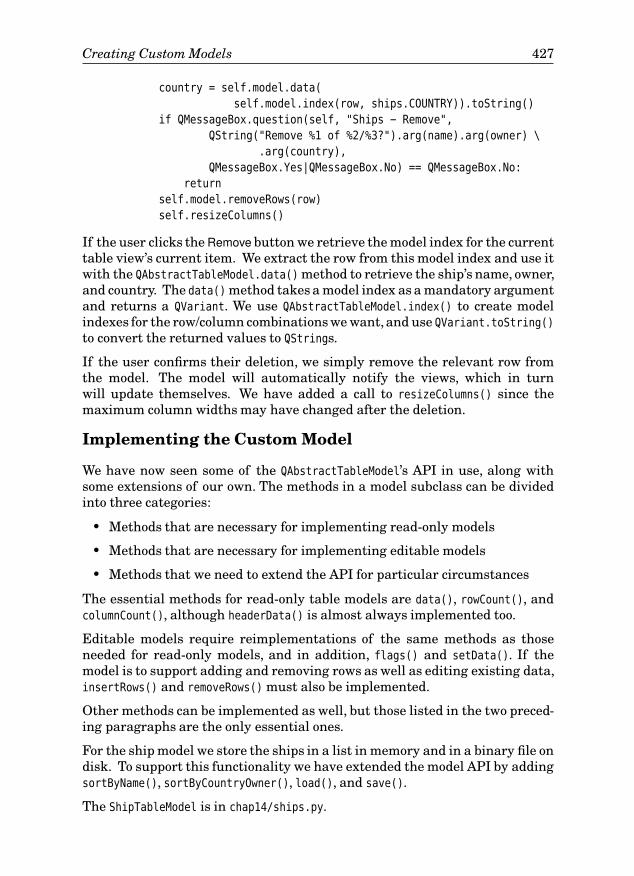
Creating Custom Models 427
country = self.model.data(
self.model.index(row, ships.COUNTRY)).toString()
if QMessageBox.question(self, "Ships - Remove",
QString("Remove %1 of %2/%3?").arg(name).arg(owner) \
.arg(country),
QMessageBox.Yes|QMessageBox.No) == QMessageBox.No:
return
self.model.removeRows(row)
self.resizeColumns()
If the user clicks theRemove button we retrieve the model index for the currenttable view’s current item. We extract the row from this model index and use itwith the QAbstractTableModel.data() method to retrieve the ship’s name, owner,and country. The data() method takes a model index as a mandatory argumentand returns a QVariant. We use QAbstractTableModel.index() to create modelindexes for the row/column combinations we want,and use QVariant.toString()
to convert the returned values to QStrings.
If the user confirms their deletion, we simply remove the relevant row fromthe model. The model will automatically notify the views, which in turnwill update themselves. We have added a call to resizeColumns() since themaximum column widths may have changed after the deletion.
Implementing the Custom Model
We have now seen some of the QAbstractTableModel’s API in use, along withsome extensions of our own. The methods in a model subclass can be dividedinto three categories:
• Methods that are necessary for implementing read-only models
• Methods that are necessary for implementing editable models
• Methods that we need to extend the API for particular circumstances
The essential methods for read-only table models are data(), rowCount(), andcolumnCount(), although headerData() is almost always implemented too.
Editable models require reimplementations of the same methods as thoseneeded for read-only models, and in addition, flags() and setData(). If themodel is to support adding and removing rows as well as editing existing data,insertRows() and removeRows() must also be implemented.
Other methods can be implemented as well, but those listed in the two preced-ing paragraphs are the only essential ones.
For the ship model we store the ships in a list in memory and in a binary file ondisk. To support this functionality we have extended the model API by addingsortByName(), sortByCountryOwner(), load(), and save().
The ShipTableModel is in chap14/ships.py.
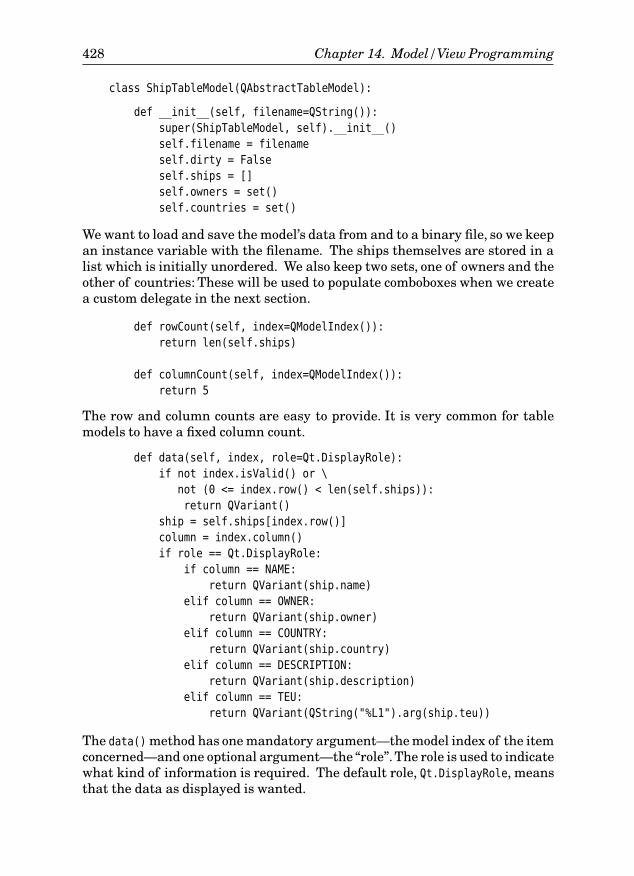
428 Chapter 14. Model/View Programming
class ShipTableModel(QAbstractTableModel):
def __init__(self, filename=QString()):
super(ShipTableModel, self).__init__()
self.filename = filename
self.dirty = False
self.ships = []
self.owners = set()
self.countries = set()
We want to load and save the model’s data from and to a binary file, so we keepan instance variable with the filename. The ships themselves are stored in alist which is initially unordered. We also keep two sets, one of owners and theother of countries: These will be used to populate comboboxes when we createa custom delegate in the next section.
def rowCount(self, index=QModelIndex()):
return len(self.ships)
def columnCount(self, index=QModelIndex()):
return 5
The row and column counts are easy to provide. It is very common for tablemodels to have a fixed column count.
def data(self, index, role=Qt.DisplayRole):
if not index.isValid() or \
not (0 <= index.row() < len(self.ships)):
return QVariant()
ship = self.ships[index.row()]
column = index.column()
if role == Qt.DisplayRole:
if column == NAME:
return QVariant(ship.name)
elif column == OWNER:
return QVariant(ship.owner)
elif column == COUNTRY:
return QVariant(ship.country)
elif column == DESCRIPTION:
return QVariant(ship.description)
elif column == TEU:
return QVariant(QString("%L1").arg(ship.teu))
The data() method has one mandatory argument—the model index of the itemconcerned—and one optional argument—the “role”.The role is used to indicatewhat kind of information is required. The default role, Qt.DisplayRole, meansthat the data as displayed is wanted.

Creating Custom Models 429
If the model index is invalid or if the row is out of range we return an invalidQVariant. PyQt’s model/view architecture does not raise exceptions or give errormessages; it simply uses invalid QVariants. If the index is valid we retrieve theship at the row corresponding to the index’s row. If the role is Qt.DisplayRole wereturn the data for the requested column as a QVariant. In the case of the TEU,instead of returning an integer, we return the number as a localized string.
elif role == Qt.TextAlignmentRole:
if column == TEU:
return QVariant(int(Qt.AlignRight|Qt.AlignVCenter))
return QVariant(int(Qt.AlignLeft|Qt.AlignVCenter))
elif role == Qt.TextColorRole and column == TEU:
if ship.teu < 80000:
return QVariant(QColor(Qt.black))
elif ship.teu < 100000:
return QVariant(QColor(Qt.darkBlue))
elif ship.teu < 120000:
return QVariant(QColor(Qt.blue))
else:
return QVariant(QColor(Qt.red))
elif role == Qt.BackgroundColorRole:
if ship.country in (u"Bahamas", u"Cyprus", u"Denmark",
u"France", u"Germany", u"Greece"):
return QVariant(QColor(250, 230, 250))
elif ship.country in (u"Hong Kong", u"Japan", u"Taiwan"):
return QVariant(QColor(250, 250, 230))
elif ship.country in (u"Marshall Islands",):
return QVariant(QColor(230, 250, 250))
else:
return QVariant(QColor(210, 230, 230))
return QVariant()
If data() is being called with the Qt.TextAlignmentRole, we return a right-align-ment for TEUs and a left-alignment for the other columns. QVariants cannotaccept alignments, so we must convert them to an integer value.
For the Qt.TextColorRole, we return a color for the TEU column and ignore oth-er columns. This means that the non-TEU columns will have the default textcolor, usually black. For the Qt.BackgroundColorRole, we provide different col-ored backgrounds depending on which group of countries the ship belongs to.
We can handle several other roles if we wish, including Qt.DecorationRole
(the item’s icon), Qt.ToolTipRole, Qt.StatusTipRole, and Qt.WhatsThisRole. Andfor controlling appearance, in addition to the alignment and color roles wediscussed earlier, there is Qt.FontRole and Qt.CheckStateRole.
We return an invalid QVariant for all the cases we choose not to handle. Thistells the model/view architecture to use a default value in these cases.
430 Chapter 14. Model/View Programming
Some developers don’t like mixing appearance-related information with thedata, as we have done here in our data() implementation. PyQt is neutral onthis issue: It gives us the flexibility to mix, but if we prefer data() to be purelyconcerned with data we can do that too, and leave all appearance-relatedissues to the delegate.
def headerData(self, section, orientation, role=Qt.DisplayRole):
if role == Qt.TextAlignmentRole:
if orientation == Qt.Horizontal:
return QVariant(int(Qt.AlignLeft|Qt.AlignVCenter))
return QVariant(int(Qt.AlignRight|Qt.AlignVCenter))
if role != Qt.DisplayRole:
return QVariant()
if orientation == Qt.Horizontal:
if section == NAME:
return QVariant("Name")
elif section == OWNER:
return QVariant("Owner")
elif section == COUNTRY:
return QVariant("Country")
elif section == DESCRIPTION:
return QVariant("Description")
elif section == TEU:
return QVariant("TEU")
return QVariant(int(section + 1))
Although not essential, it is a good practice to provide a headerData() implemen-tation. The section is a row offset when the orientation is Qt.Vertical, and acolumn offset when the orientation is Qt.Horizontal. Here, we provide columnheaders, and number the rows from 1.
Like data(), this method accepts a role, and we use this to make the rownumbers right-aligned and the column headers left-aligned.
The methods we have looked at so far are enough to implement read-only tablemodels. Now we will look at the additional methods that must be implementedto make a model editable.
def flags(self, index):
if not index.isValid():
return Qt.ItemIsEnabled
return Qt.ItemFlags(QAbstractTableModel.flags(self, index)|
Qt.ItemIsEditable)
If we have a valid model index we return a Qt.ItemFlags that combines theexisting item flags with the Qt.ItemIsEditable flag. We can use this method tomake items read-only by applying the Qt.ItemIsEditable flag only when themodel index is for a row and column that we want to be editable.
Creating Custom Models 431
def setData(self, index, value, role=Qt.EditRole):
if index.isValid() and 0 <= index.row() < len(self.ships):
ship = self.ships[index.row()]
column = index.column()
if column == NAME:
ship.name = value.toString()
elif column == OWNER:
ship.owner = value.toString()
elif column == COUNTRY:
ship.country = value.toString()
elif column == DESCRIPTION:
ship.description = value.toString()
elif column == TEU:
value, ok = value.toInt()
if ok:
ship.teu = value
self.dirty = True
self.emit(SIGNAL("dataChanged(QModelIndex,QModelIndex)"),
index, index)
return True
return False
This method is called when the user completes an edit. In this case, we ignorethe role, although it is possible to have separate display and edit data (forexample, a spreadsheet’s result and the formula behind it). If the index is validand the row is in range we retrieve the relevant ship and update the columnthat has been edited. In the case of the TEU, we apply the change only if whatthe user typed in was converted successfully to an integer.
The dataChanged() signal must be emitted if a change has taken place. Themodel/view architecture depends on this signal to ensure that all the views arekept up-to-date. We must pass the model index of the changed item twice be-cause the signal can be used to indicate a block of changes, with the first indexbeing the top-left item and the second index the bottom-right item. We mustreturn True if the change was accepted and applied, and False otherwise.
Implementing flags() and setData() (in addition to the methods necessaryfor a read-only model) is sufficient to make a model editable. But to makeit possible for users to add or delete entire rows we need to implement twoadditional methods.
def insertRows(self, position, rows=1, index=QModelIndex()):
self.beginInsertRows(QModelIndex(), position,
position + rows - 1)
for row in range(rows):
self.ships.insert(position + row,
Ship(" Unknown", " Unknown", " Unknown"))
self.endInsertRows()
432 Chapter 14. Model/View Programming
self.dirty = True
return True
The call to beginInsertRows() is essential when we want to insert one or morerows into a model. The position is the row we want to insert at. The call tobeginInsertRows() is taken straight from the PyQt documentation and shouldnot need to be changed for any table model insertRows() implementation. Afterthe insertions, we must call endInsertRows(). The model will automaticallynotify the views that the changes have been made, and the views will ask fornew data if the relevant rows are visible to the user.
def removeRows(self, position, rows=1, index=QModelIndex()):
self.beginRemoveRows(QModelIndex(), position,
position + rows - 1)
self.ships = self.ships[:position] + \
self.ships[position + rows:]
self.endRemoveRows()
self.dirty = True
return True
This method is similar to the preceding one. The call to beginRemoveRows() istaken from the documentation and is standard for table model reimplementa-tions.After the relevant rows have been removed,we must call endRemoveRows().The model will automatically notify the views about the changes.
We have now implemented the essential methods for an editable table model.Some models are merely interfaces to external data sources such as databasetables (covered in the next chapter), or to external files or processes. In thiscase, we have stored the data inside the model itself and for this reason wemust provide some extra methods, in particular load() and save().We have alsoprovided a couple of sorting methods as a convenience for the user. Sorting isexpensive forOrdered-
Dict
92 ☞
large datasets,and in such cases using an ordered data structure,such as an OrderedDict, or using a list in conjunction with the bisect module’sfunctions may prove beneficial.
def sortByName(self):
self.ships = sorted(self.ships)
self.reset()
When sort() is called on a list it uses the items’ __lt__() special method forcomparisons, falling back to use the __cmp__() special method if __lt__() hasnot been implemented. We provided Ship.__cmp__() which does a locale-awarecomparison of ships’ names.
Sorting the data makes all model indexes invalid and means that the viewsare now showing the wrong data. The model must notify the views that theyneed to update themselves by retrieving fresh data. One way to do this isto emit a dataChanged() signal, but for big changes it is more efficient to call

Creating Custom Models 433
Table 14.1 Selected QAbstractItemModel Methods #1
Syntax Description
m.beginInsert-
Rows(p, f, l)Call in reimplementationsof insertRows() before insert-ing data. The arguments are the parent QModelIndex p
and the first and last row numbers the new rows willoccupy; m is a QAbstractItemModel subclass.
m.beginRemove-
Rows(p, f, l)Call in reimplementations of removeRows() before re-moving data. The arguments are the parent QModel-Index p and the first and last row numbers to beremoved; m is a QAbstractItemModel subclass.
m.columnCount(p) Subclasses must reimplement this; the parent QModel-Index p matters only to tree models
m.create-
Index(r, c, p)Subclasses must use this to create QModelIndexes withrow int r, column int c, and parent QModelIndex p
m.data(i, rl) Returns the data as a QVariant for QModelIndex i andQt.ItemDataRole rl; subclasses must reimplement this
m.endInsertRows() Call in reimplementations of insertRows() after insert-ing new data; m is a QAbstractItemModel subclass
m.endRemoveRows() Call in reimplementations of removeRows() after remov-ing data; m is a QAbstractItemModel subclass
m.flags(i) Returns the Qt.ItemFlags for QModelIndex i; these governwhether the item is selectable, editable, and so on.Editable model subclasses must reimplement this
m.hasChildren(p) Returns True if parent QModelIndex p has children;mean-ingful only for tree models
m.header-
Data(s, o, rl)Returns a QVariant for “section” (row or column) int s,with Qt.Orientation o indicating row or column, andwith Qt.ItemDataRole rl. Subclasses normally reimple-ment this; m is a QAbstractItemModel subclass.
m.index(r, c, p) Returns the QModelIndex for the given row int r, columnint c, and parent QModelIndex p; subclasses must reim-plement this and must use createIndex()
m.insertRow(r, p) Inserts one row before row int r. In tree models, the rowis inserted as a child of parent QModelIndex p.
m.insert-
Rows(r, n, p)Inserts int n rows before row int r. In tree mod-els, the rows are inserted as children of parentQModelIndex p. Editable subclasses often reimplementthis—reimplementations must call beginInsertRows()and endInsertRows().
m.parent(i) Returns the parent QModelIndex of QModelIndex i. Treemodel subclasses must reimplement this.
434 Chapter 14. Model/View Programming
Table 14.2 Selected QAbstractItemModel Methods #2
Syntax Description
m.removeRow(r, p) Removes row int r. The parent QModelIndex p is rel-evant only to tree models; m is a QAbstractItemModel
subclass.m.removeRows(r, n, p) Removes int n rows from row int r. The parent
QModelIndex p is relevant only to tree models.Editable model subclasses often reimplement thismethod—reimplementations must call begin-RemoveRows() and endRemoveRows().
m.reset() Notifies all associated views that the model’s datahas radically changed—this forces views to refetchall their visible data
m.rowCount(p) Subclasses must reimplement this; the parentQModelIndex p matters only to tree models
m.setData(i, v, rl) Sets QModelIndex i’s data for Qt.ItemDataRole rl toQVariant v.Editable model subclasses must reimple-ment this—reimplementations must emit the data-
Changed() signal if data was actually changed.m.setHeader-
Data(s, o, v, rl)Sets the header data for section int s withQt.Orientation o (i.e., for row or column), forQt.ItemDataRole rl to QVariant v
QAbstractTableModel.reset(); this tells all associated views that everything isout-of-date and forces them to update themselves.
def sortByCountryOwner(self):
def compare(a, b):
if a.country != b.country:
return QString.localeAwareCompare(a.country, b.country)
if a.owner != b.owner:
return QString.localeAwareCompare(a.owner, b.owner)
return QString.localeAwareCompare(a.name, b.name)
self.ships = sorted(self.ships, compare)
self.reset()
Here we provide a custom sort method, sorting by country, by owner, and byship’s name.For a large dataset it might be more efficient to use DSU (decorate,sort, undecorate). For example:
def sortByCountryOwner(self):
ships = []
for ship in self.ships:
ships.append((ship.country, ship.owner, ship.name, ship))
ships.sort()
Creating Custom Models 435
self.ships = [ship for country, owner, name, ship in ships]
self.reset()
This uses the normal QString.compare(), so it might be better to have usedunicode(ship.country), unicode(ship.owner), and unicode(ship.name). Of course,for very large datasets it is probably better to avoid sorting altogether and touse ordered containers instead.
The save() and load() methods are very similar to ones we haveSavingandLoadingBinaryFiles
240 ☞
seen before forhandling binary data using QDataStream, so we will just show an extract fromthe heart of each, starting with the save() method.
for ship in self.ships:
stream << ship.name << ship.owner << ship.country \
<< ship.description
stream.writeInt32(ship.teu)
Thanks to using QDataStream we don’t have to worry about how long the stringsare or about encoding issues.
The ships are loaded in correspondingly: Here is an extract from the load()
method:
self.ships = []
while not stream.atEnd():
name = QString()
owner = QString()
country = QString()
description = QString()
stream >> name >> owner >> country >> description
teu = stream.readInt32()
self.ships.append(Ship(name, owner, country, teu,
description))
self.owners.add(unicode(owner))
self.countries.add(unicode(country))
As noted earlier, we keep sets of owners and countries to make them availablein comboboxes when we add a custom delegate.
Implementing custom models, particularly list and table models, is quitestraightforward. For read-only models we need to implement only three meth-ods, although normally we implement four. For editable models, we normallyimplement a total of eight methods. Once you have created a couple of models,creating others will become easy, because all list and table models follow thesame pattern. Implementing tree models is more challenging; the topic is cov-ered in the last section of Chapter 16.
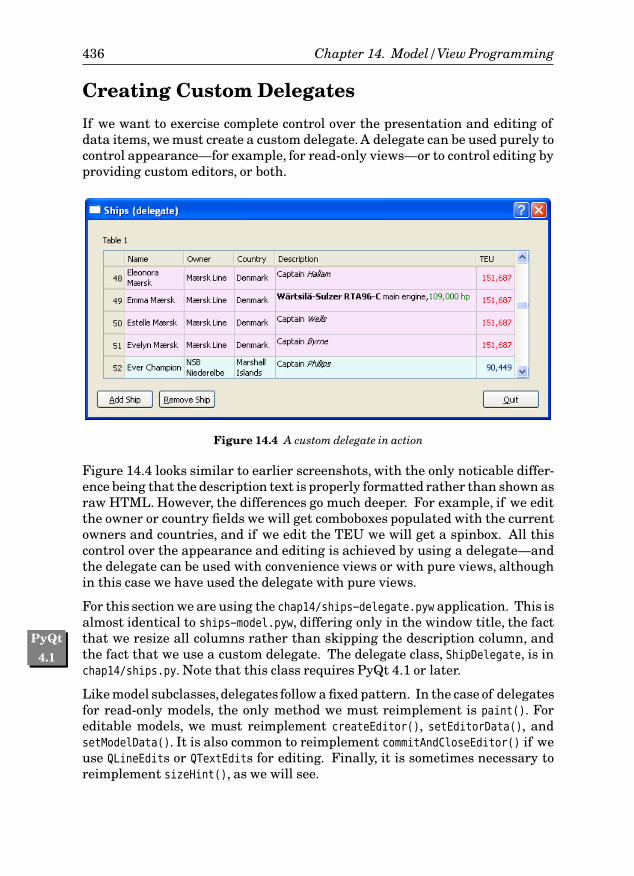
436 Chapter 14. Model/View Programming
Creating Custom Delegates
If we want to exercise complete control over the presentation and editing ofdata items, we must create a custom delegate. A delegate can be used purely tocontrol appearance—for example, for read-only views—or to control editing byproviding custom editors, or both.
Figure 14.4 A custom delegate in action
Figure 14.4 looks similar to earlier screenshots, with the only noticable differ-ence being that the description text is properly formatted rather than shown asraw HTML. However, the differences go much deeper. For example, if we editthe owner or country fields we will get comboboxes populated with the currentowners and countries, and if we edit the TEU we will get a spinbox. All thiscontrol over the appearance and editing is achieved by using a delegate—andthe delegate can be used with convenience views or with pure views, althoughin this case we have used the delegate with pure views.
For this section we are using the chap14/ships-delegate.pyw application. This isalmost identical to ships-model.pyw, differing only in the window title, the factthat we resize allPyQt
4.1
columns rather than skipping the description column, andthe fact that we use a custom delegate. The delegate class, ShipDelegate, is inchap14/ships.py. Note that this class requires PyQt 4.1 or later.
Like model subclasses,delegates follow a fixed pattern. In the case of delegatesfor read-only models, the only method we must reimplement is paint(). Foreditable models, we must reimplement createEditor(), setEditorData(), andsetModelData(). It is also common to reimplement commitAndCloseEditor() if weuse QLineEdits or QTextEdits for editing. Finally, it is sometimes necessary toreimplement sizeHint(), as we will see.
Creating Custom Delegates 437
It is quite common to create delegates that handle only some of the columns,particularly when it comes to painting, leaving the base class to handlecolumns where the default behavior is sufficient.
We will begin by looking at a small extract from the main form’s constructor tosee the creation of the first table:
class MainForm(QDialog):
def __init__(self, parent=None):
super(MainForm, self).__init__(parent)
self.model = ships.ShipTableModel(QString("ships.dat"))
tableLabel1 = QLabel("Table &1")
self.tableView1 = QTableView()
tableLabel1.setBuddy(self.tableView1)
self.tableView1.setModel(self.model)
self.tableView1.setItemDelegate(ships.ShipDelegate(self))
The only difference from the preceding section is that we have calledsetItemDelegate(), passing it a newly constructed ship.ShipDelegate. The del-egate must be given the form as a parent to keep it alive while the form is inuse. The code for the second table is just the same, with the same model be-ing set, but with its own ship.ShipDelegate. This is the only change that’snecessary—and now all the work of presenting and editing the data will behandled by the delegates.
class ShipDelegate(QItemDelegate):
def __init__(self, parent=None):
super(ShipDelegate, self).__init__(parent)
Quite often, a delegate’s constructor does not need to do anything, beyondinitializing the base class which is all that we do here. In fact, for cases like thiswe can omit the __init__() altogether.
def paint(self, painter, option, index):
if index.column() == DESCRIPTION:
text = index.model().data(index).toString()
palette = QApplication.palette()
document = QTextDocument()
document.setDefaultFont(option.font)
if option.state & QStyle.State_Selected:
document.setHtml(QString("<font color=%1>%2</font>") \
.arg(palette.highlightedText().color().name())\
.arg(text))
else:
document.setHtml(text)
color = palette.highlight().color() \
if option.state & QStyle.State_Selected \
438 Chapter 14. Model/View Programming
else QColor(index.model().data(index,
Qt.BackgroundColorRole))
painter.save()
painter.fillRect(option.rect, color)
painter.translate(option.rect.x(), option.rect.y())
document.drawContents(painter)
painter.restore()
else:
QItemDelegate.paint(self, painter, option, index)
For plain text strings, numbers, dates, and so on, the base class QItemDele-
gate.paint() method works perfectly well, so it is very common not to reimple-ment it at all. However, in this example, the description column holds HTML,and this we must render ourselves.
The paint() method is called with a painter ready to draw on, a QStyleOption-
ViewItem which holds various pieces of information including the rectanglein which the painting should take place, and the model index of the item tobe drawn.
We begin by retrieving the HTML text using the model’s data() method, andrelying on the Qt.DisplayRole default that we set in the model, for the secondargument. Notice that a model index can give us a reference to the model itrefers to with the QModelIndex.model() method.
We then retrieve the application’s palette—this is based on the user’s themecolor preferences. If the item is selected, we apply the palette’s highlightedtext color to the HTML; otherwise, we use the HTML “as is”. The QColor.name()
method returns the color as a hexadecimal string; for example, red would bereturned as the string "#FF0000", which is the same format used for HTML colorspecifications. Similarly, we use the palette’s highlighted background colorif the item is selected; otherwise, we use the background color that the modelspecifies by calling the data() method with the Qt.BackgroundColorRole.
The QTextDocument.drawContents() method draws relative to the painter’stop-left (0, 0) coordinate. For this reason, we move (translate) the painter’stop-left corner to the style option rectangle’s (x, y) position, and then tell thedocument to paint itself on the painter.
In many cases, we don’t have to bother saving and restoring the painter’s statebetween paint events,but in this case we must.Some Qt programmersconsiderit a good practice to always save and restore the painter’s state, whereasothers prefer to do so only when necessary, that is, only when they apply alasting change to the painter’s state, such as applying a transformation, liketranslation, to it.
Unfortunately, this is not quite the end of the story for drawing HTML. Whenthe view asks for the size hint of an HTML column, the default behavior willbe to return a size hint based on the view’s font and the number of characters.
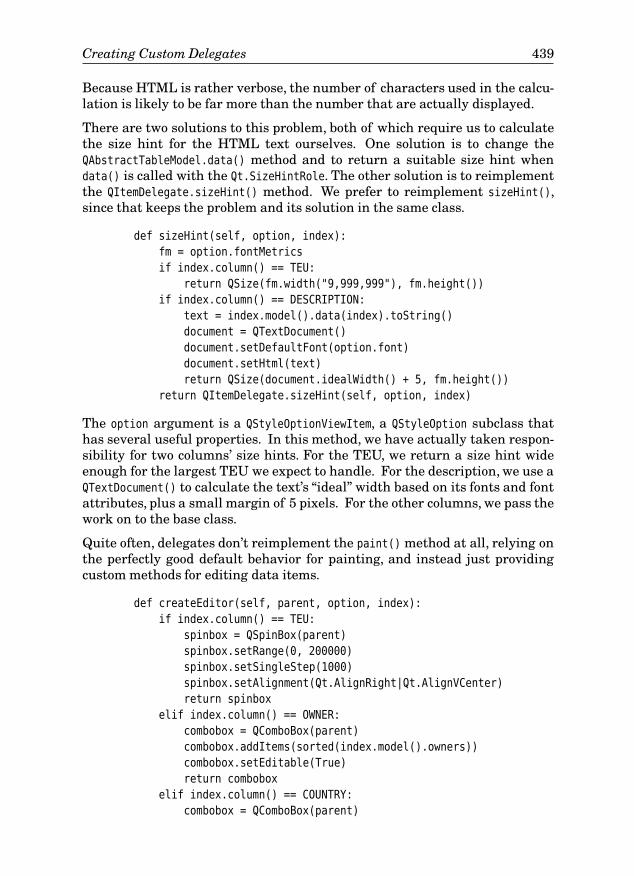
Creating Custom Delegates 439
Because HTML is rather verbose, the number of characters used in the calcu-lation is likely to be far more than the number that are actually displayed.
There are two solutions to this problem, both of which require us to calculatethe size hint for the HTML text ourselves. One solution is to change theQAbstractTableModel.data() method and to return a suitable size hint whendata() is called with the Qt.SizeHintRole. The other solution is to reimplementthe QItemDelegate.sizeHint() method. We prefer to reimplement sizeHint(),since that keeps the problem and its solution in the same class.
def sizeHint(self, option, index):
fm = option.fontMetrics
if index.column() == TEU:
return QSize(fm.width("9,999,999"), fm.height())
if index.column() == DESCRIPTION:
text = index.model().data(index).toString()
document = QTextDocument()
document.setDefaultFont(option.font)
document.setHtml(text)
return QSize(document.idealWidth() + 5, fm.height())
return QItemDelegate.sizeHint(self, option, index)
The option argument is a QStyleOptionViewItem, a QStyleOption subclass thathas several useful properties. In this method, we have actually taken respon-sibility for two columns’ size hints. For the TEU, we return a size hint wideenough for the largest TEU we expect to handle. For the description, we use aQTextDocument() to calculate the text’s “ideal” width based on its fonts and fontattributes, plus a small margin of 5 pixels. For the other columns, we pass thework on to the base class.
Quite often, delegates don’t reimplement the paint() method at all, relying onthe perfectly good default behavior for painting, and instead just providingcustom methods for editing data items.
def createEditor(self, parent, option, index):
if index.column() == TEU:
spinbox = QSpinBox(parent)
spinbox.setRange(0, 200000)
spinbox.setSingleStep(1000)
spinbox.setAlignment(Qt.AlignRight|Qt.AlignVCenter)
return spinbox
elif index.column() == OWNER:
combobox = QComboBox(parent)
combobox.addItems(sorted(index.model().owners))
combobox.setEditable(True)
return combobox
elif index.column() == COUNTRY:
combobox = QComboBox(parent)
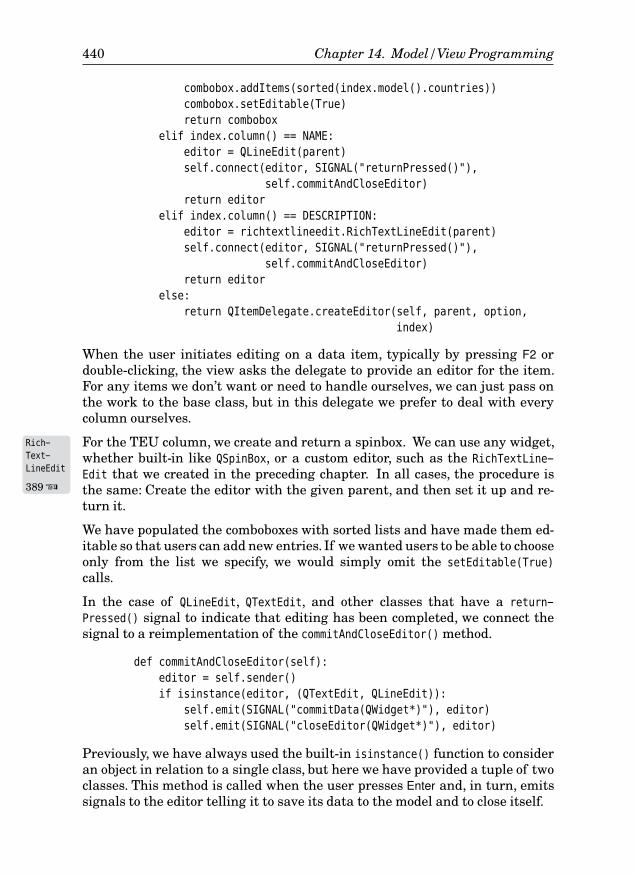
440 Chapter 14. Model/View Programming
combobox.addItems(sorted(index.model().countries))
combobox.setEditable(True)
return combobox
elif index.column() == NAME:
editor = QLineEdit(parent)
self.connect(editor, SIGNAL("returnPressed()"),
self.commitAndCloseEditor)
return editor
elif index.column() == DESCRIPTION:
editor = richtextlineedit.RichTextLineEdit(parent)
self.connect(editor, SIGNAL("returnPressed()"),
self.commitAndCloseEditor)
return editor
else:
return QItemDelegate.createEditor(self, parent, option,
index)
When the user initiates editing on a data item, typically by pressing F2 ordouble-clicking, the view asks the delegate to provide an editor for the item.For any items we don’t want or need to handle ourselves, we can just pass onthe work to the base class, but in this delegate we prefer to deal with everycolumn ourselves.
For the TEU column, we create and return a spinbox. We can use anyRich-
Text-
LineEdit
389 ☞
widget,whether built-in like QSpinBox, or a custom editor, such as the RichTextLine-
Edit that we created in the preceding chapter. In all cases, the procedure isthe same: Create the editor with the given parent, and then set it up and re-turn it.
We have populated the comboboxes with sorted lists and have made them ed-itable so that users can add new entries. If we wanted users to be able to chooseonly from the list we specify, we would simply omit the setEditable(True)
calls.
In the case of QLineEdit, QTextEdit, and other classes that have a return-
Pressed() signal to indicate that editing has been completed, we connect thesignal to a reimplementation of the commitAndCloseEditor() method.
def commitAndCloseEditor(self):
editor = self.sender()
if isinstance(editor, (QTextEdit, QLineEdit)):
self.emit(SIGNAL("commitData(QWidget*)"), editor)
self.emit(SIGNAL("closeEditor(QWidget*)"), editor)
Previously, we have always used the built-in isinstance() function to consideran object in relation to a single class, but here we have provided a tuple of twoclasses. This method is called when the user presses Enter and, in turn, emitssignals to the editor telling it to save its data to the model and to close itself.
Creating Custom Delegates 441
def setEditorData(self, editor, index):
text = index.model().data(index, Qt.DisplayRole).toString()
if index.column() == TEU:
value = text.replace(QRegExp("[., ]"), "").toInt()[0]
editor.setValue(value)
elif index.column() in (OWNER, COUNTRY):
i = editor.findText(text)
if i == -1:
i = 0
editor.setCurrentIndex(i)
elif index.column() == NAME:
editor.setText(text)
elif index.column() == DESCRIPTION:
editor.setHtml(text)
else:
QItemDelegate.setEditorData(self, editor, index)
Once the editor has been created and given to the view, the view calls setEditor-Data(). This gives the delegate the opportunity to populate the editor with thecurrent data, ready for the user to edit. In the case of TEUs, we are showingthem as text, possibly containing spaces, commas, or periods. So for these westrip out the unwanted characters, convert the value to an integer, and set thespinbox’s value accordingly. An alternative approach would have been to haveseparate Qt.DisplayRole and Qt.EditRole values for this column.
If the editor is a combobox, we set its current index to be the item that matchesthe data value. If there isn’t a match we just make the first item the currentone. For the line edit used for ships’ names we use setText(), and for the richtext line edit we use setHtml() (inherited from QTextEdit). As usual, we passon unhandled cases to the base class, although here it is a formality since wehandle all the columns ourselves.
def setModelData(self, editor, model, index):
if index.column() == TEU:
model.setData(index, QVariant(editor.value()))
elif index.column() in (OWNER, COUNTRY):
model.setData(index, QVariant(editor.currentText()))
elif index.column() == NAME:
model.setData(index, QVariant(editor.text()))
elif index.column() == DESCRIPTION:
model.setData(index, QVariant(editor.toSimpleHtml()))
else:
QItemDelegate.setModelData(self, editor, model, index)
If the user confirms their edit, the editor’s data must be written back to themodel. The model will then notify the views that the item has changed, andthose views that are showing the item will request fresh data to display.
442 Chapter 14. Model/View Programming
In each case, we simply retrieve the value from the appropriate editor and callsetData(), passing the values as QVariants.
We have now completed the delegate. Two delegates are used in the nextchapter, both of which provide editors for certain fields, and both of whichimplement only createEditor(), setEditorData(), and setModelData(). In thischapter and the next, the custom delegatesare for specific models. But in Chap-ter 16, we have a section devoted to “generic delegates”, which can be used tocreate delegates for any model without having to have model-specific customdelegates—this can reduce code duplication and make maintenance easier.
Summary
PyQt’s convenience item view widgets, such as QListWidget, QTableWidget, andQTreeWidget, are very useful for viewing and editing small and ad hoc datasets.They can be used in conjunction with external datasets as we did in the firstsection, or they can be used as data containers in their own right. Adding,editing, and removing items is straightforward, but if we use more than oneview to show one dataset, we must accept the responsibility for keeping theviews and dataset in sync. This problem goes away if we use the model/viewapproach with a custom model.
The convenience views do not provide any control over the editing of the itemsthey handle. This deficiency is easy to rectify, both for convenience views andfor pure views, by setting our own custom item delegate.
The pure views provide similar functionality to the convenience views, but donot provide sorting or direct control over the appearance of data items. Theseviews must be used in conjunction with a model, whether a predefined oneprovided with PyQt, or more commonly, our own custom model.
To implement a custom table model we must reimplement rowCount(), column-Count(), and data() for both read-only and editable models; it is also usual toreimplement headerData(). In addition, we must implement flags() and set-
Data() to make items editable, and insertRows() and removeRows() to allow usersto insert or remove rows of data. If we want the user to be able to sort the datawe can add additional sort methods, although in the case of database tables wecan simply add ORDER BY clauses. Using databases with the model/view archi-tecture is covered in the next chapter.
Creating custom delegates allows us to exercise complete control over theappearance and editing of data items. It is possible to share the responsibil-ity for data appearance between the model and the delegate, or to give all ofthe responsibility to either of them. But only a custom delegate can be usedto provide control over editing. For read-only delegates, and for delegateswhere we are concerned only with the appearance of data, we normally needto reimplement only the paint() method, although in some cases we must alsoreimplement sizeHint() (or handle the Qt.SizeHintRole in the model’s data()

Summary 443
reimplementation). For most delegates, we don’t need to reimplement paint()or sizeHint() at all, and only reimplement createEditor(), setEditorData(), andsetModelData().
In the next chapter we will see further examples of the model/view architec-ture, with pure views, custom delegates, and built-in SQL database models.
ExerciseAdd a new method to the ShipTableModel, sortByTEU(). Use any sorting tech-nique you like; we have used DSU. Then use this method in MainForm.sort-
Table(). In total this should take just half a dozen lines.
Extend the ShipTableModel.data() method to provide tooltips. The tip shouldsimply be the text of the data item, except for TEUs, where the text shouldbe the (localized) number followed by “twenty foot equivalents”. Notice thatHTML is correctly formatted in the tooltip. This is easy and takes only adozen lines.
Modify ShipTableDelegate.setModelData() so that it will change the name,owner, or country, only if the new text is at least three characters long. Extendthe tooltips for these columns with the text “(minimum of 3 characters)”. Thiscan be done in about half a dozen lines.
Add an Export button that, when pressed, prompts the user for a filename withthe suffix .txt, and saves the data using the UTF-8 encoding, one ship per line,in the form:
name|owner|country|teu|description
with a bar “|” (pipe) as a separator. The data should be accessed through themodel’s data() method and output in country/owner order, with no HTML tagsin the description and with TEUs output with digits only (no commas, periods,or spaces). Pop up a message box at the end, either to report an error or toreport success. Use Python or PyQt for writing the file; we have used PyQt. Ifyou write using a version of PyQt prior to 4.1, you will need to convert the TEUto a QString before writing it to the text stream. The export() method can bewritten in less than 50 lines.
A solution is provided in chap14/ships_ans.py and chap14/ships-delegate-
_ans.py.

This page intentionally left blank
Databases
1515 ● Connecting to the Database
● Executing SQL Queries
● Using Database Form Views
● Using Database Table Views
PyQt provides a consistent cross-platform API for database access using theQtSql module and PyQt’s model/view architecture.★ Python also has its owncompletely different database API, called DB-API, but it isn’t needed withPyQt and is not covered here. The commercial edition of Qt comes with manydatabase drivers, whereas the GPL edition has fewer due to licensing restric-tions. The drivers that are available include ones for IBM’s DB2, Borland’sInterbase, MySQL, Oracle, ODBC (for Microsoft SQL Server), PostgreSQL,SQLite, and Sybase. However, like any aspect of PyQt, it is possible to createadditional database drivers if one we need is not available.
When Qt is built from source we can configure it to include SQLite, a public do-main in-process database. For binary Qt packages, such as the GPL packagesfor Windows and Mac OS X, SQLite is built-in. The examples in this chapteruse SQLite, but apart from the initial connection to the database, and a coupleof aspects of raw SQL syntax that we will mention, they should work with anySQL database.
PyQt provides access to databases at two levels. The high level involves usingQSqlTableModel or QSqlRelationalTableModel. These models provide abstractionsfor handling database tables with the same API as the other QAbstractItemModelsubclasses, as well as providing some database-specific extensions. The SQLmodels can be used with views such as QTableView, as we will see in this chap-ter’s last section, or with a QDataWidgetMapper for form views, the topic of thischapter’s second section.
The low-level approach, also the most versatile, is based on using QSqlQuery.This class can accept any DDL (data definition language) or DML (data ma-nipulation language) SQL statements and execute them on the database. Forexample, we can use QSqlQuery to create tables, and to insert, update,and deleterecords in tables. We will see QSqlQuery in action in this chapter’s first section.
★This chapter assumes a knowledge of PyQt’s model/view architecture, covered in the precedingchapter, as well as a basic knowledge of SQL.
445
446 Chapter 15. Databases
Connecting to the Database
But before we can do any work with a database,we must establish a connectionto it. In many database applications this is done after the creation of theQApplication object, but before the main form is created or shown. Otherapplications establish their connections later on—for example, only when theyare needed.
To use PyQt’s SQL classes we must import the QtSql module:
from PyQt4.QtSql import *
A database connection is established by calling the static QSqlDatabase.addData-base() method, with the name of the driver we want to use. Then we must setvarious attributes, such as the database’s name, the username, and the pass-word. And finally, we must call open() to make the connection.
db = QSqlDatabase.addDatabase("QSQLITE")
db.setDatabaseName(filename)
if not db.open():
QMessageBox.warning(None, "Phone Log",
QString("Database Error: %1").arg(db.lastError().text()))
sys.exit(1)
For SQLite we need to specify only the name of the database. This is normallya filename, but it can be the special name “:memory:” for an in-memorydatabase. When we call QSqlDatabase.open() using the SQLite driver, if the filedoes not exist it will be created, in which case it will have no tables or records.
Notice that we have passed None as the message box’s parent: This is becausewe have tried to establish the connection before creating the main window, sothere is no possible parent. Since this application depends on the database, ifno connection can be made it simply tells the user the error message that wasreceived and terminates the application.
If the database connection was successfully opened, from now on all databasemethods will apply to this connection. If we need two or more separateconnections, whether to the same database or to different databases, we mustpass a second argument to addDatabase(), giving the connection a name that wecan then use to distinguish between our different connections.
Executing SQL Queries
Now that we have a connection, we can execute some SQL statements.
query = QSqlQuery()
query.exec_("""CREATE TABLE outcomes (
id INTEGER PRIMARY KEY AUTOINCREMENT UNIQUE NOT NULL,
name VARCHAR(40) NOT NULL)""")
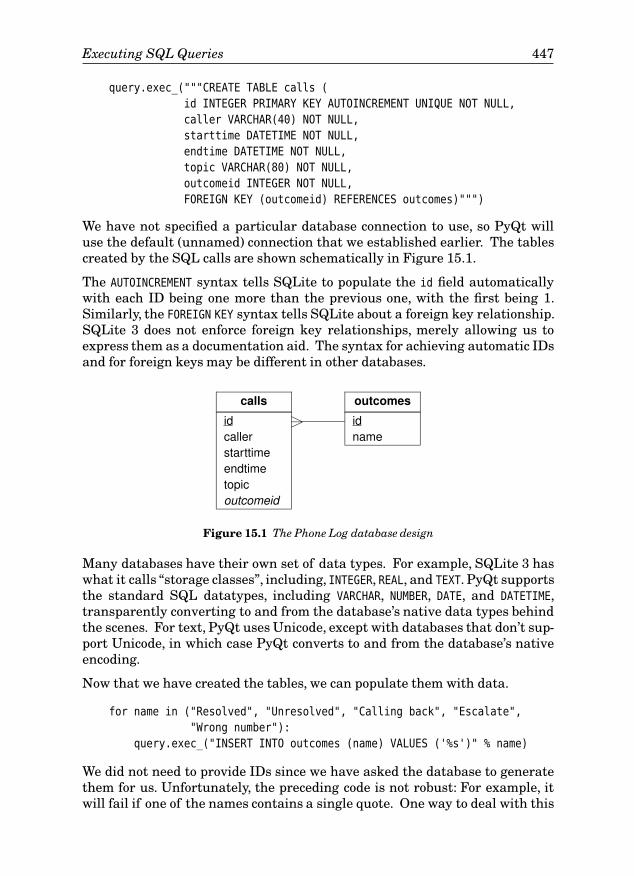
Executing SQL Queries 447
query.exec_("""CREATE TABLE calls (
id INTEGER PRIMARY KEY AUTOINCREMENT UNIQUE NOT NULL,
caller VARCHAR(40) NOT NULL,
starttime DATETIME NOT NULL,
endtime DATETIME NOT NULL,
topic VARCHAR(80) NOT NULL,
outcomeid INTEGER NOT NULL,
FOREIGN KEY (outcomeid) REFERENCES outcomes)""")
We have not specified a particular database connection to use, so PyQt willuse the default (unnamed) connection that we established earlier. The tablescreated by the SQL calls are shown schematically in Figure 15.1.
The AUTOINCREMENT syntax tells SQLite to populate the id field automaticallywith each ID being one more than the previous one, with the first being 1.Similarly, the FOREIGN KEY syntax tells SQLite about a foreign key relationship.SQLite 3 does not enforce foreign key relationships, merely allowing us toexpress them as a documentation aid. The syntax for achieving automatic IDsand for foreign keys may be different in other databases.
calls
idcallerstarttimeendtimetopicoutcomeid
outcomes
idname
Figure 15.1 The Phone Log database design
Many databases have their own set of data types. For example, SQLite 3 haswhat it calls “storage classes”, including, INTEGER, REAL, and TEXT. PyQt supportsthe standard SQL datatypes, including VARCHAR, NUMBER, DATE, and DATETIME,transparently converting to and from the database’s native data types behindthe scenes. For text, PyQt uses Unicode, except with databases that don’t sup-port Unicode, in which case PyQt converts to and from the database’s nativeencoding.
Now that we have created the tables, we can populate them with data.
for name in ("Resolved", "Unresolved", "Calling back", "Escalate",
"Wrong number"):
query.exec_("INSERT INTO outcomes (name) VALUES ('%s')" % name)
We did not need to provide IDs since we have asked the database to generatethem for us. Unfortunately, the preceding code is not robust: For example, itwill fail if one of the names contains a single quote. One way to deal with this
448 Chapter 15. Databases
is to ensure that we either remove or escape unacceptable characters,but PyQtprovides a better alternative: prepared queries.
There are two widely used forms of syntax for prepared queries, one based onthe ODBC place holder approach, and the other based on the Oracle namedvariable approach. PyQt supports both, converting from one to the other be-hind the scenes if necessary, so that both work no matter what the underlyingdatabase is.
query.prepare("INSERT INTO calls (caller, starttime, endtime, "
"topic, outcomeid) VALUES (?, ?, ?, ?, ?)")
for name, start, end, topic, outcomeid in data:
query.addBindValue(QVariant(QString(name)))
query.addBindValue(QVariant(start)) # QDateTime
query.addBindValue(QVariant(end)) # QDateTime
query.addBindValue(QVariant(QString(topic)))
query.addBindValue(QVariant(outcomeid)) # int
query.exec_()
This example uses the ODBC syntax. One benefit of using place holders is thatPyQt takes care of the quoting issues, so we don’t have to worry about what ourdata contains, as long as the types we pass are appropriate for the fields theywill populate.
query.prepare("INSERT INTO calls (caller, starttime, endtime, "
"topic, outcomeid) VALUES (:caller, :starttime, "
":endtime, :topic, :outcomeid)")
for name, start, end, topic, outcomeid in data:
query.bindValue(":caller", QVariant(QString(name)))
query.bindValue(":starttime", QVariant(start))
query.bindValue(":endtime", QVariant(end))
query.bindValue(":topic", QVariant(QString(topic)))
query.bindValue(":outcomeid", QVariant(outcomeid))
query.exec_()
This second example performs the same work as the first, but uses Oracle-stylenamed variables. PyQt also supports a couple of other variations of preparedquery syntax, but they don’t add anything to what we can do with the twoforms of syntax shown earlier. Prepared queries can improve performance ondatabases that support them, and make no difference on those that don’t.
Prepared queries can also be used to call stored procedures, but we will notcover them because support for them is neither universal nor uniform. For ex-ample, not all databases support stored procedures, and the syntax for callingthem and for retrieving OUT values is different from database to database. Also,stored procedures that return values are not fully supported.
We can use QSqlQuery to execute any arbitrary SQL statement. For example:
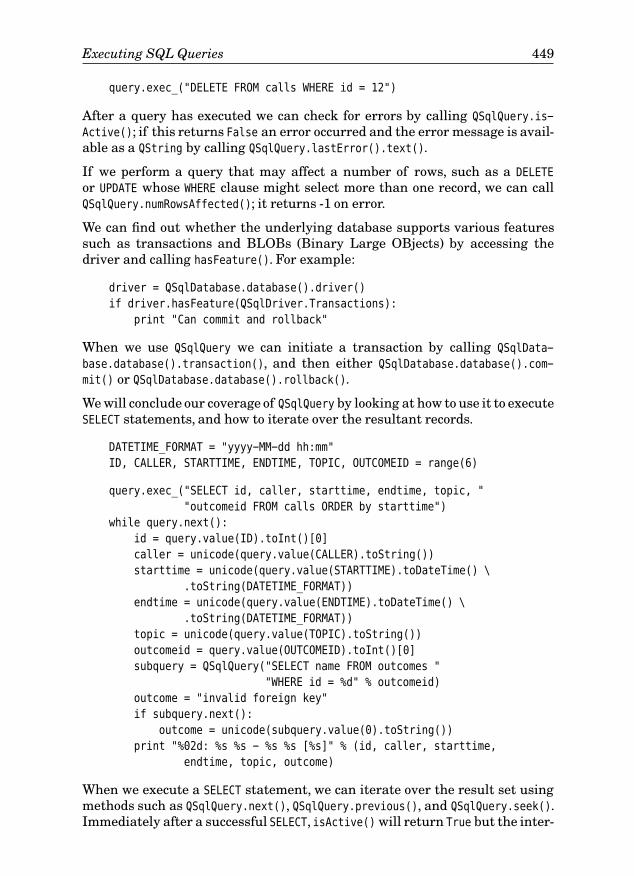
Executing SQL Queries 449
query.exec_("DELETE FROM calls WHERE id = 12")
After a query has executed we can check for errors by calling QSqlQuery.is-
Active(); if this returns False an error occurred and the error message is avail-able as a QString by calling QSqlQuery.lastError().text().
If we perform a query that may affect a number of rows, such as a DELETE
or UPDATE whose WHERE clause might select more than one record, we can callQSqlQuery.numRowsAffected(); it returns -1 on error.
We can find out whether the underlying database supports various featuressuch as transactions and BLOBs (Binary Large OBjects) by accessing thedriver and calling hasFeature(). For example:
driver = QSqlDatabase.database().driver()
if driver.hasFeature(QSqlDriver.Transactions):
print "Can commit and rollback"
When we use QSqlQuery we can initiate a transaction by calling QSqlData-
base.database().transaction(), and then either QSqlDatabase.database().com-
mit() or QSqlDatabase.database().rollback().
We will conclude our coverage of QSqlQuery by looking at how to use it to executeSELECT statements, and how to iterate over the resultant records.
DATETIME_FORMAT = "yyyy-MM-dd hh:mm"
ID, CALLER, STARTTIME, ENDTIME, TOPIC, OUTCOMEID = range(6)
query.exec_("SELECT id, caller, starttime, endtime, topic, "
"outcomeid FROM calls ORDER by starttime")
while query.next():
id = query.value(ID).toInt()[0]
caller = unicode(query.value(CALLER).toString())
starttime = unicode(query.value(STARTTIME).toDateTime() \
.toString(DATETIME_FORMAT))
endtime = unicode(query.value(ENDTIME).toDateTime() \
.toString(DATETIME_FORMAT))
topic = unicode(query.value(TOPIC).toString())
outcomeid = query.value(OUTCOMEID).toInt()[0]
subquery = QSqlQuery("SELECT name FROM outcomes "
"WHERE id = %d" % outcomeid)
outcome = "invalid foreign key"
if subquery.next():
outcome = unicode(subquery.value(0).toString())
print "%02d: %s %s - %s %s [%s]" % (id, caller, starttime,
endtime, topic, outcome)
When we execute a SELECT statement, we can iterate over the result set usingmethods such as QSqlQuery.next(), QSqlQuery.previous(), and QSqlQuery.seek().Immediately after a successful SELECT, isActive() will return True but the inter-
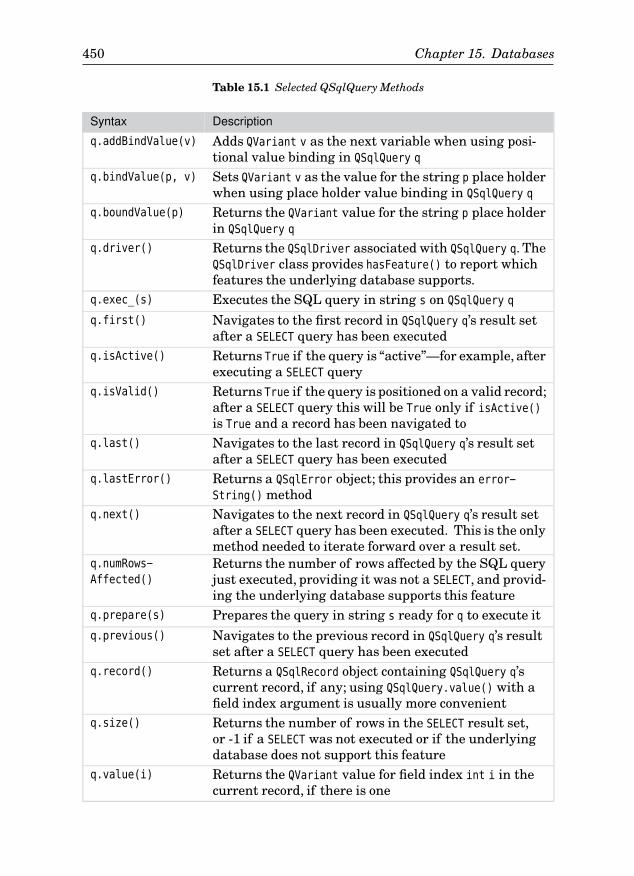
450 Chapter 15. Databases
Table 15.1 Selected QSqlQuery Methods
Syntax Description
q.addBindValue(v) Adds QVariant v as the next variable when using posi-tional value binding in QSqlQuery q
q.bindValue(p, v) Sets QVariant v as the value for the string p place holderwhen using place holder value binding in QSqlQuery q
q.boundValue(p) Returns the QVariant value for the string p place holderin QSqlQuery q
q.driver() Returns the QSqlDriver associated with QSqlQuery q. TheQSqlDriver class provides hasFeature() to report whichfeatures the underlying database supports.
q.exec_(s) Executes the SQL query in string s on QSqlQuery q
q.first() Navigates to the first record in QSqlQuery q’s result setafter a SELECT query has been executed
q.isActive() Returns True if the query is “active”—for example, afterexecuting a SELECT query
q.isValid() Returns True if the query is positioned on a valid record;after a SELECT query this will be True only if isActive()
is True and a record has been navigated toq.last() Navigates to the last record in QSqlQuery q’s result set
after a SELECT query has been executedq.lastError() Returns a QSqlError object; this provides an error-
String() methodq.next() Navigates to the next record in QSqlQuery q’s result set
after a SELECT query has been executed. This is the onlymethod needed to iterate forward over a result set.
q.numRows-
Affected()Returns the number of rows affected by the SQL queryjust executed, providing it was not a SELECT, and provid-ing the underlying database supports this feature
q.prepare(s) Prepares the query in string s ready for q to execute itq.previous() Navigates to the previous record in QSqlQuery q’s result
set after a SELECT query has been executedq.record() Returns a QSqlRecord object containing QSqlQuery q’s
current record, if any; using QSqlQuery.value() with afield index argument is usually more convenient
q.size() Returns the number of rows in the SELECT result set,or -1 if a SELECT was not executed or if the underlyingdatabase does not support this feature
q.value(i) Returns the QVariant value for field index int i in thecurrent record, if there is one
Executing SQL Queries 451
nal record pointer will not be referring to a valid record. Each of the navigationmethods returns True if the query’s internal record pointer was successfullymoved onto a valid record; this is why we call QSqlQuery.next() before accessingthe first record. They return False if an error occurred or if they pass the last(or first) record.
When navigating large result sets, providing we only use next(), or only seek()
forward, we can call QSqlQuery.setForwardOnly(True). This can significantly im-prove performance or reduce memory overhead, or both, with some databases.
The QSqlQuery.value() method takes an index position argument, based on theorder of the field names given in the SELECT statement. For this reason, usingSELECT * is not recommended because in that case, we don’t know what theorder of the fields is. Each field is returned as a QVariant and must thereforebe converted to the proper type. In the case of the date/times, we first convertthem from QVariant to QDateTime, then to QString, and finally to unicode, readyto be printed on the console.
We used an additional query to look up the name of the outcome from itsID, giving error text if the database does not have relational integrity. For alarge dataset, it would have been more efficient to use a prepared query forthe subquery.
We can use QSqlQuery to do all the database work we want, but using PyQt’sSQL models is much easier for GUI programming, and it does not prevent usfrom using QSqlQuery when the need arises.
Using Database Form Views
One of the easiest user interfaces we can provide for database data is a formthat displays the fields from a single record at a time. In this section we willdevelop an application that uses such a form, initially a simplified version ofthe phone log database introduced in the preceding section, and then the fullversion which includes the foreign key field.
The examples presented in this section depend on the Qt
4.2
QDataWidgetMapper classintroduced with Qt 4.2. The next section’s example uses SQL table models andQTableView, and can be used with Qt 4.1 or later.
The simplified application is shown in Figure 15.2, and its source code is inchap15/phonelog.pyw; the full version is in chap15/phonelog-fk.pyw. When theseapplications are run for the very first time they create a database of fakerecords which they then use on subsequent runs. Generating these recordsusing Qt’s built-in SQLite is fast on Linux but very slow on some Windowsmachines. (A splash screen is used to disguise the slowness.)
The simplified application has a single table, calls, and no foreign key field.The form is represented by the PhoneLogDlg class. The initializer is quite long,
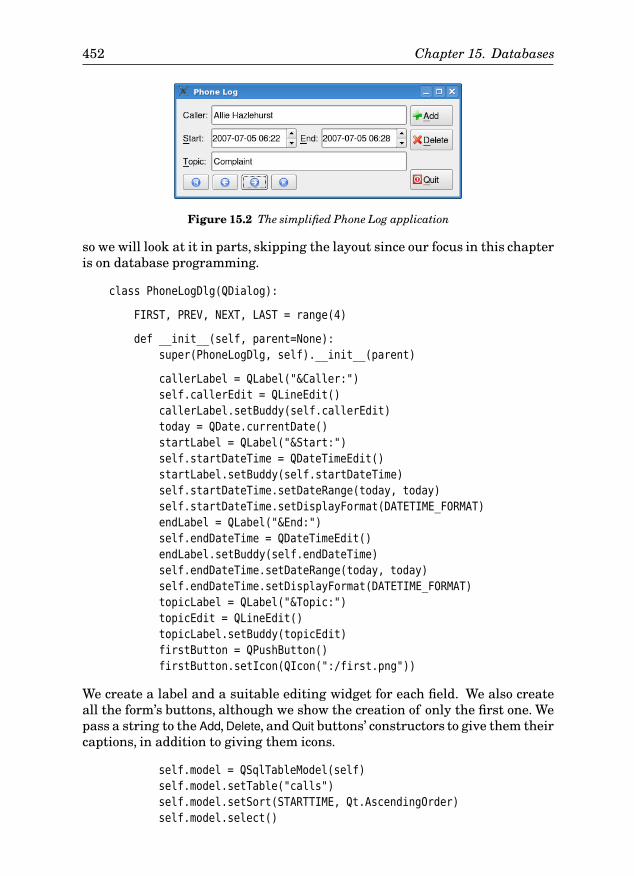
452 Chapter 15. Databases
Figure 15.2 The simplified Phone Log application
so we will look at it in parts, skipping the layout since our focus in this chapteris on database programming.
class PhoneLogDlg(QDialog):
FIRST, PREV, NEXT, LAST = range(4)
def __init__(self, parent=None):
super(PhoneLogDlg, self).__init__(parent)
callerLabel = QLabel("&Caller:")
self.callerEdit = QLineEdit()
callerLabel.setBuddy(self.callerEdit)
today = QDate.currentDate()
startLabel = QLabel("&Start:")
self.startDateTime = QDateTimeEdit()
startLabel.setBuddy(self.startDateTime)
self.startDateTime.setDateRange(today, today)
self.startDateTime.setDisplayFormat(DATETIME_FORMAT)
endLabel = QLabel("&End:")
self.endDateTime = QDateTimeEdit()
endLabel.setBuddy(self.endDateTime)
self.endDateTime.setDateRange(today, today)
self.endDateTime.setDisplayFormat(DATETIME_FORMAT)
topicLabel = QLabel("&Topic:")
topicEdit = QLineEdit()
topicLabel.setBuddy(topicEdit)
firstButton = QPushButton()
firstButton.setIcon(QIcon(":/first.png"))
We create a label and a suitable editing widget for each field. We also createall the form’s buttons, although we show the creation of only the first one. Wepass a string to the Add,Delete, andQuit buttons’ constructors to give them theircaptions, in addition to giving them icons.
self.model = QSqlTableModel(self)
self.model.setTable("calls")
self.model.setSort(STARTTIME, Qt.AscendingOrder)
self.model.select()
Using Database Form Views 453
With the widgets in place, we create a QSqlTableModel. Since we did not specify aparticular database connection, it uses the default one.We tell the model whichtable it is to work on and call select() to make it populate itself with data. Wealso choose to apply a sort order to the table.
Now that we have suitable widgets and a model, we must somehow link themtogether. This is achieved by using a QDataWidgetMapper.
self.mapper = QDataWidgetMapper(self)
self.mapper.setSubmitPolicy(QDataWidgetMapper.ManualSubmit)
self.mapper.setModel(self.model)
self.mapper.addMapping(self.callerEdit, CALLER)
self.mapper.addMapping(self.startDateTime, STARTTIME)
self.mapper.addMapping(self.endDateTime, ENDTIME)
self.mapper.addMapping(topicEdit, TOPIC)
self.mapper.toFirst()
To make a data widget mapper work, we must give it a model and a set of map-pings between the widgets in the form and the corresponding columns in themodel. (The variables, ID, CALLER, STARTTIME, and so on, are set to 0, 1, 2, and soon at the start of the file.) The mapper can be set to submit changes automati-cally, or only when told. We prefer the latter approach because it gives us finercontrol and means that when the user navigates to a different record we canmake sure that any unsaved changes are saved. Once we have set up the map-ping, we need to make the mapper populate the widgets with a record; we havedone this by calling toFirst(), which means that at startup, the first recordis shown.
self.connect(firstButton, SIGNAL("clicked()"),
lambda: self.saveRecord(PhoneLogDlg.FIRST))
self.connect(prevButton, SIGNAL("clicked()"),
lambda: self.saveRecord(PhoneLogDlg.PREV))
self.connect(nextButton, SIGNAL("clicked()"),
lambda: self.saveRecord(PhoneLogDlg.NEXT))
self.connect(lastButton, SIGNAL("clicked()"),
lambda: self.saveRecord(PhoneLogDlg.LAST))
self.connect(addButton, SIGNAL("clicked()"), self.addRecord)
self.connect(deleteButton, SIGNAL("clicked()"),
self.deleteRecord)
self.connect(quitButton, SIGNAL("clicked()"), self.accept)
self.setWindowTitle("Phone Log")
The first four connections provide navigation. In each case, we call save-
Record(), which saves any unsaved changes, and then navigates inLambdacall-backs
134 ☞
accordancewith the argument that has been wrapped in the lambda PyQt
4.1.1
statement. This meansthat we need only a single method, saveRecord(), instead of one for each nav-igation button. However, the connections will work only with PyQt 4.1.1 orlater. For earlier versions we must keep an instance variable (for example, a
454 Chapter 15. Databases
list) that contains references to the lambda functions to prevent them from beinggarbage-collected.
def accept(self):
self.mapper.submit()
QDialog.accept(self)
If the user clicks Quit we call QDataWidgetMapper.submit(), which writes thecurrent record back to the underlying model, and then we close the window.
def saveRecord(self, where):
row = self.mapper.currentIndex()
self.mapper.submit()
if where == PhoneLogDlg.FIRST:
row = 0
elif where == PhoneLogDlg.PREV:
row = 0 if row <= 1 else row - 1
elif where == PhoneLogDlg.NEXT:
row += 1
if row >= self.model.rowCount():
row = self.model.rowCount() - 1
elif where == PhoneLogDlg.LAST:
row = self.model.rowCount() - 1
self.mapper.setCurrentIndex(row)
If the user navigates, we must remember the current row, since it is forgottenafter calling submit(). Then, after saving the current record, we set the row tobe the one appropriate for the navigation the user requested (but kept withinbounds), and then use setCurrentIndex() to move to the appropriate record.
def addRecord(self):
row = self.model.rowCount()
self.mapper.submit()
self.model.insertRow(row)
self.mapper.setCurrentIndex(row)
now = QDateTime.currentDateTime()
self.startDateTime.setDateTime(now)
self.endDateTime.setDateTime(now)
self.callerEdit.setFocus()
We have chosen to always add new records at the end. To do this we find therow after the last one, save the current record, and then insert a new record atthe last row in the model. Then we set the mapper’s current index to the newrow, initialize a couple of fields, and give the caller field the focus, ready for theuser to start typing.
def deleteRecord(self):
caller = self.callerEdit.text()
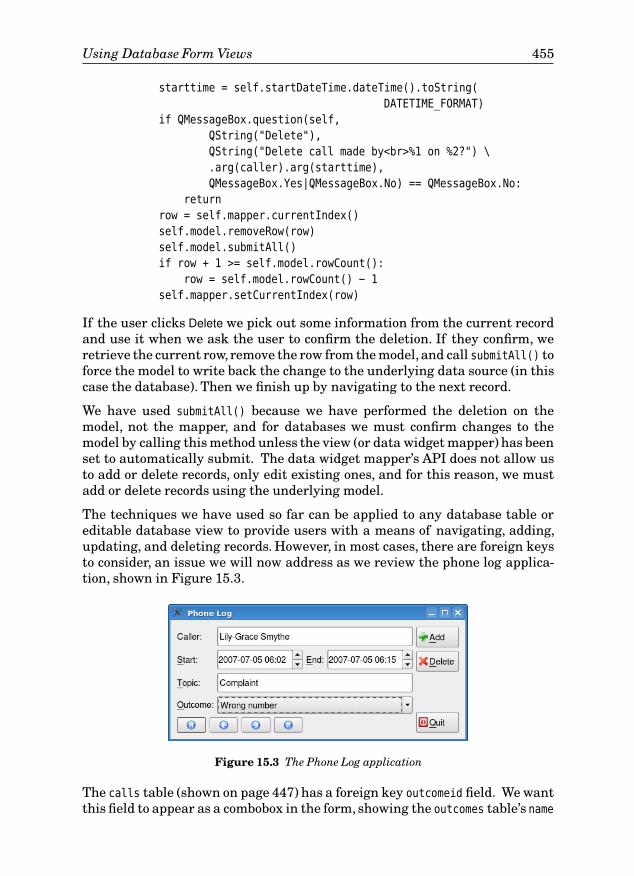
Using Database Form Views 455
starttime = self.startDateTime.dateTime().toString(
DATETIME_FORMAT)
if QMessageBox.question(self,
QString("Delete"),
QString("Delete call made by<br>%1 on %2?") \
.arg(caller).arg(starttime),
QMessageBox.Yes|QMessageBox.No) == QMessageBox.No:
return
row = self.mapper.currentIndex()
self.model.removeRow(row)
self.model.submitAll()
if row + 1 >= self.model.rowCount():
row = self.model.rowCount() - 1
self.mapper.setCurrentIndex(row)
If the user clicks Delete we pick out some information from the current recordand use it when we ask the user to confirm the deletion. If they confirm, weretrieve the current row, remove the row from the model, and call submitAll() toforce the model to write back the change to the underlying data source (in thiscase the database). Then we finish up by navigating to the next record.
We have used submitAll() because we have performed the deletion on themodel, not the mapper, and for databases we must confirm changes to themodel by calling this method unless the view (or data widget mapper) has beenset to automatically submit. The data widget mapper’s API does not allow usto add or delete records, only edit existing ones, and for this reason, we mustadd or delete records using the underlying model.
The techniques we have used so far can be applied to any database table oreditable database view to provide users with a means of navigating, adding,updating, and deleting records. However, in most cases, there are foreign keysto consider, an issue we will now address as we review the phone log applica-tion, shown in Figure 15.3.
Figure 15.3 The Phone Log application
The calls table (shown on page 447) has a foreign key outcomeid field. We wantthis field to appear as a combobox in the form, showing the outcomes table’s name
456 Chapter 15. Databases
field for each corresponding ID. To do this we create a combobox in the usualway, but we do not populate it.
Since we are now using a table that has a foreign key we must use a QSql-
RelationalTableModel rather than a QSqlTableModel.
self.model = QSqlRelationalTableModel(self)
self.model.setTable("calls")
self.model.setRelation(OUTCOMEID,
QSqlRelation("outcomes", "id", "name"))
self.model.setSort(STARTTIME, Qt.AscendingOrder)
self.model.select()
The QSqlRelationalTableModel is very similar to a QSqlTableModel, except that itprovides a few extra methods for handling relations.The setRelation() methodtakes a field index in the model, and a QSqlRelation object. The relation objectis created with the name of the foreign key’s table, the field to actually store,and the field to display.
The data widget mapper code must also be changed. In particular, we must usea QSqlRelationalDelegate rather than the standard built-in delegate, and wemust set up the combobox that is used for the foreign key.
self.mapper = QDataWidgetMapper(self)
self.mapper.setSubmitPolicy(QDataWidgetMapper.ManualSubmit)
self.mapper.setModel(self.model)
self.mapper.setItemDelegate(QSqlRelationalDelegate(self))
self.mapper.addMapping(self.callerEdit, CALLER)
self.mapper.addMapping(self.startDateTime, STARTTIME)
self.mapper.addMapping(self.endDateTime, ENDTIME)
self.mapper.addMapping(topicEdit, TOPIC)
relationModel = self.model.relationModel(OUTCOMEID)
self.outcomeComboBox.setModel(relationModel)
self.outcomeComboBox.setModelColumn(
relationModel.fieldIndex("name"))
self.mapper.addMapping(self.outcomeComboBox, OUTCOMEID)
self.mapper.toFirst()
The code is similar to what we had before. Setting the relational delegate iseasy, but setting up the combobox is slightly subtle. First, we must retrieve therelation model (outcomes table) used by the model (calls table) to handle the for-eign key. A QComboBox is actually a convenience view widget with a built-in mod-el, just like a QListWidget; but it is possible to substitute our own model, andthat’s what we have done here. However, a combobox shows a single column,and our relation model has two columns (id, name), so we must specify which oneto display. We cannot be certain about the column indexes used by the relationmodel (since it was created for us, not by us), so we use the fieldIndex() methodwith a field name to specify the correct column index. Once the combobox is setup, we can add it to the mapper like any other widget.
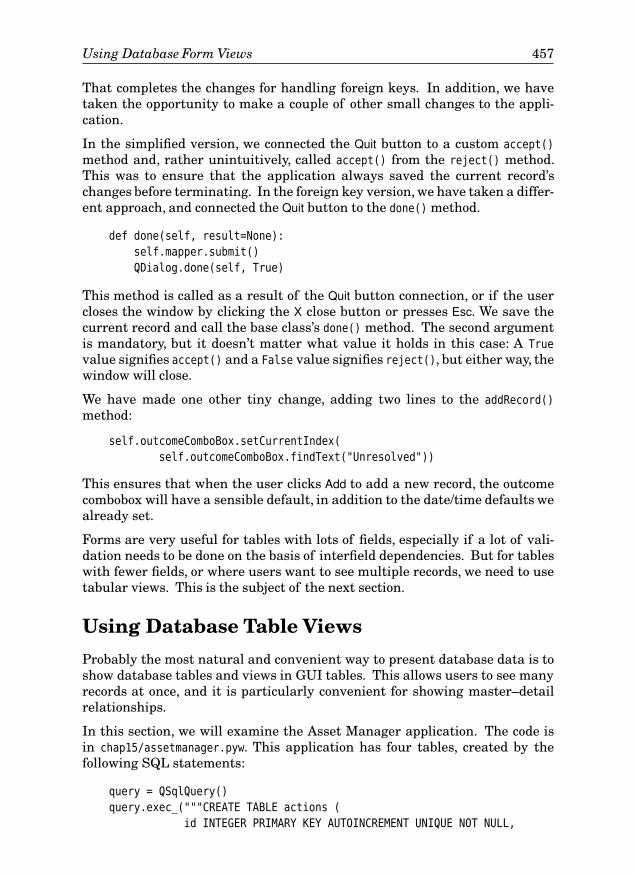
Using Database Form Views 457
That completes the changes for handling foreign keys. In addition, we havetaken the opportunity to make a couple of other small changes to the appli-cation.
In the simplified version, we connected the Quit button to a custom accept()
method and, rather unintuitively, called accept() from the reject() method.This was to ensure that the application always saved the current record’schanges before terminating. In the foreign key version, we have taken a differ-ent approach, and connected the Quit button to the done() method.
def done(self, result=None):
self.mapper.submit()
QDialog.done(self, True)
This method is called as a result of the Quit button connection, or if the usercloses the window by clicking the X close button or presses Esc. We save thecurrent record and call the base class’s done() method. The second argumentis mandatory, but it doesn’t matter what value it holds in this case: A True
value signifies accept() and a False value signifies reject(), but either way, thewindow will close.
We have made one other tiny change, adding two lines to the addRecord()
method:
self.outcomeComboBox.setCurrentIndex(
self.outcomeComboBox.findText("Unresolved"))
This ensures that when the user clicks Add to add a new record, the outcomecombobox will have a sensible default, in addition to the date/time defaults wealready set.
Forms are very useful for tables with lots of fields, especially if a lot of vali-dation needs to be done on the basis of interfield dependencies. But for tableswith fewer fields, or where users want to see multiple records, we need to usetabular views. This is the subject of the next section.
Using Database Table Views
Probably the most natural and convenient way to present database data is toshow database tables and views in GUI tables. This allows users to see manyrecords at once, and it is particularly convenient for showing master–detailrelationships.
In this section, we will examine the Asset Manager application. The code isin chap15/assetmanager.pyw. This application has four tables, created by thefollowing SQL statements:
query = QSqlQuery()
query.exec_("""CREATE TABLE actions (
id INTEGER PRIMARY KEY AUTOINCREMENT UNIQUE NOT NULL,
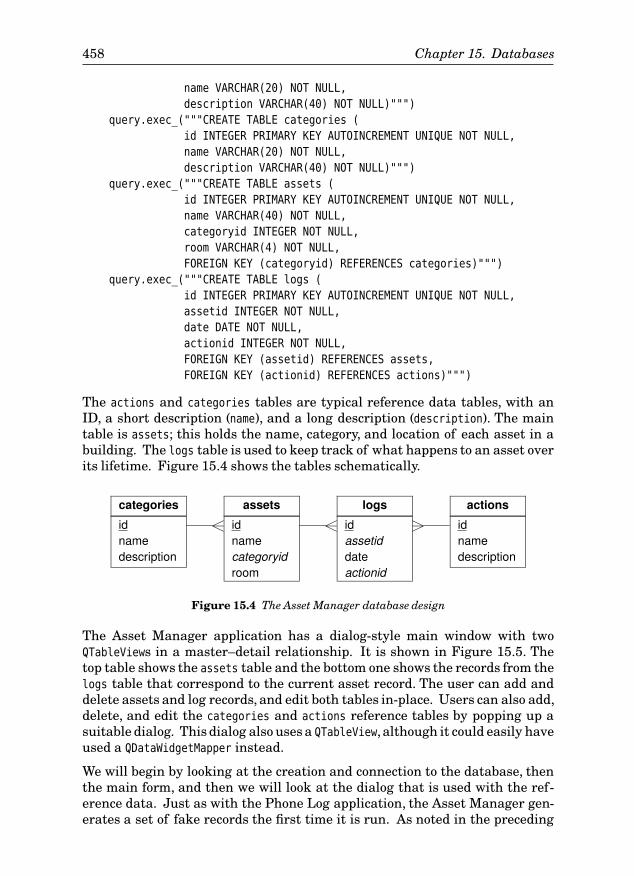
458 Chapter 15. Databases
name VARCHAR(20) NOT NULL,
description VARCHAR(40) NOT NULL)""")
query.exec_("""CREATE TABLE categories (
id INTEGER PRIMARY KEY AUTOINCREMENT UNIQUE NOT NULL,
name VARCHAR(20) NOT NULL,
description VARCHAR(40) NOT NULL)""")
query.exec_("""CREATE TABLE assets (
id INTEGER PRIMARY KEY AUTOINCREMENT UNIQUE NOT NULL,
name VARCHAR(40) NOT NULL,
categoryid INTEGER NOT NULL,
room VARCHAR(4) NOT NULL,
FOREIGN KEY (categoryid) REFERENCES categories)""")
query.exec_("""CREATE TABLE logs (
id INTEGER PRIMARY KEY AUTOINCREMENT UNIQUE NOT NULL,
assetid INTEGER NOT NULL,
date DATE NOT NULL,
actionid INTEGER NOT NULL,
FOREIGN KEY (assetid) REFERENCES assets,
FOREIGN KEY (actionid) REFERENCES actions)""")
The actions and categories tables are typical reference data tables, with anID, a short description (name), and a long description (description). The maintable is assets; this holds the name, category, and location of each asset in abuilding. The logs table is used to keep track of what happens to an asset overits lifetime. Figure 15.4 shows the tables schematically.
categories
idnamedescription
assets
idnamecategoryidroom
logs
idassetiddateactionid
actions
idnamedescription
Figure 15.4 The Asset Manager database design
The Asset Manager application has a dialog-style main window with twoQTableViews in a master–detail relationship. It is shown in Figure 15.5. Thetop table shows the assets table and the bottom one shows the records from thelogs table that correspond to the current asset record. The user can add anddelete assets and log records, and edit both tables in-place. Users can also add,delete, and edit the categories and actions reference tables by popping up asuitable dialog. This dialog also uses a QTableView, although it could easily haveused a QDataWidgetMapper instead.
We will begin by looking at the creation and connection to the database, thenthe main form, and then we will look at the dialog that is used with the ref-erence data. Just as with the Phone Log application, the Asset Manager gen-erates a set of fake records the first time it is run. As noted in the preceding
Using Database Table Views 459
Figure 15.5 The Asset Manager application
section, this is fast with SQLite on Linux and very slow on some Windowsmachines.
app = QApplication(sys.argv)
db = QSqlDatabase.addDatabase("QSQLITE")
db.setDatabaseName(filename)
if not db.open():
QMessageBox.warning(None, "Asset Manager",
QString("Database Error: %1").arg(db.lastError().text()))
sys.exit(1)
form = MainForm()
form.show()
app.exec_()
We begin as usual by creating a QApplication object. Next we create theconnection; if the database file doesn’t exist, SQLite will create an empty one.Then we create the main form, call show() on it to schedule a paint event, andstart off the event loop.
What we haven’t shown is the code that we have used to generate the fake datathe first time the application is run, and to pop up the splash screen. This codeis, of course, in the source file, chap15/assetmanager.pyw.
As we did in the preceding section, we will skip the form’s layout and concen-trate instead on the creation of the widgets and the models. We will also skipthe code for creating the buttons, although we will show the first couple ofsignal–slot connections.
460 Chapter 15. Databases
class MainForm(QDialog):
def __init__(self):
super(MainForm, self).__init__()
self.assetModel = QSqlRelationalTableModel(self)
self.assetModel.setTable("assets")
self.assetModel.setRelation(CATEGORYID,
QSqlRelation("categories", "id", "name"))
self.assetModel.setSort(ROOM, Qt.AscendingOrder)
self.assetModel.setHeaderData(ID, Qt.Horizontal,
QVariant("ID"))
self.assetModel.setHeaderData(NAME, Qt.Horizontal,
QVariant("Name"))
self.assetModel.setHeaderData(CATEGORYID, Qt.Horizontal,
QVariant("Category"))
self.assetModel.setHeaderData(ROOM, Qt.Horizontal,
QVariant("Room"))
self.assetModel.select()
The model is created in much the same way as we saw in the preceding sec-tion. The ID, NAME, and others are integer column indexes set up earlier in theassetmanager.pyw file. What’s different from using a QDataWidgetMapper is thatwe have set the header data to give the columns titles; if we don’t do this, theQTableView that presents the model will use the database field names for thecolumn titles. Since the categoryid field is a foreign key, we have used a QSql-
RelationalTableModel and called setRelation() appropriately.
self.assetView = QTableView()
self.assetView.setModel(self.assetModel)
self.assetView.setItemDelegate(AssetDelegate(self))
self.assetView.setSelectionMode(QTableView.SingleSelection)
self.assetView.setSelectionBehavior(QTableView.SelectRows)
self.assetView.setColumnHidden(ID, True)
self.assetView.resizeColumnsToContents()
The view is a standard QTableView, but instead of setting a QSqlRelational-
Delegate, we have set a custom delegate. We will detour to look at this in a mo-ment. The selection mode is set so that users can navigate to individual fields;the selection behavior is that the row that has the focus is highlighted. We don’twant to show the ID field since it isn’t meaningful to the user, so we hide it.
We have not used a standard QSqlRelationalDelegate because we want to takecontrol of the editing of the room numbers, since they are not straightforwardto validate. We will now take a brief detour to look at the AssetDelegate class.
class AssetDelegate(QSqlRelationalDelegate):
def __init__(self, parent=None):

Using Database Table Views 461
super(AssetDelegate, self).__init__(parent)
The initializer is typical of most delegate subclasses, simply calling thebase class.
def paint(self, painter, option, index):
myoption = QStyleOptionViewItem(option)
if index.column() == ROOM:
myoption.displayAlignment |= Qt.AlignRight|Qt.AlignVCenter
QSqlRelationalDelegate.paint(self, painter, myoption, index)
We have reimplemented the paint() method only to right-align the roomnumbers. We do this by changing the QStyleOptionViewItem, and we leave thepainting itself to be done by the base class.
def createEditor(self, parent, option, index):
if index.column() == ROOM:
editor = QLineEdit(parent)
regex = QRegExp(r"(?:0[1-9]|1[0124-9]|2[0-7])"
r"(?:0[1-9]|[1-5][0-9]|6[012])")
validator = QRegExpValidator(regex, parent)
editor.setValidator(validator)
editor.setInputMask("9999")
editor.setAlignment(Qt.AlignRight|Qt.AlignVCenter)
return editor
else:
return QSqlRelationalDelegate.createEditor(self, parent,
option, index)
The heart of the createEditor() method is the code that sets up the QLineEdit
for entering room numbers. Room numbers are four digits long, made up ofa floor number, in the range 01–27 (but excluding 13), and a room number onthe floor in the range 01–62. For example, 0231 is floor 2, room 31, but 0364 isinvalid. The regular expression is sufficient for specifying valid room numbers,but it cannot set a minimum number of digits, since one, two, or three digitsmay be a valid prefix for a valid four digit room number. We have solved thisby using an input mask that requires exactly four digits to be entered. For theother fields, we pass the work on to the base class.
def setEditorData(self, editor, index):
if index.column() == ROOM:
text = index.model().data(index, Qt.DisplayRole).toString()
editor.setText(text)
else:
QSqlRelationalDelegate.setEditorData(self, editor, index)
462 Chapter 15. Databases
Once the editor has been created, the view will call setEditorData() so that itcan be populated with the current value. In this case, we care only about theroom column, passing on the work for the other fields to the base class.
def setModelData(self, editor, model, index):
if index.column() == ROOM:
model.setData(index, QVariant(editor.text()))
else:
QSqlRelationalDelegate.setModelData(self, editor, model,
index)
We have taken a similar approach to the previous method, handling the roomfield and leaving the others to be handled by the base class. As a matter offact, we could have omitted reimplementing this method, and PyQt would havebeen smart enough to retrieve the value from our QLineEdit. However, it is abetter practice to take full responsibility for our own customizations.
We have now finished the detour and can return to the MainForm.__init__()
method, beginning with the bottom table that shows the log records that areapplicable to the current asset.
self.logModel = QSqlRelationalTableModel(self)
self.logModel.setTable("logs")
self.logModel.setRelation(ACTIONID,
QSqlRelation("actions", "id", "name"))
self.logModel.setSort(DATE, Qt.AscendingOrder)
self.logModel.setHeaderData(DATE, Qt.Horizontal,
QVariant("Date"))
self.logModel.setHeaderData(ACTIONID, Qt.Horizontal,
QVariant("Action"))
self.logModel.select()
The code for creating the log model is almost the same as the code we used forthe asset model. We use a QSqlRelationalTableModel because we have a foreignkey field, and we provide our own column titles.
self.logView = QTableView()
self.logView.setModel(self.logModel)
self.logView.setItemDelegate(LogDelegate(self))
self.logView.setSelectionMode(QTableView.SingleSelection)
self.logView.setSelectionBehavior(QTableView.SelectRows)
self.logView.setColumnHidden(ID, True)
self.logView.setColumnHidden(ASSETID, True)
self.logView.resizeColumnsToContents()
self.logView.horizontalHeader().setStretchLastSection(True)
This code is also similar to what we did for the assets table, but with three dif-ferences. Here we have used a custom LogDelegate class—we won’t review it
Using Database Table Views 463
because it is structurally very similar to the AssetDelegate. It provides customediting of the date field. We also hide both the log record’s ID field and theassetid foreign key—there’s no need to show which asset the log records are forbecause we are using master–detail, so the only log records that are visible arethose that apply to the current asset. (We will see how the master–detail rela-tionship is coded shortly.) The last difference is that we have set the last col-umn to stretch to fill all the available space. The QTableView.horizontalHeader()
method returns a QHeaderView, and this is what controls some aspects of thetable view’s columns, including their widths.
self.connect(self.assetView.selectionModel(),
SIGNAL("currentRowChanged(QModelIndex,QModelIndex)"),
self.assetChanged)
self.connect(addAssetButton, SIGNAL("clicked()"),
self.addAsset)
If the user navigates to a different row we must update the log view to showthe log records for the right asset. This is achieved by the first connection inconjunction with the assetChanged() method that we will review in a moment.
Every view has at least one selection model that is used to keep track ofwhich items in the view’s model (if any) are selected. We connect the view’sselection model’s currentRowChanged() signal so that we can update the log viewdepending on the current asset.
All the other connections are button-clicked connections like the second oneshown here. We will cover all the methods the buttons connect to as weprogress through this section.
self.assetChanged(self.assetView.currentIndex())
self.setMinimumWidth(650)
self.setWindowTitle("Asset Manager")
The initializer ends by calling the assetChanged() method with the asset view’scurrent model index—this will result in the log view showing the relevantasset’s records.
def assetChanged(self, index):
if index.isValid():
record = self.assetModel.record(index.row())
id = record.value("id").toInt()[0]
self.logModel.setFilter(QString("assetid = %1").arg(id))
else:
self.logModel.setFilter("assetid = -1")
self.logModel.select()
self.logView.horizontalHeader().setVisible(
self.logModel.rowCount() > 0)
464 Chapter 15. Databases
This method is called once by the form’s initializer and then whenever theuser navigates to a different asset, that is, to a different row in the assets
table view.
If the model index of the new position in the view is valid, we retrieve the row’sentire record from the model and set a filter on the log model that selects onlythose log records which have an assetid corresponding to the asset ID of thecurrent row. (This is the equivalent of doing SELECT * FROM logs WHERE assetid =
id.) Then we call select() to refresh the log view with the selected log records.If the model index is invalid, we set the ID to be one that we know does notexist, thereby guaranteeing that no rows will be retrieved and the log view willbe empty. Finally,we hide the log view’s column titles if there are no log recordsto display.
The record() method is one of the extensions that the QSqlTableModel andQSqlRelationalTableModel classes provide in addition to the methods from theirQAbstractItemModel base class, to make them easier to use with databases.Other extensions include setQuery(), which allows us to write our own SELECT
statement using SQL syntax, and insertRecord(), for adding records.
The connection to the assetChanged() method, and the implementation of themethod,are all we have to do to establish a master–detail relationship betweentwo models (and therefore, between their views).
def done(self, result=1):
query = QSqlQuery()
query.exec_("DELETE FROM logs WHERE logs.assetid NOT IN"
"(SELECT id FROM assets)")
QDialog.done(self, 1)
When the application terminates we execute one final query to delete anylog records that are present for nonexistent (deleted) assets. In theory, thisshould never be needed, and therefore should do nothing. This is because, fordatabases that support transactions, we use transactions to ensure that if anasset is deleted, so are its log records.
def addAction(self):
index = self.assetView.currentIndex()
if not index.isValid():
return
QSqlDatabase.database().transaction()
record = self.assetModel.record(index.row())
assetid = record.value(ID).toInt()[0]
row = self.logModel.rowCount()
self.logModel.insertRow(row)
self.logModel.setData(self.logModel.index(row, ASSETID),
QVariant(assetid))
self.logModel.setData(self.logModel.index(row, DATE),
Using Database Table Views 465
QVariant(QDate.currentDate()))
QSqlDatabase.database().commit()
index = self.logModel.index(row, ACTIONID)
self.logView.setCurrentIndex(index)
self.logView.edit(index)
If the user asks to add an action (a new log record), this method is called. Weretrieve the assetid for the current asset, and then insert a new log record asthe last record in the logs table. We then set the record’s assetid foreign keyto the one we have retrieved and provide an initial default date. Finally, weretrieve a model index to the new log record’s action combobox, and initiateediting ready for the user to choose a suitable action.
Before we retrieve the assetid, we begin a transaction. This is to prevent thetheoretical possibility that having retrieved the assetid, the asset is deletedjust before the new log record is created. If this occurred, the log record wouldrefer to a nonexistent asset, something that might cause crashes or subtlerproblems later on. Once we call commit(), we know that the asset and the newlog record exist. If someone now tries to delete the asset, they can do so—butthe asset’s log records, including this one, will correctly be deleted alongwith it.
For a really defensive approach we might structure our transaction codelike this:
class DatabaseError(Exception): pass
rollback = False
try:
if not QSqlDatabase.database().transaction():
raise DatabaseError
rollback = True
# execute commands that affect the database
if not QSqlDatabase.database().commit()
raise DatabaseError
rollback = False
finally:
if rollback:
if not QSqlDatabase.database().rollback():
raise DatabaseError
This tries to ensure that if some problem occurs that prevents the commit frombeing reached, or from being able to execute successfully if it is called, we rollback to the previous position and therefore preserve the database’s relationalintegrity. All bets are off if the rollback fails, though. The error text can beretrieved from QSqlDatabase.database().lastError().text(), which returns aQString.
The scope of a transaction goes from when transaction() is called until thetransaction is either committed or rolled back. It does not matter whether the
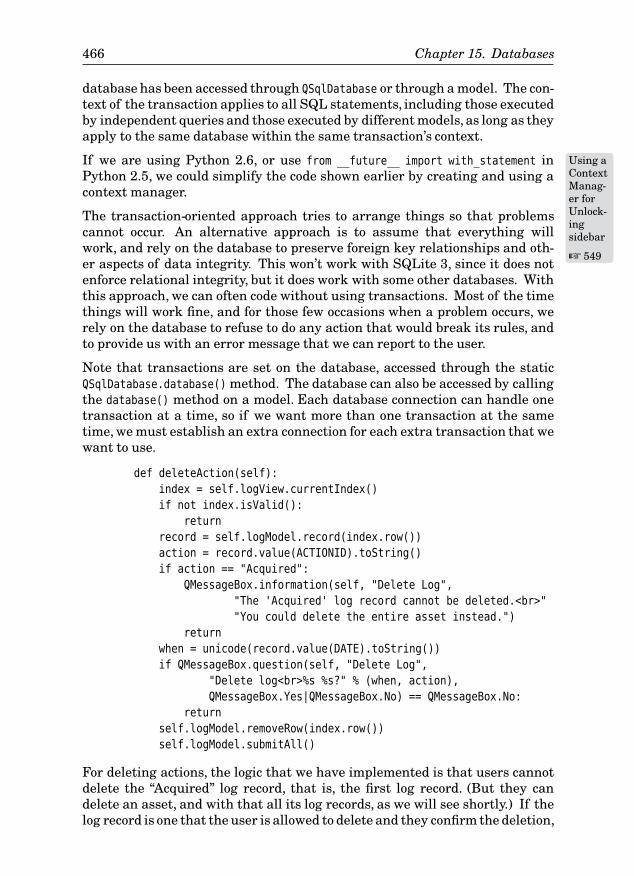
466 Chapter 15. Databases
database has been accessed through QSqlDatabase or through a model. The con-text of the transaction applies to all SQL statements, including those executedby independent queries and those executed by different models, as long as theyapply to the same database within the same transaction’s context.
If we are using Python 2.6, or use from __future__ import Using aContextManag-er forUnlock-ingsidebar
☞ 549
with_statement inPython 2.5, we could simplify the code shown earlier by creating and using acontext manager.
The transaction-oriented approach tries to arrange things so that problemscannot occur. An alternative approach is to assume that everything willwork, and rely on the database to preserve foreign key relationships and oth-er aspects of data integrity. This won’t work with SQLite 3, since it does notenforce relational integrity, but it does work with some other databases. Withthis approach, we can often code without using transactions. Most of the timethings will work fine, and for those few occasions when a problem occurs, werely on the database to refuse to do any action that would break its rules, andto provide us with an error message that we can report to the user.
Note that transactions are set on the database, accessed through the staticQSqlDatabase.database() method. The database can also be accessed by callingthe database() method on a model. Each database connection can handle onetransaction at a time, so if we want more than one transaction at the sametime, we must establish an extra connection for each extra transaction that wewant to use.
def deleteAction(self):
index = self.logView.currentIndex()
if not index.isValid():
return
record = self.logModel.record(index.row())
action = record.value(ACTIONID).toString()
if action == "Acquired":
QMessageBox.information(self, "Delete Log",
"The 'Acquired' log record cannot be deleted.<br>"
"You could delete the entire asset instead.")
return
when = unicode(record.value(DATE).toString())
if QMessageBox.question(self, "Delete Log",
"Delete log<br>%s %s?" % (when, action),
QMessageBox.Yes|QMessageBox.No) == QMessageBox.No:
return
self.logModel.removeRow(index.row())
self.logModel.submitAll()
For deleting actions, the logic that we have implemented is that users cannotdelete the “Acquired” log record, that is, the first log record. (But they candelete an asset, and with that all its log records, as we will see shortly.) If thelog record is one that the user is allowed to delete and they confirm the deletion,
Using Database Table Views 467
we simply call removeRow() on the log model and then submitAll() to update theunderlying database.
def editActions(self):
form = ReferenceDataDlg("actions", "Action", self)
form.exec_()
def editCategories(self):
form = ReferenceDataDlg("categories", "Category", self)
form.exec_()
Since both the actions and the categories reference tables have identicalstructures, we can use the same smart dialog for when we want to drill downto add, edit, and delete their records. We give the dialog the name of the tablein the database, and the name of the reference data to be shown in the userinterface (in the dialog’s title bar, for example).
Figure 15.6 The Asset Manager Reference Data form
We won’t review the code for the ReferenceDataDlg shown in Figure 15.6,because it does not have anything new to teach us. It uses a QTableView witha QSqlTableModel set to the table that is passed in to its constructor. Editing isin-place and handled automatically by the table view and table model. Addinga record is simply a matter of inserting a new row into the model and settingthe view to it.
For reference data deletions, we execute a query to see whether the particularreference data record is being used by one of the other tables, that is, an actionis used by any records in the logs table, or if a category is used by any records inthe assets table. If the record is in use, we pop up an informative error messageand do not permit the deletion to take place. Otherwise, we call removeRow() onthe model for the relevant row and then submitAll() to commit the change tothe database, just as we did when deleting an action.
Unlike reference data, adding and deleting assets is handled by the mainform’s methods.
def addAsset(self):
row = self.assetView.currentIndex().row() \
468 Chapter 15. Databases
if self.assetView.currentIndex().isValid() else 0
QSqlDatabase.database().transaction()
self.assetModel.insertRow(row)
index = self.assetModel.index(row, NAME)
self.assetView.setCurrentIndex(index)
assetid = 1
query = QSqlQuery()
query.exec_("SELECT MAX(id) FROM assets")
if query.next():
assetid = query.value(0).toInt()[0]
query.prepare("INSERT INTO logs (assetid, date, actionid) "
"VALUES (:assetid, :date, :actionid)")
query.bindValue(":assetid", QVariant(assetid + 1))
query.bindValue(":date", QVariant(QDate.currentDate()))
query.bindValue(":actionid", QVariant(ACQUIRED))
query.exec_()
QSqlDatabase.database().commit()
self.assetView.edit(index)
When the user adds a new asset we want to create a new log record for theasset with its action set to “Acquired”. Naturally, we want either both of theserecords created, or, if something goes wrong, neither, and to do this we mustuse a transaction.
We begin by initiating a transaction. Then we insert a new row and make itthe current one in the asset view. If this is the very first asset, its ID will be1, but if there are other assets, its ID will be one more than the highest assetID. We execute a query to find the current highest asset ID and then we use aprepared query (so that we don’t have to worry about quoting), to insert a newrecord into the logs table. Once the new record has gone into the logs table,we commit the transaction. Now we will have one log record for the new assetwith an action of “Acquired”, and a new blank asset record. Finally, we initiateediting on the new asset’s name field.
We will finish reviewing the main form by looking at the deleteAsset() method.The method is slightly involved, so we will look at it in three parts.
def deleteAsset(self):
index = self.assetView.currentIndex()
if not index.isValid():
return
QSqlDatabase.database().transaction()
record = self.assetModel.record(index.row())
assetid = record.value(ID).toInt()[0]
logrecords = 1
query = QSqlQuery(QString("SELECT COUNT(*) FROM logs "
"WHERE assetid = %1").arg(assetid))
Using Database Table Views 469
if query.next():
logrecords = query.value(0).toInt()[0]
We begin by starting a transaction. This is because if an asset is to be deleted,all its log records must also be deleted, and either both of these things musthappen or neither, to maintain the database’s relational integrity.
We know that there must be at least one log record, the “Acquired” record, butwe perform a query to see what the total number of log records is.
msg = QString("<font color=red>Delete</font><br><b>%1</b>"
"<br>from room %2") \
.arg(record.value(NAME).toString()) \
.arg(record.value(ROOM).toString())
if logrecords > 1:
msg += QString(", along with %1 log records") \
.arg(logrecords)
msg += "?"
if QMessageBox.question(self, "Delete Asset", msg,
QMessageBox.Yes|QMessageBox.No) == QMessageBox.No:
QSqlDatabase.database().rollback()
return
Here we give the user the opportunity to confirm their deletion or to cancel it.If they cancel, we rollback the transaction and return.
query.exec_(QString("DELETE FROM logs WHERE assetid = %1") \
.arg(assetid))
self.assetModel.removeRow(index.row())
self.assetModel.submitAll()
QSqlDatabase.database().commit()
self.assetChanged(self.assetView.currentIndex())
We have deleted the log records using a SQL query, and the asset recordusing the model API. After the deletion we commit the transaction and callassetChanged() to make sure that the master–detail view is showing the correctlog records.
We could have used the model API for both deletions. For example:
self.logModel.setFilter(QString("assetid = %1").arg(assetid))
self.logModel.select()
if self.logModel.rowCount() > 0:
self.logModel.removeRows(0, self.logModel.rowCount())
self.logModel.submitAll()
This completes our review of the Asset Manager application. Creatingmaster–detail relationships between tables is quite straightforward, and thesame thing can be done between tables and forms using a data widget mapper.
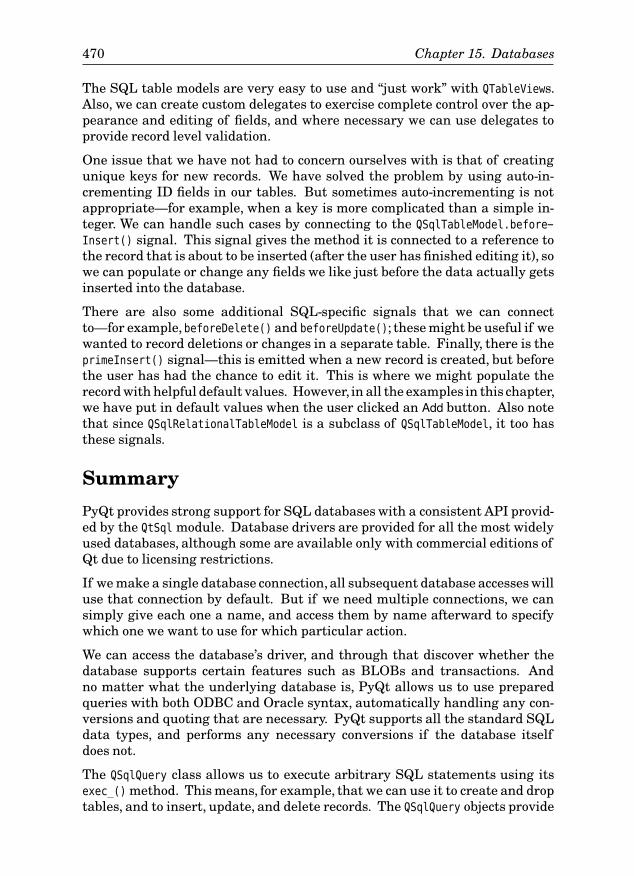
470 Chapter 15. Databases
The SQL table models are very easy to use and “just work” with QTableViews.Also, we can create custom delegates to exercise complete control over the ap-pearance and editing of fields, and where necessary we can use delegates toprovide record level validation.
One issue that we have not had to concern ourselves with is that of creatingunique keys for new records. We have solved the problem by using auto-in-crementing ID fields in our tables. But sometimes auto-incrementing is notappropriate—for example, when a key is more complicated than a simple in-teger. We can handle such cases by connecting to the QSqlTableModel.before-
Insert() signal. This signal gives the method it is connected to a reference tothe record that is about to be inserted (after the user has finished editing it), sowe can populate or change any fields we like just before the data actually getsinserted into the database.
There are also some additional SQL-specific signals that we can connectto—for example, beforeDelete() and beforeUpdate(); these might be useful if wewanted to record deletions or changes in a separate table. Finally, there is theprimeInsert() signal—this is emitted when a new record is created, but beforethe user has had the chance to edit it. This is where we might populate therecord with helpful default values. However, in all the examples in this chapter,we have put in default values when the user clicked an Add button. Also notethat since QSqlRelationalTableModel is a subclass of QSqlTableModel, it too hasthese signals.
Summary
PyQt provides strong support for SQL databases with a consistent API provid-ed by the QtSql module. Database drivers are provided for all the most widelyused databases, although some are available only with commercial editions ofQt due to licensing restrictions.
If we make a single database connection, all subsequent database accesses willuse that connection by default. But if we need multiple connections, we cansimply give each one a name, and access them by name afterward to specifywhich one we want to use for which particular action.
We can access the database’s driver, and through that discover whether thedatabase supports certain features such as BLOBs and transactions. Andno matter what the underlying database is, PyQt allows us to use preparedqueries with both ODBC and Oracle syntax, automatically handling any con-versions and quoting that are necessary. PyQt supports all the standard SQLdata types, and performs any necessary conversions if the database itselfdoes not.
The QSqlQuery class allows us to execute arbitrary SQL statements using itsexec_() method. This means, for example, that we can use it to create and droptables, and to insert, update, and delete records. The QSqlQuery objects provide
Summary 471
methods for navigating the result set produced when a SELECT statement isexecuted, and they can provide information on the number of rows affected bya query—for example, how many were deleted or updated.
Creating GUI forms for displaying database tables (or editable views) isstraightforward using a QDataWidgetMapper. We normally use a QComboBox foreach foreign key field, giving it the appropriate relation model as its internalmodel. Although it is possible to set a QDataWidgetMapper to submit changes au-tomatically, this can lead to data loss when the user navigates, so if we providea means of navigation, it is best to submit all the changes ourselves.
Displaying database tables and views is very easy using QTableView in conjunc-tion with a QSqlTableModel or a QSqlRelationalTableModel.These classes combineto offer in-place editing of field data. Adding and deleting records can easilybe achieved by inserting or deleting rows from the model, and when we needatomic actions we can use transactions.
All the functionality of PyQt’s model/view architecture is available to databaseprogrammers. In addition, the SQL table models’ APIs have been extended tomake database programming easier. And when we need to execute raw SQL,we can easily do so using the QSqlQuery class.
We have now reached the point where you should be able to create any kindof GUI application you like, limited only by your imagination and the timeavailable to you. In Part IV we will look at some additional topics that canbe tricky to deal with, starting with more advanced material on model/viewprogramming, then internationalization, then networking, and finishing upwith multithreading.
ExerciseCreate a dialog-style application for adding, editing, and deleting records ina reference table, like the one shown in Figure 15.7. The application shouldcreate the reference.db database the first time it is run, with a single, emptytable:
CREATE TABLE reference (
id INTEGER PRIMARY KEY AUTOINCREMENT UNIQUE NOT NULL,
category VARCHAR(30) NOT NULL,
shortdesc VARCHAR(20) NOT NULL,
longdesc VARCHAR(80))
In addition to offering Add and Delete buttons, provide a Sort button that hasa pop-up menu with three sort order options: by ID, by category, and by shortdescription. All three could be connected to a single method using lambda orfunctools.partial. To make any new sort (or filter) take effect, you must callselect() on the model. Use a QDialogButtonBox for all the buttons.
472 Chapter 15. Databases
Figure 15.7 The Reference Data dialog
If the user clicks Delete, pop up a yes/no message box, and delete only if theyclick the Yes button. The application is similar to the ReferenceDataDlg from theAsset Manager application, and can be written in about 130 lines.
A solution is provided in chap15/referencedata.pyw.

Part IV
Advanced GUI Programming

This page intentionally left blank
Advanced Model/ViewProgramming
1616 ● Custom Views
● Generic Delegates
● Representing Tabular Data in Trees
In the two preceding chapters we explored the basics of PyQt model/view pro-gramming.★ We saw how to create custom models, and how to use the prede-fined SQL table models. We also saw how to create custom delegates to controlthe appearance and editing of data items. In this chapter, we will deepen ourknowledge of PyQt model/view programming.
All of the topics covered in this chapter, and the ones that follow, are moreadvanced than the ones we have seen before, at least conceptually. However,in most cases the code is no more difficult than what we have already seen.
In the first section we will look at how to implement a custom view so that wecan see how to visualize our data in any way we want. This section is usefulfor understanding more about how views work, and to see one straightforwardapproach to implementing a custom view.
The second section revisits the subject of custom delegates, showing how tominimize code duplication and how to easily create arbitrary delegates forviews. This section should prove especially useful to those who need to createmany delegates, especially for datasets such as SQL tables where each columnis of a particular type.
In the final section we will see how to reflect tabular data into a tree view. Oneuse of this is where we represent tables as trees when the first few columnsoften contain the same values—this has the effect of reducing the number ofrows that the user must navigate to find the item they want. Another use isto let users pick particular values that form a “path”. For example, rather thanproviding two, three, or more comboboxes, each with values that depend on thecurrent values of its predecessors, we just provide a single tree for the user tonavigate and choose from.
★This chapter assumes a knowledge of PyQt’s model/view architecture, covered in Chapter 14.
475
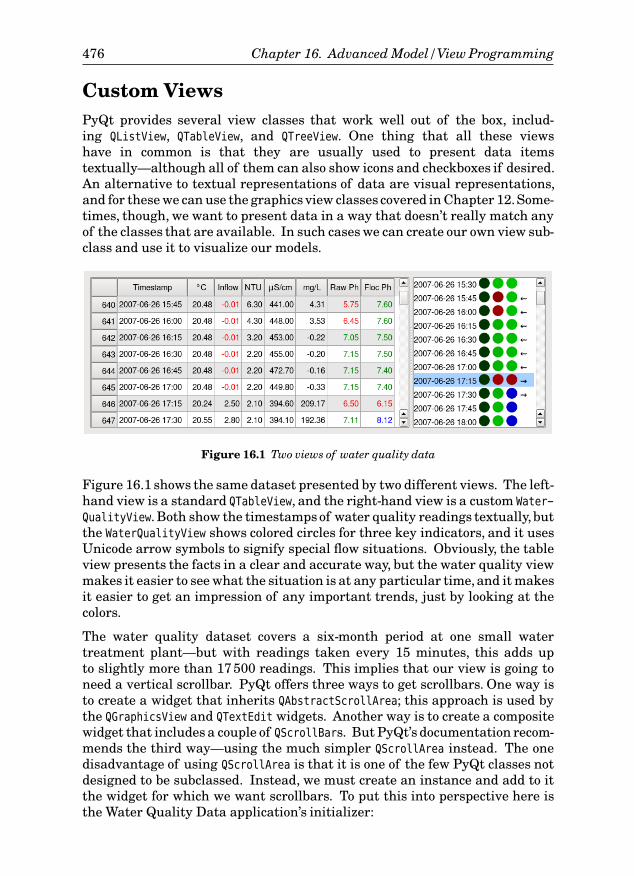
476 Chapter 16. Advanced Model/View Programming
Custom ViewsPyQt provides several view classes that work well out of the box, includ-ing QListView, QTableView, and QTreeView. One thing that all these viewshave in common is that they are usually used to present data itemstextually—although all of them can also show icons and checkboxes if desired.An alternative to textual representations of data are visual representations,and for these we can use the graphics view classes covered in Chapter 12.Some-times, though, we want to present data in a way that doesn’t really match anyof the classes that are available. In such cases we can create our own view sub-class and use it to visualize our models.
Figure 16.1 Two views of water quality data
Figure 16.1 shows the same dataset presented by two different views. The left-hand view is a standard QTableView, and the right-hand view is a custom Water-
QualityView. Both show the timestamps of water quality readings textually,butthe WaterQualityView shows colored circles for three key indicators, and it usesUnicode arrow symbols to signify special flow situations. Obviously, the tableview presents the facts in a clear and accurate way, but the water quality viewmakes it easier to see what the situation is at any particular time, and it makesit easier to get an impression of any important trends, just by looking at thecolors.
The water quality dataset covers a six-month period at one small watertreatment plant—but with readings taken every 15 minutes, this adds upto slightly more than 17500 readings. This implies that our view is going toneed a vertical scrollbar. PyQt offers three ways to get scrollbars. One way isto create a widget that inherits QAbstractScrollArea; this approach is used bythe QGraphicsView and QTextEdit widgets. Another way is to create a compositewidget that includes a couple of QScrollBars. But PyQt’s documentation recom-mends the third way—using the much simpler QScrollArea instead. The onedisadvantage of using QScrollArea is that it is one of the few PyQt classes notdesigned to be subclassed. Instead, we must create an instance and add to itthe widget for which we want scrollbars. To put this into perspective here isthe Water Quality Data application’s initializer:
Custom Views 477
class MainForm(QDialog):
def __init__(self, parent=None):
super(MainForm, self).__init__(parent)
self.model = WaterQualityModel(os.path.join(
os.path.dirname(__file__), "waterdata.csv.gz"))
self.tableView = QTableView()
self.tableView.setAlternatingRowColors(True)
self.tableView.setModel(self.model)
self.waterView = WaterQualityView()
self.waterView.setModel(self.model)
scrollArea = QScrollArea()
scrollArea.setBackgroundRole(QPalette.Light)
scrollArea.setWidget(self.waterView)
self.waterView.scrollarea = scrollArea
splitter = QSplitter(Qt.Horizontal)
splitter.addWidget(self.tableView)
splitter.addWidget(scrollArea)
splitter.setSizes([600, 250])
layout = QHBoxLayout()
layout.addWidget(splitter)
self.setLayout(layout)
self.setWindowTitle("Water Quality Data")
QTimer.singleShot(0, self.initialLoad)
The preceding code is the whole thing. The WaterQualityModel is a QAbstract-
TableModel subclass that provides read-only access to a water quality data file.The WaterQualityView is the class we will develop in this section. One specialthing that we have done here is to create a QScrollArea widget and add thewater quality view to it—this basically means that the water quality view canbe as wide and as tall as we like and the scroll area will take care of scrollingissues.
We will see shortly that keyboard users can navigate in the water qualityview using the up and down arrow keys, and to ensure that the selected row isalways visible we must pass the scroll area to the water quality view so thatour key press handler can interact with it. Another thing that is special isthat we have given initial sizes to the two parts of the horizontal splitter sothat at start-up, they are roughly in the right proportions for the widgets theyare holding.
We will now review the WaterQualityView, beginning with some static data andthe initializer.
class WaterQualityView(QWidget):
FLOWCHARS = (unichr(0x21DC), unichr(0x21DD), unichr(0x21C9))
478 Chapter 16. Advanced Model/View Programming
def __init__(self, parent=None):
super(WaterQualityView, self).__init__(parent)
self.scrollarea = None
self.model = None
self.setFocusPolicy(Qt.StrongFocus)
self.selectedRow = -1
self.flowfont = self.font()
size = self.font().pointSize()
if platform.system() == "Windows":
fontDb = QFontDatabase()
for face in [face.toLower() for face in fontDb.families()]:
if face.contains("unicode"):
self.flowfont = QFont(face, size)
break
else:
self.flowfont = QFont("symbol", size)
WaterQualityView.FLOWCHARS = (
chr(0xAC), chr(0xAE), chr(0xDE))
Setting the focus policy to anything (except Qt.NoFocus) means that the widgetcan accept keyboard focus. We will discuss why we have done this, and theselectedRow instance variable, at the end of this section.
When water flow is going the wrong way, or too slowly, or too quickly, we wantto indicate the situation with a suitable character—for example, ∼→, ∼→, and→→.These characters are available in Unicode,but most of the default fonts sup-plied with Windows don’t appear to include the whole Unicode character set, soall the arrows are shown as characters. (On Linux, if a Unicode character isnot available in the current font,PyQt can usually find the character in anotherfont, in which case it uses the found font just for that character.)
To solve this problem on Windows we iterate over the list of available fontsuntil we find one with “Unicode” in its name (e.g., “Lucida Sans Unicode”). If wefind such a font, we store it as the flow characters’ font; otherwise, we fall backto the standard (but non-Unicode) Symbol font and use the nearest equivalentcharacters in that font.
def setModel(self, model):
self.model = model
self.connect(self.model,
SIGNAL("dataChanged(QModelIndex,QModelIndex)"),
self.setNewSize)
self.connect(self.model, SIGNAL("modelReset()"),
self.setNewSize)
self.setNewSize()
Once a model is set on the view we connect to its data-changed and resetsignals so that the view can be resized to match the available data.
Custom Views 479
def setNewSize(self):
self.resize(self.sizeHint())
self.update()
self.updateGeometry()
This method resizes the view to its preferred size and calls update() to schedulea repaint and updateGeometry() to tell any layout manager that is responsiblefor the view that its size has changed.Because we put the view in a QScrollArea,the scroll area will respond to changes in size by adjusting the scrollbarsit provides.
def minimumSizeHint(self):
size = self.sizeHint()
fm = QFontMetrics(self.font())
size.setHeight(fm.height() * 3)
return size
We calculate the view’s minimum size to be its preferred size’s width and threecharacters in height. In a layout this makes sense, but since a QScrollArea isused, the minimum size will, in practice, be whatever the scroll area decides.
def sizeHint(self):
fm = QFontMetrics(self.font())
size = fm.height()
return QSize(fm.width("9999-99-99 99:99 ") + (size * 4),
(size / 4) + (size * self.model.rowCount()))
We use the height of one character (including its interline spacing) as our unitof size for both vertical and horizontal measurements. The view’s preferredsize is wide enough to show a timestamp plus four units of size to allow for thecolored circles and the flow character, and it’s tall enough for all the rows in themodel plus one-quarter of the unit of size to allow a tiny bit of margin.
The paint event isn’t too difficult, but we will look at it in three parts, and showthe code for only one colored circle since the code for all three is almost iden-tical.
def paintEvent(self, event):
if self.model is None:
return
fm = QFontMetrics(self.font())
timestampWidth = fm.width("9999-99-99 99:99 ")
size = fm.height()
indicatorSize = int(size * 0.8)
offset = int(1.5 * (size - indicatorSize))
minY = event.rect().y()
maxY = minY + event.rect().height() + size
minY -= size
painter = QPainter(self)
480 Chapter 16. Advanced Model/View Programming
painter.setRenderHint(QPainter.Antialiasing)
painter.setRenderHint(QPainter.TextAntialiasing)
If there is no model we do nothing and return. Otherwise, we need to calculatesome sizes. Just like the sizeHint(), we use the height of one character as ourunit of size, setting the indicatorSize (the diameter of the colored circles) to80% of this amount. The offset is a tiny amount of vertical spacing designedto make the circles align vertically with the timestamp text.
Given the large size of the datasets that the view might be asked to show, itseems sensible to paint only those items that are wholly or partially visible tothe user. For this reason, we set the minimum y coordinate to the paint eventrectangle’s y coordinate (but minus one size unit), and the maximum y coordi-nate to be the minimum plus the paint event’s height plus one size unit. Thismeans that we will paint from the item above the topmost item that is wholly inthe view (i.e., the one with the lowest y coordinate in range, since point (0, 0) isthe top-left corner), down to the item below the bottommost item that is whollyin the view (i.e., the one with the highest y coordinate in range).
A paint event’s event parameter contains the size of the region that needsrepainting. Very often we can disregard this information and simply paintthe entire widget, but sometimes, as here, we use the information to make ourpainting more efficient.
y = 0
for row in range(self.model.rowCount()):
x = 0
if minY <= y <= maxY:
painter.save()
painter.setPen(self.palette().color(QPalette.Text))
if row == self.selectedRow:
painter.fillRect(x, y + (offset * 0.8),
self.width(), size,
self.palette().highlight())
painter.setPen(self.palette().color(
QPalette.HighlightedText))
timestamp = self.model.data(
self.model.index(row, TIMESTAMP)).toDateTime()
painter.drawText(x, y + size,
timestamp.toString(TIMESTAMPFORMAT))
x += timestampWidth
temperature = self.model.data(
self.model.index(row, TEMPERATURE))
temperature = temperature.toDouble()[0]
if temperature < 20:
color = QColor(0, 0,
int(255 * (20 - temperature) / 20))
elif temperature > 25:
Custom Views 481
color = QColor(int(255 * temperature / 100), 0, 0)
else:
color = QColor(0, int(255 * temperature / 100), 0)
painter.setPen(Qt.NoPen)
painter.setBrush(color)
painter.drawEllipse(x, y + offset, indicatorSize,
indicatorSize)
x += size
We iterate over every row in the model, but paint only those with a y coordinatethat is in range. Once we have a row to paint, we set the pen (used for drawingtext) to the palette’s text color. If the row is selected (something we will explainafter covering the paint event), we paint the background in the palette’shighlight color and set the pen to the palette’s highlighted text color.
Having set up the text color, and possibly painted the background, we thenretrieve and draw the row’s timestamp. For each row we keep an x coordinatethat tells us how far across we are, and that we increment by the font metricstimestamp width we calculated earlier.
The first colored circle is used to indicate the water’s temperature in °C. If thewater is too cool we use a color with a blue tint; if it is too warm we use a colorwith a red tint; otherwise, we use a green tint. Then we switch off the pen andset the brush to the color we have set up and paint an ellipse to the right of thetimestamp. The drawEllipse() method will draw a circle because the width andheight of the rectangle in which the ellipse is drawn are the same.
We then increment the x coordinate. Now we repeat the process for theother two colored circle indicators, using the same tinting approach we usedfor temperature. We have omitted the code for these, since it is structurallyidentical to the code used for the temperature circle.
flow = self.model.data(
self.model.index(row, INLETFLOW))
flow = flow.toDouble()[0]
char = None
if flow <= 0:
char = WaterQualityView.FLOWCHARS[0]
elif flow < 3:
char = WaterQualityView.FLOWCHARS[1]
elif flow > 5.5:
char = WaterQualityView.FLOWCHARS[2]
if char is not None:
painter.setFont(self.flowfont)
painter.drawText(x, y + size, char)
painter.restore()
y += size
if y > maxY:
break
482 Chapter 16. Advanced Model/View Programming
If the water flow is in the wrong direction, or if it is too slow or too fast, wedraw a suitable character, using the font and characters that were set inthe initializer.
At the end we increment the y coordinate ready for the next row of data, but ifwe have gone past the last row that is in view, we stop.
The code we have written so far is sufficient to provide a read-only view of thedataset. But users often want to highlight an item. The easiest way to do thisis to add a mouse press event handler.
def mousePressEvent(self, event):
fm = QFontMetrics(self.font())
self.selectedRow = event.y() // fm.height()
self.update()
self.emit(SIGNAL("clicked(QModelIndex)"),
self.model.index(self.selectedRow, 0))
The unit of size used for all our calculations is the height of a character. Wedivide the mouse position’s y coordinate (which is relative to the top-left cornerof the widget) by the unit of size, to find which row the user clicked. We use in-teger division because row numbers are whole numbers. Then we call update()to schedule a paint event. In the paintEvent() we saw that the selected row isdrawn using highlighted text and background colors. We also emit a clicked()
signal, with the model index of the first column of the row that was clicked.The signal is not used by this application, but providing it is a good practicewhen implementing custom views.
Keyboard users are catered for already by the scroll area: They can scroll usingthe PageUp and PageDownkeys. But we ought to provide a means for keyboardusers to select an item. To do this we must make sure that the widget has asuitable focus policy—we did this in the initializer—and we must provide a keypress event handler.
def keyPressEvent(self, event):
if self.model is None:
return
row = -1
if event.key() == Qt.Key_Up:
row = max(0, self.selectedRow - 1)
elif event.key() == Qt.Key_Down:
row = min(self.selectedRow + 1, self.model.rowCount() - 1)
if row != -1 and row != self.selectedRow:
self.selectedRow = row
if self.scrollarea is not None:
fm = QFontMetrics(self.font())
y = fm.height() * self.selectedRow
self.scrollarea.ensureVisible(0, y)
self.update()
Custom Views 483
self.emit(SIGNAL("clicked(QModelIndex)"),
self.model.index(self.selectedRow, 0))
else:
QWidget.keyPressEvent(self, event)
We have chosen to support just two key presses: Up Arrow and Down Arrow. Ifthe user presses either of these, we increment or decrement the selected row,make sure that the selected row is in range, and then schedule a paint event.If the user navigates to the row above the topmost visible row or below thebottommost visible row, we tell the scroll area to make sure that the row thathas been scrolled to is visible—if necessary, the scroll area will scroll to achievethis. We also emit a clicked() signal with the newly selected row’s model index.It is quite conventional to use a clicked() signal in this circumstance, since ineffect, the user is “clicking” using the keyboard—after all, the signals and slotsmechanism is concerned with what the user wants rather than how they askedfor it, and here they just want to select a row.
If we do not handle the key press ourselves, that is, for all other key presses,we pass the event on to the base class.
The water quality view widget is visually very different from the table viewshown beside it, yet it did not require that much code to implement and was nottoo difficult to program. We made the widget fairly efficient by reducing theamount of unnecessary painting. We also made the painting code as simple aspossible by ensuring that the widget was always exactly the size necessary todisplay the entire dataset. The disadvantage of this approach is that it pushesresponsibility on to the programmer using our widget to use a QScrollArea,although this saves us from having to implement scrolling ourselves.
The water quality view visualizes the data in one-to-one correspondence withthe data in the model, but we are not constrained to doing this. It is also possi-ble to create custom views that show aggregated data. In this case, for example,we could have shown one entry per day, or per hour, perhaps by averaging eachday or hour’s readings.
Generic Delegates
As we have seen in earlier chapters, custom delegates allow us to exercisecomplete control over the appearance and behavior of the data items thatappear in views. Although it is obvious that if we have many models, we arelikely to want a custom delegate for most if not all of them, what is not soobvious, is that the custom delegates will very likely have a lot of duplicatecode.★
★This section is partly based on ideas from the author’s whitepaper, “Qt 4’s Model/View Delegates”,available at http://www.ics.com/developers/papers/.

484 Chapter 16. Advanced Model/View Programming
Imagine that we have just four models, each with an integer ID column, somestring columns holding plain text, and a description column holding HTMLtext, and for some of the models, one or two floating-point columns. All themodels have the ID as their first column, but the other columns don’t match up,so each one requires its own custom delegate. Providing the custom delegatesis not a big undertaking,but the code dealing with the integer IDs might be thesame in all of them; similarly for the strings, HTML strings, and floating-pointnumbers.
Now imagine that we have to write custom delegates for another half dozennew models: Much of the code will again be duplicated—and this will probablymake maintenance more difficult.
What would be better, particularly for models that have one data type per col-umn, like database tables, is if instead of creating a custom delegate for eachmodel, we could compose a delegate from a set of generic components. Thiswould mean that the maintenance would be confined to the generic compo-nents, and a bug fix in one would automatically benefit any view that used it.
In code, the effect we are after is something like this:
self.table1 = QTableView()
self.table1.setModel(self.model1)
delegate1 = GenericDelegate(self)
delegate1.insertColumnDelegate(1, PlainTextColumnDelegate())
delegate1.insertColumnDelegate(2, PlainTextColumnDelegate())
delegate1.insertColumnDelegate(3, RichTextColumnDelegate())
delegate1.insertColumnDelegate(4, IntegerColumnDelegate())
self.table1.setItemDelegate(delegate1)
self.table2 = QTableView()
self.table2.setModel(self.model2)
delegate2 = GenericDelegate(self)
delegate2.insertColumnDelegate(1, PlainTextColumnDelegate())
delegate2.insertColumnDelegate(2, IntegerColumnDelegate())
delegate2.insertColumnDelegate(3, FloatColumnDelegate())
delegate2.insertColumnDelegate(4, FloatColumnDelegate())
delegate2.insertColumnDelegate(5, RichTextColumnDelegate())
self.table2.setItemDelegate(delegate2)
Here we have two separate models, but both use generic delegates that arecomposed of predefined column delegates that are data-type-specific.
With this approach, we only ever have to create a single plain text column dele-gate, a single rich text column delegate,and so on, for each data type we want tohandle, such as integers, floating-point numbers, dates, times, and date/times.In addition, we might create some project-specific column delegates to handlecustom types, but for any given data type there would be only one column dele-gate,drastically cutting down on code duplication and ensuring that any model
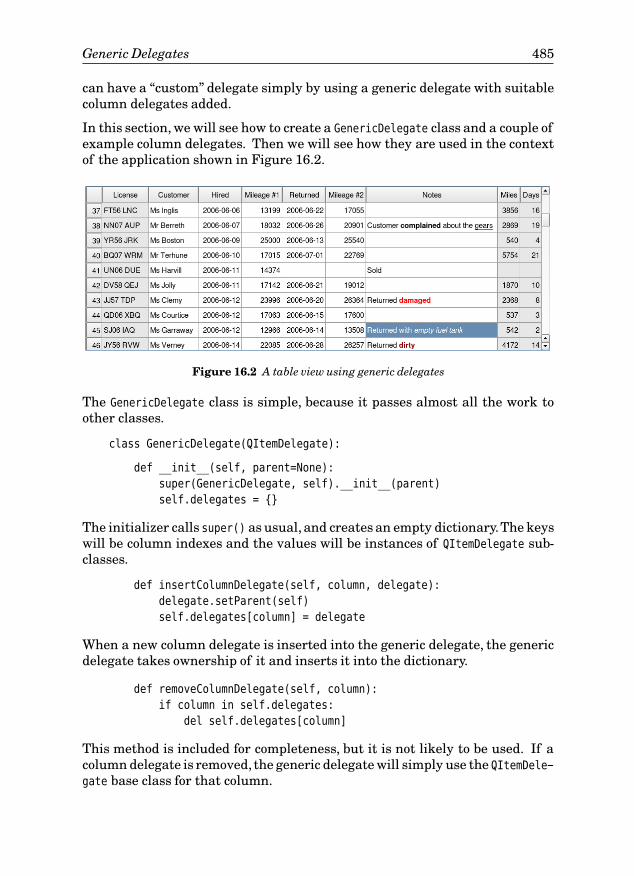
Generic Delegates 485
can have a “custom” delegate simply by using a generic delegate with suitablecolumn delegates added.
In this section, we will see how to create a GenericDelegate class and a couple ofexample column delegates. Then we will see how they are used in the contextof the application shown in Figure 16.2.
Figure 16.2 A table view using generic delegates
The GenericDelegate class is simple, because it passes almost all the work toother classes.
class GenericDelegate(QItemDelegate):
def __init__(self, parent=None):
super(GenericDelegate, self).__init__(parent)
self.delegates = {}
The initializer calls super() as usual, and creates an empty dictionary.The keyswill be column indexes and the values will be instances of QItemDelegate sub-classes.
def insertColumnDelegate(self, column, delegate):
delegate.setParent(self)
self.delegates[column] = delegate
When a new column delegate is inserted into the generic delegate, the genericdelegate takes ownership of it and inserts it into the dictionary.
def removeColumnDelegate(self, column):
if column in self.delegates:
del self.delegates[column]
This method is included for completeness, but it is not likely to be used. If acolumn delegate is removed, the generic delegate will simply use the QItemDele-
gate base class for that column.
486 Chapter 16. Advanced Model/View Programming
def paint(self, painter, option, index):
delegate = self.delegates.get(index.column())
if delegate is not None:
delegate.paint(painter, option, index)
else:
QItemDelegate.paint(self, painter, option, index)
The structure of this method is the key to how the GenericDelegate class works.We begin by getting the column delegate for the given column. If we get adelegate, we pass the work to it; otherwise, we pass the work to the base class.
def createEditor(self, parent, option, index):
delegate = self.delegates.get(index.column())
if delegate is not None:
return delegate.createEditor(parent, option, index)
else:
return QItemDelegate.createEditor(self, parent, option,
index)
This method follows the same pattern as the paint() method, except that itreturns a value (the editor that was created for it).
def setEditorData(self, editor, index):
delegate = self.delegates.get(index.column())
if delegate is not None:
delegate.setEditorData(editor, index)
else:
QItemDelegate.setEditorData(self, editor, index)
def setModelData(self, editor, model, index):
delegate = self.delegates.get(index.column())
if delegate is not None:
delegate.setModelData(editor, model, index)
else:
QItemDelegate.setModelData(self, editor, model, index)
These last two GenericDelegate methods follow the same pattern as the paint()
and createEditor() methods, using the column delegate if one has been set forthe given column, and using the QItemDelegate base class otherwise.
Now that we have seen the GenericDelegate’s implementation, we can turn ourattention to the column delegates that can be inserted into it. In chap16/gen-
ericdelegates.py we provide the IntegerColumnDelegate, DateColumnDelegate,PlainTextColumnDelegate, and RichTextColumnDelegate classes. All of them havea similar structure, so we will look at the code for only two of them, Date-ColumnDelegate, and RichTextColumnDelegate. Once the implementation of theseis understood (and it is easy, at least for the date column delegate), creating
Generic Delegates 487
additional column delegates, such as one for floating-point numbers, will bestraightforward.
class DateColumnDelegate(QItemDelegate):
def __init__(self, minimum=QDate(), maximum=QDate.currentDate(),
format="yyyy-MM-dd", parent=None):
super(DateColumnDelegate, self).__init__(parent)
self.minimum = minimum
self.maximum = maximum
self.format = QString(format)
For dates, we want to provide minimum and maximum values, as well as adisplay format.
def createEditor(self, parent, option, index):
dateedit = QDateEdit(parent)
dateedit.setDateRange(self.minimum, self.maximum)
dateedit.setAlignment(Qt.AlignRight|Qt.AlignVCenter)
dateedit.setDisplayFormat(self.format)
dateedit.setCalendarPopup(True)
return dateedit
The code for creating the editor follows the general pattern we saw back inChapter 14: We create the editor with the given parent, set it up, and thenreturn it. Here we have used the minimum, maximum, and format values thatwere passed to the initializer.
def setEditorData(self, editor, index):
value = index.model().data(index, Qt.DisplayRole).toDate()
editor.setDate(value)
We set the editor’s value to be the value of the data item at the given modelindex. We do not need to check the column, since this column delegate will becalled only by the GenericDelegate for the column that the user has specified.
def setModelData(self, editor, model, index):
model.setData(index, QVariant(editor.date()))
When writing the editor’s data back to the model, again we don’t have to checkthe column because that’s taken care of by the GenericDelegate.
This is the complete DateColumnDelegate. We did not need to reimplement thepaint() method because the QItemDelegate base class can draw the data perfect-ly well. The IntegerColumnDelegate and PlainTextColumnDelegate are both verysimilar to the DateColumnDelegate. The RichTextColumnDelegate is also similar,but it also reimplements the paint() and sizeHint() methods.
class RichTextColumnDelegate(QItemDelegate):
488 Chapter 16. Advanced Model/View Programming
def __init__(self, parent=None):
super(RichTextColumnDelegate, self).__init__(parent)
The constructor is even simpler than the one used for the other columndelegates. We could even omit it, but we prefer to be explicit.
def createEditor(self, parent, option, index):
lineedit = richtextlineedit.RichTextLineEdit(parent)
return lineedit
We use the RichTextLineEdit that we created in Chapter 13. Structurally thismethod is the same as for the other column delegates, except that here we don’tneed to set up the editor in any particular way.
def setEditorData(self, editor, index):
value = index.model().data(index, Qt.DisplayRole).toString()
editor.setHtml(value)
The RichTextLineEdit accepts HTML text if we use its setHtml() method. (It alsohas a setPlainText() method.)
def setModelData(self, editor, model, index):
model.setData(index, QVariant(editor.toSimpleHtml()))
The RichTextLineEdit has a toHtml() method, but we use the toSimpleHtml()
method that we developed in Chapter 13. This ensures that we store theshortest possible HTML that validly represents the text. This is importantbecause in the paint() method, for highlighted (i.e., selected) items, we will setthe color of the text by wrapping it in a <font> tag—this will work for text thatuses the simple HTML format since it is just an HTML fragment, but not forthe normal HTML format which is a complete HTML document.
def paint(self, painter, option, index):
text = index.model().data(index, Qt.DisplayRole).toString()
palette = QApplication.palette()
document = QTextDocument()
document.setDefaultFont(option.font)
if option.state & QStyle.State_Selected:
document.setHtml(QString("<font color=%1>%2</font>") \
.arg(palette.highlightedText().color().name()) \
.arg(text))
else:
document.setHtml(text)
painter.save()
color = palette.highlight().color() \
if option.state & QStyle.State_Selected \
else QColor(index.model().data(index,
Qt.BackgroundColorRole))
painter.fillRect(option.rect, color)
Generic Delegates 489
painter.translate(option.rect.x(), option.rect.y())
document.drawContents(painter)
painter.restore()
The paint() method is almost the same as the one used with the ShipDelegate
described in Chapter 14. ThePaint-ing richtext in adelegate
438 ☞
only difference is that we don’t have to check fora particular column since we know that the column delegate is only ever calledfor the column the user has specified.
One limitation of this approach is that the highlighting works only with HTMLfragments. If we want the code to work with both fragments and completeHTML documents, we could use code like this:
if option.state & QStyle.State_Selected:
if text.startsWith("<html>"):
text = QString(text).replace("<body ",
QString("<body bgcolor=%1 ")
.arg(palette.highlightedText().color().name())
else:
text = QString("<font color=%1>%2</font>")\
.arg(palette.highlightedText().color().name())\
.arg(text))
document.setHtml(text)
Another approach would be to extract the text document’s style sheet, updatethe background color, and set the updated style sheet back on the document.
def sizeHint(self, option, index):
text = index.model().data(index).toString()
document = QTextDocument()
document.setDefaultFont(option.font)
document.setHtml(text)
return QSize(document.idealWidth() + 5,
option.fontMetrics.height())
We must calculate the size hint for a rich text column ourselves becauseSizehints forrich textin adelegate
439 ☞
the de-fault calculation based on the widget’s font size and the number of characterswill usually give widths that are much too wide. This is because HTML textusually contains far more characters (such as tags and entities) than the num-ber of characters that are actually displayed. This is easy to solve by using aQTextDocument. The code is almost the same as that used for the ShipDelegate’ssize hint method.
We can easily create other column delegates, and we could make any columndelegate offer more functionality than the examples shown here provide.For example, for the IntegerColumnDelegate we have minimum and maximumvalues, but it would be simple to provide additional options, such as prefix andsuffix text.
490 Chapter 16. Advanced Model/View Programming
Now that we have seen how the GenericDelegate works and how to createcolumn delegates, we can see how they are used in practice. Figure 16.2 (onpage 485) shows a table view that uses a generic delegate with several columndelegates to provide control over the editing and appearance of its columns.The form is in chap16/carhirelog.pyw; here is the beginning of its initializer:
class MainForm(QMainWindow):
def __init__(self, parent=None):
super(MainForm, self).__init__(parent)
model = CarHireModel(self)
self.view = QTableView()
self.view.setModel(model)
self.view.resizeColumnsToContents()
delegate = genericdelegates.GenericDelegate(self)
delegate.insertColumnDelegate(CUSTOMER,
genericdelegates.PlainTextColumnDelegate())
earliest = QDate.currentDate().addYears(-3)
delegate.insertColumnDelegate(HIRED,
HireDateColumnDelegate(earliest))
delegate.insertColumnDelegate(MILEAGEOUT,
MileageOutColumnDelegate(0, 1000000))
delegate.insertColumnDelegate(RETURNED,
ReturnDateColumnDelegate(earliest))
delegate.insertColumnDelegate(MILEAGEBACK,
MileageBackColumnDelegate(0, 1000000))
delegate.insertColumnDelegate(NOTES,
genericdelegates.RichTextColumnDelegate())
self.view.setItemDelegate(delegate)
self.setCentralWidget(self.view)
The model is a custom model similar to ones we created in Chapter 14. Theview is a standard QTableView.
The model has nine columns:a plain text read-only license number, a plain textcustomer name, a hired date (a QDate), an integer starting mileage (mileageout), a returned date (a QDate), an integer returned mileage (mileage back), anda rich text notes column, as well as two columns that are generated rather thanstored—a mileage column (the difference between the back and out mileages),and a days column (the difference between the returned and hired dates).
The model and the underlying data structure take care of the read-only licensecolumn and the generated columns (as we will discuss shortly), so we only needto provide column delegates for the editable columns. For the customer namewe use a PlainTextColumnDelegate, and for the notes we use a RichTextLineEdit.But for the mileages and dates we have used custom column delegates that are
Generic Delegates 491
subclasses of the IntegerColumnDelegate and DateColumnDelegate. We need thesesubclasses to provide cross-column validation. For example, we cannot accepta returned date that is earlier than the hired date, or a mileage back that isless than the starting mileage.
class HireDateColumnDelegate(genericdelegates.DateColumnDelegate):
def createEditor(self, parent, option, index):
i = index.sibling(index.row(), RETURNED)
self.maximum = i.model().data(i, Qt.DisplayRole) \
.toDate().addDays(-1)
return genericdelegates.DateColumnDelegate.createEditor(
self, parent, option, index)
This is the complete HireDateColumnDelegate subclass. We only need to reimple-ment createEditor().We retrieve the returned date and set the maximum hireddate to be the day before the car was returned, since we have a minimum of oneday’s car hire. We actually leave the creation of the editor to the base class. Wecannot set a meaningful maximum date when the column delegate is createdbecause the user could edit the returned date at any time, so we must calculatethe maximum hired date when the user starts to edit it.
Using the sibling() method provides us with a more convenient alternative tocalling index.model().index(index.row(), RETURNED).
The ReturnDateColumnDelegate is almost identical, except that we retrievethe hired date and set the minimum returned date to the day after the carwas hired. The MileageOutColumnDelegate and MileageBackColumnDelegate aresimilar; they both only reimplement the createEditor() method, and both setthe maximum (or minimum) depending on the other mileage’s value.
The model’s setData() method does not allow editing of the license number,or of the generated columns. It does this by simply returning False for thosecolumns, which indicates that they were not updated. For the other columnsthe value passed in to the setData() method is set in the underlying datastructure.
The model’s data() method faithfully returns the value of the column it isasked for, as provided by the underlying data structure. The data structurereturns stored values for most of the columns, but for the MILEAGE and DAYS
columns it returns values calculated from the relevant values.
Creating general data-type-specific column delegates is quite easy, and sub-classing them when validation must take into account the whole row (record)is not difficult either. But since it isn’t hard to create a custom delegate foreach model, why use the generic delegate approach at all? There are two maincontexts where generic delegates don’t make sense: simple applications whereonly a few delegates are needed, and models that have columns which containheterogeneous data types. But for applications that need many delegates and
492 Chapter 16. Advanced Model/View Programming
where columns have homogeneous data types such as those used in databases,generic delegates offer three key benefits.
• It is easy to change the delegate used for a particular column, or to add ad-ditional column delegates if the model is changed to have more columns.
• Using column delegates means that we avoid the code duplication thatis inevitable if we create many model-specific custom delegates—forexample, we need to write only one rich text line editing delegate, onedate/time editing delegate, and so on.
• Once a data-type-specific column delegate is created, it can be reused forevery column that uses that data type, in any number of generic delegatesused with any number of models. This means that bug fixes and enhance-ments need to be applied to only one column delegate for each data type.
Representing Tabular Data in Trees
Suppose we want the user to pick out a data item, but that the item theypick depends on some previous item they picked, which in turn depends onsome previous item again. In concrete terms, imagine that we want the userto choose a particular airport—first they must choose the country, then thecity, and then the airport. This could be done by providing three comboboxes,populating the first with country names, and populating the second with thecities in the current country, and the third with the airports in the current city.This is not difficult to program, but the user must use three separate widgetsto specify their choice, and can’t easily see what range of choices are availableto them.
One solution to choosing dependent data items is to use a tree view. To contin-ue the example, the roots of the tree would be the countries, and each countrywould have city branches,and each city branch would have airport leaves. Thismakes it much easier for the user to follow a path (and they can follow onlyvalid paths), and easier for us to retrieve their complete country/city/airportchoice.
Another benefit of using a tree view, compared, for example, with using a tableview, is that it is more compact and easier to navigate. For example, if we had100 countries, with an average of 4 cities each and an average of 2 airports percity, a table would require 100 × 4 × 2 = 800 rows—but a tree would need only100 rows (one per country) with each row capable of being expanded to showits cities and airports.
In this section, we will show how to represent a table of data in a tree, andhow to extract the complete “path” that the user has chosen. The exampleapplication we will use is called Server Info. It reads a dataset that has sixcolumns—country, state (meaningful only in the United States), city, provider,server, and IP address—and allows users to specify one particular 6-tuple. Thesample dataset has 163 rows, but refers to only 33 unique countries, so the user
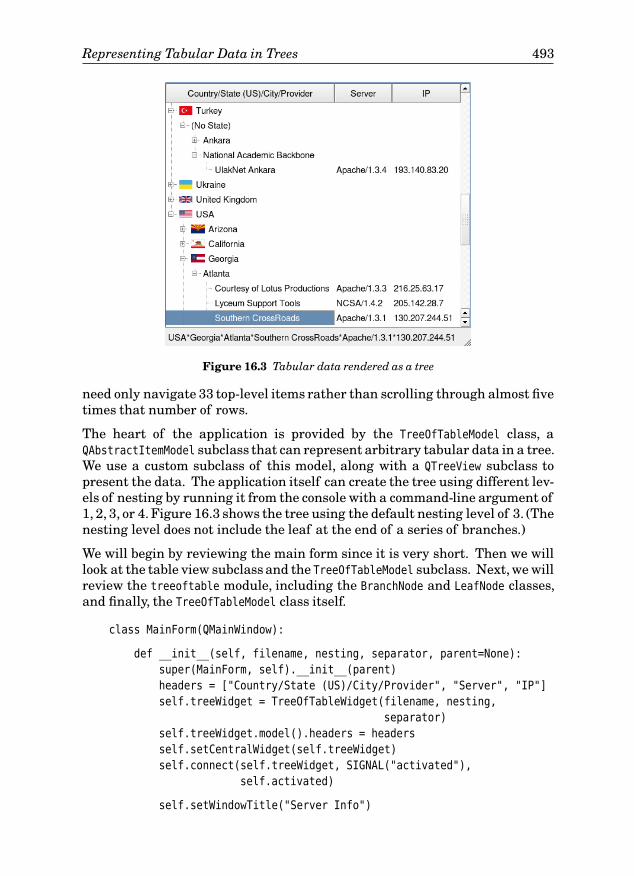
Representing Tabular Data in Trees 493
Figure 16.3 Tabular data rendered as a tree
need only navigate 33 top-level items rather than scrolling through almost fivetimes that number of rows.
The heart of the application is provided by the TreeOfTableModel class, aQAbstractItemModel subclass that can represent arbitrary tabular data in a tree.We use a custom subclass of this model, along with a QTreeView subclass topresent the data. The application itself can create the tree using different lev-els of nesting by running it from the console with a command-line argument of1, 2, 3, or 4. Figure 16.3 shows the tree using the default nesting level of 3. (Thenesting level does not include the leaf at the end of a series of branches.)
We will begin by reviewing the main form since it is very short. Then we willlook at the table view subclass and the TreeOfTableModel subclass. Next, we willreview the treeoftable module, including the BranchNode and LeafNode classes,and finally, the TreeOfTableModel class itself.
class MainForm(QMainWindow):
def __init__(self, filename, nesting, separator, parent=None):
super(MainForm, self).__init__(parent)
headers = ["Country/State (US)/City/Provider", "Server", "IP"]
self.treeWidget = TreeOfTableWidget(filename, nesting,
separator)
self.treeWidget.model().headers = headers
self.setCentralWidget(self.treeWidget)
self.connect(self.treeWidget, SIGNAL("activated"),
self.activated)
self.setWindowTitle("Server Info")

494 Chapter 16. Advanced Model/View Programming
The TreeOfTableWidget is similar to a convenience view, since it incorporates amodel inside it. The model is a ServerModel, a small TreeOfTableModel subclassthat adds the ability to show flag icons.
The filename is the name of a file that has data suitable for a TreeOfTableModel.In particular, it must have one record per line, and each column (field) must beseparated by the specified separator.
The nesting value is the maximum number of branches that can spur offfrom a root, and does not count the leaves at the end. In this case, the nestingvalue passed in through the nesting parameter is 3 (unless it’s changed on thecommand line), which means that we will have 3 levels of branches (country,state, city) and 1 level of leaves (provider). Since we have 6 fields, this meansthat the first 4 fields will be shown in the tree part of the tree widget, with theremaining 2 fields shown as separate columns in the rows that have leaves.The resultant tree view will have 3 columns, one containing the tree, and 2more showing the extra fields. We set the model’s headers by directly accessingthe model inside the custom TreeOfTableWidget.
The activated() method is called when the user double-clicks or presses Enteron a row in the tree widget.
def activated(self, fields):
self.statusBar().showMessage("*".join(fields), 60000)
The “path”, that is, the (country, city, state, provider, server, IP address) 6-tuplethat the user has chosen, is shown “*”-separated in the status bar for a minute(60000 milliseconds), whenever a suitable row is activated. In this context, asuitable row is one containing a leaf, since these are the only ones that have allsix fields.
The TreeOfTableWidget is a QTreeView subclass that contains the model itdisplays. It also provides a few simple convenience methods and creates someuseful signal–slot connections.
class TreeOfTableWidget(QTreeView):
def __init__(self, filename, nesting, separator, parent=None):
super(TreeOfTableWidget, self).__init__(parent)
self.setSelectionBehavior(QTreeView.SelectItems)
self.setUniformRowHeights(True)
model = ServerModel(self)
self.setModel(model)
try:
model.load(filename, nesting, separator)
except IOError, e:
QMessageBox.warning(self, "Server Info - Error",
unicode(e))
self.connect(self, SIGNAL("activated(QModelIndex)"),
self.activated)
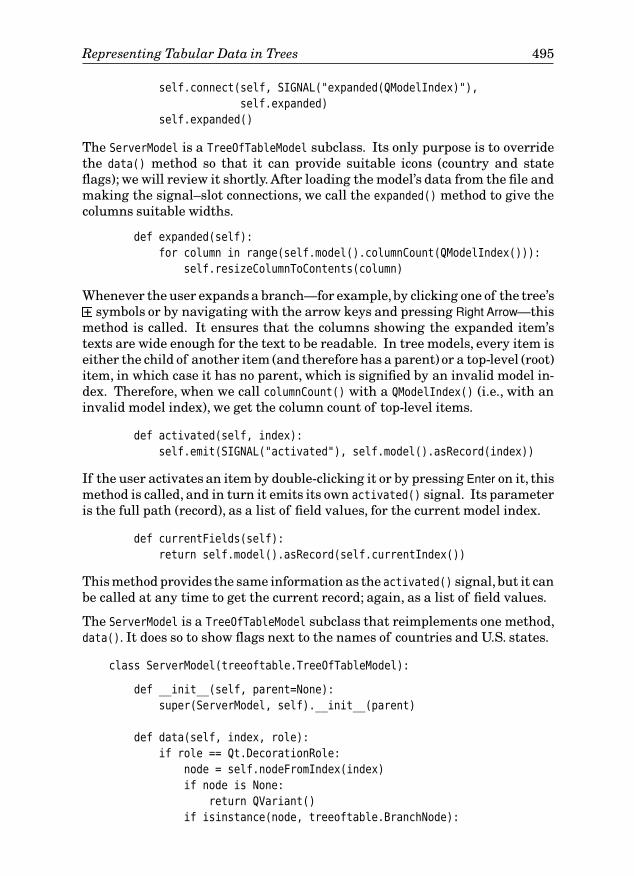
Representing Tabular Data in Trees 495
self.connect(self, SIGNAL("expanded(QModelIndex)"),
self.expanded)
self.expanded()
The ServerModel is a TreeOfTableModel subclass. Its only purpose is to overridethe data() method so that it can provide suitable icons (country and stateflags); we will review it shortly. After loading the model’s data from the file andmaking the signal–slot connections, we call the expanded() method to give thecolumns suitable widths.
def expanded(self):
for column in range(self.model().columnCount(QModelIndex())):
self.resizeColumnToContents(column)
Whenever the user expands a branch—for example,by clicking one of the tree’s+ symbols or by navigating with the arrow keys and pressing Right Arrow—thismethod is called. It ensures that the columns showing the expanded item’stexts are wide enough for the text to be readable. In tree models, every item iseither the child of another item (and therefore has a parent) or a top-level (root)item, in which case it has no parent, which is signified by an invalid model in-dex. Therefore, when we call columnCount() with a QModelIndex() (i.e., with aninvalid model index), we get the column count of top-level items.
def activated(self, index):
self.emit(SIGNAL("activated"), self.model().asRecord(index))
If the user activates an item by double-clicking it or by pressing Enter on it, thismethod is called, and in turn it emits its own activated() signal. Its parameteris the full path (record), as a list of field values, for the current model index.
def currentFields(self):
return self.model().asRecord(self.currentIndex())
This method provides the same information as the activated() signal,but it canbe called at any time to get the current record; again, as a list of field values.
The ServerModel is a TreeOfTableModel subclass that reimplements one method,data(). It does so to show flags next to the names of countries and U.S. states.
class ServerModel(treeoftable.TreeOfTableModel):
def __init__(self, parent=None):
super(ServerModel, self).__init__(parent)
def data(self, index, role):
if role == Qt.DecorationRole:
node = self.nodeFromIndex(index)
if node is None:
return QVariant()
if isinstance(node, treeoftable.BranchNode):
496 Chapter 16. Advanced Model/View Programming
if index.column() != 0:
return QVariant()
filename = node.toString().replace(" ", "_")
parent = node.parent.toString()
if parent and parent != "USA":
return QVariant()
if parent == "USA":
filename = "USA_" + filename
filename = os.path.join(os.path.dirname(__file__),
"flags", filename + ".png")
pixmap = QPixmap(filename)
if pixmap.isNull():
return QVariant()
return QVariant(pixmap)
return treeoftable.TreeOfTableModel.data(self, index, role)
This data() reimplementation only handles data() requests where the role isQt.DecorationRole, passing on any other request to the TreeOfTableModel baseclass. In list, table, and tree views, the decoration role is used to set or retrieveicons for data items.
Tree models work in terms of parents and children. In the TreeOfTableModel
base class we have provided a method, nodeFromIndex(), that returns the node(item) corresponding to a particular model index. We have two kinds of nodes,branch nodes and leaf nodes. Each node can have any number of columns,although in this case the branch nodes have only one column and leaf nodeshave at least one column. We provide icons for only the first (and only) columnof branch nodes, and then only for the branches for countries and U.S. states.
The flag icons are stored in the flags subdirectory, with country flag nameshaving underscores instead of spaces, and U.S. state names beginning with“USA_”. All the flag icons are .png images. Instead of using a .qrc resourcefile, we retrieve the images directly from the filesystem. The os.path.dirname()
function returns the path part of a full filename, and the os.path.join() func-tion joins two or more strings to form a single path string with the appropri-ate path separators. If the required image does not exist or is unreadable,QPixmap.isNull() will return True; in this case, we return an invalid QVariant tosignify that no icon is available. Otherwise, we return the pixmap wrapped ina QVariant.
The classes we have seen so far have been quite straightforward. This is be-cause the real work of providing the tree model is done by the TreeOfTableModel.This model reads in a tabular dataset and converts the row/column data intoa tree. The tree has a single branch node as its root, and then any numberof branch nodes hanging off the root, with each branch able to have its ownbranches. At the end of each branch are one or more leaf nodes.
The nodes hanging off a branch are the branch’s children. The children canbe branches or leaves, and they are held in a list. Each child’s position in its
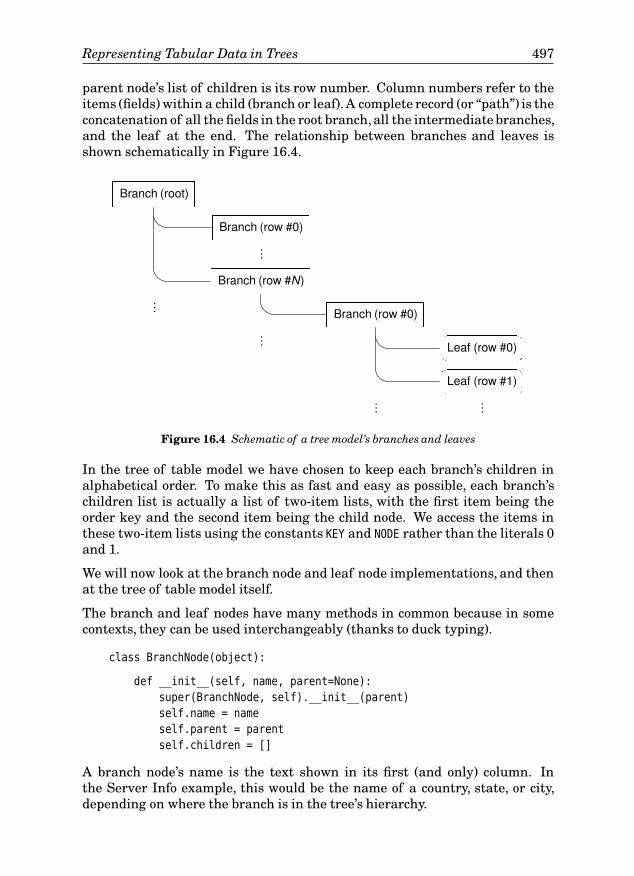
Representing Tabular Data in Trees 497
parent node’s list of children is its row number. Column numbers refer to theitems (fields) within a child (branch or leaf). A complete record (or “path”) is theconcatenation of all the fields in the root branch, all the intermediate branches,and the leaf at the end. The relationship between branches and leaves isshown schematically in Figure 16.4.
Branch (root)
Branch (row #0)
…
Branch (row #N)
… Branch (row #0)
… Leaf (row #0)
Leaf (row #1)… …
Figure 16.4 Schematic of a tree model’s branches and leaves
In the tree of table model we have chosen to keep each branch’s children inalphabetical order. To make this as fast and easy as possible, each branch’schildren list is actually a list of two-item lists, with the first item being theorder key and the second item being the child node. We access the items inthese two-item lists using the constants KEY and NODE rather than the literals 0and 1.
We will now look at the branch node and leaf node implementations, and thenat the tree of table model itself.
The branch and leaf nodes have many methods in common because in somecontexts, they can be used interchangeably (thanks to duck typing).
class BranchNode(object):
def __init__(self, name, parent=None):
super(BranchNode, self).__init__(parent)
self.name = name
self.parent = parent
self.children = []
A branch node’s name is the text shown in its first (and only) column. Inthe Server Info example, this would be the name of a country, state, or city,depending on where the branch is in the tree’s hierarchy.

498 Chapter 16. Advanced Model/View Programming
def orderKey(self):
return self.name.lower()
def toString(self):
return self.name
def __len__(self):
return len(self.children)
The order key is a string that is used by the node’s parent to position thisbranch correctly in the node’s parent’s list of children. The toString() methodreturns the branch’s one field as a string. These methods are provided forcompatibility with leaf nodes to make it easier to use either kind of nodebased on duck typing. The __len__() method returns how many children thebranch has.
def childAtRow(self, row):
assert 0 <= row < len(self.children)
return self.children[row][NODE]
This method returns the node for the given row. We have used an assert
statement here, and in many other places in the tree of tableassert
state-ment
69 ☞
model’s code. Thecode can be tricky to get right, but by using assertions we can at least be clearabout what we expect to be true at particular points in the code.
def rowOfChild(self, child):
for i, item in enumerate(self.children):
if item[NODE] == child:
return i
return -1
Here we return the row index of a particular child node, or -1 if the child is notone of this node’s children.
def childWithKey(self, key):
if not self.children:
return None
i = bisect.bisect_left(self.children, (key, None))
if i < 0 or i >= len(self.children):
return None
if self.children[i][KEY] == key:
return self.children[i][NODE]
return None
We sometimes want to find the first child that has a given order key. Oneapproach would be to do what we did in the rowOfChild() method, iteratingthrough the list of children to find the right one. Here we have taken a moreefficient approach. We find the position that a node with the given key oughtto occupy, and if this is in range and has the right key, we return the child.
Representing Tabular Data in Trees 499
def insertChild(self, child):
child.parent = self
bisect.insort(self.children, (child.orderKey(), child))
This method inserts a new child node into a branch’s list of children,and makesthis branch the child’s parent. By using bisect.insort() in conjunction withthe child’s order key, we ensure that the child is put in the correct positionas quickly and efficiently as possible. The insort() function is identical toinsort_right().
def hasLeaves(self):
if not self.children:
return False
return isinstance(self.children[0], LeafNode)
In the tree of table model, a branch that has children has either branches orleaves, but not a mixture of both. For this reason, if a branch has no children atall, clearly it has no leaves; and similarly, if it does have children and the firstone is a leaf, all of them are leaves.
We have now seen the entire branch node class. Next, we will look at the muchshorter leaf node class.
class LeafNode(object):
def __init__(self, fields, parent=None):
super(LeafNode, self).__init__(parent)
self.parent = parent
self.fields = fields
The fields in a leaf node are the node’s columns.
def orderKey(self):
return u"\t".join(self.fields).lower()
def toString(self, separator="\t"):
return separator.join(self.fields)
def __len__(self):
return len(self.fields)
A leaf node’s order key is the tab-separated concatenation of its fields. Simi-larly, its toString() method returns a concatenation of its fields. The __len__()
method returns the number of fields; for branches it returns the number ofchildren.
def field(self, column):
assert 0 <= column <= len(self.fields)
return self.fields[column]
500 Chapter 16. Advanced Model/View Programming
This method makes it easy to extract a single field’s value while having theassertion that the field’s column is within range.
def asRecord(self):
record = []
branch = self.parent
while branch is not None:
record.insert(0, branch.toString())
branch = branch.parent
assert record and not record[0]
record = record[1:]
return record + self.fields
The notion of a record used by the tree of table model is the concatenationof all the branches from the root to the leaf ’s parent, plus the leaf itself—inother words, the user’s complete choice “path”. In terms of the Server Infoapplication, this is the country, state, city, provider, server, and IP address,where the country, state, and city are branches, and each leaf contains threefields: provider, server, and IP address.
To construct a record (a list of fields), we begin with the leaf node’s parentbranch, and walk up the tree of branches. Each branch’s string is prependedto the record list. The root branch has no string, so we remove that item fromthe list. The list that is returned is the concatenation of all the branch stringsplus the leaf ’s strings.
We have now completed reviewing the nodes. The tree of table model is aQAbstractItemModel subclass and it reimplements many of the methods wewould expect, such as data(), headerData(), rowCount(), and columnCount(). Inaddition, it provides the index(), parent(), and nodeFromIndex() methods whichare usually reimplemented for tree models. It also has some extra methods,namely, load() and addRecord(); these are used to load tabular data and convertit into a tree of branches and leaves. We will begin by looking at the initializ-er, then the methods for loading the data, and then the standard model/viewmethods.
class TreeOfTableModel(QAbstractItemModel):
def __init__(self, parent=None):
super(TreeOfTableModel, self).__init__(parent)
self.columns = 0
self.root = BranchNode("")
self.headers = []
The number of columns depends on the number of columns in the data that isloaded and on the level of nesting requested. There is always one root branchnode that contains no text that is used purely as the parent of all the otherbranches. The headers are the text used as column headers.
Representing Tabular Data in Trees 501
def load(self, filename, nesting, separator):
assert nesting > 0
self.nesting = nesting
self.root = BranchNode("")
exception = None
fh = None
try:
for line in codecs.open(unicode(filename), "rU", "utf8"):
if not line:
continue
self.addRecord(line.split(separator), False)
except IOError, e:
exception = e
finally:
if fh is not None:
fh.close()
self.reset()
for i in range(self.columns):
self.headers.append("Column #%d" % i)
if exception is not None:
raise exception
The file to be loaded must be a text file with one record per line, with eachfield separated by the specified separator. The file must be encoded as UTF-8Unicode (or ASCII, since that is a subset of UTF-8). Blank lines are ignored;any other line is treated as a record and is added to the tree.
Once loading has finished (successfully or not), we call reset() to notify anyviews that the model has dramatically changed,and create some initial columnheaders. If the load failed, we then reraise the exception for the caller tohandle. The columns variable is set to 0 in the initializer, and to a meaningfulvalue in addRecord().
def addRecord(self, fields, callReset=True):
assert len(fields) > self.nesting
root = self.root
branch = None
for i in range(self.nesting):
key = fields[i].lower()
branch = root.childWithKey(key)
if branch is not None:
root = branch
else:
branch = BranchNode(fields[i])
root.insertChild(branch)
root = branch
assert branch is not None
items = fields[self.nesting:]
502 Chapter 16. Advanced Model/View Programming
self.columns = max(self.columns, len(items))
branch.insertChild(LeafNode(items, branch))
if callReset:
self.reset()
To add a record there must be more fields than the level of nesting. The logicwe use is similar to what we saw in Chapter 14 when we populated a QTree-
Widget’s internal model. For each field that is to be a branch we look for anexisting branch with the same key. If we find one, we make it the current rootbranch; otherwise, we create a new branch, insert it as a child of the currentroot branch, and make the new branch the current root branch. As the loopprogresses, we gradually walk down the tree, creating any branches that areneeded, until we reach the lowest branch.
Once the loop has gone over all the branches that are necessary, creating anythat did not previously exist, we can create a list of the non-nesting fields andadd them as a child leaf node of the current (lowest-level) branch.
To put things in concrete terms, using the Server Info application as an exam-ple, here’s what happens. When the first record is read we have a new coun-try, new state, new city, new provider, and so on, so no suitable branches willexist. First a country branch will be created, then a state branch, and then acity branch, and finally a leaf containing the remaining provider, server, andIP address fields. If the next record read is for the same country, but for a newstate, it will find the existing country node and use it as the parent node forthe new state. Similarly, if a record has a country and state for which brancheshave already been created, these will be used. But whenever a new branch isneeded the code in the loop’s body will create it.
When new records are added on an ad hoc basis, we call reset() to notify anyviews that a significant change has taken place; but when loading from a filewe pass False and call reset() in the calling code once all the records havebeen read.
def asRecord(self, index):
leaf = self.nodeFromIndex(index)
if leaf is not None and isinstance(leaf, LeafNode):
return leaf.asRecord()
return []
This method provides a list of the user’s chosen “path”. It makes sense onlyfor leaf nodes, since only a leaf node can represent a complete path. ReturningNone for nonleaf nodes would have been an equally good design choice. Noticethat we use the nodeFromIndex() method to retrieve the node for a given modelindex: We will discuss how this works shortly.
def rowCount(self, parent):
node = self.nodeFromIndex(parent)
if node is None or isinstance(node, LeafNode):
Representing Tabular Data in Trees 503
return 0
return len(node)
For tree models the row count is the number of children that a particularnode has. Our implementation allows only branch nodes to have children, sowhen called on leaf nodes we always return 0. The len() function calls Branch-
Node.__len__(), which returns the count of the branch’s children.
def columnCount(self, parent):
return self.columns
The number of columns is the maximum number of non-nested fields. Thismay appear to be one too few, but it is correct because the first non-nested fieldis shown in the first (tree) column.
def data(self, index, role):
if role == Qt.TextAlignmentRole:
return QVariant(int(Qt.AlignTop|Qt.AlignLeft))
if role != Qt.DisplayRole:
return QVariant()
node = self.nodeFromIndex(index)
assert node is not None
if isinstance(node, BranchNode):
return QVariant(node.toString()) \
if index.column() == 0 else QVariant(QString(""))
return QVariant(node.field(index.column()))
If the display data is requested for a branch node, we return the node’s text forcolumn 0 and an empty string for the other columns.For a leaf node, we returnthe field that corresponds to the requested column.
Prior to Qt 4.2, Qt
4.2
the default text alignment worked fine and did not need to bespecified, but from Qt 4.2, we must explicitly return a sensible text alignmentourselves.
def headerData(self, section, orientation, role):
if orientation == Qt.Horizontal and \
role == Qt.DisplayRole:
assert 0 <= section <= len(self.headers)
return QVariant(self.headers[section])
return QVariant()
Tree views have only horizontal (column) headers. They don’t have rowheaders (e.g., row numbers), because these don’t really make sense since eachbranch has its own 0-based list of children (rows).
def index(self, row, column, parent):
assert self.root
branch = self.nodeFromIndex(parent)
assert branch is not None
504 Chapter 16. Advanced Model/View Programming
return self.createIndex(row, column,
branch.childAtRow(row))
The index() method must return the model index for the data item with thegiven row and column and that is a child of the given parent. In a branchesand leaves tree model, this means that we must return the model index of theparent item’s row-th child.
We begin by finding the branch node of the given parent model index, andreturn a model index with the given row and column, and with a parent thatis the (branch) node’s row-th child node.
def parent(self, child):
node = self.nodeFromIndex(child)
if node is None:
return QModelIndex()
parent = node.parent
if parent is None:
return QModelIndex()
grandparent = parent.parent
if grandparent is None:
return QModelIndex()
row = grandparent.rowOfChild(parent)
assert row != -1
return self.createIndex(row, 0, parent)
The parent() method must return the model index of the given child’s parent.In a branches and leaves tree model, this is the child’s grandparent’s row-th child.
We start by finding the child node’s parent node’s parent (that is, the child’sgrandparent). Then we return a model index that has the row the parent nodeoccupies in the grandparent’s list of children, column 0 (since all parents arebranches and branches have only a zero-th column), and a parent that is thechild’s parent.
The reimplementations of the index() and parent() methods shown here arerather subtle. However, they are standard for tree models that take a branchand leaf approach, so their code can simply be copied “as is” in most cases.
def nodeFromIndex(self, index):
return index.internalPointer() \
if index.isValid() else self.root
When we call QAbstractItemModel.createIndex(), the third argument is a refer-ence to a node. This reference is available from a model index and is returnedby the internalPointer() method. For any given model index we return abranch or leaf node, or the branch root node.
Representing Tabular Data in Trees 505
Understanding tree models is more challenging than understanding tablemodels (or list models, which are just tables with a single column). However,in many cases the difficulties can be reduced by building upon or adapting thecode presented in this section.
Summary
PyQt’s built-in view widgets, and the graphics view widgets, between them pro-vide considerable scope for visualizing datasets. But when our requirementsdon’t really match what these classes provide, we can always create our owncustom views and present our data exactly how we like.
Since a custom view could potentially be showing a portion of a very largedataset, it is usually best to optimize the paint event handler to retrieve anddisplay only those data items that are actually visible. If scrollbars are goingto be required, we could require that users of our view class use a QScrollArea,or create a composite widget with a couple of QScrollBars, or create a widgetthat inherits QAbstractScrollArea. The first of these approaches adds only a fewlines to the user’s code, and makes implementing the view much easier.
Using generic delegates with data-type-specific column delegates makes iteasy to create ad hoc “custom” delegates for views. Column delegates areeasy to create and can cut down on code duplication since we need only onecolumn delegate for each data type we want to work with. The generic delegateapproach is ideal for datasets where each column’s data holds values of a singledata type, such as database tables.
Creating tree models can be difficult because we have to think in terms of par-ents and children, where the children may also be parents, and so on recur-sively to an arbitrary level of depth. This just isn’t as easy as the thinking interms of rows and columns necessary for tree and column models. Althoughthe tree of table model presented in this chapter is a specific example, some ofthe methods that provide its tree functionality, such as index(), parent(), andnodeFromIndex(), should be able to be used “as is” or with little adaptation, andother methods, such as addRecord(), should also prove to be adaptable.
ExerciseThis exercise draws together many of the model/view features that have beencovered in this and in earlier chapters.
Create an application that shows two widgets: a QListView and a custom Bar-
GraphView. The data should be held in a custom BarGraphModel. The user shouldbe able to edit the data through the QListView, using a custom BarGraphDelegate
to control both the presentation and the editing of data items in the list view.The application is shown in Figure 16.5.
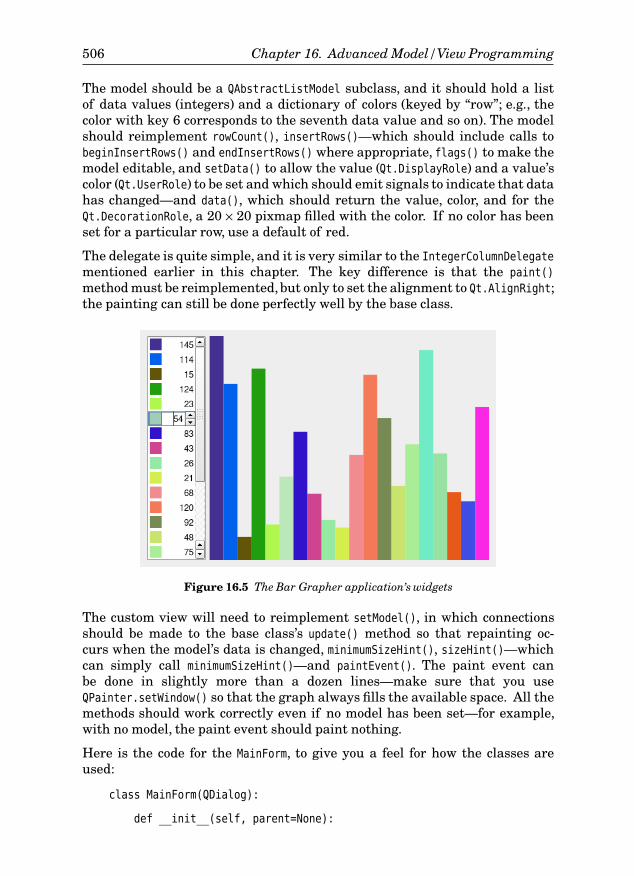
506 Chapter 16. Advanced Model/View Programming
The model should be a QAbstractListModel subclass, and it should hold a listof data values (integers) and a dictionary of colors (keyed by “row”; e.g., thecolor with key 6 corresponds to the seventh data value and so on). The modelshould reimplement rowCount(), insertRows()—which should include calls tobeginInsertRows() and endInsertRows() where appropriate, flags() to make themodel editable, and setData() to allow the value (Qt.DisplayRole) and a value’scolor (Qt.UserRole) to be set and which should emit signals to indicate that datahas changed—and data(), which should return the value, color, and for theQt.DecorationRole, a 20 × 20 pixmap filled with the color. If no color has beenset for a particular row, use a default of red.
The delegate is quite simple, and it is very similar to the IntegerColumnDelegate
mentioned earlier in this chapter. The key difference is that the paint()
method must be reimplemented,but only to set the alignment to Qt.AlignRight;the painting can still be done perfectly well by the base class.
Figure 16.5 The Bar Grapher application’s widgets
The custom view will need to reimplement setModel(), in which connectionsshould be made to the base class’s update() method so that repainting oc-curs when the model’s data is changed, minimumSizeHint(), sizeHint()—whichcan simply call minimumSizeHint()—and paintEvent(). The paint event canbe done in slightly more than a dozen lines—make sure that you useQPainter.setWindow() so that the graph always fills the available space. All themethods should work correctly even if no model has been set—for example,with no model, the paint event should paint nothing.
Here is the code for the MainForm, to give you a feel for how the classes areused:
class MainForm(QDialog):
def __init__(self, parent=None):
Exercise 507
super(MainForm, self).__init__(parent)
self.model = BarGraphModel()
self.barGraphView = BarGraphView()
self.barGraphView.setModel(self.model)
self.listView = QListView()
self.listView.setModel(self.model)
self.listView.setItemDelegate(BarGraphDelegate(0, 1000, self))
self.listView.setMaximumWidth(100)
self.listView.setEditTriggers(QListView.DoubleClicked|
QListView.EditKeyPressed)
layout = QHBoxLayout()
layout.addWidget(self.listView)
layout.addWidget(self.barGraphView, 1)
self.setLayout(layout)
self.setWindowTitle("Bar Grapher")
In the model solution, we added some extra code to create 20 random itemsto create an initial bar graph. The whole thing can be done in less than200 lines.
A solution is provided in chap16/bargrapher.pyw.

This page intentionally left blank
Online Help andInternationalization
1717 ● Online Help
● Internationalization
Users may be able to use a very simple application just by reading its menuoptions and button texts. Other applicationsmay require a littleTooltips
and sta-tus tips
171 ☞
more informa-tion, and in these cases tooltips and status tips are an easy-to-program solution.But some applications are so complex or sophisticated that users may needmore extensive help to understand what facilities are available to them, andhow to use the applications.
One solution to giving adequate information is to supply a printed manual;another is to provide a help system. Several possible approaches can be usedto create a suitable online help system; we will mention them all, and showone of them. We will return to the Image Changer application introduced inChapter 6, and in this chapter’s first section we will show the implementationof the application’s MainWindow.helpHelp() method, and how to provide anonline help system.
Throughout the book, the applications shown have provided menu text, buttontext, labels, tips, and so on, in English. This is fine for the minority of theworld’s people who can read English, but not much use to those who speakthe world’s most widely spoken language, Mandarin Chinese, or to those whospeak other major languages such as Spanish, Arabic, Hindi, Portuguese,Bengali, Russian, or Japanese.
For an application to be as widely useable as possible, it must be accessible tonon-English speakers. PyQt provides a toolchain for identifying user-visiblestrings and for making these strings available in the easy-to-use Qt LinguistGUI application that human translators can use to provide suitable transla-tions. In this chapter’s second section, we will discuss the translation tools andshow how to use them. We will also present a new translation-aware versionof the Image Changer application suitable for use with the translation tools.
509
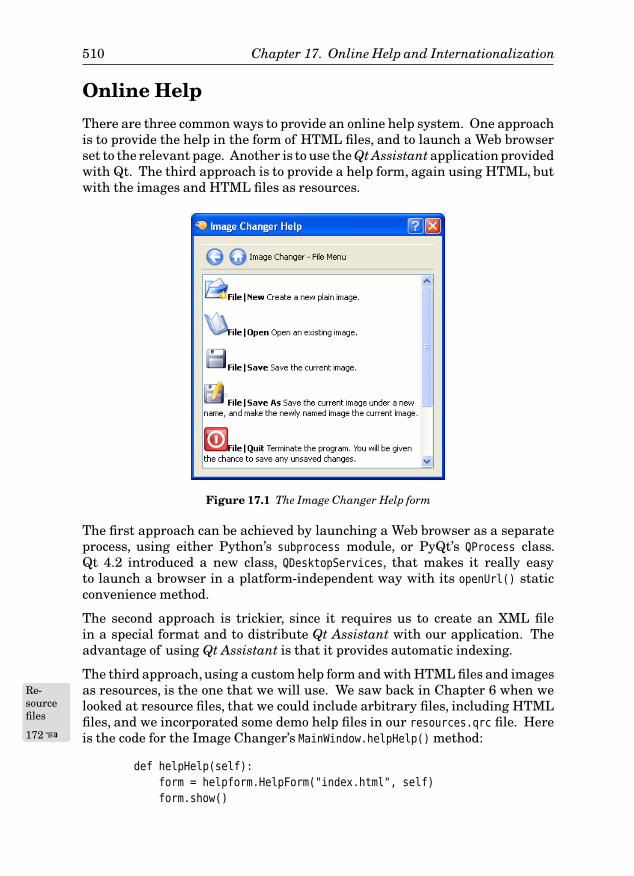
510 Chapter 17. Online Help and Internationalization
Online Help
There are three common ways to provide an online help system. One approachis to provide the help in the form of HTML files, and to launch a Web browserset to the relevant page. Another is to use the Qt Assistant application providedwith Qt. The third approach is to provide a help form, again using HTML, butwith the images and HTML files as resources.
Figure 17.1 The Image Changer Help form
The first approach can be achieved by launching a Web browser as a separateprocess, using either Python’s subprocess module, or PyQt’s QProcess class.Qt 4.2 introduced a new class, QDesktopServices, that makes it really easyto launch a browser in a platform-independent way with its openUrl() staticconvenience method.
The second approach is trickier, since it requires us to create an XML filein a special format and to distribute Qt Assistant with our application. Theadvantage of using Qt Assistant is that it provides automatic indexing.
The third approach,using a custom help form and with HTML files and imagesas resources, is the one that we will use. We saw back in Chapter 6 when weRe-
sourcefiles
172 ☞
looked at resource files, that we could include arbitrary files, including HTMLfiles, and we incorporated some demo help files in our resources.qrc file. Hereis the code for the Image Changer’s MainWindow.helpHelp() method:
def helpHelp(self):
form = helpform.HelpForm("index.html", self)
form.show()
Online Help 511
Using our help form is easy: We just give it one of the HTML files, and self
(over which the form will center itself). Notice that we use show() rather thanexec_(); this almost always means that the form shown will have the delete onclose attribute set.
The screenshot in Figure 17.1 may give the misleading impression that key-board users are not catered to, but in fact, the class used to show the HTMLfiles, QTextBrowser, provides good keyboard support. For example, users canpress Tab to move the focus from hyperlink to hyperlink, and Enter to follow ahyperlink. They can go back by pressing Alt+Left Arrow, and they can go to thefirst page by pressing Home. And because the form is a QDialog subclass, theycan close the window by pressing Esc.
By now we are very familiar with creating PyQt dialogs, so we will confineourselves to showing just those extracts that are relevant to creating the onlinehelp system—specifically, a couple of extracts from the HelpForm’s initializer,and one of its methods. (The code is in chap17/helpform.py.)
class HelpForm(QDialog):
def __init__(self, page, parent=None):
super(HelpForm, self).__init__(parent)
self.setAttribute(Qt.WA_DeleteOnClose)
self.setAttribute(Qt.WA_GroupLeader)
The Qt.WA_GroupLeader attribute ensures that if the help form is invoked froma modal dialog, the user will be able to interact with both the modal dialog andthe help form, something that would not be possible otherwise. If the help formis invoked from a modeless dialog or main window, the attribute has no effect,and the user can interact with both as usual.
self.textBrowser.setSearchPaths([":/"])
self.textBrowser.setSource(QUrl(page))
The QTextBrowser class is a subclass of QTextEdit that can be used to displaya large subset of HTML tags, including images, lists, and tables. We have setits search path to the resource file’s root directory, and set its initial page to bethe page that was passed in. Because we have set a search path we are ableto pass a page without a path (e.g., simply index.html or filemenu.html). TheQTextBrowser understands resource paths, and is therefore able to find imageresources in <img> tags such as <img src=":/filenew.png">.
self.connect(backAction, SIGNAL("triggered()"),
self.textBrowser, SLOT("backward()"))
self.connect(homeAction, SIGNAL("triggered()"),
self.textBrowser, SLOT("home()"))
self.connect(self.textBrowser, SIGNAL("sourceChanged(QUrl)"),
self.updatePageTitle)
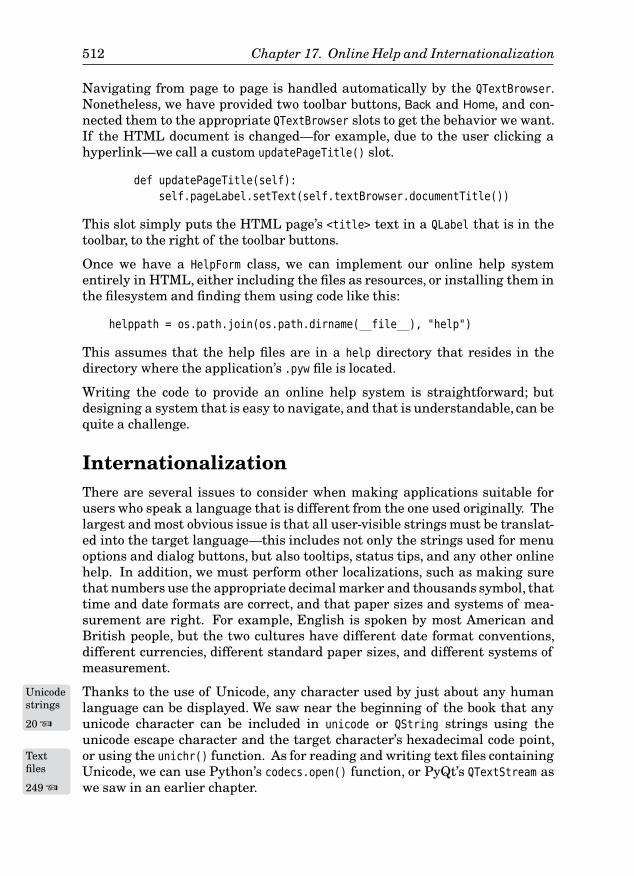
512 Chapter 17. Online Help and Internationalization
Navigating from page to page is handled automatically by the QTextBrowser.Nonetheless, we have provided two toolbar buttons, Back and Home, and con-nected them to the appropriate QTextBrowser slots to get the behavior we want.If the HTML document is changed—for example, due to the user clicking ahyperlink—we call a custom updatePageTitle() slot.
def updatePageTitle(self):
self.pageLabel.setText(self.textBrowser.documentTitle())
This slot simply puts the HTML page’s <title> text in a QLabel that is in thetoolbar, to the right of the toolbar buttons.
Once we have a HelpForm class, we can implement our online help systementirely in HTML, either including the files as resources, or installing them inthe filesystem and finding them using code like this:
helppath = os.path.join(os.path.dirname(__file__), "help")
This assumes that the help files are in a help directory that resides in thedirectory where the application’s .pyw file is located.
Writing the code to provide an online help system is straightforward; butdesigning a system that is easy to navigate, and that is understandable, can bequite a challenge.
InternationalizationThere are several issues to consider when making applications suitable forusers who speak a language that is different from the one used originally. Thelargest and most obvious issue is that all user-visible strings must be translat-ed into the target language—this includes not only the strings used for menuoptions and dialog buttons, but also tooltips, status tips, and any other onlinehelp. In addition, we must perform other localizations, such as making surethat numbers use the appropriate decimal marker and thousands symbol, thattime and date formats are correct, and that paper sizes and systems of mea-surement are right. For example, English is spoken by most American andBritish people, but the two cultures have different date format conventions,different currencies, different standard paper sizes, and different systems ofmeasurement.
Thanks to the use of Unicode, any character used by just about anyUnicodestrings
20 ☞
humanlanguage can be displayed. We saw near the beginning of the book that anyunicode character can be included in unicode or QString strings using theunicode escape character and the target character’s hexadecimal code point,or using the unichr() function. As for reading and writingText
files
249 ☞
text files containingUnicode, we can use Python’s codecs.open() function, or PyQt’s QTextStream aswe saw in an earlier chapter.
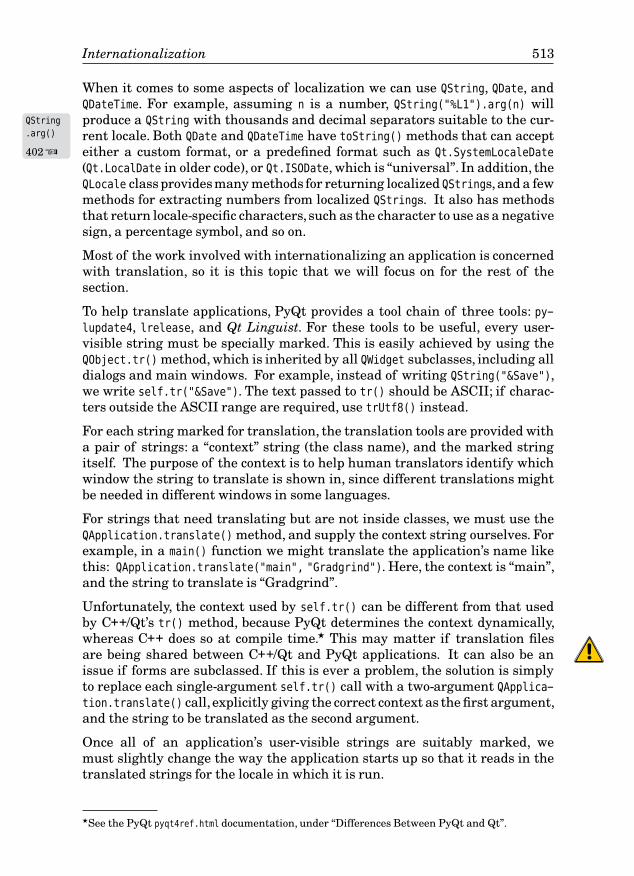
Internationalization 513
When it comes to some aspects of localization we can use QString, QDate, andQDateTime. For example, assuming n is a number, QString("%L1").arg(n) willproduce a QString with thousandsQString
.arg()
402 ☞
and decimal separators suitable to the cur-rent locale. Both QDate and QDateTime have toString() methods that can accepteither a custom format, or a predefined format such as Qt.SystemLocaleDate
(Qt.LocalDate in older code), or Qt.ISODate, which is “universal”. In addition, theQLocale class providesmany methods for returning localized QStrings,and a fewmethods for extracting numbers from localized QStrings. It also has methodsthat return locale-specific characters, such as the character to use as a negativesign, a percentage symbol, and so on.
Most of the work involved with internationalizing an application is concernedwith translation, so it is this topic that we will focus on for the rest of thesection.
To help translate applications, PyQt provides a tool chain of three tools: py-lupdate4, lrelease, and Qt Linguist. For these tools to be useful, every user-visible string must be specially marked. This is easily achieved by using theQObject.tr() method, which is inherited by all QWidget subclasses, including alldialogs and main windows. For example, instead of writing QString("&Save"),we write self.tr("&Save"). The text passed to tr() should be ASCII; if charac-ters outside the ASCII range are required, use trUtf8() instead.
For each string marked for translation, the translation tools are provided witha pair of strings: a “context” string (the class name), and the marked stringitself. The purpose of the context is to help human translators identify whichwindow the string to translate is shown in, since different translations mightbe needed in different windows in some languages.
For strings that need translating but are not inside classes, we must use theQApplication.translate() method, and supply the context string ourselves. Forexample, in a main() function we might translate the application’s name likethis: QApplication.translate("main", "Gradgrind"). Here, the context is “main”,and the string to translate is “Gradgrind”.
Unfortunately, the context used by self.tr() can be different from that usedby C++/Qt’s tr() method, because PyQt determines the context dynamically,whereas C++ does so at compile time.★ This may matter if translation filesare being shared between C++/Qt and PyQt applications. It can also be anissue if forms are subclassed. If this is ever a problem, the solution is simplyto replace each single-argument self.tr() call with a two-argument QApplica-tion.translate() call, explicitly giving the correct context as the first argument,and the string to be translated as the second argument.
Once all of an application’s user-visible strings are suitably marked, wemust slightly change the way the application starts up so that it reads in thetranslated strings for the locale in which it is run.
★See the PyQt pyqt4ref.html documentation, under “Differences Between PyQt and Qt”.
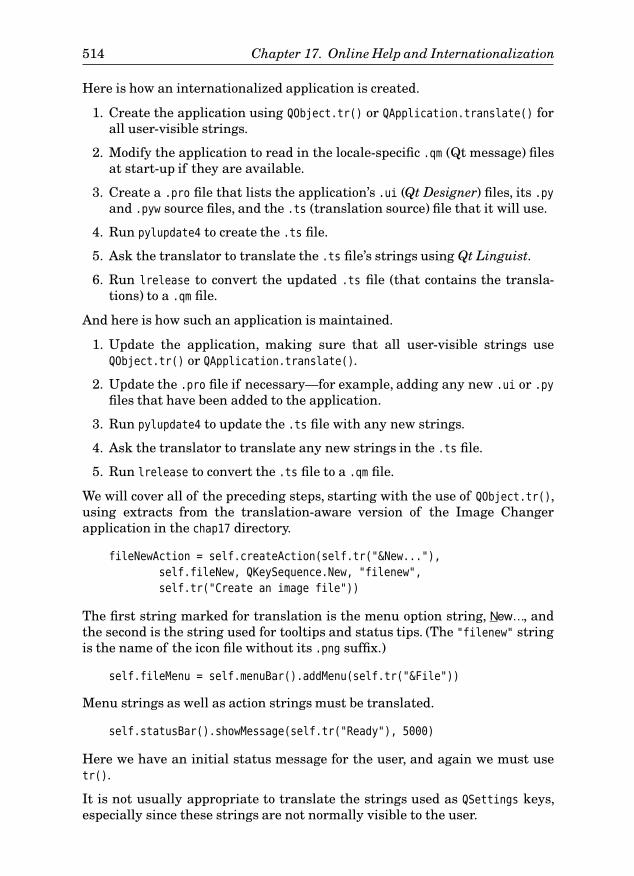
514 Chapter 17. Online Help and Internationalization
Here is how an internationalized application is created.
1. Create the application using QObject.tr() or QApplication.translate() forall user-visible strings.
2. Modify the application to read in the locale-specific .qm (Qt message) filesat start-up if they are available.
3. Create a .pro file that lists the application’s .ui (Qt Designer) files, its .py
and .pyw source files, and the .ts (translation source) file that it will use.
4. Run pylupdate4 to create the .ts file.
5. Ask the translator to translate the .ts file’s strings using Qt Linguist.
6. Run lrelease to convert the updated .ts file (that contains the transla-tions) to a .qm file.
And here is how such an application is maintained.
1. Update the application, making sure that all user-visible strings useQObject.tr() or QApplication.translate().
2. Update the .pro file if necessary—for example, adding any new .ui or .py
files that have been added to the application.
3. Run pylupdate4 to update the .ts file with any new strings.
4. Ask the translator to translate any new strings in the .ts file.
5. Run lrelease to convert the .ts file to a .qm file.
We will cover all of the preceding steps, starting with the use of QObject.tr(),using extracts from the translation-aware version of the Image Changerapplication in the chap17 directory.
fileNewAction = self.createAction(self.tr("&New..."),
self.fileNew, QKeySequence.New, "filenew",
self.tr("Create an image file"))
The first string marked for translation is the menu option string, New…, andthe second is the string used for tooltips and status tips. (The "filenew" stringis the name of the icon file without its .png suffix.)
self.fileMenu = self.menuBar().addMenu(self.tr("&File"))
Menu strings as well as action strings must be translated.
self.statusBar().showMessage(self.tr("Ready"), 5000)
Here we have an initial status message for the user, and again we must usetr().
It is not usually appropriate to translate the strings used as QSettings keys,especially since these strings are not normally visible to the user.
Internationalization 515
reply = QMessageBox.question(self,
self.tr("Image Changer - Unsaved Changes"),
self.tr("Save unsaved changes?"),
QMessageBox.Yes|QMessageBox.No|
QMessageBox.Cancel)
For this message box, we have marked both the window title and the messagetext for translation. We don’t have to worry about translating the buttons inthis case because we are using standard buttons and Qt has translations forthese.★ If we had used our own text we would have had to use tr() on it, likeany other user-visible string.
self.tr("Saved %1 in file %2").arg(self.dataname).arg(self.filename)
One way to provide the preceding string is to write:
self.tr("Saved %s in file %s" % (self.dataname, self.filename)) # BAD
This is not recommended. Always use QStrings, and always use QString.arg();this makes it easier for translators. (The tr() method returns a QString, so wecan call any QString method, such as arg(), on its return value.) For example, insome languages the translation would be phrased “Saved in file %2 the data %1”.This is no problem using a QString with arg()s, since the translator can changethe order of the %ns in the string and the arg() methods will respect this. Butswapping one Python string’s %s for another will not change anything.
We must use tr() for every user-visible string in hand-coded .pyw and .py files.But for .py files generated from .ui files by pyuic4 we don’t need to do anything,since pyuic4 automatically uses QApplication.translate() on all strings anyway.This works even for untranslated applications, because if there is no suitabletranslation, the original language—for example, English—is used instead.
A PyQt application usually uses PyQt built-in dialogs; for example, the fileopen dialog, or the file print dialog. These must also be translated,although forseveral languages translations are already available in the .qm files providedby Trolltech.
Having used tr() throughout, and having located an appropriate Qt transla-tion, we are ready to modify the application’s start-up code to load in suitabletranslation files if they exist.
app = QApplication(sys.argv)
locale = QLocale.system().name()
qtTranslator = QTranslator()
if qtTranslator.load("qt_" + locale, ":/"):
app.installTranslator(qtTranslator)
★Trolltech provides translations for some languages,such as French and German,and some unsup-ported translations to various other languages. These translations are in Qt’s (not PyQt’s) trans-lations directory; search your filesystem for qt_fr.qm, for example, to find the French translation.
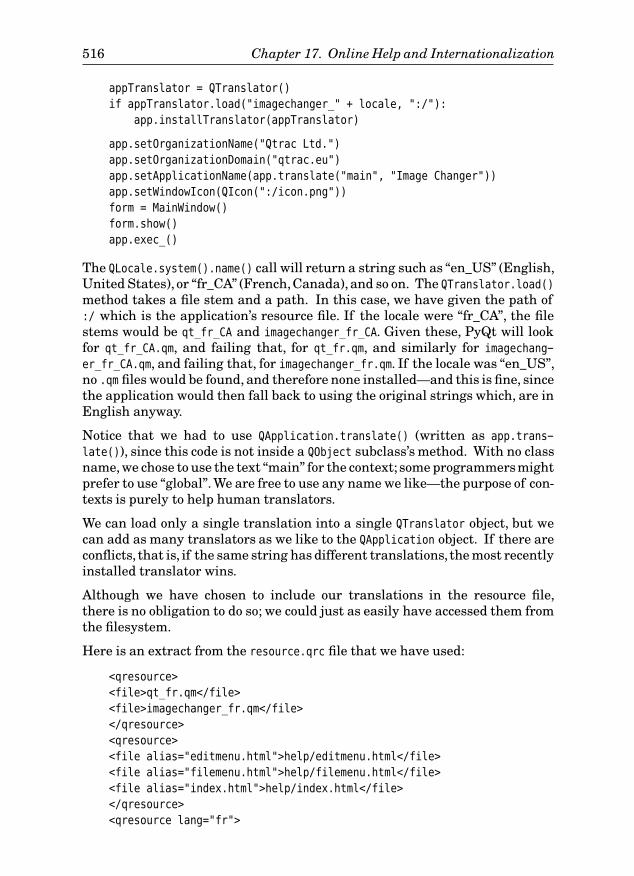
516 Chapter 17. Online Help and Internationalization
appTranslator = QTranslator()
if appTranslator.load("imagechanger_" + locale, ":/"):
app.installTranslator(appTranslator)
app.setOrganizationName("Qtrac Ltd.")
app.setOrganizationDomain("qtrac.eu")
app.setApplicationName(app.translate("main", "Image Changer"))
app.setWindowIcon(QIcon(":/icon.png"))
form = MainWindow()
form.show()
app.exec_()
The QLocale.system().name() call will return a string such as “en_US” (English,United States), or “fr_CA” (French,Canada), and so on. The QTranslator.load()
method takes a file stem and a path. In this case, we have given the path of:/ which is the application’s resource file. If the locale were “fr_CA”, the filestems would be qt_fr_CA and imagechanger_fr_CA. Given these, PyQt will lookfor qt_fr_CA.qm, and failing that, for qt_fr.qm, and similarly for imagechang-
er_fr_CA.qm, and failing that, for imagechanger_fr.qm. If the locale was “en_US”,no .qm files would be found, and therefore none installed—and this is fine, sincethe application would then fall back to using the original strings which, are inEnglish anyway.
Notice that we had to use QApplication.translate() (written as app.trans-
late()), since this code is not inside a QObject subclass’s method. With no classname, we chose to use the text “main” for the context; some programmersmightprefer to use “global”. We are free to use any name we like—the purpose of con-texts is purely to help human translators.
We can load only a single translation into a single QTranslator object, but wecan add as many translators as we like to the QApplication object. If there areconflicts, that is, if the same string has different translations, the most recentlyinstalled translator wins.
Although we have chosen to include our translations in the resource file,there is no obligation to do so; we could just as easily have accessed them fromthe filesystem.
Here is an extract from the resource.qrc file that we have used:
<qresource>
<file>qt_fr.qm</file>
<file>imagechanger_fr.qm</file>
</qresource>
<qresource>
<file alias="editmenu.html">help/editmenu.html</file>
<file alias="filemenu.html">help/filemenu.html</file>
<file alias="index.html">help/index.html</file>
</qresource>
<qresource lang="fr">
Internationalization 517
<file alias="editmenu.html">help/editmenu_fr.html</file>
<file alias="filemenu.html">help/filemenu_fr.html</file>
<file alias="index.html">help/index_fr.html</file>
</qresource>
A resource file can have any number of <qresource> tags, although up untilnow we have only ever used one. If the current locale is “en_US”, the main helpfile will be :/index.html; but if the locale is “fr_CA” or “fr” or any other “fr_*”,when we seek to access file :/index.html in code, the file we will actually get is:/index_fr.html.
Figure 17.2 Qt Linguist
The tool that is used to create and update a .ts (translation source) file ispylupdate4. This program is run from the command line with the name of a .pro
file as a parameter. Here is the complete imagechanger.pro file:
FORMS += newimagedlg.ui
SOURCES += helpform.py
SOURCES += imagechanger.pyw
SOURCES += newimagedlg.py
SOURCES += resizedlg.py
TRANSLATIONS += imagechanger_fr.ts

518 Chapter 17. Online Help and Internationalization
The .pro file format is used primarily by C++/Qt programmers, but it makesusing pylupdate4 and lrelease easier if we use it for PyQt projects. We careabout only three kinds of entries: FORMS for .ui files, SOURCES for .py and .pyw
files, and TRANSLATIONs for .ts files. Notice that we do not list .qm files (such asqt_fr.qm); this is because we do not generate the qt_fr.qm file, but simply copyit from the translations directory.
We don’t have to use one line per file; instead, we can group files. For ex-ample:
FORMS = newimagedlg.ui
SOURCES = helpform.py imagechanger.pyw newimagedlg.py resizedlg.py
TRANSLATIONS = imagechanger_fr.ts
Once we have used tr() and translate() in our source code, and created the.pro file, we can run pylupdate4:
C:\>cd c:\pyqt\chap17
C:\pyqt\chap17>pylupdate4 -verbose imagechanger.pro
Updating 'imagechanger_fr.ts'...
Found 96 source texts (96 new and 0 already existing)
Using the -verbose option is, of course, optional. The pylupdate4 program cre-ates the .ts file listed in the .pro file if it doesn’t exist, and puts into it all thecontexts and strings for the strings marked using tr() and translate() thatappear in the files listed in the FORMS and SOURCES .pro file entries. If the .ts
file already exists, pylupdate4 adds any new contexts and strings that are nec-essary, leaving intact any translations that have been added in the meantime.Because pylupdate4 is smart, we can run it as often as we like, even if a transla-tor has updated the .ts file by adding or changing translations, without losingany data.
When we are ready to release (or to simply test) the translated application, wecan generate a .qm file for the .ts file by running lrelease:
C:\pyqt\chap17>lrelease -verbose imagechanger.pro
Updating 'C:/pyqt/chap17/imagechanger_fr.qm'...
Generated 85 translations (81 finished and 4 unfinished)
Ignored 11 untranslated source texts
Just like pylupdate4, we can run lrelease as often as we like. We don’t need togenerate the qt_fr.qm file, because we copied it.
It is possible to avoid using a .pro file entirely, and simply rely on the mkpyqt.py
or Make PyQt build tools. To do this, we must run pylupdate4 once on thecommand line. For example:
C:\>cd c:\pyqt\chap17
C:\pyqt\chap17>pylupdate4 *.py *.pyw -ts imagechanger_fr.ts
Internationalization 519
From now on we can simply run mkpyqt.py with the -t (translate) option, orrun Make PyQt and check the Translate checkbox.With translation switched on,both tools run pylupdate4 followed by lrelease.
The main piece of work left to do is the translation itself. For this, we can givethe translator the Qt Linguist application—it is written in C++/Qt and runs onWindows, Mac OS X, and Linux—along with the .ts file, and ask them to entertranslations for the strings.The Qt Linguist application (shown in Figure 17.2),is quite easy to use and can help minimize duplication by suggesting similarpreviously translated phrases. It groups translation strings by contexts (whichare normally window class names). This is useful when a string might need tobe translated in different ways depending on which form it appears in.
To get started with Qt Linguist, run it, click File→Open, and open a .ts file.Now click one of the + symbols in the Context dock window on the left to showthe strings in a context, and then click one of the strings. The string will ap-pear in the top-right panel under the “Source text” heading. Click under the“Translation” heading and type in a translation. To confirm that the transla-tion of the string is finished, click the question mark icon in the Context dockwindow beside the relevant string: Clicking the icon makes it toggle betweenbeing a question mark or a tick. Translations that are ticked are “done” andwill be put into the .qm file by lrelease.
Summary
Creating an HTML-based online help system using QTextBrowser or QDesk-
topServices.openUrl() is straightforward, whereas creating a system that usesQt Assistant is trickier to set up. But no matter which approach we take to pro-viding access to online help, the real challenge is the design and content of theonline help documentation itself.
Setting up an application for translation is quite straightforward. A .pro fileis normally used to list the .ts file and the .ui, .py, and .pyw files that haveuser-visible strings in them, and we must use pylupdate4 and lrelease tokeep the .ts file up-to-date and to produce the .qm file. We can avoid using a.pro file by generating the initial .ts file and then using either mkpyqt.py orMake PyQt.
In terms of coding we must make sure that every user-visible string uses QOb-
ject.tr() or QApplication.translate(). Strings that have replaceable argu-ments should always use QString.arg() with its numbered %n arguments ratherthan the Python % operator.
For numbers we may need to use %Ln to get the correct thousands and decimalseparators. One trick we can use for currency symbols is to do somethinglike this:
currency = QApplication.translate("Currency", "$")
520 Chapter 17. Online Help and Internationalization
and translate “$” as “ ”, “£”, “¥”, or whatever else is appropriate. For dateswe can use QDate.toString(Qt.SystemLocaleDate) or QDate.toString(Qt.ISODate).For units of measurement it is probably best either to provide a sensibledefault that the user can change through a configuration dialog, or have a “firstrun” dialog that asks the user to choose their units, default paper size, andso on.
ExerciseIf you are multilingual, pick one of the examples or exercises, or one of yourown PyQt applications, and translate it to your second language.
If you are monolingual, pick one of the examples or exercises, or one of yourown PyQt applications, and add online help to it, including tooltips and statustips, as well as HTML help files.
No solutions are provided.
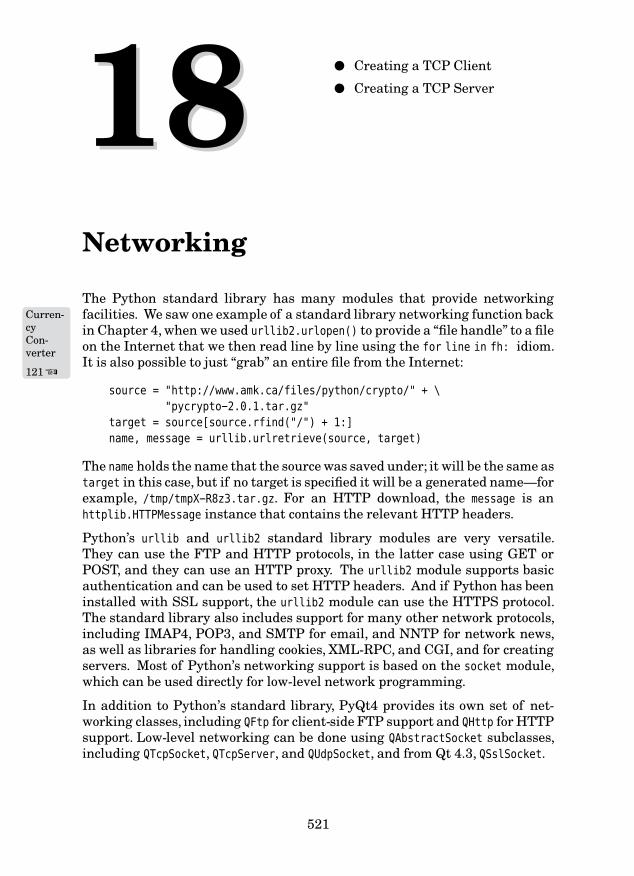
Networking
1818 ● Creating a TCP Client
● Creating a TCP Server
The Python standard library has many modules that provide networkingfacilities. We saw one example of a standard library networking functionCurren-
cyCon-verter
121 ☞
backin Chapter 4, when we used urllib2.urlopen() to provide a “file handle” to a fileon the Internet that we then read line by line using the for line in fh: idiom.It is also possible to just “grab” an entire file from the Internet:
source = "http://www.amk.ca/files/python/crypto/" + \
"pycrypto-2.0.1.tar.gz"
target = source[source.rfind("/") + 1:]
name, message = urllib.urlretrieve(source, target)
The name holds the name that the source was saved under; it will be the same astarget in this case, but if no target is specified it will be a generated name—forexample, /tmp/tmpX-R8z3.tar.gz. For an HTTP download, the message is anhttplib.HTTPMessage instance that contains the relevant HTTP headers.
Python’s urllib and urllib2 standard library modules are very versatile.They can use the FTP and HTTP protocols, in the latter case using GET orPOST, and they can use an HTTP proxy. The urllib2 module supports basicauthentication and can be used to set HTTP headers. And if Python has beeninstalled with SSL support, the urllib2 module can use the HTTPS protocol.The standard library also includes support for many other network protocols,including IMAP4, POP3, and SMTP for email, and NNTP for network news,as well as libraries for handling cookies, XML-RPC, and CGI, and for creatingservers. Most of Python’s networking support is based on the socket module,which can be used directly for low-level network programming.
In addition to Python’s standard library, PyQt4 provides its own set of net-working classes, including QFtp for client-side FTP support and QHttp for HTTPsupport. Low-level networking can be done using QAbstractSocket subclasses,including QTcpSocket, QTcpServer, and QUdpSocket, and from Qt 4.3, QSslSocket.
521
522 Introduction
Networking support for Python can also be found in other third-party li-braries, the most well known being the Twisted networking framework; seehttp://twistedmatrix.com for further details.
In this chapter we will only concern ourselves with creating a simple client/server application, and we will create both the client and the server usingjust two of PyQt’s networking classes: QTcpSocket and QTcpServer. In the nextchapter, we will look at a multithreaded version of the server that is capableof handling multiple simultaneous requests without having to block.
Client/server applications are normally implemented as two separate pro-grams:a server that waits for and responds to requests, and one or more clientsthat send requests to the server and read back the server’s response. For thisto work, the clients must know where to connect to the server, that is, the serv-er’s IP address and port number. Also, both clients and server must send andreceive data using an agreed-upon socket protocol, and using data formats thatthey both understand.
PyQt provides two different kinds of socket. The UDP (User DatagramProtocol) is supported by the QUdpSocket class. UDP is lightweight, butunreliable—there are no guarantees that data will be received. UDP is con-nectionless, so data is just sent or received as discrete items. The TCP (Trans-mission Control Protocol) is supported by the QTcpSocket class. TCP is a reliableconnection- and stream-oriented protocol; any amount of data can be sent andreceived—the socket is responsible for breaking the data into chunks that aresmall enough to send, and for reconstructing the data at the other end.
Chapter 18. Networking
UDP is often used to monitor instruments that give continuous readings, andwhere the odd missed reading is not significant. Client/server applicationsnormally use TCP because they need reliability; this is the protocol we will usein this chapter.
Another decision that must be made is whether to send and receive data aslines of text, or as blocks of binary data. PyQt’s TCP sockets can use eitherapproach, but we have opted to work with binary data since this is the mostversatile and easiest to handle.
The example we will use is the Building Services application. The server holdsdetails of the rooms in a building and the dates they have been booked. Theclient is used to book and unbook particular rooms for particular dates. Anynumber of clients can be used, but if two clients make a request that arrivesat exactly the same time, one will be blocked until the other’s request has beenhandled. This problem can be mitigated by using a threaded server, as we willsee in the next chapter.
For the sake of the example, we will run the server and clients on the samemachine; this means that we can use “localhost” as the IP address. The serverand two clients are shown in Figure 18.1. We have also chosen a port numberof 9407—this is just an arbitrary number. The port number should be greaterthan 1023 and is normally between 5001 and 32767, although port numbers
Introduction 523
Figure 18.1 A server with two clients
up to 65535 are valid. The server can accept two kinds of request, “BOOK” and“UNBOOK”, and can make three kinds of response, “BOOK”, “UNBOOK”, and“ERROR”.All the requests and responses are sent and received as binary data;we will look at their formats in the sections that follow.
In addition to the port number that is held in the PORT variable, we also createthe SIZEOF_UINT16 variable and set it to 2 (meaning two bytes). In addition tothe normal imports, we must also import the QtNetwork module:
from PyQt4.QtNetwork import *
The same PORT and SIZEOF_UINT16 variables, and the same QtNetwork import, areused in both the client and the server applications. In the following section, wewill look at the implementation of the client, and in the second section we willreview the server.
Creating a TCP Client
The Building Services client is in chap18/buildingservicesclient.pyw. It allowsthe user to enter a room number (with only valid room numbers being accept-ed) and a date, and to request that the room is booked (or unbooked) for thatdate. The server responds to the request and the client displays the responsefor the user to read in the response label.
We will begin by looking at the initializer, but omitting the creation of thewidgets and layouts. We will look at it in three parts, and then go on to look atthe client’s methods.
class BuildingServicesClient(QWidget):
def __init__(self, parent=None):
super(BuildingServicesClient, self).__init__(parent)
self.socket = QTcpSocket()
self.nextBlockSize = 0
self.request = None
524 Chapter 18. Networking
We have subclassed QWidget rather than QDialog or QMainWindow. The onlynoticeable difference is that had we subclassed QDialog, pressing Esc wouldhave terminated the application.
We have three objects to store. The first is the socket that the client will use tocommunicate with the server. The second is the “next block size”; this is a vari-able that we use to determine whether we have received sufficient responsedata to be able to process the response. The third is a request object; this is aQByteArray containing the request data, or None if we have no data to send.
We will skip the creation, setup, and laying out of the widgets, since all of thatshould all be familiar by now, although we will look at the widget connectionsafter we have looked at the socket connections.
self.connect(self.socket, SIGNAL("connected()"),
self.sendRequest)
self.connect(self.socket, SIGNAL("readyRead()"),
self.readResponse)
self.connect(self.socket, SIGNAL("disconnected()"),
self.serverHasStopped)
self.connect(self.socket,
SIGNAL("error(QAbstractSocket::SocketError)"),
self.serverHasError)
The first four signals are concerned with the socket. We need to know whenthe connection is established, since at that point we can send our request data.We also need to know whether the socket has data to read, since when it does,it will have the server’s response, which we want to read. If the connection isterminated—for example, because the server has been shut down or an errorhas occurred—we want to know so that we can inform the user.
self.connect(self.roomEdit, SIGNAL("textEdited(QString)"),
self.updateUi)
self.connect(self.dateEdit, SIGNAL("dateChanged(QDate)"),
self.updateUi)
self.connect(self.bookButton, SIGNAL("clicked()"),
self.book)
self.connect(self.unBookButton, SIGNAL("clicked()"),
self.unBook)
self.connect(quitButton, SIGNAL("clicked()"), self.close)
The other connections are concerned with the user interface. As usual, wehave an updateUi() method for doing validation and for enabling/disabling thebuttons as appropriate. We also have connections to book and unbook roomsand to terminate the application.
def updateUi(self):
enabled = False
if not self.roomEdit.text().isEmpty() and \
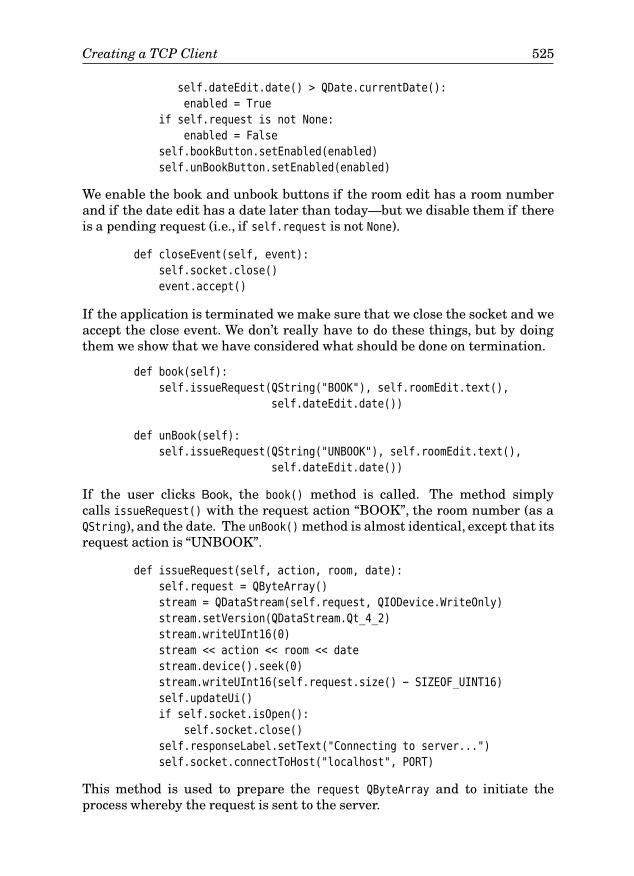
Creating a TCP Client 525
self.dateEdit.date() > QDate.currentDate():
enabled = True
if self.request is not None:
enabled = False
self.bookButton.setEnabled(enabled)
self.unBookButton.setEnabled(enabled)
We enable the book and unbook buttons if the room edit has a room numberand if the date edit has a date later than today—but we disable them if thereis a pending request (i.e., if self.request is not None).
def closeEvent(self, event):
self.socket.close()
event.accept()
If the application is terminated we make sure that we close the socket and weaccept the close event. We don’t really have to do these things, but by doingthem we show that we have considered what should be done on termination.
def book(self):
self.issueRequest(QString("BOOK"), self.roomEdit.text(),
self.dateEdit.date())
def unBook(self):
self.issueRequest(QString("UNBOOK"), self.roomEdit.text(),
self.dateEdit.date())
If the user clicks Book, the book() method is called. The method simplycalls issueRequest() with the request action “BOOK”, the room number (as aQString), and the date. The unBook() method is almost identical, except that itsrequest action is “UNBOOK”.
def issueRequest(self, action, room, date):
self.request = QByteArray()
stream = QDataStream(self.request, QIODevice.WriteOnly)
stream.setVersion(QDataStream.Qt_4_2)
stream.writeUInt16(0)
stream << action << room << date
stream.device().seek(0)
stream.writeUInt16(self.request.size() - SIZEOF_UINT16)
self.updateUi()
if self.socket.isOpen():
self.socket.close()
self.responseLabel.setText("Connecting to server...")
self.socket.connectToHost("localhost", PORT)
This method is used to prepare the request QByteArray and to initiate theprocess whereby the request is sent to the server.
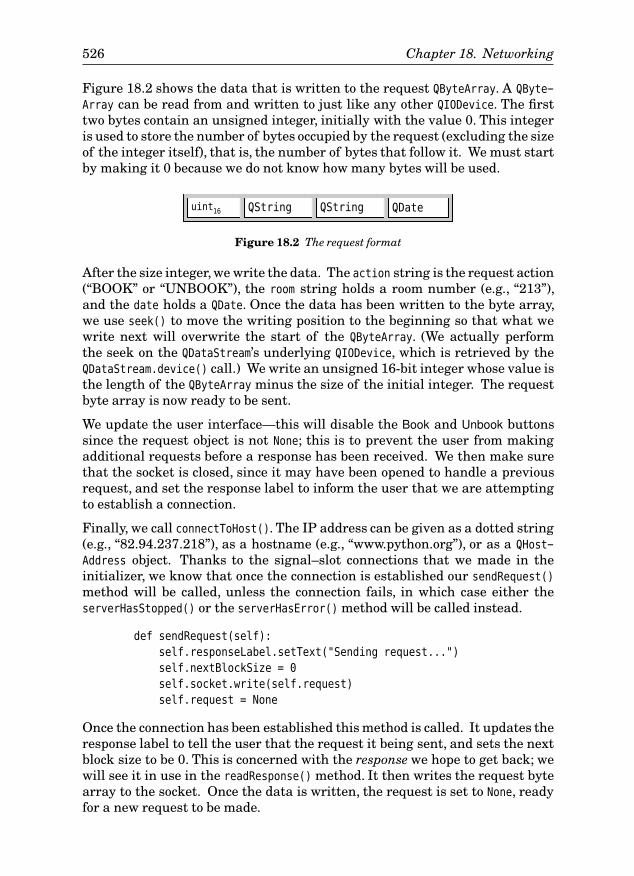
526 Chapter 18. Networking
Figure 18.2 shows the data that is written to the request QByteArray. A QByte-
Array can be read from and written to just like any other QIODevice. The firsttwo bytes contain an unsigned integer, initially with the value 0. This integeris used to store the number of bytes occupied by the request (excluding the sizeof the integer itself), that is, the number of bytes that follow it. We must startby making it 0 because we do not know how many bytes will be used.
uint16 QString QString QDate
Figure 18.2 The request format
After the size integer, we write the data. The action string is the request action(“BOOK” or “UNBOOK”), the room string holds a room number (e.g., “213”),and the date holds a QDate. Once the data has been written to the byte array,we use seek() to move the writing position to the beginning so that what wewrite next will overwrite the start of the QByteArray. (We actually performthe seek on the QDataStream’s underlying QIODevice, which is retrieved by theQDataStream.device() call.) We write an unsigned 16-bit integer whose value isthe length of the QByteArray minus the size of the initial integer. The requestbyte array is now ready to be sent.
We update the user interface—this will disable the Book and Unbook buttonssince the request object is not None; this is to prevent the user from makingadditional requests before a response has been received. We then make surethat the socket is closed, since it may have been opened to handle a previousrequest, and set the response label to inform the user that we are attemptingto establish a connection.
Finally, we call connectToHost(). The IP address can be given as a dotted string(e.g., “82.94.237.218”), as a hostname (e.g., “www.python.org”), or as a QHost-
Address object. Thanks to the signal–slot connections that we made in theinitializer, we know that once the connection is established our sendRequest()
method will be called, unless the connection fails, in which case either theserverHasStopped() or the serverHasError() method will be called instead.
def sendRequest(self):
self.responseLabel.setText("Sending request...")
self.nextBlockSize = 0
self.socket.write(self.request)
self.request = None
Once the connection has been established this method is called. It updates theresponse label to tell the user that the request it being sent, and sets the nextblock size to be 0. This is concerned with the response we hope to get back; wewill see it in use in the readResponse() method. It then writes the request bytearray to the socket. Once the data is written, the request is set to None, readyfor a new request to be made.
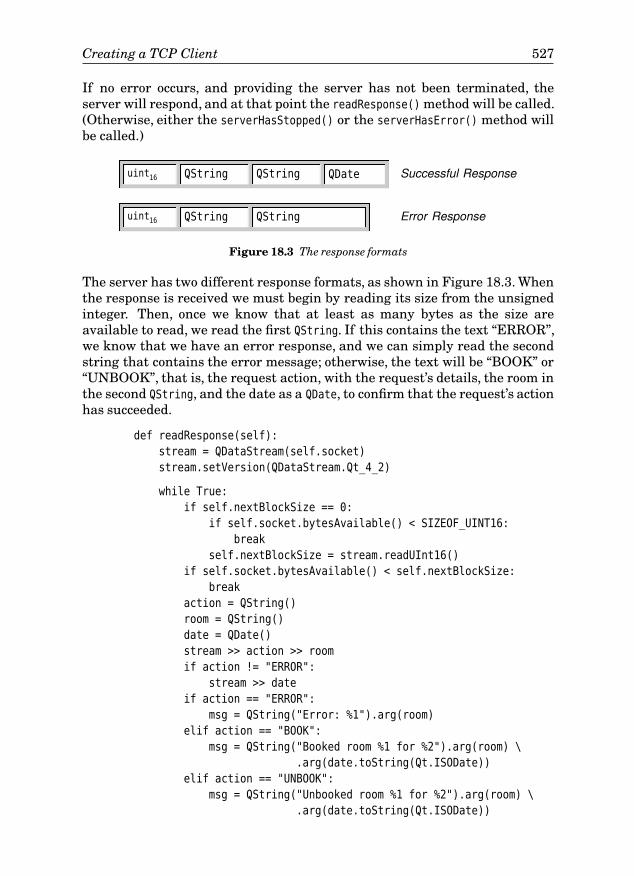
Creating a TCP Client 527
If no error occurs, and providing the server has not been terminated, theserver will respond, and at that point the readResponse() method will be called.(Otherwise, either the serverHasStopped() or the serverHasError() method willbe called.)
uint16 QString QString QDate Successful Response
uint16 QString QString Error Response
Figure 18.3 The response formats
The server has two different response formats, as shown in Figure 18.3. Whenthe response is received we must begin by reading its size from the unsignedinteger. Then, once we know that at least as many bytes as the size areavailable to read, we read the first QString. If this contains the text “ERROR”,we know that we have an error response, and we can simply read the secondstring that contains the error message; otherwise, the text will be “BOOK” or“UNBOOK”, that is, the request action, with the request’s details, the room inthe second QString, and the date as a QDate, to confirm that the request’s actionhas succeeded.
def readResponse(self):
stream = QDataStream(self.socket)
stream.setVersion(QDataStream.Qt_4_2)
while True:
if self.nextBlockSize == 0:
if self.socket.bytesAvailable() < SIZEOF_UINT16:
break
self.nextBlockSize = stream.readUInt16()
if self.socket.bytesAvailable() < self.nextBlockSize:
break
action = QString()
room = QString()
date = QDate()
stream >> action >> room
if action != "ERROR":
stream >> date
if action == "ERROR":
msg = QString("Error: %1").arg(room)
elif action == "BOOK":
msg = QString("Booked room %1 for %2").arg(room) \
.arg(date.toString(Qt.ISODate))
elif action == "UNBOOK":
msg = QString("Unbooked room %1 for %2").arg(room) \
.arg(date.toString(Qt.ISODate))
528 Chapter 18. Networking
self.responseLabel.setText(msg)
self.updateUi()
self.nextBlockSize = 0
It is possible that the server’s response will be returned in fragments. Forthis reason we use an infinite loop, first to retrieve the byte count and thento ensure that there are at least that number of bytes available to read. Thisleaves the responsibility for buffering with the server, and it means that whenwe read we know that we can read a complete response in one go.
If at least two bytes are available, we read them as an unsigned 16-bit inte-ger: This gives us the number of bytes that are to follow. Then we test to seewhether there are enough bytes to read: If there aren’t, we exit the loop andwait for another readyRead() signal to result in the readResponse() method be-ing called. If there are enough bytes, we read the action, and the string thatfollows—this is either the room number or an error message. If the action isnot “ERROR”, we also read the date. Then, depending on which action we re-ceived, we prepare a message string and display it in the response label.
Having read an entire response we reset the next block size since we haveread that many bytes. Now when we loop, either another response is waiting,in which case QTcpSocket.bytesAvailable() will return a value greater thanzero, and we repeat the process of reading and displaying; or there is no otherresponse and we simply break out of the loop and finish.
def serverHasStopped(self):
self.responseLabel.setText(
"Error: Connection closed by server")
self.socket.close()
def serverHasError(self, error):
self.responseLabel.setText(QString("Error: %1") \
.arg(self.socket.errorString()))
self.socket.close()
If the server is terminated or if the server responds with a networking error(rather than with our own “ERROR” response), the relevant serverHas*()
method is called. In both cases, we display the error message to the user in theresponse label and close the socket.
The BuildingServicesClient class is now complete. The user can enter theirbooking and unbooking requests and send them to the server by clicking theBook and Unbook buttons, and can see the results of their requests displayed inthe response label. Requests are sent by writing a QByteArray to a suitably setup socket. Responses are read back from the socket through a QDataStream; thisenables us to directly read QStrings, QDates, and any other data-stream-support-ed types, into local variables.
Now that we have seen how the client is created, we can turn our attention tothe server.
Creating a TCP Server 529
Creating a TCP Server
The Building Services TCP server is in chap18/buildingservicesserver.pyw. Ithas three components: a GUI that holds a TCP server instance and that pro-vides an easy means by which the user can terminate the server, a QTcpServer
subclass that is instantiated to provide the server instance, and a QTcpSocket
subclass that is used to handle incoming connections. We will begin by lookingat the first two, since they are short, and then focus on the QTcpSocket subclasswhere most of the work is done.
class BuildingServicesDlg(QPushButton):
def __init__(self, parent=None):
super(BuildingServicesDlg, self).__init__(
"&Close Server", parent)
self.setWindowFlags(Qt.WindowStaysOnTopHint)
self.loadBookings()
self.tcpServer = TcpServer(self)
if not self.tcpServer.listen(QHostAddress("0.0.0.0"), PORT):
QMessageBox.critical(self, "Building Services Server",
QString("Failed to start server: %1") \
.arg(self.tcpServer.errorString()))
self.close()
return
self.connect(self, SIGNAL("clicked()"), self.close)
Just for a change, and to remind us that any PyQt widget can be a top-levelwindow, we have made the dialog a QPushButton subclass. We have also set theQt.WindowStaysOnTopHint; most windowing systems will respect the hint andkeep the widget on top of all other windows.
We won’t cover the loadBookings() method; it is used to populate the in-memorydata structure, the Bookings default dictionary, that holds the bookings data.The dictionary’s keys are dates stored as datetime.date objects, and the valuesare ordered lists of room Python
2.5numbers stored as unicode strings. Default dictionar-
ies were introduced with Python 2.5. They are like normal dictionaries, exceptthat when we use a key that isn’t in the dictionary, the key is inserted with adefault value. What default value is used depends on how we create the dictio-nary. In the Building Services server we have created the dictionary like this:
Bookings = collections.defaultdict(list)
Here we have said that the default value for any new key is to be an emptylist; in other cases, we might have chosen an empty set. We can always replacea default dictionary with a normal dictionary—for example, if using a Pythonversion older than 2.5—by using the dict.setdefault() method when accessingpossibly nonexistent keys, as we will show later.
530 Chapter 18. Networking
We will review the TcpServer class shortly. Once we have created a server,we tell it to listen for incoming connections on the given IP address and portnumber. The IP address is specified as a QHostAddress, with the special address“0.0.0.0”, meaning “all network interfaces”; the port number is the samearbitrary 9407 that we used for the client.
The connection ensures that if the user clicks the button, the window will close.We don’t do any special cleanup for the TCP server; when it is destroyed anyconnected clients will be notified and their sockets’ disconnected() signals willbe emitted.
There is no more to the dialog, so we can now look at the tiny TcpServer classthat inherits QTcpServer.
class TcpServer(QTcpServer):
def __init__(self, parent=None):
super(TcpServer, self).__init__(parent)
def incomingConnection(self, socketId):
socket = Socket(self)
socket.setSocketDescriptor(socketId)
This is the complete code for the TCP server. Whenever an incoming connec-tion request occurs the incomingConnection() method is called with a socket de-scriptor in socketId. We simply create a new Socket (a QTcpSocket subclass thatwe will review next), and set it to use the socket descriptor that the server hasprovided.
This TCP server depends on the PyQt event loop. If we wanted to create aQTcpServer-based server that did not have a GUI, there are two approaches wecould take. One approach would be to use a QEventLoop, to provide an event loopwithout needing a GUI, and write the code in the same way as we have donehere. The other approach is to not have an event loop, but in this case we wouldhave to do things slightly differently. In particular, we would have to use theblocking QTcpServer.waitForNewConnection()method instead of reimplementingincomingConnection(). Of course, if the server does not have a GUI, it could bewritten purely using Python’sstandard librarieswithout needing the QtNetwork
module at all. Alternatively, the server could be written using Twisted.
Once a connection is established, all the work is passed on to the Socket class,a QTcpSocket subclass that we will now review.
class Socket(QTcpSocket):
def __init__(self, parent=None):
super(Socket, self).__init__(parent)
self.connect(self, SIGNAL("readyRead()"), self.readRequest)
self.connect(self, SIGNAL("disconnected()"), self.deleteLater)
self.nextBlockSize = 0
Creating a TCP Server 531
The socket connects its readyRead() signal to our custom readRequest() method,and its disconnected() signal to its deleteLater() slot—this ensures that thesocket is cleanly deleted when the connection is terminated. The next blocksize variable is used for the same purpose and in the same way as in the client,to ensure that we read a request only when there are at least as many bytesavailable to read as are in the request.
Once the socket has been created and the connections set up, it simply waitsuntil its readRequest() method is called. This method is a bit long, so we willreview it in two parts.
def readRequest(self):
stream = QDataStream(self)
stream.setVersion(QDataStream.Qt_4_2)
if self.nextBlockSize == 0:
if self.bytesAvailable() < SIZEOF_UINT16:
return
self.nextBlockSize = stream.readUInt16()
if self.bytesAvailable() < self.nextBlockSize:
return
action = QString()
room = QString()
date = QDate()
We begin by seeing whether there are at least two bytes to read: If there are,we read in the size of the next block. If there are not two bytes to read, or ifthere were but there are not enough bytes available to read the entire request,we return and wait for the readRequest() to be called again, when more byteshave arrived.
Once there are enough bytes, we create empty action and room strings, and anull QDate, ready to populate them from the incoming request data.
stream >> action
if action in ("BOOK", "UNBOOK"):
stream >> room >> date
bookings = Bookings.get(date.toPyDate())
uroom = unicode(room)
if action == "BOOK":
if bookings is None:
bookings = Bookings[date.toPyDate()]
if len(bookings) < MAX_BOOKINGS_PER_DAY:
if uroom in bookings:
self.sendError("Cannot accept duplicate booking")
else:
bisect.insort(bookings, uroom)
self.sendReply(action, room, date)
532 Chapter 18. Networking
else:
self.sendError(QString("%1 is fully booked") \
.arg(date.toString(Qt.ISODate)))
elif action == "UNBOOK":
if bookings is None or uroom not in bookings:
self.sendError("Cannot unbook nonexistent booking")
else:
bookings.remove(uroom)
self.sendReply(action, room, date)
else:
self.sendError("Unrecognized request")
The server recognizes only two request actions, “BOOK” and “UNBOOK”; ifit gets one of these it reads in the room and date, and retrieves the (possiblyempty) list of bookings for the given date. It also stores a unicode copy of theroom number QString, since the Bookings dictionary the server uses holds all itsdata using Python types rather than PyQt types.
Next, the server attempts to book or unbook the given room for the given date.When booking, if there are no bookings for the given date, an empty list ofbookings is created for that date. This works because we are using a defaultdictionary, so when we access it with a key it does not have, it automaticallyinserts a new item with the given key and with a default value; in this case,an empty list. The code is a little bit subtle because we begin by calling get().We do this to avoid creating an empty list for the given date if the action is tounbook. Only when we know that the action is to book do we want to ensurethat there is a list for the given date.
If we were using a normal dictionary, we would have to use dict.setdefault()
to retrieve the list for the given date, creating a new item with the given dateas the key and an empty list as the value, if the key is not already present.For example:
bookings = Bookings.setdefault(date.toPyDate(), [])
The QDate.toPyDate() method was introduced inPyQt
4.1
PyQt 4.1; for earlier versionswe would have to perform the conversion ourselves by writing datetime.date(
date.year(), date.month(), date.day()).
Once we have our (possibly empty) bookings list, and providing that there arefewer than the maximum number of bookings allowed (MAX_BOOKINGS_PER_DAY,which has a value of 5), the room number string is inserted into the list inorder, and a reply is sent to the client which simply echoes the request data. Ifthe room is already booked for the given date, or if the date has the maximumnumber of bookings already, an error reply is sent to the client instead.
If the action is to unbook, the room is removed from the bookings for the givendate and the action echoed back to the client; or an error reply is given if thebooking did not exist in the first place. Although the rooms are stored in order,
Creating a TCP Server 533
we have simply used not in and list.remove(), which both do a linear search;for longer lists we would use bisect.bisect_left() to find the room using abinary chop, but that seems like overkill in this example.
If the request action is unrecognized, we simply reply with an error message.
def sendReply(self, action, room, date):
reply = QByteArray()
stream = QDataStream(reply, QIODevice.WriteOnly)
stream.setVersion(QDataStream.Qt_4_2)
stream.writeUInt16(0)
stream << action << room << date
stream.device().seek(0)
stream.writeUInt16(reply.size() - SIZEOF_UINT16)
self.write(reply)
The reply sent to the client is created in the same way as the client’s requestsare created. We write to a QByteArray using a QDataStream, beginning by writingan unsigned 16-bit integer and ending by overwriting the integer with the sizeof the reply, and then writing the reply to the socket.
def sendError(self, msg):
reply = QByteArray()
stream = QDataStream(reply, QIODevice.WriteOnly)
stream.setVersion(QDataStream.Qt_4_2)
stream.writeUInt16(0)
stream << QString("ERROR") << QString(msg)
stream.device().seek(0)
stream.writeUInt16(reply.size() - SIZEOF_UINT16)
self.write(reply)
The code for sending an error reply is almost the same as for sending a successreply, and arguably we could have used one method for both.
The server could easily be extended to handle more request types simply byadding more if statements to readRequest(). For example, the client mightwant to know which rooms are booked on a particular day, or which days aparticular room is booked on.
Although we have used a dictionary to hold the server’s data, there is no reasonwhy the server could not hold its data in-process in a SQLite database or in anout-of-process database, or in files. Nor does the server need to have a GUI; itcould have no QWidgets, and simply be run in the background as a Linux dæmonor Windows service.

534 Chapter 18. Networking
Summary
The Python standard library, the Twisted networking engine, and the PyQtQtNetwork module provide considerable support for networking, from low-levelsockets to various high-level protocols, including FTP and HTTP.
To write client/server applications we must ensure that the client and theserver programs can communicate. This means that the server must runat a known IP address and listen at a specific port address. Both client andserver must communicate using an agreed-upon protocol such as UDP, or morecommonly, TCP. They must also agree on how the data is to be transmitted,whether as lines of text or as blocks of binary data—and in both cases, theymust know what format each request and response must take.
The scenario shown in this chapter is a very common one: The server sits wait-ing for requests, and clients send requests and then read back the server’s re-sponses. Before a client can communicate at all it must establish a connection,and then, once the connection has been established, it can send its data. Theserver may respond with data, or some problem may have occurred. If datais received, we must make sure that we never attempt to read more bytes (orlines) than are available.
PyQt’s QTcpServer and QTcpSocket classes make it very easy to implementservers. And although it is possible to read and write lines of textual data,using binary data is much more versatile, allowing us to send and receive anytype of data and with no need to write a parser.
One theoretical problem with the TCP server we have implemented is that itis single threaded. This means that it may have to block to handle one requestat a time if multiple requests arrive at the same moment. This can be solvedby using a threaded server, as we will see in the next chapter.
ExerciseModify the Building Services server so that it accepts a new request action,BOOKINGSONDATE. When such a request is received it should ignore the room, andinstead retrieve the bookings for the given date. If there are no bookings theserver should send an error reply. Otherwise, it should send as its reply nota single room string, but rather a string containing comma-space-separatedroom numbers as shown in Figure 18.4.
Modify the Building Services client so that it has a Bookings on Date? but-ton, connected to a method that issues a suitable request. The client’s read-
Response() method will need to be modified slightly so that it can read theserver’s response to the new request.
The modifications necessary to provide “bookings on date” are quite straight-forward. For a bit more challenge, modify the Building Services server to ac-cept another new request action, BOOKINGSFORROOM. When one of these requests
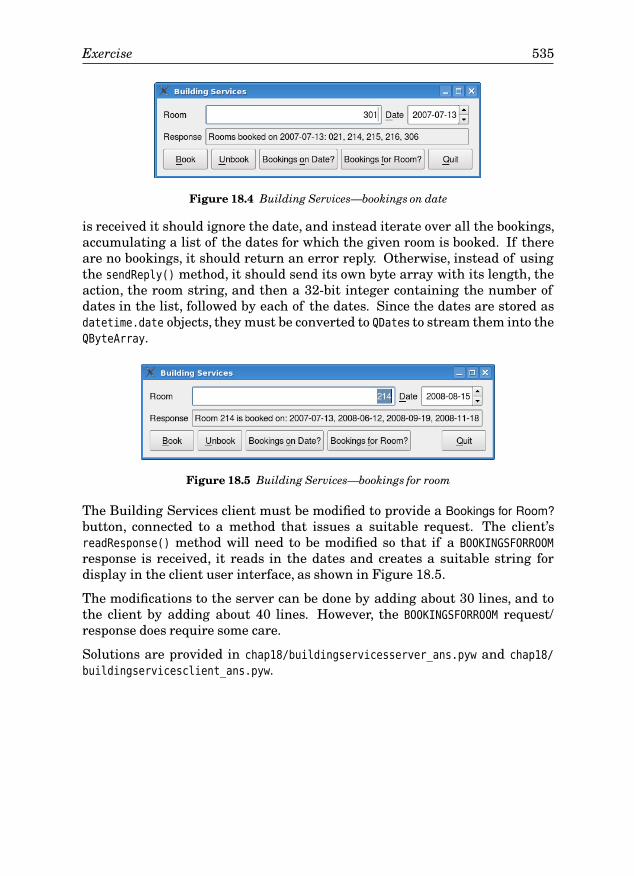
Exercise 535
Figure 18.4 Building Services—bookings on date
is received it should ignore the date, and instead iterate over all the bookings,accumulating a list of the dates for which the given room is booked. If thereare no bookings, it should return an error reply. Otherwise, instead of usingthe sendReply() method, it should send its own byte array with its length, theaction, the room string, and then a 32-bit integer containing the number ofdates in the list, followed by each of the dates. Since the dates are stored asdatetime.date objects, they must be converted to QDates to stream them into theQByteArray.
Figure 18.5 Building Services—bookings for room
The Building Services client must be modified to provide a Bookings for Room?button, connected to a method that issues a suitable request. The client’sreadResponse() method will need to be modified so that if a BOOKINGSFORROOM
response is received, it reads in the dates and creates a suitable string fordisplay in the client user interface, as shown in Figure 18.5.
The modifications to the server can be done by adding about 30 lines, and tothe client by adding about 40 lines. However, the BOOKINGSFORROOM request/response does require some care.
Solutions are provided in chap18/buildingservicesserver_ans.pyw and chap18/
buildingservicesclient_ans.pyw.

This page intentionally left blank
Multithreading
1919 ● Creating a Threaded Server
● Creating and Managing SecondaryThreads
● Implementing a Secondary Thread
Traditionally, applications have a single thread of execution and perform oneoperation at a time. For GUI programs this can sometimes be a problem—forexample, if the user invokes a long-running operation, the user interface mightfreeze up while the operation is taking place. There are a few solutions thatcan be tried to eliminate this problem.
One simple solution, particularly useful in long-running loops, is to call QAp-plication.processEvents(). This method gives the event loop the opportunity tohandle any unprocessed events, such as paint events, as well as mouse and keypress events.Another solution is to use zero-timeout timers. We have combinedboth approaches in several examples, usually when loading lots of files—forexample, in Chapter 9’s Text Editor’s MainWindow.loadFiles() method.
A third solution is to farm the work out to another program entirely. This canbe done using the Python standard library’s subprocess module, or using PyQt’sQProcess class. The makepyqt.pyw application supplied with the examples usesQProcess to execute PyQt’s command-line tools such as pyuic4 and pyrcc4.
In some cases what we really need is a separate thread of execution within theapplication itself. Applications that have more than one thread of executionare said to be multithreaded.★ For example, we might want to create a serverthat can service as many simultaneous connections as the hardware can copewith, something relatively easily done if we devote a new thread to eachconnection. And in some cases we might have a GUI application where wewant the user to be able to start off a long-running process, and then continueinteracting with the application; in such cases it may be best to pass on theprocessing to a separate secondary thread and leave the primary (GUI) threadfree to respond to the user.
This chapter shows some common techniques used in multithreaded program-ming. These are enough to get started, but the coverage is not comprehensive,
★This chapter assumes a knowledge of the fundamentals of threading. For a thorough, but notlight, introduction, see Foundations of Multithreaded,Parallel,and Distributed Programming.
537
538 Chapter 19. Multithreading
since that would take us beyond the scope of the book and would require a bookin itself.
Because several threads may access the same data concurrently, multithread-ed applications are usually more difficult to write, maintain, and debug thansingle-threadedapplications. On single-processormachines,multithreadedap-plications can sometimes run slower than single-threaded applications (due tothe processing overhead of having the additional threads),but they are usuallyperceived to run faster by users because they don’t freeze the user interface,and because they make it much easier for progress to be reported back to theuser incrementally.
Using the right number of threads can significantly affect performance. Forexample, in the Page Indexer example covered later in the chapter, we have aprimary (GUI) thread and a secondary thread. The exercise involves chang-ing this example to use multiple secondary threads. If too many are used, theapplication runs slower than the version with one secondary thread, but withthe right number, we can start up the one secondary thread version, and thenstart up the multiple secondary thread version, and see the multiple secondarythread version catch up, overtake, and finish, before the one secondary threadversion has finished. How many secondary threads should we use? The an-swer depends on what processing must be done and on the particular machineand operating system that the application is run on. We could experiment withrealistic datasets to fix a number, or we could make our code use more or fewersecondary threads depending on circumstances.
Python’s standard library provides the low-level thread module and the higher-level threading module, but for PyQt programming, we recommend using thePyQt threading classes. PyQt’s threading classes offer a high-level API, butunder the hood some of their basic operations are implemented in assemblylanguage to make them as fast and fine-grained as possible, something notdone in Python’s threading modules.
PyQt applications always have at least one thread of execution, the primary(initial) thread. In addition, they may create as many secondary threads asthey need. However, if the application has a GUI, the GUI operations, suchas executing the event loop, may only take place in the primary thread. Newthreads are created by instantiating QThread subclasses that reimplement theQThread.run() method.
It is possible to create PyQt applications that do not have a GUI, usingQCoreApplication instead of QApplication. Just like GUI PyQt applications, theyhave one primary thread and may have any number of secondary threads.
Communication between secondary threads and the primary thread is oftendesirable—for example, to keep the user informed of progress, to allow theuser to intervene during processing, and to let the primary thread know whenprocessing is complete. Traditionally, such communication has taken place byusing shared variables in conjunction with a resource protection mechanism.
Creating a Threaded Server 539
PyQt has classes to support this approach, including QMutex,QReadWriteLock, andQSemaphore. In addition, PyQt applications can use the signal–slot mechanismto communicate between threads; this is very convenient and useful.
In this chapter’s first section we will look at a threaded TCP server; it does thesame job as the server described in the preceding chapter’s last section, but itcan serve several clients simultaneously because it is threaded. In the secondand third sections we will look at a GUI application that has some potentiallyvery time-consuming processing to do, and that passes on the processing toa secondary thread. This application uses signals and slots to keep the userinterface up-to-date regarding progress, and to provide the user with somecontrol over the secondary thread. This example also uses some of the resourceprotection classes so that the user interface can access work in progress.
Creating a Threaded Server
Unlike some other GUI libraries, PyQt’s network socket classes are integratedwith the event loop. This means that the user interface remains responsiveduring network processing, even in single-threaded PyQt applications. But ifwe want to be able to handle multiple simultaneous incoming connections, wemight prefer to use a multithreaded server.
Making a multithreaded server is no more complicated than making a single-threaded server—the difference between the two being that instead of creat-ing a separate socket to handle incoming connections, a multithreaded servercreates a new thread for each new connection, and creates a new socket insideeach new thread. For example, here is a complete threaded server:
class TcpServer(QTcpServer):
def __init__(self, parent=None):
super(TcpServer, self).__init__(parent)
def incomingConnection(self, socketId):
thread = Thread(socketId, self)
self.connect(thread, SIGNAL("finished()"),
thread, SLOT("deleteLater()"))
thread.start()
The incomingConnection() method is reimplemented from the QTcpServer baseclass. It is called whenever a new network connection is made to the server.
The signal–slot connection is necessary to ensure that the thread is deletedwhen it is no longer needed, thereby keeping the server’s memory footprint assmall as possible. Although we must reimplement QThread.run() in a QThread
subclass, the thread is always started by calling QThread.start() (and never bycalling run() directly).
540 Chapter 19. Multithreading
The Thread subclass has one static variable and four methods. The sendReply()
and sendError() methods are identical to those shown in the preceding chapter,so we will omit them.
class Thread(QThread):
lock = QReadWriteLock()
def __init__(self, socketId, parent):
super(Thread, self).__init__(parent)
self.socketId = socketId
The Thread.lock variable is static, so all the Thread instances share it. Theinitializer simply takes note of the socket descriptor ready for when the threadis started. The run() method is quite long, so we will review it in parts.
def run(self):
socket = QTcpSocket()
if not socket.setSocketDescriptor(self.socketId):
self.emit(SIGNAL("error(int)"), socket.error())
return
while socket.state() == QAbstractSocket.ConnectedState:
nextBlockSize = 0
stream = QDataStream(socket)
stream.setVersion(QDataStream.Qt_4_2)
while True:
socket.waitForReadyRead(-1)
if socket.bytesAvailable() >= SIZEOF_UINT16:
nextBlockSize = stream.readUInt16()
break
if socket.bytesAvailable() < nextBlockSize:
while True:
socket.waitForReadyRead(-1)
if socket.bytesAvailable() >= nextBlockSize:
break
We begin by creating a new socket and setting its socket descriptor to the onewe were given. We take a slightly more robust approach than before, checkingthe return value of the QTcpSocket.setSocketDescriptor() call, and giving anerror message on failure. Once the run() method finishes, the finished() signalis emitted and, thanks to our earlier signal–slot connection, the thread willbe deleted.
As long as the socket is connected, we can use it to receive requests and sendresponses. Unlike the TCP server we created in the preceding chapter, ratherthan running asynchronously and waiting for things to happen, such as databeing available, through signal–slot connections, here we block using wait-
ReadyRead() until there is data. (The -1 argument means “wait forever”.) It doesnot matter that we block, because we are in a separate thread of execution, so

Creating a Threaded Server 541
the rest of the application, its primary thread, and any other connection-han-dling secondary threads can continue unhindered.
Once there are two bytes available, we read the unsigned 16-bit byte count, andonce at least that number of bytes is available to read, we can continue.
action = QString()
room = QString()
date = QDate()
stream >> action
if action in ("BOOK", "UNBOOK"):
stream >> room >> date
try:
Thread.lock.lockForRead()
bookings = Bookings.get(date.toPyDate())
finally:
Thread.lock.unlock()
uroom = unicode(room)
We read in the request action, which should be “BOOK” or “UNBOOK”, andif it is one of these, we then read in the room number string and the date. TheBookings default dictionary holds all the bookings data, and any number ofthreads could be accessing it simultaneously. For this reason we must protecteach access. Here, we only want to read,Default
dictio-naries
529 ☞
so we call lockForRead(), extractthe data we want, and then unlock the lock. We use a try … finally block toguarantee that the lock will be unlocked when we have finished accessing theshared data.
Python 2.6 (and 2.5 with a suitable from __future__ statement) offers a nicerand more compact syntax that can replace the try … finally, as the Using aContext Manager for Unlocking sidebar on page 549 shows.
One well-known locking mechanism is a mutex (also called a binarysemaphore), provided by PyQt’s QMutex class. A mutex allows only the threadthat locks it to have access to the protected resource. PyQt also offers a morefine-grained mechanism, the read/write lock, provided by the QReadWriteLock
class that we have used here. Whenever a lock is in force in one thread, otherthreads may be blocked, waiting for access. We can minimize this problem intwo ways. First we can use read locks whenever possible—if the only locks inforce are read locks, none of the threads is blocked since it is safe for all threadsto read if no thread is writing. And second,we can minimize the amount of pro-cessing we do when a lock is in force. We have used both of these techniques inthe run() reimplementation; the downside is that the code is much longer thanmight be expected.
QMutex, QReadWriteLock, and the other protection mechanisms work becausethey are all “thread-safe”. Any number of threads can simultaneously call themethods of a thread-safe object, and can rely on the underlying system, thatis, PyQt, to automatically serialize any accesses to shared data that might
542 Chapter 19. Multithreading
occur. This means, for example, that if two or more threads attempt to locka QReadWriteLock for writing, only one will succeed, and all the others will beblocked. This allows the thread that gained the lock to perform its updates onthe shared data, and when it releases the lock one of the other threads thatwants to write will be given access, and so on until no more threads requirewrite access.
The PyQt documentation indicates which classes, or which methods withinclasses, are thread-safe. It also indicates which methods are reentrant. Reen-trant methods are more constrained than thread-safe methods. This is becauseit is safe to call reentrant methods simultaneously from multiple threads onlyif each invocation results only in unique data being accessed, such as localvariables. A reentrant method can be made thread-safe by using locks for allaccesses to instance variables, and to any variables that refer to shared data.
if action == "BOOK":
newlist = False
try:
Thread.lock.lockForRead()
if bookings is None:
newlist = True
finally:
Thread.lock.unlock()
if newlist:
try:
Thread.lock.lockForWrite()
bookings = Bookings[date.toPyDate()]
finally:
Thread.lock.unlock()
If the request is to book a room we begin by examining the bookings variable.This is either None or a reference to a list held by the shared Bookings defaultdictionary, so we must use a read lock when accessing it. If bookings is None, weinsert a new empty list into the dictionary with the given date as its key; thistime we must use a write lock.
error = None
insert = False
try:
Thread.lock.lockForRead()
if len(bookings) < MAX_BOOKINGS_PER_DAY:
if uroom in bookings:
error = "Cannot accept duplicate booking"
else:
insert = True
else:
error = QString("%1 is fully booked").arg(
date.toString(Qt.ISODate))
Creating a Threaded Server 543
finally:
Thread.lock.unlock()
if insert:
try:
Thread.lock.lockForWrite()
bisect.insort(bookings, uroom)
finally:
Thread.lock.unlock()
self.sendReply(socket, action, room, date)
else:
self.sendError(socket, error)
If the room is already booked for the given date, we do not duplicate thebooking, but instead send an error response to the client. In the nonthreadedserver, we simply called sendError() in this case, but here we just assign anerror text. We do this to keep the processing that is done within the context ofthe lock to a minimum.
If the booking can be made, we take a write lock, insert the room into thebookings list, and send a response indicating success. Otherwise, we send anerror response. Neither response is sent within the context of a lock, again tominimize the time that locks are in force.
elif action == "UNBOOK":
error = None
remove = False
try:
Thread.lock.lockForRead()
if bookings is None or uroom not in bookings:
error = "Cannot unbook nonexistent booking"
else:
remove = True
finally:
Thread.lock.unlock()
if remove:
try:
Thread.lock.lockForWrite()
bookings.remove(uroom)
finally:
Thread.lock.unlock()
self.sendReply(socket, action, room, date)
else:
self.sendError(socket, error)
The unbooking if branch follows the same pattern as the booking branch. Webegin by checking whether the booking can be made, using a read lock, and ifnecessary, storing an error message rather than doing a time-consuming sendwhile the lock is in force. Then we either unbook the room by removing it from
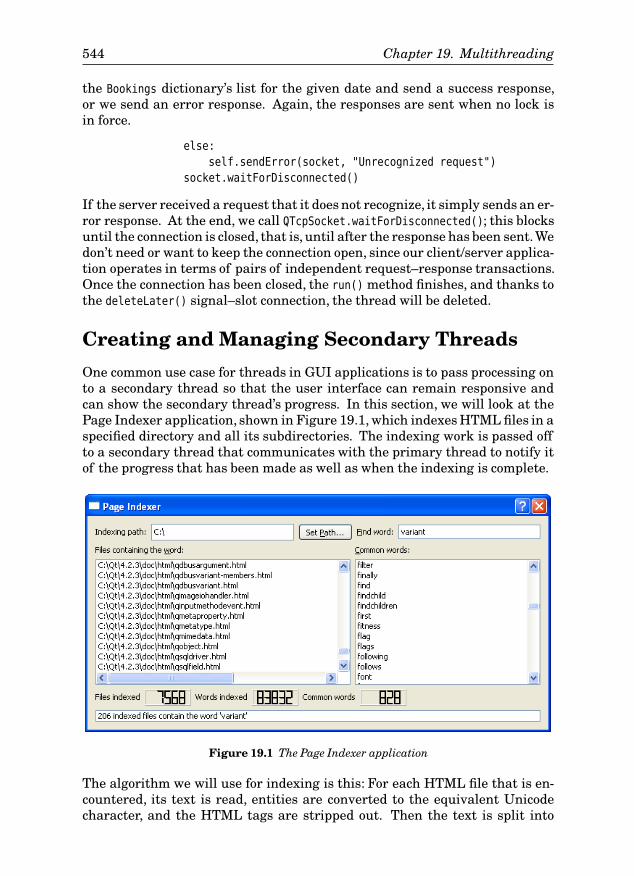
544 Chapter 19. Multithreading
the Bookings dictionary’s list for the given date and send a success response,or we send an error response. Again, the responses are sent when no lock isin force.
else:
self.sendError(socket, "Unrecognized request")
socket.waitForDisconnected()
If the server received a request that it does not recognize, it simply sends an er-ror response. At the end, we call QTcpSocket.waitForDisconnected(); this blocksuntil the connection is closed, that is, until after the response has been sent.Wedon’t need or want to keep the connection open, since our client/server applica-tion operates in terms of pairs of independent request–response transactions.Once the connection has been closed, the run() method finishes, and thanks tothe deleteLater() signal–slot connection, the thread will be deleted.
Creating and Managing Secondary Threads
One common use case for threads in GUI applications is to pass processing onto a secondary thread so that the user interface can remain responsive andcan show the secondary thread’s progress. In this section, we will look at thePage Indexer application, shown in Figure 19.1, which indexes HTML files in aspecified directory and all its subdirectories. The indexing work is passed offto a secondary thread that communicates with the primary thread to notify itof the progress that has been made as well as when the indexing is complete.
Figure 19.1 The Page Indexer application
The algorithm we will use for indexing is this: For each HTML file that is en-countered, its text is read, entities are converted to the equivalent Unicodecharacter, and the HTML tags are stripped out. Then the text is split into
Creating and Managing Secondary Threads 545
words and each word of 3–25 characters in length inclusive that isn’t in the setof common words isDefault
dictio-naries
529 ☞
added to the filenamesForWords default dictionary. Each ofthe dictionary’s keys is a unique word, and each associated value is a set of thefilenames where the word occurs. If any word occurs in more than 250 files, itis deleted from the dictionary and added to the set of common words. This en-sures that the dictionary is kept to a reasonable size and means that searchesfor words like “and” and “the” won’t work—which is a good thing, since suchwords are likely to match in thousands of files, far too many to be useful.
We will begin by looking at two extracts from the application’s main form,which is in file chap19/pageindexer.pyw.
class Form(QDialog):
def __init__(self, parent=None):
super(Form, self).__init__(parent)
self.fileCount = 0
self.filenamesForWords = collections.defaultdict(set)
self.commonWords = set()
self.lock = QReadWriteLock()
self.path = QDir.homePath()
The fileCount variable is used to keep track of how many files have been in-dexed so far. The filenamesForWords default dictionary’s keys are words andits values are sets of filenames. The commonWords set holds words that have oc-curred in at least 250 files. The read/write lock is used to ensure that access tothe filenamesForWords dictionary and to the commonWords set are protected sincethey will be read in the primary thread and read and written in the secondarythread. The QDir.homePath() method returns the user’s home directory; we useit to set an initial search path.
self.walker = walker.Walker(self.lock, self)
self.connect(self.walker, SIGNAL("indexed(QString)"),
self.indexed)
self.connect(self.walker, SIGNAL("finished(bool)"),
self.finished)
self.connect(self.pathButton, SIGNAL("clicked()"),
self.setPath)
self.connect(self.findEdit, SIGNAL("returnPressed()"),
self.find)
The secondary thread is in the walker module (so named because it walks thefilesystem), and the QThread subclass is called Walker. Whenever the thread in-dexes a new file it emits a signal with the filename. It also emits a finished()
signal when it has indexed all the files in the path it was given when it wasstarted.
Signals emitted in one thread that are intended for another work asyn-chronously, that is, they don’t block. But they work only if there is an event
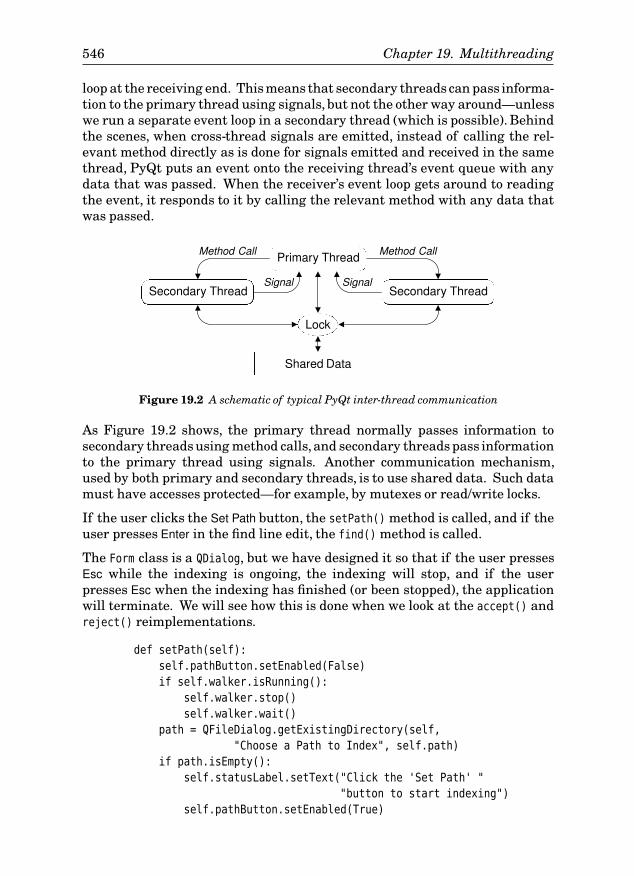
546 Chapter 19. Multithreading
loop at the receiving end. This means that secondary threadscan pass informa-tion to the primary thread using signals, but not the other way around—unlesswe run a separate event loop in a secondary thread (which is possible). Behindthe scenes, when cross-thread signals are emitted, instead of calling the rel-evant method directly as is done for signals emitted and received in the samethread, PyQt puts an event onto the receiving thread’s event queue with anydata that was passed. When the receiver’s event loop gets around to readingthe event, it responds to it by calling the relevant method with any data thatwas passed.
Primary Thread
Secondary Thread Secondary Thread
Lock
Shared Data
Method Call Method Call
Signal Signal
Figure 19.2 A schematic of typical PyQt inter-thread communication
As Figure 19.2 shows, the primary thread normally passes information tosecondary threads using method calls,and secondary threads pass informationto the primary thread using signals. Another communication mechanism,used by both primary and secondary threads, is to use shared data. Such datamust have accesses protected—for example, by mutexes or read/write locks.
If the user clicks the Set Path button, the setPath() method is called, and if theuser presses Enter in the find line edit, the find() method is called.
The Form class is a QDialog, but we have designed it so that if the user pressesEsc while the indexing is ongoing, the indexing will stop, and if the userpresses Esc when the indexing has finished (or been stopped), the applicationwill terminate. We will see how this is done when we look at the accept() andreject() reimplementations.
def setPath(self):
self.pathButton.setEnabled(False)
if self.walker.isRunning():
self.walker.stop()
self.walker.wait()
path = QFileDialog.getExistingDirectory(self,
"Choose a Path to Index", self.path)
if path.isEmpty():
self.statusLabel.setText("Click the 'Set Path' "
"button to start indexing")
self.pathButton.setEnabled(True)
Creating and Managing Secondary Threads 547
return
self.path = QDir.toNativeSeparators(path)
self.findEdit.setFocus()
self.pathLabel.setText(self.path)
self.statusLabel.clear()
self.filesListWidget.clear()
self.fileCount = 0
self.filenamesForWords = collections.defaultdict(set)
self.commonWords = set()
self.walker.initialize(unicode(self.path),
self.filenamesForWords, self.commonWords)
self.walker.start()
When the user clicks Set Path, we begin by disabling the button and thenstopping the thread if it is running. The stop() method is a custom one of ourown. The wait() method is one inherited from QThread; it blocks until the threadhas finished running, that is, until the run() method returns. In the stop()
method, we indirectly ensure that the run() method finishes as soon as possibleafter stop() has been called, as we will see in the next section.
Next we get the path the user chose (or return, if they canceled). We haveused QDir.toNativeSeparators() since internally PyQt always Qt
4.2
uses “/” toseparate paths, but on Windows we want to show “\”s instead. The toNa-
tiveSeparators() method was introduced with Qt 4.2; for earlier versions useQDir.convertSeparators() instead. By default, getExistingDirectory() showsonly directories because there is an optional fourth argument with a defaultvalue of QFileDialog.ShowDirsOnly; if we want filenames to be visible, we canclear this flag by passing QFileDialog.Options().
The user interface is set up by moving the keyboard focus to the find line edit,setting the path label to the chosen path, and clearing the status label that isused to keep the user informed about progress. The files list widget lists thosefiles that contain the word in the find line edit. We don’t need to protect accessto the filenamesForWords default dictionary or to the commonWords set since theonly thread running at this point is the primary thread.
We finish off by initializing the walker thread with the path and referencesto the data structures we want it to populate, and then we call start() to startit executing.
def indexed(self, fname):
self.statusLabel.setText(fname)
self.fileCount += 1
if self.fileCount % 25 == 0:
self.filesIndexedLCD.display(self.fileCount)
try:
self.lock.lockForRead()
indexedWordCount = len(self.filenamesForWords)
commonWordCount = len(self.commonWords)
548 Chapter 19. Multithreading
finally:
self.lock.unlock()
self.wordsIndexedLCD.display(indexedWordCount)
self.commonWordsLCD.display(commonWordCount)
elif self.fileCount % 101 == 0:
self.commonWordsListWidget.clear()
try:
self.lock.lockForRead()
words = self.commonWords.copy()
finally:
self.lock.unlock()
self.commonWordsListWidget.addItems(sorted(words))
Whenever the walker thread finishes indexing a file, it emits an indexed()
signal with the filename; this signal is connected to the Form.indexed() methodshown earlier. We update the status label to show the name of the file thathas just been indexed, and every 25 files we also update the file count, wordsindexed, and common words LCD widgets. We use a read lock to ensure thatthe shared data structures are safe to read from, and we do the minimumamount of work inside the context of the lock, updating the LCD widgets onlyafter the lock has been released.
For every 101st file processed we update the common words list widget. Againwe use a read lock, and we use set.copy() to ensure that we do not refer to theshared data once the lock has been released.
def finished(self, completed):
self.statusLabel.setText("Indexing complete" \
if completed else "Stopped")
self.finishedIndexing()
When the thread has been stopped or has finished, it emits a finished()
signal, connected to this method and passing a Boolean to indicate whether itcompleted. We update the status label and call our finishedIndexing() methodto update the user interface.
def finishedIndexing(self):
self.walker.wait()
self.filesIndexedLCD.display(self.fileCount)
self.wordsIndexedLCD.display(len(self.filenamesForWords))
self.commonWordsLCD.display(len(self.commonWords))
self.pathButton.setEnabled(True)
When the indexing has finished we call QThread.wait() to make sure that thethread’s run() method has finished. Then we update the user interface basedon the current values of the shared data structures. We don’t need to protectaccess to the dictionary or the set because the walker thread is not running.
Creating and Managing Secondary Threads 549
Using a Context Manager for Unlocking
In this chapter,we use try …finally blocks to ensure that locks are unlockedafter use. Python 2.6 Python
2.6offers an alternative approach using the new with
keyword, in conjunction with a context manager. Context managers are ex-plained in http://www.python.org/dev/peps/pep-0343; suffice it to say that wecan make a context manager by creating a class that has two special meth-ods: __enter__() and __exit__(). Then, instead of writing code like this:
try:
self.lock.lockForRead()
found = word in self.commonWords
finally:
self.lock.unlock()
we can write something much simpler and shorter:
with ReadLocker(self.lock):
found = word in self.commonWords
This works because the semantics of the object given to the with statement(at its simplest) are:
ContextManager.__enter__()
try:
# statements, e.g., found = word in self.commonWords
finally:
ContextManager.__exit__()
The ReadLocker context manager class itself is also easy to implement,assuming it is passed a QReadWriteLock object:
class ReadLocker:
def __init__(self, lock):
self.lock = lock
def __enter__(self):
self.lock.lockForRead()
def __exit__(self, type, value, tb):
self.lock.unlock()
If fact, since PyQt 4.1, QReadLocker and QWriteLocker can be PyQt
4.1
Python
2.5
used as contextmanagers, so with Python 2.6 (or Python 2.5 with a from __future__ import
with_statement), we don’t need to use try … finally to guarantee unlocking,and can instead write code like this:
with QReadLocker(self.lock):
found = word in self.commonWords
The files pageindexer_26.pyw and walker_26.py in chap19 use this approach.
550 Chapter 19. Multithreading
At any time during the indexing, the user can interact with the user interfacewith no freezing or performance degradation. In particular, they can entertext in the find line edit and press Enter to populate the files list widget withthose files that contain the word they typed. If they pressEntermore than oncewith a bit of time between presses, the list of files may change, because in theinterval more files may have been indexed. The find() method is slightly long,so we will review it in two parts.
def find(self):
word = unicode(self.findEdit.text())
if not word:
self.statusLabel.setText("Enter a word to find in files")
return
self.statusLabel.clear()
self.filesListWidget.clear()
word = word.lower()
if " " in word:
word = word.split()[0]
try:
self.lock.lockForRead()
found = word in self.commonWords
finally:
self.lock.unlock()
if found:
self.statusLabel.setText(
"Common words like '%s' are not indexed" % word)
return
If the user enters a word to find, we clear the status label and the file listwidget and look for the word in the set of common words. If the word wasfound, it is too common to be indexed, so we just give an informative messageand return.
try:
self.lock.lockForRead()
files = self.filenamesForWords.get(word, set()).copy()
finally:
self.lock.unlock()
if not files:
self.statusLabel.setText(
"No indexed file contains the word '%s'" % word)
return
files = [QDir.toNativeSeparators(name) for name in \
sorted(files, key=unicode.lower)]
self.filesListWidget.addItems(files)
self.statusLabel.setText(
"%d indexed files contain the word '%s'" % (
len(files), word))
Creating and Managing Secondary Threads 551
If the user’s word is not in the set of common words, it might be in the index.We access the filenamesForWords default dictionary using a read lock, and copythe set of files that match the word. The set will be empty if no files have theword, but in either case, the set we have is a copy, so there is no risk of access-ing shared data outside the context of a lock. If there are matching files weadd them to the files list widget, sorted and using platform-native path sepa-rators.
The sorted() function returns its first argument (e.g., a list or set), in sortedorder. It can be given a comparison function as the second argument, but herewe have specified a “key”. This has the effect of doing a DSU (decorate, sort,undecorate) sort that is the equivalent of:
templist = [(fname.lower(), fname) for fname in files]
templist.sort()
files = [fname for key, fname in templist]
This is more efficient than using a comparison function because each item islowercased just once rather than every time it is used in a comparison.
def reject(self):
if self.walker.isRunning():
self.walker.stop()
self.finishedIndexing()
else:
self.accept()
If the user pressesEsc, the reject() method is called. If indexing is in progress,we call stop() on the thread and then call finishedIndexing(); the finishedIn-
dexing() method calls wait(). Otherwise, indexing has either been stopped by apreviousEsc key press or has finished; either way, we call accept() to terminatethe application.
def closeEvent(self, event=None):
self.walker.stop()
self.walker.wait()
When the application is terminated, either by the accept() call that occurs inthe reject() method, or by other means, such as the user clicking the closeX button, the close event is called. Here we make sure that indexing hasbeen stopped and that the thread has finished so that a clean terminationtakes place.
All the indexing work has been done by the walker secondary thread. Thisthread has been controlled by the primary thread calling its methods (e.g.,start() and stop()), and has notified the primary thread of its status (file in-dexed, indexing finished) through PyQt’s signals and slots mechanism. The theshared data has been accessed—for example, when the user has asked whichfiles contain a particular word, or when the data has been updated by the walk-

552 Chapter 19. Multithreading
er thread, using the protection of a read/write lock. In the following section wewill see how the Walker thread is implemented,how it emits its signals,and howit populates the data structures it is given.
Implementing a Secondary Thread
The Page Indexer’s secondary thread is implemented in the Walker class in thefile chap19/walker.py.The class is a QThread subclass that uses a QMutex to protectaccesses that it makes to its own private data, and that uses the QReadWriteLock
passed to it to protect accesses to data it shares with the primary thread.
class Walker(QThread):
COMMON_WORDS_THRESHOLD = 250
MIN_WORD_LEN = 3
MAX_WORD_LEN = 25
INVALID_FIRST_OR_LAST = frozenset("0123456789_")
STRIPHTML_RE = re.compile(r"<[^>]*?>", re.IGNORECASE|re.MULTILINE)
ENTITY_RE = re.compile(r"&(\w+?);|&#(\d+?);")
SPLIT_RE = re.compile(r"\W+", re.IGNORECASE|re.MULTILINE)
The class begins with some static variables that govern how many files a wordcan occur in before it is considered to be a common word, the minimum andmaximum lengths of a word, and what characters a word may not begin or endwith. The “strip HTML” regular expression is used to strip out HTML tags, theentity regular expression is used to pick out entities to be converted to Unicodecharacters, and the split regular expression is used to split a file’s text into itsconstituent words. A more realistic application might use an HTML parserrather than regular expressions.
def __init__(self, lock, parent=None):
super(Walker, self).__init__(parent)
self.lock = lock
self.stopped = False
self.mutex = QMutex()
self.path = None
self.completed = False
The application creates one walker thread object but does not start it offstraight away. The lock is the same QReadWriteLock used by the primarythread—the walker thread uses it to protect all accesses to the shared file-
namesForWords default dictionary and to the commonWords set. The stopped vari-able is used inside the class to determine whether the thread has been asked tostop (by a call to the stop() method). The mutex is used to protect access to thestopped variable by the walker thread itself. This is necessary because whilethe run() method is executing it is possible that another of the thread’s meth-
Implementing a Secondary Thread 553
ods, such as stop(), is called. The completed variable is used to indicate whetherthe indexing was completed when the thread stopped.
def initialize(self, path, filenamesForWords, commonWords):
self.stopped = False
self.path = path
self.filenamesForWords = filenamesForWords
self.commonWords = commonWords
self.completed = False
This method is designed to be called just before QThread.start() is called, to setup the thread for doing the indexing. It should not be called while the thread isrunning. (If we were paranoid we could put an if not self.isStopped(): return
at the beginning.)
Although it would be harmless to use the mutex and the lock, neither is neces-sary. When this method is called the walker thread is not running, so assigningto stopped is no problem, and in the case of the dictionary and set passed in, weare just taking references to them, not altering them in any way.
def run(self):
self.processFiles(self.path)
self.stop()
self.emit(SIGNAL("finished(bool)"), self.completed)
When the caller calls start(), the thread in turn calls the run() method—some-thing we must never do ourselves. The method has only three statements,but processFiles() can take a long time to execute since it involves recursive-ly reading and indexing all the HTML files in the path. This isn’t a problem,though, because the processing is taking place in the walker thread’s ownthread of execution, so the user interface remains responsive, and the pri-mary thread can call the walker thread’s methods, and respond to the walk-er thread’s signals, as we saw in the preceding section. At the end, the run()
method emits a finished() signal, with a Boolean flag that indicates whetherthe indexing was finished; if it wasn’t, the user must have stopped it throughthe user interface.
def stop(self):
try:
self.mutex.lock()
self.stopped = True
finally:
self.mutex.unlock()
This blocks until the lock is obtained and, thanks to the try …Using aContextManag-er forUnlock-ing side-bar
549 ☞
finally block,guarantees that the mutex is unlocked at the end.
If we were using Python 2.6, or Python 2.5 with a suitable from __future__
statement, we could rewrite this method as:
554 Chapter 19. Multithreading
def stop(self):
with QMutexLocker(self.mutex):
self.stopped = True
Since PyQt 4.1, the QMutexLocker class can be used as a contextPyQt
4.1
manager. It locksthe QMutex it is given as an argument (blocking until it can obtain the lock), andunlocks the mutex when the flow of control leaves the with scope (even if thescope is exited as the result of an exception).
def isStopped(self):
try:
self.mutex.lock()
return self.stopped
finally:
self.mutex.unlock()
Notice that the return statement is inside the try … finally block. When thereturn is reached the method will attempt to return the value, but it will beforced to enter the finally block, after which the method will return with thereturn statement’s value.
If we were using Python 2.6 (or 2.5 with a suitable from __future__ statement),we might omit this method entirely, and in some of the other methods, insteadof writing:
if self.isStopped():
return
we might write this:
with QMutexLocker(self.mutex):
if self.stopped:
return
There should not be any significant difference in the overhead of any of theseapproaches, although using with with a QMutexLocker seems to be the cleanestand clearest approach.
The processFiles() method is rather long, so we will review it in three parts.
def processFiles(self, path):
def unichrFromEntity(match):
text = match.group(match.lastindex)
if text.isdigit():
return unichr(int(text))
u = htmlentitydefs.name2codepoint.get(text)
return unichr(u) if u is not None else ""
We begin with a nested function definition. It is used in conjunction withthe entity regular expression (shown on page 552). This expression has two
Implementing a Secondary Thread 555
match groups, only one of which can match at any one time. Given a matchobject matched by the regular expression, the function takes the last, that is,the only, match group, and if it is all digits, it returns the Unicode characterfor the corresponding code point. Otherwise, the function returns the Unicodecharacter matching the entity name, or an empty string if the name is not inthe htmlentitydefs.name2codepoint dictionary.
for root, dirs, files in os.walk(path):
if self.isStopped():
return
for name in [name for name in files \
if name.endswith((".htm", ".html"))]:
fname = os.path.join(root, name)
if self.isStopped():
return
words = set()
fh = None
try:
fh = codecs.open(fname, "r", "UTF8", "ignore")
text = fh.read()
except (IOError, OSError), e:
sys.stderr.write("Error: %s\n" % e)
continue
finally:
if fh is not None:
fh.close()
if self.isStopped():
return
text = self.STRIPHTML_RE.sub("", text)
text = self.ENTITY_RE.sub(unichrFromEntity, text)
text = text.lower()
The os.walk() method recursively walks a directory tree starting from thegiven path. For each directory it finds, it returns a three-tuple of the root path,a list of subdirectories, and a list of files in the directory.
We iterate over each of the directory’s files that has a .htm or .html suffix. Theunicode.endswith() and str.endswith() Python
2.5methods accept either a single string or
a tuple of strings to match against. For each matching file we create a filenamewith the full path and create a local empty set that will contain the uniquewords found in the file.
We should really check the encoding used by the HTML files, but instead wehave just assumed that they are either UTF-8 Unicode, or ASCII (which is astrict subset of UTF-8). We have also passed an additional parameter to indi-cate how decoding errors should be dealt with (i.e., they should be ignored).
Once we have the file’s text, read in as a single large string, we strip out itsHTML tags, convert any entities to their Unicode equivalents, and lowercase
556 Chapter 19. Multithreading
the text that remains. The re.sub() (“substitute”) method takes the text towork on as its second argument; its first argument is either a literal stringto replace each match, or a function to call. In the case of a function, for eachmatch a match object is passed to the function, and the function’s return value(which should be a string) is used as the replacement string.
At several points we check to see whether the stopped variable is True, whichwill be the case if the stop() method has been called. If this has occurred, wedo no further indexing, and simply return. If we have too few checks, the usermay experience a delay between requesting that the indexing stop and thethread actually stopping. But on the other hand, the more checks we put in,the slower the thread will run. So how often we check, and where we place thechecks, may require a bit of trial and error before we get it right.
for word in self.SPLIT_RE.split(text):
if self.MIN_WORD_LEN <= len(word) <= \
self.MAX_WORD_LEN and \
word[0] not in self.INVALID_FIRST_OR_LAST and \
word[-1] not in self.INVALID_FIRST_OR_LAST:
try:
self.lock.lockForRead()
new = word not in self.commonWords
finally:
self.lock.unlock()
if new:
words.add(word)
if self.isStopped():
return
for word in words:
try:
self.lock.lockForWrite()
files = self.filenamesForWords[word]
if len(files) > self.COMMON_WORDS_THRESHOLD:
del self.filenamesForWords[word]
self.commonWords.add(word)
else:
files.add(unicode(fname))
finally:
self.lock.unlock()
self.emit(SIGNAL("indexed(QString)"), fname)
self.completed = True
For each word in the file’s text that is not too long or too short and which doesnot start with an unacceptable character, we first look to see whether it is inthe set of common words, and if it is not, we add it to the local set of words.
Once we have gathered all the file’s uncommon words in the words set, we it-erate over this set. New words are added to the filenamesForWords default
Implementing a Secondary Thread 557
dictionary. If the dictionary’s set of filenames for the word is too large, wedelete the dictionary entry and add the word to the set of common words;other-wise, we add the filename to the dictionary’s set for the current word. We must,of course, use a write lock to ensure that no other thread (e.g., the primarythread) can access the dictionary or the common words set while they are beingupdated.
After the file has been indexed, the indexed() signal is emitted with the file’sname as a parameter. The primary thread has a connection to this signaland shows the filename in a label so that the user can see which file has justbeen indexed.
Once the os.walk() loop finishes, the completed variable is set to True, themethod ends, and control returns to the caller, run(). It is possible that the laststatement is never executed,because if the user stops the indexing (by pressingEsc, which causes stop() to be called, which sets stopped to True and means thatisStopped() will return True), one of the if isStopped(): statements will causethe processFiles() method to return immediately. In this case the completed
variable will (correctly) be False.
This completes our review of the walker thread. Using with statements andcontext managers instead of try … finally blocks can make the code muchshorter and easier to understand, as can be seen by comparing pageindexer.pyw
with pageindexer_26.pyw, and walker.py with walker_26.py. Having a stop()
method and a stopped variable is quite common for secondary threads thatserve a primary thread, so the Walker class, though specific in its processing, isquite general in its structure.
Summary
Writing threaded servers using PyQt’s threading and networking classes isrelatively straightforward. For non-GUI servers, it is possible to use QCore-
Application rather than QApplication, or to avoid using PyQt classes at all, rely-ing instead on the Python standard library threading and networking classes,or using Twisted.
Farming out processing to secondary threads is not difficult in theory, but inpractice we must be very careful to ensure that any data that is accessible bymore than one thread uses a protection mechanism such as QMutex, QReadWrite-Lock, or QSemaphore. Inside the context of a protection mechanism we must makesure that we do the least amount of work possible to minimize the time thatother threads might be blocked. And in the case of reading data, especially ifthe data is not too large, it is often best to copy it to avoid the risk of accessingit outside the scope of the protection.
It is quite common for the primary thread to communicate with secondarythreads by calling the secondary threads’ methods—for example, start() tostart them and stop() to stop them. Secondary threads can communicate
558 Chapter 19. Multithreading
with the primary thread by emitting signals that the primary thread connectsto. Both primary and secondary threads can also use shared data structuresprotected by QMutexes, QReadWriteLocks, or QSemaphores—with one common sce-nario being that the primary reads and the secondary threads read and writeshared data. Threads may need to protect accesses to their own data—forexample to a secondary thread’s stopped variable—since more than one of theirmethods may be active at the same time (e.g., both run() and stop() in a sec-ondary thread).
Multithreaded programs are more difficult to write and maintain than single-threaded programs, so it is often worthwhile to see whether simpler alterna-tives, such as calling QApplication.processEvents() or calling external processesusing QProcess, can be used instead.
ExerciseModify the Page Indexer application so that it uses multiple secondary threadsinstead of just one. By getting the number of secondary threads right, theapplication could be made to run faster than the single secondary threadversion. Although this exercise involves writing or modifying only about 100lines of code, it is quite subtle and challenging.
The approach taken in the solution is to move os.walk() to the primary thread,and create a list of filenames. Whenever the list has 1000 files, a secondarythread is created to process those files. At the end, another secondary threadis created to process whatever files remain. The Walker.initialize() methodis not required since we can pass all the parameters to the constructor. Andchanges to Walker.run() and Walker.processFiles() are quite small. Most of thechanges must be made in the pageindexer.pyw file.
The setPath() method is where the filenames can be gathered and secondarythreads created to process them. In the solution we used a separate methodto create the secondary threads. Since there could be many secondary threadswe also added a stopWalkers() method and modified the finished(), accept(),reject(), and finishedIndexing() methods. Since some of the widgets in theuser interface could potentially be accessed in response to signals from morethan one thread, we protect accesses to them with a mutex.
Make sure that the threads are deleted when they are no longer needed toavoid creating more and more threads each time setPath() is called.
The new version of the walker module should be a bit shorter than the original,but the new page indexer will be about 90 lines longer than the original. Asolution is provided in chap19/pageindexer_ans.pyw and chap19/walker_ans.py.
This Is Not Quite the End 559
This Is Not Quite the End
We have reached the end of the book, but by no means have we reached theend of what Python or PyQt has to offer. Python’s standard library is verylarge, and because of our focus on PyQt we have hardly used a fraction ofwhat is available in it. Many other libraries are also available as add-ons forPython and PyQt, so in many cases, we can program by composing existingcomponents rather than having to build everything ourselves from scratch.A good place to begin looking for add-ons is the Python Package Index athttp://pypi.python.org/pypi. And a good place to look for tricks, tips, and ideasis the Python Cookbook at http://aspn.activestate.com/ASPN/Python/Cookbook.
Our coverage of PyQt has been extensive, and all the major features have beenshown and described. But PyQt has hundreds of classes, so we have not beenable to cover, or even mention, all of them. For example, PyQt includes morewidgets than we have used, including QCalendarWidget, QGroupBox, QProgressBar,and QToolBox.There are also lots of useful nonwidget classes, such as QCompleter(text completion), QFileSystemWatcher (to observe changes to files or directoriesin the filesystem),and QSystemTrayIcon (to put an icon with a popup menu in thesystem tray). It also has support for accessibility and an undo/redo framework.In addition, PyQt has some platform-specific features, including ActiveX sup-port on Windows, session management on the X Window System, and sheetsand drawers on Mac OS X. All of these are described in the extensive onlinedocumentation. PyQt is also provided with its own set of examples—those thatcover areas similar to the ones you are interested in will be well worth look-ing at.
This book has laid a solid foundation in GUI programming with Python andPyQt. The principles and practices it shows should make it straightforward tolearn new PyQt classes from the documentation and examples supplied withPyQt, and to be able to successfully create your own classes. Programmingwith PyQt is both productive and enjoyable, and it leaves us free to ignoreirrelevant details. This means that we can concentrate on building greatapplications that look good and that work well.

This page intentionally left blank

Installing
AA ● Installing on Windows
● Installing on Mac OS X
● Installing on Linux and Unix
All the tools described in this book are freely available for downloadingonline. Note, however, that some of the packages are quite large (~50MB forQt, ~12MB for Python, ~6MB for PyQt, and ~0.5MB for SIP★), so they are onlyreally suitable for downloading with broadband connections. In this appendixwe cover both downloading and installing, on Windows, Mac OS X, and mostX11-based forms of Unix and Unix clones, including Linux and BSD.
All of the packages come with their own installation instructions, which willprobably be more up-to-date and comprehensive than those given here, so ide-ally they are the instructions that you should follow. However, in many cas-es, this appendix contains sufficient information to get the tools installed andworking. One approach would be to use this appendix to identify the packagesthat need to be obtained (and the order in which they should be downloaded,which matters for Windows users), as well as the order they should be installed(which matters for all platforms). Then, once the tools are downloaded, use theofficial instructions to install each one, and skim this appendix’s instructions tohelp clarify what needs to be done, as well as to learn a couple of tips, one forWindows users and one for Mac OS X users, that may prove helpful.
Installing on Windows
For Windows, there are four tools to install: a C++ compiler, the Qt C++ appli-cation development framework, the Python interpreter and its accompanyinglibraries, and PyQt4 (which includes SIP in the Windows binary package). Weassume that the GPL editions are being used, in which case the only C++ com-piler that will work with Qt is MinGW. (Visual C++ can be used only with thecommercial editions of Qt and PyQt and the instructions for installing themare provided when you buy them.)
★SIP is a tool used to create “bindings” that allow C++ classes to be accessible from Python.
561
562 Appendix A. Installing
At the time of this writing, an all-in-one package was under development. Thispackage is an executable setup file that is expected to contain all the PyQt mod-ules (except the QtDesigner module),QScintilla, the translation and Qt Designersupport tools, the documentation and examples, the SQLite database, and sup-port for .png, .svg, .gif, and .jpeg image formats. This package is complete andself-contained and requires no other software to be installed apart from Pythonitself. However,the package is not extensible. If you are learning or evaluatingPyQt for the first time, using this package is probably the easiest way to begin.You can always uninstall it and install the precise set of components you needlater on when you have gained experience. When the package is available itwill be on the Web site http://riverbankcomputing.com. After intalling Python,simply download and execute the all-in-one package to install everything else.
In the instructions that follow, we are using Windows XP Home edition andare installing each component separately. There may be differences for otherWindows versions,but they should not be so different that they can’t be workedout from what’s written here.
The files required for installation are MinGW-3.4.2.exe, qt-win-opensource-
4.2.3-mingw.exe, python-2.5.1.msi, and PyQt-gpl-4.2-Py2.5-Qt4.2.3.exe. Thebook’s examples are in the file pyqtbook.zip.
The first item to get is PyQt itself. This is because the versions of Python andQt you will need depend on the version of PyQt you get. Go to http://www.
riverbankcomputing.co.uk/pyqt/download.php and download the binary packagePyQt-gpl-4.2-Py2.5-Qt4.2.3.exe. The filename has version numbers embeddedin it and these may differ from the ones shown here: The first number is thePyQt version which must be at least 4.2 to get the most out of this book; thesecond number is the Python version that you must get; and the third numberis the Qt version—you must download this precise version.
Now get Qt. Go to http://www.trolltech.com/developer/downloads/qt/index andclick the Qt/Windows Open Source Edition link; at the bottom of the page,download qt-win-opensource-4.2.3-mingw.exe. The version number should ex-actly match the one in the PyQt package name, so if, for example, you down-loaded PyQt-gpl-4.3-Py2.5-Qt4.3.1.exe, you will need to get qt-win-opensource-4.3.1-mingw.exe.
The MinGW C++ compiler is also available from Trolltech’s Web site, but froma completely different URL.Go to ftp://ftp.trolltech.com/misc/ and downloadMingGW-3.4.2.exe. (You can skip this step and let the Qt installer download thecompiler for you, but by downloading it yourself you have the package in hand,which is more convenient for installing on other machines, or for restoring ifyour Windows installation goes bad.)
Now it is time to get Python. Go to http://www.python.org/download and down-load one of the Windows installers. (The ones at the top of the page do notinclude the source code; this is fine, as you need the source only if you want tomodify Python itself.) There may be more than one Windows installer; click a
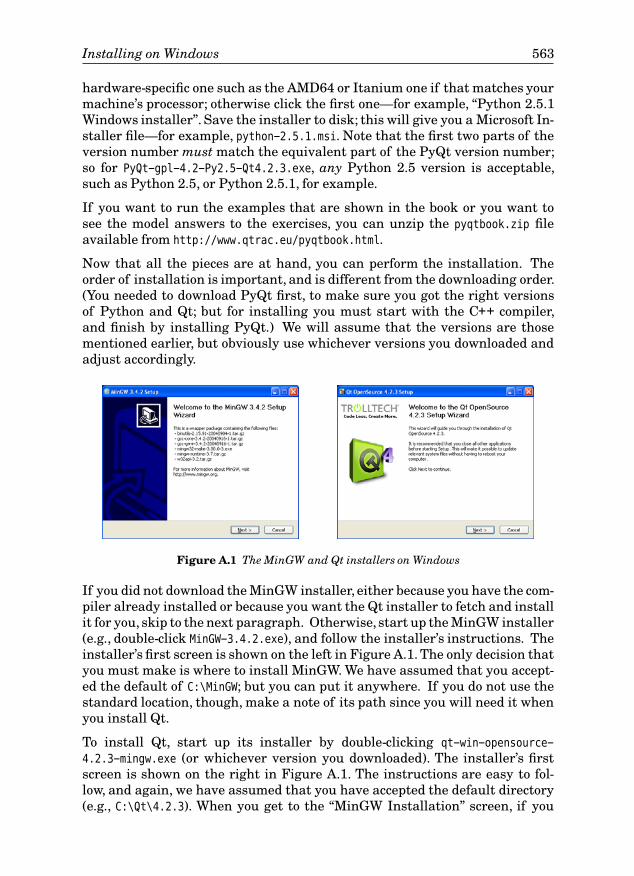
Installing on Windows 563
hardware-specific one such as the AMD64 or Itanium one if that matches yourmachine’s processor; otherwise click the first one—for example, “Python 2.5.1Windows installer”. Save the installer to disk; this will give you a Microsoft In-staller file—for example, python-2.5.1.msi. Note that the first two parts of theversion number must match the equivalent part of the PyQt version number;so for PyQt-gpl-4.2-Py2.5-Qt4.2.3.exe, any Python 2.5 version is acceptable,such as Python 2.5, or Python 2.5.1, for example.
If you want to run the examples that are shown in the book or you want tosee the model answers to the exercises, you can unzip the pyqtbook.zip fileavailable from http://www.qtrac.eu/pyqtbook.html.
Now that all the pieces are at hand, you can perform the installation. Theorder of installation is important, and is different from the downloading order.(You needed to download PyQt first, to make sure you got the right versionsof Python and Qt; but for installing you must start with the C++ compiler,and finish by installing PyQt.) We will assume that the versions are thosementioned earlier, but obviously use whichever versions you downloaded andadjust accordingly.
Figure A.1 The MinGW and Qt installers on Windows
If you did not download the MinGW installer, either because you have the com-piler already installed or because you want the Qt installer to fetch and installit for you, skip to the next paragraph. Otherwise, start up the MinGW installer(e.g., double-click MinGW-3.4.2.exe), and follow the installer’s instructions. Theinstaller’s first screen is shown on the left in Figure A.1. The only decision thatyou must make is where to install MinGW. We have assumed that you accept-ed the default of C:\MinGW; but you can put it anywhere. If you do not use thestandard location, though, make a note of its path since you will need it whenyou install Qt.
To install Qt, start up its installer by double-clicking qt-win-opensource-
4.2.3-mingw.exe (or whichever version you downloaded). The installer’s firstscreen is shown on the right in Figure A.1. The instructions are easy to fol-low, and again, we have assumed that you have accepted the default directory(e.g., C:\Qt\4.2.3). When you get to the “MinGW Installation” screen, if you
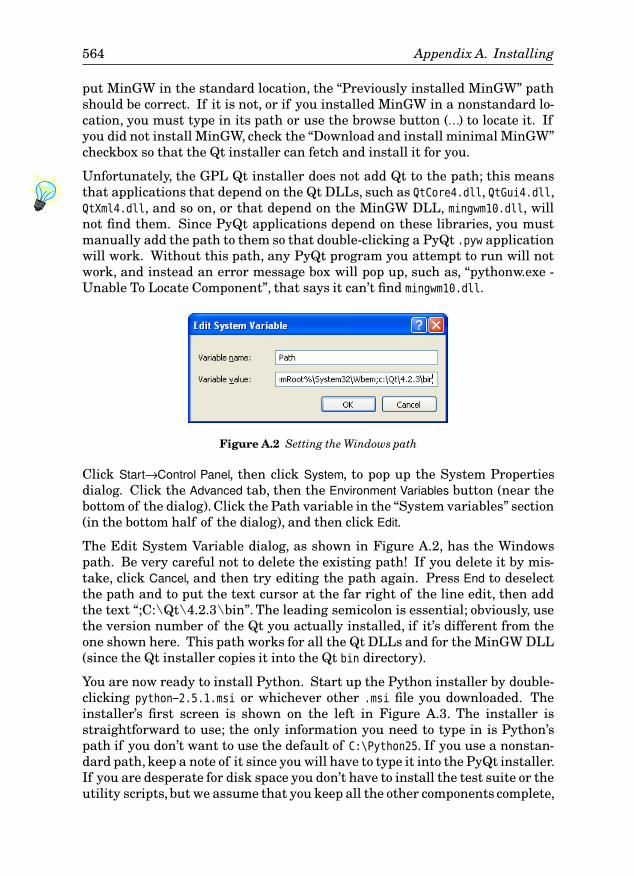
564 Appendix A. Installing
put MinGW in the standard location, the “Previously installed MinGW” pathshould be correct. If it is not, or if you installed MinGW in a nonstandard lo-cation, you must type in its path or use the browse button (…) to locate it. Ifyou did not install MinGW, check the “Download and install minimal MinGW”checkbox so that the Qt installer can fetch and install it for you.
Unfortunately, the GPL Qt installer does not add Qt to the path; this meansthat applications that depend on the Qt DLLs, such as QtCore4.dll, QtGui4.dll,QtXml4.dll, and so on, or that depend on the MinGW DLL, mingwm10.dll, willnot find them. Since PyQt applications depend on these libraries, you mustmanually add the path to them so that double-clicking a PyQt .pyw applicationwill work. Without this path, any PyQt program you attempt to run will notwork, and instead an error message box will pop up, such as, “pythonw.exe -Unable To Locate Component”, that says it can’t find mingwm10.dll.
Figure A.2 Setting the Windows path
Click Start→Control Panel, then click System, to pop up the System Propertiesdialog. Click the Advanced tab, then the Environment Variables button (near thebottom of the dialog). Click the Path variable in the “System variables” section(in the bottom half of the dialog), and then click Edit.
The Edit System Variable dialog, as shown in Figure A.2, has the Windowspath. Be very careful not to delete the existing path! If you delete it by mis-take, click Cancel, and then try editing the path again. Press End to deselectthe path and to put the text cursor at the far right of the line edit, then addthe text “;C:\Qt\4.2.3\bin”. The leading semicolon is essential; obviously, usethe version number of the Qt you actually installed, if it’s different from theone shown here. This path works for all the Qt DLLs and for the MinGW DLL(since the Qt installer copies it into the Qt bin directory).
You are now ready to install Python. Start up the Python installer by double-clicking python-2.5.1.msi or whichever other .msi file you downloaded. Theinstaller’s first screen is shown on the left in Figure A.3. The installer isstraightforward to use; the only information you need to type in is Python’spath if you don’t want to use the default of C:\Python25. If you use a nonstan-dard path, keep a note of it since you will have to type it into the PyQt installer.If you are desperate for disk space you don’t have to install the test suite or theutility scripts,but we assume that you keep all the other components complete,
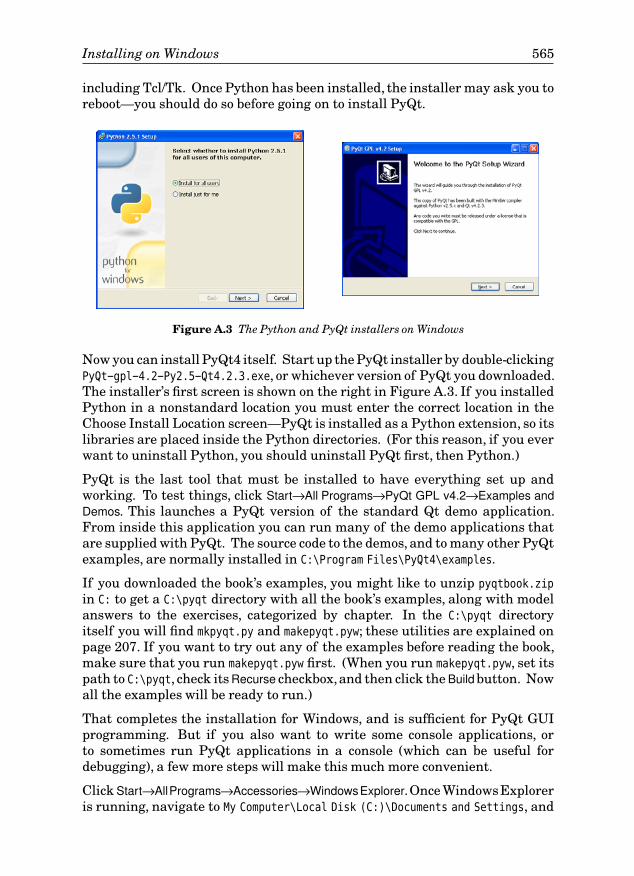
Installing on Windows 565
including Tcl/Tk. Once Python has been installed, the installer may ask you toreboot—you should do so before going on to install PyQt.
Figure A.3 The Python and PyQt installers on Windows
Now you can install PyQt4 itself. Start up the PyQt installer by double-clickingPyQt-gpl-4.2-Py2.5-Qt4.2.3.exe, or whichever version of PyQt you downloaded.The installer’s first screen is shown on the right in Figure A.3. If you installedPython in a nonstandard location you must enter the correct location in theChoose Install Location screen—PyQt is installed as a Python extension, so itslibraries are placed inside the Python directories. (For this reason, if you everwant to uninstall Python, you should uninstall PyQt first, then Python.)
PyQt is the last tool that must be installed to have everything set up andworking. To test things, click Start→All Programs→PyQt GPL v4.2→Examples andDemos. This launches a PyQt version of the standard Qt demo application.From inside this application you can run many of the demo applications thatare supplied with PyQt. The source code to the demos, and to many other PyQtexamples, are normally installed in C:\Program Files\PyQt4\examples.
If you downloaded the book’s examples, you might like to unzip pyqtbook.zip
in C: to get a C:\pyqt directory with all the book’s examples, along with modelanswers to the exercises, categorized by chapter. In the C:\pyqt directoryitself you will find mkpyqt.py and makepyqt.pyw; these utilities are explained onpage 207. If you want to try out any of the examples before reading the book,make sure that you run makepyqt.pyw first. (When you run makepyqt.pyw, set itspath to C:\pyqt, check itsRecurse checkbox,and then click theBuildbutton. Nowall the examples will be ready to run.)
That completes the installation for Windows, and is sufficient for PyQt GUIprogramming. But if you also want to write some console applications, orto sometimes run PyQt applications in a console (which can be useful fordebugging), a few more steps will make this much more convenient.
Click Start→AllPrograms→Accessories→WindowsExplorer.Once WindowsExploreris running, navigate to My Computer\Local Disk (C:)\Documents and Settings, and
566 Appendix A. Installing
then to the directory that has your username,and inside that, navigate to Start
Menu\Programs\Accessories. Copy and paste the Console (or MS-DOS Prompt)shortcut, and rename the copy “Console (PyQt)”. Right-click the new Console(PyQt) shortcut to edit its properties. On the General page, change the Targetto cmd.exe /k C:\pyqt\pyqt.bat. Now when you want a PyQt-friendly console youcan click Start→All Programs→Accessories→Console (PyQt) and the console thatappears will automatically run C:\pyqt\pyqt.bat. This batch file contains onlytwo lines:
set QMAKESPEC=win32-g++
path=C:\pyqt;C:\MinGW\bin;c:\Python25;c:\Python25\lib\idlelib;%path%
You might like to edit this file (using a plain text editor) to add a third line con-taining a cd command—for example, cd C:\pyqt—so that the console starts upin a convenient directory. If you installed MinGW or Python in nonstandardlocations you will need to edit this file anyway, to put in their correct paths.
You are now ready to write and run PyQt applications on your Windowsmachine—and they will run unchanged on Mac OS X and Linux too!
Installing on Mac OS X
To install PyQt on Mac OS X, you must already have the Xcode tools installed.This is because a compiler and build tool are required to install PyQt. Xcode isa very large package, normally supplied on a separate developer’s CD provid-ed with the machine; it is also available online from http://developer.apple.
com/tools/xcode. The following instructions assume that Xcode is alreadyinstalled.
Although Macs are normally supplied with a version of Python preinstalled,it may be an old version, in which case we recommend installing an up-to-dateversion for PyQt development. To check the Python version, start up a Terminal,and type in python -V; if this prints “Python 2.5”, or a higher version number,there is no need to install a new version of Python.
The files required for installing PyQt are qt-mac-opensource-4.2.3.dmg, python-2.5.1-macosx.dmg (unless you already have Python 2.5 or later installed), sip-4.6.tar.gz, and, PyQt-mac-gpl-4.2.tar.gz. The book’s examples are in the filepyqtbook.tar.gz.
Start by getting Qt. Go to http://www.trolltech.com/developer/downloads/qt/
index and click the Qt/Mac Open Source Edition link, and near the bottom ofthe page, download qt-mac-opensource-4.2.3.dmg. A later version number, say,4.3.1, should also be fine.
If you need to install an up-to-date version of Python, go to http://www.python.
org/download and download the Python 2.5.1 for Macintosh OS X version—forexample, python-2.5.1-macosx.dmg. A later 2.x series version, such as 2.5.2 or
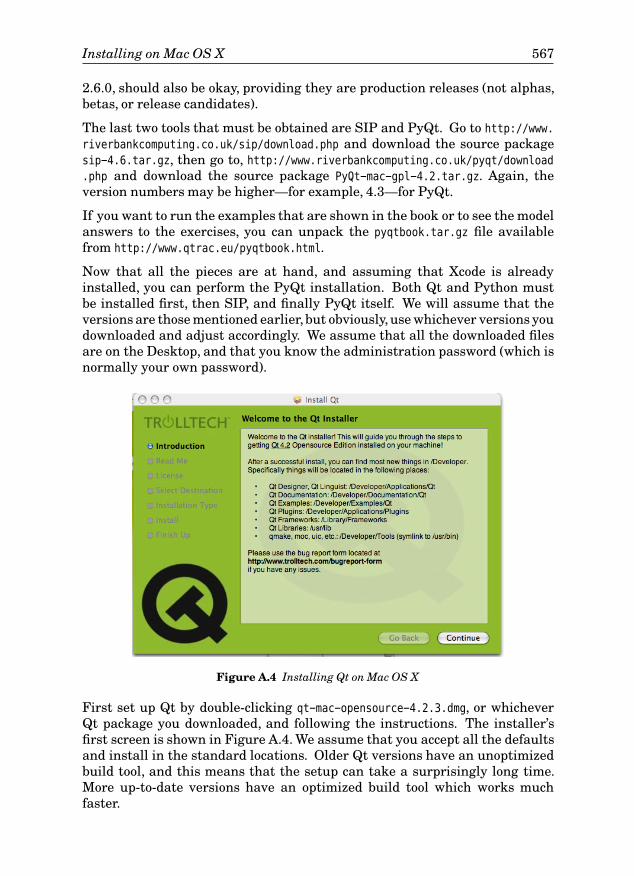
Installing on Mac OS X 567
2.6.0, should also be okay, providing they are production releases (not alphas,betas, or release candidates).
The last two tools that must be obtained are SIP and PyQt. Go to http://www.
riverbankcomputing.co.uk/sip/download.php and download the source packagesip-4.6.tar.gz, then go to, http://www.riverbankcomputing.co.uk/pyqt/download.php and download the source package PyQt-mac-gpl-4.2.tar.gz. Again, theversion numbers may be higher—for example, 4.3—for PyQt.
If you want to run the examples that are shown in the book or to see the modelanswers to the exercises, you can unpack the pyqtbook.tar.gz file availablefrom http://www.qtrac.eu/pyqtbook.html.
Now that all the pieces are at hand, and assuming that Xcode is alreadyinstalled, you can perform the PyQt installation. Both Qt and Python mustbe installed first, then SIP, and finally PyQt itself. We will assume that theversions are those mentioned earlier, but obviously, use whichever versions youdownloaded and adjust accordingly. We assume that all the downloaded filesare on the Desktop, and that you know the administration password (which isnormally your own password).
Figure A.4 Installing Qt on Mac OS X
First set up Qt by double-clicking qt-mac-opensource-4.2.3.dmg, or whicheverQt package you downloaded, and following the instructions. The installer’sfirst screen is shown in Figure A.4. We assume that you accept all the defaultsand install in the standard locations. Older Qt versions have an unoptimizedbuild tool, and this means that the setup can take a surprisingly long time.More up-to-date versions have an optimized build tool which works muchfaster.
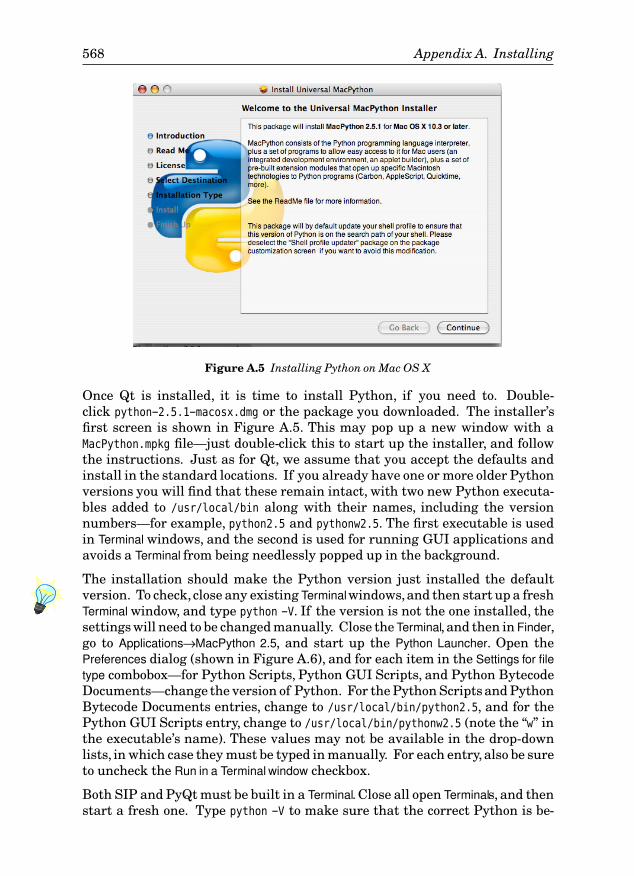
568 Appendix A. Installing
Figure A.5 Installing Python on Mac OS X
Once Qt is installed, it is time to install Python, if you need to. Double-click python-2.5.1-macosx.dmg or the package you downloaded. The installer’sfirst screen is shown in Figure A.5. This may pop up a new window with aMacPython.mpkg file—just double-click this to start up the installer, and followthe instructions. Just as for Qt, we assume that you accept the defaults andinstall in the standard locations. If you already have one or more older Pythonversions you will find that these remain intact, with two new Python executa-bles added to /usr/local/bin along with their names, including the versionnumbers—for example, python2.5 and pythonw2.5. The first executable is usedin Terminalwindows, and the second is used for running GUI applications andavoids a Terminal from being needlessly popped up in the background.
The installation should make the Python version just installed the defaultversion. To check,close any existing Terminalwindows,and then start up a freshTerminalwindow, and type python -V. If the version is not the one installed, thesettings will need to be changed manually. Close theTerminal, and then in Finder,go to Applications→MacPython 2.5, and start up the Python Launcher. Open thePreferences dialog (shown in Figure A.6), and for each item in the Settings for filetype combobox—for Python Scripts, Python GUI Scripts, and Python BytecodeDocuments—change the version of Python. For the Python Scripts and PythonBytecode Documents entries, change to /usr/local/bin/python2.5, and for thePython GUI Scripts entry, change to /usr/local/bin/pythonw2.5 (note the “w” inthe executable’s name). These values may not be available in the drop-downlists, in which case they must be typed in manually. For each entry, also be sureto uncheck the Run in a Terminal window checkbox.
Both SIP and PyQt must be built in a Terminal. Close all open Terminals, and thenstart a fresh one. Type python -V to make sure that the correct Python is be-
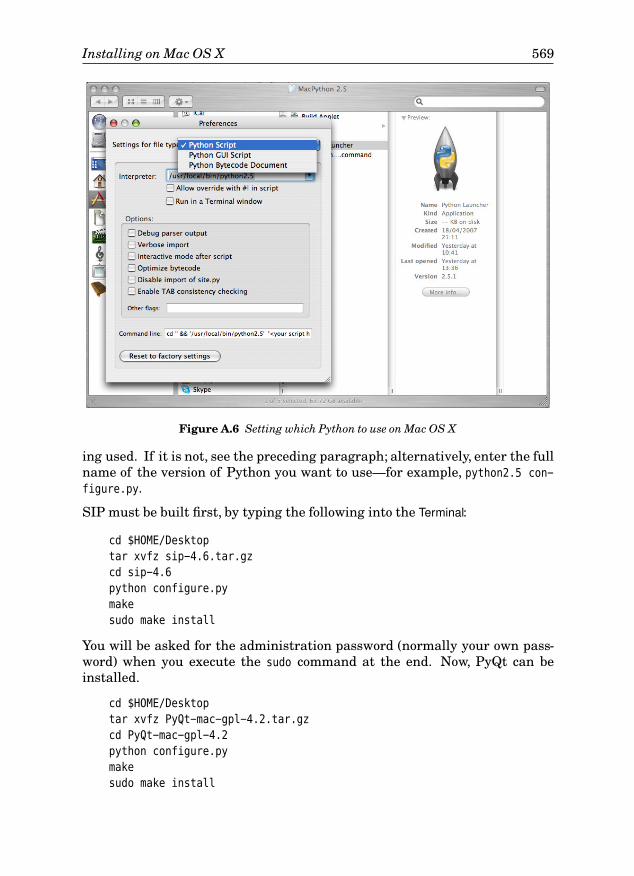
Installing on Mac OS X 569
Figure A.6 Setting which Python to use on Mac OS X
ing used. If it is not, see the preceding paragraph; alternatively, enter the fullname of the version of Python you want to use—for example, python2.5 con-
figure.py.
SIP must be built first, by typing the following into the Terminal:
cd $HOME/Desktop
tar xvfz sip-4.6.tar.gz
cd sip-4.6
python configure.py
make
sudo make install
You will be asked for the administration password (normally your own pass-word) when you execute the sudo command at the end. Now, PyQt can beinstalled.
cd $HOME/Desktop
tar xvfz PyQt-mac-gpl-4.2.tar.gz
cd PyQt-mac-gpl-4.2
python configure.py
make
sudo make install
570 Appendix A. Installing
Again, you will be prompted for a password when you execute the sudo com-mand. Building PyQt can take quite a long time, so you will need to bepatient.
The Qt documentation is available through Qt Assistant, which can berun from Finder. PyQt’s documentation is supplied in HTML format in the$HOME/Desktop/PyQt-mac-gpl-4.2/doc directory. It is worthwhile moving thissomewhere permanent and adding a suitable bookmark to your browser. Italso comes with numerous examples; at the very least it is worth looking at thePyQt examples and running the demo. (For example, change the directory to$HOME/Desktop/PyQt-mac-gpl-4.2/examples/tools/qtdemo and run ./qtdemo.py.)
If you downloaded the book’s examples, you might like to unpack pyqtbook.
tar.gz in $HOME to get a $HOME/pyqt directory with all the book’s examples, andmodel answers to the exercises, categorized by chapter. In the $HOME/pyqt direc-tory itself you will find mkpyqt.py and makepyqt.pyw; you might like to move (orsoft-link) these to a directory on your $PATH—for example, $HOME/bin—to makethem more convenient to use. Some of the examples depend on Qt Designer.ui files or on .qrc resource files. How to turn these into Python modules iscovered on page 207, but for now it might be convenient to simply perform theconversions:
cd $HOME/pyqt
./mkpyqt.py -r
This will convert any .ui and .qrc files that are found in the pyqt directory andin its subdirectories.★ If you prefer to use the GUI makepyqt.pyw tool, you mayhave to click its More→Tool paths option and set the path to pyuic4. It may alsobe necessary to set the paths to the other tools too.
This completes the installation for Mac OS X. If you unpacked the examples,you could go to the Desktop and click the pyqt directory, then the chap12 direc-tory, and then click multipedes.pyw to see a graphics application. If an unwant-ed Terminalwindow pops up, right-click multipedes.pyw, and click the Info dialog;change the Open with setting to the Python Launcher for the correct version ofPython, and apply the change to all files with the .pyw suffix.
You are now ready to write and run PyQt applications on your Mac OS Xmachine—and they will run unchanged on Windows and Linux too!
Installing on Linux and Unix
If you are running Kubuntu (7.04 Fiesty Fawn and later), you already havePyQt4 installed! So,you only need to install the book’s examples (see page 573),and the documentation packages python-doc and python-qt4-doc.
★If mkpyqt.py does not work, you will have to edit the mkpyqt.py file and at least hard-code the pathto pyuic4.
Installing on Linux and Unix 571
For Linux and most other Unixes that don’t have PyQt4 preinstalled, thereare four tools to install: the Qt C++ application development framework, thePython interpreter and its accompanying libraries, the SIP bindings tool, andPyQt4 itself. The most convenient way to get everything up and running is toinstall the tools using standard packages for the Linux or Unix distributionbeing used.
For ArchLinux, Debian, Fedora, Gentoo, Kubuntu, Pardus, Ubuntu, and manyothers, the necessary components are available as packages. These can be in-stalled using Adept, Pirut, apt-get, yum, or whatever other package managerthe system uses. For PyQt4, the package is usually called pyqt4 or PyQt4 orpyqt4-dev-tools. PyQt4’s documentation package is usually called pyqt4-doc orpython-qt4-doc or PyQt4-examples. Python’s documentation is usually in a pack-age called python-doc or python-docs. IDLE is often available separately in apackage called idle or python-tools. If you want a more powerful IDE, Eric4,itself written in PyQt, is available in a package for many popular distributions.The package manager should be able to figure out the dependencies, but if itcannot, you may have to also request that it install Python itself, and maybeeven Qt and the g++ compiler. The Qt Designer visual design tool and the trans-lation support tools are often packaged separately—for example, in packagescalled qt4-designer and qt4-dev-tools.
If you are fortunate enough to be able to install using standard packages, onceyou have done so, you are all set for writing PyQt programs, and can skip toinstalling the book’s examples, described on page 573.
For users of older distributions, for those who don’t have suitable packagesavailable or who have only some of the components available in packages, andfor those who want to build manually to get the most up-to-date versions,build-ing and installing by hand is quite straightforward. However, we make two as-sumptions if you are building from source—First, that a C++ compiler and toolchain, such as make, are already installed and operational, and second, that youinstall as root (using su or sudo), or know how to use configure’s --prefix optionto install locally.
The files required for installation are qt-x11-opensource-src-4.2.3.tar.gz,Python-2.5.1.tgz, sip-4.6.tar.gz, and PyQt-x11-gpl-4.2.tar.gz. The book’sexamples are in the file pyqtbook.tar.gz.
Start by getting Qt. Go to http://www.trolltech.com/developer/downloads/qt/
index and click the Qt/X11 Open Source Edition link, and near the bottomof the page, download qt-x11-opensource-src-4.2.3.tar.gz. A later versionnumber, say, 4.3.1, should also be fine.
Now it is time to get Python. Go to http://www.python.org/download and thenclick the current production version link, and download one of the other plat-forms source versions—for example, Python-2.5.1.tgz or Python-2.5.1.tar.bz2.We will assume you got the .tgz version—later 2.x series versions such as 2.5.2
572 Appendix A. Installing
or 2.6.0 should be okay, providing they are production releases (not alphas, be-tas, or release candidates).
The last two tools that must be obtained are SIP and PyQt. Go to http://www.
riverbankcomputing.co.uk/sip/download.php and download the source packagesip-4.6.tar.gz, then go to, http://www.riverbankcomputing.co.uk/pyqt/download.php and download the source package PyQt-x11-gpl-4.2.tar.gz. Again, theversion numbers may be higher—for example, 4.3—for PyQt.
If you want to run the examples that are shown in the book or to see the modelanswers to the exercises, you can unpack the pyqtbook.tar.gz file availablefrom http://www.qtrac.eu/pyqtbook.html.
Now that all the pieces are at hand, you can perform the installation. BothQt and Python must be installed first, then SIP, and finally PyQt itself. Wewill assume that the versions are those mentioned earlier, but obviously, usewhichever versions you downloaded and adjust accordingly. We assume thatthe downloaded tarballs are in the $HOME/packages directory,and that either youdo everything as superuser having done su, or that you do every make install
as superuser using sudo.
First you need to build Qt. The last line should be sudo make install if you areusing sudo.
cd $HOME/packages
tar xvfz qt-x11-opensource-src-4.2.3.tar.gz
cd qt-x11-opensource-src-4.2.3
./configure -fast -qt-sql-sqlite -no-qt3support
make
make install
The -qt-sql-sqlite option will build the SQLite in-process database; this isused in Chapter 15 but can be omitted if desired. The -fast and -no-qt3support
options should reduce the build time slightly, but both can be safely omitted.If you want to see what other options are available, including the databasedrivers that can be installed, run ./configure -help. Building Qt can takequite a while (from half an hour to more than three hours depending on theprocessor), since it is more than 600000 lines of C++ code.
Python and SIP don’t take anywhere near as long. You should build Pythonnext, again using sudo make install if you are using sudo (We’ll take this forgranted from now on.).
cd $HOME/packages
tar xvfz Python-2.5.1.tgz
cd Python-2.5.1
./configure
make
make install
Installing on Linux and Unix 573
This should be a lot faster than the Qt build. Once it is complete, you canperform the last two phases, building SIP and then PyQt, doing so in a slightlydifferent way than you built Qt and Python.
cd $HOME/packages
tar xvfz sip-4.6.tar.gz
cd sip-4.6
python configure.py
make
make install
This assumes that (the correct version of) Python is in your $PATH. If thatis not the case (i.e., because you have two or more versions of Python in-stalled), give the full path to the appropriate Python executable—for example,$HOME/opt/python25/bin/python configure.py. Once SIP is installed, you can in-stall PyQt.
cd $HOME/packages
tar xvfz PyQt-x11-gpl-4.2.tar.gz
cd PyQt-x11-gpl-4.2
python configure.py
make
make install
Just like the SIP installation, this assumes that the correct version of Python isin your $PATH. Again, if this is not the case, give the full path to the appropriatePython executable when running configure.py. The make phase can take a longtime (but not as long as building Qt).
Qt, Python, and PyQt are supplied with documentation in HTML format. Itis worthwhile moving this somewhere permanent and adding suitable book-marks to your browser. All three also come with numerous examples; at thevery least it is worth looking at the PyQt examples and running the demo. (Forexample, change the directory to $HOME/PyQt-x11-gpl-4.2/examples/tools/qtdemo
and run ./qtdemo.py.)
If you downloaded the book’s examples, you might like to unpack pyqtbook.
tar.gz in $HOME to get a $HOME/pyqt directory with all the book’s examples, andmodel answers to the exercises, categorized by chapter. In the $HOME/pyqt
directory itself, you will find mkpyqt.py and makepyqt.pyw; you might like to move(or soft-link) these to a directory on your $PATH—for example, $HOME/bin to makethem more convenient to use. Some of the examples depend on Qt Designer.ui files or on .qrc resource files. How to turn these into Python modules iscovered on page 207, but for now it might be convenient to simply perform theconversions:★
★If mkpyqt.py does not work, you will have to edit the mkpyqt.py file and at least hard-code the pathto pyuic4.
574 Appendix A. Installing
cd $HOME/pyqt
./mkpyqt.py -r
This completes the installation for X11-based forms of Unix and Unix clones,including Linux and BSD. You are now ready to write and run PyQt applica-tions on your Unix or Unix-like platform—and they will run unchanged onMac OS X and Windows too!
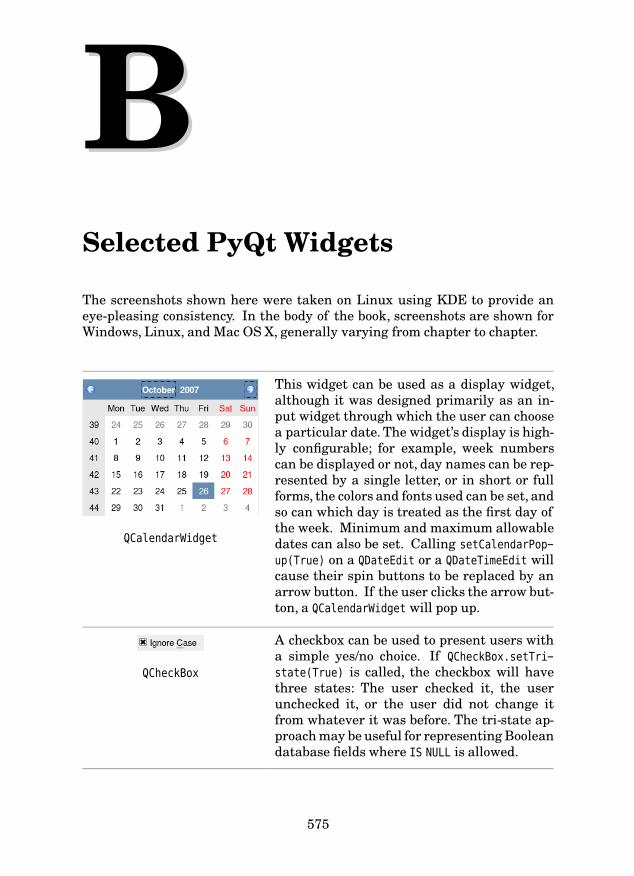
Selected PyQt Widgets
BBThe screenshots shown here were taken on Linux using KDE to provide aneye-pleasing consistency. In the body of the book, screenshots are shown forWindows, Linux, and Mac OS X, generally varying from chapter to chapter.
QCalendarWidget
This widget can be used as a display widget,although it was designed primarily as an in-put widget through which the user can choosea particular date. The widget’s display is high-ly configurable; for example, week numberscan be displayed or not, day names can be rep-resented by a single letter, or in short or fullforms, the colors and fonts used can be set, andso can which day is treated as the first day ofthe week. Minimum and maximum allowabledates can also be set. Calling setCalendarPop-
up(True) on a QDateEdit or a QDateTimeEdit willcause their spin buttons to be replaced by anarrow button. If the user clicks the arrow but-ton, a QCalendarWidget will pop up.
QCheckBox
A checkbox can be used to present users witha simple yes/no choice. If QCheckBox.setTri-
state(True) is called, the checkbox will havethree states: The user checked it, the userunchecked it, or the user did not change itfrom whatever it was before. The tri-state ap-proach may be useful for representing Booleandatabase fields where IS NULL is allowed.
575
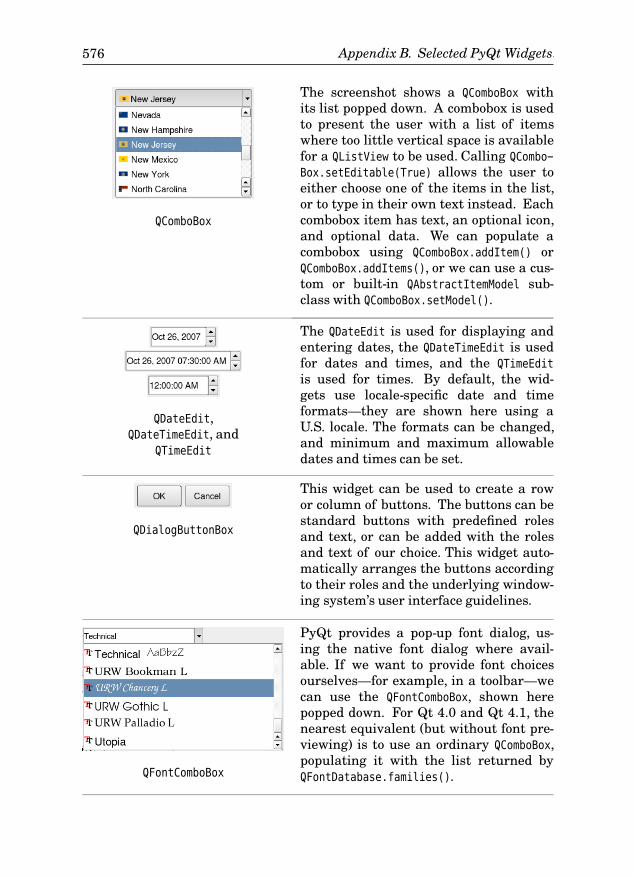
576 Introduction
QComboBox
The screenshot shows a QComboBox withits list popped down. A combobox is usedto present the user with a list of itemswhere too little vertical space is availablefor a QListView to be used. Calling QCombo-
Box.setEditable(True) allows the user toeither choose one of the items in the list,or to type in their own text instead. Eachcombobox item has text, an optional icon,and optional data. We can populate acombobox using QComboBox.addItem() orQComboBox.addItems(), or we can use a cus-tom or built-in QAbstractItemModel sub-class with QComboBox.setModel().
QDateEdit,QDateTimeEdit, and
QTimeEdit
The QDateEdit is used for displaying andentering dates, the QDateTimeEdit is usedfor dates and times, and the QTimeEdit
is used for times. By default, the wid-gets use locale-specific date and timeformats—they are shown here using aU.S. locale. The formats can be changed,and minimum and maximum allowabledates and times can be set.
Appendix B. Selected PyQt Widgets
QDialogButtonBox
This widget can be used to create a rowor column of buttons. The buttons can bestandard buttons with predefined rolesand text, or can be added with the rolesand text of our choice. This widget auto-matically arranges the buttons accordingto their roles and the underlying window-ing system’s user interface guidelines.
QFontComboBox
PyQt provides a pop-up font dialog, us-ing the native font dialog where avail-able. If we want to provide font choicesourselves—for example, in a toolbar—wecan use the QFontComboBox, shown herepopped down. For Qt 4.0 and Qt 4.1, thenearest equivalent (but without font pre-viewing) is to use an ordinary QComboBox,populating it with the list returned byQFontDatabase.families().
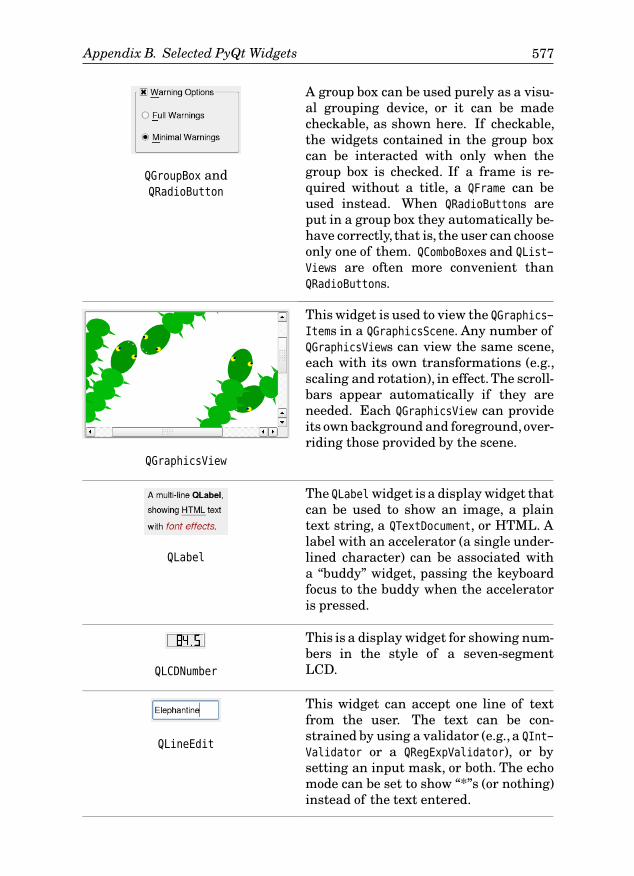
Introduction 577
QGroupBox andQRadioButton
A group box can be used purely as a visu-al grouping device, or it can be madecheckable, as shown here. If checkable,the widgets contained in the group boxcan be interacted with only when thegroup box is checked. If a frame is re-quired without a title, a QFrame can beused instead. When QRadioButtons areput in a group box they automatically be-have correctly, that is, the user can chooseonly one of them. QComboBoxes and QList-
Views are often more convenient thanQRadioButtons.
QGraphicsView
This widget is used to view the QGraphics-
Items in a QGraphicsScene. Any number ofQGraphicsViews can view the same scene,each with its own transformations (e.g.,scaling and rotation), in effect.The scroll-bars appear automatically if they areneeded. Each QGraphicsView can provideits own background and foreground,over-riding those provided by the scene.
Appendix B. Selected PyQt Widgets
QLabel
The QLabel widget is a display widget thatcan be used to show an image, a plaintext string, a QTextDocument, or HTML. Alabel with an accelerator (a single under-lined character) can be associated witha “buddy” widget, passing the keyboardfocus to the buddy when the acceleratoris pressed.
QLCDNumber
This is a display widget for showing num-bers in the style of a seven-segmentLCD.
QLineEdit
This widget can accept one line of textfrom the user. The text can be con-strained by using a validator (e.g., a QInt-
Validator or a QRegExpValidator), or bysetting an input mask, or both. The echomode can be set to show “*”s (or nothing)instead of the text entered.
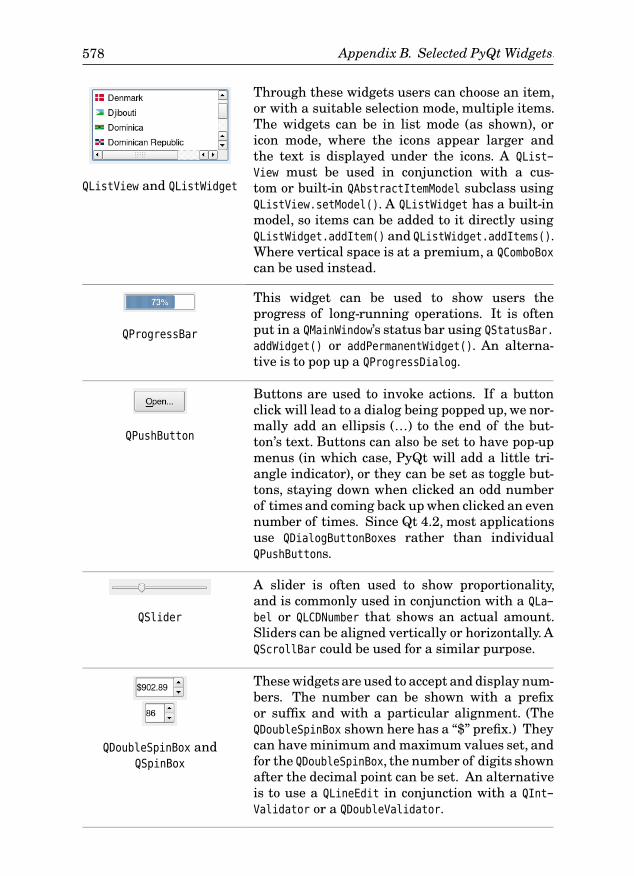
578 Introduction
QListView and QListWidget
Through these widgets users can choose an item,or with a suitable selection mode, multiple items.The widgets can be in list mode (as shown), oricon mode, where the icons appear larger andthe text is displayed under the icons. A QList-
View must be used in conjunction with a cus-tom or built-in QAbstractItemModel subclass usingQListView.setModel(). A QListWidget has a built-inmodel, so items can be added to it directly usingQListWidget.addItem() and QListWidget.addItems().Where vertical space is at a premium, a QComboBox
can be used instead.
QProgressBar
This widget can be used to show users theprogress of long-running operations. It is oftenput in a QMainWindow’s status bar using QStatusBar.
addWidget() or addPermanentWidget(). An alterna-tive is to pop up a QProgressDialog.
Appendix B. Selected PyQt Widgets
QPushButton
Buttons are used to invoke actions. If a buttonclick will lead to a dialog being popped up, we nor-mally add an ellipsis (…) to the end of the but-ton’s text. Buttons can also be set to have pop-upmenus (in which case, PyQt will add a little tri-angle indicator), or they can be set as toggle but-tons, staying down when clicked an odd numberof times and coming back up when clicked an evennumber of times. Since Qt 4.2, most applicationsuse QDialogButtonBoxes rather than individualQPushButtons.
QSlider
A slider is often used to show proportionality,and is commonly used in conjunction with a QLa-
bel or QLCDNumber that shows an actual amount.Sliders can be aligned vertically or horizontally. AQScrollBar could be used for a similar purpose.
QDoubleSpinBox andQSpinBox
These widgets are used to accept and display num-bers. The number can be shown with a prefixor suffix and with a particular alignment. (TheQDoubleSpinBox shown here has a “$” prefix.) Theycan have minimum and maximum values set, andfor the QDoubleSpinBox, the number of digits shownafter the decimal point can be set. An alternativeis to use a QLineEdit in conjunction with a QInt-
Validator or a QDoubleValidator.
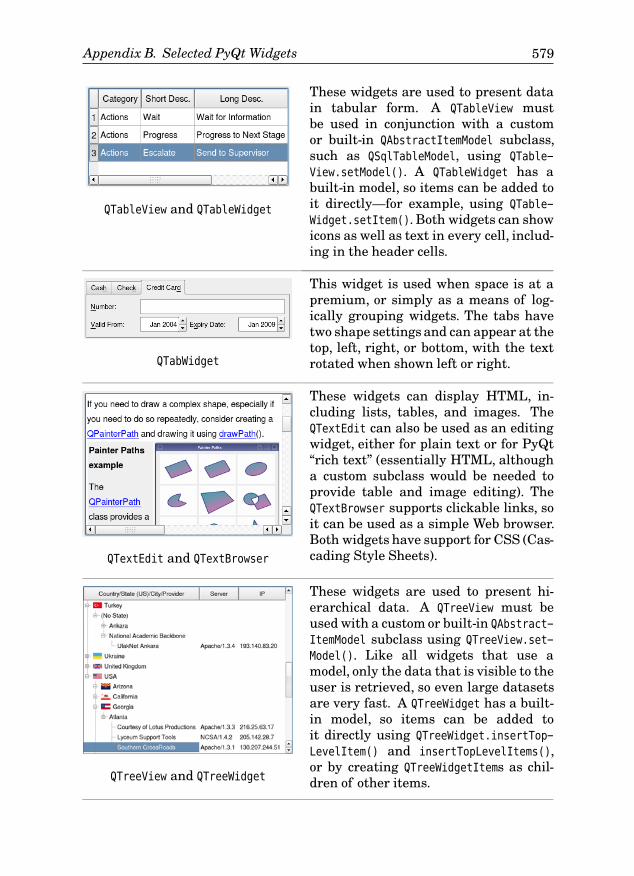
Introduction 579
QTableView and QTableWidget
These widgets are used to present datain tabular form. A QTableView mustbe used in conjunction with a customor built-in QAbstractItemModel subclass,such as QSqlTableModel, using QTable-
View.setModel(). A QTableWidget has abuilt-in model, so items can be added toit directly—for example, using QTable-
Widget.setItem(). Both widgets can showicons as well as text in every cell, includ-ing in the header cells.
QTabWidget
This widget is used when space is at apremium, or simply as a means of log-ically grouping widgets. The tabs havetwo shape settings and can appear at thetop, left, right, or bottom, with the textrotated when shown left or right.
QTextEdit and QTextBrowser
These widgets can display HTML, in-cluding lists, tables, and images. TheQTextEdit can also be used as an editingwidget, either for plain text or for PyQt“rich text” (essentially HTML, althougha custom subclass would be needed toprovide table and image editing). TheQTextBrowser supports clickable links, soit can be used as a simple Web browser.Both widgets have support for CSS (Cas-cading Style Sheets).
Appendix B. Selected PyQt Widgets
QTreeView and QTreeWidget
These widgets are used to present hi-erarchical data. A QTreeView must beused with a custom or built-in QAbstract-
ItemModel subclass using QTreeView.set-
Model(). Like all widgets that use amodel, only the data that is visible to theuser is retrieved, so even large datasetsare very fast. A QTreeWidget has a built-in model, so items can be added toit directly using QTreeWidget.insertTop-
LevelItem() and insertTopLevelItems(),or by creating QTreeWidgetItems as chil-dren of other items.

This page intentionally left blank
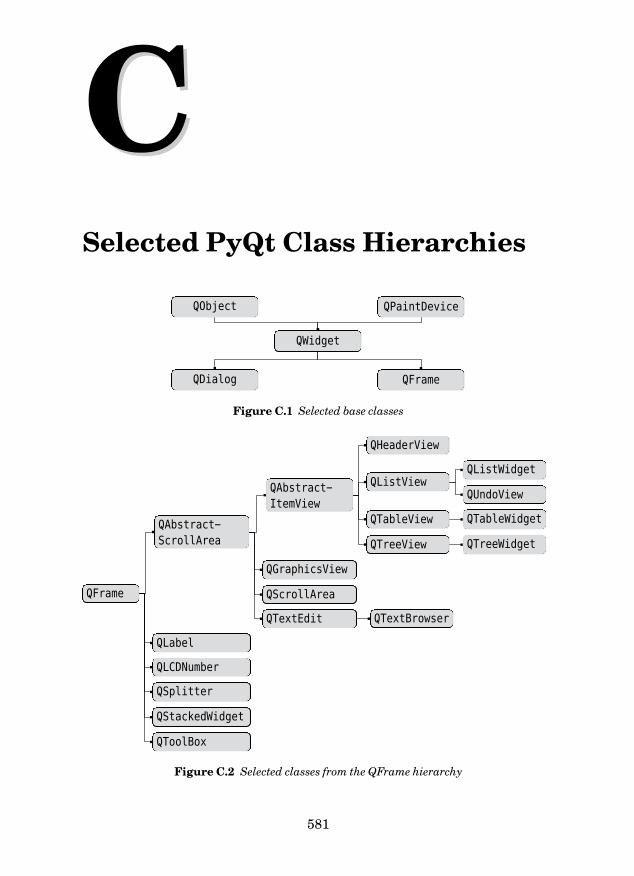
Selected PyQt Class Hierarchies
CCQObject QPaintDevice
QWidget
QDialog QFrame
Figure C.1 Selected base classes
QFrame
QAbstract-
ScrollArea
QAbstract-
ItemView
QHeaderView
QListViewQListWidget
QUndoView
QTableView QTableWidget
QTreeView QTreeWidget
QGraphicsView
QScrollArea
QTextEdit QTextBrowser
QLabel
QLCDNumber
QSplitter
QStackedWidget
QToolBox
Figure C.2 Selected classes from the QFrame hierarchy
581
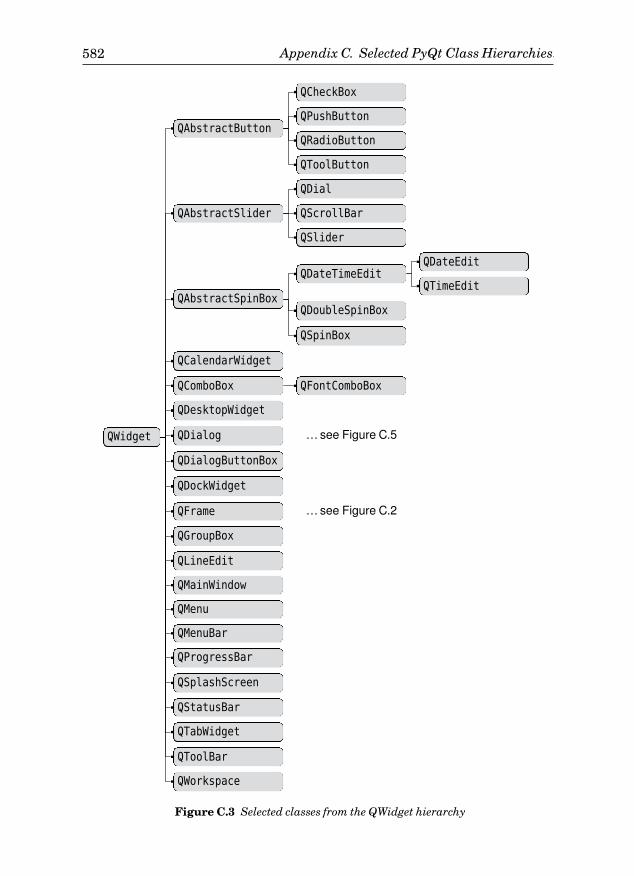
582 IntroductionAppendix C. Selected PyQt Class Hierarchies
QWidget
QAbstractButton
QCheckBox
QPushButton
QRadioButton
QToolButton
QAbstractSlider
QDial
QScrollBar
QSlider
QAbstractSpinBox
QDateTimeEditQDateEdit
QTimeEdit
QDoubleSpinBox
QSpinBox
QCalendarWidget
QComboBox QFontComboBox
QDesktopWidget
QDialog …see Figure C.5
QDialogButtonBox
QDockWidget
QFrame …see Figure C.2
QGroupBox
QLineEdit
QMainWindow
QMenu
QMenuBar
QProgressBar
QSplashScreen
QStatusBar
QTabWidget
QToolBar
QWorkspace
Figure C.3 Selected classes from the QWidget hierarchy
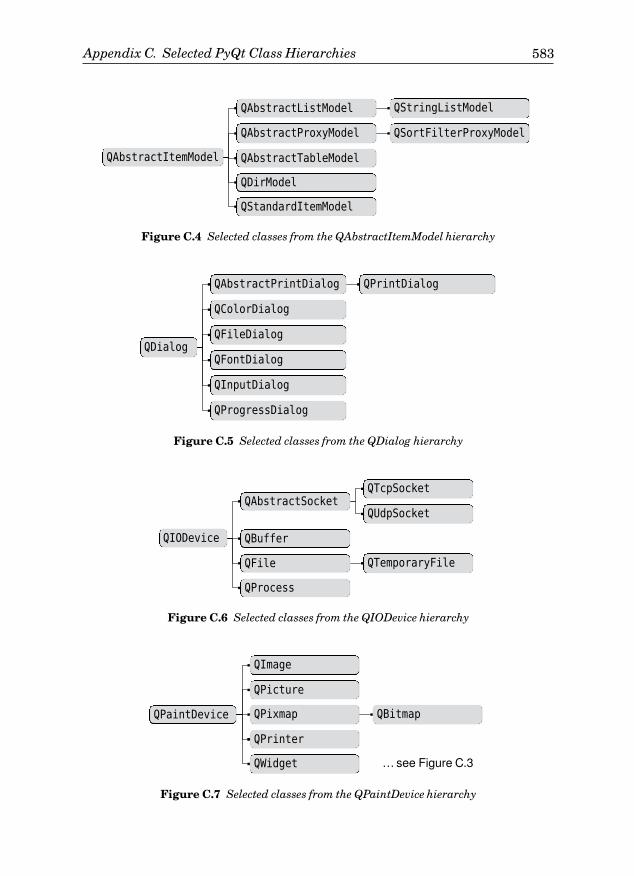
Introduction 583Appendix C. Selected PyQt Class Hierarchies
QAbstractItemModel
QAbstractListModel QStringListModel
QAbstractProxyModel QSortFilterProxyModel
QAbstractTableModel
QDirModel
QStandardItemModel
Figure C.4 Selected classes from the QAbstractItemModel hierarchy
QDialog
QAbstractPrintDialog QPrintDialog
QColorDialog
QFileDialog
QFontDialog
QInputDialog
QProgressDialog
Figure C.5 Selected classes from the QDialog hierarchy
QIODevice
QAbstractSocketQTcpSocket
QUdpSocket
QBuffer
QFile QTemporaryFile
QProcess
Figure C.6 Selected classes from the QIODevice hierarchy
QPaintDevice
QImage
QPicture
QPixmap QBitmap
QPrinter
QWidget …see Figure C.3
Figure C.7 Selected classes from the QPaintDevice hierarchy
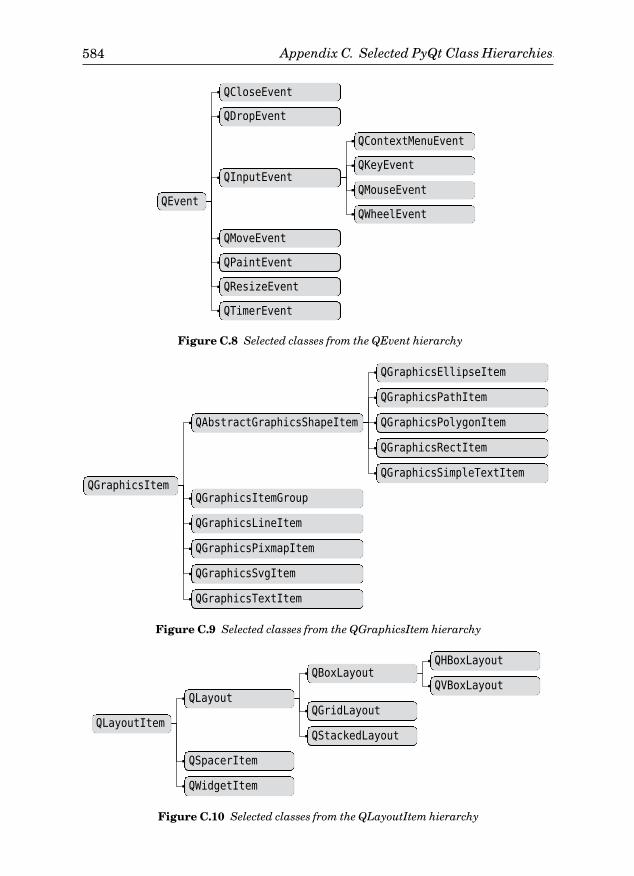
584 IntroductionAppendix C. Selected PyQt Class Hierarchies
QEvent
QCloseEvent
QDropEvent
QInputEvent
QContextMenuEvent
QKeyEvent
QMouseEvent
QWheelEvent
QMoveEvent
QPaintEvent
QResizeEvent
QTimerEvent
Figure C.8 Selected classes from the QEvent hierarchy
QGraphicsItem
QAbstractGraphicsShapeItem
QGraphicsEllipseItem
QGraphicsPathItem
QGraphicsPolygonItem
QGraphicsRectItem
QGraphicsSimpleTextItem
QGraphicsItemGroup
QGraphicsLineItem
QGraphicsPixmapItem
QGraphicsSvgItem
QGraphicsTextItem
Figure C.9 Selected classes from the QGraphicsItem hierarchy
QLayoutItem
QLayout
QBoxLayoutQHBoxLayout
QVBoxLayout
QGridLayout
QStackedLayout
QSpacerItem
QWidgetItem
Figure C.10 Selected classes from the QLayoutItem hierarchy
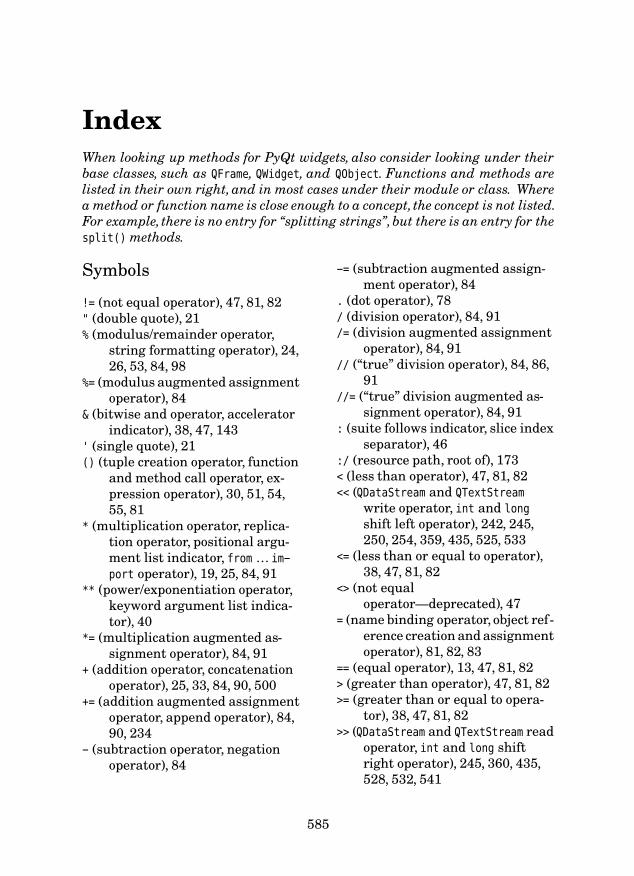
IndexWhen looking up methods for PyQt widgets, also consider looking under theirbase classes, such as QFrame, QWidget, and QObject. Functions and methods arelisted in their own right, and in most cases under their module or class. Wherea method or function name is close enough to a concept, the concept is not listed.For example, there is no entry for “splitting strings”,but there is an entry for thesplit() methods.
Symbols
!= (not equal operator), 47, 81, 82" (double quote), 21% (modulus/remainder operator,
string formatting operator), 24,26, 53, 84, 98
%= (modulus augmented assignmentoperator), 84
& (bitwise and operator, acceleratorindicator), 38, 47, 143
' (single quote), 21() (tuple creation operator, function
and method call operator, ex-pression operator), 30, 51, 54,55, 81
* (multiplication operator, replica-tion operator, positional argu-ment list indicator, from … im-
port operator), 19, 25, 84, 91** (power/exponentiation operator,
keyword argument list indica-tor), 40
*= (multiplication augmented as-signment operator), 84, 91
+ (addition operator, concatenationoperator), 25, 33, 84, 90, 500
+= (addition augmented assignmentoperator, append operator), 84,90, 234
- (subtraction operator, negationoperator), 84
-= (subtraction augmented assign-ment operator), 84
. (dot operator), 78/ (division operator), 84, 91/= (division augmented assignment
operator), 84, 91// (“true” division operator), 84, 86,
91//= (“true” division augmented as-
signment operator), 84, 91: (suite follows indicator, slice index
separator), 46:/ (resource path, root of), 173< (less than operator), 47, 81, 82<< (QDataStream and QTextStream
write operator, int and long
shift left operator), 242, 245,250, 254, 359, 435, 525, 533
<= (less than or equal to operator),38, 47, 81, 82
<> (not equaloperator—deprecated), 47
= (name binding operator, object ref-erence creation and assignmentoperator), 81, 82, 83
== (equal operator), 13, 47, 81, 82> (greater than operator), 47, 81, 82>= (greater than or equal to opera-
tor), 38, 47, 81, 82>> (QDataStream and QTextStream read
operator, int and long shiftright operator), 245, 360, 435,528, 532, 541
585
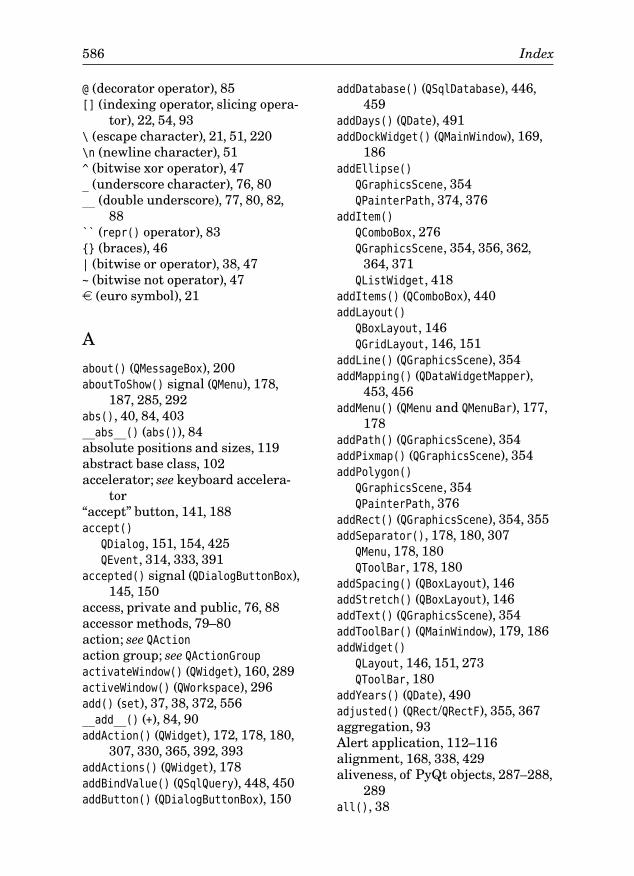
586 Index
@ (decorator operator), 85[] (indexing operator, slicing opera-
tor), 22, 54, 93\ (escape character), 21, 51, 220\n (newline character), 51^ (bitwise xor operator), 47_ (underscore character), 76, 80__ (double underscore), 77, 80, 82,
88`` (repr() operator), 83{} (braces), 46| (bitwise or operator), 38, 47~ (bitwise not operator), 47
(euro symbol), 21
A
about() (QMessageBox), 200aboutToShow() signal (QMenu), 178,
187, 285, 292abs(), 40, 84, 403__abs__() (abs()), 84absolute positions and sizes, 119abstract base class, 102accelerator; see keyboard accelera-
tor“accept” button, 141, 188accept()
QDialog, 151, 154, 425QEvent, 314, 333, 391
accepted() signal (QDialogButtonBox),145, 150
access, private and public, 76, 88accessor methods, 79–80action; see QActionaction group; see QActionGroupactivateWindow() (QWidget), 160, 289activeWindow() (QWorkspace), 296add() (set), 37, 38, 372, 556__add__() (+), 84, 90addAction() (QWidget), 172, 178, 180,
307, 330, 365, 392, 393addActions() (QWidget), 178addBindValue() (QSqlQuery), 448, 450addButton() (QDialogButtonBox), 150
addDatabase() (QSqlDatabase), 446,459
addDays() (QDate), 491addDockWidget() (QMainWindow), 169,
186addEllipse()
QGraphicsScene, 354QPainterPath, 374, 376
addItem()
QComboBox, 276QGraphicsScene, 354, 356, 362,
364, 371QListWidget, 418
addItems() (QComboBox), 440addLayout()
QBoxLayout, 146QGridLayout, 146, 151
addLine() (QGraphicsScene), 354addMapping() (QDataWidgetMapper),
453, 456addMenu() (QMenu and QMenuBar), 177,
178addPath() (QGraphicsScene), 354addPixmap() (QGraphicsScene), 354addPolygon()
QGraphicsScene, 354QPainterPath, 376
addRect() (QGraphicsScene), 354, 355addSeparator(), 178, 180, 307
QMenu, 178, 180QToolBar, 178, 180
addSpacing() (QBoxLayout), 146addStretch() (QBoxLayout), 146addText() (QGraphicsScene), 354addToolBar() (QMainWindow), 179, 186addWidget()
QLayout, 146, 151, 273QToolBar, 180
addYears() (QDate), 490adjusted() (QRect/QRectF), 355, 367aggregation, 93Alert application, 112–116alignment, 168, 338, 429aliveness, of PyQt objects, 287–288,
289all(), 38
Index 587
and operator, 47anonymous functions; see lambda
statementantialiasing, 337, 342, 361, 369any(), 38append()
list, 33QTextEdit, 120
application modal dialogs, 140application termination, 115, 185applicationDirPath() (QCoreApplica-
tion), 173applicationName() (QCoreApplica-
tion), 194applications
lrelease, 207, 513, 518Make PyQt (makepyqt.pyw), 174,
206, 207, 216, 519mkpyqt.py, 174, 206, 207, 216, 519pylupdate4, 207, 513, 517, 518pyrcc4, 173, 174, 207pyuic4, 206, 207, 216, 221, 515Qt Assistant, 510Qt Linguist, 513
arg() (QString), 402, 418, 419, 423,427, 428, 455, 513, 515
arguments; see parametersargv variable (sys), 114array module, 29as keyword, 104ASCII, 20, 22, 250, 501, 513, 555
see also codecs, QString, and Uni-code encodings
aspect ratio, 329, 400assert statement, 69, 498, 500, 501,
502, 503, 504AssertionError exception, 69Asset Manager application,
457–469assignment operators, 15, 83associative array; see dict, default-
dict, and OrderedDict
atEnd() (QDataStream andQTextStream), 245, 252, 253, 254
attribute() (QDomElement), 261AttributeError exception, 89, 101attributes, 75, 78, 103, 106, 125
augmented assignment operators,15, 16, 84, 90, 91
automatic disconnection, 130automatic garbage collection; see
garbage collectionautomatic reparenting, 119automatic signal–slot connections,
217automatically deleting windows,
156, 284, 286
B
backslash escapes, 21, 22, 51base class, 75, 76, 102basename() (os.path), 189beforeInsert() (QSqlTableModel), 470beginInsertRows() (QAbstractItem-
Model), 432, 433beginRemoveRows() (QAbstractItem-
Model), 433bibliography; see booksbinary chop algorithm, 93, 95, 238binary data, 20binary files, 240–248binding names, 14–16
see also assignment operatorsbindValue() (QSqlQuery), 448, 450,
468bisect module, 93, 238bisect_left() (bisect), 95, 239, 498bitwise operators, 47BLOBs (Binary Large OBjects), 449block of code; see suite of codeblock structure, 46blockSignals() (QObject), 135.bmp (image file), 193books
Core PYTHON Programming,27
Dive into Python, 327Mastering Regular Expressions,
220Python and XML, 256Python Cookbook, 27Python in a Nutshell, 27
588 Index
books (cont.)XML Processing in Python, 256
bool(), 83bool type, 16–17, 46Boolean context, 83Booleans, 45, 46bounding rectangle, 338, 367, 373,
377boundingRect()
QGraphicsItem, 365, 366, 367, 373,377
QPainterPath, 377boundValue() (QSqlQuery), 450braces, no need for, 46break statement, 49, 50, 53buddies, 143, 206, 215, 217
see also QLabel.setBuddy()
built-ins!= operator, 47, 81, 82% operator, 24, 26, 53, 84& operator, 38, 47* operator, 19, 25, 84, 91** operator, 40*= operator, 84, 91+ operator, 25, 33, 84, 90+= operator, 84, 90- operator, 38, 84-= operator, 84. operator, 78/ operator, 84, 91/= operator, 84, 91// operator, 84, 86, 91//= operator, 84, 91< operator, 47, 81, 82<= operator, 38, 47, 81, 82= operator, 81, 82, 83== operator, 13, 47, 81, 82> operator, 47, 81, 82>= operator, 38, 47, 81, 82@ operator, 85[] operator, 22, 54^ operator, 47| operator, 38, 47~ operator, 47abs(), 40, 84, 403all(), 38
built-ins (cont.)and operator, 47any(), 38as keyword, 104assert statement, 69, 498, 500,
501, 502, 503, 504bool(), 83bool type, 16–17, 46break statement, 49, 50, 53callable(), 102chr(), 21, 39class statement, 69, 75, 76, 77, 85,
86, 103, 115cmp(), 82, 89complex type, 17–20continue statement, 53def statement, 55, 62–63, 77del statement, 32, 355, 359, 361,
372, 556dict type, 35–36, 51, 93dir(), 39, 40divmod(), 40enumerate(), 87, 419, 498eval(), 39, 81, 83, 89, 120, 247except statement, 66–67exceptions; see exceptionsFalse constant, 45finally statement, 66, 70–71, 78,
541, 542, 543, 548, 550, 551, 553,554, 556
float(), 40, 84, 91float type, 17–20, 241for loop, 50–51, 54, 59frozenset type, 37, 552hasattr(), 39, 102, 218, 336help(), 37, 39hex(), 40id(), 13, 39, 231, 237, 418if statement, 46–49import statement, 18, 19in operator, 25, 33, 36, 38, 45, 96int(), 40, 84, 91, 256int type, 16–17, 241is statement, 13, 47, 57
Index 589
built-ins (cont.)isinstance(), 39, 94, 102, 135,
289, 296, 359, 372, 375, 393, 395,440, 496, 499, 502, 503
iter(), 97, 237lambda statement, 61–62, 134,
453len(), 20, 25, 33, 36, 38, 96, 237,
503list type, 31–35, 93long(), 40long type, 16–17, 231, 241max(), 38min(), 38None constant, 13, 57not operator, 47object type, 76, 77, 78oct(), 40open(), 39, 70or operator, 47ord(), 21, 39, 50pass statement, 47pow(), 40print statement, 10, 26property(), 80range(), 39, 50–51, 54repr(), 81, 83, 89, 90, 98return statement, 58, 97, 554round(), 40, 91, 333set type, 37, 93sorted(), 52, 53, 63, 432, 434, 551special methods; see special
methodsstaticmethod(), 85, 239, 288str type; see str typesum(), 38super(), 100, 153, 217True constant, 45try statement, 66, 70, 78, 541,
542, 543, 548, 550, 551, 553, 554,556
tuple type, 29–31, 30, 50, 87type(), 18, 39, 102unichr(), 21, 39, 236, 554unicode type; see unicode typewhile loop, 49–50
built-ins (cont.)with statement, 549xrange(), 51, 54yield statement, 58, 97, 237
button()
QDialogButtonBox, 150, 158QMouseEvent, 333
buttons; see QAbstractButton,QDialogButtonBox, and QPush-
Button
byte array; see QByteArraybytecode, 11, 111bytesAvailable() (QIODevice), 528,
531, 540
C
Calculate application, 116–121__call__(), 81callable(), 102callables, 63, 97, 102, 115, 128, 131callbacks; see object references to,
under functionscalling context, 64canPaste() (QTextEdit), 385case statement; see if statementcenter() (QRect/QRectF), 392, 393centering, 168, 338central widget, 168character escapes, 21, 22character formatting, 397characters() (QXmlContentHandler),
263checkable actions, 176, 177chr(), 21, 39class statement, 69, 75, 76, 77, 85,
86, 103, 115clear(), 98
dict, 36QListWidget, 418QTableWidget, 418QTextDocument, 383QTreeWidget, 420set, 38
clearMessage() (QStatusBar), 170,232
590 Index
clearSelection() (QGraphicsScene),356, 361, 362, 364
click; see mousePressEvent() andmouseReleaseEvent()
clicked() signal (QPushButton), 219client/server applications, 522clipboard; see QClipboardclipboard() (QApplication), 297, 311close button, 118, 121close()
file, 70, 555QIODevice, 243, 259, 525, 528QWidget, 175, 285, 289, 330
closeAllWindows() (QMainWindow), 289,293
closeEvent() (QWidget), 175, 185, 187,282, 285, 289, 293, 309, 551
closeSubPath() (QPainterPath), 376closing dialogs, 118, 121closures; see partial function appli-
cationcmp(), 82, 89__cmp__() (cmp()), 81, 82, 89, 416,
432code suite, 46codecs; see encodingscodecs module, 255–256
open(), 255, 260, 501, 555readline(), 255
collections, 29–37, 92–98collections module, 29
defaultdict type, 529, 532, 545collidesWithPath() (QGraphicsItem),
366collidingItems()
QGraphicsItem, 366QGraphicsScene, 354, 375
collision detection, 349, 374, 375color palette; see QPalettecolumn() (QModelIndex), 428, 431, 439,
461, 462, 486, 496, 503columnCount() (QAbstractItemModel),
427, 428, 433, 503combining comparison expressions,
47combobox; see QComboBox
command-line arguments, 113, 114commercial licensing, 3commit() (QSqlDatabase), 449, 465,
468, 469communication mechanisms; see
events and signals and slotscompare() (QString), 435comparisons, 13, 38, 47, 57, 63, 82
cmp(), 89__cmp__(), 89, 416, 432creating operators for, 82disallowing, 83expressions, 47operators, 47see also == operator, != operator,id(), and is statement
compile() (re), 220complex type, 17–20composite widgets, 168, 280,
325–326composition, 93conditional expression, 49, 390connect() (QObject), 124, 130, 133,
145, 146, 151, 158, 453connecting to databases, 446connections; see signals and slotsConnections application, 132–135connectSlotsByName() (QMetaObject),
217connectToHost() (QAbstractSocket),
525constructors; see initializers,
__init__(), and __new__()
containers; see collections, and dict
type, list type, and tuple typecontains()
QGraphicsItem, 366QRect/QRectF, 357QString, 234QStringList, 189
__contains__() (in), 93, 96context managers, 549, 554context menus, 168, 180–181, 307,
365, 390contextMenuEvent()
QGraphicsItem, 365
Index 591
contextMenuEvent() (cont.)QWidget, 307, 309, 390
continue statement, 53control structures; see if, for, while,
and try statementscontrols; see QWidgetconvenience widgets; see QList-
Widget, QTableWidget, and QTree-
Widget
conventional entry point, 62conversions
bool() conversion, 83float() conversion, 40, 84, 91generator to list, 58int() conversion, 40, 84, 91int to float, 14, 20int to long, 17long() conversion, 40str() conversion, 81, 83, 90, 98str to unicode, 20unicode() conversion, 81, 83unicode to QString, 28
coordinates, 309, 328–331, 339, 342,350, 357, 374
copy constructor, unnecessary, 83copy(), 98
copy module, 83, 88, 89dict, 36set, 38, 548, 551
copy modulecopy(), 83, 88, 89deepcopy(), 34, 83
copy_reg module, 247copying, 34, 51, 88, 89, 98cos() (math), 371, 375count()
list, 33str/unicode, 25
cPickle module, 235, 246–248see also pickle module
createActions() helper, 174–175createEditor() (QAbstractItem-
Delegate), 436, 440, 461, 486,487, 488, 491
createIndex() (QAbstractItemModel),433, 504
critical() (QMessageBox), 188cStringIO module, 23
see also StringIO moduleCurrency Converter application,
121–127current mouse position, 318currentCharFormat() (QTextEdit), 393,
395currentColumn() (QTableWidget), 422currentDate() (QDate), 46, 236, 401,
490currentDateTime() (QDateTime), 454currentFrame() (QTextCursor), 404currentIndex()
QAbstractItemView, 427, 463, 465,466, 468, 469
QDataWidgetMapper, 454, 455currentIndexChanged() signal
(QComboBox), 124, 275currentItem() (QTableWidget), 422currentRowChanged() signal (QList-
Widget), 275currentText() (QComboBox), 441currying; see partial function appli-
cationcursor, text; see insertion pointcursorRect() (QTextEdit), 392, 393custom data containers, 235custom delegates, 436–442custom models, 423–435customized message boxes, 188cut() (QTextEdit), 385cycles, avoiding in signal–slot con-
nections, 135
D
dangling else trap, not possible, 48data containers, 235data dictionary; see dict typedata()
QAbstractItemModel, 414, 427, 428,429, 430, 433, 438, 441, 462, 481,487, 488, 489, 491, 496, 503
QAction, 172, 393, 395QMimeData, 315, 316
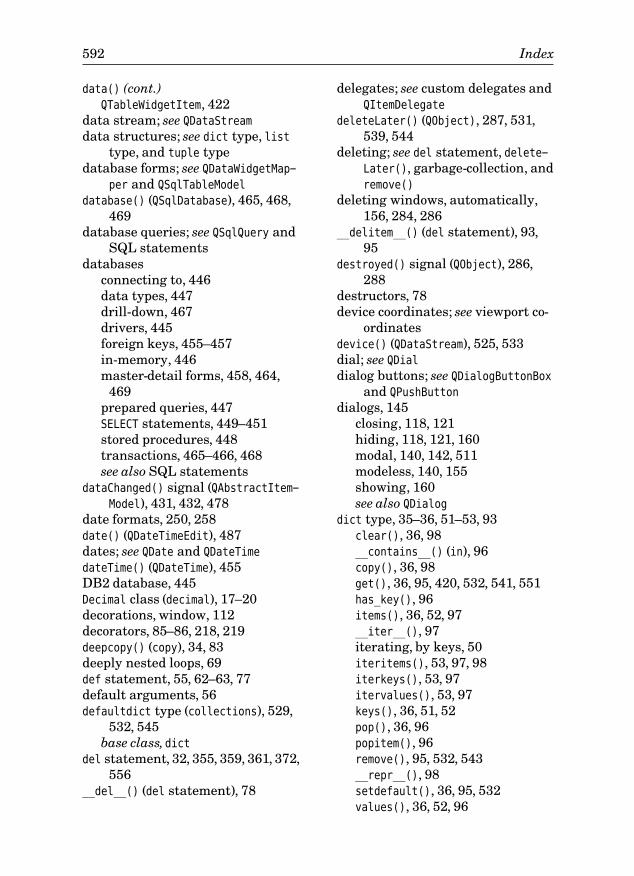
592 Index
data() (cont.)QTableWidgetItem, 422
data stream; see QDataStreamdata structures; see dict type, list
type, and tuple typedatabase forms; see QDataWidgetMap-
per and QSqlTableModel
database() (QSqlDatabase), 465, 468,469
database queries; see QSqlQuery andSQL statements
databasesconnecting to, 446data types, 447drill-down, 467drivers, 445foreign keys, 455–457in-memory, 446master-detail forms, 458, 464,
469prepared queries, 447SELECT statements, 449–451stored procedures, 448transactions, 465–466, 468see also SQL statements
dataChanged() signal (QAbstractItem-Model), 431, 432, 478
date formats, 250, 258date() (QDateTimeEdit), 487dates; see QDate and QDateTime
dateTime() (QDateTime), 455DB2 database, 445Decimal class (decimal), 17–20decorations, window, 112decorators, 85–86, 218, 219deepcopy() (copy), 34, 83deeply nested loops, 69def statement, 55, 62–63, 77default arguments, 56defaultdict type (collections), 529,
532, 545base class,dict
del statement, 32, 355, 359, 361, 372,556
__del__() (del statement), 78
delegates; see custom delegates andQItemDelegate
deleteLater() (QObject), 287, 531,539, 544
deleting; see del statement, delete-Later(), garbage-collection, andremove()
deleting windows, automatically,156, 284, 286
__delitem__() (del statement), 93,95
destroyed() signal (QObject), 286,288
destructors, 78device coordinates; see viewport co-
ordinatesdevice() (QDataStream), 525, 533dial; see QDialdialog buttons; see QDialogButtonBox
and QPushButton
dialogs, 145closing, 118, 121hiding, 118, 121, 160modal, 140, 142, 511modeless, 140, 155showing, 160see also QDialog
dict type, 35–36, 51–53, 93clear(), 36, 98__contains__() (in), 96copy(), 36, 98get(), 36, 95, 420, 532, 541, 551has_key(), 96items(), 36, 52, 97__iter__(), 97iterating, by keys, 50iteritems(), 53, 97, 98iterkeys(), 53, 97itervalues(), 53, 97keys(), 36, 51, 52pop(), 36, 96popitem(), 96remove(), 95, 532, 543__repr__(), 98setdefault(), 36, 95, 532values(), 36, 52, 96
Index 593
dict type (cont.)see also defaultdict type andOrderedDict example class
difference() (set), 38dir(), 39, 40dirname() (os.path), 173, 477, 496,
512dirty flag, 168, 187, 192, 232, 356,
361, 362, 364, 365, 422, 425, 431disabling widgets and actions, 219,
274, 385discard() (set), 38disconnect() (QObject), 130division (/ and //), 17, 84, 86, 91divmod(), 40dock window; see QDockWidgetdock windows, 169–170docstrings, 57, 77, 105doctest module, 105–107document() (QTextEdit), 286, 287, 383,
384, 385, 396documentation, 27, 111documentElement() (QDomDocument),
260DOM parser, 259–262done() (QDialog), 154, 457, 464double-click; see mouseDoubleClick-
Event()
double-quoted strings, 21drag and drop, 312–317drag icon, 316dragEnterEvent() (QWidget), 309, 314,
316dragMoveEvent() (QWidget), 309, 314,
315, 316drawArc() (QPainter), 344drawChord() (QPainter), 344drawContents() (QTextDocument), 438,
489drawConvexPolygon() (QPainter), 344drawEllipse() (QPainter), 344, 374,
377, 481drawImage() (QPainter), 344, 363, 400drawLine() (QPainter), 338, 344drawPath() (QPainter), 344, 377drawPicture() (QPainter), 363
drawPie() (QPainter), 344drawPixmap() (QPainter), 344, 363,
408drawPoint() (QPainter), 344drawPolygon() (QPainter), 338, 343,
344, 345drawPolyline() (QPainter), 344, 345drawRect() (QPainter), 337, 344, 368,
410drawRoundRect() (QPainter), 344drawText() (QPainter), 306, 338, 344,
408, 410, 481drill-down, 467driver()
QSqlDatabase, 449QSqlQuery, 450
drivers, for databases, 445dropEvent() (QWidget), 309, 315, 316DSU (decorate, sort, undecorate),
551duck typing, 101, 222, 497dump() (pickle/cPickle), 248duplicated data, avoiding, 413dynamic attributes, 78dynamic function definitions, 62–63dynamic menus; see menus and
QMenu
dynamic typing, 12, 13–15, 101
E
edit() (QAbstractItemView), 426, 465,468
editing, in-place, 414, 458editing, initiating,417, 426, 440,465,
468editItem() (QTableWidget), 422editor, IDLE, 10, 105, 382editors; see IDEselif statement; see if statementelse statement; see if statementemit() (QObject), 130, 131, 219, 333,
340, 391, 431, 440, 556enabling widgets and actions, 219,
274, 385encodings, 20, 250, 258, 501
594 Index
encodings (cont.)ASCII, 20, 236, 250, 501, 555Latin1, 20UTF-8, 236, 250, 258, 501, 555see also codecs module, QString,
and UnicodeendElement() (QXmlContentHandler),
263endInsertRows() (QAbstractItem-
Model), 432, 433endRemoveRows() (QAbstractItem-
Model), 432, 433endswith() (str/unicode), 25, 31, 555endsWith() (QString), 240ensureCursorVisible() (QTextEdit),
392, 393Enter keypress, 120, 145, 188, 391,
421, 422, 440, 511entities; see HTMLentry point, no fixed, 62enumerate(), 87, 419, 498__eq__() (==), 81Eric4, IDE, 2, 10, 105, 382error handling, for files, 244errorString() (QIODevice), 241, 243,
250, 252, 258, 259, 528Esc keypress, 121, 161, 188, 421, 422escape()
Qt namespace, 258, 397, 401re, 220
escaped characters, 21, 22, 401newlines, 51
euro symbol ( ), 21eval(), 39, 81, 83, 89, 120, 247event handlers; see eventsevent loop, 115–116, 184, 221, 537,
539event() (QObject), 304, 309, 310, 384events, 115, 303–310
see also closeEvent(), keyPress-Event(), keyReleaseEvent(),paintEvent(), resizeEvent(),timerEvent(), and wheelEvent()
examplesAlert application, 112–116Asset Manager application,
457–469
examples (cont.)Calculate application, 116–121Connections application,
132–135Currency Converter application,
121–127FractionSlider class, 331–338frange(), 55–57Image Changer application,
165–200Length class, 86–91Multipedes application, 368–377My Movies application, 227–265OrderedDict class, 92–98Page Designer application,
351–368partial(), 64–65, 133RichTextLineEdit class, 389–398RomanSpinBox class, 326–328Signals and Slots application,
128–131simplified(), 61simplify(), 59, 61YPipe class, 339–345
except statement, 66–67see also finally statement andtry statement
exceptions, 52, 66–71AssertionError, 69AttributeError, 89, 101Exception, 68, 69handling, 66–71hierarchy, 67IOError, 243, 244KeyError, 94NotImplementedError, 83, 102OSError, 243, 244RuntimeError, 288StopIteration, 52, 58, 59TypeError, 56ValueError, 68, 114vs. testing for errors, 68
exec_()
QCoreApplication, 115, 184QDialog, 142, 154, 511QDrag, 316

Index 595
exec_() (cont.)QMenu, 307, 365, 392, 393QSqlQuery, 447, 448, 449, 450, 464,
468, 469exists() (QFile), 294exiting applications;seeterminating
applicationsexpandItem() (QTreeWidget), 421exporting files, 229extend() (list), 33extension; see file extensionsextension dialogs, 276–280
F
F2 keypress, 417, 422, 440False constant, 45fatalError() (QXmlErrorHandler), 263field-level validation, 140fieldIndex() (QSqlTableModel), 456file; see file type, open(), and QFile
file dialog; see QFileDialogfile error handling, 244file extensions
.bmp, .jpg, .jpeg, and .png (imagefiles), 193
.pro (C++/Qt project file), 518
.py and .pyw (Python file), 11, 111,207
.pyc and .pyo (Python bytecodefile), 11, 207
.qm (Qt message file), 516, 518
.qrc (PyQt resource file), 173,207, 517
.ts (translation source file), 517,518, 519
.ui (user interface file), 206, 207,515
file formats, 241file handle, generator, 70file type
close(), 70, 555__file__ variable, 173fileName() (QFileInfo), 189files, 70, 229fill() (QPixmap), 392
fillPath() (QPainter), 344fillRect() (QPainter), 344, 438, 481,
489finally statement, 66, 70–71, 78,
541, 542, 543, 548, 550, 551, 553,554, 556
see also except statement and try
statementfinancial calculations, 18find() (str/unicode), 24, 25, 68findText() (QComboBox), 142, 441, 457first() (QSqlQuery), 450firstChild() (QDomNode), 260fixed size, of widget, 277flags() (QAbstractItemModel), 427,
430, 433flags, window, 115float(), 40, 84, 91float type, 17–20, 241
%f format specifier, 26__float__() (float()), 84, 91floating-point division; see “true”
division__floordiv__() (//), 84focus; see keyboard focusfont; see QFontfont()
QGraphicsTextItem, 359QWidget, 336, 342
for loop, 50–51, 54, 59break statement, 53continue statement, 53else statement, 50, 53, 254vs. list comprehensions, 96–97
foreign keys, 455–457form design; see user interface de-
signform-level validation, 140, 158, 491format specifiers, for %, 26formats, of images, 193formatting, of characters, 397forms, previewing, 215FractionSlider example class,
331–338frame; see QFramefrange() example, 55–57
596 Index
from __future__ import division, 86from __future__ import
with_statement, 549from … import statement; see import
statementfromImage() (QPixmap), 199frozenset type, 37, 552function definitions, nested, 261functions; see under the functions’
names,and built-insas closures, 64dynamic definitions, 62–63nested, 65, 261object references to, 63, 64signatures, 56wrapping; see partial function
applicationfunctools module
partial(), 64–65, 133, 365
G
garbage collection, 15, 78, 168, 169,170
__ge__() (>=), 81generating lists, 54generators, 54–55, 58–59, 70, 92, 97geometry() (QWidget), 357get() (dict), 36, 95, 420, 532, 541,
551getcwd() (os), 173getDouble() (QInputDialog), 199getExistingDirectory() (QFile-
Dialog), 547getInteger() (QInputDialog), 199getItem() (QInputDialog), 199__getitem__() ([]), 93, 94getOpenFileName() (QFileDialog), 193,
194, 233, 234, 287, 295, 356getSaveFileName() (QFileDialog), 196getText() (QInputDialog), 199global functions; see under the func-
tions’ names,and built-insglobal scope, 55globalPos() (QEvent), 307, 309gradient fills; see QLinearGradient
graphics items; see QGraphicsItemgraphics scenes; see QGraphicsScenegraphic transformations; see trans-
formationsgraphics item coordinates, 350graphics, rotating, 349graphics, scaling, 349, 370, 374grid layout; see QGridLayoutgroup() (re), 554__gt__() (>), 81
H
handling errors, reading and writ-ing files, 244
has_key() (dict), 96hasattr(), 39, 102, 218, 336hasChildren() (QAbstractItemModel),
433hasFeature() (QSqlDriver), 449hasFocus() (QWidget), 330, 426hasFormat() (QMimeData), 314, 316hash, Perl; see dict typehasHtml() (QClipboard), 312hasMouseTracking() (QWidget), 308hasSelection() (QTextCursor), 385headerData() (QAbstractItemModel),
427, 430, 433, 503height() (QWidget), 330help(), 37, 39hex(), 40hide() (QWidget), 280, 330hiding dialogs, 118, 121, 160hiding widgets, 277, 280high-level communication mecha-
nisms; see signals and slotshomePath() (QDir), 545horizontal layout; see QHBoxLayouthorizontal lines; see QFramehorizontalHeader() (QTableView), 463,
464hotspot, icon, 316HTML (Hyper-Text Markup Lan-
guage), 114, 117, 168, 188, 311,349, 381, 396, 397, 401, 488, 511,552
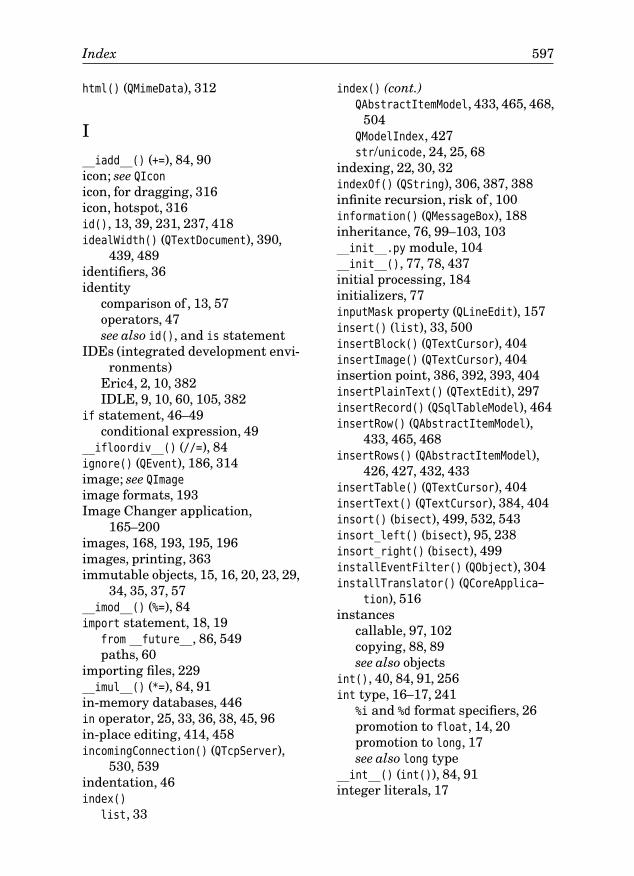
Index 597
html() (QMimeData), 312
I
__iadd__() (+=), 84, 90icon; see QIconicon, for dragging, 316icon, hotspot, 316id(), 13, 39, 231, 237, 418idealWidth() (QTextDocument), 390,
439, 489identifiers, 36identity
comparison of , 13, 57operators, 47see also id(), and is statement
IDEs (integrated development envi-ronments)
Eric4, 2, 10, 382IDLE, 9, 10, 60, 105, 382
if statement, 46–49conditional expression, 49
__ifloordiv__() (//=), 84ignore() (QEvent), 186, 314image; see QImageimage formats, 193Image Changer application,
165–200images, 168, 193, 195, 196images, printing, 363immutable objects, 15, 16, 20, 23, 29,
34, 35, 37, 57__imod__() (%=), 84import statement, 18, 19
from __future__, 86, 549paths, 60
importing files, 229__imul__() (*=), 84, 91in-memory databases, 446in operator, 25, 33, 36, 38, 45, 96in-place editing, 414, 458incomingConnection() (QTcpServer),
530, 539indentation, 46index()
list, 33
index() (cont.)QAbstractItemModel, 433, 465, 468,
504QModelIndex, 427str/unicode, 24, 25, 68
indexing, 22, 30, 32indexOf() (QString), 306, 387, 388infinite recursion, risk of , 100information() (QMessageBox), 188inheritance, 76, 99–103, 103__init__.py module, 104__init__(), 77, 78, 437initial processing, 184initializers, 77inputMask property (QLineEdit), 157insert() (list), 33, 500insertBlock() (QTextCursor), 404insertImage() (QTextCursor), 404insertion point, 386, 392, 393, 404insertPlainText() (QTextEdit), 297insertRecord() (QSqlTableModel), 464insertRow() (QAbstractItemModel),
433, 465, 468insertRows() (QAbstractItemModel),
426, 427, 432, 433insertTable() (QTextCursor), 404insertText() (QTextCursor), 384, 404insort() (bisect), 499, 532, 543insort_left() (bisect), 95, 238insort_right() (bisect), 499installEventFilter() (QObject), 304installTranslator() (QCoreApplica-
tion), 516instances
callable, 97, 102copying, 88, 89see also objects
int(), 40, 84, 91, 256int type, 16–17, 241
%i and %d format specifiers, 26promotion to float, 14, 20promotion to long, 17see also long type
__int__() (int()), 84, 91integer literals, 17
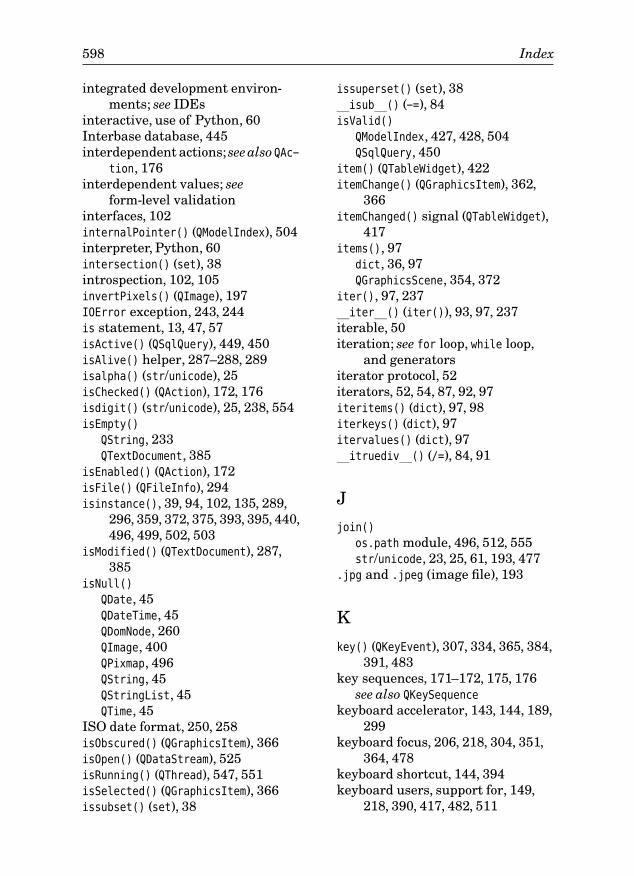
598 Index
integrated development environ-ments; see IDEs
interactive, use of Python, 60Interbase database, 445interdependent actions;see also QAc-
tion, 176interdependent values; see
form-level validationinterfaces, 102internalPointer() (QModelIndex), 504interpreter, Python, 60intersection() (set), 38introspection, 102, 105invertPixels() (QImage), 197IOError exception, 243, 244is statement, 13, 47, 57isActive() (QSqlQuery), 449, 450isAlive() helper, 287–288, 289isalpha() (str/unicode), 25isChecked() (QAction), 172, 176isdigit() (str/unicode), 25, 238, 554isEmpty()
QString, 233QTextDocument, 385
isEnabled() (QAction), 172isFile() (QFileInfo), 294isinstance(), 39, 94, 102, 135, 289,
296, 359, 372, 375, 393, 395, 440,496, 499, 502, 503
isModified() (QTextDocument), 287,385
isNull()
QDate, 45QDateTime, 45QDomNode, 260QImage, 400QPixmap, 496QString, 45QStringList, 45QTime, 45
ISO date format, 250, 258isObscured() (QGraphicsItem), 366isOpen() (QDataStream), 525isRunning() (QThread), 547, 551isSelected() (QGraphicsItem), 366issubset() (set), 38
issuperset() (set), 38__isub__() (-=), 84isValid()
QModelIndex, 427, 428, 504QSqlQuery, 450
item() (QTableWidget), 422itemChange() (QGraphicsItem), 362,
366itemChanged() signal (QTableWidget),
417items(), 97
dict, 36, 97QGraphicsScene, 354, 372
iter(), 97, 237__iter__() (iter()), 93, 97, 237iterable, 50iteration; see for loop, while loop,
and generatorsiterator protocol, 52iterators, 52, 54, 87, 92, 97iteritems() (dict), 97, 98iterkeys() (dict), 97itervalues() (dict), 97__itruediv__() (/=), 84, 91
J
join()
os.path module, 496, 512, 555str/unicode, 23, 25, 61, 193, 477
.jpg and .jpeg (image file), 193
K
key() (QKeyEvent), 307, 334, 365, 384,391, 483
key sequences, 171–172, 175, 176see also QKeySequence
keyboard accelerator, 143, 144, 189,299
keyboard focus, 206, 218, 304, 351,364, 478
keyboard shortcut, 144, 394keyboard users, support for, 149,
218, 390, 417, 482, 511
Index 599
KeyError exception, 94keypresses, 483Enter, 120, 145, 188, 391, 421, 422,
440, 511Esc, 121, 161, 188, 421, 422F2, 417, 422, 440Shift, 365Tab, 206, 218, 310, 421, 422, 511
keyPressEvent()
QGraphicsItem, 365QWidget, 307, 309, 334, 391, 483
keyReleaseEvent() (QWidget), 307keys() (dict), 36keyword arguments, 55, 59–61keywords, table of , 16
L
label; see QLabellambda statement, 61–62, 134, 453last() (QSqlQuery), 450lastError()
QSqlDatabase, 446, 450, 459, 465QSqlQuery, 449
lastIndexOf() (QString), 234Latin1 encoding, 20layout managers, 118–120, 123,
144–146, 145, 150, 209–210,212, 213–215, 270–271, 332
layout() (QWidget), 277layout policies, 270–271__le__() (<=), 81left() (QString), 234, 306len(), 20, 25, 33, 36, 38, 96, 237, 503__len__() (len()), 93, 96, 237, 503Length example class (length),
86–91length() (QString), 388level of detail, 374licensing, 3lifetime, of PyQt objects, 287line editor; see QLineEditline width; see pen widthlineEdit() (QAbstractSpinBox), 327list comprehensions, 53–54, 96–97list type, 31–35, 33, 38, 93
list type (cont.)+ concatenation operator, 33append(), 33, 53count(), 25, 33extend(), 33generating, 54index(), 24, 33indexing, 32insert(), 33, 500iterating, 50pop(), 33, 355, 361remove(), 32, 33reverse(), 33slicing, 32sort(), 33, 53, 63, 95, 239title(), 24
list widget; see QListWidgetlisten() (QTcpServer), 529literals
integer, 17string, 20
live dialogs, 159–162loading files, 184, 229, 240–248,
249–256, 256–265local scope, 55local variables, 87locale; see QLocale and
QString.arg()
localeAwareCompare() (QString), 416,434
lock() (QMutex), 553, 554lockForRead() (QReadWriteLock), 541,
542, 543, 548, 550, 551, 556lockForWrite() (QReadWriteLock), 542,
543, 556logical coordinates; see window coor-
dinateslogical operators, 47long(), 40long type, 16–17, 231, 241
%i and %d format specifiers, 26see also int type
loops; see for statement and while
statementdeeply nested, 69

600 Index
low-level communication mecha-nisms; see events
lower() (str/unicode), 25, 238lrelease application, 207, 513, 518__lt__() (<), 81, 82, 432
M
Mac OS X detection, 218magic number, 241mailing lists, 5main(), conventional entry point, 62main window; see QMainWindow__main__ module attribute value,
106Make PyQt application
(makepyqt.pyw), 174, 206, 207,216, 519
mangling names, 77, 88, 89mapFromGlobal() (QWidget), 357mapToGlobal() (QWidget), 309, 392,
393mapToScene() (QGraphicsView), 357master-detail forms, 458, 464, 469math module, 40, 117, 371, 375matrix()
QGraphicsItem, 359, 377QGraphicsView, 370
max(), 38maximum size, of layouts and wid-
gets, 271maximumHeight() (QWidget), 390MDI (Multiple Document Interface),
290–300membership operators, 47menu separators, 178, 180menuBar() (QMainWindow), 186menus, 168, 177–178
see also QMenu and QMenuBar
mergeCurrentCharFormat() (QText-Edit), 395
message box; see QMessageBoxmeta-characters
regular expression, 220XML, 257, 258
methods, 81
methods (cont.)static, 78virtual, 75, 99
mid() (QString), 252MIME (Multipurpose Internet Mail
Extensions) format, 310, 313mimeData()
QClipboard, 312QDropEvent, 314
min(), 38minimizing windows, 297minimum size, of layouts and wid-
gets, 270, 271, 335minimumHeight() (QWidget), 390minimumSizeHint() (QWidget), 271,
335, 340, 341, 479mirrored() (QImage), 198mkpyqt.py application, 174, 206, 207,
216, 519__mod__() (%), 84modality, 140, 142, 511model() (QModelIndex), 438, 441, 462,
489modeless dialogs, 140, 155, 159, 286models; see custom models and
QAbstractItemModel
modifiers() (QInputEvent), 307, 365,391
modules, 104modulus (%), 53mouse position, 318mouse tracking; see hasMouseTrack-
ing() and setMouseTracking()
mouseDoubleClickEvent()
QGraphicsItem, 362QWidget, 308, 309, 417, 422, 440
mouseMoveEvent() (QWidget), 309, 317mousePressEvent() (QWidget), 309,
333, 482mouseReleaseEvent() (QWidget), 308,
309move() (QWidget), 183, 330, 341moveBy() (QGraphicsItem), 366__mul__() (*), 84, 91multifile applications, 104Multipedes application, 368–377
Index 601
multiple document interface; seeMDI
multiple inheritance, 76, 103, 216,217, 373
multiway branching; see if state-ment
mutable objects, 16, 23, 28, 29, 31, 32,34, 35, 37, 51, 57
mutually exclusive actions, 176see also QAction
My Movies application, 227–265MySQL database, 445
N
name mangling, 77, 88, 89__name__ module attribute, 106names, of variables, 76, 80, 88namespaces, 19__ne__() (!=), 81__neg__() (-), 84negative lookahead, in regular ex-
pressions, 387nested functions, 65, 261, 554network protocols, 521new-style vs. old-style classes, 76__new__(), 77, 78, 81newlines, escaping, 51newlines, universal, 256newPage() (QPrinter), 410next()
iterator method, 52, 59, 97QSqlQuery, 449, 450, 451, 468, 469
nextSibling() (QDomNode), 260nodeType() (QDomNode), 261None constant, 13, 45, 57__nonzero__() (bool()), 81, 83not operator, 47notify() (QCoreApplication), 305NotImplementedError exception, 83,
102number() (QString), 338numRowsAffected() (QSqlQuery), 449,
450
O
object names; see QObject.setObject-Name()
object references, 12, 55, 57, 58, 63,64
object type, 76, 77, 78objects
callable, 97, 102comparing, 13copying, 88, 89function references, 63, 64immutable, 15, 16, 20, 23, 29, 34,
35, 37, 57mutable, 16, 23, 28, 29, 31, 32, 34,
35, 37, 51, 57ownership of , 119, 168, 170, 172,
180, 355, 357, 359, 372, 376references, 12, 15, 55, 57, 58, 63,
64oct(), 40ODBC database, 445, 448okToContinue() helper, 187old-style vs. new-style classes, 76open()
built-in, 39, 70codecs, 255, 260, 501, 555gzip, 248QIODevice, 241, 243, 250, 252, 258,
259QSqlDatabase, 446, 459
Open Source licensing, 3or operator, 47Oracle database, 445, 448ord(), 21, 39, 50OrderedDict example class, 92–98orientation, 430os module
walk(), 555os.path module
basename(), 189dirname(), 173, 477, 496, 512join(), 496, 512, 555
OSError exception, 243, 244overloading, 75ownership, of objects, 119, 168, 170,
172, 180, 355, 357, 359, 372, 376
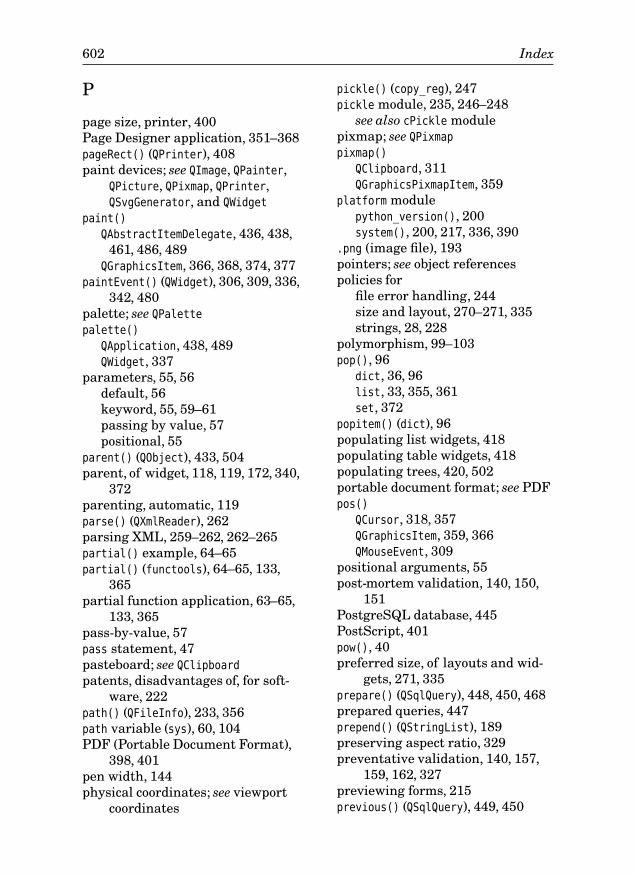
602 Index
P
page size, printer, 400Page Designer application, 351–368pageRect() (QPrinter), 408paint devices; see QImage, QPainter,
QPicture, QPixmap, QPrinter,QSvgGenerator, and QWidget
paint()
QAbstractItemDelegate, 436, 438,461, 486, 489
QGraphicsItem, 366, 368, 374, 377paintEvent() (QWidget), 306, 309, 336,
342, 480palette; see QPalettepalette()
QApplication, 438, 489QWidget, 337
parameters, 55, 56default, 56keyword, 55, 59–61passing by value, 57positional, 55
parent() (QObject), 433, 504parent, of widget, 118, 119, 172, 340,
372parenting, automatic, 119parse() (QXmlReader), 262parsing XML, 259–262, 262–265partial() example, 64–65partial() (functools), 64–65, 133,
365partial function application, 63–65,
133, 365pass-by-value, 57pass statement, 47pasteboard; see QClipboardpatents, disadvantages of, for soft-
ware, 222path() (QFileInfo), 233, 356path variable (sys), 60, 104PDF (Portable Document Format),
398, 401pen width, 144physical coordinates; see viewport
coordinates
pickle() (copy_reg), 247pickle module, 235, 246–248
see also cPickle modulepixmap; see QPixmappixmap()
QClipboard, 311QGraphicsPixmapItem, 359
platform modulepython_version(), 200system(), 200, 217, 336, 390
.png (image file), 193pointers; see object referencespolicies for
file error handling, 244size and layout, 270–271, 335strings, 28, 228
polymorphism, 99–103pop(), 96
dict, 36, 96list, 33, 355, 361set, 372
popitem() (dict), 96populating list widgets, 418populating table widgets, 418populating trees, 420, 502portable document format; see PDFpos()
QCursor, 318, 357QGraphicsItem, 359, 366QMouseEvent, 309
positional arguments, 55post-mortem validation, 140, 150,
151PostgreSQL database, 445PostScript, 401pow(), 40preferred size, of layouts and wid-
gets, 271, 335prepare() (QSqlQuery), 448, 450, 468prepared queries, 447prepend() (QStringList), 189preserving aspect ratio, 329preventative validation, 140, 157,
159, 162, 327previewing forms, 215previous() (QSqlQuery), 449, 450
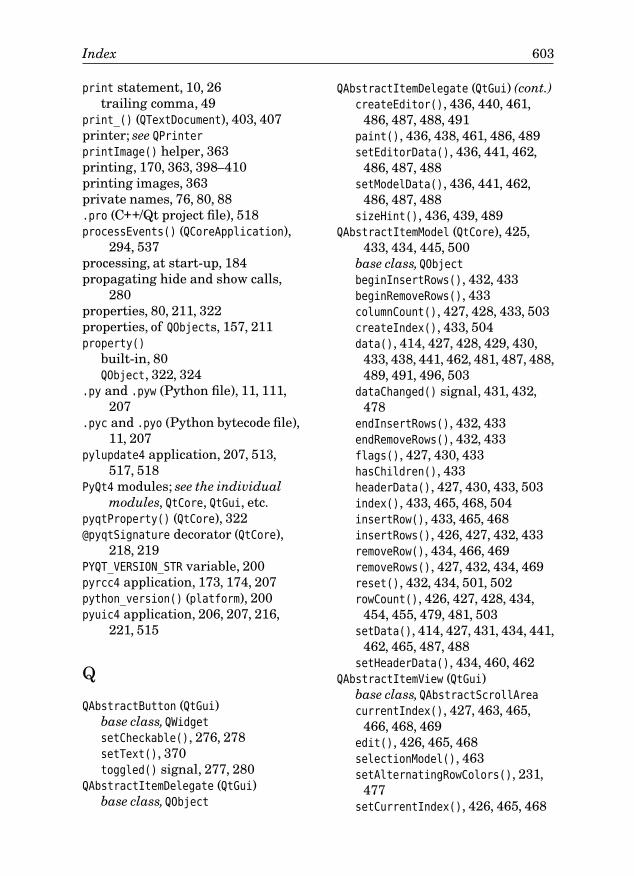
Index 603
print statement, 10, 26trailing comma, 49
print_() (QTextDocument), 403, 407printer; see QPrinterprintImage() helper, 363printing, 170, 363, 398–410printing images, 363private names, 76, 80, 88.pro (C++/Qt project file), 518processEvents() (QCoreApplication),
294, 537processing, at start-up, 184propagating hide and show calls,
280properties, 80, 211, 322properties, of QObjects, 157, 211property()
built-in, 80QObject, 322, 324
.py and .pyw (Python file), 11, 111,207
.pyc and .pyo (Python bytecode file),11, 207
pylupdate4 application, 207, 513,517, 518
PyQt4 modules; see the individualmodules, QtCore, QtGui, etc.
pyqtProperty() (QtCore), 322@pyqtSignature decorator (QtCore),
218, 219PYQT_VERSION_STR variable, 200pyrcc4 application, 173, 174, 207python_version() (platform), 200pyuic4 application, 206, 207, 216,
221, 515
Q
QAbstractButton (QtGui)base class,QWidgetsetCheckable(), 276, 278setText(), 370toggled() signal, 277, 280
QAbstractItemDelegate (QtGui)base class,QObject
QAbstractItemDelegate (QtGui) (cont.)createEditor(), 436, 440, 461,
486, 487, 488, 491paint(), 436, 438, 461, 486, 489setEditorData(), 436, 441, 462,
486, 487, 488setModelData(), 436, 441, 462,
486, 487, 488sizeHint(), 436, 439, 489
QAbstractItemModel (QtCore), 425,433, 434, 445, 500
base class,QObjectbeginInsertRows(), 432, 433beginRemoveRows(), 433columnCount(), 427, 428, 433, 503createIndex(), 433, 504data(), 414, 427, 428, 429, 430,
433, 438, 441, 462, 481, 487, 488,489, 491, 496, 503
dataChanged() signal, 431, 432,478
endInsertRows(), 432, 433endRemoveRows(), 432, 433flags(), 427, 430, 433hasChildren(), 433headerData(), 427, 430, 433, 503index(), 433, 465, 468, 504insertRow(), 433, 465, 468insertRows(), 426, 427, 432, 433removeRow(), 434, 466, 469removeRows(), 427, 432, 434, 469reset(), 432, 434, 501, 502rowCount(), 426, 427, 428, 434,
454, 455, 479, 481, 503setData(), 414, 427, 431, 434, 441,
462, 465, 487, 488setHeaderData(), 434, 460, 462
QAbstractItemView (QtGui)base class,QAbstractScrollAreacurrentIndex(), 427, 463, 465,
466, 468, 469edit(), 426, 465, 468selectionModel(), 463setAlternatingRowColors(), 231,
477setCurrentIndex(), 426, 465, 468
604 Index
QAbstractItemView (QtGui) (cont.)setDragEnabled(), 312, 313, 315setEditTriggers(), 231setItemDelegate(), 437, 460, 463,
490setModel(), 425, 437, 460, 463,
477, 490setSelectionBehavior(), 231, 460,
463, 495setSelectionMode(), 231, 460, 463startDrag(), 316
QAbstractScrollArea (QtGui)base class,QFrameviewport(), 392, 393
QAbstractSlider (QtGui)base class,QWidgetsetRange(), 369setValue(), 128, 369
QAbstractSocket (QtNetwork), 521base class,QIODeviceconnectToHost(), 525state(), 540waitForDisconnected(), 544
QAbstractSpinBox (QtGui)base class,QWidgetlineEdit(), 327setAlignment(), 340, 487validate(), 327, 328
QAbstractTableModel (QtCore), 425,427
base class,QAbstractItemModelQAction (QtGui), 171–172, 175, 194,
385base class,QObjectdata(), 172, 393, 395editor, visual, 206isChecked(), 172, 176isEnabled(), 172setCheckable(), 393setChecked(), 172, 177, 393setData(), 172, 189, 392, 393setEnabled(), 172setSeparator(), 172setShortcut(), 171, 172setStatusTip(), 172setText(), 172
QAction (QtGui) (cont.)setToolTip(), 172setwhatsThis(), 172toggled() signal, 172, 176, 177triggered() signal, 172, 176
QActionGroup (QtGui), 176QApplication (QtGui), 113, 115, 304
base class,QCoreApplicationclipboard(), 297, 311palette(), 438, 489setQuitOnLastWindowClosed(), 121
QBoxLayout (QtGui), 146, 326base class,QLayoutaddLayout(), 146addSpacing(), 146addStretch(), 146setStretchFactor(), 146
QBrush (QtGui), 374, 377QByteArray (QtCore), 313, 316, 358,
359, 525, 526, 533QCalendarWidget (QtGui), 575QCheckBox (QtGui), 575QClipboard (QtGui), 297, 310–312
base class,QObjecthasHtml(), 312mimeData(), 312pixmap(), 311setImage(), 311setMimeData(), 311setPixmap(), 311setText(), 297, 311text(), 297, 311
QCloseEvent (QtGui), 186QColor (QtGui), 337, 345, 371, 392,
393, 438, 481, 489QComboBox (QtGui), 440, 576
base class,QWidgetaddItem(), 276addItems(), 440currentIndexChanged() signal,
124, 275currentText(), 441findText(), 142, 441, 457setCurrentIndex(), 441, 457setEditable(), 440setModel(), 456
Index 605
QComboBox (QtGui) (cont.)setModelColumn(), 456
QContextMenuEvent (QtGui), 307base class,QInputEvent
QCoreApplication (QtCore), 538base class,QObjectapplicationDirPath(), 173applicationName(), 194exec_(), 115, 184installTranslator(), 516notify(), 305processEvents(), 294, 537quit(), 115translate(), 513, 515
QCursor (QtGui), 318pos(), 318, 357
QDataStream (QtCore), 240–246, 242,245, 315, 316, 358, 359, 435, 525,528, 531, 533, 540
atEnd(), 245device(), 525, 533isOpen(), 525readBool(), 245readDouble(), 241, 245readIntn(), 243, 245, 360, 435readUIntn(), 245, 528, 540setVersion(), 241, 243, 245, 525,
528, 531, 533, 540write(), 526, 533writeBool(), 245writeDouble(), 241, 245writeIntn(), 241, 242, 245, 359,
435writeUIntn(), 245, 525, 533
QDataWidgetMapper (QtGui), 453, 456base class,QObjectaddMapping(), 453, 456currentIndex(), 454, 455setCurrentIndex(), 454, 455setItemDelegate(), 456setModel(), 453, 456setSubmitPolicy(), 453, 456submit(), 454toFirst(), 453, 456
QDate (QtCore), 19, 45, 253, 513addDays(), 491
QDate (QtCore) (cont.)addYears(), 490currentDate(), 46, 236, 401, 490isNull(), 45toPyDate(), 532, 541toString(), 258, 401
QDateEdit (QtGui), 487, 576base class,QDateTimeEdit
QDateTime (QtCore), 45, 454, 513currentDateTime(), 454dateTime(), 455isNull(), 45setDateTime(), 454toString(), 455
QDateTimeEdit (QtGui), 452, 576base class,QAbstractSpinBoxdate(), 487setCalendarPopup(), 487setDate(), 487setDateRange(), 452, 487setDisplayFormat(), 452, 487
QDesktopServices (QtGui), 510QDial (QtGui), 128QDialog (QtGui), 118, 154, 217
base class,QWidgetaccept(), 151, 154, 425done(), 154, 457, 464exec_(), 142, 154, 511reject(), 215setSizeGripEnabled(), 154
QDialogButtonBox (QtGui), 145, 150,576
base class,QWidgetaccepted(), 145, 150addButton(), 150button(), 150, 158default button, 145, 188rejected(), 145, 150
QDir (QtCore)homePath(), 545toNativeSeparators(), 547, 551
QDockWidget (QtGui), 169base class,QWidgetsetAllowedAreas(), 169, 170setFeatures(), 170
QDomDocument (QtXml), 257, 259–262base class,QDomNode
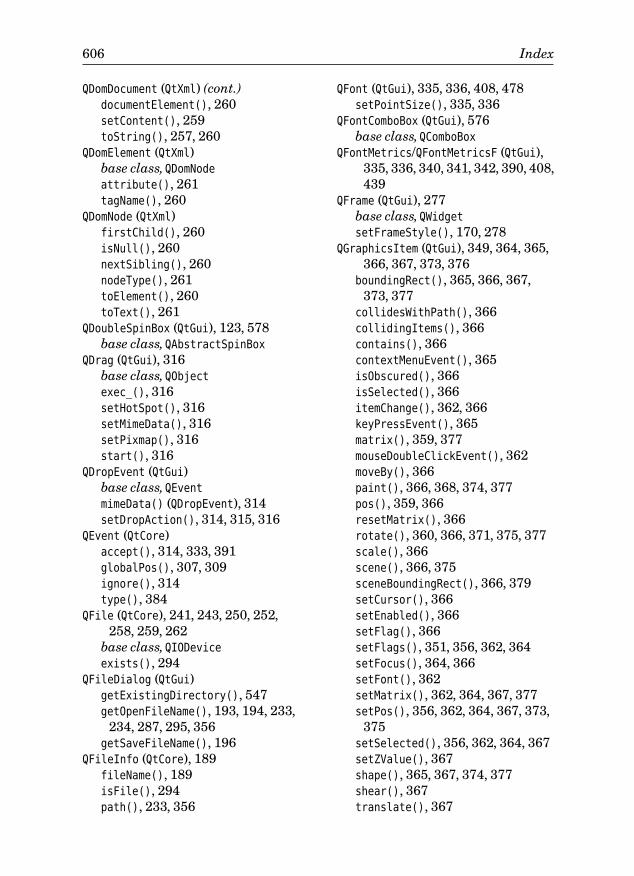
606 Index
QDomDocument (QtXml) (cont.)documentElement(), 260setContent(), 259toString(), 257, 260
QDomElement (QtXml)base class,QDomNodeattribute(), 261tagName(), 260
QDomNode (QtXml)firstChild(), 260isNull(), 260nextSibling(), 260nodeType(), 261toElement(), 260toText(), 261
QDoubleSpinBox (QtGui), 123, 578base class,QAbstractSpinBox
QDrag (QtGui), 316base class,QObjectexec_(), 316setHotSpot(), 316setMimeData(), 316setPixmap(), 316start(), 316
QDropEvent (QtGui)base class,QEventmimeData() (QDropEvent), 314setDropAction(), 314, 315, 316
QEvent (QtCore)accept(), 314, 333, 391globalPos(), 307, 309ignore(), 314type(), 384
QFile (QtCore), 241, 243, 250, 252,258, 259, 262
base class,QIODeviceexists(), 294
QFileDialog (QtGui)getExistingDirectory(), 547getOpenFileName(), 193, 194, 233,
234, 287, 295, 356getSaveFileName(), 196
QFileInfo (QtCore), 189fileName(), 189isFile(), 294path(), 233, 356
QFont (QtGui), 335, 336, 408, 478setPointSize(), 335, 336
QFontComboBox (QtGui), 576base class,QComboBox
QFontMetrics/QFontMetricsF (QtGui),335, 336, 340, 341, 342, 390, 408,439
QFrame (QtGui), 277base class,QWidgetsetFrameStyle(), 170, 278
QGraphicsItem (QtGui), 349, 364, 365,366, 367, 373, 376
boundingRect(), 365, 366, 367,373, 377
collidesWithPath(), 366collidingItems(), 366contains(), 366contextMenuEvent(), 365isObscured(), 366isSelected(), 366itemChange(), 362, 366keyPressEvent(), 365matrix(), 359, 377mouseDoubleClickEvent(), 362moveBy(), 366paint(), 366, 368, 374, 377pos(), 359, 366resetMatrix(), 366rotate(), 360, 366, 371, 375, 377scale(), 366scene(), 366, 375sceneBoundingRect(), 366, 379setCursor(), 366setEnabled(), 366setFlag(), 366setFlags(), 351, 356, 362, 364setFocus(), 364, 366setFont(), 362setMatrix(), 362, 364, 367, 377setPos(), 356, 362, 364, 367, 373,
375setSelected(), 356, 362, 364, 367setZValue(), 367shape(), 365, 367, 374, 377shear(), 367translate(), 367
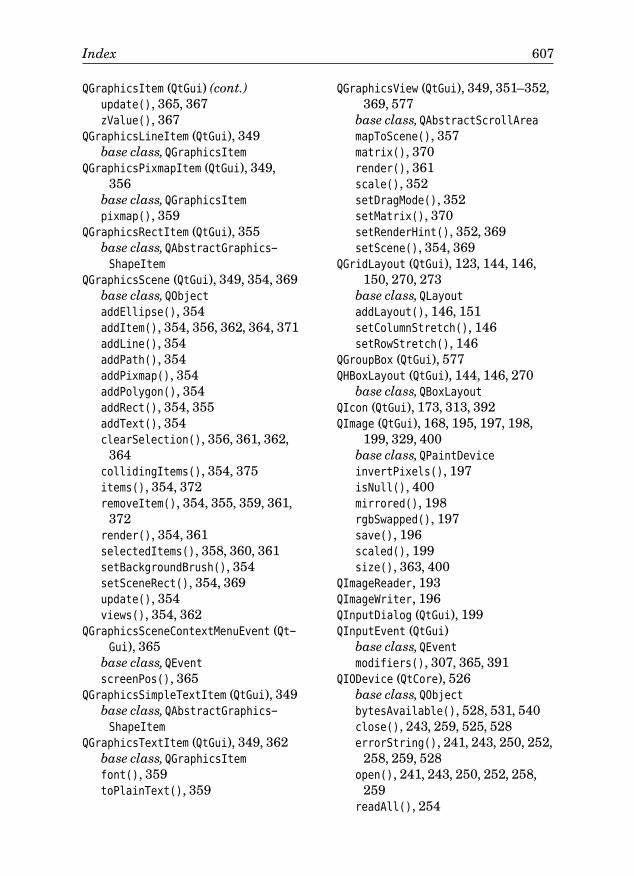
Index 607
QGraphicsItem (QtGui) (cont.)update(), 365, 367zValue(), 367
QGraphicsLineItem (QtGui), 349base class,QGraphicsItem
QGraphicsPixmapItem (QtGui), 349,356
base class,QGraphicsItempixmap(), 359
QGraphicsRectItem (QtGui), 355base class,QAbstractGraphics-ShapeItem
QGraphicsScene (QtGui), 349, 354, 369base class,QObjectaddEllipse(), 354addItem(), 354, 356, 362, 364, 371addLine(), 354addPath(), 354addPixmap(), 354addPolygon(), 354addRect(), 354, 355addText(), 354clearSelection(), 356, 361, 362,
364collidingItems(), 354, 375items(), 354, 372removeItem(), 354, 355, 359, 361,
372render(), 354, 361selectedItems(), 358, 360, 361setBackgroundBrush(), 354setSceneRect(), 354, 369update(), 354views(), 354, 362
QGraphicsSceneContextMenuEvent (Qt-Gui), 365
base class,QEventscreenPos(), 365
QGraphicsSimpleTextItem (QtGui), 349base class,QAbstractGraphics-ShapeItem
QGraphicsTextItem (QtGui), 349, 362base class,QGraphicsItemfont(), 359toPlainText(), 359
QGraphicsView (QtGui), 349, 351–352,369, 577
base class,QAbstractScrollAreamapToScene(), 357matrix(), 370render(), 361scale(), 352setDragMode(), 352setMatrix(), 370setRenderHint(), 352, 369setScene(), 354, 369
QGridLayout (QtGui), 123, 144, 146,150, 270, 273
base class,QLayoutaddLayout(), 146, 151setColumnStretch(), 146setRowStretch(), 146
QGroupBox (QtGui), 577QHBoxLayout (QtGui), 144, 146, 270
base class,QBoxLayoutQIcon (QtGui), 173, 313, 392QImage (QtGui), 168, 195, 197, 198,
199, 329, 400base class,QPaintDeviceinvertPixels(), 197isNull(), 400mirrored(), 198rgbSwapped(), 197save(), 196scaled(), 199size(), 363, 400
QImageReader, 193QImageWriter, 196QInputDialog (QtGui), 199QInputEvent (QtGui)
base class,QEventmodifiers(), 307, 365, 391
QIODevice (QtCore), 526base class,QObjectbytesAvailable(), 528, 531, 540close(), 243, 259, 525, 528errorString(), 241, 243, 250, 252,
258, 259, 528open(), 241, 243, 250, 252, 258,
259readAll(), 254
608 Index
QIODevice (QtCore) (cont.)waitForReadyRead(), 540
QItemDelegate (QtGui), 436, 437,485–489
base class,QAbstractItemDelegateQKeyEvent (QtGui), 307
base class,QInputEventkey(), 307, 334, 365, 384, 391,
483QKeySequence (QtGui), 171, 175, 285,
292, 393QLabel (QtGui), 114, 168, 340, 577
base class,QFramesetAlignment(), 168, 340setBuddy(), 143, 425setPixmap(), 199
QLayout (QtGui), 146base class,QLayoutItemaddWidget(), 146, 151, 273setSizeConstraint(), 277, 279
QLCDNumber (QtGui), 577QLinearGradient (QtGui), 343QLineEdit (QtGui), 117, 310, 314, 440,
461, 577base class,QWidgetinputMask property, 157returnPressed() signal, 440setAlignment(), 461setInputMask(), 461setText(), 441, 462setValidator(), 461text(), 441textEdited() signal, 161, 217,
218QListView (QtGui), 415, 578
base class,QAbstractItemViewQListWidget (QtGui), 275, 312, 315,
414, 418, 578base class,QListViewaddItem(), 418clear(), 418currentRowChanged() signal, 275populating, 418setCurrentItem(), 418
QListWidgetItem (QtGui), 316, 418setIcon(), 316
QListWidgetItem (QtGui) (cont.)takeItem(), 316
QLocale (QtCore), 513, 516.qm (Qt message file), 516, 518QMainWindow (QtGui), 168, 186, 284,
290base class,QWidgetaddDockWidget(), 169, 186addToolBar(), 179, 186closeAllWindows(), 289, 293menuBar(), 177, 186restoreState(), 183, 186saveState(), 183, 186setCentralWidget(), 168, 186, 285statusBar(), 170, 186
QMatrix and QTransform (QtGui), 356reset(), 370, 377scale(), 370
QMdiArea (QtGui), 290QMenu (QtGui), 307, 365, 392, 393
base class,QWidgetaboutToShow() signal, 178, 187,
285, 292addMenu(), 178addSeparator(), 178, 180, 307exec_(), 307, 365, 392, 393
QMenuBar (QtGui), 177, 178QMessageBox (QtGui), 153, 187, 188,
200, 361, 423, 455QMetaObject (QtCore), 217
connectSlotsByName(), 217QMimeData (QtCore), 311, 313, 316
base class,QObjectdata(), 315, 316hasFormat(), 314, 316html(), 312setData(), 316setHtml(), 311
QModelIndex (QtCore), 414, 432, 504column(), 428, 431, 439, 461, 462,
486, 496, 503index(), 427internalPointer(), 504isValid(), 427, 428, 504model(), 438, 441, 462, 489row(), 427, 491
Index 609
QModelIndex (QtCore) (cont.)sibling(), 491
QMouseEvent (QtGui), 309base class,QInputEventbutton(), 333pos(), 309
QMutex (QtCore), 541, 552, 553, 554QMutexLocker (QtCore), 554QObject (QtCore), 119, 127, 304, 322,
370blockSignals(), 135connect(), 124, 130, 133, 145, 146,
151, 158, 453deleteLater(), 287, 531, 539, 544destroyed() signal, 286, 288disconnect(), 130emit(), 130, 131, 219, 333, 340,
391, 431, 440, 556event(), 304, 309, 310, 384installEventFilter(), 304parent(), 433, 504properties, 157, 211property(), 322, 324sender(), 135, 289, 393, 395, 440setObjectName(), 169, 183, 324setProperty(), 322, 324startTimer(), 370timerEvent(), 372tr(), 513, 514, 515trUtf8(), 513
QPainter (QtGui), 306, 328, 337, 342,343, 344, 361, 363, 400, 407–410,408, 480
drawArc(), 344drawChord(), 344drawConvexPolygon(), 344drawEllipse(), 344, 374, 377, 481drawImage(), 344, 363, 400drawLine(), 338, 344drawPath(), 344, 377drawPicture(), 363drawPie(), 344drawPixmap(), 344, 363, 408drawPoint(), 344drawPolygon(), 338, 343, 344, 345drawPolyline(), 344, 345
QPainter (QtGui) (cont.)drawRect(), 337, 344, 368, 410drawRoundRect(), 344drawText(), 306, 338, 344, 408,
410, 481fillPath(), 344fillRect(), 344, 438, 481, 489restore(), 343, 346, 410, 438, 482,
489rotate(), 343save(), 343, 346, 438, 481, 489scale(), 343setBrush(), 337, 344, 345, 374,
377, 481setFont(), 344, 408, 482setMatrix(), 343setPen(), 337, 338, 343, 344, 345,
374, 377, 409, 410, 481setRenderHint(), 306, 337, 342,
343, 363setViewport(), 329, 342, 343, 363setWindow(), 329, 342, 343, 363shear(), 343translate(), 343, 438, 489viewport(), 363, 400
QPainterPath (QtGui), 374, 376addEllipse(), 374, 376addPolygon(), 376boundingRect(), 377closeSubPath(), 376
QPaintEvent (QtGui), 480base class,QEventrect(), 480
QPalette (QtGui), 337, 481QPen (QtGui), 368
setColor(), 368setWidth(), 368
QPicture (QtGui), 329base class,QPaintDevice
QPixmap (QtGui), 199, 329, 392, 404,408, 496
base class,QPaintDevicefill(), 392fromImage(), 199isNull(), 496
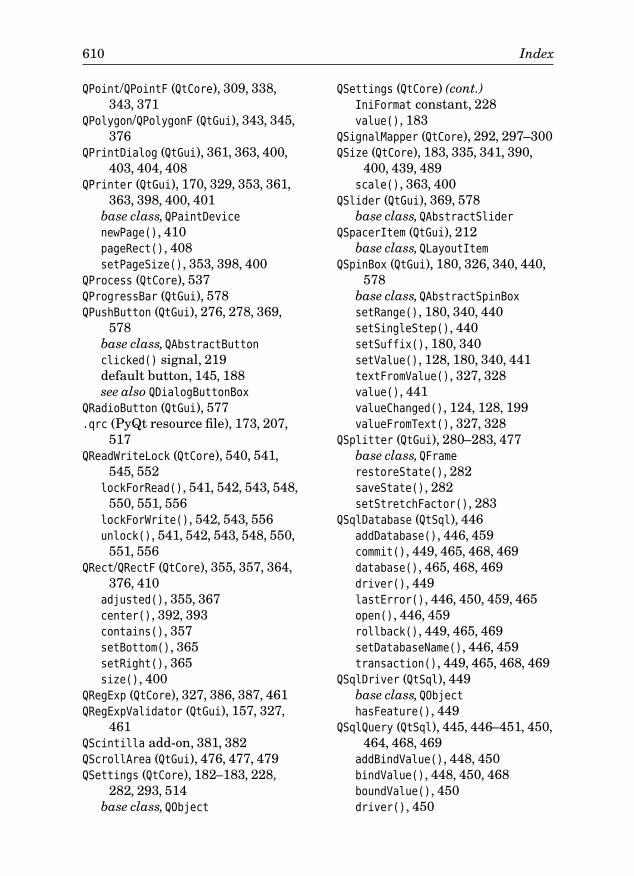
610 Index
QPoint/QPointF (QtCore), 309, 338,343, 371
QPolygon/QPolygonF (QtGui), 343, 345,376
QPrintDialog (QtGui), 361, 363, 400,403, 404, 408
QPrinter (QtGui), 170, 329, 353, 361,363, 398, 400, 401
base class,QPaintDevicenewPage(), 410pageRect(), 408setPageSize(), 353, 398, 400
QProcess (QtCore), 537QProgressBar (QtGui), 578QPushButton (QtGui), 276, 278, 369,
578base class,QAbstractButtonclicked() signal, 219default button, 145, 188see also QDialogButtonBox
QRadioButton (QtGui), 577.qrc (PyQt resource file), 173, 207,
517QReadWriteLock (QtCore), 540, 541,
545, 552lockForRead(), 541, 542, 543, 548,
550, 551, 556lockForWrite(), 542, 543, 556unlock(), 541, 542, 543, 548, 550,
551, 556QRect/QRectF (QtCore), 355, 357, 364,
376, 410adjusted(), 355, 367center(), 392, 393contains(), 357setBottom(), 365setRight(), 365size(), 400
QRegExp (QtCore), 327, 386, 387, 461QRegExpValidator (QtGui), 157, 327,
461QScintilla add-on, 381, 382QScrollArea (QtGui), 476, 477, 479QSettings (QtCore), 182–183, 228,
282, 293, 514base class,QObject
QSettings (QtCore) (cont.)IniFormat constant, 228value(), 183
QSignalMapper (QtCore), 292, 297–300QSize (QtCore), 183, 335, 341, 390,
400, 439, 489scale(), 363, 400
QSlider (QtGui), 369, 578base class,QAbstractSlider
QSpacerItem (QtGui), 212base class,QLayoutItem
QSpinBox (QtGui), 180, 326, 340, 440,578
base class,QAbstractSpinBoxsetRange(), 180, 340, 440setSingleStep(), 440setSuffix(), 180, 340setValue(), 128, 180, 340, 441textFromValue(), 327, 328value(), 441valueChanged(), 124, 128, 199valueFromText(), 327, 328
QSplitter (QtGui), 280–283, 477base class,QFramerestoreState(), 282saveState(), 282setStretchFactor(), 283
QSqlDatabase (QtSql), 446addDatabase(), 446, 459commit(), 449, 465, 468, 469database(), 465, 468, 469driver(), 449lastError(), 446, 450, 459, 465open(), 446, 459rollback(), 449, 465, 469setDatabaseName(), 446, 459transaction(), 449, 465, 468, 469
QSqlDriver (QtSql), 449base class,QObjecthasFeature(), 449
QSqlQuery (QtSql), 445, 446–451, 450,464, 468, 469
addBindValue(), 448, 450bindValue(), 448, 450, 468boundValue(), 450driver(), 450
Index 611
QSqlQuery (QtSql) (cont.)exec_(), 447, 448, 449, 450, 464,
468, 469first(), 450isActive(), 449, 450isValid(), 450last(), 450lastError(), 449next(), 449, 450, 451, 468, 469numRowsAffected(), 449, 450prepare(), 448, 450, 468previous(), 449, 450record(), 450seek(), 449, 451setForwardOnly(), 451size(), 450value(), 449, 450, 451
QSqlQueryModel (QtSql)base class,QAbstractTableModelrecord(), 464, 465, 466, 469setQuery(), 464
QSqlRecord (QtSql)value(), 464, 465, 466, 469
QSqlRelation (QtSql), 456, 460, 462QSqlRelationalDelegate (QtSql), 456,
460, 461QSqlRelationalTableModel (QtSql),
445, 456, 462base class,QSqlTableModelrelationModel(), 456setRelation(), 456, 460, 462
QSqlTableModel (QtSql), 445, 453base class,QSqlQueryModelbeforeInsert(), 470fieldIndex(), 456insertRecord(), 464select(), 453, 456, 460, 462, 464,
469setFilter(), 464, 469setSort(), 453, 456, 460, 462setTable(), 453, 456, 460, 462submitAll(), 455, 466, 469
QSslSocket (QtNetwork), 521QStackedWidget (QtGui), 274–276
base class,QFramesetCurrentIndex(), 275
QStatusBar (QtGui)
QStatusBar (QtGui) (cont.)base class,QWidgetclearMessage(), 170, 232setSizeGripEnabled(), 170showMessage(), 170, 233
QString (QtCore), 19, 23, 28, 233, 234,256, 313, 402
arg(), 402, 418, 419, 423, 427, 428,455, 513, 515
compare(), 435contains(), 234endsWith(), 240indexOf(), 306, 387, 388isEmpty(), 233isNull(), 45lastIndexOf(), 234left(), 234, 306length(), 388localeAwareCompare(), 416, 434mid(), 252number(), 338simplified(), 61, 422split(), 253startsWith(), 252toInt(), 251, 422toUpper(), 327trimmed(), 252, 422see also str type and unicode
typeQStringList (QtCore), 45, 189
contains(), 189isNull(), 45prepend(), 189takeLast(), 189
QStyleOptionGraphicsItem (QtGui),374
QStyleOptionViewItem (QtGui), 438,439, 461
QSvgGenerator (QtGui), 329, 363base class,QPaintDevice
QSvgRenderer (QtSvg), 363QSyntaxHighlighter (QtGui), 386–389Qt namespace, 258
escape(), 258, 397, 401WindowStaysOnTopHint, 529
Qt Assistant application, 510

612 Index
Qt Designer application, 205–216,272, 274, 275, 276, 277, 280, 324,326, 333
Qt.ItemDataRole (QtGui), 231Qt Linguist application, 513Qt.WidgetAttribute (QtGui)
WA_DeleteOnClose, 156, 158, 284,286
WA_GroupLeader, 511QTableView (QtGui), 415, 425, 437, 458,
460, 463, 477, 490, 579base class,QAbstractItemViewhorizontalHeader(), 463, 464resizeColumnsToContents(), 232,
419, 460, 463, 490setColumnHidden(), 460, 463setSortingEnabled(), 418, 419
QTableWidget (QtGui), 230–232, 310,313, 414, 418, 579
base class,QTableViewclear(), 418currentColumn(), 422currentItem(), 422editItem(), 422item(), 422itemChanged() signal, 417populating, 418scrollToItem(), 232setColumnCount(), 231, 418setCurrentItem(), 232, 419setHorizontalHeaderLabels(),
231, 418setItem(), 231, 419setRowCount(), 231, 418
QTableWidgetItem (QtGui), 231–232,418, 419
data(), 422setData(), 419setSelected(), 232, 419setTextAlignment(), 231, 419text(), 422
QTabWidget (QtGui), 272–274, 579base class,QWidget
QtCore module (PyQt4), 19pyqtProperty(), 322@pyqtSignature(), 218, 219
QtCore module (PyQt4) (cont.)PYQT_VERSION_STR variable, 200QT_VERSION_STR variable, 200SIGNAL(), 131SLOT(), 131see also under class names
QTcpServer (QtNetwork), 529, 530, 539incomingConnection(), 530, 539listen(), 529
QTcpSocket (QtNetwork), 522, 524, 531,540
base class,QAbstractSocketQTextBlock (QtGui), 396QTextBlockFormat (QtGui), 404QTextBrowser (QtGui), 117, 381, 511,
579base class,QTextEdit
QTextCharFormat (QtGui), 386, 387,404
QTextCursor (QtGui), 297, 384,403–407
currentFrame(), 404hasSelection(), 385insertBlock(), 404insertImage(), 404insertTable(), 404insertText(), 384, 404removeSelectedText(), 297selectedText(), 297setPosition(), 406
QTextDocument (QtGui), 381, 383, 396,398, 401–407, 403, 438, 439,489
base class,QObjectclear(), 383drawContents(), 438, 489idealWidth(), 390, 439, 489isEmpty(), 385isModified(), 287, 385print_(), 403, 407setDefaultFont(), 438, 439, 489setHtml(), 403, 438, 439, 489setModified(), 286, 383, 384toHtml(), 407
QTextEdit (QtGui), 285, 310, 381, 383,390, 392, 579
Index 613
QTextEdit (QtGui) (cont.)base class,QAbstractScrollAreaappend(), 120canPaste(), 385currentCharFormat(), 393, 395cursorRect(), 392, 393cut(), 385document(), 286, 287, 383, 384,
385, 396ensureCursorVisible(), 392, 393insertPlainText(), 297mergeCurrentCharFormat(), 395setHtml(), 488setLineWrapMode(), 390setPlainText(), 384setTabChangesFocus(), 390setTextColor(), 393textCursor(), 297, 384, 385toHtml(), 395toPlainText(), 384, 395
QTextOption (QtGui), 409QTextStream (QtCore), 250–255, 254,
258, 384atEnd(), 252, 253, 254readAll(), 384readLine(), 252, 253, 254setCodec(), 250, 252, 254, 258,
384QTextTableFormat (QtGui), 404QtGui module (PyQt4), 19
see also under class namesQThread (QtCore), 538, 540
isRunning(), 547, 551run(), 538, 540, 548, 553start(), 539, 547, 553wait(), 547, 548, 551
QTime (QtCore), 45isNull(), 45see also time module
QTimeEdit (QtGui), 576base class,QDateTimeEdit
QTimer (QtCore), 373, 376base class,QObjectsingleShot(), 115, 306start(), 373, 376timeout() signal, 373, 376
QtNetwork module (PyQt4), 521, 523see also under class names
QToolBar (QtGui), 179–180, 180base class,QWidgetaddSeparator(), 178, 180
QToolTip (QtGui), 171, 200, 514QTransform (QtGui), 356QTranslator (QtCore), 516QTreeView (QtGui), 415, 495, 579
base class,QAbstractItemViewpopulating, 502setItemsExpandable(), 420setUniformRowHeights(), 495
QTreeWidget (QtGui), 414, 579base class,QTreeViewclear(), 420expandItem(), 421populating, 420setColumnCount(), 420setCurrentItem(), 421setHeaderLabels(), 420
QTreeWidgetItem (QtGui), 420, 421QtSql module (PyQt4), 445, 446
see also under class namesQtSvg module (PyQt4), 363
see also under class namesQT_VERSION_STR variable, 200QtXml module (PyQt4), 235
see also under class namesQUdpSocket (QtNetwork), 522
base class,QAbstractSocketqueries, database; see QSqlQuery and
SQL statementsquestion() (QMessageBox), 187, 188,
361, 423, 455quit() (QCoreApplication), 115quitting applications; see terminat-
ing applicationsquoted strings; see string literalsQVariant (QtCore), 183, 185, 231, 323,
392, 414, 427, 428, 429, 430, 441,448, 451, 488, 496
toBool(), 324toDate(), 487, 491toDateTime(), 449toDouble(), 481
614 Index
QVariant (QtCore) (cont.)toInt(), 395, 431, 449toLongLong(), 422toString(), 427, 431, 441, 449,
488QVBoxLayout (QtGui), 146, 270
base class,QBoxLayoutQWidget (QtGui), 118, 119, 127, 168,
273, 305, 306, 309, 322–324, 324,325–326, 328, 329, 330, 331, 370,421
base classes,QObject and QPaint-
Device
activateWindow(), 160, 289addAction(), 172, 178, 180, 307,
330, 365, 392, 393addActions(), 178close(), 175, 285, 289, 330closeEvent(), 175, 185, 187, 282,
285, 289, 293, 309, 551contextMenuEvent(), 307, 309, 390dragEnterEvent(), 309, 314, 316dragMoveEvent(), 309, 314, 315,
316dropEvent(), 309, 315, 316font(), 336, 342geometry(), 357hasFocus(), 330, 426hasMouseTracking(), 308height(), 330hide(), 279, 330keyPressEvent(), 307, 309, 334,
391, 483keyReleaseEvent(), 307layout(), 277mapFromGlobal(), 357mapToGlobal(), 309, 392, 393maximumHeight(), 390minimumHeight(), 390minimumSizeHint(), 271, 335, 340,
341, 479mouseDoubleClickEvent(), 308,
309, 417, 422, 440mouseMoveEvent(), 309, 317mousePressEvent(), 309, 333mouseReleaseEvent(), 308, 309
QWidget (QtGui) (cont.)move(), 183, 330, 341paintEvent(), 306, 309, 336, 342,
480palette(), 337raise_(), 160, 289, 330rect(), 306, 330resize(), 183resizeEvent(), 306, 309, 341restoreGeometry(), 183, 186, 330saveGeometry(), 183, 186, 330setAcceptDrops(), 312, 313, 314,
315, 316, 330setAttribute(), 156, 284, 330,
511setContextMenuPolicy(), 168, 330,
365setCursor(), 330setEnabled(), 219, 330setFocus(), 120, 310, 330, 422setFocusPolicy(), 180, 217, 331,
369, 478setFont(), 330setLayout(), 273, 279, 330setMaximumHeight(), 390setMinimumHeight(), 390setMinimumSize(), 168, 340setMinimumWidth(), 340setMouseTracking(), 308, 334setSizePolicy(), 330, 331, 340setStatusTip(), 171, 180setStyleSheet(), 323, 330setTabOrder(), 206setToolTip(), 171, 180, 390setVisible(), 277, 280setWindowFlags(), 529setWindowIcon(), 186, 330setWindowModified(), 192setWindowTitle(), 146, 151, 186,
330, 370show(), 115, 155, 280, 286, 330,
511showMinimized(), 297showNormal(), 297sizeHint(), 335, 390, 479update(), 306, 330, 332, 479, 482
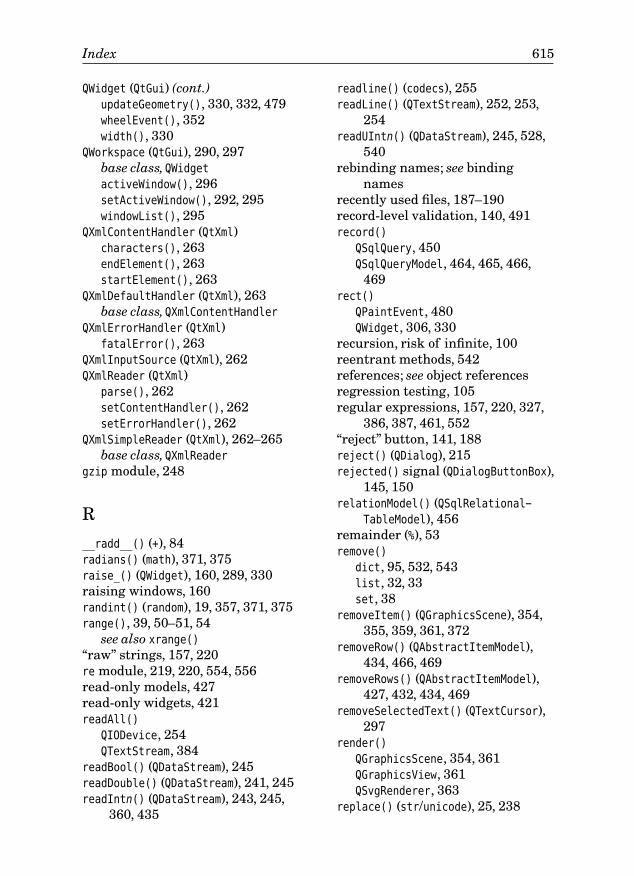
Index 615
QWidget (QtGui) (cont.)updateGeometry(), 330, 332, 479wheelEvent(), 352width(), 330
QWorkspace (QtGui), 290, 297base class,QWidgetactiveWindow(), 296setActiveWindow(), 292, 295windowList(), 295
QXmlContentHandler (QtXml)characters(), 263endElement(), 263startElement(), 263
QXmlDefaultHandler (QtXml), 263base class,QXmlContentHandler
QXmlErrorHandler (QtXml)fatalError(), 263
QXmlInputSource (QtXml), 262QXmlReader (QtXml)
parse(), 262setContentHandler(), 262setErrorHandler(), 262
QXmlSimpleReader (QtXml), 262–265base class,QXmlReader
gzip module, 248
R
__radd__() (+), 84radians() (math), 371, 375raise_() (QWidget), 160, 289, 330raising windows, 160randint() (random), 19, 357, 371, 375range(), 39, 50–51, 54
see also xrange()
“raw” strings, 157, 220re module, 219, 220, 554, 556read-only models, 427read-only widgets, 421readAll()
QIODevice, 254QTextStream, 384
readBool() (QDataStream), 245readDouble() (QDataStream), 241, 245readIntn() (QDataStream), 243, 245,
360, 435
readline() (codecs), 255readLine() (QTextStream), 252, 253,
254readUIntn() (QDataStream), 245, 528,
540rebinding names; see binding
namesrecently used files, 187–190record-level validation, 140, 491record()
QSqlQuery, 450QSqlQueryModel, 464, 465, 466,
469rect()
QPaintEvent, 480QWidget, 306, 330
recursion, risk of infinite, 100reentrant methods, 542references; see object referencesregression testing, 105regular expressions, 157, 220, 327,
386, 387, 461, 552“reject” button, 141, 188reject() (QDialog), 215rejected() signal (QDialogButtonBox),
145, 150relationModel() (QSqlRelational-
TableModel), 456remainder (%), 53remove()
dict, 95, 532, 543list, 32, 33set, 38
removeItem() (QGraphicsScene), 354,355, 359, 361, 372
removeRow() (QAbstractItemModel),434, 466, 469
removeRows() (QAbstractItemModel),427, 432, 434, 469
removeSelectedText() (QTextCursor),297
render()
QGraphicsScene, 354, 361QGraphicsView, 361QSvgRenderer, 363
replace() (str/unicode), 25, 238
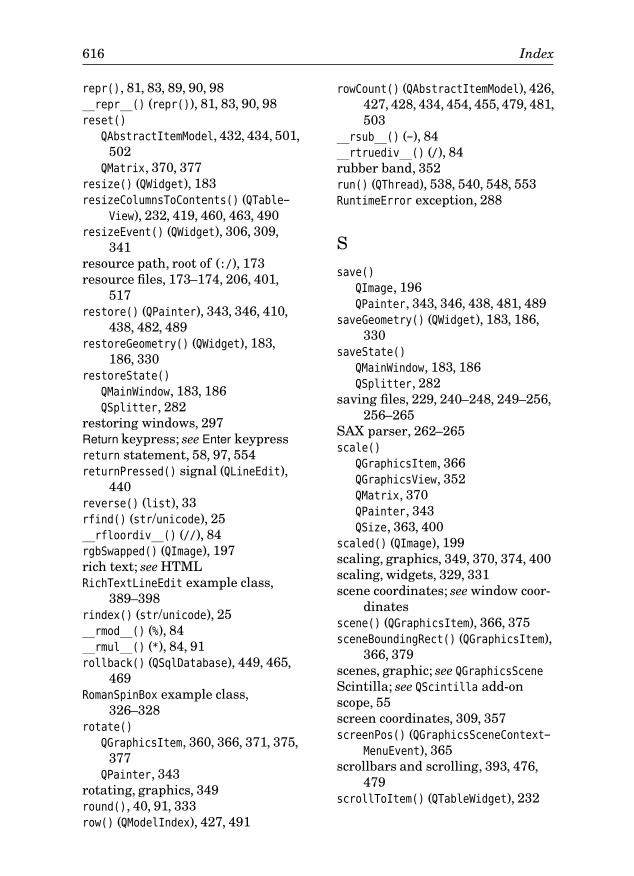
616 Index
repr(), 81, 83, 89, 90, 98__repr__() (repr()), 81, 83, 90, 98reset()
QAbstractItemModel, 432, 434, 501,502
QMatrix, 370, 377resize() (QWidget), 183resizeColumnsToContents() (QTable-
View), 232, 419, 460, 463, 490resizeEvent() (QWidget), 306, 309,
341resource path, root of (:/), 173resource files, 173–174, 206, 401,
517restore() (QPainter), 343, 346, 410,
438, 482, 489restoreGeometry() (QWidget), 183,
186, 330restoreState()
QMainWindow, 183, 186QSplitter, 282
restoring windows, 297Return keypress; see Enter keypressreturn statement, 58, 97, 554returnPressed() signal (QLineEdit),
440reverse() (list), 33rfind() (str/unicode), 25__rfloordiv__() (//), 84rgbSwapped() (QImage), 197rich text; see HTMLRichTextLineEdit example class,
389–398rindex() (str/unicode), 25__rmod__() (%), 84__rmul__() (*), 84, 91rollback() (QSqlDatabase), 449, 465,
469RomanSpinBox example class,
326–328rotate()
QGraphicsItem, 360, 366, 371, 375,377
QPainter, 343rotating, graphics, 349round(), 40, 91, 333row() (QModelIndex), 427, 491
rowCount() (QAbstractItemModel), 426,427, 428, 434, 454, 455, 479, 481,503
__rsub__() (-), 84__rtruediv__() (/), 84rubber band, 352run() (QThread), 538, 540, 548, 553RuntimeError exception, 288
S
save()
QImage, 196QPainter, 343, 346, 438, 481, 489
saveGeometry() (QWidget), 183, 186,330
saveState()
QMainWindow, 183, 186QSplitter, 282
saving files, 229, 240–248, 249–256,256–265
SAX parser, 262–265scale()
QGraphicsItem, 366QGraphicsView, 352QMatrix, 370QPainter, 343QSize, 363, 400
scaled() (QImage), 199scaling, graphics, 349, 370, 374, 400scaling, widgets, 329, 331scene coordinates; see window coor-
dinatesscene() (QGraphicsItem), 366, 375sceneBoundingRect() (QGraphicsItem),
366, 379scenes, graphic; see QGraphicsSceneScintilla; see QScintilla add-onscope, 55screen coordinates, 309, 357screenPos() (QGraphicsSceneContext-
MenuEvent), 365scrollbars and scrolling, 393, 476,
479scrollToItem() (QTableWidget), 232
Index 617
SDI (Single Document Interface),283–290
search() (re), 219seek() (QSqlQuery), 449, 451select() (QSqlTableModel), 453, 456,
460, 462, 464, 469SELECT statements, 449–451selected text, 392selectedItems() (QGraphicsScene),
358, 360, 361selectedText() (QTextCursor), 297selecting graphics items, 352selectionModel() (QAbstractItem-
View), 463self, 77, 78sender() (QObject), 135, 289, 393, 395,
440separators, menu, 178, 180sequences, 22set type, 37, 38, 93, 551
add(), 37, 38, 372, 556clear(), 38copy(), 38, 548, 551discard(), 38pop(), 372remove(), 38
setAcceptDrops() (QWidget), 312, 313,314, 315, 316, 330
setActiveWindow() (QWorkspace), 292,295
setAlignment()
QAbstractSpinBox, 340, 487QLabel, 168, 340QLineEdit, 461
setAllowedAreas() (QDockWidget), 169,170
setAlternatingRowColors() (QAb-stractItemView) (QAbstractItem-View), 231, 477
setAttribute() (QWidget), 156, 284,330, 511
setBackgroundBrush() (QGraphics-Scene), 354
setBottom() (QRect/QRectF), 365setBrush() (QPainter), 337, 344, 345,
374, 377, 481
setBuddy() (QLabel), 143, 425setCalendarPopup() (QDateTimeEdit),
487setCentralWidget() (QMainWindow),
168, 186, 285setCheckable()
QAbstractButton, 276, 278QAction, 393
setChecked() (QAction), 172, 177, 393setCodec() (QTextStream), 250, 252,
254, 258, 384setColor() (QPen), 368setColumnCount()
QTableWidget, 231, 418QTreeWidget, 420
setColumnHidden() (QTableView), 460,463
setColumnStretch() (QGridLayout),146
setContent() (QDomDocument), 259setContentHandler() (QXmlReader),
262setContextMenuPolicy() (QWidget),
168, 330, 365setCurrentIndex()
QAbstractItemView, 426, 465, 468QComboBox, 441, 457QDataWidgetMapper, 454, 455QStackedWidget, 275
setCurrentItem()
QListWidget, 418QTableWidget, 232, 419QTreeWidget, 421
setCursor()
QGraphicsItem, 366QWidget, 330
setData(), 189, 231QAbstractItemModel, 414, 427, 431,
434, 441, 462, 465, 487, 488QAction, 172, 189, 392, 393QMimeData, 316QTableWidgetItem, 231QTableWidgetItem, 419
setDatabaseName() (QSqlDatabase),446, 459
setDate() (QDateTimeEdit), 487
618 Index
setDateRange() (QDateTimeEdit), 452,487
setDateTime() (QDateTime), 454setdefault() (dict), 36, 95, 532
see also defaultdict typesetDefaultFont() (QTextDocument),
438, 439, 489setDisplayFormat() (QDateTimeEdit),
452, 487setDragEnabled() (QAbstractItemView,
312, 313, 315, 316setDragMode() (QGraphicsView), 352setDropAction() (QDropEvent), 314,
315, 316setEditable() (QComboBox), 440setEditorData() (QAbstractItem-
Delegate), 436, 441, 462, 486,487, 488
setEditTriggers() (QAbstrac-tItemView), 231
setEnabled()
QAction, 172QGraphicsItem, 366QWidget, 219, 330
setErrorHandler() (QXmlReader), 262setFeatures() (QDockWidget), 170setFilter() (QSqlTableModel), 464,
469setFlag() (QGraphicsItem), 366setFlags() (QGraphicsItem), 351, 356,
362, 364setFocus()
QGraphicsItem, 364, 366QWidget, 120, 310, 330, 422
setFocusPolicy() (QWidget), 180, 217,331, 369, 478
setFont()
QGraphicsItem, 362QPainter, 344, 408, 482QWidget, 330
setForwardOnly() (QSqlQuery), 451setFrameStyle() (QFrame), 170, 278setHeaderData() (QAbstractItem-
Model), 434, 460, 462setHeaderLabels() (QTreeWidget), 420
setHorizontalHeaderLabels()
(QTableWidget), 231, 418setHotSpot() (QDrag), 316setHtml()
QMimeData, 311QTextDocument, 403, 438, 439, 489QTextEdit, 488
setIcon() (QListWidgetItem), 316setImage() (QClipboard), 311setInputMask() (QLineEdit), 461setItem() (QTableWidget), 231, 419__setitem__() ([]), 93, 95setItemDelegate()
QAbstractItemView, 437, 460, 463,490
QDataWidgetMapper, 456setItemsExpandable() (QTreeView),
420setLayout() (QWidget), 273, 279, 330setLineWrapMode() (QTextEdit), 390setMatrix()
QGraphicsItem, 362, 364, 367, 377QGraphicsView, 370QPainter, 343
setMaximumHeight() (QWidget), 390setMimeData()
QClipboard, 311QDrag, 316
setMinimumHeight() (QWidget), 390setMinimumSize() (QWidget), 168, 340setMinimumWidth() (QWidget), 340setModel()
QAbstractItemView, 425, 437, 460,463, 477, 490
QComboBox, 456QDataWidgetMapper, 453, 456
setModelColumn() (QComboBox), 456setModelData() (QAbstractItem-
Delegate), 436, 441, 462, 486,487, 488
setModified() (QTextDocument), 286,383, 384
setMouseTracking() (QWidget), 308,334
setObjectName() (QObject), 169, 183,324
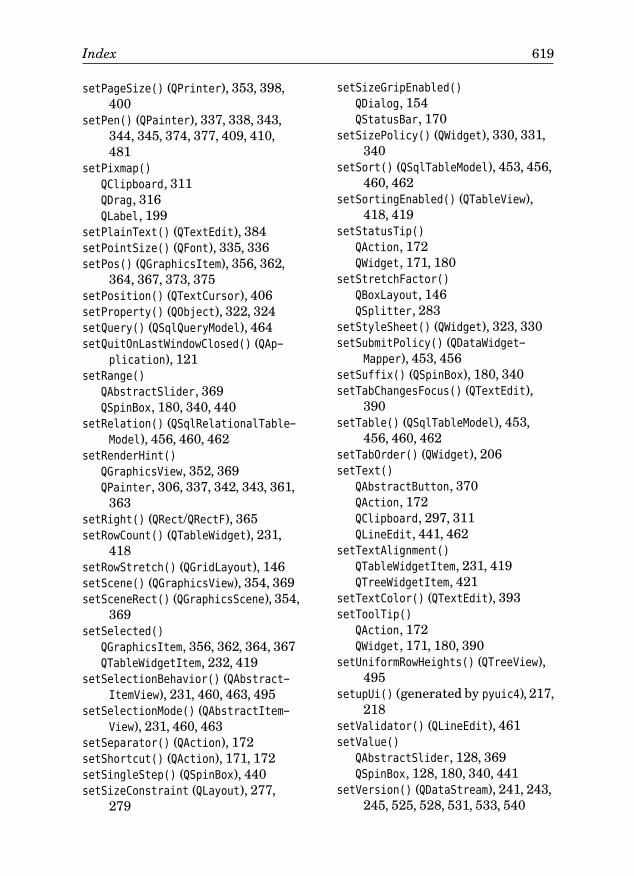
Index 619
setPageSize() (QPrinter), 353, 398,400
setPen() (QPainter), 337, 338, 343,344, 345, 374, 377, 409, 410,481
setPixmap()
QClipboard, 311QDrag, 316QLabel, 199
setPlainText() (QTextEdit), 384setPointSize() (QFont), 335, 336setPos() (QGraphicsItem), 356, 362,
364, 367, 373, 375setPosition() (QTextCursor), 406setProperty() (QObject), 322, 324setQuery() (QSqlQueryModel), 464setQuitOnLastWindowClosed() (QAp-
plication), 121setRange()
QAbstractSlider, 369QSpinBox, 180, 340, 440
setRelation() (QSqlRelationalTable-Model), 456, 460, 462
setRenderHint()
QGraphicsView, 352, 369QPainter, 306, 337, 342, 343, 361,
363setRight() (QRect/QRectF), 365setRowCount() (QTableWidget), 231,
418setRowStretch() (QGridLayout), 146setScene() (QGraphicsView), 354, 369setSceneRect() (QGraphicsScene), 354,
369setSelected()
QGraphicsItem, 356, 362, 364, 367QTableWidgetItem, 232, 419
setSelectionBehavior() (QAbstract-ItemView), 231, 460, 463, 495
setSelectionMode() (QAbstractItem-View), 231, 460, 463
setSeparator() (QAction), 172setShortcut() (QAction), 171, 172setSingleStep() (QSpinBox), 440setSizeConstraint (QLayout), 277,
279
setSizeGripEnabled()
QDialog, 154QStatusBar, 170
setSizePolicy() (QWidget), 330, 331,340
setSort() (QSqlTableModel), 453, 456,460, 462
setSortingEnabled() (QTableView),418, 419
setStatusTip()
QAction, 172QWidget, 171, 180
setStretchFactor()
QBoxLayout, 146QSplitter, 283
setStyleSheet() (QWidget), 323, 330setSubmitPolicy() (QDataWidget-
Mapper), 453, 456setSuffix() (QSpinBox), 180, 340setTabChangesFocus() (QTextEdit),
390setTable() (QSqlTableModel), 453,
456, 460, 462setTabOrder() (QWidget), 206setText()
QAbstractButton, 370QAction, 172QClipboard, 297, 311QLineEdit, 441, 462
setTextAlignment()
QTableWidgetItem, 231, 419QTreeWidgetItem, 421
setTextColor() (QTextEdit), 393setToolTip()
QAction, 172QWidget, 171, 180, 390
setUniformRowHeights() (QTreeView),495
setupUi() (generated by pyuic4), 217,218
setValidator() (QLineEdit), 461setValue()
QAbstractSlider, 128, 369QSpinBox, 128, 180, 340, 441
setVersion() (QDataStream), 241, 243,245, 525, 528, 531, 533, 540
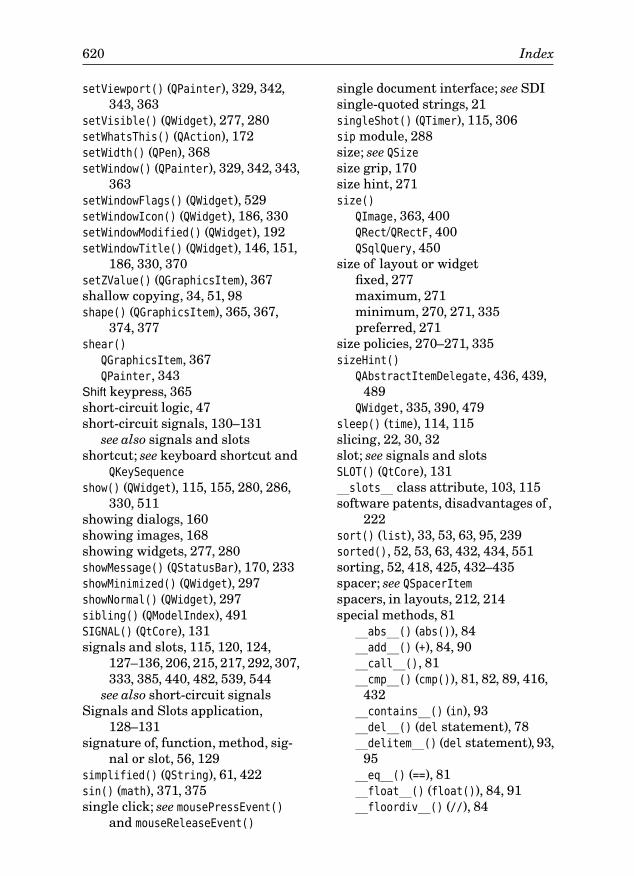
620 Index
setViewport() (QPainter), 329, 342,343, 363
setVisible() (QWidget), 277, 280setWhatsThis() (QAction), 172setWidth() (QPen), 368setWindow() (QPainter), 329, 342, 343,
363setWindowFlags() (QWidget), 529setWindowIcon() (QWidget), 186, 330setWindowModified() (QWidget), 192setWindowTitle() (QWidget), 146, 151,
186, 330, 370setZValue() (QGraphicsItem), 367shallow copying, 34, 51, 98shape() (QGraphicsItem), 365, 367,
374, 377shear()
QGraphicsItem, 367QPainter, 343
Shift keypress, 365short-circuit logic, 47short-circuit signals, 130–131
see also signals and slotsshortcut; see keyboard shortcut and
QKeySequence
show() (QWidget), 115, 155, 280, 286,330, 511
showing dialogs, 160showing images, 168showing widgets, 277, 280showMessage() (QStatusBar), 170, 233showMinimized() (QWidget), 297showNormal() (QWidget), 297sibling() (QModelIndex), 491SIGNAL() (QtCore), 131signals and slots, 115, 120, 124,
127–136, 206, 215, 217, 292, 307,333, 385, 440, 482, 539, 544
see also short-circuit signalsSignals and Slots application,
128–131signature of, function, method, sig-
nal or slot, 56, 129simplified() (QString), 61, 422sin() (math), 371, 375single click; see mousePressEvent()
and mouseReleaseEvent()
single document interface; see SDIsingle-quoted strings, 21singleShot() (QTimer), 115, 306sip module, 288size; see QSizesize grip, 170size hint, 271size()
QImage, 363, 400QRect/QRectF, 400QSqlQuery, 450
size of layout or widgetfixed, 277maximum, 271minimum, 270, 271, 335preferred, 271
size policies, 270–271, 335sizeHint()
QAbstractItemDelegate, 436, 439,489
QWidget, 335, 390, 479sleep() (time), 114, 115slicing, 22, 30, 32slot; see signals and slotsSLOT() (QtCore), 131__slots__ class attribute, 103, 115software patents, disadvantages of ,
222sort() (list), 33, 53, 63, 95, 239sorted(), 52, 53, 63, 432, 434, 551sorting, 52, 418, 425, 432–435spacer; see QSpacerItemspacers, in layouts, 212, 214special methods, 81
__abs__() (abs()), 84__add__() (+), 84, 90__call__(), 81__cmp__() (cmp()), 81, 82, 89, 416,
432__contains__() (in), 93__del__() (del statement), 78__delitem__() (del statement), 93,
95__eq__() (==), 81__float__() (float()), 84, 91__floordiv__() (//), 84
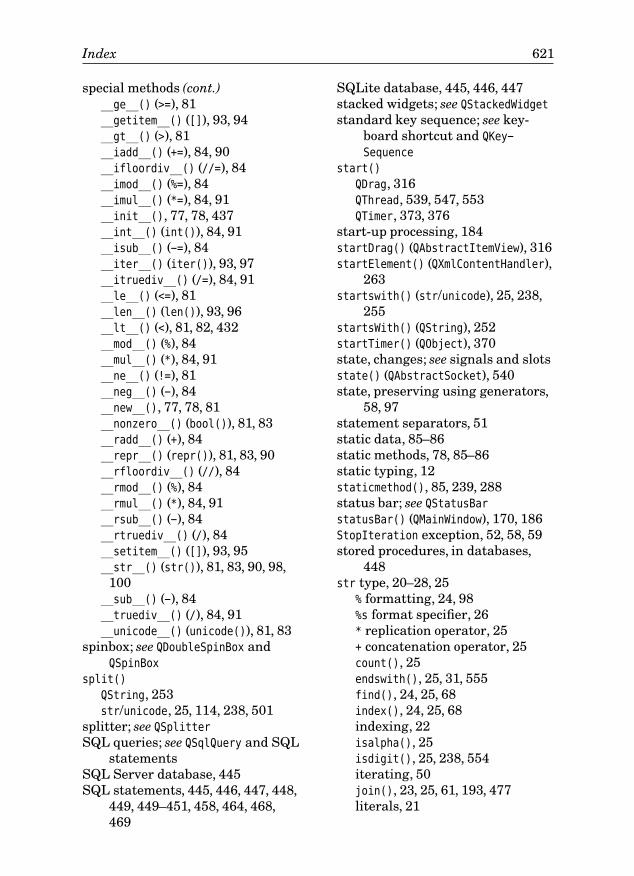
Index 621
special methods (cont.)__ge__() (>=), 81__getitem__() ([]), 93, 94__gt__() (>), 81__iadd__() (+=), 84, 90__ifloordiv__() (//=), 84__imod__() (%=), 84__imul__() (*=), 84, 91__init__(), 77, 78, 437__int__() (int()), 84, 91__isub__() (-=), 84__iter__() (iter()), 93, 97__itruediv__() (/=), 84, 91__le__() (<=), 81__len__() (len()), 93, 96__lt__() (<), 81, 82, 432__mod__() (%), 84__mul__() (*), 84, 91__ne__() (!=), 81__neg__() (-), 84__new__(), 77, 78, 81__nonzero__() (bool()), 81, 83__radd__() (+), 84__repr__() (repr()), 81, 83, 90__rfloordiv__() (//), 84__rmod__() (%), 84__rmul__() (*), 84, 91__rsub__() (-), 84__rtruediv__() (/), 84__setitem__() ([]), 93, 95__str__() (str()), 81, 83, 90, 98,
100__sub__() (-), 84__truediv__() (/), 84, 91__unicode__() (unicode()), 81, 83
spinbox; see QDoubleSpinBox andQSpinBox
split()
QString, 253str/unicode, 25, 114, 238, 501
splitter; see QSplitterSQL queries; see QSqlQuery and SQL
statementsSQL Server database, 445SQL statements, 445, 446, 447, 448,
449, 449–451, 458, 464, 468,469
SQLite database, 445, 446, 447stacked widgets; see QStackedWidgetstandard key sequence; see key-
board shortcut and QKey-
Sequence
start()
QDrag, 316QThread, 539, 547, 553QTimer, 373, 376
start-up processing, 184startDrag() (QAbstractItemView), 316startElement() (QXmlContentHandler),
263startswith() (str/unicode), 25, 238,
255startsWith() (QString), 252startTimer() (QObject), 370state, changes; see signals and slotsstate() (QAbstractSocket), 540state, preserving using generators,
58, 97statement separators, 51static data, 85–86static methods, 78, 85–86static typing, 12staticmethod(), 85, 239, 288status bar; see QStatusBarstatusBar() (QMainWindow), 170, 186StopIteration exception, 52, 58, 59stored procedures, in databases,
448str type, 20–28, 25
% formatting, 24, 98%s format specifier, 26* replication operator, 25+ concatenation operator, 25count(), 25endswith(), 25, 31, 555find(), 24, 25, 68index(), 24, 25, 68indexing, 22isalpha(), 25isdigit(), 25, 238, 554iterating, 50join(), 23, 25, 61, 193, 477literals, 21
622 Index
str type (cont.)lower(), 25, 238promotion to unicode, 20replace(), 25, 238rfind(), 25rindex(), 25slicing, 22split(), 25, 114, 238, 501startswith(), 25, 238, 255strip(), 25, 59, 255title(), 24upper(), 25see also QString and unicode type
__str__() (str()), 81, 83, 90, 98, 100stream reading and writing, 242,
245, 250, 252, 258streams; see QDataStream and
QTextStream
stretch factors, 144, 212, 271, 283string literals, 20string module, 26
Template class, 26StringIO module, 23
see also cStringIO modulestrings; see QString, str type, and
unicode typestrip() (str/unicode), 25, 59, 255style sheets, 322–324sub() (re), 220, 556__sub__() (-), 84subcontrols, in widgets, 324submit() (QDataWidgetMapper), 454submitAll() (QSqlTableModel), 455,
466, 469suite of code, 46, 47sum(), 38super(), 100, 153, 217support for keyboard users; see key-
board users, support forsupportedImageFormats()
QImageReader, 193QImageWriter, 196
SVG (Scalable Vector Graphics) for-mat, 363
switch statement; see if statementSybase database, 445
sys module, 60, 63, 114argv variable, 114path variable, 60, 104version_info tuple, 63
system() (platform), 200, 217, 336,390
T
Tab keypress, 206, 218, 310, 386, 390,421, 422, 511
tab order, 206, 215, 217, 310tab widget; see QTabWidgettable widget; see QTableWidgettagName() (QDomElement), 260takeItem() (QListWidgetItem), 316takeLast() (QStringList), 189taskbar entries, 142TCP (Transmission Control Proto-
col), 522Template class (string), 26terminating applications, 115, 121,
185terminology, 13, 75ternary operator; see conditional ex-
pressiontesting for errors vs. exception han-
dling, 68testing, user interface, 221–222testmod() (doctest), 106text cursor; see insertion pointtext editor; see QTextEdittext files, 249–256text()
QClipboard, 297, 311QLineEdit, 441QTableWidgetItem, 422
text stream; see QTextStreamtext stream reading and writing,
250, 252, 258textCursor() (QTextEdit), 297, 384,
385textEdited() signal (QLineEdit), 161,
217, 218textFromValue() (QSpinBox), 327, 328this pointer; see self
Index 623
thread safety, 541–542time module
sleep(), 114, 115see also QTime
timeout() signal (QTimer), 373, 376timer; see QTimertimerEvent() (QObject), 372times; see QDateTime, QTime, and time
moduletitle bar, 115title() (str/unicode), 24toBool() (QVariant), 324toDate() (QVariant), 487, 491toDateTime() (QVariant), 449toDouble() (QVariant), 481toElement() (QDomNode), 260toFirst() (QDataWidgetMapper), 453,
456toggle actions, 176
see also QAction
toggle button, 276, 278see also QPushButton
toggled() signalQAbstractButton, 277, 280QAction, 172, 176, 177
toHtml()
QTextDocument, 407QTextEdit, 395
toInt()
QString, 251, 422QVariant, 395, 431, 449
toLongLong() (QVariant), 422toNativeSeparators() (QDir), 547,
551toolbar; see QToolBartoolbar buttons, 169tools; see applicationstooltip; see QToolTiptop-level windows, 115, 118, 221toPlainText()
QGraphicsTextItem, 359QTextEdit, 384, 395
toPyDate() (QDate), 532, 541toString()
QDate, 258, 401QDateTime, 455
toString() (cont.)QDomDocument, 257, 260QVariant, 427, 431, 441, 449, 488
toText() (QDomNode), 261toUpper() (QString), 327tr() (QObject), 513, 514, 515transaction() (QSqlDatabase), 449,
465, 468, 469transactions, database, 465–466,
468transformations, graphics, 349, 350,
356, 360, 370, 374, 376, 438translate()
QCoreApplication, 513, 515QGraphicsItem, 367QPainter, 343, 438, 489
triggered() signal (QAction), 172,176
trimmed() (QString), 252, 422triple quoted strings, 21, 57True constant, 45“true” division, 17, 84, 86__truediv__() (/), 84, 91truncating division, 17, 84, 86, 91trUtf8() (QObject), 513try statement, 66, 78, 541, 542, 543,
548, 550, 551, 553, 554, 556else statement, 70, 295see also except statement and fi-
nally statement.ts (translation source file), 517,
518, 519tuple type, 29–31, 30, 50, 87Twisted networking framework,
522type conversions; see conversionstype(), 18, 39, 102
see also isinstance()
type() (QEvent), 384type promotion; see conversionstype testing, 94TypeError exception, 56typing; see duck typing, dynamic
typing, and static typing
624 Index
U
UDP (User Datagram Protocol),522
.ui (user interface file), 206, 207,515
ultimate base class; see object typeunderscores, leading, 77, 80, 82unichr(), 21, 39, 236, 554Unicode, 20, 117, 236, 250, 258, 447,
478, 512, 552, 555characters, 22encodings, 20, 21, 250, 258, 501see also ASCII, codecs, andQString
unicode type, 20–28, 25, 256, 401% formatting, 24%s format specifier, 26* replication operator, 25+ concatenation operator, 25count(), 25endswith(), 25, 31, 555find(), 24, 25, 68index(), 24, 25, 68indexing, 22isalpha(), 25isdigit(), 25, 238, 554iterating, 50join(), 23, 25, 61, 193, 477literals, 20, 21lower(), 25, 238promotion to QString, 28replace(), 25, 238rfind(), 25rindex(), 25slicing, 22split(), 25, 114, 238, 501startswith(), 25, 238, 255strip(), 25, 59, 255title(), 24upper(), 25see also str type and QString
__unicode__() (unicode()), 81, 83union() (set), 38unit testing, 105–107universal newlines, 256unlock()
unlock() (cont.)QMutex, 553, 554QReadWriteLock, 541, 542, 543,
548, 550, 551, 556unpacking tuples, 87unsaved changes, 168, 187, 192, 232,
293, 356, 361, 362, 364, 365, 425,453
update()
QGraphicsItem, 365, 367QGraphicsScene, 354QWidget, 306, 330, 332, 479, 482
updateGeometry() (QWidget), 330, 332,479
upper() (str/unicode), 25urlopen() (urllib2), 126urlretrieve() (urllib), 521user actions; see QActionuser interface design, 205–216user preferences; see QSettingsUTF-8 encoding, 236, 250, 258, 501,
555
V
validate() (QAbstractSpinBox), 327,328
validation, 140, 151, 157, 327, 328,491
value comparison, 13, 57value()
QSettings, 183QSpinBox, 441QSqlQuery, 449, 450, 451QSqlRecord, 464, 465, 466, 469
valueChanged()
QDial, 128QSpinBox, 124, 128, 199
ValueError exception, 68, 114valueFromText() (QSpinBox), 327, 328values() (dict), 36, 96variable names, 15, 76, 80, 88version_info tuple (sys), 63version string, application, 167__version__, application variable,
167

Index 625
vertical layout; see QVBoxLayoutvertical lines; see QFrameview widgets; see QGraphicsView,
QListView, QTableView, andQTreeView
viewport coordinates, 328–331, 339,342, 350, 400
viewport()
QAbstractScrollArea, 392, 393QPainter, 363, 400
views() (QGraphicsScene), 354, 362virtual methods, 75, 99visual design tool; see Qt Designer
W
wait() (QThread), 547, 548, 551waitForDisconnected() (QAbstract-
Socket), 544waitForReadyRead() (QIODevice), 540walk() (os), 555warning() (QMessageBox), 153, 188,
293Web browser, launching, 510wheelEvent() (QWidget), 352while loop, 49–50
break statement, 53continue statement, 53else statement, 49–50, 254
widget attributes; seeQt.WidgetAttribute
widget coordinates, 309widget-level validation, 140, 144widget stack; see QStackedWidgetwidgets; see QWidgetwidth() (QWidget), 330window coordinates, 328–331, 339,
342, 350, 354, 357window decorations, 112window flags, 115window menu, MDI, 292–293,
297–300window menu, SDI, 285, 288–289window modal dialogs, 140, 511window system detection, 218, 336,
389, 390
windowList() (QWorkspace), 295windows, 115, 118, 160
see also widgets, QWidget, QDialog,and QMainWindow
Windows detection, 389, 390windows, previewing, 215WindowStaysOnTopHint (Qt name-
space), 529with statement, 549wrapping functions;seepartial func-
tion applicationwrite() (QDataStream), 526, 533writeBool() (QDataStream), 245writeDouble() (QDataStream), 241,
245writeIntn() (QDataStream), 241, 242,
245, 359, 435writeUIntn() (QDataStream), 245, 525,
533writing files; see saving files
X
X Window System detection, 336XML files, 256–265XML meta-characters, 257, 258XML parser, DOM, 259–262XML parser, SAX, 262–265xrange(), 51, 54
see also range()
Y
yield statement, 58, 97, 237YPipe example class, 339–345
Z
z value, 349zoom; see scaling, graphicszValue() (QGraphicsItem), 367
About the Author
Mark Summerfield
Mark graduated in computer science with first class honors from the Universi-ty of Wales Swansea. He followed this with a year’s postgraduate research be-fore going into industry. He spent many years working as a software engineerfor a variety of firms before joining Trolltech. He spent almost three years asTrolltech’s documentation manager, during which he founded and edited Troll-tech’s technical journal, Qt Quarterly, and co-wrote C++ GUI Programmingwith Qt 3, and later C++ GUI Programming with Qt 4. Mark owns Qtrac Ltd.,www.qtrac.eu, where he works as an independent author,editor, trainer,and con-sultant, specializing in C++, Qt, Python, and PyQt.
Production
The text was written using gvim and marked up with the Lout typesetting lan-guage. The index was compiled by the author, with the assistance of a PyQtprogram developed for the purpose. All the diagrams were produced usingLout. Almost all of the code snippets were extracted directly from the exampleprograms using Lout in conjunction with a Python script. The icons used inthe example programs are mostly from KDE (The “K” Desktop Environment),with a few created by the author. The images used in the book’s margins arefrom the Open Clip Art Library, with some other images coming from ProjectGutenberg. SVG images were converted to EPS using Inkscape. The Linuxscreenshots were taken with KSnapshot, and the Windows screenshots werecaptured and saved using a tiny PyQt application; in both cases, the .png im-ages were converted to .eps using ImageMagick. The monospaced font used forcode is derived from a condensed version of DejaVu Mono and was modified us-ing FontForge. Wikipedia proved itself to be useful in all kinds of ways, includ-ing being the source of the flag images,and was frequently referred to for ideas,information, and sample data. The marked-up text was previewed using gvand evince, and converted to PostScript by Lout, then to PDF by Ghostscript.
All the editing and processing were done on Fedora and Kubuntu systems.The cover was provided by the publisher, with the picture suggested by theauthor in view of the fact that Python is used to calibrate and analyze datafrom the Hubble Space Telescope. The screenshots were taken on Windows XP,Mac OS X, and Linux/KDE. All the example programs have been tested onWindows, Linux, and Mac OS X, using Python 2.5, Qt 4.2, and PyQt 4.2, andadditionally on Windows and Linux using Qt 4.3 and PyQt 4.3.

This page intentionally left blank
Visit us online for more information about these books and to read sample chapters. www.prenhallprofesional.com
0-13-187249-4 © 2006
$59.99 560 pages
0-13-124072-2 © 2004
$49.99 464 pages
The First Official Trolltech Guide to Qt 3.2Programming
Straight from Trolltech, this book covers all you need tobuild industrial-strength applications with Qt 3.2.x andC++—applications that run natively on Windows,Linux/Unix, Mac OS X, and embedded Linux with nosource code changes! The book teaches solid Qtprogramming practices; it is not a rehash of thedocumentation. You’ll find start-to-finish coveragepacked with examples, plus a CD with the Qt 3.2 toolsetand Borland C++ compilers—including a non-commercialQt 3.2 for Windows available nowhere else.
The Only Official Best-Practice Guide to Qt 4.1Programming
Using Trolltech’s Qt you can build industrial-strength C++applications that run natively on Windows, Linux/Unix,Mac OS X, and embedded Linux—without making sourcecode changes. With this book Trolltech insiders havewritten a start-to-finish guide to getting great results withthe most powerful version of Qt ever created: Qt 4.1.
Using C++ GUI Programming with Qt 4 you’ll discoverthe most effective Qt 4 programming patterns andtechniques as you master key technologies ranging fromQt’s model/view architecture to Qt’s powerful new 2Dpaint engine. The authors provide readers withunparalleled insight into Qt’s event model and layoutsystem. Then, using realistic examples, they introducesuperior techniques for everything from basic GUIdevelopment to advanced database and XML integration.
The accompanying CD includes the open source edition ofQt 4.1.1 for Windows, Mac, Linux, and many Unixes, aswell as MinGW, a set of freely available development toolsthat can be used to build Qt applications on Windows,and also the source code for the book’s examples.
Also Available from Mark Summerfield and Prentice Hall
C++ GUI Programming with Qt 3Jasmin Blanchette and Mark Summerfield
C++ GUI Programming with Qt 4Jasmin Blanchette and Mark Summerfield