preparing and presenting effective powerpoints
TRANSCRIPT
1
Preparing and Presenting Effective PowerPoints
A Workshop Organized by the OLLI Moderator Support Committee
Table of Contents
PART I. CREATING A BASIC POWERPOINT PRESENTATION ................................................3
THE POWERPOINT INTERFACE ............................................................................................................3 CREATING A PRESENTATION ...............................................................................................................5 TO ADD A SLIDE .................................................................................................................................................. 5 TO REARRANGE THE ORDER OF SLIDES .................................................................................................................... 5 TO DUPLICATE A SLIDE ......................................................................................................................................... 5 TO DELETE SLIDES ............................................................................................................................................... 5 DIFFERENT VIEWS FOR DIFFERENT PURPOSES .....................................................................................6 CREATING THE DESIGN OR “LOOK” OF YOUR PRESENTATION ...............................................................6 THEMES ............................................................................................................................................................ 7 ADDING CONTENT ..............................................................................................................................8 TO ADD TEXT ..................................................................................................................................................... 8 TO FORMAT TEXT................................................................................................................................................ 9 TO INSERT AN IMAGE .......................................................................................................................................... 9 TO ADD A SHAPE .............................................................................................................................................. 11 TO ADD A HYPERLINK......................................................................................................................................... 12 TO ADD TABLES AND CHARTS .............................................................................................................................. 13 ORGANIZING AND ARRANGING SLIDE CONTENT ................................................................................ 14 TO ALIGN MULTIPLE OBJECTS .............................................................................................................................. 14 TO GROUP OR UNGROUP OBJECTS ....................................................................................................................... 14 TO ANIMATE TEXT OR OBJECTS ............................................................................................................................ 14 TO ADD SLIDE TRANSITIONS ................................................................................................................................ 15 GIVING THE PRESENTATION .............................................................................................................. 15 EXTRAS ............................................................................................................................................ 18 LOGISTICAL ISSUES ........................................................................................................................... 18 HELP! ............................................................................................................................................... 18 SAVE FREQUENTLY ........................................................................................................................................... 18
TO PACKAGE A PRESENTATION FOR A CD OR USB FLASH DRIVE: ................................. 19
UNDO! .......................................................................................................................................................... 19 HELP MENU .................................................................................................................................................... 19
PART II. ADVANCED POWERPOINT TECHNIQUES ................................................................. 20
FOUR GREAT RESOURCES ................................................................................................................. 20 MICROSOFT POWERPOINT TRAINING SITE ............................................................................................................ 20 GOOGLE SEARCH .............................................................................................................................................. 20 YOUTUBE ........................................................................................................................................................ 20

2
LINKEDIN LEARNING.......................................................................................................................................... 20 HOW TO CREATE A STRONG PRESENTATION ...................................................................................... 21 THINK OF A SINGLE MAIN THEME OR CENTRAL IDEA ................................................................................................ 21 WRITE DOWN YOUR KEY POINTS OR TAKE-AWAYS .................................................................................................. 21 ARRANGE THESE KEY POINTS IN A LOGICAL ORDER .................................................................................................. 21 SPEND TIME MAKING A “KEY SLIDE” FOR EACH OF YOUR KEY POINTS ......................................................................... 21 START STRONG – FINISH STRONG ........................................................................................................................ 22 CARNEGIE HALL ............................................................................................................................................... 22 TIPS FOR EMPHASIZING YOUR MESSAGE ........................................................................................... 23 A ROADMAP .................................................................................................................................................... 23 THE SLIDE IS ONLY A SPRINGBOARD ...................................................................................................................... 23 GET THEIR ATTENTION ....................................................................................................................................... 23 TO GO DARK ................................................................................................................................................... 23 TO CREATE A LIGHTBOX ..................................................................................................................................... 24 ACCESSIBILITY AND CAPTIONING ......................................................................................................................... 26 RISK-FREE MULTIMEDIA ................................................................................................................... 26 INSTRUCTIONS FOR WINDOWS COMPUTERS ......................................................................................................... 27 TO INSERT A WEB VIDEO .................................................................................................................................... 27 TO INSERT A VIDEO FROM YOUR COMPUTER .......................................................................................................... 27 INSTRUCTIONS FOR MAC COMPUTERS ................................................................................................................. 28 TO INSERT A WEB VIDEO ............................................................................................................................. 28 TO INSERT A VIDEO STORED ON YOUR COMPUTER ................................................................................... 28 EDITING VIDEOS WITH POWERPOINT ................................................................................................................... 29 COMPRESS PICTURES AND MEDIA ....................................................................................................................... 29 ARTIFICIAL INTELLIGENCE IS IN THE HOUSE! ...................................................................................... 30 HELP AND USEFUL RESOURCES ......................................................................................................... 32 GOOD, GENERAL POWERPOINT ADVICE ................................................................................................................ 32 ALTERNATIVE SLIDE PRESENTATION SOFTWARE ...................................................................................................... 33
PART III. EFFECTIVE POWERPOINT PRESENTATIONS ......................................................... 34
KEY TIPS ............................................................................................................................................ 34 1. MAKE USE OF THE STAGE ................................................................................................................ 34 2. BODY LANGUAGE .......................................................................................................................... 34 3. EYE CONTACT ............................................................................................................................... 34 4. AUTHENTIC & RELATABLE ................................................................................................................ 34 5. DEFER TO YOUR AUDIENCE’S NEEDS ................................................................................................... 34 6. PRACTICE, PRACTICE ...................................................................................................................... 34 7. TRAIN YOUR VOICE ........................................................................................................................ 34 8. SPEAKING, NOT READING ................................................................................................................ 34 9. FAITH IN TECHNOLOGY ................................................................................................................... 34 10. END YOUR PRESENTATION WITH NEXT STEPS ...................................................................................... 34
APPENDIX ..................................................................................................................................... 35
QUICK LINKS TO MICROSOFT’S POWERPOINT TRAINING SITE .......................................... 35
3
PART I. CREATING A BASIC POWERPOINT PRESENTATION
Microsoft’s PowerPoint software is by far the most widely-used application for creating slideshows. PowerPoint can be used on PCs, Macs or mobile devices and, although Microsoft supports several different versions of PowerPoint, their layouts and use are actually quite similar. While PowerPoint can appear daunting when first opened, its interface is organized logically, and it quickly becomes easy to use. This handout roughly follows the order of the OLLI Professional Development Presentations, and draws heavily from Microsoft’s own online instruction series.1 The handout provides links and illustrations that will allow you to duplicate the procedures that were demonstrated in the workshops and to refresh yourself on the guidelines and tips that were described. Several other excellent resources for learning more about how to use PowerPoint effectively are listed at the end of this handout.
A quick, how-to summary: https://support.microsoft.com/en-us/office/basic-tasks-for-creating-a-powerpoint-presentation-efbbc1cd-c5f1-4264-b48e-c8a7b0334e36
THE POWERPOINT INTERFACE
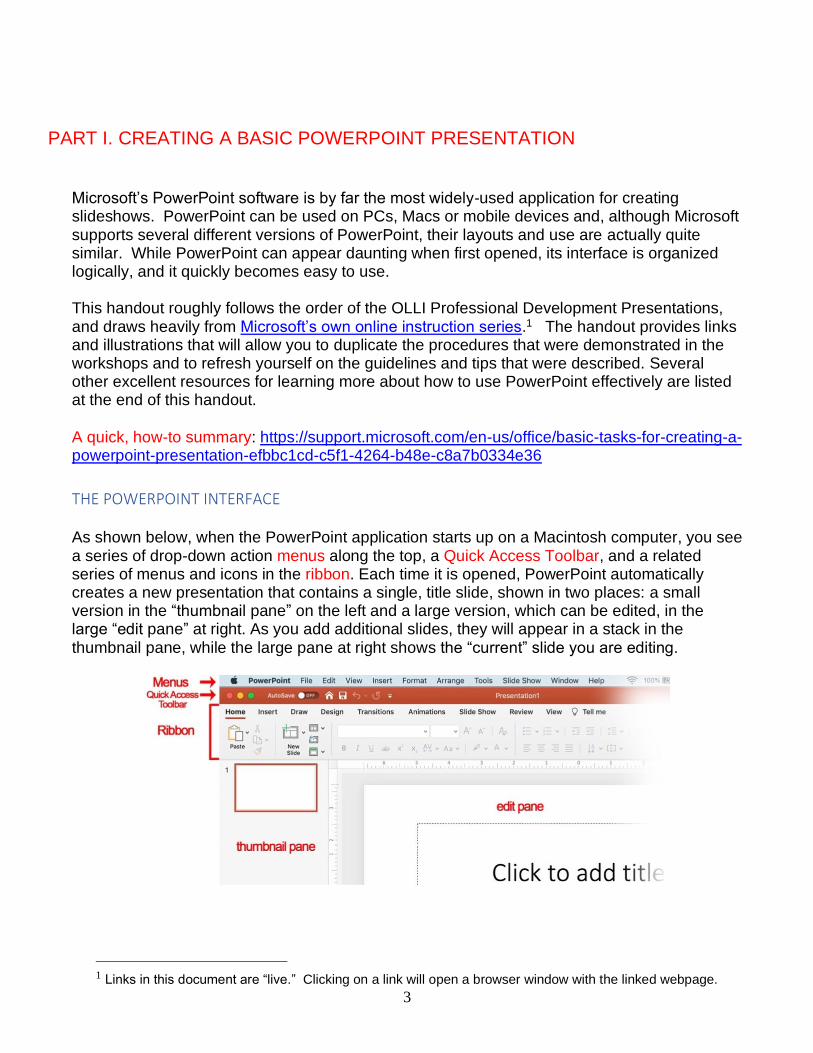
As shown below, when the PowerPoint application starts up on a Macintosh computer, you see a series of drop-down action menus along the top, a Quick Access Toolbar, and a related series of menus and icons in the ribbon. Each time it is opened, PowerPoint automatically creates a new presentation that contains a single, title slide, shown in two places: a small version in the “thumbnail pane” on the left and a large version, which can be edited, in the large “edit pane” at right. As you add additional slides, they will appear in a stack in the thumbnail pane, while the large pane at right shows the “current” slide you are editing.
1 Links in this document are “live.” Clicking on a link will open a browser window with the linked webpage.
4
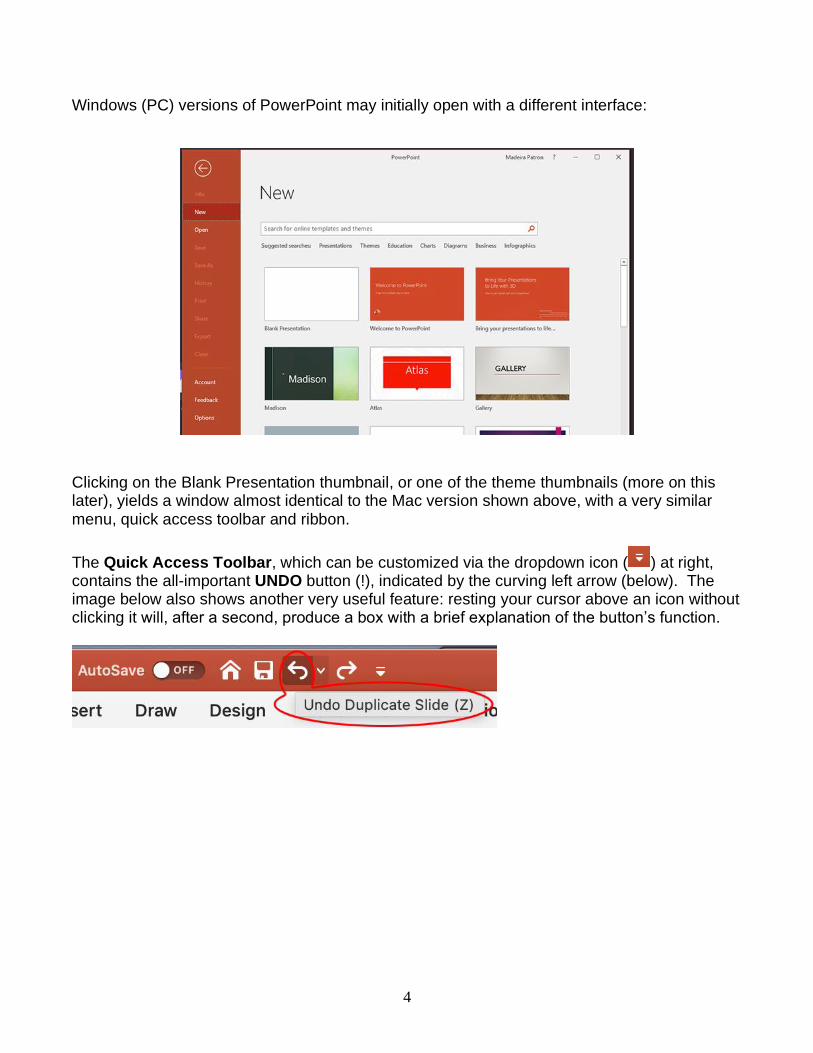
Windows (PC) versions of PowerPoint may initially open with a different interface:
Clicking on the Blank Presentation thumbnail, or one of the theme thumbnails (more on this later), yields a window almost identical to the Mac version shown above, with a very similar menu, quick access toolbar and ribbon.
The Quick Access Toolbar, which can be customized via the dropdown icon ( ) at right, contains the all-important UNDO button (!), indicated by the curving left arrow (below). The image below also shows another very useful feature: resting your cursor above an icon without clicking it will, after a second, produce a box with a brief explanation of the button’s function.
5
CREATING A PRESENTATION
When creating your presentation, you’ll typically add new slides, move your slides around, and delete the slides you don’t need.
To add a slide:
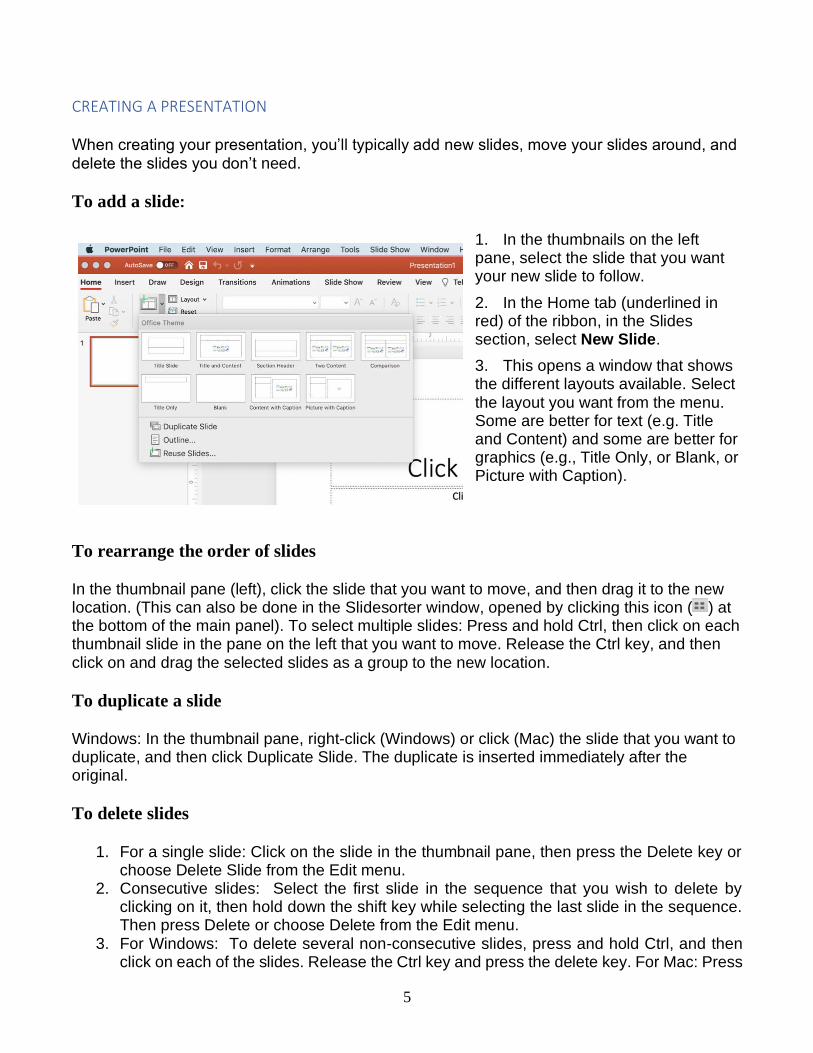
1. In the thumbnails on the left pane, select the slide that you want your new slide to follow.
2. In the Home tab (underlined in red) of the ribbon, in the Slides section, select New Slide.
3. This opens a window that shows the different layouts available. Select the layout you want from the menu. Some are better for text (e.g. Title and Content) and some are better for graphics (e.g., Title Only, or Blank, or Picture with Caption).
To rearrange the order of slides
In the thumbnail pane (left), click the slide that you want to move, and then drag it to the new location. (This can also be done in the Slidesorter window, opened by clicking this icon ( ) at the bottom of the main panel). To select multiple slides: Press and hold Ctrl, then click on each thumbnail slide in the pane on the left that you want to move. Release the Ctrl key, and then click on and drag the selected slides as a group to the new location.
To duplicate a slide
Windows: In the thumbnail pane, right-click (Windows) or click (Mac) the slide that you want to duplicate, and then click Duplicate Slide. The duplicate is inserted immediately after the original.
To delete slides
1. For a single slide: Click on the slide in the thumbnail pane, then press the Delete key or choose Delete Slide from the Edit menu.
2. Consecutive slides: Select the first slide in the sequence that you wish to delete by clicking on it, then hold down the shift key while selecting the last slide in the sequence. Then press Delete or choose Delete from the Edit menu.
3. For Windows: To delete several non-consecutive slides, press and hold Ctrl, and then click on each of the slides. Release the Ctrl key and press the delete key. For Mac: Press
6
and hold Command, then select the slides in the thumbnail pane on the left. Release the Command key, then press the delete key or choose Delete Slide from the Edit menu.
DIFFERENT VIEWS FOR DIFFERENT PURPOSES
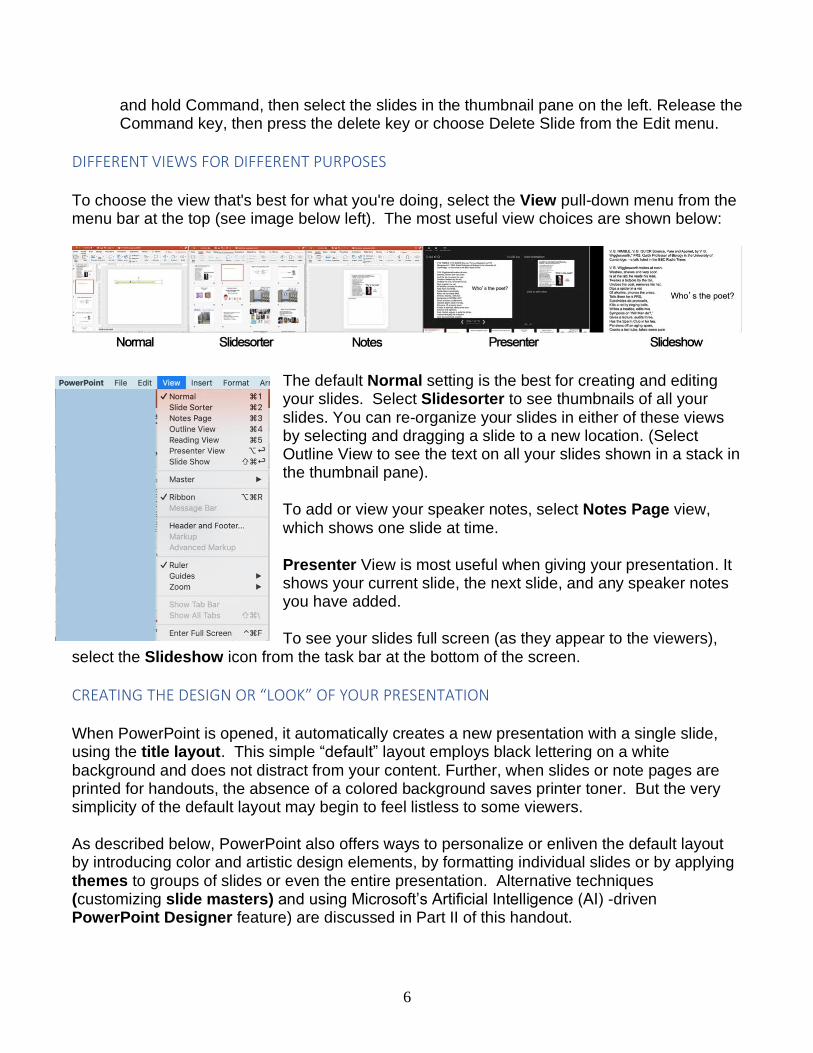
To choose the view that's best for what you're doing, select the View pull-down menu from the menu bar at the top (see image below left). The most useful view choices are shown below:
The default Normal setting is the best for creating and editing your slides. Select Slidesorter to see thumbnails of all your slides. You can re-organize your slides in either of these views by selecting and dragging a slide to a new location. (Select Outline View to see the text on all your slides shown in a stack in the thumbnail pane).
To add or view your speaker notes, select Notes Page view, which shows one slide at time.
Presenter View is most useful when giving your presentation. It shows your current slide, the next slide, and any speaker notes you have added.
To see your slides full screen (as they appear to the viewers), select the Slideshow icon from the task bar at the bottom of the screen.
CREATING THE DESIGN OR “LOOK” OF YOUR PRESENTATION
When PowerPoint is opened, it automatically creates a new presentation with a single slide, using the title layout. This simple “default” layout employs black lettering on a white background and does not distract from your content. Further, when slides or note pages are printed for handouts, the absence of a colored background saves printer toner. But the very simplicity of the default layout may begin to feel listless to some viewers.
As described below, PowerPoint also offers ways to personalize or enliven the default layout by introducing color and artistic design elements, by formatting individual slides or by applying themes to groups of slides or even the entire presentation. Alternative techniques (customizing slide masters) and using Microsoft’s Artificial Intelligence (AI) -driven PowerPoint Designer feature) are discussed in Part II of this handout.
7
Themes2
A theme is a palette of colors, fonts, and special effects (like shadows, reflections, 3-D effects, and more) that complement one another. These pre-designed themes are available on the Design tab in Normal view. You can also get more themes from templates.office.com.
This excellent video shows how to use themes effectively.
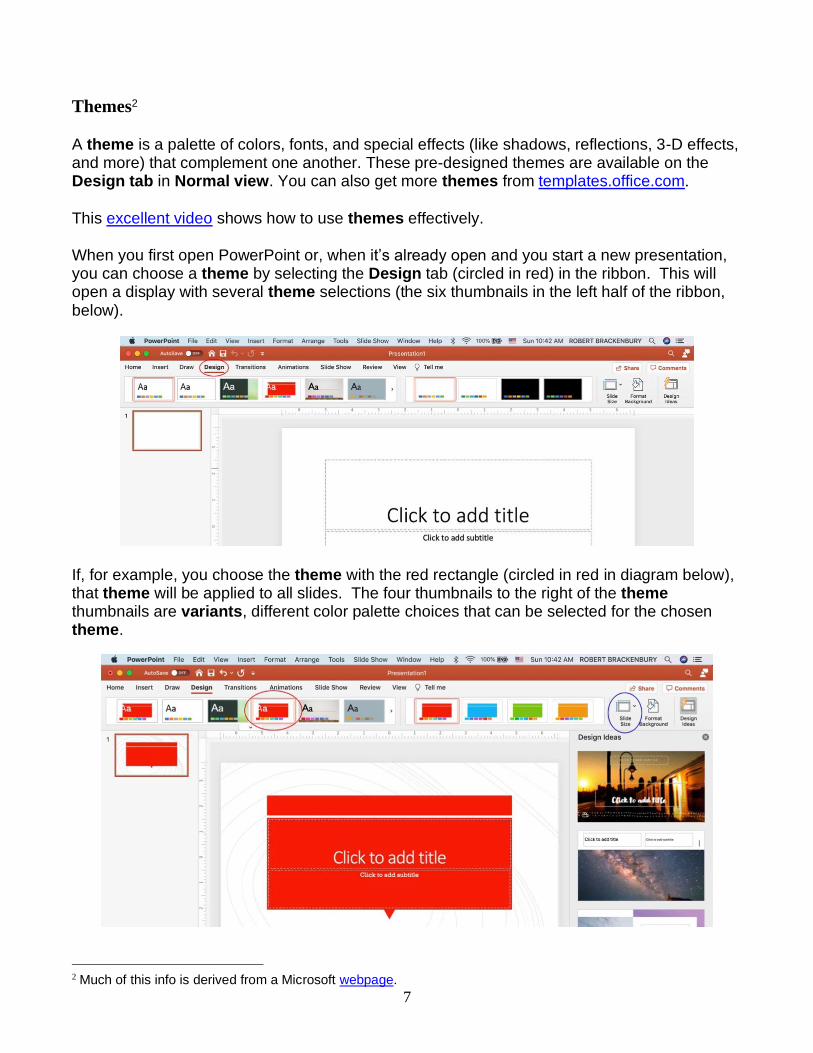
When you first open PowerPoint or, when it’s already open and you start a new presentation, you can choose a theme by selecting the Design tab (circled in red) in the ribbon. This will open a display with several theme selections (the six thumbnails in the left half of the ribbon, below).
If, for example, you choose the theme with the red rectangle (circled in red in diagram below), that theme will be applied to all slides. The four thumbnails to the right of the theme thumbnails are variants, different color palette choices that can be selected for the chosen theme.
2 Much of this info is derived from a Microsoft webpage.
8
The image above shows slides in the Widescreen (16:9) format. To select different slide dimensions, click on the Slide Size icon (circled in blue, to the right of the Variant thumbnails). The panel of thumbnails with images, aligned vertically along the right border, illustrates Microsoft’s Design Ideas (aka Designer) feature, which is discussed in Part II of the handout. Formatting and customizing slide masters also can be used to apply consistent changes to many slides at once.
ADDING CONTENT
To add text
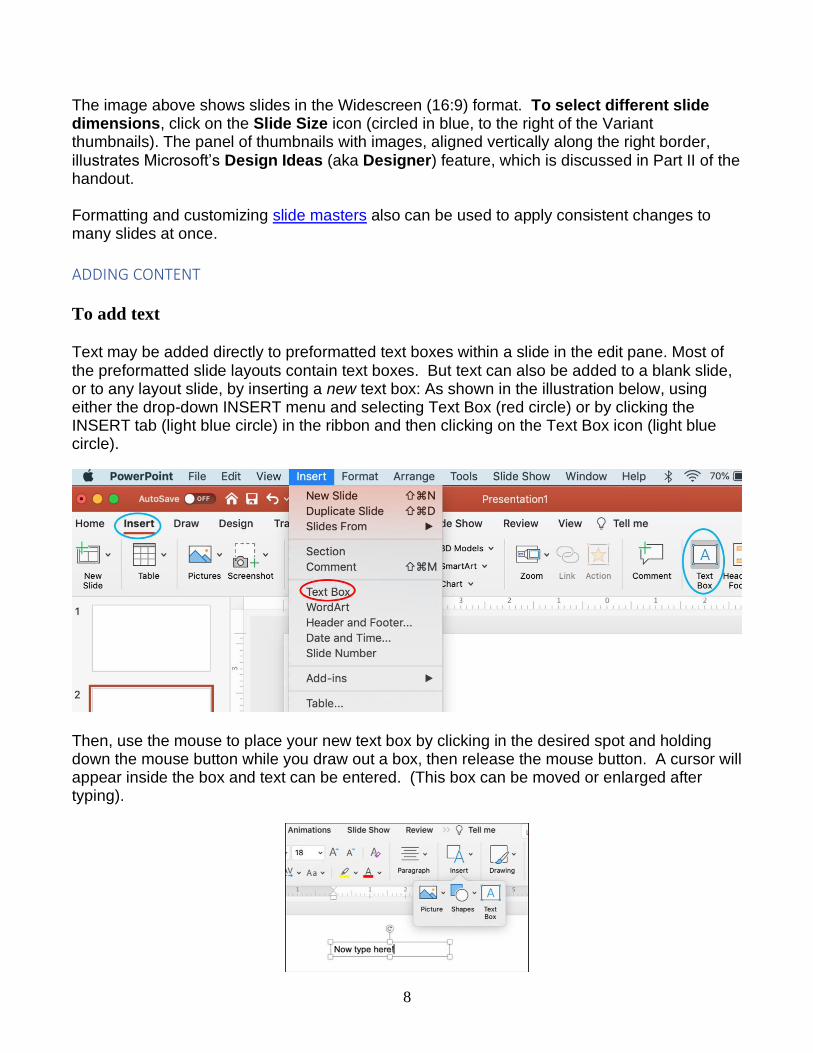
Text may be added directly to preformatted text boxes within a slide in the edit pane. Most of the preformatted slide layouts contain text boxes. But text can also be added to a blank slide, or to any layout slide, by inserting a new text box: As shown in the illustration below, using either the drop-down INSERT menu and selecting Text Box (red circle) or by clicking the INSERT tab (light blue circle) in the ribbon and then clicking on the Text Box icon (light blue circle).
Then, use the mouse to place your new text box by clicking in the desired spot and holding down the mouse button while you draw out a box, then release the mouse button. A cursor will appear inside the box and text can be entered. (This box can be moved or enlarged after typing).
9
To format text
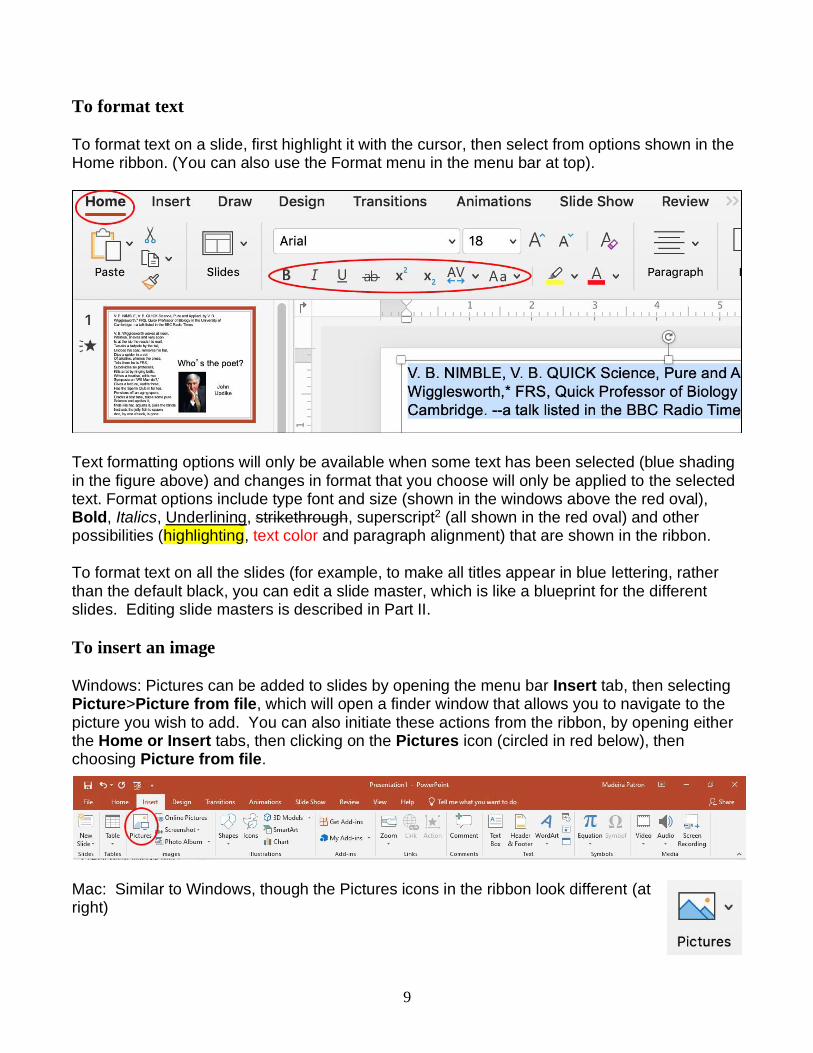
To format text on a slide, first highlight it with the cursor, then select from options shown in the Home ribbon. (You can also use the Format menu in the menu bar at top).
Text formatting options will only be available when some text has been selected (blue shading in the figure above) and changes in format that you choose will only be applied to the selected text. Format options include type font and size (shown in the windows above the red oval), Bold, Italics, Underlining, strikethrough, superscript2 (all shown in the red oval) and other possibilities (highlighting, text color and paragraph alignment) that are shown in the ribbon.
To format text on all the slides (for example, to make all titles appear in blue lettering, rather than the default black, you can edit a slide master, which is like a blueprint for the different slides. Editing slide masters is described in Part II.
To insert an image
Windows: Pictures can be added to slides by opening the menu bar Insert tab, then selecting Picture>Picture from file, which will open a finder window that allows you to navigate to the picture you wish to add. You can also initiate these actions from the ribbon, by opening either the Home or Insert tabs, then clicking on the Pictures icon (circled in red below), then choosing Picture from file.
Mac: Similar to Windows, though the Pictures icons in the ribbon look different (at right)
10
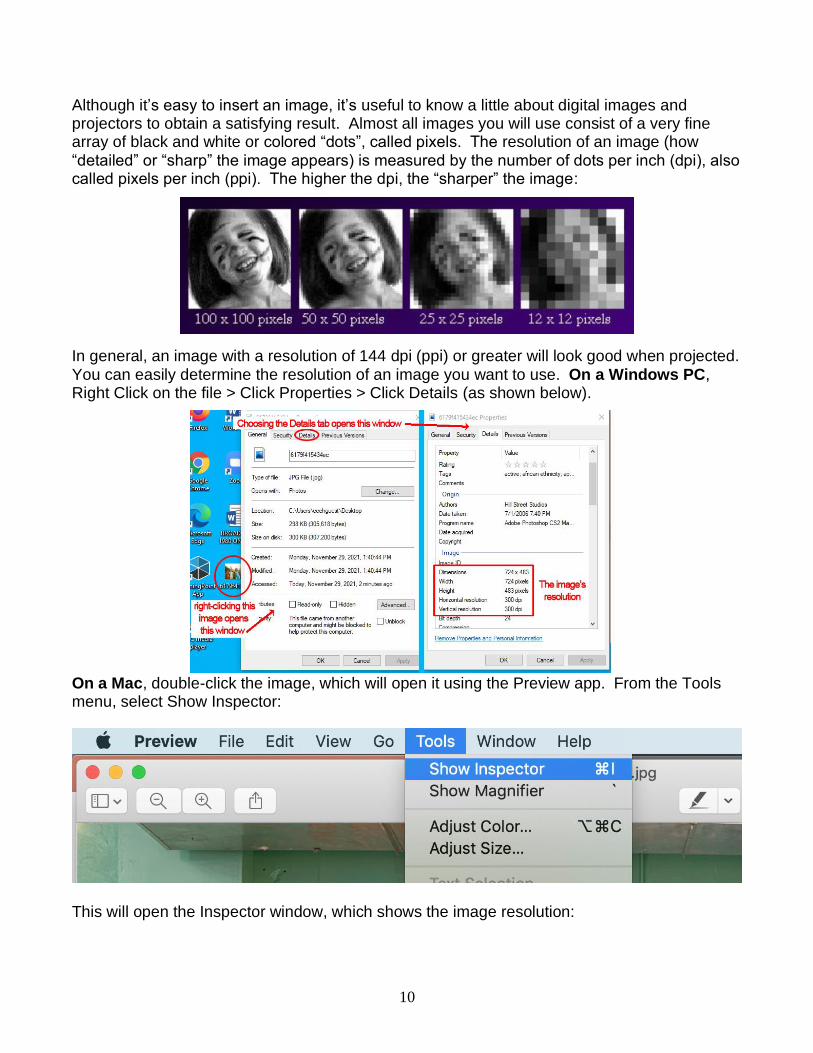
Although it’s easy to insert an image, it’s useful to know a little about digital images and projectors to obtain a satisfying result. Almost all images you will use consist of a very fine array of black and white or colored “dots”, called pixels. The resolution of an image (how “detailed” or “sharp” the image appears) is measured by the number of dots per inch (dpi), also called pixels per inch (ppi). The higher the dpi, the “sharper” the image:
In general, an image with a resolution of 144 dpi (ppi) or greater will look good when projected. You can easily determine the resolution of an image you want to use. On a Windows PC, Right Click on the file > Click Properties > Click Details (as shown below).
On a Mac, double-click the image, which will open it using the Preview app. From the Tools menu, select Show Inspector:
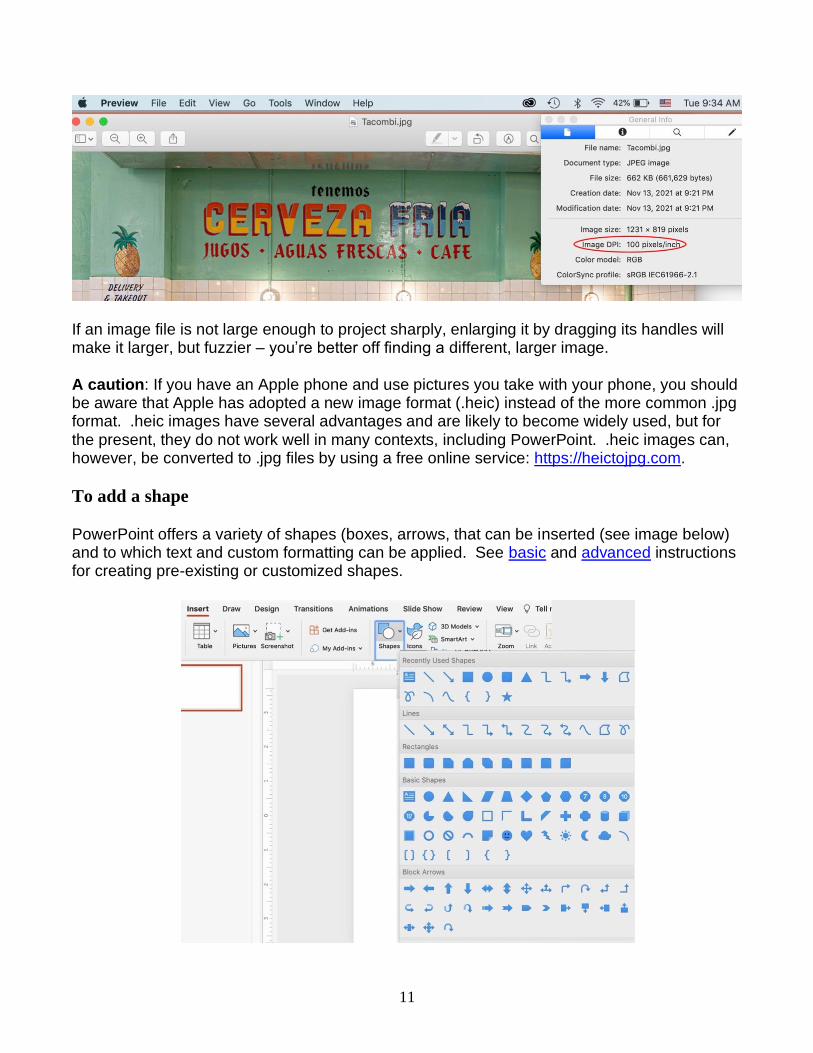
This will open the Inspector window, which shows the image resolution:
11
If an image file is not large enough to project sharply, enlarging it by dragging its handles will make it larger, but fuzzier – you’re better off finding a different, larger image.
A caution: If you have an Apple phone and use pictures you take with your phone, you should be aware that Apple has adopted a new image format (.heic) instead of the more common .jpg format. .heic images have several advantages and are likely to become widely used, but for the present, they do not work well in many contexts, including PowerPoint. .heic images can, however, be converted to .jpg files by using a free online service: https://heictojpg.com.
To add a shape
PowerPoint offers a variety of shapes (boxes, arrows, that can be inserted (see image below) and to which text and custom formatting can be applied. See basic and advanced instructions for creating pre-existing or customized shapes.
12
To add a hyperlink
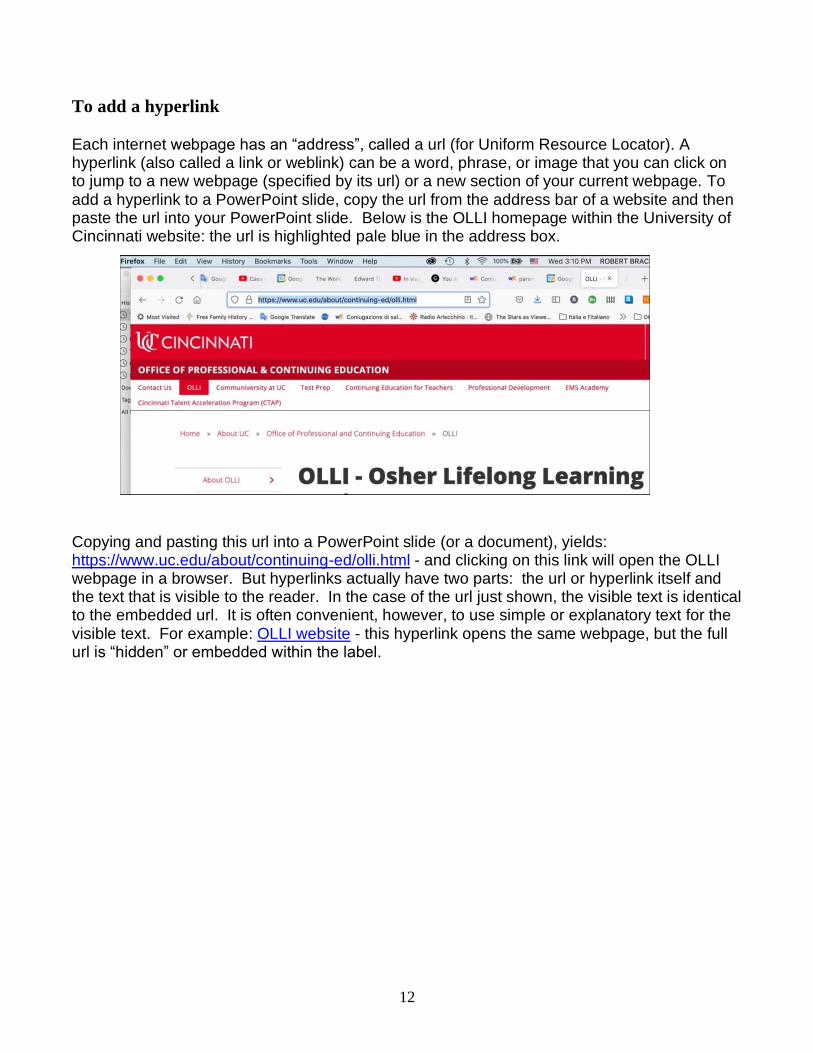
Each internet webpage has an “address”, called a url (for Uniform Resource Locator). A hyperlink (also called a link or weblink) can be a word, phrase, or image that you can click on to jump to a new webpage (specified by its url) or a new section of your current webpage. To add a hyperlink to a PowerPoint slide, copy the url from the address bar of a website and then paste the url into your PowerPoint slide. Below is the OLLI homepage within the University of Cincinnati website: the url is highlighted pale blue in the address box.
Copying and pasting this url into a PowerPoint slide (or a document), yields: https://www.uc.edu/about/continuing-ed/olli.html - and clicking on this link will open the OLLI webpage in a browser. But hyperlinks actually have two parts: the url or hyperlink itself and the text that is visible to the reader. In the case of the url just shown, the visible text is identical to the embedded url. It is often convenient, however, to use simple or explanatory text for the visible text. For example: OLLI website - this hyperlink opens the same webpage, but the full url is “hidden” or embedded within the label.
13
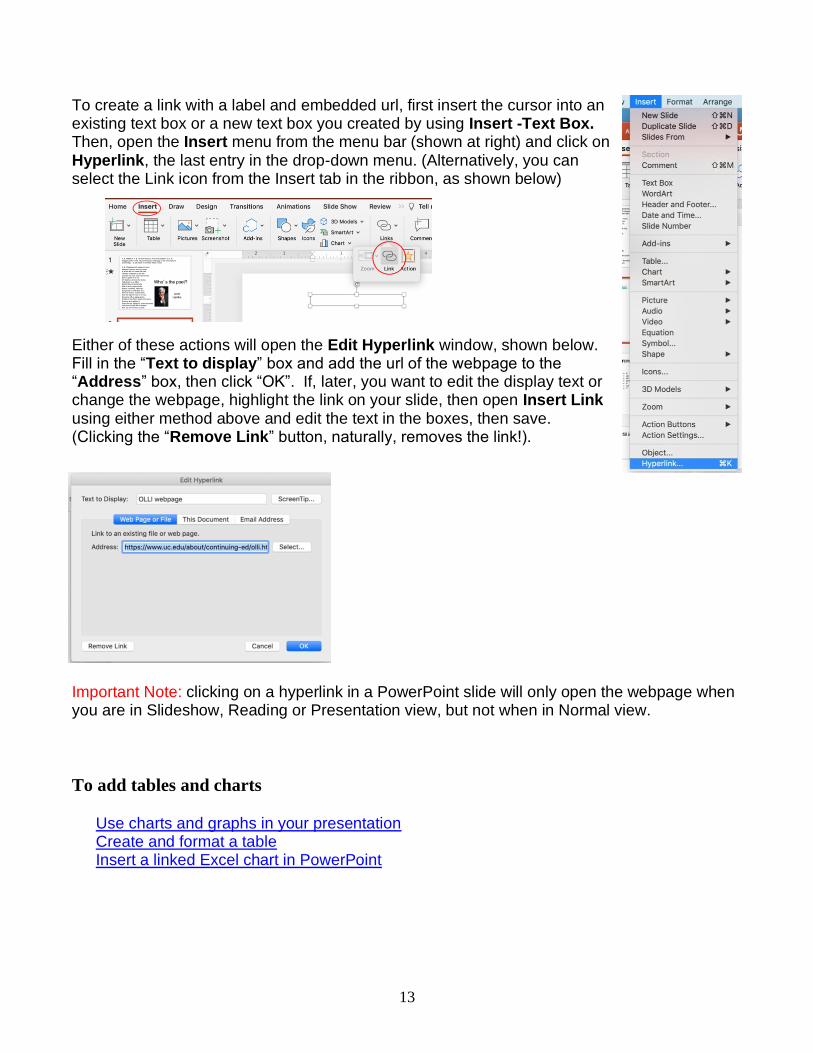
To create a link with a label and embedded url, first insert the cursor into an existing text box or a new text box you created by using Insert -Text Box. Then, open the Insert menu from the menu bar (shown at right) and click on Hyperlink, the last entry in the drop-down menu. (Alternatively, you can select the Link icon from the Insert tab in the ribbon, as shown below)
Either of these actions will open the Edit Hyperlink window, shown below. Fill in the “Text to display” box and add the url of the webpage to the “Address” box, then click “OK”. If, later, you want to edit the display text or change the webpage, highlight the link on your slide, then open Insert Link using either method above and edit the text in the boxes, then save. (Clicking the “Remove Link” button, naturally, removes the link!).
Important Note: clicking on a hyperlink in a PowerPoint slide will only open the webpage when you are in Slideshow, Reading or Presentation view, but not when in Normal view.
To add tables and charts
Use charts and graphs in your presentation Create and format a table Insert a linked Excel chart in PowerPoint
14
ORGANIZING AND ARRANGING SLIDE CONTENT
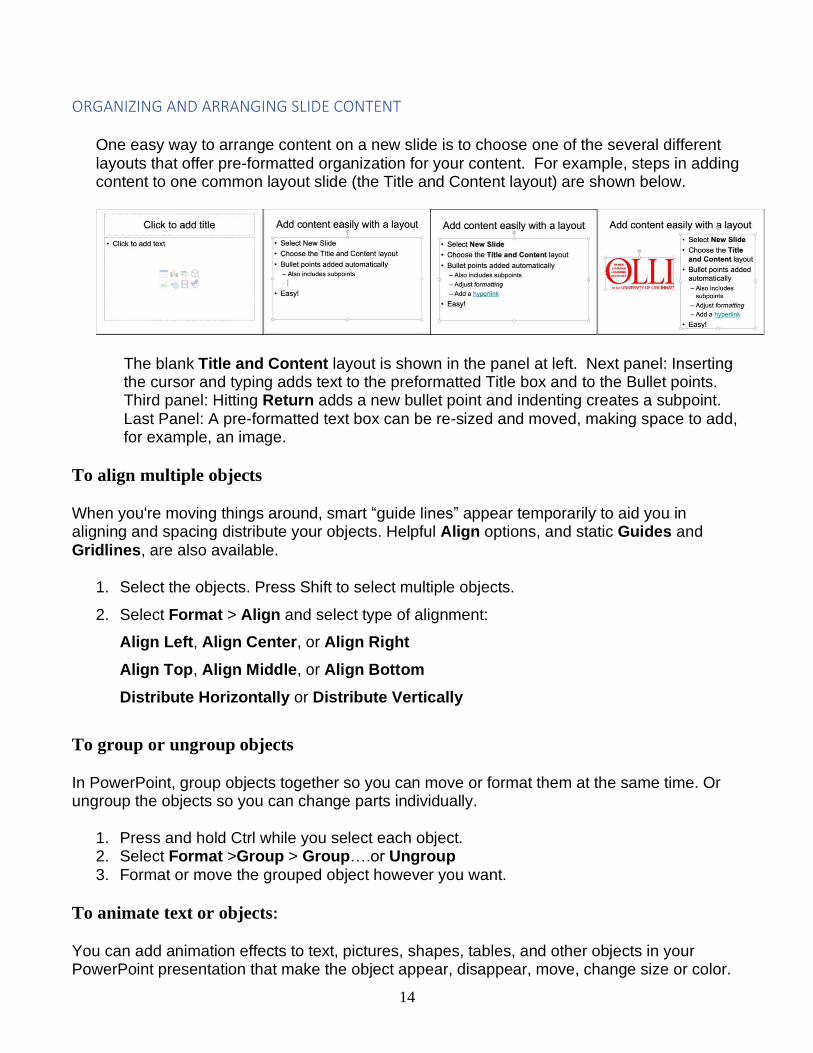
One easy way to arrange content on a new slide is to choose one of the several different layouts that offer pre-formatted organization for your content. For example, steps in adding content to one common layout slide (the Title and Content layout) are shown below.
The blank Title and Content layout is shown in the panel at left. Next panel: Inserting the cursor and typing adds text to the preformatted Title box and to the Bullet points. Third panel: Hitting Return adds a new bullet point and indenting creates a subpoint. Last Panel: A pre-formatted text box can be re-sized and moved, making space to add, for example, an image.
To align multiple objects
When you're moving things around, smart “guide lines” appear temporarily to aid you in aligning and spacing distribute your objects. Helpful Align options, and static Guides and Gridlines, are also available.
1. Select the objects. Press Shift to select multiple objects.
2. Select Format > Align and select type of alignment:
Align Left, Align Center, or Align Right
Align Top, Align Middle, or Align Bottom
Distribute Horizontally or Distribute Vertically
To group or ungroup objects
In PowerPoint, group objects together so you can move or format them at the same time. Or ungroup the objects so you can change parts individually.
1. Press and hold Ctrl while you select each object. 2. Select Format >Group > Group….or Ungroup 3. Format or move the grouped object however you want.
To animate text or objects:
You can add animation effects to text, pictures, shapes, tables, and other objects in your PowerPoint presentation that make the object appear, disappear, move, change size or color.
15
1. Select the object or text you want to animate. 2. Select Animations and choose an animation. 3. Select Effect Options and choose an effect.
There are different options for starting animations:
• On Click: Start an animation when you click a slide. • With Previous: Start an animation at the same time as the previous animation in your
sequence. • After Previous: Start an animation immediately after the previous one happens. • Duration: Lengthen or shorten an effect. • Delay: Define the time before an effect starts.
More detailed instructions and additional features of animations can be found here.
To add slide transitions:
A slide transition is a visual effect (such as a fade-out) that occurs when you move from one slide to the next during a presentation. You can control the speed, add sound, and customize the look of transition effects.
1. Select the slide you want to add a transition to. 2. Select the Transitions tab and choose a transition. Select a transition to see a preview. 3. Select Effect Options to choose the direction and nature of the transition. 4. Select Preview to see what the transition looks like. 5. Select Apply To All to add the transition to the entire presentation. 6. To remove a transition, select Transitions > None.
GIVING THE PRESENTATION
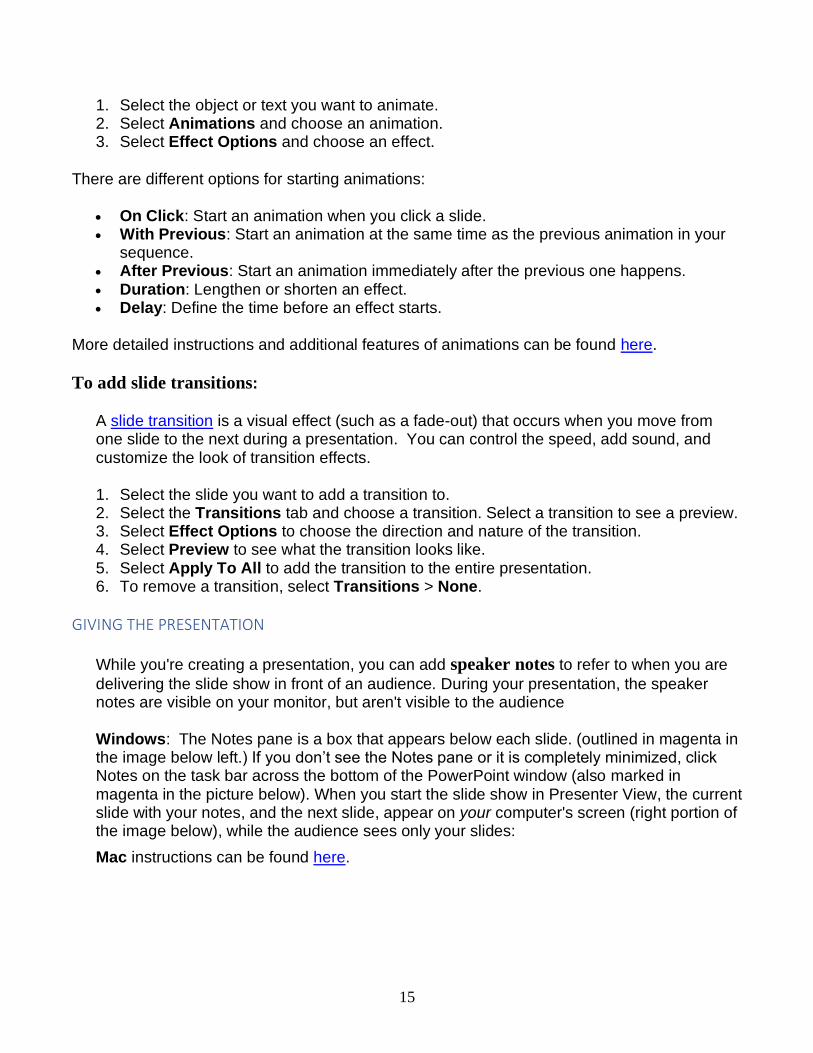
While you're creating a presentation, you can add speaker notes to refer to when you are
delivering the slide show in front of an audience. During your presentation, the speaker notes are visible on your monitor, but aren't visible to the audience
Windows: The Notes pane is a box that appears below each slide. (outlined in magenta in the image below left.) If you don’t see the Notes pane or it is completely minimized, click Notes on the task bar across the bottom of the PowerPoint window (also marked in magenta in the picture below). When you start the slide show in Presenter View, the current slide with your notes, and the next slide, appear on your computer's screen (right portion of the image below), while the audience sees only your slides:
Mac instructions can be found here.
16
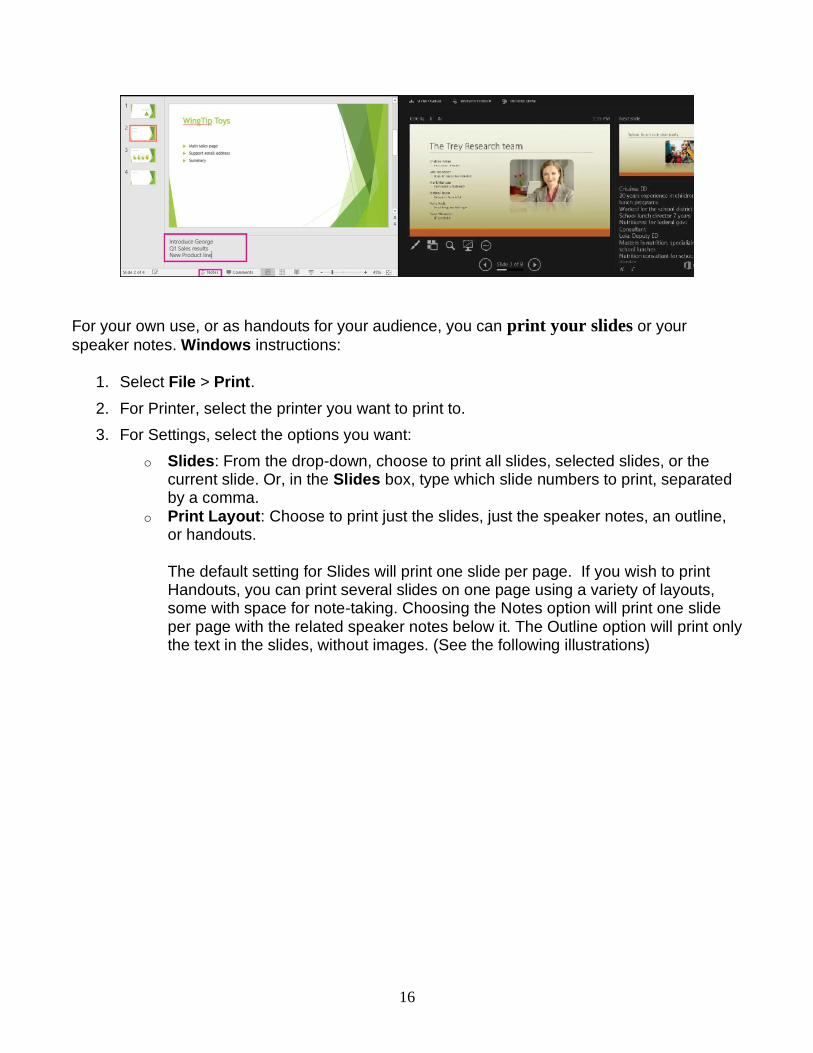
For your own use, or as handouts for your audience, you can print your slides or your
speaker notes. Windows instructions:
1. Select File > Print.
2. For Printer, select the printer you want to print to.
3. For Settings, select the options you want:
o Slides: From the drop-down, choose to print all slides, selected slides, or the current slide. Or, in the Slides box, type which slide numbers to print, separated by a comma.
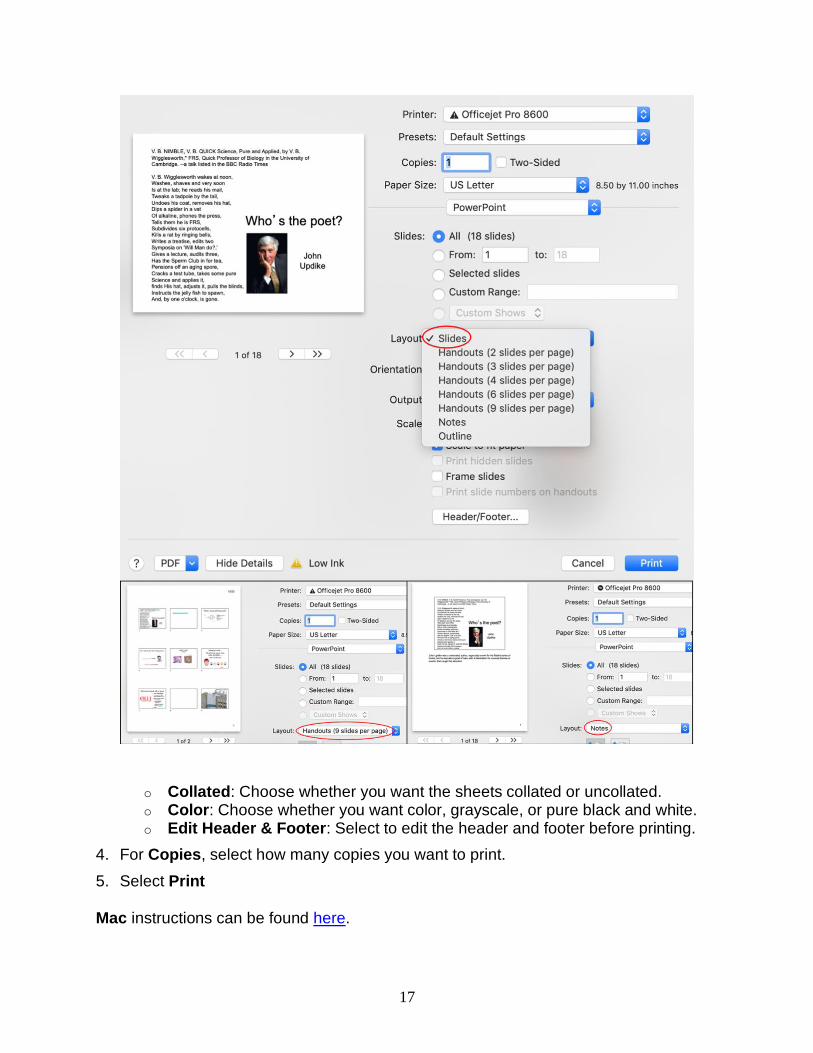
o Print Layout: Choose to print just the slides, just the speaker notes, an outline, or handouts.
The default setting for Slides will print one slide per page. If you wish to print Handouts, you can print several slides on one page using a variety of layouts, some with space for note-taking. Choosing the Notes option will print one slide per page with the related speaker notes below it. The Outline option will print only the text in the slides, without images. (See the following illustrations)
17
o Collated: Choose whether you want the sheets collated or uncollated. o Color: Choose whether you want color, grayscale, or pure black and white. o Edit Header & Footer: Select to edit the header and footer before printing.
4. For Copies, select how many copies you want to print.
5. Select Print
Mac instructions can be found here.
18
You can save your presentation as a PDF file (lower left corner of Print window shown above), which freezes the formatting and layout so that people can view the slides even if they don’t have PowerPoint software on their computer. Instructions are here. Also, OLLI staff can upload your presentation in PDF format to the OLLI website for easy student access. Email your digital file to [email protected]. Call the OLLI office (513-556-9186) if you have any questions.
EXTRAS
• Change the order in which stacked objects, placeholders, or shapes appear on a slide • Rotate or flip an object • Set text direction and position in a shape or text box • Add, change, or remove transitions between slides • Add slide numbers, page numbers, or the date and time • Check spelling in your presentation • Rehearse and time the delivery of a presentation
LOGISTICAL ISSUES
All VPC classrooms are equipped with PCs running under the Windows 10 operating system and offering a full suite of applications including Microsoft Office Professional Plus 2019.
Video and audio files are played by the VLC Player (orange cone icon).
Hand-held microphones and clip-on microphones are available in the classrooms but you need to make an arrangement in advance to access them. (You will see flat microphones resting on the classroom computer stations, but these mics pick up sound only for Zoom and do not generate any sound within
the classroom.)
For in-person classes, you may connect a personal PC laptop using available HDMI or VGA connectors, but if you wish to use a Mac laptop, you must bring an adaptor appropriate for your Mac’s port that will plug into the supplied HDMI connector.
IMPORTANT NOTE: Connected laptops do not integrate properly with Zoom, so if you are leading a hybrid class, you should plan to use the classroom PC.
HELP!
SAVE frequently! Once you create and begin working on a presentation, open the FILE
menu, select Save As, type in a name for your presentation and select a place to save it – a folder on your computer, or in a cloud service such as Microsoft OneDrive, Google Drive or iCloud. Then, so that you don’t lose the excellent slides you create, SAVE your work often by selecting File→Save.
19
If you will be presenting your PowerPoint in an OLLI classroom, you could save it at home on a USB thumbdrive that you take to class, or you could download your presentation onto the classroom computer from your cloud account.
To package a presentation for a CD or USB flash drive: https://support.microsoft.com/en-us/office/package-a-presentation-for-cd-or-usb-flash-drive-ac1ae03e-c5f2-4a0d-8bcb-3c48741117c9
UNDO! Unfortunately, it is easy to make mistakes that accidentally delete slides or major
portions of content. Fortunately, the UNDO arrow (in the Quick Access Toolbar, or the first choice under EDIT in the Menu Toolbar) can reverse these errors. Pressing UNDO repeatedly will reverse the last several steps.
Help Menu, available at the far right of the Menu Toolbar, may provide answers, though
often, a specific search via Google (or another search engine) can be quicker and more helpful.
For superb help with technical problems during OLLI class sessions, call OLLI
Program Coordinator Kristin Suess (513-967-3266 or 513-556-9179)
20
PART II. ADVANCED POWERPOINT TECHNIQUES
1. Four Great Resources
a. Microsoft PowerPoint Training Site b. Google searches c. YouTube d. LinkedIn Learning
2. How to Create a Strong Presentation a. Advance planning b. Creating the first few slides c. Start strong – finish strong d. Carnegie Hall
3. Tips for Emphasizing your Message a. The Roadmap b. The slide is only a springboard c. Get their attention: Lighting Box and Go Dark d. Accessibility and captioning
4. Risk-Free Multimedia a. Windows vs MacOS b. Embedding vs linking c. Converting file types d. Editing video in PowerPoint e. Compressing pictures and media
5. AI is in the House a. Microsoft Intelligent Services b. Microsoft Designer
6. Help and Useful Resources 7. Appendix: Quick links to Microsoft PowerPoint training website
FOUR GREAT RESOURCES
Microsoft PowerPoint Training Site: Microsoft has a very helpful online training site for
PowerPoint that gives step-by-step directions for many frequently-used commands. See Quick Links in the Appendix.
Google Search: As well as their use for locating information, images and data, search
engines like Google Search are a quick way of solving specific software questions or problems, like “How do I get my PowerPoint text to appear one line at a time?”
YouTube: Although most appreciated for cat videos, YouTube also is a great source for
seeing the different presentation styles of PowerPoint speakers and learning new tools, through searches such as “strong finishes for PowerPoint presentations”.
LinkedIn Learning: (Previously Lynda.com) LinkedIn Learning, aka InLearning,is an
exceptionally high quality suite of online instructional videos and “pathways of learning” that teaches tech, business, and creative skills at all levels. From photography, to creating a

21
strong resume, to graphic design, to computer programming, LinkedIn Learning offers terrific learning opportunities….including many courses on PowerPoint. This suite is available free via the Cincinnati Public Library (and many universities). To access via the library: Follow this link, or
Go to https://cincinnatilibrary.org/ Click on Research Databases in the blue Quick Links window at left. Scroll down to the Lifelong Learning box and click Online Courses. Scroll down and click on LinkedIn Learning (Formerly Lynda.com). This will take you to a landing page – click on the blue Get Started button.
Type in your library card number and PIN and click Continue. This takes you to the LinkedIn site, which becomes personalized as you use it. To learn about the general capabilities of the site, click on the Browse icon (as shown in the image below) at the upper left of the webpage, or, to search for a specific topic, use the search window.
HOW TO CREATE A STRONG PRESENTATION
Before starting to make slides:
Think of a single main theme or central idea of your presentation. This will help your
audience understand and remember your presentation and will help you to avoid including extraneous material that erodes your impact. Some topics may include more than one “main” theme, but it is much more difficult to make a coherent “split-personality” presentation.
Write down your key points or take-aways. At this stage, it’s helpful to ask yourself
what your audience is likely to know already, so you can emphasize things that will be new to them.
Arrange these key points in a logical order. When it’s possible, conceive of these
points as a narrative or story – stories stay with people.
Start making slides:
Spend time making a “key slide” for each of your key points. To underscore the arc of
your narrative, it’s useful to connect these slides in some way…perhaps by a common color format or template, or by numbering the titles or by a “Road Map” (see later).
22
Now make a title slide, and then add slides that fill in or support your key points. As
noted in the Tips for Effective Presentations (below), your slides should be very simple and clear - with few lines and few words - so they do not distract the audience’s attention. Note also that if you wish to show data, you should present the minimum amount necessary, so that the conclusion or point of the data is clear. If the story is complicated, you can explain or answer questions. YOU are the presentation and YOU should convey the information, not your slides.
Start strong – finish strong
This is often-heard advice, but implementing it takes thought and some creativity. A story or personal anecdote, a joke, a memorable quote or a question for the audience – these can all be effective but need to be personal or fresh. After an introductory hook, thanking your audience for attending cannot fail to be appreciated. Here again, consulting the internet can help generate ideas. Two resources listed below may help:
https://24slides.com/presentbetter/how-to-begin-a-presentation-and-how-to-end-a-presentation
https://designshack.net/articles/business-articles/how-to-start-end-a-presentation/
Carnegie Hall
A pedestrian on 57th Street sees a musician getting out of a cab and asks, “How do you get to Carnegie Hall?” Without pause, the artist replies wearily, “Practice.”
This iconic joke nevertheless emphasizes crucial advice for successful PowerPointing – start preparing your presentation substantially in advance, so that you will have time to Practice, Practice, Practice! Thorough preparation smooths the bumps, hones the timing, and calms the nerves.
One excellent aid for practicing is the Rehearse TimingsTool, which records and times your presentation. After recording, the time taken for each of your slides is visible when the slides are displayed in Slide Sorter View.
23
TIPS FOR EMPHASIZING YOUR MESSAGE
A Roadmap
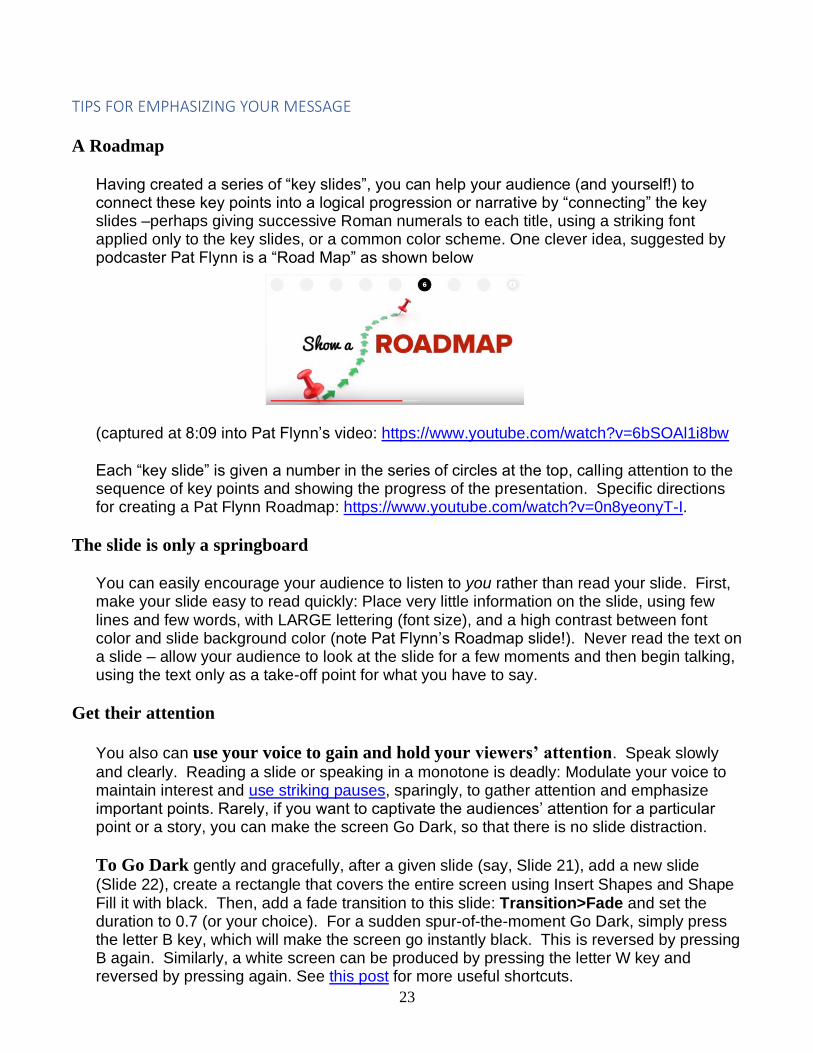
Having created a series of “key slides”, you can help your audience (and yourself!) to connect these key points into a logical progression or narrative by “connecting” the key slides –perhaps giving successive Roman numerals to each title, using a striking font applied only to the key slides, or a common color scheme. One clever idea, suggested by podcaster Pat Flynn is a “Road Map” as shown below
(captured at 8:09 into Pat Flynn’s video: https://www.youtube.com/watch?v=6bSOAl1i8bw
Each “key slide” is given a number in the series of circles at the top, calling attention to the sequence of key points and showing the progress of the presentation. Specific directions for creating a Pat Flynn Roadmap: https://www.youtube.com/watch?v=0n8yeonyT-I.
The slide is only a springboard
You can easily encourage your audience to listen to you rather than read your slide. First, make your slide easy to read quickly: Place very little information on the slide, using few lines and few words, with LARGE lettering (font size), and a high contrast between font color and slide background color (note Pat Flynn’s Roadmap slide!). Never read the text on a slide – allow your audience to look at the slide for a few moments and then begin talking, using the text only as a take-off point for what you have to say.
Get their attention
You also can use your voice to gain and hold your viewers’ attention. Speak slowly
and clearly. Reading a slide or speaking in a monotone is deadly: Modulate your voice to maintain interest and use striking pauses, sparingly, to gather attention and emphasize important points. Rarely, if you want to captivate the audiences’ attention for a particular point or a story, you can make the screen Go Dark, so that there is no slide distraction.
To Go Dark gently and gracefully, after a given slide (say, Slide 21), add a new slide
(Slide 22), create a rectangle that covers the entire screen using Insert Shapes and Shape Fill it with black. Then, add a fade transition to this slide: Transition>Fade and set the duration to 0.7 (or your choice). For a sudden spur-of-the-moment Go Dark, simply press the letter B key, which will make the screen go instantly black. This is reversed by pressing B again. Similarly, a white screen can be produced by pressing the letter W key and reversed by pressing again. See this post for more useful shortcuts.

24
Another way of focusing attention, in this case on a particular portion of an image or slide, is The Lightbox (see example below).
To Create a Lightbox effect for the first time, involves several steps, partly because you
must first reveal the Subtract Shapes Tool, which is normally hidden. To add this tool to your Quick Access Toolbar:
First click on the chevron icon ( ) at the far right of your Quick Access Toolbar. From the dropdown menu, click on More Commands, which is the last entry in the list. This opens the Ribbon and Toolbar window, shown below.
From the small “Choose commands from” window at left, select “All commands,” then, in the large panel immediately below, scroll way down to the Subtract Shapes command. (circled in the image below)
25
Select Subtract Shapes and click the “>” symbol in the center to add this tool to the right-
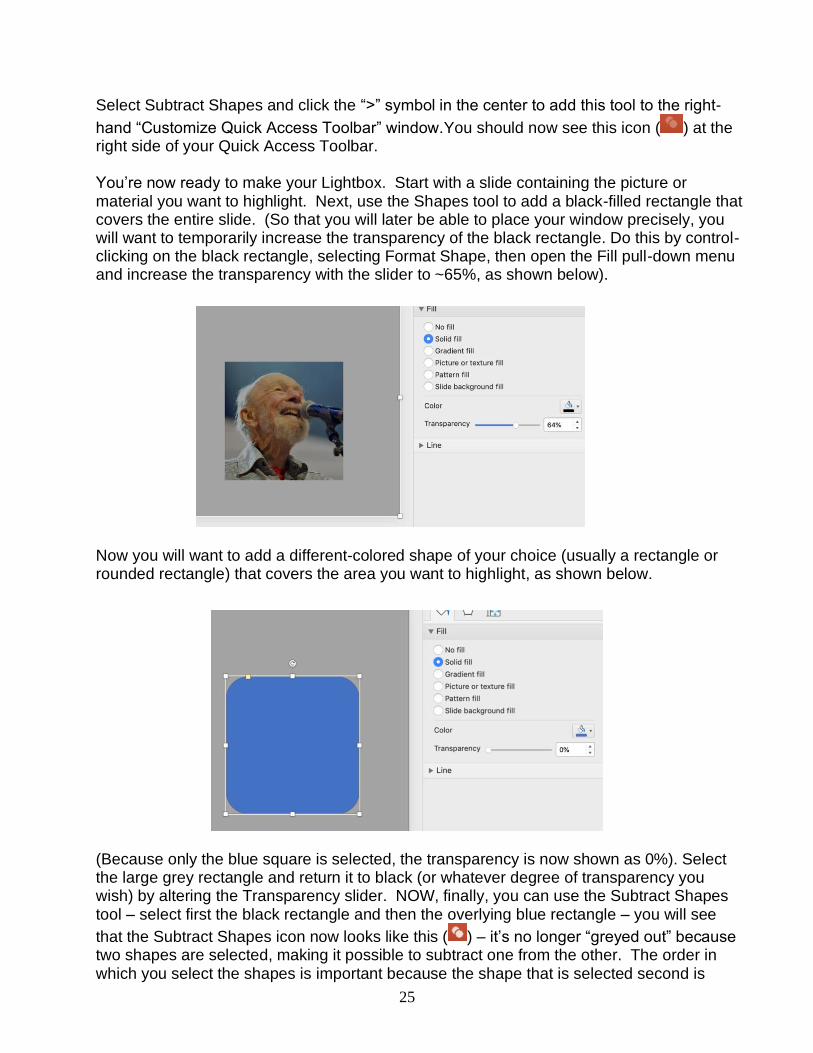
hand “Customize Quick Access Toolbar” window.You should now see this icon ( ) at the right side of your Quick Access Toolbar. You’re now ready to make your Lightbox. Start with a slide containing the picture or material you want to highlight. Next, use the Shapes tool to add a black-filled rectangle that covers the entire slide. (So that you will later be able to place your window precisely, you will want to temporarily increase the transparency of the black rectangle. Do this by control-clicking on the black rectangle, selecting Format Shape, then open the Fill pull-down menu and increase the transparency with the slider to ~65%, as shown below).
Now you will want to add a different-colored shape of your choice (usually a rectangle or rounded rectangle) that covers the area you want to highlight, as shown below.
(Because only the blue square is selected, the transparency is now shown as 0%). Select the large grey rectangle and return it to black (or whatever degree of transparency you wish) by altering the Transparency slider. NOW, finally, you can use the Subtract Shapes tool – select first the black rectangle and then the overlying blue rectangle – you will see
that the Subtract Shapes icon now looks like this ( ) – it’s no longer “greyed out” because two shapes are selected, making it possible to subtract one from the other. The order in which you select the shapes is important because the shape that is selected second is
26
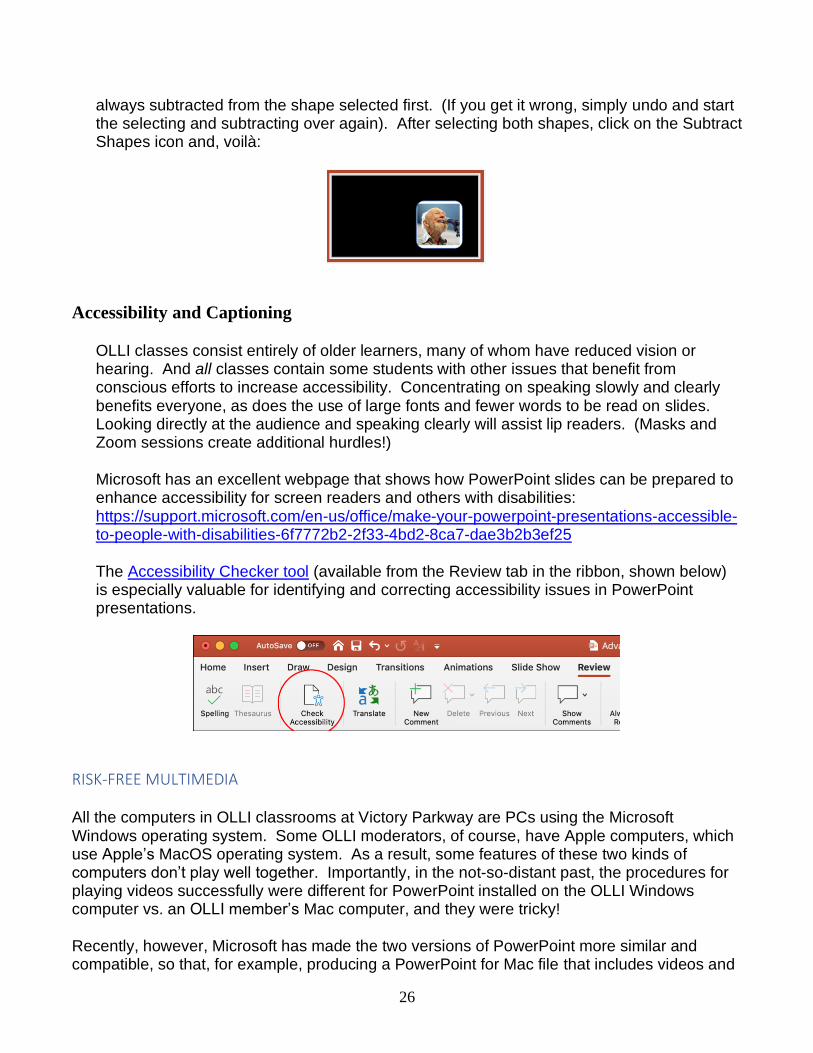
always subtracted from the shape selected first. (If you get it wrong, simply undo and start the selecting and subtracting over again). After selecting both shapes, click on the Subtract Shapes icon and, voilà:
Accessibility and Captioning
OLLI classes consist entirely of older learners, many of whom have reduced vision or hearing. And all classes contain some students with other issues that benefit from conscious efforts to increase accessibility. Concentrating on speaking slowly and clearly benefits everyone, as does the use of large fonts and fewer words to be read on slides. Looking directly at the audience and speaking clearly will assist lip readers. (Masks and Zoom sessions create additional hurdles!)
Microsoft has an excellent webpage that shows how PowerPoint slides can be prepared to enhance accessibility for screen readers and others with disabilities: https://support.microsoft.com/en-us/office/make-your-powerpoint-presentations-accessible-to-people-with-disabilities-6f7772b2-2f33-4bd2-8ca7-dae3b2b3ef25
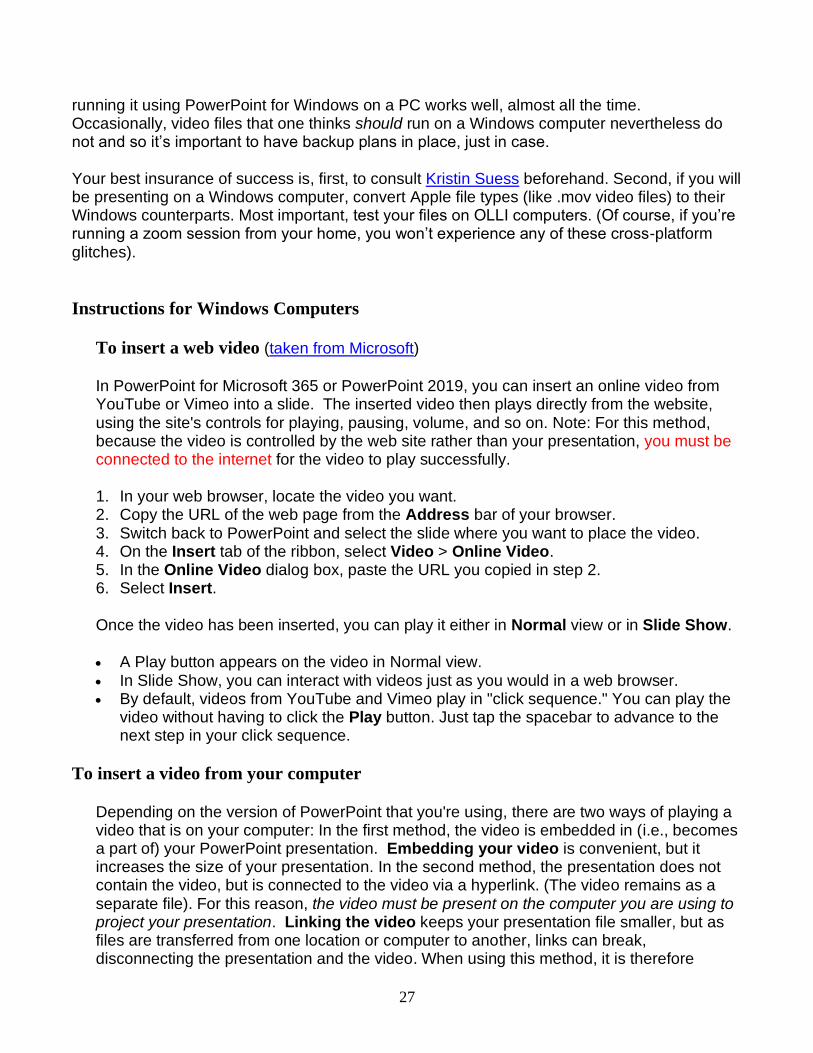
The Accessibility Checker tool (available from the Review tab in the ribbon, shown below) is especially valuable for identifying and correcting accessibility issues in PowerPoint presentations.
RISK-FREE MULTIMEDIA All the computers in OLLI classrooms at Victory Parkway are PCs using the Microsoft Windows operating system. Some OLLI moderators, of course, have Apple computers, which use Apple’s MacOS operating system. As a result, some features of these two kinds of computers don’t play well together. Importantly, in the not-so-distant past, the procedures for playing videos successfully were different for PowerPoint installed on the OLLI Windows computer vs. an OLLI member’s Mac computer, and they were tricky! Recently, however, Microsoft has made the two versions of PowerPoint more similar and compatible, so that, for example, producing a PowerPoint for Mac file that includes videos and
27
running it using PowerPoint for Windows on a PC works well, almost all the time. Occasionally, video files that one thinks should run on a Windows computer nevertheless do not and so it’s important to have backup plans in place, just in case. Your best insurance of success is, first, to consult Kristin Suess beforehand. Second, if you will be presenting on a Windows computer, convert Apple file types (like .mov video files) to their Windows counterparts. Most important, test your files on OLLI computers. (Of course, if you’re running a zoom session from your home, you won’t experience any of these cross-platform glitches).
Instructions for Windows Computers
To insert a web video (taken from Microsoft)
In PowerPoint for Microsoft 365 or PowerPoint 2019, you can insert an online video from YouTube or Vimeo into a slide. The inserted video then plays directly from the website, using the site's controls for playing, pausing, volume, and so on. Note: For this method, because the video is controlled by the web site rather than your presentation, you must be connected to the internet for the video to play successfully.
1. In your web browser, locate the video you want. 2. Copy the URL of the web page from the Address bar of your browser. 3. Switch back to PowerPoint and select the slide where you want to place the video. 4. On the Insert tab of the ribbon, select Video > Online Video. 5. In the Online Video dialog box, paste the URL you copied in step 2. 6. Select Insert.
Once the video has been inserted, you can play it either in Normal view or in Slide Show.
• A Play button appears on the video in Normal view. • In Slide Show, you can interact with videos just as you would in a web browser. • By default, videos from YouTube and Vimeo play in "click sequence." You can play the
video without having to click the Play button. Just tap the spacebar to advance to the next step in your click sequence.
To insert a video from your computer
Depending on the version of PowerPoint that you're using, there are two ways of playing a video that is on your computer: In the first method, the video is embedded in (i.e., becomes a part of) your PowerPoint presentation. Embedding your video is convenient, but it increases the size of your presentation. In the second method, the presentation does not contain the video, but is connected to the video via a hyperlink. (The video remains as a separate file). For this reason, the video must be present on the computer you are using to project your presentation. Linking the video keeps your presentation file smaller, but as files are transferred from one location or computer to another, links can break, disconnecting the presentation and the video. When using this method, it is therefore
28
recommended to store (and, if needed, transfer) presentations and linked videos in the same folder. To embed a video that is stored on your PC:
1. In Normal view, click the slide you’d like to add a video to. 2. On the Insert tab, click the arrow under Video, then click Video on my PC. 3. In the Insert Video box, select the file you want, then click Insert.
To link to a video that is stored on your PC:
1. In Normal view, click the slide in which you want to place the video link. 2. On the Insert tab, click the arrow under Video, then click Video on my PC. 3. In the Insert Video box, click the file that you want to link to, click the down arrow next
to the Insert button, and then click Link to File.
Instructions for Mac Computers
To insert a web video
In PowerPoint for Microsoft 365 for Mac or PowerPoint 2019 for Mac, you can insert an online video from YouTube or Vimeo on a slide. (Earlier versions of PowerPoint for macOS don't support inserting an online video). As for PC-generated video slides, the video plays directly from the website, and you use the site's controls for playing, pausing, volume, and so on. Consequently, you must be connected to the internet for the video to play successfully.
1. In your web browser, locate the video you want. 2. Copy the URL of the web page from the Address bar of your browser. 3. Switch to PowerPoint and select the slide where you want to place the video. 4. On the Insert tab of the ribbon, in the Media group at the right end, select Video. Then
select Online Movie. 5. In the dialog box, paste the URL you copied in step 2. 6. Click Insert, which adds the video is to the slide. 7. To preview the video, click the Play button that appears on top of video.
To insert a video stored on your computer
1. In Normal view, select the slide you'd like to add a video to. 2. On the Insert tab, click Video, then click Movie from File. 3. In the Choose a Movie dialog box, select the file you want to insert.
o If you want to embed the video on the slide, simply click Insert. o If you want to put a link to the video on the slide, click Options at the lower left
corner of the dialog box, and then select the Link to file box, and then click Insert.
NOTE: Recent versions of PowerPoint for PCs, but not older versions, can play videos generated by Apple phones or software, which are created in the .mov format (Apple’s

29
QuickTime file format), rather than the .mp4 format (which runs in both PC and Apple devices). To be safe, therefore, you may wish to convert any .mov videos to the .mp4 format, using a convenient online converter such as https://freeconvert.com or https://www.adobe.com/express/feature/video/convert/mov-to-mp4.
Editing videos with PowerPoint
PowerPoint not only plays videos, but also offers sophisticated tools for editing videos that you have added from your computer (but not those embedded from an internet site like YouTube or Vimeo). An excellent description of editing options is available as a segment (Add and Format Video) of the LinkedIn Learning course “PowerPoint Essential Training (Office 365/Microsoft 365) shown below.
• Add or delete audio in your PowerPoint presentation • How to trim video or audio files
Compress Pictures and Media
Image files from modern digital cameras are quite large, as are many image files obtained from the internet. Video files can be even larger. Consequently, inserting many images or videos into a presentation can make the file unwieldy to edit, slow to load during your presentation or too large for easy distribution. To address this problem, PowerPoint has a compression tool that can reduce image file size without compromising the quality of the projected image.
From the Windows main menu, select Info (as shown below), then Media Size and Performance.

30
For Mac, select File > Compress Pictures from the menu bar at the top. This will open the Compress Pictures window (below). Open the drop-down Picture Quality box:
Typically, the On-screen option (150 ppi, or pixels per inch) results in projected images that look good and, indeed, are the highest quality that a standard digital projector can produce. (For this reason, using images with higher resolution does not improve the quality of the projected image, but does unnecessarily increase the size of your PowerPoint file).
ARTIFICIAL INTELLIGENCE IS IN THE HOUSE!
PowerPoint offers a variety of ways for you to personalize or enliven the default layout, but few of us have notable graphic skills. Pre-formatted themes, discussed in Part I of this handout, are one way of enhancing slides. Pre-designed themes are available on the Design tab, as shown below. You can also get more themes from templates.office.com or by an online search. This excellent video shows how to use themes effectively.
31
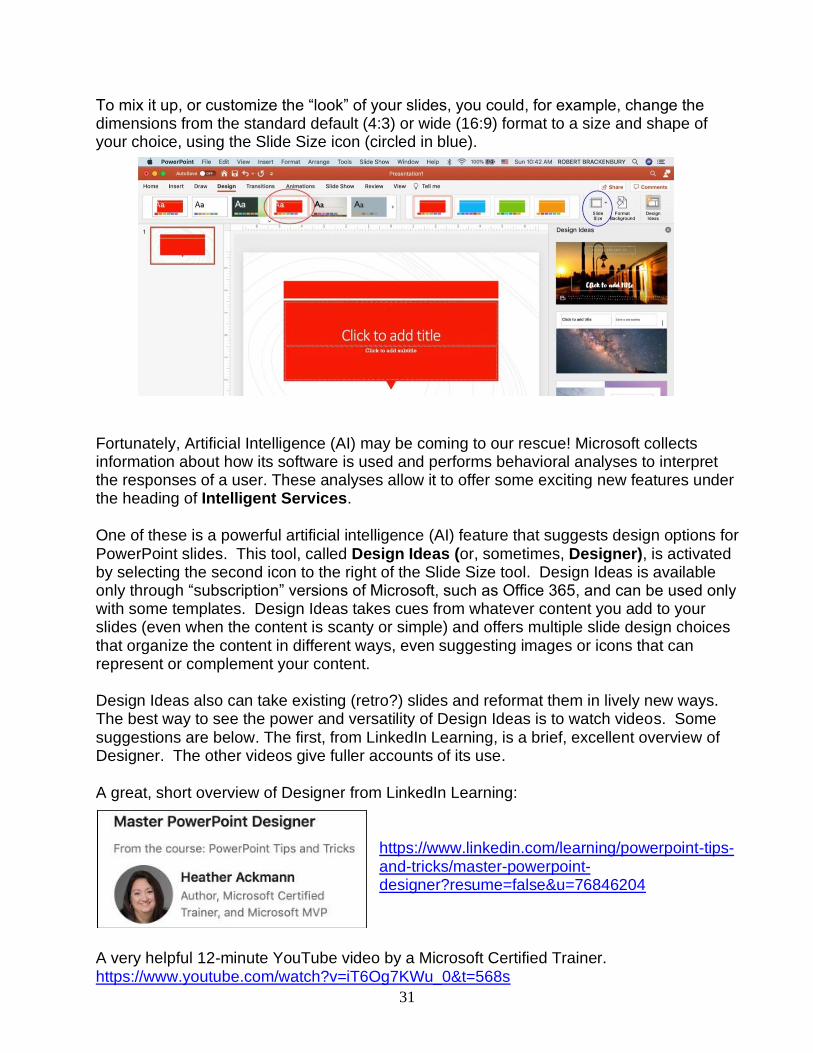
To mix it up, or customize the “look” of your slides, you could, for example, change the dimensions from the standard default (4:3) or wide (16:9) format to a size and shape of your choice, using the Slide Size icon (circled in blue).
Fortunately, Artificial Intelligence (AI) may be coming to our rescue! Microsoft collects information about how its software is used and performs behavioral analyses to interpret the responses of a user. These analyses allow it to offer some exciting new features under the heading of Intelligent Services.
One of these is a powerful artificial intelligence (AI) feature that suggests design options for PowerPoint slides. This tool, called Design Ideas (or, sometimes, Designer), is activated by selecting the second icon to the right of the Slide Size tool. Design Ideas is available only through “subscription” versions of Microsoft, such as Office 365, and can be used only with some templates. Design Ideas takes cues from whatever content you add to your slides (even when the content is scanty or simple) and offers multiple slide design choices that organize the content in different ways, even suggesting images or icons that can represent or complement your content. Design Ideas also can take existing (retro?) slides and reformat them in lively new ways. The best way to see the power and versatility of Design Ideas is to watch videos. Some suggestions are below. The first, from LinkedIn Learning, is a brief, excellent overview of Designer. The other videos give fuller accounts of its use.
A great, short overview of Designer from LinkedIn Learning:
https://www.linkedin.com/learning/powerpoint-tips-and-tricks/master-powerpoint-designer?resume=false&u=76846204
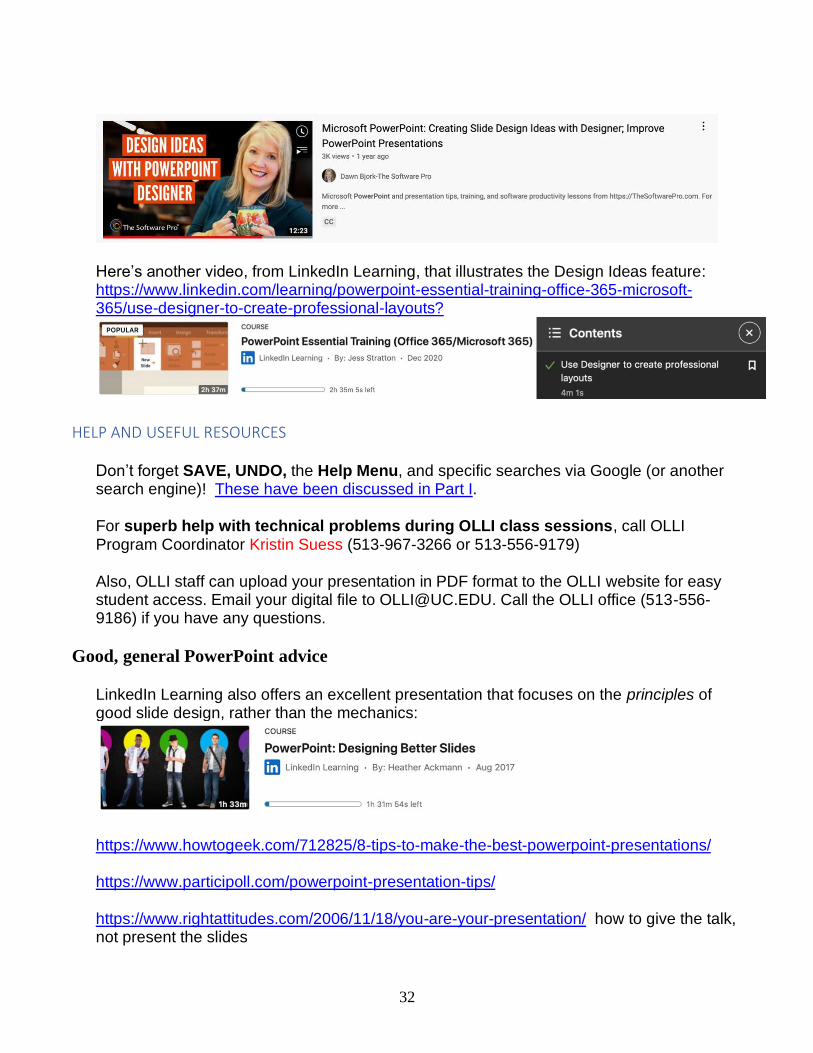
A very helpful 12-minute YouTube video by a Microsoft Certified Trainer. https://www.youtube.com/watch?v=iT6Og7KWu_0&t=568s
32
Here’s another video, from LinkedIn Learning, that illustrates the Design Ideas feature: https://www.linkedin.com/learning/powerpoint-essential-training-office-365-microsoft-365/use-designer-to-create-professional-layouts?
HELP AND USEFUL RESOURCES Don’t forget SAVE, UNDO, the Help Menu, and specific searches via Google (or another search engine)! These have been discussed in Part I.
For superb help with technical problems during OLLI class sessions, call OLLI Program Coordinator Kristin Suess (513-967-3266 or 513-556-9179)
Also, OLLI staff can upload your presentation in PDF format to the OLLI website for easy student access. Email your digital file to [email protected]. Call the OLLI office (513-556-9186) if you have any questions.
Good, general PowerPoint advice
LinkedIn Learning also offers an excellent presentation that focuses on the principles of good slide design, rather than the mechanics:
https://www.howtogeek.com/712825/8-tips-to-make-the-best-powerpoint-presentations/ https://www.participoll.com/powerpoint-presentation-tips/ https://www.rightattitudes.com/2006/11/18/you-are-your-presentation/ how to give the talk, not present the slides
33
Good info on image resolution, projection, etc: https://www.redeye.org.uk/opinion/preparing-photos-digital-projection
A good recent course that covers audio and video well:
Alternative slide presentation software
Prezi (https://prezi.com/) has a very different format than other presentation applications, which permits non-linear presentations. A useful recent review from PC Magazine (https://www.pcmag.com/reviews/prezi) says “Prezi frees your presentations from the sequential slide-deck format. It allows non-artistic people to easily make interactive presentations, talking head videos, and standalone graphics. Keynote (https://www.apple.com/keynote/) is included as a pre-installed app on most Apple devices and permits real-time collaboration with users on Macs, iPads, iPhones, or PCs. Google Slides (https://www.google.com/slides/about/#features) is included as part of the free, web-based Google Docs Editors suite, and can be used on either Mac or PC computers. The app is compatible with Microsoft PowerPoint file formats.
34
PART III. EFFECTIVE POWERPOINT PRESENTATIONS
Key Tips: Confidence, articulation, humor, statistics, suitable slides & engaged audience
1. Make use of the stage Unless the presentation is virtual, or hybrid, use the stage or
classroom for moving around. Engage with the audience.
2. Body language Body language is important for making points. Use your hands and
facial expression. Leading up to a strong point, can you shift for its importance?
3. Eye contact It’s important to make eye contact with your audience. If nervous,
choose 3 – 4 folks to focus on. Besides your eyes, smile. Have your eyes walk the room.
4. Authentic & relatable Be real. Assumption is you know the subject, use stories to help tell
it. Make them accessible for the participants as your talk. Is there one they can clearly relate
to?
5. Defer to your audience’s needs Check for understanding and comfort level with your
audience. Do they seem engaged? Are they comfortable? Phones off? If they look restless,
take a five minute break.
6. Practice, practice To be comfortable with the presentation, practice. In front of a mirror, at
your desk, with a partner or just alone, go over your presentation so its clear in your head
and you do not have to read from notes.
7. Train your voice Articulation – modulate so as not to be monotonous. Can you
demonstrate excitement, sadness, based on your stories?
8. Speaking, not reading Be sure to just talk (where practice came in) rather than read. If
there’s a critical slide you want to emphasize, explain you’re just reading that one. Interact
with the audience. Can they interject? Spoken language is shorter, less formal and more
direct than written print. One of your goals is to capture the audience’s attention. Giving full
print will have them reading. Giving them a very abbreviated hand out leads to notes only.
9. Faith in technology Practice the use of technology ahead of time but plan for back-ups.
Bring your own laptop and a USB jump/thumb drive. Is a CD available? Think of what can
go wrong and plan for that.
10. End your presentation with next steps What do you want folks to walk away with? What’s the
plan for the following week? Wrap up your presentation. Leave a thought on the last slide
rather than “Questions.
35
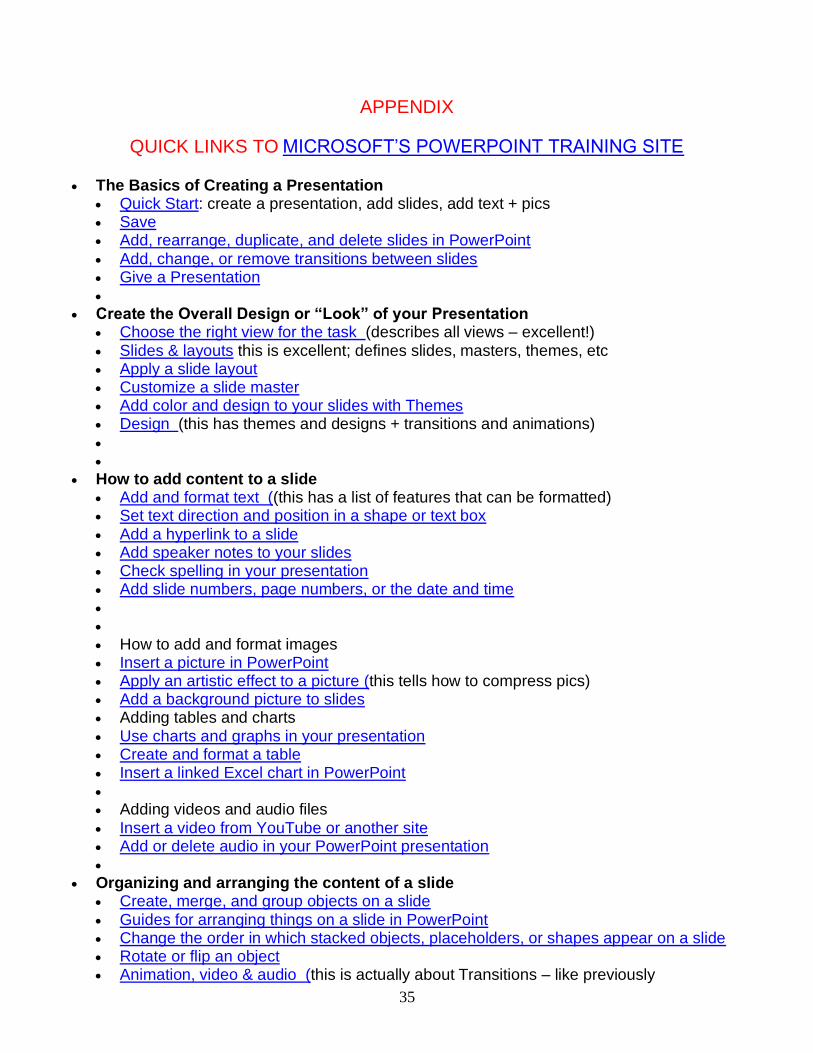
APPENDIX
QUICK LINKS TO MICROSOFT’S POWERPOINT TRAINING SITE
• The Basics of Creating a Presentation • Quick Start: create a presentation, add slides, add text + pics • Save • Add, rearrange, duplicate, and delete slides in PowerPoint • Add, change, or remove transitions between slides • Give a Presentation •
• Create the Overall Design or “Look” of your Presentation • Choose the right view for the task (describes all views – excellent!) • Slides & layouts this is excellent; defines slides, masters, themes, etc • Apply a slide layout • Customize a slide master • Add color and design to your slides with Themes • Design (this has themes and designs + transitions and animations) • •
• How to add content to a slide • Add and format text ((this has a list of features that can be formatted) • Set text direction and position in a shape or text box • Add a hyperlink to a slide • Add speaker notes to your slides • Check spelling in your presentation • Add slide numbers, page numbers, or the date and time • • • How to add and format images • Insert a picture in PowerPoint • Apply an artistic effect to a picture (this tells how to compress pics) • Add a background picture to slides • Adding tables and charts • Use charts and graphs in your presentation • Create and format a table • Insert a linked Excel chart in PowerPoint • • Adding videos and audio files • Insert a video from YouTube or another site • Add or delete audio in your PowerPoint presentation •
• Organizing and arranging the content of a slide • Create, merge, and group objects on a slide • Guides for arranging things on a slide in PowerPoint • Change the order in which stacked objects, placeholders, or shapes appear on a slide • Rotate or flip an object • Animation, video & audio (this is actually about Transitions – like previously

36
• Animate text or objects •
• Giving the Presentation • Add speaker notes to your slides • Start the presentation and see your notes in Presenter view • Rehearse and time the delivery of a presentation • Print your PowerPoint slides, handouts, or notes • Save PowerPoint presentations as PDF files •
• When You Get Stuck • Learn more