pottery recording guide - portable antiquities scheme
TRANSCRIPT
1
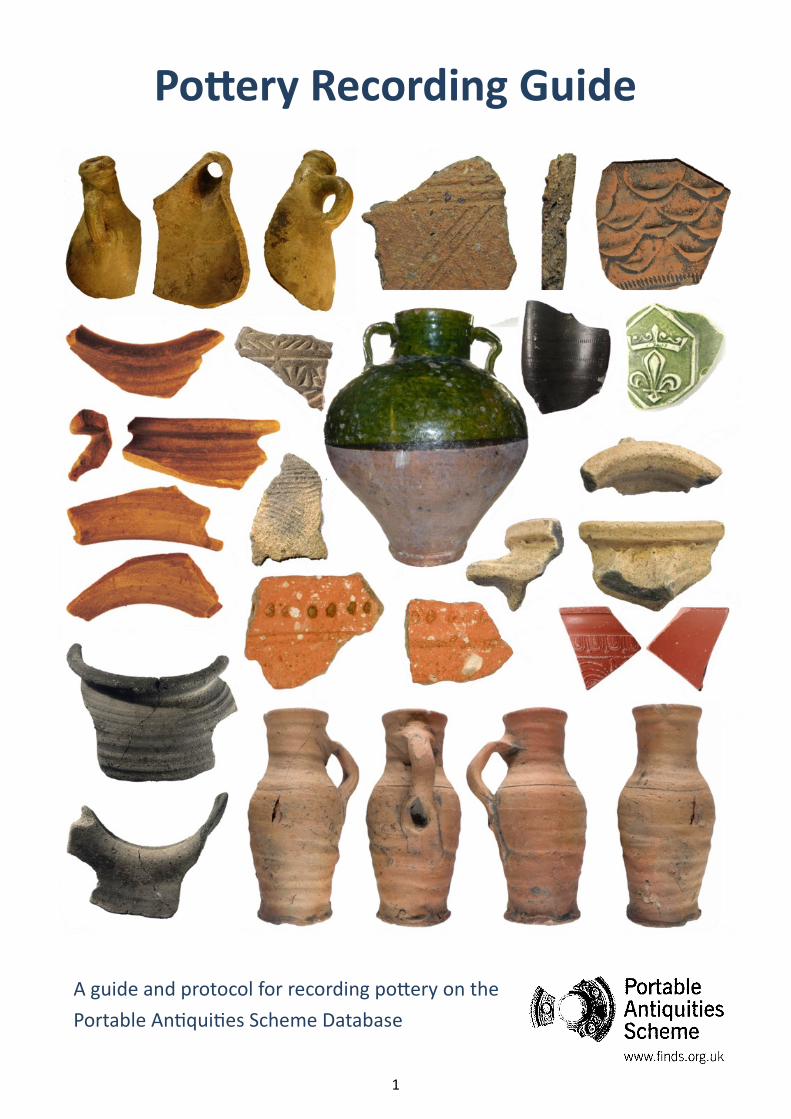
Pottery Recording Guide
A guide and protocol for recording pottery on the
Portable Antiquities Scheme Database
2
Acknowledgements 3
1. Introduction 4 1.1 Conventions used in the Guide 4 2. Pottery for the non-specialist 5 2.1 Why record pottery? 5 2.2 Dating pottery 5 2.3 What are clays, ceramics and pottery? 6 1. Clays 6 2. Ceramics 6 3. Inclusions 7 4. Pottery 7 2.4 Finding help with your local pottery 7 3. Recording pottery on the PAS database 8 3.1 The Object Type field and the Classification fields 8 3.2 The Object Description field—the basics 9 3.3 The Material fields 9 3.4 The Method of Manufacture field 10 3.5 The Surface Treatment field 11 3.6 The Object Description field in detail 11 1. Which part of the pot is it? 12-15 List of the parts of a vessel 12-13 2. Describing the fabric: colour 15-16 3. Describing the fabric: hardness 16 4. Describing the fabric: feel 17 5. Describing the fabric: inclusions 17-18 Materials 19-20 Peacock’s key to inclusions 21-22 Frequency, size, shape, sorting 23 6. Methods of manufacture 24 7. Surface treatment and decoration 25-26 8. Recording the shape of a pot 27-28 3.7 Model descriptions 29 3.8 Recording the dimensions 30 4. Illustrating pottery 30 4.1 Drawing pottery 30-32 4.2 Photographing pottery 33 4.3 Combining photography and drawings 34 5. Recording large groups of ceramic finds 35 5.1 What to record 35 5.2 How many records to make 35
6. List of vessel types 37 6.1 The three basic vessel types 38 6.2 Alphabetical list of vessel types 39-42 7. Other ceramic objects 43 7.1 Lighting equipment 43 7.2 Fire covers (curfews) 43 7.3 Moulds 43 7.4 Crucibles and cupels 44 7.5 Briquetage 44 7.6 Kiln furniture and kiln wasters 45-46 7.7 Weights - spindle-whorls, loomweights, other ceramic weights 46-47 7.8 Pipeclay objects - smoking pipes, figurines, dolls, hair-curlers 48-49 7.9 Ceramic building material (CBM) 50 Brick and tile in the Roman world 50 Medieval brick 51 Post-medieval brick 51 Roman tile 52 Medieval tile 52-53 Post-medieval tile 53 Field drains and drain pipes 54 Daub, cob and clay lump 54 8. Beware! Things that look like pottery, but aren’t 55 Clay pigeon 55 Asbestos sheeting 55 Ironstones 55 9. Glossary 56-59
10. Bibliography and further reading 60 Useful books to own or download 60 Full bibliography 60-61 Useful websites 61
Contents
Terms in italics can be found in the Glossary
3
Acknowledgements
The text of the guide has mainly been written by Kevin Leahy and edited by Helen Geake.
This guide is a work of synthesis, not research. It is based on the work of others, and we acknowledge
the many scholars on whose efforts we have drawn. It has been necessary to simplify their work for a
wider, non-specialist, audience and we hope that they will forgive the liberties that we have taken,
and excuse any errors which have crept in.
People have been kind and generous in their support during the preparation of the this guide, and
Kevin would like to thank in particular Rose Nicholson of the North Lincolnshire Museum in
Scunthorpe, who was always willing to find examples of particular sherds from the Museum’s
extensive collections. Helen would like to thank Victoria Bryant, Mark Whyman and Andrew
Rogerson in particular for reading the whole text and giving many invaluable suggestions, help and
advice. Any errors that remain, of course, are entirely our responsibility.
Other people have been generous in allowing the use of illustrations from their own publications,
which are acknowledged in the image captions. We would like to thank Mike McCarthy and
Catherine Brooks for allowing the use of their drawings of medieval pottery (McCarthy and Brooks
1988); Nick Hodgson and the Society of Antiquaries of Newcastle upon Tyne for allowing the
reproduction of illustrations from John Gillam’s report on Roman pottery from northern Britain
(Gillam 1957); David Gurney for permission to copy illustrations from Sarah Jennings’s book on
pottery from Norwich (Jennings 1981); and the York Museums Trust for allowing the use of
illustrations from Sarah’s book on medieval pottery in the Yorkshire Museum (Jennings 1992).
The images on the front cover are all taken from the Portable Antiquities Scheme’s database. Other
images from the database all have their PAS record number in the caption.
We have tried to ensure that all images are correctly credited, but if you spot a mistake, please e-
mail [email protected] with the details, and we will endeavour to correct it.
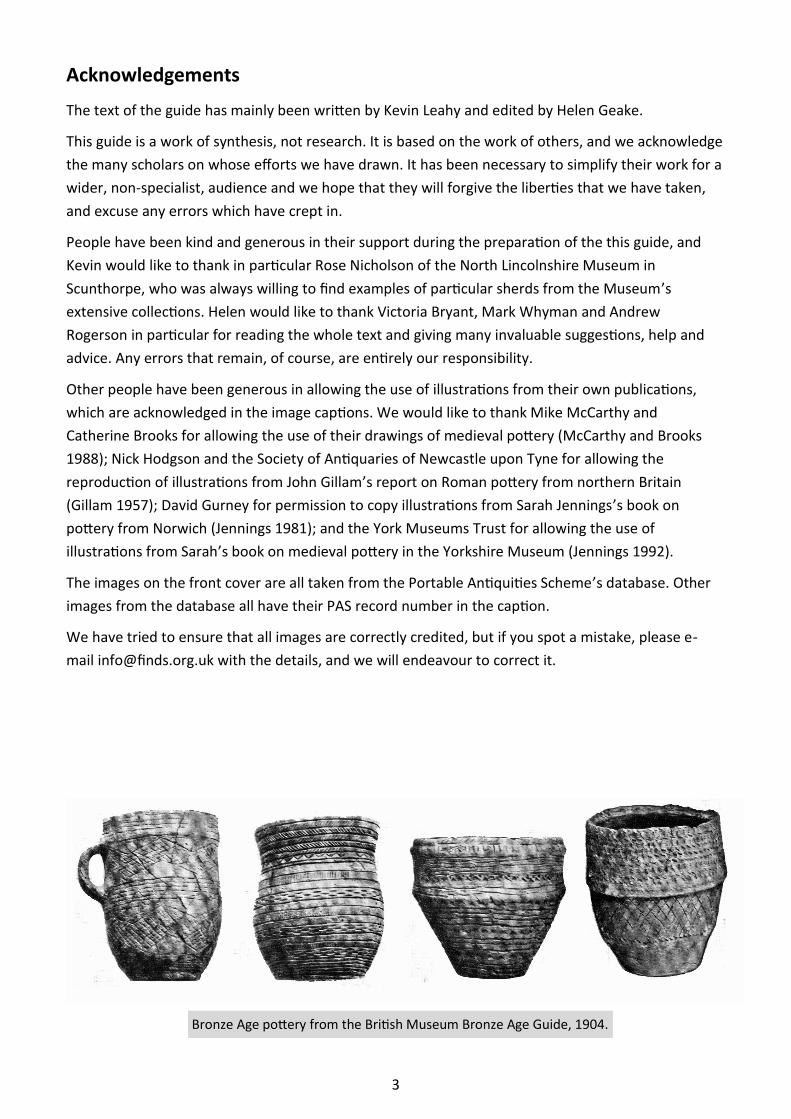
Bronze Age pottery from the British Museum Bronze Age Guide, 1904.
4
1. Introduction
This guide is here to help the reader make records of pottery (ceramic
vessels) on the Portable Antiquities Scheme’s database. Our
philosophy of recording is the same as any other archaeological
recording—we aim to substitute the object itself with a thorough
record. This record should fully describe the object, allowing a future
reader to evaluate the record and if necessary re-identify the object.
We therefore aim to give the reader the tools to recognise, describe,
draw and photograph pottery vessels. We look at what all pottery has
in common; shape, materials, technology, decoration, colour and
hardness. We will tell you what information to put in which field of a
PAS record, and how to get this information out of your sherd.
This guide is not intended as a universal guide to pottery in Britain.
What kinds of pottery were made when, and where, is a vast topic
and better covered elsewhere (e.g. Laing 2014). Instead, it is designed
to be practical; the aim is to allow recorders to describe and record
pottery, not necessarily to identify it.
It is also not a guide to other ceramic items. Clay pipes, ceramic lamps
and moulds, kiln furniture and so on are briefly noted towards the end
with recommendations as to the object type to use, but are better covered in other PAS guides to
these object types. Ceramic building material has a short section as well.
This guide should help you to record pottery of all dates. Don’t be intimidated, just describe what you
see. Pottery has a story to tell; it is not just sherds, but part of the lives of people. Look at it, and think
about what it is telling us.
1.1 Conventions used in the Guide
Terms that should be used in the Object Type field are written in CAPITAL
LETTERS, as this is how they appear on the database. Terms that should be
used in other fields are in ‘single inverted commas’.
Cross-references within the List of Parts of a Vessel (pp. 12-13) and the List of
Vessel Types (pp. 39-42) are also in ‘Single Inverted Commas’, and given an
initial capital letter.
The names of PAS database fields are given an initial capital letter (e.g. Sub-
classification, Object Description, Length).
Words that are explained in the Glossary are in italics.
Many of the photographs in this guide are there to give an impression of a
particular aspect of pottery, rather than to provide a record of it. They are
artistic photographs rather than records, and so may not conform to the
standards that the PAS expects of its record photographs.
Medieval glazed jug
handle, Lincoln.
Photo: Kevin Leahy
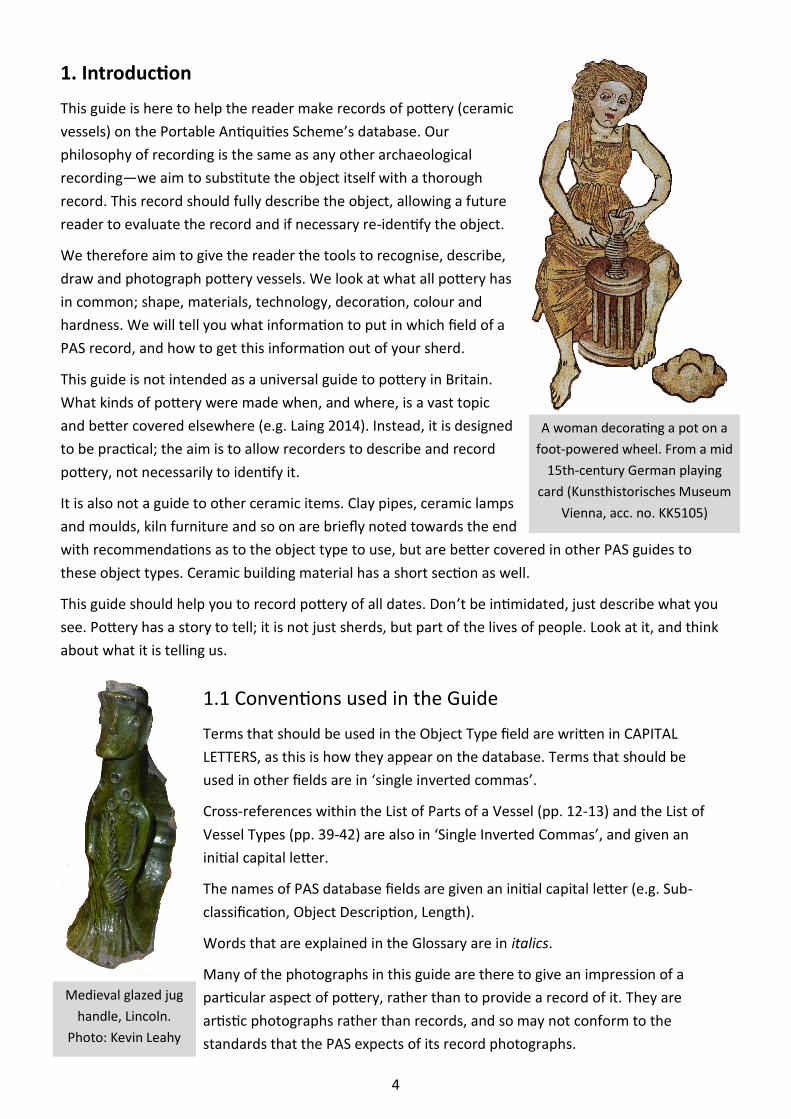
A woman decorating a pot on a
foot-powered wheel. From a mid
15th-century German playing
card (Kunsthistorisches Museum
Vienna, acc. no. KK5105)

5
2. Pottery for the non-specialist
2.1 Why record pottery?
Sherds of pottery are, to many people, not the most exciting of finds.
But a sherd can be as archaeologically important as a coin, or even a
hoard. This sherd (right) was picked up next to a footpath in
Lincolnshire. It was the first find from that parish to be recorded by the
Portable Antiquities Scheme .
Pottery is one of the mainstays of archaeology. Unlike metal, it
doesn’t corrode and it can’t be melted down. So it is common,
usually well preserved (even if broken) and can be dated. Even a single
sherd is an indicator of human activity and should be recorded.
Unfortunately, however, most pottery is highly regionalised. Medieval Lincolnshire alone contained at
least 29 ceramic zones, which present difficulties even to the specialist. Most of us don’t have the
time or the reference collections to allow us to become specialists. All we can do is to record what we
see to the best of our ability, so that our data can be used by people with the detailed local
knowledge. See p. 7 for how to find help with your local pottery types.
Roman greyware sherd
(FAKL-3ABC2B )
2.2 Dating pottery
Unlike coins, pottery does not bear a convenient date or
a ruler’s name. However, many years of excavation and
analysis have established a sequence and dating for
most pottery. Dates are based on pottery found either in
historically dated deposits, or in deposits which contain
coins or other, better dated, types of pottery.
There is the problem of ‘residuality’: pottery (and coins)
can survive to become incorporated in later deposits. A
back-filled hole might contain pieces of 20th-century
pottery and a halfpenny of Victoria. Using the coin to
date the pottery would result in a date over a century
too early. But with care, and by making comparisons
between sites, the problems caused by residuality can
be minimised.
Once the experts have established the pottery types and
given us a dated sequence, all we have to do is identify
our finds as to type, and look up the date! Of course it is
not that easy. Remember that we are not pottery
specialists; what we do is record finds so well that they
can be re-identified or re-dated if mistakes are made.
We should concentrate on a good description, and
accept that a precise date is a bonus.
Few pots are as well dated as this jug, with
sprigged and stamped decoration
celebrating Queen Victoria’s Golden
Jubilee in 1887 - but most sherds can be
dated precisely enough to be useful.
Photo: Kevin Leahy
6
2.3 What are clays, ceramics and pottery?
1. Clays
Clay consists of a mass of tiny particles of aluminium
silicate produced by the decomposition of igneous
rocks (e.g. granite). Water mixed with the particles
lubricates them so they slide over each other, making
the clay plastic and easily modelled to practically any
shape.
Primary clays, such as Cornish china clay, have
remained close to their origin. As they are chemically
pure, they give white fabrics which need a high firing
temperature. Pipeclays and fireclays are relatively pure
secondary clays with similar properties.
Secondary clays have been moved from their igneous
source by water and glacial action. They contain
impurities (particularly iron) which act as fluxes,
reducing the temperature needed to fire them. The
impurities also give colour to the clay, which can
change on firing depending on the environment. Most
secondary clays are used for making ceramic vessels,
and so are known as potter’s clay.
2. Ceramics
When clay is fired, it undergoes permanent changes to become a ceramic. First it is air-dried, then firing
starts slowly to steam off the remaining free water without cracking the pot.
Between 450oC and 700oC the chemically combined water of crystallization is driven off. At 900oC-
1200oC the particles of a secondary clay start to fuse where they touch, giving an earthenware. As
temperatures rise still higher, the clay particles melt and fuse more completely producing, at 1300oC-
1400oC, a vitrified stoneware. If heating continues beyond this point, the particles eventually melt
completely and the pot collapses.
The type of ceramic produced depends on the firing temperature, but the temperature needed depends
on the type of clay and the inclusions in it. Inclusions are everything that is not the clay matrix. They can
be naturally present, or can be added by the potter, when they are called filler or temper.
Ceramics can be defined as fired clays, so include tiles, bricks, daub, etc. which are collectively known as
ceramic building materials or CBM. Other objects made from ceramic include tobacco pipes, wig-curlers
and figurines (all made from pipeclay), and weights, spindle-whorls, lamps, fire-covers and briquetage
(all made from potter’s clay). Kiln furniture and moulds may be made from fireclay, which is particularly
resistant to heat. See pp. 43-54 for other objects made from ceramic.
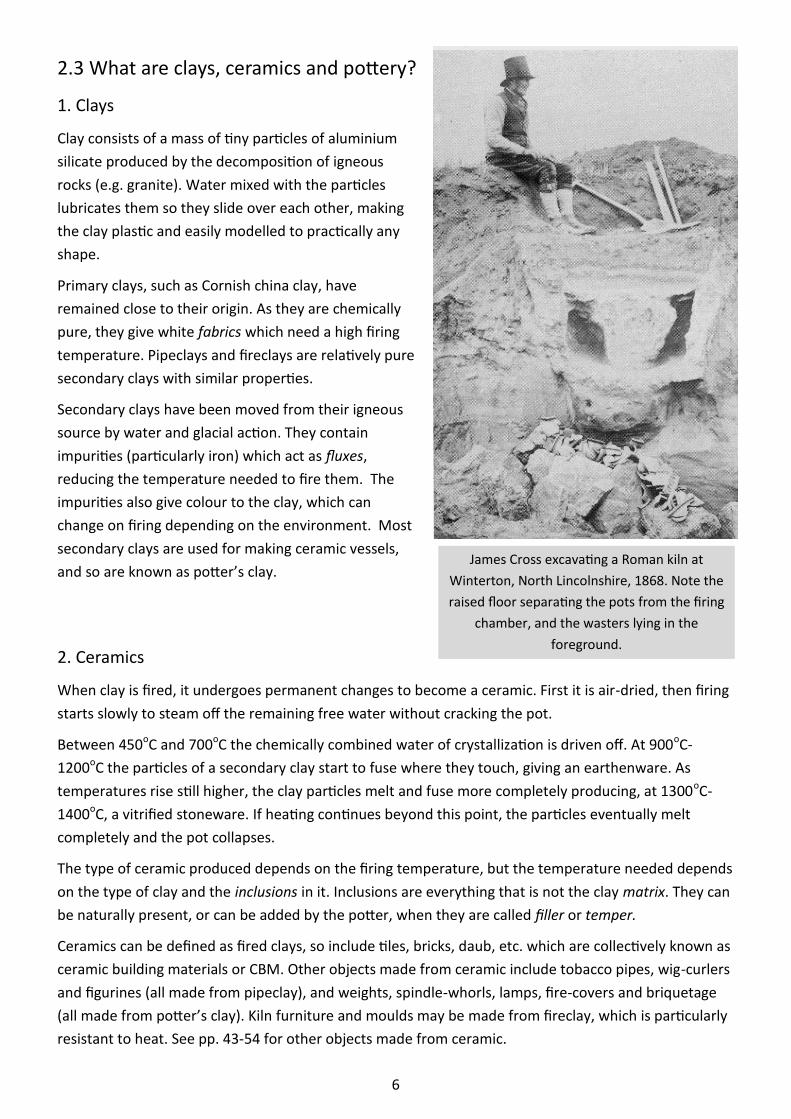
James Cross excavating a Roman kiln at
Winterton, North Lincolnshire, 1868. Note the
raised floor separating the pots from the firing
chamber, and the wasters lying in the
foreground.
7
4. Pottery
In A Standard for Pottery Studies in Archaeology (Barclay et al 2016, 1), pottery is defined as ‘vessels
made of fired clay, complete or fragmented’. ‘Pot’ probably comes from the Latin potare, to drink, so
may originally have meant a drinking cup.
‘Pottery’ is also used by the PAS to mean the kind of ceramic that vessels are made from. It can be
used as an adjective (e.g. a pottery bottle) or a noun (a sherd of pottery). It isn’t used, however, as an
object type, nor is it an option in the materials fields. See Chapter 3, pp. 8-30, for how to record
pottery on the PAS database.
3. Inclusions
Inclusions are anything that isn’t raw clay, either
naturally present in the clay or added before it is
used to make pots. Some fabrics contain more
inclusions than clay.
Inclusions help in several ways:
• They make wet clay less sticky
• They reduce shrinkage
• They increase resistance to thermal shock
• They give pots strength before and during
firing.
Inclusions are crucial in allowing us to describe and identify
a pot fabrics. See pp. 17-23 for how to recognise and
describe inclusions.
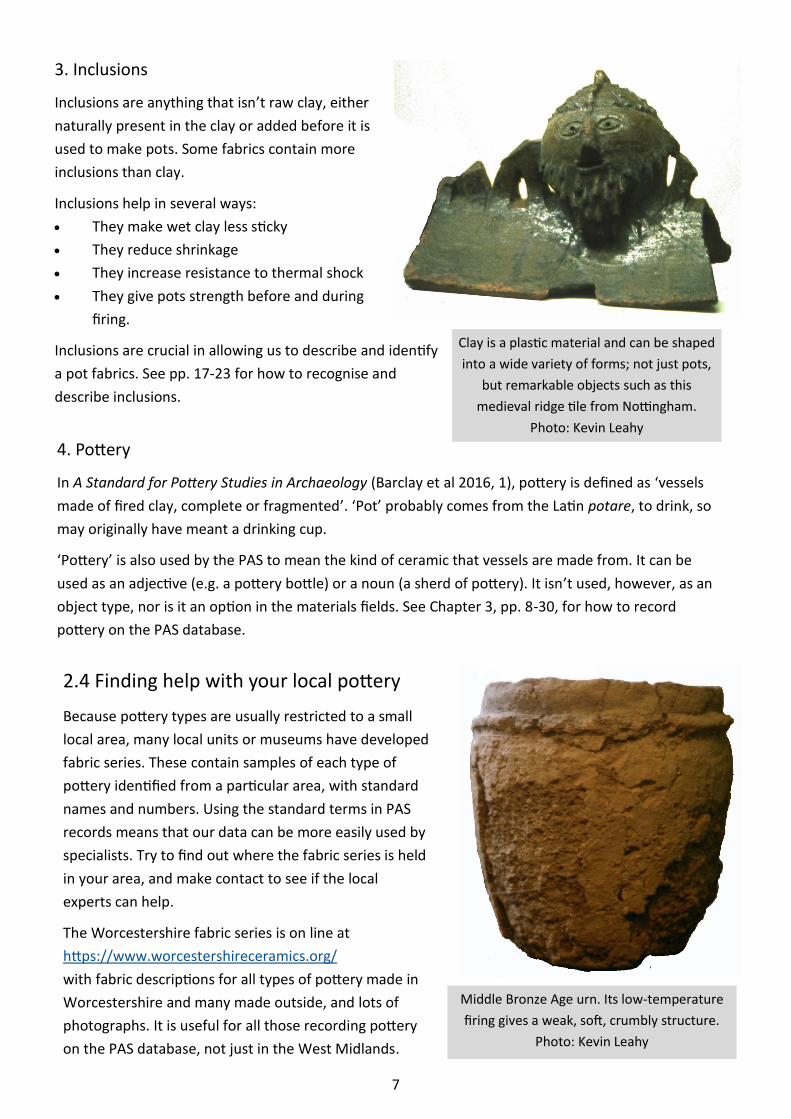
Clay is a plastic material and can be shaped
into a wide variety of forms; not just pots,
but remarkable objects such as this
medieval ridge tile from Nottingham.
Photo: Kevin Leahy
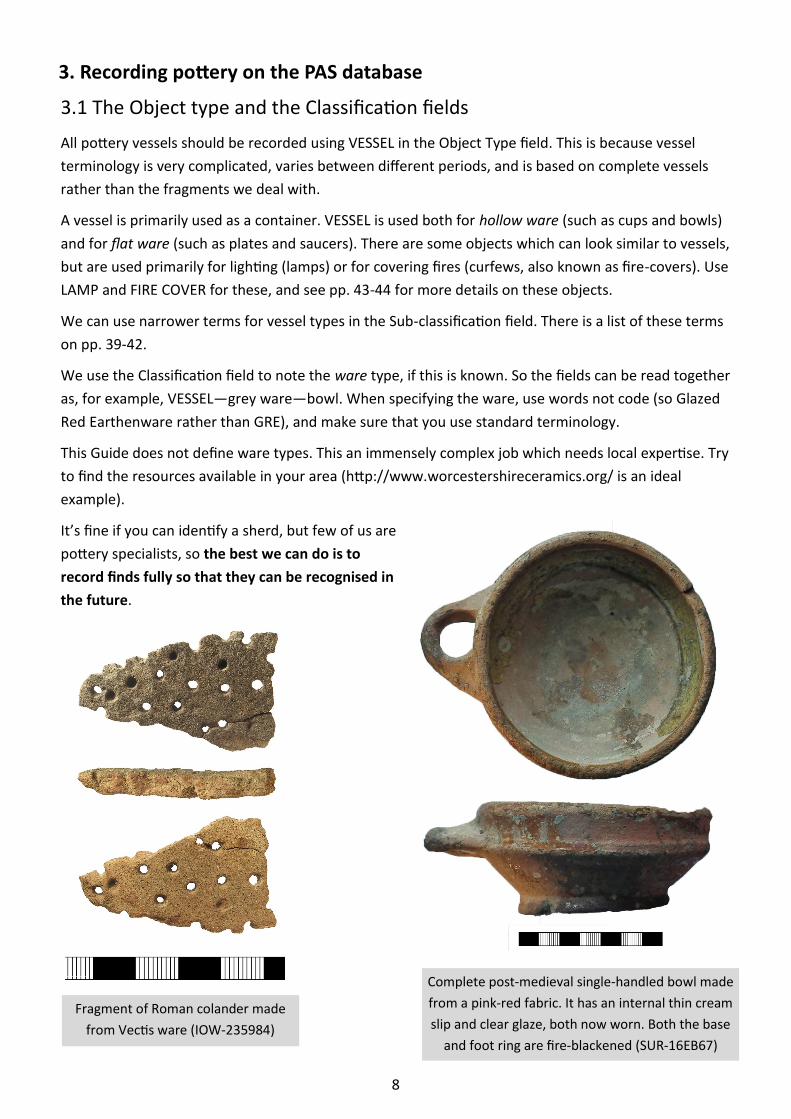
Middle Bronze Age urn. Its low-temperature
firing gives a weak, soft, crumbly structure.
Photo: Kevin Leahy
2.4 Finding help with your local pottery
Because pottery types are usually restricted to a small
local area, many local units or museums have developed
fabric series. These contain samples of each type of
pottery identified from a particular area, with standard
names and numbers. Using the standard terms in PAS
records means that our data can be more easily used by
specialists. Try to find out where the fabric series is held
in your area, and make contact to see if the local
experts can help.
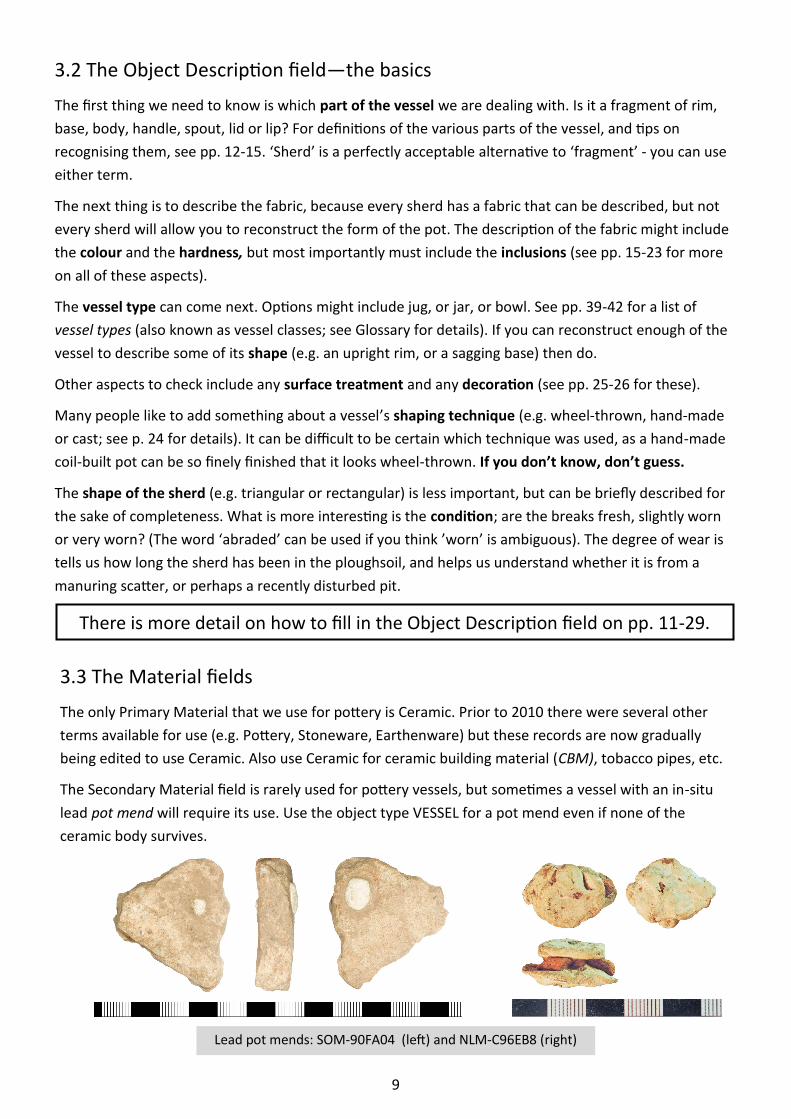
The Worcestershire fabric series is on line at
https://www.worcestershireceramics.org/
with fabric descriptions for all types of pottery made in
Worcestershire and many made outside, and lots of
photographs. It is useful for all those recording pottery
on the PAS database, not just in the West Midlands.
8
3. Recording pottery on the PAS database
3.1 The Object type and the Classification fields
All pottery vessels should be recorded using VESSEL in the Object Type field. This is because vessel
terminology is very complicated, varies between different periods, and is based on complete vessels
rather than the fragments we deal with.
A vessel is primarily used as a container. VESSEL is used both for hollow ware (such as cups and bowls)
and for flat ware (such as plates and saucers). There are some objects which can look similar to vessels,
but are used primarily for lighting (lamps) or for covering fires (curfews, also known as fire-covers). Use
LAMP and FIRE COVER for these, and see pp. 43-44 for more details on these objects.
We can use narrower terms for vessel types in the Sub-classification field. There is a list of these terms
on pp. 39-42.
We use the Classification field to note the ware type, if this is known. So the fields can be read together
as, for example, VESSEL—grey ware—bowl. When specifying the ware, use words not code (so Glazed
Red Earthenware rather than GRE), and make sure that you use standard terminology.
This Guide does not define ware types. This an immensely complex job which needs local expertise. Try
to find the resources available in your area (http://www.worcestershireceramics.org/ is an ideal
example).
It’s fine if you can identify a sherd, but few of us are
pottery specialists, so the best we can do is to
record finds fully so that they can be recognised in
the future.
Fragment of Roman colander made
from Vectis ware (IOW-235984)
Complete post-medieval single-handled bowl made
from a pink-red fabric. It has an internal thin cream
slip and clear glaze, both now worn. Both the base
and foot ring are fire-blackened (SUR-16EB67)
9
There is more detail on how to fill in the Object Description field on pp. 11-29.
3.2 The Object Description field—the basics
The first thing we need to know is which part of the vessel we are dealing with. Is it a fragment of rim,
base, body, handle, spout, lid or lip? For definitions of the various parts of the vessel, and tips on
recognising them, see pp. 12-15. ‘Sherd’ is a perfectly acceptable alternative to ‘fragment’ - you can use
either term.
The next thing is to describe the fabric, because every sherd has a fabric that can be described, but not
every sherd will allow you to reconstruct the form of the pot. The description of the fabric might include
the colour and the hardness, but most importantly must include the inclusions (see pp. 15-23 for more
on all of these aspects).
The vessel type can come next. Options might include jug, or jar, or bowl. See pp. 39-42 for a list of
vessel types (also known as vessel classes; see Glossary for details). If you can reconstruct enough of the
vessel to describe some of its shape (e.g. an upright rim, or a sagging base) then do.
Other aspects to check include any surface treatment and any decoration (see pp. 25-26 for these).
Many people like to add something about a vessel’s shaping technique (e.g. wheel-thrown, hand-made
or cast; see p. 24 for details). It can be difficult to be certain which technique was used, as a hand-made
coil-built pot can be so finely finished that it looks wheel-thrown. If you don’t know, don’t guess.
The shape of the sherd (e.g. triangular or rectangular) is less important, but can be briefly described for
the sake of completeness. What is more interesting is the condition; are the breaks fresh, slightly worn
or very worn? (The word ‘abraded’ can be used if you think ’worn’ is ambiguous). The degree of wear is
tells us how long the sherd has been in the ploughsoil, and helps us understand whether it is from a
manuring scatter, or perhaps a recently disturbed pit.
3.3 The Material fields
The only Primary Material that we use for pottery is Ceramic. Prior to 2010 there were several other
terms available for use (e.g. Pottery, Stoneware, Earthenware) but these records are now gradually
being edited to use Ceramic. Also use Ceramic for ceramic building material (CBM), tobacco pipes, etc.
The Secondary Material field is rarely used for pottery vessels, but sometimes a vessel with an in-situ
lead pot mend will require its use. Use the object type VESSEL for a pot mend even if none of the
ceramic body survives.
Lead pot mends: SOM-90FA04 (left) and NLM-C96EB8 (right)
10
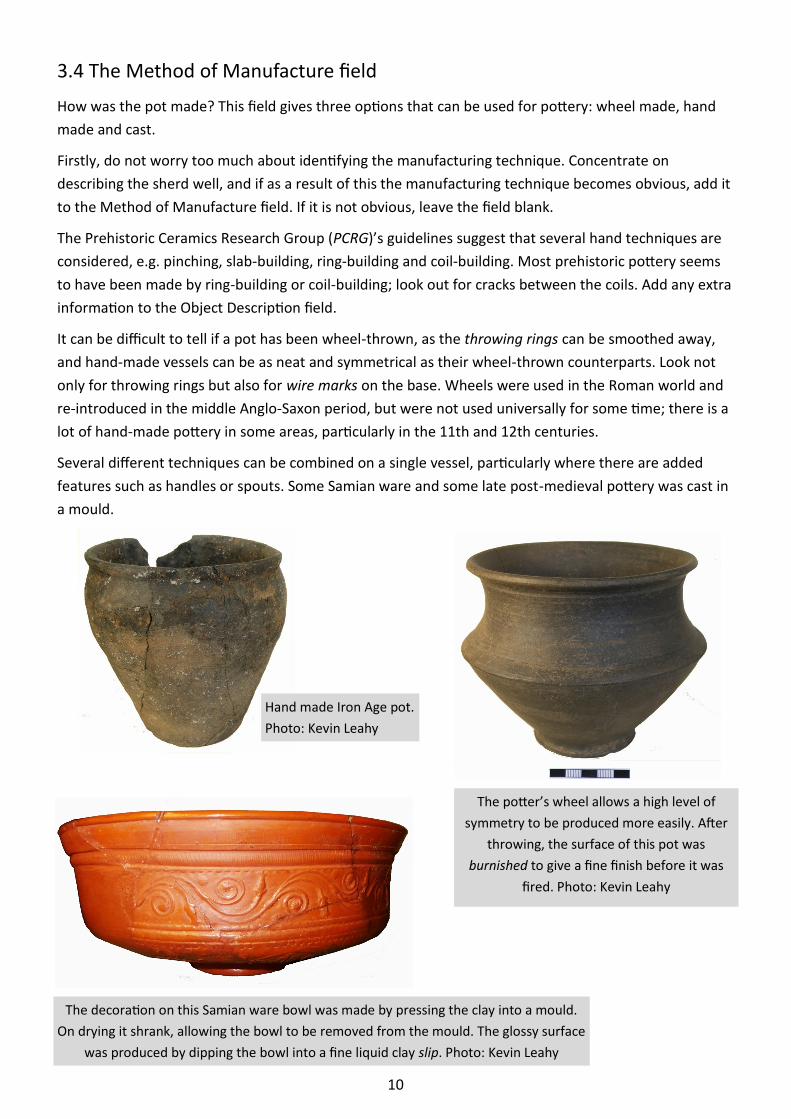
3.4 The Method of Manufacture field
How was the pot made? This field gives three options that can be used for pottery: wheel made, hand
made and cast.
Firstly, do not worry too much about identifying the manufacturing technique. Concentrate on
describing the sherd well, and if as a result of this the manufacturing technique becomes obvious, add it
to the Method of Manufacture field. If it is not obvious, leave the field blank.
The Prehistoric Ceramics Research Group (PCRG)’s guidelines suggest that several hand techniques are
considered, e.g. pinching, slab-building, ring-building and coil-building. Most prehistoric pottery seems
to have been made by ring-building or coil-building; look out for cracks between the coils. Add any extra
information to the Object Description field.
It can be difficult to tell if a pot has been wheel-thrown, as the throwing rings can be smoothed away,
and hand-made vessels can be as neat and symmetrical as their wheel-thrown counterparts. Look not
only for throwing rings but also for wire marks on the base. Wheels were used in the Roman world and
re-introduced in the middle Anglo-Saxon period, but were not used universally for some time; there is a
lot of hand-made pottery in some areas, particularly in the 11th and 12th centuries.
Several different techniques can be combined on a single vessel, particularly where there are added
features such as handles or spouts. Some Samian ware and some late post-medieval pottery was cast in
a mould.
Hand made Iron Age pot.
Photo: Kevin Leahy
The potter’s wheel allows a high level of
symmetry to be produced more easily. After
throwing, the surface of this pot was
burnished to give a fine finish before it was
fired. Photo: Kevin Leahy
The decoration on this Samian ware bowl was made by pressing the clay into a mould.
On drying it shrank, allowing the bowl to be removed from the mould. The glossy surface
was produced by dipping the bowl into a fine liquid clay slip. Photo: Kevin Leahy

11
3.5 The Surface Treatment field
The Surface Treatment drop-down list does not contain
any terms specifically designed for pottery. This is
because many wares are defined (at least in part) by
their surface treatments. If relevant, you can add
details about the surface treatment to the Object
Description field. See pp. 25-26 for more detail on
surface treatments and decoration, and how to
describe these aspects.
The only exception to this is for stamped pottery, for
which it is useful to select ‘Stamped’ in the Surface
Treatment field. This hand-made early Anglo-Saxon cremation urn
has stamped decoration together with many of the
other methods commonly used to decorate
pottery. While still workable, large bosses were
modelled around its middle. Strips of clay (or
plastic decoration) were applied and decorated
with impressed notches. The upper part of the
vessel bears scored lines. Photo: Kevin Leahy
Antler stamps for decorating Early Anglo-
Saxon pottery. West Stow, Suffolk.
3.6 The Object Description field in detail
As for metal objects, the Object Description field should contain a
complete description of the object. This will normally include all the
information that you have put into the Method of Manufacture,
Surface Treatment and Dimensions fields, plus a lot more besides. The
next few pages contain sections on:
• identifying which part of the vessel you are dealing with
• describing the pottery fabric, including colour, hardness and
inclusions
• identifying the techniques of manufacture, surface treatment and
decoration, and describing the style of decoration
• describing the shape of the vessel, or at least the part of it that
survives.
Medieval Humber ware jug
(YORYM-BFDCBB)
12
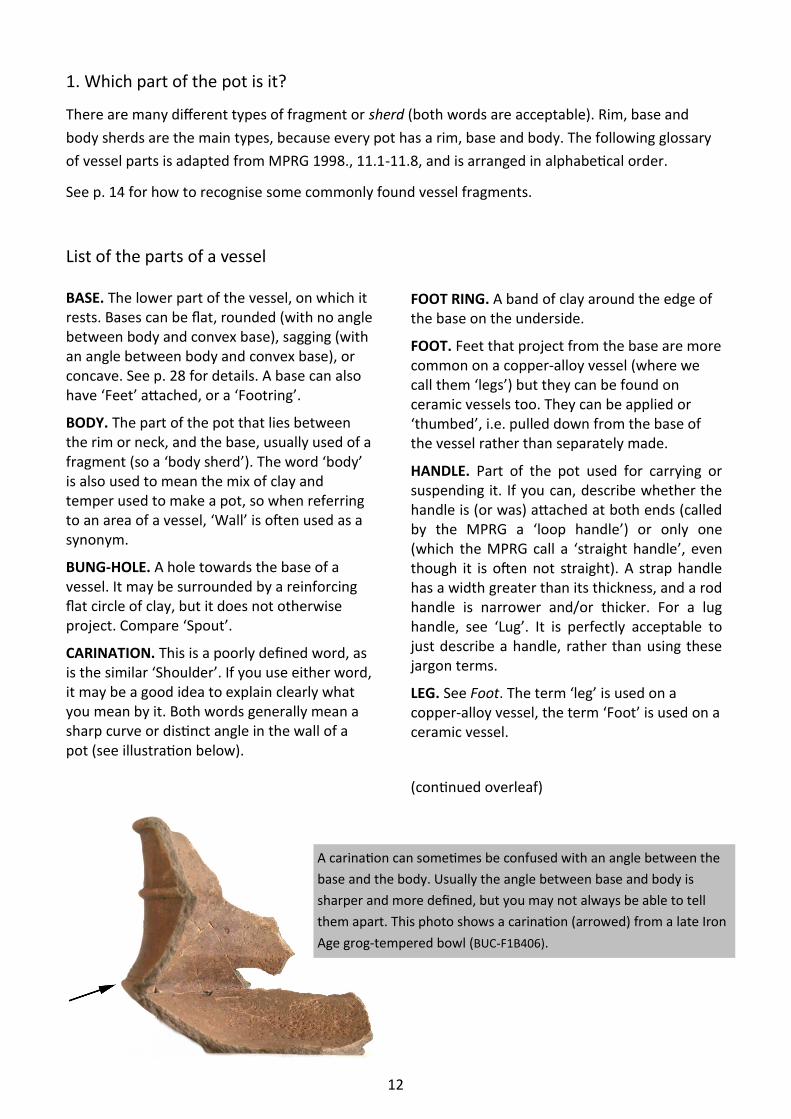
1. Which part of the pot is it?
There are many different types of fragment or sherd (both words are acceptable). Rim, base and
body sherds are the main types, because every pot has a rim, base and body. The following glossary
of vessel parts is adapted from MPRG 1998., 11.1-11.8, and is arranged in alphabetical order.
See p. 14 for how to recognise some commonly found vessel fragments.
List of the parts of a vessel
BASE. The lower part of the vessel, on which it rests. Bases can be flat, rounded (with no angle between body and convex base), sagging (with an angle between body and convex base), or concave. See p. 28 for details. A base can also have ‘Feet’ attached, or a ‘Footring’.
BODY. The part of the pot that lies between the rim or neck, and the base, usually used of a fragment (so a ‘body sherd’). The word ‘body’ is also used to mean the mix of clay and temper used to make a pot, so when referring to an area of a vessel, ‘Wall’ is often used as a synonym.
BUNG-HOLE. A hole towards the base of a vessel. It may be surrounded by a reinforcing flat circle of clay, but it does not otherwise project. Compare ‘Spout’.
CARINATION. This is a poorly defined word, as is the similar ‘Shoulder’. If you use either word, it may be a good idea to explain clearly what you mean by it. Both words generally mean a sharp curve or distinct angle in the wall of a pot (see illustration below).
FOOT RING. A band of clay around the edge of the base on the underside.
FOOT. Feet that project from the base are more common on a copper-alloy vessel (where we call them ‘legs’) but they can be found on ceramic vessels too. They can be applied or ‘thumbed’, i.e. pulled down from the base of the vessel rather than separately made.
HANDLE. Part of the pot used for carrying or suspending it. If you can, describe whether the handle is (or was) attached at both ends (called by the MPRG a ‘loop handle’) or only one (which the MPRG call a ‘straight handle’, even though it is often not straight). A strap handle has a width greater than its thickness, and a rod handle is narrower and/or thicker. For a lug handle, see ‘Lug’. It is perfectly acceptable to just describe a handle, rather than using these jargon terms.
LEG. See Foot. The term ‘leg’ is used on a copper-alloy vessel, the term ‘Foot’ is used on a ceramic vessel.
(continued overleaf)
A carination can sometimes be confused with an angle between the
base and the body. Usually the angle between base and body is
sharper and more defined, but you may not always be able to tell
them apart. This photo shows a carination (arrowed) from a late Iron
Age grog-tempered bowl (BUC-F1B406).
13
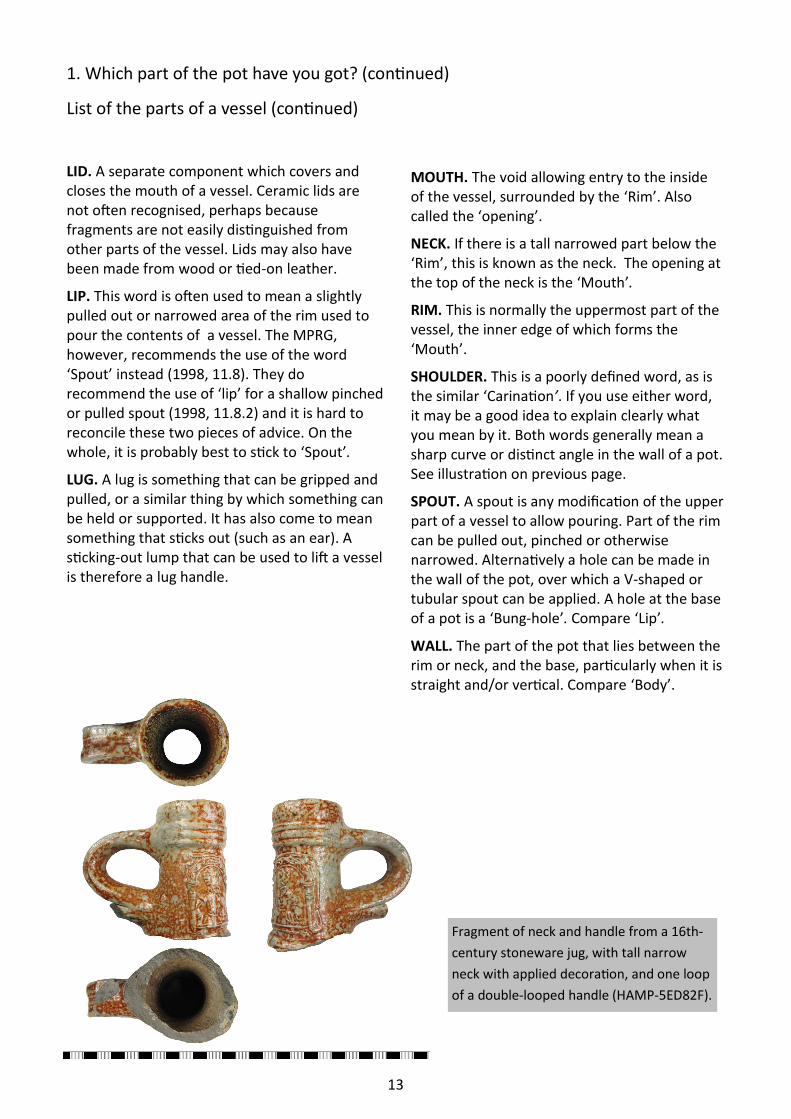
1. Which part of the pot have you got? (continued)
List of the parts of a vessel (continued)
LID. A separate component which covers and closes the mouth of a vessel. Ceramic lids are not often recognised, perhaps because fragments are not easily distinguished from other parts of the vessel. Lids may also have been made from wood or tied-on leather.
LIP. This word is often used to mean a slightly pulled out or narrowed area of the rim used to pour the contents of a vessel. The MPRG, however, recommends the use of the word ‘Spout’ instead (1998, 11.8). They do recommend the use of ‘lip’ for a shallow pinched or pulled spout (1998, 11.8.2) and it is hard to reconcile these two pieces of advice. On the whole, it is probably best to stick to ‘Spout’.
LUG. A lug is something that can be gripped and pulled, or a similar thing by which something can be held or supported. It has also come to mean something that sticks out (such as an ear). A sticking-out lump that can be used to lift a vessel is therefore a lug handle.
MOUTH. The void allowing entry to the inside of the vessel, surrounded by the ‘Rim’. Also called the ‘opening’.
NECK. If there is a tall narrowed part below the ‘Rim’, this is known as the neck. The opening at the top of the neck is the ‘Mouth’.
RIM. This is normally the uppermost part of the vessel, the inner edge of which forms the ‘Mouth’.
SHOULDER. This is a poorly defined word, as is the similar ‘Carination’. If you use either word, it may be a good idea to explain clearly what you mean by it. Both words generally mean a sharp curve or distinct angle in the wall of a pot. See illustration on previous page.
SPOUT. A spout is any modification of the upper part of a vessel to allow pouring. Part of the rim can be pulled out, pinched or otherwise narrowed. Alternatively a hole can be made in the wall of the pot, over which a V-shaped or tubular spout can be applied. A hole at the base of a pot is a ‘Bung-hole’. Compare ‘Lip’.
WALL. The part of the pot that lies between the rim or neck, and the base, particularly when it is straight and/or vertical. Compare ‘Body’.
Fragment of neck and handle from a 16th-
century stoneware jug, with tall narrow
neck with applied decoration, and one loop
of a double-looped handle (HAMP-5ED82F).
14
Rim sherd: any sherd
which includes part of the
rim. The rim will be
unbroken and rounded,
and can be of various
shapes (see below).
Handle: most handle
sherds have the original
surface all around, but the
ends broken. Handles can
be a variety of shapes and
there is not always a clear
dividing line between strap
handles, lug handles, loop
handles, etc.
Body sherd: any sherd which does
not include part of the rim or base
(or handle, lip, spout, etc). All edges
must be broken. Look out for angles
which could distinguish a base from
a body sherd.
Base sherd: any sherd which includes
part of the base. As with the body sherd,
all edges must be broken, but there will
usually be a clear angle between the
side wall and the base. The base is
usually flat or sagging (slightly convex).
Sherds which consist of just the base,
with no angle or body fragments, can be
hard to recognise.
Spout: like a rim sherd,
but the spout is a small
area with a tighter curve
than the rest of the rim.
1. Which part of the pot have you got? (continued)
15
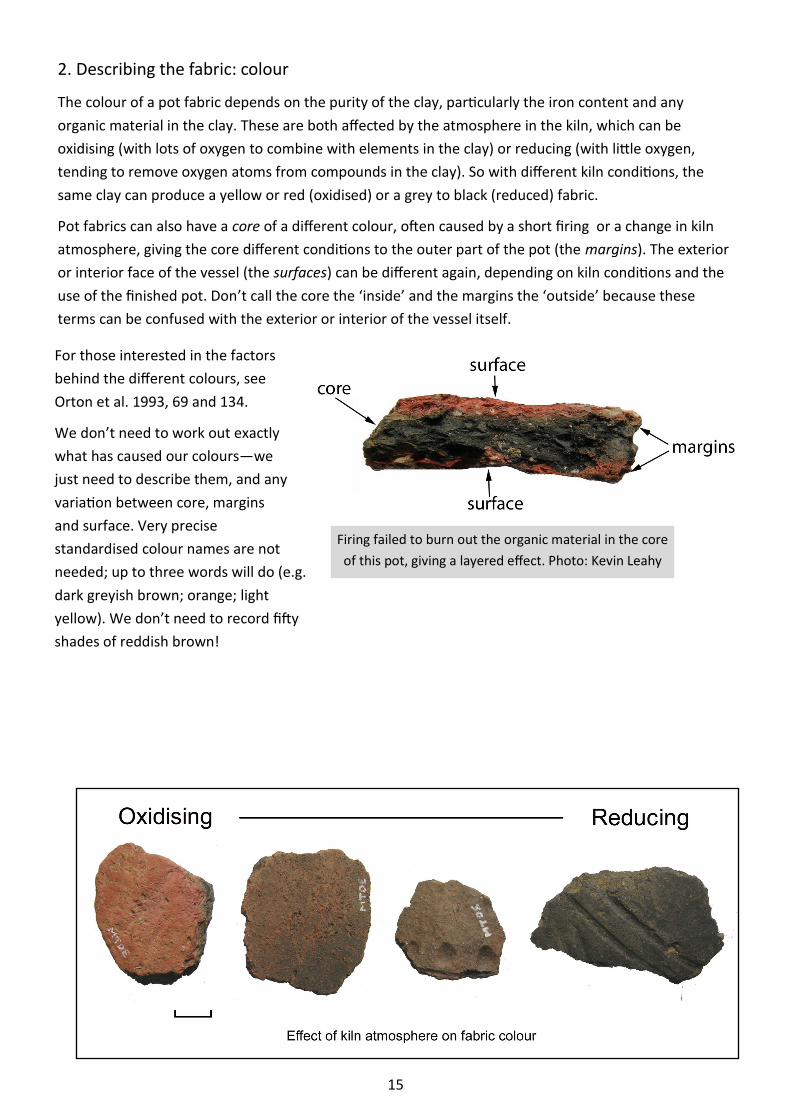
2. Describing the fabric: colour
The colour of a pot fabric depends on the purity of the clay, particularly the iron content and any
organic material in the clay. These are both affected by the atmosphere in the kiln, which can be
oxidising (with lots of oxygen to combine with elements in the clay) or reducing (with little oxygen,
tending to remove oxygen atoms from compounds in the clay). So with different kiln conditions, the
same clay can produce a yellow or red (oxidised) or a grey to black (reduced) fabric.
Pot fabrics can also have a core of a different colour, often caused by a short firing or a change in kiln
atmosphere, giving the core different conditions to the outer part of the pot (the margins). The exterior
or interior face of the vessel (the surfaces) can be different again, depending on kiln conditions and the
use of the finished pot. Don’t call the core the ‘inside’ and the margins the ‘outside’ because these
terms can be confused with the exterior or interior of the vessel itself.
Firing failed to burn out the organic material in the core
of this pot, giving a layered effect. Photo: Kevin Leahy
For those interested in the factors
behind the different colours, see
Orton et al. 1993, 69 and 134.
We don’t need to work out exactly
what has caused our colours—we
just need to describe them, and any
variation between core, margins
and surface. Very precise
standardised colour names are not
needed; up to three words will do (e.g.
dark greyish brown; orange; light
yellow). We don’t need to record fifty
shades of reddish brown!
16
If this pot broke into several fragments,
they might look as if they were from
different vessels. Photo: Kevin Leahy
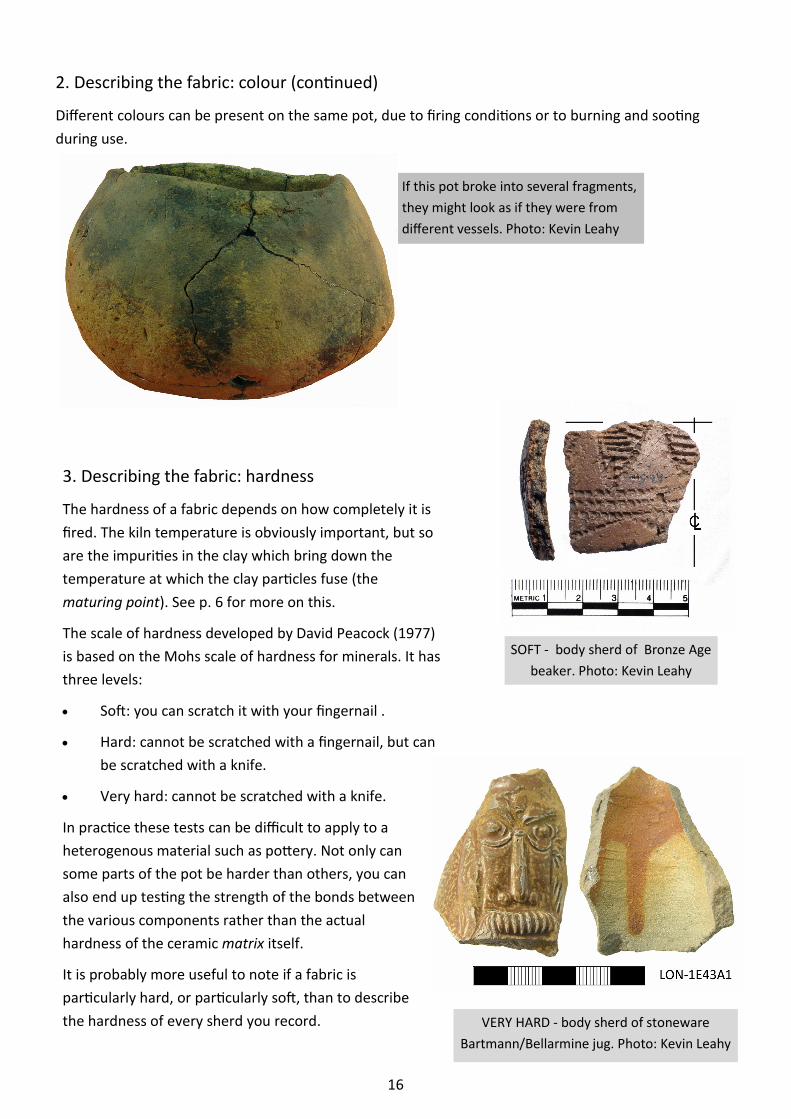
3. Describing the fabric: hardness
The hardness of a fabric depends on how completely it is
fired. The kiln temperature is obviously important, but so
are the impurities in the clay which bring down the
temperature at which the clay particles fuse (the
maturing point). See p. 6 for more on this.
The scale of hardness developed by David Peacock (1977)
is based on the Mohs scale of hardness for minerals. It has
three levels:
• Soft: you can scratch it with your fingernail .
• Hard: cannot be scratched with a fingernail, but can
be scratched with a knife.
• Very hard: cannot be scratched with a knife.
In practice these tests can be difficult to apply to a
heterogenous material such as pottery. Not only can
some parts of the pot be harder than others, you can
also end up testing the strength of the bonds between
the various components rather than the actual
hardness of the ceramic matrix itself.
It is probably more useful to note if a fabric is
particularly hard, or particularly soft, than to describe
the hardness of every sherd you record.
SOFT - body sherd of Bronze Age
beaker. Photo: Kevin Leahy
VERY HARD - body sherd of stoneware
Bartmann/Bellarmine jug. Photo: Kevin Leahy
2. Describing the fabric: colour (continued)
Different colours can be present on the same pot, due to firing conditions or to burning and sooting
during use.
17
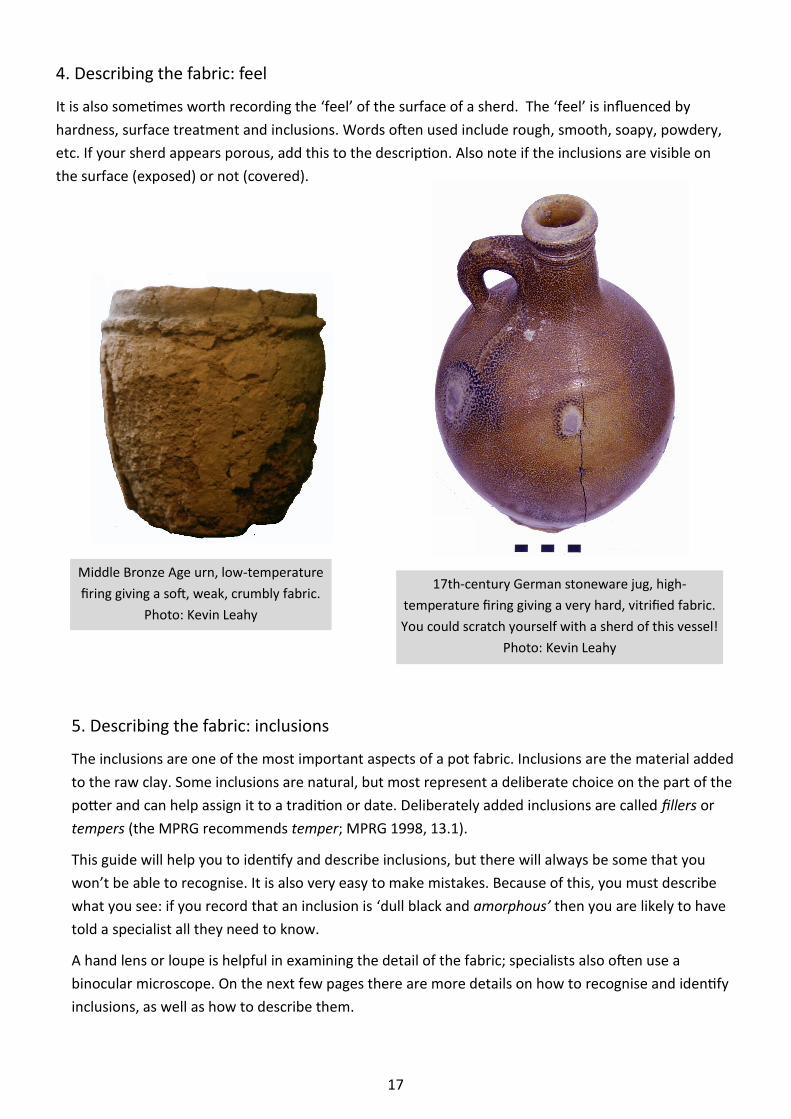
Middle Bronze Age urn, low-temperature
firing giving a soft, weak, crumbly fabric.
Photo: Kevin Leahy
17th-century German stoneware jug, high-
temperature firing giving a very hard, vitrified fabric.
You could scratch yourself with a sherd of this vessel!
Photo: Kevin Leahy
4. Describing the fabric: feel
It is also sometimes worth recording the ‘feel’ of the surface of a sherd. The ‘feel’ is influenced by
hardness, surface treatment and inclusions. Words often used include rough, smooth, soapy, powdery,
etc. If your sherd appears porous, add this to the description. Also note if the inclusions are visible on
the surface (exposed) or not (covered).
5. Describing the fabric: inclusions
The inclusions are one of the most important aspects of a pot fabric. Inclusions are the material added
to the raw clay. Some inclusions are natural, but most represent a deliberate choice on the part of the
potter and can help assign it to a tradition or date. Deliberately added inclusions are called fillers or
tempers (the MPRG recommends temper; MPRG 1998, 13.1).
This guide will help you to identify and describe inclusions, but there will always be some that you
won’t be able to recognise. It is also very easy to make mistakes. Because of this, you must describe
what you see: if you record that an inclusion is ‘dull black and amorphous’ then you are likely to have
told a specialist all they need to know.
A hand lens or loupe is helpful in examining the detail of the fabric; specialists also often use a
binocular microscope. On the next few pages there are more details on how to recognise and identify
inclusions, as well as how to describe them.
18
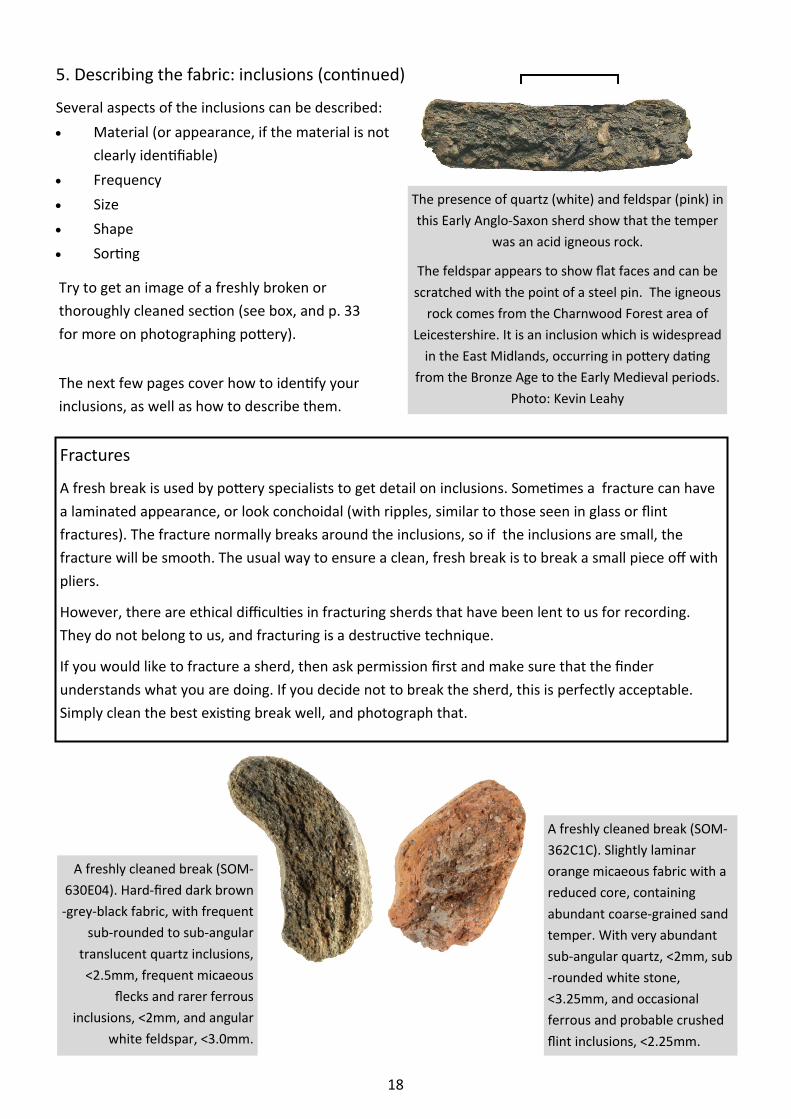
5. Describing the fabric: inclusions (continued)
Several aspects of the inclusions can be described:
• Material (or appearance, if the material is not
clearly identifiable)
• Frequency
• Size
• Shape
• Sorting
Fractures
A fresh break is used by pottery specialists to get detail on inclusions. Sometimes a fracture can have
a laminated appearance, or look conchoidal (with ripples, similar to those seen in glass or flint
fractures). The fracture normally breaks around the inclusions, so if the inclusions are small, the
fracture will be smooth. The usual way to ensure a clean, fresh break is to break a small piece off with
pliers.
However, there are ethical difficulties in fracturing sherds that have been lent to us for recording.
They do not belong to us, and fracturing is a destructive technique.
If you would like to fracture a sherd, then ask permission first and make sure that the finder
understands what you are doing. If you decide not to break the sherd, this is perfectly acceptable.
Simply clean the best existing break well, and photograph that.
The presence of quartz (white) and feldspar (pink) in
this Early Anglo-Saxon sherd show that the temper
was an acid igneous rock.
The feldspar appears to show flat faces and can be
scratched with the point of a steel pin. The igneous
rock comes from the Charnwood Forest area of
Leicestershire. It is an inclusion which is widespread
in the East Midlands, occurring in pottery dating
from the Bronze Age to the Early Medieval periods.
Photo: Kevin Leahy
A freshly cleaned break (SOM-
362C1C). Slightly laminar
orange micaeous fabric with a
reduced core, containing
abundant coarse-grained sand
temper. With very abundant
sub-angular quartz, <2mm, sub
-rounded white stone,
<3.25mm, and occasional
ferrous and probable crushed
flint inclusions, <2.25mm.
A freshly cleaned break (SOM-
630E04). Hard-fired dark brown
-grey-black fabric, with frequent
sub-rounded to sub-angular
translucent quartz inclusions,
<2.5mm, frequent micaeous
flecks and rarer ferrous
inclusions, <2mm, and angular
white feldspar, <3.0mm.
Try to get an image of a freshly broken or
thoroughly cleaned section (see box, and p. 33
for more on photographing pottery).
The next few pages cover how to identify your
inclusions, as well as how to describe them.
19
5. Describing the fabric: inclusions (continued)
Materials
In the words of Orton and Hughes (1993, 75), ‘A very wide range of materials can be and have been
used as pottery temper, ranging from donkey dung to powdered slag. Since 1977 they have been
identified in the UK mainly by using the key published by Peacock (1977). This key enables inclusions
to be identified using a binocular microscope, a steel needle or blade, a pipette with a bottle of 10%
dilute hydrochloric acid and a magnet.’
Not all of us have this equipment handy. For those that do, Peacock’s key is also reproduced in Orton
and Hughes (1993, 280-1) and there is a variant in this Guide, on p. 22. For those that don’t, try a hand
lens, a needle and a magnet. Gibson and Woods suggest using vinegar if 10% dilute hydrochloric acid is
not available (1997, 191).
For more help, see below for photographs of sherds with different inclusions. Remember that it is
often more difficult to identify inclusions than it is to identify pottery! If you can’t identify the
inclusions, at least you can describe them. Aim to include their colour, and tell us about their hardness
if you can. Look at other PAS pottery records to see the level of description that they use.
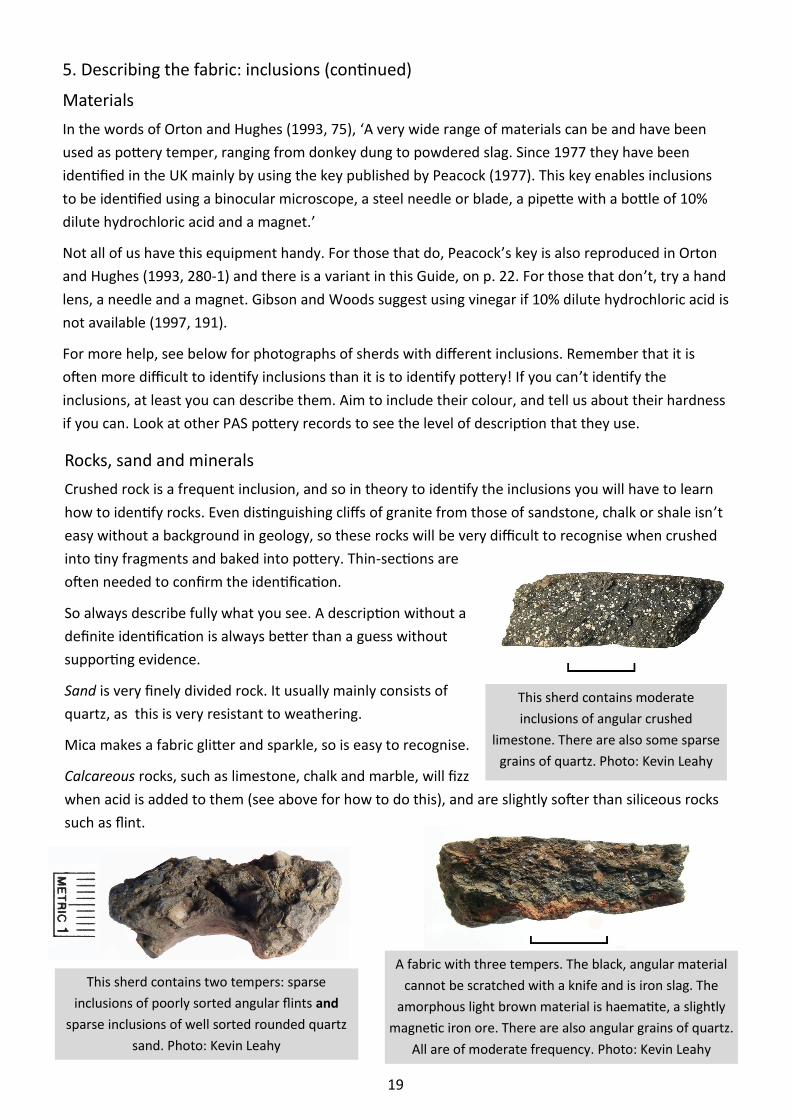
Rocks, sand and minerals
Crushed rock is a frequent inclusion, and so in theory to identify the inclusions you will have to learn
how to identify rocks. Even distinguishing cliffs of granite from those of sandstone, chalk or shale isn’t
easy without a background in geology, so these rocks will be very difficult to recognise when crushed
into tiny fragments and baked into pottery. Thin-sections are
often needed to confirm the identification.
So always describe fully what you see. A description without a
definite identification is always better than a guess without
supporting evidence.
Sand is very finely divided rock. It usually mainly consists of
quartz, as this is very resistant to weathering.
Mica makes a fabric glitter and sparkle, so is easy to recognise.
Calcareous rocks, such as limestone, chalk and marble, will fizz
when acid is added to them (see above for how to do this), and are slightly softer than siliceous rocks
such as flint.
This sherd contains moderate
inclusions of angular crushed
limestone. There are also some sparse
grains of quartz. Photo: Kevin Leahy
This sherd contains two tempers: sparse
inclusions of poorly sorted angular flints and
sparse inclusions of well sorted rounded quartz
sand. Photo: Kevin Leahy
A fabric with three tempers. The black, angular material
cannot be scratched with a knife and is iron slag. The
amorphous light brown material is haematite, a slightly
magnetic iron ore. There are also angular grains of quartz.
All are of moderate frequency. Photo: Kevin Leahy
20
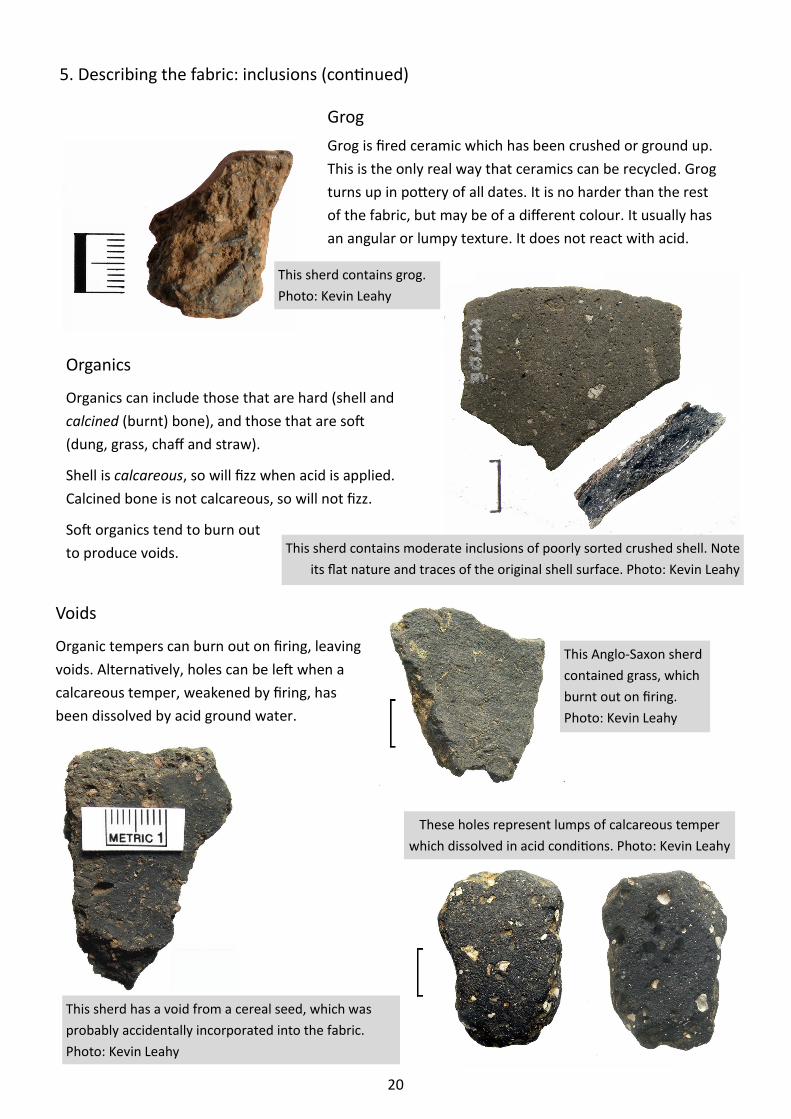
Voids
Organic tempers can burn out on firing, leaving
voids. Alternatively, holes can be left when a
calcareous temper, weakened by firing, has
been dissolved by acid ground water.
These holes represent lumps of calcareous temper
which dissolved in acid conditions. Photo: Kevin Leahy
This Anglo-Saxon sherd
contained grass, which
burnt out on firing.
Photo: Kevin Leahy
This sherd has a void from a cereal seed, which was
probably accidentally incorporated into the fabric.
Photo: Kevin Leahy
Organics
Organics can include those that are hard (shell and
calcined (burnt) bone), and those that are soft
(dung, grass, chaff and straw).
Shell is calcareous, so will fizz when acid is applied.
Calcined bone is not calcareous, so will not fizz.
Soft organics tend to burn out
to produce voids. This sherd contains moderate inclusions of poorly sorted crushed shell. Note
its flat nature and traces of the original shell surface. Photo: Kevin Leahy
Grog
Grog is fired ceramic which has been crushed or ground up.
This is the only real way that ceramics can be recycled. Grog
turns up in pottery of all dates. It is no harder than the rest
of the fabric, but may be of a different colour. It usually has
an angular or lumpy texture. It does not react with acid.
This sherd contains grog.
Photo: Kevin Leahy
5. Describing the fabric: inclusions (continued)
21
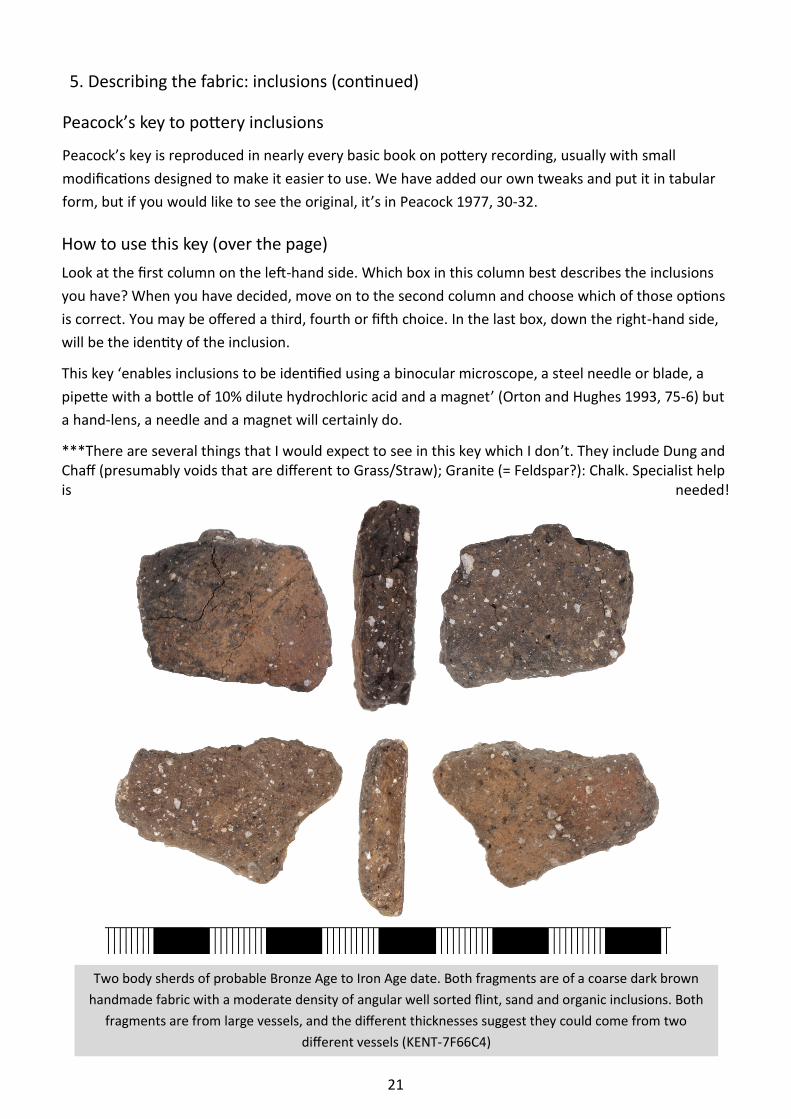
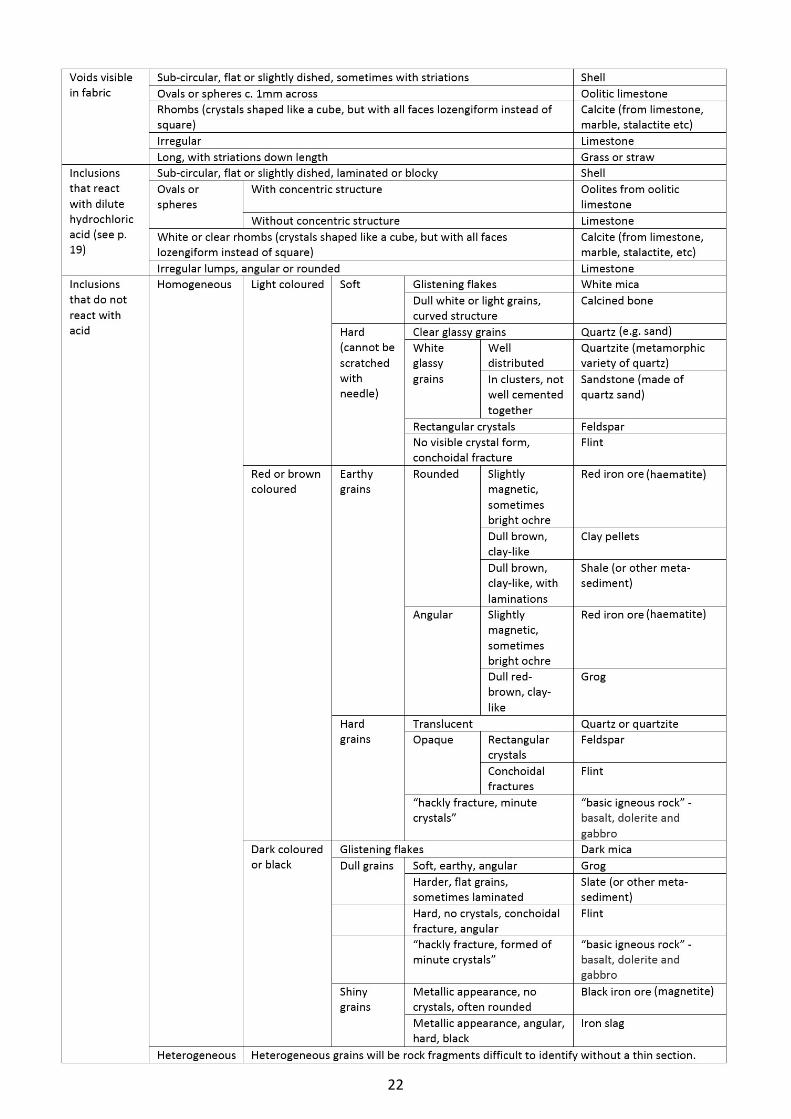
Peacock’s key to pottery inclusions
Peacock’s key is reproduced in nearly every basic book on pottery recording, usually with small
modifications designed to make it easier to use. We have added our own tweaks and put it in tabular
form, but if you would like to see the original, it’s in Peacock 1977, 30-32.
How to use this key (over the page)
Look at the first column on the left-hand side. Which box in this column best describes the inclusions
you have? When you have decided, move on to the second column and choose which of those options
is correct. You may be offered a third, fourth or fifth choice. In the last box, down the right-hand side,
will be the identity of the inclusion.
This key ‘enables inclusions to be identified using a binocular microscope, a steel needle or blade, a
pipette with a bottle of 10% dilute hydrochloric acid and a magnet’ (Orton and Hughes 1993, 75-6) but
a hand-lens, a needle and a magnet will certainly do.
***There are several things that I would expect to see in this key which I don’t. They include Dung and Chaff (presumably voids that are different to Grass/Straw); Granite (= Feldspar?): Chalk. Specialist help is needed!
5. Describing the fabric: inclusions (continued)
Two body sherds of probable Bronze Age to Iron Age date. Both fragments are of a coarse dark brown
handmade fabric with a moderate density of angular well sorted flint, sand and organic inclusions. Both
fragments are from large vessels, and the different thicknesses suggest they could come from two
different vessels (KENT-7F66C4)
22
23
5. Describing the fabric: inclusions (continued)
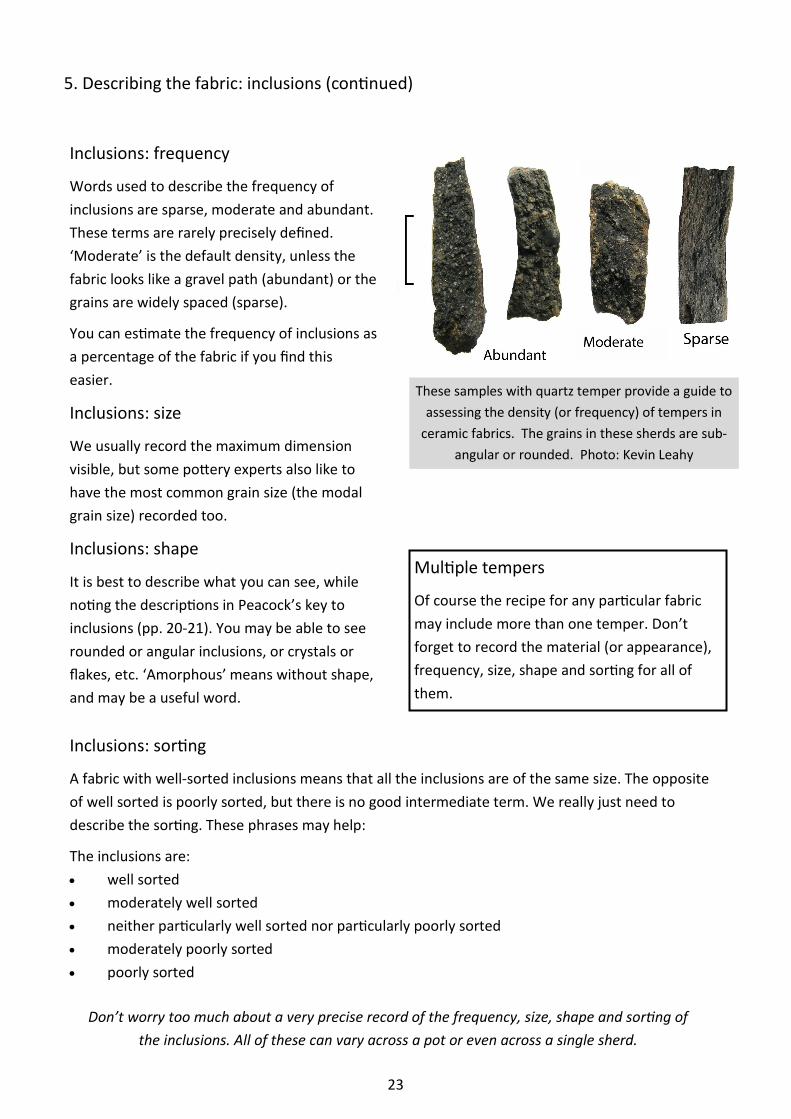
Inclusions: frequency
Words used to describe the frequency of
inclusions are sparse, moderate and abundant.
These terms are rarely precisely defined.
‘Moderate’ is the default density, unless the
fabric looks like a gravel path (abundant) or the
grains are widely spaced (sparse).
You can estimate the frequency of inclusions as
a percentage of the fabric if you find this
easier.
Inclusions: size
We usually record the maximum dimension
visible, but some pottery experts also like to
have the most common grain size (the modal
grain size) recorded too.
Inclusions: shape
It is best to describe what you can see, while
noting the descriptions in Peacock’s key to
inclusions (pp. 20-21). You may be able to see
rounded or angular inclusions, or crystals or
flakes, etc. ‘Amorphous’ means without shape,
and may be a useful word.
Inclusions: sorting
A fabric with well-sorted inclusions means that all the inclusions are of the same size. The opposite
of well sorted is poorly sorted, but there is no good intermediate term. We really just need to
describe the sorting. These phrases may help:
The inclusions are:
• well sorted
• moderately well sorted
• neither particularly well sorted nor particularly poorly sorted
• moderately poorly sorted
• poorly sorted
Multiple tempers
Of course the recipe for any particular fabric
may include more than one temper. Don’t
forget to record the material (or appearance),
frequency, size, shape and sorting for all of
them.
Don’t worry too much about a very precise record of the frequency, size, shape and sorting of
the inclusions. All of these can vary across a pot or even across a single sherd.
These samples with quartz temper provide a guide to
assessing the density (or frequency) of tempers in
ceramic fabrics. The grains in these sherds are sub-
angular or rounded. Photo: Kevin Leahy

24
6. Methods of manufacture
While describing the features of your sherd, look out for any evidence of the way in which it was
made. There is usually not a great deal of evidence on one sherd, whether the pot was pinched, slab-
built, ring-built, coil-built, cast or wheel-thrown; in addition, pots can be finished on a slow wheel or by
the paddle-and-anvil method. Several of these techniques can be used on different parts of the same
vessel.
Most prehistoric pottery seems to have been made by ring-building or coil-building; look out for cracks
between the coils. It can be difficult to tell if a pot has been wheel-thrown, as the horizontal lines left
by throwing can be smoothed away, and hand-made vessels can be as neat and symmetrical as their
wheel-thrown counterparts.
So note the evidence for method(s) of manufacture if it is obvious, but otherwise do not worry about
identifying any particular method.
See p. 7 for what to add to the Method of Manufacture field. There are three choices available for
pottery: ‘Wheel made’, ‘Hand made’, or ‘Cast’.
Jug with applied decoration, Nottingham,
mid 13th century. Photo: Kevin Leahy
Secondary forming
A vessel can be made in several pieces that are then
joined together or applied and then smoothed to join. If
the join uses slip as an adhesive, this is known as luting.
A leather-hard vessel can be smoothed, thinned and
tidied up considerably by trimming with a knife. Knife-
trimming is often seen around the base. Alternatively a
leather-hard pot can be improved by turning, normally
upside-down on a wheel. If the turning-tool picks up a
large grit it can carry it across the surface for a moment
until it works free, creating a characteristic groove.
25
7. Surface treatment and decoration
There are an enormous number of possible decorative techniques and surface treatments that have
been applied to pottery. Here is a brief list of some of the most common, and tips on describing them.
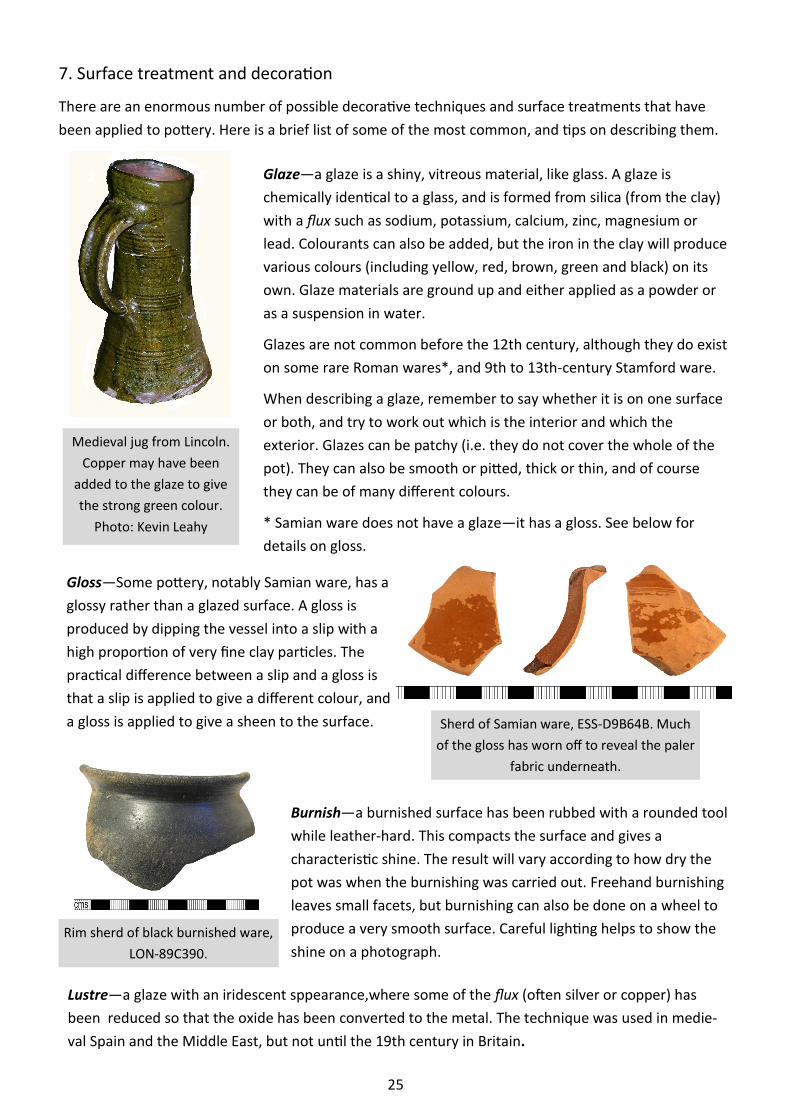
Glaze—a glaze is a shiny, vitreous material, like glass. A glaze is
chemically identical to a glass, and is formed from silica (from the clay)
with a flux such as sodium, potassium, calcium, zinc, magnesium or
lead. Colourants can also be added, but the iron in the clay will produce
various colours (including yellow, red, brown, green and black) on its
own. Glaze materials are ground up and either applied as a powder or
as a suspension in water.
Glazes are not common before the 12th century, although they do exist
on some rare Roman wares*, and 9th to 13th-century Stamford ware.
When describing a glaze, remember to say whether it is on one surface
or both, and try to work out which is the interior and which the
exterior. Glazes can be patchy (i.e. they do not cover the whole of the
pot). They can also be smooth or pitted, thick or thin, and of course
they can be of many different colours.
* Samian ware does not have a glaze—it has a gloss. See below for
details on gloss.
Medieval jug from Lincoln.
Copper may have been
added to the glaze to give
the strong green colour.
Photo: Kevin Leahy
Gloss—Some pottery, notably Samian ware, has a
glossy rather than a glazed surface. A gloss is
produced by dipping the vessel into a slip with a
high proportion of very fine clay particles. The
practical difference between a slip and a gloss is
that a slip is applied to give a different colour, and
a gloss is applied to give a sheen to the surface. Sherd of Samian ware, ESS-D9B64B. Much
of the gloss has worn off to reveal the paler
fabric underneath.
Rim sherd of black burnished ware,
LON-89C390.
Burnish—a burnished surface has been rubbed with a rounded tool
while leather-hard. This compacts the surface and gives a
characteristic shine. The result will vary according to how dry the
pot was when the burnishing was carried out. Freehand burnishing
leaves small facets, but burnishing can also be done on a wheel to
produce a very smooth surface. Careful lighting helps to show the
shine on a photograph.
Lustre—a glaze with an iridescent sppearance,where some of the flux (often silver or copper) has
been reduced so that the oxide has been converted to the metal. The technique was used in medie-
val Spain and the Middle East, but not until the 19th century in Britain.
26
7. Surface treatment and decoration (continued)
Slipped—a slip is a mixture of clay and water, perhaps with colourants and
glossy minerals added. In medieval and post-medieval pottery the slip is
usually painted on to the surface of a leather-hard pot, and medievalists
and post-medievalists call this ‘slipped’ decoration. Slip is also used for
colour-coated and barbotine decoration.
Slip-trailed—see Barbotine
Colour-coated—colour-coated is a term used by Romanists to describe
pottery that has been dipped into a coloured slip. Compare Slipped.
Sgraffito—this technique is used on pottery which has been coated with
slip of a contrasting colour. A design is cut through the slip to reveal the
colour beneath. It can be done when the slip is wet or dry.
Barbotine (a term used only by Romanists—medievalists and post-
medievalists use ‘slip-trailed’)—the barbotine or slip-trailing technique
also uses slip, but a thicker slip which can be piped to form decoration
slightly raised above the background surface. Barbotine or slip trails can
be the same or a different colour.
Sprigged—like barbotine, sprigged decoration is slightly raised above the background surface, but
instead of being made from slip, it is generally made in a mould and applied to the vessel using slip as a
glue (this technique is called luting). The appearance of sprigging can be very similar to barbotine and
so it is essential, after using the technical word, to fully describe what you see.
Romano-British beaker with
trailed white slip decoration.
Using the word ‘barbotine’ for
the decoration helps in
searching, but the record must
also include a full description.
Photo: Kevin Leahy
Applied—this is a catch-all term for any decoration made up of extra clay added to the surface. This
could be a thick slip, or a clay sprig, strip or lump which could be luted or smoothed on. An applied strip
is sometimes called a cordon. Applied decoration can be further modelled while still plastic.
Stamped—see impressed
Impressed—impressed decoration is pressed into the surface of the clay using a tool or fingers.
Impressed decoration can be freehand, whereas stamped decoration uses a specially carved tool (a die
stamp) to give a particular shape to the design. The use of a roulette or a cord sits between the two.
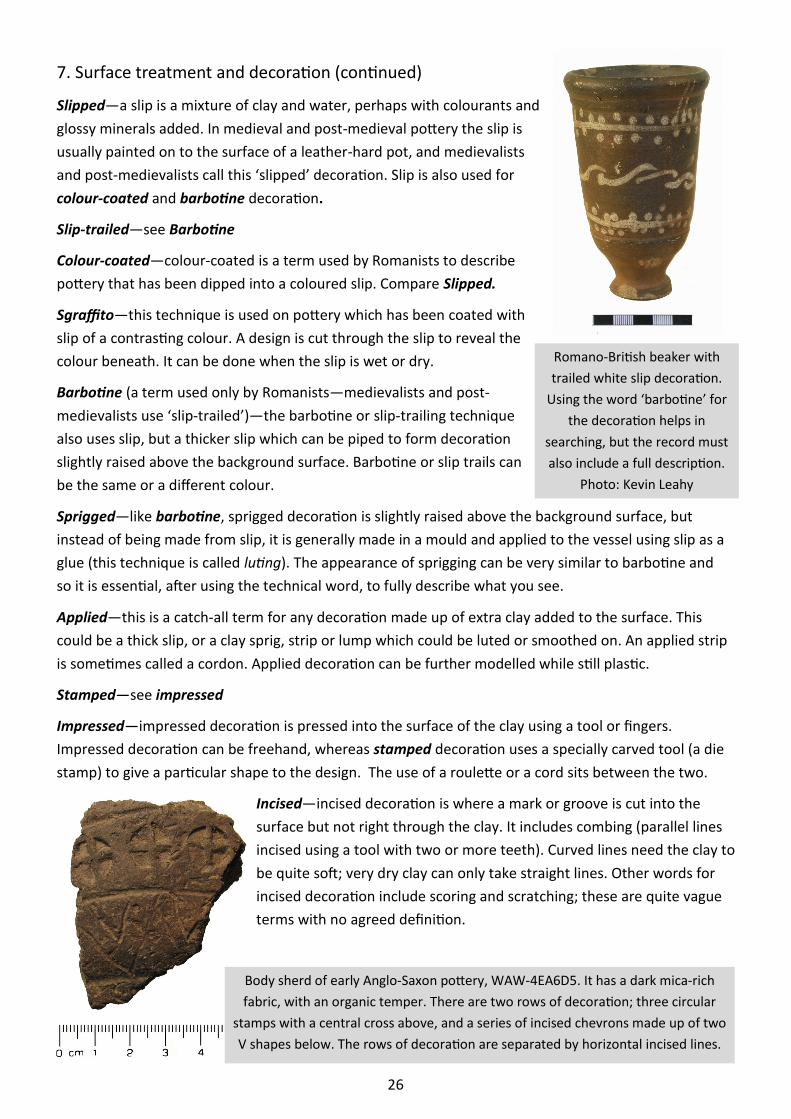
Incised—incised decoration is where a mark or groove is cut into the
surface but not right through the clay. It includes combing (parallel lines
incised using a tool with two or more teeth). Curved lines need the clay to
be quite soft; very dry clay can only take straight lines. Other words for
incised decoration include scoring and scratching; these are quite vague
terms with no agreed definition.
Body sherd of early Anglo-Saxon pottery, WAW-4EA6D5. It has a dark mica-rich
fabric, with an organic temper. There are two rows of decoration; three circular
stamps with a central cross above, and a series of incised chevrons made up of two
V shapes below. The rows of decoration are separated by horizontal incised lines.
27
8. Recording the shape of a pot
Because pots are normally symmetrical, much of their shape can be reconstructed from just a sherd.
Rims vary the most, so are the most useful in identifying the vessel type. It is important to record their
cross-section by photography or by drawing (Chapter 4, pp. 30-34). If you can reconstruct the overall
shape of the vessel, then describe this, including measurements (below and p. 30).
Rim sherds
Rims come in a variety of shapes and it is better to describe each one individually than to use a jargon
term (such as ‘everted’).
The first thing you need to do is get your rim in the right alignment (also known as attitude). Put the
rim upside down on a flat surface and rock it back and
forth until the rim sits on the surface with minimum
movement. In symmetrical wheel-thrown vessels, the
rim should sit flush against the surface. This will show
the angle at which the rim should be held and
illustrated. It is crucial to judge this correctly; if the
angle is mis-judged, the whole form of the pot can be
mis-interpreted. For more detail on this, see Collett
2012, 6.
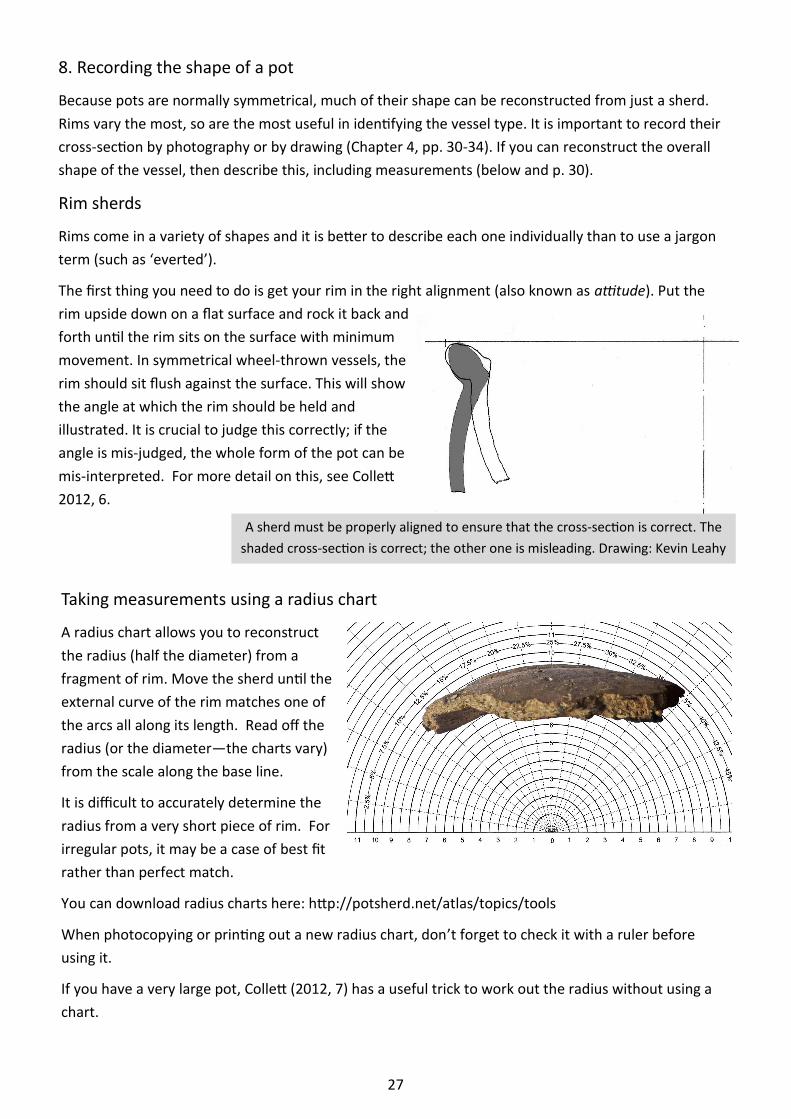
Taking measurements using a radius chart
A radius chart allows you to reconstruct
the radius (half the diameter) from a
fragment of rim. Move the sherd until the
external curve of the rim matches one of
the arcs all along its length. Read off the
radius (or the diameter—the charts vary)
from the scale along the base line.
It is difficult to accurately determine the
radius from a very short piece of rim. For
irregular pots, it may be a case of best fit
rather than perfect match.
You can download radius charts here: http://potsherd.net/atlas/topics/tools
When photocopying or printing out a new radius chart, don’t forget to check it with a ruler before
using it.
If you have a very large pot, Collett (2012, 7) has a useful trick to work out the radius without using a
chart.
A sherd must be properly aligned to ensure that the cross-section is correct. The
shaded cross-section is correct; the other one is misleading. Drawing: Kevin Leahy

28
Body sherds and the overall shape of the vessel
Sometimes you will get enough information from a body sherd to be able to reconstruct some of the
shape of the vessel. Words for describing simple shapes
include globular and cylindrical, tall and short; the mouth of
the vessel can be narrow or wide. A tall narrow part just below
the rim is a neck. Vessels with small mouths (and/or narrow
necks) can also have shoulders, where the vessel widens below
the rim before tapering again to the base. If the shoulders are
angled, rather than rounded, they are often called a
carination. See pp. 12-13 for more on the various parts of a
pottery vessel.
8. Recording the shape of a pot (continued)
Base sherds
Bases do not vary so much in shape. Most bases are flat, but some can be sagging (slightly convex,
with an angle between body and base) or rounded (more strongly convex, with no angle between
body and base). Describe the angle between the base and any part of the body that survives.
Left: a rounded base on an early Neolithic
decorated bowl. Centre: a sagging base on a
Stamford ware jar of the 9th to 13th
centuries.
Roman grey ware jar with wide mouth, short
neck, rounded shoulders and a body which
tapers to a narrow base.
It over-heated in the kiln, so the particles
over-vitrified and sagged. Despite this, the pot
has survived almost intact. Photo: Kevin Leahy
13th-century glazed polychrome Saintonge ware jug, imported from south-west
France. It has a wide mouth, applied spout, vertical handle attached at either
end, , cylindrical body, and rounded base with deep footring. Photo: Kevin Leahy
29
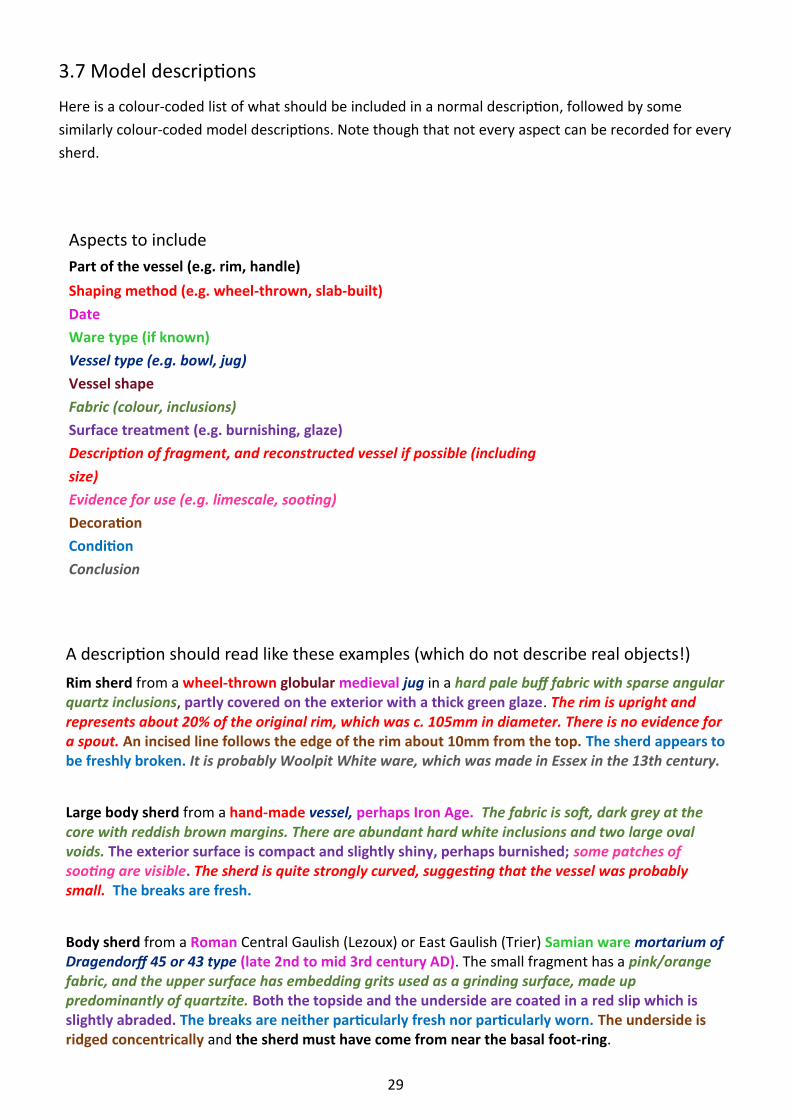
3.7 Model descriptions
Here is a colour-coded list of what should be included in a normal description, followed by some
similarly colour-coded model descriptions. Note though that not every aspect can be recorded for every
sherd.
Aspects to include
Part of the vessel (e.g. rim, handle)
Shaping method (e.g. wheel-thrown, slab-built)
Date
Ware type (if known)
Vessel type (e.g. bowl, jug)
Vessel shape
Fabric (colour, inclusions)
Surface treatment (e.g. burnishing, glaze)
Description of fragment, and reconstructed vessel if possible (including
size)
Evidence for use (e.g. limescale, sooting)
Decoration
Condition
Conclusion
A description should read like these examples (which do not describe real objects!)
Rim sherd from a wheel-thrown globular medieval jug in a hard pale buff fabric with sparse angular quartz inclusions, partly covered on the exterior with a thick green glaze. The rim is upright and represents about 20% of the original rim, which was c. 105mm in diameter. There is no evidence for a spout. An incised line follows the edge of the rim about 10mm from the top. The sherd appears to be freshly broken. It is probably Woolpit White ware, which was made in Essex in the 13th century.
Large body sherd from a hand-made vessel, perhaps Iron Age. The fabric is soft, dark grey at the core with reddish brown margins. There are abundant hard white inclusions and two large oval voids. The exterior surface is compact and slightly shiny, perhaps burnished; some patches of sooting are visible. The sherd is quite strongly curved, suggesting that the vessel was probably small. The breaks are fresh.
Body sherd from a Roman Central Gaulish (Lezoux) or East Gaulish (Trier) Samian ware mortarium of Dragendorff 45 or 43 type (late 2nd to mid 3rd century AD). The small fragment has a pink/orange fabric, and the upper surface has embedding grits used as a grinding surface, made up predominantly of quartzite. Both the topside and the underside are coated in a red slip which is slightly abraded. The breaks are neither particularly fresh nor particularly worn. The underside is ridged concentrically and the sherd must have come from near the basal foot-ring.
30
3.8 Recording the dimensions
Don’t forget to also add the dimensions of the sherd, including the weight. These will also need to be
copied to the Object Description field, where you can explain how you have taken the dimensions.
The length will normally be the longest dimension of the sherd, and the width will be perpendicular to
this. The thickness will be the thickness of the sherd, not the vessel.
If you have a fairly complete vessel, the Length of the vessel is normally the distance from rim to
base. The Diameter field can be used to record the maximum diameter, but be careful that you
describe where this is in the Object Description field; is the rim the widest point, or is it a quarter or
halfway down?
If you are including more than one sherd on a single record, then the weight of the individual sherds
do not need to be recorded. Put the total weight in the ‘Weight’ field and copy this to the Description
field.
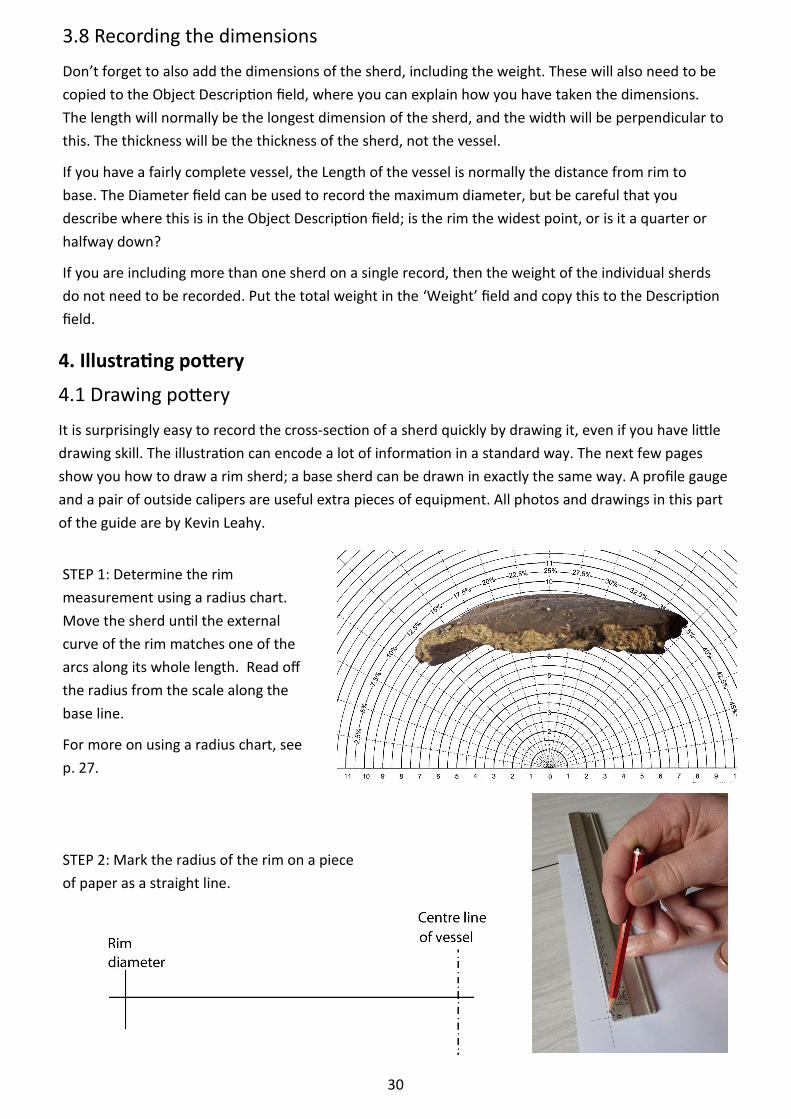
4. Illustrating pottery
4.1 Drawing pottery
It is surprisingly easy to record the cross-section of a sherd quickly by drawing it, even if you have little
drawing skill. The illustration can encode a lot of information in a standard way. The next few pages
show you how to draw a rim sherd; a base sherd can be drawn in exactly the same way. A profile gauge
and a pair of outside calipers are useful extra pieces of equipment. All photos and drawings in this part
of the guide are by Kevin Leahy.
STEP 1: Determine the rim
measurement using a radius chart.
Move the sherd until the external
curve of the rim matches one of the
arcs along its whole length. Read off
the radius from the scale along the
base line.
For more on using a radius chart, see
p. 27.
STEP 2: Mark the radius of the rim on a piece
of paper as a straight line.
31
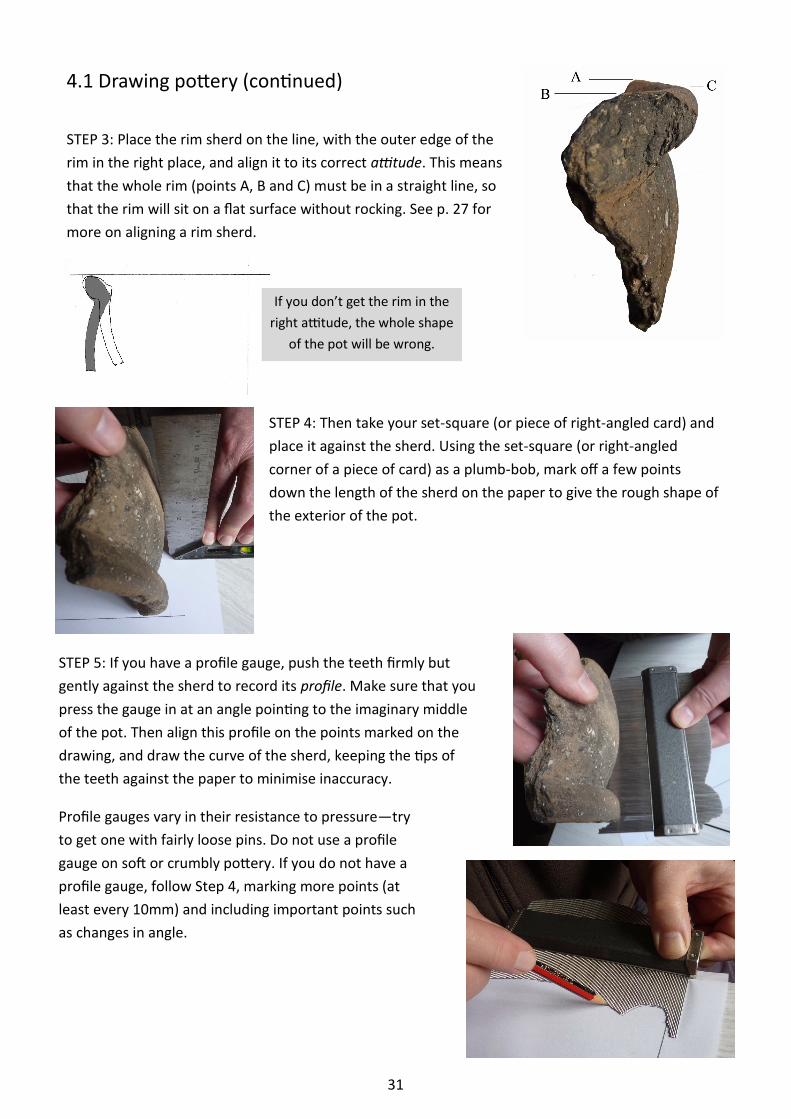
STEP 3: Place the rim sherd on the line, with the outer edge of the
rim in the right place, and align it to its correct attitude. This means
that the whole rim (points A, B and C) must be in a straight line, so
that the rim will sit on a flat surface without rocking. See p. 27 for
more on aligning a rim sherd.
4.1 Drawing pottery (continued)
STEP 4: Then take your set-square (or piece of right-angled card) and
place it against the sherd. Using the set-square (or right-angled
corner of a piece of card) as a plumb-bob, mark off a few points
down the length of the sherd on the paper to give the rough shape of
the exterior of the pot.
If you don’t get the rim in the
right attitude, the whole shape
of the pot will be wrong.
STEP 5: If you have a profile gauge, push the teeth firmly but
gently against the sherd to record its profile. Make sure that you
press the gauge in at an angle pointing to the imaginary middle
of the pot. Then align this profile on the points marked on the
drawing, and draw the curve of the sherd, keeping the tips of
the teeth against the paper to minimise inaccuracy.
Profile gauges vary in their resistance to pressure—try
to get one with fairly loose pins. Do not use a profile
gauge on soft or crumbly pottery. If you do not have a
profile gauge, follow Step 4, marking more points (at
least every 10mm) and including important points such
as changes in angle.
32
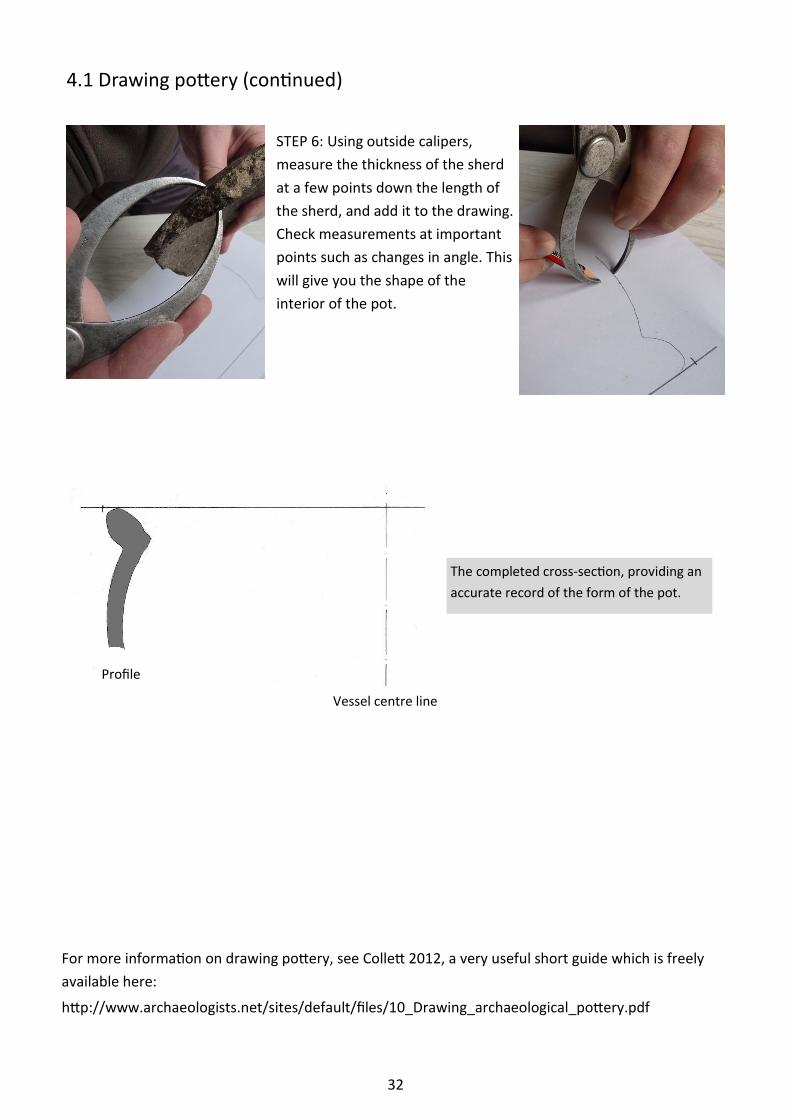
4.1 Drawing pottery (continued)
STEP 6: Using outside calipers,
measure the thickness of the sherd
at a few points down the length of
the sherd, and add it to the drawing.
Check measurements at important
points such as changes in angle. This
will give you the shape of the
interior of the pot.
The completed cross-section, providing an
accurate record of the form of the pot.
Profile
Vessel centre line
For more information on drawing pottery, see Collett 2012, a very useful short guide which is freely
available here:
http://www.archaeologists.net/sites/default/files/10_Drawing_archaeological_pottery.pdf
33
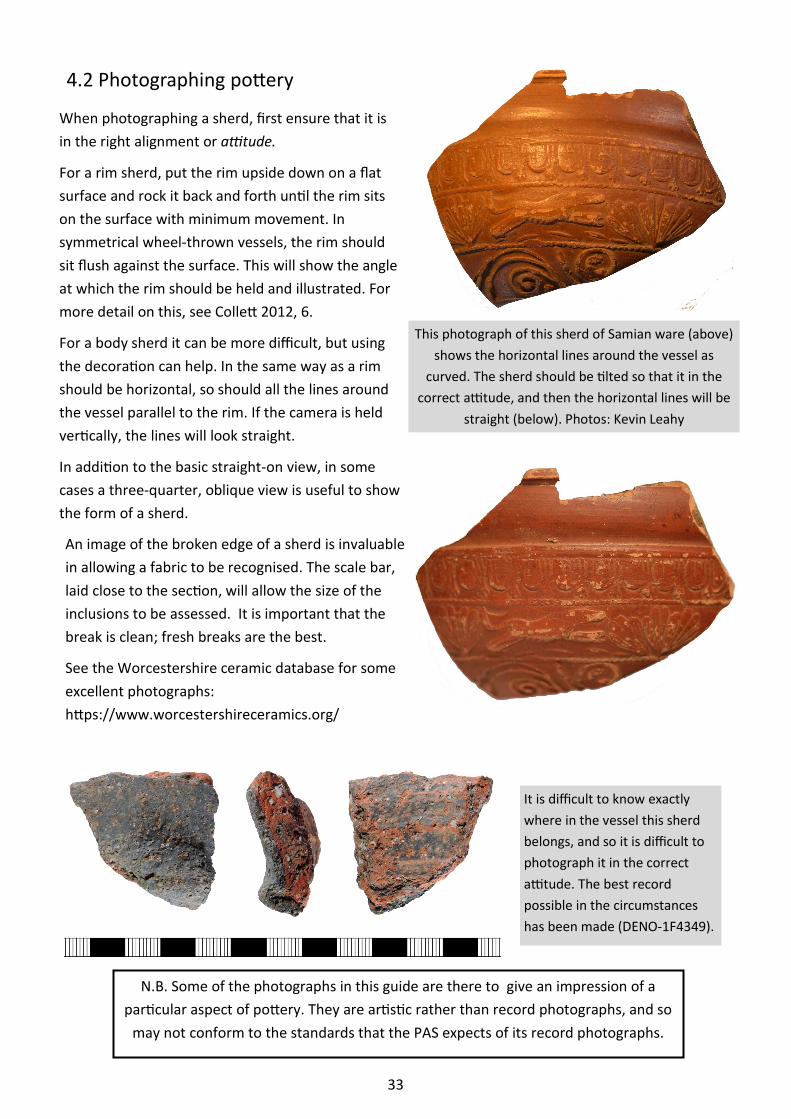
4.2 Photographing pottery
This photograph of this sherd of Samian ware (above)
shows the horizontal lines around the vessel as
curved. The sherd should be tilted so that it in the
correct attitude, and then the horizontal lines will be
straight (below). Photos: Kevin Leahy
When photographing a sherd, first ensure that it is
in the right alignment or attitude.
For a rim sherd, put the rim upside down on a flat
surface and rock it back and forth until the rim sits
on the surface with minimum movement. In
symmetrical wheel-thrown vessels, the rim should
sit flush against the surface. This will show the angle
at which the rim should be held and illustrated. For
more detail on this, see Collett 2012, 6.
For a body sherd it can be more difficult, but using
the decoration can help. In the same way as a rim
should be horizontal, so should all the lines around
the vessel parallel to the rim. If the camera is held
vertically, the lines will look straight.
In addition to the basic straight-on view, in some
cases a three-quarter, oblique view is useful to show
the form of a sherd.
An image of the broken edge of a sherd is invaluable
in allowing a fabric to be recognised. The scale bar,
laid close to the section, will allow the size of the
inclusions to be assessed. It is important that the
break is clean; fresh breaks are the best.
See the Worcestershire ceramic database for some
excellent photographs:
https://www.worcestershireceramics.org/
N.B. Some of the photographs in this guide are there to give an impression of a
particular aspect of pottery. They are artistic rather than record photographs, and so
may not conform to the standards that the PAS expects of its record photographs.
It is difficult to know exactly
where in the vessel this sherd
belongs, and so it is difficult to
photograph it in the correct
attitude. The best record
possible in the circumstances
has been made (DENO-1F4349).
34
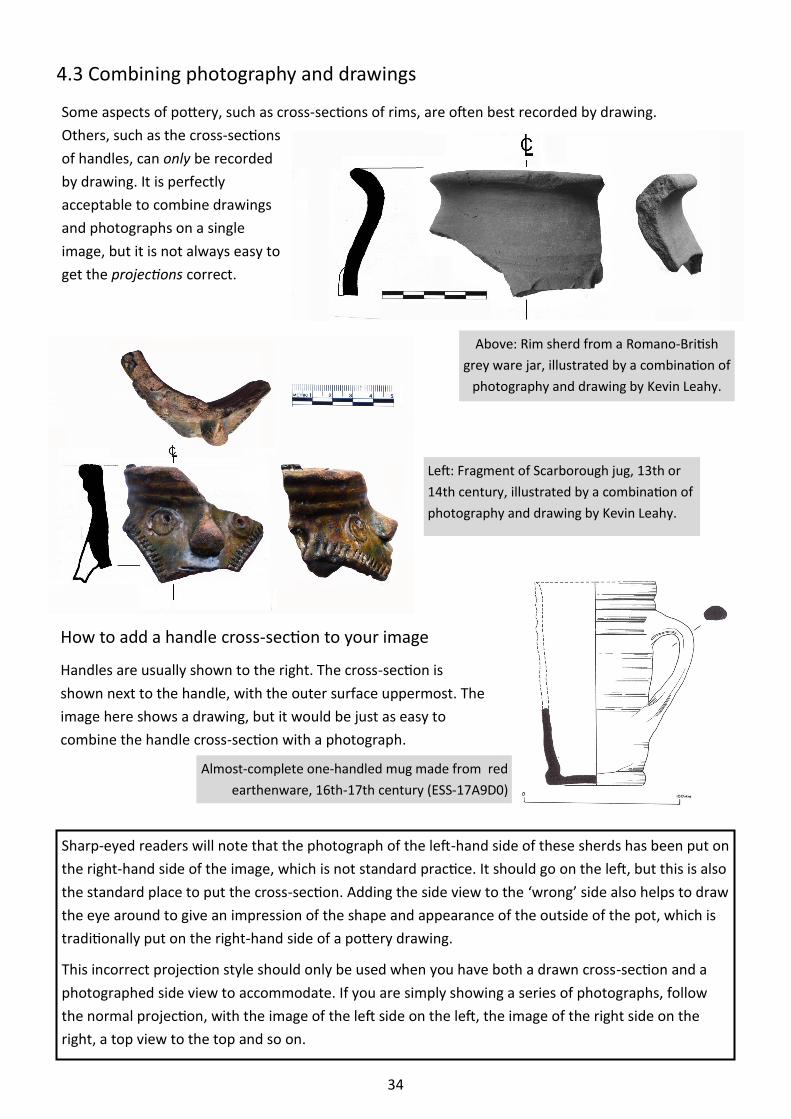
Some aspects of pottery, such as cross-sections of rims, are often best recorded by drawing.
Others, such as the cross-sections
of handles, can only be recorded
by drawing. It is perfectly
acceptable to combine drawings
and photographs on a single
image, but it is not always easy to
get the projections correct.
4.3 Combining photography and drawings
Above: Rim sherd from a Romano-British
grey ware jar, illustrated by a combination of
photography and drawing by Kevin Leahy.
Left: Fragment of Scarborough jug, 13th or
14th century, illustrated by a combination of
photography and drawing by Kevin Leahy.
Sharp-eyed readers will note that the photograph of the left-hand side of these sherds has been put on
the right-hand side of the image, which is not standard practice. It should go on the left, but this is also
the standard place to put the cross-section. Adding the side view to the ‘wrong’ side also helps to draw
the eye around to give an impression of the shape and appearance of the outside of the pot, which is
traditionally put on the right-hand side of a pottery drawing.
This incorrect projection style should only be used when you have both a drawn cross-section and a
photographed side view to accommodate. If you are simply showing a series of photographs, follow
the normal projection, with the image of the left side on the left, the image of the right side on the
right, a top view to the top and so on.
How to add a handle cross-section to your image
Handles are usually shown to the right. The cross-section is
shown next to the handle, with the outer surface uppermost. The
image here shows a drawing, but it would be just as easy to
combine the handle cross-section with a photograph.
Almost-complete one-handled mug made from red
earthenware, 16th-17th century (ESS-17A9D0)
35
5. Recording large groups of ceramic finds
5.1 What to record
The PAS records finds made by members of the public, not finds from organised archaeological
projects. Our database is not set up to record quantities of systematically collected objects such as a
fieldwalking assemblage. Archaeological projects, including fieldwalking, should arrange their own
recording and deposit the resulting archive with an HER.
If you feel you have to record a collection from an archaeological project, it is best to consult a Finds
Adviser beforehand to work out the correct protocol together.
However, finds made by members of the public will sometimes include quite large groups, and so this
page gives some hints on managing these. Examples of good records include ESS-17A9D0 (found when
digging for a water main).
5.2 How many records to make per assemblage
Normally our rule is to make one record per object, but with pottery it is justifiable to have more
than one sherd on a single record.
As a minimum, the PAS recommends that one record is made per fabric type or ware type and also
per vessel type. A big assemblage therefore needs to be split first into fabric or ware, and then into
vessel types. Group all of the same vessel type and the same fabric, and you can put the whole group
on a single record.
You do not need to be sure that they come from the same single vessel, because the important thing
is that the record can have the standard information added in the normal way. So the classification
field must have only one ware type in it, and the sub-classification field must have only one vessel
type in it.
All of the sherds that come from unidentifiable vessels (but the same fabric) can be put on the same
record. Again, you do not need to be certain that they come from the same vessel, but they do need
to be recordable in just one single way.
This will ensure that if a searcher is looking for all Roman greyware bowls, or all Late Medieval and
Transitional Ware aquamaniles, they will be able to find them.
If you do not feel happy about identifying the ware type, you can put things that look similar, or
whose fabric and vessel type can be described in similar terms, together on a single record. Or if you
feel happier about simply creating one record for each sherd, this is perfectly acceptable.
When putting more than one sherd on a single record, the Description field must include:
• how many sherds the record contains, and what parts of the vessel(s) are represented (e.g.
four body sherds and a handle, or 18 body, 34 rim and 12 base sherds)
• the total weight of the sherds in both the Weight field and the Description field; you don’t
need to record the weight of each individual sherd.
• lastly, don’t forget to change the figure in the Quantity field.
36
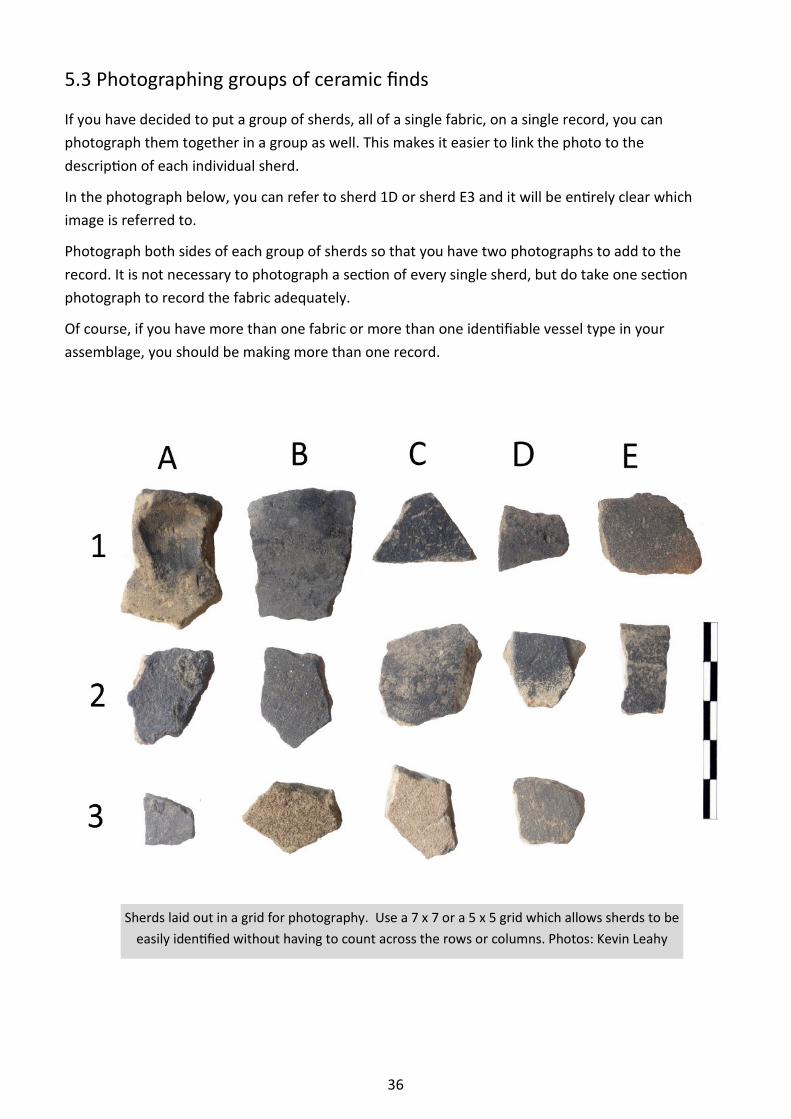
5.3 Photographing groups of ceramic finds
Sherds laid out in a grid for photography. Use a 7 x 7 or a 5 x 5 grid which allows sherds to be
easily identified without having to count across the rows or columns. Photos: Kevin Leahy
If you have decided to put a group of sherds, all of a single fabric, on a single record, you can
photograph them together in a group as well. This makes it easier to link the photo to the
description of each individual sherd.
In the photograph below, you can refer to sherd 1D or sherd E3 and it will be entirely clear which
image is referred to.
Photograph both sides of each group of sherds so that you have two photographs to add to the
record. It is not necessary to photograph a section of every single sherd, but do take one section
photograph to record the fabric adequately.
Of course, if you have more than one fabric or more than one identifiable vessel type in your
assemblage, you should be making more than one record.

37
6. List of vessel types
This has been put together from the mda thesaurus, informed by several other sources. Most im-
portantly, the Medieval Pottery Research Groups’s A Guide to the Classification of Medieval Ceramic
Forms (MPRG 1998) defines these terms precisely for medieval and early post-medieval types. There
are fewer formal definitions for Roman and prehistoric vessel types, but some additional Roman
forms have been gleaned from Pottery in Roman Britain (de la Bedoyère 2000) and there is much use-
ful information, illustrations and references in the glossary in Prehistoric Pottery for the Archaeologist
(Gibson and Woods 1997, 81-283).
There are also two European lists of vessel types, Kunow et al. 1986 and Balfet et al. 1988, both of
which give translations of vessel names but no precise definitions.
The vessel type should be added to the Sub-classification field if possible, but in most cases it will
not be possible to identify the vessel type from a single sherd and therefore the Sub-classification
field should be left blank.
You will find the three basic divisions of vessel type on the next page, followed by an alphabetical list
of individual vessel types.
Salt-glazed stoneware jugs. The glaze has a distinctive pitted ‘orange-skin’ surface. These tall jugs often
have grooves around their bodies to support them during the high-temperature firing which was
necessary to achieve the hard fabric. First imported into Britain in the early 14th century stone wares
became common in the 16th and 17th centuries. Most came from production centres in the Rhineland,
notably Cologne, Frechen, Langerwehe, Raeren and Westerwald. Photo from Jennings 1992, fig. 44.
38
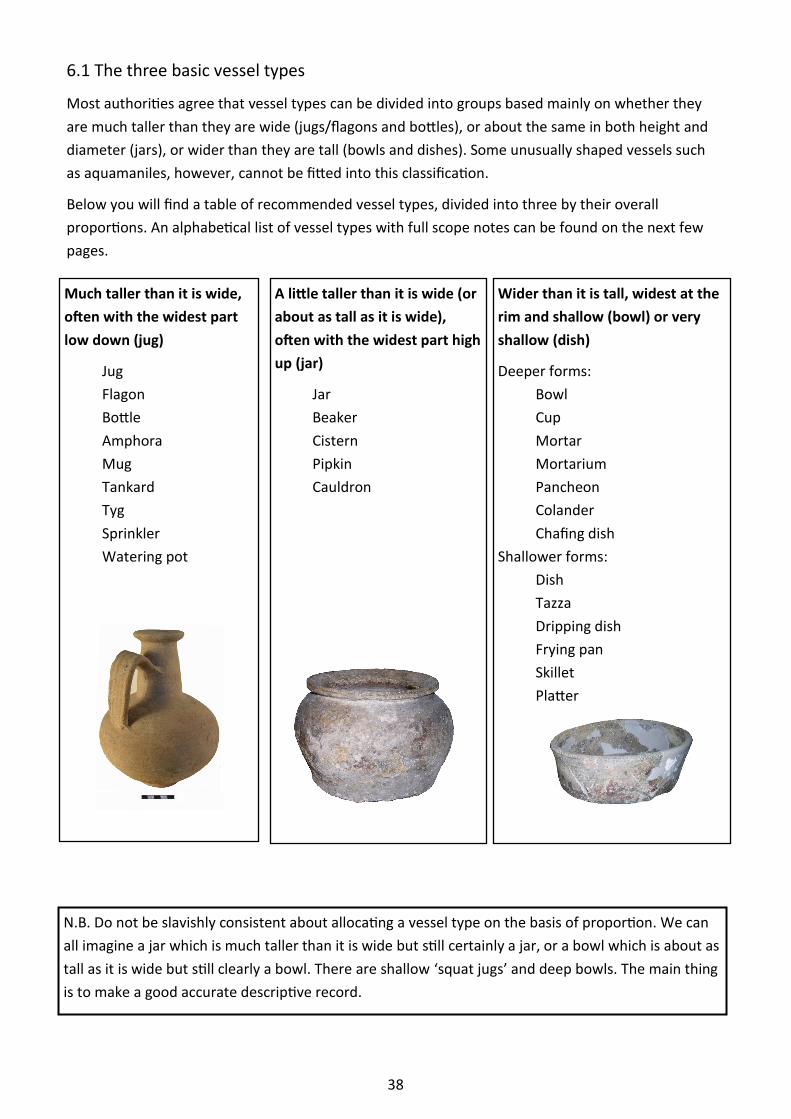
6.1 The three basic vessel types
Most authorities agree that vessel types can be divided into groups based mainly on whether they
are much taller than they are wide (jugs/flagons and bottles), or about the same in both height and
diameter (jars), or wider than they are tall (bowls and dishes). Some unusually shaped vessels such
as aquamaniles, however, cannot be fitted into this classification.
Below you will find a table of recommended vessel types, divided into three by their overall
proportions. An alphabetical list of vessel types with full scope notes can be found on the next few
pages.
Much taller than it is wide,
often with the widest part
low down (jug)
Jug
Flagon
Bottle
Amphora
Mug
Tankard
Tyg
Sprinkler
Watering pot
A little taller than it is wide (or
about as tall as it is wide),
often with the widest part high
up (jar)
Jar
Beaker
Cistern
Pipkin
Cauldron
Wider than it is tall, widest at the
rim and shallow (bowl) or very
shallow (dish)
Deeper forms:
Bowl
Cup
Mortar
Mortarium
Pancheon
Colander
Chafing dish
Shallower forms:
Dish
Tazza
Dripping dish
Frying pan
Skillet
Platter
N.B. Do not be slavishly consistent about allocating a vessel type on the basis of proportion. We can
all imagine a jar which is much taller than it is wide but still certainly a jar, or a bowl which is about as
tall as it is wide but still clearly a bowl. There are shallow ‘squat jugs’ and deep bowls. The main thing
is to make a good accurate descriptive record.

39
AMPHORA. Massive narrow-necked double-handled Roman storage and transportation vessel. Amphorae hold from 20 to 80 litres and are classified by their Dressel type (de la Bedoyère 2000, 36-39). Dressel 1 is known from the late Iron Age; the other types are Roman. Handmade from a distinctive thick oxidised gritty fabric.
AQUAMANILE. Ceramic version of a medieval metal vessel, usually zoomorphic, used for pouring water at the table. Drawing: McCarthy and Brooks 1988, no. 1164.
BEAKER. A tall, handle-less vessel. The term ‘Beaker’ often implies a presumed function as a drinking vessel (MPRG 1998, 6-6.1). Bronze Age beakers have thin walls and fine fabrics, are highly decorated and have wide mouths. A medieval or post-medieval beaker can have a pedestal base, either integrally thrown as part of the rest of the vessel, or separately made and applied.
BOTTLE. Tall hollow-ware vessel with a narrow neck and no handle, and a flat base. Bottles are taller than they are wide. Use for ‘Flask’.
BOWL. A bowl is defined by the MPRG (1998, 5.1) as having a rim diameter equal to or greater than the base diameter (so of open shape) and also shallower than it is wide. A bowl cannot be too shallow; its minimum depth is one-third its height. If a vessel is shallower than this, it is a ‘Dish’. A bowl tends to have an open form. It is possible to add a footring, a pedestal base, a spout or one or more handles to a bowl. A small bowl with a single vertical loop handle is normally called a ‘Cup’. Drawing: Gillam 1957, no. 196.
CAULDRON. A cauldron is a large vessel of ‘Jar’ proportions (diameter more or less equal to height), with three feet and a pair of vertical lug or loop handles. This type of vessel is also known in copper alloy, where the ‘feet’ are known as ‘legs’. Drawing: McCarthy and Brooks 1988, no. 1344.
CHAFING DISH. Ceramic chafing dishes are similar in form to copper-alloy chafing dishes; a bowl on a pedestal base with dish-supports projecting upwards from the rim. The body of the chafing dish can be pierced with vents, and there may be one or more handles. Drawing: McCarthy and Brooks 1988, no. 1848.
6.2 Alphabetical list of vessel types
This alphabetical list includes all of the PAS’s recommended vessel types (‘preferred terms’, in capital
letters) and a few non-preferred terms (in lower-case). It does not contain all the terms in the mda
thesaurus and the list of non-preferred terms is not exhaustive. Preferred terms should be used in the
Object Description field and in the Sub-classification field. Non-preferred terms can be used in the
Object Description field.
Most authorities also agree that ‘functional’ names (such as Storage Vessel, Drinking Vessel, Dripping
Dish, Chamber Pot, Cooking Vessel, Flower Pot, Fuming Pot) tend to be subjective and therefore
difficult to define precisely. So if you use a ‘functional’ name, you must of course add a full description,
which should include (if possible) a more objective vessel type based on the proportions and shape.

40
FLAGON. Romanists generally use the word ‘Flagon’ as a synonym for ‘Jug’. Flagons are more standardised than jugs, all having globular bodies and narrow mouths. There are several types which develop over time: ring-necked, flange-necked, pinch-necked, etc. Flagon-type vessels with particularly large mouths are sometimes called ‘Jug’. You may use either term, at your discretion. Drawing: Gillam 1957, no. 19.
FLASK. Medievalists use this word for a tall hollow-ware vessel with a narrow neck, no handle and a rounded base, such as a Martincamp flask (Jennings 1981, 74-6). Romanists use this word as a synonym for ‘Bottle’. Because of the inconsistency, ‘Flask’ is best avoided as a general vessel type (although it can be used for Martincamp flasks).
FLOWER POT. It is easy to confuse fragments of modern flower pot with orange/red Roman earthenwares, such as Severn Valley ware. They both have the same uniform bright red colour, but flower pot has a slightly coarser fabric. It is also similar to post-medieval Staffordshire red wares, but look out for thin walls and careless finishing which indicate that you have a flower pot.
FOOD VESSEL. This term refers to a type of Bronze Age vessel only. It began as a functional name, used for a vessel like a ‘Beaker’, but which had a thickened body and/or rim and so was thought to be unsuitable for drinking from. It is now used for small thick-walled wide-mouthed jars and bowls, generally 10-20cm high, often richly decorated but of a coarser fabric than Beakers. Compare the larger ‘Urn’. Drawing: Savory 1980, no. 384.
CISTERN. A large vessel with a bung-hole just above the base is often known as a cistern. It may have one or two vertical loop handles, and be of jug or jar proportions. Drawing: McCarthy and Brooks 1988, no. 1787.
COLANDER. A ‘Bowl’ with multiple pierced holes in the vessel wall and base. Some have feet and/or one or more handles. Use ‘Colander’ for any type of strainer. They are usually medieval or early post-medieval, but can occasionally be Bronze Age or Iron Age. Drawing: McCarthy and Brooks 1988, no. 1940.
COSTREL. These come in a variety of shapes, but all have a narrow neck and are designed to be suspended from pierced lug handles with the neck upright.
CUP. A small ‘Bowl’ with a single vertical loop handle. Cups can have pedestal bases. Compare ‘Mug’.
DISH. Defined by the MPRG (1998, 5.3) as having a rim diameter greater than the base diameter, and shallow; a dish should have a height between one-third and one-seventh of its rim diameter. If a vessel is deeper than this, it is a ‘Bowl’. If it is even shallower, it may be a ‘Platter’. Dishes can have pedestal bases or straight handles. Drawing: Gillam 1957, no. 318.
DRIPPING DISH. Dish with a straight handle (attached at one end only) and a pulled or pinched spout. Dripping dishes are normally not circular, but oval, semi-circular, rectangular, etc. Compare ‘Frying pan’. Drawing: McCarthy and Brooks 1988, no. 1163.
6.2 Alphabetical list of vessel types (continued)
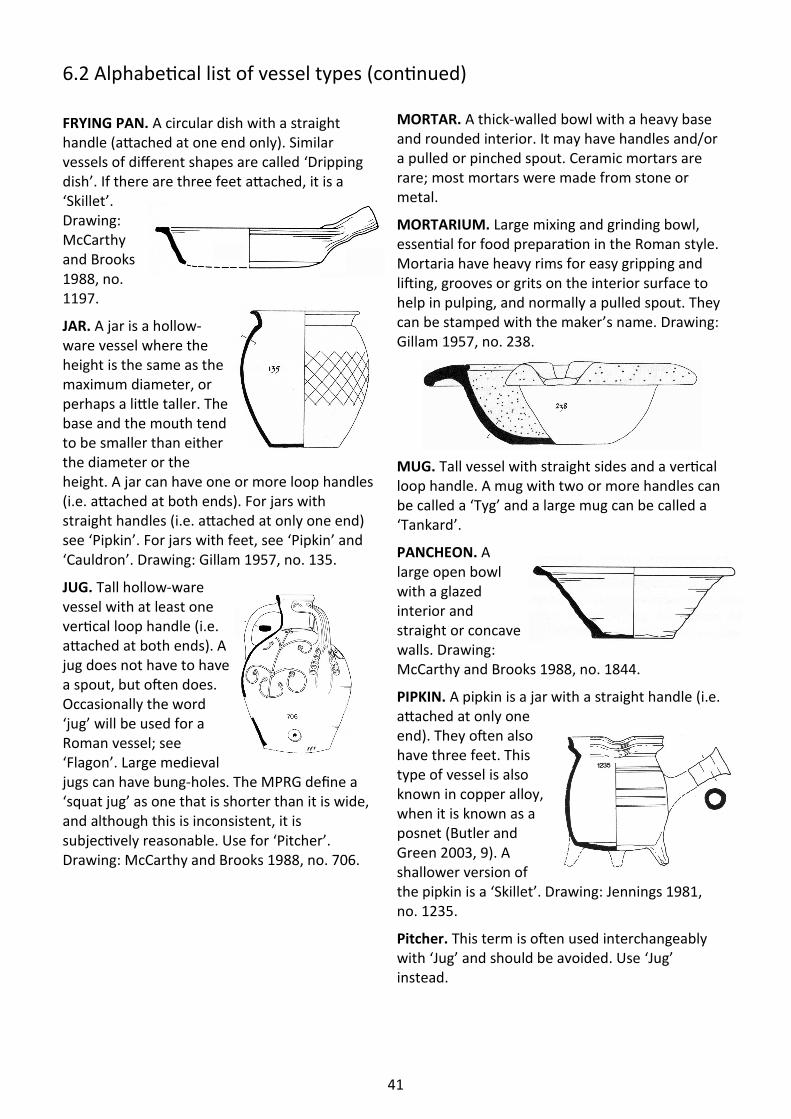
41
MORTAR. A thick-walled bowl with a heavy base and rounded interior. It may have handles and/or a pulled or pinched spout. Ceramic mortars are rare; most mortars were made from stone or metal.
MORTARIUM. Large mixing and grinding bowl, essential for food preparation in the Roman style. Mortaria have heavy rims for easy gripping and lifting, grooves or grits on the interior surface to help in pulping, and normally a pulled spout. They can be stamped with the maker’s name. Drawing: Gillam 1957, no. 238.
MUG. Tall vessel with straight sides and a vertical loop handle. A mug with two or more handles can be called a ‘Tyg’ and a large mug can be called a ‘Tankard’.
PANCHEON. A large open bowl with a glazed interior and straight or concave walls. Drawing: McCarthy and Brooks 1988, no. 1844.
PIPKIN. A pipkin is a jar with a straight handle (i.e. attached at only one end). They often also have three feet. This type of vessel is also known in copper alloy, when it is known as a posnet (Butler and Green 2003, 9). A shallower version of the pipkin is a ‘Skillet’. Drawing: Jennings 1981, no. 1235.
Pitcher. This term is often used interchangeably with ‘Jug’ and should be avoided. Use ‘Jug’ instead.
6.2 Alphabetical list of vessel types (continued)
FRYING PAN. A circular dish with a straight handle (attached at one end only). Similar vessels of different shapes are called ‘Dripping dish’. If there are three feet attached, it is a ‘Skillet’. Drawing: McCarthy and Brooks 1988, no. 1197.
JAR. A jar is a hollow-ware vessel where the height is the same as the maximum diameter, or perhaps a little taller. The base and the mouth tend to be smaller than either the diameter or the height. A jar can have one or more loop handles (i.e. attached at both ends). For jars with straight handles (i.e. attached at only one end) see ‘Pipkin’. For jars with feet, see ‘Pipkin’ and ‘Cauldron’. Drawing: Gillam 1957, no. 135.
JUG. Tall hollow-ware vessel with at least one vertical loop handle (i.e. attached at both ends). A jug does not have to have a spout, but often does. Occasionally the word ‘jug’ will be used for a Roman vessel; see ‘Flagon’. Large medieval jugs can have bung-holes. The MPRG define a ‘squat jug’ as one that is shorter than it is wide, and although this is inconsistent, it is subjectively reasonable. Use for ‘Pitcher’. Drawing: McCarthy and Brooks 1988, no. 706.
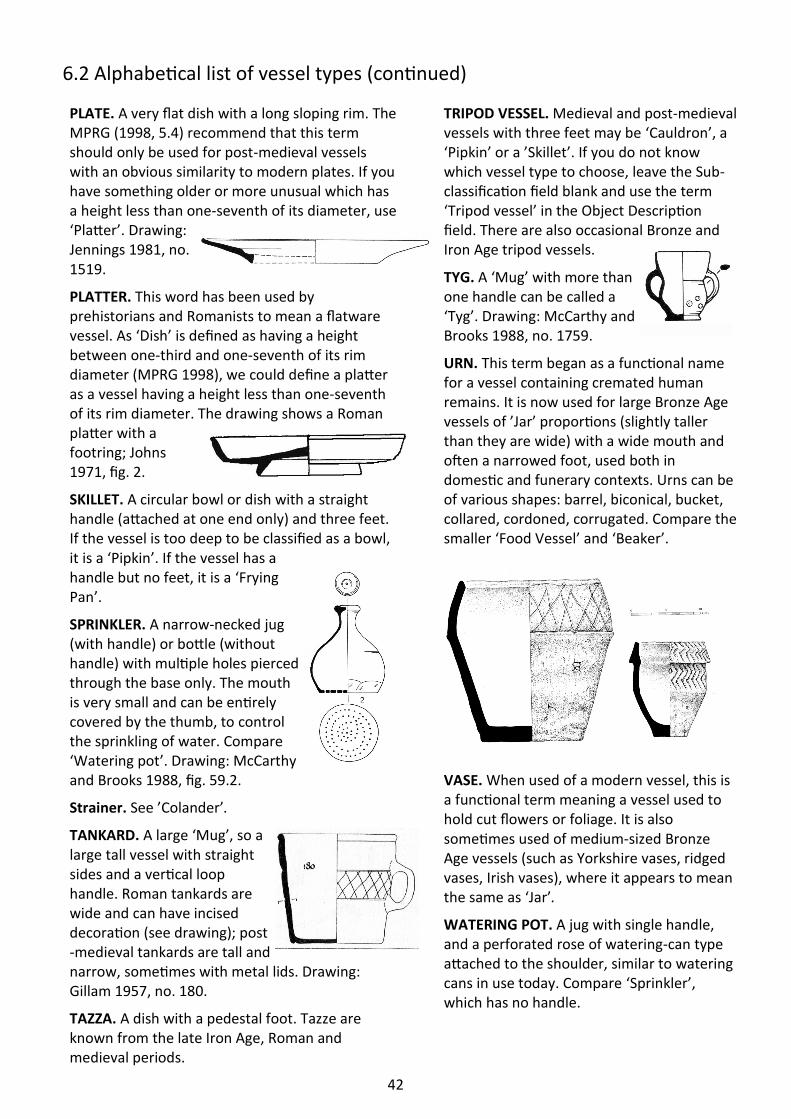
42
TRIPOD VESSEL. Medieval and post-medieval vessels with three feet may be ‘Cauldron’, a ‘Pipkin’ or a ’Skillet’. If you do not know which vessel type to choose, leave the Sub-classification field blank and use the term ‘Tripod vessel’ in the Object Description field. There are also occasional Bronze and Iron Age tripod vessels.
TYG. A ‘Mug’ with more than one handle can be called a ‘Tyg’. Drawing: McCarthy and Brooks 1988, no. 1759.
URN. This term began as a functional name for a vessel containing cremated human remains. It is now used for large Bronze Age vessels of ’Jar’ proportions (slightly taller than they are wide) with a wide mouth and often a narrowed foot, used both in domestic and funerary contexts. Urns can be of various shapes: barrel, biconical, bucket, collared, cordoned, corrugated. Compare the smaller ‘Food Vessel’ and ‘Beaker’.
VASE. When used of a modern vessel, this is a functional term meaning a vessel used to hold cut flowers or foliage. It is also sometimes used of medium-sized Bronze Age vessels (such as Yorkshire vases, ridged vases, Irish vases), where it appears to mean the same as ‘Jar’.
WATERING POT. A jug with single handle, and a perforated rose of watering-can type attached to the shoulder, similar to watering cans in use today. Compare ‘Sprinkler’, which has no handle.
PLATE. A very flat dish with a long sloping rim. The MPRG (1998, 5.4) recommend that this term should only be used for post-medieval vessels with an obvious similarity to modern plates. If you have something older or more unusual which has a height less than one-seventh of its diameter, use ‘Platter’. Drawing: Jennings 1981, no. 1519.
PLATTER. This word has been used by prehistorians and Romanists to mean a flatware vessel. As ‘Dish’ is defined as having a height between one-third and one-seventh of its rim diameter (MPRG 1998), we could define a platter as a vessel having a height less than one-seventh of its rim diameter. The drawing shows a Roman platter with a footring; Johns 1971, fig. 2.
SKILLET. A circular bowl or dish with a straight handle (attached at one end only) and three feet. If the vessel is too deep to be classified as a bowl, it is a ‘Pipkin’. If the vessel has a handle but no feet, it is a ‘Frying Pan’.
SPRINKLER. A narrow-necked jug (with handle) or bottle (without handle) with multiple holes pierced through the base only. The mouth is very small and can be entirely covered by the thumb, to control the sprinkling of water. Compare ‘Watering pot’. Drawing: McCarthy and Brooks 1988, fig. 59.2.
Strainer. See ’Colander’.
TANKARD. A large ‘Mug’, so a large tall vessel with straight sides and a vertical loop handle. Roman tankards are wide and can have incised decoration (see drawing); post-medieval tankards are tall and narrow, sometimes with metal lids. Drawing: Gillam 1957, no. 180.
TAZZA. A dish with a pedestal foot. Tazze are known from the late Iron Age, Roman and medieval periods.
6.2 Alphabetical list of vessel types (continued)
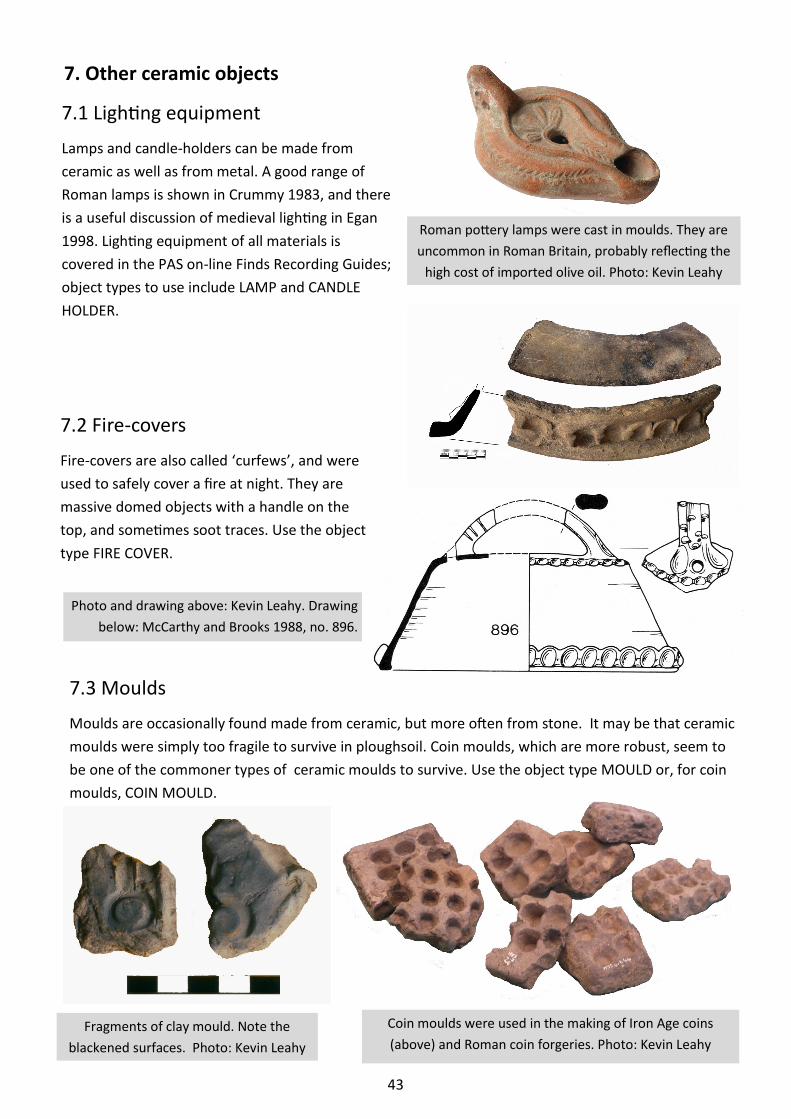
43
7. Other ceramic objects
7.1 Lighting equipment
Lamps and candle-holders can be made from
ceramic as well as from metal. A good range of
Roman lamps is shown in Crummy 1983, and there
is a useful discussion of medieval lighting in Egan
1998. Lighting equipment of all materials is
covered in the PAS on-line Finds Recording Guides;
object types to use include LAMP and CANDLE
HOLDER.
Roman pottery lamps were cast in moulds. They are
uncommon in Roman Britain, probably reflecting the
high cost of imported olive oil. Photo: Kevin Leahy
7.2 Fire-covers
Fire-covers are also called ‘curfews’, and were
used to safely cover a fire at night. They are
massive domed objects with a handle on the
top, and sometimes soot traces. Use the object
type FIRE COVER.
7.3 Moulds
Moulds are occasionally found made from ceramic, but more often from stone. It may be that ceramic
moulds were simply too fragile to survive in ploughsoil. Coin moulds, which are more robust, seem to
be one of the commoner types of ceramic moulds to survive. Use the object type MOULD or, for coin
moulds, COIN MOULD.
Coin moulds were used in the making of Iron Age coins
(above) and Roman coin forgeries. Photo: Kevin Leahy Fragments of clay mould. Note the
blackened surfaces. Photo: Kevin Leahy
Photo and drawing above: Kevin Leahy. Drawing
below: McCarthy and Brooks 1988, no. 896.
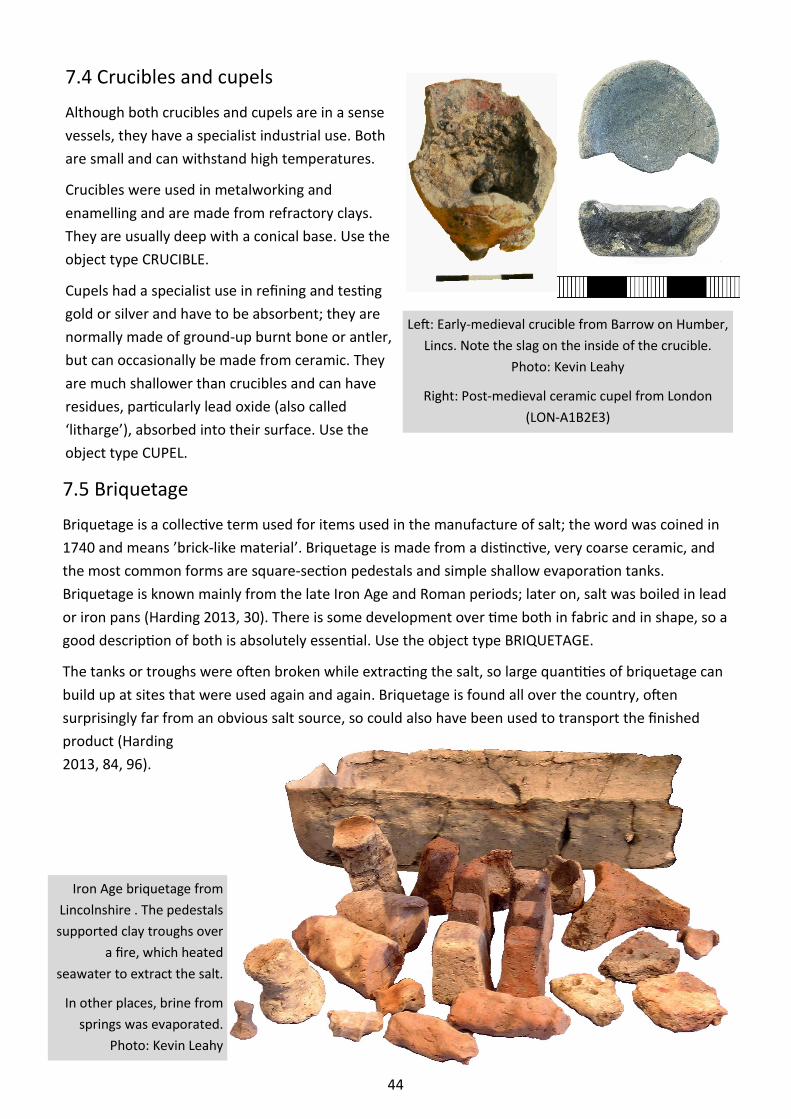
44
7.4 Crucibles and cupels
Although both crucibles and cupels are in a sense
vessels, they have a specialist industrial use. Both
are small and can withstand high temperatures.
Crucibles were used in metalworking and
enamelling and are made from refractory clays.
They are usually deep with a conical base. Use the
object type CRUCIBLE.
Cupels had a specialist use in refining and testing
gold or silver and have to be absorbent; they are
normally made of ground-up burnt bone or antler,
but can occasionally be made from ceramic. They
are much shallower than crucibles and can have
residues, particularly lead oxide (also called
‘litharge’), absorbed into their surface. Use the
object type CUPEL.
7.5 Briquetage
Briquetage is a collective term used for items used in the manufacture of salt; the word was coined in
1740 and means ’brick-like material’. Briquetage is made from a distinctive, very coarse ceramic, and
the most common forms are square-section pedestals and simple shallow evaporation tanks.
Briquetage is known mainly from the late Iron Age and Roman periods; later on, salt was boiled in lead
or iron pans (Harding 2013, 30). There is some development over time both in fabric and in shape, so a
good description of both is absolutely essential. Use the object type BRIQUETAGE.
The tanks or troughs were often broken while extracting the salt, so large quantities of briquetage can
build up at sites that were used again and again. Briquetage is found all over the country, often
surprisingly far from an obvious salt source, so could also have been used to transport the finished
product (Harding
2013, 84, 96).
Iron Age briquetage from
Lincolnshire . The pedestals
supported clay troughs over
a fire, which heated
seawater to extract the salt.
In other places, brine from
springs was evaporated.
Photo: Kevin Leahy
Left: Early-medieval crucible from Barrow on Humber,
Lincs. Note the slag on the inside of the crucible.
Photo: Kevin Leahy
Right: Post-medieval ceramic cupel from London
(LON-A1B2E3)
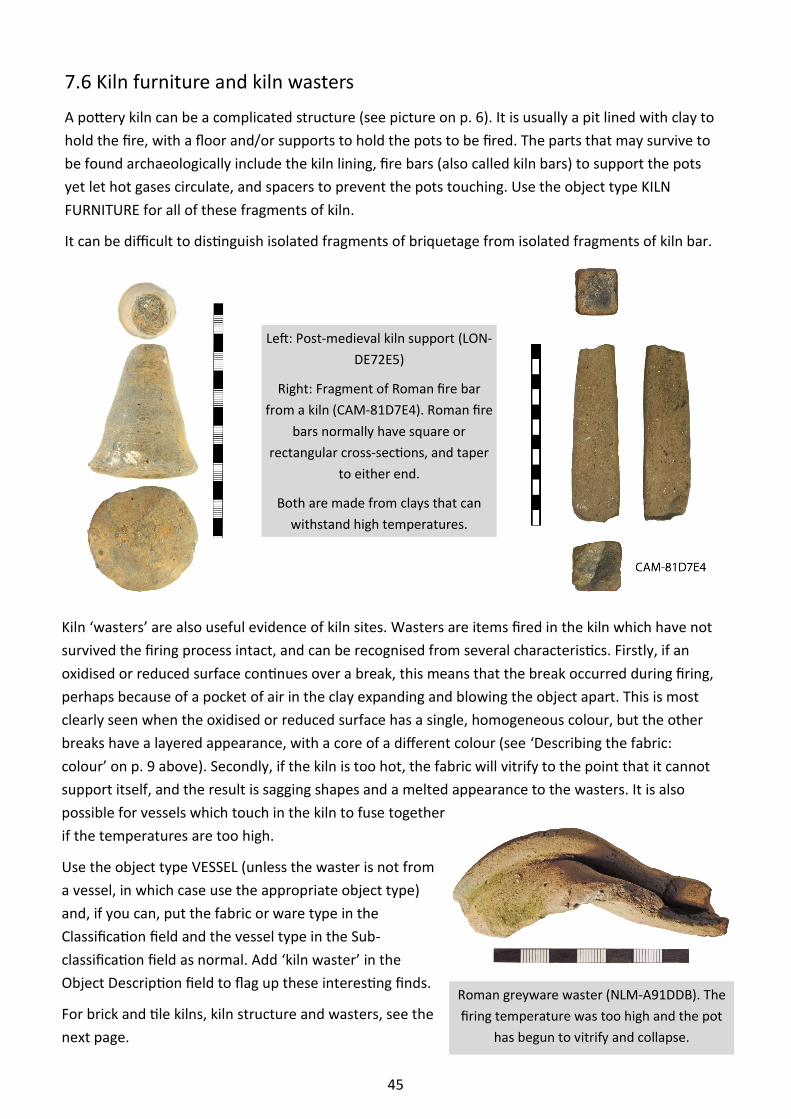
45
7.6 Kiln furniture and kiln wasters
A pottery kiln can be a complicated structure (see picture on p. 6). It is usually a pit lined with clay to
hold the fire, with a floor and/or supports to hold the pots to be fired. The parts that may survive to
be found archaeologically include the kiln lining, fire bars (also called kiln bars) to support the pots
yet let hot gases circulate, and spacers to prevent the pots touching. Use the object type KILN
FURNITURE for all of these fragments of kiln.
It can be difficult to distinguish isolated fragments of briquetage from isolated fragments of kiln bar.
Kiln ‘wasters’ are also useful evidence of kiln sites. Wasters are items fired in the kiln which have not
survived the firing process intact, and can be recognised from several characteristics. Firstly, if an
oxidised or reduced surface continues over a break, this means that the break occurred during firing,
perhaps because of a pocket of air in the clay expanding and blowing the object apart. This is most
clearly seen when the oxidised or reduced surface has a single, homogeneous colour, but the other
breaks have a layered appearance, with a core of a different colour (see ‘Describing the fabric:
colour’ on p. 9 above). Secondly, if the kiln is too hot, the fabric will vitrify to the point that it cannot
support itself, and the result is sagging shapes and a melted appearance to the wasters. It is also
possible for vessels which touch in the kiln to fuse together
if the temperatures are too high.
Use the object type VESSEL (unless the waster is not from
a vessel, in which case use the appropriate object type)
and, if you can, put the fabric or ware type in the
Classification field and the vessel type in the Sub-
classification field as normal. Add ‘kiln waster’ in the
Object Description field to flag up these interesting finds.
For brick and tile kilns, kiln structure and wasters, see the
next page.
Left: Post-medieval kiln support (LON-
DE72E5)
Right: Fragment of Roman fire bar
from a kiln (CAM-81D7E4). Roman fire
bars normally have square or
rectangular cross-sections, and taper
to either end.
Both are made from clays that can
withstand high temperatures.
Roman greyware waster (NLM-A91DDB). The
firing temperature was too high and the pot
has begun to vitrify and collapse.
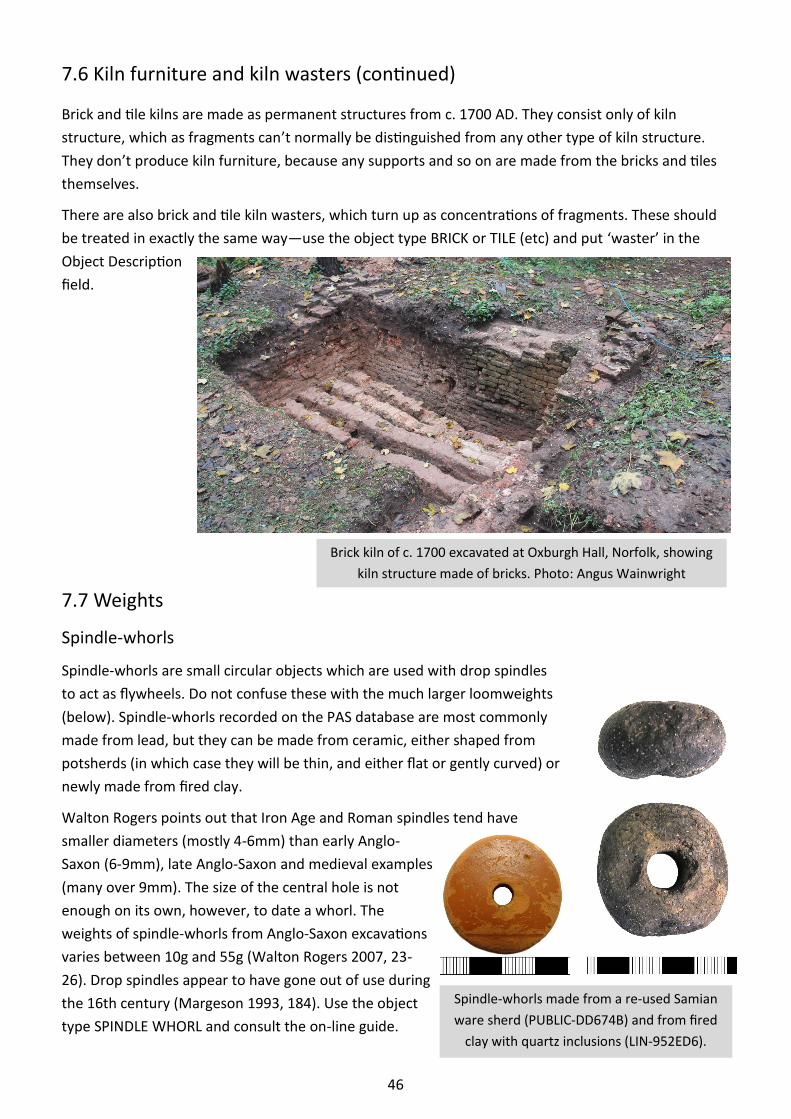
46
Brick and tile kilns are made as permanent structures from c. 1700 AD. They consist only of kiln
structure, which as fragments can’t normally be distinguished from any other type of kiln structure.
They don’t produce kiln furniture, because any supports and so on are made from the bricks and tiles
themselves.
There are also brick and tile kiln wasters, which turn up as concentrations of fragments. These should
be treated in exactly the same way—use the object type BRICK or TILE (etc) and put ‘waster’ in the
Object Description
field.
7.6 Kiln furniture and kiln wasters (continued)
7.7 Weights
Spindle-whorls
Spindle-whorls are small circular objects which are used with drop spindles
to act as flywheels. Do not confuse these with the much larger loomweights
(below). Spindle-whorls recorded on the PAS database are most commonly
made from lead, but they can be made from ceramic, either shaped from
potsherds (in which case they will be thin, and either flat or gently curved) or
newly made from fired clay.
Walton Rogers points out that Iron Age and Roman spindles tend have
smaller diameters (mostly 4-6mm) than early Anglo-
Saxon (6-9mm), late Anglo-Saxon and medieval examples
(many over 9mm). The size of the central hole is not
enough on its own, however, to date a whorl. The
weights of spindle-whorls from Anglo-Saxon excavations
varies between 10g and 55g (Walton Rogers 2007, 23-
26). Drop spindles appear to have gone out of use during
the 16th century (Margeson 1993, 184). Use the object
type SPINDLE WHORL and consult the on-line guide.
Spindle-whorls made from a re-used Samian
ware sherd (PUBLIC-DD674B) and from fired
clay with quartz inclusions (LIN-952ED6).
Brick kiln of c. 1700 excavated at Oxburgh Hall, Norfolk, showing
kiln structure made of bricks. Photo: Angus Wainwright
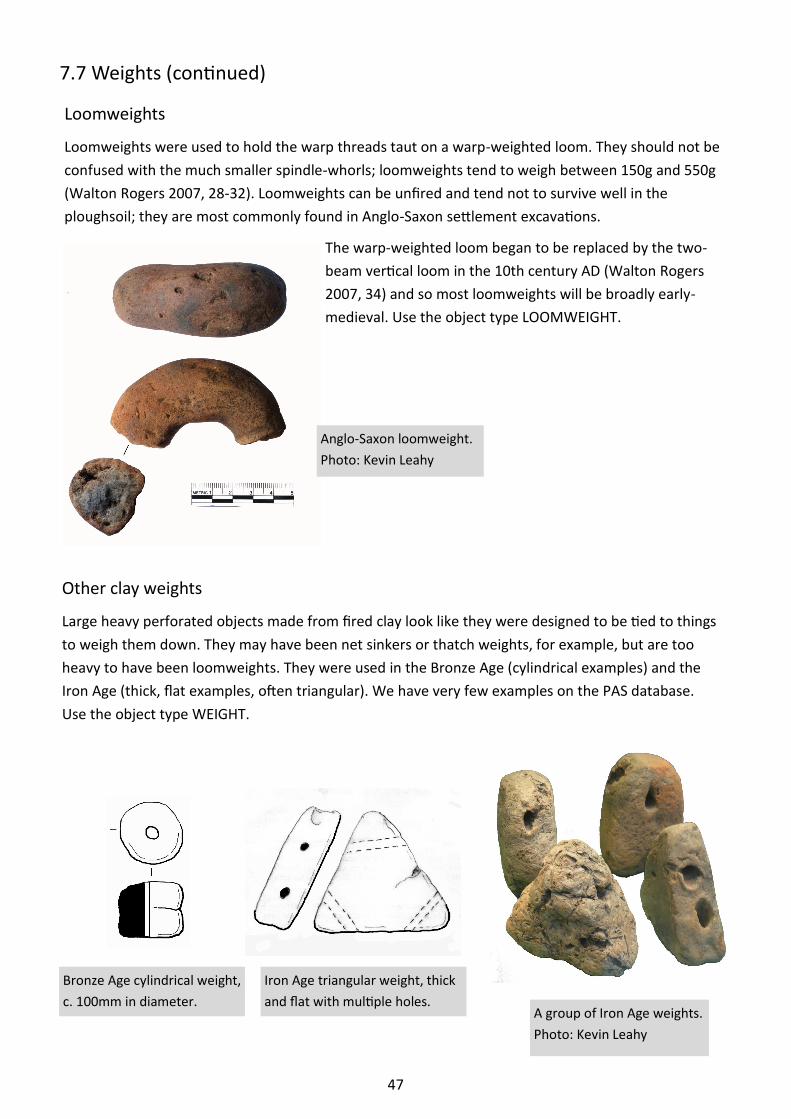
47
Loomweights
Loomweights were used to hold the warp threads taut on a warp-weighted loom. They should not be
confused with the much smaller spindle-whorls; loomweights tend to weigh between 150g and 550g
(Walton Rogers 2007, 28-32). Loomweights can be unfired and tend not to survive well in the
ploughsoil; they are most commonly found in Anglo-Saxon settlement excavations.
The warp-weighted loom began to be replaced by the two-
beam vertical loom in the 10th century AD (Walton Rogers
2007, 34) and so most loomweights will be broadly early-
medieval. Use the object type LOOMWEIGHT.
Other clay weights
Large heavy perforated objects made from fired clay look like they were designed to be tied to things
to weigh them down. They may have been net sinkers or thatch weights, for example, but are too
heavy to have been loomweights. They were used in the Bronze Age (cylindrical examples) and the
Iron Age (thick, flat examples, often triangular). We have very few examples on the PAS database.
Use the object type WEIGHT.
Bronze Age cylindrical weight,
c. 100mm in diameter.
Iron Age triangular weight, thick
and flat with multiple holes. A group of Iron Age weights.
Photo: Kevin Leahy
Anglo-Saxon loomweight.
Photo: Kevin Leahy
7.7 Weights (continued)
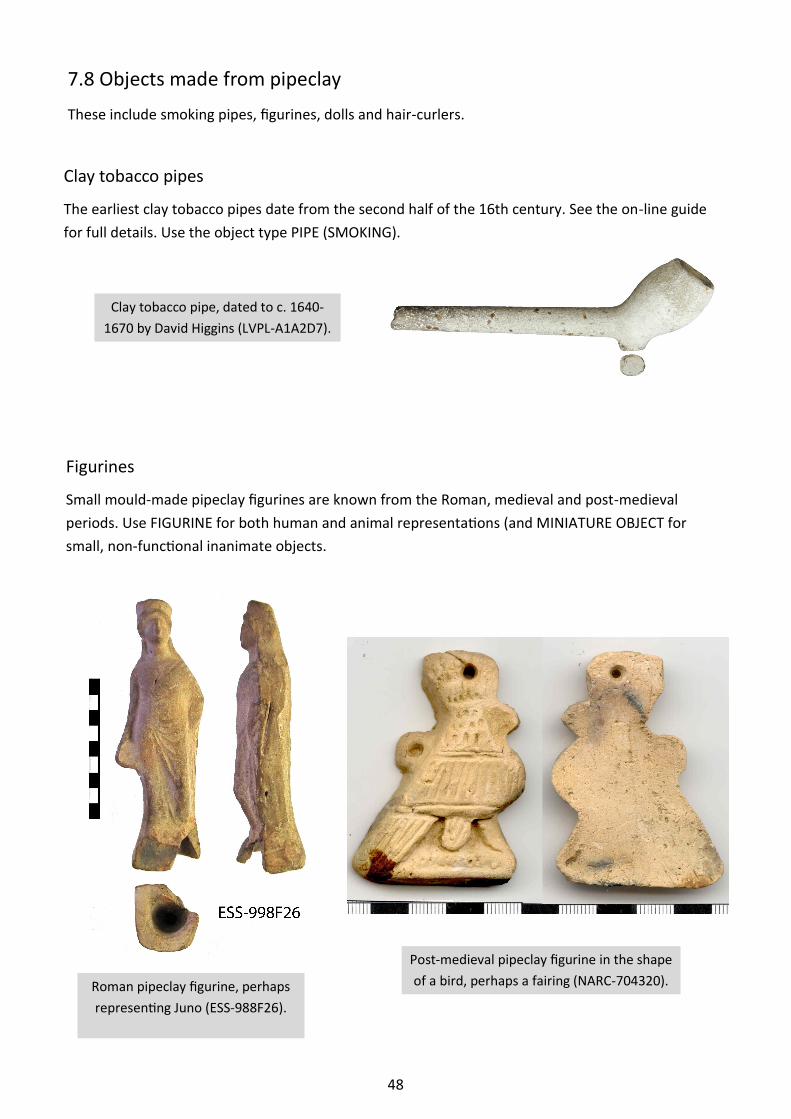
48
7.8 Objects made from pipeclay
These include smoking pipes, figurines, dolls and hair-curlers.
Clay tobacco pipes
The earliest clay tobacco pipes date from the second half of the 16th century. See the on-line guide
for full details. Use the object type PIPE (SMOKING).
Clay tobacco pipe, dated to c. 1640-
1670 by David Higgins (LVPL-A1A2D7).
Figurines
Small mould-made pipeclay figurines are known from the Roman, medieval and post-medieval
periods. Use FIGURINE for both human and animal representations (and MINIATURE OBJECT for
small, non-functional inanimate objects.
Roman pipeclay figurine, perhaps
representing Juno (ESS-988F26).
Post-medieval pipeclay figurine in the shape
of a bird, perhaps a fairing (NARC-704320).
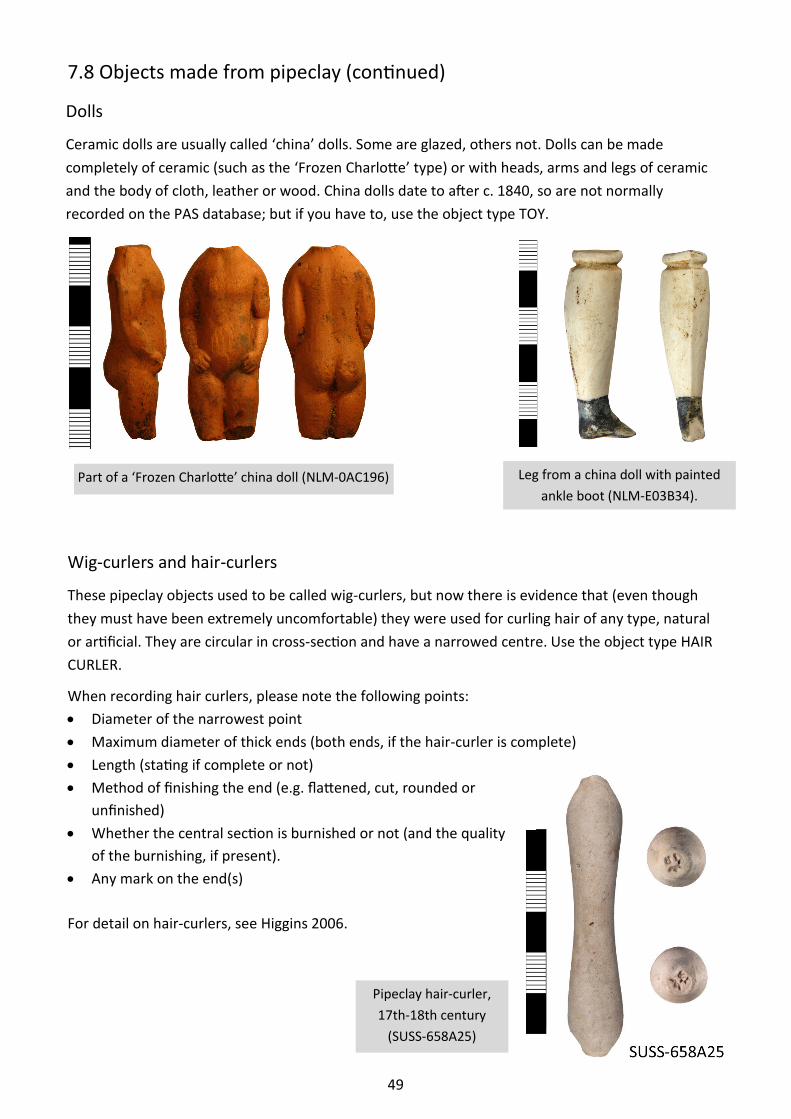
49
Wig-curlers and hair-curlers
These pipeclay objects used to be called wig-curlers, but now there is evidence that (even though
they must have been extremely uncomfortable) they were used for curling hair of any type, natural
or artificial. They are circular in cross-section and have a narrowed centre. Use the object type HAIR
CURLER.
When recording hair curlers, please note the following points:
• Diameter of the narrowest point
• Maximum diameter of thick ends (both ends, if the hair-curler is complete)
• Length (stating if complete or not)
• Method of finishing the end (e.g. flattened, cut, rounded or
unfinished)
• Whether the central section is burnished or not (and the quality
of the burnishing, if present).
• Any mark on the end(s)
For detail on hair-curlers, see Higgins 2006.
Pipeclay hair-curler,
17th-18th century
(SUSS-658A25)
7.8 Objects made from pipeclay (continued)
Dolls
Ceramic dolls are usually called ‘china’ dolls. Some are glazed, others not. Dolls can be made
completely of ceramic (such as the ‘Frozen Charlotte’ type) or with heads, arms and legs of ceramic
and the body of cloth, leather or wood. China dolls date to after c. 1840, so are not normally
recorded on the PAS database; but if you have to, use the object type TOY.
Part of a ‘Frozen Charlotte’ china doll (NLM-0AC196) Leg from a china doll with painted
ankle boot (NLM-E03B34).

50
7.9 Ceramic building material (CBM)
The term ’CBM’ includes brick, tile, and pipe (chimney pots, drainpipes and waterpipes, and also field
drains even though these are not normally part of buildings). Burnt fragments of daub, cob and clay
lump are also included, but plaster and mortar are not technically ceramics. McComish 2015 (free
download) is a useful guide to CBM. The PAS database uses specific object types (e.g. BRICK, TILE,
DAUB), not CBM as an object type.
It is acceptable to record more than one piece of CBM on the same record, as long as the Object Type,
Periods and Dates, and Findspot are the same for each fragment. Add the individual dimensions to the
Object Description field, and put the total weight in the Weight field. Don’t forget to fill in the Quantity
field accurately.
Brick and tile in the Roman world
Brick and tile making was introduced into Britain by the Romans, who made extensive use of ceramic
building material. The terms ‘brick’ and ‘tile’ are used almost interchangeably by Romanists. York
Archaeological Trust have defined the term ‘tile’ as referring to all items whose original form and
measurements can be reconstructed, whether used as roof tiles, floor tiles, levelling courses,
hypocaust supports or walling. The term ‘brick’ is used for sherds of CBM which are too fragmentary
for the original form to be determined (McComish 2015, 19). This terminology can usefully be followed
on the PAS database, using BRICK for otherwise unidentifiable sherds and TILE for any identifiable type
of Roman CBM.
Roman brick and tile have a relatively fine fabric with small
inclusions, and were made in sand formers, leading to a sandy
surface on the underside. They have red margins and surfaces,
but can have an intense, deeply coloured grey-blue reduced
core. The average thickness for tiles used in walling, flooring
and hypocaust supports is about 40mm.
Occasionally Roman bricks and tiles are stamped, or otherwise
marked before firing; they can also have graffiti scratched in
after firing (McComish 2015, 8). The manufacture of brick and
tile ceased with the end of Roman Britain. Roman brick or tile, perhaps used in
flooring or walling (HESH-EA0F18)
Fragment of Roman tegula.
Flint-tempered fabric, grey
core, orange surface and
margins (IOW-AABAE7)
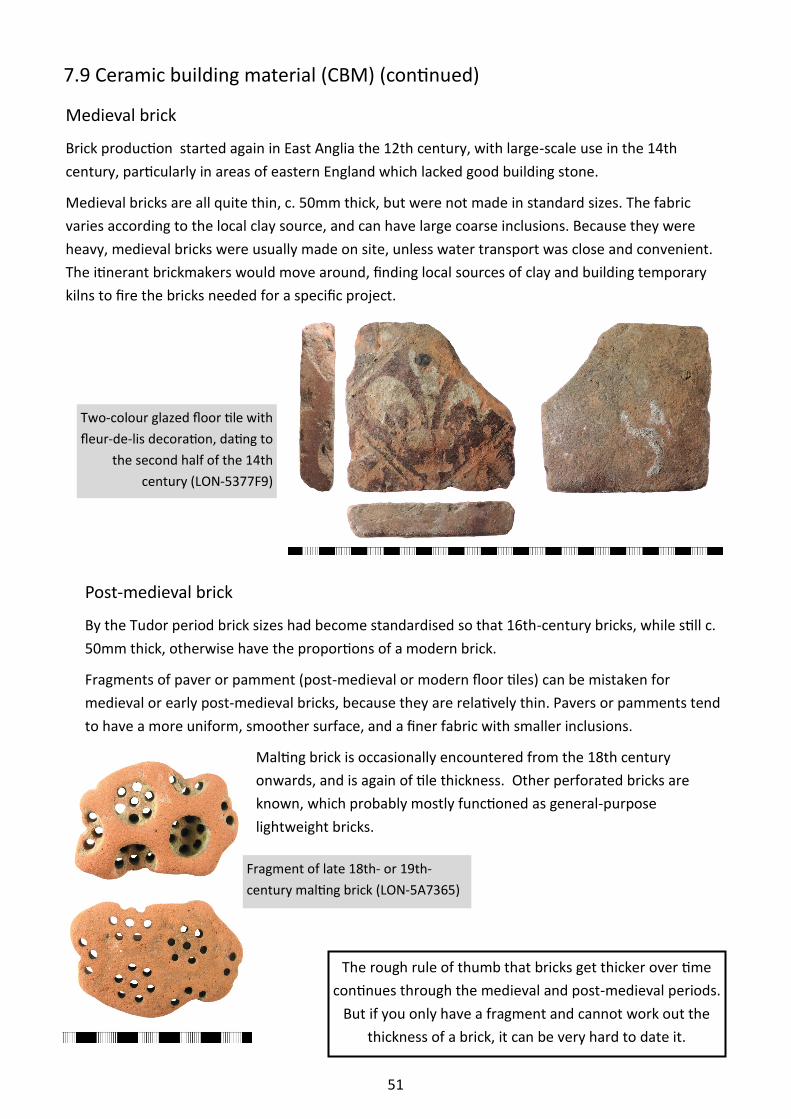
51
Medieval brick
Brick production started again in East Anglia the 12th century, with large-scale use in the 14th
century, particularly in areas of eastern England which lacked good building stone.
Medieval bricks are all quite thin, c. 50mm thick, but were not made in standard sizes. The fabric
varies according to the local clay source, and can have large coarse inclusions. Because they were
heavy, medieval bricks were usually made on site, unless water transport was close and convenient.
The itinerant brickmakers would move around, finding local sources of clay and building temporary
kilns to fire the bricks needed for a specific project.
The rough rule of thumb that bricks get thicker over time
continues through the medieval and post-medieval periods.
But if you only have a fragment and cannot work out the
thickness of a brick, it can be very hard to date it.
7.9 Ceramic building material (CBM) (continued)
Post-medieval brick
By the Tudor period brick sizes had become standardised so that 16th-century bricks, while still c.
50mm thick, otherwise have the proportions of a modern brick.
Fragments of paver or pamment (post-medieval or modern floor tiles) can be mistaken for
medieval or early post-medieval bricks, because they are relatively thin. Pavers or pamments tend
to have a more uniform, smoother surface, and a finer fabric with smaller inclusions.
Malting brick is occasionally encountered from the 18th century
onwards, and is again of tile thickness. Other perforated bricks are
known, which probably mostly functioned as general-purpose
lightweight bricks.
Fragment of late 18th- or 19th-
century malting brick (LON-5A7365)
Two-colour glazed floor tile with
fleur-de-lis decoration, dating to
the second half of the 14th
century (LON-5377F9)

52
7.9 Ceramic building material (CBM) (continued)
Roman tile
Tiles are common finds on Roman sites, particularly roof
tiles. There are two shapes of roof tile. A tegula is flat with
two long upturned edges; an imbrex has a curved cross-
section with slightly splayed sides, and tapers slightly along
its length. Tegulae alternated with imbrices which covered
the joints, giving a Roman roof its characteristic corrugated
appearance. The tapering shape of the imbrices allowed
these to overlap each other too.
Occasionally the open ends of the imbrices were covered
with antefixes (also called antefix tiles). We only have one
record of an antefix on the PAS database; BH-B26360, which
is semi-circular and undecorated. Use the object type TILE
for antefixes.
Large square tiles were used on floors, and stacks of square
tiles were also used to support floors in hypocaust systems.
Another use of tiles was in walling, often as a levelling
course. In this case the object is being used as a brick,
although the term BRICK is only used for unidentifiable
fragments of Roman CBM.
Hypocaust systems used hollow box flue tiles to carry the
heat and smoke up through the wall. Box flue tiles have a
characteristic complex grooved keying, made with a comb-
like tool, making wall-plaster adhere well to the surface.
Use the object type TILE for box flue tiles.
Tiles were often cut up to make tesserae for use in mosaics.
Use the object type TESSERA for all tesserae, even those
made from re-used tiles.
Roman roof tiles (tegula and imbrex).
Photo: Kevin Leahy
Left: Tesserae cut from Roman tiles.
Right: Roman box tile from a hypocaust
wall flue. Photos: Kevin Leahy
Antefixes from the roof of a Roman
building at Caerleon. Photos: Kevin Leahy
Medieval tile
The manufacture of brick and tile ceased with the end of Roman Britain. Tiles salvaged from Roman
buildings were used in Anglo-Saxon churches and by the late Anglo-Saxon period there was some, in-
frequent, manufacture of polychrome floor tiles. Roof tiles seem to have been made in greater quanti-
ty from the 13th century onwards, and floor tiles from the 14th century onwards (McComish 2015, 33-
35).
See the next page for more on medieval floor and roof tiles.
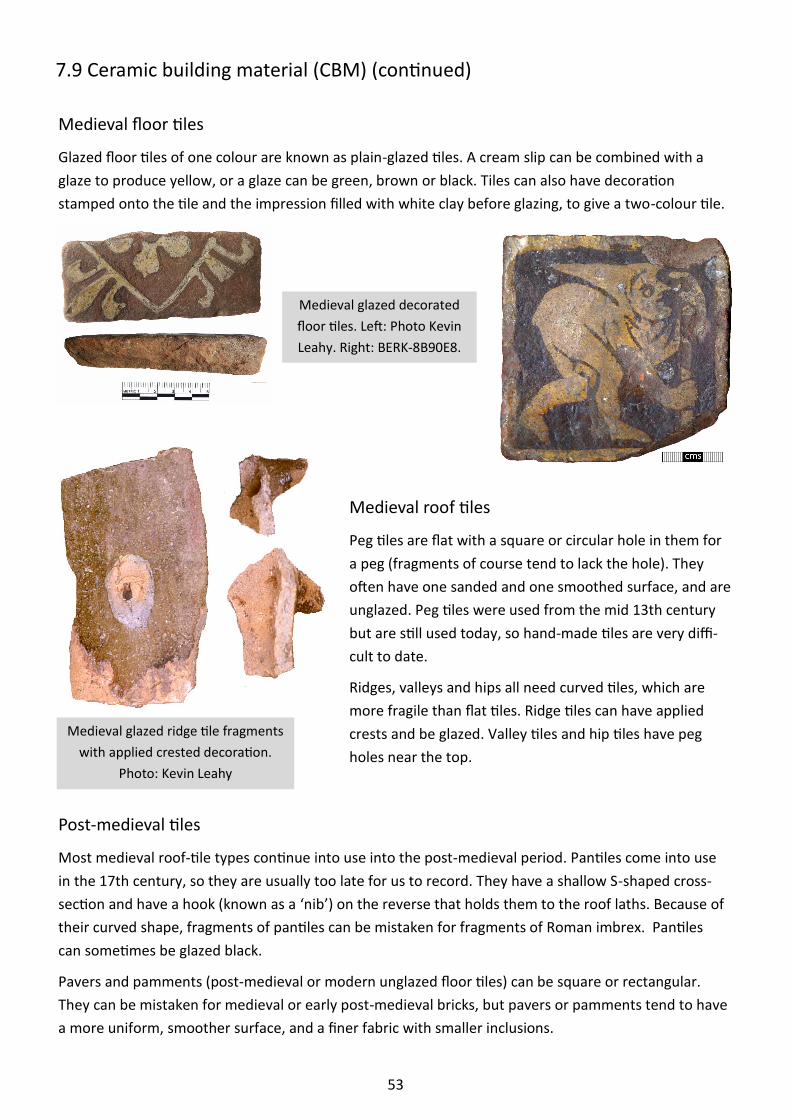
53
Medieval roof tiles
Peg tiles are flat with a square or circular hole in them for
a peg (fragments of course tend to lack the hole). They
often have one sanded and one smoothed surface, and are
unglazed. Peg tiles were used from the mid 13th century
but are still used today, so hand-made tiles are very diffi-
cult to date.
Ridges, valleys and hips all need curved tiles, which are
more fragile than flat tiles. Ridge tiles can have applied
crests and be glazed. Valley tiles and hip tiles have peg
holes near the top.
Medieval glazed ridge tile fragments
with applied crested decoration.
Photo: Kevin Leahy
7.9 Ceramic building material (CBM) (continued)
Medieval floor tiles
Glazed floor tiles of one colour are known as plain-glazed tiles. A cream slip can be combined with a
glaze to produce yellow, or a glaze can be green, brown or black. Tiles can also have decoration
stamped onto the tile and the impression filled with white clay before glazing, to give a two-colour tile.
Medieval glazed decorated
floor tiles. Left: Photo Kevin
Leahy. Right: BERK-8B90E8.
Post-medieval tiles
Most medieval roof-tile types continue into use into the post-medieval period. Pantiles come into use
in the 17th century, so they are usually too late for us to record. They have a shallow S-shaped cross-
section and have a hook (known as a ‘nib’) on the reverse that holds them to the roof laths. Because of
their curved shape, fragments of pantiles can be mistaken for fragments of Roman imbrex. Pantiles
can sometimes be glazed black.
Pavers and pamments (post-medieval or modern unglazed floor tiles) can be square or rectangular.
They can be mistaken for medieval or early post-medieval bricks, but pavers or pamments tend to have
a more uniform, smoother surface, and a finer fabric with smaller inclusions.

54
Burnt daub with wattle impressions.
Photos: Kevin Leahy
Field drains and drain pipes
Late 18th– and 19th-century field drains of open ‘horseshoe’
shape can be confused with similarly shaped Roman imbrices.
While field drains tend to have parallel, vertical sides, they
can sometimes taper down their length and have splayed
sides just like a Roman imbrex. D-shaped drains with a closed
cross-section were introduced in the 19th century, and
modern drains are normally closed circular pipes.
The fabric of Roman tiles is normally much finer than recent
field drains, which are usually red but can be yellow or white.
Roman imbrices are also almost always broken, whereas
recent field drains are usually found complete or near-
complete.
There is a handy guide to field underdrainage here: http://www.collectionsgateway.org.uk/
collections/8/field_drainage_tiles.pdf
Recent field drain; note the vertical sides.
Photo: Kevin Leahy
7.9 Ceramic building material (CBM) (continued)
Cob and clay lump
These are extremely unlikely to be found fired,
and even less likely to be recognised. Still, a
definition may be useful here. Cob (called ‘clom’ in
Wales and ‘wychert’ in Oxfordshire and
Buckinghamshire) is a type of rammed earth
construction which does not use wattle.
Clay lump buildings are found mainly in Norfolk
and Suffolk, built of air-dried blocks of clay subsoil.
The technique of clay lump was developed in the
19th century.
Daub
Daub is a mixture of mud, dung, straw and (if the
mud does not contain enough) clay and sand. It is
applied to wattle panels and often limewashed. If
the building burns down and the daub reaches a
high enough temperature, it can be fired into a
ceramic. It has an open, porous texture due to the
inclusion of organic material.
Mud-and-stud is a variant of wattle-and-daub,
found in Lincolnshire (and early America). The daub
is used to fill around closely spaced earth-fast posts.
Plaster superseded daub during the 18th century.
Plaster, cement and mortar
These materials are not ceramics. Use the
object type WALL PLASTER or, if this is not
appropriate, ARCHITECTURAL FRAGMENT
(see the mda thesaurus for scope notes for
this term). The material to choose is
‘Mortar or Plaster’; see scope notes for this
term under Controlled Vocabulary at the
foot of any page.
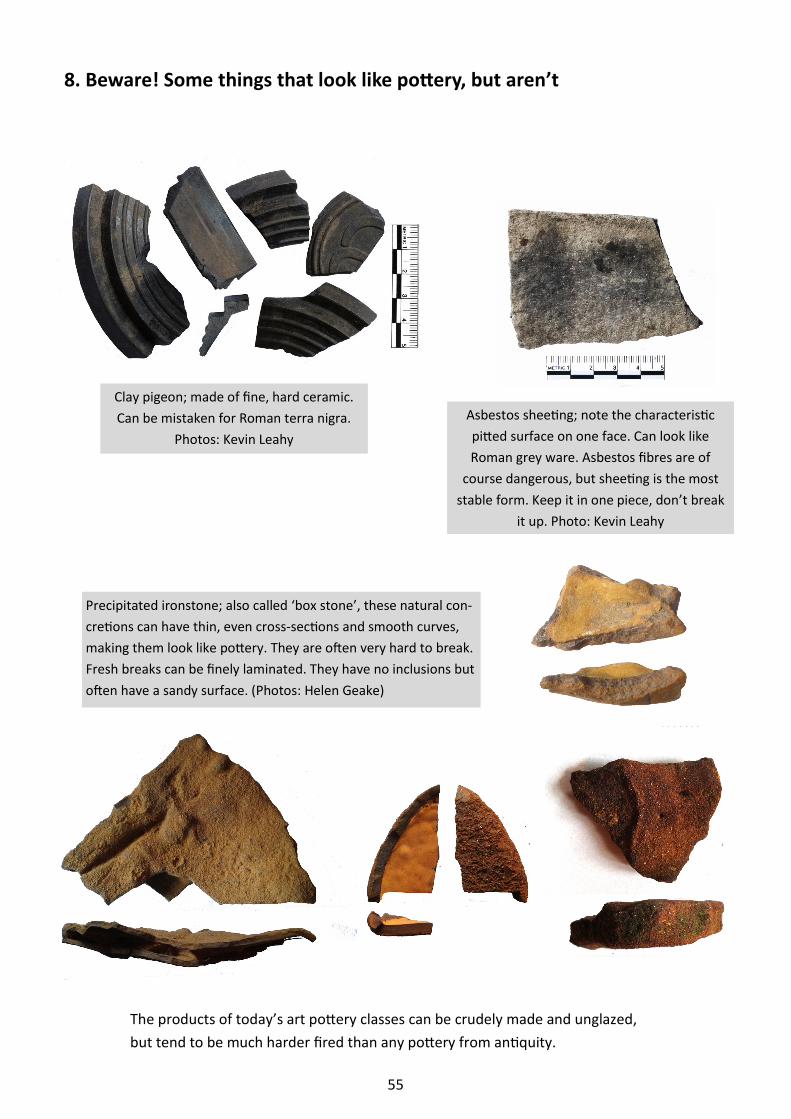
55
8. Beware! Some things that look like pottery, but aren’t
Clay pigeon; made of fine, hard ceramic.
Can be mistaken for Roman terra nigra.
Photos: Kevin Leahy
Asbestos sheeting; note the characteristic
pitted surface on one face. Can look like
Roman grey ware. Asbestos fibres are of
course dangerous, but sheeting is the most
stable form. Keep it in one piece, don’t break
it up. Photo: Kevin Leahy
The products of today’s art pottery classes can be crudely made and unglazed,
but tend to be much harder fired than any pottery from antiquity.
Precipitated ironstone; also called ‘box stone’, these natural con-
cretions can have thin, even cross-sections and smooth curves,
making them look like pottery. They are often very hard to break.
Fresh breaks can be finely laminated. They have no inclusions but
often have a sandy surface. (Photos: Helen Geake)
56
9. Glossary
AMORPHOUS. This means ‘without shape’ and can be a useful word for describing inclusions which have no clear shape.
APPLIED. Applied decoration is made separately and added to the surface of the pot (often by luting). See p. 26.
A pottery vessel can also be made from several different components which are joined together or ‘applied’. See p. 24. Compare Luted.
ATTITUDE. The correct alignment of a sherd, with the rim horizontal. See p. 27.
BARBOTINE. See Slip.
BASE. The lower part of the vessel, on which it rests. Bases can be flat, rounded (with no angle between body and convex base), sagging (with an angle between body and convex base), or concave. A base can also have feet attached, or a footring. See p. 28.
BODY. The part of the pot that lies between the rim or neck, and the base, usually used of a fragment (so a ‘body sherd’). The ‘body’ is also used to mean the mix of clay and temper used to make a pot (compare Fabric) so, when referring to an area of a vessel, Wall is often used as a synonym.
BUNG-HOLE. A hole towards the base of a vessel. It may be surrounded by a reinforcing flat circle of clay, but it does not otherwise project. Compare Spout.
BURNISH. A burnished surface has been rubbed with a rounded tool while leather-hard. This compacts the surface and gives a shine. See p. 25.
CALCAREOUS. This means ‘consisting of, or containing, calcium carbonate’. Calcareous rocks include chalk, limestone and marble. Calcite is a crystal mineral form of calcium carbonate, and shells are largely made up of calcium carbonate, so they are calcareous too. Calcareous materials react with acid to produce carbon dioxide, so they fizz when an acid such as vinegar is applied.
CALCINED. Heated to a high temperature. If flint is heated to c. 400°C, water is driven out of the crystal lattice, resulting in cracking and making the flint easier to crush for use as a temper. Calcined bone is also used as a temper.
CALCITE. A mineral found in veins within limestone and marble, also in stalactite or stalagmite, and in oyster shell. It was used extensively in late Roman pottery. Under a microscope it shows up as distinctive rhomboidal crystals (crystals shaped like a cube, but with all faces lozengiform instead of square). See also Calcareous.
CARINATION. A change of angle in the wall of a pot. This is a poorly defined word, as is the similar Shoulder, so if you use either word, it may be a good idea to explain clearly what you mean by it. See p. 12.
CBM. Ceramic Building Material, including brick, tile, and pipe (chimney pots, drainpipes and waterpipes, and also field drains even though these are not normally part of buildings). Burnt fragments of daub, cob and clay lump are also technically CBM, but plaster and mortar are not. See pp. 50-54.
CLOSED VESSEL. A vessel where the diameter of the rim (or more properly the mouth or opening) is smaller than the maximum diameter of the vessel. Also called Hollow ware. Compare Open vessel.
COLOUR-COATED. See Slip.
CORE. The inner part of the body of the pot. Compare Margins and Surface. See p. 15.
FABRIC. The fabric is a combination of what the pot is made from (clay and filler or temper) and how those ingredients have reacted to the conditions of firing (temperature, atmosphere, timing).
FLAT WARE. This is a collective term for vessel types where the diameter at the rim (the opening, or the mouth) is greater than the maximum girth and the height. Compare Open vessels. Compare Hollow ware.
FILLER. See Temper.
57
FLUX. This word comes from the Latin ‘to flow’ and has several meanings. In ceramics and glass, it means an added substance that lowers the melting point.
FOOT. Part of a vessel. Feet that project from the base are more common on a copper-alloy vessel (where we call them ‘legs’) but they can be found on ceramic vessels too. They can be applied or ‘thumbed’, i.e. pulled down from the base of the vessel rather than separately made.
GIRTH. A non-preferred term for the circumference (or sometimes the diameter) of a vessel.
GLAZE. A glass-like shiny coating on the surface of a pot. See p. 25.
GLOSS. A gloss is produced by dipping the vessel into a slip with a high proportion of very fine clay particles. It gives a sheen to the surface and is most often found on Samian ware. See p. 25.
GRIT. ‘Grits’ is a shorthand for coarse, angular inclusions, giving a gritty texture to the fabric.
GROG. Grog is fired ceramic which has been crushed or ground up and added to the clay as a temper. It is usually recognised by being a different colour to the rest of the fabric. See p. 20.
HANDLE. Part of the pot used for carrying or suspending it. See p. 12 and p. 14.
HOLLOW WARE. This is a collective term for vessel types where the diameter of the rim (or more properly the mouth or opening) is smaller than the maximum diameter. Also called Closed vessels. Compare Flat ware and Open vessels.
IMPRESSED. Impressed decoration is pressed into the surface of the clay freehand, using a tool or fingers. Compare Stamped. See p. 26.
INCISED. Incised decoration is where a mark or groove is cut into the surface but not right through the clay. It includes combing (parallel lines incised using a tool with two or more teeth). Other words for incised decoration include ‘scoring’ and ‘scratching’; these are quite vague terms with no agreed definition. See p. 26.
9. Glossary (continued)
INCLUSIONS. Inclusions are everything in the ‘body’ that is not the clay matrix. They can be naturally present, or can be added by the potter, when they are called Filler or Temper. See pp. 17-23.
LEG. See Foot. The term ‘leg’ is used on a copper-alloy vessel, the term ‘foot’ is used on a ceramic vessel.
LID. A separate component which covers and closes the mouth of a vessel. Ceramic lids are often not recognised, perhaps because fragments are not easily distinguished from other parts of the vessel. Lids may also have been made from wood or tied-on leather.
LIP. This word is often used to mean a slightly pulled out or narrowed area of the rim used to pour the contents of a vessel. The MPRG, however, recommends the use of the word Spout instead (1998, 11.8). They do recommend the use of ‘lip’ for a shallow pinched or pulled spout (1998, 11.8.2) and it is hard to reconcile these two pieces of advice. On the whole, it is probably best to stick to Spout.
LUG. A lug is something that can be gripped and pulled, or something by which something can be held or supported. It has also come to mean something that sticks out (such as an ear). A sticking-out lump that can be used to lift a vessel is therefore a lug handle.
LUSTRE. A type of glaze, where some of the Flux (often silver or copper) has been reduced, so that the oxide has been converted to the metal. See p. 25.
LUTING. Vessel components and decorative elements can be luted together, which means being attached using Slip as an adhesive. See p. 26.
MARGINS. The outer part of the body of the pot, between the Core and the Surfaces. See p. 15.
MATRIX. The clay of the pot, without the inclusions. Strictly speaking, the matrix is the framework which holds the inclusions.
58
PROJECTION. The arrangement of different views on a single image. The correct projection encodes further information about the object. The PAS uses the American projection, putting the view of the left-hand face of an object on the left, the view of the right-hand face on the right, the view of the top above, and the view of the base below.
REDUCING. The opposite of Oxidising. Oxidisation is the gain of oxygen atoms, and reduction is the loss of oxygen atoms. See p. 15.
RIM. This is normally the uppermost part of the vessel, the inner edge of which forms the Mouth.
SAND. Fine mineral grains, usually of quartz because that is the mineral most resistant to weathering from the parent rock.
SGRAFFITO. This technique is used on pottery which has been coated with slip of a contrasting colour. A design is cut through the slip to reveal the colour beneath. It can be done when the slip is wet or dry. See p. 26.
SGRP. The Study Group for Roman Pottery. Compare MPRG and PCRG.
SHERD. A fragment of pottery. Either ‘sherd’ or ‘fragment’ can be used.
SHOULDER. This is a poorly defined word, as is the similar Carination. If you use either word, it may be a good idea to explain clearly what you mean by it. Both words generally mean a sharp curve or distinct angle in the wall of a pot.
SINTER POINT. The moment in firing where the clay particles begin to fuse, turning a clay into a ceramic.
SLIP. A liquid clay with a high proportion of water, used either as an adhesive (luting) or for decoration. See p. 26 for the uses of slip in decoration, including slip-trailing, colour-coating and barbotine. The practical difference between a slip and a gloss is that a slip is applied to give a different colour, and a gloss is applied to give a sheen to the surface.
MATURING POINT. The temperature at which a ceramic reaches its desired degree of fusing of the clay particles, giving the desired colour, hardness, density, and so on. The maturing point of an earthenware is lower than that of a stoneware. Compare Sinter point and Vitrified.
MOUTH. The void allowing entry to the inside of the vessel, surrounded by the Rim. Also called the ‘opening’.
MPRG. The Medieval Pottery Research Group. Compare PCRG and SGRP.
NECK. If there is a tall narrowed part below the Rim, this is known as the neck. The opening at the top of the neck is the Mouth.
OPEN VESSEL. A vessel where the diameter at the rim (or more properly the mouth or the opening) is the maximum diameter of the vessel. Compare Closed vessel, Flat ware and Hollow ware.
OXIDISING. The opposite of Reducing. Oxidisation is the gain of oxygen atoms, and reduction is the loss of oxygen atoms. See p. 15.
PCRG. The Prehistoric Ceramics Research Group. Compare MPRG and SGRP.
PLASTIC. The term ‘plastic decoration’ has been used to describe decoration which has been added when the clay is still flexible. This includes applied and incised decoration, and decoration raised from the body of the pot. See p. 26.
POT MEND. This informal term is used for lead repairs to pottery only. The more formal term ‘vessel repair’ is used for repairs to copper-alloy vessels. See p. 9. Use the object type VESSEL for pot mends, even if there is no ceramic surviving.
PROFILE. A profile is a side view of an object. A cross-section is a cut through an object. In practice, they are often exactly the same.
9. Glossary (continued)
59
TYPE SERIES. A ceramic type series is a defined typology of ceramic types (usually fabrics) which have been identified as being most common in a local or national setting. A pottery type series is a reference collection of specimens of every pottery fabric identified within a specific area, accompanied by a descriptive catalogue.
VESSEL TYPE. This is analogous to a PAS object type, e.g. a bowl, jar, bottle or cup. In thesaurus terms, it is a narrow term for VESSEL. However, be aware that Barclay et al. (2016) call this level of classification a ‘vessel class’ and reserve ‘vessel type’ for a narrower term such as ‘carinated bowl, rounded jar [or] ring-necked flagon’ (2016, 21 and 26).
VITRIFIED. When firing reaches a very high temperature, the particles melt and coalesce together. The process is called vitrification, and the ceramic is then said to be vitrified. In theory a completely vitrified pot will melt and collapse, but a very high-fired ceramic is often called ‘vitrified’.
WALL. The part of the pot that lies between the rim or neck, and the base, particularly when it is straight and/or vertical. Compare Body.
WARE. A ‘ware’ is a broad type of pottery, defined both by its fabric and by its range of vessel forms. The identification of a sherd as to ware type is generally based on its fabric, the manufacturing technique(s) and a typology (the range of vessel forms). If only a small bit of the vessel survives, then you can use the fabric to make an educated guess at the ware.
WASTER. A pot (or sherds) rejected after failure during firing, perhaps by melting, exploding or just breaking. See p. 45.
WIRE MARKS. Marks seen on the base of a wheel-thrown pot, consisting of concentric curves or parallel or radiating lines. They are made by using a string or wire to cut the pot from the wheel.
SPOUT. A spout is any modification of the upper part of a vessel to allow pouring. Part of the rim can be pulled out, pinched or oth-erwise narrowed. Alternatively a hole can be made in the wall of the pot, over which a V-shaped or tubular spout can be applied. A hole at the base of a pot is a Bung-hole. Also compare Lip.
SPRIGGED. When decorative elements are separately made in a mould and added to the surface of a pot, this is known as sprigged decoration. The ‘sprig’ is the deco-rative element and it can be attached using water or slip. Sprigging was used in the Staffordshire potteries, especially on Wedg-wood’s famous Jasper ware. It can also be called ‘applied relief decoration’. See p. 26.
STAMPED. Stamped decoration uses a spe-cially carved tool (a die stamp) to give a par-ticular shape to the design. See p. 26.
SURFACE. The exterior or interior face of the vessel. Compare Core and Margins. See p. 15.
TEMPER. Inclusions which have been delib-erately added by the potter. Temper is the preferred term, but deliberate inclusions are also often called ‘fillers’.
THROWING RINGS. A horizontal spiral of broad ridges on the interior of a vessel, formed during wheel-throwing. It is possible to use these to work out the direction of ro-tation of the wheel, and whether the potter was left– or right-handed. They can also be smoothed completely away during the fin-ishing of the pot. Throwing rings are some-times called ‘rilling’, but this is a jargon term which is difficult to understand without a full explanation. See p. 10.
9. Glossary (continued)
60
10. Bibliography and further reading
10.2 Full bibliography
Balfet, H., Fauvet, M. and Monzon, S (eds) 1988. Lexique Plurilingue pour la Description des Poteries.
Éditions du CNRS, Paris. (This slim volume gives words for vessel types, parts of the vessel, technical
terms and terms for decoration in seven European languages)
Barclay, A., Booth, P., Brown, D., Evans, J., Knight, D. and Wood, I. 2016. A Standard for Pottery Studies
in Archaeology. Prehistoric Ceramics Research Group, Study Group for Roman Pottery and Medieval
Pottery Research Group. (http://romanpotterystudy.org/new/wp-content/uploads/2016/06/
Standard_for_Pottery_Studies_in_Archaeology.pdf)
Butler, R. and Green, C. 2003. English Bronze Cooking Vessels and their Founders 1350-1830 (useful in
showing the overlap between ceramic and copper-alloy forms)
Collett, L. 2012. An Introduction to Drawing Archaeological Pottery (http://www.archaeologists.net/
sites/default/files/10_Drawing_archaeological_pottery.pdf)
de la Bédoyère, G. 2000. Pottery in Roman Britain. Shire Archaeology, Princes Risborough.
Elsdon, S. 1989. Later Prehistoric Pottery in England and Wales. Shire Archaeology, Princes Risborough.
Gibson, A. 2002. Prehistoric Pottery in Britain and Ireland. History Press, Stroud.
Gibson, A. and Woods, A. 1997. Prehistoric Pottery for the Archaeologist. Leicester University Press,
2nd edition. (The most useful single book on prehistoric pottery)
Gillam, J. 1957. Types of Roman Coarse Pottery Vessels in Northern Britain. Oriel Press, Newcastle.
(Revised and reprinted in many editions)
10.1 Useful books to own or download
de la Bédoyère, G. 2000. Pottery in Roman Britain. Shire Archaeology, Princes Risborough. (A short
book, but comprehensive and easy to use.)
Gibson, A. and Woods, A. 1997. Prehistoric Pottery for the Archaeologist. Leicester University Press,
2nd edition. (The most useful single book on prehistoric pottery.)
Laing, L. 2014. Pottery in Britain, 4000BC to AD 1900. Greenlight Publishing. (A useful quick tour of
pottery through the ages. Well illustrated with photographs of sherds and drawings of complete pots,
but few section photographs showing fabrics.)
McCarthy, M. and Brooks, C. 1988, Medieval Pottery in Britain AD900-1600, Leicester University Press.
(To find a particular vessel type, look under ‘pottery forms’ in the index, pp. 515-518.)
McComish, J. 2015. A Guide to Ceramic Building Materials (http://www.yorkarchaeology.co.uk/wp-
content/uploads/2015/08/A-guide-to-ceramic-building-material.pdf)
MPRG, 1998. A Guide to the Classification of Medieval Ceramic Forms. MPRG Occasional Paper 1.
(This useful ring-binder of forms (without chronological detail) can be ordered from http://
www.medievalpottery.org.uk/classmcf.htm)
61
Harding, A., 2013. Salt in Prehistoric Europe, Sidestone Press.
Haslam, J., 1978. Medieval Pottery. Shire Archaeology, Princes Risborough.
Higgins, D. A. 2006. ‘Pipe Clay Objects’ in A Saunders (ed.) Excavations at Launceston Castle. Society
for Medieval Archaeology Monograph, 24, 381-416.
Jennings, S. 1981. Eighteen Centuries of Pottery from Norwich. East Anglian Archaeology Report No. 13
Jennings, S. 1992. Medieval Pottery in the Yorkshire Museum. Yorkshire Museum, York.
Johns, C. 1971. Arretine and Samian Pottery. British Museum Press, London.
Kunow, J., Giesler, J., Gechter, M., Gaitzsch, W., Follmann-Schulz, A. B. and von Brandt, D. 1986.
Suggestions for the Systematic Recording of Pottery. Rheinland-Verlag GmbH, Köln.
Laing, L. 2014. Pottery in Britain, 4000BC to AD 1900. Greenlight Publishing.
McCarthy, M. and Brooks, C. 1988. Medieval Pottery in Britain AD900-1600. Leicester University Press,
Leicester.
McComish, J. 2015. A Guide to Ceramic Building Materials (http://www.yorkarchaeology.co.uk/wp-
content/uploads/2015/08/A-guide-to-ceramic-building-material.pdf)
MPRG, 1998. A Guide to the Classification of Medieval Ceramic Forms. Medieval Pottery Research
Group Occasional Paper 1.
Orton, C., Tyers, P. and Vince A. 1993. Pottery in Archaeology. Cambridge Manuals in Archaeology,
Cambridge: 1st edition. (Updated as Orton and Hughes 2013)
Orton, C. and Hughes, M. 2013. Pottery in Archaeology. Cambridge Manuals in Archaeology,
Cambridge: 2nd edition. (The go-to guide for pottery technology and analysis.)
Peacock, D. (ed) 1977. Pottery and Early Commerce, Academic Press, London. (A range of papers,
including the first publication of Peacock’s key to inclusions, much copied since.)
Savory, H. N. 1980. Guide catalogue of the Bronze Age collections. National Museum of Wales, Cardiff.
Tyers, P. 1996. Roman Pottery in Britain, Batsford (reprinted 1999 and 2003 by Routledge).
Webster P. V. 1996. Roman Samian Pottery in Britain. Council for British Archaeology, York.
Young, J. and Vince, A. with Nailor, V. 2005. A Corpus of Anglo-Saxon and Medieval Pottery from
Lincoln, Lincoln Archaeological Studies No. 7, Oxbow Books, Oxford.
10.2 Full bibliography (continued)
10.3 Useful websites
http://potsherd.net/atlas/potsherd
http://www.thamesdiscovery.org/discover/pottery-identification
https://www.worcestershireceramics.org