polyester plate lithography - hcc learning web
TRANSCRIPT
Litho1
Polyester Plate Lithography
Litho2
!Lithography is a planographic printing pro-cess. This means that the surface plane of the printing matrix holds ink rather than incised lines or raised surfaces, etc.
!Lithography works on an “oil and water don’t mix” principle. Greasy, oily marks are made on a water receptive plate or stone. The printing substrate is chemically treated and all the “white” (open) areas of the plate absorb water and repel ink. Conversely, the greasy areas of the plate repel water and accept ink. Thus the printing takes place on one “plane” and only the grease (or lack thereof) allows an image to be made.
!Traditional lithography requires a degree in chemistry or highly refined skills in black magic. Polyester plates are a cheap and easy way to enter into the world of lithography without all the complications or toxic chemi-cals needed for traditional plate or stone litho. Polyester plates may be printed with a traditional lithography press, an etching press, by hand, or even on non-traditional materials (3-D objects, wood, etc.).
!However, polyester litho does not replace traditional litho; and all the pain and suf-fering of working on a stone are worth it in the end (you should try it when you get a chance...).
!Polyester litho plates were developed for commercial offset printing, and rather than using the “greasy” principle for creating ink-holding marks, they may be imaged with any water-proof material that will stick to the plate during printing.
!Polyester lithography involves creating an image on a polyester plate using water-proof substances such as Sharpie markers, Future floor wax, litho crayons, copier toner, ball point pen, finger prints, etc.
!Polyester plates, also called “pronto plates,” contain itty-bitty pores. By covering those pores with an image created using ball point pens, Sharpies, etc., you create an area that will repel water and accept ink.
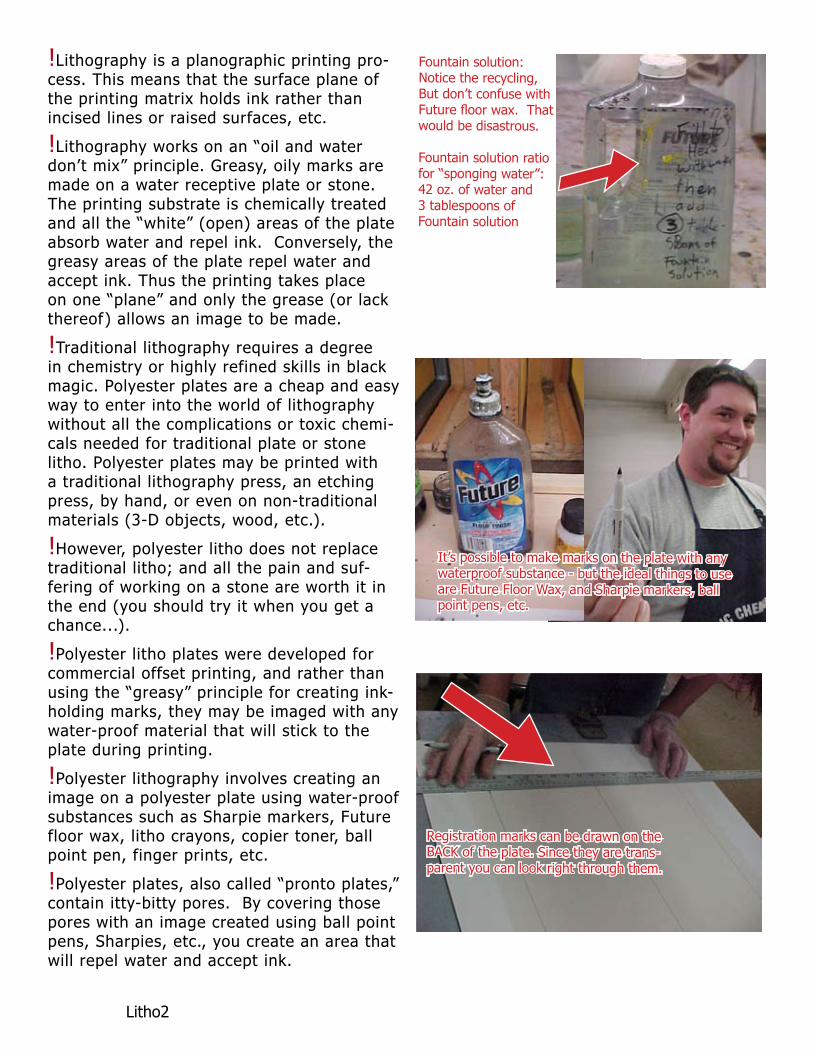
Fountain solution: Notice the recycling, But don’t confuse with Future floor wax. That would be disastrous.
Fountain solution ratio for “sponging water”:42 oz. of water and3 tablespoons of Fountain solution
Registration marks can be drawn on the BACK of the plate. Since they are trans-parent you can look right through them.
It’s possible to make marks on the plate with any waterproof substance - but the ideal things to use are Future Floor Wax, and Sharpie markers, ball point pens, etc.
Litho3
!Leave yourself at least a one inch boarder around the edge of the plate and don’t forget to draw registration marks on the back of the plate if needed.
!Printing from a drawn image involves applying oil based inks with a roller. By continually sponging the plate with foun-tain solution, the pores not covered by your image will absorb the diluted fountain solu-tion, and repel the ink you roll onto the plate.
!Before you draw anything on your plate make sure that you “zap” the plate with pure fountain solution. This cleans grease and/or invisible fingerprints off of the plate. Use a clean rag and wash both sides with undiluted fountain solution. Rinse the plate off with water and then let it drip dry.
!Begin by drawing your image on the plate by whatever means you choose. Avoid touching it as your invisible fingerprints will hold ink. Placing a sheet of paper between yourself and the plate will allow you to rest your hand.
!You may scratch back into the plate to create “white lines” and use more than one media on the plate at once (for example you could draw on the plates with ball point pens and then use a toner wash over the top ...)
Printing polyester litho plates!To print the plate, sponge with the foun-tain solution and roll with ink.
!The ideal sponging technique leaves a thin film of water on the plate: not too much and not too little (but it is best to err on the side of too much water - but it’s best to have a uniform, thin, layer of water).
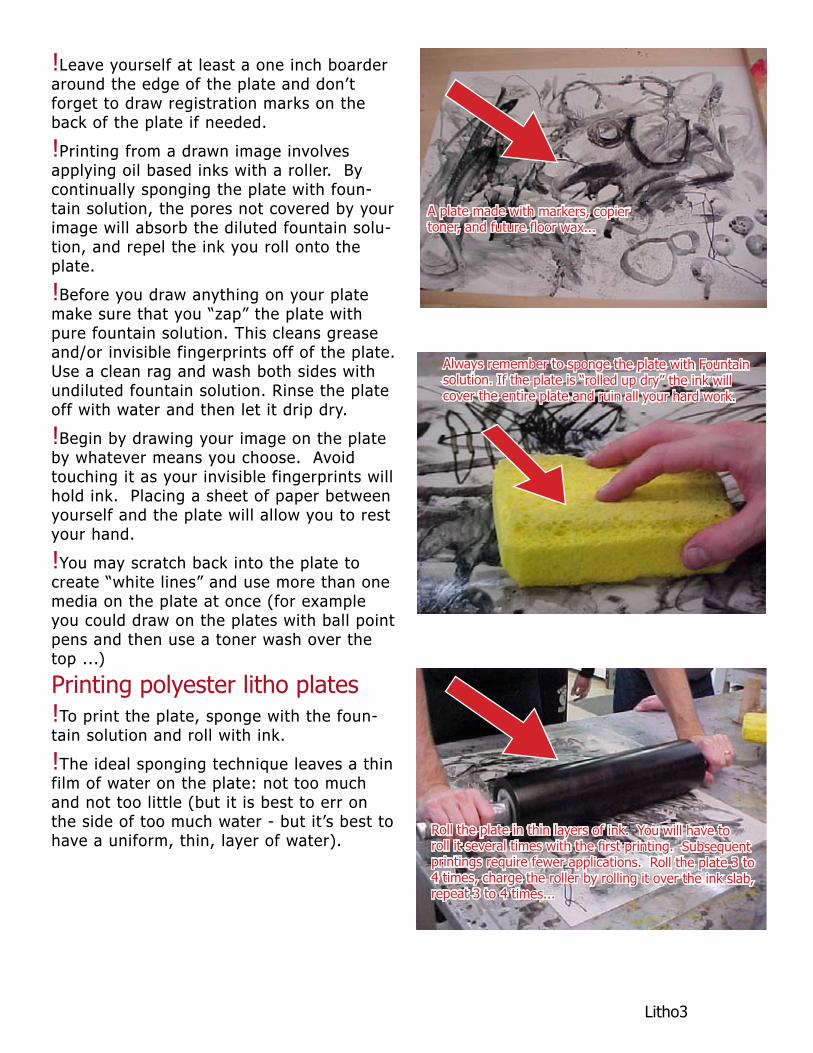
Roll the plate in thin layers of ink. You will have to roll it several times with the first printing. Subsequent printings require fewer applications. Roll the plate 3 to 4 times, charge the roller by rolling it over the ink slab, repeat 3 to 4 times...
Always remember to sponge the plate with Fountain solution. If the plate is “rolled up dry” the ink will cover the entire plate and ruin all your hard work.
A plate made with markers, copier toner, and future floor wax...
Litho4
!You aren’t trying to paint a wall so start off by rolling a thin layer of ink on the glass slab. It should look “velvety” (it’s a beauti-ful sight). If “orange peeling” occurs on the slab, this is an indication that you have too much ink. Scrape all the ink off the slab and start again.
!Sponge the back of the plate to secure it onto the printing matrix and sponge before each roll-up.
!Establish a consistent pattern as you roll up the plate. Charge the roller the same amount of times that you roll over the plate and repeat the process three times before you print the plate, etc. Consistency is the key.
!When you print the plate, don’t forget to use the registration marks and newsprint (protect the felts at all costs!). You may soak the paper for a better image or print on dry paper.
!If you are using an etching press to print the image, then test the pressure before you ink up your plate. The idea is to create solid contact with the paper, not to emboss it or “squish” the ink too much.
!To clean a plate, simply run it through the press with newsprint until most of the ink is gone, and sponge it with fountain solu-tion. DO NOT USE VEGETABLE OIL OR SIMPLE GREEN ON THE PLATE TO CLEAN IT! This will ruin subsequent printings from the plate.
!To clean the rollers you may use vegetable oil or kerosene. NEVER use mineral spirits or anything else that might dry the roller out (see instructions at the end of the litho sec-tion on how to clean a roller).
!If you’re feeling lucky then you can re-work the plate and print it again (or flip it over--they’re two-sided!). The plates, however, never print the same way the second time...
!Be aware that while polyester plate litho is
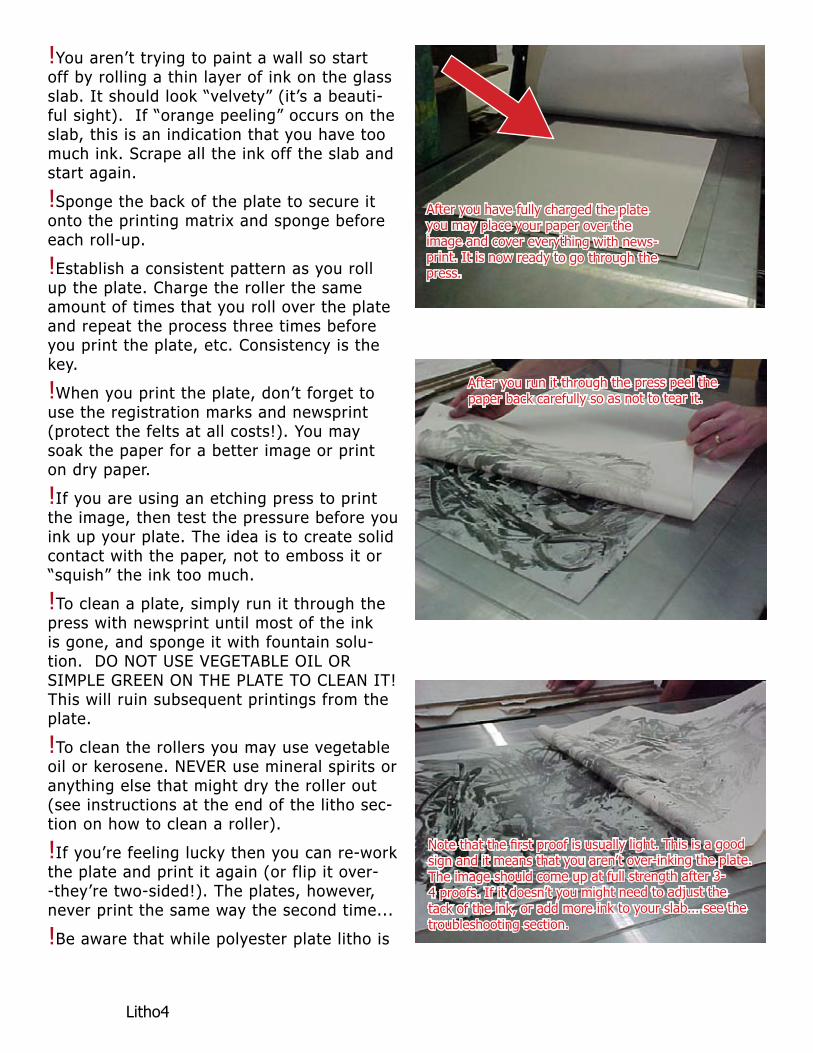
After you run it through the press peel the paper back carefully so as not to tear it.
After you have fully charged the plate you may place your paper over the image and cover everything with news-print. It is now ready to go through the press.
Roll the plate in thin layers of ink. You will have to roll the plate several times on the first printing. Fewer applica-tions are necessary on subsequent printings. Roll the plate 3 to 4 times, charge the roller, repeat 3 to 4 times...
Note that the first proof is usually light. This is a good sign and it means that you aren’t over-inking the plate. The image should come up at full strength after 3-4 proofs. If it doesn’t you might need to adjust the tack of the ink, or add more ink to your slab... see the troubleshooting section.
Litho5
more straightforward than traditional litho, it’s still LITHO and any number of things can go wrong as you print.
!Learn to love the unexpected and make your technical difficulties into something good.
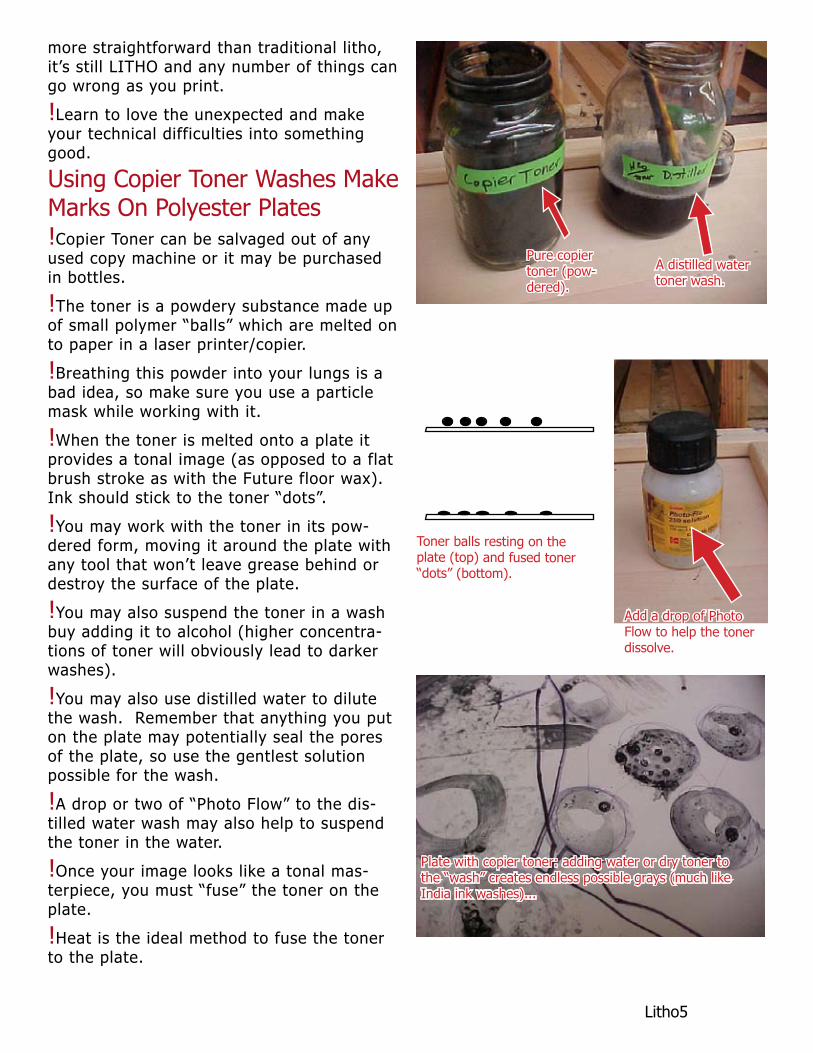
Using Copier Toner Washes Make Marks On Polyester Plates!Copier Toner can be salvaged out of any used copy machine or it may be purchased in bottles.
!The toner is a powdery substance made up of small polymer “balls” which are melted on to paper in a laser printer/copier.
!Breathing this powder into your lungs is a bad idea, so make sure you use a particle mask while working with it.
!When the toner is melted onto a plate it provides a tonal image (as opposed to a flat brush stroke as with the Future floor wax). Ink should stick to the toner “dots”.
!You may work with the toner in its pow-dered form, moving it around the plate with any tool that won’t leave grease behind or destroy the surface of the plate.
!You may also suspend the toner in a wash buy adding it to alcohol (higher concentra-tions of toner will obviously lead to darker washes).
!You may also use distilled water to dilute the wash. Remember that anything you put on the plate may potentially seal the pores of the plate, so use the gentlest solution possible for the wash.
!A drop or two of “Photo Flow” to the dis-tilled water wash may also help to suspend the toner in the water.
!Once your image looks like a tonal mas-terpiece, you must “fuse” the toner on the plate.
!Heat is the ideal method to fuse the toner to the plate.
A distilled water toner wash.
Add a drop of Photo Flow to help the toner dissolve.
Toner balls resting on the plate (top) and fused toner “dots” (bottom).
Plate with copier toner: adding water or dry toner to the “wash” creates endless possible grays (much like India ink washes)...
Pure copier toner (pow-dered).
Litho6
!You may use a pre-heated oven at 200 degrees to melt the toner on the plate, or “spot fix it” with a heat gun or iron.
!Take care not to heat the plate too much or it will bubble and burn.
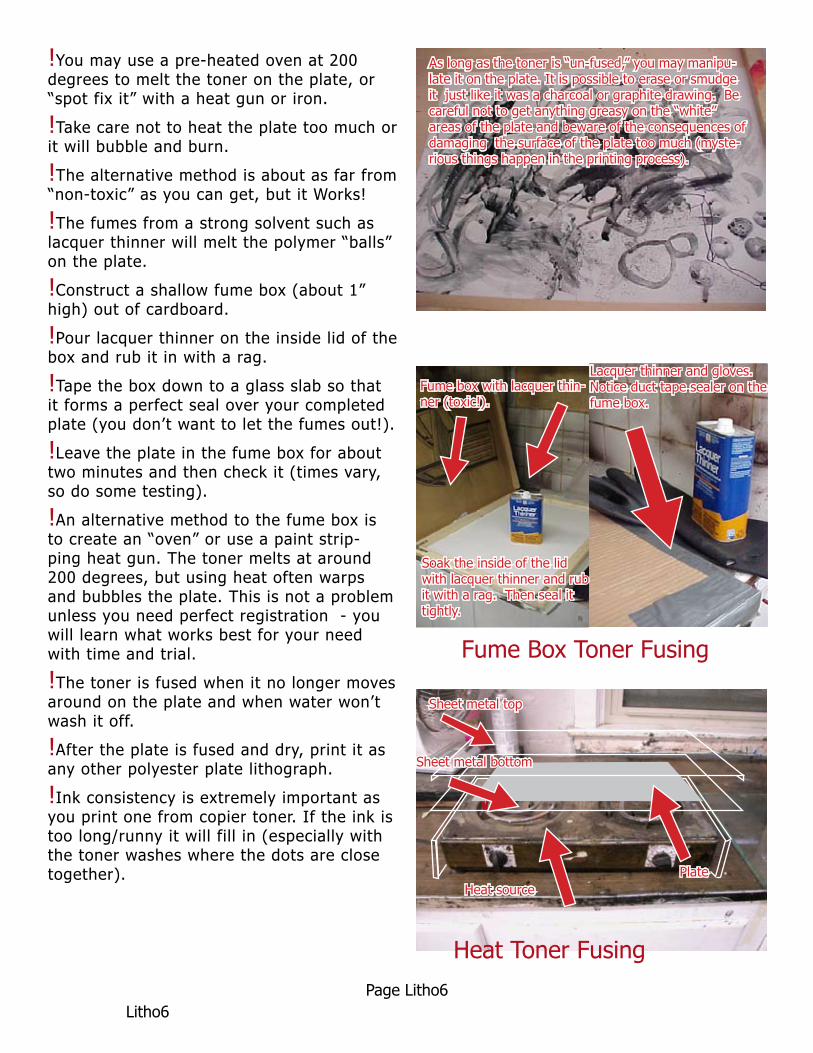
!The alternative method is about as far from “non-toxic” as you can get, but it Works!
!The fumes from a strong solvent such as lacquer thinner will melt the polymer “balls” on the plate.
!Construct a shallow fume box (about 1” high) out of cardboard.
!Pour lacquer thinner on the inside lid of the box and rub it in with a rag.
!Tape the box down to a glass slab so that it forms a perfect seal over your completed plate (you don’t want to let the fumes out!).
!Leave the plate in the fume box for about two minutes and then check it (times vary, so do some testing).
!An alternative method to the fume box is to create an “oven” or use a paint strip-ping heat gun. The toner melts at around 200 degrees, but using heat often warps and bubbles the plate. This is not a problem unless you need perfect registration - you will learn what works best for your need with time and trial.
!The toner is fused when it no longer moves around on the plate and when water won’t wash it off.
!After the plate is fused and dry, print it as any other polyester plate lithograph.
!Ink consistency is extremely important as you print one from copier toner. If the ink is too long/runny it will fill in (especially with the toner washes where the dots are close together).
v
Fume box with lacquer thin-ner (toxic!).
Lacquer thinner and gloves. Notice duct tape sealer on the fume box.
As long as the toner is “un-fused,” you may manipu-late it on the plate. It is possible to erase or smudge it just like it was a charcoal or graphite drawing. Be careful not to get anything greasy on the “white” areas of the plate and beware of the consequences of damaging the surface of the plate too much (myste-rious things happen in the printing process).
Soak the inside of the lid with lacquer thinner and rub it with a rag. Then seal it tightly.
Sheet metal top
Sheet metal bottom
Heat sourcePlate
Page Litho6
Fume Box Toner Fusing
Heat Toner Fusing
Litho7
Cleaning up a rollerUse vegetable oil and simple green to clean up your roller - do not leave any ink anywhere on the roller and do not leave a greasy film on the roller, glass slab, or any of the other tools.
Litho8
TECHNICAL DIFFICULTIES PRINTING POLYESTER LITHO PLATESVocabulary for ink:“Length” - Long or short ink refers to the thickness or thinness of the ink. To test this work the ink up on a glass slab with a putty knife. Once you have worked the ink up to an even consistency push the flat edge of the knife into the ink and pull up on it. A stringy, taffy-like, “short/thick” ink will break quickly. A long/thin ink will pull a 3-4 inches off the slab before the string of ink breaks.
“Tack” - This basically refers to the “stickiness” of the ink.
“Body” - This term refers to the stiffness of the ink. Does it stand up and hold it’s shape like putty, or does it form itself back into a runny puddle?
“Greasiness” - This refers to the amount of grease in an ink (add a loose varnish to make it greasier).
!For Litho you want a greasy ink which isn’t too short (otherwise it won’t stick to the
imaging media).
!If the image is too light you must lengthen the ink by adding a “loose” lithographic var-nish (#00, #01).
!It is sometimes helpful to add a touch of “Setswell” to the ink to get rid of lap marks (if you are using a roller that is smaller than the plate you will get darker inking over the places where it overlaps - this is called lapping).
!If the image rolls up too dark too fast and starts to loose detail (called “filling in”) then you must “shorten” the ink by adding Magnesium Carbonate and a think varnish (#8, body gum).
!The imaging media (toner, pen, floor wax) must stay on the plate and be waterproof.
!If the ink it too short/tacky it will pull the imaging media off the plate and you will loose all those wonderful marks you wanted in the first place.
!Have fun finding the balance

�