pdf studio 2021 user guide - qoppa software
TRANSCRIPT
-1-
Affordable, Powerful PDF Software / PDF Editor for Windows, macOS, Linux
Copyright © 2002-Present Qoppa Software. All rights reserved.
•
••••••••••••••
Welcome to PDF Studio 2022
PDF Studio - Affordable, Powerful PDF Software for Windows, Mac, & Linux.
PDF Studio™ is an all-in-one, easy to use PDF editor that provides all PDF features needed at a fraction of the cost of Adobe® Acrobat® and other PDF editors. PDF Studio maintains full compatibility with the PDF Standard.
PDF Studio allows you to:
Create PDFs from scratch, scanned documents, MS Word, MS Excel, MS PowerPoint, Text, and Image filesMerge, Split & Assemble DocumentsAnnotate PDFs with Comments and Text MarkupsFill In & Save PDF FormsSecure Documents with Passwords and PermissionsAdd Bookmarks, Watermarks, Headers and FootersCreate and edit Form Fields Add text to a document using OCR (Text Recognition)Edit PDF content directly (Text, Images, Shapes) Digitally Sign PDFs Redact content from any document including images Batch Process Multiple PDFs at once Precision Measuring Tools including Distance, Perimeter and AreaValidate and convert PDF documents to meet PDF/A ISO standards and much more!
PDF Studio uses Qoppa Software's proprietary technology to view and modify PDF files. It is platform independent and can run on Windows, Mac OS X, and Linux. Simply download, install, and start working with PDF files immediately.
Customer Support
Users who have purchased PDF Studio receive free online and e-mail only technical support.
Online
PDF Studio Online Knowledge Base or Help Tab > Knowledge Base
Contains step-by-step tutorials as well as answers to most common questions on just about anything you would need for PDF Studio.
-2-
Affordable, Powerful PDF Software / PDF Editor for Windows, macOS, Linux
Copyright © 2002-Present Qoppa Software. All rights reserved.
Within PDF Studio
Contact us from within PDF Studio by going to Help Tab > Email Support and sending us an email or question. This is the most effective way for us to assist you as it will provide us a copy of the PDF Studio error logs which will help us to resolve any problems you may have.
Only e-mail Technical Support directly if you encounter problems while using PDF Studio and are unable to send us an e-mail from within PDF Studio as listed above. When you contact us, please have a clear description of the problem, PDF Studio version, name and version of your operating system, as well as include any documents or screenshots showing the issue. To find the PDF Studio version and serial number, start PDF Studio and select About PDF Studio from the Help tab.
Release notes
For documentation updates and release notes, refer to our knowledge base here (PDF Studio 2022 change log)
-3-
Affordable, Powerful PDF Software / PDF Editor for Windows, macOS, Linux
Copyright © 2002-Present Qoppa Software. All rights reserved.
••
•
••
System Requirements
Installation requirements
400 MB free hard disk space (OCR language packs will require additional space)Internet connection for product activation, internet services (i.e. Google Drive, DocuSign, etc..), OCR languages, and product updatesPointing device and keyboard
Minimum Hardware requirements
1024 MB free RAM (system memory) Screen resolution minimum 1024 х 768 (higher is highly recommended)
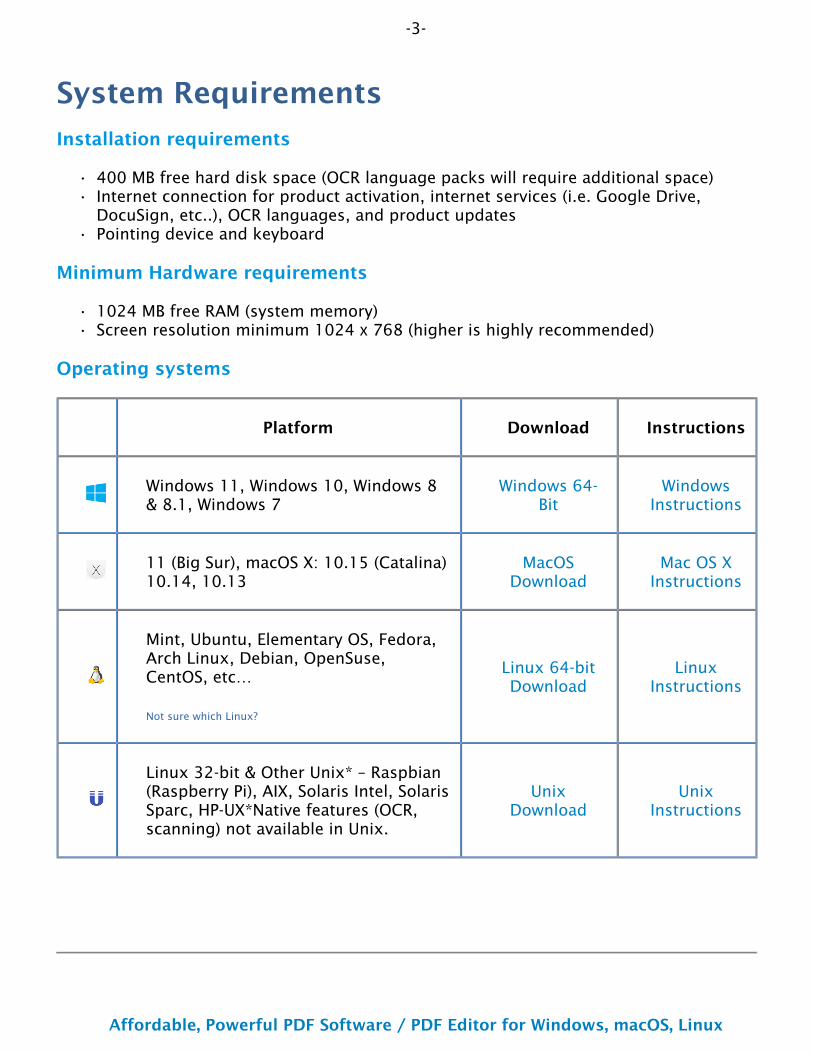
Operating systems
Platform Download Instructions
Windows 11, Windows 10, Windows 8 & 8.1, Windows 7
Windows 64- Bit
Windows Instructions
11 (Big Sur), macOS X: 10.15 (Catalina) 10.14, 10.13
MacOS Download
Mac OS X Instructions
Mint, Ubuntu, Elementary OS, Fedora, Arch Linux, Debian, OpenSuse, CentOS, etc…
Not sure which Linux?
Linux 64-bit Download
Linux Instructions
Linux 32-bit & Other Unix* – Raspbian (Raspberry Pi), AIX, Solaris Intel, Solaris Sparc, HP-UX*Native features (OCR, scanning) not available in Unix.
Unix Download
Unix Instructions
-4-
Affordable, Powerful PDF Software / PDF Editor for Windows, macOS, Linux
Copyright © 2002-Present Qoppa Software. All rights reserved.
•
•
•
•
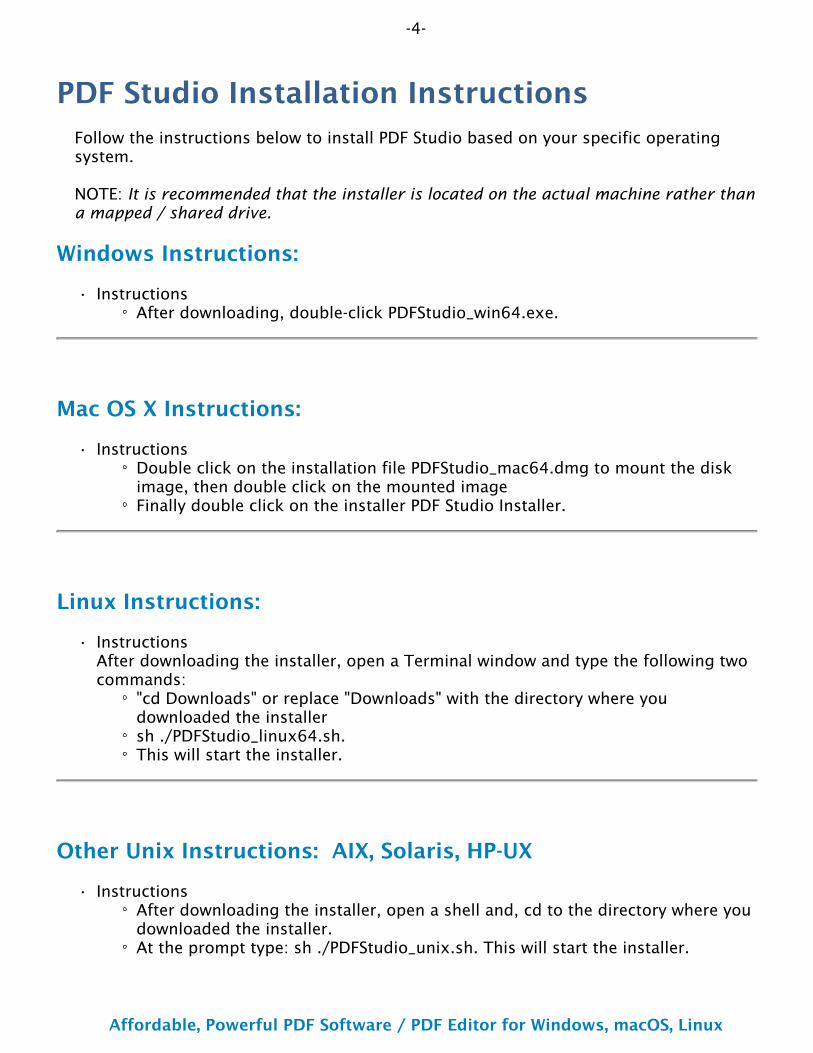
PDF Studio Installation InstructionsFollow the instructions below to install PDF Studio based on your specific operating system.
NOTE: It is recommended that the installer is located on the actual machine rather than a mapped / shared drive.
Windows Instructions:
InstructionsAfter downloading, double-click PDFStudio_win64.exe.
Mac OS X Instructions:
InstructionsDouble click on the installation file PDFStudio_mac64.dmg to mount the disk image, then double click on the mounted imageFinally double click on the installer PDF Studio Installer.
Linux Instructions:
Instructions After downloading the installer, open a Terminal window and type the following two commands:
"cd Downloads" or replace "Downloads" with the directory where you downloaded the installersh ./PDFStudio_linux64.sh.This will start the installer.
Other Unix Instructions: AIX, Solaris, HP-UX
InstructionsAfter downloading the installer, open a shell and, cd to the directory where you downloaded the installer.At the prompt type: sh ./PDFStudio_unix.sh. This will start the installer.

-5-
Affordable, Powerful PDF Software / PDF Editor for Windows, macOS, Linux
Copyright © 2002-Present Qoppa Software. All rights reserved.
-6-
Affordable, Powerful PDF Software / PDF Editor for Windows, macOS, Linux
Copyright © 2002-Present Qoppa Software. All rights reserved.
•
•
1.
2.
Registration / Unregistration / TransferWhen running in demo version, a watermark will be added to documents upon saving them. To run in full production mode, PDF Studio needs to be activated with the license key that is emailed to you after your purchase.
Registration / Activation
Use one of the following methods below to register / activate PDF Studio
Launch PDF Studio and a trial dialog will show up where you can click on the Activate button.
If PDF Studio is already launched go to Help Tab > Activate.
Then enter your license key and follow the instructions to activate the software
Note: If your computer is offline, put it online temporarily to activate the software. If the computer can not be put online, contact PDF Studio Customer Support for help.
Unregister / Deactivate Device
Uninstalling PDF Studio from a computer does not automatically deactivate it. If you are moving computers, first deactivate PDF Studio from your old computer before activating it on your new computer.
If you have reached the maximum number of activations allowed on your license, you need to first deactivate PDF Studio on a computer you no longer use before activating it on another computer.
How to Unregister Single Device
Go to Help Tab > License Information and click on the “Unregister” button.
Note: If your computer is offline, put it online temporarily to activate the software. If the computer can not be put online, contact PDF Studio Customer Support for help.
To access the key management tool:
The License Key Management tool can be used to view or remove any current users & machines registered to your license key.
Launch PDF Studio on any of the machines currently registered
Go to the Help Tab > License Information on the toolbar

-7-
Affordable, Powerful PDF Software / PDF Editor for Windows, macOS, Linux
Copyright © 2002-Present Qoppa Software. All rights reserved.
3.
•4.5.
1.
2.3.
1.2.3.
Click on Manage to see the current list of registered users and devices associated with your key
Note: This option is only available for license keys with 10 or less UsersCheck the box next to each of the User(s) / Device(s) you wish to unregisterClick on the “Unregister” button
Transfer License Key
If you are moving computers or have reached the maximum number of activations allowed on your license, you need to first deactivate PDF Studio on a computer you no longer use before activating it on another computer.
Follow the directions above to deactivate the User(s) / Device(s) you no longer need to free up a spotOnce deactivated Download and install PDF Studio on the new deviceUser your license key to activate the new User(s) / Device(s)
Retrieve Current Registered User(s) / Device(s)
For keys with 10 users or less, use the new license key management tool to view the list of current users & machines registered to your license key.
To access the key management tool:
Launch PDF Studio on any of the machines currently registeredGo to the Help Tab then click on License InformationClick on Manage to see the current list of registered users and devices associated with your key
Note: This option is only available for license keys with 10 or less Users
License Key Management for Volume (Multi Users / Multi Key) Licenses
For customers with over 10 licenses we offer a support & upgrade contract to access our new license key portal. This feature is currently only available by request.
To receive a quote for the PDF Studio Support & Upgrades contract and gain access to this new tool please contact [email protected].
Once your account has been activated the new service can be accessed HERE
-8-
Affordable, Powerful PDF Software / PDF Editor for Windows, macOS, Linux
Copyright © 2002-Present Qoppa Software. All rights reserved.
•••••
License Key Management Tool Features
The new license key management dashboard allows IT and Admins to easily keep track of and manage user registrations. It also provides easy access to add additional users as needed. The new tool comes with the following features with more planned for the future.
Dashboard with quick links to key management and support toolsAbility to claim multiple keys under a single loginView license key details including: User count, transaction ID, subscription statusView / export all user registration details per license keyUnregister / deactivate users individually or in a batch
Feel free to submit any additional license key management feature requests to [email protected]
-9-
Affordable, Powerful PDF Software / PDF Editor for Windows, macOS, Linux
Copyright © 2002-Present Qoppa Software. All rights reserved.
•
•
Removing Demo WatermarksWhen running in demo version, a watermark will be added to documents upon saving them. If you have saved documents while PDF Studio was running in demo mode you can remove the demo watermarks once PDF Studio has been activated.
How To Remove Demo Watermarks
Go to Help Tab > Remove Demo Watermark and use one of the below options to remove the watermarks.
Current Document - Removes the PDF Studio Demo watermark from the currently opened documentBatch - Use this option to start a batch process and remove the PDF Studio Demo watermarks from multiple documents. See Selecting Batch Files for instructions on using the batch dialog.

-11-
Affordable, Powerful PDF Software / PDF Editor for Windows, macOS, Linux
Copyright © 2002-Present Qoppa Software. All rights reserved.
Getting Started with PDF StudioTo start using PDF studio, simply launch the application and open a PDF document
using the Welcome Screen, by going to File Tab > Open, or the using Open button on the toolbar. Once a document is loaded, you can being navigating, editing, printing, or saving the document as you wish.
Top Toolbar
The main Toolbar is located at the top of the PDF Studio window. Use the ribbon tabs to navigate between each set of tools available in PDF Studio. The Office Style Ribbon Toolbar is the default layout and where you will find all of the functions in PDF Studio. If you wish, you can switch to the Classic Toolbar in Toolbar Preferences.
Document View Area
The main center frame is used to display documents. By default documents are displayed using the tabbed interface to view multiple PDFs at once. Each new PDF that is opened will open in a in the same application frame only in a new tab. The tab names display the name of the PDF document opened in that tab and you can switch between the tabs by clicking the name of the file you wish to view.
To disable the tabbed document view go to General Preferences.
Welcome Screen
The Welcome Screen is located in the main frame of PDF Studio and is only displayed when no document is currently open. The welcome screen allows you to quickly open recent new files, create PDFs from various sources, or access the user guide and knowledge base.
Panes
Panes are where you will find additional tools or information on the current document. These pane can be resized by clicking and dragging the edge of the pane. Pane can also be completed closed by either clicking the "x" on the top right of the pane or using the toggle buttons on the left of the PDF Studio window.
Details of each of the panels are listed below.
Left Pane
The left pane can show one of four different views. The views can be toggled by their respective buttons on the left side of the screen, or from the View menu. The following views are available:
-12-
Affordable, Powerful PDF Software / PDF Editor for Windows, macOS, Linux
Copyright © 2002-Present Qoppa Software. All rights reserved.
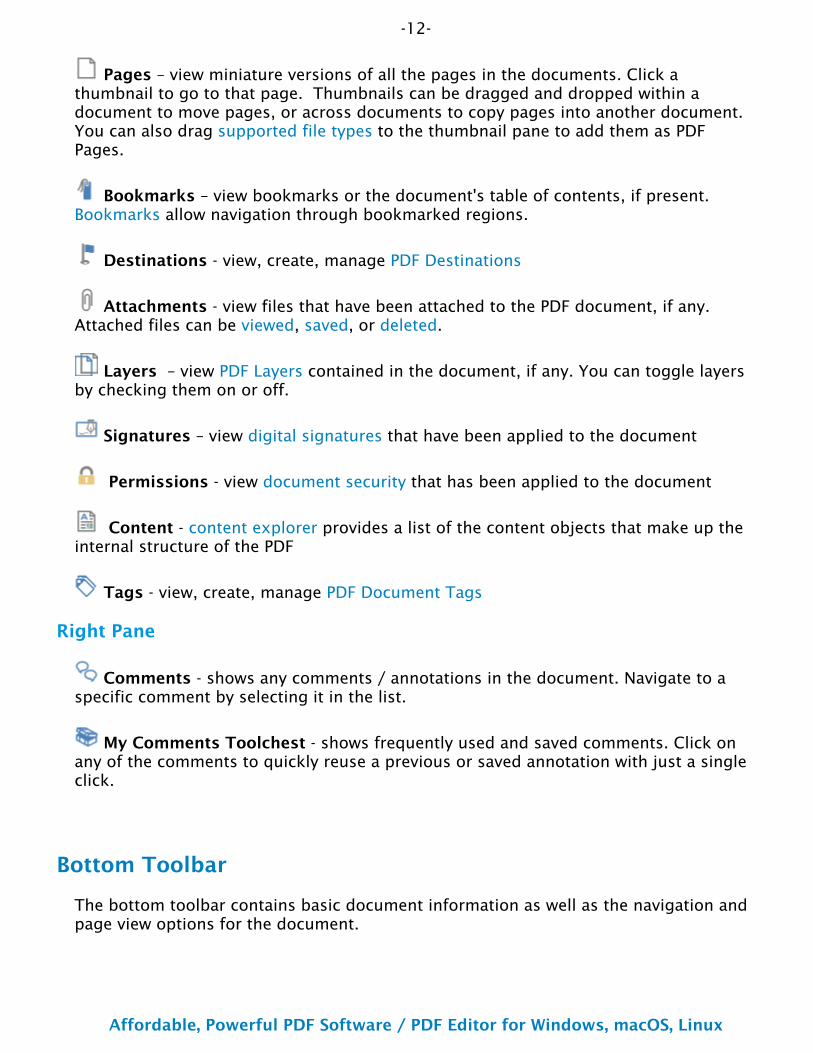
Pages – view miniature versions of all the pages in the documents. Click a thumbnail to go to that page. Thumbnails can be dragged and dropped within a document to move pages, or across documents to copy pages into another document. You can also drag supported file types to the thumbnail pane to add them as PDF Pages.
Bookmarks – view bookmarks or the document's table of contents, if present. Bookmarks allow navigation through bookmarked regions.
Destinations - view, create, manage PDF Destinations
Attachments - view files that have been attached to the PDF document, if any. Attached files can be viewed, saved, or deleted.
Layers – view PDF Layers contained in the document, if any. You can toggle layers by checking them on or off.
Signatures – view digital signatures that have been applied to the document
Permissions - view document security that has been applied to the document
Content - content explorer provides a list of the content objects that make up the internal structure of the PDF
Tags - view, create, manage PDF Document Tags
Right Pane
Comments - shows any comments / annotations in the document. Navigate to a specific comment by selecting it in the list.
My Comments Toolchest - shows frequently used and saved comments. Click on any of the comments to quickly reuse a previous or saved annotation with just a single click.
Bottom Toolbar
The bottom toolbar contains basic document information as well as the navigation and page view options for the document.
-13-
Affordable, Powerful PDF Software / PDF Editor for Windows, macOS, Linux
Copyright © 2002-Present Qoppa Software. All rights reserved.
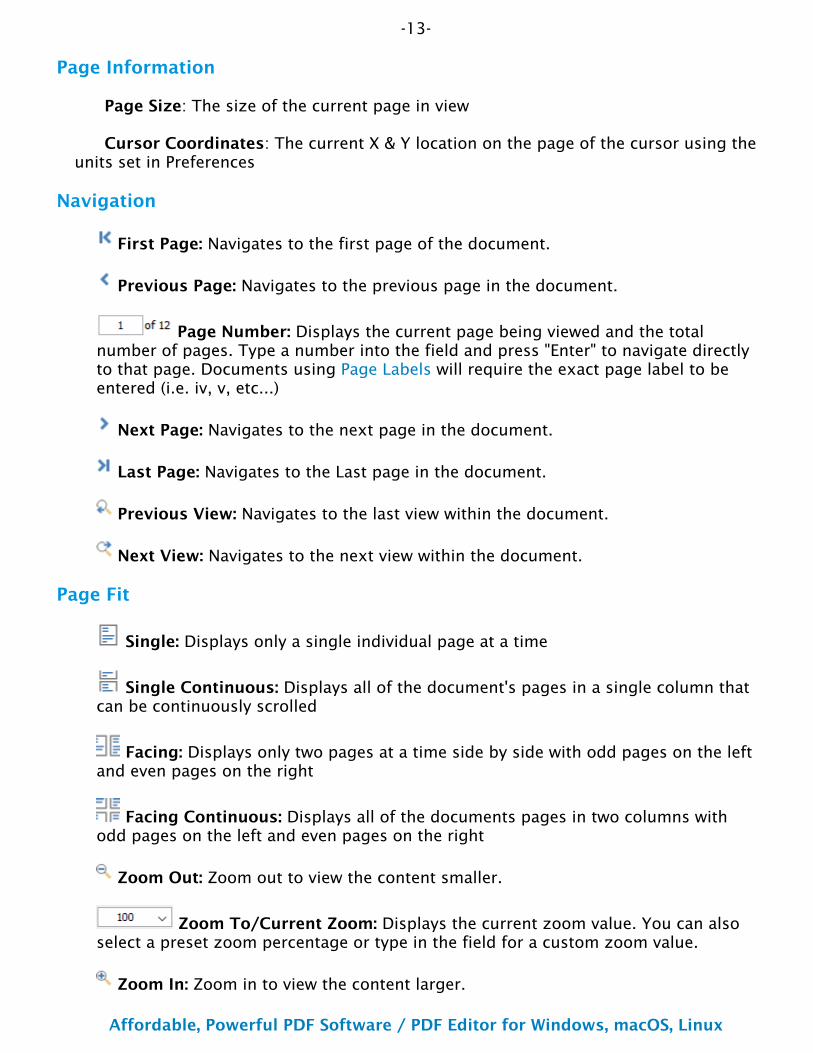
Page Information
Page Size: The size of the current page in view
Cursor Coordinates: The current X & Y location on the page of the cursor using the units set in Preferences
Navigation
First Page: Navigates to the first page of the document.
Previous Page: Navigates to the previous page in the document.
Page Number: Displays the current page being viewed and the total number of pages. Type a number into the field and press "Enter" to navigate directly to that page. Documents using Page Labels will require the exact page label to be entered (i.e. iv, v, etc...)
Next Page: Navigates to the next page in the document.
Last Page: Navigates to the Last page in the document.
Previous View: Navigates to the last view within the document.
Next View: Navigates to the next view within the document.
Page Fit
Single: Displays only a single individual page at a time
Single Continuous: Displays all of the document's pages in a single column that can be continuously scrolled
Facing: Displays only two pages at a time side by side with odd pages on the left and even pages on the right
Facing Continuous: Displays all of the documents pages in two columns with odd pages on the left and even pages on the right
Zoom Out: Zoom out to view the content smaller.
Zoom To/Current Zoom: Displays the current zoom value. You can also select a preset zoom percentage or type in the field for a custom zoom value.
Zoom In: Zoom in to view the content larger.

-14-
Affordable, Powerful PDF Software / PDF Editor for Windows, macOS, Linux
Copyright © 2002-Present Qoppa Software. All rights reserved.
-15-
Affordable, Powerful PDF Software / PDF Editor for Windows, macOS, Linux
Copyright © 2002-Present Qoppa Software. All rights reserved.
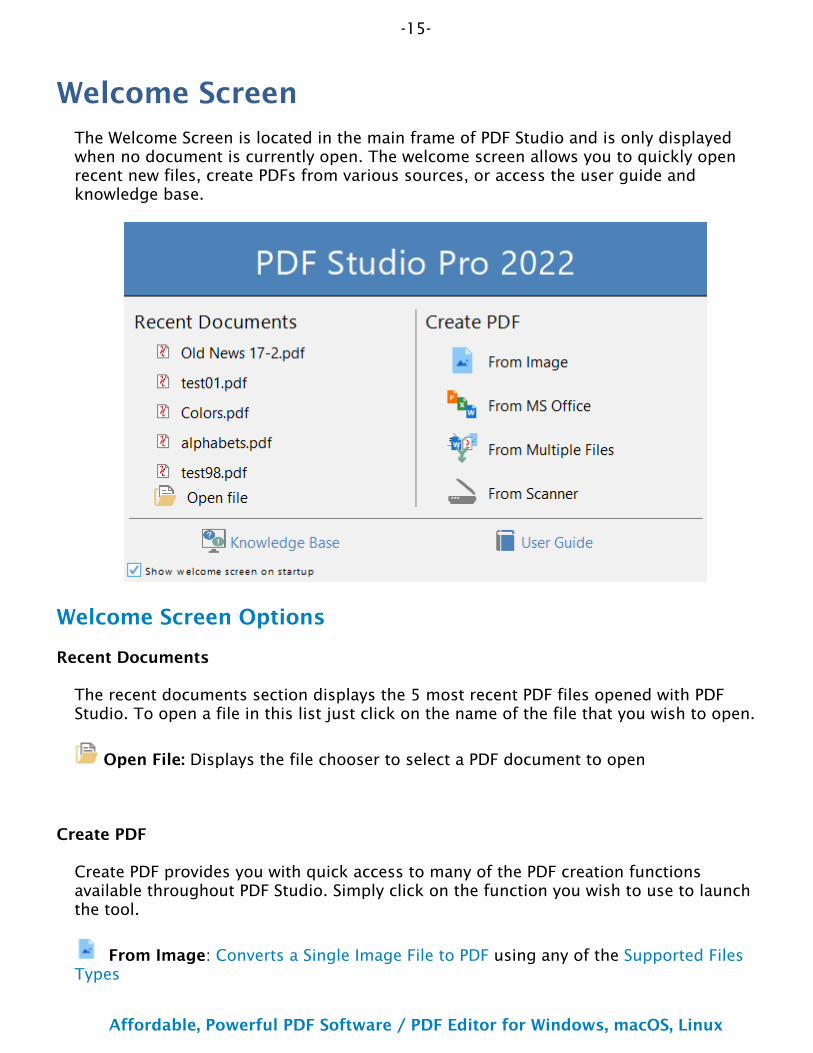
Welcome ScreenThe Welcome Screen is located in the main frame of PDF Studio and is only displayed when no document is currently open. The welcome screen allows you to quickly open recent new files, create PDFs from various sources, or access the user guide and knowledge base.
Welcome Screen Options
Recent Documents
The recent documents section displays the 5 most recent PDF files opened with PDF Studio. To open a file in this list just click on the name of the file that you wish to open.
Open File: Displays the file chooser to select a PDF document to open
Create PDF
Create PDF provides you with quick access to many of the PDF creation functions available throughout PDF Studio. Simply click on the function you wish to use to launch the tool.
From Image: Converts a Single Image File to PDF using any of the Supported Files Types
-16-
Affordable, Powerful PDF Software / PDF Editor for Windows, macOS, Linux
Copyright © 2002-Present Qoppa Software. All rights reserved.
From MS Office: Converts Microsoft Office Word, Excel & PowerPoint files to PDF from the Supported Files Types
From Multiple Files: Merges/Converts Multiple Files at once to create a single PDF
From Scanner: Launches the Scanning Dialog to create a new PDF
Information
Online Knowledge Base - Link that opens the Online Knowledge Base for PDF Studio that contains additional information and tutorials
PDF Studio User Guide - Link that opens the online PDF Studio user guide
Options
Show Welcome Screen on Startup - Uncheck this option if you wish to not see this dialog at startup. This setting can be re-enabled in the General Preferences
-17-
Affordable, Powerful PDF Software / PDF Editor for Windows, macOS, Linux
Copyright © 2002-Present Qoppa Software. All rights reserved.
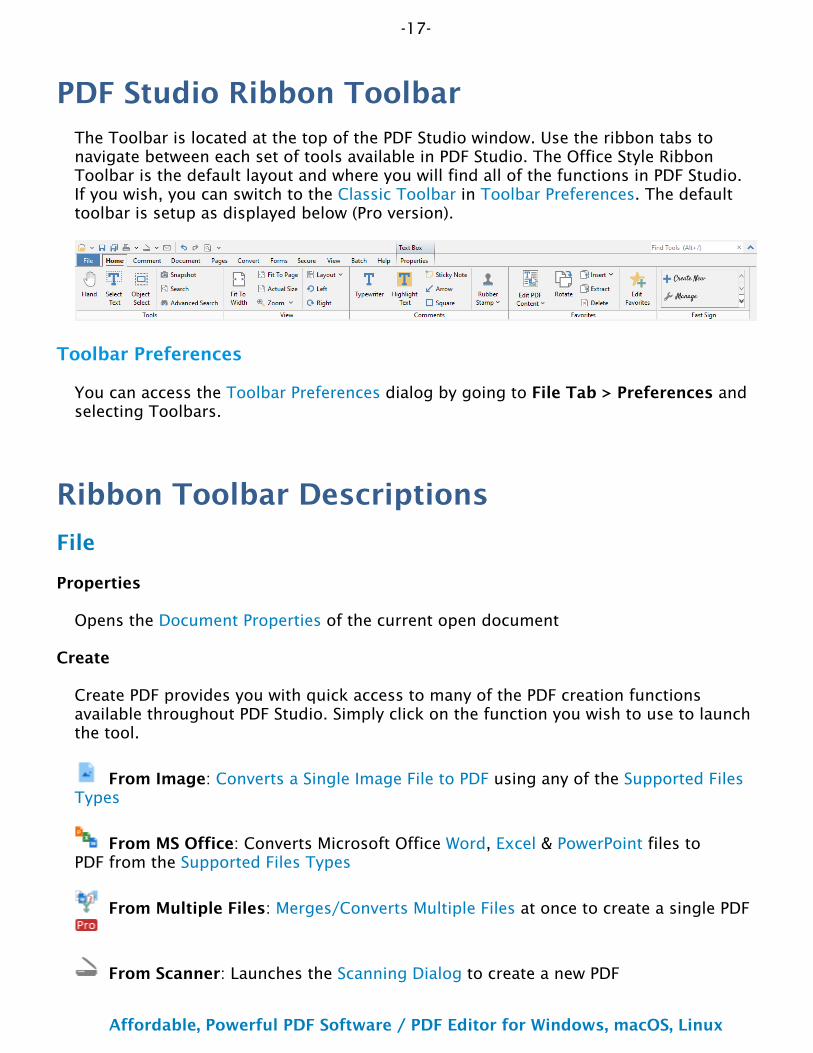
The Toolbar is located at the top of the PDF Studio window. Use the ribbon tabs to navigate between each set of tools available in PDF Studio. The Office Style Ribbon Toolbar is the default layout and where you will find all of the functions in PDF Studio. If you wish, you can switch to the Classic Toolbar in Toolbar Preferences. The default toolbar is setup as displayed below (Pro version).
Toolbar Preferences
You can access the Toolbar Preferences dialog by going to File Tab > Preferences and selecting Toolbars.
Ribbon Toolbar Descriptions
File
Properties
Opens the Document Properties of the current open document
Create
Create PDF provides you with quick access to many of the PDF creation functions available throughout PDF Studio. Simply click on the function you wish to use to launch the tool.
From Image: Converts a Single Image File to PDF using any of the Supported Files Types
From MS Office: Converts Microsoft Office Word, Excel & PowerPoint files to PDF from the Supported Files Types
From Multiple Files: Merges/Converts Multiple Files at once to create a single PDF
From Scanner: Launches the Scanning Dialog to create a new PDF
PDF Studio Ribbon Toolbar

-18-
Affordable, Powerful PDF Software / PDF Editor for Windows, macOS, Linux
Copyright © 2002-Present Qoppa Software. All rights reserved.
•
•
From Blank Page: Creates a Blank PDF with no content
Open
Open a PDF document or convert any of the supported file types to a PDF.
Recent Documents: Displays a list of most recent 200 documents that have been opened. Use the search field on the top right to more easily find a specific document.
Sessions: Session manager allowing you to reopen last used or saved sessions
Computer: Opens local file chooser select a file to open
From URL: Open a PDF file from a specified web address
Google Drive: Open any supported file type directly from your linked Google Drive
Dropbox: Open any supported file type directly from your linked Dropbox
OneDrive: Open any supported file type directly from your linked OneDrive
Add Place: Pin a local directory to the list for quicker access in the future. This folder will be accessible in both the Open & Save As panels
Add Place: Click the button to select the folder to be added to the list
Remove: Click on the to remove the place from the open list
Save
Save the current document. This button will be disabled if no changes have been made to the document.
Save As
Save the current document as a new file.
Computer: Opens file chooser to save the file locally
Google Drive: Save your PDF document directly to your linked Google Drive
Dropbox: Save your PDF document directly to your linked Dropbox
OneDrive: Save your PDF document directly to your linked OneDrive
-19-
Affordable, Powerful PDF Software / PDF Editor for Windows, macOS, Linux
Copyright © 2002-Present Qoppa Software. All rights reserved.
•
•
Add Place: Pin a local directory to the list for quicker access in the future. This folder will be accessible in both the Open & Save As panels
Add Place: Click the button to select the folder to be added to the list
Remove: Click on the to remove the place from the open list
Reduce File Size
Launches the PDF Optimizer to create an optimized version of the document and reduce the file size.
Attaches the current document to an email using the email application set within Email Preferences.
Send
Sends the current document to additional integrations such as DocuSign and Word
Close
Closes the currently open document
Close All
Closes all documents currently open in PDF Studio
Revert/Reload
Closes and reopens the currently reopened document to it's last saved state
Prints the current document using the PDF Studio printer dialog. To use the system print dialog see Print Preferences.
Action Wizard
Create and start document actions that can be used to run multiple tools on one or multiple sets of files
Preferences
Opens PDF Studio Preferences. Can also be accessed using Ctrl + K shortcut keys
Exit
Closes all currently open document and shuts down PDF Studio
-20-
Affordable, Powerful PDF Software / PDF Editor for Windows, macOS, Linux
Copyright © 2002-Present Qoppa Software. All rights reserved.
Home
Tools
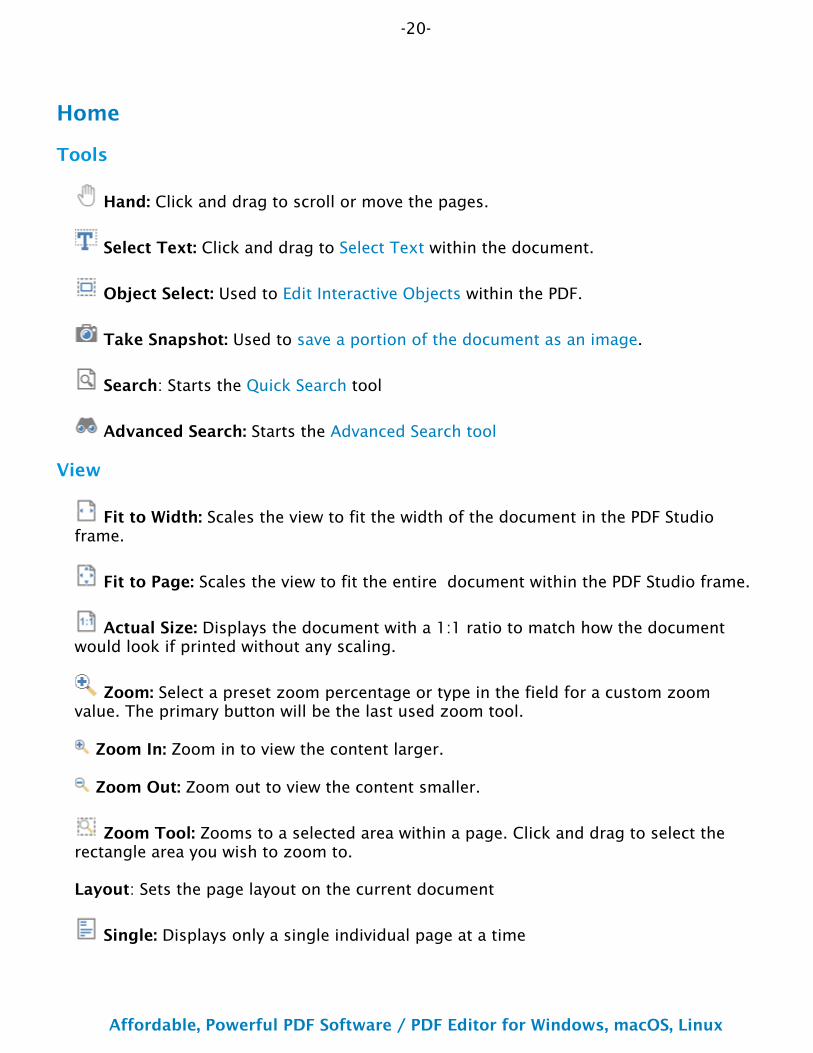
Hand: Click and drag to scroll or move the pages.
Select Text: Click and drag to Select Text within the document.
Object Select: Used to Edit Interactive Objects within the PDF.
Take Snapshot: Used to save a portion of the document as an image.
Search: Starts the Quick Search tool
Advanced Search: Starts the Advanced Search tool
View
Fit to Width: Scales the view to fit the width of the document in the PDF Studio frame.
Fit to Page: Scales the view to fit the entire document within the PDF Studio frame.
Actual Size: Displays the document with a 1:1 ratio to match how the document would look if printed without any scaling.
Zoom: Select a preset zoom percentage or type in the field for a custom zoom value. The primary button will be the last used zoom tool.
Zoom In: Zoom in to view the content larger.
Zoom Out: Zoom out to view the content smaller.
Zoom Tool: Zooms to a selected area within a page. Click and drag to select the rectangle area you wish to zoom to.
Layout: Sets the page layout on the current document
Single: Displays only a single individual page at a time
-21-
Affordable, Powerful PDF Software / PDF Editor for Windows, macOS, Linux
Copyright © 2002-Present Qoppa Software. All rights reserved.
•
•
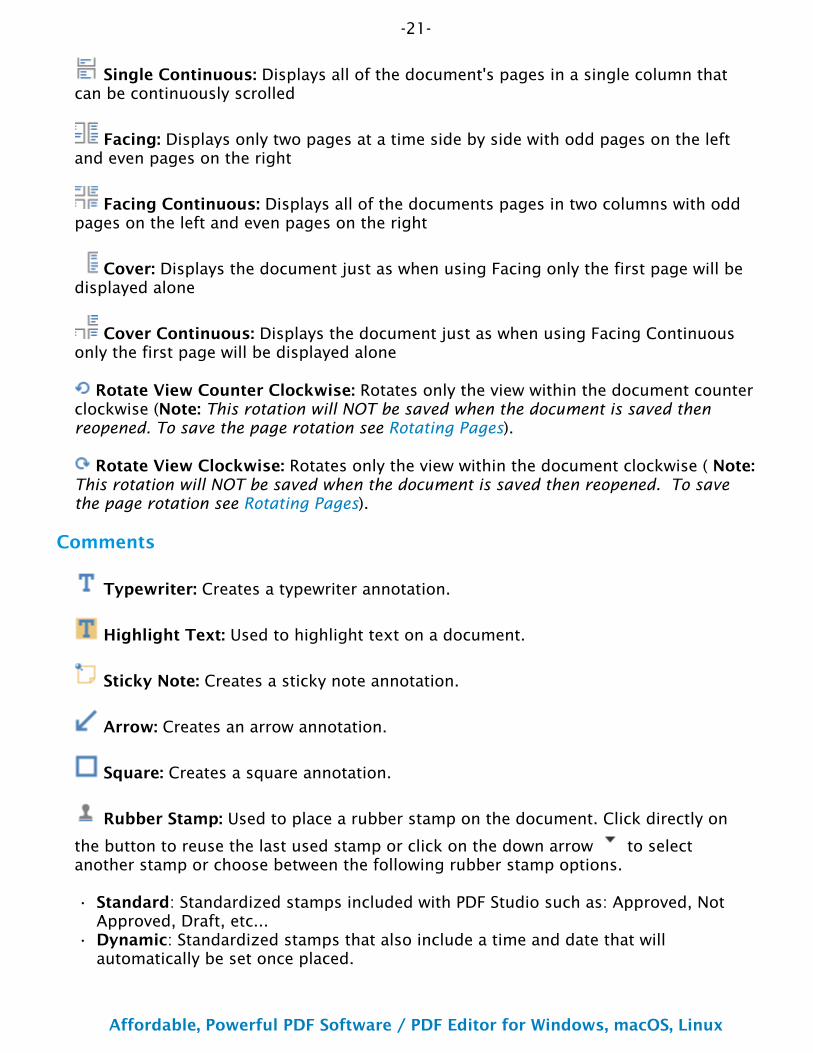
Single Continuous: Displays all of the document's pages in a single column that can be continuously scrolled
Facing: Displays only two pages at a time side by side with odd pages on the left and even pages on the right
Facing Continuous: Displays all of the documents pages in two columns with odd pages on the left and even pages on the right
Cover: Displays the document just as when using Facing only the first page will be displayed alone
Cover Continuous: Displays the document just as when using Facing Continuous only the first page will be displayed alone
Rotate View Counter Clockwise: Rotates only the view within the document counter clockwise (Note: This rotation will NOT be saved when the document is saved then reopened. To save the page rotation see Rotating Pages).
Rotate View Clockwise: Rotates only the view within the document clockwise ( Note: This rotation will NOT be saved when the document is saved then reopened. To save the page rotation see Rotating Pages).
Comments
Typewriter: Creates a typewriter annotation.
Highlight Text: Used to highlight text on a document.
Sticky Note: Creates a sticky note annotation.
Arrow: Creates an arrow annotation.
Square: Creates a square annotation.
Rubber Stamp: Used to place a rubber stamp on the document. Click directly on
the button to reuse the last used stamp or click on the down arrow to select another stamp or choose between the following rubber stamp options.
Standard: Standardized stamps included with PDF Studio such as: Approved, Not Approved, Draft, etc...Dynamic: Standardized stamps that also include a time and date that will automatically be set once placed.

-22-
Affordable, Powerful PDF Software / PDF Editor for Windows, macOS, Linux
Copyright © 2002-Present Qoppa Software. All rights reserved.
•
•••••
••
•••
Sign Here: Standardized signature stamps included with PDF Studio such as: Sign Here, Initial Here, Witness, etc...
Favorites
The favorites is preset with the following popular defaults but can be customized in Toolbar Preferences to show any tools you wish. The favorites group is limited to 9 tools.
Edit PDF Content : Allows you to Edit Content within the PDF using the selected option.
Edit Text & Images: Allows you to Edit Text & Images directly inline in the PDF.Text: Edit individual text strings with the PDFImages: Edit images contained within the PDFPaths: Edit lines and shapes within the PDFShades: Edit shade and gradient objects within the PDF
Rotate: Options to rotate pages in 90 degree increments.
Note: Rotating Pages is different then Rotating Page View in that it is not temporary and the changes made using this tool will permanently rotate the pages within the document when saved.
Insert:
Add Blank Page: Inserts a blank page into the documentAppend Document: Select a PDF file to add to the end to the currently open documentInsert Pages: Insert other PDF documents to a location you specify within the PDFImport Image as Page: Import an image directly into the PDF as a pageFrom Scanner: Creates a PDF from a scanne
Scan with WIA / ICA / Sane Direct: Scans using the PDF Studio dialog.Scan with Sane Daemon: starts Sane Daemon Scanning
Extract: Options to extract pages from the PDF
Delete: Delete pages from the current PDF
Edit Favorites: Opens the preferences dialog to customize the Favorite Group tools
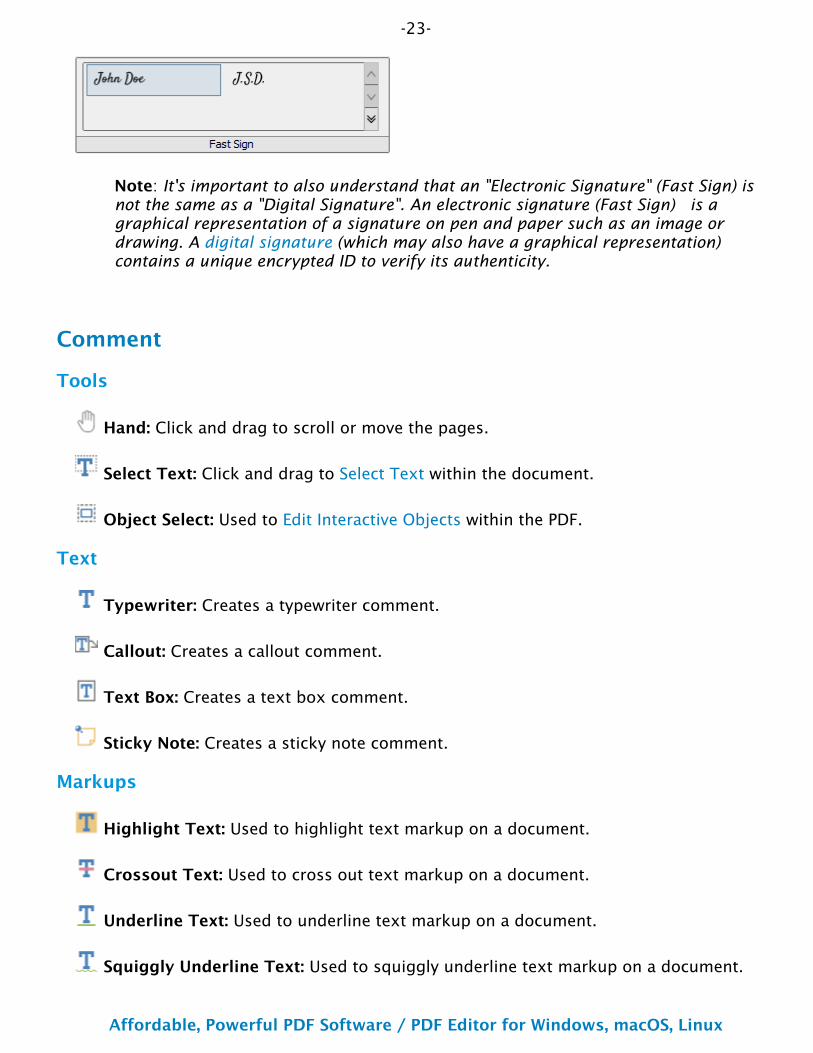
Fast Sign
The Fast Sign tool allows you to create electronic signature stamps that can be easily applied to documents.
-23-
Affordable, Powerful PDF Software / PDF Editor for Windows, macOS, Linux
Copyright © 2002-Present Qoppa Software. All rights reserved.
Note: It's important to also understand that an "Electronic Signature" (Fast Sign) is not the same as a "Digital Signature". An electronic signature (Fast Sign) is a graphical representation of a signature on pen and paper such as an image or drawing. A digital signature (which may also have a graphical representation) contains a unique encrypted ID to verify its authenticity.
Comment
Tools
Hand: Click and drag to scroll or move the pages.
Select Text: Click and drag to Select Text within the document.
Object Select: Used to Edit Interactive Objects within the PDF.
Text
Typewriter: Creates a typewriter comment.
Callout: Creates a callout comment.
Text Box: Creates a text box comment.
Sticky Note: Creates a sticky note comment.
Markups
Highlight Text: Used to highlight text markup on a document.
Crossout Text: Used to cross out text markup on a document.
Underline Text: Used to underline text markup on a document.
Squiggly Underline Text: Used to squiggly underline text markup on a document.
-24-
Affordable, Powerful PDF Software / PDF Editor for Windows, macOS, Linux
Copyright © 2002-Present Qoppa Software. All rights reserved.
•
•
•
Insert Text: Adds an insert text markup on the document.
Replace Text: Adds a replace text markup markup markup on the selected text.
Shapes
Circle: Creates a circle annotation.
Square: Creates a square annotation.
Area Highlight: Highlights an area on a document. Useful when trying to highlight scanned text.
Polyline: Creates a polyline annotation.
Polygon: Creates a polygon annotation.
Cloud: Creates a cloud annotation.
Line: Creates a line annotation.
Arrow: Creates an arrow annotation.
Pencil: Creates a pencil annotation.
Stamps
Rubber Stamp: Used to place a rubber stamp on the document. Click directly on
the button to reuse the last used stamp or click on the down arrow to select another stamp or choose between the following rubber stamp options.
Standard: Standardized stamps included with PDF Studio such as: Approved, Not Approved, Draft, etc...Dynamic: Standardized stamps that also include a time and date that will automatically be set once placed.Sign Here: Standardized signature stamps included with PDF Studio such as: Sign Here, Initial Here, Witness, etc...
Image: Adds an Image as a Rubber Stamp annotation to the document.
Create: Choose from the below options to create a stamp
-25-
Affordable, Powerful PDF Software / PDF Editor for Windows, macOS, Linux
Copyright © 2002-Present Qoppa Software. All rights reserved.
•
•
••
••
•
Create Text Stamp: Create a custom Text Stamp that will be added to the rubber stamps list.Create Image Stamp: Create a custom Image Stamp that will be added to the rubber stamps list.Create PDF Stamp: Create a PDF Stamp that will be added to the rubber stamp listCreate Custom Stamp: Create a Custom Stamp that will be added to the rubber stamps list.
Manage: Opens the Rubber Stamp Manager to create/edit/delete rubber stamps.
Measure
Distance: Used to measure the Distance between two points on the document.
Perimeter: Used to measure the Perimeter on the document using multiple connected lines.
Area: Used to measure a designated Area on the document.
Media
Link: Used to Create Links in a document.
Create Link: Starts the link tool to create links in the documentAuto Create Links: Tool used to automatically create links based on text found within the documentRemove All Links: removes all links found within the document
Sound: Adds a Sound Comment attachment to the document.
Attach File: Attaches a file to the PDF without a comment. Click on the down arrow
to attach a file to the document with a comment.
Add 3D: Used to create 3D content in the document
Comments
View: Displays the Comments Panel
Export: Options to Export All Comments into a separate file
Import: Options to Import Comments from either an FDF, XFDF, or PDF file into the current document.
-26-
Affordable, Powerful PDF Software / PDF Editor for Windows, macOS, Linux
Copyright © 2002-Present Qoppa Software. All rights reserved.
•••••
Flatten: Flatten Comments directly on the page to which they belong so they are not editable anymore.
Delete: Delete all comments on the current page or entire document
Anonymize: Anonymize comments & annotations by deleting all personally identifying information from any comments or annotations within the PDF document.
Document
Tools
Hand: Click and drag to scroll or move the pages.
Select Text: Click and drag to Select Text within the document.
Object Select: Used to Edit Interactive Objects within the PDF.
Content
Redact : Marks content for Redaction.
Edit PDF Content : Allows you to Edit Content within the PDF using the selected option.
Edit Text & Images: Allows you to Edit Text & Images directly inline in the PDF.Text: Edit individual text strings with the PDFImages: Edit images contained within the PDFPaths: Edit lines and shapes within the PDFShades: Edit shade and gradient objects within the PDF
Add Text: Creates new text on the page
Add Image: Import images as content to be added to the document
Add Shape: Add new shape content (circle, square, line, etc...) to the PDF
Process PDF
OCR : Allows you to add text to scanned documents or images so that the document can be searched or marked up as you would any other text document.
-27-
Affordable, Powerful PDF Software / PDF Editor for Windows, macOS, Linux
Copyright © 2002-Present Qoppa Software. All rights reserved.
••
•
•
•
•
Optimize : Compress images or remove objects in order to reduce the PDF file size. Contains the following drop down options.
Optimize...: Starts the custom optimize dialogAudit: Performs an optimization audit to show what elements of the document are using the most spaceAggressive: Starts the aggressive optimization profile - Light compression maintaining higher quality imagesBalanced: Starts the balanced optimization profile - Compression suitable for most standard needsLight: Starts the light optimization profile - High compression while sacrificing image quality
Fix Scan : Enhance scans to deskew, optimize & add searchable text
Compare
Overlay : Visually compare documents by overlaying a second document onto the first using different colors to display any differences.
Side by Side : Open two PDF documents in the same window next to each other to compare visually.
Print Production
Preflight: Compliance verification to verify the document meets various archival compliances defined by ISO PDF standards.
Imposition: Advanced Imposition Module that will allow you to preview and create PDF Imposition Layouts.
Output Preview: Simulates how the document will look based on different ICC color profiles to accurately preview how the printed version will look.
Form Data
Reset Fields: Resets the data in all fields in the form.
Flatten: Flatten all fields in the form.
Export: Export form data in the current document into a file in FDF, XFDF, XDP, or XML formats.
FDF: File format created by Adobe that is supported by most PDF applications
-28-
Affordable, Powerful PDF Software / PDF Editor for Windows, macOS, Linux
Copyright © 2002-Present Qoppa Software. All rights reserved.
•
•
••
•
••
•
••
••
•
XFDF: Extended FDF file format created by Adobe that is supported by most PDF applicationsXDP: An XML Data package created by Adobe that is supported by most PDF applicationsCSV: A plain text file containing a list of data separated by commasXML: File that use custom tags to describe the structure and other features of the document.Text: Plain text file that exports all form data in tab separated format
Import: Import form data in the current document into a file in FDF, XFDF, XDP, or XML formats.
FDF: File format created by Adobe that is supported by most PDF applicationsXFDF: Extended FDF file format created by Adobe that is supported by most PDF applicationsXDP: An XML Data package created by Adobe that is supported by most PDF applications
Highlight Fields: Highlight all fields in the form, making them easier to locate.
Pages
Tools
Hand: Click and drag to scroll or move the pages.
Select Text: Click and drag to Select Text within the document.
Object Select: Used to Edit Interactive Objects within the PDF.
Navigation
Bookmarks: Create bookmarks within the PDF document.
Create Bookmark: creates a bookmark using the current page locationAuto Create Bookmarks: automatically creates bookmarks for every page of the document
Links:Used to Create Links in a document.
Create Link: Starts the link tool to create links in the documentAuto Create Links: Tool used to automatically create links based on text found within the documentRemove All Links: removes all links found within the document
-29-
Affordable, Powerful PDF Software / PDF Editor for Windows, macOS, Linux
Copyright © 2002-Present Qoppa Software. All rights reserved.
••
••
••
•
•••
Table of Contents: builds a Table of Contents using the existing document bookmarks
Page Marks
Header & Footer: Add or remove headers & footers
Add: starts tool to add headers or footers to the documentRemove: removes all headers and footers from every page of the document.
Watermark: Add or remove document watermarks
Add: starts tool to add watermarks to the documentRemove: removes all watermarks from every page of the document.
Pages
Insert: Options to insert various pages and content to the document
Add Blank Page: Inserts a blank page into the documentAppend Document: Select a PDF file to add to the end to the currently open documentAppend Multiple Documents: Merges Multiple Files at once to append to the currently open document Insert Pages: Insert other PDF documents to a location you specify within the PDFImport Image as Page: Import an image directly into the PDF as a pageFrom Scanner: Creates a PDF from a scanner
Scan with WIA / ICA / Sane Direct: Scans using the PDF Studio dialogScan with Sane Daemon: starts Sane Daemon Scanning
Split: Tools to split PDF documents in a variety of ways.
Rotate: Options to rotate pages in 90 degree increments.
Note: Rotating Pages is different then Rotating Page View in that it is not temporary and the changes made using this tool will permanently rotate the pages within the document when saved.
Crop Pages: Allows you to Crop PDF page(s)
Delete: Delete pages from the current PDF
Extract: Extract a portion of a PDF into a separate document.
Replace: Replace pages from a PDF using pages from another PDF
-30-
Affordable, Powerful PDF Software / PDF Editor for Windows, macOS, Linux
Copyright © 2002-Present Qoppa Software. All rights reserved.
••
Reverse: Automatically reverse the order of the pages within a PDF.
Advanced
Resize: Resize a page to a specified dimension.
Templates: Create/Edit additional pages stored within the PDF that can be appended or shown based on a JavaScript trigger or action within a document.
Label Pages: Set distinct names or numbers that can be different from bookmarks or standard page numbers.
Convert
Tools
Hand: Click and drag to scroll or move the pages.
Select Text: Click and drag to Select Text within the document.
Object Select: Used to Edit Interactive Objects within the PDF.
Create PDF
From Scanner: Creates a PDF ftrom a scanner
Scan with WIA / ICA / Sane Direct: Scans using the PDF Studio dialog.Scan with Sane Daemon: starts Sane Daemon Scanning
From Image: Create PDF from one of the supported image file types *png, *jpg, *jpeg, *jpe, *gif, *tif & *tiff. (Image To PDF settings are in the Preferences Dialog)
From Word: Create PDF from Word .doc and .docx files (Word to PDF font settings are in the Preferences Dialog)
From Excel: Create PDF from Excel .xlsx files only (Excel to PDF font settings are in the Preferences Dialog)
From Excel: Create PDF from PowerPoint .pptx files only (Excel to PDF font settings are in the Preferences Dialog)
-31-
Affordable, Powerful PDF Software / PDF Editor for Windows, macOS, Linux
Copyright © 2002-Present Qoppa Software. All rights reserved.
•
•
New Document: Creates a Blank PDF with no content
From Multiple Files: Merges/Converts Multiple Files at once to create a single PDF
Convert To
Text: Extract all text contained within the PDF document to a plain text .txt file.
Rich Text: Extracts all text within the PDF to formatted .rtf file
Images: Convert the pages of a PDF document into the following image formats .jpg, .png, .tif, .gif
Fast Web View : Convert to fast web view allowing large documents to load faster when downloading from a web.
HTML5 / SVG : Convert PDF documents to an HTML5 web page.
Word : Has the following options:
Convert to .Docx:This conversion option uses Qoppa Software's new custom conversion engine. This is a new feature released for 2022 and currently in BETA. Not all PDF features may be supported or created in the new Word file. Send to Word: Convert PDF documents to a Microsoft Word file using a direct connection with the Microsoft Office application installed on your computer. Requires a valid version of Microsoft Word (2013 or later).
PDF/A : Convert files to the PDF/A format, a strict subset of the ISO PDF specification used to create archival versions of documents with the intent that they will always render exactly the same as when they were saved.
PDF/X : Convert files to the PDF/X format, a strict subset of the ISO PDF specification with a series of printing-related requirements which do not apply to standard PDF files. These are done with the intent that the document will print exactly the same as when they were saved.
Forms
Tools
Object Select: Used to Edit Interactive Objects within the PDF.
Typewriter: Creates a typewriter annotation.
-32-
Affordable, Powerful PDF Software / PDF Editor for Windows, macOS, Linux
Copyright © 2002-Present Qoppa Software. All rights reserved.
••
•
••
•
Fields
Text Box: Creates a text box field
Check Box: Creates a check box
Radio Button: Creates a radio button. To create a new group of Radio Buttons
click on the down arrow to the right of the Radio Button on the toolbar and then select New. This will start a new group for the Radio Buttons.
Combo Box: Creates a combo box
List Box: Creates a list box
Button: Creates a push button
Signature: Creates a digital signature field
Image Button: Creates an Image button
Date Field: Creates a date field using the following format m/d/yy
Form Data
Calculation Order: Allows you to set the form field calculation order in the document
Reset Fields: Resets the data in all fields in the form.
Export: Export form data in the current document into a file in FDF, XFDF, XDP, or XML formats.
FDF: File format created by Adobe that is supported by most PDF applicationsXFDF: Extended FDF file format created by Adobe that is supported by most PDF applicationsXDP: An XML Data package created by Adobe that is supported by most PDF applicationsCSV: A plain text file containing a list of data separated by commasXML: File that use custom tags to describe the structure and other features of the document.Text: Plain text file that exports all form data in tab separated format
-33-
Affordable, Powerful PDF Software / PDF Editor for Windows, macOS, Linux
Copyright © 2002-Present Qoppa Software. All rights reserved.
••
•
Import: Import form data in the current document into a file in FDF, XFDF, XDP, or XML formats.
FDF: File format created by Adobe that is supported by most PDF applicationsXFDF: Extended FDF file format created by Adobe that is supported by most PDF applicationsXDP: An XML Data package created by Adobe that is supported by most PDF applications
Flatten: Flatten all fields in the form so they are not editable anymore.
View
Preview Form: Toggles form editing mode to allow testing the fields while remaining in the Forms tab
Show Tab Order: Displays the field's tab order number when in editing mode
Highlight Fields: Highlight all fields in the form, making them easier to locate
Show Rulers: Toggles display of rulers in document viewing area
Show Grid: Toggles the grid display on top of the PDF
Secure
Tools
Hand: Click and drag to scroll or move the pages
Select Text: Click and drag to Select Text within the document
Object Select: Used to Edit Interactive Objects within the PDF
Protect Document
Document Security: Change passwords and permissions on PDF documents
Sanitize: Converts the pages of the document to images and removes all sensitive information
-34-
Affordable, Powerful PDF Software / PDF Editor for Windows, macOS, Linux
Copyright © 2002-Present Qoppa Software. All rights reserved.
Digitally Sign
Digitally Sign : Allows you to Digitally Sign the current PDF
Certify Document : Digitally Sign the current PDF with additional document security options to prevent the document from being modified.
Timestamp : Adds a digital document timestamp to the PDF
Add Signature Field : Creates a digital signature field
Digital IDs : Manage the Digital IDs used by PDF Studio
Timestamp Servers : Manage the Timestamp Servers used by PDF Studio
Trusted Certificates: Manage the Trusted Certificates used by PDF Studio
Docusign©: Allows you to send or sign the document using the DocuSign© service
Fast Sign
The Fast Sign tool allows you to create electronic signature stamps that can be easily applied to documents.
Note: It's important to also understand that an "Electronic Signature" (Fast Sign) is not the same as a "Digital Signature". An electronic signature (Fast Sign) is a graphical representation of a signature on pen and paper such as an image or drawing. A digital signature (which may also have a graphical representation) contains a unique encrypted ID to verify its authenticity.
View
Zoom
Loupe Tool: Displays a zoom window that zooms in on the PDF to show the smallest detail.
-35-
Affordable, Powerful PDF Software / PDF Editor for Windows, macOS, Linux
Copyright © 2002-Present Qoppa Software. All rights reserved.
Pan and Zoom: A window showing the portion of the page currently on screen. Drag the red box to adjust the view of the document.
Zoom: Select a preset zoom percentage or type in the field for a custom zoom value.
Zoom In: Zoom in to view the content larger.
Zoom Out: Zoom out to view the content smaller.
Zoom Tool: Zooms to a selected area within a page. Click and drag to select the rectangle area you wish to zoom to.
Fit to Width: Scales the view to fit the width of the document in the PDF Studio frame.
Fit to Page: Scales the view to fit the entire document within the PDF Studio frame.
Actual Size: Displays the document with a 1:1 ratio to match how the document would look if printed without any scaling.
Display
Rotate View Counter Clockwise: Rotates only the view within the document counter clockwise (Note: This rotation will NOT be saved when the document is saved then reopened. To save the page rotation see Rotating Pages).
Rotate View Clockwise: Rotates only the view within the document clockwise ( Note: This rotation will NOT be saved when the document is saved then reopened. To save the page rotation see Rotating Pages).
Layout: Sets the page layout on the current document
Single: Displays only a single individual page at a time
Single Continuous: Displays all of the document's pages in a single column that can be continuously scrolled
Facing: Displays only two pages at a time side by side with odd pages on the left and even pages on the right
Facing Continuous: Displays all of the documents pages in two columns with odd pages on the left and even pages on the right
-36-
Affordable, Powerful PDF Software / PDF Editor for Windows, macOS, Linux
Copyright © 2002-Present Qoppa Software. All rights reserved.
Cover: Displays the document just as when using Facing only the first page will be displayed alone
Cover Continuous: Displays the document just as when using Facing Continuous only the first page will be displayed alone
Show Rulers: Toggles display of rulers in document viewing area
Show Grid: Toggles the grid display on top of the PDF
Navigate
Previous Page: Navigates to the previous page in the document.
Next Page: Navigates to the next page in the document.
First Page: Navigates to the first page of the document.
Last Page: Navigates to the Last page in the document.
Previous View: Navigates to the last view within the document.
Next View: Navigates to the next view within the document.
View
Split View: Displays 2 separate views of the same currently opened document
Invert Colors: Invert colors when rendering a PDF document
Enhance Thin Lines: converts all lines to a minimum width of 1px
Cursor Position: Toggles display of the cursor coordinates
Modes
Reading Mode: Hide all of the toolbars and panes to enhance the reading experience.
Full Screen Mode: Displays only the document hiding the menu bar, toolbars, task panes, and window controls.
Touch Mode: Enables/Disables Touch mode
-37-
Affordable, Powerful PDF Software / PDF Editor for Windows, macOS, Linux
Copyright © 2002-Present Qoppa Software. All rights reserved.
Read Out Loud: a Text-to-Speech (TTS) tool that reads the document text out loud to assist users with disabilities.
Window
Cascade: Rearrange all PDF Studio windows so that they are staggered on top of each other
Tile: Rearrange all PDF Studio windows horizontally or vertically in the entire screen area so that each frame is equal size and visible
Minimize All: Minimize all PDF Studio windows
Open Frames: Displays a preview of the each document open in PDF Studio. Click on the preview image to bring that PDF Studio window to the front.
Batch
Action Wizard
Create and start document actions that can be used to run multiple tools on one or multiple sets of files
Run Action - Run a previously created actions
Create New Action - Create and save new custom actions
Manage Action - View and manage existing actions
Comments
Batch Delete All Comments: Deletes all comments and annotations from a batch of PDFs
Batch Export All Comments: Exports all comments to the specified format
Batch Flatten All Comments: Flattens all comments and annotations from a batch of PDFs
Document
Batch Merge Documents: Merge a batch of PDFs to a single document

-38-
Affordable, Powerful PDF Software / PDF Editor for Windows, macOS, Linux
Copyright © 2002-Present Qoppa Software. All rights reserved.
Batch OCR Documents: OCR a batch of PDFs to add searchable text
Batch Optimize: Optimize a batch of PDFs to reduce the file size
Batch Preflight: Verify document compliance using various PDF standards for a batch of PDFs
Batch Set Initial View: Set the initial view settings for a batch of PDFs
Batch Set Security: Set the security settings for a batch of PDFs
Batch Sign: Add a digital signature to a batch of PDFs
Pages
Batch Crop Pages: Crop a batch of PDFs
Batch Delete Pages: Deletes a selected page range from each of the PDFs in the batch
Batch Apply Header and Footer: Add a header and/or footer to a batch of PDFs
Batch Resize Pages: Change the document page size of PDFs
Batch Rotate Pages: Rotates all pages within a batch of PDFs
Batch Apply Watermark: Add a watermark to a batch of PDFs
Batch Print: Print a batch of PDFs
Batch Split Documents: Split a batch of documents
Convert To
Batch Convert to HTML5 / SVG: Convert a batch of PDFs to HTML5 / SVG files
Batch Extract Pages as Images: Convert the pages from a batch of PDFs to images
Batch Rasterize PDF: Re-creates the document using images of the pages instead of vector commands.
-39-
Affordable, Powerful PDF Software / PDF Editor for Windows, macOS, Linux
Copyright © 2002-Present Qoppa Software. All rights reserved.
Batch Convert Files to PDF: Convert a batch of Supported Files to PDF
Batch Convert to PDF/A: Convert a batch of PDFs to PDF/A
Batch Extract Text from PDF: Extract text from a batch of PDFs
Forms
Batch Export Forms: Export form field data from a batch of PDFs
Batch Flatten All Fields: Flattens all fields from a batch of PDFs
Batch Reset Fields: Resets the field values from a batch of PDFs
Properties
Tools
Hand: Click and drag to scroll or move the pages.
Select Text: Click and drag to Select Text within the document.
Object Select: Used to Edit Interactive Objects within the PDF.
Font
Font: Sets the font for the selected annotation.
Size: Sets the font size for the selected annotation.
Text Color: Sets the font color for the selected annotation.
Bold: Makes the selected annotation or text Bold.
Italic: Makes the selected annotation or text Italic.
Underline: Makes the selected annotation or text underlined
Strikethrough: Marks the selected annotation or text with a strikethrough
-40-
Affordable, Powerful PDF Software / PDF Editor for Windows, macOS, Linux
Copyright © 2002-Present Qoppa Software. All rights reserved.
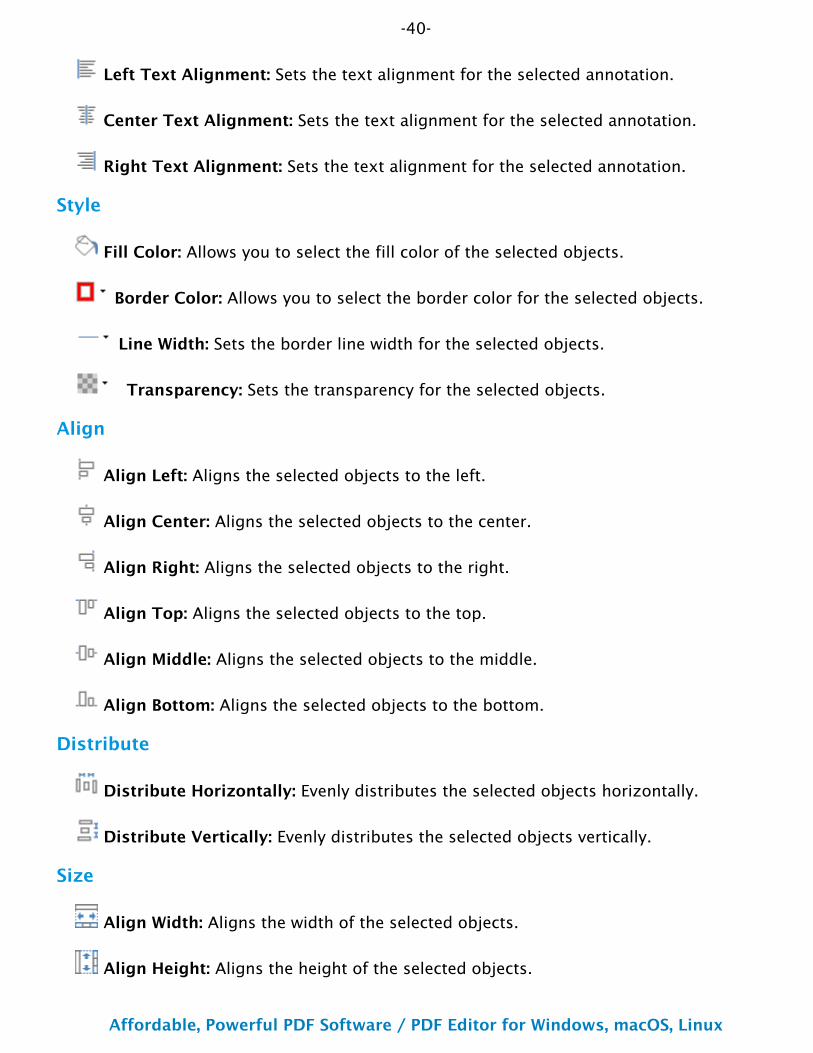
Left Text Alignment: Sets the text alignment for the selected annotation.
Center Text Alignment: Sets the text alignment for the selected annotation.
Right Text Alignment: Sets the text alignment for the selected annotation.
Style
Fill Color: Allows you to select the fill color of the selected objects.
Border Color: Allows you to select the border color for the selected objects.
Line Width: Sets the border line width for the selected objects.
Transparency: Sets the transparency for the selected objects.
Align
Align Left: Aligns the selected objects to the left.
Align Center: Aligns the selected objects to the center.
Align Right: Aligns the selected objects to the right.
Align Top: Aligns the selected objects to the top.
Align Middle: Aligns the selected objects to the middle.
Align Bottom: Aligns the selected objects to the bottom.
Distribute
Distribute Horizontally: Evenly distributes the selected objects horizontally.
Distribute Vertically: Evenly distributes the selected objects vertically.
Size
Align Width: Aligns the width of the selected objects.
Align Height: Aligns the height of the selected objects.
-41-
Affordable, Powerful PDF Software / PDF Editor for Windows, macOS, Linux
Copyright © 2002-Present Qoppa Software. All rights reserved.
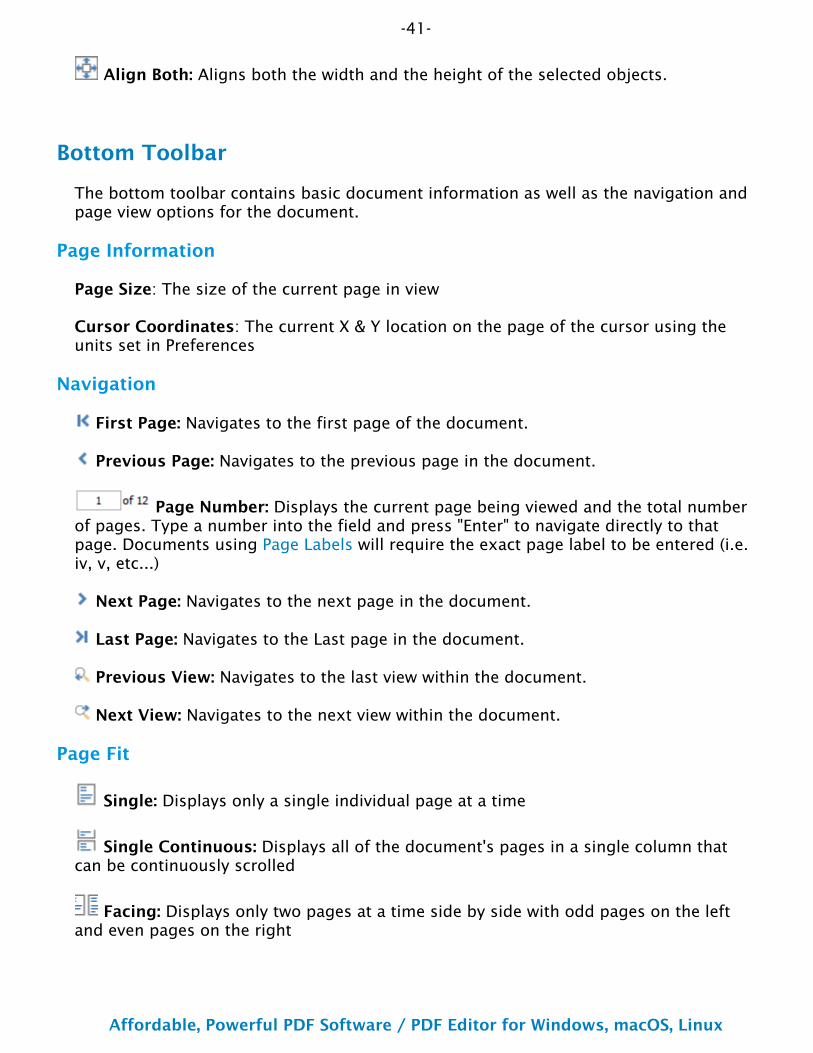
Align Both: Aligns both the width and the height of the selected objects.
Bottom Toolbar
The bottom toolbar contains basic document information as well as the navigation and page view options for the document.
Page Information
Page Size: The size of the current page in view
Cursor Coordinates: The current X & Y location on the page of the cursor using the units set in Preferences
Navigation
First Page: Navigates to the first page of the document.
Previous Page: Navigates to the previous page in the document.
Page Number: Displays the current page being viewed and the total number of pages. Type a number into the field and press "Enter" to navigate directly to that page. Documents using Page Labels will require the exact page label to be entered (i.e. iv, v, etc...)
Next Page: Navigates to the next page in the document.
Last Page: Navigates to the Last page in the document.
Previous View: Navigates to the last view within the document.
Next View: Navigates to the next view within the document.
Page Fit
Single: Displays only a single individual page at a time
Single Continuous: Displays all of the document's pages in a single column that can be continuously scrolled
Facing: Displays only two pages at a time side by side with odd pages on the left and even pages on the right
-42-
Affordable, Powerful PDF Software / PDF Editor for Windows, macOS, Linux
Copyright © 2002-Present Qoppa Software. All rights reserved.
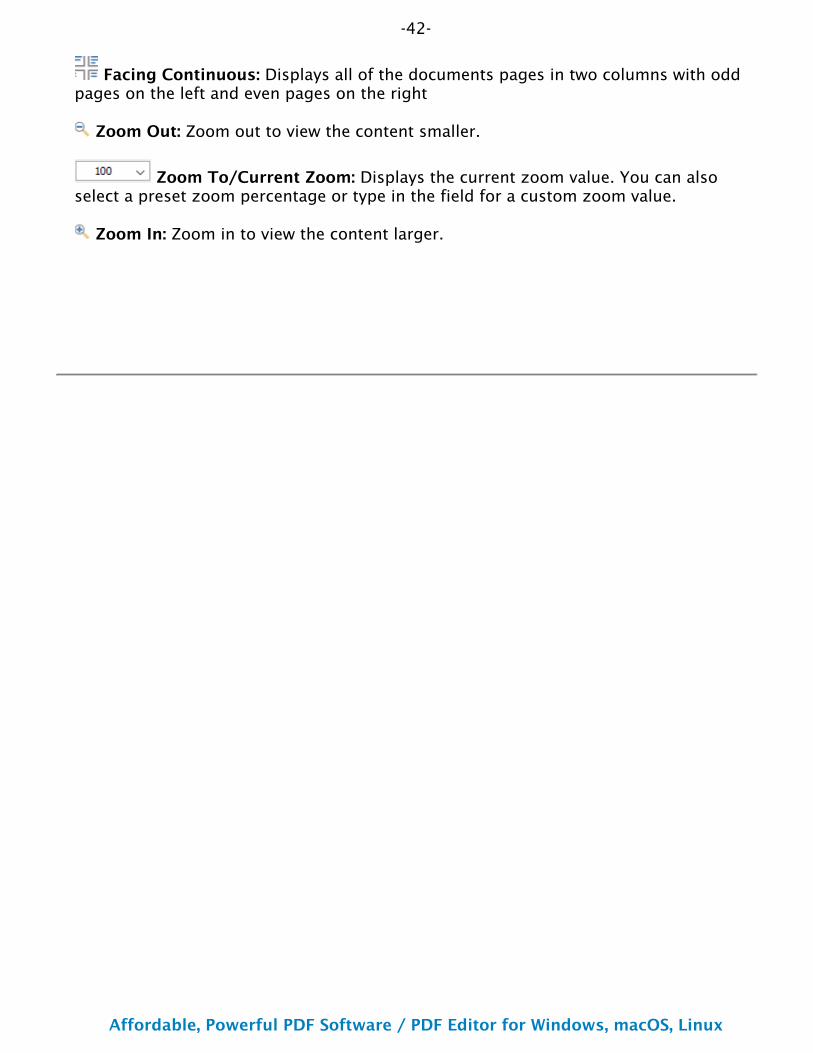
Facing Continuous: Displays all of the documents pages in two columns with odd pages on the left and even pages on the right
Zoom Out: Zoom out to view the content smaller.
Zoom To/Current Zoom: Displays the current zoom value. You can also select a preset zoom percentage or type in the field for a custom zoom value.
Zoom In: Zoom in to view the content larger.
-43-
Affordable, Powerful PDF Software / PDF Editor for Windows, macOS, Linux
Copyright © 2002-Present Qoppa Software. All rights reserved.
••
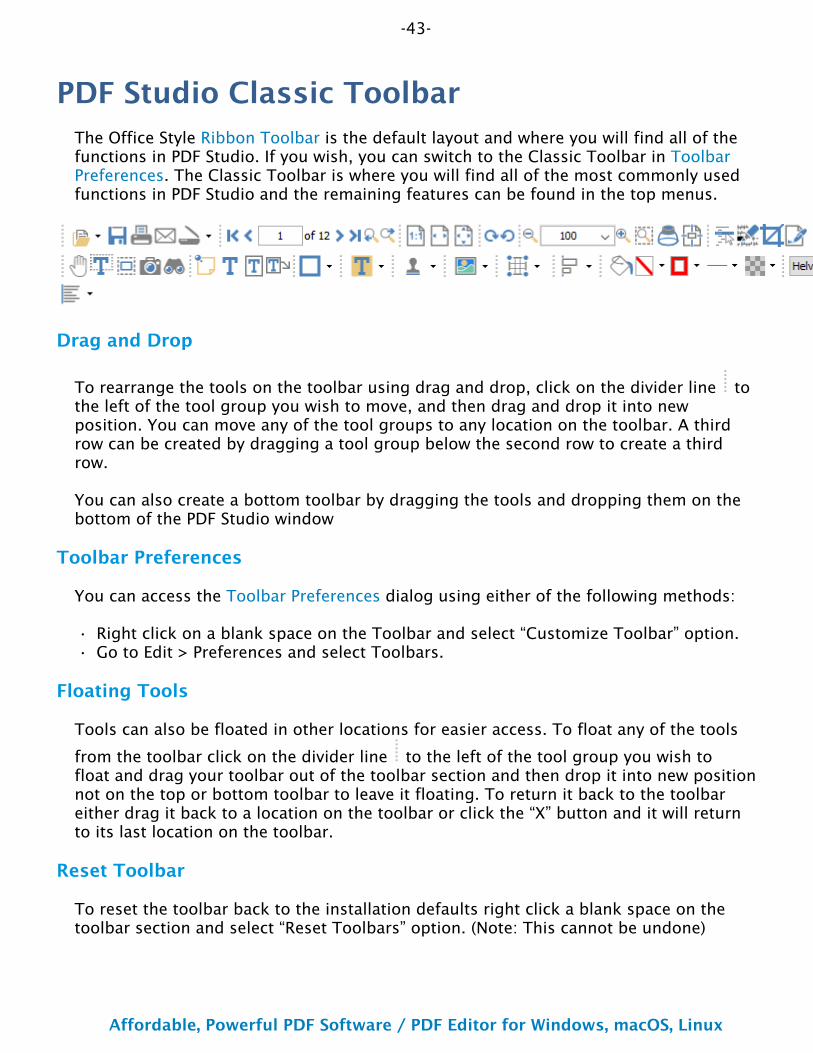
PDF Studio Classic ToolbarThe Office Style Ribbon Toolbar is the default layout and where you will find all of the functions in PDF Studio. If you wish, you can switch to the Classic Toolbar in Toolbar Preferences. The Classic Toolbar is where you will find all of the most commonly used functions in PDF Studio and the remaining features can be found in the top menus.
Drag and Drop
To rearrange the tools on the toolbar using drag and drop, click on the divider line to the left of the tool group you wish to move, and then drag and drop it into new position. You can move any of the tool groups to any location on the toolbar. A third row can be created by dragging a tool group below the second row to create a third row.
You can also create a bottom toolbar by dragging the tools and dropping them on the bottom of the PDF Studio window
Toolbar Preferences
You can access the Toolbar Preferences dialog using either of the following methods:
Right click on a blank space on the Toolbar and select “Customize Toolbar” option.Go to Edit > Preferences and select Toolbars.
Floating Tools
Tools can also be floated in other locations for easier access. To float any of the tools
from the toolbar click on the divider line to the left of the tool group you wish to float and drag your toolbar out of the toolbar section and then drop it into new position not on the top or bottom toolbar to leave it floating. To return it back to the toolbar either drag it back to a location on the toolbar or click the “X” button and it will return to its last location on the toolbar.
Reset Toolbar
To reset the toolbar back to the installation defaults right click a blank space on the toolbar section and select “Reset Toolbars” option. (Note: This cannot be undone)
-44-
Affordable, Powerful PDF Software / PDF Editor for Windows, macOS, Linux
Copyright © 2002-Present Qoppa Software. All rights reserved.
••
Classic Toolbar Descriptions
File
Open : Open a PDF document or convert any of the supported file types to a PDF.
Click on the down arrow to choose a document from the Recent File History to open.
Save: Save the current document. This button will be disabled if no changes have been made to the document.
Print: Prints the current document using the PDF Studio printer dialog. To use the system print dialog see Print Preferences.
Email PDF: Attaches the current document to an email using the email application set within Email Preferences.
Scan to PDF: Creates a PDF from a scanner using either of the 2 available scanning
dialogs. The last used option will be the default. Click on the down arrow to choose between the available scanner dialogs. (Note: Windows and Mac 64-bit installers will always use WIA/OCA and Linux will always use Sane for scanning)
Scan with Twain: Scans using the default system print dialog.Scan with WIA/ICA: Scans using the PDF Studio dialog.
Navigation
First Page: Navigates to the first page of the document.
Previous Page: Navigates to the previous page in the document.
Page Number: Displays the current page being viewed and the total number of pages. Type a number into the field and press "Enter" to navigate directly to that page. Documents using Page Labels will require the exact page label to be entered (i.e. iv, v, etc...)
Next Page: Navigates to the next page in the document.
Last Page: Navigates to the Last page in the document.
Previous View: Navigates to the last view within the document.
Next View: Navigates to the next view within the document.
-45-
Affordable, Powerful PDF Software / PDF Editor for Windows, macOS, Linux
Copyright © 2002-Present Qoppa Software. All rights reserved.
Page Fit
Actual Size: Displays the document with a 1:1 ratio to match how the document would look if printed without any scaling.
Fit to Width: Scales the view to fit the width of the document in the PDF Studio frame.
Fit to Page: Scales the view to fit the entire document within the PDF Studio frame.
View Rotation
Rotate View Clockwise: Rotates only the view within the document clockwise (Note: This rotation will NOT be saved when the document is saved then reopened).
Rotate View Counter Clockwise: Rotates only the view within the document counter clockwise (Note: This rotation will NOT be saved when the document is saved then reopened).
Zoom
Zoom Out: Zoom out to view the content smaller.
Zoom To/Current Zoom: Displays the current zoom value. You can also select a preset zoom percentage or type in the field for a custom zoom value.
Zoom In: Zoom in to view the content larger.
Zoom Tool: Zooms to a selected area within a page. Click and drag to select the rectangle area you wish to zoom to.
Loupe Tool: Displays a zoom window that zooms in on the PDF to show the smallest detail.
Pan and Zoom: A window showing the portion of the page currently on screen. Drag the red box to adjust the view of the document.
Document
Edit Content : Allows you to Edit Content within the PDF.
Mark for Redaction : Marks content for Redaction.
Crop Pages: Allows you to Crop the PDF pages(s).
-46-
Affordable, Powerful PDF Software / PDF Editor for Windows, macOS, Linux
Copyright © 2002-Present Qoppa Software. All rights reserved.
Sign Document : Allows you to Digitally Sign the current PDF.
Standard
Drag and Scroll Page: Click and drag to scroll or move the pages.
Select Text: Click and drag to select text within the document.
Edit Interactive Objects: Used to edit interactive objects within the PDF.
Take Snapshot: Used to save a portion of the screen as an image.
Advanced Search: Used to search the text of a PDF document.
Text Comments
Sticky Note: Creates a sticky note annotation.
Typewriter: Creates a typewriter annotation.
Text Box: Creates a text box annotation.
Callout: Creates a callout annotation.
Shape Comments
Circle: Creates a circle annotation.
Arrow: Creates an arrow annotation.
Line: Creates a line annotation.
Square: Creates a square annotation.
Pencil: Creates a pencil annotation.
Polygon: Creates a polygon annotation.
Cloud: Creates a cloud annotation.
Polyline: Creates a polyline annotation.
-47-
Affordable, Powerful PDF Software / PDF Editor for Windows, macOS, Linux
Copyright © 2002-Present Qoppa Software. All rights reserved.
•
•
•
•
Text Markups
Highlight Text: Used to highlight text on a document.
Crossout Text: Used to cross out text on a document.
Underline Text: Used to underline text on a document.
Squiggly Underline Text: Used to squiggly underline text on a document.
Insert Text: Adds an insert text markup on the document.
Replace Text: Adds a replace text markup on the selected text.
Area Highlight: Highlights an area on a document. Useful when trying to highlight scanned text.
Rubber Stamps
Rubber Stamp: Used to place a rubber stamp on the document. Click directly on the
button to reuse the last used stamp or click on the down arrow to select another stamp or choose between the following rubber stamp options.
Standard: Standardized stamps included with PDF Studio such as: Approved, Not Approved, Draft, etc...
Dynamic: Standardized stamps that also include a time and date that will automatically be set once placed.
Sign Here: Standardized signature stamps included with PDF Studio such as: Sign Here, Initial Here, Witness, etc...
Create New: Choose from the below options to create a stamp
Create Text Stamp: Create a custom text stamp that will be added to the rubber stamps list.Create Image Stamp: Create a custom image stamp that will be added to the rubber stamps list.Create PDF Stamp: Create a custom stamp from a PDF that will be added to the rubber stamp listCreate Custom Stamp: Create a custom stamp that will be added to the rubber stamps list.
Manage Stamps: Opens the rubber stamps manager to create/edit/delete rubber stamps.
-48-
Affordable, Powerful PDF Software / PDF Editor for Windows, macOS, Linux
Copyright © 2002-Present Qoppa Software. All rights reserved.
Multimedia
Sound: Adds a sound annotation attachment to the document.
Image: Adds an image as a rubber stamp annotation to the document.
Link: Used to create links in a document.
Attach File: Attaches a file to the PDF without an annotation.
Attach File as Comment: Attaches a file to the document with an annotation.
Measurements
Distance: Used to measure the distance between two points on the document.
Perimeter: Used to measure the perimeter on the document using multiple lines.
Area: Used to measure a designated area on the document.
Alignments
Align Left: Aligns the selected objects to the left.
Align Center: Aligns the selected objects to the center.
Align Right: Aligns the selected objects to the right.
Align Top: Aligns the selected objects to the top.
Align Middle: Aligns the selected objects to the middle.
Align Bottom: Aligns the selected objects to the bottom.
Distribute Horizontally: Evenly distributes the selected objects horizontally.
Distribute Vertically: Evenly distributes the selected objects vertically.
Align Width: Aligns the width of the selected objects.
Align Height: Aligns the height of the selected objects.
-49-
Affordable, Powerful PDF Software / PDF Editor for Windows, macOS, Linux
Copyright © 2002-Present Qoppa Software. All rights reserved.
•
Align Both: Aligns both the width and the height of the selected objects.
Properties - Appearance
Fill Color: Allows you to select the fill color of the selected objects.
Border Color: Allows you to select the border color for the selected objects.
Line Width: Sets the border line width for the selected objects.
Transparency: Sets the transparency for the selected objects.
Properties - Text
Font: Sets the font for the selected annotation.
Size: Sets the font size for the selected annotation.
Text Color: Sets the font color for the selected annotation.
Bold: Makes the selected annotation or text Bold.
Italic: Makes the selected annotation or text Italic.
Underline: Makes the selected annotation or text underlined
Strikethrough: Marks the selected annotation or text with a strikethrough
Horizontal Alignment: Sets the text alignment for the selected annotation.
Touch Mode
Touch Mode: Enables/Disables Touch mode
Others
Divider: separates each of the toolbar sections
Grouped Button/Options: used in one of the following
choose between different options for the tool it is attached to
-50-
Affordable, Powerful PDF Software / PDF Editor for Windows, macOS, Linux
Copyright © 2002-Present Qoppa Software. All rights reserved.
• to select other tools when toolbars are grouped (see Grouped Buttons in Toolbar Preferences)
-51-
Affordable, Powerful PDF Software / PDF Editor for Windows, macOS, Linux
Copyright © 2002-Present Qoppa Software. All rights reserved.
Mini ToolbarThe mini toolbar is a small toolbar that is displayed when an Annotation, Link, or Form Field is selected. This toolbar allows you to easily access the properties or delete the selected object without needing to use the right click context menu or keyboard. The toolbar can be enabled or disabled in the Toolbar Preferences.
Note: The mini toolbar will only be displayed on form fields when in Form Editing Mode or when Selecting Objects.
The Mini Toolbar has the following buttons
Border Color: Allows you to select the border color for the selected objects.
Fill Color: Allows you to select the fill color of the selected objects.
Text Color: Sets the font color for the selected annotation.
Properties: Opens the properties for the selected annotation, link, or form field
Delete: Deletes the selected annotation, link, or form field
-52-
Affordable, Powerful PDF Software / PDF Editor for Windows, macOS, Linux
Copyright © 2002-Present Qoppa Software. All rights reserved.
1.2.
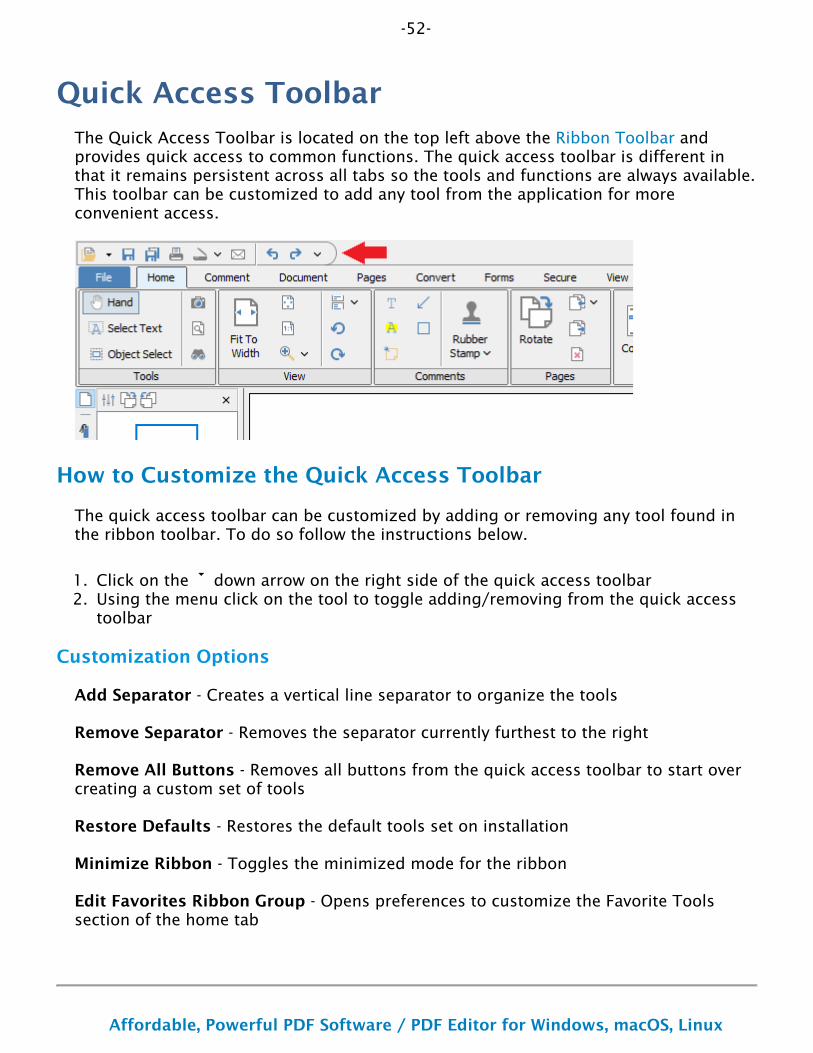
Quick Access ToolbarThe Quick Access Toolbar is located on the top left above the Ribbon Toolbar and provides quick access to common functions. The quick access toolbar is different in that it remains persistent across all tabs so the tools and functions are always available. This toolbar can be customized to add any tool from the application for more convenient access.
How to Customize the Quick Access Toolbar
The quick access toolbar can be customized by adding or removing any tool found in the ribbon toolbar. To do so follow the instructions below.
Click on the down arrow on the right side of the quick access toolbarUsing the menu click on the tool to toggle adding/removing from the quick access toolbar
Customization Options
Add Separator - Creates a vertical line separator to organize the tools
Remove Separator - Removes the separator currently furthest to the right
Remove All Buttons - Removes all buttons from the quick access toolbar to start over creating a custom set of tools
Restore Defaults - Restores the default tools set on installation
Minimize Ribbon - Toggles the minimized mode for the ribbon
Edit Favorites Ribbon Group - Opens preferences to customize the Favorite Tools section of the home tab
-53-
Affordable, Powerful PDF Software / PDF Editor for Windows, macOS, Linux
Copyright © 2002-Present Qoppa Software. All rights reserved.
•
•
•
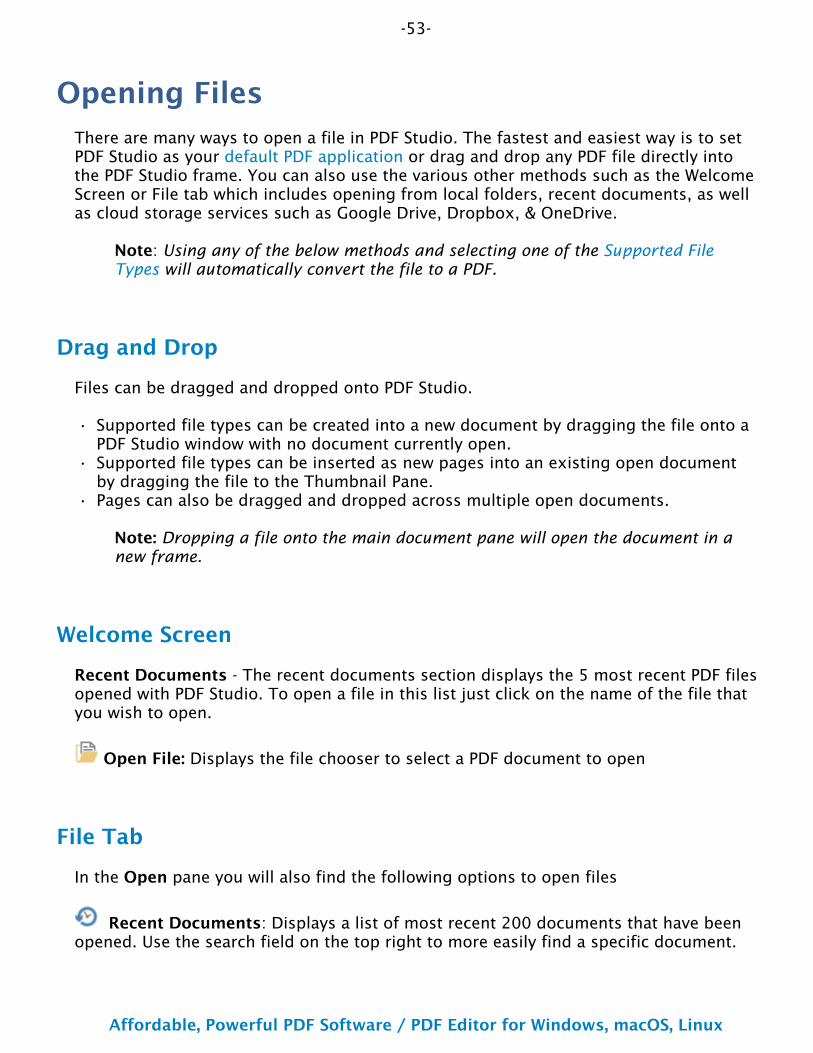
Opening FilesThere are many ways to open a file in PDF Studio. The fastest and easiest way is to set PDF Studio as your default PDF application or drag and drop any PDF file directly into the PDF Studio frame. You can also use the various other methods such as the Welcome Screen or File tab which includes opening from local folders, recent documents, as well as cloud storage services such as Google Drive, Dropbox, & OneDrive.
Note: Using any of the below methods and selecting one of the Supported File Types will automatically convert the file to a PDF.
Drag and Drop
Files can be dragged and dropped onto PDF Studio.
Supported file types can be created into a new document by dragging the file onto a PDF Studio window with no document currently open.Supported file types can be inserted as new pages into an existing open document by dragging the file to the Thumbnail Pane. Pages can also be dragged and dropped across multiple open documents.
Note: Dropping a file onto the main document pane will open the document in a new frame.
Welcome Screen
Recent Documents - The recent documents section displays the 5 most recent PDF files opened with PDF Studio. To open a file in this list just click on the name of the file that you wish to open.
Open File: Displays the file chooser to select a PDF document to open
File Tab
In the Open pane you will also find the following options to open files
Recent Documents: Displays a list of most recent 200 documents that have been opened. Use the search field on the top right to more easily find a specific document.
-54-
Affordable, Powerful PDF Software / PDF Editor for Windows, macOS, Linux
Copyright © 2002-Present Qoppa Software. All rights reserved.
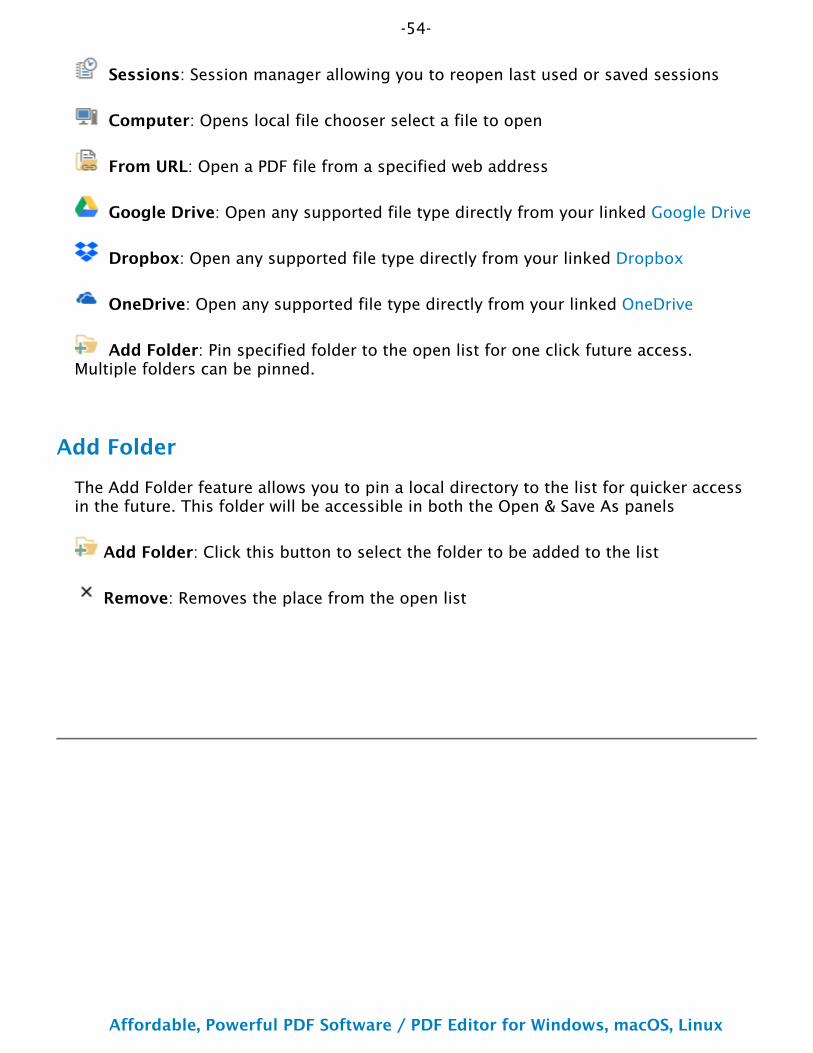
Sessions: Session manager allowing you to reopen last used or saved sessions
Computer: Opens local file chooser select a file to open
From URL: Open a PDF file from a specified web address
Google Drive: Open any supported file type directly from your linked Google Drive
Dropbox: Open any supported file type directly from your linked Dropbox
OneDrive: Open any supported file type directly from your linked OneDrive
Add Folder: Pin specified folder to the open list for one click future access. Multiple folders can be pinned.
Add Folder
The Add Folder feature allows you to pin a local directory to the list for quicker access in the future. This folder will be accessible in both the Open & Save As panels
Add Folder: Click this button to select the folder to be added to the list
Remove: Removes the place from the open list
-55-
Affordable, Powerful PDF Software / PDF Editor for Windows, macOS, Linux
Copyright © 2002-Present Qoppa Software. All rights reserved.
•••••
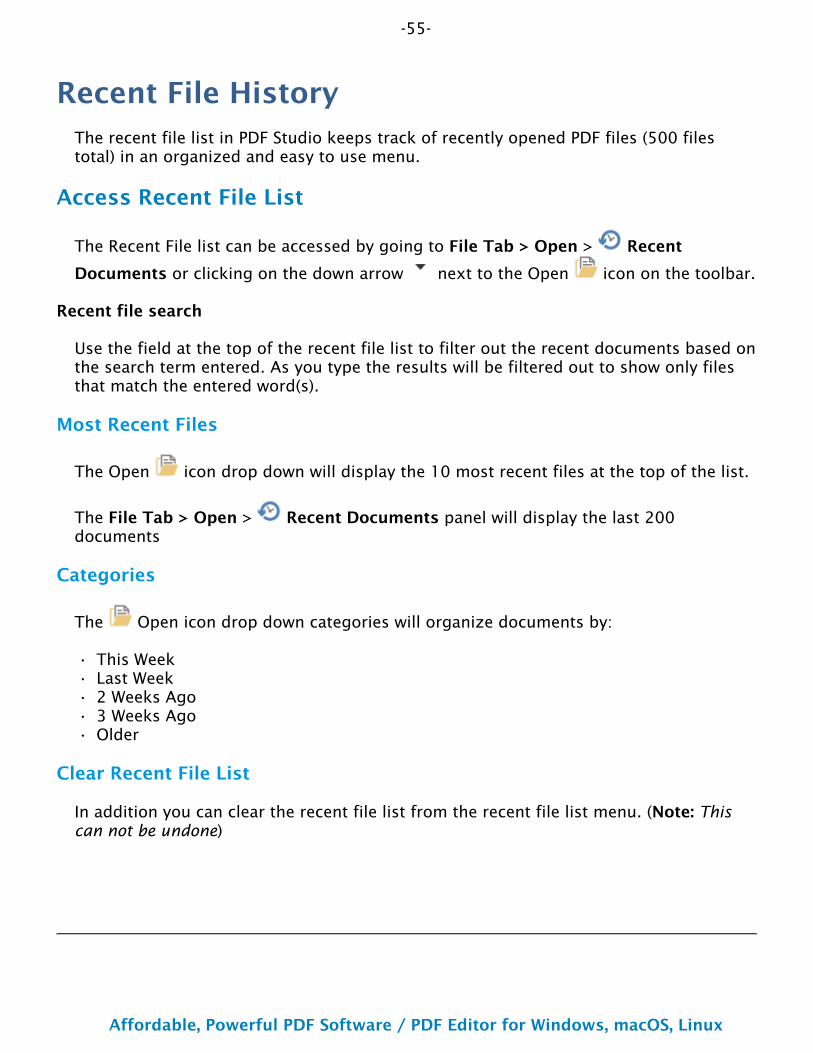
Recent File HistoryThe recent file list in PDF Studio keeps track of recently opened PDF files (500 files total) in an organized and easy to use menu.
Access Recent File List
The Recent File list can be accessed by going to File Tab > Open > Recent
Documents or clicking on the down arrow next to the Open icon on the toolbar.
Recent file search
Use the field at the top of the recent file list to filter out the recent documents based on the search term entered. As you type the results will be filtered out to show only files that match the entered word(s).
Most Recent Files
The Open icon drop down will display the 10 most recent files at the top of the list.
The File Tab > Open > Recent Documents panel will display the last 200 documents
Categories
The Open icon drop down categories will organize documents by:
This WeekLast Week2 Weeks Ago3 Weeks AgoOlder
Clear Recent File List
In addition you can clear the recent file list from the recent file list menu. (Note: This can not be undone)
-56-
Affordable, Powerful PDF Software / PDF Editor for Windows, macOS, Linux
Copyright © 2002-Present Qoppa Software. All rights reserved.
1.2.3.
4.
1.
2.3.4.
5.
1.
2.
3.4.
Google DriveGoogle drive integration allows you to connect to your cloud storage to view, modify & save the files directly from within PDF Studio. Once done you can save it back to the Google Drive if needed.
Note: A Google account is required. Files are not edited directly on the server but instead a temporary local file is stored during editing. Once saved, the file is sent back to the server and the temp file is removed.
How to use Google Drive
Opening Files
Go the File Tab > Open panel select Google DriveIf not already logged in, follow the steps to log into your Google Drive accountUse the right pane to explore your Google drive directories and files just as you normally wouldDouble click to open the file, and you can begin editing the PDF as you normally would
Saving Files
Files can be saved directly to the drive it came from by just clicking on the Save button on the toolbar or using the Ctrl + S (Cmd + S on Mac) shortcut key.
If you wish to save the file with a new name or a new directory use the Save As panel in the File tab
Go to the File Tab > Save As panel and select Google DriveIf not already logged in, follow the steps to log into your Google Drive accountUse the right pane to navigate to where you wish to save the file on your Google driveSet a file name and click Save
Logging Out
Once logged in your access key is stored across sessions. If needed you can log out of your cloud drive service to ensure that another user cannot access your files.Go to the File Tab > Open or Save As panel
Click on the logout button to the right of the Google Drive labelClick YES to confirm and your account will be logged out
Additional Options
Add Folder - Click to create a new folder in the current directory
-57-
Affordable, Powerful PDF Software / PDF Editor for Windows, macOS, Linux
Copyright © 2002-Present Qoppa Software. All rights reserved.
Refresh - Click to refresh the file/folder list in the current directory
Log Out - Click to log out of your Google Drive account

-58-
Affordable, Powerful PDF Software / PDF Editor for Windows, macOS, Linux
Copyright © 2002-Present Qoppa Software. All rights reserved.
1.2.3.
4.
1.
2.3.4.5.
1.
2.
3.4.
DropboxDropbox integration allows you to connect to your cloud storage to view, modify & save the files directly from within PDF Studio. Once done you can save it back to the Dropbox if needed.
Note: A Dropbox account is required. Files are not edited directly on the server but instead a temporary local file is stored during editing. Once saved, the file is sent back to the server and the temp file is removed.
How to use Dropbox
Opening Files
Go the File Tab > Open panel select DropboxIf not already logged in, follow the steps to log into your Dropbox accountUse the right pane to explore your Dropbox directories and files just as you normally wouldDouble click to open the file, and you can begin editing the PDF as you normally would
Saving Files
Files can be saved directly to the drive it came from by just clicking on the Save button on the toolbar or using the Ctrl + S (Cmd + S on Mac) shortcut key.
If you wish to save the file with a new name or a new directory use the Save As panel in the File tab
Go to the File Tab > Save As panel and select DropboxIf not already logged in, follow the steps to log into your Dropbox accountUse the right pane to navigate to where you wish to save the file on your DropboxSet a file name and click Save
Logging Out
Once logged in your access key is stored across sessions. If needed you can log out of your cloud drive service to ensure that another user cannot access your files.Go to the File Tab > Open or Save As panel
Click on the logout button to the right of the Dropbox labelClick YES to confirm and your account will be logged out
Additional Options
Add Folder - Click to create a new folder in the current directory
-59-
Affordable, Powerful PDF Software / PDF Editor for Windows, macOS, Linux
Copyright © 2002-Present Qoppa Software. All rights reserved.
Refresh - Click to refresh the file/folder list in the current directory
Log Out - Click to log out of your Dropbox account
-60-
Affordable, Powerful PDF Software / PDF Editor for Windows, macOS, Linux
Copyright © 2002-Present Qoppa Software. All rights reserved.
1.2.3.
4.
1.
2.3.4.5.
1.
2.
3.4.
OneDriveOneDrive integration allows you to connect to your cloud storage to view, modify & save the files directly from within PDF Studio. Once done you can save it back to the OneDrive if needed.
Note: A OneDrive account is required. Files are not edited directly on the server but instead a temporary local file is stored during editing. Once saved, the file is sent back to the server and the temp file is removed.
How to use OneDrive
Opening Files
Go the File Tab > Open panel select OneDriveIf not already logged in, follow the steps to log into your OneDrive accountUse the right pane to explore your OneDrive directories and files just as you normally wouldDouble click to open the file, and you can begin editing the PDF as you normally would
Saving Files
Files can be saved directly to the drive it came from by just clicking on the Save button on the toolbar or using the Ctrl + S (Cmd + S on Mac) shortcut key.
If you wish to save the file with a new name or a new directory use the Save As panel in the File tab
Go to the File Tab > Save As panel and select OneDriveIf not already logged in, follow the steps to log into your OneDrive accountUse the right pane to navigate to where you wish to save the file on your OneDriveSet a file name and click Save
Logging Out
Once logged in your access key is stored across sessions. If needed you can log out of your cloud drive service to ensure that another user cannot access your files.Go to the File Tab > Open or Save As panel
Click on the logout button to the right of the Goole Drive labelClick YES to confirm and your account will be logged out
Additional Options
Add Folder - Click to create a new folder in the current directory

-61-
Affordable, Powerful PDF Software / PDF Editor for Windows, macOS, Linux
Copyright © 2002-Present Qoppa Software. All rights reserved.
Refresh - Click to refresh the file/folder list in the current directory
Log Out - Click to log out of your OneDrive account
-62-
Affordable, Powerful PDF Software / PDF Editor for Windows, macOS, Linux
Copyright © 2002-Present Qoppa Software. All rights reserved.
•
••
•
••
Saving PDFsAfter creating or modifying your PDF you can save your changes to the original PDF document or as a new copy of the file. Documents that have been modified and not yet saved will be marked with an asterisk '*' next to the file name in the application title bar.
Additionally, PDF documents can also be exported or converted to other formats including images, HTML, Word and more by using the Conversion Tools available in PDF Studio.
Save a PDF
Use Save to write any changes you have made on to the original file. The Save feature will only be enabled once PDF Studio detects any changes to the open document.
Use any of the options below to Save your document at any time during the editing process:
Save button on the Quick Access Toolbar
Save option in the File Tab of the Ribbon ToolbarCtrl + S shortcut keys
Save a Copy of a PDF
Use the Save As option allows you to save a copy of the current file to a different file name. This feature is always enabled and can be done even when there are no modifications made to the document.
Use any of the options below to Save your document at any time during the editing process:
Save As button on the Quick Access Toolbar
Save As option in the File Tab of the Ribbon ToolbarCtrl + Shift + S shortcut keys
-63-
Affordable, Powerful PDF Software / PDF Editor for Windows, macOS, Linux
Copyright © 2002-Present Qoppa Software. All rights reserved.
1.2.3.4.
Autosave Document RecoveryAutosave is a new feature available in PDF Studio that automatically saves your document as you work. This feature is enabled by default and will create a backup of the current modifications based on the specified time interval (defaulted to 5 minutes).
The autosave interval timer is not started until after the first document modification. At the specified autosave interval, the original file is not modified and instead, a separate temporary file is created that stores only the document modifications. This file will be updated at each interval until the the document is closed, saved or reverted, at which point the temporary file will be removed.
Note: Changes made in between the time intervals will not be saved. If the autosave interval is set to 20 minutes and something happens at 19 minutes, then work will be lost back to the last autosave. The 5 minute default we have set is a good balance between performance and preventing loss of work.
Enable / Disable Autosave
The auto save feature will be enabled by default on first install. However, you can enable / disable autosaving or adjust the autosave frequency by following the instructions below:
Go to File Tab > PreferencesSelect Application from the panel on the left of the preferences dialogCheck / uncheck the Autosave option to enable / disable the featureUse the Interval field to adjust the frequency of the saves
Recovering Lost Edits
PDF Studio will search for any autosaved files on each startup. When PDF Studio finds an autosave temporary file it will open the document recovery window for you to choose whether or not you wish to recover the saved changes. Once recovered the file should be saved as the temporary file will be removed.
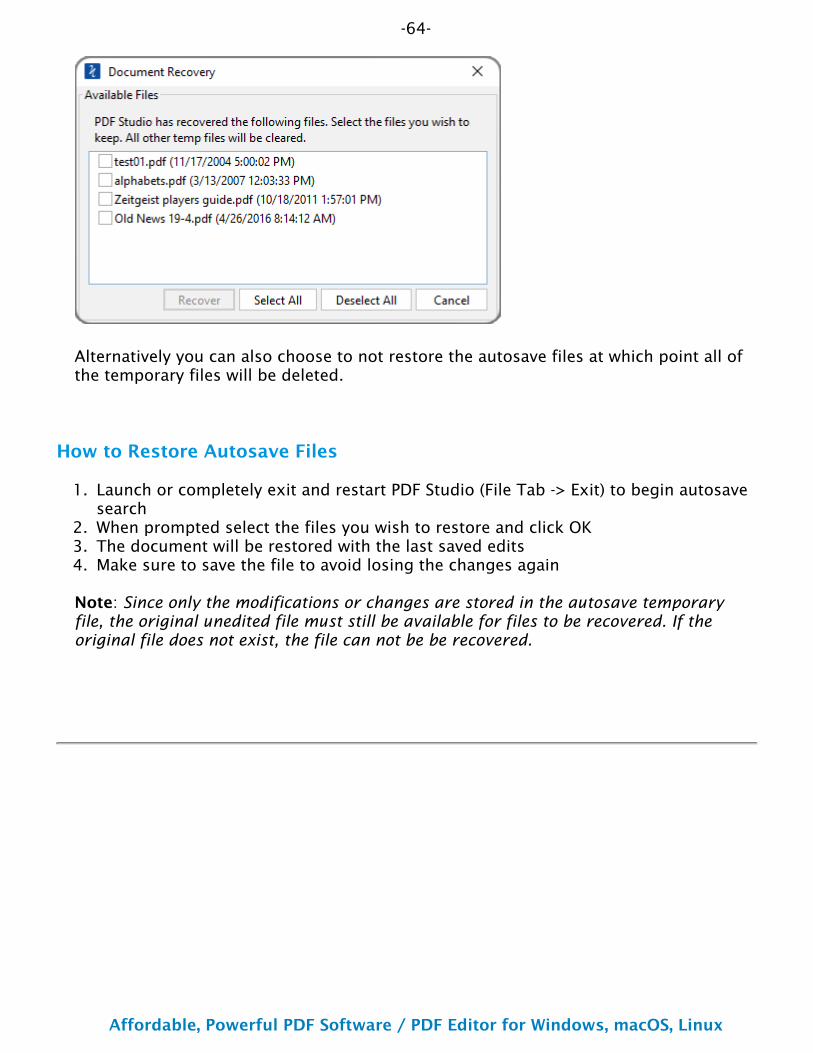
-64-
Affordable, Powerful PDF Software / PDF Editor for Windows, macOS, Linux
Copyright © 2002-Present Qoppa Software. All rights reserved.
1.
2.3.4.
Alternatively you can also choose to not restore the autosave files at which point all of the temporary files will be deleted.
How to Restore Autosave Files
Launch or completely exit and restart PDF Studio (File Tab -> Exit) to begin autosave searchWhen prompted select the files you wish to restore and click OKThe document will be restored with the last saved editsMake sure to save the file to avoid losing the changes again
Note: Since only the modifications or changes are stored in the autosave temporary file, the original unedited file must still be available for files to be recovered. If the original file does not exist, the file can not be be recovered.
-65-
Affordable, Powerful PDF Software / PDF Editor for Windows, macOS, Linux
Copyright © 2002-Present Qoppa Software. All rights reserved.
•••
1.
2.
3.4.
SessionsThe sessions feature allows you to store the active list of documents opened in PDF Studio and then reopen that session again at a later time with a single click. Multiple sessions can be saved for ease of use when working across multiple projects. The stored session will retain the following:
Documents that were openTab order of the open documentsNumber of windows open (if documents open in separate windows)
Note: To also restore the last page viewed when reopening the documents in your session go to Preferences -> Display and enable the Restore Last Page option.
How to Use Sessions
To access the sessions panel go to File Tab > Open > Sessions. From there, you can save the current session, open an existing session or edit / delete existing sessions.
Session search
Use the field at the top of the sessions list to filter out the sessions documents based on the search term entered. As you type the results will be filtered out to show only sessions that match the entered word(s).
Save Current Session
Open the documents you wish to store in the session
Go to File Tab > Open > Sessions
Click on Save current session Enter a name for the session and click OK to save
Open Previous Session
Existing sessions can be accessed by going to File Tab > Open > Sessions or
clicking on the down arrow next to the Open icon on the Quick Acces Toolbar.
-66-
Affordable, Powerful PDF Software / PDF Editor for Windows, macOS, Linux
Copyright © 2002-Present Qoppa Software. All rights reserved.
Edit / Delete Saved Session
Use the following buttons to edit / delete existing sessions
Edit: Opens dialog to rename the selected session
Delete: Removes the saved session
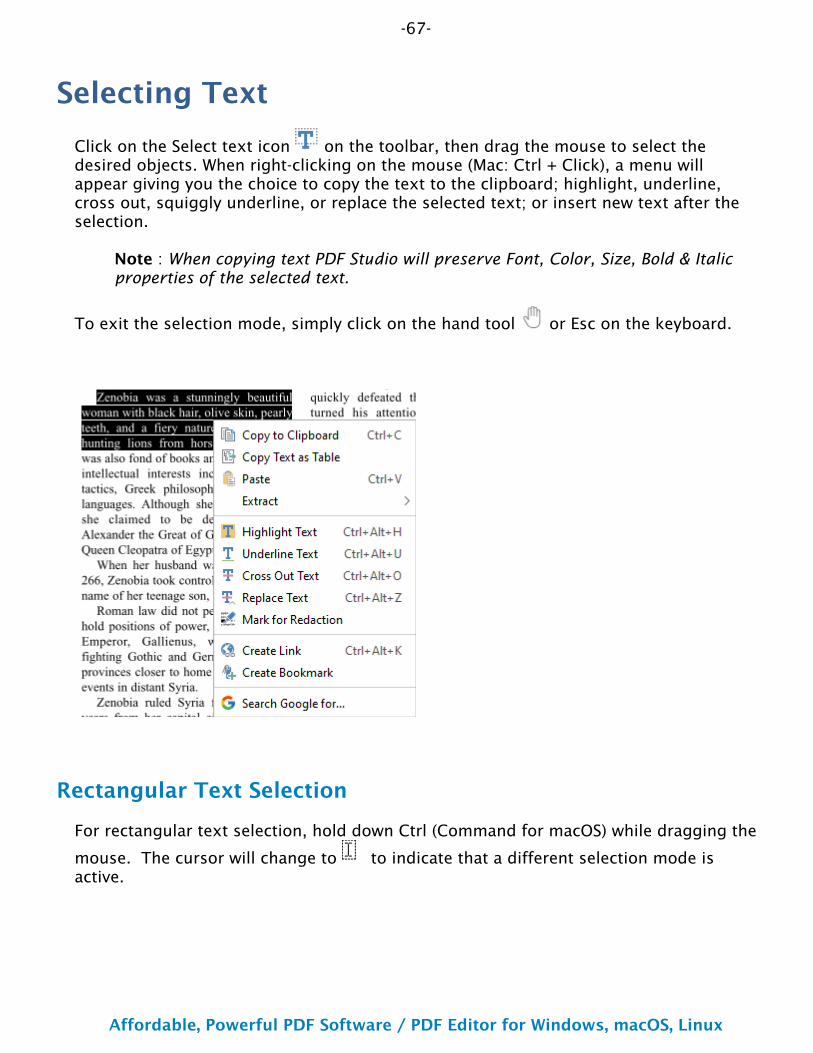
-67-
Affordable, Powerful PDF Software / PDF Editor for Windows, macOS, Linux
Copyright © 2002-Present Qoppa Software. All rights reserved.
Selecting Text
Click on the Select text icon on the toolbar, then drag the mouse to select the desired objects. When right-clicking on the mouse (Mac: Ctrl + Click), a menu will appear giving you the choice to copy the text to the clipboard; highlight, underline, cross out, squiggly underline, or replace the selected text; or insert new text after the selection.
Note : When copying text PDF Studio will preserve Font, Color, Size, Bold & Italic properties of the selected text.
To exit the selection mode, simply click on the hand tool or Esc on the keyboard.
Rectangular Text Selection
For rectangular text selection, hold down Ctrl (Command for macOS) while dragging the
mouse. The cursor will change to to indicate that a different selection mode is active.
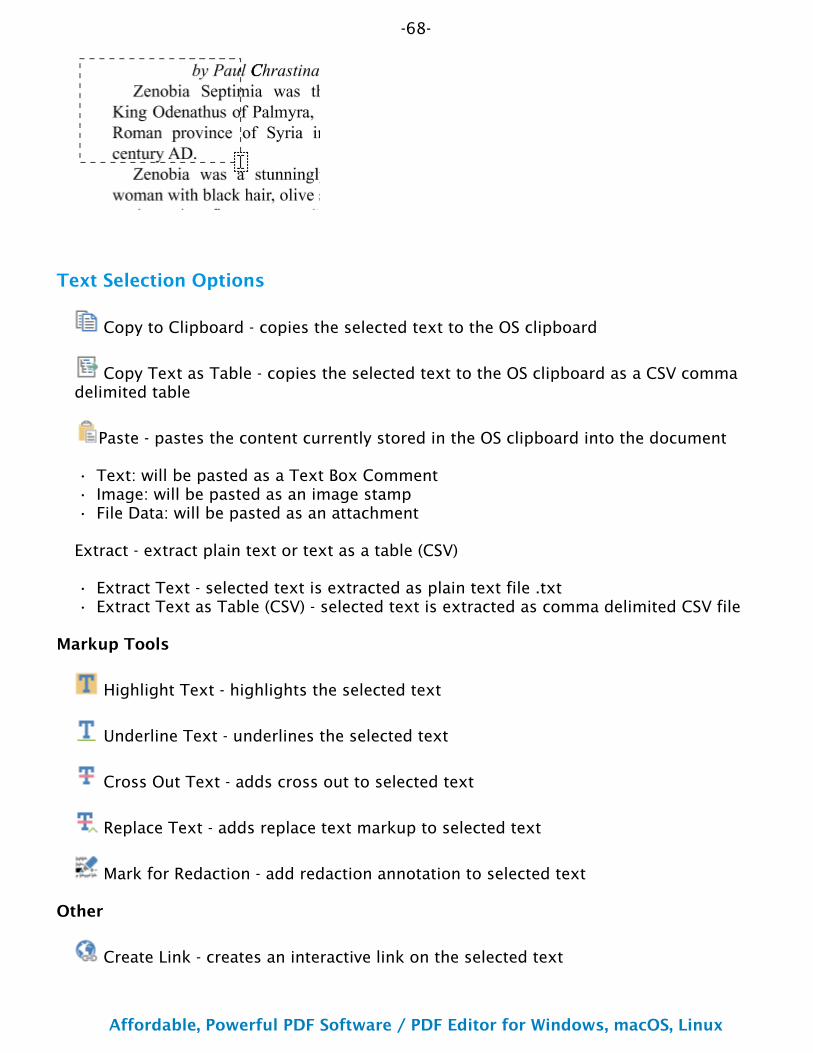
-68-
Affordable, Powerful PDF Software / PDF Editor for Windows, macOS, Linux
Copyright © 2002-Present Qoppa Software. All rights reserved.
•••
••
Text Selection Options
Copy to Clipboard - copies the selected text to the OS clipboard
Copy Text as Table - copies the selected text to the OS clipboard as a CSV comma delimited table
Paste - pastes the content currently stored in the OS clipboard into the document
Text: will be pasted as a Text Box CommentImage: will be pasted as an image stampFile Data: will be pasted as an attachment
Extract - extract plain text or text as a table (CSV)
Extract Text - selected text is extracted as plain text file .txtExtract Text as Table (CSV) - selected text is extracted as comma delimited CSV file
Markup Tools
Highlight Text - highlights the selected text
Underline Text - underlines the selected text
Cross Out Text - adds cross out to selected text
Replace Text - adds replace text markup to selected text
Mark for Redaction - add redaction annotation to selected text
Other
Create Link - creates an interactive link on the selected text
-69-
Affordable, Powerful PDF Software / PDF Editor for Windows, macOS, Linux
Copyright © 2002-Present Qoppa Software. All rights reserved.
Create Bookmark - creates a bookmark at the current position using the selected text
Search
Search Google for... - performs a Google search with the selected text
-70-
Affordable, Powerful PDF Software / PDF Editor for Windows, macOS, Linux
Copyright © 2002-Present Qoppa Software. All rights reserved.
••••••
Selecting ObjectsThe object selection tool can be used to edit objects that are not a part of the actual PDF content. Below is a list of the objects that can be selected.
AnnotationsText MarkupsForm FieldsLinksFile Attachment Comments3D content
Using the Object Selection Tool
Click on the Object Selection icon on the toolbar, then click or drag an area with the mouse to select the desired objects. Once selected objects can be edited, moved, or deleted just the same as you would anything else.
To exit the selection mode, simply click on the hand tool or Esc on the keyboard.
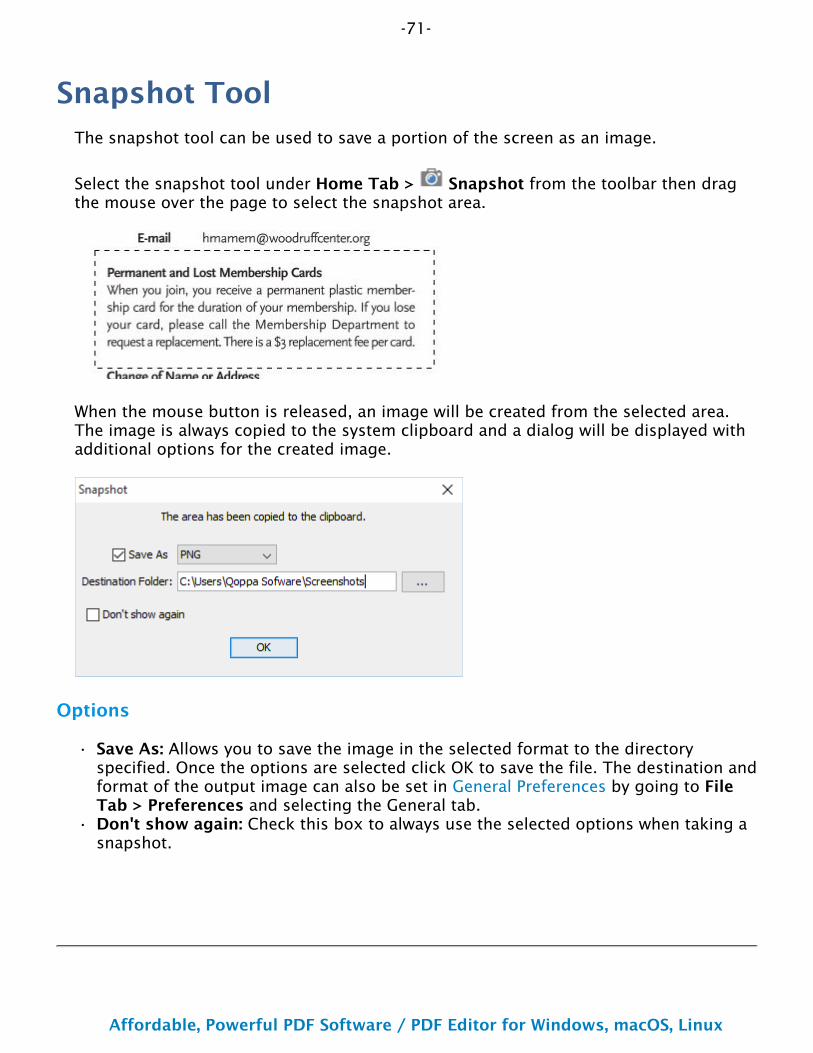
-71-
Affordable, Powerful PDF Software / PDF Editor for Windows, macOS, Linux
Copyright © 2002-Present Qoppa Software. All rights reserved.
•
•
Snapshot ToolThe snapshot tool can be used to save a portion of the screen as an image.
Select the snapshot tool under Home Tab > Snapshot from the toolbar then drag the mouse over the page to select the snapshot area.
When the mouse button is released, an image will be created from the selected area. The image is always copied to the system clipboard and a dialog will be displayed with additional options for the created image.
Options
Save As: Allows you to save the image in the selected format to the directory specified. Once the options are selected click OK to save the file. The destination and format of the output image can also be set in General Preferences by going to File Tab > Preferences and selecting the General tab.Don't show again: Check this box to always use the selected options when taking a snapshot.
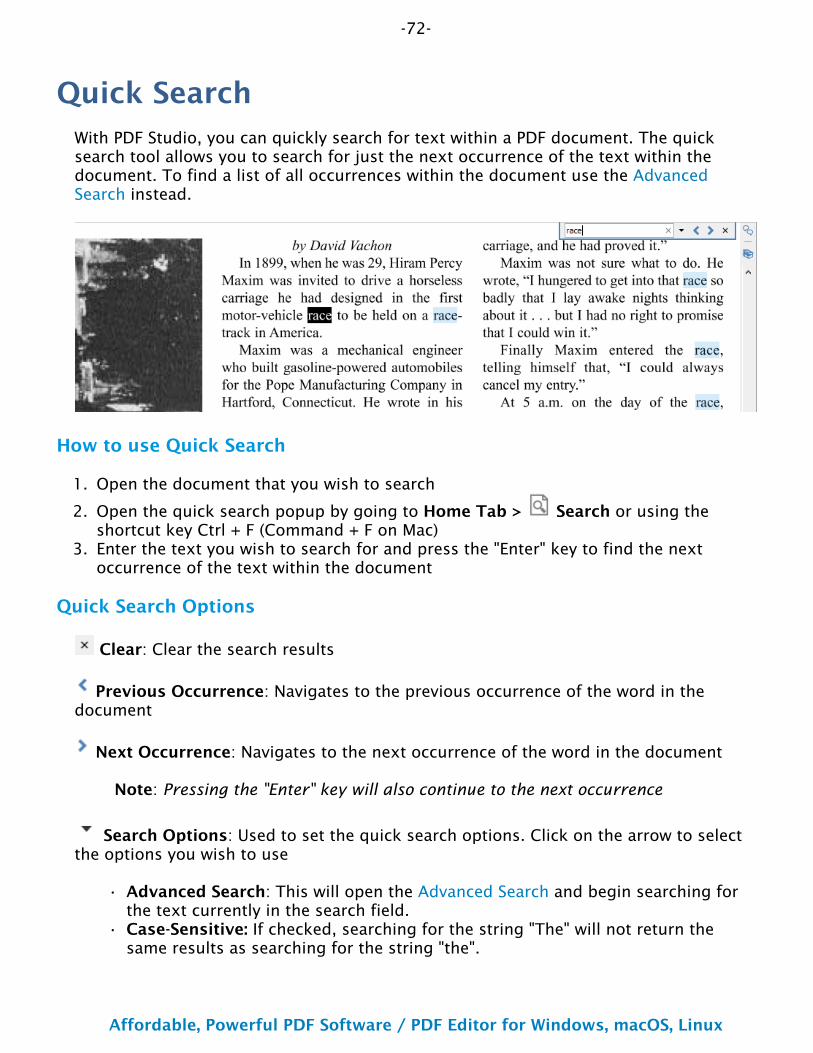
-72-
Affordable, Powerful PDF Software / PDF Editor for Windows, macOS, Linux
Copyright © 2002-Present Qoppa Software. All rights reserved.
1.
2.
3.
•
•
Quick SearchWith PDF Studio, you can quickly search for text within a PDF document. The quick search tool allows you to search for just the next occurrence of the text within the document. To find a list of all occurrences within the document use the Advanced Search instead.
How to use Quick Search
Open the document that you wish to search
Open the quick search popup by going to Home Tab > Search or using the shortcut key Ctrl + F (Command + F on Mac)Enter the text you wish to search for and press the "Enter" key to find the next occurrence of the text within the document
Quick Search Options
Clear: Clear the search results
Previous Occurrence: Navigates to the previous occurrence of the word in the document
Next Occurrence: Navigates to the next occurrence of the word in the document
Note: Pressing the "Enter" key will also continue to the next occurrence
Search Options: Used to set the quick search options. Click on the arrow to select the options you wish to use
Advanced Search: This will open the Advanced Search and begin searching for the text currently in the search field.Case-Sensitive: If checked, searching for the string "The" will not return the same results as searching for the string "the".
-73-
Affordable, Powerful PDF Software / PDF Editor for Windows, macOS, Linux
Copyright © 2002-Present Qoppa Software. All rights reserved.
•
•
•
Whole words only: If checked, searching for "the" will not return occurrences of "they". But when this option is left unchecked, all occurrences of "they", and other words with the letters "the", will appear in the occurrence list.Include comments: If checked, the search will include text in annotation comments.Include fields: If checked, the search will include text in form fields. (this is on by default)
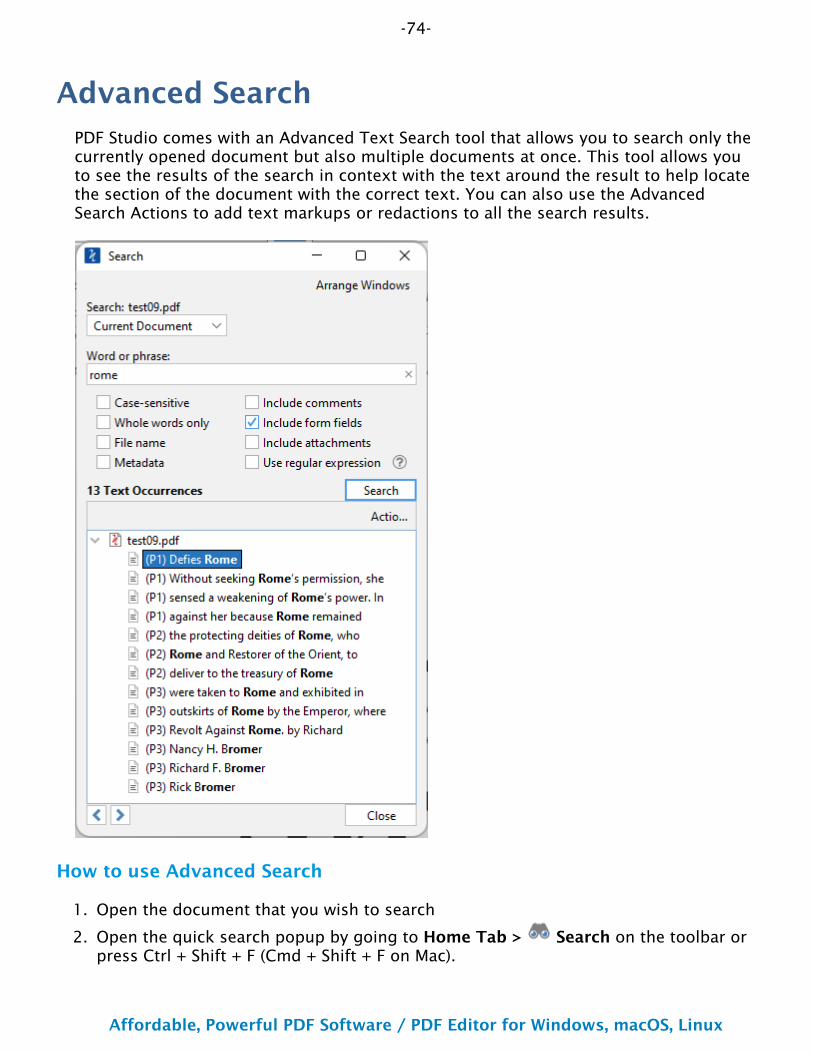
-74-
Affordable, Powerful PDF Software / PDF Editor for Windows, macOS, Linux
Copyright © 2002-Present Qoppa Software. All rights reserved.
1.
2.
Advanced SearchPDF Studio comes with an Advanced Text Search tool that allows you to search only the currently opened document but also multiple documents at once. This tool allows you to see the results of the search in context with the text around the result to help locate the section of the document with the correct text. You can also use the Advanced Search Actions to add text markups or redactions to all the search results.
How to use Advanced Search
Open the document that you wish to search
Open the quick search popup by going to Home Tab > Search on the toolbar or press Ctrl + Shift + F (Cmd + Shift + F on Mac).
-75-
Affordable, Powerful PDF Software / PDF Editor for Windows, macOS, Linux
Copyright © 2002-Present Qoppa Software. All rights reserved.
3.
•••
•••
•
Enter the text to search in the text field and select any additional options, then press the Enter key or click on the Search button. All occurrences of the text in the document will appear in the occurrences list.
To navigate through the results:
Use the Up arrow key (previous) and Down arrow key (next).Click on the Previous Occurrence or Next Occurrence buttons.Click on the result with the mouse
Note: When navigating the search results for multiple documents, highlighting or selecting another document will open it in a new PDF Studio window.
Advanced Search Options
Search: Allows you to select where to search for the desired text. Choose from one of the following options
Current Document: searches only the currently opened and active document.All Open Documents: searches all documents currently opened in PDF StudioDirectory: searches all PDF documents within a selected directory. You can type the destination manually or click on the "..." button to open a directory chooser to set the destination folder. Check the "Include Subfolders" option to include any documents found in any folders within the selected directory.Recent Documents: searches all documents in the Recent File History list
Word or Phrase: Enter the text you wish to search for
Case-Sensitive: If checked, searching for the string "The" will not return the same results as searching for the string "the".
Whole words only: If checked, searching for "the" will not return occurrences of "they". But when this option is left unchecked, all occurrences of "they" will appear in the occurrence list.
File Name: If checked, the search will include PDF documents with the text in the file name
Metadata: If checked, the search will include the Metadata found in Document Properties of any PDF files
Include comments: If checked, the search will include text in annotation comments.
Include form fields: If checked, the search will include text in form fields. (this is on by default)
Include attachments: If checked, will search the text within attached PDF documents.
Use regular expression: Allows you to user a regular expression to perform more advanced search queries
-76-
Affordable, Powerful PDF Software / PDF Editor for Windows, macOS, Linux
Copyright © 2002-Present Qoppa Software. All rights reserved.
••••
Examples:
US phone number: ((\(\d{3}\)?)|(\d{3}-))?\d{3}-\d{4}US Social Security number: \d{3}-\d{2}-\d{4}Email address: [\w-]+@([\w-]+\.)+[\w-]+For more information: https://en.wikipedia.org/wiki/Regex
Result Navigation
Previous Occurrence: Navigates to the previous occurrence of the word in the document
Next Occurrence: Navigates to the next occurrence of the word in the document
Note: Pressing the "Enter" key will also continue to the next occurrence
Advanced Search Actions
Use the Actions options to apply markups or redactions to all the results found in the document.
Highlight Text - applies Text Highlight markups to the results
Cross Out Text - applies Cross Out text markups to the results
Underline Text - applies Underline text markups to the results
Squiggly Underline Text - applies Squiggly Underline text markups to the results
Create Bookmark - creates a Bookmark for each of the results found
Create Link - creates a Web Link for each of the results found using the selected options
Mark for Redaction - creates a Redaction Annotation for each for the results found
Note: This only applies the redaction annotations so that you can first review the redaction before Applying Redactions
Replace Text - replaces all instances of the text found with the new text you choose
-77-
Affordable, Powerful PDF Software / PDF Editor for Windows, macOS, Linux
Copyright © 2002-Present Qoppa Software. All rights reserved.
Note: This will not reflow or change the layout of paragraphs. This tool is useful for small changes only.
-78-
Affordable, Powerful PDF Software / PDF Editor for Windows, macOS, Linux
Copyright © 2002-Present Qoppa Software. All rights reserved.
•
•
Printing PDFsPDF documents can be printed from within PDF Studio. By default, PDF Studio will print using our custom dialog which provides additional advanced printing options as well as
a live print preview. Start the print dialog by clicking on the Print icon or press Ctrl + P (Cmd + P on Mac).
Print Dialog
Print with Windows/Mac/Linux: Prints the PDF using the default system print dialog. The settings in this dialog will be determined by the operating system.Print with PDF Studio: Prints the PDF using the PDF Studio dialog. Below is a list of the available settings when using the PDF Studio Print Dialog
Note: If you wish to set the Operating System print dialog as the default, see Print Defaults in Preferences.
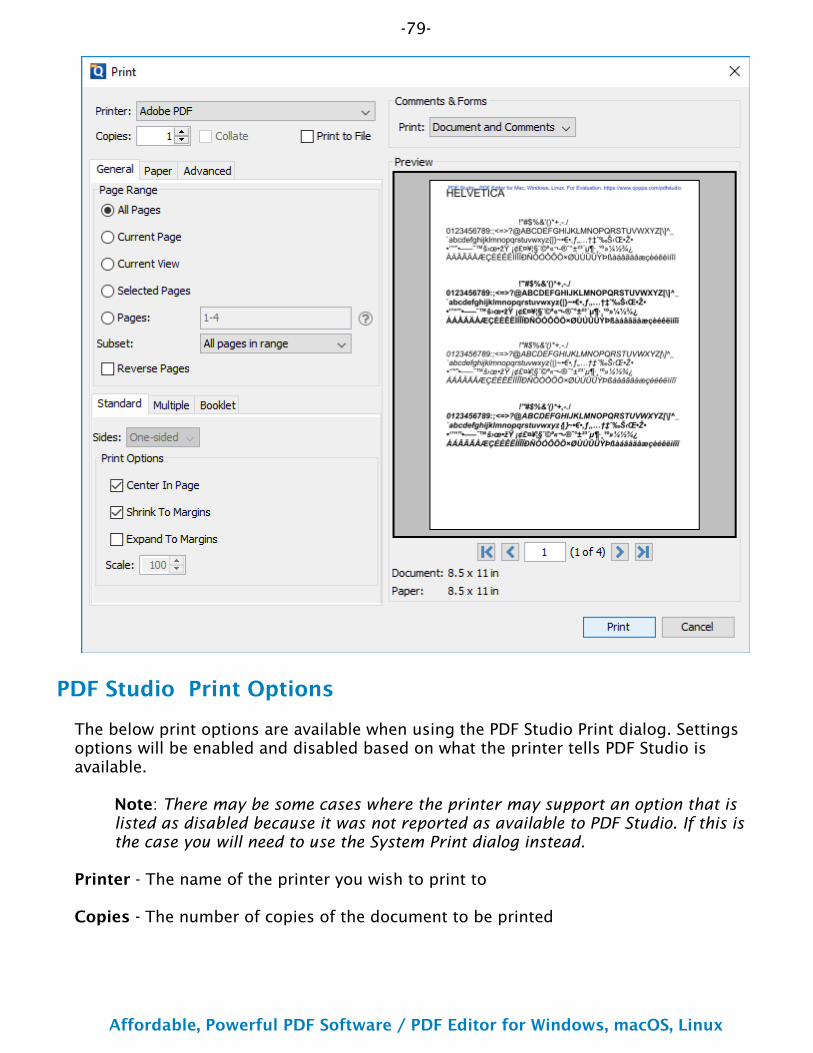
-79-
Affordable, Powerful PDF Software / PDF Editor for Windows, macOS, Linux
Copyright © 2002-Present Qoppa Software. All rights reserved.
PDF Studio Print Options
The below print options are available when using the PDF Studio Print dialog. Settings options will be enabled and disabled based on what the printer tells PDF Studio is available.
Note: There may be some cases where the printer may support an option that is listed as disabled because it was not reported as available to PDF Studio. If this is the case you will need to use the System Print dialog instead.
Printer - The name of the printer you wish to print to
Copies - The number of copies of the document to be printed
-80-
Affordable, Powerful PDF Software / PDF Editor for Windows, macOS, Linux
Copyright © 2002-Present Qoppa Software. All rights reserved.
•••
••
•
•
Collate: Keeps pages in order when printing multiple copies. For example, if unchecked, two copies of a three-page document will print in this order: 1,1,2,2,3,3. If checked, the order will be 1,2,3,1,2,3. This option is not available when printing only one copy.
Print to File - Option to print to a .prn file instead of directly to the printer. This allows you to reprint the document without running or even having the original application that created the file. For example, if you need to send the document to a printing company that only prints on a specific printer.
General
Page Range
All Pages: all pages in the document
Current Page: the current page being displayed
Current View: prints the page exactly as it is displayed in the current PDF Studio frame. Note: This option will be disabled if more than one page is currently being displayed.
Selected Pages: prints the pages currently selected in the thumbnails pane
Pages: set custom range of pages if needed using values separated by commas. For example, to print only pages 2 to 4 & 6 to 12 & 20 of a 30 page document enter “2-4, 6-12, 20″. Documents using Page Labels will require the exact page label to be entered (i.e. iv, v, etc...)
Subset: Subset of the currently set page range to print. Choose from the below options
All pages in range: prints all the pages in the set rangeEven pages only: prints only the even pages in the set range (i.e. 2, 4, 6, etc...)Odd pages only: prints only the odd pages in the set range (i.e. 1, 3, 5, etc...)
Reverse Pages: reverse the order in which the pages will come out of the printer
Standard Printing
Sides - The options to print pages either one sided or on both sides of the paper
One-sided: prints only one page on the front of each sheet of paperTwo-Sided (short edge): prints two pages, one on front and one on back, per sheet of paper flipping the page on the short edgeTwo-Sided (long edge): prints two pages, one on front and one on back, per sheet of paper flipping the page on the long edge
Print Options - Additional print options to size the content to the page.
Center In Page: center the page in the paper. No effect if the pages in a document are larger than the paper they are being printed on.
-81-
Affordable, Powerful PDF Software / PDF Editor for Windows, macOS, Linux
Copyright © 2002-Present Qoppa Software. All rights reserved.
•
•
•
••
•
•
•
•
Shrink To Margins: shrink pages so that they fit in the paper. No effect if the pages in a document are smaller than the paper they are being printed on.Expand To Margins: expand pages to fill the paper they are being printed on. No effect if the pages in a document are larger than the paper they are being printed on.Scale: Sets a custom scale to the document when printing. This option is only available when Shrink to Margins or Expand to Margins are not selected.
Multiple Pages per Sheet Printing
Pages per sheet: Number of pages from the document that should be printed per sheet. Pages will be added to the sheet using evenly spaced grids
Page order: Options to order the pages Horizontally from top to bottom or Vertically from left to right
Page margins: Adjusts the spacing between each of the page grids
Sides - The options to print pages either one sided or on both sides of the paper
One-sided: prints only one page on the front of each sheet of paperTwo-Sided (short edge): prints two pages, one on front and one on back, per sheet of paper flipping the page on the short edgeTwo-Sided (long edge): prints two pages, one on front and one on back, per sheet of paper flipping the page on the long edge
Auto-rotate individual pages in sheet: Rotates each individual page so that the width and length best fit each of the individual grids on the sheet.
Print border: When checked adds a border around each of the pages on the sheet
Booklet Printing
Booklet subset: Subset of the currently set page range options. Choose from the below options
Both Sides (long edge): This will print all of the booklet pages on both sides of each sheet of paper so that when folded will create a booklet.Front sides only: Will work just as it currently does only printing the front sides of the booklet so the user can flip the pages and print the back sides to manually duplex if needed.Back sides only: Will work just as it currently does only printing the back sides of the booklet
Page margins: Adjusts the spacing between each of the page grids
Binding: Determines whether the binding (folded edge) of the booklet when folded should be on the left or the right
Auto-rotate individual pages in sheet: Rotates each individual page so that the width and length best fit each of the individual grids on the sheet.
-82-
Affordable, Powerful PDF Software / PDF Editor for Windows, macOS, Linux
Copyright © 2002-Present Qoppa Software. All rights reserved.
•
•••
••
•••
•
•
••
••
Print border: When checked adds a border around each of the pages on the sheet
Paper
Paper Size - The size of the paper to be printed on. This sizes in the list are determined by the printer that is selected
Paper Tray - The tray on the printer where the paper will be coming from
Orientation - The layout and direction of the content being placed on the page
Auto Rotate pages: rotate the printout to match the width and length with the paper. The portrait / landscape settings cannot be set by the user when this option is selected.Portrait: print the page portraitLandscape: print the page landscapeReverse Landscape: print the page landscape but reversed
Advanced
Chromaticity - Sets the color of the document to be printed
Monochrome: will print in B&W or grayscaleColor: will print the document in color
Quality - Sets the quality of the pages to be printed
Draft: fast printing a low qualityNormal: normal print quality at standard speed. Best for most printing situationsHigh: high quality print for fine details. May take much longer to print
Performance - Sets additional advanced options to improve printing performance
Print as image - instead of sending drawing commands to the printer sends single image per page. Useful when running into performance issues on documents with very large amounts of drawing commands on the pageScale image to output - tells the printer to rescale images to match output DPI, setting it to false sends the image in its original size and lets the printer resize it.
Comments & Forms
Print: Sets the printing options for documents with comments and forms
Document and Comments: prints the document with all commentsDocument Only: prints the document without any comments. For a list of all comments that will be removed see Annotating and Commenting PDFsForm Fields Only: prints only the form fields and no other content.Comments Only: prints only the annotations & comments and no other content.
-83-
Affordable, Powerful PDF Software / PDF Editor for Windows, macOS, Linux
Copyright © 2002-Present Qoppa Software. All rights reserved.
Summarize Comments - appends a text summary of the comments in annotations either by page or to the end of the document.
Preview
The print preview panel displays what the document will look like once printed based on the selected options, as well as contain navigation buttons allowing you to navigate the preview pages, and document properties showing selected paper and document sizes. Changing printing options will update the preview in real time.
Note: On Mac OS and Linux, some printers will always display "Color" even if the printer only prints in black & white.
First Page: Navigates to the first page of the preview document.
Previous Page: Navigates to the previous page in the preview document.
Page Number: Displays the current page being viewed and the total number of pages. Type a number into the field and press "Enter" to navigate directly to that page.
Next Page: Navigates to the next page in the preview document.
Last Page: Navigates to the Last page in the preview document.
-84-
Affordable, Powerful PDF Software / PDF Editor for Windows, macOS, Linux
Copyright © 2002-Present Qoppa Software. All rights reserved.
••
• • •
• • •
• • •
• • •
• • •
• • •
• •
• •
User PreferencesThe Preferences dialog allows customization of various PDF Studio settings. Below is a list of the available sections in the preferences dialog.
To open the Preferences dialog:
Go to File Tab > PreferencesUse the Ctrl + K shortcut key
General Forms Tools
Accessibility JavaScript Digital IDs
Comments OCR Timestamp Servers
Conversion Preflight Trusted Certificates
Conversion MS Office Print Defaults Application
Display Rulers & Grids Settings Manager
Email Spell Check
Fonts Toolbars
-85-
Affordable, Powerful PDF Software / PDF Editor for Windows, macOS, Linux
Copyright © 2002-Present Qoppa Software. All rights reserved.
1.2.
•
•
•
•
•
•
•
General PreferencesThe General Preferences section contains all of the general settings for PDF Studio.
To open the General Preferences dialog:
Go to File Tab > PreferencesSelect General from the panel on the left of the preferences dialog to view or modify these preferences.
Settings
Language - Select English, French, German, Japanese, Italian, or Spanish. Additional locale options are listed after the language. The default language will be determined from the language setting for the computer/operating system. Restart PDF Studio after changing this setting.
Units – Define preferred measurement units (inches, centimeters, points, millimeters). Units will be used for the Crop dialog and in Document Properties when displaying the page size.
Default Page - Sets the default page size and orientation when Creating a Blank PDF or Adding a Blank Page.
Size: the page size of the document using many of the global standards and also a custom option.Orientation: The orientation of the page, landscape or portrait.
Documents - Sets document behavior for opening additional documents
Open documents in new tabs: Sets the application to open all documents as tabs within the frame. Open document links in same window: When checked, links to external documents will open in the same windowRestore last session on startup: When checked, will restore all document tabs that were open when PDF Studio was last exited
Signatures - Digital signature display settings
Show signature validity: When checked displays the Signature Validation directly on the signature on the page. Otherwise validity will need to be checked in the Signature Panel
Paste Images – Sets whether or not adjust to zoom for the pasted images.
Adjust to zoom: When checked images pasted into PDF Studio will maintain the same size and scale as when viewed from the application it was pasted from.
-86-
Affordable, Powerful PDF Software / PDF Editor for Windows, macOS, Linux
Copyright © 2002-Present Qoppa Software. All rights reserved.
•
•
•
••
••
•
•
•
•
•
•
•
Other
Use system file dialog: Switch between the PDF Studio file dialog and System file dialog. This selection is available to Windows and Linux/Unix installations.Use temporary file on save: Create a temporary file when saving documents. Some document management applications that use a WebDAV server require writing directly to the original file to preserve the document history.Show welcome screen on startup: when checked, the Welcome Screen will be displayed on startupWarn before deleting pages: displays a warning before Deleting Pages.Warn before changing security: displays a warning when making changes to Document SecurityWarn before sanitizing document: displays a warning before Sanitizing DocumentsCreate Links from URLs: Automatically detects text in a document that resembles a URL and makes it a clickable linkWarn before flattening all comments: displays a warning before Flattening All Comments.Warn before deleting all comments: displays a warning before Deleting All Comments.Warn before saving signed document: Displays a warning before saving a document that contains a Digital Signature as this would invalidate the signature within the document.Show '*' on title bar of modified document: When a document is modified PDF Studio will append an asterisk '*' to the end of the file name displayed so to easily distinguish if the document has been modified or not.Prompt for including subfolders on Batch -> Add folder: Displays a warning before processing batch files with the "subfolders" option enabledShow page options dialog when creating new document: When checked, user will be prompted for new page size settings before creating a new documentPaste pages after current selection: When checked, pages that are copied will be pasted AFTER the selected page in the thumbnails pane

-87-
Affordable, Powerful PDF Software / PDF Editor for Windows, macOS, Linux
Copyright © 2002-Present Qoppa Software. All rights reserved.
1.2.
••
Accessibility PreferencesThe General Preferences section contains all of the accessibility settings for PDF Studio.
To open the General Preferences dialog:
Go to File Tab > AccessibilitySelect General from the panel on the left of the preferences dialog to view or modify these preferences.
Settings
Replace Document Colors: Select this option to enable the accessibility options you wish to use.
Use High Contrast Colors: Choose from a predefined list of high contrast color combinations
Custom Color: set your own color combination for page background and text color
Page background: the color of the background displayed Text Color: color of all text in the document including content, annotations & form fields
Only change the color of black text or line art: when checked will ignore any text or line art that is not curently set to black
Change the color of line art as well as text: when checked will use the text color specified above to also colorize any path or line content within the document
-88-
Affordable, Powerful PDF Software / PDF Editor for Windows, macOS, Linux
Copyright © 2002-Present Qoppa Software. All rights reserved.
1.2.
•
•
•
•
•
•
Comments PreferencesThe Comments Preferences section contains all of the comment, markup, and annotation settings for PDF Studio.
To open the Comments Preferences dialog:
Go to File Tab > PreferencesSelect Comments from the panel on the left of the preferences dialog to view or modify these preferences.
Settings
Default Tool Properties - Contains the default preferences for each of the individual annotation tools. To edit the default values for an annotation, click on the tool's name to open its properties dialog. Then set the values you wish to be the default and click OK to save the changes.
Drawing
Allow drawing overlapping comments: Allows annotations to be drawn directly on top of another annotation.Use Ctrl + Drag to copy selected annotations
Note: When "Allow drawing overlapping comments" is disabled, annotations can still be overlapped by first creating the annotation on a different part of the page then dragging it over the existing annotation.
Rubber Stamp
Display Stamp Previews: When enabled, a preview of the rubber stamps will be displayed in the menu. Otherwise, only the stamp's name will be displayed as textCopy stamp name to note: Adds the name of the stamp to the note as a way to categorize annotations on export.
Text Markups
Copy text to note: when using text markup annotations the selected text will be copied into the annotation's note.
Author
Author: This name will be associated with annotations added to the document
Comments Panel
-89-
Affordable, Powerful PDF Software / PDF Editor for Windows, macOS, Linux
Copyright © 2002-Present Qoppa Software. All rights reserved.
•
•
Show comments pane on opening a PDF with comments: When checked will automatically open the Comments Panel when a document that contains annotations is opened.
Viewing
Enable text indicators & tooltips: When checked will display speech bubbles and tooltips on annotations that contain comments.
-90-
Affordable, Powerful PDF Software / PDF Editor for Windows, macOS, Linux
Copyright © 2002-Present Qoppa Software. All rights reserved.
1.2.
••••
•
••••••
•••
Conversion PreferencesThe Conversion Preferences section contains all of the settings for PDF Studio when converting text documents & image files to a PDF.
To open the Conversion Preferences dialog:
Go to File Tab > PreferencesSelect Conversion from the panel on the left of the preferences dialog to view or modify these preferences.
Settings
Text to PDF
Font - Font settings when .txt files are converted.
Font: font to be used when converting the .txt document.Size: font size to be used when converting the .txt document.Bold: makes all text in the converted document bold.Italic: makes all text in the converted document Italic.
Page Size & Margins - Page size & margin settings when .txt files are converted.
Units: units to be used for the page size and margin settings when converting .txt to PDFWidth: width of the page in the units selected.Height: height of the page in the units selected.Top: top margin of the page in the units selected.Bottom: bottom margin of the page in the units selected.Left: left margin of the page in the units selected.Right: right margin of the page in the units selected.
Use Background - Sets an image that will be used as a background when converting a .txt file to PDF
Image to PDF
These settings apply to Converting Images to PDF or Importing Images as Pages.
Color Images - Settings used when color images are converted
Compression - Convert any image to either a JPEG, JPEG2000, FLATE, or JBIG2.
JPEG: lossy compression that will reduce image quality and sizeJPEG2000: less lossy compression that will reduce size and some qualityFLATE: Lossless compression does not reduce quality
-91-
Affordable, Powerful PDF Software / PDF Editor for Windows, macOS, Linux
Copyright © 2002-Present Qoppa Software. All rights reserved.
•
•
••
••••
•
•
JBIG2: Lossless compression that can only support black and white colors. Color images will be converted to black and white. Best for scanned documents with no images
Note: Anytime a change is made to “Color Space” or “DPI” the image will have to be re-compressed. When the “No Change” option is selected, PDF Studio will attempt to keep the current image compression format. If it is not supported, PDF Studio will re-compress to the closest matching supported compression.
JPEG Quality - Allows the image quality to be adjusted between 10-100%.
This will only affect JPEG or JPEG2000 images as these are the only formats that support image quality settings.
Color Space - Choose to either retain or convert the image colors to Grayscale or B&W.
Gray: Only supported with JPEG, JPEG2000, or FLATE. Best for full color imagesB&W: Only supported by FLATE or JBIG2. Best for scanned documents with no images
Note: When the “No Change” option is selected, PDF Studio will attempt to keep the current image color space. If it is not supported, PDF Studio will change to the closest matching supported color space. JPEG images with CMYK color space will be converted to RGB due to a regression bug in JDK 1.7.
Grayscale Images - Settings used when grayscale images are converted
Compression - Convert any image to either a JPEG, JPEG2000, FLATE, or JBIG2.
JPEG: lossy compression that will reduce image quality and sizeJPEG2000: less lossy compression that will reduce size and some qualityFLATE: Lossless compression does not reduce qualityJBIG2: Lossless compression that can only support black and white colors. Color images will be converted to black and white. Best for scanned documents with no images
Note: Anytime a change is made to “Color Space” or “DPI” the image will have to be re-compressed. When the “No Change” option is selected, PDF Studio will attempt to keep the current image compression format. If it is not supported, PDF Studio will re-compress to the closest matching supported compression.
JPEG Quality - Allows the image quality to be adjusted between 10-100%.
This will only affect JPEG or JPEG2000 images as these are the only formats that support image quality settings.
Color Space - Choose to either retain or convert the image colors B&W.
B&W: Only supported by FLATE or JBIG2. Best for scanned documents with no images
-92-
Affordable, Powerful PDF Software / PDF Editor for Windows, macOS, Linux
Copyright © 2002-Present Qoppa Software. All rights reserved.
••
Note: When the “No Change” option is selected, PDF Studio will attempt to keep the current image color space. If it is not supported, PDF Studio will change to the closest matching supported color space. JPEG images with CMYK color space will be converted to RGB due to a regression bug in JDK 1.7.
Black and White Images - Settings used when black and white images are converted
Compression - Convert any image to either a FLATE or JBIG2.
FLATE: Lossless compression does not reduce qualityJBIG2: Lossless compression that can only support black and white colors. Color images will be converted to black and white. Best for scanned documents with no images
Note: Anytime a change is made to “Color Space” or “DPI” the image will have to be re-compressed. When the “No Change” option is selected, PDF Studio will attempt to keep the current image compression format. If it is not supported, PDF Studio will re-compress to the closest matching supported compression.
Optimize images only if there is a reduction in size - when checked image conversion will validate that the new image using the selected options is actually smaller in bytes than the original. If not the original image will remain in the newly created document.
-93-
Affordable, Powerful PDF Software / PDF Editor for Windows, macOS, Linux
Copyright © 2002-Present Qoppa Software. All rights reserved.
1.2.
•
•
•
MS Office Conversion PreferencesThe MS Office Conversion Preferences section contains all of the settings for PDF Studio when converting Word and Excel documents to PDF and PDF to Word documents.
To open the MS Office Conversion Preferences dialog:
Go to File Tab > PreferencesSelect Conversion MS Office from the panel on the left of the preferences dialog to view or modify these preferences.
Settings
Word to PDF
The Font Embedding settings allow you to set whether fonts are embedded or not when converting word documents (.doc or .docx) to PDFs. It also allows you to set a fallback font to be used when the font does not exist on the system.
Note: By default PDF Studio will use the DroidSansFallbackFull.ttf font that has been packaged with the installer as a fallback font.
Do not embed fonts - fonts will not be embedded in the document when converted. Instead fonts will be referenced by name within the document and it will be up to the PDF viewer to find the font on the system to be displayed when viewing the document.
Embed fonts - fonts will be embedded into the PDF document when converted.
When embedding fails - Determines what PDF Studio will do if the font named in the Word document does not exist on the system.
Throw error: if the font is not found on the system the document conversion will fail and display an error message in PDF Studio.Use PDF Studio fallback font: Will attempt to find the characters using the fallback font packaged with PDF StudioUse selected fallback font: will attempt to find the characters within the fallback font set below.
Note: When converting a word document PDF Studio will first look for the font on the system, then will attempt to find the characters within the fallback font set. If no characters are found within either the system or fallback font the entire document will fail conversion. It's important that, when selecting a fallback, a font is chosen with as many characters as possible to avoid conversion failures.
Fallback font - The full path to the font file (.ttf) to use. Click on the "Browse..." button to open a file chooser and navigate to the font file (.ttf) you wish to use .
-94-
Affordable, Powerful PDF Software / PDF Editor for Windows, macOS, Linux
Copyright © 2002-Present Qoppa Software. All rights reserved.
••
•
•
•
•
Max missing characters: Set the maximum number of unique unsupported characters allowed when falling back to the fallback font.Setting this option allows some control over whether conversion should succeed or not when the Fallback Font does not provide complete glyph support for characters it will be used to render.
Create bookmarks from headings - This option will create bookmarks using the Word heading styles (Header 1, Header 2, etc...)
Excel to PDF
Add a Bookmark for each sheet - Creates a bookmark in the PDF for each sheet in the workbook
Scaling - Determines how the spreadsheet will be broken up into pages when converting to PDF. PDF Studio will use page size and margin settings set within the Excel document when creating the PDF document.
Fit to Page: shrinks the entire worksheet so that it all fits on a single pageFit to Width: shrinks the worksheet so that all columns fit on a single page. Rows will continue onto additional pages as neededActual Size: no scaling, when the data does not fit on one page it will be broken up into pages using the Page Order set within the Excel file.
Max page count - Extremely large worksheets may take a very long time or run out of memory during conversion. This sets the max number of pages to attempt when converting a worksheet. The default setting is 2,000 pages.
Do not embed fonts - fonts will not be embedded in the document when converted. Instead fonts will be referenced by name within the document and it will be up to the PDF viewer to find the font on the system to be displayed when viewing the document.
Embed fonts - fonts will be embedded into the PDF document when converted.
Note: By default PDF Studio will use the DroidSansFallbackFull.ttf font that has been packaged with the installer as a fallback font.
When embedding fails - Determines what PDF Studio will do if the font named in the Excel document does not exist on the system.
Throw error: if the font is not found on the system the document conversion will fail and display an error message in PDF Studio.Use PDF Studio fallback font: Will attempt to find the characters using the fallback font packaged with PDF StudioUse selected fallback font: will attempt to find the characters within the fallback font set below.
-95-
Affordable, Powerful PDF Software / PDF Editor for Windows, macOS, Linux
Copyright © 2002-Present Qoppa Software. All rights reserved.
•
•
•
Note: When converting a word document PDF Studio will first look for the font on the system, then will attempt to find the characters within the fallback font set. If no characters are found within either the system or fallback font the entire document will fail conversion. It's important that, when selecting a fallback, a font is chosen with as many characters as possible to avoid conversion failures.
Fallback font - The full path to the font file (.ttf) to use. Click on the "Browse..." button to open a file chooser and navigate to the font file (.ttf) you wish to use .
Max missing characters: Set the maximum number of unique unsupported characters allowed when falling back to the fallback font.Setting this option allows some control over whether conversion should succeed or not when the Fallback Font does not provide complete glyph support for characters it will be used to render.
PowerPoint to PDF
Do not embed fonts - fonts will not be embedded in the document when converted. Instead fonts will be referenced by name within the document and it will be up to the PDF viewer to find the font on the system to be displayed when viewing the document.
Embed fonts - fonts will be embedded into the PDF document when converted.
When embedding fails - Determines what PDF Studio will do if the font named in the PowerPoint document does not exist on the system.
Throw error: if the font is not found on the system the document conversion will fail and display an error message in PDF Studio.Use PDF Studio fallback font: Will attempt to find the characters using the fallback font packaged with PDF StudioUse selected fallback font: will attempt to find the characters within the fallback font set below.
Note: When converting a word document PDF Studio will first look for the font on the system, then will attempt to find the characters within the fallback font set. If no characters are found within either the system or fallback font the entire document will fail conversion. It's important that, when selecting a fallback, a font is chosen with as many characters as possible to avoid conversion failures.
Fallback font - The full path to the font file (.ttf) to use. Click on the "Browse..." button to open a file chooser and navigate to the font file (.ttf) you wish to use .
Max missing characters: Set the maximum number of unique unsupported characters allowed when falling back to the fallback font.Setting this option allows some control over whether conversion should succeed or not when the Fallback Font does not provide complete glyph support for characters it will be used to render.

-96-
Affordable, Powerful PDF Software / PDF Editor for Windows, macOS, Linux
Copyright © 2002-Present Qoppa Software. All rights reserved.

-97-
Affordable, Powerful PDF Software / PDF Editor for Windows, macOS, Linux
Copyright © 2002-Present Qoppa Software. All rights reserved.
1.2.
•••
••
•
••••
Display PreferencesThe Display Preferences section contains all of the display settings for PDF Studio.
To open the Display Preferences dialog:
Go to File Tab > PreferencesSelect Display from the panel on the left of the preferences dialog to view or modify these preferences.
Settings
Look and Feel - Changes the look and feel (theme) of PDF Studio. Requires a restart to be applied.
Theme
Auto: (default) will set light or dark colored theme to match the theme set in the OSLight: modern light styled flat user interfaceDark: modern dark styled flat user interface
Icon Color
Color: full color modern flat iconsMonochrome: greyscale modern flat icons, better for dark mode
Full Screen Appearance
Background: Sets the options used when PDF Studio is displaying a document in Full Screen Mode
Layout and Magnification - Sets the layout and magnification defaults for displaying documents.
By default, PDF Studio uses the initial view settings set within the document to display the panels on the left when opening a document. If no setting is set within the PDF document’s initial view settings, the Pages panel will be opened by default. Selecting "Ignore document setting" on any of the options will force PDF Studio to ignore the document's settings and use the selected option.
Navigation Tab - sets the default behavior for the navigation tab when opening PDF documents.
Default: Uses the PDF Studio default settingsNone (Document Only): No navigation tab will be displayedBookmarks Panel: Displays the bookmarks panel when the document is openedPages Panel: Displays the pages panel when the document is opened
-98-
Affordable, Powerful PDF Software / PDF Editor for Windows, macOS, Linux
Copyright © 2002-Present Qoppa Software. All rights reserved.
•
•••
•
•
•
•
••
•
•
•
Attachments Panel: Displays the attachments panel when the document is opened
Page Layout - sets the default behavior for the page layout when opening PDF documents.
Default: Uses the PDF Studio default settingsSingle: Displays only a single individual page at a timeSingle Continuous: Displays all of the document's pages in a single column that can be continuously scrolledFacing: Displays only two pages at a time side by side with odd pages on the left and even pages on the rightFacing Continuous: Displays all of the documents pages in two columns with odd pages on the left and even pages on the rightCover: Displays the document just as when using Facing only the first page will be displayed aloneCover Continuous: Displays the document just as when using Facing Continuous only the first page will be displayed alone
Magnification - sets the default magnification to use when opening PDF documents.
Default: Uses the PDF Studio default settingsActual: Displays the document with a 1:1 ratio to match how the document would look if printed without any scalingFit to Page: Scales the view to fit the width of the document in the PDF Studio frameFit to Width: Scales the view to fit the entire document within the PDF Studio frame%: Sets the zoom to the specified number value
Restore Last Page - when enabled PDF Studio reopen to the last page viewed when reopening the same PDF.
Note: The “Default” and “None (document only)” options will use the initial view settings set within the PDF. If any other option is selected it will use the PDF Studio setting instead of the setting within the PDF document’s initial view setting.
Invert Colors - Sets PDF Studio to always default to Invert Colors mode.
Binding - Specifies whether to display a PDF file with left-side or right-side binding. This setting affects the display of pages in the Facing Page - Continuous layout and the display of thumbnails side by side.
Document Resolution - Sets the resolution to be used when displaying PDFs. This only affects the size of the document when it is displayed on the screen. Ideally this should be set at a value so that when the zoom is set to 100% it will be the same size as the document once printed.
-99-
Affordable, Powerful PDF Software / PDF Editor for Windows, macOS, Linux
Copyright © 2002-Present Qoppa Software. All rights reserved.
••
•
•
System Setting: uses the resolution set by the system.Custom Resolution: allows you to set a custom resolution to be used.
By default PDF Studio will set a resolution value that will most accurately display the PDF size at 100% zoom. If the custom value is changed use the "Reset" button to restore the PDF Studio calculated default.
Rendering: Options for document content display
Enhance thin lines: converts all lines to a minimum width of 1px

-100-
Affordable, Powerful PDF Software / PDF Editor for Windows, macOS, Linux
Copyright © 2002-Present Qoppa Software. All rights reserved.
1.2.
•
•
•
•••
Email PreferencesThe Email Preferences section contains all of the email settings for PDF Studio.
To open the Email Preferences dialog:
Go to File Tab > PreferencesSelect Email from the panel on the left of the preferences dialog to view or modify these preferences.
Settings
Enter your email account information to send PDFs from within PDF Studio.
PDF Options - Options to perform on the document prior to sending via email.
Flatten All Comments: Flattens all annotations including text boxes, shapes, highlights, and stamps directly onto the document so that they can no longer be edited.
Annotations such as the sticky note will have comments removed but the image will still be placed on the document
Note: The following annotations (file attachment annotations, links, sounds, and redaction annotations) will NOT be removed when flattening annotations. Even though technically file attachment annotations, links, sounds, and redaction annotations are annotations, they contain actions that would also be removed if the annotation was flattened and so they remain to not interfere with the functions placed in the PDF.
Flatten All Fields: Flattens all fields including text boxes, check boxes, radio buttons, combo boxes, list boxes, buttons, and signature fields directly onto the document so that they can no longer be edited. All values within the fields will be flattened as well
Use Microsoft Outlook - Check to enable sending directly from Outlook (only on Windows)
Use Mac OS X Mail - Check to enable sending directly from Mail (only on Mac)
Use PDF Studio - Check this option to use the built in email function within PDF Studio. You will need to first setup your email account information in order for this to work.
Click on Edit to input your email settings.
User InformationYour Name: Name to be displayed when sending the email.Your Email: Email address of the account you wish to use.
-101-
Affordable, Powerful PDF Software / PDF Editor for Windows, macOS, Linux
Copyright © 2002-Present Qoppa Software. All rights reserved.
•
•••••••
Server Information - these settings will need to be obtained from your email service provider.
Outgoing serverServer requires authenticationUser NamePasswordRemember PasswordSpecify PortStart TLS
Use the Test Connection button to make sure that your settings are correct before saving your settings.
Use other email application - Allows you to use a command line action to start an email application. Enter the 2 command lines fields to send email with or without attachments since you must use different command lines for each of them. This can happen when running Javascript actions or when starting the mail function in PDF Studio.
Command line email examples with a subject and an attachment
Outlook on Windows:
Command line: start outlook.exe /c ipm.note /m "&subject=$filename"
Command line (with Attachment): start outlook.exe /c ipm.note /m "&subject=$filename" /a "$filepath"
Thunderbird on Linux:
Command Line: thunderbird
Command Line (with Attachment): thunderbird -compose subject=$filename,attachment=$filepath
Thunderbird/Outlook on Mac:
Command Line: open -a "Microsoft Outlook.app"
Command Line (with Attachment): open -a "Microsoft Outlook.app" $filepath
You can also click on “Add variable” to add some pre-defined variables.
To verify your settings have worked correctly, open a document and click on the email
button or go to File > Email.
Note: At this moment, Mac users can only open the specific mail application without composing new email
-102-
Affordable, Powerful PDF Software / PDF Editor for Windows, macOS, Linux
Copyright © 2002-Present Qoppa Software. All rights reserved.
-103-
Affordable, Powerful PDF Software / PDF Editor for Windows, macOS, Linux
Copyright © 2002-Present Qoppa Software. All rights reserved.
1.2.
•••••
Fonts PreferencesThe Fonts Preferences section contains all of the font settings for PDF Studio.
To open the Fonts Preferences dialog:
Go to File Tab > PreferencesSelect Fonts from the panel on the left of the preferences dialog to view or modify these preferences.
Settings
CJK Font Defaults
This section determines the default fonts to use when rendering unembedded CJK fonts
Type - Lists each of the CJK font types used in PDF documents.
System Font - The font that is currently being used for the selected CJK font types. To edit, select the CJK font type and then choose the font from the system to be used when the font is not embedded. For each type of CJK font (Chinese, Simplified Chinese, Japanese, Korean, etc...), users can select what local font to use among all the fonts installed on their system. If no CJK fonts are available within the system font combo box, you will need to find and install new CJK fonts on your system. It is usually possible to install new fonts in ttf or ttc format. By default PDF Studio will have the below settings.
Default CJK Font Substitution Settings
When rendering a PDF document where CJK fonts are NOT embedded, PDF Studio will try and find CJK fonts on the system . We have examined recent versions of Windows, macOS and Linux to understand which CJK fonts are provided with the operating system.
From this information we have developed prioritized font lists for each OS. PDF Studio will look for the fonts and will select the first one that is found as the default substitute font for that CJK category.
Default CJK Fonts in Windows
PDF Studio will use the following CJK fonts that ship with Windows:
Chinese Sans Serif - Microsoft JhengHeiChinese Serif - PmingLiu, MingLiu, SimSunChinese Simplified - SimSun, NsimSun, Microsoft YaHeiJapanese Sans Serif - Meiryo, MS PGothic, MS Gothic, Yu Gothic RegularJapanese Serif - MS PMincho, MS Mincho, SimSun, NSimSun
-104-
Affordable, Powerful PDF Software / PDF Editor for Windows, macOS, Linux
Copyright © 2002-Present Qoppa Software. All rights reserved.
••
••••
•••
•••
•
•
••
Korean Sans Serif - Malgun Gothic, Dotum, GulimKorean Serif - Batang, Gungsuh, Malgun Gothic
Default CJK Fonts on the Mac
PDF Studio will use the following CJK fonts that ship with Mac:
Chinese Sans Serif - Apple LiGothic Medium, PingFang TC, STHeitiChinese Serif - LiSong Pro, Biau Kai, STSongti-TCChinese Simplified - STSong, STFangsongJapanese Sans Serif - Hiragino Kaku Gothic Pro W3, Apple Gothic, Hiragino Maru Gothic Pro W4, OsakaJapanese Serif - Hiragino Mincho Pro W3, PCMyungjoKorean Sans Serif - Apple Gothic, AppleSDGothicNeoR00Korean Serif - Appley Myungjo, PCMyungjo, PilGi
Default CJK Fonts in Linux
PDF Studio will use the following CJK fonts that ship with Linux:
Chinese Sans Serif - UMingTW, UMingHK, Source Han Sans TW, DroidSan sFallbackChinese Serif - UMingTW, UMingHK, Source Han Sans TW, DroidSans FallbackChinese Simplified - WenQuanYiMicroHei, WenQuanYiZenHei, DroidSans Fallback, Source Han Sans CNJapanese Sans Serif - Droid Sans Japanese, Takao PGothic, VL-Gothic- Regular, WenQuanYiMicroHeiJapanese Serif - Droid Sans Japanese, Takao PGothic, VL-Gothic- Regular, WenQuanYiMicroHeiKorean Sans Serif - Nanum Gothic, Nanum Barun GothicKorean Serif - Nanum Myeongjo
Font Substitution Rules
During conversion, if the source document contains a font that is not available, the following table can be used to define your preferred replacement font. For Word to PDF conversion with font embedding, the Fallback Font set in Conversion MS Office preferences will be used as a last resort if no matching font defined here is available.
Use the "Always" option to replace the specified font regardless of whether or not it is available.
NOTE: Font substitution can cause text layout differences if the substituted font's metrics differ from the original.
Add: Create a new font substitution rule
Edit: Edits the selected font substitution rule
-105-
Affordable, Powerful PDF Software / PDF Editor for Windows, macOS, Linux
Copyright © 2002-Present Qoppa Software. All rights reserved.
Remove: Deletes the selected font substitution rule
Restore Defaults: when clicked restores the font rules back to the installation defaults
-106-
Affordable, Powerful PDF Software / PDF Editor for Windows, macOS, Linux
Copyright © 2002-Present Qoppa Software. All rights reserved.
1.2.
•
••
•
Forms PreferencesThe Forms Preferences section contains all of the form settings for PDF Studio.
To open the Forms Preferences dialog:
Go to File Tab > PreferencesSelect Forms from the panel on the left of the preferences dialog to view or modify these preferences.
Settings
Merging Forms - Settings used when merging documents containing form fields
Rename Fields: When merging documents that have fields, the fields can either be renamed or fields with the same name can be merged. Fields with the same name but are different types will still be renamed.
Flatten - These settings are used when flattening fields within a PDF.
Paint Push Buttons: will draw the button as an image when flattening.Paint Image Buttons Only: will only draw a button as an image when flatting when the button contains an image. Standard text buttons will not be drawn.
Paint Non Printable Fields: will still flatten a field that has the visibility property set as "Hide" or "Show/Don't Print".
Field Properties - This section contains the default preferences for each of the form editing tools. To edit the default appearance values when creating form fields, click on the field's name to open its properties dialog. Then set the values you wish to be the default and click OK to save the changes.
-107-
Affordable, Powerful PDF Software / PDF Editor for Windows, macOS, Linux
Copyright © 2002-Present Qoppa Software. All rights reserved.
1.2.
••
•
JavaScript PreferencesThe JavaScript Preferences section contains all of the JavaScript settings for PDF Studio.
To open the JavaScript Preferences dialog:
Go to File Tab > PreferencesSelect JavaScript from the panel on the left of the preferences dialog to view or modify these preferences.
Settings
Enable JavaScript - Enable the processing of JavaScript features in PDFs, and silence errors if desired. JavaScript can be set to Always on, Never on, or Prompt when you open a document with JavaScript in it. Prompt is the default.
Never: will never allow JavaScript to run within the PDF document.Prompt: will display a message prompting the user to allow JavaScript to run in the PDF document.Always: Will always run JavaScript within the PDF document. Warning: Make sure to only open documents from trusted sources.
Formatting Errors - Whether to Show Warning Message or Sound a Beep when there is JavaScript in the PDF Document.
Warn before submitting form - When checked will prompt before submitting a PDF form using JavaScript
Warn before emailing document - When checked will prompt before emailing a document using JavaScript
-108-
Affordable, Powerful PDF Software / PDF Editor for Windows, macOS, Linux
Copyright © 2002-Present Qoppa Software. All rights reserved.
1.2.
••
•
•
•••••••••
••••••••
•••••••
•
OCR PreferencesThe OCR Preferences section contains all of the OCR (Optical Character Recognition) settings for PDF Studio.
To open the OCR Preferences dialog:
Go to File Tab > PreferencesSelect OCR from the panel on the left of the preferences dialog to view or modify these preferences.
Settings
Recognition Languages - Options to set the default OCR language and ability to download new languages.
Primary Language: sets the default OCR language to be used.Enable Secondary Language: (Experimental) Enable this option when working with documents that contain multiple languages to recognize text for a secondary language as well as the default selected language.Download OCR Languages: opens the language download manager.
Image Processing - Settings used when passing the scanned image to the OCR engine to recognize text.
DPI Resolution: Sets the resolution of the image to be sent to the OCR engine.
Note: From our testing, a resolution of 300 DPI produces good OCR results for most images. When dealing with scans containing noise, you may try using a lower DPI setting to get rid of the noise and obtain better OCR results.
Available OCR Languages
The following language dictionary files are available for download directly from within PDF Studio OCR functions.
AfrikaansAlbanian – shqipArabic – ةيبرعلاAzerbaijani – azərbaycanBasque – euskaraBelarusian – беларускаяBengali – বাংলাBulgarian – българскиCatalan – català
Galician – galegoGerman - DeutscheGreek – ΕλληνικάHebrew – תירבעHindi – हिन्दीHungarian – magyarIcelandic – íslenskaIndonesian – Bahasa Indonesia
Polish - PolskiePortuguese - PortuguêsRomanian – românăRussian – русскийSerbian – српскиSlovakian – slovenčinaSlovakian (Fraktur) – slovenčina (Fraktur)Slovenian – slovenščina
-109-
Affordable, Powerful PDF Software / PDF Editor for Windows, macOS, Linux
Copyright © 2002-Present Qoppa Software. All rights reserved.
••
•
••
••
•••••
••
••••••
•
••••
••
•••••••••
CherokeeChinese (Simplified) – 中 文(简体中文)Chinese (Traditional) – 中 文(繁體)Croatian – hrvatskiCzech – čeština “da”>Danish – danskDanish – DanskDanish (Fraktur) – Dansk (Fraktur)Dutch - NetherlandishEnglishEstonian – eestiFinnish - SuomalainenFrench - Français
Italian - ItalianoItalian (old) – italino vecchioJapanese – 日本語Kannada – ಕನ್ನಡKorean – 한국어Latvian – latviešuLithuanian – lietuviųMacedonian – македонскиMalay – Bahasa MelayuMalayalam – മലയാളംMaltese – MaltiMath / EquationsNorwegian - Norsk
Spanish - EspañolSpanish (Old) – español (Antiguo)Swahili – KiswahiliSwedish - SvenskTagalogTamil – தமிழ்Telugu – తెలుగుThai – ไทยTurkish – TürkçeUkrainian – українськаVietnamese – Tiếng Việt
Using the appropriate language file will improve the accuracy of OCR results. See Tips on Improving OCR Results for additional information
-110-
Affordable, Powerful PDF Software / PDF Editor for Windows, macOS, Linux
Copyright © 2002-Present Qoppa Software. All rights reserved.
1.2.
•
••
•
••
••
•
•
•
Preflight PreferencesThe Preflight Preferences section contains all of the Preflight settings (including PDF/A & PDF/X conversion and verification) for PDF Studio.
To open the Preflight Preferences dialog:
Go to File Tab > PreferencesSelect Preflight from the panel on the left of the preferences dialog to view or modify these preferences.
Settings
PDF/A Conversion - Settings that apply when converting a document to PDF/A
Unsupported Annotations: whether to delete or warn when unsupported annotations are detected.Transparency: whether to remove or warn when transparency is detected in images.Embedded Files: whether to delete or warn when embedded files are detected.
PDF/X Conversion - Settings that apply when converting a document to PDF/X
Unsupported Annotations: whether to delete or warn when unsupported annotations are detected.Transparency: whether to remove or warn when transparency is detected in images.Image Compression: The value of this setting is only used on images that must be modified because either their color space and/or their current compression type is not pdf/x compliant. Images already having a valid color space and a different but pdf/x compliant compression type will not be converted to use this compression type.Output Profile: Choose the ICC profile to set when converting images. Embedded Files: whether to delete or warn when embedded files are detected.
Options - Additional Preflight conversion settings
Show information dialog: whether to show a dialog explaining how the below options will be handled before starting the conversionEnable saving to original file: Once modified, PDF Studio clears the PDF/A tag from the document. This option enables the "Save" button which allows the original file to be overwritten with no tag. Otherwise only "Save As" will be enabled to prevent overwriting the original document without the PDF/A tags.Retain PDF/A format on Save or Save As:O nce modified, PDF Studio clears the PDF/A tag from the document. When this option is enabled PDF Studio will attempt to reconvert the document back to the same PDF/A tag version (if supported).

-111-
Affordable, Powerful PDF Software / PDF Editor for Windows, macOS, Linux
Copyright © 2002-Present Qoppa Software. All rights reserved.
-112-
Affordable, Powerful PDF Software / PDF Editor for Windows, macOS, Linux
Copyright © 2002-Present Qoppa Software. All rights reserved.
1.2.
•
•
•
•
•
•
•
•
Print Defaults PreferencesThe Print Defaults Preferences section allows you to select which Print dialog to use in PDF Studio as well as set the print options to use when printing with the System Print Dialog.
To open the Print Defaults Preferences dialog:
Go to File Tab > PreferencesSelect Print Defaults from the panel on the left of the preferences dialog to view or modify these preferences.
Settings
Print dialog - allows you to choose which print dialog to use in PDF Studio.
Print with Windows/Mac/Linux: Prints the PDF using the default system print dialog. The settings in this dialog will be determined by the operating system not PDF Studio. Below are additional settings that will be enabled when printing with the System.Print with PDF Studio: Prints the PDF using the PDF Studio dialog. When selected the settings below will be disabled because these settings are available directly in the PDF Studio print dialog.
Print with Windows/Mac/Linux Settings
Print Options - Additional print options to size the content to the page.
Center In Page: center the page in the paper. No effect if the pages in a document are larger than the paper they are being printed on.Shrink To Margins: shrink pages so that they fit in the paper. No effect if the pages in a document are smaller than the paper they are being printed on.Expand To Margins: expand pages to fill the paper they are being printed on. No effect if the pages in a document are larger than the paper they are being printed on.
Orientation - The layout and direction of the content being placed on the page
Auto Rotate pages: rotate the printout to match the width and length with the paper. The portrait / landscape settings cannot be set by the user when this option is selected.Scale image to output - tells the printer to rescale images to match output DPI, setting it to false sends the image in its original size and lets the printer resize it.
Comments & Forms: Sets the printing options for documents with comments and forms
Document and Comments: prints the document with all comments
-113-
Affordable, Powerful PDF Software / PDF Editor for Windows, macOS, Linux
Copyright © 2002-Present Qoppa Software. All rights reserved.
•
••
Document Only: prints the document without any comments. For a list of all comments that will be removed see Annotating and Commenting PDFsForm Fields Only: prints only the form fields and no other content.Comments Only: prints only the comments and annotations and no other content
-114-
Affordable, Powerful PDF Software / PDF Editor for Windows, macOS, Linux
Copyright © 2002-Present Qoppa Software. All rights reserved.
1.2.
•
•
•
•••
Rulers & Grids PreferencesThe Rulers & Grids Preferences section contains all of the ruler and grid settings for PDF Studio.
To open the Rulers and Grids Preferences dialog:
Go to File Tab > PreferencesSelect Rulers & Grids from the panel on the left of the preferences dialog to view or modify these preferences.
Settings
Units - Choose between using inches or centimeters when the rulers and grids are enabled
Grids - Spacing and color options used for the grid options below and when displayed
Horizontal Spacing: horizontal space between each of the grid lines in the units selected above.Vertical Spacing: vertical space between each of the grid lines in the units selected above.Subdivisions: number of sub divider lines between each of the horizontal and vertical lines.Left Offset: left offset distance for the initial grid line.Top Offset: right offset distance for the initial grid line.Color: color of the grid lines when enabled.
-115-
Affordable, Powerful PDF Software / PDF Editor for Windows, macOS, Linux
Copyright © 2002-Present Qoppa Software. All rights reserved.
1.2.
• •••••••••
Spell Check PreferencesThe Spell Check Preferences section contains all of the spell check settings for PDF Studio used when entering text in Annotations or Form Fields.
To open the Spell Check Preferences dialog:
Go to File Tab > PreferencesSelect Spell Check from the panel on the left of the preferences dialog to view or modify these preferences.
Settings
Options - General spell check options
Enable Spell Check - Enables or disables using spell check
Color - Sets the color of the squiggly line that is placed under the misspelled word
Ignore Words in ALL CAPS - When checked any words that are typed in all capital letters will not be marked as misspelled
Ignore Numbers in Words - When checked any words that contain numbers (i.e. "Studio11") will not be marked as misspelled
Dictionaries - Dictionary options including language and custom words
Language - Sets the language to be used when spell check is enabled. Checking more than one language will enable multi-language spell check. The following languages are available for spell check.
ArabicDutchEnglishFrenchGermanItalianPolishRussianSpanish
Custom Words - Displays a list of user defined words added to the spelling dictionary. Words in this list will not be marked as misspelled
Add: Used to add a custom word to the custom dictionary
Edit: Edit the selected word in the custom dictionary
-116-
Affordable, Powerful PDF Software / PDF Editor for Windows, macOS, Linux
Copyright © 2002-Present Qoppa Software. All rights reserved.
Delete: Deletes the selected word from the custom dictionary
-117-
Affordable, Powerful PDF Software / PDF Editor for Windows, macOS, Linux
Copyright © 2002-Present Qoppa Software. All rights reserved.
1.2.
••
Toolbar PreferencesThe Toolbar Preferences section contains all of the toolbar settings for PDF Studio.
To open the Toolbars Preferences dialog:
Go to File Tab > PreferencesSelect Toolbar from the panel on the left of the preferences dialog to view or modify these preferences.
Settings
Toolbar Style - Choose between using the Ribbon Toolbar or the Classic Toolbar
Ribbon Toolbar Settings
Favorites Ribbon Group
Allows you to specify the buttons of the custom "Favorites" group on the Home tab of the ribbons. The list on the left shows all the available tools organized by tabs and the list on the right shows the current favorite list of tools
Add / Remove Tools
Use the Add >> and << Remove buttons to choose set the favorite tools you wish to have on the toolbar
Rearrange Tools
Use the and buttons to change the order of the buttons on the toolbar.
Classic Toolbar Settings
View Mode - Select which mode to change the settings for
Standard: Settings to be used when in normal mode.Touch Mode: Settings to be used when in touch mode.
Customize Toolbars - In the toolbar tree, check groups on or off to show or hide that toolbar group. Each group can also be expanded to show or hide individual items within each group as well.
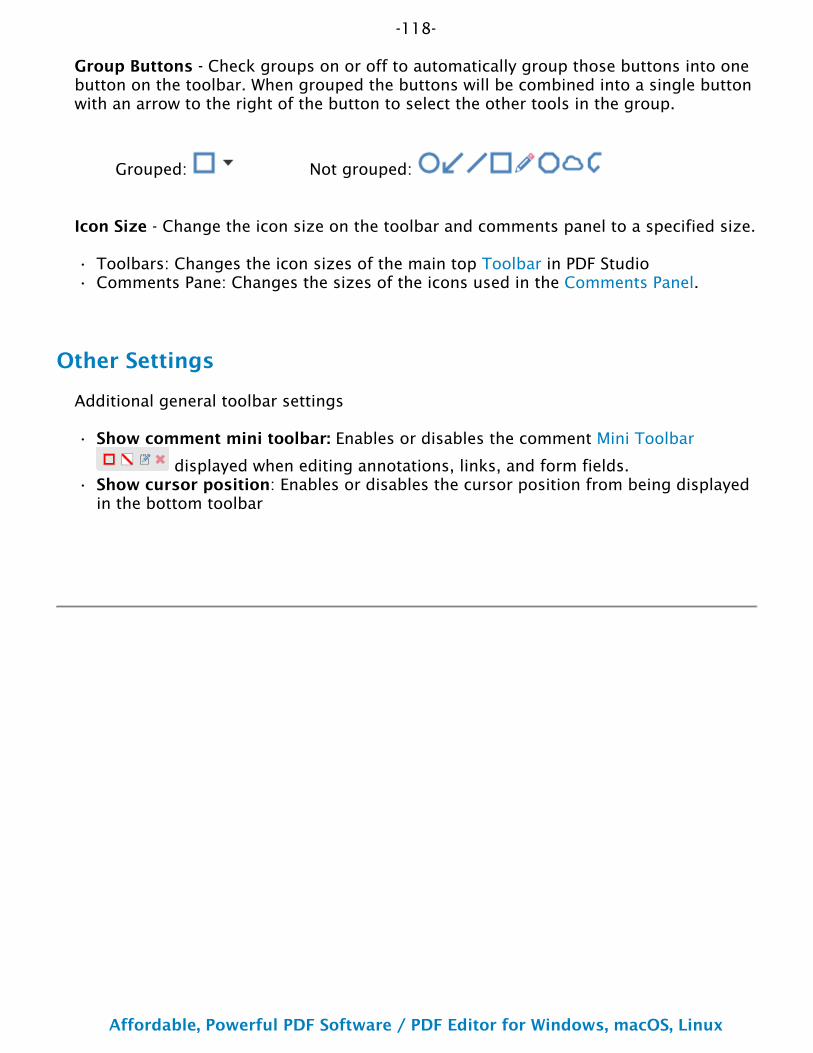
-118-
Affordable, Powerful PDF Software / PDF Editor for Windows, macOS, Linux
Copyright © 2002-Present Qoppa Software. All rights reserved.
••
•
•
Group Buttons - Check groups on or off to automatically group those buttons into one button on the toolbar. When grouped the buttons will be combined into a single button with an arrow to the right of the button to select the other tools in the group.
Grouped: Not grouped:
Icon Size - Change the icon size on the toolbar and comments panel to a specified size.
Toolbars: Changes the icon sizes of the main top Toolbar in PDF StudioComments Pane: Changes the sizes of the icons used in the Comments Panel.
Other Settings
Additional general toolbar settings
Show comment mini toolbar: Enables or disables the comment Mini Toolbar
displayed when editing annotations, links, and form fields.Show cursor position: Enables or disables the cursor position from being displayed in the bottom toolbar
-119-
Affordable, Powerful PDF Software / PDF Editor for Windows, macOS, Linux
Copyright © 2002-Present Qoppa Software. All rights reserved.
1.2.
••
Tools PreferencesThe Tools Preferences section contains all of the tool settings for PDF Studio.
To open the Tools Preferences dialog:
Go to File Tab > PreferencesSelect Tools from the panel on the left of the preferences dialog to view or modify these preferences.
Settings
General
Make hand tool use mouse-wheel zooming - When checked changes the mouse wheel behavior from scrolling the document to zooming in / out of the document.
Active Tools
Default Tool - Default tool to be used when opening a new document or using the Esc key to exit an active tool.
Keep current tool active for newly opened documents - When checked the currently active tool will remain active when opening a new file.
Snapshot
Save As - When selected, the snapshot taken will save an image to the file system.
Format: format of the image file to be saved (JPG, PNG, GIF, TIF)Folder:The destination directory to store the snapshots
Always Show Dialog - choose to always show the dialog to select the image format and save location when taking a snapshot.
-120-
Affordable, Powerful PDF Software / PDF Editor for Windows, macOS, Linux
Copyright © 2002-Present Qoppa Software. All rights reserved.
1.2.
Digital IDs PreferencesThe Digital IDs Preferences section contains all of the digital ID settings for PDF Studio.
To open the Digital IDs Preferences dialog:
Go to File Tab > PreferencesSelect Digital IDs from the panel on the left of the preferences dialog to view or modify these preferences.
Settings
System IDs - Displays a list of digital IDs currently installed on the system
Enable signing with System Digital IDs: Choose whether or not to allow signing documents with system digital IDs.
My Digital IDs - Allows you to Manage Digital IDs used when signing documents.
Password - A digital ID may be protected with a complex password. PDF Studio can save this password and protect it with your own password. When signing documents, PDF Studio will prompt you for your own password. This makes it easier to sign documents without having to remember the complex passwords.
Linux Only
Other PKCS11 IDs (USB, Tokens, HSM, CAC) - Allows you to manage Smartcard / USB tokens that store certificate private keys required to apply digital signatures on a document. Configuration file is required - see Digitally Signing PDFs with smartcard USB token for more information.
Browse - use the file browser to navigate to and select your configuration file to use
Remove - clears the currently stored configuration file

-121-
Affordable, Powerful PDF Software / PDF Editor for Windows, macOS, Linux
Copyright © 2002-Present Qoppa Software. All rights reserved.
1.2.
••••
Timestamp Servers PreferencesThe Timestamp Server Preferences section contains all of the timestamp server settings for PDF Studio.
To open the Timestamp Servers Preferences dialog:
Go to File Tab > PreferencesSelect Timestamp Servers from the panel on the left of the preferences dialog to view or modify these preferences.
Settings
Timestamp Servers - Allows you to add, edit, and remove time stamp servers as well as set the default timestamp server to be used with Digital IDs.
By default PDF Studio comes packaged with the following timestamp servers:
Digicert - http://timestamp.digicert.com ( Default)Entrust - http://timestamp.entrust.net/TSS/RFC3161sha2TSTime.certum - http://time.certum.plzeitstempel - http://zeitstempel.dfn.de
-122-
Affordable, Powerful PDF Software / PDF Editor for Windows, macOS, Linux
Copyright © 2002-Present Qoppa Software. All rights reserved.
1.2.
•
•
Trusted Certificates PreferencesThe Trusted Certificates Preferences section contains all of the trusted certificate settings for PDF Studio.
To open the Trusted Certificates Preferences dialog:
Go to File Tab > PreferencesSelect Trusted Certificates from the panel on the left of the preferences dialog to view or modify these preferences.
Settings
System Certificates - Displays a list of certificates from the system to be used when validating digital signatures.
Trust System Root Certificate Authorities: Enable using the certificate authorities that are currently installed on your system.
PDF Studio Certificates - Displays a list of certificates packaged in PDF Studio to be used when validating digital signatures.
Trust PDF Studio Root Certificate Authorities: Enable using the certificate authorities that come packaged within PDF Studio.
My Trusted Certificates - Allows you to Import and Manage additional trusted certificates to be used when validating digital signatures.
-123-
Affordable, Powerful PDF Software / PDF Editor for Windows, macOS, Linux
Copyright © 2002-Present Qoppa Software. All rights reserved.
1.2.
•••
Application PreferencesThe Update Preferences section contains all of the update settings for PDF Studio.
To open the Updates Preferences dialog:
Go to File Tab > PreferencesSelect Application from the panel on the left of the preferences dialog to view or modify these preferences.
Settings
Updates - Check for the updated version of PDF Studio and set the automatic check interval.
Monthly: will check only once every 30 days for updatesWeekly: will check once a week for updatesNever: will never check for updates
Check Now - Checks for updates when pressed
In-App Messaging - Enables or disables in-app messaging from Qoppa announcing new product releases.
Application - Settings that apply to the memory and performance of PDF Studio.
Run in Background - WINDOWS ONLY: Enables or disables the "Run in background" feature in PDF Studio. PDF Studio can remain open in the background after the first start to improve launch performance when opening PDF documents. When "Run in background" is set, PDF Studio will remain running as a background process until the computer is restarted or the application is quit by going to File > Exit.
Note: IMPORTANT: While running as a background process, resources used by PDF Studio will not be released and will not be available to be used by other applications.
Allocated Memory - Allows you to modify the amount of memory allocated to PDF Studio. When running intense processes in PDF Studio, you may get a "Heap Space" error or an image may not show up properly on the page. This happens when PDF Studio is running out of memory. Use the setting below to change the amount of memory allocated to PDF Studio.
Suggested maximums based on the amount of total memory available on your system.
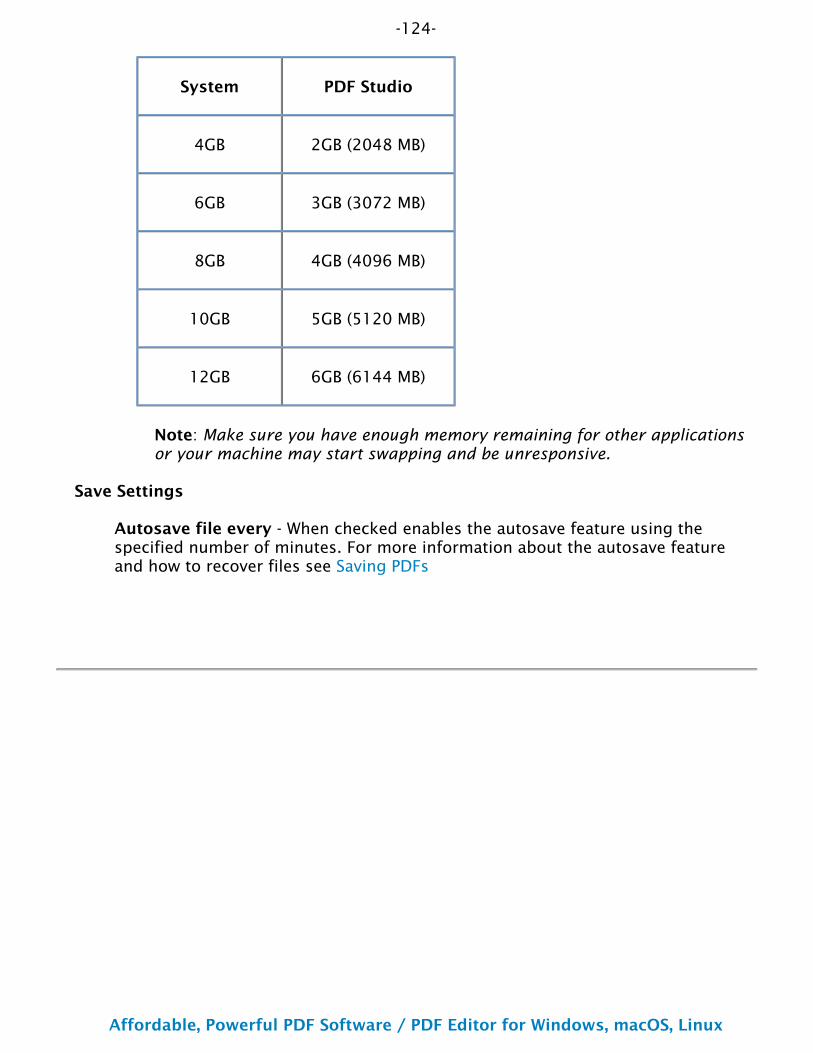
-124-
Affordable, Powerful PDF Software / PDF Editor for Windows, macOS, Linux
Copyright © 2002-Present Qoppa Software. All rights reserved.
System PDF Studio
4GB 2GB (2048 MB)
6GB 3GB (3072 MB)
8GB 4GB (4096 MB)
10GB 5GB (5120 MB)
12GB 6GB (6144 MB)
Note: Make sure you have enough memory remaining for other applications or your machine may start swapping and be unresponsive.
Save Settings
Autosave file every - When checked enables the autosave feature using the specified number of minutes. For more information about the autosave feature and how to recover files see Saving PDFs
-125-
Affordable, Powerful PDF Software / PDF Editor for Windows, macOS, Linux
Copyright © 2002-Present Qoppa Software. All rights reserved.
1.2.
Settings ManagerThe Settings Manager section contains options that allow you to export or import your PDF Studio Preferences, Stamps, or Digital IDs & Trusted Certificates as well as restore PDF Studio preferences to the installation defaults.
To open the Settings Manager dialog:
Go to File Tab > PreferencesSelect Settings Manager from the panel on the left of the preferences dialog to view or modify these preferences.
Settings
Export
Select the preference categories that you wish to export and then click on the "Export" button to generate the settings file.
Preferences - Options to export all PDF Studio preferences or import a previously exported preferences file.
Rubber Stamps - Options to export all rubber stamps stored in PDF Studio or import a previously exported stamps file.
Digital IDs & Trusted Certificates - Options to export all digital IDs and trusted certificates stored in PDF Studio or import previously exported digital IDs and trusted certificates file.
Note: For security reasons, when exporting digital IDs and certificates only digital IDs and certificates created by PDF Studio will be exported. All other IDs and certificates that are found on the system will not be exported.
Restore
Import - Click to select the settings file you wish to import.
Restore Defaults - Restores all PDF Studio settings to installation defaults.
Note: This cannot be undone
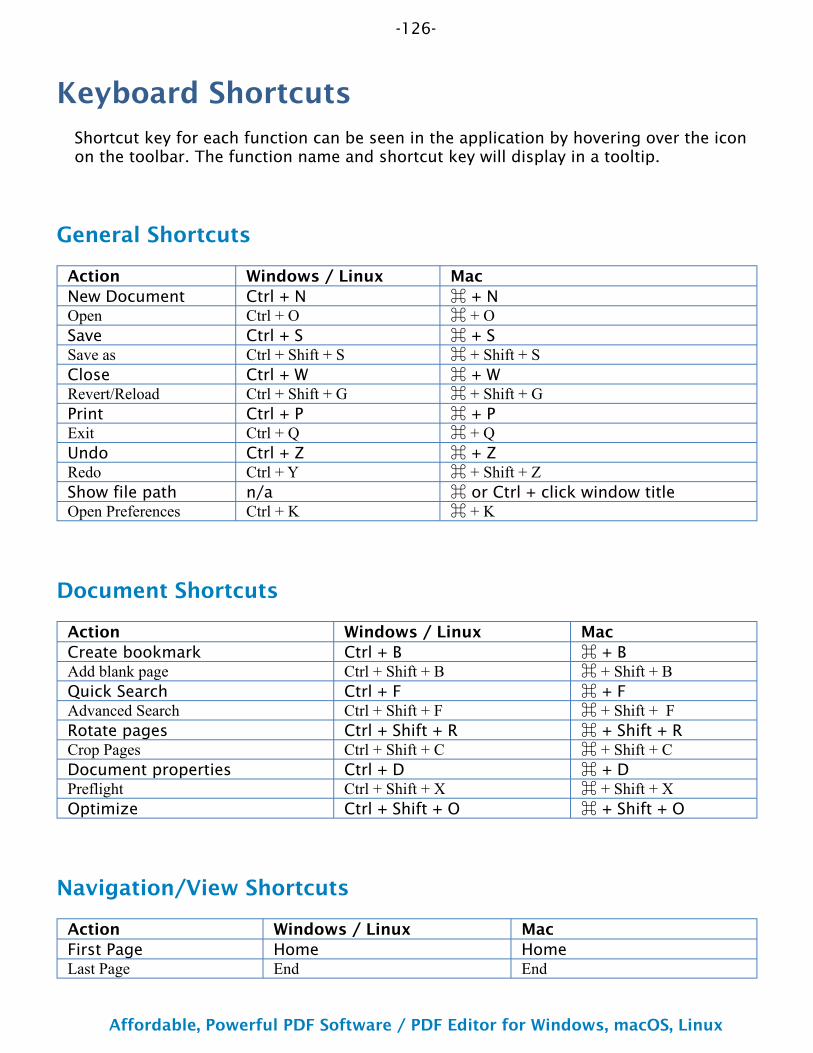
-126-
Affordable, Powerful PDF Software / PDF Editor for Windows, macOS, Linux
Copyright © 2002-Present Qoppa Software. All rights reserved.
Keyboard ShortcutsShortcut key for each function can be seen in the application by hovering over the icon on the toolbar. The function name and shortcut key will display in a tooltip.
General Shortcuts
Action Windows / Linux MacNew Document Ctrl + N ⌘ + NOpen Ctrl + O ⌘ + OSave Ctrl + S ⌘ + SSave as Ctrl + Shift + S ⌘ + Shift + SClose Ctrl + W ⌘ + WRevert/Reload Ctrl + Shift + G ⌘ + Shift + GPrint Ctrl + P ⌘ + PExit Ctrl + Q ⌘ + QUndo Ctrl + Z ⌘ + ZRedo Ctrl + Y ⌘ + Shift + ZShow file path n/a ⌘ or Ctrl + click window titleOpen Preferences Ctrl + K ⌘ + K
Document Shortcuts
Action Windows / Linux MacCreate bookmark Ctrl + B ⌘ + BAdd blank page Ctrl + Shift + B ⌘ + Shift + BQuick Search Ctrl + F ⌘ + FAdvanced Search Ctrl + Shift + F ⌘ + Shift + FRotate pages Ctrl + Shift + R ⌘ + Shift + RCrop Pages Ctrl + Shift + C ⌘ + Shift + CDocument properties Ctrl + D ⌘ + DPreflight Ctrl + Shift + X ⌘ + Shift + XOptimize Ctrl + Shift + O ⌘ + Shift + O
Navigation/View Shortcuts
Action Windows / Linux MacFirst Page Home HomeLast Page End End
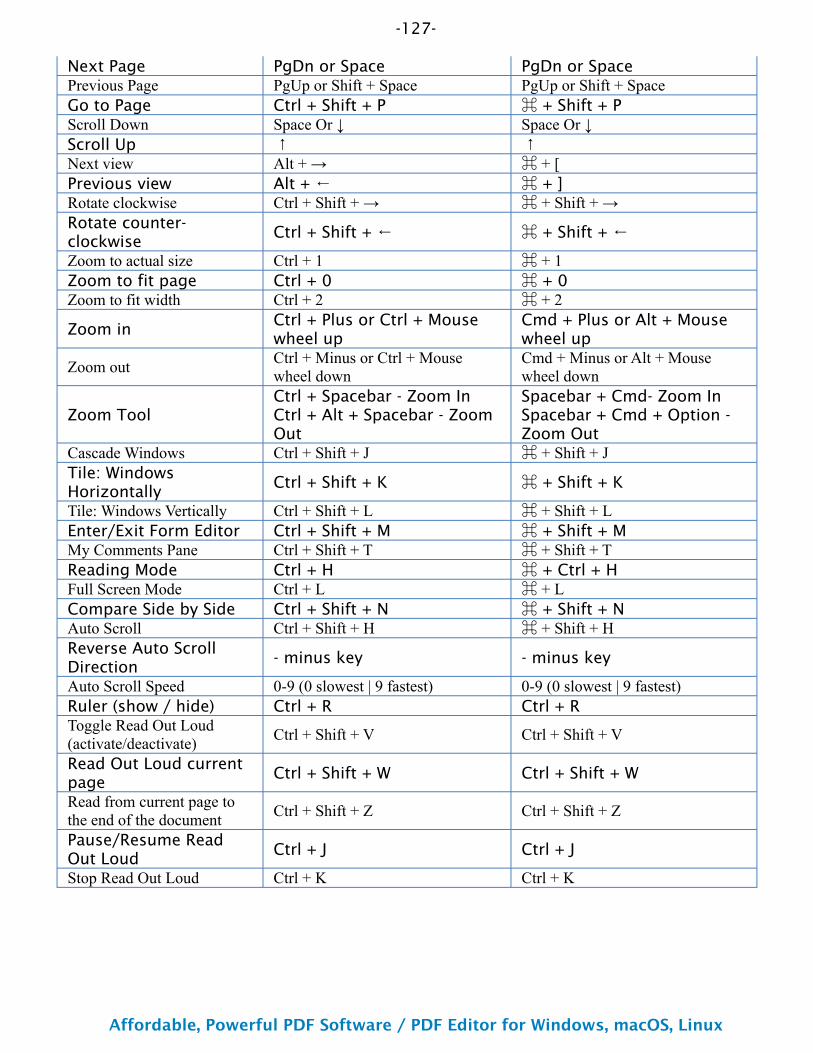
-127-
Affordable, Powerful PDF Software / PDF Editor for Windows, macOS, Linux
Copyright © 2002-Present Qoppa Software. All rights reserved.
Next Page PgDn or Space PgDn or SpacePrevious Page PgUp or Shift + Space PgUp or Shift + SpaceGo to Page Ctrl + Shift + P ⌘ + Shift + PScroll Down Space Or ↓ Space Or ↓Scroll Up ↑ ↑Next view Alt + → ⌘ + [Previous view Alt + ← ⌘ + ]Rotate clockwise Ctrl + Shift + → ⌘ + Shift + →Rotate counter- clockwise
Ctrl + Shift + ← ⌘ + Shift + ←Zoom to actual size Ctrl + 1 ⌘ + 1Zoom to fit page Ctrl + 0 ⌘ + 0Zoom to fit width Ctrl + 2 ⌘ + 2
Zoom inCtrl + Plus or Ctrl + Mouse wheel up
Cmd + Plus or Alt + Mouse wheel up
Zoom out Ctrl + Minus or Ctrl + Mouse wheel down
Cmd + Minus or Alt + Mouse wheel down
Zoom ToolCtrl + Spacebar - Zoom In Ctrl + Alt + Spacebar - Zoom Out
Spacebar + Cmd- Zoom In Spacebar + Cmd + Option - Zoom Out
Cascade Windows Ctrl + Shift + J ⌘ + Shift + JTile: Windows Horizontally
Ctrl + Shift + K ⌘ + Shift + K
Tile: Windows Vertically Ctrl + Shift + L ⌘ + Shift + LEnter/Exit Form Editor Ctrl + Shift + M ⌘ + Shift + MMy Comments Pane Ctrl + Shift + T ⌘ + Shift + TReading Mode Ctrl + H ⌘ + Ctrl + HFull Screen Mode Ctrl + L ⌘ + LCompare Side by Side Ctrl + Shift + N ⌘ + Shift + NAuto Scroll Ctrl + Shift + H ⌘ + Shift + HReverse Auto Scroll Direction
- minus key - minus key
Auto Scroll Speed 0-9 (0 slowest | 9 fastest) 0-9 (0 slowest | 9 fastest)Ruler (show / hide) Ctrl + R Ctrl + RToggle Read Out Loud (activate/deactivate) Ctrl + Shift + V Ctrl + Shift + V
Read Out Loud current page
Ctrl + Shift + W Ctrl + Shift + W
Read from current page to the end of the document Ctrl + Shift + Z Ctrl + Shift + Z
Pause/Resume Read Out Loud
Ctrl + J Ctrl + J
Stop Read Out Loud Ctrl + K Ctrl + K

-128-
Affordable, Powerful PDF Software / PDF Editor for Windows, macOS, Linux
Copyright © 2002-Present Qoppa Software. All rights reserved.
Select/Edit Tools
Tool/Action Windows / Linux MacHand Tool Esc or Hold Spacebar Esc or Hold SpacebarSelect Text Cursor Ctrl + T ⌘ + TRectangular text selection Ctrl + drag cursor Cmd + drag cursorEdit Interactive Object Ctrl + I ⌘ + IEdit Content Ctrl + Shift + E ⌘ + Shift + ERedaction Tool Ctrl + Shift + Y ⌘ + Shift + YSelect All Text Ctrl + A ⌘ + ADeselect All Text Ctrl + Shift + A ⌘ + Shift + AFlatten All Form Fields Ctrl + Shift + D ⌘ + Shift + DSnapshot Tool Ctrl + G ⌘ + G
Annotation Shortcuts
Annotation Windows / Linux MacArea Ctrl + Alt + E ⌘ + Alt + EArea Highlighter Ctrl + Alt + I ⌘ + Alt + IArrow Ctrl + Alt + A ⌘ + Alt + AAttach File Ctrl + Alt + F ⌘ + Alt + FCallout Ctrl + Alt + V ⌘ + Alt + VCircle Ctrl + Alt + C ⌘ + Alt + CCloud Ctrl + Alt + B ⌘ + Alt + BCross out Text Ctrl + Alt + O ⌘ + Alt + ODistance Ctrl + Alt + M ⌘ + Alt + MText Box Ctrl + Alt + T / Ctrl + Alt + Shift + T ⌘ + Alt + THighlight Text Ctrl + Alt + H ⌘ + Alt + Shift + HInsert Image Ctrl + Shift + I ⌘ + Shift + IInsert Text Ctrl + Alt + X ⌘ + Alt + XLine Ctrl + Alt + L / Ctrl + Alt + Shift + L ⌘ + Alt + LPencil Ctrl + Alt + P ⌘ + Alt + PLink Ctrl + Alt + K ⌘ + Alt + KPerimeter Ctrl + Alt + R ⌘ + Alt + RPolygon Ctrl + Alt + G ⌘ + Alt + GPolyline Ctrl + Alt + Y ⌘ + Alt + YReplace Text Ctrl + Alt + Z ⌘ + Alt + ZSound Ctrl + Alt + S / Ctrl + Alt + Shift + S ⌘ + Alt + SSquare Ctrl + Alt + Q ⌘ + Alt + Shift + RSquiggly Underline Ctrl + Alt + J ⌘ + Alt + JSticky Note Ctrl + Alt + N ⌘ + Alt + NUnderline Text Ctrl + Alt + U ⌘ + Alt + UTypewriter Ctrl + Alt + W ⌘ + Alt + W

-129-
Affordable, Powerful PDF Software / PDF Editor for Windows, macOS, Linux
Copyright © 2002-Present Qoppa Software. All rights reserved.
Text Annotation Shortcuts
These are used only when editing text in Typewriter, Callout, and Text Box annotations.
Action Windows / Linux MacBold Ctrl + B ⌘ + BItalic Ctrl + I ⌘ + IUnderline Ctrl + U ⌘ + UIncrease Font Size Ctrl + Shift + > ⌘ + Shift + >Decrease Font Size Ctrl + Shift + < ⌘ + Shift + <Left Align Ctrl + L ⌘ + LCenter Align Ctrl + E ⌘ + ERight Align Ctrl + R ⌘ + R
Content Editing Shortcuts
These are used only when editing content in the PDF.
Action Windows / Linux MacBring to Front Ctrl + Shift + ↑ ⌘ + Shift + ↑Send to Back Ctrl + Shift + ↓ ⌘ + Shift + ↓Send Forward Ctrl + ↑ ⌘ + ↑Send Backwards Ctrl + ↓ ⌘ + ↓
-130-
Affordable, Powerful PDF Software / PDF Editor for Windows, macOS, Linux
Copyright © 2002-Present Qoppa Software. All rights reserved.
•••
Touch Mode
Touch mode can be enabled on your device by clicking on the Touch Mode icon under the View Tab on the toolbar.
Features added specifically for Touch Mode in PDF Studio.
Enlarged re-size handles on annotations and form fields for easier controlEnlarged fonts and rows in comments and thumbnail panes.Mini toolbar during object selection for quick access to delete & show properties
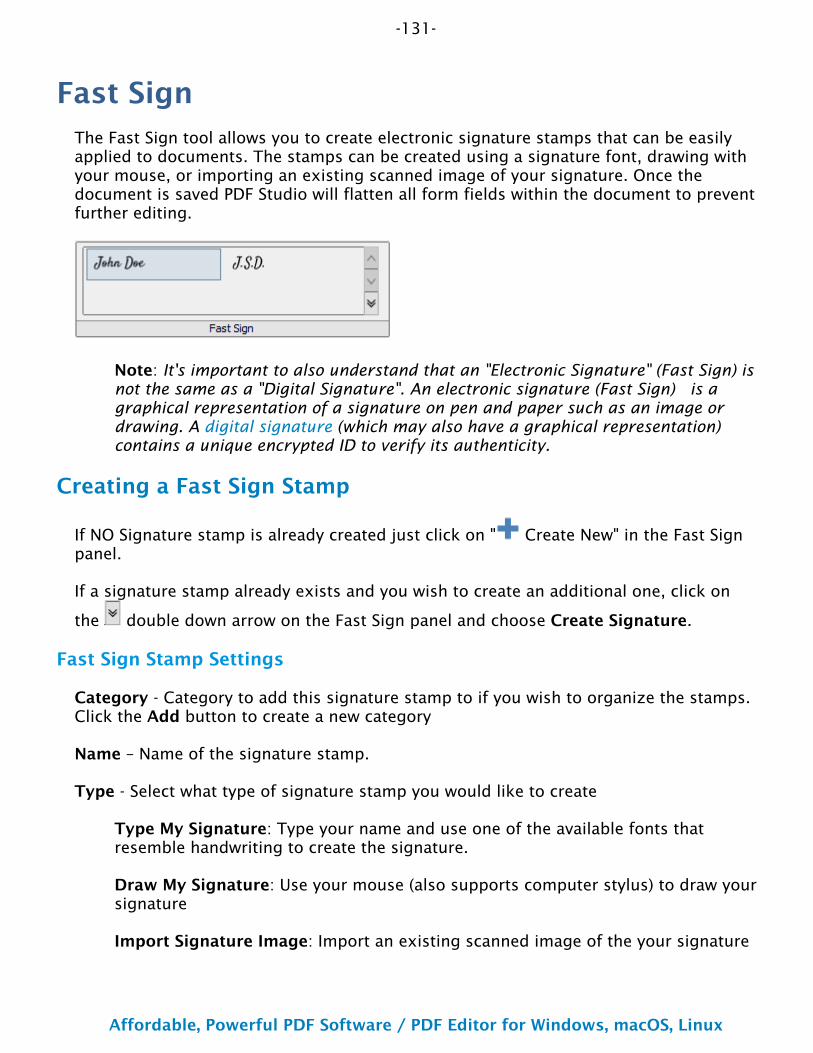
-131-
Affordable, Powerful PDF Software / PDF Editor for Windows, macOS, Linux
Copyright © 2002-Present Qoppa Software. All rights reserved.
Fast SignThe Fast Sign tool allows you to create electronic signature stamps that can be easily applied to documents. The stamps can be created using a signature font, drawing with your mouse, or importing an existing scanned image of your signature. Once the document is saved PDF Studio will flatten all form fields within the document to prevent further editing.
Note: It's important to also understand that an "Electronic Signature" (Fast Sign) is not the same as a "Digital Signature". An electronic signature (Fast Sign) is a graphical representation of a signature on pen and paper such as an image or drawing. A digital signature (which may also have a graphical representation) contains a unique encrypted ID to verify its authenticity.
Creating a Fast Sign Stamp
If NO Signature stamp is already created just click on " Create New" in the Fast Sign panel.
If a signature stamp already exists and you wish to create an additional one, click on
the double down arrow on the Fast Sign panel and choose Create Signature.
Fast Sign Stamp Settings
Category - Category to add this signature stamp to if you wish to organize the stamps. Click the Add button to create a new category
Name – Name of the signature stamp.
Type - Select what type of signature stamp you would like to create
Type My Signature: Type your name and use one of the available fonts that resemble handwriting to create the signature.
Draw My Signature: Use your mouse (also supports computer stylus) to draw your signature
Import Signature Image: Import an existing scanned image of the your signature

-132-
Affordable, Powerful PDF Software / PDF Editor for Windows, macOS, Linux
Copyright © 2002-Present Qoppa Software. All rights reserved.
1.2.3.
4.•
•
•
•
•
Convert White to Transparent - when checked will change any white background to be transparent.
Tolerance - This option removes the white background from an image. Tolerance affects the range of colors that are considered "white" to be converted to transparent. Higher tolerance converts more pixels. For hand drawn signatures it is recommended to use a bold thick pen.
Require Password - When checked will require a password to be entered before the Fast Sign signature stamp can be placed on the page. Click on Set Password to designate the password.
Applying Fast Sign Signature
To apply the Fast Sign signature stamp:
Open the document you wish to apply the stamp toClick on the signature stamp you wish to useClick the document where you would like to apply the stamp. Resize and move placement if neededSave the document to apply the stamp
Once document is saved PDF Studio will flatten all form fields within the document to prevent further editing.
Managing Fast Sign Stamps
Fast Sign stamps can be managed using the Fast Sign Signature Manager.
Accessing the Fast Sign Signature Manager
The Fast Sign Signature Manager can be accessed by clicking on the Manage button
or the double down arrow on the Fast Sign panel.
Using the Fast Sign Signature Manager
The dialog shows a tree of fast sign stamps and a toolbar to work with the tree. The toolbar has the following buttons
Create a new signature stamp
Add a new folder to the tree.
Brings up the edit dialog for the currently selected signature stamp or the name change dialog for the selected folder.
Delete the currently selected item.

-133-
Affordable, Powerful PDF Software / PDF Editor for Windows, macOS, Linux
Copyright © 2002-Present Qoppa Software. All rights reserved.
-134-
Affordable, Powerful PDF Software / PDF Editor for Windows, macOS, Linux
Copyright © 2002-Present Qoppa Software. All rights reserved.
•
•
•••••••
••••
••••
UndoIn PDF Studio, it is possible to undo most actions.
Undo or redo by clicking on the Undo or Redo buttons on the toolbar, or by using the standard shortcut keys:
Undo: CTRL + Z (Cmd + Z on macOS)
Redo: CTRL + Y (Shift + Cmd + Z on macOS)
Actions that can be undone / redone:
Annotations
(Textbox, callout, sticky note, typewriter, 8 shapes, sound, image, link, area highlight, measurements, stamp)
AddNewPasteMy CommentsRecent Comments
MoveMouse
KeyboardResizeChange propertiesFlattenDeleteMark with CheckmarkReview
Bookmarks
AddRenameDeleteReorder
Content editing – text, path objects, image
Redact (before being applied)DeleteMoveEdit text properties (text data, font, outline color, size, etc..).
-135-
Affordable, Powerful PDF Software / PDF Editor for Windows, macOS, Linux
Copyright © 2002-Present Qoppa Software. All rights reserved.
••
•
•••••
•••
••
•••
••
••
•••
Edit path object propertiesResize path and image
Form
Edit field contents
Markup (highlight, crossout, underline, squiggly, replace, insert)
AddMoveChange propertiesFlattenDelete
Pages
RotateCropHeader/Footer/Watermark
Actions that reset the undo / redo stacks:
Document
SaveSecurity
Sign FieldSignRemove Signatures
Page
MoveDelete
Form
Flatten form fieldsReset form fields
Actions that are being ignored:
Document
Attach fileAdd a blank pageInsert pages
-136-
Affordable, Powerful PDF Software / PDF Editor for Windows, macOS, Linux
Copyright © 2002-Present Qoppa Software. All rights reserved.
Import Annotations
-137-
Affordable, Powerful PDF Software / PDF Editor for Windows, macOS, Linux
Copyright © 2002-Present Qoppa Software. All rights reserved.
•
•
•
Command Line ArgumentsPDF Studio supports various command line arguments allowing to customize the page view, the location in the PDF document or even which side pane is open when launching from the command line (or terminal).
How to Call PDF Studio from the Command Line
When calling PDF Studio from the command line (or terminal) make sure to use the full file path for the PDF document. See the below examples
Windows: “C:\Program Files\PDFStudio2021\pdfstudio2021.exe” C:\mydocument.pdf
Mac: open -a “PDF Studio 2021” –args “/Users/user/Desktop/mydocument.pdf”
Linux: ./pdfstudio2021 “/home/qoppa/Downloads/mydocument.pdf”
Command Line Argument Options
View options
zoom=scaleWindows: pdfstudio2021.exe /A “zoom=150” “C:\temp\CommandLine.pdf”Linux: ./pdfstudio2021 /A “zoom=150” “/home/user/CommandLine.pdf”Mac: open -a “PDF Studio 2021” –args /A “zoom=150” “/Users/user/Desktop/ CommandLine.pdf”Open From URL: https://www.qoppa.com/files/pdfstudio/images/ CommandLine.pdf?zoom=150
zoom=scale,top,leftWindows: pdfstudio2021.exe /A “zoom=300,200,200” “C: \temp\CommandLine.pdf”Linux: ./pdfstudio2021 /A “zoom=300,200,200” “/home/user/ CommandLine.pdf”Mac: open -a “PDF Studio 2021” –args /A “zoom=300,200,200” “/Users/user/ Desktop/CommandLine.pdf”Open From URL: https://www.qoppa.com/files/pdfstudio/images/ CommandLine.pdf?zoom=300,200,200
view=FitWindows: pdfstudio2021.exe /A “view=Fit” “C:\temp\CommandLine.pdf”Linux: ./pdfstudio2021 /A “view=Fit” “/home/user/CommandLine.pdf”Mac: open -a “PDF Studio 2021” –args /A “view=fit” “/Users/user/Desktop/ CommandLine.pdf”
-138-
Affordable, Powerful PDF Software / PDF Editor for Windows, macOS, Linux
Copyright © 2002-Present Qoppa Software. All rights reserved.
•
•
•
•
•
•
•
Open From URL: https://www.qoppa.com/files/pdfstudio/images/ CommandLine.pdf?view=Fit
view=FitHWindows: pdfstudio2021.exe /A “view=FitH” “C:\temp\CommandLine.pdf”Linux: ./pdfstudio2021 /A “view=FitH” “/home/user/CommandLine.pdf”Mac: open -a “PDF Studio 2021” –args /A “view=FitH” “/Users/user/Desktop/ CommandLine.pdf”Open From URL: https://www.qoppa.com/files/pdfstudio/images/ CommandLine.pdf?view=FitH
view=FitH,topWindows: pdfstudio2021.exe /A “view=FitH,200” “C:\temp\CommandLine.pdf”Linux: ./pdfstudio2021 /A “view=FitH,200” “/home/user/CommandLine.pdf”Mac: open -a “PDF Studio 2021” –args /A “view=FitH,200” “/Users/user/ Desktop/CommandLine.pdf”Open From URL: https://www.qoppa.com/files/pdfstudio/images/ CommandLine.pdf?view=Fit,200
nameddest=destination – Specifies a named destination in the document
Location options
page=pagenumWindows: pdfstudio2021.exe /A “page=2” “C:\temp\CommandLine.pdf”Linux: ./pdfstudio2021 /A “page=2” “/home/user/CommandLine.pdf”Mac: open -a “PDF Studio 2021” –args /A “page=2” “/Users/user/Desktop/ CommandLine.pdf”Open From URL: https://www.qoppa.com/files/pdfstudio/images/ CommandLine.pdf?page=2
comment=commentID – Specifies a comment on a given page in the PDF document.
Use the page command before this command.For example: “page=3&comment=AA617F97B2482D900FE18B6DBEE431C2”
Studio pane options
pagemode=bookmarksWindows: pdfstudio2021.exe /A “pagemode=bookmarks” “C: \temp\CommandLine.pdf”Linux: ./pdfstudio2021 /A “pagemode=bookmarks” “/home/user/ CommandLine.pdf”Mac: open -a “PDF Studio 2021” –args /A “pagemode=bookmarks” “/Users/user/ Desktop/CommandLine.pdf”Open From URL: https://www.qoppa.com/files/pdfstudio/images/ CommandLine.pdf?pagemode=bookmarks
pagemode=thumbsWindows: pdfstudio2021.exe /A “pagemode=thumbs” “C: \temp\CommandLine.pdf”Linux: ./pdfstudio2021 /A “pagemode=thumbs” “/home/user/ CommandLine.pdf”
-139-
Affordable, Powerful PDF Software / PDF Editor for Windows, macOS, Linux
Copyright © 2002-Present Qoppa Software. All rights reserved.
◦
◦
•◦
◦◦
◦
•◦
◦
◦
◦
•
•
•
•
Mac: open -a “PDF Studio 2021” –args /A “pagemode=thumbs” “/Users/user/ Desktop/CommandLine.pdf”Open From URL: https://www.qoppa.com/files/pdfstudio/images/ CommandLine.pdf?pagemode=thumbs
pagemode=noneWindows: pdfstudio2021.exe /A “pagemode=none” “C: \temp\CommandLine.pdf”Linux: ./pdfstudio2021 /A “pagemode=none” “/home/user/CommandLine.pdf”Mac: open -a “PDF Studio 2021” –args /A “pagemode=none” “/Users/user/ Desktop/CommandLine.pdf”Open From URL: https://www.qoppa.com/files/pdfstudio/images/ CommandLine.pdf?pagemode=none
pagemode=attachmentsWindows: pdfstudio2021.exe /A “pagemode=attachments” “C: \temp\CommandLine.pdf”Linux: ./pdfstudio2021 /A “pagemode=attachments” “/home/user/ CommandLine.pdf”Mac: open -a “PDF Studio 2021” –args /A “pagemode=attachments” “/Users/ user/Desktop/CommandLine.pdf”Open From URL: https://www.qoppa.com/files/pdfstudio/images/ CommandLine.pdf?pagemode=attachments
Combining Options / Flags:
If you need to use two or more of the above options, you can combine them using the "&" symbol. See below.
Windows: pdfstudio2021.exe /A “zoom=150&pagemode=none” “C: \temp\CommandLine.pdf”Linux: https://www.qoppa.com/files/pdfstudio/images/CommandLine.pdf? zoom=150&pagemode=noneMac: open -a “PDF Studio 2021” –args /A “zoom=150&pagemode=none” “/Users/ user/Desktop/CommandLine.pdf”Open From URL: https://www.qoppa.com/files/pdfstudio/images/ CommandLine.pdf?zoom=150&pagemode=none

-141-
Affordable, Powerful PDF Software / PDF Editor for Windows, macOS, Linux
Copyright © 2002-Present Qoppa Software. All rights reserved.
••
Creating PDFsThere are many ways to create a PDF file in PDF Studio.
File Tab
Under File Tab > Create, you will find the following options:
From Image: Converts a Single Image File to PDF using any of the Supported Files Types
From MS Office: Converts Microsoft Office Word, Excel & PowerPoint files to PDF from the Supported Files Types
From Multiple Files: Merges/Converts Multiple Files at once to create a single PDF
From Scanner: Launches the Scanning Dialog to create a new PDF
From Blank Page: Creates a Blank PDF with no content
Convert Tab
Under Convert Tab on the toolbar you will find the following options:
From Scanner: Creates a PDF from a scanner.
Scan with WIA / ICA / Sane Direct: Scans using the PDF Studio dialog.Scan with Sane Daemon: starts Sane Daemon Scanning
From Image: Create PDF from one of the supported image file types *png, *jpg, *jpeg, *jpe, *gif, *tif & *tiff. (Image To PDF settings are in the Preferences Dialog)
From Word: Create PDF from Word .doc and .docx files (Word to PDF font settings are in the Preferences Dialog)
From Excel: Create PDF from Excel .xlsx files only (Excel to PDF font settings are in the Preferences Dialog)
From Excel: Create PDF from PowerPoint .pptx files only (Excel to PDF font settings are in the Preferences Dialog)
-142-
Affordable, Powerful PDF Software / PDF Editor for Windows, macOS, Linux
Copyright © 2002-Present Qoppa Software. All rights reserved.
New Document: Creates a Blank PDF with no content
From Multiple Files: Merges/Converts Multiple Files at once to create a single PDF
Drag and Drop
Supported file types can be drag and dropped directly onto PDF Studio to convert the file to PDF.
-143-
Affordable, Powerful PDF Software / PDF Editor for Windows, macOS, Linux
Copyright © 2002-Present Qoppa Software. All rights reserved.
•
•
••
Creating a Blank PDFA blank PDF can be created in PDF Studio. To create a blank PDF, with no document currently open, do one of the following:
Go to File Tab > Create > New Document or use the shortcut key Ctrl + N (⌘ + N on Mac) to create a blank document using the default settings set within the General Preferences.
Go to Pages Tab > Insert > Add Blank Page or use the shortcut key Ctrl + Shift + B (⌘ + Shift + B on Mac) to create a blank page using custom settings.
The newly created blank page will contain absolutely no content at all, the same as if it's a blank sheet of paper.
SettingsSame as Page - (only available when Adding a Blank Page) Allows you to match the new page settings to an existing page in the document
New Page Size - Allows you to select a page size from a list of predefined standard document sizes.
Portrait: sets the selected page orientation size to portraitLandscape: sets the selected page size orientation to landscape
Note: Portrait and Landscape options are not available when selecting a "Custom" media size
Count - number of blank pages to be created
Color - sets the background color of the new pages being created
-144-
Affordable, Powerful PDF Software / PDF Editor for Windows, macOS, Linux
Copyright © 2002-Present Qoppa Software. All rights reserved.
Converting Files to PDFPDF Studio can convert non-PDF file types into PDF Documents. See Supported File Types for a list of the supported file types.
Converting Word to PDF - Converts Microsoft Word files to PDF.
Converting Excel to PDF - Converts Microsoft Excel files to PDF.
Converting PowerPoint to PDF - Converts Microsoft PowerPoint files to PDF.
Converting Images to PDF - Converts image files to PDF.
Converting Text to PDF - Converts text files to PDF.
-145-
Affordable, Powerful PDF Software / PDF Editor for Windows, macOS, Linux
Copyright © 2002-Present Qoppa Software. All rights reserved.
1.2.3.
1.2.
1.2.
1.
Converting Word© to PDFPDF Studio can convert Word© documents to PDF, both .doc (Word 97© to 2003) and .docx (Word 2007© and later) extensions are supported. By default fonts within the word document will be embedded into the created PDF. If you wish to change these options see Fonts Preferences.
Instructions:
Using the Welcome Screen
Launch PDF StudioUsing the Welcome Screen click on the From MS Office option under "Create PDF"Navigate to the Word© file (*doc, *docx) you wish to covert and click "Open"
From the Toolbar
Go to Convert Tab > From WordNavigate to the Word© file (*doc, *docx) you wish to covert and click "Open"
From the File Tab
Go to File Tab > Create > From MS OfficeNavigate to the Word© file (*doc, *docx) you wish to covert and click "Open"
Drag and Drop
Drag and drop the Word© file (*doc, *docx) you wish to covert directly onto PDF Studio to convert the file to PDF.
Upon opening the file, PDF Studio will automatically convert the document to a PDF document that you can then save as new PDF document.
-146-
Affordable, Powerful PDF Software / PDF Editor for Windows, macOS, Linux
Copyright © 2002-Present Qoppa Software. All rights reserved.
1.2.3.
1.2.
1.2.
1.
Converting Excel© to PDFPDF Studio can convert Excel© documents to PDF. Only .xlsx files are supported. By default fonts within the Excel© document will be embedded into the created PDF.
Instructions:
Using the Welcome Screen
Launch PDF StudioUsing the Welcome Screen click on the From MS Office option under "Create PDF"Navigate to the Excel© file (*xlsx) you wish to covert and click "Open"
From the Toolbar
Go to Convert Tab > From ExcelNavigate to the Excel© file (*xlsx) you wish to covert and click "Open"
From the File Tab
Go to File Tab > Create > From MS OfficeNavigate to the Excel© file (*xlsx) you wish to covert and click "Open"
Drag and Drop
Drag and drop the Excel© file (*xlsx) you wish to covert directly onto PDF Studio to convert the file to PDF.
Upon opening the file, PDF Studio will automatically convert the document to a PDF document that you can then save as new PDF document.
-147-
Affordable, Powerful PDF Software / PDF Editor for Windows, macOS, Linux
Copyright © 2002-Present Qoppa Software. All rights reserved.
1.2.3.
1.2.
1.2.
1.
Converting PowerPoint© to PDFPDF Studio can convert PowerPoint© documents to PDF. Only the .pptx (PowerPoint 2007© and later) extensions are supported. By default fonts within the PowerPoint document will be embedded into the created PDF. If you wish to change these options see Fonts Preferences.
Instructions:
Using the Welcome Screen
Launch PDF StudioUsing the Welcome Screen click on the From MS Office option under "Create PDF"Navigate to the PowerPoint© file (*pptx) you wish to covert and click "Open"
From the Toolbar
Go to Convert Tab > From PowerPointNavigate to the PowerPoint© file (*pptx) you wish to covert and click "Open"
From the File Tab
Go to File Tab > Create > From MS OfficeNavigate to the PowerPoint© file (*pptx) you wish to covert and click "Open"
Drag and Drop
Drag and drop the PowerPoint© file (*pptx) you wish to covert directly onto PDF Studio to convert the file to PDF.
Upon opening the file, PDF Studio will automatically convert the document to a PDF document that you can then save as new PDF document.
-148-
Affordable, Powerful PDF Software / PDF Editor for Windows, macOS, Linux
Copyright © 2002-Present Qoppa Software. All rights reserved.
1.2.
1.2.
1.
Converting Images to PDFPDF Studio can convert Images to PDF. The following image types can be converted *png, *jpg, *jpeg, *jpe, *gif, *tif & *tiff. When converting images the Image Preferences settings will be used when creating the PDF.
Instructions:
From the Toolbar
Go to Convert Tab > From ImageNavigate to the Image file (*png, *jpg, *jpeg, *jpe, *gif, *tif & *tiff) you wish to covert and click "Open"
From the File Tab
Go to File Tab > Create > From ImageNavigate to the Image file (*png, *jpg, *jpeg, *jpe, *gif, *tif & *tiff) you wish to covert and click "Open"
Drag and Drop
Drag and drop the Image file (*png, *jpg, *jpeg, *jpe, *gif, *tif & *tiff) you wish to covert directly onto PDF Studio to convert the file to PDF.
Upon opening the file, PDF Studio will automatically convert the document to a PDF document that you can then save as new PDF document.
-149-
Affordable, Powerful PDF Software / PDF Editor for Windows, macOS, Linux
Copyright © 2002-Present Qoppa Software. All rights reserved.
1.2.
1.
Converting Text to PDFPDF Studio can convert text documents with a .txt extension to PDF. When converting .txt files the Text to PDF settings in preferences will be used to format the document.
Instructions:
From the File Tab
Go to File Tab > Create > From FileNavigate to the text file (*txt ) you wish to covert and click "Open"
Drag and Drop
Drag and drop the text file (*txt ) you wish to covert directly onto PDF Studio to convert the file to PDF.
Upon opening the file, PDF Studio will automatically convert the document to a PDF document that you can then save as new PDF document.
-150-
Affordable, Powerful PDF Software / PDF Editor for Windows, macOS, Linux
Copyright © 2002-Present Qoppa Software. All rights reserved.
1.2.
3.
4.•••
5.6.
1.2.
3.•••
4.5.
1.2.
3.•••
4.
Merging/Converting Multiple Files to PDFPDF Studio is able to merge/convert multiple files at once to create a single PDF. Only the Supported File Types are able to be merged/converted into a single PDF.
Instructions:
Using the Welcome Screen
Launch PDF StudioUsing the Welcome Screen click on the From Multiple Files option under "Create PDF"Using Add Files or Add Folder select the files you wish to merge/convert into a single PDF.Select any additional options when converting the files.
Add bookmarks for each merged document.Results: Open or save new merged documentPasswords to try when opening documents
Once all of the options are selected click Start to begin merging/converting the files.All files will be merged/converted in a single action. All Supported File Types will be converted to PDF.
From the Toolbar
Go to Convert Tab > From Multiple FilesUsing Add Files or Add Folder select the files you wish to merge/convert into a single PDF.Select any additional options when converting the files.
Add bookmarks for each merged document.Results: Open or save new merged documentPasswords to try when opening documents
Once all of the options are selected click Start to begin merging/converting the files.All files will be merged/converted in a single action. All Supported File Types will be converted to PDF.
From the File Tab
Go to File Tab > Create > From Multiple FilesUsing Add Files or Add Folder select the files you wish to merge/convert into a single PDF.Select any additional options when converting the files.
Add bookmarks for each merged document.Results: Open or save new merged documentPasswords to try when opening documents
Once all of the options are selected click Start to begin merging/converting the files.
-151-
Affordable, Powerful PDF Software / PDF Editor for Windows, macOS, Linux
Copyright © 2002-Present Qoppa Software. All rights reserved.
5.
••
All files will be merged/converted in a single action. All Supported File Types will be converted to PDF
Merge/Convert Settings
New Page
Page Size - Allows you to select a page size from a list of predefined standard document sizes.
Portrait: sets the selected page orientation size to portraitLandscape: sets the selected page size orientation to landscape
Note: Portrait and Landscape options are not available when selecting a "Custom" media size
Units - Select the measurement unit for the crop margins in either Inches, Points, Centimeters, or Millimeters
Width - Width of the page in the units selected
Height - Height of the page in the units selected
Keep Proportional - Toggles keeping the width and height values in sync
Current Page
Center - When checked this option will center the original page content in the new page size
Scale to Fit - Resizes the page content to best fit the new page size
Fit Crop to Page - Sets the crop box equal to the media box
Bookmarks
Add a bookmark for each merged document - This will create a separate bookmark for each merged file added to the document
File List
Add Files - Displays a file chooser to add individual files to the list.
Add Folder - Displays a file chooser that adds the contents of a directory to the list.
Delete - Removes the selected file(s) from the list.
-152-
Affordable, Powerful PDF Software / PDF Editor for Windows, macOS, Linux
Copyright © 2002-Present Qoppa Software. All rights reserved.
Move Up - Moves the selected file(s) up the list.
Move Down - Moves the selected file(s) down the list.
Move to Top - Moves the selected file(s) to the top of the list.
Move to Bottom - Moves the selected file(s) to the bottom of the list.
Results
Open New Merged Document - After the merge is complete the new file will be displayed in PDF Studio
Append to Current Document - Appends the selected pages to the end of the currently open document
Save As - This option allows you to set a destination for the newly created merged file. You can type the destination manually or click on the "..." button to open a file chooser to set the destination for the newly created file
Passwords to try when opening documents
To set a password click in the password field or on the Edit button. Then enter the password you want to be used. Do this for up to four passwords to try on password protected PDFs during the batch process. Only PDF files with passwords are supported.
Note: The passwords entered here will only be used for this batch process and will not be stored anywhere else. Passwords will have be entered for each new batch process.
-153-
Affordable, Powerful PDF Software / PDF Editor for Windows, macOS, Linux
Copyright © 2002-Present Qoppa Software. All rights reserved.
•
•
•
Drag and Drop to Create PDFSupported file types can be dragged and dropped onto PDF Studio to immediately convert to PDF. This will use the default conversion settings for the file types based on settings in Preferences.
Supported file types can be created into a new document by dragging the file onto a PDF Studio window with no document currently open.Supported file types can be inserted as new pages into an existing open document by dragging the file to the Thumbnail Pane. Pages can also be dragged and dropped across multiple open documents.
Note: Dropping a file onto the main document pane will open the document in a new frame.
-154-
Affordable, Powerful PDF Software / PDF Editor for Windows, macOS, Linux
Copyright © 2002-Present Qoppa Software. All rights reserved.
•
•
•
••
•
•
•
Scanning Documents to PDFWith PDF Studio, you can scan images into an existing or new PDF document using any WIA/ICA, or Sane compliant scanner. The scanning driver (WIA/ICA, or Sane) options available will depend on the operating system being used.
To create a PDF from a scanner do one of the following:
Using the Welcome Screen click on the From Scanner option under "Create PDF"
Go to File Tab > Create > From Scanner on the menu bar.
Go to Convert Tab > From Scanner on the toolbar.
Scanning Options
Below is a list of available scanning driver options when scanning to PDF for each operating system and PDF Studio version.
Windows
PDF Studio 32-bit
WIA Scanning - Scan using the WIA drivers & PDF Studio scanning dialogTwain Scanning - Scan using the Twain native scanner interface
PDF Studio 64-bit
WIA Scanning - Scan using the WIA drivers & PDF Studio scanning dialog
Mac
PDF Studio 64-bit
ICA Scanning - Scan using the ICA drivers & PDF Studio scanning dialog
Linux
PDF Studio 64-bit
Sane Direct Scanning - Scan using the PDF Studio scanning dialog with direct access to Sane drivers
-155-
Affordable, Powerful PDF Software / PDF Editor for Windows, macOS, Linux
Copyright © 2002-Present Qoppa Software. All rights reserved.
• Sane Network Daemon Scanning - Scan using the Sane Network Daemon native scanner interface
-156-
Affordable, Powerful PDF Software / PDF Editor for Windows, macOS, Linux
Copyright © 2002-Present Qoppa Software. All rights reserved.
1.2.
3.
4.
5.
Scanning ProfilesPDF Studio allows you to create Scanning Profiles to set specific scanners and settings to be used again later. Once set, using the profiles allows for single click scanning with the specified settings.
Note: Scanning profiles are only supported when using the WIA/ICA scanning dialogs on Windows and Mac.
Creating a Scanning Profile
Start the scanning dialog as normalSet all of the options that you would like to have in your profile. You can either start from an existing profile or a blank template by selecting "<new profile>" from the drop down.Once you have completed your settings, click on Save. This will bring up a window to name your profile.If you are starting from a blank template this field will be blank. If you have previously used a profile the previous profile name will be displayed. If you would like to just update the previous profile leave the name and click OK. If you would like to create a new profile just type in the new name you would like to save it as and click OK.Once complete your profile will now be available in the drop down menu
Note: You do not need to create or save a scanning profile before scanning a document. To scan documents without saving settings just click Scan after selecting your scanning settings.
Scanning a PDF Document Using an Existing Scanning Profile
There are 2 ways to use an existing optimizer profile:
From the Scanning dialog
Start the scanning dialog as you normally would. Choose the scanning profile from the drop down list in the combo box, click on the scan button to start scanning with your saved settings.
From the Toolbar
Click on the small down arrow to the right of the scanning button and select the profile you wish to scan with. This will immediately start scanning with the settings you chose for the profile.
-157-
Affordable, Powerful PDF Software / PDF Editor for Windows, macOS, Linux
Copyright © 2002-Present Qoppa Software. All rights reserved.
•••
••••
•••
Note: Only the ones for which you chose the Show on Menu option will appear on this list. Click on the optimizer profile in the list you'd like to run and it will begin immediately optimizing the PDF using the settings saved in the optimizer profile.
Scan Options
Scanner - The scanner to be used
Set Default Scanner - When checked this will make the selected scanner the default going forward
Source - What scanning input to use when scanning the document/image (i.e. flat bed or feeder)
Duplex - If the scanner supports 2 sided scanning, select this option to scan both sides at the same time.
Color Format - Choose between Black and White, Greyscale, or Color when scanning
Note: If "(Conversion)" is listed next to the color option, then this option is not supported by your device. PDF Studio will convert the scanned image to the selected color space for you as a part of the scanning process.
Page Size - Size of the document being scanned
DPI Resolution - What resolution to use when saving the image into the PDF document. Select a predefined value between 50 - 600 or type in your own custom value up to 1200. When selecting a DPI it's best to follow the below guidelines
Black-and-white documents
Lowest acceptable resolution = 200 DPI (equal to “high” fax quality)Conventional resolution = 300 DPIHighest conventional resolution = 600 DPI
Color documents (and color compression)
Lowest acceptable resolution = 150 DPIConventional resolution = 200 DPIHighest conventional resolution = 300 DPIArchive resolution = 600 DPI
Scan More Pages - Options to continue scanning more pages if needed after initial scan is completed. Useful if for example if scanning a single page at a time from a flatbed scanner
Disabled: Will create the new document as soon as the scan has completeAsk User: Prompts the user to see if additional pages need to be scannedAutomatically After: Automatically starts another scan after the selected number of seconds
-158-
Affordable, Powerful PDF Software / PDF Editor for Windows, macOS, Linux
Copyright © 2002-Present Qoppa Software. All rights reserved.
•
•
•••
•
•
••
••
••
••
•••
••
Brightness - Adjusts the brightness of the scanned document. Increase the value to make the document/image look lighter
Contrast - Adjusts the contrast of the scanned document. This affects the differences between light and dark on the document/image
PDF Options
Insert At - Where to insert the new image. Choose from the following options:
Beginning Of Document: Inserts the scanned pages before the first page of the currently opened documentCurrent Location: Inserts the scanned pages in front of the current page being displayed of the currently opened documentEnd Of Document: Appends the scan at the end of the document.New Document: Creates a new document using only the scanned pagesInterleave – When scanning multiple images, this option can be used to insert them at every other page. This is especially useful for scanning two-sided documents.Reverse Interleave: Insert the scan in the current document at every other page in reverse order starting after the last page of the document.Multiple documents - Use this option to create multiple documents when scanning multiple pages. When selected a dialog will be displayed to set the following options.
Pages per PDF - Number of pages before creating the next PDFFile Name Pattern - The file name to be used when creating the PDFs. Each file will have the number of the document appended to the end of the file nameSave files To - Where to save the created filesSave as Default - When checked this will make the selected options the default going forward
Page Size - What size to use when creating a new page to hold the image.
Size to Image – The new page will be created the same size as the scanned image.Same as Document – The new page will be created the same size as the current open document. If the document is empty or if the Insert At choice is set to New Document the new page will be created at the same size as the scanned image.
Compression - What compression to use when saving the image into the PDF document.
JPEG - Lossy compression (recommended compression)Quality (for JPEG compression only) – If using JPEG, the compression quality can be adjusted from 1 to 100%.
1 = high compression, very low quality100 = low compression, very high qualityGenerally, 80=high quality, 50=medium quality, 20=low quality
Flate - Lossless compression formatJBIG2 B&W - Lossless compression format that only supports B&W color
-159-
Affordable, Powerful PDF Software / PDF Editor for Windows, macOS, Linux
Copyright © 2002-Present Qoppa Software. All rights reserved.
Auto deskew images - When checked, if the document’s text/images are slanting too far in one direction or is misaligned, PDF Studio will attempt to auto-rotate the document so that the alignment is corrected.
OCR Options
OCR - Create Searchable PDF - Check this to automatically OCR the document after scanning
Language - Language to be used if OCR is selected. Click on "Download OCR Languages" to download additional languages.
-160-
Affordable, Powerful PDF Software / PDF Editor for Windows, macOS, Linux
Copyright © 2002-Present Qoppa Software. All rights reserved.
1.2.3.4.
•
•
WIA / ICA / Sane Direct ScanningWIA (Windows), ICA (Mac), & Sane Direct (Linux) are application interfaces or drivers included by the operating system that enables software to communicate with imaging hardware such as scanners and digital cameras. When scanning using one of these interfaces, PDF Studio will use our custom scanning dialog that will directly communicate with your scanners that support the WIA, ICA, or Sane Direct interface.
Scanning with WIA/ICA
Go to File Tab > Create > From ScannerThis will open the Scan to PDF options dialogSelect the scanner and the setting you wish to use.Once you have selected all of your options click on either Preview or Scan
Preview - generates a quick preview using the scanning options that will be displayed on the right of the dialogScan - will use the selected options to scan and then create a new PDF or append the image to an existing PDF depending on the option selected.
WIA / ICA / Sane Direct Scan Settings
Scan to PDF Options
Profile - Allows you to add, edit, or delete scanning profiles
Scanner - The scanner to be used
Source - What scanning input to use when scanning the document/image (i.e. flat bed or feeder)
Duplex - If the scanner supports 2 sided scanning, select this option to scan both sides at the same time.
Color Format - Choose between Black and White, Greyscale, or Color when scanning
Note: If "(Conversion)" is listed next to the color option, then this option is not supported by your device. PDF Studio will convert the scanned image to the selected color space for you as a part of the scanning process.
Page Size - Size of the document being scanned

-161-
Affordable, Powerful PDF Software / PDF Editor for Windows, macOS, Linux
Copyright © 2002-Present Qoppa Software. All rights reserved.
•••
••••
••
•
•
•
•••
•
•
••
DPI Resolution - What resolution to use when saving the image into the PDF document. Select a predefined value between 50 - 600 or type in your own custom value up to 1200. When selecting a DPI it's best to follow the below guidelines
Black-and-white documents
Lowest acceptable resolution = 200 DPI (equal to “high” fax quality)Conventional resolution = 300 DPIHighest conventional resolution = 600 DPI
Color documents (and color compression)
Lowest acceptable resolution = 150 DPIConventional resolution = 200 DPIHighest conventional resolution = 300 DPIArchive resolution = 600 DPI
Scan more pages: Sets the behavior after the scanning is completed
Disabled: will not prompt to continue scanningAsk user: Prompts after completing the page scan to continue scanning additional pagesAutomatically after: waits the specified time before automatically starting another scan
Brightness - Adjusts the brightness of the scanned document. Increase the value to make the document/image look lighter
Contrast - Adjusts the contrast of the scanned document. This affects the differences between light and dark on the document/image
PDF Options
Insert At - Where to insert the new image. Choose from the following options:
Beginning Of Document: Inserts the scanned pages before the first page of the currently opened documentCurrent Location: Inserts the scanned pages in front of the current page being displayed of the currently opened documentEnd Of Document: Appends the scan at the end of the document.New Document: Creates a new document using only the scanned pagesInterleave – When scanning multiple images, this option can be used to insert them at every other page. This is especially useful for scanning two-sided documents.Reverse Interleave: Insert the scan in the current document at every other page in reverse order starting after the last page of the document.Multiple documents - Use this option to create multiple documents when scanning multiple pages. When selected a dialog will be displayed to set the following options.
Pages per PDF - Number of pages before creating the next PDFFile Name Pattern - The file name to be used when creating the PDFs. Each file will have the number of the document appended to the end of the file name
-162-
Affordable, Powerful PDF Software / PDF Editor for Windows, macOS, Linux
Copyright © 2002-Present Qoppa Software. All rights reserved.
••
••
••
•••
••
Save files To - Where to save the created filesSave as Default - When checked this will make the selected options the default going forward
Page Size - What size to use when creating a new page to hold the image.
Size to Image – The new page will be created the same size as the scanned image.Same as Document – The new page will be created the same size as the current open document. If the document is empty or if the Insert At choice is set to New Document the new page will be created at the same size as the scanned image.
Compression - What compression to use when saving the image into the PDF document.
JPEG - Lossy compression (recommended compression)Quality (for JPEG compression only) – If using JPEG, the compression quality can be adjusted from 1 to 100%.
1 = high compression, very low quality100 = low compression, very high qualityGenerally, 80=high quality, 50=medium quality, 20=low quality
Flate - Lossless compression formatJBIG2 B&W - Lossless compression format that only supports B&W color
Auto deskew images - When checked, if the document’s text/images are slanting too far in one direction or is misaligned, PDF Studio will attempt to auto-rotate the document so that the alignment is corrected.
OCR Options
OCR - Create Searchable PDF - Check this to automatically OCR the document after scanning
Language - Language to be used if OCR is selected. Click on "Download OCR Languages" to download additional languages.
-163-
Affordable, Powerful PDF Software / PDF Editor for Windows, macOS, Linux
Copyright © 2002-Present Qoppa Software. All rights reserved.
1.
2.
•
3.
4.
5.
•
Sane Daemon ScanningSane (Linux Only) is a scanning protocol that connects to scanners by providing a standardized interface. SANE only provides an interface with the hardware and displays the options available for each scanner. When scanning using Sane PDF Studio will first launch the scanning application, then once the scanning is complete import the scanned image to complete the Scan to PDF process.
Note: For PDF Studio to connect to the scanner properly, you need to make sure that you have a saned daemon and at least one sane back-end installed. This is required for our scanning library to work properly. Note that this is not requirement for other products such as XSane and Gimp, so it is possible that XSane and Gimp work but PDF Studio doesn’t . For more information on how to setup the saned daemon see Scanning to PDF with Linux on our Knowledge Base.
Go to Convert Tab > From Scanner click on the small down arrow to the right of
the scanning button and select "Sane Daemon Scanning".Choose a scanner from the list and click on the OK button to proceed. If there is an error with the selected scanner, the dialog will appear again with the previously tried scanner highlighted so you can choose a new scanner.
If the selected scanner had been a default option, you can use this dialog to change the default scanner by selecting the new scanner and checking the "Set default Scanner" option.
When the OK button is pressed, a standard scanning interface will be displayed. This is a separate program that will allow you to adjust the scan settings and then begin the scanning process.Once the scan has been completed and PDF Studio has received the data from the scanner, PDF Studio will display a dialog box showing some information about the scan and will prompt you for a number of choices to determine how to insert the new image.Once you've selected the options click OK to then create a new PDF or append the image to an existing PDF depending on the option selected.
Sane Scan Import Settings
Image Info
This sections displays some basic details on the image that was received from your scanners software
PDF Options
Insert At - Where to insert the new image. Choose from the following options:
Beginning Of Document: Inserts the scanned pages before the first page of the currently opened document
-164-
Affordable, Powerful PDF Software / PDF Editor for Windows, macOS, Linux
Copyright © 2002-Present Qoppa Software. All rights reserved.
•
•••
•
•
••
••
••
••
•••
••
Current Location: Inserts the scanned pages in front of the current page being displayed of the currently opened documentEnd Of Document: Appends the scan at the end of the document.New Document: Creates a new document using only the scanned pagesInterleave – When scanning multiple images, this option can be used to insert them at every other page. This is especially useful for scanning two-sided documents.Reverse Interleave: Insert the scan in the current document at every other page in reverse order starting after the last page of the document.Multiple documents - Use this option to create multiple documents when scanning multiple pages. When selected a dialog will be displayed to set the following options.
Pages per PDF - Number of pages before creating the next PDFFile Name Pattern - The file name to be used when creating the PDFs. Each file will have the number of the document appended to the end of the file nameSave files To - Where to save the created filesSave as Default - When checked this will make the selected options the default going forward
Page Size - What size to use when creating a new page to hold the image.
Size to Image – The new page will be created the same size as the scanned image.Same as Document – The new page will be created the same size as the current open document. If the document is empty or if the Insert At choice is set to New Document the new page will be created at the same size as the scanned image.
Compression - What compression to use when saving the image into the PDF document.
JPEG - Lossy compression (recommended compression)Quality (for JPEG compression only) – If using JPEG, the compression quality can be adjusted from 1 to 100%.
1 = high compression, very low quality100 = low compression, very high qualityGenerally, 80=high quality, 50=medium quality, 20=low quality
Flate - Lossless compression formatJBIG2 B&W - Lossless compression format that only supports B&W color
Auto deskew images - When checked, if the document’s text/images are slanting too far in one direction or is misaligned, PDF Studio will attempt to auto-rotate the document so that the alignment is corrected.
OCR Options
OCR - Create Searchable PDF - Check this to automatically OCR the document after scanning
Language - Language to be used if OCR is selected. Click on "Download OCR Languages" to download additional languages.

-165-
Affordable, Powerful PDF Software / PDF Editor for Windows, macOS, Linux
Copyright © 2002-Present Qoppa Software. All rights reserved.
-166-
Affordable, Powerful PDF Software / PDF Editor for Windows, macOS, Linux
Copyright © 2002-Present Qoppa Software. All rights reserved.
Supported File TypesPDF Studio supports converting certain non-PDF file types into PDF Documents. The current supported types are:
Image Files: *png, *jpg, *jpeg, *jpe, *gif, *tif & *tiff. (Image To PDF settings are in the Preferences Dialog)
Word Files: .doc and .docx (Word to PDF font settings are in the Preferences Dialog)
Excel Files: .xlsx files only (Excel to PDF font settings are in the Preferences Dialog)
PowerPoint FIles: .pptx files only (PowerPoint to PDF font settings are in the Preferences Dialog)
Text Files: .txt (Text To PDF settings are in the Preferences Dialog)
-167-
Affordable, Powerful PDF Software / PDF Editor for Windows, macOS, Linux
Copyright © 2002-Present Qoppa Software. All rights reserved.
Viewing and Comparing PDFsPDF Studio provides extensive functionality for viewing and comparing PDFs
Viewing PDFs
Navigating: General navigation tips and tools
Tabbed Document View: Working with multiple documents are displayed in Studio
Zooming: Zooming in/out of the document
Setting Page Layout: Setting how the pages are displayed
Rotating Page View: Rotating the view of the page
Loupe Tool: Magnify a small region of the page
Pan and Zoom Tool: Display a window with the current location on the document
Reading Mode: Hides all the toolbars and task panes to maximize the viewing area on your screen
Full Screen Mode: Displays only the document hiding the menu bar, toolbars, task panes, and window controls
Invert Colors Mode: Invert colors when displaying PDFs for accessibility
Split View: Show two separate parts of the same document
Show / Hide Layers: enable & disable layers.
Auto Scroll Document: Auto scroll the document for easy reading
Comparing PDFs
Side by Side Comparison : Compare two different PDFs next to each other
Overlay Comparison : Compare two different PDFs on top of each other highlighting the differences
-168-
Affordable, Powerful PDF Software / PDF Editor for Windows, macOS, Linux
Copyright © 2002-Present Qoppa Software. All rights reserved.
••
•
•
NavigatingPDF Studio has a variety of methods that can be used to navigate PDF documents.
Using the Mouse
The primary method for navigating within PDF documents is with the mouse. PDF Studio is compatible with all standard mice and supports the following actions using the 2 buttons and scroll wheel typically found on the mouse.
Note: On Mac if using a mouse with a single button you can right click by holding Ctrl and clicking the mouse button
Left Mouse Button
Click to select itemsHold down to drag items
Scroll Wheel
Scroll the pages in the document
Right Mouse Button
Displays context menus with additional options
Panning/Moving Pages
With the hand tool selected click and drag anywhere on the page to pan the document
Using the scroll wheel on the mouse you can move the document up and down
You can also use the vertical and horizontal scrollbars to pan the document by clicking and dragging on the scrollbar
Using the Keyboard
The keyboard can also be used in some cases to quickly navigate the document using shortcut keys. The following shortcuts can be used.

-169-
Affordable, Powerful PDF Software / PDF Editor for Windows, macOS, Linux
Copyright © 2002-Present Qoppa Software. All rights reserved.
Action Windows/UNIX MacFirst Page Home HomeLast Page End EndNext Page PgDn or Space PgDn or SpacePrevious Page PgUp or Shift + Space PgUp or Shift + SpaceGo to Page Ctrl + Shift + P ⌘ + Shift + PScroll Down Space or ↓ Space or ↓Scroll Up ↑ ↑Next view Alt + → ⌘ + [Previous view Alt + ← ⌘ + ]
Using the Navigation Tools
The navigation tools are located on the bottom toolbar and can be used to navigate the document.
First Page: Navigates to the first page of the document.
Previous Page: Navigates to the previous page in the document.
Page Number: Displays the current page being viewed and the total number of pages. Type a number into the field and press "Enter" to navigate directly to that page. Documents using Page Labels will require the exact page label to be entered (i.e. iv, v, etc...)
Next Page: Navigates to the next page in the document.
Last Page: Navigates to the Last page in the document.
Previous View: Navigates to the last view within the document.
Next View: Navigates to the next view within the document.
Using Page Thumbnails
The page thumbnails can be found on the left side of the PDF Studio window. If not
displayed the pane can be opened using the Pages button on the left side of the screen
The page thumbnails show miniature versions of all the pages in the documents.
-170-
Affordable, Powerful PDF Software / PDF Editor for Windows, macOS, Linux
Copyright © 2002-Present Qoppa Software. All rights reserved.
••
Click a thumbnail to go directly to that page.use the Left ← and Right → arrow keys to navigate to the Previous and Next pages
Using Bookmarks
The Bookmarks pane is located on the left of the PDF Studio window. If not displayed
the pane can be opened using the Bookmarks button on the left side of the screen.
Using bookmarks can be useful when navigating large PDFs that contain many pages. Often bookmarks are put in place to label chapters or sections within a document. Click on the bookmark to jump directly to that location in the document.
NOTE: the following icon signifies an invalid bookmark with no destination.
Using Destinations
The Destination pane is located on the left of the PDF Studio window. If not displayed
the pane can be opened using the Destinations button on the left side of the screen.
Using destinations can be useful when navigating large PDFs that contain many pages. Destinations are additional navigation tools put in place to label specific locations or sections within a document. Click on the destination name to jump directly to that location in the document.
-171-
Affordable, Powerful PDF Software / PDF Editor for Windows, macOS, Linux
Copyright © 2002-Present Qoppa Software. All rights reserved.
•
•••
•
•
•
Tabbed Document ViewIn PDF Studio documents will open using the tabbed interface to view multiple PDFs at once. Each new PDF that is opened will open in a in the same application frame only in a new tab.
The tab names display the name of the PDF document opened in that tab and you can switch between the tabs by clicking the name of the file you wish to view. When the number of opened document tabs can no longer fit in the tab area a Previous & Next button will display on the right side to navigate through the tabs. Use menu button to the right of the arrows to quickly jump between tabs.
Working With Document Tabs
The following functions are available when working with document tabs. Each action can be performed on a single tab or you an use the Ctrl + Click shortcut to select multiple tabs at once.
Managing Tabs
Move Tab to a New Location
Click on the tab, then drag and drop it in between the two document tabs you would like it to be placed
Closing Tabs
To close a single document click on the icon to the right of the document name or right click on the document tab and choose from the following options:
Close: closes the specified documentClose all: closes all currently opened document leaving PDF Studio openClose others: leaves the selected document tab open and closes all other documentsClose tabs to the right: closes all documents to the right of the selected tab leaving any documents to the left of the selected tab open
Create New Window
Click on a tab, then drag it outside of the existing window and drop. This will create a new window.Right click on the tab and select “Open in new window”.
-172-
Affordable, Powerful PDF Software / PDF Editor for Windows, macOS, Linux
Copyright © 2002-Present Qoppa Software. All rights reserved.
•
•
•
•
••
•
••
Move Across Windows
Each PDF Studio window can have multiple document tabs at once
Click on a tab, drag and drop it into the tab area of another window. This will move the selected tabs from one window into another.
Working Across Tabs
PDF Studio supports operations across tabs as well as across separate PDF Studio windows. This can be useful when needing to copy pages or text from one document to another. Below are some examples:
Drag pages across tabs: Open the thumbnail pane in both tabs, select the page to move then drag it and hover over the second document tab which will then display the second document. Continue dragging the page and drop it into the pages pane of the second document. Copy pages across tabs: Open the thumbnail pane in both tabs, select a page and right click to copy. Then click on the second document tab and right click in the thumbnail pane to paste the page. Copy text across tabs: Select text and you wish to copy in one document tab, and then paste it into desired location of another document tab.
Additional Options
The following additional actions can be performed when working with multiple document tabs open. These features are only available when using the Ctrl + Click shortcut to select multiple tabs at once.
File
Copy path to clipboard: copies the file path to the system clipboardOpen containing folder: opens the folder on the system where the document is stored
Document
Merge: starts the Merge PDF tool with selected documents already set in the merge listCompare overlay: starts the Compare Overlay tool with the selected documents Compare side by side: only available with 2 documents - starts the Side by Side comparison view with the selected documents
Enable / Disable Tabbed Document view
To disable the tabbed document view go to General Preferences and uncheck the "Open documents in new tabs" option.

-173-
Affordable, Powerful PDF Software / PDF Editor for Windows, macOS, Linux
Copyright © 2002-Present Qoppa Software. All rights reserved.
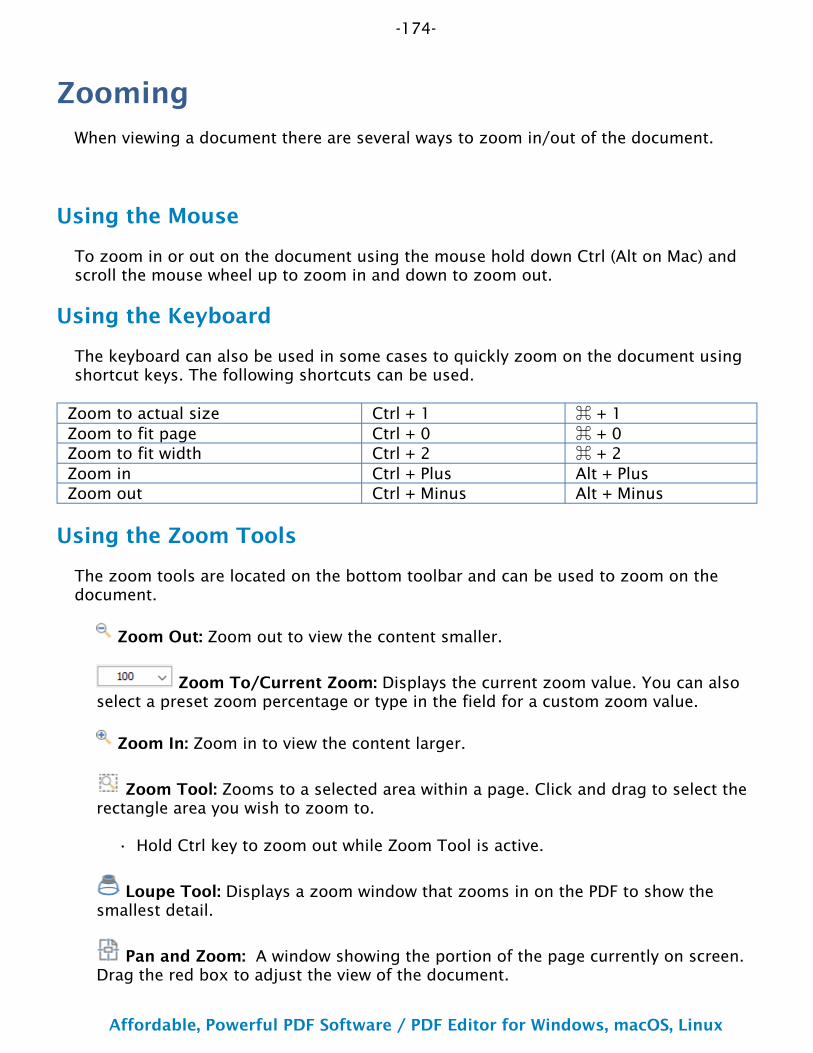
-174-
Affordable, Powerful PDF Software / PDF Editor for Windows, macOS, Linux
Copyright © 2002-Present Qoppa Software. All rights reserved.
•
ZoomingWhen viewing a document there are several ways to zoom in/out of the document.
Using the Mouse
To zoom in or out on the document using the mouse hold down Ctrl (Alt on Mac) and scroll the mouse wheel up to zoom in and down to zoom out.
Using the Keyboard
The keyboard can also be used in some cases to quickly zoom on the document using shortcut keys. The following shortcuts can be used.
Zoom to actual size Ctrl + 1 ⌘ + 1Zoom to fit page Ctrl + 0 ⌘ + 0Zoom to fit width Ctrl + 2 ⌘ + 2Zoom in Ctrl + Plus Alt + PlusZoom out Ctrl + Minus Alt + Minus
Using the Zoom Tools
The zoom tools are located on the bottom toolbar and can be used to zoom on the document.
Zoom Out: Zoom out to view the content smaller.
Zoom To/Current Zoom: Displays the current zoom value. You can also select a preset zoom percentage or type in the field for a custom zoom value.
Zoom In: Zoom in to view the content larger.
Zoom Tool: Zooms to a selected area within a page. Click and drag to select the rectangle area you wish to zoom to.
Hold Ctrl key to zoom out while Zoom Tool is active.
Loupe Tool: Displays a zoom window that zooms in on the PDF to show the smallest detail.
Pan and Zoom: A window showing the portion of the page currently on screen. Drag the red box to adjust the view of the document.

-175-
Affordable, Powerful PDF Software / PDF Editor for Windows, macOS, Linux
Copyright © 2002-Present Qoppa Software. All rights reserved.
-176-
Affordable, Powerful PDF Software / PDF Editor for Windows, macOS, Linux
Copyright © 2002-Present Qoppa Software. All rights reserved.
Setting Page LayoutWhen viewing a document there are several page layout options available to choose from.
Page Layouts
By default the page layout will be determined by the Initial View Settings in the document or the default Page Layout Settings set in PDF Studio preferences. A different
page layout can be selected when viewing the document by going to Home Tab > Layout on the tool bar and selecting the layout you wish to use.
Single: Displays only a single individual page at a time
Single Continuous: Displays all of the document's pages in a single column that can be continuously scrolled
Facing: Displays only two pages at a time side by side with odd pages on the left and even pages on the right
Facing Continuous: Displays all of the documents pages in two columns with odd pages on the left and even pages on the right
Cover: Displays the document just as when using Facing only the first page will be displayed alone
Cover Continuous: Displays the document just as when using Facing Continuous only the first page will be displayed alone
Page Views
By default the page view will be determined by the Initial View Settings in the document or the default Magnification Settings set in PDF Studio preferences. A different page view can be selected when viewing the document by going to Home Tab or Bottom Toolbar and selecting the view you wish to use.
Actual Size: Displays the document with a 1:1 ratio to match how the document would look if printed without any scaling.
Fit to Width: Scales the view to fit the width of the document in the PDF Studio frame.
-177-
Affordable, Powerful PDF Software / PDF Editor for Windows, macOS, Linux
Copyright © 2002-Present Qoppa Software. All rights reserved.
Fit to Page: Scales the view to fit the entire document within the PDF Studio frame.
-178-
Affordable, Powerful PDF Software / PDF Editor for Windows, macOS, Linux
Copyright © 2002-Present Qoppa Software. All rights reserved.
Rotating Page ViewThe pages of a document can be rotated temporarily, as if you were rotating a book or magazine in your hands. This can be accessed by clicking on the Rotate View on the Home Tab of the toolbar.
Note: This rotation will NOT be saved when the document is saved then reopened. To permanently rotate pages in the document when saved see Rotating Pages
Rotate View Clockwise: Rotates only the view within the document clockwise
Rotate View Counter Clockwise: Rotates only the view within the document counter clockwise

-179-
Affordable, Powerful PDF Software / PDF Editor for Windows, macOS, Linux
Copyright © 2002-Present Qoppa Software. All rights reserved.
1.2.
3.
4.
Loupe ToolThe loupe tool is a draggable rectangle that zooms in on the PDF to show the smallest detail. When active a second window will be displayed showing the current content that you are magnifying.
Instructions:
Go to View Tab and click on the Loupe tool button on the toolbarClick on the part of the page you would like to magnify. This will display the magnification window.Use either the handles on the corners of the blue zoom area or the slider in the magnification window to change the level of magnification when using the toolWhen finished to close the tool either click on the "x" on the magnification window or press Esc on the keyboard
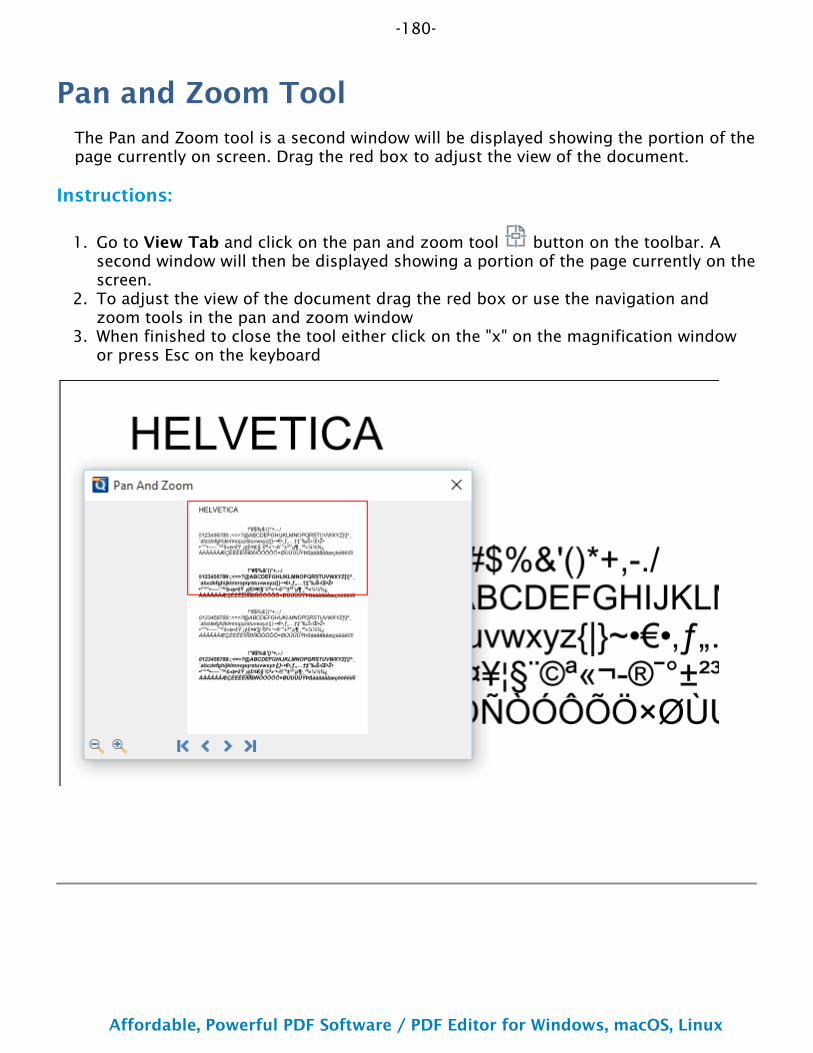
-180-
Affordable, Powerful PDF Software / PDF Editor for Windows, macOS, Linux
Copyright © 2002-Present Qoppa Software. All rights reserved.
1.
2.
3.
Pan and Zoom ToolThe Pan and Zoom tool is a second window will be displayed showing the portion of the page currently on screen. Drag the red box to adjust the view of the document.
Instructions:
Go to View Tab and click on the pan and zoom tool button on the toolbar. A second window will then be displayed showing a portion of the page currently on the screen.To adjust the view of the document drag the red box or use the navigation and zoom tools in the pan and zoom windowWhen finished to close the tool either click on the "x" on the magnification window or press Esc on the keyboard
-181-
Affordable, Powerful PDF Software / PDF Editor for Windows, macOS, Linux
Copyright © 2002-Present Qoppa Software. All rights reserved.
Reading ModeWhen reading a document you can hide all of the toolbars and panes to enhance the reading experience.
Note: This mode will not fill the entire screen as the window title will still be shown. To cover as much of the screen as possible make sure to maximize the PDF Studio window.
How to start Reading Mode
To enable reading mode go to View Tab > Reading Mode or use the shortcut key Ctrl + H (Cmd + Ctrl + H on the Mac)
Reading Mode Options
Once reading mode is enable Navigating the document using the keyboard or mouse works as it normally would.
In addition you can use the left and right arrows that are displayed in reading mode to navigate to the next and previous pages.
Press the "esc" key to exit reading mode.
-182-
Affordable, Powerful PDF Software / PDF Editor for Windows, macOS, Linux
Copyright © 2002-Present Qoppa Software. All rights reserved.
Full Screen ModeFull screen mode displays only the document hiding the menu bar, toolbars, task panes, and window controls. When in this mode only the document is displayed with all remaining area made black.
How to start Full Screen Mode
To enable reading mode go to View Tab > Reading Mode or use the shortcut key Ctrl + L (Cmd + Ctrl + L on the Mac)
Reading Mode Options
Once full screen mode is enable Navigating the document using the keyboard or mouse works as it normally would.
Press the "esc" key to exit reading mode.

-183-
Affordable, Powerful PDF Software / PDF Editor for Windows, macOS, Linux
Copyright © 2002-Present Qoppa Software. All rights reserved.
Invert Colors
Invert colors when rendering a PDF document by selecting View Tab > Invert Colors from the menu.
For typical documents, the display will change from "Black on White" to "White on Black". Inverting colors make things much easier to read on small screens, particularly when working in a dark room, on an airplane, or at night. This mode is available as a preference to invert colors on all documents or on any currently open document from the View menu.
Example Document with Invert Colors Enabled:
-184-
Affordable, Powerful PDF Software / PDF Editor for Windows, macOS, Linux
Copyright © 2002-Present Qoppa Software. All rights reserved.
1.
2.3.
Split ViewSplit view allows you to have 2 separate views of the currently open document in the same window. This can be useful if you need to reference a different part of the document while viewing another.
How to Start Split View
Open any document
Go to View Tab > Split View on the toolbarA new pane will be opened showing a separate view of the currently opened document
Split view options
Split Horizontally: Displays each pane of the split view horizontally
Split Vertically: Displays each pane of the split view vertically

-185-
Affordable, Powerful PDF Software / PDF Editor for Windows, macOS, Linux
Copyright © 2002-Present Qoppa Software. All rights reserved.
1.
2.3.
Show/Hide LayersWhen viewing a document layers can be toggled on and off to create different views.
Note: Layers can be reset to their original state using the "Reset Layers" menu option.
How to Show/Hide Layers in a PDF
Access the layers pane by clicking the Layers button on the left side of the screen.Show or hide layers by clicking the check box next to the layers nameContinue working on the document as you normally would
Note: Toggling the layers on and off does not modify the document and will not be saved. To change the default state when opening the PDF see Layer Properties

-186-
Affordable, Powerful PDF Software / PDF Editor for Windows, macOS, Linux
Copyright © 2002-Present Qoppa Software. All rights reserved.
••••
••
Auto Scroll DocumentThe auto scroll feature in PDF Studio allows you to scroll through pages without pressing any keystrokes. This is helpful for those that may be impaired as well as making it easier to scroll through long PDFs to find the information you need.
How to use Auto Scroll
Use the below shortcut keys
Use Ctrl + Shift + H (Command + Shift + H on Mac) to start and stop auto scrollingMinus key "-" reverses scrolling directionNumber keys 0-9 control scroll speed (0 for slowest & 9 for fastest)While scrolling down (normal reading direction), down arrow increases scroll speed and up arrow decreases.While scrolling up, arrow speed control is reversed to match expected behavior.Jump to next or previous pages using the Left & Right arrow keys
-187-
Affordable, Powerful PDF Software / PDF Editor for Windows, macOS, Linux
Copyright © 2002-Present Qoppa Software. All rights reserved.
•
•
PDF Document ComparisonPDF Studio has multiple tools that can be used to compare PDF documents. These tools can be used to find changes and differences between one or more PDF documents.
Comparison Tools
Side by Side - Open two PDF documents in the same window next to each other to compare visually
Overlay Compare - Compare documents by overlaying a second document onto the first using different colors to find differences.
There are 2 features for overlay comparison in PDF Studio:
Overlay PDF Compare: Create a new PDF that overlays 2 or multiple documents. The overlay comparison PDF is saved in vector format. It allows you to preview the scaling and compute the offset through a 3 point method and preview windows. Annotations can then be added to the newly created Overlay PDF.Live Overlay PDF: This is a live rendering mode that overlays 2 documents and that can only be accessed from the side by side comparison. Only allows 2 docs can be overlaid. Exported PDF is in image format. Annotations can be added only to the first document.
Overlay Color Options - How to set document color options for the overlay comparison
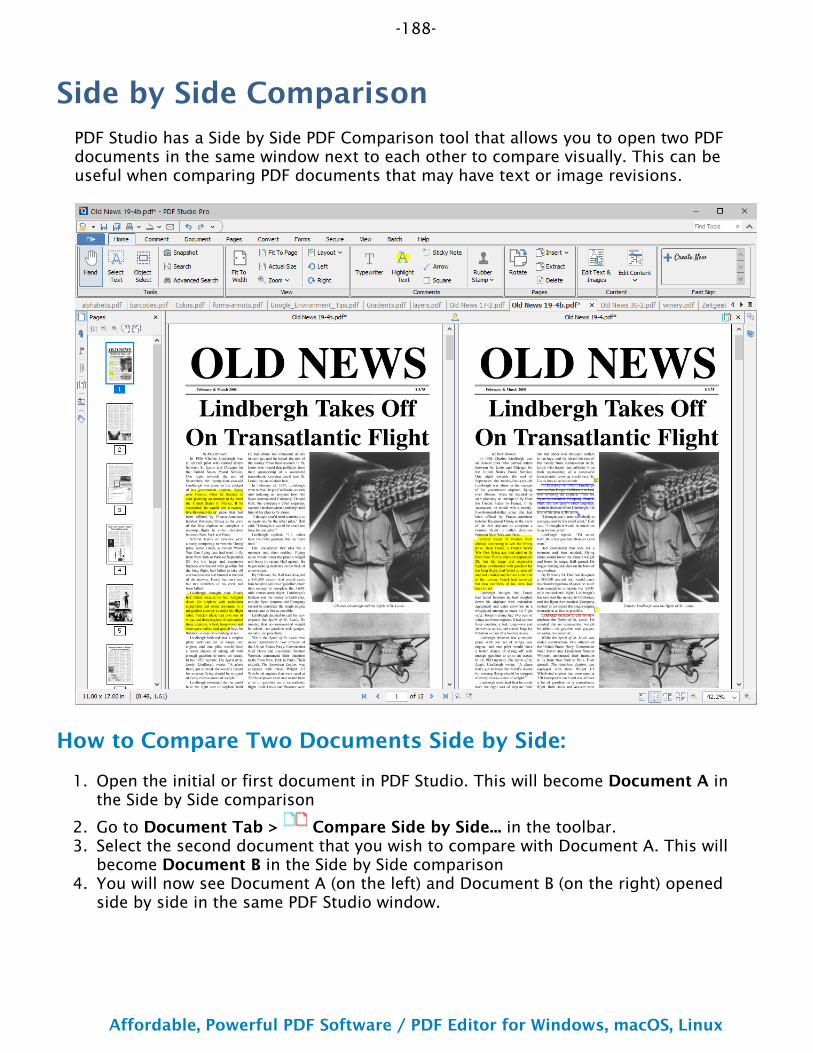
-188-
Affordable, Powerful PDF Software / PDF Editor for Windows, macOS, Linux
Copyright © 2002-Present Qoppa Software. All rights reserved.
1.
2.3.
4.
Side by Side ComparisonPDF Studio has a Side by Side PDF Comparison tool that allows you to open two PDF documents in the same window next to each other to compare visually. This can be useful when comparing PDF documents that may have text or image revisions.
How to Compare Two Documents Side by Side:
Open the initial or first document in PDF Studio. This will become Document A in the Side by Side comparison
Go to Document Tab > Compare Side by Side... in the toolbar.Select the second document that you wish to compare with Document A. This will become Document B in the Side by Side comparisonYou will now see Document A (on the left) and Document B (on the right) opened side by side in the same PDF Studio window.
-189-
Affordable, Powerful PDF Software / PDF Editor for Windows, macOS, Linux
Copyright © 2002-Present Qoppa Software. All rights reserved.
•
•
•
•
••
Annotating in Side by Side
At any time during the comparison, using the toolbar, you can only annotate or markup any changes onto Document A.You can markup Document B by right clicking on Document B and selecting the tool that you wish to use. The tools available for document B are:
Sticky Note
Pencil
Select Text Once the text is selected you can right click on the highlighted and choose a text markup action.
Switching to Overlay View
If you would like you can switch over to our Overlay Comparison mode by clicking on
the Overlay button overlay on the main toolbar or in the top right corner of the above Document B.
Note: When switching over to Overlay Comparison if any changes have been made to Document B they will need to first be saved. PDF Studio will prompt you to do so when switching to Overlay Comparison.
Side by Side Compare Options
Switch to Live Overlay Comparison Mode - Switches the to the Live Overlay Comparison mode
Scroll Lock - Locks / unlocks the scroll panes in the view. When locked the document scrolling will be synchronized.
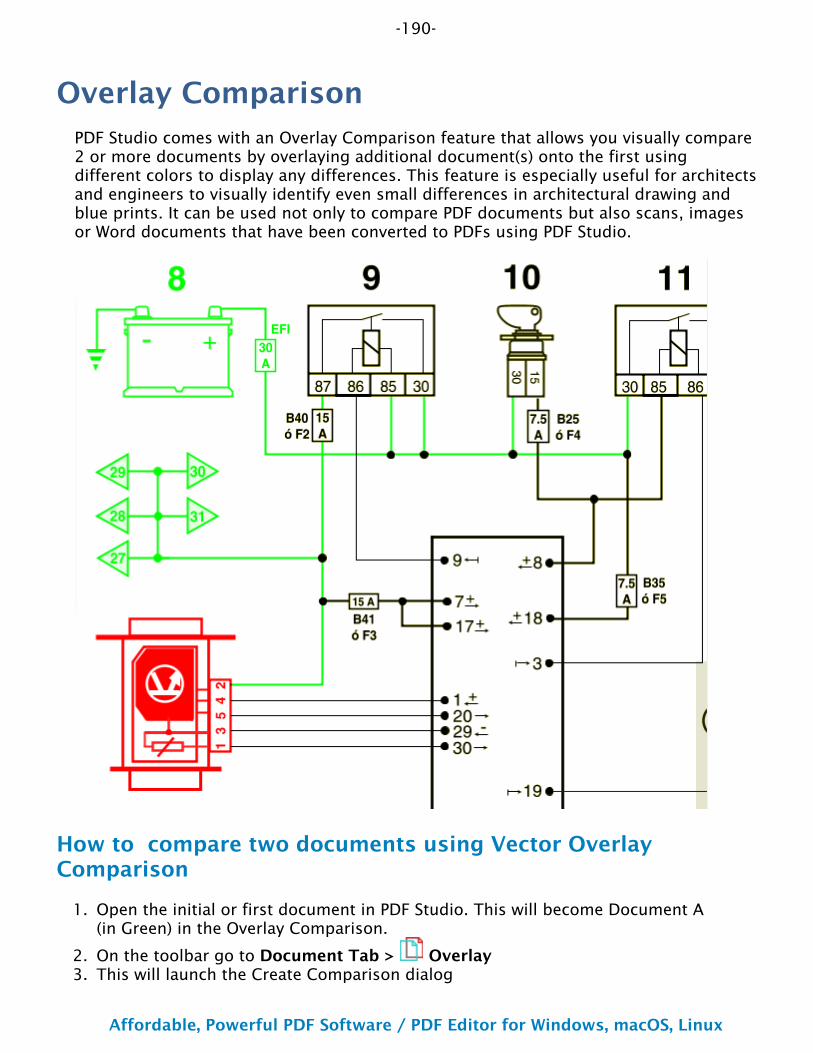
-190-
Affordable, Powerful PDF Software / PDF Editor for Windows, macOS, Linux
Copyright © 2002-Present Qoppa Software. All rights reserved.
1.
2.3.
Overlay ComparisonPDF Studio comes with an Overlay Comparison feature that allows you visually compare 2 or more documents by overlaying additional document(s) onto the first using different colors to display any differences. This feature is especially useful for architects and engineers to visually identify even small differences in architectural drawing and blue prints. It can be used not only to compare PDF documents but also scans, images or Word documents that have been converted to PDFs using PDF Studio.
How to compare two documents using Vector Overlay Comparison
Open the initial or first document in PDF Studio. This will become Document A (in Green) in the Overlay Comparison.
On the toolbar go to Document Tab > OverlayThis will launch the Create Comparison dialog
-191-
Affordable, Powerful PDF Software / PDF Editor for Windows, macOS, Linux
Copyright © 2002-Present Qoppa Software. All rights reserved.
4.5.6.
Select the documents you wish to compareSet the options for each of the documentsClick Start and it will create the new overlay document and open it in a separate window
Vector Overlay Options
Below are the options available when setting up the overlay comparison
File List
Add Files - Displays a file chooser to add one or more files to the list
Edit - Opens the layer options for the selected layer
Align Points - Starts the automated alignment tool, see How to Align Documents below
- Removes the selected file(s) from the list.
- Moves the selected file(s) up the list.
- Moves the selected file(s) down the list.
- Moves the selected file(s) to the top of the list.
- Moves the selected file(s) to the bottom of the list.
Layer Options
Layer
File - Displays the file name and path of the selected document
Layer Name - Sets the name to be used for the comparison layer
Color - Select the color for the document (the default colors generally provide the best results). See Choosing colors for overlay PDF comparison.
Pages - Set the pages of the document to be compared using the From and To options
Position
Rotate - Adjust the rotation of the document if needed
Offset X & Y - Adjust the X & Y location values of the document move it left, right, up, or down
Scale X & Y - Adjust the scale values to increase or decrease the size of the document
-192-
Affordable, Powerful PDF Software / PDF Editor for Windows, macOS, Linux
Copyright © 2002-Present Qoppa Software. All rights reserved.
1.2.3.
•4.
How to Align Documents
Add all of the documents you wish to compare to the document listClick on Align Points to begin the processEach document in the list will be opened in order. For each document: select the same 3 points, in the same order to align the pages
Note: For best results, the points should be far apart (close to the corners)Once completed the documents will be automatically aligned when the overlay document is created
Once the alignment has been set the Position values in the Layer Options dialog will be disabled. If needed you can click on Clear Alignment to remove the automatically set alingment and set a manual alignment instead.
-193-
Affordable, Powerful PDF Software / PDF Editor for Windows, macOS, Linux
Copyright © 2002-Present Qoppa Software. All rights reserved.
•
•••
Choosing Colors for Overlay ComparisonThe Overlay Comparison feature allows to customize the colors of the 2 documents that are being compared. When changing from the default colors, we suggest using complementary colors when comparing PDF documents using the Overlay Comparison feature in PDF Studio. Complementary colors are colors that add up to black which will ensure that the common elements on the two drawings / documents are displayed in black (overlay of the 2 complementary colors).
Using RGB (Red, Green, Blue) values, complementary colors are colors that add up to (255, 255, 255). See below for a few color pairs of complementary colors. The number in parenthesis represent the color in RGB values.
Example Colors
Cyan (51, 204, 204) / Dark Red (204, 51, 51) These are the default colors in PDF Studio. Green (0, 204, 51) / Dark Pink (255, 51, 204) Blue (0, 125, 255) / Orange (0, 125, 255) Green (0, 255, 0) / Red (0, 255, 0) Note: that the common elements in both drawings will not be as black in this color pair as the colors above because the colors do not add up to black.

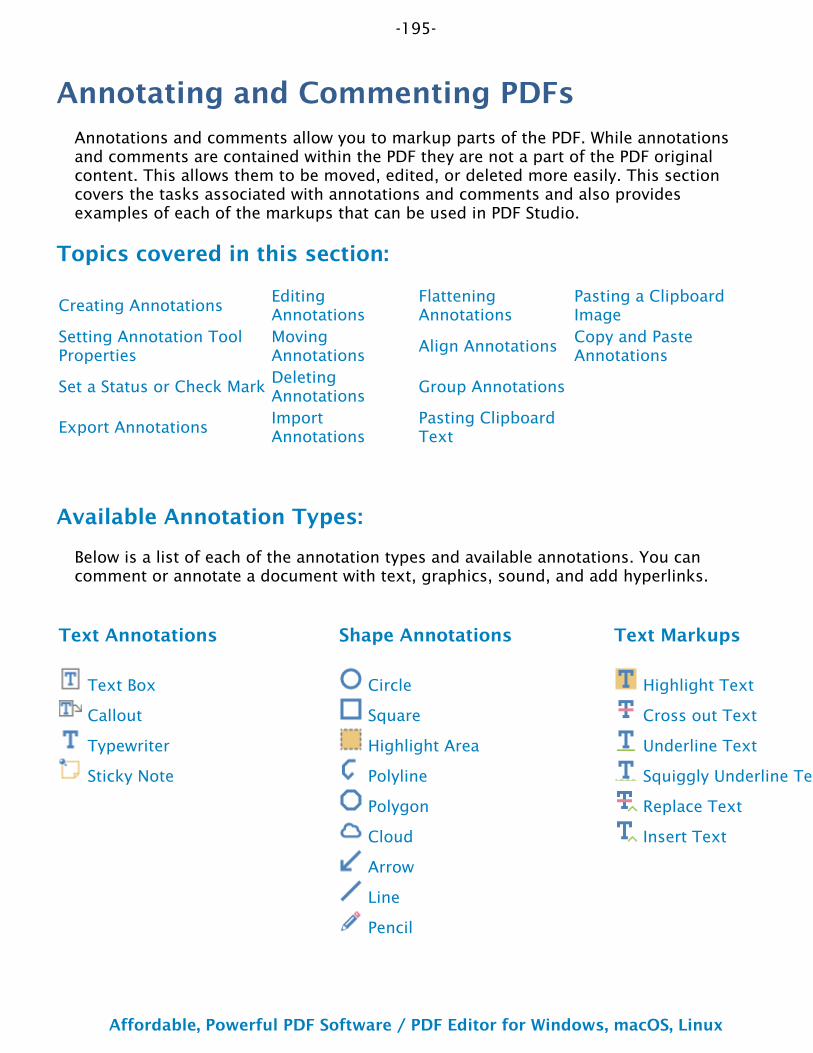
-195-
Affordable, Powerful PDF Software / PDF Editor for Windows, macOS, Linux
Copyright © 2002-Present Qoppa Software. All rights reserved.
Annotating and Commenting PDFsAnnotations and comments allow you to markup parts of the PDF. While annotations and comments are contained within the PDF they are not a part of the PDF original content. This allows them to be moved, edited, or deleted more easily. This section covers the tasks associated with annotations and comments and also provides examples of each of the markups that can be used in PDF Studio.
Topics covered in this section:
Creating AnnotationsEditing Annotations
Flattening Annotations
Pasting a Clipboard Image
Setting Annotation Tool Properties
Moving Annotations
Align AnnotationsCopy and Paste Annotations
Set a Status or Check MarkDeleting Annotations
Group Annotations
Export AnnotationsImport Annotations
Pasting Clipboard Text
Available Annotation Types:
Below is a list of each of the annotation types and available annotations. You can comment or annotate a document with text, graphics, sound, and add hyperlinks.
Text Annotations Shape Annotations Text Markups
Text Box Circle Highlight Text
Callout Square Cross out Text
Typewriter Highlight Area Underline Text
Sticky Note Polyline Squiggly Underline Text
Polygon Replace Text
Cloud Insert Text
Arrow
Line
Pencil
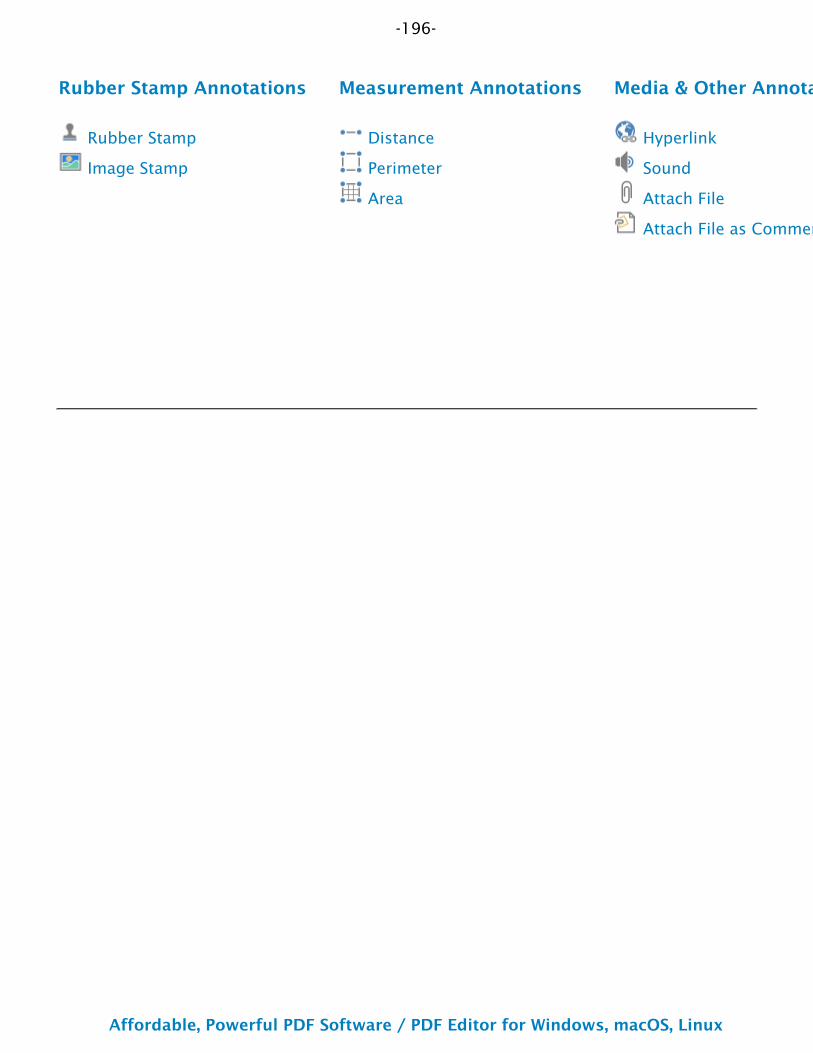
-196-
Affordable, Powerful PDF Software / PDF Editor for Windows, macOS, Linux
Copyright © 2002-Present Qoppa Software. All rights reserved.
Rubber Stamp Annotations Measurement Annotations Media & Other Annotations
Rubber Stamp Distance Hyperlink
Image Stamp Perimeter Sound
Area Attach File
Attach File as Comment
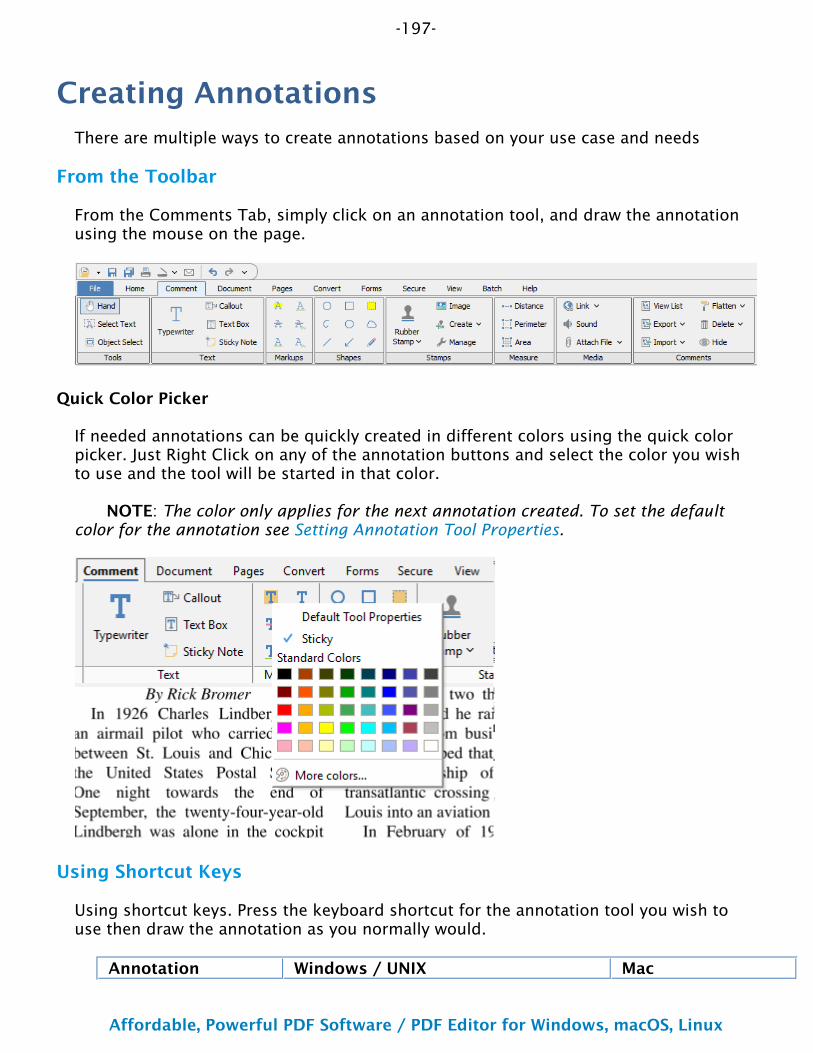
-197-
Affordable, Powerful PDF Software / PDF Editor for Windows, macOS, Linux
Copyright © 2002-Present Qoppa Software. All rights reserved.
Creating AnnotationsThere are multiple ways to create annotations based on your use case and needs
From the Toolbar
From the Comments Tab, simply click on an annotation tool, and draw the annotation using the mouse on the page.
Quick Color Picker
If needed annotations can be quickly created in different colors using the quick color picker. Just Right Click on any of the annotation buttons and select the color you wish to use and the tool will be started in that color.
NOTE: The color only applies for the next annotation created. To set the default color for the annotation see Setting Annotation Tool Properties.
Using Shortcut Keys
Using shortcut keys. Press the keyboard shortcut for the annotation tool you wish to use then draw the annotation as you normally would.
Annotation Windows / UNIX Mac
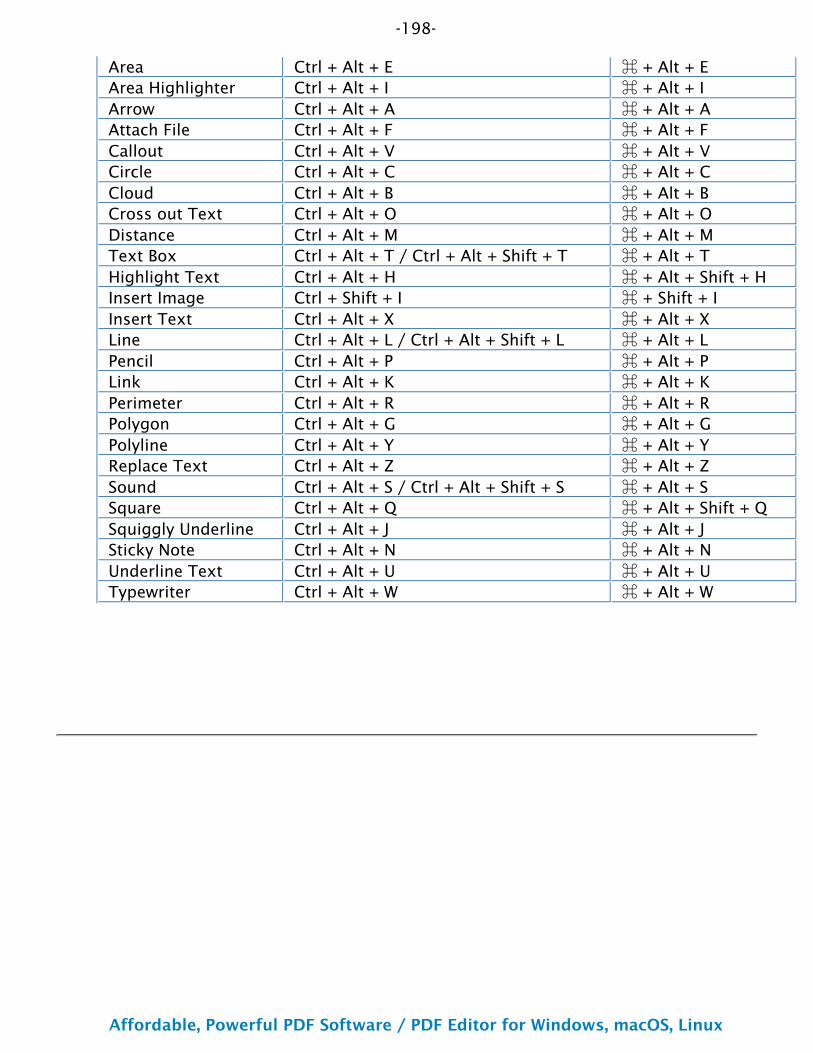
-198-
Affordable, Powerful PDF Software / PDF Editor for Windows, macOS, Linux
Copyright © 2002-Present Qoppa Software. All rights reserved.
Area Ctrl + Alt + E ⌘ + Alt + EArea Highlighter Ctrl + Alt + I ⌘ + Alt + IArrow Ctrl + Alt + A ⌘ + Alt + AAttach File Ctrl + Alt + F ⌘ + Alt + FCallout Ctrl + Alt + V ⌘ + Alt + VCircle Ctrl + Alt + C ⌘ + Alt + CCloud Ctrl + Alt + B ⌘ + Alt + BCross out Text Ctrl + Alt + O ⌘ + Alt + ODistance Ctrl + Alt + M ⌘ + Alt + MText Box Ctrl + Alt + T / Ctrl + Alt + Shift + T ⌘ + Alt + THighlight Text Ctrl + Alt + H ⌘ + Alt + Shift + HInsert Image Ctrl + Shift + I ⌘ + Shift + IInsert Text Ctrl + Alt + X ⌘ + Alt + XLine Ctrl + Alt + L / Ctrl + Alt + Shift + L ⌘ + Alt + LPencil Ctrl + Alt + P ⌘ + Alt + PLink Ctrl + Alt + K ⌘ + Alt + KPerimeter Ctrl + Alt + R ⌘ + Alt + RPolygon Ctrl + Alt + G ⌘ + Alt + GPolyline Ctrl + Alt + Y ⌘ + Alt + YReplace Text Ctrl + Alt + Z ⌘ + Alt + ZSound Ctrl + Alt + S / Ctrl + Alt + Shift + S ⌘ + Alt + SSquare Ctrl + Alt + Q ⌘ + Alt + Shift + QSquiggly Underline Ctrl + Alt + J ⌘ + Alt + JSticky Note Ctrl + Alt + N ⌘ + Alt + NUnderline Text Ctrl + Alt + U ⌘ + Alt + UTypewriter Ctrl + Alt + W ⌘ + Alt + W
-199-
Affordable, Powerful PDF Software / PDF Editor for Windows, macOS, Linux
Copyright © 2002-Present Qoppa Software. All rights reserved.
Text AnnotationsPDF Studio has the following text annotation tools available.
Typewriter: Creates a sticky note annotation.
Text Box: Creates a text box annotation.
Callout: Creates a callout annotation
Sticky Note: Creates a typewriter annotation.
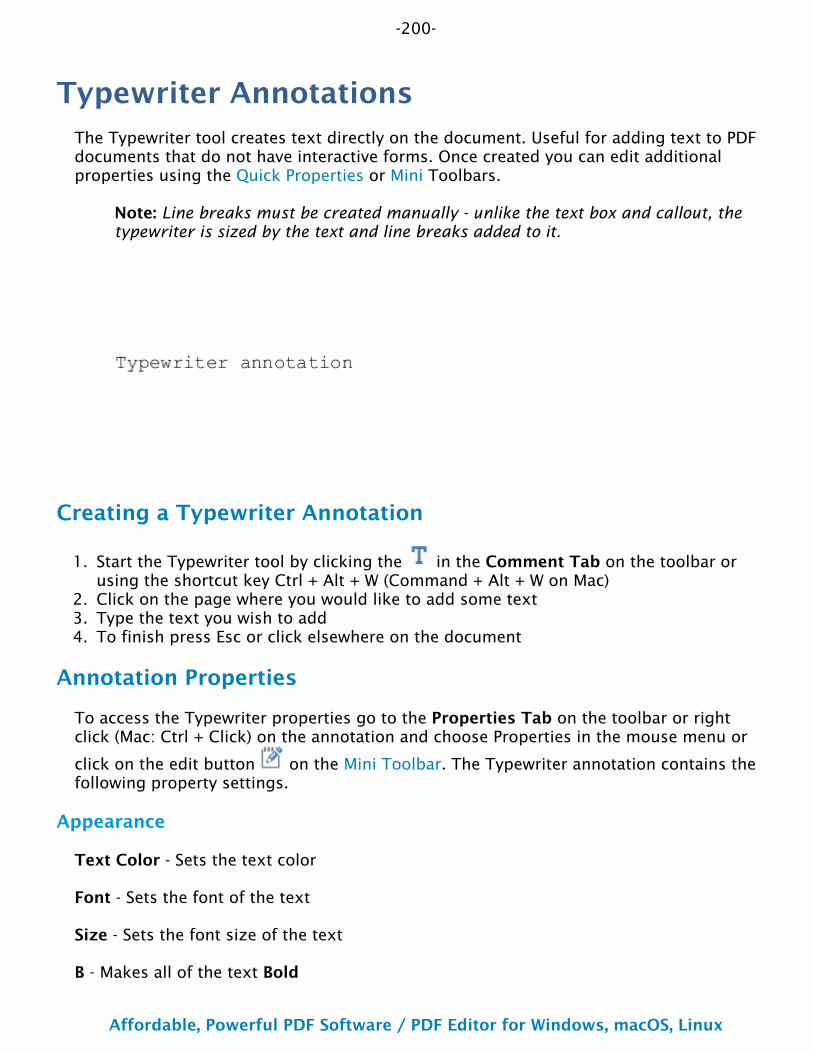
-200-
Affordable, Powerful PDF Software / PDF Editor for Windows, macOS, Linux
Copyright © 2002-Present Qoppa Software. All rights reserved.
1.
2.3.4.
Typewriter AnnotationsThe Typewriter tool creates text directly on the document. Useful for adding text to PDF documents that do not have interactive forms. Once created you can edit additional properties using the Quick Properties or Mini Toolbars.
Note: Line breaks must be created manually - unlike the text box and callout, the typewriter is sized by the text and line breaks added to it.
Creating a Typewriter Annotation
Start the Typewriter tool by clicking the in the Comment Tab on the toolbar or using the shortcut key Ctrl + Alt + W (Command + Alt + W on Mac)Click on the page where you would like to add some textType the text you wish to addTo finish press Esc or click elsewhere on the document
Annotation Properties
To access the Typewriter properties go to the Properties Tab on the toolbar or right click (Mac: Ctrl + Click) on the annotation and choose Properties in the mouse menu or
click on the edit button on the Mini Toolbar. The Typewriter annotation contains the following property settings.
Appearance
Text Color - Sets the text color
Font - Sets the font of the text
Size - Sets the font size of the text
B - Makes all of the text Bold

-201-
Affordable, Powerful PDF Software / PDF Editor for Windows, macOS, Linux
Copyright © 2002-Present Qoppa Software. All rights reserved.
I - Makes all of the text Italic
U - Makes the selected annotation text underlined
S - Marks the selected annotation text with a strikethrough
Transparency - Sets the transparency of the text annotation
Save as default - When checked this will make the selected appearance settings the default for any new Typewriter annotations going forward
Locked - When checked prevents the following on the annotation: being moved or resized, editing appearance properties, & deleting the annotation.
General
Author - Allows you to edit the author
Subject - Allows you to edit the subject
Layer - Only available when the document contains layers. Sets the layer that the annotation belongs to. For more information see Assigning Comments to Layers
Status History
This tab will display and changes to the review status of the annotation including Author, Status, and Timestamp. For more details see Setting Status or Check Marks on Annotations
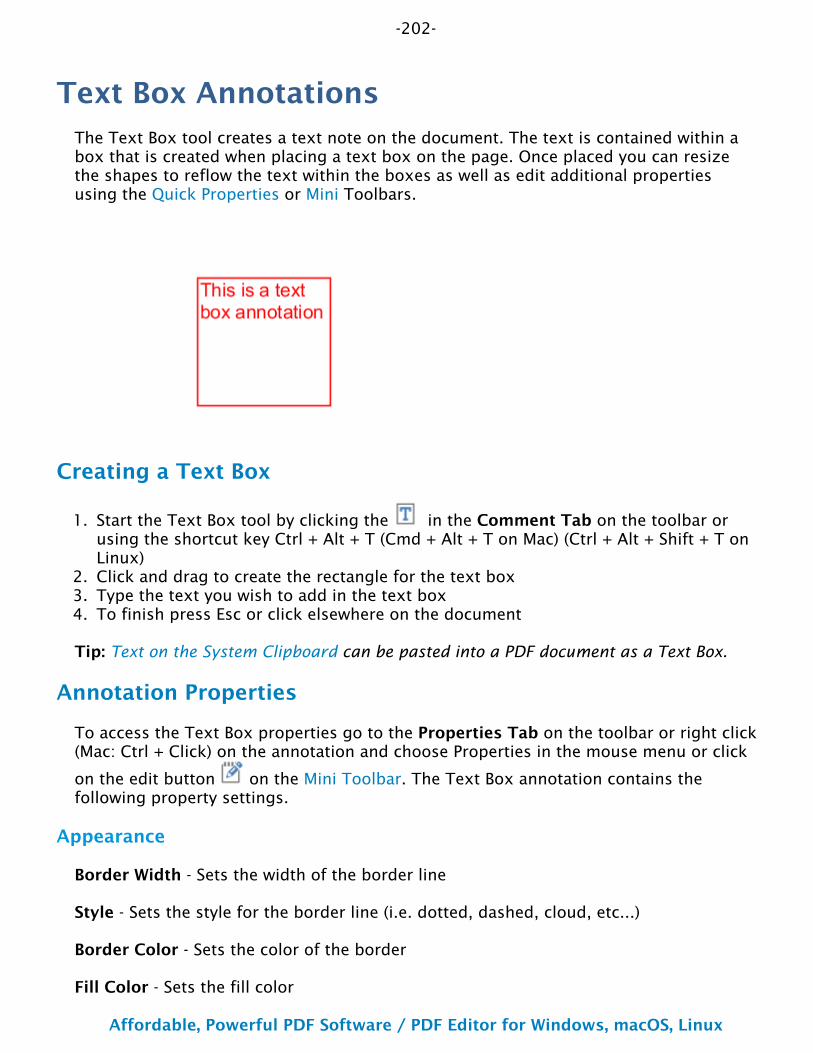
-202-
Affordable, Powerful PDF Software / PDF Editor for Windows, macOS, Linux
Copyright © 2002-Present Qoppa Software. All rights reserved.
1.
2.3.4.
Text Box AnnotationsThe Text Box tool creates a text note on the document. The text is contained within a box that is created when placing a text box on the page. Once placed you can resize the shapes to reflow the text within the boxes as well as edit additional properties using the Quick Properties or Mini Toolbars.
Creating a Text Box
Start the Text Box tool by clicking the in the Comment Tab on the toolbar or using the shortcut key Ctrl + Alt + T (Cmd + Alt + T on Mac) (Ctrl + Alt + Shift + T on Linux)Click and drag to create the rectangle for the text boxType the text you wish to add in the text boxTo finish press Esc or click elsewhere on the document
Tip: Text on the System Clipboard can be pasted into a PDF document as a Text Box.
Annotation Properties
To access the Text Box properties go to the Properties Tab on the toolbar or right click (Mac: Ctrl + Click) on the annotation and choose Properties in the mouse menu or click
on the edit button on the Mini Toolbar. The Text Box annotation contains the following property settings.
Appearance
Border Width - Sets the width of the border line
Style - Sets the style for the border line (i.e. dotted, dashed, cloud, etc...)
Border Color - Sets the color of the border
Fill Color - Sets the fill color
-203-
Affordable, Powerful PDF Software / PDF Editor for Windows, macOS, Linux
Copyright © 2002-Present Qoppa Software. All rights reserved.
Text Color - Sets the text color
Horiz Align - Sets the horizontal alignment of the text
Font - Sets the font of the text
Size - Sets the font size of the text
B - Makes all of the text Bold
I - Makes all of the text Italic
U - Makes the selected annotation text underlined
S - Marks the selected annotation text with a strikethrough
Transparency - Sets the transparency of the text annotation
Save as default - When checked this will make the selected appearance settings the default for any new Text Box annotations going forward
Locked - When checked prevents the following on the annotation: being moved or resized, editing appearance properties, & deleting the annotation.
General
Author - Allows you to edit the author
Subject - Allows you to edit the subject
Layer - Only available when the document contains layers. Sets the layer that the annotation belongs to. For more information see Assigning Comments to Layers
Status History
This tab will display and changes to the review status of the annotation including Author, Status, and Timestamp. For more details see Setting Status or Check Marks on Annotations
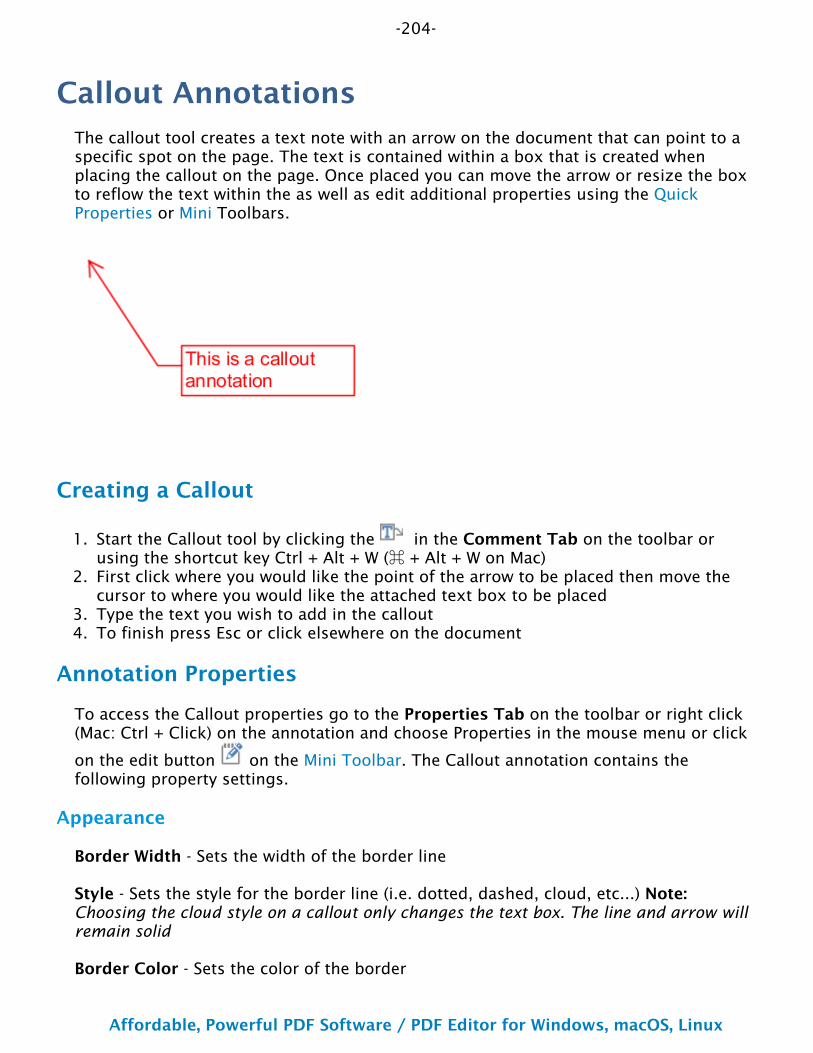
-204-
Affordable, Powerful PDF Software / PDF Editor for Windows, macOS, Linux
Copyright © 2002-Present Qoppa Software. All rights reserved.
1.
2.
3.4.
Callout AnnotationsThe callout tool creates a text note with an arrow on the document that can point to a specific spot on the page. The text is contained within a box that is created when placing the callout on the page. Once placed you can move the arrow or resize the box to reflow the text within the as well as edit additional properties using the Quick Properties or Mini Toolbars.
Creating a Callout
Start the Callout tool by clicking the in the Comment Tab on the toolbar or using the shortcut key Ctrl + Alt + W (⌘ + Alt + W on Mac)First click where you would like the point of the arrow to be placed then move the cursor to where you would like the attached text box to be placedType the text you wish to add in the calloutTo finish press Esc or click elsewhere on the document
Annotation Properties
To access the Callout properties go to the Properties Tab on the toolbar or right click (Mac: Ctrl + Click) on the annotation and choose Properties in the mouse menu or click
on the edit button on the Mini Toolbar. The Callout annotation contains the following property settings.
Appearance
Border Width - Sets the width of the border line
Style - Sets the style for the border line (i.e. dotted, dashed, cloud, etc...) Note: Choosing the cloud style on a callout only changes the text box. The line and arrow will remain solid
Border Color - Sets the color of the border
-205-
Affordable, Powerful PDF Software / PDF Editor for Windows, macOS, Linux
Copyright © 2002-Present Qoppa Software. All rights reserved.
Fill Color - Sets the fill color
Text Color - Sets the text color
Horiz Align - Sets the horizontal alignment of the text
Font - Sets the font of the text
Size - Sets the font size of the text
B - Makes all of the text Bold
I - Makes all of the text Italic
U - Makes the selected annotation text underlined
S - Marks the selected annotation text with a strikethrough
Transparency - Sets the transparency of the text annotation
Save as default - When checked this will make the selected appearance settings the default for any new Callout annotations going forward
Locked - When checked prevents the following on the annotation: being moved or resized, editing appearance properties, & deleting the annotation.
General
Author - Allows you to edit the author
Subject - Allows you to edit the subject
Layer - Only available when the document contains layers. Sets the layer that the annotation belongs to. For more information see Assigning Comments to Layers
Status History
This tab will display and changes to the review status of the annotation including Author, Status, and Timestamp. For more details see Setting Status or Check Marks on Annotations
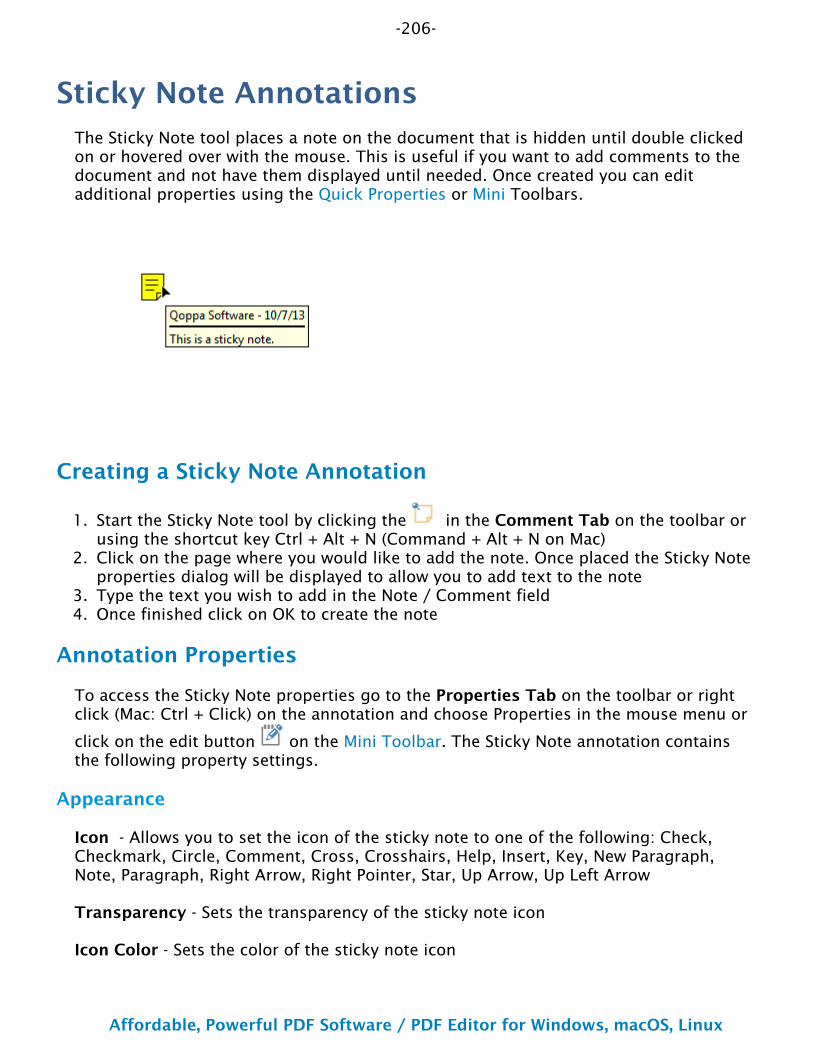
-206-
Affordable, Powerful PDF Software / PDF Editor for Windows, macOS, Linux
Copyright © 2002-Present Qoppa Software. All rights reserved.
1.
2.
3.4.
Sticky Note AnnotationsThe Sticky Note tool places a note on the document that is hidden until double clicked on or hovered over with the mouse. This is useful if you want to add comments to the document and not have them displayed until needed. Once created you can edit additional properties using the Quick Properties or Mini Toolbars.
Creating a Sticky Note Annotation
Start the Sticky Note tool by clicking the in the Comment Tab on the toolbar or using the shortcut key Ctrl + Alt + N (Command + Alt + N on Mac)Click on the page where you would like to add the note. Once placed the Sticky Note properties dialog will be displayed to allow you to add text to the noteType the text you wish to add in the Note / Comment fieldOnce finished click on OK to create the note
Annotation Properties
To access the Sticky Note properties go to the Properties Tab on the toolbar or right click (Mac: Ctrl + Click) on the annotation and choose Properties in the mouse menu or
click on the edit button on the Mini Toolbar. The Sticky Note annotation contains the following property settings.
Appearance
Icon - Allows you to set the icon of the sticky note to one of the following: Check, Checkmark, Circle, Comment, Cross, Crosshairs, Help, Insert, Key, New Paragraph, Note, Paragraph, Right Arrow, Right Pointer, Star, Up Arrow, Up Left Arrow
Transparency - Sets the transparency of the sticky note icon
Icon Color - Sets the color of the sticky note icon
-207-
Affordable, Powerful PDF Software / PDF Editor for Windows, macOS, Linux
Copyright © 2002-Present Qoppa Software. All rights reserved.
Open Initially - When this property is set, when the document is initially opened the sticky note text will automatically be opened and displayed on the screen.
Note: In order for "Open Initially" to work correctly the application must also support this feature. PDF Studio at this time can set the option but is not able to automatically display the notes when the document is opened.
Note / Comment - Contains the text added to the Sticky Note
Save as default - When checked this will make the selected appearance settings the default for any new Sticky Note annotations going forward
Locked - When checked prevents the following on the annotation: being moved or resized, editing appearance properties, & deleting the annotation.
General
Author - Allows you to edit the author
Subject - Allows you to edit the subject
Layer - Only available when the document contains layers. Sets the layer that the annotation belongs to. For more information see Assigning Comments to Layers
Status History
This tab will display and changes to the review status of the annotation including Author, Status, and Timestamp. For more details see Setting Status or Check Marks on Annotations
-208-
Affordable, Powerful PDF Software / PDF Editor for Windows, macOS, Linux
Copyright © 2002-Present Qoppa Software. All rights reserved.
Text MarkupsPDF Studio has the following Text Markup tools available.
Highlight Text: Creates a text highlight annotation
Cross Out Text: Creates a text crossout annotation
Underline Text: Creates a text underline annotation
Squiggly Underline Text: Creates a squiggly underline text annotation
Replace Text: Creates a replace text annotation
Insert Text: Creates an insert text annotation
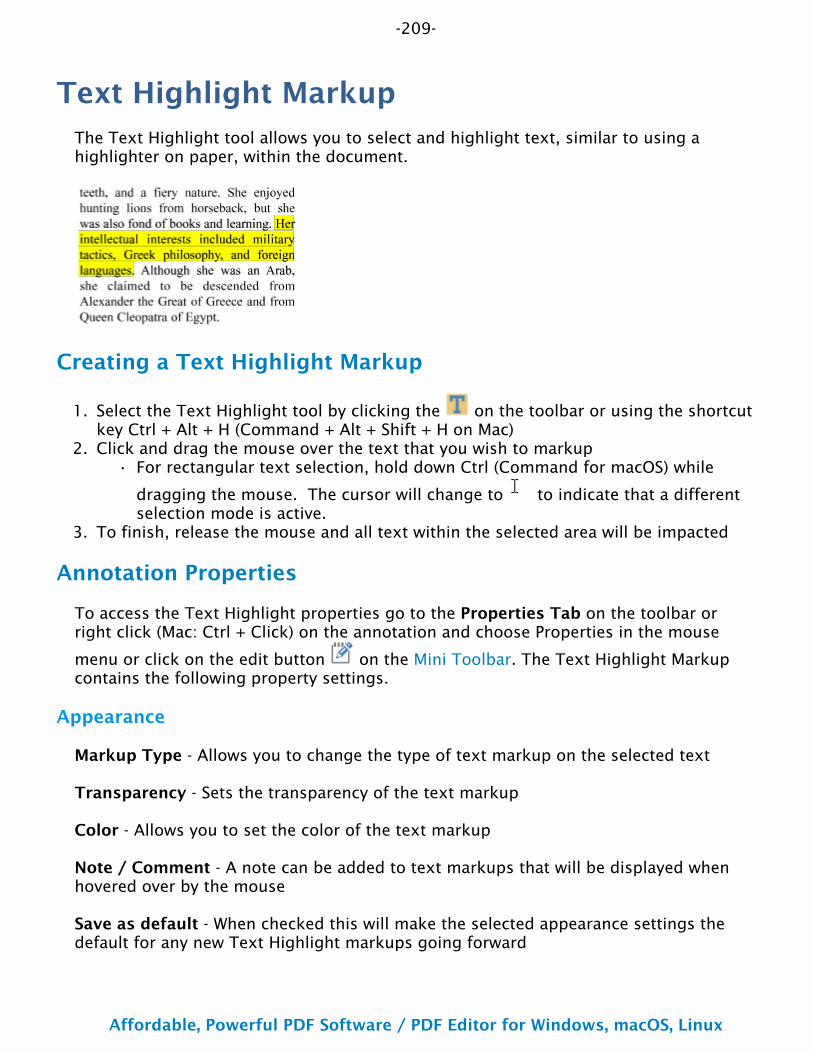
-209-
Affordable, Powerful PDF Software / PDF Editor for Windows, macOS, Linux
Copyright © 2002-Present Qoppa Software. All rights reserved.
1.
2.•
3.
Text Highlight MarkupThe Text Highlight tool allows you to select and highlight text, similar to using a highlighter on paper, within the document.
Creating a Text Highlight Markup
Select the Text Highlight tool by clicking the on the toolbar or using the shortcut key Ctrl + Alt + H (Command + Alt + Shift + H on Mac)Click and drag the mouse over the text that you wish to markup
For rectangular text selection, hold down Ctrl (Command for macOS) while
dragging the mouse. The cursor will change to to indicate that a different selection mode is active.
To finish, release the mouse and all text within the selected area will be impacted
Annotation Properties
To access the Text Highlight properties go to the Properties Tab on the toolbar or right click (Mac: Ctrl + Click) on the annotation and choose Properties in the mouse
menu or click on the edit button on the Mini Toolbar. The Text Highlight Markup contains the following property settings.
Appearance
Markup Type - Allows you to change the type of text markup on the selected text
Transparency - Sets the transparency of the text markup
Color - Allows you to set the color of the text markup
Note / Comment - A note can be added to text markups that will be displayed when hovered over by the mouse
Save as default - When checked this will make the selected appearance settings the default for any new Text Highlight markups going forward

-210-
Affordable, Powerful PDF Software / PDF Editor for Windows, macOS, Linux
Copyright © 2002-Present Qoppa Software. All rights reserved.
Locked - When checked prevents the following on the annotation: being moved or resized, editing appearance properties, & deleting the annotation.
General
Author - Allows you to edit the author
Subject - Allows you to edit the subject
Layer - Only available when the document contains layers. Sets the layer that the annotation belongs to. For more information see Assigning Comments to Layers
Status History
This tab will display and changes to the review status of the annotation including Author, Status, and Timestamp. For more details see Setting Status or Check Marks on Annotations
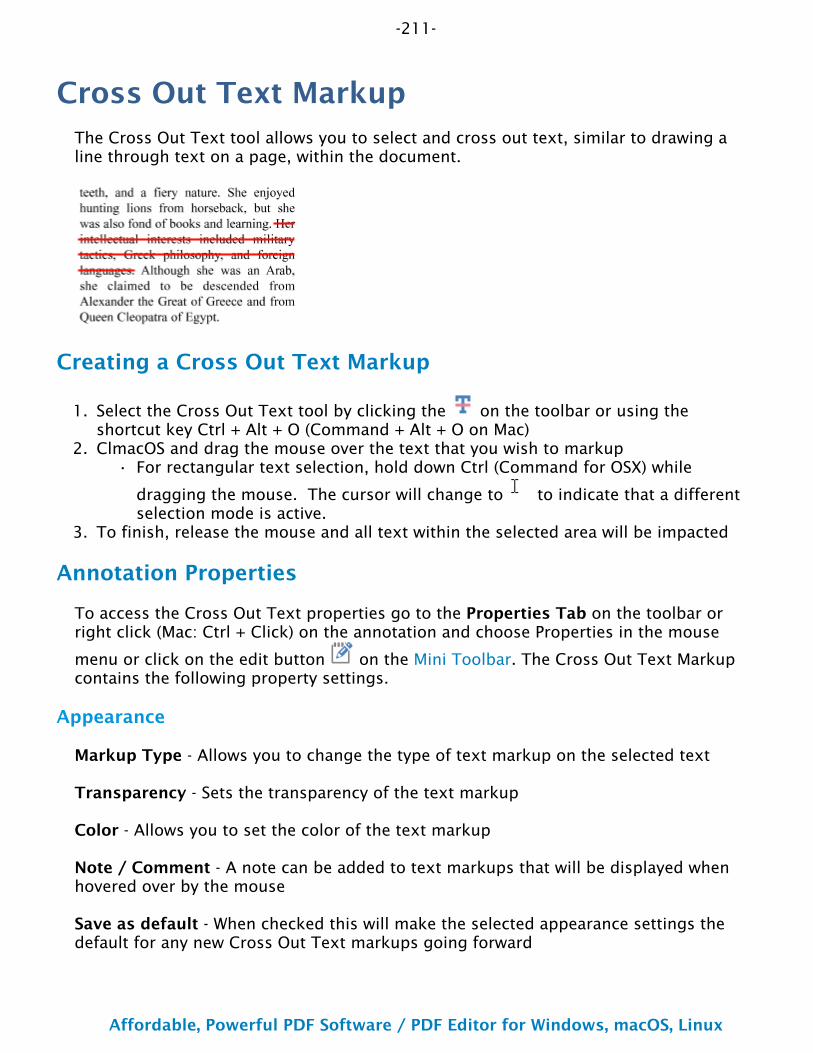
-211-
Affordable, Powerful PDF Software / PDF Editor for Windows, macOS, Linux
Copyright © 2002-Present Qoppa Software. All rights reserved.
1.
2.•
3.
Cross Out Text MarkupThe Cross Out Text tool allows you to select and cross out text, similar to drawing a line through text on a page, within the document.
Creating a Cross Out Text Markup
Select the Cross Out Text tool by clicking the on the toolbar or using the shortcut key Ctrl + Alt + O (Command + Alt + O on Mac)ClmacOS and drag the mouse over the text that you wish to markup
For rectangular text selection, hold down Ctrl (Command for OSX) while
dragging the mouse. The cursor will change to to indicate that a different selection mode is active.
To finish, release the mouse and all text within the selected area will be impacted
Annotation Properties
To access the Cross Out Text properties go to the Properties Tab on the toolbar or right click (Mac: Ctrl + Click) on the annotation and choose Properties in the mouse
menu or click on the edit button on the Mini Toolbar. The Cross Out Text Markup contains the following property settings.
Appearance
Markup Type - Allows you to change the type of text markup on the selected text
Transparency - Sets the transparency of the text markup
Color - Allows you to set the color of the text markup
Note / Comment - A note can be added to text markups that will be displayed when hovered over by the mouse
Save as default - When checked this will make the selected appearance settings the default for any new Cross Out Text markups going forward

-212-
Affordable, Powerful PDF Software / PDF Editor for Windows, macOS, Linux
Copyright © 2002-Present Qoppa Software. All rights reserved.
Locked - When checked prevents the following on the annotation: being moved or resized, editing appearance properties, & deleting the annotation.
General
Author - Allows you to edit the author
Subject - Allows you to edit the subject
Layer - Only available when the document contains layers. Sets the layer that the annotation belongs to. For more information see Assigning Comments to Layers
Status History
This tab will display and changes to the review status of the annotation including Author, Status, and Timestamp. For more details see Setting Status or Check Marks on Annotations
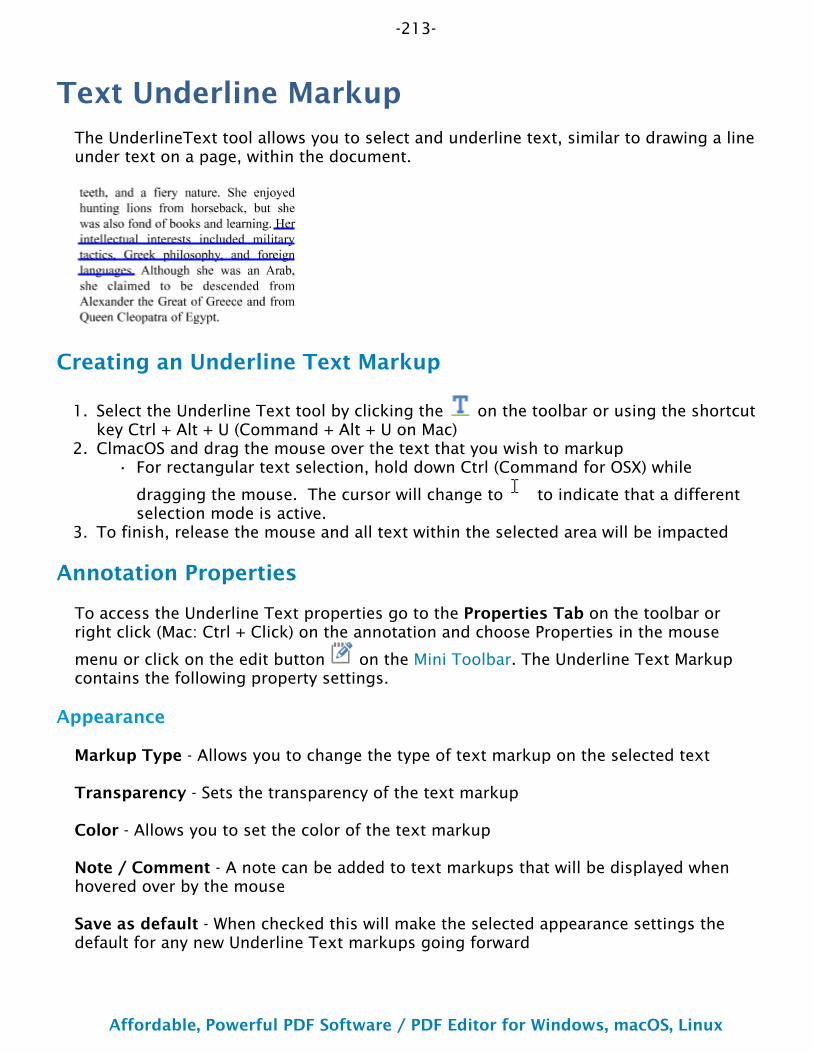
-213-
Affordable, Powerful PDF Software / PDF Editor for Windows, macOS, Linux
Copyright © 2002-Present Qoppa Software. All rights reserved.
1.
2.•
3.
Text Underline MarkupThe UnderlineText tool allows you to select and underline text, similar to drawing a line under text on a page, within the document.
Creating an Underline Text Markup
Select the Underline Text tool by clicking the on the toolbar or using the shortcut key Ctrl + Alt + U (Command + Alt + U on Mac)ClmacOS and drag the mouse over the text that you wish to markup
For rectangular text selection, hold down Ctrl (Command for OSX) while
dragging the mouse. The cursor will change to to indicate that a different selection mode is active.
To finish, release the mouse and all text within the selected area will be impacted
Annotation Properties
To access the Underline Text properties go to the Properties Tab on the toolbar or right click (Mac: Ctrl + Click) on the annotation and choose Properties in the mouse
menu or click on the edit button on the Mini Toolbar. The Underline Text Markup contains the following property settings.
Appearance
Markup Type - Allows you to change the type of text markup on the selected text
Transparency - Sets the transparency of the text markup
Color - Allows you to set the color of the text markup
Note / Comment - A note can be added to text markups that will be displayed when hovered over by the mouse
Save as default - When checked this will make the selected appearance settings the default for any new Underline Text markups going forward

-214-
Affordable, Powerful PDF Software / PDF Editor for Windows, macOS, Linux
Copyright © 2002-Present Qoppa Software. All rights reserved.
Locked - When checked prevents the following on the annotation: being moved or resized, editing appearance properties, & deleting the annotation.
General
Author - Allows you to edit the author
Subject - Allows you to edit the subject
Layer - Only available when the document contains layers. Sets the layer that the annotation belongs to. For more information see Assigning Comments to Layers
Status History
This tab will display and changes to the review status of the annotation including Author, Status, and Timestamp. For more details see Setting Status or Check Marks on Annotations
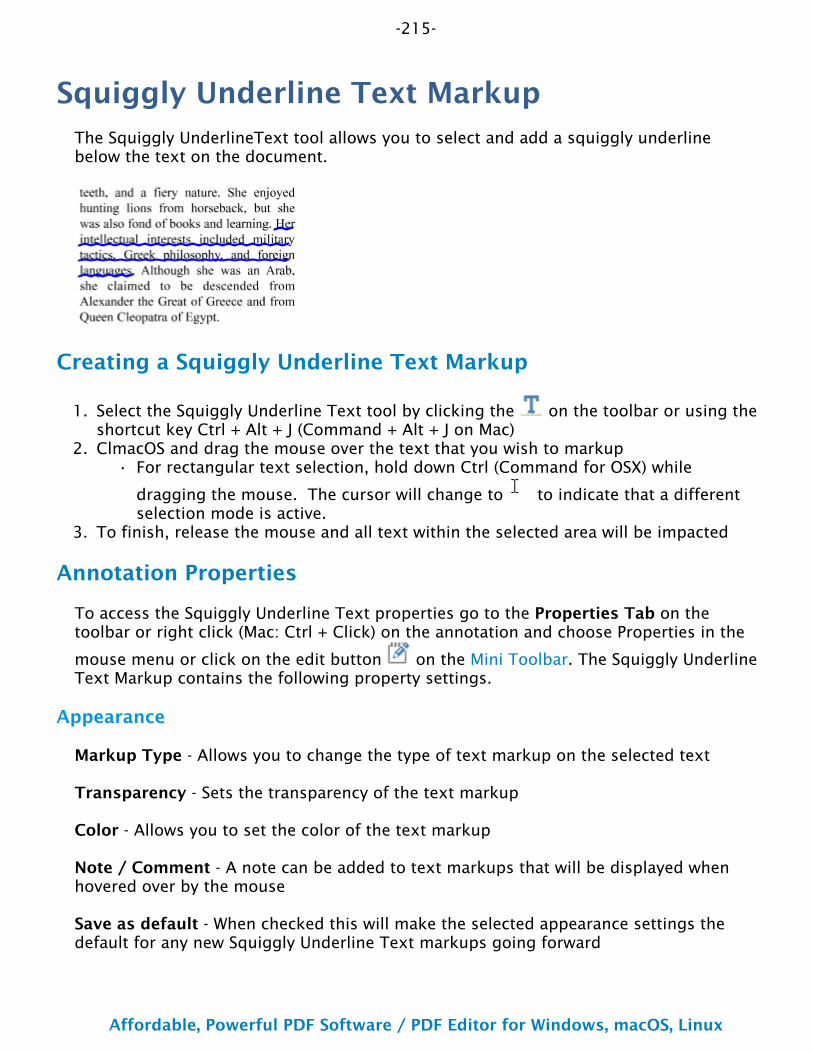
-215-
Affordable, Powerful PDF Software / PDF Editor for Windows, macOS, Linux
Copyright © 2002-Present Qoppa Software. All rights reserved.
1.
2.•
3.
Squiggly Underline Text MarkupThe Squiggly UnderlineText tool allows you to select and add a squiggly underline below the text on the document.
Creating a Squiggly Underline Text Markup
Select the Squiggly Underline Text tool by clicking the on the toolbar or using the shortcut key Ctrl + Alt + J (Command + Alt + J on Mac)ClmacOS and drag the mouse over the text that you wish to markup
For rectangular text selection, hold down Ctrl (Command for OSX) while
dragging the mouse. The cursor will change to to indicate that a different selection mode is active.
To finish, release the mouse and all text within the selected area will be impacted
Annotation Properties
To access the Squiggly Underline Text properties go to the Properties Tab on the toolbar or right click (Mac: Ctrl + Click) on the annotation and choose Properties in the
mouse menu or click on the edit button on the Mini Toolbar. The Squiggly Underline Text Markup contains the following property settings.
Appearance
Markup Type - Allows you to change the type of text markup on the selected text
Transparency - Sets the transparency of the text markup
Color - Allows you to set the color of the text markup
Note / Comment - A note can be added to text markups that will be displayed when hovered over by the mouse
Save as default - When checked this will make the selected appearance settings the default for any new Squiggly Underline Text markups going forward
-216-
Affordable, Powerful PDF Software / PDF Editor for Windows, macOS, Linux
Copyright © 2002-Present Qoppa Software. All rights reserved.
Locked - When checked prevents the following on the annotation: being moved or resized, editing appearance properties, & deleting the annotation.
General
Author - Allows you to edit the author
Subject - Allows you to edit the subject
Layer - Only available when the document contains layers. Sets the layer that the annotation belongs to. For more information see Assigning Comments to Layers
Status History
This tab will display and changes to the review status of the annotation including Author, Status, and Timestamp. For more details see Setting Status or Check Marks on Annotations
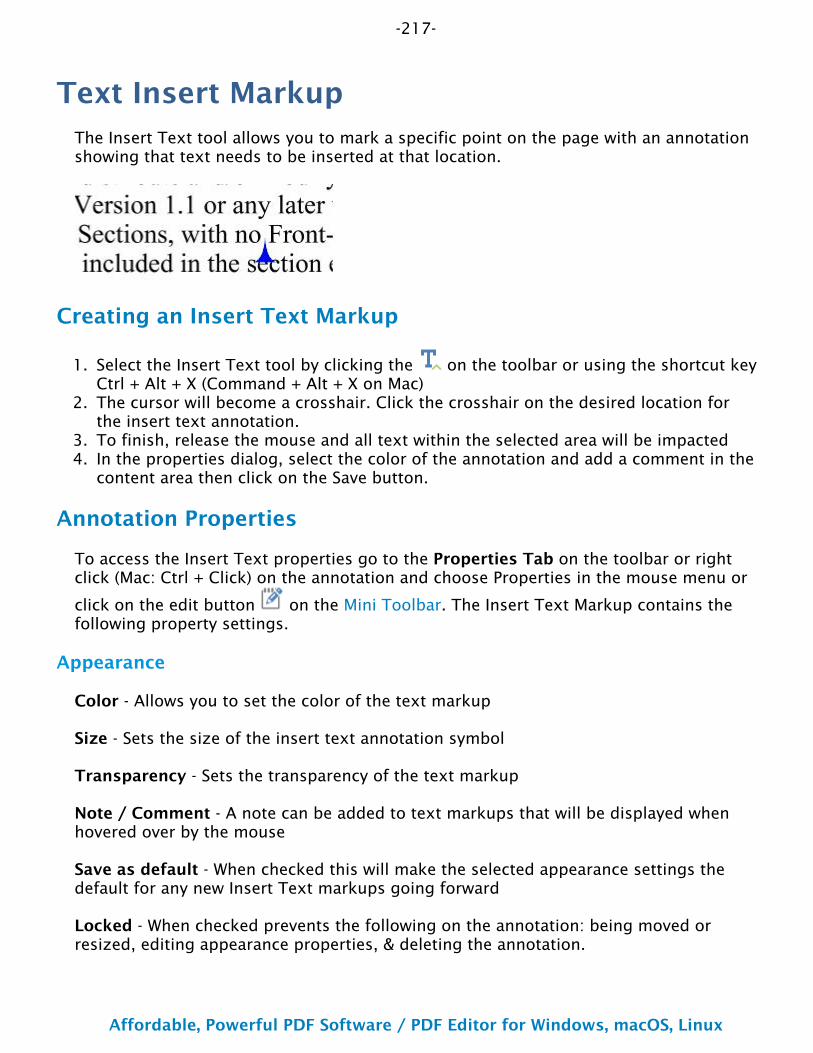
-217-
Affordable, Powerful PDF Software / PDF Editor for Windows, macOS, Linux
Copyright © 2002-Present Qoppa Software. All rights reserved.
1.
2.
3.4.
Text Insert MarkupThe Insert Text tool allows you to mark a specific point on the page with an annotation showing that text needs to be inserted at that location.
Creating an Insert Text Markup
Select the Insert Text tool by clicking the on the toolbar or using the shortcut key Ctrl + Alt + X (Command + Alt + X on Mac)The cursor will become a crosshair. Click the crosshair on the desired location for the insert text annotation.To finish, release the mouse and all text within the selected area will be impactedIn the properties dialog, select the color of the annotation and add a comment in the content area then click on the Save button.
Annotation Properties
To access the Insert Text properties go to the Properties Tab on the toolbar or right click (Mac: Ctrl + Click) on the annotation and choose Properties in the mouse menu or
click on the edit button on the Mini Toolbar. The Insert Text Markup contains the following property settings.
Appearance
Color - Allows you to set the color of the text markup
Size - Sets the size of the insert text annotation symbol
Transparency - Sets the transparency of the text markup
Note / Comment - A note can be added to text markups that will be displayed when hovered over by the mouse
Save as default - When checked this will make the selected appearance settings the default for any new Insert Text markups going forward
Locked - When checked prevents the following on the annotation: being moved or resized, editing appearance properties, & deleting the annotation.
-218-
Affordable, Powerful PDF Software / PDF Editor for Windows, macOS, Linux
Copyright © 2002-Present Qoppa Software. All rights reserved.
General
Author - Allows you to edit the author
Subject - Allows you to edit the subject
Layer - Only available when the document contains layers. Sets the layer that the annotation belongs to. For more information see Assigning Comments to Layers
Status History
This tab will display and changes to the review status of the annotation including Author, Status, and Timestamp. For more details see Setting Status or Check Marks on Annotations

-219-
Affordable, Powerful PDF Software / PDF Editor for Windows, macOS, Linux
Copyright © 2002-Present Qoppa Software. All rights reserved.
1.
2.•
3.4.
Replace Text MarkupThe Replace Text tool allows you to mark text for deletion and to replace it with something else using a single annotation.
Creating a Replace Text Markup
Select the Replace Text tool by clicking the on the toolbar or using the shortcut key Ctrl + Alt + Z (Command + Alt + Z on Mac)ClmacOS and drag the mouse over the text that you wish to markup
For rectangular text selection, hold down Ctrl (Command for OSX) while
dragging the mouse. The cursor will change to to indicate that a different selection mode is active.
To finish, release the mouse and all text within the selected area will be impactedIn the properties dialog, select the color of the annotation and add a comment in the content area then click on the Save button.
Annotation Properties
To access the Replace Text properties go to the Properties Tab on the toolbar or right click (Mac: Ctrl + Click) on the annotation and choose Properties in the mouse menu or
click on the edit button on the Mini Toolbar. The Replace Text Markup contains the following property settings.
Appearance
Markup Type - Allows you to change the type of text markup on the selected text
Transparency - Sets the transparency of the text markup
Color - Allows you to set the color of the text markup
Note / Comment - A note can be added to text markups that will be displayed when hovered over by the mouse
Save as default - When checked this will make the selected appearance settings the default for any new Replace Text markups going forward

-220-
Affordable, Powerful PDF Software / PDF Editor for Windows, macOS, Linux
Copyright © 2002-Present Qoppa Software. All rights reserved.
Locked - When checked prevents the following on the annotation: being moved or resized, editing appearance properties, & deleting the annotation.
General
Author - Allows you to edit the author
Subject - Allows you to edit the subject
Layer - Only available when the document contains layers. Sets the layer that the annotation belongs to. For more information see Assigning Comments to Layers
Status History
This tab will display and changes to the review status of the annotation including Author, Status, and Timestamp. For more details see Setting Status or Check Marks on Annotations
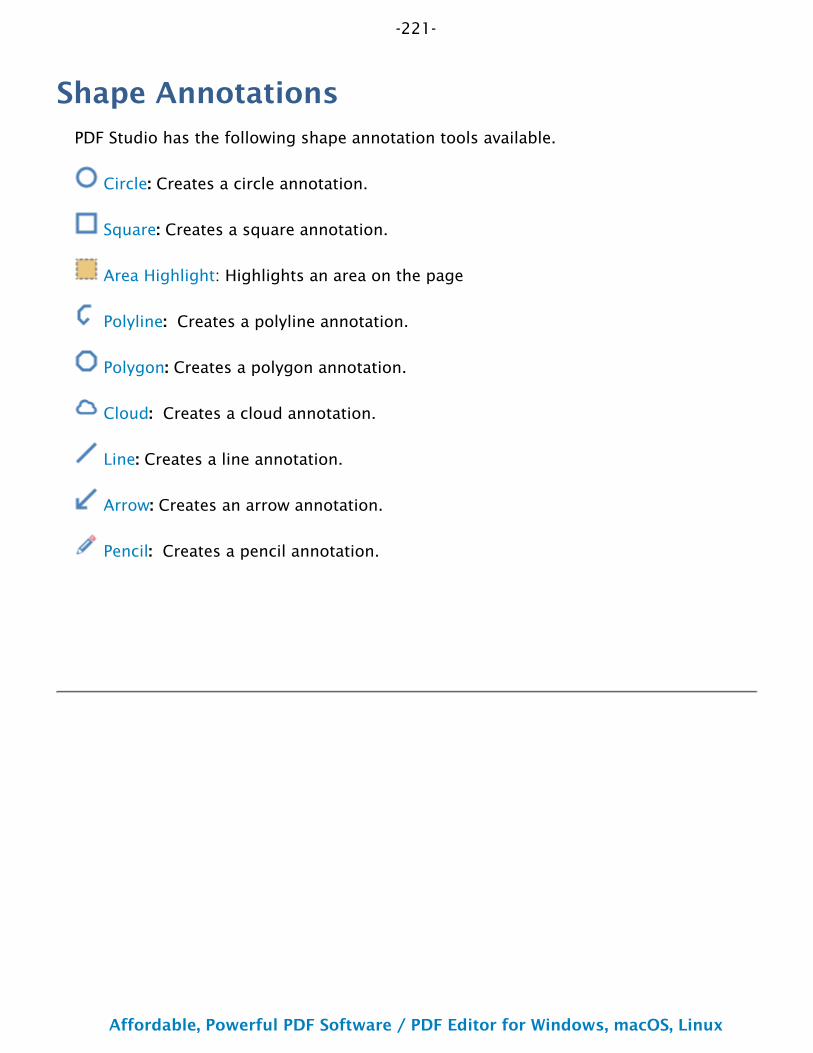
-221-
Affordable, Powerful PDF Software / PDF Editor for Windows, macOS, Linux
Copyright © 2002-Present Qoppa Software. All rights reserved.
Shape AnnotationsPDF Studio has the following shape annotation tools available.
Circle: Creates a circle annotation.
Square: Creates a square annotation.
Area Highlight: Highlights an area on the page
Polyline: Creates a polyline annotation.
Polygon: Creates a polygon annotation.
Cloud: Creates a cloud annotation.
Line: Creates a line annotation.
Arrow: Creates an arrow annotation.
Pencil: Creates a pencil annotation.
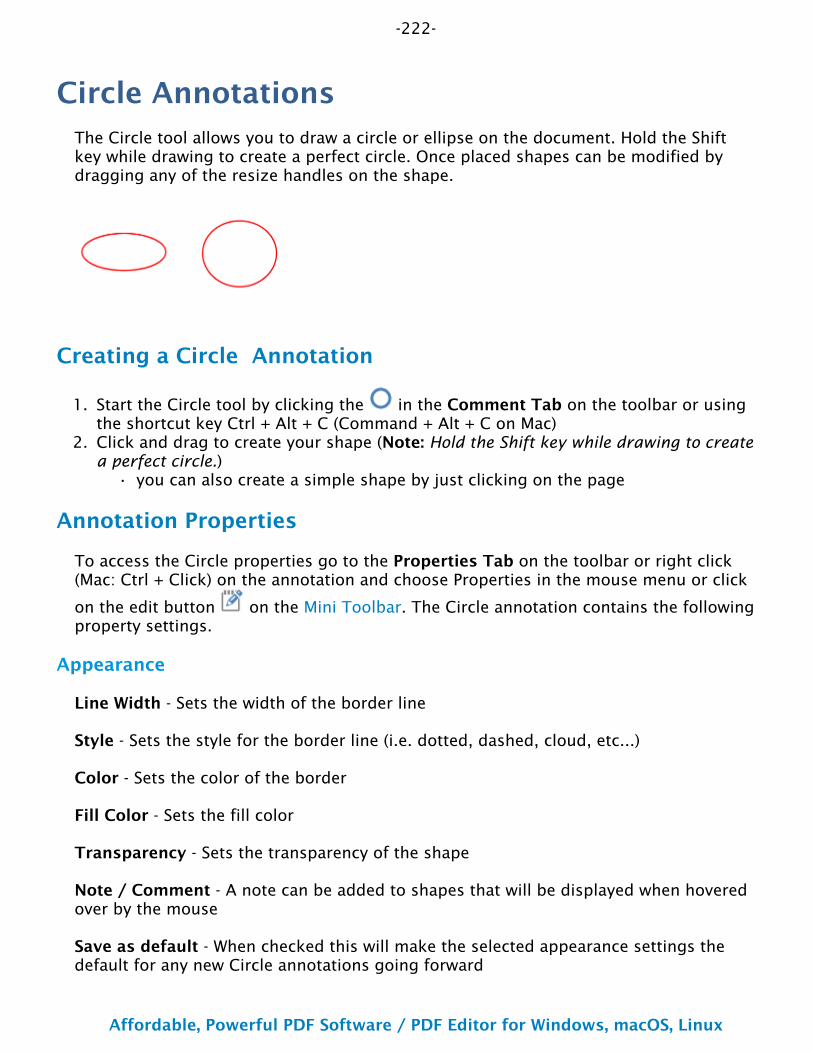
-222-
Affordable, Powerful PDF Software / PDF Editor for Windows, macOS, Linux
Copyright © 2002-Present Qoppa Software. All rights reserved.
1.
2.
•
Circle AnnotationsThe Circle tool allows you to draw a circle or ellipse on the document. Hold the Shift key while drawing to create a perfect circle. Once placed shapes can be modified by dragging any of the resize handles on the shape.
Creating a Circle Annotation
Start the Circle tool by clicking the in the Comment Tab on the toolbar or using the shortcut key Ctrl + Alt + C (Command + Alt + C on Mac)Click and drag to create your shape (Note: Hold the Shift key while drawing to create a perfect circle.)
you can also create a simple shape by just clicking on the page
Annotation Properties
To access the Circle properties go to the Properties Tab on the toolbar or right click (Mac: Ctrl + Click) on the annotation and choose Properties in the mouse menu or click
on the edit button on the Mini Toolbar. The Circle annotation contains the following property settings.
Appearance
Line Width - Sets the width of the border line
Style - Sets the style for the border line (i.e. dotted, dashed, cloud, etc...)
Color - Sets the color of the border
Fill Color - Sets the fill color
Transparency - Sets the transparency of the shape
Note / Comment - A note can be added to shapes that will be displayed when hovered over by the mouse
Save as default - When checked this will make the selected appearance settings the default for any new Circle annotations going forward

-223-
Affordable, Powerful PDF Software / PDF Editor for Windows, macOS, Linux
Copyright © 2002-Present Qoppa Software. All rights reserved.
Locked - When checked prevents the following on the annotation: being moved or resized, editing appearance properties, & deleting the annotation.
General
Author - Allows you to edit the author
Subject - Allows you to edit the subject
Layer - Only available when the document contains layers. Sets the layer that the annotation belongs to. For more information see Assigning Comments to Layers
Status History
This tab will display and changes to the review status of the annotation including Author, Status, and Timestamp. For more details see Setting Status or Check Marks on Annotations
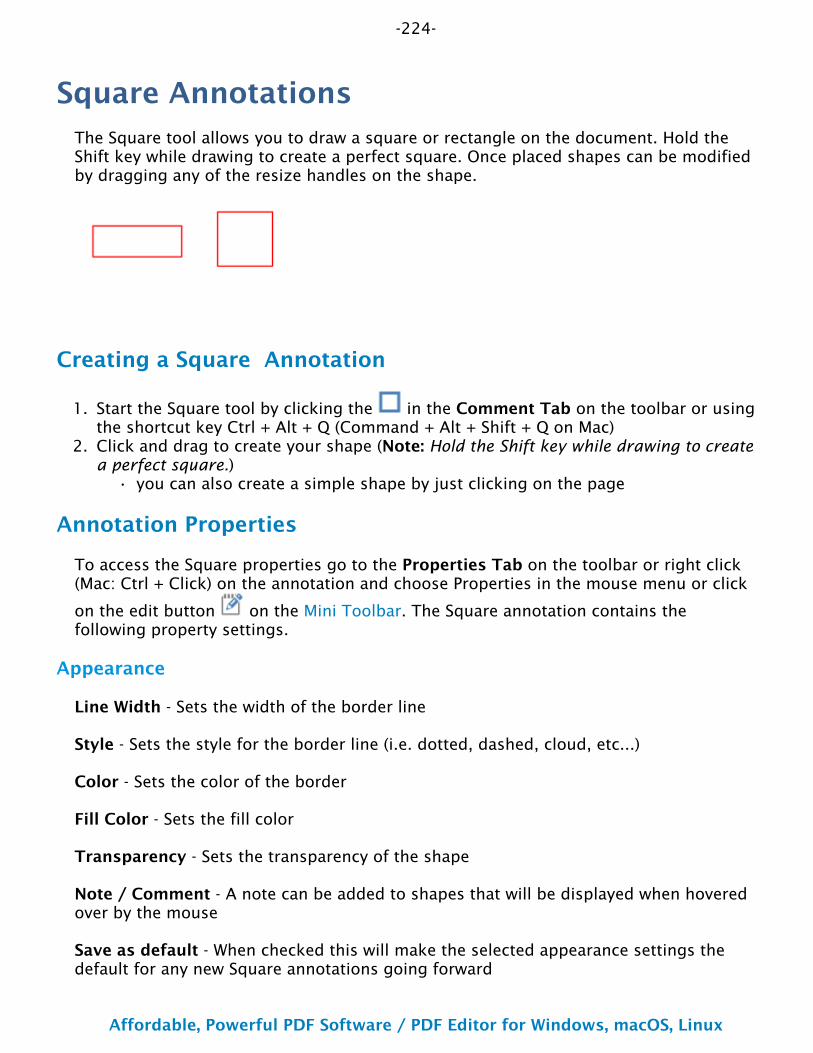
-224-
Affordable, Powerful PDF Software / PDF Editor for Windows, macOS, Linux
Copyright © 2002-Present Qoppa Software. All rights reserved.
1.
2.
•
Square AnnotationsThe Square tool allows you to draw a square or rectangle on the document. Hold the Shift key while drawing to create a perfect square. Once placed shapes can be modified by dragging any of the resize handles on the shape.
Creating a Square Annotation
Start the Square tool by clicking the in the Comment Tab on the toolbar or using the shortcut key Ctrl + Alt + Q (Command + Alt + Shift + Q on Mac)Click and drag to create your shape (Note: Hold the Shift key while drawing to create a perfect square.)
you can also create a simple shape by just clicking on the page
Annotation Properties
To access the Square properties go to the Properties Tab on the toolbar or right click (Mac: Ctrl + Click) on the annotation and choose Properties in the mouse menu or click
on the edit button on the Mini Toolbar. The Square annotation contains the following property settings.
Appearance
Line Width - Sets the width of the border line
Style - Sets the style for the border line (i.e. dotted, dashed, cloud, etc...)
Color - Sets the color of the border
Fill Color - Sets the fill color
Transparency - Sets the transparency of the shape
Note / Comment - A note can be added to shapes that will be displayed when hovered over by the mouse
Save as default - When checked this will make the selected appearance settings the default for any new Square annotations going forward

-225-
Affordable, Powerful PDF Software / PDF Editor for Windows, macOS, Linux
Copyright © 2002-Present Qoppa Software. All rights reserved.
Locked - When checked prevents the following on the annotation: being moved or resized, editing appearance properties, & deleting the annotation.
General
Author - Allows you to edit the author
Subject - Allows you to edit the subject
Layer - Only available when the document contains layers. Sets the layer that the annotation belongs to. For more information see Assigning Comments to Layers
Status History
This tab will display and changes to the review status of the annotation including Author, Status, and Timestamp. For more details see Setting Status or Check Marks on Annotations
-226-
Affordable, Powerful PDF Software / PDF Editor for Windows, macOS, Linux
Copyright © 2002-Present Qoppa Software. All rights reserved.
1.
2.
Area HighlightAdd highlights to scanned documents without text objects.
Note: An area highlight annotation is simply a square annotation with a transparent background and no border (line width = 0).
Creating an Area Highlight
Start the Area Highlight tool by clicking the in the Comment Tab on the toolbar or using the shortcut key Ctrl + Alt + I (Command + Alt + I on Mac)Click and drag to highlight an area (Note: Hold the Shift key while drawing to create a perfect square.)
Annotation Properties
To access the Area Highlight properties go to the Properties Tab on the toolbar or right click (Mac: Ctrl + Click) on the annotation and choose Properties in the mouse
menu or click on the edit button on the Mini Toolbar. The Area Highlight annotation contains the following property settings.
Appearance
Line Width - Sets the width of the border line
Style - Sets the style for the border line (i.e. dotted, dashed, cloud, etc...)
Color - Sets the color of the border
Fill Color - Sets the fill color
Transparency - Sets the transparency of the shape
Note / Comment - A note can be added to shapes that will be displayed when hovered over by the mouse
Save as default - When checked this will make the selected appearance settings the default for any new Area Highlights going forward
Locked - When checked prevents the following on the annotation: being moved or resized, editing appearance properties, & deleting the annotation.
General
Author - Allows you to edit the author
-227-
Affordable, Powerful PDF Software / PDF Editor for Windows, macOS, Linux
Copyright © 2002-Present Qoppa Software. All rights reserved.
Subject - Allows you to edit the subject
Layer - Only available when the document contains layers. Sets the layer that the annotation belongs to. For more information see Assigning Comments to Layers
Status History
This tab will display and changes to the review status of the annotation including Author, Status, and Timestamp. For more details see Setting Status or Check Marks on Annotations
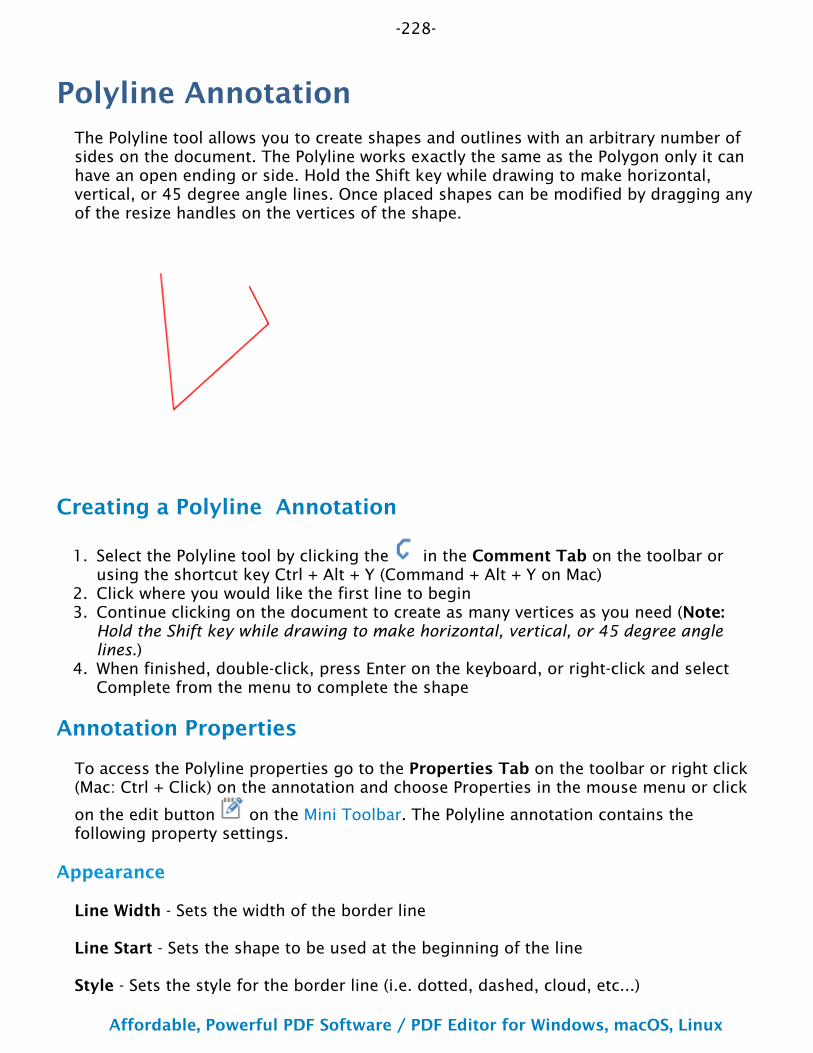
-228-
Affordable, Powerful PDF Software / PDF Editor for Windows, macOS, Linux
Copyright © 2002-Present Qoppa Software. All rights reserved.
1.
2.3.
4.
Polyline AnnotationThe Polyline tool allows you to create shapes and outlines with an arbitrary number of sides on the document. The Polyline works exactly the same as the Polygon only it can have an open ending or side. Hold the Shift key while drawing to make horizontal, vertical, or 45 degree angle lines. Once placed shapes can be modified by dragging any of the resize handles on the vertices of the shape.
Creating a Polyline Annotation
Select the Polyline tool by clicking the in the Comment Tab on the toolbar or using the shortcut key Ctrl + Alt + Y (Command + Alt + Y on Mac)Click where you would like the first line to beginContinue clicking on the document to create as many vertices as you need (Note: Hold the Shift key while drawing to make horizontal, vertical, or 45 degree angle lines.)When finished, double-click, press Enter on the keyboard, or right-click and select Complete from the menu to complete the shape
Annotation Properties
To access the Polyline properties go to the Properties Tab on the toolbar or right click (Mac: Ctrl + Click) on the annotation and choose Properties in the mouse menu or click
on the edit button on the Mini Toolbar. The Polyline annotation contains the following property settings.
Appearance
Line Width - Sets the width of the border line
Line Start - Sets the shape to be used at the beginning of the line
Style - Sets the style for the border line (i.e. dotted, dashed, cloud, etc...)
-229-
Affordable, Powerful PDF Software / PDF Editor for Windows, macOS, Linux
Copyright © 2002-Present Qoppa Software. All rights reserved.
Line End - Sets the shape to be used at the end of the line
Color - Sets the color of the border
Transparency - Sets the transparency of the shape
Note / Comment - A note can be added to shapes that will be displayed when hovered over by the mouse
Save as default - When checked this will make the selected appearance settings the default for any new Polyline annotations going forward
Locked - When checked prevents the following on the annotation: being moved or resized, editing appearance properties, & deleting the annotation.
General
Author - Allows you to edit the author
Subject - Allows you to edit the subject
Layer - Only available when the document contains layers. Sets the layer that the annotation belongs to. For more information see Assigning Comments to Layers
Status History
This tab will display and changes to the review status of the annotation including Author, Status, and Timestamp. For more details see Setting Status or Check Marks on Annotations
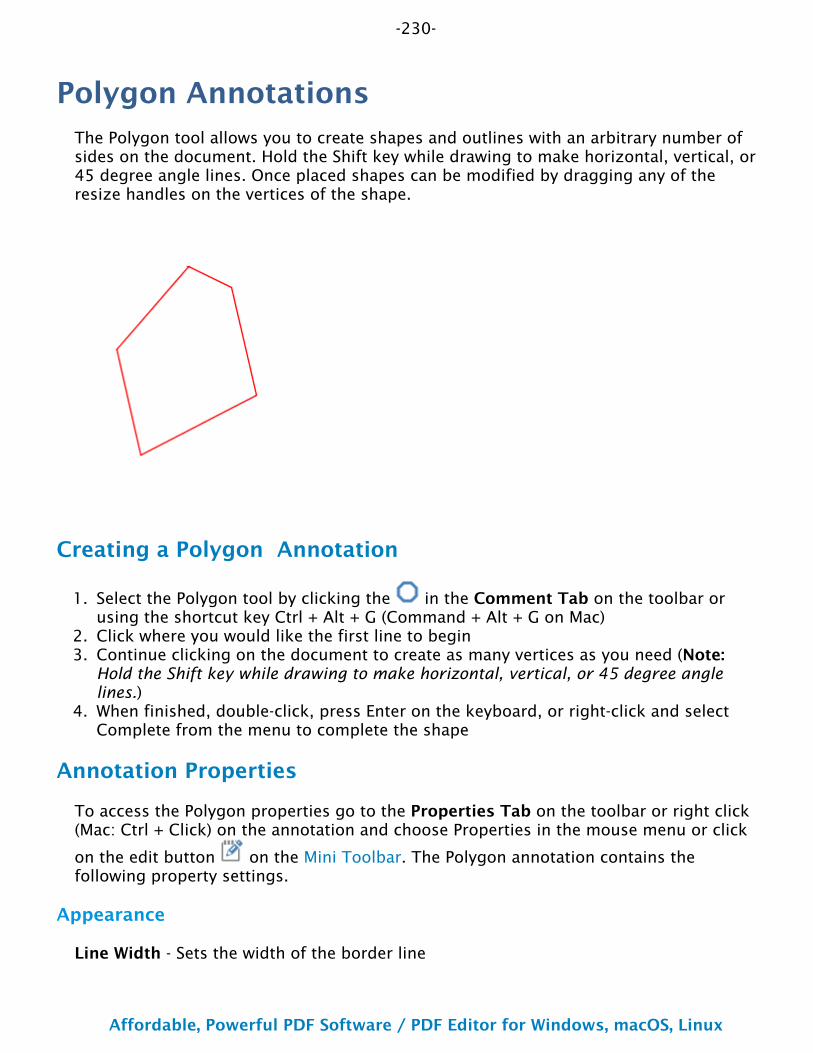
-230-
Affordable, Powerful PDF Software / PDF Editor for Windows, macOS, Linux
Copyright © 2002-Present Qoppa Software. All rights reserved.
1.
2.3.
4.
Polygon AnnotationsThe Polygon tool allows you to create shapes and outlines with an arbitrary number of sides on the document. Hold the Shift key while drawing to make horizontal, vertical, or 45 degree angle lines. Once placed shapes can be modified by dragging any of the resize handles on the vertices of the shape.
Creating a Polygon Annotation
Select the Polygon tool by clicking the in the Comment Tab on the toolbar or using the shortcut key Ctrl + Alt + G (Command + Alt + G on Mac)Click where you would like the first line to beginContinue clicking on the document to create as many vertices as you need (Note: Hold the Shift key while drawing to make horizontal, vertical, or 45 degree angle lines.)When finished, double-click, press Enter on the keyboard, or right-click and select Complete from the menu to complete the shape
Annotation Properties
To access the Polygon properties go to the Properties Tab on the toolbar or right click (Mac: Ctrl + Click) on the annotation and choose Properties in the mouse menu or click
on the edit button on the Mini Toolbar. The Polygon annotation contains the following property settings.
Appearance
Line Width - Sets the width of the border line
-231-
Affordable, Powerful PDF Software / PDF Editor for Windows, macOS, Linux
Copyright © 2002-Present Qoppa Software. All rights reserved.
Style - Sets the style for the border line (i.e. dotted, dashed, cloud, etc...)
Color - Sets the color of the border
Fill Color - Sets the fill color
Transparency - Sets the transparency of the shape
Note / Comment - A note can be added to shapes that will be displayed when hovered over by the mouse
Save as default - When checked this will make the selected appearance settings the default for any new Polygon annotations going forward
Locked - When checked prevents the following on the annotation: being moved or resized, editing appearance properties, & deleting the annotation.
General
Author - Allows you to edit the author
Subject - Allows you to edit the subject
Layer - Only available when the document contains layers. Sets the layer that the annotation belongs to. For more information see Assigning Comments to Layers
Status History
This tab will display and changes to the review status of the annotation including Author, Status, and Timestamp. For more details see Setting Status or Check Marks on Annotations
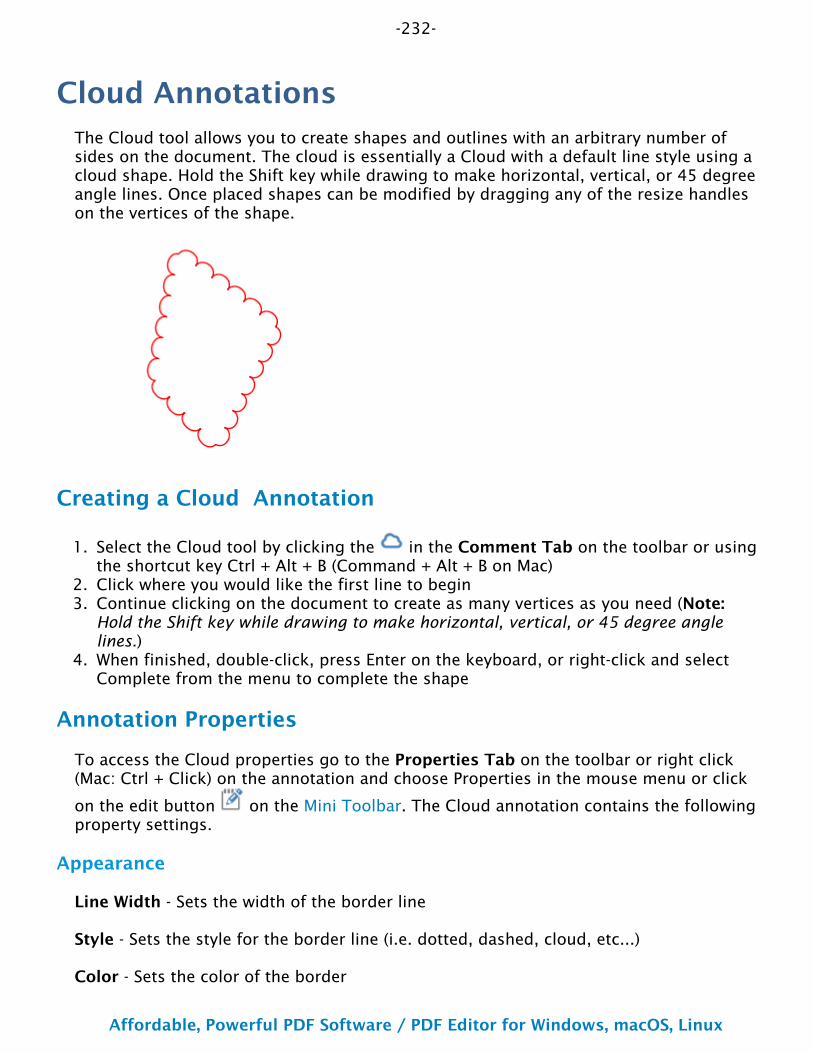
-232-
Affordable, Powerful PDF Software / PDF Editor for Windows, macOS, Linux
Copyright © 2002-Present Qoppa Software. All rights reserved.
1.
2.3.
4.
Cloud AnnotationsThe Cloud tool allows you to create shapes and outlines with an arbitrary number of sides on the document. The cloud is essentially a Cloud with a default line style using a cloud shape. Hold the Shift key while drawing to make horizontal, vertical, or 45 degree angle lines. Once placed shapes can be modified by dragging any of the resize handles on the vertices of the shape.
Creating a Cloud Annotation
Select the Cloud tool by clicking the in the Comment Tab on the toolbar or using the shortcut key Ctrl + Alt + B (Command + Alt + B on Mac)Click where you would like the first line to beginContinue clicking on the document to create as many vertices as you need (Note: Hold the Shift key while drawing to make horizontal, vertical, or 45 degree angle lines.)When finished, double-click, press Enter on the keyboard, or right-click and select Complete from the menu to complete the shape
Annotation Properties
To access the Cloud properties go to the Properties Tab on the toolbar or right click (Mac: Ctrl + Click) on the annotation and choose Properties in the mouse menu or click
on the edit button on the Mini Toolbar. The Cloud annotation contains the following property settings.
Appearance
Line Width - Sets the width of the border line
Style - Sets the style for the border line (i.e. dotted, dashed, cloud, etc...)
Color - Sets the color of the border
-233-
Affordable, Powerful PDF Software / PDF Editor for Windows, macOS, Linux
Copyright © 2002-Present Qoppa Software. All rights reserved.
Fill Color - Sets the fill color
Transparency - Sets the transparency of the shape
Note / Comment - A note can be added to shapes that will be displayed when hovered over by the mouse
Save as default - When checked this will make the selected appearance settings the default for any new Cloud annotations going forward
Locked - When checked prevents the following on the annotation: being moved or resized, editing appearance properties, & deleting the annotation.
General
Author - Allows you to edit the author
Subject - Allows you to edit the subject
Layer - Only available when the document contains layers. Sets the layer that the annotation belongs to. For more information see Assigning Comments to Layers
Status History
This tab will display and changes to the review status of the annotation including Author, Status, and Timestamp. For more details see Setting Status or Check Marks on Annotations
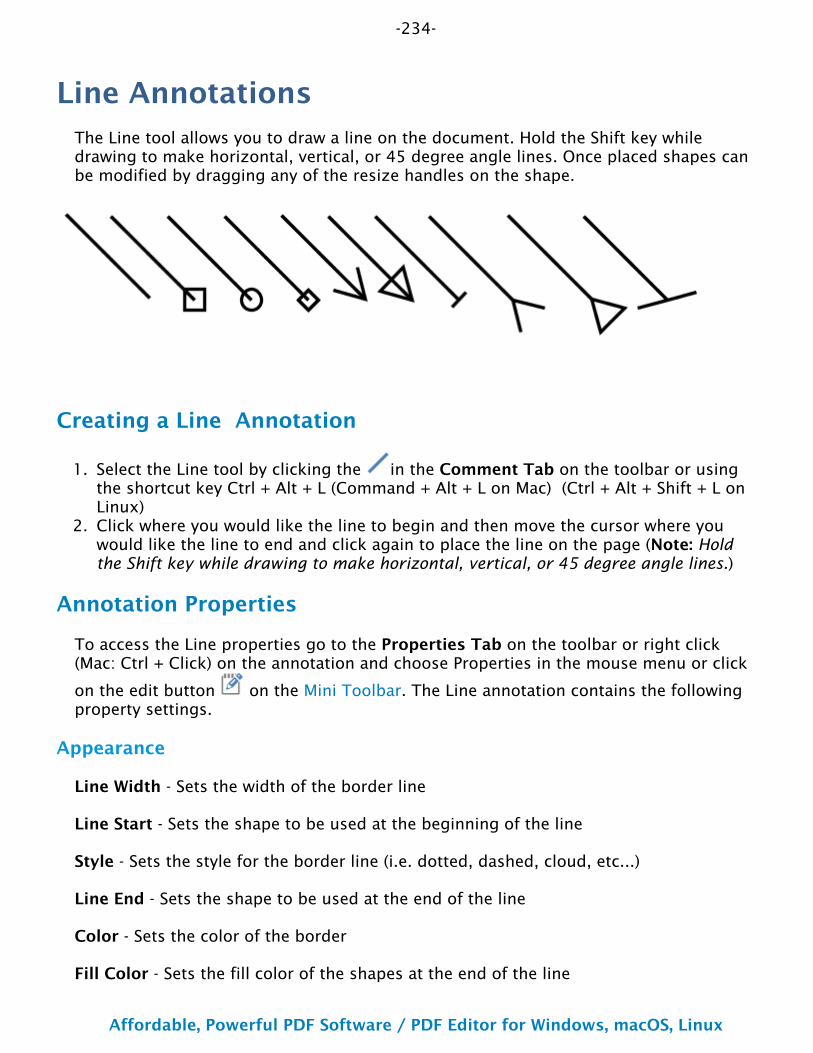
-234-
Affordable, Powerful PDF Software / PDF Editor for Windows, macOS, Linux
Copyright © 2002-Present Qoppa Software. All rights reserved.
1.
2.
Line AnnotationsThe Line tool allows you to draw a line on the document. Hold the Shift key while drawing to make horizontal, vertical, or 45 degree angle lines. Once placed shapes can be modified by dragging any of the resize handles on the shape.
Creating a Line Annotation
Select the Line tool by clicking the in the Comment Tab on the toolbar or using the shortcut key Ctrl + Alt + L (Command + Alt + L on Mac) (Ctrl + Alt + Shift + L on Linux)Click where you would like the line to begin and then move the cursor where you would like the line to end and click again to place the line on the page (Note: Hold the Shift key while drawing to make horizontal, vertical, or 45 degree angle lines.)
Annotation Properties
To access the Line properties go to the Properties Tab on the toolbar or right click (Mac: Ctrl + Click) on the annotation and choose Properties in the mouse menu or click
on the edit button on the Mini Toolbar. The Line annotation contains the following property settings.
Appearance
Line Width - Sets the width of the border line
Line Start - Sets the shape to be used at the beginning of the line
Style - Sets the style for the border line (i.e. dotted, dashed, cloud, etc...)
Line End - Sets the shape to be used at the end of the line
Color - Sets the color of the border
Fill Color - Sets the fill color of the shapes at the end of the line
-235-
Affordable, Powerful PDF Software / PDF Editor for Windows, macOS, Linux
Copyright © 2002-Present Qoppa Software. All rights reserved.
Transparency - Sets the transparency of the shape
Note / Comment - A note can be added to shapes that will be displayed when hovered over by the mouse
Save as default - When checked this will make the selected appearance settings the default for any new Line annotations going forward
Locked - When checked prevents the following on the annotation: being moved or resized, editing appearance properties, & deleting the annotation.
General
Author - Allows you to edit the author
Subject - Allows you to edit the subject
Layer - Only available when the document contains layers. Sets the layer that the annotation belongs to. For more information see Assigning Comments to Layers
Status History
This tab will display and changes to the review status of the annotation including Author, Status, and Timestamp. For more details see Setting Status or Check Marks on Annotations
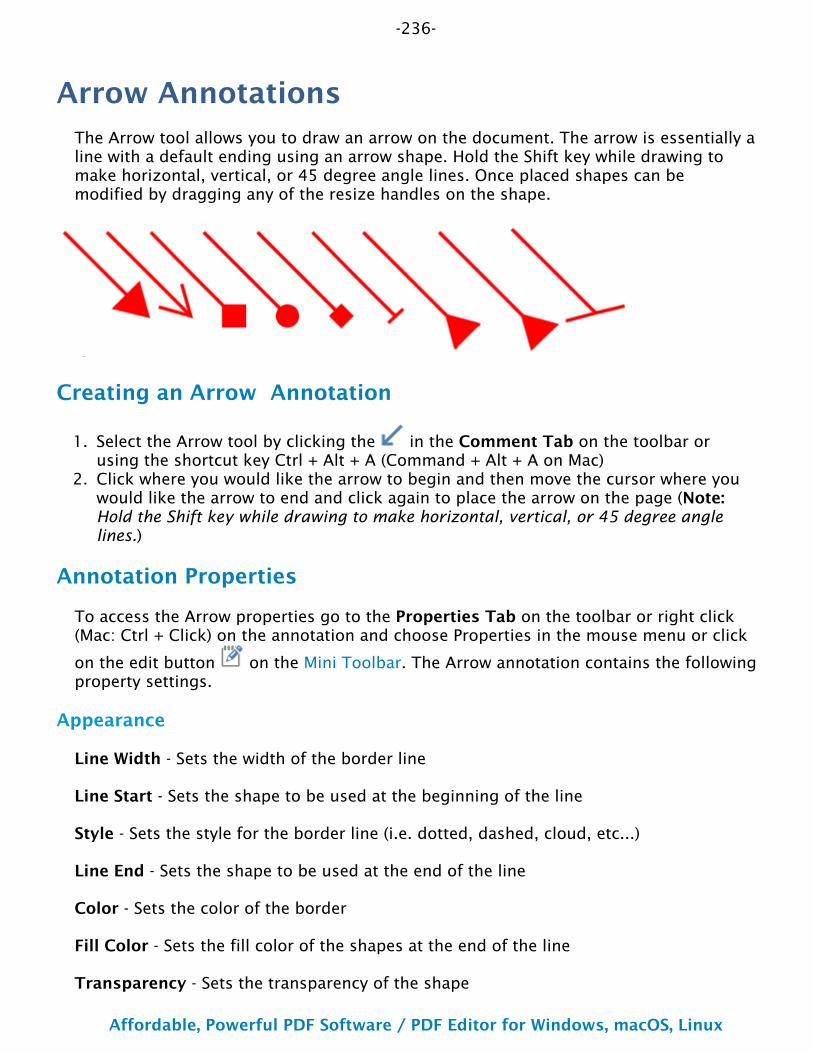
-236-
Affordable, Powerful PDF Software / PDF Editor for Windows, macOS, Linux
Copyright © 2002-Present Qoppa Software. All rights reserved.
1.
2.
Arrow AnnotationsThe Arrow tool allows you to draw an arrow on the document. The arrow is essentially a line with a default ending using an arrow shape. Hold the Shift key while drawing to make horizontal, vertical, or 45 degree angle lines. Once placed shapes can be modified by dragging any of the resize handles on the shape.
Creating an Arrow Annotation
Select the Arrow tool by clicking the in the Comment Tab on the toolbar or using the shortcut key Ctrl + Alt + A (Command + Alt + A on Mac)Click where you would like the arrow to begin and then move the cursor where you would like the arrow to end and click again to place the arrow on the page (Note: Hold the Shift key while drawing to make horizontal, vertical, or 45 degree angle lines.)
Annotation Properties
To access the Arrow properties go to the Properties Tab on the toolbar or right click (Mac: Ctrl + Click) on the annotation and choose Properties in the mouse menu or click
on the edit button on the Mini Toolbar. The Arrow annotation contains the following property settings.
Appearance
Line Width - Sets the width of the border line
Line Start - Sets the shape to be used at the beginning of the line
Style - Sets the style for the border line (i.e. dotted, dashed, cloud, etc...)
Line End - Sets the shape to be used at the end of the line
Color - Sets the color of the border
Fill Color - Sets the fill color of the shapes at the end of the line
Transparency - Sets the transparency of the shape
-237-
Affordable, Powerful PDF Software / PDF Editor for Windows, macOS, Linux
Copyright © 2002-Present Qoppa Software. All rights reserved.
Note / Comment - A note can be added to shapes that will be displayed when hovered over by the mouse
Save as default - When checked this will make the selected appearance settings the default for any new Arrow annotations going forward
Locked - When checked prevents the following on the annotation: being moved or resized, editing appearance properties, & deleting the annotation.
General
Author - Allows you to edit the author
Subject - Allows you to edit the subject
Layer - Only available when the document contains layers. Sets the layer that the annotation belongs to. For more information see Assigning Comments to Layers
Status History
This tab will display and changes to the review status of the annotation including Author, Status, and Timestamp. For more details see Setting Status or Check Marks on Annotations
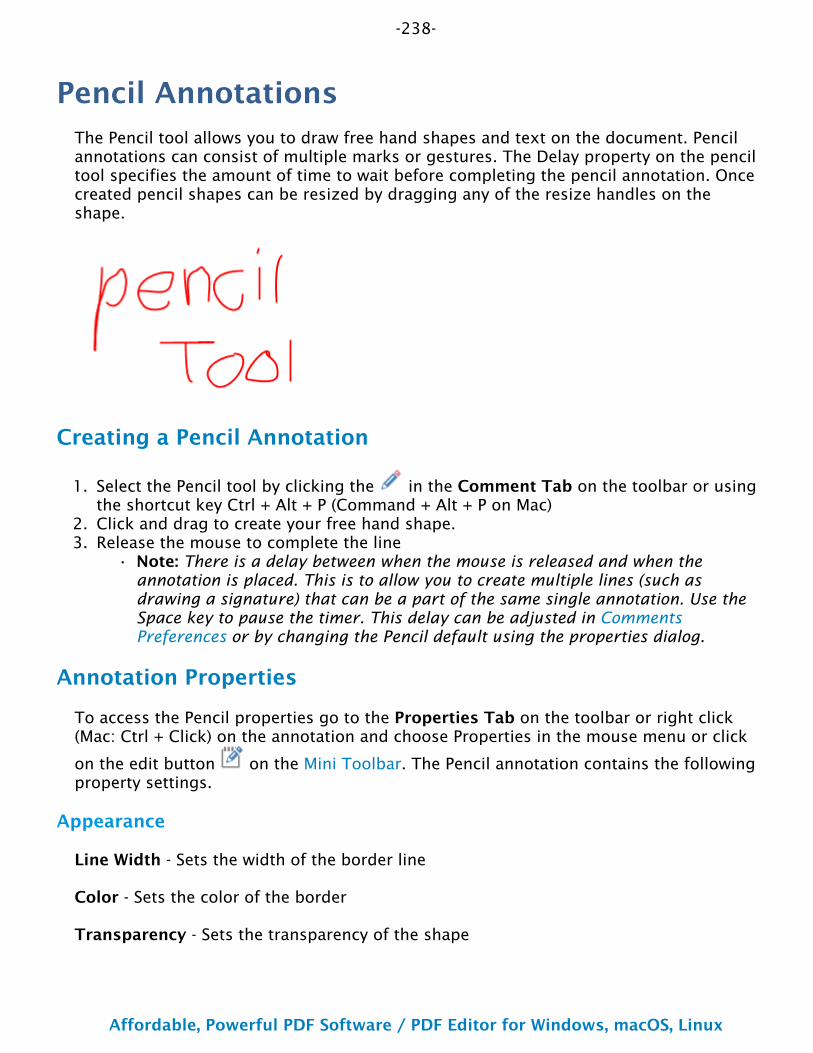
-238-
Affordable, Powerful PDF Software / PDF Editor for Windows, macOS, Linux
Copyright © 2002-Present Qoppa Software. All rights reserved.
1.
2.3.
•
Pencil AnnotationsThe Pencil tool allows you to draw free hand shapes and text on the document. Pencil annotations can consist of multiple marks or gestures. The Delay property on the pencil tool specifies the amount of time to wait before completing the pencil annotation. Once created pencil shapes can be resized by dragging any of the resize handles on the shape.
Creating a Pencil Annotation
Select the Pencil tool by clicking the in the Comment Tab on the toolbar or using the shortcut key Ctrl + Alt + P (Command + Alt + P on Mac)Click and drag to create your free hand shape.Release the mouse to complete the line
Note: There is a delay between when the mouse is released and when the annotation is placed. This is to allow you to create multiple lines (such as drawing a signature) that can be a part of the same single annotation. Use the Space key to pause the timer. This delay can be adjusted in Comments Preferences or by changing the Pencil default using the properties dialog.
Annotation Properties
To access the Pencil properties go to the Properties Tab on the toolbar or right click (Mac: Ctrl + Click) on the annotation and choose Properties in the mouse menu or click
on the edit button on the Mini Toolbar. The Pencil annotation contains the following property settings.
Appearance
Line Width - Sets the width of the border line
Color - Sets the color of the border
Transparency - Sets the transparency of the shape

-239-
Affordable, Powerful PDF Software / PDF Editor for Windows, macOS, Linux
Copyright © 2002-Present Qoppa Software. All rights reserved.
Note / Comment - A note can be added to shapes that will be displayed when hovered over by the mouse
Save as default - When checked this will make the selected appearance settings the default for any new Pencil annotations going forward
Locked - When checked prevents the following on the annotation: being moved or resized, editing appearance properties, & deleting the annotation.
General
Author - Allows you to edit the author
Subject - Allows you to edit the subject
Layer - Only available when the document contains layers. Sets the layer that the annotation belongs to. For more information see Assigning Comments to Layers
Status History
This tab will display and changes to the review status of the annotation including Author, Status, and Timestamp. For more details see Setting Status or Check Marks on Annotations
Delay Setting
The Delay property on the pencil tool specifies the amount of time to wait before completing the pencil annotation. This is to allow you to create multiple lines (such as drawing a signature) that can be a part of the same single annotation.
-240-
Affordable, Powerful PDF Software / PDF Editor for Windows, macOS, Linux
Copyright © 2002-Present Qoppa Software. All rights reserved.
Rubber Stamp AnnotationsPDF Studio is able to apply Rubber Stamp annotations to PDF Documents. PDF Studio comes with some standard rubber stamps but additional text, image, and custom stamps can also be created. In addition, you can also create a rubber stamp from an existing PDF document.
Rubber Stamp Annotation: Creating a rubber stamp annotation
Rotating Rubber Stamps: How to rotate rubber stamps
Managing Rubber Stamps: Managing rubber stamps
Creating an Image Stamp: Creating an image stamp
Creating a Text Stamp: Creating a text stamp
Creating a PDF Stamp: Creating a rubber stamp from a PDF document
Creating a Custom Stamp: Creating a custom stamp
Importing Image as Stamp: How to quickly import an image as a stamp
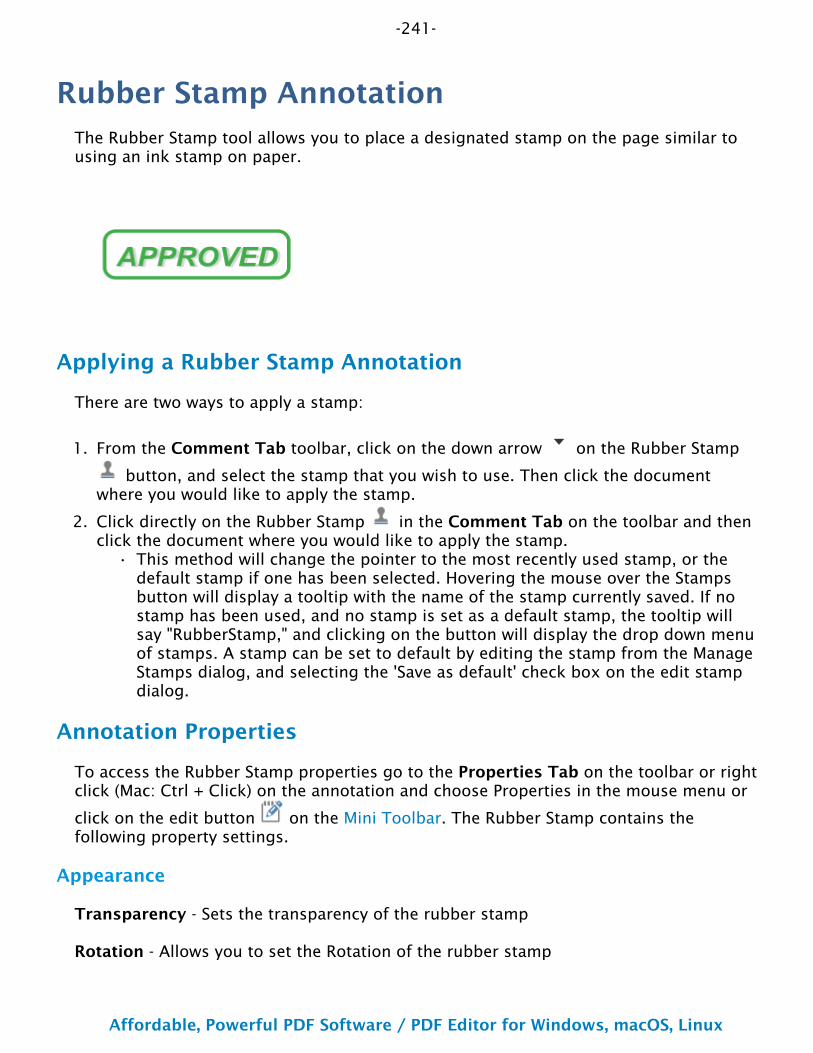
-241-
Affordable, Powerful PDF Software / PDF Editor for Windows, macOS, Linux
Copyright © 2002-Present Qoppa Software. All rights reserved.
1.
2.
•
Rubber Stamp AnnotationThe Rubber Stamp tool allows you to place a designated stamp on the page similar to using an ink stamp on paper.
Applying a Rubber Stamp Annotation
There are two ways to apply a stamp:
From the Comment Tab toolbar, click on the down arrow on the Rubber Stamp
button, and select the stamp that you wish to use. Then click the document where you would like to apply the stamp.
Click directly on the Rubber Stamp in the Comment Tab on the toolbar and then click the document where you would like to apply the stamp.
This method will change the pointer to the most recently used stamp, or the default stamp if one has been selected. Hovering the mouse over the Stamps button will display a tooltip with the name of the stamp currently saved. If no stamp has been used, and no stamp is set as a default stamp, the tooltip will say "RubberStamp," and clicking on the button will display the drop down menu of stamps. A stamp can be set to default by editing the stamp from the Manage Stamps dialog, and selecting the 'Save as default' check box on the edit stamp dialog.
Annotation Properties
To access the Rubber Stamp properties go to the Properties Tab on the toolbar or right click (Mac: Ctrl + Click) on the annotation and choose Properties in the mouse menu or
click on the edit button on the Mini Toolbar. The Rubber Stamp contains the following property settings.
Appearance
Transparency - Sets the transparency of the rubber stamp
Rotation - Allows you to set the Rotation of the rubber stamp
-242-
Affordable, Powerful PDF Software / PDF Editor for Windows, macOS, Linux
Copyright © 2002-Present Qoppa Software. All rights reserved.
Note / Comment - A note can be added to rubber stamps that will be displayed when hovered over by the mouse
Save as default - When checked this will make the selected appearance settings the default for any new Rubber Stamps going forward
Locked - When checked prevents the following on the annotation: being moved or resized, editing appearance properties, & deleting the annotation.
General
Author - Allows you to edit the author
Subject - Allows you to edit the subject
Layer - Only available when the document contains layers. Sets the layer that the annotation belongs to. For more information see Assigning Comments to Layers
Status History
This tab will display and changes to the review status of the annotation including Author, Status, and Timestamp. For more details see Setting Status or Check Marks on Annotations
-243-
Affordable, Powerful PDF Software / PDF Editor for Windows, macOS, Linux
Copyright © 2002-Present Qoppa Software. All rights reserved.
1.
2.3.
Image AnnotationImages can be imported directly as a stamp without having to create and save the stamp. Any of the supported image formats (*png, *jpg, *jpeg, *jpe, *gif, *tif & *tiff.) can be used.
Note: When importing an image directly as a stamp the image will be converted to a JPEG and inserted as is.
Creating an Image Annotation
Select the Image tool by clicking the in the Comment Tab on the toolbar or using the shortcut key Ctrl + Shift + I (Command + Shift + I on Mac)Use the file chooser select the image you wish to useClick on the page where you would like to add the image annotation.
To create an image stamp that can be reused instead of an "on-the-fly" stamp, create a custom image stamp.
Annotation Properties
To access the Image Stamp properties go to the Properties Tab on the toolbar or right click (Mac: Ctrl + Click) on the annotation and choose Properties in the mouse menu or
click on the edit button on the Mini Toolbar. The Image contains the following property settings.
Appearance
Transparency - Sets the transparency of the image
Rotation - Allows you to set the Rotation of the image
Note / Comment - A note can be added to image stamps that will be displayed when hovered over by the mouse
Locked - When checked prevents the following on the annotation: being moved or resized, editing appearance properties, & deleting the annotation.
General
Author - Allows you to edit the author
Subject - Allows you to edit the subject
-244-
Affordable, Powerful PDF Software / PDF Editor for Windows, macOS, Linux
Copyright © 2002-Present Qoppa Software. All rights reserved.
Layer - Only available when the document contains layers. Sets the layer that the annotation belongs to. For more information see Assigning Comments to Layers
Status History
This tab will display and changes to the review status of the annotation including Author, Status, and Timestamp. For more details see Setting Status or Check Marks on Annotations
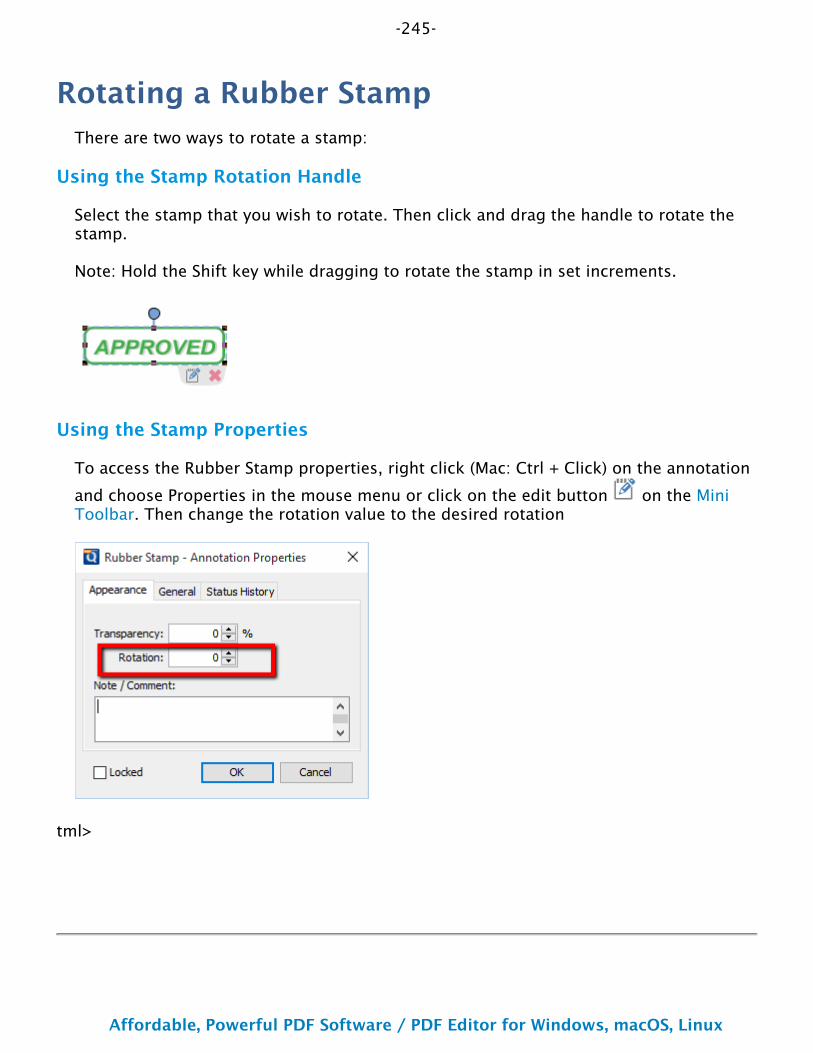
-245-
Affordable, Powerful PDF Software / PDF Editor for Windows, macOS, Linux
Copyright © 2002-Present Qoppa Software. All rights reserved.
Rotating a Rubber StampThere are two ways to rotate a stamp:
Using the Stamp Rotation Handle
Select the stamp that you wish to rotate. Then click and drag the handle to rotate the stamp.
Note: Hold the Shift key while dragging to rotate the stamp in set increments.
Using the Stamp Properties
To access the Rubber Stamp properties, right click (Mac: Ctrl + Click) on the annotation
and choose Properties in the mouse menu or click on the edit button on the Mini Toolbar. Then change the rotation value to the desired rotation
tml>
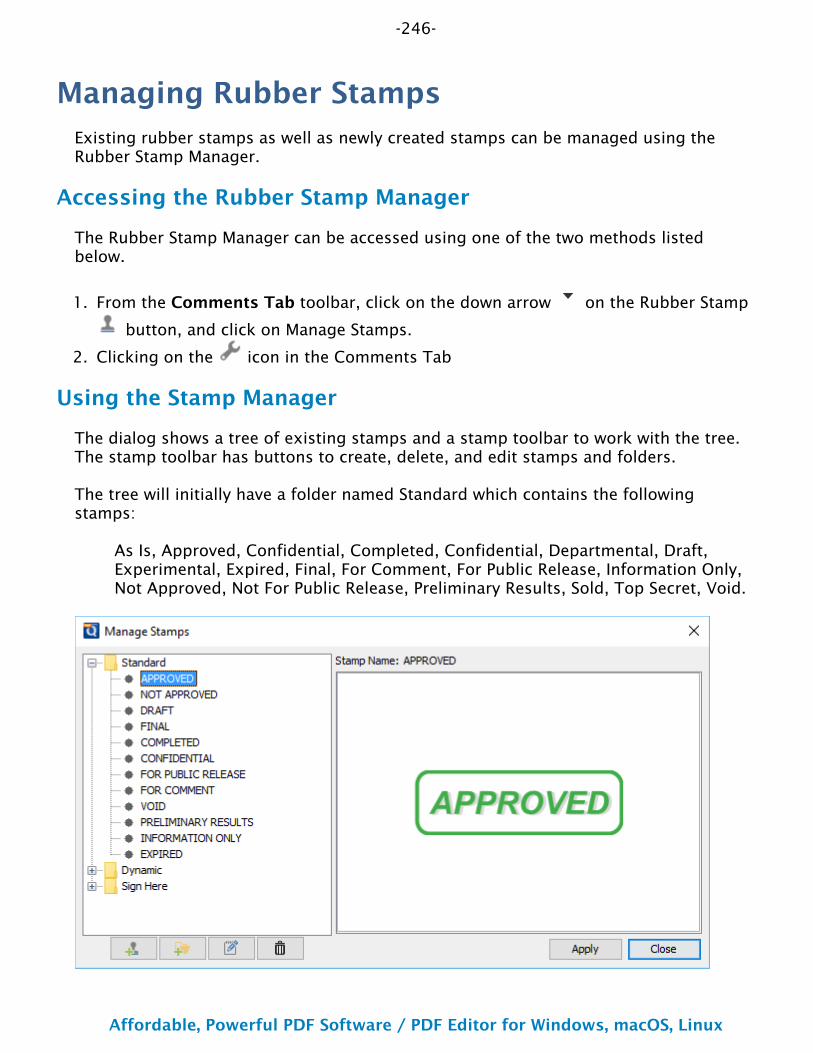
-246-
Affordable, Powerful PDF Software / PDF Editor for Windows, macOS, Linux
Copyright © 2002-Present Qoppa Software. All rights reserved.
1.
2.
Managing Rubber StampsExisting rubber stamps as well as newly created stamps can be managed using the Rubber Stamp Manager.
Accessing the Rubber Stamp Manager
The Rubber Stamp Manager can be accessed using one of the two methods listed below.
From the Comments Tab toolbar, click on the down arrow on the Rubber Stamp
button, and click on Manage Stamps.
Clicking on the icon in the Comments Tab
Using the Stamp Manager
The dialog shows a tree of existing stamps and a stamp toolbar to work with the tree. The stamp toolbar has buttons to create, delete, and edit stamps and folders.
The tree will initially have a folder named Standard which contains the following stamps:
As Is, Approved, Confidential, Completed, Confidential, Departmental, Draft, Experimental, Expired, Final, For Comment, For Public Release, Information Only, Not Approved, Not For Public Release, Preliminary Results, Sold, Top Secret, Void.
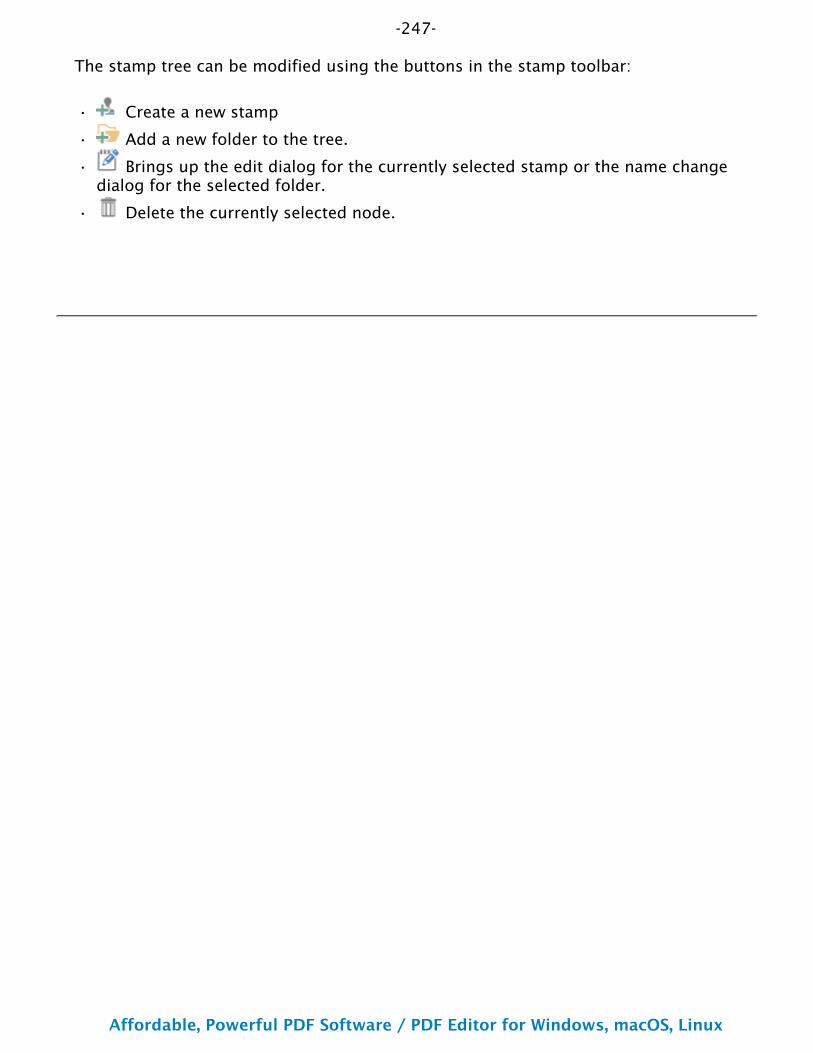
-247-
Affordable, Powerful PDF Software / PDF Editor for Windows, macOS, Linux
Copyright © 2002-Present Qoppa Software. All rights reserved.
•
•
•
•
The stamp tree can be modified using the buttons in the stamp toolbar:
Create a new stamp
Add a new folder to the tree.
Brings up the edit dialog for the currently selected stamp or the name change dialog for the selected folder.
Delete the currently selected node.
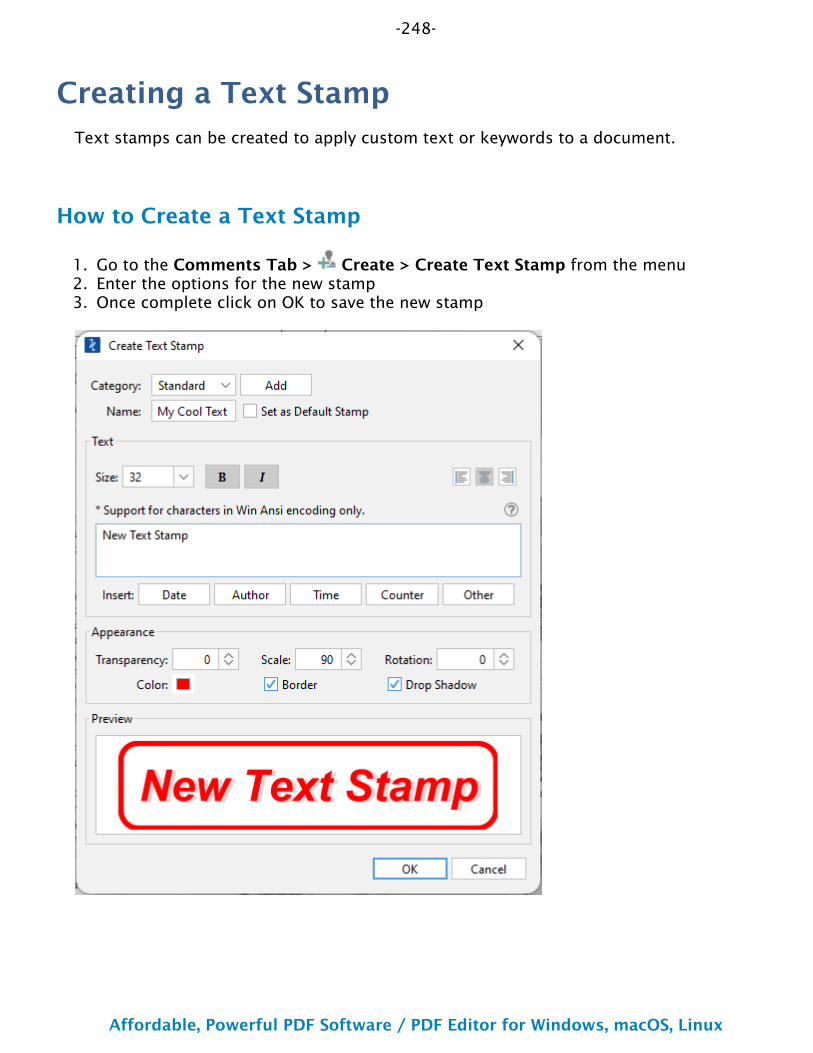
-248-
Affordable, Powerful PDF Software / PDF Editor for Windows, macOS, Linux
Copyright © 2002-Present Qoppa Software. All rights reserved.
1.2.3.
Creating a Text StampText stamps can be created to apply custom text or keywords to a document.
How to Create a Text Stamp
Go to the Comments Tab > Create > Create Text Stamp from the menuEnter the options for the new stampOnce complete click on OK to save the new stamp
-249-
Affordable, Powerful PDF Software / PDF Editor for Windows, macOS, Linux
Copyright © 2002-Present Qoppa Software. All rights reserved.
•
•
•
••••
••••••••••••
Create Text Stamp Settings
The options for Text Stamps are as follows:
Category - Category to add this stamp to. Click the Add button to create a new category
Name – Name of the stamp. The name that will be displayed in the Stamps menu
Set as Default Stamp – Check this to set this stamp as the default stamp
Text
Size - Sets the font size for the text stamp.
B - Makes all of the text Bold
I - Makes all of the text Italic
Alignment - choose how the text should be aligned
Aligns the text to the left
Aligns the text in the center
Aligns the text to the right
Insert - Use these options to insert custom variables within the content sections. Place the cursor where you would like the text and then click on the variable option you want to insert. These variables will be dynamically generated when the stamp is placed on the document.
Date - displays a dialog to select a date format to insert into the stampAuthor - inserts the Author name set in Comments PreferencesTime - inserts a time variableOther - displays a list of other supported variables
$page – The page number$author – Inserts the Author name set in Comments Preferences$pagelabel - The bookmark for this page$bookmark - The label for this page$totalpages – The number of pages in the document$filename – The file name (no extension) that the document was opened from$filepath – The full file path that the document was opened from$date – The current date formatted as Nov 28, 2007$shortdate – The current date formatted as 11/28/07$time – The current time$day – The current day of the month$month – The current month, using two digits
-250-
Affordable, Powerful PDF Software / PDF Editor for Windows, macOS, Linux
Copyright © 2002-Present Qoppa Software. All rights reserved.
••••••••
$year – The current year, using four digits$shortyear – The current year, using two digits$second – The current second$minute – The current minute$hour – The current hour, 1-12$ampm – AM or PM$longhour – The current hour, 0-23$env(VAR_NAME) - Any OS environment label. Replace "VAR_NAME" with the variable you wish to use from your Operating System.
Appearance
Transparency – Transparency of the stamp
Scale – Change the scale of the entire text stamp
Rotation - The angle the text stamp should be rotated
Color – Color of the stamp
Border - Adds a border to the text stamp
Drop Shadow - Adds a small shadow behind only the text of the stamp
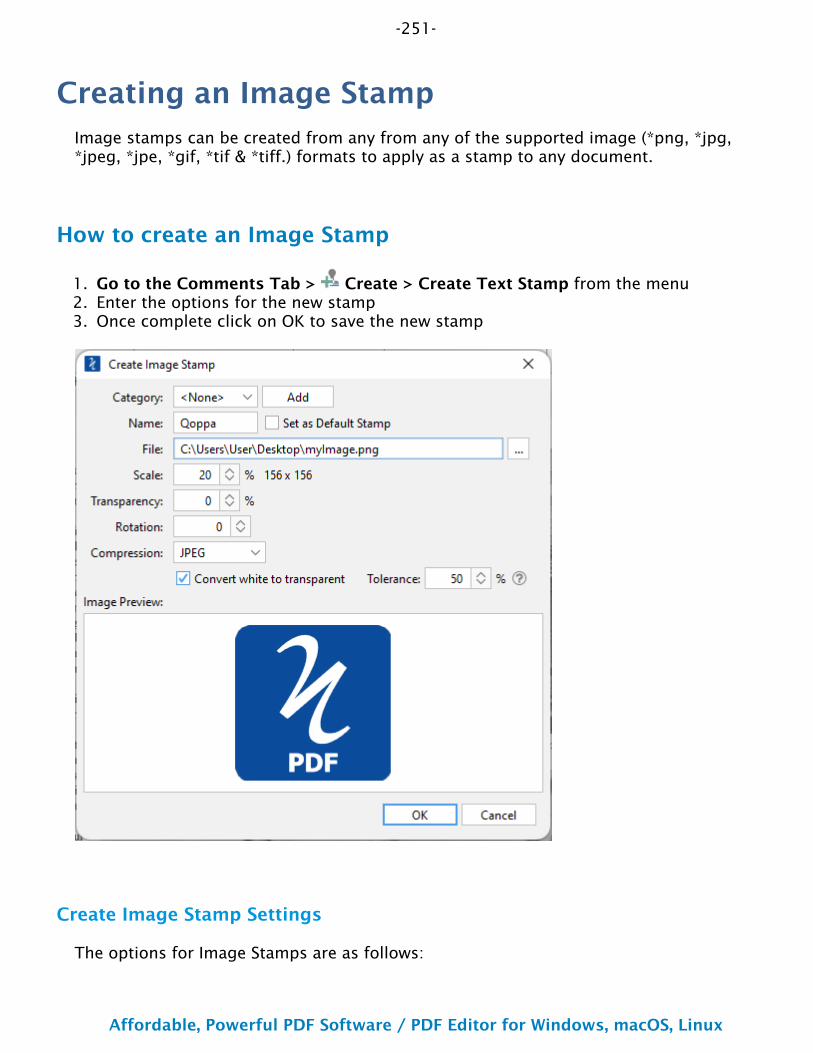
-251-
Affordable, Powerful PDF Software / PDF Editor for Windows, macOS, Linux
Copyright © 2002-Present Qoppa Software. All rights reserved.
1.2.3.
Creating an Image StampImage stamps can be created from any from any of the supported image (*png, *jpg, *jpeg, *jpe, *gif, *tif & *tiff.) formats to apply as a stamp to any document.
How to create an Image Stamp
Go to the Comments Tab > Create > Create Text Stamp from the menuEnter the options for the new stampOnce complete click on OK to save the new stamp
Create Image Stamp Settings
The options for Image Stamps are as follows:
-252-
Affordable, Powerful PDF Software / PDF Editor for Windows, macOS, Linux
Copyright © 2002-Present Qoppa Software. All rights reserved.
••••
Category - Category to add this stamp to.
Name – Name of the stamp. The name that will be displayed in the Stamps menu.
Set as Default Stamp – Check this to set this stamp as the default stamp
File – The full path to the image file used in the stamp. Click on the "..." button to open a file chooser and navigate to the image you wish to use.
Transparency – Transparency of the stamp
Scale – Change the original image to the size you want your stamp to be
Rotation - The angle the image should be rotated
Compression - The image compression to use when creating the image stamp. Only PDF compatible image compression can be chosen.
JPEG: lossy compression that will reduce image quality and sizeJPEG2000: less lossy compression that will reduce size and some qualityFLATE: Lossless compression does not reduce qualityJBIG2: Lossless compression that can only support black and white colors. Color images will be converted to black and white.
Convert White to Transparent - when checked will change any white background to be transparent.
Tolerance - This option removes the white background from an image. Tolerance affects the range of colors that are considered "white" to be converted to transparent. Higher tolerance converts more pixels. For hand drawn signatures it is recommended to use a bold thick pen.
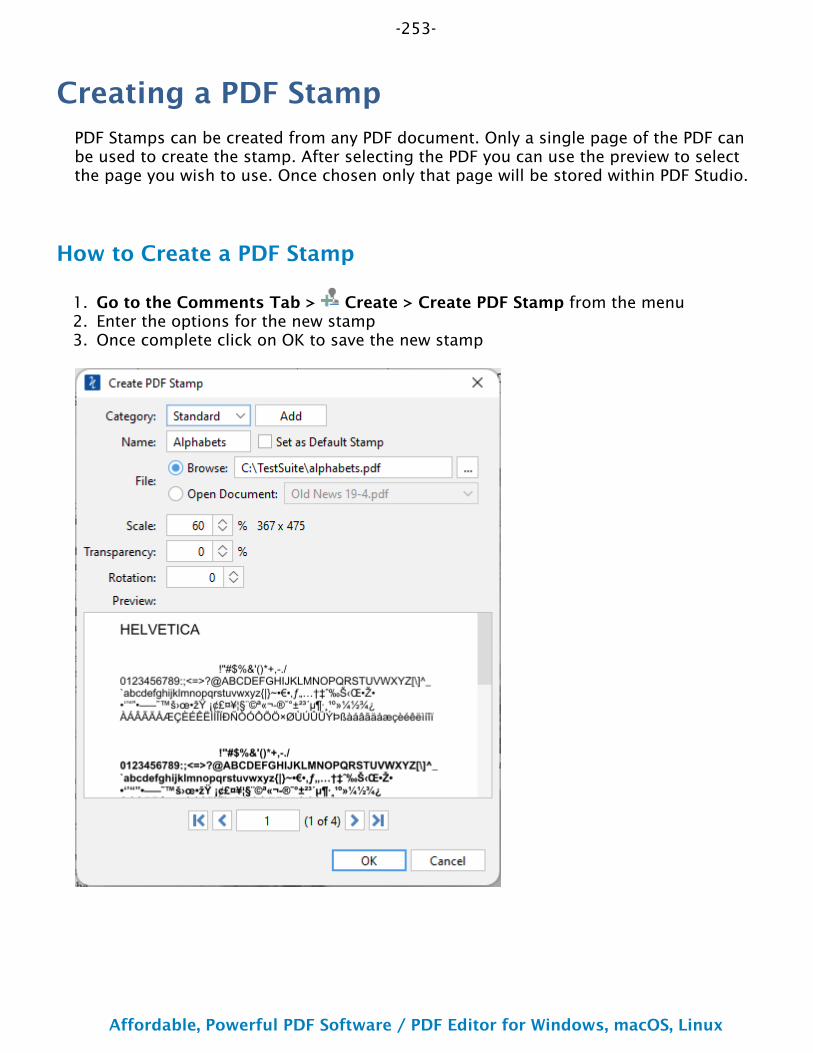
-253-
Affordable, Powerful PDF Software / PDF Editor for Windows, macOS, Linux
Copyright © 2002-Present Qoppa Software. All rights reserved.
1.2.3.
Creating a PDF StampPDF Stamps can be created from any PDF document. Only a single page of the PDF can be used to create the stamp. After selecting the PDF you can use the preview to select the page you wish to use. Once chosen only that page will be stored within PDF Studio.
How to Create a PDF Stamp
Go to the Comments Tab > Create > Create PDF Stamp from the menuEnter the options for the new stampOnce complete click on OK to save the new stamp
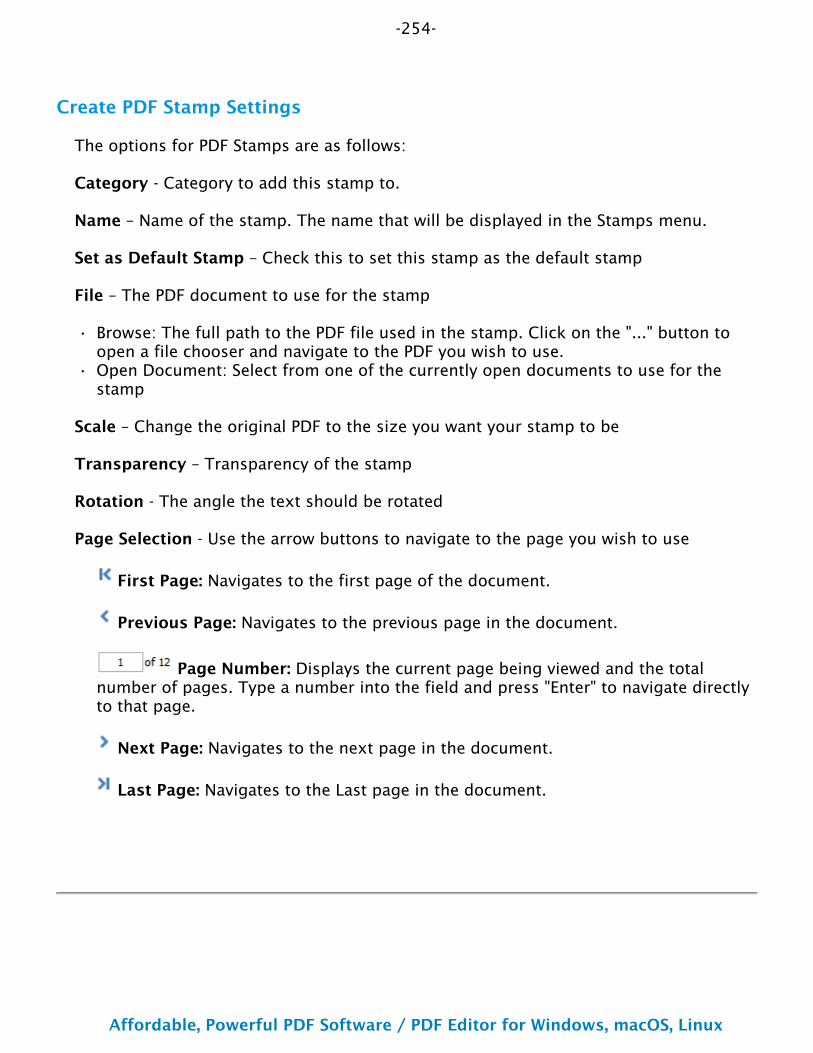
-254-
Affordable, Powerful PDF Software / PDF Editor for Windows, macOS, Linux
Copyright © 2002-Present Qoppa Software. All rights reserved.
•
•
Create PDF Stamp Settings
The options for PDF Stamps are as follows:
Category - Category to add this stamp to.
Name – Name of the stamp. The name that will be displayed in the Stamps menu.
Set as Default Stamp – Check this to set this stamp as the default stamp
File – The PDF document to use for the stamp
Browse: The full path to the PDF file used in the stamp. Click on the "..." button to open a file chooser and navigate to the PDF you wish to use.Open Document: Select from one of the currently open documents to use for the stamp
Scale – Change the original PDF to the size you want your stamp to be
Transparency – Transparency of the stamp
Rotation - The angle the text should be rotated
Page Selection - Use the arrow buttons to navigate to the page you wish to use
First Page: Navigates to the first page of the document.
Previous Page: Navigates to the previous page in the document.
Page Number: Displays the current page being viewed and the total number of pages. Type a number into the field and press "Enter" to navigate directly to that page.
Next Page: Navigates to the next page in the document.
Last Page: Navigates to the Last page in the document.
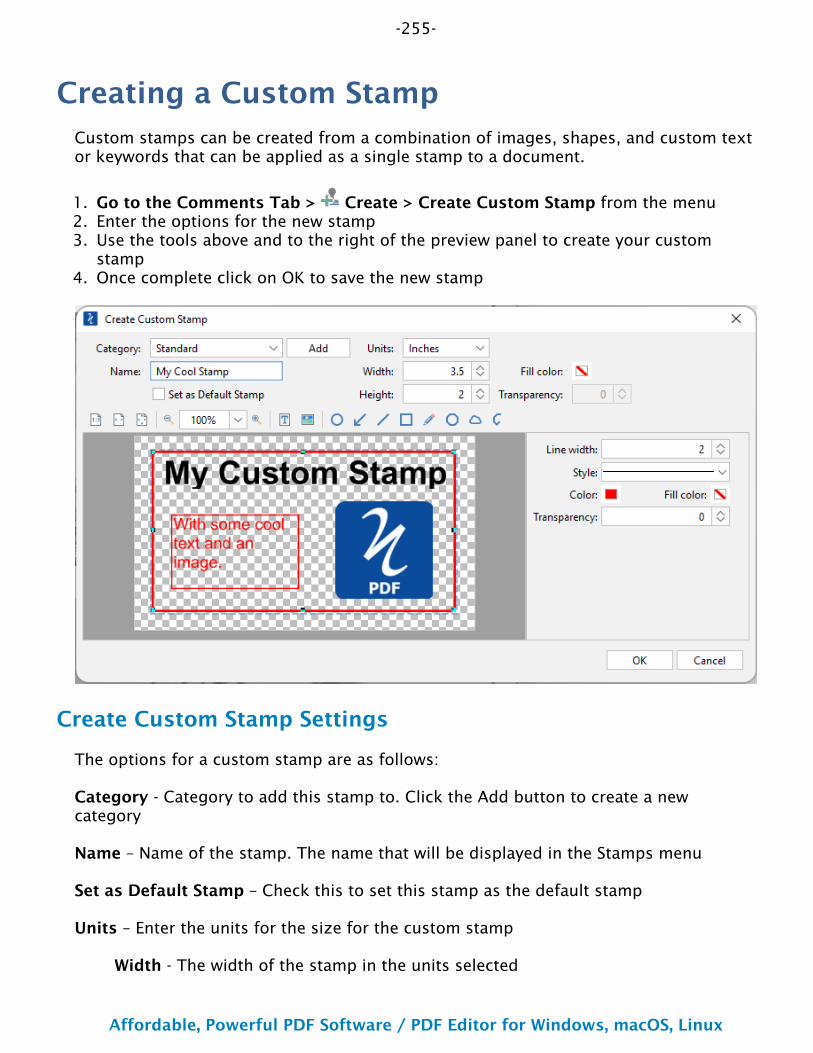
-255-
Affordable, Powerful PDF Software / PDF Editor for Windows, macOS, Linux
Copyright © 2002-Present Qoppa Software. All rights reserved.
1.2.3.
4.
Creating a Custom StampCustom stamps can be created from a combination of images, shapes, and custom text or keywords that can be applied as a single stamp to a document.
Go to the Comments Tab > Create > Create Custom Stamp from the menuEnter the options for the new stampUse the tools above and to the right of the preview panel to create your custom stampOnce complete click on OK to save the new stamp
Create Custom Stamp Settings
The options for a custom stamp are as follows:
Category - Category to add this stamp to. Click the Add button to create a new category
Name – Name of the stamp. The name that will be displayed in the Stamps menu
Set as Default Stamp – Check this to set this stamp as the default stamp
Units – Enter the units for the size for the custom stamp
Width - The width of the stamp in the units selected
-256-
Affordable, Powerful PDF Software / PDF Editor for Windows, macOS, Linux
Copyright © 2002-Present Qoppa Software. All rights reserved.
Height - The height of the stamp in the units selected
Fill Color - Choose a color for your custom stamp background.
Transparency - Enter a transparency value for the stamp's fill color.
Custom Stamp Drawing Tools
The following tools are available to use when creating the custom stamp. The tools function as they normally would on a PDF document except these will only be applied to the custom stamp.
Actual Size: Displays the stamp with a 1:1 ratio to match how the document would look if printed without any scaling.
Fit to Width: Scales the view to fit the width of the stamp in the preview window.
Fit to Page: Scales the view to fit the entire stamp within the preview window.
Zoom Out: Zoom out to view the stamp content smaller.
Zoom To/Current Zoom: Displays the current zoom value. You can also select a preset zoom percentage or type in the field for a custom zoom value.
Zoom In: Zoom in to view the stamp content larger.
Text Box: Creates a text box annotation. Use this to add text to the custom stamp
Image: Adds an image to the stamp.
Circle: Creates a circle.
Arrow: Creates an arrow.
Line: Creates a line.
Square: Creates a square.
Pencil: Creates a pencil.
Polygon: Creates a polygon.
-257-
Affordable, Powerful PDF Software / PDF Editor for Windows, macOS, Linux
Copyright © 2002-Present Qoppa Software. All rights reserved.
Cloud: Creates a cloud.
Polyline: Creates a polyline.
-258-
Affordable, Powerful PDF Software / PDF Editor for Windows, macOS, Linux
Copyright © 2002-Present Qoppa Software. All rights reserved.
1.•
2.
3.4.
•5.6.
7.8.9.
10.
Creating a Dynamic PDF StampDynamic PDF Stamps are special PDF Documents containing JavaScript code that will either prompt the user for additional information or dynamically generate additional details on the stamp such as current date and time.
How to Create a Dynamic PDF Stamp
Open an existing PDF Stamp templateAlternatively you can also Create a Blank PDF and choose the dimensions for your new stamp
Start Form Editing Mode and create a text field where you would like the dynamic text to be displayed on the stamp
Using the Object Selection Tool, select the FieldAccess the field properties by right clicking (Mac: Ctrl + Click) on the field and choose Properties in the mouse menu
or click on the edit button on the Mini Toolbar.In the Properties window select the Calculate tabChoose the This field has a custom calculation option and enter the JavaScript code to generate the dynamic data for the stamp. Once you have completed setting your calculations click on OKRepeat steps 2- 5 to create as many fields with dynamic calculations as you need.Once all calculations are complete save the documentFollow the instructions to Create a PDF Stamp using the PDF document you just created aboveYour dynamic stamp is now ready to use
Sample Dynamic JavaScript Calculations
Below are some JavaScript code samples showing how to create a dynamic stamp data.
Prompt for User Name
var cAsk = "Please enter a name";
var cTitle = "Document State For Stamp";
var cMsg = app.response(cAsk, cTitle);
event.value = cMsg;
-259-
Affordable, Powerful PDF Software / PDF Editor for Windows, macOS, Linux
Copyright © 2002-Present Qoppa Software. All rights reserved.
Display Current Date & Time
event.value = util.printd("h:MM tt, mmm dd yyyy", new Date);
-260-
Affordable, Powerful PDF Software / PDF Editor for Windows, macOS, Linux
Copyright © 2002-Present Qoppa Software. All rights reserved.
1.
Importing Image as StampImages can be imported directly as a stamp without having to create and save the stamp. Any of the any of the supported image formats (*png, *jpg, *jpeg, *jpe, *gif, *tif & *tiff.) can be used.
Note: When importing an image directly as a stamp the image will be converted to a JPEG and inserted as is.
Directions
Select the Image tool by clicking the on the toolbar or using the shortcut key Ctrl + Shift + I (Command + Shift + I on Mac)
Once an image stamp has been applied to a page, it is possible to flatten it so the image is painted directly into the content of the PDF document itself instead of being an annotation sitting on top of it.
To create an image stamp that can be reused instead of an "on-the-fly" stamp, create a custom image stamp.
-261-
Affordable, Powerful PDF Software / PDF Editor for Windows, macOS, Linux
Copyright © 2002-Present Qoppa Software. All rights reserved.
Measurement AnnotationsPDF Studio is able to create measurement annotations to measure distance, perimeter, and area within a PDF.
Distance Annotation: Creates a distance measurement
Perimeter Annotation: Creates a perimeter measurement
Area Annotation: Creates an area measurement
Calibrating Measurement Annotations: How to calibrate measurements
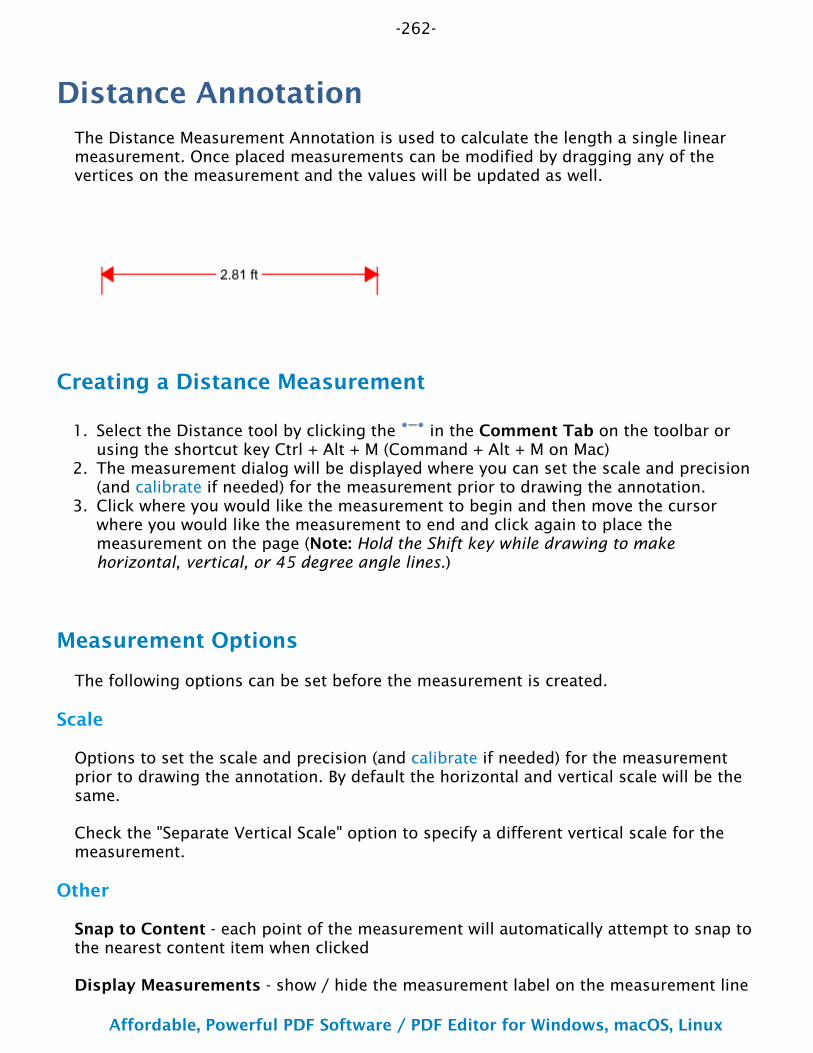
-262-
Affordable, Powerful PDF Software / PDF Editor for Windows, macOS, Linux
Copyright © 2002-Present Qoppa Software. All rights reserved.
1.
2.
3.
Distance AnnotationThe Distance Measurement Annotation is used to calculate the length a single linear measurement. Once placed measurements can be modified by dragging any of the vertices on the measurement and the values will be updated as well.
Creating a Distance Measurement
Select the Distance tool by clicking the in the Comment Tab on the toolbar or using the shortcut key Ctrl + Alt + M (Command + Alt + M on Mac)The measurement dialog will be displayed where you can set the scale and precision (and calibrate if needed) for the measurement prior to drawing the annotation.Click where you would like the measurement to begin and then move the cursor where you would like the measurement to end and click again to place the measurement on the page (Note: Hold the Shift key while drawing to make horizontal, vertical, or 45 degree angle lines.)
Measurement Options
The following options can be set before the measurement is created.
Scale
Options to set the scale and precision (and calibrate if needed) for the measurement prior to drawing the annotation. By default the horizontal and vertical scale will be the same.
Check the "Separate Vertical Scale" option to specify a different vertical scale for the measurement.
Other
Snap to Content - each point of the measurement will automatically attempt to snap to the nearest content item when clicked
Display Measurements - show / hide the measurement label on the measurement line
-263-
Affordable, Powerful PDF Software / PDF Editor for Windows, macOS, Linux
Copyright © 2002-Present Qoppa Software. All rights reserved.
Always used fixed angles (shift key) - forces all measurements to make horizontal, vertical, or 45 degree angle lines only
Annotation Properties
To access the Distance properties go to the Properties Tab on the toolbar or right click (Mac: Ctrl + Click) on the annotation and choose Properties in the mouse menu or click
on the edit button on the Mini Toolbar. The Distance measurement contains the following property settings.
Appearance
Line Width - Sets the width of the line
Line Start - Sets the shape to be used at the beginning of the line
Style - Sets the style for the line (i.e. dotted, dashed, cloud, etc...)
Line End - Sets the shape to be used at the end of the line
Color - Sets the color of the line
Fill Color - Sets the fill color of the shapes at the end of the line
Transparency - Sets the transparency of the measurement
Length - The current length of the measurement annotation. Can be manually edited if needed to set a specific value and will adjust the annotation on the page accordingly.
Note / Comment - a comment field that allows you to add an additional comment to the measurement if needed
Save as default - When checked this will make the selected appearance settings the default for any new Distance annotations going forward
Locked - When checked prevents the following on the annotation: being moved or resized, editing appearance properties, & deleting the annotation.
General
Author - Allows you to edit the author
Subject - Allows you to edit the subject
Layer - Only available when the document contains layers. Sets the layer that the annotation belongs to. For more information see Assigning Comments to Layers
-264-
Affordable, Powerful PDF Software / PDF Editor for Windows, macOS, Linux
Copyright © 2002-Present Qoppa Software. All rights reserved.
Status History
This tab will display and changes to the review status of the annotation including Author, Status, and Timestamp. For more details see Setting Status or Check Marks on Annotations
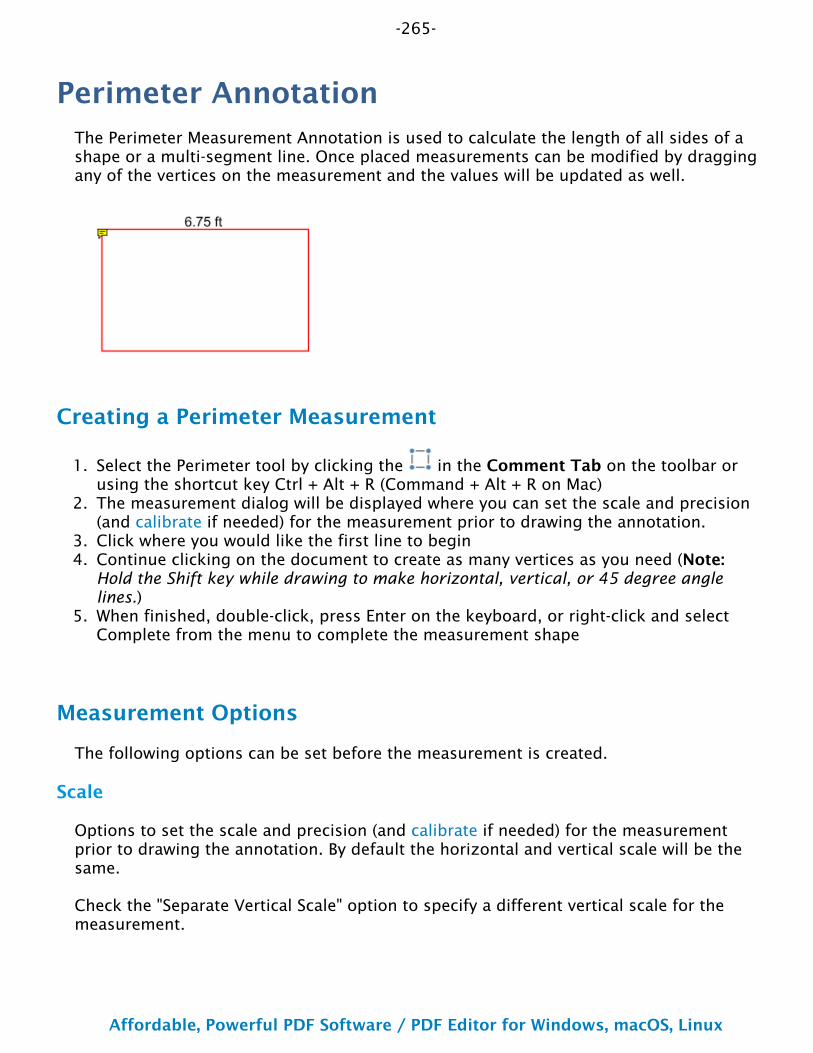
-265-
Affordable, Powerful PDF Software / PDF Editor for Windows, macOS, Linux
Copyright © 2002-Present Qoppa Software. All rights reserved.
1.
2.
3.4.
5.
Perimeter AnnotationThe Perimeter Measurement Annotation is used to calculate the length of all sides of a shape or a multi-segment line. Once placed measurements can be modified by dragging any of the vertices on the measurement and the values will be updated as well.
Creating a Perimeter Measurement
Select the Perimeter tool by clicking the in the Comment Tab on the toolbar or using the shortcut key Ctrl + Alt + R (Command + Alt + R on Mac)The measurement dialog will be displayed where you can set the scale and precision (and calibrate if needed) for the measurement prior to drawing the annotation.Click where you would like the first line to beginContinue clicking on the document to create as many vertices as you need (Note: Hold the Shift key while drawing to make horizontal, vertical, or 45 degree angle lines.)When finished, double-click, press Enter on the keyboard, or right-click and select Complete from the menu to complete the measurement shape
Measurement Options
The following options can be set before the measurement is created.
Scale
Options to set the scale and precision (and calibrate if needed) for the measurement prior to drawing the annotation. By default the horizontal and vertical scale will be the same.
Check the "Separate Vertical Scale" option to specify a different vertical scale for the measurement.
-266-
Affordable, Powerful PDF Software / PDF Editor for Windows, macOS, Linux
Copyright © 2002-Present Qoppa Software. All rights reserved.
Other
Snap to Content - each point of the measurement will automatically attempt to snap to the nearest content item when clicked
Display Measurements - show / hide the measurement label on the measurement line
Always used fixed angles (shift key) - forces all measurements to make horizontal, vertical, or 45 degree angle lines only
Annotation Properties
To access the Perimeter properties go to the Properties Tab on the toolbar or right click (Mac: Ctrl + Click) on the annotation and choose Properties in the mouse menu or
click on the edit button on the Mini Toolbar. The Perimeter measurement contains the following property settings.
Appearance
Line Width - Sets the width of the line
Style - Sets the style for the line (i.e. dotted, dashed, cloud, etc...)
Color - Sets the color of the line
Transparency - Sets the transparency of the measurement
Note / Comment - Contains two fields. The first is a comment field that allows you to add an additional comment to the measurement if needed. The second is the measurement value and can not be edited.
Save as default - When checked this will make the selected appearance settings the default for any new Perimeter annotations going forward
Locked - When checked prevents the following on the annotation: being moved or resized, editing appearance properties, & deleting the annotation.
General
Author - Allows you to edit the author
Subject - Allows you to edit the subject
Layer - Only available when the document contains layers. Sets the layer that the annotation belongs to. For more information see Assigning Comments to Layers

-267-
Affordable, Powerful PDF Software / PDF Editor for Windows, macOS, Linux
Copyright © 2002-Present Qoppa Software. All rights reserved.
Status History
This tab will display and changes to the review status of the annotation including Author, Status, and Timestamp. For more details see Setting Status or Check Marks on Annotations
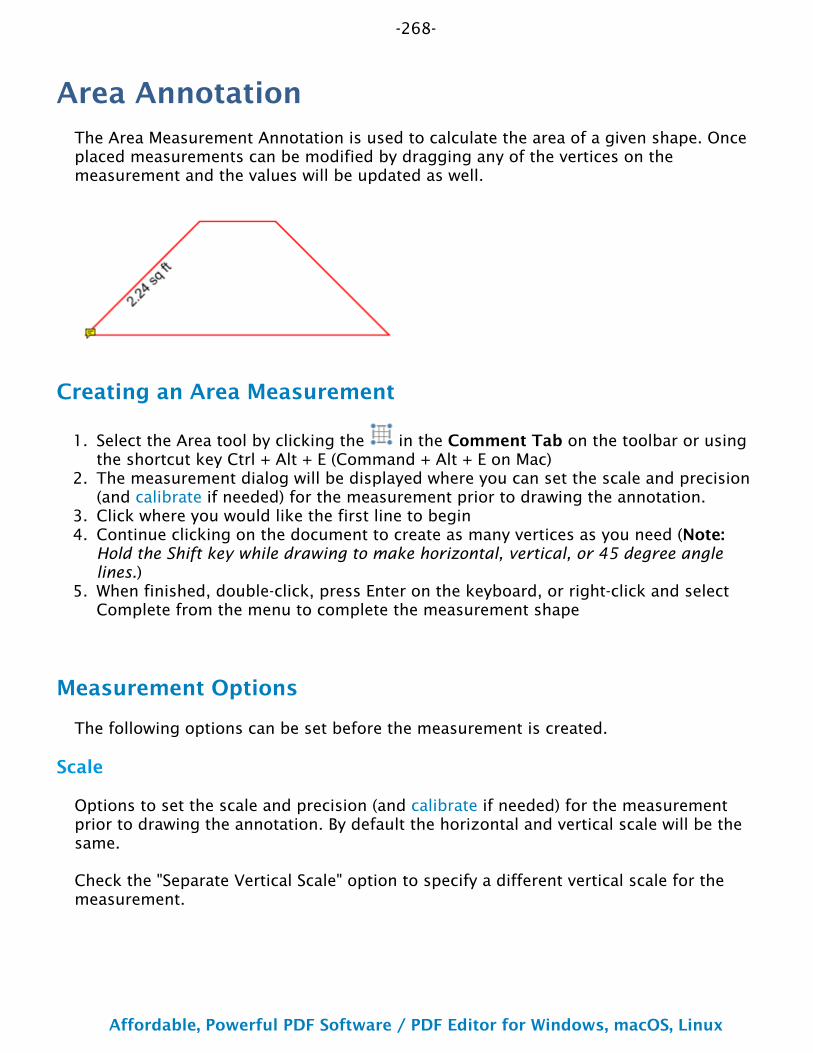
-268-
Affordable, Powerful PDF Software / PDF Editor for Windows, macOS, Linux
Copyright © 2002-Present Qoppa Software. All rights reserved.
1.
2.
3.4.
5.
Area AnnotationThe Area Measurement Annotation is used to calculate the area of a given shape. Once placed measurements can be modified by dragging any of the vertices on the measurement and the values will be updated as well.
Creating an Area Measurement
Select the Area tool by clicking the in the Comment Tab on the toolbar or using the shortcut key Ctrl + Alt + E (Command + Alt + E on Mac)The measurement dialog will be displayed where you can set the scale and precision (and calibrate if needed) for the measurement prior to drawing the annotation.Click where you would like the first line to beginContinue clicking on the document to create as many vertices as you need (Note: Hold the Shift key while drawing to make horizontal, vertical, or 45 degree angle lines.)When finished, double-click, press Enter on the keyboard, or right-click and select Complete from the menu to complete the measurement shape
Measurement Options
The following options can be set before the measurement is created.
Scale
Options to set the scale and precision (and calibrate if needed) for the measurement prior to drawing the annotation. By default the horizontal and vertical scale will be the same.
Check the "Separate Vertical Scale" option to specify a different vertical scale for the measurement.
-269-
Affordable, Powerful PDF Software / PDF Editor for Windows, macOS, Linux
Copyright © 2002-Present Qoppa Software. All rights reserved.
Other
Snap to Content - each point of the measurement will automatically attempt to snap to the nearest content item when clicked
Display Measurements - show / hide the measurement label on the measurement line
Always used fixed angles (shift key) - forces all measurements to make horizontal, vertical, or 45 degree angle lines only
Annotation Properties
To access the Area properties go to the Properties Tab on the toolbar or right click (Mac: Ctrl + Click) on the annotation and choose Properties in the mouse menu or click
on the edit button on the Mini Toolbar. The Area measurement contains the following property settings.
Appearance
Line Width - Sets the width of the line
Style - Sets the style for the line (i.e. dotted, dashed, cloud, etc...)
Color - Sets the color of the line
Transparency - Sets the transparency of the measurement
Fill Color - Sets the fill color of the area annotation
Note / Comment - Contains two fields. The first is a comment field that allows you to add an additional comment to the measurement if needed. The second is the measurement value and can not be edited.
Save as default - When checked this will make the selected appearance settings the default for any new Area annotations going forward
Locked - When checked prevents the following on the annotation: being moved or resized, editing appearance properties, & deleting the annotation.
General
Author - Allows you to edit the author
Subject - Allows you to edit the subject
Layer - Only available when the document contains layers. Sets the layer that the annotation belongs to. For more information see Assigning Comments to Layers

-270-
Affordable, Powerful PDF Software / PDF Editor for Windows, macOS, Linux
Copyright © 2002-Present Qoppa Software. All rights reserved.
Status History
This tab will display and changes to the review status of the annotation including Author, Status, and Timestamp. For more details see Setting Status or Check Marks on Annotations
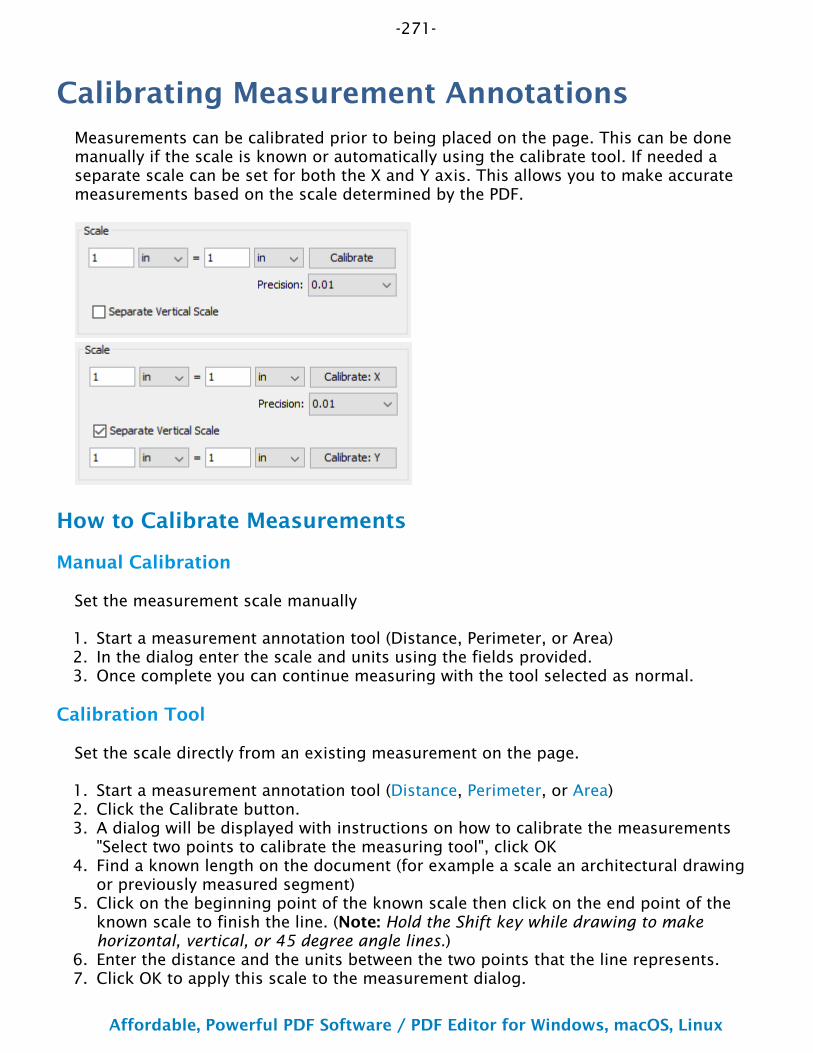
-271-
Affordable, Powerful PDF Software / PDF Editor for Windows, macOS, Linux
Copyright © 2002-Present Qoppa Software. All rights reserved.
1.2.3.
1.2.3.
4.
5.
6.7.
Calibrating Measurement AnnotationsMeasurements can be calibrated prior to being placed on the page. This can be done manually if the scale is known or automatically using the calibrate tool. If needed a separate scale can be set for both the X and Y axis. This allows you to make accurate measurements based on the scale determined by the PDF.
How to Calibrate Measurements
Manual Calibration
Set the measurement scale manually
Start a measurement annotation tool (Distance, Perimeter, or Area)In the dialog enter the scale and units using the fields provided.Once complete you can continue measuring with the tool selected as normal.
Calibration Tool
Set the scale directly from an existing measurement on the page.
Start a measurement annotation tool (Distance, Perimeter, or Area)Click the Calibrate button.A dialog will be displayed with instructions on how to calibrate the measurements "Select two points to calibrate the measuring tool", click OKFind a known length on the document (for example a scale an architectural drawing or previously measured segment)Click on the beginning point of the known scale then click on the end point of the known scale to finish the line. (Note: Hold the Shift key while drawing to make horizontal, vertical, or 45 degree angle lines.)Enter the distance and the units between the two points that the line represents.Click OK to apply this scale to the measurement dialog.

-272-
Affordable, Powerful PDF Software / PDF Editor for Windows, macOS, Linux
Copyright © 2002-Present Qoppa Software. All rights reserved.
8. Once complete you can continue measuring with the tool selected as normal.
-273-
Affordable, Powerful PDF Software / PDF Editor for Windows, macOS, Linux
Copyright © 2002-Present Qoppa Software. All rights reserved.
Media and Other Annotations
Link: Links that can have actions
Sound: Embedded audio files that can be played when clicked
Attach File: Attaches a file within the PDF
Attach File as Comment: Attaches a file within the PDF and displays an icon that can be clicked on to view the file

-274-
Affordable, Powerful PDF Software / PDF Editor for Windows, macOS, Linux
Copyright © 2002-Present Qoppa Software. All rights reserved.
HyperlinksUse the link tool to create and edit links within the PDF. Links can also be automatically generated and removed.
Creating Links: How to create links
Custom Link Actions: Actions available when creating a link
Auto Create Links: Using the auto create link tool
Remove All Links: Removing all links from a document

-275-
Affordable, Powerful PDF Software / PDF Editor for Windows, macOS, Linux
Copyright © 2002-Present Qoppa Software. All rights reserved.
1.
2.
•
3.4.
•••
••
••••
••
••••
•
••
•
•
•
•
•
Creating LinksThe Link tool allows you to designate an area within the PDF that can be linked to a web page, pages in a PDF document, or even have custom actions.
How to Create Links
Select the Link tool by clicking the in the Pages Tab on the toolbar or using the shortcut key Ctrl + Alt + K (Command + Alt + K on Mac)Click and drag to select the area that you wish to make a link (Note: Hold the Shift key while drawing to create a perfect square.)
You can also select the desired text area and right-click on the selected text (CTRL + Click on Mac), choose "Create Link" in the context menu.
After the link annotation is added, the Link Properties dialog is displayed.Set the options for the link:
AppearanceBorder Width - Sets the width of the border lineBorder Color - Sets the color of the border line
ActionOpen a web link. Examples of valid links:
http://www.qoppa.comftp://ftp.site.comfile:c:\qoppa\temp.txtmailto:[email protected]
Go to a page in this documentPage
Number - the page number of the document to link toZoom - Set the page fit when navigating to the pagePercent - The zoom level for Custom zoom settingSet Visually - Allows you to set the location of the link visually
Destination - choose from a named Destination already set within the PDF
Go to a page in another documentNew Window - opens the document in a completely new window of the PDF applicationExisting Window - will open the document in the current window of the PDF application replacing the currently open documentPage Number - the page number to show when opening the other documentDocument - The full path to the file to open. Click on the "..." button to open a file chooser and navigate to the file you wish to select.Destination - choose from a named Destination already set within the PDF
Custom link - Allows you to add custom Link Actions from a list of available actions.

-276-
Affordable, Powerful PDF Software / PDF Editor for Windows, macOS, Linux
Copyright © 2002-Present Qoppa Software. All rights reserved.
5.
•••
Once complete, click OK to create the link
Link Properties
To access the Link properties go to the Properties Tab on the toolbar or right click (Mac: Ctrl + Click) on the annotation and choose Properties in the mouse menu or click
on the edit button on the Mini Toolbar. Links contain the following property settings.
Locked - When checked prevents the following on the annotation: being moved or resized, editing appearance properties, & deleting the annotation.
Appearance
Border Width - Sets the width of the border line
Border Color - Sets the color of the border line
Style - Sets the border style for the link
Solid: Creates a solid lineDashed: Creates a dashed lineUnderlined: Creates a bottom line only
Action
The Action Panel displays a list of the current actions associated with the link. Actions can be added, edited, or deleted using the buttons below the actions list.
Add - Adds a custom Link Action from a list of available actions.
Edit - Edits the currently selected action from the list
Remove - Removes the currently selected action from the list
-277-
Affordable, Powerful PDF Software / PDF Editor for Windows, macOS, Linux
Copyright © 2002-Present Qoppa Software. All rights reserved.
••••
••
•••
•
Custom Link ActionsWhen adding a link to a PDF document custom actions can be created instead of the standard link options. Below is a list of the each of the custom actions and their settings.
Go to a page in this document
Sets the link to go to a page within the current document
Page Number - the page number of the document to link toZoom - Set the page fit when navigating to the pagePercent - The zoom level for Custom zoom settingSet Visually - Allows you to set the location of the link visually
Go to a page in another document
Sets the link to go to a page within a different designated document
Page Number - the page number of the document to link toDocument - The full path to the document to open. Click on the "..." button to open a file chooser and navigate to the file you wish to select.
Note: When sending this document to other users this action may not work if the file is not in the same location on the users computer. To make sure the file is included with the PDF when sending to another user try using a File Attachment instead.
Show/Hide Fields
Sets the link to either Show or Hide selected fields within the document
Show - Will show the selected fields when clickedHide - Will hide the selected fields when clickedField List - Displays a list of the fields in the document to select. To select more than one field use Ctrl + Click to select separate fields or Shift + Click to select a group of fields
Open File
Sets the link to open a specific file.
File - The full path to the file to open. Click on the "..." button to open a file chooser and navigate to the file you wish to select.

-278-
Affordable, Powerful PDF Software / PDF Editor for Windows, macOS, Linux
Copyright © 2002-Present Qoppa Software. All rights reserved.
••••
••
•••••
•••••
•••
Note: When sending this document to other users this action may not work if the file is not in the same location on the users computer. To make sure the file is included with the PDF when sending to another user try using a File Attachment instead.
Open a web link
Set's the link to open a specific web page or start an email. Examples of valid links:
http://www.qoppa.comftp://ftp.site.comfile:c:\qoppa\temp.txtmailto:[email protected]
Reset Form Fields
Sets the link to reset the selected fields within the document
All Fields - When checked will reset all the fields within the documentField List - Displays a list of the fields in the document to select. To select more than one field use Ctrl + Click to select separate fields or Shift + Click to select a group of fields
JavaScript Action
Sets the link to perform a custom Supported JavaScript action that can be typed into the field.
Submit Form
Sets the link to send the form field values to a designated location in one of 4 formats. This can be used to have an automatic way to send back forms or values once a user has completed the form.
URL - The destination to send the selected file to. Examples of valid links:http://www.qoppa.comftp://ftp.site.comfile:c:\qoppa\temp.txtmailto:[email protected]
FDF - Sends an FDF file containing the selected field valuesXFDF - Sends an XFDF file containing the selected field valuesPDF - Sends a copy of the entire PDFHTML - Sends an HTML file containing the selected field valuesFields - Sets the options when sending the field values
All Fields - Will send all fields regardless of valueInclude - Will include the selected fields in the list when sending the fileExclude - Will exclude the selected fields in the list when sending the file

-279-
Affordable, Powerful PDF Software / PDF Editor for Windows, macOS, Linux
Copyright © 2002-Present Qoppa Software. All rights reserved.
•
•
•
••••
•
•••••••
Field List - Displays a list of the fields in the document to select. To select more than one field use Ctrl + Click to select separate fields or Shift + Click to select a group of fieldsSend Empty Fields - When checked will send the selected fields values even when fields are empty
Show/Hide Layers
Sets the link to either Show or Hide selected layers within the document
Use Current Visibility - Sets the action to display the layers as they are currently being displayed so that if layers are turned off later they will return to the current stateOther - Sets a new action for the layer using the blow options
Show - Will show the selected layers in the listHide - Will hide the selected layers in the listToggle - Will switch the selected layer(s) state from hidden to displayed or displayed to hidden depending on the layers current stateLayers List - Displays a list of the layers in the document to select. To select more than one layer use Ctrl + Click to select separate layers or Shift + Click to select a group of layers
Named Action
Sets the link to perform one of standard predefined actions listed below.
NextPage - Goes to the next page in the documentPrevPage - Goes to the previous page in the documentFirstPage - Goes to the first page in the documentLastPage - Goes to the last page in the documentPrint - Starts the print dialog to print the current documentSave - Saves the current documentOpen - Displays the open file dialog

-280-
Affordable, Powerful PDF Software / PDF Editor for Windows, macOS, Linux
Copyright © 2002-Present Qoppa Software. All rights reserved.
1.2.
•••
•
•3.
4.5.
•••••
6.•••
7.
Auto Create LinksThe Auto Create Links tool within PDF Studio allows you to search the entire document to automatically create links for the defined criteria set by the user. Once the text is found using the defined settings links can be automatically applied to the document at each of the text locations.
Note: The PDF must contain searchable text in order for the Auto Create Links tool to work
Automatically Creating Links
Search for
Select Comments Tab > Link > Auto Create Links. Set the search options for the type or specific text you wish to find in the document using the below settings
Web Links - Searches for text strings that contains "http://" or "www."Email Links - Searches for emails matching the standard "...@..." formatSearch - Searches for specific text defined by the user
Case Sensitive - When checked will only find the specific text matching the exact case (i.e. searching for capital "A" will ignore lowercase "a")URL - Defines what web address to set as the link when searching by text
Click Find to search the document for text that appears depending on which "search for" options are selected. The matching text that is found based on the search options set will be displayed in the table below.Check the boxes in the "Make" column of the text you wish to add links to.The link to be created is displayed in the "Link" column of the table. This value can be edited by double clicking on the Link you wish to edit. Once finished editing click anywhere else to finish editing.
Examples of valid links:http://www.qoppa.comftp://ftp.site.comfile:c:\qoppa\temp.txtmailto:[email protected]
Set the options for the Links that will be created for the selected textBorder Width - Sets the width of the border lineBorder Color - Sets the color of the border lineText Color - This will change the color of the text that was found. Useful if you want others to know that the text is now a link.
Click on the Make button to create the links in the document
Once created the links function just as normal Link Annotations and can be edited as normal.

-281-
Affordable, Powerful PDF Software / PDF Editor for Windows, macOS, Linux
Copyright © 2002-Present Qoppa Software. All rights reserved.

-282-
Affordable, Powerful PDF Software / PDF Editor for Windows, macOS, Linux
Copyright © 2002-Present Qoppa Software. All rights reserved.
Removing all LinksTo automatically remove all links from a document, select Comments Tab > Link > Remove All Links. Once the removal is confirmed, all links in the document will be deleted.
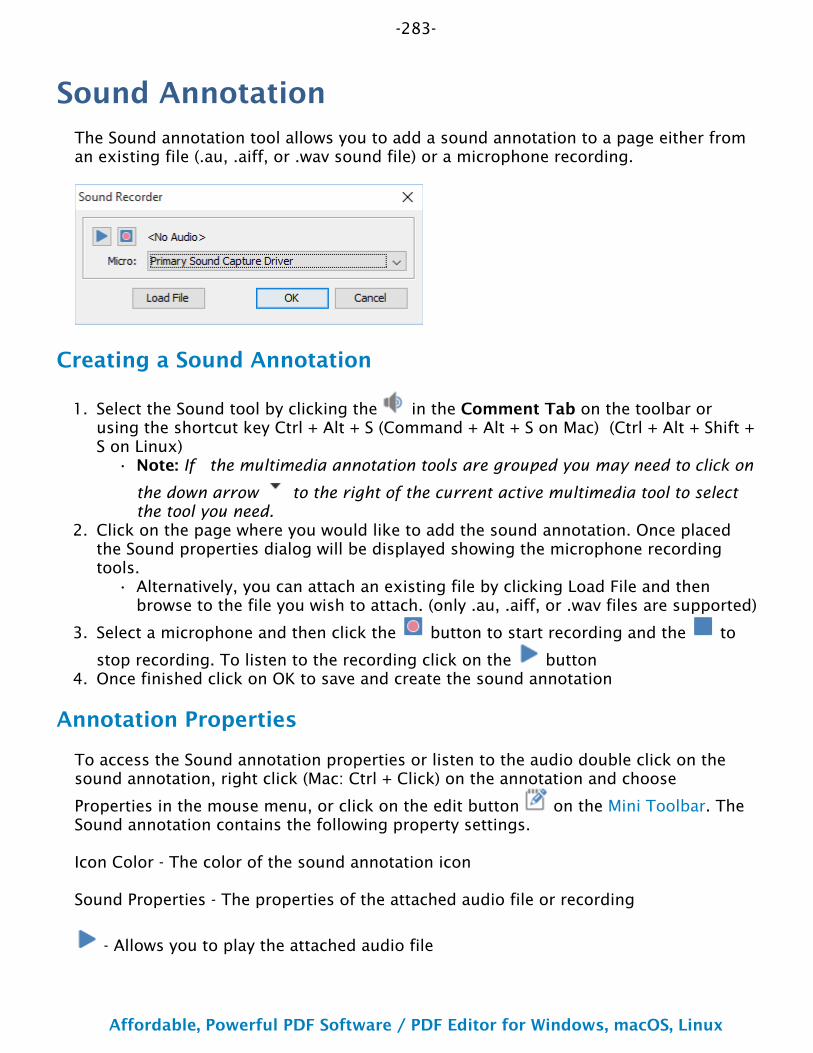
-283-
Affordable, Powerful PDF Software / PDF Editor for Windows, macOS, Linux
Copyright © 2002-Present Qoppa Software. All rights reserved.
1.
•
2.
•
3.
4.
Sound AnnotationThe Sound annotation tool allows you to add a sound annotation to a page either from an existing file (.au, .aiff, or .wav sound file) or a microphone recording.
Creating a Sound Annotation
Select the Sound tool by clicking the in the Comment Tab on the toolbar or using the shortcut key Ctrl + Alt + S (Command + Alt + S on Mac) (Ctrl + Alt + Shift + S on Linux)
Note: If the multimedia annotation tools are grouped you may need to click on
the down arrow to the right of the current active multimedia tool to select the tool you need.
Click on the page where you would like to add the sound annotation. Once placed the Sound properties dialog will be displayed showing the microphone recording tools.
Alternatively, you can attach an existing file by clicking Load File and then browse to the file you wish to attach. (only .au, .aiff, or .wav files are supported)
Select a microphone and then click the button to start recording and the to
stop recording. To listen to the recording click on the buttonOnce finished click on OK to save and create the sound annotation
Annotation Properties
To access the Sound annotation properties or listen to the audio double click on the sound annotation, right click (Mac: Ctrl + Click) on the annotation and choose
Properties in the mouse menu, or click on the edit button on the Mini Toolbar. The Sound annotation contains the following property settings.
Icon Color - The color of the sound annotation icon
Sound Properties - The properties of the attached audio file or recording
- Allows you to play the attached audio file
-284-
Affordable, Powerful PDF Software / PDF Editor for Windows, macOS, Linux
Copyright © 2002-Present Qoppa Software. All rights reserved.
- Stops the playing audio
-285-
Affordable, Powerful PDF Software / PDF Editor for Windows, macOS, Linux
Copyright © 2002-Present Qoppa Software. All rights reserved.
File Attachment AnnotationsPDF Studio allows you to attach files to a PDF either as an attachment or as a comment. Attached files can also be opened, saved, and deleted with PDF Studio.
Attaching a File: How to embed a file to the PDF
Attaching a File as a Comment: Embedding a file with a comment
Opening an Attached File: Opening attached files from the PDF
Saving Attached File: Saving attached files from the PDF
Deleting an Attached File: Deleting attached files from the PDF
-286-
Affordable, Powerful PDF Software / PDF Editor for Windows, macOS, Linux
Copyright © 2002-Present Qoppa Software. All rights reserved.
1.
2.
3.
Attaching a FileFiles can be attached directly to a PDF Document. When files are attached directly to a PDF document they are embedded within the PDF file directly so that when the PDF is sent to another user they can still have access to the file. Once a file is attached the file will be displayed in the Attachments Pane on the left of the PDF Studio window.
Note: Attaching a file does increase the size of the PDF. If size is a concern try using a Link instead that will open the file from another location.
Using the File Attachment Tool
Select the Attach File tool by clicking the in the Comment Tab on the toolbar or using the shortcut key Ctrl + Shift + F (Command + Shift + F on Mac)A file chooser dialog will be displayed where you can navigate and select the file you wish to attach.Once complete, click Open to attach the file
Note: You can also drag and drop files onto the attachments tab to attach them as an embedded file.
Using Paste Shortcut Keys
Any file or document currently on the clipboard for your OS can also be attached to the document by just using the Paste shortcut keys with the PDF Studio frame active.
Once pasted the file attachment can be viewed in the Attachments Pane.
-287-
Affordable, Powerful PDF Software / PDF Editor for Windows, macOS, Linux
Copyright © 2002-Present Qoppa Software. All rights reserved.
1.
2.3.
4.
••
1.
2.
Attaching a File as a CommentWhen attaching a file as a comment an icon is added to the page letting the user know that a file has been attached. Files attached as a comment are still embedded within the PDF just the same as when attaching a file without a comment. When files are attached directly to a PDF document they are embedded within the PDF file directly so that when the PDF is sent to another user they can still have access to the file.
Note: Attaching a file as a comment does increase the size of the PDF. If size is a concern try using a Link instead that will open the file from another location.
How to Attach a File as a Comment
Select the Attach File tool by going to Comment Tab > Attach File > Attach File as Comment on the toolbarClick on the page where you would like to add the file comment.Once placed, a file chooser dialog will be displayed where you can navigate and select the file you wish to attach. Once you've selected the file click Open.The File Attachment properties dialog will be displayed. Set the options for the comment and then click OK to place the note on the page
Icon - Sets the icon to be used for the file commentTransparency - Sets the transparency of the file comment icon
Using Right Click Context Menu
Any file or document currently on the clipboard for your OS can also be attached to the document by just using the right click context menu.
Using the Hand Tool or Object Selection Tool Right-click on page (CTRL + Click on Mac) where you wish to add the file comment
Select the Paste File as Comment option to create the file attachment comment annotation
File Comment Properties
To access the File Comment properties go to the Properties Tab on the toolbar or right click (Mac: Ctrl + Click) on the annotation and choose Properties in the mouse menu or
-288-
Affordable, Powerful PDF Software / PDF Editor for Windows, macOS, Linux
Copyright © 2002-Present Qoppa Software. All rights reserved.
click on the edit button on the Mini Toolbar. The File Comment contains the following property settings.
Appearance
Icon - Sets the icon to be used for the file comment
Transparency - Sets the transparency of the file comment icon
File - Displays the file name associated with this file comment icon
-289-
Affordable, Powerful PDF Software / PDF Editor for Windows, macOS, Linux
Copyright © 2002-Present Qoppa Software. All rights reserved.
•
•
Opening Attached FileFiles attached to PDFs can easily be opened. Depending on how the file is attached use one of the two methods below to open the file.
Note: PDF Studio simply sends the file to your operating system for opening. If your operating system doesn't recognize the type of file or doesn't have the appropriate application to open the file, nothing will happen.
Embedded Files
If the file is attached as an embedded file, go to the attachments tab where the list of attached files is displayed, and double-click on the attached file. You can also right-click (Mac: Ctrl+Click) on the attached file and choose Open File.
Files Attached as Comment
If the file is attached as a comment, double-click on the file attachment comment on the page. You can also right-click (Mac: Ctrl+Click) on the file attachment comment and choose Open File. You can also open the file from the attachments tab as you would embedded files.
-290-
Affordable, Powerful PDF Software / PDF Editor for Windows, macOS, Linux
Copyright © 2002-Present Qoppa Software. All rights reserved.
•
•
Saving Attached FileFiles attached to PDFs can easily be saved directly to your computer so that they no longer have to be accessed through the PDF. Depending on how the file is attached use one of the two methods below to save attached files.
Embedded Files
If the file is attached as an embedded file, go to the attachments tab where the list of attached files is displayed, right-click (Mac: Ctrl+Click) on the attached file and choose Save File.
Files Attached as Comment
If the file is attached as a comment, right-click (Mac: Ctrl+Click) on the file attachment comment on the page or in the attachments tab and choose Save File.
-291-
Affordable, Powerful PDF Software / PDF Editor for Windows, macOS, Linux
Copyright © 2002-Present Qoppa Software. All rights reserved.
•
•
Deleting Attached FileFiles attached to PDFs can easily be deleted so that they are no longer a part of the PDF. Depending on how the file is attached use one of the two methods below to delete attached files.
Embedded Files
If the file is attached as an embedded file, go to the attachments tab where the list of attached files is displayed, right-click (Mac: Ctrl+Click) on the attached file and choose the option Delete.
Files Attached as Comment
If the file is attached as a comment, select the file attachment comment on the page and click delete. You can also right-click (Mac: Ctrl+Click) on the file attachment comment and choose Delete. You can also delete the file from the attachments tab as you would embedded files.
-292-
Affordable, Powerful PDF Software / PDF Editor for Windows, macOS, Linux
Copyright © 2002-Present Qoppa Software. All rights reserved.
1.2.
3.4.
••
•
••
5.
1.
3D Media AnnotationUse the 3D annotation tools to add 3D content and export embedded 3D data. The add 3D tool allows you to designate an area within the PDF to add 3D annotation to the page. The embedded 3D data file can also be exported if you wish to view in a separate application.
NOTE: PDF Studio has limited support for 3D objects stored in PDFs. 3D content can be added to the page but cannot be viewed from within PDF Studio. To view the file first export then view in a compatible 3D application.
How to Add 3D Annotations
Select the Add 3D tool in the Comments Tab on the toolbar Click and drag to select the area that you wish to add the 3D annotation (Note: Hold the Shift key while drawing to create a perfect square.)After the 3D annotation is added, the 3D Properties dialog is displayed.Set the options for the 3D annotation:
File: the path to the 3d file (only .prc & .u3d files are currently supported)Image: a placeholder image to be shown when the PDF viewer does not support full 3D rendering
Icon: When checked will display a default 3D icon for the placeholder image (disabled when an image is file is set)Border Width: creates a small border around the 3D annotation objectBorder Color: color of the border
Once complete, click OK to finish adding the 3D annotation to the page
3D Annotation Properties
At this time, 3D annotation properties are not supported. To edit any of the above settings set when creating the 3D annotation you will need to first delete the 3D annotation and then create new one.
Exporting Embedded 3D Data
3D data embedded within the annotations can be exported to view in another 3D application.
Using the Hand Tool or Object Selection Tool Select the 3D media that you wish to export.
-293-
Affordable, Powerful PDF Software / PDF Editor for Windows, macOS, Linux
Copyright © 2002-Present Qoppa Software. All rights reserved.
2.3.
Right click (Mac: Ctrl + Click) and select the Export optionChoose where to save the file and click OK
-294-
Affordable, Powerful PDF Software / PDF Editor for Windows, macOS, Linux
Copyright © 2002-Present Qoppa Software. All rights reserved.
Editing AnnotationsPDF Studio allows you to edit existing annotations in the PDF Document using a variety of methods.
Editing the Annotation Comment: Edit the comment associated with the annotation using the Comment popup
Quick Properties Toolbar: Edit the properties using the Quick properties toolbar
Annotation Properties Dialog: Edit the annotation properties using the full properties dialog
Moving Annotations: Moving annotations on the page
Deleting Annotations: Deleting annotations on the page
Flattening Annotations: Flattening annotations on the page
Unflatten Annotations: Restores flattened annotations
Copy & Paste Annotations: Copy and Pasting annotations on the page or across documents
Aligning Annotations: Aligning annotations on the page
Grouping Annotations: Grouping annotations together
-295-
Affordable, Powerful PDF Software / PDF Editor for Windows, macOS, Linux
Copyright © 2002-Present Qoppa Software. All rights reserved.
Moving & Resizing AnnotationsAnnotations can be moved or resized after being placed on the page.
Using the Hand Tool or Object Selection Tool Select the annotation that you wish to edit.
Note: More than one annotation can be selected at a time
Move
Click on the annotation and drag it to its new location on the page.
Use the arrow keys to move the annotations in small increments. Hold down Shift and use the arrow keys to move the annotations in larger increments.
Note: Text markups cannot be moved
Resize
Simply drag the corner or vertex handles to change the bounds of the annotation. Hold down Shift when resizing the annotation to maintain the aspect ratio.
For line & arrow anotations, Shift will draw the line at fixed angles.
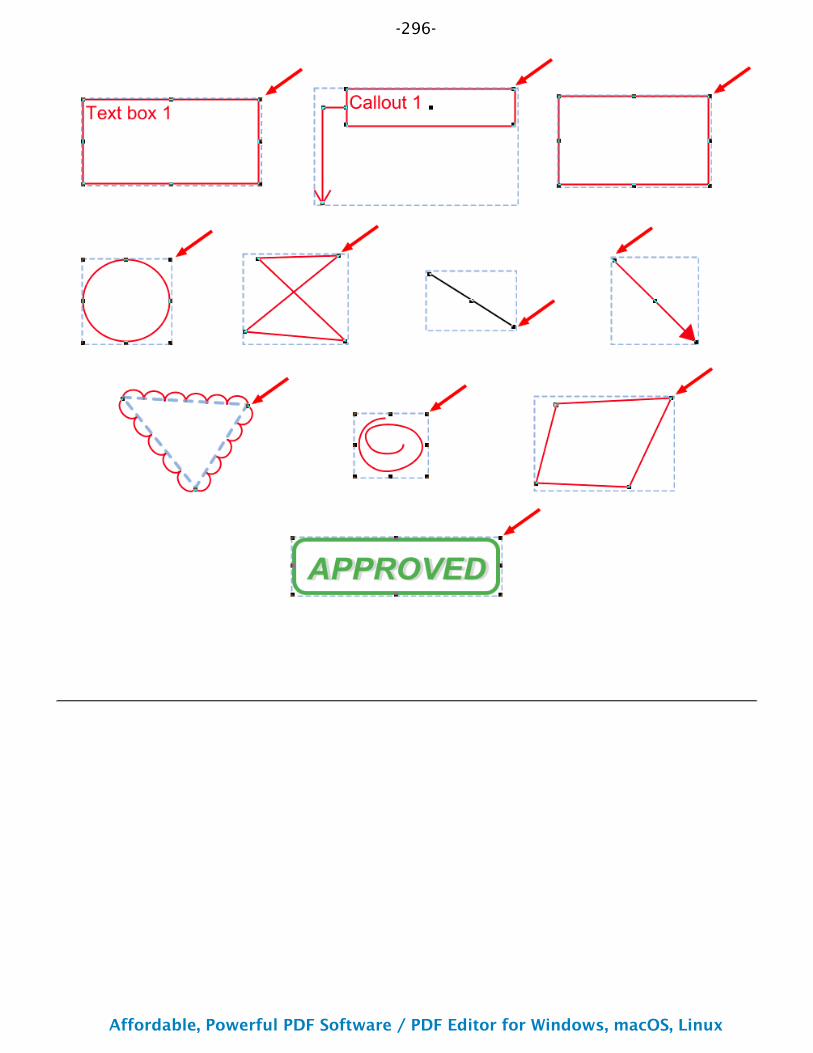
-296-
Affordable, Powerful PDF Software / PDF Editor for Windows, macOS, Linux
Copyright © 2002-Present Qoppa Software. All rights reserved.
-297-
Affordable, Powerful PDF Software / PDF Editor for Windows, macOS, Linux
Copyright © 2002-Present Qoppa Software. All rights reserved.
1.
2.
Deleting AnnotationsAnnotations on the page can be deleted using any of the below options
Delete a Specific Annotation:
Using the Hand Tool or Object Selection Tool Select the annotation that you wish to delete.
Delete the annotation by pressing the Del key, click on the Delete button on the Mini Toolbar, or right-click on the annotation (CTRL + Click on Mac), choose "Delete" in the context menu.
Delete All Annotations:
From the menu, choose Comments > Delete All Comments.
Delete All Annotations on Any Given Page:
From the menu, choose Comments > Delete Comments on Current Page.

-298-
Affordable, Powerful PDF Software / PDF Editor for Windows, macOS, Linux
Copyright © 2002-Present Qoppa Software. All rights reserved.
Editing the Annotation CommentAnnotations can contain additional stored comment information. These can be used to provide additional details on the reason for then annotation being placed ont the page.
From the comment bubble
An annotation's note can be edited by double-clicking directly on the annotation. This will display a small pop that will allow you to edit just the comment on the annotation. Type in the field to add, change, or delete the comment on the note. Once done click on the "x" or any where on the page to save the comment.
From the comments panel
Select the annotation from the Comments Panel, then double click on the annotation in the list you wish to add a comment to. Once you have completed the comment clicking elsewhere or pressing the Esc key.
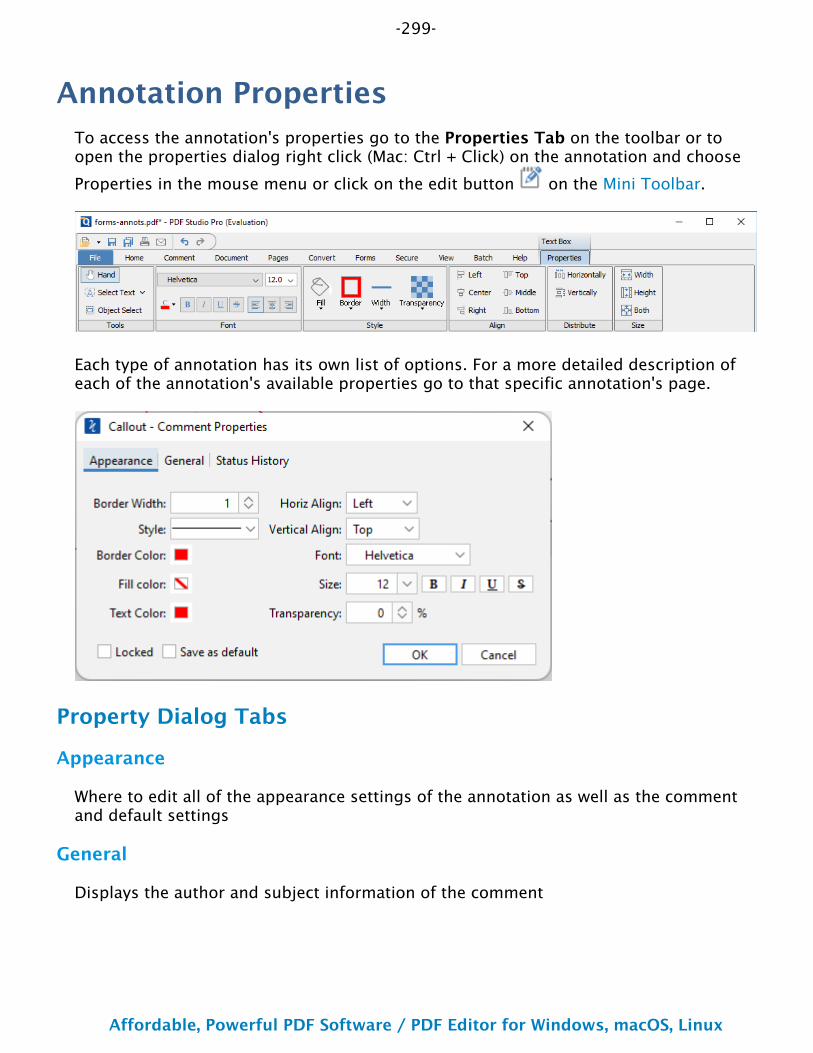
-299-
Affordable, Powerful PDF Software / PDF Editor for Windows, macOS, Linux
Copyright © 2002-Present Qoppa Software. All rights reserved.
Annotation PropertiesTo access the annotation's properties go to the Properties Tab on the toolbar or to open the properties dialog right click (Mac: Ctrl + Click) on the annotation and choose
Properties in the mouse menu or click on the edit button on the Mini Toolbar.
Each type of annotation has its own list of options. For a more detailed description of each of the annotation's available properties go to that specific annotation's page.
Property Dialog Tabs
Appearance
Where to edit all of the appearance settings of the annotation as well as the comment and default settings
General
Displays the author and subject information of the comment
-300-
Affordable, Powerful PDF Software / PDF Editor for Windows, macOS, Linux
Copyright © 2002-Present Qoppa Software. All rights reserved.
Status History
This tab will display and changes to the review status of the annotation including Author, Status, and Timestamp. For more details see Setting Status or Check Marks on Annotations
tml>
-301-
Affordable, Powerful PDF Software / PDF Editor for Windows, macOS, Linux
Copyright © 2002-Present Qoppa Software. All rights reserved.
1.
2.
•••••
Flattening AnnotationsFlattening annotations is the act of painting the annotations directly on the page to which they belong so they are not editable anymore. This will permanently write an annotation into the document. For instance, a custom signature stamp can be flattened so the signature is added to the document itself and doesn't sit on a document as an annotation anymore.
Note: The following annotations (file attachment annotations, links, sounds, and redaction annotations) will NOT be flattened when flattening annotations. Even though technically file attachment annotations, links, sounds, and redaction annotations are annotations, they contain actions that would also be removed if the annotation was flattened and so they remain to not interfere with the functions placed in the PDF.
Flatten a Specific Annotation:
Using the Hand Tool or Object Selection Tool Select the annotation that you wish to flatten.Right-click on the annotation (CTRL + Click on Mac), choose "Flatten" in the context menu.
Flatten Multiple Annotations:
From the Comments Tab choose Flatten
Options
Pages - The range of pages to be exported as images
All Pages: all pages in the documentCurrent: only the current page in viewPage Range: set the pages to be exported using the From and To optionsEven Pages Only: only export the even pages of the documentOdd Pages Only: only export the odd pages of the document
Allow Unflattening - When checked allows the flattening process to be reversed at a later time. Flattening is irreversible if the PDF is flattened without this option checked.
NOTE: Any additional document or content changes performed on any page could affect unflattening so it is recommended as a final step before saving the document.
Assign to Layer - Adds the comment to the selected layer before flattening.
All Types - Flattens all annotations found in the document
-302-
Affordable, Powerful PDF Software / PDF Editor for Windows, macOS, Linux
Copyright © 2002-Present Qoppa Software. All rights reserved.
Selected Types - Flattens only the annotation types checked in the list. Any annotations not checked will remain as an interactive annotation.
-303-
Affordable, Powerful PDF Software / PDF Editor for Windows, macOS, Linux
Copyright © 2002-Present Qoppa Software. All rights reserved.
••••
Unflatten AnnotationsIf the "Allow Unflattening" option was chosen when Flattening Annotations you can then unflatten the annotations at a later time.
NOTE: Any additional document or content changes performed on any page could affect unflattening so it is recommended as a final step before saving the document.
How to Unflatten Annotations:
From the Comments Tab choose Flatten dropdown -> Unflatten Comments
Options
Pages - The range of pages to be exported as images
All Pages: all pages in the documentPage Range: set the pages to be exported using the From and To optionsEven Pages Only: only export the even pages of the documentOdd Pages Only: only export the odd pages of the document
-304-
Affordable, Powerful PDF Software / PDF Editor for Windows, macOS, Linux
Copyright © 2002-Present Qoppa Software. All rights reserved.
1.2.3.4.
Copy and Paste AnnotationsAll annotations can be copied using one of the following methods below: Annotations can be copied to anywhere within the document or across document opened in PDF Studio.
Using the System Shortcuts
The copy command Ctrl+C (Mac: Cmd+C) will copy any selected annotation to the system clipboard. If an annotation is in the system clipboard when the paste command Ctrl+V (Mac: Cmd+V) is pressed, a copy of that annotation will be placed in the center of the screen. On subsequent pastes at the same location, the annotation will be pasted at a slight offset so that they are not placed directly on top of each other.
Using Ctrl + Drag
Any selected annotation can be duplicated by holding the Ctrl (Cmd on Mac) key and then clicking on the selected annotation and dragging to where you would like to place the copied annotation. This will also work when more than one annotation is selected at a time.
Duplicate Across Pages
Annotations can also be duplicated on a specified page range within the document. This will replicate the annotation on the same location of each page. To do so follow the instructions below.
Select the annotation to duplicateRight Click (Ctrl + Click on Mac) and select the Duplicate optionSpecify the page rangeClick OK to apply the changes
-305-
Affordable, Powerful PDF Software / PDF Editor for Windows, macOS, Linux
Copyright © 2002-Present Qoppa Software. All rights reserved.
1.2.3.
Pasting Clipboard Images as a StampWhen an image is on the system clipboard, it can be pasted onto a page by following the steps below.
Navigate to the page.Click on the page with the mouse to select the page.Paste the image using Ctrl+V (Mac: Cmd+V) onto the page. This will paste the image as a Rubber Stamp annotation that can be moved around or resized after it has been placed.
Note: When importing an image directly as a stamp the image will be converted using the compression set in the Rubber Stamp Tool Properties. If Adjust To Zoom is selected in General Preferences, the initial size of the pasted image will depend on the zoom level of the document. Otherwise, the image will be pasted at its original size.
-306-
Affordable, Powerful PDF Software / PDF Editor for Windows, macOS, Linux
Copyright © 2002-Present Qoppa Software. All rights reserved.
1.2.3.
Pasting Clipboard Text as a Text BoxWhen text is on the system clipboard, it can be pasted onto a page by following the steps below:
Navigate to the page.Click on the page with the mouse to select the page.Paste the text using Ctrl+V (Mac: Cmd+V) onto the page. Doing so will paste the text as a Text Box Annotation using default properties. The annotation can be moved around and resized after it has been placed.
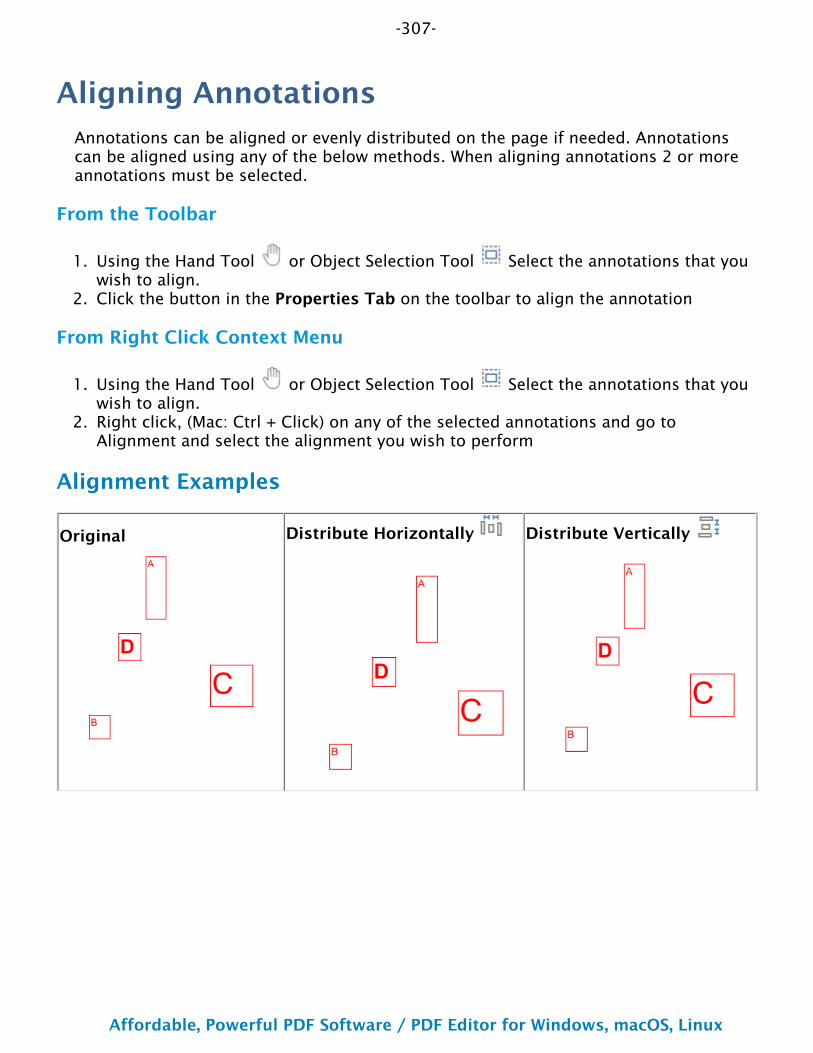
-307-
Affordable, Powerful PDF Software / PDF Editor for Windows, macOS, Linux
Copyright © 2002-Present Qoppa Software. All rights reserved.
1.
2.
1.
2.
Aligning AnnotationsAnnotations can be aligned or evenly distributed on the page if needed. Annotations can be aligned using any of the below methods. When aligning annotations 2 or more annotations must be selected.
From the Toolbar
Using the Hand Tool or Object Selection Tool Select the annotations that you wish to align.Click the button in the Properties Tab on the toolbar to align the annotation
From Right Click Context Menu
Using the Hand Tool or Object Selection Tool Select the annotations that you wish to align.Right click, (Mac: Ctrl + Click) on any of the selected annotations and go to Alignment and select the alignment you wish to perform
Alignment Examples
Original Distribute Horizontally Distribute Vertically
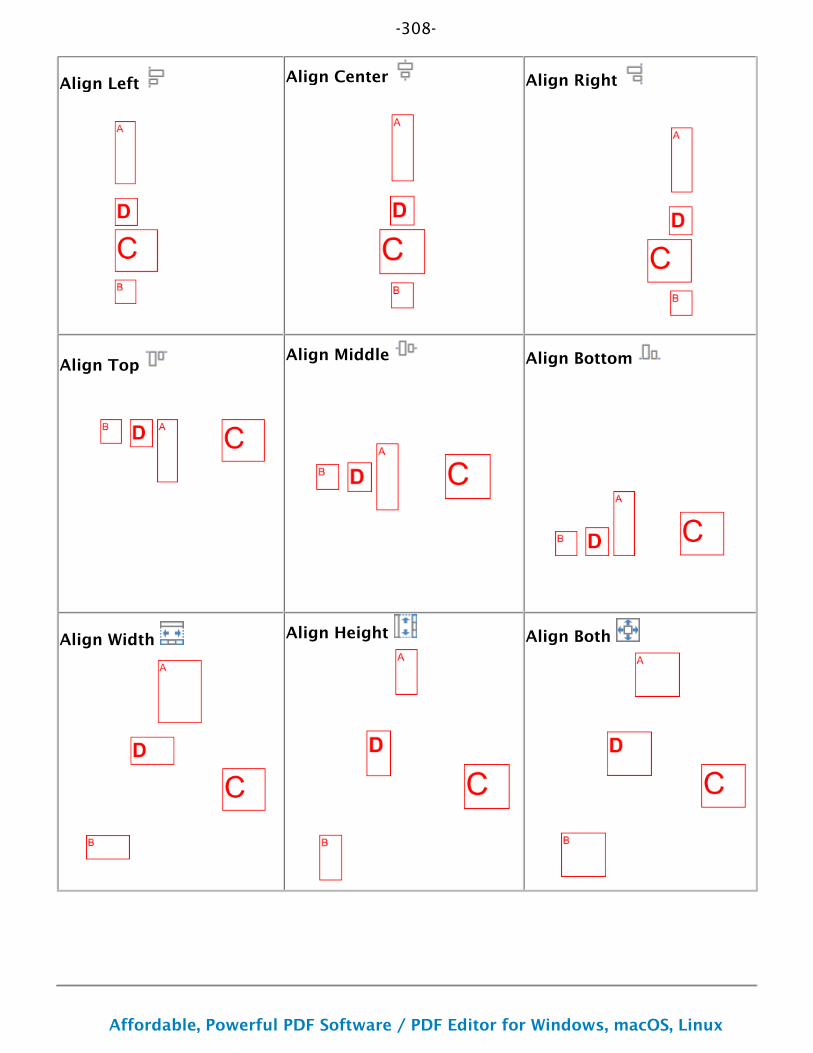
-308-
Affordable, Powerful PDF Software / PDF Editor for Windows, macOS, Linux
Copyright © 2002-Present Qoppa Software. All rights reserved.
Align Left Align Center Align Right
Align Top Align Middle Align Bottom
Align Width Align Height Align Both
-309-
Affordable, Powerful PDF Software / PDF Editor for Windows, macOS, Linux
Copyright © 2002-Present Qoppa Software. All rights reserved.
1.2.3.
Changing Z OrderZ order is the overlapping of 2 dimensional objects on a page to move a piece content either in front of or behind of another item on the page. Z order of annotations can easily be changed following the instructions below.
From Right Click Context Menu
Using the Hand Tool or Object Selection Tool Select the content items that you wish to change the z order.Right click, (Mac: Ctrl + Click) on any of the selected Content and go to Move and select where you wish to move the annotation to.
Options
Bring to Front - Moves the selected item to the top above all other items
Send to Back - Moves the selected item to the bottom below all other items
Bring Forward - Moves the selected item one step above it's current location
Send Backwards - Moves the selected item one step below it's current location
-310-
Affordable, Powerful PDF Software / PDF Editor for Windows, macOS, Linux
Copyright © 2002-Present Qoppa Software. All rights reserved.
Group AnnotationsA group of annotations is comprised of one parent annotation and one or more child annotations. Any operation (delete, move, etc.) performed upon one annotation in a group will also be performed on the rest of group. Also, all children will display their parent's comments.
Create a group by selecting two or more annotations, right-clicking (Mac: Ctrl+click) on one of them, and choosing Group from the mouse context menu. The annotation that was right-clicked will be the parent.
Annotations may be ungrouped by right-clicking (Mac: Ctrl+click) on an annotation group and choosing Ungroup from the mouse context menu.
Note: that the following annotations cannot be included in a group: sound and text replace annotations.

-311-
Affordable, Powerful PDF Software / PDF Editor for Windows, macOS, Linux
Copyright © 2002-Present Qoppa Software. All rights reserved.
1.
2.3.4.5.
1.
•
2.3.4.
Assigning Comments to LayersComments can be assigned to a specific layer in the document. When the comment is associated with a layer showing or hiding the layer also affects the comments. You can either designate a layer as the Comments Layer, or Move Comments to a new layer. Comments that are associated with No Layer will be a part of the primary PDF content.
Designating the Comments Layer
When a layer is designated as the comments layer all new comments going forward will be added to this layer
Access the layers pane by clicking the Layers button on the left side of the screen.Right click (Mac: Ctrl + Click) on the layer you want to set as the comments layerChoose the Comments Layer option in the right click menuClick OK to confirmContinue working on the document as you normally would
Note: Repeat steps 1-3 to undesignate the layer as the comments layer
Moving Comments to a New Layer
Existing comments can be moved to a new layer using the properties dialog
Access the Comment properties by right clicking (Mac: Ctrl + Click) on the annotation and choosing Properties in the right click menu or clicking on the edit
button on the Mini Toolbar.Note: Multiple annotations can be edited at once by using Ctrl + Click to first select all the annotations you wish to edit
Go to the General tabIn the Layer option, select the layer you wish to move the annotation toClick OK to apply the changes
Note: If the layer selected is currently hidden the annotation will disappear until the layer is displayed again.

-312-
Affordable, Powerful PDF Software / PDF Editor for Windows, macOS, Linux
Copyright © 2002-Present Qoppa Software. All rights reserved.
Setting Annotation Tool PropertiesThe tool's properties determine its default appearance and how the tool behaves after the annotation is created. The default properties can be accessed by right clicking (Mac: Ctrl+click) the tool icon in the toolbar or by going to Comments Preferences.
You can also set an existing annotations style as the default by right clicking (Mac: Ctrl+click) on any annotation and selecting Set style as Default. This will apply all "Appearance" settings as the default for the selected annotation type going forward.
Appearance
Each type of annotation has its own list of options. For a more detailed description of each of the annotation's available properties go to that specific annotation's page.
Behavior
Sticky - When the tool is "sticky", the tool remains selected after a new annotation is added to the document until it is turned off. This allows you to place many annotations without having to reselect the tool. Once active click the button on the toolbar again to deactivate the tool.
After Creation Show
Determines whether the annotation properties dialog or popup note will be displayed after each new annotation is added to the document.

-313-
Affordable, Powerful PDF Software / PDF Editor for Windows, macOS, Linux
Copyright © 2002-Present Qoppa Software. All rights reserved.
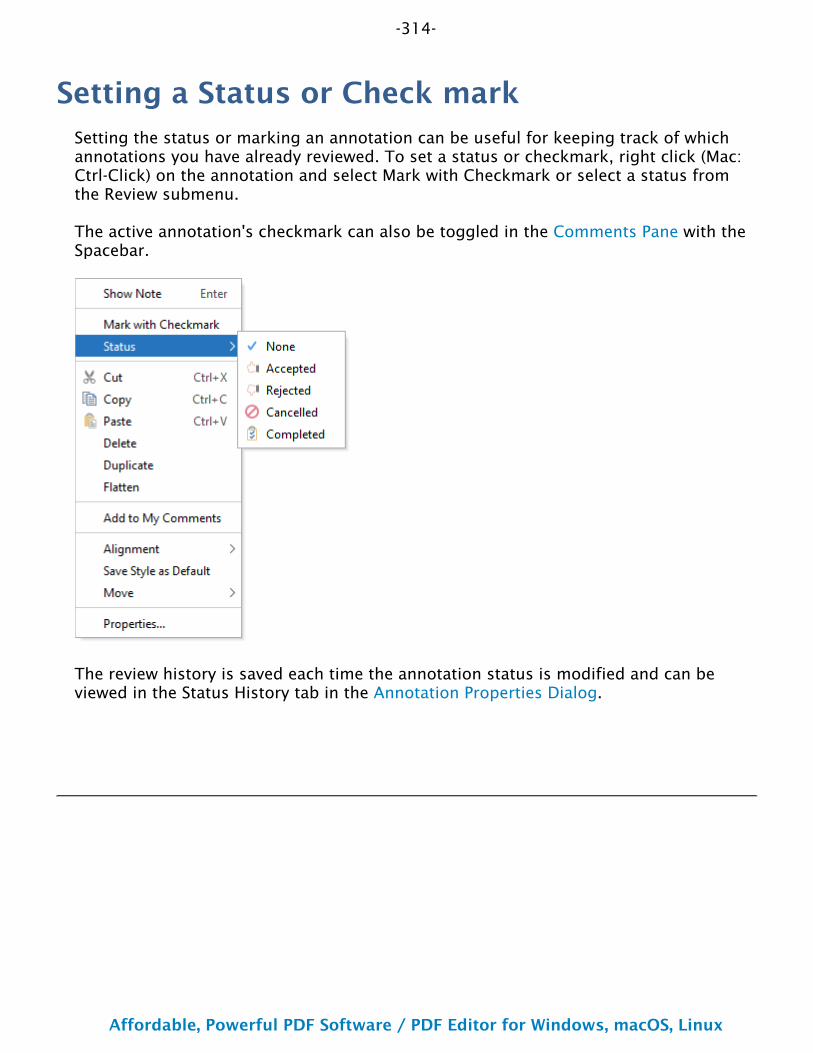
-314-
Affordable, Powerful PDF Software / PDF Editor for Windows, macOS, Linux
Copyright © 2002-Present Qoppa Software. All rights reserved.
Setting a Status or Check markSetting the status or marking an annotation can be useful for keeping track of which annotations you have already reviewed. To set a status or checkmark, right click (Mac: Ctrl-Click) on the annotation and select Mark with Checkmark or select a status from the Review submenu.
The active annotation's checkmark can also be toggled in the Comments Pane with the Spacebar.
The review history is saved each time the annotation status is modified and can be viewed in the Status History tab in the Annotation Properties Dialog.
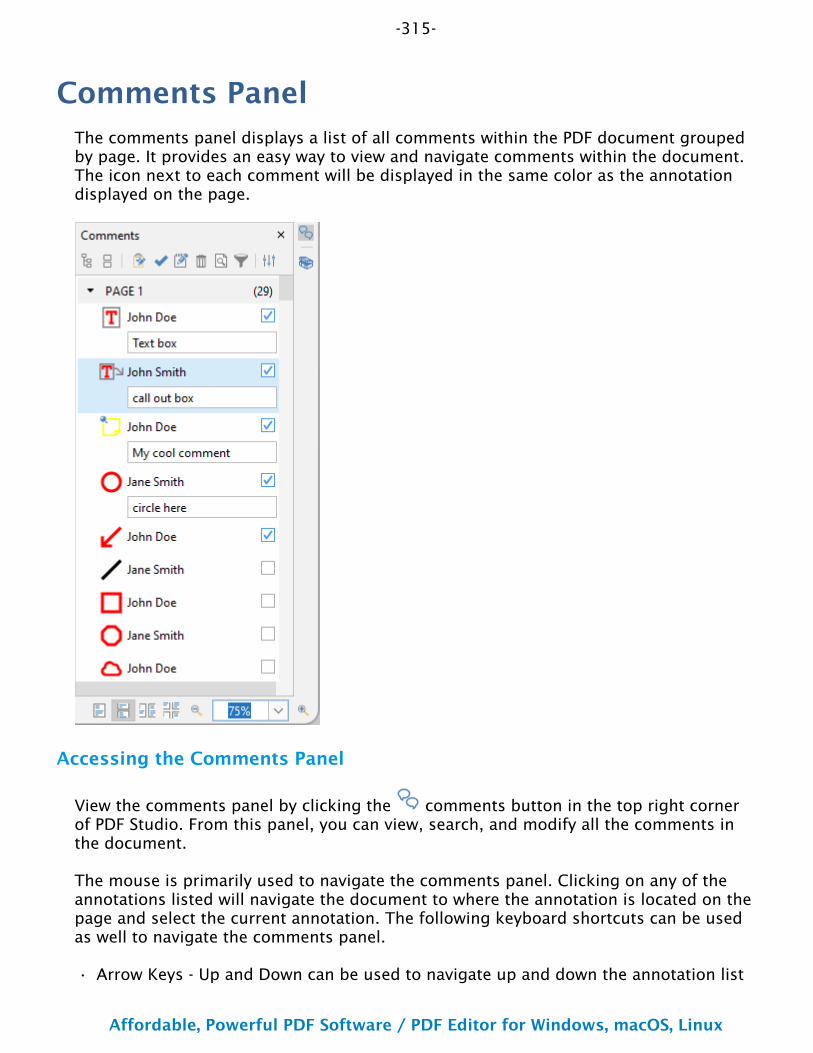
-315-
Affordable, Powerful PDF Software / PDF Editor for Windows, macOS, Linux
Copyright © 2002-Present Qoppa Software. All rights reserved.
•
Comments PanelThe comments panel displays a list of all comments within the PDF document grouped by page. It provides an easy way to view and navigate comments within the document. The icon next to each comment will be displayed in the same color as the annotation displayed on the page.
Accessing the Comments Panel
View the comments panel by clicking the comments button in the top right corner of PDF Studio. From this panel, you can view, search, and modify all the comments in the document.
The mouse is primarily used to navigate the comments panel. Clicking on any of the annotations listed will navigate the document to where the annotation is located on the page and select the current annotation. The following keyboard shortcuts can be used as well to navigate the comments panel.
Arrow Keys - Up and Down can be used to navigate up and down the annotation list
-316-
Affordable, Powerful PDF Software / PDF Editor for Windows, macOS, Linux
Copyright © 2002-Present Qoppa Software. All rights reserved.
••
••••••
•
Spacebar - Highlight an annotation and press space bar to toggle the check box.Enter - Press Enter on a selected annotation to open the Note popup, then type the note you wish to add. Once complete press Esc to close the popup.
Comments Panel Toolbar
The following options are available at the top of the comments panel.
Expand: Expands the comment tree to show all pages and review markups
Collapse: Collapses the tree to only show the page folders
Status : Marks the selected annotation with a review status. See Setting Status or Check Marks
Properties: Opens the properties for the selected annotation(s)
Mark with Check Mark: Marks the selected annotation with a check mark. See Setting Status or Check Marks
Delete: Deletes the selected comment
Search: Enter text and press Enter to search for the text within the annotation comments
Previous Search Result: Goes to the previous search result
Next Search Result: Goes to the next search result
Filter: Allows you to filter out comments based on the following properties. Check the properties you wish to be shown and all annotations that do not have a property matching the selection will be hidden in the comments pane and on the page.
All: Select the "All" option to restore showing all the annotations. Author: list of authors found in the documentType: list of annotation types found in the documentMarked: list of marked annotations in the documentStatus: list of statuses found in the documentColor: list of annotation colors found in the document
Options: Contains additional comment panel options
Export: Export comments into a separate file.FDF: File format created by Adobe that is supported by most PDF applications
-317-
Affordable, Powerful PDF Software / PDF Editor for Windows, macOS, Linux
Copyright © 2002-Present Qoppa Software. All rights reserved.
•
••
XFDF: Extended FDF file format created by Adobe that is supported by most PDF applicationsText: Simple text file (.txt) that will contain all of the annotation informationXML: File format that is similar to an Excel file that will contain all of the annotation informationCSV: Exports all comment data into the .csv format allowing you to view in any spreadsheet editor such as Microsoft Excelhighlighted Text: Creates a plain text file with all highlighted text separated by pages.
Print: Allows you to print the comments in the treeText: Prints just a simple text tree with all commentsTree: Prints the entire tree exactly as it is displayed in the Comments Panel
Hide All Comments: When checked will hide all the comments from being displayedView: turns on and off individual details displayed in the comments panel
-318-
Affordable, Powerful PDF Software / PDF Editor for Windows, macOS, Linux
Copyright © 2002-Present Qoppa Software. All rights reserved.
1.2.3.4.
••
•
•••
Anonymize CommentsAnonymize comments allows you to completely delete all personally identifying information from any comments or annotations within the PDF document. This is useful for example in academic peer reviews or scholarly articles, when authors wish for their comments or feedback to remain anonymous.
How to Anonymize Comments in a PDF
To anonymize comments or annotation information (see below list) you can do the following:
On the toolbar go to Comments Tab > SanitizeSelect the comment properties you would like to remove or replaceSelect to anonymize all comments or only comments from a specific authorClick apply to make the changes
Settings
The following settings are available when anonymizing comments in a PDF
Options - Set which data types are removed or replaced
Apply to - Choose to anonymize either all comments or a specified subset by author
Comment Types
The anonymize tool applies changes to the following comment types:
Text Annotations: text box, callout, typewriter, sticky note.Shape Annotations: circle, square, highlight area, polyline, polygone, cloud, line, pencil.Text Markups: highlight text, cross out text, underline text, squiggly underline text, replace text, insert text.Rubber Stamps: text and image stampsMeasurement Annotations: distance, perimeter, areaMedia: sound, attach file as comment
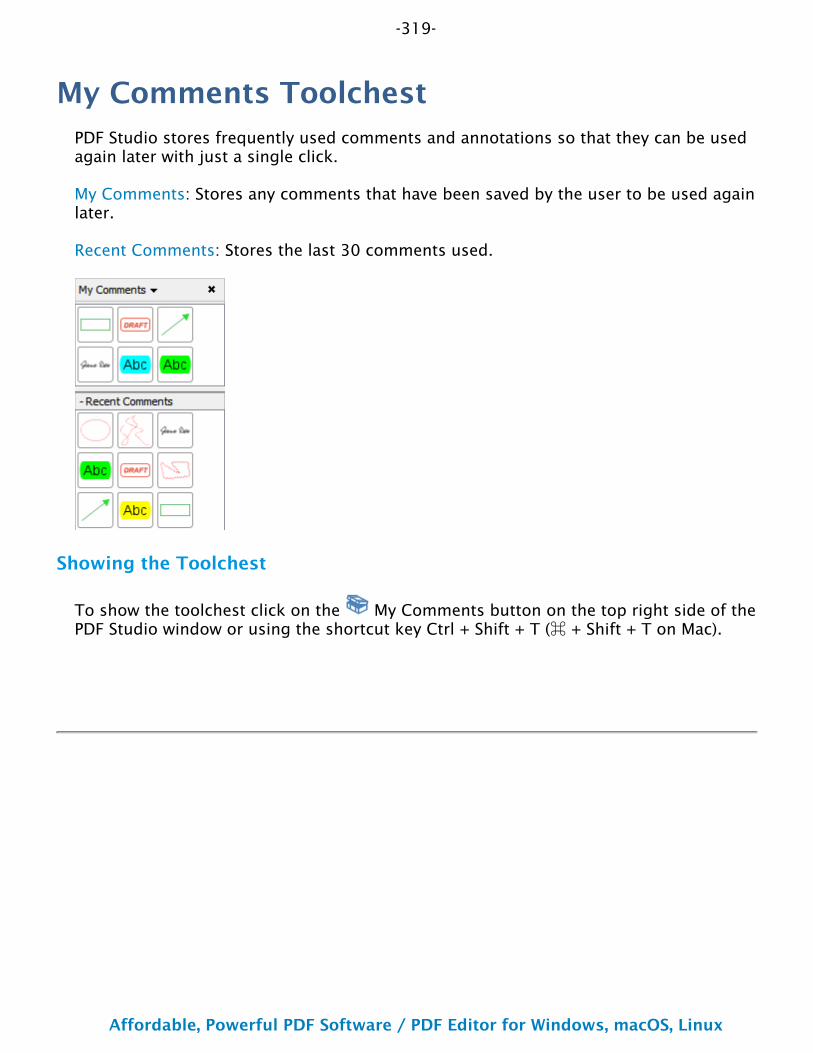
-319-
Affordable, Powerful PDF Software / PDF Editor for Windows, macOS, Linux
Copyright © 2002-Present Qoppa Software. All rights reserved.
My Comments ToolchestPDF Studio stores frequently used comments and annotations so that they can be used again later with just a single click.
My Comments: Stores any comments that have been saved by the user to be used again later.
Recent Comments: Stores the last 30 comments used.
Showing the Toolchest
To show the toolchest click on the My Comments button on the top right side of the PDF Studio window or using the shortcut key Ctrl + Shift + T (⌘ + Shift + T on Mac).
-320-
Affordable, Powerful PDF Software / PDF Editor for Windows, macOS, Linux
Copyright © 2002-Present Qoppa Software. All rights reserved.
••
•
My CommentsSaved comments and annotations can be found in the My Comments section of the My Comments Toolchest.
Saving Annotations to My Comments
To save an annotation, right-click (Mac: Ctrl+click) on it to show the context menu and select Add to My Comments from the menu.
Using Saved Comments
To add a saved annotation to a document, click the annotation in My Comments, and then click the location on the document to place the annotation. Once placed the annotation can be edited as normal.
Managing Saved Comments
Saved comments can be reordered, deleted, or resized.
To reorder, select one or more comments and drag to the desired location.To delete, select one or more comments and press Delete, or right-click and select Remove.
To resize, select the down arrow next to My Comments and choose Small, Medium (default), or Large.
-321-
Affordable, Powerful PDF Software / PDF Editor for Windows, macOS, Linux
Copyright © 2002-Present Qoppa Software. All rights reserved.
••
•
Recent CommentsRecently used annotations are listed in the Recent Comments section of the My Comments Toolchest. Annotations that are added to a document or modified on a document will automatically be added to this list. This list keeps the 30 most recently used annotations.
Saving Recent Comments
To permanently keep an item from the Recent Comments list, right-click (Mac: Ctrl+click) the annotation in the Recent Comments list and select Save Comment from the context menu.
Using Saved Comments
To add a Recent annotation to a document, click the annotation in Recent Comments, and then click the location on the document to place the annotation. Once placed the annotation can be edited as normal.
Managing Recent Comments
Recent comments can be reordered, deleted, or resized.
To reorder, select one or more comments and drag to the desired location.To delete, select one or more comments and press Delete, or right-click and select Remove.
To resize, select the down arrow next to My Comments and choose Small, Medium (default), or Large.
-322-
Affordable, Powerful PDF Software / PDF Editor for Windows, macOS, Linux
Copyright © 2002-Present Qoppa Software. All rights reserved.
Importing and Exporting AnnotationsAnnotations can be imported into or exported from a PDF document.
Exporting Comments: Exports annotations from the current document
Importing Comments: Imports annotations into the existing document
-323-
Affordable, Powerful PDF Software / PDF Editor for Windows, macOS, Linux
Copyright © 2002-Present Qoppa Software. All rights reserved.
1.2.
3.
Importing AnnotationsComments can be imported from either an FDF, XFDF, or PDF file into the current document. Comments from Text Annotations, Graphics Annotations, and Sound Annotations will be imported. When imported the comments will show up in the exact same location on the page as when they were exported.
Comments can be imported using the following formats
FDF: File format created by Adobe that is supported by most PDF applications
XFDF: Extended FDF file format created by Adobe that is supported by most PDF applications
PDF: Takes any comments found in the selected PDF file and duplicates them in the current PDF
How to Import Annotations
From the Comments Tab choose ImportSelect whether to import an FDF, XFDF, or PDF file. This will display a file chooser dialog.Navigate to the location of the FDF, XFDF, or PDF file and then click Open
-324-
Affordable, Powerful PDF Software / PDF Editor for Windows, macOS, Linux
Copyright © 2002-Present Qoppa Software. All rights reserved.
1.2.3.
Exporting AnnotationsComments can be exported from the current document into a file in FDF, XFDF, .txt, XML & CSV format. Comments from Text Annotations, Graphics Annotations, and Sound Annotations will be exported. Hyperlinks are not considered comments in PDF format and thus are not exported.
Comments can be exported in the following formats
FDF: File format created by Adobe that is supported by most PDF applications
XFDF: Extended FDF file format created by Adobe that is supported by most PDF applications
Text: Simple text file (.txt) that will contain all of the annotation information
XML: File format that is similar to an Excel file that will contain all of the annotation information
CSV: Exports all comment data into the .csv format allowing you to view in any spreadsheet editor such as Micrsoft Excel
Highlighted Text: Creates a plain text file with all highlighted text separated by pages.
How to Export Annotations
From the Comments Tab choose ExportSelect format to export and this will display the save dialog.Select the location and name of the file to export to and click Save
-325-
Affordable, Powerful PDF Software / PDF Editor for Windows, macOS, Linux
Copyright © 2002-Present Qoppa Software. All rights reserved.
Editing and Manipulating PDFsPDF Studio comes with advanced tools to edit and manipulate PDF documents including content editing, redaction, modifying and splitting pages, and creating bookmarks, headers, footers, and watermarks.
Content Editing: Edit text, images, and content within the PDF
Redaction: Securely redact text and images from the PDF
Modifying PDF Pages: Edit pages including, cropping, appending, inserting, extracting, deleting, and more
Splitting PDF Documents: Split PDF documents by number of pages, bookmarks, blank page, text, and more
Optimizing PDFs: Reduce the file size of the PDF by optimizing specific parts of the PDF
Bookmarks: Create, edit, and delete bookmarks
Links: Create, edit, and delete links
Destinations: Create, edit, and delete PDF destinations
Headers and Footers: Create, edit, and delete headers and footers
Watermarks: Create, edit, and delete watermarks
OCR PDF: Recognize text on scanned images

-326-
Affordable, Powerful PDF Software / PDF Editor for Windows, macOS, Linux
Copyright © 2002-Present Qoppa Software. All rights reserved.
BookmarksPDF Studio has the following options available to create, edit, or manage bookmarks within a PDF.
Creating Bookmarks: how to create bookmarks in a PDF
Deleting Bookmarks: how to delete bookmarks in a PDF
Moving Bookmarks: how to move or rearrange bookmarks in a PDF
Bookmarking Selected Text: add a bookmark for the currently selected text
Renaming a Bookmark: editing or changing a bookmarks name
Set Bookmark Location: set the location of the bookmark when clicked
Editing Bookmark Actions: edit the actions associated with bookmarks
Custom Bookmark Actions: a list of all the available actions that can be set on bookmarks
Editing Bookmark Appearance : edit the appearance of bookmarks
Automatically Create Bookmarks: automatically create bookmarks within the PDF
-327-
Affordable, Powerful PDF Software / PDF Editor for Windows, macOS, Linux
Copyright © 2002-Present Qoppa Software. All rights reserved.
•
••
•
•
Creating BookmarksPDF Studio is able to create bookmarks in a PDF. This is useful when creating a table of contents or list of shortcuts to specific sections within the PDF. Typically a bookmark will only have one action associated with it and will be a Go To Page action. However, in the PDF format definition, bookmarks can have many different Bookmark Actions associated with them.
How to Create Bookmarks
Bookmarks may be added as parents or as children to existing bookmarks. In both cases, the new bookmark is added as a Go To Page action for the current page view (the current page number, magnification, and scrollbar values). Clicking on a bookmark will move to the bookmarked page and the scrollbars and scale are also set as they were when the bookmark was created.
Note: If any text is selected on the document, it will be used as the name of the bookmark. If not, the bookmark name will be based on the page number.
Create Bookmark as a Parent
To add a bookmark as a parent do one of the following:
Go to the Pages Tab > Bookmarks, or use the shortcut key Ctrl + B (Command + B on Mac)
Click the add bookmark button at the top of the bookmark panelNote: If the bookmark panel is not visible (this happens when a document
doesn't have any bookmarks defined), click the icon on the left side of the PDF Studio window
Right click on an existing bookmark and go to Add in the right click menu and select Before or After
Create Bookmark as a Child (under a parent)
To create a bookmark as a child (underneath or a subgroup of the parent)
Right click (Mac: Ctrl + Click) on an existing bookmark and go to Add in the right click menu and select Child
Bookmark Properties
To access the bookmark properties right click (Mac: Ctrl + Click) on the bookmark and choose Properties in the mouse menu. Bookmarks contain the following property settings.
-328-
Affordable, Powerful PDF Software / PDF Editor for Windows, macOS, Linux
Copyright © 2002-Present Qoppa Software. All rights reserved.
Action
Bookmark Title - this is the label for the bookmark that will be displayed in the bookmarks pane
Bookmark Actions - After creation the bookmark's actions can be modified using this section. See Editing Bookmark Actions for a complete list of the available actions.
Appearance
Text Color - Sets the text color
Font Style - Sets the bookmark font to be either Bold or Italic
B - Makes all of the text Bold
I - Makes all of the text Italic
Save as default - When checked this will make the selected appearance settings the default for any new bookmarks going forward
-329-
Affordable, Powerful PDF Software / PDF Editor for Windows, macOS, Linux
Copyright © 2002-Present Qoppa Software. All rights reserved.
•
•
•
Deleting BookmarksPDF Studio is able to delete existing or created bookmarks from a PDF.
How to Delete Bookmarks
There are three ways that a bookmark can be deleted:
Select the bookmark with the mouse and press Delete on your keyboard
Select the bookmark with the mouse and click on the delete button at the top of the bookmark panelRight-click (Mac: Ctrl + Click) on the bookmark in the bookmark tree and choose the Delete option in the mouse menu
Note: Hold down SHIFT or CTRL (Command on Mac) to edit multiple bookmarks.
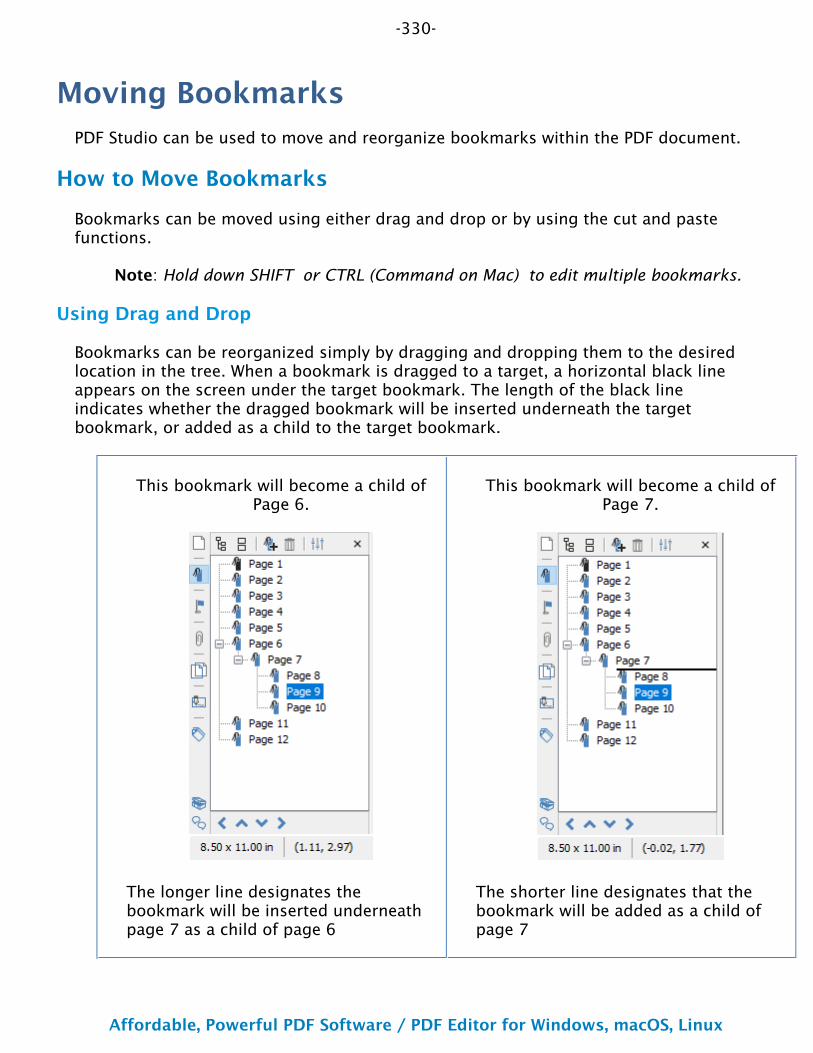
-330-
Affordable, Powerful PDF Software / PDF Editor for Windows, macOS, Linux
Copyright © 2002-Present Qoppa Software. All rights reserved.
Moving BookmarksPDF Studio can be used to move and reorganize bookmarks within the PDF document.
How to Move Bookmarks
Bookmarks can be moved using either drag and drop or by using the cut and paste functions.
Note: Hold down SHIFT or CTRL (Command on Mac) to edit multiple bookmarks.
Using Drag and Drop
Bookmarks can be reorganized simply by dragging and dropping them to the desired location in the tree. When a bookmark is dragged to a target, a horizontal black line appears on the screen under the target bookmark. The length of the black line indicates whether the dragged bookmark will be inserted underneath the target bookmark, or added as a child to the target bookmark.
This bookmark will become a child of Page 6.
The longer line designates the bookmark will be inserted underneath page 7 as a child of page 6
This bookmark will become a child of Page 7.
The shorter line designates that the bookmark will be added as a child of page 7

-331-
Affordable, Powerful PDF Software / PDF Editor for Windows, macOS, Linux
Copyright © 2002-Present Qoppa Software. All rights reserved.
Using Toolbar Buttons
Bookmarks can also be moved by using the buttons located at the bottom of the bookmarks pane. Multiple bookmarks can be selected at once when moving them using the buttons.
Note: The buttons will only be enabled when the bookmark is able to be moved
Left - Moves the selected bookmarks to the left making it a parent bookmark
Up - Moves the bookmark up so it's before the one above it
Down - Moves the bookmark down so it's after the one below it
Right - Moves the bookmark to the right making it a child of the bookmark above it
Using Cut & Paste
Cut and Paste can also be used to reorganize bookmarks. You can cut a bookmark from the tree by right-clicking (Mac: Ctrl + Click) on it and selecting cut or by using the keyboard shortcut, Ctrl+X (Mac: Cmd + C). Then paste the bookmark onto its new parent by right-clicking (Mac: Ctrl + Click) on an existent bookmark and selecting Paste or by using the keyboard shortcut, Ctrl+V (Mac: Cmd + V).
-332-
Affordable, Powerful PDF Software / PDF Editor for Windows, macOS, Linux
Copyright © 2002-Present Qoppa Software. All rights reserved.
1.2.3.
•
••
•
•
Bookmarking Selected TextIf a bookmark is created while some text is selected in a document, the bookmark will be created for the current page view and the selected text will be used as its name.
How to Create a Bookmark from Selected Text
Click on the Select Text icon on the toolbarDrag the mouse to select the desired textOnce you have the word or text selected, create the bookmark using one of the methods below:
Create Bookmark from Text as a Parent
To add a bookmark as a parent do one of the following:
Go to the Pages Tab > Bookmarks, or use the shortcut key Ctrl + B (Command + B on Mac)
Click the add bookmark button at the top of the bookmark panelNote: If the bookmark panel is not visible (this happens when a document
doesn't have any bookmarks defined), click the icon on the left side of the PDF Studio window
Right click on an existing bookmark and go to Add in the right click menu and select Before or After
Create Bookmark from Text as a Child (under a parent)
To create a bookmark as a child (underneath or a subgroup of the parent)
Right click (Mac: Ctrl + Click) on an existing bookmark and go to Add in the right click menu and select Child
-333-
Affordable, Powerful PDF Software / PDF Editor for Windows, macOS, Linux
Copyright © 2002-Present Qoppa Software. All rights reserved.
•
•
Renaming BookmarksBy default the bookmark name will be the page number which may not be as useful to the reader. Bookmarks can be renamed after creation so the reader can understand exactly where it will lead them.
How to rename a Bookmark
Bookmarks can be renamed using one of the following methods below:
Double-click on the bookmark in the bookmark tree and the bookmark label will become editable. Enter the new name for the bookmark then to save the new name press Enter or click somewhere elseRight-click (Mac: Ctrl + Click) on the bookmark in the bookmark tree and select the Rename option in the mouse menu and enter a new name.
-334-
Affordable, Powerful PDF Software / PDF Editor for Windows, macOS, Linux
Copyright © 2002-Present Qoppa Software. All rights reserved.
1.2.
•
1.
2.3.
•••
••
•4.
Setting Bookmark LocationA bookmarks location is where the user will be taken within the document when clicked. By default this will be the exact same view and scale set when the bookmark was created. The destination can easily be changed if needed after being created.
How to Set a Bookmark Location
A bookmark's location can be changed using one of the following methods below:
Using Set Destination
Navigate to the location in the document that you want the bookmark to go toThen Right-click (Mac: Ctrl + Click) on the bookmark in the bookmark tree and select Set Destination.
Note: This will remove any actions currently associated with the bookmark and replace them with a Go To Page action for the current page and view.
Note: A bookmark destination is just the location stored within the bookmark. This is different then a PDF Destination which is a named end point (similar to an anchor in HTML) stored within the page.
Using the Properties Dialog
Right click (Mac: Ctrl + Click) on the bookmark you wish to edit and choose Properties in the mouse menu.Click on the Edit button below the Bookmark Actions sectionEnter the details for the destination you would like the bookmark to go to
PageNumber - the page number of the document to link toZoom - the zoom to use if needed
Percent: only available if Custom is selected in ZoomPercent - The zoom level for Custom zoom settingSet Visually - Allows you to set the destination by navigating to a point in the document. Once set the bookmark will go to the exact location and zoom level in the document that is set when using this function.Destination - choose from a named Destination already set within the PDF
Click OK to apply the changes
-335-
Affordable, Powerful PDF Software / PDF Editor for Windows, macOS, Linux
Copyright © 2002-Present Qoppa Software. All rights reserved.
1.
2.3.4.
5.
1.
2.3.4.
5.6.
1.
Editing Bookmark ActionsWhen a bookmark is created it will typically only have one action associated with it and that is the Go To Page action. However, in the PDF format definition, bookmarks can have many different Bookmark Actions associated with them. When adding a bookmark to a PDF document Custom Bookmark Actions can be created instead of the standard Go To Page action.
Note: If a bookmark has multiple actions associated with it, actions will be executed in the order they were added to the bookmark.
Modifying Bookmark Actions
Actions can be added, edited, and removed from a bookmark by following the instructions below
Adding Bookmark Actions
New actions can be added to a bookmark
Right click (Mac: Ctrl + Click) on the bookmark you wish to add an action to and choose Properties in the mouse menu.The Action tab will display a list of actions currently associated with the bookmark.Click on the Add button below the Bookmark Actions sectionThe Action Dialog will be displayed where the Custom Bookmark Actions can be set for the bookmarkOnce complete click OK on the Action dialog and OK again to save the action
Editing Bookmark Actions
Existing actions in a bookmark can be edited
Right click (Mac: Ctrl + Click) on the bookmark you wish to edit and choose Properties in the mouse menu.The Action tab will display a list of actions currently associated with the bookmark.Click on the Edit button below the Bookmark Actions sectionThe Action Dialog will be displayed showing the properties for the currently selected actionMake the changes needed to the actionOnce complete click OK on the Action dialog and OK again to save the action
Removing Bookmark Actions
Existing actions in a bookmark can be removed
Right click (Mac: Ctrl + Click) on the bookmark you wish to remove and choose Properties in the mouse menu.
-336-
Affordable, Powerful PDF Software / PDF Editor for Windows, macOS, Linux
Copyright © 2002-Present Qoppa Software. All rights reserved.
2.3.
4.•
The Action tab will display a list of actions currently associated with the bookmark.Click on the Remove button below the Bookmark Actions section to delete the action from the bookmarkOnce complete click OK to save the changes
Note: It is possible to have a bookmark with no actions set.
-337-
Affordable, Powerful PDF Software / PDF Editor for Windows, macOS, Linux
Copyright © 2002-Present Qoppa Software. All rights reserved.
•••••
•
•
•
••
•
•••
Custom Bookmark ActionsBelow is a list of the each of the custom bookmark actions and their settings.
Go to a page in this document
Sets the bookmark to go to a page within the current document
PageNumber - the page number of the document to link toZoom - Set the page fit when navigating to the pagePercent - The zoom level for Custom zoom settingSet Visually - Allows you to set the location of the link visually
Destination - choose from a named Destination already set within the PDF
Go to a page in another document
Sets the bookmark to go to a page within a different designated document
New Window - opens the document in a completely new window of the PDF applicationExisting Window - will open the document in the current window of the PDF application replacing the currently open documentPage Number - the page number to show when opening the other documentDocument - The full path to the file to open. Click on the "..." button to open a file chooser and navigate to the file you wish to select.Destination - choose from a named Destination already set within the PDF
Note: When sending this document to other users this action may not work if the file is not in the same location on the users computer. To make sure the file is included with the PDF when sending to another user try using a File Attachment instead.
Show/Hide Fields
Sets the bookmark to either Show or Hide selected fields within the document
Show - Will show the selected fields when clickedHide - Will hide the selected fields when clickedField List - Displays a list of the fields in the document to select. To select more than one field use Ctrl + Click (⌘ + Click for Mac) to select separate fields or Shift + Click to select a group of fields
Open File
Sets the bookmark to open a specific file.
-338-
Affordable, Powerful PDF Software / PDF Editor for Windows, macOS, Linux
Copyright © 2002-Present Qoppa Software. All rights reserved.
•
••••
••
•••••
•••••
•
File - The full path to the file to open. Click on the "..." button to open a file chooser and navigate to the file you wish to select.
Note: When sending this document to other users this action may not work if the file is not in the same location on the users computer. To make sure the file is included with the PDF when sending to another user try using a File Attachment instead.
Open a web link
Set's the bookmark to open a specific web page or start an email. Examples of valid links:
http://www.qoppa.comftp://ftp.site.comfile:c:\qoppa\temp.txtmailto:[email protected]
Reset Form Fields
Sets the bookmark to reset the selected fields within the document
All Fields - When checked will reset all the fields within the documentField List - Displays a list of the fields in the document to select. To select more than one field use Ctrl + Click (⌘ + Click for Mac) to select separate fields or Shift + Click to select a group of fields
JavaScript Action
Sets the bookmark to perform a custom Supported JavaScript action that can be typed into the field.
Submit Form
Sets the bookmark to send the form field values to a designated location in one of 4 formats. This can be used to have an automatic way to send back forms or values once a user has completed the form.
URL - The destination to send the selected file to. Examples of valid links:http://www.qoppa.comftp://ftp.site.comfile:c:\qoppa\temp.txtmailto:[email protected]
FDF - Sends an FDF file containing the selected field valuesXFDF - Sends an XFDF file containing the selected field valuesPDF - Sends a copy of the entire PDFHTML - Sends an HTML file containing the selected field valuesFields - Sets the options when sending the field values
All Fields - Will send all fields regardless of value
-339-
Affordable, Powerful PDF Software / PDF Editor for Windows, macOS, Linux
Copyright © 2002-Present Qoppa Software. All rights reserved.
•••
•
•
••••
•
•••••••
Include - Will include the selected fields in the list when sending the fileExclude - Will exclude the selected fields in the list when sending the fileField List - Displays a list of the fields in the document to select. To select more than one field use Ctrl + Click (⌘ + Click for Mac) to select separate fields or Shift + Click to select a group of fieldsSend Empty Fields - When checked will send the selected fields values even when fields are empty
Show/Hide Layers
Sets the bookmark to either Show or Hide selected layers within the document
Use Current Visibility - Sets the action to display the layers as they are currently being displayed so that if layers are turned off later they will return to the current stateOther - Sets a new action for the layer using the blow options
Show - Will show the selected layers in the listHide - Will hide the selected layers in the listToggle - Will switch the selected layer(s) state from hidden to displayed or displayed to hidden depending on the layers current stateLayers List - Displays a list of the layers in the document to select. To select more than one layer use Ctrl + Click (⌘ + Click for Mac) to select separate layers or Shift + Click to select a group of layers
Named Action
Sets the bookmark to perform one of standard predefined actions listed below.
NextPage - Goes to the next page in the documentPrevPage - Goes to the previous page in the documentFirstPage - Goes to the first page in the documentLastPage - Goes to the last page in the documentPrint - Starts the print dialog to print the current documentSave - Saves the current documentOpen - Displays the open file dialog
-340-
Affordable, Powerful PDF Software / PDF Editor for Windows, macOS, Linux
Copyright © 2002-Present Qoppa Software. All rights reserved.
1.
•
2.3.
Editing Bookmark AppearanceA bookmark's appearance can be edited to give the text a different color or style. This can be used when organizing the bookmarks to highlight or color code topics
How to Edit a Bookmark's Appearance
Right-click (Mac: Ctrl + Click) on the bookmark in the bookmark tree and select the Properties option in the mouse menu.
Note: Hold down SHIFT or CTRL (Command on Mac) to edit multiple bookmarks.
Then go to the Appearance tab and set the below settingsOnce complete click OK to save the changes
Appearance Settings
Text Color - Sets the text color
Font Style - Sets the bookmark font to be either Bold or Italic
B - Makes all of the text Bold
I - Makes all of the text Italic
Save as default - When checked this will make the selected appearance settings the default for any new bookmarks going forward
-341-
Affordable, Powerful PDF Software / PDF Editor for Windows, macOS, Linux
Copyright © 2002-Present Qoppa Software. All rights reserved.
1.
2.•
•
3.
Automatically Create BookmarksBookmarks can automatically be created for every page within the PDF document.
How to Automatically Create Bookmarks
Go to the Pages Tab > Bookmarks > Auto Create Bookmarks. This will display the Auto Create Bookmarks dialog.Select the options to automatically create bookmarks
Create bookmarks for all pages: this will add Go To Page action bookmarks for ever page in the documentCreate bookmarks for selected pages: This will add Go To Page action bookmarks for each page in the given range.
Once the bookmarks have been created bookmarks can be rearranged or edited as normal.
-342-
Affordable, Powerful PDF Software / PDF Editor for Windows, macOS, Linux
Copyright © 2002-Present Qoppa Software. All rights reserved.
PDF ContentThe PDF Content tools allow you to edit existing content or add new content to a PDF. Content can be moved, edited or deleted as needed.
Note: Annotations are not a part of the PDF content as they are considered "interactive objects" and so these can not be edited by the Content Editing tool. To edit annotations see Editing Annotations.
Editing Existing Content
Below are the available editing tools used to modify existing content found within the document.
Edit Text & Images: Edit text directly on the page with paragraphs and sentences automatically wrapping on the page as well as moving & rearranging images. (Default)
Edit Text: Modify or change individual text strings
Edit Images: Move or resize images contained within the PDF
Edit Paths: Edit, move & resize lines and shapes within the PDF
Edit Shades: Edit, move & resize shade and gradient objects within the PDF
Adding New Content
The following tools can be used to create new content on the document when needed.
Add Text: Creates new text on the page
Add Image: Import images as content to be added to the document
Add Shape: Add new shape content (circle, square, line, etc...) to the PDF
-343-
Affordable, Powerful PDF Software / PDF Editor for Windows, macOS, Linux
Copyright © 2002-Present Qoppa Software. All rights reserved.
Other Content Tools
Additional content tools that can be used when editing or creating new content.
Aligning Content: Align or evenly distribute selected content on the page
Changing Z Order of Content: Move a piece content either in front of or behind of another content item on the page.
Content Explorer: Tree based hierarchical view of the content objects that make up the internal structure of the PDF.
-344-
Affordable, Powerful PDF Software / PDF Editor for Windows, macOS, Linux
Copyright © 2002-Present Qoppa Software. All rights reserved.
1.
2.
•
Editing Existing ContentThe Edit PDF Content tool allows you to edit any existing content found within the PDF. By default this tool will will be in Edit Text & Images Mode, which allows you to edit the text and images in the document similar to a word processor. Additional modes can also be selected to edit only a specific content type (for example: images only).
Starting the Edit PDF Content tool
There are two ways to start editing existing content.
From the Document Tab on the toolbar, click on the down arrow on the Edit PDF Content button, and select the Content Editing Mode you wish to use. Then click or drag an area with the mouse to select the desired content.
Click directly on the Edit PDF Content in the Document Tab on the toolbar and it will use the last previously selected mode.
Once the tool has been started selected, content can be edited, moved or deleted following the instructions for the content types listed below.
Content Editing Modes
Each of the content editing modes below can be used to edit various types of content.
Simplified Editing
Text Reflow & Images: Edit text directly on the page with paragraphs and sentences automatically wrapping on the page as well as moving & rearranging images. (Default)
NOTE: This mode can not be activated at the same time as the other modes below.
Advanced Editing
Each of the modes below can be toggled on / off in any combination so that you can work with the specific content types you need. For example you can enable only editing Text & Paths which will disable selection of Images and Shades in the document.
Edit Text: Modify or change individual text strings
Edit Images: Move or resize images contained within the PDF
-345-
Affordable, Powerful PDF Software / PDF Editor for Windows, macOS, Linux
Copyright © 2002-Present Qoppa Software. All rights reserved.
Edit Paths: Edit, move & resize lines and shapes within the PDF
Edit Shades: Edit, move & resize shade and gradient objects within the PDF
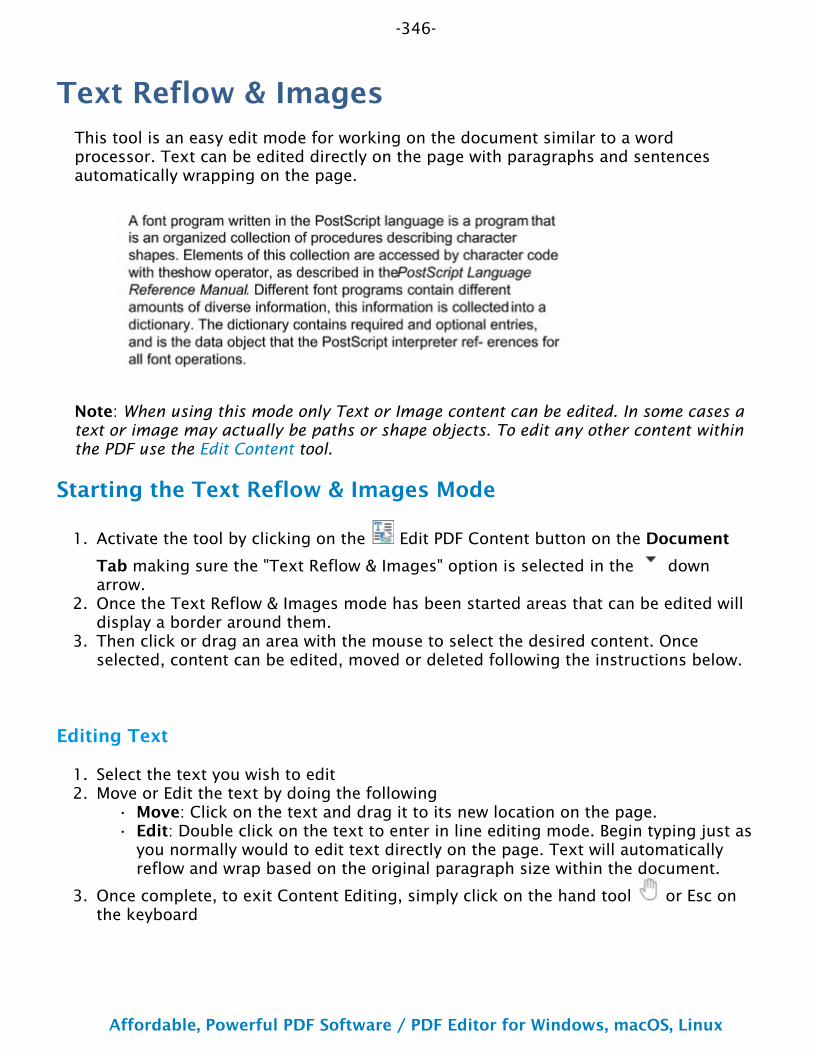
-346-
Affordable, Powerful PDF Software / PDF Editor for Windows, macOS, Linux
Copyright © 2002-Present Qoppa Software. All rights reserved.
1.
2.
3.
1.2.
••
3.
Text Reflow & ImagesThis tool is an easy edit mode for working on the document similar to a word processor. Text can be edited directly on the page with paragraphs and sentences automatically wrapping on the page.
Note: When using this mode only Text or Image content can be edited. In some cases a text or image may actually be paths or shape objects. To edit any other content within the PDF use the Edit Content tool.
Starting the Text Reflow & Images Mode
Activate the tool by clicking on the Edit PDF Content button on the Document
Tab making sure the "Text Reflow & Images" option is selected in the down arrow. Once the Text Reflow & Images mode has been started areas that can be edited will display a border around them. Then click or drag an area with the mouse to select the desired content. Once selected, content can be edited, moved or deleted following the instructions below.
Editing Text
Select the text you wish to editMove or Edit the text by doing the following
Move: Click on the text and drag it to its new location on the page.Edit: Double click on the text to enter in line editing mode. Begin typing just as you normally would to edit text directly on the page. Text will automatically reflow and wrap based on the original paragraph size within the document.
Once complete, to exit Content Editing, simply click on the hand tool or Esc on the keyboard
-347-
Affordable, Powerful PDF Software / PDF Editor for Windows, macOS, Linux
Copyright © 2002-Present Qoppa Software. All rights reserved.
1.2.
••
•
3.
Editing Images
Select the text you wish to editMove or edit the image by doing the following:
Move: Click on the text and drag it to its new location on the page.Edit: Double click on the image to access the Image Properties. Click on the "Edit" button to display the image editing options. Choose the options you wish to change for the selected image and click OK when done.
Note: Editing the image properties cannot be undone without reopening the original document. Make sure to select the settings appropriately.
Once complete, to exit Content Editing mode, simply click on the hand tool or Esc on the keyboard
-348-
Affordable, Powerful PDF Software / PDF Editor for Windows, macOS, Linux
Copyright © 2002-Present Qoppa Software. All rights reserved.
1.
2.
•
3.
••
Editing Text ContentThe Edit PDF Content tool is capable of editing the raw strings of text stored in the PDF content. Text can be moved, edited, deleted, or redacted using the content editing tool. This advanced option is useful when needing to make only minor edits or as a fallback when the Edit Text & Images Mode is unable to correctly detect paragraphs.
Note: Not all text displayed in a PDF is considered text content. In some cases the text may actually be an image or even path objects. Text content that is either a path or image will not function the same and have limited editing abilities.
How to Edit Text Content
Activate the tool by clicking on the Edit Content button on the Document Tab
making sure the "Text" option is selected in the drop down arrow.Then click or drag an area with the mouse to select the desired text content. Once selected, content can be edited, moved or deleted following the instructions below.
Note: Selecting multiple pieces of content will let you update the properties for all pieces at once
Once complete, to exit Content Editing mode, simply click on the hand tool or Esc on the keyboard
Move or Edit Properties
Move or Edit the text by doing the following
Move: Click on the text and drag it to its new location on the page.Edit: To access the Text properties, right click (Mac: Ctrl + Click) and choose Properties in the mouse menu or double click on the selected text.
Text Content Properties
Text Content contains the following property settings:
Font – choose a new font for the selected text from the list
Note: When choosing a font only fonts that are embedded in the document can be selected. In addition, if the font is subset not all of the font characters may be available and may show up as either an incorrect or missing character when editing the text.
Text Color – change the color of the text
Outline Color – add or adjust the outline of the text
Text Size – edit the font size
-349-
Affordable, Powerful PDF Software / PDF Editor for Windows, macOS, Linux
Copyright © 2002-Present Qoppa Software. All rights reserved.
•
•
•
•
•
Outline Width – increase or decrease the width of the outline
Character Spacing – increase the space between each letter
Horizontal Scaling – increase or decrease the spacing between each letter
Word Spacing – increase the space between each word
Baseline Offset – move line of text above or below the surrounding text; create super- or sub-scripts
Text – change the wording of the text
Cut, Copy, & Paste Text Content
Cut or Copy text by doing the following
Cut: Cut the Text by using the shortcut key Ctrl + X (Mac: Cmd + X) or right-click on the text (CTRL + Click on Mac) and choose Cut in the context menu.Copy: Copy the Text by using the shortcut key Ctrl + C (Mac: Cmd + C) or right-click on the text (CTRL + Click on Mac) and choose Copy in the context menu.Paste: Navigate to the location you wish to paste the text and use the shortcut key Ctrl + V (Mac: Cmd + V) or right click (Mac: Ctrl + Click) and select Paste in the context menu
Remove Text Content
Delete or Redact text by doing the following
Delete: Delete the Text by pressing the Del key or right-click on the text (CTRL + Click on Mac) and choose Delete in the context menu.Redact: Redact the Text by right-click on the text (CTRL + Click on Mac) and choose Redact Text in the context menu.
Note: The Redact option in Content editing functions exactly the same as using the PDF Redaction and will completely remove the selected text and replace it with a black bar.
-350-
Affordable, Powerful PDF Software / PDF Editor for Windows, macOS, Linux
Copyright © 2002-Present Qoppa Software. All rights reserved.
1.
2.
•
3.
••
•
Editing Image ContentThe Edit PDF Content tool is capable of editing images that are a part of the PDF. Images can be moved, deleted, or redacted using the content editing tool. The content editing tool can also change the compression, color space, and DPI of individual images within the document. Images from within the PDF can also be saved directly to your computer by using Save As which will allow you to choose a location to save the image to.
Note: Not all images displayed in a PDF are actually image content. In some cases the images may actually be many path objects combined together to form an image. Image content that is a path will not function the same and have limited editing abilities.
How to Edit Image Content
Activate the tool by clicking on the Edit Content button on the Document Tab
making sure the "Image" option is selected in the drop down arrow.Then click or drag an area with the mouse to select the desired image content. Once selected, content can be edited, moved or deleted following the instructions below.
Note: Selecting multiple pieces of content will let you update the properties for all pieces at once
Once complete, to exit Content Editing mode, simply click on the hand tool or Esc on the keyboard
Move or Edit Properties
Move or Edit the image by doing the following
Move: Click on the text and drag it to its new location on the page.Edit: To access the Image properties, right click (Mac: Ctrl + Click) and choose Properties in the mouse menu or double click on the selected image. Click on the "Edit" button to display the image editing options. Choose the options you wish to change for the selected image and click OK when done.
Note: Editing the image properties cannot be undone without reopening the original document. Make sure to select the settings appropriately.
Image Content Properties
Image Content contains the following property settings:
Compression type: displays the image compression format used for the image
Mask Type - displays the image mask type (if exists) used on the image
-351-
Affordable, Powerful PDF Software / PDF Editor for Windows, macOS, Linux
Copyright © 2002-Present Qoppa Software. All rights reserved.
Color space: displays the color format details of the image
BPC - Bits per component
DPI Resolution: displays the DPI (dots per inch) of the image
Dimensions: the dimensions of the image in pixels
Size: the file size of just the selected image
Edit Image Options
The following options are available when editing the image.
Compression: Convert any image to either a JPEG, JPEG2000, FLATE, or JBIG2.
JPEG - lossy compression that will reduce image quality and size
JPEG2000 - less lossy compression that will reduce size and some quality
FLATE - Lossless compression does not reduce quality but may not always reduce file size
JBIG2 - Lossless compression that can only support black and white color space. Color images will be converted to black and white. Best for scanned documents with no images
Quality: Allows the image quality to be adjusted between 10-100%.
This will only affect JPEG or JPEG2000 images as these are the only formats that support image quality settings.
Color Space: Choose to either retain or convert the image colors to Grayscale or B&W.
Grayscale - Only supported with JPEG, JPEG2000, or FLATE. Best for full color images
B&W - Only supported by FLATE or JBIG2. Best for scanned documents with no images
DPI: Adjust the image resolution of all images that are larger than the option selected
Preset options include retain, 50, 100, 150, 200, 300, & 600 DPI
Custom option allows user to set any value between 50-1200 DPI
-352-
Affordable, Powerful PDF Software / PDF Editor for Windows, macOS, Linux
Copyright © 2002-Present Qoppa Software. All rights reserved.
•
•
•
1.
2.3.
•
•
Cut, Copy, & Paste Image Content
Cut or Copy image by doing the following
Cut: Cut the image by using the shortcut key Ctrl + X (Mac: Cmd + X) or right-click on the text (CTRL + Click on Mac) and choose Cut in the context menu.Copy: Copy the image by using the shortcut key Ctrl + C (Mac: Cmd + C) or right- click on the text (CTRL + Click on Mac) and choose Copy in the context menu.Paste: Navigate to the location you wish to paste the image and use the shortcut key Ctrl + V (Mac: Cmd + V) or right click (Mac: Ctrl + Click) and select Paste in the context menu
Replace Image Content
Image content can be replaced with a new image if needed. For example when updating the logo on an existing document. To do so follow the instructions below
Right-click on the text (CTRL + Click on Mac) and choose Replace Image... in the context menuSelect the new image file from your machine and click OKThe new image will replace the selected image using the exact same position and size
Reloading New Images
After an image has been replaced you can reload / refresh the new image until the image content has been deselected. This is useful for example if you need to make additional small changes and want to refresh the new file to make sure it looks correct without having to do the full replace image action.
Remove Image Content
Delete or Redact image by doing the following
Delete: Delete the image by pressing the Del key or right-click on the text (CTRL + Click on Mac) and choose Delete in the context menu.Redact: Redact the image by right-click on the image (CTRL + Click on Mac) and choose Redact Text in the context menu.
Note: The Redact option in Content editing functions exactly the same as using the PDF Redaction and will completely remove the selected image and replace it with a black bar.
-353-
Affordable, Powerful PDF Software / PDF Editor for Windows, macOS, Linux
Copyright © 2002-Present Qoppa Software. All rights reserved.
1.
•2.
3.
Save Images
Select the image you wish to save to your computer and right-click (CTRL + Click on Mac) on the image and choose Save As.
Note: Only 1 image can be saved at a time.Select the location on your computer where you would like to save the image, choose a file name and an image format then click Save.
Once complete, to exit Content Editing mode, simply click on the hand tool or Esc on the keyboard
You can use the Export All Images tool to save all the images within the document to your computer at once.
-354-
Affordable, Powerful PDF Software / PDF Editor for Windows, macOS, Linux
Copyright © 2002-Present Qoppa Software. All rights reserved.
1.
2.
•
3.
••
Editing Path ContentPath content are lines and shape objects within the PDF. Paths are two-dimensional shapes created using a set of points to generate lines or shapes. Paths can be used to create anything from shapes and dividers to even text and images. The Content editing tool is capable of editing paths that are a part of the PDF. Paths can be moved, edited, or deleted using the content editing tool.
How to Edit Path Content
Activate the tool by clicking on the Edit Content button on the Document Tab
making sure the "Path" option is selected in the drop down arrow.Then click or drag an area with the mouse to select the desired content. Once selected, content can be edited, moved or deleted following the instructions below.
Note: Selecting multiple pieces of content will let you update the properties for all pieces at once
Once complete, to exit Content Editing mode, simply click on the hand tool or Esc on the keyboard
Move or Edit Properties
Move or Edit the path by doing the following
Move: Click on the path and drag it to its new location on the page.Edit: To access the path properties, right click (Mac: Ctrl + Click) and choose Properties in the mouse menu or double click on the selected path.
Path Content Properties
Path Content contain the following property settings:
Fill Color: the fill color of the path
Fill Transparency: Sets the transparency of the fill color
Stroke Color: the border color of the path
Stroke Transparency: Sets the transparency of the stroke color
Border Width: the width of the border line of the path
Line Cap: Sets the shape to be used at the end of the line
Line Join: Sets the shape to be used on the corners or joints of the line
-355-
Affordable, Powerful PDF Software / PDF Editor for Windows, macOS, Linux
Copyright © 2002-Present Qoppa Software. All rights reserved.
•
•
•
•
•
•
•
•
•
•
•
•
•
•
Blend Mode: settings to determine how the path object colors will be blended together when overlayed on top of each other
Normal: edits or paints each pixel to make it the result color. This is the default mode.Multiply: multiplies the RGB channel numbers for each pixel from the top layer with the values for the corresponding pixel from the bottom layer. The result is always a darker picture; since each value is less than 1, their product will be less than either of the initial values.Screen: values of the pixels in the two layers are inverted, multiplied, and then inverted again. This yields the opposite effect to multiply, and results in a brighter picture.Overlay: overlay combines Multiply and Screen blend modes. The parts of the top layer where the base layer is light become lighter, the parts where the base layer is dark become darker. Areas where the top layer are mid grey are unaffected. Darken: creates a pixel that retains the smallest components of the foreground and background pixels.Lighten: the opposite action of Darken. It selects the maximum of each component from the foreground and background pixels.ColorDodge: divides the bottom layer by the inverted top layer. This lightens the bottom layer depending on the value of the top layer: the brighter the top layer, the more its color affects the bottom layer. Blending any color with white gives white. Blending with black does not change the image.ColorBurn: divides the inverted bottom layer by the top layer, and then inverts the result. This darkens the top layer increasing the contrast to reflect the color of the bottom layer. The darker the bottom layer, the more its color is used. Blending with white produces no difference.HardLight: a combination of Multiply and Screen. Hard Light affects the blend layer's relationship to the base layer in the same way Overlay affects the base layer's relationship to the blend layer. The inverse relationship between Overlay and Hard Light makes them "commuted blend modes".SoftLight: closely related to Overlay and is only similar to Hard Light by name. Applying pure black or white does not result in pure black or whiteDifference: subtracts the bottom layer from the top layer or the other way round, to always get a non-negative value. Blending with black produces no change, as values for all colors are 0.Exclusion: Creates an effect similar to Difference but lower in contrast. Blending with white inverts the base color values. Blending with black produces no change.
Cut, Copy, & Paste Path Content
Cut or Copy path by doing the following
Cut: Cut the path by using the shortcut key Ctrl + X (Mac: Cmd + X) or right-click on the path (CTRL + Click on Mac) and choose Cut in the context menu.Copy: Copy the path by using the shortcut key Ctrl + C (Mac: Cmd + C) or right-click on the path (CTRL + Click on Mac) and choose Copy in the context menu.
-356-
Affordable, Powerful PDF Software / PDF Editor for Windows, macOS, Linux
Copyright © 2002-Present Qoppa Software. All rights reserved.
• Paste: Navigate to the location you wish to paste the path and use the shortcut key Ctrl + V (Mac: Cmd + V) or right click (Mac: Ctrl + Click) and select Paste in the context menu
Remove Path Content
Delete the path by pressing the Del key or right-click on the path (CTRL + Click on Mac) and choose Delete in the context menu.
-357-
Affordable, Powerful PDF Software / PDF Editor for Windows, macOS, Linux
Copyright © 2002-Present Qoppa Software. All rights reserved.
1.
2.
•
3.
••
•
•
Editing Shade ContentShade content is very similar to paths except instead of a solid color fill a gradient or shade formula is used to create colors that gradually change across the shape. Shades can be used to create anything from shapes and dividers to even logos and images. The Content editing tool is capable of editing shades that are a part of the PDF. Shades can be moved, edited, or deleted using the content editing tool.
How to Edit Shade Content
Activate the tool by clicking on the Edit Content button on the Document Tab
making sure the "Shade" option is selected in the drop down arrow.Then click or drag an area with the mouse to select the desired content. Once selected, content can be edited, moved or deleted following the instructions below.
Note: Selecting multiple pieces of content will let you update the properties for all pieces at once
Once complete, to exit Content Editing mode, simply click on the hand tool or Esc on the keyboard
Move or Edit Properties
Move or Edit the shade by doing the following
Move: Click on the shade and drag it to its new location on the page.Edit: To access the shade properties, right click (Mac: Ctrl + Click) and choose Properties in the mouse menu or double click on the selected shade.
Shade Content Properties
Shade Content contain the following property settings:
Fill Color: the fill color of the shade
Stroke Color: the border color of the shade
Border Width: the width of the border line of the shade
Cut, Copy, & Paste Shade Content
Cut or Copy shade by doing the following
Cut: Cut the shade by using the shortcut key Ctrl + X (Mac: Cmd + X) or right-click on the shade (CTRL + Click on Mac) and choose Cut in the context menu.Copy: Copy the shade by using the shortcut key Ctrl + C (Mac: Cmd + C) or right- click on the shade (CTRL + Click on Mac) and choose Copy in the context menu.

-358-
Affordable, Powerful PDF Software / PDF Editor for Windows, macOS, Linux
Copyright © 2002-Present Qoppa Software. All rights reserved.
• Paste: Navigate to the location you wish to paste the shade and use the shortcut key Ctrl + V (Mac: Cmd + V) or right click (Mac: Ctrl + Click) and select Paste in the context menu
Remove Shade Content
Delete the shade by pressing the Del key or right-click on the shade (CTRL + Click on Mac) and choose Delete in the context menu.
-359-
Affordable, Powerful PDF Software / PDF Editor for Windows, macOS, Linux
Copyright © 2002-Present Qoppa Software. All rights reserved.
Adding New ContentIn addition to Editing Existing Content you can also add / create new content. The following content types can be added to a document.
Note: Content is different than adding annotations as they are created as permanent objects into the page and are not interactive. For information on adding annotations / comments to the document see Annotating & Commenting PDFs
Content Types
Add Text: Creates new text on the page
Add Image: Import images as content to be added to the document
Add Shape: Add new shape content (circle, square, line, etc...) to the PDF
-360-
Affordable, Powerful PDF Software / PDF Editor for Windows, macOS, Linux
Copyright © 2002-Present Qoppa Software. All rights reserved.
1.2.3.4.
Add Text ContentThe Add Text Content tool allows you to add / create new text content in a PDF document. This can be useful when for example you need to add new line items to a list or new rows in a table.
Starting the Add Text Content tool
Start the Add Text tool by clicking the on the Document Tab of the toolbarClick on the page where you would like to add some textType the text you wish to addTo finish press Esc or click elsewhere on the document
Once you have completed adding all the text content you need to the page, use the Edit PDF Content tools to modify it further if needed.
Text Content Properties
To access the Text Content properties go to the Properties Tab on the toolbar or right click (Mac: Ctrl + Click) on the toolbar button and click Default Tool Properties. The following default settings can be applied to Text Content.
Appearance
Text Color - Sets the text color
Font - Sets the font of the text
Size - Sets the font size of the text
B - Makes all of the text Bold
I - Makes all of the text Italic
U - Makes the selected annotation text underlined
S - Marks the selected annotation text with a strikethrough
Transparency - Sets the transparency of the text annotation
-361-
Affordable, Powerful PDF Software / PDF Editor for Windows, macOS, Linux
Copyright © 2002-Present Qoppa Software. All rights reserved.
Behavior
Sticky - When the tool is "sticky", the tool remains selected after a new content is added to the document until it is turned off. This allows you to create multiple content items without having to reselect the tool. Once active, press Esc or click the button on the toolbar again to deactivate the tool.
After Creation Show
Determines whether the properties dialog will be displayed after each new content item is added to the document.
-362-
Affordable, Powerful PDF Software / PDF Editor for Windows, macOS, Linux
Copyright © 2002-Present Qoppa Software. All rights reserved.
1.2.3.
•••
•
Add Image ContentThe Add Image Content tool allows you to add / create new image content in a PDF document. This can be useful when for example you need to add new reference images or tables to a report.
Starting the Add Text Content tool
Start the Add Image tool by clicking the on the Document Tab of the toolbarClick on the page where you would like to place the imageTo finish press Esc or click elsewhere on the document
Once you have completed adding all the image content you need to the page, use the Edit PDF Content tools to modify it further if needed.
Image Content Properties
To access the Image Content properties right click (Mac: Ctrl + Click) on the toolbar button and click Default Tool Properties. The following default settings can be applied to image Content.
Appearance
Transparency - Sets the transparency of the text annotation
Compression: Convert any image to either a JPEG, JPEG2000, FLATE, or JBIG2.
JPEG - lossy compression that will reduce image quality and sizeJPEG2000 - less lossy compression that will reduce size and some qualityFLATE - Lossless compression does not reduce quality but may not always reduce file sizeJBIG2 - Lossless compression that can only support black and white color space. Color images will be converted to black and white. Best for scanned documents with no images
-363-
Affordable, Powerful PDF Software / PDF Editor for Windows, macOS, Linux
Copyright © 2002-Present Qoppa Software. All rights reserved.
Behavior
After Creation Show
Determines whether the properties dialog will be displayed after each new content item is added to the document.

-364-
Affordable, Powerful PDF Software / PDF Editor for Windows, macOS, Linux
Copyright © 2002-Present Qoppa Software. All rights reserved.
1.2.3.4.
•
•
•
•
•
•
•
•
Add Shape ContentThe Add Shape Content tool allows you to add / create new shape content in a PDF document. This can be useful when for example you need to new divider lines or markers to the page content.
Starting the Add Shape Content tool
Start the Add Shape tool by clicking the on the Document Tab of the toolbarSelect the shape you wish to drawClick and drag on the page to create the new shape at the size you needTo finish press Esc or click elsewhere on the document
Once you have completed adding all the shape content you need to the page, use the Edit PDF Content tools to modify it further if needed.
Available Content Shape Types
Circle - Creates a circle shape.
Square - Creates a square shape.
Polyline - Creates a polyline shape.
Polygon - Creates a polygon shape.
Cloud - Creates a cloud shape.
Line - Creates a line shape.
Arrow - Creates an arrow shape.
Pencil - Creates a pencil shape.
Shape Content Properties
To access the Shape Content properties right click (Mac: Ctrl + Click) on the toolbar button option and click Default Tool Properties. Each shape will have it's o
Appearance
Line Width - Sets the width of the border line
Style - Sets the style for the border line (i.e. dotted, dashed, cloud, etc...)
-365-
Affordable, Powerful PDF Software / PDF Editor for Windows, macOS, Linux
Copyright © 2002-Present Qoppa Software. All rights reserved.
Color - Sets the color of the border
Fill Color - Sets the fill color
Transparency - Sets the transparency of the shape
Behavior
Sticky - When the tool is "sticky", the tool remains selected after a new content is added to the document until it is turned off. This allows you to create multiple content items without having to reselect the tool. Once active, press Esc or click the button on the toolbar again to deactivate the tool.
After Creation Show
Determines whether the properties dialog will be displayed after each new content item is added to the document.
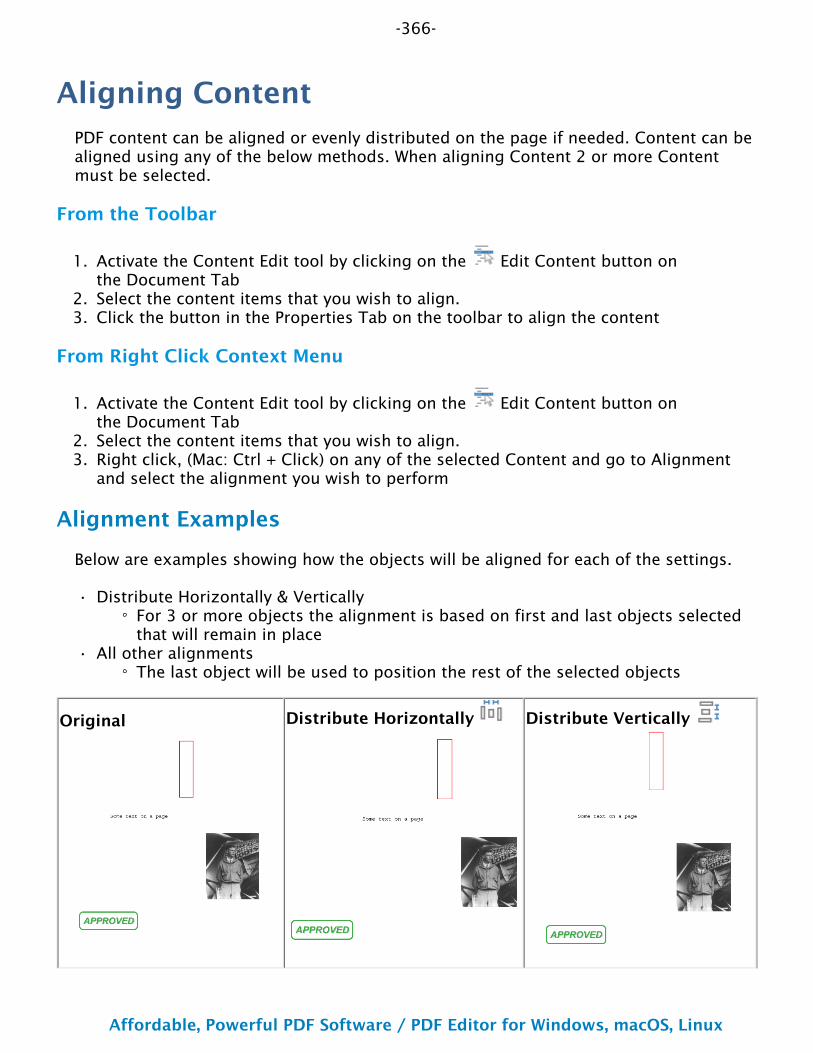
-366-
Affordable, Powerful PDF Software / PDF Editor for Windows, macOS, Linux
Copyright © 2002-Present Qoppa Software. All rights reserved.
1.
2.3.
1.
2.3.
•
•
Aligning ContentPDF content can be aligned or evenly distributed on the page if needed. Content can be aligned using any of the below methods. When aligning Content 2 or more Content must be selected.
From the Toolbar
Activate the Content Edit tool by clicking on the Edit Content button on the Document TabSelect the content items that you wish to align.Click the button in the Properties Tab on the toolbar to align the content
From Right Click Context Menu
Activate the Content Edit tool by clicking on the Edit Content button on the Document TabSelect the content items that you wish to align.Right click, (Mac: Ctrl + Click) on any of the selected Content and go to Alignment and select the alignment you wish to perform
Alignment Examples
Below are examples showing how the objects will be aligned for each of the settings.
Distribute Horizontally & VerticallyFor 3 or more objects the alignment is based on first and last objects selected that will remain in place
All other alignmentsThe last object will be used to position the rest of the selected objects
Original Distribute Horizontally Distribute Vertically
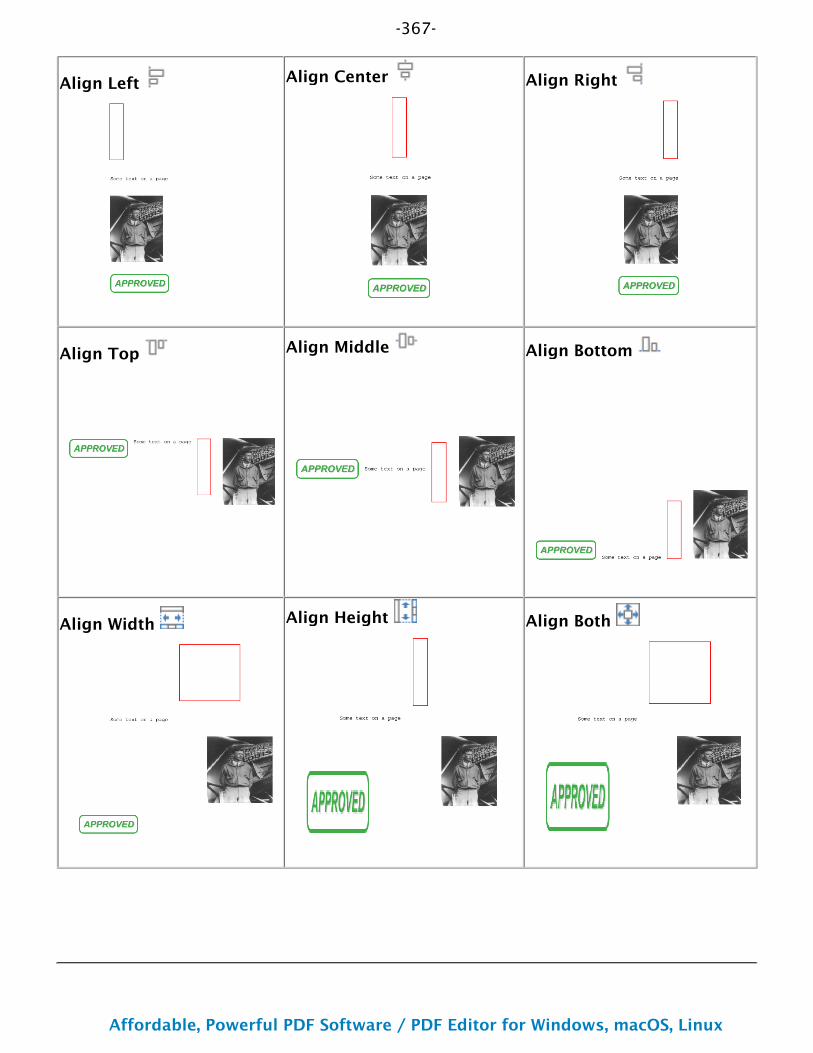
-367-
Affordable, Powerful PDF Software / PDF Editor for Windows, macOS, Linux
Copyright © 2002-Present Qoppa Software. All rights reserved.
Align Left Align Center Align Right
Align Top Align Middle Align Bottom
Align Width Align Height Align Both
-368-
Affordable, Powerful PDF Software / PDF Editor for Windows, macOS, Linux
Copyright © 2002-Present Qoppa Software. All rights reserved.
1.
2.3.
Changing Z OrderZ order is the overlapping of 2 dimensional objects on a page to move a piece content either in front of or behind of another content item on the page. Z order of content items can easily be changed following the instructions below.
From Right Click Context Menu
Activate the Content Edit tool by clicking on the Edit Content button on the Document TabSelect the content items that you wish to change the z order.Right click, (Mac: Ctrl + Click) on any of the selected Content and go to Move and select where you wish to move the content to.
Options
Bring to Front - Moves the selected item to the top above all other items
Send to Back - Moves the selected item to the bottom below all other items
Bring Forward - Moves the selected item one step above it's current location
Send Backwards - Moves the selected item one step below it's current location
-369-
Affordable, Powerful PDF Software / PDF Editor for Windows, macOS, Linux
Copyright © 2002-Present Qoppa Software. All rights reserved.
1.
2.3.
•
Content Explorer PanelThe Content Explorer Panel provides a tree based hierarchical view of the content objects that make up the internal structure of the PDF. These include the pages and content objects including Containers, Form XObjects, Text, Images, Paths and Shades. The content in the tree matches the same order in which the content is written within the document and so may not match the reading order on the page.
NOTE: This panel is primarily used for viewing the document structure. To make edits to the PDF see Content Editing.
How to Open the Content Panel
Open any document
Click on the Content button on the left side of the PDF Studio windowOnce loaded the left pane will display the document content structure tree
Viewing / Navigating Content
Use the content tree to view and navigate to the content in the document. Use the arrow icons to expand or collapse items and click on the content element to highlight the content on the page.
The expand and collapse all buttons can also be used to show and hide all the children in the content tree at once.
Content Types
Container: a group of related graphics objects that can be processed as a single unit and can be located in different parts of the document. For example: content grouped into Layers across the PDF that can be toggled on or off.
Form XObject: a group of graphics objects that can be referenced from different places within the PDF so It can be reused and drawn multiple times.For example: a company logo drawn on every page.
Text: text content stored as strings within the document
Note: Not all text displayed in a PDF is considered text content. In some cases the text may actually be an image or even path objects. Text content that is
-370-
Affordable, Powerful PDF Software / PDF Editor for Windows, macOS, Linux
Copyright © 2002-Present Qoppa Software. All rights reserved.
•
either a path or image will not function the same and have limited editing abilities
Images: image content stored as graphical image ojects within the document
Note: Not all images displayed in a PDF are actually image content. In some cases the images may actually be many path objects combined together to form an image. Image content that is a path will not function the same and have limited editing abilities.
Paths: a sequence of connected and disconnected points, lines, and curves that together create shapes.
Shades: Similar to path except using a gradient fill that produces a smooth transition between colors across the area.
Viewing Content Properties
Double Click on any content in the tree (or Right click and select the Properties option) to view additional details for the selected content.
-371-
Affordable, Powerful PDF Software / PDF Editor for Windows, macOS, Linux
Copyright © 2002-Present Qoppa Software. All rights reserved.
DestinationsA Destination is a named end point (similar to an anchor in HTML) stored within the pages of the PDF document. Destinations allow you to set navigation locations that can be used either within the same PDF or across multiple PDFs. Using a destination is often recommended because, unlike a Bookmark or Hyperlink to a specific page, destinations are not affected by the addition or deletion of pages within the document.
Creating Destinations: How to view and create Destinations
Linking to Destinations: How to link to Destinations in the same or another PDF
Deleting Destinations: How to remove Destinations
Renaming Destinations: How to set a new name for the Destination
Setting Destination Location: Setting a new location for the destination
-372-
Affordable, Powerful PDF Software / PDF Editor for Windows, macOS, Linux
Copyright © 2002-Present Qoppa Software. All rights reserved.
1.
2.
3.4.
•
Creating DestinationsA Destination is a named end point (similar to an anchor in HTML) stored within the pages of the PDF document. Destinations allow you to set navigation locations that can be used either within the same PDF or across multiple PDFs. Using a destination is often recommended because, unlike a Bookmark or Hyperlink to a specific page, destinations are not affected by the addition or deletion of pages within the document.
How to Create a Destination
To create a destination with the PDF follow the steps below:
Open the Destinations pane by clicking on the button on the left side of the PDF Studio windowSet the Zoom and page location to the way you want it on the screen
Click on the Create Destination buttonGive the destination a name and Click OK to apply the changes
Note: Using a name that does not have any spaces makes it easier to link to afterwards
Once the destination has been created it can now be linked to from either a Bookmark or Hyperlink.
-373-
Affordable, Powerful PDF Software / PDF Editor for Windows, macOS, Linux
Copyright © 2002-Present Qoppa Software. All rights reserved.
1.•
••
•
2.
3.4.
5.
6.
1.
2.
•
3.4.
5.
Linking to DestinationsOnce a destination has been created it needs to be linked to so that when the user clicks on the bookmark or link the PDF file will be opened to the Destination location that was created. Unlike a Bookmark or Hyperlink to a specific page, destinations are not affected by the addition or deletion of pages within the document.
How to Link to a Destination in a PDF
There are 3 ways to link to a Destination set within a PDF file.
Bookmark to Destination
Create a bookmark by doing one of the following:Go to the Pages Tab > Bookmarks, or use the shortcut key Ctrl + B (Command + B on Mac)
Click the add bookmark button at the top of the bookmark panelNote: If the bookmark panel is not visible (this happens when a document
doesn't have any bookmarks defined), click on the icon on the left side of the PDF Studio window
Right click on an existing bookmark and go to Add in the right click menu and select Before or After
Right click (Mac: Ctrl + Click) on the bookmark you wish to link to a destination and choose Properties in the mouse menu.Click on the Edit button below the Bookmark Actions sectionChoose either Go to a page in this document or Go to a page in another documentSelect the Destination option and then choose the named destination from the drop downClick OK to apply the changes
Now when the Bookmark is clicked it will navigate to the specified destination.
PDF Link to Destination
Select the Link tool by clicking the in the Pages Tab on the toolbar or using the shortcut key Ctrl + Alt + K (Command + Alt + K on Mac)Click and drag to select the area that you wish to make a link (Note: Hold the Shift key while drawing to create a perfect square.)
You can also select the desired text area and right-click on the selected text (CTRL + Click on Mac), choose "Create Link" in the context menu.
After the link annotation is added, the Link Properties dialog is displayed.In the link options choose either Go to a page in this document or Go to a page in another documentSelect the Destination option and then choose the named destination from the drop down
-374-
Affordable, Powerful PDF Software / PDF Editor for Windows, macOS, Linux
Copyright © 2002-Present Qoppa Software. All rights reserved.
6. Once complete, click OK to create the link
Now when the link is clicked it will navigate to the specified destination.
Webpage Link to Destination
If the PDF file is stored on a web server Destinations can also be used in an HTML URL to point to a specified destination by adding #[destination name] to the end of the links URL.
Note: This requires the browser or PDF viewer plugin (currently supported by most major applications) to support the destination property in the URL. If it does not it will just open to the first page of the document.
For example, the following Web URL will open a destination named "index" in a PDF file named sample.pdf:
http://www.example.com/sample.pdf#index
Or, you can use this HTML tag in a web page to open the destination named "index" in a PDF file named sample.pdf:
<a href="http://www.example.com/sample.pdf#index">link text</a>
-375-
Affordable, Powerful PDF Software / PDF Editor for Windows, macOS, Linux
Copyright © 2002-Present Qoppa Software. All rights reserved.
•
•
•
•
Deleting DestinationsPDF Studio is able to delete existing or created destinations from a PDF.
How to Delete Destinations
There are three ways that a destination can be deleted:
Open the Destinations pane by clicking on the button on the left side of the PDF Studio windowSelect the destination with the mouse and press Delete on your keyboard
Select the destination with the mouse and click on the delete button at the top of the destination panelRight-click (Mac: Ctrl + Click) on the destination in the list and choose the Delete option in the mouse menu
Note: Hold down SHIFT or CTRL (Command on Mac) to edit multiple destinations.
-376-
Affordable, Powerful PDF Software / PDF Editor for Windows, macOS, Linux
Copyright © 2002-Present Qoppa Software. All rights reserved.
•
•
Renaming DestinationsBy default the destination name will be the page number which may not be as useful to the reader. Destinations can be renamed after creation so the reader can understand exactly where it will lead them.
How to rename a Destination
Destination can be renamed
Open the Destinations pane by clicking on the button on the left side of the PDF Studio windowThen Right-click (Mac: Ctrl + Click) on the destination in the list and select the Rename option in the mouse menu and enter a new name.
Note: Using a name that does not have any spaces makes it easier to link to afterwards

-377-
Affordable, Powerful PDF Software / PDF Editor for Windows, macOS, Linux
Copyright © 2002-Present Qoppa Software. All rights reserved.
1.
2.3.
Setting Destination LocationA Destination's location is where the user will be taken within the document when clicked. By default this will be the exact same view and scale set when the destination was created. The destination can easily be changed if needed after being created.
How to Set a Destination Location
A destination's location can be changed by doing the following:
Open the Destinations pane by clicking on the button on the left side of the PDF Studio windowSet the Zoom and page location to the way you want it on the screenThen Right-click (Mac: Ctrl + Click) on the destination in the list and select Set Destination.
-378-
Affordable, Powerful PDF Software / PDF Editor for Windows, macOS, Linux
Copyright © 2002-Present Qoppa Software. All rights reserved.
Headers and FootersPDF Studio has the following options available when working with Headers and Footers on a PDF.
Creating Headers and Footers: How to create and apply a header and footer to a PDF
Header and Footer Options: The options available when adding headers and footers
Header and Footer Profiles: Using and managing existing header and footer profiles
Removing Headers and Footers: Removing headers and footers from a document
-379-
Affordable, Powerful PDF Software / PDF Editor for Windows, macOS, Linux
Copyright © 2002-Present Qoppa Software. All rights reserved.
1.•
2.3.
•
4.
Creating Headers and FootersPDF Studio can add custom headers and footers on a PDF. This can be used to add page numbers to a document or add a custom label to pages within the document.
How to Create and Apply Headers and Footers
Open the document that you would like to add a header and/or footer toNote: This is not a required step if you only wish to create a watermark profile without applying it immediately.
Go to the Pages Tab > Header & Footer > Add on the toolbarFill in the desired Header and Footer Options. A name for a Header and Footer Profile can also be set during this step to save the settings to be reused later.
Note: You do not need to create or save a header and footer profile before applying them to a document. To save the current header and footer configuration, click on the Save button and enter a name.
To apply the headers and/or footers to the document, click on Apply
-380-
Affordable, Powerful PDF Software / PDF Editor for Windows, macOS, Linux
Copyright © 2002-Present Qoppa Software. All rights reserved.
Header and Footer OptionsBelow are the options available when adding headers and footers to a PDF document.
Settings
The options for a header and footer are as follows:
Profile
Name - Name of the header and footer profile (if created). To create a new profile select "<new profile>" and click Save. Then enter a name for the new profile
Show on Menu - Whether to show this header and footer configuration on the header and footer menu for faster access.
Margins
Units - Units to use when calculating the position of the header and footer. This can be inches, centimeters, or points. Points are calculated in the PDF standard, 72 points per inch.
Top - The distance of the margin from the top
Bottom - The distance of the margin from the bottom
Left - The distance of the margin from the left
Right - The distance of the margin from the right
Shrink Document - Shrinks the document based on Top and Bottom margins to prevent the Header or Footer from overlapping original document content.
Appearance
Font - The font for the header and footer
Font Size - The font size for the header and footer
Font Color - The font color for the header and footer
B - Makes all of the text Bold
I - Makes all of the text Italic
Border - Sets a border around the header and footer text
-381-
Affordable, Powerful PDF Software / PDF Editor for Windows, macOS, Linux
Copyright © 2002-Present Qoppa Software. All rights reserved.
••••
••••
•••••••••
Border Color - Sets the color of the border
Width - Sets the width of the border
Background - Background color settings for the header and footer text
Pages
Page Range - The range of pages to apply headers and footers.
All Pages: all pages in the documentPage Range: set the page range using the From and To optionsEven Pages Only: only adds headers and footers the even pagesOdd Pages Only: only adds headers and footers the odd pages
Header & Footer
This section defines the text content for the different mark areas in the document
Header Left - Text placed in the left of the header
Header Center - Text placed in the center of the header
Header Right - Text placed in the right of the header
Footer Left - Text placed in the left of the footer
Footer Center - Text placed in the center of the footer
Footer Right - Text placed in the right of the footer
Insert - Use these options to insert custom variables within the content sections. Place the cursor where you would like the text and then click on the variable option you want to insert. These variables will be used when the headers and footers are placed on the document
Date - creates a date variablePage Number - creates a page number variableBates Number - creates a bates number variableOther - displays a list of other supported variables
$page – The page number$author – Inserts the Author name set in Comments Preferences$pagelabel - The bookmark for this page$bookmark - The label for this page$totalpages – The number of pages in the document$filename – The file name that the document was opened from$filepath – The full file path that the document was opened from$date – The current date formatted as Nov 28, 2007$shortdate – The current date formatted as 11/28/07
-382-
Affordable, Powerful PDF Software / PDF Editor for Windows, macOS, Linux
Copyright © 2002-Present Qoppa Software. All rights reserved.
••••••••••
$time – The current time$day – The current day of the month$month – The current month, using two digits$year – The current year, using four digits$shortyear – The current year, using two digits$second – The current second$minute – The current minute$hour – The current hour, 1-12$ampm – AM or PM$longhour – The current hour, 0-23
Preview Section
Allows you to see how the header and footer will look on the document once placed. Use the arrow buttons and drop down to navigate and preview a different page in the document.
-383-
Affordable, Powerful PDF Software / PDF Editor for Windows, macOS, Linux
Copyright © 2002-Present Qoppa Software. All rights reserved.
1.2.
3.
4.
5.
6.
Header and Footer ProfilesHeader and footer Profiles allow you to save custom header and footer settings as templates that can be used again later to add a header and footer to documents. There is also an option available to "Show on Menu" and when this is set for the profile it will be put under Pages Tab > Header & Footer so that the profile can be run in just two clicks from the document menu.
Note: You do not need to create or save a header and footer configuration before adding a header and footer to a document. To add a header and footer to a
document without saving settings just go to Pages Tab > Header & Footer > Add and choose the settings to use and click Apply to run the header and footer settings without saving a profile.
Creating a Header and Footer Profile
Go to the Pages Tab > Header & Footer > Add on the toolbar. Fill in the desired Header and Footer Options for the current header and footer configuration.Set all of the options that you would like to have in your profile. You can either start from an existing profile or a blank template by selecting "<new item>" from the drop down.Once you have completed your settings, click on Save. This will bring up a window to name your profile.If you are starting from a blank template this field will be blank. If you started from a previous profile the previous profiles name will be displayed. If you would like to just update the previous profile leave the name and click OK. If you would like to create a new profile just type in the new name you would like to save it as and click OK.Once complete your profile will now be available in the drop down menu as well as the quick options in the menu bar
Add a Header and/or Footer to a PDF Document Using an Existing Profile
There are 2 ways to apply an existing header and footer profile:
From the Header and Footer Dialog
Open the document that you would like to add a header and footer to. Open the header
and footer dialog from Pages Tab > Header & Footer > Add. Choose the header and footer profile from the drop down list in the combo box, click on the Apply button at the bottom of the dialog.
-384-
Affordable, Powerful PDF Software / PDF Editor for Windows, macOS, Linux
Copyright © 2002-Present Qoppa Software. All rights reserved.
From the Header and Footer Menu
Open the document that you would like to add a header and footer to. Under the Pages
Tab > Header & Footer menu, there is a list of all the header and footer profiles that you have previously created. Click on the header and footer profile in the list you'd like to run and it will begin immediately using the settings saved in the header and footer profile.
Note: Only the ones for which you chose the Show on Menu option will appear on this list. Click on the header and footer profile in the list you'd like to run and it will begin immediately using the settings saved in the header and footer profile.
-385-
Affordable, Powerful PDF Software / PDF Editor for Windows, macOS, Linux
Copyright © 2002-Present Qoppa Software. All rights reserved.
Removing Headers and FootersPDF Studio can remove existing Headers and footers from PDF Documents. This function will remove all headers and footers from every page of the document.
Note: Not all text at the top or the bottom of the page is a header or a footer. In order for PDF Studio to remove headers and footers the text must have been added to the document as a header and footer following the PDF standards. If not, the headers and footers will not be removed by this feature. Instead you will need to use Content Editing to remove them
How to Remove All Headers and Footers
Select Pages Tab > Header & Footer > Remove from the menu. This will remove all headers and footer from every page within the entire document.
-386-
Affordable, Powerful PDF Software / PDF Editor for Windows, macOS, Linux
Copyright © 2002-Present Qoppa Software. All rights reserved.
HyperlinksUse the link tool to create and edit links within the PDF. Links can also be automatically generated and removed.
Creating Links: How to create links
Custom Link Actions: Actions available when creating a link
Auto Create Links: Using the auto create link tool
Remove All Links: Removing all links from a document

-387-
Affordable, Powerful PDF Software / PDF Editor for Windows, macOS, Linux
Copyright © 2002-Present Qoppa Software. All rights reserved.
1.
2.
•
3.4.
•••
••
••••
••
••••
•
••
•
•
•
•
•
Creating LinksThe Link tool allows you to designate an area within the PDF that can be linked to a web page, pages in a PDF document, or even have custom actions.
How to Create Links
Select the Link tool by clicking the in the Pages Tab on the toolbar or using the shortcut key Ctrl + Alt + K (Command + Alt + K on Mac)Click and drag to select the area that you wish to make a link (Note: Hold the Shift key while drawing to create a perfect square.)
You can also select the desired text area and right-click on the selected text (CTRL + Click on Mac), choose "Create Link" in the context menu.
After the link annotation is added, the Link Properties dialog is displayed.Set the options for the link:
AppearanceBorder Width - Sets the width of the border lineBorder Color - Sets the color of the border line
ActionOpen a web link. Examples of valid links:
http://www.qoppa.comftp://ftp.site.comfile:c:\qoppa\temp.txtmailto:[email protected]
Go to a page in this documentPage
Number - the page number of the document to link toZoom - Set the page fit when navigating to the pagePercent - The zoom level for Custom zoom settingSet Visually - Allows you to set the location of the link visually
Destination - choose from a named Destination already set within the PDF
Go to a page in another documentNew Window - opens the document in a completely new window of the PDF applicationExisting Window - will open the document in the current window of the PDF application replacing the currently open documentPage Number - the page number to show when opening the other documentDocument - The full path to the file to open. Click on the "..." button to open a file chooser and navigate to the file you wish to select.Destination - choose from a named Destination already set within the PDF
Custom link - Allows you to add custom Link Actions from a list of available actions.

-388-
Affordable, Powerful PDF Software / PDF Editor for Windows, macOS, Linux
Copyright © 2002-Present Qoppa Software. All rights reserved.
5.
•••
Once complete, click OK to create the link
Link Properties
To access the Link properties go to the Properties Tab on the toolbar or right click (Mac: Ctrl + Click) on the annotation and choose Properties in the mouse menu or click
on the edit button on the Mini Toolbar. Links contain the following property settings.
Locked - When checked prevents the following on the annotation: being moved or resized, editing appearance properties, & deleting the annotation.
Appearance
Border Width - Sets the width of the border line
Border Color - Sets the color of the border line
Style - Sets the border style for the link
Solid: Creates a solid lineDashed: Creates a dashed lineUnderlined: Creates a bottom line only
Action
The Action Panel displays a list of the current actions associated with the link. Actions can be added, edited, or deleted using the buttons below the actions list.
Add - Adds a custom Link Action from a list of available actions.
Edit - Edits the currently selected action from the list
Remove - Removes the currently selected action from the list

-389-
Affordable, Powerful PDF Software / PDF Editor for Windows, macOS, Linux
Copyright © 2002-Present Qoppa Software. All rights reserved.
••••
••
•••
•
Custom Link ActionsWhen adding a link to a PDF document custom actions can be created instead of the standard link options. Below is a list of the each of the custom actions and their settings.
Go to a page in this document
Sets the link to go to a page within the current document
Page Number - the page number of the document to link toZoom - Set the page fit when navigating to the pagePercent - The zoom level for Custom zoom settingSet Visually - Allows you to set the location of the link visually
Go to a page in another document
Sets the link to go to a page within a different designated document
Page Number - the page number of the document to link toDocument - The full path to the document to open. Click on the "..." button to open a file chooser and navigate to the file you wish to select.
Note: When sending this document to other users this action may not work if the file is not in the same location on the users computer. To make sure the file is included with the PDF when sending to another user try using a File Attachment instead.
Show/Hide Fields
Sets the link to either Show or Hide selected fields within the document
Show - Will show the selected fields when clickedHide - Will hide the selected fields when clickedField List - Displays a list of the fields in the document to select. To select more than one field use Ctrl + Click to select separate fields or Shift + Click to select a group of fields
Open File
Sets the link to open a specific file.
File - The full path to the file to open. Click on the "..." button to open a file chooser and navigate to the file you wish to select.
-390-
Affordable, Powerful PDF Software / PDF Editor for Windows, macOS, Linux
Copyright © 2002-Present Qoppa Software. All rights reserved.
••••
••
•••••
•••••
•••
Note: When sending this document to other users this action may not work if the file is not in the same location on the users computer. To make sure the file is included with the PDF when sending to another user try using a File Attachment instead.
Open a web link
Set's the link to open a specific web page or start an email. Examples of valid links:
http://www.qoppa.comftp://ftp.site.comfile:c:\qoppa\temp.txtmailto:[email protected]
Reset Form Fields
Sets the link to reset the selected fields within the document
All Fields - When checked will reset all the fields within the documentField List - Displays a list of the fields in the document to select. To select more than one field use Ctrl + Click to select separate fields or Shift + Click to select a group of fields
JavaScript Action
Sets the link to perform a custom Supported JavaScript action that can be typed into the field.
Submit Form
Sets the link to send the form field values to a designated location in one of 4 formats. This can be used to have an automatic way to send back forms or values once a user has completed the form.
URL - The destination to send the selected file to. Examples of valid links:http://www.qoppa.comftp://ftp.site.comfile:c:\qoppa\temp.txtmailto:[email protected]
FDF - Sends an FDF file containing the selected field valuesXFDF - Sends an XFDF file containing the selected field valuesPDF - Sends a copy of the entire PDFHTML - Sends an HTML file containing the selected field valuesFields - Sets the options when sending the field values
All Fields - Will send all fields regardless of valueInclude - Will include the selected fields in the list when sending the fileExclude - Will exclude the selected fields in the list when sending the file
-391-
Affordable, Powerful PDF Software / PDF Editor for Windows, macOS, Linux
Copyright © 2002-Present Qoppa Software. All rights reserved.
•
•
•
••••
•
•••••••
Field List - Displays a list of the fields in the document to select. To select more than one field use Ctrl + Click to select separate fields or Shift + Click to select a group of fieldsSend Empty Fields - When checked will send the selected fields values even when fields are empty
Show/Hide Layers
Sets the link to either Show or Hide selected layers within the document
Use Current Visibility - Sets the action to display the layers as they are currently being displayed so that if layers are turned off later they will return to the current stateOther - Sets a new action for the layer using the blow options
Show - Will show the selected layers in the listHide - Will hide the selected layers in the listToggle - Will switch the selected layer(s) state from hidden to displayed or displayed to hidden depending on the layers current stateLayers List - Displays a list of the layers in the document to select. To select more than one layer use Ctrl + Click to select separate layers or Shift + Click to select a group of layers
Named Action
Sets the link to perform one of standard predefined actions listed below.
NextPage - Goes to the next page in the documentPrevPage - Goes to the previous page in the documentFirstPage - Goes to the first page in the documentLastPage - Goes to the last page in the documentPrint - Starts the print dialog to print the current documentSave - Saves the current documentOpen - Displays the open file dialog
-392-
Affordable, Powerful PDF Software / PDF Editor for Windows, macOS, Linux
Copyright © 2002-Present Qoppa Software. All rights reserved.
1.2.
•••
•
•3.
4.5.
•••••
6.•••
7.
Auto Create LinksThe Auto Create Links tool within PDF Studio allows you to search the entire document to automatically create links for the defined criteria set by the user. Once the text is found using the defined settings links can be automatically applied to the document at each of the text locations.
Note: The PDF must contain searchable text in order for the Auto Create Links tool to work
Automatically Creating Links
Search for
Select Comments Tab > Link > Auto Create Links. Set the search options for the type or specific text you wish to find in the document using the below settings
Web Links - Searches for text strings that contains "http://" or "www."Email Links - Searches for emails matching the standard "...@..." formatSearch - Searches for specific text defined by the user
Case Sensitive - When checked will only find the specific text matching the exact case (i.e. searching for capital "A" will ignore lowercase "a")URL - Defines what web address to set as the link when searching by text
Click Find to search the document for text that appears depending on which "search for" options are selected. The matching text that is found based on the search options set will be displayed in the table below.Check the boxes in the "Make" column of the text you wish to add links to.The link to be created is displayed in the "Link" column of the table. This value can be edited by double clicking on the Link you wish to edit. Once finished editing click anywhere else to finish editing.
Examples of valid links:http://www.qoppa.comftp://ftp.site.comfile:c:\qoppa\temp.txtmailto:[email protected]
Set the options for the Links that will be created for the selected textBorder Width - Sets the width of the border lineBorder Color - Sets the color of the border lineText Color - This will change the color of the text that was found. Useful if you want others to know that the text is now a link.
Click on the Make button to create the links in the document
Once created the links function just as normal Link Annotations and can be edited as normal.

-393-
Affordable, Powerful PDF Software / PDF Editor for Windows, macOS, Linux
Copyright © 2002-Present Qoppa Software. All rights reserved.
-394-
Affordable, Powerful PDF Software / PDF Editor for Windows, macOS, Linux
Copyright © 2002-Present Qoppa Software. All rights reserved.
Removing all LinksTo automatically remove all links from a document, select Comments Tab > Link > Remove All Links. Once the removal is confirmed, all links in the document will be deleted.
-395-
Affordable, Powerful PDF Software / PDF Editor for Windows, macOS, Linux
Copyright © 2002-Present Qoppa Software. All rights reserved.
Modifying PDF PagesPDF Studio has the following options available to modify pages within a PDF document.
Editing Page Properties - View page properties and options to add actions to pages
Adding a Blank Page - Adds a blank page into the document
Cropping Pages - Crop pages within the PDF Document
Appending Document – Append another PDF document to the current one.
Inserting Pages – Insert pages from another PDF document into the current one.
Extracting Pages – Extract pages from the current document into a new document.
Replacing Pages – Replace pages from the current document with pages from another document.
Resizing Pages - Change the physical page size of the document as well as content to fit.
Deleting Pages – Delete pages from the current document.
Rotating Pages – Rotate pages in the current document.
Reversing Pages – Reverse the page order in the current document.
Move, Cut, Copy, and Paste Pages - Cut/Copy and Paste pages within a document or across documents.
Importing Images as Pages - Takes a selected image and inserts the image as a page within the PDF
Page Templates - Additional pages stored within the PDF that can be appended or shown based on a JavaScript trigger or action within a document.
Page Labels - Change the page numbers to display custom text instead of numbers
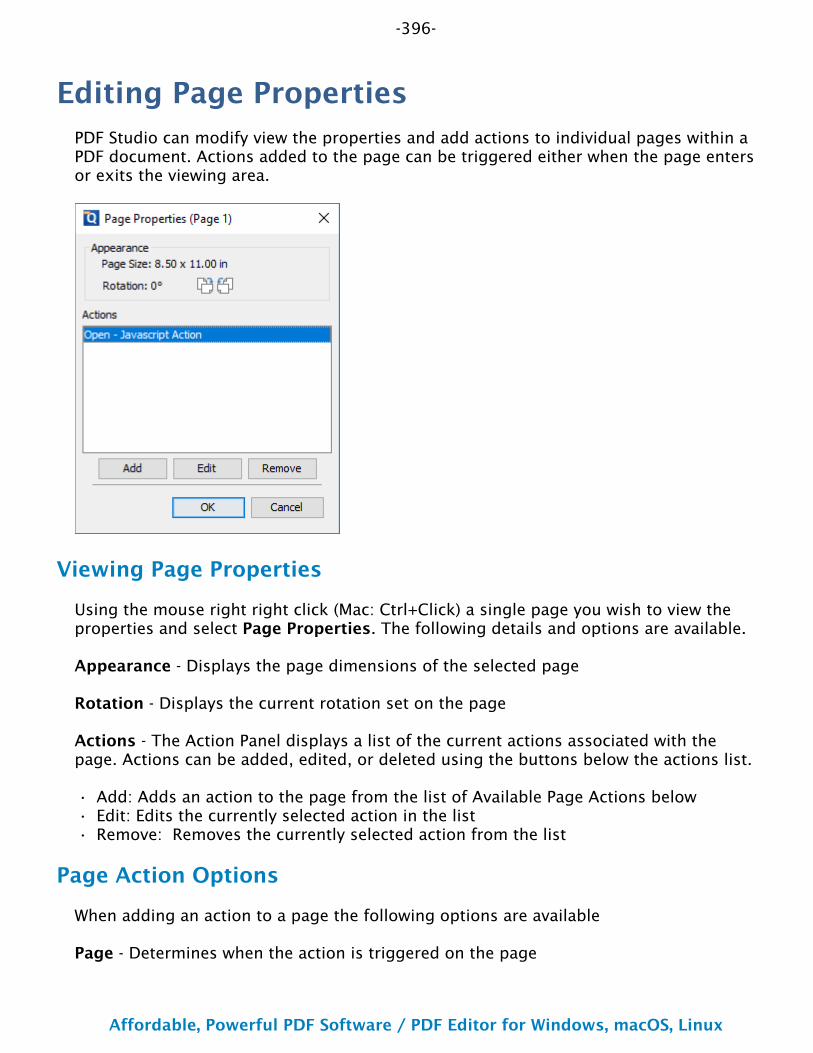
-396-
Affordable, Powerful PDF Software / PDF Editor for Windows, macOS, Linux
Copyright © 2002-Present Qoppa Software. All rights reserved.
•••
Editing Page PropertiesPDF Studio can modify view the properties and add actions to individual pages within a PDF document. Actions added to the page can be triggered either when the page enters or exits the viewing area.
Viewing Page Properties
Using the mouse right right click (Mac: Ctrl+Click) a single page you wish to view the properties and select Page Properties. The following details and options are available.
Appearance - Displays the page dimensions of the selected page
Rotation - Displays the current rotation set on the page
Actions - The Action Panel displays a list of the current actions associated with the page. Actions can be added, edited, or deleted using the buttons below the actions list.
Add: Adds an action to the page from the list of Available Page Actions belowEdit: Edits the currently selected action in the listRemove: Removes the currently selected action from the list
Page Action Options
When adding an action to a page the following options are available
Page - Determines when the action is triggered on the page
-397-
Affordable, Powerful PDF Software / PDF Editor for Windows, macOS, Linux
Copyright © 2002-Present Qoppa Software. All rights reserved.
••
••••
••
•••
•
Open: triggers the action the moment the page is within viewClose: triggers the action when the page is no longer visible
Action - Choose from the available page actions below to be added to the page
Available Page Actions
Go to a page in this document
Sets the link to go to a page within the current document
Page Number - the page number of the document to link toZoom - Set the page fit when navigating to the pagePercent - The zoom level for Custom zoom settingSet Visually - Allows you to set the location of the link visually
Go to a page in another document
Sets the link to go to a page within a different designated document
Page Number - the page number of the document to link toDocument - The full path to the document to open. Click on the "..." button to open a file chooser and navigate to the file you wish to select.
Note: When sending this document to other users this action may not work if the file is not in the same location on the users computer. To make sure the file is included with the PDF when sending to another user try using a File Attachment instead.
Show/Hide Fields
Sets the link to either Show or Hide selected fields within the document
Show - Will show the selected fields when clickedHide - Will hide the selected fields when clickedField List - Displays a list of the fields in the document to select. To select more than one field use Ctrl + Click to select separate fields or Shift + Click to select a group of fields
Open File
Sets the link to open a specific file.
File - The full path to the file to open. Click on the "..." button to open a file chooser and navigate to the file you wish to select.
Note: When sending this document to other users this action may not work if the file is not in the same location on the users computer. To make sure the file is
-398-
Affordable, Powerful PDF Software / PDF Editor for Windows, macOS, Linux
Copyright © 2002-Present Qoppa Software. All rights reserved.
••••
••
•••••
•••••
••••
•
included with the PDF when sending to another user try using a File Attachment instead.
Open a web link
Set's the link to open a specific web page or start an email. Examples of valid links:
http://www.qoppa.comftp://ftp.site.comfile:c:\qoppa\temp.txtmailto:[email protected]
Reset Form Fields
Sets the link to reset the selected fields within the document
All Fields - When checked will reset all the fields within the documentField List - Displays a list of the fields in the document to select. To select more than one field use Ctrl + Click to select separate fields or Shift + Click to select a group of fields
JavaScript Action
Sets the link to perform a custom Supported JavaScript action that can be typed into the field.
Submit Form
Sets the link to send the form field values to a designated location in one of 4 formats. This can be used to have an automatic way to send back forms or values once a user has completed the form.
URL - The destination to send the selected file to. Examples of valid links:http://www.qoppa.comftp://ftp.site.comfile:c:\qoppa\temp.txtmailto:[email protected]
FDF - Sends an FDF file containing the selected field valuesXFDF - Sends an XFDF file containing the selected field valuesPDF - Sends a copy of the entire PDFHTML - Sends an HTML file containing the selected field valuesFields - Sets the options when sending the field values
All Fields - Will send all fields regardless of valueInclude - Will include the selected fields in the list when sending the fileExclude - Will exclude the selected fields in the list when sending the fileField List - Displays a list of the fields in the document to select. To select more than one field use Ctrl + Click to select separate fields or Shift + Click to select a group of fieldsSend Empty Fields - When checked will send the selected fields values even when fields are empty
-399-
Affordable, Powerful PDF Software / PDF Editor for Windows, macOS, Linux
Copyright © 2002-Present Qoppa Software. All rights reserved.
•
••••
•
•••••••
Show/Hide Layers
Sets the link to either Show or Hide selected layers within the document
Use Current Visibility - Sets the action to display the layers as they are currently being displayed so that if layers are turned off later they will return to the current stateOther - Sets a new action for the layer using the blow options
Show - Will show the selected layers in the listHide - Will hide the selected layers in the listToggle - Will switch the selected layer(s) state from hidden to displayed or displayed to hidden depending on the layers current stateLayers List - Displays a list of the layers in the document to select. To select more than one layer use Ctrl + Click to select separate layers or Shift + Click to select a group of layers
Named Action
Sets the link to perform one of standard predefined actions listed below.
NextPage - Goes to the next page in the documentPrevPage - Goes to the previous page in the documentFirstPage - Goes to the first page in the documentLastPage - Goes to the last page in the documentPrint - Starts the print dialog to print the current documentSave - Saves the current documentOpen - Displays the open file dialog
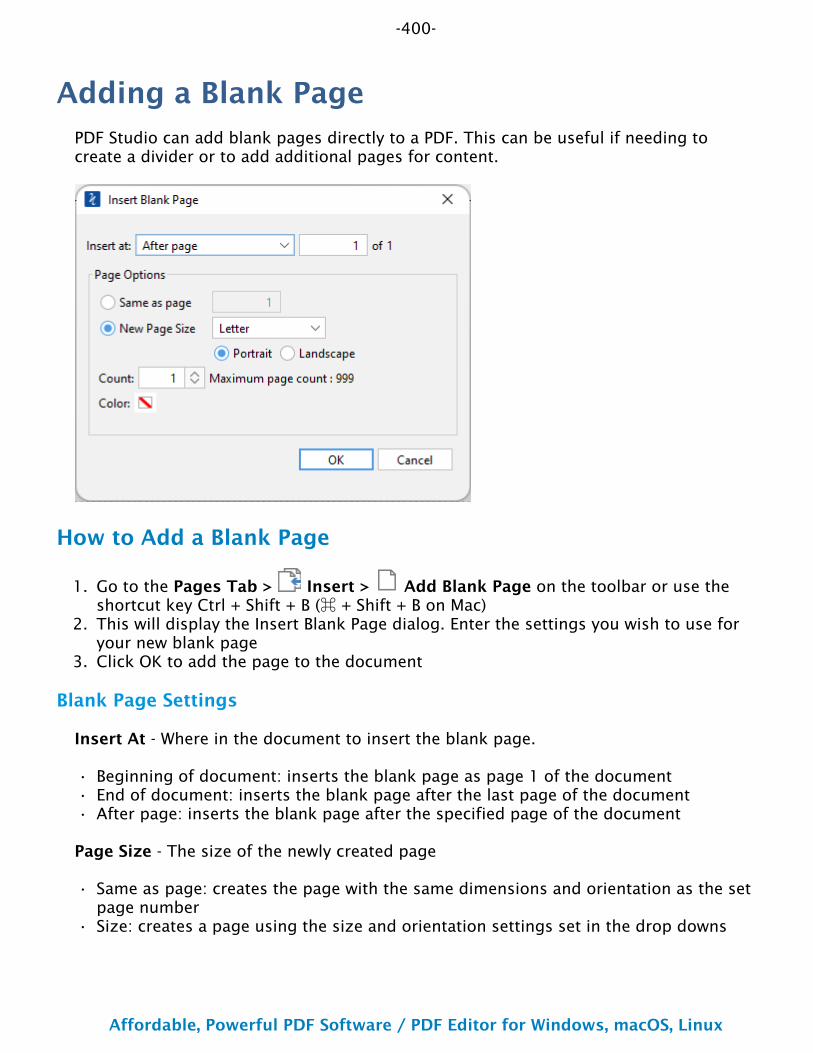
-400-
Affordable, Powerful PDF Software / PDF Editor for Windows, macOS, Linux
Copyright © 2002-Present Qoppa Software. All rights reserved.
1.
2.
3.
•••
•
•
Adding a Blank PagePDF Studio can add blank pages directly to a PDF. This can be useful if needing to create a divider or to add additional pages for content.
How to Add a Blank Page
Go to the Pages Tab > Insert > Add Blank Page on the toolbar or use the shortcut key Ctrl + Shift + B (⌘ + Shift + B on Mac)This will display the Insert Blank Page dialog. Enter the settings you wish to use for your new blank pageClick OK to add the page to the document
Blank Page Settings
Insert At - Where in the document to insert the blank page.
Beginning of document: inserts the blank page as page 1 of the documentEnd of document: inserts the blank page after the last page of the documentAfter page: inserts the blank page after the specified page of the document
Page Size - The size of the newly created page
Same as page: creates the page with the same dimensions and orientation as the set page numberSize: creates a page using the size and orientation settings set in the drop downs

-401-
Affordable, Powerful PDF Software / PDF Editor for Windows, macOS, Linux
Copyright © 2002-Present Qoppa Software. All rights reserved.
-402-
Affordable, Powerful PDF Software / PDF Editor for Windows, macOS, Linux
Copyright © 2002-Present Qoppa Software. All rights reserved.
1.2.
•••
3.
•
•
Appending DocumentsPDF Studio can append any of the Supported File Types to a PDF. When non-PDF files are selected they will be automatically converted to PDF before being appended to the document. Files can also be appended by dragging files directly onto the Thumbnail Pane directly.
Using the Menu
Appending a Single Document
Select the Pages Tab > Insert > Append Document on the toolbar and choose the file to insert at the end of the current document.
Appending Multiple Documents
Select the Pages Tab > Insert > Append Multiple Document sSet the options you wish to use. For more details see Batch Merge
Using the File List select the files that need to be processedSet the destination settings for the processed batch filesIf needed, set any open passwords to be attempted when processing files
Once all of the settings are complete, click on Start... to begin the batch process.
Using Drag & Drop
Use the mouse to select thumbnail page(s) from the thumbnail pane and then:
Copy - Select and drag thumbnail pages from the source document to the destination document's Thumbnail pane of the second document.Move - Select thumbnail pages from the source document. While holding Ctrl, drag the pages to the desired location within the Thumbnail Pane of the second document.
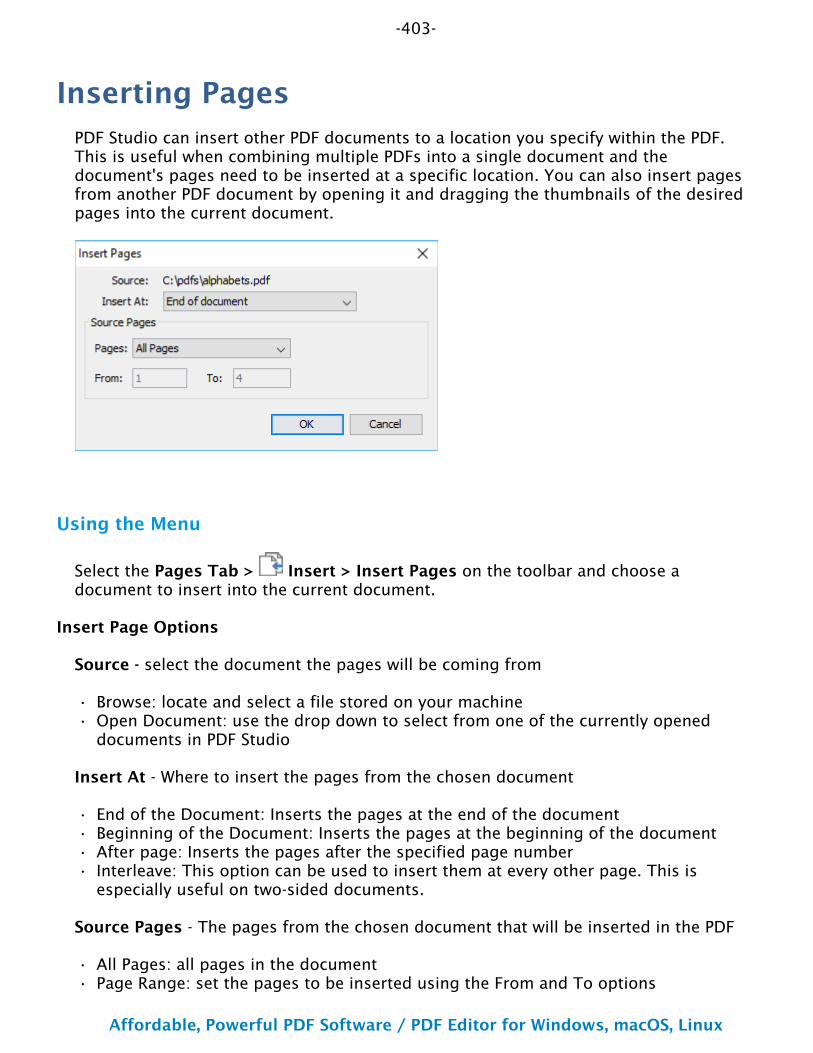
-403-
Affordable, Powerful PDF Software / PDF Editor for Windows, macOS, Linux
Copyright © 2002-Present Qoppa Software. All rights reserved.
••
••••
••
Inserting PagesPDF Studio can insert other PDF documents to a location you specify within the PDF. This is useful when combining multiple PDFs into a single document and the document's pages need to be inserted at a specific location. You can also insert pages from another PDF document by opening it and dragging the thumbnails of the desired pages into the current document.
Using the Menu
Select the Pages Tab > Insert > Insert Pages on the toolbar and choose a document to insert into the current document.
Insert Page Options
Source - select the document the pages will be coming from
Browse: locate and select a file stored on your machineOpen Document: use the drop down to select from one of the currently opened documents in PDF Studio
Insert At - Where to insert the pages from the chosen document
End of the Document: Inserts the pages at the end of the documentBeginning of the Document: Inserts the pages at the beginning of the documentAfter page: Inserts the pages after the specified page numberInterleave: This option can be used to insert them at every other page. This is especially useful on two-sided documents.
Source Pages - The pages from the chosen document that will be inserted in the PDF
All Pages: all pages in the documentPage Range: set the pages to be inserted using the From and To options
-404-
Affordable, Powerful PDF Software / PDF Editor for Windows, macOS, Linux
Copyright © 2002-Present Qoppa Software. All rights reserved.
••
•
•
Even Pages Only: only the even pagesOdd Pages Only: only the odd pages
Using Drag & Drop
Use the mouse to select thumbnail page(s) from the thumbnail pane and then:
Copy - Select and drag thumbnail pages from the source document to the destination document's Thumbnail pane of the second document.Move - Select thumbnail pages from the source document. While holding Ctrl, drag the pages to the desired location within the Thumbnail Pane of the second document.
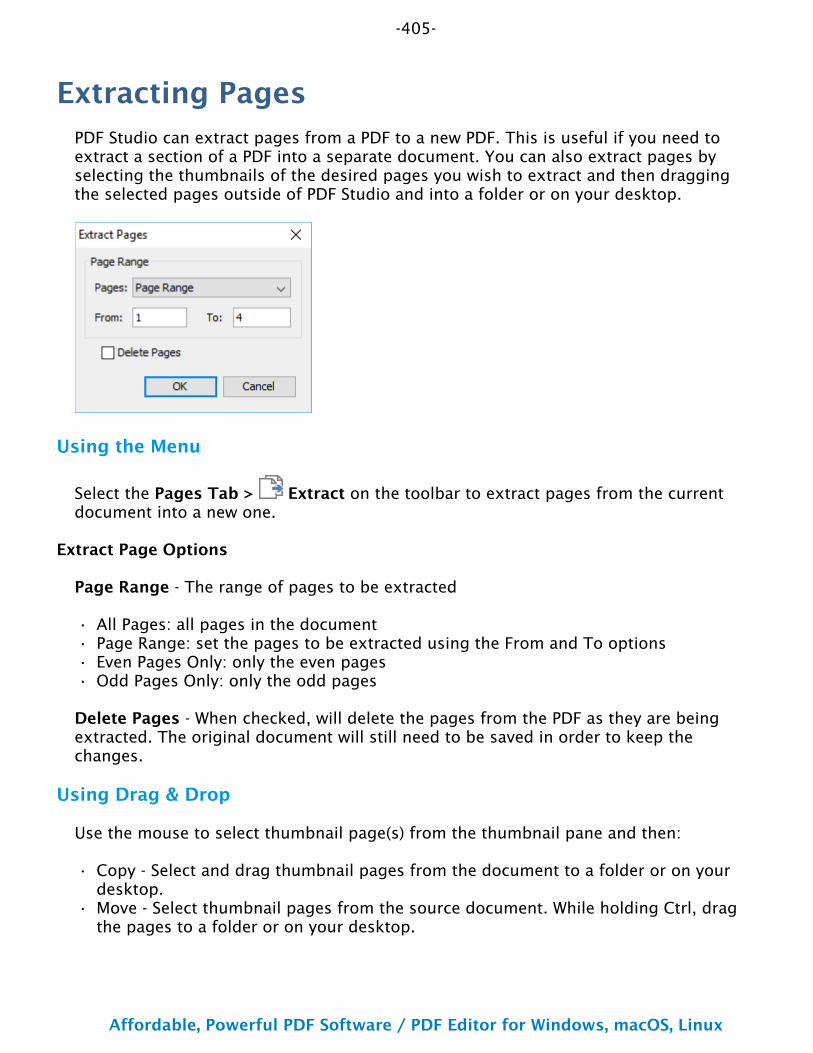
-405-
Affordable, Powerful PDF Software / PDF Editor for Windows, macOS, Linux
Copyright © 2002-Present Qoppa Software. All rights reserved.
••••
•
•
Extracting PagesPDF Studio can extract pages from a PDF to a new PDF. This is useful if you need to extract a section of a PDF into a separate document. You can also extract pages by selecting the thumbnails of the desired pages you wish to extract and then dragging the selected pages outside of PDF Studio and into a folder or on your desktop.
Using the Menu
Select the Pages Tab > Extract on the toolbar to extract pages from the current document into a new one.
Extract Page Options
Page Range - The range of pages to be extracted
All Pages: all pages in the documentPage Range: set the pages to be extracted using the From and To optionsEven Pages Only: only the even pagesOdd Pages Only: only the odd pages
Delete Pages - When checked, will delete the pages from the PDF as they are being extracted. The original document will still need to be saved in order to keep the changes.
Using Drag & Drop
Use the mouse to select thumbnail page(s) from the thumbnail pane and then:
Copy - Select and drag thumbnail pages from the document to a folder or on your desktop.Move - Select thumbnail pages from the source document. While holding Ctrl, drag the pages to a folder or on your desktop.

-406-
Affordable, Powerful PDF Software / PDF Editor for Windows, macOS, Linux
Copyright © 2002-Present Qoppa Software. All rights reserved.
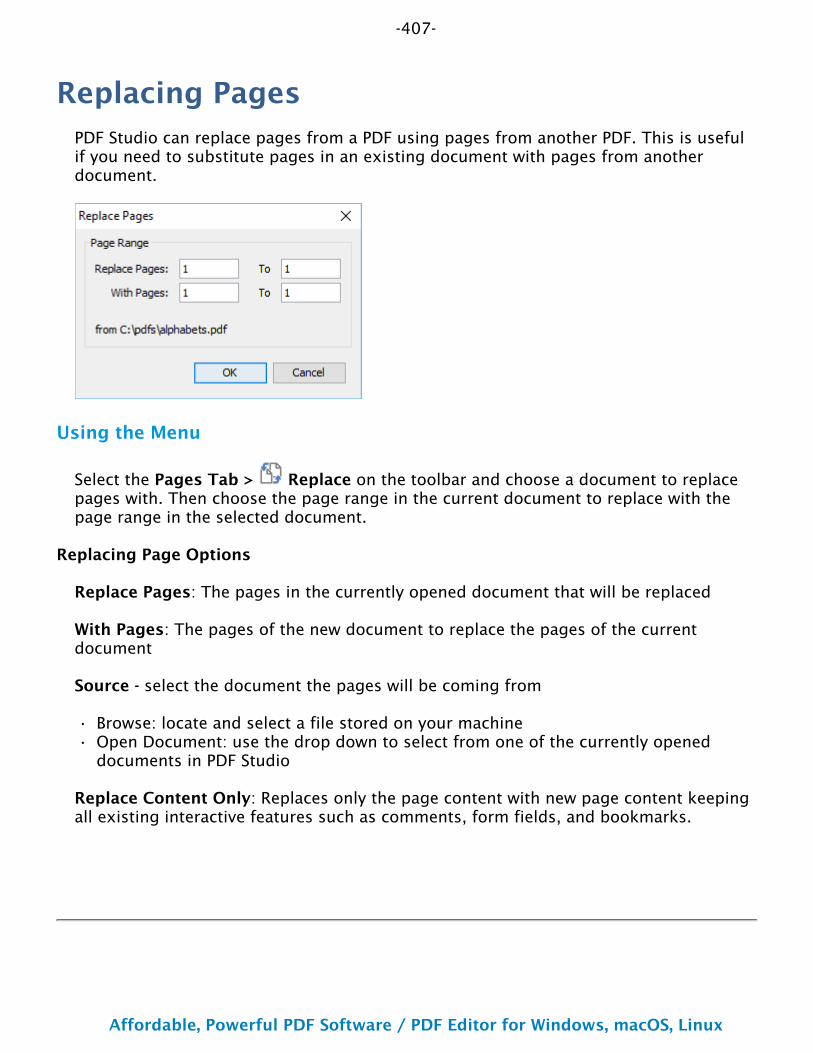
-407-
Affordable, Powerful PDF Software / PDF Editor for Windows, macOS, Linux
Copyright © 2002-Present Qoppa Software. All rights reserved.
••
Replacing PagesPDF Studio can replace pages from a PDF using pages from another PDF. This is useful if you need to substitute pages in an existing document with pages from another document.
Using the Menu
Select the Pages Tab > Replace on the toolbar and choose a document to replace pages with. Then choose the page range in the current document to replace with the page range in the selected document.
Replacing Page Options
Replace Pages: The pages in the currently opened document that will be replaced
With Pages: The pages of the new document to replace the pages of the current document
Source - select the document the pages will be coming from
Browse: locate and select a file stored on your machineOpen Document: use the drop down to select from one of the currently opened documents in PDF Studio
Replace Content Only: Replaces only the page content with new page content keeping all existing interactive features such as comments, form fields, and bookmarks.
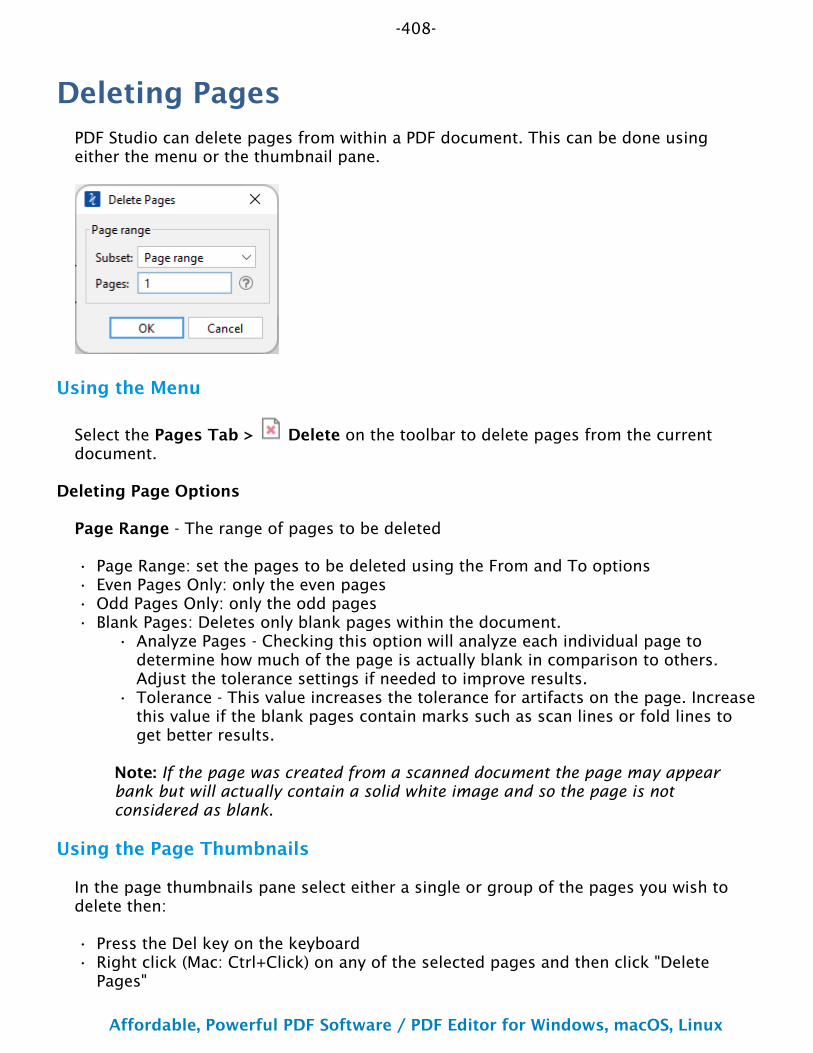
-408-
Affordable, Powerful PDF Software / PDF Editor for Windows, macOS, Linux
Copyright © 2002-Present Qoppa Software. All rights reserved.
••••
•
•
••
Deleting PagesPDF Studio can delete pages from within a PDF document. This can be done using either the menu or the thumbnail pane.
Using the Menu
Select the Pages Tab > Delete on the toolbar to delete pages from the current document.
Deleting Page Options
Page Range - The range of pages to be deleted
Page Range: set the pages to be deleted using the From and To optionsEven Pages Only: only the even pagesOdd Pages Only: only the odd pagesBlank Pages: Deletes only blank pages within the document.
Analyze Pages - Checking this option will analyze each individual page to determine how much of the page is actually blank in comparison to others. Adjust the tolerance settings if needed to improve results.Tolerance - This value increases the tolerance for artifacts on the page. Increase this value if the blank pages contain marks such as scan lines or fold lines to get better results.
Note: If the page was created from a scanned document the page may appear bank but will actually contain a solid white image and so the page is not considered as blank.
Using the Page Thumbnails
In the page thumbnails pane select either a single or group of the pages you wish to delete then:
Press the Del key on the keyboardRight click (Mac: Ctrl+Click) on any of the selected pages and then click "Delete Pages"

-409-
Affordable, Powerful PDF Software / PDF Editor for Windows, macOS, Linux
Copyright © 2002-Present Qoppa Software. All rights reserved.
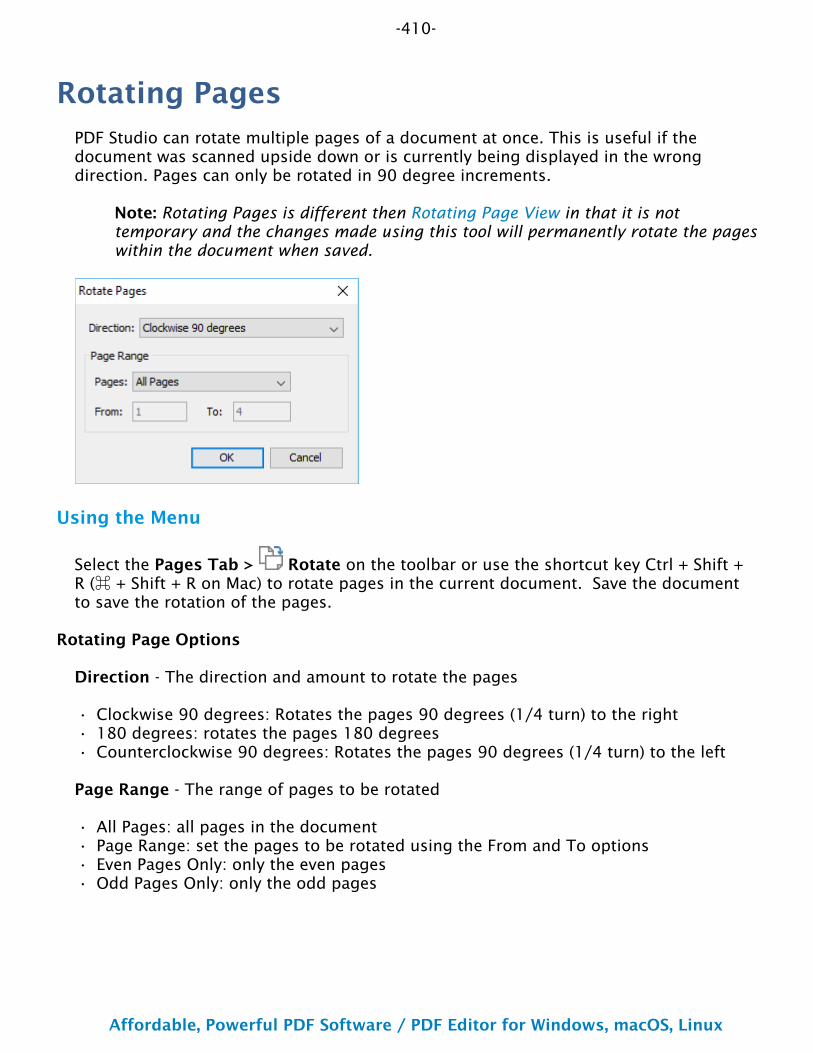
-410-
Affordable, Powerful PDF Software / PDF Editor for Windows, macOS, Linux
Copyright © 2002-Present Qoppa Software. All rights reserved.
•••
••••
Rotating PagesPDF Studio can rotate multiple pages of a document at once. This is useful if the document was scanned upside down or is currently being displayed in the wrong direction. Pages can only be rotated in 90 degree increments.
Note: Rotating Pages is different then Rotating Page View in that it is not temporary and the changes made using this tool will permanently rotate the pages within the document when saved.
Using the Menu
Select the Pages Tab > Rotate on the toolbar or use the shortcut key Ctrl + Shift + R (⌘ + Shift + R on Mac) to rotate pages in the current document. Save the document to save the rotation of the pages.
Rotating Page Options
Direction - The direction and amount to rotate the pages
Clockwise 90 degrees: Rotates the pages 90 degrees (1/4 turn) to the right180 degrees: rotates the pages 180 degreesCounterclockwise 90 degrees: Rotates the pages 90 degrees (1/4 turn) to the left
Page Range - The range of pages to be rotated
All Pages: all pages in the documentPage Range: set the pages to be rotated using the From and To optionsEven Pages Only: only the even pagesOdd Pages Only: only the odd pages
-411-
Affordable, Powerful PDF Software / PDF Editor for Windows, macOS, Linux
Copyright © 2002-Present Qoppa Software. All rights reserved.
1.
2.
1.
2.
•••
3.
Using the Page Thumbnails
Using the Page Rotation Buttons
In the page thumbnails pane select either a single or group of the pages you wish to rotateAt the top of the thumbnails pane click on one of the icons to rotate the page
Rotate Clockwise: Rotates the pages 90 degrees (1/4 turn) to the right
Rotate Counterclockwise: Rotates the pages 90 degrees (1/4 turn) to the left
Using the Right Click Menu
In the page thumbnails pane select either a single or group of the pages you wish to rotateRight click (Mac: Ctrl+Click) on any of the selected pages and then highlight "Rotate Pages". You will have the following 3 options available
Clockwise 90 degrees: Rotates the pages 90 degrees (1/4 turn) to the right180 degrees: rotates the pages 180 degreesCounterclockwise 90 degrees: Rotates the pages 90 degrees (1/4 turn) to the left
Click on the option you want to rotate the selected pages
Note: This will update the rotation property for the pages rotated in the document itself and the rotation will be saved when the document is saved. To rotate pages temporarily in the current view only, use the Rotate Clockwise and Rotate Counterclockwise buttons on the Toolbar or in the View menu.
-412-
Affordable, Powerful PDF Software / PDF Editor for Windows, macOS, Linux
Copyright © 2002-Present Qoppa Software. All rights reserved.
Reversing PagesPDF Studio can automatically reverse the order of the pages within a PDF. This can be done from the menu and is useful for example if a document was scanned in reverse.
Using the Menu
Select the Pages Tab > Reverse on the toolbar from the menu to reverse the page order in the current document.
-413-
Affordable, Powerful PDF Software / PDF Editor for Windows, macOS, Linux
Copyright © 2002-Present Qoppa Software. All rights reserved.
1.
2.3.
1.2.
3.
4.
Cropping PagesPDF Studio can adjust the crop box, bleed box, trim box, and art box on PDF documents. Documents may be cropped using the cropping dialog or the cropping tool. Units can be specified in inches, points, centimeters or millimeters. Cropping can be applied to a single page, a range of pages, or all pages.
How to Crop Pages
Using the Dialog
Go to Pages Tab > Crop Pages clicking on the down arrow and selecting Box Margins on the toolbar or use the shortcut key Ctrl + Shift + C (⌘ + Shift + C on Mac)Type in the crop settings and values for the documentClick OK to apply the settings
Using Drag & Crop
Activate the Crop tool by clicking on the Crop Tool button on the Document TabThen click and drag an area on the page with the mouse to select the desired area you wish keep.When the mouse button is released, the page crop margins will appear and the crop dialog will open so that the crop values can be manually adjusted.Click OK to apply the settings
Crop Settings
Box
Crop box – the region to which the contents of the page are to be or cropped when displayed or printed.
Bleed box – the bounds to which the contents of the page should be clipped when output in a production environment.
Trim box – the intended dimensions of the finished page after trimming.
Art box – the extent of the page’s meaningful content (including potential white space) as intended by the document creator.
Margins
Size - Displays what the size of the page will be once cropped
-414-
Affordable, Powerful PDF Software / PDF Editor for Windows, macOS, Linux
Copyright © 2002-Present Qoppa Software. All rights reserved.
•••
Units - Select the measurement unit for the crop margins in either Inches, Points, Centimeters, or Millimeters
Top - The distance of the margin from the top
Bottom - The distance of the margin from the bottom
Left - The distance of the margin from the left
Right - The distance of the margin from the right
Pages
All Pages: all pages in the document
Current Page: the current page being displayed
Pages: set custom range of pages if needed using values separated by commas. For example, to print only pages 2 to 4 & 6 to 12 & 20 of a 30 page document enter “2-4, 6-12, 20″.
Subset: Subset of the currently set page range to print. Choose from the below options
All pages in range: prints all the pages in the set rangeEven pages only: prints only the even pages in the set range (i.e. 2, 4, 6, etc...)Odd pages only: prints only the odd pages in the set range (i.e. 1, 3, 5, etc...)
-415-
Affordable, Powerful PDF Software / PDF Editor for Windows, macOS, Linux
Copyright © 2002-Present Qoppa Software. All rights reserved.
1.2.3.
1.
2.
3.4.
••
Resizing PagesPDF Studio can resize a page to a specified dimension. This tool can be used to scale pages so that the content better fits the page or to increases borders and margins. Units can be specified in inches, points, centimeters or millimeters. Resizing can be applied to a single page, a range of pages, or all pages.
How to Resize Pages
Using the Dialog
Go to Pages Tab > Resize Pages on the toolbarChoose the page size settings and values for the documentClick OK to apply the settings
Using the Page Thumbnails
In the page thumbnails pane select either a single or group of the pages you wish to resizeRight click (Mac: Ctrl+Click) on any of the selected pages and then select "Resize Pages"Choose the page size settings and values for the documentClick OK to apply the settings
Resize Settings
New Page
New Page Size - Allows you to select a page size from a list of predefined standard document sizes.
Portrait: sets the selected page orientation size to portraitLandscape: sets the selected page size orientation to landscape
Note: Portrait and Landscape options are not available when selecting a "Custom" media size
Units - Select the measurement unit for the crop margins in either Inches, Points, Centimeters, or Millimeters
Width - Width of the page in the units selected
Height - Height of the page in the units selected
Keep Proportional - Toggles keeping the width and height values in sync
-416-
Affordable, Powerful PDF Software / PDF Editor for Windows, macOS, Linux
Copyright © 2002-Present Qoppa Software. All rights reserved.
• •
•
••
•••
Current Page
Location - Choose the location of the current page within the new page size.
Custom - Set the location of the page using the x & y coordinates
x - Sets the left position of the original document content relative to the left side of the pagey - Sets the top position of the original document content relative to the bottom of the page
Center - Will center the original page content in the new page size
Rotation - The angle in degrees to rotate the original page content
Note: Comments and forms will not be rotated.
Scale - Set the scale of the current page within the new page size
Custom - Scale the page using a set percentage valueScale to Fit - Resizes the page content to best fit the new page size
Other
Fit Crop to Page - Sets the crop box equal to the media box
Reset - Resets the options to the original document values
Pages
All Pages: all pages in the document
Current Page: the current page being displayed
Pages: set custom range of pages if needed using values separated by commas. For example, to resize only pages 2 to 4 & 6 to 12 & 20 of a 30 page document enter "2-4, 6-12, 20".
Subset: Subset of the currently set page range to print. Choose from the below options
All pages in range: prints all the pages in the set rangeEven pages only: prints only the even pages in the set range (i.e. 2, 4, 6, etc...)Odd pages only: prints only the odd pages in the set range (i.e. 1, 3, 5, etc...)
-417-
Affordable, Powerful PDF Software / PDF Editor for Windows, macOS, Linux
Copyright © 2002-Present Qoppa Software. All rights reserved.
1.2.3.
1.
2.
3.4.
••••••
Labeling PagesPDF Studio can add page labels to PDF documents. Page labels allow you to set distinct names or numbers that can be different from bookmarks or standard page numbers. For example using lower case roman numerals (iii,iv,v,vi) for a Preface at the beginning of a document. Page labels can be styled using various numbering styles including prefixes. Page labels can be applied to a single page, a range of pages, or all pages.
How to Change Page Labels
Using the Dialog
Go to Pages Tab > Resize Pages on the toolbarChoose the page label settings and values for the documentClick OK to apply the settings
Using the Page Thumbnails
In the page thumbnails pane select either a single or group of the pages you wish to resizeRight click (Mac: Ctrl+Click) on any of the selected pages and then select "Label Pages"Choose the page label settings and values for the documentClick OK to apply the settings
Resize Settings
Page Range
All Pages - all pages in the document
Selected - only the pages selected in the thumbnail pane
Page Range - set the pages to be rotated using the From and To options
Label
Style - Set's the style for the page numbering values
NoneStandard (1, 2, 3)Lower Case Roman Numerals (iii, iv, v, vi)Upper Case Roman Numerals (III, IV, V, VI)Lower Case AlphaNumerics (a, b, c)Upper Case AlphaNumerics (A, B, C)
-418-
Affordable, Powerful PDF Software / PDF Editor for Windows, macOS, Linux
Copyright © 2002-Present Qoppa Software. All rights reserved.
Prefix - Text to be displayed before the chosen number style
Start - The number to start labeling the chosen pages using the style selected and prefix options selected
-419-
Affordable, Powerful PDF Software / PDF Editor for Windows, macOS, Linux
Copyright © 2002-Present Qoppa Software. All rights reserved.
•
•
•
•
•
•
•
•
•
Move, Cut, Copy, & Paste PagesYou can use the page thumbnails in the thumbnails pane to copy or move pages within a document or between different documents.
When you drag a page thumbnail in the page thumbnails pane, a bar appears between other page thumbnails, indicating the position in which the page will be moved to.
Within a PDF, using the Page Thumbnails
Use the mouse to select thumbnail page(s) from the thumbnail pane and then:
Using Drag and Drop
Move - Select and drag thumbnail pages to the desired location within the Thumbnail Pane.
Using Right Click (Mac: Ctrl+Click)
Copy - Right click (Mac: Ctrl+Click) or use keyboard shortcuts to copy the selected pages.Move - Right click (Mac: Ctrl+Click) or use keyboard shortcuts to cut the selected pages.Paste - Right click (Mac: Ctrl+Click) or use keyboard shortcuts to paste the copied or cut pages in the same document.
Between PDFs, Using the Page Thumbnails
Use the mouse to select thumbnail page(s) from the thumbnail pane and then:
Using Drag and Drop
Copy - Select and drag thumbnail pages from the source document to the destination document's Thumbnail pane of the second document.Move - Select thumbnail pages from the source document. While holding Ctrl, drag the pages to the desired location within the Thumbnail Pane of the second document.
Using Right Click (Mac: Ctrl+Click)
Copy - Right click (Mac: Ctrl+Click) or use keyboard shortcuts to copy the selected pages.Move - Right click (Mac: Ctrl+Click) or use keyboard shortcuts to cut the selected pages.Paste - Right click (Mac: Ctrl+Click) or use keyboard shortcuts to paste the copied or cut pages in the same document.

-420-
Affordable, Powerful PDF Software / PDF Editor for Windows, macOS, Linux
Copyright © 2002-Present Qoppa Software. All rights reserved.
-421-
Affordable, Powerful PDF Software / PDF Editor for Windows, macOS, Linux
Copyright © 2002-Present Qoppa Software. All rights reserved.
1.2.3.4.
Import Images as PagesPDF Studio can import an image directly into the PDF as a page. This can be useful when adding scanned pages or charts to a document for example. The following image types can be imported: *png, *jpg, *jpeg, *jpe, *gif, *tif & *tiff.
Using the Menu
Select the Pages Tab > Insert > Import Images as Pages on the toolbarUsing Add Files or Add Folder select the files you wish to insert as pages.Once all of the files are added click Start to begin merging/converting the files.All images will be converted in a single action and appended to the end of the document.
Using Drag & Drop
Use the mouse to select the image(s) from a folder or your desktop and then drag them directly into the thumbnail pane of the document to have them converted into a page.
-422-
Affordable, Powerful PDF Software / PDF Editor for Windows, macOS, Linux
Copyright © 2002-Present Qoppa Software. All rights reserved.
1.
2.3.4.
•
Page TemplatesPage templates are additional pages stored within the PDF that can be appended or shown based on a JavaScript trigger or action within a document. Page templates can be used to create more dynamic PDFs by being able to add pages that don’t appear to originally be a part of the document.
For example: If you wanted to create an inspection form with the option to add additional pages for details you can create a page template of the additional details page and set a button to add additional pages to the PDF as needed.
How to Create Page Templates
Open/create a PDF documentNote: The page you wish to use as a template must already exist in the document
Launch the Page Template dialog by going to the Pages Tab > TemplatesClick “Add” and set the settings for the page templateOnce done click OK to set the page template
After the page template has been created you will need to set an event or trigger to use the Page Template. To do this, you can add JavaScript to the document that will create the new page referencing the page template name set in step 3
expTplt = getTemplate("{template name here}");
expTplt.spawn(insertAtPage,renameFields,newPage);
expTplt.spawn() options:
insertAtPage: page number to insert pagerenameFields: true/false to rename fields on page template being insertednewPage: true = add page on top of existing page / false = create new page
Page Template Settings
Name: The name of the page template. Used to reference the template later in the JavaScript used to generate the templates
Visible: Whether or not the page set as a template is initially visible within the document
Page Selection: Use the page navigation tools and preview to select the page to use in the template

-423-
Affordable, Powerful PDF Software / PDF Editor for Windows, macOS, Linux
Copyright © 2002-Present Qoppa Software. All rights reserved.
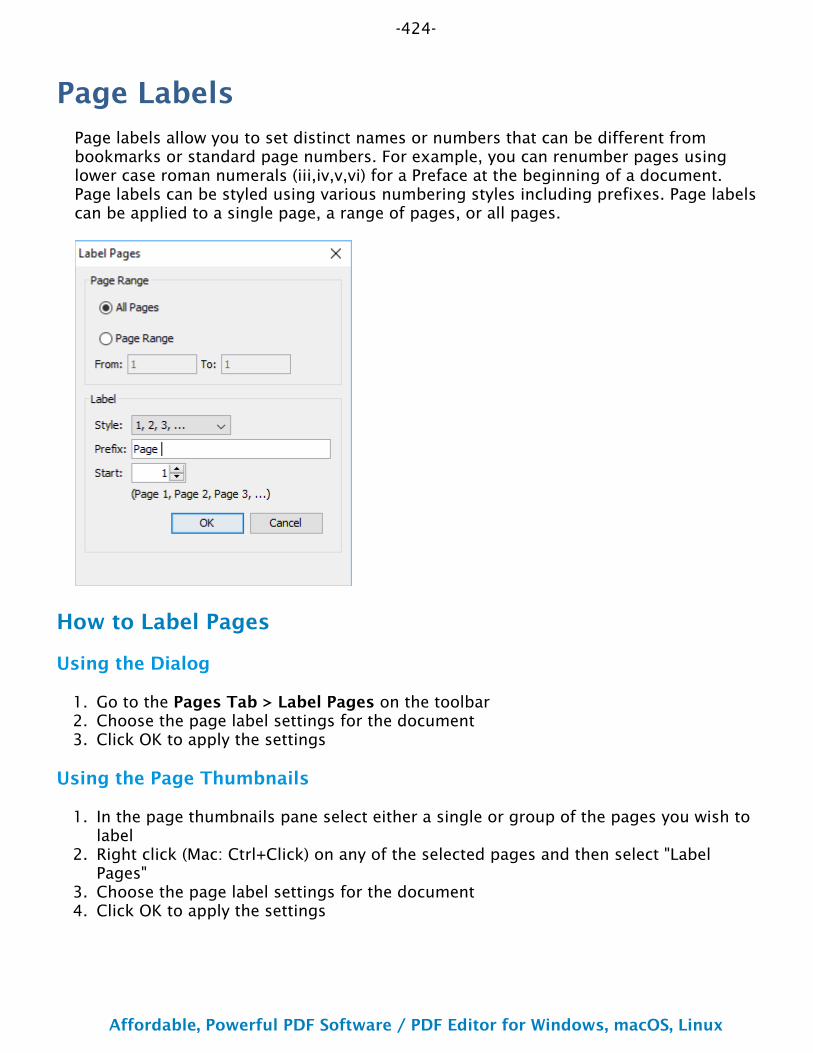
-424-
Affordable, Powerful PDF Software / PDF Editor for Windows, macOS, Linux
Copyright © 2002-Present Qoppa Software. All rights reserved.
1.2.3.
1.
2.
3.4.
Page LabelsPage labels allow you to set distinct names or numbers that can be different from bookmarks or standard page numbers. For example, you can renumber pages using lower case roman numerals (iii,iv,v,vi) for a Preface at the beginning of a document. Page labels can be styled using various numbering styles including prefixes. Page labels can be applied to a single page, a range of pages, or all pages.
How to Label Pages
Using the Dialog
Go to the Pages Tab > Label Pages on the toolbarChoose the page label settings for the documentClick OK to apply the settings
Using the Page Thumbnails
In the page thumbnails pane select either a single or group of the pages you wish to labelRight click (Mac: Ctrl+Click) on any of the selected pages and then select "Label Pages"Choose the page label settings for the documentClick OK to apply the settings
-425-
Affordable, Powerful PDF Software / PDF Editor for Windows, macOS, Linux
Copyright © 2002-Present Qoppa Software. All rights reserved.
••••••
Page Label Settings
Page Range
All Pages: all pages in the document
Page Range: set the pages to be extracted using the From and To options
Label
Style: Set’s the style for the page numbering values
NoneStandard (1, 2, 3)Lower Case Roman Numerals (iii, iv, v, vi)Upper Case Roman Numerals (III, IV, V, VI)Lower Case AlphaNumerics (a, b, c)Upper Case AlphaNumerics (A, B, C)
Prefix: Text to be displayed before the chosen number style
Start: The number to start labeling the chosen pages using the style selected and prefix options selected
-426-
Affordable, Powerful PDF Software / PDF Editor for Windows, macOS, Linux
Copyright © 2002-Present Qoppa Software. All rights reserved.
Optimizing PDFsPDF Studio has the following functions available when optimizing PDF documents.
Optimizing a PDF: How to optimize a PDF using Optimizer in PDF Studio
Optimizer Settings: Options available when optimizing PDF documents
Optimizer Profiles: Using and managing existing PDF optimizer profiles
-427-
Affordable, Powerful PDF Software / PDF Editor for Windows, macOS, Linux
Copyright © 2002-Present Qoppa Software. All rights reserved.
1.
2.3.
4.
•
5.
6.
Optimizing a PDFPDF Studio is capable of optimizing PDF documents. Optimizing a PDF document is useful if you need to compress images or remove objects in order to reduce the PDF file size. There are many different optimization options available in PDF Studio.
How to Optimize a PDF document
On the toolbar go to Document Tab > Optimize or use the shortcut key Ctrl + Shift + O (Command + Shift + O on Mac)This will display the Optimizer Settings dialogSelect an Optimizer Profile or the settings that you wish to use to optimize your documentOnce complete click on Optimize. This will prompt you for a location to save the document
Note: If the document is protected or locked you will not be able to optimize the document until it is unlocked.
Once you have set the save location for your document and click save and your document will be optimized and saved to the location you chose.After optimization is complete the new file will automatically be opened and an optimization report will be displayed so that you can review the results.
Analyze PDF
Prior to optimizing, the document can be analyzed to determine what specific document elements including Fonts, Images, Annotations, etc... are within the document. You can then use the report to determine the best options to effectively reduce the file size.
Open the Optimizer Settings dialog and click on the "Analyze" button to generate the report.
-428-
Affordable, Powerful PDF Software / PDF Editor for Windows, macOS, Linux
Copyright © 2002-Present Qoppa Software. All rights reserved.
•••
•
•
•
•
Optimizer Settings Below is a list of each of the PDF optimizer settings and a description of their functions.
PDF Optimize Options:
Profile
PDF Studio comes with 3 default profiles for optimizing PDFs that generally cover most scenarios. Users can create custom Optimizer Profiles to fit their specific needs that can be saved and reused later without having to re-enter settings.
Defaults Profiles Included:
Light - light compression maintaining higher quality imagesBalanced - compression suitable for most standard needsAggressive - high compression while sacrificing image quality
Image Processing
PDF Studio can process images contained within the document using a variety of settings:
Image Compression
Convert any image to either a JPEG, JPEG2000, FLATE, or JBIG2.
JPEG - lossy compression that will reduce image quality and sizeJPEG2000 - less lossy compression that will reduce size and some qualityFLATE - Lossless compression does not reduce quality but may not always reduce file sizeJBIG2 - Lossless compression that can only support black and white color space. Color images will be converted to black and white. Best for scanned documents with no images
Note: *Note - Anytime a change is made to "Color Space" or "DPI" the image will have to be re-compressed. When the "No Change" option is selected, PDF Studio will attempt to keep the current image compression format. If it is not supported, PDF Studio will re-compress to the closest matching supported compression.
Image Quality Allows the image quality to be adjusted between 10-100%.
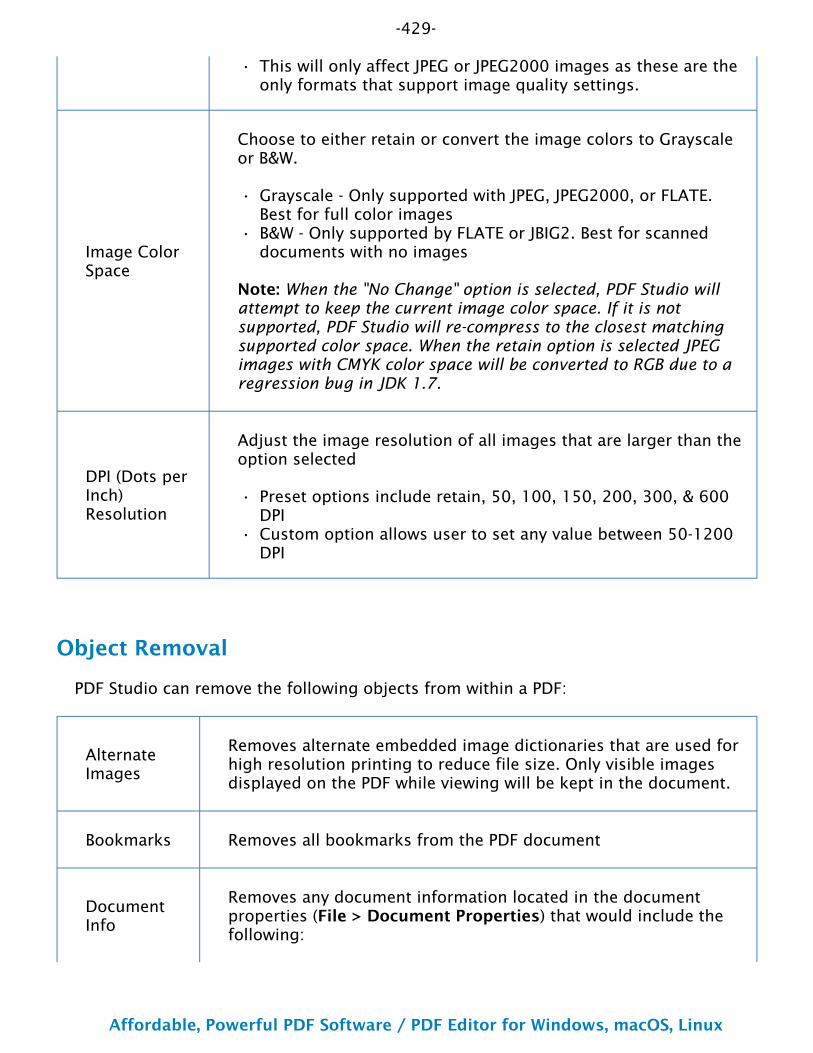
-429-
Affordable, Powerful PDF Software / PDF Editor for Windows, macOS, Linux
Copyright © 2002-Present Qoppa Software. All rights reserved.
•
•
•
•
•
This will only affect JPEG or JPEG2000 images as these are the only formats that support image quality settings.
Image Color Space
Choose to either retain or convert the image colors to Grayscale or B&W.
Grayscale - Only supported with JPEG, JPEG2000, or FLATE. Best for full color imagesB&W - Only supported by FLATE or JBIG2. Best for scanned documents with no images
Note: When the "No Change" option is selected, PDF Studio will attempt to keep the current image color space. If it is not supported, PDF Studio will re-compress to the closest matching supported color space. When the retain option is selected JPEG images with CMYK color space will be converted to RGB due to a regression bug in JDK 1.7.
DPI (Dots per Inch) Resolution
Adjust the image resolution of all images that are larger than the option selected
Preset options include retain, 50, 100, 150, 200, 300, & 600 DPICustom option allows user to set any value between 50-1200 DPI
Object Removal
PDF Studio can remove the following objects from within a PDF:
Alternate Images
Removes alternate embedded image dictionaries that are used for high resolution printing to reduce file size. Only visible images displayed on the PDF while viewing will be kept in the document.
Bookmarks Removes all bookmarks from the PDF document
Document Info
Removes any document information located in the document properties (File > Document Properties) that would include the following:
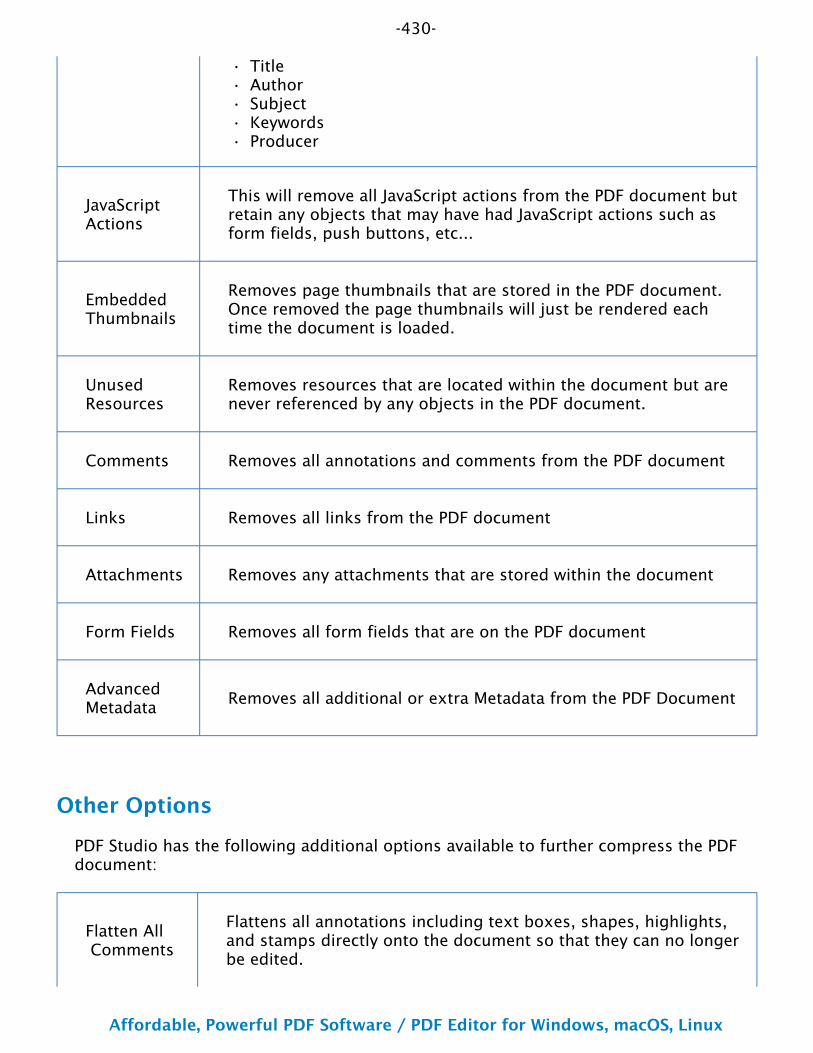
-430-
Affordable, Powerful PDF Software / PDF Editor for Windows, macOS, Linux
Copyright © 2002-Present Qoppa Software. All rights reserved.
•••••
TitleAuthorSubjectKeywordsProducer
JavaScript Actions
This will remove all JavaScript actions from the PDF document but retain any objects that may have had JavaScript actions such as form fields, push buttons, etc...
Embedded Thumbnails
Removes page thumbnails that are stored in the PDF document. Once removed the page thumbnails will just be rendered each time the document is loaded.
Unused Resources
Removes resources that are located within the document but are never referenced by any objects in the PDF document.
Comments Removes all annotations and comments from the PDF document
Links Removes all links from the PDF document
Attachments Removes any attachments that are stored within the document
Form Fields Removes all form fields that are on the PDF document
Advanced Metadata
Removes all additional or extra Metadata from the PDF Document
Other Options
PDF Studio has the following additional options available to further compress the PDF document:
Flatten All Comments
Flattens all annotations including text boxes, shapes, highlights, and stamps directly onto the document so that they can no longer be edited.
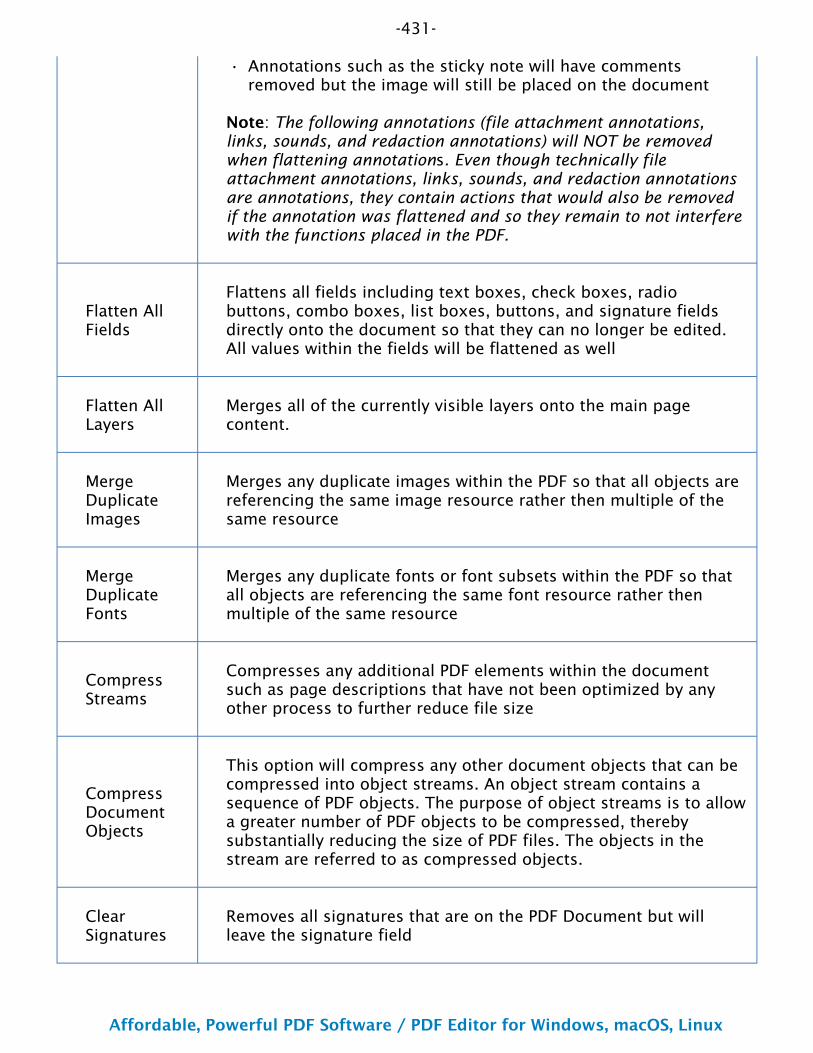
-431-
Affordable, Powerful PDF Software / PDF Editor for Windows, macOS, Linux
Copyright © 2002-Present Qoppa Software. All rights reserved.
• Annotations such as the sticky note will have comments removed but the image will still be placed on the document
Note: The following annotations (file attachment annotations, links, sounds, and redaction annotations) will NOT be removed when flattening annotations. Even though technically file attachment annotations, links, sounds, and redaction annotations are annotations, they contain actions that would also be removed if the annotation was flattened and so they remain to not interfere with the functions placed in the PDF.
Flatten All Fields
Flattens all fields including text boxes, check boxes, radio buttons, combo boxes, list boxes, buttons, and signature fields directly onto the document so that they can no longer be edited. All values within the fields will be flattened as well
Flatten All Layers
Merges all of the currently visible layers onto the main page content.
Merge Duplicate Images
Merges any duplicate images within the PDF so that all objects are referencing the same image resource rather then multiple of the same resource
Merge Duplicate Fonts
Merges any duplicate fonts or font subsets within the PDF so that all objects are referencing the same font resource rather then multiple of the same resource
Compress Streams
Compresses any additional PDF elements within the document such as page descriptions that have not been optimized by any other process to further reduce file size
Compress Document Objects
This option will compress any other document objects that can be compressed into object streams. An object stream contains a sequence of PDF objects. The purpose of object streams is to allow a greater number of PDF objects to be compressed, thereby substantially reducing the size of PDF files. The objects in the stream are referred to as compressed objects.
Clear Signatures
Removes all signatures that are on the PDF Document but will leave the signature field
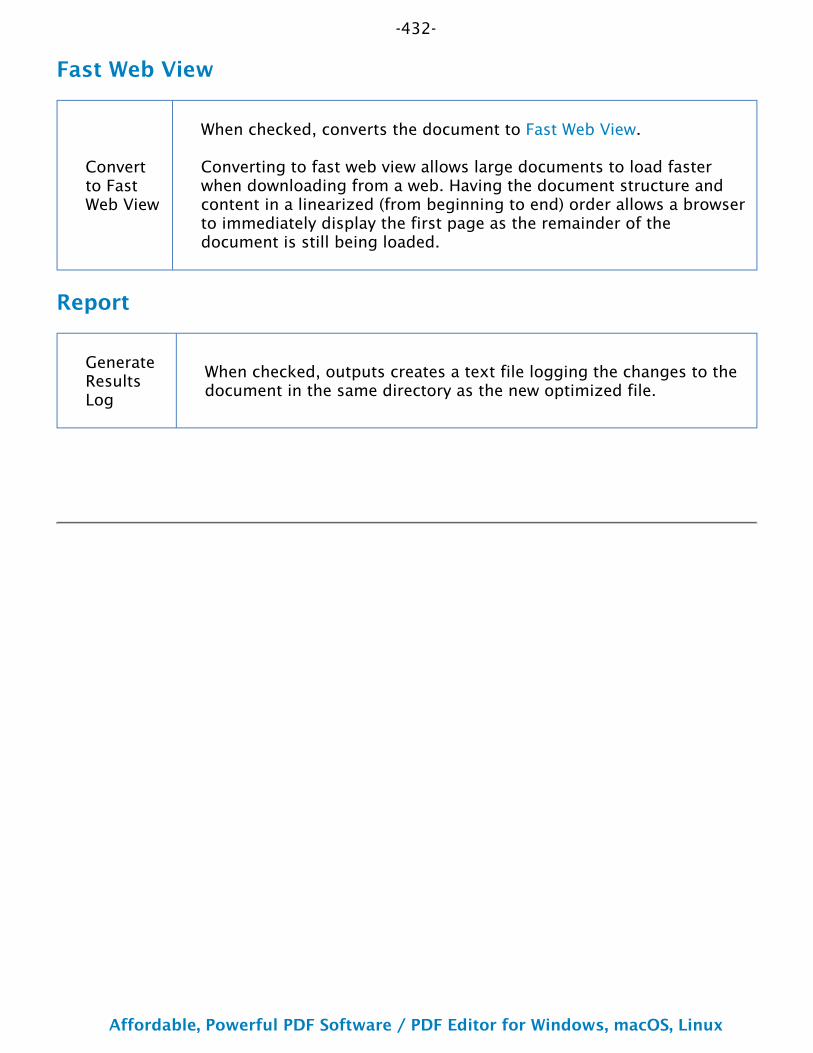
-432-
Affordable, Powerful PDF Software / PDF Editor for Windows, macOS, Linux
Copyright © 2002-Present Qoppa Software. All rights reserved.
Fast Web View
Convert to Fast Web View
When checked, converts the document to Fast Web View.
Converting to fast web view allows large documents to load faster when downloading from a web. Having the document structure and content in a linearized (from beginning to end) order allows a browser to immediately display the first page as the remainder of the document is still being loaded.
Report
Generate Results Log
When checked, outputs creates a text file logging the changes to the document in the same directory as the new optimized file.
-433-
Affordable, Powerful PDF Software / PDF Editor for Windows, macOS, Linux
Copyright © 2002-Present Qoppa Software. All rights reserved.
1.
2.3.
4.
5.
6.
Optimizer ProfilesTo make the optimization process easier, PDF Studio allows you to create Optimizer Profiles which allow you to save your settings to use later. PDF Studio comes with 3 default profiles that you can use or you can create your own from either a blank template or by modifying one of the existing default profiles.
Note: You do not need to create or save an optimizer configuration before optimizing a document. To optimize documents without saving settings just go to
Document Tab > Optimize > Optimize... and choose the settings to use and click Apply to run the optimize settings without saving a profile.
Creating an Optimizer Profile
On the toolbar go to Document Tab > Optimize > Optimize... or use the shortcut key Ctrl + Shift + O (Command + Shift + O on Mac)This will display the Optimizer Settings dialogSet all of the options that you would like to have in your profile. You can either start from an existing profile or a blank template by selecting "<New Item>" from the drop down.Once you have completed your settings, click on Save. This will bring up a window to name your profile.If you are starting from a blank template this field will be blank. If you have previously used a profile the previous profile name will be displayed. If you would like to just update the previous profile leave the name and click OK. If you would like to create a new profile just type in the new name you would like to save it as and click OK.Once complete your profile will now be available in the drop down menu as well as the quick optimize options in the menu bar
Optimize a PDF Document Using an Existing Optimizer Profile
There are 2 ways to use an existing optimizer profile:
From the Optimize dialog
Open the document that you would like to optimize. Open the optimizer dialog from
Document Tab > Optimize > Optimize... or use the shortcut key Ctrl + Shift + O (Command + Shift + O on Mac). Choose the optimizer profile from the drop down list in the combo box, click on the Apply button at the bottom of the dialog.
-434-
Affordable, Powerful PDF Software / PDF Editor for Windows, macOS, Linux
Copyright © 2002-Present Qoppa Software. All rights reserved.
•••
•••
•••
••
••
•••
•••
•••
••
••
From the Optimize menu
Open the document that you would like to optimize. Under the Document Tab > Optimize menu, there is a list of all the optimize profiles that you have previously created.
Note: Only the ones for which you chose the Show on Menu option will appear on this list. Click on the optimizer profile in the list you'd like to run and it will begin immediately optimizing the PDF using the settings saved in the optimizer profile.
Default Optimizer Profile Settings
Light
Light compression maintaining higher quality images
Color ImagesCompression = JPEG - Quality = 8DPI = 600
Grayscale ImagesCompression = JPEG - Quality = 8DPI = 600
B&W ImagesCompression = JBIG2DPI = 600
Object RemovalAlternate Images, Unused Resources, Embedded Thumbnails
OtherFlate Uncompressed Streams, Merge Duplicate Images, Merge Duplicate Fonts
Balanced
Compression suitable for most standard needs
Color ImagesCompression = JPEG - Quality = 5DPI = 150
Grayscale ImagesCompression = JPEG - Quality = 5DPI = 150
B&W ImagesCompression = JBIG2DPI = 300
Object RemovalAlternate Images, Unused Resources, Embedded Thumbnails
OtherFlatten All Comments, Flate Uncompressed Streams, Merge Duplicate Images, Merge Duplicate Fonts
-435-
Affordable, Powerful PDF Software / PDF Editor for Windows, macOS, Linux
Copyright © 2002-Present Qoppa Software. All rights reserved.
•••
•••
•••
••
••
Aggressive
High compression while sacrificing image quality
Color ImagesCompression = JPEG2000 - Quality = 3DPI = 100
Grayscale ImagesCompression = JPEG2000 - Quality = 3DPI = 100
B&W ImagesCompression = JBIG2DPI = 150
Object RemovalAlternate Images, Attachments, Metadata, Unused Resources, Embedded Thumbnails, Comments
OtherFlatten All Fields, Flate Uncompressed Streams, Merge Duplicate Images, Merge Duplicate Fonts
-436-
Affordable, Powerful PDF Software / PDF Editor for Windows, macOS, Linux
Copyright © 2002-Present Qoppa Software. All rights reserved.
PDF LayersPDF layers allow documents to have content placed either above or below other content within the document. Individual layers within a PDF can be displayed or hidden by the user if needed. Each layer can also have it's own set of comments associated with them that can be assigned to another layer or even flatten to the current layer. PDF Studio supports the following layer functions:
Note: In order to work with Layers you will first need to open the Layers Pane.
Show/Hide Layers: How to show or hide selected layers
Adding a Blank Layer : Adding a new blank layer to a PDF
Importing PDF as Layer : Import a PDF as a new layer
Assigning Comments to Layer: How to designate the layer comments will be added to and move existing comments to a new layer
Flattening Comments to Layer: How to flatten comments on a specific layer
Merge Layers - Select specific layers to join together into a single layer
Flatten Layers - Flattens all layers to base content
Layer Properties : Layer properties and settings available
Displaying the Layers Pane
The layers pane is located on the left of the PDF Studio window. If not displayed the
pane can be opened using the Layers button on the left side of the screen.
-437-
Affordable, Powerful PDF Software / PDF Editor for Windows, macOS, Linux
Copyright © 2002-Present Qoppa Software. All rights reserved.
1.
2.3.
Show/Hide LayersWhen viewing a document layers can be toggled on and off to create different views.
Note: Layers can be reset to their original state using the "Reset Layers" menu option.
How to Show/Hide Layers in a PDF
Access the layers pane by clicking the Layers button on the left side of the screen.Show or hide layers by clicking the check box next to the layers nameContinue working on the document as you normally would
Note: Toggling the layers on and off does not modify the document and will not be saved. To change the default state when opening the PDF see Layer Properties
-438-
Affordable, Powerful PDF Software / PDF Editor for Windows, macOS, Linux
Copyright © 2002-Present Qoppa Software. All rights reserved.
1.
2.3.4.
Adding a Blank LayerA blank layer can be added to a document in PDF Studio. This is useful if you want to place all comments on a separate layer from the document. When adding a layer to a PDF it will always be placed above all other layers currently in the PDF.
How to Add a Blank Layer in a PDF
Access the layers pane by clicking the Layers button on the left side of the screen.
Click on the Add Layer button in the top of the layers paneEnter the name for the new layerClick OK to create the new layer
Note: When adding a layer to a PDF it will always be placed above all other layers currently in the PDF.
-439-
Affordable, Powerful PDF Software / PDF Editor for Windows, macOS, Linux
Copyright © 2002-Present Qoppa Software. All rights reserved.
1.
2.3.4.5.
••••
Importing PDF as LayerPDF Studio allows you to import a separate PDF as a new layer into an existing PDF. This is useful if you want to merge several documents on top of one another.
How to Import PDF as a layer
Access the layers pane by clicking the Layers button on the left side of the screen.
Click on the Import PDF as Layer button in the top of the layers paneSelect the PDF file you wish to import as the new layerSet the options for the new layerOnce complete, click OK to create the new layer
Import PDF as Layer Options
Source Pages
Page Range - The range of pages to be cropped
All Pages: all pages in the documentPage Range: set the pages to be cropped using the From and To optionsEven Pages Only: only crops the even pagesOdd Pages Only: only crops the odd pages
Import Options
Layer - The layer to import the PDF document into. Select <New Layer> to create a new layer
Layer Name - The name of the layer the document will be imported to. If <New Layer> is selected you will need to enter a name for the new layer
Starting at Page - The page within the current document to begin adding the layers
Show on Print - Whether or not the layer will be displayed when the document is printed.
Insert - Choose to insert the layer on top of or behind the current page content
-440-
Affordable, Powerful PDF Software / PDF Editor for Windows, macOS, Linux
Copyright © 2002-Present Qoppa Software. All rights reserved.
1.
2.3.4.5.
1.
•
2.3.4.
Assigning Comments to LayersComments can be assigned to a specific layer in the document. When the comment is associated with a layer showing or hiding the layer also affects the comments. You can either designate a layer as the Comments Layer, or Move Comments to a new layer. Comments that are associated with No Layer will be a part of the primary PDF content.
Designating the Comments Layer
When a layer is designated as the comments layer all new comments going forward will be added to this layer
Access the layers pane by clicking the Layers button on the left side of the screen.Right click (Mac: Ctrl + Click) on the layer you want to set as the comments layerChoose the Comments Layer option in the right click menuClick OK to confirmContinue working on the document as you normally would
Note: Repeat steps 1-3 to undesignate the layer as the comments layer
Moving Comments to a New Layer
Existing comments can be moved to a new layer using the properties dialog
Access the Comment properties by right clicking (Mac: Ctrl + Click) on the annotation and choosing Properties in the right click menu or clicking on the edit
button on the Mini Toolbar.Note: Multiple annotations can be edited at once by using Ctrl + Click to first select all the annotations you wish to edit
Go to the General tabIn the Layer option, select the layer you wish to move the annotation toClick OK to apply the changes
Note: If the layer selected is currently hidden the annotation will disappear until the layer is displayed again.
-441-
Affordable, Powerful PDF Software / PDF Editor for Windows, macOS, Linux
Copyright © 2002-Present Qoppa Software. All rights reserved.
1.
2.
3.
Flattening Comments on LayerFlattening annotations is the act of painting the annotations directly on the layer to which they belong so they are not editable anymore. This will permanently write an annotation into the document. For instance, a custom signature stamp can be flattened so the signature is added to the document itself and doesn't sit on a document as an annotation anymore.
Note: The following annotations (links, sounds, and redaction annotations) will NOT be removed when flattening annotations. Even though technically, links, sounds, and redaction annotations are annotations, they contain actions that would also be removed if the annotation was flattened and so they remain to not interfere with the functions placed in the PDF.
How to Flatten all Comments on Layer
Access the layers pane by clicking the Layers button on the left side of the screen.Right click (Mac: Ctrl + Click) on the layer you want to flatten comments and select the Flatten Comments optionClick OK to confirm
Note: This cannot be undone. Make sure to save a copy before completing this action.
-442-
Affordable, Powerful PDF Software / PDF Editor for Windows, macOS, Linux
Copyright © 2002-Present Qoppa Software. All rights reserved.
1.
2.3.
•4.
5.
Merge LayersPDF Studio allows you to merge multiple layers into a single target layer. All content belonging to the selected layers will become part of the target layer. This can be used to join similar layers together to reduce the number of layer options in the document.
How to Merge Layers in a PDF
Access the layers pane by clicking the Layers button on the left side of the screen.
Click on the Options button and select Merge LayersSelect one or more layers to merge from the "Layers to merge" list.
Hold down SHIFT or CTRL (Command on Mac) to select multiple layers.In the "Target Layer" list, select the layer you wish to merge the layers selected in step #3 intoClick Merge to begin the process
-443-
Affordable, Powerful PDF Software / PDF Editor for Windows, macOS, Linux
Copyright © 2002-Present Qoppa Software. All rights reserved.
1.
2.3.
Flatten LayersThe Flatten Layers function merges all of the currently visible layers onto the main page content. This essentially consolidates all of the layers in the document into the main content of the page.
How to Flatten Layers in a PDF
Access the layers pane by clicking the Layers button on the left side of the screen.
Click on the Options button and select Flatten LayersSave the document to keep the changes
-444-
Affordable, Powerful PDF Software / PDF Editor for Windows, macOS, Linux
Copyright © 2002-Present Qoppa Software. All rights reserved.
1.
2.3.
Delete LayersThe Delete Layers function removes the selected layer and all of it's associated content.
How to Flatten Layers in a PDF
Access the layers pane by clicking the Layers button on the left side of the screen.
Click on the Options button and select Delete LayersSave the document to keep the changes
-445-
Affordable, Powerful PDF Software / PDF Editor for Windows, macOS, Linux
Copyright © 2002-Present Qoppa Software. All rights reserved.
1.
2.3.4.
Layer PropertiesPDF Studio allows you to change the properties of layers within the PDF.
How to Access the Layer Properties
Access the layers pane by clicking the Layers button on the left side of the screen.Right click (Mac: Ctrl + Click) on the layer and choose Properties in the mouse menuSet the Layer Property Options you wish to useClick OK to apply the changes
Layer Property Options
Name - The name of the layer
Default State - The default state for the layer when the document is first opened
Show on Print - Options to set whether or not the layer will be displayed when printed.
Lock Layer - When checked, if the document is protected will lock the layer from being changed
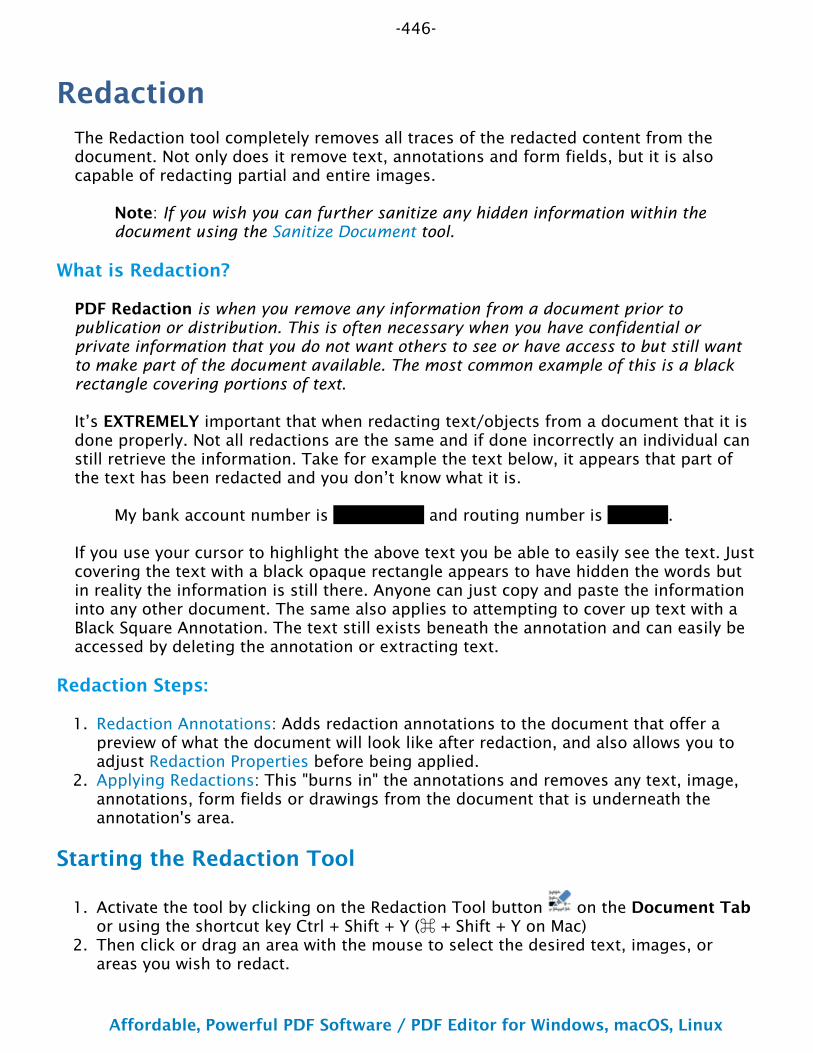
-446-
Affordable, Powerful PDF Software / PDF Editor for Windows, macOS, Linux
Copyright © 2002-Present Qoppa Software. All rights reserved.
1.
2.
1.
2.
RedactionThe Redaction tool completely removes all traces of the redacted content from the document. Not only does it remove text, annotations and form fields, but it is also capable of redacting partial and entire images.
Note: If you wish you can further sanitize any hidden information within the document using the Sanitize Document tool.
What is Redaction?
PDF Redaction is when you remove any information from a document prior to publication or distribution. This is often necessary when you have confidential or private information that you do not want others to see or have access to but still want to make part of the document available. The most common example of this is a black rectangle covering portions of text.
It’s EXTREMELY important that when redacting text/objects from a document that it is done properly. Not all redactions are the same and if done incorrectly an individual can still retrieve the information. Take for example the text below, it appears that part of the text has been redacted and you don’t know what it is.
My bank account number is 123456789 and routing number is 654987.
If you use your cursor to highlight the above text you be able to easily see the text. Just covering the text with a black opaque rectangle appears to have hidden the words but in reality the information is still there. Anyone can just copy and paste the information into any other document. The same also applies to attempting to cover up text with a Black Square Annotation. The text still exists beneath the annotation and can easily be accessed by deleting the annotation or extracting text.
Redaction Steps:
Redaction Annotations: Adds redaction annotations to the document that offer a preview of what the document will look like after redaction, and also allows you to adjust Redaction Properties before being applied.Applying Redactions: This "burns in" the annotations and removes any text, image, annotations, form fields or drawings from the document that is underneath the annotation's area.
Starting the Redaction Tool
Activate the tool by clicking on the Redaction Tool button on the Document Tab or using the shortcut key Ctrl + Shift + Y (⌘ + Shift + Y on Mac)Then click or drag an area with the mouse to select the desired text, images, or areas you wish to redact.
-447-
Affordable, Powerful PDF Software / PDF Editor for Windows, macOS, Linux
Copyright © 2002-Present Qoppa Software. All rights reserved.
3.
4.
Once selected right click (Mac: Ctrl + Click) and choose Apply All Redactions in the
mouse menu or go to the Redaction Tool button on the Document Tab, click on
the down arrow and select Apply All Redactions.
To exit the selection mode, simply click on the hand tool or Esc on the keyboard.
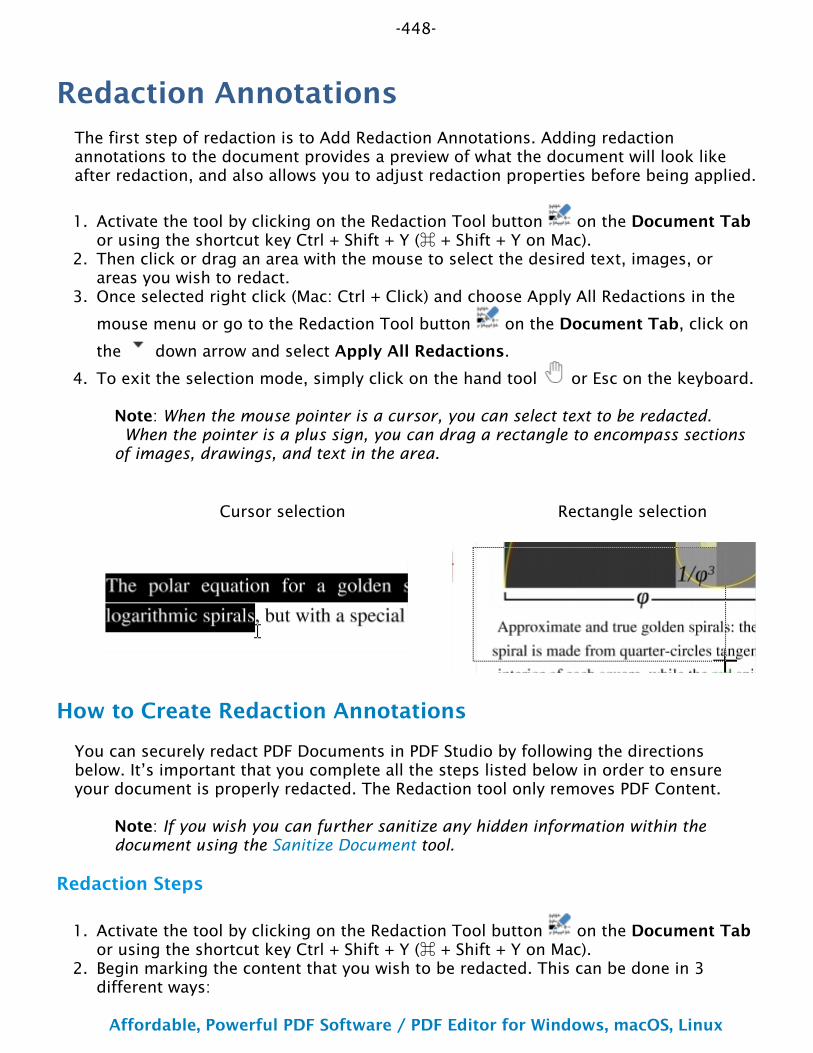
-448-
Affordable, Powerful PDF Software / PDF Editor for Windows, macOS, Linux
Copyright © 2002-Present Qoppa Software. All rights reserved.
1.
2.
3.
4.
1.
2.
Redaction AnnotationsThe first step of redaction is to Add Redaction Annotations. Adding redaction annotations to the document provides a preview of what the document will look like after redaction, and also allows you to adjust redaction properties before being applied.
Activate the tool by clicking on the Redaction Tool button on the Document Tab or using the shortcut key Ctrl + Shift + Y (⌘ + Shift + Y on Mac).Then click or drag an area with the mouse to select the desired text, images, or areas you wish to redact.Once selected right click (Mac: Ctrl + Click) and choose Apply All Redactions in the
mouse menu or go to the Redaction Tool button on the Document Tab, click on
the down arrow and select Apply All Redactions.
To exit the selection mode, simply click on the hand tool or Esc on the keyboard.
Note: When the mouse pointer is a cursor, you can select text to be redacted. When the pointer is a plus sign, you can drag a rectangle to encompass sections of images, drawings, and text in the area.
Cursor selection Rectangle selection
How to Create Redaction Annotations
You can securely redact PDF Documents in PDF Studio by following the directions below. It’s important that you complete all the steps listed below in order to ensure your document is properly redacted. The Redaction tool only removes PDF Content.
Note: If you wish you can further sanitize any hidden information within the document using the Sanitize Document tool.
Redaction Steps
Activate the tool by clicking on the Redaction Tool button on the Document Tab or using the shortcut key Ctrl + Shift + Y (⌘ + Shift + Y on Mac).Begin marking the content that you wish to be redacted. This can be done in 3 different ways:

-449-
Affordable, Powerful PDF Software / PDF Editor for Windows, macOS, Linux
Copyright © 2002-Present Qoppa Software. All rights reserved.
•
•
•
3.
4.
5.
Text: Text can be marked for redaction by using the cursor to highlight the text you wish to be redacted.Other Objects/Images: Other objects that cannot be selected (for example: images, scanned text, paths) can be marked for redaction by using Ctrl + Click (⌘ + Click on Mac) and dragging to create a box over the content you would like redacted.Alternate Selection Method: Double click on a word or image to highlight just that word or image for redaction.
Each of the items that you mark for redaction will show a transparent black box with a red outline. IMPORTANT: The text has not yet been redacted. These marks are just there as an indication of what will be redacted and allows you to verify what will be removed prior to redaction. **EXTREMELY IMPORTANT** Once you have completed marking all of your items for redaction you then need to actually redact the content from the document. You can do so by right clicking (Mac: Ctrl + Click) and choose Apply All Redactions in the
mouse menu or go to the Redaction Tool button on the Document Tab, click on
the down arrow and select Apply All Redactions.
Once complete, to exit the Redaction Tool, simply click on the hand tool or Esc on the keyboard
-450-
Affordable, Powerful PDF Software / PDF Editor for Windows, macOS, Linux
Copyright © 2002-Present Qoppa Software. All rights reserved.
Redaction PropertiesWhen redacting content from within the PDF there are a variety of options that can be set. These options can apply to either the redaction annotation or the redaction once applied.
Redaction Annotation Properties
To access the Redaction Annotation properties right click (Mac: Ctrl + Click) on the redaction annotation and choose Properties in the mouse menu or click on the edit
button on the Mini Toolbar. Redaction Annotations contain the following property settings.
Appearance
Annotation
Outline Color - Sets the color of the border for only the redaction annotation
Fill Color - Sets the fill color for only the redaction annotation
Transparency - Sets the transparency of the shape for only the redaction annotation
Redaction
Fill Color - Sets the fill color of the redaction once it is applied
Note: Selecting the No Color option erases the content and will not place any square where the content used to be once the redaction has been applied.
Text - This will apply text on top of the redaction square once applied
Font - The font of the text placed on top of the redaction
Font Size - The font size of the text placed on top of the redaction
Font Color - The color of the text placed on top of the redaction
Alignment - The alignment of the text placed on top of the redaction
Repeat Text - Weather or not to continuously repeat the text placed on top of the redaction
Note / Comment - A note can be added to shapes that will be displayed when hovered over by the mouse
-451-
Affordable, Powerful PDF Software / PDF Editor for Windows, macOS, Linux
Copyright © 2002-Present Qoppa Software. All rights reserved.
Save as default - When checked this will make the selected appearance settings the default for any new Redaction annotations going forward
Locked - When checked prevents the following on the annotation: being moved or resized, editing appearance properties, & deleting the annotation.
General
Author - Allows you to edit the author
Subject - Allows you to edit the subject
Status History
This tab will display and changes to the review status of the annotation including Author, Status, and Timestamp. For more details see Setting Status or Check Marks on Annotations
-452-
Affordable, Powerful PDF Software / PDF Editor for Windows, macOS, Linux
Copyright © 2002-Present Qoppa Software. All rights reserved.
1.
2.
3.
4.
1.2.
3.
4.5.6.
1.
Applying RedactionsApplying the redaction is an important step to ensure that the selected content will actually be removed. This "burns in" the annotations and removes any text, image, annotations, form fields or drawings from the document that is underneath the annotation's area.
Applying Redactions
To complete the redaction process after the Redaction Annotations have been applied, follow the steps below.
Right click on the redaction annotation (Mac: Ctrl + Click) and choose Apply All
Redactions in the mouse menu or go to the Redaction Tool button on the
Document Tab, click on the down arrow and select Apply All Redactions.The document is now redacted and all of the marked items will now be solid black squares (unless a different color option was selected in Redaction Properties). Make sure to save your document. If you would like to confirm that the document is in fact redacted you can confirm by following the steps listed below.
Once complete, to exit the Redaction Tool, simply click on the hand tool or Esc on the keyboard
Note: If you wish you can further sanitize any hidden information within the document using the Sanitize Document tool.
Checking if Your PDF Document is Redacted Correctly
You can check if your document was redacted correctly in PDF Studio by using the Text Selection, Text Search, and Content Editor tool to see if you can select any of the content that you were trying to redact.
Using the Text Selection Tool
Open the Redacted PDF Document you wish to checkUsing the Text Selection Tool highlight the line of text that contains the redacted wordsCopy the highlighted text to your clipboard by using the shortcut keys CTRL + C (⌘ + C on a Mac)Open up any text editor (Word, Notepad, Text Edit, etc…)Paste the text you highlighted using CTRL + V (⌘ + V on a Mac)If you redacted correctly then only the non redacted text should be displayed. If you see the text you were trying to remove than it was not done correctly.
Using the Advanced Search Tool
Open the Redacted PDF Document you wish to check
-453-
Affordable, Powerful PDF Software / PDF Editor for Windows, macOS, Linux
Copyright © 2002-Present Qoppa Software. All rights reserved.
2.
3.4.
5.
1.
2.
3.
4.
Open the Advanced Search Tool by clicking on the Home Tab > Search on the toolbar or pressing Ctrl-F (Cmd + F on Mac)Type in the word you redacted and click on New SearchThis will bring up a list of all the text matching what you typed in the search box. Once the results appear you can click on each of the results to see where in the document that text is located.If you redacted correctly then only the non redacted text should be displayed and highlighted in the search results. If you see the text you were trying to remove than it was not done correctly.
Using the Content Editor
Open the Redacted PDF Document you wish to check
Start the Content Edit tool by clicking on the Edit Content button on the Document Tab, or using the shortcut key Ctrl + Shift + E (⌘ + Shift + E on Mac)Select any of the redaction boxes on your document by clicking on it and then either move or delete the box.If you redacted correctly then nothing should remain under where the redaction box was. If you see the text you were trying to remove than it was not done correctly.
Note: When redacting part or all of an image sometimes the redaction square will become a part of the image and you will not be able to move or delete the actual square. During the redaction process if an image does not have a transparency value the removed data will just be converted to a solid black color. As long as the black square is now a part of the image and moves with the image it is properly redacted.
-454-
Affordable, Powerful PDF Software / PDF Editor for Windows, macOS, Linux
Copyright © 2002-Present Qoppa Software. All rights reserved.
Splitting PDF DocumentsPDF Studio has the following options available when splitting a PDF document.
Splitting a PDF: How to split PDF documents
Split PDF Options: Options available when splitting PDF documents
Split PDF Profiles: Using and managing existing PDF split profiles
-455-
Affordable, Powerful PDF Software / PDF Editor for Windows, macOS, Linux
Copyright © 2002-Present Qoppa Software. All rights reserved.
••••••
1.•
2.3.
•
4.
Splitting a PDFPDF Studio can split PDF documents in a variety of ways. The available split options are listed below:
Equal Size Documents: Splits the document into equal number of pagesPage Ranges: Splits the document by a set of defined page rangesBy Blank Page: Spits the documents by blank pageBy Bookmarks: Splits the document by bookmarksBefore Text: Splits the document before specified textAfter Text: Splits the document after specified text
How to Split a PDF
Open the document that you would like to split.Note: This is not a required step if you only wish to create a split profile without applying it immediately.
Go to the Pages Tab > Split > Custom Split on the toolbar Fill in the desired Split PDF Options for the current split configuration. A name for a Split PDF Profile can also be set during this step to save the settings to be reused later.
Note: You do not need to create or save a split configuration before splitting a document. To save the current split configuration, click on the Save button and enter a name.
To split the current document, click on Apply
-456-
Affordable, Powerful PDF Software / PDF Editor for Windows, macOS, Linux
Copyright © 2002-Present Qoppa Software. All rights reserved.
Split PDF Options Below are the options available when splitting a PDF document into multiple documents:
Settings
The available settings are broken into sections based on the settings available within the dialog.
General
Options associated with the current split profile.
Name
Name of the split profile (if created).
To create a new profile select "<new profile>" and click Save. Then enter a name for the new profile
Show on Menu
Whether to show this split configuration on the Split PDF menu for faster access.
Split Method
Use this section to tell PDF Studio how to split the document into multiple documents. The available options in this section are:
Split into equal size documents of
Use this method to split the document into equal size documents of a given number of pages. Enter the page count in the text field.
Split by page range (1,3-5;7-10)
Use this method to split the document into multiple documents based on page range. Enter the page range in the text field. Dash is used for a page range, comma to separate pages within the same document, semicolon to separate documents. So for instance, 1, 3-5; 7-10 will output two documents, the first document with pages 1, 3, 4, and 5, and the second document with pages 7, 8, 9, and 10.
-457-
Affordable, Powerful PDF Software / PDF Editor for Windows, macOS, Linux
Copyright © 2002-Present Qoppa Software. All rights reserved.
Split by blank page
Use this method to split the document when a white page is encountered. The white page will be used as a separator between documents and will be discarded. There are two methods of detecting white pages:
Standard - will split the documents by blank pages that contain no content.
Note: If the page was created from a scanned document the page may appear bank but will actually contain a solid white image and so the page is not considered as blank.
Analyze Pages - Checking this option will analyze each individual page to determine how much of the page is actually blank in comparison to others. Adjust the tolerance settings if needed to improve results.
Tolerance - This value increases the tolerance for artifacts on the page. Increase this value if the blank pages contain marks such as scan lines or fold lines to get better results.
Split by bookmarks at level
Use this method to split the document based on bookmarks at level 1. You can also choose to split up to a higher level, for instance up to level 3. In this case, the document will be split at bookmark level 1, level 2, and level 3. In this method, we assume that the bookmarks contain Go To Page actions within the PDF document itself and that the bookmarks have been created in ascending page order.
Split before text
Use this method to split the document when specific text in the document is encountered. When the text is encountered in a page, this page will become the first page of the next document.
Split after text
Use this method to split the document when specific text in the document is encountered. When the text is encountered in a page, this page will become the last page of the document and the following page will become the first page of the next document.
Save Files To
This section is about the output PDF files (the PDF documents obtained by splitting the incoming document)
File Name Pattern
This section is to determine the pattern of the output files.
-458-
Affordable, Powerful PDF Software / PDF Editor for Windows, macOS, Linux
Copyright © 2002-Present Qoppa Software. All rights reserved.
•
•
•
•
•••••••
Use Source filename
When this option is selected, the original filename for the current PDF document (the document that is being split) will be used to name the output files.
Append
For each output PDF file, you can choose to append the page range or an incremental counter starting at any given number. PDF Studio will start with the original PDF file name (note that the original PDF file name can first be altered using the Change the PDF File Name section below).
Page Range: When the Page Range option is chosen, PDF Studio will append a string containing the page range (for instance, test_p4-p6.pdf). When Split by Page Range method was selected, the page range formula will be appended as a string (for instance, the page range formula 1,3,5-10 will create a new file with the name test_1_3_5-10.pdf). Note that an underscore character precedes the page range formula and commas are replaced with an underscore character.Starting Number At: When this option is chosen, PDF Studio will append an incremental counter. The counter will be reset for each new incoming PDF file.Current Bookmark – This option is only available when the Split by Bookmarks method was selected. This will append the name of the starting bookmark to the output document names (for instance, if "Cover Page" is the first bookmark name, the first output document could be named test_p1-p1_CoverPage.pdf). Only letters, numbers, hyphen and underscore characters are preserved in the bookmark name to guarantee that all operating systems will accept this file name. Commas are replaced by underscores.Bookmark Hierarchy: This option is only available when the Split by Bookmarks method was selected. This will append the name of the Parent and Child bookmark names to the output document names (for instance, if "Cover Page" is the first bookmark name, the first output document could be named test_p1- p1_CoverPage.pdf). Only letters, numbers, hyphen and underscore characters are preserved in the bookmark name to guarantee that all operating systems will accept this file name. Commas are replaced by underscores.
New filename
When this option is selected, you will need to enter a new filename used for the output files. Each document name will have an incremental counter starting at zero appended to the file name entered in this field. Custom variables may also be used to further distinguish each of the file separations. The available variables are:
$sourcefilename - The name of the source file$counter - a number starting at 1$pagerange - the page range$firstpage - the first page in the range$lastpage - the last page in the range$date - the current date$pagelabel - The page label
-459-
Affordable, Powerful PDF Software / PDF Editor for Windows, macOS, Linux
Copyright © 2002-Present Qoppa Software. All rights reserved.
Destination Folder
This section determines the destination folder where the output PDF files will be saved.
Use Source Folder
When this option is selected, the original folder for the current PDF document (the document that is being split) will be used to save the output files.
Prompt for Folder
When set, the profile will prompt for a directory to save the output files before performing the split
Destination Folder
When this option is selected, you will need to enter the folder of your choice where output files should be saved. You can browse to a folder by clicking on the Browse button.
Overwrite Files
When this option is selected if a file of the same name is encountered during the split process the file will be overwritten. Otherwise, when not selected the file will have a number appended to the end.
-460-
Affordable, Powerful PDF Software / PDF Editor for Windows, macOS, Linux
Copyright © 2002-Present Qoppa Software. All rights reserved.
1.2.3.
4.
5.
6.
Split PDF ProfilesSplit PDF Profiles allow you to save custom split settings as templates that can be used again later to split documents. There is also an option available to "Show on Menu" and when this is set for the profile it will be put under Document > Rearrange Pages > Split Document so that the profile can be run in just two clicks from the document menu.
Note: You do not need to create or save a split configuration before splitting a document. To split documents without saving settings just go to the Pages Tab >
Split > Custom Split and choose the settings to use and click Apply to run the split settings without saving a profile.
Creating a Split PDF Profile
Go to the Pages Tab > Split > Custom Split on the toolbar Fill in the desired Split PDF Options for the current split configuration.Set all of the options that you would like to have in your profile. You can either start from an existing profile or a blank template by selecting "<new item>" from the drop down.Once you have completed your settings, click on Save. This will bring up a window to name your profile.If you are starting from a blank template this field will be blank. If you started from a previous profile the previous profiles name will be displayed. If you would like to just update the previous profile leave the name and click OK. If you would like to create a new profile just type in the new name you would like to save it as and click OK.Once complete your profile will now be available in the drop down menu as well as the quick options in the menu bar
Split a PDF Document Using an Existing Split Profile
There are 2 ways to apply an existing split profile:
From the Split dialog
Open the document that you would like to split. Go to the Pages Tab > Split > Custom Split on the toolbar. Choose the split profile from the drop down list in the combo box, click on the Apply button at the bottom of the dialog.
From the Split Document menu
Open the document that you would like to split. Go to the Pages Tab > Split on the toolbar menu, there is a list of all the split profiles that you have previously created.
-461-
Affordable, Powerful PDF Software / PDF Editor for Windows, macOS, Linux
Copyright © 2002-Present Qoppa Software. All rights reserved.
Click on the split profile in the list you'd like to run and it will begin immediately using the settings saved in the split profile.
Note: Only the ones for which you chose the Show on Menu option will appear on this list.
-462-
Affordable, Powerful PDF Software / PDF Editor for Windows, macOS, Linux
Copyright © 2002-Present Qoppa Software. All rights reserved.
WatermarksPDF Studio has the following options available when working with Watermarks on a PDF.
Creating a Watermark: How to create and apply a watermark to a PDF
Watermark Options: The options available when adding watermarks
Watermark Profiles: Using and managing existing watermark profiles
Removing Watermarks: Removing watermarks from a document

-463-
Affordable, Powerful PDF Software / PDF Editor for Windows, macOS, Linux
Copyright © 2002-Present Qoppa Software. All rights reserved.
1.•
2.3.
•
4.
Creating a WatermarkPDF Studio can add custom watermarks to a PDF. This can be used to add either a company logo or a label such as "Confidential" to pages within the document.
How to Create and Apply Watermarks
Open the document that you would like to add a watermark toNote: This is not a required step if you only wish to create a watermark profile without applying it immediately.
Go to Pages Tab > Watermark > AddFill in the desired Watermark Options. A name for a Watermark Profile can also be set during this step to save the settings to be reused later.
Note: You do not need to create or save a watermark profile before applying them to a document. To save the current watermark configuration, click on the Save button and enter a name.
To apply the watermark to the document, click on Apply
-464-
Affordable, Powerful PDF Software / PDF Editor for Windows, macOS, Linux
Copyright © 2002-Present Qoppa Software. All rights reserved.
•••
Watermark optionsBelow are the options available when adding watermarks to a PDF document.
Settings
The options for a watermark are as follows:
Profile
Name - Name of the watermark profile (if created). To create a new profile select "<new profile>" and click Save. Then enter a name for the new profile
Show on Menu - Whether to show this watermark configuration on the watermark menu for faster access.
Appearance
Units - Units to use when calculating the position of the watermark. This can be inches, centimeters, millimeters, or points. Points are calculated in the PDF standard, 72 points per inch.
Horizontal – The horizontal location is relative to the left, right, or center of the page according to the choice in the drop down box. The number entered here is interpreted in units.
Vertical – The vertical location is relative to the top, bottom, or center of the page according to the choice in the drop down box. The number entered here is interpreted in units.
Rotation – Rotate the watermark (text or image) by the given degrees clockwise.
Transparency – Transparency of the watermark. 100% is invisible and 0% is opaque.
Show on Screen - Whether or not to show the watermark when viewing the document
Show on Print - Whether or not to show the watermark when the document is printed
Behind Page Content - Places the watermark under the page content instead of on top
Pages
Page Range - The range of pages to be cropped
All Pages: all pages in the documentPage Range: set the pages to be cropped using the From and To optionsEven Pages Only: only crops the even pages
-465-
Affordable, Powerful PDF Software / PDF Editor for Windows, macOS, Linux
Copyright © 2002-Present Qoppa Software. All rights reserved.
•
•
•
•
••••
••••••••••••
Odd Pages Only: only crops the odd pages
Watermark
You have the option to add either a text or image watermark to the document. The options will change based on whether or not text or image is selected.
Text Watermark Options
Font - The font for the watermark
Font Size - The font size for the watermark
Font Color - The font color for the watermark
B - Makes all of the text Bold
I - Makes all of the text Italic
Alignment - choose how the text should be aligned
Aligns the text to the left
Aligns the text in the center
Aligns the text to the right
Text - Enter the text to be displayed on the watermark
Insert - Use these options to insert custom variables within the content sections. Place the cursor where you would like the text and then click on the variable option you want to insert. These variables will be used when the headers and footers are placed on the document
Date - creates a date variablePage Number - creates a page number variableBates Number - creates a bates number variableOther - displays a list of other supported variables
$page – The page number$author – Inserts the Author name set in Comments Preferences$pagelabel - The bookmark for this page$bookmark - The label for this page$totalpages – The number of pages in the document$filename – The file name that the document was opened from$filepath – The full file path that the document was opened from$date – The current date formatted as Nov 28, 2007$shortdate – The current date formatted as 11/28/07$time – The current time$day – The current day of the month$month – The current month, using two digits
-466-
Affordable, Powerful PDF Software / PDF Editor for Windows, macOS, Linux
Copyright © 2002-Present Qoppa Software. All rights reserved.
•••••••
$year – The current year, using four digits$shortyear – The current year, using two digits$second – The current second$minute – The current minute$hour – The current hour, 1-12$ampm – AM or PM$longhour – The current hour, 0-23
Border - Sets a border around the watermark text
Border Color - Sets the color of the border
Width - Sets the width of the border
Background - Background color settings for the watermark text
Image Watermark Options
File – The path to the image file. Accepted formats are jpg, png, gif, & tiff.
Scale – The scale to apply to the image (100% for the full-size image)
Preview Window
Allows you to see how the watermark will look on the document once placed. Use the arrow buttons and drop down to navigate and preview a different page in the document.
-467-
Affordable, Powerful PDF Software / PDF Editor for Windows, macOS, Linux
Copyright © 2002-Present Qoppa Software. All rights reserved.
1.2.3.
4.
5.
6.
Watermark ProfilesWatermark profiles allow you to save custom watermark settings as templates that can be used again later to add watermarks to documents. There is also an option available to "Show on Menu" and when this is set for the profile it will be put under Pages Tab > Watermarks so that the profile can be run in just two clicks from the document menu.
Note: You do not need to create or save a watermark configuration before adding a watermark to a document. To add a watermark to a document without saving
settings just go to Pages Tab > Watermark > Add and choose the settings to use and click Apply to run the watermark settings without saving a profile.
Creating a Watermark Profile
Go to the Pages Tab > Watermark > Add on the toolbar. Fill in the desired Watermark Options for the current watermark configuration.Set all of the options that you would like to have in your profile. You can either start from an existing profile or a blank template by selecting "<new item>" from the drop down.Once you have completed your settings, click on Save. This will bring up a window to name your profile.If you are starting from a blank template this field will be blank. If you started from a previous profile the previous profiles name will be displayed. If you would like to just update the previous profile leave the name and click OK. If you would like to create a new profile just type in the new name you would like to save it as and click OK.Once complete your profile will now be available in the drop down menu as well as the quick options in the menu bar
Add a watermark to a PDF Document Using an Existing Profile
There are 2 ways to apply an existing watermark profile:
From the Watermark Dialog
Open the document that you would like to apply a watermark to. Open the Watermark
dialog from Pages Tab > Watermark > Add. Choose the watermark from the drop down list in the combo box, click on the Apply button at the bottom of the dialog.
From the Watermark Menu
Open the document that you would like to add a watermark to. Under the Pages Tab >
Watermark menu, there is a list of all the watermark profiles that you have previously created. Click on the watermark profile in the list you'd like to run and it will begin immediately using the settings saved in the watermark profile.
-468-
Affordable, Powerful PDF Software / PDF Editor for Windows, macOS, Linux
Copyright © 2002-Present Qoppa Software. All rights reserved.
Note: Only the ones for which you chose the Show on Menu option will appear on this list. Click on the watermark profile in the list you'd like to run and it will begin immediately using the settings saved in the watermark profile.
-469-
Affordable, Powerful PDF Software / PDF Editor for Windows, macOS, Linux
Copyright © 2002-Present Qoppa Software. All rights reserved.
Removing a WatermarkPDF Studio can remove existing watermarks from PDF Documents. This function will remove all watermarks from every page of the document.
Note: Not all text or images above text is a watermark. In order for PDF Studio to remove watermarks the text must have been added to the document as a watermark following the PDF standards. If not, the watermarks will not be removed by this feature. Instead you will need to use Content Editing to remove them
How to Remove All Watermarks
Select Pages Tab > Watermark > Remove from the menu. This will remove all watermarks from every page within the entire document.

-470-
Affordable, Powerful PDF Software / PDF Editor for Windows, macOS, Linux
Copyright © 2002-Present Qoppa Software. All rights reserved.
1.2.3.
4.
••
Build Table of Contents The Build Table of Contents tool allows you to create a table of contents in the PDF document using the existing bookmark structure.
How to Build a Table of Contents
On the toolbar go to Pages Tab Table of ContentsThis will display the Build Table of Contents dialogSelect an existing profile or the settings that you wish to use for the Table of ContentsOnce complete click the Create button
Build Table of Contents Options
Profile
Custom profiles can be created to fit specific needs and can be saved to be reused later without having to re-enter settings.
Options
Title - Text to be used as the Title on the first page of the Table of Contents
Insert At - Location to insert the Table of Contents pages once created
Page Size
Same as Page - (only available when Adding a Blank Page) Allows you to match the new page settings to an existing page in the document
New Page Size - Allows you to select a page size from a list of predefined standard document sizes.
Portrait: sets the selected page orientation size to portraitLandscape: sets the selected page size orientation to landscape
Note: Portrait and Landscape options are not available when selecting a "Custom" media size
-471-
Affordable, Powerful PDF Software / PDF Editor for Windows, macOS, Linux
Copyright © 2002-Present Qoppa Software. All rights reserved.
Margins
Size - Displays what the size of the page will be once cropped
Units - Select the measurement unit for the crop margins in either Inches, Points, Centimeters, or Millimeters
Top - The distance of the margin from the top
Bottom - The distance of the margin from the bottom
Left - The distance of the margin from the left
Right - The distance of the margin from the right
Format
Line Spacing - sets the distance between each line of the table of contents
Style - sets the style of the content items
Indent - determines how large the indent for each content level should be
Use page labels - When checked will use the page labels instead (if set in the document) of the page number
-472-
Affordable, Powerful PDF Software / PDF Editor for Windows, macOS, Linux
Copyright © 2002-Present Qoppa Software. All rights reserved.
•••
1.2.3.4.
•
5.
6.
••
Fix ScanThe fix scan tool allows you to perform various repair functions on scanned documents. This is useful if you do not have access to the original document or scanner to rescan and fix alignment or size issues.
The options include:
OCR - Add searchable text to the pagesOptimize - Reduce the file size of the documentDeskew - Attempts to auto-rotate the document so that the alignment is corrected
How to Fix a Scanned PDF document
On the toolbar go to Document Tab > Fix ScanThis will display the Fix Scan dialogSelect an existing profile or the settings that you wish to use to fix the scanOnce complete click on Apply. This will prompt you for a location to save the document
Note: If the document is protected or locked you will not be able to fix the document until it is unlocked.
Once you have set the save location for your document and click save PDF Studio will begin fixing the scan with the settings chosen and save it to the location you chose.After the process is complete the new file will automatically be opened so that you can review the results.
Fix Scan Options
Profile
PDF Studio comes with 2 default profiles for fixing scans. Custom profiles can be created to fit specific needs and can be saved to be reused later without having to re- enter settings.
Defaults Profiles Included:
Current page - Performs all fix scan functions on the current pageEntire Document - Performs all fix scan functions on the entire document
Pages
All Pages: all pages in the document
Current Page: the current page being displayed
-473-
Affordable, Powerful PDF Software / PDF Editor for Windows, macOS, Linux
Copyright © 2002-Present Qoppa Software. All rights reserved.
Pages: set custom range of pages if needed using values separated by commas. For example, to print only pages 2 to 4 & 6 to 12 & 20 of a 30 page document enter “2-4, 6-12, 20″. Documents using Page Labels will require the exact page label to be entered (i.e. iv, v, etc...)
OCR Options
OCR - Create Searchable PDF - Check this to create text searchable text within the document
Language - Language to be used if OCR is selected. Click on "Download OCR Languages" to download additional languages.
Optimize
Profile - Click on the drop down choose the Optimizer Profile to be used
Add - Use Add to create a new profile to be used for this batch process
Edit - Click edit to modify the currently selected profile in the drop down
Options
Auto deskew images - When checked, if the document’s text/images are slanting too far in one direction or is misaligned, PDF Studio will attempt to auto-rotate the document so that the alignment is corrected.
Reduce Noise - This filter reduces light noise in an image. It tries to move each pixel closer in value to its neighbors. As it only has a small effect, you may need to apply it several times. This is good for removing small levels of noise from an image but does give the image some fuzziness.
Despeckle - This filter smooths areas in which noise is noticeable while leaving complex areas untouched. The effect is that grain or other noise is reduced without severely affecting edges.

-474-
Affordable, Powerful PDF Software / PDF Editor for Windows, macOS, Linux
Copyright © 2002-Present Qoppa Software. All rights reserved.
1.
2.3.
•
4.•
5.•
•
6.7.
8.
1.2.3.
OCR PDFPDF Studio is capable of OCRing documents using any of the available OCR languages to add text to documents. OCR allows you to add text to scanned documents or images so that the document can be searched or marked up as you would any other text document. PDF Studio 2022 also introduces the ability to run OCR with two languages at once. For more information on OCRing with two languages see OCR Preferences.
What is OCR?
Optical character recognition (OCR) is the mechanical or electronic conversion of images of typed or printed text into machine-encoded searchable text data.
From Existing Document
Text can be added to an existing document using OCR
Launch PDF Studio and open the PDF document that you wish to add searchable text toGo to the Document Tab > OCR from the toolbarFrom the Language drop down select the language you wish to use
Note: The first time using OCR you will need to download the language packs. To do so click on “Download OCR Languages“, then select the languages you wish to use and click on “Download”.
Select the Page Range and Resolution that you wish to useNote: A resolution of 300 DPI produces good OCR results for most images. When dealing with scans containing noise, you may try using a lower DPI setting to get rid of the noise and obtain better OCR results.
Choose additional optionsDiscard Invisible Text - removes any previous OCR text that has been added to the page.Auto Deskew Images - When checked, if the document’s text/images are slanting too far in one direction or is misaligned, PDF Studio will attempt to auto-rotate the document so that the alignment is corrected.
Click on “OK” to begin the OCR processYou will see a progress dialog showing you the current page being processed. Once complete click on “OK” to close the dialog Your document is now ready to be searched, edited, or marked up with highlights, underlined, crossed-out or used with caret annotations.
When Scanning a Document
OCR can add text to a document at the same time it is being scanned with PDF Studio
Start the Scanning Dialog as normalIn the scanning dialog you will see an option to OCR the document after scanning From the Language drop down select the language you wish to use
-475-
Affordable, Powerful PDF Software / PDF Editor for Windows, macOS, Linux
Copyright © 2002-Present Qoppa Software. All rights reserved.
•
4.
5.
6.
•••••••••••
•
••
••
•••••
••••••••
••
••••••
•
••••
•••••••
•••
•••••••••
Note: The first time using OCR you will need to download the language packs. To do so click on “Download OCR Languages“, then select the languages you wish to use and click on “Download”.
After setting all of your scanning and OCR settings click on “Scan” to begin scanning the documentOnce the scanning completes the OCR process will begin and you will see a progress dialog showing you the current page being processed. Once complete click on “OK” to close the dialog Your document is now ready to be searched, edited, or marked up with highlights, underlined, crossed-out or used with caret annotations.
Available OCR Languages
The following language dictionary files are available for download directly from within PDF Studio OCR functions. Using the appropriate language file will improve the accuracy of OCR results. See Tips on Improving OCR Results for additional information
AfrikaansAlbanian – shqipArabic – ةيبرعلاAzerbaijani – azərbaycanBasque – euskaraBelarusian – беларускаяBengali – বাংলাBulgarian – българскиCatalan – catalàCherokeeChinese (Simplified) – 中 文(简体中文)Chinese (Traditional) – 中 文(繁體)Croatian – hrvatskiCzech – čeština “da”>Danish – danskDanish – DanskDanish (Fraktur) – Dansk (Fraktur)Dutch - NetherlandishEnglishEstonian – eestiFinnish - SuomalainenFrench - Français
Galician – galegoGerman - DeutscheGreek – ΕλληνικάHebrew – תירבעHindi – हिन्दीHungarian – magyarIcelandic – íslenskaIndonesian – Bahasa IndonesiaItalian - ItalianoItalian (old) – italino vecchioJapanese – 日本語Kannada – ಕನ್ನಡKorean – 한국어Latvian – latviešuLithuanian – lietuviųMacedonian – македонскиMalay – Bahasa MelayuMalayalam – മലയാളംMaltese – MaltiMath / EquationsNorwegian - Norsk
Polish - PolskiePortuguese - PortuguêsRomanian – românăRussian – русскийSerbian – српскиSlovakian – slovenčinaSlovakian (Fraktur) – slovenčina (Fraktur)Slovenian – slovenščinaSpanish - EspañolSpanish (Old) – español (Antiguo)Swahili – KiswahiliSwedish - SvenskTagalogTamil – தமிழ்Telugu – తెలుగుThai – ไทยTurkish – TürkçeUkrainian – українськаVietnamese – Tiếng Việt
-476-
Affordable, Powerful PDF Software / PDF Editor for Windows, macOS, Linux
Copyright © 2002-Present Qoppa Software. All rights reserved.
•••••••••••••
1.2.3.
4.
Sanitize a PDFPDF Studio is capable of sanitizing PDF documents to remove all hidden sensitive information from the PDF. This can be very useful when working with sensitive documents that you want to ensure have any possible hidden information removed.
Note: All document changes must be completed BEFORE sanitizing the document. Once sanitization is complete it will no longer be possible to edit items on the pages as they will be converted to images.
The sanitize function will convert all pages of the document to images removing sensitive information including the following:
MetadataDocument InfoAttachmentsJavaScript ActionsLinksForm FieldsCommentsUnused ResourcesUnreferenced DataHidden LayersHidden DataOverlapping ObjectsEmbedded Search Indexes
How to Sanitize a PDF document
On the toolbar go to Secure Tab > SanitizeThis will prompt you for a location to save the documentOnce you have set the save location for your document and click save and your document will be sanitized and saved to the location you chose.After sanitizing is complete the new file will automatically be opened for you to review
Note: To protect the document further use the Document Security settings to add additional permissions.
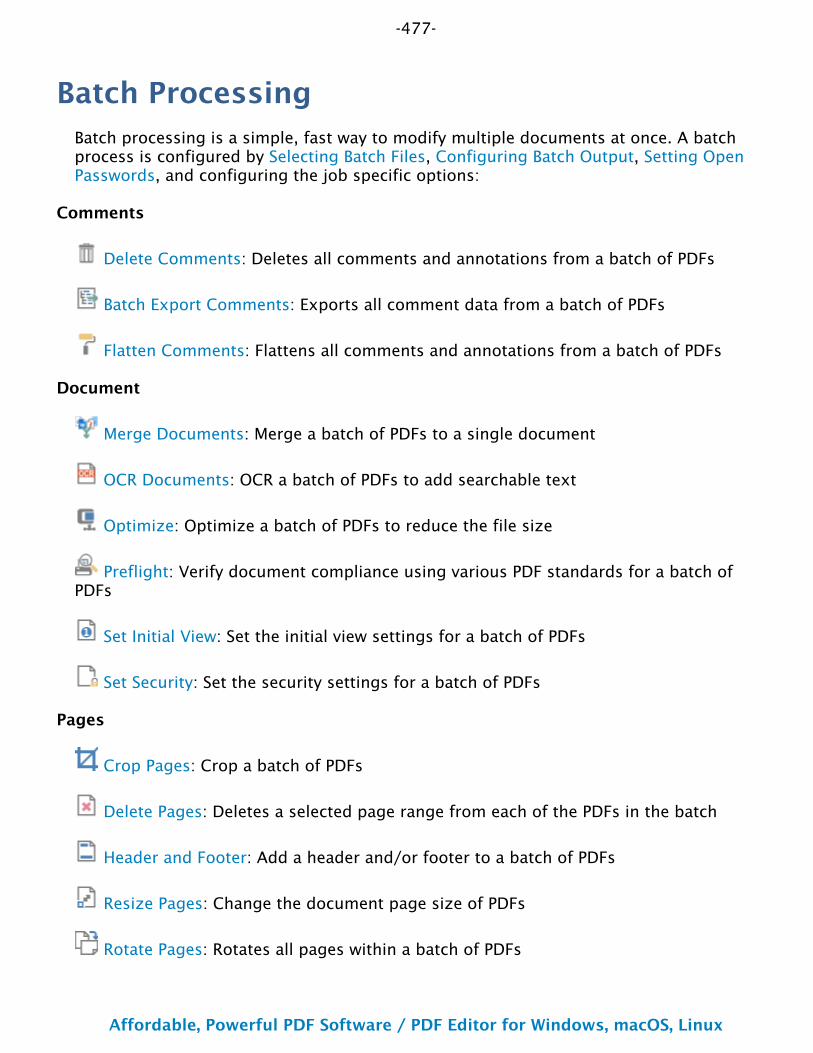
-477-
Affordable, Powerful PDF Software / PDF Editor for Windows, macOS, Linux
Copyright © 2002-Present Qoppa Software. All rights reserved.
Batch ProcessingBatch processing is a simple, fast way to modify multiple documents at once. A batch process is configured by Selecting Batch Files, Configuring Batch Output, Setting Open Passwords, and configuring the job specific options:
Comments
Delete Comments: Deletes all comments and annotations from a batch of PDFs
Batch Export Comments: Exports all comment data from a batch of PDFs
Flatten Comments: Flattens all comments and annotations from a batch of PDFs
Document
Merge Documents: Merge a batch of PDFs to a single document
OCR Documents: OCR a batch of PDFs to add searchable text
Optimize: Optimize a batch of PDFs to reduce the file size
Preflight: Verify document compliance using various PDF standards for a batch of PDFs
Set Initial View: Set the initial view settings for a batch of PDFs
Set Security: Set the security settings for a batch of PDFs
Pages
Crop Pages: Crop a batch of PDFs
Delete Pages: Deletes a selected page range from each of the PDFs in the batch
Header and Footer: Add a header and/or footer to a batch of PDFs
Resize Pages: Change the document page size of PDFs
Rotate Pages: Rotates all pages within a batch of PDFs
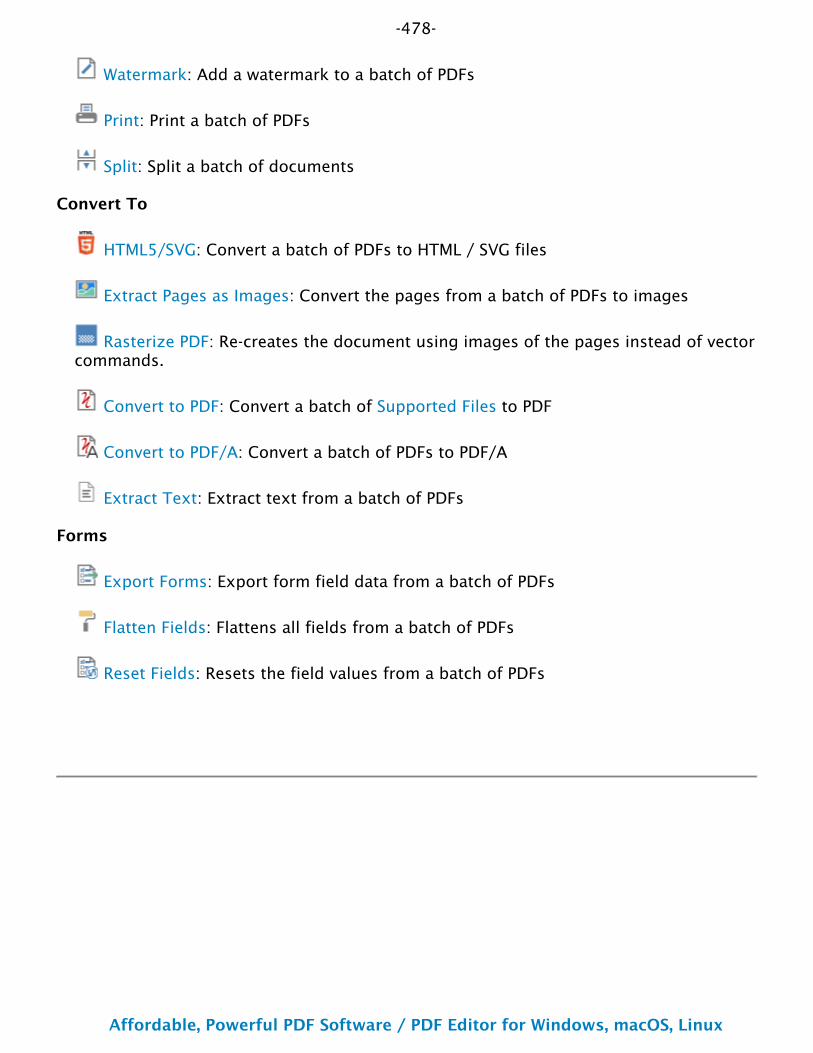
-478-
Affordable, Powerful PDF Software / PDF Editor for Windows, macOS, Linux
Copyright © 2002-Present Qoppa Software. All rights reserved.
Watermark: Add a watermark to a batch of PDFs
Print: Print a batch of PDFs
Split: Split a batch of documents
Convert To
HTML5/SVG: Convert a batch of PDFs to HTML / SVG files
Extract Pages as Images: Convert the pages from a batch of PDFs to images
Rasterize PDF: Re-creates the document using images of the pages instead of vector commands.
Convert to PDF: Convert a batch of Supported Files to PDF
Convert to PDF/A: Convert a batch of PDFs to PDF/A
Extract Text: Extract text from a batch of PDFs
Forms
Export Forms: Export form field data from a batch of PDFs
Flatten Fields: Flattens all fields from a batch of PDFs
Reset Fields: Resets the field values from a batch of PDFs
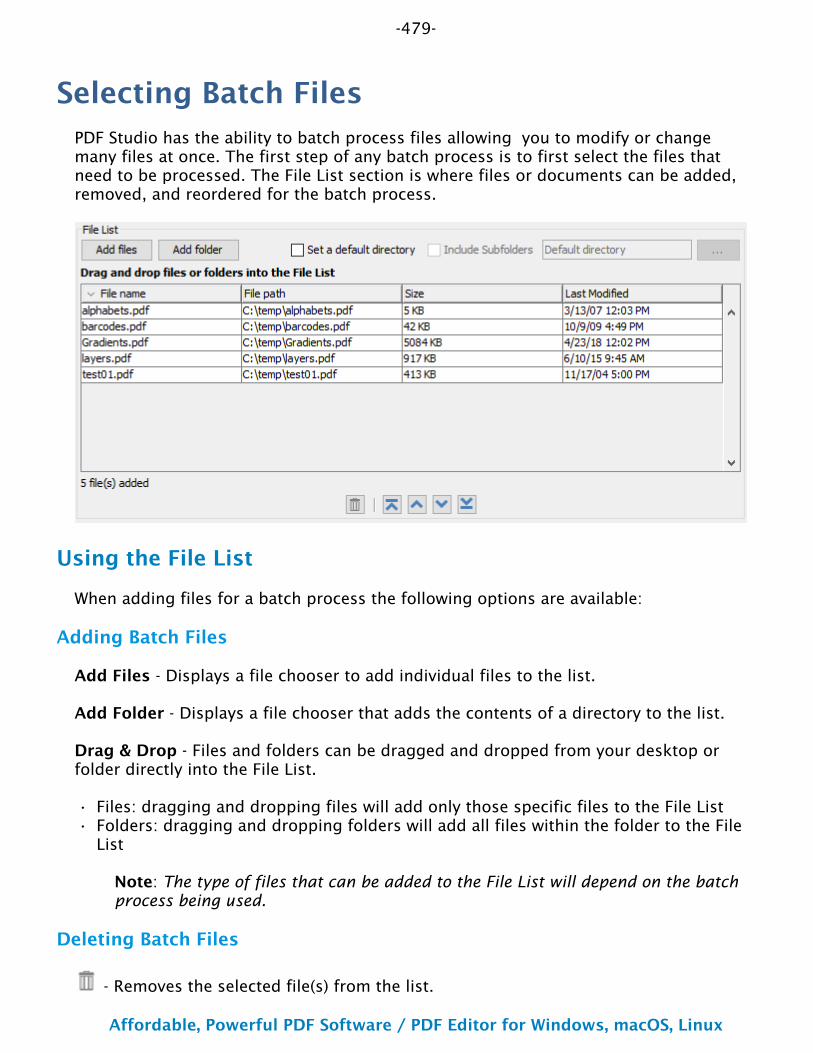
-479-
Affordable, Powerful PDF Software / PDF Editor for Windows, macOS, Linux
Copyright © 2002-Present Qoppa Software. All rights reserved.
••
Selecting Batch FilesPDF Studio has the ability to batch process files allowing you to modify or change many files at once. The first step of any batch process is to first select the files that need to be processed. The File List section is where files or documents can be added, removed, and reordered for the batch process.
Using the File List
When adding files for a batch process the following options are available:
Adding Batch Files
Add Files - Displays a file chooser to add individual files to the list.
Add Folder - Displays a file chooser that adds the contents of a directory to the list.
Drag & Drop - Files and folders can be dragged and dropped from your desktop or folder directly into the File List.
Files: dragging and dropping files will add only those specific files to the File ListFolders: dragging and dropping folders will add all files within the folder to the File List
Note: The type of files that can be added to the File List will depend on the batch process being used.
Deleting Batch Files
- Removes the selected file(s) from the list.
-480-
Affordable, Powerful PDF Software / PDF Editor for Windows, macOS, Linux
Copyright © 2002-Present Qoppa Software. All rights reserved.
Delete - Press the Delete key on your keyboard to remove the selected file(s) from the list.
Note: Multiple files can be selected at once by holding down CTRL (Command on Mac) and then clicking on each file in the list.
Reorganizing Batch Files
- Moves the selected file(s) up the list.
- Moves the selected file(s) down the list.
- Moves the selected file(s) to the top of the list.
- Moves the selected file(s) to the bottom of the list.
Note: Multiple files can be selected at once by holding down CTRL (Command on Mac) and then clicking on each file in the list.
Setting Directory Defaults
Set Default Batch Directory - When checked, all files from the default batch directory will be added to the File List each time a batch dialog is opened.
Include subfolders - When checked, will include any supported file types found within sub folder of the chosen default batch directory.
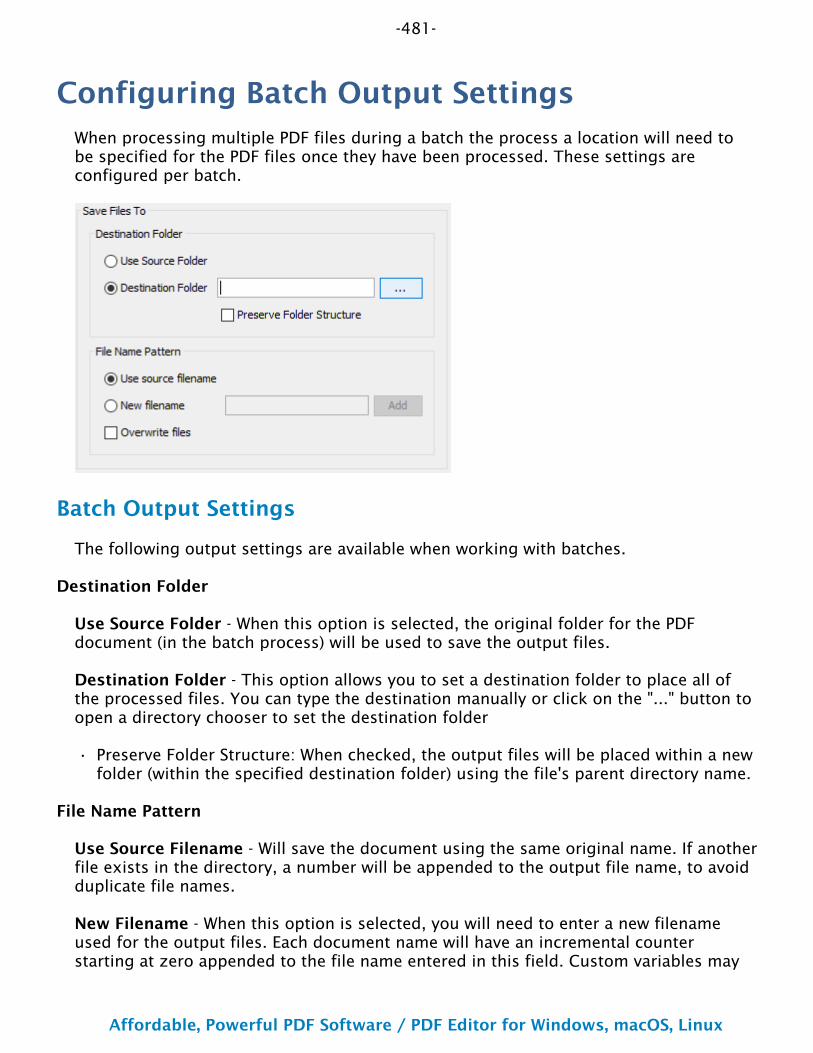
-481-
Affordable, Powerful PDF Software / PDF Editor for Windows, macOS, Linux
Copyright © 2002-Present Qoppa Software. All rights reserved.
•
Configuring Batch Output SettingsWhen processing multiple PDF files during a batch the process a location will need to be specified for the PDF files once they have been processed. These settings are configured per batch.
Batch Output Settings
The following output settings are available when working with batches.
Destination Folder
Use Source Folder - When this option is selected, the original folder for the PDF document (in the batch process) will be used to save the output files.
Destination Folder - This option allows you to set a destination folder to place all of the processed files. You can type the destination manually or click on the "..." button to open a directory chooser to set the destination folder
Preserve Folder Structure: When checked, the output files will be placed within a new folder (within the specified destination folder) using the file's parent directory name.
File Name Pattern
Use Source Filename - Will save the document using the same original name. If another file exists in the directory, a number will be appended to the output file name, to avoid duplicate file names.
New Filename - When this option is selected, you will need to enter a new filename used for the output files. Each document name will have an incremental counter starting at zero appended to the file name entered in this field. Custom variables may
-482-
Affordable, Powerful PDF Software / PDF Editor for Windows, macOS, Linux
Copyright © 2002-Present Qoppa Software. All rights reserved.
•••••••••••
also be used to further distinguish each of the file separations. The available variables are:
$filename - The file name (no extension) that the document was opened from$counter - An automatically incrementing number$day - The day of the month$month - The current month, using two digits$year - The current year, using four digits$shortyear - The current year, using two digits$second - The current second$minute - The current minute$hour - The current hour, 1-12$ampm - AM or PM$longhour - The current hour, 0-23
Overwrite Files - When set, if a file with the same name already exists in the directory it will be overwritten with the newly output document.
Note: This CAN NOT be undone. Make sure that you have all your settings correct prior to starting the batch process
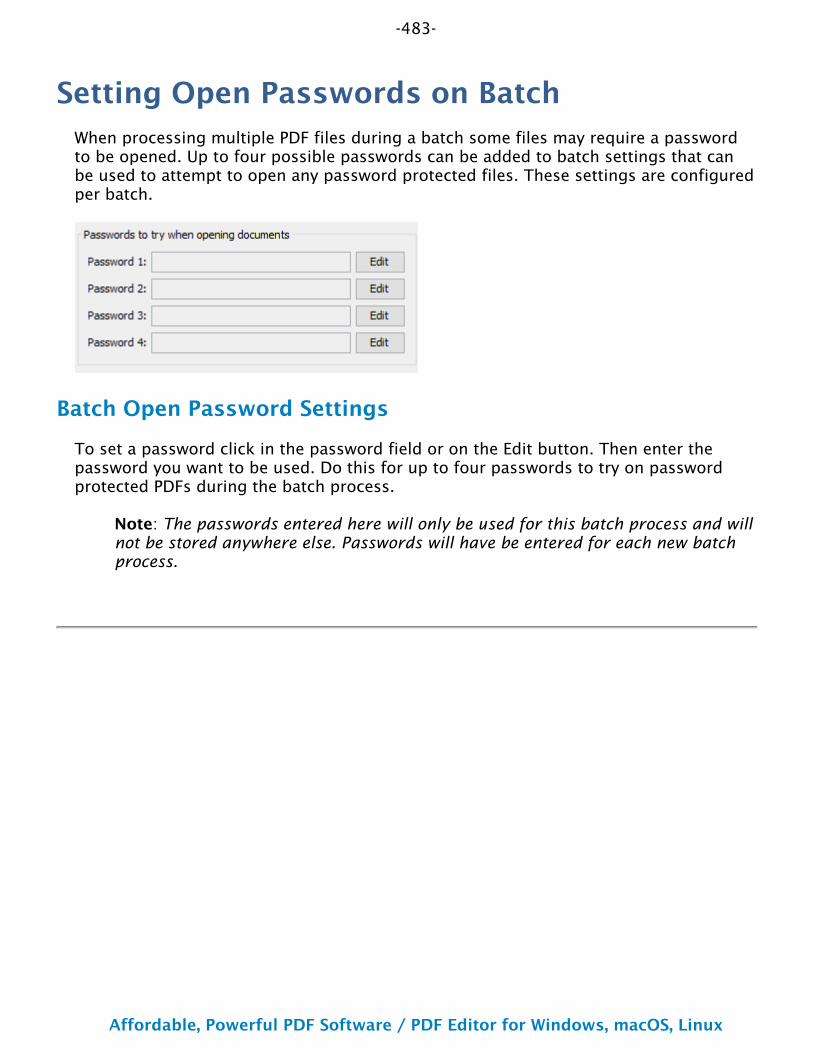
-483-
Affordable, Powerful PDF Software / PDF Editor for Windows, macOS, Linux
Copyright © 2002-Present Qoppa Software. All rights reserved.
Setting Open Passwords on BatchWhen processing multiple PDF files during a batch some files may require a password to be opened. Up to four possible passwords can be added to batch settings that can be used to attempt to open any password protected files. These settings are configured per batch.
Batch Open Password Settings
To set a password click in the password field or on the Edit button. Then enter the password you want to be used. Do this for up to four passwords to try on password protected PDFs during the batch process.
Note: The passwords entered here will only be used for this batch process and will not be stored anywhere else. Passwords will have be entered for each new batch process.
-484-
Affordable, Powerful PDF Software / PDF Editor for Windows, macOS, Linux
Copyright © 2002-Present Qoppa Software. All rights reserved.
1.2.
•••
3.
Batch Export CommentsBatch export all comments allow you to export comment data from PDF files in FDF, XFDF, .txt, XML & CSV formats.. Each document will be handled individually using the chosen settings during the batch process.
How to Batch Export All Comments
On the toolbar bar go to the Batch Tab > Comments > ExportSet the options for the batch process. Additional details for each of the settings are available below.
Using the File List select the files that need to be processedSet the destination settings for the processed batch filesIf needed, set any open passwords to be attempted when processing files
Once all of the settings are complete, click on Start... to begin the batch process.
Batch Export All Comments Settings
Format
FDF: File format created by Adobe that is supported by most PDF applications
XFDF: Extended FDF file format created by Adobe that is supported by most PDF applications
Text: Simple text file (.txt) that will contain all of the annotation information
XML: File format that is similar to an Excel file that will contain all of the annotation information
CSV: Exports all comment data into the .csv format allowing you to view in any spreadsheet editor such as Microsoft Excel
Highlighted Text: Creates a plain text file with all highlighted text separated by pages.
File List
Add Files - Displays a file chooser to add individual files to the list.
Add Folder - Displays a file chooser that adds the contents of a directory to the list.
Set Default Batch Directory - When checked, all files from the default batch directory will be added to the File List each time a batch dialog is opened.

-485-
Affordable, Powerful PDF Software / PDF Editor for Windows, macOS, Linux
Copyright © 2002-Present Qoppa Software. All rights reserved.
•
••••••••••
Include Subfolders - When checked, will include any supported file types found within sub folder of the chosen default bartch directory.
- Removes the selected file(s) from the list.
- Moves the selected file(s) up the list.
- Moves the selected file(s) down the list.
- Moves the selected file(s) to the top of the list.
- Moves the selected file(s) to the bottom of the list.
Save Files To
Destination Folder
Use Source Folder - When this option is selected, the original folder for the PDF document (in the batch process) will be used to save the output files.
Destination Folder - This option allows you to set a destination folder to place all of the processed files. You can type the destination manually or click on the "..." button to open a directory chooser to set the destination folder
Preserve Folder Structure: When checked, the output files will be placed within a new folder (within the specified destination folder) using the file's parent directory name.
File Name Pattern
Use Source Filename - Will save the document using the same original name. If another file exists in the directory, a number will be appended to the output file name, to avoid duplicate file names.
New Filename - When this option is selected, you will need to enter a new filename used for the output files. Each document name will have an incremental counter starting at zero appended to the file name entered in this field. Custom variables may also be used to further distinguish each of the file separations. The available variables are:
$filename - The file name (no extension) that the document was opened from$counter - An automatically incrementing number$day - The day of the month$month - The current month, using two digits$year - The current year, using four digits$shortyear - The current year, using two digits$second - The current second$minute - The current minute$hour - The current hour, 1-12$ampm - AM or PM
-486-
Affordable, Powerful PDF Software / PDF Editor for Windows, macOS, Linux
Copyright © 2002-Present Qoppa Software. All rights reserved.
• $longhour - The current hour, 0-23
Overwrite Files - When set, if a file with the same name already exists in the directory it will be overwritten with the newly output document.
Note: This CAN NOT be undone. Make sure that you have all your settings correct prior to starting the batch process
Passwords to try when opening documents
To set a password click in the password field or on the Edit button. Then enter the password you want to be used. Do this for up to four passwords to try on password protected PDFs during the batch process.
Note: The passwords entered here will only be used for this batch process and will not be stored anywhere else. Passwords will have to be entered for each new batch process.
-487-
Affordable, Powerful PDF Software / PDF Editor for Windows, macOS, Linux
Copyright © 2002-Present Qoppa Software. All rights reserved.
1.2.
•••
3.
Batch Extract Text from PDFBatch extract text from PDF allows you to extract text from multiple PDF documents. For each document the batch process will output a separate text file with the text contents of that document.
Note: If the document does not contain text (for example: scanned documents or images) it will need to be OCR'd first so that there is text to extract.
How to Extract Text from a Batch of PDFs
On the toolbar bar go to the Batch Tab > Convert to > TextSet the options for the batch process. Additional details for each of the settings are available below.
Using the File List select the files that need to be processedSet the destination settings for the processed batch filesIf needed, set any open passwords to be attempted when processing files
Once all of the settings are complete, click on Start... to begin the batch process.
Batch Extract Text Settings
File List
Add Files - Displays a file chooser to add individual files to the list.
Add Folder - Displays a file chooser that adds the contents of a directory to the list.
Set Default Batch Directory - When checked, all files from the default batch directory will be added to the File List each time a batch dialog is opened.
Include Subfolders - When checked, will include any supported file types found within sub folder of the chosen default bartch directory.
- Removes the selected file(s) from the list.
- Moves the selected file(s) up the list.
- Moves the selected file(s) down the list.
- Moves the selected file(s) to the top of the list.
- Moves the selected file(s) to the bottom of the list.

-488-
Affordable, Powerful PDF Software / PDF Editor for Windows, macOS, Linux
Copyright © 2002-Present Qoppa Software. All rights reserved.
•
•••••••••••
Save Files To
Destination Folder
Use Source Folder - When this option is selected, the original folder for the PDF document (in the batch process) will be used to save the output files.
Destination Folder - This option allows you to set a destination folder to place all of the processed files. You can type the destination manually or click on the "..." button to open a directory chooser to set the destination folder
Preserve Folder Structure: When checked, the output files will be placed within a new folder (within the specified destination folder) using the file's parent directory name.
File Name Pattern
Use Source Filename - Will save the document using the same original name. If another file exists in the directory, a number will be appended to the output file name, to avoid duplicate file names.
New Filename - When this option is selected, you will need to enter a new filename used for the output files. Each document name will have an incremental counter starting at zero appended to the file name entered in this field. Custom variables may also be used to further distinguish each of the file separations. The available variables are:
$filename - The file name (no extension) that the document was opened from$counter - An automatically incrementing number$day - The day of the month$month - The current month, using two digits$year - The current year, using four digits$shortyear - The current year, using two digits$second - The current second$minute - The current minute$hour - The current hour, 1-12$ampm - AM or PM$longhour - The current hour, 0-23
Overwrite Files - When set, if a file with the same name already exists in the directory it will be overwritten with the newly output document.
Note: This CAN NOT be undone. Make sure that you have all your settings correct prior to starting the batch process
Passwords to try when opening documents
To set a password click in the password field or on the Edit button. Then enter the password you want to be used. Do this for up to four passwords to try on password protected PDFs during the batch process.
-489-
Affordable, Powerful PDF Software / PDF Editor for Windows, macOS, Linux
Copyright © 2002-Present Qoppa Software. All rights reserved.
Note: The passwords entered here will only be used for this batch process and will not be stored anywhere else. Passwords will have to be entered for each new batch process.
-490-
Affordable, Powerful PDF Software / PDF Editor for Windows, macOS, Linux
Copyright © 2002-Present Qoppa Software. All rights reserved.
1.2.
••••
3.
•
•
•
••••
Batch Convert to HTML5 / SVGPDF Studio allows you to convert PDF documents to an HTML5 web page. This makes it possible to easily publish the content of PDF document onto any website, as HTML5 is supported by all browsers, without the need of a viewer plug-in. The PDF to HTML5 conversion engine in PDF Studio preserves fonts and uses the SVG format to preserve vector graphics. Sample PDF documents that have been converted to HTML5 can be found HERE.
How to Convert a Batch of PDFs to HTML
On the toolbar bar go to the Batch Tab > Convert To > HTML5 / SVGSet the options for the batch process. Additional details for each of the settings are available below.
Select the HTML5 conversion settings you wish to useUsing the File List select the files that need to be processedSet the results settings for the processed batch filesIf needed, set any open passwords to be attempted when processing files
Once all of the settings are complete, click on Start... to begin the batch process.
Batch Convert to HTML5 / SVG Settings
HTML5 Conversion Options
The options in the are as follows:
Convert to - Select the output type
Single HTML per document: creates a single HTML file for each document being processedSingle SVG per document : creates a single SVG file for each document being processedSeparate SVG per page: creates individual SVG files for each page of each document being processed
Pages - The range of pages to be exported as images
All Pages: all pages in the documentPage Range: set the pages to be exported using the From and To optionsEven Pages Only: only export the even pages of the documentOdd Pages Only: only export the odd pages of the document
Show Page Border - When checked ads a 1px border to the created pages. This makes it easier to distinguish the page are on white documents
-491-
Affordable, Powerful PDF Software / PDF Editor for Windows, macOS, Linux
Copyright © 2002-Present Qoppa Software. All rights reserved.
••
Compress Images - When checked will compress images found in the PDF to JPEG in order to reduce the size of the output
JPG Quality – Select the desired quality of JPG compression. Based on the quality parameter. Some guidelines for the quality value: 8 high quality, 5 medium quality, 2 low quality.
0 – very high compression, very low quality10 – low compression, very high quality
Results
In addition to displaying the preflight results dialog, results can be saved in a variety of configurable ways. If preflighting encounters any errors, these errors can be added to the document as annotations and/or a report detailing the errors can be created. The report is either appended to the document or saved as a new document. The modified document and/or the new report document are saved to the destination folder.
Add comments for preflight errors - whether or not to add annotations to the original document for preflight errors
Create Preflight report - whether or not to create a separate report for the preflight errors using the below options
Append report to document - appends an error report to the beginning of the document
Create new document for report - creates a separate document for the error report that will be exported to the below destination folder
File List
Add Files - Displays a file chooser to add individual files to the list.
Add Folder - Displays a file chooser that adds the contents of a directory to the list.
Set Default Batch Directory - When checked, all files from the default batch directory will be added to the File List each time a batch dialog is opened.
Include Subfolders - When checked, will include any supported file types found within sub folder of the chosen default bartch directory.
- Removes the selected file(s) from the list.
- Moves the selected file(s) up the list.
- Moves the selected file(s) down the list.
- Moves the selected file(s) to the top of the list.
-492-
Affordable, Powerful PDF Software / PDF Editor for Windows, macOS, Linux
Copyright © 2002-Present Qoppa Software. All rights reserved.
•
•••••••••••
- Moves the selected file(s) to the bottom of the list.
Save Files To
Destination Folder
Use Source Folder - When this option is selected, the original folder for the PDF document (in the batch process) will be used to save the output files.
Destination Folder - This option allows you to set a destination folder to place all of the processed files. You can type the destination manually or click on the "..." button to open a directory chooser to set the destination folder
Preserve Folder Structure: When checked, the output files will be placed within a new folder (within the specified destination folder) using the file's parent directory name.
File Name Pattern
Use Source Filename - Will save the document using the same original name. If another file exists in the directory, a number will be appended to the output file name, to avoid duplicate file names.
New Filename - When this option is selected, you will need to enter a new filename used for the output files. Each document name will have an incremental counter starting at zero appended to the file name entered in this field. Custom variables may also be used to further distinguish each of the file separations. The available variables are:
$filename - The file name (no extension) that the document was opened from$counter - An automatically incrementing number$day - The day of the month$month - The current month, using two digits$year - The current year, using four digits$shortyear - The current year, using two digits$second - The current second$minute - The current minute$hour - The current hour, 1-12$ampm - AM or PM$longhour - The current hour, 0-23
Overwrite Files - When set, if a file with the same name already exists in the directory it will be overwritten with the newly output document.
Note: This CAN NOT be undone. Make sure that you have all your settings correct prior to starting the batch process
-493-
Affordable, Powerful PDF Software / PDF Editor for Windows, macOS, Linux
Copyright © 2002-Present Qoppa Software. All rights reserved.
Passwords to try when opening documents
To set a password click in the password field or on the Edit button. Then enter the password you want to be used. Do this for up to four passwords to try on password protected PDFs during the batch process.
Note: The passwords entered here will only be used for this batch process and will not be stored anywhere else. Passwords will have to be entered for each new batch process.
-494-
Affordable, Powerful PDF Software / PDF Editor for Windows, macOS, Linux
Copyright © 2002-Present Qoppa Software. All rights reserved.
1.2.
•••
3.
••
Batch Convert Files to PDFBatch convert files to PDF allows you to convert supported non-PDF files into PDF documents. This function is similar to Converting Files to PDF except it will convert many files at once.
How to Batch Convert Files to PDF
On the toolbar bar go to the Batch Tab > Convert to > PDFSet the options for the batch process. Additional details for each of the settings are available below.
Using the File List select the files that need to be processedSet the destination settings for the processed batch filesIf needed, set any open passwords to be attempted when processing files
Once all of the settings are complete, click on Start... to begin the batch process.
Batch Convert Settings
New Page
Page Size - Allows you to select a page size from a list of predefined standard document sizes.
Portrait: sets the selected page orientation size to portraitLandscape: sets the selected page size orientation to landscape
Note: Portrait and Landscape options are not available when selecting a "Custom" media size
Units - Select the measurement unit for the crop margins in either Inches, Points, Centimeters, or Millimeters
Width - Width of the page in the units selected
Height - Height of the page in the units selected
Keep Proportional - When checked keeps the width and height values in sync
Current Page
Center - When checked this option will center the original page content in the new page size
Scale to Fit - Resizes the page content to best fit the new page size
Fit to Crop Page - Sets the crop box equal to the media box

-495-
Affordable, Powerful PDF Software / PDF Editor for Windows, macOS, Linux
Copyright © 2002-Present Qoppa Software. All rights reserved.
•
•
File List
Add Files - Displays a file chooser to add individual files to the list.
Add Folder - Displays a file chooser that adds the contents of a directory to the list.
Set Default Batch Directory - When checked, all files from the default batch directory will be added to the File List each time a batch dialog is opened.
Include Subfolders - When checked, will include any supported file types found within sub folder of the chosen default bartch directory.
- Removes the selected file(s) from the list.
- Moves the selected file(s) up the list.
- Moves the selected file(s) down the list.
- Moves the selected file(s) to the top of the list.
- Moves the selected file(s) to the bottom of the list.
Save Files To
Destination Folder
Use Source Folder - When this option is selected, the original folder for the PDF document (in the batch process) will be used to save the output files.
Destination Folder - This option allows you to set a destination folder to place all of the processed files. You can type the destination manually or click on the "..." button to open a directory chooser to set the destination folder
Preserve Folder Structure: When checked, the output files will be placed within a new folder (within the specified destination folder) using the file's parent directory name.
File Name Pattern
Use Source Filename - Will save the document using the same original name. If another file exists in the directory, a number will be appended to the output file name, to avoid duplicate file names.
New Filename - When this option is selected, you will need to enter a new filename used for the output files. Each document name will have an incremental counter starting at zero appended to the file name entered in this field. Custom variables may also be used to further distinguish each of the file separations. The available variables are:
$filename - The file name (no extension) that the document was opened from

-496-
Affordable, Powerful PDF Software / PDF Editor for Windows, macOS, Linux
Copyright © 2002-Present Qoppa Software. All rights reserved.
••••••••••
$counter - An automatically incrementing number$day - The day of the month$month - The current month, using two digits$year - The current year, using four digits$shortyear - The current year, using two digits$second - The current second$minute - The current minute$hour - The current hour, 1-12$ampm - AM or PM$longhour - The current hour, 0-23
Overwrite Files - When set, if a file with the same name already exists in the directory it will be overwritten with the newly output document.
Note: This CAN NOT be undone. Make sure that you have all your settings correct prior to starting the batch process
Passwords to try when opening documents
To set a password click in the password field or on the Edit button. Then enter the password you want to be used. Do this for up to four passwords to try on password protected PDFs during the batch process.
Note: The passwords entered here will only be used for this batch process and will not be stored anywhere else. Passwords will have to be entered for each new batch process.
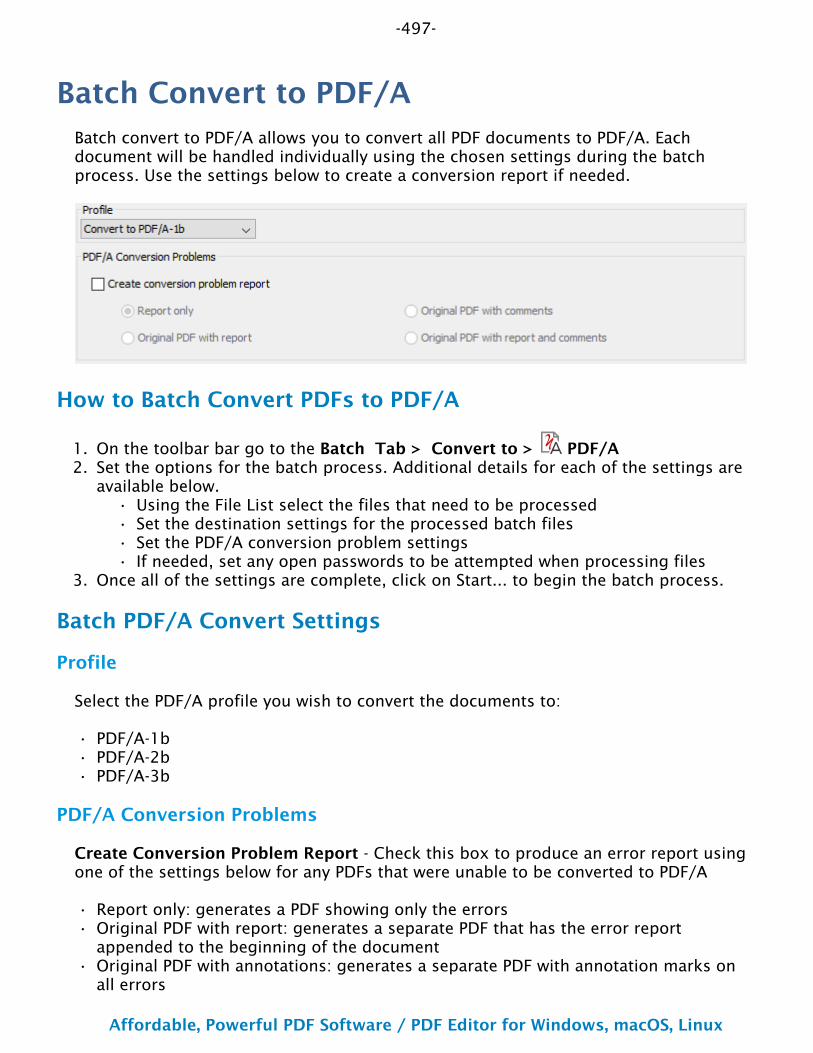
-497-
Affordable, Powerful PDF Software / PDF Editor for Windows, macOS, Linux
Copyright © 2002-Present Qoppa Software. All rights reserved.
1.2.
••••
3.
•••
••
•
Batch Convert to PDF/ABatch convert to PDF/A allows you to convert all PDF documents to PDF/A. Each document will be handled individually using the chosen settings during the batch process. Use the settings below to create a conversion report if needed.
How to Batch Convert PDFs to PDF/A
On the toolbar bar go to the Batch Tab > Convert to > PDF/ASet the options for the batch process. Additional details for each of the settings are available below.
Using the File List select the files that need to be processedSet the destination settings for the processed batch filesSet the PDF/A conversion problem settingsIf needed, set any open passwords to be attempted when processing files
Once all of the settings are complete, click on Start... to begin the batch process.
Batch PDF/A Convert Settings
Profile
Select the PDF/A profile you wish to convert the documents to:
PDF/A-1bPDF/A-2bPDF/A-3b
PDF/A Conversion Problems
Create Conversion Problem Report - Check this box to produce an error report using one of the settings below for any PDFs that were unable to be converted to PDF/A
Report only: generates a PDF showing only the errorsOriginal PDF with report: generates a separate PDF that has the error report appended to the beginning of the documentOriginal PDF with annotations: generates a separate PDF with annotation marks on all errors

-498-
Affordable, Powerful PDF Software / PDF Editor for Windows, macOS, Linux
Copyright © 2002-Present Qoppa Software. All rights reserved.
•
•
Original PDF with report and annotations: generates a separate PDF with annotation marks on all errors as well as an error report appended to the beginning of the document
File List
Add Files - Displays a file chooser to add individual files to the list.
Add Folder - Displays a file chooser that adds the contents of a directory to the list.
Set Default Batch Directory - When checked, all files from the default batch directory will be added to the File List each time a batch dialog is opened.
Include Subfolders - When checked, will include any supported file types found within sub folder of the chosen default bartch directory.
- Removes the selected file(s) from the list.
- Moves the selected file(s) up the list.
- Moves the selected file(s) down the list.
- Moves the selected file(s) to the top of the list.
- Moves the selected file(s) to the bottom of the list.
Save Files To
Destination Folder
Use Source Folder - When this option is selected, the original folder for the PDF document (in the batch process) will be used to save the output files.
Destination Folder - This option allows you to set a destination folder to place all of the processed files. You can type the destination manually or click on the "..." button to open a directory chooser to set the destination folder
Preserve Folder Structure: When checked, the output files will be placed within a new folder (within the specified destination folder) using the file's parent directory name.
File Name Pattern
Use Source Filename - Will save the document using the same original name. If another file exists in the directory, a number will be appended to the output file name, to avoid duplicate file names.
New Filename - When this option is selected, you will need to enter a new filename used for the output files. Each document name will have an incremental counter starting at zero appended to the file name entered in this field. Custom variables may
-499-
Affordable, Powerful PDF Software / PDF Editor for Windows, macOS, Linux
Copyright © 2002-Present Qoppa Software. All rights reserved.
•••••••••••
also be used to further distinguish each of the file separations. The available variables are:
$filename - The file name (no extension) that the document was opened from$counter - An automatically incrementing number$day - The day of the month$month - The current month, using two digits$year - The current year, using four digits$shortyear - The current year, using two digits$second - The current second$minute - The current minute$hour - The current hour, 1-12$ampm - AM or PM$longhour - The current hour, 0-23
Overwrite Files - When set, if a file with the same name already exists in the directory it will be overwritten with the newly output document.
Note: This CAN NOT be undone. Make sure that you have all your settings correct prior to starting the batch process
Passwords to try when opening documents
To set a password click in the password field or on the Edit button. Then enter the password you want to be used. Do this for up to four passwords to try on password protected PDFs during the batch process.
Note: The passwords entered here will only be used for this batch process and will not be stored anywhere else. Passwords will have to be entered for each new batch process.
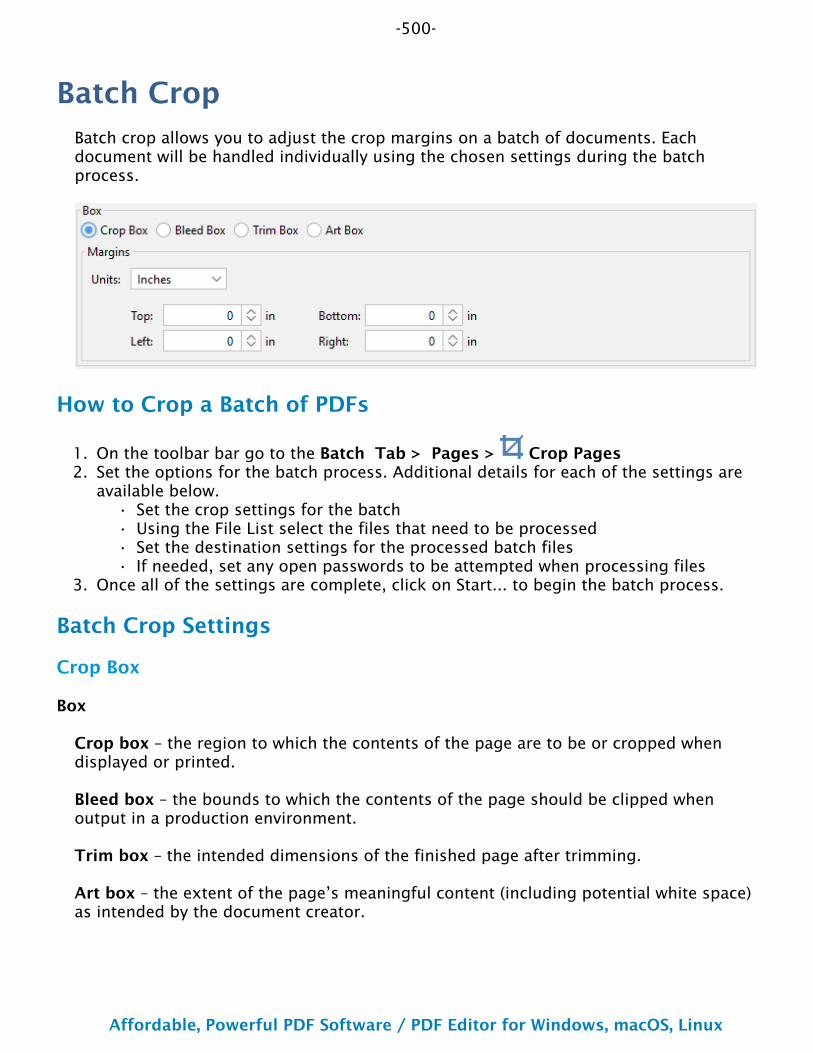
-500-
Affordable, Powerful PDF Software / PDF Editor for Windows, macOS, Linux
Copyright © 2002-Present Qoppa Software. All rights reserved.
1.2.
••••
3.
Batch CropBatch crop allows you to adjust the crop margins on a batch of documents. Each document will be handled individually using the chosen settings during the batch process.
How to Crop a Batch of PDFs
On the toolbar bar go to the Batch Tab > Pages > Crop PagesSet the options for the batch process. Additional details for each of the settings are available below.
Set the crop settings for the batchUsing the File List select the files that need to be processedSet the destination settings for the processed batch filesIf needed, set any open passwords to be attempted when processing files
Once all of the settings are complete, click on Start... to begin the batch process.
Batch Crop Settings
Crop Box
Box
Crop box – the region to which the contents of the page are to be or cropped when displayed or printed.
Bleed box – the bounds to which the contents of the page should be clipped when output in a production environment.
Trim box – the intended dimensions of the finished page after trimming.
Art box – the extent of the page’s meaningful content (including potential white space) as intended by the document creator.
-501-
Affordable, Powerful PDF Software / PDF Editor for Windows, macOS, Linux
Copyright © 2002-Present Qoppa Software. All rights reserved.
•
Margins
Units - Select the measurement unit for the crop margins in either Inches, Points, Centimeters, or Millimeters
Top - The distance of the margin from the top
Bottom - The distance of the margin from the bottom
Left - The distance of the margin from the left
Right - The distance of the margin from the right
File List
Add Files - Displays a file chooser to add individual files to the list.
Add Folder - Displays a file chooser that adds the contents of a directory to the list.
Set Default Batch Directory - When checked, all files from the default batch directory will be added to the File List each time a batch dialog is opened.
Include Subfolders - When checked, will include any supported file types found within sub folder of the chosen default bartch directory.
- Removes the selected file(s) from the list.
- Moves the selected file(s) up the list.
- Moves the selected file(s) down the list.
- Moves the selected file(s) to the top of the list.
- Moves the selected file(s) to the bottom of the list.
Save Files To
Destination Folder
Use Source Folder - When this option is selected, the original folder for the PDF document (in the batch process) will be used to save the output files.
Destination Folder - This option allows you to set a destination folder to place all of the processed files. You can type the destination manually or click on the "..." button to open a directory chooser to set the destination folder
Preserve Folder Structure: When checked, the output files will be placed within a new folder (within the specified destination folder) using the file's parent directory name.
-502-
Affordable, Powerful PDF Software / PDF Editor for Windows, macOS, Linux
Copyright © 2002-Present Qoppa Software. All rights reserved.
•••••••••••
File Name Pattern
Use Source Filename - Will save the document using the same original name. If another file exists in the directory, a number will be appended to the output file name, to avoid duplicate file names.
New Filename - When this option is selected, you will need to enter a new filename used for the output files. Each document name will have an incremental counter starting at zero appended to the file name entered in this field. Custom variables may also be used to further distinguish each of the file separations. The available variables are:
$filename - The file name (no extension) that the document was opened from$counter - An automatically incrementing number$day - The day of the month$month - The current month, using two digits$year - The current year, using four digits$shortyear - The current year, using two digits$second - The current second$minute - The current minute$hour - The current hour, 1-12$ampm - AM or PM$longhour - The current hour, 0-23
Overwrite Files - When set, if a file with the same name already exists in the directory it will be overwritten with the newly output document.
Note: This CAN NOT be undone. Make sure that you have all your settings correct prior to starting the batch process
Passwords to try when opening documents
To set a password click in the password field or on the Edit button. Then enter the password you want to be used. Do this for up to four passwords to try on password protected PDFs during the batch process.
Note: The passwords entered here will only be used for this batch process and will not be stored anywhere else. Passwords will have to be entered for each new batch process.
-503-
Affordable, Powerful PDF Software / PDF Editor for Windows, macOS, Linux
Copyright © 2002-Present Qoppa Software. All rights reserved.
1.2.
•••
3.
Batch Delete All CommentsBatch delete all comments allow you to delete all comments and annotations from a batch of PDFs. Each document will be handled individually using the chosen settings during the batch process.
How to Batch Delete All Comments
On the toolbar bar go to the Batch Tab > Comments > DeleteSet the options for the batch process. Additional details for each of the settings are available below.
Using the File List select the files that need to be processedSet the destination settings for the processed batch filesIf needed, set any open passwords to be attempted when processing files
Once all of the settings are complete, click on Start... to begin the batch process.
Batch Delete All Comments Settings
File List
Add Files - Displays a file chooser to add individual files to the list.
Add Folder - Displays a file chooser that adds the contents of a directory to the list.
Set Default Batch Directory - When checked, all files from the default batch directory will be added to the File List each time a batch dialog is opened.
Include Subfolders - When checked, will include any supported file types found within sub folder of the chosen default bartch directory.
- Removes the selected file(s) from the list.
- Moves the selected file(s) up the list.
- Moves the selected file(s) down the list.
- Moves the selected file(s) to the top of the list.
- Moves the selected file(s) to the bottom of the list.
Save Files To
Destination Folder
Use Source Folder - When this option is selected, the original folder for the PDF document (in the batch process) will be used to save the output files.
-504-
Affordable, Powerful PDF Software / PDF Editor for Windows, macOS, Linux
Copyright © 2002-Present Qoppa Software. All rights reserved.
•
•••••••••••
Destination Folder - This option allows you to set a destination folder to place all of the processed files. You can type the destination manually or click on the "..." button to open a directory chooser to set the destination folder
Preserve Folder Structure: When checked, the output files will be placed within a new folder (within the specified destination folder) using the file's parent directory name.
File Name Pattern
Use Source Filename - Will save the document using the same original name. If another file exists in the directory, a number will be appended to the output file name, to avoid duplicate file names.
New Filename - When this option is selected, you will need to enter a new filename used for the output files. Each document name will have an incremental counter starting at zero appended to the file name entered in this field. Custom variables may also be used to further distinguish each of the file separations. The available variables are:
$filename - The file name (no extension) that the document was opened from$counter - An automatically incrementing number$day - The day of the month$month - The current month, using two digits$year - The current year, using four digits$shortyear - The current year, using two digits$second - The current second$minute - The current minute$hour - The current hour, 1-12$ampm - AM or PM$longhour - The current hour, 0-23
Overwrite Files - When set, if a file with the same name already exists in the directory it will be overwritten with the newly output document.
Note: This CAN NOT be undone. Make sure that you have all your settings correct prior to starting the batch process
Passwords to try when opening documents
To set a password click in the password field or on the Edit button. Then enter the password you want to be used. Do this for up to four passwords to try on password protected PDFs during the batch process.
Note: The passwords entered here will only be used for this batch process and will not be stored anywhere else. Passwords will have to be entered for each new batch process.

-505-
Affordable, Powerful PDF Software / PDF Editor for Windows, macOS, Linux
Copyright © 2002-Present Qoppa Software. All rights reserved.
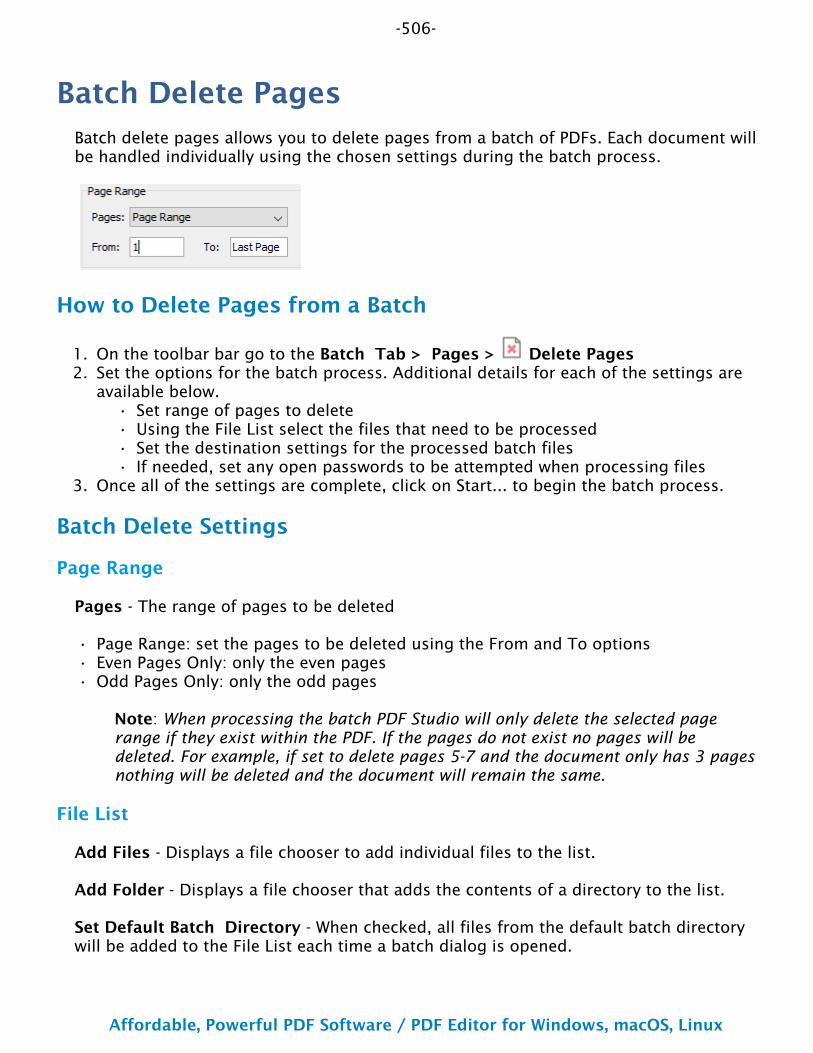
-506-
Affordable, Powerful PDF Software / PDF Editor for Windows, macOS, Linux
Copyright © 2002-Present Qoppa Software. All rights reserved.
1.2.
••••
3.
•••
Batch Delete PagesBatch delete pages allows you to delete pages from a batch of PDFs. Each document will be handled individually using the chosen settings during the batch process.
How to Delete Pages from a Batch
On the toolbar bar go to the Batch Tab > Pages > Delete PagesSet the options for the batch process. Additional details for each of the settings are available below.
Set range of pages to deleteUsing the File List select the files that need to be processedSet the destination settings for the processed batch filesIf needed, set any open passwords to be attempted when processing files
Once all of the settings are complete, click on Start... to begin the batch process.
Batch Delete Settings
Page Range
Pages - The range of pages to be deleted
Page Range: set the pages to be deleted using the From and To optionsEven Pages Only: only the even pagesOdd Pages Only: only the odd pages
Note: When processing the batch PDF Studio will only delete the selected page range if they exist within the PDF. If the pages do not exist no pages will be deleted. For example, if set to delete pages 5-7 and the document only has 3 pages nothing will be deleted and the document will remain the same.
File List
Add Files - Displays a file chooser to add individual files to the list.
Add Folder - Displays a file chooser that adds the contents of a directory to the list.
Set Default Batch Directory - When checked, all files from the default batch directory will be added to the File List each time a batch dialog is opened.
-507-
Affordable, Powerful PDF Software / PDF Editor for Windows, macOS, Linux
Copyright © 2002-Present Qoppa Software. All rights reserved.
•
••••••••••
Include Subfolders - When checked, will include any supported file types found within sub folder of the chosen default bartch directory.
- Removes the selected file(s) from the list.
- Moves the selected file(s) up the list.
- Moves the selected file(s) down the list.
- Moves the selected file(s) to the top of the list.
- Moves the selected file(s) to the bottom of the list.
Save Files To
Destination Folder
Use Source Folder - When this option is selected, the original folder for the PDF document (in the batch process) will be used to save the output files.
Destination Folder - This option allows you to set a destination folder to place all of the processed files. You can type the destination manually or click on the "..." button to open a directory chooser to set the destination folder
Preserve Folder Structure: When checked, the output files will be placed within a new folder (within the specified destination folder) using the file's parent directory name.
File Name Pattern
Use Source Filename - Will save the document using the same original name. If another file exists in the directory, a number will be appended to the output file name, to avoid duplicate file names.
New Filename - When this option is selected, you will need to enter a new filename used for the output files. Each document name will have an incremental counter starting at zero appended to the file name entered in this field. Custom variables may also be used to further distinguish each of the file separations. The available variables are:
$filename - The file name (no extension) that the document was opened from$counter - An automatically incrementing number$day - The day of the month$month - The current month, using two digits$year - The current year, using four digits$shortyear - The current year, using two digits$second - The current second$minute - The current minute$hour - The current hour, 1-12$ampm - AM or PM
-508-
Affordable, Powerful PDF Software / PDF Editor for Windows, macOS, Linux
Copyright © 2002-Present Qoppa Software. All rights reserved.
• $longhour - The current hour, 0-23
Overwrite Files - When set, if a file with the same name already exists in the directory it will be overwritten with the newly output document.
Note: This CAN NOT be undone. Make sure that you have all your settings correct prior to starting the batch process
Passwords to try when opening documents
To set a password click in the password field or on the Edit button. Then enter the password you want to be used. Do this for up to four passwords to try on password protected PDFs during the batch process.
Note: The passwords entered here will only be used for this batch process and will not be stored anywhere else. Passwords will have to be entered for each new batch process.
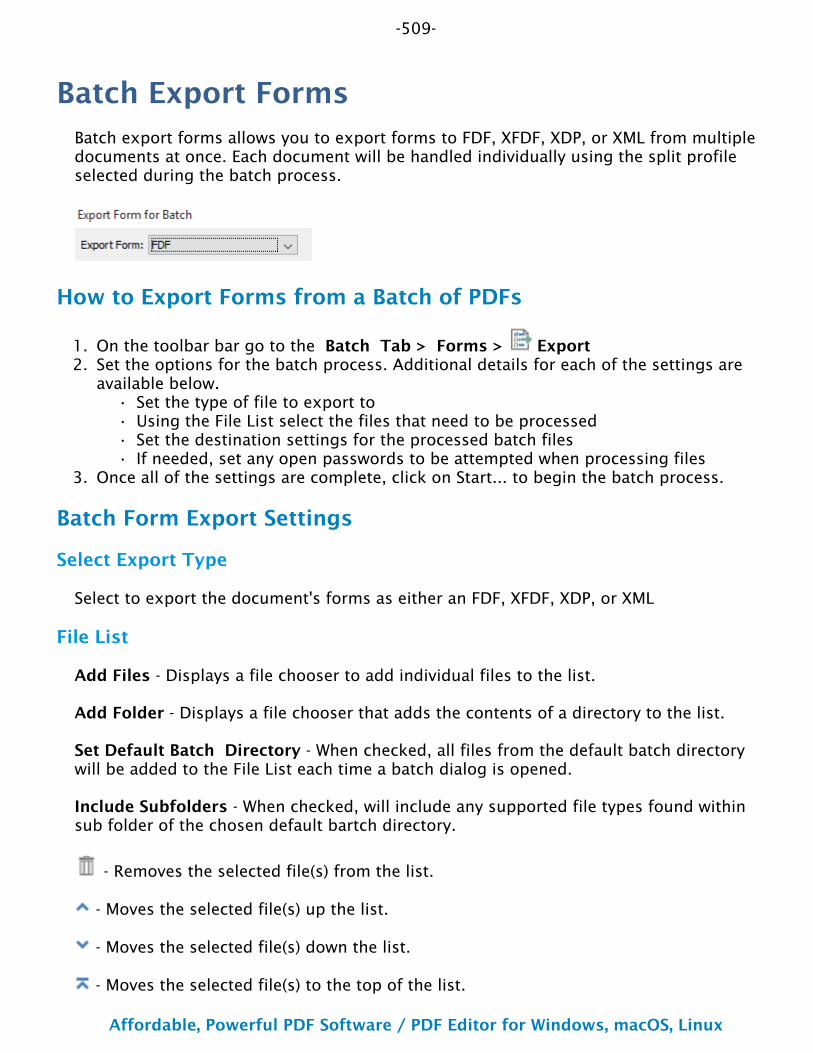
-509-
Affordable, Powerful PDF Software / PDF Editor for Windows, macOS, Linux
Copyright © 2002-Present Qoppa Software. All rights reserved.
1.2.
••••
3.
Batch Export FormsBatch export forms allows you to export forms to FDF, XFDF, XDP, or XML from multiple documents at once. Each document will be handled individually using the split profile selected during the batch process.
How to Export Forms from a Batch of PDFs
On the toolbar bar go to the Batch Tab > Forms > ExportSet the options for the batch process. Additional details for each of the settings are available below.
Set the type of file to export toUsing the File List select the files that need to be processedSet the destination settings for the processed batch filesIf needed, set any open passwords to be attempted when processing files
Once all of the settings are complete, click on Start... to begin the batch process.
Batch Form Export Settings
Select Export Type
Select to export the document's forms as either an FDF, XFDF, XDP, or XML
File List
Add Files - Displays a file chooser to add individual files to the list.
Add Folder - Displays a file chooser that adds the contents of a directory to the list.
Set Default Batch Directory - When checked, all files from the default batch directory will be added to the File List each time a batch dialog is opened.
Include Subfolders - When checked, will include any supported file types found within sub folder of the chosen default bartch directory.
- Removes the selected file(s) from the list.
- Moves the selected file(s) up the list.
- Moves the selected file(s) down the list.
- Moves the selected file(s) to the top of the list.

-510-
Affordable, Powerful PDF Software / PDF Editor for Windows, macOS, Linux
Copyright © 2002-Present Qoppa Software. All rights reserved.
•
•••••••••••
- Moves the selected file(s) to the bottom of the list.
Save Files To
Destination Folder
Use Source Folder - When this option is selected, the original folder for the PDF document (in the batch process) will be used to save the output files.
Destination Folder - This option allows you to set a destination folder to place all of the processed files. You can type the destination manually or click on the "..." button to open a directory chooser to set the destination folder
Preserve Folder Structure: When checked, the output files will be placed within a new folder (within the specified destination folder) using the file's parent directory name.
File Name Pattern
Use Source Filename - Will save the document using the same original name. If another file exists in the directory, a number will be appended to the output file name, to avoid duplicate file names.
New Filename - When this option is selected, you will need to enter a new filename used for the output files. Each document name will have an incremental counter starting at zero appended to the file name entered in this field. Custom variables may also be used to further distinguish each of the file separations. The available variables are:
$filename - The file name (no extension) that the document was opened from$counter - An automatically incrementing number$day - The day of the month$month - The current month, using two digits$year - The current year, using four digits$shortyear - The current year, using two digits$second - The current second$minute - The current minute$hour - The current hour, 1-12$ampm - AM or PM$longhour - The current hour, 0-23
Overwrite Files - When set, if a file with the same name already exists in the directory it will be overwritten with the newly output document.
Note: This CAN NOT be undone. Make sure that you have all your settings correct prior to starting the batch process

-511-
Affordable, Powerful PDF Software / PDF Editor for Windows, macOS, Linux
Copyright © 2002-Present Qoppa Software. All rights reserved.
Passwords to try when opening documents
To set a password click in the password field or on the Edit button. Then enter the password you want to be used. Do this for up to four passwords to try on password protected PDFs during the batch process.
Note: The passwords entered here will only be used for this batch process and will not be stored anywhere else. Passwords will have to be entered for each new batch process.
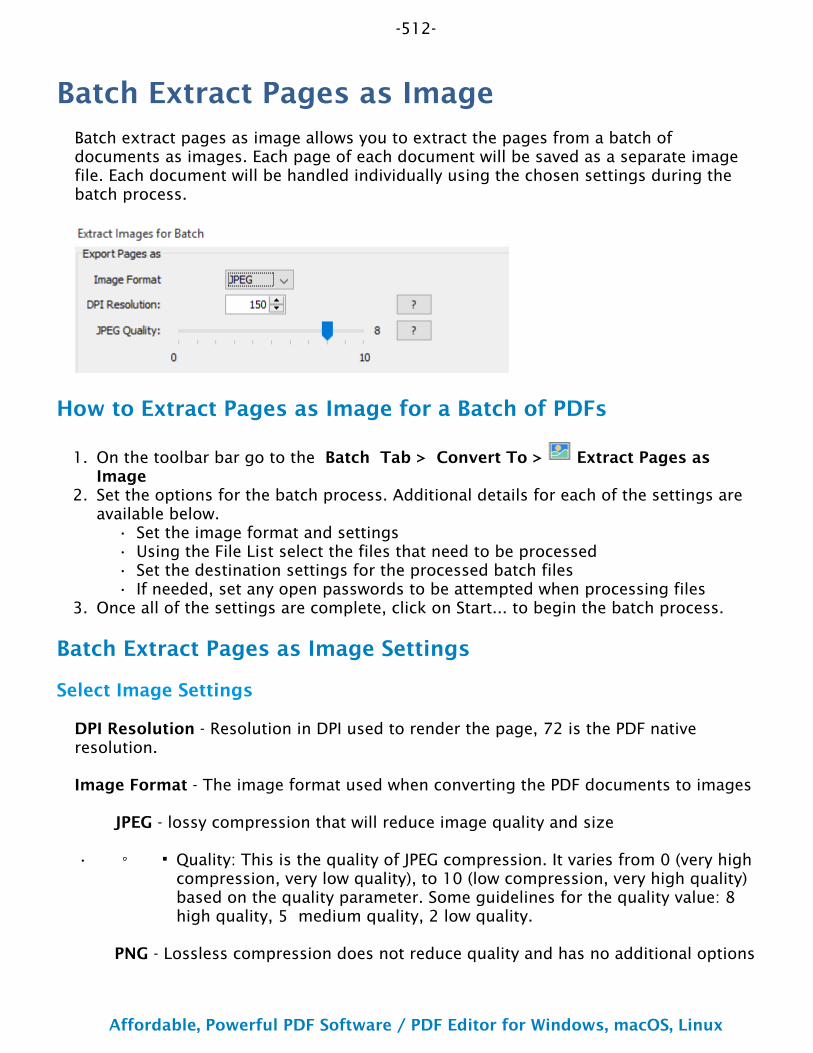
-512-
Affordable, Powerful PDF Software / PDF Editor for Windows, macOS, Linux
Copyright © 2002-Present Qoppa Software. All rights reserved.
1.
2.
••••
3.
•
Batch Extract Pages as ImageBatch extract pages as image allows you to extract the pages from a batch of documents as images. Each page of each document will be saved as a separate image file. Each document will be handled individually using the chosen settings during the batch process.
How to Extract Pages as Image for a Batch of PDFs
On the toolbar bar go to the Batch Tab > Convert To > Extract Pages as ImageSet the options for the batch process. Additional details for each of the settings are available below.
Set the image format and settingsUsing the File List select the files that need to be processedSet the destination settings for the processed batch filesIf needed, set any open passwords to be attempted when processing files
Once all of the settings are complete, click on Start... to begin the batch process.
Batch Extract Pages as Image Settings
Select Image Settings
DPI Resolution - Resolution in DPI used to render the page, 72 is the PDF native resolution.
Image Format - The image format used when converting the PDF documents to images
JPEG - lossy compression that will reduce image quality and size
Quality: This is the quality of JPEG compression. It varies from 0 (very high compression, very low quality), to 10 (low compression, very high quality) based on the quality parameter. Some guidelines for the quality value: 8 high quality, 5 medium quality, 2 low quality.
PNG - Lossless compression does not reduce quality and has no additional options
-513-
Affordable, Powerful PDF Software / PDF Editor for Windows, macOS, Linux
Copyright © 2002-Present Qoppa Software. All rights reserved.
•
•
TIFF - Lossless compression does not reduce quality but allows for more than one image per file and additional compression formats
Compression: Select the specific compression type for the TIFF image. The available TIFF compressions are: CCITT_RLE(B&W), Group 3 Fax (B&W), Group 4 Fax (B&W), Pack Bits, LZW, ZLib, Deflate, JPEG, No Compression.
Note: CCITT RLE, Group 3 Fax, and Group 4 Fax are compressed black and white formats.
Export all pages as a single tiff: By default, a default separate TIFF images will be generated for each page. Check this option export a single file containing multiple images.
GIF - Lossless compression format for image files that does not reduce quality but supports both animated and static images.
File List
Add Files - Displays a file chooser to add individual files to the list.
Add Folder - Displays a file chooser that adds the contents of a directory to the list.
Set Default Batch Directory - When checked, all files from the default batch directory will be added to the File List each time a batch dialog is opened.
Include Subfolders - When checked, will include any supported file types found within sub folder of the chosen default bartch directory.
- Removes the selected file(s) from the list.
- Moves the selected file(s) up the list.
- Moves the selected file(s) down the list.
- Moves the selected file(s) to the top of the list.
- Moves the selected file(s) to the bottom of the list.
Save Files To
Destination Folder
Use Source Folder - When this option is selected, the original folder for the PDF document (in the batch process) will be used to save the output files.
Destination Folder - This option allows you to set a destination folder to place all of the processed files. You can type the destination manually or click on the "..." button to open a directory chooser to set the destination folder

-514-
Affordable, Powerful PDF Software / PDF Editor for Windows, macOS, Linux
Copyright © 2002-Present Qoppa Software. All rights reserved.
•
•••••••••••
Preserve Folder Structure: When checked, the output files will be placed within a new folder (within the specified destination folder) using the file's parent directory name.
File Name Pattern
Use Source Filename - Will save the document using the same original name. If another file exists in the directory, a number will be appended to the output file name, to avoid duplicate file names.
New Filename - When this option is selected, you will need to enter a new filename used for the output files. Each document name will have an incremental counter starting at zero appended to the file name entered in this field. Custom variables may also be used to further distinguish each of the file separations. The available variables are:
$filename - The file name (no extension) that the document was opened from$counter - An automatically incrementing number$day - The day of the month$month - The current month, using two digits$year - The current year, using four digits$shortyear - The current year, using two digits$second - The current second$minute - The current minute$hour - The current hour, 1-12$ampm - AM or PM$longhour - The current hour, 0-23
Overwrite Files - When set, if a file with the same name already exists in the directory it will be overwritten with the newly output document.
Note: This CAN NOT be undone. Make sure that you have all your settings correct prior to starting the batch process
Passwords to try when opening documents
To set a password click in the password field or on the Edit button. Then enter the password you want to be used. Do this for up to four passwords to try on password protected PDFs during the batch process.
Note: The passwords entered here will only be used for this batch process and will not be stored anywhere else. Passwords will have to be entered for each new batch process.
-515-
Affordable, Powerful PDF Software / PDF Editor for Windows, macOS, Linux
Copyright © 2002-Present Qoppa Software. All rights reserved.
1.2.
•••
3.
Batch Flatten All CommentsBatch flatten all comments allow you to flatten all comments and annotations from a batch of PDFs. Flattening annotations is the act of painting the annotations directly on the page to which they belong so they are not editable anymore. This will permanently write an annotation into the document. For instance, a custom signature stamp can be flattened so the signature is added to the document itself and doesn't sit on a document as an editable annotation anymore. Each document will be handled individually using the chosen settings during the batch process.
Note: Annotations such as the sticky note will have comments removed but the image will still be placed on the document. The following annotations (file attachment annotations, links, sounds, and redaction annotations) will NOT be removed when flattening annotations . Even though technically file attachment annotations, links, sounds, and redaction annotations are annotations, they contain actions that would also be removed if the annotation was flattened and so they remain to not interfere with the functions placed in the PDF.
How to Batch Flatten All Comments
On the toolbar bar go to the Batch Tab > Comments > FlattenSet the options for the batch process. Additional details for each of the settings are available below.
Using the File List select the files that need to be processedSet the destination settings for the processed batch filesIf needed, set any open passwords to be attempted when processing files
Once all of the settings are complete, click on Start... to begin the batch process.
Batch Flatten All Comments Settings
File List
Add Files - Displays a file chooser to add individual files to the list.
Add Folder - Displays a file chooser that adds the contents of a directory to the list.
Set Default Batch Directory - When checked, all files from the default batch directory will be added to the File List each time a batch dialog is opened.
Include Subfolders - When checked, will include any supported file types found within sub folder of the chosen default bartch directory.
- Removes the selected file(s) from the list.
- Moves the selected file(s) up the list.
-516-
Affordable, Powerful PDF Software / PDF Editor for Windows, macOS, Linux
Copyright © 2002-Present Qoppa Software. All rights reserved.
•
•••••••••••
- Moves the selected file(s) down the list.
- Moves the selected file(s) to the top of the list.
- Moves the selected file(s) to the bottom of the list.
Save Files To
Destination Folder
Use Source Folder - When this option is selected, the original folder for the PDF document (in the batch process) will be used to save the output files.
Destination Folder - This option allows you to set a destination folder to place all of the processed files. You can type the destination manually or click on the "..." button to open a directory chooser to set the destination folder
Preserve Folder Structure: When checked, the output files will be placed within a new folder (within the specified destination folder) using the file's parent directory name.
File Name Pattern
Use Source Filename - Will save the document using the same original name. If another file exists in the directory, a number will be appended to the output file name, to avoid duplicate file names.
New Filename - When this option is selected, you will need to enter a new filename used for the output files. Each document name will have an incremental counter starting at zero appended to the file name entered in this field. Custom variables may also be used to further distinguish each of the file separations. The available variables are:
$filename - The file name (no extension) that the document was opened from$counter - An automatically incrementing number$day - The day of the month$month - The current month, using two digits$year - The current year, using four digits$shortyear - The current year, using two digits$second - The current second$minute - The current minute$hour - The current hour, 1-12$ampm - AM or PM$longhour - The current hour, 0-23
Overwrite Files - When set, if a file with the same name already exists in the directory it will be overwritten with the newly output document.
Note: This CAN NOT be undone. Make sure that you have all your settings correct prior to starting the batch process
-517-
Affordable, Powerful PDF Software / PDF Editor for Windows, macOS, Linux
Copyright © 2002-Present Qoppa Software. All rights reserved.
Passwords to try when opening documents
To set a password click in the password field or on the Edit button. Then enter the password you want to be used. Do this for up to four passwords to try on password protected PDFs during the batch process.
Note: The passwords entered here will only be used for this batch process and will not be stored anywhere else. Passwords will have to be entered for each new batch process.
-518-
Affordable, Powerful PDF Software / PDF Editor for Windows, macOS, Linux
Copyright © 2002-Present Qoppa Software. All rights reserved.
1.2.
•••
3.
Batch Flatten All FieldsBatch flatten all fields allow you to flatten all fields from a batch of PDFs. Fields will be painted directly in the content page to which they belong and will not be editable anymore. Each document will be handled individually using the chosen settings during the batch process.
How to Batch Flatten All Fields
On the toolbar bar go to the Batch Tab > Forms > FlattenSet the options for the batch process. Additional details for each of the settings are available below.
Using the File List select the files that need to be processedSet the destination settings for the processed batch filesIf needed, set any open passwords to be attempted when processing files
Once all of the settings are complete, click on Start... to begin the batch process.
Batch Flatten All Fields Settings
File List
Add Files - Displays a file chooser to add individual files to the list.
Add Folder - Displays a file chooser that adds the contents of a directory to the list.
Set Default Batch Directory - When checked, all files from the default batch directory will be added to the File List each time a batch dialog is opened.
Include Subfolders - When checked, will include any supported file types found within sub folder of the chosen default bartch directory.
- Removes the selected file(s) from the list.
- Moves the selected file(s) up the list.
- Moves the selected file(s) down the list.
- Moves the selected file(s) to the top of the list.
- Moves the selected file(s) to the bottom of the list.

-519-
Affordable, Powerful PDF Software / PDF Editor for Windows, macOS, Linux
Copyright © 2002-Present Qoppa Software. All rights reserved.
•
•••••••••••
Save Files To
Destination Folder
Use Source Folder - When this option is selected, the original folder for the PDF document (in the batch process) will be used to save the output files.
Destination Folder - This option allows you to set a destination folder to place all of the processed files. You can type the destination manually or click on the "..." button to open a directory chooser to set the destination folder
Preserve Folder Structure: When checked, the output files will be placed within a new folder (within the specified destination folder) using the file's parent directory name.
File Name Pattern
Use Source Filename - Will save the document using the same original name. If another file exists in the directory, a number will be appended to the output file name, to avoid duplicate file names.
New Filename - When this option is selected, you will need to enter a new filename used for the output files. Each document name will have an incremental counter starting at zero appended to the file name entered in this field. Custom variables may also be used to further distinguish each of the file separations. The available variables are:
$filename - The file name (no extension) that the document was opened from$counter - An automatically incrementing number$day - The day of the month$month - The current month, using two digits$year - The current year, using four digits$shortyear - The current year, using two digits$second - The current second$minute - The current minute$hour - The current hour, 1-12$ampm - AM or PM$longhour - The current hour, 0-23
Overwrite Files - When set, if a file with the same name already exists in the directory it will be overwritten with the newly output document.
Note: This CAN NOT be undone. Make sure that you have all your settings correct prior to starting the batch process
Passwords to try when opening documents
To set a password click in the password field or on the Edit button. Then enter the password you want to be used. Do this for up to four passwords to try on password protected PDFs during the batch process.

-520-
Affordable, Powerful PDF Software / PDF Editor for Windows, macOS, Linux
Copyright © 2002-Present Qoppa Software. All rights reserved.
Note: The passwords entered here will only be used for this batch process and will not be stored anywhere else. Passwords will have to be entered for each new batch process.
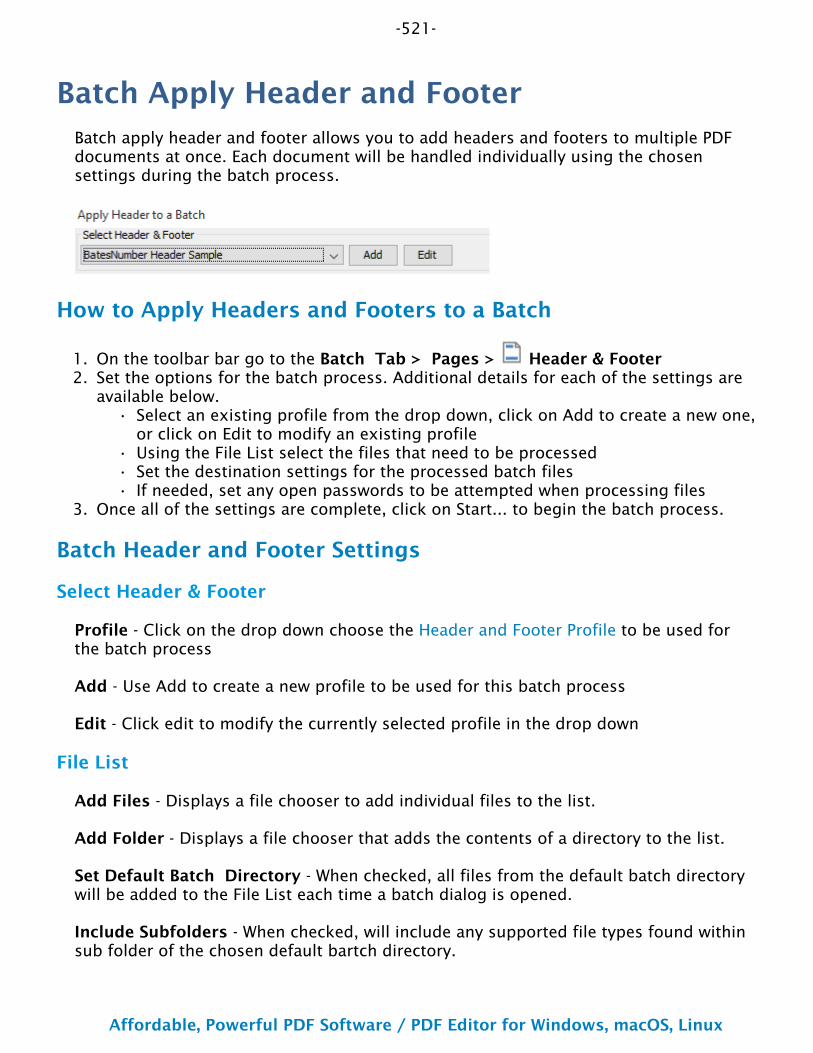
-521-
Affordable, Powerful PDF Software / PDF Editor for Windows, macOS, Linux
Copyright © 2002-Present Qoppa Software. All rights reserved.
1.2.
•
•••
3.
Batch Apply Header and FooterBatch apply header and footer allows you to add headers and footers to multiple PDF documents at once. Each document will be handled individually using the chosen settings during the batch process.
How to Apply Headers and Footers to a Batch
On the toolbar bar go to the Batch Tab > Pages > Header & FooterSet the options for the batch process. Additional details for each of the settings are available below.
Select an existing profile from the drop down, click on Add to create a new one, or click on Edit to modify an existing profileUsing the File List select the files that need to be processedSet the destination settings for the processed batch filesIf needed, set any open passwords to be attempted when processing files
Once all of the settings are complete, click on Start... to begin the batch process.
Batch Header and Footer Settings
Select Header & Footer
Profile - Click on the drop down choose the Header and Footer Profile to be used for the batch process
Add - Use Add to create a new profile to be used for this batch process
Edit - Click edit to modify the currently selected profile in the drop down
File List
Add Files - Displays a file chooser to add individual files to the list.
Add Folder - Displays a file chooser that adds the contents of a directory to the list.
Set Default Batch Directory - When checked, all files from the default batch directory will be added to the File List each time a batch dialog is opened.
Include Subfolders - When checked, will include any supported file types found within sub folder of the chosen default bartch directory.

-522-
Affordable, Powerful PDF Software / PDF Editor for Windows, macOS, Linux
Copyright © 2002-Present Qoppa Software. All rights reserved.
•
•••••••••••
- Removes the selected file(s) from the list.
- Moves the selected file(s) up the list.
- Moves the selected file(s) down the list.
- Moves the selected file(s) to the top of the list.
- Moves the selected file(s) to the bottom of the list.
Save Files To
Destination Folder
Use Source Folder - When this option is selected, the original folder for the PDF document (in the batch process) will be used to save the output files.
Destination Folder - This option allows you to set a destination folder to place all of the processed files. You can type the destination manually or click on the "..." button to open a directory chooser to set the destination folder
Preserve Folder Structure: When checked, the output files will be placed within a new folder (within the specified destination folder) using the file's parent directory name.
File Name Pattern
Use Source Filename - Will save the document using the same original name. If another file exists in the directory, a number will be appended to the output file name, to avoid duplicate file names.
New Filename - When this option is selected, you will need to enter a new filename used for the output files. Each document name will have an incremental counter starting at zero appended to the file name entered in this field. Custom variables may also be used to further distinguish each of the file separations. The available variables are:
$filename - The file name (no extension) that the document was opened from$counter - An automatically incrementing number$day - The day of the month$month - The current month, using two digits$year - The current year, using four digits$shortyear - The current year, using two digits$second - The current second$minute - The current minute$hour - The current hour, 1-12$ampm - AM or PM$longhour - The current hour, 0-23
-523-
Affordable, Powerful PDF Software / PDF Editor for Windows, macOS, Linux
Copyright © 2002-Present Qoppa Software. All rights reserved.
Overwrite Files - When set, if a file with the same name already exists in the directory it will be overwritten with the newly output document.
Note: This CAN NOT be undone. Make sure that you have all your settings correct prior to starting the batch process
Passwords to try when opening documents
To set a password click in the password field or on the Edit button. Then enter the password you want to be used. Do this for up to four passwords to try on password protected PDFs during the batch process.
Note: The passwords entered here will only be used for this batch process and will not be stored anywhere else. Passwords will have to be entered for each new batch process.
-524-
Affordable, Powerful PDF Software / PDF Editor for Windows, macOS, Linux
Copyright © 2002-Present Qoppa Software. All rights reserved.
1.2.
•••
3.
••
Merge a Batch DocumentsBatch merge documents allows you to merge any of the Supported File Types to a single PDF. This batch process functions exactly the same as Merging/Converting multiple files to PDF.
How to Merge/Convert a Batch of Files to PDFs
On the toolbar bar go to the Batch Tab > Document > MergeSet the options for the batch process. Additional details for each of the settings are available below.
Using the File List select the files that need to be processedSet the destination settings for the processed batch filesIf needed, set any open passwords to be attempted when processing files
Once all of the settings are complete, click on Start... to begin the batch process.
Batch Merge/Convert Settings
New Page
Page Size - Allows you to select a page size from a list of predefined standard document sizes.
Portrait: sets the selected page orientation size to portraitLandscape: sets the selected page size orientation to landscape
Note: Portrait and Landscape options are not available when selecting a "Custom" media size
Units - Select the measurement unit for the crop margins in either Inches, Points, Centimeters, or Millimeters
Width - Width of the page in the units selected
Height - Height of the page in the units selected
Keep Proportional - When checked keeps the width and height values in sync
Current Page
Center - When checked this option will center the original page content in the new page size
Scale to Fit - Resizes the page content to best fit the new page size
Fit to Crop Page - Sets the crop box equal to the media box
-525-
Affordable, Powerful PDF Software / PDF Editor for Windows, macOS, Linux
Copyright © 2002-Present Qoppa Software. All rights reserved.
Options
Add a bookmark for each merged document - This will create a separate bookmark for each merged file added to the document
Set page labels based on original file name - When set, creates page labels for every page using the following format "[document file name]_[page number]"
File List
Add Files - Displays a file chooser to add individual files to the list.
Add Folder - Displays a file chooser that adds the contents of a directory to the list.
Set Default Batch Directory - When checked, all files from the default batch directory will be added to the File List each time a batch dialog is opened.
Include Subfolders - When checked, will include any supported file types found within sub folder of the chosen default bartch directory.
- Removes the selected file(s) from the list.
- Moves the selected file(s) up the list.
- Moves the selected file(s) down the list.
- Moves the selected file(s) to the top of the list.
- Moves the selected file(s) to the bottom of the list.
Results
Open New Merged Document - After the merge is complete the new file will be displayed in PDF Studio
Save As - This option allows you to set a destination for the newly created merged file. You can type the destination manually or click on the "..." button to open a file chooser to set the destination for the newly created file
Passwords to try when opening documents
To set a password click in the password field or on the Edit button. Then enter the password you want to be used. Do this for up to four passwords to try on password protected PDFs during the batch process. Only PDF files with passwords are supported.
Note: The passwords entered here will only be used for this batch process and will not be stored anywhere else. Passwords will have to be entered for each new batch process.

-526-
Affordable, Powerful PDF Software / PDF Editor for Windows, macOS, Linux
Copyright © 2002-Present Qoppa Software. All rights reserved.

-527-
Affordable, Powerful PDF Software / PDF Editor for Windows, macOS, Linux
Copyright © 2002-Present Qoppa Software. All rights reserved.
1.2.
•
••••
3.
Batch OCR DocumentsBatch OCR documents adds text to any documents that do not contain text using any of the supported OCR languages. Each document will be handled individually using the chosen settings during the batch process. PDF Studio 2022 also introduces the ability to run OCR with two languages at once. For more information on OCRing with two languages see OCR Preferences.
What is OCR?
Optical character recognition (OCR) is the mechanical or electronic conversion of images of typed or printed text into machine-encoded searchable text data.
How to OCR a Batch of PDFs
On the toolbar bar go to the Batch Tab > Document > OCRSet the options for the batch process. Additional details for each of the settings are available below.
Select a language from the drop down or click on Download OCR Languages to download a new one.Choose additional OCR optionsUsing the File List select the files that need to be processedSet the destination settings for the processed batch filesIf needed, set any open passwords to be attempted when processing files
Once all of the settings are complete, click on Start... to begin the batch process.
Batch OCR Settings
Select Language
Language - Select the language to OCR the documents with
Download OCR Languages - Opens the language download manager
Discard Invisible Text - Removes any previous OCR text that has been added to the page.
Auto Deskew Images - When checked, if the document’s text/images are slanting too far in one direction or is misaligned, PDF Studio will attempt to auto-rotate the document so that the alignment is corrected.
-528-
Affordable, Powerful PDF Software / PDF Editor for Windows, macOS, Linux
Copyright © 2002-Present Qoppa Software. All rights reserved.
•
•
File List
Add Files - Displays a file chooser to add individual files to the list.
Add Folder - Displays a file chooser that adds the contents of a directory to the list.
Set Default Batch Directory - When checked, all files from the default batch directory will be added to the File List each time a batch dialog is opened.
Include Subfolders - When checked, will include any supported file types found within sub folder of the chosen default bartch directory.
- Removes the selected file(s) from the list.
- Moves the selected file(s) up the list.
- Moves the selected file(s) down the list.
- Moves the selected file(s) to the top of the list.
- Moves the selected file(s) to the bottom of the list.
Save Files To
Destination Folder
Use Source Folder - When this option is selected, the original folder for the PDF document (in the batch process) will be used to save the output files.
Destination Folder - This option allows you to set a destination folder to place all of the processed files. You can type the destination manually or click on the "..." button to open a directory chooser to set the destination folder
Preserve Folder Structure: When checked, the output files will be placed within a new folder (within the specified destination folder) using the file's parent directory name.
File Name Pattern
Use Source Filename - Will save the document using the same original name. If another file exists in the directory, a number will be appended to the output file name, to avoid duplicate file names.
New Filename - When this option is selected, you will need to enter a new filename used for the output files. Each document name will have an incremental counter starting at zero appended to the file name entered in this field. Custom variables may also be used to further distinguish each of the file separations. The available variables are:
$filename - The file name (no extension) that the document was opened from

-529-
Affordable, Powerful PDF Software / PDF Editor for Windows, macOS, Linux
Copyright © 2002-Present Qoppa Software. All rights reserved.
••••••••••
$counter - An automatically incrementing number$day - The day of the month$month - The current month, using two digits$year - The current year, using four digits$shortyear - The current year, using two digits$second - The current second$minute - The current minute$hour - The current hour, 1-12$ampm - AM or PM$longhour - The current hour, 0-23
Overwrite Files - When set, if a file with the same name already exists in the directory it will be overwritten with the newly output document.
Note: This CAN NOT be undone. Make sure that you have all your settings correct prior to starting the batch process
Passwords to try when opening documents
To set a password click in the password field or on the Edit button. Then enter the password you want to be used. Do this for up to four passwords to try on password protected PDFs during the batch process.
Note: The passwords entered here will only be used for this batch process and will not be stored anywhere else. Passwords will have to be entered for each new batch process.

-530-
Affordable, Powerful PDF Software / PDF Editor for Windows, macOS, Linux
Copyright © 2002-Present Qoppa Software. All rights reserved.
1.2.
•
•••
3.
Batch OptimizeBatch optimize allows you to optimize all selected documents using the profile options selected at the top. Choose an existing preset profile or click on "Add" to create a new one to use in optimizing the batch. Each document will be handled individually using the split profile selected during the batch process.
How to Optimize a Batch of PDFs
On the toolbar bar go to the Batch Tab > Document > OptimizeSet the options for the batch process. Additional details for each of the settings are available below.
Select an existing profile from the drop down, click on Add to create a new one, or click on Edit to modify an existing profileUsing the File List select the files that need to be processedSet the destination settings for the processed batch filesIf needed, set any open passwords to be attempted when processing files
Once all of the settings are complete, click on Start... to begin the batch process.
Batch Optimize Settings
Select Optimizer Settings
Profile - Click on the drop down choose the Optimizer Profile to be used for the batch process
Add - Use Add to create a new profile to be used for this batch process
Edit - Click edit to modify the currently selected profile in the drop down
Report
Generate Results Log - When checked, outputs creates a text file logging the changes to the document in the same directory as the new optimized file.
File List
Add Files - Displays a file chooser to add individual files to the list.
-531-
Affordable, Powerful PDF Software / PDF Editor for Windows, macOS, Linux
Copyright © 2002-Present Qoppa Software. All rights reserved.
•
•••••
Add Folder - Displays a file chooser that adds the contents of a directory to the list.
Set Default Batch Directory - When checked, all files from the default batch directory will be added to the File List each time a batch dialog is opened.
Include Subfolders - When checked, will include any supported file types found within sub folder of the chosen default bartch directory.
- Removes the selected file(s) from the list.
- Moves the selected file(s) up the list.
- Moves the selected file(s) down the list.
- Moves the selected file(s) to the top of the list.
- Moves the selected file(s) to the bottom of the list.
Save Files To
Destination Folder
Use Source Folder - When this option is selected, the original folder for the PDF document (in the batch process) will be used to save the output files.
Destination Folder - This option allows you to set a destination folder to place all of the processed files. You can type the destination manually or click on the "..." button to open a directory chooser to set the destination folder
Preserve Folder Structure: When checked, the output files will be placed within a new folder (within the specified destination folder) using the file's parent directory name.
File Name Pattern
Use Source Filename - Will save the document using the same original name. If another file exists in the directory, a number will be appended to the output file name, to avoid duplicate file names.
New Filename - When this option is selected, you will need to enter a new filename used for the output files. Each document name will have an incremental counter starting at zero appended to the file name entered in this field. Custom variables may also be used to further distinguish each of the file separations. The available variables are:
$filename - The file name (no extension) that the document was opened from$counter - An automatically incrementing number$day - The day of the month$month - The current month, using two digits$year - The current year, using four digits

-532-
Affordable, Powerful PDF Software / PDF Editor for Windows, macOS, Linux
Copyright © 2002-Present Qoppa Software. All rights reserved.
••••••
$shortyear - The current year, using two digits$second - The current second$minute - The current minute$hour - The current hour, 1-12$ampm - AM or PM$longhour - The current hour, 0-23
Overwrite Files - When set, if a file with the same name already exists in the directory it will be overwritten with the newly output document.
Note: This CAN NOT be undone. Make sure that you have all your settings correct prior to starting the batch process
Passwords to try when opening documents
To set a password click in the password field or on the Edit button. Then enter the password you want to be used. Do this for up to four passwords to try on password protected PDFs during the batch process.
Note: The passwords entered here will only be used for this batch process and will not be stored anywhere else. Passwords will have to be entered for each new batch process.
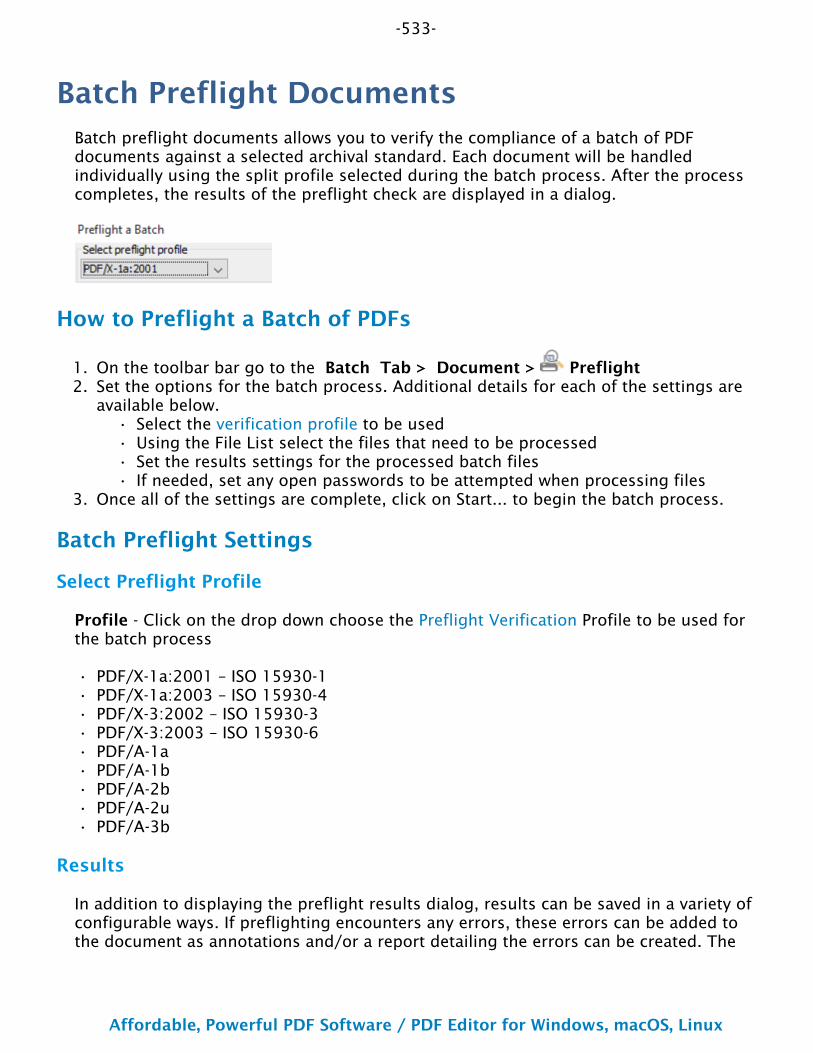
-533-
Affordable, Powerful PDF Software / PDF Editor for Windows, macOS, Linux
Copyright © 2002-Present Qoppa Software. All rights reserved.
1.2.
••••
3.
•••••••••
Batch Preflight DocumentsBatch preflight documents allows you to verify the compliance of a batch of PDF documents against a selected archival standard. Each document will be handled individually using the split profile selected during the batch process. After the process completes, the results of the preflight check are displayed in a dialog.
How to Preflight a Batch of PDFs
On the toolbar bar go to the Batch Tab > Document > PreflightSet the options for the batch process. Additional details for each of the settings are available below.
Select the verification profile to be usedUsing the File List select the files that need to be processedSet the results settings for the processed batch filesIf needed, set any open passwords to be attempted when processing files
Once all of the settings are complete, click on Start... to begin the batch process.
Batch Preflight Settings
Select Preflight Profile
Profile - Click on the drop down choose the Preflight Verification Profile to be used for the batch process
PDF/X-1a:2001 – ISO 15930-1PDF/X-1a:2003 – ISO 15930-4PDF/X-3:2002 – ISO 15930-3PDF/X-3:2003 – ISO 15930-6PDF/A-1aPDF/A-1bPDF/A-2bPDF/A-2uPDF/A-3b
Results
In addition to displaying the preflight results dialog, results can be saved in a variety of configurable ways. If preflighting encounters any errors, these errors can be added to the document as annotations and/or a report detailing the errors can be created. The
-534-
Affordable, Powerful PDF Software / PDF Editor for Windows, macOS, Linux
Copyright © 2002-Present Qoppa Software. All rights reserved.
report is either appended to the document or saved as a new document. The modified document and/or the new report document are saved to the destination folder.
Add comments for preflight errors - whether or not to add annotations to the original document for preflight errors
Create preflight report - whether or not to create a separate report for the preflight errors using the below options
Append report to document - appends an error report to the beginning of the document
Create new document for report - creates a separate document for the error report that will be exported to the below destination folder
File List
Add Files - Displays a file chooser to add individual files to the list.
Add Folder - Displays a file chooser that adds the contents of a directory to the list.
Set Default Batch Directory - When checked, all files from the default batch directory will be added to the File List each time a batch dialog is opened.
Include Subfolders - When checked, will include any supported file types found within sub folder of the chosen default bartch directory.
- Removes the selected file(s) from the list.
- Moves the selected file(s) up the list.
- Moves the selected file(s) down the list.
- Moves the selected file(s) to the top of the list.
- Moves the selected file(s) to the bottom of the list.
Save Files To
Destination Folder
Use Source Folder - When this option is selected, the original folder for the PDF document (in the batch process) will be used to save the output files.
Destination Folder - This option allows you to set a destination folder to place all of the processed files. You can type the destination manually or click on the "..." button to open a directory chooser to set the destination folder
-535-
Affordable, Powerful PDF Software / PDF Editor for Windows, macOS, Linux
Copyright © 2002-Present Qoppa Software. All rights reserved.
•
•••••••••••
Preserve Folder Structure: When checked, the output files will be placed within a new folder (within the specified destination folder) using the file's parent directory name.
File Name Pattern
Use Source Filename - Will save the document using the same original name. If another file exists in the directory, a number will be appended to the output file name, to avoid duplicate file names.
New Filename - When this option is selected, you will need to enter a new filename used for the output files. Each document name will have an incremental counter starting at zero appended to the file name entered in this field. Custom variables may also be used to further distinguish each of the file separations. The available variables are:
$filename - The file name (no extension) that the document was opened from$counter - An automatically incrementing number$day - The day of the month$month - The current month, using two digits$year - The current year, using four digits$shortyear - The current year, using two digits$second - The current second$minute - The current minute$hour - The current hour, 1-12$ampm - AM or PM$longhour - The current hour, 0-23
Overwrite Files - When set, if a file with the same name already exists in the directory it will be overwritten with the newly output document.
Note: This CAN NOT be undone. Make sure that you have all your settings correct prior to starting the batch process
Passwords to try when opening documents
To set a password click in the password field or on the Edit button. Then enter the password you want to be used. Do this for up to four passwords to try on password protected PDFs during the batch process.
Note: The passwords entered here will only be used for this batch process and will not be stored anywhere else. Passwords will have to be entered for each new batch process.
-536-
Affordable, Powerful PDF Software / PDF Editor for Windows, macOS, Linux
Copyright © 2002-Present Qoppa Software. All rights reserved.
1.2.
•••
3.
4.
Batch PrintBatch print allows you to print multiple PDF documents at the same time to a specific printer.
Note: The last used printer dialog will be used when printing a batch. For more information on each of the printing dialogs see Printing PDFs
How to Print a Batch of PDFs
On the toolbar bar go to the Batch Tab > Pages > PrintSet the options for the batch process. Additional details for each of the settings are available below.
Using the File List select the files that need to be processedSet the destination settings for the processed batch filesIf needed, set any open passwords to be attempted when processing files
Once all of the settings are complete, click on Start... to display the batch print dialog.Choose the settings you wish to use and then click Print to print all of the documents.
Note: When printing each document will be handled individually using the chosen settings from the print dialog.
Batch Print Settings
File List
Add Files - Displays a file chooser to add individual files to the list.
Add Folder - Displays a file chooser that adds the contents of a directory to the list.
Set Default Batch Directory - When checked, all files from the default batch directory will be added to the File List each time a batch dialog is opened.
Include Subfolders - When checked, will include any supported file types found within sub folder of the chosen default bartch directory.
- Removes the selected file(s) from the list.
- Moves the selected file(s) up the list.
- Moves the selected file(s) down the list.
- Moves the selected file(s) to the top of the list.
-537-
Affordable, Powerful PDF Software / PDF Editor for Windows, macOS, Linux
Copyright © 2002-Present Qoppa Software. All rights reserved.
- Moves the selected file(s) to the bottom of the list.
Passwords to try when opening documents
To set a password click in the password field or on the Edit button. Then enter the password you want to be used. Do this for up to four passwords to try on password protected PDFs during the batch process.
Note: The passwords entered here will only be used for this batch process and will not be stored anywhere else. Passwords will have to be entered for each new batch process.
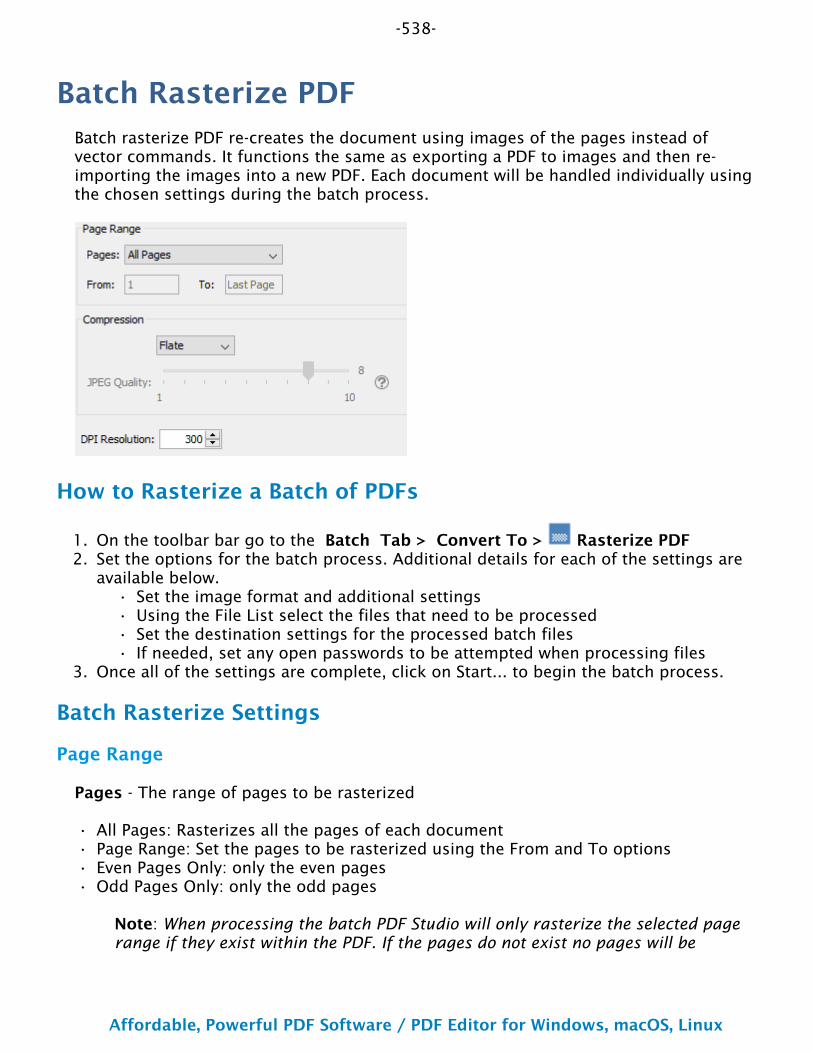
-538-
Affordable, Powerful PDF Software / PDF Editor for Windows, macOS, Linux
Copyright © 2002-Present Qoppa Software. All rights reserved.
1.2.
••••
3.
••••
Batch Rasterize PDFBatch rasterize PDF re-creates the document using images of the pages instead of vector commands. It functions the same as exporting a PDF to images and then re- importing the images into a new PDF. Each document will be handled individually using the chosen settings during the batch process.
How to Rasterize a Batch of PDFs
On the toolbar bar go to the Batch Tab > Convert To > Rasterize PDFSet the options for the batch process. Additional details for each of the settings are available below.
Set the image format and additional settingsUsing the File List select the files that need to be processedSet the destination settings for the processed batch filesIf needed, set any open passwords to be attempted when processing files
Once all of the settings are complete, click on Start... to begin the batch process.
Batch Rasterize Settings
Page Range
Pages - The range of pages to be rasterized
All Pages: Rasterizes all the pages of each documentPage Range: Set the pages to be rasterized using the From and To optionsEven Pages Only: only the even pagesOdd Pages Only: only the odd pages
Note: When processing the batch PDF Studio will only rasterize the selected page range if they exist within the PDF. If the pages do not exist no pages will be
-539-
Affordable, Powerful PDF Software / PDF Editor for Windows, macOS, Linux
Copyright © 2002-Present Qoppa Software. All rights reserved.
•••
•
rasterized. For example, if set to rasterize pages 5-7 and the document only has 3 pages nothing will be rasterized and the document will remain the same.
Compression
Compression - Sets the image format when rasterizing the PDFs. Only images compatible with the PDF format can be chosen.
JPEG - lossy compression that will reduce image quality and sizeJPEG2000 - less lossy compression that will reduce size and some qualityFLATE - Lossless compression does not reduce quality but may not always reduce file sizeJBIG2 - Lossless compression that can only support black and white color space. Color images will be converted to black and white. Best for scanned documents with no images
JPEG Quality - This is the quality of JPEG compression. It varies from 0 (very high compression, very low quality), to 10 (low compression, very high quality) based on the quality parameter. Some guidelines for the quality value: 8 high quality, 5 medium quality, 2 low quality.
DPI Resolution - Resolution in DPI used to render the page, 72 is the PDF native resolution.
File List
Add Files - Displays a file chooser to add individual files to the list.
Add Folder - Displays a file chooser that adds the contents of a directory to the list.
Set Default Batch Directory - When checked, all files from the default batch directory will be added to the File List each time a batch dialog is opened.
Include Subfolders - When checked, will include any supported file types found within sub folder of the chosen default bartch directory.
- Removes the selected file(s) from the list.
- Moves the selected file(s) up the list.
- Moves the selected file(s) down the list.
- Moves the selected file(s) to the top of the list.
- Moves the selected file(s) to the bottom of the list.

-540-
Affordable, Powerful PDF Software / PDF Editor for Windows, macOS, Linux
Copyright © 2002-Present Qoppa Software. All rights reserved.
•
•••••••••••
Save Files To
Destination Folder
Use Source Folder - When this option is selected, the original folder for the PDF document (in the batch process) will be used to save the output files.
Destination Folder - This option allows you to set a destination folder to place all of the processed files. You can type the destination manually or click on the "..." button to open a directory chooser to set the destination folder
Preserve Folder Structure: When checked, the output files will be placed within a new folder (within the specified destination folder) using the file's parent directory name.
File Name Pattern
Use Source Filename - Will save the document using the same original name. If another file exists in the directory, a number will be appended to the output file name, to avoid duplicate file names.
New Filename - When this option is selected, you will need to enter a new filename used for the output files. Each document name will have an incremental counter starting at zero appended to the file name entered in this field. Custom variables may also be used to further distinguish each of the file separations. The available variables are:
$filename - The file name (no extension) that the document was opened from$counter - An automatically incrementing number$day - The day of the month$month - The current month, using two digits$year - The current year, using four digits$shortyear - The current year, using two digits$second - The current second$minute - The current minute$hour - The current hour, 1-12$ampm - AM or PM$longhour - The current hour, 0-23
Overwrite Files - When set, if a file with the same name already exists in the directory it will be overwritten with the newly output document.
Note: This CAN NOT be undone. Make sure that you have all your settings correct prior to starting the batch process
Passwords to try when opening documents
To set a password click in the password field or on the Edit button. Then enter the password you want to be used. Do this for up to four passwords to try on password protected PDFs during the batch process.

-541-
Affordable, Powerful PDF Software / PDF Editor for Windows, macOS, Linux
Copyright © 2002-Present Qoppa Software. All rights reserved.
Note: The passwords entered here will only be used for this batch process and will not be stored anywhere else. Passwords will have to be entered for each new batch process.

-542-
Affordable, Powerful PDF Software / PDF Editor for Windows, macOS, Linux
Copyright © 2002-Present Qoppa Software. All rights reserved.
1.2.
•••
3.
Batch Reset FieldsBatch reset fields allow you to reset all fields within documents from a batch of PDFs. Reset fields will have their values either set to blank or the default value if specified. Each document will be handled individually using the chosen settings during the batch process.
How to Batch Reset Fields
On the toolbar bar go to the Batch Tab > Forms > ResetSet the options for the batch process. Additional details for each of the settings are available below.
Using the File List select the files that need to be processedSet the destination settings for the processed batch filesIf needed, set any open passwords to be attempted when processing files
Once all of the settings are complete, click on Start... to begin the batch process.
Batch Reset Fields Settings
File List
Add Files - Displays a file chooser to add individual files to the list.
Add Folder - Displays a file chooser that adds the contents of a directory to the list.
Set Default Batch Directory - When checked, all files from the default batch directory will be added to the File List each time a batch dialog is opened.
Include Subfolders - When checked, will include any supported file types found within sub folder of the chosen default bartch directory.
- Removes the selected file(s) from the list.
- Moves the selected file(s) up the list.
- Moves the selected file(s) down the list.
- Moves the selected file(s) to the top of the list.
- Moves the selected file(s) to the bottom of the list.

-543-
Affordable, Powerful PDF Software / PDF Editor for Windows, macOS, Linux
Copyright © 2002-Present Qoppa Software. All rights reserved.
•
•••••••••••
Save Files To
Destination Folder
Use Source Folder - When this option is selected, the original folder for the PDF document (in the batch process) will be used to save the output files.
Destination Folder - This option allows you to set a destination folder to place all of the processed files. You can type the destination manually or click on the "..." button to open a directory chooser to set the destination folder
Preserve Folder Structure: When checked, the output files will be placed within a new folder (within the specified destination folder) using the file's parent directory name.
File Name Pattern
Use Source Filename - Will save the document using the same original name. If another file exists in the directory, a number will be appended to the output file name, to avoid duplicate file names.
New Filename - When this option is selected, you will need to enter a new filename used for the output files. Each document name will have an incremental counter starting at zero appended to the file name entered in this field. Custom variables may also be used to further distinguish each of the file separations. The available variables are:
$filename - The file name (no extension) that the document was opened from$counter - An automatically incrementing number$day - The day of the month$month - The current month, using two digits$year - The current year, using four digits$shortyear - The current year, using two digits$second - The current second$minute - The current minute$hour - The current hour, 1-12$ampm - AM or PM$longhour - The current hour, 0-23
Overwrite Files - When set, if a file with the same name already exists in the directory it will be overwritten with the newly output document.
Note: This CAN NOT be undone. Make sure that you have all your settings correct prior to starting the batch process
Passwords to try when opening documents
To set a password click in the password field or on the Edit button. Then enter the password you want to be used. Do this for up to four passwords to try on password protected PDFs during the batch process.

-544-
Affordable, Powerful PDF Software / PDF Editor for Windows, macOS, Linux
Copyright © 2002-Present Qoppa Software. All rights reserved.
Note: The passwords entered here will only be used for this batch process and will not be stored anywhere else. Passwords will have to be entered for each new batch process.
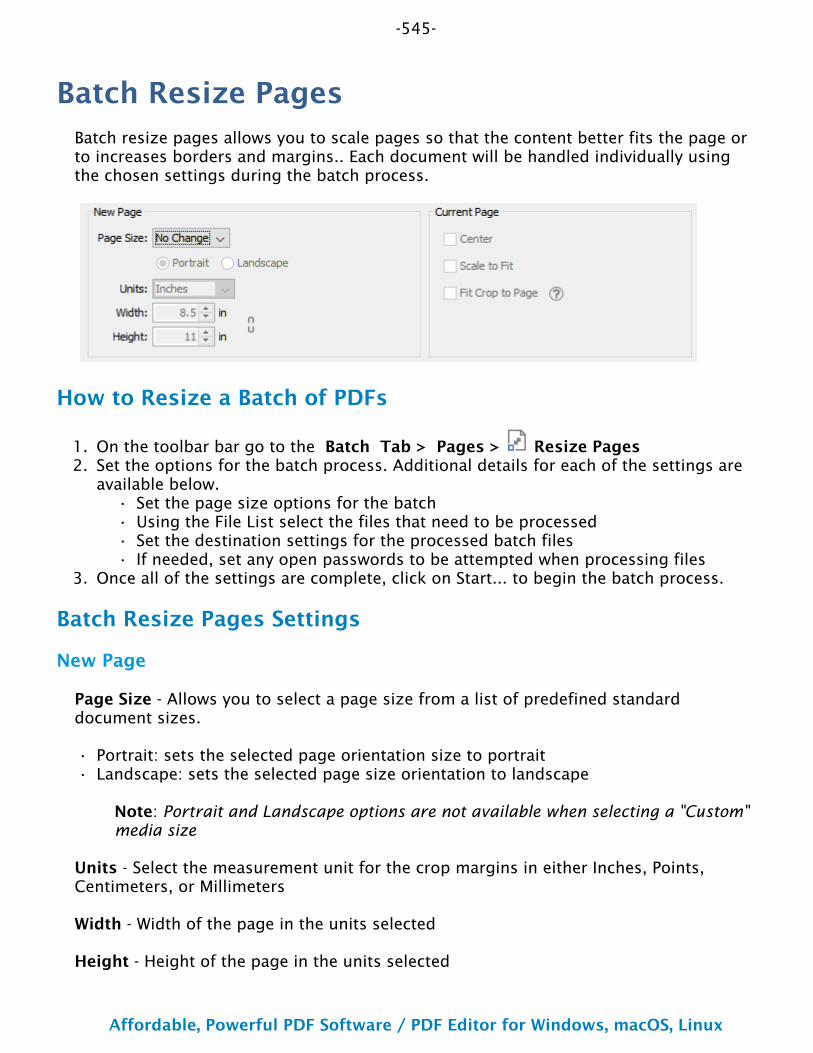
-545-
Affordable, Powerful PDF Software / PDF Editor for Windows, macOS, Linux
Copyright © 2002-Present Qoppa Software. All rights reserved.
1.2.
••••
3.
••
Batch Resize PagesBatch resize pages allows you to scale pages so that the content better fits the page or to increases borders and margins.. Each document will be handled individually using the chosen settings during the batch process.
How to Resize a Batch of PDFs
On the toolbar bar go to the Batch Tab > Pages > Resize PagesSet the options for the batch process. Additional details for each of the settings are available below.
Set the page size options for the batchUsing the File List select the files that need to be processedSet the destination settings for the processed batch filesIf needed, set any open passwords to be attempted when processing files
Once all of the settings are complete, click on Start... to begin the batch process.
Batch Resize Pages Settings
New Page
Page Size - Allows you to select a page size from a list of predefined standard document sizes.
Portrait: sets the selected page orientation size to portraitLandscape: sets the selected page size orientation to landscape
Note: Portrait and Landscape options are not available when selecting a "Custom" media size
Units - Select the measurement unit for the crop margins in either Inches, Points, Centimeters, or Millimeters
Width - Width of the page in the units selected
Height - Height of the page in the units selected
-546-
Affordable, Powerful PDF Software / PDF Editor for Windows, macOS, Linux
Copyright © 2002-Present Qoppa Software. All rights reserved.
•
Keep Proportional - When checked keeps the width and height values in sync
Current Page
Center - When checked this option will center the original page content in the new page size
Scale to Fit - Resizes the page content to best fit the new page size
Fit to Crop Page - Sets the crop box equal to the media box
File List
Add Files - Displays a file chooser to add individual files to the list.
Add Folder - Displays a file chooser that adds the contents of a directory to the list.
Set Default Batch Directory - When checked, all files from the default batch directory will be added to the File List each time a batch dialog is opened.
Include Subfolders - When checked, will include any supported file types found within sub folder of the chosen default bartch directory.
- Removes the selected file(s) from the list.
- Moves the selected file(s) up the list.
- Moves the selected file(s) down the list.
- Moves the selected file(s) to the top of the list.
- Moves the selected file(s) to the bottom of the list.
Save Files To
Destination Folder
Use Source Folder - When this option is selected, the original folder for the PDF document (in the batch process) will be used to save the output files.
Destination Folder - This option allows you to set a destination folder to place all of the processed files. You can type the destination manually or click on the "..." button to open a directory chooser to set the destination folder
Preserve Folder Structure: When checked, the output files will be placed within a new folder (within the specified destination folder) using the file's parent directory name.
-547-
Affordable, Powerful PDF Software / PDF Editor for Windows, macOS, Linux
Copyright © 2002-Present Qoppa Software. All rights reserved.
•••••••••••
File Name Pattern
Use Source Filename - Will save the document using the same original name. If another file exists in the directory, a number will be appended to the output file name, to avoid duplicate file names.
New Filename - When this option is selected, you will need to enter a new filename used for the output files. Each document name will have an incremental counter starting at zero appended to the file name entered in this field. Custom variables may also be used to further distinguish each of the file separations. The available variables are:
$filename - The file name (no extension) that the document was opened from$counter - An automatically incrementing number$day - The day of the month$month - The current month, using two digits$year - The current year, using four digits$shortyear - The current year, using two digits$second - The current second$minute - The current minute$hour - The current hour, 1-12$ampm - AM or PM$longhour - The current hour, 0-23
Overwrite Files - When set, if a file with the same name already exists in the directory it will be overwritten with the newly output document.
Note: This CAN NOT be undone. Make sure that you have all your settings correct prior to starting the batch process
Passwords to try when opening documents
To set a password click in the password field or on the Edit button. Then enter the password you want to be used. Do this for up to four passwords to try on password protected PDFs during the batch process.
Note: The passwords entered here will only be used for this batch process and will not be stored anywhere else. Passwords will have to be entered for each new batch process.
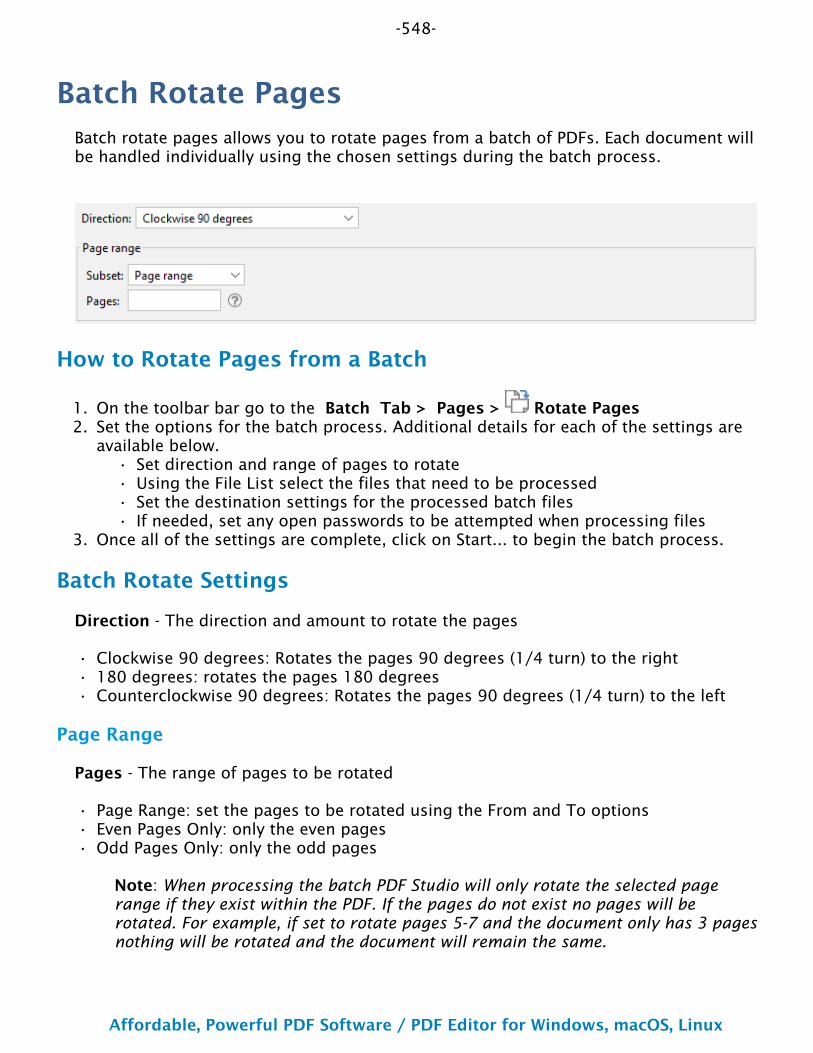
-548-
Affordable, Powerful PDF Software / PDF Editor for Windows, macOS, Linux
Copyright © 2002-Present Qoppa Software. All rights reserved.
1.2.
••••
3.
•••
•••
Batch Rotate PagesBatch rotate pages allows you to rotate pages from a batch of PDFs. Each document will be handled individually using the chosen settings during the batch process.
How to Rotate Pages from a Batch
On the toolbar bar go to the Batch Tab > Pages > Rotate PagesSet the options for the batch process. Additional details for each of the settings are available below.
Set direction and range of pages to rotateUsing the File List select the files that need to be processedSet the destination settings for the processed batch filesIf needed, set any open passwords to be attempted when processing files
Once all of the settings are complete, click on Start... to begin the batch process.
Batch Rotate Settings
Direction - The direction and amount to rotate the pages
Clockwise 90 degrees: Rotates the pages 90 degrees (1/4 turn) to the right180 degrees: rotates the pages 180 degreesCounterclockwise 90 degrees: Rotates the pages 90 degrees (1/4 turn) to the left
Page Range
Pages - The range of pages to be rotated
Page Range: set the pages to be rotated using the From and To optionsEven Pages Only: only the even pagesOdd Pages Only: only the odd pages
Note: When processing the batch PDF Studio will only rotate the selected page range if they exist within the PDF. If the pages do not exist no pages will be rotated. For example, if set to rotate pages 5-7 and the document only has 3 pages nothing will be rotated and the document will remain the same.

-549-
Affordable, Powerful PDF Software / PDF Editor for Windows, macOS, Linux
Copyright © 2002-Present Qoppa Software. All rights reserved.
•
•
File List
Add Files - Displays a file chooser to add individual files to the list.
Add Folder - Displays a file chooser that adds the contents of a directory to the list.
Set Default Batch Directory - When checked, all files from the default batch directory will be added to the File List each time a batch dialog is opened.
Include Subfolders - When checked, will include any supported file types found within sub folder of the chosen default bartch directory.
- Removes the selected file(s) from the list.
- Moves the selected file(s) up the list.
- Moves the selected file(s) down the list.
- Moves the selected file(s) to the top of the list.
- Moves the selected file(s) to the bottom of the list.
Save Files To
Destination Folder
Use Source Folder - When this option is selected, the original folder for the PDF document (in the batch process) will be used to save the output files.
Destination Folder - This option allows you to set a destination folder to place all of the processed files. You can type the destination manually or click on the "..." button to open a directory chooser to set the destination folder
Preserve Folder Structure: When checked, the output files will be placed within a new folder (within the specified destination folder) using the file's parent directory name.
File Name Pattern
Use Source Filename - Will save the document using the same original name. If another file exists in the directory, a number will be appended to the output file name, to avoid duplicate file names.
New Filename - When this option is selected, you will need to enter a new filename used for the output files. Each document name will have an incremental counter starting at zero appended to the file name entered in this field. Custom variables may also be used to further distinguish each of the file separations. The available variables are:
$filename - The file name (no extension) that the document was opened from
-550-
Affordable, Powerful PDF Software / PDF Editor for Windows, macOS, Linux
Copyright © 2002-Present Qoppa Software. All rights reserved.
••••••••••
$counter - An automatically incrementing number$day - The day of the month$month - The current month, using two digits$year - The current year, using four digits$shortyear - The current year, using two digits$second - The current second$minute - The current minute$hour - The current hour, 1-12$ampm - AM or PM$longhour - The current hour, 0-23
Overwrite Files - When set, if a file with the same name already exists in the directory it will be overwritten with the newly output document.
Note: This CAN NOT be undone. Make sure that you have all your settings correct prior to starting the batch process
Passwords to try when opening documents
To set a password click in the password field or on the Edit button. Then enter the password you want to be used. Do this for up to four passwords to try on password protected PDFs during the batch process.
Note: The passwords entered here will only be used for this batch process and will not be stored anywhere else. Passwords will have to be entered for each new batch process.
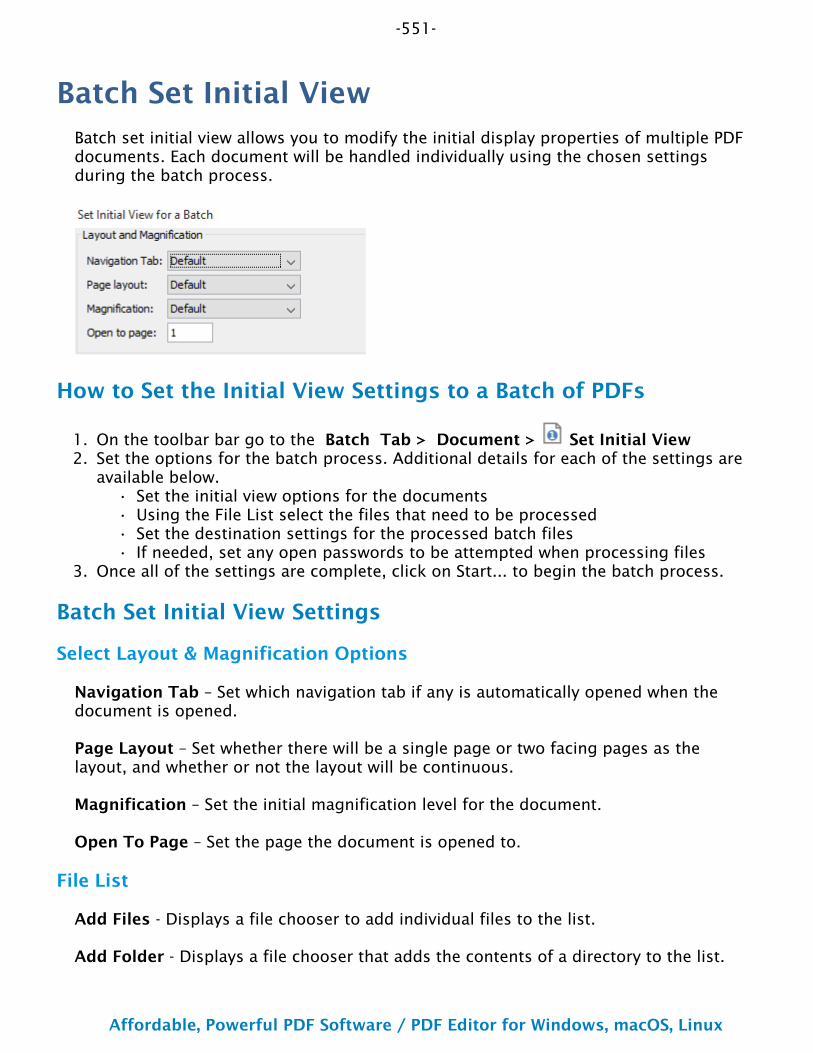
-551-
Affordable, Powerful PDF Software / PDF Editor for Windows, macOS, Linux
Copyright © 2002-Present Qoppa Software. All rights reserved.
1.2.
••••
3.
Batch Set Initial ViewBatch set initial view allows you to modify the initial display properties of multiple PDF documents. Each document will be handled individually using the chosen settings during the batch process.
How to Set the Initial View Settings to a Batch of PDFs
On the toolbar bar go to the Batch Tab > Document > Set Initial ViewSet the options for the batch process. Additional details for each of the settings are available below.
Set the initial view options for the documentsUsing the File List select the files that need to be processedSet the destination settings for the processed batch filesIf needed, set any open passwords to be attempted when processing files
Once all of the settings are complete, click on Start... to begin the batch process.
Batch Set Initial View Settings
Select Layout & Magnification Options
Navigation Tab – Set which navigation tab if any is automatically opened when the document is opened.
Page Layout – Set whether there will be a single page or two facing pages as the layout, and whether or not the layout will be continuous.
Magnification – Set the initial magnification level for the document.
Open To Page – Set the page the document is opened to.
File List
Add Files - Displays a file chooser to add individual files to the list.
Add Folder - Displays a file chooser that adds the contents of a directory to the list.
-552-
Affordable, Powerful PDF Software / PDF Editor for Windows, macOS, Linux
Copyright © 2002-Present Qoppa Software. All rights reserved.
•
•••••••
Set Default Batch Directory - When checked, all files from the default batch directory will be added to the File List each time a batch dialog is opened.
Include Subfolders - When checked, will include any supported file types found within sub folder of the chosen default bartch directory.
- Removes the selected file(s) from the list.
- Moves the selected file(s) up the list.
- Moves the selected file(s) down the list.
- Moves the selected file(s) to the top of the list.
- Moves the selected file(s) to the bottom of the list.
Save Files To
Destination Folder
Use Source Folder - When this option is selected, the original folder for the PDF document (in the batch process) will be used to save the output files.
Destination Folder - This option allows you to set a destination folder to place all of the processed files. You can type the destination manually or click on the "..." button to open a directory chooser to set the destination folder
Preserve Folder Structure: When checked, the output files will be placed within a new folder (within the specified destination folder) using the file's parent directory name.
File Name Pattern
Use Source Filename - Will save the document using the same original name. If another file exists in the directory, a number will be appended to the output file name, to avoid duplicate file names.
New Filename - When this option is selected, you will need to enter a new filename used for the output files. Each document name will have an incremental counter starting at zero appended to the file name entered in this field. Custom variables may also be used to further distinguish each of the file separations. The available variables are:
$filename - The file name (no extension) that the document was opened from$counter - An automatically incrementing number$day - The day of the month$month - The current month, using two digits$year - The current year, using four digits$shortyear - The current year, using two digits$second - The current second
-553-
Affordable, Powerful PDF Software / PDF Editor for Windows, macOS, Linux
Copyright © 2002-Present Qoppa Software. All rights reserved.
••••
$minute - The current minute$hour - The current hour, 1-12$ampm - AM or PM$longhour - The current hour, 0-23
Overwrite Files - When set, if a file with the same name already exists in the directory it will be overwritten with the newly output document.
Note: This CAN NOT be undone. Make sure that you have all your settings correct prior to starting the batch process
Passwords to try when opening documents
To set a password click in the password field or on the Edit button. Then enter the password you want to be used. Do this for up to four passwords to try on password protected PDFs during the batch process.
Note: The passwords entered here will only be used for this batch process and will not be stored anywhere else. Passwords will have to be entered for each new batch process.
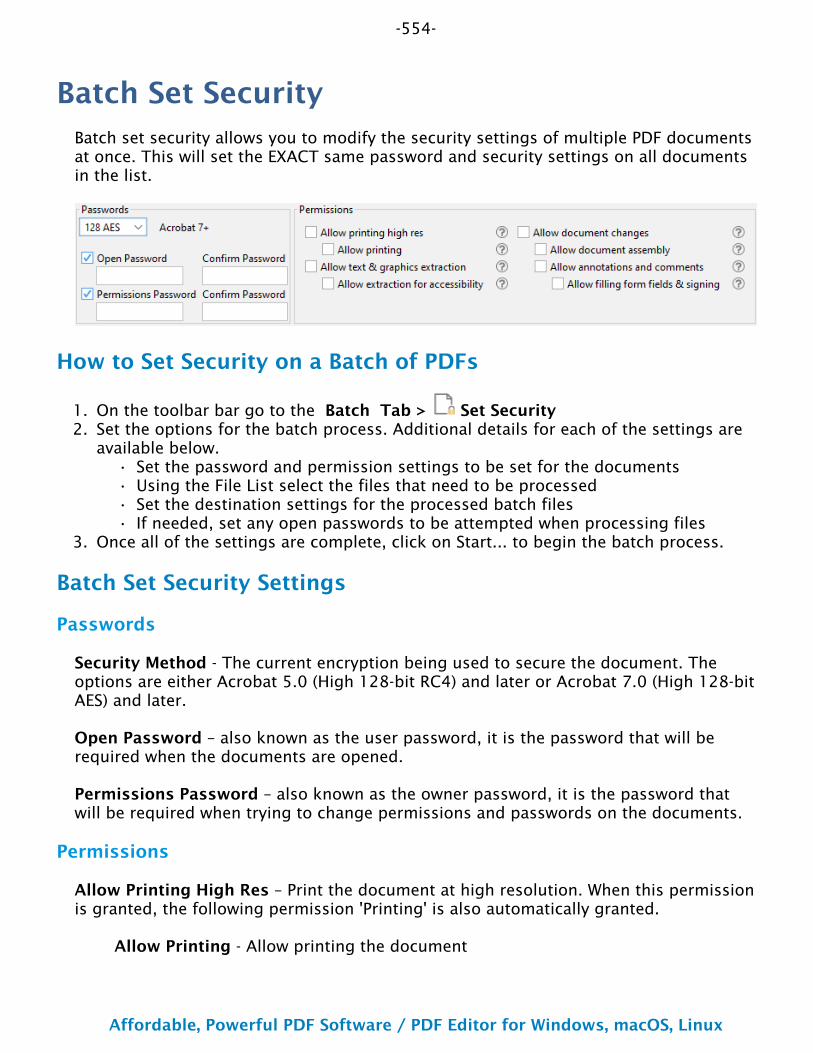
-554-
Affordable, Powerful PDF Software / PDF Editor for Windows, macOS, Linux
Copyright © 2002-Present Qoppa Software. All rights reserved.
1.2.
••••
3.
Batch Set SecurityBatch set security allows you to modify the security settings of multiple PDF documents at once. This will set the EXACT same password and security settings on all documents in the list.
How to Set Security on a Batch of PDFs
On the toolbar bar go to the Batch Tab > Set SecuritySet the options for the batch process. Additional details for each of the settings are available below.
Set the password and permission settings to be set for the documentsUsing the File List select the files that need to be processedSet the destination settings for the processed batch filesIf needed, set any open passwords to be attempted when processing files
Once all of the settings are complete, click on Start... to begin the batch process.
Batch Set Security Settings
Passwords
Security Method - The current encryption being used to secure the document. The options are either Acrobat 5.0 (High 128-bit RC4) and later or Acrobat 7.0 (High 128-bit AES) and later.
Open Password – also known as the user password, it is the password that will be required when the documents are opened.
Permissions Password – also known as the owner password, it is the password that will be required when trying to change permissions and passwords on the documents.
Permissions
Allow Printing High Res – Print the document at high resolution. When this permission is granted, the following permission 'Printing' is also automatically granted.
Allow Printing - Allow printing the document
-555-
Affordable, Powerful PDF Software / PDF Editor for Windows, macOS, Linux
Copyright © 2002-Present Qoppa Software. All rights reserved.
Allow Text & Graphics Extraction – Copy or otherwise extract text and graphics from the document. When this permission is granted, the following permission 'Extraction for Accessibility' is also automatically granted.
Allow Extraction for Accessibility – Extract text and graphics in support of accessibility to disabled users or other purposes
Allow Document Changes – Modify the document. When this permission is granted, the following 3 permissions (Document Assembly, Comments and Form Filling) are also automatically granted. When this permission is not granted, the following 3 permissions (Document Assembly, Comments and Form Filling) can independently be granted.
Allow Document Assembly – Assemble the document: insert, rotate or delete pages and create bookmarks or thumbnail images
Allow Annotations & Comments – Add or modify text annotations. When this permission is granted, the following permission 'Filling Form Fields & Signing' is automatically granted. When this permission is not granted, then the following permission 'Form Filling & Signing' can be granted independently. And when this permission is granted and the 'All Changes' permission is also granted, creating or modifying interactive form fields (including signature fields) is allowed.
Allow Filling Form Fields & Signing - Fill in existing interactive form fields including signature fields.
File List
Add Files - Displays a file chooser to add individual files to the list.
Add Folder - Displays a file chooser that adds the contents of a directory to the list.
Set Default Batch Directory - When checked, all files from the default batch directory will be added to the File List each time a batch dialog is opened.
Include Subfolders - When checked, will include any supported file types found within sub folder of the chosen default bartch directory.
- Removes the selected file(s) from the list.
- Moves the selected file(s) up the list.
- Moves the selected file(s) down the list.
- Moves the selected file(s) to the top of the list.
- Moves the selected file(s) to the bottom of the list.

-556-
Affordable, Powerful PDF Software / PDF Editor for Windows, macOS, Linux
Copyright © 2002-Present Qoppa Software. All rights reserved.
•
•••••••••••
Save Files To
Destination Folder
Use Source Folder - When this option is selected, the original folder for the PDF document (in the batch process) will be used to save the output files.
Destination Folder - This option allows you to set a destination folder to place all of the processed files. You can type the destination manually or click on the "..." button to open a directory chooser to set the destination folder
Preserve Folder Structure: When checked, the output files will be placed within a new folder (within the specified destination folder) using the file's parent directory name.
File Name Pattern
Use Source Filename - Will save the document using the same original name. If another file exists in the directory, a number will be appended to the output file name, to avoid duplicate file names.
New Filename - When this option is selected, you will need to enter a new filename used for the output files. Each document name will have an incremental counter starting at zero appended to the file name entered in this field. Custom variables may also be used to further distinguish each of the file separations. The available variables are:
$filename - The file name (no extension) that the document was opened from$counter - An automatically incrementing number$day - The day of the month$month - The current month, using two digits$year - The current year, using four digits$shortyear - The current year, using two digits$second - The current second$minute - The current minute$hour - The current hour, 1-12$ampm - AM or PM$longhour - The current hour, 0-23
Overwrite Files - When set, if a file with the same name already exists in the directory it will be overwritten with the newly output document.
Note: This CAN NOT be undone. Make sure that you have all your settings correct prior to starting the batch process
Passwords to try when opening documents
To set a password click in the password field or on the Edit button. Then enter the password you want to be used. Do this for up to four passwords to try on password protected PDFs during the batch process.

-557-
Affordable, Powerful PDF Software / PDF Editor for Windows, macOS, Linux
Copyright © 2002-Present Qoppa Software. All rights reserved.
Note: The passwords entered here will only be used for this batch process and will not be stored anywhere else. Passwords will have to be entered for each new batch process.
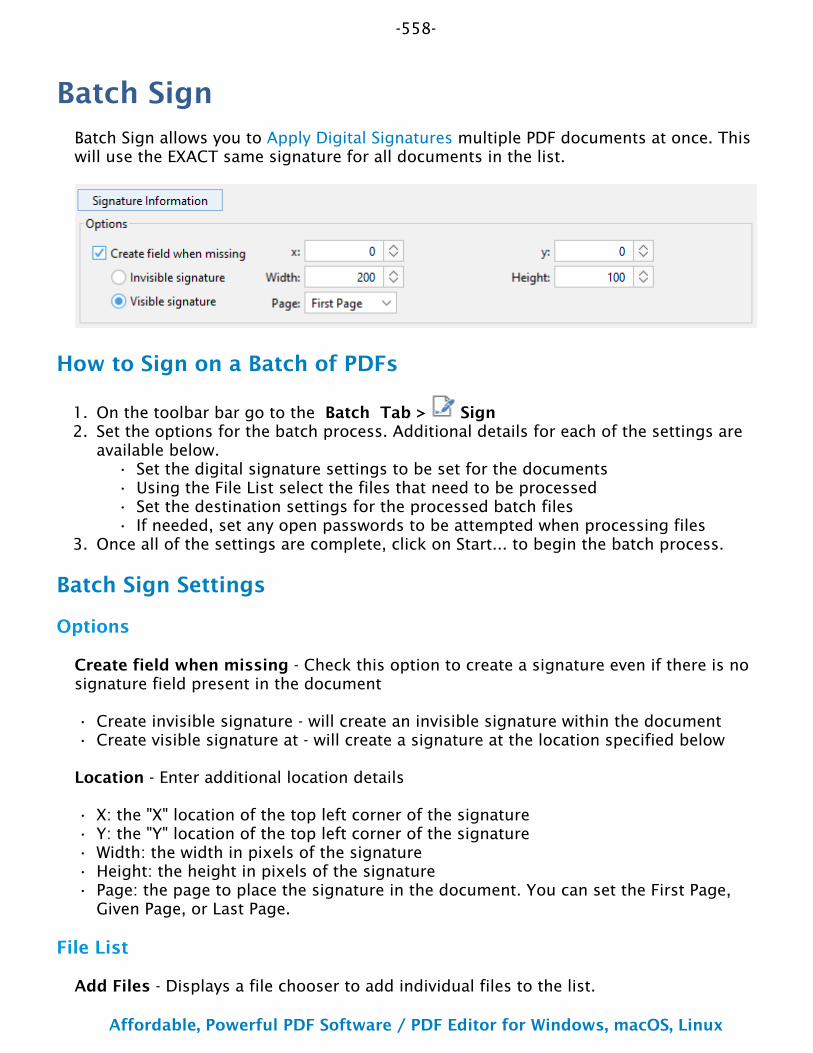
-558-
Affordable, Powerful PDF Software / PDF Editor for Windows, macOS, Linux
Copyright © 2002-Present Qoppa Software. All rights reserved.
1.2.
••••
3.
••
•••••
Batch SignBatch Sign allows you to Apply Digital Signatures multiple PDF documents at once. This will use the EXACT same signature for all documents in the list.
How to Sign on a Batch of PDFs
On the toolbar bar go to the Batch Tab > SignSet the options for the batch process. Additional details for each of the settings are available below.
Set the digital signature settings to be set for the documentsUsing the File List select the files that need to be processedSet the destination settings for the processed batch filesIf needed, set any open passwords to be attempted when processing files
Once all of the settings are complete, click on Start... to begin the batch process.
Batch Sign Settings
Options
Create field when missing - Check this option to create a signature even if there is no signature field present in the document
Create invisible signature - will create an invisible signature within the documentCreate visible signature at - will create a signature at the location specified below
Location - Enter additional location details
X: the "X" location of the top left corner of the signatureY: the "Y" location of the top left corner of the signatureWidth: the width in pixels of the signatureHeight: the height in pixels of the signaturePage: the page to place the signature in the document. You can set the First Page, Given Page, or Last Page.
File List
Add Files - Displays a file chooser to add individual files to the list.

-559-
Affordable, Powerful PDF Software / PDF Editor for Windows, macOS, Linux
Copyright © 2002-Present Qoppa Software. All rights reserved.
•
•••••
Add Folder - Displays a file chooser that adds the contents of a directory to the list.
Set Default Batch Directory - When checked, all files from the default batch directory will be added to the File List each time a batch dialog is opened.
Include Subfolders - When checked, will include any supported file types found within sub folder of the chosen default bartch directory.
- Removes the selected file(s) from the list.
- Moves the selected file(s) up the list.
- Moves the selected file(s) down the list.
- Moves the selected file(s) to the top of the list.
- Moves the selected file(s) to the bottom of the list.
Save Files To
Destination Folder
Use Source Folder - When this option is selected, the original folder for the PDF document (in the batch process) will be used to save the output files.
Destination Folder - This option allows you to set a destination folder to place all of the processed files. You can type the destination manually or click on the "..." button to open a directory chooser to set the destination folder
Preserve Folder Structure: When checked, the output files will be placed within a new folder (within the specified destination folder) using the file's parent directory name.
File Name Pattern
Use Source Filename - Will save the document using the same original name. If another file exists in the directory, a number will be appended to the output file name, to avoid duplicate file names.
New Filename - When this option is selected, you will need to enter a new filename used for the output files. Each document name will have an incremental counter starting at zero appended to the file name entered in this field. Custom variables may also be used to further distinguish each of the file separations. The available variables are:
$filename - The file name (no extension) that the document was opened from$counter - An automatically incrementing number$day - The day of the month$month - The current month, using two digits$year - The current year, using four digits

-560-
Affordable, Powerful PDF Software / PDF Editor for Windows, macOS, Linux
Copyright © 2002-Present Qoppa Software. All rights reserved.
••••••
$shortyear - The current year, using two digits$second - The current second$minute - The current minute$hour - The current hour, 1-12$ampm - AM or PM$longhour - The current hour, 0-23
Overwrite Files - When set, if a file with the same name already exists in the directory it will be overwritten with the newly output document.
Note: This CAN NOT be undone. Make sure that you have all your settings correct prior to starting the batch process
Passwords to try when opening documents
To set a password click in the password field or on the Edit button. Then enter the password you want to be used. Do this for up to four passwords to try on password protected PDFs during the batch process.
Note: The passwords entered here will only be used for this batch process and will not be stored anywhere else. Passwords will have to be entered for each new batch process.
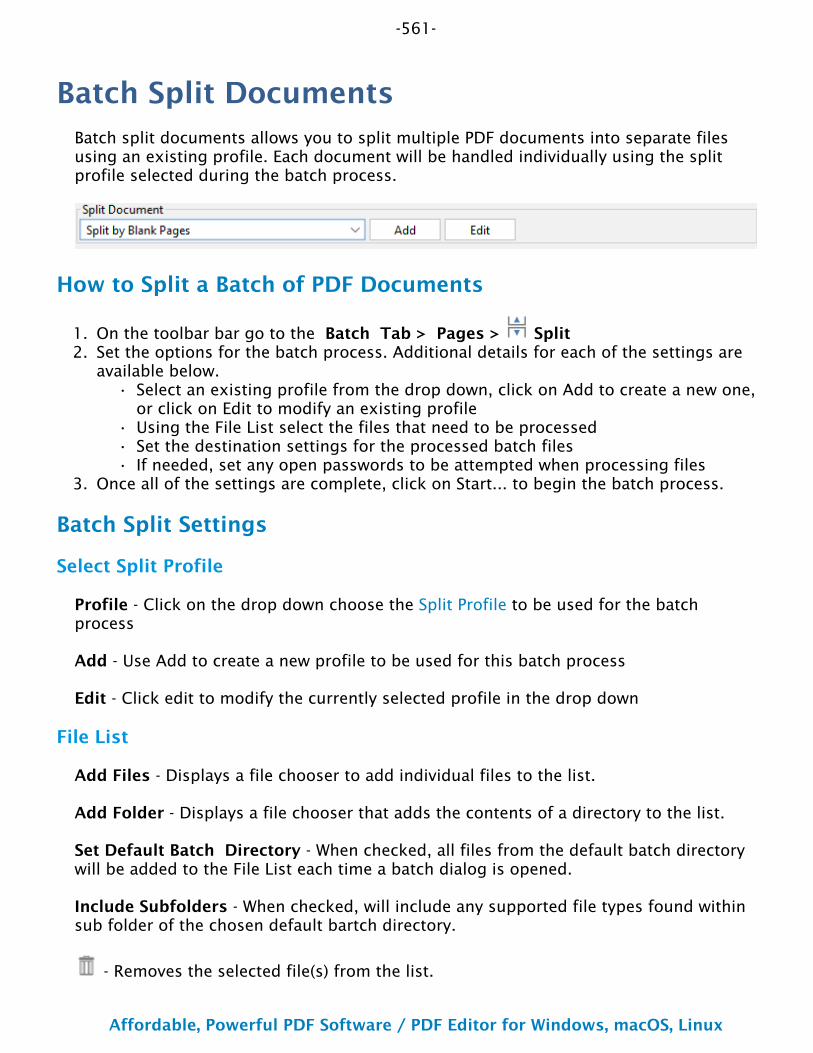
-561-
Affordable, Powerful PDF Software / PDF Editor for Windows, macOS, Linux
Copyright © 2002-Present Qoppa Software. All rights reserved.
1.2.
•
•••
3.
Batch Split DocumentsBatch split documents allows you to split multiple PDF documents into separate files using an existing profile. Each document will be handled individually using the split profile selected during the batch process.
How to Split a Batch of PDF Documents
On the toolbar bar go to the Batch Tab > Pages > SplitSet the options for the batch process. Additional details for each of the settings are available below.
Select an existing profile from the drop down, click on Add to create a new one, or click on Edit to modify an existing profileUsing the File List select the files that need to be processedSet the destination settings for the processed batch filesIf needed, set any open passwords to be attempted when processing files
Once all of the settings are complete, click on Start... to begin the batch process.
Batch Split Settings
Select Split Profile
Profile - Click on the drop down choose the Split Profile to be used for the batch process
Add - Use Add to create a new profile to be used for this batch process
Edit - Click edit to modify the currently selected profile in the drop down
File List
Add Files - Displays a file chooser to add individual files to the list.
Add Folder - Displays a file chooser that adds the contents of a directory to the list.
Set Default Batch Directory - When checked, all files from the default batch directory will be added to the File List each time a batch dialog is opened.
Include Subfolders - When checked, will include any supported file types found within sub folder of the chosen default bartch directory.
- Removes the selected file(s) from the list.
-562-
Affordable, Powerful PDF Software / PDF Editor for Windows, macOS, Linux
Copyright © 2002-Present Qoppa Software. All rights reserved.
•
- Moves the selected file(s) up the list.
- Moves the selected file(s) down the list.
- Moves the selected file(s) to the top of the list.
- Moves the selected file(s) to the bottom of the list.
Save Files To
Destination Folder
Use Source Folder - When this option is selected, the original folder for the PDF document (in the batch process) will be used to save the output files.
Destination Folder - This option allows you to set a destination folder to place all of the processed files. You can type the destination manually or click on the "..." button to open a directory chooser to set the destination folder
Preserve Folder Structure: When checked, the output files will be placed within a new folder (within the specified destination folder) using the file's parent directory name.
Passwords to try when opening documents
To set a password click in the password field or on the Edit button. Then enter the password you want to be used. Do this for up to four passwords to try on password protected PDFs during the batch process.
Note: The passwords entered here will only be used for this batch process and will not be stored anywhere else. Passwords will have to be entered for each new batch process.
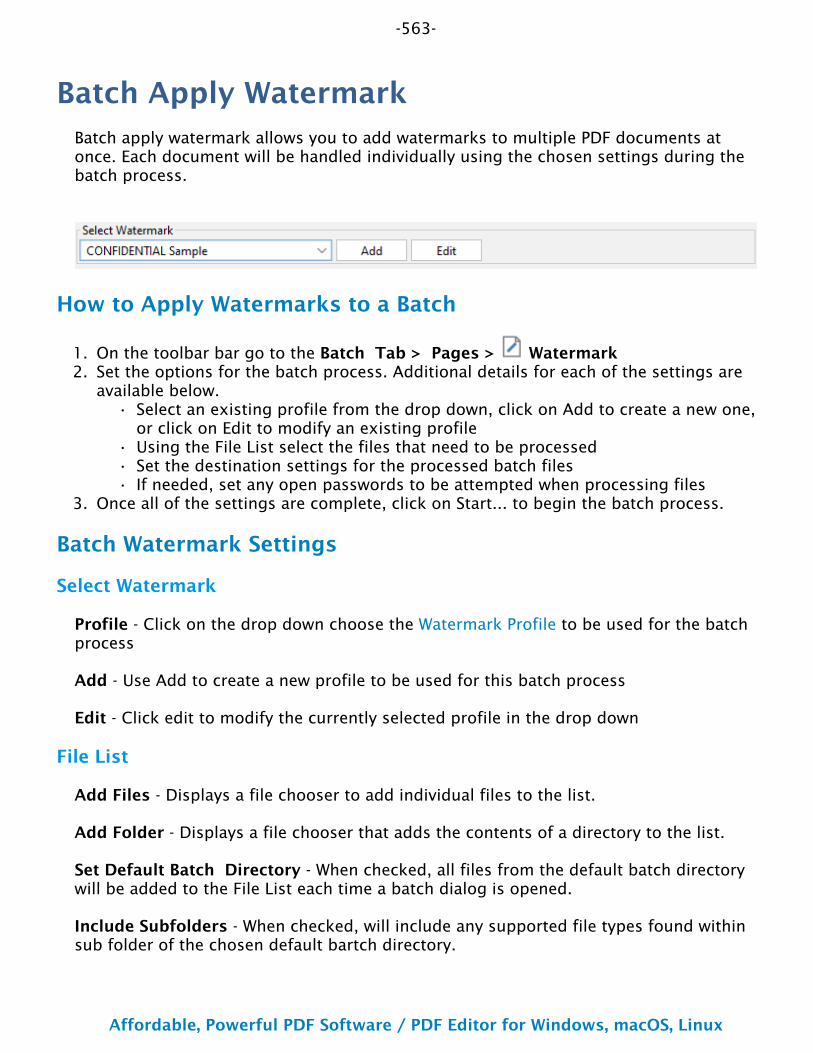
-563-
Affordable, Powerful PDF Software / PDF Editor for Windows, macOS, Linux
Copyright © 2002-Present Qoppa Software. All rights reserved.
1.2.
•
•••
3.
Batch Apply WatermarkBatch apply watermark allows you to add watermarks to multiple PDF documents at once. Each document will be handled individually using the chosen settings during the batch process.
How to Apply Watermarks to a Batch
On the toolbar bar go to the Batch Tab > Pages > WatermarkSet the options for the batch process. Additional details for each of the settings are available below.
Select an existing profile from the drop down, click on Add to create a new one, or click on Edit to modify an existing profileUsing the File List select the files that need to be processedSet the destination settings for the processed batch filesIf needed, set any open passwords to be attempted when processing files
Once all of the settings are complete, click on Start... to begin the batch process.
Batch Watermark Settings
Select Watermark
Profile - Click on the drop down choose the Watermark Profile to be used for the batch process
Add - Use Add to create a new profile to be used for this batch process
Edit - Click edit to modify the currently selected profile in the drop down
File List
Add Files - Displays a file chooser to add individual files to the list.
Add Folder - Displays a file chooser that adds the contents of a directory to the list.
Set Default Batch Directory - When checked, all files from the default batch directory will be added to the File List each time a batch dialog is opened.
Include Subfolders - When checked, will include any supported file types found within sub folder of the chosen default bartch directory.
-564-
Affordable, Powerful PDF Software / PDF Editor for Windows, macOS, Linux
Copyright © 2002-Present Qoppa Software. All rights reserved.
•
•••••••••••
- Removes the selected file(s) from the list.
- Moves the selected file(s) up the list.
- Moves the selected file(s) down the list.
- Moves the selected file(s) to the top of the list.
- Moves the selected file(s) to the bottom of the list.
Save Files To
Destination Folder
Use Source Folder - When this option is selected, the original folder for the PDF document (in the batch process) will be used to save the output files.
Destination Folder - This option allows you to set a destination folder to place all of the processed files. You can type the destination manually or click on the "..." button to open a directory chooser to set the destination folder
Preserve Folder Structure: When checked, the output files will be placed within a new folder (within the specified destination folder) using the file's parent directory name.
File Name Pattern
Use Source Filename - Will save the document using the same original name. If another file exists in the directory, a number will be appended to the output file name, to avoid duplicate file names.
New Filename - When this option is selected, you will need to enter a new filename used for the output files. Each document name will have an incremental counter starting at zero appended to the file name entered in this field. Custom variables may also be used to further distinguish each of the file separations. The available variables are:
$filename - The file name (no extension) that the document was opened from$counter - An automatically incrementing number$day - The day of the month$month - The current month, using two digits$year - The current year, using four digits$shortyear - The current year, using two digits$second - The current second$minute - The current minute$hour - The current hour, 1-12$ampm - AM or PM$longhour - The current hour, 0-23

-565-
Affordable, Powerful PDF Software / PDF Editor for Windows, macOS, Linux
Copyright © 2002-Present Qoppa Software. All rights reserved.
Overwrite Files - When set, if a file with the same name already exists in the directory it will be overwritten with the newly output document.
Note: This CAN NOT be undone. Make sure that you have all your settings correct prior to starting the batch process
Passwords to try when opening documents
To set a password click in the password field or on the Edit button. Then enter the password you want to be used. Do this for up to four passwords to try on password protected PDFs during the batch process.
Note: The passwords entered here will only be used for this batch process and will not be stored anywhere else. Passwords will have to be entered for each new batch process.

-567-
Affordable, Powerful PDF Software / PDF Editor for Windows, macOS, Linux
Copyright © 2002-Present Qoppa Software. All rights reserved.
Action WizardThe Action Wizard allows you to automate a series of routine tasks that need to be done to a PDF. Actions are custom processes created by a user that define a specific series of commands that can be started with a single click. These actions can be performed on either a single document or a chosen set of multiple documents.
Actions can also be exported and imported so they can be shared with others if needed.
Action Wizard Tools
Create New Action - Create and save new custom actions
Run Action - Run a previously created actions
Manage Action - View and manage existing actions
Action Wizard Pane - Panel showing current action progress and remaining list of documents and/or steps to be performed
-568-
Affordable, Powerful PDF Software / PDF Editor for Windows, macOS, Linux
Copyright © 2002-Present Qoppa Software. All rights reserved.
1.
2.•••
3.
4.
•
•
5.6.
Create New ActionCustom actions can be created to streamline work performed in PDF Studio by automating a series of routine tasks that need to be done to a PDF. Once an action has been created it can be started with a single click to process single (or multiple) documents.
Saved actions can also be exported and imported using Manage Actions if it needs be shared with others.
How to Create a New Action Sequence
Go to File Tab > Action Wizard and click on Create New Action to open the New Action wizardChoose the Files to Process
Current open file as default: starts the action using the currently opened fileSingle File: specific file to begin processing the actionFolder: begins processing the action on all PDF files found in the specified folder
Select the tool in the from the Tool List on the left and click on Add > to add the step to your actionChoose the settings you wish to use for the selected action
Specify Settings: Opens the tool dialog (when applicable) to specify the default settings to use in that step
Prompt User: When checked will display the tool settings dialog to the user when the action is processed
Continue adding any additional tools as neededOnce completed click on Save and specify the name and description for your new action
New Action Options
The following options are available when creating your new action:
Files to Process
Select the default files to use when running the action. If none are selected, the currently open file can be used as the default. If needed, you can also choose any of the other Supported file types to process (i.e. to convert Word files to PDF). All files will be immediately converted to a PDF when the action is started using the default conversion settings for the file types based on settings in Preferences.
-569-
Affordable, Powerful PDF Software / PDF Editor for Windows, macOS, Linux
Copyright © 2002-Present Qoppa Software. All rights reserved.
•
•
•
•
•
•
Current open file as default: starts the action using the currently opened file
Single File: choose a specific file to use when starting the action
Folder: begins processing the action on all PDF files found in the specified folder
Default Option - defines the default button behavior for adding additional files when running the action
Add Files - displays a file chooser to add individual files to the list of files to be processed
Add Folder - displays a file chooser that adds the contents of a directory to the list of files to be processed
Add Open Files - adds any files opened before the action was started ot the list of files to be processed
Steps Options
Add > - moves the selected tool to the list of steps to run in the action
Specify Settings - when available allows you to specify the default settings to use in the action for the selected tool
Prompt User - when checked will prompt the user for input before completing the step in the action
Move Up - moves the selected action up the list
Move Down - moves the selected action down the list
Remove - deletes the selected action from the list
Action Tools to Add
Below is a list of tools available to be added as steps in your action.
Comments
Delete Comments: Delete all comments on the current page or entire document
Flatten Comments: Flatten Comments directly on the page to which they belong so they are not editable anymore.
Add Stamp: Used to place a rubber stamp on the document.
-570-
Affordable, Powerful PDF Software / PDF Editor for Windows, macOS, Linux
Copyright © 2002-Present Qoppa Software. All rights reserved.
Document
OCR: Allows you to add text to scanned documents or images so that the document can be searched or marked up as you would any other text document.
Optimize: Compress images or remove objects in order to reduce the PDF file size.
Preflight: Compliance verification to verify the document meets various archival compliances defined by ISO PDF standards.
Initial View - Set the initial view settings for a batch of PDFs
Document Security: Change passwords and permissions on PDF documents
Sign Document: Allows you to Digitally Sign the current PDF
Sanitize: Sanitize PDF documents to remove all hidden sensitive information from the PDF
Mark for Redaction: Add redaction annotations to the document provides a preview of what the document will look like after redaction
Apply Redactions: "Burns in" the annotations and removes any text, image, annotations, form fields or drawings from the document that is underneath the annotation's area.
Pages
Crop Pages: Allows you to Crop PDF page(s)
Delete Pages: Delete pages from the current PDF
Header & Footer: Add or remove headers & footers
Resize Pages: Resize a page to a specified dimension.
Rotate Pages: Options to rotate pages in 90 degree increments.
Watermark: Add or remove document watermarks
Print - Prints the current document using the PDF Studio printer dialog. To use the system print dialog see Print Preferences.
-571-
Affordable, Powerful PDF Software / PDF Editor for Windows, macOS, Linux
Copyright © 2002-Present Qoppa Software. All rights reserved.
Split: Tools to split PDF documents in a variety of ways.
Fix Scan: Perform various repair functions on scanned documents.
Convert To
Export Images: Convert the pages of a PDF document into the following image formats .jpg, .png, .tif, .gif
HTML5 / SVG: Convert PDF documents to an HTML5 web page.
Rasterize PDF - Re-creates the document using images of the pages instead of vector commands
Extract Text: Extract all text contained within the PDF document to a plain text .txt file.
Forms
Export Forms: Export form data in the current document into a file in FDF, XFDF, XDP, or XML formats.
Flatten Forms: Flatten all fields in the form so they are not editable anymore.
Reset Forms: Resets the data in all fields in the form
Save
Save: Saves the document
Save As: Saves the document using a new file
-572-
Affordable, Powerful PDF Software / PDF Editor for Windows, macOS, Linux
Copyright © 2002-Present Qoppa Software. All rights reserved.
1.2.3.4.
••
•
5.6.
7.
Run ActionActions allow you to streamline work performed on documents by automating routine tasks. Once an action has been created it can be started with a single click to process single (or multiple) documents.
How to Run an Action
Go to File Tab > Action Wizard and click on Run ActionClick on any action in the list to start the processOnce started, the Action Pane will open on the right side of the PDF Studio window(Optional) In addition to any default files / folders specified in the action, you can
add more files to process by clicking on Add Files
Click on the down arrow to instead Add Folder or Add Open FilesIf needed, you can also choose any of the other Supported file types to process (i.e. to convert Word files to PDF). All files will be immediately converted to a PDF when the action is started using the default conversion settings for the file types based on settings in Preferences. NOTE: cloud drive files must be saved locally before they can be processed by an action.
Once all the files have been selected click Start(Optional) If prompted, complete any additional inputs or settings needed during the Action steps. Each file will be saved automatically once it has been processed.When all the files have been processed the Done button will be displayed
Additional Action Features
Status Icons
Processing - the current file being processed
Completed - all actions have been completed for this file
Failed - did not complete action due to error in file
Pause / Resume
Action steps can be paused at any point by either closing the options dialog or exiting the currently active action tool. To resume the action, click on the Resume button in the action panel to continue processing the remaining steps and files.
-573-
Affordable, Powerful PDF Software / PDF Editor for Windows, macOS, Linux
Copyright © 2002-Present Qoppa Software. All rights reserved.
••
•
•
Exit Running Action
Running actions can be completed stopped at any point by doing the following:
Clicking on the Exit Action button on the upper right of the action panelQuitting the PDF Studio application entirely
If any document has not yet been saved, you will be prompted to do so when exiting the action sequence.
Modifying the File List
The action file list can be modified at any point during the action sequence. This is useful if you need to process additional documents after the process has been started or realize one of the documents in the list is no longer needed.
Adding Files - additional files can be added to the list by clicking on Add Files button while the process is running.
Click on the down arrow to instead Add Folder or Add Open Files
NOTE: once the action has started documents can only be added to the END of the processing list.
Removing files - any files that have NOT been processed can be deleted from the list by selecting the item and then pressing the Delete key
-574-
Affordable, Powerful PDF Software / PDF Editor for Windows, macOS, Linux
Copyright © 2002-Present Qoppa Software. All rights reserved.
1.2.
Manage ActionsUse the Manage Actions tool to view the list of available actions and modify any existing actions if needed. You can edit, rename, copy, export/import actions from the action manager dialog.
How to Edit an Action
Go to File Tab > Action Wizard and click on Manage ActionsIn the following dialog select the action you wish to modify and choose from one of the options
Edit Action Options
Edit - Opens the action editor to make changes to the sequence or action settings
Rename - Change the action name or description
Copy - Creates a duplicate of the action appending " (Copy)" to the name. You can then edit/rename the new copy as needed
Remove - Deletes the action
Move Up - Used to rearrange the order of the actions by moving the selected action up the list
Move Down - Used to rearrange the order of the actions by moving the selected action down the list
Export - Exports the selected action to move to another device or share with others
Import - Allows you to import a previously exported action (only supports PDF Studio action files)
-575-
Affordable, Powerful PDF Software / PDF Editor for Windows, macOS, Linux
Copyright © 2002-Present Qoppa Software. All rights reserved.
••
•
Action Wizard PaneThe action wizard panel is displayed on the right side of the PDF Studio frame while an action is in process. This panel provides useful information such as which files have been processed as well as a visual guide on the list of steps to be performed on each file. The pane will only be displayed while an action is currently active.
Action Pane Status Icons
Processing - the current file being processed
Completed - all actions have been completed for this file
Failed - did not complete action due to error in file
Action Pane Options
Pause / Resume
Action steps can be paused at any point by either closing the options dialog or exiting the currently active action tool. To resume the action, click on the Resume button in the action panel to continue processing the remaining steps and files.
Exit Running Action
Running actions can be completed stopped at any point by doing the following:
Clicking on the Exit Action button on the upper right of the action panelQuitting the PDF Studio application entirely
If any document has not yet been saved, you will be prompted to do so when exiting the action sequence.
Modifying the File List
The action file list can be modified at any point during the action sequence. This is useful if you need to process additional documents after the process has been started or realize one of the documents in the list is no longer needed.
Adding Files - additional files can be added to the list by clicking on Add Files button while the process is running.
-576-
Affordable, Powerful PDF Software / PDF Editor for Windows, macOS, Linux
Copyright © 2002-Present Qoppa Software. All rights reserved.
◦
•
Click on the down arrow to instead Add Folder or Add Open Files
NOTE: once the action has started documents can only be added to the END of the processing list.
Removing files - any files that have NOT been processed can be deleted from the list by selecting the item and then pressing the Delete key
-577-
Affordable, Powerful PDF Software / PDF Editor for Windows, macOS, Linux
Copyright © 2002-Present Qoppa Software. All rights reserved.
Creating and Editing PDF FormsPDF Studio supports standard form fields in PDF documents and allows you to create, edit, and fill out PDF forms in PDF documents.
Filling PDF Forms: Filling and completing existing PDF forms
Exporting PDF Form Data : Exporting form field data from PDFs
Importing PDF Form Data : Importing form field data into PDFs
Resetting Form Fields: Resetting existing PDF form fields to their default values
Flattening Form Fields: Flatten form fields and their data onto the page
Highlighting Form Fields: Highlights existing form fields on the page to make them more noticeable
Show Field Tab Order - Display a number on the field in form editing mode showing the tab order
Creating Interactive PDF Forms : How to create, edit, and delete form fields on PDFs
PDF Form JavaScript: Custom JavaScript actions that are supported in form fields
-578-
Affordable, Powerful PDF Software / PDF Editor for Windows, macOS, Linux
Copyright © 2002-Present Qoppa Software. All rights reserved.
Filling PDF FormsPDF Studio can be used to fill and complete existing interactive form fields within a PDF. Once complete the form can be printed or saved just as any other PDF document.
Note: To fill a non-interactive form, when the form is simply a scanned page and there are no active fields on it, you can use the Typewriter Tool.
How to fill PDF form Fields
To fill a PDF interactive form, simply open the document by clicking File Tab > Open and fill the forms using the instructions for each field type below. Use the Tab key to navigate to the next field and Shift + Tab to go to the previous field. To save all of the data entered into the PDF form, simply save the PDF document by going to File Tab >
Save or clicking on the save button .
Note: LiveCycle XFA forms – also called dynamic XFA forms – are not supported in PDF Studio. For more information on these special form fields see our knowledge base here.
The following form field types are supported in PDF Studio:
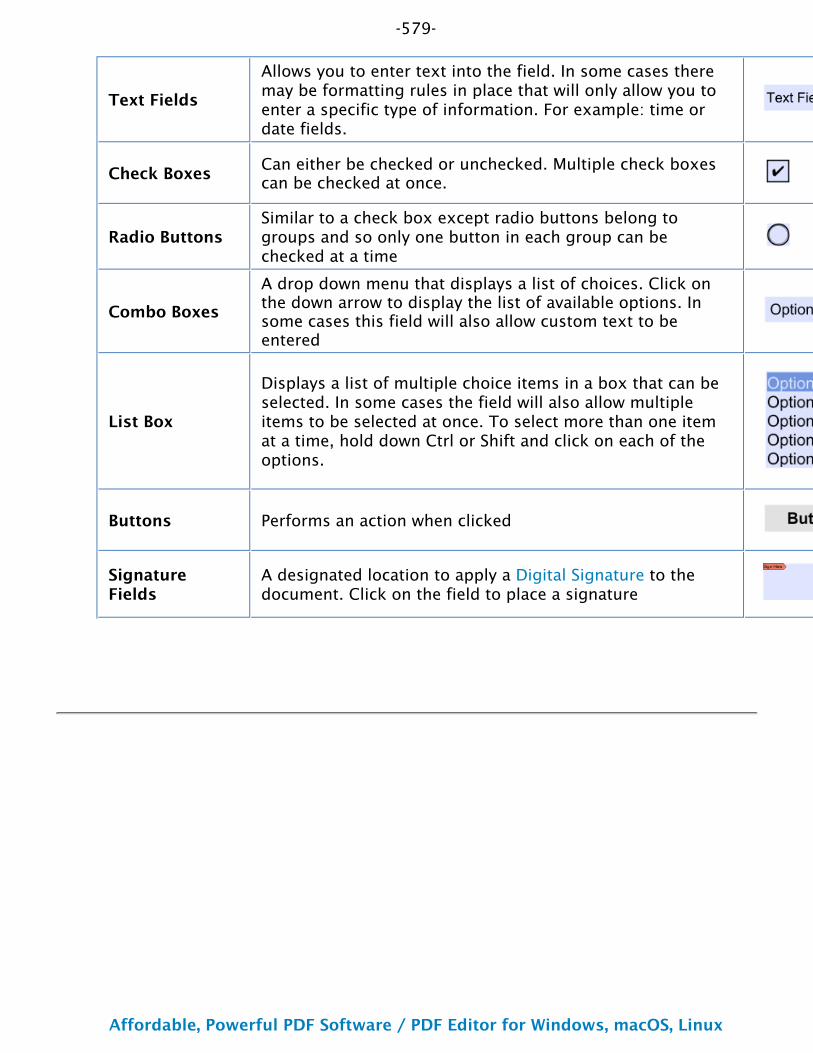
-579-
Affordable, Powerful PDF Software / PDF Editor for Windows, macOS, Linux
Copyright © 2002-Present Qoppa Software. All rights reserved.
Text Fields
Allows you to enter text into the field. In some cases there may be formatting rules in place that will only allow you to enter a specific type of information. For example: time or date fields.
Check BoxesCan either be checked or unchecked. Multiple check boxes can be checked at once.
Radio ButtonsSimilar to a check box except radio buttons belong to groups and so only one button in each group can be checked at a time
Combo Boxes
A drop down menu that displays a list of choices. Click on the down arrow to display the list of available options. In some cases this field will also allow custom text to be entered
List Box
Displays a list of multiple choice items in a box that can be selected. In some cases the field will also allow multiple items to be selected at once. To select more than one item at a time, hold down Ctrl or Shift and click on each of the options.
Buttons Performs an action when clicked
Signature Fields
A designated location to apply a Digital Signature to the document. Click on the field to place a signature
-580-
Affordable, Powerful PDF Software / PDF Editor for Windows, macOS, Linux
Copyright © 2002-Present Qoppa Software. All rights reserved.
1.2.
3.
Exporting Form DataForm data can be exported from the current document into a file in FDF, XFDF, XDP, CSV or XML formats. Form field data from all Form Field Types will be exported during this process.
Forms can be exported in the following formats
FDF: File format created by Adobe that is supported by most PDF applications
XFDF: Extended FDF file format created by Adobe that is supported by most PDF applications
XDP: An XML Data package created by Adobe that is supported by most PDF applications
CSV: A plain text file containing a list of data separated by commas
XML: File that use custom tags to describe the structure and other features of the document.
Text: Plain text file that exports all form data in tab separated format
How to Export Form Data
From the menu, choose Forms Tab > Export FormsSelect whether to export in FDF, XFDF, XDP, or CSV XML format. This will display a save dialog.Select the location and name of the file to export to and click Save
-581-
Affordable, Powerful PDF Software / PDF Editor for Windows, macOS, Linux
Copyright © 2002-Present Qoppa Software. All rights reserved.
1.2.
3.
Importing Form DataForm field data can be imported from either an FDF, XFDF, or XDP file into the current document. Any form data from any of the Form Field Types will be imported.
Note: Form data can only be imported into the exact same form as it was exported from meaning that both the field type and name have to be exactly the same in order for the data to be imported.
Comments can be imported using the following formats
FDF: File format created by Adobe that is supported by most PDF applications
XFDF: Extended FDF file format created by Adobe that is supported by most PDF applications
XDP: An XML Data package created by Adobe that is supported by most PDF applications
How to Import Form Data
From the menu, choose Forms Tab > Import FormsSelect whether to import an FDF, XFDF, or XDP file. This will display a file chooser dialog.Navigate to the location of the FDF, XFDF, or XDP file and then click Open
-582-
Affordable, Powerful PDF Software / PDF Editor for Windows, macOS, Linux
Copyright © 2002-Present Qoppa Software. All rights reserved.
Resetting Form FieldsReset Form Fields will reset the data in all fields in the form. When resetting a field, data will be set to the field's default value or to null if the field has no default value.
How to Reset Form Field Values
Select Forms Tab > Reset Fields from the menu.
Note: This cannot be undone. Make sure to save a copy before completing this action.
-583-
Affordable, Powerful PDF Software / PDF Editor for Windows, macOS, Linux
Copyright © 2002-Present Qoppa Software. All rights reserved.
Flattening Form FieldsFlatten Form Fields will flatten all fields in the form. Fields will be painted directly in the content page to which they belong and will not be editable anymore. See Forms Preferences for additional flattening settings.
How to Flatten Form Fields
Select Forms Tab > Flatten All Fields from the menu.
Note: This cannot be undone. Make sure to save a copy before completing this action.
-584-
Affordable, Powerful PDF Software / PDF Editor for Windows, macOS, Linux
Copyright © 2002-Present Qoppa Software. All rights reserved.
•
•
Highlighting Form FieldsPDF Studio can highlight all fields in the form, making them easier to locate. When highlighted a light colored box will be placed over each field within the document. This option is enabled by default but can be turned off or back on by doing the following.
Note: Hidden fields will not be highlighted in the document. To view hidden fields you will need to be in Creating PDF Forms mode.
How to Enable Highlighting Form Fields
There are 2 ways to highlight the fields on the page.
Select View Tab > Highlight Fields from the menu. The same step will toggle the field highlights off.
Select Forms Tab > Highlight Fields from the menu. The same step will toggle the field highlights off.
-585-
Affordable, Powerful PDF Software / PDF Editor for Windows, macOS, Linux
Copyright © 2002-Present Qoppa Software. All rights reserved.
Creating Interactive PDF FormsPDF Studio is capable of adding form fields in order to create an interactive PDF form or edit form fields in an existing PDF form.. Form fields are useful for when you have information that needs to be selected or filled out in a document. There are many different type of field options available in PDF Studio.
Form Editing Mode: Starts the form editing mode to begin creating PDF forms
Form Field Editor Toolbar: Tools available when creating and editing PDF forms
Creating Form Fields: How to create and edit form fields
Form Field Types: The available form field types and their functions
Moving & Resizing Form Fields - How to move and resize form field elements
Creating Multiple Form Field Copies - Creates multiple copies of the same field on a single page
Duplicate Form Fields - Creates multiple copies of the same field across multiple pages
Aligning Form Fields: How to align form fields in the document
Custom Field Formatting: Setting custom formatting such as number, percentage, dates, zip codes, social security number in form fields
Adding Calculations to Form Fields: How to add number calculations to form fields
Set Field Calculation Order - Set the order in which linked field data is calculated
Form Field Validation - Set validation rules to restrict the type of data entered into the form field
Editing Field Tab Order: How to edit the order of the fields when the Tab key is pressed
Linking Form Fields: How to link fields together so that they share a value
-586-
Affordable, Powerful PDF Software / PDF Editor for Windows, macOS, Linux
Copyright © 2002-Present Qoppa Software. All rights reserved.
•
•
•
1.2.
3.
4.•
5.6.
Form Editing ModeIn order to create forms on a PDF you must first be in form editing mode. In form editing mode, most tools will be hidden and only navigation, form fields, properties, and alignment options will remain. Once the form is completed close the form editing mode to return to the viewing the document as normal.
The object selection tool on the toolbar can select one or more fields/ annotations to move, align, or edit their properties. This tool is also available in the standard document view to allow for quick editing/moving of fields.
The typewriter annotation is included on this toolbar so that labels can be created in form editing mode. To make them permanent, flatten the typewriter annotations once the form has been created.
The Page Thumbnails tab is hidden by default but can be shown by clicking on icon on the left side of the PDF Studio frame.
Starting/Stopping Form Editing Mode
Ribbon Toolbar
When using the Ribbon Toolbar just click on the Forms Tab to activate form editing mode.
Classic Toolbar
Open any document in PDF StudioOn the menu bar select Forms > Create/Edit Form or use the shortcut keys Ctrl + Shift + M (⌘ + Shift + M on Mac).This will open up the Form Field Editor Toolbar. In form editing mode, most toolbars will be hidden; navigation, form fields, properties, and alignment options will remain.You can now edit the Create/Edit forms on the PDF document as needed.
Note: If the document is protected or locked you will not be able to edit the form fields until they are unlocked
Once complete click on Stop Form Editing to close the toolbarSave the document and the fields will be ready for use
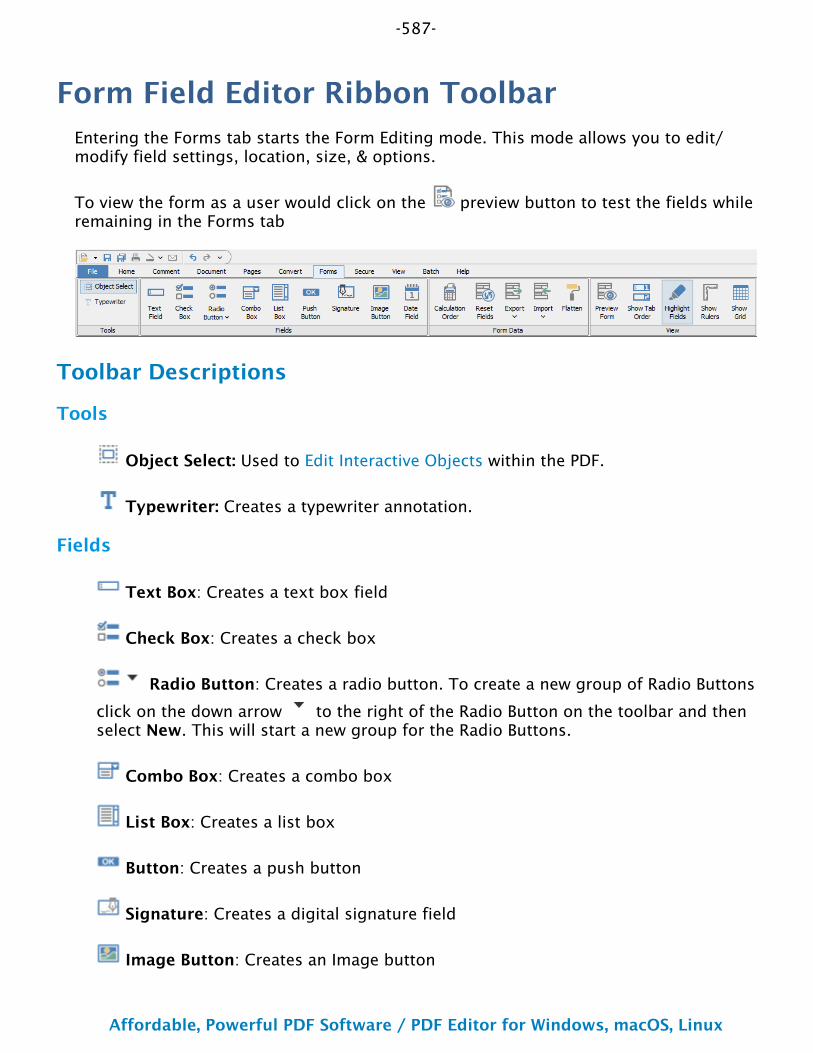
-587-
Affordable, Powerful PDF Software / PDF Editor for Windows, macOS, Linux
Copyright © 2002-Present Qoppa Software. All rights reserved.
Form Field Editor Ribbon ToolbarEntering the Forms tab starts the Form Editing mode. This mode allows you to edit/ modify field settings, location, size, & options.
To view the form as a user would click on the preview button to test the fields while remaining in the Forms tab
Toolbar Descriptions
Tools
Object Select: Used to Edit Interactive Objects within the PDF.
Typewriter: Creates a typewriter annotation.
Fields
Text Box: Creates a text box field
Check Box: Creates a check box
Radio Button: Creates a radio button. To create a new group of Radio Buttons
click on the down arrow to the right of the Radio Button on the toolbar and then select New. This will start a new group for the Radio Buttons.
Combo Box: Creates a combo box
List Box: Creates a list box
Button: Creates a push button
Signature: Creates a digital signature field
Image Button: Creates an Image button
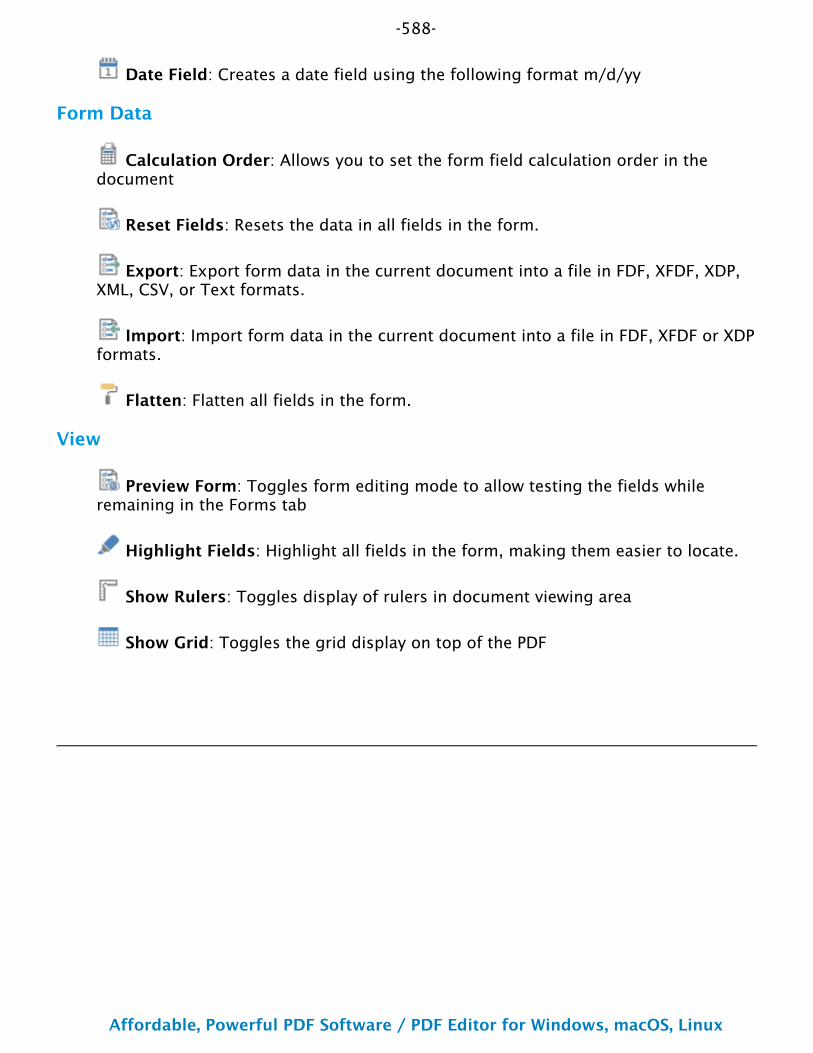
-588-
Affordable, Powerful PDF Software / PDF Editor for Windows, macOS, Linux
Copyright © 2002-Present Qoppa Software. All rights reserved.
Date Field: Creates a date field using the following format m/d/yy
Form Data
Calculation Order: Allows you to set the form field calculation order in the document
Reset Fields: Resets the data in all fields in the form.
Export: Export form data in the current document into a file in FDF, XFDF, XDP, XML, CSV, or Text formats.
Import: Import form data in the current document into a file in FDF, XFDF or XDP formats.
Flatten: Flatten all fields in the form.
View
Preview Form: Toggles form editing mode to allow testing the fields while remaining in the Forms tab
Highlight Fields: Highlight all fields in the form, making them easier to locate.
Show Rulers: Toggles display of rulers in document viewing area
Show Grid: Toggles the grid display on top of the PDF
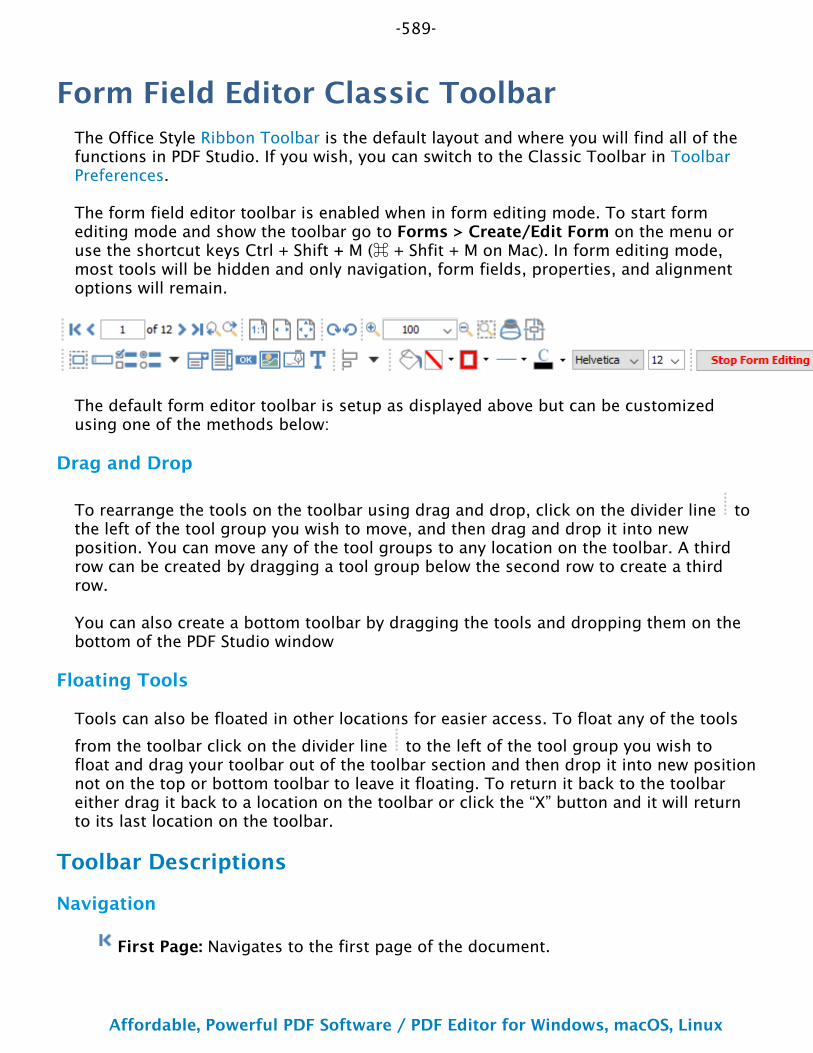
-589-
Affordable, Powerful PDF Software / PDF Editor for Windows, macOS, Linux
Copyright © 2002-Present Qoppa Software. All rights reserved.
Form Field Editor Classic ToolbarThe Office Style Ribbon Toolbar is the default layout and where you will find all of the functions in PDF Studio. If you wish, you can switch to the Classic Toolbar in Toolbar Preferences.
The form field editor toolbar is enabled when in form editing mode. To start form editing mode and show the toolbar go to Forms > Create/Edit Form on the menu or use the shortcut keys Ctrl + Shift + M (⌘ + Shfit + M on Mac). In form editing mode, most tools will be hidden and only navigation, form fields, properties, and alignment options will remain.
The default form editor toolbar is setup as displayed above but can be customized using one of the methods below:
Drag and Drop
To rearrange the tools on the toolbar using drag and drop, click on the divider line to the left of the tool group you wish to move, and then drag and drop it into new position. You can move any of the tool groups to any location on the toolbar. A third row can be created by dragging a tool group below the second row to create a third row.
You can also create a bottom toolbar by dragging the tools and dropping them on the bottom of the PDF Studio window
Floating Tools
Tools can also be floated in other locations for easier access. To float any of the tools
from the toolbar click on the divider line to the left of the tool group you wish to float and drag your toolbar out of the toolbar section and then drop it into new position not on the top or bottom toolbar to leave it floating. To return it back to the toolbar either drag it back to a location on the toolbar or click the “X” button and it will return to its last location on the toolbar.
Toolbar Descriptions
Navigation
First Page: Navigates to the first page of the document.
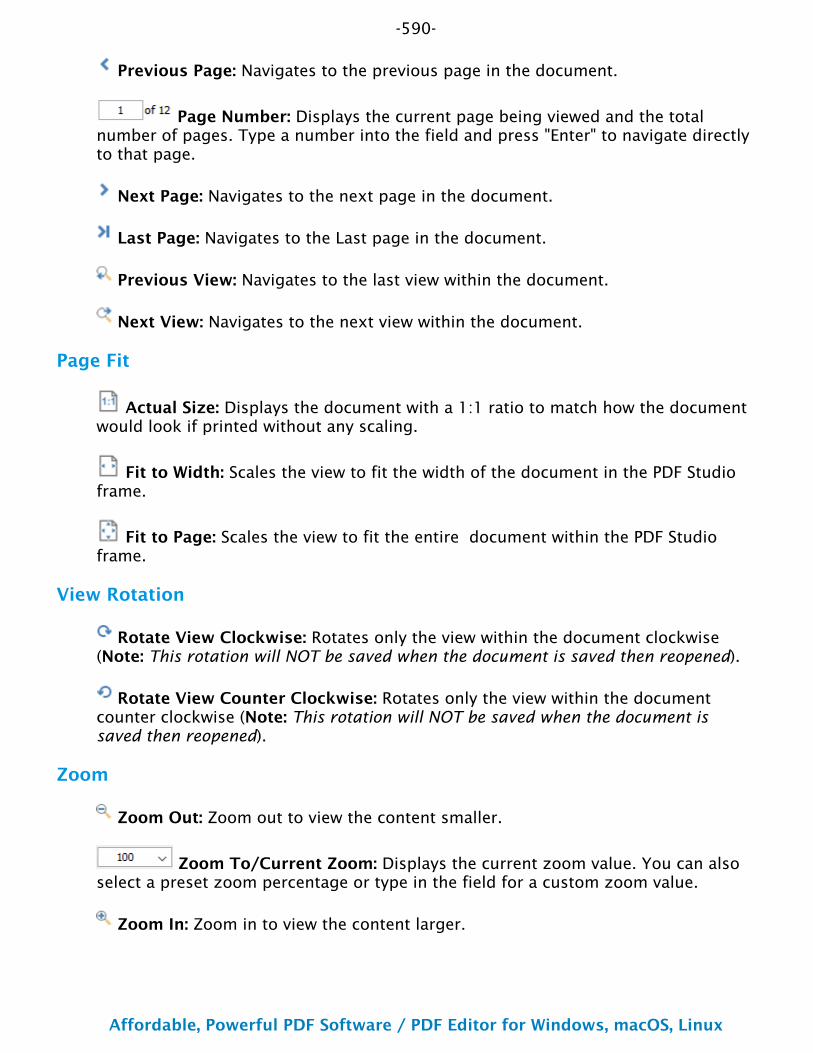
-590-
Affordable, Powerful PDF Software / PDF Editor for Windows, macOS, Linux
Copyright © 2002-Present Qoppa Software. All rights reserved.
Previous Page: Navigates to the previous page in the document.
Page Number: Displays the current page being viewed and the total number of pages. Type a number into the field and press "Enter" to navigate directly to that page.
Next Page: Navigates to the next page in the document.
Last Page: Navigates to the Last page in the document.
Previous View: Navigates to the last view within the document.
Next View: Navigates to the next view within the document.
Page Fit
Actual Size: Displays the document with a 1:1 ratio to match how the document would look if printed without any scaling.
Fit to Width: Scales the view to fit the width of the document in the PDF Studio frame.
Fit to Page: Scales the view to fit the entire document within the PDF Studio frame.
View Rotation
Rotate View Clockwise: Rotates only the view within the document clockwise (Note: This rotation will NOT be saved when the document is saved then reopened).
Rotate View Counter Clockwise: Rotates only the view within the document counter clockwise (Note: This rotation will NOT be saved when the document is saved then reopened).
Zoom
Zoom Out: Zoom out to view the content smaller.
Zoom To/Current Zoom: Displays the current zoom value. You can also select a preset zoom percentage or type in the field for a custom zoom value.
Zoom In: Zoom in to view the content larger.
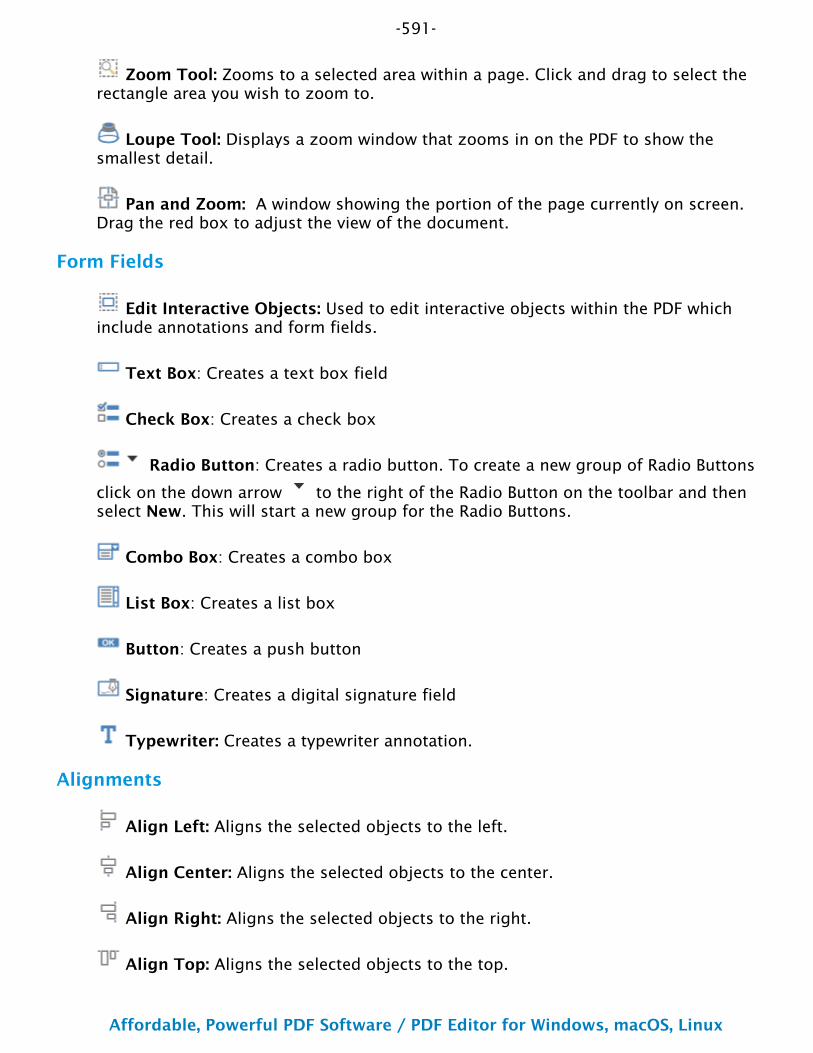
-591-
Affordable, Powerful PDF Software / PDF Editor for Windows, macOS, Linux
Copyright © 2002-Present Qoppa Software. All rights reserved.
Zoom Tool: Zooms to a selected area within a page. Click and drag to select the rectangle area you wish to zoom to.
Loupe Tool: Displays a zoom window that zooms in on the PDF to show the smallest detail.
Pan and Zoom: A window showing the portion of the page currently on screen. Drag the red box to adjust the view of the document.
Form Fields
Edit Interactive Objects: Used to edit interactive objects within the PDF which include annotations and form fields.
Text Box: Creates a text box field
Check Box: Creates a check box
Radio Button: Creates a radio button. To create a new group of Radio Buttons
click on the down arrow to the right of the Radio Button on the toolbar and then select New. This will start a new group for the Radio Buttons.
Combo Box: Creates a combo box
List Box: Creates a list box
Button: Creates a push button
Signature: Creates a digital signature field
Typewriter: Creates a typewriter annotation.
Alignments
Align Left: Aligns the selected objects to the left.
Align Center: Aligns the selected objects to the center.
Align Right: Aligns the selected objects to the right.
Align Top: Aligns the selected objects to the top.
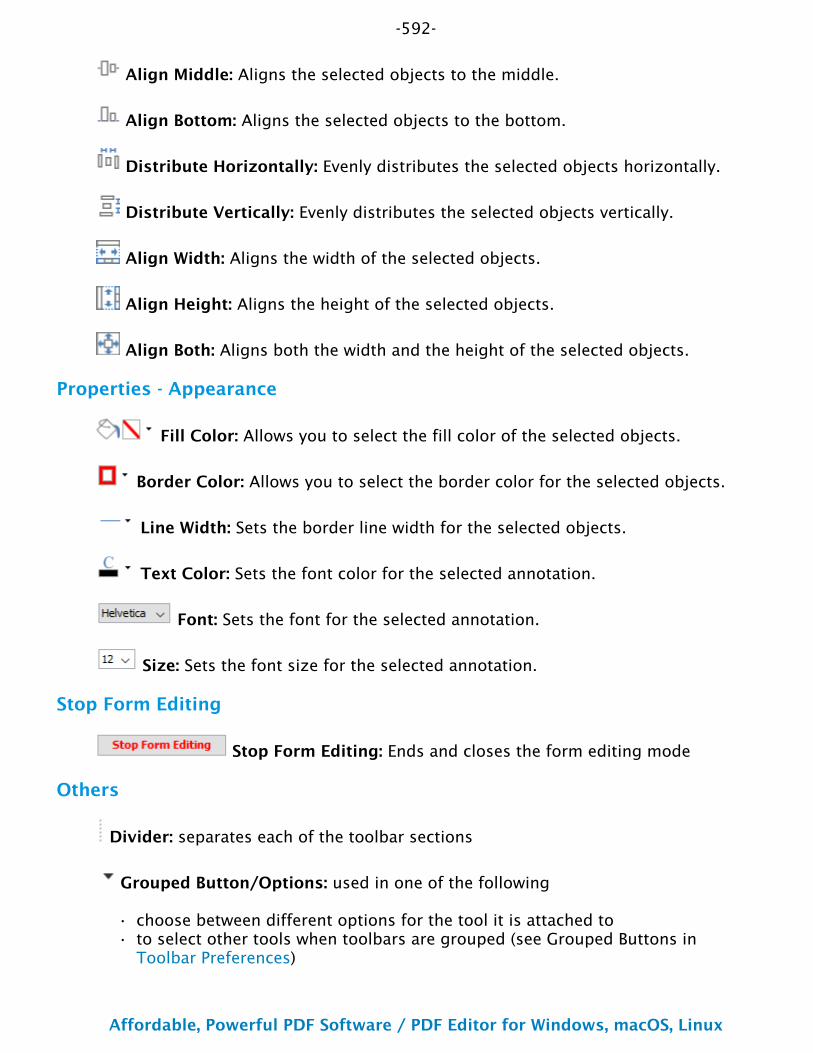
-592-
Affordable, Powerful PDF Software / PDF Editor for Windows, macOS, Linux
Copyright © 2002-Present Qoppa Software. All rights reserved.
••
Align Middle: Aligns the selected objects to the middle.
Align Bottom: Aligns the selected objects to the bottom.
Distribute Horizontally: Evenly distributes the selected objects horizontally.
Distribute Vertically: Evenly distributes the selected objects vertically.
Align Width: Aligns the width of the selected objects.
Align Height: Aligns the height of the selected objects.
Align Both: Aligns both the width and the height of the selected objects.
Properties - Appearance
Fill Color: Allows you to select the fill color of the selected objects.
Border Color: Allows you to select the border color for the selected objects.
Line Width: Sets the border line width for the selected objects.
Text Color: Sets the font color for the selected annotation.
Font: Sets the font for the selected annotation.
Size: Sets the font size for the selected annotation.
Stop Form Editing
Stop Form Editing: Ends and closes the form editing mode
Others
Divider: separates each of the toolbar sections
Grouped Button/Options: used in one of the following
choose between different options for the tool it is attached toto select other tools when toolbars are grouped (see Grouped Buttons in Toolbar Preferences)

-593-
Affordable, Powerful PDF Software / PDF Editor for Windows, macOS, Linux
Copyright © 2002-Present Qoppa Software. All rights reserved.
-594-
Affordable, Powerful PDF Software / PDF Editor for Windows, macOS, Linux
Copyright © 2002-Present Qoppa Software. All rights reserved.
1.2.
3.
1.2.
3.
4.
5.
Creating Form FieldsPDF Studio can create form fields within PDF documents. In order to create fields first the form editor must be started then you can create fields using any of the two methods below.
Note: When creating multiple fields at once you can enable "Sticky" mode to place multiple of the same field type at a time. To enable "Sticky" mode right click on the form icon on the toolbar and then select the "Sticky" option to toggle it on or off.
Single Click
Fields can be created on the page using a standard size with just a single click.
Note: To change the default form field size place one on the page and then resize to the default size you wish to use. Then Right Click (Ctrl + Click on Mac) and select Save as Default Size used for that specific field type going forward.
Start the Form Editing Mode by going to the Forms TabClick on the Form Field Type you wish to create. The cursor will then change to show the field type currently selectedUsing the mouse move to the location you want to place the field and then click to place the field
Click and Drag
Using Click and Drag allows you to create custom size fields on the page without having to resize them afterwards.
Start the Form Editing Mode by going to Forms TabClick on the Form Field Type you wish to create. The cursor will then change to show the field type currently selectedUsing the Top Left corner of the field move to the section on the page where the Top Left of the field should beginClick and while holding down the mouse button drag the mouse to create the custom field size neededOnce complete release the mouse to place the field
-595-
Affordable, Powerful PDF Software / PDF Editor for Windows, macOS, Linux
Copyright © 2002-Present Qoppa Software. All rights reserved.
Form Field TypesThe following form field types are available when creating PDF forms in PDF Studio
Text box: Store text, numbers, dates, etc. Format the field for specific data types, or use in calculations
Check box: Select or deselect an option
Radio button: Select one of a group of mutually exclusive options
List box: Select one or more items from a list
Combo Box: Select one item from a list or add a value not in the list
Button: Starts an action, calculation, validation, etc
Image Button: Button used to import an image onto the page
Date Field: Creates a date field with a pop up calendar
Signature: Apply a secure digital signature to a document
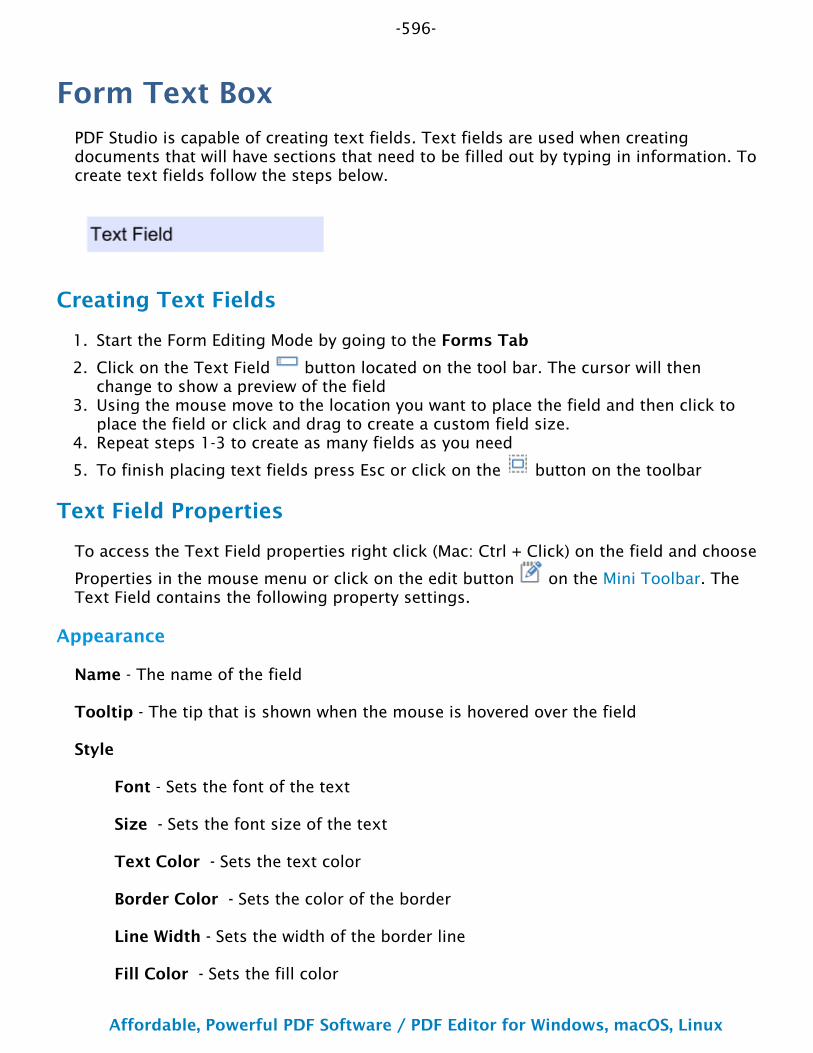
-596-
Affordable, Powerful PDF Software / PDF Editor for Windows, macOS, Linux
Copyright © 2002-Present Qoppa Software. All rights reserved.
1.
2.
3.
4.
5.
Form Text BoxPDF Studio is capable of creating text fields. Text fields are used when creating documents that will have sections that need to be filled out by typing in information. To create text fields follow the steps below.
Creating Text Fields
Start the Form Editing Mode by going to the Forms Tab
Click on the Text Field button located on the tool bar. The cursor will then change to show a preview of the fieldUsing the mouse move to the location you want to place the field and then click to place the field or click and drag to create a custom field size.Repeat steps 1-3 to create as many fields as you need
To finish placing text fields press Esc or click on the button on the toolbar
Text Field Properties
To access the Text Field properties right click (Mac: Ctrl + Click) on the field and choose
Properties in the mouse menu or click on the edit button on the Mini Toolbar. The Text Field contains the following property settings.
Appearance
Name - The name of the field
Tooltip - The tip that is shown when the mouse is hovered over the field
Style
Font - Sets the font of the text
Size - Sets the font size of the text
Text Color - Sets the text color
Border Color - Sets the color of the border
Line Width - Sets the width of the border line
Fill Color - Sets the fill color
-597-
Affordable, Powerful PDF Software / PDF Editor for Windows, macOS, Linux
Copyright © 2002-Present Qoppa Software. All rights reserved.
••••
Style - Sets the style for the border line (i.e. dotted, dashed, cloud, etc...)
Save as default - When checked this will make the selected style settings the default for any new Text Fields going forward
Properties
Rotation - Sets the field rotation in 90 degree increments
Required - When checked will display a red outline on the field letting them know the field is required
Visibility - Sets one of four visibility options for the field
Show: the default setting makes the field visibleHide: hides the field from being displayed when viewing the documentShow/Do not print: shows the field but will not print the field or it's valuesHide/Print: hides the field but the field and its value will be printed
Read Only - Makes the field uneditable and will just display the value currently set in the field
Locked - When checked prevents the following on the field: being moved or resized, editing appearance properties, & deleting the annotation.
Options
Alignment - The alignment of the text that will be typed in the field
Default - The default value of the field. This is the value that will be displayed if the field is empty or when Resetting Form Fields
Multiline - Allows users to type using multiple lines
Scroll Long Text - When checked will scroll if the text being entered is longer than the field. Unchecking this will limit the text to the length of the field
Password - When checked will hide the text and display dots •••• instead of the text typed into the field
Spell Check - When checked enables the "Spell Check" property of the field. When the Spell Check property is set, if the PDF viewer/editor supports spell checking it will be enabled only on fields with this property set.
Comb - Sets the number of vertical lines between each typed character. Useful when adding fields to forms that have a separate box for each character
Character Limit - Limits the number of characters that can be entered in the field
-598-
Affordable, Powerful PDF Software / PDF Editor for Windows, macOS, Linux
Copyright © 2002-Present Qoppa Software. All rights reserved.
Allow Rich Text - Allows special formatted characters to be entered in the field (i.e. Bold, Italic, Underline, etc...)
Format
Sets the formatting rules for the field based on the option and settings selected. When a format is selected the formatting will be enforced using JavaScript and the user will not be able to enter any other value other then what is set in the rules. See Field Formatting for additional details.
None - Default value, sets no formatting rules and any text can be entered into the field
Number - Sets the field to only accept numbers based on the settings selected
Percentage - Sets the field to display a percentage based on the settings selected
Date - Sets the field to only accept date, time, or date-time values based on the settings selected.
Note: When a date or date-time setting is selected when viewing the document PDF Studio will display a calendar button on the field. This button will allow users to select a date using a calendar picker instead of typing in the field if they wish.
Time - Sets the field to only accept time values based on the settings.
Special - Allows you to select from a list of common predefined field formatting rules
Custom JavaScript - Allows you to create your own custom formatting rules using the supported PDF Form JavaScript
Calculate
Sets the calculation rules for the field based on the option and settings selected. When a calculate is set it will be enforced using JavaScript. See Form Field Calculations for additional details
No Calculation for this field - Default value, sets no calculation rules and any text can be entered into the field
Field value has simple calculation - When selected allows you to set a single math calculation on either all or a selection of fields.
This field has a custom calculation - When selected you will need to use Form JavaScript to create custom calculations
Simple Field Notation - When checked this allows you to use simple calculation commands (+ - / *) instead of JavaScript. See Form Field Calculations for additional details
-599-
Affordable, Powerful PDF Software / PDF Editor for Windows, macOS, Linux
Copyright © 2002-Present Qoppa Software. All rights reserved.
Validate
Sets validation rules for the field based on the option selected. Validation is different from format in that validation restricts what values are allowed to be entered into the field
No validation for this field - Default value, sets no validation rules and any value can be entered into the field
Field value has a range - Only available when Format is set to a Number or Percentage.
This field has custom validation - When selected you will need to use Form JavaScript to create custom validations
Actions
The Action Panel displays a list of the current actions associated with the field. Actions can be added, edited, or deleted using the buttons below the actions list.
Add - Adds a custom Form Field Actions from a list of available actions.
Edit - Edits the currently selected action from the list
Remove - Removes the currently selected action from the list

-600-
Affordable, Powerful PDF Software / PDF Editor for Windows, macOS, Linux
Copyright © 2002-Present Qoppa Software. All rights reserved.
1.
2.
3.
4.
5.
Form Check BoxPDF Studio is capable of creating Check Boxes. Check Boxes are used to allow users to select either a single or multiple choice options on a PDF form.
Creating Check Boxes
Start the Form Editing Mode by going to the Forms Tab
Click on the Check Box button located on the toolbar. The cursor will then change to show a preview of the fieldUsing the mouse move to the location you want to place the field and then click to place the field or click and drag to create a custom field size.Repeat steps 1-3 to create as many fields as you need
To finish placing Check Boxes press Esc or click on the button on the toolbar
Check Box Properties
To access the Check Box properties right click (Mac: Ctrl + Click) on the field and
choose Properties in the mouse menu or click on the edit button on the Mini Toolbar. The Check Box contains the following property settings.
Appearance
Name - The name of the field
Tooltip - The tip that is shown when the mouse is hovered over the field
Style
Font - This field is disabled as a specific font has to be set for the check boxes to work
Size - Sets the size of the check mark symbol
Text Color - Sets the check mark color
Border Color - Sets the color of the border
Line Width - Sets the width of the border line
Fill Color - Sets the fill color
-601-
Affordable, Powerful PDF Software / PDF Editor for Windows, macOS, Linux
Copyright © 2002-Present Qoppa Software. All rights reserved.
••••
Style - Sets the style for the border line (i.e. dotted, dashed, cloud, etc...)
Save as default - When checked this will make the selected style settings the default for any new Check Boxes going forward
Properties
Rotation - Sets the field rotation in 90 degree increments
Required - When checked will display a red outline on the field letting them know the field is required
Visibility - Sets one of four visibility options for the field
Show: the default setting makes the field visibleHide: hides the field from being displayed when viewing the documentShow/Do not print: shows the field but will not print the field or it's valuesHide/Print: hides the field but the field and its value will be printed
Read Only - Makes the field uneditable and will just display the value currently set in the field
Locked - When checked prevents the following on the field: being moved or resized, editing appearance properties, & deleting the annotation.
Options
Button Style - Sets the symbol to be used when the button is checked
Export Value - The value to be exported when the field is checked
Selected by Default - Sets the default value of the field to checked or unchecked
Actions
The Action Panel displays a list of the current actions associated with the field. Actions can be added, edited, or deleted using the buttons below the actions list.
Add - Adds a custom Form Field Actions from a list of available actions.
Edit - Edits the currently selected action from the list
Remove - Removes the currently selected action from the list
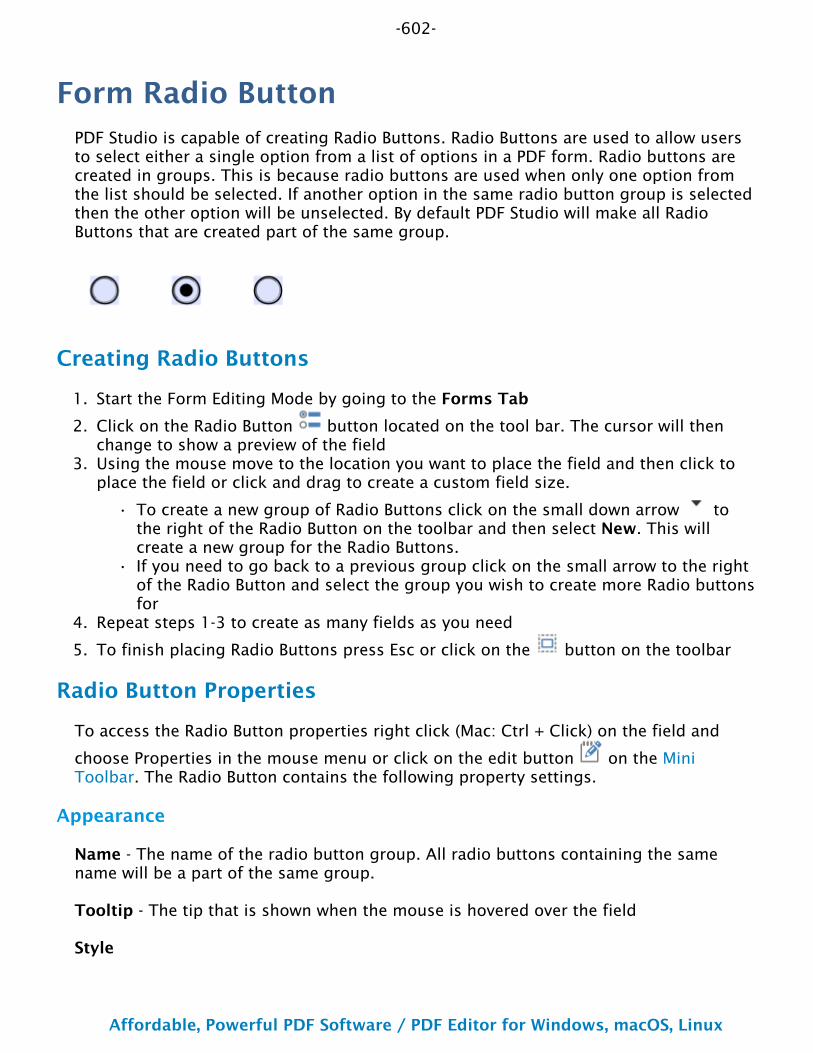
-602-
Affordable, Powerful PDF Software / PDF Editor for Windows, macOS, Linux
Copyright © 2002-Present Qoppa Software. All rights reserved.
1.
2.
3.
•
•
4.
5.
Form Radio ButtonPDF Studio is capable of creating Radio Buttons. Radio Buttons are used to allow users to select either a single option from a list of options in a PDF form. Radio buttons are created in groups. This is because radio buttons are used when only one option from the list should be selected. If another option in the same radio button group is selected then the other option will be unselected. By default PDF Studio will make all Radio Buttons that are created part of the same group.
Creating Radio Buttons
Start the Form Editing Mode by going to the Forms Tab
Click on the Radio Button button located on the tool bar. The cursor will then change to show a preview of the fieldUsing the mouse move to the location you want to place the field and then click to place the field or click and drag to create a custom field size.
To create a new group of Radio Buttons click on the small down arrow to the right of the Radio Button on the toolbar and then select New. This will create a new group for the Radio Buttons.If you need to go back to a previous group click on the small arrow to the right of the Radio Button and select the group you wish to create more Radio buttons for
Repeat steps 1-3 to create as many fields as you need
To finish placing Radio Buttons press Esc or click on the button on the toolbar
Radio Button Properties
To access the Radio Button properties right click (Mac: Ctrl + Click) on the field and
choose Properties in the mouse menu or click on the edit button on the Mini Toolbar. The Radio Button contains the following property settings.
Appearance
Name - The name of the radio button group. All radio buttons containing the same name will be a part of the same group.
Tooltip - The tip that is shown when the mouse is hovered over the field
Style
-603-
Affordable, Powerful PDF Software / PDF Editor for Windows, macOS, Linux
Copyright © 2002-Present Qoppa Software. All rights reserved.
••••
Font - This field is disabled as a specific font has to be set for the Radio Buttons to work
Size - Sets the size of the checked button symbol
Text Color - Sets the check mark color
Border Color - Sets the color of the border
Line Width - Sets the width of the border line
Fill Color - Sets the fill color
Style - Sets the style for the border line (i.e. dotted, dashed, cloud, etc...)
Save as default - When checked this will make the selected style settings the default for any new Radio Buttons going forward
Properties
Rotation - Sets the field rotation in 90 degree increments
Required - When checked will display a red outline on the field letting them know the field is required
Visibility - Sets one of four visibility options for the field
Show: the default setting makes the field visibleHide: hides the field from being displayed when viewing the documentShow/Do not print: shows the field but will not print the field or it's valuesHide/Print: hides the field but the field and its value will be printed
Read Only - Makes the field uneditable and will just display the value currently set in the field
Locked - When checked prevents the following on the field: being moved or resized, editing appearance properties, & deleting the annotation.
Options
Button Style - Sets the symbol to be used when the button is checked
Radio Button Choice - This defines the choice number for the radio button group
Selected by Default - Sets the default value of the field to checked or unchecked
Border Shape - Sets the shape of the border for the radio button to either a circle or square

-604-
Affordable, Powerful PDF Software / PDF Editor for Windows, macOS, Linux
Copyright © 2002-Present Qoppa Software. All rights reserved.
Actions
The Action Panel displays a list of the current actions associated with the field. Actions can be added, edited, or deleted using the buttons below the actions list.
Add - Adds a custom Form Field Actions from a list of available actions.
Edit - Edits the currently selected action from the list
Remove - Removes the currently selected action from the list
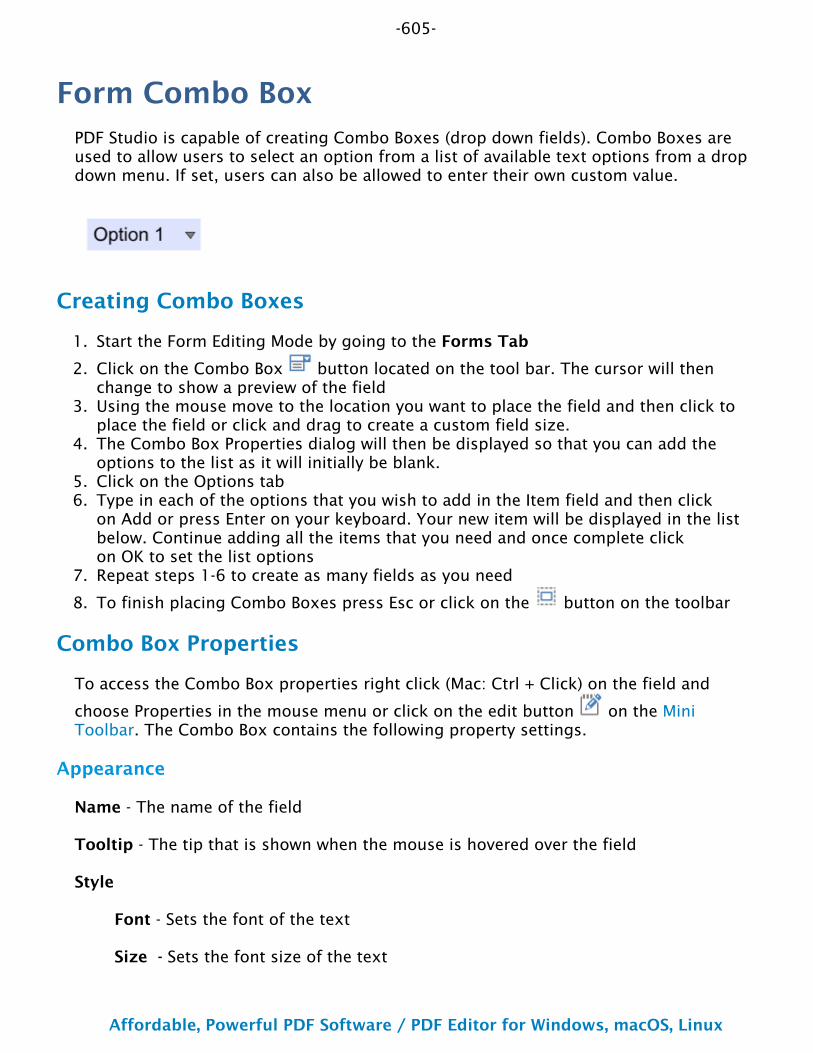
-605-
Affordable, Powerful PDF Software / PDF Editor for Windows, macOS, Linux
Copyright © 2002-Present Qoppa Software. All rights reserved.
1.
2.
3.
4.
5.6.
7.
8.
Form Combo BoxPDF Studio is capable of creating Combo Boxes (drop down fields). Combo Boxes are used to allow users to select an option from a list of available text options from a drop down menu. If set, users can also be allowed to enter their own custom value.
Creating Combo Boxes
Start the Form Editing Mode by going to the Forms Tab
Click on the Combo Box button located on the tool bar. The cursor will then change to show a preview of the fieldUsing the mouse move to the location you want to place the field and then click to place the field or click and drag to create a custom field size.The Combo Box Properties dialog will then be displayed so that you can add the options to the list as it will initially be blank.Click on the Options tabType in each of the options that you wish to add in the Item field and then click on Add or press Enter on your keyboard. Your new item will be displayed in the list below. Continue adding all the items that you need and once complete click on OK to set the list optionsRepeat steps 1-6 to create as many fields as you need
To finish placing Combo Boxes press Esc or click on the button on the toolbar
Combo Box Properties
To access the Combo Box properties right click (Mac: Ctrl + Click) on the field and
choose Properties in the mouse menu or click on the edit button on the Mini Toolbar. The Combo Box contains the following property settings.
Appearance
Name - The name of the field
Tooltip - The tip that is shown when the mouse is hovered over the field
Style
Font - Sets the font of the text
Size - Sets the font size of the text
-606-
Affordable, Powerful PDF Software / PDF Editor for Windows, macOS, Linux
Copyright © 2002-Present Qoppa Software. All rights reserved.
••••
Text Color - Sets the text color
Border Color - Sets the color of the border
Line Width - Sets the width of the border line
Fill Color - Sets the fill color
Style - Sets the style for the border line (i.e. dotted, dashed, cloud, etc...)
Save as default - When checked this will make the selected style settings the default for any new Combo Boxes going forward
Properties
Rotation - Sets the field rotation in 90 degree increments
Required - When checked will display a red outline on the field letting them know the field is required
Visibility - Sets one of four visibility options for the field
Show: the default setting makes the field visibleHide: hides the field from being displayed when viewing the documentShow/Do not print: shows the field but will not print the field or it's valuesHide/Print: hides the field but the field and its value will be printed
Read Only - Makes the field uneditable and will just display the value currently set in the field
Locked - When checked prevents the following on the field: being moved or resized, editing appearance properties, & deleting the annotation.
Options
Item - Type the name of the item you would like to add to the combo list
Add - Adds the text in the Item field to the combo list
Export Value - The value to be exported when the Item is selected in the combo box
Default - When checked, this will make the selected option the default value of the field. This is the value that will be displayed if the field is empty or when Resetting Form Fields
Delete - Deletes the selected items from the list
Move Up - Moves the selected item up the list
-607-
Affordable, Powerful PDF Software / PDF Editor for Windows, macOS, Linux
Copyright © 2002-Present Qoppa Software. All rights reserved.
Move Down - Moves the selected item down the list
Allow Custom Text - When checked, allows the user to enter custom text in the field. Otherwise, the user must select an option
Sort Items - Will alphabetically sort all of the items in the list
Note: This cannot be undone after it has been sorted you will need to manually resort the items
Commit Selected Immediately - When using Form Field Calculations this will submit the value to the calculation (if set) immediately. Otherwise, it will need to be triggered using another method.
Spell Check - When checked enables the "Spell Check" property of the field. When the Spell Check property is set, if the PDF viewer/editor supports spell checking it will be enabled only on fields with this property set.
Note: This option will only be enabled if "Allow Custom Text" is enabled.
Format
Sets the formatting rules for the field based on the option and settings selected. When a format is selected the formatting will be enforced using JavaScript and the user will not be able to enter any other value other then what is set in the rules. See Field Formatting for additional details.
None - Default value, sets no formatting rules and any text can be entered into the field
Number - Sets the field to only accept numbers based on the settings selected
Percentage - Sets the field to display a percentage based on the settings selected
Date - Sets the field to only accept date, time, or date-time values based on the settings selected.
Note: When a date or date-time setting is selected when viewing the document PDF Studio will display a calendar button on the field. This button will allow users to select a date using a calendar picker instead of typing in the field if they wish.
Time - Sets the field to only accept time values based on the settings.
Special - Allows you to select from a list of common predefined field formatting rules
Custom JavaScript - Allows you to create your own custom formatting rules using the supported PDF Form JavaScript
-608-
Affordable, Powerful PDF Software / PDF Editor for Windows, macOS, Linux
Copyright © 2002-Present Qoppa Software. All rights reserved.
Calculate
Sets the calculation rules for the field based on the option and settings selected. When a calculate is set it will be enforced using JavaScript. See Form Field Calculations for additional details
No Calculation for this field - Default value, sets no calculation rules and any text can be entered into the field
Field value has simple calculation - When selected allows you to set a single math calculation on either all or a selection of fields.
This field has a custom calculation - When selected you will need to use Form JavaScript to create custom calculations
Simple Field Notation - When checked this allows you to use simple calculation commands (+ - / *)instead of JavaScript. See Form Field Calculations for additional details
Validate
Sets validation rules for the field based on the option selected. Validation is different from format in that validation restricts what values are allowed to be entered into the field
No validation for this field - Default value, sets no validation rules and any value can be entered into the field
Field values has a range - Only available when Format is set to a Number or Percentage.
This field has custom validation - When selected you will need to use Form JavaScript to create custom validations
Actions
The Action Panel displays a list of the current actions associated with the field. Actions can be added, edited, or deleted using the buttons below the actions list.
Add - Adds a custom Form Field Actions from a list of available actions.
Edit - Edits the currently selected action from the list
Remove - Removes the currently selected action from the list
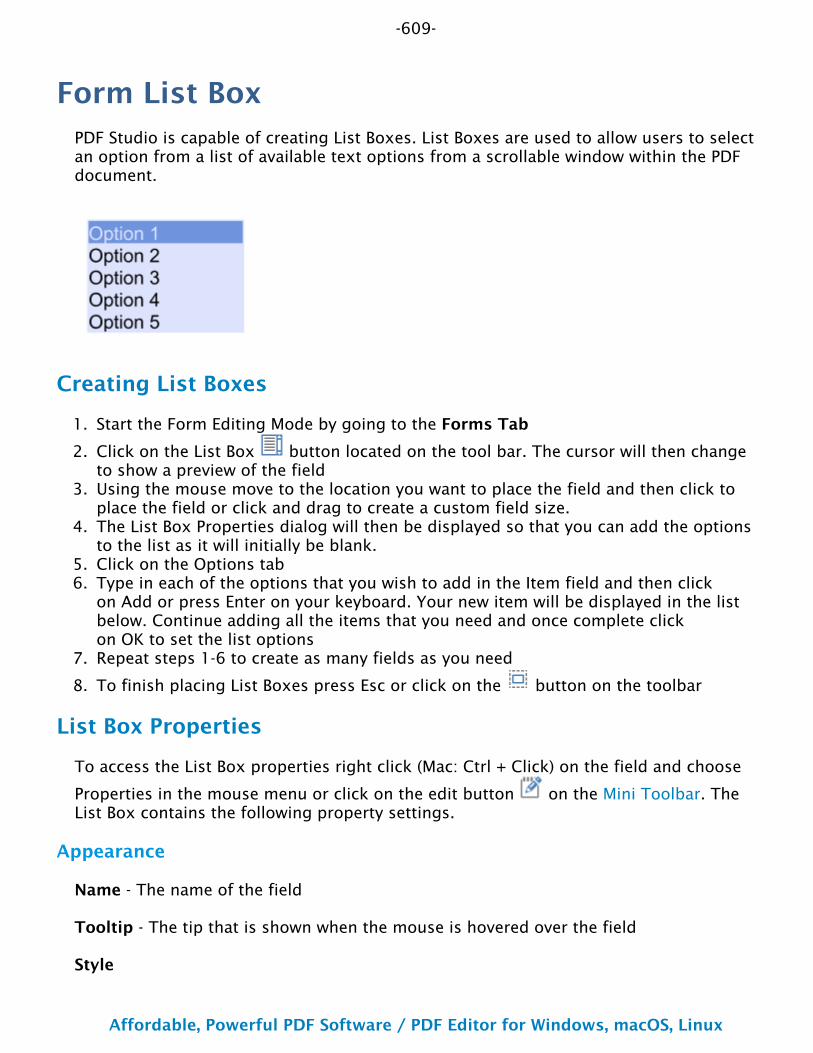
-609-
Affordable, Powerful PDF Software / PDF Editor for Windows, macOS, Linux
Copyright © 2002-Present Qoppa Software. All rights reserved.
1.
2.
3.
4.
5.6.
7.
8.
Form List BoxPDF Studio is capable of creating List Boxes. List Boxes are used to allow users to select an option from a list of available text options from a scrollable window within the PDF document.
Creating List Boxes
Start the Form Editing Mode by going to the Forms Tab
Click on the List Box button located on the tool bar. The cursor will then change to show a preview of the fieldUsing the mouse move to the location you want to place the field and then click to place the field or click and drag to create a custom field size.The List Box Properties dialog will then be displayed so that you can add the options to the list as it will initially be blank.Click on the Options tabType in each of the options that you wish to add in the Item field and then click on Add or press Enter on your keyboard. Your new item will be displayed in the list below. Continue adding all the items that you need and once complete click on OK to set the list optionsRepeat steps 1-6 to create as many fields as you need
To finish placing List Boxes press Esc or click on the button on the toolbar
List Box Properties
To access the List Box properties right click (Mac: Ctrl + Click) on the field and choose
Properties in the mouse menu or click on the edit button on the Mini Toolbar. The List Box contains the following property settings.
Appearance
Name - The name of the field
Tooltip - The tip that is shown when the mouse is hovered over the field
Style
-610-
Affordable, Powerful PDF Software / PDF Editor for Windows, macOS, Linux
Copyright © 2002-Present Qoppa Software. All rights reserved.
••••
Font - Sets the font of the text
Size - Sets the font size of the text
Text Color - Sets the text color
Border Color - Sets the color of the border
Line Width - Sets the width of the border line
Fill Color - Sets the fill color
Style - Sets the style for the border line (i.e. dotted, dashed, cloud, etc...)
Save as default - When checked this will make the selected style settings the default for any new List Boxes going forward
Properties
Rotation - Sets the field rotation in 90 degree increments
Required - This option is not available on List Boxes
Visibility - Sets one of four visibility options for the field
Show: the default setting makes the field visibleHide: hides the field from being displayed when viewing the documentShow/Do not print: shows the field but will not print the field or it's valuesHide/Print: hides the field but the field and its value will be printed
Read Only - Makes the field uneditable and will just display the value currently set in the field
Locked - When checked prevents the following on the field: being moved or resized, editing appearance properties, & deleting the annotation.
Options
Item - Type the name of the item you would like to add to the List Box list
Add - Adds the text in the Item field to the List Box list
Export Value - The value to be exported when the Item is selected in the List box
Default - When checked, this will make the selected option the default value of the field. This is the value that will be displayed if the field is empty or when Resetting Form Fields
Delete - Deletes the selected items from the list
-611-
Affordable, Powerful PDF Software / PDF Editor for Windows, macOS, Linux
Copyright © 2002-Present Qoppa Software. All rights reserved.
Move Up - Moves the selected item up the list
Move Down - Moves the selected item down the list
Allow Multi Select - When checked, allows the user to select multiple options using either Shift or Ctrl + Click
Sort Items - Will alphabetically sort all of the items in the list
Note: This cannot be undone after it has been sorted you will need to manually resort the items
Commit Selected Immediately - When using Form Field Calculations this will submit the value to the calculation (if set) immediately. Otherwise, it will need to be triggered using another method.
Selection Change
Allows you to set an action to occur when a selection is changed. Only JavaScript can be used when setting change actions.
Do nothing on selection change - Default value, sets no validation rules and any value can be entered into the field
Do custom script on selection change - When selected you will need to use Form JavaScript to create custom validations
Actions
The Action Panel displays a list of the current actions associated with the field. Actions can be added, edited, or deleted using the buttons below the actions list.
Add - Adds a custom Form Field Actions from a list of available actions.
Edit - Edits the currently selected action from the list
Remove - Removes the currently selected action from the list
-612-
Affordable, Powerful PDF Software / PDF Editor for Windows, macOS, Linux
Copyright © 2002-Present Qoppa Software. All rights reserved.
1.
2.
3.
4.
5.6.
7.8.
9.
Form ButtonPDF Studio is capable of creating Push Buttons. Push Buttons allow you to create custom buttons on the PDF document that will perform an action when pressed. PDF Studio does include some basic actions that can be added without any coding required. For more advanced options you can program the actions using JavaScript. You will need to have advance knowledge in programming JavaScript in order to create the actions for the buttons. For more information regarding JavaScript in PDF Studio see Supported JavaScript in PDFStudio
Creating Buttons
Start the Form Editing Mode by going to the Forms Tab
Click on the Button button located on the tool bar. The cursor will then change to show a preview of the fieldUsing the mouse move to the location you want to place the field and then click to place the field or click and drag to create a custom field size.The Button Properties dialog will then be displayed so that you can add the action to the button as it will initially do nothing.Click on the Actions tabClick on Add to create an action for the button. See Form Field Actions for a list of available actions and their optionsOnce the actions have been added click on OK to set the actionsRepeat steps 1-7 to create as many Buttons as you need
To finish placing Buttons press Esc or click on the button on the toolbar
Button Properties
To access the Button properties right click (Mac: Ctrl + Click) on the field and choose
Properties in the mouse menu or click on the edit button on the Mini Toolbar. The Button contains the following property settings.
Appearance
Name - The Button field
Tooltip - The tip that is shown when the mouse is hovered over the field
Style
Font - Sets the font of the text on the button
-613-
Affordable, Powerful PDF Software / PDF Editor for Windows, macOS, Linux
Copyright © 2002-Present Qoppa Software. All rights reserved.
••••
•••
•
•••
Size - Sets the font size of the text on the button
Text Color - Sets the text color on the button
Border Color - Sets the color of the border on the button
Line Width - Sets the width of the border line on the button
Fill Color - Sets the fill color on the button
Style - Sets the style for the border line (i.e. dotted, dashed, cloud, etc...) on the button
Save as default - When checked this will make the selected style settings the default for any new Buttons going forward
Properties
Rotation - Sets the field rotation in 90 degree increments
Required - This option is not available on Buttons
Visibility - Sets one of four visibility options for the field
Show: the default setting makes the field visibleHide: hides the field from being displayed when viewing the documentShow/Do not print: shows the field but will not print the field or it's valuesHide/Print: hides the field but the field and its value will be printed
Read Only - Makes the field uneditable and will just display the value currently set in the field
Locked - When checked prevents the following on the field: being moved or resized, editing appearance properties, & deleting the annotation.
Options
Style - Sets the style of the Button
None: The button will have no effect when pushedInvert: The entire button will highlight when pressedOutline: Only the outline of the button will be highlighted when pressed. Change to a larger line width to see it morePush: Allows you to define separate labels for each of the below interactions with the button
Up: when the button is not being acted onDown: when the button is pressedMouse Over: When the mouse is hovered over the button
Label - Sets whether the button has a label and it's location
-614-
Affordable, Powerful PDF Software / PDF Editor for Windows, macOS, Linux
Copyright © 2002-Present Qoppa Software. All rights reserved.
Image - Sets whether the button has an image in the background and it's location
Note: Any of the supported image formats (JPEG, PNG, GIF, & TIFF) or a PDF document can be set as the image on the button
Actions
The Action Panel displays a list of the current actions associated with the field. Actions can be added, edited, or deleted using the buttons below the actions list.
Add - Adds a custom Form Field Actions from a list of available actions.
Edit - Edits the currently selected action from the list
Remove - Removes the currently selected action from the list
-615-
Affordable, Powerful PDF Software / PDF Editor for Windows, macOS, Linux
Copyright © 2002-Present Qoppa Software. All rights reserved.
1.
2.
3.
4.
5.6.
7.
8.
Form Signature FieldPDF Studio is capable of creating Signature Fields. Signature Fields allow you to create fields that your users can use to digitally sign the PDF document. See Applying Digital Signatures for instructions on how to sign a document.
Creating Signature Fields
Start the Form Editing Mode by going to the Forms Tab
Click on the Signature Field button located on the tool bar. The cursor will then change to show a preview of the fieldUsing the mouse move to the location you want to place the field and then click to place the field or click and drag to create a custom field size.The Signature Field Properties dialog will then be displayed so that you can add the options to the list as it will initially be blank.Click on the Options tabType in each of the options that you wish to add in the Item field and then click on Add or press Enter on your keyboard. Your new item will be displayed in the list below. Continue adding all the items that you need and once complete click on OK to set the list optionsRepeat steps 1-6 to create as many fields as you need
To finish placing Signature Fields press Esc or click on the button on the toolbar
Signature Field Properties
To access the Signature Field properties right click (Mac: Ctrl + Click) on the field and
choose Properties in the mouse menu or click on the edit button on the Mini Toolbar. The Signature Field contains the following property settings.
Appearance
Name - The name of the signature field
Style
Font - Sets the font of the text used in the digital signature once it is applied
Size - This option does not apply to signature fields
Text Color - Sets the text color
-616-
Affordable, Powerful PDF Software / PDF Editor for Windows, macOS, Linux
Copyright © 2002-Present Qoppa Software. All rights reserved.
••••
••
•
Border Color - Sets the color of the border
Line Width - Sets the width of the border line
Fill Color - Sets the fill color
Style - Sets the style for the border line (i.e. dotted, dashed, cloud, etc...)
Save as default - When checked this will make the selected style settings the default for any new Signature Fieldes going forward
Properties
Rotation - Sets the field rotation in 90 degree increments
Required - This option is not available on Signature Fields
Visibility - Sets one of four visibility options for the field
Show: the default setting makes the field visibleHide: hides the field from being displayed when viewing the documentShow/Do not print: shows the field but will not print the field or it's valuesHide/Print: hides the field but the field and its value will be printed
Read Only - Makes the field uneditable and will just display the value currently set in the field
Locked - When checked prevents the following on the field: being moved or resized, editing appearance properties, & deleting the annotation.
Signed
Allows you to set an action to occur when the field is signed. Only JavaScript can be used when setting change actions.
Do nothing on sign - Default value, sets no validation rules and any value can be entered into the field
Set the following read only on sign - When selected, use the drop down to set which fields to mark as "Read Only" when the document is signed.
All Fields: marks all the fields in the document as Read OnlyJust These Fields: allows you to select which fields to mark as Read Only. To select more than one item at a time, hold down Ctrl or Shift and click on each of the options.All Fields Except: allows you to select which fields NOT to mark as Read Only. To select more than one item at a time, hold down Ctrl or Shift and click on each of the options.
-617-
Affordable, Powerful PDF Software / PDF Editor for Windows, macOS, Linux
Copyright © 2002-Present Qoppa Software. All rights reserved.
Do custom script on sign - When selected you will need to use Form JavaScript to create custom validations
Actions
The Action Panel displays a list of the current actions associated with the field. Actions can be added, edited, or deleted using the buttons below the actions list.
Add - Adds a custom Form Field Actions from a list of available actions.
Edit - Edits the currently selected action from the list
Remove - Removes the currently selected action from the list
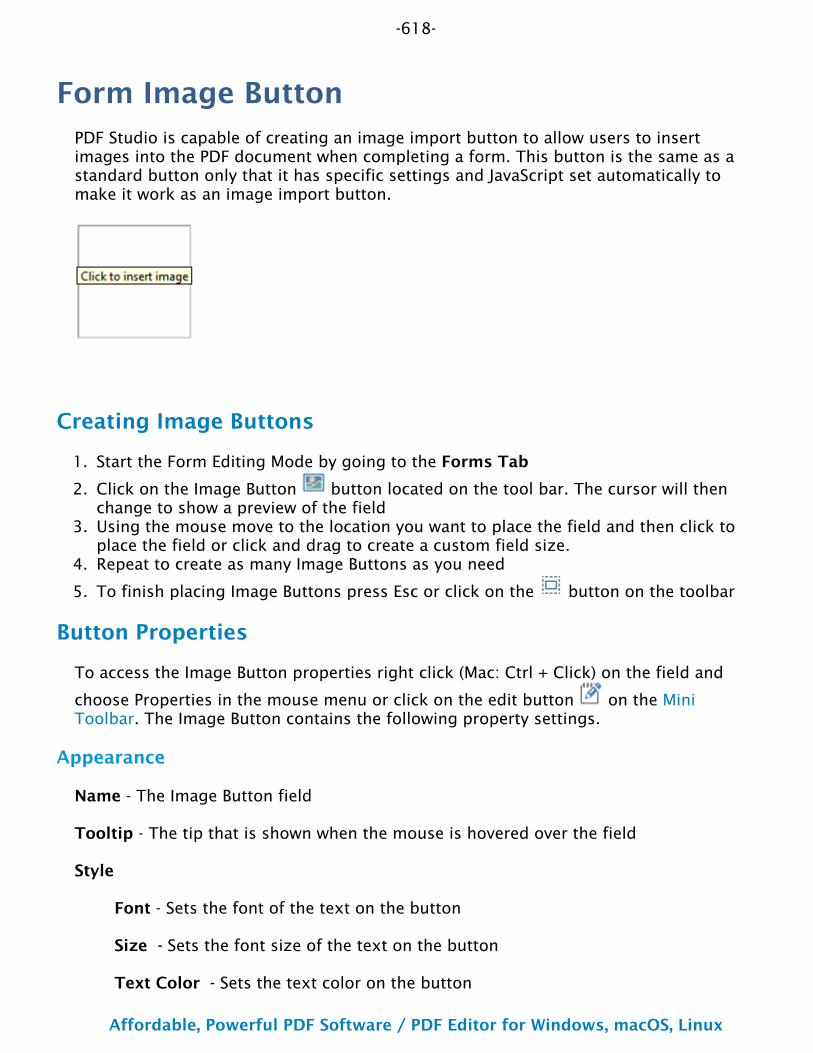
-618-
Affordable, Powerful PDF Software / PDF Editor for Windows, macOS, Linux
Copyright © 2002-Present Qoppa Software. All rights reserved.
1.
2.
3.
4.
5.
Form Image ButtonPDF Studio is capable of creating an image import button to allow users to insert images into the PDF document when completing a form. This button is the same as a standard button only that it has specific settings and JavaScript set automatically to make it work as an image import button.
Creating Image Buttons
Start the Form Editing Mode by going to the Forms Tab
Click on the Image Button button located on the tool bar. The cursor will then change to show a preview of the fieldUsing the mouse move to the location you want to place the field and then click to place the field or click and drag to create a custom field size.Repeat to create as many Image Buttons as you need
To finish placing Image Buttons press Esc or click on the button on the toolbar
Button Properties
To access the Image Button properties right click (Mac: Ctrl + Click) on the field and
choose Properties in the mouse menu or click on the edit button on the Mini Toolbar. The Image Button contains the following property settings.
Appearance
Name - The Image Button field
Tooltip - The tip that is shown when the mouse is hovered over the field
Style
Font - Sets the font of the text on the button
Size - Sets the font size of the text on the button
Text Color - Sets the text color on the button
-619-
Affordable, Powerful PDF Software / PDF Editor for Windows, macOS, Linux
Copyright © 2002-Present Qoppa Software. All rights reserved.
••••
•••
•
•••
Border Color - Sets the color of the border on the button
Line Width - Sets the width of the border line on the button
Fill Color - Sets the fill color on the button
Style - Sets the style for the border line (i.e. dotted, dashed, cloud, etc...) on the button
Save as default - When checked this will make the selected style settings the default for any new Image Buttons going forward
Properties
Rotation - Sets the field rotation in 90 degree increments
Required - This option is not available on Image Buttons
Visibility - Sets one of four visibility options for the field
Show: the default setting makes the field visibleHide: hides the field from being displayed when viewing the documentShow/Do not print: shows the field but will not print the field or it's valuesHide/Print: hides the field but the field and its value will be printed
Read Only - Makes the field uneditable and will just display the value currently set in the field
Locked - When checked prevents the following on the field: being moved or resized, editing appearance properties, & deleting the annotation.
Options
NOTE: These options have been preset to make the Image Button function correctly. Changing these settings may cause the Image Button to no longer work.
Style - Sets the style of the Image Button
None: The button will have no effect when pushedInvert: The entire button will highlight when pressedOutline: Only the outline of the button will be highlighted when pressed. Change to a larger line width to see it morePush: Allows you to define separate labels for each of the below interactions with the button
Up: when the button is not being acted onDown: when the button is pressedMouse Over: When the mouse is hovered over the button
Label - Sets whether the button has a label and it's location
-620-
Affordable, Powerful PDF Software / PDF Editor for Windows, macOS, Linux
Copyright © 2002-Present Qoppa Software. All rights reserved.
Image - Sets whether the button has an image in the background and it's location
Note: Any of the supported image formats (JPEG, PNG, GIF, & TIFF) or a PDF document can be set as the image on the button
Actions
NOTE: These options have been preset to make the Image Button function correctly. Changing these settings may cause the Image Button to no longer work.
The Action Panel displays a list of the current actions associated with the field. Actions can be added, edited, or deleted using the buttons below the actions list.
Add - Adds a custom Form Field Actions from a list of available actions.
Edit - Edits the currently selected action from the list
Remove - Removes the currently selected action from the list
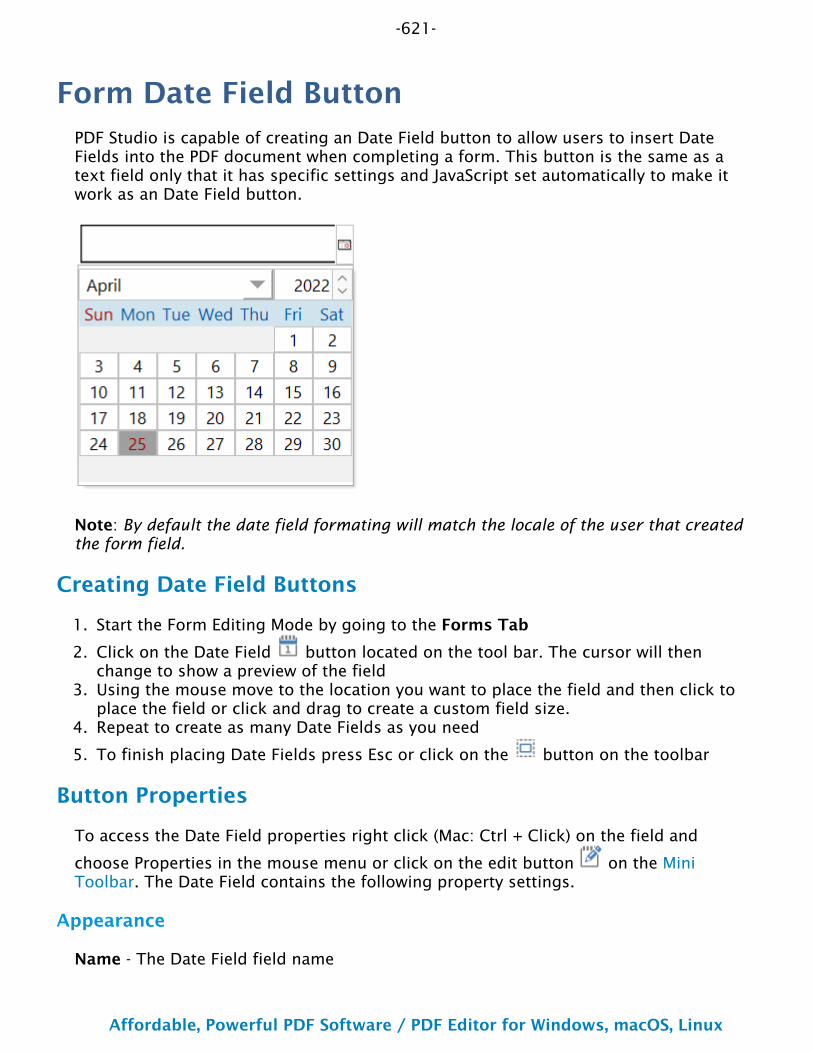
-621-
Affordable, Powerful PDF Software / PDF Editor for Windows, macOS, Linux
Copyright © 2002-Present Qoppa Software. All rights reserved.
1.
2.
3.
4.
5.
Form Date Field ButtonPDF Studio is capable of creating an Date Field button to allow users to insert Date Fields into the PDF document when completing a form. This button is the same as a text field only that it has specific settings and JavaScript set automatically to make it work as an Date Field button.
Note: By default the date field formating will match the locale of the user that created the form field.
Creating Date Field Buttons
Start the Form Editing Mode by going to the Forms Tab
Click on the Date Field button located on the tool bar. The cursor will then change to show a preview of the fieldUsing the mouse move to the location you want to place the field and then click to place the field or click and drag to create a custom field size.Repeat to create as many Date Fields as you need
To finish placing Date Fields press Esc or click on the button on the toolbar
Button Properties
To access the Date Field properties right click (Mac: Ctrl + Click) on the field and
choose Properties in the mouse menu or click on the edit button on the Mini Toolbar. The Date Field contains the following property settings.
Appearance
Name - The Date Field field name
-622-
Affordable, Powerful PDF Software / PDF Editor for Windows, macOS, Linux
Copyright © 2002-Present Qoppa Software. All rights reserved.
••••
Tooltip - The tip that is shown when the mouse is hovered over the field
Style
Font - Sets the font of the text on the button
Size - Sets the font size of the text on the button
Text Color - Sets the text color on the button
Border Color - Sets the color of the border on the button
Line Width - Sets the width of the border line on the button
Fill Color - Sets the fill color on the button
Style - Sets the style for the border line (i.e. dotted, dashed, cloud, etc...) on the button
Save as default - When checked this will make the selected style settings the default for any new Date Field Buttons going forward
Properties
Rotation - Sets the field rotation in 90 degree increments
Required - This option is not available on Date Field Buttons
Visibility - Sets one of four visibility options for the field
Show: the default setting makes the field visibleHide: hides the field from being displayed when viewing the documentShow/Do not print: shows the field but will not print the field or it's valuesHide/Print: hides the field but the field and its value will be printed
Read Only - Makes the field uneditable and will just display the value currently set in the field
Locked - When checked prevents the following on the field: being moved or resized, editing appearance properties, & deleting the annotation.
Options
Alignment - The alignment of the text that will be typed in the field
Default - The default value of the field. This is the value that will be displayed if the field is empty or when Resetting Form Fields
Multiline - Allows users to type using multiple lines

-623-
Affordable, Powerful PDF Software / PDF Editor for Windows, macOS, Linux
Copyright © 2002-Present Qoppa Software. All rights reserved.
Scroll Long Text - When checked will scroll if the text being entered is longer than the field. Unchecking this will limit the text to the length of the field
Password - When checked will hide the text and display dots •••• instead of the text typed into the field
Spell Check - When checked enables the "Spell Check" property of the field. When the Spell Check property is set, if the PDF viewer/editor supports spell checking it will be enabled only on fields with this property set.
Comb - Sets the number of vertical lines between each typed character. Useful when adding fields to forms that have a separate box for each character
Character Limit - Limits the number of characters that can be entered in the field
Allow Rich Text - Allows special formatted characters to be entered in the field (i.e. Bold, Italic, Underline, etc...)
Format
NOTE: These options have been preset to make the Date Field function correctly. Changing these settings may cause the Date Field Button to no longer work.
Sets the formatting rules for the field based on the option and settings selected. When a format is selected the formatting will be enforced using JavaScript and the user will not be able to enter any other value other then what is set in the rules. See Field Formatting for additional details.
None - Default value, sets no formatting rules and any text can be entered into the field
Number - Sets the field to only accept numbers based on the settings selected
Percentage - Sets the field to display a percentage based on the settings selected
Date/Time - Sets the field to only accept date, time, or date-time values based on the settings selected.
Note: When a date or date-time setting is selected when viewing the document PDF Studio will display a calendar button on the field. This button will allow users to select a date using a calendar picker instead of typing in the field if they wish.
Other - Allows you to select from a list of common predefined field formatting rules
Custom - Allows you to create your own custom formatting rules using the supported PDF Form JavaScript
-624-
Affordable, Powerful PDF Software / PDF Editor for Windows, macOS, Linux
Copyright © 2002-Present Qoppa Software. All rights reserved.
Calculate
Sets the calculation rules for the field based on the option and settings selected. When a calculate is set it will be enforced using JavaScript. See Form Field Calculations for additional details
No Calculation for this field - Default value, sets no calculation rules and any text can be entered into the field
Field value has simple calculation - When selected allows you to set a single math calculation on either all or a selection of fields.
This field has a custom calculation - When selected you will need to use Form JavaScript to create custom calculations
Simple Field Notation - When checked this allows you to use simple calculation commands (+ - / *) instead of JavaScript. See Form Field Calculations for additional details
Validate
Sets validation rules for the field based on the option selected. Validation is different from format in that validation restricts what values are allowed to be entered into the field
No validation for this field - Default value, sets no validation rules and any value can be entered into the field
Field value has a range - Only available when Format is set to a Number or Percentage.
This field has custom validation - When selected you will need to use Form JavaScript to create custom validations
Actions
The Action Panel displays a list of the current actions associated with the field. Actions can be added, edited, or deleted using the buttons below the actions list.
Add - Adds a custom Form Field Actions from a list of available actions.
Edit - Edits the currently selected action from the list
Remove - Removes the currently selected action from the list
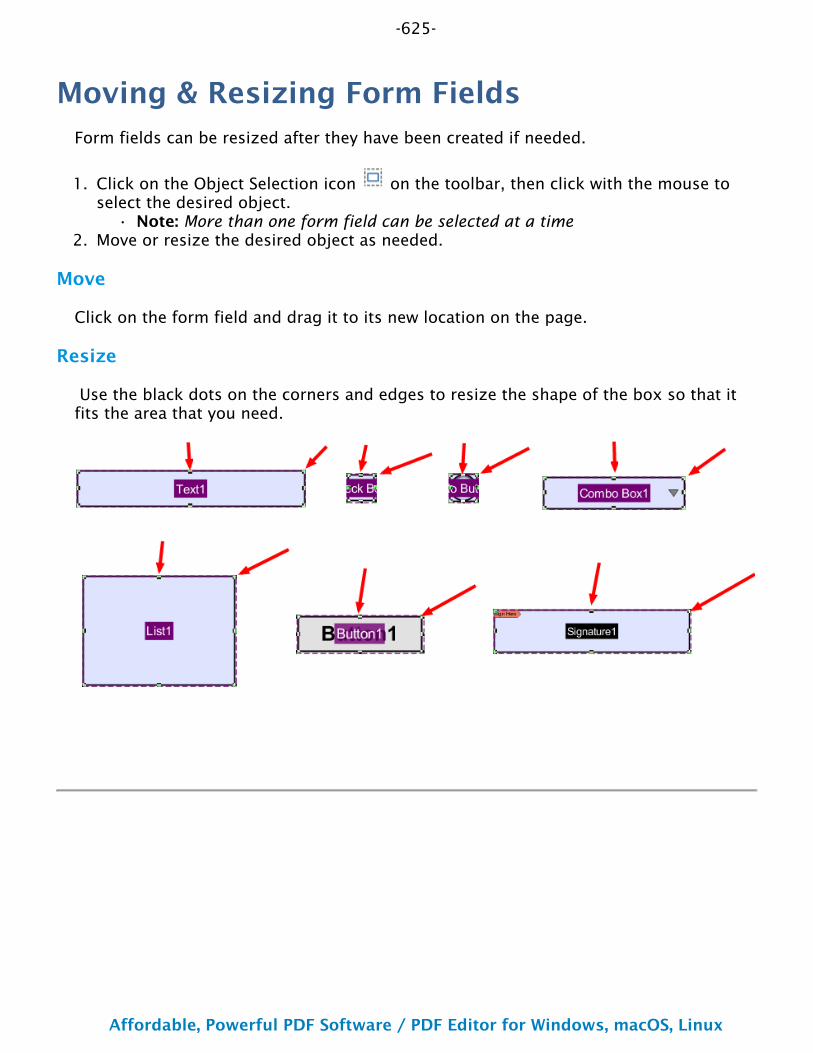
-625-
Affordable, Powerful PDF Software / PDF Editor for Windows, macOS, Linux
Copyright © 2002-Present Qoppa Software. All rights reserved.
1.
•2.
Moving & Resizing Form FieldsForm fields can be resized after they have been created if needed.
Click on the Object Selection icon on the toolbar, then click with the mouse to select the desired object.
Note: More than one form field can be selected at a timeMove or resize the desired object as needed.
Move
Click on the form field and drag it to its new location on the page.
Resize
Use the black dots on the corners and edges to resize the shape of the box so that it fits the area that you need.
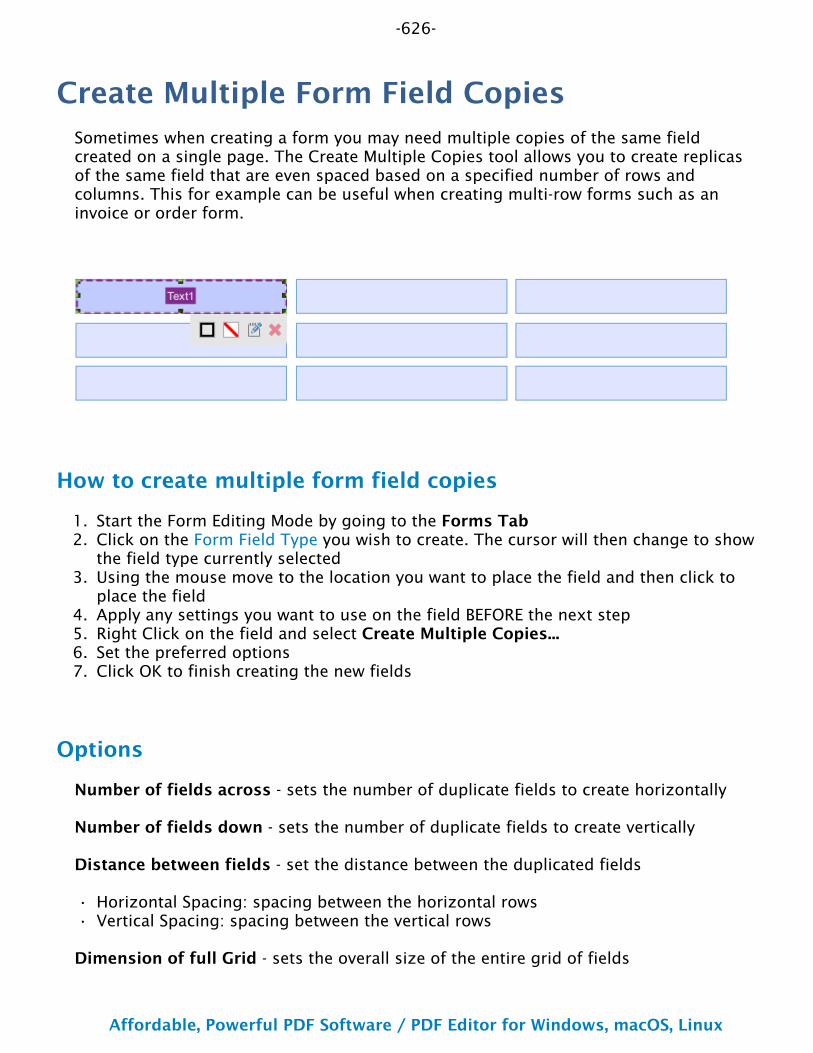
-626-
Affordable, Powerful PDF Software / PDF Editor for Windows, macOS, Linux
Copyright © 2002-Present Qoppa Software. All rights reserved.
1.2.
3.
4.5.6.7.
••
Create Multiple Form Field CopiesSometimes when creating a form you may need multiple copies of the same field created on a single page. The Create Multiple Copies tool allows you to create replicas of the same field that are even spaced based on a specified number of rows and columns. This for example can be useful when creating multi-row forms such as an invoice or order form.
How to create multiple form field copies
Start the Form Editing Mode by going to the Forms TabClick on the Form Field Type you wish to create. The cursor will then change to show the field type currently selectedUsing the mouse move to the location you want to place the field and then click to place the fieldApply any settings you want to use on the field BEFORE the next stepRight Click on the field and select Create Multiple Copies...Set the preferred options Click OK to finish creating the new fields
Options
Number of fields across - sets the number of duplicate fields to create horizontally
Number of fields down - sets the number of duplicate fields to create vertically
Distance between fields - set the distance between the duplicated fields
Horizontal Spacing: spacing between the horizontal rowsVertical Spacing: spacing between the vertical rows
Dimension of full Grid - sets the overall size of the entire grid of fields
-627-
Affordable, Powerful PDF Software / PDF Editor for Windows, macOS, Linux
Copyright © 2002-Present Qoppa Software. All rights reserved.
•
•
••
Grid width: width of the grid from the left side of the first field and the right side of the last fieldGrid height: height of the grid from the top of the upper most field and the bottom of the lowest field
Units - Units to use when calculating the position of the fields. This can be inches, centimeters, millimeters, or points. Points are calculated in the PDF standard, 72 points per inch.
Position - sets the position of the field copies based on the top left corner of the original field
X: the "X" location of the top left corner of the original fieldY: the "Y" location of the top left corner of the original field
Use same names/link fields - when checked all created fields will be set to the same name to link them together. See Linking Form Fields for more information.
-628-
Affordable, Powerful PDF Software / PDF Editor for Windows, macOS, Linux
Copyright © 2002-Present Qoppa Software. All rights reserved.
1.2.
3.
4.5.6.7.
•••
•
Duplicate Form FieldsSometimes when creating a form you may need multiple copies of the same field across multiple pages. The Duplicate feature allows you to create replicas of the selected field in the exact same position across the specified pages. This for example can be useful when creating an ID number that needs to be displayed in the header of every page of the document.
By default duplicated fields are linked together so that same data populates each instance of the field within the document. See Linking Form Fields for more information.
How to Duplicate Form Fields
Start the Form Editing Mode by going to the Forms TabClick on the Form Field Type you wish to create. The cursor will then change to show the field type currently selectedUsing the mouse move to the location you want to place the field and then click to place the fieldApply any settings you want to use on the field BEFORE the next stepRight Click on the field and select DuplicateSet the preferred options Click OK to finish creating the new fields
Options
Pages - The range of pages to create the duplicated fields
All Pages: all pages in the documentPage Range: specify the page range using the From and To optionsEven Pages Only: only copy fields to the even pages of the document (i.e. 2, 4, 6, 8, etc..)Odd Pages Only: only copy fields to the odd pages of the document (i.e. 1, 3, 5, 7, etc...)
Use same names/link fields - when checked all created fields will be set to the same name to link them together. See Linking Form Fields for more information.
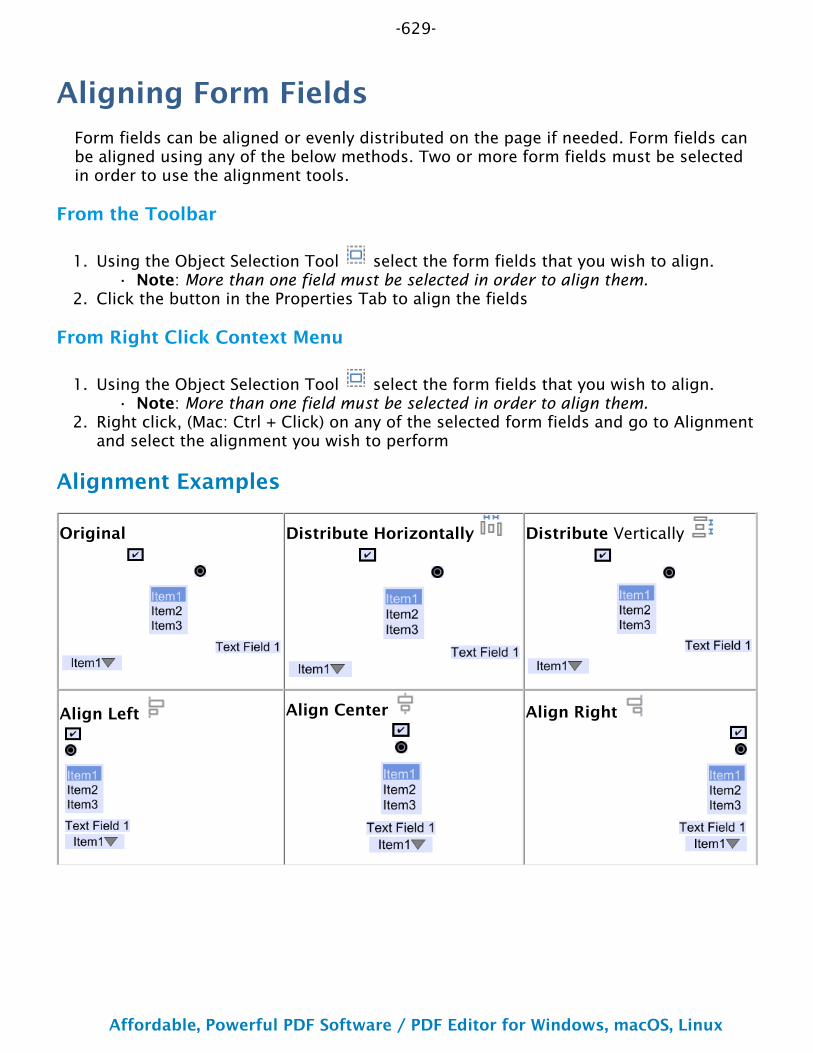
-629-
Affordable, Powerful PDF Software / PDF Editor for Windows, macOS, Linux
Copyright © 2002-Present Qoppa Software. All rights reserved.
1.•
2.
1.•
2.
Aligning Form FieldsForm fields can be aligned or evenly distributed on the page if needed. Form fields can be aligned using any of the below methods. Two or more form fields must be selected in order to use the alignment tools.
From the Toolbar
Using the Object Selection Tool select the form fields that you wish to align.Note: More than one field must be selected in order to align them.
Click the button in the Properties Tab to align the fields
From Right Click Context Menu
Using the Object Selection Tool select the form fields that you wish to align.Note: More than one field must be selected in order to align them.
Right click, (Mac: Ctrl + Click) on any of the selected form fields and go to Alignment and select the alignment you wish to perform
Alignment Examples
Original Distribute Horizontally Distribute Vertically
Align Left Align Center Align Right
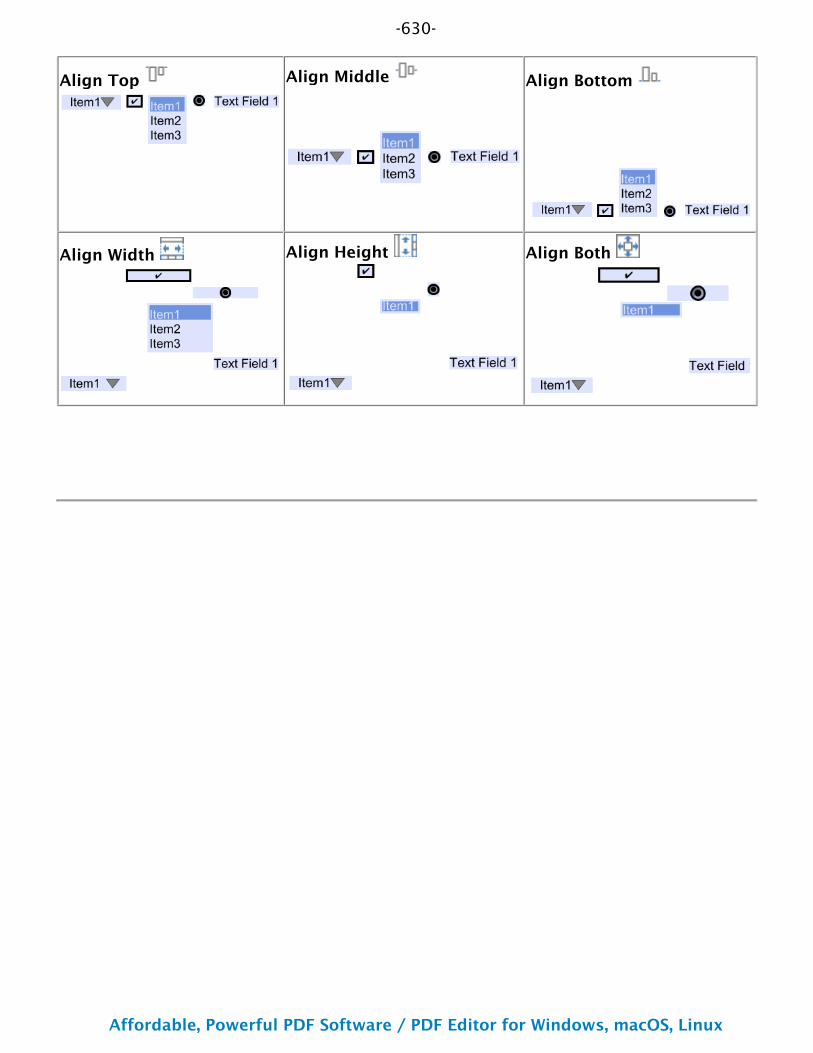
-630-
Affordable, Powerful PDF Software / PDF Editor for Windows, macOS, Linux
Copyright © 2002-Present Qoppa Software. All rights reserved.
Align Top Align Middle Align Bottom
Align Width Align Height Align Both
-631-
Affordable, Powerful PDF Software / PDF Editor for Windows, macOS, Linux
Copyright © 2002-Present Qoppa Software. All rights reserved.
1.
2.3.
•••••
••
••
•
•
•••
Form Field FormattingWhen creating or editing a form field, it is possible to define formatting rules which are enforced through JavaScript. Field Formatting allows you to define how the values or text within a field will be displayed. For Example: Making currency always show 2 decimal places or a date that shows a 2 digit month, day, and year.
Note: Formatting options are only available for text boxes and combo boxes.
Setting Custom Field Formatting
Access the field properties by right clicking (Mac: Ctrl + Click) on the field and
choose Properties in the mouse menu or click on the edit button on the Mini Toolbar.Click on the Format TabSet the options below to be applied to the selected field
Field Formatting Options
None - Default value, sets no formatting rules and any text can be entered into the field
Number - Sets the field to only accept numbers based on the settings selected
Decimal Places: number of decimal places to useSeparator Style: separators to use for thousands and decimal placesCurrency Symbol: currency symbol to be usedSymbol Placement: the location of the currency symbolNegative Number Style: the style of the text when the value is a negative number
Use red text: turns the negative number redUse parenthesis: puts the negative number inside parenthesis
Percentage - Sets the field to display a percentage based on the settings selected
Decimal Places: number of decimal places to useSeparator Style: separators to use for thousands and decimal places
Date/Time - Sets the field to only accept date, time, or date-time values based on the settings selected.
Options List: Select any of the predefined date/time formats that come with PDF StudioCustom: Create your own custom date/time format using the below date/time codes
yyyy = four-digit year yy = two-digit yearmm = two-digit month (01=January, etc.)
-632-
Affordable, Powerful PDF Software / PDF Editor for Windows, macOS, Linux
Copyright © 2002-Present Qoppa Software. All rights reserved.
••••••••
••
•••
••••
••••
•
•
•
mmm = three letter month abbreviation (Jan=January, etc.)mmmm = full month namedd = two-digit day of month (01 through 31) HH = two digits of hour (00 through 23) (AM/PM NOT allowed) MM = two digits of minute (00 through 59) ss = two digits of second (00 through 59) h = two digit hour using 12-hour AM/PM format tt = displays AM/PM based on the time
Note: When a date or date-time setting is selected when viewing the document PDF Studio will display a calendar button on the field. This button will allow users to select a date using a calendar picker instead of typing in the field if they wish.
Other - Allows you to select from a list of common predefined field formatting rules
US Zip Code: standard 5 digit US zip codeUS Zip Code + 4: standard 5 digit US zip code plus the additional 4 digit geographic segmentUS Phone Number: US phone number format (XXX) XXX-XXXXUS Social Security Number: US social security number format XXX-XX-XXXXCustom: set a custom format using the below letter codes
9 to allow numbersA to allow lettersO (the letter) to allow numbers and lettersX to allow printable characters
Custom - Allows you to create your own custom formatting rules using the supported PDF Form JavaScript
Sample Format Examples
Date/Time
Year: yyyy (eg 1997) Year and month: yyyy-mm (eg 1997-07) Complete date: yyyy-mm-dd (eg 1997-07-16) Complete date plus hours and minutes: yyyy-mm-dd HH:MM (eg 1997-07-16 19:20)
Other / Custom
A phone number in France such as "05 44 06 72 25" would be represented by the following custom format: "99 99 99 99 99"A phone number in Sweden such as "46 71 123 456" would be represented by the following custom format: "99 99 999 999"A seat on a flight such as "99C" would be represented by the following custom format: "99A"

-633-
Affordable, Powerful PDF Software / PDF Editor for Windows, macOS, Linux
Copyright © 2002-Present Qoppa Software. All rights reserved.
-634-
Affordable, Powerful PDF Software / PDF Editor for Windows, macOS, Linux
Copyright © 2002-Present Qoppa Software. All rights reserved.
1.•
2.
3.
4.5.
6.7.
8.
1.2.
••••
Form Field CalculationsPDF Studio is capable of creating PDF forms with custom calculations. You have the ability to use some of the preset simple calculations or advanced custom calculations using JavaScript. This is very useful for when you want values entered into a form calculated automatically. For example: summing up a total on an invoice sheet to give to a customer.
Adding Calculations to Forms
Start the Form Editing Mode by going to the Forms TabNote: Make sure to create all of the Fields that you need in the document first. For more information regarding on how to create Fields see Creating Text Fields. Also, Make sure that you have correctly named all of the Form Fields in your document to make it easier to setup the calculations
Using the Object Selection Tool select the Field that you would like to perform the calculationAccess the field properties by right clicking (Mac: Ctrl + Click) on the field and
choose Properties in the mouse menu or click on the edit button on the Mini Toolbar.In the Properties window select the Calculate tabUse this screen to set any of the Form Field Calculation Options listed below. Once you have completed setting your calculations click on OKRepeat steps 2- 5 to create as many fields with calculations as you need.Once all calculations are complete click on the Stop Form Editing button on the toolbar to close the form editor and save the documentThe Form Calculations will now be ready for you to use
Form Field Calculation Options
No Calculation for this field
Default value, sets no calculation rules and any text can be entered into the field
Field value has simple calculation
When selected this option allows you to set a single math calculation on either all or a selection of fields. To Setup a simple calculation follow the steps below
Select the option for “Field value has a simple calculation:”Then select the type of calculation you would like from the drop down menu. You have the below options available for simple calculations:
Sum (+) – adds the fields togetherProduct (x) – multiplies the fields togetherAverage – returns the average value of all the fieldsMinimum – Returns the lowest value from all the fields
-635-
Affordable, Powerful PDF Software / PDF Editor for Windows, macOS, Linux
Copyright © 2002-Present Qoppa Software. All rights reserved.
•3.
•
1.
2.
•••••
Maximum – Returns the highest value of all the fieldsSelect the fields from the list you would like to be included in the calculation. To select more than one field from the list either click and drag the mouse or hold Ctrl and click the fields that you need from the list. Only highlighted fields will be used in the calculation.
Note: (You can also select other fields such as Combo or List Boxes to be used in calculations)
This field has a custom calculation
The Custom Calculation allows you to perform more advanced calculations using JavaSript. You will need to have advance knowledge in programming JavaScript in order to create the calculations. For more information regarding using JavaScript in PDF Studio see PDF Form JavaScript.
Select the option “This field has a custom calculation:” and then type in the JavaScript calculation that you would like to perform.
Simple Field Notation
Simple field notation allows you to use simple calculation commands (+ - / *) instead of JavaScript. For Example to add Text1 to Text 2 you would type "Text1 + Text2". Once complete PDF Studio will convert the simple annotation into JavaScript that is compatible with the PDF format.
Select the option “This field has a custom calculation:” and check the box for "Simple Field Notation"Then use the custom calculation field to enter your calculations.
Note: When creating custom calculations the field name must exactly match the name set in the field properties in order for the calculation to work.
The following math functions are available:
+: adds the two fields-: subtracts the two fieldsx: multiplies the two fields together/: divides the two fields(): groups the equations within the parenthesis as a separate function
-636-
Affordable, Powerful PDF Software / PDF Editor for Windows, macOS, Linux
Copyright © 2002-Present Qoppa Software. All rights reserved.
1.
2.3.
•4.
5.6.
Set Field Calculation OrderThe field calculation order determines the order in which linked field data is calculated. If there are fields that have calculations using results from other field calculations if not done in the correct order the values will be incorrect.
For example: on an invoice document you would want to calculate the tag BEFORE you calculate the total.
How to set the Field Calculation Order
Start the Form Editing Mode by going to the Forms Tab
Click on the Calculation Order button to start the toolSelect one or more fields from the list
Hold down SHIFT or CTRL (Command on Mac) to select multiple fields.Fields will be calculated in order from Top to Bottom. Use the buttons on the right side of the list to reorder the selected fields in the listOnce complete click OK to apply the changesConfirm the calculation order is correct by entering a new value in any of the calculated fields
Field Calculation Order Options
Move Up - Moves the selected field(s) up the list.
Move Down - Moves the selected field(s) down the list.
Move to Top - Moves the selected field(s) to the top of the list.
Move to Bottom - Moves the selected field(s) to the bottom of the list.
-637-
Affordable, Powerful PDF Software / PDF Editor for Windows, macOS, Linux
Copyright © 2002-Present Qoppa Software. All rights reserved.
1.
2.
3.
4.5.
6.7.
8.
Form Field ValidationForm field validation sets validation rules for the field based on the option selected. Validation is different from format in that validation restricts what values are allowed to be entered into the field
Note: Field validation settings are only available for text and combo boxes.
Adding Validation to Fields
Start the Form Editing Mode by going to the Forms Tab
Using the Object Selection Tool select the Field that you would like to add validation toAccess the field properties by right clicking (Mac: Ctrl + Click) on the field and
choose Properties in the mouse menu or click on the edit button on the Mini Toolbar.In the Properties window select the Validate tabUse this screen to set any of the Form Field Validation Options listed below. Once you have completed setting your validation click on OKRepeat steps 2- 5 to set as many fields with validations as you need.Once all validations are set click on the Stop Form Editing button on the toolbar to close the form editor and save the documentThe Form Validations will now be ready to use
Form Field Validation Options
No validation for this field
Default value, sets no validation rules and any value can be entered into the field
Field values has a range
Only available when Format is set to a Number or Percentage.
This field has custom validation
When selected you will need to use Form JavaScript to create custom validations
-638-
Affordable, Powerful PDF Software / PDF Editor for Windows, macOS, Linux
Copyright © 2002-Present Qoppa Software. All rights reserved.
••••
••
Form Field ActionsPDF Studio has the available actions that can be added to form fields. For form fields you must set both an Event and Action to be used.
Events
Mouse Up: When the mouse button is released
Mouse Down: When the mouse button is pressed
Mouse Entered: When the mouse cursor enters the field boundary (not clicking, just hovering)
Mouse Exited:When the mouse cursor exits the field boundary (not clicking, just hovering)
On Blur: When the field has lost focus and is no longer active (i.e. clicking else where or tabbing to the next field)
On Focus: When the field has gained focus and is now active (i.e. clicking on or tabbing to the field)
Actions
Go to a page in this document
Sets the link to go to a page within the current document
Page Number - the page number of the document to link toZoom - Set the page fit when navigating to the pagePercent - The zoom level for Custom zoom settingSet Visually - Allows you to set the location of the link visually
Go to a page in another document
Sets the link to go to a page within a different designated document
Page Number - the page number of the document to link toDocument - The full path to the document to open. Click on the "..." button to open a file chooser and navigate to the file you wish to select.
Note: When sending this document to other users this action may not work if the file is not in the same location on the users computer. To make sure the file is included with the PDF when sending to another user try using a File Attachment instead.
-639-
Affordable, Powerful PDF Software / PDF Editor for Windows, macOS, Linux
Copyright © 2002-Present Qoppa Software. All rights reserved.
•••
•
••••
••
Show/Hide Fields
Sets the link to either Show or Hide selected fields within the document
Show - Will show the selected fields when clickedHide - Will hide the selected fields when clickedField List - Displays a list of the fields in the document to select. To select more than one field use Ctrl + Click to select separate fields or Shift + Click to select a group of fields
Open File
Sets the link to open a specific file.
File - The full path to the file to open. Click on the "..." button to open a file chooser and navigate to the file you wish to select.
Note: When sending this document to other users this action may not work if the file is not in the same location on the users computer. To make sure the file is included with the PDF when sending to another user try using a File Attachment instead.
Open a web link
Set's the link to open a specific web page or start an email. Examples of valid links:
http://www.qoppa.comftp://ftp.site.comfile:c:\qoppa\temp.txtmailto:[email protected]
Reset Form Fields
Sets the link to reset the selected fields within the document
All Fields - When checked will reset all the fields within the documentField List - Displays a list of the fields in the document to select. To select more than one field use Ctrl + Click to select separate fields or Shift + Click to select a group of fields
JavaScript Action
Sets the link to perform a custom Supported JavaScript action that can be typed into the field.
Submit Form
Sets the link to send the form field values to a designated location in one of 4 formats. This can be used to have an automatic way to send back forms or values once a user has completed the form.
-640-
Affordable, Powerful PDF Software / PDF Editor for Windows, macOS, Linux
Copyright © 2002-Present Qoppa Software. All rights reserved.
•••••
•••••
••••
•
•
••••
•
••••••••
URL - The destination to send the selected file to. Examples of valid links:http://www.qoppa.comftp://ftp.site.comfile:c:\qoppa\temp.txtmailto:[email protected]
FDF - Sends an FDF file containing the selected field valuesXFDF - Sends an XFDF file containing the selected field valuesPDF - Sends a copy of the entire PDFHTML - Sends an HTML file containing the selected field valuesFields - Sets the options when sending the field values
All Fields - Will send all fields regardless of valueInclude - Will include the selected fields in the list when sending the fileExclude - Will exclude the selected fields in the list when sending the fileField List - Displays a list of the fields in the document to select. To select more than one field use Ctrl + Click to select separate fields or Shift + Click to select a group of fieldsSend Empty Fields - When checked will send the selected fields values even when fields are empty
Show/Hide Layers
Sets the link to either Show or Hide selected layers within the document
Use Current Visibility - Sets the action to display the layers as they are currently being displayed so that if layers are turned off later they will return to the current stateOther - Sets a new action for the layer using the blow options
Show - Will show the selected layers in the listHide - Will hide the selected layers in the listToggle - Will switch the selected layer(s) state from hidden to displayed or displayed to hidden depending on the layers current stateLayers List - Displays a list of the layers in the document to select. To select more than one layer use Ctrl + Click to select separate layers or Shift + Click to select a group of layers
Named Action
Sets the link to perform one of standard predefined actions listed below.
NextPage - Goes to the next page in the documentPrevPage - Goes to the previous page in the documentFirstPage - Goes to the first page in the documentLastPage - Goes to the last page in the documentPrint - Starts the print dialog to print the current documentSave - Saves the current documentSave As - Opens a file chooser dialog to save the file in a user specified locationOpen - Displays the open file dialog
-641-
Affordable, Powerful PDF Software / PDF Editor for Windows, macOS, Linux
Copyright © 2002-Present Qoppa Software. All rights reserved.
-642-
Affordable, Powerful PDF Software / PDF Editor for Windows, macOS, Linux
Copyright © 2002-Present Qoppa Software. All rights reserved.
1.2.
•3.
•
4.5.
Editing Field Tab OrderPDF Studio allows you to set the tab order of fields within a document. This allows you to designate what field comes next when the user is tabbing through the document to make it easier to complete. Follow the instructions below to rearrange the field tab order in a PDF form.
Note: By default the tab order is created in the order that the fields are created. It's usually best practice to either create the fields in the correct order or rearrange them afterwards as many users will be confused if the when pressing tab they are taken to a completely different section of the page.
Changing the Field Tab Order
Start the Form Editing Mode by going to the Forms TabOn the left hand side of the PDF Studio frame will be the Fields Pane
Note: You may need to click on the "Fields" button to open the paneIn this pane you will see a list of all the fields per page within the document. To field tab order in the document goes from the top of the field tree to the bottom of the field tree. To edit the field tab order drag and drop the items into the order that you want the fields to tab starting with the first at the top and the last at the bottom of the list.
Note: You can choose to Show Field Tab Order option to see the tab order directly on the fields on the page
Once complete click on Stop Form Editing to close the tool barSave the document and the fields will be ready for use
-643-
Affordable, Powerful PDF Software / PDF Editor for Windows, macOS, Linux
Copyright © 2002-Present Qoppa Software. All rights reserved.
1.
2.
3.
4.5.
6.
Linking Form FieldsPDF Studio allows you to link multiple form fields in a document together. Linking one or more fields together makes the same data populate each instance of the field within the document. This is helpful for putting dates or client names on every page of the document.
Note: Only fields of the same type can be linked together.
How to Link Form Fields
First create the form fields that you need in your document. For more information on creating form fields see Creating Form FieldsTo link the fields all you need to do is give each of the fields the same name either when creating them or by editing them.Once you click OK to confirm the field name setting you will get a message asking if you would like to link the fields. Click on OK to save the field name and link the fieldsRepeat steps 1-3 to link as many form fields as you need.Once complete click on the Stop Form Editing button on the toolbar to close the form editor and save the documentThe fields will now be ready for you to begin typing in information
Note: Radio buttons can be grouped in a similar way, by giving them the same name, you will also have to make sure the Radio Button Choice under the Options tab is also labeled the same.
-644-
Affordable, Powerful PDF Software / PDF Editor for Windows, macOS, Linux
Copyright © 2002-Present Qoppa Software. All rights reserved.
PDF Form JavaScriptIn PDF Studio when creating custom functions/actions for specific items such as form fields or buttons you will need to use JavaScript for the commands. JavaScript can perform calculations, button actions (adding images, submitting forms, or populating other fields), validate field input, and set field formatting, among many other things.
Note: PDF Studio only supports Acroform (non-LiveCycle) JavaScript in PDF forms.
You will need to have advance knowledge in programming JavaScript in order to create the actions for the buttons. For additional details on how to use these functions, take a look at the tutorials and lessons on this site http://www.w3schools.com/js/js_intro.asp
PDF Studio supports the following JavaScript commands for each of the below items.
Supported JavaScript
Annotation
Properties:
author page points strokeColor type width
Doc
Methods:
addAnnot addField calculateNow closeDoc flattenPages getAnnots3D getDataObjectContents getField getNthFieldName getOCGs getPageBox getPageRotation getTemplate gotoNamedDest importAnFDF
-645-
Affordable, Powerful PDF Software / PDF Editor for Windows, macOS, Linux
Copyright © 2002-Present Qoppa Software. All rights reserved.
mailDoc print resetForm spawnPageFromTemplate submitForm
Properties:
URL calculate info numFields numPages
Field
Methods:
buttonGetCaption buttonImportIcon buttonSetCaption checkThisBox clearItems deleteItemAt getArray getItemAt insertItemAt isBoxChecked setAction setFocus setItems signatureInfo
Properties:
borderColor borderStyle borderWidth calcOrderIndex charLimit comb commitOnSelChange currentValueIndices defaultValue delay display doNotScroll doNotSpellCheck doc
-646-
Affordable, Powerful PDF Software / PDF Editor for Windows, macOS, Linux
Copyright © 2002-Present Qoppa Software. All rights reserved.
editable exportValues fileSelect fillColor hidden lineWidth multiline multipleSelection name numItems page password readonly rect required strokeColor style submitName textColor type userName value valueAsString
Global
Methods:
setPersistent
Identity
Properties:
corporation email loginName name
Matrix2D
Methods:
fromRotated transform
-647-
Affordable, Powerful PDF Software / PDF Editor for Windows, macOS, Linux
Copyright © 2002-Present Qoppa Software. All rights reserved.
MenuItem
Properties:
bEnabled bMarked cName cReturn oSubMenu
OCG
Methods:
getIntent setAction setIntent
Properties:
initState locked name state
ReadStream
Methods:
read
SignatureInfo
Properties:
date reason
Template
Methods:
spawn
Util
Methods:
-648-
Affordable, Powerful PDF Software / PDF Editor for Windows, macOS, Linux
Copyright © 2002-Present Qoppa Software. All rights reserved.
printd printf printx scand stringFromStream
-649-
Affordable, Powerful PDF Software / PDF Editor for Windows, macOS, Linux
Copyright © 2002-Present Qoppa Software. All rights reserved.
Digital SignaturesPDF Studio supports both adding a digital signature field to a PDF or applying digital signatures to existing fields. Digital Signatures are a way of authenticating the contents of a document. A document with a valid signature is guaranteed not to have been changed since being signed.
Create Digital Signature Fields : Create new unsigned digital signature fields
Modify Digital Signature Fields : Modify existing field including clearing, moving, and properties
Apply Digital Signatures : How to apply digital signatures to a document
Create Self-Signed Digital IDs : Creating digital IDs within PDF Studio to be used when signing documents
Import Digital IDs : Importing an existing or third-party digital ID to be used when signing documents
Digital Signature Options : Options available when digitally signing a PDF
Digital Signature Appearance : Appearance settings when applying a digital signature
Validate Digital Signatures : How to validate a digital signature
Trust Digital Signatures: How to add a digital signature to your trusted certificates
Manage Trusted Certificates: Manage the trusted certificate options
Manage Digital IDs : Create, edit, and remove digital IDs
Manage Timestamp Servers : Manage the timestamp servers that are used when digitally signing PDFs
Displaying the Signatures Pane
The layers pane is located on the left of the PDF Studio window. If not displayed the
pane can be opened using the Signatures button on the left side of the screen.
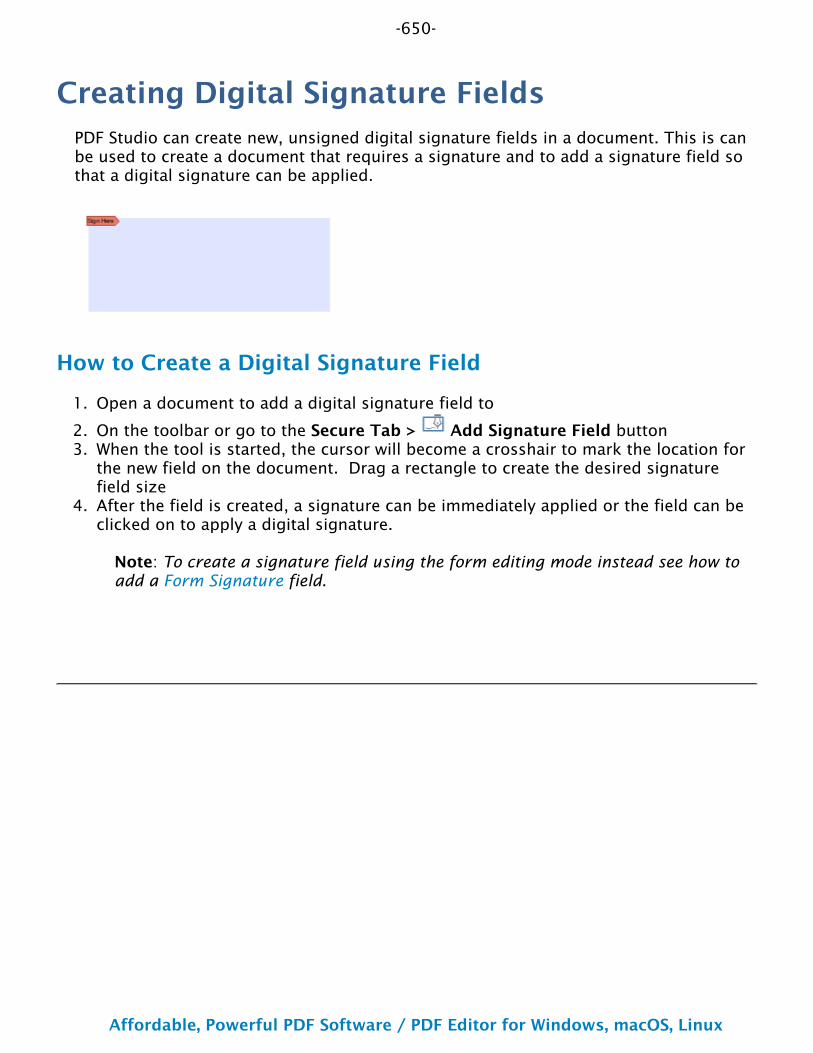
-650-
Affordable, Powerful PDF Software / PDF Editor for Windows, macOS, Linux
Copyright © 2002-Present Qoppa Software. All rights reserved.
1.
2.3.
4.
Creating Digital Signature FieldsPDF Studio can create new, unsigned digital signature fields in a document. This is can be used to create a document that requires a signature and to add a signature field so that a digital signature can be applied.
How to Create a Digital Signature Field
Open a document to add a digital signature field to
On the toolbar or go to the Secure Tab > Add Signature Field buttonWhen the tool is started, the cursor will become a crosshair to mark the location for the new field on the document. Drag a rectangle to create the desired signature field sizeAfter the field is created, a signature can be immediately applied or the field can be clicked on to apply a digital signature.
Note: To create a signature field using the form editing mode instead see how to add a Form Signature field.
-651-
Affordable, Powerful PDF Software / PDF Editor for Windows, macOS, Linux
Copyright © 2002-Present Qoppa Software. All rights reserved.
••
Modifying Digital Signature FieldsSignature fields can be modified using any of the available options below. The options will vary depending on whether the digital signature field has been signed.
To access the digital signature field options Right Click (Ctrl + Click on Mac) on the field and then a mouse context menu will be displayed showing the available options. Any text that has been greyed out is a disabled option.
Unsigned Digital Signature Fields
The Following options are available for an unsigned digital signature field.
Apply Signature - Starts the Applying Digital Signatures dialog
Apply Certifying Signature - Starts the Applying Digital Signatures dialog except with the certifying signature option already selected
Move - Allows you to move or resize the unsigned field on the page. When finished click anywhere on the page or pres Esc to finish editing.
Move: click on the signature field and drag it to its new location on the page.Resize: use the black dots on the corners and edges to resize the shape of the box so that it fits the area that you need.
Properties - Displays the properties dialog for the field. See Form Signature Field for a description of the available properties
Save As Default Size - Sets the default size of future created signature fields to the same size as the selected field
Delete - Deletes the selected signature field
Details - Displays the details for the signature field.
Note: When unsigned this will just display a "Signature field has not been signed" message as there are no details to display.
Signed Digital Signature Fields
The following options are available for signed digital fields
Clear Signature - Removes the signature from the signature field
Details - Displays the details for the signature field to help in Validating a Digital Signature

-652-
Affordable, Powerful PDF Software / PDF Editor for Windows, macOS, Linux
Copyright © 2002-Present Qoppa Software. All rights reserved.

-653-
Affordable, Powerful PDF Software / PDF Editor for Windows, macOS, Linux
Copyright © 2002-Present Qoppa Software. All rights reserved.
1.•
••
2.3.
••••••••
4.•
5.6.
Creating Self-Signed Digital IDsIn order to sign documents, you must first have a digital ID. If you do not have an existing ID you can use PDF Studio to create a new digital ID to be used when signing documents. When creating a digital ID with PDF Studio it is considered a Self-Signed Digital ID which means that it is not using a third-party to validate the signature.
Note: When creating a Self-Signed Digital ID with PDF Studio the signature will not show as validated on other users computer as the trusted certificate will currently only be on your computer. You will need to send your newly created digital certificate to your recipients and they will need to install them before your signatures can be validated.
How to Create Self-Signed Digital ID
Access the Add Digital ID dialog using one of the methods belowGo to File Tab > Preferences and select Digital IDs from the panel on the left of the preferences dialog and click on Add Digital ID.When applying a digital signature, select New Digital ID from the drop downGo to Secure Tab > Digital IDs and click on Add Digital ID.
Select Create New Digital ID NowFill out the information for digital ID. Name and Email Address are required
Valid Until: The expiration date of the digital IDName: Name of the signerOrganizational Unit: Name of the organizational unitOrganization Name: Name of the organizationLocality/City: city where the signer is locatedState: state where the signer is locatedCountry: country where the signer is locatedEmail: Email address of the signer
Choose a location to save the digital ID and set a passwordNote: By default the location will be stored in the PDF Studio user settings folder
Click Finish to create the digital IDThe newly created ID will be added to PDF Studio's list of IDs and can now be used when Applying Digital Signatures
-654-
Affordable, Powerful PDF Software / PDF Editor for Windows, macOS, Linux
Copyright © 2002-Present Qoppa Software. All rights reserved.
1.•
••
2.•
3.4.
•
5.
6.
Importing Digital IDsIn order to sign documents, you must first have a digital ID. If you have an existing digital ID either exported from another application or from a third-party Certificate Authority, it can be imported directly into PDF Studio to be used when signing documents. PDF Studio supports importing digital IDs in either .pfx or .p12 formats.
When using a digital ID from a third-party certificate authority there is no need to first send your digital certificate to your recipients because the OS will usually be able to validate the certificate from third-party vendors.
How to Import a Digital ID
Access the Add Digital ID dialog using one of the methods belowGo to Edit > Preferences and select Digital IDs from the panel on the left of the preferences dialog and click on Add Digital ID.When applying a digital signature, select New Digital ID from the drop downGo to Secure Tab > Digital IDs and click on Add Digital ID.
Select Import my existing digital ID from a file and click NextNote: Only .pfx or .p12 formats can be imported
Click on Browse to open the file dialog and locate the digital ID you wish to useEnter the password for the selected digital ID file and click Next
Note: If your digital ID has a complex password that is hard to remember you can select the "Use my password" option to save this password and protect it with your own password. When signing documents, PDF Studio will prompt you for your own password. This makes it easier to sign documents without having to remember the complex passwords.
Some digital ID files may contain more than one digital ID and the following page will display a list of digital IDs that will be imported. Click on Finish to complete importing the digital ID.The imported ID will be added to PDF Studio's list of IDs and can now be used when Applying Digital Signatures
-655-
Affordable, Powerful PDF Software / PDF Editor for Windows, macOS, Linux
Copyright © 2002-Present Qoppa Software. All rights reserved.
1.
•
2.
•
Applying a Digital SignaturePDF Studio supports both digital signatures and certified digital signatures. It's important to understand the differences between each type of digital signature prior to applying one to a PDF. In order to sign documents, you must first have a digital ID. You can either Create a New Digital ID or Import A Digital ID to be used when digitally signing documents.
Note: It's important to also understand that a digital signature is not the same as an electronic signature. An electronic signature is a graphical representation of a signature on pen and paper such as an image or drawing. A digital signature (which may also have a graphical representation) contains a unique encrypted ID to verify its authenticity.
Digital Signatures
A Digital Signature is similar to actually signing a physical document in that it identifies the person signing the document. The difference between a digital and hand written signature is that a digital signature contains encrypted information that is unique to the signer so it cannot be forged. The signer’s certificate or issuing third-party Certificate Authority will need to be trusted by the user receiving the PDF in order for the signature to be considered valid. . Once signed, if the document is modified in any way the signature will no longer be considered valid.
Certified Digital Signatures
A certified digital signature is similar in that it contains an encrypted ID unique to the signer. However, a certified signature provides additional document security options to prevent the document from being modified. The signer has the option to prevent any further changes or allow some limited changes (i.e. filling forms, adding comments, or adding digital signatures) to the document once it has been signed .
How to Apply a Digital Signature
A digital signature can be applied to an existing signature field or a new signature field can be created to apply a signature to a document
Applying Signature to Existing Field
Click on the signature field, or click on the Digitally Sign button on the Secure Tab
Note: If there is more than one signature field in the document you will need to sign by clicking on the signature field
This will display the Sign Document dialog. Select the Digital ID and enter the Password for the Digital ID
Note: If this is your first signing a document you will be asked to either import an existing ID or create a new one.
-656-
Affordable, Powerful PDF Software / PDF Editor for Windows, macOS, Linux
Copyright © 2002-Present Qoppa Software. All rights reserved.
3.
4.5.
6.
1.
2.
3.
•
4.
5.6.
7.
1.
•
2.
•
3.
•4.5.
Select the Digital Signature Options and Digital Signature Appearance settings that you wish to useOnce complete click on SignThis will then prompt you to select a location on your computer to save the signed documentClick Save to complete signing and save the document
Applying Signature When No Field Exists
Click on the signature field, or click on the Digitally Sign button on the Secure TabWhen the tool is started, the cursor will become a crosshair to mark the location for the new field on the document. Drag a rectangle to create the desired signature field sizeAfter the field is created, the Sign Document dialog will be displayed. Select the Digital ID and enter the Password for the Digital ID
Note: If this is your first signing a document you will be asked to either import an existing ID or create a new one.
Select the Digital Signature Options and Digital Signature Appearance settings that you wish to useOnce complete click on SignThis will then prompt you to select a location on your computer to save the signed documentClick Save to complete signing and save the document
How to Apply a Certified Digital Signature
A Certified digital signature can be applied to a document using the instructions below. When applying a certified signature without a field the signature can be either visible or invisible. Invisible signatures are stored using the same encryption only there is no visual representation of the signature on any of the document's pages.
Applying a Certified Signature to Existing Field
Click on the signature field, or click on the Certify Document button on the Secure Tab
Note: If there is more than one signature field in the document you will need to sign by clicking on the signature field
This will display the Sign Document dialog. Select the Digital ID and enter the Password for the Digital ID
Note: If this is your first signing a document you will be asked to either import an existing ID or create a new one.
Choose the Digital Signature Options and Digital Signature Appearance settings that you wish to use
Note: Make sure that "Certifying Signature" is selected for the signature TypeSelect the certifying signature permissions from the drop downOnce complete click on Sign
-657-
Affordable, Powerful PDF Software / PDF Editor for Windows, macOS, Linux
Copyright © 2002-Present Qoppa Software. All rights reserved.
6.
7.
1.
2.
3.
•
4.
•5.6.7.
8.
1.
2.
•
3.
•4.5.6.
7.
This will then prompt you to select a location on your computer to save the signed documentClick Save to complete signing and save the document
Applying a Certified Signature When No Field Exists
Click on the signature field, or click on the Certify Document button on the Secure Tab and choose VisibleWhen the tool is started, the cursor will become a crosshair to mark the location for the new field on the document. Drag a rectangle to create the desired signature field sizeAfter the field is created, the Sign Document dialog will be displayed. Select the Digital ID and enter the Password for the Digital ID
Note: If this is your first signing a document you will be asked to either import an existing ID or create a new one.
Select the Digital Signature Options and Digital Signature Appearance settings that you wish to use
Note: Make sure that "Certifying Signature" is selected for the signature TypeSelect the certifying signature permissions from the drop downOnce complete click on SignThis will then prompt you to select a location on your computer to save the signed documentClick Save to complete signing and save the document
Applying an Invisible Certified Digital Signature
Click on the signature field, or click on the Certify Document button on the Secure Tab and choose InvisibleThe Sign Document dialog will be displayed. Select the Digital ID and enter the Password for the Digital ID
Note: If this is your first signing a document you will be asked to either import an existing ID or create a new one.
Select the Digital Signature Options and Digital Signature Appearance settings that you wish to use
Note: Make sure that "Certifying Signature" is selected for the signature TypeSelect the certifying signature permissions from the drop downOnce complete click on SignThis will then prompt you to select a location on your computer to save the signed documentClick Save to complete signing and save the document
-658-
Affordable, Powerful PDF Software / PDF Editor for Windows, macOS, Linux
Copyright © 2002-Present Qoppa Software. All rights reserved.
••
Digital Signature OptionsWhen applying a digital signature the following options are available to change either the appearance, signature type, or signature information. These settings are not saved and have to be set each time a signature is applied.
Digital ID
Digital ID - The digital ID combo will list all digital IDs saved in PDF Studio or available in your OS certificate store. A new digital ID can be added by selecting the New Digital ID... option in the list. See Create a New Digital ID or Import A Digital ID for more information.
Password - The password for the selected digital ID. You must enter the correct password in order to be able to digitally sign the document
Timestamp Server - Allows you to select a timestamp server to be used when signing. See Managing Timestamp Servers for more information
Details - Allows you to see the specific details for the selected digital ID
Appearance:
This section will display a preview of the digital signature as it will display on the document once applied. A different appearance can be selected from the drop down. Choose "Create New Appearance..." to create a new custom appearance. See Digital Signature Appearance for more information
Signature Type:
Select the type of signature to be applied to the when signing
Signature - A digital signature contains encrypted information that is unique to the signer so it cannot be forged. The signer’s certificate or issuing third-party Certificate Authority will need to be trusted by the user receiving the PDF in order for the signature to be considered valid. Once signed, if the document is modified in any way the signature will no longer be considered valid.
Certifying Signature - A certified signature provides additional document security options to prevent the document from being modified. When choosing certifying signature, a combo box will show, allowing to specify which changes are permitted on the certified document.
Disallow Changes: Does not allow any further changes to the document once signedAllow Form fill and Signatures: Allows users to fill forms and complete signatures once signed
-659-
Affordable, Powerful PDF Software / PDF Editor for Windows, macOS, Linux
Copyright © 2002-Present Qoppa Software. All rights reserved.
•
•••••
Allow Form fill, Signatures, and Comments: Allows users to fill forms, complete signatures, and add comments to the document once signed
Signature Information:
This section allows you to add additional details to the signature if needed. This information will not be displayed in the appearance but will be listed with the signature details
Reason - Select a reason the document was signed from the list from the below options
I approve this documentI am the author of this documentI have reviewed this documentI attest to the accuracy and integrity of this documentI agree to the terms defined by this document
Location - Enter additional location details
Contact Info - Enter additional contact information for the signature
-660-
Affordable, Powerful PDF Software / PDF Editor for Windows, macOS, Linux
Copyright © 2002-Present Qoppa Software. All rights reserved.
1.
•
•2.3.4.
Digital Signature AppearancePDF Studio allows you to customize the appearance of a digital signature to display only specific information that you choose. Multiple appearances can be created for different situations if needed. Created appearances can be used on any digital ID. Additionally, an image can be used for the signature appearance.
Note: Altering a signature's appearance does not remove any of the details from the signature.
How to Create a New Digital Signature Appearance
Begin signing a document to access the Sign Document dialog using one of the methods below
Click on the signature field
Click on the Sign Document buttonSelect "Create New Appearance..." in the Appearance drop downEnter a title and the signature appearance options you wish to useOnce the options have been set click on OK to save the appearance
Signature Appearance Options
The following appearance options are available in PDF Studio.
Title
This will be the name of the created appearance that will display in the Digital Signature Options when applying a signature
Preview
Displays a preview of how the digital signature will look once applied to a document
Note: The preview displays the signature in a standard dimension. If the field within the document is a different size the contents of the signature appearance will be resized to fit the field
Image
Show Image - When checked an image can be added to the background of the digital stamp appearance
Transparency - Transparency setting for the image
File - The full path to the image file used in the signature. Click on the "..." button to open a file chooser and navigate to the image you wish to use .
-661-
Affordable, Powerful PDF Software / PDF Editor for Windows, macOS, Linux
Copyright © 2002-Present Qoppa Software. All rights reserved.
•••••••••••
•
•
Align - Allows you to align the image on the left, center, or right of the signature
Text
Show - The options below, when checked, set which digital signature properties will be displayed on the signature
Name: The large text that will display the nameDigitally signed by: Adds the text "Digitally signed by" before the Common NameDate: Date the signature was completedCommon Name: The name associated with the digital IDOrganizational Unit: The organizational unit associated with the digital IDOrganization Name: The organization name associated with the digital IDLocality/City: the locality/city associated with the digital IDState: The state associated with the digital IDCountry: The country associated with the digital IDEmail: The email associated with the digital IDReason: The reason chosen when digitally signing the document
Orientation - Sets the digital signature text to be displayed with one of two options
Left to Right: Displays the Name on the left and all other properties in smaller text on the rightRight to Left: Displays the Name on the right and all other properties in smaller text on the left
-662-
Affordable, Powerful PDF Software / PDF Editor for Windows, macOS, Linux
Copyright © 2002-Present Qoppa Software. All rights reserved.
1.2.3.
4.
Applying Document TimestampsA Document Timestamp is an internal dictionary that allows an individual to validate the exact contents of the PDF at the time indicated in the timestamp token. It is similar to a Digital Signature except there is no personal identity assicated with the certificate.
How to Apply a Document Timestamp
Click on the Timestamp button on the Secure TabFrom the list of available Timestamp servers select the one you wish to useThis will then prompt you to select a location on your computer to save the documentClick Save to complete adding the Document Timestamp and save the document
Add / Edit Timestamp Servers
To add or edit timestamp servers that can be used see Managing Timestamp Servers in preferences
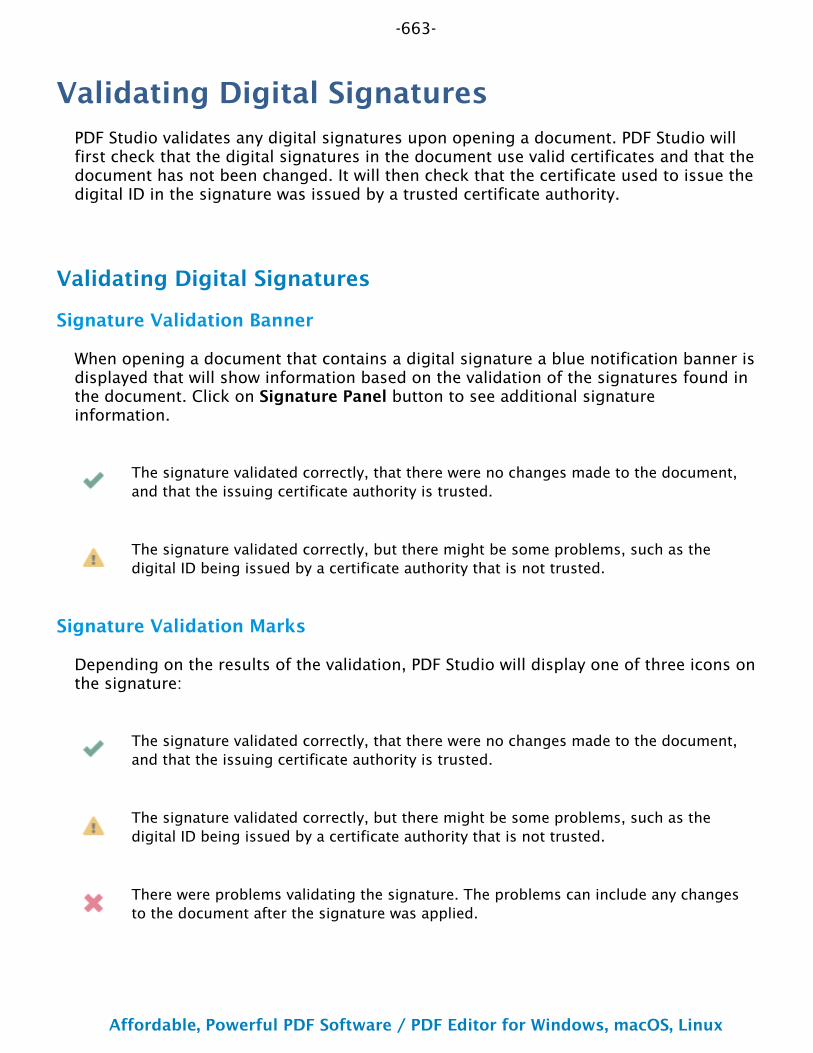
-663-
Affordable, Powerful PDF Software / PDF Editor for Windows, macOS, Linux
Copyright © 2002-Present Qoppa Software. All rights reserved.
Validating Digital SignaturesPDF Studio validates any digital signatures upon opening a document. PDF Studio will first check that the digital signatures in the document use valid certificates and that the document has not been changed. It will then check that the certificate used to issue the digital ID in the signature was issued by a trusted certificate authority.
Validating Digital Signatures
Signature Validation Banner
When opening a document that contains a digital signature a blue notification banner is displayed that will show information based on the validation of the signatures found in the document. Click on Signature Panel button to see additional signature information.
The signature validated correctly, that there were no changes made to the document, and that the issuing certificate authority is trusted.
The signature validated correctly, but there might be some problems, such as the digital ID being issued by a certificate authority that is not trusted.
Signature Validation Marks
Depending on the results of the validation, PDF Studio will display one of three icons on the signature:
The signature validated correctly, that there were no changes made to the document, and that the issuing certificate authority is trusted.
The signature validated correctly, but there might be some problems, such as the digital ID being issued by a certificate authority that is not trusted.
There were problems validating the signature. The problems can include any changes to the document after the signature was applied.
-664-
Affordable, Powerful PDF Software / PDF Editor for Windows, macOS, Linux
Copyright © 2002-Present Qoppa Software. All rights reserved.
1.2.3.4.
Checking Additional Validation Details
Using the Hand Tool select the signature that you wish to validate.This will display a dialog showing the Signature Validation StatusTo view further information click on the Details buttonOnce complete, to close the dialog, click on Close or press Esc on the keyboard
-665-
Affordable, Powerful PDF Software / PDF Editor for Windows, macOS, Linux
Copyright © 2002-Present Qoppa Software. All rights reserved.
1.2.3.4.
1.2.
3.4.
•5.
Trusting Digital SignaturesDigital signatures can be added to your trusted certificates list from other users that you trust. Once added to your list, anytime a document is signed using the same digital ID it will be listed as trusted.
Note: It's important that you only trust certificates from someone you know and have already established a mutual trust.
How to Trust a Digital ID
Trusted IDs can be added either from an existing signature field or by importing a trusted certificate
Using an Existing Signed Field
Using the Hand Tool click on the signature that you wish to validate.This will display a dialog showing the Signature Validation StatusClick on the Details buttonSelect a certificate on the left and click on the Trust Certificate button to add the digital ID as a trusted certificate
Importing Trusted Certificates
Go to File > PreferencesSelect Trusted Certificates from the panel on the left of the preferences dialog
Click on the Import button. This will open a file chooser dialogNavigate to the certificate you wish to import
Note: Only .cer or .crt formats can be importedClick on Open to import the certificate and add the digital ID as a trusted certificate
-666-
Affordable, Powerful PDF Software / PDF Editor for Windows, macOS, Linux
Copyright © 2002-Present Qoppa Software. All rights reserved.
••
Managing Trusted CertificatesWhen PDF Studio validates digital IDs, it checks that the digital ID was issued by a trusted certificate authority. The trusted certificate authorities can be managed using the preferences available in PDF Studio. By default, PDF Studio will also trust Oracle root certificate authorities, as well as those from your operating system.
Accessing the Trusted Certificate Settings
To access the trusted certificate preferences do one of the following
Go to Secure Tab > Trusted Certificates on the toolbarGo to File > Preferences then select Trusted Certificates from the panel on the left
Trusted Certificate Options
The additional certificate settings allow you to enable or disable the PDF Studio or System root certificates. You can also double click on any of the certificates in the list to see their details.
System Certificates
PDF Studio will also trust any system root certificate authorities by default. Uncheck the box next to "Trust System root Certificate Authorities" if you wish to not trust these authorities
PDF Studio Certificates
By default, PDF Studio will trust Oracle root certificate authorities. Uncheck the box next to "Trust PDF Studio root Certificate Authorities" if you wish to not trust these authorities
My Trusted Certificates
My Trusted Certificates allows you to import, view, or delete any additional trusted certificates added to PDF Studio.
Note: When a digital ID is created or imported, its issuing authority is automatically added to the "My Trusted Certificates" list.
Importing Trusted Certificates
Click on the Import button. Then navigate to the certificate you wish to import and click on Open to import the certificate and add the digital ID as a trusted certificate
Note: Only .cer or .crt formats can be imported
-667-
Affordable, Powerful PDF Software / PDF Editor for Windows, macOS, Linux
Copyright © 2002-Present Qoppa Software. All rights reserved.
Viewing Trusted Certificate Details
Click on the Details button to display the additional details of the selected certificate
Deleting Trusted Certificates
Click on the Delete button to delete the selected certificate
Note: This cannot be undone. You will need to reimport the certificate if you wish to trust it again.
-668-
Affordable, Powerful PDF Software / PDF Editor for Windows, macOS, Linux
Copyright © 2002-Present Qoppa Software. All rights reserved.
••
Managing Digital IDsPDF Studio allows you to manage digital IDs digital IDs that have been created with PDF Studio or Imported into PDF Studio. The My Password settings can also be managed from this screen as well.
Note: Digital IDs found in the system will need to be managed by the system digital ID manager
Accessing the Digital ID Settings
To access the digital ID preferences do one of the following
Go to Secure Tab > Digital IDs on the toolbarGo to File > Preferences then select Digital IDs from the panel on the left
Digital ID Options
System IDs
If you have IDs stored in your operating system, you can use those in PDF Studio as well. Uncheck the box next to "Enable Signing with System Digital IDs" if you wish to make these digital IDs available when signing
My Digital IDs
Add Digital ID
Click on the Add Digital ID button to open a dialog and either create or import a digital ID
Change Display Name
Click on the Change Display Name button to change the display name of the selected digital ID
Remove
Click on the Delete button to delete the selected digital ID
Note: This cannot be undone. You will need to create or reimport the digital ID if you wish to trust it again.
-669-
Affordable, Powerful PDF Software / PDF Editor for Windows, macOS, Linux
Copyright © 2002-Present Qoppa Software. All rights reserved.
My Password
If your digital ID has a complex password that is hard to remember you can select the "Use my password" option to save this password and protect it with your own password. When signing documents, PDF Studio will prompt you for your own password. This makes it easier to sign documents without having to remember the complex passwords.
Click on the Create My Password button to setup a single password to be used when signing documents. This will open a dialog where you will enter the new password and create a password hint if needed.
Note: Make sure to use a password you can remember because you will need the password in order to apply any digital signature or to change and remove the My Password.
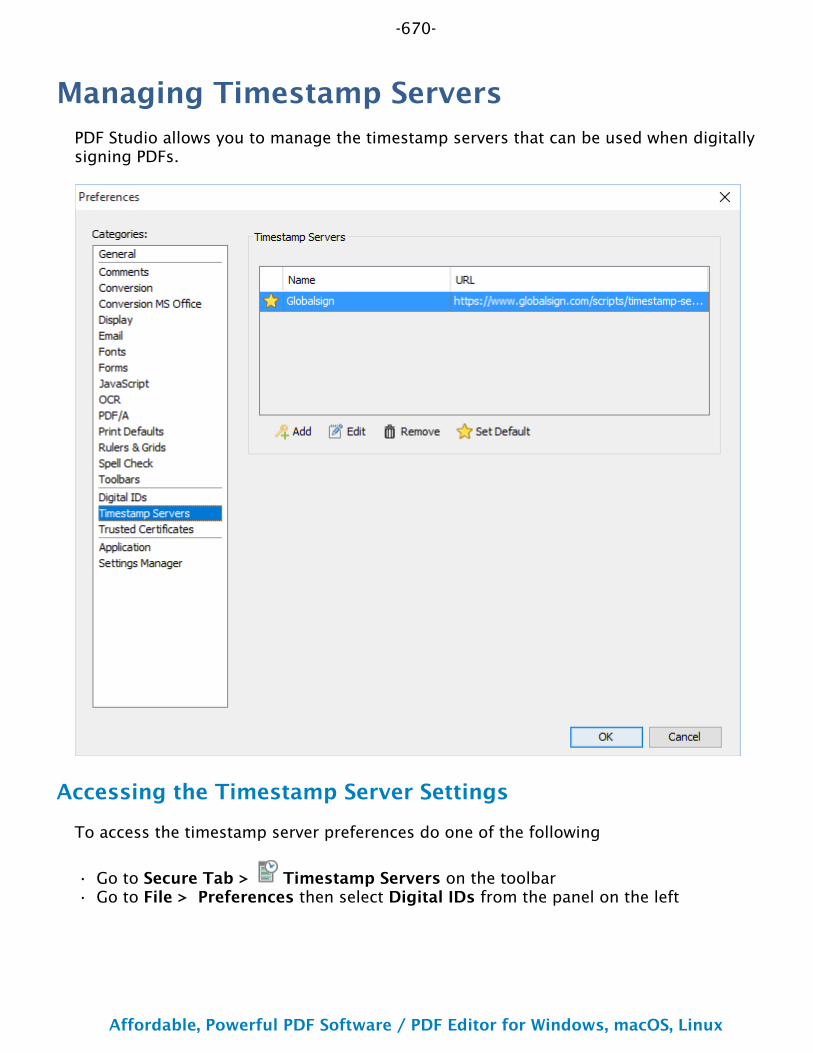
-670-
Affordable, Powerful PDF Software / PDF Editor for Windows, macOS, Linux
Copyright © 2002-Present Qoppa Software. All rights reserved.
••
Managing Timestamp ServersPDF Studio allows you to manage the timestamp servers that can be used when digitally signing PDFs.
Accessing the Timestamp Server Settings
To access the timestamp server preferences do one of the following
Go to Secure Tab > Timestamp Servers on the toolbarGo to File > Preferences then select Digital IDs from the panel on the left
-671-
Affordable, Powerful PDF Software / PDF Editor for Windows, macOS, Linux
Copyright © 2002-Present Qoppa Software. All rights reserved.
••
••
••••
Timestamp Server Options
Timestamp Servers
Add
Click on the Add button to add a new timestamp server. Use the dialog to set the settings for the server
Server InformationDisplay Name: the name displayed in the Digital Signature Options when applying a stampURL: the URL of the timestamp server
Make this my default TSA: when checked, this timestamp server will be used as the default when signing
User InformationTSA requires authentication: check this box if the server requires authenticationUser name: the user name for authentication on the timestamp serverPassword: the password for authentication on the timestamp server
Edit
Click on the Edit button to change the details of the selected timestamp server
Remove
Click on the Delete button to delete the selected timestamp server
Note: This cannot be undone. You will need to re-add the timestamp server again if needed
Set Default
Click on the Set Default button to set the selected server as the default.
Note: A default must be selected for a timestamp server to be used with signing or certifying.

-673-
Affordable, Powerful PDF Software / PDF Editor for Windows, macOS, Linux
Copyright © 2002-Present Qoppa Software. All rights reserved.
DocuSignThe DocuSign integration allows you to take any document created / edited and add online signatures directly from within PDF Studio.
Using the integration in just a single click you can sign into your DocuSign account and sign or email documents directly from your DocuSign account saving time and extra steps normally needed.
Sign with DocuSign: Upload current document to digitally sign with your DocuSign account
Email with DocuSign: Upload the current document, create signature fields and send to other users to request a signature
Log out of DocuSign: Log out of your DocuSign account
-674-
Affordable, Powerful PDF Software / PDF Editor for Windows, macOS, Linux
Copyright © 2002-Present Qoppa Software. All rights reserved.
1.
2.
3.•
4.
Sign with DocuSignThe DocuSign integration allows you to sign and send PDF documents directly from within PDF Studio integrating directly into your business processes and workflows.
How to Sign with DocuSign
Open the document you wish to sign
Go to the Secure Tab and click on the DocuSign button then Sign with DocuSignLog into your DocuSign account
Note: DocuSign account required to use this service.Complete the signature using the DocuSign service. For more information see DocuSign Support
-675-
Affordable, Powerful PDF Software / PDF Editor for Windows, macOS, Linux
Copyright © 2002-Present Qoppa Software. All rights reserved.
1.
2.
3.•
4.
Email with DocuSignThe DocuSign integration allows you send a document for signature through the DocuSign service directly from within PDF Studio integrating directly into your business processes and workflows.
How to Email with DocuSign
Open the document you wish to sign
Go to the Secure Tab and click on the DocuSign button then Email with DocuSignLog into your DocuSign account
Note: DocuSign account required to use this service.Complete the signature using the DocuSign service. For more information see DocuSign Support
-676-
Affordable, Powerful PDF Software / PDF Editor for Windows, macOS, Linux
Copyright © 2002-Present Qoppa Software. All rights reserved.
1.
2.3.
Log Out of DocuSignWhen using the DocuSign service within PDF Studio once logged in your account will stay signed in until the application is closed. This allows you to work with multiple documents without having to sign into your account multiple times. However, if needed you can manually log out to prevent other users from using your DocuSign account.
How to Log Out of DocuSign
Open any PDF Studio window
Go to the Secure Tab and click on the DocuSign button then Log OutYour account information will now be completely cleared from the application
Note: You can also just exit PDF Studio (File Tab > Exit) which will also log out of your account.
-677-
Affordable, Powerful PDF Software / PDF Editor for Windows, macOS, Linux
Copyright © 2002-Present Qoppa Software. All rights reserved.
Document PropertiesAdditional document information such as the title, the fonts used, initial view, security settings, and document JavaScript can be viewed using PDF Studio. Some settings can also be modified using this dialog.
These settings are separated into the following tabs
General: View and edit the PDF's title, author, subject, and keywords
Security:View and edit document security settings
Initial View: Modify the properties that determine how the document will be initially displayed
Fonts: Displays a list of fonts used in the document
JavaScript: Displays the document JavaScript actions and allows actions to be added or edited
Custom: View / Edit custom metadata properties set in the PDF
Advanced: Set reading options including binding direction and language
Accessing Document Properties
The document properties can be accessed by going to File Tab > Properties or using the shortcut keys Ctrl + D (Cmd + D on Mac).
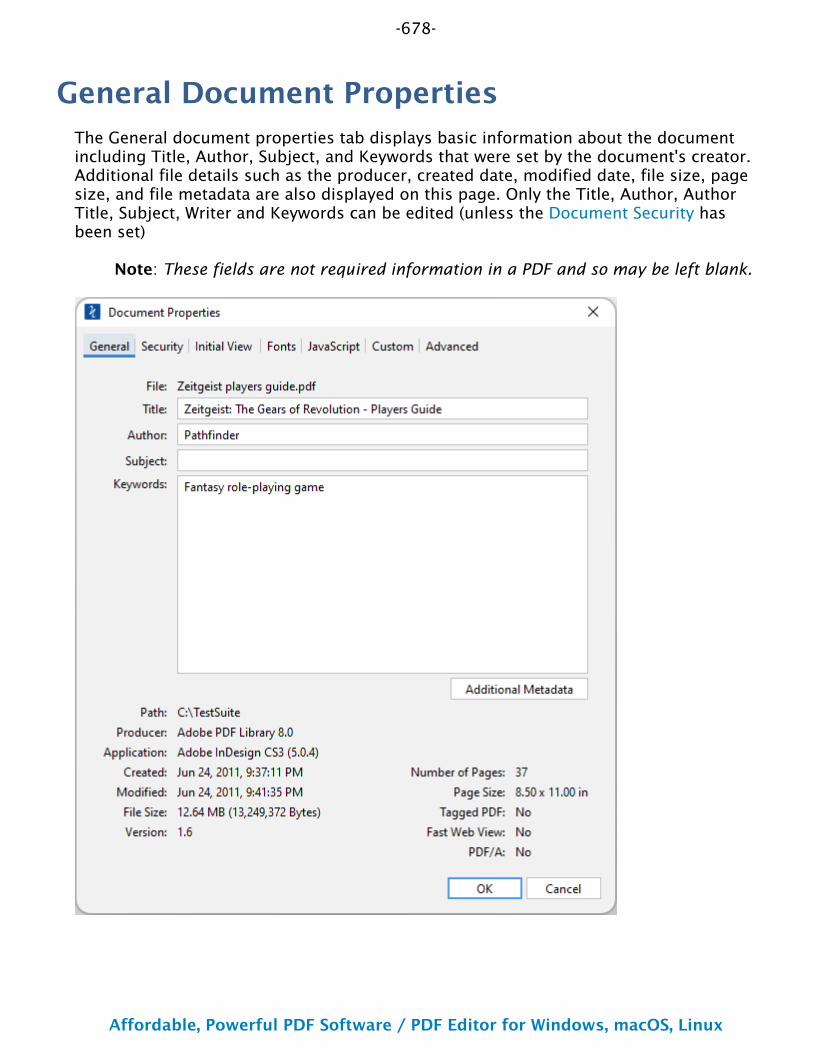
-678-
Affordable, Powerful PDF Software / PDF Editor for Windows, macOS, Linux
Copyright © 2002-Present Qoppa Software. All rights reserved.
General Document PropertiesThe General document properties tab displays basic information about the document including Title, Author, Subject, and Keywords that were set by the document's creator. Additional file details such as the producer, created date, modified date, file size, page size, and file metadata are also displayed on this page. Only the Title, Author, Author Title, Subject, Writer and Keywords can be edited (unless the Document Security has been set)
Note: These fields are not required information in a PDF and so may be left blank.

-679-
Affordable, Powerful PDF Software / PDF Editor for Windows, macOS, Linux
Copyright © 2002-Present Qoppa Software. All rights reserved.
1.2.
How to View the General Document Properties
Go to File Tab > Properties or using the shortcut keys Ctrl + D (Cmd + D on Mac).Click on the General Tab
Document Properties
File - Name of the file stored on the system
Title - Displays the current Title of the document.
Author - Displays the current Author of the document.
Subject - Displays the current Subject of the document.
Keywords - Displays the current Keywords of the document.
Path - The full address of where PDF file is stored on the computer
Note: For new documents created in PDF Studio this will be blank until the file is saved
Producer - Name of the application that generated the PDF file
Note: This value may be empty if the application failed to include the name in the file properties
Created - Date the document was created
Modified - Date the document was last modified
File Size - Amount of file space needed to store the PDF
Version - The PDF standards version of the PDF document
Number of pages - Number of pages in the document
Page Size - Displays the height and width of the document in either inches or millimeters depending on your local settings
Note: For document's with multiple page sizes this value will show the size of the current page being displayed
Tagged PDF - Whether or not the document has been tagged for accessibility
Fast Web View - Whether or not the document has been saved using the Fast Web View (linearized) format

-680-
Affordable, Powerful PDF Software / PDF Editor for Windows, macOS, Linux
Copyright © 2002-Present Qoppa Software. All rights reserved.
PDF/A - Whether or not the document meets the PDF/A standards
Additional Metadata
When clicked, opens a new dialog showing additional internal document metadata including copyrights, XML tree and raw XMP Metadata output. The following additional details are accessible.
Description
Description
Title - Displays the current Title of the document.
Author - Displays the current Author of the document.
Author Title - Displays the current Author title of the document.
Description - Displays the current Description of the document.
Description writer - Displays the name of the person who wrote the description
Keywords - Displays the current Keywords of the document. Commas can be used to separate keywords.
Copyrights
Copyright Status - Displays the current status of the copyright for the document
Copyright notice - Displays the details of the copyright information
Copyright info URL - Displays the URL to access the copyright information if available. Click the icon on the right of the field to open the webpage in your default web browser
Metadata
Created - Date the document was created
Modified - Date the document was last modified
Application - Name of the application that generated the PDF file

-681-
Affordable, Powerful PDF Software / PDF Editor for Windows, macOS, Linux
Copyright © 2002-Present Qoppa Software. All rights reserved.
Note: This value may be empty if the application failed to include the name in the file properties
Format - Mimetype of the currently opened file
Advanced
This tab displays additional metadata found within the document using a tree structure to explore if needed. This section is for reference only.
XMP Metadata
This tab displays raw XMP Metadata output in an XML format just as it is stored within the document. This information can be selected and copied if needed but can not be edited.
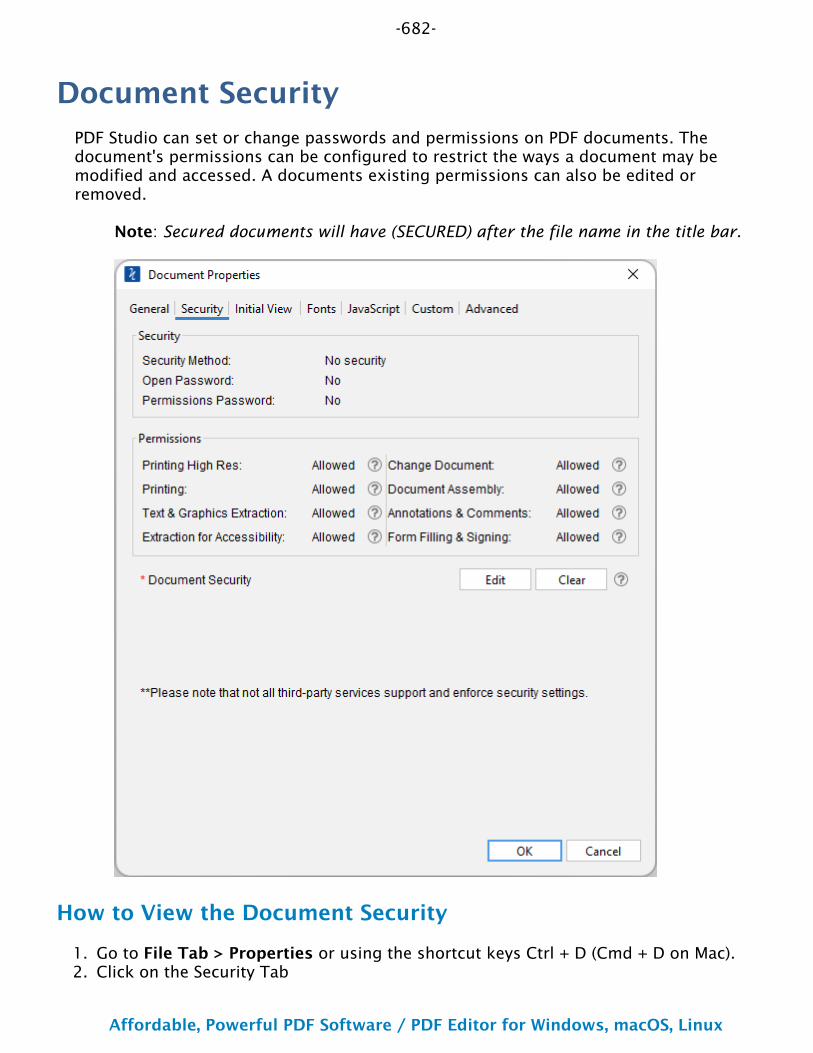
-682-
Affordable, Powerful PDF Software / PDF Editor for Windows, macOS, Linux
Copyright © 2002-Present Qoppa Software. All rights reserved.
1.2.
Document SecurityPDF Studio can set or change passwords and permissions on PDF documents. The document's permissions can be configured to restrict the ways a document may be modified and accessed. A documents existing permissions can also be edited or removed.
Note: Secured documents will have (SECURED) after the file name in the title bar.
How to View the Document Security
Go to File Tab > Properties or using the shortcut keys Ctrl + D (Cmd + D on Mac).Click on the Security Tab
-683-
Affordable, Powerful PDF Software / PDF Editor for Windows, macOS, Linux
Copyright © 2002-Present Qoppa Software. All rights reserved.
Document Security Settings
Security
Security Method - The current encryption being used to secure the document
Open Password – Also known as the user password, it is the password that will be required when the documents are opened.
Permissions Password – Also known as the owner password, it is the password that will be required when trying to change permissions and passwords on the documents.
Permissions
Allow Printing High Res – Print the document at high resolution. When this permission is granted, the following permission 'Printing' is also automatically granted.
Allow Printing - Allow printing the document
Allow Text & Graphics Extraction – Copy or otherwise extract text and graphics from the document. When this permission is granted, the following permission 'Extraction for Accessibility' is also automatically granted.
Allow Extraction for Accessibility – Extract text and graphics in support of accessibility to disabled users or other purposes
Allow Document Changes – Modify the document. When this permission is granted, the following 3 permissions (Document Assembly, Comments and Form Filling) are also automatically granted. When this permission is not granted, the following 3 permissions (Document Assembly, Comments and Form Filling) can independently be granted.
Allow Document Assembly – Assemble the document: insert, rotate or delete pages and create bookmarks or thumbnail images
Allow Annotations & Comments – Add or modify text annotations. When this permission is granted, the following permission 'Filling Form Fields & Signing' is automatically granted. When this permission is not granted then the following permission 'Form Filling & Signing' can be granted independently. And when this permission is granted and the 'All Changes' permission is also granted, creating or modifying interactive form fields (including signature fields) is allowed.
Allow Filling Form Fields & Signing - Fill in existing interactive form fields including signature fields.
-684-
Affordable, Powerful PDF Software / PDF Editor for Windows, macOS, Linux
Copyright © 2002-Present Qoppa Software. All rights reserved.
1.2.3.4.5.
1.2.3.4.5.
How to Edit/Create Document Security Settings
Two passwords may be set for a document: an open password and a permissions password. If set, the open password must be entered to open the document. The permissions password prevents anyone without the password from modifying the document's permissions.
Go to File Tab > Properties or using the shortcut keys Ctrl + D (Cmd + D on Mac).Click on the Security Tab and then click on the Edit buttonChoose the desired Document Security SettingsClick OK to set the settingsSave the document to save the new security settings
Note: You must SAVE the document in order for the security settings to be set. Just setting them in the document properties does not apply them to the document
How to Remove Document Security Settings
Go to File Tab > Properties or using the shortcut keys Ctrl + D (Cmd + D on Mac).Click on the Security TabClick on the Edit buttonEnter the Change Permissions password for the document and Click OKSave the document to save the new security settings
Note: You must SAVE the document in order for the security settings to be removed. Just clearing them in the document properties does not remove them to the document

-685-
Affordable, Powerful PDF Software / PDF Editor for Windows, macOS, Linux
Copyright © 2002-Present Qoppa Software. All rights reserved.
Document Initial ViewThe Initial View tab displays the initial view settings that determine how the document will be initially displayed when opened. These settings can be changed to control how the document appears the next time it is opened.
Note: If "Ignore document setting" has been set on any of the options in the Display Preferences, PDF Studio to ignore the document's settings and use the selected option instead of the options set in the initial view settings of the document

-686-
Affordable, Powerful PDF Software / PDF Editor for Windows, macOS, Linux
Copyright © 2002-Present Qoppa Software. All rights reserved.
1.2.3.4.5.
••••••
•••
•
•
•
•
••
••
How to View/Edit the Initial View Settings
Go to File Tab > Properties or using the shortcut keys Ctrl + D (Cmd + D on Mac).Click on the Initial View TabSelect the initial view settings you wish to useClick OK to set the settingsSave the document to save the new initial view settings
Note: You must SAVE the document in order for the initial view settings to be set. Just setting them in the document properties does not apply them to the document.
Initial View Settings
Layout & Magnification
Navigation tab - Sets the default behavior for the navigation tab when the document is opened
Default: Uses the default settings for the application the document is opened inNone (Document Only): No navigation tab will be displayedBookmarks Panel: Displays the bookmarks panel when the document is openedPages Panel: Displays the pages panel when the document is openedAttachments Panel: Displays the attachments panel when the document is openedFull Screen Mode: Displays the document in full screen mode when opened
Page Layout - Sets the default behavior for the page layout when the document is opened
Default: Uses the default settings for the application the document is opened inSingle: Displays only a single individual page at a timeSingle Continuous: Displays all of the document's pages in a single column that can be continuously scrolledFacing: Displays only two pages at a time side by side with odd pages on the left and even pages on the rightFacing Continuous: Displays all of the documents pages in two columns with odd pages on the left and even pages on the rightCover: Displays the document just as when using Facing only the first page will be displayed aloneCover Continuous: Displays the document just as when using Facing Continuous only the first page will be displayed alone
Magnification - Sets the default magnification for the document when opened
Default: Uses the default settings for the application the document is opened inActual: Displays the document with a 1:1 ratio to match how the document would look if printed without any scalingFit to Page: Scales the view to fit the width of the document in the PDF Studio frameFit to Width: Scales the view to fit the entire document within the PDF Studio frame
-687-
Affordable, Powerful PDF Software / PDF Editor for Windows, macOS, Linux
Copyright © 2002-Present Qoppa Software. All rights reserved.
• %: Sets the zoom to the specified number value
Open to Page - Sets the page number to be displayed when the document is opened
Window Options
Resize window to initial page* - When set will resize the window to match the initial page size at 100%. This is an Acrobat only feature.
Center window on screen - Centers the application frame in the center of the monitor / screen
Open in Full Screen Mode - Opens the file directly into Full Screen Mode
Show - Choose whether to show the File Name or Document Title in the titlebar of the PDF Studio application frame
User Interface Options
Hide menu bar - Hides the top menu bar when document is opened.
Note: menu bars are only shown when using the Classic Toolbar
Hide tool bars - Collapses the toolbar when the document is opened. Toolbar can be reopenen by clicking on the tab name or the down arrow icon on the toolbar
Hide Window Controls - Hides the scrollbars from the document viewing area
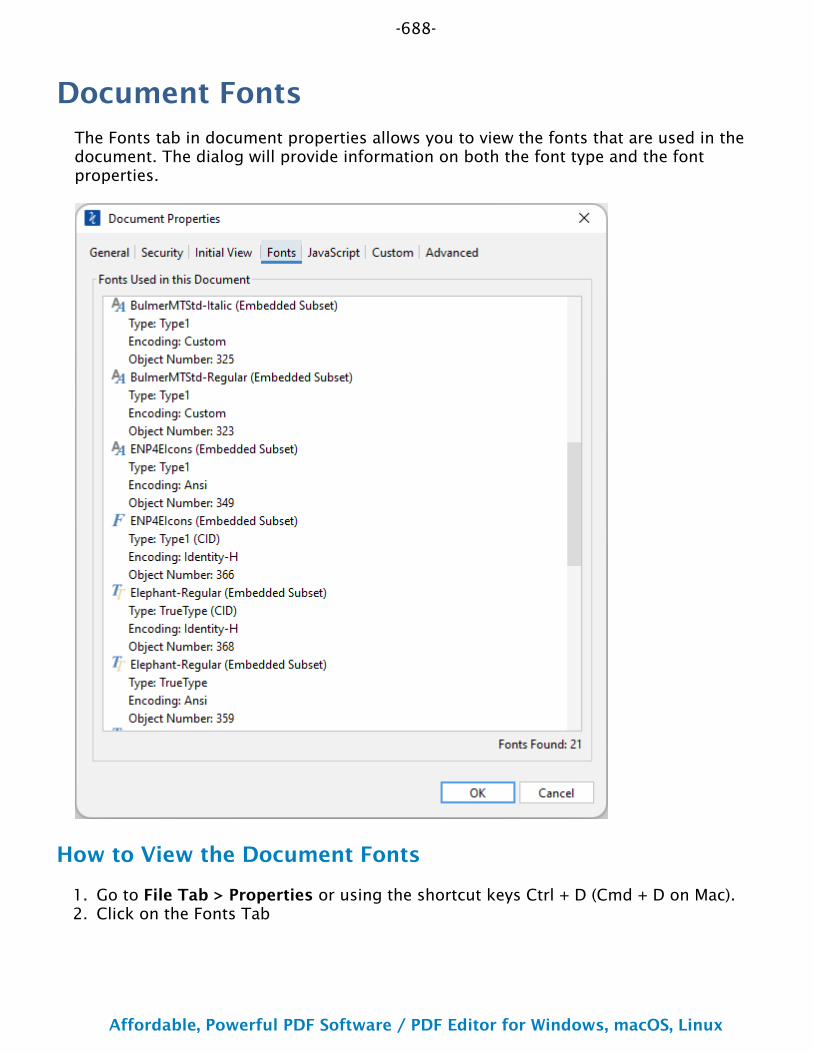
-688-
Affordable, Powerful PDF Software / PDF Editor for Windows, macOS, Linux
Copyright © 2002-Present Qoppa Software. All rights reserved.
1.2.
Document FontsThe Fonts tab in document properties allows you to view the fonts that are used in the document. The dialog will provide information on both the font type and the font properties.
How to View the Document Fonts
Go to File Tab > Properties or using the shortcut keys Ctrl + D (Cmd + D on Mac).Click on the Fonts Tab

-689-
Affordable, Powerful PDF Software / PDF Editor for Windows, macOS, Linux
Copyright © 2002-Present Qoppa Software. All rights reserved.
Font Types
Depending on the type of fonts within the documents, PDF Studio will display one of the follow
- Signifies any font that is not either a Type 1 (CID), Type 3, or TrueType
- Used when the font is either a Type 1 (CID) or Type 3
- All TrueType fonts will display this symbol
Font Properties
Each font within the document can have its own properties. Below is a description of the properties that are associated with each font.
(Embedded) - An embedded font has the entire font stored within the PDF document. This means that if the font is not available on the system the text will still be displayed correctly.
(Embedded Subset) - An embedded subset font has portions of the font stored within the PDF. This means that not every character available in the font will be available. While the original document text will be displayed correctly, if any characters are added or modified that are not one of the embedded characters they may not show up correctly within the document
Type - The complete font type name
Encoding - The character encoding used in the font
Actual Font - If a substitute font is being used (when a font is not embedded) this will display the name of the font that replaced the Font listed
Actual Type - If a substitute font is being used (when a font is not embedded) this will display the type of the font that replaced the Font listed

-690-
Affordable, Powerful PDF Software / PDF Editor for Windows, macOS, Linux
Copyright © 2002-Present Qoppa Software. All rights reserved.
1.2.
Document JavaScriptThe JavaScipt tab in document properties allow you to view and edit a document's JavaScript actions. These are actions that occur at the document level based on certain events. These events can be on open, close, before saving, after saving, before printing, and after printing. Actions can be added, edited, or deleted using the options in this tab.
How to View/Edit the Document JavaScript Actions
Go to File Tab > Properties or using the shortcut keys Ctrl + D (Cmd + D on Mac).Click on the JavaScript Tab
-691-
Affordable, Powerful PDF Software / PDF Editor for Windows, macOS, Linux
Copyright © 2002-Present Qoppa Software. All rights reserved.
3.
4.5.
The current actions will be displayed in the dialog. Use the Add, Edit, or Remove options to modify the JavaScript actions if neededClick OK to apply the changesSave the document to save the new Document JavaScript settings
Options
Add - Opens the action dialog to add an action to the document
Edit - Edits the currently selected action from the list
Remove - Removes the currently selected action from the list
Document Actions
Document actions define JavaScript actions to be performed following a predefined event.
Event
Open: Open actions will be triggered when the document is opened
Close: Close actions will be triggered when the document is closed
Before Save: Before save actions will be triggered when the document is saved but before the file on the system is actually updated. For example, if you wanted to update a date value with the exact time saved
After Save: After save actions will be triggered once the file has been saved
Before Print: Before print actions will be triggered when the document is printed but before the file is actually sent to the printer. For example, if you wanted to update a date value with the exact time printed
After Print: After print actions will be triggered after the document is printed
JavaScript Action
Sets the Action to perform a custom Supported JavaScript action that can be typed into the field. Type the JavaScript you wish to be used into the text box.
-692-
Affordable, Powerful PDF Software / PDF Editor for Windows, macOS, Linux
Copyright © 2002-Present Qoppa Software. All rights reserved.
Named JavaScript
Named JavaScript is used to define fucntions that can be referenced by other JavaScript calls within the document. These can be referenced when the document is opened or at any other point in time needed. This is useful when you have a common function that needs to be performed on different triggers and actions across the document and helps limit writing duplicate JavaScript code.
Name
Use the name field to define the name to be used when referencing this specific action in the future
JavaScript Action
Type the JavaScript fuctions you wish to be used into the text box. Sets the Action to perform a custom Supported JavaScript action that can be typed into the field.
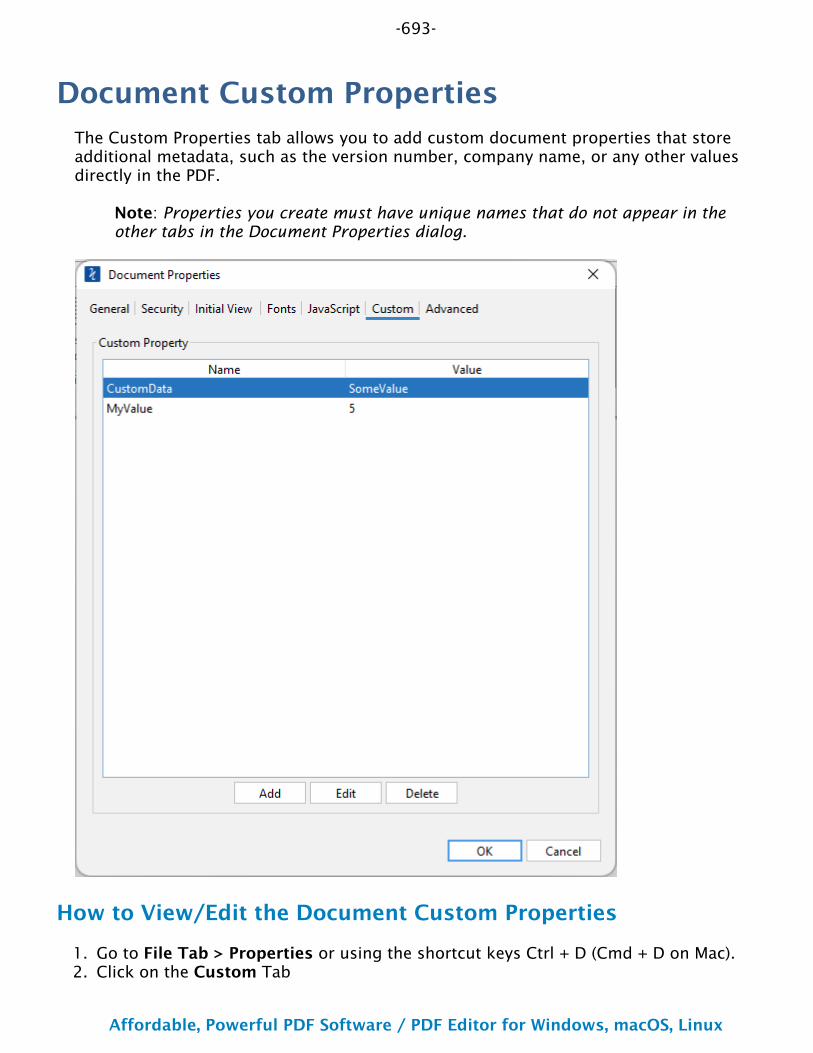
-693-
Affordable, Powerful PDF Software / PDF Editor for Windows, macOS, Linux
Copyright © 2002-Present Qoppa Software. All rights reserved.
1.2.
Document Custom PropertiesThe Custom Properties tab allows you to add custom document properties that store additional metadata, such as the version number, company name, or any other values directly in the PDF.
Note: Properties you create must have unique names that do not appear in the other tabs in the Document Properties dialog.
How to View/Edit the Document Custom Properties
Go to File Tab > Properties or using the shortcut keys Ctrl + D (Cmd + D on Mac).Click on the Custom Tab
-694-
Affordable, Powerful PDF Software / PDF Editor for Windows, macOS, Linux
Copyright © 2002-Present Qoppa Software. All rights reserved.
3.
4.5.
The current properties will be displayed in the dialog. Use the Add, Edit, or Remove options to modify the custom properties if neededClick OK to apply the changesSave the document to save the new Document Custom Property settings
Options
Add - Opens the action dialog to add a new custom property to the document
Edit - Edits the currently selected property from the list
Delete- Removes the currently selected property from the list
Custom Property Settings
Name: Name of the property stored within the PDF
Value: Value associated with the named property

-695-
Affordable, Powerful PDF Software / PDF Editor for Windows, macOS, Linux
Copyright © 2002-Present Qoppa Software. All rights reserved.
1.2.3.4.
Advanced Document PropertiesThe Advanced tab allows you to set additional options for the document. These include reading options such as binding and language for user accessibility needs. Setting the document language in a PDF enables some screen readers to switch to the appropriate language.
How to View/Edit the Advanced Document Settings
Go to File Tab > Properties or using the shortcut keys Ctrl + D (Cmd + D on Mac).Click on the Advanced TabSelect the settings you wish to useClick OK to apply the changes
-696-
Affordable, Powerful PDF Software / PDF Editor for Windows, macOS, Linux
Copyright © 2002-Present Qoppa Software. All rights reserved.
5.
••
Save the document to save the new Advanced Document settings
Options
Binding - Sets the order to display the pages in Facing or Cover view modes.
Left Edge: For documents that read from Left to Right (i.e. English, French, etc...)Right Edge: For documents that read from Right to Left (Arabic, Hebrew, etc...)
Note: This does not affect page order in the thumbnails pane.
Language - Sets the langauge for the entire documents. See Tagging PDFs for details on setting the language for specific text within the document.
Note: If the language doesn't appear in the drop-down list, you can enter the ISO 639 code for the language in the Language field.
-697-
Affordable, Powerful PDF Software / PDF Editor for Windows, macOS, Linux
Copyright © 2002-Present Qoppa Software. All rights reserved.
Supported Document JavaScriptIn PDF Studio when creating custom functions/actions for specific items such as form fields, bookmarks, or document actions you will need to use JavaScript for the commands. JavaScript can perform calculations, button actions (adding images, submitting forms, or populating other fields), validate field input, and set field formatting, among many other things.
Note: PDF Studio only supports Acroform (non-LiveCycle) JavaScript in PDF forms.
You will need to have advance knowledge in programming JavaScript in order to create the actions for the buttons. For additional details on how to use these functions, take a look at the tutorials and lessons on this site http://www.w3schools.com/js/js_intro.asp
PDF Studio supports the following JavaScript commands for each of the below items.
Annotation
Properties:
author page points strokeColor type width
Doc
Methods:
addAnnot addField calculateNow closeDoc flattenPages getAnnots3D getDataObjectContents getField getNthFieldName getOCGs getPageBox getPageRotation getTemplate gotoNamedDest importAnFDF mailDoc
-698-
Affordable, Powerful PDF Software / PDF Editor for Windows, macOS, Linux
Copyright © 2002-Present Qoppa Software. All rights reserved.
print resetForm spawnPageFromTemplate submitForm
Properties:
URL calculate info numFields numPages
Field
Methods:
buttonGetCaption buttonImportIcon buttonSetCaption checkThisBox clearItems deleteItemAt getArray getItemAt insertItemAt isBoxChecked setAction setFocus setItems signatureInfo
Properties:
borderColor borderStyle borderWidth calcOrderIndex charLimit comb commitOnSelChange currentValueIndices defaultValue delay display doNotScroll doNotSpellCheck doc editable
-699-
Affordable, Powerful PDF Software / PDF Editor for Windows, macOS, Linux
Copyright © 2002-Present Qoppa Software. All rights reserved.
exportValues fileSelect fillColor hidden lineWidth multiline multipleSelection name numItems page password readonly rect required strokeColor style submitName textColor type userName value valueAsString
Global
Methods:
setPersistent
Identity
Properties:
corporation email loginName name
Matrix2D
Methods:
fromRotated transform
MenuItem
Properties:
-700-
Affordable, Powerful PDF Software / PDF Editor for Windows, macOS, Linux
Copyright © 2002-Present Qoppa Software. All rights reserved.
bEnabled bMarked cName cReturn oSubMenu
OCG
Methods:
getIntent setAction setIntent
Properties:
initState locked name state
ReadStream
Methods:
read
SignatureInfo
Properties:
date reason
Template
Methods:
spawn
Util
Methods:
printd printf printx
-701-
Affordable, Powerful PDF Software / PDF Editor for Windows, macOS, Linux
Copyright © 2002-Present Qoppa Software. All rights reserved.
scand stringFromStream

-703-
Affordable, Powerful PDF Software / PDF Editor for Windows, macOS, Linux
Copyright © 2002-Present Qoppa Software. All rights reserved.
Converting PDF DocumentsPDF Studio is able to convert PDF documents to the following formats
Fast Web View (Linearized): Optimizes the document for faster web viewing
HTML5/SVG: Converts the document to an SVG image wrapped in an HTML header to display PDFs in a web browser without needing a PDF viewer
Images: Converts PDF documents into any of the following formats JPEG, TIFF, PNG, or GIF
PDF/A-1b: Converts the document to meet the PDF/A-1b compliance standards
Text: Extracts all text from a PDF document and creates a standard .txt file
RTF: Converts all text in the document to a .rtf formatted text file
Microsoft Word®: Integrates with Microsoft Office 2013 and up to convert PDF documents to Word files
-704-
Affordable, Powerful PDF Software / PDF Editor for Windows, macOS, Linux
Copyright © 2002-Present Qoppa Software. All rights reserved.
1.
2.3.4.
1.2.3.
Converting PDF to Fast Web ViewPDF Studio allows you to convert PDF documents to fast web view (or linearized). Fast web view restructures the documents internal structure and content so that the pages load in order. When converting to Fast Web View the content is just reorganized internally. No content is altered or removed so the PDF will be displayed exactly the same as it was prior to conversion.
Converting to fast web view allows large documents to load faster when downloading from a web. Having the document structure and content in a linearized (from beginning to end) order allows a browser to immediately display the first page as the remainder of the document is still being loaded.
Note: In order to see the complete speed benefits the server where the PDF is being hosted must also support page by page loading.
How to Convert a PDF to Fast Web View
Open the PDF Document you wish to convert
Go to File Tab > Convert To > Fast Web View on the toolbarChoose a file name and location to save the documentClick Save to create the document
Verify that Existing Document has Fast Web View Enabled
Go to File Tab > Properties or use the shortcut keys Ctrl + D (Cmd + D on Mac).Click on the General TabIn the lower right corner of the general document properties there will be a "Fast Web View" label that will show "Yes" if the document has Fast Web View Enabled.
-705-
Affordable, Powerful PDF Software / PDF Editor for Windows, macOS, Linux
Copyright © 2002-Present Qoppa Software. All rights reserved.
1.
2.3.4.
•
•
•
••
Convert PDF to HTML5 /SVGPDF Studio allows you to convert PDF documents to an HTML5 web page. This makes it possible to easily publish the content of PDF document onto any website, as HTML5 is supported by all browsers, without the need of a viewer plug-in. The PDF to HTML5 conversion engine in PDF Studio preserves fonts and uses the SVG format to preserve vector graphics. Sample PDF documents that have been converted to HTML5 can be found HERE.
How to Convert a PDF to HTML 5
Open the PDF Document you wish to convert
Go to the File Tab > Convert To > HTML5/SVGChoose a file name and location to save the documentClick Save to create the document
Once the conversion is complete you can use the created HTML5 document in any application that supports HTML5 to view the document.
HTML5 Conversion Options
The options in the are as follows:
Destination Folder – You can type the destination manually or click on the "..." button to open a directory chooser to set the destination folder
Remember Folder - When checked the selected folder will be remembered for the next time pages are exported as images
File Name Pattern – Enter the desired pattern for the output file names.
Note: Current page number and file extension will be appended to the pattern to create the final file name.
Convert to - Select the output type
Single HTML per document: creates a single HTML file for each document being processedSingle SVG per document : creates a single SVG file for each document being processedSeparate SVG per page: creates individual SVG files for each page of each document being processed
Pages - The range of pages to be exported as images
All Pages: all pages in the documentPage Range: set the pages to be exported using the From and To options

-706-
Affordable, Powerful PDF Software / PDF Editor for Windows, macOS, Linux
Copyright © 2002-Present Qoppa Software. All rights reserved.
••
••
Even Pages Only: only export the even pages of the documentOdd Pages Only: only export the odd pages of the document
Show Page Border - When checked ads a 1px border to the created pages. This makes it easier to distinguish the page are on white documents
Compress Images - When checked will compress images found in the PDF to JPEG in order to reduce the size of the output
JPG Quality – Select the desired quality of JPG compression. Based on the quality parameter. Some guidelines for the quality value: 8 high quality, 5 medium quality, 2 low quality.
0 – very high compression, very low quality10 – low compression, very high quality
-707-
Affordable, Powerful PDF Software / PDF Editor for Windows, macOS, Linux
Copyright © 2002-Present Qoppa Software. All rights reserved.
Converting PDF to ImagesPDF Studio is able to convert the pages of a PDF document into the following image formats. When converting to an image all page content that is displayed is flattened and then exported using one of the below file types.
Export pages as JPEG: Exports the pages of the current document as JPEG images
Export pages as TIFF: Exports the pages of the current document as TIFF images
Export pages as PNG: Exports the pages of the current document as PNG images
Export pages as GIF: Exports the pages of the current document as GIF images
Export All Images: Exports all the images from within the document content to individual image files
Rasterized PDF: Re-creates the document using images of the pages instead of vector commands
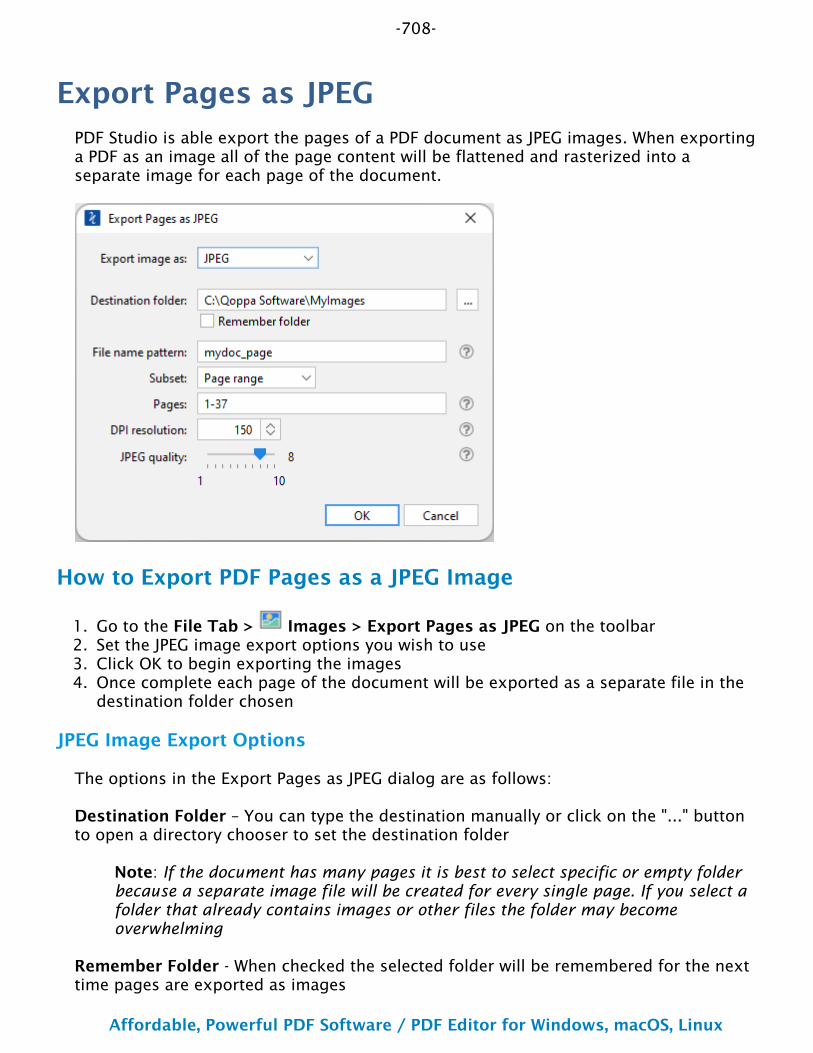
-708-
Affordable, Powerful PDF Software / PDF Editor for Windows, macOS, Linux
Copyright © 2002-Present Qoppa Software. All rights reserved.
1.2.3.4.
Export Pages as JPEGPDF Studio is able export the pages of a PDF document as JPEG images. When exporting a PDF as an image all of the page content will be flattened and rasterized into a separate image for each page of the document.
How to Export PDF Pages as a JPEG Image
Go to the File Tab > Images > Export Pages as JPEG on the toolbarSet the JPEG image export options you wish to useClick OK to begin exporting the imagesOnce complete each page of the document will be exported as a separate file in the destination folder chosen
JPEG Image Export Options
The options in the Export Pages as JPEG dialog are as follows:
Destination Folder – You can type the destination manually or click on the "..." button to open a directory chooser to set the destination folder
Note: If the document has many pages it is best to select specific or empty folder because a separate image file will be created for every single page. If you select a folder that already contains images or other files the folder may become overwhelming
Remember Folder - When checked the selected folder will be remembered for the next time pages are exported as images
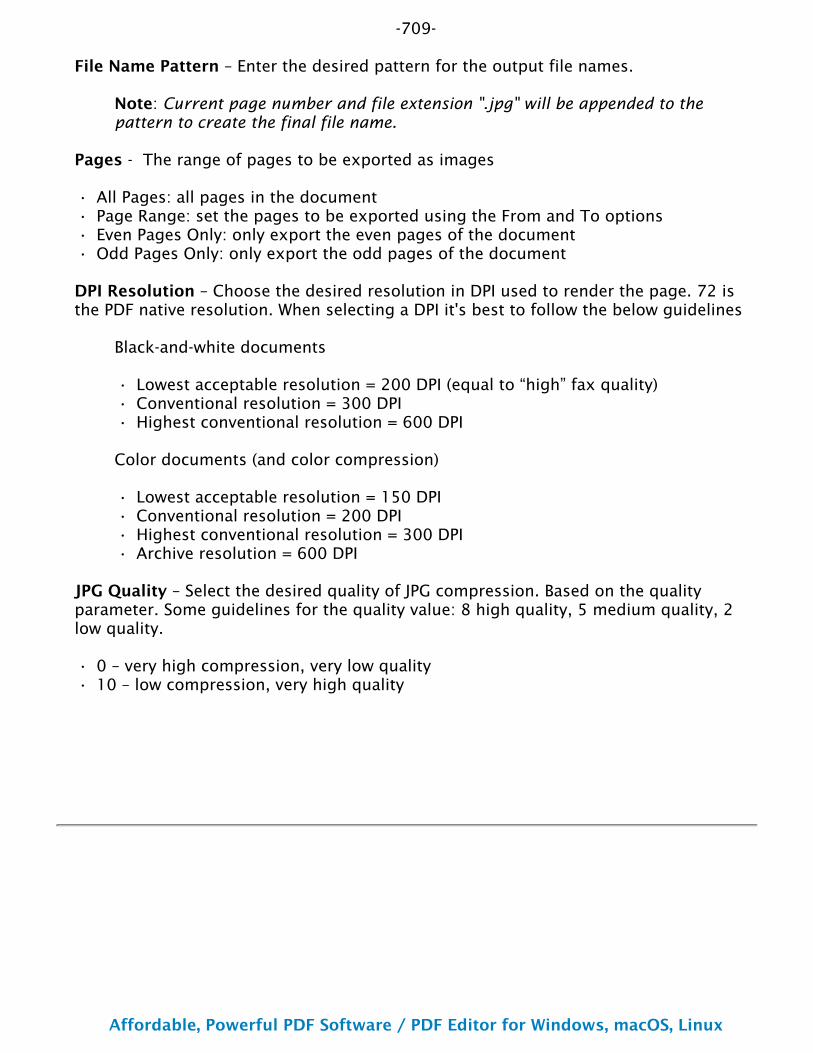
-709-
Affordable, Powerful PDF Software / PDF Editor for Windows, macOS, Linux
Copyright © 2002-Present Qoppa Software. All rights reserved.
••••
•••
••••
••
File Name Pattern – Enter the desired pattern for the output file names.
Note: Current page number and file extension ".jpg" will be appended to the pattern to create the final file name.
Pages - The range of pages to be exported as images
All Pages: all pages in the documentPage Range: set the pages to be exported using the From and To optionsEven Pages Only: only export the even pages of the documentOdd Pages Only: only export the odd pages of the document
DPI Resolution – Choose the desired resolution in DPI used to render the page. 72 is the PDF native resolution. When selecting a DPI it's best to follow the below guidelines
Black-and-white documents
Lowest acceptable resolution = 200 DPI (equal to “high” fax quality)Conventional resolution = 300 DPIHighest conventional resolution = 600 DPI
Color documents (and color compression)
Lowest acceptable resolution = 150 DPIConventional resolution = 200 DPIHighest conventional resolution = 300 DPIArchive resolution = 600 DPI
JPG Quality – Select the desired quality of JPG compression. Based on the quality parameter. Some guidelines for the quality value: 8 high quality, 5 medium quality, 2 low quality.
0 – very high compression, very low quality10 – low compression, very high quality
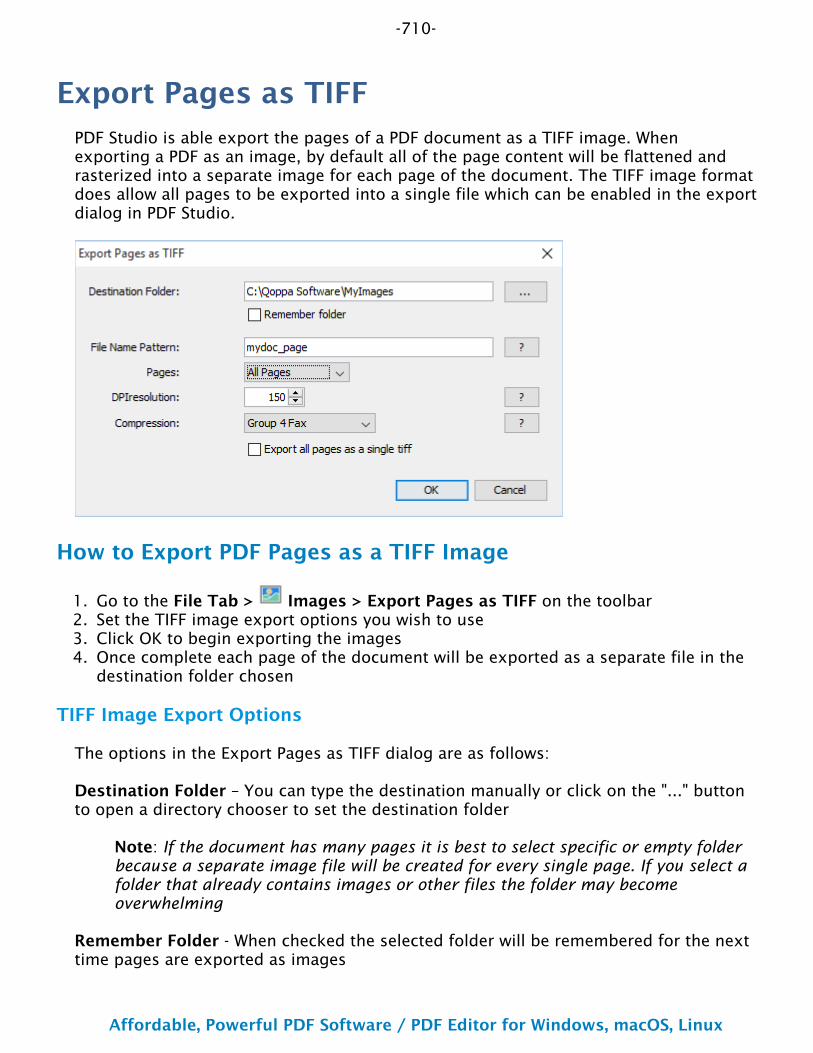
-710-
Affordable, Powerful PDF Software / PDF Editor for Windows, macOS, Linux
Copyright © 2002-Present Qoppa Software. All rights reserved.
1.2.3.4.
Export Pages as TIFFPDF Studio is able export the pages of a PDF document as a TIFF image. When exporting a PDF as an image, by default all of the page content will be flattened and rasterized into a separate image for each page of the document. The TIFF image format does allow all pages to be exported into a single file which can be enabled in the export dialog in PDF Studio.
How to Export PDF Pages as a TIFF Image
Go to the File Tab > Images > Export Pages as TIFF on the toolbarSet the TIFF image export options you wish to useClick OK to begin exporting the imagesOnce complete each page of the document will be exported as a separate file in the destination folder chosen
TIFF Image Export Options
The options in the Export Pages as TIFF dialog are as follows:
Destination Folder – You can type the destination manually or click on the "..." button to open a directory chooser to set the destination folder
Note: If the document has many pages it is best to select specific or empty folder because a separate image file will be created for every single page. If you select a folder that already contains images or other files the folder may become overwhelming
Remember Folder - When checked the selected folder will be remembered for the next time pages are exported as images
-711-
Affordable, Powerful PDF Software / PDF Editor for Windows, macOS, Linux
Copyright © 2002-Present Qoppa Software. All rights reserved.
••••
•••
••••
••••••••
File Name Pattern – Enter the desired pattern for the output file names.
Note: Current page number and file extension ".tiff" will be appended to the pattern to create the final file name.
Pages - The range of pages to be exported as images
All Pages: all pages in the documentPage Range: set the pages to be exported using the From and To optionsEven Pages Only: only export the even pages of the documentOdd Pages Only: only export the odd pages of the document
DPI Resolution – Choose the desired resolution in DPI used to render the page. 72 is the PDF native resolution. When selecting a DPI it's best to follow the below guidelines
Black-and-white documents
Lowest acceptable resolution = 200 DPI (equal to “high” fax quality)Conventional resolution = 300 DPIHighest conventional resolution = 600 DPI
Color documents (and color compression)
Lowest acceptable resolution = 150 DPIConventional resolution = 200 DPIHighest conventional resolution = 300 DPIArchive resolution = 600 DPI
Compression – Choose the compression to use when exporting pages. The most standard one is Group 4 Fax, which is optimized for faxing.
CCIT RLEGroup 3 FaxGroup 4 FaxPack BitsLZWZLibDeflateNo Compression
Export all pages as a Single TIFF - The TIFF image format allows multiple images to be stored within a single document. When the image is opened in a supported viewer the image viewer will display page navigation tools just like in the document. This makes it easier to send a large number of pages as a single file instead of multiple files.
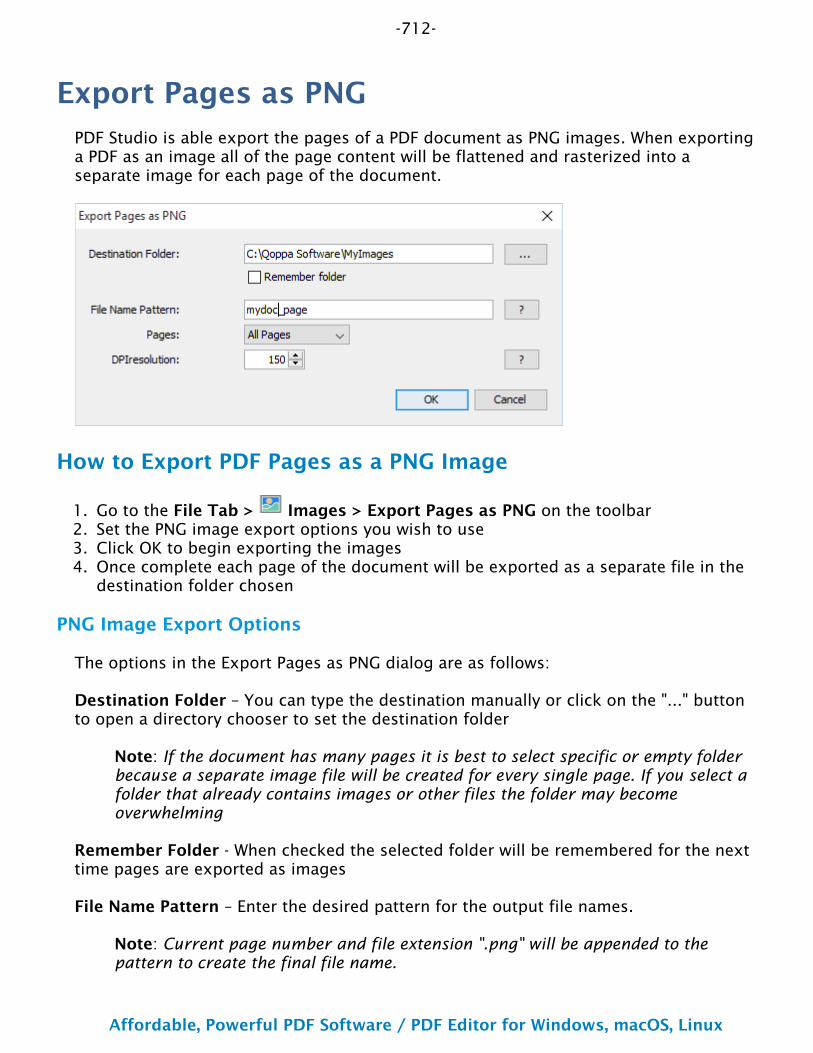
-712-
Affordable, Powerful PDF Software / PDF Editor for Windows, macOS, Linux
Copyright © 2002-Present Qoppa Software. All rights reserved.
1.2.3.4.
Export Pages as PNGPDF Studio is able export the pages of a PDF document as PNG images. When exporting a PDF as an image all of the page content will be flattened and rasterized into a separate image for each page of the document.
How to Export PDF Pages as a PNG Image
Go to the File Tab > Images > Export Pages as PNG on the toolbarSet the PNG image export options you wish to useClick OK to begin exporting the imagesOnce complete each page of the document will be exported as a separate file in the destination folder chosen
PNG Image Export Options
The options in the Export Pages as PNG dialog are as follows:
Destination Folder – You can type the destination manually or click on the "..." button to open a directory chooser to set the destination folder
Note: If the document has many pages it is best to select specific or empty folder because a separate image file will be created for every single page. If you select a folder that already contains images or other files the folder may become overwhelming
Remember Folder - When checked the selected folder will be remembered for the next time pages are exported as images
File Name Pattern – Enter the desired pattern for the output file names.
Note: Current page number and file extension ".png" will be appended to the pattern to create the final file name.
-713-
Affordable, Powerful PDF Software / PDF Editor for Windows, macOS, Linux
Copyright © 2002-Present Qoppa Software. All rights reserved.
••••
•••
••••
Pages - The range of pages to be exported as images
All Pages: all pages in the documentPage Range: set the pages to be exported using the From and To optionsEven Pages Only: only export the even pages of the documentOdd Pages Only: only export the odd pages of the document
DPI Resolution – Choose the desired resolution in DPI used to render the page. 72 is the PDF native resolution. When selecting a DPI it's best to follow the below guidelines
Black-and-white documents
Lowest acceptable resolution = 200 DPI (equal to “high” fax quality)Conventional resolution = 300 DPIHighest conventional resolution = 600 DPI
Color documents (and color compression)
Lowest acceptable resolution = 150 DPIConventional resolution = 200 DPIHighest conventional resolution = 300 DPIArchive resolution = 600 DPI
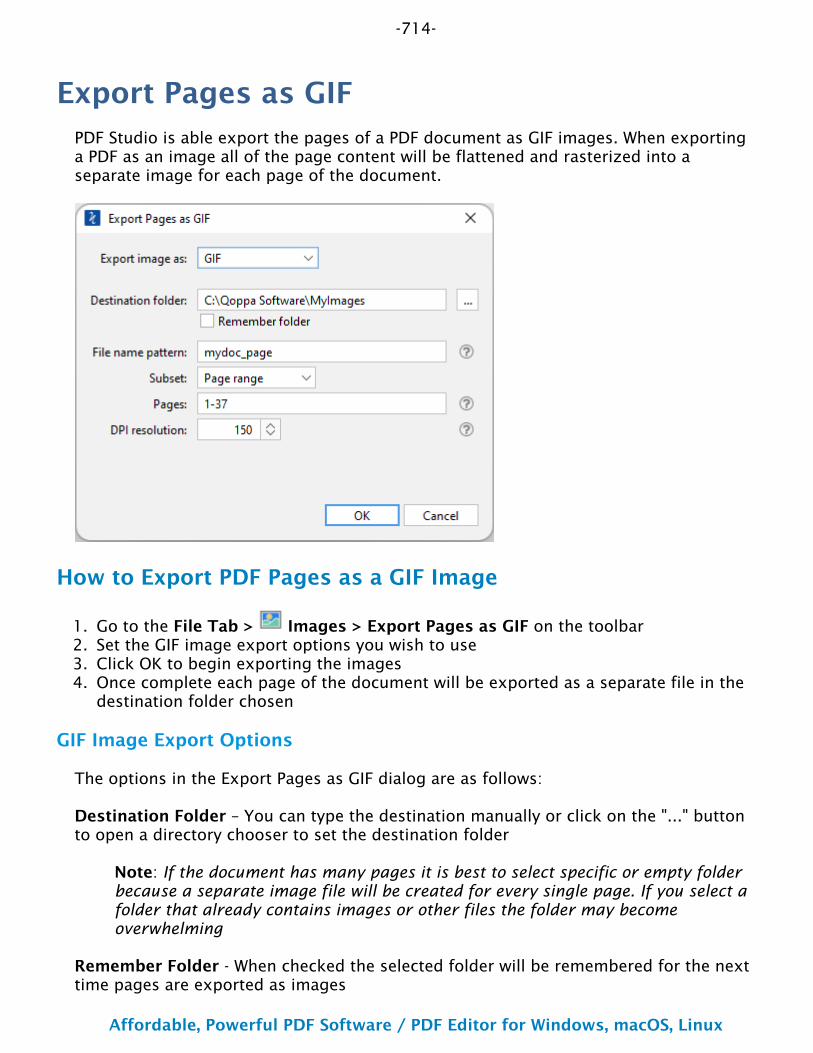
-714-
Affordable, Powerful PDF Software / PDF Editor for Windows, macOS, Linux
Copyright © 2002-Present Qoppa Software. All rights reserved.
1.2.3.4.
Export Pages as GIFPDF Studio is able export the pages of a PDF document as GIF images. When exporting a PDF as an image all of the page content will be flattened and rasterized into a separate image for each page of the document.
How to Export PDF Pages as a GIF Image
Go to the File Tab > Images > Export Pages as GIF on the toolbarSet the GIF image export options you wish to useClick OK to begin exporting the imagesOnce complete each page of the document will be exported as a separate file in the destination folder chosen
GIF Image Export Options
The options in the Export Pages as GIF dialog are as follows:
Destination Folder – You can type the destination manually or click on the "..." button to open a directory chooser to set the destination folder
Note: If the document has many pages it is best to select specific or empty folder because a separate image file will be created for every single page. If you select a folder that already contains images or other files the folder may become overwhelming
Remember Folder - When checked the selected folder will be remembered for the next time pages are exported as images
-715-
Affordable, Powerful PDF Software / PDF Editor for Windows, macOS, Linux
Copyright © 2002-Present Qoppa Software. All rights reserved.
••••
•••
••••
File Name Pattern – Enter the desired pattern for the output file names.
Note: Current page number and file extension ".gif" will be appended to the pattern to create the final file name.
Pages - The range of pages to be exported as images
All Pages: all pages in the documentPage Range: set the pages to be exported using the From and To optionsEven Pages Only: only export the even pages of the documentOdd Pages Only: only export the odd pages of the document
DPI Resolution – Choose the desired resolution in DPI used to render the page. 72 is the PDF native resolution. When selecting a DPI it's best to follow the below guidelines
Black-and-white documents
Lowest acceptable resolution = 200 DPI (equal to “high” fax quality)Conventional resolution = 300 DPIHighest conventional resolution = 600 DPI
Color documents (and color compression)
Lowest acceptable resolution = 150 DPIConventional resolution = 200 DPIHighest conventional resolution = 300 DPIArchive resolution = 600 DPI

-716-
Affordable, Powerful PDF Software / PDF Editor for Windows, macOS, Linux
Copyright © 2002-Present Qoppa Software. All rights reserved.
1.2.3.4.
Export Pages as JPEGPDF Studio is able export the pages of a PDF document as JPEG images. When exporting a PDF as an image all of the page content will be flattened and rasterized into a separate image for each page of the document.
How to Export PDF Pages as a JPEG Image
Go to the File Tab > Images > Export Pages as JPEG on the toolbarSet the JPEG image export options you wish to useClick OK to begin exporting the imagesOnce complete each page of the document will be exported as a separate file in the destination folder chosen
JPEG Image Export Options
The options in the Export Pages as JPEG dialog are as follows:
Destination Folder – You can type the destination manually or click on the "..." button to open a directory chooser to set the destination folder
Note: If the document has many pages it is best to select specific or empty folder because a separate image file will be created for every single page. If you select a folder that already contains images or other files the folder may become overwhelming
Remember Folder - When checked the selected folder will be remembered for the next time pages are exported as images

-717-
Affordable, Powerful PDF Software / PDF Editor for Windows, macOS, Linux
Copyright © 2002-Present Qoppa Software. All rights reserved.
••••
•••
••••
••
File Name Pattern – Enter the desired pattern for the output file names.
Note: Current page number and file extension ".jpg" will be appended to the pattern to create the final file name.
Pages - The range of pages to be exported as images
All Pages: all pages in the documentPage Range: set the pages to be exported using the From and To optionsEven Pages Only: only export the even pages of the documentOdd Pages Only: only export the odd pages of the document
DPI Resolution – Choose the desired resolution in DPI used to render the page. 72 is the PDF native resolution. When selecting a DPI it's best to follow the below guidelines
Black-and-white documents
Lowest acceptable resolution = 200 DPI (equal to “high” fax quality)Conventional resolution = 300 DPIHighest conventional resolution = 600 DPI
Color documents (and color compression)
Lowest acceptable resolution = 150 DPIConventional resolution = 200 DPIHighest conventional resolution = 300 DPIArchive resolution = 600 DPI
JPG Quality – Select the desired quality of JPG compression. Based on the quality parameter. Some guidelines for the quality value: 8 high quality, 5 medium quality, 2 low quality.
0 – very high compression, very low quality10 – low compression, very high quality
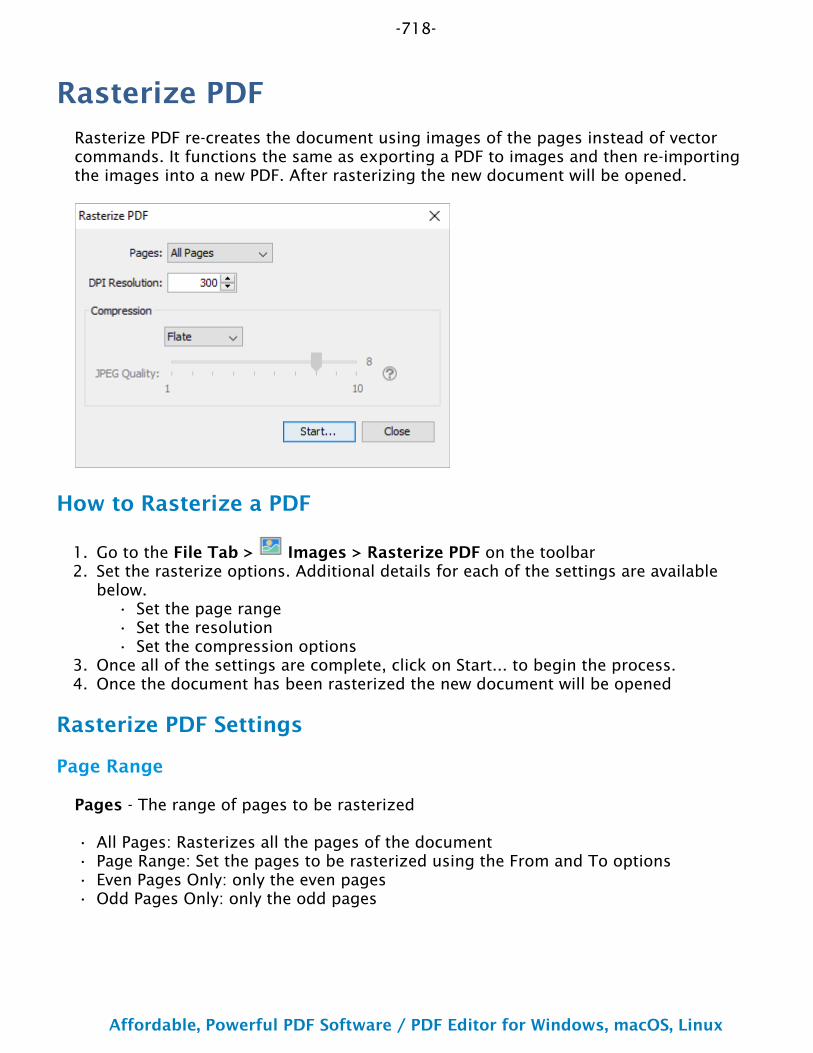
-718-
Affordable, Powerful PDF Software / PDF Editor for Windows, macOS, Linux
Copyright © 2002-Present Qoppa Software. All rights reserved.
1.2.
•••
3.4.
••••
Rasterize PDFRasterize PDF re-creates the document using images of the pages instead of vector commands. It functions the same as exporting a PDF to images and then re-importing the images into a new PDF. After rasterizing the new document will be opened.
How to Rasterize a PDF
Go to the File Tab > Images > Rasterize PDF on the toolbarSet the rasterize options. Additional details for each of the settings are available below.
Set the page rangeSet the resolutionSet the compression options
Once all of the settings are complete, click on Start... to begin the process. Once the document has been rasterized the new document will be opened
Rasterize PDF Settings
Page Range
Pages - The range of pages to be rasterized
All Pages: Rasterizes all the pages of the documentPage Range: Set the pages to be rasterized using the From and To optionsEven Pages Only: only the even pagesOdd Pages Only: only the odd pages
-719-
Affordable, Powerful PDF Software / PDF Editor for Windows, macOS, Linux
Copyright © 2002-Present Qoppa Software. All rights reserved.
•••
•
DPI & Compression
DPI Resolution - Resolution in DPI used to render the page, 72 is the PDF native resolution.
Compression - Sets the image format. Only images compatible with the PDF format can be chosen.
JPEG - lossy compression that will reduce image quality and sizeJPEG2000 - less lossy compression that will reduce size and some qualityFlate - Lossless compression does not reduce quality but may not always reduce file sizeJBIG2 B&W - Lossless compression that can only support black and white color space. Color images will be converted to black and white. Best for scanned documents with no images
JPEG Quality - This is the quality of JPEG compression. It varies from 0 (very high compression, very low quality), to 10 (low compression, very high quality) based on the quality parameter. Some guidelines for the quality value: 8 high quality, 5 medium quality, 2 low quality.
-720-
Affordable, Powerful PDF Software / PDF Editor for Windows, macOS, Linux
Copyright © 2002-Present Qoppa Software. All rights reserved.
1.
2.3.
4.
Extracting Text from PDFPDF Studio is able to extract all text contained within a PDF document. During this process PDF Studio will extract all text in the document and export the raw text data to the .txt file. The text can then be copied into a text editor to be formatted if needed.
Note: The text will be exported with no formatting except for return characters (designates move to the next line). PDF Studio does not currently support exporting PDFs into the Microsoft Word format.
How to Extract Text from a PDF
Open the PDF Document you wish to convert
Go to the Convert Tab > Convert To > Text on the toolbarChoose a file name and location to save the .txt document that will contain the extracted textClick Save to extract the text and to the file selected
Note: Only documents that contain text using font characters can be extracted. If the PDF contains scanned images of documents or text created using Path Content you will first need to OCR the PDF in order to be able to extract text.
-721-
Affordable, Powerful PDF Software / PDF Editor for Windows, macOS, Linux
Copyright © 2002-Present Qoppa Software. All rights reserved.
1.
2.3.4.
Converting a PDF to RTF DocumentPDF Studio is able to converr text contained within a PDF document to an RTF formatted document. During this process PDF Studio will extract only the text data and export it to a new .rtf file. The RTF file can then be edited with any word processor that supports the RTF format.
Note: PDF Studio does not currently support exporting images in RTF conversion.
How to Extract Text from a PDF
Open the PDF Document you wish to convert
Go to the Convert Tab > Convert To > Rich Text on the toolbarChoose a file name and location to save the .rtf documentClick Save to begin the conversion process
Note: Only documents that contain text using font characters can be extracted. If the PDF contains scanned images of documents or text created using Path Content you will first need to OCR the PDF in order to be able to extract text.
-722-
Affordable, Powerful PDF Software / PDF Editor for Windows, macOS, Linux
Copyright © 2002-Present Qoppa Software. All rights reserved.
1.
2.3.
1.
2.3.
4.
Convert PDF to Microsoft Word®PDF Studio allows you to convert PDF documents to a Microsoft Word file using the PDF Studio conversion engine or a direct connection with the Microsoft Office application installed on your computer.
How to Convert a PDF to a Microsoft Word Document
PDF Studio has 2 different methods to convert a PDF document to a Microsoft Word file.
Converting with PDF Studio Conversion Engine
This conversion option uses Qoppa Software's new custom conversion engine. This is a new feature released for 2022 and currently in BETA. Not all PDF features may be supported or created in the new Word file.
Open the PDF Document you wish to convert
Go to the Convert Tab > Convert To > Convert to .docx on the toolbarChoose the location to save the Word file and click OK to begin conversion
Converting with Microsoft Word integration
This conversion option is only available on Windows with a valid version of Microsoft Office installed and requires a valid version of Microsoft Word (2013 or later). See Conversion Preferences for more details.
Open the PDF Document you wish to convert
Go to the Convert Tab > Convert To > Send to MS Word on the toolbarMicrosoft Word will then be launched with the PDF document to complete the conversionOnce converted make sure to save the Word file
-723-
Affordable, Powerful PDF Software / PDF Editor for Windows, macOS, Linux
Copyright © 2002-Present Qoppa Software. All rights reserved.
•••••••
1.2.
•
•3.4.5.
••
••
••
•
Preflight ConversionPDF Studio allows you to convert PDF documents to ISO PDF formats. These document formats were designed so that they will always render or display exactly the same as when they were saved.
Below are the available PDF standards that PDF Studio is able to convert to.
PDF/A-1bPDF/A-2bPDF/A-2uPDF/A-3bPDF/A-3uPDF/X-1a:2003PDF/X-3:2003
How to Convert PDF Documents
Open the PDF Document you wish to convertGo to the Convert Tab on the toolbar and select the profile you wish to use
PDF/A - Archival formats
PDF/X - Print Production & Prepress formatsA dialog will be displayed showing the changes that will be made to the documentChoose a file name and location to save the documentClick Save to convert the document to the selected profile
If any problems occur during preflight conversion, a results list will be displayed showing the content items that could not be fixed. If the conversion completes successfully the problems list will not be shown and the newly converted document will be opened.
Unsupported Features in Preflight Conversion:
Below is a list of features that may cause errors during the conversion.
The PDF document contains non-embedded fonts that do not exist on the systemWorkaround: There is no workaround for fixing this other then recreating the PDF document using different fonts.
The PDF document is secured / encrypted with passwords and permissions.Workaround: Users should clear any security on a document before running Preflight conversion.
The PDF documents has user rights enabled.Workaround: Users should clear user rights before running Preflight conversion.
The PDF document contains a digital signature. Converting to Preflight would invalidate any digital signature.
-724-
Affordable, Powerful PDF Software / PDF Editor for Windows, macOS, Linux
Copyright © 2002-Present Qoppa Software. All rights reserved.
•
•
•
•
•
••
•
Workaround: Users should clear or remove digital signature fields before running Preflight conversion.
The PDF document contains unsupported PDF commands or operators. Often these documents can not render in PDF Studio or will have pages that do not render properly.
Workaround: Users may be able delete the invalid pages.
Preflight Conversion Problems
Results List - Lists any content in the document that was not converted with the selected profile.
- Items that could NOT be fixed by PDF Studio.
- Items that are not PDF/A compliant and that COULD be fixed by Preflight Conversion depending on user settings in Preflight Preferences.
Expand - Expands the results tree to show all preflight error results
Collapse - Collapses the results tree to only show the preflight error categories
Preflight Result Options
Annotations & Reports
After reviewing the conversion problems you can use the following options to add comments or append results to the document. Select the result options you wish to use and then click Apply to add the chosen options.
Add comments for preflight errors - When checked, will add an annotation for each preflight error with the details of the error in the annotation commentInclude report - Choose whether to Append / Prepend a Preflight Results report to the document that was tested.
Export
Preflight results can exported to various formats. To do so click on the export button on the top of the results list. Then choose from one of the following options.
Text - Simple text file (.txt) that will contain all of the preflight report informationXML - File format that is similar to an Excel file that will contain all of the preflight report informationPDF - Creates a new PDF document with the preflight results
-725-
Affordable, Powerful PDF Software / PDF Editor for Windows, macOS, Linux
Copyright © 2002-Present Qoppa Software. All rights reserved.
••
Preflight results can printed if needed. To do so click on the print button on the top of the results list. Then choose from one of the following options.
Text - Plain text list of the preflight resultsTree - Prints the entire tree exactly as it is displayed in the preflight results list
Verify that an Existing Document is Compliant
You can also use the Preflight Verification tool in PDF Studio to verify that the document complies with the various Preflight profiles.

-726-
Affordable, Powerful PDF Software / PDF Editor for Windows, macOS, Linux
Copyright © 2002-Present Qoppa Software. All rights reserved.
•
••••••
1.
2.3.4.5.
Converting PDF to PDF/A-1bPDF Studio has the ability to convert files in the PDF/A-1b format. PDF/A-1b is a strict subset of the ISO PDF specification used to create archival versions of documents with the intent that they will always render exactly the same as when they were saved.
When converting to PDF Studio will attempt to convert the PDF to the PDF/A-1b format by making the following changes to the document
Graphics will be converted to a device-independent format. If any device dependent color spaces are used, they will be defined by embedding a color profile for these color spacesFonts will be embeddedTransparency may be removedUnsupported annotations (e.g., video, audio, 3D) will be removedJavaScript (mostly used in Forms) will be removedAll embedded files and external hyperlinks will be removedForm fields will be flattened
How to Convert a PDF to PDF/A-1b
Open the PDF Document you wish to convert
Go to the Convert Tab > PDF/A > PDF/A-1b on the menuA dialog will be displayed showing the changes that will be made to the documentChoose a file name and location to save the documentClick Save to convert the document to PDF/A-1b
If any problems occur during preflight conversion, a results list will be displayed showing the content items that could not be fixed. If the conversion completes successfuly the problems list will not be shown and the newly converted document will be opened.
PDF/A Conversion Results
PDF Studio will attempt to convert every file but due to the PDF/A-1b requirements some files may not be able to be converted. If the conversion fails a dialog will be displayed showing the reasons that the conversion failed.
Results List - Lists any content in the document that was not converted with the selected profile.
- Items that could NOT be fixed by PDF Studio.
- Items that were not fixed due to user settings in PDF/A Preferences.
Expand - Expands the results tree to show all preflight error results

-727-
Affordable, Powerful PDF Software / PDF Editor for Windows, macOS, Linux
Copyright © 2002-Present Qoppa Software. All rights reserved.
••
••
••
•
•
•
•
1.
2.3.
Collapse - Collapses the results tree to only show the preflight error categories
Print - Prints the entire tree exactly as it is displayed in the preflight results list
Note: When the conversion is successful no dialog will be displayed as the conversion process completed and saved the new document correctly
Unsupported Features in PDF/A-1b Conversion:
Below is a list of features that may cause errors during the PDF/A-1b conversion.
The PDF document contains non-embedded fonts that do not exist on the systemWorkaround: There is no workaround for fixing this other then recreating the PDF document using different fonts.
The PDF document is secured / encrypted with passwords and permissions.Workaround: Users should clear any security on a document before running PDF/A conversion.
The PDF documents has user rights enabled.Workaround: Users should clear user rights before running PDF/A conversion.
The PDF document contains a digital signature. Converting to PDF/A would invalidate any digital signature.
Workaround: Users should clear or remove digital signature fields before running PDF/A conversion.
The PDF document contains unsupported PDF commands or operators. Often these documents can not render in PDF Studio or will have pages that do not render properly.
Workaround: Users may be able delete the invalid pages.
Verify that Existing Document is PDF/A-1b Compliant
Viewing the Document or Document Properties
When opening a document that is PDF/A-1b compliant a blue notification "This document is tagged as PDF/A-1b compliant" will be displayed at the bottom of the PDF Studio window. You can also confirm the PDF/A-1b compliance in the document properties dialog.
Go to File Tab > Properties from the menu or using the shortcut keys Ctrl + D (Cmd + D on Mac).Click on the General TabIn the lower right corner of the general document properties there will be a "PDF/A" label that will show "Yes" if the document meets the PDF/A-1b compliance standards
Using Preflight Verification
You can also use the PDF/A-1b Preflight Validation to verify that the document complies with the PDF/A-1b standards

-728-
Affordable, Powerful PDF Software / PDF Editor for Windows, macOS, Linux
Copyright © 2002-Present Qoppa Software. All rights reserved.
-729-
Affordable, Powerful PDF Software / PDF Editor for Windows, macOS, Linux
Copyright © 2002-Present Qoppa Software. All rights reserved.
•
••••••
1.
2.3.4.5.
Converting PDF to PDF/A-2bPDF Studio has the ability to convert files in the PDF/A-2b format. PDF/A-2b is a strict subset of the ISO PDF specification used to create archival versions of documents with the intent that they will always render exactly the same as when they were saved.
When converting to PDF Studio will attempt to convert the PDF to the PDF/A-2b format by making the following changes to the document
Graphics will be converted to a device-independent format. If any device dependent color spaces are used, they will be defined by embedding a color profile for these color spacesFonts will be embeddedTransparency may be removedUnsupported annotations (e.g., video, audio, 3D) will be removedJavaScript (mostly used in Forms) will be removedNon-PDF/A embedded files and external hyperlinks will be removedForm fields will be flattened
How to Convert a PDF to PDF/A-2b
Open the PDF Document you wish to convert
Go to the Convert Tab > PDF/A > PDF/A-2b on the menuA dialog will be displayed showing the changes that will be made to the documentChoose a file name and location to save the documentClick Save to convert the document to PDF/A-2b
If any problems occur during preflight conversion, a results list will be displayed showing the content items that could not be fixed. If the conversion completes successfuly the problems list will not be shown and the newly converted document will be opened.
PDF/A Conversion Results
PDF Studio will attempt to convert every file but due to the PDF/A-2b requirements some files may not be able to be converted. If the conversion fails a dialog will be displayed showing the reasons that the conversion failed.
Results List - Lists any content in the document that was not converted with the selected profile.
- Items that could NOT be fixed by PDF Studio.
- Items that were not fixed due to user settings in PDF/A Preferences.
Expand - Expands the results tree to show all preflight error results

-730-
Affordable, Powerful PDF Software / PDF Editor for Windows, macOS, Linux
Copyright © 2002-Present Qoppa Software. All rights reserved.
••
••
••
•
•
•
•
1.
2.3.
Collapse - Collapses the results tree to only show the preflight error categories
Print - Prints the entire tree exactly as it is displayed in the preflight results list
Note: When the conversion is successful no dialog will be displayed as the conversion process completed and saved the new document correctly
Unsupported Features in PDF/A-2b Conversion:
Below is a list of features that may cause errors during the PDF/A-2b conversion.
The PDF document contains non-embedded fonts that do not exist on the systemWorkaround: There is no workaround for fixing this other then recreating the PDF document using different fonts.
The PDF document is secured / encrypted with passwords and permissions.Workaround: Users should clear any security on a document before running PDF/A conversion.
The PDF documents has user rights enabled.Workaround: Users should clear user rights before running PDF/A conversion.
The PDF document contains a digital signature. Converting to PDF/A would invalidate any digital signature.
Workaround: Users should clear or remove digital signature fields before running PDF/A conversion.
The PDF document contains unsupported PDF commands or operators. Often these documents can not render in PDF Studio or will have pages that do not render properly.
Workaround: Users may be able delete the invalid pages.
Verify that Existing Document is PDF/A-2b Compliant
Viewing the Document or Document Properties
When opening a document that is PDF/A-2b compliant a blue notification "This document is tagged as PDF/A-2b compliant" will be displayed at the bottom of the PDF Studio window. You can also confirm the PDF/A-2b compliance in the document properties dialog.
Go to File Tab > Properties from the menu or using the shortcut keys Ctrl + D (Cmd + D on Mac).Click on the General TabIn the lower right corner of the general document properties there will be a "PDF/A" label that will show "Yes" if the document meets the PDF/A-2b compliance standards
Using Preflight Verification
You can also use the PDF/A-2b Preflight Validation to verify that the document complies with the PDF/A-2b standards

-731-
Affordable, Powerful PDF Software / PDF Editor for Windows, macOS, Linux
Copyright © 2002-Present Qoppa Software. All rights reserved.

-732-
Affordable, Powerful PDF Software / PDF Editor for Windows, macOS, Linux
Copyright © 2002-Present Qoppa Software. All rights reserved.
•
••••••
1.
2.3.4.5.
Converting PDF to PDF/A-2uPDF Studio has the ability to convert files in the PDF/A-2u format. PDF/A-2u is a strict subset of the ISO PDF specification used to create archival versions of documents with the intent that they will always render exactly the same as when they were saved.
When converting to PDF Studio will attempt to convert the PDF to the PDF/A-2u format by making the following changes to the document
Graphics will be converted to a device-independent format. If any device dependent color spaces are used, they will be defined by embedding a color profile for these color spacesFonts will be embeddedTransparency may be removedUnsupported annotations (e.g., video, audio, 3D) will be removedJavaScript (mostly used in Forms) will be removedNon-PDF/A embedded files and external hyperlinks will be removedForm fields will be flattened
How to Convert a PDF to PDF/A-2u
Open the PDF Document you wish to convert
Go to the Convert Tab > PDF/A > PDF/A-2u on the menuA dialog will be displayed showing the changes that will be made to the documentChoose a file name and location to save the documentClick Save to convert the document to PDF/A-2u
If any problems occur during preflight conversion, a results list will be displayed showing the content items that could not be fixed. If the conversion completes successfuly the problems list will not be shown and the newly converted document will be opened.
PDF/A Conversion Results
PDF Studio will attempt to convert every file but due to the PDF/A-2u requirements some files may not be able to be converted. If the conversion fails a dialog will be displayed showing the reasons that the conversion failed.
Results List - Lists any content in the document that was not converted with the selected profile.
- Items that could NOT be fixed by PDF Studio.
- Items that were not fixed due to user settings in PDF/A Preferences.
Expand - Expands the results tree to show all preflight error results

-733-
Affordable, Powerful PDF Software / PDF Editor for Windows, macOS, Linux
Copyright © 2002-Present Qoppa Software. All rights reserved.
••
••
••
•
•
•
•
1.
2.3.
Collapse - Collapses the results tree to only show the preflight error categories
Print - Prints the entire tree exactly as it is displayed in the preflight results list
Note: When the conversion is successful no dialog will be displayed as the conversion process completed and saved the new document correctly
Unsupported Features in PDF/A-2u Conversion:
Below is a list of features that may cause errors during the PDF/A-2u conversion.
The PDF document contains non-embedded fonts that do not exist on the systemWorkaround: There is no workaround for fixing this other then recreating the PDF document using different fonts.
The PDF document is secured / encrypted with passwords and permissions.Workaround: Users should clear any security on a document before running PDF/A conversion.
The PDF documents has user rights enabled.Workaround: Users should clear user rights before running PDF/A conversion.
The PDF document contains a digital signature. Converting to PDF/A would invalidate any digital signature.
Workaround: Users should clear or remove digital signature fields before running PDF/A conversion.
The PDF document contains unsupported PDF commands or operators. Often these documents can not render in PDF Studio or will have pages that do not render properly.
Workaround: Users may be able delete the invalid pages.
Verify that Existing Document is PDF/A-2u Compliant
Viewing the Document or Document Properties
When opening a document that is PDF/A-2u compliant a blue notification "This document is tagged as PDF/A-2u compliant" will be displayed at the bottom of the PDF Studio window. You can also confirm the PDF/A-2u compliance in the document properties dialog.
Go to File Tab > Properties from the menu or using the shortcut keys Ctrl + D (Cmd + D on Mac).Click on the General TabIn the lower right corner of the general document properties there will be a "PDF/A" label that will show "Yes" if the document meets the PDF/A-2u compliance standards
Using Preflight Verification
You can also use the PDF/A-2u Preflight Validation to verify that the document complies with the PDF/A-2u standards

-734-
Affordable, Powerful PDF Software / PDF Editor for Windows, macOS, Linux
Copyright © 2002-Present Qoppa Software. All rights reserved.
-735-
Affordable, Powerful PDF Software / PDF Editor for Windows, macOS, Linux
Copyright © 2002-Present Qoppa Software. All rights reserved.
•
••••
1.
2.3.4.5.
Converting PDF to PDF/A-3bPDF Studio has the ability to convert files in the PDF/A-3b format. PDF/A-3b is a strict subset of the ISO PDF specification used to create archival versions of documents with the intent that they will always render exactly the same as when they were saved.
When converting to PDF Studio will attempt to convert the PDF to the PDF/A-3b format by making the following changes to the document
Graphics will be converted to a device-independent format. If any device dependent color spaces are used, they will be defined by embedding a color profile for these color spaces.Fonts will be embedded.Unsupported annotations (e.g., video, audio, 3D) will be removed.JavaScript (mostly used in Forms) will be removed.External hyperlinks will be removed.
How to Convert a PDF to PDF/A-3b
Open the PDF Document you wish to convert
Go to the Convert Tab > PDF/A > PDF/A-3b on the menuA dialog will be displayed showing the changes that will be made to the documentChoose a file name and location to save the documentClick Save to convert the document to PDF/A-3b
If any problems occur during preflight conversion, a results list will be displayed showing the content items that could not be fixed. If the conversion completes successfuly the problems list will not be shown and the newly converted document will be opened.
PDF/A Conversion Results
PDF Studio will attempt to convert every file but due to the PDF/A-3b requirements some files may not be able to be converted. If the conversion fails a dialog will be displayed showing the reasons that the conversion failed.
Results List - Lists any content in the document that was not converted with the selected profile.
- Items that could NOT be fixed by PDF Studio.
- Items that were not fixed due to user settings in PDF/A Preferences.
Expand - Expands the results tree to show all preflight error results
Collapse - Collapses the results tree to only show the preflight error categories

-736-
Affordable, Powerful PDF Software / PDF Editor for Windows, macOS, Linux
Copyright © 2002-Present Qoppa Software. All rights reserved.
••
••
••
•
•
•
•
1.
2.3.
Print - Prints the entire tree exactly as it is displayed in the preflight results list
Note: When the conversion is successful no dialog will be displayed as the conversion process completed and saved the new document correctly
Unsupported Features in PDF/A-3b Conversion:
Below is a list of features that may cause errors during the PDF/A-3b conversion.
The PDF document contains non-embedded fonts that do not exist on the systemWorkaround: There is no workaround for fixing this other then recreating the PDF document using different fonts.
The PDF document is secured / encrypted with passwords and permissions.Workaround: Users should clear any security on a document before running PDF/A conversion.
The PDF documents has user rights enabled.Workaround: Users should clear user rights before running PDF/A conversion.
The PDF document contains a digital signature. Converting to PDF/A would invalidate any digital signature.
Workaround: Users should clear or remove digital signature fields before running PDF/A conversion.
The PDF document contains unsupported PDF commands or operators. Often these documents can not render in PDF Studio or will have pages that do not render properly.
Workaround: Users may be able delete the invalid pages.
Verify that Existing Document is PDF/A-3b Compliant
Viewing the Document or Document Properties
When opening a document that is PDF/A-3b compliant a blue notification "This document is tagged as PDF/A-3b compliant" will be displayed at the bottom of the PDF Studio window. You can also confirm the PDF/A-3b compliance in the document properties dialog.
Go to File Tab > Properties from the menu or using the shortcut keys Ctrl + D (Cmd + D on Mac).Click on the General TabIn the lower right corner of the general document properties there will be a "PDF/A" label that will show "Yes" if the document meets the PDF/A-3b compliance standards
Using Preflight Verification
You can also use the PDF/A-3b Preflight Validation to verify that the document complies with the PDF/A-3b standards

-737-
Affordable, Powerful PDF Software / PDF Editor for Windows, macOS, Linux
Copyright © 2002-Present Qoppa Software. All rights reserved.
-738-
Affordable, Powerful PDF Software / PDF Editor for Windows, macOS, Linux
Copyright © 2002-Present Qoppa Software. All rights reserved.
•
••••
1.
2.3.4.5.
Converting PDF to PDF/A-3uPDF Studio has the ability to convert files in the PDF/A-3u format. PDF/A-3u is a strict subset of the ISO PDF specification used to create archival versions of documents with the intent that they will always render exactly the same as when they were saved.
When converting to PDF Studio will attempt to convert the PDF to the PDF/A-3u format by making the following changes to the document
Graphics will be converted to a device-independent format. If any device dependent color spaces are used, they will be defined by embedding a color profile for these color spaces.Fonts will be embedded with Unicode support.Unsupported annotations (e.g., video, audio, 3D) will be removed.JavaScript (mostly used in Forms) will be removed.External hyperlinks will be removed.
How to Convert a PDF to PDF/A-3u
Open the PDF Document you wish to convert
Go to the Convert Tab > PDF/A > PDF/A-3u on the menuA dialog will be displayed showing the changes that will be made to the documentChoose a file name and location to save the documentClick Save to convert the document to PDF/A-3u
If any problems occur during preflight conversion, a results list will be displayed showing the content items that could not be fixed. If the conversion completes successfully the problems list will not be shown and the newly converted document will be opened.
PDF/A Conversion Results
PDF Studio will attempt to convert every file but due to the PDF/A-3u requirements some files may not be able to be converted. If the conversion fails a dialog will be displayed showing the reasons that the conversion failed.
Results List - Lists any content in the document that was not converted with the selected profile.
- Items that could NOT be fixed by PDF Studio.
- Items that were not fixed due to user settings in PDF/A Preferences.
Expand - Expands the results tree to show all preflight error results
Collapse - Collapses the results tree to only show the preflight error categories
-739-
Affordable, Powerful PDF Software / PDF Editor for Windows, macOS, Linux
Copyright © 2002-Present Qoppa Software. All rights reserved.
••
••
••
•
•
•
•
1.
2.3.
Print - Prints the entire tree exactly as it is displayed in the preflight results list
Note: When the conversion is successful no dialog will be displayed as the conversion process completed and saved the new document correctly
Unsupported Features in PDF/A-3u Conversion:
Below is a list of features that may cause errors during the PDF/A-3u conversion.
The PDF document contains non-embedded fonts that do not exist on the systemWorkaround: There is no workaround for fixing this other then recreating the PDF document using different fonts.
The PDF document is secured / encrypted with passwords and permissions.Workaround: Users should clear any security on a document before running PDF/A conversion.
The PDF documents has user rights enabled.Workaround: Users should clear user rights before running PDF/A conversion.
The PDF document contains a digital signature. Converting to PDF/A would invalidate any digital signature.
Workaround: Users should clear or remove digital signature fields before running PDF/A conversion.
The PDF document contains unsupported PDF commands or operators. Often these documents can not render in PDF Studio or will have pages that do not render properly.
Workaround: Users may be able delete the invalid pages.
Verify that Existing Document is PDF/A-3u Compliant
Viewing the Document or Document Properties
When opening a document that is PDF/A-3u compliant a blue notification "This document is tagged as PDF/A-3u compliant" will be displayed at the bottom of the PDF Studio window. You can also confirm the PDF/A-3u compliance in the document properties dialog.
Go to File Tab > Properties from the menu or using the shortcut keys Ctrl + D (Cmd + D on Mac).Click on the General TabIn the lower right corner of the general document properties there will be a "PDF/A" label that will show "Yes" if the document meets the PDF/A-3u compliance standards
Using Preflight Verification
You can also use the PDF/A-3u Preflight Validation to verify that the document complies with the PDF/A-3u standards

-740-
Affordable, Powerful PDF Software / PDF Editor for Windows, macOS, Linux
Copyright © 2002-Present Qoppa Software. All rights reserved.
-741-
Affordable, Powerful PDF Software / PDF Editor for Windows, macOS, Linux
Copyright © 2002-Present Qoppa Software. All rights reserved.
Print Production & PrepressPDF Studio has various Print Production & Prepress functions to verify document compliance and preview print output.
PDF Preflight: Options to analyze the content of a PDF based on a selected profile to determine if the format meets the standards required by the profile as well as convert documents to PDF/A-1b.
Output Preview: Simulates how the PDF will look based on different ICC color profiles to accurately preview how the printed version will look.
PDF Imposition: Advanced Imposition Module that will allow you to preview and create PDF Imposition Layouts.
-742-
Affordable, Powerful PDF Software / PDF Editor for Windows, macOS, Linux
Copyright © 2002-Present Qoppa Software. All rights reserved.
••••••••••••
•••••••
PDF PreflightPDF Studio can both verify document compliance and convert PDFs to meet various ISO PDF archival compliance standards.
Preflight Verification - The following formats can be verified in PDF Studio
PDF/A-1aPDF/A-1bPDF/A-2bPDF/A-2uPDF/A-3bPDF/A-3uPDF/A-3b ZUGFeRDPDF/UAPDF/X-1a:2001PDF/X-1a:2003PDF/X-3:2002PDF/X-3:2003
Preflight Conversion - PDF Studio can convert to the following formats
PDF/A-1bPDF/A-2bPDF/A-2uPDF/A-3bPDF/A-3uPDF/X-1a:2003PDF/X-3:2003
-743-
Affordable, Powerful PDF Software / PDF Editor for Windows, macOS, Linux
Copyright © 2002-Present Qoppa Software. All rights reserved.
••••••••••••
1.
2.
3.4.
Preflight VerificationPDF Studio provides preflight and compliance verification to verify the document meets various archival compliances defined by ISO PDF standards. When verifying documents PDF Studio will generate a report listing the errors. Errors can then be exported or appended to the current PDF if needed.
Below are the available PDF archival standards that PDF Studio is able to verify.
PDF/A-1aPDF/A-1bPDF/A-2bPDF/A-2uPDF/A-3bPDF/A-3uPDF/A-3b ZUGFeRDPDF/UAPDF/X-1a:2001PDF/X-1a:2003PDF/X-3:2002PDF/X-3:2003
How to Run Preflight Verification on a PDF
Open the document you wish to verify
Select Document Tab > Preflight or use the shortcut key Ctrl + Shift + X (Mac: ⌘ + Shift + X) to show the Preflight dialog.Select the standard that you wish to verify.Click on Verify to begin the verification process
Preflight Verification Results
Results List - details the content in the document that is not compliant with the selected profile and whether or not it can be fixed with Preflight Conversion.
- Items that are not compliant and that can NOT be fixed by PDF Studio Preflight Conversion.
- Items that are not PDF/A compliant and that COULD be fixed by Preflight Conversion depending on user settings in PDF/A Preferences .
- Items that are not PDF/A compliant and that WILL be fixed by PDF Studio PDF/A Conversion.
-744-
Affordable, Powerful PDF Software / PDF Editor for Windows, macOS, Linux
Copyright © 2002-Present Qoppa Software. All rights reserved.
•
•
••
•
••
Expand - Expands the results tree to show all preflight error results
Collapse - Collapses the results tree to only show the preflight error categories
Preflight Result Options
Annotations & Reports
Once the validation is completed you can use the following options to add comments or append results to the document. Select the result options you wish to use and then click Apply to add the chosen options.
Add comments for preflight errors - When checked, will add an annotation for each preflight error with the details of the error in the annotation commentInclude report - Choose whether to Append / Prepend a Preflight Results report to the document that was tested.
Export
Preflight results can exported to various formats. To do so click on the export button on the top of the results list. Then choose from one of the following options.
Text - Simple text file (.txt) that will contain all of the preflight report informationXML - File format that is similar to an Excel file that will contain all of the preflight report informationPDF - Creates a new PDF document with the preflight results
Preflight results can printed if needed. To do so click on the print button on the top of the results list. Then choose from one of the following options.
Text - Plain text list of the preflight resultsTree - Prints the entire tree exactly as it is displayed in the preflight results list
-745-
Affordable, Powerful PDF Software / PDF Editor for Windows, macOS, Linux
Copyright © 2002-Present Qoppa Software. All rights reserved.
1.
2.
3.4.
•
•
•
PDF/A-1a ValidationPDF Studio provides PDF/A-1a preflight and compliance verification. Once verification is complete the results can be reviewed, appended to the document or exported if needed.
How to Validate PDF/A-1a Compliance
Open the document you wish to verify
Select Document Tab > Preflight or use the shortcut key Ctrl + Shift + X (Mac: ⌘ + Shift + X) to show the Preflight dialog.Select the standard that you wish to verify.Click on Verify to begin the verification process
Preflight Verification Results
Results List - details the content in the document that is not compliant with the selected profile and whether or not it can be fixed with Preflight Conversion.
- Items that are not compliant and that can NOT be fixed by PDF Studio Preflight Conversion.
Expand - Expands the results tree to show all preflight error results
Collapse - Collapses the results tree to only show the preflight error categories
Preflight Result Options
Annotations & Reports
Once the validation is completed you can use the following options to add comments or append results to the document. Select the result options you wish to use and then click Apply to add the chosen options.
Add comments for preflight errors - When checked, will add an annotation for each preflight error with the details of the error in the annotation commentInclude report - Choose whether to Append / Prepend a Preflight Results report to the document that was tested.
Export
Preflight results can exported to various formats. To do so click on the export button on the top of the results list. Then choose from one of the following options.
Text - Simple text file (.txt) that will contain all of the preflight report information
-746-
Affordable, Powerful PDF Software / PDF Editor for Windows, macOS, Linux
Copyright © 2002-Present Qoppa Software. All rights reserved.
•
•
••
XML - File format that is similar to an Excel file that will contain all of the preflight report informationPDF - Creates a new PDF document with the preflight results
Preflight results can printed if needed. To do so click on the print button on the top of the results list. Then choose from one of the following options.
Text - Plain text list of the preflight resultsTree - Prints the entire tree exactly as it is displayed in the preflight results list
-747-
Affordable, Powerful PDF Software / PDF Editor for Windows, macOS, Linux
Copyright © 2002-Present Qoppa Software. All rights reserved.
1.
2.
3.4.
•
•
PDF/A-1b ValidationPDF Studio provides PDF/A-1b preflight and compliance verification. Once verification is complete the results can be reviewed, appended to the document or exported if needed.
How to Validate PDF/A-1b Compliance
Open the document you wish to verify
Select Document Tab > Preflight or use the shortcut key Ctrl + Shift + X (Mac: ⌘ + Shift + X) to show the Preflight dialog.Select the standard that you wish to verify.Click on Verify to begin the verification process
Preflight Verification Results
Results List - details the content in the document that is not compliant with the selected profile and whether or not it can be fixed with Preflight Conversion.
- Items that are not compliant and that can NOT be fixed by PDF Studio Preflight Conversion.
- Items that are not PDF/A compliant and that COULD be fixed by Preflight Conversion depending on user settings in PDF/A Preferences .
- Items that are not PDF/A compliant and that WILL be fixed by PDF Studio PDF/A Conversion.
Expand - Expands the results tree to show all preflight error results
Collapse - Collapses the results tree to only show the preflight error categories
Preflight Result Options
Annotations & Reports
Once the validation is completed you can use the following options to add comments or append results to the document. Select the result options you wish to use and then click Apply to add the chosen options.
Add comments for preflight errors - When checked, will add an annotation for each preflight error with the details of the error in the annotation commentInclude report - Choose whether to Append / Prepend a Preflight Results report to the document that was tested.

-748-
Affordable, Powerful PDF Software / PDF Editor for Windows, macOS, Linux
Copyright © 2002-Present Qoppa Software. All rights reserved.
••
•
••
Export
Preflight results can exported to various formats. To do so click on the export button on the top of the results list. Then choose from one of the following options.
Text - Simple text file (.txt) that will contain all of the preflight report informationXML - File format that is similar to an Excel file that will contain all of the preflight report informationPDF - Creates a new PDF document with the preflight results
Preflight results can printed if needed. To do so click on the print button on the top of the results list. Then choose from one of the following options.
Text - Plain text list of the preflight resultsTree - Prints the entire tree exactly as it is displayed in the preflight results list

-749-
Affordable, Powerful PDF Software / PDF Editor for Windows, macOS, Linux
Copyright © 2002-Present Qoppa Software. All rights reserved.
1.
2.
3.4.
•
•
PDF/A-2b ValidationPDF Studio provides PDF/A-2b preflight and compliance verification. Once verification is complete the results can be reviewed, appended to the document or exported if needed.
How to Validate PDF/A-2b Compliance
Open the document you wish to verify
Select Document Tab > Preflight or use the shortcut key Ctrl + Shift + X (Mac: ⌘ + Shift + X) to show the Preflight dialog.Select the standard that you wish to verify.Click on Verify to begin the verification process
Preflight Verification Results
Results List - details the content in the document that is not compliant with the selected profile and whether or not it can be fixed with Preflight Conversion.
- Items that are not compliant and that can NOT be fixed by PDF Studio Preflight Conversion.
- Items that are not PDF/A compliant and that COULD be fixed by Preflight Conversion depending on user settings in PDF/A Preferences .
- Items that are not PDF/A compliant and that WILL be fixed by PDF Studio PDF/A Conversion.
Expand - Expands the results tree to show all preflight error results
Collapse - Collapses the results tree to only show the preflight error categories
Preflight Result Options
Annotations & Reports
Once the validation is completed you can use the following options to add comments or append results to the document. Select the result options you wish to use and then click Apply to add the chosen options.
Add comments for preflight errors - When checked, will add an annotation for each preflight error with the details of the error in the annotation commentInclude report - Choose whether to Append / Prepend a Preflight Results report to the document that was tested.
-750-
Affordable, Powerful PDF Software / PDF Editor for Windows, macOS, Linux
Copyright © 2002-Present Qoppa Software. All rights reserved.
••
•
••
Export
Preflight results can exported to various formats. To do so click on the export button on the top of the results list. Then choose from one of the following options.
Text - Simple text file (.txt) that will contain all of the preflight report informationXML - File format that is similar to an Excel file that will contain all of the preflight report informationPDF - Creates a new PDF document with the preflight results
Preflight results can printed if needed. To do so click on the print button on the top of the results list. Then choose from one of the following options.
Text - Plain text list of the preflight resultsTree - Prints the entire tree exactly as it is displayed in the preflight results list

-751-
Affordable, Powerful PDF Software / PDF Editor for Windows, macOS, Linux
Copyright © 2002-Present Qoppa Software. All rights reserved.
1.
2.
3.4.
•
•
PDF/A-2u ValidationPDF Studio provides PDF/A-2u preflight and compliance verification. Once verification is complete the results can be reviewed, appended to the document or exported if needed.
How to Validate PDF/A-2u Compliance
Open the document you wish to verify
Select Document Tab > Preflight or use the shortcut key Ctrl + Shift + X (Mac: ⌘ + Shift + X) to show the Preflight dialog.Select the standard that you wish to verify.Click on Verify to begin the verification process
Preflight Verification Results
Results List - details the content in the document that is not compliant with the selected profile and whether or not it can be fixed with Preflight Conversion.
- Items that are not compliant and that can NOT be fixed by PDF Studio Preflight Conversion.
- Items that are not PDF/A compliant and that COULD be fixed by Preflight Conversion depending on user settings in PDF/A Preferences .
- Items that are not PDF/A compliant and that WILL be fixed by PDF Studio PDF/A Conversion.
Expand - Expands the results tree to show all preflight error results
Collapse - Collapses the results tree to only show the preflight error categories
Preflight Result Options
Annotations & Reports
Once the validation is completed you can use the following options to add comments or append results to the document. Select the result options you wish to use and then click Apply to add the chosen options.
Add comments for preflight errors - When checked, will add an annotation for each preflight error with the details of the error in the annotation commentInclude report - Choose whether to Append / Prepend a Preflight Results report to the document that was tested.
-752-
Affordable, Powerful PDF Software / PDF Editor for Windows, macOS, Linux
Copyright © 2002-Present Qoppa Software. All rights reserved.
••
•
••
Export
Preflight results can exported to various formats. To do so click on the export button on the top of the results list. Then choose from one of the following options.
Text - Simple text file (.txt) that will contain all of the preflight report informationXML - File format that is similar to an Excel file that will contain all of the preflight report informationPDF - Creates a new PDF document with the preflight results
Preflight results can printed if needed. To do so click on the print button on the top of the results list. Then choose from one of the following options.
Text - Plain text list of the preflight resultsTree - Prints the entire tree exactly as it is displayed in the preflight results list

-753-
Affordable, Powerful PDF Software / PDF Editor for Windows, macOS, Linux
Copyright © 2002-Present Qoppa Software. All rights reserved.
1.
2.
3.4.
•
•
PDF/A-3b ValidationPDF Studio provides PDF/A-3b preflight and compliance verification. Once verification is complete the results can be reviewed, appended to the document or exported if needed.
How to Validate PDF/A-3b Compliance
Open the document you wish to verify
Select Document Tab > Preflight or use the shortcut key Ctrl + Shift + X (Mac: ⌘ + Shift + X) to show the Preflight dialog.Select the standard that you wish to verify.Click on Verify to begin the verification process
Preflight Verification Results
Results List - details the content in the document that is not compliant with the selected profile and whether or not it can be fixed with Preflight Conversion.
- Items that are not compliant and that can NOT be fixed by PDF Studio Preflight Conversion.
- Items that are not PDF/A compliant and that COULD be fixed by Preflight Conversion depending on user settings in PDF/A Preferences .
- Items that are not PDF/A compliant and that WILL be fixed by PDF Studio PDF/A Conversion.
Expand - Expands the results tree to show all preflight error results
Collapse - Collapses the results tree to only show the preflight error categories
Preflight Result Options
Annotations & Reports
Once the validation is completed you can use the following options to add comments or append results to the document. Select the result options you wish to use and then click Apply to add the chosen options.
Add comments for preflight errors - When checked, will add an annotation for each preflight error with the details of the error in the annotation commentInclude report - Choose whether to Append / Prepend a Preflight Results report to the document that was tested.

-754-
Affordable, Powerful PDF Software / PDF Editor for Windows, macOS, Linux
Copyright © 2002-Present Qoppa Software. All rights reserved.
••
•
••
Export
Preflight results can exported to various formats. To do so click on the export button on the top of the results list. Then choose from one of the following options.
Text - Simple text file (.txt) that will contain all of the preflight report informationXML - File format that is similar to an Excel file that will contain all of the preflight report informationPDF - Creates a new PDF document with the preflight results
Preflight results can printed if needed. To do so click on the print button on the top of the results list. Then choose from one of the following options.
Text - Plain text list of the preflight resultsTree - Prints the entire tree exactly as it is displayed in the preflight results list

-755-
Affordable, Powerful PDF Software / PDF Editor for Windows, macOS, Linux
Copyright © 2002-Present Qoppa Software. All rights reserved.
1.
2.
3.4.
•
•
PDF/A-3u ValidationPDF Studio provides PDF/A-3u preflight and compliance verification. Once verification is complete the results can be reviewed, appended to the document or exported if needed.
How to Validate PDF/A-3u Compliance
Open the document you wish to verify
Select Document Tab > Preflight or use the shortcut key Ctrl + Shift + X (Mac: ⌘ + Shift + X) to show the Preflight dialog.Select the standard that you wish to verify.Click on Verify to begin the verification process
Preflight Verification Results
Results List - details the content in the document that is not compliant with the selected profile and whether or not it can be fixed with Preflight Conversion.
- Items that are not compliant and that can NOT be fixed by PDF Studio Preflight Conversion.
- Items that are not PDF/A compliant and that COULD be fixed by Preflight Conversion depending on user settings in PDF/A Preferences .
- Items that are not PDF/A compliant and that WILL be fixed by PDF Studio PDF/A Conversion.
Expand - Expands the results tree to show all preflight error results
Collapse - Collapses the results tree to only show the preflight error categories
Preflight Result Options
Annotations & Reports
Once the validation is completed you can use the following options to add comments or append results to the document. Select the result options you wish to use and then click Apply to add the chosen options.
Add comments for preflight errors - When checked, will add an annotation for each preflight error with the details of the error in the annotation commentInclude report - Choose whether to Append / Prepend a Preflight Results report to the document that was tested.

-756-
Affordable, Powerful PDF Software / PDF Editor for Windows, macOS, Linux
Copyright © 2002-Present Qoppa Software. All rights reserved.
••
•
••
Export
Preflight results can exported to various formats. To do so click on the export button on the top of the results list. Then choose from one of the following options.
Text - Simple text file (.txt) that will contain all of the preflight report informationXML - File format that is similar to an Excel file that will contain all of the preflight report informationPDF - Creates a new PDF document with the preflight results
Preflight results can printed if needed. To do so click on the print button on the top of the results list. Then choose from one of the following options.
Text - Plain text list of the preflight resultsTree - Prints the entire tree exactly as it is displayed in the preflight results list
-757-
Affordable, Powerful PDF Software / PDF Editor for Windows, macOS, Linux
Copyright © 2002-Present Qoppa Software. All rights reserved.
1.
2.
3.4.
•
•
•
PDF/A-3b ZUGFeRD ValidationPDF Studio provides PDF/A-3b ZUGFeRD preflight and compliance verification. Once verification is complete the results can be reviewed, appended to the document or exported if needed.
How to Validate PDF/A-3b ZUGFeRD Compliance
Open the document you wish to verify
Select Document Tab > Preflight or use the shortcut key Ctrl + Shift + X (Mac: ⌘ + Shift + X) to show the Preflight dialog.Select the standard that you wish to verify.Click on Verify to begin the verification process
Preflight Verification Results
Results List - details the content in the document that is not compliant with the selected profile and whether or not it can be fixed with Preflight Conversion.
- Items that are not compliant and that can NOT be fixed by PDF Studio Preflight Conversion.
Expand - Expands the results tree to show all preflight error results
Collapse - Collapses the results tree to only show the preflight error categories
Preflight Result Options
Annotations & Reports
Once the validation is completed you can use the following options to add comments or append results to the document. Select the result options you wish to use and then click Apply to add the chosen options.
Add comments for preflight errors - When checked, will add an annotation for each preflight error with the details of the error in the annotation commentInclude report - Choose whether to Append / Prepend a Preflight Results report to the document that was tested.
Export
Preflight results can exported to various formats. To do so click on the export button on the top of the results list. Then choose from one of the following options.
Text - Simple text file (.txt) that will contain all of the preflight report information

-758-
Affordable, Powerful PDF Software / PDF Editor for Windows, macOS, Linux
Copyright © 2002-Present Qoppa Software. All rights reserved.
•
•
••
XML - File format that is similar to an Excel file that will contain all of the preflight report informationPDF - Creates a new PDF document with the preflight results
Preflight results can printed if needed. To do so click on the print button on the top of the results list. Then choose from one of the following options.
Text - Plain text list of the preflight resultsTree - Prints the entire tree exactly as it is displayed in the preflight results list

-759-
Affordable, Powerful PDF Software / PDF Editor for Windows, macOS, Linux
Copyright © 2002-Present Qoppa Software. All rights reserved.
1.
2.
3.4.
•
•
•
PDF/UA ValidationPDF Studio provides PDF/UA (PDF User Accessibility) preflight and compliance verification. Once verification is complete the results can be reviewed, appended to the document or exported if needed. See What is PDF Accessibility for more information.
How to Validate PDF/UA Compliance
Open the document you wish to verify
Select Document Tab > Preflight or use the shortcut key Ctrl + Shift + X (Mac: ⌘ + Shift + X) to show the Preflight dialog.Select the standard that you wish to verify.Click on Verify to begin the verification process
Preflight Verification Results
Results List - details the content in the document that is not compliant with the selected profile and whether or not it can be fixed with Preflight Conversion.
- Items that are not compliant and that can NOT be fixed by PDF Studio Preflight Conversion.
Expand - Expands the results tree to show all preflight error results
Collapse - Collapses the results tree to only show the preflight error categories
Preflight Result Options
Annotations & Reports
Once the validation is completed you can use the following options to add comments or append results to the document. Select the result options you wish to use and then click Apply to add the chosen options.
Add comments for preflight errors - When checked, will add an annotation for each preflight error with the details of the error in the annotation commentInclude report - Choose whether to Append / Prepend a Preflight Results report to the document that was tested.
Export
Preflight results can exported to various formats. To do so click on the export button on the top of the results list. Then choose from one of the following options.
Text - Simple text file (.txt) that will contain all of the preflight report information
-760-
Affordable, Powerful PDF Software / PDF Editor for Windows, macOS, Linux
Copyright © 2002-Present Qoppa Software. All rights reserved.
•
•
••
XML - File format that is similar to an Excel file that will contain all of the preflight report informationPDF - Creates a new PDF document with the preflight results
Preflight results can printed if needed. To do so click on the print button on the top of the results list. Then choose from one of the following options.
Text - Plain text list of the preflight resultsTree - Prints the entire tree exactly as it is displayed in the preflight results list

-761-
Affordable, Powerful PDF Software / PDF Editor for Windows, macOS, Linux
Copyright © 2002-Present Qoppa Software. All rights reserved.
1.
2.
3.4.
•
•
•
PDF/X-1a:2001 – ISO 15930-1 ValidationPDF Studio provides PDF/X-1a:2001 – ISO 15930-1 preflight and compliance verification. Once verification is complete the results can be reviewed, appended to the document or exported if needed.
How to Validate PDF/X-1a:2001 – ISO 15930-1 Compliance
Open the document you wish to verify
Select Document Tab > Preflight or use the shortcut key Ctrl + Shift + X (Mac: ⌘ + Shift + X) to show the Preflight dialog.Select the standard that you wish to verify.Click on Verify to begin the verification process
Preflight Verification Results
Results List - details the content in the document that is not compliant with the selected profile and whether or not it can be fixed with Preflight Conversion.
- Items that are not compliant and that can NOT be fixed by PDF Studio Preflight Conversion.
Expand - Expands the results tree to show all preflight error results
Collapse - Collapses the results tree to only show the preflight error categories
Preflight Result Options
Annotations & Reports
Once the validation is completed you can use the following options to add comments or append results to the document. Select the result options you wish to use and then click Apply to add the chosen options.
Add comments for preflight errors - When checked, will add an annotation for each preflight error with the details of the error in the annotation commentInclude report - Choose whether to Append / Prepend a Preflight Results report to the document that was tested.
Export
Preflight results can exported to various formats. To do so click on the export button on the top of the results list. Then choose from one of the following options.
Text - Simple text file (.txt) that will contain all of the preflight report information

-762-
Affordable, Powerful PDF Software / PDF Editor for Windows, macOS, Linux
Copyright © 2002-Present Qoppa Software. All rights reserved.
•
•
••
XML - File format that is similar to an Excel file that will contain all of the preflight report informationPDF - Creates a new PDF document with the preflight results
Preflight results can printed if needed. To do so click on the print button on the top of the results list. Then choose from one of the following options.
Text - Plain text list of the preflight resultsTree - Prints the entire tree exactly as it is displayed in the preflight results list
-763-
Affordable, Powerful PDF Software / PDF Editor for Windows, macOS, Linux
Copyright © 2002-Present Qoppa Software. All rights reserved.
1.
2.
3.4.
•
•
•
PDF/X-1a:2003 – ISO 15930-4 ValidationPDF Studio provides PDF/X-1a:2003 – ISO 15930-4 preflight and compliance verification. Once verification is complete the results can be reviewed, appended to the document or exported if needed.
How to Validate PDF/X-1a:2003 – ISO 15930-4 Compliance
Open the document you wish to verify
Select Document Tab > Preflight or use the shortcut key Ctrl + Shift + X (Mac: ⌘ + Shift + X) to show the Preflight dialog.Select the standard that you wish to verify.Click on Verify to begin the verification process
Preflight Verification Results
Results List - details the content in the document that is not compliant with the selected profile and whether or not it can be fixed with Preflight Conversion.
- Items that are not compliant and that can NOT be fixed by PDF Studio Preflight Conversion.
Expand - Expands the results tree to show all preflight error results
Collapse - Collapses the results tree to only show the preflight error categories
Preflight Result Options
Annotations & Reports
Once the validation is completed you can use the following options to add comments or append results to the document. Select the result options you wish to use and then click Apply to add the chosen options.
Add comments for preflight errors - When checked, will add an annotation for each preflight error with the details of the error in the annotation commentInclude report - Choose whether to Append / Prepend a Preflight Results report to the document that was tested.
Export
Preflight results can exported to various formats. To do so click on the export button on the top of the results list. Then choose from one of the following options.
Text - Simple text file (.txt) that will contain all of the preflight report information
-764-
Affordable, Powerful PDF Software / PDF Editor for Windows, macOS, Linux
Copyright © 2002-Present Qoppa Software. All rights reserved.
•
•
••
XML - File format that is similar to an Excel file that will contain all of the preflight report informationPDF - Creates a new PDF document with the preflight results
Preflight results can printed if needed. To do so click on the print button on the top of the results list. Then choose from one of the following options.
Text - Plain text list of the preflight resultsTree - Prints the entire tree exactly as it is displayed in the preflight results list
-765-
Affordable, Powerful PDF Software / PDF Editor for Windows, macOS, Linux
Copyright © 2002-Present Qoppa Software. All rights reserved.
1.
2.
3.4.
•
•
•
PDF/X-3:2002 – ISO 15930-3 ValidationPDF Studio provides PDF/X-3:2002 – ISO 15930-3 preflight and compliance verification. Once verification is complete the results can be reviewed, appended to the document or exported if needed.
How to Validate PDF/X-3:2002 – ISO 15930-3 Compliance
Open the document you wish to verify
Select Document Tab > Preflight or use the shortcut key Ctrl + Shift + X (Mac: ⌘ + Shift + X) to show the Preflight dialog.Select the standard that you wish to verify.Click on Verify to begin the verification process
Preflight Verification Results
Results List - details the content in the document that is not compliant with the selected profile and whether or not it can be fixed with Preflight Conversion.
- Items that are not compliant and that can NOT be fixed by PDF Studio Preflight Conversion.
Expand - Expands the results tree to show all preflight error results
Collapse - Collapses the results tree to only show the preflight error categories
Preflight Result Options
Annotations & Reports
Once the validation is completed you can use the following options to add comments or append results to the document. Select the result options you wish to use and then click Apply to add the chosen options.
Add comments for preflight errors - When checked, will add an annotation for each preflight error with the details of the error in the annotation commentInclude report - Choose whether to Append / Prepend a Preflight Results report to the document that was tested.
Export
Preflight results can exported to various formats. To do so click on the export button on the top of the results list. Then choose from one of the following options.
Text - Simple text file (.txt) that will contain all of the preflight report information

-766-
Affordable, Powerful PDF Software / PDF Editor for Windows, macOS, Linux
Copyright © 2002-Present Qoppa Software. All rights reserved.
•
•
••
XML - File format that is similar to an Excel file that will contain all of the preflight report informationPDF - Creates a new PDF document with the preflight results
Preflight results can printed if needed. To do so click on the print button on the top of the results list. Then choose from one of the following options.
Text - Plain text list of the preflight resultsTree - Prints the entire tree exactly as it is displayed in the preflight results list
-767-
Affordable, Powerful PDF Software / PDF Editor for Windows, macOS, Linux
Copyright © 2002-Present Qoppa Software. All rights reserved.
1.
2.
3.4.
•
•
•
PDF/X-3:2003 – ISO 15930-6 ValidationPDF Studio provides PDF/X-3:2003 – ISO 15930-6 preflight and compliance verification. Once verification is complete the results can be reviewed, appended to the document or exported if needed.
How to Validate PDF/X-3:2003 – ISO 15930-6 Compliance
Open the document you wish to verify
Select Document Tab > Preflight or use the shortcut key Ctrl + Shift + X (Mac: ⌘ + Shift + X) to show the Preflight dialog.Select the standard that you wish to verify.Click on Verify to begin the verification process
Preflight Verification Results
Results List - details the content in the document that is not compliant with the selected profile and whether or not it can be fixed with Preflight Conversion.
- Items that are not compliant and that can NOT be fixed by PDF Studio Preflight Conversion.
Expand - Expands the results tree to show all preflight error results
Collapse - Collapses the results tree to only show the preflight error categories
Preflight Result Options
Annotations & Reports
Once the validation is completed you can use the following options to add comments or append results to the document. Select the result options you wish to use and then click Apply to add the chosen options.
Add comments for preflight errors - When checked, will add an annotation for each preflight error with the details of the error in the annotation commentInclude report - Choose whether to Append / Prepend a Preflight Results report to the document that was tested.
Export
Preflight results can exported to various formats. To do so click on the export button on the top of the results list. Then choose from one of the following options.
Text - Simple text file (.txt) that will contain all of the preflight report information

-768-
Affordable, Powerful PDF Software / PDF Editor for Windows, macOS, Linux
Copyright © 2002-Present Qoppa Software. All rights reserved.
•
•
••
XML - File format that is similar to an Excel file that will contain all of the preflight report informationPDF - Creates a new PDF document with the preflight results
Preflight results can printed if needed. To do so click on the print button on the top of the results list. Then choose from one of the following options.
Text - Plain text list of the preflight resultsTree - Prints the entire tree exactly as it is displayed in the preflight results list
-769-
Affordable, Powerful PDF Software / PDF Editor for Windows, macOS, Linux
Copyright © 2002-Present Qoppa Software. All rights reserved.
•••••••
1.2.
•
•3.4.5.
••
••
••
•
Preflight ConversionPDF Studio allows you to convert PDF documents to ISO PDF formats. These document formats were designed so that they will always render or display exactly the same as when they were saved.
Below are the available PDF standards that PDF Studio is able to convert to.
PDF/A-1bPDF/A-2bPDF/A-2uPDF/A-3bPDF/A-3uPDF/X-1a:2003PDF/X-3:2003
How to Convert PDF Documents
Open the PDF Document you wish to convertGo to the Convert Tab on the toolbar and select the profile you wish to use
PDF/A - Archival formats
PDF/X - Print Production & Prepress formatsA dialog will be displayed showing the changes that will be made to the documentChoose a file name and location to save the documentClick Save to convert the document to the selected profile
If any problems occur during preflight conversion, a results list will be displayed showing the content items that could not be fixed. If the conversion completes successfully the problems list will not be shown and the newly converted document will be opened.
Unsupported Features in Preflight Conversion:
Below is a list of features that may cause errors during the conversion.
The PDF document contains non-embedded fonts that do not exist on the systemWorkaround: There is no workaround for fixing this other then recreating the PDF document using different fonts.
The PDF document is secured / encrypted with passwords and permissions.Workaround: Users should clear any security on a document before running Preflight conversion.
The PDF documents has user rights enabled.Workaround: Users should clear user rights before running Preflight conversion.
The PDF document contains a digital signature. Converting to Preflight would invalidate any digital signature.

-770-
Affordable, Powerful PDF Software / PDF Editor for Windows, macOS, Linux
Copyright © 2002-Present Qoppa Software. All rights reserved.
•
•
•
•
•
••
•
Workaround: Users should clear or remove digital signature fields before running Preflight conversion.
The PDF document contains unsupported PDF commands or operators. Often these documents can not render in PDF Studio or will have pages that do not render properly.
Workaround: Users may be able delete the invalid pages.
Preflight Conversion Problems
Results List - Lists any content in the document that was not converted with the selected profile.
- Items that could NOT be fixed by PDF Studio.
- Items that are not PDF/A compliant and that COULD be fixed by Preflight Conversion depending on user settings in Preflight Preferences.
Expand - Expands the results tree to show all preflight error results
Collapse - Collapses the results tree to only show the preflight error categories
Preflight Result Options
Annotations & Reports
After reviewing the conversion problems you can use the following options to add comments or append results to the document. Select the result options you wish to use and then click Apply to add the chosen options.
Add comments for preflight errors - When checked, will add an annotation for each preflight error with the details of the error in the annotation commentInclude report - Choose whether to Append / Prepend a Preflight Results report to the document that was tested.
Export
Preflight results can exported to various formats. To do so click on the export button on the top of the results list. Then choose from one of the following options.
Text - Simple text file (.txt) that will contain all of the preflight report informationXML - File format that is similar to an Excel file that will contain all of the preflight report informationPDF - Creates a new PDF document with the preflight results
-771-
Affordable, Powerful PDF Software / PDF Editor for Windows, macOS, Linux
Copyright © 2002-Present Qoppa Software. All rights reserved.
••
Preflight results can printed if needed. To do so click on the print button on the top of the results list. Then choose from one of the following options.
Text - Plain text list of the preflight resultsTree - Prints the entire tree exactly as it is displayed in the preflight results list
Verify that an Existing Document is Compliant
You can also use the Preflight Verification tool in PDF Studio to verify that the document complies with the various Preflight profiles.
-772-
Affordable, Powerful PDF Software / PDF Editor for Windows, macOS, Linux
Copyright © 2002-Present Qoppa Software. All rights reserved.
•
••••••
1.
2.3.4.5.
Converting PDF to PDF/A-1bPDF Studio has the ability to convert files in the PDF/A-1b format. PDF/A-1b is a strict subset of the ISO PDF specification used to create archival versions of documents with the intent that they will always render exactly the same as when they were saved.
When converting to PDF Studio will attempt to convert the PDF to the PDF/A-1b format by making the following changes to the document
Graphics will be converted to a device-independent format. If any device dependent color spaces are used, they will be defined by embedding a color profile for these color spacesFonts will be embeddedTransparency may be removedUnsupported annotations (e.g., video, audio, 3D) will be removedJavaScript (mostly used in Forms) will be removedAll embedded files and external hyperlinks will be removedForm fields will be flattened
How to Convert a PDF to PDF/A-1b
Open the PDF Document you wish to convert
Go to the Convert Tab > PDF/A > PDF/A-1b on the menuA dialog will be displayed showing the changes that will be made to the documentChoose a file name and location to save the documentClick Save to convert the document to PDF/A-1b
If any problems occur during preflight conversion, a results list will be displayed showing the content items that could not be fixed. If the conversion completes successfuly the problems list will not be shown and the newly converted document will be opened.
PDF/A Conversion Results
PDF Studio will attempt to convert every file but due to the PDF/A-1b requirements some files may not be able to be converted. If the conversion fails a dialog will be displayed showing the reasons that the conversion failed.
Results List - Lists any content in the document that was not converted with the selected profile.
- Items that could NOT be fixed by PDF Studio.
- Items that were not fixed due to user settings in PDF/A Preferences.
Expand - Expands the results tree to show all preflight error results
-773-
Affordable, Powerful PDF Software / PDF Editor for Windows, macOS, Linux
Copyright © 2002-Present Qoppa Software. All rights reserved.
••
••
••
•
•
•
•
1.
2.3.
Collapse - Collapses the results tree to only show the preflight error categories
Print - Prints the entire tree exactly as it is displayed in the preflight results list
Note: When the conversion is successful no dialog will be displayed as the conversion process completed and saved the new document correctly
Unsupported Features in PDF/A-1b Conversion:
Below is a list of features that may cause errors during the PDF/A-1b conversion.
The PDF document contains non-embedded fonts that do not exist on the systemWorkaround: There is no workaround for fixing this other then recreating the PDF document using different fonts.
The PDF document is secured / encrypted with passwords and permissions.Workaround: Users should clear any security on a document before running PDF/A conversion.
The PDF documents has user rights enabled.Workaround: Users should clear user rights before running PDF/A conversion.
The PDF document contains a digital signature. Converting to PDF/A would invalidate any digital signature.
Workaround: Users should clear or remove digital signature fields before running PDF/A conversion.
The PDF document contains unsupported PDF commands or operators. Often these documents can not render in PDF Studio or will have pages that do not render properly.
Workaround: Users may be able delete the invalid pages.
Verify that Existing Document is PDF/A-1b Compliant
Viewing the Document or Document Properties
When opening a document that is PDF/A-1b compliant a blue notification "This document is tagged as PDF/A-1b compliant" will be displayed at the bottom of the PDF Studio window. You can also confirm the PDF/A-1b compliance in the document properties dialog.
Go to File Tab > Properties from the menu or using the shortcut keys Ctrl + D (Cmd + D on Mac).Click on the General TabIn the lower right corner of the general document properties there will be a "PDF/A" label that will show "Yes" if the document meets the PDF/A-1b compliance standards
Using Preflight Verification
You can also use the PDF/A-1b Preflight Validation to verify that the document complies with the PDF/A-1b standards

-774-
Affordable, Powerful PDF Software / PDF Editor for Windows, macOS, Linux
Copyright © 2002-Present Qoppa Software. All rights reserved.

-775-
Affordable, Powerful PDF Software / PDF Editor for Windows, macOS, Linux
Copyright © 2002-Present Qoppa Software. All rights reserved.
•
••••••
1.
2.3.4.5.
Converting PDF to PDF/A-2bPDF Studio has the ability to convert files in the PDF/A-2b format. PDF/A-2b is a strict subset of the ISO PDF specification used to create archival versions of documents with the intent that they will always render exactly the same as when they were saved.
When converting to PDF Studio will attempt to convert the PDF to the PDF/A-2b format by making the following changes to the document
Graphics will be converted to a device-independent format. If any device dependent color spaces are used, they will be defined by embedding a color profile for these color spacesFonts will be embeddedTransparency may be removedUnsupported annotations (e.g., video, audio, 3D) will be removedJavaScript (mostly used in Forms) will be removedNon-PDF/A embedded files and external hyperlinks will be removedForm fields will be flattened
How to Convert a PDF to PDF/A-2b
Open the PDF Document you wish to convert
Go to the Convert Tab > PDF/A > PDF/A-2b on the menuA dialog will be displayed showing the changes that will be made to the documentChoose a file name and location to save the documentClick Save to convert the document to PDF/A-2b
If any problems occur during preflight conversion, a results list will be displayed showing the content items that could not be fixed. If the conversion completes successfuly the problems list will not be shown and the newly converted document will be opened.
PDF/A Conversion Results
PDF Studio will attempt to convert every file but due to the PDF/A-2b requirements some files may not be able to be converted. If the conversion fails a dialog will be displayed showing the reasons that the conversion failed.
Results List - Lists any content in the document that was not converted with the selected profile.
- Items that could NOT be fixed by PDF Studio.
- Items that were not fixed due to user settings in PDF/A Preferences.
Expand - Expands the results tree to show all preflight error results
-776-
Affordable, Powerful PDF Software / PDF Editor for Windows, macOS, Linux
Copyright © 2002-Present Qoppa Software. All rights reserved.
••
••
••
•
•
•
•
1.
2.3.
Collapse - Collapses the results tree to only show the preflight error categories
Print - Prints the entire tree exactly as it is displayed in the preflight results list
Note: When the conversion is successful no dialog will be displayed as the conversion process completed and saved the new document correctly
Unsupported Features in PDF/A-2b Conversion:
Below is a list of features that may cause errors during the PDF/A-2b conversion.
The PDF document contains non-embedded fonts that do not exist on the systemWorkaround: There is no workaround for fixing this other then recreating the PDF document using different fonts.
The PDF document is secured / encrypted with passwords and permissions.Workaround: Users should clear any security on a document before running PDF/A conversion.
The PDF documents has user rights enabled.Workaround: Users should clear user rights before running PDF/A conversion.
The PDF document contains a digital signature. Converting to PDF/A would invalidate any digital signature.
Workaround: Users should clear or remove digital signature fields before running PDF/A conversion.
The PDF document contains unsupported PDF commands or operators. Often these documents can not render in PDF Studio or will have pages that do not render properly.
Workaround: Users may be able delete the invalid pages.
Verify that Existing Document is PDF/A-2b Compliant
Viewing the Document or Document Properties
When opening a document that is PDF/A-2b compliant a blue notification "This document is tagged as PDF/A-2b compliant" will be displayed at the bottom of the PDF Studio window. You can also confirm the PDF/A-2b compliance in the document properties dialog.
Go to File Tab > Properties from the menu or using the shortcut keys Ctrl + D (Cmd + D on Mac).Click on the General TabIn the lower right corner of the general document properties there will be a "PDF/A" label that will show "Yes" if the document meets the PDF/A-2b compliance standards
Using Preflight Verification
You can also use the PDF/A-2b Preflight Validation to verify that the document complies with the PDF/A-2b standards

-777-
Affordable, Powerful PDF Software / PDF Editor for Windows, macOS, Linux
Copyright © 2002-Present Qoppa Software. All rights reserved.
-778-
Affordable, Powerful PDF Software / PDF Editor for Windows, macOS, Linux
Copyright © 2002-Present Qoppa Software. All rights reserved.
•
••••••
1.
2.3.4.5.
Converting PDF to PDF/A-2uPDF Studio has the ability to convert files in the PDF/A-2u format. PDF/A-2u is a strict subset of the ISO PDF specification used to create archival versions of documents with the intent that they will always render exactly the same as when they were saved.
When converting to PDF Studio will attempt to convert the PDF to the PDF/A-2u format by making the following changes to the document
Graphics will be converted to a device-independent format. If any device dependent color spaces are used, they will be defined by embedding a color profile for these color spacesFonts will be embeddedTransparency may be removedUnsupported annotations (e.g., video, audio, 3D) will be removedJavaScript (mostly used in Forms) will be removedNon-PDF/A embedded files and external hyperlinks will be removedForm fields will be flattened
How to Convert a PDF to PDF/A-2u
Open the PDF Document you wish to convert
Go to the Convert Tab > PDF/A > PDF/A-2u on the menuA dialog will be displayed showing the changes that will be made to the documentChoose a file name and location to save the documentClick Save to convert the document to PDF/A-2u
If any problems occur during preflight conversion, a results list will be displayed showing the content items that could not be fixed. If the conversion completes successfuly the problems list will not be shown and the newly converted document will be opened.
PDF/A Conversion Results
PDF Studio will attempt to convert every file but due to the PDF/A-2u requirements some files may not be able to be converted. If the conversion fails a dialog will be displayed showing the reasons that the conversion failed.
Results List - Lists any content in the document that was not converted with the selected profile.
- Items that could NOT be fixed by PDF Studio.
- Items that were not fixed due to user settings in PDF/A Preferences.
Expand - Expands the results tree to show all preflight error results
-779-
Affordable, Powerful PDF Software / PDF Editor for Windows, macOS, Linux
Copyright © 2002-Present Qoppa Software. All rights reserved.
••
••
••
•
•
•
•
1.
2.3.
Collapse - Collapses the results tree to only show the preflight error categories
Print - Prints the entire tree exactly as it is displayed in the preflight results list
Note: When the conversion is successful no dialog will be displayed as the conversion process completed and saved the new document correctly
Unsupported Features in PDF/A-2u Conversion:
Below is a list of features that may cause errors during the PDF/A-2u conversion.
The PDF document contains non-embedded fonts that do not exist on the systemWorkaround: There is no workaround for fixing this other then recreating the PDF document using different fonts.
The PDF document is secured / encrypted with passwords and permissions.Workaround: Users should clear any security on a document before running PDF/A conversion.
The PDF documents has user rights enabled.Workaround: Users should clear user rights before running PDF/A conversion.
The PDF document contains a digital signature. Converting to PDF/A would invalidate any digital signature.
Workaround: Users should clear or remove digital signature fields before running PDF/A conversion.
The PDF document contains unsupported PDF commands or operators. Often these documents can not render in PDF Studio or will have pages that do not render properly.
Workaround: Users may be able delete the invalid pages.
Verify that Existing Document is PDF/A-2u Compliant
Viewing the Document or Document Properties
When opening a document that is PDF/A-2u compliant a blue notification "This document is tagged as PDF/A-2u compliant" will be displayed at the bottom of the PDF Studio window. You can also confirm the PDF/A-2u compliance in the document properties dialog.
Go to File Tab > Properties from the menu or using the shortcut keys Ctrl + D (Cmd + D on Mac).Click on the General TabIn the lower right corner of the general document properties there will be a "PDF/A" label that will show "Yes" if the document meets the PDF/A-2u compliance standards
Using Preflight Verification
You can also use the PDF/A-2u Preflight Validation to verify that the document complies with the PDF/A-2u standards

-780-
Affordable, Powerful PDF Software / PDF Editor for Windows, macOS, Linux
Copyright © 2002-Present Qoppa Software. All rights reserved.

-781-
Affordable, Powerful PDF Software / PDF Editor for Windows, macOS, Linux
Copyright © 2002-Present Qoppa Software. All rights reserved.
•
••••
1.
2.3.4.5.
Converting PDF to PDF/A-3bPDF Studio has the ability to convert files in the PDF/A-3b format. PDF/A-3b is a strict subset of the ISO PDF specification used to create archival versions of documents with the intent that they will always render exactly the same as when they were saved.
When converting to PDF Studio will attempt to convert the PDF to the PDF/A-3b format by making the following changes to the document
Graphics will be converted to a device-independent format. If any device dependent color spaces are used, they will be defined by embedding a color profile for these color spaces.Fonts will be embedded.Unsupported annotations (e.g., video, audio, 3D) will be removed.JavaScript (mostly used in Forms) will be removed.External hyperlinks will be removed.
How to Convert a PDF to PDF/A-3b
Open the PDF Document you wish to convert
Go to the Convert Tab > PDF/A > PDF/A-3b on the menuA dialog will be displayed showing the changes that will be made to the documentChoose a file name and location to save the documentClick Save to convert the document to PDF/A-3b
If any problems occur during preflight conversion, a results list will be displayed showing the content items that could not be fixed. If the conversion completes successfuly the problems list will not be shown and the newly converted document will be opened.
PDF/A Conversion Results
PDF Studio will attempt to convert every file but due to the PDF/A-3b requirements some files may not be able to be converted. If the conversion fails a dialog will be displayed showing the reasons that the conversion failed.
Results List - Lists any content in the document that was not converted with the selected profile.
- Items that could NOT be fixed by PDF Studio.
- Items that were not fixed due to user settings in PDF/A Preferences.
Expand - Expands the results tree to show all preflight error results
Collapse - Collapses the results tree to only show the preflight error categories
-782-
Affordable, Powerful PDF Software / PDF Editor for Windows, macOS, Linux
Copyright © 2002-Present Qoppa Software. All rights reserved.
••
••
••
•
•
•
•
1.
2.3.
Print - Prints the entire tree exactly as it is displayed in the preflight results list
Note: When the conversion is successful no dialog will be displayed as the conversion process completed and saved the new document correctly
Unsupported Features in PDF/A-3b Conversion:
Below is a list of features that may cause errors during the PDF/A-3b conversion.
The PDF document contains non-embedded fonts that do not exist on the systemWorkaround: There is no workaround for fixing this other then recreating the PDF document using different fonts.
The PDF document is secured / encrypted with passwords and permissions.Workaround: Users should clear any security on a document before running PDF/A conversion.
The PDF documents has user rights enabled.Workaround: Users should clear user rights before running PDF/A conversion.
The PDF document contains a digital signature. Converting to PDF/A would invalidate any digital signature.
Workaround: Users should clear or remove digital signature fields before running PDF/A conversion.
The PDF document contains unsupported PDF commands or operators. Often these documents can not render in PDF Studio or will have pages that do not render properly.
Workaround: Users may be able delete the invalid pages.
Verify that Existing Document is PDF/A-3b Compliant
Viewing the Document or Document Properties
When opening a document that is PDF/A-3b compliant a blue notification "This document is tagged as PDF/A-3b compliant" will be displayed at the bottom of the PDF Studio window. You can also confirm the PDF/A-3b compliance in the document properties dialog.
Go to File Tab > Properties from the menu or using the shortcut keys Ctrl + D (Cmd + D on Mac).Click on the General TabIn the lower right corner of the general document properties there will be a "PDF/A" label that will show "Yes" if the document meets the PDF/A-3b compliance standards
Using Preflight Verification
You can also use the PDF/A-3b Preflight Validation to verify that the document complies with the PDF/A-3b standards

-783-
Affordable, Powerful PDF Software / PDF Editor for Windows, macOS, Linux
Copyright © 2002-Present Qoppa Software. All rights reserved.

-784-
Affordable, Powerful PDF Software / PDF Editor for Windows, macOS, Linux
Copyright © 2002-Present Qoppa Software. All rights reserved.
•
••••
1.
2.3.4.5.
Converting PDF to PDF/A-3uPDF Studio has the ability to convert files in the PDF/A-3u format. PDF/A-3u is a strict subset of the ISO PDF specification used to create archival versions of documents with the intent that they will always render exactly the same as when they were saved.
When converting to PDF Studio will attempt to convert the PDF to the PDF/A-3u format by making the following changes to the document
Graphics will be converted to a device-independent format. If any device dependent color spaces are used, they will be defined by embedding a color profile for these color spaces.Fonts will be embedded with Unicode support.Unsupported annotations (e.g., video, audio, 3D) will be removed.JavaScript (mostly used in Forms) will be removed.External hyperlinks will be removed.
How to Convert a PDF to PDF/A-3u
Open the PDF Document you wish to convert
Go to the Convert Tab > PDF/A > PDF/A-3u on the menuA dialog will be displayed showing the changes that will be made to the documentChoose a file name and location to save the documentClick Save to convert the document to PDF/A-3u
If any problems occur during preflight conversion, a results list will be displayed showing the content items that could not be fixed. If the conversion completes successfully the problems list will not be shown and the newly converted document will be opened.
PDF/A Conversion Results
PDF Studio will attempt to convert every file but due to the PDF/A-3u requirements some files may not be able to be converted. If the conversion fails a dialog will be displayed showing the reasons that the conversion failed.
Results List - Lists any content in the document that was not converted with the selected profile.
- Items that could NOT be fixed by PDF Studio.
- Items that were not fixed due to user settings in PDF/A Preferences.
Expand - Expands the results tree to show all preflight error results
Collapse - Collapses the results tree to only show the preflight error categories

-785-
Affordable, Powerful PDF Software / PDF Editor for Windows, macOS, Linux
Copyright © 2002-Present Qoppa Software. All rights reserved.
••
••
••
•
•
•
•
1.
2.3.
Print - Prints the entire tree exactly as it is displayed in the preflight results list
Note: When the conversion is successful no dialog will be displayed as the conversion process completed and saved the new document correctly
Unsupported Features in PDF/A-3u Conversion:
Below is a list of features that may cause errors during the PDF/A-3u conversion.
The PDF document contains non-embedded fonts that do not exist on the systemWorkaround: There is no workaround for fixing this other then recreating the PDF document using different fonts.
The PDF document is secured / encrypted with passwords and permissions.Workaround: Users should clear any security on a document before running PDF/A conversion.
The PDF documents has user rights enabled.Workaround: Users should clear user rights before running PDF/A conversion.
The PDF document contains a digital signature. Converting to PDF/A would invalidate any digital signature.
Workaround: Users should clear or remove digital signature fields before running PDF/A conversion.
The PDF document contains unsupported PDF commands or operators. Often these documents can not render in PDF Studio or will have pages that do not render properly.
Workaround: Users may be able delete the invalid pages.
Verify that Existing Document is PDF/A-3u Compliant
Viewing the Document or Document Properties
When opening a document that is PDF/A-3u compliant a blue notification "This document is tagged as PDF/A-3u compliant" will be displayed at the bottom of the PDF Studio window. You can also confirm the PDF/A-3u compliance in the document properties dialog.
Go to File Tab > Properties from the menu or using the shortcut keys Ctrl + D (Cmd + D on Mac).Click on the General TabIn the lower right corner of the general document properties there will be a "PDF/A" label that will show "Yes" if the document meets the PDF/A-3u compliance standards
Using Preflight Verification
You can also use the PDF/A-3u Preflight Validation to verify that the document complies with the PDF/A-3u standards

-786-
Affordable, Powerful PDF Software / PDF Editor for Windows, macOS, Linux
Copyright © 2002-Present Qoppa Software. All rights reserved.
-787-
Affordable, Powerful PDF Software / PDF Editor for Windows, macOS, Linux
Copyright © 2002-Present Qoppa Software. All rights reserved.
•
•••••
1.
2.3.4.5.
Converting PDF to PDF/X-1aPDF Studio has the ability to convert files in the PDF/X-1a format. PDF/X-1a is a strict subset of the ISO PDF specification with a series of printing-related requirements which do not apply to standard PDF files. These are done with the intent that the document will print exactly the same as when they were saved.
When converting to PDF Studio will attempt to convert the PDF to the PDF/X-1a format by making the following changes to the document
Colors and/or Color Spaces of Vector (paths and text) and raster (images) graphics objects may be converted to be compatible with the PDF/X Output Intent's color profileFonts will be embeddedTransparency will be removedAnnotations may be removed or flattenedJavaScript (mostly used in Forms) will be removedImage encoding / compression types may be changed
How to Convert a PDF to PDF/X-1a
Open the PDF Document you wish to convert
Go to the Convert Tab > PDF/X > PDF/X-1a on the menuA dialog will be displayed showing the changes that will be made to the documentChoose a file name and location to save the documentClick Save to convert the document to PDF/X-1a
If any problems occur during preflight conversion, a results list will be displayed showing the content items that could not be fixed. If the conversion completes successfully the problems list will not be shown and the newly converted document will be opened.
PDF/X Conversion Results
PDF Studio will attempt to convert every file but due to the PDF/X-1a requirements some files may not be able to be converted. If the conversion fails a dialog will be displayed showing the reasons that the conversion failed.
Results List - Lists any content in the document that was not converted with the selected profile.
- Items that could NOT be fixed by PDF Studio.
- Items that were not fixed due to user settings in PDF/X Preferences.
-788-
Affordable, Powerful PDF Software / PDF Editor for Windows, macOS, Linux
Copyright © 2002-Present Qoppa Software. All rights reserved.
••
••
••
•
•
•
•
1.
2.3.
Expand - Expands the results tree to show all preflight error results
Collapse - Collapses the results tree to only show the preflight error categories
Print - Prints the entire tree exactly as it is displayed in the preflight results list
Note: When the conversion is successful no dialog will be displayed as the conversion process completed and saved the new document correctly
Unsupported Features in PDF/X-1a Conversion:
Below is a list of features that may cause errors during the PDF/X-1a conversion.
The PDF document contains non-embedded fonts that do not exist on the systemWorkaround: There is no workaround for fixing this other then recreating the PDF document using different fonts.
The PDF document is secured / encrypted with passwords and permissions.Workaround: Users should clear any security on a document before running PDF/X conversion.
The PDF documents has user rights enabled.Workaround: Users should clear user rights before running PDF/X conversion.
The PDF document contains a digital signature. Converting to PDF/X would invalidate any digital signature.
Workaround: Users should clear or remove digital signature fields before running PDF/X conversion.
The PDF document contains unsupported PDF commands or operators. Often these documents can not render in PDF Studio or will have pages that do not render properly.
Workaround: Users may be able delete the invalid pages.
Verify that Existing Document is PDF/X-1a Compliant
Viewing the Document or Document Properties
When opening a document that is PDF/X-1a compliant a blue notification "This document is tagged as PDF/X-1a compliant" will be displayed at the bottom of the PDF Studio window. You can also confirm the PDF/X-1a compliance in the document properties dialog.
Go to File Tab > Properties from the menu or using the shortcut keys Ctrl + D (Cmd + D on Mac).Click on the General TabIn the lower right corner of the general document properties there will be a "PDF/X" label that will show "Yes" if the document meets the PDF/X-1a compliance standards
Using Preflight Verification
You can also use the PDF/X-1a Preflight Validation to verify that the document complies with the PDF/X-1a standards

-789-
Affordable, Powerful PDF Software / PDF Editor for Windows, macOS, Linux
Copyright © 2002-Present Qoppa Software. All rights reserved.
-790-
Affordable, Powerful PDF Software / PDF Editor for Windows, macOS, Linux
Copyright © 2002-Present Qoppa Software. All rights reserved.
•
•••••
1.
2.3.4.5.
Converting PDF to PDF/X-3PDF Studio has the ability to convert files in the PDF/X-3 format. PDF/X-3 is a strict subset of the ISO PDF specification with a series of printing-related requirements which do not apply to standard PDF files. These are done with the intent that the document will print exactly the same as when they were saved. PDF/X-3 accepts calibrated RGB and CIELAB colors, while retaining most of the other restrictions of PDF/X-1a.
When converting to PDF Studio will attempt to convert the PDF to the PDF/X-3 format by making the following changes to the document
Colors and/or Color Spaces of Vector (paths and text) and raster (images) graphics objects may be converted to be compatible with the PDF/X Output Intent's color profileFonts will be embeddedTransparency will be removedAnnotations may be removed or flattenedJavaScript (mostly used in Forms) will be removedImage encoding / compression types may be changed
How to Convert a PDF to PDF/X-3
Open the PDF Document you wish to convert
Go to the Convert Tab > PDF/X > PDF/X-3 on the menuA dialog will be displayed showing the changes that will be made to the documentChoose a file name and location to save the documentClick Save to convert the document to PDF/X-3
If any problems occur during preflight conversion, a results list will be displayed showing the content items that could not be fixed. If the conversion completes successfully the problems list will not be shown and the newly converted document will be opened.
PDF/X Conversion Results
PDF Studio will attempt to convert every file but due to the PDF/X-3 requirements some files may not be able to be converted. If the conversion fails a dialog will be displayed showing the reasons that the conversion failed.
Results List - Lists any content in the document that was not converted with the selected profile.
- Items that could NOT be fixed by PDF Studio.
-791-
Affordable, Powerful PDF Software / PDF Editor for Windows, macOS, Linux
Copyright © 2002-Present Qoppa Software. All rights reserved.
••
••
••
•
•
•
•
1.
2.3.
- Items that were not fixed due to user settings in PDF/X Preferences.
Expand - Expands the results tree to show all preflight error results
Collapse - Collapses the results tree to only show the preflight error categories
Print - Prints the entire tree exactly as it is displayed in the preflight results list
Note: When the conversion is successful no dialog will be displayed as the conversion process completed and saved the new document correctly
Unsupported Features in PDF/X-3 Conversion:
Below is a list of features that may cause errors during the PDF/X-3 conversion.
The PDF document contains non-embedded fonts that do not exist on the systemWorkaround: There is no workaround for fixing this other then recreating the PDF document using different fonts.
The PDF document is secured / encrypted with passwords and permissions.Workaround: Users should clear any security on a document before running PDF/X conversion.
The PDF documents has user rights enabled.Workaround: Users should clear user rights before running PDF/X conversion.
The PDF document contains a digital signature. Converting to PDF/X would invalidate any digital signature.
Workaround: Users should clear or remove digital signature fields before running PDF/X conversion.
The PDF document contains unsupported PDF commands or operators. Often these documents can not render in PDF Studio or will have pages that do not render properly.
Workaround: Users may be able delete the invalid pages.
Verify that Existing Document is PDF/X-3 Compliant
Viewing the Document or Document Properties
When opening a document that is PDF/X-3 compliant a blue notification "This document is tagged as PDF/X-3 compliant" will be displayed at the bottom of the PDF Studio window. You can also confirm the PDF/X-3 compliance in the document properties dialog.
Go to File Tab > Properties from the menu or using the shortcut keys Ctrl + D (Cmd + D on Mac).Click on the General TabIn the lower right corner of the general document properties there will be a "PDF/X" label that will show "Yes" if the document meets the PDF/X-3 compliance standards
-792-
Affordable, Powerful PDF Software / PDF Editor for Windows, macOS, Linux
Copyright © 2002-Present Qoppa Software. All rights reserved.
Using Preflight Verification
You can also use the PDF/X-3 Preflight Validation to verify that the document complies with the PDF/X-3 standards
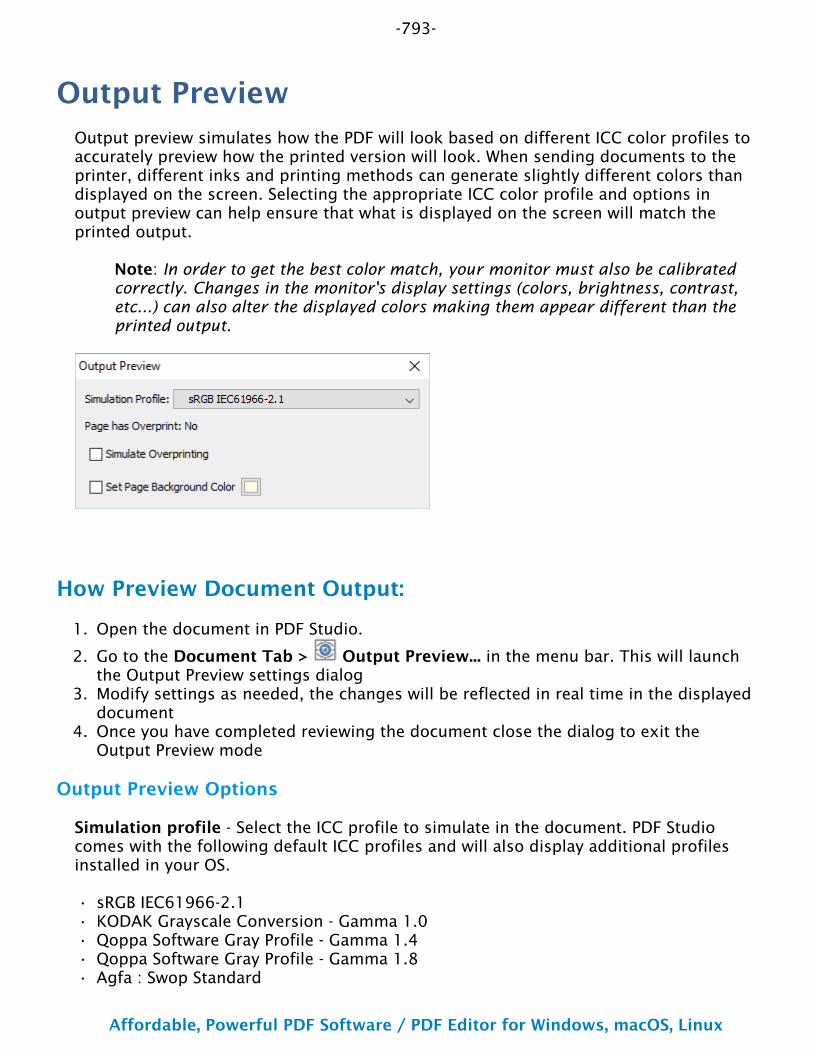
-793-
Affordable, Powerful PDF Software / PDF Editor for Windows, macOS, Linux
Copyright © 2002-Present Qoppa Software. All rights reserved.
1.
2.
3.
4.
•••••
Output PreviewOutput preview simulates how the PDF will look based on different ICC color profiles to accurately preview how the printed version will look. When sending documents to the printer, different inks and printing methods can generate slightly different colors than displayed on the screen. Selecting the appropriate ICC color profile and options in output preview can help ensure that what is displayed on the screen will match the printed output.
Note: In order to get the best color match, your monitor must also be calibrated correctly. Changes in the monitor's display settings (colors, brightness, contrast, etc...) can also alter the displayed colors making them appear different than the printed output.
How Preview Document Output:
Open the document in PDF Studio.
Go to the Document Tab > Output Preview... in the menu bar. This will launch the Output Preview settings dialogModify settings as needed, the changes will be reflected in real time in the displayed documentOnce you have completed reviewing the document close the dialog to exit the Output Preview mode
Output Preview Options
Simulation profile - Select the ICC profile to simulate in the document. PDF Studio comes with the following default ICC profiles and will also display additional profiles installed in your OS.
sRGB IEC61966-2.1KODAK Grayscale Conversion - Gamma 1.0Qoppa Software Gray Profile - Gamma 1.4Qoppa Software Gray Profile - Gamma 1.8Agfa : Swop Standard
-794-
Affordable, Powerful PDF Software / PDF Editor for Windows, macOS, Linux
Copyright © 2002-Present Qoppa Software. All rights reserved.
Page has Overprint - Displays whether or not any of the document's content has the overprint property.
What is Overprint? - Overprint is the process of printing one color on top of another. In an advanced printing press, such as one that uses plates of color to print colors, overlapping layers are blended together to create different colors. In some cases, overlapping content can have unintended color blending results. The overprint property is designed to account for the blending of colors in these advanced printing scenarios to accurately represent the physical printed output.
Simulate Overprinting - Check this box to simulate blending of colors in overprinting output.
Note: If the document does not contain any overprint content you will not see any changes.
Set Page Background Color - Sets the color of the page background to simulate printing on different colored sheets of paper.
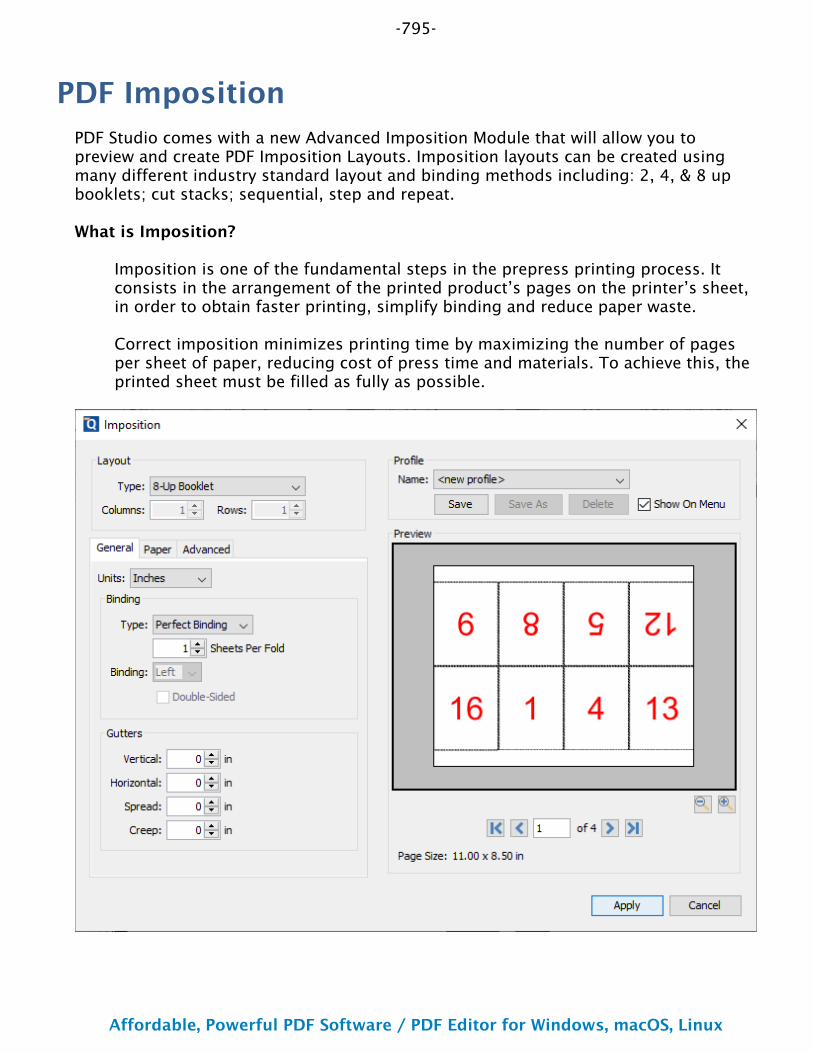
-795-
Affordable, Powerful PDF Software / PDF Editor for Windows, macOS, Linux
Copyright © 2002-Present Qoppa Software. All rights reserved.
PDF ImpositionPDF Studio comes with a new Advanced Imposition Module that will allow you to preview and create PDF Imposition Layouts. Imposition layouts can be created using many different industry standard layout and binding methods including: 2, 4, & 8 up booklets; cut stacks; sequential, step and repeat.
What is Imposition?
Imposition is one of the fundamental steps in the prepress printing process. It consists in the arrangement of the printed product’s pages on the printer’s sheet, in order to obtain faster printing, simplify binding and reduce paper waste.
Correct imposition minimizes printing time by maximizing the number of pages per sheet of paper, reducing cost of press time and materials. To achieve this, the printed sheet must be filled as fully as possible.
-796-
Affordable, Powerful PDF Software / PDF Editor for Windows, macOS, Linux
Copyright © 2002-Present Qoppa Software. All rights reserved.
1.
2.
3.
4.
••••
•
•
How to Start the PDF Imposition Tool
Open the document in PDF Studio.
Go to the Document Tab > Imposition > New Imposition on the tool bar. This will launch the Imposition settings dialog.Modify settings as needed, the changes will be reflected in the preview pane to the rightOnce you have completed reviewing the document click Apply to create a new document using the settings chosen
Imposition Settings
Layout
Type - the imposition layout choices available
2-Up Booklet: fits 2 pages side by side on a sheet4-Up Booklet: fits 4 pages (2 rows & 2 pages per row) on a sheet 8-Up Booklet: fits 8 pages (2 rows & 4 pages per row) on a sheet Cut stacks: fits the pages per sheet using the column and row settings so that once cut each stack can be placed on each other maintain the page order for bindingSequential: fits multiple pages per sheet using the column and row settings in sequential order from right to left top to bottomStep and Repeat: creates multiple copies of the each page on separate sheets based on the number rows and columns set
Columns - Sets the number of vertical columns for Cut Stacks, Sequential, & Step and Repeat
Rows - Sets the number of horizontal rows for Cut Stacks, Sequential, & Step and Repeat
Profiles
Name - Name of the header and footer profile (if created).
Save - Saves the current settings to the selected profile. To create a new profile select "<new profile>" and click Save. Then enter a name for the new profile.
Save As - Saves a copy of the current settings. It differs from the Save command, which saves the current settings to the currently selected profile.
Delete - Deletes the currently selected profile
Show on Menu - Whether to show this imposition configuration on the imposition menu for faster access.
-797-
Affordable, Powerful PDF Software / PDF Editor for Windows, macOS, Linux
Copyright © 2002-Present Qoppa Software. All rights reserved.
•
•
••
General
Units - Select the measurement unit for the imposition
Binding
Type - determines how the pages will be bound together once printed
Saddle-Stitching: staples each of the pages along a center fold such as a magazine, or catalog.Perfect Binding: the sheets are split into stacks designated by the "Sheets per fold". Then the spine edge is trimmed from each stack and then glue is applied to the spine so the cover can be adhered to spine to create a book.
Sheets per fold - designates the number of pages per stack when using Perfect Binding
Binding (left/right) - Determines whether the binding (folded edge) of the booklet when folded should be on the left or the right
Double Sided - Rearranges the pages so that pages are printed on the front and back per imposition sheet based on the binding type selected
Gutters
Vertical - The space between each column of pages
Note: for 8-up pages the "Spread" value is used for the center column between the 2nd & 3rd column.
Horizontal - The space between each row of pages
Spread - Used only for 8-up layout, this is the space between the 2nd & 3rd columns
Creep - Specifies the distance pages move away from the spine to accommodate paper thickness and folding in Saddle Stitch and Perfect Bound layouts
Paper
Media
Autosize Media - Resizes the sheet to fit the
Fit to Media Size - Allows you to select a sheet size from a list of predefined standard sizes or set a sheet custom size.
Portrait: sets the selected page orientation size to portraitLandscape: sets the selected page size orientation to landscape
-798-
Affordable, Powerful PDF Software / PDF Editor for Windows, macOS, Linux
Copyright © 2002-Present Qoppa Software. All rights reserved.
Note: Portrait and Landscape options are not available when selecting a "Custom" media size
Width - Width of the page in the units selected
Height - Height of the page in the units selected
Auto-rotate - Rotates each individual page so that the width and length best fit on the sheet.
Auto Scale - shrink pages so that they fit in the paper. No effect if the pages in a document are smaller than the paper they are being printed on.
Margins
Top - The distance of the margin from the top
Bottom - The distance of the margin from the bottom
Left - The distance of the margin from the left
Right - The distance of the margin from the right
Advanced
Printer Marks
Trim Marks - Horizontal and vertical marks that define where the page should be trimmed.
Bleed Marks - Displays the bleed crop box on the page. Useful when a document has images or elements that touch the edge of the page, extending beyond the trim edge and leaving no white margin.
Registration Marks - Small targets outside the page area for aligning pages and colors separations in a document.
Page Information - Labels the sheet in the top left corner with the document name, page number, date & time.
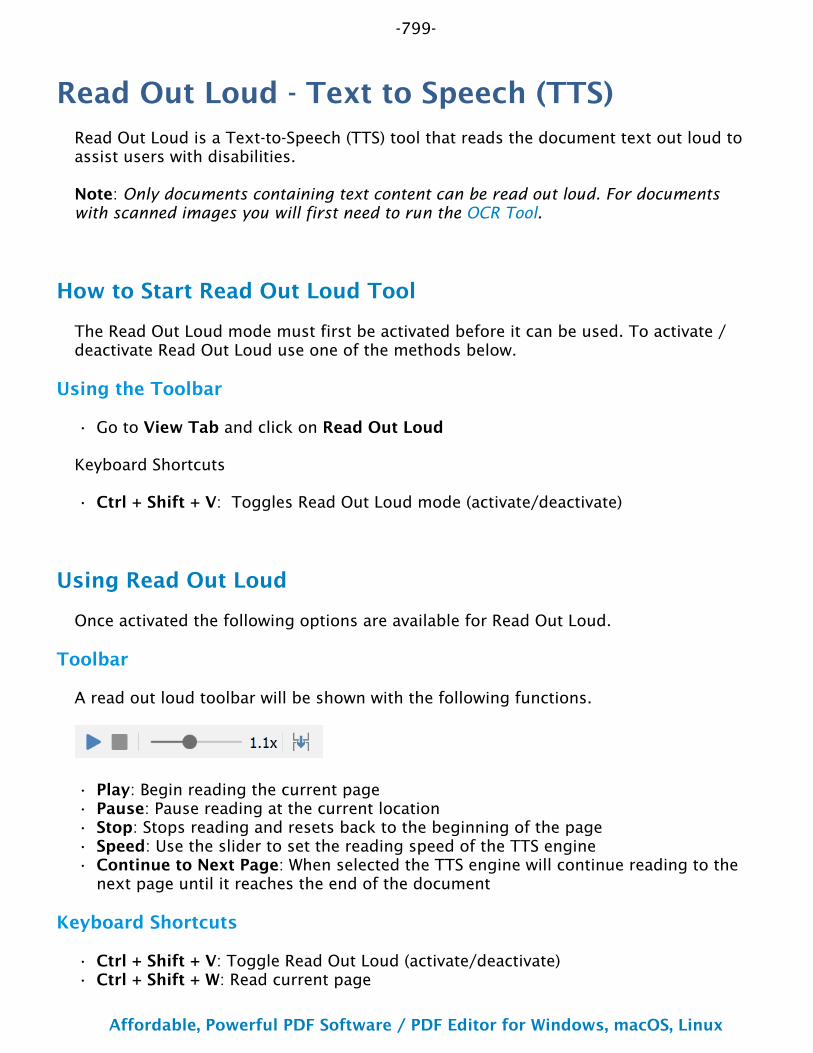
-799-
Affordable, Powerful PDF Software / PDF Editor for Windows, macOS, Linux
Copyright © 2002-Present Qoppa Software. All rights reserved.
•
•
•••••
••
Read Out Loud - Text to Speech (TTS)Read Out Loud is a Text-to-Speech (TTS) tool that reads the document text out loud to assist users with disabilities.
Note: Only documents containing text content can be read out loud. For documents with scanned images you will first need to run the OCR Tool.
How to Start Read Out Loud Tool
The Read Out Loud mode must first be activated before it can be used. To activate / deactivate Read Out Loud use one of the methods below.
Using the Toolbar
Go to View Tab and click on Read Out Loud
Keyboard Shortcuts
Ctrl + Shift + V: Toggles Read Out Loud mode (activate/deactivate)
Using Read Out Loud
Once activated the following options are available for Read Out Loud.
Toolbar
A read out loud toolbar will be shown with the following functions.
Play: Begin reading the current pagePause: Pause reading at the current locationStop: Stops reading and resets back to the beginning of the pageSpeed: Use the slider to set the reading speed of the TTS engineContinue to Next Page: When selected the TTS engine will continue reading to the next page until it reaches the end of the document
Keyboard Shortcuts
Ctrl + Shift + V: Toggle Read Out Loud (activate/deactivate)Ctrl + Shift + W: Read current page
-800-
Affordable, Powerful PDF Software / PDF Editor for Windows, macOS, Linux
Copyright © 2002-Present Qoppa Software. All rights reserved.
•••
Ctrl + Shift + Z: Read from current page to the end of the documentCtrl + J: Pause/ResumeCtrl + K: Stop
-801-
Affordable, Powerful PDF Software / PDF Editor for Windows, macOS, Linux
Copyright © 2002-Present Qoppa Software. All rights reserved.
•••••••••
What is PDF AccessibilityPDF Accessibility (typically called PDF/UA which stands for “User Accessibility” or ADA stands for “Americans with Disabilities Act”)means the PDF document contains features that make it more accessible for people with disabilities, such as mobility impairments, blindness, and low vision.
PDF/UA
PDF/UA is the informal name for ISO 14289, the International Standard for accessible PDF technology. A technical specification intended for developers implementing PDF writing and processing software, PDF/UA provides definitive terms and requirements for accessibility in PDF documents and applications. For those equipped with appropriate software, conformance with PDF/UA ensures accessibility for people with disabilities who use assistive technology such as screen readers, screen magnifiers, joysticks and other technologies to navigate and read electronic content.
– Wikipedia: PDF/UA
ADA Compliance
ADA compliance refers to the Americans with Disabilities Act requirements that companies and organizations make every effort to make education accessible to those with disabilities including those who are visually and audibly impaired.
Format Details
PDF/UA and ADA Compliance is not a separate file-format, but instead uses the PDF format and features invented by Adobe Systems to ensure documents are accessible to all users.
Some of the features of a PDF/UA or ADA compliant PDF include:
Searchable textBookmarks for documents over 9 pagesDocument tagsAlt Text used to describe an image to one visually impairedLogical reading order (left-to-right) in tablesNo background images or watermarksTable rows that don’t split across pagesDocument TitleForm fields with tool-tips (descriptions)
Accessibility in PDF Studio
These features and/or settings built into PDF Studio make reading PDF documents more accessible to users.
-802-
Affordable, Powerful PDF Software / PDF Editor for Windows, macOS, Linux
Copyright © 2002-Present Qoppa Software. All rights reserved.
•
•
••
••
••
•
••••
Accessibility Display Preferences - additional options to change color of documents for higher contrast and easier readingInvert Colors Mode - inverts document and text colors to create higher contrast for easier readingZooming - increase the size of the document when viewing to see content easierPan and Zoom Tool - displays a window highlighting the currently viewed area within the documentLoupe Tool - draggable rectangle that zooms in on the PDF to show an enlarged viewKeyboard Shortcuts - keyboard hotkeys to start application tools without the menu or toolbarHighlight Form Fields - highlight all fields in the form, making them easier to locateLayout and Magnification Preferences - set the default view of documents opened within the applicationNavigation Tools - use bookmarks, page thumbnails and keyboard shortcuts to easily navigate the document
Operating System Accessibility tools
Accessibility tools in Windows
Windows operating systems have built-in tools that provide increased or alternate access to information on the computer screen. Narrator is a light version of a screen reader. Magnifier is a screen magnification tool.
For more information on the accessibility tools in the Windows, see the Microsoft Accessibility website.
Accessibility tools in Mac OS
macOS has built-in tools that provide increased or alternate access to information on the computer screen.
For more information on the accessibility tools in the Mac operating system, see the Apple Accessibility website.
Accessibility tools in Linux
Accessibility tools are not available in all Linux distributions. Check your Linux version documentation for more information on what is available.
Below are some known Linux distros with accessibility tools.
Debian AccessibilityFedora AccessibilityUbuntu AccessibilityArchLinux Accessibility
-803-
Affordable, Powerful PDF Software / PDF Editor for Windows, macOS, Linux
Copyright © 2002-Present Qoppa Software. All rights reserved.
-804-
Affordable, Powerful PDF Software / PDF Editor for Windows, macOS, Linux
Copyright © 2002-Present Qoppa Software. All rights reserved.
•
•
••
••
••
•
••
Accessibility Reading FeaturesThese features and/or settings built into PDF Studio make reading PDF documents more accessible to users.
Accessibility Preferences - additional options to change color of documents for higher contrast and easier readingInvert Colors Mode - inverts document and text colors to create higher contrast for easier readingZooming - increase the size of the document when viewing to see content easierPan and Zoom Tool - displays a window highlighting the currently viewed area within the documentLoupe Tool - draggable rectangle that zooms in on the PDF to show an enlarged viewKeyboard Shortcuts - keyboard hotkeys to start application tools without the menu or toolbarHighlight Form Fields - highlight all fields in the form, making them easier to locateLayout and Magnification Preferences - set the default view of documents opened within the applicationNavigation Tools - use bookmarks, page thumbnails and keyboard shortcuts to easily navigate the documentAuto Scrolling - automatically scroll through the documentRead Out Loud - Text to Speech (TTS) - Reads the document text out loud to assist users with disabilities.
-805-
Affordable, Powerful PDF Software / PDF Editor for Windows, macOS, Linux
Copyright © 2002-Present Qoppa Software. All rights reserved.
1.2.
••
Accessibility PreferencesThe General Preferences section contains all of the accessibility settings for PDF Studio.
To open the General Preferences dialog:
Go to File Tab > AccessibilitySelect General from the panel on the left of the preferences dialog to view or modify these preferences.
Settings
Replace Document Colors: Select this option to enable the accessibility options you wish to use.
Use High Contrast Colors: Choose from a predefined list of high contrast color combinations
Custom Color: set your own color combination for page background and text color
Page background: the color of the background displayed Text Color: color of all text in the document including content, annotations & form fields
Only change the color of black text or line art: when checked will ignore any text or line art that is not curently set to black
Change the color of line art as well as text: when checked will use the text color specified above to also colorize any path or line content within the document
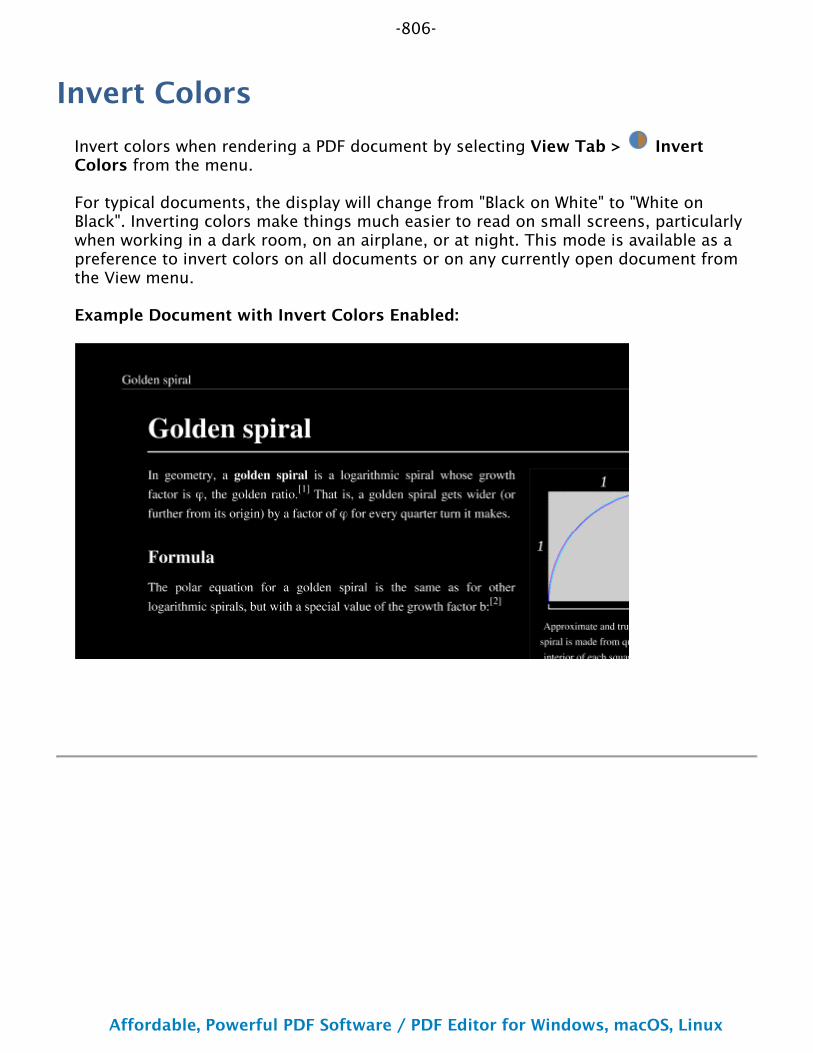
-806-
Affordable, Powerful PDF Software / PDF Editor for Windows, macOS, Linux
Copyright © 2002-Present Qoppa Software. All rights reserved.
Invert Colors
Invert colors when rendering a PDF document by selecting View Tab > Invert Colors from the menu.
For typical documents, the display will change from "Black on White" to "White on Black". Inverting colors make things much easier to read on small screens, particularly when working in a dark room, on an airplane, or at night. This mode is available as a preference to invert colors on all documents or on any currently open document from the View menu.
Example Document with Invert Colors Enabled:

-807-
Affordable, Powerful PDF Software / PDF Editor for Windows, macOS, Linux
Copyright © 2002-Present Qoppa Software. All rights reserved.
•
ZoomingWhen viewing a document there are several ways to zoom in/out of the document.
Using the Mouse
To zoom in or out on the document using the mouse hold down Ctrl (Alt on Mac) and scroll the mouse wheel up to zoom in and down to zoom out.
Using the Keyboard
The keyboard can also be used in some cases to quickly zoom on the document using shortcut keys. The following shortcuts can be used.
Zoom to actual size Ctrl + 1 ⌘ + 1Zoom to fit page Ctrl + 0 ⌘ + 0Zoom to fit width Ctrl + 2 ⌘ + 2Zoom in Ctrl + Plus Alt + PlusZoom out Ctrl + Minus Alt + Minus
Using the Zoom Tools
The zoom tools are located on the bottom toolbar and can be used to zoom on the document.
Zoom Out: Zoom out to view the content smaller.
Zoom To/Current Zoom: Displays the current zoom value. You can also select a preset zoom percentage or type in the field for a custom zoom value.
Zoom In: Zoom in to view the content larger.
Zoom Tool: Zooms to a selected area within a page. Click and drag to select the rectangle area you wish to zoom to.
Hold Ctrl key to zoom out while Zoom Tool is active.
Loupe Tool: Displays a zoom window that zooms in on the PDF to show the smallest detail.
Pan and Zoom: A window showing the portion of the page currently on screen. Drag the red box to adjust the view of the document.
-808-
Affordable, Powerful PDF Software / PDF Editor for Windows, macOS, Linux
Copyright © 2002-Present Qoppa Software. All rights reserved.

-809-
Affordable, Powerful PDF Software / PDF Editor for Windows, macOS, Linux
Copyright © 2002-Present Qoppa Software. All rights reserved.
1.
2.
3.
Pan and Zoom ToolThe Pan and Zoom tool is a second window will be displayed showing the portion of the page currently on screen. Drag the red box to adjust the view of the document.
Instructions:
Go to View Tab and click on the pan and zoom tool button on the toolbar. A second window will then be displayed showing a portion of the page currently on the screen.To adjust the view of the document drag the red box or use the navigation and zoom tools in the pan and zoom windowWhen finished to close the tool either click on the "x" on the magnification window or press Esc on the keyboard
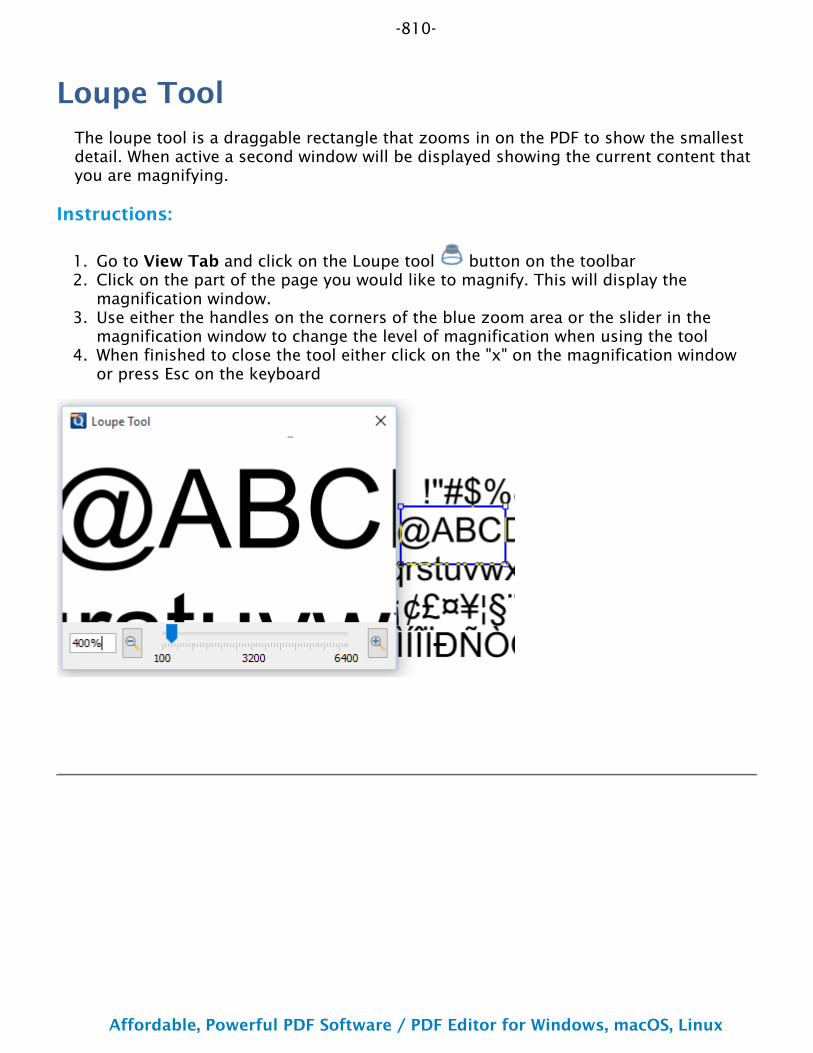
-810-
Affordable, Powerful PDF Software / PDF Editor for Windows, macOS, Linux
Copyright © 2002-Present Qoppa Software. All rights reserved.
1.2.
3.
4.
Loupe ToolThe loupe tool is a draggable rectangle that zooms in on the PDF to show the smallest detail. When active a second window will be displayed showing the current content that you are magnifying.
Instructions:
Go to View Tab and click on the Loupe tool button on the toolbarClick on the part of the page you would like to magnify. This will display the magnification window.Use either the handles on the corners of the blue zoom area or the slider in the magnification window to change the level of magnification when using the toolWhen finished to close the tool either click on the "x" on the magnification window or press Esc on the keyboard

-811-
Affordable, Powerful PDF Software / PDF Editor for Windows, macOS, Linux
Copyright © 2002-Present Qoppa Software. All rights reserved.
Keyboard ShortcutsShortcut key for each function can be seen in the application by hovering over the icon on the toolbar. The function name and shortcut key will display in a tooltip.
General Shortcuts
Action Windows / Linux MacNew Document Ctrl + N ⌘ + NOpen Ctrl + O ⌘ + OSave Ctrl + S ⌘ + SSave as Ctrl + Shift + S ⌘ + Shift + SClose Ctrl + W ⌘ + WRevert/Reload Ctrl + Shift + G ⌘ + Shift + GPrint Ctrl + P ⌘ + PExit Ctrl + Q ⌘ + QUndo Ctrl + Z ⌘ + ZRedo Ctrl + Y ⌘ + Shift + ZShow file path n/a ⌘ or Ctrl + click window titleOpen Preferences Ctrl + K ⌘ + K
Document Shortcuts
Action Windows / Linux MacCreate bookmark Ctrl + B ⌘ + BAdd blank page Ctrl + Shift + B ⌘ + Shift + BQuick Search Ctrl + F ⌘ + FAdvanced Search Ctrl + Shift + F ⌘ + Shift + FRotate pages Ctrl + Shift + R ⌘ + Shift + RCrop Pages Ctrl + Shift + C ⌘ + Shift + CDocument properties Ctrl + D ⌘ + DPreflight Ctrl + Shift + X ⌘ + Shift + XOptimize Ctrl + Shift + O ⌘ + Shift + O
Navigation/View Shortcuts
Action Windows / Linux MacFirst Page Home HomeLast Page End End

-812-
Affordable, Powerful PDF Software / PDF Editor for Windows, macOS, Linux
Copyright © 2002-Present Qoppa Software. All rights reserved.
Next Page PgDn or Space PgDn or SpacePrevious Page PgUp or Shift + Space PgUp or Shift + SpaceGo to Page Ctrl + Shift + P ⌘ + Shift + PScroll Down Space Or ↓ Space Or ↓Scroll Up ↑ ↑Next view Alt + → ⌘ + [Previous view Alt + ← ⌘ + ]Rotate clockwise Ctrl + Shift + → ⌘ + Shift + →Rotate counter- clockwise
Ctrl + Shift + ← ⌘ + Shift + ←Zoom to actual size Ctrl + 1 ⌘ + 1Zoom to fit page Ctrl + 0 ⌘ + 0Zoom to fit width Ctrl + 2 ⌘ + 2
Zoom inCtrl + Plus or Ctrl + Mouse wheel up
Cmd + Plus or Alt + Mouse wheel up
Zoom out Ctrl + Minus or Ctrl + Mouse wheel down
Cmd + Minus or Alt + Mouse wheel down
Zoom ToolCtrl + Spacebar - Zoom In Ctrl + Alt + Spacebar - Zoom Out
Spacebar + Cmd- Zoom In Spacebar + Cmd + Option - Zoom Out
Cascade Windows Ctrl + Shift + J ⌘ + Shift + JTile: Windows Horizontally
Ctrl + Shift + K ⌘ + Shift + K
Tile: Windows Vertically Ctrl + Shift + L ⌘ + Shift + LEnter/Exit Form Editor Ctrl + Shift + M ⌘ + Shift + MMy Comments Pane Ctrl + Shift + T ⌘ + Shift + TReading Mode Ctrl + H ⌘ + Ctrl + HFull Screen Mode Ctrl + L ⌘ + LCompare Side by Side Ctrl + Shift + N ⌘ + Shift + NAuto Scroll Ctrl + Shift + H ⌘ + Shift + HReverse Auto Scroll Direction
- minus key - minus key
Auto Scroll Speed 0-9 (0 slowest | 9 fastest) 0-9 (0 slowest | 9 fastest)Ruler (show / hide) Ctrl + R Ctrl + RToggle Read Out Loud (activate/deactivate) Ctrl + Shift + V Ctrl + Shift + V
Read Out Loud current page
Ctrl + Shift + W Ctrl + Shift + W
Read from current page to the end of the document Ctrl + Shift + Z Ctrl + Shift + Z
Pause/Resume Read Out Loud
Ctrl + J Ctrl + J
Stop Read Out Loud Ctrl + K Ctrl + K
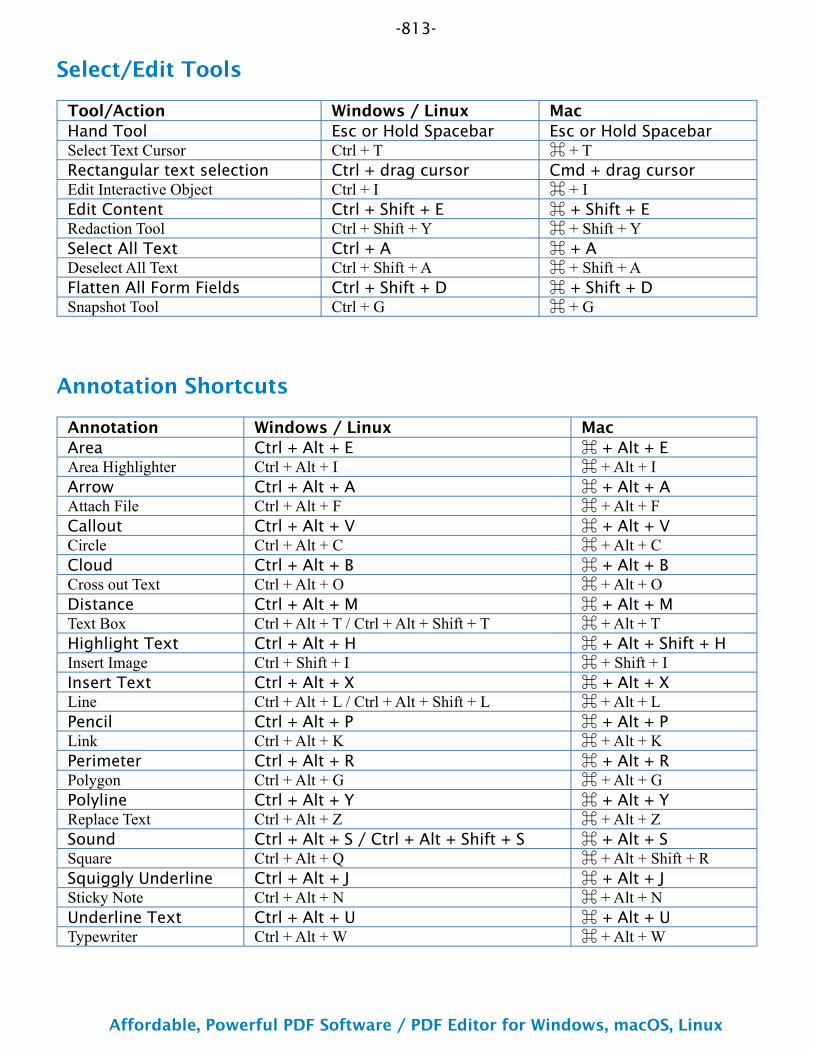
-813-
Affordable, Powerful PDF Software / PDF Editor for Windows, macOS, Linux
Copyright © 2002-Present Qoppa Software. All rights reserved.
Select/Edit Tools
Tool/Action Windows / Linux MacHand Tool Esc or Hold Spacebar Esc or Hold SpacebarSelect Text Cursor Ctrl + T ⌘ + TRectangular text selection Ctrl + drag cursor Cmd + drag cursorEdit Interactive Object Ctrl + I ⌘ + IEdit Content Ctrl + Shift + E ⌘ + Shift + ERedaction Tool Ctrl + Shift + Y ⌘ + Shift + YSelect All Text Ctrl + A ⌘ + ADeselect All Text Ctrl + Shift + A ⌘ + Shift + AFlatten All Form Fields Ctrl + Shift + D ⌘ + Shift + DSnapshot Tool Ctrl + G ⌘ + G
Annotation Shortcuts
Annotation Windows / Linux MacArea Ctrl + Alt + E ⌘ + Alt + EArea Highlighter Ctrl + Alt + I ⌘ + Alt + IArrow Ctrl + Alt + A ⌘ + Alt + AAttach File Ctrl + Alt + F ⌘ + Alt + FCallout Ctrl + Alt + V ⌘ + Alt + VCircle Ctrl + Alt + C ⌘ + Alt + CCloud Ctrl + Alt + B ⌘ + Alt + BCross out Text Ctrl + Alt + O ⌘ + Alt + ODistance Ctrl + Alt + M ⌘ + Alt + MText Box Ctrl + Alt + T / Ctrl + Alt + Shift + T ⌘ + Alt + THighlight Text Ctrl + Alt + H ⌘ + Alt + Shift + HInsert Image Ctrl + Shift + I ⌘ + Shift + IInsert Text Ctrl + Alt + X ⌘ + Alt + XLine Ctrl + Alt + L / Ctrl + Alt + Shift + L ⌘ + Alt + LPencil Ctrl + Alt + P ⌘ + Alt + PLink Ctrl + Alt + K ⌘ + Alt + KPerimeter Ctrl + Alt + R ⌘ + Alt + RPolygon Ctrl + Alt + G ⌘ + Alt + GPolyline Ctrl + Alt + Y ⌘ + Alt + YReplace Text Ctrl + Alt + Z ⌘ + Alt + ZSound Ctrl + Alt + S / Ctrl + Alt + Shift + S ⌘ + Alt + SSquare Ctrl + Alt + Q ⌘ + Alt + Shift + RSquiggly Underline Ctrl + Alt + J ⌘ + Alt + JSticky Note Ctrl + Alt + N ⌘ + Alt + NUnderline Text Ctrl + Alt + U ⌘ + Alt + UTypewriter Ctrl + Alt + W ⌘ + Alt + W
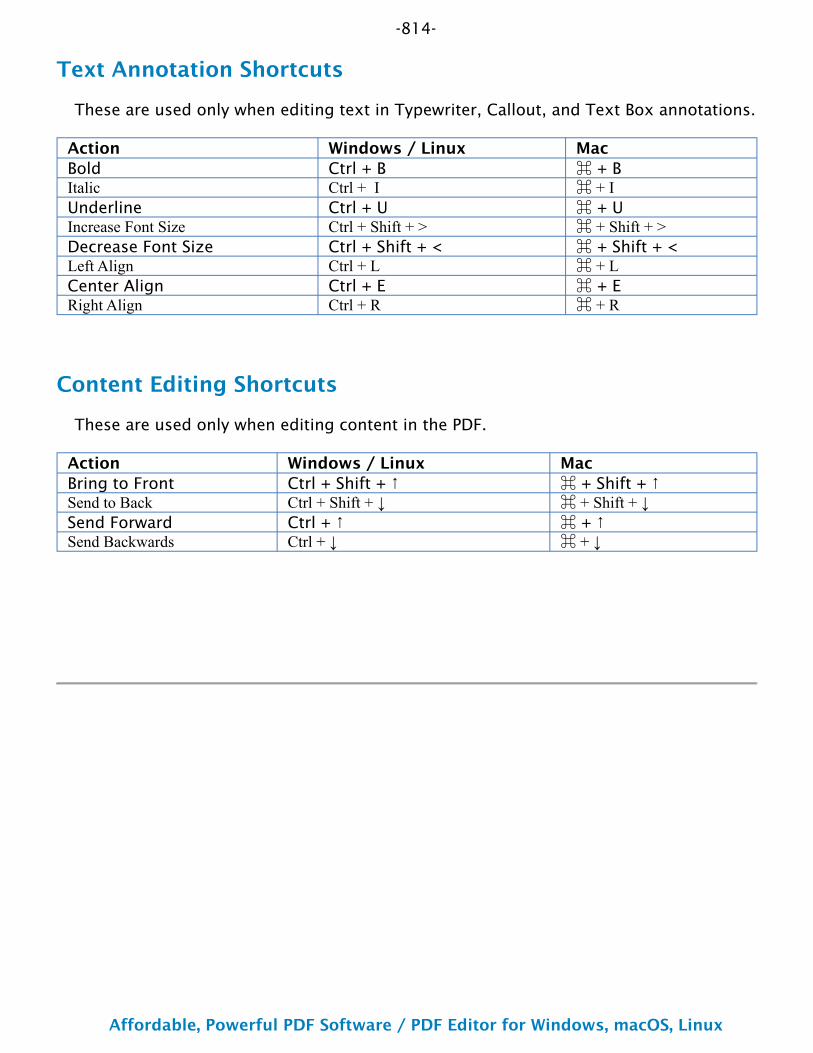
-814-
Affordable, Powerful PDF Software / PDF Editor for Windows, macOS, Linux
Copyright © 2002-Present Qoppa Software. All rights reserved.
Text Annotation Shortcuts
These are used only when editing text in Typewriter, Callout, and Text Box annotations.
Action Windows / Linux MacBold Ctrl + B ⌘ + BItalic Ctrl + I ⌘ + IUnderline Ctrl + U ⌘ + UIncrease Font Size Ctrl + Shift + > ⌘ + Shift + >Decrease Font Size Ctrl + Shift + < ⌘ + Shift + <Left Align Ctrl + L ⌘ + LCenter Align Ctrl + E ⌘ + ERight Align Ctrl + R ⌘ + R
Content Editing Shortcuts
These are used only when editing content in the PDF.
Action Windows / Linux MacBring to Front Ctrl + Shift + ↑ ⌘ + Shift + ↑Send to Back Ctrl + Shift + ↓ ⌘ + Shift + ↓Send Forward Ctrl + ↑ ⌘ + ↑Send Backwards Ctrl + ↓ ⌘ + ↓

-815-
Affordable, Powerful PDF Software / PDF Editor for Windows, macOS, Linux
Copyright © 2002-Present Qoppa Software. All rights reserved.
•
•
Highlighting Form FieldsPDF Studio can highlight all fields in the form, making them easier to locate. When highlighted a light colored box will be placed over each field within the document. This option is enabled by default but can be turned off or back on by doing the following.
Note: Hidden fields will not be highlighted in the document. To view hidden fields you will need to be in Creating PDF Forms mode.
How to Enable Highlighting Form Fields
There are 2 ways to highlight the fields on the page.
Select View Tab > Highlight Fields from the menu. The same step will toggle the field highlights off.
Select Forms Tab > Highlight Fields from the menu. The same step will toggle the field highlights off.
-816-
Affordable, Powerful PDF Software / PDF Editor for Windows, macOS, Linux
Copyright © 2002-Present Qoppa Software. All rights reserved.
1.2.
•••
••
•
••••
Display PreferencesThe Display Preferences section contains all of the display settings for PDF Studio.
To open the Display Preferences dialog:
Go to File Tab > PreferencesSelect Display from the panel on the left of the preferences dialog to view or modify these preferences.
Settings
Look and Feel - Changes the look and feel (theme) of PDF Studio. Requires a restart to be applied.
Theme
Auto: (default) will set light or dark colored theme to match the theme set in the OSLight: modern light styled flat user interfaceDark: modern dark styled flat user interface
Icon Color
Color: full color modern flat iconsMonochrome: greyscale modern flat icons, better for dark mode
Full Screen Appearance
Background: Sets the options used when PDF Studio is displaying a document in Full Screen Mode
Layout and Magnification - Sets the layout and magnification defaults for displaying documents.
By default, PDF Studio uses the initial view settings set within the document to display the panels on the left when opening a document. If no setting is set within the PDF document’s initial view settings, the Pages panel will be opened by default. Selecting "Ignore document setting" on any of the options will force PDF Studio to ignore the document's settings and use the selected option.
Navigation Tab - sets the default behavior for the navigation tab when opening PDF documents.
Default: Uses the PDF Studio default settingsNone (Document Only): No navigation tab will be displayedBookmarks Panel: Displays the bookmarks panel when the document is openedPages Panel: Displays the pages panel when the document is opened

-817-
Affordable, Powerful PDF Software / PDF Editor for Windows, macOS, Linux
Copyright © 2002-Present Qoppa Software. All rights reserved.
•
•••
•
•
•
•
••
•
•
•
Attachments Panel: Displays the attachments panel when the document is opened
Page Layout - sets the default behavior for the page layout when opening PDF documents.
Default: Uses the PDF Studio default settingsSingle: Displays only a single individual page at a timeSingle Continuous: Displays all of the document's pages in a single column that can be continuously scrolledFacing: Displays only two pages at a time side by side with odd pages on the left and even pages on the rightFacing Continuous: Displays all of the documents pages in two columns with odd pages on the left and even pages on the rightCover: Displays the document just as when using Facing only the first page will be displayed aloneCover Continuous: Displays the document just as when using Facing Continuous only the first page will be displayed alone
Magnification - sets the default magnification to use when opening PDF documents.
Default: Uses the PDF Studio default settingsActual: Displays the document with a 1:1 ratio to match how the document would look if printed without any scalingFit to Page: Scales the view to fit the width of the document in the PDF Studio frameFit to Width: Scales the view to fit the entire document within the PDF Studio frame%: Sets the zoom to the specified number value
Restore Last Page - when enabled PDF Studio reopen to the last page viewed when reopening the same PDF.
Note: The “Default” and “None (document only)” options will use the initial view settings set within the PDF. If any other option is selected it will use the PDF Studio setting instead of the setting within the PDF document’s initial view setting.
Invert Colors - Sets PDF Studio to always default to Invert Colors mode.
Binding - Specifies whether to display a PDF file with left-side or right-side binding. This setting affects the display of pages in the Facing Page - Continuous layout and the display of thumbnails side by side.
Document Resolution - Sets the resolution to be used when displaying PDFs. This only affects the size of the document when it is displayed on the screen. Ideally this should be set at a value so that when the zoom is set to 100% it will be the same size as the document once printed.

-818-
Affordable, Powerful PDF Software / PDF Editor for Windows, macOS, Linux
Copyright © 2002-Present Qoppa Software. All rights reserved.
••
•
•
System Setting: uses the resolution set by the system.Custom Resolution: allows you to set a custom resolution to be used.
By default PDF Studio will set a resolution value that will most accurately display the PDF size at 100% zoom. If the custom value is changed use the "Reset" button to restore the PDF Studio calculated default.
Rendering: Options for document content display
Enhance thin lines: converts all lines to a minimum width of 1px

-819-
Affordable, Powerful PDF Software / PDF Editor for Windows, macOS, Linux
Copyright © 2002-Present Qoppa Software. All rights reserved.
••
•
•
NavigatingPDF Studio has a variety of methods that can be used to navigate PDF documents.
Using the Mouse
The primary method for navigating within PDF documents is with the mouse. PDF Studio is compatible with all standard mice and supports the following actions using the 2 buttons and scroll wheel typically found on the mouse.
Note: On Mac if using a mouse with a single button you can right click by holding Ctrl and clicking the mouse button
Left Mouse Button
Click to select itemsHold down to drag items
Scroll Wheel
Scroll the pages in the document
Right Mouse Button
Displays context menus with additional options
Panning/Moving Pages
With the hand tool selected click and drag anywhere on the page to pan the document
Using the scroll wheel on the mouse you can move the document up and down
You can also use the vertical and horizontal scrollbars to pan the document by clicking and dragging on the scrollbar
Using the Keyboard
The keyboard can also be used in some cases to quickly navigate the document using shortcut keys. The following shortcuts can be used.

-820-
Affordable, Powerful PDF Software / PDF Editor for Windows, macOS, Linux
Copyright © 2002-Present Qoppa Software. All rights reserved.
Action Windows/UNIX MacFirst Page Home HomeLast Page End EndNext Page PgDn or Space PgDn or SpacePrevious Page PgUp or Shift + Space PgUp or Shift + SpaceGo to Page Ctrl + Shift + P ⌘ + Shift + PScroll Down Space or ↓ Space or ↓Scroll Up ↑ ↑Next view Alt + → ⌘ + [Previous view Alt + ← ⌘ + ]
Using the Navigation Tools
The navigation tools are located on the bottom toolbar and can be used to navigate the document.
First Page: Navigates to the first page of the document.
Previous Page: Navigates to the previous page in the document.
Page Number: Displays the current page being viewed and the total number of pages. Type a number into the field and press "Enter" to navigate directly to that page. Documents using Page Labels will require the exact page label to be entered (i.e. iv, v, etc...)
Next Page: Navigates to the next page in the document.
Last Page: Navigates to the Last page in the document.
Previous View: Navigates to the last view within the document.
Next View: Navigates to the next view within the document.
Using Page Thumbnails
The page thumbnails can be found on the left side of the PDF Studio window. If not
displayed the pane can be opened using the Pages button on the left side of the screen
The page thumbnails show miniature versions of all the pages in the documents.

-821-
Affordable, Powerful PDF Software / PDF Editor for Windows, macOS, Linux
Copyright © 2002-Present Qoppa Software. All rights reserved.
••
Click a thumbnail to go directly to that page.use the Left ← and Right → arrow keys to navigate to the Previous and Next pages
Using Bookmarks
The Bookmarks pane is located on the left of the PDF Studio window. If not displayed
the pane can be opened using the Bookmarks button on the left side of the screen.
Using bookmarks can be useful when navigating large PDFs that contain many pages. Often bookmarks are put in place to label chapters or sections within a document. Click on the bookmark to jump directly to that location in the document.
NOTE: the following icon signifies an invalid bookmark with no destination.
Using Destinations
The Destination pane is located on the left of the PDF Studio window. If not displayed
the pane can be opened using the Destinations button on the left side of the screen.
Using destinations can be useful when navigating large PDFs that contain many pages. Destinations are additional navigation tools put in place to label specific locations or sections within a document. Click on the destination name to jump directly to that location in the document.

-822-
Affordable, Powerful PDF Software / PDF Editor for Windows, macOS, Linux
Copyright © 2002-Present Qoppa Software. All rights reserved.
••••
••
Auto Scroll DocumentThe auto scroll feature in PDF Studio allows you to scroll through pages without pressing any keystrokes. This is helpful for those that may be impaired as well as making it easier to scroll through long PDFs to find the information you need.
How to use Auto Scroll
Use the below shortcut keys
Use Ctrl + Shift + H (Command + Shift + H on Mac) to start and stop auto scrollingMinus key "-" reverses scrolling directionNumber keys 0-9 control scroll speed (0 for slowest & 9 for fastest)While scrolling down (normal reading direction), down arrow increases scroll speed and up arrow decreases.While scrolling up, arrow speed control is reversed to match expected behavior.Jump to next or previous pages using the Left & Right arrow keys
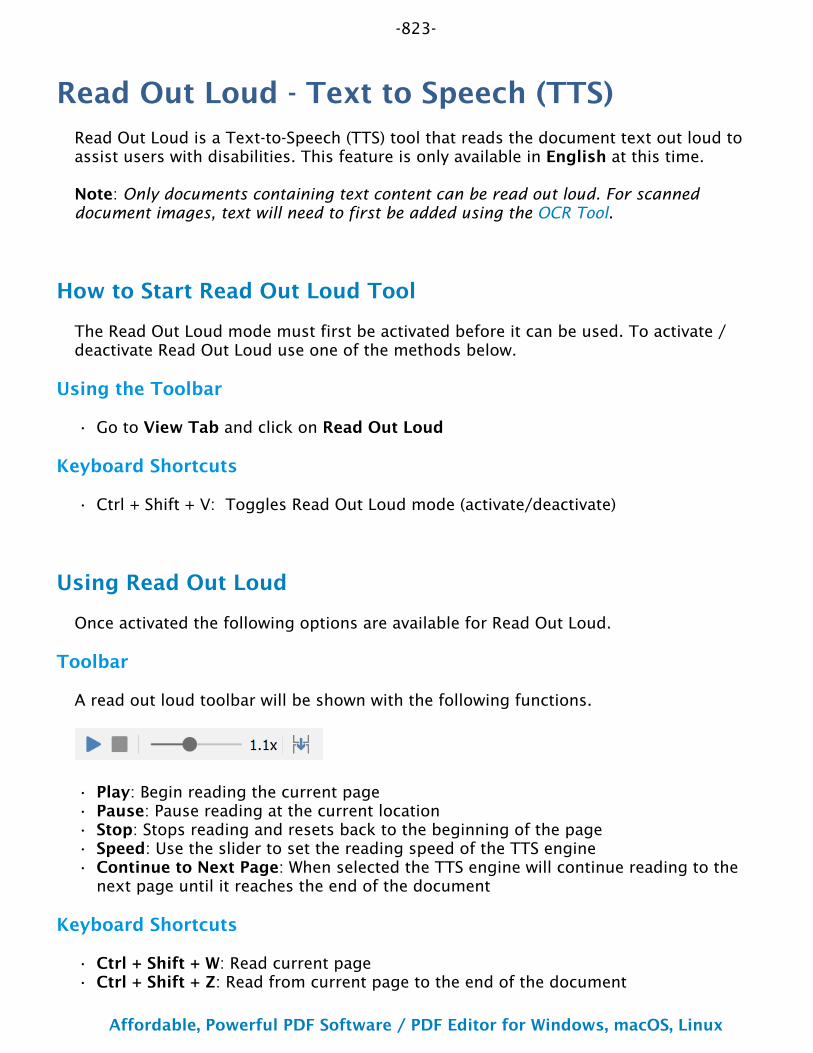
-823-
Affordable, Powerful PDF Software / PDF Editor for Windows, macOS, Linux
Copyright © 2002-Present Qoppa Software. All rights reserved.
•
•
•••••
••
Read Out Loud - Text to Speech (TTS)Read Out Loud is a Text-to-Speech (TTS) tool that reads the document text out loud to assist users with disabilities. This feature is only available in English at this time.
Note: Only documents containing text content can be read out loud. For scanned document images, text will need to first be added using the OCR Tool.
How to Start Read Out Loud Tool
The Read Out Loud mode must first be activated before it can be used. To activate / deactivate Read Out Loud use one of the methods below.
Using the Toolbar
Go to View Tab and click on Read Out Loud
Keyboard Shortcuts
Ctrl + Shift + V: Toggles Read Out Loud mode (activate/deactivate)
Using Read Out Loud
Once activated the following options are available for Read Out Loud.
Toolbar
A read out loud toolbar will be shown with the following functions.
Play: Begin reading the current pagePause: Pause reading at the current locationStop: Stops reading and resets back to the beginning of the pageSpeed: Use the slider to set the reading speed of the TTS engineContinue to Next Page: When selected the TTS engine will continue reading to the next page until it reaches the end of the document
Keyboard Shortcuts
Ctrl + Shift + W: Read current pageCtrl + Shift + Z: Read from current page to the end of the document
-824-
Affordable, Powerful PDF Software / PDF Editor for Windows, macOS, Linux
Copyright © 2002-Present Qoppa Software. All rights reserved.
••
Ctrl + J: Pause/ResumeCtrl + K: Stop
-825-
Affordable, Powerful PDF Software / PDF Editor for Windows, macOS, Linux
Copyright © 2002-Present Qoppa Software. All rights reserved.
•
••
•••••
•
•
•
•
•
•
••
Creating Accessible PDFsThese features allow you to create more accessible PDFs that are compatible with other applications such as screen readers or other assistive devices.
PDF/UA Validation - check the document against PDF/UA (PDF User Accessibility) standardsPDF Document Tags - Create / Edit document tags
Check if a Document is Tagged - How to see if a document is marked as tagged and/or contains tagsTags Explorer Panel - View the tag tree structure of the document Create Document Tag - Create a new document level tag Create Content Tags - Create tags from existing document content Edit Tags - Edit existing tags in the document Set Alternative Text - Set alternative text for figures, shapes or other languages
Standard PDF Tag Types - A list of standard tag types defined by the PDF specifications
Bookmark Creation / Editing - create / edit bookmarks to help users navigate the documentOCR PDF - add text to the document that is searchable and able to be read by screen readersSet Field Tab Order - designate what field comes next when the user is tabbing through the document to make it easier to completeForm Field Tooltips - set descriptions on fields with additional information on completing the formsGeneral Document Properties - set properties such as title, author and keywords for screen readersDocument Initial View - set how the documet will be initially displayed when openedAdvanced Document Properties - set reading options such as binding and language for user accessibility needs

-826-
Affordable, Powerful PDF Software / PDF Editor for Windows, macOS, Linux
Copyright © 2002-Present Qoppa Software. All rights reserved.
1.
2.
3.4.
•
•
•
PDF/UA ValidationPDF Studio provides PDF/UA (PDF User Accessibility) preflight and compliance verification. Once verification is complete the results can be reviewed, appended to the document or exported if needed. See What is PDF Accessibility for more information.
How to Validate PDF/UA Compliance
Open the document you wish to verify
Select Document Tab > Preflight or use the shortcut key Ctrl + Shift + X (Mac: ⌘ + Shift + X) to show the Preflight dialog.Select the standard that you wish to verify.Click on Verify to begin the verification process
Preflight Verification Results
Results List - details the content in the document that is not compliant with the selected profile and whether or not it can be fixed with Preflight Conversion.
- Items that are not compliant and that can NOT be fixed by PDF Studio Preflight Conversion.
Expand - Expands the results tree to show all preflight error results
Collapse - Collapses the results tree to only show the preflight error categories
Preflight Result Options
Annotations & Reports
Once the validation is completed you can use the following options to add comments or append results to the document. Select the result options you wish to use and then click Apply to add the chosen options.
Add comments for preflight errors - When checked, will add an annotation for each preflight error with the details of the error in the annotation commentInclude report - Choose whether to Append / Prepend a Preflight Results report to the document that was tested.
Export
Preflight results can exported to various formats. To do so click on the export button on the top of the results list. Then choose from one of the following options.
Text - Simple text file (.txt) that will contain all of the preflight report information
-827-
Affordable, Powerful PDF Software / PDF Editor for Windows, macOS, Linux
Copyright © 2002-Present Qoppa Software. All rights reserved.
•
•
••
XML - File format that is similar to an Excel file that will contain all of the preflight report informationPDF - Creates a new PDF document with the preflight results
Preflight results can printed if needed. To do so click on the print button on the top of the results list. Then choose from one of the following options.
Text - Plain text list of the preflight resultsTree - Prints the entire tree exactly as it is displayed in the preflight results list
-828-
Affordable, Powerful PDF Software / PDF Editor for Windows, macOS, Linux
Copyright © 2002-Present Qoppa Software. All rights reserved.
PDF Document TagsThe PDF format defines a standard set of tag types that can be applied to a PDF. These standard types are designed to help accessibility software like screen readers understand the document structure to present the information to the user in an understandable way.
PDF Studio Tagging Features:
Check if a Document is Tagged - How to see if a document is marked as tagged and/or contains tags
Tags Panel Explorer - View the tag tree structure of the document
Create Document Tag - Create a new document level tag
Create Content Tags - Create tags from existing document content
Create Artifact Tags - Mark decoative images so they are ignored
Edit Tags - Edit existing tags in the document
Set Alternative Text - Set alternative text for figures, shapes or other languages
Standard PDF Tag Types - A list of standard tag types defined by the PDF specifications
-829-
Affordable, Powerful PDF Software / PDF Editor for Windows, macOS, Linux
Copyright © 2002-Present Qoppa Software. All rights reserved.
1.2.3.
•
•
Check if Document is TaggedA Tagged PDF is a PDF file that contains additional metadata information around each of the content elements within the PDF. This information is used to help accessibility software like screen readers understand the document structure to present the information to the user in an understandable way.
For more information on tags in a PDF see Standard PDF Tags.
How to Check if a Document is Tagged
Use one of the following options to check if document is tagged.
PDF/UA Validation
Run the PDF/UA Validation tool in PDF Studio to verify the document is tagged correctly.
Document Properties
Go to File Tab > Properties or using the shortcut keys Ctrl + D (Cmd + D on Mac).Click on the General TabMake sure the Tagged PDF property in the bottom left column says Yes
Tags Panel
Access the Tags pane by clicking the Tags button on the left side of PDF Studio. Then confirm the following:
There is a tag tree structure in the pane showing a logical order of page contents.
Click on the Options button and make sure the Document is Tagged PDF option is checked.
-830-
Affordable, Powerful PDF Software / PDF Editor for Windows, macOS, Linux
Copyright © 2002-Present Qoppa Software. All rights reserved.
1.
2.3.
•••
Tags PanelThe Tags Panel allows you to view the tag tree structure of the document. These include content items such as headings, paragraphs, and tables within the PDF. PDF tags are used by accessibility tools (such as screen readers) to present the document contents to the user in a logical and understandable way.
How to Open the Tags Panel
Open any document
Click on the Tags button on the left side of the PDF Studio windowOnce loaded the left pane will display the document tag tree
Viewing / Navigating Tags
Use the tag tree to view and navigate to the tags in the document. Use the + and - icons to expand or collapse items and click on the tag to highlight the tagged content on the page.
The expand and collapse all buttons can also be used to show and hide all the children in the tags tree at once.
Viewing Tag Properties
Right click on any tag in the tree and select the Properties option to view additional details for the selected tag.
Tags Panel Options
Tag Content - Starts the tool to create Content Tag
Create New Tag - Allows you to create a Document Tag
Delete Tag - Delete the selected tag
Options - Additional tag options
Document is Tagged PDF: Sets the "Tagged Document" flag in the documentHighlight Content: Option to highlight the selected tag content on the pageProperties: View additional details for the selected tag

-831-
Affordable, Powerful PDF Software / PDF Editor for Windows, macOS, Linux
Copyright © 2002-Present Qoppa Software. All rights reserved.
-832-
Affordable, Powerful PDF Software / PDF Editor for Windows, macOS, Linux
Copyright © 2002-Present Qoppa Software. All rights reserved.
1.
2.3.4.5.
Create Document Level TagDocument level tags are embedded meta data not associated with any content on the page. These types of tags are use to help provide additional organization to the tags tree structure in the PDF.
It is highly recommended that a document is tagged by the authoring application when converted to PDF. The original authoring application will be more fully able to interpret the document elements during conversion to properly apply the tags in a logical structure within the document.
However, if the original document or authoring application is unavailable PDF Studio can be used to manually create document level tags within the document. To do so follow the steps below:
How to Create Document Level Tags
Access the Tags pane by clicking the Tags button on the left side of PDF Studio
Click on the Create New Tag buttonSet the Tag Type and TitleClick OK to apply the changes and the new tag will now be shown in the Tags PanelOnce added you can Edit the tags to better organize the tree structure
Content Tag Options
Type - Select the type of content being tagged from the drop down. See Standard PDF Tag Types for a description of each
Title - The title for the element being tagged. This is an additional label to further identify the type of tag
-833-
Affordable, Powerful PDF Software / PDF Editor for Windows, macOS, Linux
Copyright © 2002-Present Qoppa Software. All rights reserved.
1.
2.3.
••
4.
5.6.
Create Content TagsContent tags are embedded meta data surrounding page level content in a PDF file. These can include paragraph styles, layouts, tables, etc...This information is used to help accessibility software like screen readers understand the document structure to present the information to the user in an understandable way.
It is highly recommended that a document is tagged by the authoring application when converted to PDF. The original authoring application will be more fully able to interpret the document elements during conversion to properly apply the tags in a logical structure within the document.
However, if the original document or authoring application is unavailable PDF Studio can be used to manually create content tags within the document. To do so follow the steps below:
How to Create Content Tags
Access the Tags pane by clicking the Tags button on the left side of PDF Studio
Click on the Tag Content button to start the toolUsing the cursor select then content you wish to tag
Select text by clicking and draggig the mouse over the textSelect image content by clicking on the image with the cursor
Create a tag by either double clicking on the content or Right Clicking and selecting Tag ContentSet the Tag Type and TitleClick OK to apply the changes and the new tag will now be shown in the Tags Panel
Content Tag Options
Type - Select the type of content being tagged from the drop down. See Standard PDF Tag Types for a description of each
Title - The title for the element being tagged. This is an additional label to further identify the type of tag
-834-
Affordable, Powerful PDF Software / PDF Editor for Windows, macOS, Linux
Copyright © 2002-Present Qoppa Software. All rights reserved.
1.2.
3.4.
••
5.
6.7.
Create Artifact TagsArtifact are graphics objects or other markings that are not part of the authored content. Examples of artifacts include page header or footer information, lines or other graphics separating sections of the page, or decorative images. This information is used to help accessibility software like screen readers understand the document structure to present the information to the user in an understandable way.
It is highly recommended that a document is tagged by the authoring application when converted to PDF. The original authoring application will be more fully able to interpret the document elements during conversion to properly apply the tags in a logical structure within the document.
However, if the original document or authoring application is unavailable PDF Studio can be used to manually create artifact tags within the document. To do so follow the steps below:
How to Create Content Tags
Access the Tags pane by clicking the Tags button on the left side of PDF StudioClick on the Artifacts tab
Click on the Tag Artifact button to start the toolUsing the cursor select then content you wish to tag
Select text by clicking and dragging the mouse over the textSelect image content by clicking on the image with the cursor
Create a tag by either double clicking on the content or Right Clicking and selecting Tag ArtifactSet the Tag Type and TitleClick OK to apply the changes and the new tag will now be shown in the Tags Panel
-835-
Affordable, Powerful PDF Software / PDF Editor for Windows, macOS, Linux
Copyright © 2002-Present Qoppa Software. All rights reserved.
1.
2.3.
Edit TagsExisting tags in a document can be edited if needed using the below options.
Change Tag Properties
Right click (Mac: Ctrl + Click) on the tag you wish to edit and choose Properties in the mouse menu.Set the tag property options you wish to useClick OK to apply the changes
Tag Property Options
Type - Select the type of content being tagged from the drop down. See Standard PDF Tag Types for a description of each
Title - The title for the element being tagged. This is an additional label to further identify the type of tag
Actual Text - Actual text displayed in the page content
Alternate Text - Additional explanitory text related to the text or image content (i.e. a caption for an image)
ID - Unique identifier for the tag
Language - Sets the langauge for the entire documents. See Tagging PDFs for details on setting the language for specific text within the document.
Note: If the language doesn't appear in the drop-down list, you can enter the ISO 639 code for the language in the Language field.
Move Tags
Tags can be moved using either drag and drop or by using the cut and paste functions.
Note: Hold down SHIFT or CTRL (Command on Mac) to edit multiple tags.
Using Drag and Drop
tags can be reorganized simply by dragging and dropping them to the desired location in the tree. When a tag is dragged to a target, a horizontal black line appears on the screen under the target tag. The length of the black line indicates whether the dragged tag will be inserted underneath the target tag, or added as a child to the target tag.
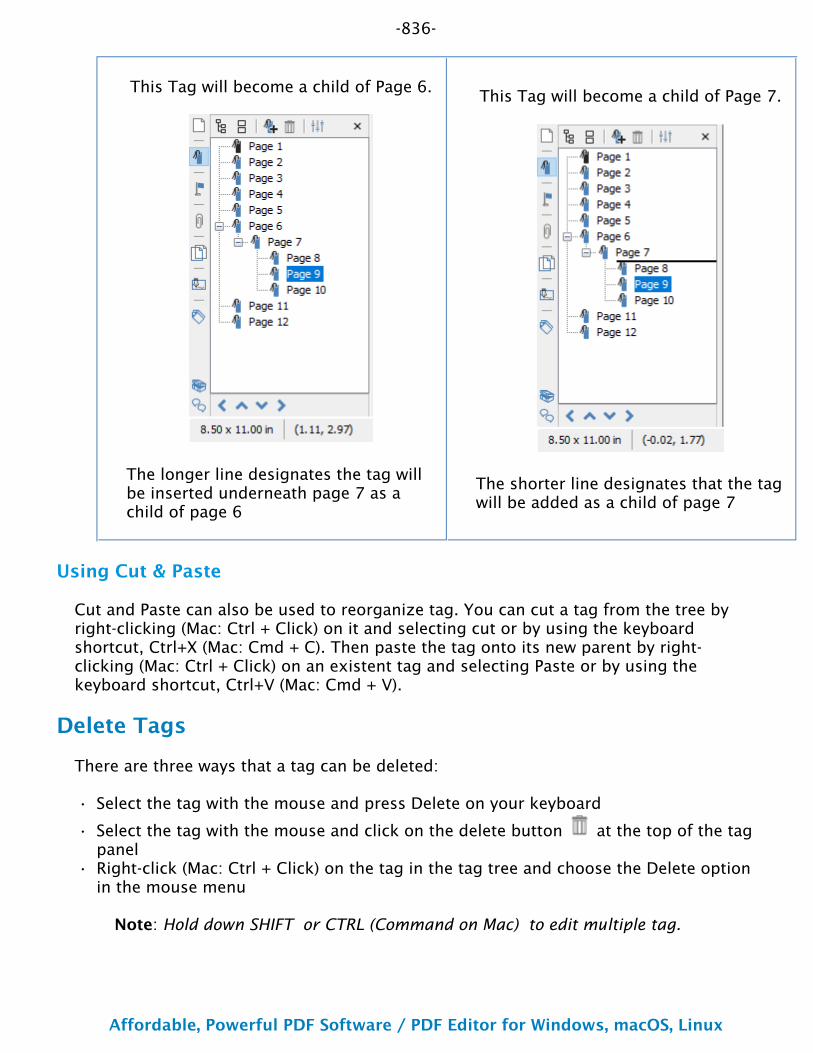
-836-
Affordable, Powerful PDF Software / PDF Editor for Windows, macOS, Linux
Copyright © 2002-Present Qoppa Software. All rights reserved.
•
•
•
This Tag will become a child of Page 6.
The longer line designates the tag will be inserted underneath page 7 as a child of page 6
This Tag will become a child of Page 7.
The shorter line designates that the tag will be added as a child of page 7
Using Cut & Paste
Cut and Paste can also be used to reorganize tag. You can cut a tag from the tree by right-clicking (Mac: Ctrl + Click) on it and selecting cut or by using the keyboard shortcut, Ctrl+X (Mac: Cmd + C). Then paste the tag onto its new parent by right- clicking (Mac: Ctrl + Click) on an existent tag and selecting Paste or by using the keyboard shortcut, Ctrl+V (Mac: Cmd + V).
Delete Tags
There are three ways that a tag can be deleted:
Select the tag with the mouse and press Delete on your keyboard
Select the tag with the mouse and click on the delete button at the top of the tag panelRight-click (Mac: Ctrl + Click) on the tag in the tag tree and choose the Delete option in the mouse menu
Note: Hold down SHIFT or CTRL (Command on Mac) to edit multiple tag.
-837-
Affordable, Powerful PDF Software / PDF Editor for Windows, macOS, Linux
Copyright © 2002-Present Qoppa Software. All rights reserved.
tml>
-838-
Affordable, Powerful PDF Software / PDF Editor for Windows, macOS, Linux
Copyright © 2002-Present Qoppa Software. All rights reserved.
1.2.
3.4.
Set Alternative TextWhile all content in the PDF must be tagged sometimes additional information is neccessary to make the document fully compliant. Tags such as figures or shapes should contain additional alternate text that helps describe the image to the user. Alternative text can also be used to provide additional explanations (such as a portion of text in another language) to tagged text content as well.
When setting alternate text on a tag it's important that a Language value is set to ensure accessibility tools such as screen readers know how interpret the contents of the alternate text.
Follow the instructions below to set alternate text on any tagged content within the PDF.
How to Set Alternative Text
Access the Tags pane by clicking the Tags button on the left side of PDF StudioRight click (Mac: Ctrl + Click) on the tag you wish to edit and choose Properties in the mouse menu.In the tag property dialog set the Alternative Text you wish to useClick OK to apply the changes
-839-
Affordable, Powerful PDF Software / PDF Editor for Windows, macOS, Linux
Copyright © 2002-Present Qoppa Software. All rights reserved.
Standard PDF Tag TypesBelow is a list of the standard set of tag types defined by the PDF format. These standard types are designed to help accessibility software like screen readers understand the document structure to present the information to users with disabilities in an understandable way.
Note: PDF Studio only supports creating or editing the standard types defined by the PDF standards, however additional applications can choose to set custom tag values not part of the standard types. In this case PDF studio will just display the name of the custom tag value set by the authoring application.
Container
Container elements are the highest level elements in the tag structure
Document - Root element of a document’s tag tree.
Part - Large division of a document; may group smaller units of content together, such as division, article, or section elements.
Division - Generic block element or group of elements.
Article - Self-contained body of text considered to be a single narrative.
Section - General container element type that is usually a component of a Part or Article element
Heading and Paragraph
Heading and paragraph are block elements that include specific level heading and paragraph tags.
H1 to H6 - The title or heading of a section within the text content
P - A distinct section of a piece of writing, usually dealing with a single theme and indicated by a new line or indentation
Label and List
Label and list elements are used to mark content such as a list or bulleted items
List - A group of similar items that are related to each other.
-840-
Affordable, Powerful PDF Software / PDF Editor for Windows, macOS, Linux
Copyright © 2002-Present Qoppa Software. All rights reserved.
List Item - A single item of a list element, may have a label element (optional) and a list body element is required as a child
Label - A marker such as a bullet, name or number that identifies an element from others in the list
List Item Body - Contains the description of the list item
Special Text
Special text elements mark content that is not considered a heading or paragraph
Block Quote - A large portion of text referencing work from another author
Caption - Text that is used to describe a table or a figure on the page
Index - A list of items, typically at the end of a document, that list the locations of specific keywords within the document
Table of Contents- A list of items, sometimes hierarchical, that contain page numbers to locate that specific item in the document
Table of Contents Item - Specific item found in the table of contents element
Table
Table elements define a section of content organized into rows and columns
Table - Data like text, images, etc. arrented into rows and columns of cells.
Table Header - A cell in a data table that contains header label describing the contents of the column
Table Row - A single row of cell elements within a table
Table Data Cell - An element stored within a single Data cell within at table
Inline
Inline-level elements identify a span of text that has specific formatting or behavior. They are differentiated from block-level elements. Inline-level elements may be contained in or contain block-level elements.
-841-
Affordable, Powerful PDF Software / PDF Editor for Windows, macOS, Linux
Copyright © 2002-Present Qoppa Software. All rights reserved.
Bibliography Entry - Text information referring the user to where the cited text can be found
Quote - A portion of text referencing work from another author, different from a block quote in that it is a single string of text found inline with other text.
Span - An inline segment of text that is formatted differently then the surrounding text, usually to provide emphasis such as Bold or Italic.
Special inline
Similar to inline-level elements, special inline-level elements describe an inline portion of text that has special formatting or behavior.
Code - Text used for computer programming language
Figure - An image or graphic that is referenced by the text
Form - A editable PDF field used to complete a form
Formula - A scientific or mathematical formula element
Link - Hyperlink element that when clicked can navigate a user to a website or location within the current or different PDF file
Note - Additional text or information, such as an endnote or footnote, that is referred to in some previous text
Reference - A text citation in reference to data found elsewhere in the document

-842-
Affordable, Powerful PDF Software / PDF Editor for Windows, macOS, Linux
Copyright © 2002-Present Qoppa Software. All rights reserved.
BookmarksPDF Studio has the following options available to create, edit, or manage bookmarks within a PDF.
Creating Bookmarks: how to create bookmarks in a PDF
Deleting Bookmarks: how to delete bookmarks in a PDF
Moving Bookmarks: how to move or rearrange bookmarks in a PDF
Bookmarking Selected Text: add a bookmark for the currently selected text
Renaming a Bookmark: editing or changing a bookmarks name
Set Bookmark Location: set the location of the bookmark when clicked
Editing Bookmark Actions: edit the actions associated with bookmarks
Custom Bookmark Actions: a list of all the available actions that can be set on bookmarks
Editing Bookmark Appearance : edit the appearance of bookmarks
Automatically Create Bookmarks: automatically create bookmarks within the PDF
-843-
Affordable, Powerful PDF Software / PDF Editor for Windows, macOS, Linux
Copyright © 2002-Present Qoppa Software. All rights reserved.
1.
2.3.
•
4.•
5.•
•
6.7.
8.
1.2.3.
OCR PDFPDF Studio is capable of OCRing documents using any of the available OCR languages to add text to documents. OCR allows you to add text to scanned documents or images so that the document can be searched or marked up as you would any other text document. PDF Studio 2022 also introduces the ability to run OCR with two languages at once. For more information on OCRing with two languages see OCR Preferences.
What is OCR?
Optical character recognition (OCR) is the mechanical or electronic conversion of images of typed or printed text into machine-encoded searchable text data.
From Existing Document
Text can be added to an existing document using OCR
Launch PDF Studio and open the PDF document that you wish to add searchable text toGo to the Document Tab > OCR from the toolbarFrom the Language drop down select the language you wish to use
Note: The first time using OCR you will need to download the language packs. To do so click on “Download OCR Languages“, then select the languages you wish to use and click on “Download”.
Select the Page Range and Resolution that you wish to useNote: A resolution of 300 DPI produces good OCR results for most images. When dealing with scans containing noise, you may try using a lower DPI setting to get rid of the noise and obtain better OCR results.
Choose additional optionsDiscard Invisible Text - removes any previous OCR text that has been added to the page.Auto Deskew Images - When checked, if the document’s text/images are slanting too far in one direction or is misaligned, PDF Studio will attempt to auto-rotate the document so that the alignment is corrected.
Click on “OK” to begin the OCR processYou will see a progress dialog showing you the current page being processed. Once complete click on “OK” to close the dialog Your document is now ready to be searched, edited, or marked up with highlights, underlined, crossed-out or used with caret annotations.
When Scanning a Document
OCR can add text to a document at the same time it is being scanned with PDF Studio
Start the Scanning Dialog as normalIn the scanning dialog you will see an option to OCR the document after scanning From the Language drop down select the language you wish to use

-844-
Affordable, Powerful PDF Software / PDF Editor for Windows, macOS, Linux
Copyright © 2002-Present Qoppa Software. All rights reserved.
•
4.
5.
6.
•••••••••••
•
••
••
•••••
••••••••
••
••••••
•
••••
•••••••
•••
•••••••••
Note: The first time using OCR you will need to download the language packs. To do so click on “Download OCR Languages“, then select the languages you wish to use and click on “Download”.
After setting all of your scanning and OCR settings click on “Scan” to begin scanning the documentOnce the scanning completes the OCR process will begin and you will see a progress dialog showing you the current page being processed. Once complete click on “OK” to close the dialog Your document is now ready to be searched, edited, or marked up with highlights, underlined, crossed-out or used with caret annotations.
Available OCR Languages
The following language dictionary files are available for download directly from within PDF Studio OCR functions. Using the appropriate language file will improve the accuracy of OCR results. See Tips on Improving OCR Results for additional information
AfrikaansAlbanian – shqipArabic – ةيبرعلاAzerbaijani – azərbaycanBasque – euskaraBelarusian – беларускаяBengali – বাংলাBulgarian – българскиCatalan – catalàCherokeeChinese (Simplified) – 中 文(简体中文)Chinese (Traditional) – 中 文(繁體)Croatian – hrvatskiCzech – čeština “da”>Danish – danskDanish – DanskDanish (Fraktur) – Dansk (Fraktur)Dutch - NetherlandishEnglishEstonian – eestiFinnish - SuomalainenFrench - Français
Galician – galegoGerman - DeutscheGreek – ΕλληνικάHebrew – תירבעHindi – हिन्दीHungarian – magyarIcelandic – íslenskaIndonesian – Bahasa IndonesiaItalian - ItalianoItalian (old) – italino vecchioJapanese – 日本語Kannada – ಕನ್ನಡKorean – 한국어Latvian – latviešuLithuanian – lietuviųMacedonian – македонскиMalay – Bahasa MelayuMalayalam – മലയാളംMaltese – MaltiMath / EquationsNorwegian - Norsk
Polish - PolskiePortuguese - PortuguêsRomanian – românăRussian – русскийSerbian – српскиSlovakian – slovenčinaSlovakian (Fraktur) – slovenčina (Fraktur)Slovenian – slovenščinaSpanish - EspañolSpanish (Old) – español (Antiguo)Swahili – KiswahiliSwedish - SvenskTagalogTamil – தமிழ்Telugu – తెలుగుThai – ไทยTurkish – TürkçeUkrainian – українськаVietnamese – Tiếng Việt

-845-
Affordable, Powerful PDF Software / PDF Editor for Windows, macOS, Linux
Copyright © 2002-Present Qoppa Software. All rights reserved.
1.2.
•3.
•
4.5.
Editing Field Tab OrderPDF Studio allows you to set the tab order of fields within a document. This allows you to designate what field comes next when the user is tabbing through the document to make it easier to complete. Follow the instructions below to rearrange the field tab order in a PDF form.
Note: By default the tab order is created in the order that the fields are created. It's usually best practice to either create the fields in the correct order or rearrange them afterwards as many users will be confused if the when pressing tab they are taken to a completely different section of the page.
Changing the Field Tab Order
Start the Form Editing Mode by going to the Forms TabOn the left hand side of the PDF Studio frame will be the Fields Pane
Note: You may need to click on the "Fields" button to open the paneIn this pane you will see a list of all the fields per page within the document. To field tab order in the document goes from the top of the field tree to the bottom of the field tree. To edit the field tab order drag and drop the items into the order that you want the fields to tab starting with the first at the top and the last at the bottom of the list.
Note: You can choose to Show Field Tab Order option to see the tab order directly on the fields on the page
Once complete click on Stop Form Editing to close the tool barSave the document and the fields will be ready for use

-846-
Affordable, Powerful PDF Software / PDF Editor for Windows, macOS, Linux
Copyright © 2002-Present Qoppa Software. All rights reserved.
General Document PropertiesThe General document properties tab displays basic information about the document including Title, Author, Subject, and Keywords that were set by the document's creator. Additional file details such as the producer, created date, modified date, file size, page size, and file metadata are also displayed on this page. Only the Title, Author, Author Title, Subject, Writer and Keywords can be edited (unless the Document Security has been set)
Note: These fields are not required information in a PDF and so may be left blank.
-847-
Affordable, Powerful PDF Software / PDF Editor for Windows, macOS, Linux
Copyright © 2002-Present Qoppa Software. All rights reserved.
1.2.
How to View the General Document Properties
Go to File Tab > Properties or using the shortcut keys Ctrl + D (Cmd + D on Mac).Click on the General Tab
Document Properties
File - Name of the file stored on the system
Title - Displays the current Title of the document.
Author - Displays the current Author of the document.
Subject - Displays the current Subject of the document.
Keywords - Displays the current Keywords of the document.
Path - The full address of where PDF file is stored on the computer
Note: For new documents created in PDF Studio this will be blank until the file is saved
Producer - Name of the application that generated the PDF file
Note: This value may be empty if the application failed to include the name in the file properties
Created - Date the document was created
Modified - Date the document was last modified
File Size - Amount of file space needed to store the PDF
Version - The PDF standards version of the PDF document
Number of pages - Number of pages in the document
Page Size - Displays the height and width of the document in either inches or millimeters depending on your local settings
Note: For document's with multiple page sizes this value will show the size of the current page being displayed
Tagged PDF - Whether or not the document has been tagged for accessibility
Fast Web View - Whether or not the document has been saved using the Fast Web View (linearized) format
-848-
Affordable, Powerful PDF Software / PDF Editor for Windows, macOS, Linux
Copyright © 2002-Present Qoppa Software. All rights reserved.
PDF/A - Whether or not the document meets the PDF/A standards
Additional Metadata
When clicked, opens a new dialog showing additional internal document metadata including copyrights, XML tree and raw XMP Metadata output. The following additional details are accessible.
Description
Description
Title - Displays the current Title of the document.
Author - Displays the current Author of the document.
Author Title - Displays the current Author title of the document.
Description - Displays the current Description of the document.
Description writer - Displays the name of the person who wrote the description
Keywords - Displays the current Keywords of the document. Commas can be used to separate keywords.
Copyrights
Copyright Status - Displays the current status of the copyright for the document
Copyright notice - Displays the details of the copyright information
Copyright info URL - Displays the URL to access the copyright information if available. Click the icon on the right of the field to open the webpage in your default web browser
Metadata
Created - Date the document was created
Modified - Date the document was last modified
Application - Name of the application that generated the PDF file
-849-
Affordable, Powerful PDF Software / PDF Editor for Windows, macOS, Linux
Copyright © 2002-Present Qoppa Software. All rights reserved.
Note: This value may be empty if the application failed to include the name in the file properties
Format - Mimetype of the currently opened file
Advanced
This tab displays additional metadata found within the document using a tree structure to explore if needed. This section is for reference only.
XMP Metadata
This tab displays raw XMP Metadata output in an XML format just as it is stored within the document. This information can be selected and copied if needed but can not be edited.
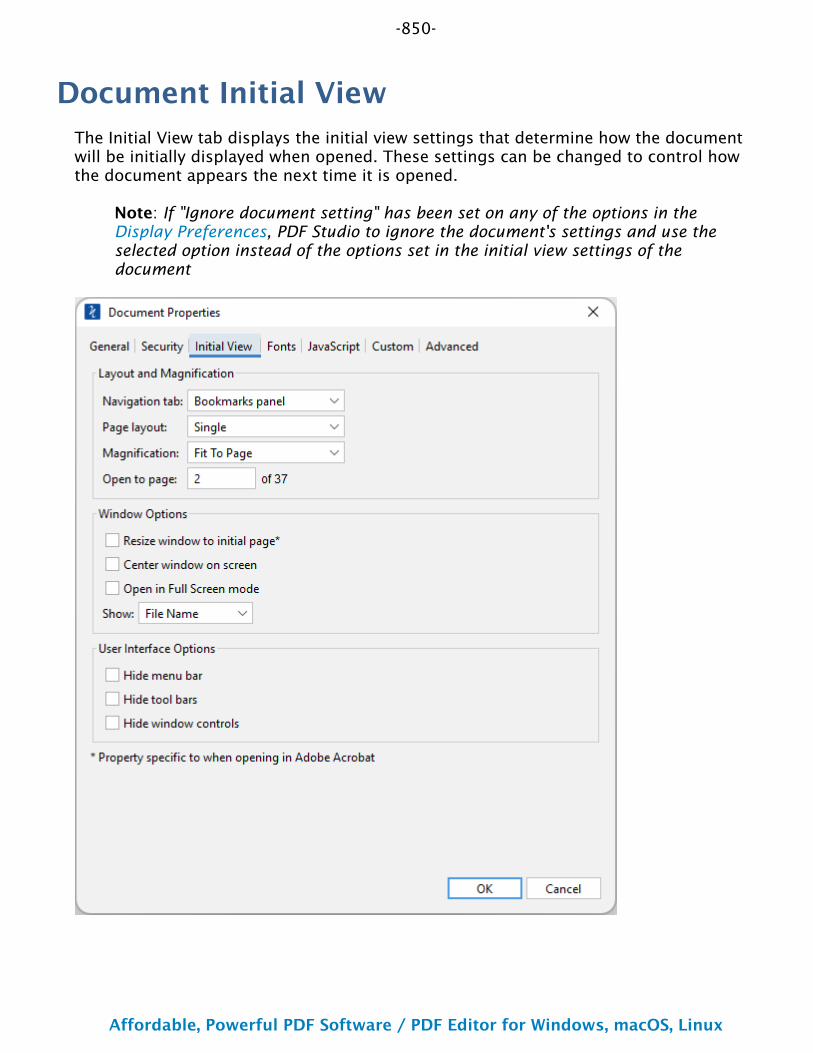
-850-
Affordable, Powerful PDF Software / PDF Editor for Windows, macOS, Linux
Copyright © 2002-Present Qoppa Software. All rights reserved.
Document Initial ViewThe Initial View tab displays the initial view settings that determine how the document will be initially displayed when opened. These settings can be changed to control how the document appears the next time it is opened.
Note: If "Ignore document setting" has been set on any of the options in the Display Preferences, PDF Studio to ignore the document's settings and use the selected option instead of the options set in the initial view settings of the document
-851-
Affordable, Powerful PDF Software / PDF Editor for Windows, macOS, Linux
Copyright © 2002-Present Qoppa Software. All rights reserved.
1.2.3.4.5.
••••••
•••
•
•
•
•
••
••
How to View/Edit the Initial View Settings
Go to File Tab > Properties or using the shortcut keys Ctrl + D (Cmd + D on Mac).Click on the Initial View TabSelect the initial view settings you wish to useClick OK to set the settingsSave the document to save the new initial view settings
Note: You must SAVE the document in order for the initial view settings to be set. Just setting them in the document properties does not apply them to the document.
Initial View Settings
Layout & Magnification
Navigation tab - Sets the default behavior for the navigation tab when the document is opened
Default: Uses the default settings for the application the document is opened inNone (Document Only): No navigation tab will be displayedBookmarks Panel: Displays the bookmarks panel when the document is openedPages Panel: Displays the pages panel when the document is openedAttachments Panel: Displays the attachments panel when the document is openedFull Screen Mode: Displays the document in full screen mode when opened
Page Layout - Sets the default behavior for the page layout when the document is opened
Default: Uses the default settings for the application the document is opened inSingle: Displays only a single individual page at a timeSingle Continuous: Displays all of the document's pages in a single column that can be continuously scrolledFacing: Displays only two pages at a time side by side with odd pages on the left and even pages on the rightFacing Continuous: Displays all of the documents pages in two columns with odd pages on the left and even pages on the rightCover: Displays the document just as when using Facing only the first page will be displayed aloneCover Continuous: Displays the document just as when using Facing Continuous only the first page will be displayed alone
Magnification - Sets the default magnification for the document when opened
Default: Uses the default settings for the application the document is opened inActual: Displays the document with a 1:1 ratio to match how the document would look if printed without any scalingFit to Page: Scales the view to fit the width of the document in the PDF Studio frameFit to Width: Scales the view to fit the entire document within the PDF Studio frame

-852-
Affordable, Powerful PDF Software / PDF Editor for Windows, macOS, Linux
Copyright © 2002-Present Qoppa Software. All rights reserved.
• %: Sets the zoom to the specified number value
Open to Page - Sets the page number to be displayed when the document is opened
Window Options
Resize window to initial page* - When set will resize the window to match the initial page size at 100%. This is an Acrobat only feature.
Center window on screen - Centers the application frame in the center of the monitor / screen
Open in Full Screen Mode - Opens the file directly into Full Screen Mode
Show - Choose whether to show the File Name or Document Title in the titlebar of the PDF Studio application frame
User Interface Options
Hide menu bar - Hides the top menu bar when document is opened.
Note: menu bars are only shown when using the Classic Toolbar
Hide tool bars - Collapses the toolbar when the document is opened. Toolbar can be reopenen by clicking on the tab name or the down arrow icon on the toolbar
Hide Window Controls - Hides the scrollbars from the document viewing area
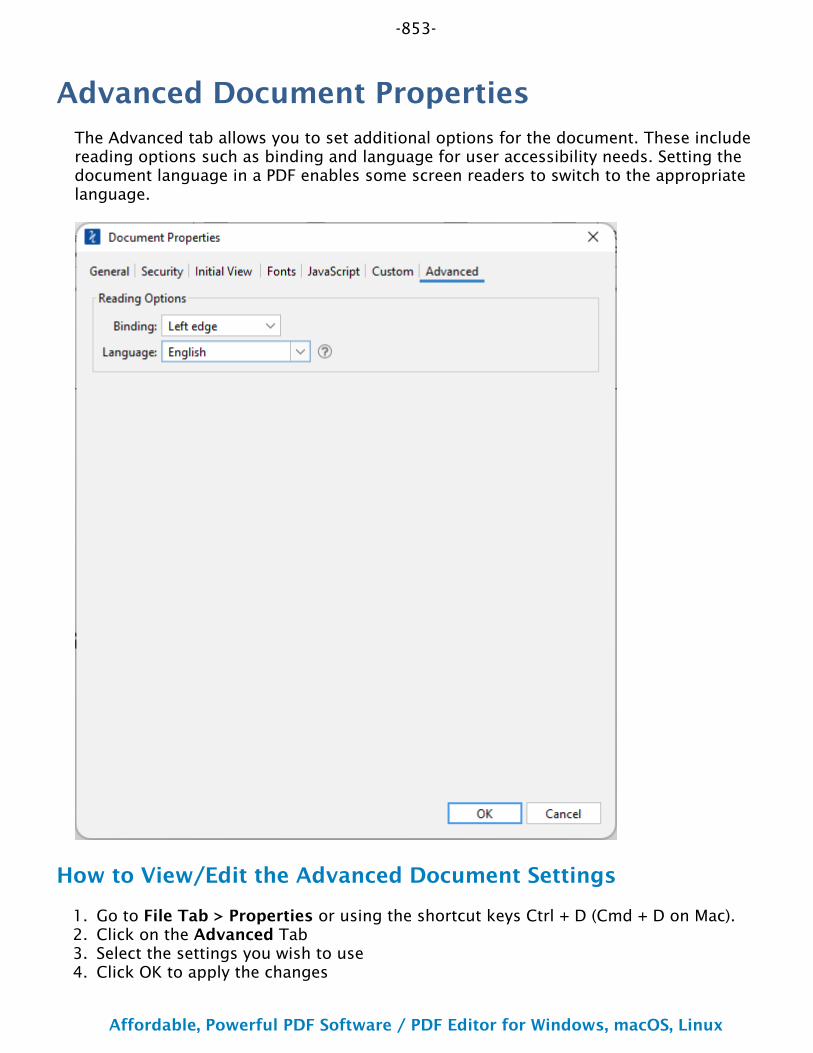
-853-
Affordable, Powerful PDF Software / PDF Editor for Windows, macOS, Linux
Copyright © 2002-Present Qoppa Software. All rights reserved.
1.2.3.4.
Advanced Document PropertiesThe Advanced tab allows you to set additional options for the document. These include reading options such as binding and language for user accessibility needs. Setting the document language in a PDF enables some screen readers to switch to the appropriate language.
How to View/Edit the Advanced Document Settings
Go to File Tab > Properties or using the shortcut keys Ctrl + D (Cmd + D on Mac).Click on the Advanced TabSelect the settings you wish to useClick OK to apply the changes

-854-
Affordable, Powerful PDF Software / PDF Editor for Windows, macOS, Linux
Copyright © 2002-Present Qoppa Software. All rights reserved.
5.
••
Save the document to save the new Advanced Document settings
Options
Binding - Sets the order to display the pages in Facing or Cover view modes.
Left Edge: For documents that read from Left to Right (i.e. English, French, etc...)Right Edge: For documents that read from Right to Left (Arabic, Hebrew, etc...)
Note: This does not affect page order in the thumbnails pane.
Language - Sets the langauge for the entire documents. See Tagging PDFs for details on setting the language for specific text within the document.
Note: If the language doesn't appear in the drop-down list, you can enter the ISO 639 code for the language in the Language field.
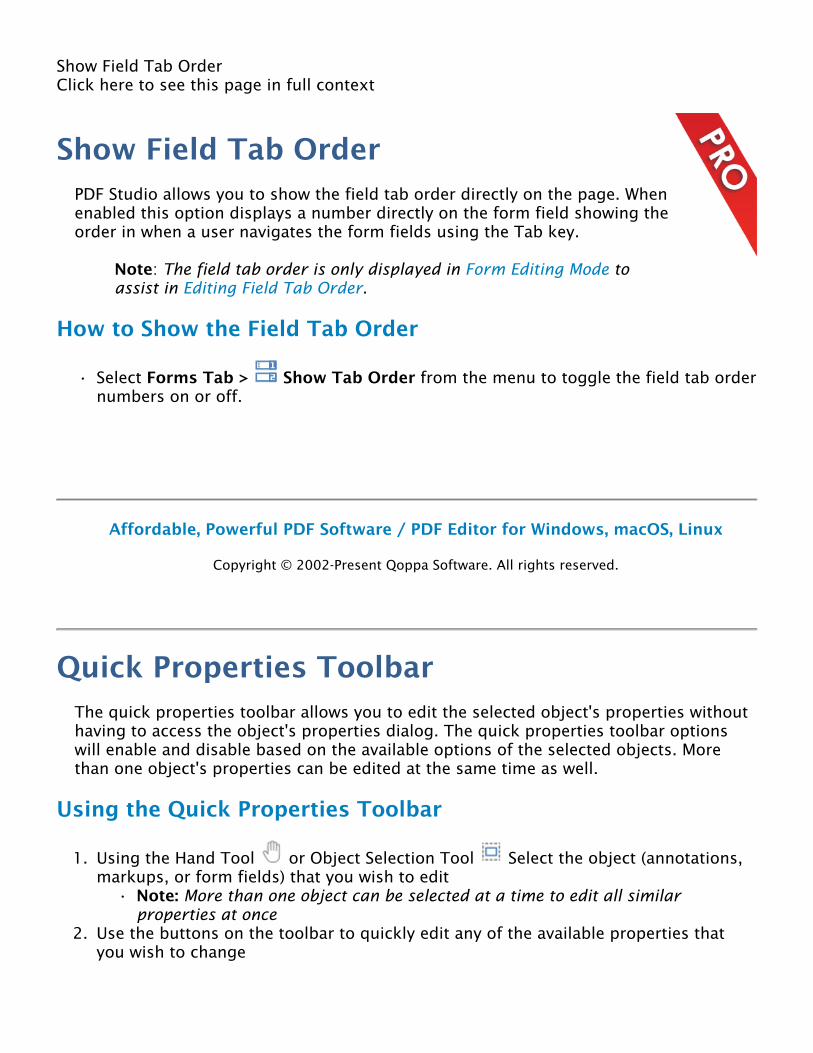
•
1.
•
2.
Show Field Tab OrderClick here to see this page in full context
Show Field Tab OrderPDF Studio allows you to show the field tab order directly on the page. When enabled this option displays a number directly on the form field showing the order in when a user navigates the form fields using the Tab key.
Note: The field tab order is only displayed in Form Editing Mode to assist in Editing Field Tab Order.
How to Show the Field Tab Order
Select Forms Tab > Show Tab Order from the menu to toggle the field tab order numbers on or off.
Affordable, Powerful PDF Software / PDF Editor for Windows, macOS, Linux
Copyright © 2002-Present Qoppa Software. All rights reserved.
Quick Properties ToolbarThe quick properties toolbar allows you to edit the selected object's properties without having to access the object's properties dialog. The quick properties toolbar options will enable and disable based on the available options of the selected objects. More than one object's properties can be edited at the same time as well.
Using the Quick Properties Toolbar
Using the Hand Tool or Object Selection Tool Select the object (annotations, markups, or form fields) that you wish to edit
Note: More than one object can be selected at a time to edit all similar properties at once
Use the buttons on the toolbar to quickly edit any of the available properties that you wish to change
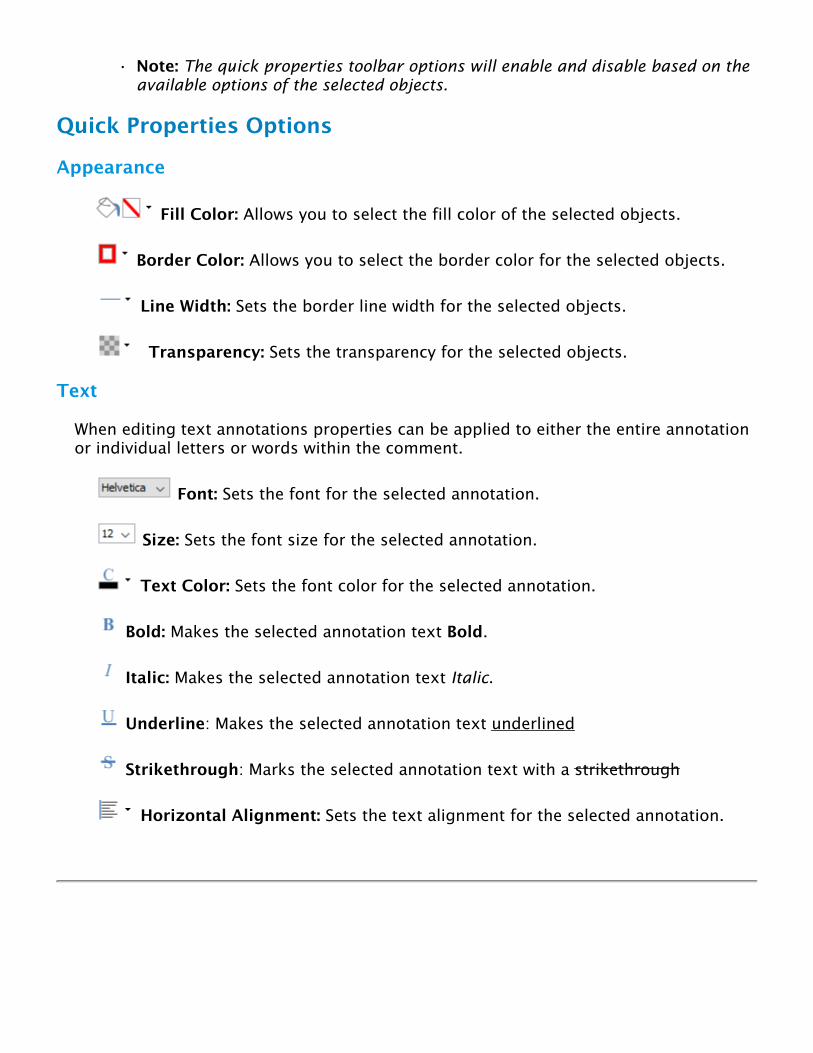
• Note: The quick properties toolbar options will enable and disable based on the available options of the selected objects.
Quick Properties Options
Appearance
Fill Color: Allows you to select the fill color of the selected objects.
Border Color: Allows you to select the border color for the selected objects.
Line Width: Sets the border line width for the selected objects.
Transparency: Sets the transparency for the selected objects.
Text
When editing text annotations properties can be applied to either the entire annotation or individual letters or words within the comment.
Font: Sets the font for the selected annotation.
Size: Sets the font size for the selected annotation.
Text Color: Sets the font color for the selected annotation.
Bold: Makes the selected annotation text Bold.
Italic: Makes the selected annotation text Italic.
Underline: Makes the selected annotation text underlined
Strikethrough: Marks the selected annotation text with a strikethrough
Horizontal Alignment: Sets the text alignment for the selected annotation.
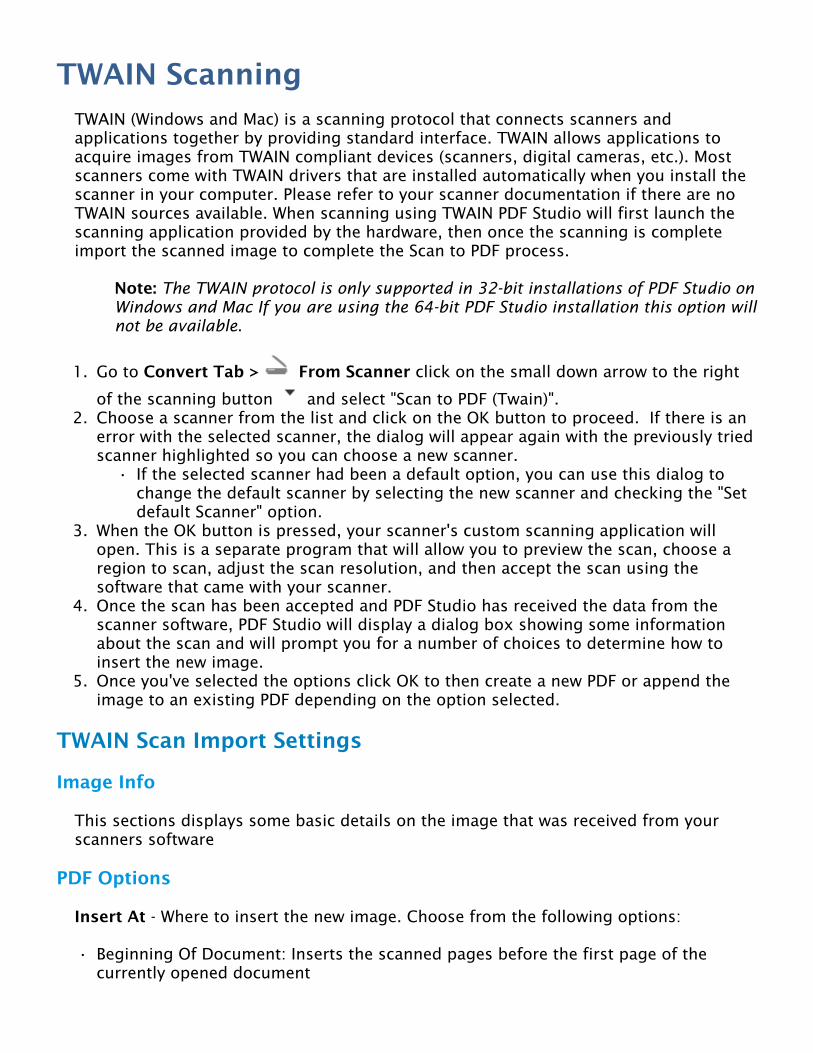
1.
2.
•
3.
4.
5.
•
TWAIN ScanningTWAIN (Windows and Mac) is a scanning protocol that connects scanners and applications together by providing standard interface. TWAIN allows applications to acquire images from TWAIN compliant devices (scanners, digital cameras, etc.). Most scanners come with TWAIN drivers that are installed automatically when you install the scanner in your computer. Please refer to your scanner documentation if there are no TWAIN sources available. When scanning using TWAIN PDF Studio will first launch the scanning application provided by the hardware, then once the scanning is complete import the scanned image to complete the Scan to PDF process.
Note: The TWAIN protocol is only supported in 32-bit installations of PDF Studio on Windows and Mac If you are using the 64-bit PDF Studio installation this option will not be available.
Go to Convert Tab > From Scanner click on the small down arrow to the right
of the scanning button and select "Scan to PDF (Twain)".Choose a scanner from the list and click on the OK button to proceed. If there is an error with the selected scanner, the dialog will appear again with the previously tried scanner highlighted so you can choose a new scanner.
If the selected scanner had been a default option, you can use this dialog to change the default scanner by selecting the new scanner and checking the "Set default Scanner" option.
When the OK button is pressed, your scanner's custom scanning application will open. This is a separate program that will allow you to preview the scan, choose a region to scan, adjust the scan resolution, and then accept the scan using the software that came with your scanner.Once the scan has been accepted and PDF Studio has received the data from the scanner software, PDF Studio will display a dialog box showing some information about the scan and will prompt you for a number of choices to determine how to insert the new image.Once you've selected the options click OK to then create a new PDF or append the image to an existing PDF depending on the option selected.
TWAIN Scan Import Settings
Image Info
This sections displays some basic details on the image that was received from your scanners software
PDF Options
Insert At - Where to insert the new image. Choose from the following options:
Beginning Of Document: Inserts the scanned pages before the first page of the currently opened document
•
•••
•
•
••
••
••
••
•••
••
Current Location: Inserts the scanned pages in front of the current page being displayed of the currently opened documentEnd Of Document: Appends the scan at the end of the document.New Document: Creates a new document using only the scanned pagesInterleave – When scanning multiple images, this option can be used to insert them at every other page. This is especially useful for scanning two-sided documents.Reverse Interleave: Insert the scan in the current document at every other page in reverse order starting after the last page of the document.Multiple documents - Use this option to create multiple documents when scanning multiple pages. When selected a dialog will be displayed to set the following options.
Pages per PDF - Number of pages before creating the next PDFFile Name Pattern - The file name to be used when creating the PDFs. Each file will have the number of the document appended to the end of the file nameSave files To - Where to save the created filesSave as Default - When checked this will make the selected options the default going forward
Page Size - What size to use when creating a new page to hold the image.
Size to Image – The new page will be created the same size as the scanned image.Same as Document – The new page will be created the same size as the current open document. If the document is empty or if the Insert At choice is set to New Document the new page will be created at the same size as the scanned image.
Compression - What compression to use when saving the image into the PDF document.
JPEG - Lossy compression (recommended compression)Quality (for JPEG compression only) – If using JPEG, the compression quality can be adjusted from 1 to 100%.
1 = high compression, very low quality100 = low compression, very high qualityGenerally, 80=high quality, 50=medium quality, 20=low quality
Flate - Lossless compression formatJBIG2 B&W - Lossless compression format that only supports B&W color
Auto deskew images - When checked, if the document’s text/images are slanting too far in one direction or is misaligned, PDF Studio will attempt to auto-rotate the document so that the alignment is corrected.
OCR Options
OCR - Create Searchable PDF - Check this to automatically OCR the document after scanning
Language - Language to be used if OCR is selected. Click on "Download OCR Languages" to download additional languages.
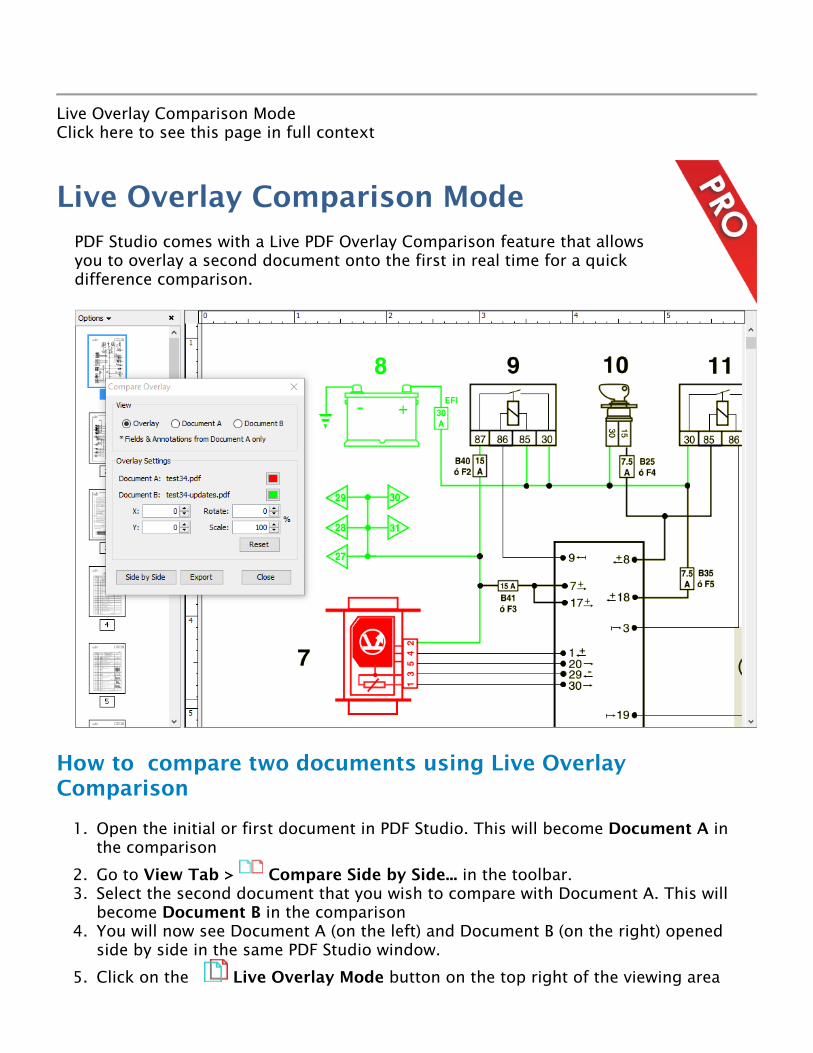
1.
2.3.
4.
5.
Live Overlay Comparison ModeClick here to see this page in full context
Live Overlay Comparison ModePDF Studio comes with a Live PDF Overlay Comparison feature that allows you to overlay a second document onto the first in real time for a quick difference comparison.
How to compare two documents using Live Overlay Comparison
Open the initial or first document in PDF Studio. This will become Document A in the comparison
Go to View Tab > Compare Side by Side... in the toolbar.Select the second document that you wish to compare with Document A. This will become Document B in the comparisonYou will now see Document A (on the left) and Document B (on the right) opened side by side in the same PDF Studio window.
Click on the Live Overlay Mode button on the top right of the viewing area
6. You will now see Document B overlayed onto Document A and the Compare Overlay dialog that can be used to make any alignment changes to Document B (in real time) if needed to correctly match up the documents.
Note: The overlay view can also be printed by printing the document while the overlay view is enabled.
Image Overlay Options:
View
Choose to display both or each document individually
Click on the icon to minimize the overlay comparison settings dialog. It will be docked at the bottom right corner of the PDF Studio window. Click on the docked button to restore the dialog.
Settings
Color - select the color of each document (the default colors generally provide the best results). See Choosing colors for overlay PDF comparison.
X & Y - adjust the X & Y values of Document B to move it left, right, up, or down
Rotate- adjust the rotation of Document B if needed
Scale - make Document B smaller or larger if needed.
Note: The scale option has a minimum of 1 and a maximum value of 999.
Additional Options
Annotations & Markups - At any time during the comparison you can only annotate or markup any changes in Document A.*
Note: It is worth noting that all annotation and text markup tools, as well as other PDF editing tools, are still active while in comparison overlay view, allowing to mark up and modify the original PDF. One can also easily switch back and forth between the overlay comparison view and the side by side comparison view (where the 2 documents are displayed side by side in a synchronized way). In side by side comparison, it is possible to annotate the second document to add sticky notes and text highlights (look under the right-click context menu).
Switching Comparison Modes - You can also switch over to our Side by Side
Comparison mode by clicking on the Side by Side button in the Overlay Comparison dialog. When switching back and forth the scale values will be remembered until a new document is opened for comparison.
•
••
•
•••••
Exporting - Once you've completed your comparison you can export the comparison into a single document with the Overlay Comparison View as the as the base layer and Documents A & B as layers within the document. If you have completed your comparison and want to exit the comparison mode just close the comparison tool to return back to Document A.
The Overlay comparison - Layer 1 (on by default) and will be rasterized (turned into an image per page).The original Document A - Layer 2The original Document B - Layer 3
Note: The overlay view can also be printed by printing the document while the overlay view is enabled.
Affordable, Powerful PDF Software / PDF Editor for Windows, macOS, Linux
Copyright © 2002-Present Qoppa Software. All rights reserved.
Converting PDF to PDF/A-1BClick here to see this page in full context
Converting PDF to PDF/A-1bPDF Studio provides the ability to convert files to the PDF/A-1b format. PDF/ A-1b is a strict subset of the ISO PDF specification used to create archival versions of documents with the intent that they will always render exactly the same as when they were saved. PDF/A-1b is growing in popularity as international governments, libraries, newspapers, and legal systems recognize the need for digital documents to be preserved in a consistent format for a long period of time.
When converting to PDF Studio will attempt to convert the PDF to the PDF/A-1b format by making the following changes to the document
Graphics will be converted to a device-independent format. If any device dependent color spaces are used, they will be defined by embedding a color profile for these color spaces.Fonts will be embedded.Transparency may be removed.Unsupported comments (e.g., video, audio, 3D) may be removed.JavaScript (mostly used in Forms) will be removed.Embedded files and external hyperlinks may be removed.
•
1.
2.3.4.5.
•
•
••
••
•
•
•
•
Form fields will be flattened
How to Convert a PDF to PDF/A-1b
Open the PDF Document you wish to convert
Go to the Convert Tab > Convert To > PDF/A-1b on the toolbarA dialog will be displayed showing the changes that will be made to the documentChoose a file name and location to save the documentClick Save to convert the document to PDF/A-1b
PDF/A Conversion Results
PDF Studio will attempt to convert every file but due to the PDF/A-1b requirements some files may not be able to be converted. If the conversion fails a dialog will be
displayed showing the reasons that the conversion failed. A red symbol will be displayed next to the items that are not PDF/A compliant and can not be fixed by PDF Studio PDF/A conversion.
Note: When the conversion is successful no dialog will be displayed as the conversion process completed and saved the new document correctly
Unsupported Features in PDF/A-1b Conversion:
Below is a list of features that may cause errors during the PDF/A-1b conversion.
The PDF document contains non-embedded, non standard system fonts. Only the standard 14 PDF fonts can be embedded. Non standard system fonts will not be embedded.
Workaround: There is no workaround for fixing this other then recreating the PDF document using different fonts.
The PDF document is secured / encrypted with passwords and permissions.Workaround: Users should clear any security on a document before running PDF/A conversion.
The PDF documents has user rights enabled.Workaround: Users should clear user rights before running PDF/A conversion.
The PDF document contains a digital signature. Converting to PDF/A would invalidate any digital signature.
Workaround: Users should clear or remove digital signature fields before running PDF/A conversion.
The PDF document contains unsupported PDF commands or operators. Often these documents can not render in PDF Studio or will have pages that do not render properly.
Workaround: Users may be able delete the invalid pages.
1.
2.3.
Verify that Existing Document is PDF/A-1b Compliant
Viewing the Document or Document Properties
When opening a document that is PDF/A-1b compliant a blue notification "This document is tagged as PDF/A-1b compliant" will be displayed at the bottom of the PDF Studio window. You can also confirm the PDF/A-1b compliance in the document properties dialog.
Go to the File Tab> Properties from the menu or using the shortcut keys Ctrl + D (Cmd + D on Mac).Click on the General TabIn the lower right corner of the general document properties there will be a "PDF/A" label that will show "Yes" if the document meets the PDF/A-1b compliance standards
Using Preflight Verification
You can also use the PDF/A-1b Preflight Verification to verify that the document complies with the PDF/A-1b standards
Affordable, Powerful PDF Software / PDF Editor for Windows, macOS, Linux
Copyright © 2002-Present Qoppa Software. All rights reserved.