page 1 - sketchup-ur-space
TRANSCRIPT
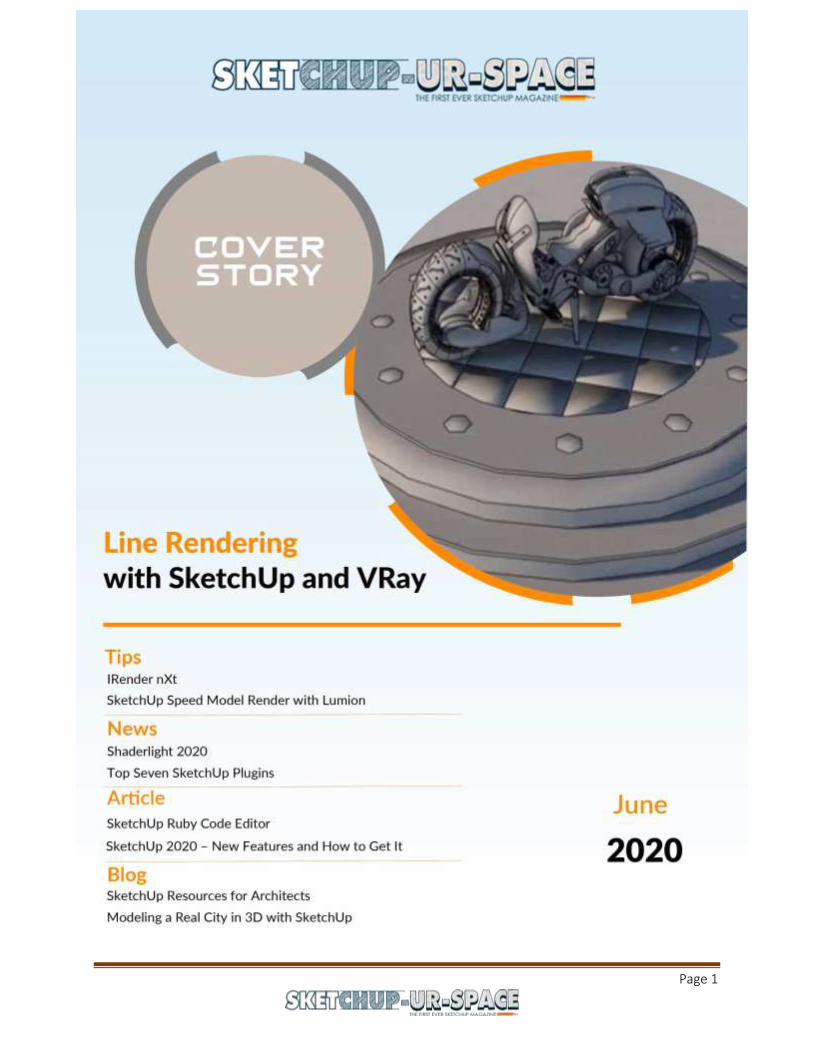
Page 1
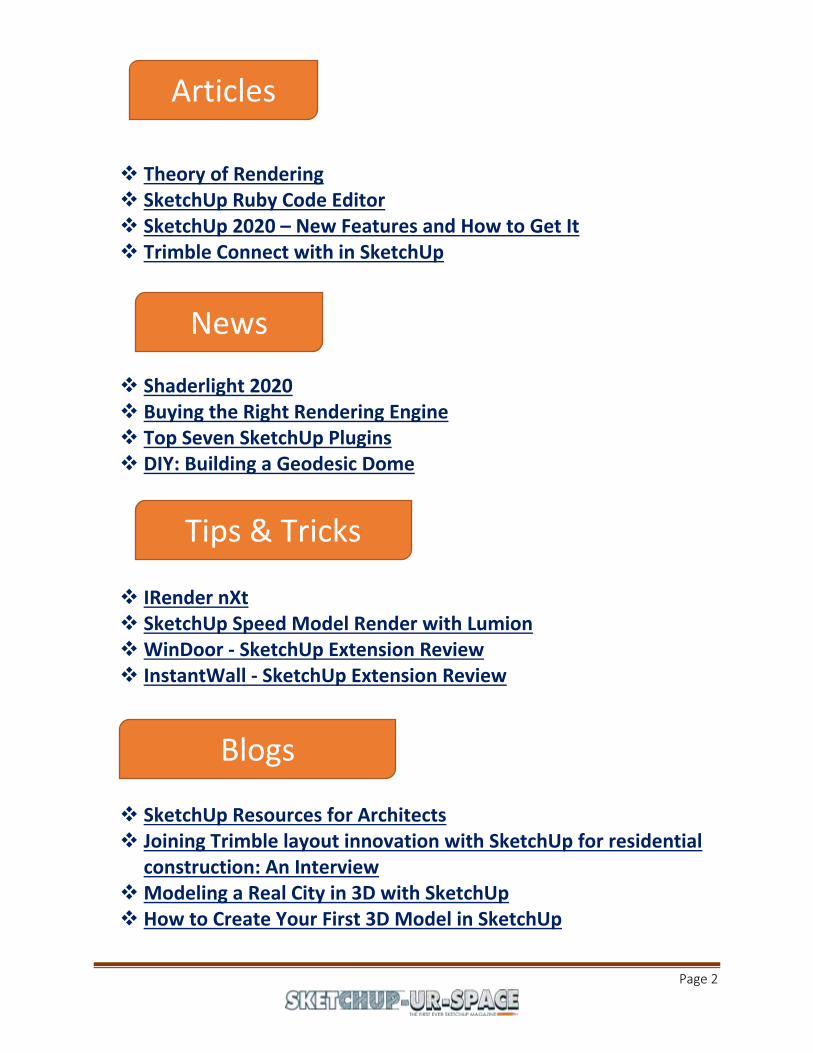
Page 2
Theory of Rendering SketchUp Ruby Code Editor SketchUp 2020 – New Features and How to Get It Trimble Connect with in SketchUp
Shaderlight 2020 Buying the Right Rendering Engine Top Seven SketchUp Plugins DIY: Building a Geodesic Dome
IRender nXt SketchUp Speed Model Render with Lumion WinDoor - SketchUp Extension Review InstantWall - SketchUp Extension Review
SketchUp Resources for Architects Joining Trimble layout innovation with SketchUp for residential
construction: An Interview Modeling a Real City in 3D with SketchUp How to Create Your First 3D Model in SketchUp
Articles
News
Tips & Tricks
Blogs
Page 3
Line Rendering with SketchUp and VRay
Often do we hear this question? “How do I do a line showing render? I’ve been trying out SketchUp for a few months now and people have been doing some renders that have only black lines on white background. Can you guys please help me?” Today, we will try to answer this question.
In this article, we will handle how to make a line rendering from SketchUp and Vray.
We've imported a model from the 3D Warehouse to show you what steps you have to take. There are two significant strides to move toward this inquiry. Initially, we're demonstrating what you'll have to do in Sketchup.
Make a Line Rendering with Sketchup
Window > Default Tray > Show Tray. Open the default tray by exploring to "window" > "default tray" and select "show tray." You likewise need to ensure "styles" are checked.
Alter Style. Go to the "alter" tab of the "styles" dropdown in the default tray. Select the "faces" thumbnail so you can alter the model faces. At that point, under the "style" segment, select "show shaded utilizing all equivalent."
You may see that a portion of the faces seem white and some of them seem dim. This is on the grounds that Sketchup perceives both the front and rear of faces. To get a reliable look, you'll need to ensure all the faces are situated a similar way.
To fix this, double tap into the model and afterward right-click on the mistaken faces. Select "reverse faces." In certain regions, you may need to physically choose each face and reverse them separately.
Select Camera View. When you have the entirety of the faces right, you'll need to spare another scene. Hit the "+" button at the base of the default tray. There will presently be a tab at the upper left of your screen that says "scene 1." Don't neglect to spare your model!
Page 4
Styles > Model Settings. Return to the "styles" tab of the default tray to alter the line rendering settings. Under the "alter" segment, select "modeling settings." Uncheck "concealed geometry," "model tomahawks," "area cuts," "segment fills," and "aides."
Update Style. Snap on the thumbnail picture legitimately underneath the "styles" tab to refresh the style.
Edge. Snap on the "edge" thumbnail under the "style" tab. From here you can choose what settings you need to incorporate. "Edges" are basically the framework of your model. "Back edges" incorporate a ghosted picture of the rear of your model. "Profiles" thicken the lines. For the present, we simply chose "edges" and "profiles."
File > Export > 2D Graphic. When you have the entirety of the settings chose, you can export your file. Go to "file" > "export" and select "2D Graphic." Type for the sake of your file and snap "export."
Make a Line Rendering with Vray
On the off chance that you need to take your file to the following level, you can utilize Vray (or actually some other rendering programming) and Photoshop to overlay the linework on a rendering. Snap on the "render intuitive" button in Sketchup to open Vray.
Settings > Material Override. To dispose of the default materials, go to "settings" and snap on "material override." Click the slider so that "material override" is turned on and re-render the picture.
Open in Photoshop. Snap on the thumbnail picture that peruses "duplicate current channel to clipboard." Open Photoshop and afterward open your PNG file.
Make A New File. Make another file in Photoshop and glue your Vray picture (that was duplicated to your clipboard) into the file.
Duplicate. Hit "ctrl" + "A" to duplicate the entirety of your line drawing. At that point go to the Vray rendering and hit "ctrl" + "V" to glue.
Page 5
Increase. Change the mixing alternative of the line attracting layer to "increase." This will dispose of the white and permit the dark lines to sit on the render.
Change. Hit "ctrl" + "T" to change the layer and adjust it to the rendering. On the off chance that you need, you can play around with the opacities of your two layers to get the look you're after.
In the event that you discovered this article accommodating, make certain to look at the remainder of our instructional exercises! What different sorts of renderings do you make with Sketchup and Vray? Tell us in the remarks!
Theory of Rendering
Today, we will talk about the theory behind computer-generated 3D rendering of models. The physics based representation (PBR) is an energizing pattern, whenever characterized essentially, of continuous rendering. The term is across the board, which regularly makes disarray regarding what it implies precisely. The speedy answer is: 'numerous things' and 'depends', which doesn't permit us to get away from what it truly is, so I have proposed to attempt to clarify in detail the PBR what it speaks to and how it contrasts from the most seasoned rendering strategies. This archive is expected for individuals with zero or extremely essential information on this theme and won't talk about any scientific code. Quite a bit of what makes a physics-based rendering framework not the same as its ancestors is a more profound thinking about the conduct of light and the surfaces associated with it. The rendering capacity has progressed adequately so a portion of the old ways to deal with this subject would now be able to be
Articles
Page 6
viewed as out of date and with them a portion of the old techniques to produce something imaginatively momentous. This implies both the architect and the craftsman must comprehend the inspirations of these changes. We will begin with a portion of the essential ideas so they are all around characterized before beginning to highlight what's happening. In the event that you keep pursuing these first ideas that you will most likely definitely know without a doubt it will merit perusing, you can likewise check our own article of Joe Wilson on the production of PBR delineations. Diffusion and Reflection Diffusion and reflection, otherwise called "diffuse" and "specular" light individually, are two terms that depict the most fundamental detachment of the associations between the surface and the light. A great many people will be acquainted with these thoughts on a down to earth level, however they may not have a clue about the physical contrasts that exist between them. At the point when the light strikes a surface, some portion of it will be mirrored, that is, it will bob, from the surface and will do as such toward the ordinary side of that surface. This conduct is fundamentally the same as that of a ball tossed against the ground or a divider: it will ricochet at the contrary edge. On a completely cleaned surface, it will bring about a "reflect" appearance. The word 'specular', which is frequently used to portray this "reflect" impact, originates from the Latin ' speculum ' (it appears that 'specularity' sounds more expert than "reflect impact"). Nonetheless, not all light is reflected from the surface. Normally, a few beams of light will enter inside the lit up object. There they will be consumed by the material (for the most part they will be changed over to warm) or scattered inside. A portion of this light can come back to the surface, turning out to be noticeable by and by to the eyes and cameras present. This is known by numerous names: "Diffuse light", "Diffusion", "Dispersion (Subsurface Scattering)": all portray a similar impact.
Page 7
The ingestion and dispersion of diffused light are frequently very unique for various frequencies of light, which is the thing that offers shading to objects (for instance, if an item retains the greater part of the light however scatters in blue , it will look blue). The dispersion is frequently so disordered that it tends to be said that it appears to be identical every which way, altogether different from the instance of a mirror! A material that utilizes this methodology extremely just needs one worth: 'albedo', an extraordinary shading that depicts the parts of different shades of light that will scatter from the surface. 'Diffuse shading' or 'Diffuse' is the name that is some of the time utilized as an equivalent word. Translucency and Transparency Now and again, diffusion is increasingly confused, for instance, in materials that have more extensive dispersion separations, for example, skin or wax. In these cases, a basic shading for the most part doesn't work and during the rendering procedure the shape and thickness of the article being lit up must be considered. In the event that they are sufficiently slender, such items regularly observe the light scattering on the rear and can be called translucent. On the off chance that the diffusion is even lower (for instance, glass), at that point the dispersion isn't apparent and we can see totally what is on the opposite side plainly. These practices are adequately not the same as the ordinary 'close to surface' diffusion, so extraordinary setups are commonly expected to reenact them. Vitality preservation With the above portrayals we have enough data to arrive at a significant resolution, reflection and diffusion are fundamentally unrelated. This is on the grounds that, all together for the light to be diffused, the light should initially enter the surface (that is, not reflect). This is referred to in the rendering language for instance of 'vitality protection', which implies that the light that comes out of a surface is never more splendid than what initially came to it. This is anything but difficult to
Page 8
apply in a rendering framework: one basically deducts the reflected light previously permitting the diffused light impact to happen. This implies profoundly intelligent items will show next to zero diffuse light, basically on the grounds that almost no light infiltrates through the surface, since it has generally been reflected. The inverse is additionally obvious: if an item has a splendid diffusion, it can't be particularly intelligent. Vitality protection of this sort is a significant part of rendering based on physical viewpoints. It permits the craftsman to work with reflectivity and diffusion esteems (also known as albedo) for a material without coincidentally disregarding the laws of physics (with which it will in general look terrible). While consistency with these limitations in the code isn't carefully important to create something that looks great, it serves a valuable capacity as a kind of 'insurance' that will keep the last work from extraordinarily surpassing the built up rules or getting conflicting under various states of lighting. Metals Electrically conductive materials, particularly metals, merit exceptional notice now for a few reasons. To begin with, they will in general be substantially more reflective than protectors (non-conductive). The conductors will by and large show high reflectivities between 60-90%, while the encasings for the most part have a lower reflectivity, in the scope of 0-20%. These high reflectances keep most of the light from arriving at the inside and in this manner being circulated, giving the metals an exceptionally 'splendid' appearance. Second, reflectivity in conductors will here and there change along the noticeable range, which implies that their reflections seem recolored. This reflection shading is uncommon even among conveyors, yet it happens in some regular materials (for instance, gold, copper and metal). Non-conductors or covers when in doubt don't display this impact and their reflections are dismal. At long last, electrical conveyors will by and large ingest as opposed to scattering any light that enters the surface. This implies, in principle, drivers won't show any proof of diffused light. Practically speaking, be that as it may,
Page 9
there are frequently oxides or different buildups on the surface of a metal that will scatter some limited quantities of light. It is this duality among metals and nearly everything else that drives some rendering frameworks to embrace 'metallicity' as an immediate alternative. In such frameworks, craftsmen determine how much a material carries on like a metal, rather than indicating just albedo and reflectivity expressly. At times, this is favored as a less complex approach to make materials, however it isn't really a physics-based rendering highlight. Fresnel Augustin-Jean Fresnel is by all accounts one of those perished individuals that we likely won't overlook, principally in light of the fact that his name is engraved in a progression of marvels he was the first to portray precisely. It is hard to have a conversation about the reflection of the light without its name showing up. In PC illustrations, the word Fresnel alludes to the diverse reflectivity that happens at various points. In particular, the light that falls on a surface at a point other than 90 ° will be considerably more liable to be reflected than the one that hits a surface legitimately. This implies objects rendered with a suitable Fresnel impact will seem to have more splendid reflections close to the edges. The vast majority of us have been acquainted with this for some time now and its essence in PC designs isn't new. In any case, PBR materials have made some significant redresses famous in the Fresnel conditions. The first is that for all materials, the reflectivity gets aggregated for extraordinary points: the 'edges' seen on any smooth item should go about as impeccable mirrors (without shading), paying little mind to the material. To be sure, any substance can go about as an ideal mirror on the off chance that it is delicate and takes a gander at the correct edge. This might be in opposition to instinct, yet the physics is clear. The second perception about Fresnel properties is that the bend or inclination between the edges doesn't fluctuate much starting with one material then onto the next. Metals are the most disparate, however they can likewise be clarified logically.
Page 10
What this means to us is that, expecting authenticity is wanted, power over Fresnel's conduct in a render ought to be decreased, instead of expanded. Or possibly, we presently realize where to set our default esteems! This is uplifting news, since it can streamline content age. The rendering system would now be able to control the Fresnel impact on the whole; Just check a portion of different properties of prior materials, for example, cleaning and reflectivity. A PBR work process makes the craftsman indicate, by some methods, a 'base reflectivity'. This gives the base sum and shade of the reflected light. The Fresnel impact, once rendered, will add reflectivity to the worth determined by the craftsman, coming to up to 100% (white) at outrageous points. Basically, the substance depicts the base and Fresnel's conditions take control from that point, making the surface increasingly reflective at different edges, varying. There is a major "yet" for the Fresnel impact: it rapidly turns out to be more subtle as the surfaces become less delicate, less cleaned. More data on this circumstance will be given somewhat later. Microsurface The above portrayals of reflection and diffusion rely upon the direction of the surface. Extensively, this is because of the state of the 3D work that is being rendered, which can likewise utilize an ordinary guide to depict little subtleties. With this data, any rendering framework can work accurately, which causes diffusion and reflection to envision well. Nonetheless, an enormous piece is as yet absent. Most true surfaces have little blemishes: little depressions, breaks and knocks unreasonably little for the eyes to see and too little to even consider representing on a typical guide of any reasonable goals. In spite of being imperceptible to the unaided eye, these tiny highlights, be that as it may, influence the diffusion and reflection of light.
Page 11
The detail of the tiny surface has the most perceptible impact on reflection (the dispersion isn't exceptionally influenced and won't be talked about here any longer). In the outline above, you can perceive how the equal lines of the approaching light start to veer when they are reflected from a more unpleasant surface, since each beam strikes a piece of the surface with an alternate direction. The simple in the run of the mill case of the ball would be extraordinary. The light ready is as yet going to ricochet, yet at an unusual point. In synopsis, the harsher the surface, the more the reflected light will veer or show up as 'foggy'. Lamentably, the assessment of every attribute of the smaller scale surface in rendering would be restrictive as far as imaginative creation, memory use and computation. At that point what do we do? Incidentally, in the event that we quit any pretense of depicting the subtleties of the smaller scale surface legitimately and rather determine a general proportion of unpleasantness, we can get genuinely exact renderings that produce comparative outcomes. This measure is frequently called 'Brilliance', 'Delicate quality' or 'Unpleasantness'. It very well may be indicated as a surface or as a steady for a given material. Energy protection As our theoretical rendering framework is currently considering the infinitesimal subtleties of the surface and the diffusion of the reflected light appropriately, you ought to be mindful so as to reflect the right measure of light. Shockingly, numerous old rendering frameworks aren't right to reflect excessively or excessively minimal light, contingent upon the surface harshness. At the point when the conditions are effectively adjusted, a renderer must show unpleasant surfaces that have bigger reflections of reflection that seem dimmer than the latter, more keen lights of a smooth surface. This clear contrast in brilliance is the key: the two materials are reflecting a similar measure of light, yet the more unpleasant surface is expanding it in various ways, while the milder surface is reflecting a progressively focused 'pillar'.
Page 12
Here we have a second type of energy preservation that must be kept up, notwithstanding the diffusion/reflection balance portrayed previously. Having this perspective is one of the most significant focuses required for any rendering program that tries to be inside what are called physics based. Microsurface is all What's more, it is with what has been remarked already that we arrive at the most significant point: the cleaning of the miniaturized scale surface straightforwardly influences the evident brilliance of the reflections. This implies a craftsman can make varieties straightforwardly on the cleaning map (scratches, imprints, worn or cleaned zones, whatever) and a PBR framework will show not just the adjustment in the method of reflection, yet in addition the relative force. This is noteworthy on the grounds that two certifiable amounts that are truly related, surface detail and reflectivity, are presently effectively connected to one another without precedent for the substance of the strategy and the representation procedure. This is fundamentally the same as the diffusion/reflection exercise in careful control portrayed above: we could be making the two qualities independently, yet as they are connected, the assignment possibly turns out to be progressively troublesome when rewarded independently. Also, an examination of certifiable materials will show that reflectivity esteems do not change broadly. A genuine model would be water and mud: both have a fundamentally the same as reflectivity, however since the mud is very unpleasant and the surface of a puddle is delicate, they appear to be totally different as far as their reflections. A craftsman who makes such a scene in a PBR framework would be the creator of the distinction fundamentally through brilliance or unpleasantness maps as opposed to changing the reflectivity. The properties of the small scale surface additionally have other unobtrusive impacts on reflection. For instance, the Fresnel impact of 'more brilliant edges' abatements fairly with more unpleasant surfaces (the disordered idea of a
Page 13
harsh surface 'dissipates' the Fresnel impact, keeping the watcher from seeing it plainly). What's more, enormous or inward microsurface highlights can 'trap' light, which makes it reflect against the surface a few times, which expands retention and lessens splendor. Diverse rendering frameworks utilize these subtleties in various manners and in various expansions, however the general pattern of more unpleasant surfaces that show up progressively questionable is the equivalent.
SketchUp Ruby Code Editor
Hi Folks, today, we will talk about SketchUp Ruby Code Editor. This code editor extension offers a simple to-utilize and outwardly engaging approach to write and adjust Ruby scripts legitimately inside SketchUp. These scripts would then be able to be utilized to make geometry, include usefulness or include information inside the SketchUp 3D modeling condition.
The SketchUp Ruby API gives a broad arrangement of capacities to automatize SketchUp from numerous points of view or make scripted, computational geometry. The developer made this editor for the most part for two reasons: One is that we needed an approach to alter and run SketchUp Ruby code directly within SketchUp's 3D modeling condition. Regularly this is done in an outer editor, yet having an inside editor takes into account utilizing both scripting and modeling simultaneously – relying upon your requirements.
The editor needed to give simple access to the Ruby coding condition and carry on progressively like a genuine code editor. To achieve this, the devs included a touch of jQuery (and jQuery UI) enchantment to make it look great and have some extra visual highlights (for example the tabs and menus).
They likewise included the brilliant CodeMirror punctuation featuring motor. This gives the editor multi-language code featuring, right TAB control, find/supplant, section coordinating, code collapsing, and numerous different
Page 14
highlights. Simply load the plugin and check out it to see with your own eyes that it is so natural to utilize!
The other explanation behind this extension is that when we write code, we always need to look into documentation. To make this simpler, the devs included a lot of reference site pages to a program window. Additionally, a drop down underneath the editor contains some basic code scraps that can be embedded at the current cursor position.
They are likewise trying different things with a code-culmination highlight that you can summon anytime by clicking CTRL-SHIFT. It contains SketchUp's classes and strategies.
Highlights of the Plugin:
Delightful and clean editor UI with menu-based UI Light/dark themed editor Permits executing multi-line Ruby code legitimately in SketchUp Works with documents of any size Quick opening and code featuring of enormous records Most as of late utilized record list Console alternate way route Line numbering in editor Indenting/dedenting of code squares Coordinating sections, current line featuring Fix/retry in editor Find/supplant in editor (text or RegEx) Code collapsing Supplement code bits at cursor Code-finish for SketchUp classes and techniques Programmed reinforcement record creation Different choices: text dimension, tab/space indenting Fix of code execution Single fix alternative for whole code Results window monitors run history Plausibility to run outer Ruby records Reference internet browser for normal sites Investigate choice article properties and qualities
Page 15
Alternative for direct access to the Ruby support Alternative to alter default code scrap Clean printing of code
So, how to utilize this extension? Basically select Window > Ruby Code Editor or open from the Ruby Code Editor toolbar.
Where would you be able to get it? You would now be able to discover this extension in Trimble's Extension Warehouse. For a simple introduction (and update notices), peruse to it from inside SketchUp (2013 or more up to date) and introduce it legitimately. Likewise, here are the rbz and zip files legitimately: https://alexschreyer.net/download/5408/?version=4-3 https://alexschreyer.net/download/5400/?version=4-3
What's new in Version 4.3 (5/7/2020)
1. Ruby working dir changes to record dir on load/spare at this point 2. Document way appears in tab title characteristic 3. Added menu thing to open plugin organizer 4. Added capacity and menu thing to run (load) outside document rather
than editor 5. Presently prints mistake line numbers in criticism 6. Fixed 2020 GC issue (class var for program) 7. Refreshed connections in reference program 8. Refreshed UI hues to be progressively steady with SU
SketchUp 2020 – New Features and How to Get It
Great news, SketchUp 2020 has shown up! Trimble has been watching remarks in the gatherings consistently, and talking about thoughts during preparing occasions to ensure the most recent adaptation of SketchUp addresses everything that clients need to see out of this new discharge.

Page 16
We'll investigate what's happening in SketchUp and Layout down underneath, yet first we should investigate how you can get your hands on it as a current client.
Before you update, if it's not too much trouble guarantee that any modules and renderers you depend on are good with SketchUp 2020 preceding redesigning, and know that there is no help for OS X 10.12 (Sierra) any more. You should utilize OS X 10.13 (High Sierra) or more up to date.
Yearly Subscription Users The incredible news for you is that you're qualified and are prepared to utilize SketchUp 2020 immediately. Just download the application here. At the point when the application is introduced, you should simply sign in with your current accreditations.
Perpetual License Users with Active Maintenance On the off chance that you have a functioning Maintenance and Support plan, you will be sent your new SketchUp Pro 2020 permit subtleties inside the following hardly any days through email.
System Users Licenses are naturally moved up to the fresher form. Your old permit is set apart as "On Hold" in Trimble's permitting database, and the new permit is set apart as "Dynamic."
The SketchUp Pro 2019 system permit will stay in the "On Hold" state until a PC is approved with your new 2020 permit data. At the point when this occurs, you will approach both SketchUp Pro 2019 and 2020 for 60 days. Following 60 days, you will just approach SketchUp Pro 2020.
All in all, What's New in SketchUp?
Presenting another Outliner
With an end goal to expand model execution, you no longer need to make Layers upon Layers – you can oversee and compose your model straight inside Outliner. Utilize the eye symbol to flip between the significant segments of your model, for example, principle floor plans and furniture.
Page 17
New grips on bounding boxes
At the point when you snatch a point that is darkened in an object, (for example, a back corner or focus point) and begin to move it, your object will consequently go straightforward when something in your model meddles with the object you are moving. This works with both the Rotate instrument and Move apparatus.
Better control of shrouded objects
You'll see in your drop-down menu that concealing objects are isolated from concealing geometry. This will enable you to all the more likely oversee shrouded geometry and concealed objects for a much simpler modeling experience. For instance, presently you can shroud objects that are close by (like trees, shrubberies, or a structure) while as yet having the option to alter concealed edges in a scene or smoothed surface!
Updates to your SketchUp word reference
There are a couple of updates to the naming shows utilized when discussing SketchUp. This won't change how you use SketchUp; however we need to ensure you're in the know regarding how a few things will be alluded to.
Objects are presently an aggregate term for: gatherings, parts, and dynamic segments. Layers are currently alluded to as "Labels".
Shouldn't something be said about Layout?
More capacity to alter model perspectives
Design presently comprehends significantly progressively about your SketchUp model and what you've abrogated. This implies you can securely change a style or camera edge legitimately in LayOut without incidentally losing your changes.
How would you know what's diverse in your LayOut viewport versus your model? At the point when you make changes in LayOut, portions of the menu bar will go dim, alarming you that you've made a supersede.
Page 18
Remember – on the grounds that you rolled out certain improvements in LayOut, doesn't mean you're left with those. You can generally re-sync your viewports back to your SketchUp model if necessary.
Improved customization of your drawings
You would now be able to take your LayOut archives to the following level with various models and perspectives. On the off chance that you have one SketchUp model that exists over a few viewports, you can now re-interface only one of those viewports to another SketchUp model. Beforehand, you needed to erase that viewport, embed another SKP model, and reset all your scale settings and viewport measuring.
You additionally can flip Tag perceivability inside your LayOut report. Presently you don't need to make additional scenes only for your LayOut records, which will spare you a great deal of time going to and fro among LayOut and SketchUp.
Trimble Connect with in SketchUp
Trimble Connect has been incorporated straightforwardly into SketchUp 2016 for cloud-based cooperation. Moving a part along an inferenced equal: SketchUp 2016 incorporates critical upgrades to its induction motor. Trimble SketchUp 2016, the most recent form of the push/pull 3D modeling apparatus for draftsmen, specialists, design and development experts, highlights combination with cloud-based joint effort stage Trimble Connect.
Trimble says the reconciliation will permit groups to all more effectively get to, reference, share and team up on ventures in the cloud. Moreover, SketchUp 2016 offers a few improvements to its center modeling apparatuses and generally convenience. This incorporates Enhanced Inferencing, to assist clients with situating themselves, their apparatuses and their geometry in 3D space.
Also, they refreshed the extures that have progressively contemporary options and redesigned classes; Small Dimensions designed to improve clearness in bound spaces; and Improved Layout Layers to help bunch objects
Page 19
across layers or draw objects on shared layers. Smoothed out announcing gives clients more power over what data SketchUp Pro fares from models, and how it is sorted out.
More tight joining with 3D Warehouse permits clients to download a model from the online stage for sharing and downloading free 3D models and materials, at that point reload it to refresh changes to each occurrence of that part.
"We've put incredible accentuation on upgrading SketchUp for improved work process capacities and convenience, giving cautious consideration to even the littlest subtleties around drawing, the smoothness of 3D route and the hand-off between devices in the general design and BIM process," said Chris Keating, head supervisor for Trimble's Architecture and Design Division.
"We've likewise taken a shot at making it simpler for the SketchUp people group to share models and work together with others. The immediate mix with Trimble Connect is one more advance toward separating obstructions and cultivating joint effort – something we accept to be basically significant for empowering open BIM and effective structure and development ventures."
SketchUp 2016 is accessible now and supports an assortment of working frameworks including OS X El Capitan and Microsoft Windows 10.
For the Windows form Trimble has re-worked SketchUp's skimming utility discoursed (Styles, Scenes, Components, and so on.) with the goal that they perfectly stack inside an adaptable, totally collapsible plate.
Shaderlight 2020
News

Page 20
Shaderlight Ltd, the designers of Shaderlight for SketchUp, the famous rendering module for Trimble SketchUp, are satisfied to declare the arrival of Shaderlight 2020. The new discharge completely underpins the discharge SketchUp 2020, discharged yesterday. Notwithstanding SketchUp 2020 help, Shaderlight 2020 (v8.0) presently offers another approach to precisely render light emanating articles, for example, TV screens or neon signs. The new material sort consolidates the highlights of the bygone Self Illuminating material sort and a related region light and both obviously glows and transmits light that enlightens different surfaces, making it a lot simpler to accomplish the ideal lighting result. Designed considering the work process, the Light Emitting material sort has two methods of activity – one that utilizes the basic SketchUp material to characterize the outflow shading and another that permits the shading to be indicated as far as related shading temperature. Kate Jackson, Commercial Director at Shaderlight Ltd, said "By and by the Shaderlight group have endeavored to give a consistent progress to clients moving to SketchUp 2020 and utilizing Shaderlight as their picked rendering motor. “We are satisfied to incorporate a much mentioned new element to this discharge which will make rendering light transmitting objects simpler and increasingly precise." Kate proceeded, "Light Emitting is planned to supplant both Self Illuminating materials and territory lights since they produce the most truly exact outcomes for less exertion. “The old material sort and territory lights have been held with the goal that current models proceed to work and to help specific non-physical impacts, (for example, imperceptible light sources)." Notwithstanding this new instrument, Shaderlight 2020 has some component fixes revealed by clients before adaptations, for example, discourse design issues in Windows and fragmented fares of models with certain surface kinds.
Page 21
Shaderlight 2020 (v8.0) is accessible to download today and is allowed to preliminary for 14 days.
Where to Get Shaderlight 2020 (v8.0)
Shaderlight 2020 (8.0) is accessible as a free update to clients who bought or moved up to Shaderlight 2019 on or after January first 2020. Existing clients of Shaderlight 2019 or prior can redesign here: https://www.artvps.com/index.php/inventory/overhaul New Shaderlight clients can buy this most recent discharge from here: https://www.artvps.com/index.php/list/full-permit
Buying the Right Rendering Engine
Problems Buyers Face
There are more render engines available than one can shake a stick at and sadly nobody has done a far reaching 'level playing field' experimentally based examination between them all apparently – I looked.
This is presumably in light of the fact that to do so one should be wise: have a lot of objectivity, be all around experienced in coherent examination and introduction, learn in the fine and convoluted specialty of photograph sensible rendering.
Moreover, the analyst would need to: have a shed heap of free time, one mother of a wacky PC, and a genuinely powerful financial plan in their ledger to buy the whole cluster of render engines so as to think about them!
So new purchasers are essentially helpless before two wellsprings of data whereupon to settle on their choice of which render engine to purchase:
1. Seller's sales writing
2. Assessments of different users
Let’s talk about both of these below.
Page 22
Sales Literature Provided by the Vendor
Without a doubt all the individual render engines have certain preferences and impediments – in addition to focuses and negative focuses for and against one another.
Yet as I said nobody has reported that so how might one continue with a level of certainty? Is merchants' sales writing a decent reason for purchasing? Is it legit?
I can't state without a doubt, however I presume that most sellers are genuinely legit about what they put in their sales writing for every engine, except they will maybe overlook the negative parts of their item and spotlight on their item qualities. That is a genuinely characteristic activity on the off chance that you are in the selling market, yet accordingly sales writing can't give a total picture.
What's more, why would that be a difficulty you may inquire about? Well if 70% of that 80% is from the higher finish of the abilities pool at that point showcasing and advertising power is preferring a specific arrangement in light of the fact that the higher finish of the aptitudes pool is centered around that arrangement.
Would you be able to follow that? Would you be able to see where I am going? How about we separate that with a basic model. On the off chance that a college has 100 understudies on its 3D modeling and photograph practical rendering course, and the teachers (out of the blue) favor a couple of render engines, at that point maybe 90% of their group graduation will concentrate on that rendering engine.
On the off chance that all the upper second and five star graduates are in that biased gathering, at that point all the substantial ability and genuine potential is engaged by the biased course. Then again the rest of the subset who may move an alternate way is naturally impeded on the grounds that the cream went the other way!
You will get greater quality pictures from the supported subset who may have created the equivalent or better quality in the other subset had they gone there. The lesson of the story is that since publicity and user supposition says that an item is the best it doesn't really imply that is it.
Page 23
User Opinion Generally
As of late I saw a post on a Sketchup Forum from a Sketchup user who asked what seemed like a straightforward inquiry: 'There are loads of render engines out there – would somebody be able to please reveal to me which is the best one?'
He got piles of fast reactions: 'V-Ray', 'Maxwell', 'Kerkythea', 'Platform', 'ShaderLight', 'Dusk' and a remark from one notable Sketchup module engineer inconspicuously tending to the absence of objectivity characteristic for different reactions.
This person stated: 'The best eh… … I won't go there, yet… .' Yes the best issue for the potential purchaser of a render engine anyway isn't the unique sales writing, or the example pictures. It's the potential absence of objectivity in user supposition – this is a minefield for purchasers of any item as a general rule, however I will maintain the emphasis on render engines.
For what reason is it such a minefield? Render engines resemble your first relationship: the first is consistently the best until you have understanding and begin to look all starry eyed at once more, however now and then first love truly is the best, yet the potential purchaser and might I venture to state users of a render engine despite everything don't have the foggiest idea where objectivity lies.
Objectivity just originates from all out exact relative investigation and as I said in my initial articulation this has not been finished with render engines as far as anyone is concerned. The cost of render engines demoralizes one from purchasing heaps of them and the time learning them is another impediment – individuals will in general stick with the one they have purchased and learned.
In conclusion
On the off chance that I can say anything cement to potential purchasers of a render engine I would state: don't accept something since someone or some gathering reveals to you it's the best. That resembles purchasing MS Word 30 years prior.
Page 24
Try not to purchase an option that could be greater than you need – huge isn't in every case best. That resembles purchasing a database software just to make an Address Book.
Do your own examination. Think about highlights and potential expectations to absorb information corresponding to you, and what you actually do and what you actually know.
Top Seven SketchUp Plugins
Today in this article, we're going to investigate what we believe are the absolute best Sketchup plugins! These are for the most part outfitted towards engineering use (since that is the place my background is), yet you may discover them accommodating regardless of whether you use Sketchup for different purposes. How about we begin! 1. Joint Push Pull Searching for a simple method to add a sloped edge to an item? Attempt the Joint Push Pull plugin to snap and drag a surface to make it rounded. Select the "Round Push Pull" choice and you can expel a surface to have rounded corners rather than hard edges. You can likewise utilize this plugin to expel bended or smoothed surfaces. For an increasingly point by point instructional exercise on the best way to utilize this plugin, look at this instructional exercise. We energetically suggest any of the Freedo6 apparatuses in light of the fact that they make probably the best Sketchup plugins. They are anything but difficult to utilize, very much made, and in particular free! 2. Round Corner Like making slanted edges, this Freedo plugin permits you to round only the edges of a surface. This may prove to be useful on the off chance that you need to round the edge of articles like tables or ledges.
Page 25
Dissimilar to the joint push pull choice, this plugin enables you to get a hard edge in one area and a rounded edge in another. There are numerous alternatives to tweak like balance, edge parameters, and rounding parameters. On the off chance that you are uncertain what each setting does, simply mess with them until you get the look you need! 3. Weld This plugin takes chosen line fragments and gatherings them as one thing. This is an extraordinary device to utilize in the event that you need to interface a long string of line fragments that make a bended or spiraling shape. With the weld apparatus, you can undoubtedly expel or utilize the "tail me" instrument along a bended way without choosing each line section. 4. Curviloft Curviloft is another Freedo6 plugin. It includes truly required usefulness that makes it extraordinary compared to other sketchup plugins. With Curviloft, you can make an expulsion that starts as one shape and finishes as another. In the first place, select your way. At that point select your beginning shape and wrap up by choosing your consummation shape. Hit "enter" when you wrap up your determinations to produce your shape. 5. Eneroth Flatten to Plane In the event that you've at any point imported a DWG to Sketchup, you may experience some difficulty shutting everything down on the grounds that your lines end up in various planes. A straightforward arrangement is utilizing the Eneroth plugin. Just select your lines and afterward explore to "augmentations" > "eneroth flatten to plane." Select the plugin and the entirety of your lines will be on one plane! 6. Artisan
Page 26
Another option in contrast to utilizing the Joint Push Pull plugin to make bended edges is Artisan. When you have the plugin introduced, select the block symbol in the menu that says "partition and smooth." This will take any hard edges and transform them into a smooth surface. There might be a couple of regions that need extra smoothing, yet this plugin gives you an incredible beginning stage! 7. ClothWorks This plugin will permit you to take a level surface and wrap it over another item to make the presence of fabric. Initially, right snap on the item you need to wrap and select "ClothWorks" > "make material." Then, right click on the article you need to wrap your fabric over and select "ClothWorks" > "make collider." Use the UI switch device in the menu to modify choices. Right click on your fabric and ensure you select "ClothWorks" > "1 material" > "basic network." Use the reproduction apparatus close to the UI switch device to wrap the fabric. At the point when you are content with the manner in which it looks, click the stop symbol to stop the activity. Okay, so which sketchup plugins and extensions do you believe are the best? Tell us in the remarks! Make certain to look at our different instructional exercises in case you're searching for increasingly incredible tips and deceives for Sketchup.
DIY: Building a Geodesic Dome
A geodesic dome made of PVC might be the most financially savvy strategy for building a basically strong yet transportable haven, and it's conceivable to fabricate one out of a solitary day. At MakerFaire 2014 in New York City, the Sketchup group did only that. Why? We needed something that was simple and enjoyable to collect, however it additionally should have been great, yet duplicable by anybody with simply

Page 27
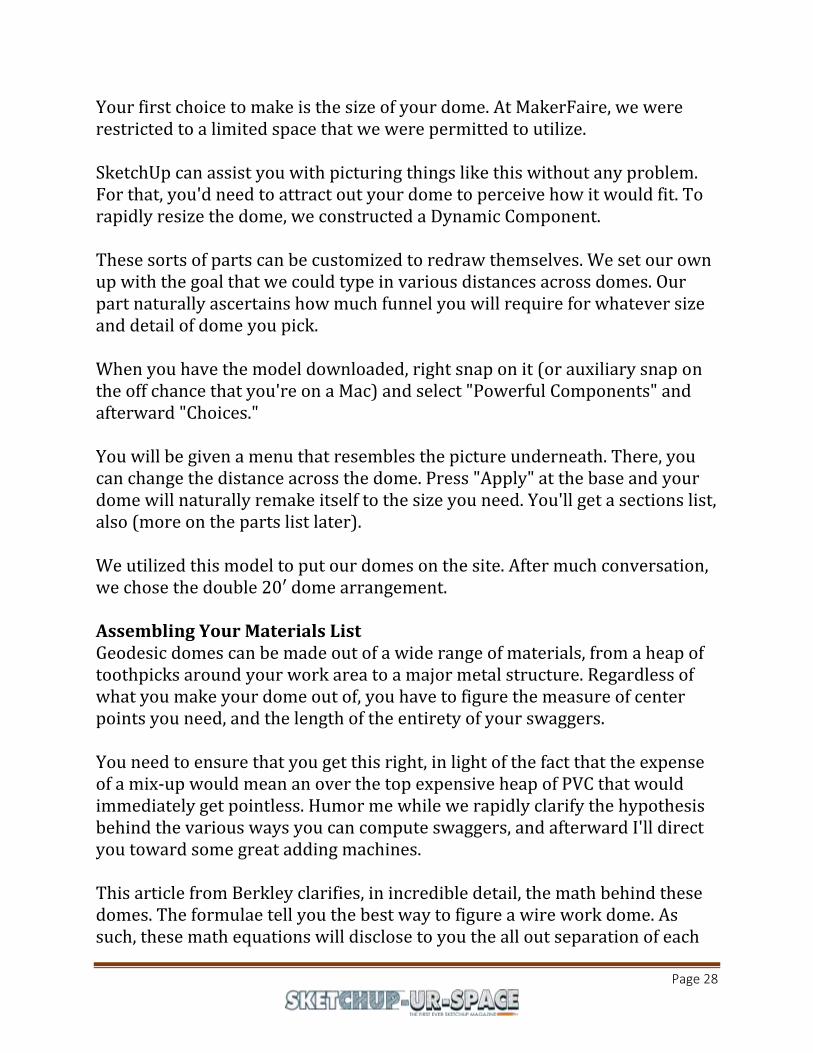
fundamental apparatuses. While this structure may look overwhelming to construct, you could really do it in your carport on a Saturday evening. We'll give you how we assembled our own, and how you can utilize Sketchup to effectively plan and manufacture your own, of any size. The History of the Geodesic Dome How about we move something: our group didn't concoct geodomes; Buckminster "Bucky" Fuller did. We should find out a little about him, civility of the Bucky Fuller Institute. R. Buckminster Fuller was an eminent twentieth century creator and visionary conceived in Milton, Massachusetts on July 12, 1895. Committing his life to making the world work for the entirety of mankind, Fuller worked as a down to earth scholar who showed his thoughts as developments that he called "curios." Fuller didn't restrain himself to one field however functioned as a 'thorough expectant plan researcher' to take care of worldwide issues encompassing lodging, cover, transportation, training, vitality, biological devastation, and neediness. Over a mind-blowing span, Fuller held 28 licenses, composed 28 books, and got 47 privileged degrees. And keeping in mind that his most notable relic, the geodesic dome, has been delivered more than multiple times around the world, Fuller's actual effect on the present reality can be found in his proceeds with heaps of fashioners, engineers, researchers and specialists attempting to make a progressively practical planet. The Different Types of Geodesic Domes Geodesic domes can be exceedingly nitty gritty or inconceivably basic. The differing levels of detail are designated "decorations" The more decorations you have, the smoother your dome is. A portion of the more normally constructed domes are 3V to 6V domes. A 3V dome has three diverse swagger lengths—as you go up in detail, you decline the swagger length, and increment the quantity of swaggers. The smoother your dome is, the more center points and swaggers you need.
Page 28
Your first choice to make is the size of your dome. At MakerFaire, we were restricted to a limited space that we were permitted to utilize. SketchUp can assist you with picturing things like this without any problem. For that, you'd need to attract out your dome to perceive how it would fit. To rapidly resize the dome, we constructed a Dynamic Component. These sorts of parts can be customized to redraw themselves. We set our own up with the goal that we could type in various distances across domes. Our part naturally ascertains how much funnel you will require for whatever size and detail of dome you pick. When you have the model downloaded, right snap on it (or auxiliary snap on the off chance that you're on a Mac) and select "Powerful Components" and afterward "Choices." You will be given a menu that resembles the picture underneath. There, you can change the distance across the dome. Press "Apply" at the base and your dome will naturally remake itself to the size you need. You'll get a sections list, also (more on the parts list later). We utilized this model to put our domes on the site. After much conversation, we chose the double 20′ dome arrangement. Assembling Your Materials List Geodesic domes can be made out of a wide range of materials, from a heap of toothpicks around your work area to a major metal structure. Regardless of what you make your dome out of, you have to figure the measure of center points you need, and the length of the entirety of your swaggers. You need to ensure that you get this right, in light of the fact that the expense of a mix-up would mean an over the top expensive heap of PVC that would immediately get pointless. Humor me while we rapidly clarify the hypothesis behind the various ways you can compute swaggers, and afterward I'll direct you toward some great adding machines. This article from Berkley clarifies, in incredible detail, the math behind these domes. The formulae tell you the best way to figure a wire work dome. As such, these math equations will disclose to you the all out separation of each
Page 29
swagger. This is a decent beginning stage, yet in case you're making or purchasing your own centers, you'll have to take away for their length where they associate. On the off chance that you know the sum you have to deduct for every center point, you can place that into our Dynamic Component above. On account of the center points we utilized from SonoStarHub.com, they have their own adding machine on their site that works incredibly. Getting the Right Hubs Centers interface the entirety of the swaggers together to shape the structure. These aren't something you can get off the rack at your nearby home improvement shop. We investigated approaches to create our own (there are many) yet we at last went with an organization called SonoStarHub.com for our centers. It spared time, and ensured wellbeing in our display. Sonostar makes and sells the center points, jolts, and complete packs in the event that you need them. The centers we picked are intended to work with 1.5″ Schedule 40 PVC pipe. This is off the rack stuff that can be sourced from any Home Depot. The size alludes to within distance across. Our funnel was really 1.9″ in its external breadth. Investigate Home Depot's determination of PVC funnels to begin your flexible list. For our dome, we utilized 15 base center points (these have 4 'arms' on them), 6 5-star centers, and 55 6-star center points. Creation Since we've arranged our dome size and we know what number of channels and the lengths we have to cut, it's an ideal opportunity to begin creating. In the wake of making a beeline for Home Depot and watching the jaws drop at the professional work area after we requested more than 150 10′ PVC pipes, we needed to concoct an approach to cut huge amounts of funnel at the very same length. Ordinarily, we utilize my hack saw and we separate lengths of things to cut, however that would be wasteful for this measure of channels. For this
Page 30
assignment, we utilized a cleave saw with stops on it. Along these lines, we could set the length and rehash cuts again and again. Ensure that when you get one that it has exceptionally durable stops on it. The principal stand we purchased didn't, and we needed to return it for one that wasn't moving when we knocked it a bit. When you have this arrangement, measure from the saw edge to the stop and begin cutting. Since you have a gigantic heap of funnels cut up (the picture above is just for one dome), you'll have to penetrate openings in each end with the goal that you can jolt them to the centers when you're nearby. The gaps should be arranged on each end. To do that, we put the channel against the stop, bored the principal opening, and afterward flipped the funnel over. Utilizing the screw on the left, we had the option to arrange the primary opening vertically so we could bore the subsequent one. Building Your Domes Presently you have a tremendous heap of funnels, cut and named. This is the place the great starts! We should assemble this thing. Before we assembled the two domes at MakerFaire, we constructed one with an assistant on her front garden just to ensure it worked. Both of us had the option to assemble a 20′ dome in only a couple of hours, utilizing a stage stepping stool. Beneath I'll give you a strong review of how we amassed it. For too nitty gritty directions, there is a download connect toward the finish of this post incorporating all the itemized fabricate guidelines, and all the models you'll require so as to collect what we assembled. The initial step is to spread out the base ring of funnels and jolt every association together, utilizing the 4-furnished centers. Try not to stress if the ground isn't totally level. In the event that there is a major drop off, simply slide a lump of wood or extra funnel underneath to raise the dome (for the time being).
Page 31
In the wake of spreading out the base ring, begin making pentagons. There will be 6 aggregate. Completely amass and jolt them together, and afterward put them in a safe spot. Next, put the first round of base shafts up, including a 6-star center point each third set. Presently it's an ideal opportunity to begin including pentagons. Associate them with the rest of the red channels, and utilize the blue cross funnels to interface them together. Remember to dart as you go! Continue filling in pipes around the pentagons. Include the last pentagon at the top, and appreciate the experience! Since you have the dome completely fabricated, you can expel a segment of 6-spoked (red) shafts to make an entryway. On the off chance that you have to move or turn the dome, it's light enough that around six individuals can lift and effectively move it. That is the way you construct and create a PVC Geodesic Dome! These are staggeringly solid structures that are fun and remunerating to construct. Here are the full guidelines, including a printable get together record, 3D models, pictures and video. On the off chance that you want to make a superior showing than me, you're free to contribute any work on GitHub.
IRender nXt
The vast majority performing rendering need to simply make a high quality rendering to meet their deliverable and energize their customers with their new thoughts, not go through weeks learning another software bundle. With the IRender nXt extension for SketchUp you can make your first rendering in quite a while.
Tips & Tricks

Page 32
They do this with basic preset determinations for lighting and materials. With lighting you can rapidly pick interior, exterior or even HDRI presets. In the event that you need to add some surface to a divider or cause water to show up genuine you can do this in a few clicks and start the rendering. In only a couple of moments you will have a render prepared for customers.
Points of interest of IRender nXt
Easy to use with cutting edge highlights when required It is a module to the SketchUp stage with improved coordination and
even stores the rendering arrangement in the model to limit arrangement time after design changes
Essentially influence lighting and material presets to spare time and produce incredible outcomes
Easy to learn and make photorealistic 3D introductions for your clients in minutes
IRender nXt is utilized in:
1. Engineering Design 2. Training 3. Building/Contracting 4. Presentation Services 5. Interior Design 6. Office Layout 7. Scene Design 8. Assembling 9. Land/Property Management 10. Carpentry/Cabinetry
Highlights of IRender nXt
Completely incorporated into SketchUp
This implies the IRender settings are put away in the SketchUp model, so you don't need to cause changes in the event that you reload the model, or for
Page 33
resulting renderings of a similar model. Rendering settings and rendering capacities are for the most part accessible from a SketchUp toolbar.
Lighting Presets
The Presets lets you pick predefined settings for the most widely recognized lighting circumstances. There are a great deal of settings to make unique lighting impacts. The presets make it simpler to get a decent rendering without making all the settings physically. Standard Presets are:
Studio or High Dynamic for unpretentious shadows for exterior scenes. Exterior - for exterior scenes with sun and sky. Interior with Sun - Interior scenes with lighting through entryways and
windows. Interior no Sun - Interior scenes with no outer lighting. HDRi Sky - Exterior scene with a sky loaded with mists.
Indirect Lighting
Indirect Lighting alludes to the IRender nXt highlight of handling light reflected from mirrors and different surfaces. This makes a sensible lighting impact which improves with each progressive rendering pass. Indirect ought to be utilized with most interiors scenes to mellow the lighting impacts.
Auto Reflection wizard
Auto Reflection makes materials intelligent by utilizing a coordinating word design strategy in the material name. The reflection esteems for power, sharpness, record of refraction, and knock are preset, so reflection esteems for materials don't need to be independently set.
Note: If you do set reflection esteems for a doled out material, your settings will abrogate the Auto Material settings.
nXt Material Libraries
There are in excess of 5,000 materials in the nXt Material library. You can choose any material from the library and spot it on a SketchUp face to make a comparative SketchUp material. Download the Libraries and introduce them on your PC.
Page 34
SketchUp Materials
SketchUp materials are naturally rendered as materials in IRender nXt. You can set reflection and other rendering properties by right clicking on a face containing a material to set its rendering properties.
IRender Ready substance in 3D Warehouse
Our uncommon assortment in the Trimble SketchUp 3D Warehouse incorporates lights, mirrors and different segments that are prepared for use with IRender. Lighting, Reflection and other render settings are as of now put away in the segments, making these parts IRender Ready.
Material Wizard
Applies reflection and straightforwardness legitimately to SketchUp materials. Changes are made effectively with a slider bar. IRender nXt sets different settings for a solitary material - such a setting both straightforwardness and list of refraction for glass materials.
Reflections and Mirrors
Make any SketchUp material intelligent with a basic right click alter. You can begin with a default Reflective Material and utilize a slider bar to change the measure of reflection.
Make Light Sources
Including lights and light installations will give lighting to your Interior Scenes or Nighttime Scenes.
Self Glow
Self Glow enlightens a surface as though it had light sparkling on it, without really making it a light. For objects which you need to show up splendid, yet which don't have to enlighten different articles, this is a lot quicker than making lights out of them.
HDRi Skies
HDRi (high dynamic range imaging)is a lot of procedures that permits a more prominent dynamic scope of exposures (the scope of qualities among light and dim territories) than ordinary computerized imaging strategies. The goal of HDRi is to precisely speak to the wide scope of force levels found in genuine scenes extending from direct sunlight to shadows.
Page 35
Translucency
Translucency is the capacity for light to go through a material that isn't transparent.
Transparency
IRender nXt consequently utilizes SketchUp transparency settings. It incorporates refraction, reflection and light through the transparent surface.
Daylight Portals
A unique transparent face set over an exterior opening or window which makes exterior light be handled better.
There are a lot increasingly magnificent highlights in IRender nXt like:
Picture Layer Wizard Post Processing Wizard Movement Light Balancer High Resolution Two Point Perspective Noticeable Light Paths Remote Rendering Make 3D PDF Computer Seat Propelled Material Wizard and so forth.
SketchUp Speed Model Render with Lumion
Today, we wi;ll tell you the steps to do a speed render of a particular model. For this speed model, we're demonstrating how we handled an advanced Sketchup interior design idea made by Encho Enchev.
Page 36
The majority of our speed models center around the outside design of a structure, yet like the storage room speed model, we decided to utilize an interior space for this one.
Investigate how it was finished! On the off chance that you need a more top to bottom instructional exercise on how we model in Sketchup, look at our idea modeling instructional exercise in the blog.
Sketchup Interior Design Speed Model: Steps
1. Import Image
To begin, we imported the picture into our Sketchup model. You need to be certain you import it as a "coordinate photograph."
2. Adjust Perspective
Next, adjust the perspective lines in Sketchup with those in the picture. This is an important advance on the grounds that the perspective lines will be the guide for your model and permit you to make an increasingly precise last item.
When you have the perspective adjusted, you can start to include planes for the dividers and floor.
3. Block it Out
We attracted a square shape to make the floor plane and started blocking out the furniture from that point. We began with the nearest pieces to the watcher and worked our way back. Start by blocking out the essential shapes.
At that point, cut into the shapes to make the bends and edges. When we had one piece down, we had the option to reorder it to make the seat and armrest. We were likewise ready to utilize a similar piece to make the end table after a couple of changes.
Page 37
4. Include the Ceiling
Next, we added the bended plane to make the ceiling utilizing expulsions. Utilizing a similar strategy, we made the ceiling boards in the rear of the picture and duplicate and glued them over the ceiling.
5. Include Walls
We utilized expulsions to make the boards on the back divider, and made a comparative shape to the furniture to make the dividers in the closer view.
6. Including Details
When most of the scene was modeled, we transferred barstools and a few illustrations to wrap up the Sketchup interior design. We made a couple of changes in accordance with making them as like the ones in the picture as could be expected under the circumstances.
We additionally transferred pads from the 3D distribution center to add to the ground surface.
In the wake of modeling the screen in the back, we applied a material to it to give the presence of a TV screen. We utilized a similar strategy to make the screen over the lounge chair.
Lumion 9 Render
When we were finished modeling, we transferred our model into Lumion to take the Sketchup interior design to the following level.
We balanced the material materials first to give them more surface. At that point we added illuminance to the screens to give them a gleaming appearance. We gave the furnishings and dividers a gleaming sheen to give the room a cutting edge and clean look.
Page 38
When we were done, we made a short liveliness to stroll through the space and truly cause it to feel dimensional.
What speed model would you like to see straightaway? Would you like to see more engineering or more Sketchup interior design? Tell us in the remarks!
WinDoor - SketchUp Extension Review
WinDoor is a great plugin for Trimble SketchUp 2015 and above. WinDoor makes it simple to make and alter windows and doors. It is a completely free extension, making life easier for civil architects! WinDoor is an extraordinary free augmentation to SketchUp. It makes modeling window and door gatherings simple. Its confinements are that the profiles are essential and bespoke formats need some intercession by hand. On the off chance that you need to move to the following level you can purchase my expansion WinDoor+ for just $60. I designed WinDoor+ around genuine client input from WinDoor and some sharp and incredibly simple to utilize altering techniques. You can separate the plane of the window/doorleaf any way you like, actually without any problem. You can include polygonal windows, for example, polygonal curves, rose windows, star molded windows and pretty much any shape you like. Look at the WinDoor+ recordings. Discover my YouTube channel by tapping on my picture on the video on this page or quest for WinDoor+ by Camlaman on YouTube or snap on WinDoor+ under 'Likewise By This Developer' on the correct hand side of this SketchUp Extension Warehouse page. WinDoor+ comes in English, German and French. Remaining with WinDoor? At that point first beginning Sketchup2015 or higher, download and introduce the augmentation from the Extension Warehouse and you should discover the 'WinDoor' apparatus in the
Page 39
Extensions drop down menu. On the off chance that it's not there first time simply take a stab at restarting Sketchup. At the point when you have made a 'WinDoor' you can alter it by right tapping on it and tapping on the setting menu thing Edit FMS_WinDoor::OpeFMS_Param_Base and modifying the discourse box passages until you have the window/doorleaf design you need. The latest version of WinDoor is 1.0.2, which was released in September. It can work in English, French and German! However, currently it is limited to windows users only. We wish you a happy SketchUping!
InstantWall - SketchUp Extension Review
InstantWall is an extension for the famous 3D computer aided design and modeling software, Trimble SketchUp. Today, we will talk about how InstantWall can help designers and modelers. InstantWall is basically a wall creation tool for SketchUp. You can create various kinds of walls instantly, for example, site walls, columns, retaining walls, pilasters, curbs, etc. Site walls, retaining walls, pilasters, curbs, you can build anything with InstaWall. Walls may be vertical, battered, sloped, stepped or rough stone. Many options exist for wall cap and pilaster cap profiles. There are also options for custom user defined wall cap profiles. Interestingly, when you build these, textures (or materials) will automatically align with the wall and wall cap. But that’s not all! Balustrades,railings and fencing may be added on top of walls or between pilasters. Many options for picket and baluster profiles including user defined shapes.

Page 40
You can also build Colonnades with InstantWall. Several options are given for column types including custom user defined. Needless to mention, you have the option to to follow terrain elevation as well. Whereas, you have the option to also make arcades. Arcades can be modeled as flat, pointed, segmented, round or elliptical. Optional voussoirs may be raised, flush, or recessed. Just as with walls, textures will automatically align with voussoirs. The InstantWall plugin for SketchUp works with Metric or Feet / Inches systems, so you can work with it from any localization. With 153 preset styles organized into libraries, you will never run out of ways to customize your model with InstantWall. Not only those, but you can also create custom styles as well! The plugin features an interactive menu: you got icons, images, and text for your convenience. Another salient point for this extension for SketchUp is that with InstantWall, all walls can be modeled as 3d, 2d face me or 2d hidden lines. That flexibility will surely help you achieve a new level of smooth workflow. The developer of this SketchUp extension, Chuck Vali, keeps it regularly updated. The latest version of InstantWall is 3.2, which was released only last March. Chuck is a licensed architect in Hawaii and California. Most of his work experience is in the hospitality industry, resorts and hotels. The InstantWall is very flexible in terms of compatibility - it can work on SketchUp 2020, SketchUp 2019, SketchUp 2018, SketchUp 2017, SketchUp 2016, SketchUp 2015, SketchUp 2014, SketchUp 2013, SketchUp 8, SketchUp 7. What’s more, it can work on both windows and mac, how cool is that! Also, the developer, Chuck made sure that language never becomes an issue for his great work. That is why the plugin works in multiple languages,
including English, Español, Français, Português (Brasil), 한국어 etc.
Page 41
SketchUp Resources for Architects
SketchUp is an exceptionally amazing asset for modelers and fashioners, as it gives you a sensible perspective on the real venture you are making. It transforms the pencil into an adaptable 3D model which you can circle in each point and get an away from the outside and inside of the structure that with basic hints you can without much of a stretch improve your SketchUp aptitudes.
On the off chance that you are having issues grasping the subtleties behind various developments methods and exterior completions, at that point you need surely to see them, all things considered. There are SketchUp Models of Construction Details for nothing download. Here, we have accumulated for you the most valuable sites from around the web that give free access to SketchUp instructional exercises, textures, materials and good modules to expand your efficiency and spare your time.
Official SketchUp Sites:
1. SketchUp Home – Trimble landing page
http://www.sketchup.com/intl/en/index.html
2. SketchUp – Download Free or Pro form and more seasoned adaptations
3. Old SketchUp Blog – Old file for news
https://sketchupdate.blogspot.com/
4. New SketchUp Blog – Official SketchUp Blog
Blog
Page 42
http://blog.sketchup.com/
5. SketchUp on Twitter – Tweet on Twitter
https://twitter.com/SketchUp
6. SketchUp Facebook Page – Exactly what it says
https://www.facebook.com/googlesketchup
SketchUp Tutorials and Resources:
1. SketchUp ARTISTS: This site has numerous instructional exercises that furnish you with post-preparing abilities, strategies and simple to adhere to bit by bit guidelines given by profoundly gifted proficient donors.
http://www.sketchupartists.org/
2. SketchUp Texture Warehouse: More than 30,000 textures and 3D models.
http://www.sketchuptexture.com/
3. 3D Warehouse – Free 3D Models
http://sketchup.google.com/3dwarehouse/
4. SketchUp Sage – Links to other extraordinary SketchUp assets
https://sites.google.com/site/sketchupsage/resources
5. masterSketchup.com: This website by Matt Donley offers excellent instructional exercises, surveys, assets, tips and deceives, recordings and downloads for nothing. You will discover a lot of data whether you are new to SketchUp, or in the event that you can circle around in SketchUp like no one's business!
http://www.mastersketchup.com/
Page 43
6. Nomeradona SketchUp VR: A spot where you are a deep rooted student of SketchUp. All assets offered by this blog website are shared by the creators themselves.
https://sketchupvrayresources.blogspot.com/
7. Nomeradona Blog: An assortment of works for the most part done in Google SketchUp and rendered in either Vray for Sketchup, Hypershot, Vray Max, LightUp, and Podium.
https://nomeradona.blogspot.gr/
8. Grafica 2D3D: An Italian site with a lot of assets and instructional exercises for SketchUp, Vray, Archicad, Rhino and other engineering structuring programs.
http://www.grafica2d3d.com/feeds/posts/default
9. SketchUp Extension Warehouse: The best spot to discover and introduce additional items for Sketchup!
http://extensions.sketchup.com/
10. SketchUcation: SketchUcation gives 3D modeling redistributing administrations to draftsmen, CAD specialists, architects and 3D representation/activity organizations.
http://sketchucation.com/
11. SketchUp Video Tutorials: In the official site of SketchUp you can approach bit by bit video instructional exercises to begin with the program.
http://www.sketchup.com/learn/videos?playlist=58
12. SketchUp Sage: This FAQ is intended for those of you who are new to SketchUp and are anxious to find out additional!
https://sites.google.com/site/sketchupsage/start

Page 44
13. One Community: OneCommunity, an open source programming site, has discharged a rundown of the most practical plants enhanced for SketchUp. The chronicle incorporates everything from palm trees to a variety of water and lowland plants, bamboo shoots, and tropical evergreen trees.
http://www.onecommunityglobal.org/sketchup-plants/
14. Smustard.com: This site furnishes SketchUp Users with the instruments and modules they have to expand profitability and encourage work process. They additionally have a discussion where you can get your inquiries replied.
http://www.smustard.com/
15. Designer Hacks: Library of tips, stunts, and instructional exercises on SketchUp. Instructional exercises are helpfully composed into three classifications, novices, transitional and progressed.
http://designerhacks.com/sketchup-tutorials/
16. Sketch This SketchUp instructional exercises, articles, 3D printing, activities and apparatuses for architects.
http://www.sketchthis.net/
17. 3D Vinci SketchUp books for plan experts with bit by bit, outlined activities.
http://www.3dvinci.net/index.php?app=ccp0&ns=catshow&ref=SU&sid=dwwrw7r22i6i9008yejhd2x5217b8y0c
18. CGarchitect The most compelling site and end-client network giving important assets and instructional exercises to building representation specialists.
http://www.cgarchitect.com/

Page 45
19. RonenBekerman.com It is a useful wellspring of learning on all parts of 3d design perception.
http://www.ronenbekerman.com/
20. Twilight Render Twilight Render is an attachment that transforms your SketchUp scenes into photograph sensible pictures, from materials to lighting, to condition after creation, liveliness, and cluster rendering.
https://www.twilightrender.com/index.php
21. FormFonts Share and download models from 3D representation specialists. 50,000+ 3D models and 2D models and textures that incorporate furnishings, individuals, plants, trees, vehicles, trucks, planes and that's just the beginning.
http://www.formfonts.com/
Discussions and Communities:
1. Official SketchUp Community – Trimble SketchUp people
http://forums.sketchup.com/
2. SketchUcation – Great SketchUp gathering full of resources
http://forums.sketchucation.com/
3. Last Forum – a nostalgic think back in time, chronicle with unique SketchUp content. https://web.archive.org/web/20040611185921/http://sketchup.com/forum/

Page 46
Joining Trimble layout innovation with SketchUp for residential construction: An Interview
Custom home developer and fashioner, J.B., has been on the front line of innovation all through his whole vocation. From creating SketchUp Extensions to accelerate development work processes to consolidating 3D demonstrating, his customers realize they can believe him with their residential development ventures.
Taking it to the following level, John talks about his most recent bit of innovation and how it encourages him to increment productivity. Here is the summary of the talk we had with him.
Educate us concerning your most recent task and how it's unique in relation to the rest.
The real task is like different undertakings I've done previously, however it's the manner by which I am doing it that is remarkable. For this residential form, I've totally changed my work process to fuse new innovation - Trimble's RPT600 with FieldLink - with SketchUp. The RPT is a Layout Station (a development layout equipment for precisely estimating positions and separations) that permits me to produce my own site models.
Regularly, I would enlist an assessor to come out to a place of work and do a topographic report and stake the house corners. This procedure would require some to and fro more than half a month to finish the entirety of the vital undertakings: gathering focuses, marking the house corners, and sticking the footings. We got truly burnt out on booking half a month out each time we required as-constructed focuses gathered nearby, or layout focuses included the field.
In addition to the fact that it cost a great many dollars and tremendous postponements, yet the "pleasant to-haves, for example, reporting utility lines would cost much more. At the point when we figured it out, it turned out the Rapid Positioning System would pay for itself inside the initial two years. Activities presently go a great deal smoother since we have more information than any time in recent memory, which we can accumulate ourselves and at, whenever we need.
Page 47
How does this new innovation fit inside your (ordinary) work process?
Our ordinary work process begins with looking into the Surveyor's property corner (or building corner) focuses, at that point gathering an itemized review of the current site condition. The RPT permits us to outline nitty gritty geography and this information is then pulled straightforwardly into SketchUp as segments.
Since they are parts, we make a guide point on one of them, which adds a guide point to every one of them. From that point, I utilize the TopoShaper extension from Fredo6 to display the landscape.
What are a portion of the advantages you've seen so far utilizing the Trimble RPT and SketchUp?
I've seen both site-explicit and building-explicit advantages utilizing FieldLink with SketchUp. On the site side, I'm ready to accelerate the time it takes to fabricate a home and decrease costs forthright with progressively precise site information readily available.
I can create plans for what the exhumed site and the proposed structure site will resemble. This will assist me with deciding expenses - for instance: what amount refill soil will this venture require? The entirety of the topo information I need, I can do promptly with my in-house group.
On the structure side, I am ready to send my models legitimately to FieldLink and the RPT and walk the whole proposed site. This causes me to make precise positions for stakes and footings. Different advantages incorporate having the option to record utility lines for customers and spreading out divider lines for my woodworkers utilizing the laser highlight. The laser estimation device disposes of blunders that would be progressively basic utilizing customary estimation devices.
Modeling a Real City in 3D with SketchUp
A Cork (Ireland) based draftsman P.L., has worked in computerized modeling, engineering, item design, and instruction for a long time. With his experience
Page 48
and master information in SketchUp, he generally needed to make a connecting approach to communicate with his city's history and culture utilizing computerized devices. Here, P.L. discusses how he utilized SketchUp to reproduce Cork, Ireland in 3D.
I've generally been enthusiastic about my old neighborhood of Cork, Ireland and I needed an approach to show it off and help manufacture a connection with involvement in it. This drove me to commence the task of making a complicated 3D model of the whole city.
The principal challenge was to make a 3D model of the city place, which implied fabricating a 1 kilometer-sweep city model... an immense assignment. I could have done everything myself, but since I'm an instructor, I assembled understudies who required work understanding and I showed them how to make 3D advanced models.
I attempted to make this learning experience fun by having the understudies work together with one another on the last model. Every understudy modeled an alternate piece of the city, and toward the end, we arranged everything into one model.
To begin, we took on the easiest errands first. I requested that the understudies make geo-models to determine the arrangement and stature measurements of the blocks. The arrangement information gave us length and width, while Street View information gave us the general tallness and states of the blocks.
At first, the goal was to make a photo model of the whole city zone, yet there were a couple of explanations behind picking to make an uncovered, non-photographic model:
The textures accessible were of low quality, particularly in the restricted streets (calculated photos)
Making perfect photo models was out of line for learners to accomplish quality outcomes
A photo model of such a zone diminished lucidity instead of upgrade it on the grounds that the model was less similar to a "guide" and increasingly like a game domain
Time impediments
Page 49
When that was finished, I entrusted every one of the understudies to take a specific city block and model it. The underlying models were totally done on a level plane. The ground shapes were turned on a while later, and the structure blocks were put in position.
The city blocks were then "sewed" together to finish the model. The ground designs (streets, trails, green regions) were fused into a different drawing and coordinated with the shapes by utilizing the "stamp" sandbox instrument.
At that point, the last, nitty gritty model was finished without anyone else. When the model was finished, I entrusted an alternate arrangement of understudies to help construct the site. The full task took a huge measure of time. At a conjecture, it was around 12-to-year and a half of work for a full-time, quick modeler.
It turned out superbly - and the understudies truly appreciated the test. The 3D model has numerous capacities. You can make recordings, maps, intelligent encounters, and even 3D prints. I made a 3D print of the advanced model which is in plain view in St. Subside's Church, the show community in North Main Street.
It's a roundabout zone about a foot in measurement, however with 3D printing, you can make models of any size. I trust 3D prints will permit guests to comprehend the geography of the city and really observe its highlights.
I'd love to see this system of 3D modeling sent in different urban areas. This innovation can be utilized for any city on the planet. I'm trusting Cork Guide assists make With Cork City increasingly available to the two guests and local people. It's taken a great deal generally evenings, hard work to get it to this stage, however I felt somebody expected to do it.
My expectation is that this asset will help make business open doors for neighborhood merchants and assist them with rivaling the difficulties of the internet.
How to Create Your First 3D Model in SketchUp
Page 50
SketchUp is a 3D modeling program for making geometric 3D articles, for example, building models, scale models, inside design things, and practical parts. It's a program that gives you the ideal blend of straightforwardness and quality.
SketchUp is known for its easy to use interface and simple expectation to absorb information. So how about we begin and get familiar with the rudiments of this extraordinary 3D modeling programming!
A. Download Software
To download SketchUp, go to sketchup site, follow the means, and fill in the essential data. You can get either the free or pro version. SketchUp Free is perfect for learners, while SketchUp Pro is for cutting edge clients. The previous gives all the orders you can use for 3D modeling, and the last gives extra capacities like imprinting in scale or trading/bringing in to/from CAD programming.
B. Prepare Workspace
SketchUp permits you to choose the workspace you need to use from a window that shows up when you open the application. The window shows three tabs: Learn, License, and Template. The Template tab shows a rundown of various presets to choose from. They rely upon the sort of model you will do.
The presets/templates fluctuate in foundations and edge styles – which just influences the visual part of your model (for example foundation shading and line thickness), sort of model to be done (for example finishing, insides and so on.) and estimation frameworks (Imperial or Metric). I suggest that you investigate these templates, yet for the time being, let us utilize the Simple Template – Meters.
C. Arrange Important Tools
Page 51
SketchUp has a great deal of orders and tools that you can choose from. On your first SketchUp workspace, you will see default toolbars on the upper piece of your screen. Presently click on View > Toolbars. A window will show up with a rundown of toolbars. For this tutorial, we will utilize the Large Tool Set. This toolbar contains the vast majority of the tools you have to fabricate a 3D model.
D. Familiarize with Axes
SketchUp uses the Red, Green, and Blue axes in the workspace like some other 3D programming. This permits you to see your work from various points. Likewise, SketchUp has a snapping highlight that encourages you to adjust your lines or models along the various axes.
E. Basic 2D Drawing
To begin, we should draw Lines, Rectangles, and Circles. These are the fundamentals of our 3D models.
Lines
1. To draw a line, first click the Pencil image on the toolbar or essentially press L on your console 2. Click anyplace on your screen to allot the main point 3. Drag the mouse to the ideal area of the subsequent point and click 4. To determine the length (for this situation I entered 5), basically type the worth just after Step 2 and press Enter.
Rectangles/squares
1. To draw a rectangle/square, first, click the Rectangle icon on the left close to the pencil image or essentially press R on your console 2. Click the ideal area to dole out the principal corner of your rectangle/square 3. Drag the mouse to the ideal area for the contrary corner and click.
Circles
1. To draw a Circle, first click the icon beneath the rectangle icon or just press C on your console
Page 52
2. Click the ideal point to allocate the midpoint of your circle 3. Drag the cursor anyplace on the screen to make the circle and afterward click 4. To determine the span (for example range = 2), just enter the worth just after Step 2 and press Enter.
F. Movement Controls
Pan
1. To utilize Pan, click the icon or just press H on your console 2. Click to set the beginning, hold the mouse button and simply drag. This will permit you to move your view
Orbit
1. To utilize Orbit, click the icon on the toolbar or just press O on your console 2. Click anyplace, hold and drag to turn the entire view 3. You can likewise utilize the mouse wheel to Orbit
G. Undo and Save
On the off chance that you committed an error just click on Edit > Undo and you will be reclaimed to your past advance. You can likewise press Alt + Backspace to accomplish this.
All together not to lose your advancement, make a point to spare your document every now and then. To do this, click File > Save or essentially press Ctrl + S on your console. Enter the filename and select the catalog you need your document to be put away in.
H. Creating a 3D Object
1. To start with, zoom in on one of your 2D shapes by utilizing your mouse wheel button 2. Click the Push/Pull icon on the toolbar or just press P on your console

Page 53
3. Drift your mouse cursor over the plane of the circle 4. At the point when you see the plane is featured (i.e., when the plane shows a spotted surface on it), click on it and essentially drag it upwards. Click the left mouse button again to set the tallness of your chamber, block or cuboid. Or then again type the stature after the primary click.
You will at that point see that the 2D shape has changed over into a 3D object. Congrats! You have made your first 3D object! You currently realize all the significant tools to begin! It's an ideal opportunity to make your first 3D model in SketchUp yourself, and we trust you delighted in this tutorial. On the off chance that you need to keep awake to date with everything identified with 3D printing, if it's not too much trouble ensure you tail us.