network usb over ip server with 4- ports usb 2.0 - bimel
TRANSCRIPT
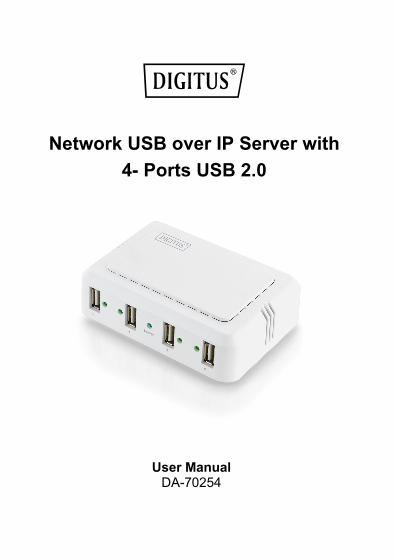
Network USB over IP Server with
4- Ports USB 2.0
User Manual DA-70254
Table of Contents
1. Introduction ......................................................................................... 3 1.1 Product Overview ......................................................................................................................................... 3 1.2 Network Management .................................................................................................................................. 3 1.3 Components and Features ........................................................................................................................... 3 1.4 Hardware Installation .................................................................................................................................... 4
2. The Software Installation .................................................................... 5 2.1 Installation .................................................................................................................................................... 5 2.2 Connecting to an USB Device ...................................................................................................................... 7 2.3 Connecting to an USB Printer or Multi-functional Printer .............................................................................. 9 2.4 Disconnecting an USB Device.................................................................................................................... 10 2.5 Request to Disconnect ............................................................................................................................... 11 2.6 Setting the Network USB over IP Server by Setup Utility ........................................................................... 12
3. WEB Management Interface ............................................................. 14 3.1 For Windows Users .................................................................................................................................... 14 3.2 WEB Page Description ............................................................................................................................... 15
4. LPR Setting ....................................................................................... 20 4.1 Description ................................................................................................................................................. 20 4.2 LPR setting for Windows ............................................................................................................................ 21 4.3 LPR setting for MAC OS ............................................................................................................................ 24 4.4 LPR setting for LINUX ................................................................................................................................ 26
5. Troubleshooting ................................................................................ 28 5.1 Frequently Asked Questions ...................................................................................................................... 28
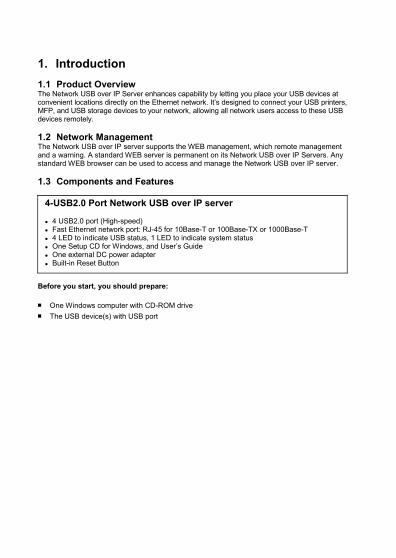
1. Introduction 1.1 Product Overview The Network USB over IP Server enhances capability by letting you place your USB devices at convenient locations directly on the Ethernet network. It’s designed to connect your USB printers, MFP, and USB storage devices to your network, allowing all network users access to these USB devices remotely. 1.2 Network Management The Network USB over IP server supports the WEB management, which remote management and a warning. A standard WEB server is permanent on its Network USB over IP Servers. Any standard WEB browser can be used to access and manage the Network USB over IP server. 1.3 Components and Features
4-USB2.0 Port Network USB over IP server 4 USB2.0 port (High-speed) Fast Ethernet network port: RJ-45 for 10Base-T or 100Base-TX or 1000Base-T 4 LED to indicate USB status, 1 LED to indicate system status One Setup CD for Windows, and User’s Guide One external DC power adapter Built-in Reset Button
Before you start, you should prepare:
■ One Windows computer with CD-ROM drive
■ The USB device(s) with USB port
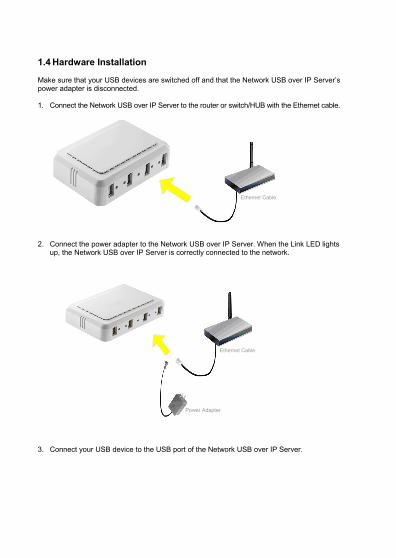
1.4 Hardware Installation Make sure that your USB devices are switched off and that the Network USB over IP Server’s power adapter is disconnected. 1. Connect the Network USB over IP Server to the router or switch/HUB with the Ethernet cable.
2. Connect the power adapter to the Network USB over IP Server. When the Link LED lights
up, the Network USB over IP Server is correctly connected to the network.
3. Connect your USB device to the USB port of the Network USB over IP Server.
Ethernet Cable
Ethernet Cable
Power Adapter

2. The Software Installation 2.1 Installation 1. Insert the setup CD into your computer. A welcome screen should appear with a menu of
options, including the option to install the proper Network USB over IP Server software, access the User Manual, or Exit out of the welcome menu.
2. The installation wizard will start the installation process. During the installation, a Windows
security message will appear. Select “Continue Anyway” to continue.
3. When the installation completed, select “Yes, I want to restart my computer now” and click
“Finish” to close the installation wizard.
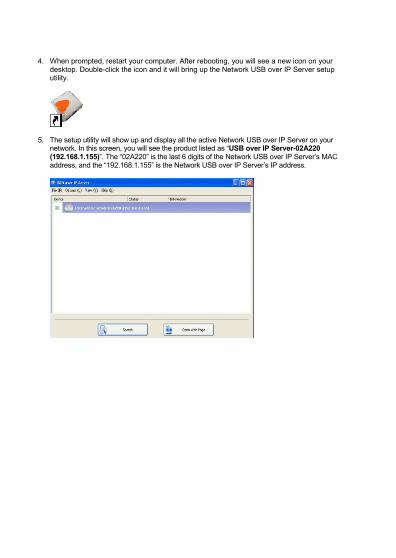
4. When prompted, restart your computer. After rebooting, you will see a new icon on your desktop. Double-click the icon and it will bring up the Network USB over IP Server setup utility.
5. The setup utility will show up and display all the active Network USB over IP Server on your
network. In this screen, you will see the product listed as “USB over IP Server-02A220 (192.168.1.155)”. The “02A220” is the last 6 digits of the Network USB over IP Server’s MAC address, and the “192.168.1.155” is the Network USB over IP Server’s IP address.
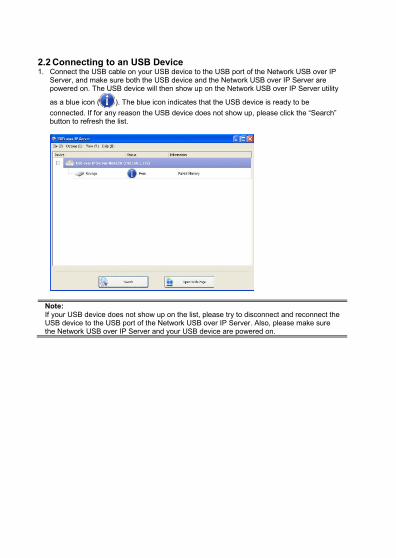
2.2 Connecting to an USB Device 1. Connect the USB cable on your USB device to the USB port of the Network USB over IP
Server, and make sure both the USB device and the Network USB over IP Server are powered on. The USB device will then show up on the Network USB over IP Server utility
as a blue icon ( ). The blue icon indicates that the USB device is ready to be
connected. If for any reason the USB device does not show up, please click the “Search” button to refresh the list.
Note: If your USB device does not show up on the list, please try to disconnect and reconnect the USB device to the USB port of the Network USB over IP Server. Also, please make sure the Network USB over IP Server and your USB device are powered on.
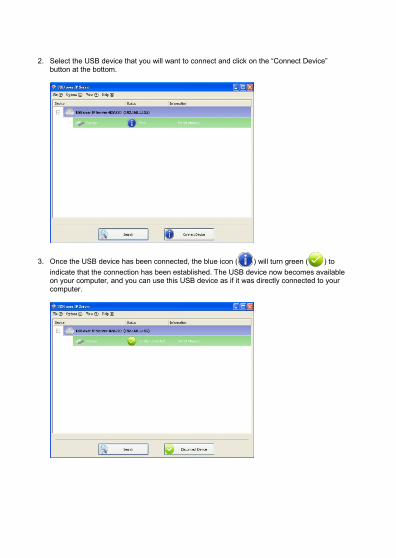
2. Select the USB device that you will want to connect and click on the “Connect Device” button at the bottom.
3. Once the USB device has been connected, the blue icon ( ) will turn green ( ) to
indicate that the connection has been established. The USB device now becomes available on your computer, and you can use this USB device as if it was directly connected to your computer.

2.3 Connecting to an USB Printer or Multi-functional Printer 1 Connect the USB cable on your printer or multi-functional printer to the Network USB over
IP Server and make sure your printer is powered on. You will then see the connected printer show up in the USB over IP Server setup utility. Select the printer from the list and click on the “Connect Device” button.
Note: If your printer does not show up on the list, please try to disconnect and reconnect the printer to the USB port of the Network USB over IP Server. Also, please make sure the Network USB over IP Server and your printer are powered on.
2 The printer will be detected as if it was plugged directly into your computer.
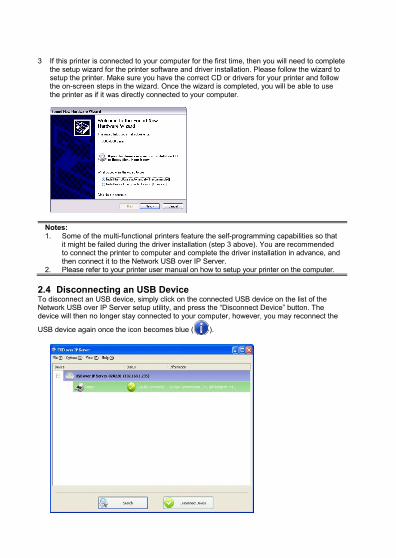
3 If this printer is connected to your computer for the first time, then you will need to complete the setup wizard for the printer software and driver installation. Please follow the wizard to setup the printer. Make sure you have the correct CD or drivers for your printer and follow the on-screen steps in the wizard. Once the wizard is completed, you will be able to use the printer as if it was directly connected to your computer.
Notes: 1. Some of the multi-functional printers feature the self-programming capabilities so that
it might be failed during the driver installation (step 3 above). You are recommended to connect the printer to computer and complete the driver installation in advance, and then connect it to the Network USB over IP Server.
2. Please refer to your printer user manual on how to setup your printer on the computer.
2.4 Disconnecting an USB Device To disconnect an USB device, simply click on the connected USB device on the list of the Network USB over IP Server setup utility, and press the “Disconnect Device” button. The device will then no longer stay connected to your computer, however, you may reconnect the
USB device again once the icon becomes blue ( ).
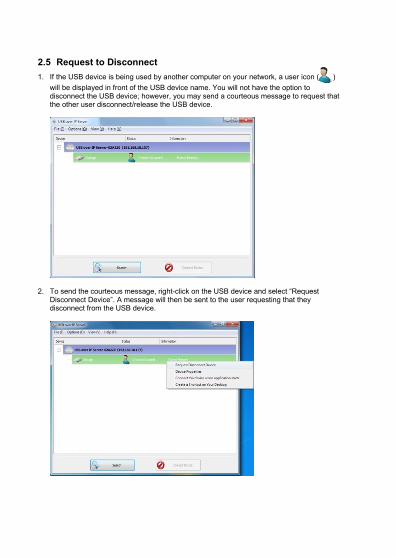
2.5 Request to Disconnect
1. If the USB device is being used by another computer on your network, a user icon ( )
will be displayed in front of the USB device name. You will not have the option to disconnect the USB device; however, you may send a courteous message to request that the other user disconnect/release the USB device.
2. To send the courteous message, right-click on the USB device and select “Request
Disconnect Device”. A message will then be sent to the user requesting that they disconnect from the USB device.
Note: If the occupying user denies this request, then you will not be able to send any further requests to the same user for 3 minutes. This is to prevent any user from flooding the occupying user will multiple requests within a short period of time.
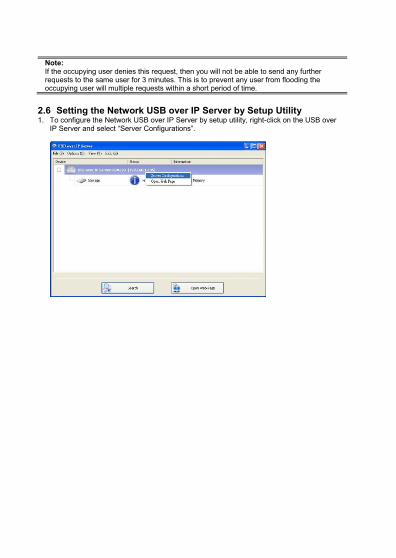
2.6 Setting the Network USB over IP Server by Setup Utility 1. To configure the Network USB over IP Server by setup utility, right-click on the USB over
IP Server and select “Server Configurations”.
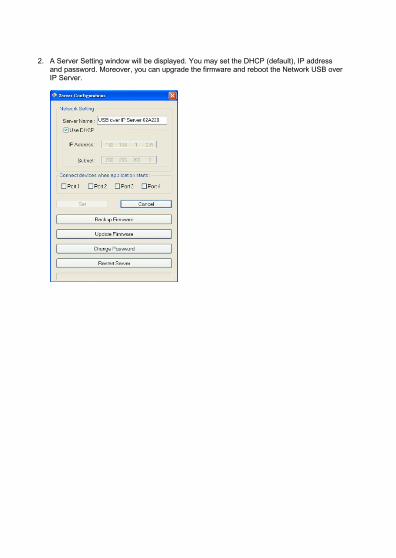
2. A Server Setting window will be displayed. You may set the DHCP (default), IP address and password. Moreover, you can upgrade the firmware and reboot the Network USB over IP Server.
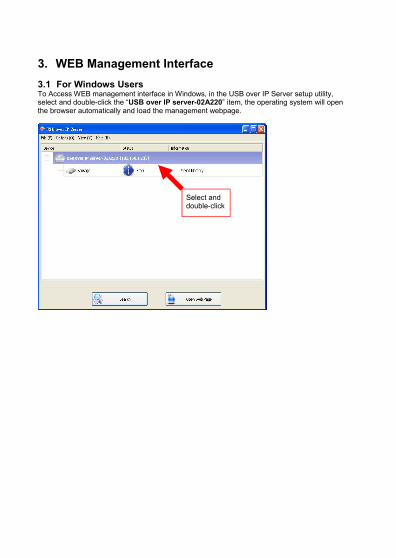
3. WEB Management Interface 3.1 For Windows Users To Access WEB management interface in Windows, in the USB over IP Server setup utility, select and double-click the “USB over IP server-02A220” item, the operating system will open the browser automatically and load the management webpage.
Select and double-click
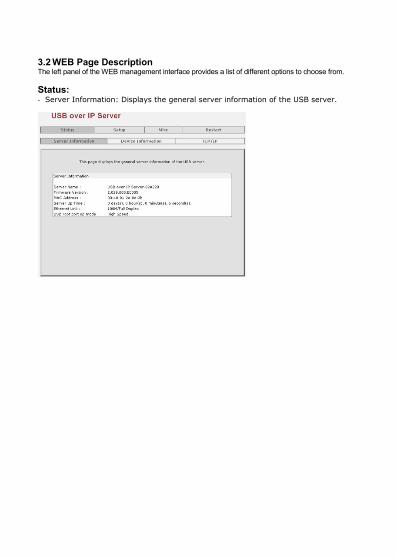
3.2 WEB Page Description The left panel of the WEB management interface provides a list of different options to choose from. Status: - Server Information: Displays the general server information of the USB server.
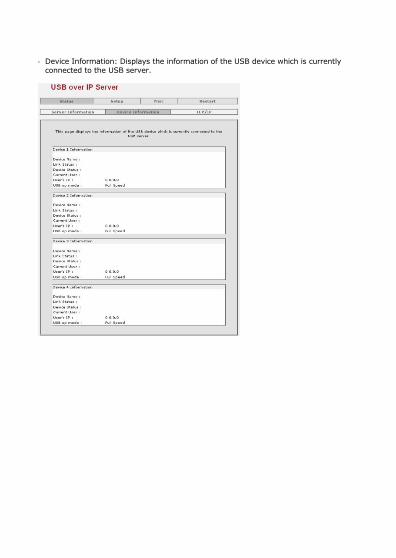
- Device Information: Displays the information of the USB device which is currently connected to the USB server.

- Device Information: Displays the current TCP/IP settings of the USB server.
Setup: - Server Settings: The page allows you to configure general system settings of the
USB server.

- Server Settings: The page allows you to configure TCP/IP settings of the USB server.
Misc: - Factory Default: Click Factory Default then OK to reload all default settings in the
USB server. Warning! All current settings will be erased.
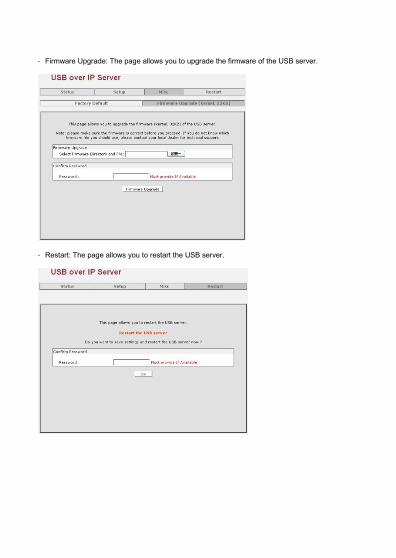
- Firmware Upgrade: The page allows you to upgrade the firmware of the USB server.
- Restart: The page allows you to restart the USB server.
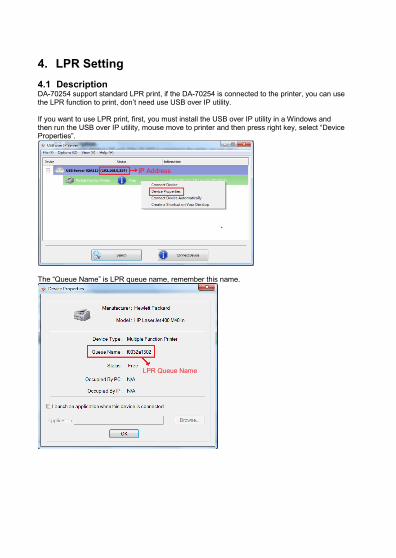
4. LPR Setting 4.1 Description DA-70254 support standard LPR print, if the DA-70254 is connected to the printer, you can use the LPR function to print, don’t need use USB over IP utility. If you want to use LPR print, first, you must install the USB over IP utility in a Windows and then run the USB over IP utility, mouse move to printer and then press right key, select “Device Properties”.
The “Queue Name” is LPR queue name, remember this name.
LPR Queue Name
IP Address
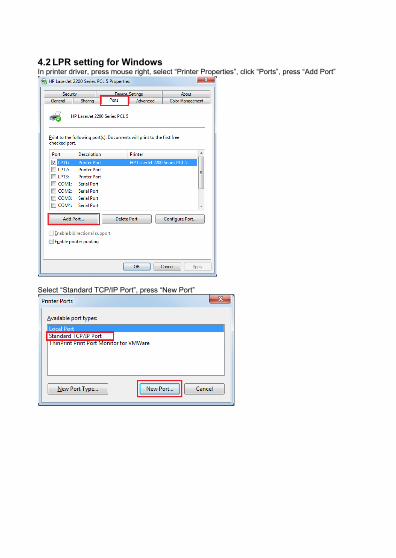
4.2 LPR setting for Windows In printer driver, press mouse right, select “Printer Properties”, click “Ports”, press “Add Port”
Select “Standard TCP/IP Port”, press “New Port”

Press “Next”
In “Printer Name or IP Address” input USB Server IP address, press “Next”
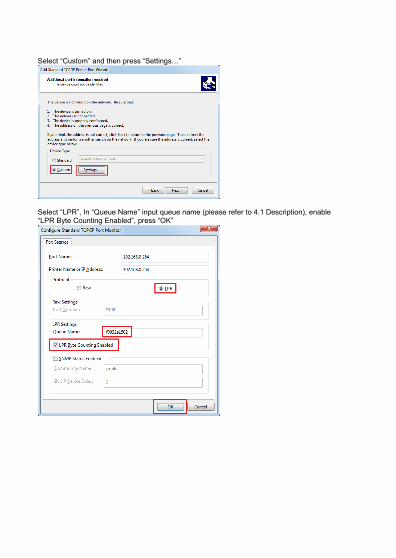
Select “Custom” and then press “Settings…”
Select “LPR”, In “Queue Name” input queue name (please refer to 4.1 Description), enable “LPR Byte Counting Enabled”, press “OK”
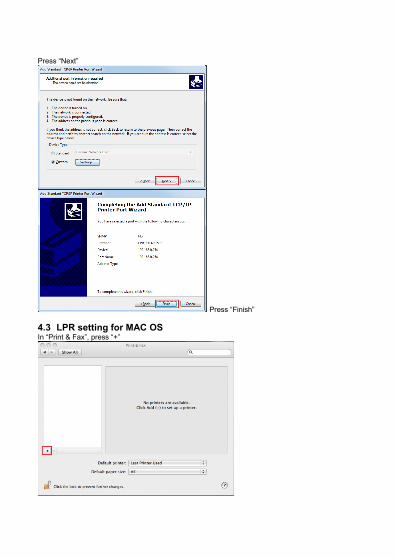
Press “Next”
Press “Finish”
4.3 LPR setting for MAC OS In “Print & Fax”, press “+”
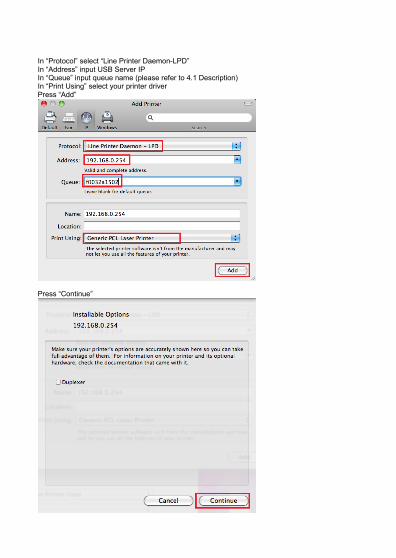
In “Protocol” select “Line Printer Daemon-LPD” In “Address” input USB Server IP In “Queue” input queue name (please refer to 4.1 Description) In “Print Using” select your printer driver Press “Add”
Press “Continue”
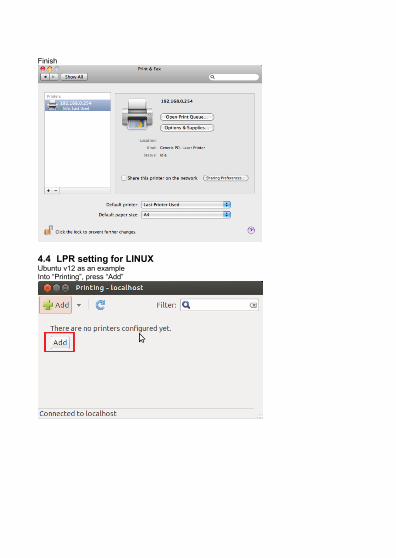
Finish
4.4 LPR setting for LINUX Ubuntu v12 as an example Into “Printing”, press “Add”

In “Devices”, click “Network Printer”, select “LPD/LPR Host or Printer” In “Host”, input USB Server IP address. In “Queue”, input queue name (please refer to 4.1 Description). Press “Forward”
In this page, select your printer model.

Finish.
5. Troubleshooting 5.1 Frequently Asked Questions 1. Why can’t I connect my USB device to my computer through Network USB over IP Server?
Make sure the USB device functions normally when you plug it into your computer via USB cable.
If the USB device, such as USB printer or multi-functional printer, requires a driver, please make sure you have installed it on the computer you wish to use. Rebooting your computer after installing USB device driver might also help.
Although the Network USB over IP Server could work with a very wide spectrum of USB devices, it still has limited support on some USB devices. Please refer to the supported device list for details.
2. Why can’t I see any servers on my Network USB over IP Server listing window after
installing it? Please make sure that all of your Network USB over IP Servers is correctly
connected to your network. Also, certain anti-virus programs come with firewall functions that might prevent the Network USB over IP Server setup utility from accessing the network. Please make sure the Network USB over IP Server setup utility is not being blocked by your anti-virus program.
3. The connected USB devices are disconnected after my computer wakes up from the
computer stand-by? Connected devices will automatically be released for other network users in case
you forget to release them. Please reconnect the USB devices again after your computer “wake up”.
Hereby ASSMANN Electronic GmbH, declares that this device is in compliance with the requirements of
Directive 2014/30/EU (EMC), Directive 2014/35/EU (LVD) and the Directive 2011/65/EU for RoHS
compliance. The complete declaration of conformity can be requested by post under the below mentioned
manufacturer address.
Warning:
This device is a class B product. This equipment may cause some radio interference in living environment.
In this case, the user can be requested to undertake appropriate measures to prevent interference.
www.assmann.com Assmann Electronic GmbH
Auf dem Schüffel 3
58513 Lüdenscheid
Germany