ms-dos 6.22
TRANSCRIPT
Contents at a GlanceIntroduction 1
I DOS Fundamentals
1 DOS and the Personal Computer 112 Starting DOS 233 Using DOS Commands 414 Using the DOS Shell 57
II Files and Directories
5 Understanding Files and Directories 996 Understanding Disks and Disk Drives 1277 Preparing and Maintaining Disks 1498 Managing Your Files 1919 Protecting and Recovering Your Data 231
III Controlling DOS
10 Working with System Information 27511 Controlling Your Environment 29312 Using Peripherals 30713 Controlling Devices 31714 Understanding the International Features
of DOS 339
IV Maximizing DOS
15 Using the DOS Editor 36116 Understanding Batch Files 38917 Understanding ANSI.SYS 41518 Mastering DOSKEY and Macros 43119 Configuring Your Computer 44120 Networking DOS 47121 Connecting to the Internet 48322 Third-Party Utilities 493
V Appendixes
A Files Supplied with MS-DOS 6.22 503B DOS Environment Variables 519C DOS Messages 529D DOS and DOS Utility Programs’ Keyboard
Commands 563E ASCII and Extended ASCII Codes 573F Command Reference 583G Glossary 959
Index 965
Using
MS-DOS
Jim Cooper
Contributors to previous editions:Allen L Wyatt, Sr.Bruce HallbergEd TileyJon Paisley
6.22Third Edition
201 W. 103rd Street
Indianapolis, Indiana 46290
Special Edition Using MS-DOS 6.22, Third Edition
Copyright 2002 by Que
All rights reserved. No part of this book shall be repro-duced, stored in a retrieval system, or transmitted by anymeans, electronic, mechanical, photocopying, recording,or otherwise, without written permission from the pub-lisher. No patent liability is assumed with respect to theuse of the information contained herein. Although everyprecaution has been taken in the preparation of this book,the publisher and author assume no responsibility forerrors or omissions. Nor is any liability assumed for dam-ages resulting from the use of the information containedherein.
International Standard Book Number: 0-7897-2573-8
Library of Congress Catalog Card Number:2001087888
Printed in the United States of America
First Printing: May 2001
04 03 02 01 4 3 2 1
TrademarksAll terms mentioned in this book that are known to betrademarks or service marks have been appropriately capi-talized. Que cannot attest to the accuracy of this informa-tion. Use of a term in this book should not be regarded asaffecting the validity of any trademark or service mark.
Warning and DisclaimerEvery effort has been made to make this book as completeand as accurate as possible, but no warranty or fitness isimplied. The information provided is on an “as is” basis.The author and the publisher shall have neither liabilitynor responsibility to any person or entity with respect toany loss or damages arising from the information con-tained in this book.
Associate PublisherDean Miller
Acquisitions EditorMichelle Newcomb
Development EditorMaureen McDaniel
Managing EditorThomas F. Hayes
Project EditorHeather McNeill
Copy EditorChuck Hutchinson
IndexerChris Barrick
ProofreaderMaribeth Echard
Technical EditorJames A. Glocke
Team CoordinatorCindy Teeters
Interior DesignerRuth Harvey
Cover DesignersDan ArmstrongRuth Harvey
Page LayoutHeather Hiatt MillerStacey Richwine-DeRome
Table of Contents
Introduction 1
Who Should Read This Book? 2
What Hardware Do You Need? 2
What Versions Are Covered? 2
What Is Not Covered? 3
How Is This Book Organized? 3
Part I: DOS Fundamentals 3
Part II: Files and Directories 4
Part III: Controlling DOS 5
Part IV: Maximizing DOS 5
Appendixes 6
Conventions Used in This Book 7
I DOS Fundamentals
1 DOS and the Personal Computer 11
DOS, Windows, and the PC 12
Other Flavors of DOS 12
PC Hardware 12
The PC Architecture 13
Computer Memory 13
Peripheral Devices 14
What Happens When the Power IsTurned On? 15
DOS and Random Access Memory 17
Conventional Memory 18
Expanded Memory 19
Extended Memory 20
DOS and Disks 20
2 Starting DOS 23
Booting Your Computer 24
Understanding the Boot Disk 24
Creating a Floppy Boot Disk 25
System Configuration 26
CONFIG.SYS 27
AUTOEXEC.BAT 30
Creating Multiple Configurations 32
Creating a Default Configuration 34
Displaying Color Menus 34
Using the Configuration Menu As aSystem Menu 36
Project: Controlling the Boot Process 38
3 Using DOS Commands 41
Understanding DOS Commands 42
Internal Versus External 42
Understanding the Elements of a DOSCommand 42
The Command Syntax 43
The Command-Line Parameters 45
The Optional Switches 45
Getting Help 46
Using the Command-Line Help Switch 46
Using the Online Help System 47
Issuing DOS Commands 51
Editing and Canceling Commands 52
Using Scroll Control 54
Using Wildcards in DOS Commands 54
Troubleshooting 55
4 Using the DOS Shell 57
What Is the DOS Shell? 58
Starting the DOS Shell 59
Using the Shell Interface 60
Selecting an Area 62
Moving Around an Area 63
Using the DOS Shell Menus 64
Using the Menu Bar 64
Using Pull-Down Menus 64
Using Keystroke Commands 66
Using Dialog Boxes 67
Modifying the View 70
Using the Shell Screen Modes 75
Using the Program List 77
Working with Program Groups 78
Working with Program Items 81
Working with Directories 83
Expanding and Collapsing Branches 84
Creating Directories 86
Working with Files 87
Selecting a Single File 87
Selecting Multiple Files 87
Selecting All Files 89
Deselecting All Files 89
Selecting Files Across Directories 89
Copying Files in the Shell 89
Moving a File in the Shell 91
Using the Shell to View a File 91
Associating Files with Programs 92
Using the Task Swapper 93
Project: Using the Help System 94
II Files and Directories
5 Understanding Files and Directories 99
Introducing the DOS File System 100
Understanding Files 100
Understanding Filenames 101
Observing File-Naming Conventions104
Understanding File Attributes 107
Understanding the Role of Directories 110
Special Edition Using MS-DOS 6.22, Third Editioniv
Expanding the File System ThroughSubdirectories 113
Understanding Pathname Expressions115
Creating Directories with MKDIR(MD) 117
Changing the Current Directory withCHDIR (CD) 119
Deleting Directories with RMDIR(RD) 120
Using DELTREE to Delete Directories 120
Renaming Directories 121
Helping DOS Find Files with PATH 122
Listing Directories with TREE 123
Using a Temporary Directory 124
Troubleshooting 125
6 Understanding Disks and Disk Drives 127
Understanding the Disk’s MagneticStorage Technique 128
Understanding Disk Drives 129
Hard Disk Drives 130
Floppy Disk Drives 131
Write-Protecting a Floppy Disk 132
Understanding the Dynamics of the DiskDrive 133
Disk Drive Heads 133
Disk Tracks 134
Disk Cylinders 134
Disk Sectors 136
Understanding Disk Formats 137
Floppy Disk Formats 138
Raw Capacity and Usable Capacity 139
Hard Disk Drive Formats 139
Understanding DoubleSpace 140
Installing DoubleSpace 141
Controlling the Operation ofDoubleSpace 142
Displaying Compressed DriveInformation 142
Changing the Size of a CompressedDrive 143
Changing the Compression Ratio 143
Formatting a Compressed Drive 145
Deleting a Compressed Drive 145
Creating a New Compressed Drive 145
Using Other DoubleSpace Features 146
Case Study: Adjusting for Drift 148
7 Preparing and Maintaining Disks 149
Understanding Disk Preparation 150
Preparing Floppy Disks with the FORMAT Command 151
Formatting Floppy Disks 152
FORMAT’s Other Tasks 154
Using FORMAT’s Switches 156
Preparing the Hard Disk 158
Dividing a Hard Disk with FDISK 159
Partitioning a Drive 164
Formatting a Hard Disk 166
Disk Commands 166
Naming Disks with LABEL 166
Examining Volume Labels with VOL 167
Using SYS to Transfer the DOS System 167
Getting the Most Speed from Your HardDisk 168
Using a Disk Cache(SMARTDrive) 169
Using FASTOPEN 173
Using a RAM Disk 174
Defragmenting Your Disk 177
Getting the Most Space from Your HardDisk 181
Deleting Unnecessary Files 182
Using File Compression 183
Archiving Files 183
Projects 184
Analyzing a Disk with CHKDSK 184
Analyzing a Disk with the SCANDISKUtility 188
8 Managing Your Files 191
Using DOS to Work with Files 192
Listing Files with the DIRCommand 193
Issuing the DIR Command 193
Understanding the Operation of the DIR Command 194
Displaying a Screen of Information with the DIR Command 195
Searching for Files with the DIRCommand 198
Customizing the DIR Command 199
Viewing Files 199
Understanding Types of Files 200
Using the TYPE Command to View Files 200
Copying Files 202
Using the COPY Command 202
Using the XCOPY Command 206
Copying Entire Disks with DISKCOPY 210
Moving Files 212
Moving Directories and Files 213
Renaming Directories with MOVE 214
Setting Defaults for COPY, XCOPY, and MOVE 214
vContents
Renaming Files 214
Comparing Files 215
Comparing Files with FC 215
Comparing Disks with DISKCOMP 219
Deleting Files 221
Understanding the Delete Operation 221
Deleting Files from the CommandLine 222
Deleting Unwanted Files 222
Using Interlnk to Share AnotherComputer’s Resources 222
Setting Up Interlnk 223
Loading INTERLNK.EXE 225
Loading the Server 226
Establishing the Interlnk Connection 227
Using Interlnk to Transfer Files 228
Using a Remote Printer 228
Installing Interlnk Remotely 228
Running Programs Remotely 229
Case Study: Editing Files with MultipleData Formats 229
9 Protecting Your Data 231
Avoiding Data Loss 232
Understanding Microsoft Backup 233
Configuring the Backup Programs 235
Understanding Microsoft BackupFunctions 236
Backup Types 238
Issuing the MSBACKUPCommand 239
Using Microsoft Backup 239
Performing a Full Backup 239
Performing Intermediate Backups 242
Special-Purpose Backups 243
Using Other Backup Options 247
Restoring Backup Files 248
Understanding Computer Viruses 252
Understanding How Viruses Spread 252
Fighting Viruses with Microsoft Anti-Virus 253
Using the Windows Version ofMicrosoft Anti-Virus 256
Guarding Against Infection 257
Unformatting a Disk 257
Recovering from an Accidental Format258
Recovering from an Accidental FormatWithout a MIRROR Image File 259
Rebuilding a Partition Table 261
Recovering Deleted Files with UNDELETE 262
Using UNDELETE from the CommandLine 262
Recovering Files with UNDELETE 264
Using the DOS Directory to Recover a File 266
Using the Microsoft Undelete Programfor Windows 3.x 267
Configuring Microsoft Undelete 267
Selecting Files to Recover 268
Recovering Files 269
Using Other Options 270
Project: Developing a Backup Policy 270
III Controlling DOS
10 Working with System Information 275
Changing the Date and Time 276
Issuing the DATE Command 277
Issuing the TIME Command 278
Special Edition Using MS-DOS 6.22, Third Editionvi
Displaying the Version Using the VERCommand 279
Setting the Version Using the SETVERCommand 280
Displaying Memory Statistics 283
Issuing the MEM Command 283
Understanding the Operation ofMEM 283
Loading a Secondary Command Processor288
Issuing the COMMANDCommand 288
Understanding the Operation of COMMAND.COM 289
Using EXIT to Leave the Current Copyof the Command Processor 290
Uses for a Secondary CommandProcessor 290
11 Controlling Your Environment 293
Changing DOS Variables 294
Issuing the SET Command 294
Changing Environment Variables with SET 294
Defining Your Own EnvironmentalVariables with SET 295
Changing the User Interface 295
Changing the Command Prompt withPROMPT 295
Altering the Look of the Screen withMODE 298
Changing Disk Drives 301
The ASSIGN Command 302
The JOIN Command 302
The SUBST Command 302
Using the COMSPEC Variable 304
12 Using Peripherals 307
Understanding Device Drivers 308
Understanding Hardware Interrupts 309
Understanding Direct Memory Access(DMA) Channels 311
Understanding Memory Input/OutputAddresses 312
Setting Up Device Drivers 312
Troubleshooting Device Drivers 314
13 Controlling Devices 317
Device Commands 318
The CLS Command 319
The GRAPHICS Command 319
Issuing the GRAPHICS Command 319
Using GRAPHICS to Print a Screen Image 321
The PRINT Command 322
Issuing the PRINT Command 322
Using PRINT to Print Several Files 324
General Rules for Using PRINT 324
The CTTY Command 325
The MODE Command 326
Using MODE to Change Parallel PortSettings 326
Using MODE to Change Serial PortSettings 328
Using MODE to Redirect a Parallel Portto a Serial Port 330
Using MODE to Change the TypematicRate 331
Using Redirection Commands 332
Issuing the Redirection Operators 332
General Rules for Using Redirection 334
viiContents
The MORE Filter 334
Issuing the MORE Filter 334
Using MORE to Pause the Screen 334
General Rules for Using MORE 335
The FIND Filter 335
Issuing the FIND Filter 335
Using FIND to Find Files on Disk 336
General Rules for Using FIND 337
The SORT Filter 337
Issuing the SORT Filter 337
Using SORT to Sort SubdirectoryListings 338
General Rules for Using SORT 338
14 Understanding the International Featuresof DOS 339
Internationalization 340
Understanding COUNTRY.SYS 340
Understanding KEYB.COM 342
Understanding Code Page Switching 344
Checking Your Hardware for CodePage Switching 345
Installing Code Page Switching 346
Loading the Code Page Tables 348
Switching the Code Page 349
Exploring More Uses for MODE andCODEPAGE 350
Considering Keyboard Remappings 351
Using Dead Keys 352
Using Foreign-Language Commands 354
International Country Codes 354
IV Maximizing DOS
15 Using the DOS Editor 361
Understanding the DOS Editor 362
Uses for the DOS Editor 362
Files Required to Run the DOS Editor 362
Using the DOS Editor from a Floppy Disk 363
Starting the DOS Editor 363
Getting Acquainted with the InitialEditor Screen 364
Navigating the DOS Editor 364
Understanding the Menu System 365
Understanding Dialog Boxes 365
Using Shortcut Keys 366
Using a Mouse 367
Mastering Fundamental EditingTechniques 368
Moving the Cursor 369
Scrolling 370
Inserting Text into a Line 370
Deleting Text from a Line 370
Splitting and Joining Lines 371
Inserting and Deleting an Entire Line 371
Overtyping 371
Learning Special Editing Techniques 371
Using Automatic Indent 372
Using Tab 372
Using Place Markers 373
Block Editing 373
Selecting Text 373
Understanding the Clipboard 374
Working with Text Blocks 374
Searching and Replacing 376
Using the Find Command 377
Using the Change Command 378
Special Edition Using MS-DOS 6.22, Third Editionviii
Managing Files 379
Introducing the File Menu 379
Saving a File 380
Using the Open Command to Load a File 382
Loading a File When You First Startthe DOS Editor 383
Using the New Command 383
Printing a File 383
Exiting the DOS Editor 384
Starting the DOS Editor with OptionalSwitches 384
Project: Customizing the DOS EditorScreen 385
Changing Colors and RemovingScrollbars 385
Saving Customized Settings 386
Using the Help System 387
16 Understanding Batch Files 389
Introducing Batch Files 390
Understanding the Contents of Batch Files 391
Creating a Simple Batch File 392
Understanding Replaceable Parameters 393
Using Batch File Commands 397
Displaying Messages and InsertingComments 398
Branching with GOTO 398
Using the IF Command 399
Pausing for Input in a Batch File 404
Making a Two-Way Choice 405
Creating a Simple Menu 405
Creating a Simple Display Menu 406
Using FOR..IN..DO 407
Using a FOR..IN..DO Batch File 408
Using FOR..IN..DO at the DOS Prompt 409
Using FOR..IN..DO with OtherCommands 409
Moving Parameters with SHIFT 409
Running Batch Files from Other BatchFiles 411
Shifting Control Permanently toAnother Batch File 411
Calling a Batch File and ReturningUsing CALL 411
Using COMMAND.COM to Execute a Batch File 412
17 Understanding ANSI.SYS 415
What Is ANSI.SYS? 416
Installing ANSI.SYS 416
Using ANSI.SYS 416
Issuing ANSI.SYS Codes in Batch Files 417
Issuing ANSI.SYS Codes in Text Files 418
Issuing ANSI.SYS Codes with thePROMPT Command 419
Controlling Your Screen with ANSI.SYS 419
Cursor Movement 420
Cursor Positioning 420
Setting the Screen Mode 421
Setting the Text Attributes 421
Screen Control 423
Customizing Your Keyboard with ANSI.SYS 423
Reassigning Character Keys 424
ANSI Control Codes 425
ANSI Set and Reset Display ModeControl Codes 425
ANSI Display Color and AttributeControl Codes 425
ANSI Cursor Control Codes 426
ixContents
ANSI Miscellaneous Display ControlCodes 427
ANSI Keyboard Layout Control Codes 427
18 Mastering DOSKEY and Macros 431
Using DOSKEY 432
Loading DOSKEY 432
Editing the Command Line 433
Reusing Commands 434
Creating and Using Macros 436
Creating Macros 437
Running Macros 439
Deleting Macros 440
19 Configuring Your Computer 441
Getting the Most from Your ComputerResources 442
Understanding Device Drivers 443
Optimizing Your Computer’s Memory 445
Using Extended Memory andHIMEM.SYS 445
Understanding HIMEM.SYS 445
Loading DOS into High Memory 448
Using Expanded Memory andEMM386.EXE 449
Loading Device Drivers and TSRs into Upper Memory 451
Displaying the Amount of Free andUsed Memory 453
Configuring Memory with MemMaker 455
Providing Memory for Your Applications 460
Increasing Hard Disk Performance 461
Fine-Tuning Your Computer with CONFIG.SYS and AUTOEXEC.BAT 463
Accessing Files through FCBS 463
Using the FILES Command 463
Using LASTDRIVE to Change theNumber of Disk Drives 464
Using the SHELL Command 464
Using the INSTALL Command 466
Using the REM Command 467
Using the SWITCHESCommand 467
Telling DOS When to Break 468
Using the DOS Pretender Commands 468
Using Other Device ControlCommands 469
20 Networking DOS 471
Common Networks for DOS-BasedComputers 472
Learning Preinstallation Items 472
Installing the Novell NetWare ClientSoftware 473
Installing the Microsoft Network Client 478
Using the Network 481
Project: Network Client Setup Tips 482
21 Connecting to the Internet 483
Internet Connection Options for DOS-Based Computers 484
Connecting to Your ISP 484
Using Internet Tools 485
A Sample FTP Session 489
Project: Common Problems with DOS Internet Tools 491
22 Third-Party Utilities 493
Enhancing Your Computer with UtilityPrograms 494
Special Edition Using MS-DOS 6.22, Third Editionx
Understanding Freeware, Shareware, andDemoware 494
PKWare’s PKZIP and PKUNZIP 495
McAfee VirusScan 496
4DOS 497
V Appendixes
A Files Supplied with MS-DOS 6.22 503
About MS-DOS Files 504
MS-DOS 6.22 Files 504
MS-DOS 6.22 Supplemental Disk Files 512
MS-DOS Utility File Extensions byVersion 515
B DOS Environment Variables 519
Understanding the DOS Environment 520
APPEND 520
COMSPEC 521
CONFIG 522
COPYCMD 522
DIRCMD 522
MSDOSDATA 523
PATH 524
PROMPT 525
TEMP and TMP 525
windir 526
WINPMT 526
C DOS Messages 529
General DOS Messages 530
DOS Device Error Messages 557
D DOS and DOS Utility Programs’ KeyboardCommands 563
DOS Startup Control Keys 564
ROM BIOS Control Keys 564
DOS Control Keys 565
Command-Line Editing Keys WithoutDOSKEY 565
Command-Line Editing Keys with DOSKEY 567
Edit Keystroke Commands 568
DOS Shell Keystroke Commands 569
E ASCII and Extended ASCII Codes 573
F Command Reference 583
DOS Commands by Function 583
Batch File Commands 584
CONFIG.SYS Commands 584
CONFIG.SYS DEVICE= Drivers 585
Directory Commands 586
Disk Commands 586
File Commands 587
DOS Applications 587
Help Commands 588
International Commands and DeviceDrivers 588
Memory and System PerformanceCommands 589
Miscellaneous Commands 589
Windows Applications 590
Conventions Used in This CommandReference 590
Icons Used in This CommandReference 592
Filenames and Pathnames 593
xiContents
Legal Filename Characters 593
DOS Reserved Names 594
?, * 1.0 and later—Internal 594
Using the ? Wildcard Character in aFilename or Extension 595
Using the * Wildcard Character in aFilename or Extension 595
Examples 595
See Also 595
> and >> 2.0 and later—Internal 596
See Also 596
< 2.0 and later—Internal 596
See Also 597
| 2.0 and later—Internal 597
See Also 598
:label 1.0 and later—Internal 598
Syntax 598
Notes 598
Examples 598
Messages 598
See Also 599
%n 1.0 and later—Internal 599
Syntax 599
Notes 599
Examples 600
See Also 600
%envir% 4.0 and later—Internal 600
Syntax 600
Notes 600
Examples 601
See Also 602
@ 4.0 and later—Internal 602
Syntax 602
Notes 603
See Also 603
; 6.0 and later—Internal 603
Syntax 603
Notes 603
Examples 604
See Also 604
? 6.0 and later—Internal 604
Syntax 604
Parameters and Switches 604
Notes 604
Examples 605
Messages 605
See Also 605
[blockname] 6.0 and later—Internal 606
Syntax 606
Notes 606
Examples 607
See Also 608
ANSI.SYS (device driver) 2.0 and later—External 608
Syntax 608
Parameters and Switches 609
Notes 609
Examples 610
See Also 610
APPEND 3.3 and later—External 610
Syntax 610
Parameters and Switches 611
Notes 611
Examples 612
Messages 612
See Also 613
ASSIGN 2.0 to 5.0—External 613
Using SUBST Instead of ASSIGN 613
See Also 613
ATTRIB 3.0 and later—External 613
Syntax 614
Parameters and Switches 614
Notes 614
Examples 615
Messages 615
See Also 615
BACKUP 2.0 to 5.0—External 616
See Also 616
Special Edition Using MS-DOS 6.22, Third Editionxii
BREAK 2.0 and later—Internal BREAK= 2.0 and later—Internal 616
Syntax 616
Parameters and Switches 616
Notes 616
See Also 617
BUFFERS= 2.0 and later—Internal 617
Syntax 617
Parameters and Switches 617
Notes 618
See Also 618
CALL 3.3 and later—Internal 619
Syntax 619
Parameters and Switches 619
Notes 619
Examples 620
Messages 621
See Also 621
CD or CHDIR 2.0 and later—Internal 621
Syntax 621
Parameters and Switches 622
Notes 622
Examples 622
Messages 623
See Also 624
CHAIN 624
Syntax 624
Parameters and Switches 624
CHCP 3.3 and later—Internal 624
Syntax 624
Parameters and Switches 624
Notes 624
Messages 625
See Also 625
CHDIR (see CD) 626
CHECK 626
Syntax 626
Parameters and Switches 626
Remarks 626
CHKDSK 1.0 and later—External 626
Syntax 626
Parameters and Switches 626
Exit Codes 627
Rules 627
Notes 627
Messages 628
See Also 630
CHKSTATE.SYS (see MEMMAKER) 631
See Also 631
CHOICE 6.0 and later—External 631
Syntax 631
Parameters and Switches 631
Exit Codes 632
Notes 632
Examples 632
See Also 633
CLS 2.0 and later—Internal 633
Syntax 633
Notes 633
See Also 634
CMOSCLK.SYS 634
Syntax 634
Parameters and Switches 634
Notes 634
CNFIGNAM.EXE 634
Syntax 634
Parameters and Switches 634
Notes 635
COMMAND 2.0 and later—External 635
Syntax 635
Parameters and Switches 635
Rules 636
Notes 636
See Also 636
COMP 1.0 to 5.0—External 636
Syntax 637
Parameters and Switches 637
xiiiContents
Notes 637
Messages 637
See Also 638
CONFIG 638
Syntax 638
Parameters and Switches 638
COPY 1.0 and later—Internal 639
Syntax 639
Parameters and Switches 639
Rules 640
Notes 641
Messages 642
See Also 642
COUNTRY= 3.0 and later—Internal 642
Syntax 643
Parameters and Switches 643
Notes 643
Examples 644
See Also 644
COUNTRY.SYS
(see COUNTRY=) 644
See Also 645
CPBACKUP 645
Syntax 645
Parameters and Switches 645
Notes 647
See Also 647
CPBDIR 647
Syntax 647
Parameters and Switches 647
See Also 647
CPSCHED 647
Syntax 647
Parameters and Switches 648
See Also 648
CRC 648
Syntax 648
Parameters and Switches 648
CREATE 648
Syntax 648
Parameters and Switches 648
See Also 649
CSCRIPT 649
Syntax 649
Parameters and Switches 649
Notes 650
CTTY 2.0 and later—Internal 650
Syntax 650
Parameters and Switches 650
Notes 650
See Also 651
CURSOR.EXE 651
Syntax 651
Parameters and Switches 651
CVT.EXE 651
Syntax 651
Parameters and Switches 651
Notes 651
DATAMON 652
Syntax 652
Parameters and Switches 652
Notes 652
DATE 1.0 and later—Internal 653
Syntax 653
Parameters and Switches 653
Notes 653
See Also 653
DBLSPACE 6.0 and later—External 654
Syntax 654
Notes 654
See Also 655
DBLSPACE/AUTOMOUNT6.2—External 655
Syntax 655
Parameters and Switches 655
Notes 655
Special Edition Using MS-DOS 6.22, Third Editionxiv
Examples 655
See Also 655
DBLSPACE/CHKDSK 6.0 only—External 656
Syntax 656
Parameters and Switches 656
Notes 656
See Also 656
DBLSPACE/COMPRESS 6.0 and later—External 656
Syntax 656
Parameters and Switches 656
Notes 657
Examples 657
See Also 657
DBLSPACE/CREATE 6.0 and later—External 657
Syntax 658
Parameters and Switches 658
Notes 658
Examples 659
See Also 659
DBLSPACE/DEFRAGMENT 6.0 and later—External 659
Syntax 659
Parameters and Switches 659
Notes 659
See Also 660
DBLSPACE/DELETE 6.0 and later—External 660
Syntax 660
Parameters and Switches 660
Notes 660
See Also 661
DBLSPACE/DOUBLEGUARD 6.2—External 661
Syntax 661
Parameters and Switches 661
Notes 661
Examples 661
See Also 661
DBLSPACE/FORMAT 6.0 and later—External 661
Syntax 662
Parameters and Switches 662
Notes 662
See Also 662
DBLSPACE/INFO 6.0 and later—External 662
Syntax 662
Parameters and Switches 662
See Also 663
DBLSPACE/LIST 6.0 and later—External 663
Syntax 663
See Also 663
DBLSPACE/MOUNT 6.0 and later—External 663
Syntax 663
Parameters and Switches 664
Notes 664
Examples 664
See Also 664
DBLSPACE/RATIO 6.0 and later—External 664
Syntax 665
Parameters and Switches 665
Notes 665
Examples 665
See Also 665
DBLSPACE/SIZE 6.0 and later—External 665
Syntax 666
Parameters and Switches 666
Examples 666
See Also 666
DBLSPACE/UNCOMPRESS 6.2—External 666
Syntax 666
Parameters and Switches 667
Notes 667
See Also 667
xvContents
DBLSPACE/UNMOUNT 6.0 and later—External 667
Syntax 667
Parameters and Switches 667
Notes 668
See Also 668
DBLSPACE.SYS (device driver)6.0 and later—External 668
Syntax 668
Parameters and Switches 668
Notes 669
Examples 670
See Also 670
DCONVERT 671
Syntax 671
Parameters and Switches 671
Notes 671
See Also 671
DEBUG 1.0 and later—External 671
Syntax 671
Parameters and Switches 672
Notes 672
Examples 672
DEFRAG 6.0 and later—External 672
Syntax 672
Parameters and Switches 673
Exit Codes 674
Notes 674
See Also 675
DEL or ERASE 1.0 and later—Internal 675
Syntax 675
Parameters and Switches 675
Notes 675
Messages 676
See Also 676
DELOLDOS 5.0 and later—External 676
Syntax 676
Parameters and Switches 676
Notes 676
See Also 676
DELPURGE.EXE 677
Syntax 677
Parameters and Switches 677
DELWATCH.EXE 677
Syntax 677
Parameters and Switches 677
See Also 678
DELQ or ERAQ 678
Syntax 678
Parameters and Switches 678
DELTREE 6.0 and later—External 679
Syntax 679
Parameters and Switches 679
Exit Codes 679
Notes 679
See Also 679
DEVICE= 2.0 and later—Internal 679
Syntax 680
Parameters and Switches 680
Notes 680
Examples 681
Messages 681
See Also 682
DEVICEHIGH= 5.0 and later—Internal 682
Syntax 682
Parameters and Switches 683
Notes 683
Examples 685
Messages 686
See Also 686
DEVLOAD 687
Syntax 687
Parameters and Switches 687
DIR 1.0 and later—Internal 687
Syntax 687
Parameters and Switches 687
Notes 689
See Also 689
Special Edition Using MS-DOS 6.22, Third Editionxvi
DISKCOMP 1.0 and later—External 690
Syntax 690
Parameters and Switches 690
Exit Codes 690
Notes 690
Messages 691
See Also 691
DISKCOPY 1.0 and later—External 692
Syntax 692
Parameters and Switches 692
Exit Codes 692
Notes 692
Messages 693
See Also 694
DISKMAP.EXE 694
Syntax 694
Parameters and Switches 694
DISKOPT.EXE 694
Syntax 694
Parameters and Switches 695
DISPLAY.SYS (device driver)3.3 and later—External 695
Syntax 695
Parameters and Switches 696
Notes 697
Examples 697
See Also 698
DOS= 5.0 and later—Internal 698
Syntax 698
Parameters and Switches 698
Notes 698
Examples 699
Messages 700
See Also 700
DOSBOOK 700
Syntax 700
Parameters and Switches 700
DOSDATA 701
Syntax 701
Parameters and Switches 701
DOSDOCK 701
Syntax 701
Parameters and Switches 701
DOSKEY 5.0 and later—External 701
Syntax 701
Parameters and Switches 702
Notes 702
Examples 703
Messages 704
See Also 704
DOSSHELL 4.0 to 6.0—External 704
Syntax 704
Parameters and Switches 704
Notes 705
Examples 706
Messages 706
See Also 707
DPMI 707
Syntax 707
Parameters and Switches 707
DPMS.EXE 707
Syntax 707
Parameters and Switches 708
Notes 708
DRIVER.SYS (device driver)3.2 and later—External 708
Syntax 708
Parameters and Switches 708
Notes 710
Examples 711
Messages 711
See Also 711
DRIVPARM= 3.2 and later—Internal 711
Syntax 711
Parameters and Switches 711
xviiContents
Notes 712
Examples 713
See Also 714
DRMOUSE 714
Syntax 714
Parameters and Switches 714
DRVLOCK 714
Syntax 714
Parameters and Switches 714
DYNALOAD 715
Syntax 715
Parameters and Switches 715
Notes 715
E 715
Syntax 715
Parameters and Switches 716
Notes 716
ECHO 2.0 and later—Internal 716
Syntax 716
Parameters and Switches 717
Notes 717
Examples 718
See Also 719
EDIT 5.0 and later—External 719
Syntax 719
Parameters and Switches 719
See Also 720
EDLIN 1.0 to 5.0—External 720
See Also 720
EGA.SYS (device driver) 5.0 and later—External 720
Syntax 720
Parameters and Switches 720
Notes 720
Examples 721
See Also 721
EJECT 721
Syntax 721
Parameters and Switches 721
Remarks 721
EMM386 5.0 and later—External 721
Syntax 722
Parameters and Switches 722
Notes 722
See Also 722
EMM386.EXE (device driver)5.0 and later—External 722
Syntax 722
Parameters and Switches 723
Notes 726
See Also 726
ERASE (see DEL) 726
ERAQ (see DELQ) 726
EXE2BIN 1.1 to 5.0—External 727
Syntax 727
Parameters and Switches 727
Notes 727
EXIT 2.0 and later—Internal 727
Syntax 727
Notes 728
See Also 728
EXPAND 5.0 and later—External 728
Syntax 728
Parameters and Switches 728
Rules 728
Notes 729
Examples 729
Messages 729
See Also 729
EXTRACT 730
Syntax 730
Parameters and Switches 730
FASTHELP 6.0 and later—External 730
Syntax 730
Parameters and Switches 730
Notes 731
See Also 731
Special Edition Using MS-DOS 6.22, Third Editionxviii
FASTOPEN 3.3 and later—External 731
Syntax 731
Parameters and Switches 731
Rules 731
Notes 732
See Also 732
FC 3.3 and later—External 732
Syntax 732
Parameters and Switches 733
Notes 733
Examples 734
See Also 734
FCBS= 3.1 and later—Internal 734
Syntax 734
Parameters and Switches 734
Notes 734
See Also 735
FDISK 2.0 and later—External 735
Syntax 735
Parameters and Switches 735
Rules 735
Notes 736
See Also 736
FILELINK 736
FILES= 2.0 and later—Internal 737
Syntax 737
Parameters and Switches 737
Notes 737
Examples 737
See Also 738
FILEUP 738
Syntax 738
Parameters and Switches 738
Notes 738
See Also 738
FIND 2.0 and later—External 738
Syntax 738
Parameters and Switches 738
Exit Codes 739
Rules 739
Notes 739
Examples 739
See Also 740
FOR 2.0 and later—Internal 740
Syntax 740
Parameters and Switches 740
Notes 741
Examples 742
See Also 742
FORMAT 1.0 and later—External 743
Syntax 743
Parameters and Switches 743
Exit Codes 744
Rules 744
Notes 745
Messages 746
See Also 746
GOTO 2.0 and later—Internal 747
Syntax 747
Parameters and Switches 747
Notes 747
See Also 747
GRAFTABL 3.0 to 5.0—External 747
Syntax 747
Parameters and Switches 748
Exit Codes 748
Notes 748
See Also 748
GRAPHICS 2.0 and later—External 748
Syntax 748
Parameters and Switches 749
See Also 750
HCONVERT 750
Syntax 750
Parameters and Switches 750
Remarks 750
xixContents
HELP 5.0 and later—External 750
Syntax 751
Parameters and Switches 751
Notes 751
See Also 751
HIINSTALL or INSTALLHIGH 751
Syntax 751
Parameters and Switches 752
HILOAD (see LOADHIGH) 752
HIMEM.SYS (device driver)4.0 and later—External 752
Syntax 752
Parameters and Switches 752
Notes 756
Examples 757
Messages 757
See Also 759
IBMAVD 759
Syntax 759
IBMAVSP 759
Syntax 759
Parameters and Switches 760
IEXTRACT 761
Syntax 761
Parameters and Switches 761
IF 2.0 and later—Internal 761
Syntax 761
Parameters and Switches 761
Notes 762
Examples 764
See Also 765
INCLUDE= 6.0 and later—Internal 765
Syntax 766
Parameters and Switches 766
Notes 766
Examples 767
See Also 768
INSTALL= 4.0 and later—Internal 768
Syntax 768
Parameters and Switches 768
Notes 768
Examples 769
Messages 769
See Also 769
INSTALLHIGH (see HIINSTALL) 769
INTERLNK 6.0 and later—External 770
Syntax 770
Parameters and Switches 770
Notes 770
Examples 772
Messages 773
See Also 774
INTERLNK.EXE (device driver)6.0 and later—External 774
Syntax 774
Parameters and Switches 774
Notes 776
Examples 778
Messages 779
See Also 781
INTERSVR 6.0 and later—External 781
Syntax 781
Parameters and Switches 781
Notes 782
Examples 784
Messages 784
See Also 786
JOIN 3.1 to 5.0—External 786
Syntax 786
Parameters and Switches 786
Rules 787
Notes 787
Messages 788
See Also 788
Special Edition Using MS-DOS 6.22, Third Editionxx
KBDBUF.SYS (device driver)External 788
Syntax 788
Parameters and Switches 788
Notes 789
Examples 789
Messages 789
See Also 789
KEYB 3.3 and later—External 790
Syntax 790
Parameters and Switches 790
Exit Codes 790
Notes 791
Messages 791
See Also 792
KEYBOARD.SYS (see KEYB) 792
See Also 793
LABEL 3.0 and later—Internal 793
Syntax 793
Parameters and Switches 793
Rules 793
Notes 794
Messages 794
See Also 794
LASTDRIVE= 3.0 and later—Internal 795
Syntax 795
Parameters and Switches 795
Notes 795
Examples 795
Messages 796
See Also 796
LH (see LOADHIGH) 796
LOADER 796
Syntax 796
Parameters and Switches 797
LOADFIX 5.0 and later—External 797
Syntax 797
Parameters and Switches 798
Notes 798
LOADHIGH or LH 5.0 and later—Internal 798
Syntax 798
Parameters and Switches 798
Notes 799
Rules 799
Examples 799
See Also 800
MD or MKDIR 2.0 and later—Internal 800
Syntax 800
Parameters and Switches 800
Notes 800
Messages 801
See Also 801
MEM 4.0 and later—External 802
Syntax 802
Parameters and Switches 802
Rules 803
Notes 803
See Also 803
MEMMAKER 6.0 and later—External 803
Syntax 804
Parameters and Switches 804
See Also 804
MEMMAX 805
Syntax 805
Parameters and Switches 805
MENUCOLOR= 6.0 and later—Internal 805
Syntax 805
Parameters and Switches 805
Notes 806
Examples 807
See Also 807
MENUDEFAULT= 6.0 and later—Internal 807
Syntax 807
Parameters and Switches 807
Notes 808
Examples 808
See Also 809
xxiContents
MENUITEM= 6.0 and later—Internal 809
Syntax 809
Parameters and Switches 809
Notes 809
Examples 810
See Also 811
MIRROR 5.0—External 811
Syntax 811
Parameters and Switches 811
Rules 812
Notes 812
Messages 813
See Also 813
MKDIR (see MD) 813
MODE 1.1 and later—External 813
Display Device Status Information 814
Parameters and Switches 814
Notes 814
Messages 814
See Also 815
MODE COM# 1.1 and later—External 815
Syntax 815
Parameters and Switches 815
Notes 816
See Also 816
MODE CON 4.0 and later—External 817
Syntax 817
Parameters and Switches 817
Notes 817
Examples 818
Messages 818
See Also 818
MODE device CP 3.3 and later—External 818
Syntax 818
Parameters and Switches 819
Notes 820
Examples 821
See Also 821
MODE display 2.0 and later—External 821
Syntax 822
Parameters and Switches 822
Notes 823
Examples 823
Messages 823
See Also 824
MODE LPT# 3.2 and later—External 824
Syntax 824
Parameters and Switches 824
Rules 825
Notes 825
See Also 826
MONOUMB.386 6.0 and later—Windows 826
Syntax 826
Parameters and Switches 826
Notes 827
See Also 827
MORE 2.0 and later—External 827
Syntax 827
Parameters and Switches 827
Rules 827
Notes 828
See Also 828
MOVE 6.0 and later—External 828
Syntax 828
Parameters and Switches 828
Exit Codes 829
Notes 829
Examples 830
See Also 830
MSAV 6.0 and later—External 830
Syntax 830
Parameters and Switches 831
Exit Codes 832
Notes 832
See Also 833
Special Edition Using MS-DOS 6.22, Third Editionxxii
MSBACKUP 6.0 and later—External 833
Syntax 833
Parameters and Switches 833
Rules 833
Notes 834
See Also 834
MSCDEX 6.0 and later—External 835
Syntax 835
Parameters and Switches 835
Notes 835
Examples 836
See Also 836
MSD 6.0 and later—External 836
Syntax 836
Parameters and Switches 836
Notes 837
See Also 837
MSHERC 5.0—External 837
Syntax 837
Parameters and Switches 837
Notes 837
MWAV 6.0 and later—Windows 838
See Also 838
MWAVTSR 6.0 and later—Windows 838
See Also 838
MWBACKUP 6.0 and later—Windows 838
See Also 839
MWUNDEL 6.0 and later—Windows 839
See Also 839
NLSFUNC 3.3 and later—External 840
Syntax 840
Parameters and Switches 840
Notes 840
See Also 840
NUMLOCK= 6.0 and later—Internal 840
Syntax 841
Notes 841
Examples 841
NWCACHE 842
Syntax for Loading NWCACHE 842
Parameters for Loading NWCACHE 842
Syntax for NWCACHE After It Is Loaded 843
Parameters for NWCACHE After It IsLoaded 843
NWCDEX 843
Syntax 843
Parameters and Switches 843
Notes 844
See Also 844
PASSWD 844
Syntax 844
Parameters and Switches 844
Notes 844
PASSWORD 844
Syntax 844
Parameters and Switches 845
Notes 845
PATH 2.0 and later—Internal 845
Syntax 845
Parameters and Switches 846
Notes 846
Messages 846
See Also 847
PAUSE 1.0 and later—Internal 847
Syntax 847
Notes 847
Examples 848
Messages 848
See Also 849
PCM 849
Syntax 849
Notes 849
xxiiiContents
PCMATA.SYS 849
PCMCS 849
PCMDINST 849
Syntax 849
PCMFDISK 850
Syntax 850
Notes 850
PCMRMAN (Standalone Utility) 850
Syntax 850
Notes 850
PCMRMAN (Command-Line Utility) 850
Syntax 850
Parameters and Switches 850
Notes 851
PCMSCD 851
Syntax 851
Notes 851
PCMSETUP 851
Syntax 851
POWER 6.0 and later—External 852
Syntax 852
Parameters and Switches 852
Notes 852
Examples 854
Messages 854
See Also 854
POWER.EXE (device driver)6.0 and later—External 854
Syntax 854
Parameters and Switches 855
Notes 855
Examples 856
Messages 857
See Also 857
PRINT 2.0 and later—External 857
Syntax 857
Parameters and Switches 857
Rules 858
Notes 859
Messages 859
See Also 860
PRINTER.SYS (device driver)3.3 to 5.0—External 860
Syntax 860
Parameters and Switches 860
Notes 861
Examples 862
See Also 862
PROMPT 2.0 and later—Internal 862
Syntax 862
Parameters and Switches 862
Notes 862
Examples 864
See Also 864
QBASIC 5.0 and later—External 864
Syntax 864
Parameters and Switches 864
Notes 865
QCONFIG 865
Syntax 865
Parameters and Switches 865
RAMBOOST 866
Syntax 866
Parameters and Switches 866
RAMBOOST.EXE 867
Syntax 867
Parameters and Switches 867
Notes 867
RAMDRIVE.SYS (device driver)3.2 and later—External 867
Syntax 867
Parameters and Switches 868
Notes 868
Special Edition Using MS-DOS 6.22, Third Editionxxiv
Examples 870
Messages 870
See Also 871
RAMSETUP 871
Syntax 871
Parameters and Switches 871
Notes 872
See Also 872
RD or RMDIR 2.0 and later—Internal 872
Syntax 872
Parameters and Switches 872
Notes 872
Messages 873
See Also 873
RECOVER 2.0–5.0—External 873
See Also 874
REM 1.0 and later—Internal 874
Syntax 874
Parameters and Switches 874
Notes 874
Examples 875
See Also 875
REMOVDRV 875
Syntax 875
Parameters and Switches 875
Notes 876
REN or RENAME 1.0 and later—Internal 876
Syntax 876
Parameters and Switches 876
Notes 876
Messages 876
See Also 876
RENDIR 877
Syntax 877
Parameters and Switches 877
REPLACE 3.2 and later—External 877
Syntax 877
Parameters and Switches 877
Exit Codes 878
Rules 878
Notes 878
Messages 879
See Also 880
REPORT 880
Syntax 880
Parameters and Switches 880
See Also 880
RESIZE 880
Syntax 880
Parameters and Switches 880
RESTORE 2.0 and later—External 881
Syntax 881
Parameters and Switches 881
Exit Codes 882
Rules 882
Notes 882
Messages 883
RMDIR (see RD) 884
SCANDISK 6.22—External 884
Syntax 884
Parameters and Switches 884
Exit Codes 886
Notes 886
Examples 887
Messages 888
See Also 888
SCANREG 888
Syntax 888
Parameters and Switches 888
Notes 889
SCHEDULE 889
Syntax 889
Parameters and Switches 889
See Also 890
xxvContents
SCREATE.SYS 890
Syntax 890
Parameters and Switches 890
See Also 890
SCRIPT 890
Syntax 891
Parameters and Switches 891
Notes 891
SDEFRAG 891
Syntax 891
Parameters and Switches 891
SDIR 892
Syntax 893
Parameters and Switches 893
See Also 894
SET 2.0 and later—Internal 894
Syntax 894
Parameters and Switches 894
Notes 894
Examples 896
Messages 897
See Also 897
SETUP (Stacker) 897
Syntax 897
Parameters and Switches 897
SETVER 5.0 and later—External 898
Syntax 898
Parameters and Switches 898
Exit Codes 899
Notes 899
Examples 901
Messages 901
See Also 903
SETVER.EXE (device driver)5.0 and later—External 904
Syntax 904
Parameters and Switches 904
Notes 904
Examples 906
Messages 906
See Also 906
SHARE 3.0 and later—External 906
Syntax 906
Parameters and Switches 906
Rules 906
Notes 907
See Also 907
SHELL= 2.0 and later—Internal 907
Syntax 908
Parameters and Switches 908
Notes 908
Examples 909
Messages 909
See Also 909
SHIFT 2.0 and later—Internal 910
Syntax 910
Notes 910
See Also 910
SIZER (see MEMMAKER) 910
See Also 910
SMARTDRV 6.0 and later—External 911
Syntax 911
Parameters and Switches 911
Notes 913
Examples 913
See Also 913
SMARTDRV.EXE (device driver)6.0 and later—External 914
Syntax 914
Parameters and Switches 914
Notes 914
Examples 914
See Also 914
SMARTMON 6.0 and later—Windows 914
See Also 915
SORT 2.0 and later—External 915
Syntax 915
Parameters and Switches 915
Notes 916
Examples 916
See Also 916
Special Edition Using MS-DOS 6.22, Third Editionxxvi
SSETUP 917
Syntax 917
Parameters and Switches 917
STAC 917
Syntax 917
Parameters and Switches 917
STACHIGH.SYS 917
Syntax 917
Parameters and Switches 917
STACKER 918
Syntax 918
Parameters and Switches 918
STACKS= 3.2 and later—Internal 918
Syntax 918
Parameters and Switches 918
Notes 919
Examples 919
Messages 919
SUBMENU= 6.0 and later—Internal 920
Syntax 920
Parameters and Switches 920
Notes 920
Examples 921
See Also 922
SUBST 3.1 and later—External 922
Syntax 922
Parameters and Switches 922
Notes 922
Messages 923
See Also 924
SWITCH 924
Syntax 924
Parameters and Switches 924
SWITCHES= 5.0 and later—Internal 924
Syntax 924
Parameters and Switches 924
Notes 924
Examples 926
Messages 926
See Also 926
SYS 1.0 and later—External 926
Syntax 927
Parameters and Switches 927
Notes 927
Messages 927
See Also 928
SYSINFO 928
Syntax 929
Parameters and Switches 929
TASKMGR 929
Syntax 929
Parameters and Switches 929
Notes 930
TIME 1.0 and later—Internal 930
Syntax 930
Parameters and Switches 930
Notes 930
See Also 931
TIMEOUT 931
Syntax 931
Parameters and Switches 931
See Also 931
TOUCH 931
Syntax 931
Parameters and Switches 931
TREE 2.0 and later—External 932
Syntax 932
Parameters and Switches 932
See Also 932
TUNER 933
Syntax 933
Parameters and Switches 933
TYPE 1.0 and later—Internal 933
Syntax 933
Parameters and Switches 933
Notes 933
Examples 934
See Also 934
xxviiContents
UMBCGA.SYS 934
Syntax 934
Parameters and Switches 934
Notes 934
UMBEMS.SYS 934
Syntax 934
Parameters and Switches 934
UMBHERC.SYS 935
Syntax 935
Parameters and Switches 935
Notes 935
UMBMONO.SYS 935
Syntax 935
Parameters and Switches 935
Notes 935
UNCOMP 936
Syntax 936
Parameters and Switches 936
UNDELETE 5.0 and later—External 936
Syntax 936
Parameters and Switches 936
Rules 938
Notes 938
Examples 939
See Also 939
UNFORMAT 5.0 and later—External 939
Syntax 939
Parameters and Switches 939
Rules 940
Notes 940
See Also 940
UNINSTALL 940
Syntax 941
Parameters and Switches 941
UNPACK2 941
Syntax 941
Parameters and Switches 941
Notes 941
UNSTACK 942
Syntax 942
Parameters and Switches 942
VER 2.0 and later—Internal 942
Syntax 942
Notes 942
Examples 942
See Also 943
VERIFY 2.0 and later—Internal 943
Syntax 943
Parameters and Switches 943
Notes 943
Examples 944
Messages 944
VFINTD.386 6.0 and later—Windows 944
Syntax 944
Parameters and Switches 944
Notes 945
Examples 945
VIEW 945
Syntax 945
Parameters and Switches 946
VOL 2.0 and later—Internal 946
Syntax 946
Parameters and Switches 946
Notes 946
Examples 946
Messages 947
See Also 947
VSAFE 6.0 and later—External 947
Syntax 947
Parameters and Switches 947
Rules 948
Notes 948
Examples 948
See Also 949
Special Edition Using MS-DOS 6.22, Third Editionxxviii
WINA20.386 5.0 and later—Windows 949
Syntax 949
Parameters and Switches 949
Notes 949
Examples 950
Messages 950
See Also 950
XCOPY 3.2 and later—External 950
Syntax 950
Parameters and Switches 950
Exit Codes 951
Rules 952
Notes 952
Messages 953
See Also 954
XCOPY32 954
XDEL 955
Syntax 955
Parameters and Switches 955
XDF 955
Syntax 955
Parameters and Switches 955
Notes 955
XDFCOPY 956
Syntax 956
Parameters and Switches 956
XDIR 956
Syntax 956
Parameters and Switches 956
See Also 957
Glossary 959
Index 965
xxixContents

About the AuthorJim Cooper is a Senior Systems Engineer currently working for a services and infrastruc-ture provider in Charlotte, North Carolina. He has worked in the information technologyfield for more than 12 years and holds numerous certifications, including MCSE+I andMCT. He has contributed chapters to numerous other books for Pearson TechnologyGroup.
Tell Us What You Think!As the reader of this book, you are our most important critic and commentator. We valueyour opinion and want to know what we’re doing right, what we could do better, what areasyou’d like to see us publish in, and any other words of wisdom you’re willing to pass our way.
As an Associate Publisher for Que, I welcome your comments. You can fax, e-mail, or writeme directly to let me know what you did or didn’t like about this book—as well as what wecan do to make our books stronger.
Please note that I cannot help you with technical problems related to the topic of this book, and thatdue to the high volume of mail I receive, I might not be able to reply to every message.
When you write, please be sure to include this book’s title and author as well as your nameand phone or fax number. I will carefully review your comments and share them with theauthor and editors who worked on the book.
Fax: 317-581-4666
E-Mail: [email protected]
Mail: Dean MillerQue201 West 103rd StreetIndianapolis, IN 46290 USA
In this introduction
Who Should Read This Book? 2
What Hardware Do You Need? 2
What Versions Are Covered? 2
What Is Not Covered? 3
How Is This Book Organized? 3
Conventions Used in This Book 7
INTRODUCTION
2 Introduction
After its introduction in 1981, MS-DOS was the most widely used operating system in theworld. Hundreds of thousands of programs have been written for MS-DOS.
Special Edition Using MS-DOS 6.22, Third Edition represents Que Corporation’s continuingcommitment to provide the best computer books in the industry. Over the years, this bookhas evolved as DOS has evolved, culminating in what you are reading right now. Keepingpace with technology and explaining it clearly, simply, and completely has been Que’s goal.This book, which is a comprehensive learning tool and reference volume for users of MS-DOS, reflects the maturity of DOS and the far-reaching impact that DOS has had onthe computing industry. Even the most popular operating system today, Windows95/98/ME, is still based on an upgraded version of DOS.
Special Edition Using MS-DOS 6.22, Third Edition offers DOS users a comprehensive sourceof information that can help them organize their work with the PC more effectively andmake their hardware respond more efficiently.
Who Should Read This Book?This book is written and organized to meet the needs of a large group of readers. It is suited for readers who have a basic familiarity with DOS but need more information toincrease their knowledge and sharpen their skills. Special Edition Using MS-DOS 6.22, ThirdEdition is also a comprehensive reference on DOS for the more advanced user.
Maybe you have just learned to use your PC and are looking to move beyond the basics.Perhaps you have upgraded your hardware to a more powerful PC, with more memory anddisk capacity. Or maybe you have upgraded your version of DOS and want to take advan-tage of its new or expanded features. If you find that you fit into any of these categories,this comprehensive edition is a “must have” volume.
What Hardware Do You Need?This book applies to the family of personal computers with Intel x86-based processors.There are literally thousands of manufacturers today making PCs, too numerous to listhere. MS-DOS will run on virtually any model available today, although you mightencounter problems locating drivers for newer hardware components, such as sound andnetwork cards.
What Versions Are Covered?We have discovered that the vast majority of readers are using MS-DOS version 6.x. Thisbook is focused on DOS version 6.22, although limited information is available for thoseusing an older DOS version. (The best advice we can offer is that you upgrade your system.If you are using a version of DOS older than 6.0, upgrade right away; you will find it wellworth the time and effort.) Throughout this book, specific versions of DOS are indicated.
3How Is This Book Organized?
When a particular reference applies to both DOS 6.0 and 6.22, however, the more genericDOS 6 designation is used.
What Is Not Covered?This book does not include the DEBUG or LINK commands, nor does it include a technicalreference to the applications programming interface that DOS provides for programmers.
For information on how to install or upgrade your version of DOS, you should refer to aseparate book—your MS-DOS manual. Special Edition Using MS-DOS 6.22, Third Editionassumes that you already have DOS installed and are using it.
Also not included in this book are computer-specific setup or configuration commands.Although these commands often are distributed with the same disks as DOS, they are toovariable to be covered adequately here. Your computer-supplied manual and your PC dealerare the best sources of information about these machine-specific features.
How Is This Book Organized?You can flip quickly through this book to get a feeling for its organization. Special EditionUsing MS-DOS 6.22, Third Edition approaches DOS in a logical, functionally defined way.The material in this book is arranged in four main parts and a set of appendixes that includea Command Reference, and a glossary.
Part I: DOS Fundamentals
Part I, “DOS Fundamentals,” is devoted to explaining the fundamental role of DOS in aworking PC:
■ Chapter 1, “DOS and the Personal Computer,” looks at today’s PCs. The chapterexplores the major components of the PC and addresses the use of system and periph-eral hardware. In this chapter, you get a feel not only for your system but also for sys-tems with different keyboards, displays, and peripherals. You also learn the role of DOSin relation to your system.
■ Chapter 2, “Starting DOS,” steps through the process of booting DOS and explainsimportant concepts along the way. You also learn how you can control the bootingprocess through setting up multiple configurations.
■ Chapter 3, “Using DOS Commands,” introduces and explains how to use DOS com-mands. You learn the concepts behind issuing commands at the DOS command line.The chapter explains syntax, parameters, and switches in an easy-to-learn fashion.Important keys and various examples of the DOS command are also covered, alongwith information on how to access the DOS built-in help system.
4 Introduction
■ Chapter 4, “Using the DOS Shell,” gets you up and running with the DOS Shell. Thischapter explores the DOS Shell screen and discusses aspects of the Shell common to allits commands.
Part II: Files and Directories
Part II, “Files and Directories,” covers everything you need to know about the heart ofDOS—working with disks and the files stored on them:
■ Chapter 5, “Understanding Files and Directories,” recognizes the important job DOSperforms in managing your files. This chapter defines files and clearly explains file-naming conventions. Also explored is the tree-structured directory system used byDOS to organize your files. You learn how to use commands that create, change,remove, and display directories.
■ Chapter 6, “Understanding Disks and Disk Drives,” provides the framework you needto better understand how DOS stores information on your disk. You discover whatdisks are, how information is recorded on them, and some of the technological issuesrelated to disks. Additionally, you explore the use of DoubleSpace, the DOS programthat enables you to virtually double the amount of information you can store on yourdisk drives.
■ Chapter 7, “Preparing and Maintaining Disks,” builds on the information presented inChapter 6. Here, you learn what formatting does and how DOS uses formatted disks tostore your files. This chapter describes SMARTDrive, a disk cache that increases thespeed with which you can access data on your hard disk, and Microsoft Defrag, a utilitythat keeps your files in proper order. You also learn how to partition a hard disk intosections that DOS can use as logical disks. Also presented are two DOS commands,CHKDSK and SCANDISK, that analyze disks for damage.
■ Chapter 8, “Managing Your Files,” is devoted to managing your files and illuminatingthe file-level DOS commands. Here, you learn how to examine directory listings, viewthe contents of files, and use the INTERLNK program to transfer files between a laptopand your desktop computer. Because you probably spend most of your time with DOSworking with files, this chapter also offers an in-depth view of the file-level commands.Each command includes examples that help you appreciate the full power of theseimportant commands.
■ Chapter 9, “Protecting and Recovering Your Data,” covers the important issuesinvolved with safeguarding the most important part of your computer system—yourcomputer data. You learn common-sense solutions to data protection, as well as how touse the backup programs supplied with DOS. This chapter also discusses how you canrecover from catastrophic errors or events. You learn how to undelete files, unformat adrive, and recover data on your hard disk. When you find yourself in a situation thatrequires this information, you’ll probably agree that this chapter alone is worth theprice of this book. Finally, this chapter also discusses computer viruses and how to pro-tect your computer against them.
5How Is This Book Organized?
Part III: Controlling DOS
Part III, “Controlling DOS,” covers the DOS commands and concepts that enable you tochange how DOS does its work. The information covered in Part III lets you use DOSeffectively to reflect the way you do your work:
■ Chapter 10, “Working with System Information,” covers the commands that set andretrieve system information in your DOS-based computer. These commands often areneglected, but they key you into the control panel of DOS. These commands are help-ful whether you oversee one PC or help other users with their PCs.
■ Chapter 11, “Controlling Your Environment,” discusses how you can set system vari-ables and change the DOS prompt. You also learn how you can use the MODE commandto change how DOS displays information on your screen, as well as how you can useDOS to change your disk drive configuration.
■ Chapter 12, “Using Peripherals,” explains device drivers and covers what you need toknow to correctly install them. You learn how to set hardware interrupts and what thedifference is between hardware and software interrupts.
■ Chapter 13, “Controlling Devices,” explains the DOS commands that control thebehavior of logical DOS devices. By using these commands, you can control the wayDOS sees your system’s drives and directories. You learn how to use your printer whiledoing other computer work, and you see how to use the DOS pipes and filters effec-tively.
■ Chapter 14, “Understanding the International Features of DOS,” steps you throughthe complicated, but sometimes necessary, configuration of a PC to various internation-al language standards.
Part IV: Maximizing DOS
Part IV, “Maximizing DOS,” provides the information you need to tap the expanded poweravailable with DOS. This part of the book helps you use the many features provided withDOS and helps you customize your computer system:
■ Chapter 15, “Using the DOS Editor,” provides a tutorial approach to the built-in text-file editor that comes with DOS. The examples developed in this chapter show youhow to use the DOS Editor as a day-to-day utility. With the careful attention given tothe Editor’s practical use, you learn the skills needed to quickly compose a text file.Practical examples, using the DOS Editor to create memos and batch files, also are pre-sented.
■ Chapter 16, “Understanding Batch Files,” guides you through the process of creatingbatch files and keystroke macros. The commands related to batch files are explained ina tutorial style. Useful examples make it easier to master the basics of batch files.
■ Chapter 17, “Understanding ANSI.SYS,” shows you how to make DOS screens look col-orful and controlled. The details of the ANSI.SYS driver are presented in workshopfashion. You learn how to reassign keys, control the cursor’s position onscreen, display
6 Introduction
the date and time, and more. This chapter also describes the ANSI commands that youcan use with the ANSI.SYS device driver provided by DOS. ANSI commands enable you tocontrol how information is displayed on your screen.
■ Chapter 18, “Mastering DOSKEY and Macros,” covers an alternative to batch files.You can use the DOSKEY program to create simple macros that quickly accomplish a series of tasks. You learn how to use DOSKEY to make entering DOS commandseasier and faster, as well as how to record commonly used commands as macros.
■ Chapter 19, “Configuring Your Computer,” is a comprehensive collection of DOScommands and directives that can help you get the best performance from your PC. In this chapter, you learn to use Microsoft MemMaker, a utility that automatically andoptimally configures the way your PC uses RAM. You also learn how to set up yourCONFIG.SYS and AUTOEXEC.BAT files to provide the best overall system configuration.
■ Chapter 20, “Networking DOS,” discusses the Novell and Microsoft clients for DOSand shows you how to install and configure each. You also learn how to identify and fixvarious common network problems.
■ Chapter 21, “Connecting to the Internet,” covers your options for connecting to theInternet and explains the fundamentals of shell accounts. You learn how to use Telnetand FTP to download files and how to troubleshoot problems you might encounterwith these tools.
■ Chapter 22, “Third-Party Utilities,” covers the basics of freeware, shareware, anddemoware and shows you how you can enhance your computer with this class of soft-ware. You learn about several powerful shareware utility programs that can help you getthe most out of your DOS system.
Appendixes
Special Edition Using MS-DOS 6.22, Third Edition, also includes seven appendixes containinguseful information:
■ Appendix A, “Files Supplied with MS-DOS 6.22,” lists the files that are provided withMS-DOS 6.22 and includes a brief description of what each file is used for. The infor-mation in this appendix can help you determine whether you can safely remove some ofthe files installed by DOS.
■ Appendix B, “DOS Environment Variables,” describes the environment variables usedby DOS and its utility programs, which you can use to control the way DOS operateson your computer.
■ Appendix C, “DOS Messages,” lists and explains screen messages you might see whileyou are using DOS.
■ Appendix D, “DOS and DOS Utility Programs’ Keyboard Commands,” lists the vari-ous keyboard commands available at the DOS prompt or when you are using utilityprograms such as EDIT and DOSSHELL.
7Conventions Used in This Book
■ Appendix E, “ASCII and Extended ASCII Codes,” This appendix lists the 256 charac-ters defined by the American Standard Code for Information Interchange (ASCII),which is the character set that DOS uses on PC-compatible computers.
■ Appendix F, “Command Reference,” lists in alphabetical order all the commands thatDOS provides for use at the DOS prompt or in your CONFIG.SYS file. For each com-mand, the purpose, proper syntax, and notes concerning its use are provided. In manycases, examples and error messages are included to help you use the command correct-ly. If you are unsure of how to use a particular DOS command, or if you would like toknow more about it, check the entry for the command in this section. The “CommandReference” is a complete, easy-to-use, quickly accessed resource on the proper use ofDOS commands.
■ This book wraps up with Appendix G, “Glossary” which offers definitions for many ofthe new terms you were introduced to in this book.
Conventions Used in This BookCertain conventions are followed in this edition to help you more easily understand the dis-cussions:
■ UPPERCASE letters are used to distinguish filenames and DOS commands. Pleasenote, however, that although uppercase letters are used in the examples, you can typecommands in either upper- or lowercase letters.
■ In most cases, keys are represented as they appear on your keyboard, and key combina-tions are connected by plus signs. For example, Ctrl+Break indicates that you press andhold the Ctrl key while you press the Break key. Other key combinations, such asCtrl+Z or Alt+F1, are activated in the same manner.
■ Words or phrases defined for the first time appear in italic.
■ Words or phrases that you are asked to type appear in monospace. Screen displays andonscreen messages also appear in a special monospace typeface.
■ Throughout the chapters of this book, syntax lines appear in monospace type and usethe conventions shown in the following example:dc:pathc\CHKDSK filename.ext /V /F /?
In any syntax line, not all elements can be represented in a literal manner. For example,filename.ext can represent any filename with any extension. It also can represent anyfilename with no extension at all. However, command names (such as CHKDSK) andswitches (such as /V, /F, and /?) are represented in a literal way.
To activate the command CHKDSK.EXE, you first must type the command name CHKDSK.Any literal text (text you type letter for letter) in a syntax line appears in UPPERCASEletters. Any variable text (text that acts as a placeholder for other text) is shown in lowercase italic letters.

8 Introduction
The conventions used for syntax lines in the “Command Reference” are slightly differentfrom those used in the chapters of this book. Refer to the section “The Conventions Usedin This Command Reference” near the beginning of Appendix F for more information onhow syntax lines are presented in that section.
DOS Fundamentals
1 DOS and the Personal Computer 11
2 Starting DOS 23
3 Using DOS Commands 41
4 Using the DOS Shell 57
IPART

DOS and the Personal Computer
In this chapter
DOS, Windows, and the PC 12
Other Flavors of DOS 12
PC Hardware 12
What Happens When the Power Is Turned On? 15
DOS and Random Access Memory 17
DOS and Disks 20
1CHAPTER
12 Chapter 1 DOS and the Personal Computer
DOS, Windows, and the PCYou might find it hard to believe, but the personal computer is now more than 20 years old,and so is the MS-DOS operating system. At one time, more than 95% of all the tens of mil-lions of personal computers sold used MS-DOS as the operating system. Nowadays, almostall systems use a variation of the Windows operating system, although DOS compatibility isstill provided through DOS subsystems. Previously, in Windows 95/98, you could boot intoan MS-DOS command prompt, bypassing the Windows user interface. With the release ofWindows ME, this capability is no longer available.
The objective of this chapter is to familiarize those of you who are less experienced comput-er users with the inner workings of your system. If you are an old hand and already familiarwith the way your computer and DOS interact, you might want to skim through this chap-ter on your way to Chapter 2, “Starting DOS.”
For those readers who have been using computers only a short time or who have neverchecked out the inner workings of a PC, this chapter provides a quick introduction thatgives you the basics. Knowing this information enables you to better exploit the features ofDOS and gives you more control over your computing environment.
Other Flavors of DOSAlthough MS-DOS is by far the most prevalent variant of the DOS family, one other ver-sion from IBM needs to be mentioned. Now that Microsoft has quit developing MS-DOSas a standalone product, this version is the only alternative for someone wanting new andadvanced features of the operating system.
IBM has continued to develop the initial DOS product since its inception. It has releasedupgraded versions containing many of the same features of the upgraded MS-DOS versions.
The latest version is called PC DOS 2000. Some of the new features include Y2K compli-ance, support for the REXX programming language, PCMCIA cards, unattended schedul-ing, and remote installation.
PC HardwareIn 1981, IBM introduced the IBM PC, which became the worldwide standard for personalcomputers. This standard endures to this day—even through all the subsequent upgrades intechnology.
In the early 1980s, IBM manufactured and sold more than half of all the personal computerssold. As the decade wore on, however, IBM’s grip on computer sales weakened and scores ofmanufacturers introduced models of their own. All these manufacturers adopted the basichardware architecture that made the original IBM computers a de facto standard.
13PC Hardware
The PC Architecture
The heart and soul of any personal computer is its central processing unit (CPU). The CPU isa microprocessor chip capable of receiving input, processing data, and producing the resultsas output. DOS-compatible personal computers have long been based on the Intel family ofmicroprocessors and their clones.
Everything in your computer is designed around the needs of the CPU. The CPU isplugged or soldered into the main circuit board of your system, which is where the termmotherboard comes from. The motherboard also contains the core group of componentsneeded to build a complete computer system.
The CPU communicates to the rest of the system via the system bus. The system bus pro-vides a communications highway where the CPU can “talk to” memory chips, as well as toperipheral devices installed in the expansion slots along the bus.
1
IPart
Ch
The word peripheral comes from the Greek language and means around the center. As itis used in computer jargon today, a peripheral is any device that is connected to your com-puter’s CPU, either by an expansion slot card or plugged into a port.
In your system, DOS plays the role of the traffic cop, organizing the flow of data in thecomputer and offering services that programs can use. DOS directs the activities of yoursystem’s CPU and helps the CPU to communicate instructions and receive informationfrom other parts of the system. In other words, DOS makes all the separate componentsinside your computer system work together as if they were all one single machine.
When you install a video card or a modem into an expansion slot in your computer, it mustconform to certain standards. These standards ensure that both DOS and the CPU knowhow to interface with the device.
It is not unusual for some peripheral devices, such as parallel and serial communicationsports, to be built directly onto the motherboard of the computer. These devices also mustconform to the standards that allow DOS and the CPU to control them.
Computer Memory
To perform operations, your computer uses binary numbers to represent both data and pro-gram instructions. Binary numbers use the binary digits 0 and 1 in various combinations torepresent everything you do with your computer. Binary digits are usually called bits, whichis an abbreviation of binary digits.
Computer memory is nothing more than thousands—or millions—of individual switchesthat can have one of two states: on or off. The binary digit 0 represents off, whereas 1 rep-resents the on condition. Eight bits arranged together form a byte; the arrangement of bitswithin the byte can produce one of 256 (2
8) possible values.
14 Chapter 1 DOS and the Personal Computer
Each one of the 256 possible values of a byte is arranged into an extension of the ASCII(American Standard Code for Information Interchange) code. The original ASCII code usedseven bits to represent 128 different characters. After the eighth bit was added, ASCII couldrepresent up to 256 characters. Officially, this set is called the PC 8 Symbol Set but has cometo be known—somewhat inaccurately—by computerists all over the world as the ASCIIExtended character set.
The first 32 ASCII codes represent common commands used by the CPU and peripheralsfor such activities as making the speaker beep, telling a printer to use compressed print, con-trolling data transmissions, and so on. The rest of the ASCII codes represent letters, numer-als, and graphic characters. Therefore, a method is needed to store this information andmake it available to the CPU.
To store information, your computer typically uses three kinds of memory:
■ Random access memory (RAM)
■ Read-only memory (ROM)
■ Disk-based storage
Each type of memory plays a different role in your system.
Random access memory, or RAM for short, is a volatile form of memory. Volatile means thatit can hold information only when electrically powered. If you turn off the power, all theinformation stored in RAM chips is lost. Think of RAM as an electronic chalkboard whereinformation can be written and erased at will. When you turn off the computer, RAM iserased automatically. As you will see later in this chapter, RAM is broken down into threecategories, determined by the way the computer addresses memory.
Read-only memory, or ROM for short, is a close cousin to RAM, with one important excep-tion: The information stored on ROM is nonvolatile. ROM information is permanentlyrecorded on the circuits of the chip during manufacturing and cannot be erased. When youturn off the computer’s power, this information is not lost. When you turn the computer onagain, the information stored in ROM is once again available to the CPU and to DOS. Yourcomputer uses ROM to store instructions and programming, as you will see later in thischapter.
The third type of computer memory is disk storage. If you have the typical computer sys-tem, you can use both floppy disks and a hard disk (often called a hard drive) to store infor-mation while the computer is turned off. Disk storage uses metal or plastic disks coated witha magnetic material to record and play back information in much the same way as a stereosystem uses magnetic tapes to record and play back music. Disk storage comes in a some-times bewildering array of formats. Later in this chapter, you will find the information youneed to demystify disk storage.
Peripheral Devices
Although you might think of your computer system as a single machine, it actually is madeup of many discrete peripheral devices. Strictly speaking, your computer is the CPU and its
15What Happens When the Power Is Turned On?
attached RAM. By themselves, the CPU and RAM can do nothing useful because there is noway to provide input for the CPU to work with, and no way for the CPU to provide outputin a form you can understand and use. Without peripheral devices, a computer is worthless.Without an operating system such as DOS, your computer would be the modern equivalentof the Tower of Babel.
Every part of your computer except the CPU and memory is a peripheral device. Key-boards, disk drives, printers, and monitors are all examples of peripheral devices. One of themost basic jobs DOS performs for you is to provide the standards and programming neces-sary to add peripheral devices to your system so that you can get some work done.
Back in the wild and woolly days of personal computers, before the IBM PC, each computermaker employed its own standards and peripheral devices. If you had an Apple II computer,you couldn’t share disks with anyone who didn’t have an Apple II. If the keyboard for yourTRS-80 broke, you couldn’t replace it with a keyboard from any other type of machine.Worst of all, if you went from an Apple II to another kind of computer, you had to learn a whole new set of commands.
One of the ancestors of DOS was an operating system called CP/M (Control Program forMicrocomputers). CP/M standardized the commands necessary for using a computer, manyof which are still used in DOS, but each different computer manufacturer still used differentstandards for peripheral devices and disk formats. According to legend, IBM investigatedusing CP/M as its operating system for the first PCs. As the rumor goes, there were differ-ences in time frames, engineering, and personalities, so IBM turned to a small upstart com-pany called Microsoft. If things had gone differently, this book might have been titled SpecialEdition Using CP/M!
The simultaneous introduction of the IBM Personal Computer and DOS changed the com-puting world forever. For the first time, because of standardization, users could walk into acomputer store and buy disk drives, video cards, keyboards, and other peripherals made byother companies to put into their IBM or compatible computers.
Peripherals that are sold today for personal computers adhere to two standards: hardwareand software. The hardware standards ensure that peripherals can fit into your system with-out doing damage and that they can communicate with the CPU. The software standardsimposed by DOS ensure that the peripheral becomes an integral, functioning part of yourcomputer system.
What Happens When the Power Is Turned On?When you flip the power switch on your computer system, you set into motion a series ofsteps that must occur before you can see the DOS prompt, which signals that your comput-er is ready for use. No doubt you have seen these steps performed, possibly without realiz-ing their significance. This set of steps is called booting the computer. This phrase refers to theold saying “pull yourself up by the bootstraps,” meaning to make something of yourselffrom nothing. That’s exactly what booting does; it makes that expensive paperweight onyour desk into a fully functional computer.
1
IPart
Ch
16 Chapter 1 DOS and the Personal Computer
The first of these steps is the activation of the Power On Self Test (POST). The Power OnSelf Test is a program that has been recorded on a ROM chip located on the motherboardof your system. This program gets the ball rolling. First, it loads instructions into RAM forthe CPU to follow. These instructions tell the computer to perform a quick self-diagnosticcheck of the hardware. One of the first things you see when you turn on the computer,therefore, is the system counting and testing the installed RAM.
Next, the POST checks to see that the system setup is still valid. Your system contains aspecial kind of chip called a Complementary Metal-Oxide Semiconductor, or CMOS, thatstores information about your system’s configuration. CMOS chips are used because theyneed only a trickle of power, which can be supplied by a battery, to retain the stored infor-mation for several years. Your system’s date and time settings are stored on this chip, alongwith information about installed floppy disk drives, hard disk configuration, and other sys-tem configuration information that can vary from manufacturer to manufacturer. If the system setup is okay, the POST passes on to the next step: loading the operating system.
When the self test is satisfied that everything about your system is in order, it is time to loadDOS using another program found on your system’s ROM chips—the bootstrap loader.This program’s job is simple and to the point: Find the operating system’s loader on the diskand make it run. By default, the first place it searches is drive A, to see whether you have abootable floppy disk inserted into the drive. If the program fails to find a disk in drive A, itnext looks to your hard disk. When the loader finds a valid operating system (in this caseDOS), it starts the program found on the boot sectors of the disk. Most computers todaywill allow you to specify in the BIOS where you want the computer to look for the operat-ing system loader—for example, going straight to the hard drive and bypassing searchingthe floppy drive.
Completely describing all the steps involved in booting DOS might take several pages andbore you to tears, so the following description is somewhat simplified. When the ROMbootstrap loader finds a disk with a bootable copy of DOS, it transfers control to that disk’sboot sectors, where the DOS loading program takes over.
The first file loaded is IO.SYS. IO.SYS places into memory the basic input/output servicesDOS provides. After this file is loaded, the second file, MSDOS.SYS, is loaded. Between thesetwo files, DOS sets up the many services it offers to programs, such as file handling, printerhandling, and so on.
IO.SYS and MSDOS.SYSIf you look at a directory of your boot disk, you normally do not see the IO.SYS and MSDOS.SYS files listed.Both of these files have the hidden attribute, which prevents the DIR command from listing them in the directory.
Also, because hardware manufacturers sometimes alter portions of DOS to meet specific hardware needs,these files might have slightly different names. IBMIO.SYS and IBMDOS.SYS are common variations, forexample.
17DOS and Random Access Memory
MSDOS.SYS completes the foundation for providing DOS services to your system. After it is loaded, it checks the disk’s boot directory (normally C:\) to see whether a file named CONFIG.SYS is present. If this file is found, it is loaded into memory, converted to all upper-case letters, and interpreted. Each line of CONFIG.SYS specifies some type of configurationinformation, such as a device driver to be loaded or a system setting to be made. After thesesettings are established, COMMAND.COM is loaded.
COMMAND.COM is the user interface to DOS. Its job is to evaluate whether commands present-ed to DOS from the keyboard or from batch files are legal. If the commands are legal, theyare run. If a command is not legal, COMMAND.COM is responsible for issuing one of those errormessages that can prove so frustrating to new users.
Just before COMMAND.COM turns the computer over to you, the user, it checks to see whether afile called AUTOEXEC.BAT is present in the boot directory. AUTOEXEC.BAT is a standard batchfile that usually contains commands to customize your DOS installation. The only thingspecial about AUTOEXEC.BAT is that it gets run automatically during bootup.
DOS and Random Access MemoryTo understand the memory issues that surround DOS and your computer system, you firstneed to know a bit of history. When Intel designed the 8088 and 8086 processors on whichthe first generation of DOS computers (PCs and XTs) was based, Intel thought that no userwould ever need more than one megabyte (1MB) of memory. Most of the computers then inuse had only 64 kilobytes (64KB) of memory, so this speculation might have been reasonableat the time. The problem is that this speculation was wrong—very wrong.
Real Mode Versus Protected ModeWhen Intel developed the 80286 processor, it created a new mode of operation that allowed the CPU toaddress memory of more than 1MB. Additionally, more than one program could run at the same time, witheach program protected from the actions of other programs. This mode of operation was called protectedmode.
To differentiate this new capability from the limited capabilities of the 8088 and 8086 processors, the term realmode was coined. Not until the release of the 80386 generation of processors did protected mode softwarebegin to appear.
Shortly after the release of the IBM PC, Lotus released a hot new spreadsheet programcalled 1-2-3. Soon businesses were buying PCs by the carload just to run Lotus 1-2-3. Itwasn’t long before users found they could build large spreadsheets that exceeded the memo-ry limits of their computers.
A few years later, IBM introduced the PC-AT, based on Intel’s 80286 processor. The AT’sprocessor was faster than those used in PC and XT machines, and it had the capability to access up to 16MB of memory using a new processor feature called protected mode.Unfortunately, DOS was never enhanced to take advantage of this capability, so softwaredevelopers never used the full capabilities of the 80286 chip. Many ATs lived and died without ever running protected-mode software.
1
IPart
Ch
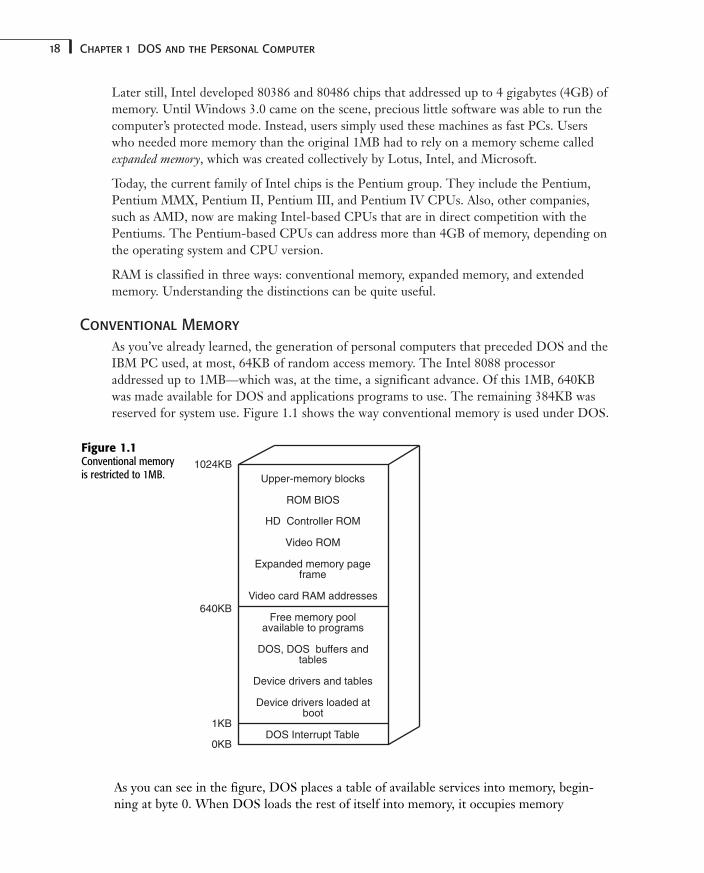
18 Chapter 1 DOS and the Personal Computer
Later still, Intel developed 80386 and 80486 chips that addressed up to 4 gigabytes (4GB) ofmemory. Until Windows 3.0 came on the scene, precious little software was able to run thecomputer’s protected mode. Instead, users simply used these machines as fast PCs. Userswho needed more memory than the original 1MB had to rely on a memory scheme calledexpanded memory, which was created collectively by Lotus, Intel, and Microsoft.
Today, the current family of Intel chips is the Pentium group. They include the Pentium,Pentium MMX, Pentium II, Pentium III, and Pentium IV CPUs. Also, other companies,such as AMD, now are making Intel-based CPUs that are in direct competition with thePentiums. The Pentium-based CPUs can address more than 4GB of memory, depending onthe operating system and CPU version.
RAM is classified in three ways: conventional memory, expanded memory, and extendedmemory. Understanding the distinctions can be quite useful.
Conventional Memory
As you’ve already learned, the generation of personal computers that preceded DOS and theIBM PC used, at most, 64KB of random access memory. The Intel 8088 processoraddressed up to 1MB—which was, at the time, a significant advance. Of this 1MB, 640KBwas made available for DOS and applications programs to use. The remaining 384KB wasreserved for system use. Figure 1.1 shows the way conventional memory is used under DOS.
Figure 1.1Conventional memoryis restricted to 1MB. Upper-memory blocks
ROM BIOS
HD Controller ROM
Video ROM
Expanded memory page frame
Video card RAM addresses
Free memory pool available to programs
DOS, DOS buffers and tables
Device drivers and tables
Device drivers loaded at boot
DOS Interrupt Table0KB
1KB
640KB
1024KB
As you can see in the figure, DOS places a table of available services into memory, begin-ning at byte 0. When DOS loads the rest of itself into memory, it occupies memory
19DOS and Random Access Memory
addresses beginning at 1KB. The space from 1KB to 640KB is reserved for DOS and what-ever programs you might run. Addresses of more than 640KB (the infamous 640KB barrier)are reserved for addresses for ROMs and for accessing video card memory.
In DOS, memory addresses use a segment:offset notation to pinpoint an exact location wheredata or program instructions can be stored. These address locations are always specifiedusing the hexadecimal number system. Each segment is 64KB in length, but each segmentbegins only 16 bytes up from its neighbor. The offset portion of the address specifies howmany bytes the address is from the beginning of the segment.
Programmers soon discovered that an extra block of usable memory can be gained by speci-fying the last possible segment in the 1MB area in the segment portion of the address.Using this trick opens up an extra 64KB (minus the 16 bytes that fall below the 1MB line) of memory, more than 1MB that can be addressed without sending DOS and the processorinto never-never land. Thus, the high memory area was born.
This newly discovered high memory area was almost immediately grabbed by networkdesigners. They saw this area as a safe place to put their data buffers, which didn’t takeRAM away from running programs that were already beginning to feel the squeeze of the640KB barrier.
Beginning with the release of DOS 5.0, users could employ unused addresses between640KB and 1MB to run DOS, programs, and device drivers by using HIMEM.SYS andEMM386.EXE to make this space available. You use the LOADHIGH and DEVICEHIGH DOS com-mands to place programs, device drivers, and even portions of DOS itself into the uppermemory area.
➔ For more information about using upper memory blocks, see Chapter 19, “Configuring Your Computer,”p. 441.
Expanded Memory
When Lotus 1-2-3 users and others began demanding a way to access more than the 640KBmemory provided by the conventional memory scheme, Lotus, Intel, and Microsoft workedtogether to come up with the Expanded Memory Specification (EMS), also known as theLIM 3.2 specification. This specification was adopted before the Intel 80286 processor hitthe market. EMS was an immediate hit, which in part accounts for the fact that few softwarecompanies even tried to exploit the enhanced memory addressing capabilities of the 80286processor. Programs that needed more than 640KB memory could easily be modified toadhere to the EMS system, so there was no great push for DOS to use the chip’s protectedmode, which could address up to 16MB of RAM.
The Expanded Memory Specification makes more memory available to processors runningin real mode, the name given to the mode of operation that mimics the original 8088 proces-sor used in PCs and XTs. The LIM specifications reserve a 64KB area of memory in theupper memory block (the area between 640KB and 1MB) for use as a page frame.
Shortly after the EMS specification was adopted, several companies—including ASTResearch, at the time the largest seller of add-on memory boards—came up with an
1
IPart
Ch
20 Chapter 1 DOS and the Personal Computer
Enhanced Expanded Memory Specification (EEMS). This new expanded memory schemeused a backfilling technique that eliminated the need for the page frame in upper memoryand allowed expanded memory to reside inside the 640KB range. In fact, some early EEMSproducts required users to remove any RAM in their system above the 256KB mark, whichprovided 384KB of expanded RAM to be situated within conventional memory addresses.
The Expanded Memory Specification has always been, and will always be, a kludge. Lifetoday would be much simpler for those folks who support computer users if the hardwareand software manufacturers had taken a “bite-the-bullet” attitude when the 80286 processorbecame available and built systems to use extended memory.
The DOS Expanded Memory Manager (EMM386) made old-fashioned EMS boards obsoletebecause it simulated expanded memory using the extended memory.
Extended Memory
The Extended Memory Specification (XMS) is a simpler way of making memory addressesof more than 1MB available to your programs. Extended memory is simply an extension ofconventional memory addresses. The 384KB system memory area is still present underXMS, so programs can use the conventional 640KB memory area and addresses greater than 1MB.
To implement extended memory, the protected mode operations of the processor (80286,80386, 80486, or higher) are turned on. DOS accomplishes this task by loading HIMEM.SYSat bootup from the CONFIG.SYS file. HIMEM, which is an extended memory manager, enablesDOS to address memory above the conventional 1MB mark.
Few DOS programs take advantage of the availability of extended memory. Windows andWindows programs, however, routinely use extended memory.
DOS and DisksRAM is volatile storage. As soon as the power goes off, RAM goes to sleep. ROM provides a permanent storage medium, but you can’t write files to ROM. What is needed is a thirdmethod of storing data and programs. DOS stands for disk operating system, so if you get thenotion that disks are used for permanent storage of data and programs, give yourself theafternoon off.
One of the major functions of DOS is to facilitate the reading and writing of data stored ondisks. Disks are circular platters of plastic or metal coated with a magnetic emulsion similarto that used to produce cassette or video tapes.
By offering standardized disk services, DOS saves programmers countless hours of workbecause their programs can simply ask DOS to read or write a disk. The programmer isspared the task of writing code to store data. These DOS file services also provide an addedbenefit to computer users: Because DOS takes care of placing files onto disks, any file creat-ed by a DOS program can reside on the same disk as any other DOS file.
21DOS and Disks
When a program writes to a disk, DOS ensures that the data is stored as a named collectionof information called a file. DOS rules determine naming conventions. A legal DOS file-name can be from one to eight characters, followed by an optional period and a one- tothree-character extension. A filename’s extension is most often used to indicate the type offile being stored.
1
IPart
Ch
In the case of Windows 95/98/ME, you can use long filenames in Windows, but when youare looking at the files from DOS, the filenames are shortened to the standard 8.3 format.The name is shortened by taking the first six characters of the filename and then adding atilde (~) followed by an incrementing value, starting with 1.
Windows NT/2000 shows the long filename for files and directories in the commandprompt window.
For more information on this and other DOS file operations, see Chapter 8, “ManagingYour Files.”
Floppy disks are wafer-thin plastic disks coated with a magnetic emulsion and encased with-in a protective sleeve. The original IBM PC used floppy disks measuring 5 1/4 inchesacross. Today, 3 1/2-inch floppies have become the industry standard. The advantages ofthe 3 1/2-inch format are the greater data density (the disks hold considerably more infor-mation than the physically larger 5 1/4-inch disks) and the hard plastic sleeve that betterprotects the disks from damage.
Floppy disks are most commonly used to store data to be archived or transferred to anothercomputer. The biggest disadvantages of floppy disks are that reading and writing on flop-pies is relatively slow, and they do not hold enough information to accommodate today’slarger programs and data files.
Hard disks are nonremovable, high-capacity, rigid platters sealed inside a dust-free casing.For increased storage capacity, several platters can be stacked within a single hard disk drivewhere multiple pickup heads are used to read and write the stored information. You canfind more detailed information about magnetic disks in Chapter 7, “Preparing andMaintaining Disks.”
Another storage technology finding wider use today is removable media. This technologyuses cartridges that can hold anywhere from 100MB to 2GB of data. The most popularbrand is Iomega, with the Zip (100MB–250MB) and Jaz (1GB–2GB) disks and drives.Another newer option is the LS-120 floppy disk, which uses a special 3 1/2-inch floppy diskand drive and can hold up to 120MB of data. The best thing about this solution is that theLS-120 drive can still read standard floppies, which eliminates the need for an additionaldrive.


Starting DOSIn this chapter
Booting Your Computer 24
System Configuration 26
Creating Multiple Configurations 32
Project: Controlling the Boot Process 38
2CHAPTER
24 Chapter 2 Starting DOS
Booting Your ComputerIn Chapter 1, “DOS and the Personal Computer,” you read a description of the steps takenwhen you boot up your computer. In fact, two types of booting are available. The first isknown as a cold boot. This term comes from the fact that the computer’s power is off and theunit is not yet warm. As you might guess, the second type of boot is the warm boot.
A cold boot occurs when you turn on the power switch to your system. Some systems alsohave a reset button. Pressing this button also triggers a cold boot. The difference between a cold and warm boot is simple. A cold boot begins at the absolute beginning, using thePower On Self Test (POST) to check the condition of the system’s major components and RAM.
A warm boot, on the other hand, bypasses the preliminary self test, moving directly to theloading of the operating system. A warm boot is triggered when you press the Ctrl+Alt+Delkeys all at the same time. This combination of keys was chosen because on most keyboardsit is almost impossible to press these three keys simultaneously by accident.
Although the general population might believe differently, computer users have a tremen-dous sense of humor. This sense of humor has introduced two slang terms to distinguishbetween cold and warm boots. Because early PCs had a large red power switch on the sideof the case, cold booting has been dubbed “Big Red Button Time,” or BRB for short. A BRBis usually necessary only when your system is so thoroughly hung up and confused that itfails to respond to the Ctrl+Alt+Del key combination. Pressing these three keys normallytriggers a warm boot, so some anonymous wag named a warm boot “the three-fingersalute.”
Using the Ctrl+Alt+Del combination for a warm reboot works only when you are bootedstraight into DOS. If you are using Windows 9x, using Ctrl+Alt+Del first brings up a task list.From there, you have the option of shutting down or canceling. Microsoft provided thisextra step to encourage users to shut down Windows instead of just warm-booting themachine.
The net effect of either a cold or warm boot is to wipe the slate clean and start the computer out fresh. Being the sophisticated computer user that you are, of course, youshould realize that rebooting the computer on a whim could be a dangerous proposition.Triggering a boot when a file is open and you’re in the process of editing can cause you tolose valuable data because you don’t have an opportunity to save the file to disk before theboot takes place.
Understanding the Boot Disk
In the preceding chapter, you learned that during the booting process three files are loaded into memory: IO.SYS, MSDOS.SYS, and COMMAND.COM. You also learned that two other
25Booting Your Computer
files—CONFIG.SYS and AUTOEXEC.BAT—are used in the boot process as well. The reason forcalling this information to your attention again is to point out that DOS is not a monolithiccreation. Rather, DOS is composed of many modular components working together.
DOS is not, however, a mind reader, so you are required to specially prepare bootable diskscapable of starting your computer. You can create bootable disks in two ways: You can usethe FORMAT command, with the /S switch, or you can use the SYS command.
When you use the FORMAT command to create a bootable disk, using the /S switch causes thenewly formatted disk to contain the disk portion of the bootstrap loader in the boot sector,IO.SYS, MSDOS.SYS, and COMMAND.COM. If any of these four conditions is not satisfied, you can-not use the disk to start DOS.
Using the SYS command to make a disk bootable requires you to know a few undocumentedfacts about the way boot disks are constructed. For a disk to be bootable, the following con-ditions must be met:
■ IO.SYS must be the first directory entry in the root directory of the disk.
■ MSDOS.SYS must be the second entry in the root directory.
■ IO.SYS must be the first physical file on the disk.
Knowing these three rules, you now can understand more readily why the SYS command sooften reports the No Room for System on Destination Disk error message even though thedisk has plenty of free space. If files already are written on the disk, chances are that the firstdirectory entry in the root is taken.
Many years ago, when DOS was well on the way to becoming the number one bootleggedsoftware of all time, the DOS development team came up with the /B switch to the FORMATcommand. Sending someone a bootable disk is a violation of your DOS software licensebecause that disk enables the person to start up a computer with software for which he orshe hasn’t paid. The idea behind the /B switch is to reserve space on the disk so that you canuse the SYS command later to make the disk bootable.
In practice, the /B switch of the FORMAT command simply copies IO.SYS and MSDOS.SYS to thenewly formatted disk, leaving off COMMAND.COM and the bootstrap loader. This restrictionensures that the SYS command can come along later and finish the job of making the diskbootable. You might need the /B switch only once every five years, but it can come in handy.
Creating a Floppy Boot Disk
These days, finding a computer system lacking a hard drive is unusual, if not impossible.The single major exception to this rule is a network workstation where the file server pro-vides all the hard drive storage needed (at one time this was very common in Novell-basednetworks). Because the boot process must be local to the workstation on a standard PC,booting from a floppy in this case is a no-brainer.
Booting from the computer’s hard drive is, in general, more efficient. Hard drives are fasterthan floppy drives, so booting from the hard drive gets you to a DOS prompt more quickly.
2
IPart
Ch
26 Chapter 2 Starting DOS
In some cases, though, you need to have a floppy disk to boot from. One scenario would bewhere COMMAND.COM on the hard drive has been damaged. To recover from this damage, youwould need to boot from a floppy and copy the system files back to your hard drive usingthe SYS.COM command.
Follow these steps to create a boot floppy:
1. Format a floppy disk in drive A using the /S (System) switch to make it a bootable disk. If you have compressed your drive with DoubleSpace, FORMAT automatically copiesDBLSPACE.BIN to the new floppy as a hidden system file.
2. Copy AUTOEXEC.BAT and CONFIG.SYS to the new boot disk.
3. Copy all the files you need for a clean boot to the floppy. Include DBLSPACE.SYS if youhave compressed disks. If you are going to be using the disk as an emergency backup torepair system files on a hard drive, you should also copy the SYS.COM file over.
I have found it is also very useful to use a DOS boot disk along with a DOS CD-ROM driverto load new systems where I want to copy the source files without adding CONFIG.SYS orAUTOEXEC.BAT to the hard drive. You can do the same by creating a boot disk with all thefiles that are necessary to prepare a hard drive, such as FDISK, FORMAT, and SYS, alongwith the MCSDEX command for the CD-ROM. Using driver device files is discussed furtherin Chapter 13, “Controlling Devices.”
➔ For a detailed description of the boot process, see “What Happens When the Power Is Turned On” inChapter 1, “DOS and the Personal Computer,” p. 15.
System ConfigurationIf you are not a long-time computer user, or if you have always had someone else maintainyour system configurations for you, you might not be familiar with the roles played by twoimportant files during startup. The CONFIG.SYS and AUTOEXEC.BAT files customize the wayyour computer is configured. These files load drivers, set options, and tweak the DOS envi-ronment.
The DOS environment is a space in memory reserved for creating variables that can belooked at by programs running on your system. The default size of the DOS environment isonly 256 bytes in length. Some programs make extensive use of the DOS environment tostore customization settings. You can use the SHELL command to increase the size of theenvironment.
➔ For a detailed description of the syntax and usage of the SHELL command, see Appendix F, “CommandReference,” p. 583.
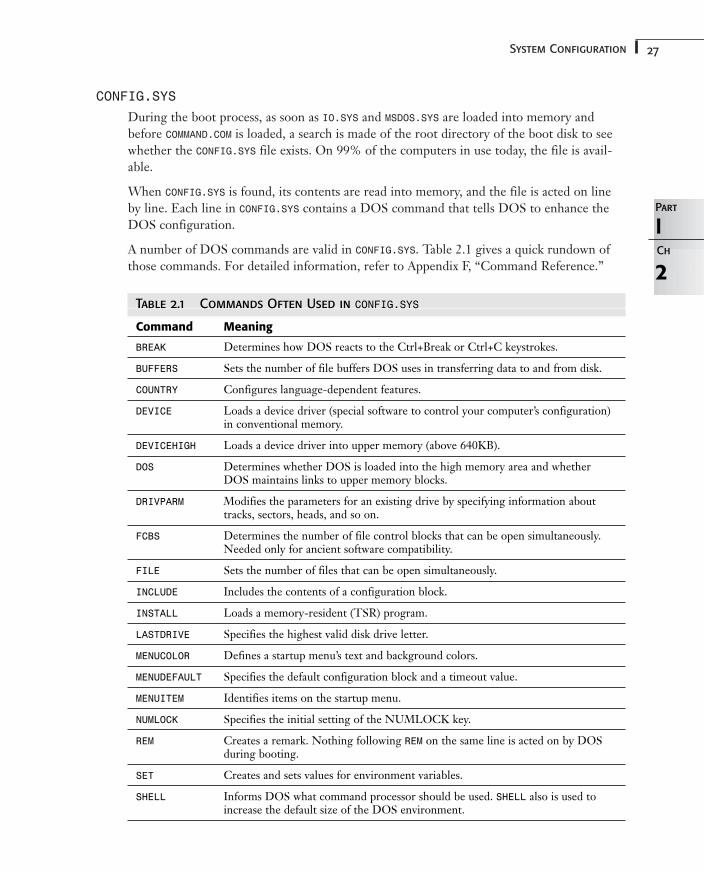
27System Configuration
CONFIG.SYS
During the boot process, as soon as IO.SYS and MSDOS.SYS are loaded into memory andbefore COMMAND.COM is loaded, a search is made of the root directory of the boot disk to seewhether the CONFIG.SYS file exists. On 99% of the computers in use today, the file is avail-able.
When CONFIG.SYS is found, its contents are read into memory, and the file is acted on lineby line. Each line in CONFIG.SYS contains a DOS command that tells DOS to enhance theDOS configuration.
A number of DOS commands are valid in CONFIG.SYS. Table 2.1 gives a quick rundown ofthose commands. For detailed information, refer to Appendix F, “Command Reference.”
Table 2.1 Commands Often Used in CONFIG.SYS
Command Meaning
BREAK Determines how DOS reacts to the Ctrl+Break or Ctrl+C keystrokes.
BUFFERS Sets the number of file buffers DOS uses in transferring data to and from disk.
COUNTRY Configures language-dependent features.
DEVICE Loads a device driver (special software to control your computer’s configuration)in conventional memory.
DEVICEHIGH Loads a device driver into upper memory (above 640KB).
DOS Determines whether DOS is loaded into the high memory area and whetherDOS maintains links to upper memory blocks.
DRIVPARM Modifies the parameters for an existing drive by specifying information abouttracks, sectors, heads, and so on.
FCBS Determines the number of file control blocks that can be open simultaneously.Needed only for ancient software compatibility.
FILE Sets the number of files that can be open simultaneously.
INCLUDE Includes the contents of a configuration block.
INSTALL Loads a memory-resident (TSR) program.
LASTDRIVE Specifies the highest valid disk drive letter.
MENUCOLOR Defines a startup menu’s text and background colors.
MENUDEFAULT Specifies the default configuration block and a timeout value.
MENUITEM Identifies items on the startup menu.
NUMLOCK Specifies the initial setting of the NUMLOCK key.
REM Creates a remark. Nothing following REM on the same line is acted on by DOSduring booting.
SET Creates and sets values for environment variables.
SHELL Informs DOS what command processor should be used. SHELL also is used toincrease the default size of the DOS environment.
2
IPart
Ch
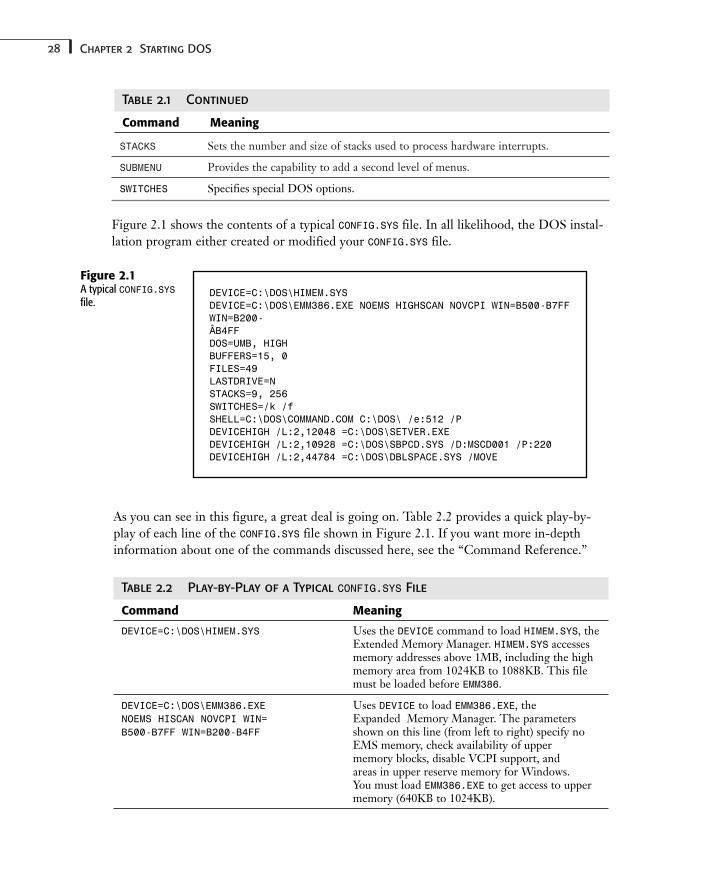
28 Chapter 2 Starting DOS
STACKS Sets the number and size of stacks used to process hardware interrupts.
SUBMENU Provides the capability to add a second level of menus.
SWITCHES Specifies special DOS options.
Figure 2.1 shows the contents of a typical CONFIG.SYS file. In all likelihood, the DOS instal-lation program either created or modified your CONFIG.SYS file.
Table 2.1 Continued
Command Meaning
Figure 2.1A typical CONFIG.SYSfile.
DEVICE=C:\DOS\HIMEM.SYSDEVICE=C:\DOS\EMM386.EXE NOEMS HIGHSCAN NOVCPI WIN=B500-B7FFWIN=B200-ÂB4FFDOS=UMB, HIGHBUFFERS=15, 0FILES=49LASTDRIVE=NSTACKS=9, 256SWITCHES=/k /fSHELL=C:\DOS\COMMAND.COM C:\DOS\ /e:512 /PDEVICEHIGH /L:2,12048 =C:\DOS\SETVER.EXEDEVICEHIGH /L:2,10928 =C:\DOS\SBPCD.SYS /D:MSCD001 /P:220DEVICEHIGH /L:2,44784 =C:\DOS\DBLSPACE.SYS /MOVE
As you can see in this figure, a great deal is going on. Table 2.2 provides a quick play-by-play of each line of the CONFIG.SYS file shown in Figure 2.1. If you want more in-depthinformation about one of the commands discussed here, see the “Command Reference.”
Table 2.2 Play-by-Play of a Typical CONFIG.SYS File
Command Meaning
DEVICE=C:\DOS\HIMEM.SYS Uses the DEVICE command to load HIMEM.SYS, theExtended Memory Manager. HIMEM.SYS accessesmemory addresses above 1MB, including the highmemory area from 1024KB to 1088KB. This filemust be loaded before EMM386.
DEVICE=C:\DOS\EMM386.EXE Uses DEVICE to load EMM386.EXE, the NOEMS HISCAN NOVCPI WIN= Expanded Memory Manager. The parametersB500-B7FF WIN=B200-B4FF shown on this line (from left to right) specify no
EMS memory, check availability of upper memory blocks, disable VCPI support, and areas in upper reserve memory for Windows. You must load EMM386.EXE to get access to uppermemory (640KB to 1024KB).
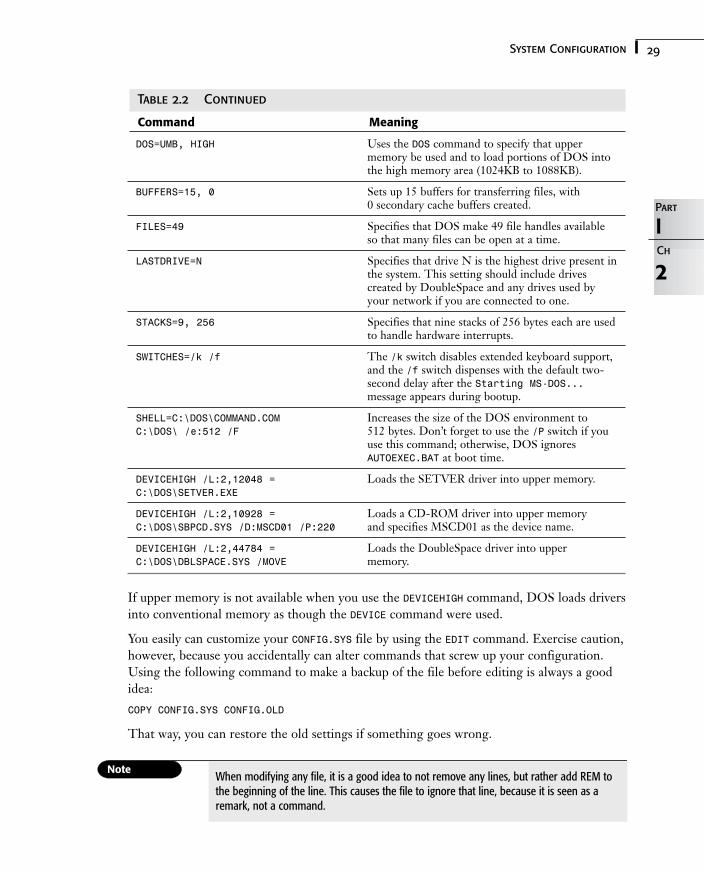
29System Configuration
DOS=UMB, HIGH Uses the DOS command to specify that upper memory be used and to load portions of DOS intothe high memory area (1024KB to 1088KB).
BUFFERS=15, 0 Sets up 15 buffers for transferring files, with 0 secondary cache buffers created.
FILES=49 Specifies that DOS make 49 file handles availableso that many files can be open at a time.
LASTDRIVE=N Specifies that drive N is the highest drive present inthe system. This setting should include drives created by DoubleSpace and any drives used byyour network if you are connected to one.
STACKS=9, 256 Specifies that nine stacks of 256 bytes each are usedto handle hardware interrupts.
SWITCHES=/k /f The /k switch disables extended keyboard support,and the /f switch dispenses with the default two-second delay after the Starting MS-DOS...message appears during bootup.
SHELL=C:\DOS\COMMAND.COM Increases the size of the DOS environment to C:\DOS\ /e:512 /F 512 bytes. Don’t forget to use the /P switch if you
use this command; otherwise, DOS ignoresAUTOEXEC.BAT at boot time.
DEVICEHIGH /L:2,12048 = Loads the SETVER driver into upper memory.C:\DOS\SETVER.EXE
DEVICEHIGH /L:2,10928 = Loads a CD-ROM driver into upper memory C:\DOS\SBPCD.SYS /D:MSCD01 /P:220 and specifies MSCD01 as the device name.
DEVICEHIGH /L:2,44784 = Loads the DoubleSpace driver into upper C:\DOS\DBLSPACE.SYS /MOVE memory.
If upper memory is not available when you use the DEVICEHIGH command, DOS loads driversinto conventional memory as though the DEVICE command were used.
You easily can customize your CONFIG.SYS file by using the EDIT command. Exercise caution,however, because you accidentally can alter commands that screw up your configuration.Using the following command to make a backup of the file before editing is always a goodidea:
COPY CONFIG.SYS CONFIG.OLD
That way, you can restore the old settings if something goes wrong.
When modifying any file, it is a good idea to not remove any lines, but rather add REM tothe beginning of the line. This causes the file to ignore that line, because it is seen as aremark, not a command.
2
IPart
Ch
Table 2.2 Continued
Command Meaning
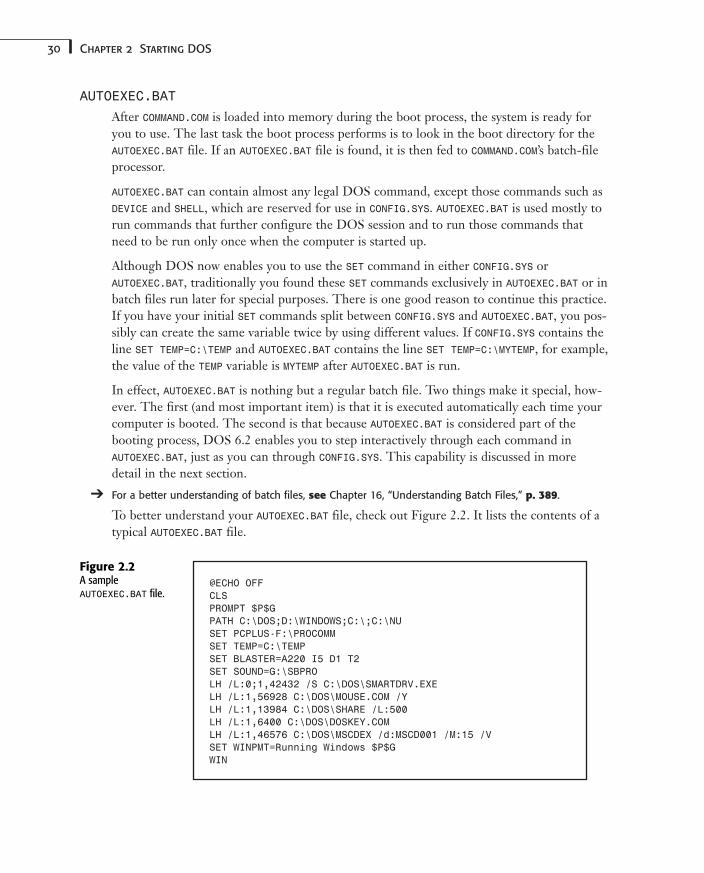
30 Chapter 2 Starting DOS
AUTOEXEC.BAT
After COMMAND.COM is loaded into memory during the boot process, the system is ready foryou to use. The last task the boot process performs is to look in the boot directory for theAUTOEXEC.BAT file. If an AUTOEXEC.BAT file is found, it is then fed to COMMAND.COM’s batch-fileprocessor.
AUTOEXEC.BAT can contain almost any legal DOS command, except those commands such asDEVICE and SHELL, which are reserved for use in CONFIG.SYS. AUTOEXEC.BAT is used mostly torun commands that further configure the DOS session and to run those commands thatneed to be run only once when the computer is started up.
Although DOS now enables you to use the SET command in either CONFIG.SYS or AUTOEXEC.BAT, traditionally you found these SET commands exclusively in AUTOEXEC.BAT or inbatch files run later for special purposes. There is one good reason to continue this practice.If you have your initial SET commands split between CONFIG.SYS and AUTOEXEC.BAT, you pos-sibly can create the same variable twice by using different values. If CONFIG.SYS contains theline SET TEMP=C:\TEMP and AUTOEXEC.BAT contains the line SET TEMP=C:\MYTEMP, for example,the value of the TEMP variable is MYTEMP after AUTOEXEC.BAT is run.
In effect, AUTOEXEC.BAT is nothing but a regular batch file. Two things make it special, how-ever. The first (and most important item) is that it is executed automatically each time yourcomputer is booted. The second is that because AUTOEXEC.BAT is considered part of the booting process, DOS 6.2 enables you to step interactively through each command inAUTOEXEC.BAT, just as you can through CONFIG.SYS. This capability is discussed in more detail in the next section.
➔ For a better understanding of batch files, see Chapter 16, “Understanding Batch Files,” p. 389.
To better understand your AUTOEXEC.BAT file, check out Figure 2.2. It lists the contents of atypical AUTOEXEC.BAT file.
@ECHO OFFCLSPROMPT $P$GPATH C:\DOS;D:\WINDOWS;C:\;C:\NUSET PCPLUS-F:\PROCOMMSET TEMP=C:\TEMPSET BLASTER=A220 I5 D1 T2SET SOUND=G:\SBPROLH /L:0;1,42432 /S C:\DOS\SMARTDRV.EXELH /L:1,56928 C:\DOS\MOUSE.COM /YLH /L:1,13984 C:\DOS\SHARE /L:500LH /L:1,6400 C:\DOS\DOSKEY.COMLH /L:1,46576 C:\DOS\MSCDEX /d:MSCD001 /M:15 /VSET WINPMT=Running Windows $P$GWIN
Figure 2.2A sample AUTOEXEC.BAT file.
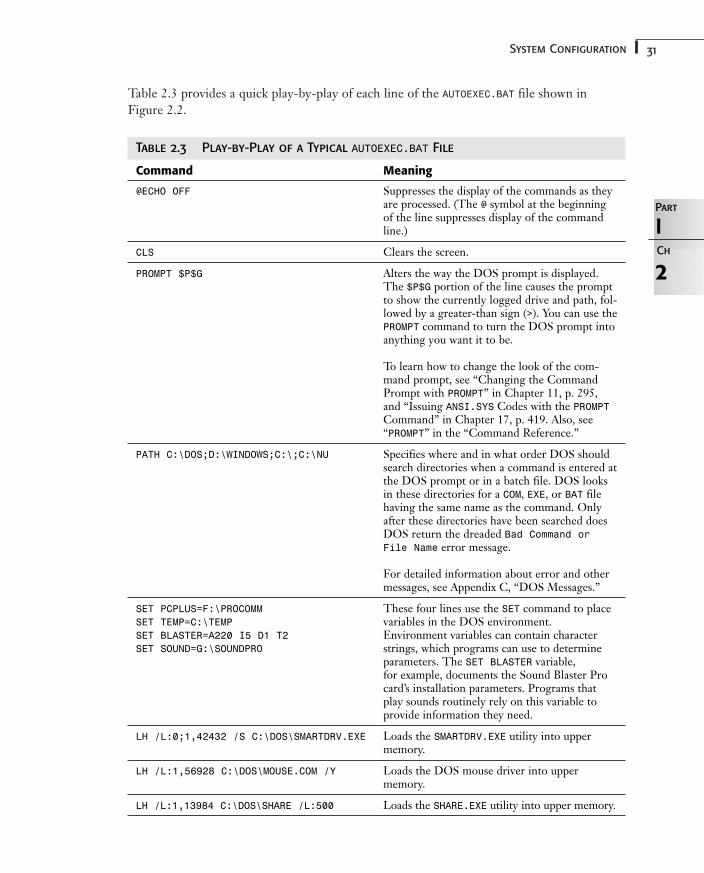
31System Configuration
Table 2.3 provides a quick play-by-play of each line of the AUTOEXEC.BAT file shown inFigure 2.2.
Table 2.3 Play-by-Play of a Typical AUTOEXEC.BAT File
Command Meaning
@ECHO OFF Suppresses the display of the commands as theyare processed. (The @ symbol at the beginningof the line suppresses display of the commandline.)
CLS Clears the screen.
PROMPT $P$G Alters the way the DOS prompt is displayed.The $P$G portion of the line causes the promptto show the currently logged drive and path, fol-lowed by a greater-than sign (>). You can use thePROMPT command to turn the DOS prompt intoanything you want it to be.
To learn how to change the look of the com-mand prompt, see “Changing the CommandPrompt with PROMPT” in Chapter 11, p. 295,and “Issuing ANSI.SYS Codes with the PROMPTCommand” in Chapter 17, p. 419. Also, see“PROMPT” in the “Command Reference.”
PATH C:\DOS;D:\WINDOWS;C:\;C:\NU Specifies where and in what order DOS shouldsearch directories when a command is entered atthe DOS prompt or in a batch file. DOS looksin these directories for a COM, EXE, or BAT filehaving the same name as the command. Onlyafter these directories have been searched doesDOS return the dreaded Bad Command orFile Name error message.
For detailed information about error and othermessages, see Appendix C, “DOS Messages.”
SET PCPLUS=F:\PROCOMM These four lines use the SET command to place SET TEMP=C:\TEMP variables in the DOS environment.SET BLASTER=A220 I5 D1 T2 Environment variables can contain character SET SOUND=G:\SOUNDPRO strings, which programs can use to determine
parameters. The SET BLASTER variable, for example, documents the Sound Blaster Pro card’s installation parameters. Programs that play sounds routinely rely on this variable to provide information they need.
LH /L:0;1,42432 /S C:\DOS\SMARTDRV.EXE Loads the SMARTDRV.EXE utility into uppermemory.
LH /L:1,56928 C:\DOS\MOUSE.COM /Y Loads the DOS mouse driver into upper memory.
LH /L:1,13984 C:\DOS\SHARE /L:500 Loads the SHARE.EXE utility into upper memory.
2
IPart
Ch
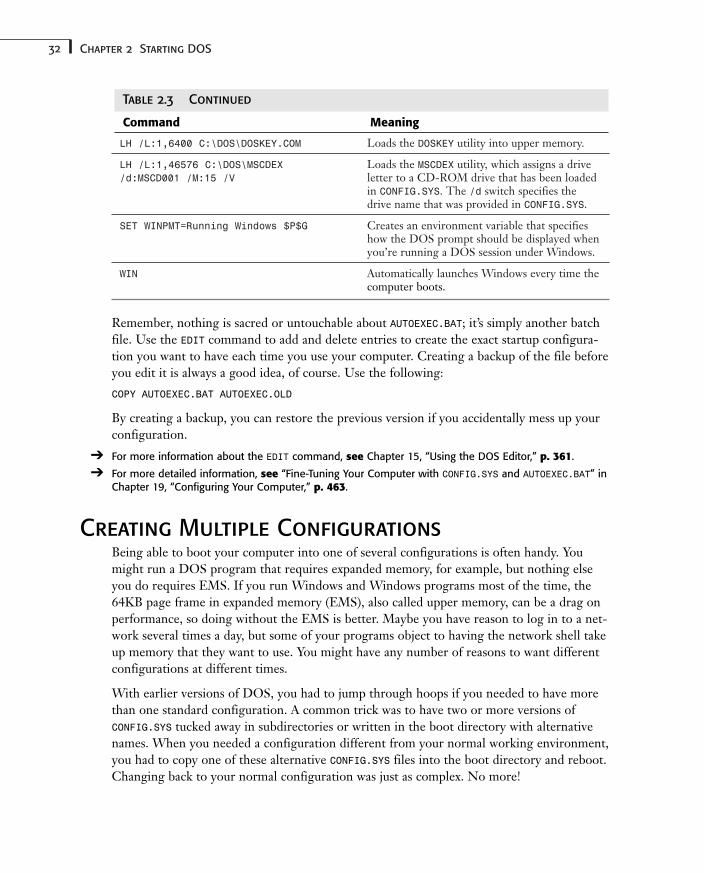
32 Chapter 2 Starting DOS
LH /L:1,6400 C:\DOS\DOSKEY.COM Loads the DOSKEY utility into upper memory.
LH /L:1,46576 C:\DOS\MSCDEX Loads the MSCDEX utility, which assigns a drive /d:MSCD001 /M:15 /V letter to a CD-ROM drive that has been loaded
in CONFIG.SYS. The /d switch specifies thedrive name that was provided in CONFIG.SYS.
SET WINPMT=Running Windows $P$G Creates an environment variable that specifieshow the DOS prompt should be displayed whenyou’re running a DOS session under Windows.
WIN Automatically launches Windows every time thecomputer boots.
Remember, nothing is sacred or untouchable about AUTOEXEC.BAT; it’s simply another batchfile. Use the EDIT command to add and delete entries to create the exact startup configura-tion you want to have each time you use your computer. Creating a backup of the file beforeyou edit it is always a good idea, of course. Use the following:
COPY AUTOEXEC.BAT AUTOEXEC.OLD
By creating a backup, you can restore the previous version if you accidentally mess up yourconfiguration.
➔ For more information about the EDIT command, see Chapter 15, “Using the DOS Editor,” p. 361.
➔ For more detailed information, see “Fine-Tuning Your Computer with CONFIG.SYS and AUTOEXEC.BAT” inChapter 19, “Configuring Your Computer,” p. 463.
Creating Multiple ConfigurationsBeing able to boot your computer into one of several configurations is often handy. Youmight run a DOS program that requires expanded memory, for example, but nothing elseyou do requires EMS. If you run Windows and Windows programs most of the time, the64KB page frame in expanded memory (EMS), also called upper memory, can be a drag onperformance, so doing without the EMS is better. Maybe you have reason to log in to a net-work several times a day, but some of your programs object to having the network shell takeup memory that they want to use. You might have any number of reasons to want differentconfigurations at different times.
With earlier versions of DOS, you had to jump through hoops if you needed to have morethan one standard configuration. A common trick was to have two or more versions of CONFIG.SYS tucked away in subdirectories or written in the boot directory with alternativenames. When you needed a configuration different from your normal working environment,you had to copy one of these alternative CONFIG.SYS files into the boot directory and reboot.Changing back to your normal configuration was just as complex. No more!
Table 2.3 Continued
Command Meaning
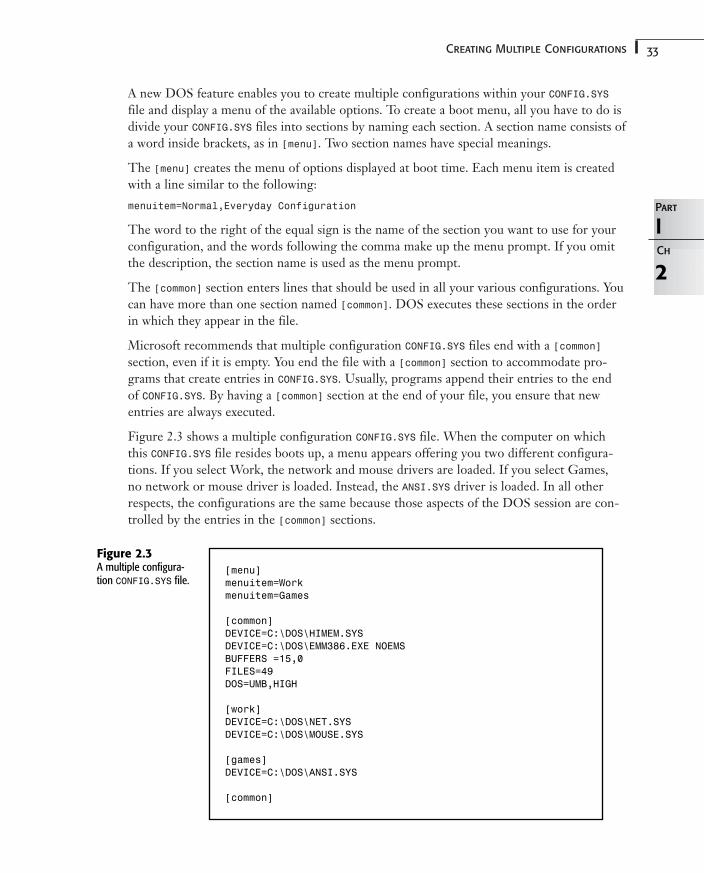
33Creating Multiple Configurations
A new DOS feature enables you to create multiple configurations within your CONFIG.SYSfile and display a menu of the available options. To create a boot menu, all you have to do isdivide your CONFIG.SYS files into sections by naming each section. A section name consists ofa word inside brackets, as in [menu]. Two section names have special meanings.
The [menu] creates the menu of options displayed at boot time. Each menu item is createdwith a line similar to the following:
menuitem=Normal,Everyday Configuration
The word to the right of the equal sign is the name of the section you want to use for yourconfiguration, and the words following the comma make up the menu prompt. If you omitthe description, the section name is used as the menu prompt.
The [common] section enters lines that should be used in all your various configurations. Youcan have more than one section named [common]. DOS executes these sections in the orderin which they appear in the file.
Microsoft recommends that multiple configuration CONFIG.SYS files end with a [common]section, even if it is empty. You end the file with a [common] section to accommodate pro-grams that create entries in CONFIG.SYS. Usually, programs append their entries to the endof CONFIG.SYS. By having a [common] section at the end of your file, you ensure that newentries are always executed.
Figure 2.3 shows a multiple configuration CONFIG.SYS file. When the computer on whichthis CONFIG.SYS file resides boots up, a menu appears offering you two different configura-tions. If you select Work, the network and mouse drivers are loaded. If you select Games, no network or mouse driver is loaded. Instead, the ANSI.SYS driver is loaded. In all otherrespects, the configurations are the same because those aspects of the DOS session are con-trolled by the entries in the [common] sections.
2
IPart
Ch
[menu]menuitem=Workmenuitem=Games
[common]DEVICE=C:\DOS\HIMEM.SYSDEVICE=C:\DOS\EMM386.EXE NOEMSBUFFERS =15,0FILES=49DOS=UMB,HIGH
[work]DEVICE=C:\DOS\NET.SYSDEVICE=C:\DOS\MOUSE.SYS
[games]DEVICE=C:\DOS\ANSI.SYS
[common]
Figure 2.3A multiple configura-tion CONFIG.SYS file.
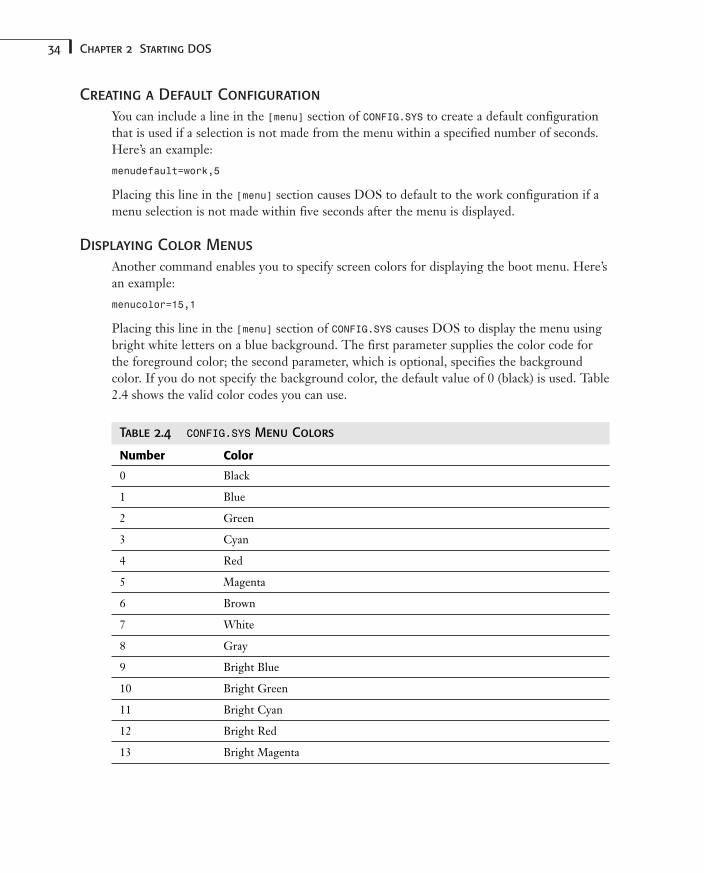
34 Chapter 2 Starting DOS
Creating a Default Configuration
You can include a line in the [menu] section of CONFIG.SYS to create a default configurationthat is used if a selection is not made from the menu within a specified number of seconds.Here’s an example:
menudefault=work,5
Placing this line in the [menu] section causes DOS to default to the work configuration if amenu selection is not made within five seconds after the menu is displayed.
Displaying Color Menus
Another command enables you to specify screen colors for displaying the boot menu. Here’san example:
menucolor=15,1
Placing this line in the [menu] section of CONFIG.SYS causes DOS to display the menu usingbright white letters on a blue background. The first parameter supplies the color code forthe foreground color; the second parameter, which is optional, specifies the backgroundcolor. If you do not specify the background color, the default value of 0 (black) is used. Table2.4 shows the valid color codes you can use.
Table 2.4 CONFIG.SYS Menu Colors
Number Color
0 Black
1 Blue
2 Green
3 Cyan
4 Red
5 Magenta
6 Brown
7 White
8 Gray
9 Bright Blue
10 Bright Green
11 Bright Cyan
12 Bright Red
13 Bright Magenta
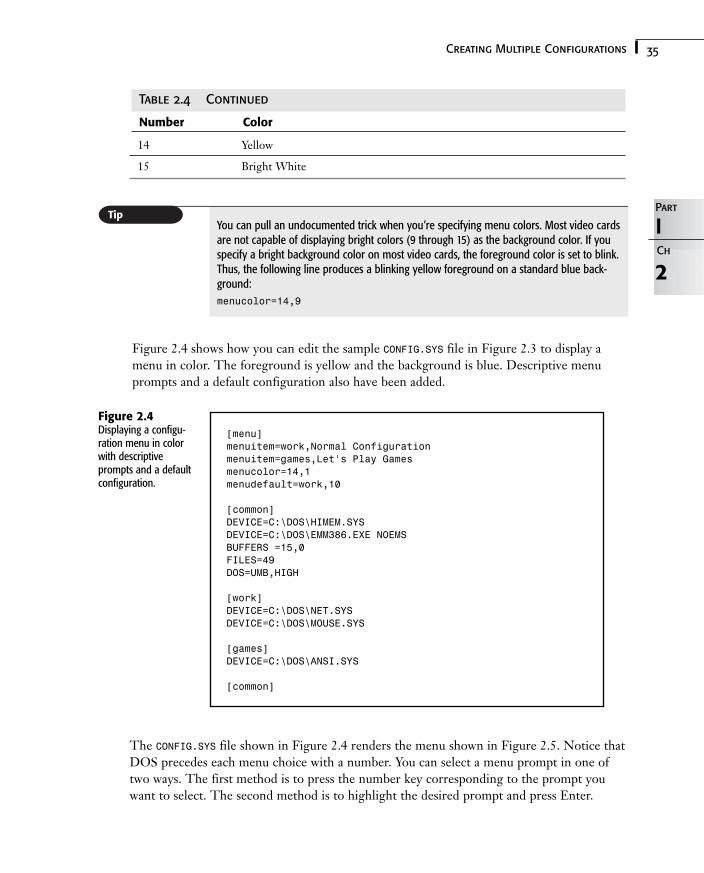
35Creating Multiple Configurations
You can pull an undocumented trick when you’re specifying menu colors. Most video cardsare not capable of displaying bright colors (9 through 15) as the background color. If youspecify a bright background color on most video cards, the foreground color is set to blink.Thus, the following line produces a blinking yellow foreground on a standard blue back-ground:
menucolor=14,9
2
IPart
Ch
Figure 2.4 shows how you can edit the sample CONFIG.SYS file in Figure 2.3 to display amenu in color. The foreground is yellow and the background is blue. Descriptive menuprompts and a default configuration also have been added.
Figure 2.4Displaying a configu-ration menu in colorwith descriptiveprompts and a defaultconfiguration.
[menu]menuitem=work,Normal Configurationmenuitem=games,Let’s Play Gamesmenucolor=14,1menudefault=work,10
[common]DEVICE=C:\DOS\HIMEM.SYSDEVICE=C:\DOS\EMM386.EXE NOEMSBUFFERS =15,0FILES=49DOS=UMB,HIGH
[work]DEVICE=C:\DOS\NET.SYSDEVICE=C:\DOS\MOUSE.SYS
[games]DEVICE=C:\DOS\ANSI.SYS
[common]
The CONFIG.SYS file shown in Figure 2.4 renders the menu shown in Figure 2.5. Notice thatDOS precedes each menu choice with a number. You can select a menu prompt in one oftwo ways. The first method is to press the number key corresponding to the prompt youwant to select. The second method is to highlight the desired prompt and press Enter.
14 Yellow
15 Bright White
Table 2.4 Continued
Number Color
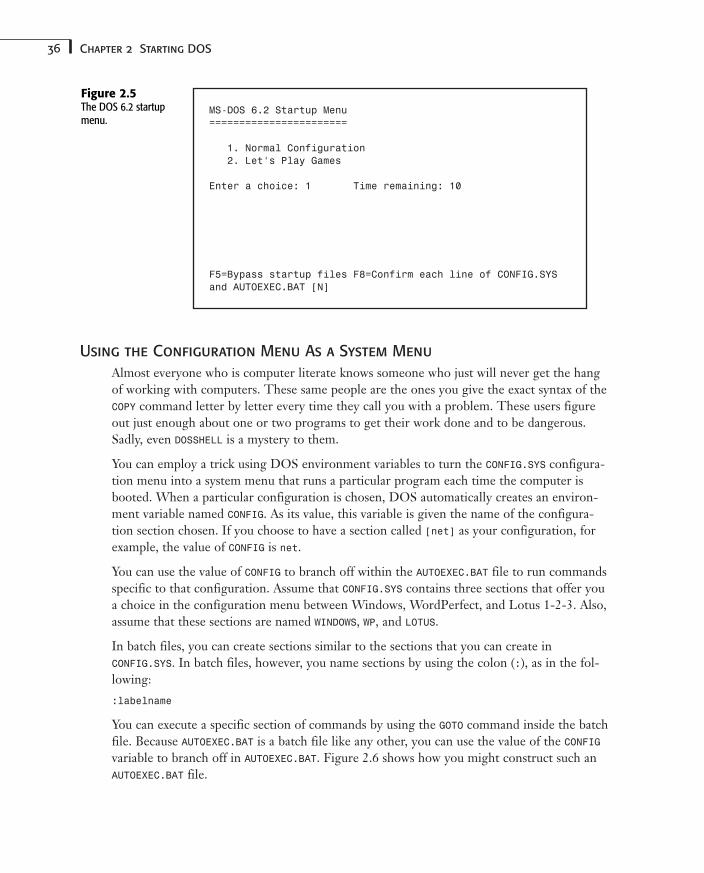
36 Chapter 2 Starting DOS
Using the Configuration Menu As a System Menu
Almost everyone who is computer literate knows someone who just will never get the hangof working with computers. These same people are the ones you give the exact syntax of theCOPY command letter by letter every time they call you with a problem. These users figureout just enough about one or two programs to get their work done and to be dangerous.Sadly, even DOSSHELL is a mystery to them.
You can employ a trick using DOS environment variables to turn the CONFIG.SYS configura-tion menu into a system menu that runs a particular program each time the computer isbooted. When a particular configuration is chosen, DOS automatically creates an environ-ment variable named CONFIG. As its value, this variable is given the name of the configura-tion section chosen. If you choose to have a section called [net] as your configuration, forexample, the value of CONFIG is net.
You can use the value of CONFIG to branch off within the AUTOEXEC.BAT file to run commandsspecific to that configuration. Assume that CONFIG.SYS contains three sections that offer youa choice in the configuration menu between Windows, WordPerfect, and Lotus 1-2-3. Also,assume that these sections are named WINDOWS, WP, and LOTUS.
In batch files, you can create sections similar to the sections that you can create inCONFIG.SYS. In batch files, however, you name sections by using the colon (:), as in the fol-lowing:
:labelname
You can execute a specific section of commands by using the GOTO command inside the batchfile. Because AUTOEXEC.BAT is a batch file like any other, you can use the value of the CONFIGvariable to branch off in AUTOEXEC.BAT. Figure 2.6 shows how you might construct such anAUTOEXEC.BAT file.
MS-DOS 6.2 Startup Menu=======================
1. Normal Configuration2. Let’s Play Games
Enter a choice: 1 Time remaining: 10
F5=Bypass startup files F8=Confirm each line of CONFIG.SYSand AUTOEXEC.BAT [N]
Figure 2.5The DOS 6.2 startupmenu.
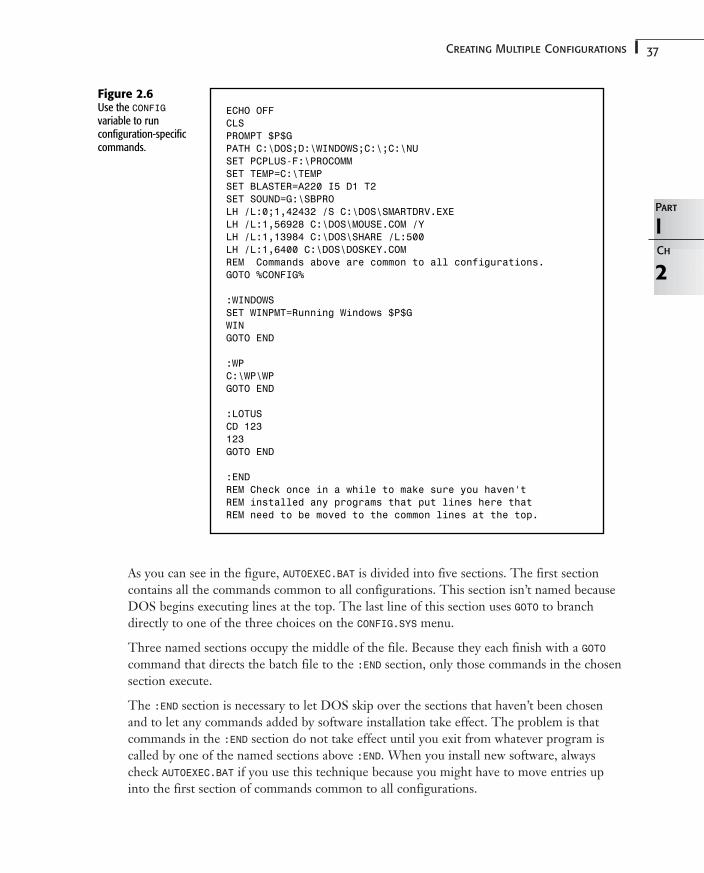
37Creating Multiple Configurations
As you can see in the figure, AUTOEXEC.BAT is divided into five sections. The first sectioncontains all the commands common to all configurations. This section isn’t named becauseDOS begins executing lines at the top. The last line of this section uses GOTO to branchdirectly to one of the three choices on the CONFIG.SYS menu.
Three named sections occupy the middle of the file. Because they each finish with a GOTOcommand that directs the batch file to the :END section, only those commands in the chosensection execute.
The :END section is necessary to let DOS skip over the sections that haven’t been chosenand to let any commands added by software installation take effect. The problem is thatcommands in the :END section do not take effect until you exit from whatever program iscalled by one of the named sections above :END. When you install new software, alwayscheck AUTOEXEC.BAT if you use this technique because you might have to move entries upinto the first section of commands common to all configurations.
2
IPart
Ch
ECHO OFFCLSPROMPT $P$GPATH C:\DOS;D:\WINDOWS;C:\;C:\NUSET PCPLUS-F:\PROCOMMSET TEMP=C:\TEMPSET BLASTER=A220 I5 D1 T2SET SOUND=G:\SBPROLH /L:0;1,42432 /S C:\DOS\SMARTDRV.EXELH /L:1,56928 C:\DOS\MOUSE.COM /YLH /L:1,13984 C:\DOS\SHARE /L:500LH /L:1,6400 C:\DOS\DOSKEY.COMREM Commands above are common to all configurations.GOTO %CONFIG%
:WINDOWSSET WINPMT=Running Windows $P$GWINGOTO END
:WPC:\WP\WPGOTO END
:LOTUSCD 123123GOTO END
:ENDREM Check once in a while to make sure you haven’tREM installed any programs that put lines here thatREM need to be moved to the common lines at the top.
Figure 2.6Use the CONFIGvariable to run configuration-specificcommands.
38 Chapter 2 Starting DOS
A drawback to using this technique is that when you exit the program, you don’t have anyway to loop back into the menu except to reboot the computer. Also, the startup menualways advertises the availability of the F5 and F8 keys.
Make sure not to simply reboot the computer while you’re still in an application program;otherwise, you lose data. Similarly, avoid using the F5 or F8 keys, or you might think themenu is broken.
Project: Controlling the Boot ProcessUsers who practice safe computing should make sure that they have a floppy-based bootdisk before messing with either CONFIG.SYS or AUTOEXEC.BAT. Fortunately, the DOS develop-ment team has made this practice less necessary. A new feature introduced in DOS 6.0enables you to use function keys to exercise control over the boot.
Imagine, for example, that you have just edited AUTOEXEC.BAT to load a program duringbootup. For whatever reason, this program is incompatible with your system, and the com-puter simply freezes each time the command is run. You can never get to a DOS prompt toedit the file because the machine hangs every time. You can boot off your floppy boot disk,of course, but now you have an easier way.
When the Starting MS-DOS... message appears onscreen during the boot process, youknow that IO.SYS and MSDOS.SYS are about to be loaded. At this point, you can press twokeys or key combinations that modify the boot process. If you use DOS 6.0, you can use theF5 and F8 keys; with DOS 6.2, you can use these two keys or Ctrl+F5 or Ctrl+F8.
If you press the F5 key when the message appears, DOS bypasses loading and processingboth CONFIG.SYS and AUTOEXEC.BAT. You boot up as if you had a floppy boot disk that didn’tcontain these files.
If you have installed DoubleSpace, you also can press Ctrl+F5. This key combination notonly skips CONFIG.SYS and AUTOEXEC.BAT, but also skips the loading of DoubleSpace. Thispractice is great if you have programs (such as the latest high-performance games) that donot work with disk-compression programs such as DoubleSpace.
If you press the F8 key when the Starting MS-DOS... message appears, DOS displays thefollowing message:
MS-DOS will prompt you to confirm each CONFIG.SYS command.
Each line in CONFIG.SYS then is displayed along with a [Y,N] prompt. To execute the dis-played command, press either Y or Enter (not both). To bypass the command, press N.
After you have dealt with all the lines in CONFIG.SYS, you see the following message:
Process AUTOEXEC.BAT [Y,N]?
39Project: Controlling the Boot Process
DOS is giving you the option of bypassing the execution of AUTOEXEC.BAT. Answer this queryas you did the earlier ones. If you press N, the AUTOEXEC.BAT file is skipped entirely. If youare using DOS 6.2 and you press Y, each line in your AUTOEXEC.BAT file is displayed, in turn,and you can choose whether you want it executed.
The final key combination you can use to modify the boot process is Ctrl+F8. If you press this combination, you can process CONFIG.SYS and AUTOEXEC.BAT interactively, butDoubleSpace is not loaded. Understand that if you choose this option, drivers or programsthat you attempt to load (which are normally stored on a compressed drive) are not accessible.
After you have broken through to the DOS prompt, you then can use the EDIT command torectify whatever problem keeps your system from successfully booting.
By default, who a two-second delay occurs between the time the Starting MS-DOS... mes-sage appears and the loading of DOS system files begins. If you eliminate this delay by usingthe SWITCHES=/F command in CONFIG.SYS, DOS still can recognize the F5, Ctrl+F5, F8, orCtrl+F8 keystrokes. Even on a fast hard drive, IO.SYS and MSDOS.SYS take a second or two toload. You should be able to break in with a keystroke before CONFIG.SYS is processed.

Using DOS Commands
In this chapter
Understanding DOS Commands 42
Understanding the Elements of a DOS Command 42
Getting Help 46
Issuing DOS Commands 51
Troubleshooting 55
3CHAPTER
42 Chapter 3 Using DOS Commands
Understanding DOS CommandsWhen you want your computer to perform an action, you communicate this request for ser-vice by entering commands at the DOS prompt. All DOS commands begin with a word,sometimes called a keyword, that identifies the action you want to take. Most DOS com-mands can accept parameters that refine the scope of the command. The DIR command, forexample, tells DOS to show you a list of files written on a disk. Adding parameters to thiscommand enables you to specify exactly the files you want listed.
Internal Versus External
DOS recognizes and responds to more than 80 commands. The programming to providethe most commonly used commands is contained within the DOS command interpreter,COMMAND.COM. You use commands such as DIR and COPY so frequently that making them avail-able on demand whenever the computer is displaying a DOS prompt saves time. BecauseDOS does not have to launch (start) any program to provide the service, the commands pro-vided by COMMAND.COM are called internal commands. You can tell which commands are inter-nal by looking in the directory where DOS is installed. You never find COPY.COM orCOPY.EXE, so you know that the COPY command is internal.
Other commands are stored as utility programs in a directory on your hard disk. Becausethese commands are not built into the command processor, they are called externalcommands. When you type a command that COMMAND.COM does not recognize as one of itsinternal commands, COMMAND.COM responds by looking on disk for a program file having thesame name as the command. The FORMAT command, for example, is provided by program-ming found in the file FORMAT.COM, which is located in the DOS directory.
Whether internal or external, all DOS commands conform to rules that provide a grammaror syntax that is consistent throughout DOS. As a user, you need to make sure only thatDOS can find the program files for external commands.
Understanding the Elements of a DOS CommandTo begin to understand DOS commands, you first need to know a few fundamental facts:
■ DOS requires that you use a specific set of rules, or syntax, when you issue commands.
■ All DOS commands begin with a keyword that identifies the action you want per-formed.
■ Parameters, which are a part of a command’s syntax, refine the way a command is exe-cuted.
Syntax is the order in which you type the elements of the DOS command—its grammar. Ifyou say, “Ball red the choose I,” people probably will not understand that you are trying tosay, “I choose the red ball.” Some people might understand what you are trying to say, butnot many. A computer, on the other hand, has no intelligence or imagination; it can inter-pret commands only according to its programming. Programming several optional syntaxes
43Understanding the Elements of a DOS Command
for commands requires using a great deal of extra memory and disk space, which cuts downon the resources available to do real work. That’s why you have to supply the intelligenceand imagination and why you must enter DOS commands precisely according to the rulesof command syntax.
You can think of the command keyword as the action part, or verb, of a DOS command. Inaddition to the keyword, many commands require or allow further directions. You supplythese directions as parameters and switches. Parameters tell DOS what action to take orhow to apply the action. Using DOS commands is easy as long as you follow the rules oforder and use the correct parameters. After you know the basic rules, you often can figureout parameters for commands that you don’t use on a regular basis.
3
IPart
Ch
You run applications software—such as word processors or drawing programs—by enteringa command at the DOS prompt. The command you use to start an application is the nameof the program file (COM or EXE) in which the programming for the software is stored.
Most applications software incorporates the issuing of commands as part of the software’soperation. The commands discussed in this book are DOS commands. Be sure that youknow the difference between DOS commands, which you issue at the DOS command line,and the commands you learn to use with your applications software.
If you are unsure whether a command you have been taught to use is part of DOS, look inAppendix F, “Command Reference.” If that command is not listed, it is an application pro-gram command, not a DOS command.
The Command Syntax
The syntax for most DOS commands can be boiled down to one of the following two sim-ple formats:
KEYWORD Drive\Files Switches
KEYWORD SourceFiles TargetFiles Switches
A DOS command always begins with the keyword, which is the name of the command, fol-lowed by a space. If you use the language metaphor, the keyword is the verb that specifiesthe action to be taken.
The first example shows the common form for DOS commands that don’t change files insome way. The Drive\Files portion of the example is a parameter that specifies what driveor files on which the command is supposed to act. This parameter is analogous to a noun inEnglish. In other words, the parameter is the thing on which the verb acts. This portion ofthe syntax is in italic to show that the parameter is optional. The parameter also can befollowed by command-line switches. To extend the language metaphor, switches are likeadverbs; they modify the verb. They change the action to be done.
44 Chapter 3 Using DOS Commands
The second example here is typical of the syntax for most DOS commands that operate ongroups of files. The keyword, of course, specifies the action, followed by two parametersthat indicate the disk or files that provide the data source for the action. The second para-meter indicates the target disk or files. To copy a group of files from one disk or directory toanother, for example, you can use the following command:
COPY A:Myfile.TXT B:Yourfile.TXT
This command copies a file having the name MYFILE.TXT on drive A into the memory ofyour computer and then writes the contents of the file onto drive B using the name YOURFILE.TXT.
Some parameters or switches are optional, meaning that some parts of the command syn-tax, such as the keyword, are mandatory. When you enter only the mandatory commandelements, DOS (in most cases) uses default parameters for other elements.
A good example is the COPY command. If the following is the command, the default targetis the currently logged disk and directory:
COPY A:MyFile.TXT
If you’re in C:\TEMP, the file is copied to that directory, and the current filename,MYFILE.TXT, is the target filename as well.
As you can see, having defaults makes commands easier to use and shorter, and gives youfewer opportunities to make mistakes.
Because many DOS commands have several parameters, switches, and defaults, differentforms of these commands might be correct. You seldom, if ever, use all the optional syntaxfor any command. Some switches actually are mutually exclusive. You cannot format a flop-py disk as both high density and low density, for example.
To find out what options are available for any given command, you should look up the com-mand in the “Command Reference” later in this book. The first time you look up a complexcommand, don’t let the sheer volume of optional parameters and switches throw you for aloop. Even the simplest of DOS commands has several options.
The way the syntax is presented often is called the paradigm. Even the simple DOS com-mands have an imposing paradigm. A good example is the DIR command, a real workhorseof a command. Its paradigm looks something like the following:
DIR filespec /P /W /S /B /L /C /CH /O:sortorder /A:attributes
You use the DIR command to display a directory of one or more files stored on a disk. Thiscommand might look formidable, but it is much easier to understand if you break down theindividual components.
➔ For a description of the DIR command and its options, see “Listing Files with the DIR Command” inChapter 8, “Managing Your Files”, p. 193.
45Understanding the Elements of a DOS Command
The Command-Line Parameters
In addition to the command’s name, a DOS command contains syntax elements known asparameters. Parameters (sometimes called arguments) are the parts of a command line thatprovide DOS with the objects of the command’s action. The objects might be files, systemsettings, or hardware devices.
In the DIR example in the preceding section, filespec is the complete filename, includingany drive, path, and wildcards that you want the DIR command to use. In some commands,you might see the filespec spelled out, as in the following:
d:path\filename.ext
Don’t be confused by this formal rendering of the filespec; it simply states that the filespec can contain a drive letter, a pathname, a filename, and an extension.
3
IPart
ChMany new users are confused about the way slashes and backslashes are used in com-mands. In actuality, their uses are stated simply in two rules:
• Backslashes (\) are used as separators (delimiters) when specifying directory and fileinformation.
• Slashes (/), sometimes called forward slashes, are used as signals to DOS that thenext character is a command-line switch.
A good memory association to use is that a backslash connects one name back to thename that comes before it, whereas a slash connects to the character in front of it.
The Optional Switches
A switch is a parameter that turns on an optional function of a command. Switches are spe-cial parameters because they usually are not the objects of a command’s action; rather,switches modify the command’s action. You can use the /W switch with the DIR command,for example, to display a wide directory of files instead of the usual single-column list.Switches can make a basic command more versatile and powerful. In the DIR example, /P,/W, /S, /B, /L, /O, /C, /CH, and /A are switches.
Usually, you can use a command’s switches in any order or any combination. Not all DOScommands have switches, however. Also, the letter used for a switch in one DOS commandmight have a different meaning in another DOS command. In addition, some switchesrequire a parameter. You usually attach switch parameters to the switch by using a colon (:),as in the following example:
FORMAT A: /F:360 /S
In this example, the /F switch specifies that a 360KB floppy disk be formatted in a disk drivethat normally uses high-density (1.2MB) disks.
46 Chapter 3 Using DOS Commands
Getting HelpThese days, the manuals supplied with DOS don’t provide all the information they did inprevious versions. They no longer contain a complete printed reference for all the DOScommands. To get the official Microsoft syntax for every DOS command, you have to ponyup extra dollars to buy the MS-DOS Technical Reference. Because you already have this book,you probably don’t want or need the Technical Reference. Appendix F, “Command Reference,”contains a wealth of information about undocumented switches and parameters.
In place of the printed manual that used to come with DOS, Microsoft has opted instead tosupply an online command reference. It falls short of the reference in the back of this book,of course, because it doesn’t include the undocumented information; but most of the time,you will find the online reference to be adequate and handy.
To access online help for the use of a particular command, use one of the following proce-dures from the DOS prompt:
■ Type the DOS command, followed by the switch /?.
■ Type HELP, followed by the DOS command.
The following sections describe each method in detail.
Using the Command-Line Help Switch
One DOS command-line switch is never documented in the syntax examples, but you canuse this switch with any DOS command. The /? switch is universal to all DOS commands.
After you enter a DOS command followed by the /? switch, DOS prints to the screen asummary of the command syntax. In some cases, the sample syntax is simplified by omittingoptions not available to you at the command line. A good example is the EMM386 command.Usually, EMM386 is loaded via CONFIG.SYS. After DOS is running, only those parts of thecommand that are accessible during a DOS session are displayed, omitting the parametersthat can be given only at boot time.
The handy thing about using the /? switch is that it gives you a short summary of the com-mand, leaving enough room onscreen for a DOS prompt. This way, you can refer to thesyntax and type the command without taking your attention away from the screen.
To get a command summary of the DIR command, for example, type the following commandand then press Enter:
DIR /?
DOS displays the command summary help screen shown in Figure 3.1.
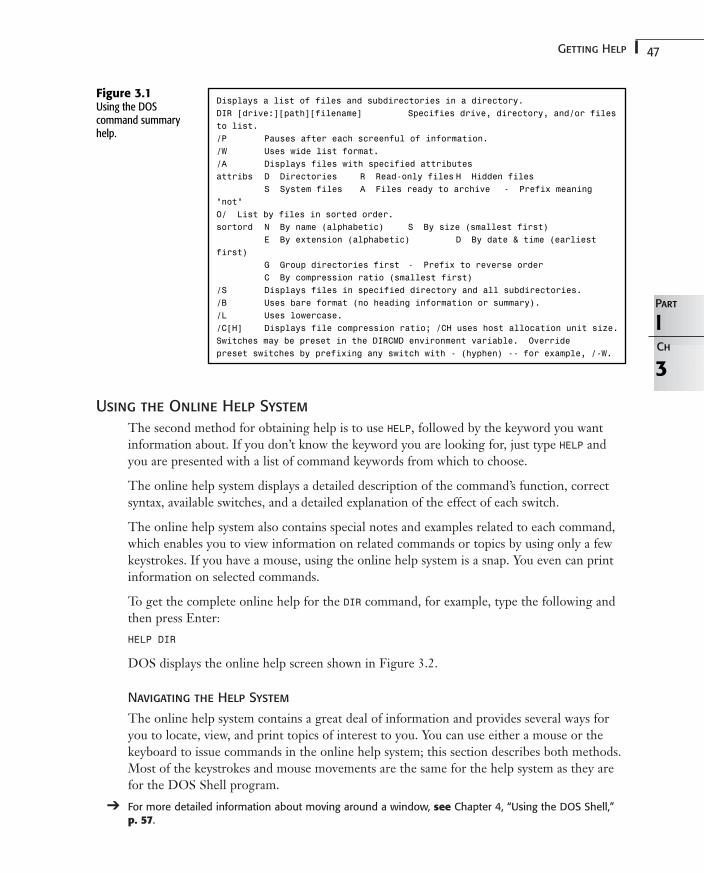
47Getting Help
Using the Online Help System
The second method for obtaining help is to use HELP, followed by the keyword you wantinformation about. If you don’t know the keyword you are looking for, just type HELP andyou are presented with a list of command keywords from which to choose.
The online help system displays a detailed description of the command’s function, correctsyntax, available switches, and a detailed explanation of the effect of each switch.
The online help system also contains special notes and examples related to each command,which enables you to view information on related commands or topics by using only a fewkeystrokes. If you have a mouse, using the online help system is a snap. You even can printinformation on selected commands.
To get the complete online help for the DIR command, for example, type the following andthen press Enter:
HELP DIR
DOS displays the online help screen shown in Figure 3.2.
Navigating the Help System
The online help system contains a great deal of information and provides several ways foryou to locate, view, and print topics of interest to you. You can use either a mouse or thekeyboard to issue commands in the online help system; this section describes both methods.Most of the keystrokes and mouse movements are the same for the help system as they arefor the DOS Shell program.
➔ For more detailed information about moving around a window, see Chapter 4, “Using the DOS Shell,”p. 57.
3
IPart
Ch
Figure 3.1Using the DOS command summaryhelp.
Displays a list of files and subdirectories in a directory.DIR [drive:][path][filename] Specifies drive, directory, and/or filesto list./P Pauses after each screenful of information./W Uses wide list format./A Displays files with specified attributesattribs D Directories R Read-only files H Hidden files
S System files A Files ready to archive - Prefix meaning“not”O/ List by files in sorted order.sortord N By name (alphabetic) S By size (smallest first)
E By extension (alphabetic) D By date & time (earliestfirst)
G Group directories first - Prefix to reverse orderC By compression ratio (smallest first)
/S Displays files in specified directory and all subdirectories./B Uses bare format (no heading information or summary)./L Uses lowercase./C[H] Displays file compression ratio; /CH uses host allocation unit size.Switches may be preset in the DIRCMD environment variable. Overridepreset switches by prefixing any switch with - (hyphen) -- for example, /-W.
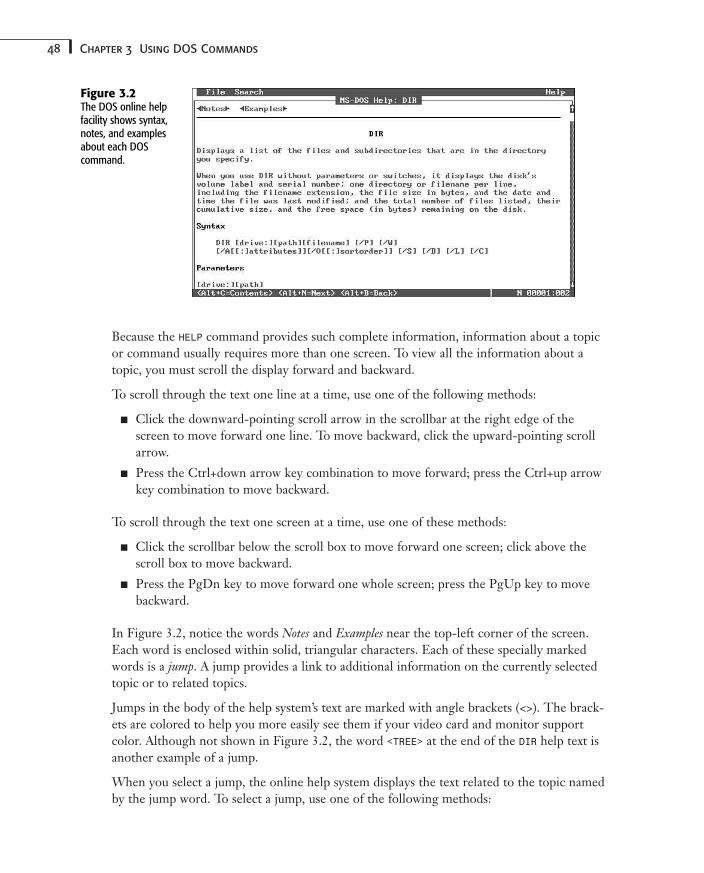
48 Chapter 3 Using DOS Commands
Because the HELP command provides such complete information, information about a topicor command usually requires more than one screen. To view all the information about atopic, you must scroll the display forward and backward.
To scroll through the text one line at a time, use one of the following methods:
■ Click the downward-pointing scroll arrow in the scrollbar at the right edge of thescreen to move forward one line. To move backward, click the upward-pointing scrollarrow.
■ Press the Ctrl+down arrow key combination to move forward; press the Ctrl+up arrowkey combination to move backward.
To scroll through the text one screen at a time, use one of these methods:
■ Click the scrollbar below the scroll box to move forward one screen; click above thescroll box to move backward.
■ Press the PgDn key to move forward one whole screen; press the PgUp key to movebackward.
In Figure 3.2, notice the words Notes and Examples near the top-left corner of the screen.Each word is enclosed within solid, triangular characters. Each of these specially markedwords is a jump. A jump provides a link to additional information on the currently selectedtopic or to related topics.
Jumps in the body of the help system’s text are marked with angle brackets (<>). The brack-ets are colored to help you more easily see them if your video card and monitor supportcolor. Although not shown in Figure 3.2, the word <TREE> at the end of the DIR help text isanother example of a jump.
When you select a jump, the online help system displays the text related to the topic namedby the jump word. To select a jump, use one of the following methods:
Figure 3.2The DOS online helpfacility shows syntax,notes, and examplesabout each DOS command.
49Getting Help
■ Click the jump with the mouse.
■ Move the cursor over the jump and then press Enter.
If you select the <Examples> jump shown in Figure 3.2, the help system displays a screencontaining examples of the DIR command and explanations of each example. Selecting ajump such as <TREE> causes the help system to display the help for the TREE command.
In Figure 3.2, the solid bar across the top of the screen with the words File and Search is thehelp system’s menu bar. You use the help system’s pull-down menus in the same way you usethe pull-down menus in the DOS Shell.
➔ If you are unfamiliar with using pull-down menus, see Chapter 4, “Using the DOS Shell,” p. 57.
The choices on the File menu enable you to print a topic or exit the online help system.The choices on the Search menu enable you to search for a topic, word, or phrase andrepeat the last search.
Another solid bar appears at the bottom of the screen (refer again to Figure 3.2). The bottom-right corner of this area of the help screen displays numbers indicating the currentline and column number of the cursor. In Figure 3.2, the cursor is at line 1, column 2 of thehelp text for the DIR command.
At the left edge of this area, three keystroke combinations and their functions are displayed:
<Alt+C=Contents> <Alt+N=Next> <Alt+B=Back>
Each label enclosed in brackets also doubles as a command button if you have a mouse. Youcan click the command button or press the key command, Alt+C, causes the online help sys-tem to display its table of contents. Each item in the table of contents is a jump. The Nextcommand, Alt+N, causes the online help system to display the next topic. The Back com-mand, Alt+B, causes the online help system to display the last topic you looked at.
Table 3.1 summarizes the command keys, and their actions, available in the online help system.
Table 3.1 Online Help Command Keys
Key Action
Alt Activates the help system menu
Alt+B Returns to the last topic you viewed
Alt+C Displays the list of topics covered in the help system
Alt+F Opens the File menu
Alt+S Opens the Search menu
Alt+N Moves to the next topic
Ctrl+down arrow Scrolls the screen down one line
Ctrl+up arrow Scrolls the screen up one line
3
IPart
Ch
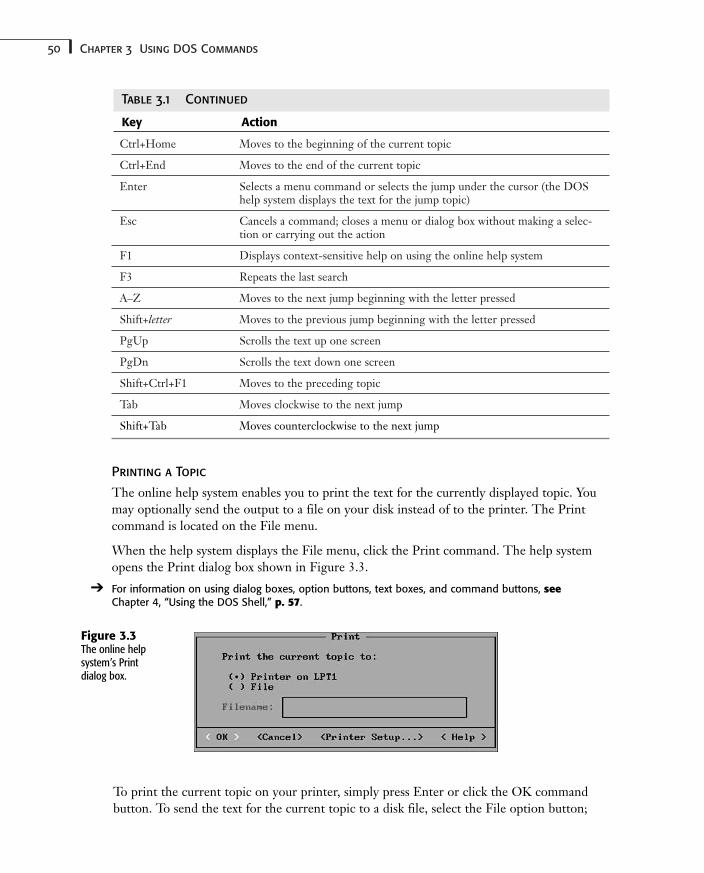
50 Chapter 3 Using DOS Commands
Ctrl+Home Moves to the beginning of the current topic
Ctrl+End Moves to the end of the current topic
Enter Selects a menu command or selects the jump under the cursor (the DOShelp system displays the text for the jump topic)
Esc Cancels a command; closes a menu or dialog box without making a selec-tion or carrying out the action
F1 Displays context-sensitive help on using the online help system
F3 Repeats the last search
A–Z Moves to the next jump beginning with the letter pressed
Shift+letter Moves to the previous jump beginning with the letter pressed
PgUp Scrolls the text up one screen
PgDn Scrolls the text down one screen
Shift+Ctrl+F1 Moves to the preceding topic
Tab Moves clockwise to the next jump
Shift+Tab Moves counterclockwise to the next jump
Printing a Topic
The online help system enables you to print the text for the currently displayed topic. Youmay optionally send the output to a file on your disk instead of to the printer. The Printcommand is located on the File menu.
When the help system displays the File menu, click the Print command. The help systemopens the Print dialog box shown in Figure 3.3.
➔ For information on using dialog boxes, option buttons, text boxes, and command buttons, seeChapter 4, “Using the DOS Shell,” p. 57.
Table 3.1 Continued
Key Action
Figure 3.3The online help system’s Print dialog box.
To print the current topic on your printer, simply press Enter or click the OK commandbutton. To send the text for the current topic to a disk file, select the File option button;
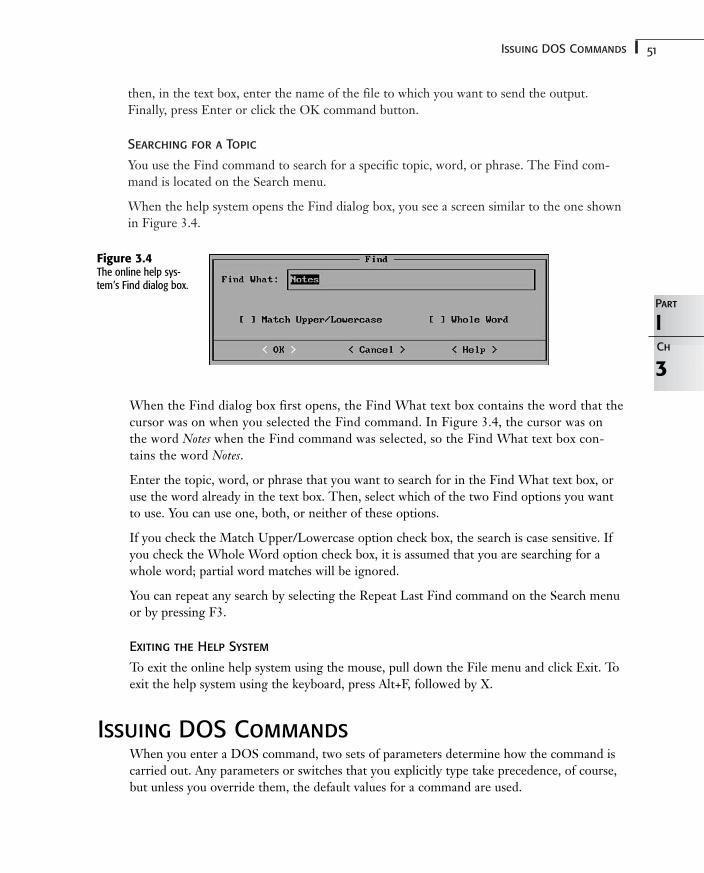
51Issuing DOS Commands
then, in the text box, enter the name of the file to which you want to send the output.Finally, press Enter or click the OK command button.
Searching for a Topic
You use the Find command to search for a specific topic, word, or phrase. The Find com-mand is located on the Search menu.
When the help system opens the Find dialog box, you see a screen similar to the one shownin Figure 3.4.
3
IPart
Ch
Figure 3.4The online help sys-tem’s Find dialog box.
When the Find dialog box first opens, the Find What text box contains the word that thecursor was on when you selected the Find command. In Figure 3.4, the cursor was on the word Notes when the Find command was selected, so the Find What text box con-tains the word Notes.
Enter the topic, word, or phrase that you want to search for in the Find What text box, oruse the word already in the text box. Then, select which of the two Find options you wantto use. You can use one, both, or neither of these options.
If you check the Match Upper/Lowercase option check box, the search is case sensitive. Ifyou check the Whole Word option check box, it is assumed that you are searching for awhole word; partial word matches will be ignored.
You can repeat any search by selecting the Repeat Last Find command on the Search menuor by pressing F3.
Exiting the Help System
To exit the online help system using the mouse, pull down the File menu and click Exit. Toexit the help system using the keyboard, press Alt+F, followed by X.
Issuing DOS CommandsWhen you enter a DOS command, two sets of parameters determine how the command iscarried out. Any parameters or switches that you explicitly type take precedence, of course,but unless you override them, the default values for a command are used.
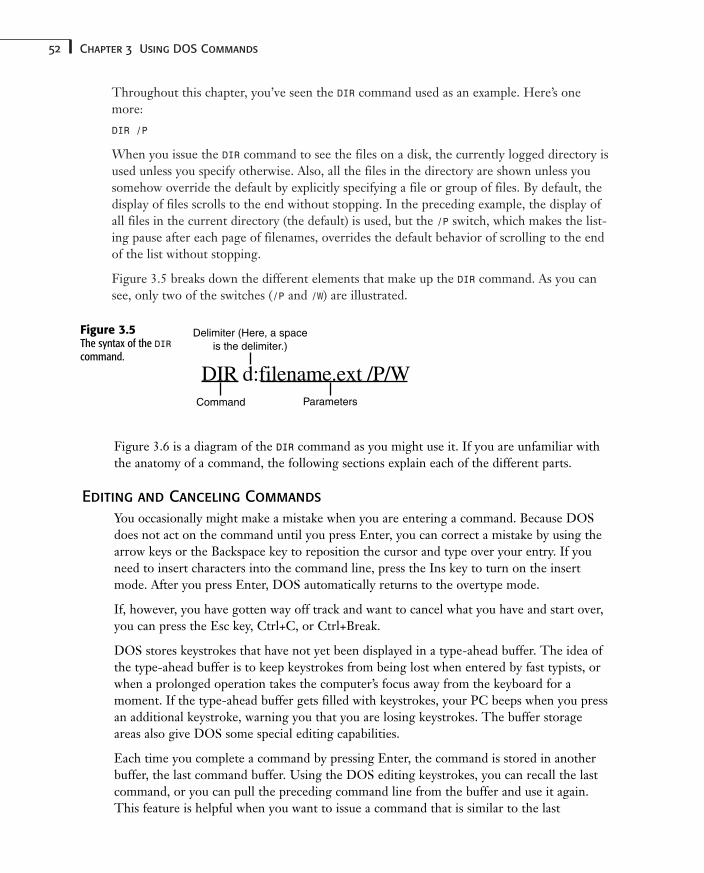
52 Chapter 3 Using DOS Commands
Throughout this chapter, you’ve seen the DIR command used as an example. Here’s onemore:
DIR /P
When you issue the DIR command to see the files on a disk, the currently logged directory isused unless you specify otherwise. Also, all the files in the directory are shown unless yousomehow override the default by explicitly specifying a file or group of files. By default, thedisplay of files scrolls to the end without stopping. In the preceding example, the display ofall files in the current directory (the default) is used, but the /P switch, which makes the list-ing pause after each page of filenames, overrides the default behavior of scrolling to the endof the list without stopping.
Figure 3.5 breaks down the different elements that make up the DIR command. As you cansee, only two of the switches (/P and /W) are illustrated.
Figure 3.5The syntax of the DIRcommand.
DIR d:filename.ext /P/W
Delimiter (Here, a space
is the delimiter.)
Command Parameters
Figure 3.6 is a diagram of the DIR command as you might use it. If you are unfamiliar withthe anatomy of a command, the following sections explain each of the different parts.
Editing and Canceling Commands
You occasionally might make a mistake when you are entering a command. Because DOSdoes not act on the command until you press Enter, you can correct a mistake by using thearrow keys or the Backspace key to reposition the cursor and type over your entry. If youneed to insert characters into the command line, press the Ins key to turn on the insertmode. After you press Enter, DOS automatically returns to the overtype mode.
If, however, you have gotten way off track and want to cancel what you have and start over,you can press the Esc key, Ctrl+C, or Ctrl+Break.
DOS stores keystrokes that have not yet been displayed in a type-ahead buffer. The idea ofthe type-ahead buffer is to keep keystrokes from being lost when entered by fast typists, orwhen a prolonged operation takes the computer’s focus away from the keyboard for amoment. If the type-ahead buffer gets filled with keystrokes, your PC beeps when you pressan additional keystroke, warning you that you are losing keystrokes. The buffer storageareas also give DOS some special editing capabilities.
Each time you complete a command by pressing Enter, the command is stored in anotherbuffer, the last command buffer. Using the DOS editing keystrokes, you can recall the lastcommand, or you can pull the preceding command line from the buffer and use it again.This feature is helpful when you want to issue a command that is similar to the last
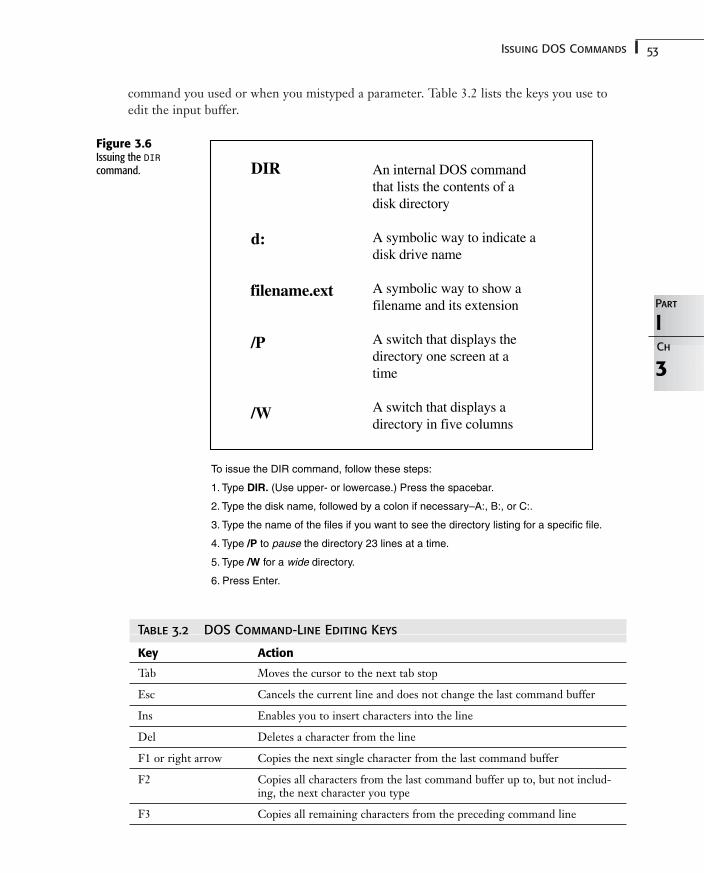
53Issuing DOS Commands
command you used or when you mistyped a parameter. Table 3.2 lists the keys you use toedit the input buffer.
3
IPart
Ch
Figure 3.6Issuing the DIRcommand. DIR
d:
filename.ext
/P
/W
An internal DOS command
that lists the contents of a
disk directory
A symbolic way to indicate a
disk drive name
A symbolic way to show a
filename and its extension
A switch that displays the
directory one screen at a
time
A switch that displays a
directory in five columns
To issue the DIR command, follow these steps:
1. Type DIR. (Use upper- or lowercase.) Press the spacebar.
2. Type the disk name, followed by a colon if necessary–A:, B:, or C:.
3. Type the name of the files if you want to see the directory listing for a specific file.
4. Type /P to pause the directory 23 lines at a time.
5. Type /W for a wide directory.
6. Press Enter.
Table 3.2 DOS Command-Line Editing Keys
Key Action
Tab Moves the cursor to the next tab stop
Esc Cancels the current line and does not change the last command buffer
Ins Enables you to insert characters into the line
Del Deletes a character from the line
F1 or right arrow Copies the next single character from the last command buffer
F2 Copies all characters from the last command buffer up to, but not includ-ing, the next character you type
F3 Copies all remaining characters from the preceding command line
54 Chapter 3 Using DOS Commands
F4 Deletes all characters from the last command buffer up to and includingthe next character typed (opposite of F2)
F5 Moves the current line into the buffer but does not allow DOS to executethe line
F6 Produces an end-of-file marker (^Z) when you copy from the console to adisk file
These editing keystrokes come from the earliest versions of DOS. Beginning with version5.0, there is a better way. The DOSKEY command, usually entered via AUTOEXEC.BAT, loads intomemory a program that creates a much larger buffer to store previous command lines.(Refer to the “Command Reference” for the DOSKEY listing.) You can recall these commandsby pressing the up-arrow key. The DOSKEY buffer is 512 bytes by default, which is enough onaverage to store the last 20 commands executed.
➔ For a complete reference source for DOS editing keystrokes, see Appendix D, “DOS and DOS UtilityPrograms’ Keyboard Commands,” p. 563.
Using Scroll Control
The term scrolling describes what happens as a DOS screen fills with information. WhenDOS displays text in response to your typing or as a result of a DOS command, the text fillsthe screen from left to right and top to bottom. As the screen fills, information scrolls offthe top of the display. To stop a scrolling screen, press Ctrl+S (hold down the Ctrl key andthen press S). Press any key to restart the scrolling. On enhanced keyboards, press the Pausekey to stop scrolling.
Using Wildcards in DOS Commands
Almost everyone has at one time played a game, such as poker, that employs wildcards. Ifyou hear the dealer say “Deuces are wild!” you know that cards having the number 2 printedon the face can be substituted for any other card in the deck.
DOS uses wildcards, too. When you’re entering DOS commands, you can use wildcards tospecify groups of files. DOS recognizes two wildcard characters: the question mark (?) andthe asterisk (*), also called star (“star dot star” means *.*).
In DOS commands, the ? represents any single character. The following command producesa directory listing of any files in the currently logged directory that have a filename begin-ning with the letters LTR followed by up to three characters:
DIR LTR???.TXT
Also, only those files bearing the extension .TXT match and are listed. Thus, LTR.TXT,LTR0.TXT, LTR01.TXT, LTR001.TXT, LTRMOM.TXT, LTR_32.TXT, and LTR999.TXT are listed, butLTRPOPS.TXT or LTR1001.TXT are not.
Table 3.2 Continued
Key Action
55Troubleshooting
The * represents any string of characters. For example, *.* represents all filenames with anyextension, the default scope of the DIR command. The following command lists all files inthe currently logged directory having the extension .DOC:
DIR *.DOC
The following command lists all the files listed by the DIR LTR???.TXT example, as well asfilenames not matched by that form of the command:
DIR LTR*.TXT
You should look out for one thing when you’re using the * wildcard, however. The follow-ing command does not produce the result you might expect:
DIR *LTR.TXT
This example does not list all the .TXT files whose names end in LTR. Rather, it lists all thefiles having the extension .TXT. The reason is deceptively simple. Because the * can repre-sent up to eight characters in a filename, any string of characters matches *LTR.
After you get the hang of using wildcards to refine the scope of command parameters thatsupply filenames, you will find that you are well on your way to becoming a DOS poweruser.
TroubleshootingMy program won’t run from the C:\ prompt!
When you install DOS on your system, by default, the program files for external commandsare written to a directory named DOS on the drive letter that your computer boots from.Because most systems boot from drive C, most of the time you’ll find that the DOS directoryis called C:\DOS.
If you look into the AUTOEXEC.BAT file, you’ll probably find a command line that begins withPATH, followed by a list of directories. This command tells DOS where to search for pro-gram files when it is trying to run a command. If your DOS directory is listed in the PATHcommand line, COMMAND.COM can find the program files for external commands no matterwhat disk drive or directory you are logged on to. A PATH statement looks like this:
Path=c:\; c:\DOS; c:\windows
If you install a program to a new directory without adding that directory to the PATH state-ment, that program will run only if you change directories to where it resides. When youadd the program’s home directory to the PATH statement, you can execute any file in thatdirectory, no matter what directory you are currently in.

Using the DOS Shell
In this chapter
What Is the DOS Shell? 58
Starting the DOS Shell 59
Using the DOS Shell Menus 64
Using the Shell Screen Modes 75
Using the Program List 77
Working with Directories 83
Working with Files 87
Using the Task Swapper 93
Project: Using the Help System 94
4CHAPTER
58 Chapter 4 Using the DOS Shell
What Is the DOS Shell?The DOS Shell program is a visually oriented user interface that replaces the DOS com-mand line with easy-to-use and easy-to-understand menus. It enables you to use a mouse (orother pointing device) to perform many common DOS tasks.
Introduced with DOS 4.0, the DOS Shell is no longer a primary part of DOS. With theadvent of DOS 6.2, it has been relegated to the status of a supplemental program and is thusincluded on the Supplemental Disk. If you are upgrading from an earlier version of DOS,however, the earlier version of the DOS Shell will remain on your disk.
The DOS Shell is a mildly controversial feature of DOS. Although it is praised by some as akinder and gentler way of using DOS, others deride it as a crutch and a crippled imitation ofWindows. In fact, there is truth to both opinions.
The DOS Shell has features that are strikingly familiar to Windows users. The point-and-click interface, disks and directories displayed in tree format, the capability to associate file-name extensions with the program that produced them so that selecting a file also starts theprogram—these features are all hallmarks of the popular Windows operating environment.In fact, if your video card permits (EGA and higher), you can run the Shell in graphicsmode.
Still, to perform complex tasks, you often are required to enter command lines using theRun option of the File menu. For anything but the most rudimentary tasks, you still arerequired to know the syntax of DOS commands.
Unlike Windows, which was built from the ground up to be used as a graphical interface,the DOS Shell is mostly text based. Using the extended ASCII drawing characters, the DOSShell simulates a graphical user interface (GUI). Even when it’s run in graphics mode, theinterface changes only slightly.
Many longtime DOS users find the DOS Shell to be restrictive, even though many tasks areeasier and quicker when you use the Shell. On the other side of the coin, many new com-puter users, especially those with less than one year’s experience, find the Shell easier towork with than the bare DOS prompt.
Most users who begin their computer careers working with the DOS Shell usually end updoing one of two things. They either discard the Shell, like a worn-out pair of trainingwheels, or they move on to the Windows environment.
In practice, the DOS Shell has become a tool used by PC support specialists when trainingnewer users. Many MIS departments and support consultants find that if they teach newusers the ins and outs of the DOS Shell, they end up fielding fewer support calls from inex-perienced users.
It is assumed that many of the readers of this book fall into the category of support specialistor office computer guru. Although you might not want to use the DOS Shell in your ownwork, you might want to use it as training wheels for users that you must support.
59Starting the DOS Shell
With the DOS Shell, you can select many commands from a menu instead of typing thecommands on the DOS command line. More significantly, with the DOS Shell, many tasksare greatly simplified. You can search quickly through directories or an entire hard disk forfiles or groups of files. Using a mouse, you can select and copy files between directories orbetween disks using a Windows-like drag-and-drop feature.
The DOS Shell also provides features not available at the DOS prompt. You can start oneapplications program, for example, and then switch to a second application without exitingfrom the first. Unlike other environments, such as those provided by Windows, QEMM, or386MAX, however, programs in the background cannot remain active.
The DOS Shell enables you to view the contents of files in ASCII or hexadecimal formatswithout opening applications programs. Another feature associates specific filename exten-sions with a particular applications program so that selecting a file causes DOS to start theassociated program.
4
IPart
Ch
To use the DOS Shell effectively, you must have a mouse and mouse driver present on thesystem. Although you can stumble through the Shell using keystrokes, using a mouse canreduce frustration and save time.
For the mouse to be available, the mouse device driver must be loaded into memorybefore you run the DOS Shell. DOS 6.0 and later include a generic mouse device drivercalled MOUSE.COM, which can usually be found in the DOS directory. The mouse driverusually is loaded with a line in the AUTOEXEC.BAT file using the LOAD or LOADHIGHcommand.
Remember that some mouse devices are not Microsoft mouse–compatible and might notwork properly with the generic DOS mouse driver. Manufacturers of such mouse devicesnormally include a special mouse driver for you to use. See the mouse manual for details.
Starting the DOS ShellAfter installing the DOS Shell from the Supplemental Programs disk, you can start it bytyping the following at the DOS prompt to load the DOS Shell into memory:
DOSSHELL
The DOS Shell first displays a copyright notice and then displays the full-screen DOS Shellwindow.
When the Shell first loads, it also displays a message box in the center of the screen con-taining the message Reading Disk Information. The Shell scans the currently logged drivefor the directory structure and file information. After the drive is scanned, the Shell createsa display similar to the one shown in Figure 4.1.
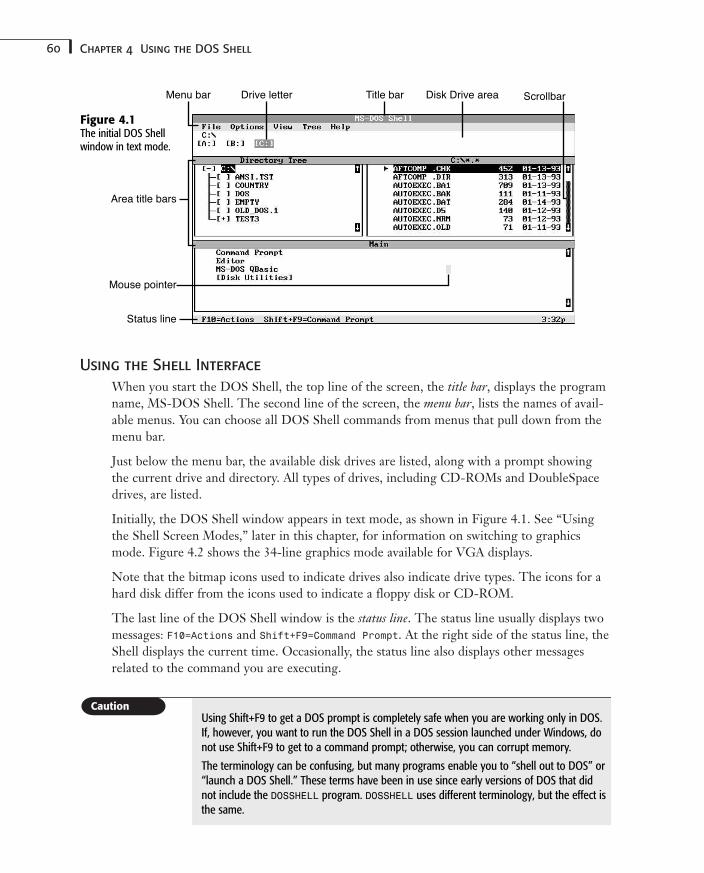
60 Chapter 4 Using the DOS Shell
Using the Shell Interface
When you start the DOS Shell, the top line of the screen, the title bar, displays the programname, MS-DOS Shell. The second line of the screen, the menu bar, lists the names of avail-able menus. You can choose all DOS Shell commands from menus that pull down from themenu bar.
Just below the menu bar, the available disk drives are listed, along with a prompt showingthe current drive and directory. All types of drives, including CD-ROMs and DoubleSpacedrives, are listed.
Initially, the DOS Shell window appears in text mode, as shown in Figure 4.1. See “Usingthe Shell Screen Modes,” later in this chapter, for information on switching to graphicsmode. Figure 4.2 shows the 34-line graphics mode available for VGA displays.
Note that the bitmap icons used to indicate drives also indicate drive types. The icons for ahard disk differ from the icons used to indicate a floppy disk or CD-ROM.
The last line of the DOS Shell window is the status line. The status line usually displays twomessages: F10=Actions and Shift+F9=Command Prompt. At the right side of the status line, theShell displays the current time. Occasionally, the status line also displays other messagesrelated to the command you are executing.
���� ��� ���� ����� ���� ��� ���������� ���� ����
����� �������
����� ���
���� ���� ����
Figure 4.1The initial DOS Shellwindow in text mode.
Using Shift+F9 to get a DOS prompt is completely safe when you are working only in DOS.If, however, you want to run the DOS Shell in a DOS session launched under Windows, donot use Shift+F9 to get to a command prompt; otherwise, you can corrupt memory.
The terminology can be confusing, but many programs enable you to “shell out to DOS” or“launch a DOS Shell.” These terms have been in use since early versions of DOS that didnot include the DOSSHELL program. DOSSHELL uses different terminology, but the effect isthe same.
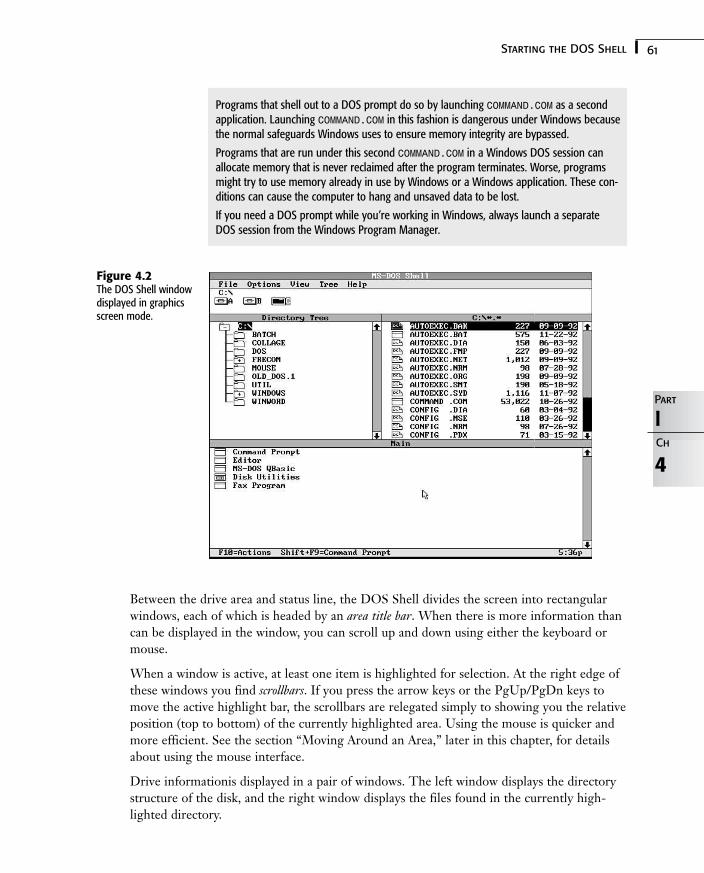
61Starting the DOS Shell
Programs that shell out to a DOS prompt do so by launching COMMAND.COM as a secondapplication. Launching COMMAND.COM in this fashion is dangerous under Windows becausethe normal safeguards Windows uses to ensure memory integrity are bypassed.
Programs that are run under this second COMMAND.COM in a Windows DOS session canallocate memory that is never reclaimed after the program terminates. Worse, programsmight try to use memory already in use by Windows or a Windows application. These con-ditions can cause the computer to hang and unsaved data to be lost.
If you need a DOS prompt while you’re working in Windows, always launch a separateDOS session from the Windows Program Manager.
4
IPart
Ch
Figure 4.2The DOS Shell windowdisplayed in graphicsscreen mode.
Between the drive area and status line, the DOS Shell divides the screen into rectangularwindows, each of which is headed by an area title bar. When there is more information thancan be displayed in the window, you can scroll up and down using either the keyboard ormouse.
When a window is active, at least one item is highlighted for selection. At the right edge ofthese windows you find scrollbars. If you press the arrow keys or the PgUp/PgDn keys tomove the active highlight bar, the scrollbars are relegated simply to showing you the relativeposition (top to bottom) of the currently highlighted area. Using the mouse is quicker andmore efficient. See the section “Moving Around an Area,” later in this chapter, for detailsabout using the mouse interface.
Drive informationis displayed in a pair of windows. The left window displays the directorystructure of the disk, and the right window displays the files found in the currently high-lighted directory.
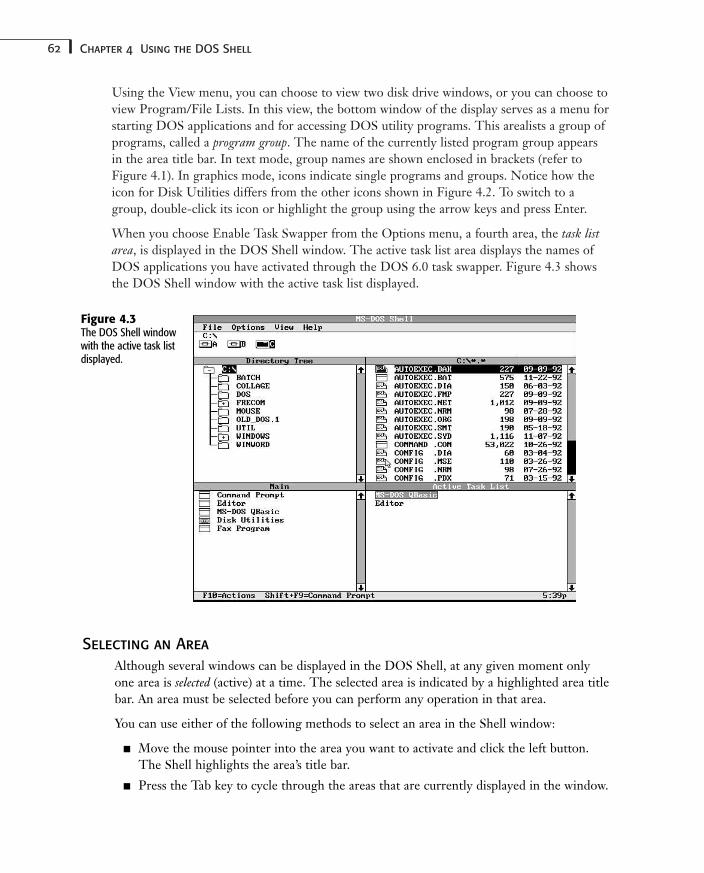
62 Chapter 4 Using the DOS Shell
Using the View menu, you can choose to view two disk drive windows, or you can choose toview Program/File Lists. In this view, the bottom window of the display serves as a menu forstarting DOS applications and for accessing DOS utility programs. This arealists a group ofprograms, called a program group. The name of the currently listed program group appearsin the area title bar. In text mode, group names are shown enclosed in brackets (refer toFigure 4.1). In graphics mode, icons indicate single programs and groups. Notice how theicon for Disk Utilities differs from the other icons shown in Figure 4.2. To switch to agroup, double-click its icon or highlight the group using the arrow keys and press Enter.
When you choose Enable Task Swapper from the Options menu, a fourth area, the task listarea, is displayed in the DOS Shell window. The active task list area displays the names ofDOS applications you have activated through the DOS 6.0 task swapper. Figure 4.3 showsthe DOS Shell window with the active task list displayed.
Figure 4.3The DOS Shell windowwith the active task listdisplayed.
Selecting an Area
Although several windows can be displayed in the DOS Shell, at any given moment onlyone area is selected (active) at a time. The selected area is indicated by a highlighted area titlebar. An area must be selected before you can perform any operation in that area.
You can use either of the following methods to select an area in the Shell window:
■ Move the mouse pointer into the area you want to activate and click the left button.The Shell highlights the area’s title bar.
■ Press the Tab key to cycle through the areas that are currently displayed in the window.
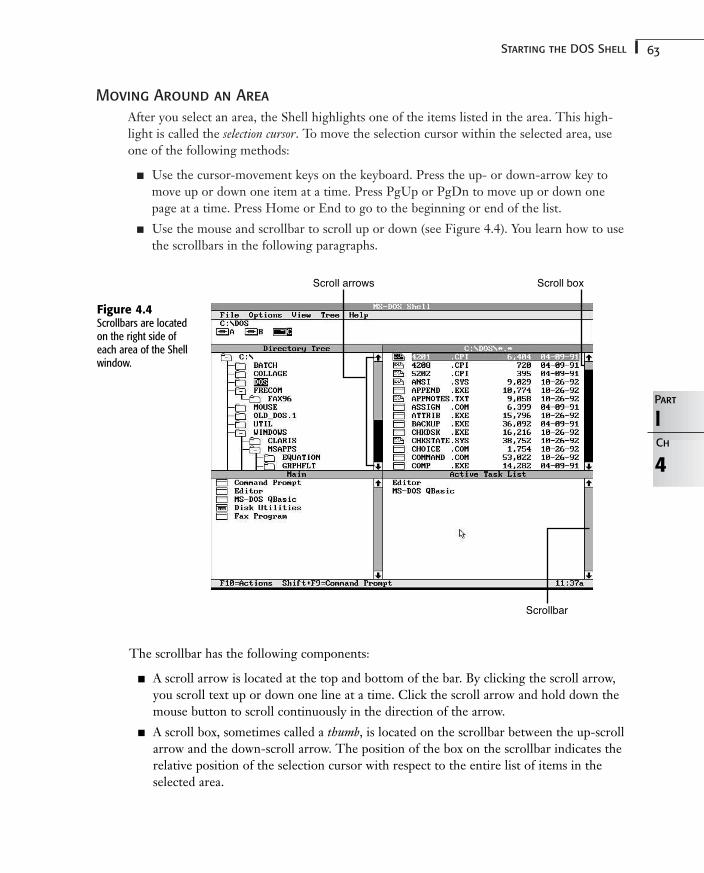
63Starting the DOS Shell
Moving Around an Area
After you select an area, the Shell highlights one of the items listed in the area. This high-light is called the selection cursor. To move the selection cursor within the selected area, useone of the following methods:
■ Use the cursor-movement keys on the keyboard. Press the up- or down-arrow key tomove up or down one item at a time. Press PgUp or PgDn to move up or down onepage at a time. Press Home or End to go to the beginning or end of the list.
■ Use the mouse and scrollbar to scroll up or down (see Figure 4.4). You learn how to usethe scrollbars in the following paragraphs.
4
IPart
Ch
Figure 4.4Scrollbars are locatedon the right side ofeach area of the Shellwindow.
������ ������ ������ ��
���������
The scrollbar has the following components:
■ A scroll arrow is located at the top and bottom of the bar. By clicking the scroll arrow,you scroll text up or down one line at a time. Click the scroll arrow and hold down themouse button to scroll continuously in the direction of the arrow.
■ A scroll box, sometimes called a thumb, is located on the scrollbar between the up-scrollarrow and the down-scroll arrow. The position of the box on the scrollbar indicates therelative position of the selection cursor with respect to the entire list of items in theselected area.
64 Chapter 4 Using the DOS Shell
Click the scrollbar above the scroll box to move the selection cursor up one page at a time.Click below the scroll box to move down one page at a time.
You can scroll quickly through the list in either direction by clicking the scroll box, holdingdown the left mouse button, and dragging the box in the direction you want the selectioncursor to move.
Using the DOS Shell MenusYou can initiate virtually every DOS Shell operation by choosing options from menus.These DOS Shell menus fall into two categories: the menu bar and pull-down menus.
Using the Menu Bar
When the disk drive area, directory tree area, or file list area is active, the menu bar lists fivemenu names: File, Options, View, Tree, and Help. The Tree menu name does not appearwhen the program list or active task list is the active area. Choosing a menu name displays a pull-down menu.
You can choose a menu option from the menu bar in one of three ways:
■ Move the mouse pointer to an option and click the left button.
■ Press the F10 key or Alt key to activate the menu bar. The Shell underlines one letterin each menu name and places a selection cursor on the menu name File at the left endof the menu bar. Press the key that corresponds to the underlined letter in the menuname you want to choose. To choose View from the menu bar, for example, press F10or Alt and then press V.
■ Press F10 or Alt to activate the menu bar, use the right- or left-arrow key to move theselection cursor to your choice, and press Enter. This method is sometimes called thepoint-and-shoot method.
Even after you choose a menu name, you still can choose another menu name by clickingthe name or by using the right- or left-arrow key.
Using Pull-Down Menus
When you choose a menu name from the menu bar, the Shell displays a pull-down menu,which displays a list of items below the menu bar. If you choose File, for example, while thefile list is the active area, the Shell displays the File pull-down menu shown in Figure 4.5.The items listed in the menu depend on which area is active.
To choose an item from a pull-down menu, use one of the following methods:
■ Move the mouse pointer to a menu item and click the left button.
■ The Shell underlines one letter in each menu item. Press the key that corresponds tothe underlined letter in the item you want to choose. To choose View File Contentsfrom the File menu in Figure 4.5, for example, press V.
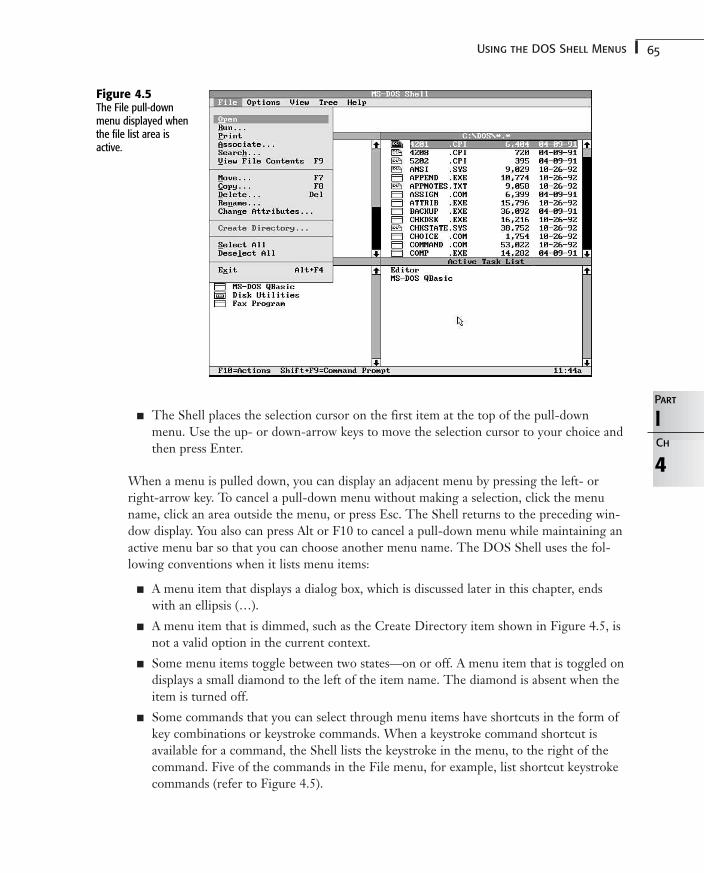
65Using the DOS Shell Menus
■ The Shell places the selection cursor on the first item at the top of the pull-downmenu. Use the up- or down-arrow keys to move the selection cursor to your choice andthen press Enter.
When a menu is pulled down, you can display an adjacent menu by pressing the left- orright-arrow key. To cancel a pull-down menu without making a selection, click the menuname, click an area outside the menu, or press Esc. The Shell returns to the preceding win-dow display. You also can press Alt or F10 to cancel a pull-down menu while maintaining anactive menu bar so that you can choose another menu name. The DOS Shell uses the fol-lowing conventions when it lists menu items:
■ A menu item that displays a dialog box, which is discussed later in this chapter, endswith an ellipsis (…).
■ A menu item that is dimmed, such as the Create Directory item shown in Figure 4.5, isnot a valid option in the current context.
■ Some menu items toggle between two states—on or off. A menu item that is toggled ondisplays a small diamond to the left of the item name. The diamond is absent when theitem is turned off.
■ Some commands that you can select through menu items have shortcuts in the form ofkey combinations or keystroke commands. When a keystroke command shortcut isavailable for a command, the Shell lists the keystroke in the menu, to the right of thecommand. Five of the commands in the File menu, for example, list shortcut keystrokecommands (refer to Figure 4.5).
4
IPart
Ch
Figure 4.5The File pull-downmenu displayed whenthe file list area isactive.
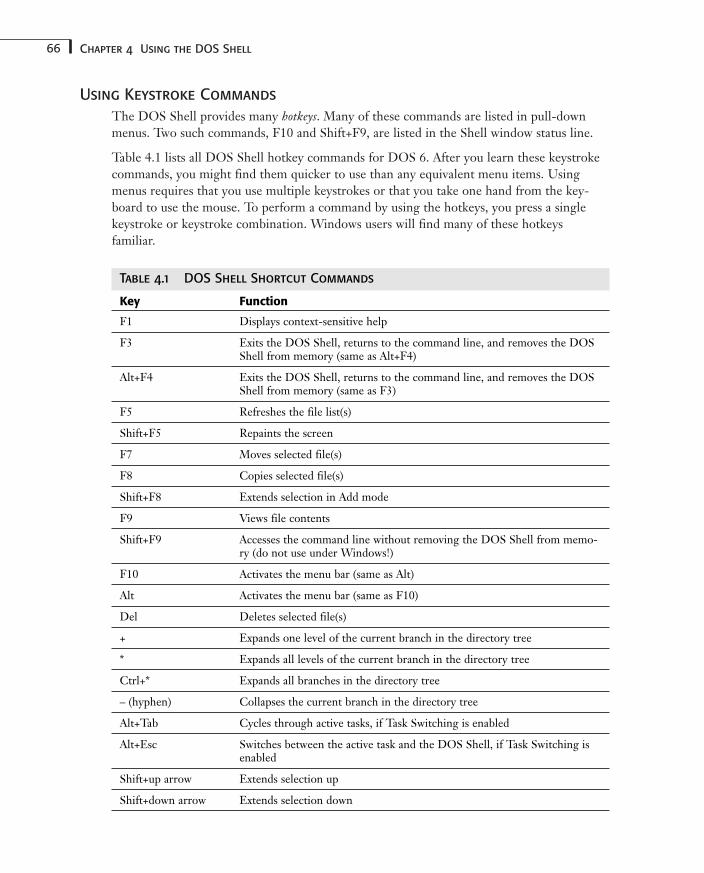
66 Chapter 4 Using the DOS Shell
Using Keystroke Commands
The DOS Shell provides many hotkeys. Many of these commands are listed in pull-downmenus. Two such commands, F10 and Shift+F9, are listed in the Shell window status line.
Table 4.1 lists all DOS Shell hotkey commands for DOS 6. After you learn these keystrokecommands, you might find them quicker to use than any equivalent menu items. Usingmenus requires that you use multiple keystrokes or that you take one hand from the key-board to use the mouse. To perform a command by using the hotkeys, you press a singlekeystroke or keystroke combination. Windows users will find many of these hotkeys familiar.
Table 4.1 DOS Shell Shortcut Commands
Key Function
F1 Displays context-sensitive help
F3 Exits the DOS Shell, returns to the command line, and removes the DOSShell from memory (same as Alt+F4)
Alt+F4 Exits the DOS Shell, returns to the command line, and removes the DOSShell from memory (same as F3)
F5 Refreshes the file list(s)
Shift+F5 Repaints the screen
F7 Moves selected file(s)
F8 Copies selected file(s)
Shift+F8 Extends selection in Add mode
F9 Views file contents
Shift+F9 Accesses the command line without removing the DOS Shell from memo-ry (do not use under Windows!)
F10 Activates the menu bar (same as Alt)
Alt Activates the menu bar (same as F10)
Del Deletes selected file(s)
+ Expands one level of the current branch in the directory tree
* Expands all levels of the current branch in the directory tree
Ctrl+* Expands all branches in the directory tree
– (hyphen) Collapses the current branch in the directory tree
Alt+Tab Cycles through active tasks, if Task Switching is enabled
Alt+Esc Switches between the active task and the DOS Shell, if Task Switching isenabled
Shift+up arrow Extends selection up
Shift+down arrow Extends selection down
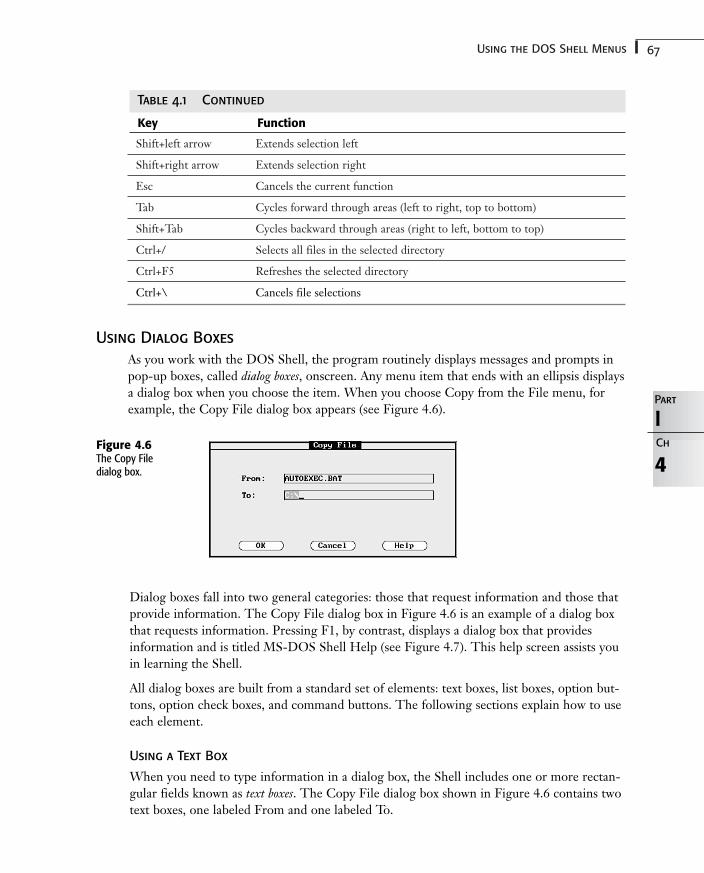
67Using the DOS Shell Menus
Shift+left arrow Extends selection left
Shift+right arrow Extends selection right
Esc Cancels the current function
Tab Cycles forward through areas (left to right, top to bottom)
Shift+Tab Cycles backward through areas (right to left, bottom to top)
Ctrl+/ Selects all files in the selected directory
Ctrl+F5 Refreshes the selected directory
Ctrl+\ Cancels file selections
Using Dialog Boxes
As you work with the DOS Shell, the program routinely displays messages and prompts inpop-up boxes, called dialog boxes, onscreen. Any menu item that ends with an ellipsis displaysa dialog box when you choose the item. When you choose Copy from the File menu, forexample, the Copy File dialog box appears (see Figure 4.6).
4
IPart
Ch
Table 4.1 Continued
Key Function
Figure 4.6The Copy File dialog box.
Dialog boxes fall into two general categories: those that request information and those thatprovide information. The Copy File dialog box in Figure 4.6 is an example of a dialog boxthat requests information. Pressing F1, by contrast, displays a dialog box that providesinformation and is titled MS-DOS Shell Help (see Figure 4.7). This help screen assists youin learning the Shell.
All dialog boxes are built from a standard set of elements: text boxes, list boxes, option but-tons, option check boxes, and command buttons. The following sections explain how to useeach element.
Using a Text Box
When you need to type information in a dialog box, the Shell includes one or more rectan-gular fields known as text boxes. The Copy File dialog box shown in Figure 4.6 contains twotext boxes, one labeled From and one labeled To.
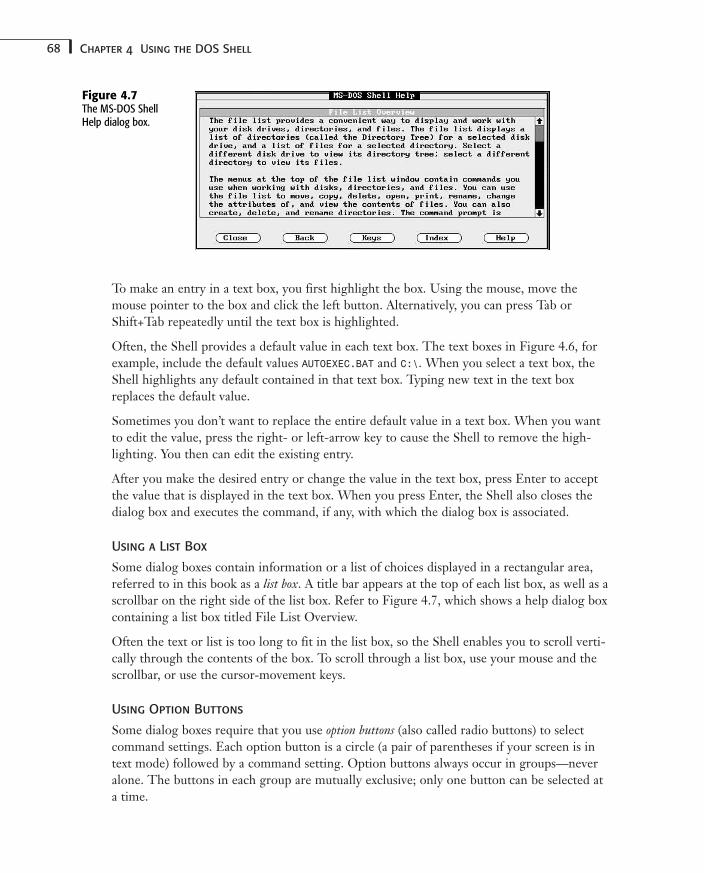
68 Chapter 4 Using the DOS Shell
To make an entry in a text box, you first highlight the box. Using the mouse, move themouse pointer to the box and click the left button. Alternatively, you can press Tab orShift+Tab repeatedly until the text box is highlighted.
Often, the Shell provides a default value in each text box. The text boxes in Figure 4.6, forexample, include the default values AUTOEXEC.BAT and C:\. When you select a text box, theShell highlights any default contained in that text box. Typing new text in the text boxreplaces the default value.
Sometimes you don’t want to replace the entire default value in a text box. When you wantto edit the value, press the right- or left-arrow key to cause the Shell to remove the high-lighting. You then can edit the existing entry.
After you make the desired entry or change the value in the text box, press Enter to acceptthe value that is displayed in the text box. When you press Enter, the Shell also closes thedialog box and executes the command, if any, with which the dialog box is associated.
Using a List Box
Some dialog boxes contain information or a list of choices displayed in a rectangular area,referred to in this book as a list box. A title bar appears at the top of each list box, as well as ascrollbar on the right side of the list box. Refer to Figure 4.7, which shows a help dialog boxcontaining a list box titled File List Overview.
Often the text or list is too long to fit in the list box, so the Shell enables you to scroll verti-cally through the contents of the box. To scroll through a list box, use your mouse and thescrollbar, or use the cursor-movement keys.
Using Option Buttons
Some dialog boxes require that you use option buttons (also called radio buttons) to selectcommand settings. Each option button is a circle (a pair of parentheses if your screen is intext mode) followed by a command setting. Option buttons always occur in groups—neveralone. The buttons in each group are mutually exclusive; only one button can be selected ata time.
Figure 4.7The MS-DOS ShellHelp dialog box.
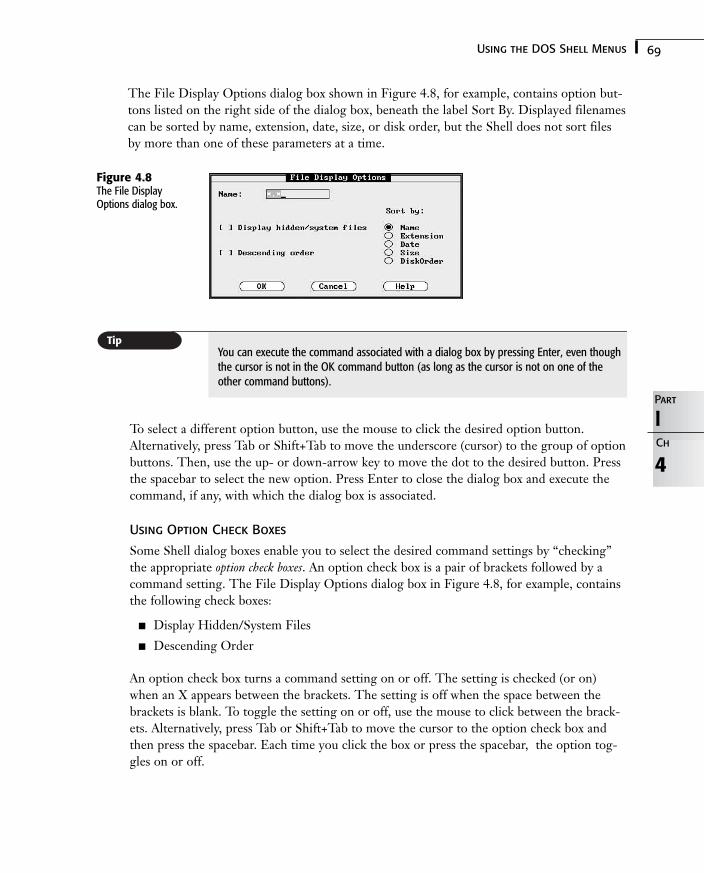
69Using the DOS Shell Menus
The File Display Options dialog box shown in Figure 4.8, for example, contains option but-tons listed on the right side of the dialog box, beneath the label Sort By. Displayed filenamescan be sorted by name, extension, date, size, or disk order, but the Shell does not sort filesby more than one of these parameters at a time.
4
IPart
Ch
Figure 4.8The File DisplayOptions dialog box.
You can execute the command associated with a dialog box by pressing Enter, even thoughthe cursor is not in the OK command button (as long as the cursor is not on one of theother command buttons).
To select a different option button, use the mouse to click the desired option button.Alternatively, press Tab or Shift+Tab to move the underscore (cursor) to the group of optionbuttons. Then, use the up- or down-arrow key to move the dot to the desired button. Pressthe spacebar to select the new option. Press Enter to close the dialog box and execute thecommand, if any, with which the dialog box is associated.
Using Option Check Boxes
Some Shell dialog boxes enable you to select the desired command settings by “checking”the appropriate option check boxes. An option check box is a pair of brackets followed by acommand setting. The File Display Options dialog box in Figure 4.8, for example, containsthe following check boxes:
■ Display Hidden/System Files
■ Descending Order
An option check box turns a command setting on or off. The setting is checked (or on)when an X appears between the brackets. The setting is off when the space between thebrackets is blank. To toggle the setting on or off, use the mouse to click between the brack-ets. Alternatively, press Tab or Shift+Tab to move the cursor to the option check box andthen press the spacebar. Each time you click the box or press the spacebar, the option tog-gles on or off.
70 Chapter 4 Using the DOS Shell
Using Command Buttons
After you make any desired entries in text boxes, select appropriate option buttons, andcheck the correct check boxes, you are ready to execute the DOS Shell command. To doso, choose one of the command buttons. Most dialog boxes in the DOS Shell contain threecommand buttons: OK, Cancel, and Help (refer to Figure 4.8). The OK command buttonactivates the choices you made in the dialog box and executes the command, if any, withwhich the dialog box is associated. The Cancel command button aborts any changes youmade in the dialog box and returns to the DOS Shell window. The Help command buttonaccesses the Shell’s online help facility.
To execute a command button, use one of the following methods:
■ Move the mouse pointer to the desired command button and click the left mouse button.
■ Press Tab or Shift+Tab to move the cursor to the desired command button and pressEnter.
Modifying the View
The DOS Shell is quite flexible. In the directory tree area and file list area, you can displaydirectories and filenames from any of your computer’s disk drives, including directories andfilenames from two disks at one time. You also can display just the program list, change theentire screen to a graphics mode, and show as many as 60 lines of information on a singlescreen (depending on the capability of your computer’s monitor).
The following sections describe how to modify the display to list directories and files fromother disks, to display files from two disks at one time, and to change the amount of infor-mation displayed about each file. In addition, the following sections show you how to dis-play the program list full-screen and how to change the number of lines that appearonscreen.
Logging On to a Different Disk
As you learned in Chapter 2, “Starting DOS,” each time you turn on your computer, theoperating system (DOS) is loaded from one of your computer’s disks. This disk is the bootdisk. If your system is configured to start the DOS Shell immediately after your computerboots up, the Shell window lists directories and filenames found on the boot disk. Often,you might need to display the directories and filenames on a disk other than the boot disk.Figure 4.2, for example, shows three drive letters: A, B, and C. Drive C is the boot disk;therefore, the directories found in drive C are shown in the directory tree. Drive C’s icon is highlighted, indicating that C is the currently selected disk drive.
To display the directories found on another disk, move the mouse pointer to the drive iconof the desired disk and click the left mouse button. Alternatively, press the left- or right-arrow key until the Shell highlights the drive letter you want and then press Enter.
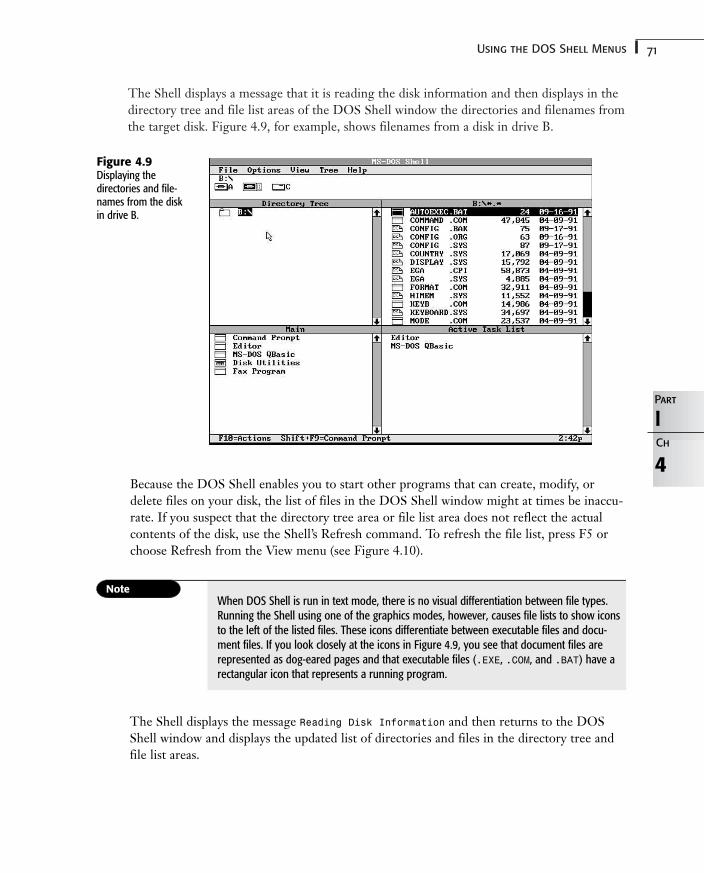
71Using the DOS Shell Menus
The Shell displays a message that it is reading the disk information and then displays in thedirectory tree and file list areas of the DOS Shell window the directories and filenames fromthe target disk. Figure 4.9, for example, shows filenames from a disk in drive B.
4
IPart
Ch
Figure 4.9Displaying the directories and file-names from the diskin drive B.
Because the DOS Shell enables you to start other programs that can create, modify, ordelete files on your disk, the list of files in the DOS Shell window might at times be inaccu-rate. If you suspect that the directory tree area or file list area does not reflect the actualcontents of the disk, use the Shell’s Refresh command. To refresh the file list, press F5 orchoose Refresh from the View menu (see Figure 4.10).
When DOS Shell is run in text mode, there is no visual differentiation between file types.Running the Shell using one of the graphics modes, however, causes file lists to show iconsto the left of the listed files. These icons differentiate between executable files and docu-ment files. If you look closely at the icons in Figure 4.9, you see that document files arerepresented as dog-eared pages and that executable files (.EXE, .COM, and .BAT) have arectangular icon that represents a running program.
The Shell displays the message Reading Disk Information and then returns to the DOSShell window and displays the updated list of directories and files in the directory tree andfile list areas.
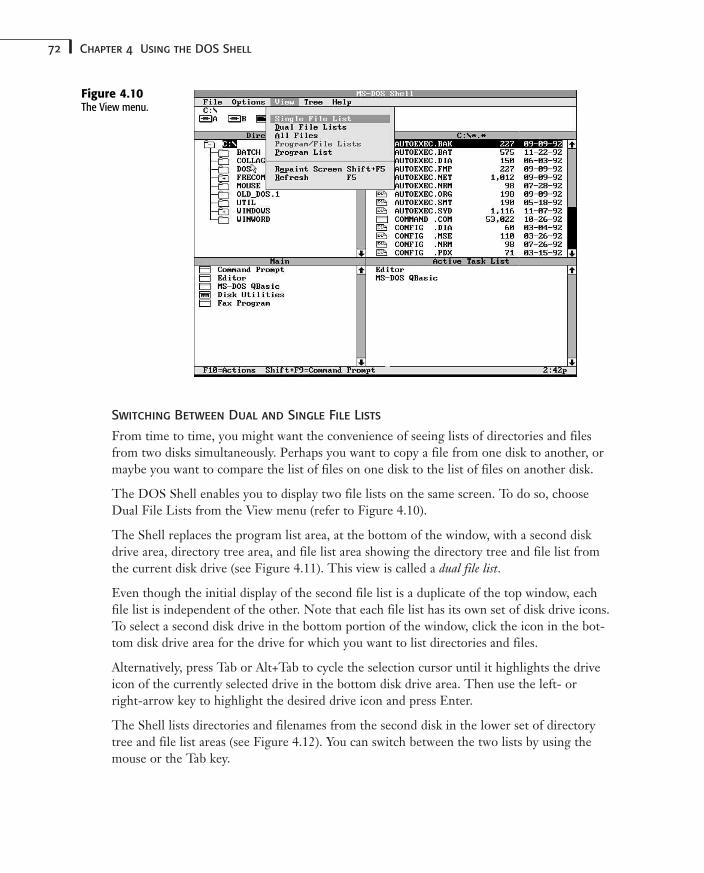
72 Chapter 4 Using the DOS Shell
Switching Between Dual and Single File Lists
From time to time, you might want the convenience of seeing lists of directories and filesfrom two disks simultaneously. Perhaps you want to copy a file from one disk to another, ormaybe you want to compare the list of files on one disk to the list of files on another disk.
The DOS Shell enables you to display two file lists on the same screen. To do so, chooseDual File Lists from the View menu (refer to Figure 4.10).
The Shell replaces the program list area, at the bottom of the window, with a second diskdrive area, directory tree area, and file list area showing the directory tree and file list fromthe current disk drive (see Figure 4.11). This view is called a dual file list.
Even though the initial display of the second file list is a duplicate of the top window, eachfile list is independent of the other. Note that each file list has its own set of disk drive icons.To select a second disk drive in the bottom portion of the window, click the icon in the bot-tom disk drive area for the drive for which you want to list directories and files.
Alternatively, press Tab or Alt+Tab to cycle the selection cursor until it highlights the driveicon of the currently selected drive in the bottom disk drive area. Then use the left- orright-arrow key to highlight the desired drive icon and press Enter.
The Shell lists directories and filenames from the second disk in the lower set of directorytree and file list areas (see Figure 4.12). You can switch between the two lists by using themouse or the Tab key.
Figure 4.10The View menu.
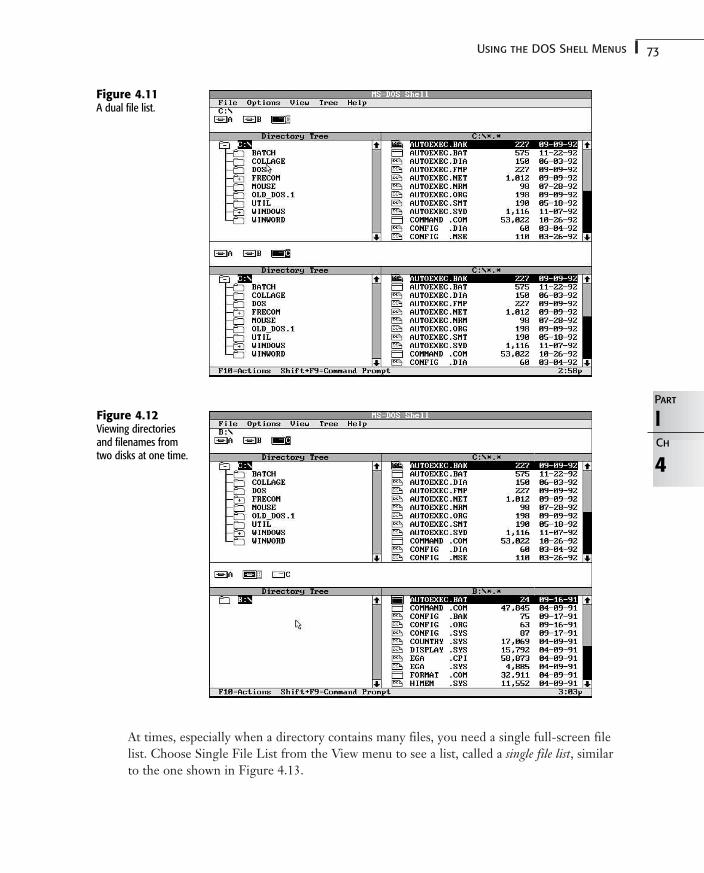
73Using the DOS Shell Menus
At times, especially when a directory contains many files, you need a single full-screen filelist. Choose Single File List from the View menu to see a list, called a single file list, similarto the one shown in Figure 4.13.
4
IPart
Ch
Figure 4.11A dual file list.
Figure 4.12Viewing directoriesand filenames fromtwo disks at one time.
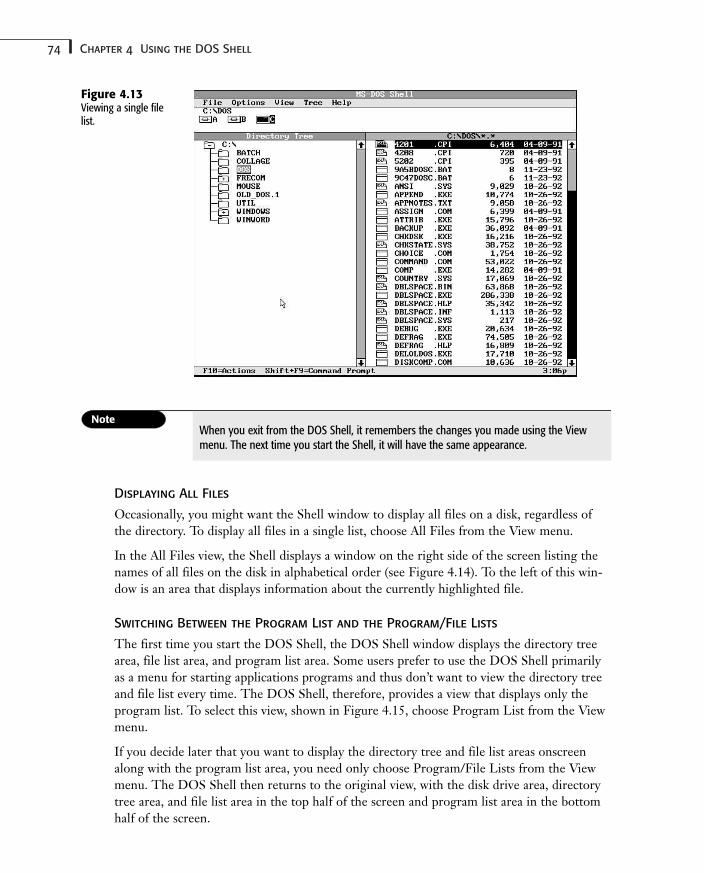
74 Chapter 4 Using the DOS Shell
Figure 4.13Viewing a single filelist.
When you exit from the DOS Shell, it remembers the changes you made using the Viewmenu. The next time you start the Shell, it will have the same appearance.
Displaying All Files
Occasionally, you might want the Shell window to display all files on a disk, regardless ofthe directory. To display all files in a single list, choose All Files from the View menu.
In the All Files view, the Shell displays a window on the right side of the screen listing thenames of all files on the disk in alphabetical order (see Figure 4.14). To the left of this win-dow is an area that displays information about the currently highlighted file.
Switching Between the Program List and the Program/File Lists
The first time you start the DOS Shell, the DOS Shell window displays the directory treearea, file list area, and program list area. Some users prefer to use the DOS Shell primarilyas a menu for starting applications programs and thus don’t want to view the directory treeand file list every time. The DOS Shell, therefore, provides a view that displays only theprogram list. To select this view, shown in Figure 4.15, choose Program List from the Viewmenu.
If you decide later that you want to display the directory tree and file list areas onscreenalong with the program list area, you need only choose Program/File Lists from the Viewmenu. The DOS Shell then returns to the original view, with the disk drive area, directorytree area, and file list area in the top half of the screen and program list area in the bottomhalf of the screen.
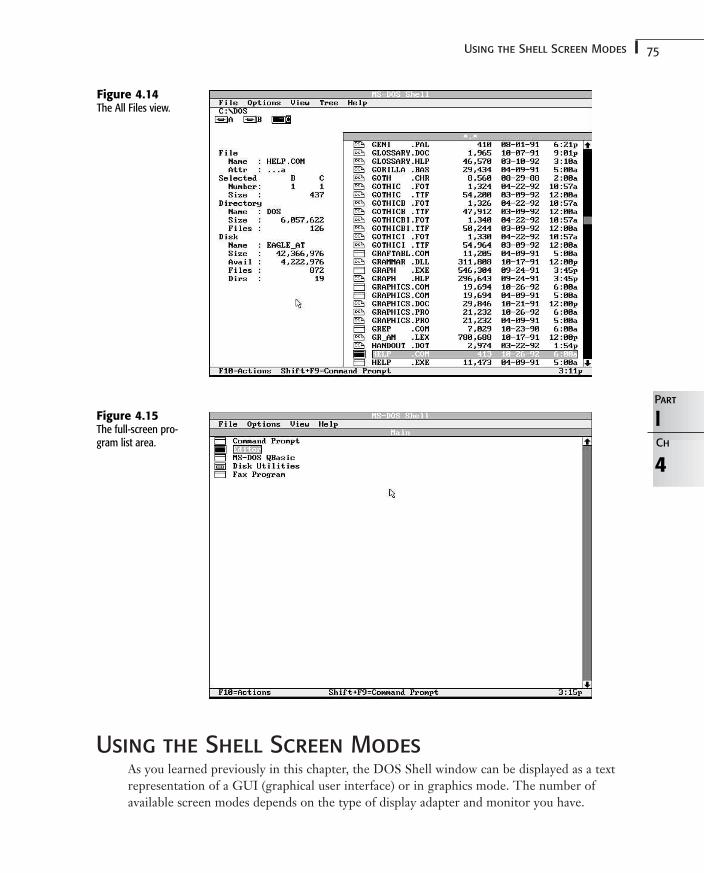
75Using the Shell Screen Modes
Using the Shell Screen ModesAs you learned previously in this chapter, the DOS Shell window can be displayed as a textrepresentation of a GUI (graphical user interface) or in graphics mode. The number ofavailable screen modes depends on the type of display adapter and monitor you have.
4
IPart
Ch
Figure 4.14The All Files view.
Figure 4.15The full-screen pro-gram list area.

76 Chapter 4 Using the DOS Shell
When you launch DOSSHELL the first time, the Shell window appears in the default 25-linelow-resolution text mode. If your video card permits, and most modern ones do, you canchoose Display from the Options menu to select from a variety of modes.
If you have a system with video cards that can support more text and graphic modes, youcan choose from an array of modes ranging from the default 25-line text mode up to high-resolution graphics modes that display 60 lines of information onscreen. Table 4.2 shows thefull list of display modes available.
Table 4.2 Available Video Modes in the DOS Shell
Text 25 lines Low Resolution
Text 43 lines High Resolution 1
Text 50 lines High Resolution 2
Graphics 25 lines Low Resolution
Graphics 30 lines Medium Resolution 1
Graphics 34 lines Medium Resolution 2
Graphics 43 lines High Resolution 1
Graphics 60 lines High Resolution 2
To change the screen mode, first select the Options menu (see Figure 4.16) and then chooseDisplay. The Screen Display Mode dialog box appears (see Figure 4.17). Next, highlight achoice in the dialog box, and click OK or press Enter. If you are unsure about your videocard’s support for a particular mode, you can choose the Preview button to see what resultsfrom that choice.
Figure 4.16The Options menu.
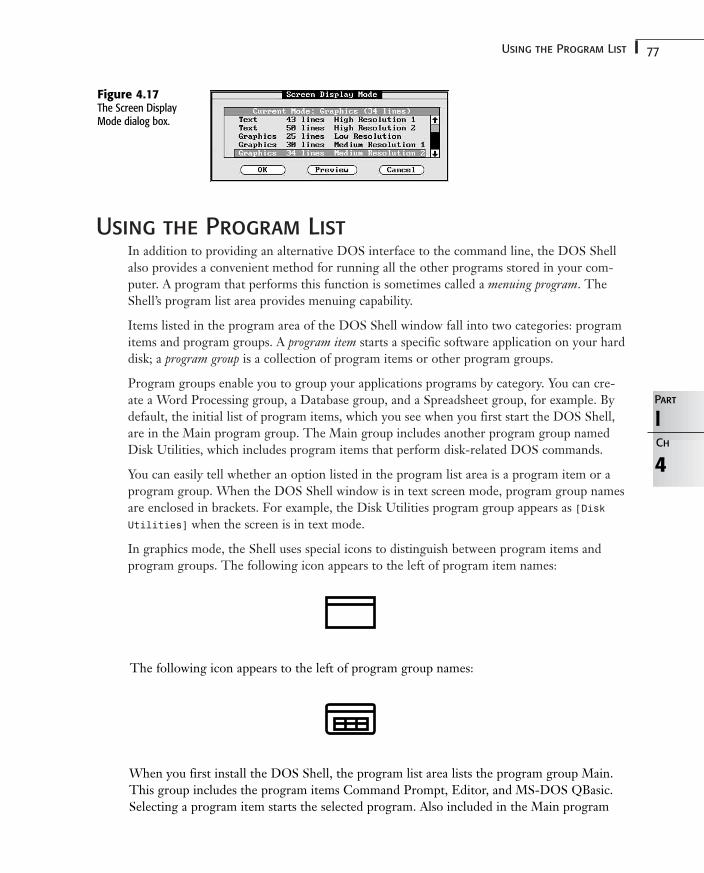
77Using the Program List
Using the Program ListIn addition to providing an alternative DOS interface to the command line, the DOS Shellalso provides a convenient method for running all the other programs stored in your com-puter. A program that performs this function is sometimes called a menuing program. TheShell’s program list area provides menuing capability.
Items listed in the program area of the DOS Shell window fall into two categories: programitems and program groups. A program item starts a specific software application on your harddisk; a program group is a collection of program items or other program groups.
Program groups enable you to group your applications programs by category. You can cre-ate a Word Processing group, a Database group, and a Spreadsheet group, for example. Bydefault, the initial list of program items, which you see when you first start the DOS Shell,are in the Main program group. The Main group includes another program group namedDisk Utilities, which includes program items that perform disk-related DOS commands.
You can easily tell whether an option listed in the program list area is a program item or aprogram group. When the DOS Shell window is in text screen mode, program group namesare enclosed in brackets. For example, the Disk Utilities program group appears as [DiskUtilities] when the screen is in text mode.
In graphics mode, the Shell uses special icons to distinguish between program items andprogram groups. The following icon appears to the left of program item names:
4
IPart
Ch
Figure 4.17The Screen DisplayMode dialog box.
The following icon appears to the left of program group names:
When you first install the DOS Shell, the program list area lists the program group Main.This group includes the program items Command Prompt, Editor, and MS-DOS QBasic.Selecting a program item starts the selected program. Also included in the Main program
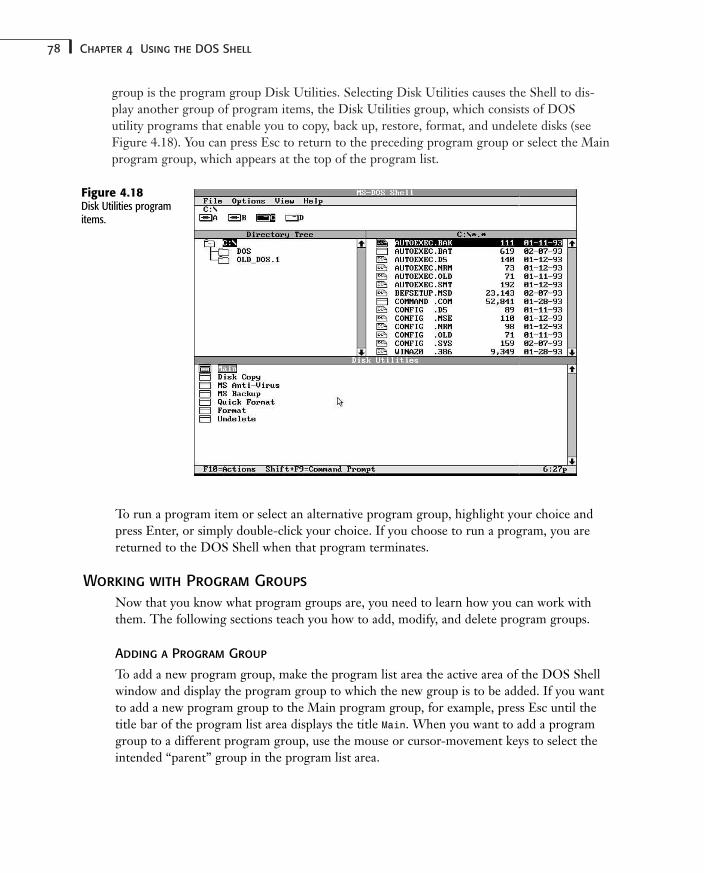
78 Chapter 4 Using the DOS Shell
group is the program group Disk Utilities. Selecting Disk Utilities causes the Shell to dis-play another group of program items, the Disk Utilities group, which consists of DOS utility programs that enable you to copy, back up, restore, format, and undelete disks (seeFigure 4.18). You can press Esc to return to the preceding program group or select the Mainprogram group, which appears at the top of the program list.
Figure 4.18Disk Utilities programitems.
To run a program item or select an alternative program group, highlight your choice andpress Enter, or simply double-click your choice. If you choose to run a program, you arereturned to the DOS Shell when that program terminates.
Working with Program Groups
Now that you know what program groups are, you need to learn how you can work withthem. The following sections teach you how to add, modify, and delete program groups.
Adding a Program Group
To add a new program group, make the program list area the active area of the DOS Shellwindow and display the program group to which the new group is to be added. If you wantto add a new program group to the Main program group, for example, press Esc until thetitle bar of the program list area displays the title Main. When you want to add a programgroup to a different program group, use the mouse or cursor-movement keys to select theintended “parent” group in the program list area.

79Using the Program List
When the program group you want is displayed, complete the following steps:
1. Choose New from the File menu. The New Program Object dialog box appears (seeFigure 4.19). This dialog box contains two option buttons: Program Group andProgram Item.
4
IPart
Ch
Figure 4.19The New ProgramObject dialog box.
2. Click the Program Group option button, and then click the OK command button orpress Enter. The Add Group dialog box appears (see Figure 4.20). This dialog box con-tains three text boxes: Title, Help Text, and Password. You must type an entry in theTitle text box to supply the group name. Entries in the Help Text and Password textboxes are optional.
Figure 4.20The Add Group dialog box.
3. Type a program group title in the Title text box. (You can use up to 23 characters,including spaces.) This title will be the name, or menu option, that appears in the pro-gram list area when the parent program group is displayed.
If you are creating a program group for your database applications, for example, youmight type Database Applications in the Title text box. This title appears not only inthe program list area, but also in that area’s title bar when a program group is activated.
4. Type a help message, if you choose, in the Help Text text box. (The message can be upto 255 characters long, even though the Shell can display only 20 characters at a time in the text box; the text in the text box scrolls to the left as you type past the 20th character.)
For a Database Applications group, for example, you might type the help messageDisplays list of database applications. Afterward, whenever you press F1 whilethe Database Applications item is highlighted, the help message appears.
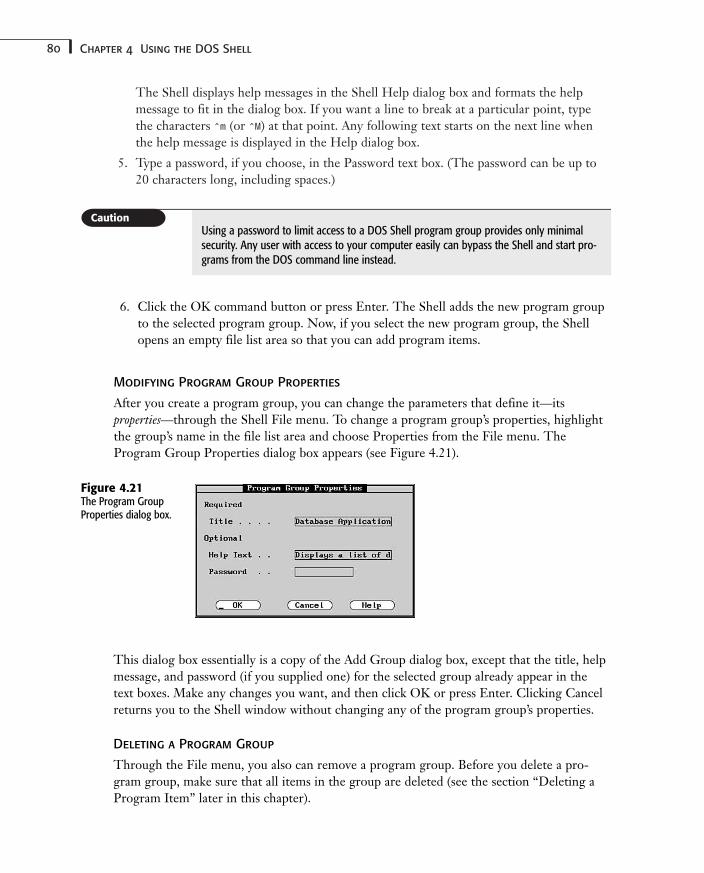
80 Chapter 4 Using the DOS Shell
The Shell displays help messages in the Shell Help dialog box and formats the helpmessage to fit in the dialog box. If you want a line to break at a particular point, typethe characters ^m (or ^M) at that point. Any following text starts on the next line whenthe help message is displayed in the Help dialog box.
5. Type a password, if you choose, in the Password text box. (The password can be up to20 characters long, including spaces.)
Using a password to limit access to a DOS Shell program group provides only minimalsecurity. Any user with access to your computer easily can bypass the Shell and start pro-grams from the DOS command line instead.
6. Click the OK command button or press Enter. The Shell adds the new program groupto the selected program group. Now, if you select the new program group, the Shellopens an empty file list area so that you can add program items.
Modifying Program Group Properties
After you create a program group, you can change the parameters that define it—its properties—through the Shell File menu. To change a program group’s properties, highlightthe group’s name in the file list area and choose Properties from the File menu. TheProgram Group Properties dialog box appears (see Figure 4.21).
Figure 4.21The Program GroupProperties dialog box.
This dialog box essentially is a copy of the Add Group dialog box, except that the title, helpmessage, and password (if you supplied one) for the selected group already appear in thetext boxes. Make any changes you want, and then click OK or press Enter. Clicking Cancelreturns you to the Shell window without changing any of the program group’s properties.
Deleting a Program Group
Through the File menu, you also can remove a program group. Before you delete a pro-gram group, make sure that all items in the group are deleted (see the section “Deleting aProgram Item” later in this chapter).
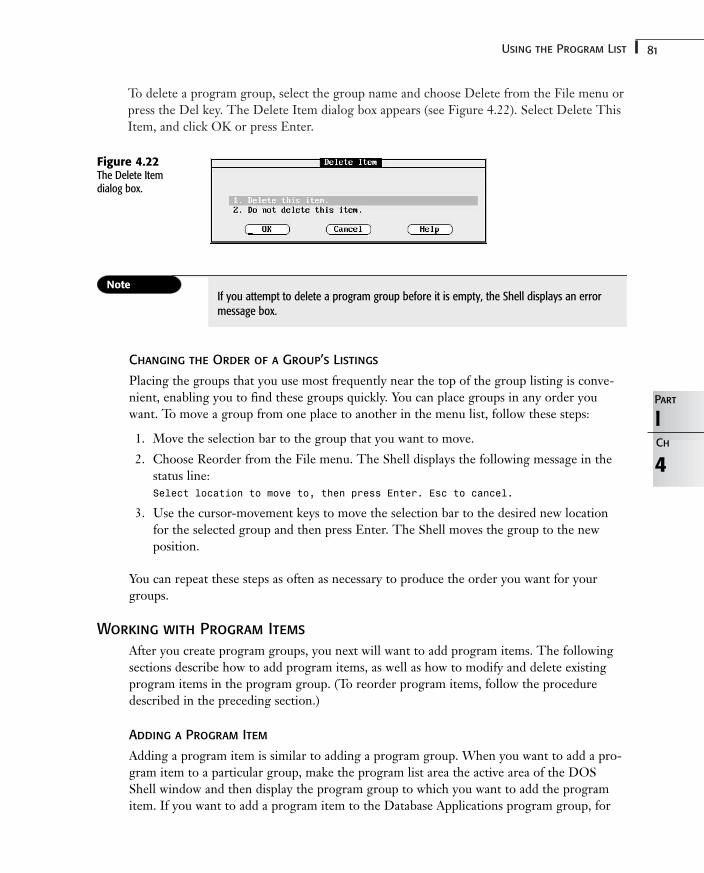
81Using the Program List
To delete a program group, select the group name and choose Delete from the File menu orpress the Del key. The Delete Item dialog box appears (see Figure 4.22). Select Delete ThisItem, and click OK or press Enter.
4
IPart
Ch
Figure 4.22The Delete Item dialog box.
If you attempt to delete a program group before it is empty, the Shell displays an errormessage box.
Changing the Order of a Group’s Listings
Placing the groups that you use most frequently near the top of the group listing is conve-nient, enabling you to find these groups quickly. You can place groups in any order youwant. To move a group from one place to another in the menu list, follow these steps:
1. Move the selection bar to the group that you want to move.
2. Choose Reorder from the File menu. The Shell displays the following message in thestatus line:Select location to move to, then press Enter. Esc to cancel.
3. Use the cursor-movement keys to move the selection bar to the desired new locationfor the selected group and then press Enter. The Shell moves the group to the newposition.
You can repeat these steps as often as necessary to produce the order you want for yourgroups.
Working with Program Items
After you create program groups, you next will want to add program items. The followingsections describe how to add program items, as well as how to modify and delete existingprogram items in the program group. (To reorder program items, follow the proceduredescribed in the preceding section.)
Adding a Program Item
Adding a program item is similar to adding a program group. When you want to add a pro-gram item to a particular group, make the program list area the active area of the DOSShell window and then display the program group to which you want to add the programitem. If you want to add a program item to the Database Applications program group, for
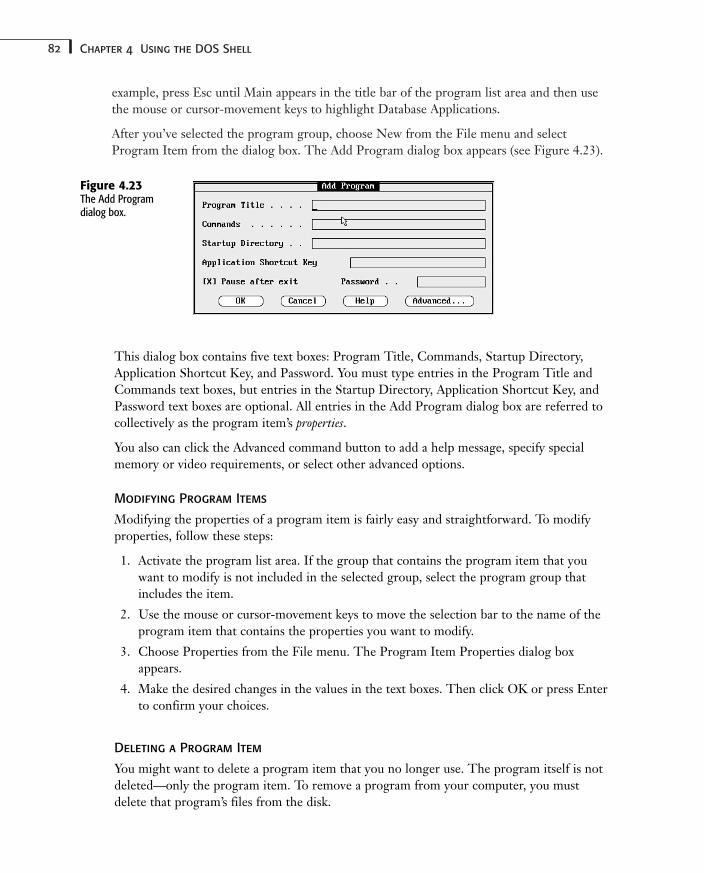
82 Chapter 4 Using the DOS Shell
example, press Esc until Main appears in the title bar of the program list area and then usethe mouse or cursor-movement keys to highlight Database Applications.
After you’ve selected the program group, choose New from the File menu and selectProgram Item from the dialog box. The Add Program dialog box appears (see Figure 4.23).
Figure 4.23The Add Program dialog box.
This dialog box contains five text boxes: Program Title, Commands, Startup Directory,Application Shortcut Key, and Password. You must type entries in the Program Title andCommands text boxes, but entries in the Startup Directory, Application Shortcut Key, andPassword text boxes are optional. All entries in the Add Program dialog box are referred tocollectively as the program item’s properties.
You also can click the Advanced command button to add a help message, specify specialmemory or video requirements, or select other advanced options.
Modifying Program Items
Modifying the properties of a program item is fairly easy and straightforward. To modifyproperties, follow these steps:
1. Activate the program list area. If the group that contains the program item that youwant to modify is not included in the selected group, select the program group thatincludes the item.
2. Use the mouse or cursor-movement keys to move the selection bar to the name of theprogram item that contains the properties you want to modify.
3. Choose Properties from the File menu. The Program Item Properties dialog boxappears.
4. Make the desired changes in the values in the text boxes. Then click OK or press Enterto confirm your choices.
Deleting a Program Item
You might want to delete a program item that you no longer use. The program itself is notdeleted—only the program item. To remove a program from your computer, you mustdelete that program’s files from the disk.
83Working with Directories
To delete a program item, follow these steps:
1. Move the selection bar to the name of the item that you want to delete.
2. Choose Delete from the File menu or press Del. The Delete Item dialog box appears.
3. Select 1. Delete this item. Then click OK or press Enter. The Shell deletes the pro-gram item from the selected program group list.
Using Shortcut Keys
You can specify shortcut keys to start applications. When you specify these key combina-tions, the Shell displays them in the Application Shortcut Key text box in the Add Programdialog box. If you press and hold down Ctrl and Alt simultaneously and then press P, forexample, the Shell displays ALT+CTRL+P in the text box.
A specified shortcut-key combination starts the program only if the following three condi-tions are met:
■ The DOS 6.0 task swapper is enabled.
■ You started the program through the DOS Shell’s program list area.
■ You used one of the task-swapper keystrokes (Alt+Tab, Alt+Esc, or Ctrl+Esc) to switchto another program or back to the Shell.
Suppose that you first enable the DOS Shell task swapper and then start Paradox from theprogram item in the Database Applications program group. You then switch back to theShell by pressing Alt+Tab and start WordStar. To return to Paradox quickly, you simplypress the shortcut key you defined (for example, Ctrl+Alt+P). The task swapper quicklyswaps WordStar to disk and displays the Paradox screen.
4
IPart
Ch
When creating shortcut keys, make sure that you are not using key combinations that arealready used by DOS Shell.
When you return to the DOS Shell window while the program you were using earlier isswapped out to disk, the Shell lists the shortcut in parentheses to the right of the programitem title in the active task list area.
Working with DirectoriesDOS manages files on your disks by maintaining file information in a hierarchical directorystructure. The directory tree area, in the upper-left quadrant of the window, graphicallydepicts this directory structure. At the top of this area, the root directory of the logged diskis shown as a folder-shaped icon or as a pair of brackets ([]) if the DOS Shell is in textmode. All other directories are shown as folder-shaped icons (or pairs of brackets). Theseother directories are listed below the root icon and connected to the root icon by a verticalline. The name of each directory is listed to the right of its icon.
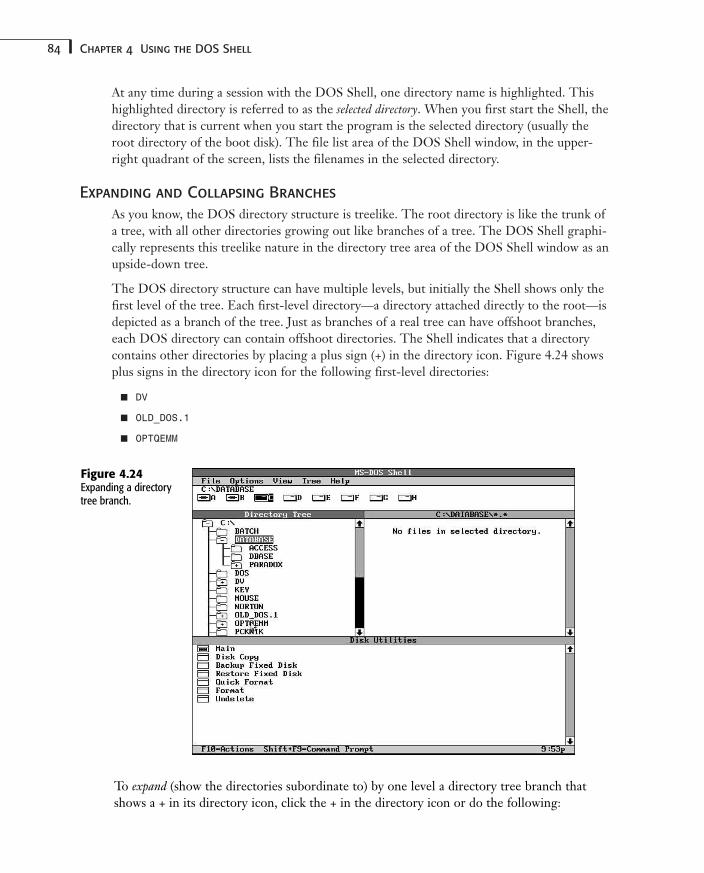
84 Chapter 4 Using the DOS Shell
At any time during a session with the DOS Shell, one directory name is highlighted. Thishighlighted directory is referred to as the selected directory. When you first start the Shell, thedirectory that is current when you start the program is the selected directory (usually theroot directory of the boot disk). The file list area of the DOS Shell window, in the upper-right quadrant of the screen, lists the filenames in the selected directory.
Expanding and Collapsing Branches
As you know, the DOS directory structure is treelike. The root directory is like the trunk ofa tree, with all other directories growing out like branches of a tree. The DOS Shell graphi-cally represents this treelike nature in the directory tree area of the DOS Shell window as anupside-down tree.
The DOS directory structure can have multiple levels, but initially the Shell shows only thefirst level of the tree. Each first-level directory—a directory attached directly to the root—isdepicted as a branch of the tree. Just as branches of a real tree can have offshoot branches,each DOS directory can contain offshoot directories. The Shell indicates that a directorycontains other directories by placing a plus sign (+) in the directory icon. Figure 4.24 showsplus signs in the directory icon for the following first-level directories:
■ DV
■ OLD_DOS.1
■ OPTQEMM
Figure 4.24Expanding a directorytree branch.
To expand (show the directories subordinate to) by one level a directory tree branch thatshows a + in its directory icon, click the + in the directory icon or do the following:
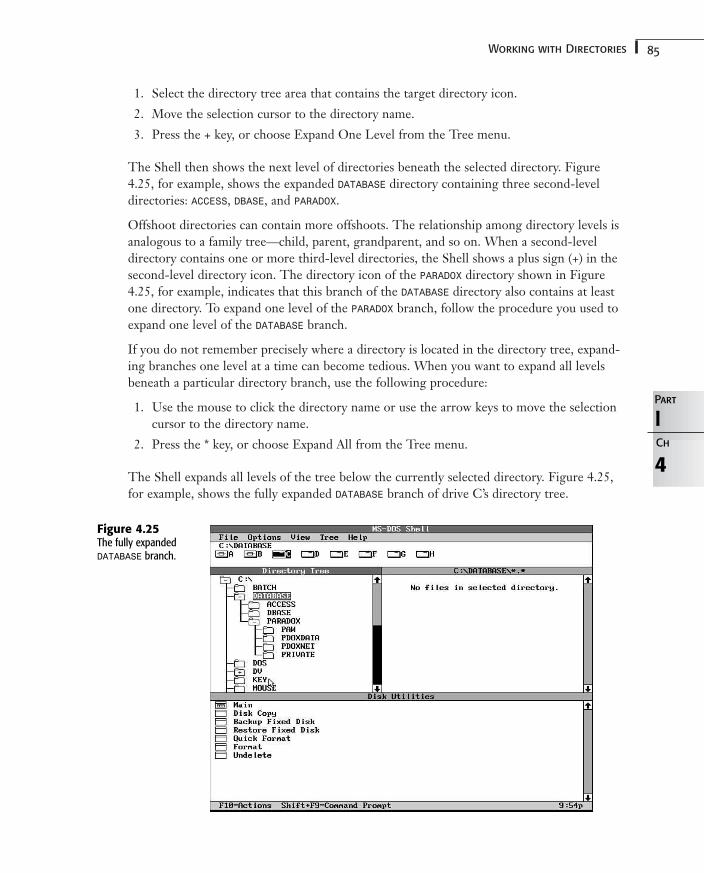
85Working with Directories
1. Select the directory tree area that contains the target directory icon.
2. Move the selection cursor to the directory name.
3. Press the + key, or choose Expand One Level from the Tree menu.
The Shell then shows the next level of directories beneath the selected directory. Figure4.25, for example, shows the expanded DATABASE directory containing three second-leveldirectories: ACCESS, DBASE, and PARADOX.
Offshoot directories can contain more offshoots. The relationship among directory levels isanalogous to a family tree—child, parent, grandparent, and so on. When a second-leveldirectory contains one or more third-level directories, the Shell shows a plus sign (+) in thesecond-level directory icon. The directory icon of the PARADOX directory shown in Figure4.25, for example, indicates that this branch of the DATABASE directory also contains at leastone directory. To expand one level of the PARADOX branch, follow the procedure you used toexpand one level of the DATABASE branch.
If you do not remember precisely where a directory is located in the directory tree, expand-ing branches one level at a time can become tedious. When you want to expand all levelsbeneath a particular directory branch, use the following procedure:
1. Use the mouse to click the directory name or use the arrow keys to move the selectioncursor to the directory name.
2. Press the * key, or choose Expand All from the Tree menu.
The Shell expands all levels of the tree below the currently selected directory. Figure 4.25,for example, shows the fully expanded DATABASE branch of drive C’s directory tree.
4
IPart
Ch
Figure 4.25The fully expandedDATABASE branch.
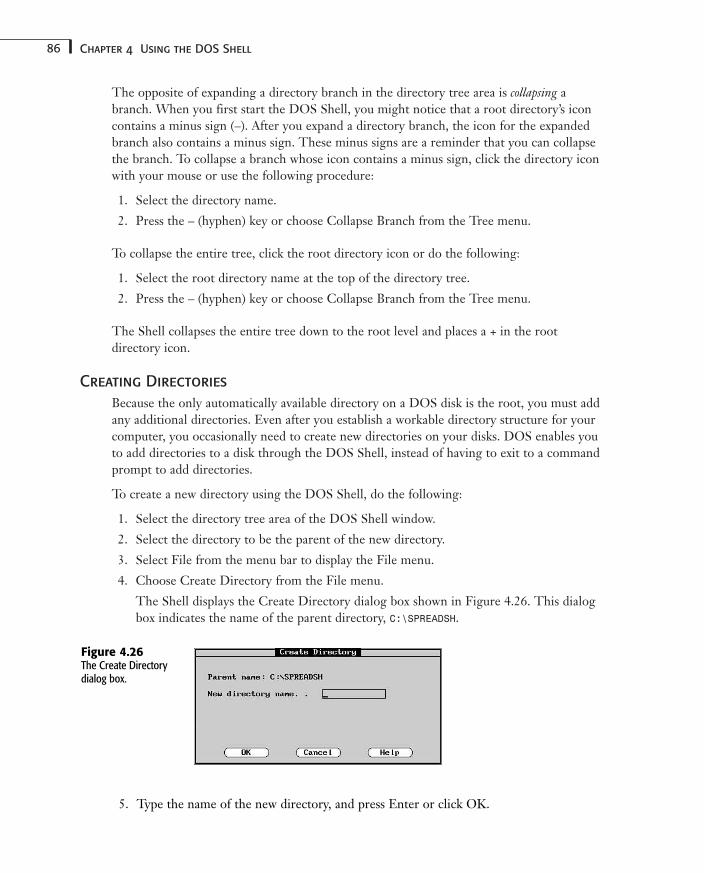
86 Chapter 4 Using the DOS Shell
The opposite of expanding a directory branch in the directory tree area is collapsing abranch. When you first start the DOS Shell, you might notice that a root directory’s iconcontains a minus sign (–). After you expand a directory branch, the icon for the expandedbranch also contains a minus sign. These minus signs are a reminder that you can collapsethe branch. To collapse a branch whose icon contains a minus sign, click the directory iconwith your mouse or use the following procedure:
1. Select the directory name.
2. Press the – (hyphen) key or choose Collapse Branch from the Tree menu.
To collapse the entire tree, click the root directory icon or do the following:
1. Select the root directory name at the top of the directory tree.
2. Press the – (hyphen) key or choose Collapse Branch from the Tree menu.
The Shell collapses the entire tree down to the root level and places a + in the root directory icon.
Creating Directories
Because the only automatically available directory on a DOS disk is the root, you must addany additional directories. Even after you establish a workable directory structure for yourcomputer, you occasionally need to create new directories on your disks. DOS enables youto add directories to a disk through the DOS Shell, instead of having to exit to a commandprompt to add directories.
To create a new directory using the DOS Shell, do the following:
1. Select the directory tree area of the DOS Shell window.
2. Select the directory to be the parent of the new directory.
3. Select File from the menu bar to display the File menu.
4. Choose Create Directory from the File menu.
The Shell displays the Create Directory dialog box shown in Figure 4.26. This dialogbox indicates the name of the parent directory, C:\SPREADSH.
Figure 4.26The Create Directorydialog box.
5. Type the name of the new directory, and press Enter or click OK.
87Working with Files
The Shell creates the new directory and returns to the directory tree area of the DOS Shellwindow. The Shell also adds to the tree an icon for the new directory.
Working with FilesIn the DOS Shell, you perform file-management operations primarily through the Filemenu. The active menu options displayed in the File menu, however, vary according towhich area of the window is active. Although the menu options displayed when the directorytree is active are the same as the options displayed when the file list is active, many of thesemenu options are dimmed (not valid) when the directory tree is active.
The DOS Shell’s file-management commands operate on all selected files. At any time, youcan select any number of files. The Shell displays both the name and file-list icon of eachselected file in reverse video. Selected files need not be from the same directory.
Selecting a Single File
To select a single file, follow these steps:
1. Activate the directory tree area.
2. Use the mouse and scrollbar or the cursor-movement keys to scroll through the direc-tory tree until the name of the directory containing the files you want to select appears.
3. Use the mouse or arrow keys to move the selection cursor to the target directory.
4. Activate the file list area.
5. Use the mouse and scrollbar or the cursor-movement keys to scroll the file list until thename of the file you want to select appears.
6. Click the name of the file to be selected (the target file). Alternatively, use the cursor-movement keys to move the selection cursor to the target file and then press the spacebar.
To indicate that a file is selected, DOS displays the filename and file list icon in reversevideo.
4
IPart
Ch
A file is not selected until the icon is displayed in reverse video. Simply highlighting the file-name with the selection cursor is not sufficient to select the file.
Selecting Multiple Files
If you want to apply a DOS Shell command to several files, applying the command simulta-neously to all the files is more efficient than applying it to one file at a time. After you selectthe first file, you can select the other files in either of the following ways (this procedure isreferred to in the DOS Shell as extending the selection):
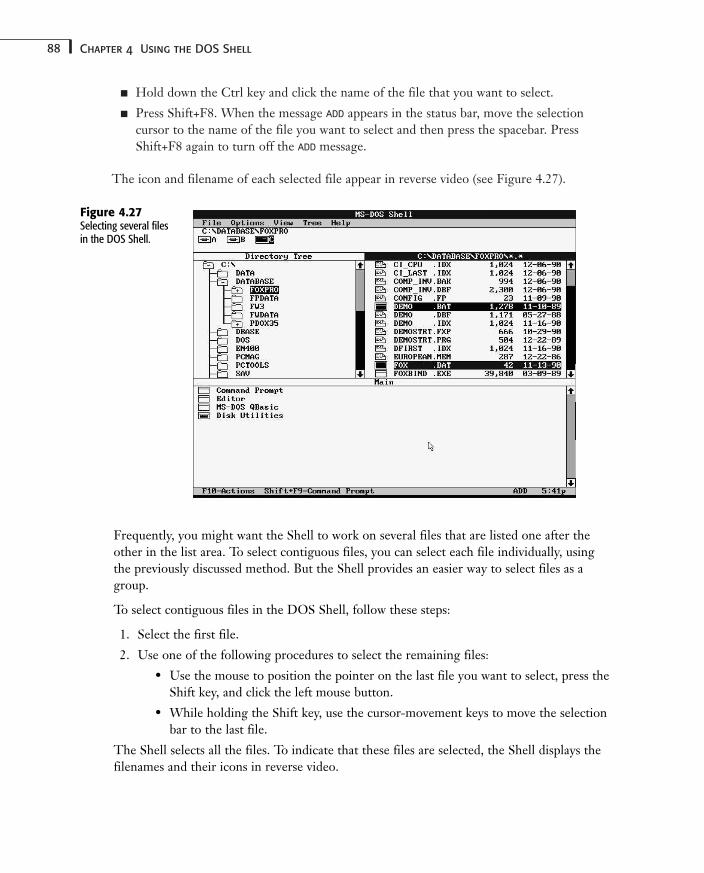
88 Chapter 4 Using the DOS Shell
■ Hold down the Ctrl key and click the name of the file that you want to select.
■ Press Shift+F8. When the message ADD appears in the status bar, move the selection cursor to the name of the file you want to select and then press the spacebar. PressShift+F8 again to turn off the ADD message.
The icon and filename of each selected file appear in reverse video (see Figure 4.27).
Figure 4.27Selecting several filesin the DOS Shell.
Frequently, you might want the Shell to work on several files that are listed one after theother in the list area. To select contiguous files, you can select each file individually, usingthe previously discussed method. But the Shell provides an easier way to select files as agroup.
To select contiguous files in the DOS Shell, follow these steps:
1. Select the first file.
2. Use one of the following procedures to select the remaining files:
• Use the mouse to position the pointer on the last file you want to select, press theShift key, and click the left mouse button.
• While holding the Shift key, use the cursor-movement keys to move the selectionbar to the last file.
The Shell selects all the files. To indicate that these files are selected, the Shell displays thefilenames and their icons in reverse video.
89Working with Files
Selecting All Files
To select allthe files in a directory, follow these steps:
1. Select the directory in the directory tree area.
2. Activate the file list area.
3. Press Ctrl+/, or choose Select All from the File menu.
Deselecting All Files
After you select files, you might decide that you don’t want to perform a DOS Shell opera-tion on that group of files. Perhaps you want to start a fresh selection process by deselectingall selected files. Normally, selecting a different directory also deselects all selected files.
You also can deselect all selected files in one procedure. Use the mouse to click anywhere inthe file area or press the spacebar. Alternatively, choose Deselect All from the File menu.
Selecting Files Across Directories
By default, the DOS Shell enables you to select files in only one directory at a time. Byselecting a different directory, you deselect all selected files. Occasionally, however, youmight want to perform a file-management operation on files from several directories. Youmight want to copy to a floppy disk, for example, one file from each of three directories onyour hard disk.
Before you can select files in several directories, you must choose Select Across Directoriesin the Options menu.
To copy files from three directories to a floppy disk in one procedure, you must first selectthe directories and then the files, one at a time. Then, choose the Copy command from theFile menu to copy all the selected files to the floppy disk.
Copying Files in the Shell
With the DOS Shell, you can copy one or more files in a directory, between directories, orbetween disks, using any of several approaches. The approach described in this section—thedual file list method—is the quickest and easiest to learn and use.
To perform the copy operation using the dual file list method, you first must select thesource and target drive and directory and create a dual file list. Complete the followingsteps:
1. Select the source drive and directory (those that contain the files you want to copy).
2. Choose Dual File Lists from the View menu to switch to the dual file list.
4
IPart
Ch
Under certain specific circumstances, you can skip step 2. For example, you can dragselected files to another directory on the same disk without opening a dual file list.Completing this step, however, always produces the result that you want.
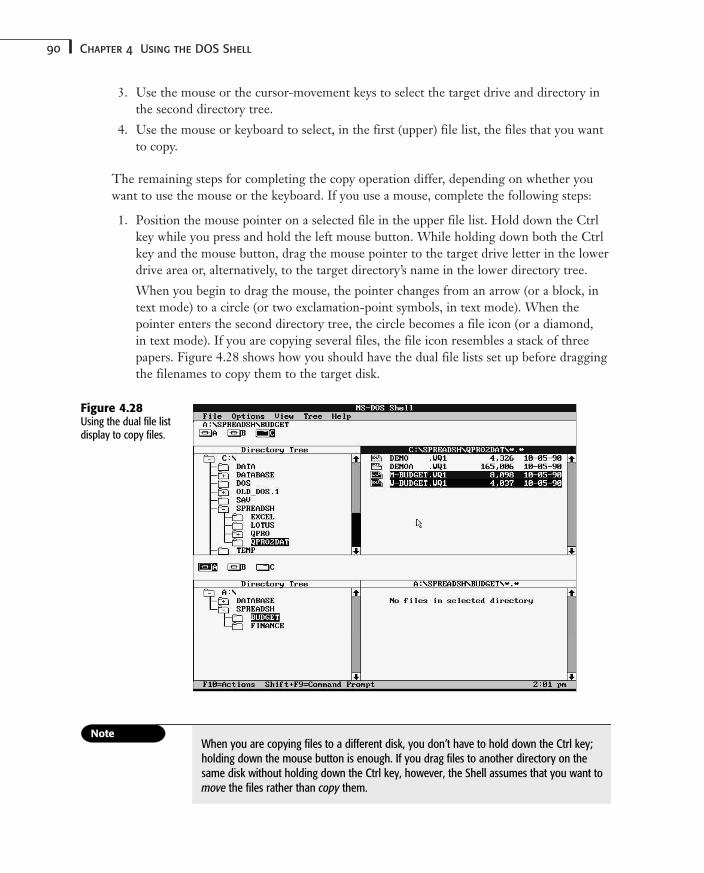
90 Chapter 4 Using the DOS Shell
3. Use the mouse or the cursor-movement keys to select the target drive and directory inthe second directory tree.
4. Use the mouse or keyboard to select, in the first (upper) file list, the files that you wantto copy.
The remaining steps for completing the copy operation differ, depending on whether youwant to use the mouse or the keyboard. If you use a mouse, complete the following steps:
1. Position the mouse pointer on a selected file in the upper file list. Hold down the Ctrlkey while you press and hold the left mouse button. While holding down both the Ctrlkey and the mouse button, drag the mouse pointer to the target drive letter in the lowerdrive area or, alternatively, to the target directory’s name in the lower directory tree.
When you begin to drag the mouse, the pointer changes from an arrow (or a block, intext mode) to a circle (or two exclamation-point symbols, in text mode). When thepointer enters the second directory tree, the circle becomes a file icon (or a diamond, in text mode). If you are copying several files, the file icon resembles a stack of threepapers. Figure 4.28 shows how you should have the dual file lists set up before draggingthe filenames to copy them to the target disk.
Figure 4.28Using the dual file listdisplay to copy files.
When you are copying files to a different disk, you don’t have to hold down the Ctrl key;holding down the mouse button is enough. If you drag files to another directory on thesame disk without holding down the Ctrl key, however, the Shell assumes that you want tomove the files rather than copy them.
91Working with Files
Depending on the selections you have made in the Confirmations Item dialog box,which can be accessed from the Options menu, you might be asked to confirm the copyoperation.
2. To confirm that the copy should take place, click Yes.
To copy files using the keyboard only, complete the copy procedure by following thesesteps:
1. Choose Copy from the File menu or press F8. The Shell displays the Copy File dialogbox. This dialog box contains the From and To text boxes. The Shell lists the sourcefiles in the From text box and the source directory in the To text box.
2. Type the target drive and directory name in the To text box and then press Enter. TheShell copies the files to the target directory and displays a message to that effect in thecenter of the screen.
Moving a File in the Shell
When the DOS Shell moves a file, the program copies the file from one storage location toanother and then deletes the file from its original location. Therefore, the steps for movingone or more files with the DOS Shell are nearly the same as those for copying files. Whenyou want to move one or more files, select the files to be moved just as you do if you aregoing to copy them.
If you are using a mouse, position the mouse pointer on one of the selected files in theupper file list. Hold down the Alt key while you press and hold down the left mouse button.While holding both the Alt key and the mouse button, drag the mouse pointer to the targetdrive letter in the lower drive area or to the target directory’s name in the lower directorytree.
To move files using only the keyboard, follow these steps:
1. Choose Move from the File menu or press F7. The Shell displays the Move File dialogbox. This dialog box contains the From and To text boxes. The Shell lists the sourcefiles in the From text box and the source directory in the To text box.
2. Type the target drive and directory name in the To text box, and then click OK or pressEnter. The Shell moves the files to the target directory and displays a message to thateffect in the center of the screen.
Using the Shell to View a File
When you want to view the contents of a file from within the DOS Shell, follow these steps:
1. Select the target file in the file list area.
2. Choose View File Contents from the File menu.
4
IPart
Ch
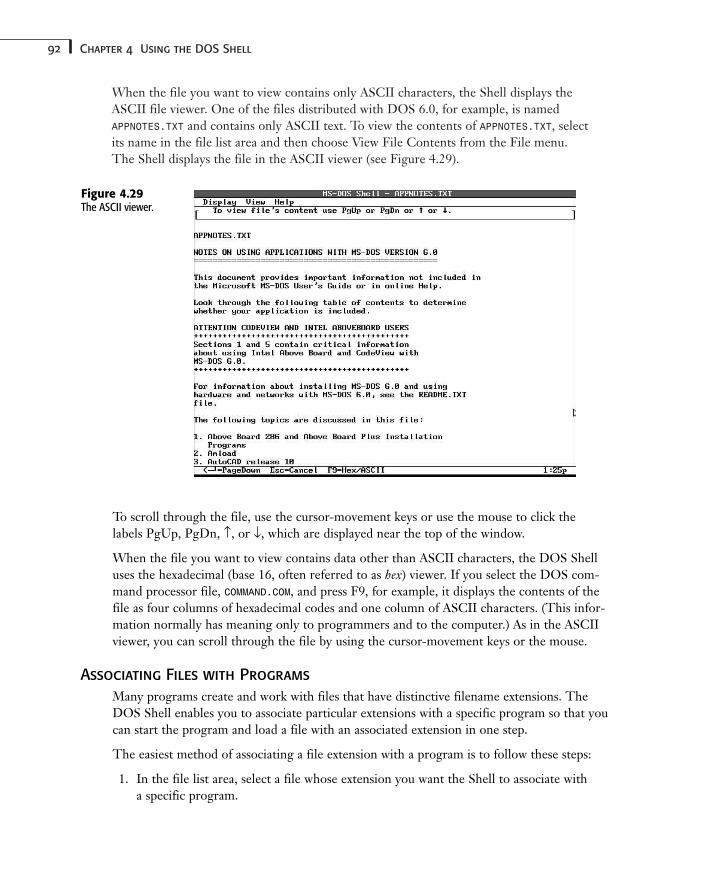
92 Chapter 4 Using the DOS Shell
When the file you want to view contains only ASCII characters, the Shell displays theASCII file viewer. One of the files distributed with DOS 6.0, for example, is named APPNOTES.TXT and contains only ASCII text. To view the contents of APPNOTES.TXT, select its name in the file list area and then choose View File Contents from the File menu. The Shell displays the file in the ASCII viewer (see Figure 4.29).
Figure 4.29The ASCII viewer.
To scroll through the file, use the cursor-movement keys or use the mouse to click thelabels PgUp, PgDn, ↑, or ↓, which are displayed near the top of the window.
When the file you want to view contains data other than ASCII characters, the DOS Shelluses the hexadecimal (base 16, often referred to as hex) viewer. If you select the DOS com-mand processor file, COMMAND.COM, and press F9, for example, it displays the contents of thefile as four columns of hexadecimal codes and one column of ASCII characters. (This infor-mation normally has meaning only to programmers and to the computer.) As in the ASCIIviewer, you can scroll through the file by using the cursor-movement keys or the mouse.
Associating Files with Programs
Many programs create and work with files that have distinctive filename extensions. TheDOS Shell enables you to associate particular extensions with a specific program so that youcan start the program and load a file with an associated extension in one step.
The easiest method of associating a file extension with a program is to follow these steps:
1. In the file list area, select a file whose extension you want the Shell to associate with a specific program.
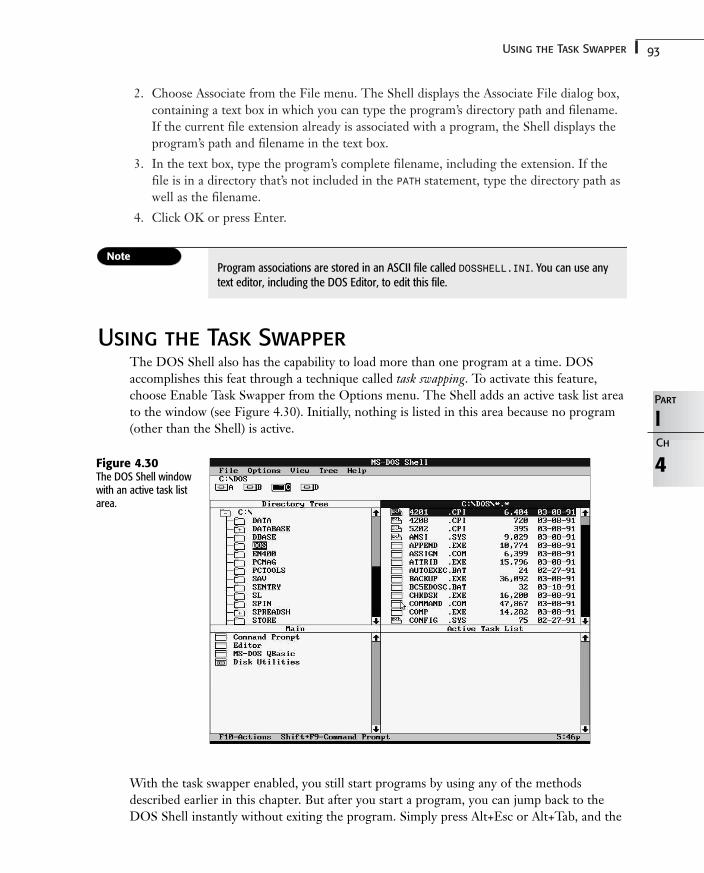
93Using the Task Swapper
2. Choose Associate from the File menu. The Shell displays the Associate File dialog box,containing a text box in which you can type the program’s directory path and filename.If the current file extension already is associated with a program, the Shell displays theprogram’s path and filename in the text box.
3. In the text box, type the program’s complete filename, including the extension. If thefile is in a directory that’s not included in the PATH statement, type the directory path aswell as the filename.
4. Click OK or press Enter.
4
IPart
Ch
Program associations are stored in an ASCII file called DOSSHELL.INI. You can use anytext editor, including the DOS Editor, to edit this file.
Using the Task SwapperThe DOS Shell also has the capability to load more than one program at a time. DOSaccomplishes this feat through a technique called task swapping. To activate this feature,choose Enable Task Swapper from the Options menu. The Shell adds an active task list areato the window (see Figure 4.30). Initially, nothing is listed in this area because no program(other than the Shell) is active.
Figure 4.30The DOS Shell windowwith an active task listarea.
With the task swapper enabled, you still start programs by using any of the methodsdescribed earlier in this chapter. But after you start a program, you can jump back to theDOS Shell instantly without exiting the program. Simply press Alt+Esc or Alt+Tab, and the
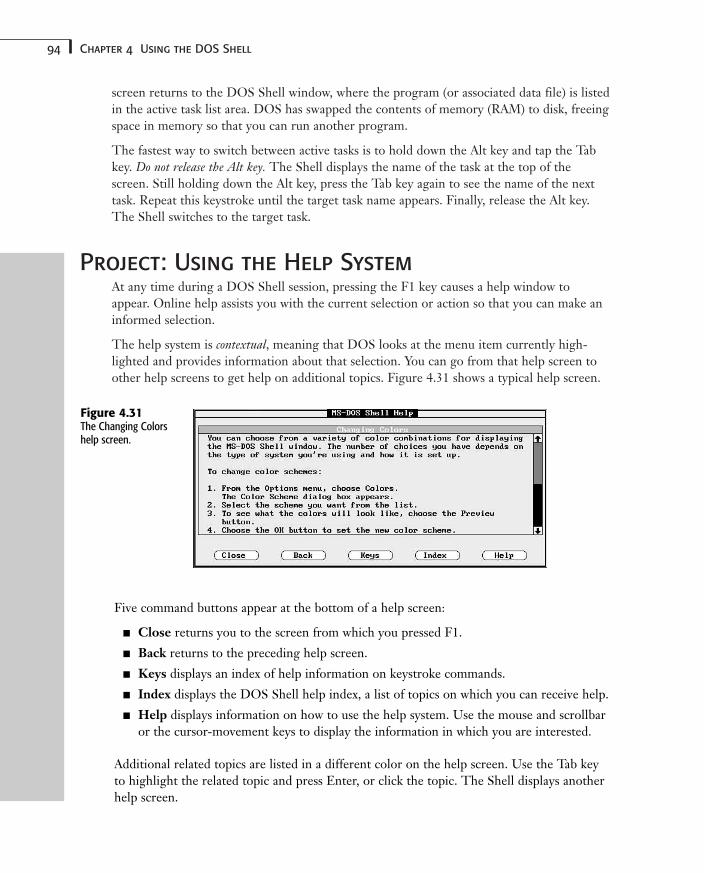
94 Chapter 4 Using the DOS Shell
screen returns to the DOS Shell window, where the program (or associated data file) is listedin the active task list area. DOS has swapped the contents of memory (RAM) to disk, freeingspace in memory so that you can run another program.
The fastest way to switch between active tasks is to hold down the Alt key and tap the Tabkey. Do not release the Alt key. The Shell displays the name of the task at the top of thescreen. Still holding down the Alt key, press the Tab key again to see the name of the nexttask. Repeat this keystroke until the target task name appears. Finally, release the Alt key.The Shell switches to the target task.
Project: Using the Help SystemAt any time during a DOS Shell session, pressing the F1 key causes a help window toappear. Online help assists you with the current selection or action so that you can make aninformed selection.
The help system is contextual, meaning that DOS looks at the menu item currently high-lighted and provides information about that selection. You can go from that help screen toother help screens to get help on additional topics. Figure 4.31 shows a typical help screen.
Figure 4.31The Changing Colorshelp screen.
Five command buttons appear at the bottom of a help screen:
■ Close returns you to the screen from which you pressed F1.
■ Back returns to the preceding help screen.
■ Keys displays an index of help information on keystroke commands.
■ Index displays the DOS Shell help index, a list of topics on which you can receive help.
■ Help displays information on how to use the help system. Use the mouse and scrollbaror the cursor-movement keys to display the information in which you are interested.
Additional related topics are listed in a different color on the help screen. Use the Tab keyto highlight the related topic and press Enter, or click the topic. The Shell displays anotherhelp screen.
95Project: Using the Help System
Choose the Close command button or press Esc to return to the screen from which youpressed F1.
Operating techniques are fairly consistent throughout the DOS Shell, and because the Helpinformation is quite thorough, you should be able to learn what isn’t covered by selectingthe menu items and using the Help feature to guide you.

Files and Directories
5 Understanding Files and Directories 99
6 Understanding Disks and Disk Drives 127
7 Preparing and Maintaining Disks 149
8 Managing Your Files 191
9 Protecting and Recovering Your Data 231
IIPART

Understanding Files andDirectoriesIn this chapter
Introducing the DOS File System 100
Understanding the Role of Directories 110
Expanding the File System ThroughSubdirectories 113
Helping DOS Find Files with PATH 122
Listing Directories with TREE 123
Using a Temporary Directory 124
Troubleshooting 125
5CHAPTER
100 Chapter 5 Understanding Files and Directories
Introducing the DOS File SystemTwo primary roles of a disk operating system are storing and retrieving data. This chapterintroduces you to the fundamental ways in which DOS handles these roles. To provide datastorage and retrieval, the operating system must provide a common method for file storageand retrieval so that any software package can access information easily and quickly. It is alsoimportant that DOS provide these services without your having to know the internal detailsof how the disk works and why.
DOS generally insulates you from the technical details involved in storing and retrievingdata on your computer. You must, however, prepare disks by formatting them, and youmight occasionally have to repair them. In this chapter, you learn information about themost basic part of DOS—the file and directory system. After you’ve mastered this informa-tion, you will have a firm footing for understanding DOS completely.
Ask almost any non–computer user what a file is, and he or she almost invariably describes a collection of papers wrapped in a manila folder. Such files are typically stored in file cabi-nets.
On a computer, a file system is an organized collection of files that has a direct parallel to theold, familiar file cabinet. The hard disk and floppy disks you use to store data electronicallyuse many of the same conventions. Each file on a disk has a unique name, just as each filefolder in a file cabinet is labeled for identification. Files are arranged on your disks in direc-tories (discussed later in this chapter) to make them easier to find, just as sections in a filecabinet are organized into group file folders that have a common purpose.
Understanding Files
A file is a variable-length collection of related information that is referenced by a name. Justas a file folder can be filled with various papers that contain information in the form of writ-ing, an electronic file can contain various pieces of related information wrapped up in anelectronic file folder referenced by the file’s name.
Files written to disk can serve many purposes. A word processor file might hold all the sen-tences in a letter or book chapter. A database file might contain the names and addresses ofall the members of a club or all the invoices for a store. Just as a good secretary uses color-coded labels and different markings on file folders to indicate the type of information in afile, DOS filenames most often indicate what kind of information they hold.
Often the way data is written in a file depends on the software that creates it. You can typethe same letter, using all the same words and punctuation, using Microsoft Word andWordPerfect. When printed, the letters are identical, yet the format of the files created bythese two programs is very different. You can, with a little work, use Microsoft Excel orLotus 1-2-3 to store the same letter in yet another file format.
Although many programs recognize one another’s file formats and convert them for you,DOS cares little about the format of a file’s content. DOS doesn’t bother trying to decipherthe contents of a file. Its job is to wrap the information in a file folder (the file’s name) and
101Introducing the DOS File System
put it where you can find it later. Your job is to know what the file contains and which pro-gram you need to use to access correctly the data contained in the file.
In a computer setting, a file can contain data (information), programs (instructions thatguide computer tasks), or both. A file can exist on a disk, on magnetic tape, on CD-ROMs,or even in a computer’s memory. Files are made up of elements of data or programs. Theindividual elements can be stored as patterns of holes in a paper tape, as patterns of mag-netic fields on the surface of a disk, and in many other ways.
Fortunately, unless you write programs for a living, you usually can ignore the technicalaspects of how a file is stored. After all, you don’t have to know how a fuel injector works todrive a fuel-injected car.
Physical storage techniques for files vary greatly, but on PCs a few file storage methodsdominate. On PCs, floppy disks are used primarily for distributing files to other computers.Hard disks provide long-term and working storage. CD-ROMs often are used for storingfiles that do not need to be edited or altered, and tape drives and floppy disks are used tomake backup copies of files for safekeeping.
Regardless of the actual media (floppy, hard disk, tape, and so on), DOS uses filenames toidentify files. As you might remember from an earlier chapter, a full filename consists of oneto eight characters followed by a period (.) and up to three characters called the extension.The period and extension are optional but are used almost universally.
The name portion of a filename (before the period) usually provides a mental picture ordescription of the contents of the file. Extensions, on the other hand, traditionally describethe type of file—its format.
If you’re using a word processing application to write a memo, you might use as the nameportion of a filename the name (or a close approximation) of the person who will receive thememo. You then can use the extension .MEM to indicate that the file is a memo. You can calla memo to Mr. Fleenor, for example, FLEENOR.MEM. Similarly, you can use the extension .DOCfor office-policy document files. A monthly policy statement for January can be namedJAN.DOC.
DOS enables you to use a wide variety of filenames. You are free to develop your own file-naming conventions, provided that you stay within the character limits imposed by DOSand the requirements of the software you use to create the file. Although most softwarepackages are lenient in the filenames they can use, many programs require a file to have aspecific extension before they recognize the file as one of their own
Understanding Filenames
DOS ensures that every one of your files has a name. In fact, DOS does not provide a wayto put file data on a disk without a filename. When a file is created, either by your softwareor a DOS file service routine, information about the physical location of the file is stored ina File Allocation Table (FAT), which is similar to a book’s table of contents. DOS places the
5
IIPart
Ch
102 Chapter 5 Understanding Files and Directories
name of each file and its attributes in a special structure called a directory, which you canthink of as the chapter headings of a book. Using this analogy, you can think of files as thepages in each chapter.
For now, however, you need only concern yourself with the names of files. You learn moreabout the other parts of the DOS file system later in this chapter. Keep in mind that a direc-tory is a special structure used to store filenames and files. Later in this chapter, you learnmore information about the directory.
Creating Filenames
The characters you see on your computer screen are the ASCII code representations ofbytes of data. One character is stored in one byte. In a disk directory, each slot where a file-name can be stored reserves a space 11 bytes long (8 for the first part of the filename plus 3for the extension). DOS accepts for filenames most characters that you use for “everyday”names. You can use the uppercase and lowercase letters A through Z; DOS automaticallystores letters in uppercase in a directory entry. You also can use the numeric characters 0through 9 and many punctuation characters not used as separators in the file system.
Following are the rules for creating legal filenames:
■ Each filename on a disk must be unique.
■ Filenames, even though they are not always expressed that way, include the drive letterand directory path of the file. In practical terms, this naming convention means thateach file in a directory must have a unique name because the difference in directorynames adds to a filename’s uniqueness.
■ A filename consists of the following items:
• A name of one to eight characters
• An optional extension of one to three characters
• A period between the name and the extension (if an extension is used)
■ The following characters are allowed in a filename:
• The letters A through Z (lowercase letters are transformed into uppercase auto-matically)
• The numerals 0 through 9
• The following special characters and punctuation marks:$ # & @ ! ( ) - { } ‘_ ~ ^ ‘
■ DOS reserves certain ASCII codes for other uses and does not let them be a part of thefilename. The following characters are not allowed in a filename:
• Any control character (ASCII codes used as commands)
• The space character
• The following special characters and punctuation symbols:
= / [ ] “ : ; , ? * \ < > |

103Introducing the DOS File System
To understand why DOS disallows the use of some characters in filenames, you must lookbelow the surface of DOS. Certain characters are not allowed because DOS does not passthose characters from the keyboard to the command or external command program thatcontrols a file’s name. You cannot, for example, use the Ctrl+G (^G) character in a filenamebecause Ctrl+G tells an input device to sound the computer’s bell or beep signal. DOS doesnot accept the Escape character, produced by the Esc key, as part of a filename becauseDOS interprets the Esc key as your request to cancel the command line and start again.
Another example of an unacceptable character is Ctrl+S (^S), which DOS and other operat-ing systems use to stop the flow of characters from the input device to the output device.Ctrl+S stops screen scrolling, for example. If you press Ctrl+S while entering a filename,DOS assumes that you are entering an input-stopping character, not part of a filename.
You cannot use in a filename any characters that COMMAND.COM and external command pro-grams use to divide the parameters and switches from the command in a command line.Because DOS must parse (distinguish the various components of) the command line, certaincharacters are seen as delimiters of parameters or as parts of a parameter. The backslashcharacter (\), for example, separates directory names in a path specifier. DOS always reads abackslash in a command line as part of a path.
Avoiding Reserved Names
One of the ways in which DOS is able to control so many different types of devices is byusing a logical device. It is important to understand that each of these devices has a name thatis reserved and cannot be used for other purposes.
In theory, DOS treats all the input and output devices it controls as if they were made out ofsoftware. Such devices include almost everything you think of as belonging to a computersystem—disks, printers, keyboards, screens, and modems.
The PC manufacturers are responsible for accepting and generating data in a fashion thatconforms to DOS standards. The actual control over the actions of a device (print heads,disk drive motors and heads, and so on) is left to programming contained on ROM chipsincorporated into the devices. Thus, DOS needs to know only that a printer exists and thatthe printer is connected to the system in a specific way, normally via a parallel or serial port.
To you, a parallel port is a hardware connector where you plug in a cable. To DOS, the par-allel port is simply an address in memory where it sends and receives data. Each of theseaddresses is called a logical device and is given a name. By default, DOS expects to see aprinter connected to the first parallel port, which it calls LPT1.
The first available disk is A:. By convention, B: is reserved for the second floppy disk, and C:is reserved for the first hard disk volume. The keyboard and video card are combined to cre-ate a logical device named CON:.
Notice that all these logical device names end with the colon (:). The colon signifies thatsomething is a DOS logical device. In some contexts, however, the colon is omitted, as inthis example:
COPY CON SUMFILE.TXT
5
IIPart
Ch
104 Chapter 5 Understanding Files and Directories
This variation of the COPY command tells DOS to take input from the console (CON:) andsave it to the currently logged drive and directory as a file having the name SUMFILE.TXT.
What does all this talk of logical devices have to do with filenames? Simply, DOS’s internalroutines treat logical devices like files in many ways. That’s why when you try to name a filewith a name for a logical device, DOS gets confused and weird things can happen, such aslosing data or sending a file to a printer.
For this reason, DOS reserves names for its logical devices. DOS can treat some of these log-ical PC devices in a high-level way by accepting their names as input or output parameters ina command line, as in the preceding example. Before it uses the filename parameters in acommand line to look for a file, DOS checks to see whether the filename is a device name.Table 5.1 lists the major logical DOS input and output device names and their purposes.
Table 5.1 DOS Device Names
Device Name Purpose
COMx or AUX Identifies a serial communication port (x can be the number 1, 2, 3, or 4).
LPTx or PRN Identifies a parallel printer port (x can be the number 1, 2, 3, or 4).
CON Identifies the screen and keyboard.
NUL Identifies the “do nothing” device, also called a bit bucket. Output sent toNUL is not displayed, stored, or acted on in any way.
CLOCK$ Provides date and time services.
Never attempt to write a disk file with a name that is the same as one of the device nameslisted in Table 5.1. DOS intercepts the device name, even if you add an extension, and triesto use the device—not the file you intend—to complete the command. Use a device nameonly as a device parameter in a command.
Observing File-Naming Conventions
A convention is an informal rule that is not explicitly enforced. DOS filenames often followcertain conventions. Although you can use any filename that follows DOS’s character anddevice-name rules, observe DOS file-naming conventions whenever possible. You can, forexample, name a memo file and give it a BAT extension, but this extension has a specialmeaning to DOS because all batch files have the extension BAT. As long as you do not try toexecute the memo as a batch file, DOS is happy. If you try to execute the memo file, how-ever, DOS sees the BAT extension and tries to execute it. Of course, the memo cannot beexecuted because it probably isn’t made up of legal DOS commands.
You can name an EXE file with a COM extension. Although both files are executable, they haveinternal differences. DOS does not take the extension’s name to mean that the file is indeedan EXE or COM file; DOS inspects a key part of the file before deciding how to load and exe-cute the program file. If you name a spreadsheet file as an EXE or COM file, for example, DOS
105Introducing the DOS File System
is not fooled into executing the nonprogram file. In all likelihood, your system simply willlock up, and you will have to perform a warm boot to begin again.
Many software manufacturers use certain extensions for special file formats created by theirapplications. To avoid confusion about the contents of a file, avoid using those extensions.Table 5.2 lists some conventional filename extensions and their meanings. Multiple pro-grams can use the same extensions in their file-naming conventions.
Table 5.2 Common Filename Extensions
Extension Common Use
ARC Archive (compressed file)
ASC ASCII text file
ASM Assembler source file
BAK Backup file
BAS BASIC program file
BAT DOS batch file
BGI Borland Graphics Interface file (Quattro, Paradox)
BIN Binary program file
BMP Windows bitmap file
C C source file
CPP C++ source file
CBL COBOL source file
CFG Program configuration information
CHP Chapter file (Ventura Publisher)
CHR Character file (Quattro, Paradox)
CNF Program configuration information
COM Program file
CPI Code page information file (DOS)
DAT Data file
DB Database file (Paradox)
DBF Database file (dBASE)
DCT Dictionary file
DEV Program device driver file
DIF Data Interchange Format file
DIR A program data file used as a directory
DLL Windows dynamic link library
5
IIPart
Ch
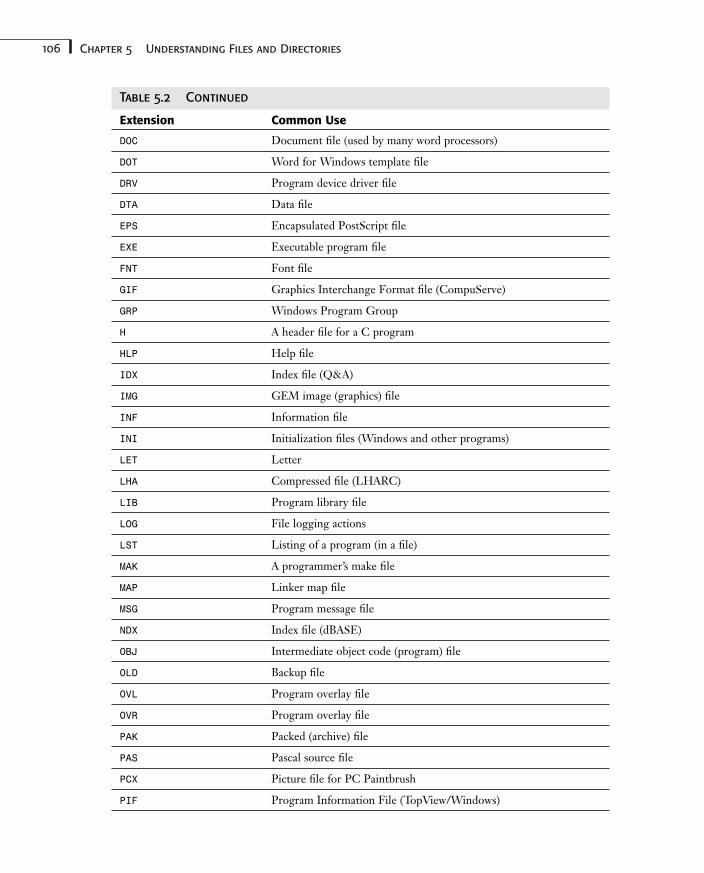
106 Chapter 5 Understanding Files and Directories
Table 5.2 Continued
Extension Common Use
DOC Document file (used by many word processors)
DOT Word for Windows template file
DRV Program device driver file
DTA Data file
EPS Encapsulated PostScript file
EXE Executable program file
FNT Font file
GIF Graphics Interchange Format file (CompuServe)
GRP Windows Program Group
H A header file for a C program
HLP Help file
IDX Index file (Q&A)
IMG GEM image (graphics) file
INF Information file
INI Initialization files (Windows and other programs)
LET Letter
LHA Compressed file (LHARC)
LIB Program library file
LOG File logging actions
LST Listing of a program (in a file)
MAK A programmer’s make file
MAP Linker map file
MSG Program message file
NDX Index file (dBASE)
OBJ Intermediate object code (program) file
OLD Backup file
OVL Program overlay file
OVR Program overlay file
PAK Packed (archive) file
PAS Pascal source file
PCX Picture file for PC Paintbrush
PIF Program Information File (TopView/Windows)
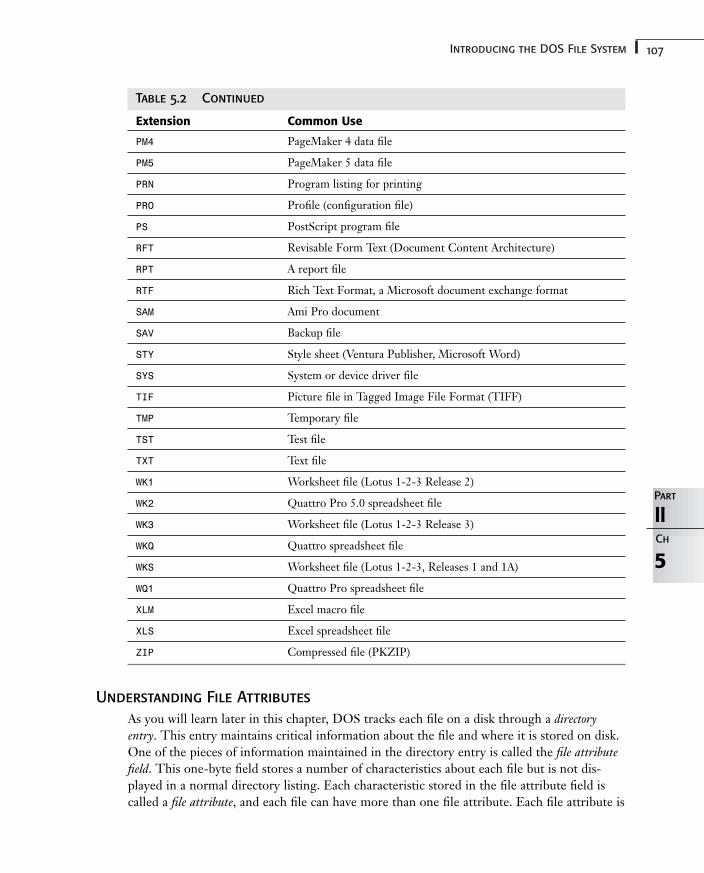
107Introducing the DOS File System
Table 5.2 Continued
Extension Common Use
PM4 PageMaker 4 data file
PM5 PageMaker 5 data file
PRN Program listing for printing
PRO Profile (configuration file)
PS PostScript program file
RFT Revisable Form Text (Document Content Architecture)
RPT A report file
RTF Rich Text Format, a Microsoft document exchange format
SAM Ami Pro document
SAV Backup file
STY Style sheet (Ventura Publisher, Microsoft Word)
SYS System or device driver file
TIF Picture file in Tagged Image File Format (TIFF)
TMP Temporary file
TST Test file
TXT Text file
WK1 Worksheet file (Lotus 1-2-3 Release 2)
WK2 Quattro Pro 5.0 spreadsheet file
WK3 Worksheet file (Lotus 1-2-3 Release 3)
WKQ Quattro spreadsheet file
WKS Worksheet file (Lotus 1-2-3, Releases 1 and 1A)
WQ1 Quattro Pro spreadsheet file
XLM Excel macro file
XLS Excel spreadsheet file
ZIP Compressed file (PKZIP)
Understanding File Attributes
As you will learn later in this chapter, DOS tracks each file on a disk through a directoryentry. This entry maintains critical information about the file and where it is stored on disk.One of the pieces of information maintained in the directory entry is called the file attributefield. This one-byte field stores a number of characteristics about each file but is not dis-played in a normal directory listing. Each characteristic stored in the file attribute field iscalled a file attribute, and each file can have more than one file attribute. Each file attribute is
5
IIPart
Ch
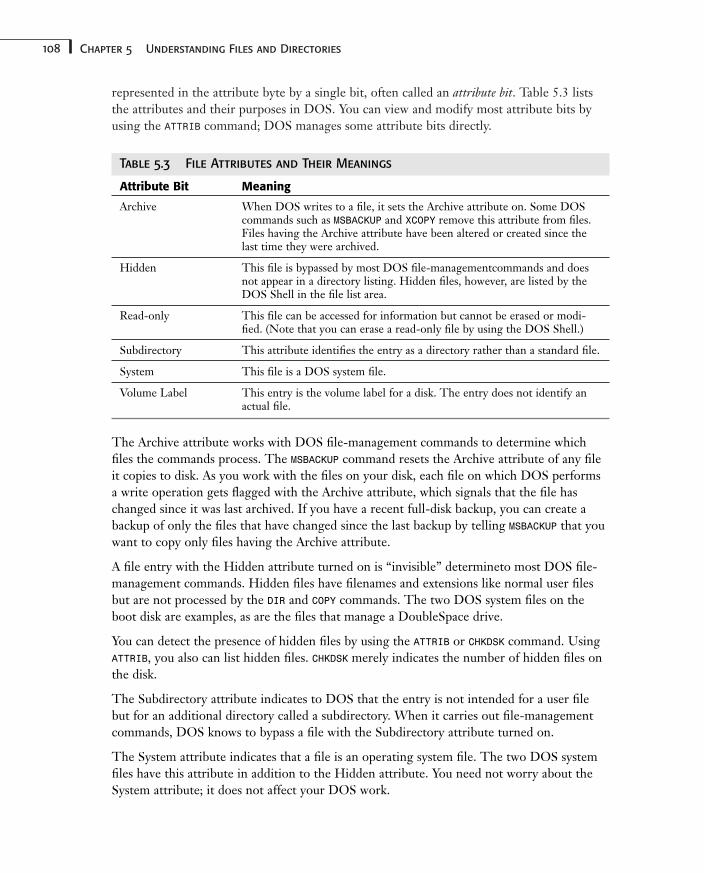
108 Chapter 5 Understanding Files and Directories
represented in the attribute byte by a single bit, often called an attribute bit. Table 5.3 liststhe attributes and their purposes in DOS. You can view and modify most attribute bits byusing the ATTRIB command; DOS manages some attribute bits directly.
Table 5.3 File Attributes and Their Meanings
Attribute Bit Meaning
Archive When DOS writes to a file, it sets the Archive attribute on. Some DOScommands such as MSBACKUP and XCOPY remove this attribute from files.Files having the Archive attribute have been altered or created since thelast time they were archived.
Hidden This file is bypassed by most DOS file-managementcommands and doesnot appear in a directory listing. Hidden files, however, are listed by theDOS Shell in the file list area.
Read-only This file can be accessed for information but cannot be erased or modi-fied. (Note that you can erase a read-only file by using the DOS Shell.)
Subdirectory This attribute identifies the entry as a directory rather than a standard file.
System This file is a DOS system file.
Volume Label This entry is the volume label for a disk. The entry does not identify anactual file.
The Archive attribute works with DOS file-management commands to determine whichfiles the commands process. The MSBACKUP command resets the Archive attribute of any fileit copies to disk. As you work with the files on your disk, each file on which DOS performsa write operation gets flagged with the Archive attribute, which signals that the file haschanged since it was last archived. If you have a recent full-disk backup, you can create abackup of only the files that have changed since the last backup by telling MSBACKUP that youwant to copy only files having the Archive attribute.
A file entry with the Hidden attribute turned on is “invisible” determineto most DOS file-management commands. Hidden files have filenames and extensions like normal user filesbut are not processed by the DIR and COPY commands. The two DOS system files on theboot disk are examples, as are the files that manage a DoubleSpace drive.
You can detect the presence of hidden files by using the ATTRIB or CHKDSK command. UsingATTRIB, you also can list hidden files. CHKDSK merely indicates the number of hidden files onthe disk.
The Subdirectory attribute indicates to DOS that the entry is not intended for a user filebut for an additional directory called a subdirectory. When it carries out file-managementcommands, DOS knows to bypass a file with the Subdirectory attribute turned on.
The System attribute indicates that a file is an operating system file. The two DOS systemfiles have this attribute in addition to the Hidden attribute. You need not worry about theSystem attribute; it does not affect your DOS work.
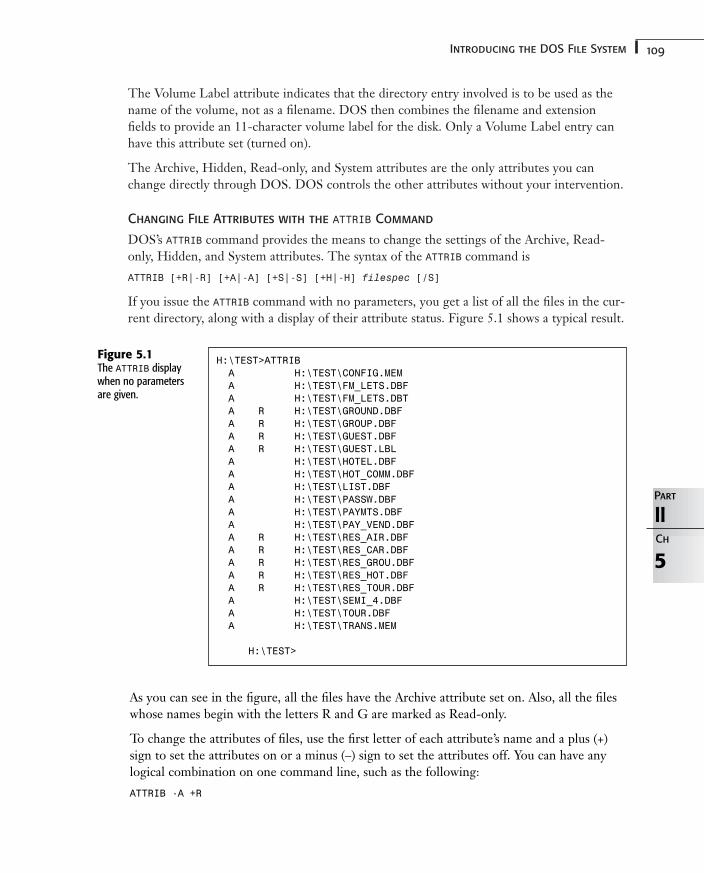
109Introducing the DOS File System
The Volume Label attribute indicates that the directory entry involved is to be used as thename of the volume, not as a filename. DOS then combines the filename and extensionfields to provide an 11-character volume label for the disk. Only a Volume Label entry canhave this attribute set (turned on).
The Archive, Hidden, Read-only, and System attributes are the only attributes you canchange directly through DOS. DOS controls the other attributes without your intervention.
Changing File Attributes with the ATTRIB Command
DOS’s ATTRIB command provides the means to change the settings of the Archive, Read-only, Hidden, and System attributes. The syntax of the ATTRIB command is
ATTRIB [+R|-R] [+A|-A] [+S|-S] [+H|-H] filespec [/S]
If you issue the ATTRIB command with no parameters, you get a list of all the files in the cur-rent directory, along with a display of their attribute status. Figure 5.1 shows a typical result.
5
IIPart
Ch
H:\TEST>ATTRIBA H:\TEST\CONFIG.MEMA H:\TEST\FM_LETS.DBFA H:\TEST\FM_LETS.DBTA R H:\TEST\GROUND.DBFA R H:\TEST\GROUP.DBFA R H:\TEST\GUEST.DBFA R H:\TEST\GUEST.LBLA H:\TEST\HOTEL.DBFA H:\TEST\HOT_COMM.DBFA H:\TEST\LIST.DBFA H:\TEST\PASSW.DBFA H:\TEST\PAYMTS.DBFA H:\TEST\PAY_VEND.DBFA R H:\TEST\RES_AIR.DBFA R H:\TEST\RES_CAR.DBFA R H:\TEST\RES_GROU.DBFA R H:\TEST\RES_HOT.DBFA R H:\TEST\RES_TOUR.DBFA H:\TEST\SEMI_4.DBFA H:\TEST\TOUR.DBFA H:\TEST\TRANS.MEM
H:\TEST>
As you can see in the figure, all the files have the Archive attribute set on. Also, all the fileswhose names begin with the letters R and G are marked as Read-only.
To change the attributes of files, use the first letter of each attribute’s name and a plus (+)sign to set the attributes on or a minus (–) sign to set the attributes off. You can have anylogical combination on one command line, such as the following:
ATTRIB -A +R
Figure 5.1The ATTRIB displaywhen no parametersare given.
110 Chapter 5 Understanding Files and Directories
The preceding example turns off the Archive attribute and turns on the Read-only attributefor every file in the current directory. You can narrow the scope of the ATTRIB command byspecifying a pathname expression (drive, path, and wildcards are honored) on the commandline, as in the following:
ATTRIB -R G*.*
This example removes the Read-only attribute from only those files whose names beginwith G. (You get a heavy dose of pathname expressions later in this chapter.)
You also can widen the scope of the ATTRIB command by using the /S switch. If you giveATTRIB a pathname expression as a parameter, by default the actions are limited only to thespecified path. Giving no pathname expression to ATTRIB limits its action to the currentlylogged directory. Using the /S switch widens the scope of the ATTRIB command to includeany directories under the directory where ATTRIB begins its actions.
Establishing Read-Only Files
The ATTRIB command gives you control over file attributes. In particular, the Read-onlyattribute makes DOS unable to overwrite a file. DOS commands such as EDIT, COPY, DEL,and XCOPY are capable of changing the data contained in a file. Files with the Read-onlyattribute cause a message to appear, telling you that the command you have tried to use cannot provide the service you are wanting.
In practice, however, the Read-only attribute has become little more than a confirmationflag to many modern programs. Both the DOS Shell and Windows File Manager can erasefiles having the Read-only attribute, for example, but only after you confirm that it is okay.
To give files the Read-only attribute, use the +R parameter, as in the following:
ATTRIB +R F:\WSTAR\*.TXT
Using the -R parameter has exactly the opposite effect, that of removing the Read-only flag.
The FDISK and FORMAT commands command do not observe the read-only status of a file. FDISK and FORMAT are disk-level commands; therefore, they don’t look at diskdirectories when they are doing their jobs. Don’t rely on the Read-only attribute of a fileto protect the file from a disk-level command. Use the disk’s write-protect tab to preventfloppies from being destroyed with FDISK and FORMAT.
Understanding the Role of DirectoriesTo this point in the chapter, you have read many references to the directory. These refer-ences, although necessary for the explanations of files at the time, do not provide a greatdeal of information about directories. Now that you know all about files, however, it is timeto turn your attention to the method used by DOS to organize files—directories.
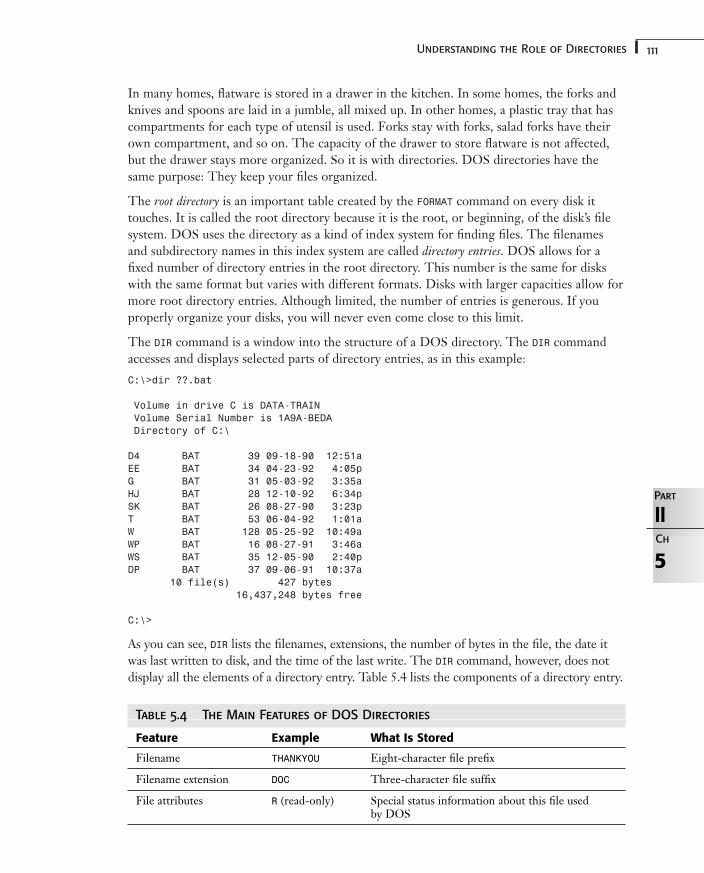
111Understanding the Role of Directories
In many homes, flatware is stored in a drawer in the kitchen. In some homes, the forks andknives and spoons are laid in a jumble, all mixed up. In other homes, a plastic tray that hascompartments for each type of utensil is used. Forks stay with forks, salad forks have theirown compartment, and so on. The capacity of the drawer to store flatware is not affected,but the drawer stays more organized. So it is with directories. DOS directories have thesame purpose: They keep your files organized.
The root directory is an important table created by the FORMAT command on every disk ittouches. It is called the root directory because it is the root, or beginning, of the disk’s filesystem. DOS uses the directory as a kind of index system for finding files. The filenamesand subdirectory names in this index system are called directory entries. DOS allows for afixed number of directory entries in the root directory. This number is the same for diskswith the same format but varies with different formats. Disks with larger capacities allow formore root directory entries. Although limited, the number of entries is generous. If youproperly organize your disks, you will never even come close to this limit.
The DIR command is a window into the structure of a DOS directory. The DIR commandaccesses and displays selected parts of directory entries, as in this example:
C:\>dir ??.bat
Volume in drive C is DATA-TRAINVolume Serial Number is 1A9A-BEDADirectory of C:\
D4 BAT 39 09-18-90 12:51aEE BAT 34 04-23-92 4:05pG BAT 31 05-03-92 3:35aHJ BAT 28 12-10-92 6:34pSK BAT 26 08-27-90 3:23pT BAT 53 06-04-92 1:01aW BAT 128 05-25-92 10:49aWP BAT 16 08-27-91 3:46aWS BAT 35 12-05-90 2:40pDP BAT 37 09-06-91 10:37a
10 file(s) 427 bytes16,437,248 bytes free
C:\>
As you can see, DIR lists the filenames, extensions, the number of bytes in the file, the date itwas last written to disk, and the time of the last write. The DIR command, however, does notdisplay all the elements of a directory entry. Table 5.4 lists the components of a directory entry.
Table 5.4 The Main Features of DOS Directories
Feature Example What Is Stored
Filename THANKYOU Eight-character file prefix
Filename extension DOC Three-character file suffix
File attributes R (read-only) Special status information about this file used by DOS
5
IIPart
Ch
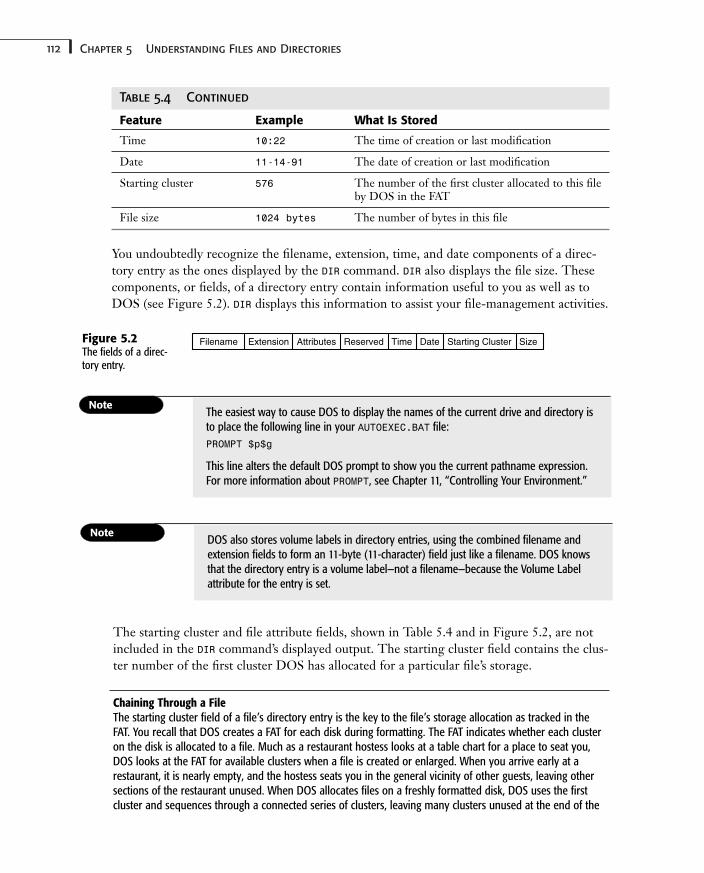
112 Chapter 5 Understanding Files and Directories
Table 5.4 Continued
Feature Example What Is Stored
Time 10:22 The time of creation or last modification
Date 11-14-91 The date of creation or last modification
Starting cluster 576 The number of the first cluster allocated to this fileby DOS in the FAT
File size 1024 bytes The number of bytes in this file
You undoubtedly recognize the filename, extension, time, and date components of a direc-tory entry as the ones displayed by the DIR command. DIR also displays the file size. Thesecomponents, or fields, of a directory entry contain information useful to you as well as toDOS (see Figure 5.2). DIR displays this information to assist your file-management activities.
Figure 5.2The fields of a direc-tory entry.
Filename Extension Attributes Reserved Time Date Starting Cluster Size
The starting cluster and file attribute fields, shown in Table 5.4 and in Figure 5.2, are notincluded in the DIR command’s displayed output. The starting cluster field contains the clus-ter number of the first cluster DOS has allocated for a particular file’s storage.
Chaining Through a FileThe starting cluster field of a file’s directory entry is the key to the file’s storage allocation as tracked in theFAT. You recall that DOS creates a FAT for each disk during formatting. The FAT indicates whether each clusteron the disk is allocated to a file. Much as a restaurant hostess looks at a table chart for a place to seat you,DOS looks at the FAT for available clusters when a file is created or enlarged. When you arrive early at arestaurant, it is nearly empty, and the hostess seats you in the general vicinity of other guests, leaving othersections of the restaurant unused. When DOS allocates files on a freshly formatted disk, DOS uses the firstcluster and sequences through a connected series of clusters, leaving many clusters unused at the end of the
The easiest way to cause DOS to display the names of the current drive and directory isto place the following line in your AUTOEXEC.BAT file:
PROMPT $p$g
This line alters the default DOS prompt to show you the current pathname expression.For more information about PROMPT, see Chapter 11, “Controlling Your Environment.”
DOS also stores volume labels in directory entries, using the combined filename andextension fields to form an 11-byte (11-character) field just like a filename. DOS knowsthat the directory entry is a volume label—not a filename—because the Volume Labelattribute for the entry is set.
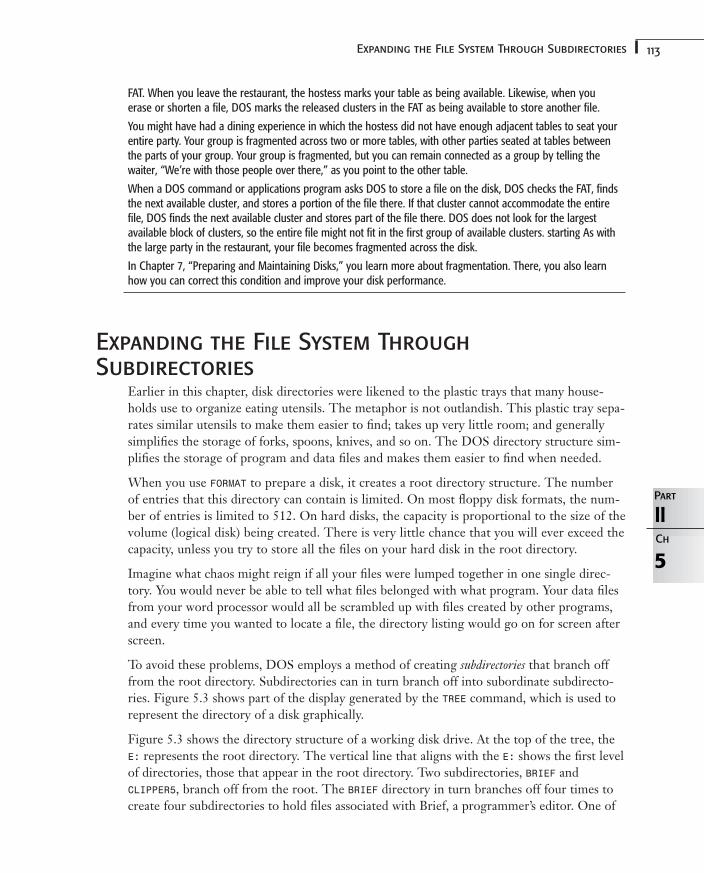
113Expanding the File System Through Subdirectories
FAT. When you leave the restaurant, the hostess marks your table as being available. Likewise, when youerase or shorten a file, DOS marks the released clusters in the FAT as being available to store another file.
You might have had a dining experience in which the hostess did not have enough adjacent tables to seat yourentire party. Your group is fragmented across two or more tables, with other parties seated at tables betweenthe parts of your group. Your group is fragmented, but you can remain connected as a group by telling thewaiter, “We’re with those people over there,” as you point to the other table.
When a DOS command or applications program asks DOS to store a file on the disk, DOS checks the FAT, findsthe next available cluster, and stores a portion of the file there. If that cluster cannot accommodate the entirefile, DOS finds the next available cluster and stores part of the file there. DOS does not look for the largestavailable block of clusters, so the entire file might not fit in the first group of available clusters. starting As withthe large party in the restaurant, your file becomes fragmented across the disk.
In Chapter 7, “Preparing and Maintaining Disks,” you learn more about fragmentation. There, you also learnhow you can correct this condition and improve your disk performance.
Expanding the File System ThroughSubdirectories
Earlier in this chapter, disk directories were likened to the plastic trays that many house-holds use to organize eating utensils. The metaphor is not outlandish. This plastic tray sepa-rates similar utensils to make them easier to find; takes up very little room; and generallysimplifies the storage of forks, spoons, knives, and so on. The DOS directory structure sim-plifies the storage of program and data files and makes them easier to find when needed.
When you use FORMAT to prepare a disk, it creates a root directory structure. The numberof entries that this directory can contain is limited. On most floppy disk formats, the num-ber of entries is limited to 512. On hard disks, the capacity is proportional to the size of thevolume (logical disk) being created. There is very little chance that you will ever exceed thecapacity, unless you try to store all the files on your hard disk in the root directory.
Imagine what chaos might reign if all your files were lumped together in one single direc-tory. You would never be able to tell what files belonged with what program. Your data filesfrom your word processor would all be scrambled up with files created by other programs,and every time you wanted to locate a file, the directory listing would go on for screen afterscreen.
To avoid these problems, DOS employs a method of creating subdirectories that branch offfrom the root directory. Subdirectories can in turn branch off into subordinate subdirecto-ries. Figure 5.3 shows part of the display generated by the TREE command, which is used torepresent the directory of a disk graphically.
Figure 5.3 shows the directory structure of a working disk drive. At the top of the tree, theE: represents the root directory. The vertical line that aligns with the E: shows the first levelof directories, those that appear in the root directory. Two subdirectories, BRIEF and CLIPPER5, branch off from the root. The BRIEF directory in turn branches off four times tocreate four subdirectories to hold files associated with Brief, a programmer’s editor. One of
5
IIPart
Ch
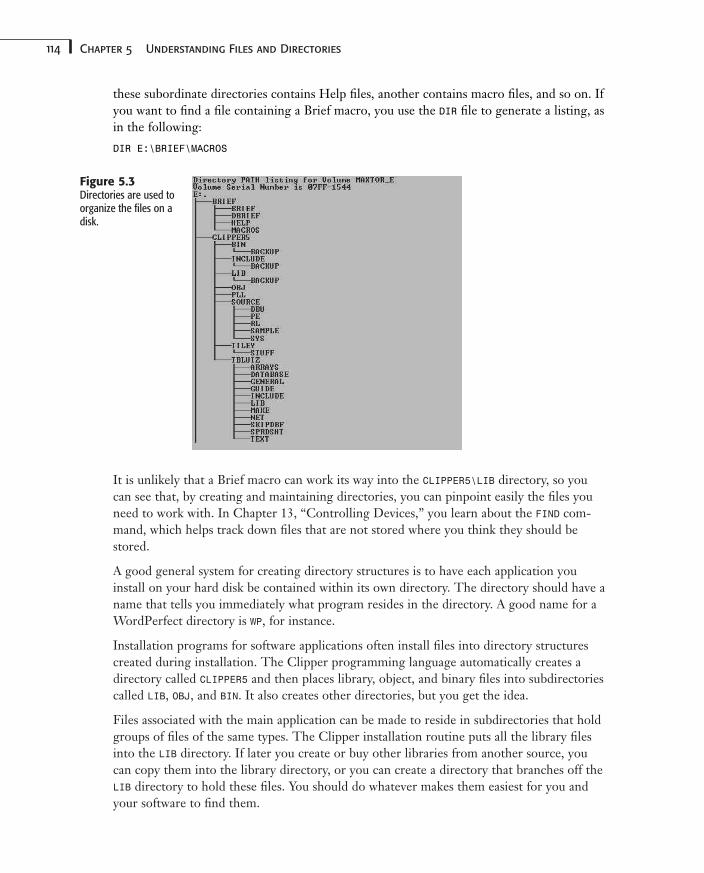
114 Chapter 5 Understanding Files and Directories
Figure 5.3Directories are used toorganize the files on adisk.
It is unlikely that a Brief macro can work its way into the CLIPPER5\LIB directory, so youcan see that, by creating and maintaining directories, you can pinpoint easily the files youneed to work with. In Chapter 13, “Controlling Devices,” you learn about the FIND com-mand, which helps track down files that are not stored where you think they should bestored.
A good general system for creating directory structures is to have each application youinstall on your hard disk be contained within its own directory. The directory should have aname that tells you immediately what program resides in the directory. A good name for aWordPerfect directory is WP, for instance.
Installation programs for software applications often install files into directory structurescreated during installation. The Clipper programming language automatically creates adirectory called CLIPPER5 and then places library, object, and binary files into subdirectoriescalled LIB, OBJ, and BIN. It also creates other directories, but you get the idea.
Files associated with the main application can be made to reside in subdirectories that holdgroups of files of the same types. The Clipper installation routine puts all the library filesinto the LIB directory. If later you create or buy other libraries from another source, youcan copy them into the library directory, or you can create a directory that branches off theLIB directory to hold these files. You should do whatever makes them easiest for you andyour software to find them.
these subordinate directories contains Help files, another contains macro files, and so on. Ifyou want to find a file containing a Brief macro, you use the DIR file to generate a listing, asin the following:
DIR E:\BRIEF\MACROS
115Expanding the File System Through Subdirectories
Understanding Pathname Expressions
A pathname expression indicates the path that DOS must traverse to find a specified file orgroup of files. A pathname expression has three components: drive, directories, and files.
The drive component identifies the disk drive used to store the files. It is made up of threecharacters: the drive letter, followed by a colon (:) and a backslash (\), as in the followingexample:
C:\
DOS uses the backslash character to separate the directories within a pathname expression.The preceding example is a pathname expression that indicates the root directory of drive Cbecause the backslash immediately follows the colon.
The directory component of the pathname expression is a list of all the directories that mustbe traversed to reach the last named directory or the file component. The following is anexample:
C:\WINDOWS\SYSTEM\GAMES
In this example, the pathname expression tells DOS to look for files by starting at the rootdirectory of C:, moving into the WINDOWS directory, through the SYSTEM directory thatbranches from the WINDOWS directory, and then into the GAMES directory. Simply stated, apathname expression gives DOS directions to directories, just like you might give a frienddirections to your house.
The third portion of a pathname expression specifies a single file explicitly, or it uses wild-cards to specify a group of files, as in the following two examples:
C:\WINDOWS\SYSTEM\GAMES\SOL.EXE
C:\DOS\*.COM
The first example specifies a single file in the GAMES directory, whereas the second examplespecifies a group of files using a wildcard. Pathname expressions can use ?, *, ., and .. asvalid wildcard characters.
DOS requires each file on a disk to have a unique name. For this reason, DOS considers afile’s full name to be the pathname expression that explicitly identifies that one file. Forexample, the name
C:\DOS\GO.BAT
is not the same as the following:
C:\TEMP\GO.BAT
Yes, two files have the name GO.BAT, but they are in different directories, so both files have aunique name.
If you issue the following command, which file’s contents are displayed depends on whatdirectory you are currently logged in to:
TYPE GO.BAT
5
IIPart
Ch
116 Chapter 5 Understanding Files and Directories
If you are logged in to either the DOS or TEMP directories of drive C, you see the contents ofthe file named GO.BAT found in that directory. If you are logged in to the GRAPHIC directory,you might get a file not found message.
The trick to using pathname expressions effectively is knowing when to use the full formalpathname and when to use a less specific pathname expression.
People, like files, can be called either by a formal title, such as George W. Bush, Presidentof the United States, or by a less formal form of address, such as President George Bush.Mr. Bush and George are other examples of names that identify the President. Pathnameexpressions can likewise be formal or informal.
New DirectoriesNewcomers to DOS often are puzzled to see directory listings that contain filenames that look like periods.Many people, afraid to appear silly, never ask what the periods mean.
When you create a new directory in DOS, it adds two entries to the new directory. The name of the first entry isalways . (called dot). The second entry is always named .. (called dot-dot). The dot entry in a directoryrefers, or points, to the directory that contains it. You can think of the dot entry as an alias for the current direc-tory’s name, analogous to the pronoun me. Although no DOS manual documents this fact, you also can use thedot as a wildcard character in most commands. For example, the following
DEL .
is the same as
DEL *.*
DOS uses the dot-dot entry to point to the parent of the current directory. This entry is an alias for the parentdirectory’s name and is analogous to the names Mom or Dad. The following command, for example, lists allthe files in the current directory’s parent directory:
DIR ..
In the root directory, .. has no meaning because the root directory has no parent.
The full formal pathname expression for a file expresses the location of a file or group offiles explicitly without regard to the currently logged directory. This type of pathnameexpression is sometimes called an absolute path. The following is an example:
TYPE C:\AUTOEXEC.BAT
This command displays the contents of your AUTOEXEC.BAT file onscreen no matter whatdrive or directory is currently logged. If, however, you currently are logged in to the rootdirectory of C:, typing the C:\ portion of the pathname expression becomes optionalbecause DOS always looks for a specified file in the current directory. Therefore, the follow-ing finds the proper file if you are logged in to C:\:
TYPE AUTOEXEC.BAT
This pathname formal expression uses a relative path to locate the file. Specifying a relativepath involves giving directions to DOS, based on its currently logged directory. Each of thefollowing three examples uses a relative path as its pathname expression:
117Expanding the File System Through Subdirectories
DIR ..DIR C:DIR SAMPLES\*.DOC
The first uses .. to cause DIR to show all files in the directory from which the current direc-tory branches out. The second example lists all files in whatever directory is currentlylogged on drive C. The third example lists all the .DOC files in the SAMPLES directory, whichbranches off from the current directory.
Pathname expressions can range from the very simple to the very complex. Keep in mindtwo rules when you’re creating directories on your system:
■ DOS pathname expressions cannot exceed 63 characters in length, including theimplicit backslash DOS adds internally.
■ Typing long strings of directory names is both a pain in the neck and an invitation totyping errors.
If you really understand the second rule, you will never have a problem with the first rule.When you’re creating directory structures on hard disks, keep the depth of directories to aminimum. When you are tempted to create a pathname that exceeds three directories deep,stop and think. At least half the time, you can come up with a better way to arrange directo-ries so that you don’t end up typing pathname expressions that sprawl across half the screen.
As complex as pathname expressions can become, most new users are surprised to find thatthey need learn only three simple commands to create and maintain DOS directories. Thefollowing sections provide a rundown of each command.
Creating Directories with MKDIR (MD)
DOS provides the internal MKDIR command to create directories. You can abbreviate thename of the command as MD for convenience. Because MD, or make directory, is easier toremember, this form is used in this chapter. Anywhere you see a reference to the MD com-mand, you can substitute MKDIR.
The syntax for the MD command is as follows:
MD d:\path\dirname
The command uses a pathname to explicitly describe the drive and pathway to the newdirectory to be created. You learn more about pathnames in the following paragraphs. Fornow, consider the following line:
MD E:\BRIEF\MACROS\OLDMACS
This example creates the OLDMACS directory branching from the BRIEF\MACROS directory.Subdirectory names are just directory entries in the parent directory. MACROS, for example, isjust an entry in the BRIEF directory. What differentiates a subdirectory name from a file-name is the Directory attribute. The starting cluster associated with the directory name isthe first cluster on the disk where that directory’s entries are written.
5
IIPart
Ch
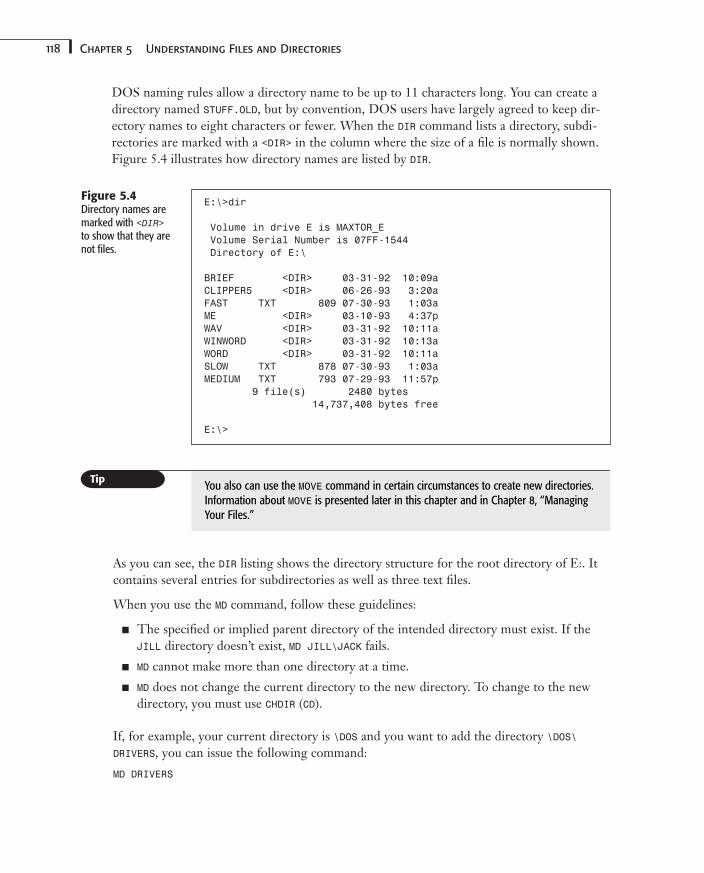
118 Chapter 5 Understanding Files and Directories
DOS naming rules allow a directory name to be up to 11 characters long. You can create adirectory named STUFF.OLD, but by convention, DOS users have largely agreed to keep dir-ectory names to eight characters or fewer. When the DIR command lists a directory, subdi-rectories are marked with a <DIR> in the column where the size of a file is normally shown.Figure 5.4 illustrates how directory names are listed by DIR.
E:\>dir
Volume in drive E is MAXTOR_EVolume Serial Number is 07FF-1544Directory of E:\
BRIEF <DIR> 03-31-92 10:09aCLIPPER5 <DIR> 06-26-93 3:20aFAST TXT 809 07-30-93 1:03aME <DIR> 03-10-93 4:37pWAV <DIR> 03-31-92 10:11aWINWORD <DIR> 03-31-92 10:13aWORD <DIR> 03-31-92 10:11aSLOW TXT 878 07-30-93 1:03aMEDIUM TXT 793 07-29-93 11:57p
9 file(s) 2480 bytes14,737,408 bytes free
E:\>
Figure 5.4Directory names aremarked with <DIR>to show that they arenot files.
As you can see, the DIR listing shows the directory structure for the root directory of E:. Itcontains several entries for subdirectories as well as three text files.
When you use the MD command, follow these guidelines:
■ The specified or implied parent directory of the intended directory must exist. If theJILL directory doesn’t exist, MD JILL\JACK fails.
■ MD cannot make more than one directory at a time.
■ MD does not change the current directory to the new directory. To change to the newdirectory, you must use CHDIR (CD).
If, for example, your current directory is \DOS and you want to add the directory \DOS\DRIVERS, you can issue the following command:
MD DRIVERS
You also can use the MOVE command in certain circumstances to create new directories.Information about MOVE is presented later in this chapter and in Chapter 8, “ManagingYour Files.”

119Expanding the File System Through Subdirectories
Notice that no backslash appears in front of the new directory name. DOS interprets thispath to be a relative path, and it adds the current directory path to the pathname expressionon the command line.
Changing the Current Directory with CHDIR (CD)
As you work with drives and files in DOS, you can consider each directory to be a locationand the pathname expression of the directory to be its map. DOS keeps in memory yourcurrent location on each drive of your machine.
Use the CHDIR command to change from one directory to another. The short form of CHDIRis CD, meaning change directory. If you are in the WINDOWS directory and you want to work inthe SYSTEM directory that branches off the WINDOWS directory, issue the following command:
CD SYSTEM
The WINDOWS\SYSTEM directory then becomes your currently logged directory. DOS remem-bers which directory is current for each drive in your system. When you switch to anotherdrive, DOS automatically retains a memory of where you were working last. Consider thisexample:
C:CD \DOS\UTILSF:COPY *.BAT C:
In this example, you move onto drive C and change directories to the DOS\UTILS directory.The next command moves you to drive F and copies all the batch files in the current direc-tory of F: to the current directory of C:. In this case, the files are copied to C:\DOS\UTILS.
5
IIPart
ChTo change directly to the root directory of the currently logged disk from any directoryon the disk, issue the following command:
CD \
Also, if you are not sure what directory you are currently in, issuing the CD commandwith no pathname expression causes DOS to display the full pathname expression forthe current directory.
You can also issue the following command to return to the directory above your currentone (for example to move from C:\DATA\DOCS to C:\DATA):
CD ..
You can use either a relative path or an absolute path to specify what directory to changeinto. Assume you are currently logged in to C:\DOS\UTILS, for example, and issue the fol-lowing command:
CD ..\STUFF
This example uses a relative path to log you in to the C:\DOS\STUFF directory. You also canlog in to the same directory by issuing this command:
CD \DOS\STUFF
120 Chapter 5 Understanding Files and Directories
When you’re using the CD command, follow these guidelines:
■ The drive and path parameters in the command line must be valid.
■ If the path parameter begins with \, CD assumes that the directory specified in the pathis absolute—from the root.
■ If the path parameter does not begin with \, CD assumes that the directory given in thepath is relative to the current directory.
■ When you specify a drive parameter but no path parameter, CD reports the currentworking directory for the specified disk.
■ When you omit the path parameter and the drive parameter from the command line, CDreports the current working directory of the currently logged drive.
Deleting Directories with RMDIR (RD)
Just as you occasionally need to add a directory to a disk, you might need to delete a direc-tory. DOS enables you to remove empty directories at the end of a directory branch in thedirectory tree with the RMDIR command, RD for short.
When you’re working with the RD command, remember that RD can delete only empty direc-tories. If a directory contains files or has another directory branching from it, RD fails. Todelete a directory using RD, use a command similar to the following:
RD \COLD\HOT\WARM
If the WARM directory is empty, RD removes it from the directory tree.
Using DELTREE to Delete Directories
The DELTREE command, new in DOS 6.0, makes the RD command obsolete. DELTREE enablesyou to delete directories that contain files—even complete branches of a directory tree. Thiscommand removes the directory you specify and everything in it—subdirectories, files, andfiles in subdirectories. In addition, attributes of files in the subdirectories are ignored. Youdo not need to use ATTRIB to clear attributes such as Read-only or Hidden before you deletethem.
The syntax for DELTREE is as follows:
DELTREE /Y d:path
The optional d: parameter specifies the disk that contains the directory branch to beremoved. If you omit d: from the command line, DOS assumes that the current (logged)disk holds the directory to be removed.
The required pathname expression specifies the topmost level of the directory branch to beremoved. If the path begins with a backslash (\), DOS assumes that the path to the directoryname is absolute from the root. If the path parameter does not begin with a backslash, DOSassumes that the path to the directory name is relative from the current directory of d:.
121Expanding the File System Through Subdirectories
The /Y parameter is optional. Because DELTREE is a potentially dangerous command, capableof wiping out hundreds of files at a time, DOS normally displays the following message:
Delete d:path and all its subdirectories? [Y/N]
If you type Y and press Enter, the command proceeds; if you type N and press Enter, theoperation stops. If you use the /Y parameter, however, the message does not appear, andDELTREE proceeds as though you had typed Y.
5
IIPart
Ch
DELTREE deletes everything in its path. As with anything in computing, a feature thatgives you a great deal of power also gives you the ability to shoot yourself in the foot.Be sure you no longer need anything in any of the directories subordinate to the oneyou name before proceeding. To make sure, first issue the DIR command (with the /Sparameter) or the TREE command, which is discussed later in this chapter.
Assume, for example, that your hard disk has a string of directories branching off from theroot directory of C:. The pathname expression that specifies the lowest level directory isC:\HOT\COLD\WARM\TEPID\ICY. If you issue this command, all the files and directories in theWARM directory are deleted regardless of file attributes:
DELTREE /Y C:\HOT\COLD\WARM
Any directories that may branch off from WARM, TEPID, or ICY are also deleted, along withany files they contain.
As you can see, DELTREE is a powerful command. Always double-check your command linefor errors before you press Enter to activate the command.
Remember, too, that you can use wildcards in the pathname expression of the commandline, but use them only with caution. If a wildcard in a pathname expression matches bothdirectory names and filenames, both are deleted. It is often a good idea to use the DIR com-mand first to see what files the pathname expression affects before using that pathnameexpression with DELTREE.
Renaming Directories
Having to change the name of a directory is not uncommon. This need might arise becauseyou misspell the name of the directory during creation or because you have upgraded soft-ware and want the upgrade to be reflected in the directory name.
The MOVE command enables you to rename directories from the command line and alsomoves files from one directory to another. The syntax of the MOVE command for renamingdirectories is as follows:
MOVE d:oldpath d:newpath
The optional d: parameter specifies the disk that contains the directory branch to beremoved. If you omit d: from the command line, DOS assumes that the current (logged)disk holds the directory to be removed.
122 Chapter 5 Understanding Files and Directories
This command requires two pathname expressions. The first specifies the directory youwant to move or rename. The second pathname expression specifies the new name of thetarget directory or the name of a directory to be created as a result of the command’sactions. If the directory does not exist, MOVE prompts you to ask whether the directoryshould be created. Answer Y, and the new directory is created.
To rename a directory, use the MOVE command as in the following example:
MOVE C:\TEMP\BAK C:\TEMP\BACKUP
Helping DOS Find Files with PATHWhen you issue a DOS command, COMMAND.COM, the command interpreter, looks first to seewhether the command is internal to DOS. If the command is not internal, DOS looks onthe disk for a filename having the same name as the command.
In this regard, both external DOS commands and other executable files have equal status.Files having the extensions .EXE, .COM, and .BAT are all considered by DOS to be executableprogram files. DOS simply looks for any executable file having the same name as the com-mand-line keyword. It then runs the first file it finds.
The DOS search path works only with executable files. If a program uses auxiliary filessuch as overlays and data files, an error can occur unless the program is written tosearch its own directory, not just the currently logged directory.
None of DOS’s external commands use auxiliary files, so you never have a “file notfound” problem as long as the DOS directory is included in the search path. To runapplications that use auxiliary files, you should log in to the directory where the applica-tion is written to disk to ensure error-free operation.
You have three ways to make sure DOS finds an external program file. You can do any ofthe following:
■ Log in to the disk and directory that contains the command
■ Supply the path in the command line
■ Establish a DOS search path to the command’s directory
The PATH command places a path search string in the DOS environment. DOS uses thecontents of this environment variable to determine where on the system it should look forprogram files.
Normally, the PATH command is included as a statement in the AUTOEXEC.BAT file, so it takeseffect even before the first DOS prompt is displayed. Using the PATH command, however, isnot restricted to lines in AUTOEXEC.BAT. You can type a new search string at any DOS
123Listing Directories with TREE
prompt. Whether it is in a batch file or typed at a DOS prompt, the PATH command is usedthe same way, as in the following example:
PATH C:\;C:\DOS;D:\WINDOWS;E:\BRIEF
If you enter a command at the DOS prompt and COMMAND.COM does not recognize it as aninternal DOS command, DOS always looks first in the currently logged directory. If the filecannot be found there, DOS uses the PATH information to first search the root directory ofdrive C, then the \DOS directory of C:, then the WINDOWS directory on D:, and finally theBRIEF directory on E:. Only after searching all five directories for an executable file, and notfinding it, does DOS give you the dread Bad command or file name message.
The directories you want searched are listed on the command line separated by semicolons(;). The order in which the directories are listed is the order in which they are searched. Forthis reason, it is prudent to keep the DOS directory and other frequently used directories atthe front of the search string.
In the preceding sample PATH command, DOS is directed to first look in the root directoryof drive C. This directory is traditionally a favorite repository for batch files that automatethe launching of applications. The second directory specified is the DOS directory. The DOSdirectory should always be at or near the beginning of the search path because files in thisdirectory are constantly being called on. Having the DOS directory at the head of the searchpath cuts down on the time spent searching for external DOS commands. Exceedingly longsearch paths can dramatically slow down your computer’s response time.
The order of the search path is important for another reason as well. If two directories haveexecutable programs with the same names, the program that is run is the one whose direc-tory is specified closer to the beginning of the search path.
Although the maximum length of the search path is 127 characters, avoid creating longsearch paths. Traditionally, search paths are used mainly to allow DOS to find often-usedutilities without having to change logged drives or directories. Having too many directoriesin the search path slows down system performance because it takes DOS longer to deter-mine whether a command is valid. Some software applications, such as Windows, require anentry in the search path for efficient operation, however. In general, if you seldom use theexecutable files in a directory, it is better to leave that directory out of the search path.
Listing Directories with TREEDOS provides an external command, TREE, that lists all the directories of a disk as a treestructure similar to the DOS Shell’s directory display. Figure 5.4 shows the TREE command’soutput. The TREE command also can list the files in the directories. TREE is especially usefulwhen you’re working with hard disks because it visually maps out the directory structures ofdisks.
The TREE command syntax is as follows:
TREE d:path /F/A
5
IIPart
Ch
124 Chapter 5 Understanding Files and Directories
d: is an optional parameter that indicates the drive whose directories you want to list. If youomit d:, TREE lists the directories on the current disk drive.
The path expression names the directory where TREE is to start processing the listing. If youomit this parameter, TREE begins processing from the root directory.
TREE accepts two switches. The /F switch instructs TREE to display the files contained withindirectories as part of the visual tree. The /A switch instructs TREE to use printable charactersinstead of the line-drawing characters normally used to indicate branching of directories.Use the /A switch when you’re directing output to an older printer that cannot print graph-ics characters or when using a text-only video adapter.
Using a Temporary DirectoryMany programs and some DOS operations use a directory as a temporary location to storescratchpad files. A scratchpad file is a file that is created as a buffer to store information tem-porarily before a permanent file is created. A good example of a program that uses tempo-rary storage space is Windows. Windows creates .TMP files in the temporary directory tohold swapping information. Also, the Windows Print Manager uses the temporary directoryto create files to hold print jobs. Other programs use temporary space as a place to storesorting information, backup copies of files being processed, and so on.
Traditionally, DOS users have created a directory called TEMP that branches off the rootdirectory of C:. In fact, if this directory doesn’t exist when you install DOS 6.22 using theSetup program, it is created for you automatically.
The SET command, which creates DOS environment variables, normally is used inAUTOEXEC.BAT to create a variable called TEMP, as shown in this example:
SET TEMP=C:\TEMP
Redirecting Your OutputLike DIR and TYPE, TREE is one of those DOS commands that can produce many pages of output. DOS offerstwo features to enable you to capture screen output in a more usable form.
You can use the MORE command to capture screen output from other commands and present the screens oneat a time, pausing for a keystroke as each screen is displayed. MORE is unusual because you enter it on thecommand line of another command using the pipe (|) symbol, which you can find on the same key as thebackslash on most keyboards. Check out the following command example:
TREE /F | MORE
The preceding command captures the output of the TREE command and passes it to the MORE command. TheMORE command breaks up the output into single screen portions. As each single screenful of the output is dis-played, MORE waits for you to press a key before it displays the next screenful.
The problem with MORE is that you cannot go backward. When a screenful of output has been replaced withanother, the first screenful is lost. To see it again, you must repeat the command that called MORE.
You also can use the DOS redirection feature to capture long output to a file or send it directly to a printer byusing the output redirection symbol (>), as in the following two examples:
TREE /F >TREE.TXT
125Troubleshooting
TREE /F >PRN
The first example directs the output to be saved in a file named TREE.TXT. You then can use an editor to viewthe output of the TREE command. If your editor has problems displaying graphic characters, use the /A switchto get readable output.
The second example directs the output of the TREE command to the printer. Make sure the printer is onlineand ready before you put the TREE command into action.
For more information on DOS’s redirection features, see Chapter 13.
When DOS or another program needs to create temporary files, it looks in the environmentto see whether a TEMP variable exists. This way, you can direct DOS to use a specific direc-tory. If you don’t have a TEMP directory, most software uses the currently logged directory tocreate scratchpad files. You should always make sure that the TEMP directory resides on a diskwith plenty of free space. Lack of scratchpad space can make programs run much moreslowly than normal or display an error message.
Most programs that create scratch files do a good job of cleaning up after themselves bydeleting any files they might create when the files are no longer needed.
It is a good idea to check the TEMP directory every few days just to make sure that noscratchpad files have been orphaned by a power failure or untimely reboot. If you findfiles in the TEMP directory, you should delete them.
Be careful, however, not to delete files in the TEMP directory while you’re runningWindows or when you’re shelled out to a DOS session from within a running applica-tion. Under these circumstances, the files still might be active and in use. Never deletefiles from the TEMP directory unless you are at a DOS prompt with no other programsrunning.
TroubleshootingWhat happened to my filenames?
Modern operating systems, such as Windows 95/98/ME and Windows NT/2000, enable youto have filenames up to 256 characters. A common problem occurs when a user copies fileswith long filenames to a DOS machine that supports only the 8.3 filename format. DOSrenames a long filename by truncating it and adding a tilde (~) and a numeric character.
If you copy the file CONVERTIBLE.EXE to a DOS machine, for example, you end up with a filecalled CONVER~1.EXE.
If you try to name a file with an illegal character or with too many characters in the exten-sion, you encounter other errors. The following example uses the COPY command to showwhat can happen:
COPY TEST.TXT 123456789.1234
126 Chapter 5 Understanding Files and Directories
Notice that both the filename and extension given for the destination filename contain anextra character: The filename has the extra character 9, and the extension has the extra char-acter 4. You might predict that DOS will issue a message warning that the filename andextension are too long. No such luck! DOS simply truncates the filename to eight charactersand the extension to three characters to create a legal filename (12345678.123), and then itcompletes the COPY operation.
Illegal characters in a filename can prevent DOS from carrying out a command. Here’s anexample:
COPY 12345678.123 1[3.123
This command causes DOS to display the following message:
File creation error
Few experienced DOS users purposely use illegal characters in a filename, but typos easilycan creep into your DOS commands and introduce illegal characters into filename parame-ters. Type commands carefully, remembering that DOS’s reaction to an illegal filename isn’talways predictable.

Understanding Disks and DiskDrivesIn this chapter
Understanding the Disk’s Magnetic Storage Technique 128
Understanding Disk Drives 129
Understanding the Dynamics of the Disk Drive 133
Understanding Disk Formats 137
Understanding DoubleSpace 140
Case Study: Adjusting for Drift 148
6CHAPTER
128 Chapter 6 Understanding Disks and Disk Drives
Understanding the Disk’s Magnetic StorageTechnique
Early computer hobbyists used everything from discarded paper tape drives to cassette tapesto store files. For a while, Radio Shack sold cassette tapes that didn’t have the normal plasticleader at the head of the tape so that computer users didn’t have to wind tapes past theleader by hand.
Fortunately, the fastest advances in computer science have revolved around memory andstorage. The original IBM PC had two single-sided 5 1/4-inch (160KB) floppy disk drives,period. Hard drives weren’t supported by the IBM PC BIOS until the 10MB hard diskbecame the standard in the early XTs.
Floppy disks have evolved to the point where four standard formats are in common use. Afifth format—Extra High Density—is available, but few manufacturers support it yet. Youlearn more about these sizes later in this chapter.
Hard disks have changed the most. A number of technology standards have come and goneas hard disks have steadily grown larger and faster. Drives that are capable of storing morethan twenty gigabytes (approximately two billion bytes) now cost less than $200.
CD-ROM drives, which can hold more than 640MB of data, are widely available in today’ssystems and have become the standard for software. Also, with the advent of both write-once(CD-R) and rewritable (CD-RW) CD-ROM media, CDs now have many more uses, such asbackups and custom software distribution. Another format that has recently come on thescene is DVD-ROM, which is a new CD-style format that can hold more than 17GB ofinformation. The main drawback of DVD-ROM drives at this time is their relatively slowspeed. Although some CD-ROM drives are as fast as 72x speed, the best DVD-ROM drive iscurrently around 16x speed. With regard to creating your own DVD-ROMs, DVD-ROMrecorders are—at the time of this writing— expensive (more than $800 a drive) compared toCD-R and CD-RW; eventually, this format will probably surpass the current CD-R standard.
Magnetic media come in two basic flavors: floppy and hard. The following sections give youthe technical background on how disks work.
Although this material doesn’t make using the COPY or FORMAT commands any more or lesseffective, knowing this information can save your data. Magnetic disks, like humans, aremortal; they sometimes suddenly drop dead. Usually, users make mistakes that wreck disks,but sometimes disks just give up the ghost unexpectedly or get trapped in a lightning zap.Disks are generally prone to hazard. This, of course, is why backups are so important.Highly specialized disk-editing software such as Norton Disk Doctor and others of its ilkcan help you to revive and resurrect lost data, but only if you know how disks are formattedand how data is stored.
Almost everyone is familiar with the way audio tape recorders work. Because tape recordersand computer disks use similar technologies, take a moment to review the form of the tech-nology you are probably most familiar with.

129Understanding Disk Drives
In a cassette tape, a long thin ribbon of plastic is coated with an emulsion of ferrous oxides(magnetic coatings), enclosed in a protective plastic case, and passed through a tape trans-port. The transport mechanism pulls the ribbon of tape through at a controlled speed andbrings the tape into contact with three magnetic tape heads.
Most tape recorders use an erase head, a record head, and a playback head. On some inex-pensive tape recorders, a single head is used for both playback and recording. This setupdoesn’t, by itself, lower sound quality; it means only that you can’t listen to the tape as it isrecorded.
When you’re recording a tape, the erase head randomizes the magnetic particles in theoxide emulsion, effectively erasing any previously stored information (sound).
The stereo record head actually has two heads: one for the left channel and one for theright. Sounds are converted into electrical fields. As the tape passes across the record head,it passes through these fields, and the random magnetic particles align into replicas of thefield through which it passes.
When the tape passes over the playback head, the magnetic patterns on the tape are pickedup much like a microphone’s diaphragm picks up sound waves. The magnetic images createelectrical fields that then can be turned back into sound waves with a speaker.
A standard stereo cassette tape has four tracks of sound information, two in each playbackdirection. The ribbon of tape has four discrete stripes of magnetic information.
Now imagine that you make a cassette tape several inches in width. Cut circular discs out ofthe tape, enclose them in a plastic casing, and build a machine that locks onto the center ofthe disc and rotates it like a potter’s wheel. To the machine, add a magnetic tape headmounted on an arm that can float over the surface of the disc. As the magnetic disc rotates,the head can be positioned to create magnetic stripes in concentric rings, just like the ringsin a tree trunk, except that they are symmetrical and evenly spaced.
Voilà! You have just invented the floppy disk!
Understanding Disk DrivesActually, you must complete a few steps before you have a floppy disk drive. First, discard therecord head. Because you are recording only the ones and zeros of binary numbers (the bitsin a byte), you can simply record over previously recorded information. Because there areonly two possible signals rather than varying shades of musical nuance, when you write aone or a zero, it effectively overwrites the previous character. You need only a singleread/write head for each side of the disk, so your floppy disk needs two head assembly unitsto be double-sided.
You also need to record a formatting track to parallel or interweave with the data tracks sothat a computer can say, “Record this group of bytes in this location and then read the byteson that other location.” Provide internal programming on a ROM chip so that DOS only
6
IIPart
Ch
130 Chapter 6 Understanding Disks and Disk Drives
needs to send instructions to the disk drive to read and write data from any location at anytime. Oh, yes, and hide all this complexity from computer users. Now you have invented theusable floppy disk!
Take it one step further. Coat a stack of ceramic or metal disks with a much denser magneticmaterial, mount them on a spindle, and spin them much faster than before. Then, mountmultiple high-density read/write heads, one for each platter side. Beef up the response timesand speeds for all the moving components. Seal all these components into a dust-free can;now you have invented the hard disk, also called a fixed disk because the platters cannot beremoved without the user damaging them.
The mechanical parts and electrical circuits of disk drives are complex. Although a disk driveis part of a PC system, the drive is a machine in its own right. DOS relies on the driver pro-grams of the BIOS (the basic input/output system, found on ROMs inside your computer)and on ROMs within the drive to handle the low-level control of the drive’s mechanicalcomponents.
All disk drives have certain common components: read/write heads, head-positioner mecha-nisms, and disk-spinning motors. All disk drives record on disks. Some disks are removable,and some are built into the drive. Both fixed disks and removable disks spin on a centerspindle within the disk drive.
Today, most PCs incorporate both fixed disks and removable disks. The BIOS extensions ofDOS make provisions for both types of drives. Even with their common features, fixed andfloppy disk drives have some important differences, which are described in the followingsections. Knowing these distinctions can help you understand how each type of drive oper-ates in your system.
Hard Disk Drives
Drives with built-in disks are called fixed disk drives or, because their disks are made of rigidmaterial, hard disk drives. You can shorten these terms to fixed disk and hard disk.
A hard disk drive can contain more than one hard disk, or platter. Multiple platters are arrangedin a stack, with space between the individual platters. Hard disk drives have great storage capac-ity; these drives can hold anywhere from a few million to a few billion bytes of data.
Figure 6.1 shows a cutaway view of a typical older hard disk. The platters are the drive’smagnetic disks. A head-positioner arm holds the read/write heads above and below each sur-face of each platter. When the drive leaves the factory, the components are not exposed, asthey are in this figure; the drive is sealed to keep dust, hair, dirt, smoke, and other contami-nants out of the delicate mechanical parts.
These parts are delicate because the read/write heads must float very close to the surface ofthe platter without actually touching them. A single hair on the surface produces a reactionsimilar to driving the family car over a fallen tree trunk.
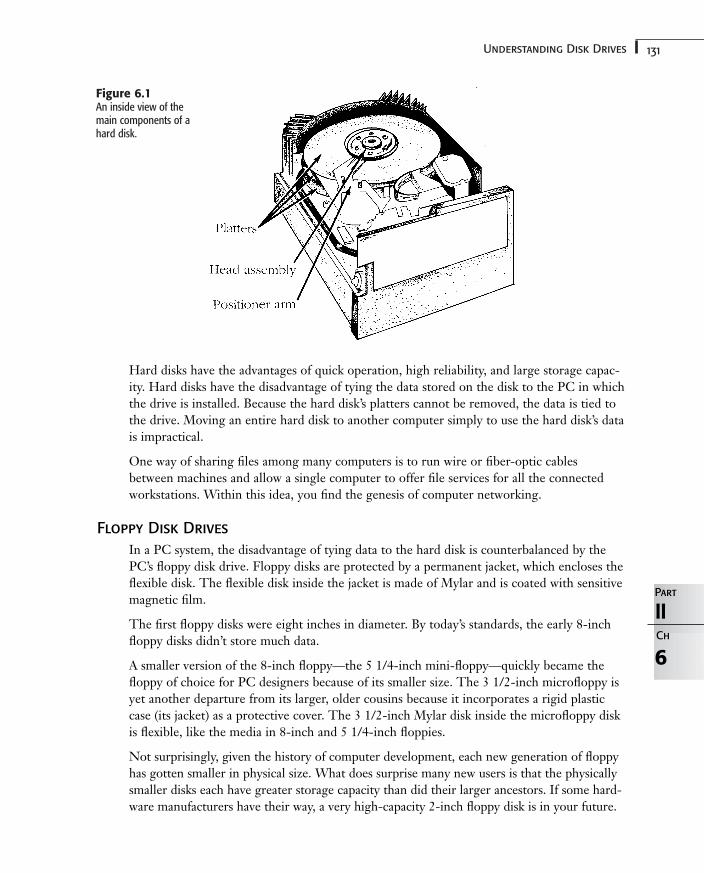
131Understanding Disk Drives
Figure 6.1An inside view of themain components of ahard disk.
6
IIPart
Ch
Hard disks have the advantages of quick operation, high reliability, and large storage capac-ity. Hard disks have the disadvantage of tying the data stored on the disk to the PC in whichthe drive is installed. Because the hard disk’s platters cannot be removed, the data is tied tothe drive. Moving an entire hard disk to another computer simply to use the hard disk’s datais impractical.
One way of sharing files among many computers is to run wire or fiber-optic cablesbetween machines and allow a single computer to offer file services for all the connectedworkstations. Within this idea, you find the genesis of computer networking.
Floppy Disk Drives
In a PC system, the disadvantage of tying data to the hard disk is counterbalanced by thePC’s floppy disk drive. Floppy disks are protected by a permanent jacket, which encloses theflexible disk. The flexible disk inside the jacket is made of Mylar and is coated with sensitivemagnetic film.
The first floppy disks were eight inches in diameter. By today’s standards, the early 8-inchfloppy disks didn’t store much data.
A smaller version of the 8-inch floppy—the 5 1/4-inch mini-floppy—quickly became thefloppy of choice for PC designers because of its smaller size. The 3 1/2-inch microfloppy isyet another departure from its larger, older cousins because it incorporates a rigid plasticcase (its jacket) as a protective cover. The 3 1/2-inch Mylar disk inside the microfloppy diskis flexible, like the media in 8-inch and 5 1/4-inch floppies.
Not surprisingly, given the history of computer development, each new generation of floppyhas gotten smaller in physical size. What does surprise many new users is that the physicallysmaller disks each have greater storage capacity than did their larger ancestors. If some hard-ware manufacturers have their way, a very high-capacity 2-inch floppy disk is in your future.
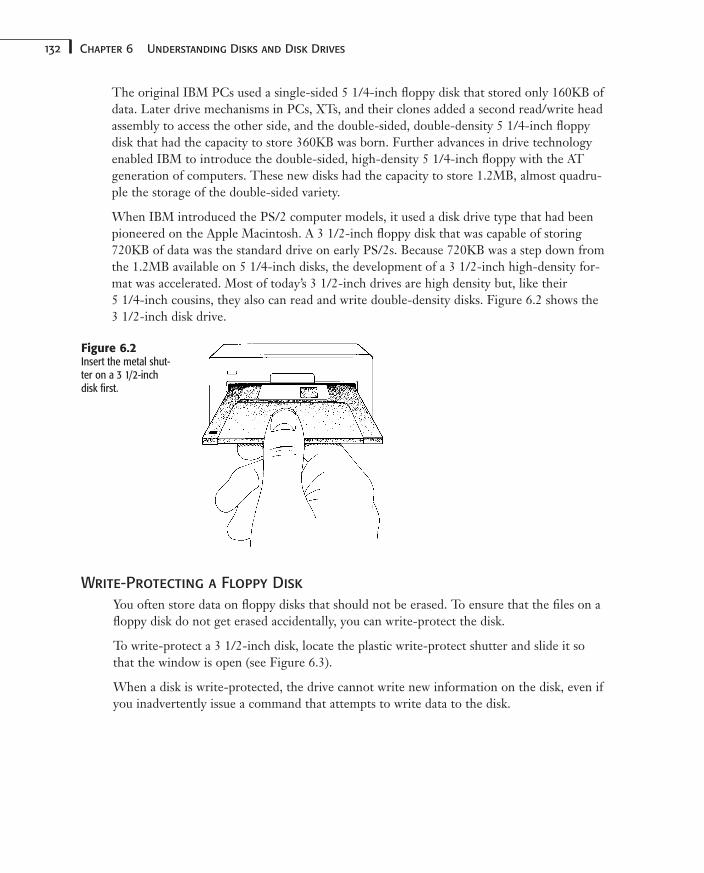
132 Chapter 6 Understanding Disks and Disk Drives
The original IBM PCs used a single-sided 5 1/4-inch floppy disk that stored only 160KB ofdata. Later drive mechanisms in PCs, XTs, and their clones added a second read/write headassembly to access the other side, and the double-sided, double-density 5 1/4-inch floppydisk that had the capacity to store 360KB was born. Further advances in drive technologyenabled IBM to introduce the double-sided, high-density 5 1/4-inch floppy with the ATgeneration of computers. These new disks had the capacity to store 1.2MB, almost quadru-ple the storage of the double-sided variety.
When IBM introduced the PS/2 computer models, it used a disk drive type that had beenpioneered on the Apple Macintosh. A 3 1/2-inch floppy disk that was capable of storing720KB of data was the standard drive on early PS/2s. Because 720KB was a step down fromthe 1.2MB available on 5 1/4-inch disks, the development of a 3 1/2-inch high-density for-mat was accelerated. Most of today’s 3 1/2-inch drives are high density but, like their 5 1/4-inch cousins, they also can read and write double-density disks. Figure 6.2 shows the 3 1/2-inch disk drive.
Figure 6.2Insert the metal shut-ter on a 3 1/2-inchdisk first.
Write-Protecting a Floppy Disk
You often store data on floppy disks that should not be erased. To ensure that the files on afloppy disk do not get erased accidentally, you can write-protect the disk.
To write-protect a 3 1/2-inch disk, locate the plastic write-protect shutter and slide it sothat the window is open (see Figure 6.3).
When a disk is write-protected, the drive cannot write new information on the disk, even ifyou inadvertently issue a command that attempts to write data to the disk.
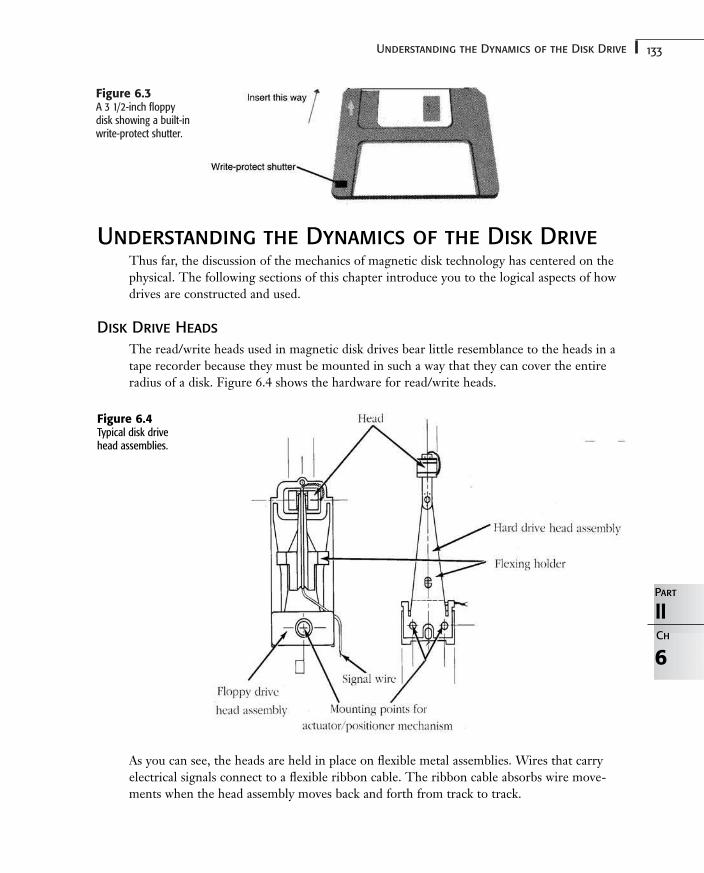
133Understanding the Dynamics of the Disk Drive
Figure 6.3A 3 1/2-inch floppydisk showing a built-inwrite-protect shutter.
6
IIPart
Ch
Understanding the Dynamics of the Disk DriveThus far, the discussion of the mechanics of magnetic disk technology has centered on thephysical. The following sections of this chapter introduce you to the logical aspects of howdrives are constructed and used.
Disk Drive Heads
The read/write heads used in magnetic disk drives bear little resemblance to the heads in atape recorder because they must be mounted in such a way that they can cover the entireradius of a disk. Figure 6.4 shows the hardware for read/write heads.
Figure 6.4Typical disk drivehead assemblies.
As you can see, the heads are held in place on flexible metal assemblies. Wires that carryelectrical signals connect to a flexible ribbon cable. The ribbon cable absorbs wire move-ments when the head assembly moves back and forth from track to track.
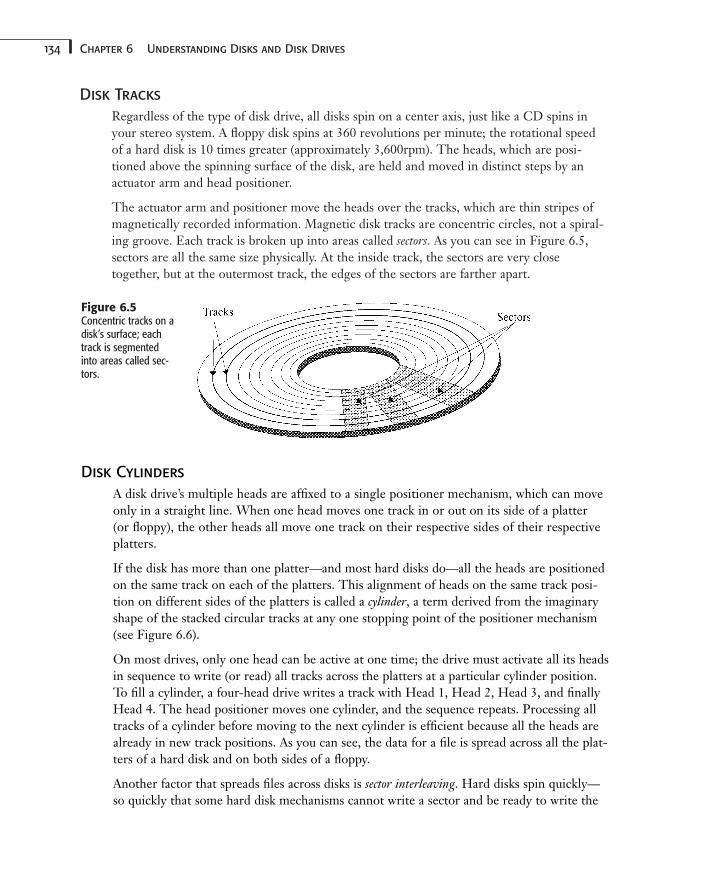
134 Chapter 6 Understanding Disks and Disk Drives
Disk Tracks
Regardless of the type of disk drive, all disks spin on a center axis, just like a CD spins inyour stereo system. A floppy disk spins at 360 revolutions per minute; the rotational speedof a hard disk is 10 times greater (approximately 3,600rpm). The heads, which are posi-tioned above the spinning surface of the disk, are held and moved in distinct steps by anactuator arm and head positioner.
The actuator arm and positioner move the heads over the tracks, which are thin stripes ofmagnetically recorded information. Magnetic disk tracks are concentric circles, not a spiral-ing groove. Each track is broken up into areas called sectors. As you can see in Figure 6.5,sectors are all the same size physically. At the inside track, the sectors are very closetogether, but at the outermost track, the edges of the sectors are farther apart.
Figure 6.5Concentric tracks on adisk’s surface; eachtrack is segmentedinto areas called sec-tors.
Disk Cylinders
A disk drive’s multiple heads are affixed to a single positioner mechanism, which can moveonly in a straight line. When one head moves one track in or out on its side of a platter (or floppy), the other heads all move one track on their respective sides of their respectiveplatters.
If the disk has more than one platter—and most hard disks do—all the heads are positionedon the same track on each of the platters. This alignment of heads on the same track posi-tion on different sides of the platters is called a cylinder, a term derived from the imaginaryshape of the stacked circular tracks at any one stopping point of the positioner mechanism(see Figure 6.6).
On most drives, only one head can be active at one time; the drive must activate all its headsin sequence to write (or read) all tracks across the platters at a particular cylinder position.To fill a cylinder, a four-head drive writes a track with Head 1, Head 2, Head 3, and finallyHead 4. The head positioner moves one cylinder, and the sequence repeats. Processing alltracks of a cylinder before moving to the next cylinder is efficient because all the heads arealready in new track positions. As you can see, the data for a file is spread across all the plat-ters of a hard disk and on both sides of a floppy.
Another factor that spreads files across disks is sector interleaving. Hard disks spin quickly—so quickly that some hard disk mechanisms cannot write a sector and be ready to write the
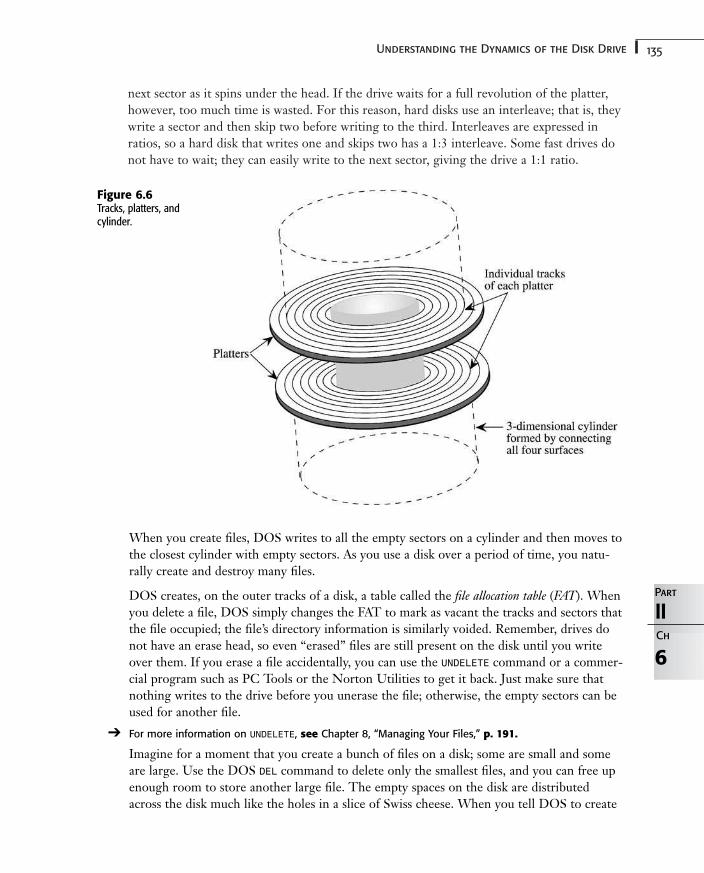
135Understanding the Dynamics of the Disk Drive
next sector as it spins under the head. If the drive waits for a full revolution of the platter,however, too much time is wasted. For this reason, hard disks use an interleave; that is, theywrite a sector and then skip two before writing to the third. Interleaves are expressed inratios, so a hard disk that writes one and skips two has a 1:3 interleave. Some fast drives donot have to wait; they can easily write to the next sector, giving the drive a 1:1 ratio.
6
IIPart
Ch
Figure 6.6Tracks, platters, andcylinder.
When you create files, DOS writes to all the empty sectors on a cylinder and then moves tothe closest cylinder with empty sectors. As you use a disk over a period of time, you natu-rally create and destroy many files.
DOS creates, on the outer tracks of a disk, a table called the file allocation table (FAT). Whenyou delete a file, DOS simply changes the FAT to mark as vacant the tracks and sectors thatthe file occupied; the file’s directory information is similarly voided. Remember, drives donot have an erase head, so even “erased” files are still present on the disk until you writeover them. If you erase a file accidentally, you can use the UNDELETE command or a commer-cial program such as PC Tools or the Norton Utilities to get it back. Just make sure thatnothing writes to the drive before you unerase the file; otherwise, the empty sectors can beused for another file.
➔ For more information on UNDELETE, see Chapter 8, “Managing Your Files,” p. 191.
Imagine for a moment that you create a bunch of files on a disk; some are small and someare large. Use the DOS DEL command to delete only the smallest files, and you can free upenough room to store another large file. The empty spaces on the disk are distributedacross the disk much like the holes in a slice of Swiss cheese. When you tell DOS to create
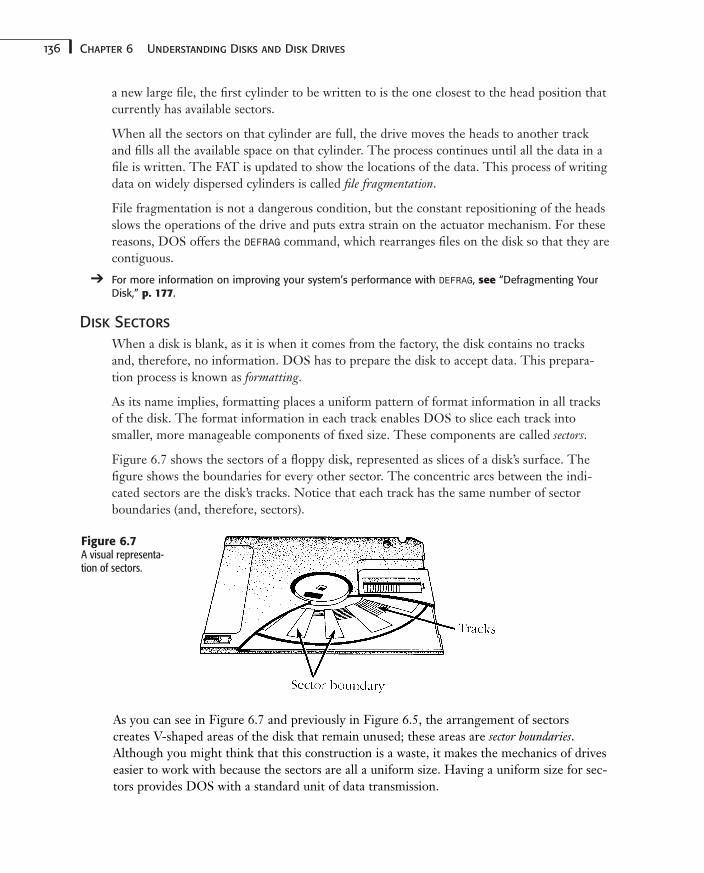
136 Chapter 6 Understanding Disks and Disk Drives
a new large file, the first cylinder to be written to is the one closest to the head position thatcurrently has available sectors.
When all the sectors on that cylinder are full, the drive moves the heads to another trackand fills all the available space on that cylinder. The process continues until all the data in afile is written. The FAT is updated to show the locations of the data. This process of writingdata on widely dispersed cylinders is called file fragmentation.
File fragmentation is not a dangerous condition, but the constant repositioning of the headsslows the operations of the drive and puts extra strain on the actuator mechanism. For thesereasons, DOS offers the DEFRAG command, which rearranges files on the disk so that they arecontiguous.
➔ For more information on improving your system’s performance with DEFRAG, see “Defragmenting YourDisk,” p. 177.
Disk Sectors
When a disk is blank, as it is when it comes from the factory, the disk contains no tracksand, therefore, no information. DOS has to prepare the disk to accept data. This prepara-tion process is known as formatting.
As its name implies, formatting places a uniform pattern of format information in all tracksof the disk. The format information in each track enables DOS to slice each track intosmaller, more manageable components of fixed size. These components are called sectors.
Figure 6.7 shows the sectors of a floppy disk, represented as slices of a disk’s surface. Thefigure shows the boundaries for every other sector. The concentric arcs between the indi-cated sectors are the disk’s tracks. Notice that each track has the same number of sectorboundaries (and, therefore, sectors).
Figure 6.7A visual representa-tion of sectors.
As you can see in Figure 6.7 and previously in Figure 6.5, the arrangement of sectors creates V-shaped areas of the disk that remain unused; these areas are sector boundaries.Although you might think that this construction is a waste, it makes the mechanics of driveseasier to work with because the sectors are all a uniform size. Having a uniform size for sec-tors provides DOS with a standard unit of data transmission.
137Understanding Disk Formats
DOS reads and writes disk data one sector at a time. Some of DOS’s internal file-systembookkeeping is performed by sectors. To DOS, a sector is the disk’s most manageable blockof data. By default, DOS uses 512-byte sectors.
The number of sectors formatted into each track is tied to the data density the drive useswhen reading or writing data. The more dense the recording in a track and the more trackson a disk, the more sectors DOS can format. Designers keep reliability in mind when select-ing the number of tracks and number of sectors per track. Floppy disk drives are designedwith more margin for error than are hard disk drives. You can easily see why some marginfor error is desirable for a drive that must ensure the mechanical alignment of disks thatusers simply shove into the drive door. Floppy disk drives must also be able to read disksthat might have been stored in a place where magnetic fields weakened the disk’s magneticimprint.
Despite the protective disk jacket, the magnetic-coated surfaces of many floppy disks can becontaminated by smoke, dust, or fingerprints. A drive must be able to tolerate some diskcontamination and still perform without errors. Clearly, no disk drive can avoid errors if thedisks it uses are abused. Drive heads cannot read through liquid spills, for example, orthrough dents made by a ballpoint pen.
Hard disk drives have greater data-storage capacity than do their floppy cousins. This capac-ity is due in large part to the precision with which the drive’s critical components work withthe special oxides that magnetically coat the platters. In addition, the working parts of thedrive are sealed at the factory in a way that protects the platters, positioners, and heads fromcontamination. With outside influence on these critical components sealed out, a hard diskdrive can offer more tracks and sectors in the same space that a floppy drive occupies. Whenyou consider the fact that most hard disks have more than one platter, each of which is capa-ble of two-sided operation and each of which provides more tracks than a floppy disk can,you begin to understand how hard disks have such large storage capacities.
Understanding Disk FormatsDisk drives have a universal way of dividing a disk’s available physical space: The number ofplatters, number of sides, number of tracks, number of bytes per sector, and number of sec-tors per track are the specific details that factor into this logical division of disk space. Thespecification for a disk’s use of its physical space is called the disk’s format.
PCs use a variety of disk drive sizes and formats. Some older PCs, for example, have both 51/4-inch and 3 1/2-inch floppy drives that can handle both double-density and high-densitydisks, while newer PCs only have a 3 1/2-inch floppy.
Most PC users and software manuals differentiate one format from other formats by usingthe byte-capacity figure for the desired format. Each new version of DOS has maintainedsupport for the disk formats that were supported by its predecessors. This support ensuresthat disks made with older drive formats can be used with current versions of DOS.
6
IIPart
Ch
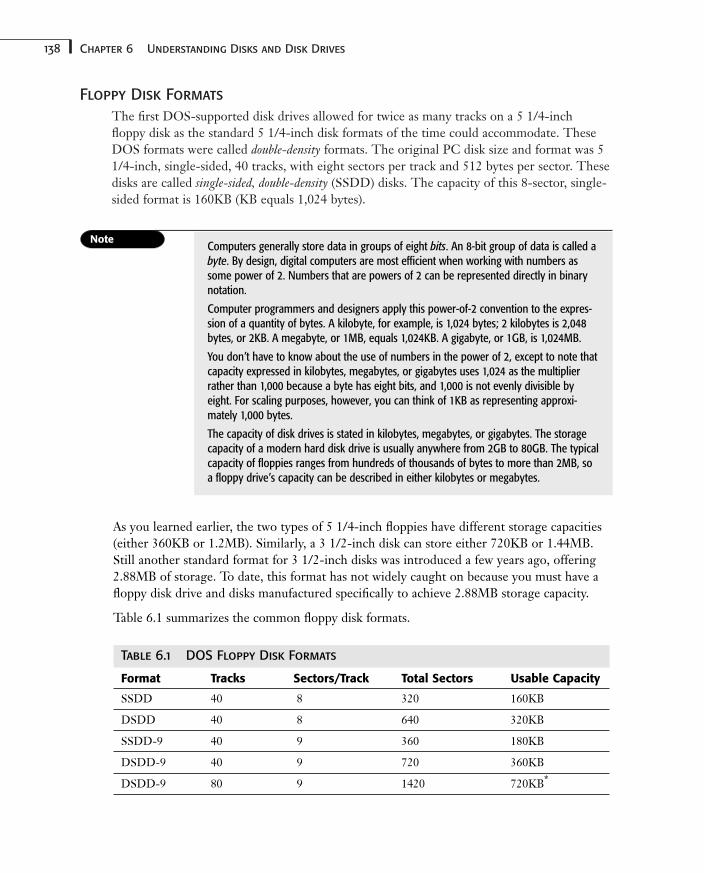
138 Chapter 6 Understanding Disks and Disk Drives
Floppy Disk Formats
The first DOS-supported disk drives allowed for twice as many tracks on a 5 1/4-inchfloppy disk as the standard 5 1/4-inch disk formats of the time could accommodate. TheseDOS formats were called double-density formats. The original PC disk size and format was 51/4-inch, single-sided, 40 tracks, with eight sectors per track and 512 bytes per sector. Thesedisks are called single-sided, double-density (SSDD) disks. The capacity of this 8-sector, single-sided format is 160KB (KB equals 1,024 bytes).
Computers generally store data in groups of eight bits. An 8-bit group of data is called abyte. By design, digital computers are most efficient when working with numbers assome power of 2. Numbers that are powers of 2 can be represented directly in binarynotation.
Computer programmers and designers apply this power-of-2 convention to the expres-sion of a quantity of bytes. A kilobyte, for example, is 1,024 bytes; 2 kilobytes is 2,048bytes, or 2KB. A megabyte, or 1MB, equals 1,024KB. A gigabyte, or 1GB, is 1,024MB.
You don’t have to know about the use of numbers in the power of 2, except to note thatcapacity expressed in kilobytes, megabytes, or gigabytes uses 1,024 as the multiplierrather than 1,000 because a byte has eight bits, and 1,000 is not evenly divisible byeight. For scaling purposes, however, you can think of 1KB as representing approxi-mately 1,000 bytes.
The capacity of disk drives is stated in kilobytes, megabytes, or gigabytes. The storagecapacity of a modern hard disk drive is usually anywhere from 2GB to 80GB. The typicalcapacity of floppies ranges from hundreds of thousands of bytes to more than 2MB, soa floppy drive’s capacity can be described in either kilobytes or megabytes.
As you learned earlier, the two types of 5 1/4-inch floppies have different storage capacities(either 360KB or 1.2MB). Similarly, a 3 1/2-inch disk can store either 720KB or 1.44MB.Still another standard format for 3 1/2-inch disks was introduced a few years ago, offering2.88MB of storage. To date, this format has not widely caught on because you must have afloppy disk drive and disks manufactured specifically to achieve 2.88MB storage capacity.
Table 6.1 summarizes the common floppy disk formats.
Table 6.1 DOS Floppy Disk Formats
Format Tracks Sectors/Track Total Sectors Usable Capacity
SSDD 40 8 320 160KB
DSDD 40 8 640 320KB
SSDD-9 40 9 360 180KB
DSDD-9 40 9 720 360KB
DSDD-9 80 9 1420 720KB*

139Understanding Disk Formats
Table 6.1 Continued
Format Tracks Sectors/Track Total Sectors Usable Capacity
DSHD-15 80 15 2400 1.2MB
DSHD-18 80 18 2880 1.44MB*
HD-36 80 36 5760 2.88MB**
*3 1/2-inch formats**Requires special disk and disk drive
Raw Capacity and Usable Capacity
The process of formatting a blank disk places on the disk some data that is not part of thedisk’s total capacity. A 1.44MB disk, for example, actually holds more than 1.44MB of information. You cannot use this extra space, however; the space is reserved for sector-identification and error-checking information. If you buy disks for a 1.44MB drive, the iden-tification label might say that the disks have 2MB capacity; disks for a 720KB drive mightindicate 1MB capacity. To understand this apparent discrepancy, you need to understand thedifference between total, or raw, capacity and usable, or formatted, capacity. The larger ofthe two numbers for the same disk is considered to be the raw capacity of the disk.
Raw capacity includes the space that the formatting information occupies. The smaller ofthe two numbers for the same disk is the usable capacity of the disk. This number of bytes isavailable for storing files after the formatting information has been put on the disk.
Hard disk manufacturers sometimes advertise the raw capacity of their drives instead of theusable capacity. Your 80MB drive, therefore, might give you only 78MB when formatted.Fortunately, most manufacturers of hard disks state the capacity of their drives as formattedcapacity. Hard disks also lose some overhead space. If you have any doubt as to the meaningof a hard disk’s stated capacity, ask the dealer whether the capacity is determined before orafter formatting. In this book, disk capacity refers to usable capacity after formatting.
Hard Disk Drive Formats
Formats for hard disks nearly always employ 512-byte sectors, usually with 17 sectors pertrack. There is an alphabet soup of hard drive types: MFM, IDE, RLL, ESDI, SCSI, and soon. Each type of hard disk uses different numbers of sectors per track. You have to worryabout these differences only when you are installing a hard disk drive. The manufacturer ofthe drive provides you with head, sector, and track information specific to your drive.
You can understand the concept of hard disk capacity by remembering the concept of cylin-ders. Hard disks, you might recall, have two or more heads. Remember that a cylinder is thealignment of all the heads on the same track on both sides of each platter. A disk with 306tracks on one side of one platter has 306 cylinders. The total number of tracks on the disk is
6
IIPart
Ch
140 Chapter 6 Understanding Disks and Disk Drives
the number of cylinders times the number of heads. The disk’s capacity in bytes is the num-ber of tracks times the number of sectors per track times the number of bytes per sector. Toobtain the capacity in kilobytes, divide the result by 1,024. To obtain the capacity inmegabytes, divide the kilobyte total by 1,024. For approximations of capacity in megabytes,you can divide by a rounded 1,000.
DOS does not provide low-level format data for a hard disk as it does for a floppy disk.Hard disks normally are given a low-level format at the factory, so you seldom need to initi-ate a low-level format on a hard disk. DOS uses the low-level format as a base upon whichto perform its high-level format.
In a discussion of hard disk formatting, the term format refers to the high-level format initi-ated by the DOS FORMAT command. During the formatting of a hard disk, DOS initializes itsbookkeeping tables and then writes dummy data into the disk’s tracks. From your point ofview, formatting a hard disk is the same basic operation as formatting a floppy. DOS keepsthe details of the low-level format hidden and out of your way.
Understanding DoubleSpaceBeginning with DOS 6.0, Microsoft decided to include a disk-compression program calledDoubleSpace. The decision to include it was apparently prompted by the popularity andsuccess of third-party disk compression programs such as Stacker. Microsoft refined andimproved DoubleSpace in DOS 6.2.
DoubleSpace enables DOS to compress data automatically when you store the data on diskand to uncompress the data when you use it. DoubleSpace works transparently; you have noindication that the program is compressing your files, except that your disk can hold moredata than before. You can select which drives use compression and which do not. You mightdecide, for example, to compress drive C, but not drive D, which contains OS/2.
Only if the DoubleSpace driver is loaded can you read a compressed drive. If you useanother operating system in addition to DOS—such as OS/2, Unix, Xenix, or WindowsNT—you cannot access a compressed drive while you are running that other system.
Using DoubleSpace provides one major advantage: The amount of data you can store onyour hard disk is roughly doubled because DoubleSpace is analyzing your data and squeez-ing more information into less space. DoubleSpace uses a compression algorithm similar tothat used in compression programs such as WinZip. The exact amount of additional datayou can store varies, depending on the characteristics of the data itself, because differentdata can be compressed different amounts. Text files and some graphics files (such as TIFfiles), for instance, can be compressed quite a bit. Other files, such as WAV files (used forsound) or GIF files (used for graphics), are already compressed and do not benefit fromDoubleSpace.
141Understanding DoubleSpace
Using DoubleSpace also has the following minor disadvantages:
■ DoubleSpace must perform extra work to compress and uncompress data each time you access your disk. This extra work takes time and slows your computer slightly. Ifyou have a 386 or 486 computer, for example, the slowdown is so insignificant that youalmost certainly will never notice the difference. On slower computers, however, youmight notice that operations involving a lot of disk access seem to run a bit more slowlythan before.
■ DoubleSpace requires some conventional memory—about 50KB if you loadDoubleSpace high (into upper memory) by using DEVICEHIGH.
■ Without the DoubleSpace device driver, a system cannot access a hard disk on whichthe files are compressed with DoubleSpace. This restriction is not likely to cause prob-lems, but if your computer breaks, you cannot remove your hard disk and use it in acomputer that has an earlier version of DOS.
■ You cannot use DoubleSpace with some disk-intensive programs. This is primarily evi-dent with some game programs that swap screens and sound between memory and disk.
6
IIPart
Ch
A drive might contain files that cannot or should not be compressed. The Windows swapfile, for example, must remain uncompressed.
When you apply compression to a drive, DoubleSpace makes the drive appear as though itwere two drives, with two distinct drive letters. DoubleSpace divides the disk into a com-pressed drive and an uncompressed drive so that you still can store some of your files in anuncompressed format.
You can decide how much of the disk to allocate for each area. If you don’t expect to storeany files in an uncompressed format, make the uncompressed drive small (a fraction of amegabyte) and allocate the rest to the compressed drive. Conversely, if you expect to storethe Windows swap file on the uncompressed drive, allocate several megabytes to that drive.
DOS assigns a new drive letter to one of the areas so that you can access either area byusing the appropriate drive letter. If you apply compression to drive C, for example,DoubleSpace might tell you that from now on C refers to the uncompressed portion of thedisk and J refers to the compressed portion.
Installing DoubleSpace
To install DoubleSpace, type the following command at the DOS prompt:
DBLSPACE
You must not have any other programs running when you first issue this command. In particular, you must not be running Windows or the DOS Shell.
DoubleSpace first asks whether you want an Express or Custom Setup; the default isExpress. If you choose Express, DoubleSpace compresses the existing files on drive C.

142 Chapter 6 Understanding Disks and Disk Drives
Choose Custom Setup if you want to select the drive to compress. DBLSPACE then installs theDoubleSpace driver in the DOS kernel and reboots your machine.
DoubleSpace also might add a line to your CONFIG.SYS file, such as the following:
DEVICEHIGH=C:\DOS\DBLSPACE.SYS /MOVE
This line does not load the DoubleSpace device driver; the DOS kernel loads the driverautomatically when you install DoubleSpace. Instead, the line moves the driver into uppermemory (if you have upper memory blocks available). If you remove this line fromCONFIG.SYS, you still load the DoubleSpace driver, just not into upper memory.
Controlling the Operation of DoubleSpace
You can run DoubleSpace at any time to get information about compression on your disksor to control various facets of DoubleSpace’s operation. You run DoubleSpace simply bytyping the following command:
DBLSPACE
When DoubleSpace starts, it lists all the available drives that employ compression. For eachdrive, DoubleSpace shows the total amount of space and current free space available.
Many DoubleSpace operations require you to select a drive, either by using the arrow keysto position the selection bar on one of the drives or by clicking a drive.
Displaying Compressed Drive Information
To display information about a compressed drive, select the compressed drive, choose Drivefrom the menu bar, and then choose Info from the resulting menu. (If you do not have amouse, press Alt+D, and then position the cursor on Info and press Enter.) For a shortcut,you can also double-click or simply press Enter when the drive is first selected.
Figure 6.8 shows the information display for a small compressed drive. In this example,notice that most of the disk is allocated for compressed files and is accessed as drive I; about2MB is uncompressed and is accessed as drive D.
Figure 6.8DoubleSpace can pro-vide an estimate offree space on a drivebased on the currentcompression ratio ofthe files.
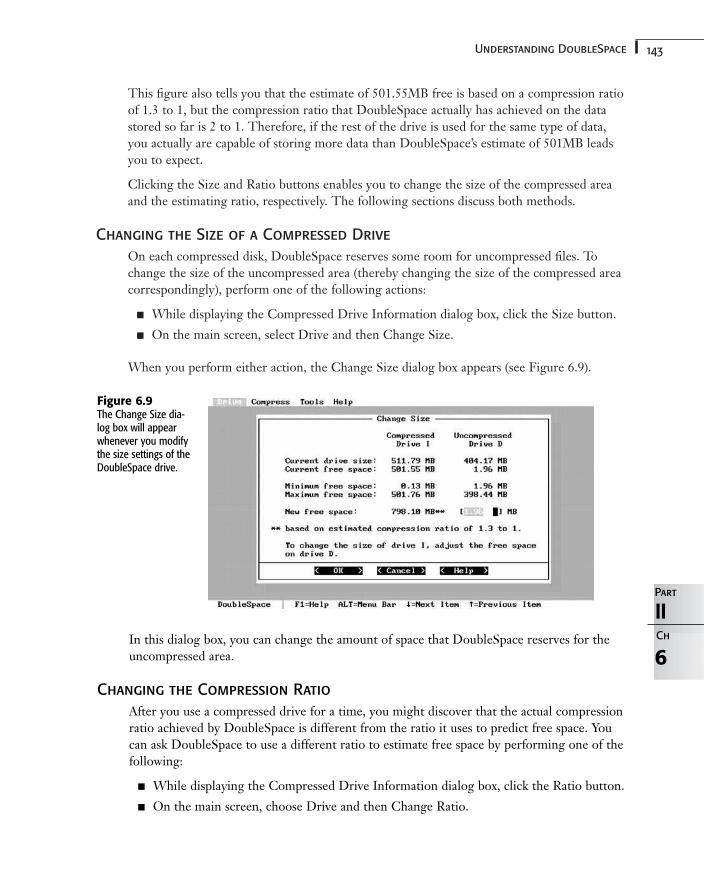
143Understanding DoubleSpace
This figure also tells you that the estimate of 501.55MB free is based on a compression ratioof 1.3 to 1, but the compression ratio that DoubleSpace actually has achieved on the datastored so far is 2 to 1. Therefore, if the rest of the drive is used for the same type of data,you actually are capable of storing more data than DoubleSpace’s estimate of 501MB leadsyou to expect.
Clicking the Size and Ratio buttons enables you to change the size of the compressed areaand the estimating ratio, respectively. The following sections discuss both methods.
Changing the Size of a Compressed Drive
On each compressed disk, DoubleSpace reserves some room for uncompressed files. Tochange the size of the uncompressed area (thereby changing the size of the compressed areacorrespondingly), perform one of the following actions:
■ While displaying the Compressed Drive Information dialog box, click the Size button.
■ On the main screen, select Drive and then Change Size.
When you perform either action, the Change Size dialog box appears (see Figure 6.9).
6
IIPart
Ch
Figure 6.9The Change Size dia-log box will appearwhenever you modifythe size settings of theDoubleSpace drive.
In this dialog box, you can change the amount of space that DoubleSpace reserves for theuncompressed area.
Changing the Compression Ratio
After you use a compressed drive for a time, you might discover that the actual compressionratio achieved by DoubleSpace is different from the ratio it uses to predict free space. Youcan ask DoubleSpace to use a different ratio to estimate free space by performing one of thefollowing:
■ While displaying the Compressed Drive Information dialog box, click the Ratio button.
■ On the main screen, choose Drive and then Change Ratio.
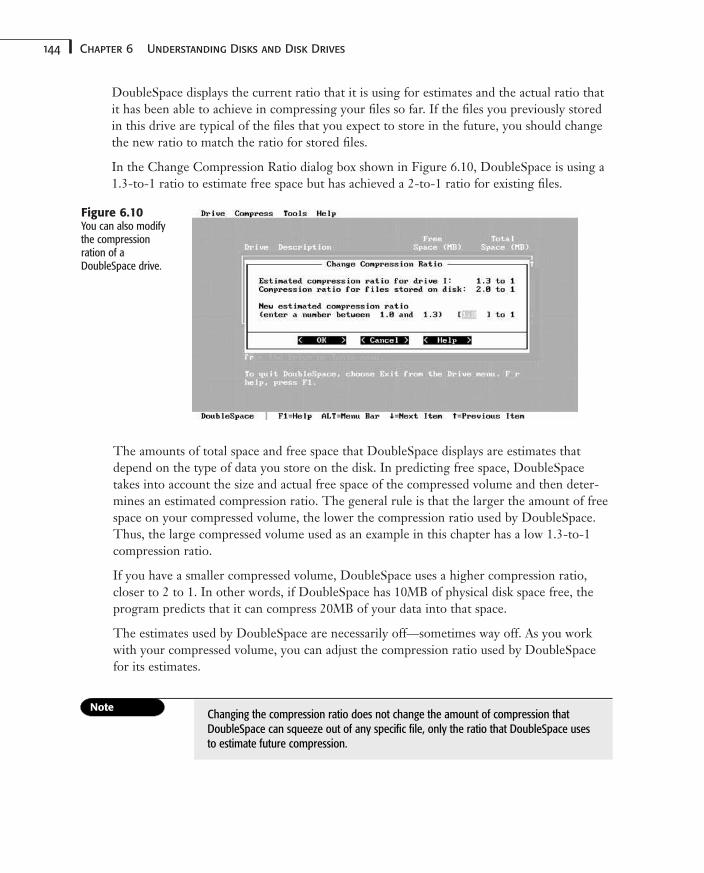
144 Chapter 6 Understanding Disks and Disk Drives
DoubleSpace displays the current ratio that it is using for estimates and the actual ratio thatit has been able to achieve in compressing your files so far. If the files you previously storedin this drive are typical of the files that you expect to store in the future, you should changethe new ratio to match the ratio for stored files.
In the Change Compression Ratio dialog box shown in Figure 6.10, DoubleSpace is using a1.3-to-1 ratio to estimate free space but has achieved a 2-to-1 ratio for existing files.
Figure 6.10You can also modifythe compressionration of aDoubleSpace drive.
The amounts of total space and free space that DoubleSpace displays are estimates thatdepend on the type of data you store on the disk. In predicting free space, DoubleSpacetakes into account the size and actual free space of the compressed volume and then deter-mines an estimated compression ratio. The general rule is that the larger the amount of freespace on your compressed volume, the lower the compression ratio used by DoubleSpace.Thus, the large compressed volume used as an example in this chapter has a low 1.3-to-1compression ratio.
If you have a smaller compressed volume, DoubleSpace uses a higher compression ratio,closer to 2 to 1. In other words, if DoubleSpace has 10MB of physical disk space free, theprogram predicts that it can compress 20MB of your data into that space.
The estimates used by DoubleSpace are necessarily off—sometimes way off. As you workwith your compressed volume, you can adjust the compression ratio used by DoubleSpacefor its estimates.
Changing the compression ratio does not change the amount of compression thatDoubleSpace can squeeze out of any specific file, only the ratio that DoubleSpace usesto estimate future compression.
145Understanding DoubleSpace
Formatting a Compressed Drive
You do not need to format a compressed drive in the same sense that you format otherdrives to prepare them for use. When you use DoubleSpace to create a compressed drive,you must have already formatted that drive in the usual way. On the other hand, peopleoften format an existing drive as a simple way of erasing all data on a drive, and you can for-mat a compressed drive if you want to erase all the data stored on that drive. However, youcannot use the standard DOS format on a compressed drive.
To format a compressed drive, select the drive you want to format from the list of com-pressed drives, and then choose Drive and Format. DoubleSpace displays an alert box thatasks whether you’re sure you want to format the drive. If you click OK, DoubleSpace erasesall data stored in that drive.
6
IIPart
Ch
You cannot unformat a compressed drive. After you choose Format and click OK, yourdata is gone forever.
Deleting a Compressed Drive
If you no longer want to use a compressed drive, you can delete that drive. To do so, selectthe drive that you want to delete from the list of compressed drives. Next, choose Drive andthen Delete. DoubleSpace displays a dialog box warning that you will permanently destroythe contents of the compressed drive and asks you for confirmation. If you click OK,DoubleSpace deletes the drive and all the data in the drive. The space that was allocated tothe compressed drive returns to the corresponding uncompressed drive.
Make sure you copy all the data from your compressed drive to a backup device or toan uncompressed drive before you delete a compressed drive. You also can use theUncompress feature, discussed later in this chapter.
Creating a New Compressed Drive
You can create a new compressed drive by choosing an option from the Compress menu.DoubleSpace displays a menu from which you can select either of two ways to compress thedisk.
To compress an existing disk and all the data stored on it, follow this procedure:
1. From the Compress menu, choose Existing Drive. DoubleSpace displays a dialog boxlisting existing uncompressed drives, along with their current and projected free space.
2. Select the drive you want to compress. DoubleSpace displays a dialog box showing thedrive letter that it assigns to the uncompressed drive and the amount of space it allo-cates to that drive. DoubleSpace allocates the rest of the space to the compressed drive.
146 Chapter 6 Understanding Disks and Disk Drives
You must allocate at least 0.14MB to the uncompressed drive; use this value if you donot expect to need any uncompressed space. If you want to change either of these val-ues, select the value that you want to change.
When you are ready to proceed, choose Continue or press Enter.
3. DoubleSpace displays a screen informing you that it is ready to compress the drive.DoubleSpace then prompts you to press C. If you press C, the program creates thecompressed drive and compresses existing files in that drive. The new compressed driveuses the original drive letter, and the uncompressed drive receives the new drive letter.
If you want to leave existing files in the uncompressed drive and create a new compresseddrive from the free portion of the existing drive, follow this procedure:
1. From the Compress menu, choose Create New Drive. DoubleSpace displays a dialogbox listing existing uncompressed drives, along with their current and projected freespace.
2. Select the drive to which you want to apply compression. DoubleSpace displays thedrive letter it will assign to the compressed drive, the compression ratio it will use toestimate free space, and the amount of free space it will leave in the uncompresseddrive, in addition to the space already used by existing files. The program allocates therest of the space to the compressed drive.
You must leave at least 0.14MB of free space in the uncompressed drive; use this value ifyou do not expect to need any more uncompressed space. If you want to change any ofthese values, click the value you want to change.
When you are ready to proceed, click Continue or press Enter.
3. DoubleSpace tells you how much time the program requires to create the drive andprompts you to press C to continue. The program then creates the compressed drive,which is empty. All existing files remain in the uncompressed drive. The uncompresseddrive retains the original drive letter, and the compressed drive receives the new driveletter.
Using Other DoubleSpace Features
You can choose two other useful features from the Tools menu: Defragment andUncompress. A Chkdsk option also is available from the Tools menu, but it just displaysinformation indicating that the Chkdsk function has been replaced by the SCANDISK com-mand.
➔ To find out more about SCANDISK, see “Analyzing a Disk with the SCANDISK Utility,” p. 188.
The Defragment option enables you to defragment a compressed volume. You can use eitherthis option or the standard DEFRAG command (from the DOS prompt). If you choose to usethis option, DoubleSpace displays a dialog box asking whether you want to defragment the
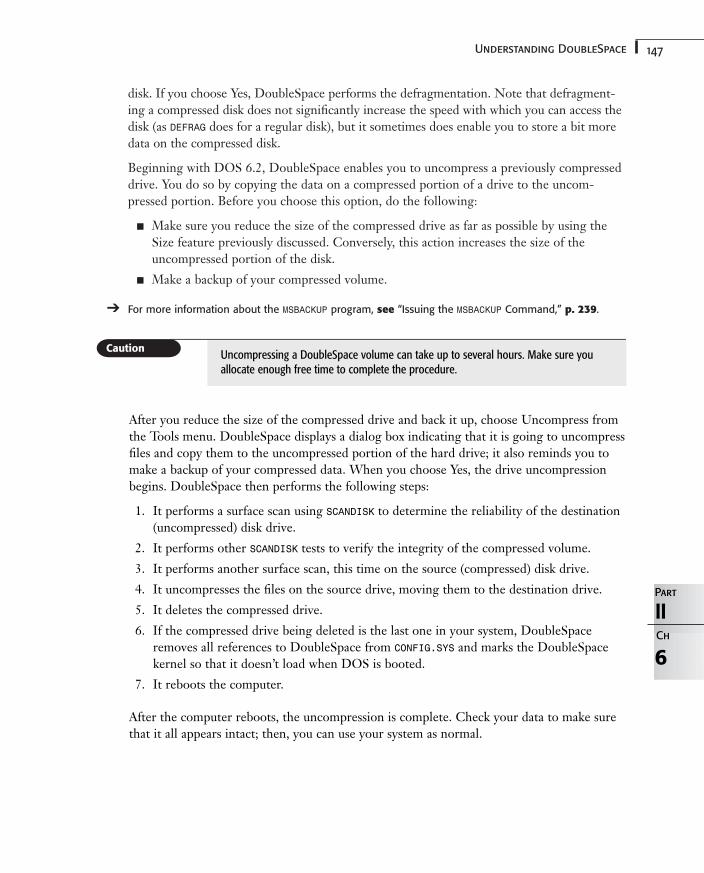
147Understanding DoubleSpace
disk. If you choose Yes, DoubleSpace performs the defragmentation. Note that defragment-ing a compressed disk does not significantly increase the speed with which you can access thedisk (as DEFRAG does for a regular disk), but it sometimes does enable you to store a bit moredata on the compressed disk.
Beginning with DOS 6.2, DoubleSpace enables you to uncompress a previously compresseddrive. You do so by copying the data on a compressed portion of a drive to the uncom-pressed portion. Before you choose this option, do the following:
■ Make sure you reduce the size of the compressed drive as far as possible by using theSize feature previously discussed. Conversely, this action increases the size of theuncompressed portion of the disk.
■ Make a backup of your compressed volume.
➔ For more information about the MSBACKUP program, see “Issuing the MSBACKUP Command,” p. 239.
6
IIPart
Ch
Uncompressing a DoubleSpace volume can take up to several hours. Make sure youallocate enough free time to complete the procedure.
After you reduce the size of the compressed drive and back it up, choose Uncompress fromthe Tools menu. DoubleSpace displays a dialog box indicating that it is going to uncompressfiles and copy them to the uncompressed portion of the hard drive; it also reminds you tomake a backup of your compressed data. When you choose Yes, the drive uncompressionbegins. DoubleSpace then performs the following steps:
1. It performs a surface scan using SCANDISK to determine the reliability of the destination(uncompressed) disk drive.
2. It performs other SCANDISK tests to verify the integrity of the compressed volume.
3. It performs another surface scan, this time on the source (compressed) disk drive.
4. It uncompresses the files on the source drive, moving them to the destination drive.
5. It deletes the compressed drive.
6. If the compressed drive being deleted is the last one in your system, DoubleSpaceremoves all references to DoubleSpace from CONFIG.SYS and marks the DoubleSpacekernel so that it doesn’t load when DOS is booted.
7. It reboots the computer.
After the computer reboots, the uncompression is complete. Check your data to make surethat it all appears intact; then, you can use your system as normal.

148 Chapter 6 Understanding Disks and Disk Drives
➔ For information on using multiple boot configurations, see “Creating Multiple Configurations,” p. 32.
Case Study: Adjusting for DriftDrift occurs when the alignment of a hard drive’s read/write heads drift slightly after contin-ual use of the drive. Drift also can be detected when you remount the drive or stand thecomputer on its side like a tower. This drifting does not affect the information that has beenwritten to the disk, but the heads might have difficulty locating the information because thelow-level format identification information, which is needed to find the data, is no longeraligned beneath the heads. You can eliminate this problem by performing a low-level formatof the disk to align the low-level disk tracks with the current location of the heads. Also,magnetic signals that are recorded on disks lose strength over the years, so the manufac-turer’s low-level format might fade to a point where the heads cannot reliably read formatinformation.
Normally, a low-level format of your hard disk erases all existing data. Certain types ofthird-party software, however, can perform a low-level format without data loss.
If you have programs that do not work with DoubleSpace, but you still want to enjoy thebenefits of disk compression, place the programs on an uncompressed volume. Then,when you need to use those programs, reboot your computer and use the Ctrl+F5 orCtrl+F8 keys to control whether DoubleSpace capability is loaded.
Preparing and Maintaining DisksIn this chapter
Understanding Disk Preparation 150
Preparing Floppy Disks with the FORMATCommand 151
Preparing the Hard Disk 158
Disk Commands 166
Getting the Most Speed from Your Hard Disk 168
Getting the Most Space from Your Hard Disk 181
Projects 184
7CHAPTER
150 Chapter 7 Preparing and Maintaining Disks
Understanding Disk PreparationBoth floppy disks and audiocassette tapes use magnetic media to store information, butthey’re different in other ways. You cannot just drop a blank disk into a drive and use thedisk in the same way that you can use a blank tape to record.
Why? The disk’s recorded areas (sectors) can be accessed in any order, randomly. The tape,however, is sequential. As it plays, the tape recorder doesn’t jump around from place toplace—unless, of course, it is being operated by a teenager.
To implement random access on a disk, you first must lay down information that can beused to find small sections of the disk quickly. In some ways, this process is like drawing thelines on a sheet of notebook paper to show where the writing should be done. This prepara-tion process is called formatting. The DOS FORMAT command performs this process for disks;you do nothing more than enter the command. FORMAT analyzes a disk for defects, generatesa root directory, sets up a storage table, and makes other technical modifications.
When you format a disk, DOS creates data-storage divisions on the disk’s surface. As youlearned in Chapter 6, “Understanding Disks and Disk Drives,” these divisions are concentriccircles called tracks (see Figure 7.1). DOS decides what type of drive you have and then posi-tions the tracks accordingly.
Figure 7.1Anatomy of a floppydisk.
You probably already know that with computers, items that are numbered often begin with0 rather than 1. It’s the same way with tracks on the disk; they’re numbered beginning withtrack 0. DOS uses this first track (track 0) to record vital information about the disk’s for-mat. Later, by checking this information on track 0, DOS quickly can determine how towork with the disk.
As you can see in Figure 7.1, each track is divided into segments called sectors, which are thesmallest divisions of a disk. When you issue the FORMAT command, DOS creates a specialdisk table called the file allocation table (FAT). The FAT, which is always located on track 0,monitors every sector on a disk as groups of clusters. DOS stores data in the clusters anduses the track and cluster numbers to retrieve the data.
A cluster is the smallest unit of storage that DOS allocates for file storage at one time, unlessyou are using DoubleSpace or a similar file-compression utility. DoubleSpace drives havestorage allocated in smaller units, but this doesn’t affect the way DOS views the disk. DOShands data to be written to DoubleSpace in the standard way.
151Preparing Floppy Disks with the FORMAT Command
In the preceding chapter, you learned about cylinders. A cylinder is formed by stackingtracks on top of one another. A cylinder on a floppy disk, for example, is made by stackingtwo tracks: the front and back of the disk. The two read/write heads in the floppy drive arepositioned over two tracks. Tracks are broken up into sectors, so the read/write heads arepositioned over two sectors.
DOS does not write one file on the front sector and one file on the back sector because doingso creates a situation in which the read/write heads have to move around too much, slowingoperations. To prevent this problem, DOS looks at the two sectors under the floppy drive’sheads as a single unit—a cluster. Therefore, if you write a file containing only six bytes onto afloppy disk, DOS reserves a cluster (two 512-byte sectors) for the file to reside in.
On hard disks, the number of sectors in a cluster also is equal to the number of read/writeheads. Therefore, a disk with four platters would group eight sectors into a cluster, so writ-ing a six-byte file would actually take 4KB of free space.
At first, all this unused space might seem wasted, but look at any disk and see how manyfiles are only six bytes long. Data files are seldom static because information constantly isbeing added or removed. Chances are that the file won’t remain six bytes long. Also, whenyou think that most files are thousands or hundreds of thousands of bytes long, a few unusedsectors represent a very small percentage of total used disk space.
All DOS commands use tracks and clusters as road maps that enable them to carry out theiroperations. When a disk is formatted, DOS creates a FAT and root directory that are suitedto the capacity of the disk.
Preparing Floppy Disks with the FORMATCommand
The FORMAT command prepares disks for use. All disks to be used by DOS must be format-ted by DOS to be treated as valid DOS disks. Both floppies and hard disks must be format-ted before they can be used. If you try to use a disk that has not been formatted, DOSreports a General failure, which sounds cataclysmic. All it really means is that the disk youare trying to read does not have valid format information. If the disk you are trying to readhas been formatted and you know that it has been formatted, a problem exists. If that driveis your C: drive, you do have a cataclysmic experience to endure. Most of the time, however,a General failure just means that somebody has handed you an unformatted disk.
7
IIPart
Ch
When you issue the FORMAT command with its required parameters, DOS presents youwith a prompt, requiring that you answer a question before the command actuallybegins its work. In the case of a floppy, DOS prompts you to insert the proper disk intothe drive. On a hard disk, DOS reminds you that you are about to wipe out everythingon the disk.
In either case, the tendency of experienced users is just to hit the key and go. Don’t!Take a deep breath and read the prompt. You might have accidentally specified C: whenyou really meant B:. Take a moment to be sure; the data you save might be your own.
152 Chapter 7 Preparing and Maintaining Disks
Reformatting an old disk also can be an efficient way to delete the contents without the has-sle of dealing with individual files and directories. Before DOS 5.0, reformatting a disk ineffect erased the data stored on the disk and left you with no way of getting it back. Startingwith DOS 5.0, however, the FORMAT command first determines whether the disk containsdata. If the disk contains data, FORMAT saves a copy of the boot sector, FAT, and root direc-tory in a safe place on the disk. Then UNFORMAT can find the information if you need tounformat the disk. You can unformat a disk only if you have not created or copied other filesonto the disk.
In DOS 5.0 (or later), the FORMAT command clears the disk’s FAT and the first character ofeach filename in the root directory but does not erase any data. The program also scans theentire disk for bad sectors. FORMAT then saves the first letter of each filename in a safe placeon the disk.
FORMAT is a DOS command that can quickly wipe out the contents of a disk. This com-mand is safer than it used to be, but before you use it, make sure that you are familiarwith its syntax and the way it works. FORMAT issues warning messages onscreen andprompts you for verification before formatting a hard disk. Take care when you useFORMAT, read the screen prompts, and, most importantly, keep good backups of yourdata.
Also, the FORMAT command cannot format a disk that has been write-protected. If thecommand fails for this reason, determine what the disk contains before simply unpro-tecting the disk and proceeding with the format.
Formatting Floppy Disks
Most disks you buy today come preformatted. If not, then they must first be formatted byDOS before using them. Some commands, such as DISKCOPY and BACKUP, stop and formatdisks if they’re given unformatted disks to work with, but few DOS commands are soaccommodating.
The syntax for the FORMAT command is as follows:
FORMAT d: /Q /V:label /F:size /S /B /C /U /1 /4 /8 /N:sectors /T:tracks
This syntax shows all the switches available with the FORMAT command, but you normallyuse only a few of them at a time. (All the FORMAT switches are discussed in the section“Using FORMAT’s Switches,” later in this chapter.)
You use the simplest version of the FORMAT command when you are formatting a floppy diskthat has the maximum capacity of which the drive is capable, as in the following example:
FORMAT A:
This command formats a nonbootable disk in the A: drive. If you are formatting a 360KBdisk in a drive whose maximum capacity is 360KB, or if you are formatting a 1.2MB floppyin a high-density drive, fine. If, however, you are formatting a 360KB disk in a 1.2MB drive,
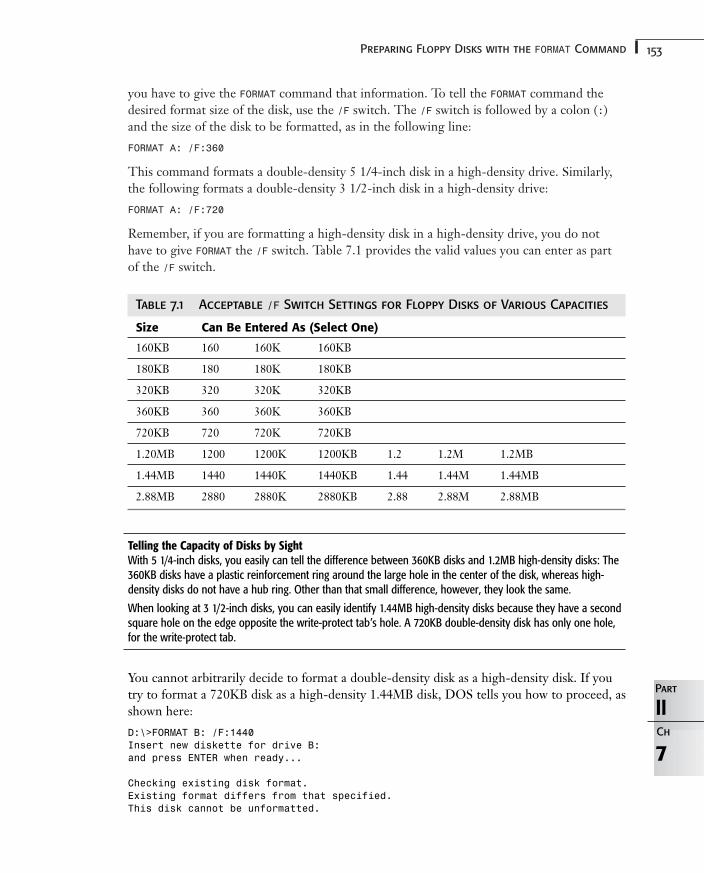
153Preparing Floppy Disks with the FORMAT Command
you have to give the FORMAT command that information. To tell the FORMAT command thedesired format size of the disk, use the /F switch. The /F switch is followed by a colon (:)and the size of the disk to be formatted, as in the following line:
FORMAT A: /F:360
This command formats a double-density 5 1/4-inch disk in a high-density drive. Similarly,the following formats a double-density 3 1/2-inch disk in a high-density drive:
FORMAT A: /F:720
Remember, if you are formatting a high-density disk in a high-density drive, you do nothave to give FORMAT the /F switch. Table 7.1 provides the valid values you can enter as partof the /F switch.
Table 7.1 Acceptable /F Switch Settings for Floppy Disks of Various Capacities
Size Can Be Entered As (Select One)
160KB 160 160K 160KB
180KB 180 180K 180KB
320KB 320 320K 320KB
360KB 360 360K 360KB
720KB 720 720K 720KB
1.20MB 1200 1200K 1200KB 1.2 1.2M 1.2MB
1.44MB 1440 1440K 1440KB 1.44 1.44M 1.44MB
2.88MB 2880 2880K 2880KB 2.88 2.88M 2.88MB
Telling the Capacity of Disks by SightWith 5 1/4-inch disks, you easily can tell the difference between 360KB disks and 1.2MB high-density disks: The360KB disks have a plastic reinforcement ring around the large hole in the center of the disk, whereas high-density disks do not have a hub ring. Other than that small difference, however, they look the same.
When looking at 3 1/2-inch disks, you can easily identify 1.44MB high-density disks because they have a secondsquare hole on the edge opposite the write-protect tab’s hole. A 720KB double-density disk has only one hole,for the write-protect tab.
You cannot arbitrarily decide to format a double-density disk as a high-density disk. If youtry to format a 720KB disk as a high-density 1.44MB disk, DOS tells you how to proceed, asshown here:
D:\>FORMAT B: /F:1440Insert new diskette for drive B:and press ENTER when ready...
Checking existing disk format.Existing format differs from that specified.This disk cannot be unformatted.
7
IIPart
Ch
154 Chapter 7 Preparing and Maintaining Disks
Proceed with Format (Y/N)?yFormatting 1.44MInvalid media or Track 0 bad - disk unusable.Format terminated.Format another (Y/N)?
As you can see, DOS asks whether you want to format another disk. Just make sure it is adisk with a capacity matching the /F switch’s value.
Similarly, you cannot format a 2.88MB disk if your floppy drive doesn’t support it, even ifyou have a 2.88MB disk in hand. If you attempt this action, you see the following messages:
D:\>FORMAT B: /F:2880Insert new diskette for drive B:and press ENTER when ready...
Checking existing disk format.Existing format differs from that specified.This disk cannot be unformatted.Proceed with Format (Y/N)?yFormatting 2.88MParameters not supported by drive.
Other switches can be added to the command line to provide other formatting services. Youcan use the following command line, for example, to format a bootable 720KB disk in a1.44MB drive:
FORMAT B: /F:720 /S
When you add the /S (System) switch, FORMAT creates a bootable disk.
FORMAT’s Other Tasks
The primary task of the FORMAT command is to divide the disk into logical storage sectors,but this task is not the command’s only purpose. FORMAT gives each disk a unique serial num-ber and prompts you for a volume label (name) for the disk. As the formatting proceeds,FORMAT continually updates what percentage of the disk has been formatted.
Assume for the moment that you have issued the command in the preceding section to for-mat a 720KB bootable disk. The following lines show the FORMAT dialog from start to finish:
C:\>FORMAT B: /F:720 /SInsert new diskette for drive B:and press ENTER when ready...
Checking existing disk format.Formatting 720KFormat complete.System transferred
Volume label (11 characters, ENTER for none)? bootable
730,112 bytes total disk space199,680 bytes used by system530,432 bytes available on disk
155Preparing Floppy Disks with the FORMAT Command
1,024 bytes in each allocation unit.518 allocation units available on disk.
Volume Serial Number is 1F44-0EE0
Format another (Y/N)?
When you press Enter to begin formatting, FORMAT first displays a two-line prompt, tellingyou to enter a disk in drive B. Always make sure that this is what you intend. Next, FORMATmust perform several steps.
The first of these steps is to check the disk format and preserve the FAT and directory struc-tures in case you need to use the UNFORMAT command. Formatting then begins, and FORMATticks off the percentage of completion until the format is finished. You are told that the for-mat is complete and nominally error free. If you use the /S switch, the boot sector is pre-pared, and the DOS system files are transferred to the disk.
You then are prompted to provide a volume label. Most users simply press Enter to bypassthis option, but you can use the volume label to your advantage in creating a cataloging sys-tem for your disks. You might want to name floppy disks according to categories such asbudget, correspondence, backups, and so on.
When you press Enter to leave the Volume label prompt, FORMAT displays some relevantnumbers about the disk. The first line shows the total capacity of the disk. If you create abootable disk, the second line shows the amount of space taken up by the DOS system files.You also are shown the amount of remaining free space on the disk.
7
IIPart
Ch
As you can tell by examining the information provided by FORMAT, the DOS system filestake up almost 200KB of space on a newly formatted disk. Don’t use the /S switch care-lessly. This switch is intended only for the disks with which you plan to start the com-puter. Making disks bootable unnecessarily is a major waste of space.
FORMAT then provides you with numerical data on what it calls allocation units. In this context,saying allocation units is just a fancy way of saying clusters. Each sector is 512 bytes, and afloppy disk has two read/write heads; therefore, a cluster is 1,024 bytes in length. The sec-ond line tells you that 518 clusters are available. Multiply 518 and 1,024, and you get530,432, exactly the amount of free space shown by FORMAT.
As reliable as floppy disks are, they sometimes have flaws. If you hear an unusual grind-ing or churning noise while formatting a disk, the disk is probably damaged or has anexcessive number of flaws. Any bad sectors found by FORMAT are reported as part ofthe numerical data.
Depending on the number of flaws that are found, you might want to reformat the disk,throw it away, or use it only for noncritical storage.
156 Chapter 7 Preparing and Maintaining Disks
Cleanliness Is Next to GodlinessJust as you must occasionally clean the heads in a cassette deck or VCR, you should clean the read/write headsin your floppy drives every once in a while. How often depends on whether you are getting errors on the drive,on the environment your computer lives in, and on how much you use the floppy drive.
Problems with reading a nearly full disk almost always indicate the need to clean the drive. Sectors near thehub are much closer together than the sectors of Track 1, and they are the first to display errors related tounclean heads.
Computer retailers sell various disk drive cleaning products. Most have a cleaning pad encased in a floppy diskjacket. You squeeze a few drops of an alcohol-based cleaning fluid onto the cleaning pad and insert the diskinto the drive. To begin cleaning, you issue a command such as DIR A: that causes DOS to try to read thedisk, and the heads are scraped clean. Check with your computer supply vendor for more information onfloppy drive cleaning.
Because your hard disk is sealed at the factory, you never have to clean its heads. Don’t even think about it.
The last thing the FORMAT routine does is to assign a serial number to the disk. The purposeof a serial number is to enable programs to determine whether you have switched disks. Theserial number, which is assigned automatically during formatting, uses the time and date ofthe format to create a hexadecimal number to be used as the serial number. No two disksfrom the same machine should ever have the same serial number, assuming that the systemclock is properly set.
Finally, FORMAT offers to process another disk. By choosing this option, you can format morethan one disk at a time. If you answer yes to the prompt by pressing Y and then Enter, FORMAT prompts you to place another disk in the drive. Any subsequently formatted diskswill have the same attributes as the command-line parameters you entered to start the com-mand. Only the serial numbers will be different.
Using FORMAT’s Switches
The FORMAT command responds to several switches that modify its behavior. Table 7.2 pro-vides a list of the available switches in the FORMAT syntax. Detailed information also is avail-able in Appendix F, “Command Reference.”
A True StoryComputer retailers have many wonderful stories to tell. This incident happened in Florida.
A woman called the computer store and asked to speak to the manager. She was connected to the owner, whoasked how he could help her. The following conversation ensued:
“I was just in a different store and bought a box of floppy disks.”
“Yes, ma’am.”
“Well, the salesman there suggested that I format all the disks in the box so that they would all be formattedwhen I need one.”
“That’s not a bad idea. Is there a problem?”
“Well, I don’t know. I barely got the third one in. I can’t imagine getting the fourth one in; it’s too tight, andthere are 10 disks in the box.”
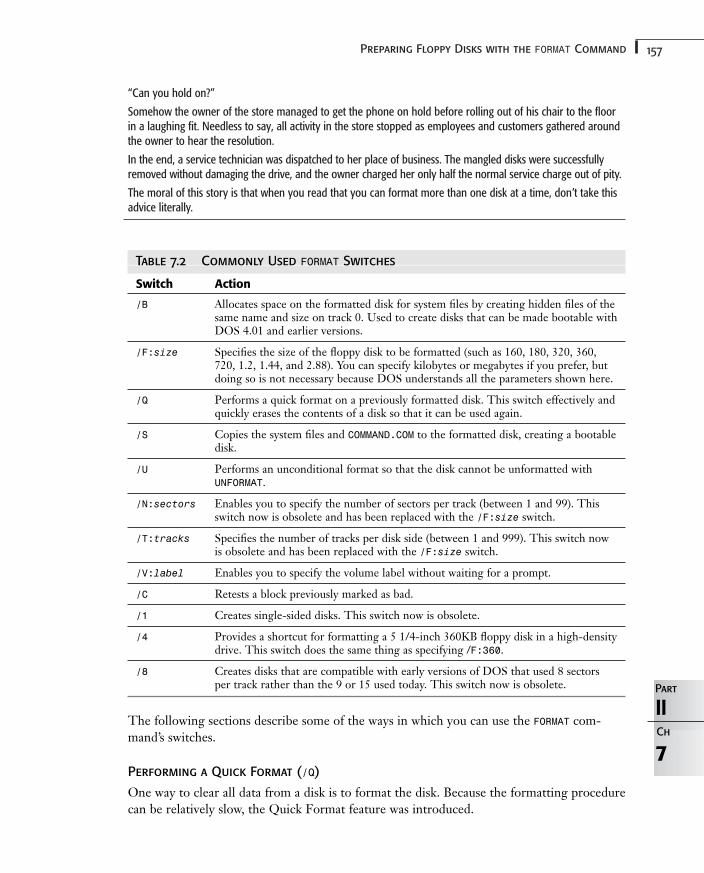
157Preparing Floppy Disks with the FORMAT Command
“Can you hold on?”
Somehow the owner of the store managed to get the phone on hold before rolling out of his chair to the floorin a laughing fit. Needless to say, all activity in the store stopped as employees and customers gathered aroundthe owner to hear the resolution.
In the end, a service technician was dispatched to her place of business. The mangled disks were successfullyremoved without damaging the drive, and the owner charged her only half the normal service charge out of pity.
The moral of this story is that when you read that you can format more than one disk at a time, don’t take thisadvice literally.
Table 7.2 Commonly Used FORMAT Switches
Switch Action
/B Allocates space on the formatted disk for system files by creating hidden files of thesame name and size on track 0. Used to create disks that can be made bootable withDOS 4.01 and earlier versions.
/F:size Specifies the size of the floppy disk to be formatted (such as 160, 180, 320, 360,720, 1.2, 1.44, and 2.88). You can specify kilobytes or megabytes if you prefer, butdoing so is not necessary because DOS understands all the parameters shown here.
/Q Performs a quick format on a previously formatted disk. This switch effectively andquickly erases the contents of a disk so that it can be used again.
/S Copies the system files and COMMAND.COM to the formatted disk, creating a bootabledisk.
/U Performs an unconditional format so that the disk cannot be unformatted withUNFORMAT.
/N:sectors Enables you to specify the number of sectors per track (between 1 and 99). Thisswitch now is obsolete and has been replaced with the /F:size switch.
/T:tracks Specifies the number of tracks per disk side (between 1 and 999). This switch nowis obsolete and has been replaced with the /F:size switch.
/V:label Enables you to specify the volume label without waiting for a prompt.
/C Retests a block previously marked as bad.
/1 Creates single-sided disks. This switch now is obsolete.
/4 Provides a shortcut for formatting a 5 1/4-inch 360KB floppy disk in a high-densitydrive. This switch does the same thing as specifying /F:360.
/8 Creates disks that are compatible with early versions of DOS that used 8 sectorsper track rather than the 9 or 15 used today. This switch now is obsolete.
The following sections describe some of the ways in which you can use the FORMAT com-mand’s switches.
Performing a Quick Format (/Q)
One way to clear all data from a disk is to format the disk. Because the formatting procedurecan be relatively slow, the Quick Format feature was introduced.
7
IIPart
Ch
158 Chapter 7 Preparing and Maintaining Disks
Using a Quick Format saves you the hassle of changing the attributes of read-only files sothat they can be deleted. A Quick Format also gets rid of directories without the laboriousprocess of deleting all subordinate files and directories.
To clear data from a disk, type the command FORMAT /Q and then press Enter. If FORMAT can-not give a disk a Quick Format, a prompt appears, asking whether you want to do a regularformat.
Performing an Unconditional Format (/U)
Unless you use the /U switch, the FORMAT command performs a safe format of previously for-matted disks. FORMAT first determines whether a disk has been formatted. If the disk has beenformatted, FORMAT clears the FAT, boot record, and root directory but does not erase anydata. FORMAT then scans the entire disk for bad sectors and saves a copy of the FAT, bootrecord, and root directory to a MIRROR image file where the UNFORMAT command can findthem. If the disk has not been formatted previously, FORMAT overwrites every data byte withthe hexadecimal value F6.
If you want DOS to overwrite all data on a previously formatted floppy disk (a procedurecalled unconditional formatting), use the /U switch. The following command, for example,unconditionally formats a disk in drive A:
FORMAT A: /U
Adding System Files (/S)
If you want to use a disk to start your computer, the disk must contain hidden DOS systemfiles as well as the command processor (COMMAND.COM). One way to install these system fileson a disk is to use the /S switch during the formatting procedure. The /S switch reduces thedisk’s available storage capacity by about 185KB.
➔ For details on the /S switch, see Chapter 2, “Starting DOS,” p. 23.
Don’t use the /S switch with FORMAT unless you plan to create a disk from which youcan boot. Having at least one bootable system disk as a backup is important in case thedisk that contains your working copy of DOS fails or your hard drive develops errors.
Preparing the Hard DiskQuite apart from the normal formatting that must be done to any DOS disk, hard disksrequire a little bit of extra work to get them ready for use. DOS provides the FDISK com-mand to prepare a hard disk to be formatted.
The following sections explain how DOS divides and formats a hard disk. If you are rela-tively inexperienced, be sure to heed all warnings and read all explanations carefully. You aremoving into potentially dangerous territory when you start playing around with FDISK.

159Preparing the Hard Disk
However, if you are determined to experiment with FDISK, make sure that you have a goodbackup of everything on the disk.
7
IIPart
Ch
Many computer dealers preinstall DOS, Windows, and other programs you purchase. Inall cases, you should have copies of these programs on their original floppy disks, ormore common nowadays, CD-ROM. Without such disks, you do not have a legal copy ofthe program. If your dealer has installed an application, such as a word processing pro-gram, do not format the hard disk unless you also have a copy of the program on CD-ROM or floppy disks. If you reformat your hard disk, all programs and data will beerased.
Dividing a Hard Disk with FDISK
Before you can format a hard disk, you must partition it—that is, divide the hard disk logi-cally into one or more areas called partitions. A partition is simply a section of the storagearea of a hard disk. Many operating systems, including DOS, can use disk partitions, andmost systems have some utility program that creates and manages partitions. In DOS, thatutility program is the external command FDISK.
Many computer dealers use FDISK on a system’s hard disk before delivering the systemto the user. In addition, FDISK is executed automatically by the DOS 6.22 Setup com-mand during installation. If your hard disk contains files, it has already been partitionedwith FDISK and formatted. If you have any questions about your hard disk’s prepara-tion, consult your dealer.
Most hard disk users choose a DOS partition size that encompasses the entire hard disk. Inother words, the one physical hard disk appears to DOS to be one logical hard disk. In thisday of rapid growth in the size of the ordinary hard disk, you might want to rethink the ideaof making a single volume out of a disk that might span many thousands of megabytes. Youmight find it more manageable to have several partitions of smaller sizes.
DOS uses a partition table to store information on how the space on a hard disk isarranged. FDISK is the command that manipulates the information in the table.
Some PC users want to have both DOS and another operating system on their hard disk.Different operating systems use file systems that might not be compatible with DOS. Someoperating systems, for example, can use file systems that are compatible with DOS-OS/2and Windows NT. Some operating systems that have DOS-compatible file structures canuse multiboot routines that give the user the opportunity to select which operating systemto boot. The incompatibility comes into play only when you are using totally foreign oper-ating systems that must reside in different partitions. FDISK, however, only can create DOSpartitions and reserve spaces on the disk; another operating system’s equivalent utility canbe used to prepare the partition for its own file scheme.
160 Chapter 7 Preparing and Maintaining Disks
The partition table can be arranged so that DOS uses one partitioned section while anotheroperating system, such as Unix, uses the other partitioned section. Through separation, eachoperating system sees its partition as its own hard disk. Only one of these partitions, how-ever, can be bootable. To use a partition with another operating system, you have to bootfrom a floppy when using the other operating system.
Fortunately, DOS installations that require a second operating system are rare. The rest ofthis chapter pertains to the 99.9% of installations in which DOS is the only operating sys-tem in use.
As you probably remember from an earlier chapter, DOS looks at disk drives as logicaldevices. A byproduct of this arrangement is the fact that you can use FDISK to carve up a sin-gle large hard disk into smaller, more manageable volumes. Each volume has its own driveletter and, for all practical purposes, becomes a separate hard disk.
Although making a large hard disk into a single logical drive might seem tempting,doing so might create some disadvantages. If your hard drive is especially large, anycommand that scans the entire drive, such as DIR or CHKDSK, might take an inordi-nately long time to complete execution. Files might become harder to find due to theirsheer numbers. Unless you work with very large data files, you might prefer to limityour logical drives to 120MB or smaller.
The FDISK command has no parameters. To start this utility, you simply type FDISK andpress Enter.
In DOS 3.3 and later versions, you can use FDISK to create more than one DOS partition.After you create a primary DOS partition (or boot disk) with FDISK, you can create anextended DOS partition, which you can divide into one or more logical drives.
After you have created your partitions, you must use the FORMAT command to format allDOS partitions and logical drives before you can use them.
You can use the FDISK command to delete an existing partition from the disk partitiontable. If you delete an existing partition, you lose all data in the files contained in thatpartition. Be sure that you have backed up or copied any data from a partition that youwant to delete. FDISK is not a command to experiment with unless your hard disk con-tains no data.
There are two types of partitions: the primary partition, from which the computer can boot,and an extended partition, which you can divide into logical drives. The primary DOS parti-tion is normally assigned the drive name C. The extended partition can be used to createdrives D, E, F, and so on.
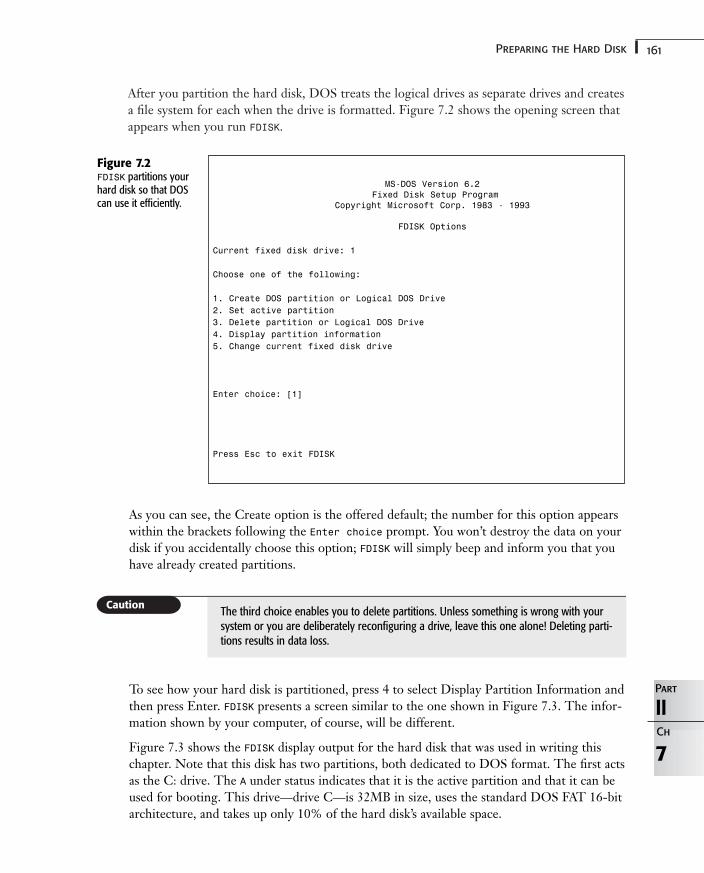
161Preparing the Hard Disk
After you partition the hard disk, DOS treats the logical drives as separate drives and createsa file system for each when the drive is formatted. Figure 7.2 shows the opening screen thatappears when you run FDISK.
7
IIPart
Ch
Figure 7.2FDISK partitions yourhard disk so that DOScan use it efficiently.
As you can see, the Create option is the offered default; the number for this option appearswithin the brackets following the Enter choice prompt. You won’t destroy the data on yourdisk if you accidentally choose this option; FDISK will simply beep and inform you that youhave already created partitions.
MS-DOS Version 6.2Fixed Disk Setup Program
Copyright Microsoft Corp. 1983 - 1993
FDISK Options
Current fixed disk drive: 1
Choose one of the following:
1. Create DOS partition or Logical DOS Drive2. Set active partition3. Delete partition or Logical DOS Drive4. Display partition information5. Change current fixed disk drive
Enter choice: [1]
Press Esc to exit FDISK
The third choice enables you to delete partitions. Unless something is wrong with yoursystem or you are deliberately reconfiguring a drive, leave this one alone! Deleting parti-tions results in data loss.
To see how your hard disk is partitioned, press 4 to select Display Partition Information andthen press Enter. FDISK presents a screen similar to the one shown in Figure 7.3. The infor-mation shown by your computer, of course, will be different.
Figure 7.3 shows the FDISK display output for the hard disk that was used in writing thischapter. Note that this disk has two partitions, both dedicated to DOS format. The first actsas the C: drive. The A under status indicates that it is the active partition and that it can beused for booting. This drive—drive C—is 32MB in size, uses the standard DOS FAT 16-bitarchitecture, and takes up only 10% of the hard disk’s available space.
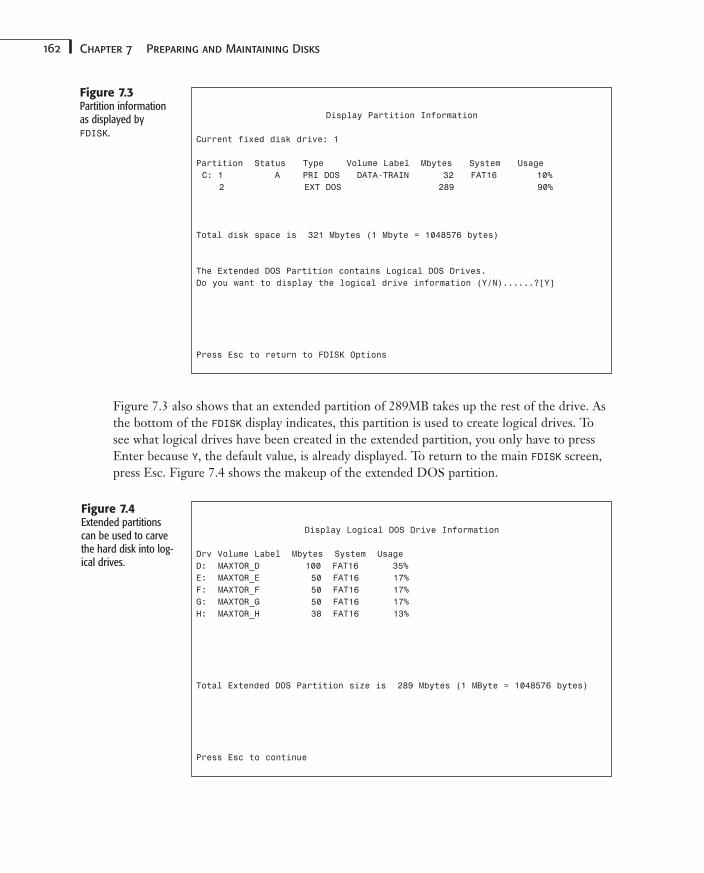
162 Chapter 7 Preparing and Maintaining Disks
Figure 7.3Partition informationas displayed byFDISK.
Figure 7.3 also shows that an extended partition of 289MB takes up the rest of the drive. Asthe bottom of the FDISK display indicates, this partition is used to create logical drives. Tosee what logical drives have been created in the extended partition, you only have to pressEnter because Y, the default value, is already displayed. To return to the main FDISK screen,press Esc. Figure 7.4 shows the makeup of the extended DOS partition.
Display Partition Information
Current fixed disk drive: 1
Partition Status Type Volume Label Mbytes System UsageC: 1 A PRI DOS DATA-TRAIN 32 FAT16 10%
2 EXT DOS 289 90%
Total disk space is 321 Mbytes (1 Mbyte = 1048576 bytes)
The Extended DOS Partition contains Logical DOS Drives.Do you want to display the logical drive information (Y/N)......?[Y]
Press Esc to return to FDISK Options
Figure 7.4Extended partitionscan be used to carvethe hard disk into log-ical drives.
Display Logical DOS Drive Information
Drv Volume Label Mbytes System UsageD: MAXTOR_D 100 FAT16 35%E: MAXTOR_E 50 FAT16 17%F: MAXTOR_F 50 FAT16 17%G: MAXTOR_G 50 FAT16 17%H: MAXTOR_H 38 FAT16 13%
Total Extended DOS Partition size is 289 Mbytes (1 MByte = 1048576 bytes)
Press Esc to continue
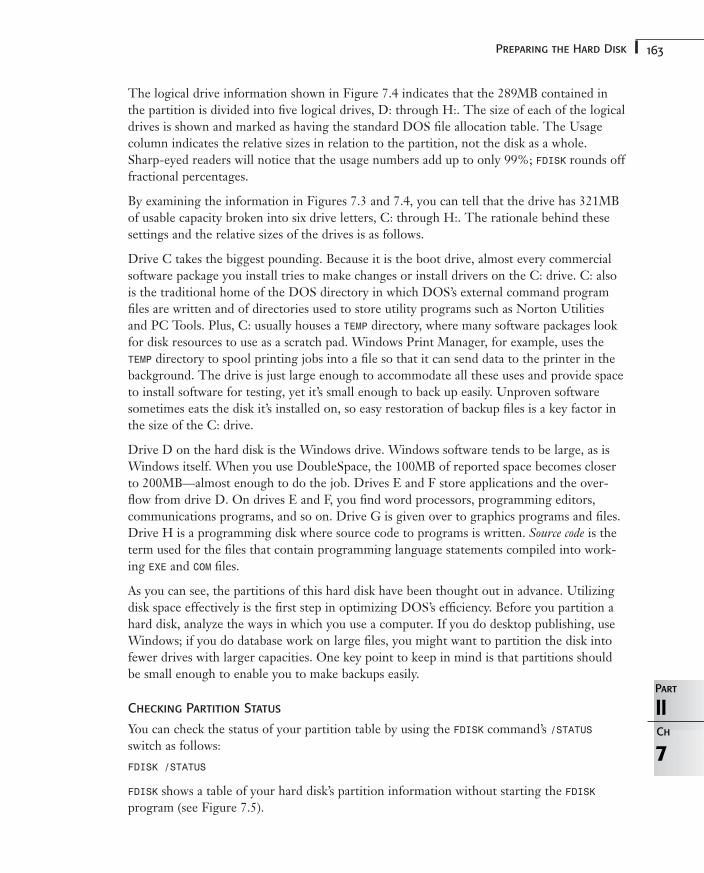
163Preparing the Hard Disk
The logical drive information shown in Figure 7.4 indicates that the 289MB contained inthe partition is divided into five logical drives, D: through H:. The size of each of the logicaldrives is shown and marked as having the standard DOS file allocation table. The Usagecolumn indicates the relative sizes in relation to the partition, not the disk as a whole.Sharp-eyed readers will notice that the usage numbers add up to only 99%; FDISK rounds offfractional percentages.
By examining the information in Figures 7.3 and 7.4, you can tell that the drive has 321MBof usable capacity broken into six drive letters, C: through H:. The rationale behind thesesettings and the relative sizes of the drives is as follows.
Drive C takes the biggest pounding. Because it is the boot drive, almost every commercialsoftware package you install tries to make changes or install drivers on the C: drive. C: alsois the traditional home of the DOS directory in which DOS’s external command programfiles are written and of directories used to store utility programs such as Norton Utilitiesand PC Tools. Plus, C: usually houses a TEMP directory, where many software packages lookfor disk resources to use as a scratch pad. Windows Print Manager, for example, uses theTEMP directory to spool printing jobs into a file so that it can send data to the printer in thebackground. The drive is just large enough to accommodate all these uses and provide spaceto install software for testing, yet it’s small enough to back up easily. Unproven softwaresometimes eats the disk it’s installed on, so easy restoration of backup files is a key factor inthe size of the C: drive.
Drive D on the hard disk is the Windows drive. Windows software tends to be large, as isWindows itself. When you use DoubleSpace, the 100MB of reported space becomes closerto 200MB—almost enough to do the job. Drives E and F store applications and the over-flow from drive D. On drives E and F, you find word processors, programming editors,communications programs, and so on. Drive G is given over to graphics programs and files.Drive H is a programming disk where source code to programs is written. Source code is theterm used for the files that contain programming language statements compiled into work-ing EXE and COM files.
As you can see, the partitions of this hard disk have been thought out in advance. Utilizingdisk space effectively is the first step in optimizing DOS’s efficiency. Before you partition ahard disk, analyze the ways in which you use a computer. If you do desktop publishing, useWindows; if you do database work on large files, you might want to partition the disk intofewer drives with larger capacities. One key point to keep in mind is that partitions shouldbe small enough to enable you to make backups easily.
Checking Partition Status
You can check the status of your partition table by using the FDISK command’s /STATUSswitch as follows:
FDISK /STATUS
FDISK shows a table of your hard disk’s partition information without starting the FDISKprogram (see Figure 7.5).
7
IIPart
Ch
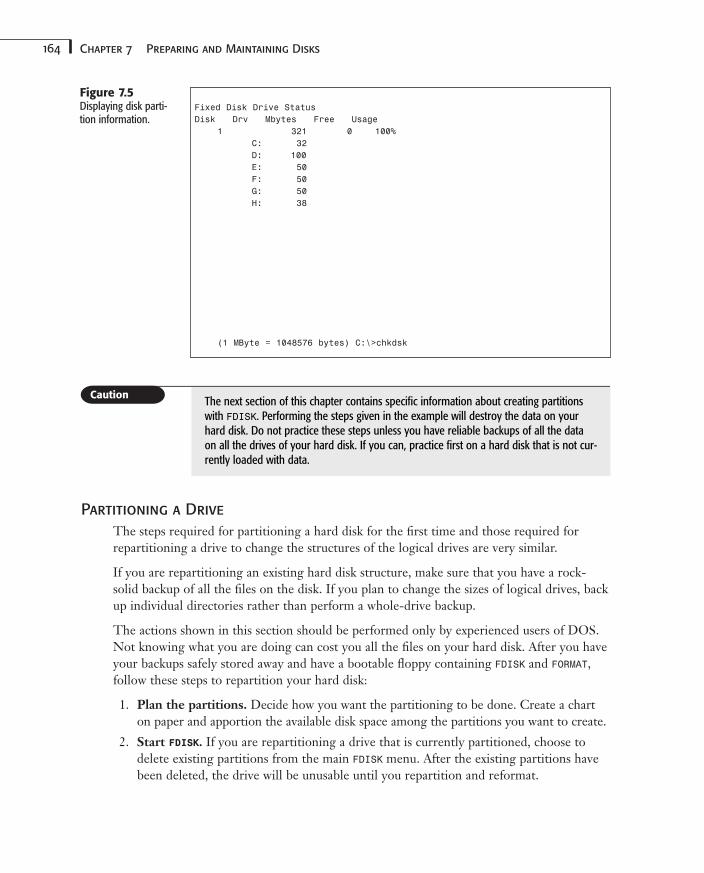
164 Chapter 7 Preparing and Maintaining Disks
Figure 7.5Displaying disk parti-tion information.
Partitioning a Drive
The steps required for partitioning a hard disk for the first time and those required forrepartitioning a drive to change the structures of the logical drives are very similar.
If you are repartitioning an existing hard disk structure, make sure that you have a rock-solid backup of all the files on the disk. If you plan to change the sizes of logical drives, backup individual directories rather than perform a whole-drive backup.
The actions shown in this section should be performed only by experienced users of DOS.Not knowing what you are doing can cost you all the files on your hard disk. After you haveyour backups safely stored away and have a bootable floppy containing FDISK and FORMAT,follow these steps to repartition your hard disk:
1. Plan the partitions. Decide how you want the partitioning to be done. Create a charton paper and apportion the available disk space among the partitions you want to create.
2. Start FDISK. If you are repartitioning a drive that is currently partitioned, choose todelete existing partitions from the main FDISK menu. After the existing partitions havebeen deleted, the drive will be unusable until you repartition and reformat.
Fixed Disk Drive StatusDisk Drv Mbytes Free Usage
1 321 0 100%C: 32D: 100E: 50F: 50G: 50H: 38
(1 MByte = 1048576 bytes) C:\>chkdsk
The next section of this chapter contains specific information about creating partitionswith FDISK. Performing the steps given in the example will destroy the data on yourhard disk. Do not practice these steps unless you have reliable backups of all the dataon all the drives of your hard disk. If you can, practice first on a hard disk that is not cur-rently loaded with data.
165Preparing the Hard Disk
3. Create the primary partition. Select Create DOS Partition from the FDISK mainscreen. If the drive does not have any existing partitions, a menu appears. Choose 1 tocreate the partition to act as drive C. By default, FDISK offers the entire disk capacity forthe primary partition. If you want to break the hard drive into multiple logical drives,answer N to the confirmation prompt and press Enter.
FDISK enables you to enter capacities for partitions as megabytes or as a percentage.Choose one method or the other, and then assign the amount of space you want C: tohave and return to the main FDISK menu.
4. Make the primary partition the active partition. Choose Set Active Partition fromthe FDISK main menu to make C: the active partition to be made bootable.
5. Create the extended partition. Again, choose Create from the main menu, but thistime choose to Create Extended DOS partition. Again, FDISK offers to make theremaining disk space the size of the partition. If you want just C: and D:, accept thedefault. If you want to create more than one logical drive, reject the default and followthe prompts to specify the size of the partition to be used for D:.
6. Create logical drives. If you finish creating a partition and disk sectors still are notassigned to a partition, FDISK loops around to create another logical drive. It offers touse all remaining space for the logical drive. If you want to break the remaining spaceinto more than one drive, answer N to reject the default and enter a value manually.When you create the last logical drive, accept the default to make sure that no usablecylinders are left out of the partition table.
7. Format each logical drive. After you have set up the partitions the way you wantthem, exit FDISK and save the partition table. Reboot the computer using your bootablefloppy and then format each of the logical drives you have created. Remember to for-mat C: using the /S switch to make it bootable.
8. Reboot and check the drives. After you have formatted each of the logical drives,reboot the computer from the hard disk and run directories of all the logical drives tomake sure that they were created the way you intended and that they are recognized asvalid DOS drives.
9. Install files. If you are repartitioning a drive or installing a new hard disk on an existingsystem, restore all the backups you made, including the DOS files on the boot drive andthe files in the DOS directory.
If you are installing a new system, install DOS and then begin installing any softwarepackages that have to reside on the hard disk of the computer.
10. Test, test, test. Before you pronounce the job finished, reboot from the hard disk, test all the software that you installed, and make sure that all configuration files, dri-vers, and so on are actually written at the locations specified by entries in CONFIG.SYSand AUTOEXEC.BAT.
7
IIPart
Ch
166 Chapter 7 Preparing and Maintaining Disks
Formatting a Hard Disk
Simply stated, you format a hard disk or logical drive just like you format a floppy disk.
Assume that the hard disk (or logical disk) you are going to format is drive C. (If you areformatting another drive, use its drive letter in place of C in the example.) If your drive isnot the primary DOS partition, you don’t have to use the /S switch; DOS boots only fromthe primary DOS partition. To format drive C, follow these steps:
1. Insert your working copy of the DOS Startup disk—or any bootable disk that containsFORMAT.COM—into drive A.
2. Switch to that drive by typing A: and pressing Enter.
3. Type the following command and press Enter:FORMAT C:/S
FORMAT issues the following warning message and confirmation prompt:WARNING, ALL DATA ON NON-REMOVABLE DISKDRIVE C: WILL BE LOST!Proceed with Format (Y/N)?
This prompt is extremely important. When the prompt appears onscreen, examine itcarefully to confirm the disk-drive name (letter) before you press Y. If you make a habitof pressing Y in response to the confirmation prompts of less dangerous commands, youmight make a serious mistake with this final FORMAT confirmation prompt.
4. If the specified drive is the one you want to format, press Y; if not, press N to terminateFORMAT. If you press Y, FORMAT updates the display with progress reports on the format-ting operation. Depending on the size of the disk that is being formatted, the processcan take from just a few minutes to more than half an hour. The greater a disk’s capac-ity, the longer the process takes.
All the normal Format complete and System transferred messages that you see when for-matting floppies also are presented when you are formatting a hard disk.
Disk CommandsSeveral useful DOS commands can help you prepare and maintain disks. The following sec-tions are devoted to these commands.
Naming Disks with LABEL
The external command LABEL adds, modifies, or changes a disk’s volume label. In DOS, avolume label is a name given to a physical or logical disk.
If a disk’s volume label is blank (if you or another user pressed Enter when FORMAT or LABELprompted for the label), you can use the LABEL command to add a volume label or changethe current volume label.
167Disk Commands
DOS displays the volume label when you issue commands such as VOL, CHKDSK, DIR, andTREE. Giving each disk—physical or logical—a volume label is a good idea. A disk with aunique volume label is easier to identify than one that doesn’t have a label.
The syntax for the LABEL command is as follows:
LABEL d:label
d: is the name of the drive that holds the disk you want to label.
label, the optional label text that you supply as the new volume label, can include up to 11characters. DOS immediately updates the specified or default drive’s label with no warningprompt. If you do not supply the label parameter, LABEL automatically goes into an interac-tive mode that prompts you for a new label.
Keep in mind this special restriction: You cannot use the LABEL command in a networkeddrive.
Examining Volume Labels with VOL
The internal command VOL is convenient when you want to view a disk’s volume label orverify that a label exists. VOL accesses the disk’s volume label from the root directory andthen displays the label that was created during the disk’s formatting or modified by a subse-quent LABEL command.
You can use VOL freely because it is a display-only command; it does not change any files orthe label name.
The syntax of the VOL command is simple:
VOL d:
d: is the optional name of the drive whose volume label you want to see. If you omit a valuefor d:, DOS displays the label for the default drive.
Using SYS to Transfer the DOS System
All DOS disks have a DOS file system, but only disks with the DOS system files and COM-MAND.COM can be used to start the computer. The external command SYS transfers (copies)the hidden system files necessary to make a disk bootable.
As you learned earlier in this chapter, you can make a disk bootable by using the /S switchwith the FORMAT command. You can use the SYS command when you need to make analready formatted disk bootable. The disk must have room for the system files that SYSintends to transfer, and those system files must be compatible with your version of DOS.
To use SYS successfully, observe the following rules:
■ The destination disk must be formatted.
■ The destination disk must contain sufficient free space for the two hidden system filesand COMMAND.COM (just more than 133KB for DOS 6.22 system files; more than 197KB if
7
IIPart
Ch
168 Chapter 7 Preparing and Maintaining Disks
you use DoubleSpace), it must already contain earlier versions of the system files, or itmust have been formatted with the /B switch.
■ You cannot use SYS in a networked drive. If you want to use SYS in a networked drive,you must log off the network or pause your drive. (For the exact restrictions, consultyour system’s network documentation.)
■ You must include the destination-drive parameter in the SYS command. SYS does nottransfer a copy of the system to the current drive; the destination must be a differentdrive.
The syntax for the SYS command is as follows:
SYS ds: dd:
dd: is the target, or destination, drive for the system files. You must specify a drive name(letter) for drive dd:. The drive specified by ds: is the drive used for the source of the sys-tem files.
Suppose that you are using DOS 6.22 with a hard disk and have an empty disk that youwant to make bootable for use with another computer. To do so, follow these steps:
1. Insert the formatted disk (the one you want to transfer system files onto) into drive A.
2. Type the following command:
SYS C: A:
SYS replies with the message System transferred. The system files now are on the disk indrive A. Now you can use this disk to boot your computer.
The C: in step 2 is optional, depending on whether drive C is current. If you are loggedon to drive C, C: is already the default source for the system files; therefore, you don’thave to add it to the command line.
Getting the Most Speed from Your Hard DiskYour hard disk just might be the most important component of your computer. Manyaspects of your computer’s performance are strongly influenced by the characteristics ofyour disk. These characteristics include the following:
■ Speed—The speed of your hard disk influences the speed of your system. Even if yourcomputer’s processor is super fast, a slow disk can make your computer perform like asnail.
■ Space—The amount of space on your disk determines what you can do with your com-puter. No matter how fast and powerful your processor is, if you have only 20MB ofspace on your disk, you cannot run much Windows software.
169Getting the Most Speed from Your Hard Disk
The most dramatic way to increase your computer’s performance is to purchase a larger,faster hard disk. As an alternative to buying another hard disk, you often can increase yourcomputer’s performance simply by making the best use of your current hard disk. In the fol-lowing sections, you learn how to get the most speed and most space from your hard disk.The safety issue is covered thoroughly in Chapter 9, “Protecting Your Data.”
The programs you use on your computer frequently must access data on disk. The speed atwhich your computer can retrieve that information is one of the most significant factors thatdetermine how fast the computer operates. You can buy faster disk drives (which are expen-sive), or you can use DOS, which provides several techniques you can use to increase thespeed at which your programs access information without actually increasing the speed ofyour disk. The following sections explain those techniques.
Using a Disk Cache (SMARTDrive)
Perhaps the most significant way to enhance the performance of your hard disk is to use adisk-caching program. Disk caching takes advantage of the fact that during the course ofnormal work, most users access the same programs and data repeatedly within a shortperiod. You might list the contents of a file, edit the file, and then print it; or you might runthe same program several times in a row. Even if you don’t access programs or data repeat-edly, the programs you use probably do.
If you have a disk-caching program installed, that program allocates some of your memoryfor temporary data storage on disk. When you access data, the disk-caching program savesthat data in its memory area, on the assumption that you are likely to use the same data—orrelated data stored with it—in the near future (within a few seconds, perhaps). If you (oryour program) do try to read the same data again soon, the disk-caching program interceptsthe disk access and gives the program the data stored in memory. You (or your program)receive the data immediately because DOS doesn’t actually read the data from disk; instead,the disk-caching program finds the data in its cache buffer. If your program never requeststhe same information again, the caching program eventually realizes that you are not likelyto use that data soon and deletes the data from memory.
The disk-caching program that comes with DOS is named SMARTDRV.EXE, or simplySMARTDrive. SMARTDrive builds its buffer area in XMS or EMS memory, using very lit-tle conventional memory. When DOS reads information from the disk, it places that infor-mation in the cache and sends specifically requested information to the program thatrequested it. SMARTDrive, however, reads more information than the program requestsand stores this information in memory. If the program later requests information that isalready in memory, the cache can supply the information faster than DOS can if DOS has to read the disk again.
SMARTDrive eliminates redundant disk writing by putting information on disk only whenthe data differs from data already stored. The program also accumulates information, writ-ing out data only when a certain amount has accumulated. Write-caching operationsdecrease the amount of time that your programs spend writing to disk, but write caching
7
IIPart
Ch
170 Chapter 7 Preparing and Maintaining Disks
also forces you to shut down your computer by issuing a special SMARTDrive command(explained later in this section) or by making sure you return to the DOS prompt.
You might not want to use write caching in an area with unreliable electrical power. Ifthe power fails while SMARTDrive is accumulating data, you lose the data that it has notyet written to disk. This risk of data loss is of little concern if you own an uninterruptiblepower supply (UPS), which keeps your computer running during a power failure. Thereis no equivalent danger in the case of read caching.
A disk-caching program such as SMARTDrive remembers which sections of the disk youhave used most frequently. When the cache must be recycled, the program retains the datain the most frequently used areas and discards the data in the less frequently used areas. In arandom disk-access operation in which program and data files are scattered uniformly acrossthe disk, the cache method of recycling the least frequently used area is more efficient thanthe buffer method of recycling the oldest area. A cache tends to keep in memory the mostheavily used areas of the disk.
To start SMARTDrive, enter a command with the following syntax in your AUTOEXEC.BATfile:
SMARTDRV drive+ | drive-... /E:elementsize initcachesize wincachesize/B:buffersize /C /R /F /N /L /Q /S /U /V /X
The SMARTDRV command is followed by the drives for which you want caching used. Thisnotation takes the form of a drive letter, followed optionally by a plus (+) or minus (–) sign,as in the following examples:
C Specifies that drive C will be cached for reads but not for writes
C+ Specifies that drive C will be cached for reads and writes
C– Specifies that drive C will not be cached
If you don’t specify any drive letters in your SMARTDRV command, floppy disk drives are read cached but not write cached, and hard disks are read cached and write cached. If youare using the version of SMARTDrive supplied with DOS 6.22, you also can cache yourCD-ROM drives. Other kinds of drives—such as network drives and compressed drives—are not cached.
As an alternative to specifying every drive you want read cached but not write cached, youcan use the /X switch. SMARTDrive then enables only read caching; write caching for alldrives is automatically disabled. The /X switch is used automatically when you install DOS6.22 (unless you were using SMARTDrive with different switches in an existingAUTOEXEC.BAT file).
The /E:elementsize parameter specifies the number of bytes that SMARTDrive reads orwrites at a time: 1,024; 2,048; 4,096; or 8,192 (the default value). The larger the value, themore conventional memory SMARTDrive uses, but the fewer disk accesses you are likely toneed.

171Getting the Most Speed from Your Hard Disk
The initcachesize parameter is a number that specifies the size (in kilobytes) of the cachewhen SMARTDrive starts. The larger the cache, the more likely that SMARTDrive canfind information required by programs in the cache. The larger the cache, however, themore memory SMARTDrive requires. If you do not specify initcachesize, SMARTDriveselects a value based on the amount of memory in your system.
The wincachesize parameter specifies the size (in kilobytes) to which DOS can reduce thecache when you start Windows so that Windows can use the memory for other purposes.The philosophy behind this parameter is that if SMARTDrive uses too much of your mem-ory, Windows runs too slowly. Therefore, even though SMARTDrive becomes less efficientby giving up some of its memory, Windows can run faster. When you exit Windows,SMARTDrive recovers the memory it gave up for Windows. Table 7.3 shows the defaultvalues for initcachesize and wincachesize.
Table 7.3 Default SMARTDrive Memory Values
Size of Default DefaultExtended Value for Value forMemory initcachesize wincachesize
Up to 1MB All XMS Zero (no caching)
Up to 2MB 1MB 256KB
Up to 4MB 1MB 512KB
Up to 6MB 2MB 1MB
6MB or more 2MB 2MB
The /B:buffersize parameter tells SMARTDrive how much additional information to readwhen DOS executes a disk read. Because programs often read sequentially through files,SMARTDrive anticipates that the next data request will be for the area following the cur-rent area. The default size of the read-ahead buffer is 16KB; this value can be any multipleof elementsize. The larger the value of buffersize, the more conventional memorySMARTDrive uses.
The /L switch prevents SMARTDrive from loading into your upper memory area (UMA).This option might be useful if other programs need to use the UMA.
Normally, the DOS 6.22 version of SMARTDrive enables read caching for CD-ROMdrives. If you do not want this feature enabled, you can use the /U switch.
The /Q switch tells SMARTDrive to be “quiet” while installing itself rather than displayingthe usual status messages. This is the opposite of the /V switch, which turns on “verbose”mode and shows the status messages.
You also can run SMARTDrive as a command from the DOS prompt. Several specialswitches that provide important features are available from the command line. The first is
7
IIPart
Ch
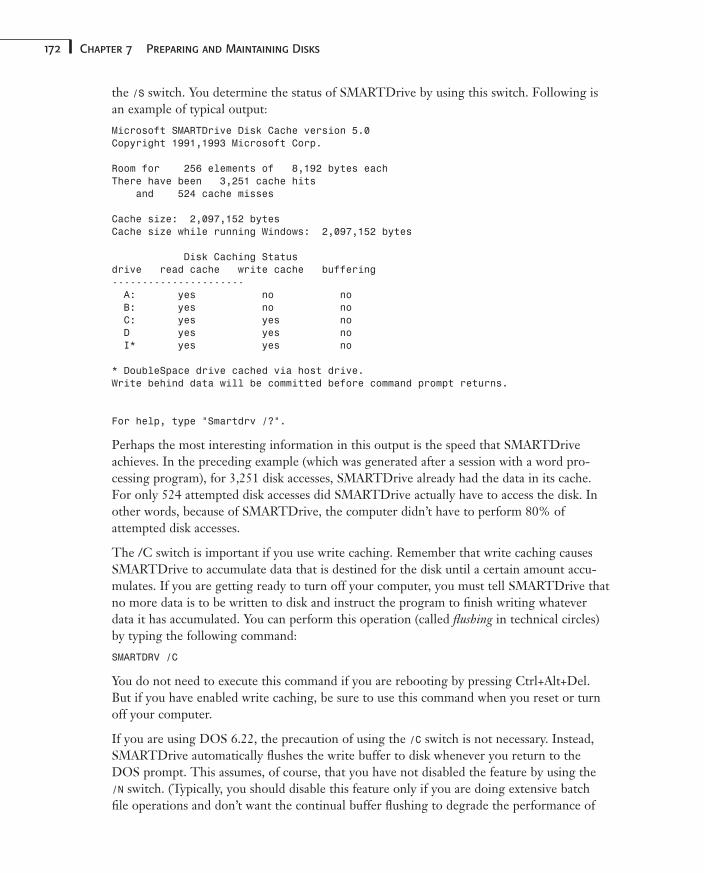
172 Chapter 7 Preparing and Maintaining Disks
the /S switch. You determine the status of SMARTDrive by using this switch. Following isan example of typical output:
Microsoft SMARTDrive Disk Cache version 5.0Copyright 1991,1993 Microsoft Corp.
Room for 256 elements of 8,192 bytes eachThere have been 3,251 cache hits
and 524 cache misses
Cache size: 2,097,152 bytesCache size while running Windows: 2,097,152 bytes
Disk Caching Statusdrive read cache write cache buffering----------------------A: yes no noB: yes no noC: yes yes noD yes yes noI* yes yes no
* DoubleSpace drive cached via host drive.Write behind data will be committed before command prompt returns.
For help, type “Smartdrv /?”.
Perhaps the most interesting information in this output is the speed that SMARTDriveachieves. In the preceding example (which was generated after a session with a word pro-cessing program), for 3,251 disk accesses, SMARTDrive already had the data in its cache.For only 524 attempted disk accesses did SMARTDrive actually have to access the disk. Inother words, because of SMARTDrive, the computer didn’t have to perform 80% ofattempted disk accesses.
The /C switch is important if you use write caching. Remember that write caching causesSMARTDrive to accumulate data that is destined for the disk until a certain amount accu-mulates. If you are getting ready to turn off your computer, you must tell SMARTDrive thatno more data is to be written to disk and instruct the program to finish writing whateverdata it has accumulated. You can perform this operation (called flushing in technical circles)by typing the following command:
SMARTDRV /C
You do not need to execute this command if you are rebooting by pressing Ctrl+Alt+Del.But if you have enabled write caching, be sure to use this command when you reset or turnoff your computer.
If you are using DOS 6.22, the precaution of using the /C switch is not necessary. Instead,SMARTDrive automatically flushes the write buffer to disk whenever you return to theDOS prompt. This assumes, of course, that you have not disabled the feature by using the/N switch. (Typically, you should disable this feature only if you are doing extensive batchfile operations and don’t want the continual buffer flushing to degrade the performance of
173Getting the Most Speed from Your Hard Disk
your batch files.) If you turn off this feature by using the /N switch, you can turn it on laterby using the /F switch.
Using FASTOPEN
Another way to improve hard disk performance is to use the FASTOPEN program. FASTOPEN isnot a device driver per se, but an executable program that you can include in AUTOEXEC.BAT.You also can load the program through CONFIG.SYS by using the special INSTALL command.
➔ For more information on using the INSTALL command, see “Using the INSTALL Command,” p. 466.
You can use FASTOPEN only with hard drives. FASTOPEN caches directory information, holdingin memory the locations of frequently used files and directories.
A directory is a type of file that you cannot access through regular means. DOS reads andwrites directories in a manner similar to the way it handles other files. Part of the directoryentry for a file or subdirectory holds the starting point for the file in the file allocation table.Because DOS typically holds the FAT in the disk buffers, FASTOPEN was developed to holddirectory entries in memory.
FASTOPEN is not a complex command, but you must do a little work before you can use iteffectively. The syntax for FASTOPEN is as follows:
FASTOPEN.EXE d: = n /X
The d: parameter is the name of the first hard drive that you want FASTOPEN to track. (Youcan specify up to 24 hard disks or hard disk partitions at one time.) The /X switch, which issimilar to the /X switches of other commands, enables FASTOPEN information to reside inEMS. By default, FASTOPEN uses conventional memory.
The n parameter is the number of directory entries that FASTOPEN is to cache. Each file orsubdirectory requires one directory entry. You can enter a value ranging from 10 to 999. Ifyou do not specify a value for n, DOS uses a default value of 48.
You can use FASTOPEN on as many disks as you want. Be aware, however, that the total num-ber of directory entries or fragmented entries FASTOPEN can handle is 999. If you issue thecommand for several disk drives, the sum of the n values cannot exceed 999. The practicallimit of n is between 100 and 200 per disk. If you specify a value much higher, DOS wadesthrough the internal directory entries more slowly than it reads information from disk.Additionally, each directory entry stored in memory takes 48 bytes. Considering this trade-off of speed and memory, the 100-to-200-disk limit yields adequate performance.
Using too small a number for n also can be a disadvantage. When directory entries are recy-cled, FASTOPEN discards the least recently used entry when it needs space for a new entry. Ifthe n value is too small, DOS discards entries that it still might need. The objective is tohave enough entries in memory so that FASTOPEN operates efficiently, but not so manyentries that FASTOPEN wastes time wading through directory entries. 7
IIPart
Ch
174 Chapter 7 Preparing and Maintaining Disks
To load FASTOPEN as part of your regular configuration, use the INSTALL command in yourCONFIG.SYS file as follows:
INSTALL = FASTOPEN.EXE C:
To load FASTOPEN into upper memory, use LOADHIGH in AUTOEXEC.BAT. The following com-mand, for example, loads FASTOPEN into upper memory and tracks filenames and directorieson drive C:
LOADHIGH C:\DOS\FASTOPEN C:
Keep in mind the following points regarding the use of FASTOPEN:
• Do not use FASTOPEN if you are using Windows.
• Do not run a disk-defragmenting program, such as DEFRAG, while FASTOPEN isrunning.
Using a RAM Disk
Another way to speed disk operation doesn’t involve a disk at all. A RAM disk is a devicedriver that uses a portion of your computer’s memory to emulate a disk drive. You use aRAM drive as you use any other disk drive. Because this “imitation,” or virtual, disk islocated in RAM, a RAM disk is extremely fast compared with a real disk drive. You must,however, give up a significant amount of memory to create a useful RAM disk. Worse, youcannot store anything in that disk permanently; the contents of the RAM disk disappearwhen you turn off or reboot your computer.
As a general rule, a disk-caching program such as SMARTDrive provides better overall per-formance gains than a RAM disk. You generally use RAM disks to enhance the performanceof one or two specific programs that read and write to the disk frequently or that use over-lays. A disk cache, on the other hand, improves the performance of all programs that readand write to disk.
If your computer’s memory resources are limited, give more consideration to a diskcache rather than to a RAM disk.
Overlays and RAM DisksSome programs are too large to fit in your PC’s memory. These programs load a core part into memory andaccess additional parts from overlay files as necessary. When a new section of the program is needed, theappropriate overlay for that section is read from the disk into the area occupied by the current overlay.
The term overlay comes from this process of overlaying sections of program space in memory with new sec-tions. RAM disks facilitate rapid switching of active overlays because the overlay disk files actually are in mem-ory, not on disk. You must copy any needed overlay files to the RAM disk before starting the program. You alsomust configure the program to look for its overlays on the RAM disk.
175Getting the Most Speed from Your Hard Disk
The RAM disk driver that comes with DOS is named RAMDRIVE.SYS. To install RAMDRIVE andcreate a virtual disk, include RAMDRIVE.SYS as a device driver in CONFIG.SYS. The syntax forincluding RAMDRIVE.SYS is as follows:
DEVICE = RAMDRIVE.SYS disksize sectorsize entries /E /A
The disksize parameter indicates the size of the RAM disk (in kilobytes). This number canrange from 16 to 32,767 (equivalent to 32MB). The default value is 64.
The sectorsize parameter represents the size of the sectors used in the virtual disk. You canspecify one of three sector sizes: 128, 256, or 512 (the default) bytes. Normally, you do notchange this parameter; if you do, however, you also must specify the disksize parameter.
The entries parameter determines the maximum number of directory entries permitted in the RAM disk’s root directory. This parameter can be a value ranging from 2 to 1,024. The default value is 64. You normally don’t need to change this parameter. If you do specifythe entries parameter, you also must enter the disksize and sectorsize parameters. Set thenumber of directories based on the size of the RAM disk and the number of files you arestoring.
By default, DOS creates a RAM disk in conventional memory. You can, however, include the/E switch to cause the RAM disk to be created in XMS memory. Even with this switch, how-ever, RAMDRIVE uses some conventional memory, so you might want to try loading the RAMDRIVE.SYS device driver into upper memory. The following command creates a 1,024KBRAM disk in XMS memory and loads the device driver into upper memory:
DEVICEHIGH=C:\DOS\RAMDRIVE.SYS 1024 /E
7
IIPart
Ch
If you want your RAM disk to use extended memory, it must follow the CONFIG.SYScommands that load HIMEM.SYS or a different memory manager.
The /A switch creates the RAM disk in EMS memory. To use this switch, you must load anexpanded memory manager (such as EMM386.EXE) before loading RAMDRIVE.SYS. You cannotuse the /A and /E switches for the same RAM disk. You can create different RAM disks,however, some using EMS memory and others using XMS memory. Given a choice, useXMS memory.
After you insert the DEVICE=RAMDRIVE.SYS command into CONFIG.SYS and reboot your com-puter, DOS displays a message similar to the following during initialization of your com-puter:
Microsoft RAMDrive version 3.07 virtual disk D:Disk size: 64kSector size: 512 bytesAllocation unit: 1 sectorsDirectory entries: 64
176 Chapter 7 Preparing and Maintaining Disks
Most importantly, this message tells you that this RAM disk is accessed as drive D. Themessage also shows the disk size, sector size, allocation-unit (cluster) size, and maximumnumber of root directory entries.
The amount of RAM in your computer, the programs you use, and the convenience of aRAM disk help determine what size RAM disk you use and even whether you need to use aRAM disk at all.
Drive Letters and Block DevicesThe logical disk drive names (the drive letters) that DOS assigns to disks created by RAMDRIVE.SYS andDRIVER.SYS (see the “Command Reference”) depend on the placement of the commands in theCONFIG.SYS file. You might try to use the wrong disk drive name if you do not know how DOS assigns drivenames. When DOS encounters a block device driver (that is, any device that transfers data in blocks rather thanin bytes), DOS assigns the next highest drive letter to that device. The order is first come, first assigned.
The potential for confusion comes when several block device drivers are loaded. The order of loading, basedon the order of the commands in the CONFIG.SYS file, determines the names assigned by DOS. If you loadRAMDRIVE.SYS first and DRIVER.SYS second, the RAM disk might be named D and the DRIVER.SYS diskone letter higher. If you switch the lines so that DRIVER.SYS loads first, the disk drive names also switch; theDRIVER.SYS disk is D, and the RAM disk is E.
One excellent way to use a RAM disk is to assign the TEMP environment variable to thisvirtual drive. Certain programs use an environment variable named TEMP to determinewhere to create various temporary files. These temporary files usually are written andread frequently during the operation of the program; their temporary nature makesthem good candidates for storage in a RAM disk.
To assign TEMP to a RAM disk, you first have to determine a name for the virtual disk andthen use the SET command (see the “Command Reference”). Assign the TEMP variable to asubdirectory rather than to the RAM disk’s root directory to avoid the 64-filename limit.Assuming that the RAM disk becomes drive D, use the following commands inAUTOEXEC.BAT to create a directory on the virtual disk and to cause temporary files to bewritten to that directory:
MD D:\TEMPDATASET TEMP = D:\TEMPDATA
Some programs use an environment variable named TMP instead of TEMP for the same pur-pose. In such a case, substitute TMP for TEMP in the preceding command.
Because RAM disks are memory-based devices, you lose their contents when you rebootor turn off your PC. To prevent data loss, you must copy the contents of a RAM disk to aconventional disk file before rebooting or turning off the power. If you (or your pro-gram) are creating or modifying RAM disk files, copy the files to an actual disk regularlyin case a power failure occurs.
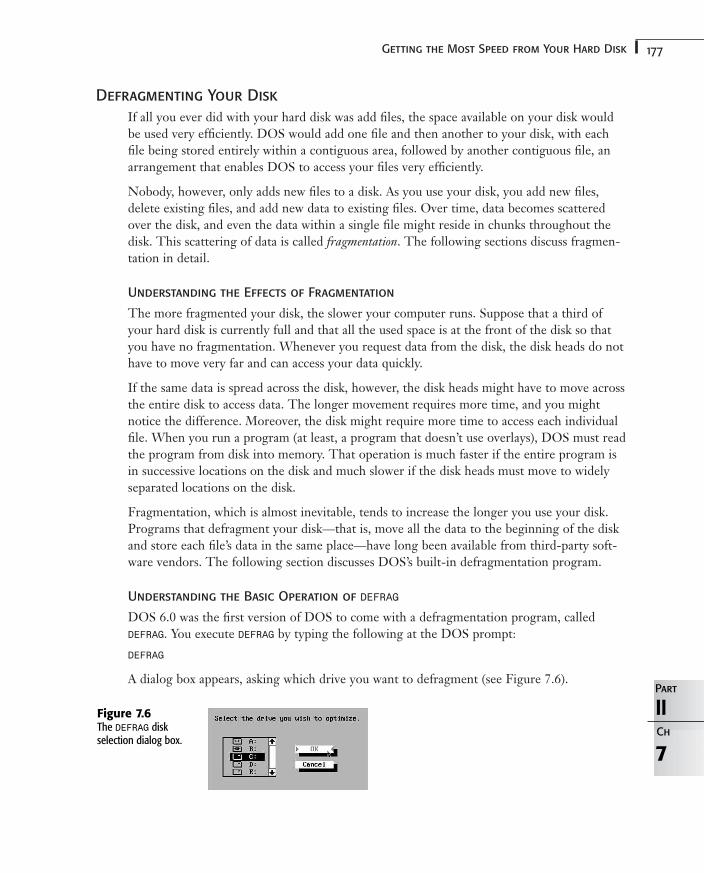
177Getting the Most Speed from Your Hard Disk
Defragmenting Your Disk
If all you ever did with your hard disk was add files, the space available on your disk wouldbe used very efficiently. DOS would add one file and then another to your disk, with eachfile being stored entirely within a contiguous area, followed by another contiguous file, anarrangement that enables DOS to access your files very efficiently.
Nobody, however, only adds new files to a disk. As you use your disk, you add new files,delete existing files, and add new data to existing files. Over time, data becomes scatteredover the disk, and even the data within a single file might reside in chunks throughout thedisk. This scattering of data is called fragmentation. The following sections discuss fragmen-tation in detail.
Understanding the Effects of Fragmentation
The more fragmented your disk, the slower your computer runs. Suppose that a third ofyour hard disk is currently full and that all the used space is at the front of the disk so thatyou have no fragmentation. Whenever you request data from the disk, the disk heads do nothave to move very far and can access your data quickly.
If the same data is spread across the disk, however, the disk heads might have to move acrossthe entire disk to access data. The longer movement requires more time, and you mightnotice the difference. Moreover, the disk might require more time to access each individualfile. When you run a program (at least, a program that doesn’t use overlays), DOS must readthe program from disk into memory. That operation is much faster if the entire program isin successive locations on the disk and much slower if the disk heads must move to widelyseparated locations on the disk.
Fragmentation, which is almost inevitable, tends to increase the longer you use your disk.Programs that defragment your disk—that is, move all the data to the beginning of the diskand store each file’s data in the same place—have long been available from third-party soft-ware vendors. The following section discusses DOS’s built-in defragmentation program.
Understanding the Basic Operation of DEFRAG
DOS 6.0 was the first version of DOS to come with a defragmentation program, calledDEFRAG. You execute DEFRAG by typing the following at the DOS prompt:
DEFRAG
A dialog box appears, asking which drive you want to defragment (see Figure 7.6).
7
IIPart
Ch
Figure 7.6The DEFRAG diskselection dialog box.
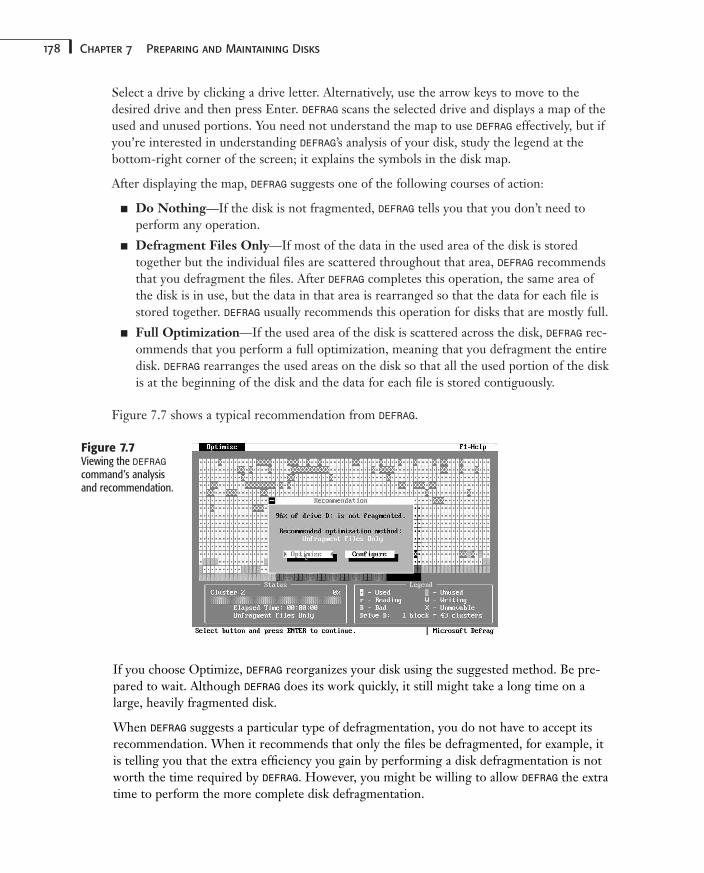
178 Chapter 7 Preparing and Maintaining Disks
Select a drive by clicking a drive letter. Alternatively, use the arrow keys to move to thedesired drive and then press Enter. DEFRAG scans the selected drive and displays a map of theused and unused portions. You need not understand the map to use DEFRAG effectively, but ifyou’re interested in understanding DEFRAG’s analysis of your disk, study the legend at thebottom-right corner of the screen; it explains the symbols in the disk map.
After displaying the map, DEFRAG suggests one of the following courses of action:
■ Do Nothing—If the disk is not fragmented, DEFRAG tells you that you don’t need toperform any operation.
■ Defragment Files Only—If most of the data in the used area of the disk is storedtogether but the individual files are scattered throughout that area, DEFRAG recommendsthat you defragment the files. After DEFRAG completes this operation, the same area ofthe disk is in use, but the data in that area is rearranged so that the data for each file isstored together. DEFRAG usually recommends this operation for disks that are mostly full.
■ Full Optimization—If the used area of the disk is scattered across the disk, DEFRAG rec-ommends that you perform a full optimization, meaning that you defragment the entiredisk. DEFRAG rearranges the used areas on the disk so that all the used portion of the diskis at the beginning of the disk and the data for each file is stored contiguously.
Figure 7.7 shows a typical recommendation from DEFRAG.
Figure 7.7Viewing the DEFRAGcommand’s analysisand recommendation.
If you choose Optimize, DEFRAG reorganizes your disk using the suggested method. Be pre-pared to wait. Although DEFRAG does its work quickly, it still might take a long time on alarge, heavily fragmented disk.
When DEFRAG suggests a particular type of defragmentation, you do not have to accept itsrecommendation. When it recommends that only the files be defragmented, for example, itis telling you that the extra efficiency you gain by performing a disk defragmentation is notworth the time required by DEFRAG. However, you might be willing to allow DEFRAG the extratime to perform the more complete disk defragmentation.
179Getting the Most Speed from Your Hard Disk
As Figure 7.7 shows, when DEFRAG makes a recommendation, you can click Configure toselect various options that control how DEFRAG works. When you click Configure, DEFRAGpresents the Optimize menu, which includes more operations than just configuration; thefirst item tells DEFRAG to begin the defragmentation procedure. Table 7.4 lists the functionsavailable in the Optimize menu.
Table 7.4 The DEFRAG Optimize (Configuration) Menu
Selection Meaning
Begin Optimization Begins optimization of your hard disk, using any configuration optionsyou have selected
Drive Enables you to choose the drive you want to optimize
Optimization Method Enables you to choose full optimization or file only (might leave emptyspace between files)
File Sort Enables you to choose how files are sorted within directories, if at all
Map Legend Displays a legend of the symbols DEFRAG uses to show disk usage
About Defrag Displays information about the DEFRAG program
Exit Exits DEFRAG
If you want to change the type of defragmentation that DEFRAG performs, chooseOptimization Method. This option presents a dialog box in which you can specify whetherDEFRAG defragments only files or completely defragments the disk. After you make a selec-tion, you can choose Begin Optimization from the Optimize menu; DEFRAG then performsthe optimization you selected.
Normally, DOS doesn’t store filenames in a directory in any particular order. As you createand delete files, DOS removes old names and inserts new names wherever empty spaceoccurs. The result is that when you use DIR to list the contents of a directory, often the filesappear to be listed in random order. You can overcome this disorganized appearance byusing the sorting switches available with the DIR command or by using some applicationprograms, such as WordPerfect, which sort a directory each time they display it. This is nota permanent solution, however. The directory information is still stored on disk in a disor-ganized manner.
While DEFRAG reorganizes your disk, you can tell it to organize the names of the files withinthe directories in one of five ways:
■ Unsorted—This option, which is the default, tells DEFRAG to leave the names in theircurrent order.
■ Name—DEFRAG organizes the directory alphabetically by filename. This option is prob-ably the one you will find most useful.
■ Extension—DEFRAG organizes the directory by extension name; for example, all the COMfiles appear together, all the EXE files appear together, and so on.
7
IIPart
Ch
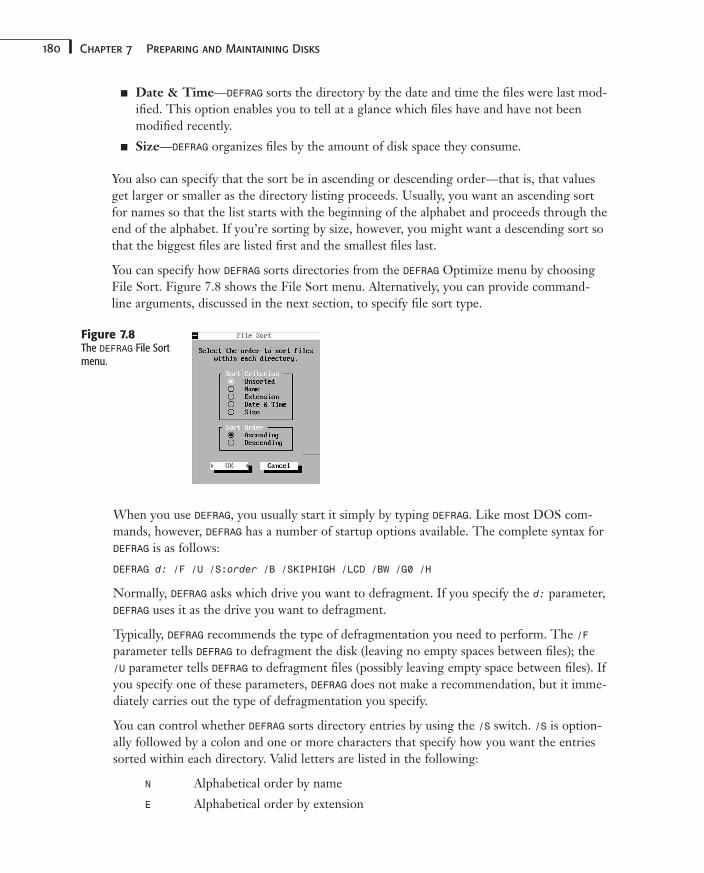
180 Chapter 7 Preparing and Maintaining Disks
■ Date & Time—DEFRAG sorts the directory by the date and time the files were last mod-ified. This option enables you to tell at a glance which files have and have not beenmodified recently.
■ Size—DEFRAG organizes files by the amount of disk space they consume.
You also can specify that the sort be in ascending or descending order—that is, that valuesget larger or smaller as the directory listing proceeds. Usually, you want an ascending sortfor names so that the list starts with the beginning of the alphabet and proceeds through theend of the alphabet. If you’re sorting by size, however, you might want a descending sort sothat the biggest files are listed first and the smallest files last.
You can specify how DEFRAG sorts directories from the DEFRAG Optimize menu by choosingFile Sort. Figure 7.8 shows the File Sort menu. Alternatively, you can provide command-line arguments, discussed in the next section, to specify file sort type.
Figure 7.8The DEFRAG File Sortmenu.
When you use DEFRAG, you usually start it simply by typing DEFRAG. Like most DOS com-mands, however, DEFRAG has a number of startup options available. The complete syntax forDEFRAG is as follows:
DEFRAG d: /F /U /S:order /B /SKIPHIGH /LCD /BW /G0 /H
Normally, DEFRAG asks which drive you want to defragment. If you specify the d: parameter,DEFRAG uses it as the drive you want to defragment.
Typically, DEFRAG recommends the type of defragmentation you need to perform. The /Fparameter tells DEFRAG to defragment the disk (leaving no empty spaces between files); the/U parameter tells DEFRAG to defragment files (possibly leaving empty space between files). Ifyou specify one of these parameters, DEFRAG does not make a recommendation, but it imme-diately carries out the type of defragmentation you specify.
You can control whether DEFRAG sorts directory entries by using the /S switch. /S is option-ally followed by a colon and one or more characters that specify how you want the entriessorted within each directory. Valid letters are listed in the following:
N Alphabetical order by name
E Alphabetical order by extension
181Getting the Most Space from Your Hard Disk
D By date and time, with the oldest dates (that is, files that were last modifiedfarthest in the past) listed first
S By size, with the smallest files listed first
The following command, for example, defragments drive C and sorts files in alphabeticalorder by name:
DEFRAG C: /SN
You also can place a minus sign (–) after a sort letter to specify a descending sort instead ofascending. Consider these two commands:
DEFRAG C: /SS
DEFRAG C: /SS-
The first (without the minus sign) lists the smallest files first; the second (with the minussign) lists the largest files first.
The /B switch tells DEFRAG to reboot your computer after the defragmentation process iscomplete.
The /SKIPHIGH switch tells DEFRAG to load itself into conventional memory. Otherwise,DEFRAG uses upper memory, if available.
The /LCD switch uses a color scheme that is likely to be more readable if you are using a lap-top or notebook computer with an LCD screen.
The /BW switch tells DEFRAG to use a black-and-white color scheme, which is likely to bemore pleasing if you have a monochrome monitor.
The /G0 switch disables the mouse and graphics character set. Use this switch if DEFRAG dis-plays strange characters on your monitor.
Normally, DEFRAG does not reorganize hidden files. You can use the /H switch to tell DEFRAGto move hidden files.
7
IIPart
Ch
When you use DEFRAG, keep in mind the following restrictions:
• You cannot use DEFRAG to defragment drives over a network.
• You cannot run DEFRAG from Windows.
• Disk statistics reported by DEFRAG and CHKDSK or SCANDISK differ slightly.When listing the number of directories, for example, DEFRAG counts the rootdirectory, but CHKDSK does not.
Getting the Most Space from Your Hard DiskSince the introduction of PCs in 1981, the amount of disk storage space available to theaverage user has increased steadily. The original PCs used cassette tapes for mass storage
182 Chapter 7 Preparing and Maintaining Disks
and offered, as an option, floppy disks with only 160KB of storage space. Today, many PCs are sold with hard disks that are thousands of times larger, usually 10GB and higher. It is important to discuss other options, though, because many older PCs that are still running are quite capable of running DOS, but they have only 100MB to 500MB harddrives. Upgrading these machines is not cost effective, so other ways to increase space areneeded.
A decade ago, few software vendors wrote software that required several megabytes of diskstorage because they knew that few of their potential customers’ systems had that kind ofstorage capability. Now vendors rarely think twice about releasing software that requiresmore than 40MB of disk storage; they expect that most people have that much space tospare. Some newer programs, especially games, can require up to 400MB of space to loadcompletely.
Although you cannot increase the physical capacity of your disk without buying a largerdisk, you might be able to increase the amount of data you can store on your disk by usingthe techniques discussed in the next couple of sections. First, you learn about manualmethods of freeing disk space; then you learn about DoubleSpace, which provides full-time disk compression.
The two most popular methods of freeing disk space are to delete files you no longer needand to compress computer files. You also can archive files that you no longer need on floppydisks or tape backups.
Deleting Unnecessary Files
Much of the software available today is very complex, offering many features that you prob-ably will never use. As a result, many of the files copied to your hard disk when you install asoftware program are files that you never open. You might be able to find and delete someof these files, thereby freeing some of your hard disk space.
Some programs, such as Microsoft Word for Windows, ask which features you expect touse and install only the files that are appropriate for you. If you later change your mind,you can install the missing pieces then.
When you install DOS, dozens of programs are installed on your hard disk. If you are shorton disk space, you might want to browse through these programs and delete the ones thatare not important to you. Consider the following examples:
Be sure to use the installation routine for programs such as Word to remove files. Neverdelete program files directly, unless you are sure there will be no adverse harm to theprogram.

183Getting the Most Space from Your Hard Disk
■ DOS includes many files that enable it to work with foreign-language character sets,including German, Swedish, and French. If you expect to use your computer only in theUnited States, you can delete these files to free disk space.
■ Some DOS utilities might duplicate functions that are available in other programsinstalled in your system. If you use a backup program (such as Norton Backup orFastBack), for example, you can delete the DOS backup program, MSBACKUP.
➔ To determine which files supplied with DOS you can safely remove, see Appendix F, “CommandReference,” p. 583.
Another side effect of upgrading your version of DOS is that the old DOS files (from theprevious version) are stored in a directory that begins with the letters OLD_DOS. After theupgrade is complete and you are sure that you want to continue using the new version ofDOS, you can safely delete this directory and everything within it. The program DELOLDDOS,provided with DOS, can take care of this deletion for you.
Using File Compression
If you examine the file that contains the text for this chapter, you find that many words—such as DOS and the—are repeated frequently. Most data includes such repetition—patternsthat occur over and over within a file, whether the file contains text, customer data, ormachine instructions.
Many programmers have written programs that analyze these patterns and squeeze a file’sdata into a smaller space by converting the data into a kind of shorthand notation. (PKZipand LHArc are examples of such programs.) This process is known as compression. In specialcases, the compressed data might require as little as 10% of the original space, although50% is more typical.
If you are interested in acquiring a good compression program, check out an online down-load site, such as http://www.downloads.com or http://www.zdnet.com. File compressionsoftware is used extensively in telecommunications because the smaller files transfer fasterand with less cost.
Archiving Files
Over time, you probably use your computer to perform many different tasks and complete amultitude of projects. When you complete a project, a good plan of action is to compressthe files using compression software discussed in the preceding section.
You can move compressed files easily to high-density floppy disks or to a backup tape. Youthen can store these disks or tapes for long periods of time in case you need the informationagain.
Take a look at your hard drive and the dates of the data files contained on it. You might findthat you have many files that you have not accessed for a long time. Such files are primecandidates for archiving.
7
IIPart
Ch
184 Chapter 7 Preparing and Maintaining Disks
ProjectsThe following two projects will walk you through using the CHKDSK and SCANDISK utilities.These utilities are very important in analyzing hard drives and determining whether theremight be a problem. CHKDSK can be used on uncompressed drives, whereas SCANDISK isrequired to check compressed drives.
Analyzing a Disk with CHKDSK
The external command CHKDSK analyzes a floppy or hard disk. CHKDSK checks a disk’s FAT,directories, and—if you want—the fragmentation of the files on the disk.
CHKDSK is DOS’s self-test command. It makes sure that the internal tables that keep files incontrol are in order.
Although the technical details of how CHKDSK performs its analysis are beyond the interest ofmost casual DOS users, the better you understand CHKDSK, the more comfortable you will bewhen the command uncovers problems. Just because you don’t understand exactly howCHKDSK works doesn’t mean that you must avoid using it.
CHKDSK checks for the following problems in the FAT:
■ Unlinked cluster chains (lost clusters)
■ Multiply linked clusters (cross-linked files)
■ Invalid next-cluster-in-chain values (invalid cluster numbers)
■ Defective sectors where the FAT is stored
CHKDSK checks for the following problems in the directory system:
■ Invalid cluster numbers (out of range)
■ Invalid file attributes in entries (attribute values that DOS does not recognize)
■ Damage to subdirectory entries (CHKDSK cannot process them)
■ Damage to a directory’s integrity (its files cannot be accessed)
CHKDSK is meant to work with normal DOS volumes; it does not work withDoubleSpace disk volumes. If you want to analyze both DOS and DoubleSpace volumes,use the SCANDISK command, which is discussed later in this chapter.
Optionally, CHKDSK repairs problems in the FAT that are caused by lost clusters, and it writesthe contents of the lost clusters to files. CHKDSK also can display all files and their paths.(Paths are discussed in Chapter 5, “Understanding Files and Directories.”)
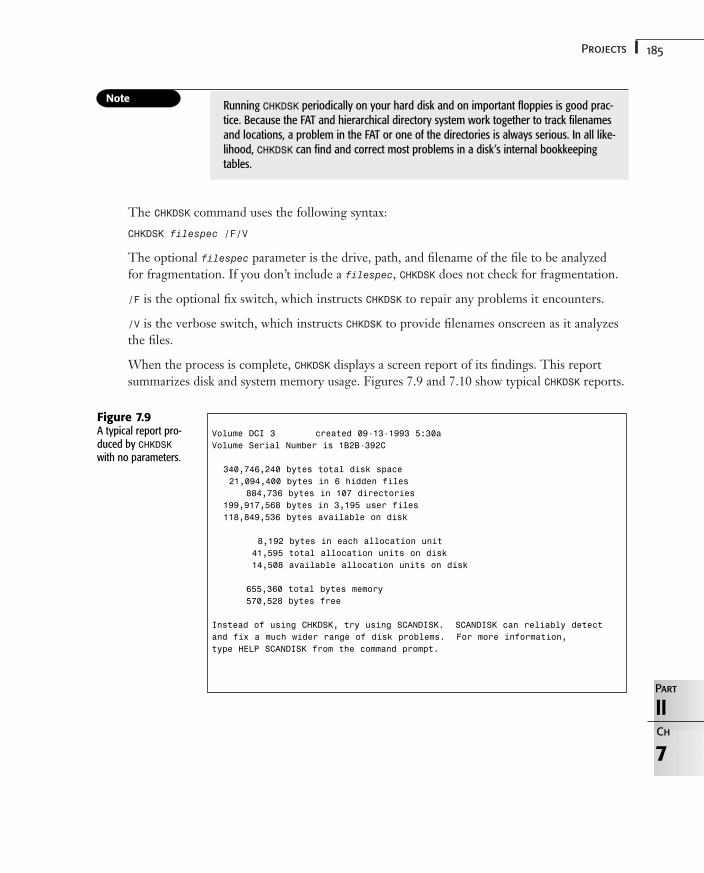
185Projects
The CHKDSK command uses the following syntax:
CHKDSK filespec /F/V
The optional filespec parameter is the drive, path, and filename of the file to be analyzedfor fragmentation. If you don’t include a filespec, CHKDSK does not check for fragmentation.
/F is the optional fix switch, which instructs CHKDSK to repair any problems it encounters.
/V is the verbose switch, which instructs CHKDSK to provide filenames onscreen as it analyzesthe files.
When the process is complete, CHKDSK displays a screen report of its findings. This reportsummarizes disk and system memory usage. Figures 7.9 and 7.10 show typical CHKDSK reports.
7
IIPart
Ch
Running CHKDSK periodically on your hard disk and on important floppies is good prac-tice. Because the FAT and hierarchical directory system work together to track filenamesand locations, a problem in the FAT or one of the directories is always serious. In all like-lihood, CHKDSK can find and correct most problems in a disk’s internal bookkeepingtables.
Figure 7.9A typical report pro-duced by CHKDSKwith no parameters.
Volume DCI 3 created 09-13-1993 5:30aVolume Serial Number is 1B2B-392C
340,746,240 bytes total disk space21,094,400 bytes in 6 hidden files
884,736 bytes in 107 directories199,917,568 bytes in 3,195 user files118,849,536 bytes available on disk
8,192 bytes in each allocation unit41,595 total allocation units on disk14,508 available allocation units on disk
655,360 total bytes memory570,528 bytes free
Instead of using CHKDSK, try using SCANDISK. SCANDISK can reliably detectand fix a much wider range of disk problems. For more information,type HELP SCANDISK from the command prompt.
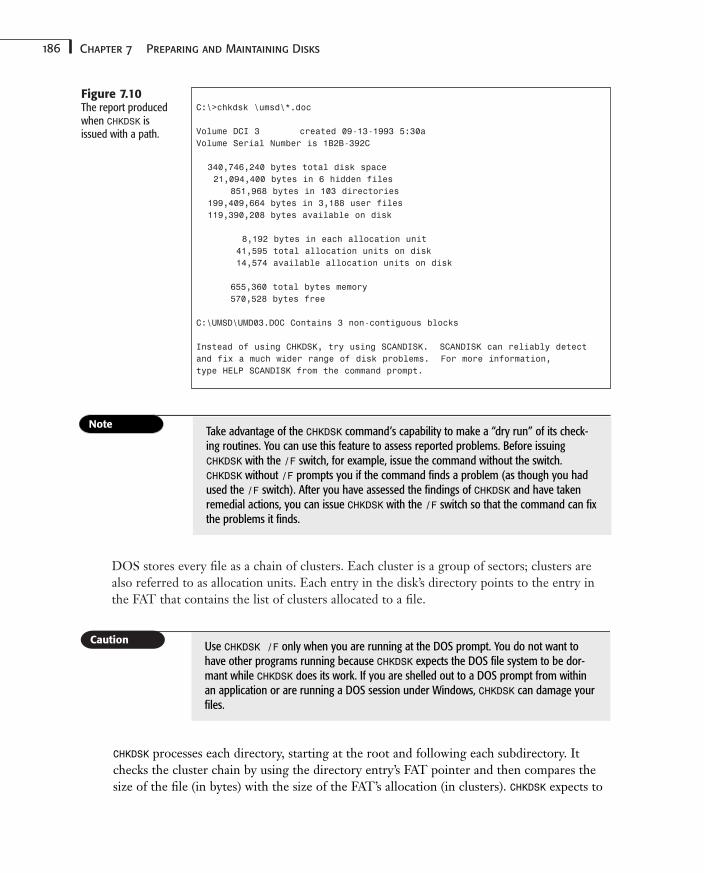
186 Chapter 7 Preparing and Maintaining Disks
DOS stores every file as a chain of clusters. Each cluster is a group of sectors; clusters arealso referred to as allocation units. Each entry in the disk’s directory points to the entry inthe FAT that contains the list of clusters allocated to a file.
Figure 7.10The report producedwhen CHKDSK isissued with a path.
C:\>chkdsk \umsd\*.doc
Volume DCI 3 created 09-13-1993 5:30aVolume Serial Number is 1B2B-392C
340,746,240 bytes total disk space21,094,400 bytes in 6 hidden files
851,968 bytes in 103 directories199,409,664 bytes in 3,188 user files119,390,208 bytes available on disk
8,192 bytes in each allocation unit41,595 total allocation units on disk14,574 available allocation units on disk
655,360 total bytes memory570,528 bytes free
C:\UMSD\UMD03.DOC Contains 3 non-contiguous blocks
Instead of using CHKDSK, try using SCANDISK. SCANDISK can reliably detectand fix a much wider range of disk problems. For more information,type HELP SCANDISK from the command prompt.
Take advantage of the CHKDSK command’s capability to make a “dry run” of its check-ing routines. You can use this feature to assess reported problems. Before issuingCHKDSK with the /F switch, for example, issue the command without the switch.CHKDSK without /F prompts you if the command finds a problem (as though you hadused the /F switch). After you have assessed the findings of CHKDSK and have takenremedial actions, you can issue CHKDSK with the /F switch so that the command can fixthe problems it finds.
Use CHKDSK /F only when you are running at the DOS prompt. You do not want tohave other programs running because CHKDSK expects the DOS file system to be dor-mant while CHKDSK does its work. If you are shelled out to a DOS prompt from withinan application or are running a DOS session under Windows, CHKDSK can damage yourfiles.
CHKDSK processes each directory, starting at the root and following each subdirectory. Itchecks the cluster chain by using the directory entry’s FAT pointer and then compares thesize of the file (in bytes) with the size of the FAT’s allocation (in clusters). CHKDSK expects to
187Projects
find enough chained clusters in the FAT to accommodate the file, but not more than arenecessary. If CHKDSK finds too many clusters, it displays the following message:
Allocation error,size adjusted
The file is truncated—excess clusters are deallocated—if you use the /F switch.
CHKDSK makes sure that each of the FAT’s clusters is allocated only once. In rare circumstances—for example, if power problems or hardware failures occur—DOS can givethe same cluster to two different files. By checking each cluster chain for cross-linked files,CHKDSK can report mixed-up files. Each time you see that the message filename is cross-linked on cluster nnnnn, copy the file reported in filename to another disk. When CHKDSKreports another file with the same message, copy the second file to another disk also.Chances are that the contents of the two files are mixed up, but you have a better chance ofrecovering the files if you save them to another disk before CHKDSK “fixes” the problem.
CHKDSK expects every cluster in the FAT to be available for allocation, part of a legitimatedirectory-based cluster chain, or a marked bad cluster. If CHKDSK encounters any clusters orcluster chains that are not pointed to by a directory entry, CHKDSK issues the message lostclusters in XXX chains. CHKDSK then asks the following:
Convert lost chains to files (Y/N)?
This message appears even if you didn’t use the /F switch.
If you used the /F switch and you press Y, CHKDSK turns each cluster chain into a file in theroot directory. Each file that is created has the name FILEnnnn.CHK. (nnnn is a number, start-ing with 0000, that increments by 1 for each file created by CHKDSK.) If you did not use the/F switch and you press Y, nothing happens. CHKDSK, however, does tell you what it wouldhave done had you used the /F switch.
7
IIPart
Ch
You can use the TYPE command to examine the contents of a text file, and you might beable to use the DOS EDIT command to put the text back into its original file. The TYPEor EDIT commands don’t do you any good, however, for a binary (program or data) file.If the problem is with a program file, you might have to use the DOS COMP or FC com-mand to compare your disk’s binary files with their counterparts from your master disks.
Of course, the disk does not physically lose any sectors. A lost cluster report does not indi-cate that the clusters are bad; lost clusters indicate only that DOS made a bookkeepingerror in the FAT, which makes some clusters appear to DOS to be lost. The clusters are nottied to a directory entry, but they’re marked as being in use.
The lost cluster problem is most likely to occur when a program you are running crashesbecause of an error while files are being manipulated.
188 Chapter 7 Preparing and Maintaining Disks
Remember that CHKDSK reports problems found during operation, but it does not repair theproblems unless you include the /F switch in the command line. Running CHKDSK at leastonce a week is a good idea. Run CHKDSK daily during periods of extreme file activity.
Analyzing a Disk with the SCANDISK Utility
You might already know a bit about DoubleSpace, which was introduced with DOS 6.0.DoubleSpace enables you to virtually double the amount of information that can be storedon your disk. To accomplish this compression, however, information must be stored in anonstandard manner. This means that CHKDSK cannot provide correct information about adisk volume that uses DoubleSpace.
Beginning with DOS 6.2, however, there is a solution: the SCANDISK command. This com-mand works with either regular or DoubleSpace disk volumes, and it provides greater func-tionality than did the older CHKDSK command. In fact, whenever you use CHKDSK, you see thismessage at the bottom of any display:
Instead of using CHKDSK, try using SCANDISK. SCANDISK can reliably detectand fix a much wider range of disk problems. For more information, typeHELP SCANDISK from the command prompt.
SCANDISK can detect and resolve all the problems that can be handled by CHKDSK. In addition,it can detect and correct the following problems:
■ MS-DOS boot sector errors
■ Defective clusters
■ Problems in a DoubleSpace volume header
■ Structure problems in the file structures of a DoubleSpace volume
■ Errors in the DoubleSpace compression structure
■ Errors in DoubleSpace volume signatures
The SCANDISK command has two possible syntaxes. If you want it to check a file or group offiles, use the following syntax:
SCANDISK /FRAGMENT filespec
If you want SCANDISK to analyze an entire drive, use the following syntax:
SCANDISK switches d:
In this syntax, d: is the drive you want to check; if you do not supply a drive, SCANDISKassumes that you want to check the current drive. Many more switches can be used withSCANDISK than with CHKDSK. These switches are detailed in Table 7.5.
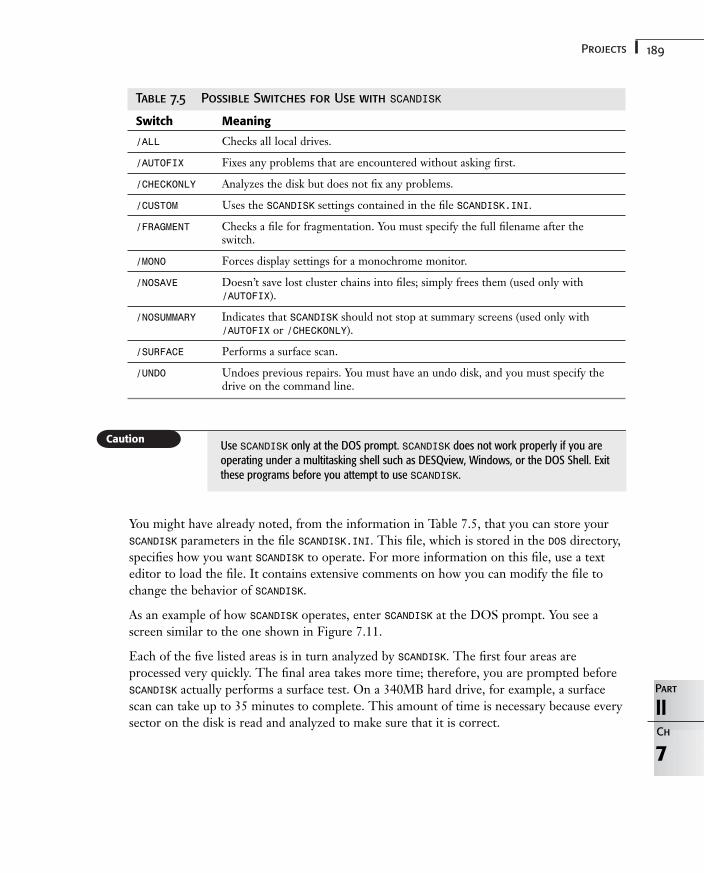
189Projects
Table 7.5 Possible Switches for Use with SCANDISK
Switch Meaning
/ALL Checks all local drives.
/AUTOFIX Fixes any problems that are encountered without asking first.
/CHECKONLY Analyzes the disk but does not fix any problems.
/CUSTOM Uses the SCANDISK settings contained in the file SCANDISK.INI.
/FRAGMENT Checks a file for fragmentation. You must specify the full filename after theswitch.
/MONO Forces display settings for a monochrome monitor.
/NOSAVE Doesn’t save lost cluster chains into files; simply frees them (used only with /AUTOFIX).
/NOSUMMARY Indicates that SCANDISK should not stop at summary screens (used only with/AUTOFIX or /CHECKONLY).
/SURFACE Performs a surface scan.
/UNDO Undoes previous repairs. You must have an undo disk, and you must specify thedrive on the command line.
7
IIPart
Ch
Use SCANDISK only at the DOS prompt. SCANDISK does not work properly if you areoperating under a multitasking shell such as DESQview, Windows, or the DOS Shell. Exitthese programs before you attempt to use SCANDISK.
You might have already noted, from the information in Table 7.5, that you can store yourSCANDISK parameters in the file SCANDISK.INI. This file, which is stored in the DOS directory,specifies how you want SCANDISK to operate. For more information on this file, use a texteditor to load the file. It contains extensive comments on how you can modify the file tochange the behavior of SCANDISK.
As an example of how SCANDISK operates, enter SCANDISK at the DOS prompt. You see ascreen similar to the one shown in Figure 7.11.
Each of the five listed areas is in turn analyzed by SCANDISK. The first four areas areprocessed very quickly. The final area takes more time; therefore, you are prompted beforeSCANDISK actually performs a surface test. On a 340MB hard drive, for example, a surfacescan can take up to 35 minutes to complete. This amount of time is necessary because everysector on the disk is read and analyzed to make sure that it is correct.

190 Chapter 7 Preparing and Maintaining Disks
Figure 7.11The SCANDISKscreen.
Microsoft ScanDisk—————————————————————————————————
ScanDisk is now checking the following areas of drive C:
Media descriptor File allocation tables» Directory structure
File systemSurface scan
< Pause > < More Info > < Exit >
—————————————————————————————————
Managing Your FilesIn this chapter
Using DOS to Work with Files 192
Listing Files with the DIR Command 193
Viewing Files 199
Copying Files 202
Moving Files 212
Setting Defaults for COPY, XCOPY, and MOVE 214
Renaming Files 214
Comparing Files 215
Deleting Files 221
Using Interlnk to Share Another Computer’s Resources 222
Case Study: Editing Files with Multiple Data Formats 229
8CHAPTER
192 Chapter 8 Managing Your Files
Using DOS to Work with FilesAfter you have installed DOS on your computer, created your directories, and installed pro-grams, in a sense you have set up housekeeping on your PC.
Most programs generate files as you work with them. You begin to accumulate files on yourcomputer’s disks in much the same way that you accumulate possessions in your home oroffice. Fortunately, DOS provides useful file-management commands that help you keep fileclutter to a minimum. This chapter covers file-management techniques.
One of the most difficult things to do in this age of multiple-gigabyte hard drives is to keeptrack of all the information stored on your hard drive. By creating a directory structure thatsegregates groups of files according to their uses, you can keep the files on your computer’shard disk organized and cataloged. The adage “a place for everything and everything in itsplace” is never more true than when you’re storing files on a large hard disk.
It is important that you understand the distinction between utility programs and applica-tions when devising a strategy to manage files using DOS. A utility is generally regarded as asingle-purpose program that performs one specific task and then gets out of your way. Anapplication generally provides a working environment capable of providing all the servicesrequired to perform general tasks such as word processing and creating pictures.
DOS’s external commands are perfect examples of utilities. Each external command serves aspecific purpose, such as sorting lists or formatting disks. You usually run a utility programby typing a command line at the DOS prompt. It does its work and then terminates, givingyou another DOS prompt to work from. Utilities usually have all their programming con-tained in a single EXE or COM file, and they seldom use auxiliary files. It therefore is mostoften convenient to place utility programs into directories that are part of the search path sothat they are available no matter what directory you are logged in to. By default, most utili-ties act on files in the currently logged directory.
Applications, even though they might be dedicated to a single activity such as word process-ing or database management, have a much broader scope. Unlike utilities, which do theirjob and terminate to a DOS prompt, applications create a working environment in whichusers can access the features of the applications. Only when you exit an application do youreceive another DOS prompt.
Applications usually are installed into a directory of their own. They often use auxiliaryfiles such as overlays—a special type of file that contains the programming code necessary to provide a subset of the application’s features. These auxiliary files often make it neces-sary or convenient to log in to an application’s home directory before running the applica-tion. This isn’t a hard-and-fast rule because some utilities also create files. The mostnotable feature of an application, in the context of this discussion, is that it most often creates files having a specific format unique to the application. WordPerfect createsWordPerfect files, Lotus 1-2-3 creates 1-2-3 files, and so on.
In terms of working with files, the distinction between utilities and applications is simple.Utilities most often work with files in place—that is, in the location (directory) where they
193Listing Files with the DIR Command
were created. Applications, on the other hand, usually work with files in specific directoriescreated to store files that have the native format particular to that application.
8
IIPart
ChWhen you’re creating directory structures on your hard disk, it is usually a good idea to cre-ate dedicated directories for your applications where those applications can store the filesyou create. Doing so enables you to find a particular file more easily when you need it.
Listing Files with the DIR CommandThe DIR command is one of the first commands most DOS users learn. It also is the most-used command in the DOS inventory. The command quickly gives you a list of your files,along with the date and time you created them, and the file sizes. If you type only DIR, youare using only a fraction of the command’s full power. The following sections help youunlock the power of the DIR command.
By default, many applications create files in their home directories when installed. Manyof these applications have dozens of auxiliary files (overlays, printer drivers, video drivers,and so on). For this reason, it is a good idea to create one or more directories—branchingoff an application’s home directory—where files created by the application are stored.
Many applications have settings that can specify which directory newly created filesshould be written in. Check the documentation for your applications to find out how toset up default directories for newly created files.
Issuing the DIR Command
DIR is an internal command. All the programming for this command is contained in COMMAND.COM, so you will never find DIR.EXE in your DOS directory. The syntax of the DIRcommand is as follows:
DIR FileNameExp /P /W /A:attributes /O:order /S /B /L
FileNameExp is a filename expression that can contain the drive, path, and file specification.Of course, the filename expression can include wildcards.
The DIR command also uses several switches. These switches and their definitions areshown in Table 8.1.
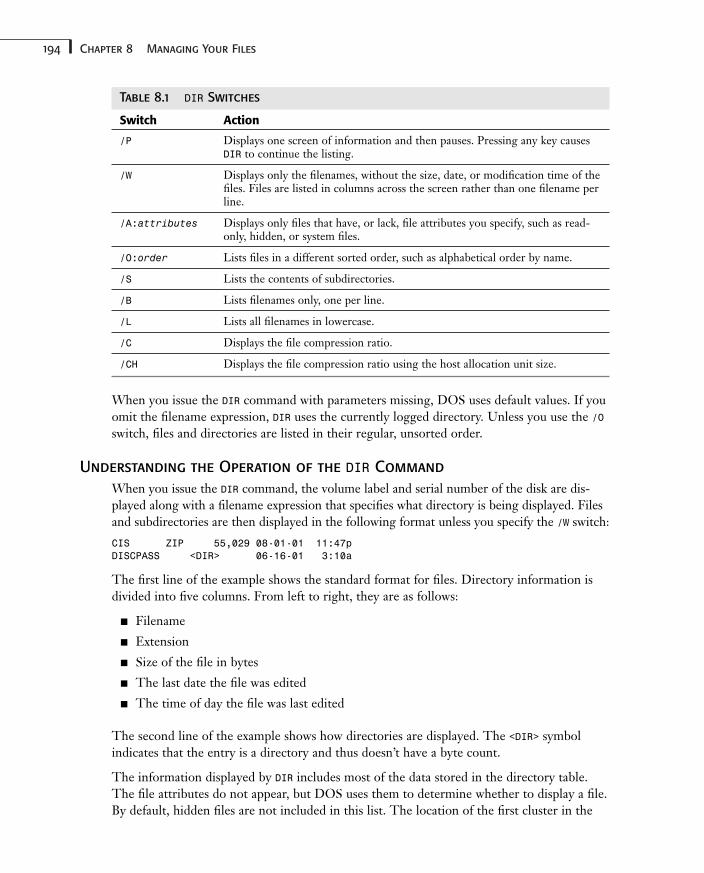
194 Chapter 8 Managing Your Files
Table 8.1 DIR Switches
Switch Action
/P Displays one screen of information and then pauses. Pressing any key causesDIR to continue the listing.
/W Displays only the filenames, without the size, date, or modification time of thefiles. Files are listed in columns across the screen rather than one filename perline.
/A:attributes Displays only files that have, or lack, file attributes you specify, such as read-only, hidden, or system files.
/O:order Lists files in a different sorted order, such as alphabetical order by name.
/S Lists the contents of subdirectories.
/B Lists filenames only, one per line.
/L Lists all filenames in lowercase.
/C Displays the file compression ratio.
/CH Displays the file compression ratio using the host allocation unit size.
When you issue the DIR command with parameters missing, DOS uses default values. If youomit the filename expression, DIR uses the currently logged directory. Unless you use the /Oswitch, files and directories are listed in their regular, unsorted order.
Understanding the Operation of the DIR Command
When you issue the DIR command, the volume label and serial number of the disk are dis-played along with a filename expression that specifies what directory is being displayed. Filesand subdirectories are then displayed in the following format unless you specify the /W switch:
CIS ZIP 55,029 08-01-01 11:47pDISCPASS <DIR> 06-16-01 3:10a
The first line of the example shows the standard format for files. Directory information isdivided into five columns. From left to right, they are as follows:
■ Filename
■ Extension
■ Size of the file in bytes
■ The last date the file was edited
■ The time of day the file was last edited
The second line of the example shows how directories are displayed. The <DIR> symbolindicates that the entry is a directory and thus doesn’t have a byte count.
The information displayed by DIR includes most of the data stored in the directory table.The file attributes do not appear, but DOS uses them to determine whether to display a file.By default, hidden files are not included in this list. The location of the first cluster in the
195Listing Files with the DIR Command
file allocation table (FAT) for the file also is not displayed because knowing the file’s startingcluster is of little use to you as a user.
At the end of the listing, DOS indicates the total number of files in the directory, the totalnumber of bytes used by the listed files, and the total number of bytes free on the currentdisk. The DIR report for C:\DOS, for example, might show the following information:
157 file(s) 6,455,328 bytes119,504,896 bytes free
If you add the size of each of the listed files on the disk and subtract the result from the totaldisk capacity, that number and the number of free bytes shown in the directory listing prob-ably do not match, but the directory listing is correct. Remember that hidden files are notshown; more importantly, the size of the file is not necessarily the same as the amount ofdisk space it occupies.
You might remember from earlier chapters that a cluster is the smallest possible chunk ofdisk space that can be allocated. When you create a file, no matter how small, DOS allocatesat least one cluster to store the file. The directory listing shows the length of the data storedin bytes and calculates the free space, based on the number of free clusters on the disk.These free clusters are the remaining positions on the disk, not yet allocated to another file.
The free space reported by DIR is the number of unallocated clusters (also called allocationunits) multiplied by the size of a cluster (1,024 bytes on most hard disks). You also can useCHKDSK to get a report of the total number of allocation units available on the disk.
Displaying a Screen of Information with the DIR Command
If you add the /P switch to the DIR command, DOS pauses the scrolling of the screen at theend of each screen of information. Pressing any key displays the next page of information.
To see more filenames, use the /W switch. When you use this switch, a directory listing likethe one shown in Figure 8.1 appears.
With hierarchical directories, your directory listing includes subdirectory names and files. Inthe wide listing, directory names are enclosed in brackets ([]). Because the filenames aregrouped so closely together, a wide listing can be useful when you want to see the types offiles in a directory.
Using the Attributes Switch (/A)
When you specify the /A switch, only those files having the attributes you include on thecommand line are listed in the DIR display. The /A switch uses one or more of the followingcodes for the attributes parameter:
D Directory attributeR Read-only attributeH Hidden attributeA Archive attributeS System attribute
8
IIPart
Ch
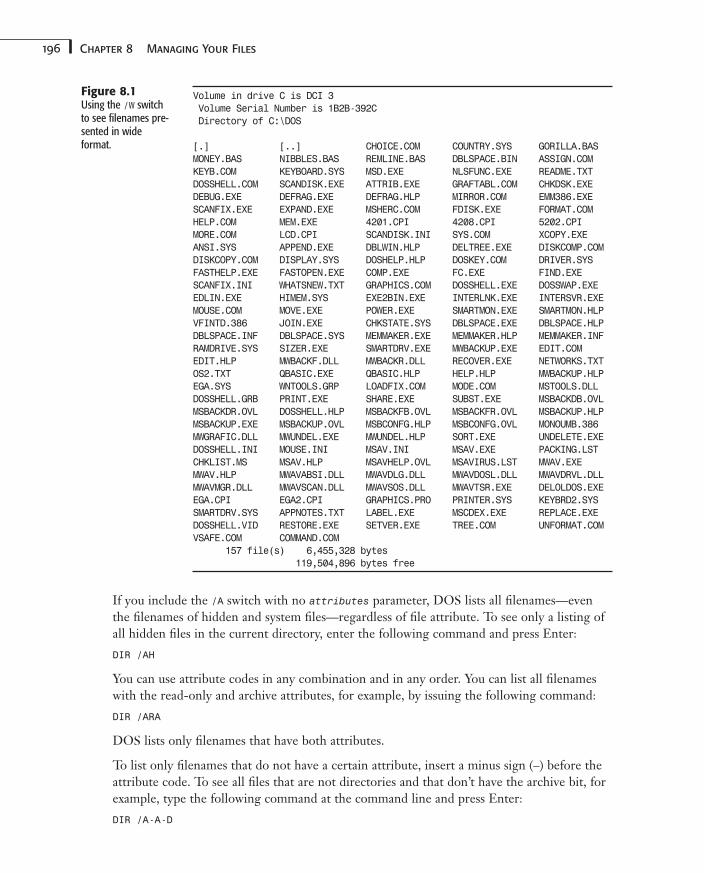
196 Chapter 8 Managing Your Files
If you include the /A switch with no attributes parameter, DOS lists all filenames—eventhe filenames of hidden and system files—regardless of file attribute. To see only a listing ofall hidden files in the current directory, enter the following command and press Enter:
DIR /AH
You can use attribute codes in any combination and in any order. You can list all filenameswith the read-only and archive attributes, for example, by issuing the following command:
DIR /ARA
DOS lists only filenames that have both attributes.
To list only filenames that do not have a certain attribute, insert a minus sign (–) before theattribute code. To see all files that are not directories and that don’t have the archive bit, forexample, type the following command at the command line and press Enter:
DIR /A-A-D
Volume in drive C is DCI 3Volume Serial Number is 1B2B-392CDirectory of C:\DOS
[.] [..] CHOICE.COM COUNTRY.SYS GORILLA.BASMONEY.BAS NIBBLES.BAS REMLINE.BAS DBLSPACE.BIN ASSIGN.COMKEYB.COM KEYBOARD.SYS MSD.EXE NLSFUNC.EXE README.TXTDOSSHELL.COM SCANDISK.EXE ATTRIB.EXE GRAFTABL.COM CHKDSK.EXEDEBUG.EXE DEFRAG.EXE DEFRAG.HLP MIRROR.COM EMM386.EXESCANFIX.EXE EXPAND.EXE MSHERC.COM FDISK.EXE FORMAT.COMHELP.COM MEM.EXE 4201.CPI 4208.CPI 5202.CPIMORE.COM LCD.CPI SCANDISK.INI SYS.COM XCOPY.EXEANSI.SYS APPEND.EXE DBLWIN.HLP DELTREE.EXE DISKCOMP.COMDISKCOPY.COM DISPLAY.SYS DOSHELP.HLP DOSKEY.COM DRIVER.SYSFASTHELP.EXE FASTOPEN.EXE COMP.EXE FC.EXE FIND.EXESCANFIX.INI WHATSNEW.TXT GRAPHICS.COM DOSSHELL.EXE DOSSWAP.EXEEDLIN.EXE HIMEM.SYS EXE2BIN.EXE INTERLNK.EXE INTERSVR.EXEMOUSE.COM MOVE.EXE POWER.EXE SMARTMON.EXE SMARTMON.HLPVFINTD.386 JOIN.EXE CHKSTATE.SYS DBLSPACE.EXE DBLSPACE.HLPDBLSPACE.INF DBLSPACE.SYS MEMMAKER.EXE MEMMAKER.HLP MEMMAKER.INFRAMDRIVE.SYS SIZER.EXE SMARTDRV.EXE MWBACKUP.EXE EDIT.COMEDIT.HLP MWBACKF.DLL MWBACKR.DLL RECOVER.EXE NETWORKS.TXTOS2.TXT QBASIC.EXE QBASIC.HLP HELP.HLP MWBACKUP.HLPEGA.SYS WNTOOLS.GRP LOADFIX.COM MODE.COM MSTOOLS.DLLDOSSHELL.GRB PRINT.EXE SHARE.EXE SUBST.EXE MSBACKDB.OVLMSBACKDR.OVL DOSSHELL.HLP MSBACKFB.OVL MSBACKFR.OVL MSBACKUP.HLPMSBACKUP.EXE MSBACKUP.OVL MSBCONFG.HLP MSBCONFG.OVL MONOUMB.386MWGRAFIC.DLL MWUNDEL.EXE MWUNDEL.HLP SORT.EXE UNDELETE.EXEDOSSHELL.INI MOUSE.INI MSAV.INI MSAV.EXE PACKING.LSTCHKLIST.MS MSAV.HLP MSAVHELP.OVL MSAVIRUS.LST MWAV.EXEMWAV.HLP MWAVABSI.DLL MWAVDLG.DLL MWAVDOSL.DLL MWAVDRVL.DLLMWAVMGR.DLL MWAVSCAN.DLL MWAVSOS.DLL MWAVTSR.EXE DELOLDOS.EXEEGA.CPI EGA2.CPI GRAPHICS.PRO PRINTER.SYS KEYBRD2.SYSSMARTDRV.SYS APPNOTES.TXT LABEL.EXE MSCDEX.EXE REPLACE.EXEDOSSHELL.VID RESTORE.EXE SETVER.EXE TREE.COM UNFORMAT.COMVSAFE.COM COMMAND.COM
157 file(s) 6,455,328 bytes119,504,896 bytes free
Figure 8.1Using the /W switchto see filenames pre-sented in wide format.
197Listing Files with the DIR Command
Using the Order Switch (/O)
As mentioned earlier, the /O switch enables you to choose the order in which DOS lists file-names. When you want DOS to sort the file list in a particular order, use the /O switch withthe following sort codes:
C Sorts files by compression ratio
D Sorts files chronologically by date and time
E Sorts files alphabetically by file extension
G Groups directories first before showing files
N Sorts files alphabetically by name
S Sorts files numerically by file size
You can include sort codes in any combination. The order of the sort codes determines thefinal sorted order. /ONE, for example, sorts the filenames first by name and then by extension.The command DIR /OEN sorts files by extension (for example, grouping all .COM files togetherand all .EXE files together) and then sorts the files by name. If you include the /O switch in aDIR command without specifying a sort code, DOS sorts the files alphabetically by name.
DOS assumes that all sorting is to be done in ascending order—A through Z, smallest tolargest, earliest to latest. DOS uses these criteria (the default setting) unless you precedeyour sort codes with a minus sign (–) to force the sort into reverse order—Z through A,largest to smallest, latest to earliest.
Using the /B and /L Switches
You can use the /B switch to display a “bare” file list—a list of filenames without informationabout file size and the date and time the file was last changed. The following is an example:
DIR A: /B
DOS lists all filenames of the files in the current directory of the floppy disk in drive A. Forthis example, DOS does not list file size or file date and time.
8
IIPart
Ch
Another way to view directory listings, especially for extremely long listings, is to pipethe information to a text file for later viewing or printing. To do so, you use the > symbolafter the DIR command and then specify a filename as follows:
DIR > dirlist.txt
This technique is especially helpful if you want to use the information in another pro-gram, such as Word, because you can cut and paste from the text file.
If you want to capture the file list to a file, issue a command similar to this:
DIR A: /B >FILES.TXT
You can use the /L switch with the DIR command if you want the filenames to appear inlowercase letters.
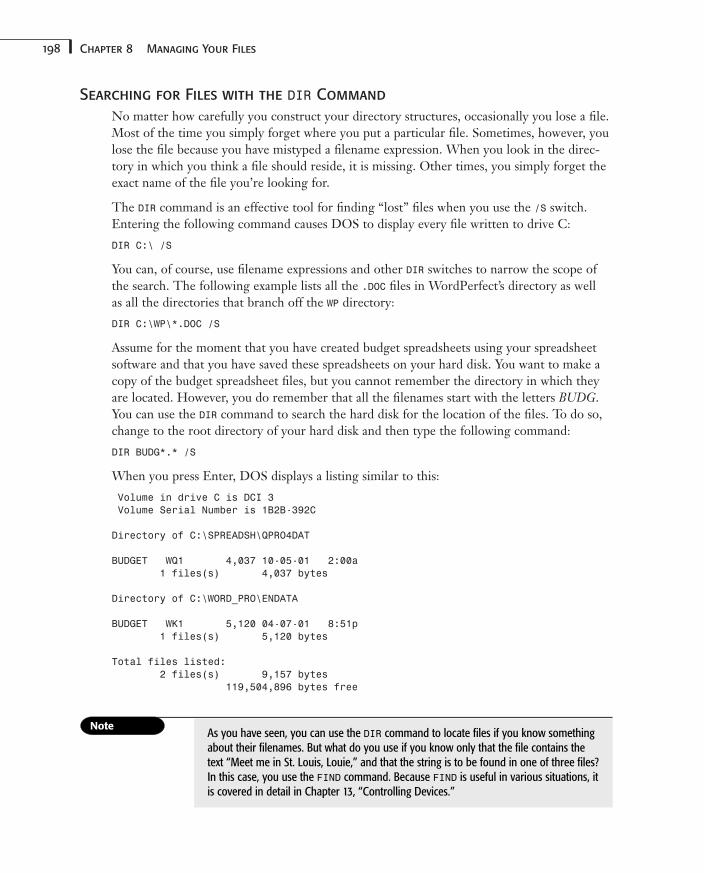
198 Chapter 8 Managing Your Files
Searching for Files with the DIR Command
No matter how carefully you construct your directory structures, occasionally you lose a file.Most of the time you simply forget where you put a particular file. Sometimes, however, youlose the file because you have mistyped a filename expression. When you look in the direc-tory in which you think a file should reside, it is missing. Other times, you simply forget theexact name of the file you’re looking for.
The DIR command is an effective tool for finding “lost” files when you use the /S switch.Entering the following command causes DOS to display every file written to drive C:
DIR C:\ /S
You can, of course, use filename expressions and other DIR switches to narrow the scope ofthe search. The following example lists all the .DOC files in WordPerfect’s directory as wellas all the directories that branch off the WP directory:
DIR C:\WP\*.DOC /S
Assume for the moment that you have created budget spreadsheets using your spreadsheetsoftware and that you have saved these spreadsheets on your hard disk. You want to make acopy of the budget spreadsheet files, but you cannot remember the directory in which theyare located. However, you do remember that all the filenames start with the letters BUDG.You can use the DIR command to search the hard disk for the location of the files. To do so,change to the root directory of your hard disk and then type the following command:
DIR BUDG*.* /S
When you press Enter, DOS displays a listing similar to this:
Volume in drive C is DCI 3Volume Serial Number is 1B2B-392C
Directory of C:\SPREADSH\QPRO4DAT
BUDGET WQ1 4,037 10-05-01 2:00a1 files(s) 4,037 bytes
Directory of C:\WORD_PRO\ENDATA
BUDGET WK1 5,120 04-07-01 8:51p1 files(s) 5,120 bytes
Total files listed:2 files(s) 9,157 bytes
119,504,896 bytes free
As you have seen, you can use the DIR command to locate files if you know somethingabout their filenames. But what do you use if you know only that the file contains thetext “Meet me in St. Louis, Louie,” and that the string is to be found in one of three files?In this case, you use the FIND command. Because FIND is useful in various situations, itis covered in detail in Chapter 13, “Controlling Devices.”

199Viewing Files
Customizing the DIR Command
If you find that you continually use one or more of the several switches with the DIR com-mand, you can avoid typing them repeatedly by creating an environment variable namedDIRCMD using the following command:
SET DIRCMD=switches
For the switches parameter, substitute the switch or switches you want DOS to use automat-ically. If, for example, you want DOS to sort filenames alphabetically and pause scrolling aftereach screenful of information, include the following command in your AUTOEXEC.BAT file:
SET DIRCMD=/ON/P
Then, reboot the computer. DOS creates the environment variable DIRCMD and gives it thevalue /ON/P. Each time you issue the DIR command, DOS adds these two switches automati-cally.
You can override a switch that is recorded in DIRCMD by preceding the switch with a minussign (–). To override the /P switch currently recorded in DIRCMD, for example, so that DOSlists all filenames without pausing at the end of each screen of information, issue the DIRcommand shown here:
DIR /-P
Viewing FilesAfter you find a file, you often need to peek into it to find out what it contains. Knowingwhat a file contains is crucial to knowing how to best work with the file. DOS provides toolsto enable you to look into files.
Previously, you learned that DOS stores files on disks in binary format—using zeros andones. You learned that these binary digits, grouped in bundles of eight, form bytes. You alsoread that each byte can form one of 256 values called the ASCII code, which represents let-ters, numbers, computer commands, and so on. That description is fine as far as it goes, butit is a simplistic view that doesn’t present the whole picture.
➔ For more information on how DOS stores data, see Chapter 6, “Understanding Disks and Disk Drives,”p. 127.
A computer uses bits and bytes in many ways. The microprocessor in your computer isdesigned to use binary digits in groups of eight, true. But those binary digits can be used indifferent contexts. Each bit in a byte might be used to indicate the status of a condition,with 1 meaning on and 0 meaning off. Large numeric values, such as a spreadsheet mightuse, might be stored in two or four bytes, which are translated into decimal numbers thatusers understand. Bytes also are used to deliver instructions (program code) to your com-puter’s microprocessor.
Understanding these contexts isn’t at all important for you to be able to work with yourcomputer, but knowing that these contexts exist makes it much easier to work with files.When you need to view the contents of files, having this knowledge is essential.
8
IIPart
Ch
200 Chapter 8 Managing Your Files
Understanding Types of Files
From a user’s point of view, files fall into two categories: binary and ASCII. Binary files arenot understandable by humans. When you try to look into them, they appear to be gibber-ish. Strings of smiley faces, hearts, and a slew of weird-looking symbols are interspersedwith letters and numbers to produce an unintelligible display. When you see this kind of dis-play, you know you have opened a binary file.
ASCII files use bytes to represent the symbols you use to communicate every day: letters,numerals, punctuation marks, and so on. An ASCII file is the simplest file format used byDOS. When DOS displays or prints an ASCII file, the groupings of binary digits aredirectly translated into a human-readable format. ASCII files also are referred to as DOStext files, or simply text files.
Unless you are programming, binary files are of little interest to you. DOS does provide theDEBUG command to view and edit binary files, but you had better know what you are doing.The DEBUG command is documented in Appendix F, “Command Reference,” for the sake ofcompleteness, but its use is far beyond the scope of this book. It is enough for you to knowthat if you open a binary file, you can look all you want, but under no circumstances do youwant to change anything or do a disk save on the file, even by accident. Changing even onebyte in an executable file can render a program useless and can even be dangerous to yourdata.
➔ DOS provides two commands for viewing the contents of ASCII files: EDIT and TYPE. The EDIT com-mand enables you to view and edit files. For complete information on EDIT, see Chapter 15, “Using theDOS Editor,” p. 361.
Using the TYPE Command to View Files
When you need to see the contents of an ASCII text file, you can use the TYPE command. Byredirecting the output of TYPE, you can print a hard copy of the file.
The syntax for the TYPE command is as follows:
TYPE filename.ext
Replace filename.ext with the name of the file you want DOS to display. (Remember toinclude a disk drive and pathname, if necessary.) A filename is not optional. Wildcard char-acters are not permitted because TYPE can display the contents of only one file at a time.
TYPE is designed to display the contents of a text file that contains ASCII characters. Whenyou issue a TYPE command, DOS opens the specified file and sends the file’s contents to thescreen as ASCII characters. When DOS encounters a Ctrl+Z character (ASCII decimal 26;the end-of-file character), it stops displaying the contents of the file and returns to the com-mand prompt.
When you use TYPE to view a text file, the file’s contents can fill and begin to scroll off thescreen faster than you can read the text. You can press Ctrl+S or the Pause key (availableonly on the Enhanced Keyboard) to stop scrolling, but the text you want to see might
201Viewing Files
already have scrolled off the screen. The MORE filter displays a screenful of a command’s output and then pauses until you press a key. You can use MORE with the TYPE command asfollows:
TYPE AUTOEXEC.BAT | MORE
The | character in this command is the DOS pipe character, which instructs DOS to send acommand’s output to the filter that follows the pipe character. Piping to MORE causes DOS topause the scrolling of the screen when the screen fills. You can press any key to display thenext screenful.
➔ For detailed information on DOS redirection and MORE, see Chapter 13, “Controlling Devices,” p. 317.
8
IIPart
Ch
An even easier way to display an ASCII file one screen at a time is to redirect a file intothe MORE command without using the TYPE command. To do so, use the following syntax:
MORE < d:path\filename.ext
The < symbol causes DOS to use the specified file parameter as input to the MORE filter.DOS displays the file, one page at a time, displaying the message -More- at the end ofeach page. To display a file in the C:\DOS directory, for example, type the followingcommand (replacing filename.ext with the filename and extension of the file youwant to view), and press Enter:
MORE < C:\DOS\filename.ext
If you want a simple printed copy of the contents of a text file, you can redirect the outputof the TYPE command to the printer by using the special redirection character, the greater-than sign (>). To print the contents of the README.TXT file, for example, make sure that yourprinter is online and then issue the following command:
TYPE README.TXT >PRN
Your printer prints the file. (Because TYPE does not format the text into pages, the printedoutput might not break at page boundaries.)
When you use the TYPE command, remember the following guidelines:
■ The output of TYPE stops when the command encounters the first Ctrl+Z in the file.
■ Because TYPE does not accept wildcards in the filename parameter, use of the commandis limited to one file at a time.
■ TYPE tries to interpret any file as an ASCII text file, even if the file contains non-ASCIIdata. If you use a binary file (such as a COM or EXE file) as the file parameter, the TYPEcommand’s output might produce graphical characters, control-character sequences,and beeps. Its output might even lock up your computer, forcing you to reboot.
■ You can pause the TYPE command’s output by pressing Ctrl+S or Pause. Press any keyto resume scrolling.
■ You can terminate the TYPE command’s output by pressing Ctrl+C or Ctrl+Break.
202 Chapter 8 Managing Your Files
Copying FilesProbably the most common file-related function is copying files from one disk or directoryto another, a fundamental job for disk operating systems. MS-DOS provides the internalCOPY command for use at the command line. Copying files via the DOS Shell is covered inChapter 4, “Using the DOS Shell.”
The DOS COPY command enables you to copy files as well as data to and from logicaldevices. Figure 8.2 diagrams the copy operation used with several possible inputs and twopossible outputs. Three of the possible inputs consist of more than one file or logical device.DOS can join two or more inputs into one output in a process called combining. You mightnever need to use all these inputs and outputs, but they’re available.
Figure 8.2Possible inputs andoutputs in a copyoperation.
Using the COPY Command
You can create a COPY command line in various ways. All the variations say the same thing toDOS: “COPY THIS THERE.” The THIS represents the source—the files to be copied.The THERE represents the target—the disk location or device you want the files to becopied to.
When you perform a copy operation, remember the following guidelines:
■ The source parameter must contain at least one of the following parameters: path, file,or device.
■ If the file specification portion of a filename expression is omitted, all files in the speci-fied directory and drive are copied. This situation is equivalent to supplying *.* as thesource-file parameter.
■ You can specify additional source-file parameters by using the + operator to combinethe files.
■ If the source-file parameter contains a wildcard and the destination parameter is a file-name, the destination file is the combination of source files that match the source-fileparameter.
■ If COPY detects an attempt to copy a single source file to itself (same drive, directory,filename, and extension), the copy operation is aborted.
■ The optional destination parameter consists of a combination of drive, path, and file-name parameters. If you don’t provide a drive or path, DOS uses the current drive orpath for the destination. If you don’t specify a destination filename, DOS uses thesource file’s name as the destination parameter.
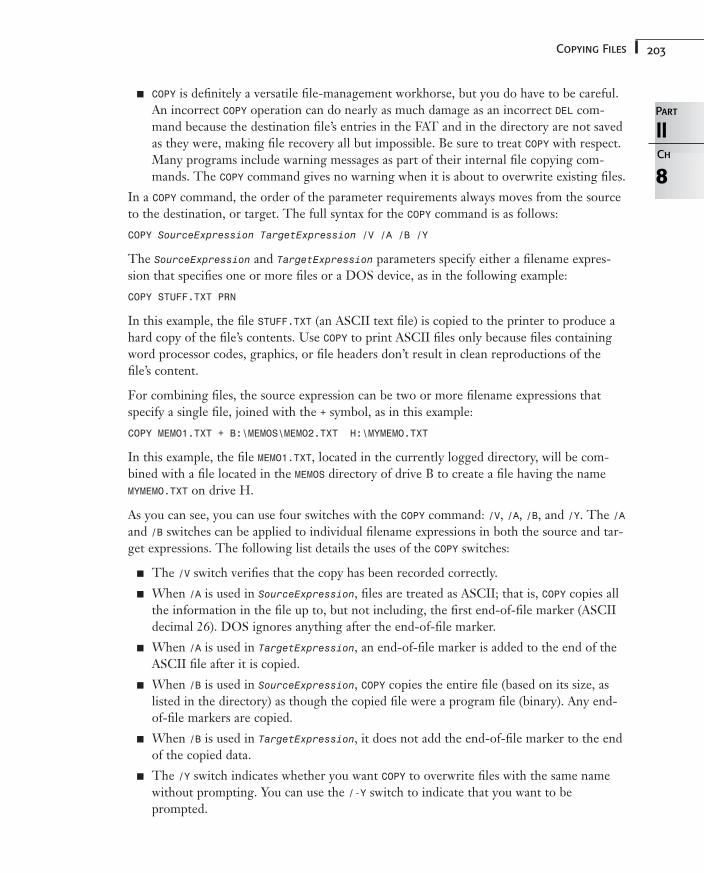
203Copying Files
■ COPY is definitely a versatile file-management workhorse, but you do have to be careful.An incorrect COPY operation can do nearly as much damage as an incorrect DEL com-mand because the destination file’s entries in the FAT and in the directory are not savedas they were, making file recovery all but impossible. Be sure to treat COPY with respect.Many programs include warning messages as part of their internal file copying com-mands. The COPY command gives no warning when it is about to overwrite existing files.
In a COPY command, the order of the parameter requirements always moves from the sourceto the destination, or target. The full syntax for the COPY command is as follows:
COPY SourceExpression TargetExpression /V /A /B /Y
The SourceExpression and TargetExpression parameters specify either a filename expres-sion that specifies one or more files or a DOS device, as in the following example:
COPY STUFF.TXT PRN
In this example, the file STUFF.TXT (an ASCII text file) is copied to the printer to produce ahard copy of the file’s contents. Use COPY to print ASCII files only because files containingword processor codes, graphics, or file headers don’t result in clean reproductions of thefile’s content.
For combining files, the source expression can be two or more filename expressions thatspecify a single file, joined with the + symbol, as in this example:
COPY MEMO1.TXT + B:\MEMOS\MEMO2.TXT H:\MYMEMO.TXT
In this example, the file MEMO1.TXT, located in the currently logged directory, will be com-bined with a file located in the MEMOS directory of drive B to create a file having the nameMYMEMO.TXT on drive H.
As you can see, you can use four switches with the COPY command: /V, /A, /B, and /Y. The /Aand /B switches can be applied to individual filename expressions in both the source and tar-get expressions. The following list details the uses of the COPY switches:
■ The /V switch verifies that the copy has been recorded correctly.
■ When /A is used in SourceExpression, files are treated as ASCII; that is, COPY copies allthe information in the file up to, but not including, the first end-of-file marker (ASCIIdecimal 26). DOS ignores anything after the end-of-file marker.
■ When /A is used in TargetExpression, an end-of-file marker is added to the end of theASCII file after it is copied.
■ When /B is used in SourceExpression, COPY copies the entire file (based on its size, aslisted in the directory) as though the copied file were a program file (binary). Any end-of-file markers are copied.
■ When /B is used in TargetExpression, it does not add the end-of-file marker to the endof the copied data.
■ The /Y switch indicates whether you want COPY to overwrite files with the same namewithout prompting. You can use the /-Y switch to indicate that you want to beprompted.
8
IIPart
Ch
204 Chapter 8 Managing Your Files
Copying Groups of Files
Suppose that you have 20 files you want to copy to a floppy disk or to another directory onyour hard disk. You can use wildcards in the filename expression to specify a subset of thefiles in a directory, as in this example:
COPY C:\ROCCANTI\*.TXT B:
This example finds all the .TXT files in the ROCCANTI directory and copies them onto thefloppy disk in drive B. You do, of course, have to make sure that the disk in drive B hasenough room to receive the files. Use the DIR command to find out how many bytes the filesto be copied require and to make sure that at least that much space is available on drive B.
If you want to copy all the files in a directory to another disk or another directory, use acommand similar to this:
COPY E:\CLIPPER5\INVNTRY\*.* H:\TEST
In this example, the *.* wildcard expression specifies that all files in the INVNTRY directoryare to be copied to the TEST directory on drive H.
Some older keyboards do not have a conveniently placed key for the asterisk. You mightwant to use the . wildcard to specify all files in the directory, as in this line:
COPY E:\CLIPPER5\INVNTRY\. H:\TEST
This command is functionally equivalent to the preceding example using the *.
Combining Text Files
Although you can use COPY to combine any files, the combine operation is most effectivewhen the files are ASCII text files. In most cases, combining binary files results in an unus-able destination file.
For the following examples, assume that the current directory contains three text files, allwith .TXT extensions. The files and their contents are listed here:
File Contents
INTRO.TXT Combining is
BODY.TXT the joining of files
ENDING.TXT into a new file.
To join the three files into a fourth file, type the following command:
COPY INTRO.TXT+BODY.TXT+ENDING.TXT ALL.TXT
The resulting file, ALL.TXT, contains the text from the three source files. To verify ALL.TXT,issue the following command:
TYPE ALL.TXT
205Copying Files
TYPE sends the contents of ALL.TXT to the screen. DOS displays the following output:
Combining is the joining of files into a new file.
8
IIPart
ChIf you omit the target expression, or specify only drive and path information in the file-name expression, the file created by combining files has the same name as the first file-name specified in the source expression.
Renaming Files with COPY
As you might guess from the examples in the preceding section, you can change the nameof a file or group of files by using COPY. Consider this example:
COPY *.TXT *.ASC
This example copies all the files in the current directory having the extension TXT. Each TXTfile is copied to an ASC file. The ASC files have the same names as the original TXT files. Thecontents are the same and the names are the same—only the extensions are altered.
Copying from a Device to a File
A common and handy use of the COPY command is copying to a file keystrokes entered fromthe keyboard or console device. (CON is the device name for console, a device constructedusing your keyboard and monitor.) You can use the resulting text file as a batch file, a con-figuration file, a memo, and so on.
To practice copying from the keyboard to a file, you can create a simple batch file thatchanges the current directory to \123R3 and starts Lotus 1-2-3 Release 3. The commandthat creates the batch file is shown here:
COPY CON C:\DOS\RUN123.BAT
When you press Enter, DOS displays the cursor on the next line, but the DOS prompt doesnot appear. You can type the file by following these steps:
1. Type C: and press Enter. The cursor drops to the next line.
2. Type CD\123R3 and press Enter. The cursor drops to the next line.
3. Type LOTUS and press Enter. The cursor drops to the next line.
4. Press the F6 function key or Ctrl+Z to indicate the end of the file. DOS displays theend-of-file marker (^Z).
5. Press Enter. The ^Z code indicates to DOS that you are finished entering data into thefile. DOS responds with the message 1 file(s) copied.
To confirm that the new file appears the way you want it, you can use the TYPE commandto review its contents.
206 Chapter 8 Managing Your Files
Knowing how to use COPY CON can be both a lifesaver and a pain in the neck. It can be a life-saver because COPY CON enables you to create a text file on any DOS system. It also can be apain in the neck because after you have pressed Enter to go to the next line, you cannot goback and edit previous lines. If you make a mistake, you must start over again.
If the DOS EDIT command—found only in version 5.0 and later—is available, or if someother ASCII editor is available, use it. You are much better off using the editor instead ofthe COPY command because you can more easily correct any typos you find.
Using the XCOPY Command
The external command XCOPY is an enhanced version of COPY that, among other capabilities,can copy whole directories and their subdirectories while creating directories on the destina-tion disk.
Using XCOPY, you can exercise much more control over the files to be copied. You can copyonly those files with the archive attribute set, for example, or only those files with a datestamp on or after a specified date.
The syntax of XCOPY is similar to that of COPY, but the switches are more complex. The XCOPYsyntax is as follows:
XCOPY SourceExpression TargetExpression /V /P /W /S /E /A /M /Y /D:date
Just like the COPY command, XCOPY takes filename expressions to specify the source files andthe target files for the operation. Unlike COPY, XCOPY has several switches that enable you tofinely control how the copy is performed. Following is a rundown of the available switches:
■ /V verifies the accuracy of the copy operation by comparing each file as it is written tothe original file.
■ /P displays a prompt to confirm whether you want to create each destination file. Using/P, you can specify a group of files with a wildcard and then decide which files you actu-ally want to copy. If, for example, you want to copy several files in a directory but don’twant to enter five separate COPY commands, you can use the following:XCOPY *.TXT B: /P
As each file is about to be copied, XCOPY prompts you to see whether that file is to becopied. Answer Y and the file is copied; answer N and it is skipped.
■ /W causes XCOPY to pause before copying any files, displaying the prompt Press any keyto begin copying file(s). You can pause to change disks.
■ /S causes XCOPY to copy the files located in any directories that branch off from thesource directory. Empty directories are ignored.
■ /E causes XCOPY to copy even empty directories.
If you try this example on your system, be sure to use the appropriate directory namesfor DOS and Lotus 1-2-3.
207Copying Files
■ /A causes XCOPY to copy only files with the archive attribute set without modifying thefile’s attributes.
■ /M causes XCOPY to remove the archive bit from any files copied.
■ The /Y switch indicates whether you want XCOPY to overwrite files with the same namewithout prompting. You also can use the /-Y switch to indicate that you want to beprompted.
■ /D enables you to specify a date parameter. XCOPY copies only files with a date attributeon or after the specified date. Which date format you use depends on the country set-ting you use.
In an XCOPY operation, DOS might not always recognize whether a particular parameterrefers to a file or to a directory. When ambiguity arises, XCOPY asks whether the destinationis a filename or pathname.
8
IIPart
Ch
Consider the following command:
XCOPY C:\WORDS\*.* A:\WORDS
If no directory named WORDS exists on the destination disk, DOS cannot determine whetheryou intend to create a file or a directory named WORDS on the A disk.
XCOPY displays the following message:
Does WORDS specify a file nameor directory name on the target(F = file, D = directory)?
Press F when the destination (target) is a filename or D when the destination is a directory.Unlike COPY, XCOPY creates directories on the destination disk as needed.
If you append a backslash to the name of the target directory, XCOPY automatically assumesthat the target is a directory, not a file. Continuing the preceding example, if you use thefollowing command instead, you do not have to specify that the target is a directory:
XCOPY C:\WORDS\*.* A:\WORDS\
XCOPY creates the \WORDS directory if it does not exist.
Understanding the Operation of XCOPY
XCOPY is best described as a hybrid between COPY and BACKUP/RESTORE. XCOPY and COPY dupli-cate files between directories and disks. Unlike COPY, however, XCOPY does not copy files to a nondisk device, such as the printer (PRN) or console (CON). Like BACKUP and RESTORE,XCOPY can copy files selectively and traverse the directory tree to copy files from more than
All files created by XCOPY have the archive attribute set automatically, even if the origi-nal source file does not have the archive attribute.
208 Chapter 8 Managing Your Files
one directory. XCOPY also can make a destination directory when one does not exist. Thisdirectory capability makes XCOPY useful for duplicating a directory branch onto another disk.
Like COPY but unlike BACKUP, XCOPY copies files that are directly usable. (You cannot use filesprocessed by BACKUP until you have processed them with RESTORE.)
When using the XCOPY command, consider the following guidelines:
■ XCOPY cannot copy hidden source files.
■ XCOPY does not overwrite read-only destination files.
■ If a file parameter is omitted in the XCOPY syntax, XCOPY assumes the *.* full wildcardpattern as the default file parameter.
■ If you include the /D switch, you must enter the date parameter in the format of thesystem’s DATE command or in the format indicated by the latest COUNTRY command.
■ The /V switch performs the same read-after-write checking as the SET VERIFY ON globalverify flag.
To use XCOPY to copy empty source subdirectories, you must specify both the /S and /Eswitches.
The XCOPY command is one of the most useful DOS file commands available. To copythe source files of an entire program (such as Windows 95) to the hard drive, for exam-ple, it is much easier to use the XCOPY command with wildcards and the /S switch (tocopy subdirectories) than to attempt to drill down and copy each directory by itself withthe COPY command.
Using XCOPY Effectively
Using XCOPY, you can control by date or archive attribute the files copied, you can copycomplete subdirectory trees, and you can confirm which files to copy. The command hasseveral ideal uses: copying files selectively between disks or directories, performing a quickhard disk backup (backing up only a few critical files in several subdirectories), and keepingthe directories of two or more computers synchronized.
With COPY, your control is limited. COPY duplicates all files that match the given name—anall-or-nothing approach. If you use the /P switch with XCOPY, however, DOS asks whetheryou want to copy each file.
Using XCOPY is practical if you want to make backup copies of something less than a disk fullof files from several directories. Rather than BACKUP, you might prefer to use the commandXCOPY /A to select files that have changed since the last backup.
209Copying Files
➔ For more information on backing up files, see “Understanding Microsoft Backup,” p. 233.
Duplicating Disks with XCOPY
The XCOPY command can be used to create duplicate floppy disks, even when the disks aredifferent sizes or formats. You can’t make a disk hold more than its capacity, of course, soyou can’t use XCOPY to copy a full 1.44MB floppy disk onto a 720KB disk. You can, however,transfer the contents and directory structures of a 1.2MB 5 1/4-inch disk to a 1.44MB 3 1/2-inch disk, or a 720KB 3 1/2-inch disk to a 1.2MB or 1.44MB disk. Assume that youhave a 720KB disk with several levels of directories in drive B, for example, and you want to copy it to a 1.2MB disk in drive A. To do so, you issue the following command:
XCOPY B: A: /S
Duplicating a Directory Branch
For this example, assume that your hard disk has a subdirectory named \WPFILES that contains a few word processing files. \WPFILES also has two subdirectories. The first,\WPFILES\MEMOS, contains your current memos; the second, \WPFILES\DOCS, contains your
8
IIPart
Ch
Keep the following points in mind when you use XCOPY to back up a disk:
• If you suspect that the files cannot fit on one disk, be sure to use the /M switch. AsXCOPY copies each file, the command resets the file’s archive attribute bit. Whenthe destination disk is full, XCOPY stops. At this point, you can change disks andrestart the XCOPY command, again using the /M switch. XCOPY copies the fileswhose archive bit has not yet been reset.
• XCOPY cannot break a large source file between destination disks. If you need toback up a file that doesn’t fit on a single floppy disk, you must use BACKUP.
• A favorite use of XCOPY is to synchronize the contents of the hard disks of twocomputers. Many people have one computer at work and another at home. Ifboth computers have hard disks, keeping the copies of programs and data filescurrent is a major task. Which files did you change today? Which machine has themore current version?
• When you want to keep separate hard disks synchronized, you might find theXCOPY command’s /A, /D:date, and /S switches especially useful. The /Sswitch forces XCOPY to traverse your disk’s directory structure, playing a huntinggame for source files. Whether you use /A or /D depends on how often you copyfiles between the machines. If you copy files between the machines frequently,you might prefer the /A switch. If you allow many days to pass between synchro-nizing your computers’ contents, you might find that the /D switch works better.Use /D if you have run BACKUP on the source machine since you last usedXCOPY. BACKUP resets the archive attribute so that the command’s /A switchdoes not catch all files changed between XCOPY backups.
210 Chapter 8 Managing Your Files
document files. You want to keep a current set of the files in these three directories storedon a floppy disk. To copy all the files in this directory branch to the floppy disk, issue thefollowing command:
XCOPY C:\WPFILES A:\WPFILES\ /S
XCOPY immediately begins to read the source directories. DOS displays the following messages:
Reading source file(s)...C:\WPFILES\LET9_1.WPC:\WPFILES\LET9_2.WPC:\WPFILES\LET9_3.WPC:\WPFILES\LET9_4.WPC:\WPFILES\LET9_5.WPC:\WPFILES\DOCS\SCHEDULE.DOCC:\WPFILES\MEMOS\SALES.MEM
7 File(s) copied
Because you included the /S switch, XCOPY copied the files in C:\WPFILES, C:\WPFILES\MEMOS,and C:\WPFILES\DOCS. The A:\WPFILES path parameter causes XCOPY to ask whether the namespecifies a directory or a file. \WPFILES conceivably can be a user file in the root directory.The full pathname of each file is echoed to the screen as the file is copied to drive A. Whenthe command finishes, the \WPFILES directory branch has been copied to drive A.
As another example, assume that your PC experiences a hardware failure and needs to go tothe shop for repairs. You want to use your floppy disk that contains the \WPFILES directorybranch to place that directory branch on a second computer’s hard disk. To do so, enter thefollowing command:
XCOPY A: C: /S
XCOPY reverses the copy process described in the preceding paragraphs by copying all thefiles on drive A to corresponding subdirectory locations on drive C.
Copying Entire Disks with DISKCOPY
The external DISKCOPY command makes exact duplicates of a disk. Duplication is so com-plete that even file fragmentation is preserved. If the target disk has not yet been formatted,DISKCOPY automatically formats it before performing the duplication.
DISKCOPY does have one major limitation. You can copy only like media to like media. A 1.2MB disk, for example, can be successfully copied only to another 1.2MB disk. Youcannot use DISKCOPY to duplicate a 720KB floppy disk on a 1.44MB disk. See the sectionon using XCOPY to duplicate disks earlier in this chapter for information on duplicatingunlike disks.
The syntax for DISKCOPY is as follows:
DISKCOPY SourceDisk TargetDisk /1 /V /M
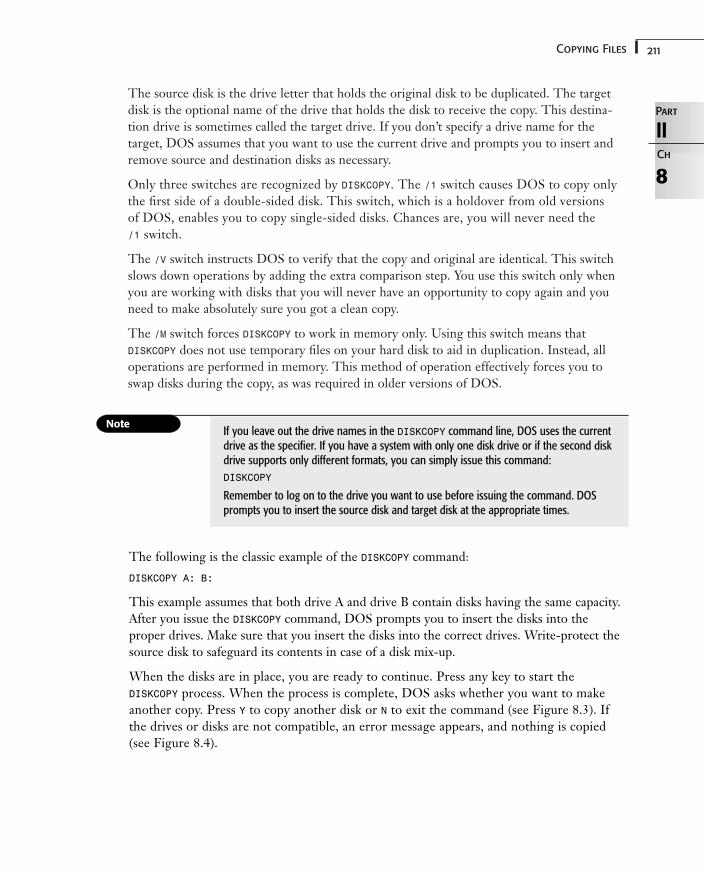
211Copying Files
The source disk is the drive letter that holds the original disk to be duplicated. The targetdisk is the optional name of the drive that holds the disk to receive the copy. This destina-tion drive is sometimes called the target drive. If you don’t specify a drive name for the target, DOS assumes that you want to use the current drive and prompts you to insert andremove source and destination disks as necessary.
Only three switches are recognized by DISKCOPY. The /1 switch causes DOS to copy onlythe first side of a double-sided disk. This switch, which is a holdover from old versions of DOS, enables you to copy single-sided disks. Chances are, you will never need the /1 switch.
The /V switch instructs DOS to verify that the copy and original are identical. This switchslows down operations by adding the extra comparison step. You use this switch only whenyou are working with disks that you will never have an opportunity to copy again and youneed to make absolutely sure you got a clean copy.
The /M switch forces DISKCOPY to work in memory only. Using this switch means thatDISKCOPY does not use temporary files on your hard disk to aid in duplication. Instead, alloperations are performed in memory. This method of operation effectively forces you toswap disks during the copy, as was required in older versions of DOS.
8
IIPart
Ch
If you leave out the drive names in the DISKCOPY command line, DOS uses the currentdrive as the specifier. If you have a system with only one disk drive or if the second diskdrive supports only different formats, you can simply issue this command:
DISKCOPY
Remember to log on to the drive you want to use before issuing the command. DOSprompts you to insert the source disk and target disk at the appropriate times.
The following is the classic example of the DISKCOPY command:
DISKCOPY A: B:
This example assumes that both drive A and drive B contain disks having the same capacity.After you issue the DISKCOPY command, DOS prompts you to insert the disks into theproper drives. Make sure that you insert the disks into the correct drives. Write-protect thesource disk to safeguard its contents in case of a disk mix-up.
When the disks are in place, you are ready to continue. Press any key to start theDISKCOPY process. When the process is complete, DOS asks whether you want to makeanother copy. Press Y to copy another disk or N to exit the command (see Figure 8.3). Ifthe drives or disks are not compatible, an error message appears, and nothing is copied(see Figure 8.4).
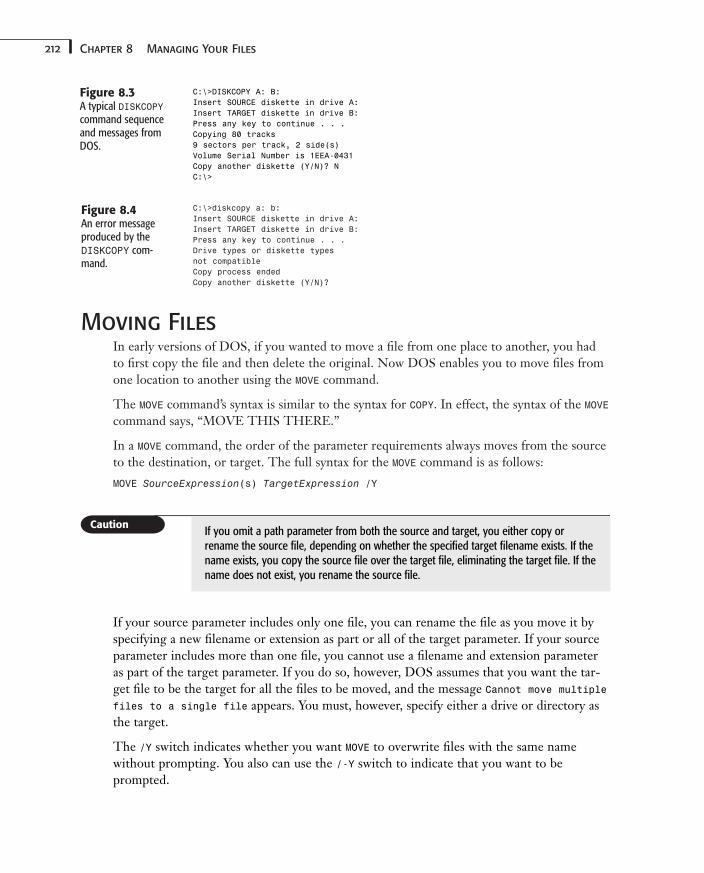
212 Chapter 8 Managing Your Files
Figure 8.3A typical DISKCOPYcommand sequenceand messages fromDOS.
Figure 8.4An error messageproduced by theDISKCOPY com-mand.
C:\>diskcopy a: b:Insert SOURCE diskette in drive A:Insert TARGET diskette in drive B:Press any key to continue . . .Drive types or diskette typesnot compatibleCopy process endedCopy another diskette (Y/N)?
Moving FilesIn early versions of DOS, if you wanted to move a file from one place to another, you hadto first copy the file and then delete the original. Now DOS enables you to move files fromone location to another using the MOVE command.
The MOVE command’s syntax is similar to the syntax for COPY. In effect, the syntax of the MOVEcommand says, “MOVE THIS THERE.”
In a MOVE command, the order of the parameter requirements always moves from the sourceto the destination, or target. The full syntax for the MOVE command is as follows:
MOVE SourceExpression(s) TargetExpression /Y
If you omit a path parameter from both the source and target, you either copy orrename the source file, depending on whether the specified target filename exists. If thename exists, you copy the source file over the target file, eliminating the target file. If thename does not exist, you rename the source file.
If your source parameter includes only one file, you can rename the file as you move it byspecifying a new filename or extension as part or all of the target parameter. If your sourceparameter includes more than one file, you cannot use a filename and extension parameteras part of the target parameter. If you do so, however, DOS assumes that you want the tar-get file to be the target for all the files to be moved, and the message Cannot move multiplefiles to a single file appears. You must, however, specify either a drive or directory asthe target.
The /Y switch indicates whether you want MOVE to overwrite files with the same namewithout prompting. You also can use the /-Y switch to indicate that you want to beprompted.
C:\>DISKCOPY A: B:Insert SOURCE diskette in drive A:Insert TARGET diskette in drive B:Press any key to continue . . .Copying 80 tracks9 sectors per track, 2 side(s)Volume Serial Number is 1EEA-0431Copy another diskette (Y/N)? NC:\>
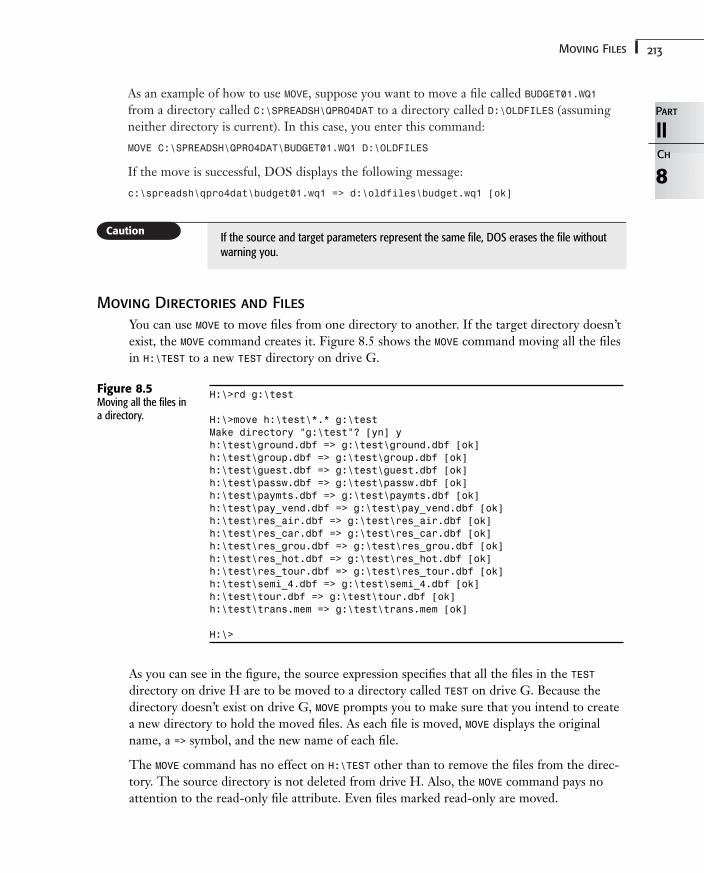
213Moving Files
As an example of how to use MOVE, suppose you want to move a file called BUDGET01.WQ1from a directory called C:\SPREADSH\QPRO4DAT to a directory called D:\OLDFILES (assumingneither directory is current). In this case, you enter this command:
MOVE C:\SPREADSH\QPRO4DAT\BUDGET01.WQ1 D:\OLDFILES
If the move is successful, DOS displays the following message:
c:\spreadsh\qpro4dat\budget01.wq1 => d:\oldfiles\budget.wq1 [ok]8
IIPart
Ch
If the source and target parameters represent the same file, DOS erases the file withoutwarning you.
Moving Directories and Files
You can use MOVE to move files from one directory to another. If the target directory doesn’texist, the MOVE command creates it. Figure 8.5 shows the MOVE command moving all the filesin H:\TEST to a new TEST directory on drive G.
H:\>rd g:\test
H:\>move h:\test\*.* g:\testMake directory “g:\test”? [yn] yh:\test\ground.dbf => g:\test\ground.dbf [ok]h:\test\group.dbf => g:\test\group.dbf [ok]h:\test\guest.dbf => g:\test\guest.dbf [ok]h:\test\passw.dbf => g:\test\passw.dbf [ok]h:\test\paymts.dbf => g:\test\paymts.dbf [ok]h:\test\pay_vend.dbf => g:\test\pay_vend.dbf [ok]h:\test\res_air.dbf => g:\test\res_air.dbf [ok]h:\test\res_car.dbf => g:\test\res_car.dbf [ok]h:\test\res_grou.dbf => g:\test\res_grou.dbf [ok]h:\test\res_hot.dbf => g:\test\res_hot.dbf [ok]h:\test\res_tour.dbf => g:\test\res_tour.dbf [ok]h:\test\semi_4.dbf => g:\test\semi_4.dbf [ok]h:\test\tour.dbf => g:\test\tour.dbf [ok]h:\test\trans.mem => g:\test\trans.mem [ok]
H:\>
Figure 8.5Moving all the files ina directory.
As you can see in the figure, the source expression specifies that all the files in the TESTdirectory on drive H are to be moved to a directory called TEST on drive G. Because thedirectory doesn’t exist on drive G, MOVE prompts you to make sure that you intend to createa new directory to hold the moved files. As each file is moved, MOVE displays the originalname, a => symbol, and the new name of each file.
The MOVE command has no effect on H:\TEST other than to remove the files from the direc-tory. The source directory is not deleted from drive H. Also, the MOVE command pays noattention to the read-only file attribute. Even files marked read-only are moved.
214 Chapter 8 Managing Your Files
Renaming Directories with MOVE
Another use for the MOVE command is to rename a directory, as shown in the followingexample:
MOVE C:\MEMOS C:\LETTERS
The effect of the sample command is to rename the MEMOS directory as LETTERS withoutaffecting the files contained in the directory.
Setting Defaults for COPY, XCOPY, and MOVEIf you are using DOS 6.22, you can use a new environment variable to specify how you wantall three file-management commands—COPY, XCOPY, and MOVE—to work. The COPYCMD envi-ronment variable is similar to the DIRCMD environment variable discussed in the section“Customizing the DIR Command” earlier in this chapter; it sets default switches that DOSuses whenever you issue the COPY, XCOPY, or MOVE commands.
The command to set the COPYCMD environment variable is as follows:
SET COPYCMD=switches
For the switches parameter, substitute the switch or switches you want DOS to use auto-matically. If, for example, you do not want DOS to prompt you when it is about to over-write a destination file, include the following command in your AUTOEXEC.BAT file:
SET COPYCMD=/Y
Then reboot the computer. DOS creates the environment variable COPYCMD and gives it thevalue /Y. Each time you issue the DIR command, DOS adds this switch automatically.
You can override a switch that is recorded in COPYCMD by preceding the switch with a minussign (–). To override the /Y switch that is currently recorded in COPYCMD (so that DOS tellsyou when it will overwrite a file), for example, issue the COPY command as shown here:
COPY /-Y
Renaming FilesIf copying files is the most common file-related function of DOS, renaming files probablyfollows close on its heels. The reasons for renaming a file are many. You might want to usethe current filename for another file, or perhaps you want to create a name that betterdescribes the contents of the current file. Whatever the reason, DOS enables you to renamea file using the internal command RENAME. Like some other DOS commands, RENAME also hasa short form, REN. Which form you use depends on how you feel about typing three extraletters.
The DOS rename operation changes the name in a file’s directory entry, but the file and itsphysical location on the disk remain unchanged. Because two files in the same directory can-not have the same name, DOS does not change a filename if the new filename already exists.
215Comparing Files
The syntax for RENAME is either of the following:
RENAME OldExpression NewExpression
REN OldExpression NewExpression
The REN command requires two parameters. OldExpression is a filename expression thatspecifies the files to be renamed. NewExpression is a filename expression that specifies whatthe new names of the files will be. Consider this example:
REN MEMO.TXT MEMO12.TXT
This example renames the file MEMO.TXT as MEMO12.TXT.
You also can use wildcards to specify groups of files to be renamed. Suppose, for example,that you have a group of files named MEMO1.TXT, MEMO2.TXT, and so on in your directory. Torename them, you can issue this command:
REN MEMO?.TXT LTR?.DOC
The result is that MEMO1.TXT is renamed as LTR1.DOC, MEMO2.TXT becomes LTR2.DOC, and so on.
When you use RENAME, remember the following guidelines:
■ You can use the commands REN and RENAME interchangeably at the command line. Bothcommands produce identical results.
■ You must supply both an old filename and a new filename. The filenames can containwildcards for DOS to use in pattern matching.
■ You cannot use the RENAME operation to move a file from one directory or disk toanother directory or disk.
8
IIPart
Ch
If you are not sure which files a wildcard parameter will match, issue the DIR com-mand, using the wildcard pattern that you plan to use in the filename parameter. DIRlists the matching filenames. Study these names carefully to see whether using the wild-card pattern with the RENAME command will produce the result you expect.
Comparing FilesMS-DOS 6.22 contains a program called FC that allows you to compare files to verify theirintegrity. For example, if you have your entire company’s budget in a file and you wanted tomake a copy of it to store offsite, using the FC command to verify that the copied file isexactly the same would provide an additional verification that it is a valid copy. The follow-ing sections will describe how to use the FC command effectively.
Comparing Files with FC
The external command FC (meaning file comparison) compares two files or two sets of filesto find differences in the files. Any differences are reported onscreen. When a copied file isextremely important, you can use FC to compare the file with the original. If differences are
216 Chapter 8 Managing Your Files
found, you know that a problem might exist with the copy. Normally, DOS detects dataintegrity errors while reading and writing files, but if you want to be sure that two files arethe same, you can ease your mind by using FC.
PC DOS versions 1.0 through 5.0 and MS-DOS versions 3.3 through 5.0 include a sim-pler file comparison command, COMP. This command, however, is less versatile than FC,provides less information, has fewer options, and cannot compare files of differentlengths.
The FC command has two general syntax forms. One form uses the /B switch for a forcedbinary comparison; the other form uses the remaining switches in an ASCII comparison.The two forms of syntax are as follows:
FC /B SourceExpression TargetExpression
FC /A /C /L /LBn /N /nnnn /T /W SourceExpression TargetExpression
The source expression specifies the originals of the files to be compared. If you use wildcardcharacters in this parameter, all files matching this parameter are compared with the secondfile.
The target expression specifies the files to be compared to the originals. Usually, you needto specify only the drive and directory part of a filename expression. FC compares those filesspecified in the source expression that can be found in the target directory.
If you use wildcard characters in both the source and target expressions, FC comparesthe files as sets. That is, only those files whose names match in other respects are com-pared.
If you use the command FC *.WK1 *.BAK, for example, FC compares each worksheetfile having the extension .WK1 with the worksheet file having the same base name andthe extension .BAK. AUGSEPT.WK1, for example, is compared with AUGSEPT.BAK. FCdoes not compare every worksheet file with every backup file.
The switches used by FC enable you to control the operations of the command more tightly.The switches used are as follows:
■ /A instructs FC to abbreviate its output (DOS 3.2 and later versions), displaying only thefirst and last lines of each set of differences separated by an ellipsis (…).
■ /B performs a binary (byte-by-byte) comparison, showing the hexadecimal address andvalue of every differing byte.
■ /C causes FC to ignore the case of alphabetic characters when making comparisons; thus,c = C.
■ /L instructs FC to compare the files in ASCII mode, even when the files have EXE, COM,SYS, OBJ, LIB, or BIN extensions (DOS 3.2 and later versions).
217Comparing Files
■ /LBn sets the number of lines in the FC command’s buffer to n. The default number is100 (DOS 3.2 and later versions). If the number of consecutive nonmatching linesexceeds the buffer size, FC aborts the compare operation.
■ /N instructs FC to include the line numbers of lines reported in the output (DOS 3.2 andlater versions).
■ /nnnn establishes the number of lines that must match after a difference in order toresynchronize FC.
■ /T instructs FC to view tab characters as literal characters rather than tab-expandedspaces (DOS 3.2 and later versions).
■ /W instructs FC to compress whitespace—tabs, empty lines, and spaces—into a singlespace for purposes of file comparison.
Understanding the Operation of FC
FC works in two modes: ASCII and binary. It defaults to ASCII mode comparison when thefiles to be compared do not have extensions (EXE, COM, SYS, OBJ, LIB, or BIN) that traditionallyindicate binary files.
In ASCII mode, FC compares two files line-by-line. Lines from both files are held in a linebuffer. FC uses the lines in the buffer to compare the first file to the second.
If FC detects a difference, it displays the first filename followed by the last matching line andthe mismatching line or lines from the first file. It then displays the next line to match inboth files.
After displaying mismatch information about file 1, FC repeats the same sequence for file 2.The file 2 name is displayed first, followed by the last matching line and the mismatchinglines from file 2, ending on the next line that matches in both files, thus synchronizing thetwo files.
FC can help you determine whether the contents of two files are different by showing youthe extent and location of any mismatch it finds. You can use this output as an alternative toa side-by-side comparison of the file contents.
8
IIPart
Ch
If you are comparing two files that are not the same, you can quickly stop the reportingof differences by pressing Ctrl+C or Ctrl+Break.
In binary mode, FC compares two files byte-for-byte. At the first difference, the byte offsetposition in the first file is reported along with the value of the two files’ bytes at that posi-tion. The offset and byte values are reported in hexadecimal (base 16) form. This form of FCis essentially equivalent to the older COMP command.
In binary mode, FC does not attempt to resynchronize the two files by finding an adjustedpoint of byte agreement. If one file has an additional byte at one place in the file, FC reportsthe additional byte and all subsequent bytes of the file as mismatches.

218 Chapter 8 Managing Your Files
If one file is longer than its comparison file, the binary mode compares as many bytes as arepresent and then reports that one file is longer. When a binary file comparison results in along listing of differences, you might want to stop the FC operation by pressing Ctrl+C orCtrl+Break.
Only one switch is available in the binary mode. The /B switch causes the comparison to bebinary even if file extensions indicate that the files are not binary. You use the /B switch tocompare two text files in binary mode. You might find situations in which you prefer to havethe binary-mode output format of FC than the ASCII mode format. Binary mode formatreports differences as pairs of hexadecimal values. You then can see the values of characters,such as Ctrl+G (bell), that do not produce printed output.
When you use FC, keep in mind that the default number of lines that must match in anASCII comparison after a difference has ended is two. The files are then considered resyn-chronized. Using the /nnnn switch, you can change the number of “must match” lines bysetting nnnn to the desired value.
Using FC to Compare a Copied File to Its Original
Suppose that you are copying the ANSI.SYS file from your hard disk to a floppy disk to usefor an important demonstration on another PC. When the copy is complete, you set the diskon the edge of your desk and go to the break room to get coffee. When you return, younotice that the disk has fallen off your desk and landed against the small transformer thatruns your cassette recorder. You are worried that the magnetic field from the transformerhas damaged ANSI.SYS. To verify that the copied ANSI.SYS file is good, you can compare it tothe original by using the following command:
FC A:ANSI.SYS C:\DOS\DRIVERS\ANSI.SYS
After a few seconds, FC reports FC: No differences encountered. The copy of ANSI.SYSseems to be good.
Comparing Two Text Files
Suppose that two similar text files, ORIGINAL.TXT and ANOTHER.TXT, are located in the defaultdirectory of the current drive. ORIGINAL.TXT contains the following text:
This is the first line.This is the second line.12345This is the last line.
ANOTHER.TXT contains the following text:
This is the first line.This is not the third line.12
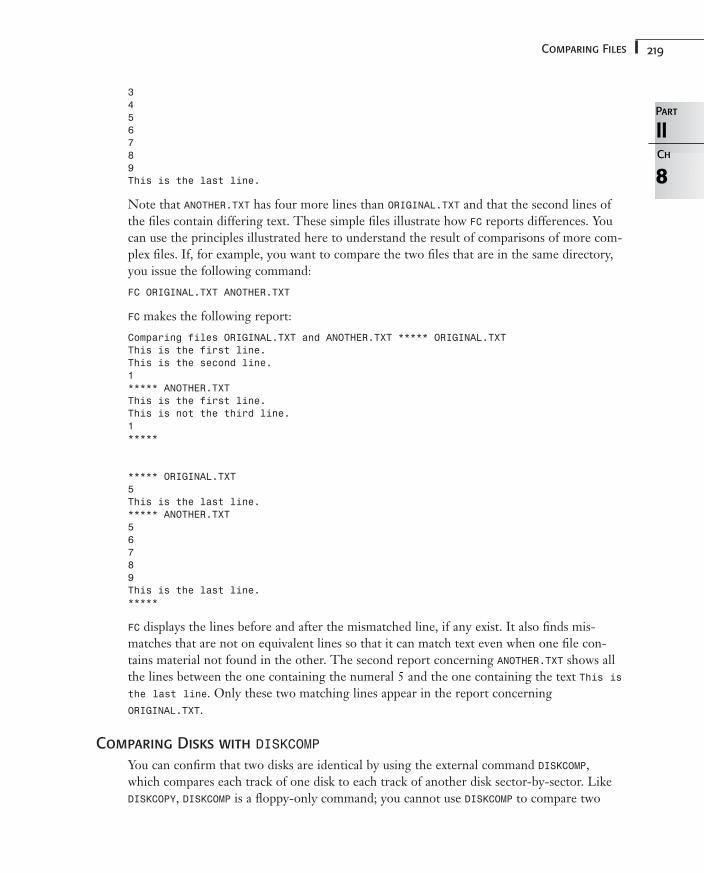
219Comparing Files
3456789This is the last line.
Note that ANOTHER.TXT has four more lines than ORIGINAL.TXT and that the second lines ofthe files contain differing text. These simple files illustrate how FC reports differences. Youcan use the principles illustrated here to understand the result of comparisons of more com-plex files. If, for example, you want to compare the two files that are in the same directory,you issue the following command:
FC ORIGINAL.TXT ANOTHER.TXT
FC makes the following report:
Comparing files ORIGINAL.TXT and ANOTHER.TXT ***** ORIGINAL.TXTThis is the first line.This is the second line.1***** ANOTHER.TXTThis is the first line.This is not the third line.1*****
***** ORIGINAL.TXT5This is the last line.***** ANOTHER.TXT56789This is the last line.*****
FC displays the lines before and after the mismatched line, if any exist. It also finds mis-matches that are not on equivalent lines so that it can match text even when one file con-tains material not found in the other. The second report concerning ANOTHER.TXT shows allthe lines between the one containing the numeral 5 and the one containing the text This isthe last line. Only these two matching lines appear in the report concerningORIGINAL.TXT.
Comparing Disks with DISKCOMP
You can confirm that two disks are identical by using the external command DISKCOMP, which compares each track of one disk to each track of another disk sector-by-sector. LikeDISKCOPY, DISKCOMP is a floppy-only command; you cannot use DISKCOMP to compare two
8
IIPart
Ch
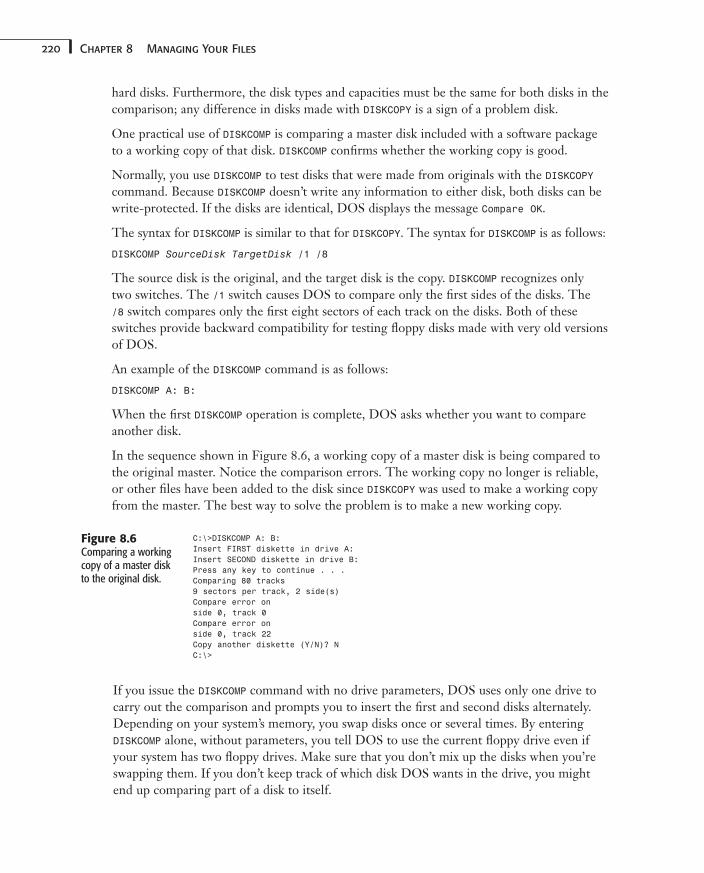
220 Chapter 8 Managing Your Files
hard disks. Furthermore, the disk types and capacities must be the same for both disks in thecomparison; any difference in disks made with DISKCOPY is a sign of a problem disk.
One practical use of DISKCOMP is comparing a master disk included with a software packageto a working copy of that disk. DISKCOMP confirms whether the working copy is good.
Normally, you use DISKCOMP to test disks that were made from originals with the DISKCOPYcommand. Because DISKCOMP doesn’t write any information to either disk, both disks can bewrite-protected. If the disks are identical, DOS displays the message Compare OK.
The syntax for DISKCOMP is similar to that for DISKCOPY. The syntax for DISKCOMP is as follows:
DISKCOMP SourceDisk TargetDisk /1 /8
The source disk is the original, and the target disk is the copy. DISKCOMP recognizes only two switches. The /1 switch causes DOS to compare only the first sides of the disks. The /8 switch compares only the first eight sectors of each track on the disks. Both of theseswitches provide backward compatibility for testing floppy disks made with very old versionsof DOS.
An example of the DISKCOMP command is as follows:
DISKCOMP A: B:
When the first DISKCOMP operation is complete, DOS asks whether you want to compareanother disk.
In the sequence shown in Figure 8.6, a working copy of a master disk is being compared tothe original master. Notice the comparison errors. The working copy no longer is reliable,or other files have been added to the disk since DISKCOPY was used to make a working copyfrom the master. The best way to solve the problem is to make a new working copy.
Figure 8.6Comparing a workingcopy of a master diskto the original disk.
C:\>DISKCOMP A: B:Insert FIRST diskette in drive A:Insert SECOND diskette in drive B:Press any key to continue . . .Comparing 80 tracks9 sectors per track, 2 side(s)Compare error on side 0, track 0Compare error onside 0, track 22Copy another diskette (Y/N)? NC:\>
If you issue the DISKCOMP command with no drive parameters, DOS uses only one drive tocarry out the comparison and prompts you to insert the first and second disks alternately.Depending on your system’s memory, you swap disks once or several times. By enteringDISKCOMP alone, without parameters, you tell DOS to use the current floppy drive even ifyour system has two floppy drives. Make sure that you don’t mix up the disks when you’reswapping them. If you don’t keep track of which disk DOS wants in the drive, you mightend up comparing part of a disk to itself.
221Deleting Files
Deleting FilesBecause no disk has unlimited storage space and because nearly every file eventuallybecomes obsolete, DOS provides a way for you to erase or delete files from your disks. Theinternal ERASE command enables you to delete files you no longer need.
Unlike other DOS commands’ short forms, the ERASE command’s short form is not simplyan abbreviation of the keyword. The short form of ERASE is DEL. Because the short form isshorter, thus quicker to type, it is generally used rather than ERASE.
When you delete a file, DOS locates that file in the directory and marks the directory entrywith a special internal indicator. DOS considers this space to be available for reassignmentwhen a new file is added to the directory. By reclaiming a deleted file’s directory entry, DOScan control the expansion of a subdirectory or reclaim one of the limited root directory entries.
Understanding the Delete Operation
The delete operation does not affect the contents of a file’s allocated clusters. Deleting a filedoes not record over the file’s data in the way erasing a cassette tape records over existingaudio. Rather, DOS alters its bookkeeping records in the directory and in the file allocationtable. The directory entry for the file is “deleted” by changing the first character of the file-name to an unprintable character (E5 hex), and the FAT cluster chain for the file is deallo-cated. DOS marks the file’s clusters as being “free.”
The DOS bookkeeping records for the deleted file remain relatively intact until another file isadded to the directory or until another file is expanded or added in any directory. The UNDELETEutility (discussed in Chapter 9, “Protecting Your Data,”) takes advantage of the fact that DOSdoes not erase a file’s content when you delete the file. UNDELETE “fixes” the deleted file’s direc-tory entry and reconstructs the deleted file’s cluster chain. If another file has been added, how-ever, the UNDELETE command might not be capable of recovering the deleted file because DOSmight have reallocated some or all of the storage space assigned to the deleted file.
The syntax for deleting files is either of the following:
DEL FileNameExpression /P
ERASE FileNameExpression /P
The filename expression specifies the drive, the directory, and/or the name of the files to bedeleted. You can use wildcards to specify multiple files.
Using the optional /P switch causes DEL (or ERASE) to prompt you for confirmation beforeDOS deletes each file. Press Y to instruct DOS to delete a file or press N to skip the filewithout erasing it.
When you are executing a delete operation, remember the following guidelines:
■ At the command line, the DEL (or ERASE) command does not erase files marked with theread-only, hidden, or system attribute.
8
IIPart
Ch
222 Chapter 8 Managing Your Files
■ The delete operation does not remove a directory, erase a volume label, or erase a hid-den or system file.
■ If you specify a directory name as the filename expression on the DEL command line,DOS tries to delete all the files in the specified subdirectory.
Deleting Files from the Command Line
The internal DEL and ERASE commands remove files from the disk, returning to the disk thespace occupied by the deleted files. When you use DEL or ERASE to erase a file, DOS nolonger can access the file. The erased file’s directory entry and storage space become avail-able to DOS for storage of another file.
Because DEL (or ERASE) deletes files from your disk, use the command with caution.DEL accepts wildcards in the file parameter. A momentary lapse of your attention whileyou are using DEL can wipe out important data in the blink of an eye.
Deleting Unwanted Files
Suppose that you have completed and delivered a series of memos composed in your wordprocessing program. That program automatically creates in the C:\WP directory a backupfile, with a BAK extension, for each memo. You want to keep the memo files on disk so thatyou can refer to them, but after the memos are safely delivered, you do not need the BAKfiles. You can erase the files with BAK extensions one at a time, or you can issue the DEL com-mand as follows:
DEL C:\WP\*.BAK
In this command line, the *.BAK filename parameter instructs DOS to delete all the fileswith the BAK extension. When the DEL command completes its work, all files with BAK exten-sions are removed from the directory. Because this command line includes drive and pathparameters, you can issue the command from any logged disk and current directory and stillerase the BAK files in C:\WP.
Using Interlnk to Share Another Computer’sResources
More and more users now have come to own more than one computer. Often they have adesktop machine in the office and a notebook or laptop computer they use when they travel.Although having two computers extends your computing power to places other than youroffice, having two computers also can make it difficult to keep data in both places up-to-date. Furthermore, it is not uncommon for two users in an office to need to share files, andmaybe even a printer, at times.
223Using Interlnk to Share Another Computer’s Resources
The DOS feature called Interlnk enables you to access drives and printers on a remote com-puter as though they were part of your computer. You can use this feature to transfer filesfrom a laptop or notebook computer to your desktop computer, to print files from yourportable computer on a printer attached to your desktop computer, and even to run pro-grams directly from the remote computer.
When you use Interlnk, one computer—the server—becomes the completely passive “slave”of the other. Before you start, decide which computer you want to work on. The servershould be the computer with the resources—files or printers—that you want to useremotely.
Setting Up Interlnk
Interlnk uses two executable files. INTERLNK.EXE makes a machine the client. You must loadthis file into the computer by using the DEVICE command in CONFIG.SYS. After the Interlnkclient software is loaded, it remains in memory as a terminate-and-stay-resident (TSR)application that responds to a set of commands not normally available in DOS.
INTERSVR is a command run from the DOS prompt. It completely takes over the system toact as an extension to the client computer running INTERLNK.EXE. You can run INTERSVR.EXEin a Windows-hosted DOS session, but while it’s running, all multitasking activities inWindows are suspended.
8
IIPart
Ch
Interlnk is the name given to the features provided by INTERLNK.EXE andINTERSVR.EXE. INTERLNK and INTERSVR are commands provided by Interlnk. Youcan tell by the capitalization and the computer font whether the following sections arespeaking of Interlnk features or the INTERLNK command.
➔ Use DOS’s multiple configuration feature to enable your computer to boot with or without INTERLNK.EXEloaded. For information on multiple configurations, see Chapter 2, “Starting DOS,” p. 23.
You need to have a special cable built for use with Interlnk. The cable connects onemachine to the other and can use either a serial or parallel connection. You cannot use astandard printer cable because the connector pins of an Interlnk cable must follow the con-figuration shown in Table 8.2.
Table 8.2 Cable Configurations for Use with Interlnk
Pin Connections for Serial Port Connections
9 Pin 25 Pin 25 Pin 9 Pin
5 7 ↔ 7 5*
3 2 ↔ 3 2
7 4 ↔ 5 8
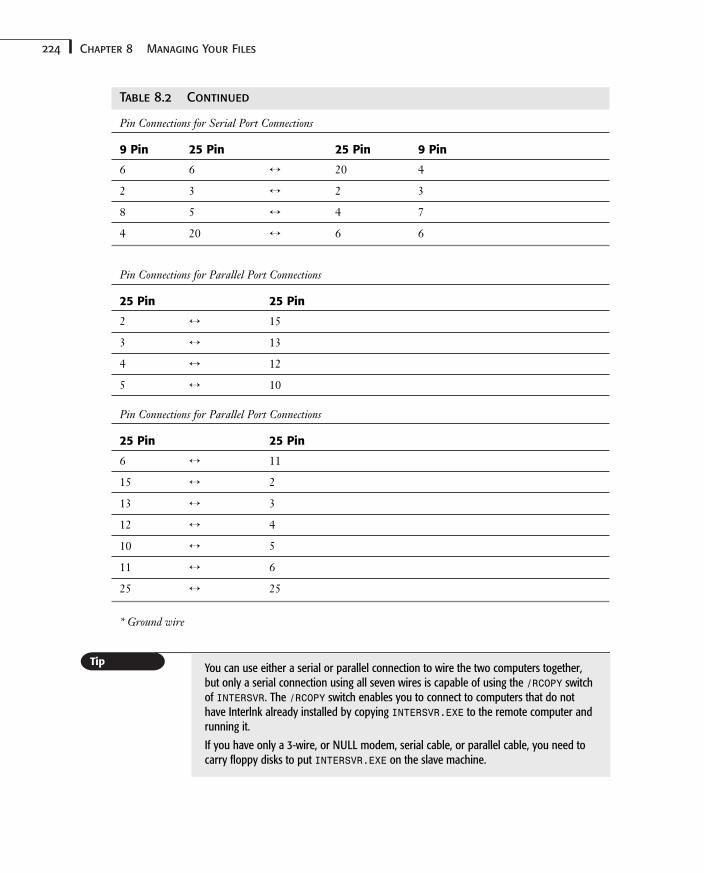
224 Chapter 8 Managing Your Files
Table 8.2 Continued
Pin Connections for Serial Port Connections
9 Pin 25 Pin 25 Pin 9 Pin
6 6 ↔ 20 4
2 3 ↔ 2 3
8 5 ↔ 4 7
4 20 ↔ 6 6
Pin Connections for Parallel Port Connections
25 Pin 25 Pin
2 ↔ 15
3 ↔ 13
4 ↔ 12
5 ↔ 10
Pin Connections for Parallel Port Connections
25 Pin 25 Pin
6 ↔ 11
15 ↔ 2
13 ↔ 3
12 ↔ 4
10 ↔ 5
11 ↔ 6
25 ↔ 25
* Ground wire
You can use either a serial or parallel connection to wire the two computers together,but only a serial connection using all seven wires is capable of using the /RCOPY switchof INTERSVR. The /RCOPY switch enables you to connect to computers that do nothave Interlnk already installed by copying INTERSVR.EXE to the remote computer andrunning it.
If you have only a 3-wire, or NULL modem, serial cable, or parallel cable, you need tocarry floppy disks to put INTERSVR.EXE on the slave machine.
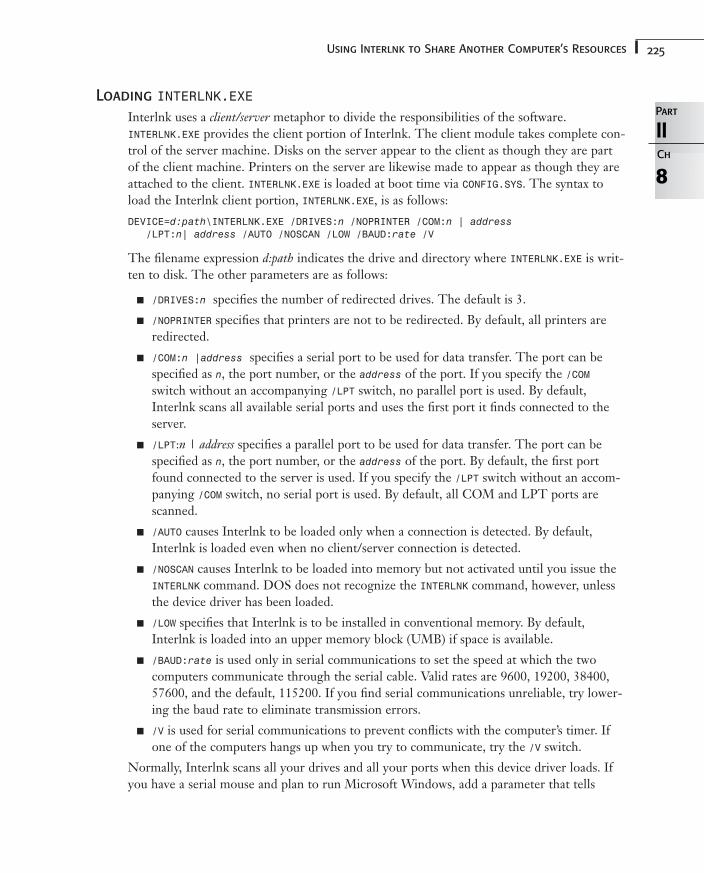
225Using Interlnk to Share Another Computer’s Resources
Loading INTERLNK.EXE
Interlnk uses a client/server metaphor to divide the responsibilities of the software.INTERLNK.EXE provides the client portion of Interlnk. The client module takes complete con-trol of the server machine. Disks on the server appear to the client as though they are partof the client machine. Printers on the server are likewise made to appear as though they areattached to the client. INTERLNK.EXE is loaded at boot time via CONFIG.SYS. The syntax toload the Interlnk client portion, INTERLNK.EXE, is as follows:
DEVICE=d:path\INTERLNK.EXE /DRIVES:n /NOPRINTER /COM:n | address/LPT:n| address /AUTO /NOSCAN /LOW /BAUD:rate /V
The filename expression d:path indicates the drive and directory where INTERLNK.EXE is writ-ten to disk. The other parameters are as follows:
■ /DRIVES:n specifies the number of redirected drives. The default is 3.
■ /NOPRINTER specifies that printers are not to be redirected. By default, all printers areredirected.
■ /COM:n |address specifies a serial port to be used for data transfer. The port can bespecified as n, the port number, or the address of the port. If you specify the /COMswitch without an accompanying /LPT switch, no parallel port is used. By default,Interlnk scans all available serial ports and uses the first port it finds connected to theserver.
■ /LPT:n | address specifies a parallel port to be used for data transfer. The port can bespecified as n, the port number, or the address of the port. By default, the first portfound connected to the server is used. If you specify the /LPT switch without an accom-panying /COM switch, no serial port is used. By default, all COM and LPT ports arescanned.
■ /AUTO causes Interlnk to be loaded only when a connection is detected. By default,Interlnk is loaded even when no client/server connection is detected.
■ /NOSCAN causes Interlnk to be loaded into memory but not activated until you issue theINTERLNK command. DOS does not recognize the INTERLNK command, however, unlessthe device driver has been loaded.
■ /LOW specifies that Interlnk is to be installed in conventional memory. By default,Interlnk is loaded into an upper memory block (UMB) if space is available.
■ /BAUD:rate is used only in serial communications to set the speed at which the twocomputers communicate through the serial cable. Valid rates are 9600, 19200, 38400,57600, and the default, 115200. If you find serial communications unreliable, try lower-ing the baud rate to eliminate transmission errors.
■ /V is used for serial communications to prevent conflicts with the computer’s timer. Ifone of the computers hangs up when you try to communicate, try the /V switch.
Normally, Interlnk scans all your drives and all your ports when this device driver loads. Ifyou have a serial mouse and plan to run Microsoft Windows, add a parameter that tells
8
IIPart
Ch
226 Chapter 8 Managing Your Files
Interlnk which port is connected to the remote computer. If you are using a second printerport for your connection, for example, type the following line:
DEVICE=C:\DOS\INTERLNK.EXE /LPT2
This command prevents Interlnk from examining all your serial and parallel ports (and fromdisrupting your mouse operations in the process).
Loading the Server
INTERSVR is an executable file, loaded from the command line, that suspends all the opera-tions of the computer and gives control over the computer’s resources to INTERLNK, runningon the client computer. You do not have to load INTERLNK.EXE on the server to make anInterlnk connection.
If you load INTERSVR on a machine that is running a multitasking system such as Windowsor QEMM, all background operations are suspended until you exit INTERSVR. The syntax toload the server portion of Interlnk, INTERSVR.EXE, is as follows:
INTERSVR.EXE /X=drives /COM:n | address /LPT:n| address/BAUD:rate /B /V /RCOPY
■ /X specifies the letter or letters of drives to be excluded from redirection. By default, alldrives are redirected. If /X is used, any listed drives are unavailable to the client.
■ /COM:n | address specifies a serial port to be used for data transfer. The port can bespecified as n, the port number, or the address of the port. If you specify the /COMswitch without an accompanying /LPT switch, no parallel port is used. By default,Interlnk scans all available serial ports and uses the first port it finds connected to theclient.
■ /LPT:n | address specifies a parallel port to be used for data transfer. The port can bespecified as n, the port number, or the address of the port. By default, the first portfound connected to the client is used. If you specify the /LPT switch without an accom-panying /COM switch, no serial port is used. By default, all COM and LPT ports arescanned.
■ /BAUD:rate is used only in serial communications to set the speed at which the twocomputers communicate through the serial cable. Valid rates are 9600, 19200, 38400,57600, and the default, 115200. If you find serial communications unreliable, try lower-ing the baud rate to eliminate transmission errors.
■ /B causes the Interlnk screen to be displayed in monochrome.
■ /V is used for serial communications to prevent conflicts with the computer’s timer. Ifone of the computers hangs up when you try to communicate, try the /V switch.
■ /RCOPY is used to copy the Interlnk files from one computer to another. You must beusing a fully pinned serial cable, and the MODE and CTTY commands must be available onthe computer where Interlnk is being installed.
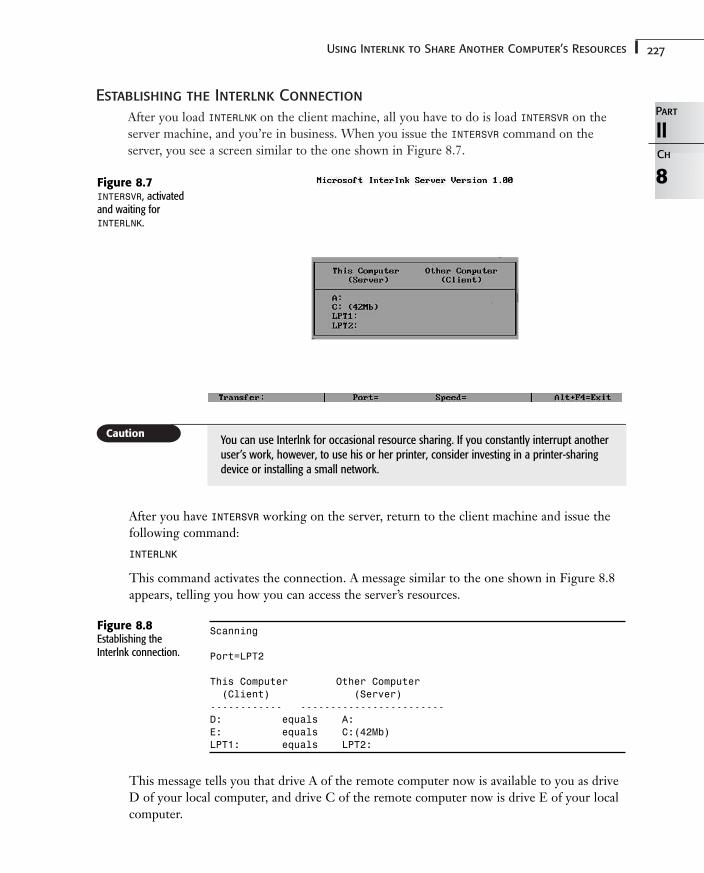
227Using Interlnk to Share Another Computer’s Resources
Establishing the Interlnk Connection
After you load INTERLNK on the client machine, all you have to do is load INTERSVR on theserver machine, and you’re in business. When you issue the INTERSVR command on theserver, you see a screen similar to the one shown in Figure 8.7.
8
IIPart
Ch
Figure 8.7INTERSVR, activatedand waiting forINTERLNK.
After you have INTERSVR working on the server, return to the client machine and issue thefollowing command:
INTERLNK
This command activates the connection. A message similar to the one shown in Figure 8.8appears, telling you how you can access the server’s resources.
You can use Interlnk for occasional resource sharing. If you constantly interrupt anotheruser’s work, however, to use his or her printer, consider investing in a printer-sharingdevice or installing a small network.
Scanning
Port=LPT2
This Computer Other Computer(Client) (Server)
------------ ------------------------D: equals A:E: equals C:(42Mb)LPT1: equals LPT2:
Figure 8.8Establishing theInterlnk connection.
This message tells you that drive A of the remote computer now is available to you as driveD of your local computer, and drive C of the remote computer now is drive E of your localcomputer.
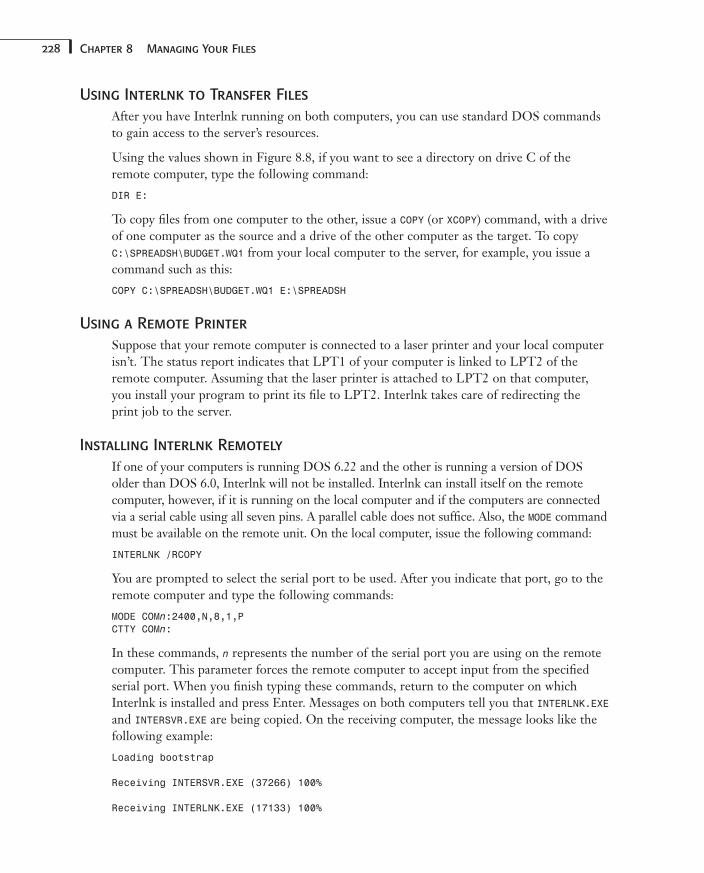
228 Chapter 8 Managing Your Files
Using Interlnk to Transfer Files
After you have Interlnk running on both computers, you can use standard DOS commandsto gain access to the server’s resources.
Using the values shown in Figure 8.8, if you want to see a directory on drive C of theremote computer, type the following command:
DIR E:
To copy files from one computer to the other, issue a COPY (or XCOPY) command, with a driveof one computer as the source and a drive of the other computer as the target. To copyC:\SPREADSH\BUDGET.WQ1 from your local computer to the server, for example, you issue acommand such as this:
COPY C:\SPREADSH\BUDGET.WQ1 E:\SPREADSH
Using a Remote Printer
Suppose that your remote computer is connected to a laser printer and your local computerisn’t. The status report indicates that LPT1 of your computer is linked to LPT2 of theremote computer. Assuming that the laser printer is attached to LPT2 on that computer,you install your program to print its file to LPT2. Interlnk takes care of redirecting theprint job to the server.
Installing Interlnk Remotely
If one of your computers is running DOS 6.22 and the other is running a version of DOSolder than DOS 6.0, Interlnk will not be installed. Interlnk can install itself on the remotecomputer, however, if it is running on the local computer and if the computers are connectedvia a serial cable using all seven pins. A parallel cable does not suffice. Also, the MODE commandmust be available on the remote unit. On the local computer, issue the following command:
INTERLNK /RCOPY
You are prompted to select the serial port to be used. After you indicate that port, go to theremote computer and type the following commands:
MODE COMn:2400,N,8,1,PCTTY COMn:
In these commands, n represents the number of the serial port you are using on the remotecomputer. This parameter forces the remote computer to accept input from the specifiedserial port. When you finish typing these commands, return to the computer on whichInterlnk is installed and press Enter. Messages on both computers tell you that INTERLNK.EXEand INTERSVR.EXE are being copied. On the receiving computer, the message looks like thefollowing example:
Loading bootstrap
Receiving INTERSVR.EXE (37266) 100%
Receiving INTERLNK.EXE (17133) 100%
229Case Study: Editing Files with Multiple Data Formats
The files are placed in the current directory of the receiving computer. Both computers thenreturn to DOS. You can use either computer as the client or the server, provided that youinstall the device driver in the server’s CONFIG.SYS file. If the remote computer is running anearly version of DOS, however (3.3 or earlier, for example), you might not be able to accessfiles on the server that were created under a version of DOS later than DOS 5.0, especiallyif those files are larger than 32MB.
Running Programs Remotely
After you are linked to another computer by Interlnk, you can use that computer’s drives asthough they were part of your local computer. Thus, you can run a program on the remotecomputer from the command line as you run one on your local computer.
Because programs on the remote computer do not appear on your local computer’s path,you must either log on to the drive and directory where the program resides or enter a PATHcommand to extend the client’s path to a remote directory on the server.
Which technique is appropriate depends on how the program works. If, for example, theprogram must be run from its home directory when it is not on the path, use the firstoption. Otherwise, you can use the second technique.
The preceding techniques actually just load the program from the remote computer and runit on your local computer. Consequently, you might encounter problems if the program isset up to use specific aspects of the remote computer’s hardware that the local computerlacks. Suppose, for example, that the two computers have different types of screens. Theprogram might be set up to display text and graphics on the remote computer’s screen andmight be unable to display anything on your local computer.
Another problem occurs if the program expects to find specific files on a particular drive butcannot access the drive because the drive names have been changed. Drive C still is drive Cof your local computer, but drive C of the remote computer now is known to DOS as driveE of your local computer. If the program needs to find certain files in drive C, it cannot findthose files unless they also exist in the same directory of your local computer. (In such acase, don’t run the program from the remote computer; use the version on your local com-puter instead.)
Case Study: Editing Files with Multiple DataFormats
One problem you commonly encounter when attempting to edit files is multiple data for-mats. Some files contain a mixture of binary and ASCII data. Almost all modern applicationsstore data and documents in proprietary file formats that contain binary elements. Many ofthese proprietary formats use a binary header. A header is a block of information at thebeginning of a file that is used by a program as a map to the contents of the file.
230 Chapter 8 Managing Your Files
Editing this type of file with a tool other than the program that created it can be dangerous.You can change the file so that the parent program no longer recognizes the file as being inthe proper format.
If you know that a file was created by a specific application, use that application to view andedit the file. The parent application usually has a method of turning data into ASCII format,either with a conversion utility or by a special file save feature built into the application. Seeyour application’s documentation for details.
Protecting Your Data
9CHAPTER
In this chapter
Avoiding Data Loss 232
Understanding Microsoft Backup 233
Using Microsoft Backup 239
Understanding Computer Viruses 252
Unformatting a Disk 257
Recovering Deleted Files with UNDELETE 262
Using the Microsoft Undelete Program for Windows 3.x 267
Project: Developing a Backup Policy 270
232 Chapter 9 Protecting Your Data
Avoiding Data LossDesktop personal computers store information on hard disk drives. These days drives aver-age 4GB–20GB in size, with drives in newer high-end systems hitting as much as 40 or60GB. (Older systems, however, might have hard drives of only 500MB, and possibly small-er.) The hard drive stores the operating system and application files installed on the system.It typically also includes all the personal and business data that has been loaded or createdon that system. The software and data represent a significant investment in money andeffort that would be lost if your hard disk were damaged or erased.
Today’s personal computers are reliable and economical data processing machines. Like allother machines, however, computers are subject to failures and operator errors. Table 9.1lists some hardware and software problems discussed in this chapter and suggests ways toprevent these problems.
Table 9.1 Hardware and Software Problems and Prevention Techniques
Problem Prevention
Static electricity Use antistatic liquid or floor mat; place a “touch pad” on desk.
Overheating Clean clogged air vents; remove objects that block vents; use air-conditioned room during the summer.
Damaged floppy disks Don’t leave floppy disks to be warped by the sun; avoid spilling liquidson them; store disks in a safe place; avoid magnetic fields from appliances(televisions, microwave ovens, and so on); if you’re using 5.25-inch flop-pies, do not use a ballpoint pen to write on the disk labels.
Data loss Keep current backups of your hard disk and any floppy disks that containimportant data; scan for viruses; use delete-tracking.
Viruses Always scan a questionable disk for viruses before copying any files fromit to your hard disk.
Always be cautious about your computer’s environment. With the low cost of surge suppres-sors and desktop UPS systems, you would be wise to use one of them. If lightning or anoth-er sort of power surge destroys your brand-new Pentium III system, you will regret notspending $60 on an uninterruptible power supply (UPS)/surge suppressor.
Your computer might perform erratically when it is too hot. Because circuits are unreliablewhen they overheat, you might get jumbled data. Make sure that your computer has roomto breathe by cleaning the air vents and allowing plenty of space for air to circulate.
You generate static electricity on your body when humidity is low, when you wear syntheticfabrics, or when you walk on carpet. Just by touching your keyboard while carrying a staticcharge, you can send an electrical shudder through your computer, causing a data jumble orcircuit failure. Fortunately, you can avoid static problems by touching your grounded systemcabinet before touching the keyboard. If static electricity is a serious problem for you, askyour dealer about antistatic products, which are inexpensive and easy to use.
233Understanding Microsoft Backup
Finally, be sure to keep your computer clean and free of dust. It is usually a good idea to usea can of compressed air to blow out the dust that accumulates over time. Take special care tokeep the fan outlet on the power supply clean and free of anything that will impede airflow.
Understanding Microsoft BackupCompared to floppy disks, hard disks have many advantages. Hard disks are faster, have larg-er storage capacities and root directories, support multiple partitions, and never require a diskswap. A file on a hard disk can be many times the size of a file on a floppy disk. Commandssuch as COPY and XCOPY enable you to keep a few duplicate files on a floppy for backup pur-poses, but DOS provides a pair of special programs specifically designed for the big jobs:Microsoft Backup (MSBACKUP.EXE) and Microsoft Backup for Windows 3.x (MWBACKUP.EXE).
Starting with Windows 95, Microsoft has moved to a graphical backup program. The ver-sion of DOS that is installed with Windows 9x does not include the command-prompt back-up utility.
For more information on using the Windows 95/98/ME backup utility, see Que’s SpecialEdition Using Windows 95, Special Edition Using Windows 98, or Special Edition UsingWindows Millennium.
By default, the Setup program installed one of these programs when you installed DOS onyour computer. If your system has Microsoft Windows 3.1, however, you have the option ofinstalling both programs. As you might expect, Microsoft Backup for Windows can be usedonly within Microsoft Windows. The DOS version, however, can be used either at a com-mand prompt or in a DOS window within Microsoft Windows.
If you do not now use Microsoft Windows but plan to add that operating environment toyour system later, you must reinstall DOS to install the Windows version of the backupprogram.
Both backup programs are full-featured programs that enable you to perform the followingtasks:
■ Copy files from a hard disk to another disk, usually a floppy disk.
■ Restore the copied files to their original location or to another disk of your choice.
■ Compare files on your backup copies with the originals to ensure their validity.
Both programs have several types of menus and many options to enable you to copy onlythose files you want to copy and to ease the process of making backups regularly. Becausethe programs are similar, this chapter focuses on MSBACKUP. Relevant differences in theWindows version are noted.
9
IIPart
Ch
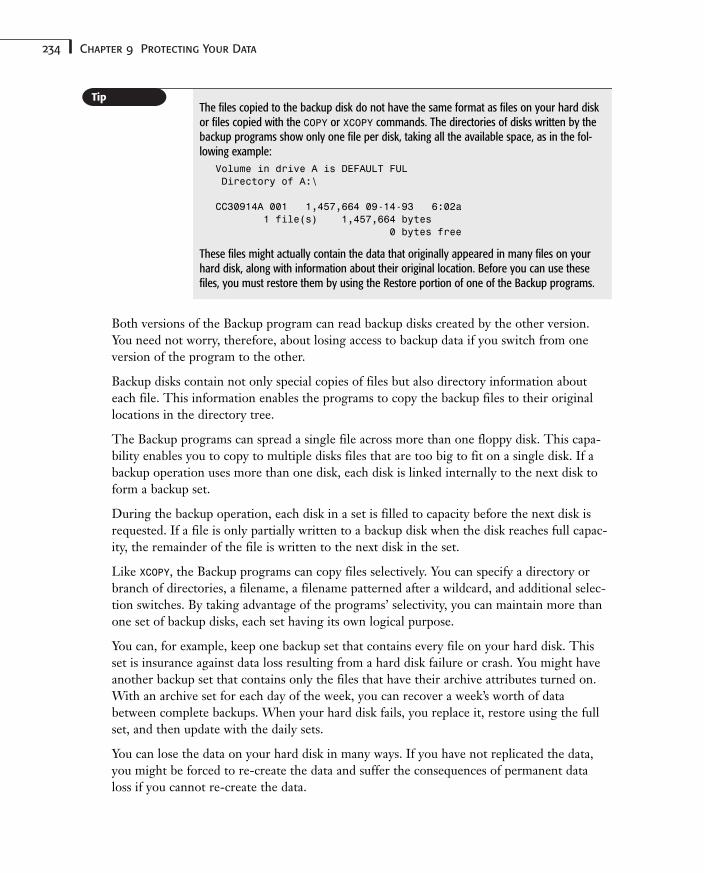
234 Chapter 9 Protecting Your Data
The files copied to the backup disk do not have the same format as files on your hard diskor files copied with the COPY or XCOPY commands. The directories of disks written by thebackup programs show only one file per disk, taking all the available space, as in the fol-lowing example:
Volume in drive A is DEFAULT FULDirectory of A:\
CC30914A 001 1,457,664 09-14-93 6:02a1 file(s) 1,457,664 bytes
0 bytes free
These files might actually contain the data that originally appeared in many files on yourhard disk, along with information about their original location. Before you can use thesefiles, you must restore them by using the Restore portion of one of the Backup programs.
Both versions of the Backup program can read backup disks created by the other version.You need not worry, therefore, about losing access to backup data if you switch from oneversion of the program to the other.
Backup disks contain not only special copies of files but also directory information abouteach file. This information enables the programs to copy the backup files to their originallocations in the directory tree.
The Backup programs can spread a single file across more than one floppy disk. This capa-bility enables you to copy to multiple disks files that are too big to fit on a single disk. If abackup operation uses more than one disk, each disk is linked internally to the next disk toform a backup set.
During the backup operation, each disk in a set is filled to capacity before the next disk isrequested. If a file is only partially written to a backup disk when the disk reaches full capac-ity, the remainder of the file is written to the next disk in the set.
Like XCOPY, the Backup programs can copy files selectively. You can specify a directory orbranch of directories, a filename, a filename patterned after a wildcard, and additional selec-tion switches. By taking advantage of the programs’ selectivity, you can maintain more thanone set of backup disks, each set having its own logical purpose.
You can, for example, keep one backup set that contains every file on your hard disk. Thisset is insurance against data loss resulting from a hard disk failure or crash. You might haveanother backup set that contains only the files that have their archive attributes turned on.With an archive set for each day of the week, you can recover a week’s worth of databetween complete backups. When your hard disk fails, you replace it, restore using the fullset, and then update with the daily sets.
You can lose the data on your hard disk in many ways. If you have not replicated the data,you might be forced to re-create the data and suffer the consequences of permanent dataloss if you cannot re-create the data.
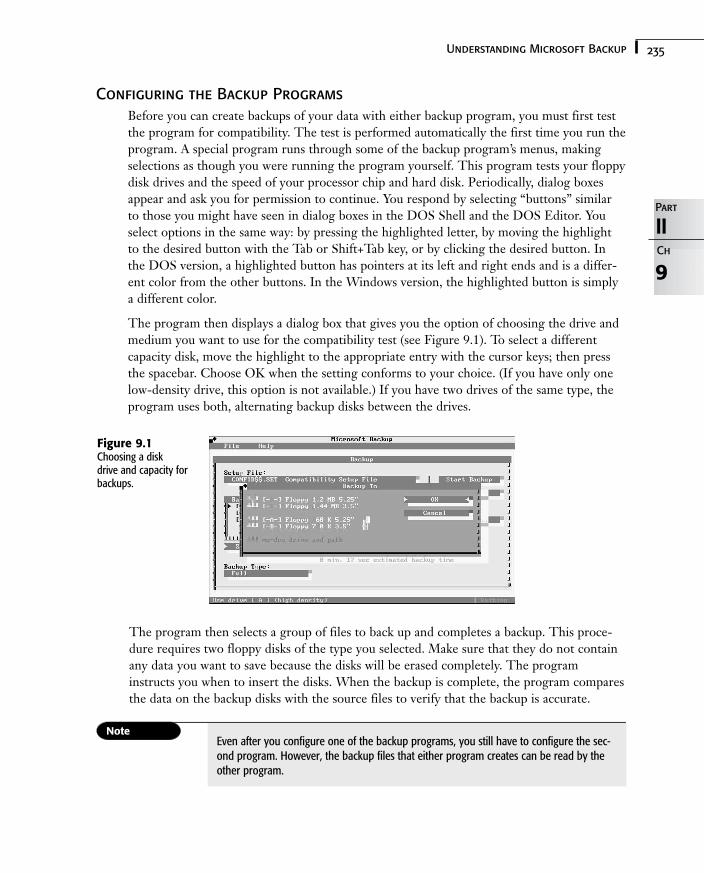
235Understanding Microsoft Backup
Configuring the Backup Programs
Before you can create backups of your data with either backup program, you must first testthe program for compatibility. The test is performed automatically the first time you run theprogram. A special program runs through some of the backup program’s menus, makingselections as though you were running the program yourself. This program tests your floppydisk drives and the speed of your processor chip and hard disk. Periodically, dialog boxesappear and ask you for permission to continue. You respond by selecting “buttons” similarto those you might have seen in dialog boxes in the DOS Shell and the DOS Editor. Youselect options in the same way: by pressing the highlighted letter, by moving the highlightto the desired button with the Tab or Shift+Tab key, or by clicking the desired button. Inthe DOS version, a highlighted button has pointers at its left and right ends and is a differ-ent color from the other buttons. In the Windows version, the highlighted button is simplya different color.
The program then displays a dialog box that gives you the option of choosing the drive andmedium you want to use for the compatibility test (see Figure 9.1). To select a differentcapacity disk, move the highlight to the appropriate entry with the cursor keys; then pressthe spacebar. Choose OK when the setting conforms to your choice. (If you have only onelow-density drive, this option is not available.) If you have two drives of the same type, theprogram uses both, alternating backup disks between the drives.
9
IIPart
Ch
Figure 9.1Choosing a disk drive and capacity forbackups.
The program then selects a group of files to back up and completes a backup. This proce-dure requires two floppy disks of the type you selected. Make sure that they do not containany data you want to save because the disks will be erased completely. The programinstructs you when to insert the disks. When the backup is complete, the program comparesthe data on the backup disks with the source files to verify that the backup is accurate.
Even after you configure one of the backup programs, you still have to configure the sec-ond program. However, the backup files that either program creates can be read by theother program.
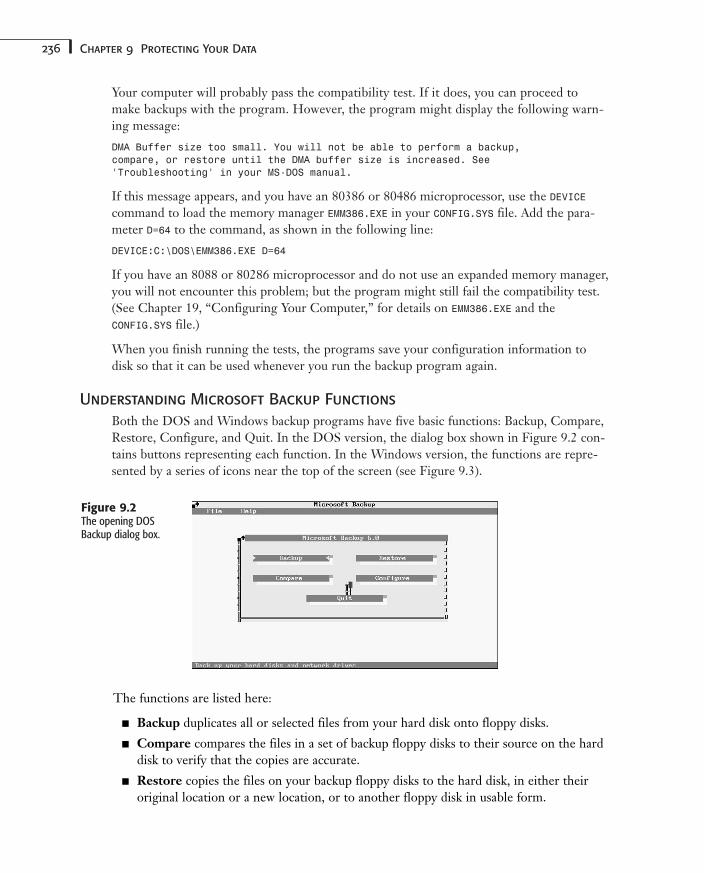
236 Chapter 9 Protecting Your Data
Your computer will probably pass the compatibility test. If it does, you can proceed tomake backups with the program. However, the program might display the following warn-ing message:
DMA Buffer size too small. You will not be able to perform a backup,compare, or restore until the DMA buffer size is increased. See‘Troubleshooting’ in your MS-DOS manual.
If this message appears, and you have an 80386 or 80486 microprocessor, use the DEVICEcommand to load the memory manager EMM386.EXE in your CONFIG.SYS file. Add the para-meter D=64 to the command, as shown in the following line:
DEVICE:C:\DOS\EMM386.EXE D=64
If you have an 8088 or 80286 microprocessor and do not use an expanded memory manager,you will not encounter this problem; but the program might still fail the compatibility test.(See Chapter 19, “Configuring Your Computer,” for details on EMM386.EXE and theCONFIG.SYS file.)
When you finish running the tests, the programs save your configuration information todisk so that it can be used whenever you run the backup program again.
Understanding Microsoft Backup Functions
Both the DOS and Windows backup programs have five basic functions: Backup, Compare,Restore, Configure, and Quit. In the DOS version, the dialog box shown in Figure 9.2 con-tains buttons representing each function. In the Windows version, the functions are repre-sented by a series of icons near the top of the screen (see Figure 9.3).
Figure 9.2The opening DOSBackup dialog box.
The functions are listed here:
■ Backup duplicates all or selected files from your hard disk onto floppy disks.
■ Compare compares the files in a set of backup floppy disks to their source on the harddisk to verify that the copies are accurate.
■ Restore copies the files on your backup floppy disks to the hard disk, in either theiroriginal location or a new location, or to another floppy disk in usable form.
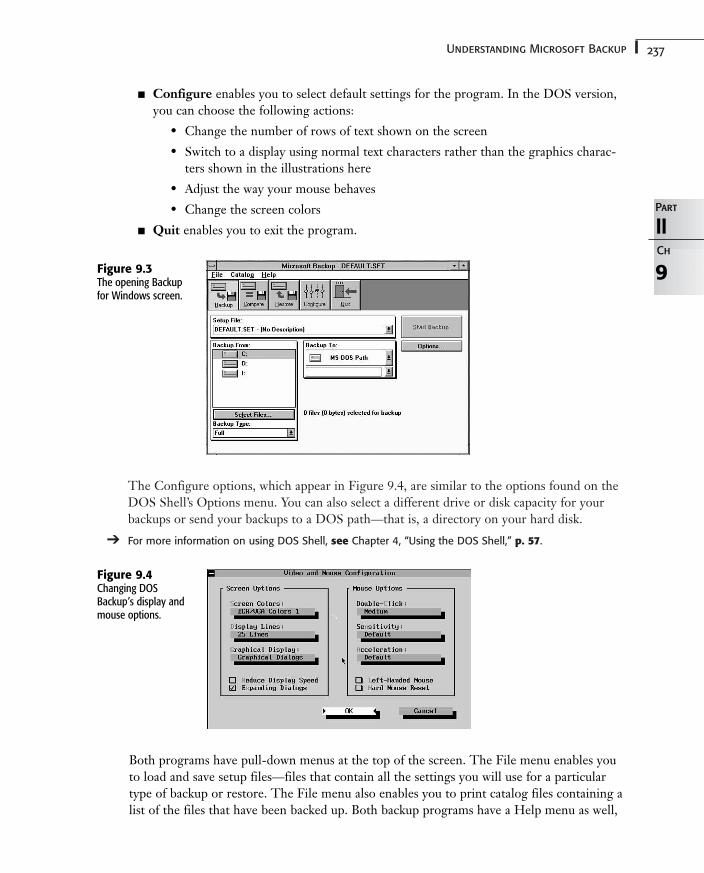
237Understanding Microsoft Backup
The Configure options, which appear in Figure 9.4, are similar to the options found on theDOS Shell’s Options menu. You can also select a different drive or disk capacity for yourbackups or send your backups to a DOS path—that is, a directory on your hard disk.
➔ For more information on using DOS Shell, see Chapter 4, “Using the DOS Shell,” p. 57.
9
IIPart
Ch
Figure 9.3The opening Backupfor Windows screen.
■ Configure enables you to select default settings for the program. In the DOS version,you can choose the following actions:
• Change the number of rows of text shown on the screen
• Switch to a display using normal text characters rather than the graphics charac-ters shown in the illustrations here
• Adjust the way your mouse behaves
• Change the screen colors
■ Quit enables you to exit the program.
Figure 9.4Changing DOSBackup’s display andmouse options.
Both programs have pull-down menus at the top of the screen. The File menu enables youto load and save setup files—files that contain all the settings you will use for a particulartype of backup or restore. The File menu also enables you to print catalog files containing alist of the files that have been backed up. Both backup programs have a Help menu as well,
238 Chapter 9 Protecting Your Data
which explains techniques and procedures. The Windows Backup program has a thirdmenu, a Catalog menu, which enables you to select catalog files for restoration or compari-son. This menu does not appear in the DOS version; however, you can select catalog filesafter you have chosen to perform a restore or compare.
Backup Types
Depending on your backup requirements, the following three specific types of backups canbe performed using MSBACKUP:
■ A full backup copies every file on your hard disk. Keep at least two full backup sets sothat you can re-create your system if your hard disk is destroyed; you need not makeboth copies at the same time.
■ An incremental backup copies only new files or files that have been changed since the lastfull or incremental backup was performed. You use an additional set of disks for theincremental backup set. You might complete several backups between full backups,depending on how many files you work with and how large the files are. Each time youperform an incremental backup, you add any files that are new or have been modifiedsince the previous new or incremental backup.
■ A differential backup copies only files that are new or have been changed since the lastfull backup and requires a separate set of disks from the full backups. With a differentialbackup, however, you reuse the same floppy disks for each backup until you performyour next full backup.
The distinction between incremental and differential backups lies with the archive bit.When you perform a full backup, the backup programs turn off the archive attribute for anyfile that is backed up. When you modify or create a file, DOS turns on the new or modifiedfile’s archive attribute.
When you perform an incremental backup, the backup programs turn off the archive bit so that each incremental backup includes only files created or modified since the previousincremental backup. When you perform a differential backup, however, the backup pro-grams do not turn off the archive bit. Therefore, every file modified or created since theprevious full backup is copied. The differential backup is appropriate if you work with thesame few files daily and do not need several generations of each file.
You can perform a full backup weekly, monthly, or at some other interval. The intervening(incremental or differential) backup intervals reduce your risk of data loss between full back-ups. The time between performing intermediate backups depends on the amount of risk toyour data you are willing to take. In a business setting, you might reduce your risk to anacceptable level by performing an intermediate backup every other day. If your PC activitylevel is high, you might have to perform an incremental backup daily. If your PC activity isminimal, a differential backup once every two weeks might be frequent enough to reduceyour risk to a manageable level.
239Using Microsoft Backup
In addition to these three types of backups, you can create backup sets for special purposes.You can select files to include in, or exclude from, the backup. You can select these files indi-vidually, by directory, according to a wildcard pattern, by date, or by attribute, and save theselections in a setup file. You learn how to select files for backups later in this chapter.
Issuing the MSBACKUP Command
The syntax for the MSBACKUP command is shown in the following line:
MSBACKUP filename /video
Both switches are optional. filename is the name of a setup file. If you created setup files fordifferent types of backups, you can load one automatically by specifying the file on the com-mand line. If you do not specify a setup file, MSBACKUP loads DEFAULT.SET and applies the set-tings to the drive specified in that file. If no drive is specified, MSBACKUP applies the settingsto the default drive.
/video specifies the type of video display to be used. Use /LCD for laptops or other LCDscreens, /BW for black and white, or /MDA for monochrome displays, including those attachedto Hercules-type adapters. Do not specify a video type for a color display.
By default, MSBACKUP uses the path contained in the MSDOSDATA environment variable todetermine where to look for configuration information. If this environment variable doesnot exist, the program searches the directory from which MSBACKUP was started. If it is notlocated there, MSBACKUP uses default values and creates a configuration information file inthat directory. To add this environment variable, add the following line to yourAUTOEXEC.BAT file:
SET MSDOSDATA=C:\DOS
You can change the path to the right of the equal sign to any other valid directory you wantto use for your backup configuration information.
Using Microsoft BackupNow that you understand how Microsoft Backup (MSBACKUP.EXE) and Microsoft Backup forWindows 3.x (MWBACKUP.EXE) work, it is time to see how to use them to perform your backupprocedures. The following sections explain how to perform these tasks.
Performing a Full Backup
In this section, you learn how to complete a full backup. First, you learn how to use MSBACKUP and then Microsoft Backup for Windows.
Performing a Full Backup with MSBACKUP
To perform a full backup in DOS, follow these steps:
1. Enter the following command:MSBACKUP
9
IIPart
Ch

240 Chapter 9 Protecting Your Data
The program scans drive C (unless you specified a different drive and saved the infor-mation in the default setup file, DEFAULT.SET), reads its directories, and then presents itsopening screen.
2. Choose the Backup button. As shown in Figure 9.5, the default setup file is loaded, andthe selected backup type is Full. To perform a full backup, select the drive to back upfrom the Backup From list by double-clicking the appropriate drive, or by using thecursor-movement keys to move the highlight to the drive and pressing the spacebar.You might choose more than one drive. Each time you choose a drive, Backup scans the drive and adds the selected files to the totals.
Figure 9.5The Backup screen.
As you select files to back up, the Backup screen shows you exactly what is required. A message similar to this one appears:1,316 files (with catalog) selected for backup24 1.44 MB 3.5” floppies needed (maximum)15 min, 50 sec estimated backup time
Backup formats any target disks that are not formatted and compresses the data on thebackup disks so that the capacity of the disks required might be less than the amount ofdata you need to back up.
The Windows Backup program indicates how many bytes of data are selected for backupand compresses the files so that fewer backup disks and less time are required to completea backup.
3. Choose Start Backup. The program begins by creating a backup catalog, listing the filesto be backed up and the options chosen. The following message appears:Insert diskette #1 in drive A:
As the backup progresses, a display similar to Figure 9.6 appears.
4. When the disk is full, the program prompts you to insert the next disk, and so on untilthe backup is complete.
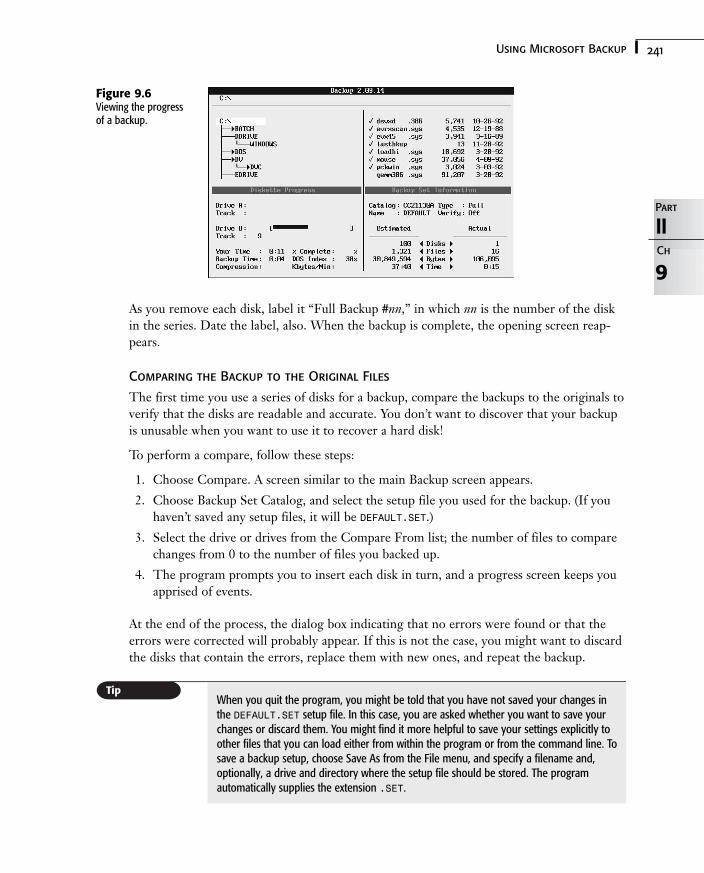
241Using Microsoft Backup
Figure 9.6Viewing the progressof a backup.
9
IIPart
Ch
As you remove each disk, label it “Full Backup #nn,” in which nn is the number of the diskin the series. Date the label, also. When the backup is complete, the opening screen reap-pears.
Comparing the Backup to the Original Files
The first time you use a series of disks for a backup, compare the backups to the originals toverify that the disks are readable and accurate. You don’t want to discover that your backupis unusable when you want to use it to recover a hard disk!
To perform a compare, follow these steps:
1. Choose Compare. A screen similar to the main Backup screen appears.
2. Choose Backup Set Catalog, and select the setup file you used for the backup. (If youhaven’t saved any setup files, it will be DEFAULT.SET.)
3. Select the drive or drives from the Compare From list; the number of files to comparechanges from 0 to the number of files you backed up.
4. The program prompts you to insert each disk in turn, and a progress screen keeps youapprised of events.
At the end of the process, the dialog box indicating that no errors were found or that theerrors were corrected will probably appear. If this is not the case, you might want to discardthe disks that contain the errors, replace them with new ones, and repeat the backup.
When you quit the program, you might be told that you have not saved your changes inthe DEFAULT.SET setup file. In this case, you are asked whether you want to save yourchanges or discard them. You might find it more helpful to save your settings explicitly toother files that you can load either from within the program or from the command line. Tosave a backup setup, choose Save As from the File menu, and specify a filename and,optionally, a drive and directory where the setup file should be stored. The programautomatically supplies the extension .SET.
242 Chapter 9 Protecting Your Data
Performing a Full Backup in Windows 3.x
The procedure for performing a full backup in Windows is essentially the same as for DOS.The primary difference is the appearance of the screen. When the program loads, you see amessage warning you not to use your disk drives while a backup, restore, or compare opera-tion is in progress. You can prevent this message from reappearing each time you load theprogram by checking the Disable This Message box. Otherwise, you proceed the same wayyou would in DOS. You can work in other programs while the backup is proceeding. A beepinforms you when you must change disks.
Performing Intermediate Backups
Two types of intermediate backups are possible: incremental and differential. The differencedepends on the status of the archive bit for selecting files. The incremental backup resetsthe archive bit after completion, and the differential backup does not reset it.
Performing an Incremental Backup
To perform an incremental backup, choose Backup Type and then choose Incremental fromthe dialog box. The backup proceeds in the same way as the full backup. Mark each disk inthe set with the number and date belonging to the increment for this backup.
You might perform an incremental backup every Tuesday and Friday, for example, and run afull backup every two weeks. Under this plan, you accumulate four incremental backup setsbefore you have to repeat the backup cycle and reuse the disks.
No matter what type of backup you perform, the backup programs erase the target disks;therefore, each incremental backup must start on a new target disk. You cannot add back-up files to disks that have been used as part of a set. By default, the backup programs warnyou when the disk you are using is part of an existing backup set and give you the optionsof overwriting the disk, placing a different disk in the drive, or canceling the backup.
Performing a Differential Backup
If you use the differential backup method, you have just one intermediate backup set. Thefirst time you do an intermediate backup in a backup cycle after a full backup, start with disknumber 01 in your intermediate backup set. You might need more than one disk to com-plete the backup. Because the differential method does not reset the archive bit, the nextintermediate backup set includes all the files included in the first intermediate backup set.Consequently, you can reuse the same backup disks for each intermediate backup set. Toperform a differential backup, select Differential from the Backup Type dialog box and pro-ceed as you would with a full backup.
The differential method has the advantage of using fewer backup disks than the incrementalmethod. On the other hand, you retain only one intermediate copy of your files that havebeen modified or created since the previous full backup. If you think you might need toexamine successive iterations of a file, use the incremental method.
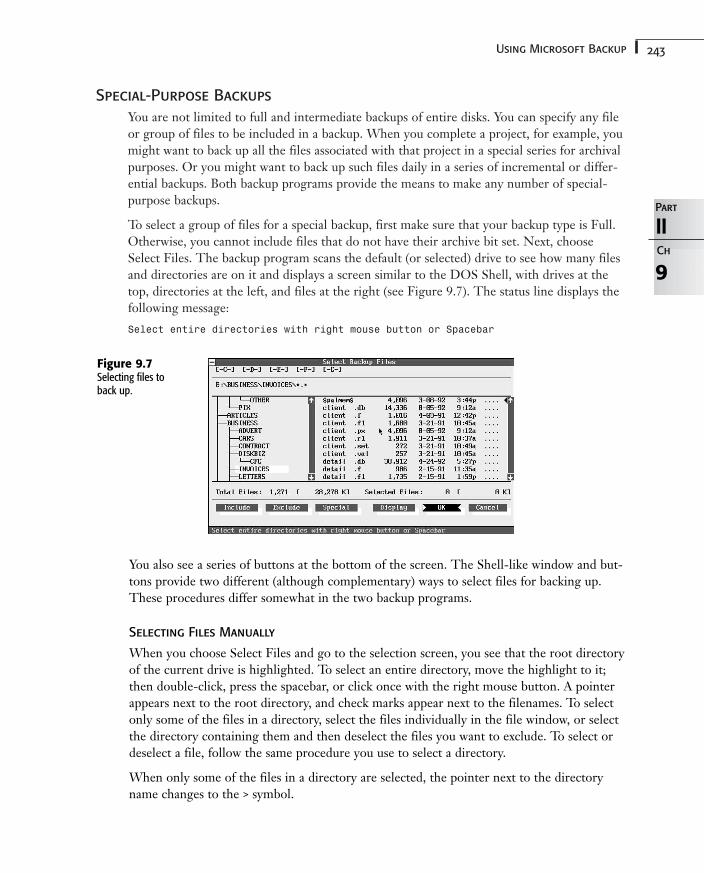
243Using Microsoft Backup
Special-Purpose Backups
You are not limited to full and intermediate backups of entire disks. You can specify any fileor group of files to be included in a backup. When you complete a project, for example, youmight want to back up all the files associated with that project in a special series for archivalpurposes. Or you might want to back up such files daily in a series of incremental or differ-ential backups. Both backup programs provide the means to make any number of special-purpose backups.
To select a group of files for a special backup, first make sure that your backup type is Full.Otherwise, you cannot include files that do not have their archive bit set. Next, chooseSelect Files. The backup program scans the default (or selected) drive to see how many filesand directories are on it and displays a screen similar to the DOS Shell, with drives at thetop, directories at the left, and files at the right (see Figure 9.7). The status line displays thefollowing message:
Select entire directories with right mouse button or Spacebar
9
IIPart
Ch
Figure 9.7Selecting files toback up.
You also see a series of buttons at the bottom of the screen. The Shell-like window and but-tons provide two different (although complementary) ways to select files for backing up.These procedures differ somewhat in the two backup programs.
Selecting Files Manually
When you choose Select Files and go to the selection screen, you see that the root directoryof the current drive is highlighted. To select an entire directory, move the highlight to it;then double-click, press the spacebar, or click once with the right mouse button. A pointerappears next to the root directory, and check marks appear next to the filenames. To selectonly some of the files in a directory, select the files individually in the file window, or selectthe directory containing them and then deselect the files you want to exclude. To select ordeselect a file, follow the same procedure you use to select a directory.
When only some of the files in a directory are selected, the pointer next to the directoryname changes to the > symbol.
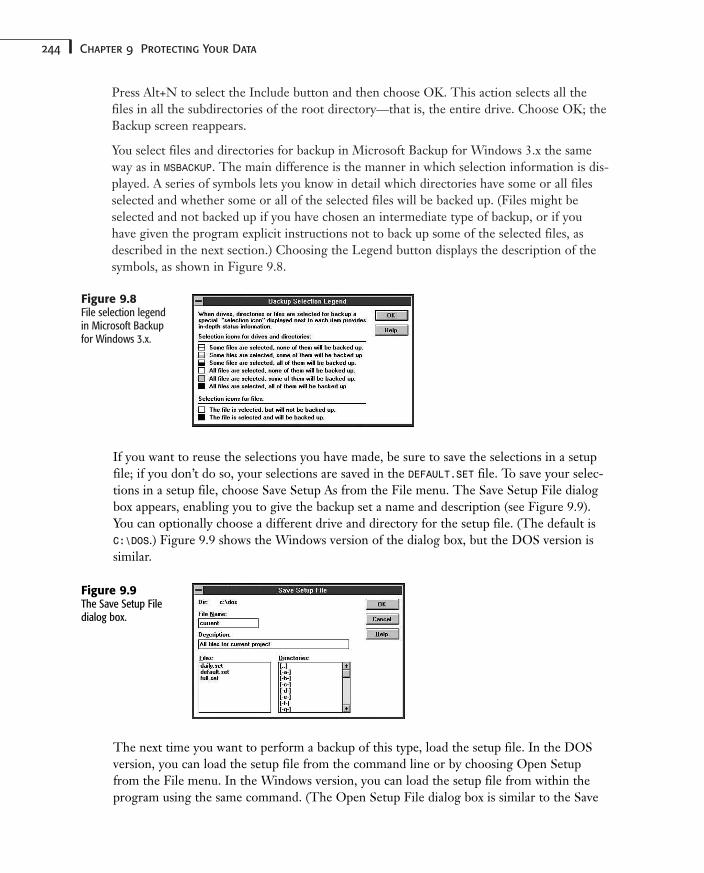
244 Chapter 9 Protecting Your Data
Press Alt+N to select the Include button and then choose OK. This action selects all thefiles in all the subdirectories of the root directory—that is, the entire drive. Choose OK; theBackup screen reappears.
You select files and directories for backup in Microsoft Backup for Windows 3.x the sameway as in MSBACKUP. The main difference is the manner in which selection information is dis-played. A series of symbols lets you know in detail which directories have some or all filesselected and whether some or all of the selected files will be backed up. (Files might beselected and not backed up if you have chosen an intermediate type of backup, or if youhave given the program explicit instructions not to back up some of the selected files, asdescribed in the next section.) Choosing the Legend button displays the description of thesymbols, as shown in Figure 9.8.
Figure 9.8File selection legendin Microsoft Backupfor Windows 3.x.
If you want to reuse the selections you have made, be sure to save the selections in a setupfile; if you don’t do so, your selections are saved in the DEFAULT.SET file. To save your selec-tions in a setup file, choose Save Setup As from the File menu. The Save Setup File dialogbox appears, enabling you to give the backup set a name and description (see Figure 9.9).You can optionally choose a different drive and directory for the setup file. (The default isC:\DOS.) Figure 9.9 shows the Windows version of the dialog box, but the DOS version issimilar.
Figure 9.9The Save Setup Filedialog box.
The next time you want to perform a backup of this type, load the setup file. In the DOSversion, you can load the setup file from the command line or by choosing Open Setupfrom the File menu. In the Windows version, you can load the setup file from within theprogram using the same command. (The Open Setup File dialog box is similar to the Save
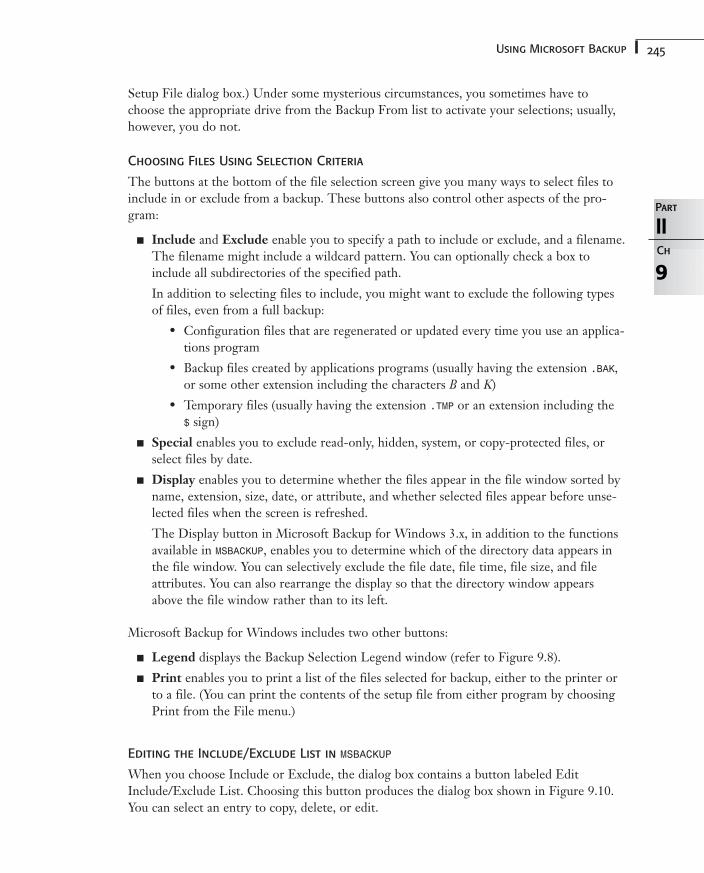
245Using Microsoft Backup
Setup File dialog box.) Under some mysterious circumstances, you sometimes have tochoose the appropriate drive from the Backup From list to activate your selections; usually,however, you do not.
Choosing Files Using Selection Criteria
The buttons at the bottom of the file selection screen give you many ways to select files toinclude in or exclude from a backup. These buttons also control other aspects of the pro-gram:
■ Include and Exclude enable you to specify a path to include or exclude, and a filename.The filename might include a wildcard pattern. You can optionally check a box toinclude all subdirectories of the specified path.
In addition to selecting files to include, you might want to exclude the following typesof files, even from a full backup:
• Configuration files that are regenerated or updated every time you use an applica-tions program
• Backup files created by applications programs (usually having the extension .BAK,or some other extension including the characters B and K)
• Temporary files (usually having the extension .TMP or an extension including the $ sign)
■ Special enables you to exclude read-only, hidden, system, or copy-protected files, orselect files by date.
■ Display enables you to determine whether the files appear in the file window sorted byname, extension, size, date, or attribute, and whether selected files appear before unse-lected files when the screen is refreshed.
The Display button in Microsoft Backup for Windows 3.x, in addition to the functionsavailable in MSBACKUP, enables you to determine which of the directory data appears inthe file window. You can selectively exclude the file date, file time, file size, and fileattributes. You can also rearrange the display so that the directory window appearsabove the file window rather than to its left.
Microsoft Backup for Windows includes two other buttons:
■ Legend displays the Backup Selection Legend window (refer to Figure 9.8).
■ Print enables you to print a list of the files selected for backup, either to the printer orto a file. (You can print the contents of the setup file from either program by choosingPrint from the File menu.)
Editing the Include/Exclude List in MSBACKUP
When you choose Include or Exclude, the dialog box contains a button labeled EditInclude/Exclude List. Choosing this button produces the dialog box shown in Figure 9.10.You can select an entry to copy, delete, or edit.
9
IIPart
Ch
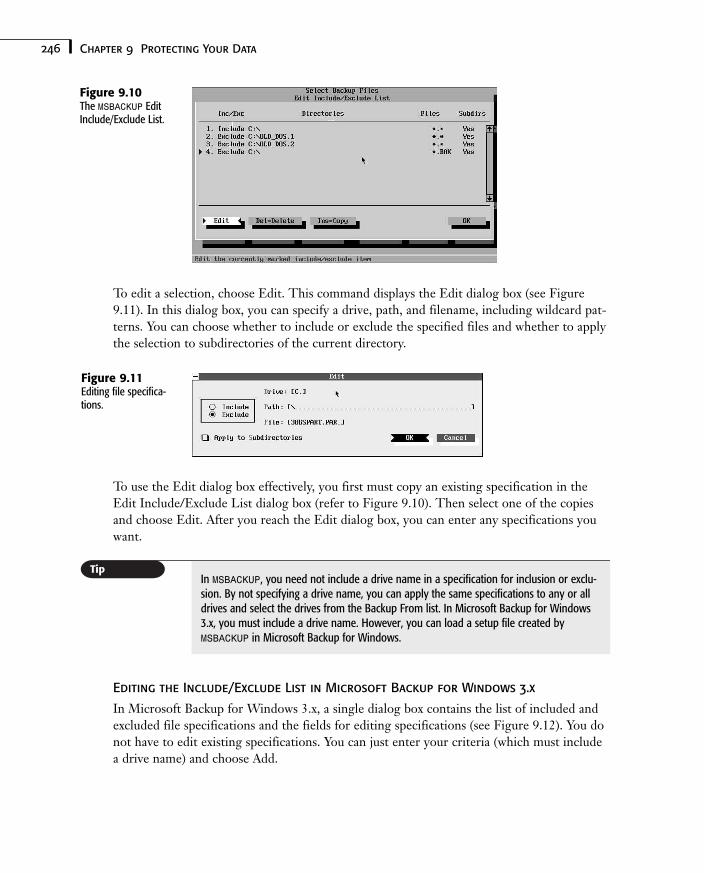
246 Chapter 9 Protecting Your Data
Figure 9.10The MSBACKUP EditInclude/Exclude List.
To edit a selection, choose Edit. This command displays the Edit dialog box (see Figure9.11). In this dialog box, you can specify a drive, path, and filename, including wildcard pat-terns. You can choose whether to include or exclude the specified files and whether to applythe selection to subdirectories of the current directory.
Figure 9.11Editing file specifica-tions.
To use the Edit dialog box effectively, you first must copy an existing specification in theEdit Include/Exclude List dialog box (refer to Figure 9.10). Then select one of the copiesand choose Edit. After you reach the Edit dialog box, you can enter any specifications youwant.
In MSBACKUP, you need not include a drive name in a specification for inclusion or exclu-sion. By not specifying a drive name, you can apply the same specifications to any or alldrives and select the drives from the Backup From list. In Microsoft Backup for Windows3.x, you must include a drive name. However, you can load a setup file created byMSBACKUP in Microsoft Backup for Windows.
Editing the Include/Exclude List in Microsoft Backup for Windows 3.x
In Microsoft Backup for Windows 3.x, a single dialog box contains the list of included andexcluded file specifications and the fields for editing specifications (see Figure 9.12). You donot have to edit existing specifications. You can just enter your criteria (which must includea drive name) and choose Add.
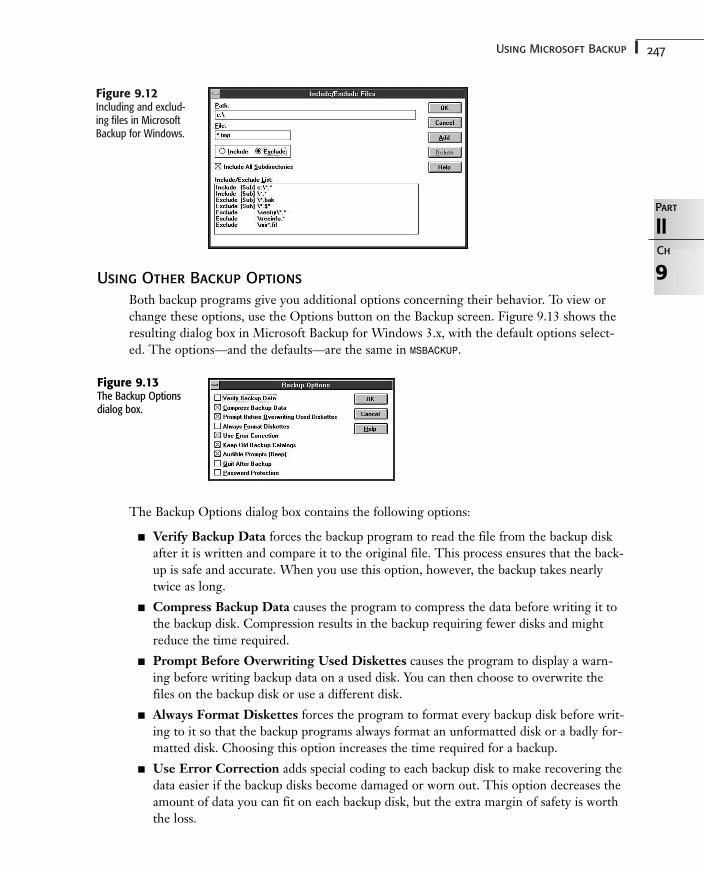
247Using Microsoft Backup
Figure 9.12Including and exclud-ing files in MicrosoftBackup for Windows.
9
IIPart
Ch
Using Other Backup Options
Both backup programs give you additional options concerning their behavior. To view orchange these options, use the Options button on the Backup screen. Figure 9.13 shows theresulting dialog box in Microsoft Backup for Windows 3.x, with the default options select-ed. The options—and the defaults—are the same in MSBACKUP.
Figure 9.13The Backup Optionsdialog box.
The Backup Options dialog box contains the following options:
■ Verify Backup Data forces the backup program to read the file from the backup diskafter it is written and compare it to the original file. This process ensures that the back-up is safe and accurate. When you use this option, however, the backup takes nearlytwice as long.
■ Compress Backup Data causes the program to compress the data before writing it tothe backup disk. Compression results in the backup requiring fewer disks and mightreduce the time required.
■ Prompt Before Overwriting Used Diskettes causes the program to display a warn-ing before writing backup data on a used disk. You can then choose to overwrite thefiles on the backup disk or use a different disk.
■ Always Format Diskettes forces the program to format every backup disk before writ-ing to it so that the backup programs always format an unformatted disk or a badly for-matted disk. Choosing this option increases the time required for a backup.
■ Use Error Correction adds special coding to each backup disk to make recovering thedata easier if the backup disks become damaged or worn out. This option decreases theamount of data you can fit on each backup disk, but the extra margin of safety is worththe loss.
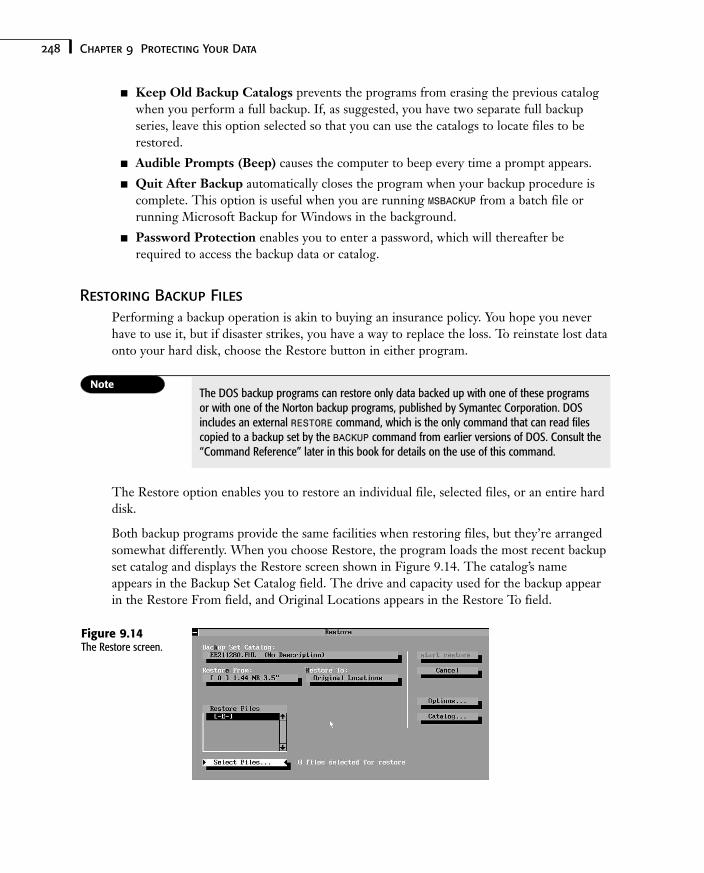
248 Chapter 9 Protecting Your Data
■ Keep Old Backup Catalogs prevents the programs from erasing the previous catalogwhen you perform a full backup. If, as suggested, you have two separate full backupseries, leave this option selected so that you can use the catalogs to locate files to berestored.
■ Audible Prompts (Beep) causes the computer to beep every time a prompt appears.
■ Quit After Backup automatically closes the program when your backup procedure iscomplete. This option is useful when you are running MSBACKUP from a batch file orrunning Microsoft Backup for Windows in the background.
■ Password Protection enables you to enter a password, which will thereafter berequired to access the backup data or catalog.
Restoring Backup Files
Performing a backup operation is akin to buying an insurance policy. You hope you neverhave to use it, but if disaster strikes, you have a way to replace the loss. To reinstate lost dataonto your hard disk, choose the Restore button in either program.
The DOS backup programs can restore only data backed up with one of these programs or with one of the Norton backup programs, published by Symantec Corporation. DOSincludes an external RESTORE command, which is the only command that can read filescopied to a backup set by the BACKUP command from earlier versions of DOS. Consult the“Command Reference” later in this book for details on the use of this command.
The Restore option enables you to restore an individual file, selected files, or an entire harddisk.
Both backup programs provide the same facilities when restoring files, but they’re arrangedsomewhat differently. When you choose Restore, the program loads the most recent backupset catalog and displays the Restore screen shown in Figure 9.14. The catalog’s nameappears in the Backup Set Catalog field. The drive and capacity used for the backup appearin the Restore From field, and Original Locations appears in the Restore To field.
Figure 9.14The Restore screen.

249Using Microsoft Backup
To choose another backup set for restore, select Backup Set Catalog and choose one of theother files listed. If the file is not in the default catalog directory (C:\DOS), choose Catalogand then choose Load; then select the drive and directory from the appropriate list beforechoosing the catalog file.
If your hard disk contains no catalog file for the backup series from which you want to restore,choose Catalog and then Retrieve. The program asks you to place the last disk of the backupseries in your drive, and the backup program reads the catalog from the disk. If the programcannot read the catalog, the catalog is missing, or the disk is damaged, choose Catalog andthen Rebuild. The program asks you to insert each backup disk from the series beginning withdisk 01. The backup program reconstructs the catalog from the data on the backup disks.
The Catalog command appears on a button in MSBACKUP and on the menu bar inMicrosoft Backup for Windows 3.x.
By default, the programs restore files to their original locations. If the file’s original directo-ry is no longer on the destination disk, the program creates the directory before restoringthe file. The programs make directory entries for files that are no longer on the destinationdisk and allocate the next available space in the FAT for the restored file’s allocation.
You can restore to other drives or other directories. To do so, choose Restore To, and selectOther Drives or Other Directories. You might want to use this option to restore an olderversion of a file without destroying your current version. By default, the programs automati-cally overwrite existing files of the same name in the same location. If you choose either ofthe alternative locations, you have a chance to enter both a drive name and directory pathafter you begin the restore.
You can restore all or only some of the files in a backup set. To restore all the files, select thedrive or drives in the Restore Files list. This action selects all the files in the backup set thatwere originally on the selected drive.
To select individual files to restore, choose Select Files. You again see a screen similar to theDOS Shell screen. However, only those drives included in the backup appear on the drivebar, and no filenames appear in the file window if the current directory did not include anyfiles that were backed up. In Microsoft Backup for Windows 3.x, directories that contain nofiles in the backup set appear in light gray. You select files and directories to restore in thesame way you selected files and directories for backup.
When the correct entries appear in all fields of the Restore screen, choose Start Restore.Like the Backup module, the Restore module prompts you for the disks of the backup set.
Restoring a full backup set to a freshly formatted disk eliminates any file fragmentation thatmight have existed on the disk when you backed up the files. Restoring an incrementalbackup set, however, might result in fragmented destination files. As you might recall, frag-mentation doesn’t affect the file’s integrity, but it might slow disk performance slightly.
9
IIPart
Ch
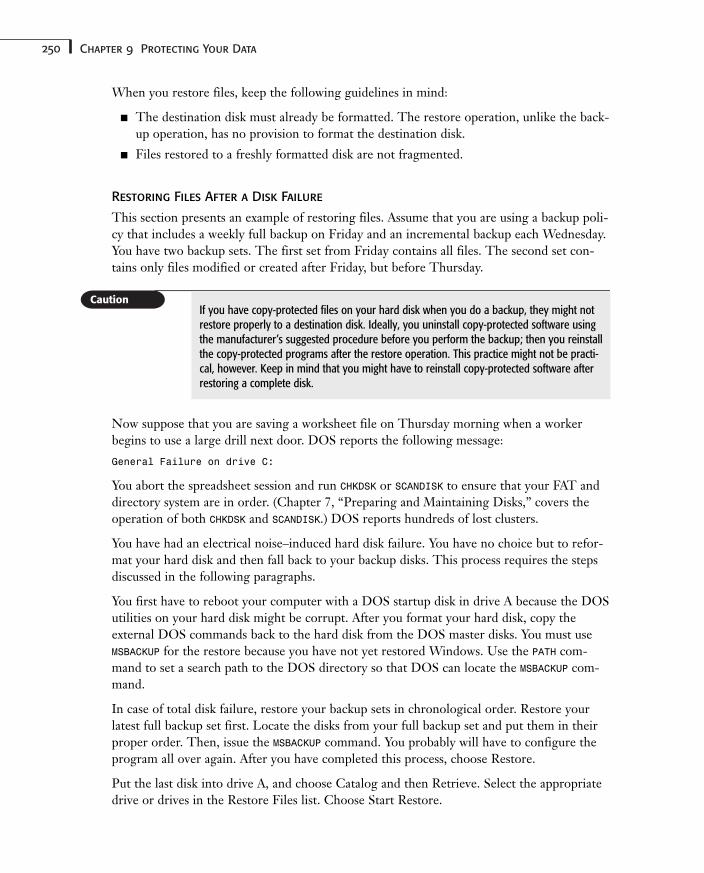
250 Chapter 9 Protecting Your Data
When you restore files, keep the following guidelines in mind:
■ The destination disk must already be formatted. The restore operation, unlike the back-up operation, has no provision to format the destination disk.
■ Files restored to a freshly formatted disk are not fragmented.
Restoring Files After a Disk Failure
This section presents an example of restoring files. Assume that you are using a backup poli-cy that includes a weekly full backup on Friday and an incremental backup each Wednesday.You have two backup sets. The first set from Friday contains all files. The second set con-tains only files modified or created after Friday, but before Thursday.
If you have copy-protected files on your hard disk when you do a backup, they might notrestore properly to a destination disk. Ideally, you uninstall copy-protected software usingthe manufacturer’s suggested procedure before you perform the backup; then you reinstallthe copy-protected programs after the restore operation. This practice might not be practi-cal, however. Keep in mind that you might have to reinstall copy-protected software afterrestoring a complete disk.
Now suppose that you are saving a worksheet file on Thursday morning when a workerbegins to use a large drill next door. DOS reports the following message:
General Failure on drive C:
You abort the spreadsheet session and run CHKDSK or SCANDISK to ensure that your FAT anddirectory system are in order. (Chapter 7, “Preparing and Maintaining Disks,” covers theoperation of both CHKDSK and SCANDISK.) DOS reports hundreds of lost clusters.
You have had an electrical noise–induced hard disk failure. You have no choice but to refor-mat your hard disk and then fall back to your backup disks. This process requires the stepsdiscussed in the following paragraphs.
You first have to reboot your computer with a DOS startup disk in drive A because the DOSutilities on your hard disk might be corrupt. After you format your hard disk, copy theexternal DOS commands back to the hard disk from the DOS master disks. You must useMSBACKUP for the restore because you have not yet restored Windows. Use the PATH com-mand to set a search path to the DOS directory so that DOS can locate the MSBACKUP com-mand.
In case of total disk failure, restore your backup sets in chronological order. Restore yourlatest full backup set first. Locate the disks from your full backup set and put them in theirproper order. Then, issue the MSBACKUP command. You probably will have to configure theprogram all over again. After you have completed this process, choose Restore.
Put the last disk into drive A, and choose Catalog and then Retrieve. Select the appropriatedrive or drives in the Restore Files list. Choose Start Restore.
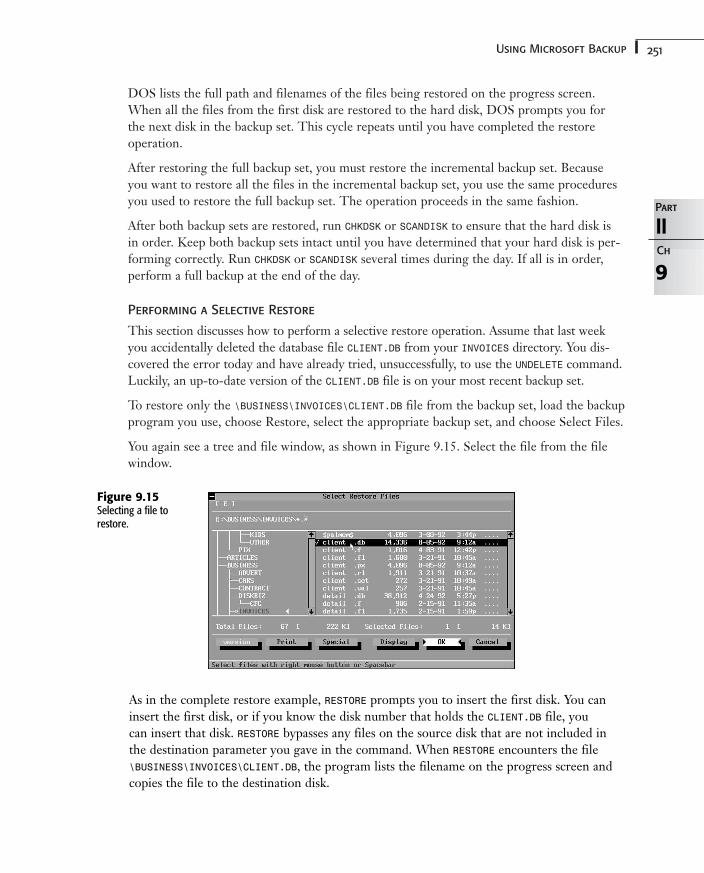
251Using Microsoft Backup
DOS lists the full path and filenames of the files being restored on the progress screen.When all the files from the first disk are restored to the hard disk, DOS prompts you forthe next disk in the backup set. This cycle repeats until you have completed the restoreoperation.
After restoring the full backup set, you must restore the incremental backup set. Becauseyou want to restore all the files in the incremental backup set, you use the same proceduresyou used to restore the full backup set. The operation proceeds in the same fashion.
After both backup sets are restored, run CHKDSK or SCANDISK to ensure that the hard disk is in order. Keep both backup sets intact until you have determined that your hard disk is per-forming correctly. Run CHKDSK or SCANDISK several times during the day. If all is in order,perform a full backup at the end of the day.
Performing a Selective Restore
This section discusses how to perform a selective restore operation. Assume that last weekyou accidentally deleted the database file CLIENT.DB from your INVOICES directory. You dis-covered the error today and have already tried, unsuccessfully, to use the UNDELETE command.Luckily, an up-to-date version of the CLIENT.DB file is on your most recent backup set.
To restore only the \BUSINESS\INVOICES\CLIENT.DB file from the backup set, load the backupprogram you use, choose Restore, select the appropriate backup set, and choose Select Files.
You again see a tree and file window, as shown in Figure 9.15. Select the file from the filewindow.
9
IIPart
Ch
Figure 9.15Selecting a file torestore.
As in the complete restore example, RESTORE prompts you to insert the first disk. You caninsert the first disk, or if you know the disk number that holds the CLIENT.DB file, you can insert that disk. RESTORE bypasses any files on the source disk that are not included inthe destination parameter you gave in the command. When RESTORE encounters the file\BUSINESS\INVOICES\CLIENT.DB, the program lists the filename on the progress screen andcopies the file to the destination disk.
252 Chapter 9 Protecting Your Data
Understanding Computer VirusesIn working with computers, you probably have encountered situations in which the comput-er didn’t do what you wanted it to do. Frustrating as these situations can be, they simplyrepresent a misunderstanding between you and your computer.
Computer viruses are quite different; viruses are supposed to do harm to your computer.Viruses are programs, written by unscrupulous programmers, designed to make copies ofthemselves and spread from one computer to another, just as a biological virus spreads inpeople. Usually, viruses also damage your computer by destroying legitimate data and pro-grams. Creating a virus is against the law, but depraved programmers still spread viruses forthe same reason that vandals throw bricks through windows—to cause senseless damage.
To protect yourself, you must understand how viruses work. The following sections explaincomputer viruses in detail.
Understanding How Viruses Spread
Computer viruses come in thousands of variations, each of which works a little differently.How viruses spread from one computer to another, and the damage they do, depends onhow the virus is written.
A virus begins in the hands of an experienced but morally corrupt programmer who is eithermalicious or insensitive to the damage caused. The programmer usually starts with an exist-ing program (anything from a game to a word processing program) and adds a few carefullycrafted instructions that modify the workings of the program. This person then distributesthe altered program to other users, either on a floppy disk or through an electronic bulletinboard.
When the unsuspecting recipient runs the altered software, the program might appear towork correctly, but the added code—the virus—performs some type of operation that thevictim doesn’t want. This operation might delete important files or erase the hard diskentirely. The virus also might display a taunting message. The most dangerous viruses, how-ever, do no immediate damage; they might alter the operating system by planting a kind oftime bomb. Days, weeks, or months after the original infected program ran, the operatingsystem might suddenly go wild, deleting files and destroying data.
Worse, most viruses are designed to spread to other computers. Between the time when avirus infects a computer and the time when it begins to damage that computer, the virusmight copy itself onto every floppy that the victim inserts into the computer. Because thevictim is unaware that the computer is infected until the virus begins to do damage, he orshe might unwittingly spread hundreds of copies to friends.
Strange as it might seem, more than 10,000 viruses exist today. You should be concernedabout computer viruses, and you should be serious about protecting your system. However,you might derive some comfort from knowing that your computer can become infected inonly one of two ways:
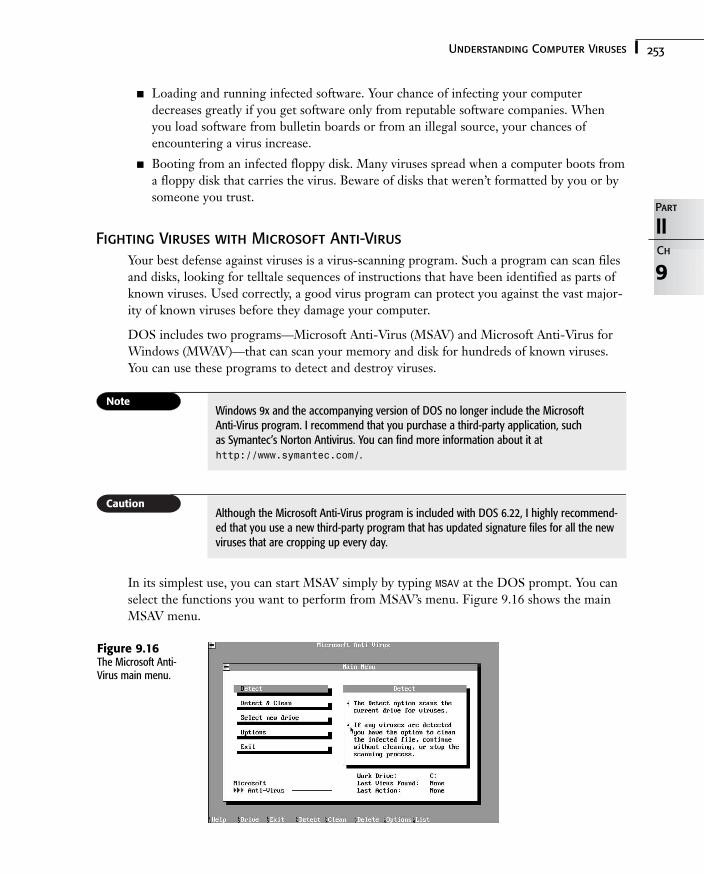
253Understanding Computer Viruses
9
IIPart
Ch
■ Loading and running infected software. Your chance of infecting your computerdecreases greatly if you get software only from reputable software companies. Whenyou load software from bulletin boards or from an illegal source, your chances ofencountering a virus increase.
■ Booting from an infected floppy disk. Many viruses spread when a computer boots froma floppy disk that carries the virus. Beware of disks that weren’t formatted by you or bysomeone you trust.
Fighting Viruses with Microsoft Anti-Virus
Your best defense against viruses is a virus-scanning program. Such a program can scan filesand disks, looking for telltale sequences of instructions that have been identified as parts ofknown viruses. Used correctly, a good virus program can protect you against the vast major-ity of known viruses before they damage your computer.
DOS includes two programs—Microsoft Anti-Virus (MSAV) and Microsoft Anti-Virus forWindows (MWAV)—that can scan your memory and disk for hundreds of known viruses.You can use these programs to detect and destroy viruses.
Windows 9x and the accompanying version of DOS no longer include the Microsoft Anti-Virus program. I recommend that you purchase a third-party application, such as Symantec’s Norton Antivirus. You can find more information about it athttp://www.symantec.com/.
Although the Microsoft Anti-Virus program is included with DOS 6.22, I highly recommend-ed that you use a new third-party program that has updated signature files for all the newviruses that are cropping up every day.
In its simplest use, you can start MSAV simply by typing MSAV at the DOS prompt. You canselect the functions you want to perform from MSAV’s menu. Figure 9.16 shows the mainMSAV menu.
Figure 9.16The Microsoft Anti-Virus main menu.
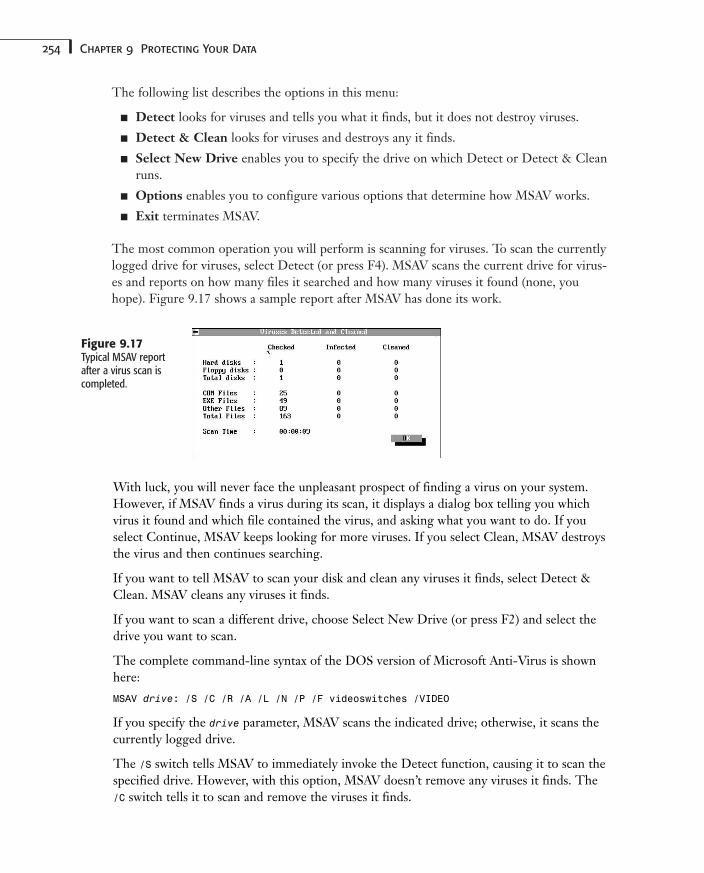
254 Chapter 9 Protecting Your Data
The following list describes the options in this menu:
■ Detect looks for viruses and tells you what it finds, but it does not destroy viruses.
■ Detect & Clean looks for viruses and destroys any it finds.
■ Select New Drive enables you to specify the drive on which Detect or Detect & Cleanruns.
■ Options enables you to configure various options that determine how MSAV works.
■ Exit terminates MSAV.
The most common operation you will perform is scanning for viruses. To scan the currentlylogged drive for viruses, select Detect (or press F4). MSAV scans the current drive for virus-es and reports on how many files it searched and how many viruses it found (none, youhope). Figure 9.17 shows a sample report after MSAV has done its work.
Figure 9.17Typical MSAV reportafter a virus scan iscompleted.
With luck, you will never face the unpleasant prospect of finding a virus on your system.However, if MSAV finds a virus during its scan, it displays a dialog box telling you whichvirus it found and which file contained the virus, and asking what you want to do. If youselect Continue, MSAV keeps looking for more viruses. If you select Clean, MSAV destroysthe virus and then continues searching.
If you want to tell MSAV to scan your disk and clean any viruses it finds, select Detect &Clean. MSAV cleans any viruses it finds.
If you want to scan a different drive, choose Select New Drive (or press F2) and select thedrive you want to scan.
The complete command-line syntax of the DOS version of Microsoft Anti-Virus is shownhere:
MSAV drive: /S /C /R /A /L /N /P /F videoswitches /VIDEO
If you specify the drive parameter, MSAV scans the indicated drive; otherwise, it scans thecurrently logged drive.
The /S switch tells MSAV to immediately invoke the Detect function, causing it to scan thespecified drive. However, with this option, MSAV doesn’t remove any viruses it finds. The/C switch tells it to scan and remove the viruses it finds.
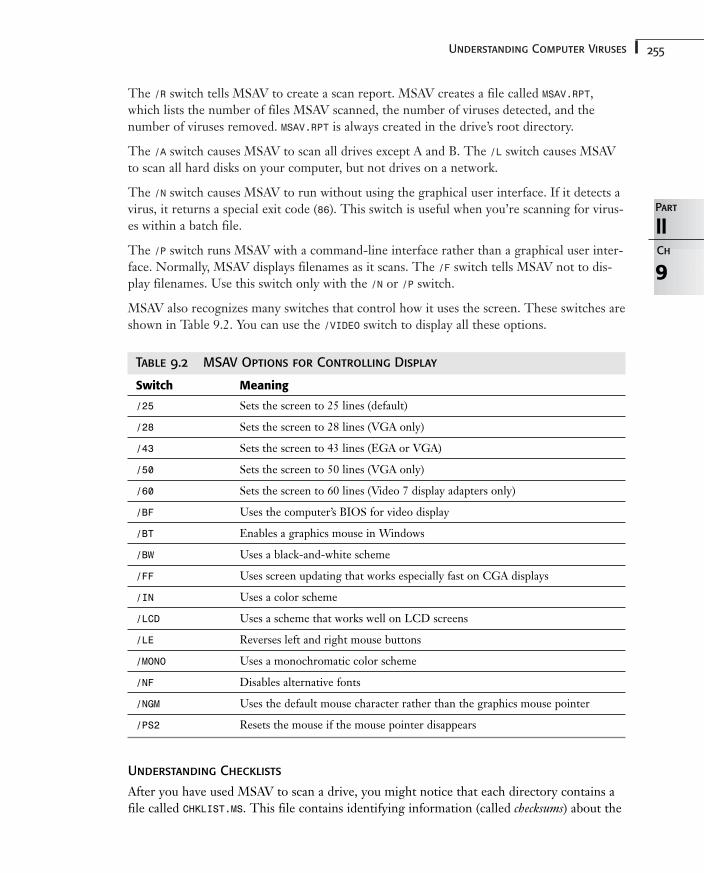
255Understanding Computer Viruses
The /R switch tells MSAV to create a scan report. MSAV creates a file called MSAV.RPT,which lists the number of files MSAV scanned, the number of viruses detected, and thenumber of viruses removed. MSAV.RPT is always created in the drive’s root directory.
The /A switch causes MSAV to scan all drives except A and B. The /L switch causes MSAVto scan all hard disks on your computer, but not drives on a network.
The /N switch causes MSAV to run without using the graphical user interface. If it detects avirus, it returns a special exit code (86). This switch is useful when you’re scanning for virus-es within a batch file.
The /P switch runs MSAV with a command-line interface rather than a graphical user inter-face. Normally, MSAV displays filenames as it scans. The /F switch tells MSAV not to dis-play filenames. Use this switch only with the /N or /P switch.
MSAV also recognizes many switches that control how it uses the screen. These switches areshown in Table 9.2. You can use the /VIDEO switch to display all these options.
Table 9.2 MSAV Options for Controlling Display
Switch Meaning
/25 Sets the screen to 25 lines (default)
/28 Sets the screen to 28 lines (VGA only)
/43 Sets the screen to 43 lines (EGA or VGA)
/50 Sets the screen to 50 lines (VGA only)
/60 Sets the screen to 60 lines (Video 7 display adapters only)
/BF Uses the computer’s BIOS for video display
/BT Enables a graphics mouse in Windows
/BW Uses a black-and-white scheme
/FF Uses screen updating that works especially fast on CGA displays
/IN Uses a color scheme
/LCD Uses a scheme that works well on LCD screens
/LE Reverses left and right mouse buttons
/MONO Uses a monochromatic color scheme
/NF Disables alternative fonts
/NGM Uses the default mouse character rather than the graphics mouse pointer
/PS2 Resets the mouse if the mouse pointer disappears
Understanding Checklists
After you have used MSAV to scan a drive, you might notice that each directory contains afile called CHKLIST.MS. This file contains identifying information (called checksums) about the
9
IIPart
Ch
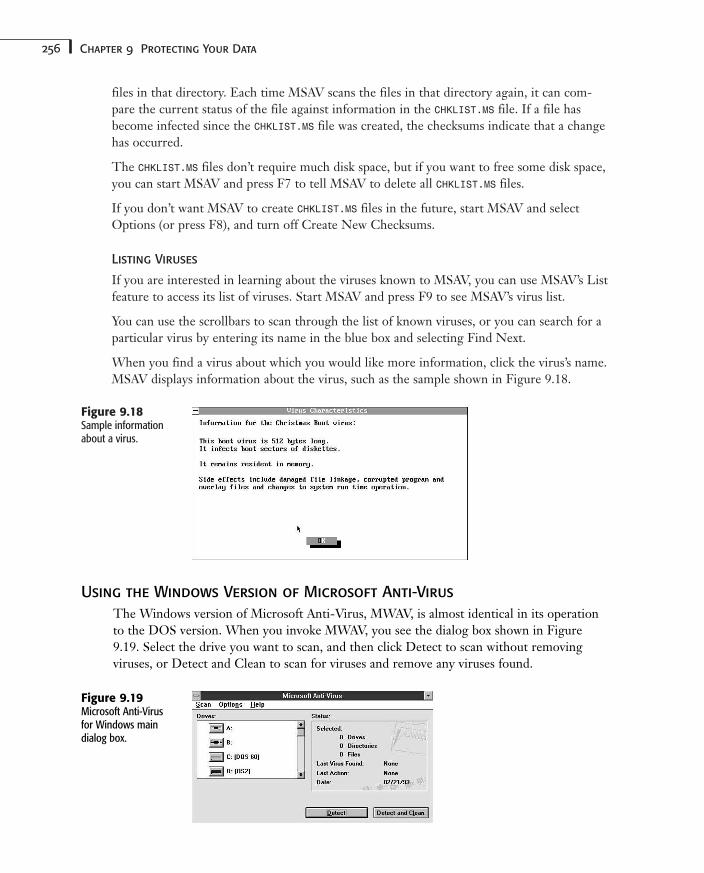
256 Chapter 9 Protecting Your Data
files in that directory. Each time MSAV scans the files in that directory again, it can com-pare the current status of the file against information in the CHKLIST.MS file. If a file hasbecome infected since the CHKLIST.MS file was created, the checksums indicate that a changehas occurred.
The CHKLIST.MS files don’t require much disk space, but if you want to free some disk space,you can start MSAV and press F7 to tell MSAV to delete all CHKLIST.MS files.
If you don’t want MSAV to create CHKLIST.MS files in the future, start MSAV and selectOptions (or press F8), and turn off Create New Checksums.
Listing Viruses
If you are interested in learning about the viruses known to MSAV, you can use MSAV’s Listfeature to access its list of viruses. Start MSAV and press F9 to see MSAV’s virus list.
You can use the scrollbars to scan through the list of known viruses, or you can search for aparticular virus by entering its name in the blue box and selecting Find Next.
When you find a virus about which you would like more information, click the virus’s name.MSAV displays information about the virus, such as the sample shown in Figure 9.18.
Figure 9.18Sample informationabout a virus.
Using the Windows Version of Microsoft Anti-Virus
The Windows version of Microsoft Anti-Virus, MWAV, is almost identical in its operationto the DOS version. When you invoke MWAV, you see the dialog box shown in Figure9.19. Select the drive you want to scan, and then click Detect to scan without removingviruses, or Detect and Clean to scan for viruses and remove any viruses found.
Figure 9.19Microsoft Anti-Virusfor Windows maindialog box.
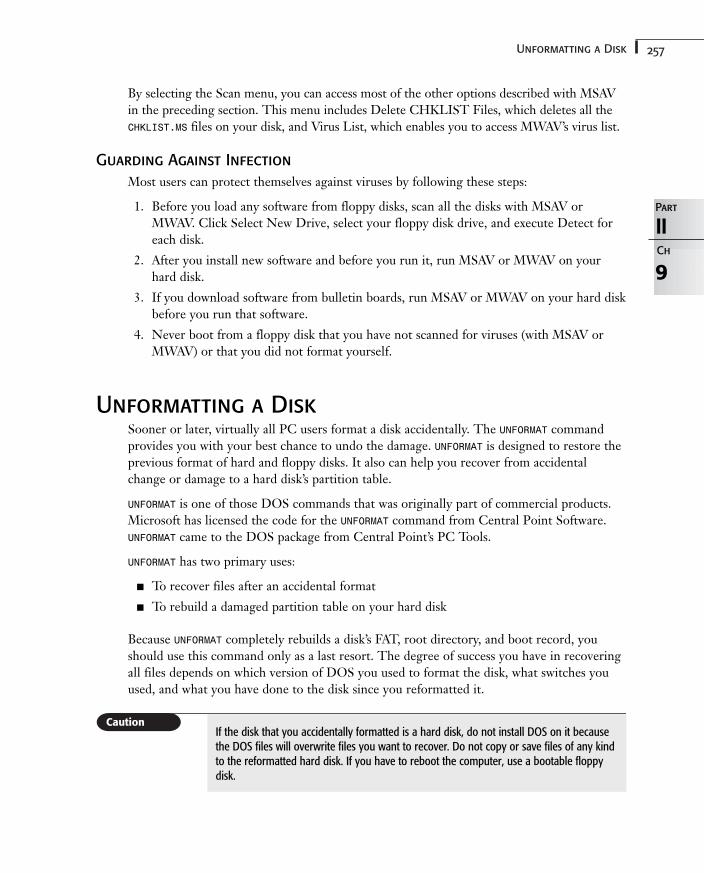
257Unformatting a Disk
9
IIPart
Ch
By selecting the Scan menu, you can access most of the other options described with MSAVin the preceding section. This menu includes Delete CHKLIST Files, which deletes all theCHKLIST.MS files on your disk, and Virus List, which enables you to access MWAV’s virus list.
Guarding Against Infection
Most users can protect themselves against viruses by following these steps:
1. Before you load any software from floppy disks, scan all the disks with MSAV orMWAV. Click Select New Drive, select your floppy disk drive, and execute Detect foreach disk.
2. After you install new software and before you run it, run MSAV or MWAV on yourhard disk.
3. If you download software from bulletin boards, run MSAV or MWAV on your hard diskbefore you run that software.
4. Never boot from a floppy disk that you have not scanned for viruses (with MSAV orMWAV) or that you did not format yourself.
Unformatting a DiskSooner or later, virtually all PC users format a disk accidentally. The UNFORMAT commandprovides you with your best chance to undo the damage. UNFORMAT is designed to restore theprevious format of hard and floppy disks. It also can help you recover from accidentalchange or damage to a hard disk’s partition table.
UNFORMAT is one of those DOS commands that was originally part of commercial products.Microsoft has licensed the code for the UNFORMAT command from Central Point Software.UNFORMAT came to the DOS package from Central Point’s PC Tools.
UNFORMAT has two primary uses:
■ To recover files after an accidental format
■ To rebuild a damaged partition table on your hard disk
Because UNFORMAT completely rebuilds a disk’s FAT, root directory, and boot record, youshould use this command only as a last resort. The degree of success you have in recoveringall files depends on which version of DOS you used to format the disk, what switches youused, and what you have done to the disk since you reformatted it.
If the disk that you accidentally formatted is a hard disk, do not install DOS on it becausethe DOS files will overwrite files you want to recover. Do not copy or save files of any kindto the reformatted hard disk. If you have to reboot the computer, use a bootable floppydisk.
258 Chapter 9 Protecting Your Data
The FORMAT command creates a MIRROR image file during the safe format procedure. TheMIRROR image file contains a copy of the disk’s FAT, root directory, and boot record. Itsaves this information in a normally unused portion of the disk. At the same time, FORMATcreates a hidden file named MIRORSAV.FIL, which contains information required by DOSto locate the MIRROR image file. The MIRORSAV.FIL file is given the hidden attribute, so it is not “visible” by the DIR command unless you use the /AH switch. If you use the /Uswitch with FORMAT, however, no MIRROR image file is created, and UNFORMAT does notwork.
When you want to use UNFORMAT after an accidental format, use the following syntax:
UNFORMAT d: /J /L /P /TEST /U
d: is the drive that contains the disk to be unformatted.
/J causes UNFORMAT to verify that the MIRROR image file accurately reflects the current diskinformation.
/L searches a formatted disk and lists the file and directory names found.
/P sends all output to a printer.
/TEST provides a test run to indicate whether UNFORMAT can unformat a disk successfully.
/U attempts to unformat a disk without the benefit of a MIRROR image file.
When you want to use UNFORMAT to rebuild a hard disk partition table, use the following syntax:
UNFORMAT /PARTN /L /P
/PARTN causes the command to try to rebuild the hard disk partition tables.
/L displays the current partition table.
/P sends all output to a printer.
Recovering from an Accidental Format
Suppose that you just accidentally formatted a hard disk (or used the DOS RECOVER com-mand incorrectly—see Appendix F, “Command Reference,” for a discussion of RECOVER). Inthis case, you need to use UNFORMAT, which uses the information stored in the MIRROR imagefile to restore the FAT, root directory, and boot record to their preformatting condition.
To unformat a disk that was safe-formatted, type the following command at the DOSprompt:
UNFORMAT d:
(Remember to replace the d: with the letter of the drive that contains the disk you want tounformat.) UNFORMAT first tells you to insert a disk into the specified drive and press Enter.
259Unformatting a Disk
When you follow these instructions, the computer beeps and displays a screen similar tothis:
Restores the system area of your disk withthe image file created by MIRROR
WARNING! WARNING!
This should be used ONLY to recover from the inadvertent useof the DOS FORMAT command or the DOS RECOVER command.Any other use of UNFORMAT may cause you to lose data!Files modified since the MIRROR file was created may be lost.
As you can see, UNFORMAT first tries to scare you by giving you messages such as WARNING!Then, it settles down and searches the disk for the MIRROR file created the last time the diskwas formatted. It then displays a message similar to the following:
The last time MIRROR was used was at hh:mm on mm-dd-yy.
For the hh:mm and mm-dd-yy information in this message, UNFORMAT substitutes the time anddate at which MIRROR.FIL was created. UNFORMAT again causes your computer to beep andthen displays the following message, substituting the correct drive letter for d:
The MIRROR image file has been validated.
Are you SURE you want to update the SYSTEM areaof your drive d (Y/N)?
If you choose to use the MIRROR information, UNFORMAT restores the FAT, root directory, andboot record stored in the MIRROR file. Unfortunately, UNFORMAT might have problems fullyrestoring fragmented files. If UNFORMAT cannot restore a file due to fragmentation, it displaysa prompt asking whether you want the file erased or truncated. This incapability to dealwith file fragmentation severely limits the usefulness of UNFORMAT. Hard disks begin to frag-ment files from the first day you start using them.
Don’t think of the UNFORMAT command as a magic bullet that will keep you and your disksfrom peril. Rather, think of it as a last-ditch chance to save you from a mistake that has onlya 50/50 chance of being totally successful. Nothing will save you from data losses betterthan a rigorously applied system of disk backups.
Recovering from an Accidental Format Without a MIRROR Image File
Even if a MIRROR image file is not available for a formatted disk, the UNFORMAT commandmight be able to recover most of the data. This process takes more time than if a MIRRORimage file were available, however, and it does not recover files that were in the disk’s rootdirectory.
To use UNFORMAT to unformat a hard disk on which no current MIRROR image file exists, usethe following syntax:
UNFORMAT d: /U /L /TEST /P
Replace d: with the letter of the drive that contains the accidentally formatted disk.
9
IIPart
Ch
260 Chapter 9 Protecting Your Data
The /U switch stands for “unformat” and tells UNFORMAT that you are not using a MIRRORimage file created by FORMAT.
The optional /L parameter causes UNFORMAT to list all files and directories found during theUNFORMAT operation. Similarly, /P causes UNFORMAT to send the entire UNFORMAT process toyour printer.
Use the /TEST option to run a simulation of the process so that you can see which filesUNFORMAT can recover before any changes are written to the hard disk.
After you execute the command, UNFORMAT displays the following message:
CAUTION !!
This attempts to recover all files lost after aFORMAT, assuming you’ve NOT been using MIRROR. Thismethod cannot guarantee complete recovery of your files.
The search-phase is safe: nothing is altered on the disk.You will be prompted again before changes are written tothe disk.Using drive d:Are you SURE you want to do this?If so, type Y; to cancel the operation, press any other key.
To continue with the unformat operation, press Y and then press Enter. Press any other keyto cancel the process. While searching the disk, UNFORMAT displays the following message:
Searching diskpp% searched, mm subdirectories found.Files found in the root: 0Subdirectories found in the root: mm
UNFORMAT does not find any root-level files, but it substitutes for mm the number of root-levelsubdirectories it finds. (Refer to Chapter 5, “Understanding Files and Directories,” for adiscussion of files and the root directory.) As UNFORMAT searches the disk, the command con-tinually updates the last message, substituting the percentage of the disk read for pp and thenumber of subdirectories found for mm.
After UNFORMAT completes its search of the disk’s data, the command lists the subdirectoriesfound. Depending on which version of the FORMAT command you used, UNFORMAT might ormight not be able to recover the names of subdirectories. If it cannot, UNFORMAT gives eachsubdirectory a name in the format SUBDIR.nnn, with nnn representing a number rangingfrom 1 to 512. If UNFORMAT can find the subdirectory names, it displays them and then dis-plays a message similar to this one:
Walking the directory tree to locate all files_
Path=D:\Path=D:\DIRNAME\Path=D:\
261Unformatting a Disk
In this message, D is the drive name, and DIRNAME is the subdirectory name. This message isrepeated for each subdirectory found. UNFORMAT then lists the number of files found, includ-ing subdirectories, and displays the following warning:
Files found: nnWarning! The next step writes changes to disk.Are you sure you want to do this?
If so, type Y; to cancel the operation, press any other key.
To proceed with the unformat operation, press Y and then Enter. Again, UNFORMAT has prob-lems dealing with fragmented files, so you have to decide whether to truncate or delete frag-mented files.
Rebuilding a Partition Table
UNFORMAT also enables you to recover from a corrupted hard disk partition table. Such anerror normally generates this DOS message:
Invalid drive specification
To recover from this problem, you first must issue the UNFORMAT command with the /PARTNswitch and then use UNFORMAT without this parameter to restore the FAT, root directory, andboot sector.
To recover from a corrupted hard disk partition table, follow these steps:
1. Boot your computer (with a floppy disk, if necessary) and display the DOS prompt.
2. Change to a drive that contains the UNFORMAT file, UNFORMAT.COM. If your only hard diskis inaccessible because of partition-table corruption, use a copy of DOS on a floppydisk. (You can find UNFORMAT.COM on the startup disk, one of the disks used during DOSinstallation.)
3. Type the following command at the DOS prompt:UNFORMAT /PARTN
UNFORMAT prompts you to insert the disk containing the file PARTNSAV.FIL and to typethe name of that disk drive.
4. Insert the disk that contains the copy of the partition table created by MIRROR.
5. Type the letter of this drive and press Enter. MIRROR rebuilds the partition table fromthe file PARTNSAV.FIL found on the floppy disk. After UNFORMAT rebuilds the partitiontable, the program prompts you to insert a master DOS disk into drive A and pressEnter. To complete this process, you need a bootable backup disk that contains yoursystem files and the UNFORMAT command.
6. Insert a bootable DOS disk into drive A and then press Enter. UNFORMAT causes yourcomputer to reboot.
7. Use the copy of UNFORMAT on the floppy to restore the FAT, root directory, and bootrecord, following the steps described in “Recovering from an Accidental Format” earlierin this chapter.
9
IIPart
Ch
262 Chapter 9 Protecting Your Data
Recovering Deleted Files with UNDELETEBecause of the way DOS deletes files, reversing the process is relatively easy, but only if youact promptly. When DOS deletes a file, it changes the first character in the filename record-ed in the directory area of the disk so that the target file no longer is listed. As far as DOS isconcerned, the file is gone. DOS does not erase the filename entry completely, or overwriteany data in the file, until it needs the space for another file.
Eventually, as you add new files to the disk, DOS reallocates the disk space assigned to thedeleted file, causing new data to overwrite the old data. Soon, the file and its data are gonepermanently. But if you use the UNDELETE command before DOS has a chance to overwrite a deleted file’s data, you can reverse the DELETE operation.
If you discover that you accidentally deleted a file, immediately try to recover it. The longeryou wait, the less likely you are to recover the file completely by using the UNDELETE com-mand.
Using UNDELETE from the Command Line
UNDELETE provides three levels of protection against losing accidentally deleted files: deletesentry, delete tracking, and standard. Both the delete sentry and delete tracker optionsrequire you to load the memory-resident portion of UNDELETE, which requires just over13KB of memory.
Delete sentry gives you the highest level of protection by creating a hidden subdirectorycalled SENTRY. As files are deleted, the memory-resident portion of UNDELETE moves copies ofthe files into this directory without changing the FAT entry for the file. UNDELETE regulatesthe amount of disk space that can be taken up by files stored in the SENTRY directory toabout 7% of the disk’s total space. As files are deleted and the SENTRY directory fills up, theoldest files in the directory are deleted for real to make room for recent additions.
Delete tracker’s protection is one step down from the sentry. It uses a hidden file namedPCTRACKER.DEL to record information about deleted files. When files are deleted, the deletetracker feature releases the file’s FAT entry, making the disk space available to another file.You can undelete the file as long as no other file has been written to that location. Usingdelete tracker makes undelete operations easier because it stores the file’s original names butdoes nothing to protect the file’s location on the disk from being overwritten. Delete track-er, however, uses much less disk space.
The standard level of protection depends on a deleted file’s directory entry and disk locationremaining intact. If neither location has been overwritten, the standard undelete protectionsimply restores the directory entry as being no longer deleted. Despite the standardmethod’s relative lack of protection, most DOS users rely on the standard method becausememory is not lost due to loading the memory-resident version of UNDELETE, and disk spaceis not used to store deleted files or information about deleted files.
263Recovering Deleted Files with UNDELETE
The UNDELETE command has the following two syntactical forms:
UNDELETE FileNameExpression /DS|/DT|/DOS
UNDELETE /LIST|/ALL|/PURGE[drive]|/STATUS|/LOAD|/UNLOAD |/S[drive]Tdrive[-entries]]
The FileNameExpression of the first form specifies the file or files to be undeleted. You canuse wildcards to indicate multiple files. By default, if you do not specify a filename, DOSattempts to undelete all deleted files in the current directory. If you do not specify a methodusing the three switches of the first form, DOS attempts to use delete sentry if available,then tracking if available, and then DOS standard if neither of the other methods is avail-able.
The /DS switch tells DOS to use the delete sentry method, recovering only files stored inthe SENTRY directory. You are prompted to confirm undeletion of each file.
The /DT switch instructs DOS to use the delete tracking method of recovering the specifiedfiles. You are prompted to confirm undeletion of each file.
/DOS causes DOS, in its attempt to undelete files, to rely on the information still stored inthe DOS directory instead of using one of the other more protective methods.
/LIST displays a list of the files that can be recovered without attempting to recover them.
The /ALL switch attempts to recover all deleted files without a confirmation prompt for eachfile. When used with this switch, UNDELETE first attempts to use the delete sentry method ifavailable, then tries the delete tracking method, and finally if neither of these methods isavailable, uses information directly from the DOS directory.
/LOAD causes UNDELETE to install itself in memory. If no UNDELETE.INI file is found, it is created.
/UNLOAD removes the memory-resident portion of UNDELETE from your system’s memory, disabling the delete sentry and delete tracking methods of file recovery.
/PURGE deletes the contents of the SENTRY directory on the specified drive. If no drive isspecified, UNDELETE searches the current drive for the directory.
/STATUS lists the type of delete protection in effect for each of the drives currently protectedwith sentry or tracking.
/S enables delete sentry protection on the specified drives using the information found inUNDELETE.INI. If this file is not found, it is created. Normally, you establish delete sentryprotection by adding a line in AUTOEXEC.BAT.
/T enables the delete tracking protection on the specified drives using information fromUNDELETE.INI. If this file is not found, it is created. The -entries portion of this parameterspecifies the maximum number of files that can be tracked. Valid values range between 1 and999. Normally, you establish delete tracking protection by adding a line in AUTOEXEC.BAT.
9
IIPart
Ch
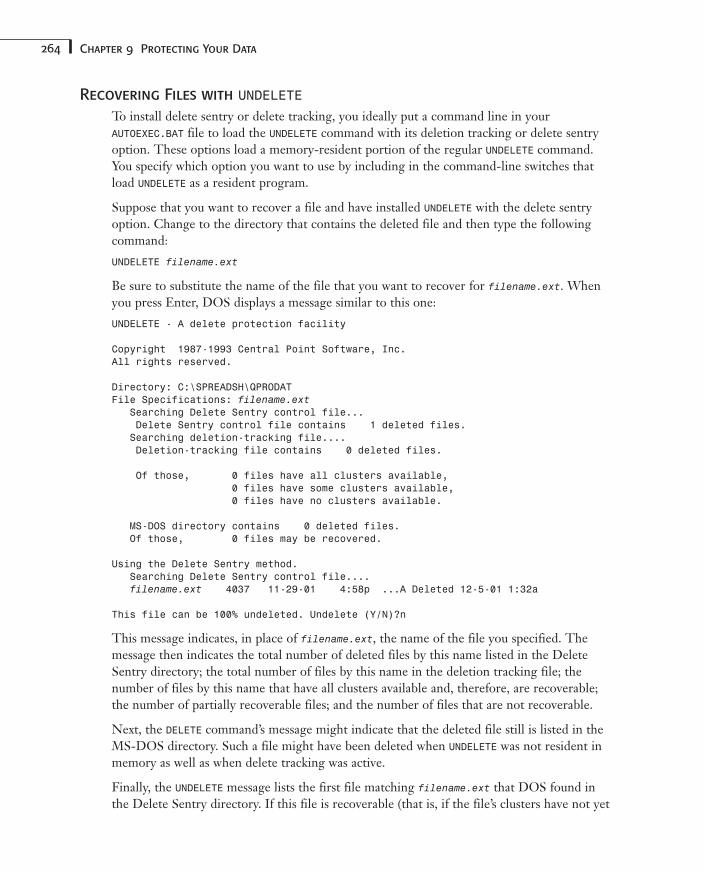
264 Chapter 9 Protecting Your Data
Recovering Files with UNDELETE
To install delete sentry or delete tracking, you ideally put a command line in your AUTOEXEC.BAT file to load the UNDELETE command with its deletion tracking or delete sentryoption. These options load a memory-resident portion of the regular UNDELETE command.You specify which option you want to use by including in the command-line switches thatload UNDELETE as a resident program.
Suppose that you want to recover a file and have installed UNDELETE with the delete sentryoption. Change to the directory that contains the deleted file and then type the followingcommand:
UNDELETE filename.ext
Be sure to substitute the name of the file that you want to recover for filename.ext. Whenyou press Enter, DOS displays a message similar to this one:
UNDELETE - A delete protection facility
Copyright 1987-1993 Central Point Software, Inc.All rights reserved.
Directory: C:\SPREADSH\QPRODATFile Specifications: filename.ext
Searching Delete Sentry control file...Delete Sentry control file contains 1 deleted files.Searching deletion-tracking file....Deletion-tracking file contains 0 deleted files.
Of those, 0 files have all clusters available,0 files have some clusters available,0 files have no clusters available.
MS-DOS directory contains 0 deleted files.Of those, 0 files may be recovered.
Using the Delete Sentry method.Searching Delete Sentry control file....filename.ext 4037 11-29-01 4:58p ...A Deleted 12-5-01 1:32a
This file can be 100% undeleted. Undelete (Y/N)?n
This message indicates, in place of filename.ext, the name of the file you specified. Themessage then indicates the total number of deleted files by this name listed in the DeleteSentry directory; the total number of files by this name in the deletion tracking file; thenumber of files by this name that have all clusters available and, therefore, are recoverable;the number of partially recoverable files; and the number of files that are not recoverable.
Next, the DELETE command’s message might indicate that the deleted file still is listed in theMS-DOS directory. Such a file might have been deleted when UNDELETE was not resident inmemory as well as when delete tracking was active.
Finally, the UNDELETE message lists the first file matching filename.ext that DOS found inthe Delete Sentry directory. If this file is recoverable (that is, if the file’s clusters have not yet
265Recovering Deleted Files with UNDELETE
9
IIPart
Ch
been reallocated to another file), DOS asks whether you want to undelete the file. To recov-er the file, press Y. DOS recovers the file and displays the following message:
File successfully undeleted.
The UNDELETE message also lists any other files with the same name in the Delete Sentry dir-ectory. The files are listed one by one, starting with the most recently deleted files. For eachfile, UNDELETE asks whether you want to recover the file. If additional files with the same nameare listed in the deletion tracking file, UNDELETE repeats the procedure for each of these files.
If recovering a file creates a duplicate filename in the directory, UNDELETE displays the fol-lowing message:
The filename already exists. Enter a different filename.
Press “F5” to bypass this file.
If you want to recover this file, type a unique filename (one thatdoes not already exist in the current directory). Otherwise, press F5to skip this file.
You might have created and deleted same-named files in a particular directory more thanonce. (In fact, every time you save a file on which you are working, you delete the preced-ing version and create a new one.) So, don’t be alarmed or confused if UNDELETE asksmore than once whether you want to recover a particular file. Normally, you recover themost recently deleted version of the file and discard the others.
Occasionally, by the time you realize that you need to recover an accidentally deleted file,other files might have reused some of the file’s clusters. In such a case, UNDELETE displays thefollowing message:
Only some of the clusters for this file are available.Do you want to recover this file with only the available clusters? (Y/N)
Press Y to recover the available bytes or N to skip the file. If you wait too long beforeattempting to recover a file, you might not be able to recover the file because other files areusing all its clusters. In this case, UNDELETE tells you so and displays this message:
Press any key to continue
Sometimes, even though most of a file still is on disk, the clusters in the first part of the filemight have been reused by another file. In such a case, UNDELETE loses its “map” to the restof the file and displays the following message:
Starting cluster is unavailable. This file cannot be recoveredwith the UNDELETE command. Press any key to continue.
If you want to know which deleted files you still can recover, type the following command:
UNDELETE /LIST
UNDELETE displays, from the Delete Sentry directory, the deletion tracking file, the DOSdirectory, and a list of deleted files from the current directory.
266 Chapter 9 Protecting Your Data
If a deletion tracking list is too long to fit in one screen, you can press Ctrl+S to pause thedisplay. Press any key on the keyboard to resume scrolling. Do not use redirection or theMORE filter; these actions create disk files that might overwrite some or all of the data thatyou want to recover.
If you delete all the files in a directory and then delete the directory, you cannot recoverany of the deleted files from that directory. UNDELETE cannot recover a deleted directory.
The UNDELETE command is a product of Central Point Software, licensed by MicrosoftCorporation for distribution as part of DOS.
Using the DOS Directory to Recover a File
If you were not using the UNDELETE command’s resident portion when you accidentally delet-ed the file that you want to recover, you can try to recover the file by using the informationstored in the DOS directory. To do so, type the following command:
UNDELETE filename.ext /DOS
Substitute for filename.ext the name of the file that you want to recover. UNDELETE displaysa message similar to the following one:
Directory: C:\SPREADSH\QPRODATFile Specifications: filename.ext
Delete Sentry Control file not found.Deletion-tracking file not found.MS-DOS Directory contains 1 deleted files.Of those, 1 files may be recovered.
Using the MS-DOS Directory.
filename ext 4037 11-29-01 4:58p ...AUndelete (Y/N)?
Press Y to recover the file or N to skip the file. After you press Y, UNDELETE displays the fol-lowing prompt:
Enter the first character of the filename.
Because the DOS directory no longer has any record of this first character, you must supplythe letter. Type the letter that you want UNDELETE to use as the beginning letter of the file-name. UNDELETE recovers the file and displays the following message:
File successfully undeleted.
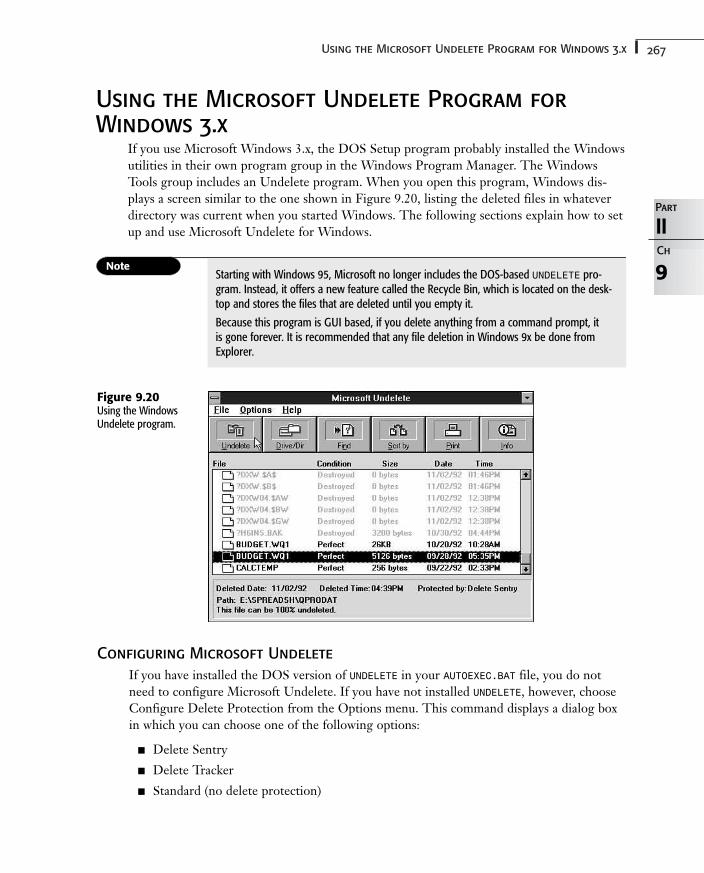
267Using the Microsoft Undelete Program for Windows 3.x
9
IIPart
Ch
Using the Microsoft Undelete Program forWindows 3.x
If you use Microsoft Windows 3.x, the DOS Setup program probably installed the Windowsutilities in their own program group in the Windows Program Manager. The WindowsTools group includes an Undelete program. When you open this program, Windows dis-plays a screen similar to the one shown in Figure 9.20, listing the deleted files in whateverdirectory was current when you started Windows. The following sections explain how to setup and use Microsoft Undelete for Windows.
Starting with Windows 95, Microsoft no longer includes the DOS-based UNDELETE pro-gram. Instead, it offers a new feature called the Recycle Bin, which is located on the desk-top and stores the files that are deleted until you empty it.
Because this program is GUI based, if you delete anything from a command prompt, it is gone forever. It is recommended that any file deletion in Windows 9x be done fromExplorer.
Figure 9.20Using the WindowsUndelete program.
Configuring Microsoft Undelete
If you have installed the DOS version of UNDELETE in your AUTOEXEC.BAT file, you do notneed to configure Microsoft Undelete. If you have not installed UNDELETE, however, chooseConfigure Delete Protection from the Options menu. This command displays a dialog boxin which you can choose one of the following options:
■ Delete Sentry
■ Delete Tracker
■ Standard (no delete protection)
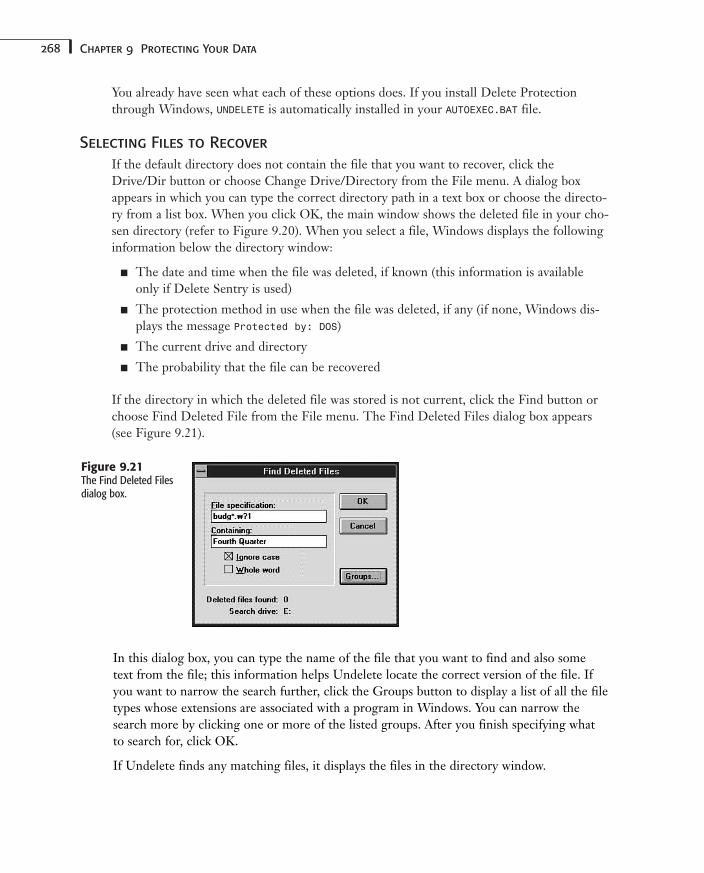
268 Chapter 9 Protecting Your Data
You already have seen what each of these options does. If you install Delete Protectionthrough Windows, UNDELETE is automatically installed in your AUTOEXEC.BAT file.
Selecting Files to Recover
If the default directory does not contain the file that you want to recover, click theDrive/Dir button or choose Change Drive/Directory from the File menu. A dialog boxappears in which you can type the correct directory path in a text box or choose the directo-ry from a list box. When you click OK, the main window shows the deleted file in your cho-sen directory (refer to Figure 9.20). When you select a file, Windows displays the followinginformation below the directory window:
■ The date and time when the file was deleted, if known (this information is availableonly if Delete Sentry is used)
■ The protection method in use when the file was deleted, if any (if none, Windows dis-plays the message Protected by: DOS)
■ The current drive and directory
■ The probability that the file can be recovered
If the directory in which the deleted file was stored is not current, click the Find button orchoose Find Deleted File from the File menu. The Find Deleted Files dialog box appears(see Figure 9.21).
Figure 9.21The Find Deleted Filesdialog box.
In this dialog box, you can type the name of the file that you want to find and also sometext from the file; this information helps Undelete locate the correct version of the file. Ifyou want to narrow the search further, click the Groups button to display a list of all the filetypes whose extensions are associated with a program in Windows. You can narrow thesearch more by clicking one or more of the listed groups. After you finish specifying whatto search for, click OK.
If Undelete finds any matching files, it displays the files in the directory window.
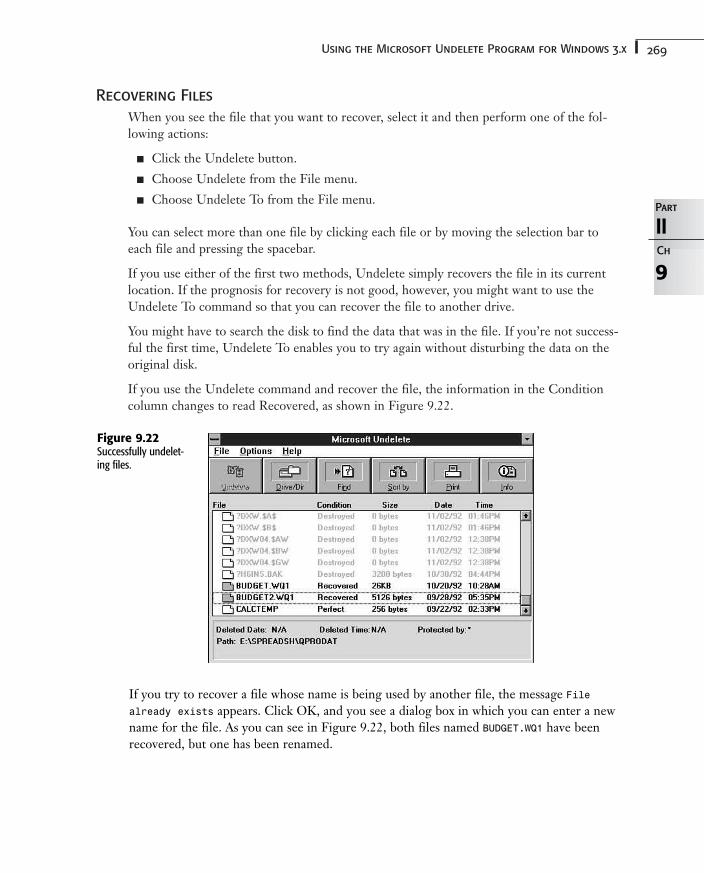
269Using the Microsoft Undelete Program for Windows 3.x
Recovering Files
When you see the file that you want to recover, select it and then perform one of the fol-lowing actions:
■ Click the Undelete button.
■ Choose Undelete from the File menu.
■ Choose Undelete To from the File menu.
You can select more than one file by clicking each file or by moving the selection bar toeach file and pressing the spacebar.
If you use either of the first two methods, Undelete simply recovers the file in its currentlocation. If the prognosis for recovery is not good, however, you might want to use theUndelete To command so that you can recover the file to another drive.
You might have to search the disk to find the data that was in the file. If you’re not success-ful the first time, Undelete To enables you to try again without disturbing the data on theoriginal disk.
If you use the Undelete command and recover the file, the information in the Conditioncolumn changes to read Recovered, as shown in Figure 9.22.
9
IIPart
Ch
Figure 9.22Successfully undelet-ing files.
If you try to recover a file whose name is being used by another file, the message Filealready exists appears. Click OK, and you see a dialog box in which you can enter a newname for the file. As you can see in Figure 9.22, both files named BUDGET.WQ1 have beenrecovered, but one has been renamed.
270 Chapter 9 Protecting Your Data
Using Other Options
Microsoft Undelete includes several other options that are not available when you try torecover a deleted file from the DOS prompt:
■ Sorting—The Sort By button and the Sort By command (Options menu) enable you tosort the filenames displayed in the Undelete window by name, date, size, directory dateand time, deletion date and time, or condition.
■ Printing—You can group the files in the display by directory and then print them byclicking the Print button or choosing Print List from the File menu.
■ Displaying information—You can click the Info button or choose File Info from theFile menu to display a box in which all the information about a deleted file is conve-niently grouped in one place.
■ Selecting files—The Options menu contains two commands that you can use to selectgroups of files for recovery. Choose Select by Name to display a dialog box in whichyou enter a filename. If you include a wildcard pattern in the filename, all matchingfiles are selected. You then can choose the Unselect by Name command to narrow theselection.
■ Deleting files—If you installed the delete sentry option, you can choose Purge DeleteSentry File from the File menu to get rid of all the files—or selected files—in theDelete Sentry directory. You might want to use this command if you are running low on disk space and need to install a new program.
Project: Developing a Backup PolicyEvery PC user should develop a backup policy—a defined method of backing up data regu-larly. The policy you develop depends on different factors. As you learned earlier in thischapter, you can choose from three different primary backup types: full, differential, andincremental. The decision to be made here is whether to use only full backups every time,or perform incremental or differential backups between full backups.
Deciding on which backups to perform can depend on many factors, such as the amount ofdata to be backed up, backup capacity and speed, and time constraints. If you have 2GB ofdata to back up, for example, and your tape drive can back up only 500MB per hour, the fullbackup will require four hours. But consider what you would do if you had only three hoursto perform a backup during the week and six hours on the weekend. Obviously, in this case,you could not perform a full backup every night.
Incremental and differential backups come into play here. After you decide when you will beperforming the full backup, you then need to decide whether to perform incremental or dif-ferential backups in between. The main difference between these two types is that differen-tial backups do not modify the archive setting for files, so every file changed since the lastfull backup is backed up. An incremental backup backs up only files that have been added orchanged since the last full or incremental backup.
271Project: Developing a Backup Policy
Taking these factors into account, you then need to decide which type of backup works bet-ter for you. Obviously, an incremental backup is going to be faster over multiple nights thana differential backup because it is backing up only files changed since the last full or incre-mental backup. The drawback to this choice is that you must restore the full backup set andthen each incremental backup set. If you use differential backups between full backups, youwould need to restore only the full backup and then the last differential backup because eachdifferential backup set includes all files changed since the last full backup.

Controlling DOS
10 Working with System Information 275
11 Controlling Your Environment 293
12 Using Peripherals 307
13 Controlling Devices 317
14 Understanding the International Features of DOS 339
IIIPART

Working with System InformationIn this chapter
Changing the Date and Time 276
Displaying the Version Using the VER Command 279
Setting the Version Using the SETVER Command 280
Displaying Memory Statistics 283
Loading a Secondary Command Processor 288
10CHAPTER
276 Chapter 10 Working with System Information
Changing the Date and TimeIn Chapter 5, ”Understanding Files and Directories,” you learned a bit about how DOSstores files using a directory. This directory maintains critical information about each file onyour disk, including the filename, its attributes, its size, and where it is stored on the disk. Italso contains date and time information that indicates when the file was last updated. Thisinformation is often referred to as a date and time stamp. This stamp is updated from the sys-tem date and time whenever you make changes to the file.
Your computer uses a battery-powered clock to maintain the date and time used by your system. Even when the computer is turned off, power from the battery goes to the chip con-taining the clock, and the date and time remain current.
Setting the date and time becomes increasingly important as you create more files on yourcomputer. Because the DOS file-naming rules limit you to only eight characters in the rootfilename and three characters in the file extension (which is generally used to indicate thefile type), the names of your files might not be very descriptive. In this situation, you mightneed to rely on the date and time stamp to tell which file is the most recent. On computerswithout a clock or with a clock that has a dead battery, however, the date and time are set tothe same value each time you turn on the computer. This situation makes it difficult foryou—or DOS—to tell the difference between an old file and a revised or new file. In addi-tion, some DOS commands work by comparing file dates. If your system time and date arenot correct, these commands will have little value to you.
Occasionally checking your computer’s date and time is worthwhile. All batteries eventuallyfail and need replacing. All clocks in personal computers lose time. How much time yourclock loses depends on the programs you run on your computer.
The clock that keeps the date and time in a PC is controlled by an electronic component inthe computer—the system timer. This chip is the heartbeat of the computer. Everything thecomputer does takes a known amount of time. The system timer provides a regular pulsethat controls all the functions occurring in the computer.
One of these functions is to update the clock that DOS uses to tell the time (and conse-quently the date). Commands or other programs that cannot afford to be interrupted whilethey’re working tell DOS not to interrupt them until they finish what they’re doing. A typi-cal example is a communications program that waits for a character to be sent from anothercomputer. If DOS is busy performing other tasks, such as updating the clock, the programmight miss the character. Consequently, this type of program disables the interrupts; theprogram tells DOS to do nothing else for the period that it needs full control. During thesetimes, the clock is not updated. These periods are typically only a fraction of a second, butthe effect is cumulative, and eventually the time loss is noticeable.
If you do not have an AUTOEXEC.BAT file (see Chapter 2, “Starting DOS”), DOS displays thecurrent date and time when you start your computer and gives you the opportunity tochange them. You should take a moment to check these settings. Make sure that you set thedate and time correctly whenever you are prompted because both are used in many DOSoperations.
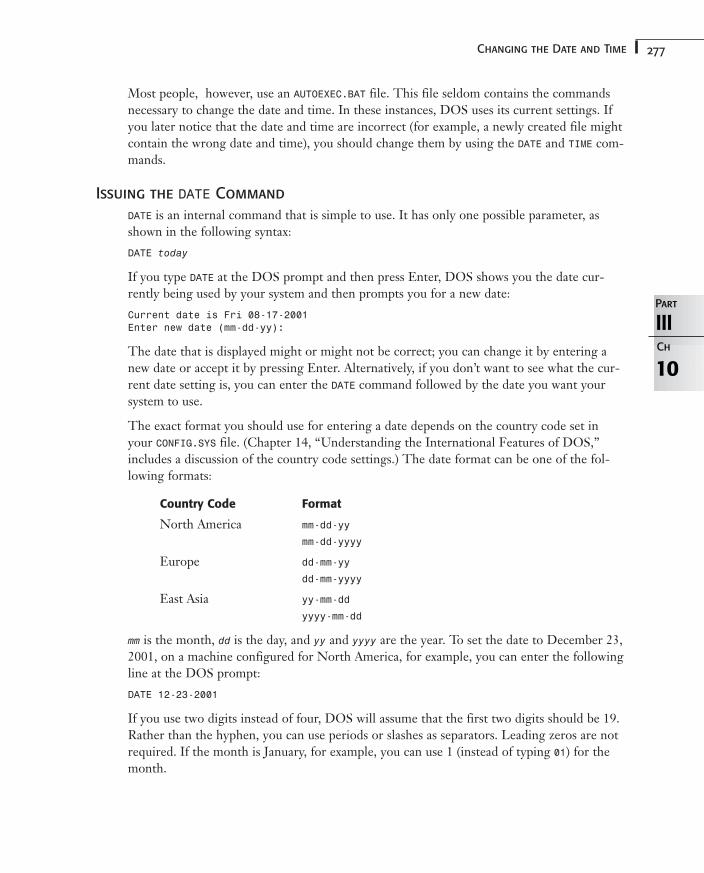
277Changing the Date and Time
Most people, however, use an AUTOEXEC.BAT file. This file seldom contains the commandsnecessary to change the date and time. In these instances, DOS uses its current settings. Ifyou later notice that the date and time are incorrect (for example, a newly created file mightcontain the wrong date and time), you should change them by using the DATE and TIME com-mands.
Issuing the DATE Command
DATE is an internal command that is simple to use. It has only one possible parameter, asshown in the following syntax:
DATE today
If you type DATE at the DOS prompt and then press Enter, DOS shows you the date cur-rently being used by your system and then prompts you for a new date:
Current date is Fri 08-17-2001Enter new date (mm-dd-yy):
The date that is displayed might or might not be correct; you can change it by entering anew date or accept it by pressing Enter. Alternatively, if you don’t want to see what the cur-rent date setting is, you can enter the DATE command followed by the date you want yoursystem to use.
The exact format you should use for entering a date depends on the country code set inyour CONFIG.SYS file. (Chapter 14, “Understanding the International Features of DOS,”includes a discussion of the country code settings.) The date format can be one of the fol-lowing formats:
Country Code Format
North America mm-dd-yy
mm-dd-yyyy
Europe dd-mm-yy
dd-mm-yyyy
East Asia yy-mm-dd
yyyy-mm-dd
mm is the month, dd is the day, and yy and yyyy are the year. To set the date to December 23,2001, on a machine configured for North America, for example, you can enter the followingline at the DOS prompt:
DATE 12-23-2001
If you use two digits instead of four, DOS will assume that the first two digits should be 19.Rather than the hyphen, you can use periods or slashes as separators. Leading zeros are notrequired. If the month is January, for example, you can use 1 (instead of typing 01) for themonth.
10
IIIPart
Ch
278 Chapter 10 Working with System Information
If you want to change the date, letting DOS prompt you is the best way to use this com-mand because the current date setting appears in the correct format, and you can copy thisformat rather than remember it. The DOS screen might appear as follows if you let DOSprompt you for the current date:
C:\>DATECurrent date is Fri 08-17-2001Enter new date (mm-dd-yy): 12-23-2001
Pressing Enter when DOS prompts you for a new date retains the current setting. If youdon’t enter the date correctly or if you select a date that is outside the range supported byDOS, you see the error message Invalid date, after which you can again try to enter a date.
Issuing the TIME Command
Closely related to the DATE command is the internal TIME command. It also has only onepossible parameter:
TIME now
As with DATE, if you type only TIME and press Enter at the DOS prompt, DOS shows youthe current time setting and prompts you for a new one. You can change the time withoutbeing prompted by including the new time on the command line as a parameter.
When you enter a new time setting, you do so using hours, minutes, and seconds. The exactformat you should use depends on the country code setting in your CONFIG.SYS file.
You can use either a 12-hour or 24-hour clock. The following line shows the format usedfor a 24-hour clock:
hrs:mins:secs.1/100secs
hrs is the hour, a number from 0 to 23; mins is the minutes, a number from 0 to 59; secs isthe seconds, a number from 0 to 59; and 1/100secs is the number of one-hundredth sec-onds, a number from 0 to 99. The 24-hour clock starts with midnight as 00:00.00. You canuse a period rather than a colon when separating the hours, minutes, and seconds, or acomma in place of a period when separating the seconds from the hundredths of a second.
If you decide to enter the time using a 12-hour clock, the format is the same as for the 24-hour clock except that hrs is a number from 1 to 12, and you add a or p to signify a.m. orp.m. If you do not add an a or a p, DOS assumes a.m.
Just because DOS enables you to enter time to the nearest 1/100 of a second, you don’tneed to. In fact, you don’t need to enter all the parts of the time. DOS sets any missing ele-ments to zero (using the 24-hour clock notation). To set the time to 8:25 p.m., for example,you can enter one of the following lines at the DOS prompt:
TIME 20:25
TIME 8:25p
279Displaying the Version Using the VER Command
Either command sets the time to 8:25 p.m. The seconds and hundredths of a second are setto zero. To set the clock to 12:30 a.m., you can enter the following line:
TIME :30
As with the DATE command, letting DOS prompt you for the time is the easiest way to usethis command. When DOS displays the current time, all you need to do is enter a new timeusing the same format. Following is an example of how the DOS screen might appear if youlet DOS prompt you for the current time:
C:\>TIMECurrent time is 2:35:07.23pEnter new time: 2:40p
You can use the COUNTRY command to change the format DOS uses to display the time (see Chapter 14).
Displaying the Version Using the VER CommandDOS includes an internal command that displays the DOS version currently in use.Knowing how to use the VER command is invaluable if you ever work with an unfamiliarcomputer. Some commands, such as DISKCOMP, FORMAT, and XCOPY, work differently or arenot available with different DOS versions. If you do not know which version of DOS a computer is using, the VER command can tell you.
When you enter the VER command at the DOS prompt, you see a message similar to this one:
MS-DOS Version 6.20
This is the DOS version used to boot your computer. If a computer with a hard disk isbooted from a floppy disk, the version of DOS might not be what you expected. Supposethat your hard disk is formatted for DOS 6.2, but you use a DOS 5.0 floppy disk to bootyour computer. The Version 6.2 commands on your hard disk might not work while yourcomputer is running a different version of DOS. In this instance, the following messageappears when you try to use one of the DOS 6.22 commands:
Incorrect DOS Version
Sometimes DOS can be slightly different even within the same version. Some computermanufacturers supply DOS packages specially designed to work with their machines, so you might see a different message if you use a different product. Compaq ComputerCorporation’s version of DOS, for example, includes Compaq’s name with the version num-ber. Because of the differences between these versions, you might be able to track downproblems on an unfamiliar computer more easily if you first determine the exact DOS version number and its manufacturer.
10
IIIPart
Ch
280 Chapter 10 Working with System Information
Setting the Version Using the SETVER CommandWhen a new version of DOS is released, some time passes before software manufacturerscan upgrade popular applications programs to take full advantage of DOS’s new features.Many programs ask the operating system to tell them which version of DOS the computeris running. If a program does not recognize the version of DOS in memory, it might refuseto run. One or more of your applications, therefore, might refuse to run because they havenot been certified by the manufacturer to run properly with DOS 6.22.
You can get a reluctant program to run under DOS 6.22 in two ways:
■ Contact the software manufacturer or your dealer to find out whether you need a pro-gram upgrade.
■ Use the SETVER command to add the name of the program to DOS 6.2’s version table.The version table is a list of programs with DOS version numbers listed next to them.When a program listed in the version table loads into memory and asks DOS for itsversion number, DOS reports the version number listed in the version table rather thanthe actual version number—6.2. The application is fooled into running under DOS 6.2.
The first option is the better choice. By checking with the manufacturer, you can determinewhether the software has been tested in DOS 6.22.
If you use SETVER, you run the risk, however slight, that your program might become cor-rupted if it is incompatible with DOS 6.2.
The SETVER command operates as both a device driver and an executable command. BeforeDOS can use the version table, you must load SETVER.EXE as a device driver. Make sure thatthe command is included in your CONFIG.SYS file so that it executes every time you startyour computer. If SETVER.EXE is not in your CONFIG.SYS file, you need to add it. To do so,use the following syntax:
DEVICE=d:path\SETVER.EXE
The parameters d: and path\ are the disk and directory that contain the SETVER.EXE externalprogram file. When you installed DOS, the installation program created a defaultCONFIG.SYS file for you, which includes the following command:
DEVICE=C:\DOS\SETVER.EXE
After the device driver SETVER.EXE is loaded into memory, DOS can use the version table toreport different DOS versions to applications programs listed in the version table.
To see whether a particular program is already in the version table, use SETVER from theDOS command line. To do so, type SETVER at the DOS prompt; do not add switches, file-names, or parameters. DOS displays a two-column listing with program names in the firstcolumn and the DOS version number the programs will work with in the second column.Microsoft has already tested the programs listed in the initial version table and determined
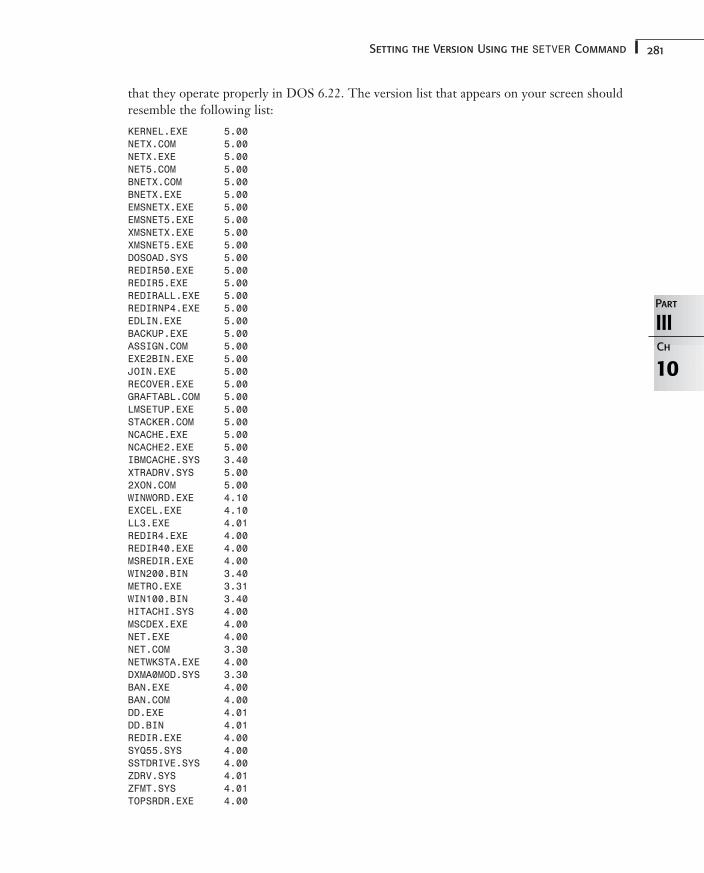
281Setting the Version Using the SETVER Command
that they operate properly in DOS 6.22. The version list that appears on your screen shouldresemble the following list:
KERNEL.EXE 5.00NETX.COM 5.00NETX.EXE 5.00NET5.COM 5.00BNETX.COM 5.00BNETX.EXE 5.00EMSNETX.EXE 5.00EMSNET5.EXE 5.00XMSNETX.EXE 5.00XMSNET5.EXE 5.00DOSOAD.SYS 5.00REDIR50.EXE 5.00REDIR5.EXE 5.00REDIRALL.EXE 5.00REDIRNP4.EXE 5.00EDLIN.EXE 5.00BACKUP.EXE 5.00ASSIGN.COM 5.00EXE2BIN.EXE 5.00JOIN.EXE 5.00RECOVER.EXE 5.00GRAFTABL.COM 5.00LMSETUP.EXE 5.00STACKER.COM 5.00NCACHE.EXE 5.00NCACHE2.EXE 5.00IBMCACHE.SYS 3.40XTRADRV.SYS 5.002XON.COM 5.00WINWORD.EXE 4.10EXCEL.EXE 4.10LL3.EXE 4.01REDIR4.EXE 4.00REDIR40.EXE 4.00MSREDIR.EXE 4.00WIN200.BIN 3.40METRO.EXE 3.31WIN100.BIN 3.40HITACHI.SYS 4.00MSCDEX.EXE 4.00NET.EXE 4.00NET.COM 3.30NETWKSTA.EXE 4.00DXMA0MOD.SYS 3.30BAN.EXE 4.00BAN.COM 4.00DD.EXE 4.01DD.BIN 4.01REDIR.EXE 4.00SYQ55.SYS 4.00SSTDRIVE.SYS 4.00ZDRV.SYS 4.01ZFMT.SYS 4.01TOPSRDR.EXE 4.00
10
IIIPart
Ch
282 Chapter 10 Working with System Information
When you run one of the programs listed in the first column of the version table, DOSreports to the program the DOS version number listed in the second column.
If you try to run a program and it displays an error message stating that you are using anincompatible version of DOS, you might want to try adding the program to the versiontable. Enter the SETVER command using the following syntax:
SETVER filespec n.nn
The filespec parameter indicates the full name of the file in question, including a path, afilename, and an extension. The n.nn parameter is a DOS version number that the programwill recognize. Consult the program’s documentation to determine with which versions ofDOS the program can run.
You also can use SETVER to delete program names. The syntax for using SETVER to deleteprograms from the version table is shown in the following line:
SETVER filespec /DELETE /QUIET
The two switches—/DELETE and /QUIET—can be abbreviated as /D and /Q.
For an example of how you use SETVER, assume that you want to run a program called GOODPROG.EXE, but the program runs only with DOS versions 3.0 to 3.3. To addGOODPROG.EXE to the version table, type the following command at the command prompt and press Enter:
SETVER GOODPROG.EXE 3.30
DOS displays the following series of messages, including an initial warning:
WARNING - The application you are adding to the MS-DOS version table may nothave been verified by Microsoft on this version of MS-DOS. Please contact yoursoftware vendor for information on whether this application will operateproperly under this version of MS-DOS. If you execute this application byinstructing MS-DOS to report a different MS-DOS version number, you may lose orcorrupt data, or cause system instabilities. In that circumstance, Microsoft isnot responsible for any loss or damage.
Version table successfully updated
The version change will take effect the next time you restart your system.
To verify that the application has been added to the version table, execute SETVER againwithout switches or parameters. The added application appears at the end of the list. Themodified table takes effect, however, only after you restart or reboot your computer.
If you later decide to delete a program from the version list, use the /D switch and the filename parameter. To delete GOODPROG.EXE from the version table, for example, type one of the following commands at the command line and press Enter:
SETVER GOODPROG.EXE /DELETE
SETVER GOODPROG.EXE /D
DOS deletes the application name from the version table and displays this message:
Version table successfully updated
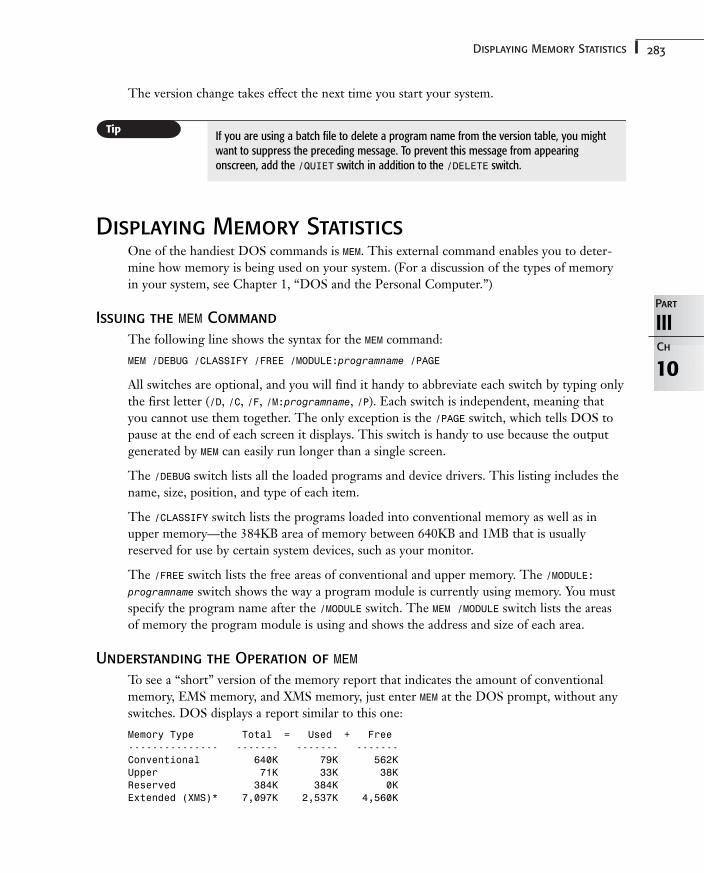
283Displaying Memory Statistics
10
IIIPart
Ch
The version change takes effect the next time you start your system.
If you are using a batch file to delete a program name from the version table, you mightwant to suppress the preceding message. To prevent this message from appearingonscreen, add the /QUIET switch in addition to the /DELETE switch.
Displaying Memory StatisticsOne of the handiest DOS commands is MEM. This external command enables you to deter-mine how memory is being used on your system. (For a discussion of the types of memoryin your system, see Chapter 1, “DOS and the Personal Computer.”)
Issuing the MEM Command
The following line shows the syntax for the MEM command:
MEM /DEBUG /CLASSIFY /FREE /MODULE:programname /PAGE
All switches are optional, and you will find it handy to abbreviate each switch by typing onlythe first letter (/D, /C, /F, /M:programname, /P). Each switch is independent, meaning thatyou cannot use them together. The only exception is the /PAGE switch, which tells DOS topause at the end of each screen it displays. This switch is handy to use because the outputgenerated by MEM can easily run longer than a single screen.
The /DEBUG switch lists all the loaded programs and device drivers. This listing includes thename, size, position, and type of each item.
The /CLASSIFY switch lists the programs loaded into conventional memory as well as inupper memory—the 384KB area of memory between 640KB and 1MB that is usuallyreserved for use by certain system devices, such as your monitor.
The /FREE switch lists the free areas of conventional and upper memory. The /MODULE:programname switch shows the way a program module is currently using memory. You mustspecify the program name after the /MODULE switch. The MEM /MODULE switch lists the areasof memory the program module is using and shows the address and size of each area.
Understanding the Operation of MEM
To see a “short” version of the memory report that indicates the amount of conventionalmemory, EMS memory, and XMS memory, just enter MEM at the DOS prompt, without anyswitches. DOS displays a report similar to this one:
Memory Type Total = Used + Free--------------- ------- ------- -------Conventional 640K 79K 562KUpper 71K 33K 38KReserved 384K 384K 0KExtended (XMS)* 7,097K 2,537K 4,560K

284 Chapter 10 Working with System Information
--------------- ------- ------- -------Total memory 8,192K 3,033K 5,159K
Total under 1 MB 711K 112K 599K
Total Expanded (EMS) 7,488K (7,667,712 bytes)Free Expanded (EMS)* 4,800K (4,915,200 bytes)
* EMM386 is using XMS memory to simulate EMS memory as needed.Free EMS memory may change as free XMS memory changes.
Largest executable program size 561K (574,752 bytes)Largest free upper memory block 22K (22,016 bytes)MS-DOS is resident in the high memory area.
This report gives you three types of information about every type of memory in your sys-tem, in three columns: the total amount, the amount currently being used, and the memoryavailable for you to use for programs.
The first line describes the conventional memory: the total amount (generally 640KB; 1KB = 1,024 bytes), the amount of memory currently being used, and the amount of freememory. The next line shows you the amount of upper (reserved) memory and adapterRAM/ROM in the same format. These two amounts total 384KB, which, in addition to theconventional memory, is the total amount of memory that DOS addresses—1,024KB.
The MEM report then tells you the total amount of extended memory that has been mapped(converted) to XMS memory, the amount currently in use, and the amount available for use.In the example, 4,560KB of XMS memory of the original 7,097KB are available.
The next line shows the total amount of memory under 1MB and the amount available toyou for running programs. This amount might be misleading because the figure lumpstogether the amount of free conventional and free reserved memory. Most programs cannotuse both of these types of memory as if they were contiguous.
The first two long lines following the totals show the total amount and free amount ofexpanded memory in your system. A footnote explains that the EMM386.EXE memory manag-er creates expanded memory from the pool of XMS memory as needed. Finally, MEM indi-cates whether MS-DOS currently is loaded in the high memory area.
Sometimes, MEM’s short report doesn’t provide enough information to meet your needs. MEMtherefore provides three switches to produce longer versions of the report. Because thesereports don’t fit on a single screen, you can use the /PAGE switch to display one page of thereport at a time.
The reports generated by MEM’s /CLASSIFY and /DEBUG switches are highly technical in con-tent. For example, to execute the MEM command with the /DEBUG switch, enter the followingline at the DOS prompt:
MEM /DEBUG
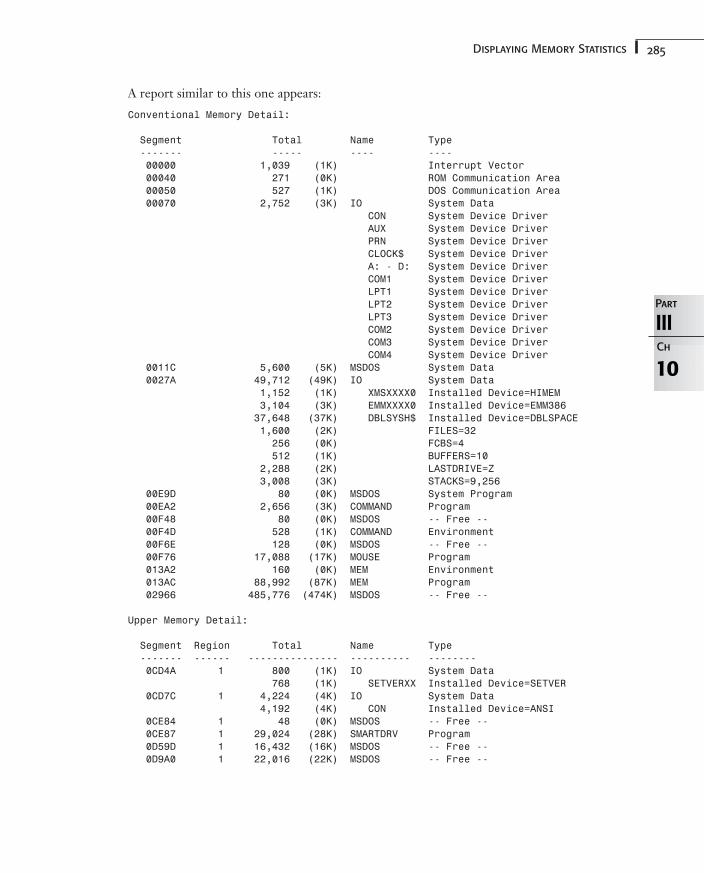
285Displaying Memory Statistics
A report similar to this one appears:
Conventional Memory Detail:
Segment Total Name Type------- ----- ---- ----00000 1,039 (1K) Interrupt Vector00040 271 (0K) ROM Communication Area00050 527 (1K) DOS Communication Area00070 2,752 (3K) IO System Data
CON System Device DriverAUX System Device DriverPRN System Device DriverCLOCK$ System Device DriverA: - D: System Device DriverCOM1 System Device DriverLPT1 System Device DriverLPT2 System Device DriverLPT3 System Device DriverCOM2 System Device DriverCOM3 System Device DriverCOM4 System Device Driver
0011C 5,600 (5K) MSDOS System Data0027A 49,712 (49K) IO System Data
1,152 (1K) XMSXXXX0 Installed Device=HIMEM3,104 (3K) EMMXXXX0 Installed Device=EMM38637,648 (37K) DBLSYSH$ Installed Device=DBLSPACE1,600 (2K) FILES=32256 (0K) FCBS=4512 (1K) BUFFERS=10
2,288 (2K) LASTDRIVE=Z3,008 (3K) STACKS=9,256
00E9D 80 (0K) MSDOS System Program00EA2 2,656 (3K) COMMAND Program00F48 80 (0K) MSDOS -- Free --00F4D 528 (1K) COMMAND Environment00F6E 128 (0K) MSDOS -- Free --00F76 17,088 (17K) MOUSE Program013A2 160 (0K) MEM Environment013AC 88,992 (87K) MEM Program02966 485,776 (474K) MSDOS -- Free --
Upper Memory Detail:
Segment Region Total Name Type------- ------ --------------- ---------- --------0CD4A 1 800 (1K) IO System Data
768 (1K) SETVERXX Installed Device=SETVER0CD7C 1 4,224 (4K) IO System Data
4,192 (4K) CON Installed Device=ANSI0CE84 1 48 (0K) MSDOS -- Free --0CE87 1 29,024 (28K) SMARTDRV Program0D59D 1 16,432 (16K) MSDOS -- Free --0D9A0 1 22,016 (22K) MSDOS -- Free --
10
IIIPart
Ch
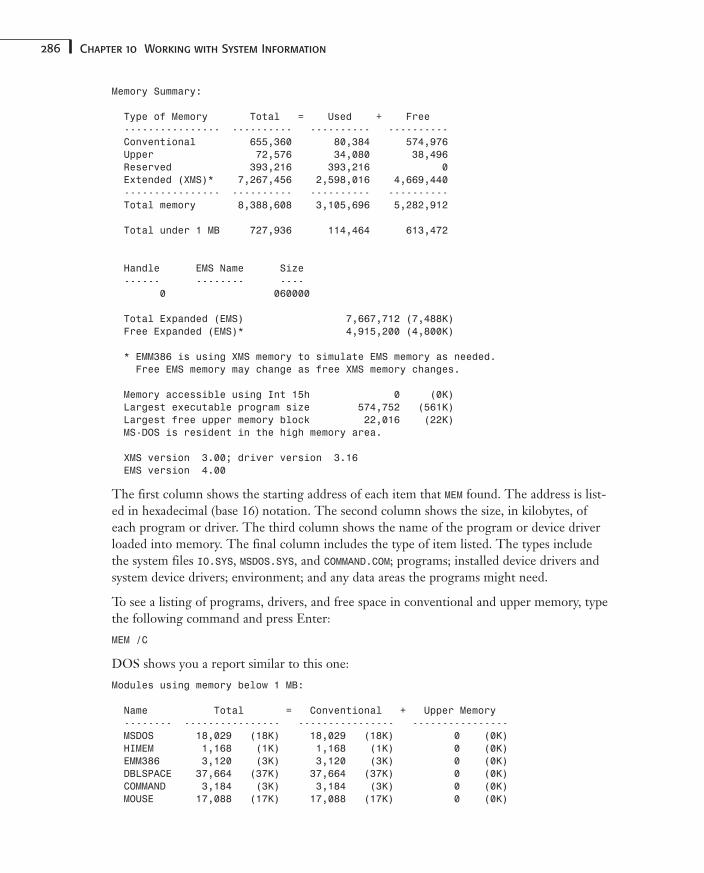
286 Chapter 10 Working with System Information
Memory Summary:
Type of Memory Total = Used + Free---------------- ---------- ---------- ----------Conventional 655,360 80,384 574,976Upper 72,576 34,080 38,496Reserved 393,216 393,216 0Extended (XMS)* 7,267,456 2,598,016 4,669,440---------------- ---------- ---------- ----------Total memory 8,388,608 3,105,696 5,282,912
Total under 1 MB 727,936 114,464 613,472
Handle EMS Name Size------ -------- ----
0 060000
Total Expanded (EMS) 7,667,712 (7,488K)Free Expanded (EMS)* 4,915,200 (4,800K)
* EMM386 is using XMS memory to simulate EMS memory as needed.Free EMS memory may change as free XMS memory changes.
Memory accessible using Int 15h 0 (0K)Largest executable program size 574,752 (561K)Largest free upper memory block 22,016 (22K)MS-DOS is resident in the high memory area.
XMS version 3.00; driver version 3.16EMS version 4.00
The first column shows the starting address of each item that MEM found. The address is list-ed in hexadecimal (base 16) notation. The second column shows the size, in kilobytes, ofeach program or driver. The third column shows the name of the program or device driverloaded into memory. The final column includes the type of item listed. The types includethe system files IO.SYS, MSDOS.SYS, and COMMAND.COM; programs; installed device drivers andsystem device drivers; environment; and any data areas the programs might need.
To see a listing of programs, drivers, and free space in conventional and upper memory, typethe following command and press Enter:
MEM /C
DOS shows you a report similar to this one:
Modules using memory below 1 MB:
Name Total = Conventional + Upper Memory-------- ---------------- ---------------- ----------------MSDOS 18,029 (18K) 18,029 (18K) 0 (0K)HIMEM 1,168 (1K) 1,168 (1K) 0 (0K)EMM386 3,120 (3K) 3,120 (3K) 0 (0K)DBLSPACE 37,664 (37K) 37,664 (37K) 0 (0K)COMMAND 3,184 (3K) 3,184 (3K) 0 (0K)MOUSE 17,088 (17K) 17,088 (17K) 0 (0K)
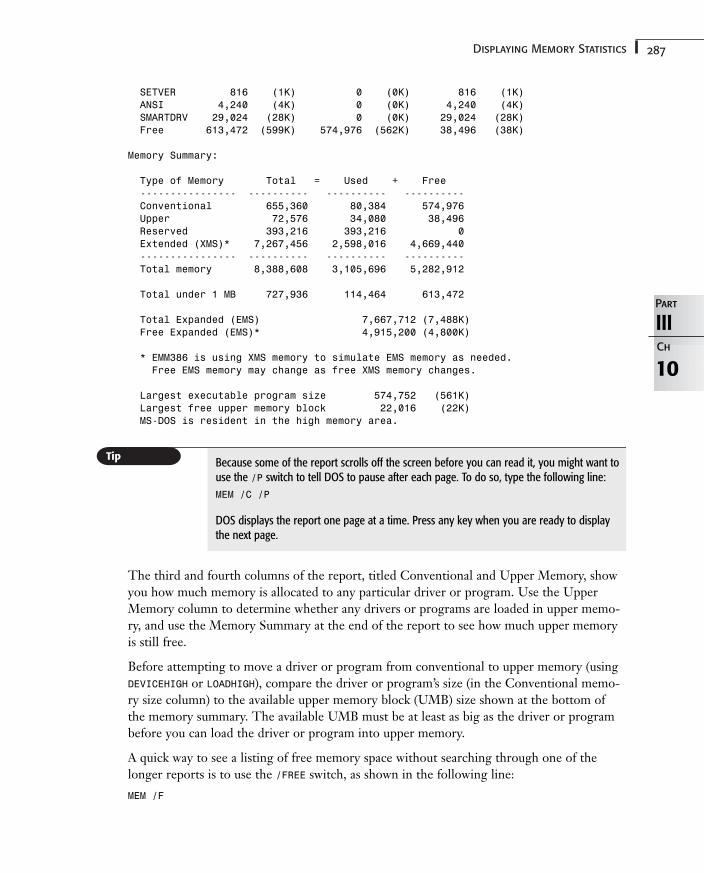
287Displaying Memory Statistics
10
IIIPart
Ch
SETVER 816 (1K) 0 (0K) 816 (1K)ANSI 4,240 (4K) 0 (0K) 4,240 (4K)SMARTDRV 29,024 (28K) 0 (0K) 29,024 (28K)Free 613,472 (599K) 574,976 (562K) 38,496 (38K)
Memory Summary:
Type of Memory Total = Used + Free---------------- ---------- ---------- ----------Conventional 655,360 80,384 574,976Upper 72,576 34,080 38,496Reserved 393,216 393,216 0Extended (XMS)* 7,267,456 2,598,016 4,669,440---------------- ---------- ---------- ----------Total memory 8,388,608 3,105,696 5,282,912
Total under 1 MB 727,936 114,464 613,472
Total Expanded (EMS) 7,667,712 (7,488K)Free Expanded (EMS)* 4,915,200 (4,800K)
* EMM386 is using XMS memory to simulate EMS memory as needed.Free EMS memory may change as free XMS memory changes.
Largest executable program size 574,752 (561K)Largest free upper memory block 22,016 (22K)MS-DOS is resident in the high memory area.
Because some of the report scrolls off the screen before you can read it, you might want touse the /P switch to tell DOS to pause after each page. To do so, type the following line:
MEM /C /P
DOS displays the report one page at a time. Press any key when you are ready to displaythe next page.
The third and fourth columns of the report, titled Conventional and Upper Memory, showyou how much memory is allocated to any particular driver or program. Use the UpperMemory column to determine whether any drivers or programs are loaded in upper memo-ry, and use the Memory Summary at the end of the report to see how much upper memoryis still free.
Before attempting to move a driver or program from conventional to upper memory (usingDEVICEHIGH or LOADHIGH), compare the driver or program’s size (in the Conventional memo-ry size column) to the available upper memory block (UMB) size shown at the bottom ofthe memory summary. The available UMB must be at least as big as the driver or programbefore you can load the driver or program into upper memory.
A quick way to see a listing of free memory space without searching through one of thelonger reports is to use the /FREE switch, as shown in the following line:
MEM /F
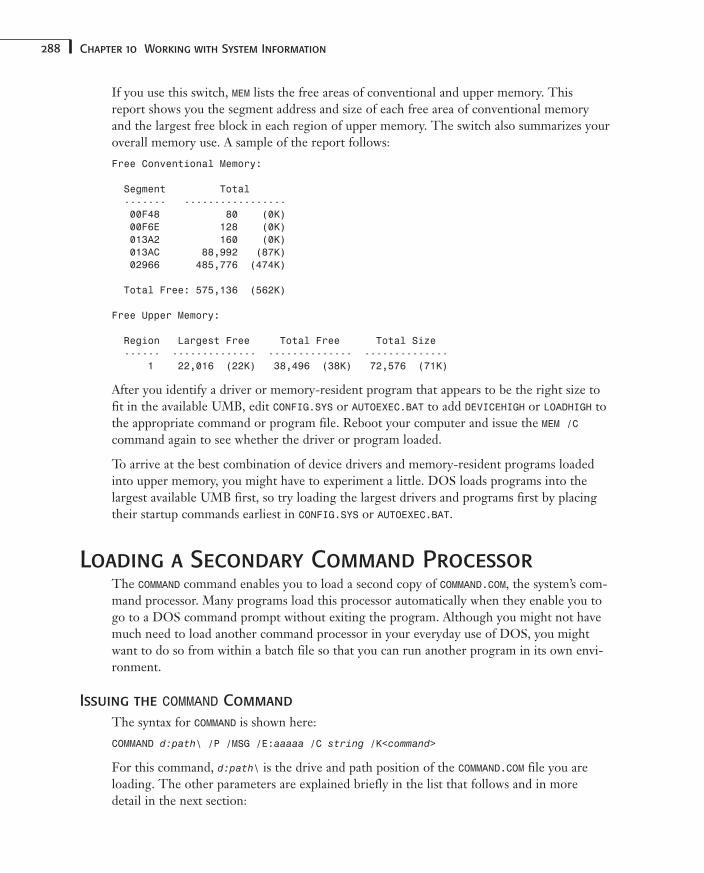
288 Chapter 10 Working with System Information
If you use this switch, MEM lists the free areas of conventional and upper memory. Thisreport shows you the segment address and size of each free area of conventional memoryand the largest free block in each region of upper memory. The switch also summarizes youroverall memory use. A sample of the report follows:
Free Conventional Memory:
Segment Total------- -----------------00F48 80 (0K)00F6E 128 (0K)013A2 160 (0K)013AC 88,992 (87K)02966 485,776 (474K)
Total Free: 575,136 (562K)
Free Upper Memory:
Region Largest Free Total Free Total Size------ -------------- -------------- --------------
1 22,016 (22K) 38,496 (38K) 72,576 (71K)
After you identify a driver or memory-resident program that appears to be the right size tofit in the available UMB, edit CONFIG.SYS or AUTOEXEC.BAT to add DEVICEHIGH or LOADHIGH tothe appropriate command or program file. Reboot your computer and issue the MEM /Ccommand again to see whether the driver or program loaded.
To arrive at the best combination of device drivers and memory-resident programs loadedinto upper memory, you might have to experiment a little. DOS loads programs into thelargest available UMB first, so try loading the largest drivers and programs first by placingtheir startup commands earliest in CONFIG.SYS or AUTOEXEC.BAT.
Loading a Secondary Command ProcessorThe COMMAND command enables you to load a second copy of COMMAND.COM, the system’s com-mand processor. Many programs load this processor automatically when they enable you togo to a DOS command prompt without exiting the program. Although you might not havemuch need to load another command processor in your everyday use of DOS, you mightwant to do so from within a batch file so that you can run another program in its own envi-ronment.
Issuing the COMMAND Command
The syntax for COMMAND is shown here:
COMMAND d:path\ /P /MSG /E:aaaaa /C string /K<command>
For this command, d:path\ is the drive and path position of the COMMAND.COM file you areloading. The other parameters are explained briefly in the list that follows and in moredetail in the next section:
289Loading a Secondary Command Processor
Parameter Description
/P Makes the second copy of the command processor permanent
/MSG Causes DOS to load DOS messages into memory instead ofreading the messages from disk every time they are needed
/E:aaaaa Enables you to adjust the number of bytes of memory that thecommand processor reserves for its environment
/C string Enables you to pass a string of characters to the commandprocessor being started
/Y Directs COMMAND.COM to step through the batch file specifiedby the /C or /K switch
/K Causes the program or named batch file to be run, with the system prompt that belongs to this second iteration ofCOMMAND.COM being displayed after the program terminates
Understanding the Operation of COMMAND.COM
COMMAND.COM, your command processor, reserves a small amount of memory called the envi-ronment. It uses this memory space to store variables, such as your PATH, PROMPT, and COMSPECsettings. If you load another copy of COMMAND.COM but omit the d:path\ parameter, the sec-ond command processor inherits the contents of the first command processor’s environ-ment. If you include the d:path\ parameter, the second command processor does not inheritthe old environment and keeps only the COMSPEC path specified by d:path\.
After you start a secondary command processor, you exit it and return to the first commandprocessor by using the EXIT command. When you leave the second command processor, thefirst command processor’s environment remains unchanged, even if you changed the secondcommand processor’s environment while you were working with it.
The optional /P switch makes the second copy of the command processor permanent. Thefirst command processor is no longer available, and DOS runs your AUTOEXEC.BAT file if youhave one. Remember, if you use the /P switch, you cannot use the EXIT command to exit thesecond copy of the command processor and return to the first one. You have to turn offyour computer and reboot.
The /MSG switch causes DOS to load DOS messages into memory instead of reading themessages from the disk every time they are needed. Using this switch improves the perfor-mance of DOS, but you lose some memory space.
The /E:aaaaa switch enables you to adjust the number of bytes of memory that the com-mand processor reserves for its environment. The minimum value for aaaaa is 160, and themaximum is 32768. The default is 256 bytes. (The recommended minimum value in aWindows environment is 512 bytes.) Each variable stored in the environment takes upspace, and you might find that you run out of room in the environment. If, for example, the
10
IIIPart
Ch
290 Chapter 10 Working with System Information
environment needs to store long settings (such as the long prompt used in the earlier PROMPTcommand example), you might have to adjust the size of the environment. If you see themessage Out of environment space, enlarge the environment.
The /C string option enables you to pass a string of characters to the command processoryou are starting. This option generally was used in batch files (see Chapter 16,“Understanding Batch Files”) in DOS versions before 3.3 but is no longer needed withDOS 3.3 and later versions, in which it has been replaced by the CALL command.
If you are using DOS 6.22, and you use the /C switch to run a batch file under the new command processor, you also can use the /Y switch to instruct COMMAND.COMto single-step through the batch file. This procedure is similar to the single-stepping ofAUTOEXEC.BAT you can do when you first boot DOS. For more information on how single-stepping works, refer to Chapter 2.
Using EXIT to Leave the Current Copy of the Command Processor
Use the EXIT command to leave the current copy of the command processor and return tothe previously loaded copy. The syntax for the EXIT command is as follows:
EXIT
No options or switches exist for this command. You cannot use the EXIT command if thesecond command processor was started by using the /P switch.
Uses for a Secondary Command Processor
Used together, the COMMAND and EXIT commands provide two interesting uses. If you havespecified an alternative location with the file COMMAND.COM, you use COMMAND to load the sec-ond processor. If, for example, the DOS command processor is in the root directory andanother command processor is loaded in the OTHER subdirectory, you can enter the followingcommand:
COMMAND C:\OTHER /E:320
This command loads the second COMMAND.COM and assigns it an environment size of 320bytes. You can use the second command processor to execute commands using the 320-byteenvironment. When you are finished using the secondary command processor, type EXIT toreturn to the primary command processor.
You also can use this command pair when you have set up a complex environment and youwant to execute a command with a basic environment without changing the existing envi-ronment. In this case, you can start the second command processor by using the d:path\option. If necessary, you can change the environment by using the SET command, covered inChapter 11, “Controlling Your Environment.” Execute the desired commands in the alteredenvironment and then exit the second command processor.
291Loading a Secondary Command Processor
If the command processor is in the root directory of drive C, enter the following command:
COMMAND C:\
This command loads a second copy of the command processor. The new environmentincludes only a setting for COMSPEC, showing that the command processor is loaded in C:\.The prompt does not have a setting and shows up in the form C>. You then execute anydesired commands in the new environment. After you finish issuing the commands, typeEXIT to exit the second command processor and return to the first command processor. Allthe environment settings for the first command processor stay as they were originally.
The principles DOS uses to execute this command are also used by applications programsthat enable you to suspend your program temporarily and go to DOS. When you select theDOSSHELL command within your word processor, for example, the program starts a secondcommand processor. All the existing information is kept in memory with the first commandprocessor. You execute DOS commands in the second command processor and type EXITwhen the commands are complete. The first command processor is then active, and youreturn to your application program.
10
IIIPart
Ch

Controlling Your Environment
In this chapter
Changing DOS Variables 294
Changing the User Interface 295
Changing Disk Drives 301
11CHAPTER
294 Chapter 11 Controlling Your Environment
Changing DOS VariablesThe SET command enables you to adjust the DOS environment by changing the variablesthat are available to programs running under DOS. This command shows the current set-tings in the environment, or you can use the command to add or change environment vari-ables.
Issuing the SET Command
The syntax for the SET command is as follows:
SET name=string
The variable name= is the name of the environment variable. The most frequently used envi-ronment variables are COMSPEC, PROMPT, and PATH. You can choose your own variable namesin addition to these three, however. Many of the programs that you might use set their ownenvironment variables, or require you to do so, before the program runs. These variablescontrol the way the program works.
The parameter string is the value to which you want to set the variable. In the case of PATH,the string can be the list of directories through which you want DOS to search to find pro-gram files. If you use the name= parameter without a value for string, the variable specifiedis a null value (contains nothing). Using the name= parameter this way effectively removesthe environment variable, and DOS no longer keeps track of it.
You also can type SET at the command prompt without any variables. The command thenlists all the current settings for environment variables.
Changing Environment Variables with SET
Typically, you use the SET command as part of a batch file to set variables to be used withinyour system. Most often, SET is part of the AUTOEXEC.BAT file, used to set the environmentvariables before any other programs are run.
If you examine your AUTOEXEC.BAT file, you might see some command lines similar to thefollowing:
SET COMSPEC=C:\SYS\COMMAND.COMPROMPT=$p$gPATH=C:\;C:\DOS;C:\SYS;
These commands, even though they look a bit different from each other, accomplish thesame thing: They assign values to system variables. The first command tells DOS that thecommand processor, COMMAND.COM, is in the SYS subdirectory of drive C. The second com-mand sets the prompt to include the current path and a greater-than sign. The third com-mand defines the root directory, DOS directory, and SYS directory of drive C as the searchpath for DOS to use.
Notice that the second and third command lines do not explicitly include the SET command.It’s not included here because neither of these variables requires the SET command, althoughyou can just as easily use these command lines:
295Changing the User Interface
11
IIIPart
Ch
SET PROMPT=$p$gSET PATH=C:\;C:\DOS;C:\SYS;
Defining Your Own Environmental Variables with SET
You also can use the SET command to set custom variables in the environment. These vari-ables usually are the names of directories or switches that programs use. The programsknow to look for particular variables in the environment, take the values assigned to thosevariables, and use them in the program.
A word processing program, for example, might look for a dictionary file called DICT in thecurrent directory. If you use the SET command, however, a different directory can containthe dictionary file. During installation, the program probably will insert a SET command inthe batch file that invokes the program. This command can use the following form:
SET DICT=C:\WP\DICT
This command enables the program to look in the WP directory for the dictionary fileinstead of looking in the current directory. Setting a variable in the environment, however,is useful only to programs that know to look for that variable.
Each variable stored in the environment occupies space. If a program needs large variablesset, you might have to increase the area of memory set aside for the environment whenDOS boots. You make this change through the SHELL command in CONFIG.SYS (seeChapter 19, “Configuring Your Computer”).
Changing the User InterfaceUser interface is a term that is often overused in computer circles. It does describe an integralpart of computers, however—how you (the user) interact with the computer. DOS provideswhat has come to be known as a text-based user interface, meaning that you communicatewith DOS via a command line. In Chapter 4, “Using the DOS Shell,” you learned about theDOS Shell, which provides a different user interface.
If you don’t want to use the DOS Shell, you can still modify how you interact with DOS.Primarily, you do so through two commands: PROMPT and MODE. The PROMPT commandenables you to change what the DOS command prompt looks like, and the MODE commandenables you to define how your system should work in conjunction with your video display.
Changing the Command Prompt with PROMPT
If you have ever booted a plain-vanillaversion of DOS (one that does not have a CONFIG.SYSor AUTOEXEC.BAT file), you probably noticed the default command prompt used by DOS. Itlooks like this:
C>
296 Chapter 11 Controlling Your Environment
This default command prompt shows the current drive and a greater-than sign—that’s it.You can, however, create a command prompt that is much more useful. You do so by usingthe PROMPT command. If you look at your AUTOEXEC.BAT file, for example, you might see aline that looks like this:
PROMPT $p$g
This line changes the default command-line prompt to the following:
C:\>
Although this prompt might not look immediately more useful, its value becomes apparentif you switch to another directory on your drive. If you use the CD command, for example, toswitch to the DOS subdirectory, your command prompt looks like this:
C:\>cd\dosC:\DOS>
It now shows the directory where you are located. This display is of great value wheneveryou are issuing commands at the DOS prompt. If you use a hard disk, this display is theminimum recommended prompt setting because navigating subdirectories can be difficult ifyou don’t know your current position. For this reason, you will find this use of the PROMPTcommand in many people’s AUTOEXEC.BAT files.
The PROMPT command has many more settings that you can use to further refine your DOSprompt. Used to its fullest, the PROMPT command requires use of the ANSI.SYS device driver(see Chapter 17, “Understanding ANSI.SYS”). Even without using the ANSI.SYS device driver,however, you can choose from many different command prompts.
Issuing the PROMPT Command
The syntax for the PROMPT command is simple:
PROMPT string
The string consists of text that defines how you want the command prompt to appear. Thistext can contain special pairs of characters, called meta-strings, which consist of a dollar signfollowed by one of the following characters:
b d e g h l n p q t v $
The string can contain any text or any number of meta-strings in any order. Table 11.1 liststhe meaning of the different meta-strings.
Table 11.1 Meta-Strings for Use with the PROMPT Command
Meta-String Displayed Information or Result
$_ Carriage return/line feed (moves the cursor to the beginning of the next line)
$b Vertical bar character (|)
$d Date
$e Esc character
297Changing the User Interface
11
IIIPart
Ch
Table 11.1 Continued
Meta-String Displayed Information or Result
$g Greater-than sign (>)
$h Backspace (moves the cursor one space to the left)
$l Less-than sign (<)
$n Current drive
$p Current path
$q Equal sign (=)
$t Time
$v DOS version
$$ Dollar sign
If you don’t like the current prompt and you want to reset it to the default originally usedby DOS, you can enter the PROMPT command without any parameters. This commandcauses DOS to reset the prompt to the current drive letter and a greater-than sign.
Understanding the Use of Meta-Strings
Earlier in this chapter, you saw an example of how to use meta-strings in a PROMPTcommand:
PROMPT $p$g
This is just one possible use, albeit the most often used. You also can use other combina-tions, such as
PROMPT Date: $d Time: $t$_$p$g
After you issue this command, your command prompt appears as follows:
Date: Thu 03-22-2001 Time: 2:35:07.23C:\WP\MEMOS>
Notice that this command creates a two-line command prompt which shows the currentdate and time, as well as the current directory. You can get as exotic as you want with yourcommand prompt; its appearance is entirely up to you.
Changing the command prompt based on certain configurations you might have within your system is not uncommon. Suppose that you use several different DOS programs, eachof which requires its own special setup. You can create a batch file (see Chapter 16,“Understanding Batch Files”) that sets up the search paths and system variables necessaryfor properly using the program. If the name of this program is XYZ Spreadsheet, ver-sion 3.7, you might want to add the following line to the batch file that performs the configuration:
298 Chapter 11 Controlling Your Environment
PROMPT Now using XYZ Spreadsheet, version 3.7$_$p$p
When this batch file executes, the command prompt becomes the following:
Now using XYZ Spreadsheet, version 3.7C:\SSDATA>
Now you can easily remember what configuration is active within your system. When yourun another batch file to change the configuration again, a different prompt command thatyou have set up can indicate which configuration is in effect. Again, how you set up yourcommand prompt is up to you and how you use your system.
Two of the meta-strings might require further explanation. You use the Esc character ($e) inassociation with the ANSI.SYS driver (see Chapter 17 for more information). In the same waythat you use the dollar sign to indicate to DOS that the next character is a meta-string, youuse the Esc character to signal ANSI.SYS that the next few characters are an ANSI.SYS com-mand.
You can :use the Backspace character ($h) to remove characters from the prompt. In the ear-lier PROMPT example that displayed the date and time, you might find the seconds and hun-dredths of a second in the displayed prompt are more of a distraction than they are helpful.You can alter the PROMPT command as follows:
PROMPT Date: $d Time: $t$h$h$h$h$h$h$_$p$g
The result is the following improved prompt, with everything after the minutes erased:
Date: Thu 03-22-2001 Time: 2:35C:\WP\MEMOS>
Altering the Look of the Screen with MODE
You can use the external MODE command to customize the number of characters per line andthe number of lines displayed onscreen. You also can use the MODE command to set the con-figuration of your computer ports (such as your printer port) and for code page switching.
Certain areas of memory in your system store the character tables for your video screenand your keyboard. By switching tables, you can configure DOS to use alternative charactersets to suit your national language and customs. These tables are called code pages. Formore information about code pages, see Chapter 14, “Understanding the InternationalFeatures of DOS.”
You might already know this fact, but it is possible to attach two types of video displays toyour computer. You can use a monochrome adapter and display for your word processing,for example, and a color graphics adapter and display for a graphics program. You canswitch between the displays by using the MODE command. When you type at the keyboard ona two-display system, you see the keystrokes only on one of the displays—the active display.The keyboard and active display make up the console. As you learned in Chapter 5,“Understanding Files and Directories,” DOS uses CON as the device name for the console.
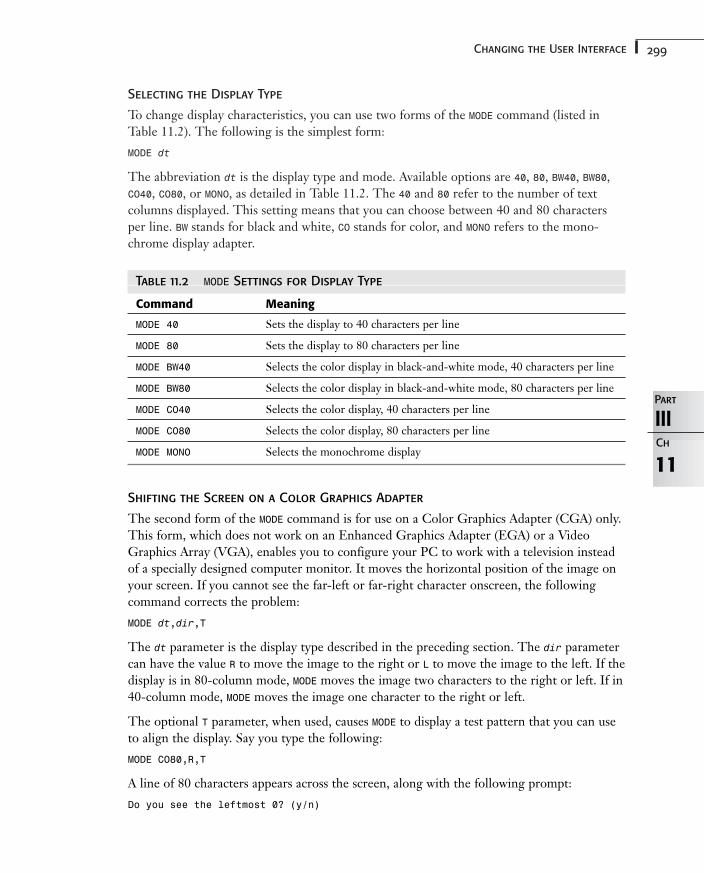
299Changing the User Interface
Selecting the Display Type
To change display characteristics, you can use two forms of the MODE command (listed inTable 11.2). The following is the simplest form:
MODE dt
The abbreviation dt is the display type and mode. Available options are 40, 80, BW40, BW80,CO40, CO80, or MONO, as detailed in Table 11.2. The 40 and 80 refer to the number of textcolumns displayed. This setting means that you can choose between 40 and 80 charactersper line. BW stands for black and white, CO stands for color, and MONO refers to the mono-chrome display adapter.
Table 11.2 MODE Settings for Display Type
Command Meaning
MODE 40 Sets the display to 40 characters per line
MODE 80 Sets the display to 80 characters per line
MODE BW40 Selects the color display in black-and-white mode, 40 characters per line
MODE BW80 Selects the color display in black-and-white mode, 80 characters per line
MODE CO40 Selects the color display, 40 characters per line
MODE CO80 Selects the color display, 80 characters per line
MODE MONO Selects the monochrome display
Shifting the Screen on a Color Graphics Adapter
The second form of the MODE command is for use on a Color Graphics Adapter (CGA) only.This form, which does not work on an Enhanced Graphics Adapter (EGA) or a VideoGraphics Array (VGA), enables you to configure your PC to work with a television insteadof a specially designed computer monitor. It moves the horizontal position of the image onyour screen. If you cannot see the far-left or far-right character onscreen, the followingcommand corrects the problem:
MODE dt,dir,T
The dt parameter is the display type described in the preceding section. The dir parametercan have the value R to move the image to the right or L to move the image to the left. If thedisplay is in 80-column mode, MODE moves the image two characters to the right or left. If in40-column mode, MODE moves the image one character to the right or left.
The optional T parameter, when used, causes MODE to display a test pattern that you can useto align the display. Say you type the following:
MODE CO80,R,T
A line of 80 characters appears across the screen, along with the following prompt:
Do you see the leftmost 0? (y/n)
11
IIIPart
Ch
300 Chapter 11 Controlling Your Environment
If you respond N to the prompt, this image moves two positions to the right of its precedingposition. If you respond Y to the prompt, the test is completed and the prompt is erased.Using the L option works in the same manner but moves the image to the left.
If you operate your system after shifting the screen, you have a little less memory availablefor your use. To display the image in an adjusted position, DOS leaves a small portion of theMODE command in memory, occupying about 1KB of memory. This program intercepts alloutput, adjusts it, and then sends it to the screen.
Using MODE to Adjust the Number of Columns or Lines Onscreen
You also can use MODE to adjust the number of columns or number of lines displayedonscreen. You must install the ANSI.SYS device driver before MODE can adjust your screen,however.
One way you can use MODE to adjust screen size is the following:
MODE CON COLS=a LINES=b
COLS= sets the number of columns displayed onscreen to a, and LINES= sets the number oflines displayed onscreen to b. If you omit a setting for the number of columns or number oflines, the current setting is preserved.
Valid numbers for a are 40 or 80. Valid numbers for b on a VGA screen are 25, 43, or 50;valid numbers for b on an EGA screen are 25 or 43.
If ANSI.SYS is loaded via the CONFIG.SYS file, typing the following command gives you a dis-play mode 80 columns wide and 43 lines high on a computer with an EGA or VGA adapterand monitor:
MODE CON COLS=80 LINES=43
After you set the display mode, you can start your application program. The display moderemains, unless the application resets it. If you use the preceding MODE command on a com-puter with an EGA screen, for example, you can use WordPerfect in 43-line mode withoutadjusting any settings in WordPerfect.
Not all applications can “see” that the extra lines are available. Try some MODE CON com-mands to determine whether you can use the extra lines. Using MODE CON to set yourscreen to 43 or 50 lines makes it easier to view long DIR listings, but the type is very smalland can be difficult to read.
Another MODE command option enables you to alter the number of lines displayed withoutspecifying that the screen is the console. This form, which is really a variation on the MODECON format, is handy when you use an auxiliary console instead of CON. Chapter 13,“Controlling Devices,” introduces the CTTY command, which establishes another device asthe standard input-and-output device. The syntax for this form of the MODE command is asfollows:
MODE dt,b
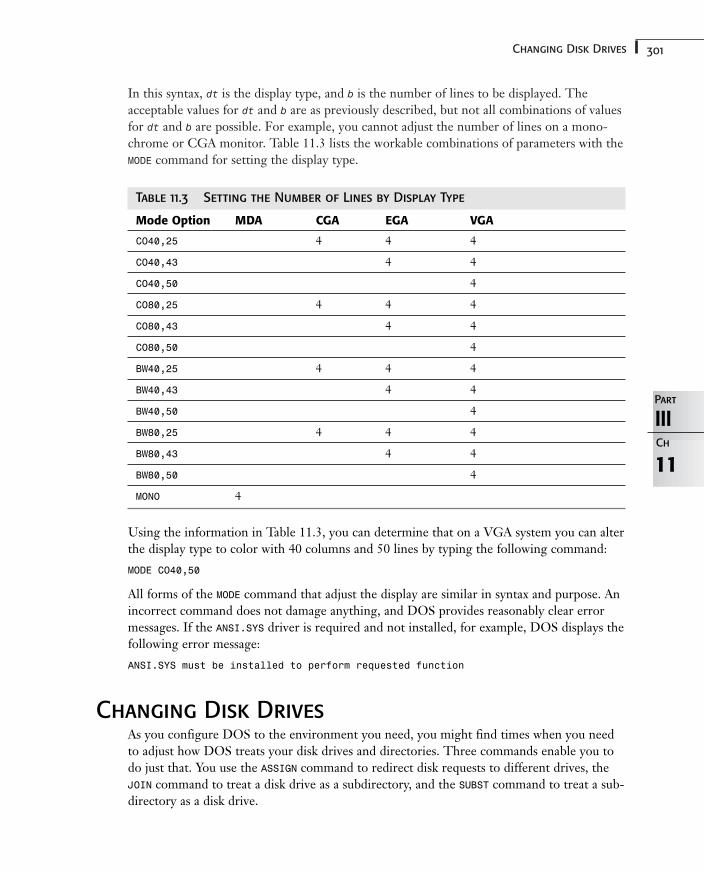
301Changing Disk Drives
In this syntax, dt is the display type, and b is the number of lines to be displayed. Theacceptable values for dt and b are as previously described, but not all combinations of valuesfor dt and b are possible. For example, you cannot adjust the number of lines on a mono-chrome or CGA monitor. Table 11.3 lists the workable combinations of parameters with theMODE command for setting the display type.
Table 11.3 Setting the Number of Lines by Display Type
Mode Option MDA CGA EGA VGA
CO40,25 4 4 4
CO40,43 4 4
CO40,50 4
CO80,25 4 4 4
CO80,43 4 4
CO80,50 4
BW40,25 4 4 4
BW40,43 4 4
BW40,50 4
BW80,25 4 4 4
BW80,43 4 4
BW80,50 4
MONO 4
Using the information in Table 11.3, you can determine that on a VGA system you can alterthe display type to color with 40 columns and 50 lines by typing the following command:
MODE CO40,50
All forms of the MODE command that adjust the display are similar in syntax and purpose. Anincorrect command does not damage anything, and DOS provides reasonably clear errormessages. If the ANSI.SYS driver is required and not installed, for example, DOS displays thefollowing error message:
ANSI.SYS must be installed to perform requested function
Changing Disk DrivesAs you configure DOS to the environment you need, you might find times when you needto adjust how DOS treats your disk drives and directories. Three commands enable you todo just that. You use the ASSIGN command to redirect disk requests to different drives, theJOIN command to treat a disk drive as a subdirectory, and the SUBST command to treat a sub-directory as a disk drive.
11
IIIPart
Ch
302 Chapter 11 Controlling Your Environment
The ASSIGN Command
You use the external command ASSIGN to redirect all DOS read-and-write (input-and-out-put) requests from one drive to another. Each drive is a DOS device. When you use theASSIGN command, DOS can interrogate a different disk from the one actually specified on acommand line.
The FORMAT and DISKCOPY commands ignore any drive ASSIGN commands.
The syntax for the ASSIGN command is as follows:
ASSIGN d1=d2 .../STATUS
d1 is the drive letter for the original disk drive; d2 is the drive letter for the reassignment.The ellipsis (...) indicates that you can reassign more than one drive on a single commandline.
/STATUS, issued with no other parameters, displays a listing of current drive assignments
The JOIN Command
You can use the JOIN command to add a disk drive to the directory structure of another disk.The external command JOIN, for example, enables you to use a floppy disk in such a waythat it appears to DOS to be part of a hard disk. You also can use JOIN if you have two harddisks: drive C and drive D. JOIN can attach drive D to a subdirectory on drive C, forinstance.
The syntax for JOIN is as follows:
JOIN d1: d2:\path /D
The directory structure of disk d1 is added to the directory structure of hard disk d2. d1: is avalid disk drive name that becomes the alias or nickname. d1: might be a nonexistent diskdrive. d2:\path is the valid disk drive name and directory path that will be nicknamed d1:. Ifyou use the /D switch, the alias is deleted.
When you use the JOIN command, DOS redirects any access from d2:\path to d1:. Thus, ifyou use the command
JOIN A: C:\SSDATA
any time you access C:\SSDATA, you actually are accessing drive A. This capability is helpfulif you have a program that can look only in a specific directory for data and you actuallywant to keep the data elsewhere.
The SUBST Command
The external command SUBST is the inverse of the JOIN command. Instead of grafting a sec-ond disk onto the tree structure of your hard drive, the SUBST command splits a disk’s direc-tory structure in two. In effect, the SUBST command creates an alias disk drive name for asubdirectory.
303Changing Disk Drives
11
IIIPart
Ch
Issuing the SUBST Command
You can use the SUBST command to perform different functions. To establish an alias, use thefollowing syntax:
SUBST d1: d2:\pathname
To delete an alias, use this form:
SUBST d1: /D
To see the current aliases, use the following form:
SUBST
The SUBST command replaces a pathname for a subdirectory with a drive letter. After aSUBST command is in effect, DOS translates all I/O (input/output) requests to a particulardrive letter back to the correct pathname. The alias drive created by the SUBST commandinherits the directory tree structure of the subdirectory reassigned to a drive letter.
As the default, DOS assigns the LASTDRIVE= parameter (used in CONFIG.SYS) a value ofE. You can make higher drive designators, however, by inserting a LASTDRIVE= parameterinto the CONFIG.SYS file. DOS then establishes as DOS devices each of the drive letters upto and including the specified LASTDRIVE. When you use the SUBST command, DOSunderstands that you are referring to a device.
Using SUBST to Reference a Path with a Drive Letter
SUBST is commonly used in two different situations. If you want to run a program that doesnot support pathnames, you can use the SUBST command to assign a drive letter to a directo-ry. The program then refers to the drive letter, and DOS translates the request into a path.If, for example, the data for a program is stored in C:\WORDPROC, you can use the followingcommand so that you can refer to this subdirectory as drive E:
SUBST E: C:\WORDPROC
After the substitution is made, you can issue the following command:
SUBST
The following message appears:
E: => C:\WORDPROC
To disconnect the substitution of drive E for the C:\WORDPROC directory, type the followingcommand:
SUBST E: /D
The other use for SUBST is to reduce typing long pathnames. When more than one personuses a PC, pathnames can become quite long because each user can use a separate section ofthe hard disk to store data files and common areas of the disk to store programs. If the paths\USER1\WORDDATA and \USER1\SSDATA exist on drive C, for example, you can reduce the typ-ing required to reach files in the directories by using the following command:
304 Chapter 11 Controlling Your Environment
SUBST E: C:\USER1
Issuing a directory command on drive E produces the following listing:
Volume in drive E is HARD DISK CVolume Serial Number is 1573-0241Directory of E:\
. <DIR> 05-02-92 12:07p
.. <DIR> 05-02-92 12:07pWORDDATA <DIR> 05-02-92 1:59pSSDATA <DIR> 05-22-01 2:08p
4 File(s) 0 bytes3477824 bytes free
The volume label given is the label from drive C, but the directory itself contains the con-tents of C:\USER1.
Do not use the following DOS commands in conjunction with drives that you create withthe SUBST command: ASSIGN, BACKUP, CHKDSK, DEFRAG, DISKCOMP, DISKCOPY, FDISK,FORMAT, LABEL, MIRROR, RECOVER, RESTORE, SCANFIX, and SYS. Some of these com-mands might refuse to work, and others might provide unwanted results.
As with JOIN and ASSIGN, you can use the SUBST command to fool software that insists onusing an otherwise unusable drive. A friend might have written an applications program, forexample, that makes direct reference in its code to a directory on drive C. By using SUBST,you can have your friend’s program attach drive D to a subdirectory on your drive C.
Understanding the General Rules for Using SUBST
As you are using the SUBST command, you must keep the following rules in mind:
■ d1: and d2: must be different.
■ You cannot specify a networked drive as d1: or d2:.
■ d1: cannot be the current drive.
■ d1: must have a designator less than the value in the LASTDRIVE statement ofCONFIG.SYS. (See Chapter 19 for more information on CONFIG.SYS.)
■ Do not use SUBST with ASSIGN or JOIN.
■ Remove all SUBST settings before you run ASSIGN, BACKUP, DEFRAG, DISKCOMP, DISKCOPY,FDISK, FORMAT, LABEL, MIRROR, PRINT, RECOVER, RESTORE, SCANFIX, or SYS.
■ Beware of using APPEND, CHDIR, MKDIR, PATH, and RMDIR with any drives reassigned.
Using the COMSPEC Variable
COMSPEC is a reserved system variable name that defines your command processor’s location.Typically, it is set to the complete path and filename for COMMAND.COM. If your command

305Changing Disk Drives
processor is not in the root directory of the boot drive, you must include an appropriateSHELL directive in CONFIG.SYS to inform DOS of the command processor’s location. Thiscommand, in turn, automatically sets the COMSPEC variable correctly. Thus, you don’t need toexplicitly set the COMSPEC variable in your AUTOEXEC.BAT file if you use the SHELL directive. Ifyou do not have the COMSPEC variable set on your system, your system might hang when youboot your computer or when you leave an application program that needs to reload thecommand processor. This failure occurs because the system cannot find the commandprocessor. Refer to Chapter 19 for information on how to use the SHELL directive in CONFIG.SYS to tell the system where to find the command processor.
11
IIIPart
Ch

Using Peripherals
In this chapter
Understanding Device Drivers 308
Setting Up Device Drivers 312
Troubleshooting Device Drivers 314
12CHAPTER
308 Chapter 12 Using Peripherals
Understanding Device DriversUnlike some operating systems, such as Windows 9x/ME, NT/2000, or OS/2, DOS does notinclude much built-in support for peripheral devices. Instead, most devices require the addi-tion of device drivers to your DOS configuration in order to access the devices in question.
Virtually every DOS-based computer system needs to work with device drivers at somepoint, unless it’s using an extremely simple hardware configuration. Spending some timefamiliarizing yourself with this important topic can help you save time when you need toadd or manage various device drivers in your system.
DOS contains only rudimentary support for computer hardware. For example, DOS canwork with standard VGA video cards, basic IDE hard disks, floppy disk drives, text-modeprinters, keyboards, and that’s about it. To use other types of hardware usually requires theinstallation and configuration of a device driver for the device in question. Device driversenable the following types of devices to work with DOS:
■ CD-ROM
■ Mouse or trackball
■ Tape backup
■ Video cards
■ Sound cards
■ Network cards
■ Other nonstandard storage devices, such as Zip and Jaz drives
DOS itself can work with printers in only the simplest possible way: It can send text-onlyinformation to a printer that can accept that type of information. This means that, just usingDOS, you can print only plain text. Other printer features, such as boldface, underline, oreven graphics, require an application that uses an application-specific printer driver thatcannot be shared with other applications.
Under DOS, you can direct text output to a printer in several ways. You can press the PrintScreen key to send a copy of what’s on the screen to the printer. You can copy a text file tothe printer by using the command COPY filename.ext PRN: and then pressing Enter.You can also use DOS redirection to do the same thing, with the command TYPE filename.ext >PRN:.
For serial printers, see Chapter 13, “Controlling Devices,” on use of the MODE command,which is usually required with serial-port printers.
You might be wondering why you don’t see printers and modems in the preceding list. Notethat there are two distinct types of device drivers. The first kind—the kind you usually hearabout—enables DOS itself to interact with and manage a particular device, such as a CD-ROM drive. When DOS can access and manage a device through the use of a device driver,applications can then make use of the device, too, through DOS.

309Understanding Device Drivers
The second kind of device driver, an application-specific device driver, supports a specific application program that needs to work with a device. For example, WordPerfect for DOSincludes its own printer device drivers to allow it to work properly with different printers.The printer device drivers that WordPerfect uses are installed in WordPerfect itself and donot benefit or work with any other application. As another example, most communicationsprograms under DOS either include their own modem device drivers, or they allow finecontrol of a number of settings that enable them to work with different modems.
To understand device drivers and how they are configured, you first need to understandsome basics about standard PC architecture and how DOS works with both application programs and devices to accomplish its work. You also need to understand how the devicesthemselves interact with the computer because many devices require that you determine andset their hardware interrupt, DMA channel, and memory address manually. The followingsections discuss this information.
Understanding Hardware Interrupts
You have no doubt heard about hardware interrupts, also called IRQs, inside your computer.All PCs are built so that devices that are part of the computer communicate with the proces-sor through the use of these hardware interrupts. A hardware interrupt enables a device,such as your keyboard, to send a signal to the processor indicating that the device requiresthe processor’s attention. When the processor receives a signal on one of these interrupts, itbranches to a region of memory that contains the program that handles the device itself. Forexample, every time you press a key on your keyboard, an interrupt is generated for yourprocessor. The processor then finds the program that corresponds to the interrupt, which in turn handles whatever the device needs. In the case of a key being pressed, the programreads which key was pressed from the keyboard and then sends the information to DOS sothat DOS or a running application program can display the key on the screen or do whatev-er else was intended.
All PCs have 16 hardware interrupts, and unfortunately this number cannot be expanded.The 16 interrupts are arranged in two banks of 8 interrupts, with the second bank beingconnected to the first bank through interrupts 2 and 9. Because interrupts 2 and 9 link thetwo banks together, you generally don’t want to use these interrupts for any devices in thesystem (although there are rare exceptions to this rule).
Hardware interrupts in most PCs are edge-sensitive, meaning that the system measures sim-ply whether the interrupt signal is on or off. In some systems, particularly those that useeither the EISA or MCA (microchannel) buses, interrupts are level-sensitive, meaning that an individual interrupt signal can be set to one of several different levels. The idea behindlevel-sensitive interrupts is that, in theory, multiple devices can share an interrupt, with eachdevice using a different level for its communication. However, in practice, this doesn’t workvery well, and so most buses stick with edge-sensitive interrupts.
IRQ assignments can be shared between devices but never between devices that will be usedat the same time. For example, if a computer has an interrupt set for one of its communica-tion ports connected to a modem, it also might be capable of using the same interrupt
12
IIIPart
Ch
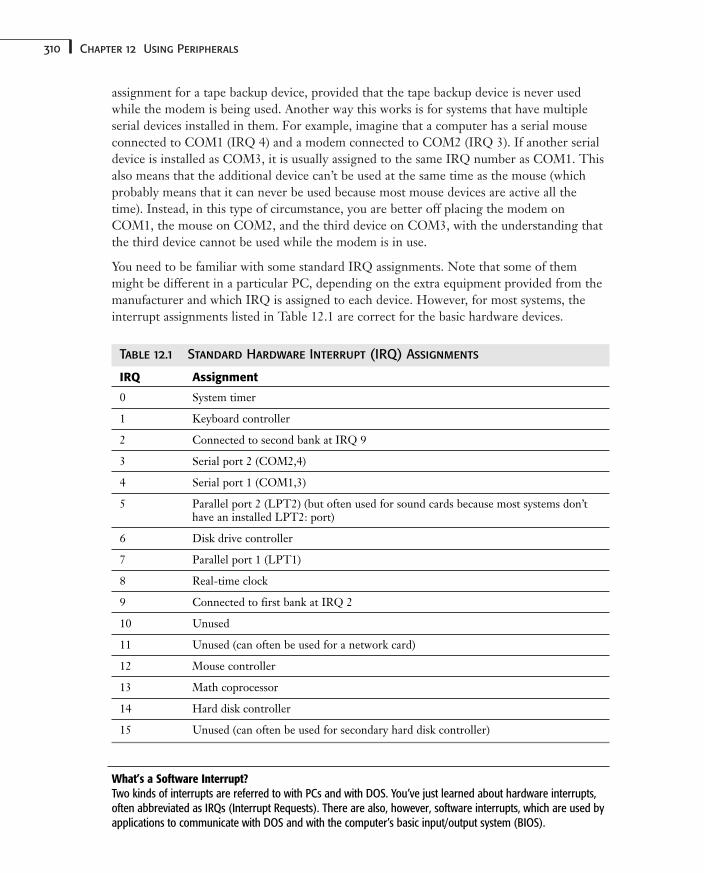
310 Chapter 12 Using Peripherals
assignment for a tape backup device, provided that the tape backup device is never usedwhile the modem is being used. Another way this works is for systems that have multipleserial devices installed in them. For example, imagine that a computer has a serial mouseconnected to COM1 (IRQ 4) and a modem connected to COM2 (IRQ 3). If another serialdevice is installed as COM3, it is usually assigned to the same IRQ number as COM1. Thisalso means that the additional device can’t be used at the same time as the mouse (whichprobably means that it can never be used because most mouse devices are active all thetime). Instead, in this type of circumstance, you are better off placing the modem onCOM1, the mouse on COM2, and the third device on COM3, with the understanding thatthe third device cannot be used while the modem is in use.
You need to be familiar with some standard IRQ assignments. Note that some of themmight be different in a particular PC, depending on the extra equipment provided from themanufacturer and which IRQ is assigned to each device. However, for most systems, theinterrupt assignments listed in Table 12.1 are correct for the basic hardware devices.
Table 12.1 Standard Hardware Interrupt (IRQ) Assignments
IRQ Assignment
0 System timer
1 Keyboard controller
2 Connected to second bank at IRQ 9
3 Serial port 2 (COM2,4)
4 Serial port 1 (COM1,3)
5 Parallel port 2 (LPT2) (but often used for sound cards because most systems don’thave an installed LPT2: port)
6 Disk drive controller
7 Parallel port 1 (LPT1)
8 Real-time clock
9 Connected to first bank at IRQ 2
10 Unused
11 Unused (can often be used for a network card)
12 Mouse controller
13 Math coprocessor
14 Hard disk controller
15 Unused (can often be used for secondary hard disk controller)
What’s a Software Interrupt?Two kinds of interrupts are referred to with PCs and with DOS. You’ve just learned about hardware interrupts,often abbreviated as IRQs (Interrupt Requests). There are also, however, software interrupts, which are used byapplications to communicate with DOS and with the computer’s basic input/output system (BIOS).
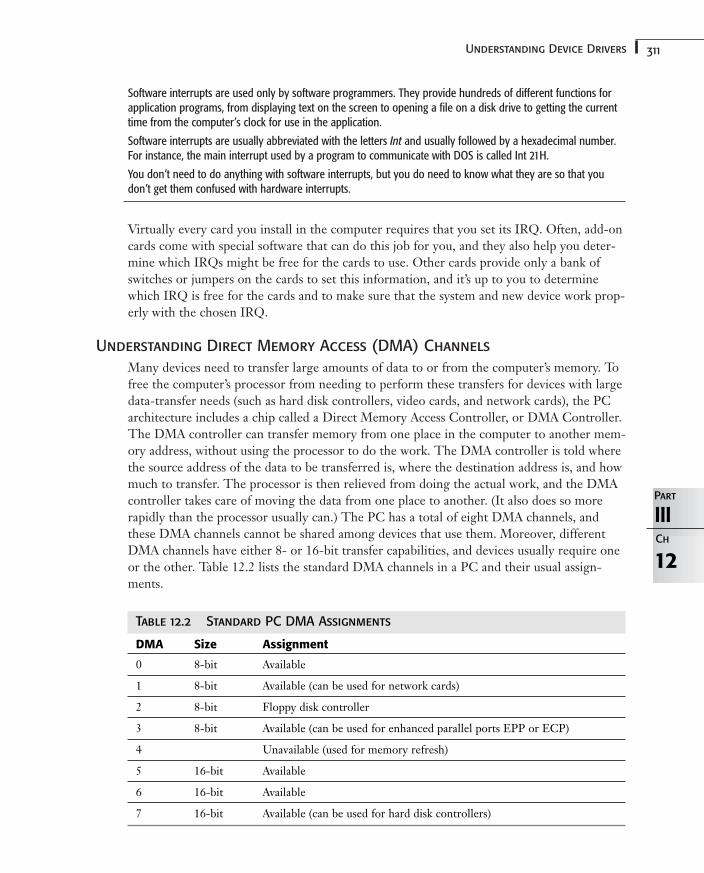
311Understanding Device Drivers
Software interrupts are used only by software programmers. They provide hundreds of different functions forapplication programs, from displaying text on the screen to opening a file on a disk drive to getting the currenttime from the computer’s clock for use in the application.
Software interrupts are usually abbreviated with the letters Int and usually followed by a hexadecimal number.For instance, the main interrupt used by a program to communicate with DOS is called Int 21H.
You don’t need to do anything with software interrupts, but you do need to know what they are so that youdon’t get them confused with hardware interrupts.
Virtually every card you install in the computer requires that you set its IRQ. Often, add-oncards come with special software that can do this job for you, and they also help you deter-mine which IRQs might be free for the cards to use. Other cards provide only a bank ofswitches or jumpers on the cards to set this information, and it’s up to you to determinewhich IRQ is free for the cards and to make sure that the system and new device work prop-erly with the chosen IRQ.
Understanding Direct Memory Access (DMA) Channels
Many devices need to transfer large amounts of data to or from the computer’s memory. Tofree the computer’s processor from needing to perform these transfers for devices with largedata-transfer needs (such as hard disk controllers, video cards, and network cards), the PCarchitecture includes a chip called a Direct Memory Access Controller, or DMA Controller.The DMA controller can transfer memory from one place in the computer to another mem-ory address, without using the processor to do the work. The DMA controller is told wherethe source address of the data to be transferred is, where the destination address is, and howmuch to transfer. The processor is then relieved from doing the actual work, and the DMAcontroller takes care of moving the data from one place to another. (It also does so morerapidly than the processor usually can.) The PC has a total of eight DMA channels, andthese DMA channels cannot be shared among devices that use them. Moreover, differentDMA channels have either 8- or 16-bit transfer capabilities, and devices usually require oneor the other. Table 12.2 lists the standard DMA channels in a PC and their usual assign-ments.
Table 12.2 Standard PC DMA Assignments
DMA Size Assignment
0 8-bit Available
1 8-bit Available (can be used for network cards)
2 8-bit Floppy disk controller
3 8-bit Available (can be used for enhanced parallel ports EPP or ECP)
4 Unavailable (used for memory refresh)
5 16-bit Available
6 16-bit Available
7 16-bit Available (can be used for hard disk controllers)
12
IIIPart
Ch
312 Chapter 12 Using Peripherals
DMA channels are sometimes abbreviated as DRQs.
Four common devices make use of the DMA controller and require that a particular DMAchannel be assigned to them. These devices are the floppy disk drive (assigned to DMAchannel 2), the hard disk controller, the video card, and any installed network cards. In thelast three cases, the devices might or might not use DMAs; it’s up to the designers of thecards. In newer PCs, these devices do not use DMAs, whereas older computers (80486-based and earlier) often use versions of these devices that do use DMAs.
Most add-on cards that use a DMA channel offer a default setting that works most often.However, if the device isn’t functioning correctly, you might have to try one of the otherpossible DMA channels available on that particular card.
Understanding Memory Input/Output Addresses
Programs cannot send data to or receive data from devices connected to the computerdirectly. Instead, small portions of memory are set aside into which programs (and DOS)place information destined for a device, and vice versa. These areas of memory are calledI/O port addresses (I/O being short for Input/Output). These memory spaces cannot beshared, nor can they overlap each other.
Most devices you install into the computer require an I/O port address be assigned to them.Often, the default setting from the manufacturer works, although usually alternativeaddresses also are provided in case of conflict. Most device drivers also need this informa-tion to properly interact with the device itself.
Setting Up Device DriversAs mentioned at the beginning of the chapter, device drivers are memory-resident programsthat enable DOS and application programs to interact with certain devices in the computer.Device drivers are generally set up in DOS through a statement in the system’s CONFIG.SYSfile. In rare cases, a device driver might be loaded in the AUTOEXEC.BAT file instead. Mostdevice drivers use the .SYS extension.
Device drivers in the CONFIG.SYS file are loaded through either the DEVICE= or DEVICEHIGH=statements. The former loads the device driver into conventional memory, whereas the lat-ter attempts to load the device driver into extended memory. Most device drivers functionwell either way, although in rare cases, a device driver might work properly only in conven-tional memory. Aside from this, though, whether they are located in conventional or extend-ed memory is determined by the overall memory tuning for the system, which is discussedin Chapter 19, “Configuring Your Computer.”
Device drivers loaded in AUTOEXEC.BAT are placed into conventional memory unless youuse the LOADHIGH command to start them.
313Setting Up Device Drivers
12
IIIPart
Ch
Two device drivers that most DOS systems load, regardless of what peripherals they haveloaded, are HIMEM and EMM386. They are both loaded in the CONFIG.SYS file, and they provideadditional memory management services for DOS (in this case, you might think of the sys-tem’s RAM as a device). Following is an example of how these two lines usually appear inthe CONFIG.SYS file:
DEVICE=C:\DOS\HIMEM.SYS
DEVICE=C:\DOS\EMM386.EXE RAM
As you can see, the actual device driver files can be located anywhere on the computer sys-tem, and the DEVICE command accepts drive letters and directories so that they can be locat-ed and loaded.
Sometimes you need to set up boot disks for different configurations on a system. Forinstance, some computer games require that only the minimum possible device drivers beloaded to provide the game with enough conventional memory and reduce potential con-flicts in the system. If you use boot disks to boot DOS with different configurations, you candramatically improve your boot time by making sure that any needed device drivers arelocated on the system’s hard disk and that the CONFIG.SYS and AUTOEXEC.BAT filesproperly reference the device drivers. This way, the system can boot much more quicklythan if it had to load the device drivers from the disk itself.
Many device drivers require that the chosen IRQ, DMA, and I/O port addresses be set aspart of the device driver load command. A good example is the device driver for supportinga Sound Blaster audio card. The following command is used, for example, for a SoundBlaster 16:
DEVICE=C:\SB16\DRV\CTSB16.SYS /UNIT=0 /BLASTER=A:220 I:5 D:1 H:5
The first part of the DEVICE= statement simply locates and loads the device driver. The nextportion of the statement is the /UNIT parameter, which in this case indicates that this is thefirst installed Sound Blaster. Next comes the /BLASTER parameter, which indicates whatresources in the system the card can use. Each resource is identified with a letter, followedby a colon and the chosen setting. The A parameter sets the memory address for the card,and the I parameter sets the IRQ used (often, IRQ 5 is used for sound cards because mostsystems don’t have an LPT2 port, so that IRQ is available). The D and H parameters set thetwo DMA channels that the card is to use—1 and 5, respectively (the Sound Blaster 16 usesboth an 8- and 16-bit DMA channel).
Unfortunately, every device driver requires different parameters and uses a different syntaxto specify any needed options. For each device driver you use, you need to examine the doc-umentation that came with the device for the proper syntax to use when loading the devicedriver.
314 Chapter 12 Using Peripherals
Troubleshooting Device DriversGenerally, you might have problems with a device driver when you install it for the firsttime, although occasional difficulties can emerge over time if it is incompatible with, say, a new program or an additional device.
If you are having trouble getting a device driver to work initially, you should first suspect aconflict in the device’s IRQ, DMA, or I/O memory setting. Depending on the device itself,different conflicts might manifest in different ways. For example, skipping sound comingfrom a sound card often indicates an IRQ conflict.
If the documentation that came with the device offers no clues on how to determine whichresource is conflicting, you will likely have to pursue a trial-and-error approach to changingthe settings.
Many versions of DOS come with a program called Microsoft Diagnostics (MSD.EXE) thatcan help you determine which IRQs are free in your computer. Similarly, some utility pro-grams such as Norton Utilities for DOS also can show you this information, as well asinformation on what I/O port addresses are in use, and sometimes which DMA channels are in use.
Another route you can take when troubleshooting a new device driver is to disable all otherdevice drivers. You do so by editing the CONFIG.SYS and AUTOEXEC.BAT files from which the system boots. You place the keyword REM (followed by a space) in front of any lines inCONFIG.SYS or AUTOEXEC.BAT that load device drivers. The keyword REM stands for remarkand indicates to DOS that the rest of that particular line is to be ignored. After “remarkingout” the other device drivers, you reboot the computer to make the changes take effect. Theidea here is to simply see whether you can get the device to function properly with a mini-mal system. If so, you can proceed in a stepwise fashion to re-enable the other device driversuntil you find the one that conflicts, and then you will probably have enough information toresolve the conflict. (You re-enable a device by removing the REM from the front of its line inCONFIG.SYS or AUTOEXEC.BAT and rebooting). If you cannot get a device to work even in aminimal system, even after trying a number of alternative settings, the device might not beworking or it might have some kind of hardware incompatibility. In this case, contact themanufacturer of either the device or the computer system for further assistance.
For example, consider the following case: You have a system that contains two COM ports(COM1 and COM2) with a modem on COM1, a mouse on COM2, a sound card, a printeron a parallel port, and a CD-ROM drive. You have just installed a network card into the sys-tem, and the first time you try to initialize it, the mouse on COM2 stops working, and thenew network card doesn’t work at all. How do you go about resolving this (unfortunatelyall-too-common) problem?
You probably suspect some kind of conflict because not only does the network card notfunction but neither does the mouse. If just the new network card doesn’t work, but every-thing else is fine, you probably suspect a configuration problem of some kind or a brokennetwork card, but not necessarily a conflict with another device. Because you’re dealing with
315Troubleshooting Device Drivers
12
IIIPart
Ch
a conflict (and assuming that no troubleshooting tools are available for either device to tellyou what the problem is), you then proceed to find out whether you can make the networkcard work if you disable the mouse. To do so, you look in both CONFIG.SYS andAUTOEXEC.BAT to find the device driver that controls the mouse (it can be in either place for mouse devices), add REM to the start of its line, and then reboot the computer.
After taking these steps, you discover that the network card starts working. This is goodnews because you’ve now proven that the card works, and you’ve confirmed that you have aconflict with the mouse. If you have any doubt, you can remove the network card or its dri-vers and see whether the mouse starts working. If so, you’ve pretty much proven that youhave a conflict.
Now the question becomes, what is conflicting? Is it an IRQ, DMA channel, or a memoryI/O port? Here, experience really pays off because over time you develop knowledge of themost likely conflict for any given device. However, as a general rule, you should always sus-pect the IRQ first—that’s where most conflicts occur. Looking at the IRQ table (refer toTable 12.1), you see that the COM2 port, which the mouse uses, makes use of IRQ 3.Looking through the documentation for the network card, you find that its default IRQ is also IRQ 3. Eureka!
Always remember that manufacturer Web sites can be invaluable resources to troubleshootand resolve device problems. Usually, they have notes, FAQs, and updated drivers thatmight resolve your problem. Also, don’t forget to check the Web site of the company thatmade the computer because the manufacturer can also have specific fixes for some devicesthat, for some reason, conflict only on its computers. For example, when I was beta testingWindows NT 4, I never got it to communicate with the serial ports on my main computer. Ifigured the problem was a bug that would get resolved before NT was released. Well, whenI loaded the released version, it had the same problem! Two weeks later, the maker of thecomputer I was using came up with an update to its BIOS that resolved the problembecause Windows NT had changed how it communicated with serial ports in some basic way.
Now that you’ve guessed that the conflict is on IRQ 3, you can do one of two things:
■ You can change the network card’s IRQ to another IRQ number.
Most network cards work best on IRQs 10, 11, or 12. If those choices aren’t available, tryIRQ 5.
■ You can’t easily change the IRQs for COM ports, so you can’t change the mouse’sCOM2 IRQ to something else. However, you might consider changing from a serialmouse that requires a COM port to something called a bus mouse that uses its owninterface card in the computer (and uses different interrupts from serial mouse devices,too).

316 Chapter 12 Using Peripherals
You use the same process to work through other types of conflicts, but if changing a device’sIRQ doesn’t work, you might have to try changing the I/O port address or, if the device usesDMA, its DMA channel.
The following are some general tips for different types of devices that you might have trou-ble with:
■ Some systems have add-on serial port cards instead of (or in addition to) built-in serialports. These cards usually enable you to change the IRQs used for those add-on serialports. However, be reluctant in changing them because many application programsdon’t work properly with a COM port that isn’t on a standard COM port IRQ.
■ Some video cards use an extra IRQ. The features that require it aren’t very important tothe functioning of most software, and you can disable a video card’s additional IRQ use.
■ CD-ROM drives rely on at least two device drivers to function. The first, which is usu-ally part of CONFIG.SYS, initializes the card that connects to the CD-ROM drive. (Often,it is a driver with ASPI in its name, but not always.) Secondarily, a device driver calledMSCDEX.EXE (Microsoft CD Extensions) is required in the AUTOEXEC.BAT file. The driverin CONFIG.SYS probably requires IRQ, I/O, and DMA assignments, whereas MSCDEXrelies on other settings that tell it the name of the device defined in CONFIG.SYS, thedrive letter to use, and some other features that can improve CD-ROM performance.Make sure that the parameters to both the CD-ROM device driver and MSCDEX are cor-rect per the manual that came with the CD-ROM and CD-ROM interface card.
■ Parallel printers don’t rely on DOS device drivers. It is up to each application to workwith the printer properly. However, serial-based printers can require that you run theDOS MODE command to properly set the system’s COM port to work with the printer.You use the MODE command to set the COM port’s baud rate, number of data bits, pari-ty, and number of stop bits, and these settings must correspond to switch-based settingson the printer itself. See Chapter 13 for details on using the MODE command.
■ Modems also do not rely on device drivers, but they are subject to IRQ conflicts withother devices that probably use device drivers. If a modem isn’t working properly, sus-pect an IRQ conflict with the COM port that the modem uses. Also, check the specificsettings in the communications program you are using, making sure that it’s set to usethe right COM port and that the baud rate is supported by the modem.
Solving device conflicts can, at times, be a frustrating task, and working through all the pos-sible issues takes patience. However, keep in mind that you need to perform all changes andtests in a controlled, stepwise fashion, and use the information presented in this chapter tohelp you understand possible sources of trouble and ways of dealing with various deviceproblems that might crop up. If you do so, and remember to involve any appropriate manu-facturers or vendors and take advantage of the help they can give, you can sort out deviceproblems in short order.

Controlling DevicesIn this chapter
Device Commands 318
The CLS Command 319
The GRAPHICS Command 319
The PRINT Command 322
The CTTY Command 325
The MODE Command 326
Using Redirection Commands 332
The MORE Filter 334
The FIND Filter 335
The SORT Filter 337
13CHAPTER
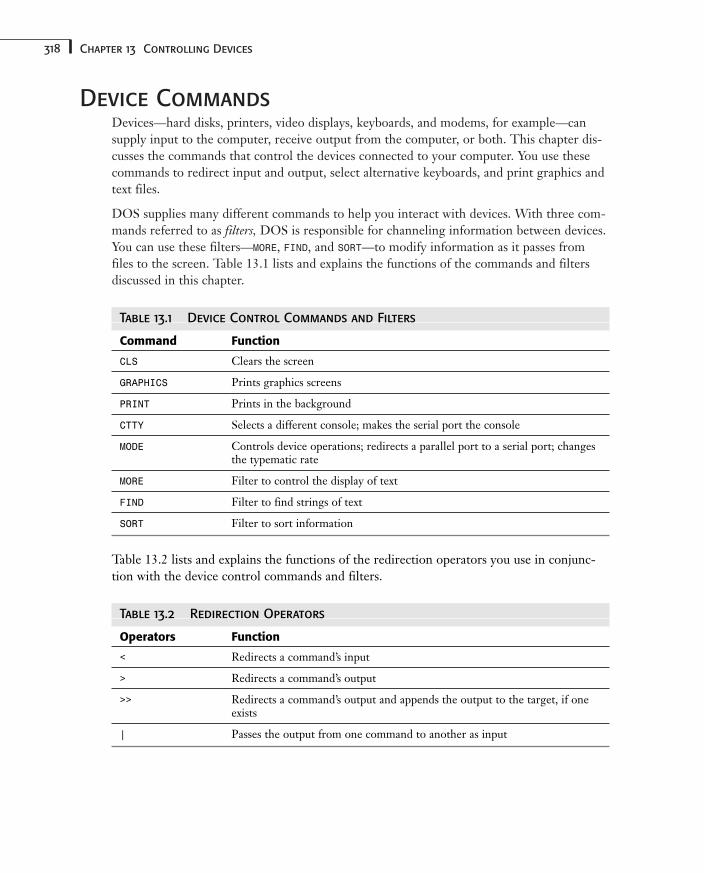
318 Chapter 13 Controlling Devices
Device CommandsDevices—hard disks, printers, video displays, keyboards, and modems, for example—cansupply input to the computer, receive output from the computer, or both. This chapter dis-cusses the commands that control the devices connected to your computer. You use thesecommands to redirect input and output, select alternative keyboards, and print graphics andtext files.
DOS supplies many different commands to help you interact with devices. With three com-mands referred to as filters, DOS is responsible for channeling information between devices.You can use these filters—MORE, FIND, and SORT—to modify information as it passes fromfiles to the screen. Table 13.1 lists and explains the functions of the commands and filtersdiscussed in this chapter.
Table 13.1 Device Control Commands and Filters
Command Function
CLS Clears the screen
GRAPHICS Prints graphics screens
PRINT Prints in the background
CTTY Selects a different console; makes the serial port the console
MODE Controls device operations; redirects a parallel port to a serial port; changesthe typematic rate
MORE Filter to control the display of text
FIND Filter to find strings of text
SORT Filter to sort information
Table 13.2 lists and explains the functions of the redirection operators you use in conjunc-tion with the device control commands and filters.
Table 13.2 Redirection Operators
Operators Function
< Redirects a command’s input
> Redirects a command’s output
>> Redirects a command’s output and appends the output to the target, if oneexists
| Passes the output from one command to another as input
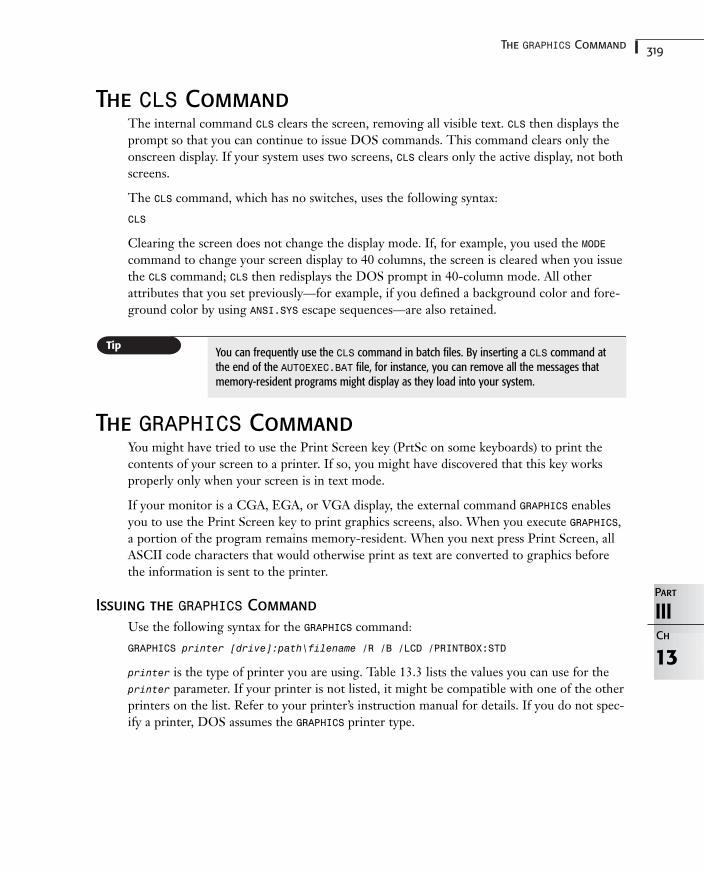
319The GRAPHICS Command
13
IIIPart
Ch
The CLS CommandThe internal command CLS clears the screen, removing all visible text. CLS then displays theprompt so that you can continue to issue DOS commands. This command clears only theonscreen display. If your system uses two screens, CLS clears only the active display, not bothscreens.
The CLS command, which has no switches, uses the following syntax:
CLS
Clearing the screen does not change the display mode. If, for example, you used the MODEcommand to change your screen display to 40 columns, the screen is cleared when you issuethe CLS command; CLS then redisplays the DOS prompt in 40-column mode. All otherattributes that you set previously—for example, if you defined a background color and fore-ground color by using ANSI.SYS escape sequences—are also retained.
You can frequently use the CLS command in batch files. By inserting a CLS command atthe end of the AUTOEXEC.BAT file, for instance, you can remove all the messages thatmemory-resident programs might display as they load into your system.
The GRAPHICS CommandYou might have tried to use the Print Screen key (PrtSc on some keyboards) to print thecontents of your screen to a printer. If so, you might have discovered that this key worksproperly only when your screen is in text mode.
If your monitor is a CGA, EGA, or VGA display, the external command GRAPHICS enablesyou to use the Print Screen key to print graphics screens, also. When you execute GRAPHICS,a portion of the program remains memory-resident. When you next press Print Screen, allASCII code characters that would otherwise print as text are converted to graphics beforethe information is sent to the printer.
Issuing the GRAPHICS Command
Use the following syntax for the GRAPHICS command:
GRAPHICS printer [drive]:path\filename /R /B /LCD /PRINTBOX:STD
printer is the type of printer you are using. Table 13.3 lists the values you can use for theprinter parameter. If your printer is not listed, it might be compatible with one of the otherprinters on the list. Refer to your printer’s instruction manual for details. If you do not spec-ify a printer, DOS assumes the GRAPHICS printer type.
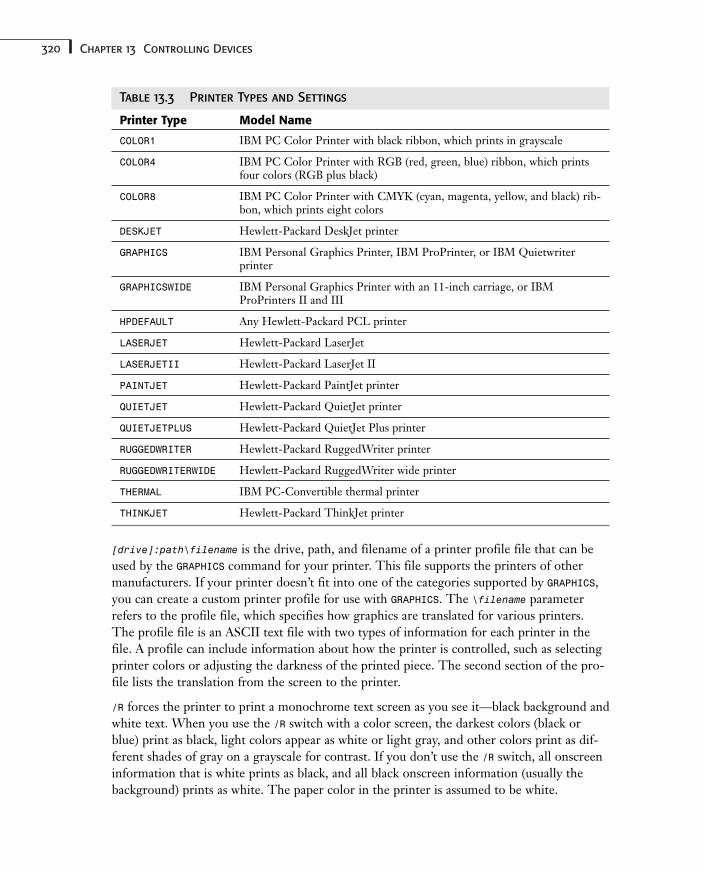
320 Chapter 13 Controlling Devices
Table 13.3 Printer Types and Settings
Printer Type Model Name
COLOR1 IBM PC Color Printer with black ribbon, which prints in grayscale
COLOR4 IBM PC Color Printer with RGB (red, green, blue) ribbon, which printsfour colors (RGB plus black)
COLOR8 IBM PC Color Printer with CMYK (cyan, magenta, yellow, and black) rib-bon, which prints eight colors
DESKJET Hewlett-Packard DeskJet printer
GRAPHICS IBM Personal Graphics Printer, IBM ProPrinter, or IBM Quietwriterprinter
GRAPHICSWIDE IBM Personal Graphics Printer with an 11-inch carriage, or IBMProPrinters II and III
HPDEFAULT Any Hewlett-Packard PCL printer
LASERJET Hewlett-Packard LaserJet
LASERJETII Hewlett-Packard LaserJet II
PAINTJET Hewlett-Packard PaintJet printer
QUIETJET Hewlett-Packard QuietJet printer
QUIETJETPLUS Hewlett-Packard QuietJet Plus printer
RUGGEDWRITER Hewlett-Packard RuggedWriter printer
RUGGEDWRITERWIDE Hewlett-Packard RuggedWriter wide printer
THERMAL IBM PC-Convertible thermal printer
THINKJET Hewlett-Packard ThinkJet printer
[drive]:path\filename is the drive, path, and filename of a printer profile file that can beused by the GRAPHICS command for your printer. This file supports the printers of othermanufacturers. If your printer doesn’t fit into one of the categories supported by GRAPHICS,you can create a custom printer profile for use with GRAPHICS. The \filename parameterrefers to the profile file, which specifies how graphics are translated for various printers.The profile file is an ASCII text file with two types of information for each printer in thefile. A profile can include information about how the printer is controlled, such as selectingprinter colors or adjusting the darkness of the printed piece. The second section of the pro-file lists the translation from the screen to the printer.
/R forces the printer to print a monochrome text screen as you see it—black background andwhite text. When you use the /R switch with a color screen, the darkest colors (black orblue) print as black, light colors appear as white or light gray, and other colors print as dif-ferent shades of gray on a grayscale for contrast. If you don’t use the /R switch, all onscreeninformation that is white prints as black, and all black onscreen information (usually thebackground) prints as white. The paper color in the printer is assumed to be white.
321The GRAPHICS Command
/B prints the background color. Use this switch only if you have a color printer and after youspecify COLOR4 or COLOR8 as your printer type. If you try to use the /B switch with a black-and-white printer, DOS displays the following message:
The /B switch is invalid with black and white printers.
/LCD is a switch designed for use with the IBM PC-Convertible, which comes with a smallliquid-crystal display (LCD) screen. /LCD forces the printer to print the screen as it appears,with the size of the screen and characters smaller than on normal monitors. You also can usethis switch with any other laptop computer that has an old-style, smaller LCD screen likethe IBM PC-Convertible. Most laptops now have a full-sized LCD screen and don’t requirethe use of this switch.
/PRINTBOX:STD sets the printbox size to standard or normal size, as it appears on mono-chrome and VGA monitors of standard size and shape. You use this setting to print thescreen when you work with Quattro Pro, Microsoft Word, or other programs in graphicsmode. You also use this setting to print the contents of a narrow LCD screen if you want itto appear as if it were on a standard monitor. By typing /PRINTBOX:LCD, you can use thisswitch to force the printer to print in LCD mode (a longer form of the /LCD switch, shownearlier). You can abbreviate the /PRINTBOX switch to /PB.
Using GRAPHICS to Print a Screen Image
Suppose that you have an IBM ProPrinter printer. If you use a monochrome system andwant to print a screen image with the background as black and the text as white, enter thefollowing command at the DOS prompt:
GRAPHICS /R
After GRAPHICS loads into memory, you can create the screen of interest and press PrintScreen to print to the printer.
To print eight-color images (including the background color) on an IBM PC Color Printerwith a CMY ribbon installed, type the following command:
GRAPHICS COLOR8 /B
On the PC-Convertible with an attached full-sized monitor, you can send the screen imageto the IBM PC-Convertible thermal printer by typing the following:
GRAPHICS THERMAL /PB:STD
Changing the command to either of the following prints the image as it normally appears onthe liquid-crystal display:
GRAPHICS THERMAL /PB:LCD
GRAPHICS THERMAL /LCD
You should remember the following guidelines when using the GRAPHICS command:
■ After you load GRAPHICS, you can press the Print Screen (Shift+PrtSc) key to printgraphics screens on listed graphics printers.
13
IIIPart
Ch
322 Chapter 13 Controlling Devices
■ If you omit the /PB and /LCD switches, GRAPHICS uses the previous printbox setting.
■ You can print up to eight colors on a color printer.
■ You can print up to 19 shades of gray on a black-and-white printer.
The PRINT CommandIn Chapter 8, ”Managing Your Files,” you learned that the COPY command can transferinformation from one device to another. For example, this command copies the file namedLETTER.TXT to the device PRN, the printer:
COPY LETTER.TXT PRN
During this copying process, the computer is not available for other use. Copying a largefile to the printer can tie up your computer for a great while, depending on the speed ofyour printer.
You can make better use of your computer if you use the PRINT command. This commandenables you to print in the background, thereby freeing up your computer for other taskswhile you print a document. Printing occurs during the idle times—while the computer iswaiting for you to type at the keyboard, for example. You also can queue files, which meanssend multiple files to the printer, each of which then prints in turn.
Issuing the PRINT Command
The external PRINT command uses the following syntax:
PRINT <switches> filename1 /P /T /C filename2 /P /T /C...
You can replace <switches> with any of the switches listed in Table 13.4. filename1 is thedrive, path, and filename of the first file you want to print, and filename2 is the drive, path,and filename of the next file you want to print. The ellipsis (…) means that you can listmore files. You also can use wildcards in the filenames.
Table 13.4 Switches for the PRINT Command
Switch Meaning
/D:device Names the serial or parallel port to which your output device is attached.Acceptable values include all DOS output devices and ports, such asLPT1, LPT2, LPT3, PRN, COM1, COM2, COM3, COM4, or AUX.
/Q:qsize Specifies the maximum number of files—from 4 to 32—that can bequeued at a time. If you omit the switch, the default queue size is 10 files.
/B:size Determines the size of buffer used in the printing process. The data forprinting is taken from the disk in chunks the size of the specified buffer.Increasing the buffer size causes the PRINT command to read data fromthe disk in bigger chunks. The minimum buffer size is 512 bytes; themaximum is 16KB. If you don’t specify the buffer size, the default size is512 bytes. Remember that the larger you make the buffer, the less RAMyou have for running applications programs.
323The PRINT Command
Table 13.4 Continued
Switch Meaning
/U:ticks1 Determines how long (in system clock ticks) the PRINT command waitsfor the printer to be available. In most cases, the PRINT command sendsdata to the printer faster than the printer can actually print. When theprinter cannot accept any more data, it sends a busy signal to the comput-er until it is ready to accept more data. The default setting for /U:ticks1is 1 clock tick, but you can set it as high as 255. If the printer is busy,PRINT waits the number of clock ticks set by this switch. If the printer isstill busy, PRINT immediately transfers control back to DOS for othertasks without using the rest of the clock ticks set aside for it by the/S:ticks3 switch.
/M:ticks2 Specifies the number of system clock ticks that the PRINT command waitsfor the printer to print a character. You can set ticks2 to any valuebetween 1 and 255; the default value is 2.
/S:ticks3 Determines the number of clock ticks allocated to background printing.Too high a value for this switch causes the computer to respond sluggishlyto other commands that you execute while you print in the background. Alow value slows the printing process. The range of values is 1 to 255; thedefault value is 8.
Like GRAPHICS, PRINT leaves a portion of itself in memory after you issue the command, andthe switches change how the PRINT command works. You can specify the optional switchesin Table 13.4 only when you first issue the PRINT command. The other switches (issued afterthe filenames) can be issued at any time, however:
■ The /P switch places a file in PRINT’s queue. The preceding file and all subsequent fileson the command line are printed.
■ The /C switch cancels the printing of some files. The filename issued before the /C andall files after the /C on the same command line are removed from the print queue. (Theprinter alarm sounds if you cancel the currently printing file with the /C switch.) Youmust issue the /P switch to add files to the queue again.
■ The /T switch terminates printing. All files are removed from the queue, including thefile being printed. The printer alarm sounds, a file cancellation message prints, and thepaper advances to the next page.
If you enter filenames without a /P, /C, or /T switch, DOS uses the /P switch as a default sothat all files are placed in the queue for printing. If, at the prompt, you type PRINT with noswitches, a list of all files in the queue appears. This list includes the name of the file that iscurrently printing and the order of files yet to print. This command also displays any errormessages. If, for example, you forget to turn on the printer, the following error messageappears:
Errors on list device indicate that it may be off-line. Please check it.
13
IIIPart
Ch
324 Chapter 13 Controlling Devices
Using PRINT to Print Several Files
You do not have to enter the names of all the files to print at one time. You can issue thePRINT command several times to add or remove files from the print queue. You can specifythe parameters that affect the way PRINT operates (those in Table 13.4), however, only whenyou first issue the command. After you first issue the PRINT command, you use the commandonly to enter filenames for printing or to cancel printing.
If you enter the PRINT command for the first time without specifying a device, PRINTprompts you for a device name. The default, PRN, is the first parallel port (LPT1) on yourcomputer. Pressing Enter at the DOS prompt accepts the default.
If you are in no hurry to collect the printed output of files and want to use the computerwhile the printer prints your files, you can readjust the default installation settings for PRINT.By changing the /M:ticks2 or /S:ticks3 settings, you can give your computer betterresponse time. To alter the default settings, you can type the following when you invoke the PRINT command for the first time:
PRINT /D:PRN /M:1 /S:25
If you are unconcerned about the sluggishness of the keyboard, you can improve the speedof the background printing by altering the buffer size, as well as by adjusting /M:ticks2 and/S:ticks3. You might type the following command, for example:
PRINT /D:PRN /B:16384 /M:1 /S:25
Experiment with these variables until you find a setting that is acceptable. A sluggish key-board is not always tolerable. If the response time is too slow, you can make errors; forexample, you might assume that a program didn’t accept your keystrokes and try to retypethe command, whereas the program was only waiting to regain control.
By using a combination of the /P, /T, and /C switches, you can adjust the order in which thefiles print. Suppose, for example, that you want to print four files: LETTER1.TXT, MEMO1.TXT,REPORT1.TXT, and REPORT2.TXT. Type the following on the command line:
PRINT /D:PRN LETTER1.TXT /P MEMO1.TXT REPORT1.TXT REPORT2.TXT
If you then decide that you want to print REPORT2.TXT before REPORT1.TXT, type the follow-ing command, which removes REPORT1.TXT from the print queue and adds the file to the endof the queue:
PRINT REPORT1.TXT /C REPORT1.TXT /P
You can cancel all files to be printed by typing the following command:
PRINT /T
General Rules for Using PRINT
As you are using PRINT, you should keep the following guidelines in mind:
■ You can specify the /D:device, /Q:qsize, /B:size, /S:ticks3, /U:ticks1, and /M:ticks2optional switches only the first time that you issue the PRINT command.
325The CTTY Command
13
IIIPart
Ch
■ If you specify /D:device, you must type this switch first, before all other switches.
■ If you issue /P, the preceding file and all subsequent files entered on the command lineby the PRINT command print until a /T or /C switch is issued.
■ If you issue /C, the preceding file and all subsequent files are canceled.
■ The files print in the order that you enter them at the command line.
■ A page-eject sequence is sent to the printer at the end of each file.
■ You cannot use the printer for other purposes while PRINT is in operation. You cannot,for example, use Print Screen when PRINT is in effect.
■ The files being printed must be on the same disk drive.
■ You cannot alter files that are in the print queue or being printed.
■ Specifying a nonexistent device causes unpredictable behavior by the computer.
■ Tab characters in the printed file convert to blanks, up to the next 8-column boundary.
GRAPHICS.PRO is the profile file supplied with DOS. If you want to create a custom profilefile for your printer, make a copy of the supplied GRAPHICS.PRO file and modify it. This exercise is also useful if you are interested in DOS programming. Modifying theGRAPHICS.PRO file is not necessary for most printers.
If the onscreen colors don’t have a sharp enough contrast, the GRAPHICS command can“miss” the difference between colors and produce an all-white or all-black printout. If thisproblem occurs, try altering your screen colors before you print.
The CTTY CommandDOS can take information or data from and send it to different kinds of devices. Any devicethat you can use to give information to DOS is called an input device, and any device DOScan send information to is an output device. DOS uses your keyboard and screen as the stan-dard input and output devices. Together, these two devices make up the console, known toDOS as the CON device. The internal command CTTY enables you to tell DOS that you wantto use a different device for input and later enables you to restore the keyboard and screenas the console.
Use one of these syntax lines for the internal command CTTY:
CTTY device
CTTY CON
device is the name of a DOS device that you can use for input. CTTY causes DOS to inter-cept the input/output (I/O) requests that normally come from the keyboard and go to thescreen; the command redirects these calls to the device you specify.
By typing the following command, for example, you designate COM1 as the device thatsends and receives standard input and output:
CTTY COM1
326 Chapter 13 Controlling Devices
You use this command in association with specialized programs that need input from a different source from the keyboard. Later, typing the following from the auxiliary devicerestores the console to the keyboard and display:
CTTY CON
You also can use CTTY if the computer is attached to an intelligent bar-code reader that col-lects information from packages. This reader, in association with a specialized program,might not need to use the display or keyboard.
You probably will not need to use the CTTY command. DOS usually can gather informationthrough alternative devices without altering the standard input and output devices. Certainapplications programs, however, benefit from your use of CTTY. One example is the DOSexternal program Interlnk, which requires the CTTY command in order to transfer itself toanother computer.
➔ For more information on the Interlnk program, see Chapter 8, “Managing Your Files.”
If you decide that you need to use CTTY, keep the following rules in mind:
■ You can use the character-based devices AUX, COM1, COM2, COM3, or COM4 asthe alternative console.
■ The physical device attached to the relevant AUX, COM1, COM2, COM3, or COM4must be able to accept input and provide output.
■ Programs that do not use DOS function calls cannot make use of the alternative console.
The MODE CommandMODE is one of the more versatile external commands supplied with DOS. It sets the opera-tional modes of serial and parallel ports and redirects information from parallel ports to seri-al ports. MODE also can set display modes, and you can use MODE with code pages.
➔ For more information about display modes and code pages, see Chapter 11, “Controlling YourEnvironment,” p. 293, and Chapter 14, “Understanding the International Features of DOS,” p. 339.
In this chapter, you learn how you can use the MODE command to control the parallel andserial ports, as well as to change how the keyboard acts. To read about all functions of theMODE command, turn to the “Command Reference” later in this book.
Using MODE to Change Parallel Port Settings
A parallel port transmits data by transferring an entire byte at one time. Because of the waydata is transferred, parallel ports are typically used to send information to a printer. To helpcontrol your printer, you can use the MODE command to adjust the number of lines per inchand columns per line on your printer and to set the retry feature.
327The MODE Command
Issuing the MODE Command
Use the following syntax for the external MODE command, which changes the parallel printercharacteristics:
MODE LPTn: cpl,lpi, P
LPTn: is the parallel port name, such as LPT1 or LPT2. cpl is the number of characters perline; the default cpl setting is 80. lpi is the number of lines per inch; the default setting forlpi is 6. P specifies continuous retries on timeout or “busy” errors.
MODE also enables you to use an alternative format, as follows:
MODE LPTn: COLS=wid, LINES=lpi, RETRY=action
wid is the number of columns per line, 80 or 132; lpi is the number of lines per inch, 6 or 8;and action is the message you want DOS to return or the action DOS should take when theprinter port is busy.
When you use the MODE command to adjust the parallel port settings, this command altersonly two items seen on the printout itself: the characters per line and lines per inch. In gen-eral, printing is performed directly from an applications program, which can set many moreparameters for a particular printer. The MODE command operates by sending Escapesequences to the printer that can adjust the printed output accordingly.
The RETRY setting is more significant than the other settings. When data is sent to the print-er, the port expects to see return signals from the printer indicating that it received the data.If the port doesn’t receive any signals within a particular period of time, a timeout erroroccurs. By default, DOS does not try to send information to the printer again and returnsan error message to the screen. If you include the P option, DOS continuously tries to sendthe data; this action prevents the error message from being displayed. Pressing theCtrl+Break key combination stops the retry process.
If you use the RETRY switch in the alternative MODE format, various retry options are available.If you don’t specify a retry option, DOS doesn’t continue trying to send data when a time-out error occurs. When you use the retry option, you can select from several options. Thefollowing list explains the various options:
■ The B setting returns a busy signal to the device driver when the port is busy. This set-ting is not available with DOS 6.0.
■ The R setting causes a ready signal to be returned from the port—even if the port isbusy. Then, when the printer does become ready, the data is ready to send, and an errormessage does not appear onscreen.
■ The E option is most commonly used when the printing is done in the background (byPRINT or a network print queue). The data is not transferred to the printer until theport is not busy.
■ The N setting indicates that no retry action is taken.
■ The P option causes DOS to try the printer continuously until the busy state ends.
13
IIIPart
Ch

328 Chapter 13 Controlling Devices
Using MODE to Print a Large File
In some cases, you must use the P option to print a file. Consider a large DOS file that youwant to copy to the printer. If the file is larger than the storage capacity of the printer, theprinter port will be busy at some point during the data transfer. If the printer remains busyfor too long, an error message appears onscreen; DOS thinks the printer is defective, andthe printing process aborts. This outcome is a particular concern when you are printinglarge, complex files such as those created by a PostScript program.
Specifying P in DOS 3.3 and earlier or RETRY=B in DOS 4.0 and 5.0 causes DOS to waituntil the printer is ready to receive data. (The B option is not available in DOS 6.0, but youcan use the P option for this purpose.) Use the following command for LPT1 in DOS 3.3:
MODE LPT1:,,P
For DOS 4.0, 4.01, 5.0, and 6.2, use the following command:
MODE LPT1 RETRY=B
For DOS 6.0 or 6.2, use the following command:
MODE LPT1 RETRY=P
If the file is large and you want to be able to fit more lines of text on a page, you can printthe file with a higher number of lines per inch (8 instead of 6). Also, you can specify 132columns per line instead of 80. This setting is not a problem for a wide-carriage printer,which accepts wide paper. If you are using a printer that accepts 8 1/2-inch paper, however,you must set the printer to print in a condensed character mode, which can fit 132 columnson a line of 8 1/2-inch paper.
When the printer is attached to LPT2, use the following command to fit as much informa-tion as possible on a page:
MODE LPT2:132,8
General Rules for Using MODE to Change Parallel Port Settings
When you are using the MODE command to change parallel port settings, you should keep thefollowing rules in mind:
■ The default values of the port will reset if you reset or initialize the printer.
■ If you omit a parameter from the command line, the setting for that parameter does notchange.
■ Do not use any of the retry options when printers are being shared on an IBM PC net-work.
Using MODE to Change Serial Port Settings
You can use another option of the MODE command to alter the functions of the serial ports.This command works in a way similar to the parallel port adjustments. DOS changes theparameters that are sent to and from the device driver.
329The MODE Command
The acceptable serial ports are COM1, COM2, COM3, and COM4. The serial port canreceive and transmit data only one bit at a time. The signaling rate (the number of times persecond that data is transmitted) is the baud rate. The amount of data transferred in a secondis referred to as the bps (bits per second).
You can use the MODE command to adjust the baud settings and change the amount of datasent in a fixed time. Although it is called a baud setting, the numbers used are actually thenumber of bits transmitted per second. Acceptable baud settings are 110, 150, 300, 600,1200, 2400, 4800, 9600, and 19200. You need to use only the first two digits of the numberto set the baud rate.
The most common devices attached to a serial port that you need to set from DOS are seri-al printers and plotters. Although modems are serial devices, you usually don’t adjust themfrom DOS. Communications programs, however, use the DOS functions to make adjust-ments to the serial ports.
Use the following syntax to change the serial port:
MODE COMy: baud,parity,databits,stopbits,P
The elements of the commands are as follows:
■ COMy: is the name of the serial port device.
■ baud is the baud rate. You must specify the baud rate for the serial port.
■ parity is the parity. Parity is used in error-correction algorithms.
■ databits is the number of data bits. The default number of data bits is 7.
■ stopbits is the number of stop bits. Stop bits mark the end of a character being trans-mitted. The default number of stop bits is 1 for all baud rates except 110, when 2 stopbits are set as the default.
■ P specifies continuous retries on timeout errors.
You also can use the following syntax:
MODE COMy: BAUD=baud PARITY=parity DATA=databits STOP=stopbits RETRY=action
All the variables in this version of the MODE command are the same as in the previous ver-sion. The only new one is action, which is the message you want DOS to return when theport is busy.
With versions of DOS before Version 4.0, the retry feature provided two choices when atimeout error occurred: no retry or continuous retries when you included the P option.When data is sent to the printer, the port expects to see signals from the printer indicatingthat it received the data. If the port doesn’t receive any signals within a particular period oftime, a timeout error occurs. By default, DOS does not try again to send information to theprinter and returns an error message to the screen. If you include the P option, DOS contin-uously tries to send the data; this action prevents the error message from being displayed.The Ctrl+Break key combination stops the retry process.
13
IIIPart
Ch
330 Chapter 13 Controlling Devices
With DOS 4.0 and later, more retry options are available. If you do not specify a retryoption, DOS doesn’t try again to send data when a timeout error occurs. When you use theretry option, you can select from the following four options:
■ The R setting causes a ready signal to be returned from the port even if the port is busy.Then, when the printer does become ready, the data is ready to send, and an error mes-sage does not appear onscreen.
■ The E option is most commonly used when you are printing in the background (usingPRINT or a network print queue). The data is not transferred to the printer until theport is not busy.
■ The N option specifies no action; this setting is the default.
■ The P action specifies continuous retry.
Using MODE to Set the Serial Port
To set the first serial port to communicate at 2400 bps, with 8 data bits, 1 stop bit, and noparity, you can type one of the following commands:
MODE COM1 2400,N,8,1
MODE COM1 24,N,8,1
If you are using DOS 3.3 or later, you can type the following instead to get the same set-tings:
MODE COM1 BAUD=24 DATA=8 STOP=1 PARITY=NONE
The printer or plotter needs to be set to receive data in the same format in which the serialport is sending the data—that is, the same baud rate, parity, and so on.
General Rules for Using MODE with Serial Ports
When you are using the MODE command to change serial port settings, you should keep thefollowing rules in mind:
■ If you set a retry option, a portion of MODE remains resident unless you use the DOS 4.0RETRY=none option.
■ The retry option slows the performance of foreground tasks when computers are beingshared on an IBM PC network.
■ DOS 4.0 and later can include Mark or Space parity settings. All versions of DOS sup-port none, odd, and even parity settings.
Using MODE to Redirect a Parallel Port to a Serial Port
The final MODE setting you can use with ports is the command to redirect a parallel port to aserial port. Typically, you use this setting if you want to redirect printer output to the serialport for use with a plotter or serial printer.
331The MODE Command
Issuing the MODE Command to Redirect Ports
Use the following syntax for the MODE command that changes the parallel printer to a serialprinter:
MODE LPTn:=COMy:
LPTn: is the name of the parallel printer port, and COMy: is the name of the serial port.
After you use MODE, DOS channels to the serial port all I/O requests that a program sends tothe parallel port. The electronics associated with the port handle automatically the conver-sion of data from bytewide to bitwide.
Using MODE to Redirect Ports
Some early programs don’t directly support serial printers. To use a serial printer, you canset a serial port and redirect a parallel port to that serial port. This process enables you toprint when you use a serial printer and also use a program that doesn’t directly support theprinter.
Earlier in this chapter, you learned how to initialize a serial port by using the MODE com-mand. For example, you initialize a serial port with DOS 3.3 by using a command similar to the following:
MODE COM2 2400,E,7,2
With DOS 4.0 and later, you can type the following command instead:
MODE COM2 BAUD=24 DATA=7 STOP=2 PARITY=EVEN
You then follow the initialization command by typing the following command:
MODE LPT1=COM2
All data that normally goes to LPT1 is transmitted to COM2 at 2400 bps, with 7 data bits, 2stop bits, and even parity.
General Rules for Using MODE to Redirect Ports
When you are using the MODE command to redirect ports, you should keep the followingrules in mind:
■ You can redirect any parallel port to any serial port.
■ You must initialize the serial port with both speed and data characteristics before theparallel port is redirected.
■ The initialization of the serial port must include the retry option if the attached deviceis a printer.
Using MODE to Change the Typematic Rate
When you press a key on the PC keyboard, a character appears onscreen. If you continue tohold down the key, the pressed character repeats onscreen. The number of times per secondthe key repeats is known as the typematic rate.
13
IIIPart
Ch
332 Chapter 13 Controlling Devices
The syntax for the MODE command that changes the typematic rate is as follows:
MODE CON RATE=rate DELAY=delay
rate is the number of repetitions per second. The rate parameter can have values in therange 1 through 32. These values represent a repeat rate of from 2 to 30 characters per sec-ond (the higher the value, the faster the repeat rate). The default value is 20 for an IBM ATand 21 for an IBM PS/2, which is equivalent to approximately 10 characters per second.
The delay parameter is the time delay before DOS starts repeating a key. The delay is spec-ified in .25-second intervals. The range for the delay is 1 through 4, making a total possibledelay of 1 second.
To set the keyboard so that the delay before the key repeats is 0.75 second and the rate valueis 24, type the following:
MODE CON RATE=24 DELAY=3
Using Redirection CommandsDOS uses three standard devices: one for input, one for output, and one for errors. Themain input/output device is the console, which is DOS’s name for your keyboard and screen.The keyboard is the standard input device, and the display is the standard output and errordevice. In short, you type commands on the keyboard, and the commands and any errormessages appear onscreen.
DOS enables you to choose the devices that you use to input and output information; thisprocess is called redirection. (Error messages are always sent to the screen.)
Issuing the Redirection Operators
The redirection symbols are the greater-than and less-than signs. If you think about it, thesesymbols look like arrows (> or <) that show the input’s source and destination. Use the fol-lowing syntax for redirecting a program or command’s input:
command < inputdevice
The syntax for redirecting a program or command’s output is shown in the following:
command > outputdevice
The syntax for redirecting and appending to an existing file is shown in the following:
function command >> outputdevice
In each syntax shown here, inputdevice is the source of the input, outputdevice is the desti-nation of the output, and command can specify almost all applications programs or DOS com-mands. With the redirection command, you can use any DOS output device as anoutputdevice, and you can use any DOS input device as an inputdevice.
Normally, redirected input comes from a file. Some devices, however, such as a mouse orbar-code reader, can also be used as a source of input. You can write a file that consists of
333Using Redirection Commands
13
IIIPart
Ch
the keystrokes used to operate a program, for example, or you can use the output from amouse as the input for a program.
Most DOS users redirect output more often than they redirect input. The two most com-mon places to redirect output are to the printer or to a disk file. The following command,which redirects the output of a directory to the printer, is a common example of redirection:
DIR > PRN
When you issue this command, DOS redirects the output (the directory listing itself) to thePRN device instead of sending the listing to the screen. This command produces a hard-copylisting of the directory.
Another common use is redirecting output to a file. To review the statistics of the MEM /Ccommand, for example, type the following command:
MEM /C > CLASSIFY.MEM
When you use redirection commands with pipes and filters, discussed later in this chapter,the command becomes even more powerful.
Take care when you use the > operator to send output to a file. If you use > and refer to anexisting file, DOS overwrites the existing file with the new output—without warning.
If you want to redirect to the printer a copy of your disk’s directory structure and a list ofthe files on your hard disk, type the following:
TREE C:\ /F >PRN
The TREE command does not supply a directory listing that includes file sizes. If you want tocreate a full listing of all the directories on your hard disk by using redirection to append theoutput of the command, you specify that each directory be listed and then specify that theoutput be appended to a file. You then can print the full list. To perform this task, you type a command similar to the following for each directory:
DIR C:\ /S >> FULLIST.DIR
The DIR command lists the files in all the directories on drive C. The /S switch causes theDIR command to display all subdirectories. You can then substitute the names of other drivesfor C.
If you are testing programs that require a large amount of user input, the following redirec-tion method is useful. For example, you can type the following:
PROGRAM < C:TESTPAT
This command results in the file TESTPAT supplying the input to PROGRAM. The redirectionprocess enables you to construct a file that contains the correct keystrokes needed to oper-ate a program. You then can test the program’s basic operation before you include the error-trapping sequences. These sequences handle the situations when the user presses anincorrect key.
334 Chapter 13 Controlling Devices
General Rules for Using Redirection
The following are some helpful rules to know when using redirection:
■ Do not use redirection on a DOS batch file command line that includes CALL, FOR, or IF.
■ Using > and referring to an existing file cause DOS to overwrite the existing file withthe new output.
■ Using >> adds the output to an existing file or creates a new file if the file does not exist.
The MORE FilterDOS uses elements called filters to channel information between devices. You can use thesefilters to modify information as it passes from files to the screen. Filters, which work only onASCII text files, are often used with the redirection symbols so that input can come from asource other than the keyboard or be sent to a device other than the screen.
Piping is another feature used with these commands. You use the pipe symbol (|) to sendoutput information that normally goes to the screen as input to another program. Piping, aform of redirection, diverts information destined for a device but then makes the informa-tion become the input from a device to another program.
The MORE filter buffers information from the input device or file and sends the data to themonitor one screen at a time.
Issuing the MORE Filter
The syntax for the MORE filter, which has no switches, is shown in the following:
MORE
MORE is commonly used in the following way, where filename is the input file:
MORE < filename
Or, it is used in the following way, where command is any command or program:
command | MORE
MORE collects—and saves in a temporary disk file—information that normally goes to thescreen. When a screen of input is obtained, MORE sends that information to the standard out-put device all at the same time. The text is channeled through the MORE filter until the end-of-file. Press any key when DOS displays the -- More -- prompt; this action displays thenext screen. After all the information is displayed onscreen, DOS erases the temporary filecreated by MORE.
Using MORE to Pause the Screen
When you use MORE to pause directory listings, the filter serves a function similar to the /Pswitch that is available with the DIR command.
335The FIND Filter
The most common use of MORE, however, is to pause the TYPE command. To read the con-tents of a README.DOC file one page at a time, for example, type one of the following:
TYPE README.DOC | MORE
MORE <README.DOC
Both syntax forms work identically. To see the contents of a file, you can use the TYPE com-mand. If the output of the file flows off the screen, reissue the command by pressing F3, andadd the pipe character (|) and MORE.
General Rules for Using MORE
The following are some helpful rules to know when using MORE:
■ Do not use MORE alone. MORE is a filter, which requires input to redirect or pipe.
■ To view additional screens full of information, press any key when DOS displays the -- More -- prompt.
■ Ctrl+Break (and Ctrl+C) terminates the command without displaying any other screens.
The FIND FilterThe FIND filter finds ASCII text in files. This filter often is used in association with redirec-tion and piping.
Issuing the FIND Filter
Use the following syntax for the FIND filter:
FIND /C /N /V /I “string” filename...
“string” specifies the ASCII characters for which you want to search, and filename is thefull filename of the file to search. The ellipsis (…) indicates that you can specify more thanone file to search.
/C causes FIND to count all the lines that contain “string”. You use the /C switch to countthe number of lines with the ASCII string; the text itself isn’t passed to the screen.
/N causes FIND to include line numbers of the lines that contain the “string”. You use the /Nswitch to locate the line numbers within the text file. The line numbers listed are the linenumbers in the original text file, not just sequential numbers. If the third, fifth, and sixthlines in the text file contain the string, for example, the line numbers displayed are 3, 5, and6—not 1, 2, and 3.
/V causes FIND to search only for lines that do not contain the “string”. Only these lines arepassed on to the screen.
/I makes FIND insensitive to case: Upper- and lowercase letters are considered the same.
13
IIIPart
Ch
336 Chapter 13 Controlling Devices
You can use /C and /V together. The count displayed is the number of lines that do notcontain “string”. You also can use /V and /N together. The lines that do not contain“string” are displayed with their appropriate line numbers.
If you use FIND without options, the filter reads each of the files you specify and displays alllines that contain the ASCII string you are looking for. DOS filters the information thatnormally goes to the output device. All lines that include the ASCII string are displayedonscreen.
Like the other filter commands, FIND is often used with redirection and piping. If you searcha text file for lines that include specific information, redirecting the output to a file might behelpful. You then can use the list as a reference while you look at the whole of the originalfile.
Using FIND to Find Files on Disk
You can use the FIND command to find all files that have a certain extension. To find all fileswith the extension .LET, for example, type the following command:
DIR /S /B | FIND “.LET”
Because the /S switch is used with this DIR command, all files whose names contain LET—either in the root or extension—are listed under the name of the directory containing them.Because the /B switch is used, the filenames are listed in the form FILENAME.EXT, with a peri-od instead of spaces separating the filename and its extension. Therefore, you can search for.LET instead of LET. In this form, each filename is preceded by its directory path.
The DIR command with the /S option lists all the files on a disk. The output for DIR thatnormally goes to the screen is filtered through the FIND command. The output from FINDthen is displayed onscreen.
You also can use the FIND filter with text files as a word-search utility. Suppose, for example,that you forget the name of the memo you sent to your boss, but you know that the file iseither MEMO1, MEMO2, or MEMO3. You also know that you always use your boss’s title, Supervisor,in memos. You can find the memo you need by typing the following:
FIND “Supervisor” MEMO1 MEMO2 MEMO3
When you issue this command, each line that contains Supervisor is listed. The listingappears in the following form:
---------- MEMO1---------- MEMO2Supervisor of Communications---------- MEMO3
337The SORT Filter
General Rules for Using FIND
The following aresome helpful rules to know when using FIND:
■ Use FIND only on ASCII text files.
■ The “string” parameter is normally case sensitive; that is, FIND regards the uppercasestring LOOK as different from the lowercase string look. In DOS 5.0 and later, you canuse the /I switch to perform a search that is not case sensitive.
■ To cause FIND to search for quotation marks in a string, type two quotation markstogether (“”). FIND then searches for occurrences of “.
■ If you do not specify a filename, FIND uses the standard input device.
■ You cannot use wildcards in a filename.
The SORT FilterThe third DOS filter is SORT, which sorts the information from an ASCII file before display-ing the result onscreen. Like FIND and MORE, SORT often is used with redirection and piping.
Issuing the SORT Filter
Use the following syntax for the SORT filter:
SORT /R /+n
/R reverses the sort order, and n is the offset column for the sorting process.
The SORT filter processes information that normally goes to your screen or to another out-put device. The text from the input is analyzed on a line-by-line basis and sorted accordingto the ASCII binary values of the characters. This order is alphabetical, but SORT doesn’t dis-criminate between upper- and lowercase letters.
When you use SORT with redirection or piping, more sophisticated sorting occurs. The mostcommon use of SORT is to sort a directory listing into a text file, which you then can print.
The offset—the /+n option—in the command shows the leftmost column to be sorted. Witha directory listing, you can sort by date or file size rather than by root name. Table 13.5 liststhe offset values for a directory listing.
Table 13.5 Offset Values for SORT
Offset Value Sorting By
1 Root name
10 File extension
14 File size
24 File date
34 File time
13
IIIPart
Ch
338 Chapter 13 Controlling Devices
The sorted output appears onscreen; the original directory listing itself remains unchanged.
This use of SORT is not as vital as it once was. Beginning with DOS 5.0, you can sort adirectory listing by using the /O switch. To sort a directory by name, you can use the fol-lowing command:
DIR \ /ON
Similarly, you can use /OE to sort by extension, /OS to sort by size, /OD to sort by dateand time combined, and /OC to sort by compression ratio (for DoubleSpace volumes). Youstill need to use SORT if you want to sort the directory by time alone.
Using SORT to Sort Subdirectory Listings
You can use redirection and piping, as well as the FIND and SORT filters, in many ways. InDOS 4.0, 4.01, or 5.0, for example, you can create a sorted list of the subdirectories in theroot directory by using the process outlined in the next paragraphs.
To create a sorted list of subdirectories in the root directory, follow these steps:
1. Type the following command:TREE C:\ /A | FIND “-” | SORT /+2 >TEMP.LST
When issued with the /A switch, the TREE command produces a listing that uses thenongraphics character set. The FIND filter then removes all lines that are not subdirec-tory names. SORT sorts the output from FIND on column 2, and the output is redirectedto a temporary file.
2. Use the temporary file as the input to the FIND filter, which removes all directories thatare not in the root, by typing the following command:
FIND /V “|” <TEMP.LST
The result is an alphabetical list of all subdirectories in the root directory.
General Rules for Using SORT
The following are some helpful rules to know when using SORT:
■ If n is not specified, DOS assumes column 1.
■ Lines are sorted according to their ASCII binary values, with two exceptions. SORT isnot case sensitive; for example, the command sorts A and a as they occur in the sourcefile. Additionally, SORT sorts characters with values greater than 127 in the order deter-mined by the current COUNTRY code setting. (See Chapter 16, “Understanding BatchFiles,” for more information.)
■ The output filename must be different from the input filename when you use redirec-tion.
■ The largest file the SORT program can handle is 64KB.
Understanding the InternationalFeatures of DOS
In this chapter
Internationalization 340
Understanding COUNTRY.SYS 340
Understanding KEYB.COM 342
Understanding Code Page Switching 344
International Country Codes 354
14CHAPTER
340 Chapter 14 Understanding the International Features of DOS
InternationalizationCommunication is making the world appear progressively smaller and smaller. Frequentcontact among people from many different countries is not unusual. You can use computersto prepare documents and other files to send to all parts of the world.
Anything you work on that has international implications can cause you inconvenience ifyou do not adapt your computer to handle various languages and national customs.Presumably, most people reading this book and using DOS as their operating system live inthe United States and have computers built to operate in the United States. Fortunately,however, Microsoft has built in to DOS the capability to internationalize your computer.
DOS provides three levels of internationalization. These levels involve the use of KEYB.COMand code page switching.
You might consider your standard version of DOS as perfect for most uses. Suppose, howev-er, that you must use a certain national format for expressing the time, the date, and curren-cy symbols. You can learn how to access these formats by reading this chapter andunderstanding the use of the COUNTRY.SYS configuration driver.
DOS supports 24 national languages or country customs. Each country or language is iden-tified by a country code that corresponds to the country’s international telephone code. TheInternational Country Codes section at the end of this chapter lists the countries and lan-guages supported by DOS and their country codes. These country codes are referencedthroughout this chapter.
When you use the country code or code page number, you must use all three digits, includ-ing any leading zeros.
In addition to the American standard version that you can customize for the supportedcountry codes, Microsoft produces special language versions in Arabic, Chinese, Israeli,Japanese, Korean, and Taiwanese.
Understanding COUNTRY.SYSCOUNTRY.SYS is a file that you can use to display alternative currency, date, and time formatson your system without using other language characters. This file contains all the conven-tions for the supported countries and national formats. Of course, if you have no need tochange the default formats for your version of DOS, you have no need to use COUNTRY.SYS.
When you perform a disk directory command (DIR), the date and time stamps for disk filesare displayed in the current national format. In the United States, the system date is normal-ly displayed and stamped on files as MM-DD-YY. You can use alternative methods such asYY-MM-DD (French Canadian) or DD/MM/YY (United Kingdom).
341Understanding COUNTRY.SYS
14
IIIPart
Ch
Time formats separate hours, minutes, seconds, and hundredths of seconds using colons(HH:MM:SS:HS), periods (HH.MM.SS.HS), or colons and a comma (HH:MM:SS,HS).
In addition to the variety of currency symbols, such as $ and £, differing customs dictatewhether the decimal characters are periods or commas—likewise for the thousands separa-tor. The placement of the currency symbol also can vary. In the United States, the dollarsign precedes the amount, but some currency symbols are placed after the amount.
COUNTRY.SYS contains information only for the video display, not for keyboards. To pro-vide keyboard support, you must use the KEYB command in your AUTOEXEC.BAT file orfrom the DOS prompt. For more information, see the next section, “UnderstandingKEYB.COM.”
You load COUNTRY.SYS by entering the COUNTRY command in the CONFIG.SYS file. Use EDIT toenter a statement into the file. Then, enter the command in the following format:
COUNTRY=xxx,yyy,C:\DOS\COUNTRY.SYS
You must place the three-character numeric country code as the first parameter, as indicatedby xxx. You cannot omit this code. The second parameter is the code page number for thecountry, as represented by yyy. If you omit this code, DOS uses the default code page num-ber for the country specified by the country code.
The inclusion of the code page in the COUNTRY command is optional, even if you installcode page switching. Be sure to include the code page, however, if you want an alternativecode page—rather than the default code page—to be installed for the indicated country.
If you do not specify the second parameter (yyy), you still must include the second commawhen you include the file specification:
COUNTRY=xxx,,C:\DOS\COUNTRY.SYS
The default statement for the United States version is shown in either of the following:
COUNTRY=001
COUNTRY=001,,C:\DOS\COUNTRY.SYS
Figure 14.1 shows a standard directory listing that uses the United States country code for-mats for the date (MM-DD-YY) and time (12-hour format with a.m. or p.m. indicator).
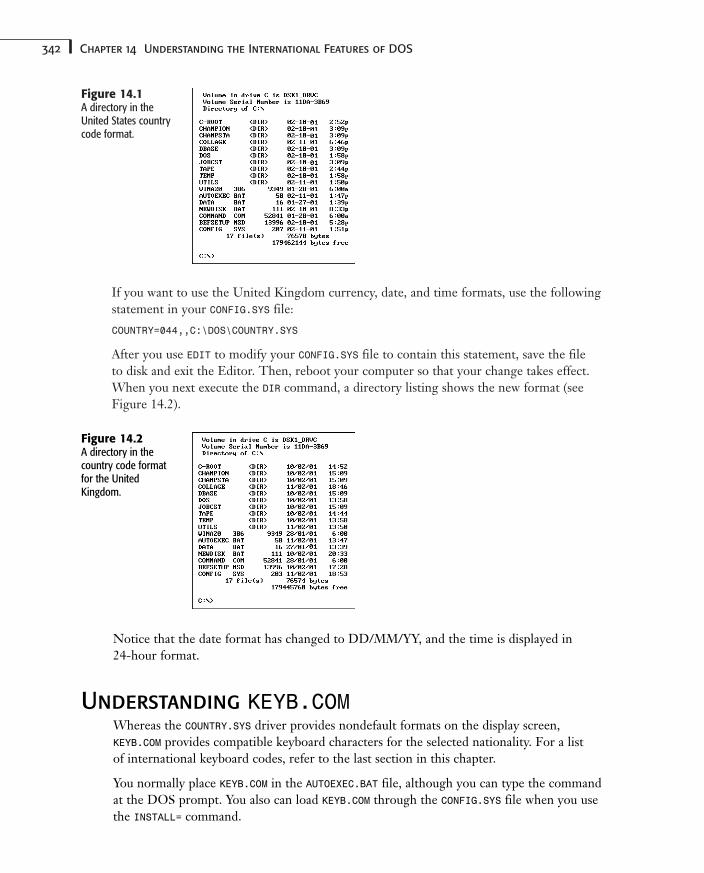
342 Chapter 14 Understanding the International Features of DOS
If you want to use the United Kingdom currency, date, and time formats, use the followingstatement in your CONFIG.SYS file:
COUNTRY=044,,C:\DOS\COUNTRY.SYS
After you use EDIT to modify your CONFIG.SYS file to contain this statement, save the file to disk and exit the Editor. Then, reboot your computer so that your change takes effect.When you next execute the DIR command, a directory listing shows the new format (seeFigure 14.2).
Figure 14.1A directory in theUnited States countrycode format.
Figure 14.2A directory in thecountry code formatfor the UnitedKingdom.
Notice that the date format has changed to DD/MM/YY, and the time is displayed in 24-hour format.
Understanding KEYB.COMWhereas the COUNTRY.SYS driver provides nondefault formats on the display screen,KEYB.COM provides compatible keyboard characters for the selected nationality. For a list of international keyboard codes, refer to the last section in this chapter.
You normally place KEYB.COM in the AUTOEXEC.BAT file, although you can type the commandat the DOS prompt. You also can load KEYB.COM through the CONFIG.SYS file when you usethe INSTALL= command.
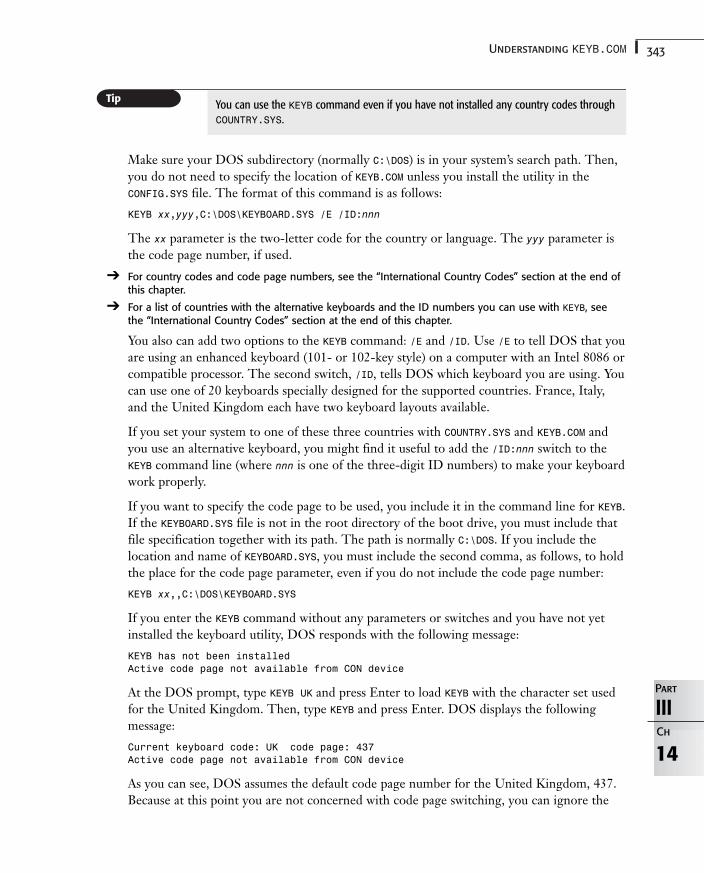
343Understanding KEYB.COM
14
IIIPart
Ch
You can use the KEYB command even if you have not installed any country codes throughCOUNTRY.SYS.
Make sure your DOS subdirectory (normally C:\DOS) is in your system’s search path. Then,you do not need to specify the location of KEYB.COM unless you install the utility in the CONFIG.SYS file. The format of this command is as follows:
KEYB xx,yyy,C:\DOS\KEYBOARD.SYS /E /ID:nnn
The xx parameter is the two-letter code for the country or language. The yyy parameter isthe code page number, if used.
➔ For country codes and code page numbers, see the “International Country Codes” section at the end ofthis chapter.
➔ For a list of countries with the alternative keyboards and the ID numbers you can use with KEYB, seethe “International Country Codes” section at the end of this chapter.
You also can add two options to the KEYB command: /E and /ID. Use /E to tell DOS that youare using an enhanced keyboard (101- or 102-key style) on a computer with an Intel 8086 orcompatible processor. The second switch, /ID, tells DOS which keyboard you are using. Youcan use one of 20 keyboards specially designed for the supported countries. France, Italy,and the United Kingdom each have two keyboard layouts available.
If you set your system to one of these three countries with COUNTRY.SYS and KEYB.COM andyou use an alternative keyboard, you might find it useful to add the /ID:nnn switch to theKEYB command line (where nnn is one of the three-digit ID numbers) to make your keyboardwork properly.
If you want to specify the code page to be used, you include it in the command line for KEYB.If the KEYBOARD.SYS file is not in the root directory of the boot drive, you must include thatfile specification together with its path. The path is normally C:\DOS. If you include thelocation and name of KEYBOARD.SYS, you must include the second comma, as follows, to holdthe place for the code page parameter, even if you do not include the code page number:
KEYB xx,,C:\DOS\KEYBOARD.SYS
If you enter the KEYB command without any parameters or switches and you have not yetinstalled the keyboard utility, DOS responds with the following message:
KEYB has not been installedActive code page not available from CON device
At the DOS prompt, type KEYB UK and press Enter to load KEYB with the character set usedfor the United Kingdom. Then, type KEYB and press Enter. DOS displays the following message:
Current keyboard code: UK code page: 437Active code page not available from CON device
As you can see, DOS assumes the default code page number for the United Kingdom, 437.Because at this point you are not concerned with code page switching, you can ignore the
344 Chapter 14 Understanding the International Features of DOS
code page message. This subject is discussed later in this chapter (in the section“Understanding Code Page Switching”).
To install KEYB when MS-DOS boots and processes the CONFIG.SYS file, use the followingformat:
INSTALL=C:\DOS\KEYB.COM xx,yyy,C:\DOS\KEYBOARD.SYS
Because your system search path has not yet been set, you must include the location of theutility. You must include also the full name and extension of the program (C:\DOS\KEYB.COM)before continuing with the parameters for KEYB.
➔ For more information on modifying the CONFIG.SYS file, see Chapter 2, “Starting DOS,” p. 23.
DOS provides a way of switching between your hardware default keyboard layout and thelayout you loaded with KEYB.COM. Press Ctrl+Alt+F1 (hold down the Ctrl and Alt keys whilepressing F1) to switch to the United States keyboard layout. Press Ctrl+Alt+F2 to return tothe keyboard layout installed with KEYB.
Understanding Code Page SwitchingCertain areas of memory in your system store the character tables for your video screen andyour keyboard. By switching tables, you can configure MS-DOS to use alternative charactertables to suit your national language and customs. These tables are called code pages.
Changing the character set used in your computer to support another language throughcode page switching does not change the language that DOS uses. All messages are dis-played in the default (English) language in which DOS was written. No translation is made.
You can set your system to use an alternative code page permanently, or you can enable sev-eral code pages in memory and switch between them from the command line. These codepages are software prepared; your system’s hardware is not changed. Your system already hasa built-in hardware code page.
In the previous section that discussed COUNTRY.SYS, you learned that each country or area ofthe world has a unique country code number borrowed from the international telephoneconvention. Each country or group of countries also has a code page number. (Many coun-tries share a code page number with another country.)
Each DOS-supported code page includes support for several languages. This feature mightsimplify international communications so that documents prepared with the same charactertable might be processed by people in different countries using different languages, with allcharacters appearing the same to all concerned.
The international code page, code 850, has some graphic limitations to provide room foradditional language characters required by some countries. Only 256 codes are available. Ifyou normally use the United States code page (437), for example, you might find that boxesunder 850 lose their graphic corners and are replaced with other characters.
345Understanding Code Page Switching
14
IIIPart
Ch
When you install alternative code pages in your computer, the normal keys and their ASCIIdisplay characters do not change. Symbol keys are remapped, and by using special key-strokes, you can enter national language characters.
Checking Your Hardware for Code Page Switching
You do need the proper hardware to switch software code pages. All code page informationrequired for loading alternative character sets is contained in disk files with the extension.CPI. Two screen device code page information files are supplied with DOS. EGA.CPI pro-vides support for EGA and VGA displays, and LCD.CPI provides support for LCD screens.You must have an EGA, VGA, or LCD video display. Hercules-type monographic and CGAscreens do not support this feature.
The LCD.CPI, 4201.CPI, 4208.CPI, 5202.CPI, and EGA2.CPI files as well as PRINTER.SYS are no longer automatically supplied as part of DOS. However, these filesand others are available from Microsoft on a supplemental disk.
You can download the MS-DOS 6.22 supplemental disks from http://www.microsoft.com/downloads.
If you have an EGA or a VGA display, you can have up to six software code pages. If youhave an LCD display, you can have only one software code page. If you have a monochromeor CGA video adapter and monitor, you can use only the built-in hardware code page.
Certain printers, along with others that are 100% compatible with them, also support codepage switching. Three code page information files are provided with DOS on the supple-mental disks: 4201.CPI, 4208.CPI, and 5202.CPI. Table 14.1 lists the printers supported bythese files. Even if your printer emulates one of these printers, it also must have the capa-bility to accept code page switching. (Some printers provide emulation but not code pagesupport.)
Table 14.1 National Code Page Printer Files
Printer Code Page File
IBM Proprinter II, III 4201.CPI
IBM Proprinter XL 4201.CPI
IBM Proprinter X24E 4208.CPI
IBM Proprinter XL24E 4208.CPI
IBM QuietWriter III 5202.CPI
346 Chapter 14 Understanding the International Features of DOS
Installing Code Page Switching
Assuming that you have the appropriate hardware, you must take a number of steps and load certain programs to enable code page switching, both for your video screen and foryour printer. (Use MS-DOS EDIT to make the necessary changes to the CONFIG.SYS andAUTOEXEC.BAT files.)
To enable code page switching for your video display, you add a statement to the CONFIG.SYSfile for the DISPLAY.SYS device driver. To enable code page switching for your printer, youadd a statement for the PRINTER.SYS device driver. If you want code page switching enabledfor both devices, you simply include both statements. (You also must use the COUNTRY.SYSdevice driver to handle the screen formats for currency, dates, and times.) Then, to providethe national language support, you add the NLSFUNC.EXE command to your AUTOEXEC.BAT file.
The following sections explain how you set up code page switching on your system, includ-ing how to use NLSFUNC.EXE to enable the feature, how to use MODE PREPARE to load the codepage tables, and how to use CHCP and MODE SELECT to switch the code page.
Using DISPLAY.SYS
You can use the DISPLAY.SYS device driver to enable code page switching for your video dis-play. The DISPLAY.SYS can be used only if you have an EGA, VGA, or LCD monitor andadapter.
The format of the command is either of the following:
DEVICE=C:\DOS\DISPLAY.SYS CON=(monitor,hardware,xx)
DEVICE=C:\DOS\DISPLAY.SYS CON=(monitor,hardware,(xx,yy))
Unless you move the DISPLAY.SYS file to the root directory of your boot drive, you mustspecify the location of the file (normally C:\DOS). Enter the monitor type as the first parame-ter for the console device (monitor). EGA is the typical monitor entry and stands for bothEGA and VGA monitors. Use LCD for LCD screens. No other values are possible.
The second parameter, hardware, refers to the built-in hardware code page. In the UnitedStates, this code page is 437; if you are not certain of your system’s built-in hardware codepage, however, do not specify it.
The xx variable refers to the number of code pages you want enabled in your system. Thisparameter tells DOS to set aside memory for the number of additional character tables to beinstalled in the AUTOEXEC.BAT file or at the DOS prompt.
Enter a number for the yy variable to represent the number of subfonts you want. You canspecify the number of fonts that DOS is to store in memory. Two subfonts are available forEGA/VGA displays, and only one is available for LCD displays. Normally, all are stored;however, you can lower the number stored to reduce the amount of memory used. If youuse this variable, you must place a pair of parentheses around the number of code pages andthe number of fonts, as shown in the second example.
347Understanding Code Page Switching
Suppose that you want to enable code page switching for your display for French Canadaand also to allow for the use of the international code. To do so, you enter the followingstatement in your CONFIG.SYS file:
DEVICE=C:\DOS\DISPLAY.SYS CON=(EGA,,2)
No default hardware code page is declared, and DOS is instructed to set aside memory fortwo code pages for an EGA or VGA adapter and monitor. Do not omit the commas.
You can specify up to six code page tables to be prepared in memory in addition to the hard-ware code page. Just remember that each code page takes up RAM (about 5,632 bytes forEGA and VGA) and might lower the amount of conventional memory available for yourapplications. Do not set aside more memory than is required.
➔ For further information on memory and memory configuration, see p. 11 and p. 441.
Using PRINTER.SYS
Use the PRINTER.SYS device driver to enable code page switching for your printer if youhave one of the supported printers or a compatible. Supported printers can be attached toany or all of the three allowed parallel printer ports: LPT1, LPT2, and LPT3.
The format of the command is as follows:
DEVICE=C:\DOS\PRINTER.SYS LPTx=(printer,hardware,yy)
Unless you move the PRINTER.SYS file to the root directory of your boot drive, you mustspecify the location of the file (normally C:\DOS). Replace x with the proper parallel portnumber: 1, 2, or 3.
Replace printer with 4201, 4208, or 5202, whichever is appropriate for your printer. Thenext parameter, hardware, refers to the built-in hardware code page. In the United States,this code page is 437, but do not specify it if you are not certain of your printer type.
The variable yy refers to the number of additional code pages that your hardware can sup-port and you want prepared. This parameter tells DOS to set aside memory for the numberof additional character tables to be installed in the AUTOEXEC.BAT file or at the DOS prompt.
To instruct DOS to set aside memory for two code pages for an IBM QuietWriter III orcompatible printer attached to LPT1, for example, enter the following statement in yourCONFIG.SYS file:
DEVICE=C:\DOS\PRINTER.SYS LPT1=(5202,,2)
No default hardware code page is declared.
You can specify up to six code page tables to be prepared in memory. The maximum, how-ever, depends on the printer you are using. Do not set aside more memory than is requiredbecause these tables consume memory. 14
IIIPart
Ch
348 Chapter 14 Understanding the International Features of DOS
To enable code page switching on your printer, make sure that your printer is turned onand is online when your system is booted. Otherwise, the control signals cannot be down-loaded to the printer.
Using NLSFUNC.EXE
After you take care of the required statements in your CONFIG.SYS file for COUNTRY.SYS andDISPLAY.SYS, move your attention to the AUTOEXEC.BAT file. As discussed in this chapter’s“Understanding KEYB.COM” section, make sure that your keyboard is specified for the appro-priate national keyboard and code page number. The following command, for example,specifies code page 863 for French Canada:
KEYB cf,863,C:\DOS\KEYBOARD.SYS
You then must include NLSFUNC as the next command to provide the National LanguageSupport (NLS) for code page switching. You can type this command at the DOS prompt orplace the command in your AUTOEXEC.BAT or CONFIG.SYS file for automatic loading wheneveryou boot your computer. To enter the NLSFUNC command in your CONFIG.SYS file, use thefollowing format:
INSTALL=C:\DOS\NLSFUNC.EXE
Because a path has not yet been established when the command is in your CONFIG.SYS file,you must specify the location of the NLSFUNC file.
Up to this point, you have specified your country code of choice and have prepared yoursystem to use code page switching. The following sections explain how to use the commandsthat load the specified code pages into the prepared memory areas.
Loading the Code Page Tables
You include the MODE command in the AUTOEXEC.BAT file to load code page information,specifying the code pages to be prepared and the code page file to use for the tables. UseMODE CON: to load the code page information for your video display (the console). Use MODELPT1: to load the code page information for your printer and download the information tothe printer. (Make sure that your printer is turned on and is online to receive the down-loaded data.)
In the command, you can list as many code pages as you specified in the CONFIG.SYS file. Donot specify the hardware default code page number because this table is already built in. Theformat of the command is shown in the following (the parentheses are required):
MODE device CP PREPARE=((xxx,yyy) filename)
The device parameter indicates that you want to load a character set into your console, key-board, or parallel printers. The xxx and yyy parameters indicate the code page numbers tobe prepared, and filename refers to the CPI file where the table is stored on disk for thedevice.
349Understanding Code Page Switching
Consider the following example:
MODE CON: CP PREPARE=((863,850) C:\DOS\EGA.CPI)
In this command, MODE is used to PREPARE (or PREP) the console (CON:) for code pages (CP),with code pages 863 for French Canada and 850 for International. EGA.CPI is listed as thetable file for EGA and VGA monitors. The location of this file is the C:\DOS subdirectory.
For your printer, use the MODE command for each parallel printer port listed in theCONFIG.SYS file’s PRINTER.SYS statement. The following examples prepare the printers at theLPT1 and LPT2 ports:
MODE LPT1: CP PREP=((863,850) C:\DOS\5202.CPI)
MODE LPT2: CP PREP=((863,850) C:\DOS\4201.CPI)
As with the other AUTOEXEC.BAT commands for code page switching, you also can enter theMODE commands at the DOS prompt.
Switching the Code Page
After you complete all the preparation work—specifying the nationality and code page codesto be used, setting aside the memory for the language tables, and loading the charactertables—you are ready to use the new code pages.
In the previous examples, you prepared your system to use the French Canadian characterset. To have this character set take effect, you must issue the CHCP command, for changing the code page. Use the CHCP command, along with the code page number, as shown in the following:
CHCP 863
Enter this command in your AUTOEXEC.BAT file or at the DOS prompt. The CHCP com-mand must be listed in AUTOEXEC.BAT after the settings for code switching. Theinstruction tells DOS to change the current code page to the new code page specified in the command on all devices prepared, including the printer if you have included it in theCONFIG.SYS and AUTOEXEC.BAT files. Make certain that the printer is turned on and is onlineso that the new code page can take effect.
➔ For more information on modifying the CONFIG.SYS and AUTOEXEC.BAT files, see p. 23.
You also can selectively change code pages of individual devices by using the MODE SELECTcommand and pressing Enter. The full format of the command follows:
MODE device CODEPAGE SELECT = xxx
For device, use CON for console or use PRN (which is the same as LPT1), LPT1, LPT2, or LPT3for the printer ports. After the equal sign (=), enter the code page number (xxx).
Suppose, for example, that you want to change the code page in your IBM QuietWriter IIIprinter, but you don’t want to affect the monitor display. If your printer is attached to LPT1and you want to print with the French Canadian character set, issue the following commandand press Enter:
MODE LPT1 CP SEL=863
14
IIIPart
Ch
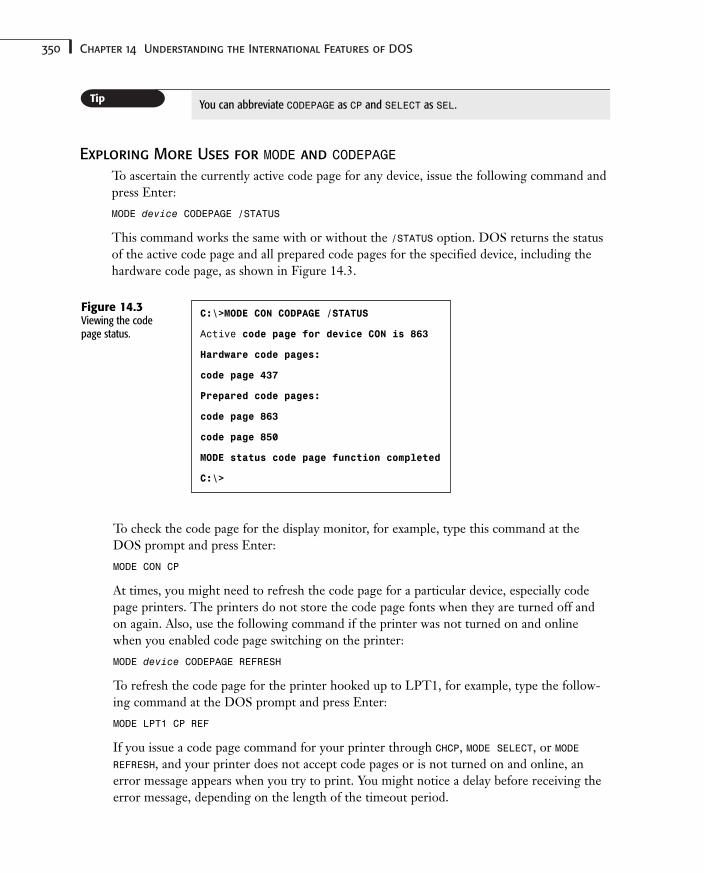
350 Chapter 14 Understanding the International Features of DOS
You can abbreviate CODEPAGE as CP and SELECT as SEL.
Exploring More Uses for MODE and CODEPAGE
To ascertain the currently active code page for any device, issue the following command andpress Enter:
MODE device CODEPAGE /STATUS
This command works the same with or without the /STATUS option. DOS returns the statusof the active code page and all prepared code pages for the specified device, including thehardware code page, as shown in Figure 14.3.
Figure 14.3Viewing the codepage status.
C:\>MODE CON CODPAGE /STATUS
Active code page for device CON is 863
Hardware code pages:
code page 437
Prepared code pages:
code page 863
code page 850
MODE status code page function completed
C:\>
To check the code page for the display monitor, for example, type this command at theDOS prompt and press Enter:
MODE CON CP
At times, you might need to refresh the code page for a particular device, especially codepage printers. The printers do not store the code page fonts when they are turned off andon again. Also, use the following command if the printer was not turned on and onlinewhen you enabled code page switching on the printer:
MODE device CODEPAGE REFRESH
To refresh the code page for the printer hooked up to LPT1, for example, type the follow-ing command at the DOS prompt and press Enter:
MODE LPT1 CP REF
If you issue a code page command for your printer through CHCP, MODE SELECT, or MODEREFRESH, and your printer does not accept code pages or is not turned on and online, anerror message appears when you try to print. You might notice a delay before receiving theerror message, depending on the length of the timeout period.
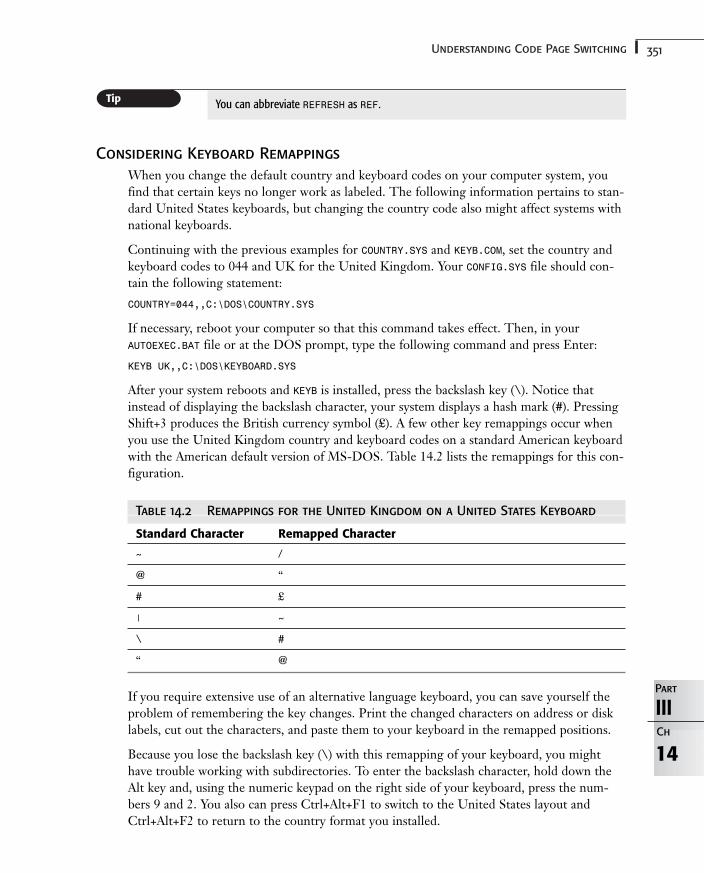
351Understanding Code Page Switching
14
IIIPart
Ch
You can abbreviate REFRESH as REF.
Considering Keyboard Remappings
When you change the default country and keyboard codes on your computer system, youfind that certain keys no longer work as labeled. The following information pertains to stan-dard United States keyboards, but changing the country code also might affect systems withnational keyboards.
Continuing with the previous examples for COUNTRY.SYS and KEYB.COM, set the country andkeyboard codes to 044 and UK for the United Kingdom. Your CONFIG.SYS file should con-tain the following statement:
COUNTRY=044,,C:\DOS\COUNTRY.SYS
If necessary, reboot your computer so that this command takes effect. Then, in your AUTOEXEC.BAT file or at the DOS prompt, type the following command and press Enter:
KEYB UK,,C:\DOS\KEYBOARD.SYS
After your system reboots and KEYB is installed, press the backslash key (\). Notice thatinstead of displaying the backslash character, your system displays a hash mark (#). PressingShift+3 produces the British currency symbol (£). A few other key remappings occur whenyou use the United Kingdom country and keyboard codes on a standard American keyboardwith the American default version of MS-DOS. Table 14.2 lists the remappings for this con-figuration.
Table 14.2 Remappings for the United Kingdom on a United States Keyboard
Standard Character Remapped Character
~ /
@ “
# £
| ~
\ #
“ @
If you require extensive use of an alternative language keyboard, you can save yourself theproblem of remembering the key changes. Print the changed characters on address or disklabels, cut out the characters, and paste them to your keyboard in the remapped positions.
Because you lose the backslash key (\) with this remapping of your keyboard, you mighthave trouble working with subdirectories. To enter the backslash character, hold down theAlt key and, using the numeric keypad on the right side of your keyboard, press the num-bers 9 and 2. You also can press Ctrl+Alt+F1 to switch to the United States layout andCtrl+Alt+F2 to return to the country format you installed.
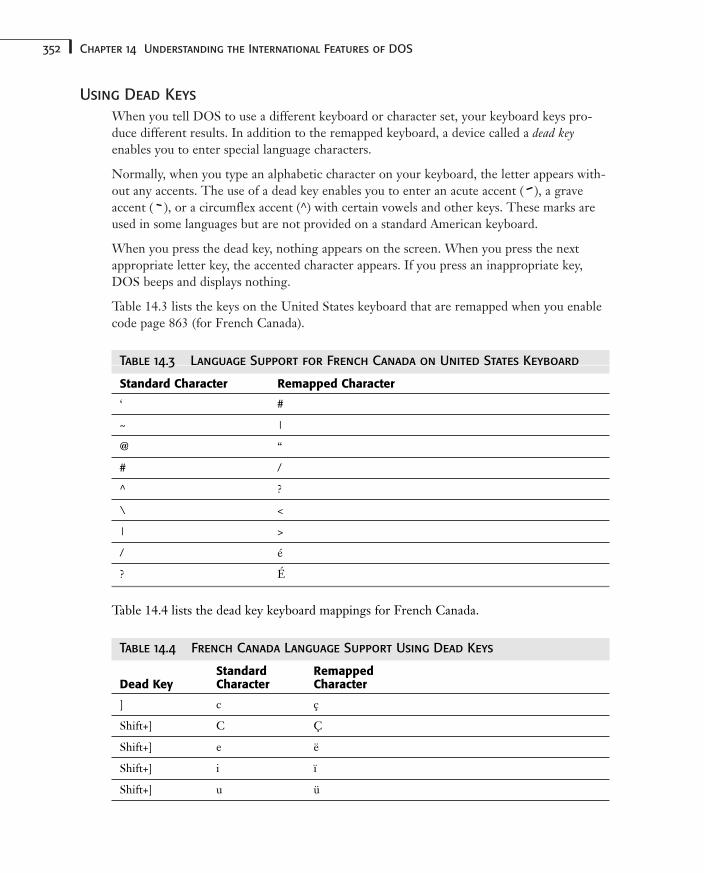
352 Chapter 14 Understanding the International Features of DOS
Using Dead Keys
When you tell DOS to use a different keyboard or character set, your keyboard keys pro-duce different results. In addition to the remapped keyboard, a device called a dead keyenables you to enter special language characters.
Normally, when you type an alphabetic character on your keyboard, the letter appears with-out any accents. The use of a dead key enables you to enter an acute accent ( ), a graveaccent ( ), or a circumflex accent (^) with certain vowels and other keys. These marks areused in some languages but are not provided on a standard American keyboard.
When you press the dead key, nothing appears on the screen. When you press the nextappropriate letter key, the accented character appears. If you press an inappropriate key,DOS beeps and displays nothing.
Table 14.3 lists the keys on the United States keyboard that are remapped when you enablecode page 863 (for French Canada).
Table 14.3 Language Support for French Canada on United States Keyboard
Standard Character Remapped Character
‘ #
~ |
@ “
# /
^ ?
\ <
| >
/ é
? É
Table 14.4 lists the dead key keyboard mappings for French Canada.
Table 14.4 French Canada Language Support Using Dead Keys
Standard RemappedDead Key Character Character
] c ç
Shift+] C Ç
Shift+] e ë
Shift+] i ï
Shift+] u ü
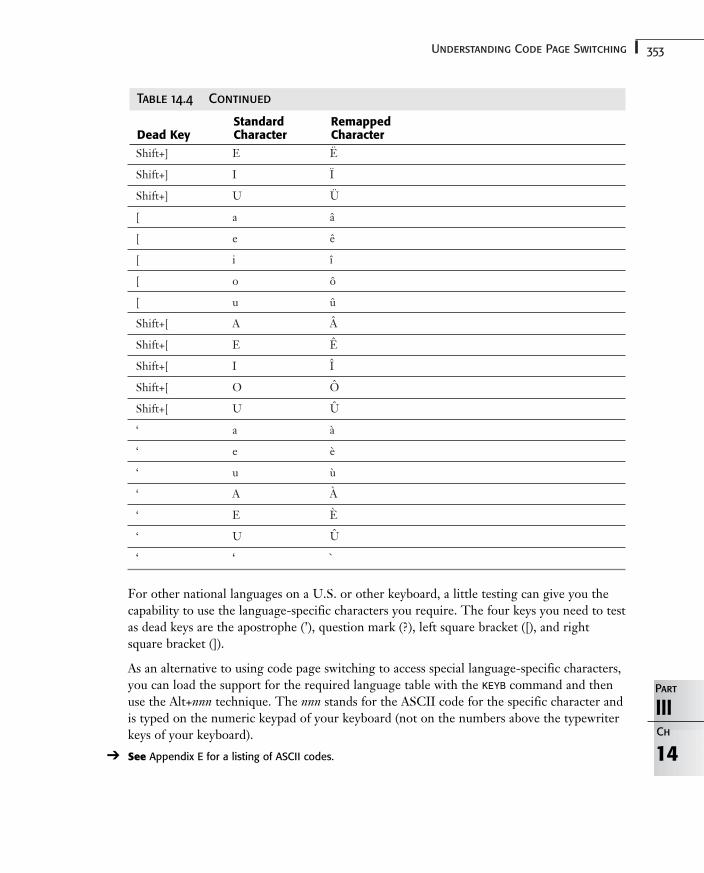
353Understanding Code Page Switching
Shift+] E Ë
Shift+] I Ï
Shift+] U Ü
[ a â
[ e ê
[ i î
[ o ô
[ u û
Shift+[ A Â
Shift+[ E Ê
Shift+[ I Î
Shift+[ O Ô
Shift+[ U Û
‘ a à
‘ e è
‘ u ù
‘ A À
‘ E È
‘ U Û
‘ ‘ `
For other national languages on a U.S. or other keyboard, a little testing can give you thecapability to use the language-specific characters you require. The four keys you need to testas dead keys are the apostrophe (’), question mark (?), left square bracket ([), and rightsquare bracket (]).
As an alternative to using code page switching to access special language-specific characters,you can load the support for the required language table with the KEYB command and thenuse the Alt+nnn technique. The nnn stands for the ASCII code for the specific character andis typed on the numeric keypad of your keyboard (not on the numbers above the typewriterkeys of your keyboard).
➔ See Appendix E for a listing of ASCII codes. 14
IIIPart
Ch
Table 14.4 Continued
Standard RemappedDead Key Character Character
354 Chapter 14 Understanding the International Features of DOS
Using Foreign-Language Commands
MS-DOS requires a foreign-language version to be installed in order to use foreign-language keyboard commands and other system functions (such as help screens for com-mands). Attempting to load an alternative code page—for example, German—and thenattempting to issue German commands does not work without using the German version of DOS.
By default, the characters in the default code page are United States English for all versions;DOS uses code pages to convert to the native language.
If you have installed the international version of DOS and are still encountering problemsusing a code page, first check how you are implementing the KEYB command and then checkthat the country code you are attempting to use matches the version of DOS you have.
International Country CodesMS-DOS provides support for a number of different international code pages, which aresimply character sets that facilitate the needs of a particular language. The lower ASCIIcharacters (0 to 127) always remain the same, but the characters available in the upperASCII set (128 to 255) are changed to make certain special characters available. The codepage information file included with DOS 6 (EGA.CPI) includes displayable character sets forthe following international code pages:
Code Page Country or Language
437 United States
860 Portuguese
850 Multilingual (Latin I)
863 Canadian-French
852 Slavic (Latin II)
865 Nordic
MS-DOS 6.2 provides an additional file (EGA2.CPI) that supports the following internationalcode pages:
Code Page Country or Language
437 United States
857 Turkish
850 Multilingual (Latin I)
861 Icelandic
852 Slavic (Latin II)
869 Greek
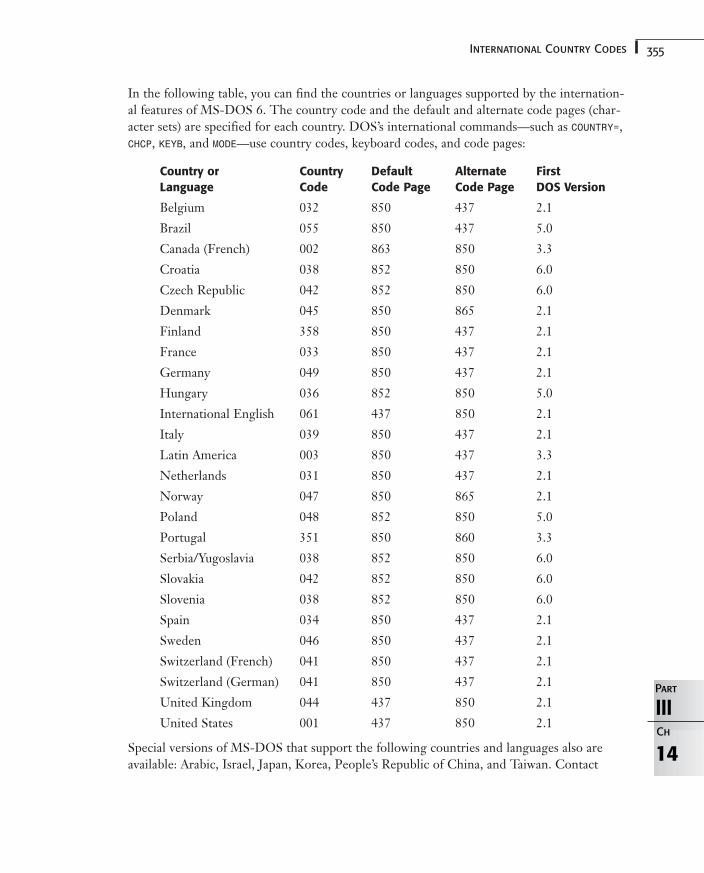
355International Country Codes
In the following table, you can find the countries or languages supported by the internation-al features of MS-DOS 6. The country code and the default and alternate code pages (char-acter sets) are specified for each country. DOS’s international commands—such as COUNTRY=,CHCP, KEYB, and MODE—use country codes, keyboard codes, and code pages:
Country or Country Default Alternate First
Language Code Code Page Code Page DOS Version
Belgium 032 850 437 2.1
Brazil 055 850 437 5.0
Canada (French) 002 863 850 3.3
Croatia 038 852 850 6.0
Czech Republic 042 852 850 6.0
Denmark 045 850 865 2.1
Finland 358 850 437 2.1
France 033 850 437 2.1
Germany 049 850 437 2.1
Hungary 036 852 850 5.0
International English 061 437 850 2.1
Italy 039 850 437 2.1
Latin America 003 850 437 3.3
Netherlands 031 850 437 2.1
Norway 047 850 865 2.1
Poland 048 852 850 5.0
Portugal 351 850 860 3.3
Serbia/Yugoslavia 038 852 850 6.0
Slovakia 042 852 850 6.0
Slovenia 038 852 850 6.0
Spain 034 850 437 2.1
Sweden 046 850 437 2.1
Switzerland (French) 041 850 437 2.1
Switzerland (German) 041 850 437 2.1
United Kingdom 044 437 850 2.1
United States 001 437 850 2.1
Special versions of MS-DOS that support the following countries and languages also areavailable: Arabic, Israel, Japan, Korea, People’s Republic of China, and Taiwan. Contact 14
IIIPart
Ch
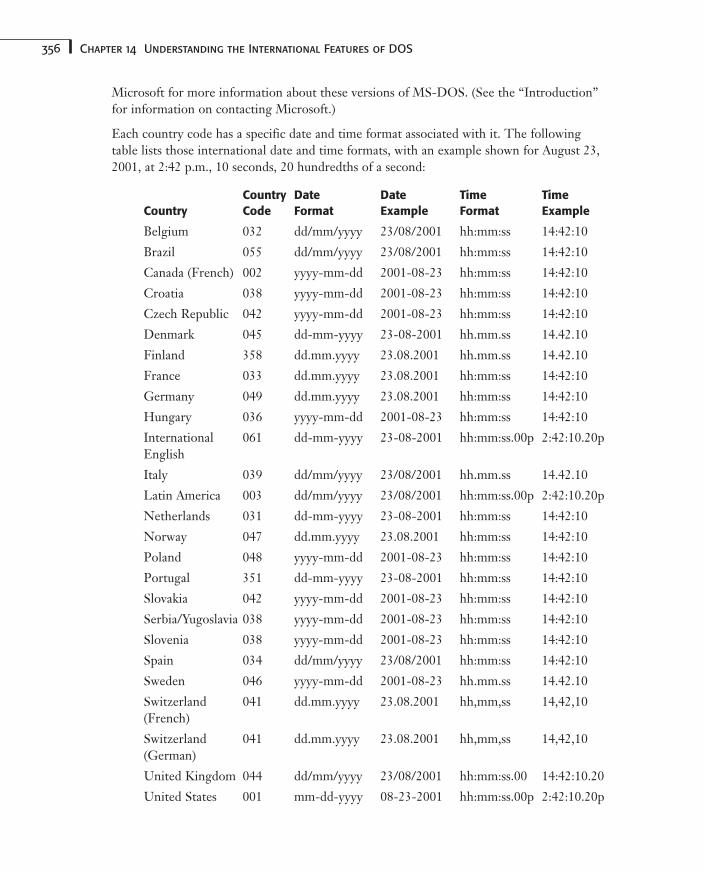
356 Chapter 14 Understanding the International Features of DOS
Microsoft for more information about these versions of MS-DOS. (See the “Introduction”for information on contacting Microsoft.)
Each country code has a specific date and time format associated with it. The followingtable lists those international date and time formats, with an example shown for August 23,2001, at 2:42 p.m., 10 seconds, 20 hundredths of a second:
Country Date Date Time Time
Country Code Format Example Format Example
Belgium 032 dd/mm/yyyy 23/08/2001 hh:mm:ss 14:42:10
Brazil 055 dd/mm/yyyy 23/08/2001 hh:mm:ss 14:42:10
Canada (French) 002 yyyy-mm-dd 2001-08-23 hh:mm:ss 14:42:10
Croatia 038 yyyy-mm-dd 2001-08-23 hh:mm:ss 14:42:10
Czech Republic 042 yyyy-mm-dd 2001-08-23 hh:mm:ss 14:42:10
Denmark 045 dd-mm-yyyy 23-08-2001 hh.mm.ss 14.42.10
Finland 358 dd.mm.yyyy 23.08.2001 hh.mm.ss 14.42.10
France 033 dd.mm.yyyy 23.08.2001 hh:mm:ss 14:42:10
Germany 049 dd.mm.yyyy 23.08.2001 hh:mm:ss 14:42:10
Hungary 036 yyyy-mm-dd 2001-08-23 hh:mm:ss 14:42:10
International 061 dd-mm-yyyy 23-08-2001 hh:mm:ss.00p 2:42:10.20pEnglish
Italy 039 dd/mm/yyyy 23/08/2001 hh.mm.ss 14.42.10
Latin America 003 dd/mm/yyyy 23/08/2001 hh:mm:ss.00p 2:42:10.20p
Netherlands 031 dd-mm-yyyy 23-08-2001 hh:mm:ss 14:42:10
Norway 047 dd.mm.yyyy 23.08.2001 hh:mm:ss 14:42:10
Poland 048 yyyy-mm-dd 2001-08-23 hh:mm:ss 14:42:10
Portugal 351 dd-mm-yyyy 23-08-2001 hh:mm:ss 14:42:10
Slovakia 042 yyyy-mm-dd 2001-08-23 hh:mm:ss 14:42:10
Serbia/Yugoslavia 038 yyyy-mm-dd 2001-08-23 hh:mm:ss 14:42:10
Slovenia 038 yyyy-mm-dd 2001-08-23 hh:mm:ss 14:42:10
Spain 034 dd/mm/yyyy 23/08/2001 hh:mm:ss 14:42:10
Sweden 046 yyyy-mm-dd 2001-08-23 hh.mm.ss 14.42.10
Switzerland 041 dd.mm.yyyy 23.08.2001 hh,mm,ss 14,42,10(French)
Switzerland 041 dd.mm.yyyy 23.08.2001 hh,mm,ss 14,42,10(German)
United Kingdom 044 dd/mm/yyyy 23/08/2001 hh:mm:ss.00 14:42:10.20
United States 001 mm-dd-yyyy 08-23-2001 hh:mm:ss.00p 2:42:10.20p
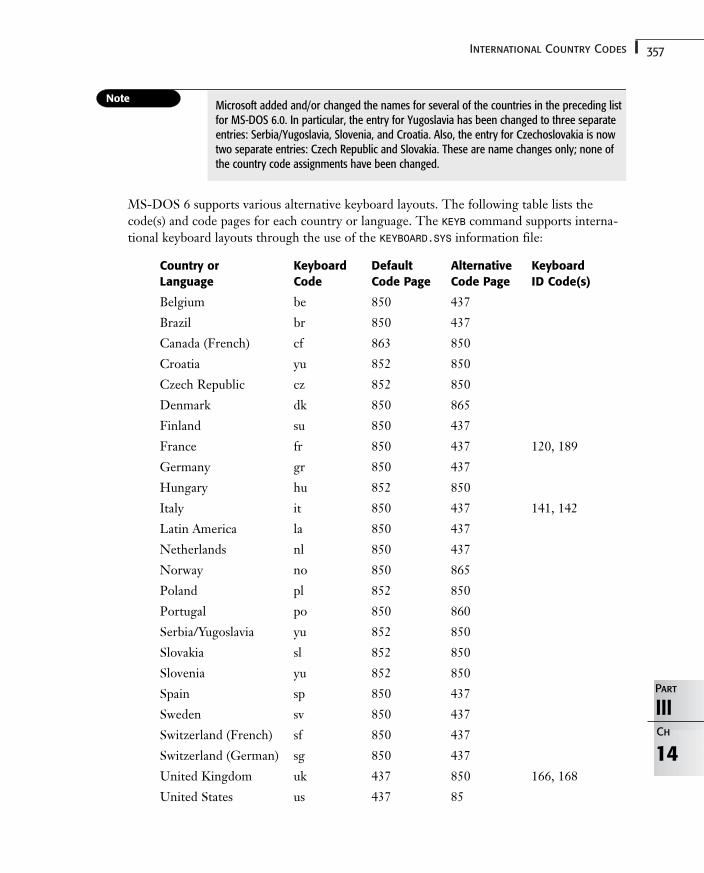
357International Country Codes
14
IIIPart
Ch
Microsoft added and/or changed the names for several of the countries in the preceding listfor MS-DOS 6.0. In particular, the entry for Yugoslavia has been changed to three separateentries: Serbia/Yugoslavia, Slovenia, and Croatia. Also, the entry for Czechoslovakia is nowtwo separate entries: Czech Republic and Slovakia. These are name changes only; none ofthe country code assignments have been changed.
MS-DOS 6 supports various alternative keyboard layouts. The following table lists thecode(s) and code pages for each country or language. The KEYB command supports interna-tional keyboard layouts through the use of the KEYBOARD.SYS information file:
Country or Keyboard Default Alternative Keyboard
Language Code Code Page Code Page ID Code(s)
Belgium be 850 437
Brazil br 850 437
Canada (French) cf 863 850
Croatia yu 852 850
Czech Republic cz 852 850
Denmark dk 850 865
Finland su 850 437
France fr 850 437 120, 189
Germany gr 850 437
Hungary hu 852 850
Italy it 850 437 141, 142
Latin America la 850 437
Netherlands nl 850 437
Norway no 850 865
Poland pl 852 850
Portugal po 850 860
Serbia/Yugoslavia yu 852 850
Slovakia sl 852 850
Slovenia yu 852 850
Spain sp 850 437
Sweden sv 850 437
Switzerland (French) sf 850 437
Switzerland (German) sg 850 437
United Kingdom uk 437 850 166, 168
United States us 437 85
358 Chapter 14 Understanding the International Features of DOS
MS-DOS 6.2 includes an alternate keyboard layout file, KEYBRD2.SYS, that KEYB can use. KEYBRD2.SYS doesn’t support either Switzerland layout, but it adds alternative keyboard lay-outs for Brazil, Canada, Greece, Iceland, Romania, and Turkey. For information on usingthe layouts available in KEYBRD2.SYS, see the README.TXT file distributed with MS-DOS 6.2.

Maximizing DOS
15 Using the DOS Editor 361
16 Understanding Batch Files 389
17 Understanding ANSI.SYS 415
18 Mastering DOSKEY and Macros 431
19 Configuring Your Computer 441
20 Networking DOS 471
21 Connecting to the Internet 483
22 Third-Party Utilities 493
IVPART

Using the DOS EditorIn this chapter
Understanding the DOS Editor 362
Navigating the DOS Editor 364
Mastering Fundamental Editing Techniques 368
Learning Special Editing Techniques 371
Block Editing 373
Searching and Replacing 376
Managing Files 379
Starting the DOS Editor with Optional Switches 384
Project: Customizing the DOS Editor Screen 385
15CHAPTER
362 Chapter 15 Using the DOS Editor
Understanding the DOS EditorThe DOS Editor is a text processor, a kind of miniature word processor. It is the perfecttool for creating short text documents and editing text files. When you try the DOS Editor,you are in for a pleasant surprise. The Editor is so easy and intuitive to use that you willlikely become a regular user.
The DOS Editor falls into a class of programs known as text editors. As the name implies, atext editor works with files that contain pure text (as opposed to binary files, which containprogramming instructions or formatted data).
Uses for the DOS Editor
Following are some of the typical tasks for which the DOS Editor is ideally suited:
■ Creating, editing, and printing memos (and other text documents)
■ Viewing text files whose contents are unknown
■ Creating or modifying various system configuration files, such as AUTOEXEC.BAT and CONFIG.SYS
■ Writing and modifying batch files➔ For more information about batch files, see Chapter 16, “Understanding Batch Files,” p. 389.
■ Writing and saving README files (Many computer users place a README file in a hard disksubdirectory, or on a floppy disk, to explain the contents of other files in the subdirec-tory or on the disk.)
■ Creating and viewing files that are uploaded to or downloaded from electronic bulletinboards, such as CompuServe
■ Writing programs for programming language environments that don’t include a resi-dent editor
Be aware that document files produced by some word processors aren’t pure text files.The files can contain special formatting or printer-control characters. Most word proces-sors can import the pure text files created with the DOS Editor. The Editor, however,might not successfully import word processor document files that contain certain format-ting characters.
Files Required to Run the DOS Editor
The Editor is provided with DOS. It is invoked by the external command EDIT, which runsthe program EDIT.COM. When you run the Editor, EDIT.COM calls on two other files:QBASIC.EXE and EDIT.HLP. Only QBASIC.EXE is required. EDIT.HLP contains the text of thehelp messages, but the Editor works without this file.
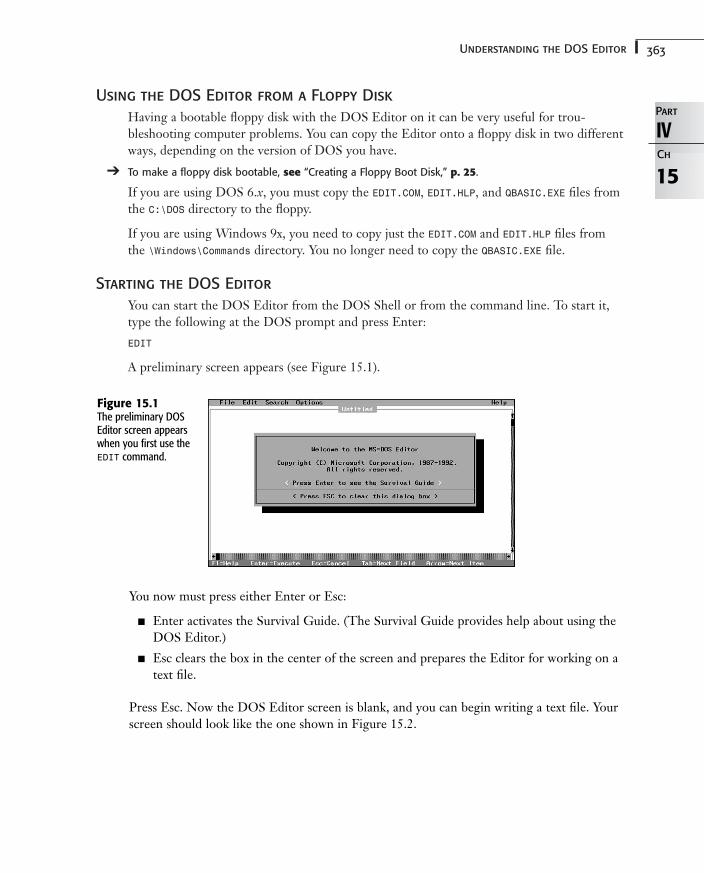
363Understanding the DOS Editor
Using the DOS Editor from a Floppy Disk
Having a bootable floppy disk with the DOS Editor on it can be very useful for trou-bleshooting computer problems. You can copy the Editor onto a floppy disk in two differentways, depending on the version of DOS you have.
➔ To make a floppy disk bootable, see “Creating a Floppy Boot Disk,” p. 25.
If you are using DOS 6.x, you must copy the EDIT.COM, EDIT.HLP, and QBASIC.EXE files fromthe C:\DOS directory to the floppy.
If you are using Windows 9x, you need to copy just the EDIT.COM and EDIT.HLP files fromthe \Windows\Commands directory. You no longer need to copy the QBASIC.EXE file.
Starting the DOS Editor
You can start the DOS Editor from the DOS Shell or from the command line. To start it,type the following at the DOS prompt and press Enter:
EDIT
A preliminary screen appears (see Figure 15.1).
15
IVPart
Ch
Figure 15.1The preliminary DOSEditor screen appearswhen you first use theEDIT command.
You now must press either Enter or Esc:
■ Enter activates the Survival Guide. (The Survival Guide provides help about using theDOS Editor.)
■ Esc clears the box in the center of the screen and prepares the Editor for working on atext file.
Press Esc. Now the DOS Editor screen is blank, and you can begin writing a text file. Yourscreen should look like the one shown in Figure 15.2.
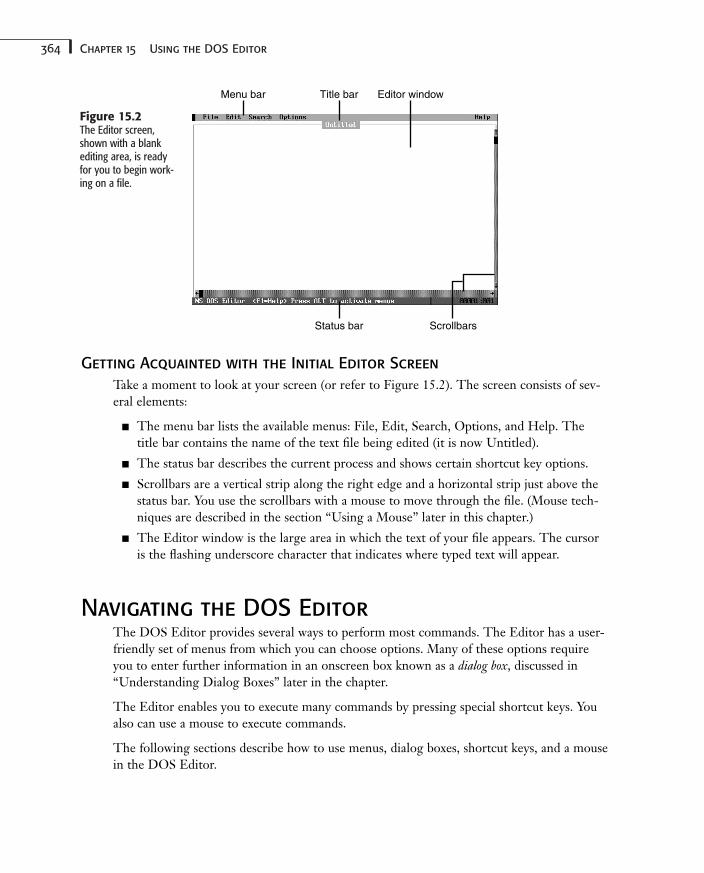
364 Chapter 15 Using the DOS Editor
Figure 15.2The Editor screen,shown with a blankediting area, is readyfor you to begin work-ing on a file.
Status bar Scrollbars
Menu bar Editor windowTitle bar
Getting Acquainted with the Initial Editor Screen
Take a moment to look at your screen (or refer to Figure 15.2). The screen consists of sev-eral elements:
■ The menu bar lists the available menus: File, Edit, Search, Options, and Help. Thetitle bar contains the name of the text file being edited (it is now Untitled).
■ The status bar describes the current process and shows certain shortcut key options.
■ Scrollbars are a vertical strip along the right edge and a horizontal strip just above thestatus bar. You use the scrollbars with a mouse to move through the file. (Mouse tech-niques are described in the section “Using a Mouse” later in this chapter.)
■ The Editor window is the large area in which the text of your file appears. The cursoris the flashing underscore character that indicates where typed text will appear.
Navigating the DOS EditorThe DOS Editor provides several ways to perform most commands. The Editor has a user-friendly set of menus from which you can choose options. Many of these options requireyou to enter further information in an onscreen box known as a dialog box, discussed in“Understanding Dialog Boxes” later in the chapter.
The Editor enables you to execute many commands by pressing special shortcut keys. Youalso can use a mouse to execute commands.
The following sections describe how to use menus, dialog boxes, shortcut keys, and a mousein the DOS Editor.
365Navigating the DOS Editor
Understanding the Menu System
The DOS Editor menu system provides many editing commands. The menu bar containsthe following options: File, Edit, Search, Options, and Help. Choosing any of these optionsdisplays a pull-down menu. The File option displays a menu that enables you to load, save,and print files. You use the Edit menu to cut and paste text. You can use the Search menufor finding and replacing specified text. The Options menu can be used to reconfigure envi-ronment options, and the Help menu provides access to online help.
To activate the menu bar, press Alt. The first letter of each menu name is highlighted. Toopen a menu, press the first letter of the menu name. To activate the File menu, for exam-ple, press Alt and then F (Alt+F). Similarly, press Alt+E to display the Edit menu, Alt+S todisplay the Search menu, Alt+O to display the Options menu, or Alt+H to display the Helpmenu.
Every time you open a main menu, the first command on the menu is highlighted. You canmove this highlight to the other commands by pressing the up- or down-arrow key. As youmove the highlight, notice that the status bar displays a brief description of the highlightedcommand.
On a menu, one letter of each command is highlighted. On most systems, the highlightedletter appears in high-intensity white. To execute a command, move the highlight to thatcommand and press Enter, or press the key that corresponds to the highlighted letter.
Depending on which editing commands you have executed previously, some commands in amenu might not be available. In such a case, the menu shows the command name in a dullcolor (usually gray), and no highlighted letter appears in the name. If you try to execute anunavailable command, the DOS Editor sounds a beep and refuses to execute the command.
The Esc key is the “oops” key. Pressing Esc closes the menu system and returns you to theEditor.
In the pull-down menus, an ellipsis (…) following the name of a command indicates that adialog box opens when you issue that command. (Sometimes, depending on the circum-stances, a command without an ellipsis also opens a dialog box.)
Understanding Dialog Boxes
When you execute a menu command, it can start immediately or, depending on the com-mand and the current context, a dialog box might pop up. A dialog box means that the DOSEditor needs more information before it can carry out the command. If, for example, youexecute the command to save a new file, the Editor first needs to know what name to givethe file. A dialog box prompts you for the necessary information.
If you activate the Search menu, for example, and then choose Change, the DOS Editor dis-plays the Change dialog box (see Figure 15.3).
15
IVPart
Ch
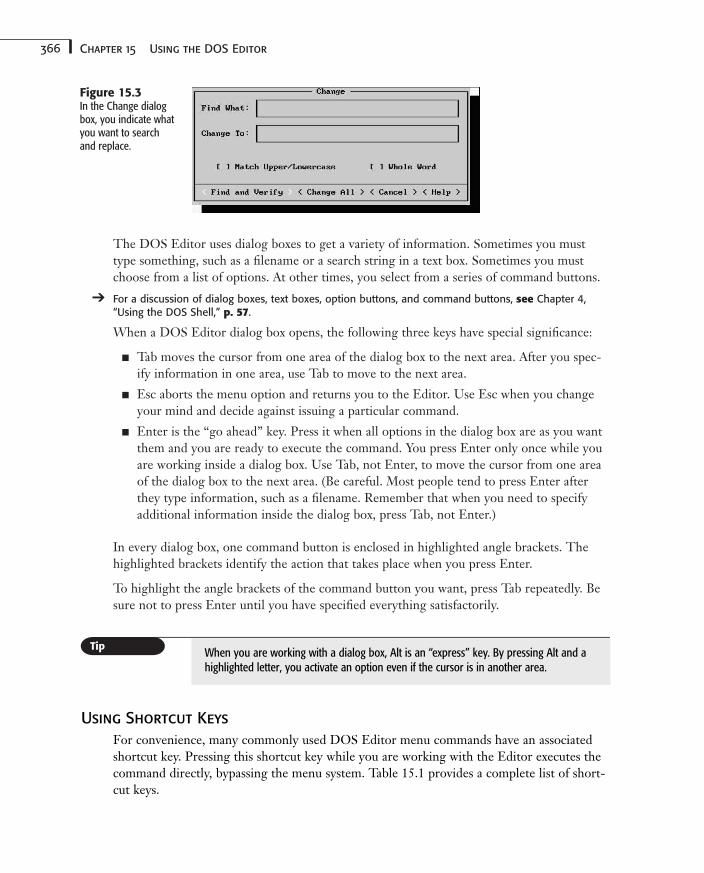
366 Chapter 15 Using the DOS Editor
Figure 15.3In the Change dialogbox, you indicate whatyou want to searchand replace.
The DOS Editor uses dialog boxes to get a variety of information. Sometimes you musttype something, such as a filename or a search string in a text box. Sometimes you mustchoose from a list of options. At other times, you select from a series of command buttons.
➔ For a discussion of dialog boxes, text boxes, option buttons, and command buttons, see Chapter 4,“Using the DOS Shell,” p. 57.
When a DOS Editor dialog box opens, the following three keys have special significance:
■ Tab moves the cursor from one area of the dialog box to the next area. After you spec-ify information in one area, use Tab to move to the next area.
■ Esc aborts the menu option and returns you to the Editor. Use Esc when you changeyour mind and decide against issuing a particular command.
■ Enter is the “go ahead” key. Press it when all options in the dialog box are as you wantthem and you are ready to execute the command. You press Enter only once while youare working inside a dialog box. Use Tab, not Enter, to move the cursor from one areaof the dialog box to the next area. (Be careful. Most people tend to press Enter afterthey type information, such as a filename. Remember that when you need to specifyadditional information inside the dialog box, press Tab, not Enter.)
In every dialog box, one command button is enclosed in highlighted angle brackets. Thehighlighted brackets identify the action that takes place when you press Enter.
To highlight the angle brackets of the command button you want, press Tab repeatedly. Besure not to press Enter until you have specified everything satisfactorily.
When you are working with a dialog box, Alt is an “express” key. By pressing Alt and ahighlighted letter, you activate an option even if the cursor is in another area.
Using Shortcut Keys
For convenience, many commonly used DOS Editor menu commands have an associatedshortcut key. Pressing this shortcut key while you are working with the Editor executes thecommand directly, bypassing the menu system. Table 15.1 provides a complete list of short-cut keys.
367Navigating the DOS Editor
Table 15.1 DOS Editor Keyboard and Mouse Shortcuts
Shortcut Key Effect Mouse
F1 View help on menu or command Click the right button on the desireditem
Shift+F1 View help on getting started Click Getting Started (Help menu)
Ctrl+F1 View the next help topic Click Next (status bar)
Alt+F1 Review the preceding help screen Click Back (status bar)
Shift+Ctrl+F1 View the preceding help topic None
F3 Repeat the last Find Click Repeat Last Find (Searchmenu)
F6 Move between help and the Click in the desired windowdesired window
Shift+F6 Make the preceding window Click in the desired windowactive
Shift+Del Cut selected text Click Cut (Edit menu)
Ctrl+Ins Copy selected text Click Copy (Edit menu)
Shift+Ins Paste text from the Clipboard Click Paste (Edit menu)
Del Erase selected text Click Clear (Edit menu)
Ctrl+Q, A Change text Click Change (Search menu)
Ctrl+Q, F Search for a text string Click Find (Search menu)
Esc Terminate the Help System Click Cancel (status bar)
Alt Enter Menu-selection mode None
Alt+plus Enlarge the active window Drag the title bar up
Alt+minus Shrink the active window Drag the title bar down
Using a Mouse
A mouse is an excellent pointing device for computer applications. The DOS Editor sup-ports a mouse. You can execute menu commands and many editing tasks by using a mouse.If your system is mouseless, you can get along fine; if you have a mouse, try it and see whatyou think.
15
IVPart
Ch
The DOS Editor works with any Microsoft-compatible mouse and driver. If you have amouse, you presumably know how to install and activate your mouse driver. Microsoftsupplies a generic mouse driver as part of MS-DOS.
368 Chapter 15 Using the DOS Editor
When the mouse is active, you see a special mouse cursor onscreen. The mouse cursor is a small rectangle, about the size of one text character, which moves as you move themouse. Notice that the regular blinking cursor remains active. You can continue to use all the keyboard commands and features. Refer to Table 15.1 for a comprehensive list ofmouse techniques.
The following are some additional mouse pointers:
■ To open a menu, click the menu name in the menu bar.
■ To execute a menu command, click the command name in the menu.
■ To set an option in a dialog box, click that option.
■ To abort a menu, click a location outside the menu.
■ To move the cursor in the file, click at the location you want.
■ To select text, drag the mouse cursor over the text. That is, move the mouse cursor toone end of the text you want to select; then press and hold down the mouse button whileyou move the mouse, across the text, to the other end of the text you want to select.
■ To activate the Editor window while a help screen is visible, click anywhere inside theEditor window.
■ To expand or shrink the Editor window while a help screen is visible, drag the title barof the Editor window up or down.
■ To scroll the screen horizontally one character, click the left or right arrow at either endof the horizontal scrollbar.
■ To scroll the screen vertically one character, click the up or down arrow at either end ofthe vertical scrollbar.
■ To scroll text vertically to a specific position, move the mouse cursor to the scroll box(the inverse-video rectangle inside the vertical scrollbar). Then, drag the scroll boxalong the scrollbar to the desired position.
■ To scroll text one page at a time, click the vertical scrollbar somewhere between thescroll box and the top or bottom of the scrollbar.
■ To scroll horizontally several positions at once, click the horizontal scrollbar somewherebetween the scroll box and the left or right end of the scrollbar.
■ To execute a dialog box action enclosed in angle brackets, click the name between thebrackets.
■ To execute any keystroke action enclosed in angle brackets in the status bar, click thename inside the angle brackets.
Mastering Fundamental Editing TechniquesEditing is a skill—almost an art. Some editing techniques are simple, others more complex.You can perform many editing tasks in more than one way. The following sections discussthe fundamental editing skills, which include moving the cursor, scrolling, and inserting anddeleting text.
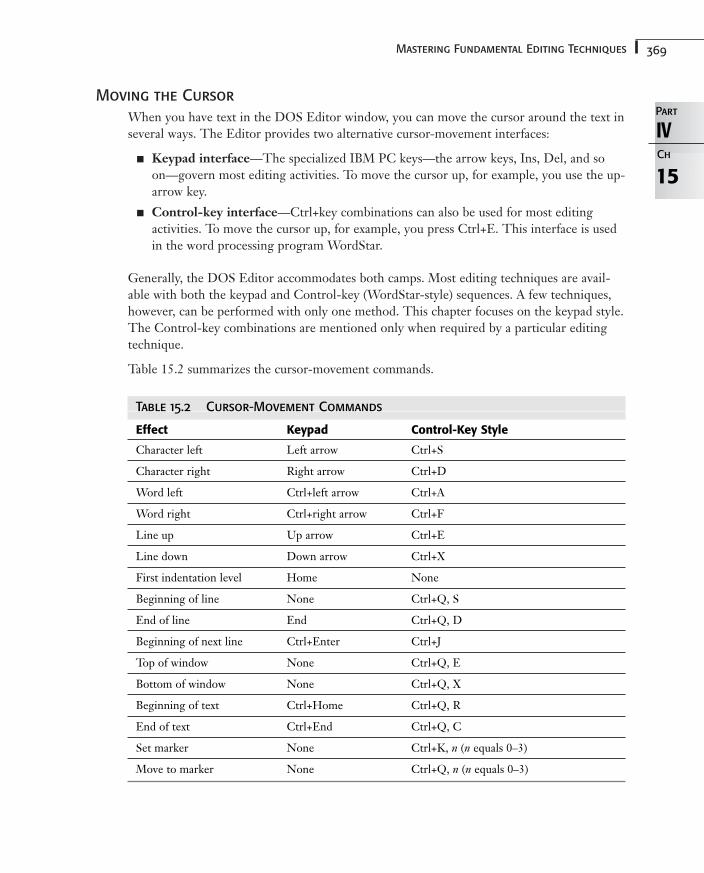
369Mastering Fundamental Editing Techniques
Moving the Cursor
When you have text in the DOS Editor window, you can move the cursor around the text inseveral ways. The Editor provides two alternative cursor-movement interfaces:
■ Keypad interface—The specialized IBM PC keys—the arrow keys, Ins, Del, and soon—govern most editing activities. To move the cursor up, for example, you use the up-arrow key.
■ Control-key interface—Ctrl+key combinations can also be used for most editingactivities. To move the cursor up, for example, you press Ctrl+E. This interface is usedin the word processing program WordStar.
Generally, the DOS Editor accommodates both camps. Most editing techniques are avail-able with both the keypad and Control-key (WordStar-style) sequences. A few techniques,however, can be performed with only one method. This chapter focuses on the keypad style.The Control-key combinations are mentioned only when required by a particular editingtechnique.
Table 15.2 summarizes the cursor-movement commands.
Table 15.2 Cursor-Movement Commands
Effect Keypad Control-Key Style
Character left Left arrow Ctrl+S
Character right Right arrow Ctrl+D
Word left Ctrl+left arrow Ctrl+A
Word right Ctrl+right arrow Ctrl+F
Line up Up arrow Ctrl+E
Line down Down arrow Ctrl+X
First indentation level Home None
Beginning of line None Ctrl+Q, S
End of line End Ctrl+Q, D
Beginning of next line Ctrl+Enter Ctrl+J
Top of window None Ctrl+Q, E
Bottom of window None Ctrl+Q, X
Beginning of text Ctrl+Home Ctrl+Q, R
End of text Ctrl+End Ctrl+Q, C
Set marker None Ctrl+K, n (n equals 0–3)
Move to marker None Ctrl+Q, n (n equals 0–3)
15
IVPart
Ch
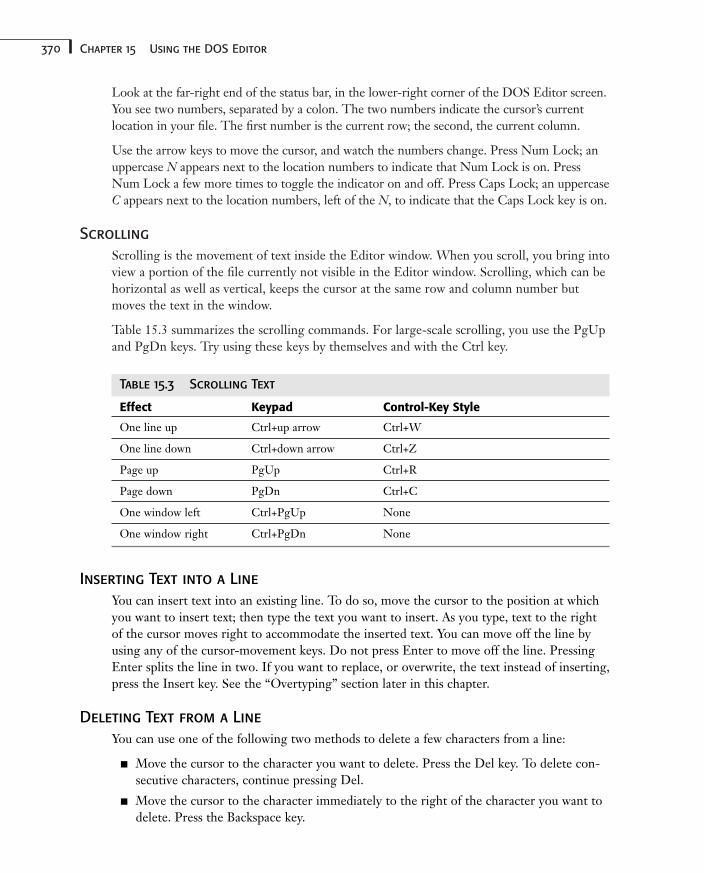
370 Chapter 15 Using the DOS Editor
Look at the far-right end of the status bar, in the lower-right corner of the DOS Editor screen.You see two numbers, separated by a colon. The two numbers indicate the cursor’s currentlocation in your file. The first number is the current row; the second, the current column.
Use the arrow keys to move the cursor, and watch the numbers change. Press Num Lock; anuppercase N appears next to the location numbers to indicate that Num Lock is on. PressNum Lock a few more times to toggle the indicator on and off. Press Caps Lock; an uppercaseC appears next to the location numbers, left of the N, to indicate that the Caps Lock key is on.
Scrolling
Scrolling is the movement of text inside the Editor window. When you scroll, you bring intoview a portion of the file currently not visible in the Editor window. Scrolling, which can behorizontal as well as vertical, keeps the cursor at the same row and column number butmoves the text in the window.
Table 15.3 summarizes the scrolling commands. For large-scale scrolling, you use the PgUpand PgDn keys. Try using these keys by themselves and with the Ctrl key.
Table 15.3 Scrolling Text
Effect Keypad Control-Key Style
One line up Ctrl+up arrow Ctrl+W
One line down Ctrl+down arrow Ctrl+Z
Page up PgUp Ctrl+R
Page down PgDn Ctrl+C
One window left Ctrl+PgUp None
One window right Ctrl+PgDn None
Inserting Text into a Line
You can insert text into an existing line. To do so, move the cursor to the position at whichyou want to insert text; then type the text you want to insert. As you type, text to the rightof the cursor moves right to accommodate the inserted text. You can move off the line byusing any of the cursor-movement keys. Do not press Enter to move off the line. PressingEnter splits the line in two. If you want to replace, or overwrite, the text instead of inserting,press the Insert key. See the “Overtyping” section later in this chapter.
Deleting Text from a Line
You can use one of the following two methods to delete a few characters from a line:
■ Move the cursor to the character you want to delete. Press the Del key. To delete con-secutive characters, continue pressing Del.
■ Move the cursor to the character immediately to the right of the character you want todelete. Press the Backspace key.
371Learning Special Editing Techniques
Most people find the first method more natural. Try both methods and make your ownchoice.
Splitting and Joining Lines
Sometimes you need to split a line of text into two lines. To do so, move the cursor so that itis positioned under the character with which you want to begin the second line of text; thenpress Enter. The line splits in two, and the second half moves down to form a new line.Succeeding lines are pushed down to accommodate the new line.
Conversely, you can join two lines to form one line. To do so, position the cursor in the sec-ond line and press Home to move the cursor to the left end of the line. Then, pressBackspace. The second line moves up to the right end of the first line. Lines beneath thesplit line move up one line.
Inserting and Deleting an Entire Line
To insert a blank line between two lines, move the cursor to column 1 in the lower of thetwo lines and then press Ctrl+N or Home (to move the cursor to the left end of the currentline), and press Enter. Then, move the cursor up to the new blank line.
To delete an entire line, place the cursor anywhere on the line and press Ctrl+Y.
Overtyping
By default, the DOS Editor operates in Insert mode. If you type new text while the cursor isin the middle of a line, the Editor inserts that new text at the cursor location. If you prefer,you can choose Overtype mode, in which the new text replaces the former text.
To activate Overtype mode, press Insert. The cursor changes from a blinking line to a blink-ing box. The larger cursor signifies Overtype mode, in which any new character you typereplaces the character at the cursor location.
15
IVPart
Ch
Depending on your keyboard, you might have a key marked either Ins or Insert. Both pro-vide the insert function.
To return to standard Insert mode, press Insert again. The Insert key acts as a toggle switchthat alternates between Insert and Overtype modes.
Learning Special Editing TechniquesIn addition to the basic editing techniques, the DOS Editor provides several special editingfeatures. The following sections describe how to use the automatic indenting, tab, and placemarker features.
372 Chapter 15 Using the DOS Editor
Using Automatic Indent
When you type a line and press Enter, the cursor drops down one line but returns to thecolumn where you began the preceding line. This feature is convenient when you want totype a series of indented lines.
For an example, type the following line and press Enter:
This line is not indented
The cursor moves to the beginning of the next line. Then press the spacebar three times tomove the cursor to column 4 and type the following:
But this line is
Press Enter again. Note that the second time you press Enter, the cursor moves to the nextrow but remains indented at column 4. Now type this message and press Enter:
So is this one
The cursor remains indented.
Now press the left-arrow key until the cursor returns to column 1. Type the following andpress Enter:
Back to no indentation
The short text block you typed looks like the following:
This line is not indentedBut this line isSo is this one
Back to no indentation
Using Tab
By default, tab stops are set every eight spaces. When you press the Tab key, the cursormoves to the right to the next tab stop. All text to the right of the cursor moves right whenyou press Tab. Additional tabbing techniques follow:
■ To indent an existing line a full tab position, move the cursor to column 1 of the lineand press Tab.
■ To remove leading spaces and move a line to the left, move the cursor anywhere on theline and then press Shift+Tab.
■ To indent or “unindent” an entire block of lines, select the lines by using one of theShift keystrokes shown in Table 15.4. Then, press Tab to indent the entire block orpress Shift+Tab to “unindent” the entire block.
■ To change the number of default tab stops, first select Display from the Options menu.In the resulting dialog box, press Tab several times to move the cursor to Tab Stops,type a new value for the number of characters per tab stop, and then press Enter toclose the dialog box.
373Block Editing
Using Place Markers
A place marker designates a specific location—a row and column—in your text. You can setas many as four place markers. After setting a place marker, you can move the cursorinstantly from anywhere in the file to that marker’s location. The markers are invisible; nocharacter appears in the text to indicate a set marker.
You can set four markers: 0 through 3. To set a place marker, press and release Ctrl+K, andthen press a number key from 0 to 3. This action associates the cursor’s current positionwith the marker having the number whose key you pressed. To move the cursor to a previ-ously set place marker, press and release Ctrl+Q, and then press the number of the marker(0 through 3).
You don’t turn off markers; they are always set. You can reset them to a different location,but you cannot unset them. They are forgotten when you exit the program.
Block EditingYou can edit blocks of text as a single unit. Block editing requires that you understand tworelevant concepts: selecting text and using the Clipboard, which temporarily stores a blockof text in a reserved area of memory.
The following sections describe these techniques:
■ Selecting text for block operations
■ Using the Clipboard
■ Cutting and pasting blocks of text
Selecting Text
A block of selected text is always one contiguous group of characters. The block can be onecharacter, a few characters, a line, several lines, a paragraph, or even an entire file. Selectedtext appears in reverse video.
Follow these steps to select a block of text:
1. Move the cursor to one end of the block.
2. While you hold down the Shift key, use the cursor-movement keys to highlight theblock.
Table 15.4 lists the keys used for selecting text. In general, the keys you use to select text arethe same as those you use to move the cursor, but you also press Shift when using them toselect text.
15
IVPart
Ch
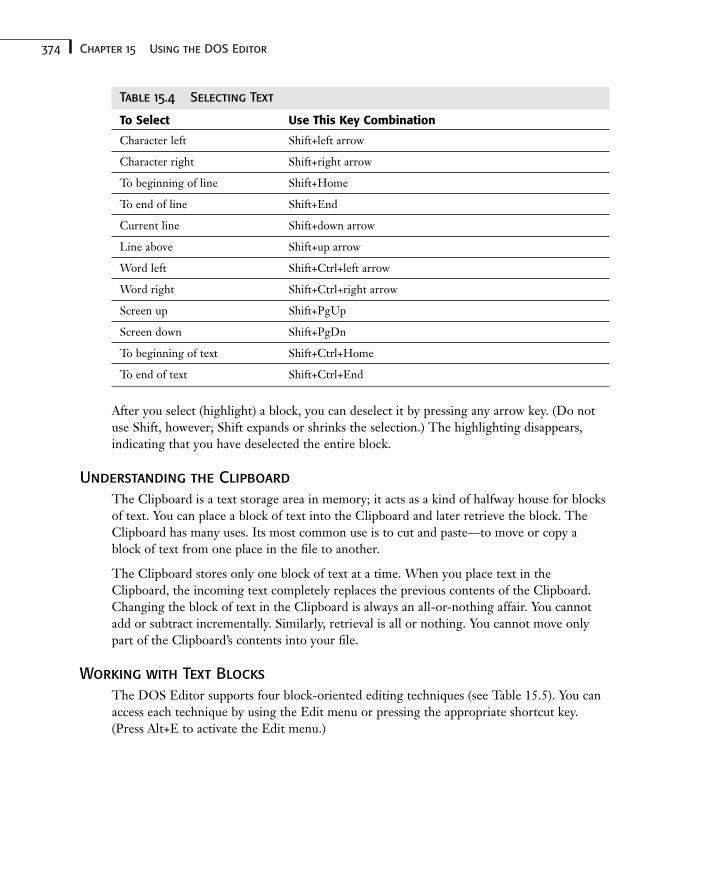
374 Chapter 15 Using the DOS Editor
Table 15.4 Selecting Text
To Select Use This Key Combination
Character left Shift+left arrow
Character right Shift+right arrow
To beginning of line Shift+Home
To end of line Shift+End
Current line Shift+down arrow
Line above Shift+up arrow
Word left Shift+Ctrl+left arrow
Word right Shift+Ctrl+right arrow
Screen up Shift+PgUp
Screen down Shift+PgDn
To beginning of text Shift+Ctrl+Home
To end of text Shift+Ctrl+End
After you select (highlight) a block, you can deselect it by pressing any arrow key. (Do notuse Shift, however; Shift expands or shrinks the selection.) The highlighting disappears,indicating that you have deselected the entire block.
Understanding the Clipboard
The Clipboard is a text storage area in memory; it acts as a kind of halfway house for blocksof text. You can place a block of text into the Clipboard and later retrieve the block. TheClipboard has many uses. Its most common use is to cut and paste—to move or copy ablock of text from one place in the file to another.
The Clipboard stores only one block of text at a time. When you place text in theClipboard, the incoming text completely replaces the previous contents of the Clipboard.Changing the block of text in the Clipboard is always an all-or-nothing affair. You cannotadd or subtract incrementally. Similarly, retrieval is all or nothing. You cannot move onlypart of the Clipboard’s contents into your file.
Working with Text Blocks
The DOS Editor supports four block-oriented editing techniques (see Table 15.5). You canaccess each technique by using the Edit menu or pressing the appropriate shortcut key.(Press Alt+E to activate the Edit menu.)
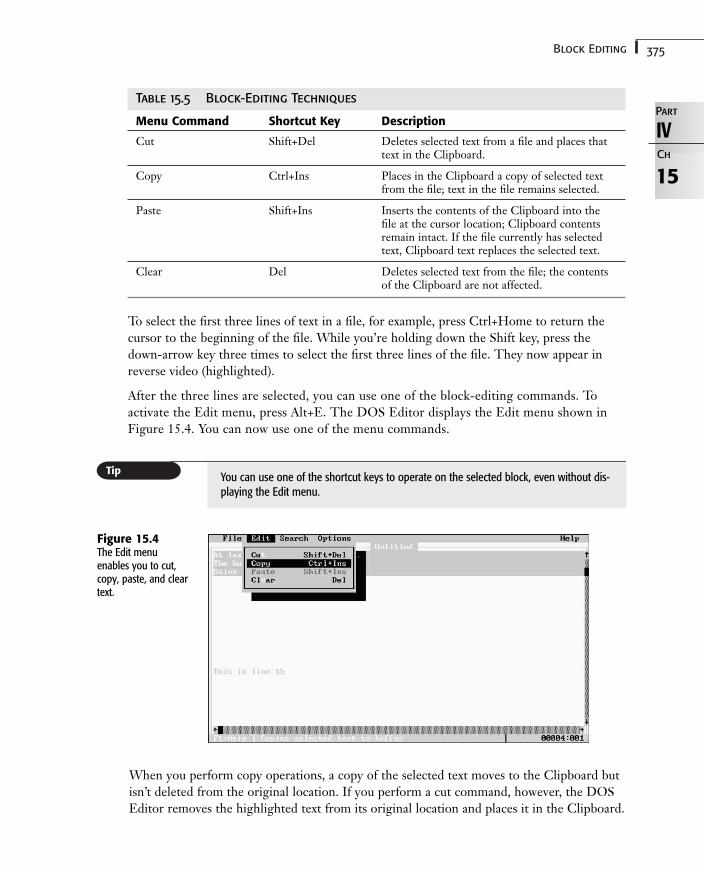
375Block Editing
Table 15.5 Block-Editing Techniques
Menu Command Shortcut Key Description
Cut Shift+Del Deletes selected text from a file and places thattext in the Clipboard.
Copy Ctrl+Ins Places in the Clipboard a copy of selected textfrom the file; text in the file remains selected.
Paste Shift+Ins Inserts the contents of the Clipboard into thefile at the cursor location; Clipboard contentsremain intact. If the file currently has selectedtext, Clipboard text replaces the selected text.
Clear Del Deletes selected text from the file; the contentsof the Clipboard are not affected.
To select the first three lines of text in a file, for example, press Ctrl+Home to return thecursor to the beginning of the file. While you’re holding down the Shift key, press thedown-arrow key three times to select the first three lines of the file. They now appear inreverse video (highlighted).
After the three lines are selected, you can use one of the block-editing commands. To activate the Edit menu, press Alt+E. The DOS Editor displays the Edit menu shown inFigure 15.4. You can now use one of the menu commands.
15
IVPart
Ch
You can use one of the shortcut keys to operate on the selected block, even without dis-playing the Edit menu.
Figure 15.4The Edit menuenables you to cut,copy, paste, and cleartext.
When you perform copy operations, a copy of the selected text moves to the Clipboard butisn’t deleted from the original location. If you perform a cut command, however, the DOSEditor removes the highlighted text from its original location and places it in the Clipboard.
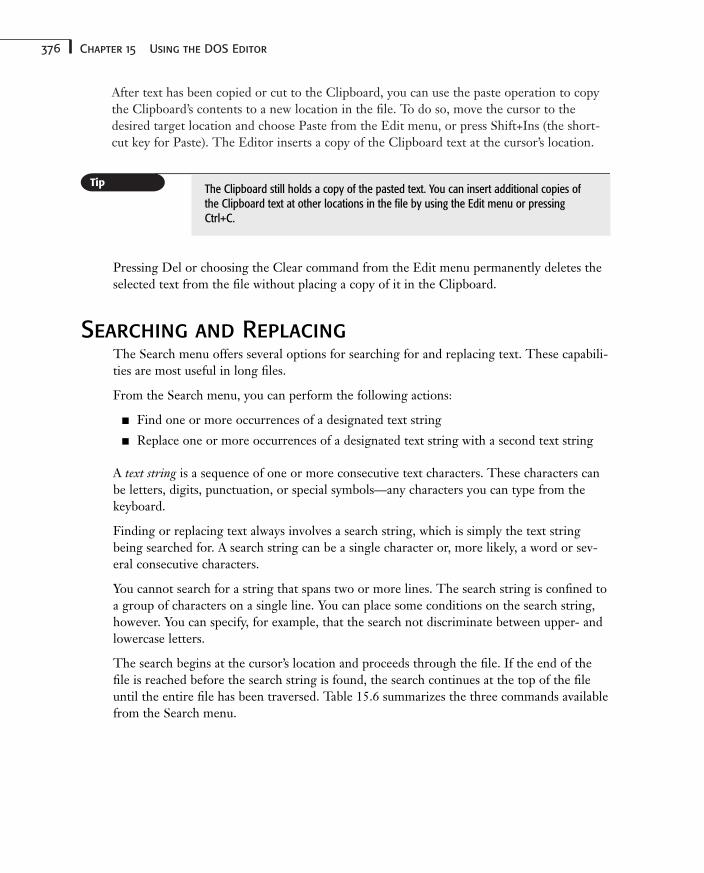
376 Chapter 15 Using the DOS Editor
After text has been copied or cut to the Clipboard, you can use the paste operation to copythe Clipboard’s contents to a new location in the file. To do so, move the cursor to thedesired target location and choose Paste from the Edit menu, or press Shift+Ins (the short-cut key for Paste). The Editor inserts a copy of the Clipboard text at the cursor’s location.
The Clipboard still holds a copy of the pasted text. You can insert additional copies ofthe Clipboard text at other locations in the file by using the Edit menu or pressingCtrl+C.
Pressing Del or choosing the Clear command from the Edit menu permanently deletes theselected text from the file without placing a copy of it in the Clipboard.
Searching and ReplacingThe Search menu offers several options for searching for and replacing text. These capabili-ties are most useful in long files.
From the Search menu, you can perform the following actions:
■ Find one or more occurrences of a designated text string
■ Replace one or more occurrences of a designated text string with a second text string
A text string is a sequence of one or more consecutive text characters. These characters canbe letters, digits, punctuation, or special symbols—any characters you can type from thekeyboard.
Finding or replacing text always involves a search string, which is simply the text stringbeing searched for. A search string can be a single character or, more likely, a word or sev-eral consecutive characters.
You cannot search for a string that spans two or more lines. The search string is confined toa group of characters on a single line. You can place some conditions on the search string,however. You can specify, for example, that the search not discriminate between upper- andlowercase letters.
The search begins at the cursor’s location and proceeds through the file. If the end of thefile is reached before the search string is found, the search continues at the top of the fileuntil the entire file has been traversed. Table 15.6 summarizes the three commands availablefrom the Search menu.
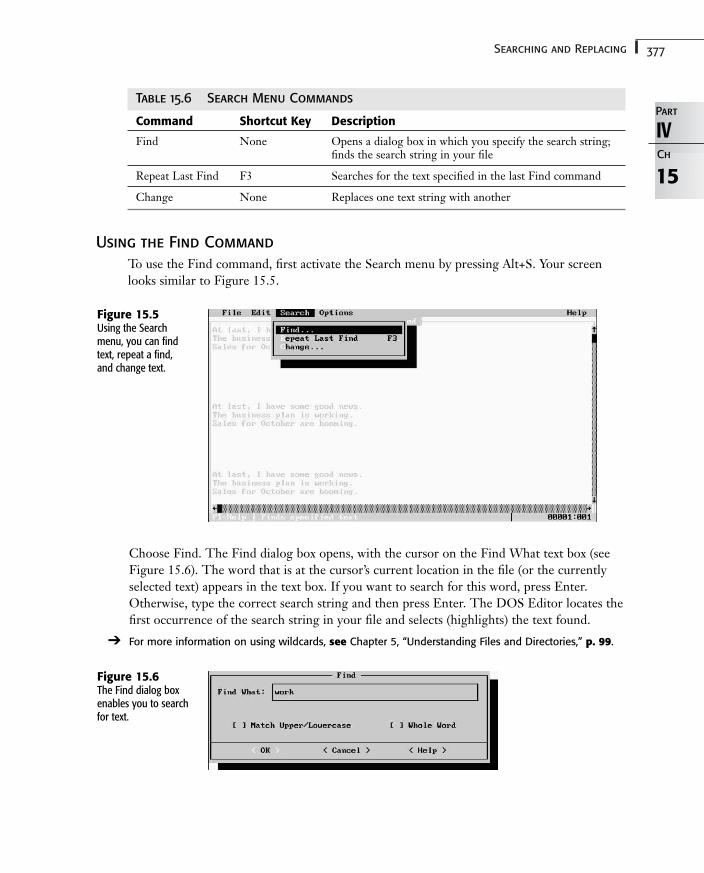
377Searching and Replacing
Table 15.6 Search Menu Commands
Command Shortcut Key Description
Find None Opens a dialog box in which you specify the search string;finds the search string in your file
Repeat Last Find F3 Searches for the text specified in the last Find command
Change None Replaces one text string with another
Using the Find Command
To use the Find command, first activate the Search menu by pressing Alt+S. Your screenlooks similar to Figure 15.5.
15
IVPart
Ch
Figure 15.5Using the Searchmenu, you can findtext, repeat a find,and change text.
Choose Find. The Find dialog box opens, with the cursor on the Find What text box (seeFigure 15.6). The word that is at the cursor’s current location in the file (or the currentlyselected text) appears in the text box. If you want to search for this word, press Enter.Otherwise, type the correct search string and then press Enter. The DOS Editor locates thefirst occurrence of the search string in your file and selects (highlights) the text found.
➔ For more information on using wildcards, see Chapter 5, “Understanding Files and Directories,” p. 99.
Figure 15.6The Find dialog boxenables you to searchfor text.
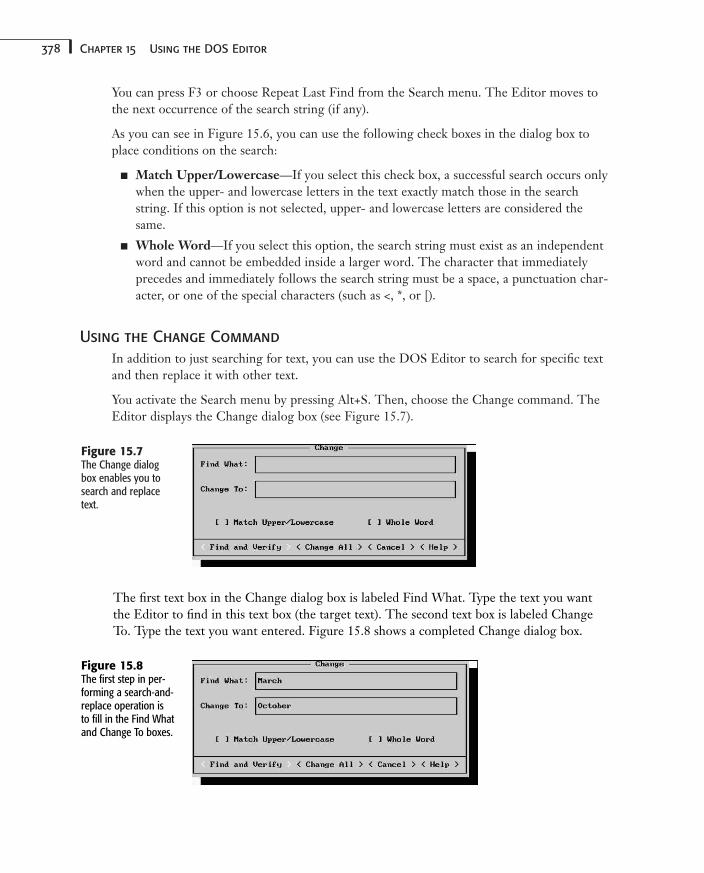
378 Chapter 15 Using the DOS Editor
You can press F3 or choose Repeat Last Find from the Search menu. The Editor moves tothe next occurrence of the search string (if any).
As you can see in Figure 15.6, you can use the following check boxes in the dialog box toplace conditions on the search:
■ Match Upper/Lowercase—If you select this check box, a successful search occurs onlywhen the upper- and lowercase letters in the text exactly match those in the searchstring. If this option is not selected, upper- and lowercase letters are considered thesame.
■ Whole Word—If you select this option, the search string must exist as an independentword and cannot be embedded inside a larger word. The character that immediatelyprecedes and immediately follows the search string must be a space, a punctuation char-acter, or one of the special characters (such as <, *, or [).
Using the Change Command
In addition to just searching for text, you can use the DOS Editor to search for specific textand then replace it with other text.
You activate the Search menu by pressing Alt+S. Then, choose the Change command. TheEditor displays the Change dialog box (see Figure 15.7).
Figure 15.7The Change dialogbox enables you tosearch and replacetext.
The first text box in the Change dialog box is labeled Find What. Type the text you wantthe Editor to find in this text box (the target text). The second text box is labeled ChangeTo. Type the text you want entered. Figure 15.8 shows a completed Change dialog box.
Figure 15.8The first step in per-forming a search-and-replace operation isto fill in the Find Whatand Change To boxes.
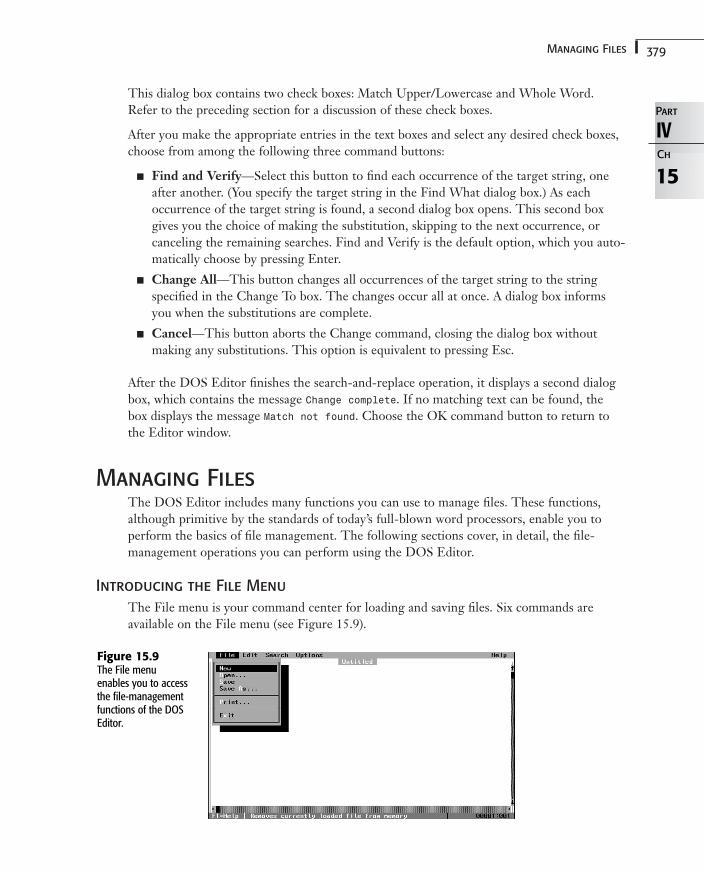
379Managing Files
This dialog box contains two check boxes: Match Upper/Lowercase and Whole Word.Refer to the preceding section for a discussion of these check boxes.
After you make the appropriate entries in the text boxes and select any desired check boxes,choose from among the following three command buttons:
■ Find and Verify—Select this button to find each occurrence of the target string, oneafter another. (You specify the target string in the Find What dialog box.) As eachoccurrence of the target string is found, a second dialog box opens. This second boxgives you the choice of making the substitution, skipping to the next occurrence, orcanceling the remaining searches. Find and Verify is the default option, which you auto-matically choose by pressing Enter.
■ Change All—This button changes all occurrences of the target string to the stringspecified in the Change To box. The changes occur all at once. A dialog box informsyou when the substitutions are complete.
■ Cancel—This button aborts the Change command, closing the dialog box withoutmaking any substitutions. This option is equivalent to pressing Esc.
After the DOS Editor finishes the search-and-replace operation, it displays a second dialogbox, which contains the message Change complete. If no matching text can be found, thebox displays the message Match not found. Choose the OK command button to return tothe Editor window.
Managing FilesThe DOS Editor includes many functions you can use to manage files. These functions,although primitive by the standards of today’s full-blown word processors, enable you toperform the basics of file management. The following sections cover, in detail, the file-management operations you can perform using the DOS Editor.
Introducing the File Menu
The File menu is your command center for loading and saving files. Six commands areavailable on the File menu (see Figure 15.9).
15
IVPart
Ch
Figure 15.9The File menuenables you to accessthe file-managementfunctions of the DOSEditor.
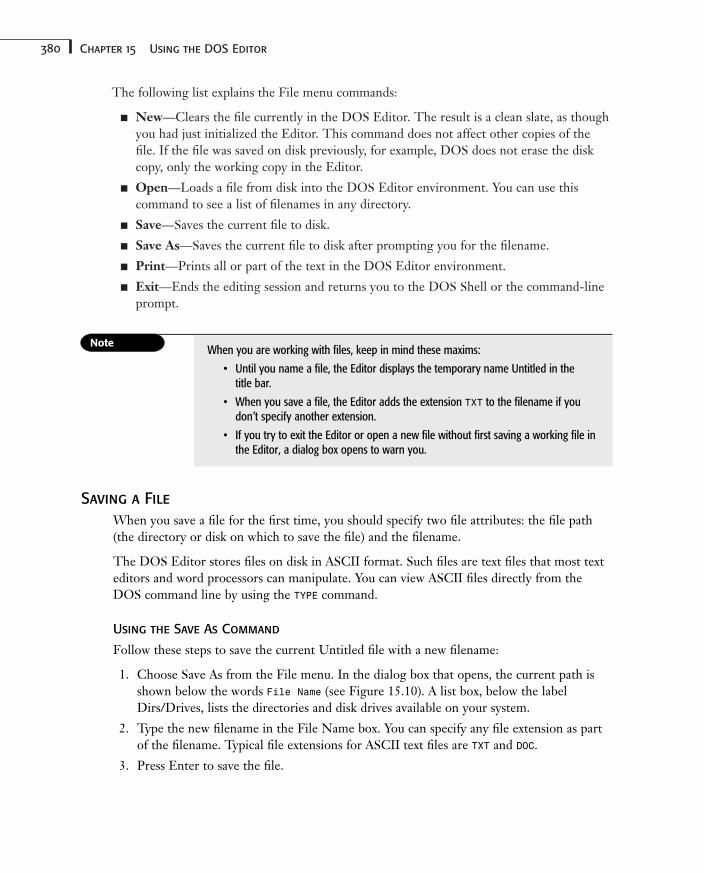
380 Chapter 15 Using the DOS Editor
The following list explains the File menu commands:
■ New—Clears the file currently in the DOS Editor. The result is a clean slate, as thoughyou had just initialized the Editor. This command does not affect other copies of thefile. If the file was saved on disk previously, for example, DOS does not erase the diskcopy, only the working copy in the Editor.
■ Open—Loads a file from disk into the DOS Editor environment. You can use thiscommand to see a list of filenames in any directory.
■ Save—Saves the current file to disk.
■ Save As—Saves the current file to disk after prompting you for the filename.
■ Print—Prints all or part of the text in the DOS Editor environment.
■ Exit—Ends the editing session and returns you to the DOS Shell or the command-lineprompt.
When you are working with files, keep in mind these maxims:
• Until you name a file, the Editor displays the temporary name Untitled in the title bar.
• When you save a file, the Editor adds the extension TXT to the filename if youdon’t specify another extension.
• If you try to exit the Editor or open a new file without first saving a working file inthe Editor, a dialog box opens to warn you.
Saving a File
When you save a file for the first time, you should specify two file attributes: the file path(the directory or disk on which to save the file) and the filename.
The DOS Editor stores files on disk in ASCII format. Such files are text files that most texteditors and word processors can manipulate. You can view ASCII files directly from theDOS command line by using the TYPE command.
Using the Save As Command
Follow these steps to save the current Untitled file with a new filename:
1. Choose Save As from the File menu. In the dialog box that opens, the current path isshown below the words File Name (see Figure 15.10). A list box, below the labelDirs/Drives, lists the directories and disk drives available on your system.
2. Type the new filename in the File Name box. You can specify any file extension as partof the filename. Typical file extensions for ASCII text files are TXT and DOC.
3. Press Enter to save the file.
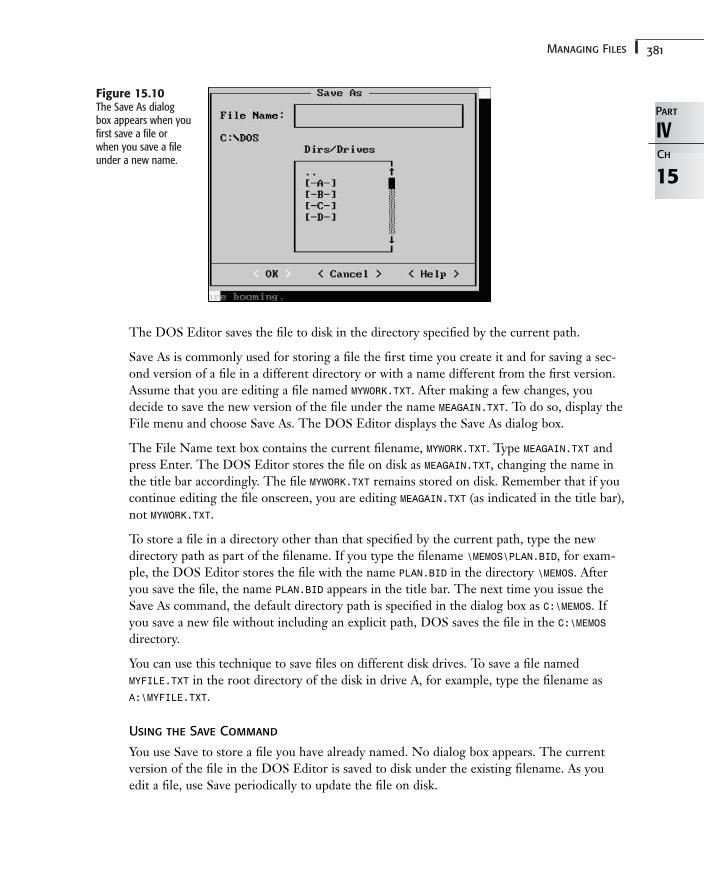
381Managing Files
Figure 15.10The Save As dialogbox appears when youfirst save a file orwhen you save a fileunder a new name.
15
IVPart
Ch
The DOS Editor saves the file to disk in the directory specified by the current path.
Save As is commonly used for storing a file the first time you create it and for saving a sec-ond version of a file in a different directory or with a name different from the first version.Assume that you are editing a file named MYWORK.TXT. After making a few changes, youdecide to save the new version of the file under the name MEAGAIN.TXT. To do so, display theFile menu and choose Save As. The DOS Editor displays the Save As dialog box.
The File Name text box contains the current filename, MYWORK.TXT. Type MEAGAIN.TXT andpress Enter. The DOS Editor stores the file on disk as MEAGAIN.TXT, changing the name inthe title bar accordingly. The file MYWORK.TXT remains stored on disk. Remember that if youcontinue editing the file onscreen, you are editing MEAGAIN.TXT (as indicated in the title bar),not MYWORK.TXT.
To store a file in a directory other than that specified by the current path, type the newdirectory path as part of the filename. If you type the filename \MEMOS\PLAN.BID, for exam-ple, the DOS Editor stores the file with the name PLAN.BID in the directory \MEMOS. Afteryou save the file, the name PLAN.BID appears in the title bar. The next time you issue theSave As command, the default directory path is specified in the dialog box as C:\MEMOS. Ifyou save a new file without including an explicit path, DOS saves the file in the C:\MEMOSdirectory.
You can use this technique to save files on different disk drives. To save a file namedMYFILE.TXT in the root directory of the disk in drive A, for example, type the filename asA:\MYFILE.TXT.
Using the Save Command
You use Save to store a file you have already named. No dialog box appears. The currentversion of the file in the DOS Editor is saved to disk under the existing filename. As youedit a file, use Save periodically to update the file on disk.
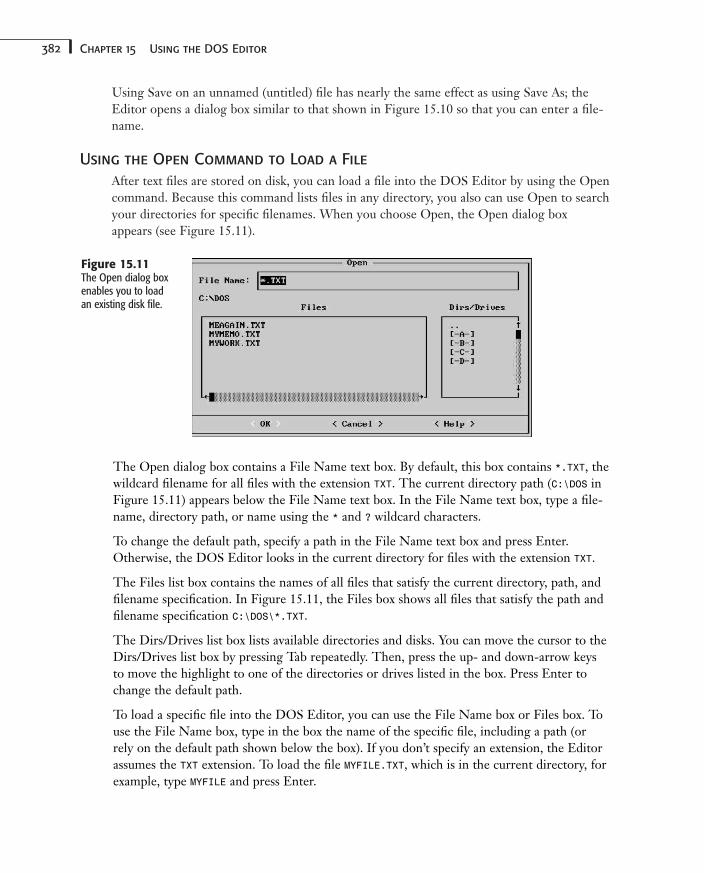
382 Chapter 15 Using the DOS Editor
Using Save on an unnamed (untitled) file has nearly the same effect as using Save As; theEditor opens a dialog box similar to that shown in Figure 15.10 so that you can enter a file-name.
Using the Open Command to Load a File
After text files are stored on disk, you can load a file into the DOS Editor by using the Opencommand. Because this command lists files in any directory, you also can use Open to searchyour directories for specific filenames. When you choose Open, the Open dialog boxappears (see Figure 15.11).
Figure 15.11The Open dialog boxenables you to loadan existing disk file.
The Open dialog box contains a File Name text box. By default, this box contains *.TXT, thewildcard filename for all files with the extension TXT. The current directory path (C:\DOS inFigure 15.11) appears below the File Name text box. In the File Name text box, type a file-name, directory path, or name using the * and ? wildcard characters.
To change the default path, specify a path in the File Name text box and press Enter.Otherwise, the DOS Editor looks in the current directory for files with the extension TXT.
The Files list box contains the names of all files that satisfy the current directory, path, andfilename specification. In Figure 15.11, the Files box shows all files that satisfy the path andfilename specification C:\DOS\*.TXT.
The Dirs/Drives list box lists available directories and disks. You can move the cursor to theDirs/Drives list box by pressing Tab repeatedly. Then, press the up- and down-arrow keysto move the highlight to one of the directories or drives listed in the box. Press Enter tochange the default path.
To load a specific file into the DOS Editor, you can use the File Name box or Files box. Touse the File Name box, type in the box the name of the specific file, including a path (orrely on the default path shown below the box). If you don’t specify an extension, the Editorassumes the TXT extension. To load the file MYFILE.TXT, which is in the current directory, forexample, type MYFILE and press Enter.
383Managing Files
You also can select a filename from the Files list box if it contains the filename you want.First, press Tab to move the cursor to the Files list box. Then, use the arrow keys to high-light the target filename. Alternatively, you can press the first letter of the filename to movethe highlight. When the name you want is highlighted, press Enter. The DOS Editor loadsthe file so that you can edit or view it.
Loading a File When You First Start the DOS Editor
You can load a file when you first start the DOS Editor. To do so, use the following syntax:
EDIT filename
filename is the name of the file you want to edit. Include the path if the file isn’t in the cur-rent directory. To start the Editor with the file \SALES\MYFILE.TXT loaded, for example, typethe following line:
EDIT \SALES\MYFILE.TXT
The following notes apply when you load a file when you start the DOS Editor:
■ The Editor does not assume the extension TXT or any other extension if you don’t spec-ify an extension as part of the filename.
■ The Editor initializes directly without taking the intermediate step of asking whetheryou want to see the help material in the onscreen Survival Guide.
■ If the Editor cannot locate the specified file, it assumes that you want to create a newfile with that name. Accordingly, the Editor initializes with a fresh slate that includesyour designated filename in the title bar. After you enter data into the file, you can saveit directly by using the Save command. (You don’t have to use Save As and specify thefilename a second time.)
Using the New Command
Use New when you want to stop work on one file and create a new file. If you haven’t savedthe old file, the DOS Editor opens a dialog box for confirmation. Otherwise, the old file iscleared, and the screen looks as though you had just initiated the Editor. You see a blankediting area with Untitled in the title bar.
Printing a File
Your computer system probably includes a printer. Whether you have a dot-matrix, inkjet,or laser printer, follow these steps to print a copy of the file currently loaded in the Editor.You can print selected text or the complete file.
1. Activate the File menu.
2. Choose Print to open the Print dialog box (see Figure 15.12).
15
IVPart
Ch
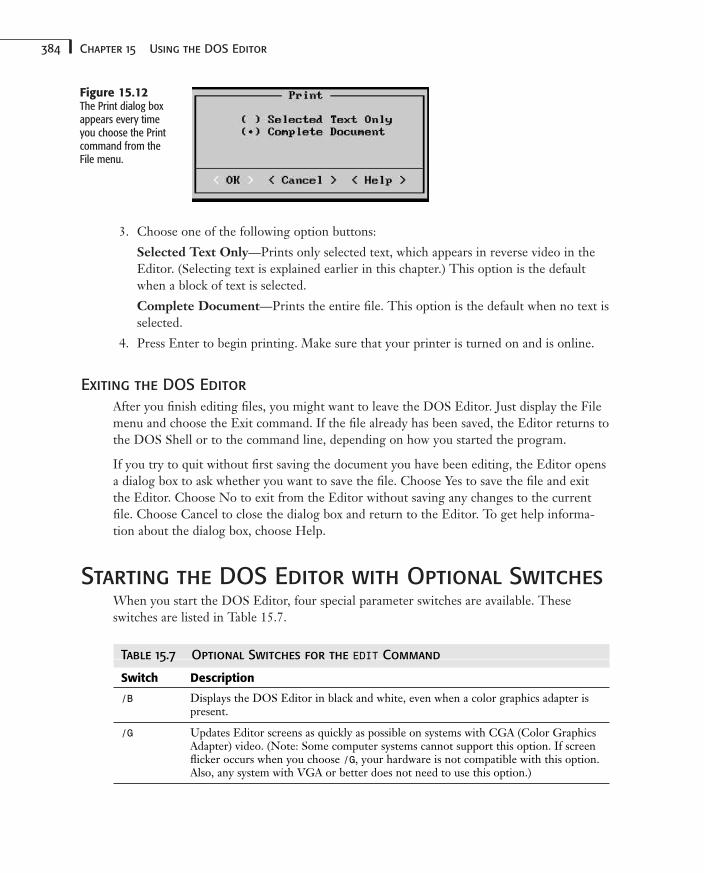
384 Chapter 15 Using the DOS Editor
Figure 15.12The Print dialog boxappears every timeyou choose the Printcommand from theFile menu.
3. Choose one of the following option buttons:
Selected Text Only—Prints only selected text, which appears in reverse video in theEditor. (Selecting text is explained earlier in this chapter.) This option is the defaultwhen a block of text is selected.
Complete Document—Prints the entire file. This option is the default when no text isselected.
4. Press Enter to begin printing. Make sure that your printer is turned on and is online.
Exiting the DOS Editor
After you finish editing files, you might want to leave the DOS Editor. Just display the Filemenu and choose the Exit command. If the file already has been saved, the Editor returns tothe DOS Shell or to the command line, depending on how you started the program.
If you try to quit without first saving the document you have been editing, the Editor opensa dialog box to ask whether you want to save the file. Choose Yes to save the file and exitthe Editor. Choose No to exit from the Editor without saving any changes to the currentfile. Choose Cancel to close the dialog box and return to the Editor. To get help informa-tion about the dialog box, choose Help.
Starting the DOS Editor with Optional SwitchesWhen you start the DOS Editor, four special parameter switches are available. Theseswitches are listed in Table 15.7.
Table 15.7 Optional Switches for the EDIT Command
Switch Description
/B Displays the DOS Editor in black and white, even when a color graphics adapter ispresent.
/G Updates Editor screens as quickly as possible on systems with CGA (Color GraphicsAdapter) video. (Note: Some computer systems cannot support this option. If screenflicker occurs when you choose /G, your hardware is not compatible with this option.Also, any system with VGA or better does not need to use this option.)
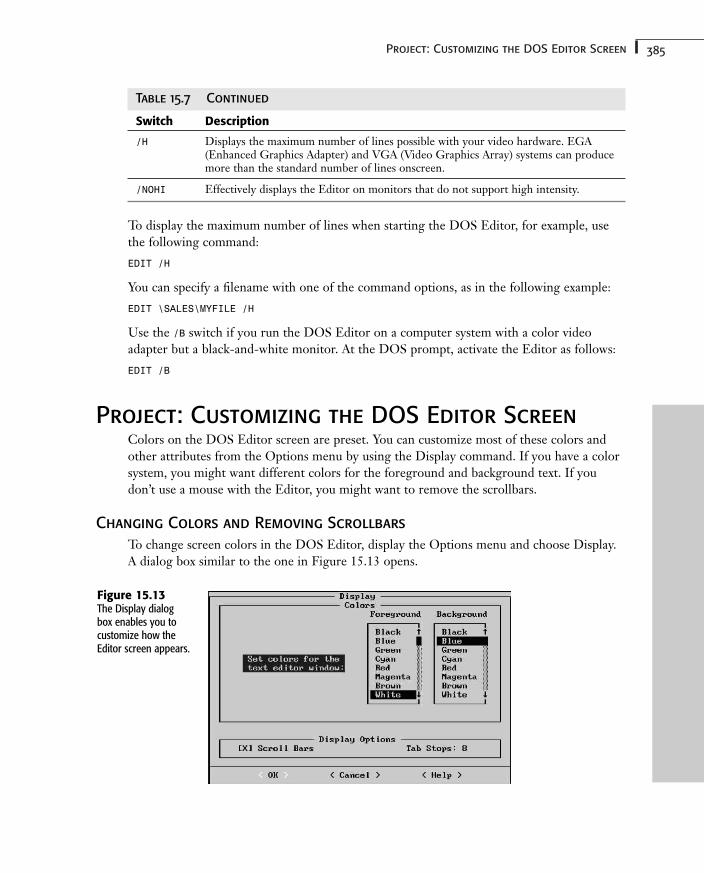
385Project: Customizing the DOS Editor Screen
Table 15.7 Continued
Switch Description
/H Displays the maximum number of lines possible with your video hardware. EGA(Enhanced Graphics Adapter) and VGA (Video Graphics Array) systems can producemore than the standard number of lines onscreen.
/NOHI Effectively displays the Editor on monitors that do not support high intensity.
To display the maximum number of lines when starting the DOS Editor, for example, usethe following command:
EDIT /H
You can specify a filename with one of the command options, as in the following example:
EDIT \SALES\MYFILE /H
Use the /B switch if you run the DOS Editor on a computer system with a color videoadapter but a black-and-white monitor. At the DOS prompt, activate the Editor as follows:
EDIT /B
Project: Customizing the DOS Editor ScreenColors on the DOS Editor screen are preset. You can customize most of these colors andother attributes from the Options menu by using the Display command. If you have a colorsystem, you might want different colors for the foreground and background text. If youdon’t use a mouse with the Editor, you might want to remove the scrollbars.
Changing Colors and Removing Scrollbars
To change screen colors in the DOS Editor, display the Options menu and choose Display.A dialog box similar to the one in Figure 15.13 opens.
Figure 15.13The Display dialogbox enables you tocustomize how theEditor screen appears.
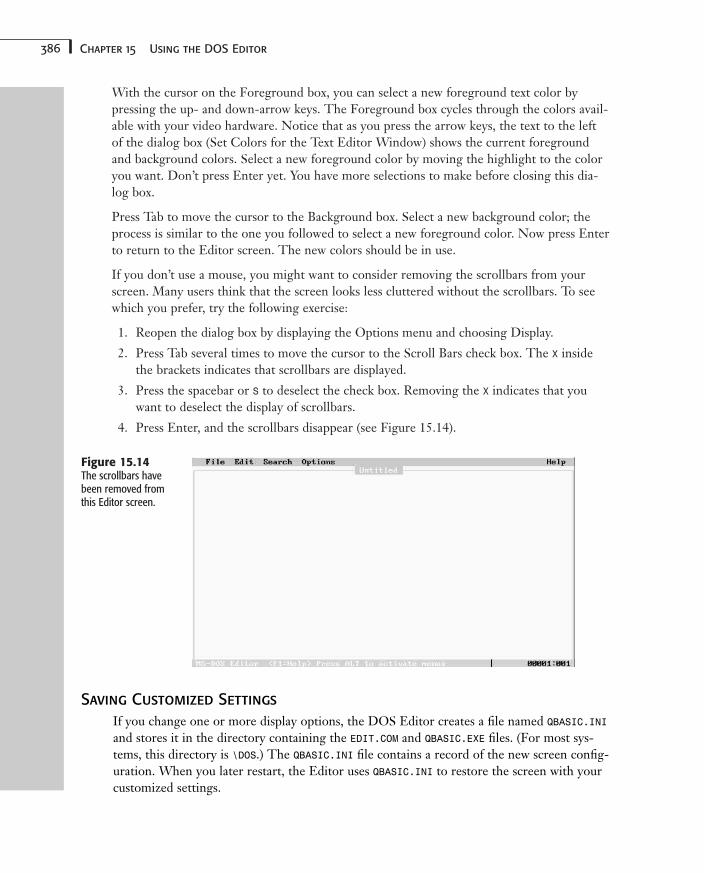
386 Chapter 15 Using the DOS Editor
With the cursor on the Foreground box, you can select a new foreground text color bypressing the up- and down-arrow keys. The Foreground box cycles through the colors avail-able with your video hardware. Notice that as you press the arrow keys, the text to the leftof the dialog box (Set Colors for the Text Editor Window) shows the current foregroundand background colors. Select a new foreground color by moving the highlight to the coloryou want. Don’t press Enter yet. You have more selections to make before closing this dia-log box.
Press Tab to move the cursor to the Background box. Select a new background color; theprocess is similar to the one you followed to select a new foreground color. Now press Enterto return to the Editor screen. The new colors should be in use.
If you don’t use a mouse, you might want to consider removing the scrollbars from yourscreen. Many users think that the screen looks less cluttered without the scrollbars. To seewhich you prefer, try the following exercise:
1. Reopen the dialog box by displaying the Options menu and choosing Display.
2. Press Tab several times to move the cursor to the Scroll Bars check box. The X insidethe brackets indicates that scrollbars are displayed.
3. Press the spacebar or S to deselect the check box. Removing the X indicates that youwant to deselect the display of scrollbars.
4. Press Enter, and the scrollbars disappear (see Figure 15.14).
Figure 15.14The scrollbars havebeen removed fromthis Editor screen.
Saving Customized Settings
If you change one or more display options, the DOS Editor creates a file named QBASIC.INIand stores it in the directory containing the EDIT.COM and QBASIC.EXE files. (For most sys-tems, this directory is \DOS.) The QBASIC.INI file contains a record of the new screen config-uration. When you later restart, the Editor uses QBASIC.INI to restore the screen with yourcustomized settings.

387Project: Customizing the DOS Editor Screen
Every time you start the Editor, it looks for QBASIC.INI in the default directory or in thedirectory chain established by the PATH statement in your AUTOEXEC.BAT file. If you restartfrom a different directory, be sure that the Editor has access to the QBASIC.INI file.
If you want to start the Editor with the original screen configuration, simply erase the QBASIC.INI file.
The DOS Editor “borrows” the programming editor from the QBASIC.EXE file. Thus, theDOS Editor shares the editing environment found in the QBasic programming language.Similarly, the DOS Editor and QBasic share the initial configuration file (QBASIC.INI).Whether you run the DOS Editor or QBasic, the initial configuration is saved in the QBASIC.INI file.
Using the Help System
The DOS Editor provides online help through the Help menu (see Figure 15.15). Helpscreens include information about menus and commands, shortcut keys, dialog boxes, key-board actions, and even about the help system itself.
Figure 15.15The Help menu helpsyou learn to use theDOS Editor.
Three categories of information are available from the Help menu:
■ Getting Started—Provides information about starting the Editor, using the menu andcommand system, and requesting help
■ Keyboard—Explains the different editing keystrokes and shortcuts for moving the cur-sor around your text file
■ About—Shows the Editor version number and copyright information
The following are general notes on using the Help system:
■ To activate the Help system at any time, press Alt+H.
■ To move the cursor to the next help topic, press Tab. When the cursor is on the topicyou want, press Enter to view the help screen.
388 Chapter 15 Using the DOS Editor
■ To activate the Getting Started help menu at any time, press Shift+F1.
■ To close a help window and exit the help system, press Esc.
■ A help screen opens in a separate window. The title bar of this window shows the helptopic on display. If you request help on the Save command from the File menu, forexample, the title bar of the help window reads HELP: Save command.
■ The F1 key provides express help. To get help on any menu, command, or dialog box,press F1 when the cursor or highlight is on the desired item.
■ For help when an error message occurs, move the cursor to the Help option in theerror message box and press Enter.
■ Sometime, at your leisure, consider browsing through all the help screens. To browse,press Shift+F1 and then press Ctrl+F1 repeatedly.
■ To scroll any particular help screen, press PgUp or PgDn.
■ When help is active, a separate help window opens in addition to the Editor window.You can move the cursor between the help and Editor windows by pressing F6 (orShift+F6).
■ When a help window and Editor window are open simultaneously, you can enlarge orreduce the size of the active window by pressing Alt+plus or Alt+minus. (Here, plus andminus refer to the + and – keys on the numeric keypad.)
■ To cut and paste text from a help screen into your file, first use the normal editing keysto select the text on the help screen. Copy the selected lines to the Clipboard. Press F6 to activate the Editor window and then, using the normal editing keys, paste thehelp text into your file. Now reactivate the help screen by pressing F6 again.
■ When the help system is active, as in all editing contexts, the status bar at the bottom ofthe screen displays useful keystrokes. If you want to execute a command shown enclosedin angle brackets, press the indicated keystroke or click the mouse when the mouse cur-sor is on the command name in the status bar.
■ The Editor keeps track of the last 20 help screens you have viewed. To cycle backthrough previously viewed screens, press Alt+F1.
■ When you start the Editor, the initial dialog box gives you the option of seeing theSurvival Guide. If you press Enter to see the Guide, the help system is activated. A helpscreen displays information about getting started with the Editor and using the helpsystem.
■ The Editor stores the text of the help screens in a file named EDIT.HLP. To display anyhelp screen, the Editor must have access to this file. The Editor searches for EDIT.HLPin the current directory or in directories specified by the PATH statement of yourAUTOEXEC.BAT file. Normal DOS installation automatically places this file in the default\DOS directory. If, for some reason, EDIT.HLP is located outside your PATH specifications,however, you can supply the Editor with the path to EDIT.HLP by choosing the HelpPath command from the Options menu.
Understanding Batch FilesIn this chapter
Introducing Batch Files 390
Understanding the Contents of Batch Files 391
Creating a Simple Batch File 392
Understanding Replaceable Parameters 393
Using Batch File Commands 397
Pausing for Input in a Batch File 404
Using FOR..IN..DO 407
Moving Parameters with SHIFT 409
Running Batch Files from Other Batch Files 411
16CHAPTER
390 Chapter 16 Understanding Batch Files
Introducing Batch FilesWhen you discover that you’re repeatedly performing a certain task on your computer, youshould look for a way to get the computer to do more of the work. Your computer can per-form most tasks faster than you can, and it doesn’t make mistakes.
DOS has always enabled you to automate your use of DOS commands by creating batch files.A batch file is a text (ASCII) file containing a series of commands that you want DOS toexecute. When you type the batch filename, DOS executes these commands in the orderthey occur within the batch file.
The idea of getting a computer to perform work in convenient, manageable batches pre-dates the personal computer by several years. The earliest computers were large and expen-sive, and they could do only one job at a time. But even these early machines were fast.Making them wait for keyboard input between jobs was inefficient.
Batch processing was developed to make computers more productive. Collections of tasks tobe carried out consecutively were put together offline—that is, without using the computer’sresources. The chunks, or batches, of tasks then were fed to the computer at a rate that keptthe computer busy and productive.
Today, computers are less expensive than human resources. Batch processing enables com-puters to carry out a series of tasks automatically so that people don’t have to waste timetyping frequently used or complex commands.
A batch file is a text file that contains a series of DOS commands. Most commands used inbatch files are familiar to you, having been explained in previous chapters of this book.Other commands, which control the flow of action during batch processing are available foruse only in batch files. DOS executes the commands in a batch file one line at a time, treat-ing each command as though you issued it individually.
You can use batch files to automate a DOS process. Using a set of commands in a batch file,you actually create a new, more powerful command. After a few experiments, you will findthis DOS feature quite handy.
Recognizing a batch file in a directory listing is easy; batch files always have the filenameextension BAT. You can execute a batch file by typing the filename at the DOS prompt andthen pressing Enter. To execute the batch file SAFE.BAT, for example, you type the followingat the DOS prompt and press Enter:
SAFE
COMMAND.COM looks in the current directory for a file named SAFE.COM, then SAFE.EXE, andfinally SAFE.BAT. After finding the file, it reads and executes the DOS commands the filecontains.
Batch files are useful for issuing frequently used commands whose parameters you havetrouble remembering. For example, you can run the Backup program by typing MSBACKUPand then selecting options from the program. But what if you have saved several sets of
391Understanding the Contents of Batch Files
options in setup files for different circumstances? You can create batch files to run MSBACKUPwith the proper setup file when you issue a simple command such as DAILYBAK.
Batch files can echo (display) messages that you designate. This text-display capability is useful for presenting instructions or reminders onscreen. You can compose messages thatdescribe how to execute a command or that contain syntax examples and reminders. Batchfiles also can use the TYPE command to display text from another file.
In some ways, batch files resemble computer programs. DOS has a host of special com-mands that are used primarily in batch files. Although you can type some of these com-mands at the DOS prompt, their main use is in batch files. These commands introduceflow-control and simple decision-making capabilities into a batch file.
Understanding the Contents of Batch FilesBatch files consist entirely of ASCII text characters. You can create batch files in the DOSEditor, in Edlin, and in nearly any other text-editing or word processing program. (If youuse a word processing program, you must use a setting that omits the special formatting andcontrol characters that many such programs use for internal purposes.)
The easiest way to create a short batch file, however, is to use the COPY command to redirectinput from the keyboard (the CON device) to a file (see Chapter 8, “Managing Your Files,” formore information).
When you create batch files, observe the following rules:
■ Batch files must be ASCII files. If you use a word processing program, be sure that theprogram saves the file without formatting characters.
■ The name of the batch file, which can be one to eight characters long, must conform toDOS’s filename rules. Make batch filenames meaningful so that they are easier toremember.
■ The filename must end with the BAT extension.
■ The filename cannot be the same as a program filename (a file with an EXE or COMextension).
■ The filename cannot be the same as an internal DOS command (such as COPY or DATE).
■ The batch file can contain any valid DOS commands that you can enter at the DOScommand line (for example – AUTOEXEC.BAT). (Typos cause errors.)
■ You can include in the batch file any program name you usually type at the DOS com-mand line. DOS executes the program as though you had entered its name at the com-mand line.
■ Use only one command or program name per line in the batch file. DOS executes batchfiles one line at a time.
16
IVPart
Ch

392 Chapter 16 Understanding Batch Files
You start a batch file by typing its filename (excluding the extension) at the DOS promptand then pressing Enter. The following list summarizes the rules DOS follows when it exe-cutes a batch file:
■ When DOS encounters a syntax error in a batch file’s command line, DOS displays anerror message, skips the incorrect command, and executes the remaining commands inthe batch file.
■ You can stop a batch file by pressing Ctrl+C or Ctrl+Break. DOS displays the followingprompt:Terminate batch job (Y/N)?
Type N to skip the current command (the one being carried out) and proceed to the nextcommand in the batch file. Type Y to abort execution of the batch file and return to theDOS prompt.
Creating a Simple Batch FileTasks consisting of the same series of commands are ideal candidates for batch files. Onetask that you might perform repetitively is copying and comparing files.
In this section, you create a simple batch file, using the COPY command to redirect inputfrom the keyboard (the CON device) to create an ASCII text file. (Remember that you alsocan use the DOS Editor, Edlin, or another text-editing or word processing program to cre-ate ASCII text files.)
Suppose that you often work with two spreadsheet files called SALES.WK1 and CUSTOMER.WK1.You frequently update these files and store them in the directory \STORE on drive C. Afteryou update the files, you normally copy them to a disk in drive A and compare the copies onthe floppy disk with the originals on the hard disk.
To begin creating a batch file that automates this process, type the following line at theDOS prompt and then press Enter:
COPY CON COPYCOMP.BAT
This COPY command redirects console (keyboard) input to the file COPYCOMP.BAT. After youpress Enter, DOS drops the cursor to the line below the DOS prompt at the left of thescreen and then waits for further instructions. Type the following three lines, pressing Enterafter each line:
@ECHO OFFCOPY C:\STORE A:FC C:\STORE A:/L
After you enter the last line in the file, press F6 or Ctrl+Z (both ways produce the characters^Z on the screen) to send a signal to DOS that the end of the file has been reached. Then,press Enter. DOS copies the three lines into a file named COPYCOMP.BAT and displays the fol-lowing message:
1 file(s) copied
393Understanding Replaceable Parameters
16
IVPart
Ch
When you use COPY CON to create a text file, check each line before pressing Enter. Youcan use Backspace and the DOS command-line editing keys (listed in Chapter 3, “UsingDOS Commands”) to edit the current line. After you press Enter, DOS moves the cursordown to the next line, and you cannot correct any errors in previous lines. You canabort the process without saving the file, however, by pressing Ctrl+C.
The first line of the COPYCOMP batch file, @ECHO OFF, instructs DOS not to display the batchfile’s commands as they are executed. In other words, when you run the batch file, you donot see the command lines themselves onscreen; you see only the results of their actions.The @ sign, just before the word ECHO, instructs DOS not to display that command line,either. Basically, all you need to remember is that @ stops display of the current line, whereasECHO OFF stops display of all subsequent lines.
The second line of COPYCOMP.BAT copies the desired files from their source location inC:\STORE to the destination root directory of drive A.
The final line of the batch file uses FC.EXE, an external DOS command that compares thecopied files with the originals. Although you can use the /V (verify) switch with COPY, usingFC is more thorough.
Now that the COPYCOMP.BAT batch file is complete, you can run the file by typing the follow-ing command at the DOS prompt and then pressing Enter:
COPYCOMP
DOS first copies the two files from the C:\STORE directory to drive A and then compares thecopies with the original files.
Understanding Replaceable ParametersThe batch files discussed so far in this chapter carry out exactly the same functions everytime you use them. You might want a particular batch file to operate on different files eachtime you use it, even though the commands in the batch file are fixed. When you usereplaceable parameters in a batch file, you can use the same commands to perform differenttasks.
You already know that a parameter is an additional instruction that defines the task a DOScommand will perform. When you type the name of the batch file at the DOS prompt, youcan include up to nine parameters. DOS assigns a variable name to each parameter, startingwith 1 and going up to 9. (DOS always assigns the variable name 0 to the name of the batchfile itself.)
You can use each variable in your batch file by preceding the variable name with the per-cent sign (%). This combination of the percent sign and variable name is called a replaceableparameter.
394 Chapter 16 Understanding Batch Files
When used in a batch file, each replaceable parameter, numbered %0 through %9, holds theplace for a parameter in one or more commands of a batch file so that you can provide theactual value of the parameter at the time you execute the batch file.
Consider the COPYCOMP.BAT batch file discussed earlier in this chapter:
@ECHO OFFCOPY C:\STORE A:FC C:\STORE A:/L
Each time you execute this batch file, it copies all files from the C:\STORE directory to driveA and then compares the files. Suppose that you want to make this batch file more versatileso that you can use it to copy and compare the files in any directory. To do so, revise COPYCOMP.BAT as follows:
@ECHO OFFCOPY %1 %2FC %1 %2 /L
Notice that %1 and %2 replace C:\STORE and A:, respectively. These parameters are thereplaceable parameters.
After making these changes in COPYCOMP.BAT, you can use the batch file to copy and comparethe files from any directory to any disk or directory. To copy and compare the files in the\SPREADSH\QPRO4DAT directory on drive C with the files on a disk in drive B, for example,type the following command and then press Enter:
COPYCOMP C:\SPREADSH\QPRO4DAT B:
DOS copies all files from C:\SPREADSH\QPRO4DAT to the disk in drive B and then comparesthe original files with the copies to ensure that the copy procedure was effective.
To see how DOS replaces the parameters, create a batch file called TEST1.BAT that containsthe following single line:
@ECHO %0 %1 %2 %3 %4 %5 %6 %7 %8 %9
After you create this file, type TEST1, followed by one space. Then, type your first name, lastname, street address, city, state, ZIP Code, and age, with each entry separated by spaces.Then, press Enter. Your screen should look similar to the following:
C\:>TEST1 DAVID SMITH 1234 PINE STREET ANYTOWN IN 46032 39TEST1 DAVID SMITH 1234 PINE STREET ANYTOWN IN 46032 39C\:>
The batch file command instructs DOS to display the parameters 0 through 9. In the preceding example, these parameters are the following:
Parameter Word
%0 TEST1
%1 DAVID
%2 SMITH
%3 1234
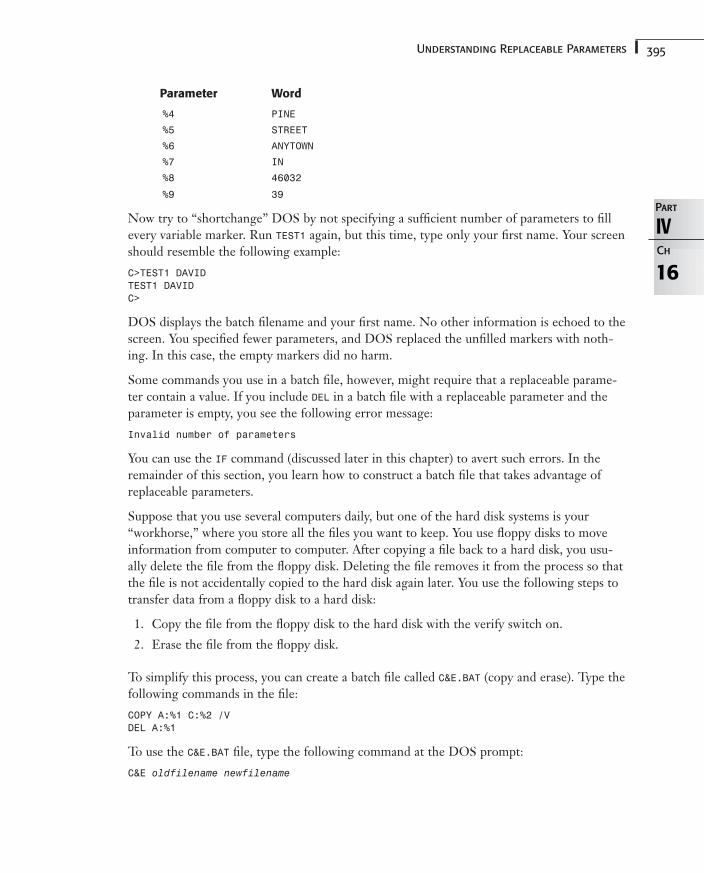
395Understanding Replaceable Parameters
Parameter Word
%4 PINE
%5 STREET
%6 ANYTOWN
%7 IN
%8 46032
%9 39
Now try to “shortchange” DOS by not specifying a sufficient number of parameters to fillevery variable marker. Run TEST1 again, but this time, type only your first name. Your screenshould resemble the following example:
C>TEST1 DAVIDTEST1 DAVIDC>
DOS displays the batch filename and your first name. No other information is echoed to thescreen. You specified fewer parameters, and DOS replaced the unfilled markers with noth-ing. In this case, the empty markers did no harm.
Some commands you use in a batch file, however, might require that a replaceable parame-ter contain a value. If you include DEL in a batch file with a replaceable parameter and theparameter is empty, you see the following error message:
Invalid number of parameters
You can use the IF command (discussed later in this chapter) to avert such errors. In theremainder of this section, you learn how to construct a batch file that takes advantage ofreplaceable parameters.
Suppose that you use several computers daily, but one of the hard disk systems is your“workhorse,” where you store all the files you want to keep. You use floppy disks to moveinformation from computer to computer. After copying a file back to a hard disk, you usu-ally delete the file from the floppy disk. Deleting the file removes it from the process so thatthe file is not accidentally copied to the hard disk again later. You use the following steps totransfer data from a floppy disk to a hard disk:
1. Copy the file from the floppy disk to the hard disk with the verify switch on.
2. Erase the file from the floppy disk.
To simplify this process, you can create a batch file called C&E.BAT (copy and erase). Type thefollowing commands in the file:
COPY A:%1 C:%2 /VDEL A:%1
To use the C&E.BAT file, type the following command at the DOS prompt:
C&E oldfilename newfilename
16
IVPart
Ch
396 Chapter 16 Understanding Batch Files
The first parameter, oldfilename, represents the name of the file you want to copy from thefloppy disk to the hard disk; newfilename is the new name for the copied file (if you want tochange the filename as the file is being copied).
Suppose that you put a disk containing the file NOTES.TXT into drive A and want to copy thefile to the hard disk. Type the following command at the DOS prompt:
C&E NOTES.TXT
The screen appears as follows:
C>COPY A:NOTES.TXT C: /V1 file(s) copiedC>DEL A:NOTES.TXTC>
Notice that even though you didn’t type the parameter newfilename, DOS carried out thebatch file, keeping the same filename during the copy. DOS copied NOTES.TXT from drive Ato drive C and then deleted the file on the disk in drive A. The %2 parameter was dropped,and the file did not get a new name during the copy operation.
One benefit of creating a batch file that copies a file using parameters is that you can use apathname as the second parameter. By specifying a pathname, you can copy the file from thefloppy disk to a different directory on the hard disk. To copy NOTES.TXT to the WORDS direc-tory, for example, type the following command:
C&E NOTES.TXT \WORDS
The screen display is as follows:
C>COPY A:NOTES.TXT C:\WORDS /V1 file(s) copiedC>DEL A:NOTES.TXTC>
Because \WORDS is a directory name, DOS copies the file NOTES.TXT into the directory\WORDS, following the rules of syntax for the COPY command. The batch file takes advantageof these syntax rules.
Time to LearnPatience and persistence are important in understanding batch files. Many PC users who tried to avoid usingbatch files finally experimented with one or two examples; these users picked up the concept rapidly and nowproduce batch files that anyone would be proud to have created. Give yourself a chance to learn batch files bycompleting the exercises in this chapter. You can use the sample batch files as templates and apply them tospecific situations. When you learn how to compose batch files, you have harnessed one of DOS’s most power-ful features.
Even if you don’t regularly create your own batch files, you can use your knowledge of batchfile principles. Many programs are started by batch files rather than by the name of theactual program file. With your knowledge of batch files, you can use the TYPE command todisplay the contents of any batch file so that you can see what the batch operation is doing.
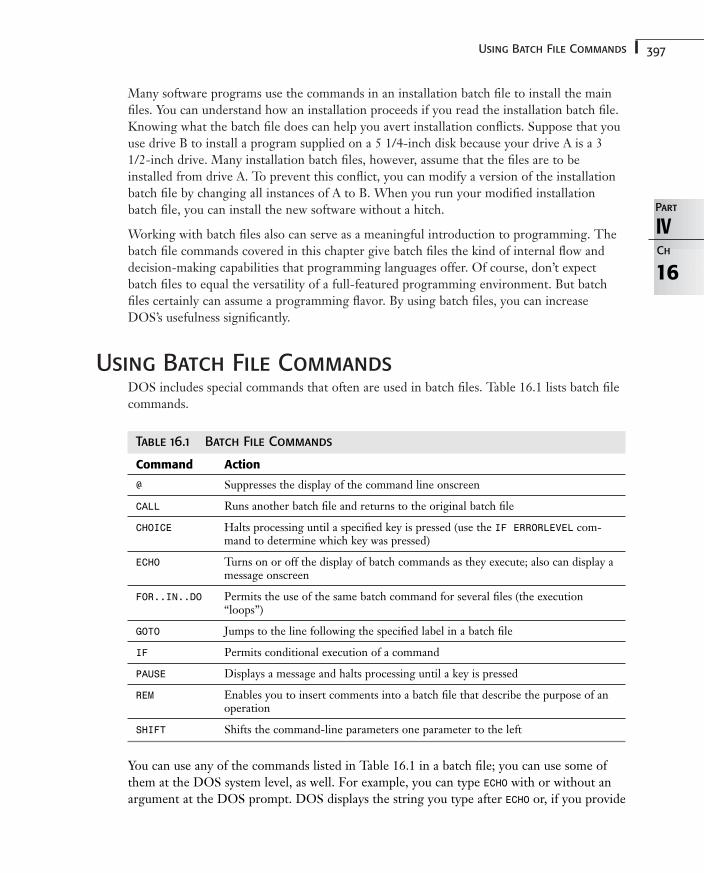
397Using Batch File Commands
Many software programs use the commands in an installation batch file to install the mainfiles. You can understand how an installation proceeds if you read the installation batch file.Knowing what the batch file does can help you avert installation conflicts. Suppose that youuse drive B to install a program supplied on a 5 1/4-inch disk because your drive A is a 31/2-inch drive. Many installation batch files, however, assume that the files are to beinstalled from drive A. To prevent this conflict, you can modify a version of the installationbatch file by changing all instances of A to B. When you run your modified installationbatch file, you can install the new software without a hitch.
Working with batch files also can serve as a meaningful introduction to programming. Thebatch file commands covered in this chapter give batch files the kind of internal flow anddecision-making capabilities that programming languages offer. Of course, don’t expectbatch files to equal the versatility of a full-featured programming environment. But batchfiles certainly can assume a programming flavor. By using batch files, you can increaseDOS’s usefulness significantly.
Using Batch File CommandsDOS includes special commands that often are used in batch files. Table 16.1 lists batch filecommands.
Table 16.1 Batch File Commands
Command Action
@ Suppresses the display of the command line onscreen
CALL Runs another batch file and returns to the original batch file
CHOICE Halts processing until a specified key is pressed (use the IF ERRORLEVEL com-mand to determine which key was pressed)
ECHO Turns on or off the display of batch commands as they execute; also can display amessage onscreen
FOR..IN..DO Permits the use of the same batch command for several files (the execution“loops”)
GOTO Jumps to the line following the specified label in a batch file
IF Permits conditional execution of a command
PAUSE Displays a message and halts processing until a key is pressed
REM Enables you to insert comments into a batch file that describe the purpose of anoperation
SHIFT Shifts the command-line parameters one parameter to the left
You can use any of the commands listed in Table 16.1 in a batch file; you can use some ofthem at the DOS system level, as well. For example, you can type ECHO with or without anargument at the DOS prompt. DOS displays the string you type after ECHO or, if you provide
16
IVPart
Ch
398 Chapter 16 Understanding Batch Files
no argument, tells you whether echo is on or off. If you type PAUSE at the DOS prompt,DOS displays the following message and waits for a keystroke:
Press any key to continue
Although these two commands are not very useful at the DOS prompt, the FOR..IN..DOcommand structure can be quite useful at the operating-system level to carry out repetitivecommands (see “Using FOR..IN..DO” later in this chapter).
The following sections explain the batch commands and their uses.
Displaying Messages and Inserting Comments
You already have had an introduction to the ECHO command earlier in this chapter. Thiscommand does two things: ECHO ON and ECHO OFF turn on and off the display of lines frombatch files as commands are executed, and ECHO also displays messages.
ECHO can display a message up to 122 characters long (the 127-character DOS command-line limit, minus the length of the ECHO command and an additional space).
You can use REM (which stands for remark) in a batch file to remind you what the batch filedoes. When you review a batch file some time after you create it, you might no longerremember why you used certain commands or why you constructed the batch file in a par-ticular way. Leave reminders in your batch file by using REM statements, which don’t appearonscreen when echo is off. The REM comments make the batch file self-documenting, a fea-ture that you and other users will appreciate later.
The REM function is an important feature to use when you’re writing batch files. It is agood idea to include remarks with every section in a batch file explaining what the sec-tion is doing, such as copying a file from one location to another. These remarks helpexplain how the batch file works if others need to modify it.
Another important use of the REM function is to comment out a line in a batch file with-out actually deleting it. This can prove very useful during troubleshooting problems in abatch file.
If you want the batch file to display particular messages, use ECHO. Messages set with ECHOappear onscreen whether or not you set ECHO OFF. To insert a blank line between messages,type a period (but no space) after the ECHO command, as follows:
ECHO.
Branching with GOTO
When you run a batch file, DOS normally processes commands one line at a time, from thebeginning of the batch file to the end. When you use the GOTO command, however, you canchange the order in which DOS executes batch commands by instructing DOS to branch toa specific line in the file.
399Using Batch File Commands
The syntax of GOTO is as follows:
GOTO label
The GOTO command uses label to specify the place in the file to which DOS should branch.A batch file label is a separate line that is not a command, per se. A label consists of a colonfollowed by one to eight characters. The label name can be longer than eight characters, butDOS reads only the first eight characters.
When DOS encounters a GOTO command in the batch file, it starts at the beginning of thebatch file and searches for a label matching the one specified by GOTO. DOS then branches tothe batch file line following the label.
Consider the following batch file, LOOP.BAT. This file is similar to the TEST.BAT batch fileyou created previously, with the addition of the GOTO and PAUSE commands:
@ECHO OFF:LOOP
@ECHO Hello, %1PAUSE
GOTO LOOP
To test the batch file, type the following and press Enter:
LOOP DAVID
The screen shows the following message:
Hello, DAVIDPress any key to continue_
The batch file begins by echoing Hello, DAVID and then waits for you to press a key. Afteryou press a key, DOS again displays the following message:
Hello, DAVIDPress any key to continue_
When you press a key again, DOS executes the GOTO LOOP command, causing execution ofthe batch file to return to the line labeled :LOOP at the beginning of the file. DOS again dis-plays the message and pauses.
This batch file is an example of what programmers call an infinite loop. The program neverstops on its own. To abort the batch file, you must press Ctrl+C or Ctrl+Break.
This simple example illustrates the operation of GOTO. You seldom will create infinite loopson purpose, but you should be able to use the GOTO command to control the order in whichDOS executes batch file commands.
Using the IF Command
The IF command is a “test-and-do” command. When a given condition is true, the IF com-mand executes a stated action. When the given condition is false, IF skips the action. If youare familiar with programming languages, such as BASIC, you should recognize the DOS IFcommand.
16
IVPart
Ch

400 Chapter 16 Understanding Batch Files
The IF command tests the following three conditions:
■ The ERRORLEVEL of a program
■ Whether a string is equal to another string
■ Whether a file exists
The following sections explain these tests.
Using IF to Test ERRORLEVEL
The first condition that IF can test is ERRORLEVEL. The proper syntax for testing the ERROR-LEVEL is as follows:
IF NOT ERRORLEVEL number command
ERRORLEVEL is a code left by a program when it finishes executing. A better name for thiscondition might be “exit level.” This form of the IF command determines whether the valueof ERRORLEVEL is greater than or equal to a number specified in the number parameter.Conversely, by adding the optional word NOT, you can determine whether the value ofERRORLEVEL is not greater than or equal to the value of the number parameter. If the specifiedcondition is true, DOS executes the command specified in the command parameter.Otherwise, DOS skips to the next line in the batch file without executing the command.
The only DOS commands that leave an ERRORLEVEL (exit) code are BACKUP, DISKCOMP,DISKCOPY, FORMAT, GRAFTABL, KEYB, REPLACE, RESTORE, and XCOPY. Many other programs gener-ate exit codes, however.
An exit code of zero (0) usually indicates that the command was successful. Any numbergreater than 0 usually indicates that something went wrong when the program executed.The following exit codes, for example, are generated by the DISKCOPY command:
Code Meaning
0 The operation was successful.
1 A read/write error that did not terminate the disk-copy operationoccurred.
2 The user pressed Ctrl+C.
3 A “fatal” read/write error occurred and terminated the copy procedurebefore it was completed.
4 An initialization error occurred.
An IF command in a batch file enables you to test for the exit code generated by a DOScommand or program to determine whether the command or program worked properly.
When you use ERRORLEVEL to test exit codes, DOS tests whether the code is equal to orgreater than the specified number. If the exit code is equal to or greater than the number,DOS executes the command parameter. If the code does not meet the condition, DOS skips
401Using Batch File Commands
the command parameter and executes the next command in the batch file. You can think ofthis condition as a BASIC-like statement, as follows:
IF exit code >= number THEN do command
The IF ERRORLEVEL command is most useful with the CHOICE command (see “Pausing forInput in a Batch File” later in this chapter). When your batch file uses this utility, the filecan pause for keyboard input. The utility puts a value in ERRORLEVEL related to the keypressed. You then can make your batch file branch or perform some other task based on thekey pressed. A batch file otherwise does not accept keyboard input except when the input isprovided on a batch-file command line.
Suppose that you want to create a batch file named DCOPY.BAT that makes disk copies in yourdrive A, using the DISKCOPY command and the verify switch. If the disk-copy procedure ter-minates before completion, you want the batch file to inform you of the cause.
➔ For more information about making copies of disks, see “Copying Entire Disks with DISKCOPY,” p. 210.
Create a batch file named DCOPY.BAT that contains the following lines:
@ECHO OFFDISKCOPY A: A: /VIF ERRORLEVEL 4 GOTO INIT_ERRIF ERRORLEVEL 3 GOTO FATL_ERRIF ERRORLEVEL 2 GOTO CTRL+CIF ERRORLEVEL 1 GOTO NON_FATLECHO DISKCOPY successful and verified!GOTO END:INIT_ERR
ECHO Initialization error!GOTO END
:FATL_ERRECHO Fatal error! DISKCOPY stopped!GOTO END
:CTRL+CECHO Someone pressed Ctrl+C!GOTO END
:NON-FATLECHO A non-fatal error occurred. Check data!
:END
To run this batch file, type DCOPY at the command line and then press Enter. DOS displaysthe following message:
Insert SOURCE diskette in drive A:Press any key to continue_
When you press a key, DOS begins the disk-copy procedure. After the DISKCOPY commandin the batch file executes, the batch file runs through a series of IF ERRORLEVEL tests. Basedon what you already know, these tests are in descending order (4 to 1) because ERRORLEVELconsiders any number equal to or greater than the specified number to be a match. Thus, ifyou were to check for 1 first, 4 would also be a match, and you would never get to theproper test.
16
IVPart
Ch
402 Chapter 16 Understanding Batch Files
First, the batch file tests for an initialization error (exit code = 4). If the exit code equals oris greater than 4, DOS skips to the line labeled :INIT_ERR. If the exit code is 3, execution ofthe batch file skips to the :FATL_ERR label. The batch file branches to the :CTRL_C label if anexit code of 2 is detected, and to the :NON_FATL label when the exit code is 1.
Finally, if no errors are detected by the series of IF ERRORLEVEL commands, the batch filedisplays the following message:
DISKCOPY successful and verified!
Using IF to Compare Strings
The second use for the IF command is to test whether string 1 equals string 2. The syntaxof the batch command is as follows:
IF NOT string1==string2 command
This form of the IF command determines whether the first character string, string1, is thesame group of characters as string2. Usually, one string is a replaceable parameter. If thetwo strings are identical, this condition is true and DOS executes the command specified inthe command parameter. Otherwise, DOS skips to the next line in the batch file withoutexecuting the command. By adding NOT to the IF command, you can test for the conditionwhen the two strings are not the same.
Assume that you want to create a batch file named DAYBACK.BAT that backs up your hard diskeach day of the week. On Fridays, you want the batch file to perform a complete backup.On Mondays through Thursdays, you want the batch file to perform an incremental backup.Use the DOS Editor or another text editor to create the following batch file:
@ECHO OFFCLSIF “%1”==”” GOTO TRY_AGAINIF %1==FRI GOTO FULLIF %1==MON GOTO ADDIF %1==TUE GOTO ADDIF %1==WED GOTO ADDIF %1==THU GOTO ADD:TRY_AGAIN
ECHO Try again! Type DAYBACK and day of week (MON-FRI).GOTO END
:FULLECHO Insert first disk of backup set.PAUSEC:CD \BACKUP C: A: /SGOTO END
:ADDECHO Insert last disk of backup set.PAUSEC:CD \BACKUP C: A: /S/M/A
:END
403Using Batch File Commands
To run this batch file, type DAYBACK, followed by the three-letter abbreviation for the day ofthe week (MON, TUE, WED, THU, or FRI), and then press Enter.
The first IF command in DAYBACK.BAT checks to make sure that you have typed the day ofthe week. If you don’t provide enough parameters with the IF command, DOS replaces thereplaceable parameter with a null value. (In batch files, null values must be enclosed in quo-tation marks to prevent a syntax error.)
The remaining IF commands determine whether you typed FRI or another day of the week.If you type FRI, the batch file branches to the :FULL label and performs a full backup. If youtyped MON through THU, the file jumps to the :ADD label and performs an additive incrementalbackup. If you typed anything else, the batch file instructs you to try again.
16
IVPart
Ch
The :END label often is used to mark the end of the batch file. In the preceding batchfile, execution branches to the :END label after a full backup, after an incrementalbackup, or after you are instructed to try again. When you use this technique, DOS exe-cutes only a portion of the batch file each time you run it, skipping the portions of thebatch file that don’t apply. Because the :END label is the last line in the batch file, thebatch file ends at that point.
In the DAYBACK.BAT example, the replaceable parameter in the first IF command is enclosedin quotation marks because programmers commonly use quotation marks to delimit charac-ter strings. Actually, a comparison with any letter, number, or symbol can do the job. Onecommon procedure is to use a single period instead of quotation marks, as shown in the fol-lowing example:
IF %1. == . GOTO TRY_AGAIN
If you don’t enter a parameter for %1, DOS interprets the line as follows:
IF . == . GOTO TRY_AGAIN
Use the syntax that is easiest for you to remember and understand.
If %1 equals nothing, DOS branches to the line following the label TRY_AGAIN and displays amessage. If %1 equals something other than nothing, DOS does not branch to TRY_AGAIN;instead, it executes the second IF command in the batch file, which tests whether you typedDAYBACK FRI, and so on. Notice that GOTO statements are used to jump around the parts ofthe batch file that DOS should not execute.
When you use the IF command, DOS compares strings literally. Uppercase characters aredifferent from lowercase characters. For example, say you run DAYBACK by typing this com-mand:
DAYBACK Fri
DOS compares Fri with the uppercase FRI and decides that the two strings are not thesame. The IF test fails, and DOS does not perform the backup operation.
404 Chapter 16 Understanding Batch Files
Using IF to Look for Files
The third type of IF command tests whether a given file is on disk. The syntax for this formof the IF command is as follows:
IF NOT EXIST filename command
This form of the IF command determines whether the file specified in the filename parame-ter exists on your computer’s disk (or doesn’t exist, if you add NOT). If the file does exist, theIF command executes the command specified in the command parameter.
You can use IF EXIST when you start a word processing program. Perhaps you use a filecalled TEMP.TXT to store temporary files or write blocks that are to be read into other docu-ments. You can use IF EXIST to test for the existence of the file and erase the file if it doesexist.
Your batch file, called WORD.BAT, would look like the following example:
@ECHO OFFCLSCD \DOCUMENTIF EXIST TEMP.TXT DEL TEMP.TXTCD WORDSWPCD \
This batch file turns off ECHO and clears the screen. The current directory changes to \DOCUMENT—the directory where you store your word processing documents.
Next, the IF command tests for the existence of TEMP.TXT. If the file does exist, DOS deletesthe file. Finally, DOS starts your word processing program from the \WORDS subdirectory.
Notice the last line of the batch file: CD \. When your word processing program starts, thebatch file is suspended temporarily. After you quit your word processing program, the batchfile regains control. The batch file then executes its last line, CD \, which changes back tothe root directory. The batch file ends.
Pausing for Input in a Batch FileBefore DOS 6.0, the only way to effect the execution of a batch file after the file started wasto press Ctrl+C or Ctrl+Break. These key combinations enabled you to cancel a single com-mand or end the entire operation. Starting with DOS 6.0, you are provided a means of tem-porarily halting the execution of a batch file and accepting limited user input. You can usethis feature to decide whether to process certain commands, to branch to a different part of a batch file, or even to present a menu and accept any of a series of choices.
To employ this capability, you use the CHOICE command. The command’s syntax is as follows:
CHOICE /C:choices /N /S /T:c,nn message
405Pausing for Input in a Batch File
Following are explanations of the components of this command:
■ /C:choices lists the keys that can be pressed. If you don’t specify choices, the default is YN.
■ /N prevents the display of acceptable keys at the end of the prompt.
■ /S instructs CHOICE to pay attention to the case of the key pressed; this feature enablesyou to use Y and y for different choices.
■ /T:c,nn causes CHOICE to act as though you pressed the key represented by c if youdon’t make a choice within nn seconds.
■ message is the optional prompt to display.
You respond to the key pressed by using a series of IF ERRORLEVEL commands. By default,the choices are Y and N. Y has the ERRORLEVEL code 2, and N has the ERRORLEVEL code 1.
Making a Two-Way Choice
If you don’t specify which keys should be pressed, CHOICE assumes Y and N, and adds [Y,N]?to the end of whatever message you choose to include. This feature is extremely useful ifyou want to decide whether to load a certain program when your computer starts. Forexample, you might type the following commands near the end of your AUTOEXEC.BAT file:
CHOICE Back up hard diskIF ERRORLEVEL 2 MSBACKUP
When the AUTOEXEC.BAT file reaches the first line, DOS displays the following message:
Back up hard disk[Y,N]?
If you have not yet backed up your hard disk today, you type Y, which generates the ERRORLEVEL code 2. DOS then executes the MSBACKUP program. If you have backed up yourhard disk, type N. You need not test for this code, however, because it’s the only other alter-native. DOS then executes any commands following these lines in AUTOEXEC.BAT, butMSBACKUP doesn’t run.
Creating a Simple Menu
Because you can specify any keys as choices, you can use CHOICE to create a simple menu,using the /C:choices parameter to specify the keys to be pressed. You might use a commandsuch as the following:
CHOICE /c:swd Load Spreadsheet, Word Processor, or Database Manager
DOS displays the following message:
Load Spreadsheet, Word Processor, or Database Manager[S,W,D]?
The ERRORLEVEL codes for the specified keys read from left to right. Thus, pressing D gener-ates a code 3; pressing W, a code 2; and pressing S, a code 1. These exit codes are thenprocessed by batch file lines such as the following:
IF ERRORLEVEL 3 DBIF ERRORLEVEL 2 WPIF ERRORLEVEL 1 SS
16
IVPart
Ch
406 Chapter 16 Understanding Batch Files
This assumes that your database program is named DB, your word processor is named WP, and your spreadsheet is named SS. There is a problem with this, however. The IFERRORLEVEL command automatically assumes that all numbers higher than the one specifiedalso are true. If you type D, for example, DOS loads your word processing program as soonas you exit from your database manager and your spreadsheet program as soon as you exitfrom your word processing program.
You can deal with this situation in either of two ways. One way is to add a second commandthat changes the flow of execution. Your file would have to resemble the following example:
CHOICE /C:swd Load Spreadsheet, Word Processor, or Database ManagerIF ERRORLEVEL 3 DBIF ERRORLEVEL 3 GOTO ENDIF ERRORLEVEL 2 WPIF ERRORLEVEL 2 GOTO ENDIF ERRORLEVEL 1 SS:END
The second way to deal with the limitation of the ERRORLEVEL directive is to have each testexecute a batch file instead of a program. (After you pass control to a second batch file, DOSdoes not return to the original file unless you use CALL or COMMAND /C.) For this command towork properly, the batch files must appear either in the current directory or in a directory inthe path that precedes the directories containing the programs.
Always give a user a way to get out of a command without choosing any of the profferedalternatives. The user, of course, can break out of the CHOICE command by pressing Ctrl+Cor Ctrl+Break. But you also can include a third alternative, such as Quit, as shown in thefollowing example:
CHOICE /C:YNQ Back up hard diskIF ERRORLEVEL 3 GOTO ENDIF ERRORLEVEL 2 GOTO ENDIF ERRORLEVEL 1 MSBACKUPother commands:END
Creating a Simple Display Menu
You can use the other switches provided with CHOICE to create a display menu. You createtext to explain the choices and suppress the display of characters at the end of the optionalmessage. You might create a batch file called MENU.BAT and type the following commands:
@ECHO OFFCLSECHO;ECHO;ECHO Press S to load SpreadsheetECHO Press W to load Word ProcessorECHO Press D to load Database ManagerECHO Press Q to quitECHO;CHOICE /C:SWDQ /N /T:Q,10 Your choice?IF ERRORLEVEL 4 GOTO ENDIF ERRORLEVEL 3 GOTO DB

407Using FOR..IN..DO
IF ERRORLEVEL 2 GOTO WPECHO Loading spreadsheet program_SSGOTO END
:WPECHO Loading word processing program_WPGOTO END
:DBECHO Loading database management program_DB
:END
Notice that no ERRORLEVEL choice is available for times the user presses S (the ERRORLEVELwould be 1) because there is no need to branch in this case. Instead, execution of the batchfile falls through to the first line after the last ERRORLEVEL statement, which is the commandfor the spreadsheet section.
When you type the MENU command, DOS clears the screen and displays the following message:
Press S to load SpreadsheetPress W to load Word ProcessorPress D to load Database ManagerPress Q to quitYour choice?
If no key is pressed within 10 seconds, the CHOICE command issues a Q, and the DOSprompt returns.
You can construct very elaborate menus by using the ASCII box-drawing characters, ANSIEscape sequences (to establish colors), and the CHOICE command.
➔ For a discussion of the uses of ANSI.SYS, see Chapter 17, “Understanding ANSI.SYS,” p. 415.
Using FOR..IN..DOFOR..IN..DO is an unusual and extremely powerful batch command. The command’s syntaxis as follows:
FOR %%variable IN (set) DO command
variable is a one-letter name that takes on the value of each item in set. You can use thiscommand from the DOS prompt as well as within a batch file. When you use the commandat the DOS prompt, however, use only one percent sign (%) instead of two (%%) in front ofvariable. You must use two percent signs in a batch file so that DOS does not confusevariable with a replaceable parameter.
The set parameter is the list of items, commands, or disk files whose value you want vari-able to take. You can use wildcard filenames with this parameter. You also can use drivenames and paths with any filenames you specify. If you have more than one item in the set,use a space or comma between the names.
The command parameter is any valid DOS command that you want to perform for each itemin set.
16
IVPart
Ch
408 Chapter 16 Understanding Batch Files
Using a FOR..IN..DO Batch File
An interesting example of the use of FOR..IN..DO is a batch file that compares filenamesfound on a disk in drive A with the filenames found on another disk and then produces a listof the files on both disks. Create the batch file CHECKIT.BAT, entering the following lines:
@ECHO OFFCLSIF “%1”==”” GOTO ENDFOR %%a IN (B: C: D: E: b: c: d: e:) DO IF “%%a”==”%1” GOTO COMPAREECHO Syntax error: You must specify a disk to compare.ECHO Be sure to leave a space before directory.GOTO END:COMPARE
%1IF “%2”==”” GOTO SKIPCD %2
:SKIPECHO The following files are on both disks:FOR %%a IN (*.*) DO IF EXIST A:%%a ECHO %%a
:END
Insert into drive A the disk that you want to compare and then use the following syntax:
CHECKIT drive directory
drive is the drive that contains the other disk that you want to compare, and directory isthe directory that you want to compare. This batch file substitutes the drive you specify for%1 in the batch file commands and substitutes any directory you specify for %2. The direc-tory is optional; if you specify a drive and directory, separate their names with a space.Otherwise, the batch file treats the drive and directory as one replaceable parameter (%1). Ifyou don’t specify a directory name, DOS compares the current directory of the drive withthe current directory of the disk in drive A.
Suppose that you want to compare the list of files in drive A with the list of files in the\GAMES directory in drive B. Type the following command at the command line:
CHECKIT B: \GAMES
The batch file determines which files in the \GAMES directory of the disk in drive B also areon the current directory of the disk in drive A.
When the CHECKIT batch file is called, DOS first determines whether %1 is empty. (%1 isempty if you typed no drive letter or directory after CHECKIT in the command line.) If %1 isempty, the batch file displays an error message, branches to the end of the file, and quitswithout performing a comparison.
If you specify a disk drive, DOS goes to the third line of the batch file and determines whetherthe drive letter is a valid drive letter. In this batch file, valid drive letters are B, C, D, E, b, c, d,and e. If no valid drive letter is found, or if you don’t include a colon (:) and space after thedrive letter, the batch file displays a message and branches to the end of the batch file.
If you specified a valid drive, CHECKIT branches to the :COMPARE section of the program.When executing the first line in this section, DOS logs on to the drive you specified in the
409Moving Parameters with SHIFT
command line (the drive designation replaces %1 in the batch file). The batch file determineswhether you included a directory parameter; if you did include this parameter, DOS changesto that directory.
Finally, the batch file displays a message and then looks at all the filenames in the currentdirectory to see whether a file with the same name exists in drive A. For every match found,the batch file lists the filename.
Using FOR..IN..DO at the DOS Prompt
You might find that you want to issue commands such as the ones in CHECKIT at the DOSprompt. Instead of using the batch file for the preceding example, you can change subdirec-tories manually and then type the FOR..IN..DO line (the line that does all the work in thebatch file) at the DOS prompt. If you do use FOR..IN..DO outside a batch file, DOS requiresthat you enter only one percent sign.
Using FOR..IN..DO with Other Commands
FOR..IN..DO works as well with commands as with filenames. Instead of naming a set of files,you can name a series of commands that you want DOS to carry out. Consider the follow-ing example:
FOR %%a IN (COPY DEL) DO %%a C:*.*
In a batch file, this line first copies all the files on drive C to the current directory and thenerases the files from drive C. Instead of specifying the drive and file, you can use a replace-able parameter in the line, as follows:
FOR %%a IN (COPY DEL) DO %%a %1
To use this batch file, you first must change to the destination directory (for example,D:\BAK). When you invoke this version of the batch file, you type the names of the files thatyou want to copy and remove. If you name the batch file MOVER.BAT, you can type the fol-lowing command to invoke the file:
MOVER C:\WP
MOVER.BAT copies all the files in the subdirectory C:\WP to D:\BAK and then erases the files inC:\WP. This file works much like the C&E.BAT file you created earlier in this chapter.
Moving Parameters with SHIFTThe SHIFT command moves the parameters in the command line that invoked the batch file;each parameter moves one parameter to the left. SHIFT tricks DOS into accepting more than9 replaceable parameters (10 if you include the batch filename, which is %0). The diagramof SHIFT is as follows:
%0 ←%1 ←%2 ←%3 ←%4 ←%5...↓
bit bucket
16
IVPart
Ch
410 Chapter 16 Understanding Batch Files
In this diagram, parameter 0 is dropped. The old parameter 1 becomes parameter 0. The oldparameter 2 becomes parameter 1; parameter 3 becomes 2; parameter 4 becomes 3; and soon. A command-line parameter that previously was 10th in line and not assigned a param-eter number now becomes parameter 9.
The following batch file, SHIFTIT.BAT, is a simple example of the use of the SHIFT command:
@ECHO OFFCLS:STARTECHO %0 %1 %2 %3 %4 %5 %6 %7 %8 %9SHIFTPAUSEIF NOT “%0”==”” GOTO START
Suppose that you type the following text:
SHIFTIT A B C D E F G H I J K L M N O P Q R S T U V W X Y Z
The screen shows the following message:
SHIFTIT A B C D E F G H IPress any key to continue_
Notice that the batch filename is displayed because %0 holds the name of the batch file.Press a key to continue; DOS now displays the following message:
A B C D E F G H I JPress any key to continue_
In this case, the filename has been dropped into the bit bucket. %0 now equals A. All theparameters have shifted one to the left. Each time you press a key to continue, SHIFT contin-ues moving down the list of parameters you typed. When the leftmost parameter (%0) isempty, the batch file ends.
SHIFT has many uses. You can use it to build a new version of the C&E.BAT file you createdearlier in this chapter. The following modified version of the copy-and-erase batch file,called MOVE.BAT, shows a use for SHIFT:
@ECHO OFFCLS:LOOPCOPY %1 /VERASE %1SHIFTIF NOT “%1” == “” GOTO LOOP
This batch file copies and erases the specified file or files. The batch file assumes nothingabout the files to be copied; you can specify a disk drive, path, and filename. The batch filecopies the files to the current directory and then erases the files from the original disk ordirectory.
The last two lines shift the parameters to the left, determine whether any parametersremain, and then repeat the operation if necessary.
411Running Batch Files from Other Batch Files
Running Batch Files from Other Batch FilesOn some occasions, you might want to run a batch file from another batch file. Runningbatch files from within batch files is particularly useful when you want to create a menubatch file that can start several different programs.
The following sections discuss three ways to run batch files from other batch files. Onemethod is a one-way transfer of control. The other two methods involve running a secondbatch file and returning control to the first batch file. These techniques are useful if you wantto build menus with batch files or use one batch file to set up and start another batch file.
Shifting Control Permanently to Another Batch File
The first method of calling a second batch file is simple: Include the root name of the sec-ond batch file as a line in the first batch file. The first batch file runs the second batch file asthough you had typed the second batch file’s root name at the DOS prompt.
To run BATCH2.BAT, for example, include in BATCH1.BAT the following line:
BATCH2
DOS loads and executes BATCH2.BAT. Control passes in only one direction: from the firstbatch file to the second. When BATCH2.BAT finishes executing, DOS displays the systemprompt. Control goes to the second file but doesn’t come back to the first file.
Calling a Batch File and Returning Using CALL
After your batch file is debugged, you can use the CALL statement to run a batch file andthen return to the original one. The syntax of the CALL command is as follows:
CALL filename parameters
filename is the root name of the batch file. When you type the CALL command, you canspecify any parameters that you want to pass to the batch file you are calling. You can placethe CALL command anywhere in the first batch file.
When DOS executes a CALL command, DOS temporarily shifts execution to the called batchfile. As soon as the called batch file is completed, DOS returns to the first batch file andcontinues execution with the line immediately following the CALL command.
The following three batch files demonstrate how CALL works:
BATCH1.BAT
@ECHO OFFCLSREM This file does the setup work forREM demonstrating the CALL command.ECHO This is the STARTUP batch fileECHO The command parameters are %%0-%0 %%1-%1CALL batch2 secondECHO MEM from %0MEMECHO Done!
16
IVPart
Ch
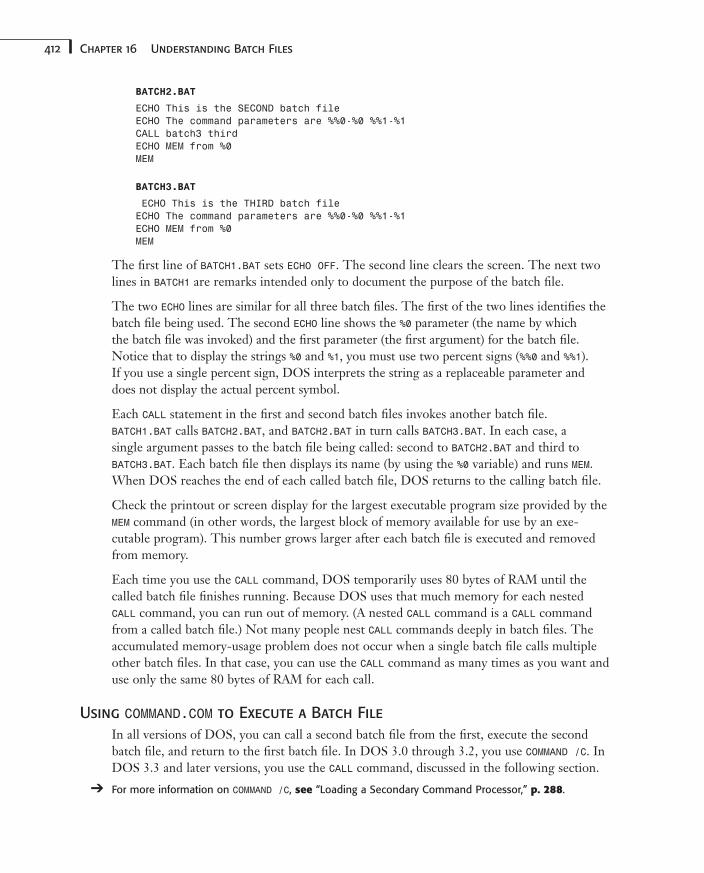
412 Chapter 16 Understanding Batch Files
BATCH2.BAT
ECHO This is the SECOND batch fileECHO The command parameters are %%0-%0 %%1-%1CALL batch3 thirdECHO MEM from %0MEM
BATCH3.BAT
ECHO This is the THIRD batch fileECHO The command parameters are %%0-%0 %%1-%1ECHO MEM from %0MEM
The first line of BATCH1.BAT sets ECHO OFF. The second line clears the screen. The next twolines in BATCH1 are remarks intended only to document the purpose of the batch file.
The two ECHO lines are similar for all three batch files. The first of the two lines identifies thebatch file being used. The second ECHO line shows the %0 parameter (the name by which the batch file was invoked) and the first parameter (the first argument) for the batch file.Notice that to display the strings %0 and %1, you must use two percent signs (%%0 and %%1). If you use a single percent sign, DOS interprets the string as a replaceable parameter anddoes not display the actual percent symbol.
Each CALL statement in the first and second batch files invokes another batch file.BATCH1.BAT calls BATCH2.BAT, and BATCH2.BAT in turn calls BATCH3.BAT. In each case, a single argument passes to the batch file being called: second to BATCH2.BAT and third toBATCH3.BAT. Each batch file then displays its name (by using the %0 variable) and runs MEM.When DOS reaches the end of each called batch file, DOS returns to the calling batch file.
Check the printout or screen display for the largest executable program size provided by theMEM command (in other words, the largest block of memory available for use by an exe-cutable program). This number grows larger after each batch file is executed and removedfrom memory.
Each time you use the CALL command, DOS temporarily uses 80 bytes of RAM until thecalled batch file finishes running. Because DOS uses that much memory for each nestedCALL command, you can run out of memory. (A nested CALL command is a CALL commandfrom a called batch file.) Not many people nest CALL commands deeply in batch files. Theaccumulated memory-usage problem does not occur when a single batch file calls multipleother batch files. In that case, you can use the CALL command as many times as you want anduse only the same 80 bytes of RAM for each call.
Using COMMAND.COM to Execute a Batch File
In all versions of DOS, you can call a second batch file from the first, execute the secondbatch file, and return to the first batch file. In DOS 3.0 through 3.2, you use COMMAND /C. InDOS 3.3 and later versions, you use the CALL command, discussed in the following section.
➔ For more information on COMMAND /C, see “Loading a Secondary Command Processor,” p. 288.
413Running Batch Files from Other Batch Files
Although it might appear at first glance that you no longer need to use the COMMAND.COMmethod of running a batch file, beginning with DOS 6.2 there is a compelling new reason.That is, with DOS 6.2, you can use COMMAND.COM’s /Y switch, in conjunction with /C, to single-step through a batch file. Suppose you execute the following command line:
COMMAND /Y /C NEW.BAT
When you do so, DOS loads a copy of the command processor and executes NEW.BAT. As itexecutes, each line in the batch file is displayed, and you are asked whether you want to exe-cute it. You use this same process when you interactively execute the AUTOEXEC.BAT file, asdescribed in Chapter 2, “Starting DOS.”
This interactive execution capability is a great debugging tool for complex batch files. Whenthe entire batch file is through running, DOS exits the command processor and returns tothe original batch file.
16
IVPart
Ch

Understanding ANSI.SYSIn this chapter
What Is ANSI.SYS? 416
Installing ANSI.SYS 416
Using ANSI.SYS 416
Controlling Your Screen with ANSI.SYS 419
Customizing Your Keyboard with ANSI.SYS 423
ANSI Control Codes 425
17CHAPTER
416 Chapter 17 Understanding ANSI.SYS
What Is ANSI.SYS?The term ANSI refers to the American National Standards Institute. ANSI is one of severalsets of computer standards established by the institute to specify the codes that computermanufacturers can use to control video displays and keyboard mapping.
ANSI.SYS is a device driver, which means that it gives DOS additional control of the screenand keyboard devices beyond the control features built into the operating system. You useANSI.SYS to enhance the functions of your video screen and keyboard. With ANSI.SYS, youcan set screen colors, use graphics, and specify other video attributes. You can provide thatpersonal touch to your DOS prompt. You even can change the assignments of keys on yourkeyboard.
The ANSI.SYS file supplied with MS-DOS contains a subset of the ANSI standards. Third-party suppliers of other ANSI.SYS files might include more features in their versions of thisfile, but those features are not necessary for most users.
Installing ANSI.SYSThe only way you can install the ANSI.SYS driver is to include it in your CONFIG.SYS file.The format of the line must be one of the following:
DEVICE = C:\DOS\ANSI.SYS /X /K /R
DEVICEHIGH = C:\DOS\ANSI.SYS /X /K /R
The /X switch enables you to remap extended keys if you are using a 101-key keyboard. The/K switch treats 101-key keyboards as if they were 84-key keyboards, ignoring extendedkeys. The /R switch slows screen scrolling for improved readability.
The /X and /K switches are mutually exclusive because you cannot define a 101-key and84-key keyboard at the same time.
When you install MS-DOS on your computer, DOS places the ANSI.SYS file in the \DOSsubdirectory. If ANSI.SYS is located in the root directory of your boot drive, you don’t haveto include its drive and directory name in the command line. If you placed the ANSI.SYS filein another directory or on another drive, however, be sure that you specify the exact loca-tion of ANSI.SYS in the CONFIG.SYS statement.
In the following sections, you will learn how to use the ANSI.SYS driver and take advantageof its features.
Using ANSI.SYSYou must place the ANSI.SYS command in the CONFIG.SYS file to load the driver and rebootthe system so that the new configuration takes effect, you must issue commands that tellDOS to use the ANSI features.
417Using ANSI.SYS
IVPart
Ch
17
Because some software is written to use ANSI codes, one or more of your programs mightrequire that ANSI.SYS be loaded. The installation procedure for this type of software notifiesyou of this requirement. (The program might even install the command in the CONFIG.SYSfile for you.)
You can activate ANSI.SYS features also by issuing the ANSI commands yourself. However,you cannot simply type the commands at the DOS prompt; you must enter an Escapesequence. All ANSI.SYS sequences begin with the Escape character (ASCII value 27), fol-lowed by a left bracket ([). If you type this sequence at the prompt, DOS understands theEscape character to be a command to cancel the current operation; DOS cancels the opera-tion, displays a backslash (\), and moves the cursor down to the next line.
If ANSI.SYS codes are not included in a program, you can send these codes to DOS in threeways: by executing a batch file, by typing a text file (that is, by using the DOS TYPE com-mand), or by including the codes in a PROMPT command. When you embed ANSI codes inEscape sequences, the ANSI.SYS device driver intercepts the codes and executes the appro-priate commands, ignoring any characters that are not preceded by the proper codes.
You can create a text file or batch file or set up your PROMPT format in the AUTOEXEC.BAT fileby using the MS-DOS editor (EDIT) or another text editor. Whatever utility you use must becapable of entering the Escape character, which is beyond the capability of many word pro-cessing programs and older text editors.
To enter the Escape character while using EDIT, hold down the Ctrl key, press P, and thenpress Esc.
➔ For information on using EDIT, see Chapter 15, “Using the DOS Editor,” p. 361.
Some text editors display the Escape character as ^[. Because the ANSI code sequencerequires a left bracket after the Escape character, the ANSI sequence might appear as ^[[.
Issuing ANSI.SYS Codes in Batch Files
The key to using ANSI.SYS is to have the Escape sequences sent to the display screen. Thisprocedure is the only way to ensure that the device driver properly intercepts and executesthe commands. Batch files send these sequences to the screen through the ECHO command,which tells DOS to display all commands on the screen.
➔ For more information on batch files, see Chapter 16, “Understanding Batch Files,” p. 389.
By default, ECHO is set ON unless you explicitly issue an ECHO OFF command. If you douse ECHO OFF, any ANSI code line you enter thereafter must begin with the ECHOcommand.
Suppose that you want to use a batch file to set up formatting for a double-density disk(360KB) in a 5 1/4-inch high-density (1.2MB) drive. You use EDIT to create the batch file
418 Chapter 17 Understanding ANSI.SYS
containing the instruction for the special effect, such as changing the color of the screen.Entering the following batch file and giving it the name NEWDISK.BAT do the trick:
@ECHO OFFECHO <Esc>[37;41mECHO THIS FUNCTION FORMATS DOUBLE DENSITY DISKETTES (360K) IN DRIVE A:FORMAT A: /F:360ECHO <Esc>[37;40m
The first line in the batch file tells DOS not to display any of the commands in the batchfile unless specifically instructed to do so through the ECHO command. The leading character(@) instructs DOS not to display the ECHO OFF command.
The second line is an ANSI.SYS code sequence that sets the color of the screen (red, withwhite characters). Replace <Esc> with the actual Escape code (ASCII value 27). The ANSIcode 37 produces a white foreground; 41 is the ANSI code for a red background. The char-acter m indicates that screen attribute codes are being issued. The last line of the batch fileresets the screen to white on black—the default setting. (Make sure that you use the lower-case character m in the ANSI.SYS Escape sequences.)
If you have a monochrome monitor, you can substitute 7m for 37;41m in the second lineof the batch file. The code 7 tells ANSI.SYS to set reverse video. If you use 7m instead of37;41m, substitute 0m for 37;40m in the last line to set the screen back to normal.
To see why you must use the ECHO command in the ANSI Escape sequence, remove the ECHOcommand from the last line of the batch file, and then run the file again. The ECHO com-mand is required to pass the codes to the display. If it is not available, DOS informs you thatit received a bad command or filename, and the screen color does not change to normal.
Issuing ANSI.SYS Codes in Text Files
Issuing ANSI codes in text files is similar to using the codes in batch files, except that youdo not use an ECHO command in a text file. Also, for the commands to take effect, you mustuse the TYPE command to pass the codes to the display for DOS to execute. To look at asample text file, create a SCREEN.TXT file that contains the following line:
<Esc>[37;41m
After you create and save this file, you can change the screen to red with white characters byentering the following command at the DOS prompt:
TYPE SCREEN.TXT
ANSI.SYS intercepts the characters of the file when being sent to the screen with the TYPEcommand. The Escape sequence, followed by the bracket, causes the device driver to exe-cute the ANSI commands instead of passing the characters through to DOS. Your screen isnow red with white characters.
419Controlling Your Screen with ANSI.SYS
You can return your screen to normal as follows. In the same way that you createdSCREEN.TXT, create NORMAL.TXT with the following single line:
<Esc>[37;40M
After you enter this line, save the file. At the DOS prompt, enter the following to returnyour screen to normal:
TYPE NORMAL.TXT
Issuing ANSI.SYS Codes with the PROMPT Command
The third way to issue ANSI.SYS instructions is to include these instructions in a PROMPTcommand. You learned about the PROMPT command in Chapter 11, “Controlling YourEnvironment.” In short, the PROMPT command alters the way the DOS prompt appears. Thenormal syntax of the command is as follows:
PROMPT string
The string consists of a set of characters that might or might not include an ANSI Escapesequence. The characters you enter tell DOS how you want the DOS prompt to look. Forfull information on the characters you can use with the command, refer to Chapter 11. Thissection focuses on using the ANSI sequences with the PROMPT command.
To add more pizzazz to your DOS prompt, you can add color, as outlined in the followingexamples. If you have a color monitor, enter the following command, using nine spaces forthe nine periods:
PROMPT $E[1;37;44mTime: $T$H$H$H$H$H$H.........$E[40m$E[K$_$E[1;44mDate:➥ $D$E[0;40m$E[K$_[DOS 6.2] $P$G
The display shows the time and date in bright white text on a blue background, returning tonormal white on black for the prompt.
If you have a monochrome monitor, enter the following command, using nine spaces for thenine periods:
PROMPT $E[7mTime: $T$H$H$H$H$H$H.........$E[0m$E[K$_$E[7mDate:➥$D$E[0m$E[K$_[DOS 6.2] $P$G
The display now shows the time and date in black characters on a white background, return-ing to normal white on black for the prompt.
As the inclusion of [DOS 6.2] in these two examples indicates, you also can display a mes-sage in the DOS prompt. (The brackets are included for cosmetic purposes only. They arenot required.) Be creative. Beam me up, Scotty; The BRAIN; USA Forever; and BOOM! are afew examples of DOS users’ humor and imagination.
Controlling Your Screen with ANSI.SYSNow that you understand how to issue ANSI.SYS commands in batch files, in text files, andas part of a PROMPT command, you’re ready to use ANSI.SYS commands to control and cus-tomize your screen display.
IVPart
Ch
17
420 Chapter 17 Understanding ANSI.SYS
All ANSI screen commands begin with the normal Escape code and a left bracket ([) andend with a letter of the alphabet. The letter depends on the type of command you are askingANSI.SYS to execute. In all instances, the capitalization of the ending letter is important. Asyou are working through the examples in this chapter, pay strict attention to the capitaliza-tion.
You can use as many ANSI control codes as you require on the same line, as long as thecodes are separated by semicolons (;) and no code contradicts another code. The order ofthe codes is not important.
The following sections detail the general functions that can be performed with ANSI.SYS.
Cursor Movement
If you end the Escape sequence with the uppercase letter A, ANSI.SYS assumes you want tomove the cursor up a given number of lines on the screen. For instance, the following linemoves the cursor up four lines on the screen:
<Esc>[4A
The horizontal position of the cursor is not affected; it only moves up. If the cursor isalready at the top of the screen, the Escape code is ignored.
If you end the Escape sequence with a B (instead of an A), the cursor is moved down on thescreen. Again, if the cursor is already at the bottom of the screen, the sequence is ignored.
Ending the Escape sequence with a C moves the cursor to the right by the number of indi-cated spaces; a D moves the cursor left. For example, the following line moves the cursor 23spaces to the right:
<Esc>[23C
Cursor Positioning
To position the cursor at a given character location on the screen, you can use either the Hor f codes. For instance, either of the following moves the cursor to line 10, column 32:
<Esc>[10;32H
<Esc>[10;32f
Note that the upper-left corner of the screen is considered position 0,0.
To save the current cursor position (in preparation for moving and later restoring it), youuse the s code, as shown here:
<Esc>[s
There are no other parameters; the cursor position is immediately saved. When you want torestore the cursor to the saved position, use the u code:
<Esc>[u
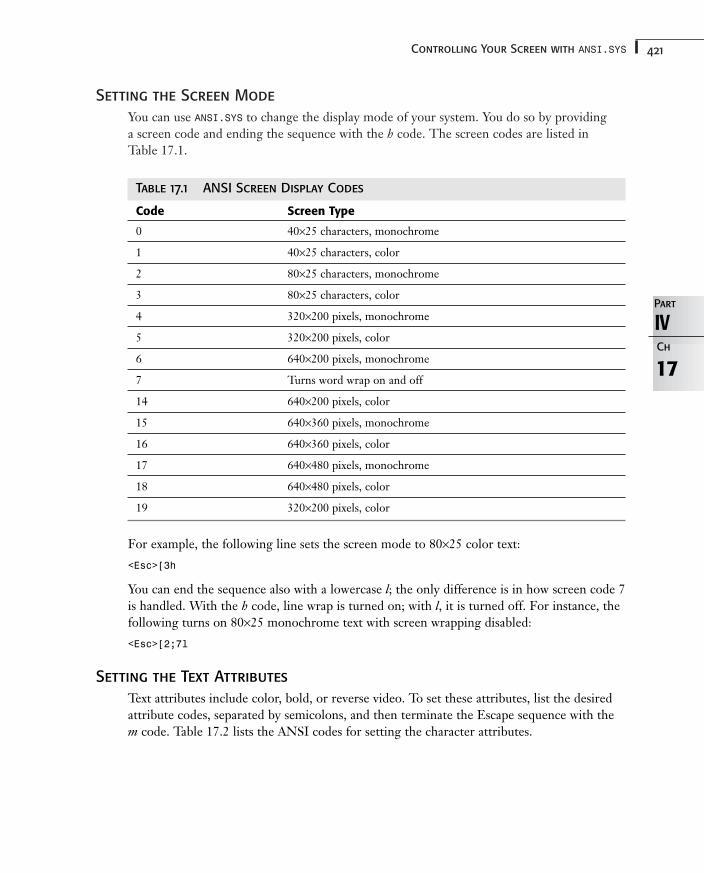
421Controlling Your Screen with ANSI.SYS
Setting the Screen Mode
You can use ANSI.SYS to change the display mode of your system. You do so by providing a screen code and ending the sequence with the h code. The screen codes are listed in Table 17.1.
Table 17.1 ANSI Screen Display Codes
Code Screen Type
0 40×25 characters, monochrome
1 40×25 characters, color
2 80×25 characters, monochrome
3 80×25 characters, color
4 320×200 pixels, monochrome
5 320×200 pixels, color
6 640×200 pixels, monochrome
7 Turns word wrap on and off
14 640×200 pixels, color
15 640×360 pixels, monochrome
16 640×360 pixels, color
17 640×480 pixels, monochrome
18 640×480 pixels, color
19 320×200 pixels, color
For example, the following line sets the screen mode to 80×25 color text:
<Esc>[3h
You can end the sequence also with a lowercase l; the only difference is in how screen code 7is handled. With the h code, line wrap is turned on; with l, it is turned off. For instance, thefollowing turns on 80×25 monochrome text with screen wrapping disabled:
<Esc>[2;7l
Setting the Text Attributes
Text attributes include color, bold, or reverse video. To set these attributes, list the desiredattribute codes, separated by semicolons, and then terminate the Escape sequence with them code. Table 17.2 lists the ANSI codes for setting the character attributes.
IVPart
Ch
17
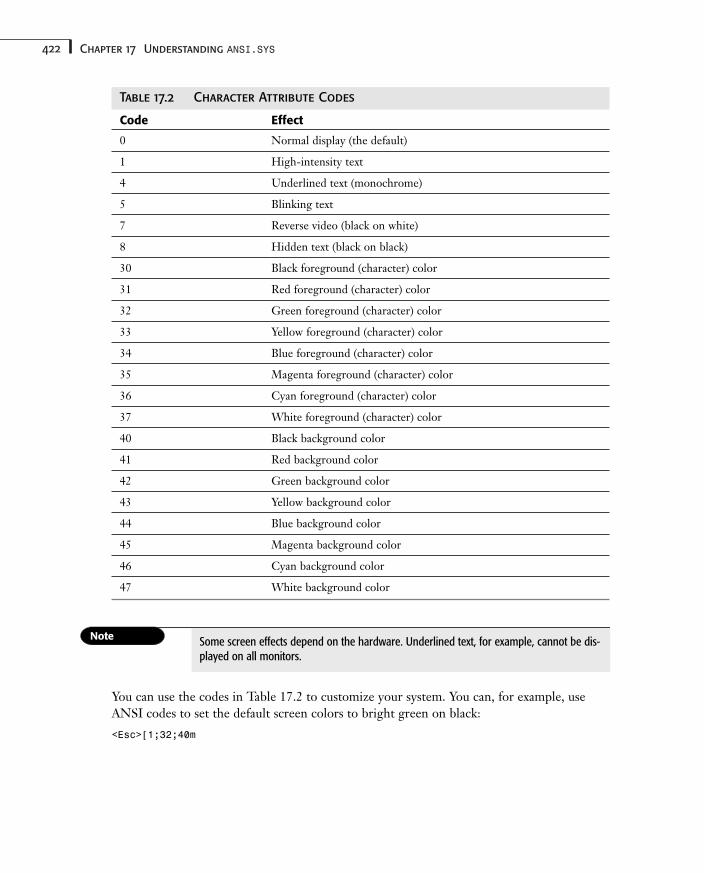
422 Chapter 17 Understanding ANSI.SYS
Table 17.2 Character Attribute Codes
Code Effect
0 Normal display (the default)
1 High-intensity text
4 Underlined text (monochrome)
5 Blinking text
7 Reverse video (black on white)
8 Hidden text (black on black)
30 Black foreground (character) color
31 Red foreground (character) color
32 Green foreground (character) color
33 Yellow foreground (character) color
34 Blue foreground (character) color
35 Magenta foreground (character) color
36 Cyan foreground (character) color
37 White foreground (character) color
40 Black background color
41 Red background color
42 Green background color
43 Yellow background color
44 Blue background color
45 Magenta background color
46 Cyan background color
47 White background color
Some screen effects depend on the hardware. Underlined text, for example, cannot be dis-played on all monitors.
You can use the codes in Table 17.2 to customize your system. You can, for example, useANSI codes to set the default screen colors to bright green on black:
<Esc>[1;32;40m
423Customizing Your Keyboard with ANSI.SYS
Screen Control
Besides the functions discussed so far, ANSI.SYS also provides functions that you can use tocontrol your screen. You can use the following ANSI code to clear the screen. It is theequivalent of the CLS command:
<Esc>[2J
If you want to erase only to the end of the current line, the following does the trick:
<Esc>[K
Customizing Your Keyboard with ANSI.SYSComputers use a set of 256 codes to indicate specific characters. These codes make up theASCII character set. (ASCII is an acronym for the American Standard Code for InformationInterchange.) A space, for example, is ASCII code 48; the uppercase A is ASCII code 65; andthe lowercase a is ASCII code 97. You already know that the Escape code used in an ANSIcontrol sequence has an ASCII value of 27. (See Appendix E, “ASCII and Extended ASCIICodes,” for a list of ASCII codes.)
Every time you press a key on your keyboard, the system’s circuits send a code to DOS.This code interprets the keystroke and displays the appropriate character. Not every code inthe ASCII set, however, has a corresponding keyboard key. Moreover, some keys representmore than one character.
Keyboards actually send individual codes to DOS for each key or key combination you presson the keyboard. These codes are known as scan codes. Many scan codes correspond toASCII codes. With the key combinations that involve the Ctrl, Alt, Shift, and Num Lockkeys, however, more than 256 keystrokes (the ASCII code limit) are possible. This problemis solved by preceding some scan codes with a 0 entry.
When DOS receives a scan code from the keyboard, the program uses a built-in table toascertain the proper character. When the ANSI.SYS device driver has been loaded throughthe CONFIG.SYS file, the ANSI driver takes over this chore. The driver also enables you tomodify the table and assign different characters to the scan codes.
Suppose that you must prepare documents or data files that include fractions. You can assignASCII codes for some fractions to keys that you normally don’t use. ASCII code 171, forexample, stands for 1/2, and code 172 stands for 1/4. (See Appendix E for a complete list ofASCII codes.) Using ANSI.SYS makes key reassignments easy.
To assign the 1/2 fraction (ASCII 171) to the Shift+6 key combination, which produces thecharacter ^ (ASCII 94), you can use either of the following commands:
<Esc>[“^”;”1/2”p
<Esc>[94;171p
IVPart
Ch
17
424 Chapter 17 Understanding ANSI.SYS
The ANSI.SYS keyboard-assignment Escape sequence starts with the standard Escape charac-ter, followed by a left bracket ([). The next character is the ASCII code, scan code, or keyrepresentation in quotation marks. Then you specify the new ASCII code or key representa-tion in quotation marks. The two characters are separated by a semicolon. The sequenceends with the lowercase p code. Thus, in the first example, the key representation ^ isentered with quotation marks (“^”) and is changed to “1/2”. In the second example, scancode 171 replaces scan code 94.
Do not use spaces in the ANSI.SYS code sequence. If you use spaces, DOS might notinterpret the sequence properly.
Remember that the first specification is for the key to be assigned. To restore the originalkey assignment, enter the code twice, as in this example:
<Esc>[94;94p
A key assignment does not need to be a single character. You also can assign a text messageto a keystroke. This process is referred to as a macro substitution. If you often need to typethe same sequence of characters, you can easily set up a macro substitution that enters thosecharacters for you. Don’t confuse this with the macro capability of DOSKEY, however. Macrosthat can be created with DOSKEY are much more powerful than those created with ANSI.SYS.
In the following example, the words Heigh-Ho, Silver! are assigned to the F7 key, which hasthe scan code 0;65:
<Esc>[0;65;”Heigh-Ho, Silver!”p
After you issue this ANSI.SYS instruction, either in a text file you type or a batch file, DOS(through ANSI.SYS) displays the message Heigh-Ho, Silver! whenever you press F7.
Because no scan code or ASCII code of 0 exists, ANSI.SYS understands that the second num-ber indicates the extended scan code for the F7 key instead of the ASCII code for the upper-case A, which is 65. If you want to add a carriage return (ASCII code 13) after the message,include that code in the Escape sequence as follows:
<Esc>[0;65;”Heigh-Ho, Silver!”;13p
You can enter many of the ASCII character codes on your keyboard by holding down theAlt key while you type the ASCII code for the character you want to display. If you reassignkeys, however, you no longer can enter certain key characters in this manner. Further, reas-signed keys no longer function the same way. If you reassign the backslash key (\), for exam-ple, you no longer can use the backslash character to access subdirectories.
Reassigning Character Keys
ANSI.SYS reassignmentof normal character keys on your keyboard is not a good idea. Such areassignment interferes with the normal operation of DOS and with many, if not all, of yoursoftware programs.
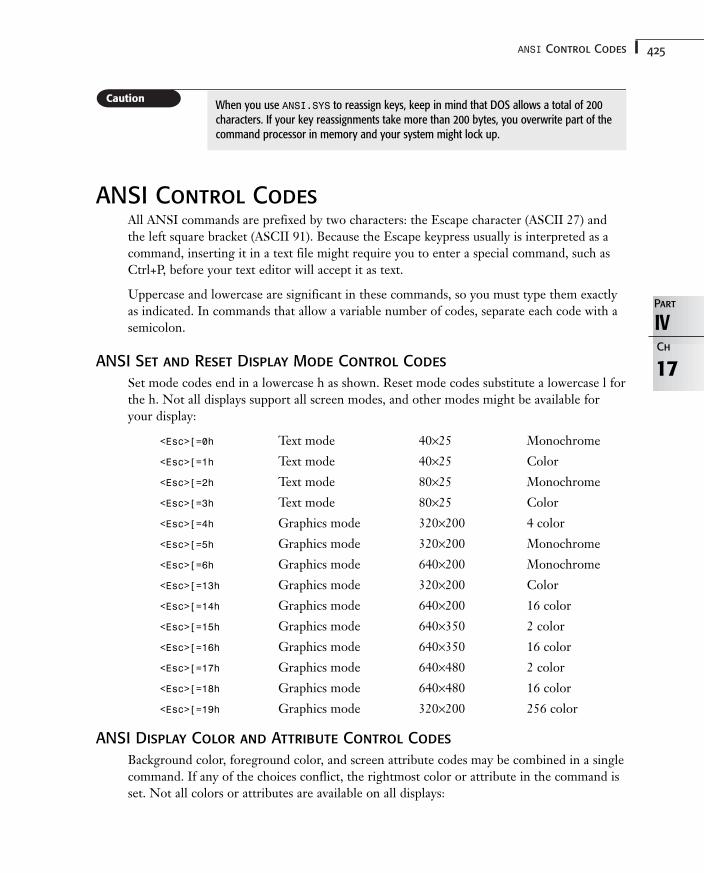
425ANSI Control Codes
IVPart
Ch
17
When you use ANSI.SYS to reassign keys, keep in mind that DOS allows a total of 200characters. If your key reassignments take more than 200 bytes, you overwrite part of thecommand processor in memory and your system might lock up.
ANSI Control CodesAll ANSI commands are prefixed by two characters: the Escape character (ASCII 27) andthe left square bracket (ASCII 91). Because the Escape keypress usually is interpreted as acommand, inserting it in a text file might require you to enter a special command, such asCtrl+P, before your text editor will accept it as text.
Uppercase and lowercase are significant in these commands, so you must type them exactlyas indicated. In commands that allow a variable number of codes, separate each code with asemicolon.
ANSI Set and Reset Display Mode Control Codes
Set mode codes end in a lowercase h as shown. Reset mode codes substitute a lowercase l forthe h. Not all displays support all screen modes, and other modes might be available foryour display:
<Esc>[=0h Text mode 40×25 Monochrome
<Esc>[=1h Text mode 40×25 Color
<Esc>[=2h Text mode 80×25 Monochrome
<Esc>[=3h Text mode 80×25 Color
<Esc>[=4h Graphics mode 320×200 4 color
<Esc>[=5h Graphics mode 320×200 Monochrome
<Esc>[=6h Graphics mode 640×200 Monochrome
<Esc>[=13h Graphics mode 320×200 Color
<Esc>[=14h Graphics mode 640×200 16 color
<Esc>[=15h Graphics mode 640×350 2 color
<Esc>[=16h Graphics mode 640×350 16 color
<Esc>[=17h Graphics mode 640×480 2 color
<Esc>[=18h Graphics mode 640×480 16 color
<Esc>[=19h Graphics mode 320×200 256 color
ANSI Display Color and Attribute Control Codes
Background color, foreground color, and screen attribute codes may be combined in a singlecommand. If any of the choices conflict, the rightmost color or attribute in the command isset. Not all colors or attributes are available on all displays:
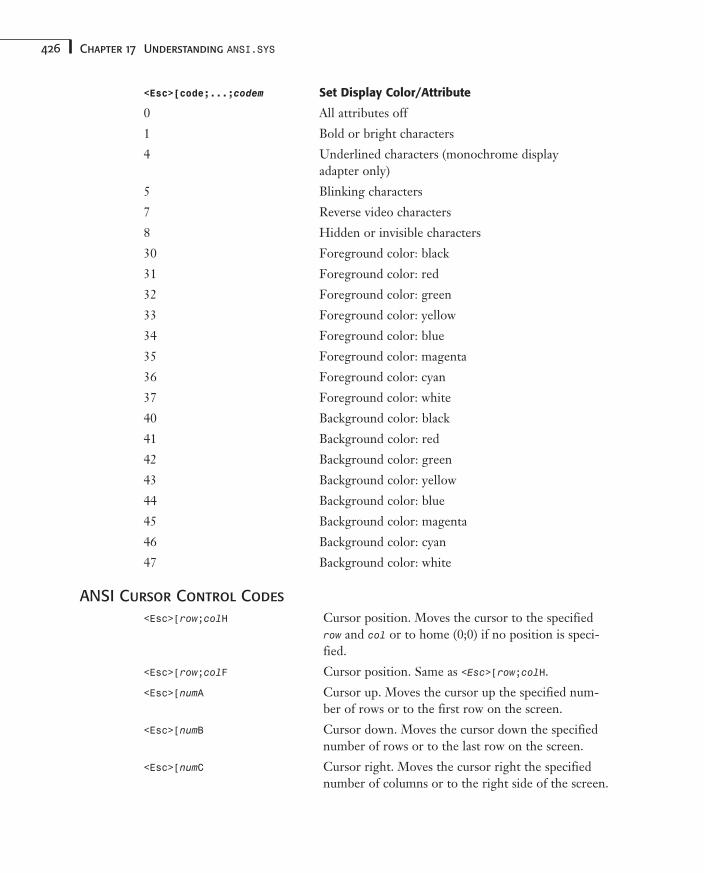
426 Chapter 17 Understanding ANSI.SYS
<Esc>[code;...;codem Set Display Color/Attribute
0 All attributes off
1 Bold or bright characters
4 Underlined characters (monochrome display adapter only)
5 Blinking characters
7 Reverse video characters
8 Hidden or invisible characters
30 Foreground color: black
31 Foreground color: red
32 Foreground color: green
33 Foreground color: yellow
34 Foreground color: blue
35 Foreground color: magenta
36 Foreground color: cyan
37 Foreground color: white
40 Background color: black
41 Background color: red
42 Background color: green
43 Background color: yellow
44 Background color: blue
45 Background color: magenta
46 Background color: cyan
47 Background color: white
ANSI Cursor Control Codes
<Esc>[row;colH Cursor position. Moves the cursor to the specifiedrow and col or to home (0;0) if no position is speci-fied.
<Esc>[row;colF Cursor position. Same as <Esc>[row;colH.
<Esc>[numA Cursor up. Moves the cursor up the specified num-ber of rows or to the first row on the screen.
<Esc>[numB Cursor down. Moves the cursor down the specifiednumber of rows or to the last row on the screen.
<Esc>[numC Cursor right. Moves the cursor right the specifiednumber of columns or to the right side of the screen.
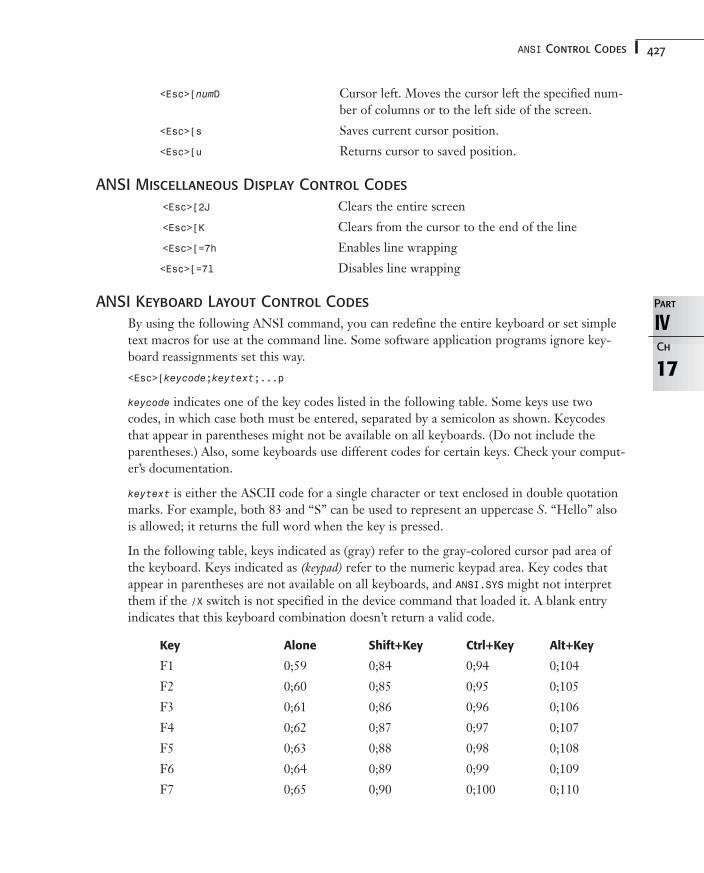
427ANSI Control Codes
<Esc>[numD Cursor left. Moves the cursor left the specified num-ber of columns or to the left side of the screen.
<Esc>[s Saves current cursor position.
<Esc>[u Returns cursor to saved position.
ANSI Miscellaneous Display Control Codes
<Esc>[2J Clears the entire screen
<Esc>[K Clears from the cursor to the end of the line
<Esc>[=7h Enables line wrapping
<Esc>[=7l Disables line wrapping
ANSI Keyboard Layout Control Codes
By using the following ANSI command, you can redefine the entire keyboard or set simpletext macros for use at the command line. Some software application programs ignore key-board reassignments set this way.
<Esc>[keycode;keytext;...p
keycode indicates one of the key codes listed in the following table. Some keys use twocodes, in which case both must be entered, separated by a semicolon as shown. Keycodesthat appear in parentheses might not be available on all keyboards. (Do not include theparentheses.) Also, some keyboards use different codes for certain keys. Check your comput-er’s documentation.
keytext is either the ASCII code for a single character or text enclosed in double quotationmarks. For example, both 83 and “S” can be used to represent an uppercase S. “Hello” alsois allowed; it returns the full word when the key is pressed.
In the following table, keys indicated as (gray) refer to the gray-colored cursor pad area ofthe keyboard. Keys indicated as (keypad) refer to the numeric keypad area. Key codes thatappear in parentheses are not available on all keyboards, and ANSI.SYS might not interpretthem if the /X switch is not specified in the device command that loaded it. A blank entryindicates that this keyboard combination doesn’t return a valid code.
Key Alone Shift+Key Ctrl+Key Alt+Key
F1 0;59 0;84 0;94 0;104
F2 0;60 0;85 0;95 0;105
F3 0;61 0;86 0;96 0;106
F4 0;62 0;87 0;97 0;107
F5 0;63 0;88 0;98 0;108
F6 0;64 0;89 0;99 0;109
F7 0;65 0;90 0;100 0;110
IVPart
Ch
17
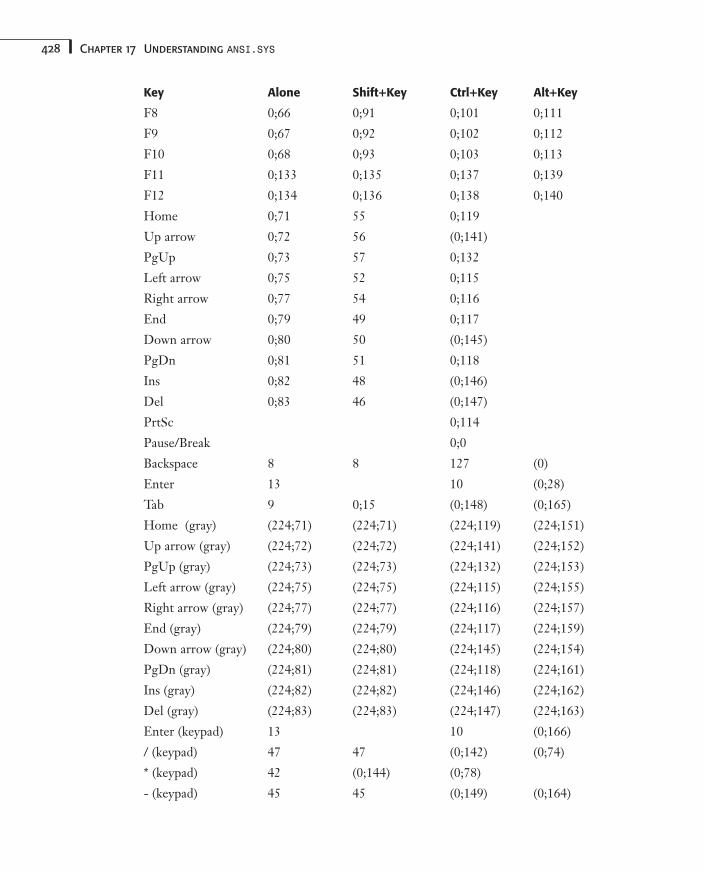
428 Chapter 17 Understanding ANSI.SYS
Key Alone Shift+Key Ctrl+Key Alt+Key
F8 0;66 0;91 0;101 0;111
F9 0;67 0;92 0;102 0;112
F10 0;68 0;93 0;103 0;113
F11 0;133 0;135 0;137 0;139
F12 0;134 0;136 0;138 0;140
Home 0;71 55 0;119
Up arrow 0;72 56 (0;141)
PgUp 0;73 57 0;132
Left arrow 0;75 52 0;115
Right arrow 0;77 54 0;116
End 0;79 49 0;117
Down arrow 0;80 50 (0;145)
PgDn 0;81 51 0;118
Ins 0;82 48 (0;146)
Del 0;83 46 (0;147)
PrtSc 0;114
Pause/Break 0;0
Backspace 8 8 127 (0)
Enter 13 10 (0;28)
Tab 9 0;15 (0;148) (0;165)
Home (gray) (224;71) (224;71) (224;119) (224;151)
Up arrow (gray) (224;72) (224;72) (224;141) (224;152)
PgUp (gray) (224;73) (224;73) (224;132) (224;153)
Left arrow (gray) (224;75) (224;75) (224;115) (224;155)
Right arrow (gray) (224;77) (224;77) (224;116) (224;157)
End (gray) (224;79) (224;79) (224;117) (224;159)
Down arrow (gray) (224;80) (224;80) (224;145) (224;154)
PgDn (gray) (224;81) (224;81) (224;118) (224;161)
Ins (gray) (224;82) (224;82) (224;146) (224;162)
Del (gray) (224;83) (224;83) (224;147) (224;163)
Enter (keypad) 13 10 (0;166)
/ (keypad) 47 47 (0;142) (0;74)
* (keypad) 42 (0;144) (0;78)
- (keypad) 45 45 (0;149) (0;164)

429ANSI Control Codes
Key Alone Shift+Key Ctrl+Key Alt+Key
+ (keypad) 43 43 (0;150) (0;55)
5 (keypad) (0;76) 53 (0;143)
A 97 65 1 0;30
B 98 66 2 0;48
C 99 67 3 0;46
D 100 68 4 0;32
E 101 69 5 0;18
F 102 70 6 0;33
G 103 71 7 0;34
H 104 72 8 0;35
I 105 73 9 0;23
J 106 74 10 0;36
K 107 75 11 0;37
L 108 76 12 0;38
M 109 77 13 0;50
N 110 78 14 0;49
O 111 79 15 0;24
P 112 80 16 0;25
Q 113 81 17 0;16
R 114 82 18 0;19
S 115 83 19 0;31
T 116 84 20 0;20
U 117 85 21 0;22
V 118 86 22 0;47
W 119 87 23 0;17
X 120 88 24 0;45
Y 121 89 25 0;21
Z 122 90 26 0;44
0 48 41 0;129
1 49 33 0;120
2 50 64 (0) Null 0;121
3 51 35 0;122
4 52 36 0;123
5 53 37 0;124
IVPart
Ch
17
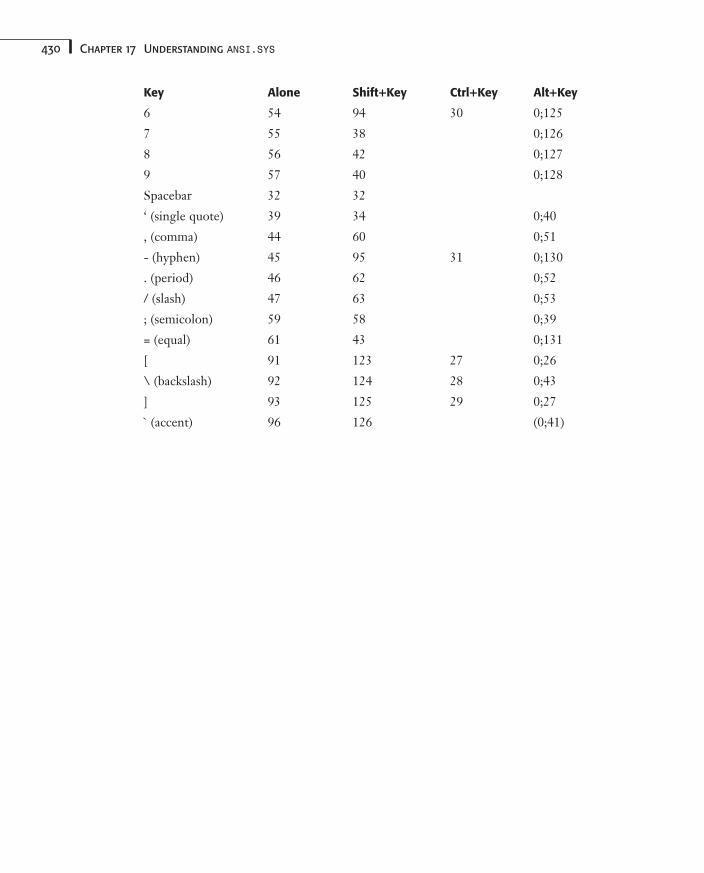
430 Chapter 17 Understanding ANSI.SYS
Key Alone Shift+Key Ctrl+Key Alt+Key
6 54 94 30 0;125
7 55 38 0;126
8 56 42 0;127
9 57 40 0;128
Spacebar 32 32
‘ (single quote) 39 34 0;40
, (comma) 44 60 0;51
- (hyphen) 45 95 31 0;130
. (period) 46 62 0;52
/ (slash) 47 63 0;53
; (semicolon) 59 58 0;39
= (equal) 61 43 0;131
[ 91 123 27 0;26
\ (backslash) 92 124 28 0;43
] 93 125 29 0;27
` (accent) 96 126 (0;41)
Mastering DOSKEY and Macros
In this chapter
Using DOSKEY 432
Creating and Using Macros 436
18CHAPTER
432 Chapter 18 Mastering DOSKEY and Macros
Using DOSKEYDOSKEY is a program that enables you to edit and reuse DOS commands without retypingthem. The program also enables you to create new commands, referred to as macros, thatcan take the place of several DOS commands. Another benefit of DOSKEY is that it occu-pies only about 4KB of memory when loaded. The following sections explain how to loadDOSKEY into your computer’s memory and use the program’s capabilities.
Loading DOSKEY
DOSKEY is a memory-resident program that was first available in DOS 5.0. This programenables you to easily edit what you enter at the DOS prompt. DOSKEY also maintains arunning history of the commands you have entered. DOSKEY then enables you to reusethose commands without retyping them.
Before you can use DOSKEY’s features, you must load the program into memory. To loadDOSKEY, enter the following command at the DOS prompt:
DOSKEY
A message appears onscreen, telling you that DOSKEY is installed. After this messageappears, all DOSKEY features are available.
The most convenient way to load DOSKEY is to include a command in yourAUTOEXEC.BAT file to start the program. In this way, DOSKEY loads every time you startyour computer. It is also easier to take advantage of loading DOSKEY in upper memory.
As is true of most DOS commands, DOSKEY has several available switches. The full syntaxof the command to install DOSKEY is as follows:
DOSKEY /REINSTALL /BUFSIZE=size /MACROS /HISTORY /INSERT /OVERSTRIKE
Following are explanations of the components of this command:
■ /REINSTALL—Installs another copy of DOSKEY and clears the command-history buffer.This command does not, however, remove existing copies of DOSKEY that already arein memory.
■ /BUFSIZE—Sets the size of the command buffer. The size parameter represents thenumber of bytes that the buffer occupies in memory. The default size is 512 bytes; theminimum size is 256 bytes.
■ /MACROS—Displays a list of the currently defined DOSKEY macros.
■ /HISTORY—Displays the contents of the command-history buffer.
■ /INSERT—Instructs DOS to insert new text into the existing text at the cursor position.(You cannot use this switch with /OVERSTRIKE.)
■ /OVERSTRIKE—Instructs DOS to insert new text in place of existing text at the cursorposition. This condition is the default. (You cannot use this switch with /INSERT
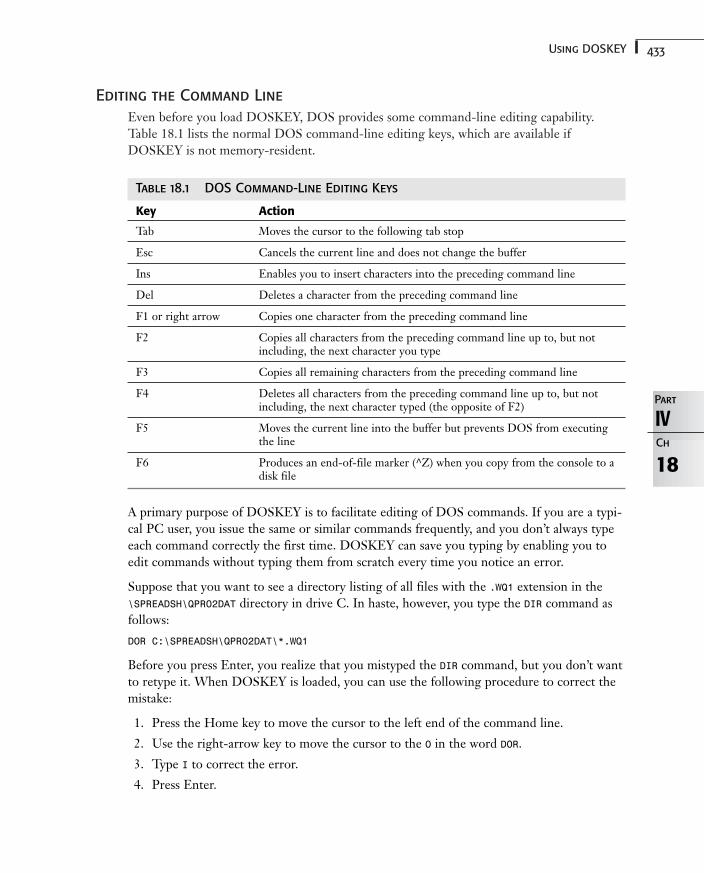
433Using DOSKEY
Editing the Command Line
Even before you load DOSKEY, DOS provides some command-line editing capability.Table 18.1 lists the normal DOS command-line editing keys, which are available ifDOSKEY is not memory-resident.
Table 18.1 DOS Command-Line Editing Keys
Key Action
Tab Moves the cursor to the following tab stop
Esc Cancels the current line and does not change the buffer
Ins Enables you to insert characters into the preceding command line
Del Deletes a character from the preceding command line
F1 or right arrow Copies one character from the preceding command line
F2 Copies all characters from the preceding command line up to, but notincluding, the next character you type
F3 Copies all remaining characters from the preceding command line
F4 Deletes all characters from the preceding command line up to, but notincluding, the next character typed (the opposite of F2)
F5 Moves the current line into the buffer but prevents DOS from executingthe line
F6 Produces an end-of-file marker (^Z) when you copy from the console to adisk file
A primary purpose of DOSKEY is to facilitate editing of DOS commands. If you are a typi-cal PC user, you issue the same or similar commands frequently, and you don’t always typeeach command correctly the first time. DOSKEY can save you typing by enabling you toedit commands without typing them from scratch every time you notice an error.
Suppose that you want to see a directory listing of all files with the .WQ1 extension in the\SPREADSH\QPRO2DAT directory in drive C. In haste, however, you type the DIR command asfollows:
DOR C:\SPREADSH\QPRO2DAT\*.WQ1
Before you press Enter, you realize that you mistyped the DIR command, but you don’t wantto retype it. When DOSKEY is loaded, you can use the following procedure to correct themistake:
1. Press the Home key to move the cursor to the left end of the command line.
2. Use the right-arrow key to move the cursor to the O in the word DOR.
3. Type I to correct the error.
4. Press Enter.
18
IVPart
Ch
434 Chapter 18 Mastering DOSKEY and Macros
DOS displays the directory listing as you requested.
Another quick way to repeat the command is to press the F1 key. Each time it is pressed, itrepeats a character of the previous command. Although this technique is more limited, inthat it does not enable you to edit a character and then continue repeating, it can be help-ful if DOSKEY was not activated before you typed the command.
The keys listed in Table 18.2 supplement the normal DOSKEY command-line editing keys.
Table 18.2 Additional DOSKEY Command-Line Editing Keys
Key Action
Left arrow Moves the cursor one character to the left
Right arrow Moves the cursor one character to the right
Backspace Moves the cursor one character to the left; erases the character to the left
Ctrl+left arrow Moves the cursor one word to the left
Ctrl+right arrow Moves the cursor one word to the right
Ins Toggles between Replace mode (the default) and Insert mode
Home Moves the cursor to the left end of the command line
End Moves the cursor to the space after the last character in the command line
Esc Erases the command line
Reusing Commands
In addition to enhancing DOS’s command-line editing capabilities, DOSKEY adds a capa-bility that was not previously available in DOS: You can redisplay a command that youissued earlier during the current DOS session. You then can execute the command withoutchanging it, or you can use the DOS and DOSKEY editing keys to make modificationsbefore executing the command.
After you load DOSKEY into memory, the program maintains a buffer in memory that con-tains a history of DOS commands issued at the command prompt during the current DOSsession. DOSKEY enables you to reuse the commands in this command-history buffer.
Suppose that earlier during the current DOS session, you issued the following COPYcommand:
COPY C:\DATABASE\FOXPRO\MAIL.DBF C:\WORDPRO\WP
Now you want to issue the following similar command without retyping the entire command:
COPY C:\DATABASE\DBASE\MAIL.DBF C:\WORDPRO\WP
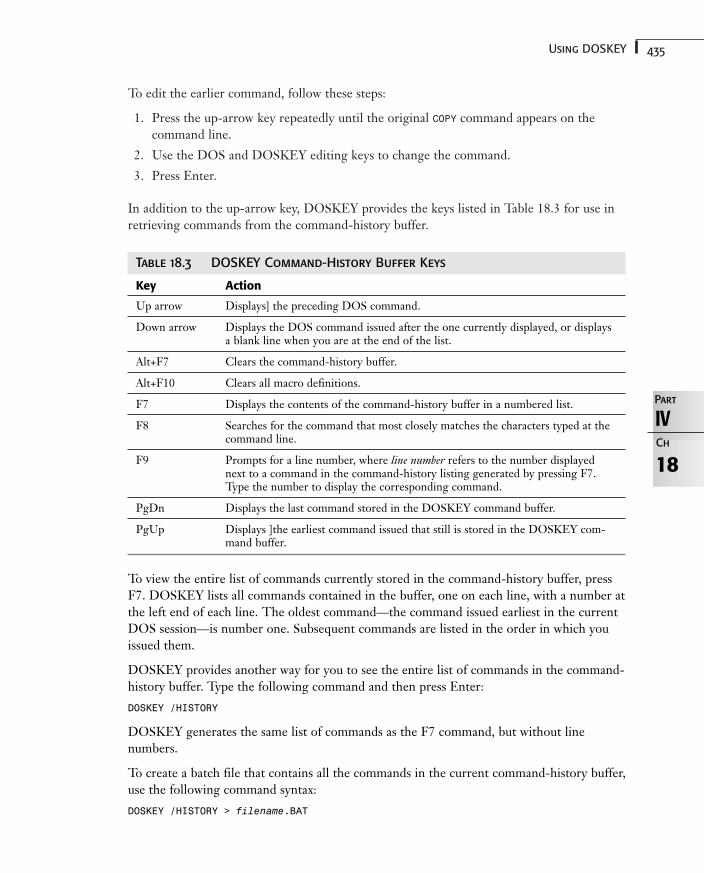
435Using DOSKEY
To edit the earlier command, follow these steps:
1. Press the up-arrow key repeatedly until the original COPY command appears on thecommand line.
2. Use the DOS and DOSKEY editing keys to change the command.
3. Press Enter.
In addition to the up-arrow key, DOSKEY provides the keys listed in Table 18.3 for use inretrieving commands from the command-history buffer.
Table 18.3 DOSKEY Command-History Buffer Keys
Key Action
Up arrow Displays] the preceding DOS command.
Down arrow Displays the DOS command issued after the one currently displayed, or displaysa blank line when you are at the end of the list.
Alt+F7 Clears the command-history buffer.
Alt+F10 Clears all macro definitions.
F7 Displays the contents of the command-history buffer in a numbered list.
F8 Searches for the command that most closely matches the characters typed at thecommand line.
F9 Prompts for a line number, where line number refers to the number displayednext to a command in the command-history listing generated by pressing F7.Type the number to display the corresponding command.
PgDn Displays the last command stored in the DOSKEY command buffer.
PgUp Displays ]the earliest command issued that still is stored in the DOSKEY com-mand buffer.
To view the entire list of commands currently stored in the command-history buffer, pressF7. DOSKEY lists all commands contained in the buffer, one on each line, with a number atthe left end of each line. The oldest command—the command issued earliest in the currentDOS session—is number one. Subsequent commands are listed in the order in which youissued them.
DOSKEY provides another way for you to see the entire list of commands in the command-history buffer. Type the following command and then press Enter:
DOSKEY /HISTORY
DOSKEY generates the same list of commands as the F7 command, but without line numbers.
To create a batch file that contains all the commands in the current command-history buffer,use the following command syntax:
DOSKEY /HISTORY > filename.BAT
18
IVPart
Ch
436 Chapter 18 Mastering DOSKEY and Macros
Substitute for filename the name that you want to give the batch file. After you issue thiscommand, the new batch file contains all the commands from the command-history buffer,including the command that created the batch file itself. Use the DOS Editor, Edlin, orsome other text editor to delete the last command and any other commands you don’t wantto include in the batch file.
You can use the up-arrow key to display previously issued commands. Each time you pressthe up-arrow key, DOSKEY displays the preceding command. After you display one ormore previous commands by pressing the up-arrow key, you can use the down-arrow key tomove back down through the commands to the most recent command. Sometimes, however,selecting a command from the list generated by pressing F7 is easier. To use this method,press F9. DOSKEY displays the following message:
Line number:
Type the number that corresponds to the desired command in the list of commands generat-ed by pressing F7. DOSKEY displays the selected command in the command line for you toedit or execute.
When you want to move quickly to the first command in the buffer, press PgUp. To go tothe last command in the buffer, press PgDn.
If you want to clear the command-history buffer, press Alt+F7. DOSKEY abandons the con-tents of the command-history buffer.
DOSKEY also can help you locate a command quickly. Type the first several characters ofthe command you need to find and then press F8. Suppose that you want to locate the fol-lowing command:
COPY C:\DATABASE\FOXPRO\MAIL.DBF C:\WORDPRO\WP
Type COPY and press F8. Each time you press F8, DOSKEY shows you the next commandthat contains the COPY command. When the desired command is displayed, you easily canedit and reuse the command with minimal typing.
Creating and Using MacrosIn addition to providing command-line editing capabilities and the command-history buffer,DOSKEY enables you to create your own DOS commands, referred to as macros. ADOSKEY macro is similar to a batch file but is contained in memory rather than on disk.Each macro can contain one or more DOS commands, up to a maximum of 127 characters.
DOSKEY macros are similar to batch files in the following ways:
■ Macros can contain multiple DOS commands.
■ You invoke macros by typing a name at the DOS prompt.
■ Macros can use replaceable parameters.
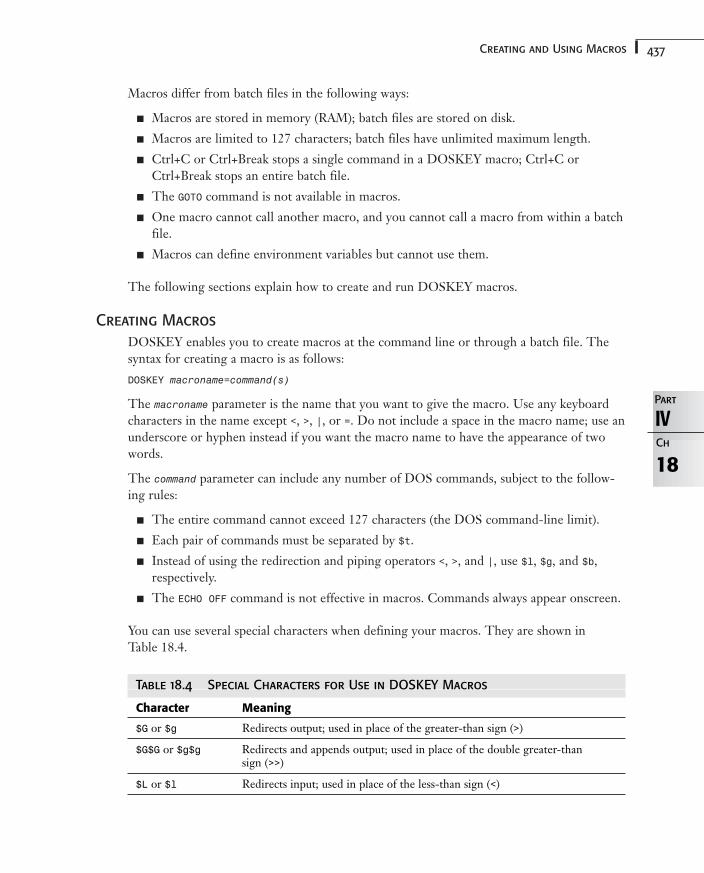
437Creating and Using Macros
Macros differ from batch files in the following ways:
■ Macros are stored in memory (RAM); batch files are stored on disk.
■ Macros are limited to 127 characters; batch files have unlimited maximum length.
■ Ctrl+C or Ctrl+Break stops a single command in a DOSKEY macro; Ctrl+C orCtrl+Break stops an entire batch file.
■ The GOTO command is not available in macros.
■ One macro cannot call another macro, and you cannot call a macro from within a batchfile.
■ Macros can define environment variables but cannot use them.
The following sections explain how to create and run DOSKEY macros.
Creating Macros
DOSKEY enables you to create macros at the command line or through a batch file. Thesyntax for creating a macro is as follows:
DOSKEY macroname=command(s)
The macroname parameter is the name that you want to give the macro. Use any keyboardcharacters in the name except <, >, |, or =. Do not include a space in the macro name; use anunderscore or hyphen instead if you want the macro name to have the appearance of twowords.
The command parameter can include any number of DOS commands, subject to the follow-ing rules:
■ The entire command cannot exceed 127 characters (the DOS command-line limit).
■ Each pair of commands must be separated by $t.
■ Instead of using the redirection and piping operators <, >, and |, use $l, $g, and $b,respectively.
■ The ECHO OFF command is not effective in macros. Commands always appear onscreen.
You can use several special characters when defining your macros. They are shown in Table 18.4.
Table 18.4 Special Characters for Use in DOSKEY Macros
Character Meaning
$G or $g Redirects output; used in place of the greater-than sign (>)
$G$G or $g$g Redirects and appends output; used in place of the double greater-than sign (>>)
$L or $l Redirects input; used in place of the less-than sign (<)
18
IVPart
Ch
438 Chapter 18 Mastering DOSKEY and Macros
$B or $b Uses output from one command as input to another; used in place of the ver-tical bar (|)
$T or $t Separates commands on the DOSKEY command line
$$ Prints the dollar sign character
$1 through $9 Indicates individual replaceable parameters
$* Indicates all parameters
Notice that when you want to use replaceable parameters in a macro, you use the codes $1through $9 rather than %1 through %9. Suppose, for example, that you often use the REPLACEcommand to keep current copies of particular subdirectory files on floppy disks so that youcan take the files with you. To do so, however, you must issue the REPLACE command twicefor each subdirectory you want to keep current. An easier method is to create the followingmacro called UPD:
DOSKEY UPD=REPLACE \C:$1\$2 A:\$1 /U $T REPLACE C:\$1\$2 A:\$1 /A
In this example, you also see how the $T (or $t) special characters separate commands on thecommand line.
DOSKEY has a special type of replaceable parameter that is not available in batch files. Thecharacters $* represent not just one parameter, but all the characters you type in the com-mand line to the right of the macro name. This type of replaceable parameter is useful whenyou don’t know ahead of time how many parameters or switches you might type when youexecute the macro.
Suppose, for example, that you want to create a macro to help format floppy disks in driveA, a 3 1/2-inch, high-density drive. You want to be able to type FA 720 to format a 720KBdisk and FA 1.44 to format a 1.44MB disk. Occasionally, however, you might want to useone or more of FORMAT’s switches, such as the /S switch to create a system disk, the /Q QuickFormat switch, or the /U unconditional format switch. To create the FA macro, you type thefollowing command:
DOSKEY FA=FORMAT A: /F:$*
To confirm that DOSKEY has stored the macros you defined, you type the following com-mand and then press Enter:
DOSKEY /MACROS
DOSKEY lists all macros currently stored in the DOSKEY macro buffer. Assuming youdefined the UPD and FA macros, the preceding command displays the following lines:
UPD=REPLACE \C:$1\$2 A:\$1 /U $T REPLACE C:\$1\$2 A:\$1 /AFA=FORMAT A: /F:$*
Table 18.4 Continued
Character Meaning
439Creating and Using Macros
18
IVPart
Ch
You can easily save a copy of the entire contents of the macro buffer by using redirection.To create a file named MACROS.BAT that contains all the current macros, you type the follow-ing command and press Enter:
DOSKEY /MACROS > MACROS.BAT
If you want to use this batch file later to re-create the macros during a future session, editthe file, adding DOSKEY to the beginning of each line.
Because DOSKEY macros reside in memory rather than on disk, all macros are erased whenyou turn off or reboot the computer. One disadvantage of using DOSKEY macros is thatyou need to reenter commonly used macros each time you turn on your computer. You canovercome this drawback, however, by using AUTOEXEC.BAT to define the macros that you usemost often. To make the UPD and FA macros routinely available, for example, include the fol-lowing commands in AUTOEXEC.BAT:
DOSKEY UPD=REPLACE \C:$1\$2 A:\$1 /U $T REPLACE C:\$1\$2 A:\$1 /ADOSKEY FA=FORMAT A: /F:$*
Every time you turn on or reboot your computer, the preceding commands create the UPDand FA macros in the DOSKEY macro buffer.
The first DOSKEY command in AUTOEXEC.BAT loads the program as memory-resident,even if the command also is defining a macro.
Running Macros
Using a DOSKEY macro is as easy as using any other DOS command. Simply type themacro name at the command line and then press Enter. If the macro has any replaceableparameters, include appropriate values in the command line. Suppose, for example, that you want to use the UPD macro to maintain current copies of files. To do so, just type the following:
UPD dirname filespec
As with a batch file, dirname is the first replaceable parameter, $1, and filespec is the sec-ond, $2. To keep current all files in C:\PROJECT1, type the following at the DOS prompt:
UPD PROJECT1 *.*
Perhaps you want to use the FA macro created in the preceding section to format a 1.44MBdisk. You want to use Quick Format, make this disk bootable, and assign the volume labelBOOT_DISK. You type the following command at the DOS prompt and then press Enter:
FA 1.44 /Q /S /V:BOOT_DISK
DOS first displays the command in the following format:
FORMAT A: /F:1.44 /Q /S /V:BOOT_DISK
440 Chapter 18 Mastering DOSKEY and Macros
Then DOS prompts you as follows:
Insert new diskette for drive A:and press ENTER when ready_
Press Enter to proceed with the formatting operation. DOS displays messages indicating theprogress and successful completion of the procedure. Finally, DOS displays the followingmessage:
QuickFormat another (Y/N)?
Press Y if you want to use the same switch settings to format another disk or press N toreturn to the DOS prompt.
Deleting Macros
You can remove a macro from memory simply by putting nothing to the right of the equalsign when you define the macro. Assume, for example, that you no longer need the FAmacro defined earlier. To remove it from memory—thereby freeing more space for othermacros—type the following at the DOS prompt:
DOSKEY FA=
If you use a macro name that is the same as an existing DOS command, you effectivelyreplace the DOS command with the macro.
Configuring Your ComputerIn this chapter
Getting the Most from Your Computer Resources 442
Understanding Device Drivers 443
Optimizing Your Computer’s Memory 445
Providing Memory for Your Applications 460
Increasing Hard Disk Performance 461
Fine-Tuning Your Computer with CONFIG.SYS and AUTOEXEC.BAT 463
19CHAPTER
442 Chapter 19 Configuring Your Computer
Getting the Most from Your ComputerResources
Computers on the market today have many similarities. They are based on the same familyof computer chips, and they have similar components, such as memory, hard disks, andpower supplies. Still, the differences between various makes and models of personal comput-ers are greater today than ever before. DOS gives you the tools to fine-tune the operation ofevery element of your computer system, an exercise often called configuring your system. Youcan adjust a bewildering number of settings; how you manipulate these settings greatlyaffects how efficiently your PC works. Sadly, the people who do not understand how to con-figure their PCs greatly outnumber the people who do. By reading this chapter, you canbecome one of the latter.
Fortunately, the folks at Microsoft realize that configuring a modern PC can be challengingfor most users, and perhaps the most important tool that Microsoft includes with DOS isMemMaker, a tool that performs the hardest part of the configuration automatically. If youwant to call yourself a PC guru, you need to understand the configuration process; but ifyou’re a novice user, the worst part of working with MS-DOS just disappeared.
The default configuration of DOS, which might be adequate for many users, is designed asa “lowest common denominator,” intended to work with the greatest number of systems. AsPC technology advances, DOS also must enable users of the most up-to-date systems totake full advantage of their computers’ most powerful features. This chapter describes howto use DOS to create the optimal configuration for your computer system, whether yoursystem is a plain vanilla PC or a banana split with all the toppings.
Whether you use your own computer or a computer owned by your employer, someone hasinvested a significant sum of money in the system. This chapter helps you discover how toconfigure your computer to operate most efficiently—how to get the “most bang for thebuck.” You generally can improve the performance of software running on your PC in twoways: You can increase the amount of memory available to the software, and you canincrease the speed at which your system or its components operate. You can tackle theseefficiency-oriented goals in two general ways:
■ Add or replace hardware
■ Use software to attain an optimal configuration for your existing hardware resources
DOS fits into the software category. This chapter teaches you how to use DOS to increasethe amount of memory available to applications. The chapter also explains how to use spe-cial device drivers and utility programs to enhance the performance of your hard disk, whichin turn enhances software performance.
443Understanding Device Drivers
Understanding Device DriversMS-DOS certain features that every DOS user needs. Regardless of the type of computeryou use or the software you run, you must be capable of creating directories, accessing files,and printing to your printer. Many other features, however, might not be important to you,depending on the type of computer you have and how you use it. If you plan to use a mousewith DOS, DOS must load the mouse-handling functions when your computer boots. If youdon’t plan to use a mouse, loading the mouse-handling functions ties up valuable memory, asacrifice you don’t want to make.
To give you the flexibility of using only the parts of DOS that you need, DOS consists of abase portion (which contains the features that everybody needs) and a series of what youmight think of as “plug-in modules” (pieces of programs that give DOS the instructions itneeds to perform certain tasks). Because you can decide which of the optional modules touse, you don’t waste memory-loading features you don’t need.
These plug-in modules are called device drivers because they generally give DOS the infor-mation needed to access various types of hardware devices. In addition to the device driversthat come with DOS, some add-on hardware comes with a device driver that enables yoursystem to recognize and use the hardware. If, for example, you buy a mouse to use with yourcomputer, you also must load the appropriate device driver so that DOS knows how to con-trol the mouse.
Most device drivers are loaded in your CONFIG.SYS file. One of the most important tasks thisfile performs is to tell DOS which device drivers to load when the computer boots. TheDEVICE command tells DOS to load a device driver and uses the following syntax:
DEVICE = filespec /switches
filespec is the complete filename (and optional disk and path) for the device driver file, and/switches are any switches the device driver software needs.
If you buy a Microsoft mouse, for example, you also get a device driver called MOUSE.SYSthat tells DOS how to use the mouse. If you place MOUSE.SYS in the root directory of your Cdrive, you can load MOUSE.SYS by adding the following command to CONFIG.SYS:
DEVICE = C:\MOUSE.SYS
(The spaces around the equal sign in this syntax are optional.)
You can load as many device drivers as you need, but you must use a separate DEVICE com-mand for each driver you install.
Most users create a special subdirectory called \DRIVERS or \SYS and put the driver files inthis directory so that they are out of the way of daily files. If you put the driver files in a sep-arate subdirectory, you must specify the pathname as part of the name of the device driver,as shown in the following examples:
DEVICE = C:\DRIVERS\MOUSE.SYS
DEVICE = C:\SYS\MOUSE.SYS
19
IVPart
Ch
444 Chapter 19 Configuring Your Computer
Table 19.1 lists the device driver files included with DOS 6.22
Table 19.1 DOS 6.22 Device Drivers
Device Driver Description
ANSI.SYS Enables control of the display by using ANSI control sequences.
CHKSTATE.SYS Used by MemMaker when optimizing your system.
DBLSPACE.BIN Enables disk compression, greatly increasing the amount of data you canstore on your hard disk. The DBLSPACE.SYS file loads this driver in yourCONFIG.SYS file.
DISPLAY.SYS Provides support for code-page switching to the screen.
DMDRVR.BIN Provides support for Ontrack Disk Manager.
DRIVER.SYS Sets parameters for physical and logical disk drives.
EGA.SYS Saves and restores an EGA screen when you’re using DOSSHELL and the taskswapper.
EMM386.EXE Uses XMS memory in an 80386 or 80486 computer to emulate EMS mem-ory and provide upper memory blocks.
HIMEM.SYS Manages extended memory.
INTERLNK.EXE Provides the Interlnk network client control program and device driver.
MONOUMB.386 Provides a device driver used by Windows that allows EMM386 access tothe monochrome video region, treating it as a UMB area.
MOUSE.COM Provides support for a Microsoft mouse.
POWER.EXE Provides support for computers utilizing APM (Advanced PowerManagement) hardware.
PRINTER.SYS Provides support for international characters and code-page switching oncertain printers.
RAMDRIVE.SYS Uses a portion of random access memory (RAM) to simulate a hard disk—often called a RAM disk.
SETVER.EXE Establishes a version table that lists the version number DOS reports tonamed programs.
SMARTDRV.EXE Uses extended or expanded memory to buffer disk reads.
SSTOR.SYS Provides support for SpeedStor hard disk compression.
VFINTD.386 Used by Windows to give MWBACKUP access to tape drives.
The most commonly used device drivers are discussed in this chapter. Refer to Appendix F,“Command Reference,” for the syntax of the drivers not covered here.
445Optimizing Your Computer’s Memory
19
IVPart
Ch
When you install DOS, you might notice that DOS installs two files that appear to be devicedrivers because they end in the .SYS extension: COUNTRY.SYS and KEYBOARD.SYS.Despite their extension, these files are not device drivers; they are used internally by otherDOS commands, and you cannot use them in your CONFIG.SYS file.
Optimizing Your Computer’s MemoryIn Chapter 1, “DOS and the Personal Computer,” you learned about memory and how itrelates to your PC. With that understanding in mind, you are ready to learn how you canmake the most of your PC’s memory.
➔ To learn more about the CONFIG.SYS file and how it works, see “Starting DOS,” p. 23.
Using Extended Memory and HIMEM.SYS
In terms of optimizing your computer, the most significant feature offered by DOS is thecapability to load most of the operating system software into extended memory. By doing so,DOS provides more conventional memory for applications, ultimately improving the perfor-mance of your system.
Understanding HIMEM.SYS
Before DOS or applications software can use extended memory, you must add a commandto your CONFIG.SYS file to load an Extended Memory Manager—a driver that provides astandard way for applications to address extended memory so that no two programs use thesame portion of extended memory at the same time. DOS 4.0 and later versions include theExtended Memory Manager HIMEM.SYS.
HIMEM.SYS manages memory according to the rules set out in the Extended MemorySpecification (XMS) Version 2.0. According to this specification, three areas of memoryabove the conventional 640KB barrier can be made available for programs to use:
■ Upper memory area (UMA)—This area consists of the 384KB of memory above640KB up to 1MB and is divided into many different-size blocks, called upper memoryblocks (UMBs).
■ High memory area (HMA)—This is a single block of memory essentially consisting ofthe first 64KB of extended memory. However, the HMA slightly overlaps the uppermemory area; the last 16 bytes of the upper memory area are the first 16 bytes of thehigh memory area. (Most people are not aware of this slight overlap, and it can be agood way to win bar bets.)
■ Extended memory blocks (XMS memory)—This portion of memory includes allmemory above 1,024KB. When extended memory is managed by an Extended MemoryManager, you refer to the memory as XMS memory.
446 Chapter 19 Configuring Your Computer
The terms used to describe DOS memory can be maddening. Try not to confuse high mem-ory with upper memory.
When used on an x86 PC, HIMEM.SYS provides HMA and XMS memory to programs thatknow how to use it. To access upper memory, however, the PC must have at least an 80386CPU or higher, and you must include one of the following device driver commands in CONFIG.SYS after HIMEM.SYS is loaded:
DEVICE=EMM386.EXE RAM
DEVICE=EMM386.EXE NOEMS
Refer to the next section for a full discussion of EMM386.EXE.
The syntax for using HIMEM.SYS is shown in the following:
DEVICE=d:path\HIMEM.SYS /A20CONTROL:ON|OFF /NUMHANDLES=n /EISA/HMAMIN=n/INT15=xxxx /MACHINE:xx /SHADOWRAM:ON|OFF /CPUCLOCK:ON|OFF /QUIET
d: is the disk drive where the HIMEM.SYS resides, and path\ is the directory containing thedevice driver file. If HIMEM.SYS is contained in the \DOS directory on your C drive, for exam-ple, you include the following command in CONFIG.SYS:
DEVICE=C:\DOS\HIMEM.SYS
In most cases, you need only this command to activate the Extended Memory Manager. Inspecial cases, however, you might need to use one of the available switches described in thefollowing paragraphs. The next section continues the discussion of loading DOS into uppermemory.
According to XMS specifications, only one program at a time can use the high memoryarea. The switch /HMAMIN=n sets the minimum amount of memory that must be requested byan application before the application is permitted to use HMA. If you load DOS into HMA,you can omit this switch, as explained in the section “Loading DOS into High Memory”later in this chapter.
When the Extended Memory Manager assigns memory to a particular program, it assignsone or more extended memory block handles to the program. The /NUMHANDLES=n switchindicates the maximum number of handles available. The number n must be between 1 and128. The default is 32 handles, usually a sufficient number. Each reserved handle requires anadditional 6 bytes of memory. Unless you are running software that complains about nothaving enough extended memory handles, you probably do not need this option.
Most current versions of commercial software support the XMS specification for addressingextended memory. Some older versions of programs, however, use a different method ofaddressing extended memory, known as the Interrupt 15h (INT15h) interface. If you workwith software that uses the INT15h interface and you want to load DOS into HMA, add the/INT15=xxxx switch. The number xxxx indicates the amount of extended memory you wantHIMEM.SYS to assign to the INT15h interface. This number must be from 64 to 65,535 (kilo-bytes), and the default is 0. If you assign some of your extended memory to the INT15hinterface, that memory is not available to programs that expect the XMS interface.
447Optimizing Your Computer’s Memory
Internally, DOS uses a wire called the A20 memory address line to access the high memoryarea. What the A20 address line is and how DOS uses it are not important here, but not allbrands of PCs handle the A20 line in the same way. Normally, HIMEM.SYS can detect howyour computer uses its A20 line, but if it is incorrect, HIMEM.SYS displays the following errormessage:
Unable to control A20
If you see this message, use the /MACHINE:xx switch in the HIMEM.SYS command to specifywhich type of A20 handler your machine uses. For xx in the /MACHINE switch, insert the codethat matches your computer. You can find the text codes in the Code column and the num-ber codes in the Number column in Table 19.2. If you see the error message but your com-puter is not listed in Table 19.2, try the switch /MACHINE:1.
Table 19.2 A20 Handler Codes
Code Number Computer
at 1 IBM PC/AT
ps2 2 IBM PS/2
pt1cascade 3 Phoenix Cascade BIOS
hpvectra 4 HP Vectra (A and A+)
att6300plus 5 AT&T 6300 Plus
acer1100 6 Acer 1100
toshiba 7 Toshiba 1600 and 1200XE
wyse 8 Wyse 12.5MHz 286
tulip 9 Tulip SX
zenith 10 Zenith ZBIOS
at1 11 IBM PC/AT (alternative delay)
at2 12 IBM PC/AT (alternative delay)
css 12 CSS Labs
at3 13 IBM PC/AT (alternative delay)
philips 13 Philips
fasthp 14 HP Vectra
IBM 7552 15 IBM 7552 Industrial Computer
Bull Mioral 16 Bull Mioral 60
DELL 17 DELL XBios
Before DEVICE=HIMEM.SYS in CONFIG.SYS, you might have listed a device driver that also usesthe A20 line. By default, HIMEM.SYS takes control of A20 even though the line is turned onwhen HIMEM.SYS loads. HIMEM.SYS warns you when this condition occurs by displaying thefollowing message:
19
IVPart
Ch
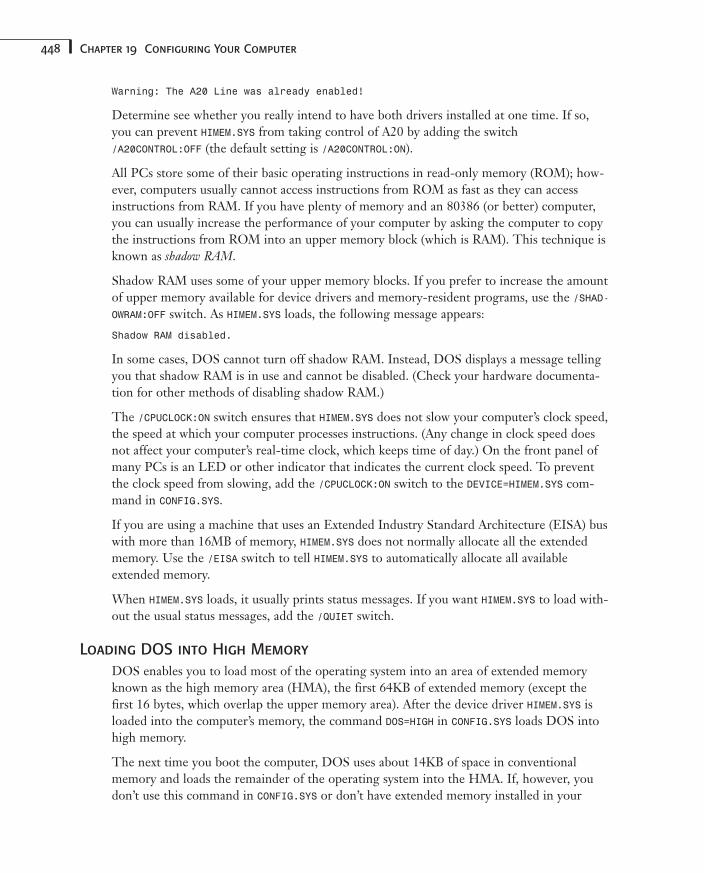
448 Chapter 19 Configuring Your Computer
Warning: The A20 Line was already enabled!
Determine see whether you really intend to have both drivers installed at one time. If so,you can prevent HIMEM.SYS from taking control of A20 by adding the switch/A20CONTROL:OFF (the default setting is /A20CONTROL:ON).
All PCs store some of their basic operating instructions in read-only memory (ROM); how-ever, computers usually cannot access instructions from ROM as fast as they can accessinstructions from RAM. If you have plenty of memory and an 80386 (or better) computer,you can usually increase the performance of your computer by asking the computer to copythe instructions from ROM into an upper memory block (which is RAM). This technique isknown as shadow RAM.
Shadow RAM uses some of your upper memory blocks. If you prefer to increase the amountof upper memory available for device drivers and memory-resident programs, use the /SHAD-OWRAM:OFF switch. As HIMEM.SYS loads, the following message appears:
Shadow RAM disabled.
In some cases, DOS cannot turn off shadow RAM. Instead, DOS displays a message tellingyou that shadow RAM is in use and cannot be disabled. (Check your hardware documenta-tion for other methods of disabling shadow RAM.)
The /CPUCLOCK:ON switch ensures that HIMEM.SYS does not slow your computer’s clock speed,the speed at which your computer processes instructions. (Any change in clock speed doesnot affect your computer’s real-time clock, which keeps time of day.) On the front panel ofmany PCs is an LED or other indicator that indicates the current clock speed. To preventthe clock speed from slowing, add the /CPUCLOCK:ON switch to the DEVICE=HIMEM.SYS com-mand in CONFIG.SYS.
If you are using a machine that uses an Extended Industry Standard Architecture (EISA) buswith more than 16MB of memory, HIMEM.SYS does not normally allocate all the extendedmemory. Use the /EISA switch to tell HIMEM.SYS to automatically allocate all availableextended memory.
When HIMEM.SYS loads, it usually prints status messages. If you want HIMEM.SYS to load with-out the usual status messages, add the /QUIET switch.
Loading DOS into High Memory
DOS enables you to load most of the operating system into an area of extended memoryknown as the high memory area (HMA), the first 64KB of extended memory (except thefirst 16 bytes, which overlap the upper memory area). After the device driver HIMEM.SYS isloaded into the computer’s memory, the command DOS=HIGH in CONFIG.SYS loads DOS intohigh memory.
The next time you boot the computer, DOS uses about 14KB of space in conventionalmemory and loads the remainder of the operating system into the HMA. If, however, youdon’t use this command in CONFIG.SYS or don’t have extended memory installed in your
449
19
IVPart
Ch
Optimizing Your Computer’s Memory
computer, DOS occupies more than 62KB of memory. By loading the operating system intohigh memory, DOS 6.2 can free about 47KB of conventional memory.
Using Expanded Memory and EMM386.EXE
Because expanded memory was introduced before extended memory, many PC applicationswere written to take advantage of expanded memory, not extended memory. Today, however,extended memory is far less expensive and much more common. The DOS device driverEMM386.EXE enables applications to use extended memory as though it were expanded memo-ry, freeing you from the need for the special memory boards and device drivers that expand-ed memory requires. Thus, EMM386.EXE emulates expanded memory by using extendedmemory.
The device driver HIMEM.SYS, discussed earlier, must be loaded before EMM386.EXE.HIMEM.SYS makes extended memory available, and EMM386.EXE enables you to usesome or all extended memory as though it were expanded memory. Do not useEMM386.EXE if you are using another driver from a third-party software vendor as anexpanded memory manager.
Some applications today can use either expanded memory or extended memory by accessingwhichever is available. If you have a choice, use extended memory, which is faster.
In addition to its role as an expanded memory emulator, EMM386.EXE also is a UMB provider,working with HIMEM.SYS to provide upper memory blocks (UMBs) into which you can loaddevice drivers and memory-resident programs. See the next section, “Loading DeviceDrivers and TSRs into Upper Memory,” for further discussion of providing UMBs.
The syntax of the command for EMM386.EXE, used as a device driver, is shown in the following:
DEVICE=EMM386.EXE ON|OFF|AUTO memory W=ON|OFFMx|FRAME=address /Pmmmm Pn=address X=mmmm-nnnI=mmmm-nnn B=address L=minxms A=altregs H=handlesD=nnn RAM NOEMS MIN=n /VERBOSE ROM=mmmm-nnnn NOVCPIWIN=mmmm-nnnn NOMOVEXBDA NOHIGHSCAN ALTBOOT NOHI
In most cases, one of the following commands is sufficient:
DEVICE=EMM386.EXE RAM
DEVICE=EMM386.EXE NOEMS
The first command loads the expanded memory emulator and allocates 256KB of extendedmemory to be used as expanded memory. The RAM switch enables upper memory. The sec-ond command also enables upper memory but tells EMM386 not to allocate extended mem-ory for use as expanded memory.
Sometimes you might need the remaining switches for the EMM386.EXE device driver to cus-tomize your computer for use with particularly demanding software or hardware. You canspecify ON, OFF, or AUTO in the EMM386.EXE device driver command to indicate whether your

450 Chapter 19 Configuring Your Computer
computer starts in the EMM386.EXE active, inactive, or automatic mode, respectively. Bydefault, the device driver is active, and EMM386.EXE makes extended memory available.However, some applications might not run properly when EMM386.EXE is active becauseEMM386.EXE places the computer in a mode known as Virtual 8086 mode. When you useEMM386.EXE as a device driver, the driver loads in memory and remains active (ON) unless youspecify otherwise by using the OFF switch.
The OFF switch starts the computer with EMM386.EXE loaded in memory but inactive. TheXMS memory allocated as EMS memory is unavailable for any purpose. You can activate thedriver by entering the following command at the DOS command prompt:
EMM386 ON
The OFF switch is not compatible, however, with the RAM or NOEMS switches, discussed later inthis section.
Use AUTO if you want EMM386.EXE to activate only when an application requests EMS memo-ry. This setting provides maximum compatibility with software that might not work proper-ly in Virtual 8086 mode. Like the OFF switch, AUTO is not compatible with the RAM or NOEMSswitches.
Even though EMM386.EXE activates when an application requests EMS memory, the driverdoes not automatically deactivate when the application terminates. To turn off the driver,you must issue the following command at the command prompt:
EMM386 OFF
The memory parameter enables you to specify the amount of XMS memory you wantEMM386.EXE to allocate as EMS memory. Type the number of kilobytes in the range from 16to 32,768. EMM386.EXE rounds any number you type down to the nearest multiple of 16. Allunallocated memory remains available as XMS memory. The default EMS memory allocat-ed is 256KB.
As a general rule, allocate only as much EMS memory as is required by your applications.Any memory allocated as EMS memory is no longer available as XMS memory. Most of thenewer DOS applications, especially games, require the maximum amount of XMS you canmake available. If none of your applications need expanded memory, use the NOEMS option sothat no memory is allocated as expanded memory.
Use the L=minxms switch, in which minxms is the number of kilobytes, to indicate the mini-mum XMS memory that EMM386.EXE is to allocate. This parameter overrides the memoryparameter.
If you installed a Weitek math coprocessor chip—a special computer chip that improves the performance of computation-intensive software, such as computer-aided design (CAD)software—use the W=ON switch. By default, the device driver does not support this type of
451
19
IVPart
Ch
Optimizing Your Computer’s Memory
coprocessor. You also can turn on or off support for the Weitek coprocessor by entering oneof the following commands at the DOS prompt:
EMM386 W=ON
EMM386 W=OFF
In some circumstances, you might want to use upper memory for device drivers and memory-resident programs, but you don’t need EMS memory. In this case, use the NOEMS switch withthe EMM386.EXE driver to free the maximum amount of upper memory and to provide no EMSmemory. You might intend to run Windows 3.1 on your computer, for example. BecauseWindows can use all your XMS memory, this software doesn’t need EMS memory.
The /VERBOSE switch causes EMM386 to print status and error messages when it loads.Normally, EMM386 suppresses these messages. You can abbreviate /VERBOSE as /V.
EMM386 scans the upper memory area (UMA) for all available free memory. Unusual archi-tectures might confuse EMM386, causing trouble when your computer boots or while you usethe computer. The NOHIGHSCAN parameter limits EMM386’s scanning of the UMA. If you expe-rience problems when you use EMM386, adding the NOHIGHSCAN parameter might solve theproblem.
EMM386 loads part of itself into the upper memory area. If one of your programs needs extraupper memory blocks, and you’re willing to give up some of your conventional memory, theNOHI parameter causes EMM386 to load all of itself into conventional memory, and doesnot use any UMA.
The remaining switches available for use with EMM386.EXE are highly technical and beyondthe scope of this book. Refer to your DOS User’s Guide or the Technical Reference manualfor more information.
Loading Device Drivers and TSRs into Upper Memory
In addition to enabling you to run DOS in high memory, DOS provides the capability ofloading memory-resident programs and device drivers into upper memory blocks, freeingmore conventional memory for other applications. DOS can access this area of memory in80386 and 80486 PCs (including SXs) that have 1MB or more of memory.
To load device drivers or memory-resident programs, also called terminate-and-stay-resident(TSR) programs, into upper memory, the following conditions must be met:
■ Your computer has an 80386 or better CPU.
■ HIMEM.SYS is loaded as a device driver.
■ EMM386.EXE is loaded as a device driver with the RAM or NOEMS switch.
■ The command DOS=UMB appears in the CONFIG.SYS file.
If you also want to use the command DOS=HIGH to load DOS into high memory, you cancombine the two commands as shown in the following:
DOS=HIGH, UMB
452 Chapter 19 Configuring Your Computer
You can load two types of programs into upper memory: device drivers and memory-resident programs (TSRs). You already know that device drivers normally are loaded usingthe DEVICE command. When you want to load a device driver into upper memory, however,you use the DEVICEHIGH command. The syntax for this configuration command is as follows:
DEVICEHIGH=filename.ext /switches
The switches in the syntax for the preceding command are any switches you use for thefile that you are loading, not for the DEVICEHIGH command itself.
To load into upper memory the screen driver ANSI.SYS, for example, you need the followingcommand in CONFIG.SYS:
DEVICEHIGH=C:\DOS\ANSI.SYS
When you boot the computer, DOS attempts to load ANSI.SYS into the upper memory area.
DEVICEHIGH and LOADHIGH recognize two switches: /L and /S. When you useMemMaker to automatically configure your PC, it might use these switches in the com-mands it generates. These switches are not intended for use by users.
To load a memory-resident program into upper memory, precede the program’s startupcommand with LOADHIGH. (You can use the abbreviation LH in place of LOADHIGH.) The syntaxfor the command for LOADHIGH is as follows:
LOADHIGH programname /switches
As an example, assume that you want to load DOSKEY (discussed in Chapter 18,“Mastering DOSKEY and Macros”) into upper memory each time you start your computer.To do so, you add the following command to your AUTOEXEC.BAT file:
LOADHIGH DOSKEY
The next time you reboot the computer, DOS attempts to load DOSKEY into upper mem-ory. DOS does not load a program into upper memory if the program requests that DOSallocate more memory during initialization than is available in the largest available uppermemory block. If DOS is not successful when it tries to load device drivers or TSRs into theupper memory area, it loads the program into conventional memory instead.
Use the MEM command to determine whether a driver or program has loaded into uppermemory.
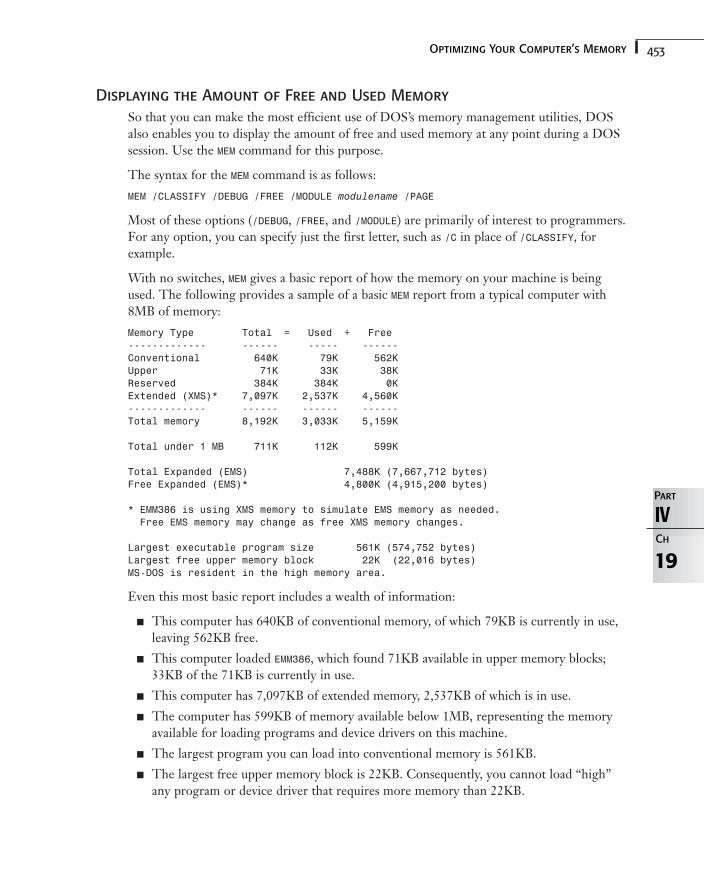
453
Displaying the Amount of Free and Used Memory
So that you can make the most efficient use of DOS’s memory management utilities, DOSalso enables you to display the amount of free and used memory at any point during a DOSsession. Use the MEM command for this purpose.
The syntax for the MEM command is as follows:
MEM /CLASSIFY /DEBUG /FREE /MODULE modulename /PAGE
Most of these options (/DEBUG, /FREE, and /MODULE) are primarily of interest to programmers.For any option, you can specify just the first letter, such as /C in place of /CLASSIFY, forexample.
With no switches, MEM gives a basic report of how the memory on your machine is beingused. The following provides a sample of a basic MEM report from a typical computer with8MB of memory:
Memory Type Total = Used + Free------------- ------ ----- ------Conventional 640K 79K 562KUpper 71K 33K 38KReserved 384K 384K 0KExtended (XMS)* 7,097K 2,537K 4,560K------------- ------ ------ ------Total memory 8,192K 3,033K 5,159K
Total under 1 MB 711K 112K 599K
Total Expanded (EMS) 7,488K (7,667,712 bytes)Free Expanded (EMS)* 4,800K (4,915,200 bytes)
* EMM386 is using XMS memory to simulate EMS memory as needed.Free EMS memory may change as free XMS memory changes.
Largest executable program size 561K (574,752 bytes)Largest free upper memory block 22K (22,016 bytes)MS-DOS is resident in the high memory area.
Even this most basic report includes a wealth of information:
■ This computer has 640KB of conventional memory, of which 79KB is currently in use,leaving 562KB free.
■ This computer loaded EMM386, which found 71KB available in upper memory blocks;33KB of the 71KB is currently in use.
■ This computer has 7,097KB of extended memory, 2,537KB of which is in use.
■ The computer has 599KB of memory available below 1MB, representing the memoryavailable for loading programs and device drivers on this machine.
■ The largest program you can load into conventional memory is 561KB.
■ The largest free upper memory block is 22KB. Consequently, you cannot load “high”any program or device driver that requires more memory than 22KB.
19
IVPart
Ch
Optimizing Your Computer’s Memory
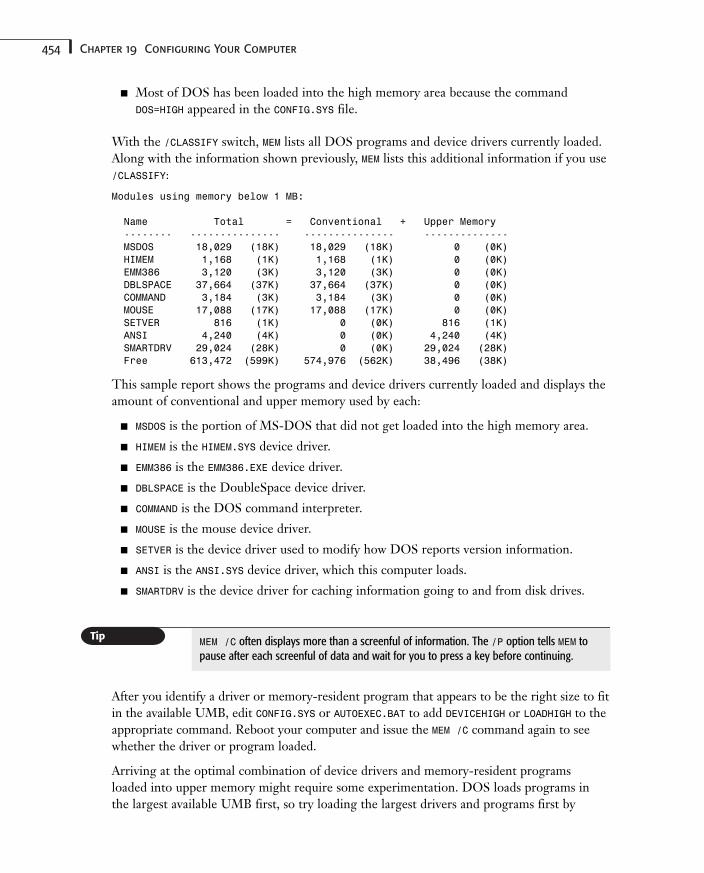
454 Chapter 19 Configuring Your Computer
■ Most of DOS has been loaded into the high memory area because the commandDOS=HIGH appeared in the CONFIG.SYS file.
With the /CLASSIFY switch, MEM lists all DOS programs and device drivers currently loaded.Along with the information shown previously, MEM lists this additional information if you use/CLASSIFY:
Modules using memory below 1 MB:
Name Total = Conventional + Upper Memory-------- --------------- --------------- --------------MSDOS 18,029 (18K) 18,029 (18K) 0 (0K)HIMEM 1,168 (1K) 1,168 (1K) 0 (0K)EMM386 3,120 (3K) 3,120 (3K) 0 (0K)DBLSPACE 37,664 (37K) 37,664 (37K) 0 (0K)COMMAND 3,184 (3K) 3,184 (3K) 0 (0K)MOUSE 17,088 (17K) 17,088 (17K) 0 (0K)SETVER 816 (1K) 0 (0K) 816 (1K)ANSI 4,240 (4K) 0 (0K) 4,240 (4K)SMARTDRV 29,024 (28K) 0 (0K) 29,024 (28K)Free 613,472 (599K) 574,976 (562K) 38,496 (38K)
This sample report shows the programs and device drivers currently loaded and displays theamount of conventional and upper memory used by each:
■ MSDOS is the portion of MS-DOS that did not get loaded into the high memory area.
■ HIMEM is the HIMEM.SYS device driver.
■ EMM386 is the EMM386.EXE device driver.
■ DBLSPACE is the DoubleSpace device driver.
■ COMMAND is the DOS command interpreter.
■ MOUSE is the mouse device driver.
■ SETVER is the device driver used to modify how DOS reports version information.
■ ANSI is the ANSI.SYS device driver, which this computer loads.
■ SMARTDRV is the device driver for caching information going to and from disk drives.
MEM /C often displays more than a screenful of information. The /P option tells MEM topause after each screenful of data and wait for you to press a key before continuing.
After you identify a driver or memory-resident program that appears to be the right size to fitin the available UMB, edit CONFIG.SYS or AUTOEXEC.BAT to add DEVICEHIGH or LOADHIGH to theappropriate command. Reboot your computer and issue the MEM /C command again to seewhether the driver or program loaded.
Arriving at the optimal combination of device drivers and memory-resident programsloaded into upper memory might require some experimentation. DOS loads programs inthe largest available UMB first, so try loading the largest drivers and programs first by
455
19
IVPart
Ch
Optimizing Your Computer’s Memory
placing their startup commands earliest in CONFIG.SYS or AUTOEXEC.BAT. To alleviate some ofthe trial-and-error necessary in arriving at the optimal memory arrangement, DOS nowprovides the MemMaker utility, which is described in the following section.
Configuring Memory with MemMaker
Understanding and configuring a PC’s memory is one of the most challenging activitiesmost users face. Because most users usually configure their computer’s memory once, theynever really get a chance to build any experience fiddling with the configuration. After sev-eral years of watching users stumble at configuring their PCs, Microsoft finally offered help.DOS includes MemMaker, a utility that analyzes your PC and makes the appropriatechanges to your CONFIG.SYS and AUTOEXEC.BAT files so that your computer uses its memorymost effectively.
Some people use Windows or a particular application so often that they add a command tothe end of their AUTOEXEC.BAT file to start the application automatically every time theyboot. If you have added such a command that takes you automatically into Windows orany other program, read this warning carefully. If, on the other hand, you find yourself atthe DOS prompt when your computer boots, you can skip this warning.
MemMaker does its work in three phases, and between each phase it reboots your com-puter. Each time MemMaker causes your computer to reboot, your AUTOEXEC.BAT filestarts your application as usual, preventing MemMaker from continuing its work. You mustexit these programs for MemMaker to perform the next phase.
You can take Understanding two different paths to configure your memory withMemMaker. One is to follow the Express Setup. The other path you can choose is theCustom Setup.
Express Setup is the easier path to choose. You have little interaction with Express Setup,other than pressing Enter when MemMaker prompts you to do so. MemMaker searchesthrough the upper memory area to find open memory addresses. It then sorts device driversand TSRs that you load in memory to see the optimum loading order. Finally, it updatesyour CONFIG.SYS and AUTOEXEC.BAT files for two reasons. MemMaker ensures that HIMEM.SYSand EMM386.EXE load to manage memory and that the DOS=UMB directive is in CONFIG.SYS toprovide the link to upper memory blocks. In addition, MemMaker inserts DEVICEHIGH andLOADHIGH before the device drivers and TSRs that load in upper memory.
Although MemMaker adds the device drivers HIMEM.SYS and EMM386.EXE and the uppermemory block directive HIGH=UMB, it does not ensure that DOS loads into upper memorywith the directive DOS=HIGH. Before you use MemMaker, ensure that your system loadsDOS in the high memory area by inserting DOS=HIGH in your CONFIG.SYS file andrebooting your computer. After you are running DOS in the high memory area (the MEMcommand tells you that DOS is in the high memory area), run MemMaker.
456 Chapter 19 Configuring Your Computer
If you start an application such as Windows from your AUTOEXEC.BAT file, place the wordREM in front of the startup command (in this case, in front of WIN) before usingMemMaker. REM causes DOS to ignore the rest of the command so that you don’t have toexit your application during each MemMaker phase. When MemMaker has completed itswork, remove REM so that your application again starts automatically each time you boot.
An easy way to run MemMaker is to use the /BATCH switch. From the command line, typeMEMMAKER /BATCH. This command runs MemMaker in automatic mode, accepting all thedefault answers.
Custom Setup is similar to Express Setup in that it scans the upper memory area for openaddress space, sorts device drivers and TSRs for optimal order, and updates yourAUTOEXEC.BAT and CONFIG.SYS files. As you might expect, however, you can customize howMemMaker performs these tasks. The following list shows the elements you can customizeusing Custom Setup:
■ Specify any TSRs that are not to be included in optimization.
■ Aggressively scan the upper memory area.
■ Set aside upper memory for Windows use.
■ Use an area of upper memory set aside for the Monochrome Display Adapter (MDA) ifyou are using only an EGA or VGA display (but not SuperVGA).
■ Keep any special memory inclusions or exclusions that you specified with EMM386.EXE.
■ Move the Extended BIOS data area in upper memory blocks.
Now that you understand what MemMaker can do to optimize your computer’s memory,you are ready to use MemMaker. The following two sections explain how to use MemMakerwith Express Setup and Custom Setup.
Using Express Setup
Follow these steps to run MemMaker using Express Setup:
1. At the DOS prompt, type MEMMAKER and press Enter.
2. MemMaker asks whether you want to continue. Press Enter to continue.
3. MemMaker asks whether you want Express or Custom Setup, as shown in Figure 19.1.For most users, an Express Setup does an excellent job. Unless you are very knowledge-able about PCs and want to guide MemMaker’s every step, press Enter to select anExpress Setup.
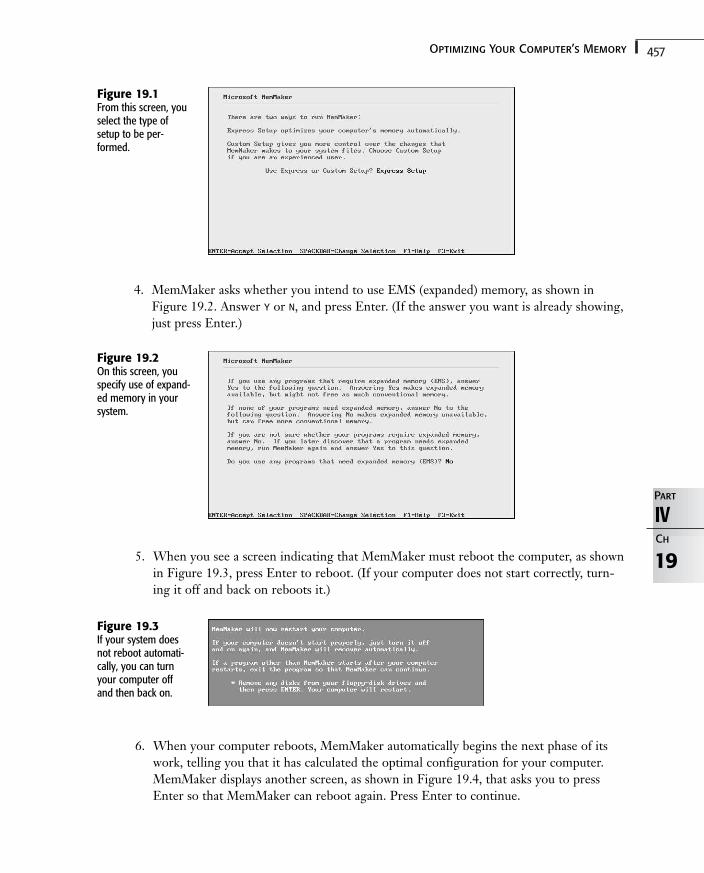
457
19
IVPart
Ch
Optimizing Your Computer’s Memory
4. MemMaker asks whether you intend to use EMS (expanded) memory, as shown inFigure 19.2. Answer Y or N, and press Enter. (If the answer you want is already showing,just press Enter.)
Figure 19.1From this screen, youselect the type ofsetup to be per-formed.
Figure 19.2On this screen, youspecify use of expand-ed memory in yoursystem.
5. When you see a screen indicating that MemMaker must reboot the computer, as shownin Figure 19.3, press Enter to reboot. (If your computer does not start correctly, turn-ing it off and back on reboots it.)
Figure 19.3If your system doesnot reboot automati-cally, you can turnyour computer offand then back on.
6. When your computer reboots, MemMaker automatically begins the next phase of itswork, telling you that it has calculated the optimal configuration for your computer.MemMaker displays another screen, as shown in Figure 19.4, that asks you to pressEnter so that MemMaker can reboot again. Press Enter to continue.
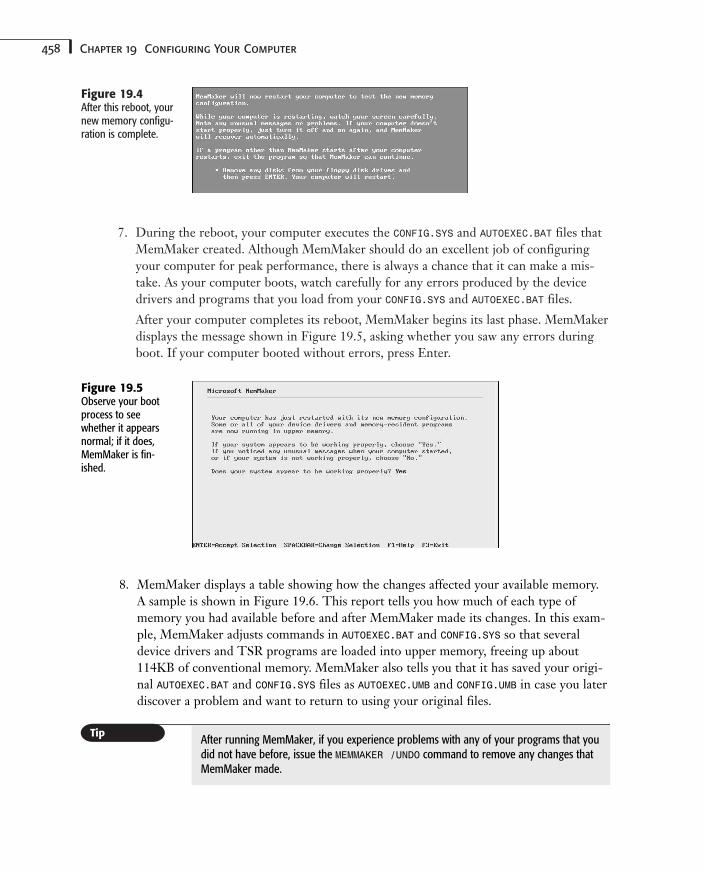
458 Chapter 19 Configuring Your Computer
7. During the reboot, your computer executes the CONFIG.SYS and AUTOEXEC.BAT files thatMemMaker created. Although MemMaker should do an excellent job of configuringyour computer for peak performance, there is always a chance that it can make a mis-take. As your computer boots, watch carefully for any errors produced by the devicedrivers and programs that you load from your CONFIG.SYS and AUTOEXEC.BAT files.
After your computer completes its reboot, MemMaker begins its last phase. MemMakerdisplays the message shown in Figure 19.5, asking whether you saw any errors duringboot. If your computer booted without errors, press Enter.
Figure 19.4After this reboot, yournew memory configu-ration is complete.
Figure 19.5Observe your bootprocess to seewhether it appearsnormal; if it does,MemMaker is fin-ished.
8. MemMaker displays a table showing how the changes affected your available memory.A sample is shown in Figure 19.6. This report tells you how much of each type ofmemory you had available before and after MemMaker made its changes. In this exam-ple, MemMaker adjusts commands in AUTOEXEC.BAT and CONFIG.SYS so that severaldevice drivers and TSR programs are loaded into upper memory, freeing up about114KB of conventional memory. MemMaker also tells you that it has saved your origi-nal AUTOEXEC.BAT and CONFIG.SYS files as AUTOEXEC.UMB and CONFIG.UMB in case you laterdiscover a problem and want to return to using your original files.
After running MemMaker, if you experience problems with any of your programs that youdid not have before, issue the MEMMAKER /UNDO command to remove any changes thatMemMaker made.
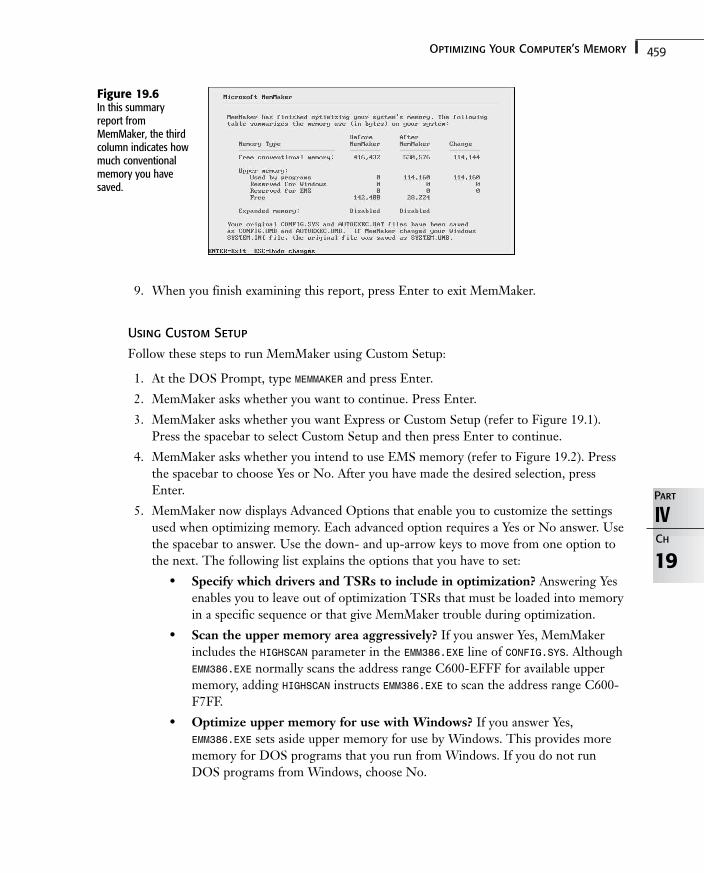
459
19
IVPart
Ch
Optimizing Your Computer’s Memory
9. When you finish examining this report, press Enter to exit MemMaker.
Using Custom Setup
Follow these steps to run MemMaker using Custom Setup:
1. At the DOS Prompt, type MEMMAKER and press Enter.
2. MemMaker asks whether you want to continue. Press Enter.
3. MemMaker asks whether you want Express or Custom Setup (refer to Figure 19.1).Press the spacebar to select Custom Setup and then press Enter to continue.
4. MemMaker asks whether you intend to use EMS memory (refer to Figure 19.2). Pressthe spacebar to choose Yes or No. After you have made the desired selection, pressEnter.
5. MemMaker now displays Advanced Options that enable you to customize the settingsused when optimizing memory. Each advanced option requires a Yes or No answer. Usethe spacebar to answer. Use the down- and up-arrow keys to move from one option tothe next. The following list explains the options that you have to set:
• Specify which drivers and TSRs to include in optimization? Answering Yesenables you to leave out of optimization TSRs that must be loaded into memoryin a specific sequence or that give MemMaker trouble during optimization.
• Scan the upper memory area aggressively? If you answer Yes, MemMakerincludes the HIGHSCAN parameter in the EMM386.EXE line of CONFIG.SYS. AlthoughEMM386.EXE normally scans the address range C600-EFFF for available uppermemory, adding HIGHSCAN instructs EMM386.EXE to scan the address range C600-F7FF.
• Optimize upper memory for use with Windows? If you answer Yes,EMM386.EXE sets aside upper memory for use by Windows. This provides morememory for DOS programs that you run from Windows. If you do not runDOS programs from Windows, choose No.
Figure 19.6In this summaryreport fromMemMaker, the thirdcolumn indicates howmuch conventionalmemory you havesaved.

460 Chapter 19 Configuring Your Computer
• Use monochrome region (B000-BFFF) for running programs? Answer Yesif you have installed an EGA or VGA display adapter but not a monochrome orSuperVGA display adapter. The address range B000-BFFF can be used as uppermemory if you have an EGA or VGA display adapter installed.
• Keep current EMM386 memory exclusions and inclusions? If you currentlyare using EMM386.EXE and have specific addresses specified to include or exclude,answer Yes to this question.
• Move Extended BIOS Data Area from conventional to upper memory?Normally, EMM386.EXE moves the Extended Bios Data Area (EBDA) to uppermemory. If any unusual problems occur while you’re running MemMaker, how-ever, answer No to this option.
6. After you answer all the Advanced Options correctly, press Enter to continue withMemMaker.
7. MemMaker searches your hard disk for a copy of Windows. If it finds Windows,MemMaker displays the directory in which the copy of Windows resides. If this direc-tory is incorrect, type the correct directory. Press Enter to continue.
From this point, MemMaker behaves exactly as in the Express Setup. Refer to the previoussection, picking up with step 5.
Providing Memory for Your ApplicationsOne of the most frustrating problems to encounter using DOS is trying to run a programand discovering that you do not have enough memory available.
If you are trying to run a new application and encounter this problem, you can take somesteps to try to resolve it:
■ Your CONFIG.SYS file loads HIMEM.SYS first and then EMM386.EXE. Together, these two dri-vers allow access to extended memory and upper memory blocks.
■ Unless you are running applications that need expanded memory, use the NOEMS optionfor EMM386.EXE so that all extended memory is available as XMS memory.
■ Load DOS into the high memory area and make upper memory available to DOS byentering the command DOS=HIGH,UMB.
■ Use the DEVICEHIGH command for as many drivers as possible in your CONFIG.SYS file.You cannot use DEVICEHIGH for HIMEM.SYS or EMM386.EXE, and some other device driversmight not load properly with DEVICEHIGH. Experiment and use MEM/C to determinewhether the drivers loaded properly.
■ Use LOADHIGH for any TSRs you load in your AUTOEXEC.BAT file. Because some TSRsmight not work correctly when loaded high, experiment until you determine what TSRyou can load high.
461
19
IVPart
Ch
Increasing Hard Disk Performance
■ If you own a 386 computer or better, your CONFIG.SYS file begins with the following:
DEVICE=C:\DOS\HIMEM.SYSDEVICE=C:\DOS\EMM386.EXE NOEMSDOS=HIGH,UMB
Using the MEM command is very important in this case to see how much memory is availablefor programs. Another point to keep in mind is that you need to avoid loading any driversthat are unnecessary. If the application you are trying to run does not require sound, forexample, and you have a sound card, try not loading the sound drivers.
One useful trick is to make multiple start configurations for different uses. If you have agame that requires a lot of memory, for example, and the only way to get it to run is not toload your tape drive driver, make a new startup configuration for it and use the DOS menufunction.
To find out more details about creating multiple configurations, refer to Chapter 2, “Starting DOS.”
Increasing Hard Disk PerformanceIf your computer is typical, it spends a lot of its time accessing data and programs on harddisk. Speeding up your hard disk is probably the single most significant change you canmake to increase the overall speed of your system. Although most later systems have a fast,IDE-based hard drive, you can configure DOS to make the most of it.
The BUFFERS command in CONFIG.SYS tells DOS how much memory to reserve for filetransfers. DOS sets aside an area of RAM called a buffer for temporary storage of data beingtransferred between the disk and an application.
When DOS is asked to retrieve information from a disk, it reads the information in incre-ments of whole sectors (512 bytes). Excess data not required from that sector is left in thebuffer. If this data is needed later, DOS does not need to perform another disk access toretrieve the data. Similarly, DOS tries to reduce disk activity when it writes information tothe disk. If less than a full sector is to be written to the disk, DOS accumulates the informa-tion in a disk buffer. When the buffer is full, DOS writes the information to the disk. Thisaction is called flushing the buffer. To make sure that all pertinent information is placed into a file, DOS also flushes the buffers when a program closes a disk file.
Whenever a disk buffer is used, DOS marks it to indicate that it has been used recently.When DOS needs to reuse buffers for new information, it takes the buffer that has not beenused for the longest time.
The net effect of DOS’s use of buffers is to reduce the number of disk accesses by readingand writing only full sectors. By reusing the least-recently used buffers, DOS retains infor-mation more likely to be needed next. Your programs and, therefore, DOS run faster.
462 Chapter 19 Configuring Your Computer
You can control the number of buffers available for DOS to use. Each buffer uses up someof your memory but results in faster disk access. The syntax for the BUFFERS command isshown in the following:
BUFFERS = n, m
The n parameter is the number of disk buffers you want DOS to allocate. A single buffer isabout 512 bytes long (plus 16 bytes used by DOS). Use a number from 1 to 99. If you donot give the BUFFERS command, DOS uses a default value between 2 and 15, depending onthe size of your disk drives, the amount of memory in your system, and the version of DOSyou are using. Table 19.3 lists the different default buffer configurations.
Table 19.3 Default Number of Disk Buffers
Buffers Hardware
2 360KB floppy disk drive
3 Any other hard or floppy disk drive
5 More than 128KB of RAM
10 More than 256KB of RAM
15 More than 512KB of RAM
The m parameter is a number in the range 1 through 8 that specifies the number of sectorsDOS reads each time it is instructed to read a file. This feature is sometimes called a sec-ondary cache or a look-ahead buffer. When files most often are read sequentially, this type ofbuffer increases performance. Do not use this secondary cache feature if you are using orplan to use a disk caching program such as SMARTDRV.SYS., discussed in Chapter 7,“Preparing and Maintaining Disks.”
Increasing the number of buffers generally improves disk performance, up to a point. Therecommended number of buffers increases with the size of your hard disk. Consider the sug-gested buffer numbers listed in Table 19.4 when adding a BUFFERS command to CONFIG.EXE.Using a number higher than the recommended number of buffers probably uses more mem-ory without further improving speed.
Table 19.4 Suggested Number of Disk Buffers
Hard Disk Size Buffers
Less than 40MB 20
40MB to 79MB 30
80MB to 119MB 40
120MB or more 50
463
If you have an 85MB hard disk and are not using a hard disk caching program, for example,you might include the following BUFFERS command in CONFIG.SYS:
BUFFERS=40,8
Fine-Tuning Your Computer with CONFIG.SYSand AUTOEXEC.BAT
In addition to the commands covered earlier in this chapter, you can use many other com-mands in CONFIG.SYS or AUTOEXEC.BAT to customize your computer configuration. The fol-lowing sections discuss other useful commands: FCBS, FILES, LASTDRIVE, SHELL, INSTALL, REM,and SWITCHES.
Accessing Files through FCBS
The FCBS configuration command enables you to use programs written for DOS 1.1; someDOS users find FCBs indispensable. FCB is an acronym for file control block. FCBs serve asone way a program can access a file. This method of file access was used by DOS 1.1 tocommunicate with programs. Later versions of DOS borrow a Unix-like method for con-trolling files, called handles (discussed in “Using the FILES Command” in this chapter).Although FCBs can be used with any version of DOS, only DOS 2.0 and higher can usehandles.
The syntax for the FCBS command in the CONFIG.SYS file is as follows:
FCBS = maxopen
The maxopen parameter is a number between 1 and 255 that sets the maximum number ofunique FCBs that programs can open at one time. The default number is four. You don’tneed to use this command in CONFIG.SYS unless you have a program that was designed towork with DOS 1.1 and the program cannot open all the required files (a message to thiseffect appears). In this case, use the FCBS command to increase the number of FCBs that canbe open at one time.
You pay a small price in RAM to use the FCBS command. For each number greater than fourthat maxopen exceeds, DOS uses about 40 bytes.
Using the FILES Command
FILES is the configuration command used in DOS 2.0 and higher to allow for Unix-like filehandling. Unix and later versions of DOS use a file handle (a number corresponding to thefilename) instead of file control blocks to access files. You never have to deal with file han-dles directly. Each application program gives the operating system the name of the file ordevice you want to use. The operating system gives the program a handle, and the programuses that handle to manipulate the file or device.
To include the FILES command in CONFIG.SYS, use the following syntax:
FILES = n
19
IVPart
Ch
Fine-Tuning Your Computer with CONFIG.SYS and AUTOEXEC.BAT
464 Chapter 19 Configuring Your Computer
The n parameter is a number (8, which is the default, through 255) that determines thenumber of files that can be open at one time during a DOS session. Each additional filebeyond eight increases the size of DOS by 39 bytes.
If you do not specify the FILES command, DOS starts with eight file handles and immedi-ately takes five handles for the standard devices, leaving only three handles for your pro-grams. This number is almost never large enough for applications you are likely to run. Onmost systems, increase the number of handles to 20 or 30.
Many installation programs for full-featured applications edit CONFIG.SYS for you andincrease the number of files when necessary to run the software efficiently.
Using LASTDRIVE to Change the Number of Disk Drives
The LASTDRIVE configuration command informs DOS of the maximum number of diskdrives on your system. Generally, LASTDRIVE is a command used with networked computersor with the pretender commands (such as SUBST).
If you do not use the LASTDRIVE command, DOS assumes that the last disk drive on yoursystem is one more than the number of physical drives and RAM disks you are using. If yourLASTDRIVE command specifies a letter corresponding to fewer drives than the number physi-cally attached to your computer or created as RAM disks, DOS ignores the command. TheLASTDRIVE command enables you to tell DOS how many disk drives, real or apparent, are onyour system, including network drives and directories (if any) and drives created with theSUBST command.
If you want to use the LASTDRIVE command in CONFIG.SYS, use the following syntax:
LASTDRIVE = x
The x parameter is the letter for the last disk drive on your system. The letters A through Zin upper- or lowercase are acceptable.
Using the SHELL Command
The SHELL command was originally implemented to enable programmers to replace theDOS command interpreter (COMMAND.COM) with other command interpreters. The SHELLcommand is more commonly used, however, to perform the following two functions:
■ Inform DOS that the command interpreter is in another directory, not in the bootdisk’s root directory.
■ Expand the size of the environment—an area of RAM that stores named variables usedby DOS and applications. Commands such as PATH and PROMPT store their current set-tings as environment variables. To display the contents of the environment, type SET atthe command prompt and press Enter.
465
19
IVPart
Ch
Fine-Tuning Your Computer with CONFIG.SYS and AUTOEXEC.BAT
SHELL is a tricky command; use it with caution. If used incorrectly, the SHELL commandcan lock up your system. Keep a bootable floppy disk handy for restarting your computerin case you run into a problem.
The syntax for the SHELL command is as follows:
SHELL = filespec parameters
The filespec parameter is the path and filename of the command processor and should beCOMMAND.COM if you are using the standard DOS command processor. The SHELL commanddoesn’t take any other parameters or switches, but you can add command-line parameters orswitches available for use with the command processor. The parameters for COMMAND.COM areexplained in the next few paragraphs.
When used from the command line, COMMAND loads a copy of the command processor intomemory. A common use of COMMAND is as a parameter of the SHELL command. The syntax forCOMMAND is as follows:
COMMAND d:path\ device /E:size /P /C string /K:filename /MSG
The d:path\ parameter specifies the disk drive and path that contain the command proces-sor if it is not located in the root directory. Always use this parameter when including COMMAND in the SHELL configuration command. This parameter has the additional effect ofsetting an environment variable named COMSPEC, which informs DOS and other programs ofthe location and name of the current command processor.
/E:size is an optional switch that sets the environment space. The size parameter is a num-ber between 160 and 32,768 that denotes the amount of memory reserved for the environ-ment. (If you do not specify a multiple of 16, DOS rounds the size parameter up to the nexthighest multiple of 16.) By default, DOS reserves 256 bytes for the environment.
The /P switch instructs DOS to load the command processor permanently. Without the /Pswitch, DOS loads COMMAND.COM only temporarily into memory. When you are using COMMANDwith the SHELL command in CONFIG.SYS, be sure to use the /P switch.
The /C switch and string parameter work together. This combination causes DOS to loadthe command processor, execute any command represented by string, and then unload thecommand processor.
The /MSG switch tells DOS to store all its error messages in memory rather than read themfrom the disk. This feature can speed operation. More importantly, if you are running a sys-tem that has only floppy disks, you sometimes remove the disk that contains COMMAND.COMfrom the disk drive. Without the /MSG switch, DOS cannot access error messages containedon disk within the COMMAND.COM file itself. Use this switch only if you are running DOS fromfloppy disks. You also must use the /P switch any time you use the /MSG switch.
The /K parameter tells DOS to run a program or batch file. Use this switch only whenyou’re running COMMAND from the DOS prompt and not as part of the SHELL command inCONFIG.SYS.
466 Chapter 19 Configuring Your Computer
The DOS Setup program adds the following command to the default CONFIG.SYS file:
SHELL=C:\DOS\COMMAND.COM C:\DOS\ /P
This configuration command tells DOS that COMMAND.COM is the command interpreter andthat it is located in the \DOS directory on the C drive. The /P switch causes the commandinterpreter to be loaded permanently, not temporarily, in memory.
The preceding SHELL command enables you to place a copy of COMMAND.COM in C:\DOS anddelete the copy in the root directory. This practice helps you maintain a clean root directoryand protects COMMAND.COM from being replaced by an older version that might be on a floppydisk you are copying. If you accidentally copy the disk to the root directory, you don’t over-write the current version of COMMAND.COM.
Occasionally, you create such a long PATH command in AUTOEXEC.BAT that you fill the avail-able environment space, causing DOS to display the following message:
Out of environment space
If this message appears, use COMMAND with the SHELL command and the /E switch to specify alarger environment space. The following command used in CONFIG.SYS, for example,increases the environment to 384 bytes:
SHELL=C:\DOS\COMMAND.COM /E:384
If you already have a SHELL command in CONFIG.SYS, you can add the /E switch. Combiningthe two preceding SHELL commands, for example, you can include the following commandin CONFIG.SYS:
SHELL=C:\DOS\COMMAND.COM C:\DOS\ /P /E:384
The SHELL command itself doesn’t use any memory, but by increasing the environmentspace, you can reduce the amount of free conventional memory by an equal amount. Inother words, increasing the environment space from 256 bytes to 384 bytes reduces freememory by 128 bytes.
Using the INSTALL Command
The INSTALL configuration command enables you to load memory-resident programs fromwithin CONFIG.SYS. In versions of DOS before 4.0, you had to load these programs from theDOS prompt or through a batch file, such as AUTOEXEC.BAT. You can save several kilobytes ofmemory by loading a program from CONFIG.SYS with INSTALL rather than from the com-mand line or a batch file as an executable program. DOS 4.0 and later versions supportloading any of the following programs by using INSTALL:
■ FASTOPEN.EXE
■ KEYB.COM
■ NLSFUNC.EXE
■ SHARE.EXE
467
19
IVPart
Ch
Fine-Tuning Your Computer with CONFIG.SYS and AUTOEXEC.BAT
➔ For more information about these programs, see Appendix F, “Command Reference,” p. 583.
The following is the syntax for using INSTALL in CONFIG.SYS:
INSTALL = filespec parameters
The filespec parameter is the path and filename information of the utility you want toload, whereas parameters specifies any parameters or switches required by the utility youwant DOS to load.
You might be able to use INSTALL with some memory-resident non-DOS programs. Do notuse INSTALL, however, to load a memory-resident program that uses environment variablesor shortcut keys or that uses COMMAND.COM. The program you install with this command musthave the extension .COM or .EXE.
Using the REM Command
The REM configuration command is equivalent to the REM batch file command. This com-mand enables you to insert remarks into your CONFIG.SYS file. You can leave notes to your-self (or others) explaining what particular lines do. Such documentation in a CONFIG.SYS fileis especially helpful if you use non-DOS device drivers for your hardware. You also can tem-porarily remove a CONFIG.SYS statement by prefacing the statement with a REM command.After you test the new configuration, you can return easily to the old configuration by sim-ply removing the REM command.
The syntax for the REM command is as follows:
REM remarks
The remarks parameter can be any string of characters that fits on a single line in the CONFIG.SYS file.
Using the SWITCHES Command
The SWITCHES configuration command enables you to set any of four options that controlhow four of DOS’s features operate. The syntax of the SWITCHES command is as follows:
SWITCHES = /K /W /N /F
You can specify one or more of these four switches in a single SWITCHES command.
The /K switch turns off the enhanced keyboard functions. This command works like theANSI.SYS /K switch. Some software cannot work with the enhanced keyboard. Use this com-mand to disable the enhanced keyboard so that the software functions properly. If you usethe SWITCHES=/K command in CONFIG.SYS and also install ANSI.SYS as a device driver, add the/K switch to the DEVICE=ANSI.SYS line as well.
The /W switch specifies that the WINA20.386 file has been moved to a directory other thanthe root directory. Use this switch if you moved WINA20.386 to another directory and areusing Windows in enhanced mode.
468 Chapter 19 Configuring Your Computer
Normally, you can use the F5 or F8 keys during the first two seconds of booting to bypasssome or all the commands in CONFIG.SYS or AUTOEXEC.BAT. The /N switch tells DOS toignore F5 or F8 during boot.
Normally, DOS displays this message at the beginning of the boot process and then pausesfor two seconds before continuing:
Starting MS-DOS
The /F switch tells DOS to skip the two-second pause.
Telling DOS When to Break
As you already know, Ctrl+Break and Ctrl+C are helpful but not foolproof panic buttonsyou can use to stop commands. The response to a Ctrl+Break or Ctrl+C is not instanta-neous. Although only an “Oh, no” second might pass from the time you press the panic but-ton until DOS responds, you still have time to wonder why DOS takes so long to respond.The reason is that DOS is busy doing other things most of the time and looks forCtrl+Break only at intervals. You can use the BREAK command in CONFIG.SYS to tell DOSwhen to check for this key sequence. BREAK does not enable or disable the Break key; theBREAK command only controls when DOS checks for the Break key.
The syntax for the BREAK command can be either of the following:
BREAK=ON
BREAK=OFF
The default setting for this command is OFF.
If you use the command BREAK=ON in CONFIG.SYS, DOS checks to see whether you pressedCtrl+Break whenever a program requests some activity from DOS (performs a DOS func-tion call). If you use the command BREAK=OFF, DOS checks for a Ctrl+Break only whenDOS is working with the video display, keyboard, printer, or asynchronous serial adapters(the ports at the back of the computer).
If you use programs that do a great deal of disk accessing but little keyboard or screenwork, you might want to set BREAK=ON. This setting enables you to break out of the pro-gram quicker when something goes awry or when you simply want to stop DOS.
Using the DOS Pretender Commands
Because DOS manages disks in a logical rather than a strictly physical way, DOS can pre-tend that a disk’s identity is different from the disk’s name. DOS provides the followingthree commands that pretend that a disk’s identity has changed:
■ ASSIGN—Redirects disk operations from one disk to another
■ JOIN—Attaches an entire disk as a subdirectory to the directory structure of anotherdisk
■ SUBST—Makes a directory of a disk appear to commands as a separate disk
469
➔ For detailed information on these commands, see Chapter 11, “Controlling Your Environment,” p. 293.
Using Other Device Control Commands
DOS provides other commands to control devices and report system information, which arebriefly discussed in this section.
➔ These commands are explained in greater detail in Appendix F, “Command Reference,” beginning on p. 583.
The SET command displays the current environment settings and enables you to make newvariable assignments.
The PRINT command enables you to print text files on your printer while you continue to doother PC work. This “background” printing can be a great timesaver if your applicationsdon’t have a similar feature.
The MODE command is a multifaceted device-control command. MODE can establish the heightand width of your screen’s lines and characters and control the speed of your serial ports.MODE can redirect the output from a parallel printer port to a serial port. You also can useMODE in association with code-page support for international character sets on the PC. Youmight want to browse through the MODE section of the “Command Reference.
19
IVPart
Ch
Fine-Tuning Your Computer with CONFIG.SYS and AUTOEXEC.BAT

Networking DOS
In this chapter
Common Networks for DOS-Based Computers 472
Learning Preinstallation Items 472
Installing the Novell NetWare Client Software 473
Installing the Microsoft Network Client 478
Using the Network 481
Project: Network Client Setup Tips 482
20CHAPTER

472 Chapter 20 Networking DOS
Common Networks for DOS-Based ComputersYou might commonly connect a DOS-based computer to two different networks: NovellNetWare and Microsoft Windows NT Server. Both network operating systems (NOSs) pro-vide client software for DOS that enables you to participate in many of the services offeredby both networks, such as file sharing, printer sharing, network security for stored files, andso forth. Installing the client software for each network operating system is relativelystraightforward. In this chapter, you learn about installing both the NetWare and Microsoftclients.
Learning Preinstallation ItemsBefore installing either NOS client, you need to perform a few steps. Primarily, they consistof installing an appropriate network card into the PC and making sure that you have theappropriate DOS driver program for that network card for the NOS client you areinstalling.
Network cards come in many different varieties. You need to have one that is compatiblewith the following:
■ The computer you are installing it in. It should fit in an available slot (ISA, EISA,MCA, or PCI), and should be selectable to an available combination of IRQ, memoryport address, and (sometimes) DMA channels. See Chapter 12, “Using Peripherals,” formore information on these subjects.
■ The network client you are installing. Often, NetWare and Microsoft clients haveseparate driver files. To make things trickier, both companies offer different versions oftheir client software, and the driver must be compatible with the client you are using.For example, Novell has supplied both ODI and VLM clients, whereas Microsoft hassupplied both LanManager and Windows NT clients. If in doubt, check the NOS com-pany’s Web site for a list of compatible hardware.
■ The network type you have. Cards are available for Ethernet, Token Ring, andARCnet, and you need one compatible with the type of network you are accessing.
■ The cabling type you use. All the different network types can use different types ofcabling, and network cards might not have all the available choices built into them. Forinstance, Ethernet can be cabled with 10BASE-5 cable (Thick Ethernet), 10BASE-2cable (Thin Ethernet), or Category 3 or 5 twisted-pair cable (10BASE-T and 10BASE-100). Although adapters might be available to make a particular card work with a dis-similar network, it is better to have a card that supports the network cabling directly.
■ What frame type the network uses. For example, Ethernet networks might use802.2, 802.3, Ethernet SNAP, or Ethernet II frame types.
You also need to know some details about the network server you are connecting to. Youneed to know answers to the following questions:
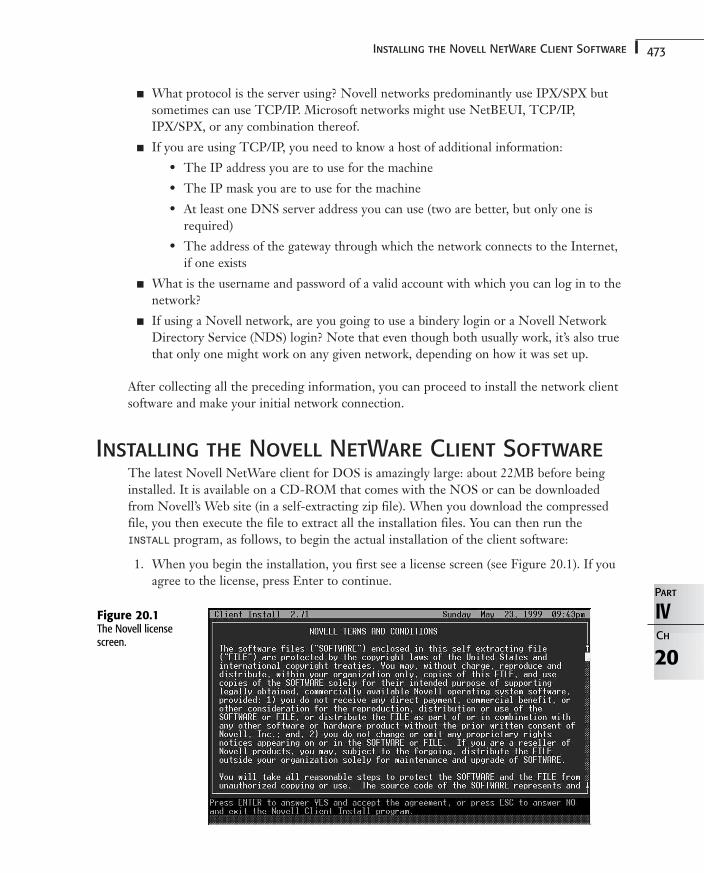
473Installing the Novell NetWare Client Software
■ What protocol is the server using? Novell networks predominantly use IPX/SPX butsometimes can use TCP/IP. Microsoft networks might use NetBEUI, TCP/IP,IPX/SPX, or any combination thereof.
■ If you are using TCP/IP, you need to know a host of additional information:
• The IP address you are to use for the machine
• The IP mask you are to use for the machine
• At least one DNS server address you can use (two are better, but only one isrequired)
• The address of the gateway through which the network connects to the Internet,if one exists
■ What is the username and password of a valid account with which you can log in to thenetwork?
■ If using a Novell network, are you going to use a bindery login or a Novell NetworkDirectory Service (NDS) login? Note that even though both usually work, it’s also truethat only one might work on any given network, depending on how it was set up.
After collecting all the preceding information, you can proceed to install the network clientsoftware and make your initial network connection.
Installing the Novell NetWare Client SoftwareThe latest Novell NetWare client for DOS is amazingly large: about 22MB before beinginstalled. It is available on a CD-ROM that comes with the NOS or can be downloadedfrom Novell’s Web site (in a self-extracting zip file). When you download the compressedfile, you then execute the file to extract all the installation files. You can then run theINSTALL program, as follows, to begin the actual installation of the client software:
1. When you begin the installation, you first see a license screen (see Figure 20.1). If youagree to the license, press Enter to continue.
20
IVPart
Ch
Figure 20.1The Novell licensescreen.
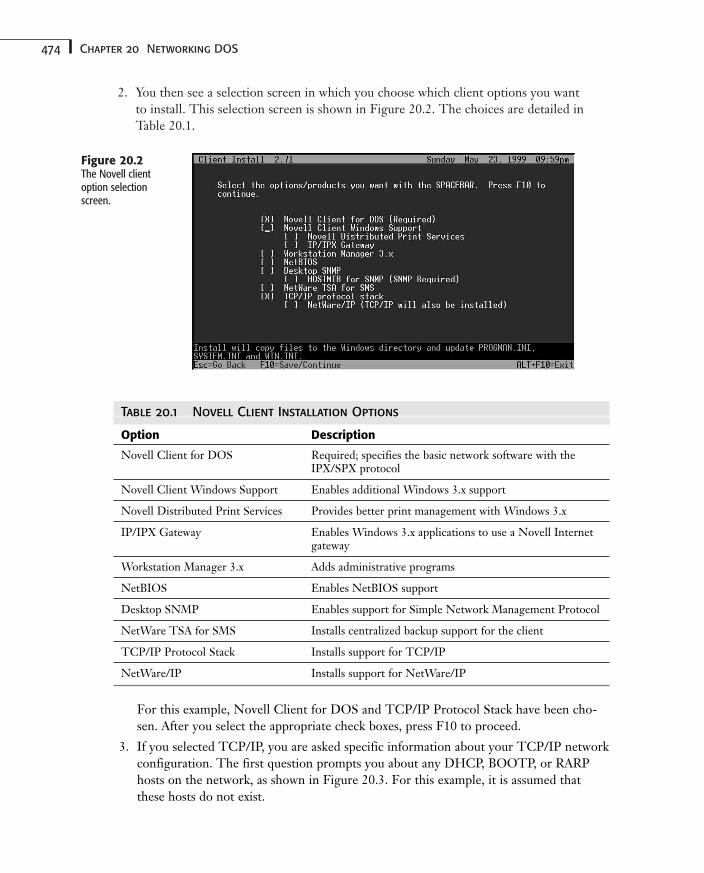
474 Chapter 20 Networking DOS
2. You then see a selection screen in which you choose which client options you want to install. This selection screen is shown in Figure 20.2. The choices are detailed inTable 20.1.
Figure 20.2The Novell clientoption selectionscreen.
Table 20.1 Novell Client Installation Options
Option Description
Novell Client for DOS Required; specifies the basic network software with theIPX/SPX protocol
Novell Client Windows Support Enables additional Windows 3.x support
Novell Distributed Print Services Provides better print management with Windows 3.x
IP/IPX Gateway Enables Windows 3.x applications to use a Novell Internetgateway
Workstation Manager 3.x Adds administrative programs
NetBIOS Enables NetBIOS support
Desktop SNMP Enables support for Simple Network Management Protocol
NetWare TSA for SMS Installs centralized backup support for the client
TCP/IP Protocol Stack Installs support for TCP/IP
NetWare/IP Installs support for NetWare/IP
For this example, Novell Client for DOS and TCP/IP Protocol Stack have been cho-sen. After you select the appropriate check boxes, press F10 to proceed.
3. If you selected TCP/IP, you are asked specific information about your TCP/IP networkconfiguration. The first question prompts you about any DHCP, BOOTP, or RARPhosts on the network, as shown in Figure 20.3. For this example, it is assumed thatthese hosts do not exist.
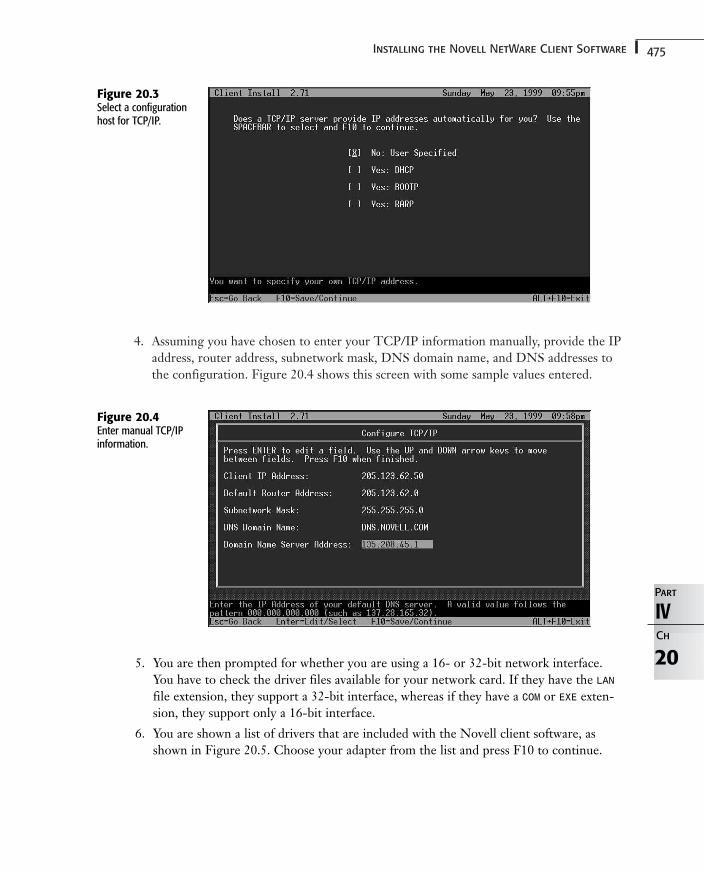
475Installing the Novell NetWare Client Software
4. Assuming you have chosen to enter your TCP/IP information manually, provide the IPaddress, router address, subnetwork mask, DNS domain name, and DNS addresses tothe configuration. Figure 20.4 shows this screen with some sample values entered.
20
IVPart
Ch
Figure 20.3Select a configurationhost for TCP/IP.
Figure 20.4Enter manual TCP/IPinformation.
5. You are then prompted for whether you are using a 16- or 32-bit network interface.You have to check the driver files available for your network card. If they have the LANfile extension, they support a 32-bit interface, whereas if they have a COM or EXE exten-sion, they support only a 16-bit interface.
6. You are shown a list of drivers that are included with the Novell client software, asshown in Figure 20.5. Choose your adapter from the list and press F10 to continue.
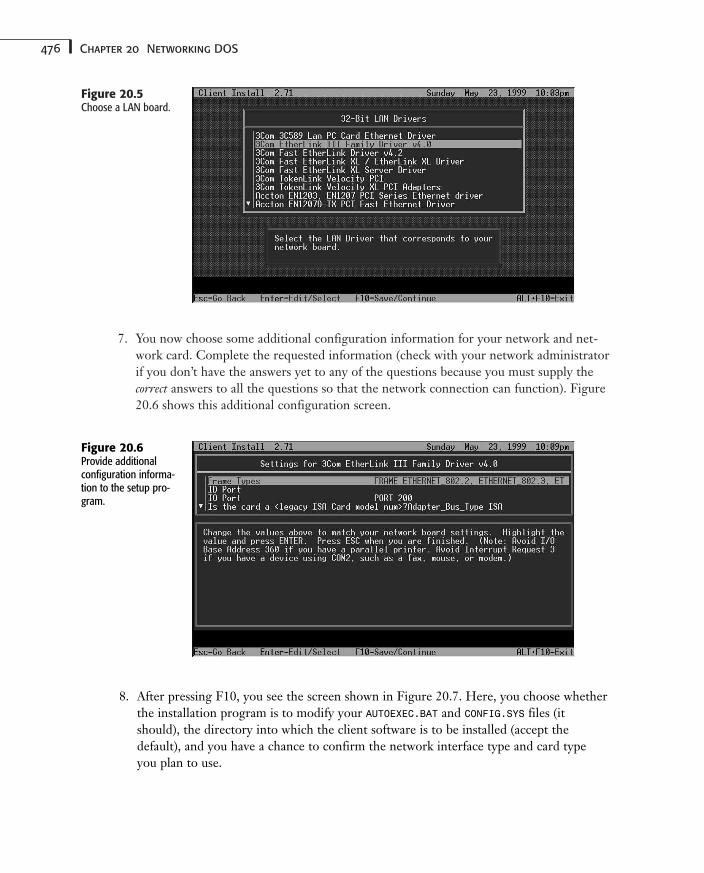
476 Chapter 20 Networking DOS
7. You now choose some additional configuration information for your network and net-work card. Complete the requested information (check with your network administratorif you don’t have the answers yet to any of the questions because you must supply thecorrect answers to all the questions so that the network connection can function). Figure20.6 shows this additional configuration screen.
Figure 20.5Choose a LAN board.
Figure 20.6Provide additionalconfiguration informa-tion to the setup pro-gram.
8. After pressing F10, you see the screen shown in Figure 20.7. Here, you choose whetherthe installation program is to modify your AUTOEXEC.BAT and CONFIG.SYS files (itshould), the directory into which the client software is to be installed (accept thedefault), and you have a chance to confirm the network interface type and card typeyou plan to use.
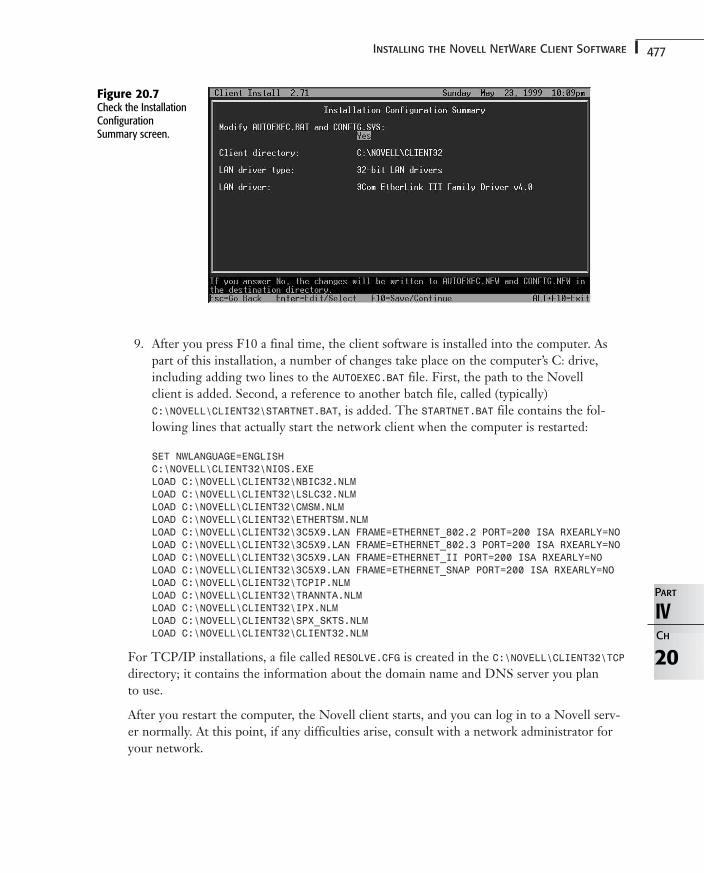
477Installing the Novell NetWare Client Software
9. After you press F10 a final time, the client software is installed into the computer. Aspart of this installation, a number of changes take place on the computer’s C: drive,including adding two lines to the AUTOEXEC.BAT file. First, the path to the Novell client is added. Second, a reference to another batch file, called (typically)C:\NOVELL\CLIENT32\STARTNET.BAT, is added. The STARTNET.BAT file contains the fol-lowing lines that actually start the network client when the computer is restarted:
SET NWLANGUAGE=ENGLISHC:\NOVELL\CLIENT32\NIOS.EXELOAD C:\NOVELL\CLIENT32\NBIC32.NLMLOAD C:\NOVELL\CLIENT32\LSLC32.NLMLOAD C:\NOVELL\CLIENT32\CMSM.NLMLOAD C:\NOVELL\CLIENT32\ETHERTSM.NLMLOAD C:\NOVELL\CLIENT32\3C5X9.LAN FRAME=ETHERNET_802.2 PORT=200 ISA RXEARLY=NOLOAD C:\NOVELL\CLIENT32\3C5X9.LAN FRAME=ETHERNET_802.3 PORT=200 ISA RXEARLY=NOLOAD C:\NOVELL\CLIENT32\3C5X9.LAN FRAME=ETHERNET_II PORT=200 ISA RXEARLY=NOLOAD C:\NOVELL\CLIENT32\3C5X9.LAN FRAME=ETHERNET_SNAP PORT=200 ISA RXEARLY=NOLOAD C:\NOVELL\CLIENT32\TCPIP.NLMLOAD C:\NOVELL\CLIENT32\TRANNTA.NLMLOAD C:\NOVELL\CLIENT32\IPX.NLMLOAD C:\NOVELL\CLIENT32\SPX_SKTS.NLMLOAD C:\NOVELL\CLIENT32\CLIENT32.NLM
For TCP/IP installations, a file called RESOLVE.CFG is created in the C:\NOVELL\CLIENT32\TCPdirectory; it contains the information about the domain name and DNS server you plan to use.
After you restart the computer, the Novell client starts, and you can log in to a Novell serv-er normally. At this point, if any difficulties arise, consult with a network administrator foryour network.
20
IVPart
Ch
Figure 20.7Check the InstallationConfigurationSummary screen.
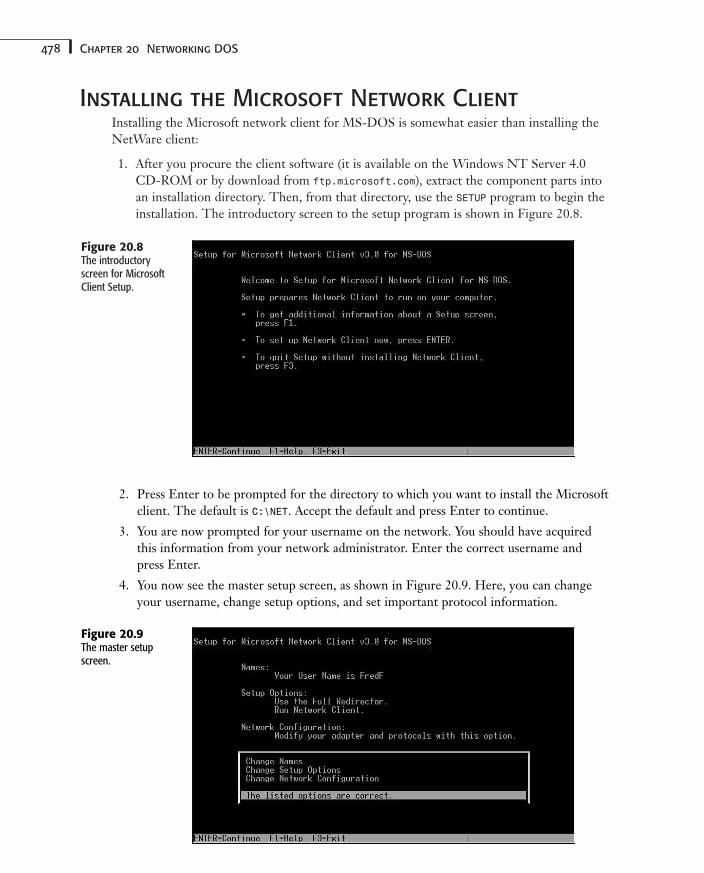
478 Chapter 20 Networking DOS
Installing the Microsoft Network ClientInstalling the Microsoft network client for MS-DOS is somewhat easier than installing theNetWare client:
1. After you procure the client software (it is available on the Windows NT Server 4.0CD-ROM or by download from ftp.microsoft.com), extract the component parts intoan installation directory. Then, from that directory, use the SETUP program to begin theinstallation. The introductory screen to the setup program is shown in Figure 20.8.
Figure 20.8The introductoryscreen for MicrosoftClient Setup.
2. Press Enter to be prompted for the directory to which you want to install the Microsoftclient. The default is C:\NET. Accept the default and press Enter to continue.
3. You are now prompted for your username on the network. You should have acquiredthis information from your network administrator. Enter the correct username andpress Enter.
4. You now see the master setup screen, as shown in Figure 20.9. Here, you can changeyour username, change setup options, and set important protocol information.
Figure 20.9The master setupscreen.
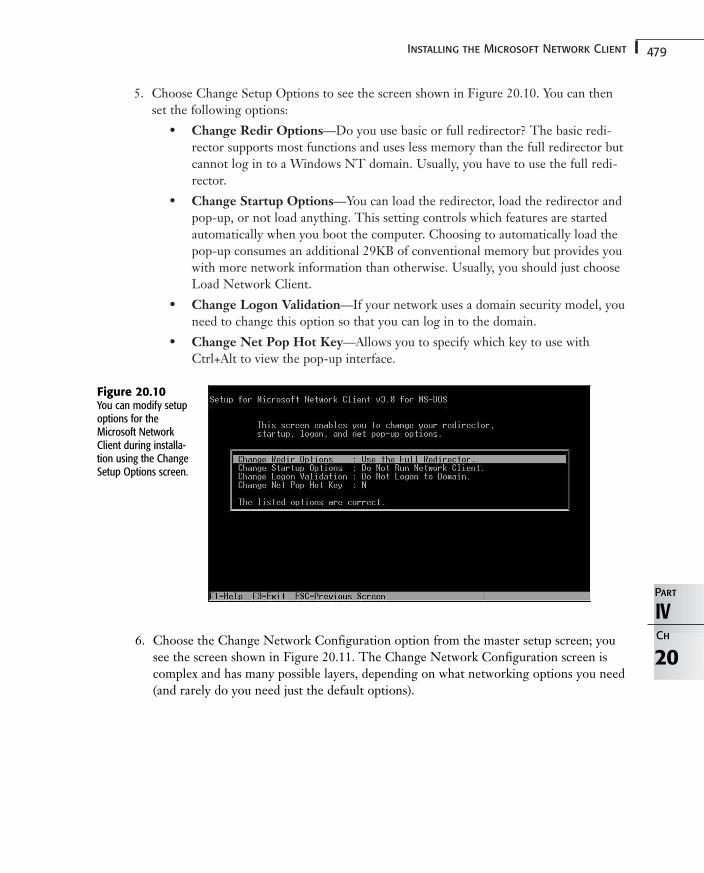
479Installing the Microsoft Network Client
5. Choose Change Setup Options to see the screen shown in Figure 20.10. You can thenset the following options:
• Change Redir Options—Do you use basic or full redirector? The basic redi-rector supports most functions and uses less memory than the full redirector butcannot log in to a Windows NT domain. Usually, you have to use the full redi-rector.
• Change Startup Options—You can load the redirector, load the redirector andpop-up, or not load anything. This setting controls which features are startedautomatically when you boot the computer. Choosing to automatically load thepop-up consumes an additional 29KB of conventional memory but provides youwith more network information than otherwise. Usually, you should just chooseLoad Network Client.
• Change Logon Validation—If your network uses a domain security model, youneed to change this option so that you can log in to the domain.
• Change Net Pop Hot Key—Allows you to specify which key to use withCtrl+Alt to view the pop-up interface.
20
IVPart
Ch
Figure 20.10You can modify setupoptions for theMicrosoft NetworkClient during installa-tion using the ChangeSetup Options screen.
6. Choose the Change Network Configuration option from the master setup screen; yousee the screen shown in Figure 20.11. The Change Network Configuration screen iscomplex and has many possible layers, depending on what networking options you need(and rarely do you need just the default options).
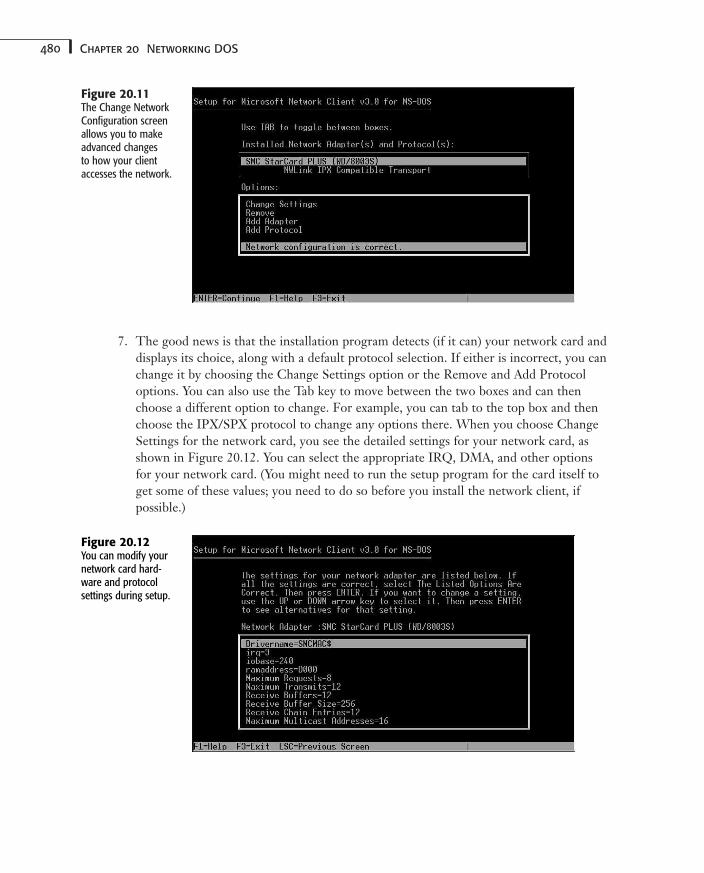
480 Chapter 20 Networking DOS
7. The good news is that the installation program detects (if it can) your network card anddisplays its choice, along with a default protocol selection. If either is incorrect, you canchange it by choosing the Change Settings option or the Remove and Add Protocoloptions. You can also use the Tab key to move between the two boxes and can thenchoose a different option to change. For example, you can tab to the top box and thenchoose the IPX/SPX protocol to change any options there. When you choose ChangeSettings for the network card, you see the detailed settings for your network card, asshown in Figure 20.12. You can select the appropriate IRQ, DMA, and other optionsfor your network card. (You might need to run the setup program for the card itself toget some of these values; you need to do so before you install the network client, if possible.)
Figure 20.11The Change NetworkConfiguration screenallows you to makeadvanced changes to how your clientaccesses the network.
Figure 20.12You can modify yournetwork card hard-ware and protocolsettings during setup.
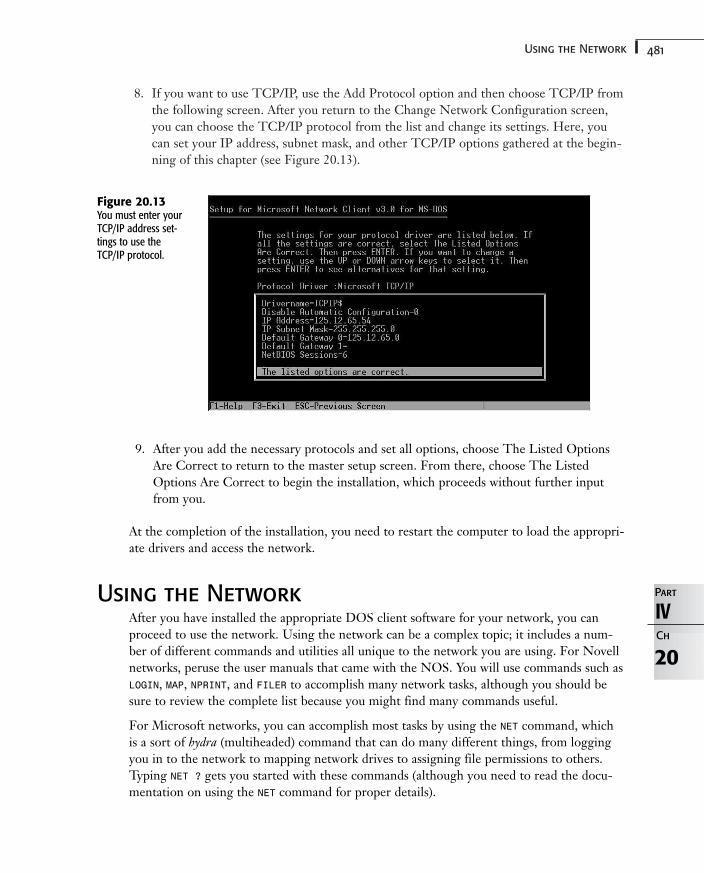
481Using the Network
8. If you want to use TCP/IP, use the Add Protocol option and then choose TCP/IP fromthe following screen. After you return to the Change Network Configuration screen,you can choose the TCP/IP protocol from the list and change its settings. Here, youcan set your IP address, subnet mask, and other TCP/IP options gathered at the begin-ning of this chapter (see Figure 20.13).
20
IVPart
Ch
Figure 20.13You must enter yourTCP/IP address set-tings to use theTCP/IP protocol.
9. After you add the necessary protocols and set all options, choose The Listed OptionsAre Correct to return to the master setup screen. From there, choose The ListedOptions Are Correct to begin the installation, which proceeds without further inputfrom you.
At the completion of the installation, you need to restart the computer to load the appropri-ate drivers and access the network.
Using the NetworkAfter you have installed the appropriate DOS client software for your network, you canproceed to use the network. Using the network can be a complex topic; it includes a num-ber of different commands and utilities all unique to the network you are using. For Novellnetworks, peruse the user manuals that came with the NOS. You will use commands such asLOGIN, MAP, NPRINT, and FILER to accomplish many network tasks, although you should besure to review the complete list because you might find many commands useful.
For Microsoft networks, you can accomplish most tasks by using the NET command, whichis a sort of hydra (multiheaded) command that can do many different things, from loggingyou in to the network to mapping network drives to assigning file permissions to others.Typing NET ? gets you started with these commands (although you need to read the docu-mentation on using the NET command for proper details).
482 Chapter 20 Networking DOS
Project: Network Client Setup TipsSetting up a DOS network client can be difficult if you’re not the network administratorand are trying to reinvent the wheel. To make the job go smoothly, make sure you find outany information specific to your network from the network administrator or person who setup the network. If that doesn’t work and you’re having trouble connecting to the network,you can “dissect” another user’s functioning network connection to see what settings mightbe wrong on your system. Looking at a working computer’s setup can be an invaluable aid inquickly spotting the problem with your own connection.
If, for some reason, the preceding two resources don’t help you find a quick answer to yourconnection problem, try the following tips:
■ Make sure that the network interface card (NIC) is functioning. Most NICs come withdiagnostic software that can perform basic tests. Often, you also can run more compre-hensive diagnostic software that sends data between the computer being tested andanother running the diagnostic software to confirm that it is fully functioning.
■ If you’re having a problem with the NIC working properly, the problem is almost cer-tainly the result of a conflict with another device. Chapter 12 provides information onresolving device conflicts.
■ Make sure that you have the correct protocol chosen for your network. For Ethernetnetworks, make sure you’ve also chosen the correct frame type, which is 802.3, 802.2,Ethernet II, or Ethernet SNAP.
■ If your network uses TCP/IP, make sure that you have the correct addresses for yourTCP/IP configuration. Also, make sure that you’re using a unique address that is notconflicting with another computer. (You might have to rely on a network administratorto help ensure this address because all networks track these things differently.)
■ For Novell network clients, watch carefully as the different programs that make up theclient load on the screen after the computer is booted. Often, you can see an error mes-sage (it might be fleeting) that leads you to the solution.
■ Try removing the network startup commands from the AUTOEXEC.BAT file. Boot the sys-tem without them and then issue those same commands manually at the DOS prompt.This approach enables you to see error messages or problems more clearly.
The nice thing about networks is that you usually have to solve problems only once, andyou then can apply that knowledge to successive installations of the client software. For thisreason, I can’t emphasize strongly enough that your first course of action if a network clientinstallation isn’t working right is to talk to people who have made it work properly and tothe administrator of the system who probably will be familiar with whatever problem youare having. In most networks, after the bugs are worked out with a sample client installationor two (or three!), getting the remaining systems up and running then becomes easy.
Connecting to the Internet
In this chapter
Internet Connection Options for DOS-Based Computers 484
Connecting to Your ISP 484
Using Internet Tools 485
A Sample FTP Session 489
Project: Common Problems with DOS Internet Tools 491
21CHAPTER
484 Chapter 21 Connecting to the Internet
Internet Connection Options for DOS-BasedComputers
Although you can connect a DOS-based computer directly to the Internet (through an ISPusing a PPP connection), this is almost never done. Instead, you can more easily use a ter-minal emulation program to dial in to what is called a shell account with an ISP, such asNetcom. Dialing in this way gives you the appearance of sitting at a Unix-based terminalconnected to the Internet. You can use all the Unix tools to perform various tasks on theInternet, such as transferring files from a remote host to your shell account (FTP), openinga terminal session on another computer on the Internet (Telnet), searching for informationusing Gopher, or getting rudimentary access (text based) to the World Wide Web.
You also need to be aware of another aspect of using DOS with the Internet. Even whenyou have a Windows-based PC, many of the basic tools for the Internet are text based andwork very well in a DOS window. So, you can connect your Windows 9x PC to an ISP;open a DOS window; and run FTP, Telnet, or other DOS-based Internet utilities, for exam-ple. In this chapter, you learn about both these DOS-based Internet access methods.
Connecting to Your ISPMany ISPs offer a type of account called a shell account. This account enables you to dial into the ISP’s system using just about any type of computer, provided it has a terminal emula-tion program that is compatible with the terminal emulation of the shell account (most are).After you have connected, the terminal emulation program gives you a window to a Unixhost at the ISP (which means that you’ll be using Unix commands), from which you canperform most Internet-related work. Most shell accounts include a certain amount of diskspace in which you can store files you’ve retrieved from other systems or have uploadedfrom your own computer, and often you can even upload Web pages to the disk space anduse the WWW services of your ISP to serve those Web pages up to others.
To connect to an ISP with a shell account, you use a terminal emulation program such asProcomm Plus, SmartTerm, or one of many others. Good shareware terminal emulationprograms are also available, such as the top-rated Telix, Qmodem, or SlickTerminal, all ofwhich can be downloaded from a number of Internet sites, including www.zdnet.com.
Usually, connecting to the ISP is relatively easy. Using the information provided by the ISP,follow these steps:
1. Set the terminal emulation program’s parameters (COM port, modem type, baud rate,data bits, stop bits, and parity).
2. Set the phone number for the ISP.
3. Dial the number.
After connecting, you see a prompt and can use the basic Unix commands listed in Table 21.1.
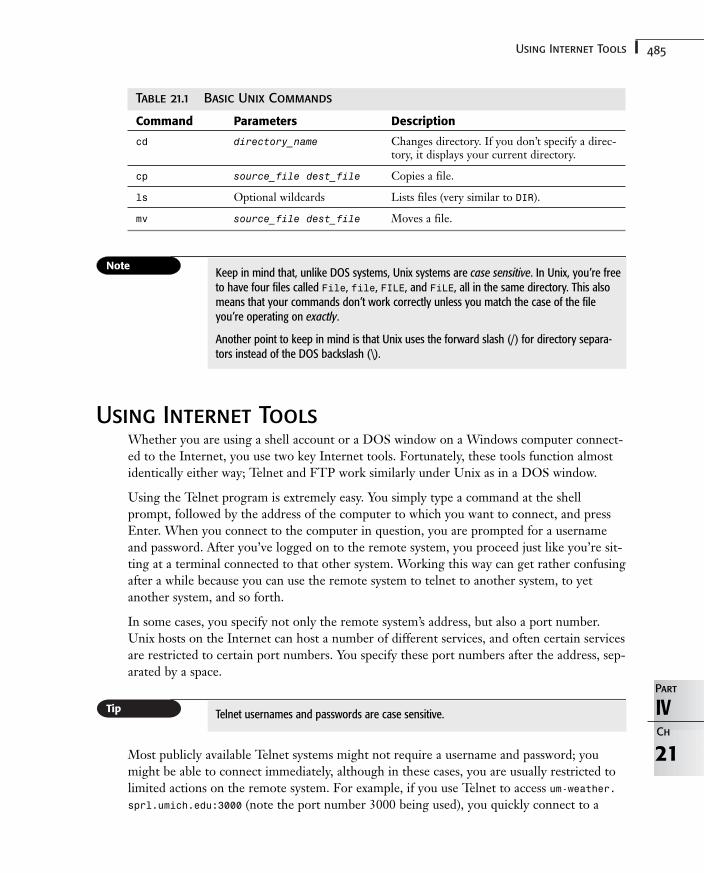
485Using Internet Tools
21
IVPart
Ch
Table 21.1 Basic Unix Commands
Command Parameters Description
cd directory_name Changes directory. If you don’t specify a direc-tory, it displays your current directory.
cp source_file dest_file Copies a file.
ls Optional wildcards Lists files (very similar to DIR).
mv source_file dest_file Moves a file.
Keep in mind that, unlike DOS systems, Unix systems are case sensitive. In Unix, you’re freeto have four files called File, file, FILE, and FiLE, all in the same directory. This alsomeans that your commands don’t work correctly unless you match the case of the fileyou’re operating on exactly.
Another point to keep in mind is that Unix uses the forward slash (/) for directory separa-tors instead of the DOS backslash (\).
Using Internet ToolsWhether you are using a shell account or a DOS window on a Windows computer connect-ed to the Internet, you use two key Internet tools. Fortunately, these tools function almostidentically either way; Telnet and FTP work similarly under Unix as in a DOS window.
Using the Telnet program is extremely easy. You simply type a command at the shellprompt, followed by the address of the computer to which you want to connect, and pressEnter. When you connect to the computer in question, you are prompted for a usernameand password. After you’ve logged on to the remote system, you proceed just like you’re sit-ting at a terminal connected to that other system. Working this way can get rather confusingafter a while because you can use the remote system to telnet to another system, to yetanother system, and so forth.
In some cases, you specify not only the remote system’s address, but also a port number.Unix hosts on the Internet can host a number of different services, and often certain servicesare restricted to certain port numbers. You specify these port numbers after the address, sep-arated by a space.
Telnet usernames and passwords are case sensitive.
Most publicly available Telnet systems might not require a username and password; youmight be able to connect immediately, although in these cases, you are usually restricted tolimited actions on the remote system. For example, if you use Telnet to access um-weather.sprl.umich.edu:3000 (note the port number 3000 being used), you quickly connect to a
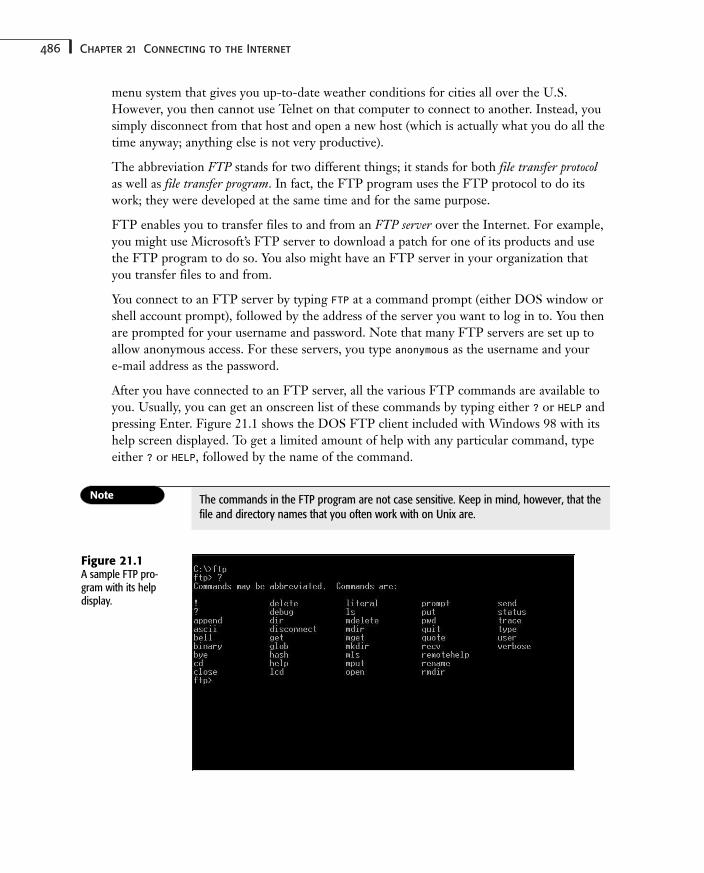
486 Chapter 21 Connecting to the Internet
Figure 21.1A sample FTP pro-gram with its help display.
menu system that gives you up-to-date weather conditions for cities all over the U.S.However, you then cannot use Telnet on that computer to connect to another. Instead, yousimply disconnect from that host and open a new host (which is actually what you do all thetime anyway; anything else is not very productive).
The abbreviation FTP stands for two different things; it stands for both file transfer protocolas well as file transfer program. In fact, the FTP program uses the FTP protocol to do itswork; they were developed at the same time and for the same purpose.
FTP enables you to transfer files to and from an FTP server over the Internet. For example,you might use Microsoft’s FTP server to download a patch for one of its products and usethe FTP program to do so. You also might have an FTP server in your organization thatyou transfer files to and from.
You connect to an FTP server by typing FTP at a command prompt (either DOS window orshell account prompt), followed by the address of the server you want to log in to. You thenare prompted for your username and password. Note that many FTP servers are set up toallow anonymous access. For these servers, you type anonymous as the username and your e-mail address as the password.
After you have connected to an FTP server, all the various FTP commands are available toyou. Usually, you can get an onscreen list of these commands by typing either ? or HELP andpressing Enter. Figure 21.1 shows the DOS FTP client included with Windows 98 with itshelp screen displayed. To get a limited amount of help with any particular command, typeeither ? or HELP, followed by the name of the command.
The commands in the FTP program are not case sensitive. Keep in mind, however, that thefile and directory names that you often work with on Unix are.
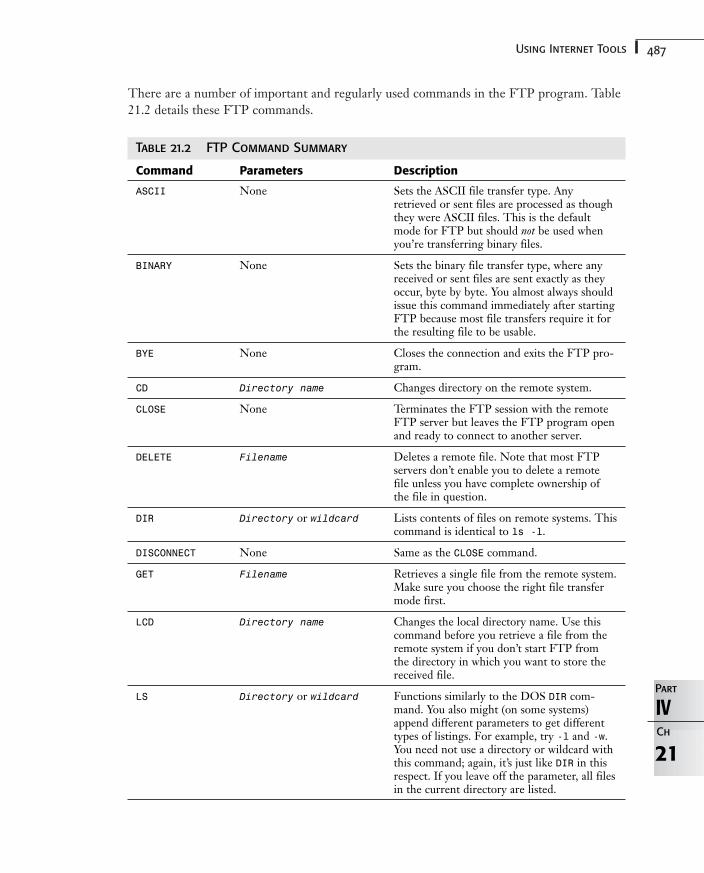
487Using Internet Tools
There are a number of important and regularly used commands in the FTP program. Table21.2 details these FTP commands.
Table 21.2 FTP Command Summary
Command Parameters Description
ASCII None Sets the ASCII file transfer type. Anyretrieved or sent files are processed as thoughthey were ASCII files. This is the defaultmode for FTP but should not be used whenyou’re transferring binary files.
BINARY None Sets the binary file transfer type, where anyreceived or sent files are sent exactly as theyoccur, byte by byte. You almost always shouldissue this command immediately after startingFTP because most file transfers require it forthe resulting file to be usable.
BYE None Closes the connection and exits the FTP pro-gram.
CD Directory name Changes directory on the remote system.
CLOSE None Terminates the FTP session with the remoteFTP server but leaves the FTP program openand ready to connect to another server.
DELETE Filename Deletes a remote file. Note that most FTPservers don’t enable you to delete a remotefile unless you have complete ownership ofthe file in question.
DIR Directory or wildcard Lists contents of files on remote systems. Thiscommand is identical to ls -l.
DISCONNECT None Same as the CLOSE command.
GET Filename Retrieves a single file from the remote system.Make sure you choose the right file transfermode first.
LCD Directory name Changes the local directory name. Use thiscommand before you retrieve a file from theremote system if you don’t start FTP from the directory in which you want to store thereceived file.
LS Directory or wildcard Functions similarly to the DOS DIR com-mand. You also might (on some systems)append different parameters to get differenttypes of listings. For example, try -l and -w.You need not use a directory or wildcard withthis command; again, it’s just like DIR in thisrespect. If you leave off the parameter, all filesin the current directory are listed.
21
IVPart
Ch
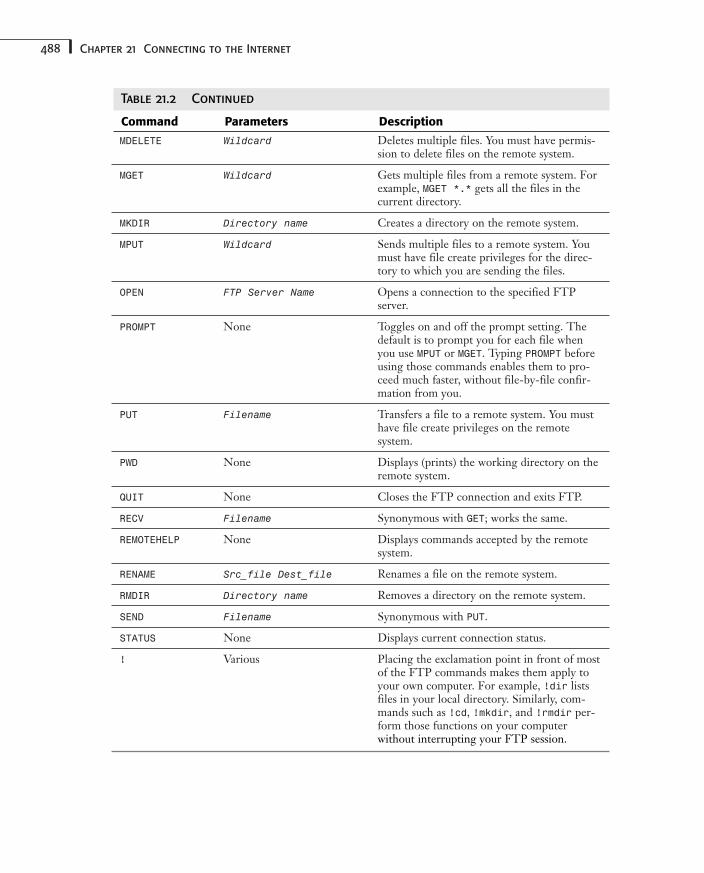
488 Chapter 21 Connecting to the Internet
MDELETE Wildcard Deletes multiple files. You must have permis-sion to delete files on the remote system.
MGET Wildcard Gets multiple files from a remote system. Forexample, MGET *.* gets all the files in thecurrent directory.
MKDIR Directory name Creates a directory on the remote system.
MPUT Wildcard Sends multiple files to a remote system. Youmust have file create privileges for the direc-tory to which you are sending the files.
OPEN FTP Server Name Opens a connection to the specified FTPserver.
PROMPT None Toggles on and off the prompt setting. Thedefault is to prompt you for each file whenyou use MPUT or MGET. Typing PROMPT beforeusing those commands enables them to pro-ceed much faster, without file-by-file confir-mation from you.
PUT Filename Transfers a file to a remote system. You musthave file create privileges on the remote system.
PWD None Displays (prints) the working directory on theremote system.
QUIT None Closes the FTP connection and exits FTP.
RECV Filename Synonymous with GET; works the same.
REMOTEHELP None Displays commands accepted by the remotesystem.
RENAME Src_file Dest_file Renames a file on the remote system.
RMDIR Directory name Removes a directory on the remote system.
SEND Filename Synonymous with PUT.
STATUS None Displays current connection status.
! Various Placing the exclamation point in front of mostof the FTP commands makes them apply toyour own computer. For example, !dir listsfiles in your local directory. Similarly, com-mands such as !cd, !mkdir, and !rmdir per-form those functions on your computerwithout interrupting your FTP session.
Table 21.2 Continued
Command Parameters Description
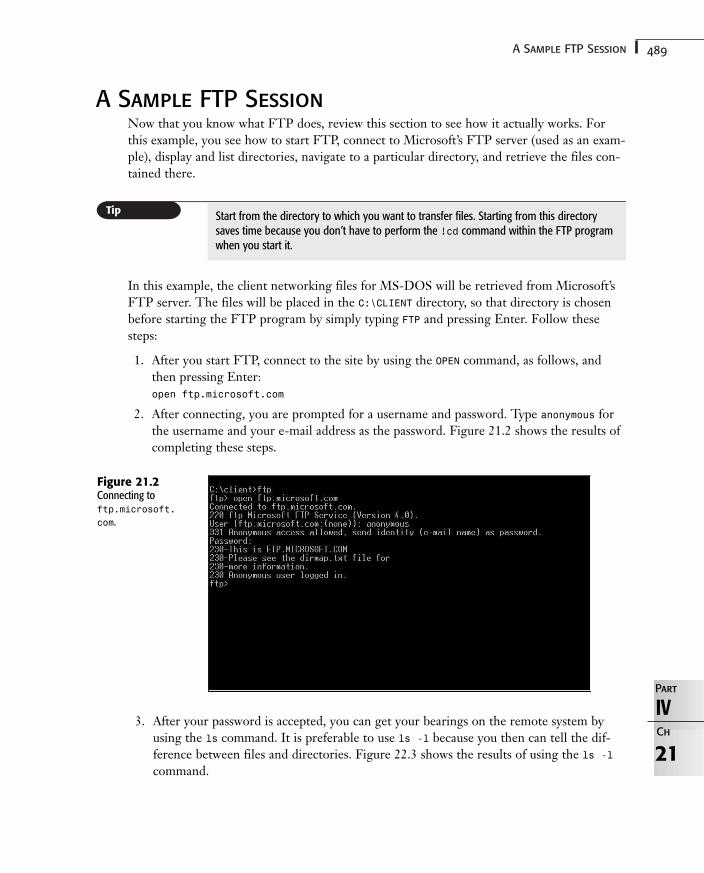
489A Sample FTP Session
21
IVPart
Ch
Figure 21.2Connecting toftp.microsoft.com.
3. After your password is accepted, you can get your bearings on the remote system byusing the ls command. It is preferable to use ls -l because you then can tell the dif-ference between files and directories. Figure 22.3 shows the results of using the ls -lcommand.
A Sample FTP SessionNow that you know what FTP does, review this section to see how it actually works. Forthis example, you see how to start FTP, connect to Microsoft’s FTP server (used as an exam-ple), display and list directories, navigate to a particular directory, and retrieve the files con-tained there.
Start from the directory to which you want to transfer files. Starting from this directorysaves time because you don’t have to perform the !cd command within the FTP programwhen you start it.
In this example, the client networking files for MS-DOS will be retrieved from Microsoft’sFTP server. The files will be placed in the C:\CLIENT directory, so that directory is chosenbefore starting the FTP program by simply typing FTP and pressing Enter. Follow thesesteps:
1. After you start FTP, connect to the site by using the OPEN command, as follows, andthen pressing Enter:open ftp.microsoft.com
2. After connecting, you are prompted for a username and password. Type anonymous forthe username and your e-mail address as the password. Figure 21.2 shows the results ofcompleting these steps.
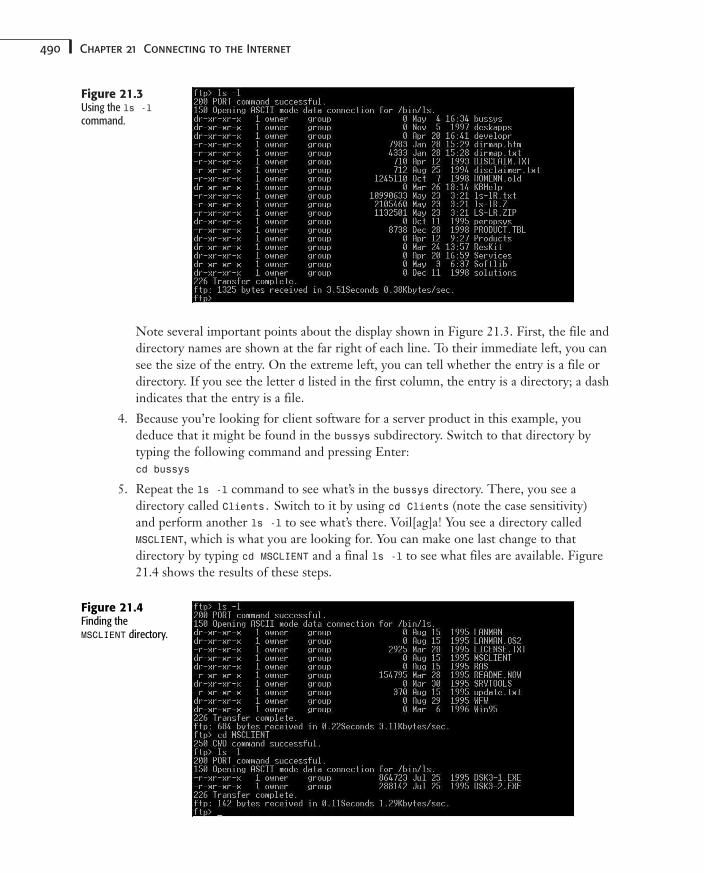
490 Chapter 21 Connecting to the Internet
Note several important points about the display shown in Figure 21.3. First, the file anddirectory names are shown at the far right of each line. To their immediate left, you cansee the size of the entry. On the extreme left, you can tell whether the entry is a file ordirectory. If you see the letter d listed in the first column, the entry is a directory; a dashindicates that the entry is a file.
4. Because you’re looking for client software for a server product in this example, youdeduce that it might be found in the bussys subdirectory. Switch to that directory bytyping the following command and pressing Enter:cd bussys
5. Repeat the ls -l command to see what’s in the bussys directory. There, you see adirectory called Clients. Switch to it by using cd Clients (note the case sensitivity)and perform another ls -l to see what’s there. Voil[ag]a! You see a directory calledMSCLIENT, which is what you are looking for. You can make one last change to thatdirectory by typing cd MSCLIENT and a final ls -l to see what files are available. Figure21.4 shows the results of these steps.
Figure 21.3Using the ls -lcommand.
Figure 21.4Finding theMSCLIENT directory.
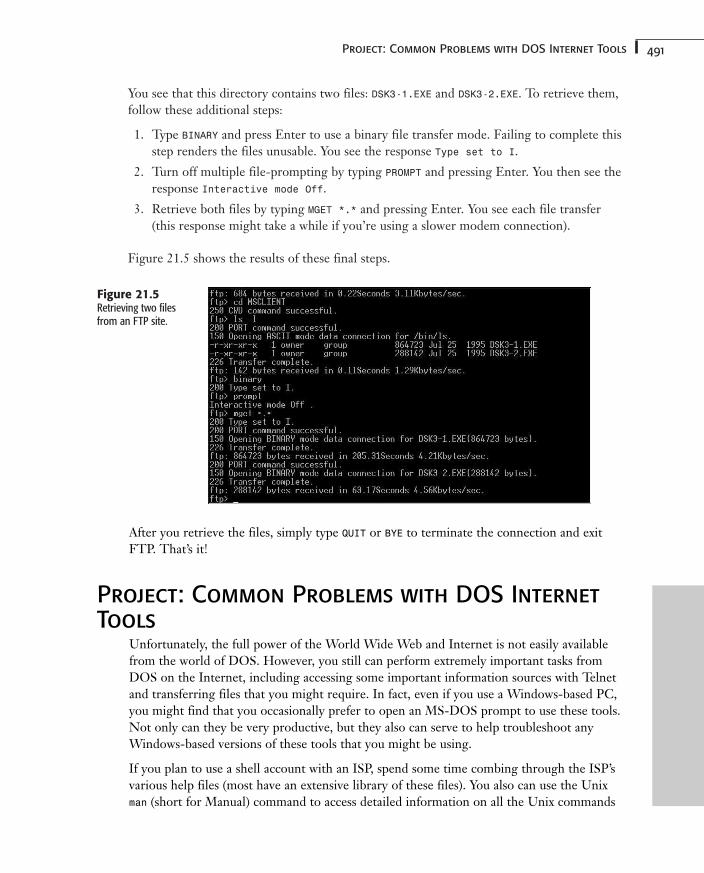
491Project: Common Problems with DOS Internet Tools
You see that this directory contains two files: DSK3-1.EXE and DSK3-2.EXE. To retrieve them,follow these additional steps:
1. Type BINARY and press Enter to use a binary file transfer mode. Failing to complete thisstep renders the files unusable. You see the response Type set to I.
2. Turn off multiple file-prompting by typing PROMPT and pressing Enter. You then see theresponse Interactive mode Off.
3. Retrieve both files by typing MGET *.* and pressing Enter. You see each file transfer(this response might take a while if you’re using a slower modem connection).
Figure 21.5 shows the results of these final steps.
Figure 21.5Retrieving two filesfrom an FTP site.
After you retrieve the files, simply type QUIT or BYE to terminate the connection and exitFTP. That’s it!
Project: Common Problems with DOS InternetTools
Unfortunately, the full power of the World Wide Web and Internet is not easily availablefrom the world of DOS. However, you still can perform extremely important tasks fromDOS on the Internet, including accessing some important information sources with Telnetand transferring files that you might require. In fact, even if you use a Windows-based PC,you might find that you occasionally prefer to open an MS-DOS prompt to use these tools.Not only can they be very productive, but they also can serve to help troubleshoot anyWindows-based versions of these tools that you might be using.
If you plan to use a shell account with an ISP, spend some time combing through the ISP’svarious help files (most have an extensive library of these files). You also can use the Unixman (short for Manual) command to access detailed information on all the Unix commands
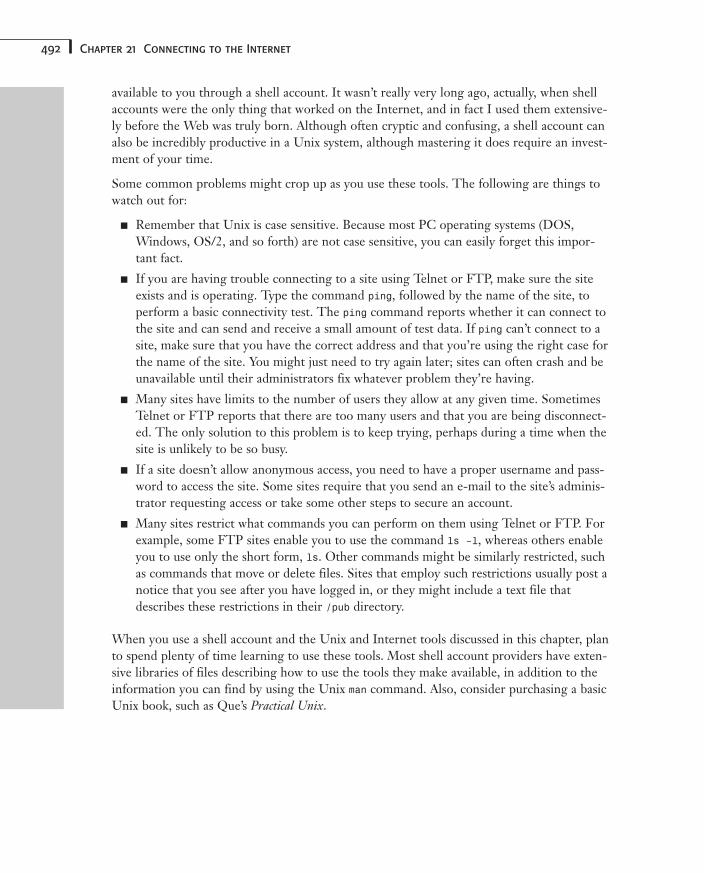
492 Chapter 21 Connecting to the Internet
available to you through a shell account. It wasn’t really very long ago, actually, when shellaccounts were the only thing that worked on the Internet, and in fact I used them extensive-ly before the Web was truly born. Although often cryptic and confusing, a shell account canalso be incredibly productive in a Unix system, although mastering it does require an invest-ment of your time.
Some common problems might crop up as you use these tools. The following are things towatch out for:
■ Remember that Unix is case sensitive. Because most PC operating systems (DOS,Windows, OS/2, and so forth) are not case sensitive, you can easily forget this impor-tant fact.
■ If you are having trouble connecting to a site using Telnet or FTP, make sure the siteexists and is operating. Type the command ping, followed by the name of the site, toperform a basic connectivity test. The ping command reports whether it can connect tothe site and can send and receive a small amount of test data. If ping can’t connect to asite, make sure that you have the correct address and that you’re using the right case forthe name of the site. You might just need to try again later; sites can often crash and beunavailable until their administrators fix whatever problem they’re having.
■ Many sites have limits to the number of users they allow at any given time. SometimesTelnet or FTP reports that there are too many users and that you are being disconnect-ed. The only solution to this problem is to keep trying, perhaps during a time when thesite is unlikely to be so busy.
■ If a site doesn’t allow anonymous access, you need to have a proper username and pass-word to access the site. Some sites require that you send an e-mail to the site’s adminis-trator requesting access or take some other steps to secure an account.
■ Many sites restrict what commands you can perform on them using Telnet or FTP. Forexample, some FTP sites enable you to use the command ls –l, whereas others enableyou to use only the short form, ls. Other commands might be similarly restricted, suchas commands that move or delete files. Sites that employ such restrictions usually post anotice that you see after you have logged in, or they might include a text file thatdescribes these restrictions in their /pub directory.
When you use a shell account and the Unix and Internet tools discussed in this chapter, planto spend plenty of time learning to use these tools. Most shell account providers have exten-sive libraries of files describing how to use the tools they make available, in addition to theinformation you can find by using the Unix man command. Also, consider purchasing a basicUnix book, such as Que’s Practical Unix.
Third-Party Utilities
In this chapter
Enhancing Your Computer with Utility Programs 494
Understanding Freeware, Shareware, and Demoware 494
PKWare’s PKZIP and PKUNZIP 495
McAfee VirusScan 496
4DOS 497
22CHAPTER
494 Chapter 22 Third-Party Utilities
Enhancing Your Computer with Utility ProgramsBecause DOS has been available for so long and has been used on so many computer sys-tems over the years, several utility programs that run under DOS and can accomplish vari-ous useful tasks are available. Many of these utilities are available either free or as sharewareprograms that you can evaluate free and then pay to license if you decide to keep them.
In this chapter, you learn about several such powerful utility programs for DOS; they canhelp you accomplish more with a DOS-based computer system or even make better use ofthe DOS command prompt in Windows and OS/2. The following DOS-based utility pro-grams are covered in this chapter:
■ PKZIP and PKUNZIP by PKWare
■ McAfee VirusScan
■ 4DOS by JP Software
Using these programs, you can increase your capability to manage files under DOS; toremain free of computer viruses; to create, manage, and extract compressed file archives; andto make the best use of the DOS command prompt.
Understanding Freeware, Shareware, andDemoware
Programmers write computer programs for many reasons: for fun, for profit, as demonstra-tions, as self-educational projects, or to solve some computing problem that they havenoticed. However, not every program has the commercial appeal of, say, an Intuit Quickenor a Microsoft Word.
Sometimes programmers choose to make their programs available to others free. When theydo so, it is understood that the programs are available on an as is basis with no warranty andno support from the programmers if some kind of problem occurs. If the program doessomething useful for you, that’s great. If it doesn’t, at least it didn’t cost you anything. Notethat programs distributed free—often called freeware—usually still carry restrictions that youcannot modify the program in any way and that the programmer’s original copyright mustbe left intact. You are typically also free to give copies to others, although you need to exam-ine each program’s copyright notice for details because they vary from program to program.
Some software programmers often choose to sell their creations using an electronic versionof a “word of mouth” sales approach called shareware. In this model, people are free todownload and try the software for a limited period of time (usually 30 days or so); and then,if they choose to keep the software, they pay the programmer a reasonable license fee. Usersare encouraged to pass along shareware programs they like to other people, who also mustpay to license the software if they want to keep it. The basic idea is to make software avail-able for sale with much lower selling and distribution costs than traditional software, withboth the programmer and user benefiting from the more efficient transaction: The programmer makes more money on each copy sold, and the user pays much less for useful
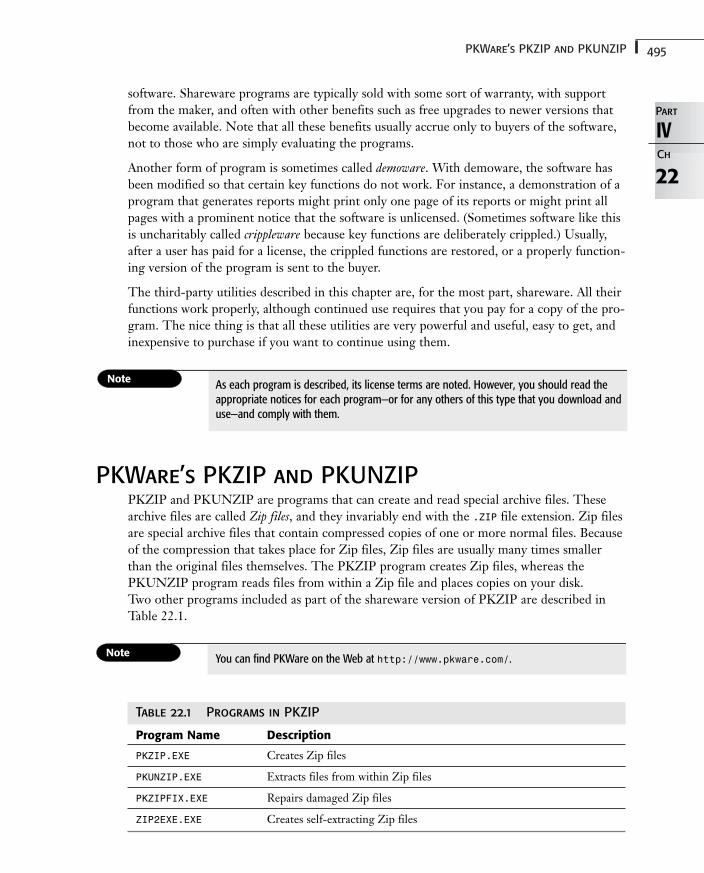
495PKWare’s PKZIP and PKUNZIP
22
IVPart
Ch
software. Shareware programs are typically sold with some sort of warranty, with supportfrom the maker, and often with other benefits such as free upgrades to newer versions thatbecome available. Note that all these benefits usually accrue only to buyers of the software,not to those who are simply evaluating the programs.
Another form of program is sometimes called demoware. With demoware, the software hasbeen modified so that certain key functions do not work. For instance, a demonstration of aprogram that generates reports might print only one page of its reports or might print allpages with a prominent notice that the software is unlicensed. (Sometimes software like thisis uncharitably called crippleware because key functions are deliberately crippled.) Usually,after a user has paid for a license, the crippled functions are restored, or a properly function-ing version of the program is sent to the buyer.
The third-party utilities described in this chapter are, for the most part, shareware. All theirfunctions work properly, although continued use requires that you pay for a copy of the pro-gram. The nice thing is that all these utilities are very powerful and useful, easy to get, andinexpensive to purchase if you want to continue using them.
As each program is described, its license terms are noted. However, you should read theappropriate notices for each program—or for any others of this type that you download anduse—and comply with them.
PKWare’s PKZIP and PKUNZIPPKZIP and PKUNZIP are programs that can create and read special archive files. Thesearchive files are called Zip files, and they invariably end with the .ZIP file extension. Zip filesare special archive files that contain compressed copies of one or more normal files. Becauseof the compression that takes place for Zip files, Zip files are usually many times smallerthan the original files themselves. The PKZIP program creates Zip files, whereas thePKUNZIP program reads files from within a Zip file and places copies on your disk. Two other programs included as part of the shareware version of PKZIP are described inTable 22.1.
You can find PKWare on the Web at http://www.pkware.com/.
Table 22.1 Programs in PKZIP
Program Name Description
PKZIP.EXE Creates Zip files
PKUNZIP.EXE Extracts files from within Zip files
PKZIPFIX.EXE Repairs damaged Zip files
ZIP2EXE.EXE Creates self-extracting Zip files
496 Chapter 22 Third-Party Utilities
The PKZIP programs are essential for almost any computer user. They enable you toaccomplish many important tasks that you cannot otherwise accomplish with DOS alone,such as the following:
■ Save space on your hard disk by putting infrequently used files into Zip files.
■ Save much time transmitting files to or from other people. Provided both parties havePKZIP, you can spend as little as one-tenth the time transmitting Zip files to anotherperson than if you were sending the actual uncompressed files.
■ Allow large files to fit on a disk when they otherwise do not.
■ Access the many Zip files available for download over the Internet. Zip files tend to bethe preferred method for distributing sizable documents and program files.
You can view a quick reference of the parameters for PKZIP.EXE and PKUNZIP.EXE bytyping the program names at the command prompt with no parameters.
McAfee VirusScanMcAfee VirusScan is one of the most widely distributed shareware programs in existence.McAfee VirusScan can rapidly scan your computer for viruses, even looking inside docu-ments for macro viruses.
What Is a Computer Virus?A computer virus is a self-replicating program that transmits copies of itself through various methods. Suchmethods include floppy disks, executable program files, certain types of documents, and some e-mail attach-ments. Thousands of different computer viruses are around, and their effects range from being relativelyinnocuous to very serious, including some that can destroy data on your computer and—in very rare cases—caneven damage some hardware components (for instance, some older monitors can be set to operate in a modethat damages them).
Computer viruses are almost never transmitted through commercial software programs. If you use onlyprepackaged programs and work with documents that you generate yourself, you probably don’t have to worrytoo much about computer viruses. However, if you occasionally download programs from the Internet or workwith documents (such as Word or Excel documents) that other people also access and use, routinely checkyour system for computer viruses. Computer viruses are unfortunately common these days; it’s better to besafe than sorry.
You can download McAfee VirusScan for DOS or for other operating systems from theMcAfee home page at http://www.mcafee.com.
4974DOS
22
IVPart
Ch
McAfee VirusScan is downloaded as a single Zip file that, when extracted using PKUNZIP,results in a main program file and a number of support files. The main program file is calledeither SCAN.EXE or SCANPM.EXE, depending on which of two possible DOS versions you areusing. In a pure DOS environment, you use SCAN.EXE. SCANPM.EXE, on the other hand, is aDOS version intended for use with protected-mode versions of DOS, such as the DOS builtinto Windows 98 or OS/2.
To run a simple scan of a disk drive using VirusScan, type the program name (SCAN orSCANPM), followed by the drive letter to be scanned. The scan starts immediately, and anydetected viruses are reported to you, along with a prompt asking whether you want to repairor delete the infected file.
Unless you use your computer disconnected from all other computers, using only your owndocuments and prepackaged software, you need to regularly scan your system for computerviruses. They are unfortunately common these days, and they can sit dormant on your sys-tem for years until the right circumstances trigger them. When triggered, they can wreakhavoc on your computer’s programs and data, and can require professional assistance forremoval—in addition to possibly causing loss of data. Aside from regularly scanning yoursystem for viruses with a program such as McAfee VirusScan, you also need to make regularbackups of your important data, which can help protect you from data loss, regardless ofwhether it is caused by a computer virus or something else.
4DOSQuite possibly the best utility program for DOS discussed in this chapter is a programcalled 4DOS, which actually serves to improve upon DOS in virtually every way conceiv-able. 4DOS is from a company called JP Software, and it replaces DOS’s COMMAND.COM with amuch more competent version that contains many powerful features not found in MS-DOSor any other DOS. Versions of 4DOS that can run under Windows 9x/ME, WindowsNT/2000, and OS/2 also are available.
On the Web, look for JP Software at http://www.jpsoft.com/.
4DOS doesn’t change the behavior of any of the DOS commands you have already learned,but it does add more features to all of them. For instance, the DIR command still works inthe same way in 4DOS, but it also accepts a larger number of parameters that enable you toformat its output much more flexibly than you can with the DIR command in standard DOS.Furthermore, the TYPE command, which cannot accept wildcards or multiple filenamesunder DOS, easily does so with 4DOS. Table 22.2 shows the major improvements that4DOS makes to existing DOS commands.
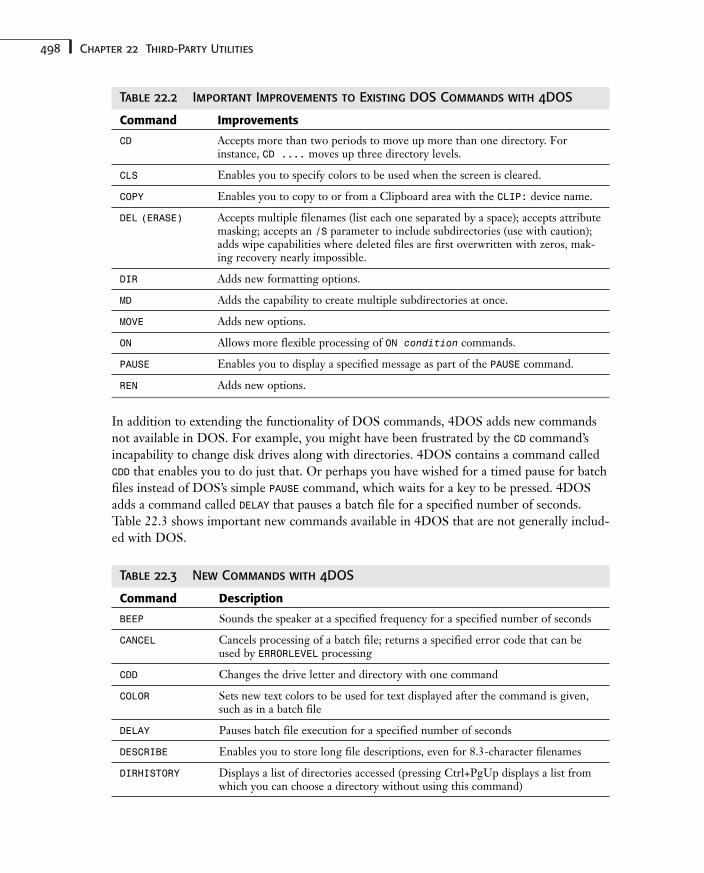
498 Chapter 22 Third-Party Utilities
Table 22.2 Important Improvements to Existing DOS Commands with 4DOS
Command Improvements
CD Accepts more than two periods to move up more than one directory. Forinstance, CD .... moves up three directory levels.
CLS Enables you to specify colors to be used when the screen is cleared.
COPY Enables you to copy to or from a Clipboard area with the CLIP: device name.
DEL (ERASE) Accepts multiple filenames (list each one separated by a space); accepts attributemasking; accepts an /S parameter to include subdirectories (use with caution);adds wipe capabilities where deleted files are first overwritten with zeros, mak-ing recovery nearly impossible.
DIR Adds new formatting options.
MD Adds the capability to create multiple subdirectories at once.
MOVE Adds new options.
ON Allows more flexible processing of ON condition commands.
PAUSE Enables you to display a specified message as part of the PAUSE command.
REN Adds new options.
In addition to extending the functionality of DOS commands, 4DOS adds new commandsnot available in DOS. For example, you might have been frustrated by the CD command’sincapability to change disk drives along with directories. 4DOS contains a command calledCDD that enables you to do just that. Or perhaps you have wished for a timed pause for batchfiles instead of DOS’s simple PAUSE command, which waits for a key to be pressed. 4DOSadds a command called DELAY that pauses a batch file for a specified number of seconds.Table 22.3 shows important new commands available in 4DOS that are not generally includ-ed with DOS.
Table 22.3 New Commands with 4DOS
Command Description
BEEP Sounds the speaker at a specified frequency for a specified number of seconds
CANCEL Cancels processing of a batch file; returns a specified error code that can beused by ERRORLEVEL processing
CDD Changes the drive letter and directory with one command
COLOR Sets new text colors to be used for text displayed after the command is given,such as in a batch file
DELAY Pauses batch file execution for a specified number of seconds
DESCRIBE Enables you to store long file descriptions, even for 8.3-character filenames
DIRHISTORY Displays a list of directories accessed (pressing Ctrl+PgUp displays a list fromwhich you can choose a directory without using this command)
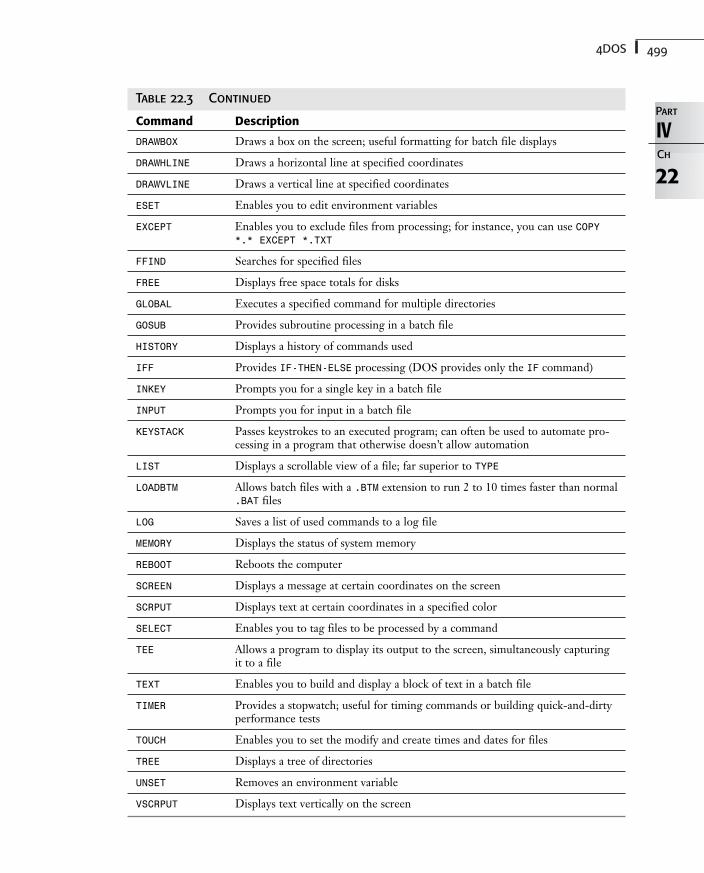
4994DOS
Table 22.3 Continued
Command Description
DRAWBOX Draws a box on the screen; useful formatting for batch file displays
DRAWHLINE Draws a horizontal line at specified coordinates
DRAWVLINE Draws a vertical line at specified coordinates
ESET Enables you to edit environment variables
EXCEPT Enables you to exclude files from processing; for instance, you can use COPY*.* EXCEPT *.TXT
FFIND Searches for specified files
FREE Displays free space totals for disks
GLOBAL Executes a specified command for multiple directories
GOSUB Provides subroutine processing in a batch file
HISTORY Displays a history of commands used
IFF Provides IF-THEN-ELSE processing (DOS provides only the IF command)
INKEY Prompts you for a single key in a batch file
INPUT Prompts you for input in a batch file
KEYSTACK Passes keystrokes to an executed program; can often be used to automate pro-cessing in a program that otherwise doesn’t allow automation
LIST Displays a scrollable view of a file; far superior to TYPE
LOADBTM Allows batch files with a .BTM extension to run 2 to 10 times faster than normal.BAT files
LOG Saves a list of used commands to a log file
MEMORY Displays the status of system memory
REBOOT Reboots the computer
SCREEN Displays a message at certain coordinates on the screen
SCRPUT Displays text at certain coordinates in a specified color
SELECT Enables you to tag files to be processed by a command
TEE Allows a program to display its output to the screen, simultaneously capturingit to a file
TEXT Enables you to build and display a block of text in a batch file
TIMER Provides a stopwatch; useful for timing commands or building quick-and-dirtyperformance tests
TOUCH Enables you to set the modify and create times and dates for files
TREE Displays a tree of directories
UNSET Removes an environment variable
VSCRPUT Displays text vertically on the screen
22
IVPart
Ch
500 Chapter 22 Third-Party Utilities
You can use the various 4DOS drawing commands, along with the color commands, tomake professional-looking batch files. Add use of the INKEY and subroutine processingfeatures, and you can construct a simple menu in 4DOS that beats anything you can do in DOS.
Another powerful feature of 4DOS is extended batch file capabilities, including a built-inbatch file debugger that enables you to step through batch files and more easily solve prob-lems within them. Add to this the capability to use BTM files that run much more quicklythan standard BAT files, along with the powerful batch file commands available in 4DOS, andyou can see that you can do much, much more with 4DOS batch files than with DOS batchfiles.
The added batch file capabilities of 4DOS are truly stunning. They almost (but not quite)give DOS batch files the power of a full programming language. The only drawback is thatfor them to work, any machine using the enhanced batch file must also have 4DOSinstalled. If you manage a number of machines, you might want to consider a license touse 4DOS on many machines for just this reason.
If you really want to become a DOS wizard, adding 4DOS to your bag of tricks can takeyou very far, indeed. The nice thing about 4DOS is that you can start using it withoutknowing much about it because DOS commands still work the same way. As you comeacross situations in which you wish DOS had some additional feature, you can open the4DOS help file and see whether it helps you solve a particular problem. Chances are excel-lent that 4DOS can help you accomplish many tasks you want to perform in DOS.
Appendixes
A Files Supplied with MS-DOS 6.22 503
B DOS Environment Variables 519
C DOS Messages 529
D DOS and DOS Utility Programs’ Keyboard Commands 563
E ASCII and Extended ASCII Codes 573
F Command Reference 583
G Glossary 959
VPART

Files Supplied with MS-DOS 6.22In this appendix
About MS-DOS Files 504
MS-DOS 6.22 Files 504
MS-DOS 6.22 Supplemental Disk Files 512
MS-DOS Utility File Extensions by Version 515
AAPPENDIX
504 Appendix A Files Supplied with MS-DOS 6.22
About MS-DOS FilesMicrosoft released MS-DOS 6.22 in three versions. When you bought a new computer, youreceived the OEM version, which might (or might not) include additional utilities specific toyour computer system. Two separate upgrade versions also were available. The MicrosoftMS-DOS 6.22 Upgrade package could be installed only on a computer running a previousversion of DOS, whereas the StepUp version could be installed only on computers runningMS-DOS 6.0 because this version simply made changes to the MS-DOS 6.0 files on yourdisk. In either case, most of the files remain the same, and the descriptions in this appendixapply to either version.
The list of MS-DOS 6.22 files in the following section is arranged alphabetically, with sup-port files grouped under the associated main file. Each is accompanied by a short descrip-tion of how the file is used.
The files are marked with the following designations where appropriate:
Vital Files that are required to run MS-DOS
Keep Files you need to keep handy
Danger! Dangerous files you might want to move off the path
Remove? Files few people use or need
International Files you need only if you use the international features of DOS
80286 Files that require an 80286 or higher processor to use
80386 Files that require an 80386 or higher processor to use
Windows Files that are useful only if you are running Microsoft Windows
If you decide to remove any of these files from your hard disk, play it safe and copy them toa floppy disk first. That way, you can get them back easily if you make a mistake. Setupplaces most of these files in the subdirectory you choose, normally C:\DOS. Exceptions arenoted.
Most of these files are distributed in a compressed form. Microsoft indicates this fact byreplacing the last character of the filename extension with an underscore (_). When Setupinstalls these files on your system, they are expanded and renamed automatically. If you copythe files from the distribution disks, however, you need to use the Expand utility (located onSetup Disk 1) to make the files usable.
MS-DOS 6.22 FilesThe following are the files that are provided with MS-DOS 6.22:
■ ANSI.SYS—Keep. ANSI display (CON) device driver. Provides enhanced control of thedisplay, as well as keyboard redefinition support. Used by MODE and certain applicationprograms.
■ APPEND.EXE—Append utility (TSR). Defines a search path for data.
505MS-DOS 6.22 Files
■ ATTRIB.EXE—File attribute utility. Views or changes file attributes.
■ CHKDSK.EXE—Keep. Check-disk utility. Checks a disk’s logical file structure for errorsand displays useful information about available disk space.
■ CHOICE.COM—Command-line choice utility. Displays a prompt and then waits for you topress a key.
■ COMMAND.COM—Vital. MS-DOS command-line shell. Normally located in the root direc-tory of the boot disk drive.
■ COUNTRY.ICE—International. (DOS 6.0 only) Code page symbol set support forIcelandic keyboards. See the README.TXT file for details.
■ COUNTRY.SYS—International. Code page symbol set support file. Loaded with the COUNTRY= command in CONFIG.SYS.
■ DBLSPACE.BIN—DoubleSpace device driver loaded into memory by MS-DOS (beforeCONFIG.SYS processing). Located in the root directory of the startup drive, DBLSPACE.BINis marked with system, hidden, and read-only attributes.
■ DBLSPACE.EXE—DoubleSpace disk compression utility.
■ DBLSPACE.HLP—DoubleSpace online help file.
■ DBLSPACE.INF—DoubleSpace setup information file.
■ DBLSPACE.INI—DoubleSpace configuration information file. Created by DBLSPACE.EXE.
■ DBLSPACE.SYS—CONFIG.SYS utility that allows the DBLSPACE.BIN driver to be moved intohigh memory.
■ DBLSPACE.WIN—DoubleSpace uses this file to keep track of Windows during the installa-tion of a compressed volume file (CVF).
■ DBLSPACE.00x—DoubleSpace CVF created by DBLSPACE.EXE. You normally do not seethese files because they are hidden, but they are your DoubleSpace compressed diskdrives.
■ DBLWIN.HLP—Windows. Help for the DoubleSpace Info Box in the Windows FileManager Tools menu.
■ DEBUG.EXE—Danger! Programmer’s debugging utility. A low-level programmer’s toolthat has almost unrestricted access to your computer. Debug can erase your hard diskwith just a few keystrokes. Don’t run Debug in a Windows DOS box.
■ DEFRAG.EXE—Keep. Disk defragmenting program. Rearranges files to eliminate frag-mentation on your disk.
■ DEFRAG.HLP—DEFRAG online help file.
■ DELOLDOS.EXE—Remove? Deletes OLD_DOS.x subdirectories from your hard disk andthen deletes itself. Feel free to delete this file if you’ve already removed the old DOSfiles from your system.
■ DELTREE.EXE—Delete directory branch utility.
■ DISKCOMP.COM—Disk compare utility. Makes an exact comparison of two floppy disks.
■ DISKCOPY.COM—Keep. Disk copy utility. Makes a copy of a floppy disk. Use it to makebackup copies of the MS-DOS distribution disks.
AApp
506 Appendix A Files Supplied with MS-DOS 6.22
■ DISPLAY.SYS—International. Display device driver with code page symbol set support.
■ EGA.CPI—International. Code page information file for EGA and VGA video displays.
■ EGA.ICE—International. (DOS 6.0 only) Code page information file for EGA and VGAvideo displays using an Icelandic symbol set. See the README.TXT file for details.
■ EGA2.CPI—International. (DOS 6.2 only) Alternative code page information file forEGA and VGA video displays. See the README.TXT file for details.
■ DMDRVR.BIN—On-track disk manager version 5.0 device driver upgrade. Installed bySetup only if an older version is on the disk.
■ XBIOS.OVL—On-track disk manager overlay file (AT Software BIOS Extended v1.3).Installed by Setup only if an older version is present on the disk.
■ DOSKEY.COM—DOS command-line editing and macro utility (TSR).
■ DRIVER.SYS—Remove? Device driver that can assign drive letters to an existing floppydrive or create an alias for a floppy disk drive.
■ EDIT.COM—Keep. ASCII text file editor. This file is actually a loader that runs the editorincluded in QBASIC.EXE. If you delete QBASIC.EXE, you cannot use EDIT.
■ EDIT.HLP—ASCII text file editor online help file.
■ EGA.SYS—Remove? Device driver that is required by the DOS Shell (and other taskswapping software) when running on an EGA display. Without an EGA display, thisdriver is useless.
■ EMM386.EXE—80386 expanded (EMS) and upper (UMB) memory manager. Requires anXMS provider, such as HIMEM, to run. Required by MS-DOS for loadhigh functions.
■ EXPAND.EXE—Keep. Utility that expands the files supplied on the MS-DOS distributiondisks into a usable form.
■ FASTHELP.EXE—Utility that displays syntax help for DOS commands. This is the samehelp you get when you type the /? switch.
■ DOSHELP.HLP—Fasthelp help text file (ASCII text). You can add or edit entries in thisfile, as long as the entries remain properly formatted in alphabetical order. This file ishandy for the shareware utilities you do not remember how to use.
■ FASTOPEN.EXE—Danger! Remove? Directory information cache (TSR). FASTOPEN isslower and more dangerous than SMARTDRV. If you can’t use SMARTDRV, use the BUFFERScommand to optimize disk access on your computer.
■ FC.EXE—File compare utility. Useful for both binary and ASCII text files.
■ FDISK.EXE—Danger! Disk partitioning utility. Prepares a new hard drive and optionallycreates one or more logical drives on it. However, one wrong keystroke can wipe out allthe information on your hard disk. Get this program off your path. I strongly adviseremoving it from your hard disk. Keep it on a bootable floppy disk with other disasterrecovery tools.
■ FIND.EXE—Find text filter utility. Useful in batch files.
■ FORMAT.COM—Keep. Format disk utility.
507MS-DOS 6.22 Files
■ GRAPHICS.COM—Enable graphics mode print screen utility (TSR).
■ GRAPHICS.PRO—Printer information file used by GRAPHICS.COM (ASCII text).
■ HELP.COM—Keep. MS-DOS online hypertext help system. This file is actually a loaderthat runs QBASIC.EXE. If you delete QBASIC.EXE, you cannot use Help.
■ HELP.HLP—Keep. MS-DOS online help system data file.
■ HIMEM.SYS—80286. Extended memory (XMS) manager. Required by EMM386 and byMS-DOS for loadhigh support. Required by Windows.
■ INTERLNK.EXE—Interlnk network client control program/device driver.
■ INTERSVR.EXE—Interlnk network server control program.
■ IO.SYS—Vital. One of two files that form the core of the MS-DOS operating system.(The other is MSDOS.SYS.) It must be present in the root directory of the startup drive.
■ KEYB.COM—International. Keyboard remapping utility with code page support. Uses theKEYBOARD.SYS file by default.
■ KEYBOARD.ICE—International. (DOS 6.0 only) Code page information file for Icelandickeyboards. Loaded by KEYB.COM. See the README.TXT file for details.
■ KEYBOARD.SYS—International. Code page information keyboard file. Loaded byKEYB.COM.
■ KEYBRD2.SYS—International. (DOS 6.2 only) Alternative code page information key-board file. Loaded by KEYB.COM. See the README.TXT file for details.
■ LABEL.EXE—Disk volume label utility.
■ LOADFIX.COM—80286. Patch that fills the first 64KB segment so that programs loadedafter it will be in the second 64KB segment of memory. Some programs display aPacked file corrupt message if they are run in the first 64KB segment of RAM.
■ MEM.EXE—Keep. Display information on memory usage utility.
■ MEMMAKER.EXE—80386. Optimize RAM memory usage program.
■ MEMMAKER.HLP—80386. MemMaker help file.
■ MEMMAKER.INF—80386. MemMaker configuration file (ASCII text).
■ MEMMAKER.STS—80386. MemMaker statistics file (ASCII text). This file is created byMemMaker and can provide insight into the way your system is configured.
■ CHKSTATE.SYS—80386. Device driver used by MemMaker to monitor and help optimizememory usage on your system.
■ SIZER.EXE—80386. Utility to help MemMaker determine how much memory eachdevice driver and TSR requires.
■ MODE.COM—Utility that can control the settings for various standard ports and devices.In some cases, MODE remains resident in memory.
■ MONOUMB.386—Windows. Device driver for Windows (SYSTEM.INI) that allows EMM386to use the B000–B7FFh region of VGA memory as UMB space. See the README.TXT filefor details.
AApp
508 Appendix A Files Supplied with MS-DOS 6.22
■ MORE.COM—MS-DOS. Filter (pipe) that enables you to view a text file or the screen out-put of a program one page at a time.
■ MOUSE.COM—Microsoft Mouse Driver version 8.20. Installed by Setup only if an olderversion is present on the disk. If you use a Microsoft mouse, keep a close watch on theversion you are using. Microsoft distributes updated drivers with most of its softwarepackages, and you can easily end up using an older driver by mistake.
■ MOUSE.INI—Microsoft Mouse configuration file (ASCII text). This file is created byMOUSE.COM in the subdirectory pointed to by the MOUSE environment variable if it isdefined.
■ MOVE.EXE—Keep. Move files or rename directories utility.
■ MSAV.EXE—Microsoft Anti-Virus program.
■ MSAV.HLP—Microsoft Anti-Virus online help file.
■ MSAV.INI—Microsoft Anti-Virus configuration file (ASCII text). This file is created byMSAV in the same subdirectory as MSAV.EXE or in the subdirectory pointed to by theMSDOSDATA environment variable if it is defined.
■ MSAVHELP.OVL—Microsoft Anti-Virus overlay file.
■ MSAVIRUS.LST—Microsoft Anti-Virus file that contains the list of known virus signaturesthat MSAV uses when scanning your disks.
■ CHKLST.MS—Microsoft Anti-Virus checksum files. MSAV creates these files in every subdi-rectory it scans, unless you turn off this feature.
■ MSBACKUP.EXE—Microsoft Backup program.
■ MSBACKUP.LOG—Microsoft Backup log file. This file is created by MSBACKUP or MWBACKUPin the same subdirectory as the corresponding executable file or in the subdirectorypointed to by the MSDOSDATA environment variable if it is defined. The Windows andDOS versions of Microsoft Backup share this file.
■ MSBACKDB.OVL—Microsoft Backup overlay file.
■ MSBACKDR.OVL—Microsoft Backup overlay file.
■ MSBACKFB.OVL—Microsoft Backup overlay file.
■ MSBACKFR.OVL—Microsoft Backup overlay file.
■ MSBACKUP.HLP—Microsoft Backup configuration file (ASCII text). This file is created byMSBACKUP in the same subdirectory as MSBACKUP.EXE or in the subdirectory pointed to bythe MSDOSDATA environment variable if it is defined. The Windows version of MSBackup keeps a separate INI file in the Windows directory.
■ MSBACKUP.INI—Microsoft Backup online help file.
■ MSBACKUP.OVL—Microsoft Backup overlay file.
■ MSBCONFG.HLP—Microsoft Backup configuration online help file.
■ MSBCONFG.OVL—Microsoft Backup configuration overlay file.
■ DEFAULT.SET—Microsoft Backup default setup file (ASCII text). This file is created byMSBACKUP or MWBACKUP in the same subdirectory as the corresponding executable file or
509MS-DOS 6.22 Files
in the subdirectory pointed to by the MSDOSDATA environment variable if it is defined.The Windows and DOS versions of Microsoft Backup share this file.
■ DEFAULT.SLT—Microsoft Backup default selection file. This file is created by MSBACKUPor MWBACKUP in the same subdirectory as the corresponding executable file or in the sub-directory pointed to by the MSDOSDATA environment variable if it is defined. TheWindows and DOS versions of Microsoft Backup share this file.
■ *.SET—Microsoft Backup setup files (ASCII text). You create and name these files tosave preferred settings for backup sets. These files are created by MSBACKUP or MWBACKUPin the same subdirectory as the corresponding executable file or in the subdirectorypointed to by the MSDOSDATA environment variable if it is defined. The Windows andDOS versions of Microsoft Backup share these files.
■ *.SLT—Microsoft Backup selection files. These files contain the file selection informa-tion that you’ve chosen for a particular backup set. These files are created by MSBACKUPor MWBACKUP in the same subdirectory as the corresponding executable file or in the sub-directory pointed to by the MSDOSDATA environment variable if it is defined. TheWindows and DOS versions of Microsoft Backup share these files.
■ *.FUL, *.INC, *.DIF—Full, incremental, and differential backup catalog files. These filesare created by MSBACKUP or MWBACKUP in the same subdirectory as the corresponding exe-cutable file or in the subdirectory pointed to by the MSDOSDATA environment variable if itis defined. The Windows and DOS versions of Microsoft Backup share these files.
■ MSCDEX.EXE—Utility that assigns drive letters to CD-ROM drives. Installed by Setuponly if an older version is present on the disk.
■ MSD.EXE—Keep. Microsoft system diagnostics. A handy utility that can tell you howyour system is configured. Used by Microsoft Product Support when troubleshooting.
■ MSDOS.SYS—Vital. One of two files that form the core of the MS-DOS operating sys-tem. (The other is IO.SYS.) It must be present in the root directory of the startup drive.
■ MSTOOLS.DLL—Windows. Windows File Manager extension DLL. Provides the FileManager Tools menu.
■ MWAV.EXE—Windows. Microsoft Anti-Virus for Windows program.
■ MWAV.HLP—Windows. Microsoft Anti-Virus for Windows online help file.
■ MWAV.INI—Windows. Microsoft Anti-Virus for Windows configuration file (ASCIItext). It is created by MWAV in the same subdirectory as MWAV.EXE or in the subdirectorypointed to by the MSDOSDATA environment variable if it is defined. MSAV and MWAV keepseparate configuration files, so options set in one do not affect the other.
■ MWAVABSI.DLL—Windows. Microsoft Anti-Virus for Windows absolute disk I/O library.
■ MWAVDLG.DLL—Windows. Microsoft Anti-Virus for Windows dialogs library.
■ MWAVDOSL.DLL—Windows. Microsoft Anti-Virus for Windows operating system library.
■ MWAVDRVL.DLL—Windows. Microsoft Anti-Virus for Windows drive list custom controllibrary.
■ MWAVMGR.DLL—Windows. Microsoft Anti-Virus for Windows TSR manager library.
AApp
510 Appendix A Files Supplied with MS-DOS 6.22
■ MWAVSCAN.DLL—Windows. Microsoft Anti-Virus for Windows virus scanning supportlibrary.
■ MWAVSOS.DLL—Windows. Microsoft Anti-Virus for Windows context-sensitive helplibrary.
■ MWGRAFIC.DLL—Windows. Microsoft Anti-Virus for Windows graphics control library.
■ MWAVTSR.EXE—Windows. VSAFE manager program for Windows. Enables VSAFE to dis-play warning messages when Windows is running.
■ MWBACKUP.EXE—Windows. Microsoft Backup for Windows program.
■ MWBACKF.DLL—Windows. Microsoft Backup for Windows DLL.
■ MWBACKR.DLL—Windows. Microsoft Backup for Windows DLL.
■ MWBACKUP.HLP—Windows. Microsoft Backup for Windows online help file.
■ MWBACKUP.INI—Windows. Microsoft Backup for Windows configuration file (ASCIItext). This file is created by MWBACKUP in the subdirectory pointed to by the WINDIR envi-ronment variable. MSBACKUP and MWBACKUP keep separate configuration files, so optionsset in one are set in the other.
■ VFINTD.386—Windows. Windows device driver (SYSTEM.INI) that allows MWBACKUP toaccess your tape drive. Setup doesn’t check for conflicts with other drivers in your SYSTEM.INI file when installing this file. See the README.TXT file for details.
■ MWUNDEL.EXE—Windows. Microsoft Undelete for Windows program.
■ MWUNDEL.HLP—Windows. Microsoft Undelete for Windows online help file.
■ NETWORKS.TXT—Remove? ASCII text file containing information about installing andusing MS-DOS 6 on various networks.
■ NLSFUNC.EXE—International. National language support program (TSR). Required toenable code page switching functions in MODE and CHCP.
■ OS2.TXT—Remove? ASCII text file describing how to install MS-DOS 6 if you are run-ning OS/2.
■ PACKING.LST—Remove? ASCII text file listing the contents of the MS-DOS 6 distribu-tion disks. Each file’s full name and compressed name are listed.
■ POWER.EXE—Remove? Power management utility/device driver, with support forAdvanced Power Management (APM) hardware.
■ PRINT.EXE—MS-DOS background print spooler utility (TSR).
■ QBASIC.EXE—Keep. QuickBasic programming environment. QBASIC.EXE is used byEDIT.COM and HELP.COM, so even if you never plan to do any BASIC programming, youprobably should keep this file.
■ QBASIC.HLP—QuickBasic online help file.
■ QBASIC.INI—QuickBasic configuration file. QBASIC.INI is updated when you makechanges to the way QuickBasic is configured on your computer.
■ RAMDRIVE.SYS—RAM disk device driver.
511MS-DOS 6.22 Files
■ README.TXT—Remove? ASCII text file containing last-minute information about MS-DOS 6.22. You would be wise to look for this file in every software package you get andread it before you install the software.
■ REPLACE.EXE—Update files utility. With this utility, you can keep two disks or directo-ries full of files in sync.
■ RESTORE.EXE—Remove? Restores backup disks created with the old BACKUP utility. Ifpossible, make new backups with MSBACKUP, move RESTORE.EXE to a floppy disk, and for-get that the old backup program ever existed.
■ SCANDISK.EXE—Keep. ScanDisk disk analysis and repair program. Checks a disk’s logicaland physical integrity and repairs any errors.
■ SCANDISK.INI—Keep. ScanDisk settings information file (ASCII text). Many ScanDisksettings can be customized and controlled from this file.
■ SETUP.EXE—MS-DOS installation program.
■ BUSETUP.EXE—Bootable upgrade setup utility. If you reboot your computer with distrib-ution disk #1 in drive A, BUSETUP starts, checks whether your computer has an operatingsystem installed, and refuses to continue if it does not. This is Microsoft’s way ofincluding a bootable disk in an upgrade-only package. BUSETUP can be run from drive Aonly.
■ DOSSETUP.INI—DOS setup information file (binary).
■ SETUP.MSG—DOS setup messages file (ASCII text).
■ AUTOEXEC.BAT—DOS setup disk AUTOEXEC.BAT file. Runs BUSETUP.
■ CONFIG.SYS—DOS setup disk CONFIG.SYS file.
■ UNINSTALL.EXE—Uninstall utility. Placed on the UNINSTALL disk created by Setup duringinstallation of MS-DOS 6.
■ SETVER.EXE—DOS version alias program/device driver. This utility fools certain pro-grams into believing they are running under a different version of MS-DOS. Setupinstalls this program on almost every computer; if you don’t need this file, it’s a waste ofmemory.
■ SHARE.EXE—Keep. Utility that provides file sharing and locking support for MS-DOS(TSR). Most people need to run SHARE, especially if they use Microsoft Windows. It cansave you from some nasty disk errors.
■ SMARTDRV.EXE—80286. Disk cache utility (TSR). SMARTDRV can provide a dramaticspeedup for your computer.
■ SMARTMON.EXE—Windows. Smart monitor, a control program for SMARTDRV that runsunder MS Windows. Strangely, this program has no DOS counterpart.
■ SMARTMON.HLP—Windows. Smart monitor online help file.
■ SMARTMON.LOG—Windows. Smart monitor cache hit log file (ASCII text).
■ SORT.EXE—Sort text filter utility. Useful in batch files.
AApp

512 Appendix A Files Supplied with MS-DOS 6.22
■ SPATCH.BAT—Batch file that can patch the Windows 3.0 SWAPFILE.EXE file to make itcompatible with DOS 6. Not required if you are running Windows 3.1. This file islocated on distribution disk #3. See the README.TXT file for details.
■ SSTOR.SYS—SpeedStor hard disk device driver version 6.3.1. Installed by Setup only ifan older version is on the disk.
■ SUBST.EXE—Remove? Assign drive alias to a subdirectory utility. Use this utility onlywhen you have to and turn it off when you are finished.
■ SYS.COM—Keep. Transfer system files utility. Handy for making preformatted disksbootable.
■ TREE.COM—Display directory structure utility.
■ UNDELETE.EXE—Keep. Recover deleted files utility. Using the sentry or tracker modes ofprotection causes UNDELETE to stay resident in memory.
■ UNDELETE.INI—UNDELETE and MWUNDEL configuration file (ASCII text). It should be locat-ed in either the same subdirectory as UNDELETE.EXE or the subdirectory pointed to bythe MSDOSDATA environment variable.
■ UNFORMAT.COM—Utility for restoring an accidentally formatted disk. Uses the informa-tion saved on the disk by FORMAT or MIRROR.
■ VSAFE.COM—Memory-resident virus-protection program.
■ WINA20.386—Windows. Windows A20 line support driver. Setup places this file in theroot directory. You can move it, but you must update SYSTEM.INI and your CONFIG.SYSfile if you do so. It is required if you are running Windows in enhanced mode and useany Windows 3.0 device drivers. (This includes most people running Windows andWindows for Workgroups 3.1 and higher.)
■ WNTOOLS.GRP—Windows. Windows Program Manager group file. Installed by Setupinto the Program Manager if you select to install any Windows version of DOS utilities.
■ AV.GRP, BK.GRP, BKAV.GRP, BKUD.GRP, BKUDAV.GRP, UD.GRP, UDAV.GRP—Depending onwhich Windows utilities you ask Setup to install, one of these group files is copied andrenamed WNTOOLS.GRP.
■ XCOPY.EXE—Keep. Extended copy utility. Copies files and subdirectories.
MS-DOS 6.22 Supplemental Disk FilesMicrosoft will send you the MS-DOS 6.22 Supplemental Disk if you request it. This diskcontains utilities that provide enhanced support for people with disabilities, updated copiesof commands no longer distributed with the standard MS-DOS package, updated drivers forcertain networks, and some sample BASIC programs. The disk also contains a batch file(SETUP.BAT) that expands the groups of files you select and updates SETVER. The contents ofthe Supplemental Disk often change, so what you receive might be different from the fol-lowing list. This list is for the DOS 6.0 Supplemental Disk with files dated 4/5/93, 6:00 a.m.
513MS-DOS 6.22 Supplemental Disk Files
AApp
In addition to other files listed in this section, the DOS 6.22 Supplemental Disk includes theDOSSHELL program and its related files. DOSSHELL does not come in the MS-DOS 6.22package.
The following are the supplemental disk files:
■ ADOS.COM—Access DOS program. Provides various utilities designed to assist peoplewith disabilities in using a computer.
■ ADOS.CFG—Access DOS configuration file.
■ ADOS.OVL—Access DOS overlay file.
■ ADOS.TXT—Access DOS instruction manual (ASCII text).
■ AREADME.TXT—Access DOS last-minute information (ASCII text).
■ FAKEMOUS.COM—IBM PS/2 “No Mouse” utility. See the description of use in ADOS.TXT.
■ ASSIGN.COM—DOS 5 disk alias utility. Assigns an alias drive letter to an existing diskdrive. Microsoft is encouraging people to use SUBST instead, but ASSIGN is still the bestchoice for fooling certain older programs.
■ BACKUP.EXE—DOS 5 backup utility. Backs up files on your hard disk to a set of floppydisks. This old utility was replaced by the MSBACKUP utility. Avoid the continued use ofBACKUP because it is not reliable.
■ COMMANDS.TXT—Instructions on how to use the utilities on the DOS 6 SupplementalDisk (ASCII text). This is the manual for this Supplemental Disk.
■ COMP.EXE—DOS 5 file compare utility. FC, which is distributed with DOS 6.22, is easierto use and more flexible than COMP.
■ CV.COM—Replacement loader for Codeview versions 3.0 to 3.13. Using Codeview ver-sions 3.0 to 3.13 without CV.COM might cause data loss if you are using an 80386 memo-ry manager such as EMM386. See COMMANDS.TXT for details.
■ DBLBOOT.BAT—Batch file to aid in creating a bootable DoubleSpace floppy disk.
■ DBLBOOT.INI—Prototype INI file used by DBLBOOT.BAT (ASCII text).
■ DVORAK.SYS—Alternative keyboard layout. Use with KEYB.COM.
■ DVORAK.TXT—Instructions for using DVORAK.SYS (ASCII text).
■ EDLIN.EXE—DOS 5 line-oriented text editor. This line editor is old-fashioned and awk-ward. Instructions on using EDLIN are included in the COMMANDS.TXT file.
■ EXE2BIN.EXE—Converts EXE files to binary format. Useful only to programmers whoare writing device drivers or COM format utilities and cannot get this service directlyfrom their linker.
■ GRAFTABL.COM—Supports international characters and code page switching on a CGAvideo adapter. Not needed for EGA or VGA.
514 Appendix A Files Supplied with MS-DOS 6.22
■ JOIN.EXE—DOS 5 utility that makes a disk drive appear to be a subdirectory of anotherdrive. Many DOS commands fail, destroy data, or both when used on a joined drive, sorun this utility only if you must.
■ KBDBUF.SYS—A device driver that enables you to specify the size of the keyboard typeahead buffer. Cannot be run in high memory.
■ LCD.CPI—Code page information file for the IBM PC Convertible’s LCD display. Usewith DISPLAY.SYS.
■ MIRROR.COM—DOS 5 utility that saves information UNDELETE and UNFORMAT use whenrecovering files. Very useful, but it might interfere with creating DoubleSpace drives.
■ MSHERC.COM—TSR that installs support for a Hercules graphics card. Required by someQBasic programs.
■ NET.TXT—Supplemental network drivers instruction file (ASCII text). Contains informa-tion on when and how to use the following drivers provided on the MS-DOS 6.22Supplemental Disk. Note that some files must be renamed before they can be used.Their “real” names (what you must rename them to before you can use them) areshown in parentheses.
• NET.1XE—LAN Manager 2.0 basic version (NET.EXE).
• NETBEUI.DOS—LAN Manager 2.0 basic and enhanced version driver.
• NETWKSTA.1XE—LAN Manager 1.x enhanced version (NETWKSTA.EXE).
• NETWKSTA.2EX—LAN Manager 2.0 enhanced version (NETWKSTA.EXE).
• REDIR.1XE—LAN Manager 1.x basic version (REDIR.EXE).
• REDIR.2XE—LAN Manager 2.0 basic version (REDIR.EXE). Microsoft MS-NET(REDIR.EXE). 3COM 3+ Share version 1.6 (MSREDIR.EXE).
■ SETNAME.EXE—Microsoft MS-NET utility.
■ PRINTER.SYS—Device driver that provides support for international characters and codepage switching on certain printers.
■ 4201.CPI—Code page information file for IBM Proprinter II and III model 4201 andXL model 4202.
■ 4208.CPI—Code page information file for IBM Proprinter X24E model 4207 andXL24E model 4208.
■ 5202.CPI—Code page information file for IBM QuietWriter III printer.
■ PRINTFIX.COM—Utility that prevents MS-DOS from checking the status of your printer.Use only if problems have developed with your printer since installing MS-DOS 6.
■ GORILLA.BAS—QuickBasic sample program (game).
■ MONEY.BAS—QuickBasic sample program (personal finance manager).
■ NIBBLES.BAS—QuickBasic sample program (game).
■ REMLINE.BAS—QuickBasic sample program (remove line numbers).
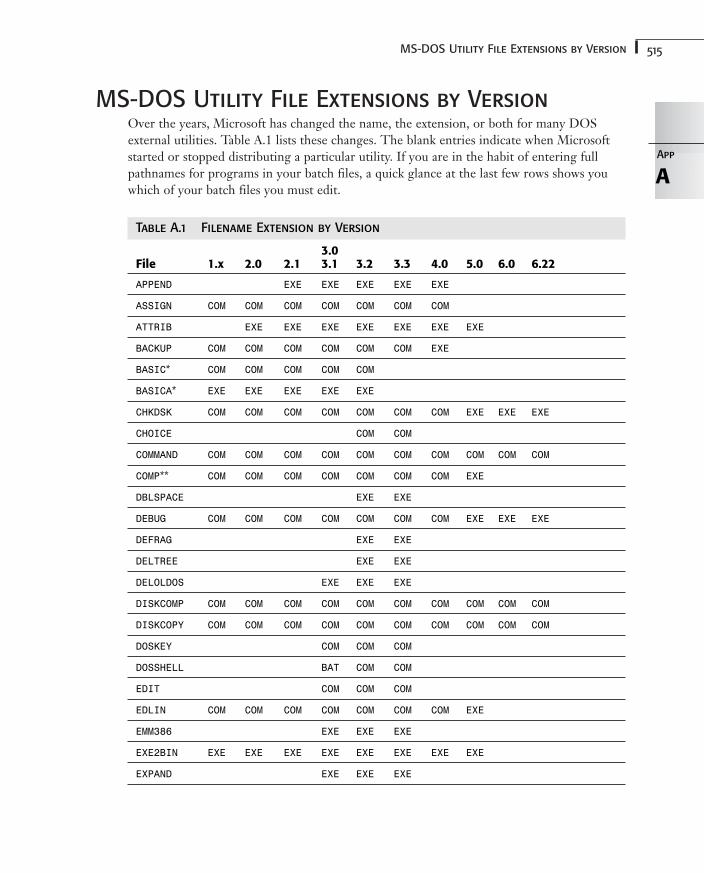
515MS-DOS Utility File Extensions by Version
MS-DOS Utility File Extensions by VersionOver the years, Microsoft has changed the name, the extension, or both for many DOSexternal utilities. Table A.1 lists these changes. The blank entries indicate when Microsoftstarted or stopped distributing a particular utility. If you are in the habit of entering fullpathnames for programs in your batch files, a quick glance at the last few rows shows youwhich of your batch files you must edit.
Table A.1 Filename Extension by Version
3.0File 1.x 2.0 2.1 3.1 3.2 3.3 4.0 5.0 6.0 6.22
APPEND EXE EXE EXE EXE EXE
ASSIGN COM COM COM COM COM COM COM
ATTRIB EXE EXE EXE EXE EXE EXE EXE
BACKUP COM COM COM COM COM COM EXE
BASIC* COM COM COM COM COM
BASICA* EXE EXE EXE EXE EXE
CHKDSK COM COM COM COM COM COM COM EXE EXE EXE
CHOICE COM COM
COMMAND COM COM COM COM COM COM COM COM COM COM
COMP** COM COM COM COM COM COM COM EXE
DBLSPACE EXE EXE
DEBUG COM COM COM COM COM COM COM EXE EXE EXE
DEFRAG EXE EXE
DELTREE EXE EXE
DELOLDOS EXE EXE EXE
DISKCOMP COM COM COM COM COM COM COM COM COM COM
DISKCOPY COM COM COM COM COM COM COM COM COM COM
DOSKEY COM COM COM
DOSSHELL BAT COM COM
EDIT COM COM COM
EDLIN COM COM COM COM COM COM COM EXE
EMM386 EXE EXE EXE
EXE2BIN EXE EXE EXE EXE EXE EXE EXE EXE
EXPAND EXE EXE EXE
AApp
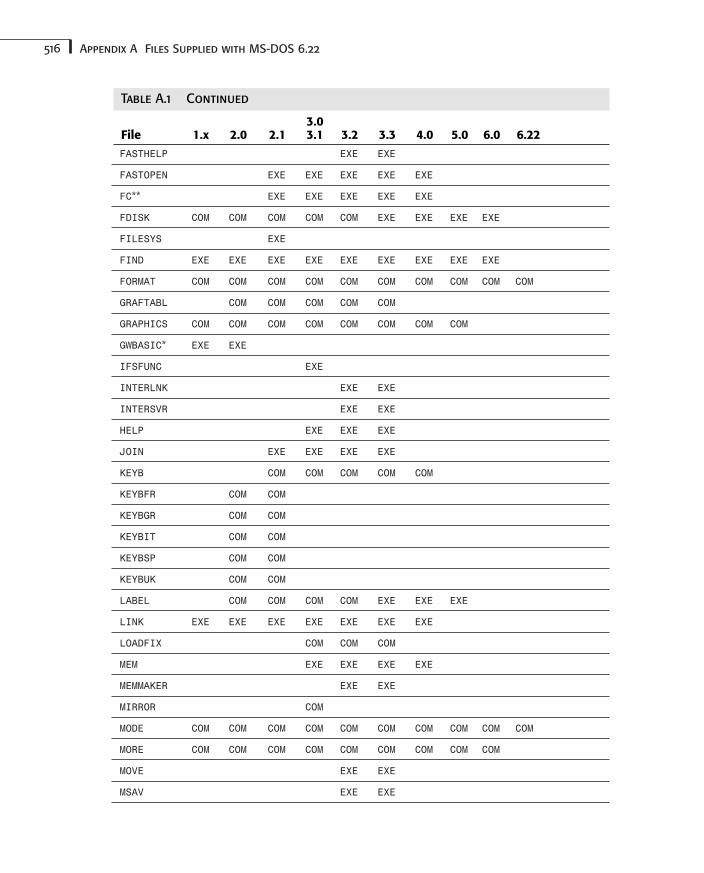
516 Appendix A Files Supplied with MS-DOS 6.22
FASTHELP EXE EXE
FASTOPEN EXE EXE EXE EXE EXE
FC** EXE EXE EXE EXE EXE
FDISK COM COM COM COM COM EXE EXE EXE EXE
FILESYS EXE
FIND EXE EXE EXE EXE EXE EXE EXE EXE EXE
FORMAT COM COM COM COM COM COM COM COM COM COM
GRAFTABL COM COM COM COM COM
GRAPHICS COM COM COM COM COM COM COM COM
GWBASIC* EXE EXE
IFSFUNC EXE
INTERLNK EXE EXE
INTERSVR EXE EXE
HELP EXE EXE EXE
JOIN EXE EXE EXE EXE
KEYB COM COM COM COM COM
KEYBFR COM COM
KEYBGR COM COM
KEYBIT COM COM
KEYBSP COM COM
KEYBUK COM COM
LABEL COM COM COM COM EXE EXE EXE
LINK EXE EXE EXE EXE EXE EXE EXE
LOADFIX COM COM COM
MEM EXE EXE EXE EXE
MEMMAKER EXE EXE
MIRROR COM
MODE COM COM COM COM COM COM COM COM COM COM
MORE COM COM COM COM COM COM COM COM COM
MOVE EXE EXE
MSAV EXE EXE
Table A.1 Continued
3.0File 1.x 2.0 2.1 3.1 3.2 3.3 4.0 5.0 6.0 6.22
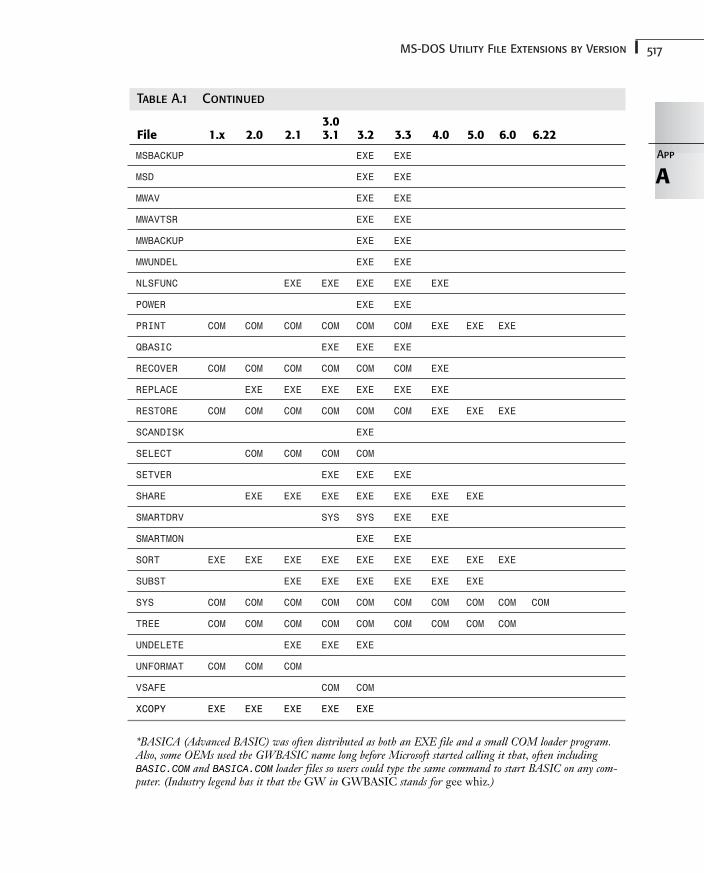
517MS-DOS Utility File Extensions by Version
MSBACKUP EXE EXE
MSD EXE EXE
MWAV EXE EXE
MWAVTSR EXE EXE
MWBACKUP EXE EXE
MWUNDEL EXE EXE
NLSFUNC EXE EXE EXE EXE EXE
POWER EXE EXE
PRINT COM COM COM COM COM COM EXE EXE EXE
QBASIC EXE EXE EXE
RECOVER COM COM COM COM COM COM EXE
REPLACE EXE EXE EXE EXE EXE EXE
RESTORE COM COM COM COM COM COM EXE EXE EXE
SCANDISK EXE
SELECT COM COM COM COM
SETVER EXE EXE EXE
SHARE EXE EXE EXE EXE EXE EXE EXE
SMARTDRV SYS SYS EXE EXE
SMARTMON EXE EXE
SORT EXE EXE EXE EXE EXE EXE EXE EXE EXE
SUBST EXE EXE EXE EXE EXE EXE
SYS COM COM COM COM COM COM COM COM COM COM
TREE COM COM COM COM COM COM COM COM COM
UNDELETE EXE EXE EXE
UNFORMAT COM COM COM
VSAFE COM COM
XCOPY EXE EXE EXE EXE EXE
*BASICA (Advanced BASIC) was often distributed as both an EXE file and a small COM loader program.Also, some OEMs used the GWBASIC name long before Microsoft started calling it that, often includingBASIC.COM and BASICA.COM loader files so users could type the same command to start BASIC on any com-puter. (Industry legend has it that the GW in GWBASIC stands for gee whiz.)
AApp
Table A.1 Continued
3.0File 1.x 2.0 2.1 3.1 3.2 3.3 4.0 5.0 6.0 6.22

518 Appendix A Files Supplied with MS-DOS 6.22
**FC and COMP have had a confusing journey through the various DOS versions. IBM originally includedCOMP with PC DOS 1.0, and then it disappeared in subsequent IBM releases, reappearing officially in MS-DOS 3.3. During this period, many OEMs added utilities to their versions of MS-DOS. A popular add-onwas COMP, often under a different name (such as FILCOM, FC, or COMPARE). Even Microsoft’s generic MS-DOS often included some type of file compare utility. Mapping all these variations is overly complicated, sothe table just indicates that COMP has been with DOS since the beginning.
DOS Environment Variables
In this appendix
Understanding the DOS Environment 520
APPEND 520
COMSPEC 521
CONFIG 521
COPYCMD 522
DIRCMD 522
MSDOSDATA 523
PATH 524
PROMPT 525
TEMP and TMP 525
windir 526
WINPMT 526
BAPPENDIX
520 Appendix B DOS Environment Variables
Understanding the DOS EnvironmentThe environment is a small area in memory that DOS sets aside for storing text variables.Normally, you set the size of the master environment area with a SHELL = statement in yourCONFIG.SYS file. The default size of the environment is 256 bytes, but you almost certainlywant to increase this size as you begin to use environment variables to automate your dailytasks.
Each variable in the environment consists of two parts: the name of the variable, whichDOS stores in uppercase characters, and the contents of the variable, which is the text asso-ciated with the variable. Normally, you view, create, and replace environment variables byusing the SET command. The PATH and PROMPT commands store their settings in the environ-ment. MS-DOS automatically creates certain environment variables, such as COMSPEC andCONFIG, when you start up your computer.
Whenever DOS loads a program into memory, it makes a copy of the current environmentand passes this copy to the program. This copy is only big enough to include the variablescurrently defined in the environment, rounded up to an even multiple of 16 bytes. Althoughthis use of memory is efficient, it is inconvenient for people who normally operate from ashell program such as DOS Shell, Norton Commander, or XTree because not much envi-ronment space is available, no matter how large an environment area you set aside. If youget an Out of environment space message while you are running a shell program, quit theshell and try the operation again. If you still receive an error message, you must increase thesize of the master environment by using the SHELL= statement in your CONFIG.SYS file.
The following sections list the standard environment variables used by MS-DOS. Alsonoted is the version of DOS in which the variable first appeared, along with the creator ofthe variable. An MS-DOS label indicates that this variable is created automatically whenyour computer starts up. A User label indicates that you must create it by using the SET com-mand or, for certain variables, the PATH, PROMPT, or APPEND command. A Windows label indi-cates that the environment variable is created by Microsoft Windows.
APPENDThe APPEND environment variable is created by DOS if you specify the /E parameter whenloading APPEND into memory. With the /E parameter, APPEND stores the appended directorysearch path in the environment instead of internally.
This variable is stored much like the PATH variable. It is a list of subdirectories to besearched, separated by semicolons. If the APPEND environment variable is created with theSET command, it might appear like this:
SET APPEND=C:\DOS;C:\WS
When you instruct APPEND to store the appended directory search path in the environment,you can change or replace the search path by using the SET command as well as the APPENDcommand.
521CONFIG
Note that APPEND /E does not work if you are launching programs that must search theappended directory search path from a shell program such as DOS Shell, NortonCommander, or XTree. In such cases, APPEND must store the appended directory search pathinternally.
COMSPECThe COMSPEC variable points to the active copy of the command interpreter shell loaded withthe SHELL= command in your CONFIG.SYS file. All of COMMAND.COM isn’t in memory all thetime; when parts of it must be reloaded, the COMSPEC variable is used to find the COMMAND.COMfile on disk.
In the following SHELL= command, COMMAND.COM sets the COMSPEC variable using the C:\DOS\parameter that follows the command interpreter’s name:
SHELL=C:\DOS\COMMAND.COM C:\DOS\ /E:512 /P
DOS executes the SHELL= command at the end of CONFIG.SYS processing. When it does,COMMAND.COM sets the COMSPEC variable in the environment as if it had executed SET COM-SPEC=C:\DOS\COMMAND.COM. (Note that COMMAND.COM doesn’t actually use the SET command.)
Many programs search the environment for the COMSPEC variable when they must locate COMMAND.COM. If you have trouble shelling to a DOS prompt from one of your applicationprograms, check the COMSPEC environment variable and make sure that it’s pointing to a validcopy of COMMAND.COM.
CONFIGWhen MS-DOS processes a startup menu in CONFIG.SYS, it defines the CONFIG environmentvariable, setting it equal to the block name of the menu item you selected. You can use theCONFIG environment variable with GOTO and IF in your AUTOEXEC.BAT file to continue makingchoices based on the configuration chosen in the startup menu.
For example, assume that your CONFIG.SYS file includes the following startup menu:
[MENU]MENUITEM=WIN, Configure for Windows (default)MENUITEM=DOS, Configure for MS-DOSMENUITEM=MAINT, Configure for file & disk maintenanceMENUDEFAULT=WIN, 10
The CONFIG environment variable is set equal to WIN, DOS, or MAINT, depending on whichconfiguration you select when your computer displays the startup menu. In yourAUTOEXEC.BAT file, you can check this value and process different commands for each config-uration. For example, you might set up separate sections for each startup configuration andlabel them with the block names you used in your CONFIG.SYS file, which in this case are:WIN, :DOS, and :MAINT. (For more information on block names, see the [blockname] entry in
BApp

522 Appendix B DOS Environment Variables
Appendix F, “Command Reference.”) Then, a simple GOTO statement such as the followingmight be all you need to jump to the correct section of your AUTOEXEC.BAT file:
GOTO %CONFIG%
A slightly safer method is to check each value with an IF statement and report an error if anunexpected value for CONFIG is encountered:
IF %CONFIG%x==WINx GOTO WINIF %CONFIG%x==DOSx GOTO DOSIF %CONFIG%x==MAINTx GOTO MAINTGOTO ERROR
The use of x prevents the generation of an error message if the CONFIG environment variableis null or undefined. When you use an IF comparison, always include a character (any char-acter will do) that prevents one side of the equation from being empty.
COPYCMDStarting with MS-DOS 6.2, COPY, MOVE, and XCOPY all prompt for confirmation before over-writing a file. Because this behavior might wreak havoc with your old batch files, this behav-ior is the default only when these commands are run from the command line. If COPY, MOVE,or XCOPY is run from a batch file, it overwrites files without warning, which is its behavior inprevious versions of DOS.
You can change the new default behavior by defining an environment variable named COPYCMD. To force COPY, MOVE, and XCOPY to prompt you before overwriting a file in all cases,even from a batch file, add the following line to your AUTOEXEC.BAT file:
SET COPYCMD=/-Y
To prevent COPY, MOVE, and XCOPY from prompting before overwriting a file, add the follow-ing line to your AUTOEXEC.BAT file:
SET COPYCMD=/Y
DIRCMDThe DIRCMD environment variable customizes the default options the DIR command uses.When you run the DIR command, the contents of the DIRCMD environment variable—if itexists—are added invisibly to what you type on the command line.
Suppose that you prefer filenames in lowercase letters, sorted by directories and then sortedby date and time. You also want the screen to pause after each page of files is displayed. Youcan define the DIRCMD variable in your AUTOEXEC.BAT file as follows:
SET DIRCMD=/L /O:GD /P
Now you don’t have to enter those options every time you want to use them. To overridethese options, specify the switch with a hyphen added before the letter. For example, to turnoff the pause option in your customized DIR command, enter the following command:
DIR /-P
523MSDOSDATA
Note that overriding options this way is temporary and changes only the behavior of thecommand in which the override switch appears.
MSDOSDATAThe MSDOSDATA environment variable defines where certain DOS utility programs look fortheir data files. Defining this variable can make it easier to keep programs and data separateon your hard disk. Defining the variable can make it easier also to run these utility programsfrom a network using individual configuration files.
The most convenient place to define the MSDOSDATA variable is in your AUTOEXEC.BAT file witha SET command. Here’s an example:
SET MSDOSDATA=C:\DOS\DATA
This line sets MSDOSDATA to point to the C:\DOS\DATA subdirectory on your hard drive. Notethat this subdirectory has to exist first; the SET command does not create it for you.
Table B.1 provides a list of the MS-DOS programs that create data files as well as the loca-tions where the programs look for the data files.
Table B.1 Data File Search Paths
Primary SecondaryProgram Data File Location Location
DBLSPACE DBLSPACE.INF Programdirectory
DBLSPACE.INI Programdirectory
DOSSHELL DOSSHELL.INI DOSSHELL Program directory
MEMMAKER MEMMAKER.INI Programdirectory
MEMMAKER.STS Programdirectory
MSAV CHKLST.MS Alldirectories
MSAV.INI MSDOSDATA Program directory
MSBACKUP MSBACKUP.INI MSDOSDATA Program directory
*.DIF MSDOSDATA Programdirectory
*.FUL MSDOSDATA Programdirectory
*.INC MSDOSDATA Programdirectory
*.SET MSDOSDATA Programdirectory
*.SLT MSDOSDATA Programdirectory
BApp
524 Appendix B DOS Environment Variables
MWAV MWAV.INI MSDOSDATA Program directory
MWBACKUP MWBACKUP.INI Windowsdirectory
*.DIF MSDOSDATA Programdirectory
*.FUL MSDOSDATA Programdirectory
*.INC MSDOSDATA Programdirectory
*.SET MSDOSDATA Programdirectory
*.SLT MSDOSDATA Programdirectory
MWUNDEL UNDELETE.INI MSDOSDATA Program directory
SCANDISK SCANDISK.INI MSDOSDATA Program directory
UNDELETE UNDELETE.INI MSDOSDATA Program directory
In Table B.1, program directory refers to the directory that the executable program file islocated in. Locations shown in all caps are environment variables that point to subdirecto-ries. Programs that list both a primary and secondary location search for the data file in theprimary location first.
If you set up a separate data subdirectory for MS-DOS, you might need to move some ofthese data files from your DOS subdirectory to that subdirectory. See the MOVE command inAppendix F, “Command Reference,” for details about how to move a file.
PATHThe PATH command stores its settings in the DOS environment under the PATH variablename. (You can set the path by using either the PATH or SET command.) You probably shouldset the initial DOS search path in your AUTOEXEC.BAT file. DOS does not define a defaultPATH automatically, although the Setup program for DOS 6 does insert the PATH commandin your AUTOEXEC.BAT file if you don’t have one there already.
DOS uses the PATH environment variable to find executable files. Whenever a command isexecuted, DOS searches for the first word on the command line in the following:
■ The DOSKEY macro list, if DOSKEY is loaded
■ The COMMAND.COM internal command list
■ Files with an extension of COM, then EXE, and then BAT in the current directory
■ Files with an extension of COM, then EXE, and then BAT in the first directory listed in thePATH variable
Table B.1 Continued
Primary SecondaryProgram Data File Location Location

525TEMP and TMP
■ Files with an extension of COM, then EXE, and then BAT in the second directory listed inthe PATH variable
■ Files with an extension of COM, then EXE, and then BAT in the next directory listed in thePATH variable, and so on until the last subdirectory in the PATH variable has beensearched
You can modify this order depending on what parts of the full pathname you enter with thecommand name. If you specify a drive or path with the filename, only that drive and pathare searched. If you specify an extension, the other extensions are not searched for. TheDOSKEY macro and internal command search are skipped if you include a disk drive or paththat includes a backslash in the name of the command, but not if you include only an exten-sion.
Other programs might search the PATH variable as well. Programs that require the additionof their subdirectory to the PATH often use the PATH environment variable to find overlay andhelp files.
PROMPTThe PROMPT environment variable describes the type of command-line prompt you wantDOS to use. It is set by the user with either the PROMPT or SET PROMPT= command. Thedefault command-line prompt that DOS uses if the PROMPT environment variable is unde-fined is the letter of the current drive and >—for example, C>.
If the PROMPT environment variable doesn’t exist, the DOS 6.0, 6.2, and 6.22 versions of COMMAND.COM create it automatically with a value of $P$G. This prompt shows the currentdirectory as well as the current drive; for example, C:\DOS>. The only way to have thePROMPT environment variable undefined is to delete it.
The PROMPT environment variable uses meta-strings to include system information in thecommand prompt. For a description of which meta-strings are available and how they canbe used, see the entry for PROMPT in the “Command Reference.”
TEMP and TMPMany programs use the TEMP environment variable as the preferred place to create anddelete temporary files. This environment variable evolved somewhat informally, which iswhy it has two popular spellings: TEMP and TMP. TEMP is the more common variation and isthe one DOS uses. Typically, if the TEMP environment variable isn’t defined, the programcreates its temporary files in the root directory of the current drive (or sometimes the start-up drive).
BApp
526 Appendix B DOS Environment Variables
DOS creates the following types of files in the directory pointed to by the TEMP environmentvariable:
■ Files required by the use of redirection (< and >) or piping (|)
■ Swap files created by the DOS Shell Task Swapper
■ Temporary files created by any full-screen application program, such as MSAV, MSBACKUP,and QBASIC
■ Temporary disk data storage for DISKCOPY
■ Microsoft Windows Print Manager spooling files
■ Microsoft Windows swapping files (standard mode only)
Many programs use the TEMP environment variable if it is defined. Temporary files thatescape deletion by their parent program are easier to delete when they are gathered in theirown subdirectory. Windows recommends at least 2MB in the subdirectory pointed to by theTEMP environment variable. If you point TEMP to a RAM disk, you never have to worry aboutdeleting leftover temporary files. They all disappear whenever you reboot or turn off yourcomputer.
windirMicrosoft Windowsadds the windir environment variable whenever you open a DOS win-dow. The windir environment variable always points to the main Windows directory, whichis normally C:\WINDOWS. If you issue the SET command to view the variables defined in aDOS window launched from Windows, the list might look like the following:
COMSPEC=C:\DOS\COMMAND.COMPROMPT=$P$GPATH=C:\BAT;C:\DOS;C:\WINDOWS;C:\UTILTEMP=C:\TEMPTMP=C:\TEMPwindir=C:\WINDOWS
Windows adds the windir variable to the environment in lowercase letters to keep you frommodifying or deleting it. If you issue a SET windir= command, SET capitalizes the variablename before searching for it, and a new variable named WINDIR is created.
WINPMTIf the WINPMT variable is defined, Microsoft Windows uses it to format the DOS prompt dis-played in a DOS window. Using a different DOS prompt from Windows can help youremember that Windows is running and that you need to type EXIT and quit Windows bypressing Alt+F4 before shutting off your computer.
To use the WINPMT environment variable, define WINPMT with the SET command (perhaps inyour AUTOEXEC.BAT file) before you start Microsoft Windows. Set WINPMT equal to theprompt you want to use from Windows, using the same formatting you use with the PROMPTcommand.
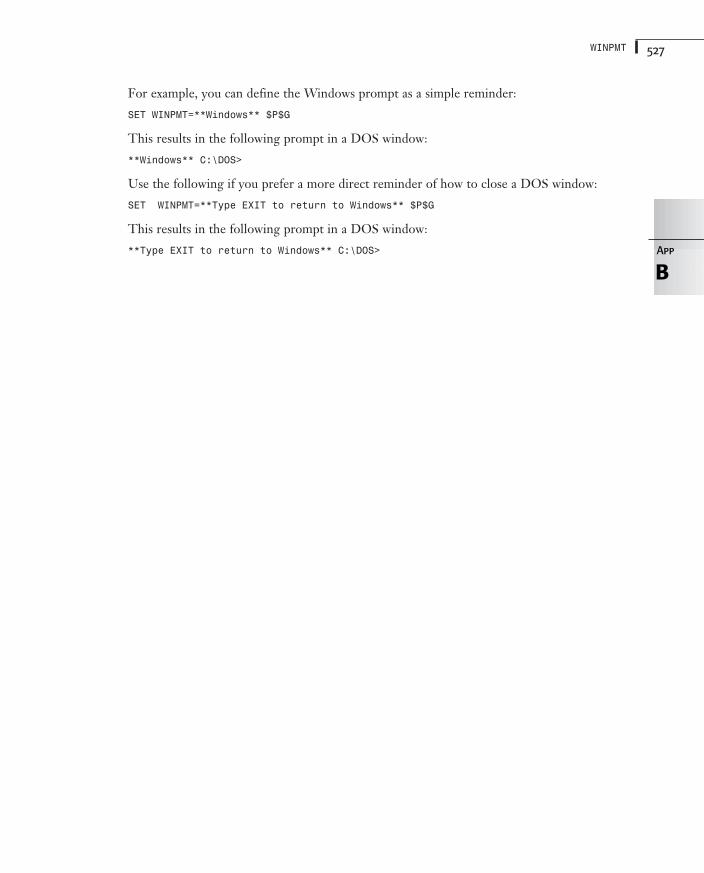
527WINPMT
For example, you can define the Windows prompt as a simple reminder:
SET WINPMT=**Windows** $P$G
This results in the following prompt in a DOS window:
**Windows** C:\DOS>
Use the following if you prefer a more direct reminder of how to close a DOS window:
SET WINPMT=**Type EXIT to return to Windows** $P$G
This results in the following prompt in a DOS window:
**Type EXIT to return to Windows** C:\DOS>
BApp


DOS MessagesIn this appendix
General DOS Messages 530
DOS Device Error Messages 537
CAPPENDIX
530 Appendix C DOS Messages
General DOS MessagesDOS messages can be divided into two groups: general error messages and device errormessages. The three types of general DOS messages are as follows:
■ Error messages—These messages indicate that DOS has encountered a problem witha command or with the syntax you used. Execution stops when DOS displays an errormessage.
■ Warning messages—These messages tell you that the next action you take might causeunwanted changes to files or to your system; they often include a prompt, whichenables you to select an action.
■ Information messages—These messages display needed information about your sys-tem’s operation or your DOS version’s performance. Like warning messages, these mes-sages also often include a prompt.
The messages in this section might appear any time during a work session. Messages thatcan occur when you start DOS are indicated by (startup). With most startup errors, DOSdoes not start and you must reboot the system:
d contains n non-contiguous blocks
Warning: CHKDSK found noncontiguous blocks on drive d. If you like, you can use adefragmenter to eliminate the fragmentation or use COPY or XCOPY to transfer the frag-mented files to a freshly formatted floppy disk in a sequential form.
A BAD UMB number has been specified
Error: You have attempted to use LOADHIGH (or LH) with the /L parameter referring to anonexistent UMB area. The best way to correct this problem is to rerun MemMaker.
A program was run that took memory that Backup requiresThe program must be removed from memory before Backup can continue
Error: You have installed a terminate-and-stay resident program (TSR) that leavesinsufficient memory for BACKUP. Examples are PRINT or some forms of MODE. The resi-dent program must be unloaded before you can continue the backup. Use MEM /C tosee which TSR was loaded last.
Access denied
Error: You or a program attempted to change or erase a file that is in use or marked asread-only. You can change the read-only attribute by using the ATTRIB command.
Active code page: xxx
Information: You issued CHCP, which displayed the code page currently in use by thesystem (represented by xxx).
Active code page for device ddd is xxx
Information: You issued MODE, which lists the code page (xxx) currently in use for thedevice (ddd). To display a single screen at a time, pipe this command into MORE(MODE|MORE).
531General DOS Messages
Active code page not available from CON device
Error: You used KEYB with a code page not supported on the CON device (screen).
Add filename? (Y/N)
Prompt: You issued REPLACE /P. DOS asks whether you want to add the file to thedisk.
Adding filename
Information: REPLACE displays this message while adding filename to your disk.
All available space in the Extended DOS Partition is assigned to logical drives
Error: No room remains for logical drives in the extended partition. Use FDISK tochange the size of the extended partition.
All files canceled by operator
Information: You issued PRINT /T, which removes all files from the print queue.
All files in directory will be deleted!Are you sure (Y/N)?
Warning: You issued DEL or ERASE with the *.* wildcard. To continue, press Y; to can-cel, press N. Then press the Enter key.
All logical drives deleted in the Extended DOS Partition
Information: While using FDISK, you removed all logical drives associated with theextended DOS partition.
All specified file(s) are contiguous
Information: None of the files you specified (to CHKDSK) are fragmented.
Allocation error, size adjusted
Warning: The contents of a file have been truncated because the size indicated in thedirectory is inconsistent with the amount of data allocated to the file. Use SCANDISK orCHKDSK /F to correct the discrepancy.
An incompatible DOSKey is already installed
Error: The version of DOSKey you are trying to run is incompatible with the one inmemory. Make sure you don’t mix the DOSKEY.COM that comes with DOS 6.0 with theversion that comes with DOS 6.2 or another vendor’s command-line editor.
ANSI.SYS must be installed to perform requested function
Warning: While using MODE, you requested a screen function that cannot be performeduntil you load ANSI.SYS.
APPEND already installed
Information: You tried to issue APPEND with /X or /E after previously using APPEND. Youcan use the /E switch only the first time you type APPEND after starting your system.You can use the /X switch only if it was used during initialization.
CApp
532 Appendix C DOS Messages
APPEND/ASSIGN conflict
Warning: You cannot use APPEND on an assigned drive. Cancel the drive assignmentbefore using APPEND with this drive.
ATTENTION: A serious disk error has occurred while writing to drive
Error: SMARTDRV has detected a hard disk error when write caching was enabled.Because the application might have already continued with something else, the usualcorrections don’t apply. Write caching must be enabled for only reliable media.
/B invalid with a black and white printer
Error: You tried to print the background color by using GRAPHICS /B, but you do nothave a color printer connected to your computer.
***Backing up files to drive x:***
Information: This message appears while you back up files to the specified drive.
Bad command or file name
Error: You entered an invalid name for invoking a command, program, or batch file.The most frequent causes are misspelling a name, omitting a required disk drive orpathname, or omitting the command name when giving parameters (for example,omitting the WordStar command, WS, by typing MYFILE instead of WS MYFILE).
Check the spelling on the command line and make sure that the command, program,or batch file is in the location specified. Then, try the command again.
Bad or missing command interpreter
Error (startup): DOS does not start because it cannot find COMMAND.COM, the commandinterpreter.
If this message appears during startup, COMMAND.COM is not on the startup disk or a COMMAND.COM file from a previous version of DOS is on the disk. If you used the SHELLcommand in CONFIG.SYS, the message means that the SHELL command is improperlyphrased or that COMMAND.COM is not in the location you specified.
With DOS 6.0 or 6.2, you can override CONFIG.SYS by using the F8 or F5 key whilebooting. This solution works if the correct COMMAND.COM is in the root directory.Otherwise, place another disk that contains the operating system (IO.SYS, MSDOS.SYS,and COMMAND.COM) in the floppy disk drive and reset the system. After DOS starts, copyCOMMAND.COM to the original startup disk so that you can boot DOS in the future.
Error: If this message appears while you are running DOS, there are several possibili-ties: COMMAND.COM has been erased from the disk and directory you used when startingDOS, a version of COMMAND.COM from a previous version of DOS has overwritten thegood version, or the COMSPEC entry in the environment has been changed. You mustrestart DOS by resetting the system.
If resetting the system does not solve your problem, restart the computer from a copyof your DOS master disk. Copy COMMAND.COM from this disk to the offending disk.
533General DOS Messages
Bad or missing filename
Warning (startup): The device driver filename was not found, an error occurred whenthe device driver was loaded, a break address for the device driver was beyond theRAM available to the computer, or DOS detected an error while loading the driverinto memory. DOS continues booting without the device driver filename.
If DOS loads, check your CONFIG.SYS file for the line DEVICE=filename. Make sure thatthe line is typed correctly and that the device driver is at the specified location; thenreboot the system. If the message reappears, copy the file from its original disk to theboot disk and try starting DOS again. If the error persists, the device driver is bad;contact the dealer or publisher who sold you the driver.
Bad or missing keyboard definition file
Warning: DOS cannot find KEYBOARD.SYS as specified by the KEYB command. Solvingthis problem might take several steps. First, check to make sure that KEYBOARD.SYSexists and is in the correct path; then retype the KEYB command. If you get the samemessage, KEYB.COM or KEYBOARD.SYS might be corrupted.
Bad partition table
Error: While using FORMAT, DOS was unable to find a DOS partition on the fixed diskyou specified. Run FDISK and create a DOS partition on this fixed-disk drive.
Batch file missing
Error: DOS could not find the batch file it was processing. The batch file might havebeen erased or renamed. With DOS 3.0 only, the disk containing the batch file mighthave been changed, causing DOS to abort processing of the batch file.
If you are using DOS 3.0 and you changed the disk that contains the batch file, restartthe batch file without changing the disk. You might need to edit the batch file so thatyou do not need to change disks. This procedure applies only to DOS 3.0.
If the batch file includes a RENAME command that causes the originating batch filenameto change, edit the batch file to prevent renaming when the batch file is processedagain. If the file was erased, re-create the batch file from its backup file if possible.Edit the file to ensure that the batch file does not erase itself.
Baud rate required
Error: When using MODE COMx commands to set any COM port parameters, you mustat least indicate the baud rate.
BREAK is off
BREAK is on
Information: When you use BREAK by itself, one of these messages displays the currentBREAK setting. You can set BREAK at the command line or in CONFIG.SYS.
CApp
534 Appendix C DOS Messages
Cannot change BUFSIZE
Error: When DOSKey has been loaded into memory, you cannot change the buffersize.
Cannot CHDIR to path - tree past this point not processed
Error: CHKDSK was unable to go to the specified directory. No subdirectories below thisdirectory are verified. Run SCANDISK or CHKDSK /F to correct this error.
Cannot CHDIR to root
Error: CHKDSK was checking the tree structure of the directory and was unable toreturn to the root directory. Remaining subdirectories were not checked. RestartDOS. If the message continues to appear, the disk is unusable and must be refor-matted.
Cannot CHKDSK a network drive
Warning: You cannot use CHKDSK to check drives redirected over the network.
Cannot CHKDSK a SUBSTed or ASSIGNed drive
Warning: You cannot use CHKDSK to check substituted or assigned drives.
Cannot create a zero size partition
Error: While using FDISK, you tried to create a partition of 0% (0 megabytes). To cor-rect this error, you must allocate 1% (or a minimum of 1MB) of hard disk space to anypartition you create.
Cannot create extended DOS partition without primary DOS partition on disk x
Error: While using FDISK, you tried to create an extended DOS partition before giv-ing your first fixed-disk drive a primary DOS partition. To correct this problem, sim-ply create a DOS partition on your first fixed-disk drive. When this operation iscomplete, you can create an extended DOS partition if you have room on this disk orif you have a second fixed disk.
Cannot create logical DOS drive without an Extended DOS Partition on the currentdrive
Error: When using FDISK, you must create an extended DOS partition before you cancreate a logical drive.
Cannot DISKCOMP to or from a network drive
Error: You cannot compare disks on any disk drive that has been reassigned to a net-work.
Cannot delete Extended DOS Partition while logical drives exist
Error: When using FDISK to delete an extended DOS partition, you first must removeany logical drives.
535General DOS Messages
Cannot DISKCOPY to or from a network drive
Error: You attempted to copy a floppy disk to a drive that was redirected to a comput-er network. DISKCOPY does not copy disks directly to a networked disk drive. Use COPYto copy the disk.
Cannot do binary reads from a device
Error: You tried to copy from a device by using the /B switch. To complete the copyprocess, use the ASCII (/A) switch to create an ASCII copy. You also can use the COPYcommand without the /B switch.
Cannot find file QBASIC.EXE
Error: EDIT.COM or HELP.COM cannot find the QBASIC.EXE program file. QBASIC must beavailable to edit a file or access the MS-DOS online help system.
Cannot find GRAPHICS profile
Error: You did not give the path of the GRAPHICS.PRO file; DOS could not find it in thecurrent directory.
Cannot find System files
Error: While running FORMAT, you specified a drive that did not have the system filesin the root directory.
Cannot FORMAT a network drive
Error: You tried to format a disk in a drive being used by a network.
Cannot FORMAT an ASSIGNed or SUBSTed drive
Error: You attempted to format a drive that was mapped to another drive with ASSIGNor SUBST. To perform a successful format, you must run ASSIGN or SUBST again to clearthe drive assignments.
Cannot LABEL a JOINed, SUBSTed or ASSIGNed drive
Error: You attempted to label a drive created with JOIN, SUBST, or ASSIGN.
Cannot LABEL a network drive
Error: You cannot use LABEL with drives redirected over the network.
Cannot load COMMAND, system halted
Error: DOS attempted to reload COMMAND.COM, but the area where DOS keeps track ofmemory was destroyed or the command processor was not found in the directoryspecified by the COMSPEC= entry. The system halts.
This message might indicate that COMMAND.COM was erased from the disk and directoryyou used when starting DOS, or that the COMSPEC= entry in the environment has beenchanged. Restart DOS from your usual startup disk. If DOS does not start, the copyof COMMAND.COM has been erased. Restart DOS from the DOS startup or master diskand copy COMMAND.COM to your usual startup disk.
CApp
536 Appendix C DOS Messages
Alternatively, an errant program might have corrupted the memory allocation tablewhere DOS tracks available memory. Try running the same program that was in thecomputer when the system halted. If the problem occurs again, the program is defec-tive. Contact the dealer or publisher who sold you the program.
Cannot loadhigh batch file
Warning: The LOADHIGH (or LH) command is used only for TSR programs. Batch filesmight not be run this way.
Cannot move multiple files to a single file
Error: When using MOVE with wildcards for the source file specification, you mustspecify a directory for the destination. The most common cause of this error is a mis-spelled name.
Cannot perform a cyclic copy
Error: When using XCOPY /S, you cannot specify a target that is a subdirectory of thesource. You might use a temporary disk or file to bypass this limitation if the directorytree structure allows a temporary disk or file.
Cannot recover ... entryEntry has a bad attribute (or link or size)
Error, Warning: The .. entry (the parent directory) is defective and cannot be recov-ered. If you have specified the /F switch, CHKDSK tries to correct the error.
Cannot set up expanded memory
Error: FASTOPEN cannot correctly access expanded memory (EMS).
Cannot specify default drive
Error: You specified the default drive as a SYS destination. Switch to another drivebefore issuing the SYS command.
Cannot start COMMAND, exiting
Error: You or one of your programs directed DOS to load another copy ofCOMMAND.COM, but DOS could not load it. Your CONFIG.SYS FILES command is set toolow, or you do not have enough free memory for another copy of COMMAND.COM.
If your system has 256KB or more and FILES is less than 10, edit the CONFIG.SYS fileon your startup disk, using FILES=15 or FILES=20. Then., restart DOS.
If the problem recurs, you do not have enough memory in your computer, or you havetoo many resident or background programs competing for memory space. RestartDOS, loading only the essential programs. If necessary, eliminate unneeded devicedrivers or RAM disk software. You also can obtain additional RAM for your system.
Cannot SUBST a network drive
Error: You cannot substitute drives redirected over the network.
537General DOS Messages
Cannot SYS a network drive
Error: You cannot transfer system files to drives redirected over the network.
Cannot use FASTOPEN for drive x
Error: You attempted to use FASTOPEN over a network, with a floppy disk drive, or withmore than four disks at one time.
Cannot use PRINT - Use NET PRINT
Error: You tried to use PRINT over the network. Use NET PRINT or consult your systemadministrator for the correct procedure for printing files over the network.
Cannot XCOPY from a reserved device
Cannot XCOPY to a reserved device
Error: The specified XCOPY source or target is a character device (printer), an asyn-chronous communication device, or NULL. You must specify a file or block device asyour source and your target.
CHDIR .. failed, trying alternate method
Warning: CHKDSK was unable to return to a parent directory while checking the treestructure. CHKDSK attempts to return to the parent directory by starting over at the rootand repeating the search.
Code page not prepared
Error: While using MODE, you selected a code page not yet prepared for the system orwithout the correct font to support the current video mode. To correct this error, prepare a code page using the MODE PREPARE command. If you have installed the DISPLAY.SYS installable device driver, make sure that the DEVICE command line in yourCONFIG.SYS file allows additional subfonts.
Code page xxx
Information: This message displays the code page currently in use by the specifieddevice. If you type MODE CON, for example, the message returns the code page in usefor your screen.
Code page xxx not prepared for all devices
Error: While using CHCP, you selected a code page not currently supported by adevice. To correct this error, first make sure that your device supports code pageswitching and that it is online. Then issue the MODE PREPARE command to ready thedevice for the code page. You are ready to retry CHCP.
Code page xxx not prepared for system
Error: CHCP is unable to select a code page for the system. If NLSFUNC is installed andyour CONFIG.SYS file does not install device drivers, you can retry CHCP. If CONFIG.SYSinstalls device drivers, you must issue the MODE PREPARE command to prepare the spe-cific code page for each device before retrying the CHCP command.
CApp
538 Appendix C DOS Messages
Code page operation not supported on this device
Error: While using MODE, you selected a device and code page combination not recog-nized by DOS. Make sure that you specified a valid device and code page and that thecode page you selected is supported on the device.
Code page requested (xxx) is not valid for given keyboard code
Error: You selected an incompatible keyboard code and code page combination. Re-enter the KEYB command with a valid keyboard code and code page.
Code page specified has not been prepared
Error: You issued the KEYB command with an unrecognized code page. Prepare thecode page for your CON (console screen device) by using the MODE PREPARE command;then retry KEYB.
Code page specified is inconsistent with selected code page
Warning: You used KEYB with an option incompatible with the code page for your con-sole screen device. Specify a compatible option or issue the MODE SELECT command tochange the code page for your console screen device.
Code pages cannot be prepared
Error: You attempted to use a duplicate code page for the specified device; or withMODE PREPARE, you specified more code pages than DOS supports for that device.Check CONFIG.SYS to see how many prepared code pages your device command lineallows or issue MODE /STATUS at the command line to view the code pages already pre-pared for the device (for example, MODE /STATUS CON).
Compare error at offset xxxxxxxx
Information: The files you are comparing are not the same. The difference occursxxxxxxxx bytes from the beginning of the file. The number of bytes and the values forthe differing bytes are given in hexadecimal format (base 16).
Compare error on side s, track t
Information: DISKCOMP has located a difference on the disk in the specified drive onside s at track t.
Compare process ended
Error: A fatal error occurred during the comparison operation.
Comparing t tracks n sectors per track, s side(s)
Information: This message confirms the format of the disks you are comparing.
Configuration too large for memory
Error (startup): DOS could not load because you set too many files or buffers in yourCONFIG.SYS file or specified too large an environment area (/E) with the SHELL com-mand. This problem occurs only on systems with less than 256KB.
539General DOS Messages
Restart DOS with a different configuration; then edit the CONFIG.SYS file on your bootdisk, lowering the number of files, buffers, or both. You also can edit CONFIG.SYS toreduce the size of the environment in addition to or as an alternative to lowering thenumber of files and buffers. Restart DOS with the edited disk.
Another alternative is to increase the RAM in your system.
Content of destination lost before copy
Error: The original contents of the destination file for the COPY (concatenation) opera-tion were overwritten because the destination and one of the source files had the samename. You might be able to recover the file by using UNDELETE; if not, you can restorethe destination file from your backup disk.
Copy process ended
Error: The DISKCOPY process ended before completion. Test with SCANDISK or CHKDSKand then copy the remaining files onto the disk with COPY or XCOPY.
Current code page settings:
Information: You issued the MODE command and specified a device with code page sup-port. MODE displays the active code page, the hardware code page, other prepared codepages, and the space available for additional code pages on the lines that follow themessage. If you want to see status information for all devices, type MODE without listinga device.
Current CON code page: xxx
Information: This message displays the current keyboard code and code page alongwith the current code page used by the console screen device (CON).
Current drive is no longer valid
Warning: The system prompt includes the meta-symbol $p, to display the currentdirectory, or $n, to display the current drive. You tried to change the default drive toan invalid drive. (You tried to make a floppy drive current, for example, without afloppy present.) DOS presented the Abort, Retry, Fail? prompt. When youresponded by pressing F, DOS temporarily changed the prompt to the Current driveis no longer valid message.
The invalid drive error also occurs when a current networked or substituted disk driveis deleted or disconnected. Simply change the current drive to a valid disk drive.
Current keyboard does not support this code page
Error: You selected a code page incompatible with the current keyboard code. First,check the selected code page. If the code page is correct, change the keyboard code byusing KEYB.
Device n not prepared
Error: No code page is present for this device.
CApp
540 Appendix C DOS Messages
Disk boot failure
Error (startup): An error occurred when DOS tried to load into memory. The diskcontained IO.SYS and MSDOS.SYS, but one of the two files could not be loaded.
Try starting DOS from the disk again. If the error recurs, try starting DOS from adisk you know is good, such as a copy of your DOS startup or master disk. If DOSstill fails to boot, you have a disk drive problem. Contact your dealer.
Disk full. Edits lost.
Error: EDLIN cannot save your work to disk because the designated disk is full. Alwaysmake sure that you have a disk with plenty of room to save your files.
Disk unsuitable for system disk
Warning: FORMAT detected one or more bad sectors on the floppy disk in the areawhere DOS normally resides. Because the portion of the disk where DOS must resideis unusable, you cannot boot DOS from this disk.
Try reformatting the disk. Some floppy disks format successfully the second time. IfFORMAT gives this message again, you cannot boot from the disk.
Divide overflow
Error: DOS aborted a program that attempted to divide by zero. The program wasincorrectly entered or contains a logic flaw. If you wrote the program, correct theerror and try the program again. If you purchased the program, report the problem to the dealer or publisher.
This message also might appear when you attempt to format a RAM disk with DOS3.0 or 3.1. Make sure that you are formatting the correct disk and try again.
Do not specify filename(s)Command format: DISKCOMP [drive1: [drive2:]] [/1] [/8]
Error: You typed an incorrect switch or added one or more filenames with theDISKCOMP command. DISKCOMP syntax does not accept filenames on the command line.
Do not specify filename(s)Command Format: DISKCOPY [drive1: [drive2:]] [/1] [/V]
Error: You added an incorrect switch to the command or placed a filename in thecommand string. Retype the command and press Enter.
DOS is in HMA
DOS is in low memory
Information: Most of the DOS system can be optionally loaded above the firstmegabyte in the high memory area (HMA), if you have at least a 286, have some avail-able extended memory, and use the DOS=HIGH parameter in CONFIG.SYS. These mes-sages tell you whether DOS is in HMA.
541General DOS Messages
DOS memory-arena error
Error: When you are using the DOS editor, this message indicates a serious memoryerror. If possible, save your work to a different file and reboot your computer.
Drive assignment syntax error
Error: INTERLNK found a syntax error in its command line. Double-check the syntax byentering HELP INTERLNK.
Drive types or diskette types not compatible
Error: When using DISKCOMP or DISKCOPY, you specified two drives of different capaci-ties. You cannot use DISKCOMP or DISKCOPY, for example, from a 1.2MB drive to a360KB drive. Retype the command using compatible drives.
Duplicate filename or file not found
Error: While using RENAME (or REN), you attempted to change a filename to a namethat already exists, or the file to be renamed did not exist in the directory. Check thedirectory to make sure that the filename exists and that you have spelled it correctly.Then try again.
Enter current volume label for drive d:
Warning: You are attempting to format a hard disk that has a volume label. Enter theexact volume label to proceed with the format; if you do not want to enter a volumelabel, press Enter and FORMAT will quit.
Error in COUNTRY command
Warning (startup): The COUNTRY command in CONFIG.SYS is improperly phrased or hasan incorrect country code or code page number. DOS continues to load but uses thedefault information for the COUNTRY command.
After DOS has started, check the COUNTRY line in your CONFIG.SYS file. Make sure thatthe command is correctly phrased (with commas between the country code, codepage, and COUNTRY.SYS file) and that any given information is correct. If you detect anerror in the line, edit the line, save the file, and restart DOS.
If you do not find an error, restart DOS. If the same message appears, editCONFIG.SYS. Re-enter the COUNTRY command and delete the old COUNTRY line. The oldline might contain some nonsense characters that DOS can see but that are not appar-ent to your text-editing program.
Error in EXE file
Error: DOS detected an error while attempting to load a program stored in an EXEfile. The problem, which is in the relocation information DOS needs to load the pro-gram, might occur if the EXE file has been altered.
Restart DOS and try the program again, this time using a backup copy of the pro-gram. If the message appears again, the program is flawed. If you are using a pur-chased program, contact the dealer or publisher. If you wrote the program, issue LINKto produce another copy of the program.
CApp
542 Appendix C DOS Messages
Error loading operating system
Error (startup): A disk error occurred when DOS was loading from the hard disk.DOS does not start.
Restart the computer. If the error occurs after several tries, restart DOS from thefloppy disk drive. If the hard disk does not respond (that is, you cannot run DIR orCHKDSK without getting an error), you have a problem with the hard disk. Contact yourdealer. If the hard disk does respond, place another copy of DOS on your hard disk byusing SYS. You also might need to copy COMMAND.COM to the hard disk.
Increase to 15 or 20 the number of FILES in the CONFIG.SYS file of your startup disk.Restart DOS. If the error recurs, you might have a problem with the disk. Try a back-up copy of the program. If the backup works, copy the backup over the offending file.
If an error occurs in the copying process, you have a flawed disk. If the problem is afloppy disk, copy the files from the flawed disk to another disk and reformat or discardthe original disk. If the problem is the hard disk, immediately back up your files andrun RECOVER on the offending file. If the problem persists, your hard disk might bedamaged.
Error reading directory
Error: During a FORMAT procedure, DOS was unable to read the directory; bad sectorsmight have developed in the file allocation table (FAT) structure.
If the message occurs when DOS is reading a floppy disk, the disk is unusable andshould be thrown away. If DOS cannot read your hard disk, however, the problem ismore serious, and you might have to reformat your disk. Remember to back up yourdata files regularly to prevent major losses.
Error reading (or writing) partition table
Error: DOS could not read from (or write to) the disk’s partition table during the FORMAT operation because the partition table is corrupted. Run FDISK on the disk andreformat the disk.
Error writing to file on remote system
Error: INTERSVR has detected that the remote system (the one running INTERLNK) has awrite error. The most likely reason is that the remote disk is full.
Extended error
Error: COMMAND.COM has detected an error but cannot tell you the normal error messagebecause the disk containing COMMAND.COM is missing. (This error doesn’t generallyoccur on a hard disk system.) To avoid these anonymous errors, use the /MSG switch on the SHELL= line of CONFIG.SYS.
File allocation table bad, drive dAbort, Retry, Fail?
Warning: DOS encountered a problem in the file allocation table of the disk in drived. Press R to retry several times; if the message recurs, press A to abort.
543General DOS Messages
CHKDSK can’t repair this type of error in the file allocation table. If you have DOS 6.2,SCANDISK might be capable of correcting this problem for you. Commercial third-party utility packages often include tools that can repair this problem as well.Otherwise, you will be forced to back up as many files as you can and then reformatthe disk. If FORMAT finds no errors, you can safely go back to using the disk.
File cannot be copied onto itself
Error: You attempted to copy a file to a disk and directory containing the same file-name. This error often occurs when you misspell or omit parts of the source or desti-nation drive, path, or filename. This error might occur also when you are usingwildcard characters for filenames or when you use SUBST. Check your spelling and thesource and destination names, and then try the command again.
File creation error
Error: A program or DOS failed to add a new file to the directory or to replace anexisting file.
If the file already exists, issue the ATTRIB command to check whether the file is markedas read-only. If the read-only flag is set and you want to change or erase the file,remove the read-only flag with ATTRIB; then try again. If the problem occurs when theread-only flag is not set, run SCANDISK or CHKDSK without the /F switch to determinewhether the directory is full, the disk is full, or some other problem exists with thedisk.
File not found
Error: DOS could not find the specified file. The file is not on the current disk ordirectory, or you specified the disk drive name, pathname, or filename incorrectly.Check these possibilities and try the command again.
Filename device driver cannot be initialized
Warning (startup): In CONFIG.SYS, the parameters in the device driver filename or thesyntax of the DEVICE line is incorrect. Check for incorrect parameters and phrasingerrors in the DEVICE line. Edit the DEVICE line in the CONFIG.SYS file, save the file, andrestart DOS.
FIRST diskette bad or incompatible
SECOND diskette bad or incompatible
Error: One of these messages might appear when you issue DISKCOMP. The messagesindicate that the FIRST (source) or the SECOND (target) floppy disk is unreadable or thatthe disks you are attempting to compare have different format densities.
Format not supported on drive x:
Error: You cannot use the FORMAT command on the specified drive. If you entereddevice driver parameters that your computer cannot support, DOS displays this mes-sage. Check CONFIG.SYS for bad DEVICE or DRIVPARM commands.
CApp
544 Appendix C DOS Messages
Formatting while copying
Information: DISKCOPY displays this message as it copies data to an unformatted disk.
Illegal device name
Error: DOS does not recognize the device name you entered with the MODE command.
Incorrect DOS version
Error: The copy of the file holding the command you just entered is from a differentversion of DOS.
Get a copy of the command from the correct version of DOS (usually from your copyof the DOS startup or master disk) and try the command again. If the disk you areusing has been updated to hold new versions of DOS, copy the new versions over theold ones.
Insert disk with batch file and strike any key when ready
Prompt: DOS attempted to execute the next command from a batch file, but the diskholding the batch file is not in the disk drive. This message occurs for DOS 3.1 andlater versions. DOS 3.0 gives a fatal error when the disk is changed.
Insert disk with batch file into disk drive, and press a key to continue
Insert disk with \COMMAND.COM in drive d and strike any key when ready
Prompt: DOS needs to reload COMMAND.COM but cannot find it on the startup disk. Ifyou are using floppy disks, the disk in drive d (usually A) has probably been changed.Place a disk with a good copy of COMMAND.COM in drive d and press a key.
Insert diskette for drive x and press any key when ready
Prompt: On a system with one floppy disk drive or a system in which DRIVER.SYS cre-ates more than one logical disk drive from a physical disk drive, you or one of yourprograms specified a tandem disk drive x (such as A or B) that is different from thecurrent disk drive.
If the correct disk is in the disk drive, press a key. Otherwise, insert the correct diskinto the floppy disk drive and then press a key.
Insufficient disk space
Warning, Error: The disk does not have enough free space to hold the file being writ-ten. All DOS programs terminate when this problem occurs, but some non-DOS pro-grams continue.
If you think that the disk should have enough room to hold the file, run SCANDISK orCHKDSK to determine whether the disk has a problem. When you terminate programsearly by pressing Ctrl+Break, DOS might not be capable of doing the necessarycleanup work, leaving some disk space temporarily trapped. SCANDISK or CHKDSK canfree these areas.
If you have simply run out of disk space, free some disk space or insert a different disk;then try the command again.
545General DOS Messages
Insufficient memory to store macro. Use the DOSKEY command with the /BUFSIZEswitch to increase available memory.
Warning: Your DOSKey macros have filled the total space set aside for them. Youmust enlarge the memory area for macros (the default is 512 bytes) by using the BUFSIZE switch before you can enter any new macros.
Intermediate file error during pipe
Error: DOS cannot create or write to one or both of the intermediate files it useswhen piping information between programs because the disk is full, the root directoryof the current disk is full, or the TEMP environment variable points to an illegal path.The most frequent cause is insufficient disk space.
Run DIR on the root directory of the current disk drive to make sure that you haveenough room in the root directory for two additional files. If you do not have enoughroom, make room by deleting or copying and deleting files. You also can copy thenecessary files to a different disk that has sufficient room.
This error also might occur if a program is deleting files, including the temporary filesDOS creates. In this case, correct the program, contact the dealer or program publish-er, or avoid using the program with piping.
Internal stack overflowSystem halted
Error: Your programs and DOS have exhausted the stack, which is the memory spacereserved for temporary use. This problem is usually caused by a rapid succession ofhardware devices demanding attention. DOS stops, and the system must be turned offand on again to restart DOS.
The circumstances that cause this message are generally infrequent and erratic, andthey might not recur. If you want to prevent this error from occurring, add the STACKScommand to your CONFIG.SYS file. If the command is already in your CONFIG.SYS file,increase the number of stacks specified.
Invalid /BAUD parameter
Warning: You have selected an illegal baud rate for either INTERLNK or INTERSVR. Forexample, you have /BAUD:9200 instead of /BAUD:9600.
Invalid characters in volume label
Error: You attempted to enter more than 11 alphanumeric characters, or you enteredillegal characters (+, =, /, \ , and |, for example) when you typed the disk’s volumelabel (the disk name). Retype the volume label with valid characters.
Invalid COMMAND.COM in drive d:
Warning: DOS tried to reload COMMAND.COM from the disk in drive d and found that thefile was from a different version of DOS. Follow the instructions for inserting a diskwith the correct version.
CApp
546 Appendix C DOS Messages
If you frequently use the disk that generated this warning message, copy the correctversion of COMMAND.COM to that disk.
Invalid COMMAND.COM, system halted
Error: DOS could not find COMMAND.COM on the hard disk. DOS halts and must berestarted.
COMMAND.COM might have been erased, or the COMSPEC variable in the environmentmight have been changed. Restart the computer from the hard disk. If a message indi-cates that COMMAND.COM is missing, the file was erased. Restart DOS from a floppy diskand copy COMMAND.COM to the root directory of the hard disk or to the location yourSHELL command indicates, if you have placed this command in your CONFIG.SYS file.
If you restart DOS and this message appears later, a program or batch file is erasingCOMMAND.COM or altering the COMSPEC variable. If a program is erasing COMMAND.COM,contact the dealer or publisher who sold you the program. If a batch file is erasingCOMMAND.COM, edit the batch file. If COMSPEC is being altered, edit the offending batchfile or program, or place COMMAND.COM in the subdirectory your program or batch fileexpects.
Invalid COUNTRY code or code page
Warning (startup): The COUNTRY code number or the code page number given to theCOUNTRY command in CONFIG.SYS is incorrect or incompatible. DOS ignores the COUN-TRY command and continues the startup process.
Check the COUNTRY command in your CONFIG.SYS file (see Chapter 14, “Understandingthe International Features of DOS”) to determine whether the correct and compatiblecountry code and code page numbers are specified. If you detect an error, edit andsave the file. Then restart DOS.
Invalid date
Error: You gave an impossible date or an invalid character to separate the month, day,and year. This message also appears if you enter the date from the keypad when it isnot in numeric mode.
Invalid device parameters from device driver
Error: The partition did not fall on a track boundary. You might have set the DEVICEdrivers incorrectly in CONFIG.SYS or attempted to format a hard disk formatted withDOS 2.x so that the total number of hidden sectors is not evenly divisible by the num-ber of sectors on a track. Therefore, the partition might not start on a track boundary.
To correct the error, run FDISK before formatting or check CONFIG.SYS for a badDEVICE or DRIVPARM command.
Invalid directory
Error: You specified a directory name that does not exist, you misspelled the directoryname, the directory path is on a different disk, you did not give the path character (\)at the beginning of the name, or you did not separate the directory names with the

547General DOS Messages
path character. Check your directory names to make sure that the directory exists andtry the command again.
Invalid disk changeAbort, Retry, Fail?
Warning: A floppy disk was changed while a program had open files to be written tothe floppy disk. Place the correct disk in the disk drive and press R to retry. Typically,this check is supported on drives larger than 360KB.
Invalid drive in search path
Warning: You specified an invalid disk drive name in the PATH command, or a diskdrive you named is nonexistent or hidden temporarily by a SUBST or JOIN command.
Use PATH to check the paths you instructed DOS to search. If you gave a nonexistentdisk drive name, issue the PATH command again with the correct search paths. If theproblem is temporary because of a SUBST or JOIN command, you can run PATH, leavingout or correcting the wrong entry. Or you can just ignore the warning message.
Invalid drive or file name
Error: You gave the name of a nonexistent disk drive, or you mistyped the disk driveor filename.
Remember that certain DOS commands (such as SUBST and JOIN) temporarily hidedisk drive names while the command is in effect. Check the disk drive name you gaveand try the command again.
Invalid drive specification
Error: You entered an invalid or nonexistent disk drive as a parameter to a command;you specified the same disk drive for the source and destination; or by not giving aparameter, you defaulted to the same disk drive for the source and the destination.
Remember that some DOS commands (such as SUBST and JOIN) temporarily hide diskdrive names while the command is in effect. Check the disk drive names. If the com-mand is objecting to a missing parameter and defaulting to the wrong disk drive, namethe correct disk drive explicitly.
Invalid drive specificationSpecified drive does not exist or is non-removable
Error: You gave the name of a nonexistent disk drive, you named the hard disk drivewhen using commands for only floppy disks, you did not give a disk drive name anddefaulted to the hard disk when using commands for only floppy disks, or you namedor defaulted to a RAM disk drive when using commands for a floppy disk.
Remember that certain DOS commands (such as SUBST and JOIN) temporarily hidedisk drive names while the command is in effect. Check the disk drive name you gaveand try the command again.
CApp
548 Appendix C DOS Messages
Invalid keyboard code specified
Error: You selected an invalid code. Enter the KEYB command again with the correctkeyboard code.
Invalid macro definition
Error: You entered an illegal character or command with DOSKey or attempted tocreate a DOSKey macro with an illegal definition. This message appears, for example,if you use a GOTO command in a DOSKey macro. Correct any errors and carefullyretype the macro.
Invalid media or Track 0 bad - disk unusable
Error: A disk you are trying to format might be damaged. A disk might not format thefirst time. Try to format again; if the same message appears, the disk is bad and shouldbe discarded. With some versions of FORMAT, this same symptom can be caused bymemory boundary problems. If the symptom occurs for multiple floppy disks, trychanging the number or sizes of TSRs to see whether the symptoms change.
Invalid number of parameters
Error: You have given too few or too many parameters to a command. One of the fol-lowing occurred: You omitted required information, you omitted a colon immediatelyafter the disk drive name, you inserted an extra space, you omitted a required space, oryou omitted a slash (/) in front of a switch.
Invalid parameter
Error: At least one parameter you entered for the command is not valid. One of thefollowing occurred: You omitted required information, you omitted a colon immedi-ately after the disk drive name, you inserted an extra space, you omitted a requiredspace, you omitted a slash (/) in front of a switch, or you used a switch the commanddoes not recognize. For more information, check the explanation of this message inthe “Command Reference” for the command you issued.
Invalid parameter combination
You typed conflicting parameters with a DOS command. Retype the command withonly one of the conflicting switches.
Invalid partition table
Error (startup): DOS has detected a problem in the hard disk’s partition information.Restart DOS from a floppy disk. Back up all files from the hard disk, if possible, andrun FDISK to correct the problem. If you change the partition information, you mustreformat the hard disk and restore all its files.
Invalid path
Error: The pathname contains illegal characters, the pathname has more than 63 char-acters, or a directory name within the path is misspelled or does not exist.
549General DOS Messages
Check the spelling of the pathname. If necessary, check the disk directory with DIR tomake sure that the directory you have specified exists and that you have specified thecorrect pathname. Make sure that the pathname contains no more than 63 characters.If necessary, change the current directory to a directory closer to the file to shortenthe pathname.
Invalid path or file name
Error: You gave a directory name or filename that does not exist, specified the wrongdirectory name (a directory not on the path), or mistyped a name. COPY aborts when itencounters an invalid path or filename. If you specified a wildcard for a filename, COPYtransfers all valid files before it issues the error message.
Check to see which files have been transferred. Determine whether the directory andfilenames are spelled correctly and whether the path is correct. Then try again.
Invalid STACK parameters
Warning (startup): One of the following problems exists with the STACKS command inyour CONFIG.SYS file. A comma is missing between the number of stacks and the sizeof the stack, the number of stack frames is not in the range of 8 to 64, the stack size isnot in the range of 32 to 512, you have omitted the number of stack frames or thestack size, or the stack frame or the stack size (but not both) is 0. DOS continues tostart but ignores the STACKS command.
Check the STACKS command in your CONFIG.SYS file. Edit and save the file; thenrestart DOS.
Invalid time
Error: You gave an impossible time or invalid character to separate the hours, minutes,and seconds. This message also appears if you enter the time from the keypad when itis not in numeric mode.
Invalid volume ID
Error: When formatting a fixed (or hard) disk, you entered an incorrect volume label,and DOS aborted the format attempt. Type VOL at the DOS prompt and press Enterto view the volume label of the disk; then try the command again.
Memory allocation errorCannot load COMMAND, system halted
Error: A program destroyed the area where DOS keeps track of memory. You mustrestart DOS. If this error occurs again with the same program, the program has a flaw.Try a backup copy of the program. If the problem persists, contact the dealer or pro-gram publisher.
Missing operating system
Error (startup): The DOS hard disk partition entry is marked as bootable (capable ofstarting DOS), but the DOS partition does not contain a copy of DOS. DOS does notstart.
CApp
550 Appendix C DOS Messages
Start DOS from a floppy disk. Issue the SYS C: command to place DOS on the harddisk and then copy COMMAND.COM to the disk. If this command fails to solve the prob-lem, you must back up the existing files, if any, from the hard disk; then issue FORMAT/S to place a copy of the operating system on the hard disk. If necessary, restore thefiles you backed up.
MSBACKUP program files must be located on your hard diskYou cannot start MSBACKUP from a floppy disk
Error: MSBACKUP relies on repeated access to its program files during the backup opera-tion. You must start it from a hard disk so that the program files will be availablethroughout the process. Change the default drive to the hard disk before startingMSBACKUP.
Must enter both /T and /N parameters
Error: On FORMAT, you must specify /T (number of tracks per side) and /N (number ofsectors per disk) on the same command line. If you include the one, you must includethe other.
Must specify COM1, COM2, COM3, or COM4
Error: You must specify COM1, COM2, COM3, or COM4 when using this form of the MODEcommand.
No drive letters redirected
Information: INTERLNK isn’t currently redirecting any drive letters to the remote system.
No free file handlesCannot start COMMAND, exiting
Error: DOS could not load an additional copy of COMMAND.COM because no file handleswere available. Edit the CONFIG.SYS file on your startup disk to increase by five thenumber of file handles (using the FILES command). Restart DOS and try the com-mand again.
No printer ports redirected
Information: INTERLNK isn’t currently redirecting any printer ports to the remote system.
No room for system on destination disk
Error: This error isn’t nearly so prevalent in DOS 6.0 or 6.2 as it was in previous ver-sions. SYS rearranges the files as needed to make a system bootable but issues thiserror if insufficient room is available or if the root directory is full.
No serial ports were found
Error: You specified the /COM switch on INTERSVR, but no serial ports are available.This problem could occur if a TSR program has taken control of the available port or if the hardware is configured to an invalid address.
551General DOS Messages
No system on default drive
Error: SYS cannot find the system files. Insert a disk containing the system files, suchas the DOS disk, and type the command again. If the system files are available onanother drive, issue the other form of the SYS command, indicating the location of thesystem files.
Non-System disk or disk errorReplace and strike any key when ready
Error (startup): Your disk does not contain IO.SYS and MSDOS.SYS, or a read erroroccurred when you started the system. DOS does not start.
If you are using a floppy disk system, insert a bootable disk into drive A and press akey. The most frequent cause of this message on hard disk systems is leaving a non-bootable disk in drive A with the door closed. Open the door to disk drive A and pressa key. DOS boots from the hard disk.
Not enough memory
Insufficient memory
Error: The computer does not have enough free RAM to execute the program orcommand. If you loaded a resident program, such as PRINT, GRAPHICS, SideKick, orProKey, restart DOS and try the command again before loading any resident pro-grams. If this method fails to solve the problem, remove any nonessential device dri-vers or RAM disk software from CONFIG.SYS and restart DOS. If this option also fails,your computer does not have enough memory for this command. You must increasethe amount of RAM installed in your computer to run the command.
Out of environment space
Warning: Not enough room is available in the current environment to add (or change)the variables you have specified with the SET, PATH, or PROMPT command. If you arerunning SET, PATH, or PROMPT from a shell program such as DOS Shell, quit the shellprogram and try the command again. If the command still fails, you can increase thesize of the environment by increasing the /E:size parameter for the SHELL= commandin your CONFIG.SYS file and restarting your computer.
Out of memory
Error: The amount of memory is insufficient to perform the operation you requested.This error occurs in the DOS 5.0 Editor.
Packed file corrupt
Error: The program appears to be damaged. A common cause of this symptom isolder format-packed executables, which could not load into the first 64KB of conven-tional memory. With older operating system versions, the resident portion of the sys-tem generally used enough memory that this wasn’t a problem. In DOS 5.0, 6.0, and6.2, the DOS=HIGH, DEVICEHIGH, and LOADHIGH features can reduce memory usageenough that this problem occurs with certain programs. Use the LOADFIX command touse up enough memory temporarily so that the program is loaded at a location it canmanage.
CApp
552 Appendix C DOS Messages
Parameters not supported
Parameters not supported by drive
Error: You entered parameters that do not exist, that are not supported by the DOSversion you are running, or that are incompatible with the specified disk drive. RunVER to determine whether the current DOS version supports the parameters (orswitches) you specified.
Parameters not compatible with fixed disk
Error: A device driver for a hard disk does not support generic IOCtl functions.
Parse Error
Error: COMMAND.COM has detected an error but cannot tell you the normal error messagebecause the floppy disk containing COMMAND.COM is missing. (This error doesn’t gener-ally occur on a hard disk system.) To avoid these “anonymous” errors, use the /MSGswitch on the SHELL= line of CONFIG.SYS.
Path not found
Error: A specified file or directory path does not exist. You might have misspelled thefilename or directory name, or you might have omitted a path character (\) betweendirectory names or between the final directory name and the filename. Another possi-bility is that the file or directory does not exist in the place specified. Check these pos-sibilities and try again.
Path too long
Error: You have given a pathname that exceeds the DOS 64-character limit, or youomitted a space between filename parameters. Check the command line. If the phras-ing is correct, you must change to a directory closer to the file you want and try thecommand again.
Program too big to fit in memory
Error: The computer does not have enough memory to load the program or com-mand you invoked. If you have any resident programs loaded (such as PRINT, GRAPHICS,or SideKick), restart DOS and try the command again without loading the residentprograms. If this message appears again, reduce the number of buffers (BUFFERS) in theCONFIG.SYS file, eliminate nonessential device drivers or RAM disk software, andrestart DOS. If the problem persists, your computer does not have enough RAM forthe program or command. You must increase the amount of RAM in your computerto run the program.
Required parameter missing
Error: Many DOS commands give this error when you omit part of the parameter list.You might have specified only a single name with the MOVE command, for example.
553General DOS Messages
Same parameter entered twice
Error: You duplicated a switch when you typed a command. Retype the commandusing the parameter only once.
Sector size too large in file filename
Error: The device driver filename that you are loading in your CONFIG.SYS file with aDEVICE= or DEVICEHIGH= command uses a sector size that is too large. You cannot usethis device driver.
SOURCE diskette bad or incompatible
Error: The disk you attempted to read during a copy process was damaged or in thewrong format (for example, a high-density disk in a double-density disk drive). DOScannot read the disk.
Specified COM port number not recognized by BIOS
Error: The port number is legal, but your ROM BIOS doesn’t support it. Generally,this problem can happen with an older BIOS that supports only two COM ports.Either replace the computer’s ROM BIOS or specify COM1 or COM2.
Syntax error
Error: You phrased a command improperly by omitting needed information, givingextraneous information, inserting an extra space into a file or pathname, or using anincorrect switch. Check the command line for these possibilities and try the commandagain.
Target diskette bad or incompatible
Target diskette may be unusable
Target diskette unusable
Error: A problem exists with the target disk. DOS does not recognize the format ofthe target disk in the drive, or the disk is defective. Make sure that the target disk isthe same density as the source disk, run SCANDISK or CHKDSK on the target disk todetermine the problem, or try to reformat the disk before proceeding with the diskcopy operation.
Target media has lower capacity than SourceContinue anyway (Y/N)?
Warning: The target disk can hold fewer bytes of data than the source disk. The mostlikely cause is bad sectors on the target disk. If you press Y, some data on the sourcedisk might not fit on the target disk.
To avoid the possibility of an incomplete transfer of data, press N and insert a disk withthe same capacity as the source disk. If you are not copying “hidden” files, you alsocan issue the COPY *.* command to transfer files.
CApp
554 Appendix C DOS Messages
There are no serial ports or parallel ports available for communication
Error: INTRSVR cannot find any serial ports or parallel ports not already in use.Without such a port, INTRSVR cannot communicate with INTRLNK.
There is not enough room to create a restore fileYou will not be able to use the unformat utilityProceed with Format (Y/N)?
Warning: The disk lacks sufficient room to create a restore file. Without this file, youcannot use UNFORMAT to reverse the format you are attempting.
This program requires Microsoft Windows
Error: At the DOS prompt, you tried to run a program that needs MicrosoftWindows to execute. If you are already running Windows, press Alt+Tab to switch tothe Program Manager and start it from there. If you haven’t started Windows, use WINto do so.
Too many block devices
Warning (startup): Your CONFIG.SYS file contains too many DEVICE commands. DOScontinues to start but does not install additional device drivers.
DOS can handle only 26 block devices. The block devices created by the DEVICE com-mands plus the number of block devices automatically created by DOS exceed thisnumber. Remove any unnecessary DEVICE commands from your CONFIG.SYS file andrestart DOS.
Too many parallel ports, port ignored
Warning: INTERLNK cannot automatically scan this many parallel ports. The earlierones will be used.
Too many serial ports, port ignored
Warning: INTERLNK cannot automatically scan this many serial ports. The earlier oneswill be used.
Top level process aborted, cannot continue
Error (startup): COMMAND.COM or another DOS command detected a disk error, and youchose the A (abort) option. DOS cannot finish starting itself, and the system halts.
Try to start DOS again. If the error recurs, start DOS from a floppy disk (if startingfrom the hard disk) or from a different floppy disk (if starting from a floppy disk).After DOS has started, issue the SYS command to place another copy of the operatingsystem on the disk and copy COMMAND.COM to the disk. If DOS reports an error whilecopying, the disk is bad. Reformat or discard the floppy disk or back up and reformatthe hard disk.
Trying to recover allocation unit nnn
Information, Warning: A bad allocation unit was found when the FORMAT commandexecuted.
555General DOS Messages
Unable to create destination
Error: MOVE was unable to create the destination file. Possible reasons are that the des-tination drive is full or that the destination is the root directory, which lacks room.
Unable to create directory
Error: You or a program could not create a directory for one of the following reasons.A directory by the same name already exists; a file by the same name already exists;you are adding a directory to the root directory, and the root directory is full; or thedirectory name has illegal characters or is a device name.
Issue DIR to make sure that no file or directory already exists with the same name. Ifyou are adding the directory to the root directory, remove or move (copy and thenerase) any nonessential files or directories. Check the spelling of the directory nameand make sure that the command is properly phrased.
Unable to initialize serial port COMn
Error: INTRSVR was unable to initialize the specified serial port. The most commonreason is that two devices in the system have the same port address.
Unable to load MS-DOS Shell, Retry (y/n)?
Error, Prompt: DOSSHELL.COM could not load DOSSHELL.EXE. Normally, this error iscaused by not having enough conventional memory. If you are attempting to runDOSSHELL from another program, quit the program and try again.
A less likely cause for this error message is that the DOSSHELL.EXE file is corrupted. Ifyou have plenty of conventional memory available (MEM /FREE), get a fresh copy ofDOSSHELL.EXE from a backup disk.
Unable to open source
Error: MOVE was unable to open the specified source file. This problem could be theresult of an illegal character used in the filename, but the more common cause is try-ing to move a directory to a different place in the disk hierarchy. You can rename adirectory by using the MOVE command but not actually move it.
Unable to read source
Error: A disk problem occurred while transferring the data from the source file to thedestination. Use COPY to copy the file, compare it, and then delete the original.
Unable to write BOOT
Error: FORMAT cannot write to the BOOT track or DOS partition of the disk that is beingformatted because one of these areas is bad. Discard the bad disk, insert anotherunformatted disk, and try the FORMAT command again.
Unable to write destination
Error: A disk problem occurred while transferring the data from the source file to thedestination. Double-check that the destination disk has sufficient room for the file. Ifthe error still occurs, use COPY.
CApp
556 Appendix C DOS Messages
Unrecognized command in CONFIG.SYS
Error in CONFIG.SYS line nnn
Warning (startup): DOS detected an improperly phrased command in CONFIG.SYS.The command is ignored, and DOS continues to start. Examine the indicated line inthe CONFIG.SYS file, looking for an improperly phrased or incorrect command. Editthe line, save the file, and restart DOS.
Unrecognized switch
Error: You tried to use a switch that was illegal for the particular internal command.Type the command followed by /? to find out what options are permitted.
Unrecoverable read error on drive x side n, track n
Error: DOS was unable to read the data at the specified location on the disk. DOSmakes four attempts before generating this message. Copy all files on the questionabledisk to another disk and try the command again, first with a new disk and then withthe backup disk. If the original disk cannot be reformatted, discard it.
Unrecoverable transmission errors, maximum retries exceeded
Error: INTRSVR is getting excessive errors on the communications cable to INTERLNK.Check that the connections are screwed in tightly and that the cable is not routed tooclose to electrical interference, such as an arc welder.
Unrecoverable write error on drive x side n, track n
Error: DOS was unable to write to a disk at the location specified. Try the commandagain; if the error recurs, the target disk is damaged at that location. If the damageddisk contains important data, copy the files to an empty, freshly formatted disk and tryto reformat the damaged disk. If the disk is bad, discard it.
WARNING: Unable to use a disk cache on the specified drive
Warning: You specified a drive that SMARTDRV cannot cache, such as a network drive.The version of SMARTDRV distributed with DOS 6.2 can cache CD-ROM drives, butprevious versions cannot. SMARTDRV ignores this drive letter.
Write failure, diskette unusable
Error: The disk you are writing to has bad sectors in the boot sector or file allocationtable (FAT). Run SCANDISK if you have DOS 6.2 to see whether the error can be cor-rected. If the disk is a floppy, you should probably discard it.
You have started the Interlnk server in a task-switching environment.Task-switching, key combinations, and some disk-writing operations areDisabled. To restore these functions, exit the server.
Warning: INTERLNK cannot permit certain operations to occur while it is in control.One of these is the DOSSHELL capability to switch tasks. If INTERLNK was swapped whilecommunicating with INTERSVR, you might lose data. INTERLNK therefore inhibits theseoperations until it is complete.
557DOS Device Error Messages
You must specify the host drive for a DoubleSpace drive
Error: SMARTDRV must be given the host drive letter to cache. The compressed drivealso is cached, and the effective cache size is increased because of the compression.You cannot separately cache the compressed drive.
DOS Device Error MessagesWhen DOS detects an error reading or writing to a disk drive or device, one of the errormessages in this section is displayed. Most of these messages are followed by this prompt:
Abort, Ignore, Retry, Fail?
You can enter one of the following characters to indicate the action that you want DOS totake:
A Abort. This option terminates the currently running program andreturns you to the DOS prompt. Any unsaved data in an applicationprogram is lost.
I Ignore. This option pretends that the error hasn’t occurred and returns(successfully) to the program that was running. If you are reading froma file, nonsensical data might be returned to your application program.If you are writing to a file, the application doesn’t know that the datahasn’t been written to disk, and this message might reappear manytimes as it keeps writing more data. In most cases, you should avoidchoosing Ignore. For most floppy disk errors, the Ignore option is notdisplayed.
R Retry. This is the safest option to choose. If you can correct the prob-lem (by turning on the printer or closing the disk drive door, for exam-ple), do so and then choose Retry. Even if you can’t correct theproblem, choose Retry a few times to see whether the error messagegoes away. Bad sectors can often be read if you choose Retry a fewtimes.
F Fail. This option fails the operation and returns to the program thatwas running. Not all programs notice that the operation they requestedhas failed, in which case Fail has the same problems as Ignore. Use thisoption in preference to Ignore, but try Retry first. Versions of DOSbefore 3.3 never display the Fail option.
Many of the error messages have a similar format, as follows:
error_type reading|writing drive|device
error_type indicates the type of disk or device error that has occurred. drive indicates thedisk drive where the error occurred. device indicates the device (AUX, CON, PRN, and so on)where the error occurred.
CApp
558 Appendix C DOS Messages
Each type of error can occur when either reading or writing to a disk or device. Rather thanlist all four possibilities for each error message, only the most common ones are shown inthe text:
Invalid device request reading drive x:
Invalid device request writing drive x:
Error: This error message is uncommon. A software program has issued an invalid orunsupported command to the drive or device indicated. The problem might be withthe device driver or software program. If either of them is new to your system, contactthe manufacturer of the software to see whether an upgrade is available.
Invalid device request parameters reading drive x:
Invalid device request parameters writing drive x:
Error: This error message is uncommon. A software program has issued a commandto the indicated drive or device, but the command contains an invalid request header.The problem is usually with the software program. Contact the manufacturer of thesoftware to see whether an upgrade is available.
Invalid unit reading drive x:
Error: An invalid subunit number was passed to the device driver. This error is dis-played if you try to access one of INTERLNK’s drives when the drive letter isn’t currentlyredirected to the INTERLNK server. Use the INTERLNK command to link the drive letterto a drive on the server and try again.
Data error reading drive x:
Error: DOS was unable to read some of the data on the disk. When this messageappears, choose Retry at least two or three times before giving up. Quit the applica-tion you are using and run SCANDISK or CHKDSK to attempt to locate and correct theproblem on the disk.
Not ready reading drive x:
Not ready writing drive x:
Error: An error occurred when DOS tried to read or write to the disk drive. For flop-py disk drives, the drive door might be open, the floppy disk might not be fully insert-ed, or the disk might not be formatted. Correct the situation and choose Retry. Forhard disk drives, this error might indicate a hardware problem. If you get this errorfor a device rather than a disk drive, check to see that the device is turned on andready to read or write.
FCB unavailable reading drive x:
FCB unavailable writing drive x:
Error: A program using file control blocks (FCBs) attempted to open more file controlblocks than were specified with the FCBS= command. Usually, you have to choose theAbort option and terminate the program you are using. Increase the value of the FCBS=
559DOS Device Error Messages
command in your CONFIG.SYS file by four or five; then reboot the system. If the mes-sage appears again, increase the value again and reboot.
This method of opening files dates back to DOS 1 and CP/M and should not be usedby any current programs that you work with.
General failure reading drive x:
General failure writing drive x:
Error: This message is a catchall for errors not covered elsewhere and can occur withdisk drives or other devices. Whenever a device driver is unsure of what to call theerror it has just received, it calls the error a general failure. Reading disks formattedfor operating systems other than DOS can often result in a general failure message.
If you load the file-sharing SHARE.EXE program into memory, you might see this mes-sage more often. SHARE prevents two programs from opening the same file at the sametime. Newer programs recognize that SHARE is denying them access, but others mightreturn general failure messages. If you are running Windows and receive this messagein a DOS program, don’t panic. It probably means that another application has a fileopen, and you are being denied access.
Lock violation reading drive x:
Lock violation writing drive x:
Error: With a file-sharing program such as SHARE.EXE or network software loaded, aprogram attempted to access a locked file. Your best choice is Retry. If you are on anetwork, get a cup of coffee and choose Retry again to see whether the other user hasreleased the lock yet. If you just can’t seem to get access to the file, choose Fail. Theprogram you are using might notice the failure and ask you what to do about it. Thelast resort is to choose Abort, but be aware that any unsaved data in memory will belost when the program is terminated.
Sharing violation reading drive x:
Sharing violation writing drive x:
Error: With a file-sharing program such as SHARE.EXE or network software loaded, aprogram attempted to access a file that is in use by another program. Your best choiceis Retry. If you are on a network, get a cup of coffee and then choose Retry again tosee whether the file is available yet. If you can’t get access to the file, choose Fail. Theprogram you are using might notice the failure and ask you what to do about it. Thelast resort is to choose Abort, but be aware that any unsaved data in memory will belost when the program is terminated.
Printer out of paper error writing device dev
Error: The printer is out of paper (or not turned on). Check your printer, add paper,make sure the printer is online, and choose Retry. The message DOS displays stays onthe screen waiting for you to make a choice, so you could go across town and buypaper if you need to.
CApp
560 Appendix C DOS Messages
Invalid media type reading drive x:
Invalid media type writing drive x:
Error: The boot sector or the file allocation table (FAT) of the disk contains invalidinformation, making the disk unusable. If you come into contact with computers usingoperating systems other than DOS, you might be trying to read one of their disks.
When you are sure that the disk is a DOS disk, run SCANDISK or CHKDSK to see whetherit can be repaired. Even if the repair is successful, you should back up all the files onthe disk and reformat it. If FORMAT finds no errors, you can safely begin using the diskagain.
Not ready reading drive x:
Not ready writing drive x:
Error: This error message is common. It usually means that you’ve left open the doorto your floppy disk drive. Other common causes are that the drive is empty or the diskisn’t seated properly. Check the drive or reinsert the disk, and then choose Retry. Ifyou can’t get a floppy disk drive to read any disks that you put in it, you might have ahardware problem.
Read fault error reading drive x:
Error: DOS was unable to read data from the drive. Often this problem is caused by afloppy disk that isn’t seated properly in the drive, or you might have a bad spot on thedisk. Reinsert the disk and choose Retry. Usually, the read operation succeeds afteryou choose Retry a few times. Check the disk by running SCANDISK to make sure thatno errors appear on it, or back up any files and reformat the disk.
If you begin to get several of these errors, your floppy disk drive might be out ofalignment. When this problem occurs, people typically start complaining that theycan’t read your disks. If your drive is out of alignment, your only options are to repairor replace the drive.
Sector not found reading drive x:
Sector not found writing drive x:
Error: The disk drive was unable to find the requested sector on the disk. This error is usually the result of a defective spot on the disk. Choose Retry quite a few timesbefore you give up; often the sector will be found if you’re persistent. Check the diskby running SCANDISK to make sure that no errors appear on it, or back up any files andreformat the disk.
Some copy-protection schemes use a defective spot to prevent unauthorized duplica-tion of the disk. If you have reason to believe that the disk you are reading or writingto is copy-protected, do not correct the disk by running SCANDISK. Contact the manu-facturer of the copy-protected software and ask for a replacement disk.
Seek error reading drive x:
Seek error writing drive x:
561DOS Device Error Messages
Error: The disk drive could not find the proper track on the disk. Seek errors areoften the result of failing drive electronics. If, however, the disk is not properly seatedin the drive, reseating it corrects the problem. Choose Retry a few times to seewhether the problem goes away. If you are having a hardware problem, you will getmore of these errors as time goes on and will eventually have to repair or replace yourdisk drive.
Write fault error writing drive x:
Error: DOS was unable to write data to the drive. Often this problem is caused by afloppy disk that isn’t seated properly in the drive, or you might have a bad spot on thedisk. Reinsert the disk and choose Retry. The write operation usually succeeds afteryou choose Retry a few times. Check the disk by running SCANDISK to make sure thatno errors appear on it, or back up any files and reformat the disk.
If you begin to get several of these errors, your floppy disk drive might be out ofalignment. When this problem occurs, people typically start complaining that theycan’t read your disks. If your drive is out of alignment, your only options are repair orreplacement.
Write fault error writing device dev
Error: DOS could not write the data to this device. This error typically is caused bynot having your printer turned on or online, although the same thing can happen withan external modem. Check the device and choose Retry. If the problem persists, youmight have a faulty cable.
Write protect error writing drive x:
Error: DOS attempted to write to a disk that is write-protected. If the disk is a floppyand the write operation is intentional, remove the disk, adjust the write-protect tab,and reinsert the disk. Don’t switch floppy disks at this prompt. To allow the writeoperation to proceed, make sure that the disk is no longer write-protected and chooseRetry. If you don’t want to allow the program to write to the disk, choose Fail or, as alast resort, Abort. Remember that if you choose Abort, any unsaved data in memorywill be lost.
Invalid disk change reading drive x:
Invalid disk change writing drive x:
Error: You have removed a disk that DOS needs access to. This message can occuronly with removable media, such as floppy disks. Unfortunately, DOS doesn’t tell youwhat disk it needs; it tells you only the drive. Think back, put the previous disk backin the drive, and choose Retry. Choosing any other option might mean that the diskthat was prematurely removed might be damaged or incomplete. Never choose Fail orAbort at this message without first removing all media from the disk drive becauseDOS could write the wrong file allocation table (FAT) to that disk and destroy all thedata on it.
CApp

DOS and DOS Utility Programs’Keyboard Commands
In this appendix
DOS Startup Control Keys 564
ROM BIOS Control Keys 564
DOS Control Keys 565
Command-Line Editing Keys Without DOSKEY 565
Command-Line Editing Keys with DOSKEY 567
Edit Keystroke Commands 568
DOS Shell Keystroke Commands 569
DAPPENDIX
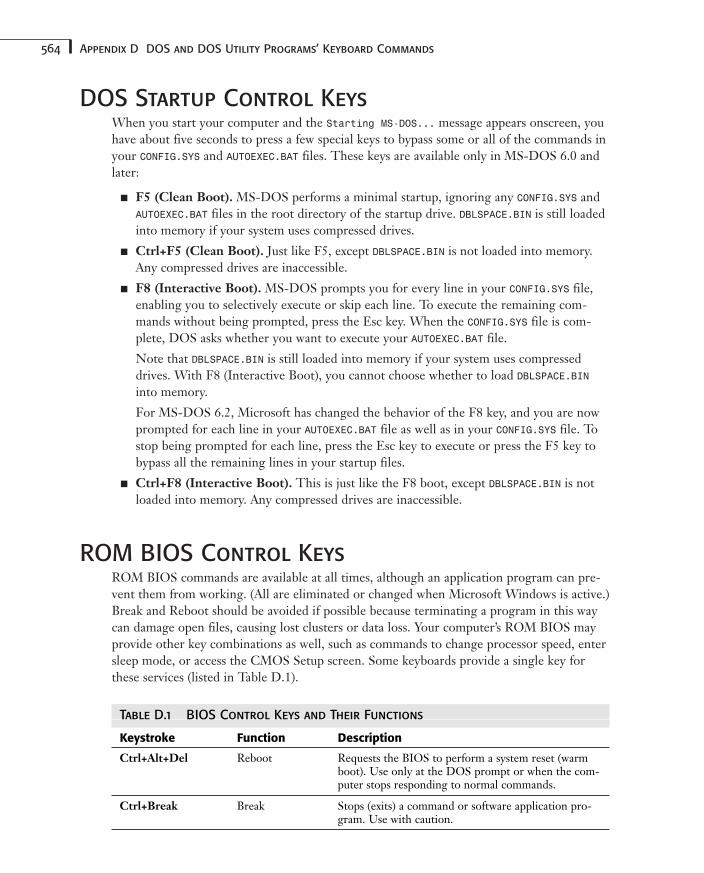
564 Appendix D DOS and DOS Utility Programs’ Keyboard Commands
DOS Startup Control KeysWhen you start your computer and the Starting MS-DOS... message appears onscreen, youhave about five seconds to press a few special keys to bypass some or all of the commands inyour CONFIG.SYS and AUTOEXEC.BAT files. These keys are available only in MS-DOS 6.0 andlater:
■ F5 (Clean Boot). MS-DOS performs a minimal startup, ignoring any CONFIG.SYS andAUTOEXEC.BAT files in the root directory of the startup drive. DBLSPACE.BIN is still loadedinto memory if your system uses compressed drives.
■ Ctrl+F5 (Clean Boot). Just like F5, except DBLSPACE.BIN is not loaded into memory.Any compressed drives are inaccessible.
■ F8 (Interactive Boot). MS-DOS prompts you for every line in your CONFIG.SYS file,enabling you to selectively execute or skip each line. To execute the remaining com-mands without being prompted, press the Esc key. When the CONFIG.SYS file is com-plete, DOS asks whether you want to execute your AUTOEXEC.BAT file.
Note that DBLSPACE.BIN is still loaded into memory if your system uses compresseddrives. With F8 (Interactive Boot), you cannot choose whether to load DBLSPACE.BINinto memory.
For MS-DOS 6.2, Microsoft has changed the behavior of the F8 key, and you are nowprompted for each line in your AUTOEXEC.BAT file as well as in your CONFIG.SYS file. Tostop being prompted for each line, press the Esc key to execute or press the F5 key tobypass all the remaining lines in your startup files.
■ Ctrl+F8 (Interactive Boot). This is just like the F8 boot, except DBLSPACE.BIN is notloaded into memory. Any compressed drives are inaccessible.
ROM BIOS Control KeysROM BIOS commands are available at all times, although an application program can pre-vent them from working. (All are eliminated or changed when Microsoft Windows is active.)Break and Reboot should be avoided if possible because terminating a program in this waycan damage open files, causing lost clusters or data loss. Your computer’s ROM BIOS mayprovide other key combinations as well, such as commands to change processor speed, entersleep mode, or access the CMOS Setup screen. Some keyboards provide a single key forthese services (listed in Table D.1).
Table D.1 BIOS Control Keys and Their Functions
Keystroke Function Description
Ctrl+Alt+Del Reboot Requests the BIOS to perform a system reset (warmboot). Use only at the DOS prompt or when the com-puter stops responding to normal commands.
Ctrl+Break Break Stops (exits) a command or software application pro-gram. Use with caution.
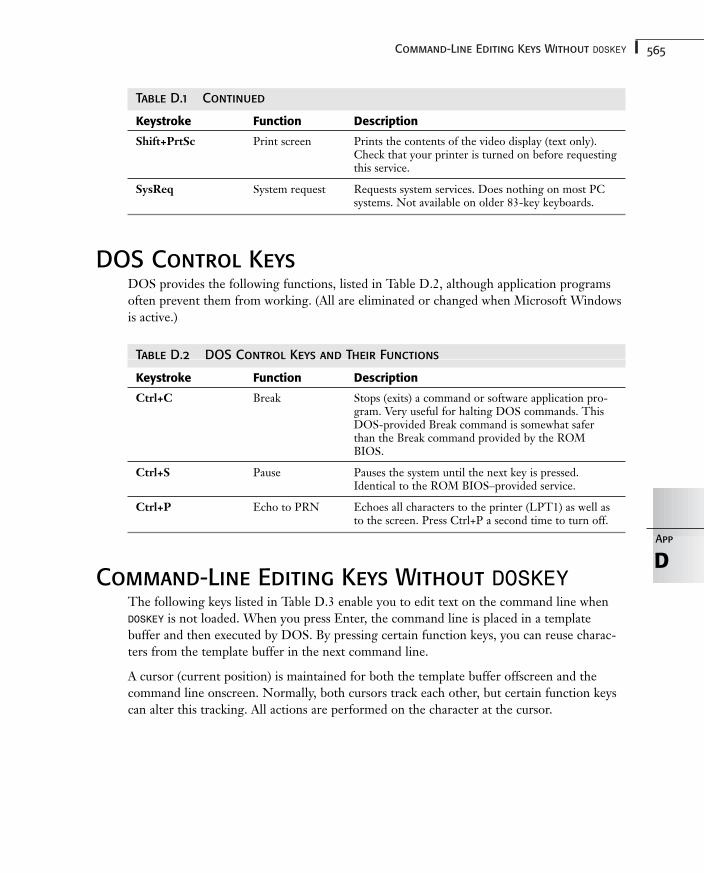
565Command-Line Editing Keys Without DOSKEY
Table D.1 Continued
Keystroke Function Description
Shift+PrtSc Print screen Prints the contents of the video display (text only).Check that your printer is turned on before requestingthis service.
SysReq System request Requests system services. Does nothing on most PCsystems. Not available on older 83-key keyboards.
DOS Control KeysDOS provides the following functions, listed in Table D.2, although application programsoften prevent them from working. (All are eliminated or changed when Microsoft Windowsis active.)
Table D.2 DOS Control Keys and Their Functions
Keystroke Function Description
Ctrl+C Break Stops (exits) a command or software application pro-gram. Very useful for halting DOS commands. ThisDOS-provided Break command is somewhat saferthan the Break command provided by the ROMBIOS.
Ctrl+S Pause Pauses the system until the next key is pressed.Identical to the ROM BIOS–provided service.
Ctrl+P Echo to PRN Echoes all characters to the printer (LPT1) as well asto the screen. Press Ctrl+P a second time to turn off.
Command-Line Editing Keys Without DOSKEYThe following keys listed in Table D.3 enable you to edit text on the command line whenDOSKEY is not loaded. When you press Enter, the command line is placed in a templatebuffer and then executed by DOS. By pressing certain function keys, you can reuse charac-ters from the template buffer in the next command line.
A cursor (current position) is maintained for both the template buffer offscreen and thecommand line onscreen. Normally, both cursors track each other, but certain function keyscan alter this tracking. All actions are performed on the character at the cursor.
DApp
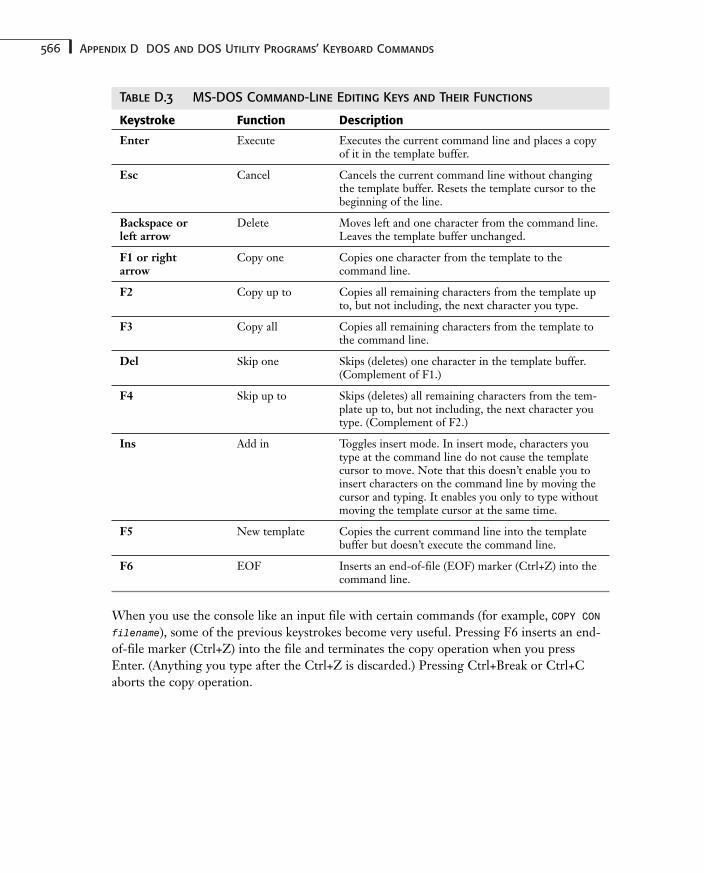
566 Appendix D DOS and DOS Utility Programs’ Keyboard Commands
Table D.3 MS-DOS Command-Line Editing Keys and Their Functions
Keystroke Function Description
Enter Execute Executes the current command line and places a copyof it in the template buffer.
Esc Cancel Cancels the current command line without changingthe template buffer. Resets the template cursor to thebeginning of the line.
Backspace or Delete Moves left and one character from the command line. left arrow Leaves the template buffer unchanged.
F1 or right Copy one Copies one character from the template to the arrow command line.
F2 Copy up to Copies all remaining characters from the template upto, but not including, the next character you type.
F3 Copy all Copies all remaining characters from the template tothe command line.
Del Skip one Skips (deletes) one character in the template buffer.(Complement of F1.)
F4 Skip up to Skips (deletes) all remaining characters from the tem-plate up to, but not including, the next character youtype. (Complement of F2.)
Ins Add in Toggles insert mode. In insert mode, characters youtype at the command line do not cause the templatecursor to move. Note that this doesn’t enable you toinsert characters on the command line by moving thecursor and typing. It enables you only to type withoutmoving the template cursor at the same time.
F5 New template Copies the current command line into the templatebuffer but doesn’t execute the command line.
F6 EOF Inserts an end-of-file (EOF) marker (Ctrl+Z) into thecommand line.
When you use the console like an input file with certain commands (for example, COPY CONfilename), some of the previous keystrokes become very useful. Pressing F6 inserts an end-of-file marker (Ctrl+Z) into the file and terminates the copy operation when you pressEnter. (Anything you type after the Ctrl+Z is discarded.) Pressing Ctrl+Break or Ctrl+Caborts the copy operation.
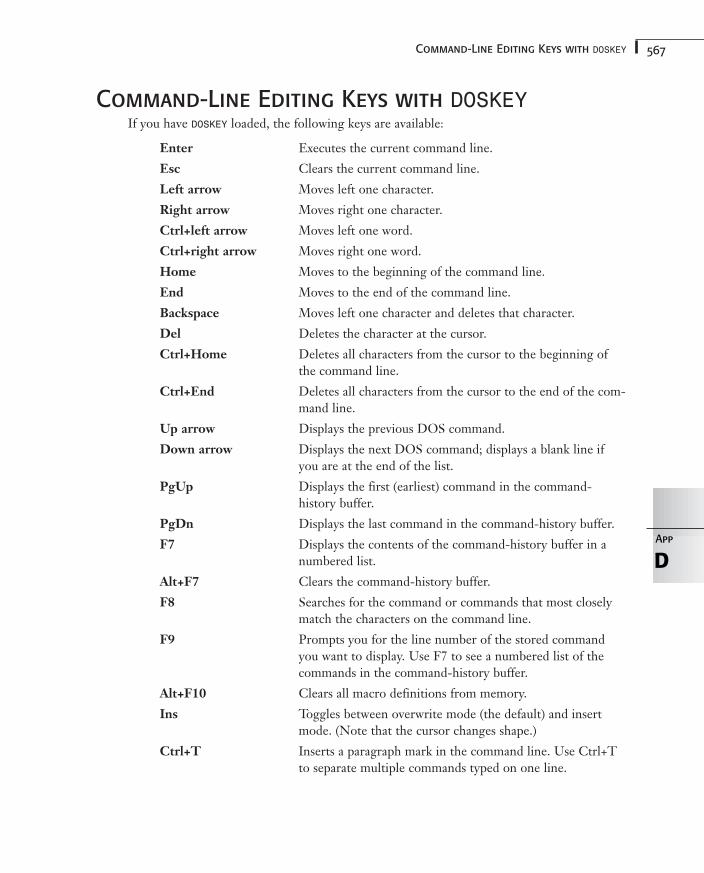
567Command-Line Editing Keys with DOSKEY
Command-Line Editing Keys with DOSKEYIf you have DOSKEY loaded, the following keys are available:
Enter Executes the current command line.
Esc Clears the current command line.
Left arrow Moves left one character.
Right arrow Moves right one character.
Ctrl+left arrow Moves left one word.
Ctrl+right arrow Moves right one word.
Home Moves to the beginning of the command line.
End Moves to the end of the command line.
Backspace Moves left one character and deletes that character.
Del Deletes the character at the cursor.
Ctrl+Home Deletes all characters from the cursor to the beginning ofthe command line.
Ctrl+End Deletes all characters from the cursor to the end of the com-mand line.
Up arrow Displays the previous DOS command.
Down arrow Displays the next DOS command; displays a blank line ifyou are at the end of the list.
PgUp Displays the first (earliest) command in the command-history buffer.
PgDn Displays the last command in the command-history buffer.
F7 Displays the contents of the command-history buffer in anumbered list.
Alt+F7 Clears the command-history buffer.
F8 Searches for the command or commands that most closelymatch the characters on the command line.
F9 Prompts you for the line number of the stored commandyou want to display. Use F7 to see a numbered list of thecommands in the command-history buffer.
Alt+F10 Clears all macro definitions from memory.
Ins Toggles between overwrite mode (the default) and insertmode. (Note that the cursor changes shape.)
Ctrl+T Inserts a paragraph mark in the command line. Use Ctrl+Tto separate multiple commands typed on one line.
DApp
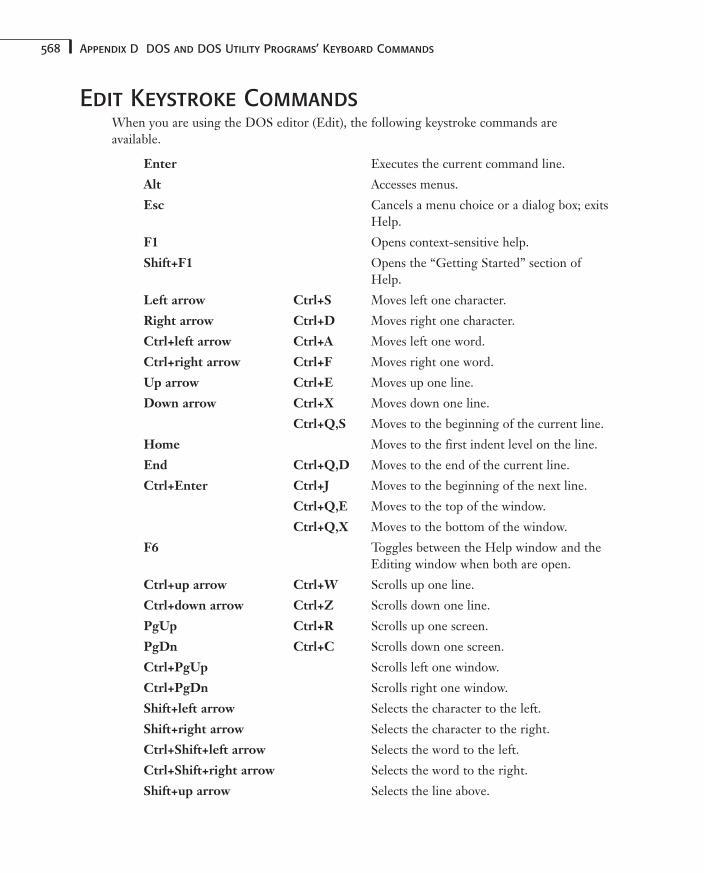
568 Appendix D DOS and DOS Utility Programs’ Keyboard Commands
Edit Keystroke CommandsWhen you are using the DOS editor (Edit), the following keystroke commands are available.
Enter Executes the current command line.
Alt Accesses menus.
Esc Cancels a menu choice or a dialog box; exitsHelp.
F1 Opens context-sensitive help.
Shift+F1 Opens the “Getting Started” section ofHelp.
Left arrow Ctrl+S Moves left one character.
Right arrow Ctrl+D Moves right one character.
Ctrl+left arrow Ctrl+A Moves left one word.
Ctrl+right arrow Ctrl+F Moves right one word.
Up arrow Ctrl+E Moves up one line.
Down arrow Ctrl+X Moves down one line.
Ctrl+Q,S Moves to the beginning of the current line.
Home Moves to the first indent level on the line.
End Ctrl+Q,D Moves to the end of the current line.
Ctrl+Enter Ctrl+J Moves to the beginning of the next line.
Ctrl+Q,E Moves to the top of the window.
Ctrl+Q,X Moves to the bottom of the window.
F6 Toggles between the Help window and theEditing window when both are open.
Ctrl+up arrow Ctrl+W Scrolls up one line.
Ctrl+down arrow Ctrl+Z Scrolls down one line.
PgUp Ctrl+R Scrolls up one screen.
PgDn Ctrl+C Scrolls down one screen.
Ctrl+PgUp Scrolls left one window.
Ctrl+PgDn Scrolls right one window.
Shift+left arrow Selects the character to the left.
Shift+right arrow Selects the character to the right.
Ctrl+Shift+left arrow Selects the word to the left.
Ctrl+Shift+right arrow Selects the word to the right.
Shift+up arrow Selects the line above.
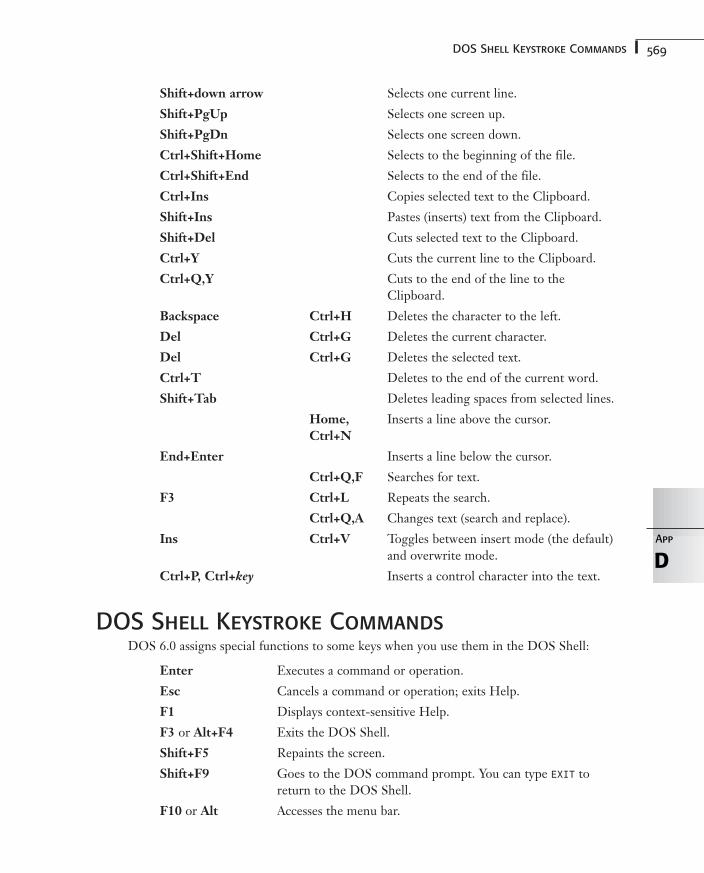
569DOS Shell Keystroke Commands
Shift+down arrow Selects one current line.
Shift+PgUp Selects one screen up.
Shift+PgDn Selects one screen down.
Ctrl+Shift+Home Selects to the beginning of the file.
Ctrl+Shift+End Selects to the end of the file.
Ctrl+Ins Copies selected text to the Clipboard.
Shift+Ins Pastes (inserts) text from the Clipboard.
Shift+Del Cuts selected text to the Clipboard.
Ctrl+Y Cuts the current line to the Clipboard.
Ctrl+Q,Y Cuts to the end of the line to theClipboard.
Backspace Ctrl+H Deletes the character to the left.
Del Ctrl+G Deletes the current character.
Del Ctrl+G Deletes the selected text.
Ctrl+T Deletes to the end of the current word.
Shift+Tab Deletes leading spaces from selected lines.
Home, Inserts a line above the cursor.Ctrl+N
End+Enter Inserts a line below the cursor.
Ctrl+Q,F Searches for text.
F3 Ctrl+L Repeats the search.
Ctrl+Q,A Changes text (search and replace).
Ins Ctrl+V Toggles between insert mode (the default)and overwrite mode.
Ctrl+P, Ctrl+key Inserts a control character into the text.
DOS Shell Keystroke CommandsDOS 6.0 assigns special functions to some keys when you use them in the DOS Shell:
Enter Executes a command or operation.
Esc Cancels a command or operation; exits Help.
F1 Displays context-sensitive Help.
F3 or Alt+F4 Exits the DOS Shell.
Shift+F5 Repaints the screen.
Shift+F9 Goes to the DOS command prompt. You can type EXIT toreturn to the DOS Shell.
F10 or Alt Accesses the menu bar.
DApp
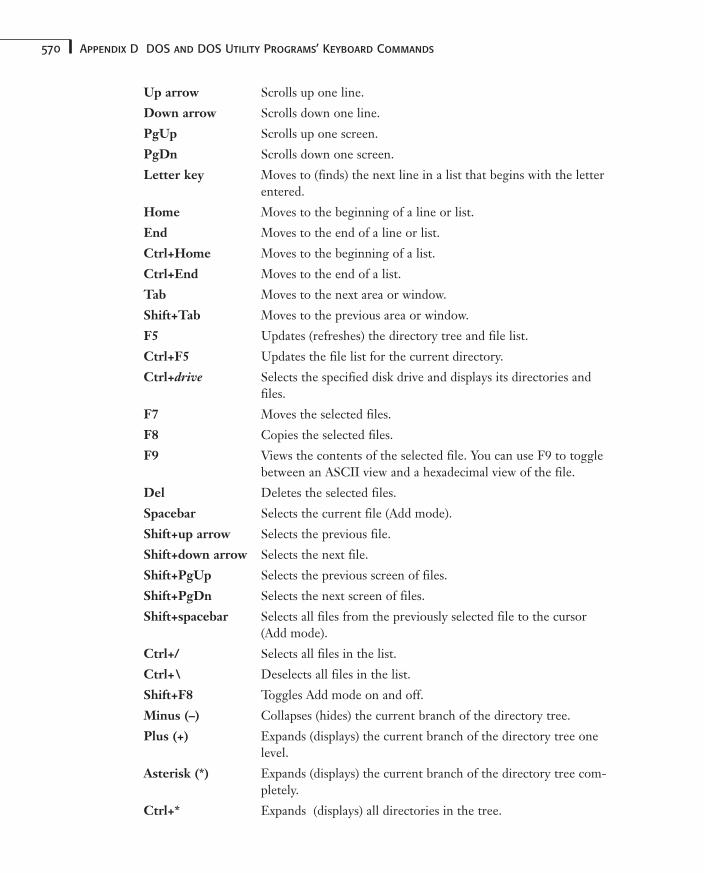
570 Appendix D DOS and DOS Utility Programs’ Keyboard Commands
Up arrow Scrolls up one line.
Down arrow Scrolls down one line.
PgUp Scrolls up one screen.
PgDn Scrolls down one screen.
Letter key Moves to (finds) the next line in a list that begins with the letterentered.
Home Moves to the beginning of a line or list.
End Moves to the end of a line or list.
Ctrl+Home Moves to the beginning of a list.
Ctrl+End Moves to the end of a list.
Tab Moves to the next area or window.
Shift+Tab Moves to the previous area or window.
F5 Updates (refreshes) the directory tree and file list.
Ctrl+F5 Updates the file list for the current directory.
Ctrl+drive Selects the specified disk drive and displays its directories andfiles.
F7 Moves the selected files.
F8 Copies the selected files.
F9 Views the contents of the selected file. You can use F9 to togglebetween an ASCII view and a hexadecimal view of the file.
Del Deletes the selected files.
Spacebar Selects the current file (Add mode).
Shift+up arrow Selects the previous file.
Shift+down arrow Selects the next file.
Shift+PgUp Selects the previous screen of files.
Shift+PgDn Selects the next screen of files.
Shift+spacebar Selects all files from the previously selected file to the cursor(Add mode).
Ctrl+/ Selects all files in the list.
Ctrl+\ Deselects all files in the list.
Shift+F8 Toggles Add mode on and off.
Minus (–) Collapses (hides) the current branch of the directory tree.
Plus (+) Expands (displays) the current branch of the directory tree onelevel.
Asterisk (*) Expands (displays) the current branch of the directory tree com-pletely.
Ctrl+* Expands (displays) all directories in the tree.
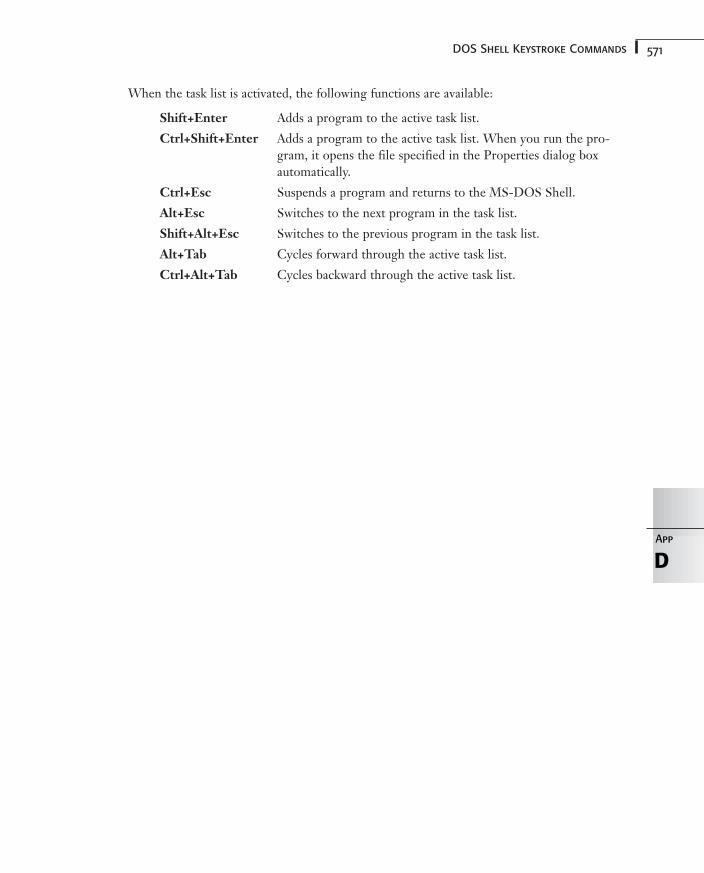
571DOS Shell Keystroke Commands
When the task list is activated, the following functions are available:
Shift+Enter Adds a program to the active task list.
Ctrl+Shift+Enter Adds a program to the active task list. When you run the pro-gram, it opens the file specified in the Properties dialog boxautomatically.
Ctrl+Esc Suspends a program and returns to the MS-DOS Shell.
Alt+Esc Switches to the next program in the task list.
Shift+Alt+Esc Switches to the previous program in the task list.
Alt+Tab Cycles forward through the active task list.
Ctrl+Alt+Tab Cycles backward through the active task list.
DApp

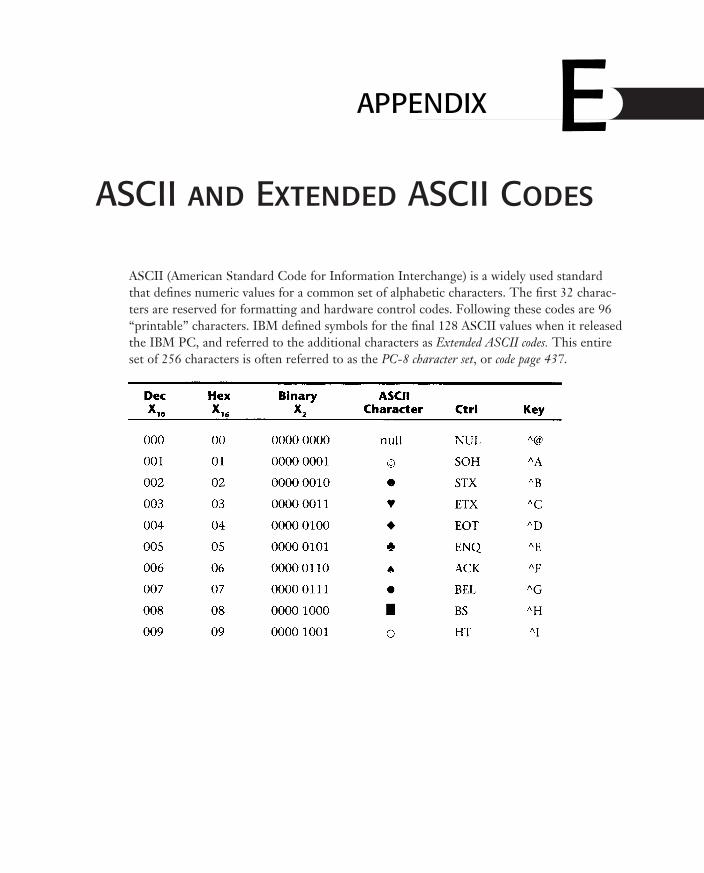
ASCII and Extended ASCII Codes
ASCII (American Standard Code for Information Interchange) is a widely used standardthat defines numeric values for a common set of alphabetic characters. The first 32 charac-ters are reserved for formatting and hardware control codes. Following these codes are 96“printable” characters. IBM defined symbols for the final 128 ASCII values when it releasedthe IBM PC, and referred to the additional characters as Extended ASCII codes. This entireset of 256 characters is often referred to as the PC-8 character set, or code page 437.
EAPPENDIX
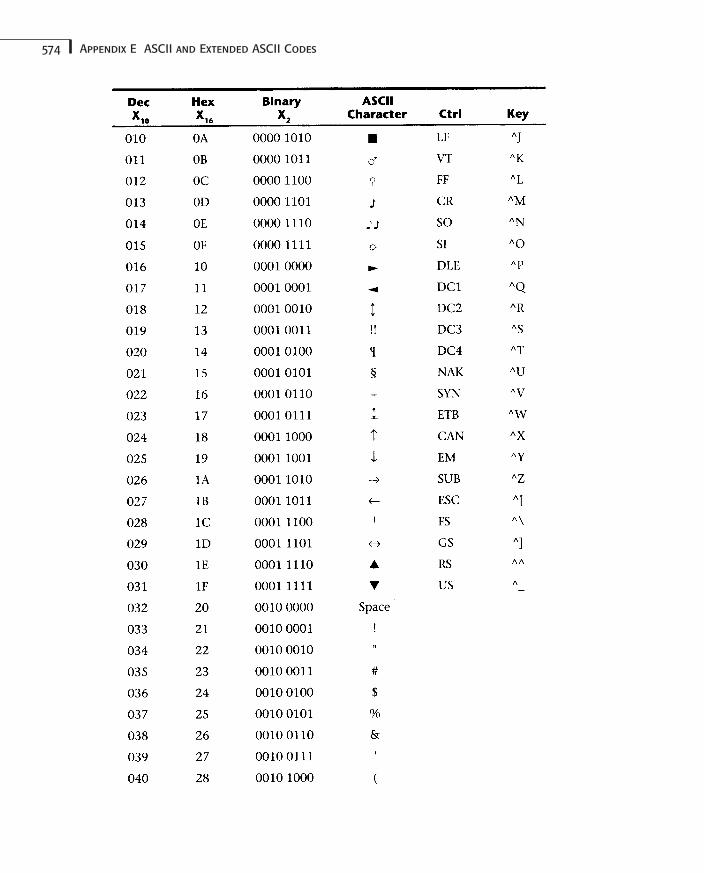
574 Appendix E ASCII and Extended ASCII Codes
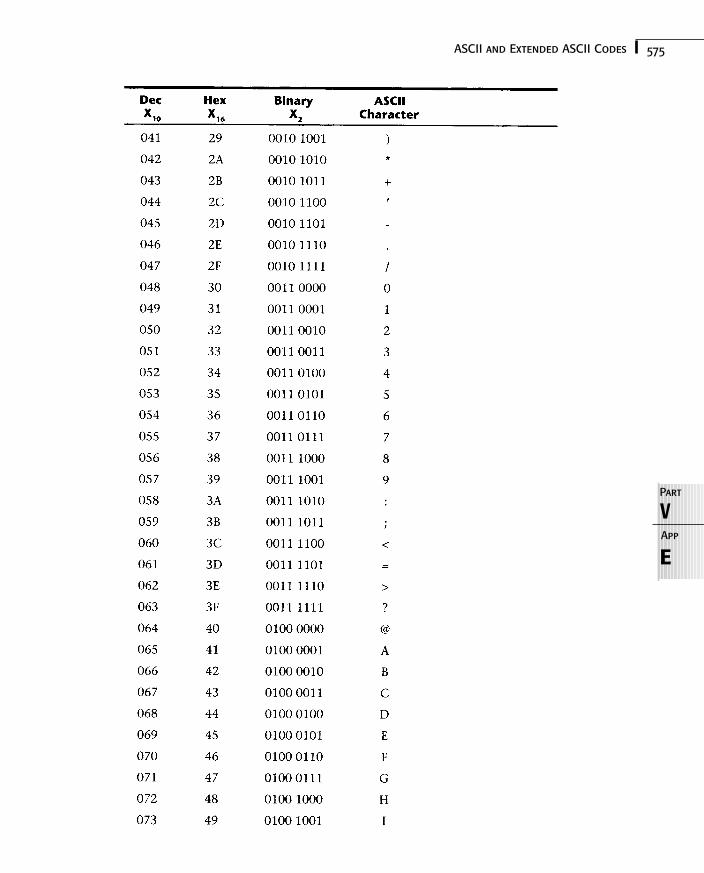
E
VPart
App
575ASCII and Extended ASCII Codes
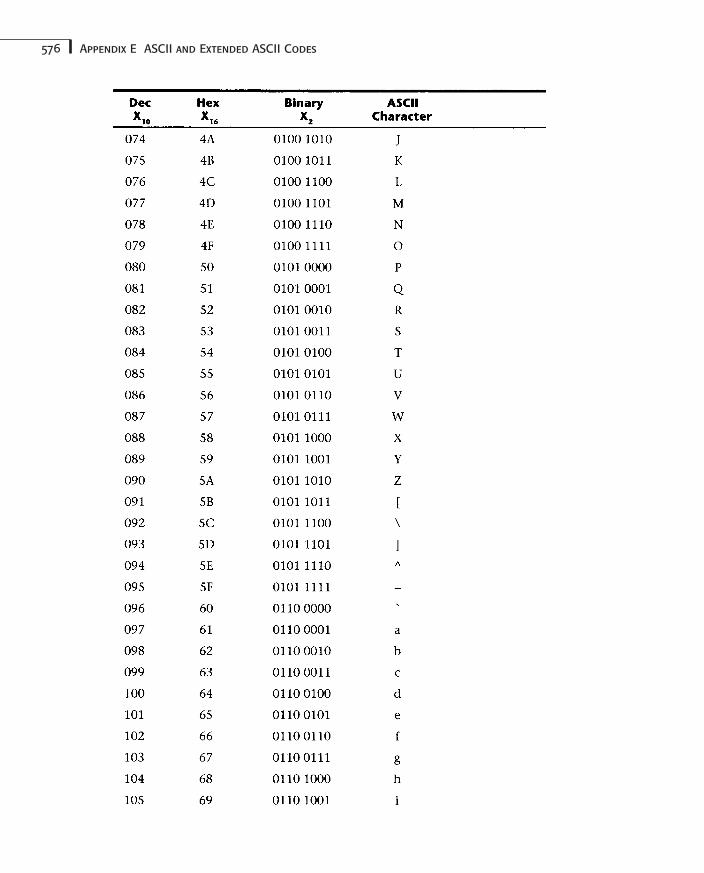
576 Appendix E ASCII and Extended ASCII Codes
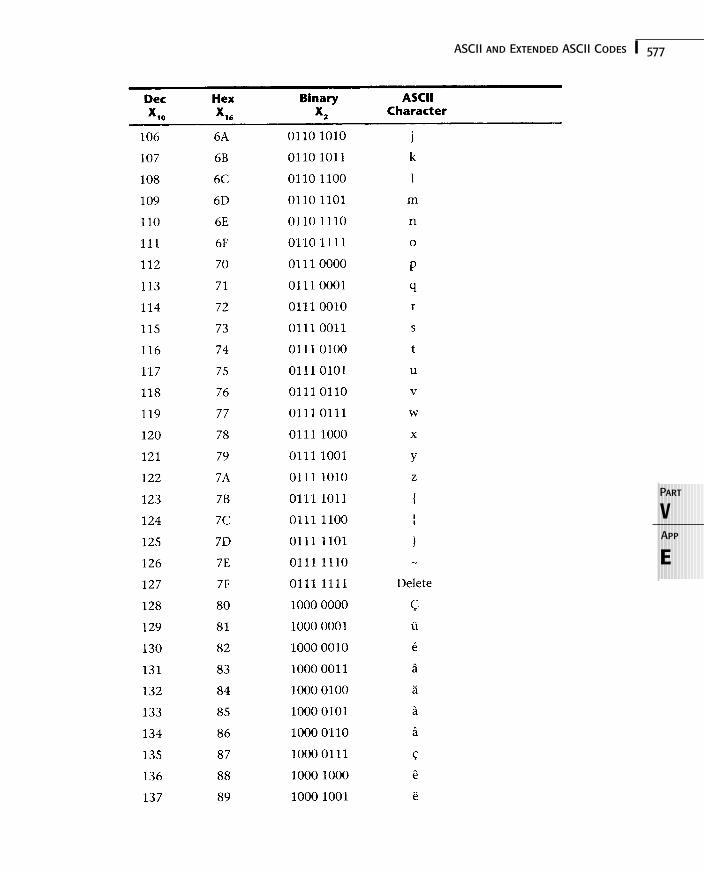
E
VPart
App
577ASCII and Extended ASCII Codes
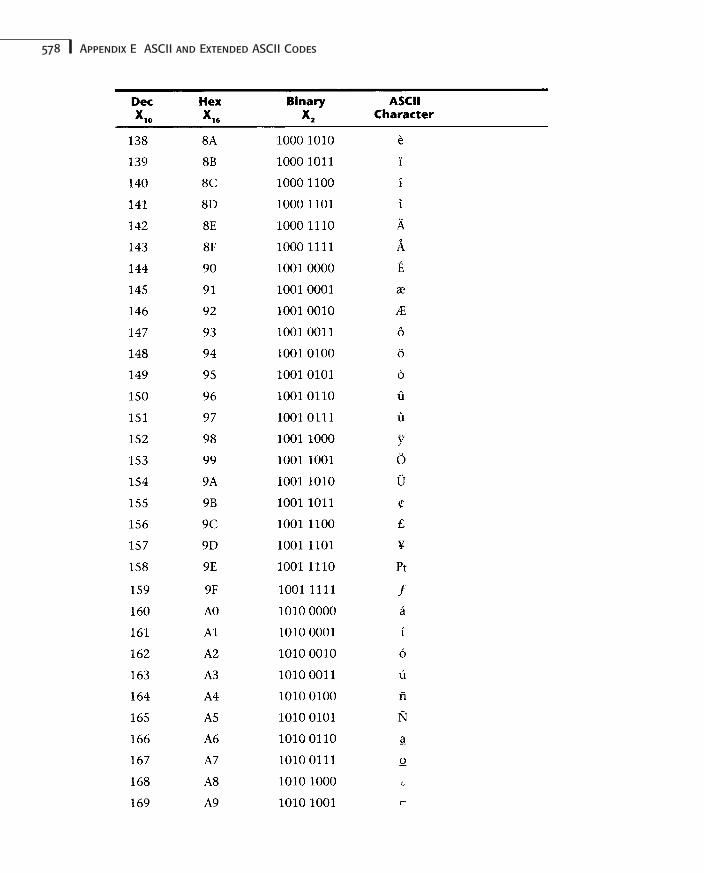
578 Appendix E ASCII and Extended ASCII Codes
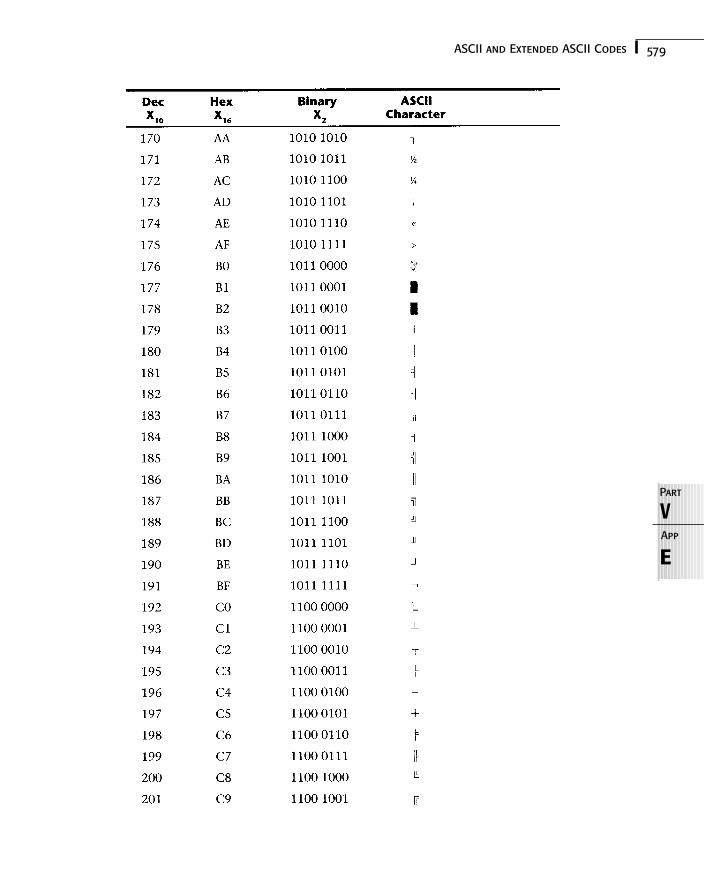
E
VPart
App
579ASCII and Extended ASCII Codes
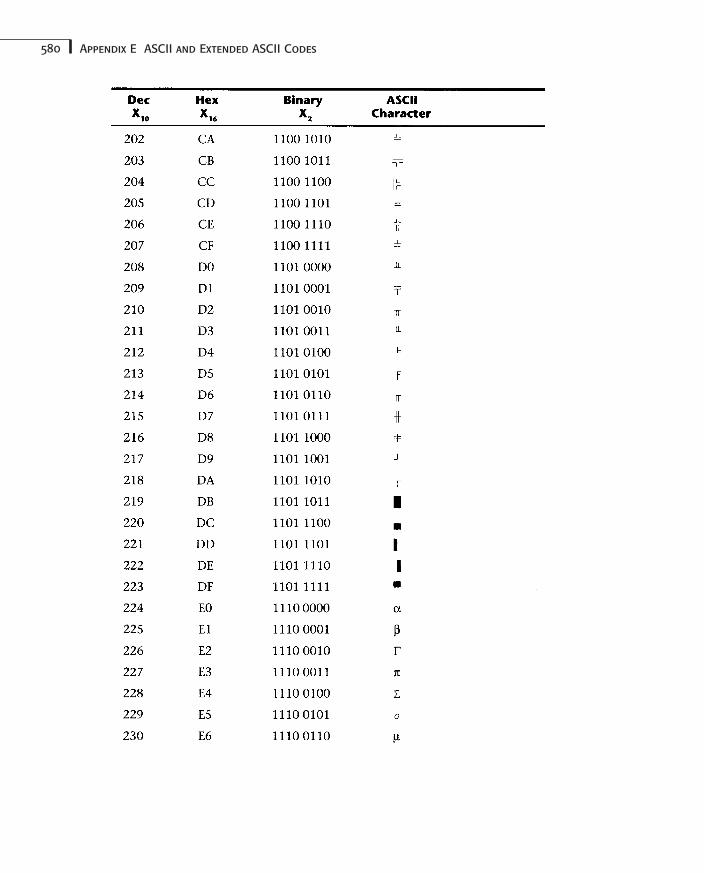
580 Appendix E ASCII and Extended ASCII Codes
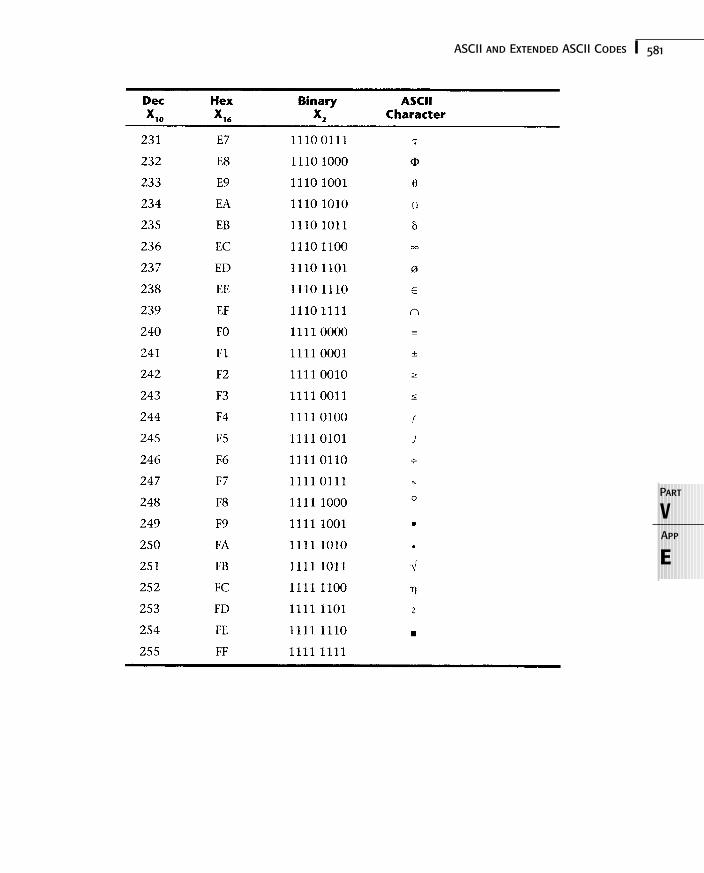
E
VPart
App
581ASCII and Extended ASCII Codes

Command Reference
FAPPENDIX
With every new release, Microsoft has added features to MS-DOS. MS-DOS 6.22 now con-tains more than 100 commands, providing configuration support and utilities for the largevariety of computers that run MS-DOS. Many commands help you organize the files andsubdirectories on your hard disk or enable you to configure your computer system to runmore efficiently. Other commands enable you to automate routine tasks that you performwith your computer every day. DOS now includes commands that provide support for thevarious characters and conventions used in many countries other than the United States.
This command reference describes all the commands that Microsoft provides in the stan-dard MS-DOS 6.22 package. Each command entry includes a description of the command’spurpose, its syntax, notes and rules on how to use it, examples of its use, error messages andexit codes when applicable, and a “See Also” section that points you to additional informa-tion about using a particular command.
This command reference also describes commands provided in other common DOS ver-sions, including MS-DOS “7” (in Windows 95), MS-DOS “7.1” (in Windows 98), Caldera DRDOS, and IBM’s PC-DOS.
DOS Commands by FunctionSo that you can easily find the command you’re looking for, the following lists group thevarious DOS commands by their functions and contain short descriptions of each command.Many commands have more than one function, so they may appear in more than one group.When you locate the command you want in these function lists, turn to the reference sec-tion for much more detailed information about a particular command. The reference sec-tion lists the commands in alphabetical order.
584 Appendix F Command Reference
In the following function lists, the commands are divided into these categories:
Batch File Commands
CONFIG.SYS Commands
CONFIG.SYS Device Drivers
Directory Commands
Disk Commands
File Commands
Full-Screen DOS Applications
Help Commands
International Commands and Device Drivers
Memory and System Performance Commands
Miscellaneous Commands
Windows Applications
Batch File Commands
CALL Executes a batch file from within another batch file.
CHOICE Accepts a single keystroke from the keyboard.
COMMAND Runs a second copy of the MS-DOS command interpreter.
ECHO Echoes text to the screen from a batch file.
FOR FOR-IN-DO loop for batch files.
GOTO Jumps to a labeled line in a batch file.
IF IF-THEN decision structure for a batch file.
PAUSE Waits for a keystroke before continuing.
REM Inserts a remark into a batch file.
SHIFT Shifts batch file parameters down one place.
CONFIG.SYS Commands
BREAK= Turns on or off extended Ctrl+Break checking.
BUFFERS= Sets the number of disk buffers used by DOS.
COUNTRY= Sets country information.
DEVICE= Loads an installable device driver.
DEVICEHIGH= Loads an installable device driver into high (UMB) memory.
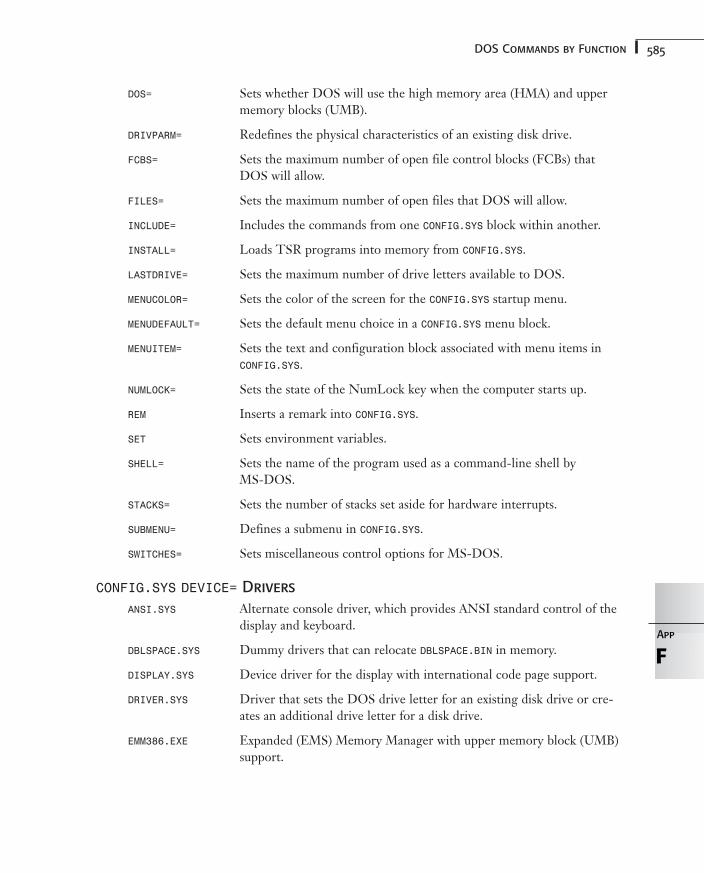
585DOS Commands by Function
DOS= Sets whether DOS will use the high memory area (HMA) and uppermemory blocks (UMB).
DRIVPARM= Redefines the physical characteristics of an existing disk drive.
FCBS= Sets the maximum number of open file control blocks (FCBs) thatDOS will allow.
FILES= Sets the maximum number of open files that DOS will allow.
INCLUDE= Includes the commands from one CONFIG.SYS block within another.
INSTALL= Loads TSR programs into memory from CONFIG.SYS.
LASTDRIVE= Sets the maximum number of drive letters available to DOS.
MENUCOLOR= Sets the color of the screen for the CONFIG.SYS startup menu.
MENUDEFAULT= Sets the default menu choice in a CONFIG.SYS menu block.
MENUITEM= Sets the text and configuration block associated with menu items inCONFIG.SYS.
NUMLOCK= Sets the state of the NumLock key when the computer starts up.
REM Inserts a remark into CONFIG.SYS.
SET Sets environment variables.
SHELL= Sets the name of the program used as a command-line shell by MS-DOS.
STACKS= Sets the number of stacks set aside for hardware interrupts.
SUBMENU= Defines a submenu in CONFIG.SYS.
SWITCHES= Sets miscellaneous control options for MS-DOS.
CONFIG.SYS DEVICE= Drivers
ANSI.SYS Alternate console driver, which provides ANSI standard control of thedisplay and keyboard.
DBLSPACE.SYS Dummy drivers that can relocate DBLSPACE.BIN in memory.
DISPLAY.SYS Device driver for the display with international code page support.
DRIVER.SYS Driver that sets the DOS drive letter for an existing disk drive or cre-ates an additional drive letter for a disk drive.
EMM386.EXE Expanded (EMS) Memory Manager with upper memory block (UMB)support.
FApp
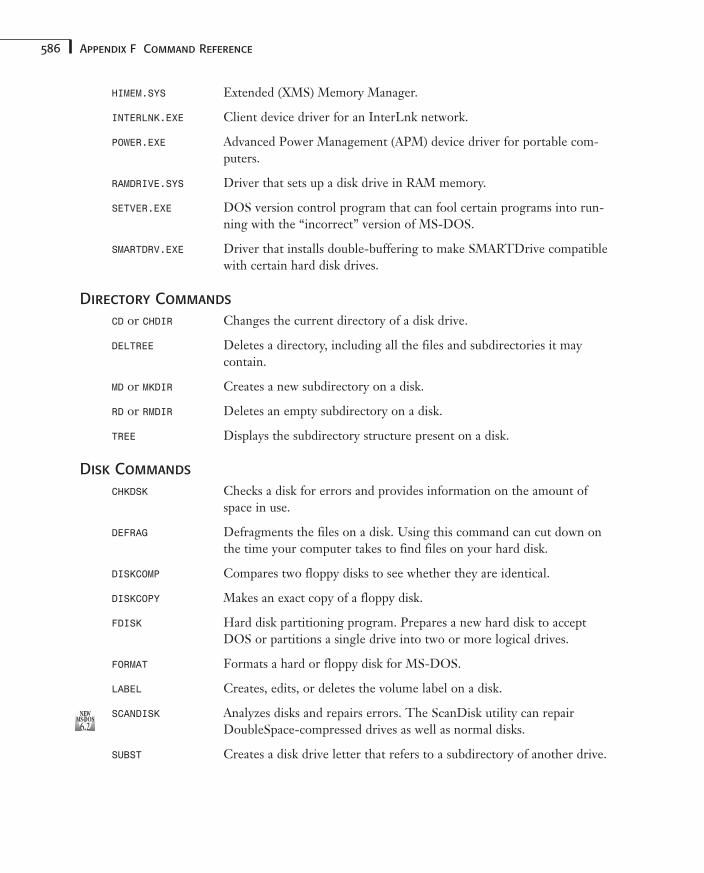
586 Appendix F Command Reference
HIMEM.SYS Extended (XMS) Memory Manager.
INTERLNK.EXE Client device driver for an InterLnk network.
POWER.EXE Advanced Power Management (APM) device driver for portable com-puters.
RAMDRIVE.SYS Driver that sets up a disk drive in RAM memory.
SETVER.EXE DOS version control program that can fool certain programs into run-ning with the “incorrect” version of MS-DOS.
SMARTDRV.EXE Driver that installs double-buffering to make SMARTDrive compatiblewith certain hard disk drives.
Directory Commands
CD or CHDIR Changes the current directory of a disk drive.
DELTREE Deletes a directory, including all the files and subdirectories it maycontain.
MD or MKDIR Creates a new subdirectory on a disk.
RD or RMDIR Deletes an empty subdirectory on a disk.
TREE Displays the subdirectory structure present on a disk.
Disk Commands
CHKDSK Checks a disk for errors and provides information on the amount ofspace in use.
DEFRAG Defragments the files on a disk. Using this command can cut down onthe time your computer takes to find files on your hard disk.
DISKCOMP Compares two floppy disks to see whether they are identical.
DISKCOPY Makes an exact copy of a floppy disk.
FDISK Hard disk partitioning program. Prepares a new hard disk to acceptDOS or partitions a single drive into two or more logical drives.
FORMAT Formats a hard or floppy disk for MS-DOS.
LABEL Creates, edits, or deletes the volume label on a disk.
SCANDISK Analyzes disks and repairs errors. The ScanDisk utility can repairDoubleSpace-compressed drives as well as normal disks.
SUBST Creates a disk drive letter that refers to a subdirectory of another drive.
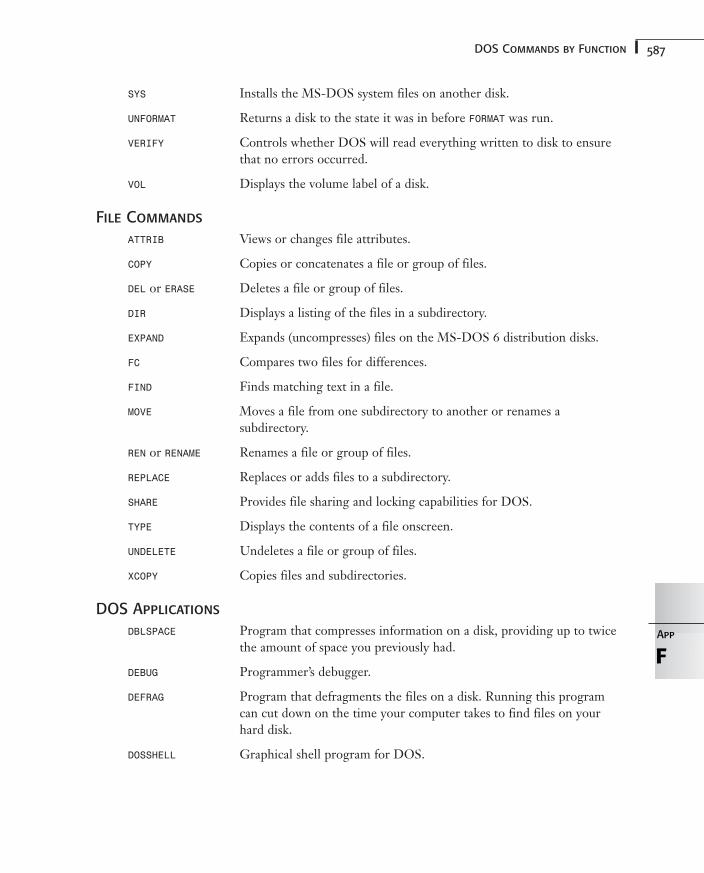
587DOS Commands by Function
SYS Installs the MS-DOS system files on another disk.
UNFORMAT Returns a disk to the state it was in before FORMAT was run.
VERIFY Controls whether DOS will read everything written to disk to ensurethat no errors occurred.
VOL Displays the volume label of a disk.
File Commands
ATTRIB Views or changes file attributes.
COPY Copies or concatenates a file or group of files.
DEL or ERASE Deletes a file or group of files.
DIR Displays a listing of the files in a subdirectory.
EXPAND Expands (uncompresses) files on the MS-DOS 6 distribution disks.
FC Compares two files for differences.
FIND Finds matching text in a file.
MOVE Moves a file from one subdirectory to another or renames a subdirectory.
REN or RENAME Renames a file or group of files.
REPLACE Replaces or adds files to a subdirectory.
SHARE Provides file sharing and locking capabilities for DOS.
TYPE Displays the contents of a file onscreen.
UNDELETE Undeletes a file or group of files.
XCOPY Copies files and subdirectories.
DOS Applications
DBLSPACE Program that compresses information on a disk, providing up to twicethe amount of space you previously had.
DEBUG Programmer’s debugger.
DEFRAG Program that defragments the files on a disk. Running this programcan cut down on the time your computer takes to find files on yourhard disk.
DOSSHELL Graphical shell program for DOS.
FApp

588 Appendix F Command Reference
EDIT A full-screen ASCII text file editor.
FDISK Hard disk partitioning program. Prepares a new hard disk to acceptDOS or partitions a single drive into two or more logical drives.
HELP An online help system that provides descriptions and examples forevery DOS command.
MSAV The Microsoft Anti-Virus program. Checks your computer for viruses.
MSBACKUP The Microsoft Backup program. Backs up files on your hard disk to aseries of floppy disks.
MSD The Microsoft System Diagnostics program. Provides informationabout the configuration of your computer system.
QBASIC Program that provides access to the Microsoft QuickBASIC develop-ment environment, which enables you to write and run programs writ-ten in the QuickBASIC language.
Help Commands
FASTHELP Displays a short description of what each DOS command is for and thecorrect syntax for its use.
HELP Opens a full-screen, online help system that provides descriptions andexamples for every DOS command.
/? Not an actual command; if you include a /? on the command line witha DOS command, DOS displays a short description of what the com-mand does and how you can use it.
International Commands and Device Drivers
CHCP Changes the active country code page.
COUNTRY= Sets country information.
DISPLAY.SYS Runs a device driver for the display with international code page sup-port.
KEYB Sets the active keyboard layout.
MODE Configures standard DOS devices, including changing the active codepage for the keyboard, display, and printer.
NLSFUNC Contains code page switching support required by CHCP and MODE.
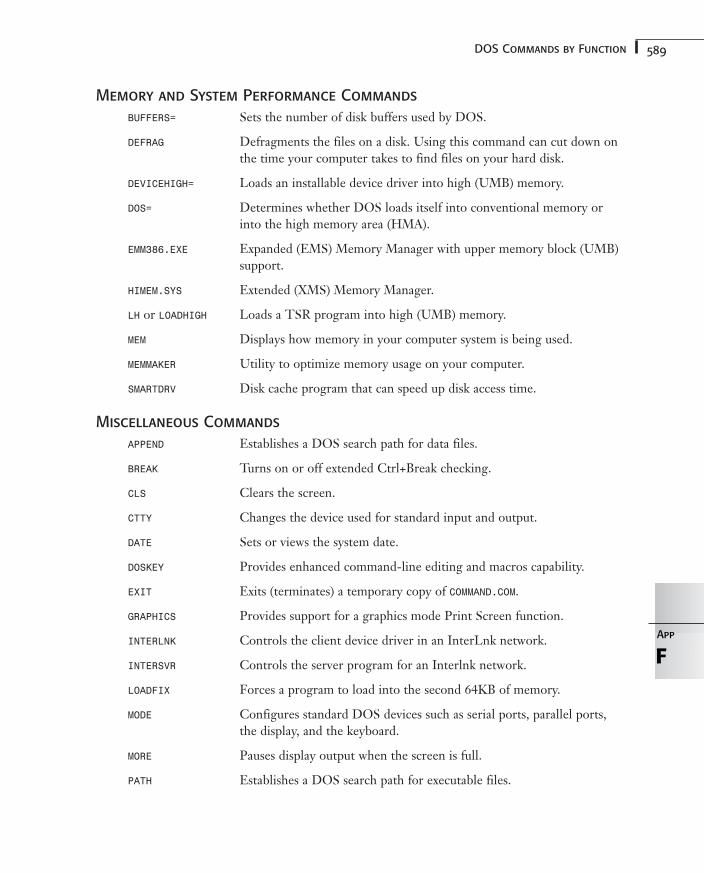
589DOS Commands by Function
Memory and System Performance Commands
BUFFERS= Sets the number of disk buffers used by DOS.
DEFRAG Defragments the files on a disk. Using this command can cut down onthe time your computer takes to find files on your hard disk.
DEVICEHIGH= Loads an installable device driver into high (UMB) memory.
DOS= Determines whether DOS loads itself into conventional memory orinto the high memory area (HMA).
EMM386.EXE Expanded (EMS) Memory Manager with upper memory block (UMB)support.
HIMEM.SYS Extended (XMS) Memory Manager.
LH or LOADHIGH Loads a TSR program into high (UMB) memory.
MEM Displays how memory in your computer system is being used.
MEMMAKER Utility to optimize memory usage on your computer.
SMARTDRV Disk cache program that can speed up disk access time.
Miscellaneous Commands
APPEND Establishes a DOS search path for data files.
BREAK Turns on or off extended Ctrl+Break checking.
CLS Clears the screen.
CTTY Changes the device used for standard input and output.
DATE Sets or views the system date.
DOSKEY Provides enhanced command-line editing and macros capability.
EXIT Exits (terminates) a temporary copy of COMMAND.COM.
GRAPHICS Provides support for a graphics mode Print Screen function.
INTERLNK Controls the client device driver in an InterLnk network.
INTERSVR Controls the server program for an Interlnk network.
LOADFIX Forces a program to load into the second 64KB of memory.
MODE Configures standard DOS devices such as serial ports, parallel ports,the display, and the keyboard.
MORE Pauses display output when the screen is full.
PATH Establishes a DOS search path for executable files.
FApp
590 Appendix F Command Reference
PRINT Controls the print spooler for ASCII text files.
PROMPT Customizes the prompt used by DOS at the command line.
RESTORE Restores files backed up with the DOS 5 version of BACKUP.
SET Sets, clears, or displays environment variables.
SORT Sorts ASCII text lines into alphabetical order.
TIME Sets or views the system time.
VER Displays the version of DOS running on the computer.
VSAFE Watches for viruses.
Windows Applications
MWAV The Microsoft Anti-Virus for Windows program. Checks your comput-er for viruses.
MWAVTSR A Windows program that enables VSAFE to alert you to trouble whenyou are running Windows.
MWBACKUP The Microsoft Backup for Windows program. Backs up files on yourhard disk to a series of floppy disks.
MWUNDEL The Microsoft Undelete for Windows program. Undeletes a file orgroup of files.
SMARTMON The SMARTDrive monitoring and configuration program forWindows.
Conventions Used in This Command ReferenceThe following conventions have been used throughout this reference to make the commanddescriptions clear and accurate:
Bold Required literal. Indicates an argument that is required andmust be typed as part of the command. For example, the com-mand name always appears in bold because it must be includedwhen you issue the command.
Italic Optional placeholder. The placeholder holds the place for theactual name or value that you would type when you issue thecommand. In other words, you don’t type the word filename,you replace filename with the actual name of a file.
591Conventions Used in This Command Reference
Bold italic Required placeholder. Indicates a placeholder argument that isrequired. When you issue the command, you must substitute anappropriate value for an argument that appears in bold italic.
Monospaced type Optional literal. Indicates an optional argument that, if includ-ed, must be typed as shown. Switches often are optional literalarguments.
The COPY command, for example, uses all four types of arguments in its syntax:
COPY source destination /V
■ COPY is a required literal, so it appears in bold. The command name always has to betyped exactly as it is shown, although you can add a drive and subdirectory path beforethe command when necessary.
■ source is a required placeholder, so it appears in bold italic. In this case, you wouldenter the name of the file or files that you wanted to copy.
■ destination is an optional placeholder, so it appears in regular italic. If you choose toomit this argument, a default value is assumed. As with all placeholders, if you includethis argument, you replace the word destination with the filename and path where youwant to copy the files.
■ /V is an optional literal, so it appears in regular text. Most switches are optional. If youwant to include one, you must type it exactly as it is shown.
DOS is not usually sensitive to the case of the characters you use. Normally, you can typecommand lines in any mixture of upper- or lowercase characters. Some third-party utilitiesand a few DOS commands, however, do use case-sensitive parameters. When upper- or lowercase is significant in a command’s syntax, it is noted in the text.
Pay particular attention to the punctuation used in syntax lines. DOS is often very pickyabout punctuation; if a semicolon is shown, a comma rarely will do the trick. Spaces are anexception: Where one space is shown, more than one space or tab usually is acceptable. Theorder of command arguments is usually somewhat flexible, with switches allowed eitherbefore or after filename arguments. Exceptions are noted in the text.
Every command line begins the same way—with the name of the command you want torun. Internal commands are located inside COMMAND.COM and are always available at the DOSprompt. External commands are files with .COM or .EXE extensions that are located on yourdisk. To run an external command, COMMAND.COM must be able to find the corresponding fileon disk. The Setup program for DOS 6 places all the external commands in the C:\DOS sub-directory by default. To help COMMAND.COM find external commands, Setup also adds or editsthe PATH statement in your AUTOEXEC.BAT file to include the C:\DOS subdirectory. As long asthe subdirectory in which the command is located is included in your DOS PATH, you cansimply type the name of the command at the command line and COMMAND.COM finds the exe-cutable file. If you move any of the files or if you remove the C:\DOS subdirectory from your
FApp
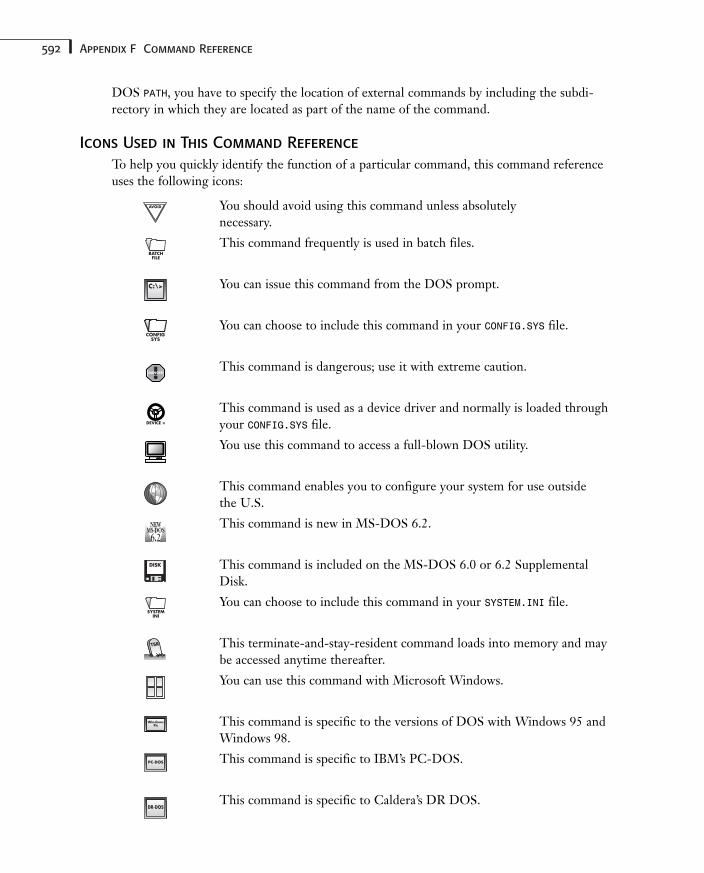
592 Appendix F Command Reference
AVOID
BATCHFILE
C:\>
DR-DOS
PC-DOS
Windows9x
TSR
SYSTEMINI
DISK
DEVICE =
!DANGER
CONFIGSYS
DOS PATH, you have to specify the location of external commands by including the subdi-rectory in which they are located as part of the name of the command.
Icons Used in This Command Reference
To help you quickly identify the function of a particular command, this command referenceuses the following icons:
You should avoid using this command unless absolutely necessary.
This command frequently is used in batch files.
You can issue this command from the DOS prompt.
You can choose to include this command in your CONFIG.SYS file.
This command is dangerous; use it with extreme caution.
This command is used as a device driver and normally is loaded throughyour CONFIG.SYS file.
You use this command to access a full-blown DOS utility.
This command enables you to configure your system for use outside the U.S.
This command is new in MS-DOS 6.2.
This command is included on the MS-DOS 6.0 or 6.2 SupplementalDisk.
You can choose to include this command in your SYSTEM.INI file.
This terminate-and-stay-resident command loads into memory and maybe accessed anytime thereafter.
You can use this command with Microsoft Windows.
This command is specific to the versions of DOS with Windows 95 andWindows 98.
This command is specific to IBM’s PC-DOS.
This command is specific to Caldera’s DR DOS.
593Conventions Used in This Command Reference
Filenames and Pathnames
Filenames and pathnames for MS-DOS consist of a series of standard parts, and DOS makescertain assumptions when these parts are omitted. A fully qualified pathname consists of thefollowing parts:
drive:\path1\path2\ ... \filename.ext
drive: Represents the disk drive letter.
path1, path2 Represent the subdirectories.
filename Represents the one- to eight-character name of the file.
.ext Represents the optional extension to the filename. When included, theextension can be up to three characters in length.
... An ellipsis in a syntax line indicates that the preceding argument can berepeated one or more times. The spaces around the ellipsis are addedhere only for clarity. An actual pathname can never include any spaces.
Note that a disk drive letter, when present, is always followed by a colon. The drive (withcolon), all pathnames, and the filename are separated from each other by backslash charac-ters (\). The filename extension, when present, is always separated from the filename by aperiod.
If no drive is specified, the current disk drive is assumed. If no path is specified, the currentsubdirectory of that disk drive is used. Typically, commands that accept wildcard charactersin their filename arguments default to “all files” if no filename is specified. Otherwise, nodefaults are assumed for the filename portion.
In this command reference, the term filename refers to the one- to eight-character name of afile, either with or without a one- to three-character extension. The term pathname refers tothe complete path to a file (the drive, subdirectory path, and filename).
Legal Filename Characters
DOS allows only certain characters to be included in the name of a file or subdirectory. Allthe letters A to Z, either upper- or lowercase, and the numbers 0 to 9 are allowed. In addi-tion, the following punctuation characters are acceptable:
& ‘ @ ^ _ { } $ ! - # ( ) % ‘ ~
No other punctuation or special characters are permissible in a filename. (If you are using anon-USA code page, you may have additional legal filename characters, such as accentedcharacters.)
Most of the illegal filename characters have a special meaning on the command line. Spaces,tabs, commas, and semicolons typically are used to separate arguments. The colon (:) indi-cates a disk drive letter, and the backslash (\) separates subdirectories or indicates the rootdirectory. The greater-than (>), less-than (<), and pipe (|) characters are used for redirectionand piping. Although percent signs (%) are legal, you should avoid using them in your
FApp
594 Appendix F Command Reference
filenames because this character indicates replaceable parameters and can lead to some con-fusing errors in batch files.
Consider using an underscore (_) or a hyphen (-) in file or subdirectory names in whichyou normally would use a space. This naming convention can help make your filenamesmore readable, as in MY_FILE.TXT.
DOS converts all pathname characters to uppercase before searching for the file, so you can enter pathnames in any combination of upper- and lowercase letters that suits you.MYFILE.TXT, myfile.txt, and MyFiLe.TxT all refer to the same file as far as DOS is con-cerned.
DOS Reserved Names
Although you are free to name your files anything you would like, a few filenames have spe-cial meaning to MS-DOS. They refer to specific devices attached to your computer system;when you use them on the command line in place of a filename, they always refer to thatdevice, not a file on the disk.
Name Device That Name Refers To
NUL The null device. This is your computer’s equivalent of the BlackHole, which accepts (and ignores) anything written to it.
CON The standard device for input and output. CON normally refers tothe keyboard for input and the video display for output.
LPTx The printer (parallel) ports. The x represents the port number, asin LPT1.
PRN The primary printer port, normally the same as LPT1.
COMx The serial ports. The x represents the port number, as in COM1.
AUX The primary serial port, normally the same as COM1.
In some cases, you are required to enter these names followed by a colon (:), as if you werereferring to a disk drive. Normally, however, you just use them as though they refer to a filein the current directory. No matter what drive, path, or extension you include with thesereserved names, they always refer to that device and never to a file on your disk. (In otherwords, you cannot have a file named PRN.TXT on your disk because this name always refersto the printer and not to a disk file.) If, however, you specify a drive or path that doesn’texist, you do receive an error message.
?, * 1.0 and later—InternalWith certain commands, you can use wildcard characters in the filename portion of a path-name argument to specify more than one file at a time. You can use the question mark (?) tomatch any single character and the asterisk (*) to match multiple characters. Wildcards arenever allowed in the drive or subdirectory portions of a pathname.
C:\>
BATCHFILE
595?, * 1.0 and later—Internal
Using the ? Wildcard Character in a Filename or Extension
A question mark (?) can be used to match any single character in a filename or extension.For example, typing MYFILE.T?T matches files named MYFILE.TXT and MYFILE.TOT but notMYFILE.TT or MYFILE.TXB. To match the latter, you have to specify MYFILE.T??. Notice that aquestion mark placed in the middle of the filename or extension matches any single characterin that position, whereas a question mark placed at the end also matches zero characters.
Using the * Wildcard Character in a Filename or Extension
An asterisk (*) matches zero or more characters from the position in which it is placed tothe end of the filename or extension. For example, MY*.TXT matches MYFILE.TXT andMYHOUSE.TXT but not MYFILE.DOC or YOURFILE.TXT. Any characters following an asterisk inthe filename, or following an asterisk in the extension, are ignored. In other words, typingMY*.TXT or MY*FILE.TXT gives you exactly the same result.
For most commands that accept wildcards, if you enter a filename with no extension, allextensions are matched. For example, MYFILE matches MYFILE, MYFILE.TXT, and MYFILE.DOC,whereas MY* matches MYHOUSE.TXT as well. If you type a period after the filename (for exam-ple, MYFILE. or MY*.), only files with no extension are matched.
Examples
*.* Match any filename.
* Same as *.* in most cases.
????????.??? Same as *.*
*. Match any filename that has no extension.
*.?? Match any file that has a zero- to two-letter extension.
?.* Match any file that has a one-letter filename.
*.BAK Match all files with a .BAK extension.
MYFILE Match all files with the filename MYFILE with any (or no) extension.
MY*.* Match all files that begin with MY.
M?F*.?XT Match any file that begins with the letter M, has an F as the third char-acter in the filename, and has a three-letter extension that ends in XT.
See Also
“Introducing the DOS File System” in Chapter 5
FApp
596 Appendix F Command Reference
> and >> 2.0 and later—InternalYou can use the greater-than redirection symbols (> and >>) on the command line to instructDOS to take any output that normally would be written to the screen and send it some-where else. These symbols are handy for sending the output of a command, such as DIR, tothe printer (DIR > PRN) or to a file on disk (DIR > MYFILE.TXT). Using two greater-than signs(>>) tells DOS to append the output to the file specified (if it already exists) instead of over-writing the file as it normally would. For example,
DIR C:\DOS > DIR_LIST.TXT
creates (or overwrites if it already exists) the file DIR_LIST.TXT in the current directory andfills it with a list of all the files in the C:\DOS subdirectory. However, the command
DIR C:\WIN >> DIR_LIST.TXT
appends (adds) a list of all the files in the C:\WIN subdirectory to the end of theDIR_LIST.TXT file.
Notice that only the program output normally written to the screen is redirected. For exam-ple, the command
COPY MYFILE.TXT YOURFILE.TXT > COPYMSG.TXT
still copies MYFILE.TXT to YOURFILE.TXT, but the message 1 file(s) copied is written to thefile COPYMSG.TXT.
In batch files, it is fairly common to redirect messages from commands such as COPY to theNUL device, as in the following:
COPY MYFILE.TXT YOURFILE.TXT > NUL
This technique can keep the onscreen clutter generated by a batch file to a minimumbecause anything written to the NUL device is essentially thrown away.
See Also
<, |, FIND, MORE, and SORT
“Using Redirection Commands” in Chapter 13
< 2.0 and later—InternalPrograms normally expect input from the user to come from the keyboard. If you want toprovide this input from a file instead of the keyboard, you can use the less-than redirectionsymbol (<) to redirect that program’s input. DOS includes three commands specificallydesigned to use with input redirection: MORE, SORT, and FIND.
One common use for input redirection is with the MORE filter program. To display the con-tents of the file README.TXT one screen at a time, you type the following command:
MORE < README.TXT
C:\>
BATCHFILE
C:\>
BATCHFILE
597| 2.0 and later—Internal
To sort all the lines in a text file, you might use the SORT command like this:
SORT < UNSORTED.TXT > SORTED.TXT
This command sorts all the lines in UNSORTED.TXT into alphabetical order and writes thesorted output to SORTED.TXT. If you did not include the > SORTED.TXT argument, SORT wouldwrite the sorted lines to the display (standard output). If you forgot to redirect the input tothe SORT command (that is, if you did not include the < UNSORTED.TXT argument), DOSwould wait for you to type the input at the keyboard.
Occasionally, you find a use for input redirection when you are automating the input to aprogram. Many software patches distributed as batch files use this technique to redirectDEBUG’s input to a text file to make changes to a program file. (Indeed, this is just what theSPATCH.BAT file on the DOS 6 distribution disk does.) Just remember that after the input toa program is redirected, control does not return to the keyboard until the program termi-nates. If you forget to put the keystrokes that exit the program at the end of your input file,you have to reboot your computer to regain control.
See Also
> and >>, |, FIND, MORE, and SORT
“Using Redirection Commands” in Chapter 13
| 2.0 and later—InternalYou can use the pipe character (|) on the command line to tell DOS to use the screen outputfrom one program as the keyboard input to another. (The term pipe comes from the Unixoperating system, which often uses this method to string together several programs to per-form a particular job.) For the pipe character to work, the first program must write outputto the screen that the second program expects to get from the keyboard.
In DOS, pipe characters are most often used with the TYPE and MORE commands to display atext file one screen at a time, as in the following:
TYPE README.TXT | MORE
You also can combine MORE with FIND to look at the results of a text search one screen at atime, as in this example:
FIND “Mr. Merryweather” BIGTEXT.TXT | MORE
DOS actually accomplishes piping by writing the output from the first program to a tempo-rary file and then redirecting the input for the second program from that file. When thesecond program terminates, DOS deletes the temporary file. So, the preceding commandaccomplishes the same thing as the following three commands:
FIND “Mr. Merryweather” BIGTEXT.TXT > TEMP.TXTMORE < TEMP.TXTDEL TEMP.TXT
FApp
C:\>
BATCHFILE

598 Appendix F Command Reference
Using the pipe character saves you from having to type all three of these commands.
See Also
> and >>, <, FIND, MORE, and SORT
“Using Redirection Commands” in Chapter 13
:label 1.0 and later—InternalIn a batch file, you can type a colon (:) in the first column of any line to indicate that thenext eight characters on that line should be interpreted as a label. Any additional characterson the line after the label are ignored. Labels are used as the destination for GOTO statementsin batch files.
Syntax:label
Notes
1. To define a label, you must use a colon as the first character on the line. Not even aspace or tab character can precede it.
2. Only the first eight characters of a label are significant, although the label can be aslong as you like. Everything on the line after the eighth character of the label isignored.
3. Although you can define the same label in more than one place in a batch file, the GOTOcommand always jumps to the first occurrence.
4. Labels and filenames share the same legal characters with the exception that labels can-not include percent signs (%) or hyphens (-). Batch file labels can be typed in any mix-ture of upper- and lowercase characters.
ExamplesGOTO SKIP_DELDEL *.BAK:SKIP_DEL This text will be ignored
In this example, when DOS executes the line containing the GOTO SKIP_DEL command, DOSsearches for the :SKIP_DEL label and continues execution with the line that follows it. TheDEL *.BAK command is never executed.
MessagesLabel not found
Error: The label specified in a GOTO statement was not found. After displaying this message,the batch file terminates.
BATCHFILE
599%n 1.0 and later—Internal
See AlsoGOTO
“Branching with GOTO” in Chapter 16
%n 1.0 and later—InternalYou can use replaceable parameters to represent command-line arguments from within a batchfile. DOS replaces these markers with their corresponding command-line arguments whenthe batch file is executed.
Syntax%n
Notes
1. Ten replaceable parameters are available, %0 through %9.
2. %0 returns the name of the batch file as it was entered on the command line, %1 returnsthe first argument on the command line, %2 returns the second, and so on. Spaces, tabs,commas, and semicolons all are considered valid argument delimiters. To include adelimiter in a command-line argument, enclose the argument in double quotationmarks.
3. DOS can find replaceable parameters almost anywhere in a batch file, including within double quotation marks and embedded in words. For example, the filenameMY%1FILE.TXT is a perfectly legal filename for DOS; in a batch file, however, the %1embedded in the name is replaced with the first argument to the batch file. This canlead to some strange errors.
4. If you want to include a percent sign in a batch file, write it twice. When DOS is pars-ing the file, it sees the two percent signs (%%) and replaces them with a single percentsign (%). For example, %1 is replaced with the first argument to the batch file, whereas%%1 simply becomes %1.
This rule explains why the variable markers in a FOR loop must be written as %%a in abatch file, but as %a from the command line. In a batch file, DOS removes the doubled%% signs and replaces them with a single % before the FOR command gets to see it. If youforget and use a single percent sign, DOS removes it and leaves only the a, whichresults in a syntax error.
5. If you require more than nine arguments in your batch file, you can use the SHIFTcommand to gain access to them.
6. An empty parameter is replaced with nothing at all. In other words, if you enterMY%2.TXT in your batch file and then forget to enter a second parameter when you runthe batch file, DOS looks for the file MY.TXT.
FApp
BATCHFILE
600 Appendix F Command Reference
Examples
The following batch file displays a series of files one screen at a time:
:STARTIF “%1”==”” GOTO ENDIF NOT EXIST %1 GOTO ENDTYPE %1 | MORESHIFTGOTO START:END
In the first IF statement, the %1 is replaced with the first argument to the batch file. As longas the argument exists, the statement is false and execution continues on the next line. Thesecond IF statement checks to see whether this argument is a valid pathname. If the argu-ment passes this check, execution finally passes to the TYPE command, which types the file tothe screen through the MORE filter program. When TYPE finishes, SHIFT moves the argumentsdown one place, and the next line transfers execution back to the first line in the batch file.The loop continues until the batch file runs out of arguments or finds an invalid pathname.
The preceding example isn’t quite foolproof. If wildcards are included in the first argumentto this batch file, it easily could pass both of the tests you perform with the IF commands.TYPE, however, cannot handle wildcards and would display the message Invalid filename or file not found rather than the files you specified.
See Also
%name%, IF, FOR, and SHIFT
“Understanding Replaceable Parameters” in Chapter 16
%envir% 4.0 and later—InternalWith the addition of the %envir% syntax in MS-DOS 4.0, users finally had access to variablesin batch files. Before executing a line in a batch file, DOS replaces every occurrence of%envir% with the contents of the corresponding environment variable. When combined withthe capability of the SET command to create and destroy environment variables, this featurecan be very powerful.
Syntax%envir%
Notes
1. The name of the environment variable can be entered in upper- or lowercase charac-ters, but it must be surrounded by percent signs (%) to be recognized by DOS.
2. DOS can find the variable placeholder almost anywhere in a batch file, includingenclosed in double quotation marks or embedded within words. Any pair of percent
BATCHFILE
601%envir% 4.0 and later—Internal
signs enclosing characters is assumed to be an environment variable. (If the first charac-ter following the percent sign is a digit, DOS assumes you are referring to a replaceableparameter, not an environment variable.) The string with values between 7% and 15%annually would tell DOS to search for an environment variable named “ and 15”.When DOS failed to find such a variable, it would change the string to read with values between 7 annually.
3. If you want to include a percent sign in a batch file, write it twice. When DOS is pars-ing the file, it sees the two percent signs (%%) and replaces them with a single one (%).For example, %PATH% is replaced with the contents of the PATH environment variable,whereas %%PATH%% becomes %PATH%.
4. If no environment variable with that name exists, the %envir% placeholder is replacedwith an empty string.
Examples
To add a subdirectory to your PATH, execute a particular program, and then restore youroriginal PATH, you might use a batch file like this:
SET OLDPATH=%PATH%PATH C:\CADD;%PATH%C:\CADD\CADD.EXE %1PATH %OLDPATH%SET OLDPATH=
The first line saves the current PATH setting in an environment variable named OLDPATH.Next, the subdirectory C:\CADD is added to the PATH. In the third line, the program is execut-ed, and a single command-line argument is passed to it if one exists. Finally, when the pro-gram terminates, PATH is set equal to OLDPATH and the OLDPATH variable is deleted.
You can easily run out of space in the environment while manipulating variables in batchfiles, especially if you are running them from a Shell program such as DOSSHELL. When thishappens, DOS displays the message Out of environment space and then continues execut-ing the batch file. To make the preceding example abort if not enough environment space isavailable, add an IF statement, as follows, to check whether OLDPATH was successfully created:
SET OLDPATH=%PATH%IF “%OLDPATH%”==”” GOTO ERRORPATH C:\CADD;%PATH%C:\CADD\CADD.EXE %1PATH %OLDPATH%SET OLDPATH=GOTO END:ERRORECHO Can’t start CADD - not enough environment space:END
Now CADD doesn’t execute if not enough environment space is available to save OLDPATH. Toincrease the size of the environment, increase the size of the /E:size parameter specified inthe SHELL= command in your CONFIG.SYS file.
FApp
602 Appendix F Command Reference
If you are running batch files from within a Shell program such as DOSSHELL, increasing the/E:size parameter may not help. When DOS runs a program, it gives the program access toa copy of the current environment. This copy is only big enough to hold the environmentvariables that are currently defined and has very little free space in it. When you run a batchfile from within a Shell program, a temporary copy of COMMAND.COM is loaded into memory,and a copy of the shrunken environment the Shell program was using is passed to it. Withso little available space in the current environment, batch files often run out of environmentspace.
One technique to avoid Out of environment space error messages when you run batch filesfrom a Shell program is to define a dummy variable in your AUTOEXEC.BAT file that simplytakes up space, as shown in this example:
SET DUMMY=XXXXXXXXXXXXXXXXXXXXXXXXXXXXXXXXXXXX
When you need space in the environment, simply delete the DUMMY variable, as follows,before you define any new variables that your batch file needs:
SET DUMMY=SET OLDPATH=%PATH%
When your batch file terminates, you return to your Shell program, and the copy of theenvironment that the batch file was using is discarded. Because the DUMMY variable is beingthrown away, there is no reason to restore it before the batch file exits.
If you might run this batch file from the DOS prompt when your Shell program isn’t run-ning, include a SET statement, such as the following, that restores your DUMMY variable afteryou delete OLDPATH:
SET OLDPATH=SET DUMMY=XXXXXXXXXXXXXXXXXXXXXXXXXXXXXXXXXXXXGOTO END
See Also
%n, IF, SET, and SHELL=
Chapter 16, “Understanding Batch Files”
@ 4.0 and later—InternalNormally, DOS echoes to the screen every line in a batch file before executing it. Althoughthis capability can be handy when you are testing a new batch file, you usually want to useECHO OFF to turn off the echo feature in a batch file you use every day. With the “at” sign(@), you can turn echo off for each line individually if you want to.
Syntax@command_line
BATCHFILE
603; 6.0 and later—Internal
FApp
Notes
1. The @ symbol must be the first character on the line. Don’t insert any spaces before orafter it.
2. The most common use of the @ symbol is with the ECHO OFF command that begins mostbatch files. Because the echo feature is on when this command is executed, the ECHO OFFcommand is echoed to the screen—unless you precede the ECHO OFF command with an@ symbol.
3. Only the display of the command line that DOS executes is suppressed, not screen out-put generated by a command, which can be rather confusing to some users. To suppressthe output generated by a command, you have to redirect the output of the commandto the NUL device. For example,@COPY MYFILE.TXT YOURFILE.TXT
does not echo the command line itself (COPY MYFILE.TXT, and so on) to the screen, butstill displays the message 1 file(s) copied that is generated by COPY. If, in addition,you redirect the screen output of the COPY command to the NUL device@COPY MYFILE.TXT YOURFILE.TXT > NUL
nothing is displayed on the screen at all.
See Also
> and >>, and ECHO
“Using Batch File Commands” in Chapter 16
; 6.0 and later—InternalWhen DOS encounters a semicolon as the first character on a line in your CONFIG.SYS file,it ignores the contents of the rest of the line. Using a semicolon in this way is exactly thesame as using the REM command. Inserting comments into your CONFIG.SYS file can help youremember what each line is for.
Syntax;comment text
Notes
1. To mark a line in CONFIG.SYS as a comment, you must add the semicolon (;) as the firstcharacter on the line. Do not precede it with any spaces.
The configuration lines necessary for many devices are quite complicated, so using a semi-colon to “comment them out” can be a handy way to turn features on and off in your CONFIG.SYS file.
CONFIGSYS
604 Appendix F Command Reference
2. Note that this technique for creating a comment line works only in CONFIG.SYS. Toinsert a comment in a batch file, you either have to use REM or define a dummy labelline with a colon.
3. If you find yourself continually commenting and uncommenting DEVICE= lines in yourCONFIG.SYS file, consider using the question mark (?) instead so that you can enable ordisable that driver interactively each time you boot up. If you insert a question mark (?)between the command name and equal sign, DOS asks you before it executes a com-mand in your CONFIG.SYS file.
Examples
Comments can help you keep track of what each line in your CONFIG.SYS file is for, as shownin the following:
; The old SCSI drive requires double buffering.; Remember to remove this line when the new drive gets installed!!!DEVICE=C:\DOS\SMARTDRV.EXE /DOUBLE_BUFFER
DOS skips over all lines that start with a semicolon and executes only the DEVICE= line thatloads SMARTDrive’s double-buffering feature.
See Also
? and REM
Chapter 2, “Starting DOS”
? 6.0 and later—InternalIn CONFIG.SYS, if you put a question mark (?) between a command and the equal sign (=),DOS prompts you for confirmation before executing that command. This technique worksfor all CONFIG.SYS commands that use the command= form, including the SET command.
Syntaxcommand?=settings
Parameters and Switches
command This parameter can be any CONFIG.SYS command that uses the command= format.
settings The settings used with the command specified (when you allow it to be run).
Notes
1. Use the question mark (?) for individual features you want to control. If you find your-self using more than one or two question marks in your CONFIG.SYS file, however, youmight want to consider setting up a menu instead. You can easily get confused andselect the wrong combination of drivers when you’re enabling each line individually.
CONFIGSYS
605? 6.0 and later—Internal
2. The question mark (?) must come between the command and the equal sign, with nospaces between it and the command name.
3. Each line you have marked for confirmation is displayed followed by [Y,N]?. Enter Y toexecute the line and N to skip it.
4. Pressing the F8 key when DOS displays the Starting MS-DOS... message causes DOSto prompt you for confirmation of every line in your CONFIG.SYS file, whether or notthe line includes a question mark.
5. DOS doesn’t necessarily process the lines in CONFIG.SYS in the order they appear in thefile, which can be confusing when you receive a prompt for a line near the end of thefile before being prompted for a line at the beginning. In general, DOS processes com-mands such as DOS=, FILES=, and BUFFERS= before it begins to load any of your devicedrivers. However, after DOS begins processing the DEVICE= (and DEVICEHIGH=) lines, itloads them in the order they appear in the file.
Examples
To instruct DOS to prompt you before setting up a 1.4MB RAM disk in extended memory,place a question mark in the line that loads the RAMDRIVE.SYS driver as follows:
DEVICEHIGH?=C:\DOS\RAMDRIVE.SYS 1450 512 224 /E
If MemMaker has optimized your CONFIG.SYS file, /L and /S switches may appear on theDEVICEHIGH line. Make sure you place the ? directly after the command name, as shownhere, not before the equal sign:
DEVICEHIGH? /L:1,1200 /S =C:\DOS\RAMDRIVE.SYS 1450 512 224 /E
Messages
If you place the ? incorrectly in a CONFIG.SYS command, you will receive one of the follow-ing error messages when you reboot:
Bad command or parameter - ?=Error in CONFIG.SYS line #
or
Bad or Missing ?Error in CONFIG.SYS line #
Edit your CONFIG.SYS file and make sure that all your question marks (?) are placed directlyafter the name of the command, with no intervening spaces.
See Also
;, [blockname], and MENUITEM=
Chapter 2, “Starting DOS”
FApp
606 Appendix F Command Reference
[blockname] 6.0 and later—InternalDefining blocks in CONFIG.SYS is part of the multiple configuration feature in DOS 6. Bynaming blocks of commands, you can choose which blocks to execute from a menu whenyou start your computer.
Syntax[blockname]
Notes
1. The name for a block can be up to 70 characters long and contain any legal filenamecharacters. You cannot use spaces in block names, so you might want to consider usingunderscores (_) or hyphens (-) to separate words and make your block names morereadable. Upper- and lowercase characters are considered the same. The name must besurrounded by square brackets ([ and ]) and appear on a line by itself. Any commandsthat follow the block name are considered to be part of that block until the next[blockname] is encountered in the file.
2. Blocks cannot be embedded inside each other. When DOS encounters another blockname in the CONFIG.SYS file, it considers the preceding block to be complete.
3. Any block never referred to by a MENUITEM= line is never executed by DOS. Exceptionsare the predefined block names [MENU] and [COMMON].
4. The [MENU] block defines entries for the main startup menu and should contain theconfiguration menu that you want DOS to display when the computer starts up. DOSalways executes this block.
5. Commands in a [COMMON] block are always executed by DOS. [COMMON] also is the onlyblock that you are allowed to define more than once in your CONFIG.SYS file. A [COMMON]block located before the [MENU] block is run before the startup menu is displayed.Similarly, a [COMMON] block located at the end of your CONFIG.SYS file is executed afterall other blocks.
6. Any commands that you include in CONFIG.SYS before the first block name are consid-ered to be part of a [COMMON] block. As far as DOS is concerned, CONFIG.SYS files thatdon’t use multiple configuration features are simply one big [COMMON] block.
7. Microsoft recommends that you include a [COMMON] block command at the end of yourCONFIG.SYS file, even if you don’t need to place any commands in it. Many softwareinstallation programs modify your CONFIG.SYS file by adding to the end of the file thesettings the software requires. With a [COMMON] block defined at the end, these addedcommands are run when you start your system; without [COMMONBLOCK], these addedcommands might never run at all.
CONFIGSYS
607[blockname] 6.0 and later—Internal
Examples
Suppose that you want to set up a menu that enables you to choose among three basic con-figurations for your computer: Windows, DOS, and Maintenance. Begin by adding a menublock like this at the beginning of your CONFIG.SYS file with the predefined block name[MENU]:
[MENU]MENUITEM=WIN, Configure for Windows (Default)MENUITEM=DOS, Configure for MS-DOSMENUITEM=MAINT, Configure for File & Disk Maintenance
When these lines are included in your CONFIG.SYS file, DOS searches for blocks named[WIN], [DOS], and [MAINT]. You also might want to include a [COMMON] block that containsany commands that you always want executed, as in this example:
[COMMON]DEVICE=C:\DOS\SETVER.EXEDEVICE=C:\DOS\HIMEM.SYSDEVICE=C:\DOS\EMM386.EXE RAM MIN=0DOS=HIGH,UMBBREAK=ONFILES=50DEVICE=C:\DOS\ANSI.SYSSHELL=C:\DOS\COMMAND.COM C:\DOS\ /P /E:512
[WIN]BUFFERS=10
[DOS]BUFFERS=10DEVICE=C:\DOS\RAMDRIVE.SYS 1450 512 224 /E
[MAINT]BUFFERS=30DEVICE=C:\DOS\RAMDRIVE.SYS 1450 512 224 /E
[COMMON]
Include a [COMMON] block at the end of your CONFIG.SYS file. That way, any commands addedto the file by software installation programs are executed, no matter what configuration youchoose. Without the final [COMMON] block, any commands that are added to the end of thefile are executed only when you choose the maintenance configuration because they are partof the [MAINT] block.
DOS displays a startup menu that looks something like this:
MS-DOS 6 Startup Menu=====================
1. Configure for Windows (Default)2. Configure for MS-DOS3. Configure for File & Disk Maintenance
Enter a choice: 1
FApp
608 Appendix F Command Reference
Entering 1, 2, or 3 at this menu tells DOS to select the [WIN], [DOS], and [MAINT] blocks,respectively. DOS sets the CONFIG environment variable equal to the name of the configura-tion block you selected from the startup menu.
In this example, you might be able to better understand the small differences between thesethree configurations if you look at a few lines from the AUTOEXEC.BAT file:
IF “%CONFIG%”==”MAINT” GOTO SET_TEMPC:\DOS\SMARTDRV
:SET_TEMPSET TEMP=C:\TEMPSET TMP=C:\TEMP
IF NOT “%CONFIG%”==”WIN” GOTO THE_RESTMD D:\TEMPSET TEMP=D:\TEMPSET TMP=D:\TEMP
:THE_REST
The SMARTDrive disk cache is loaded if you are using the DOS or Windows configura-tions, which is why so few DOS buffers are needed (BUFFERS=10). The Maintenance configu-ration does not have a disk cache, so the number of DOS buffers is set to 30.
Similarly, the Windows configuration doesn’t use a RAM drive; therefore, the TEMP (and TMP)environment variables are set pointing to the C:\TEMP subdirectory, instructing programs tocreate any temporary files they require in that subdirectory. When a RAM drive is present,temporary files are written to the RAM drive instead.
See Also
? and MENUITEM=
“Creating Multiple Configurations” in Chapter 2
ANSI.SYS (device driver) 2.0 and later—ExternalANSI.SYS is a device driver that provides a subset of the commands defined by the AmericanNational Standards Institute (ANSI) for controlling video displays and keyboards. ANSI.SYSenables you to control cursor positioning, display colors, video modes, and keyboard map-ping. To use it, you must load ANSI.SYS with a DEVICE= command in your CONFIG.SYS file.ANSI.SYS replaces the default CON driver provided by the MS-DOS kernel.
SyntaxDEVICE=drive:\path\ANSI.SYS /X /K /R
or
DEVICEHIGH=drive:\path\ANSI.SYS /X /K /R
CONFIGSYS
DEVICE =
609ANSI.SYS (device driver) 2.0 and later—External
Parameters and Switchesdrive:\path\ Indicates the full path to the ANSI.SYS file on your system. Setup places the
ANSI.SYS file in the C:\DOS subdirectory by default. If the full path to ANSI.SYSisn’t specified, DOS looks for the file in the root directory of the startup drive.
/X Enables you to remap extended keys if you are using a 101-key keyboard.
/K Forces ANSI.SYS to treat a 101-key keyboard as if it were an 84-key keyboard,which is a handy feature with older TSR programs that don’t recognize the new keycodes properly. Using this switch is the same as specifyingSWITCHES=/K. If you are using the SWITCHES=/K switch already, you also should include the /K option in the DEVICE= line that loads ANSI.SYS.
/R Slows down the line scrolling rate so that lines on the display are more read-able. Chances are, you won’t notice any difference when you use this switchbecause the scrolling rate doesn’t change that much. Microsoft claims thisswitch can aid screen-reading programs that make computers more accessibleto people with disabilities.
Notes1. You can load ANSI.SYS with either the /X or /R switch, but not both. These two functions
are mutually exclusive.
2. ANSI.SYS occupies about 4KB of memory in your computer and can be loaded into uppermemory with the DEVICEHIGH command.
3. Note that all ANSI commands begin with the Escape character and are case sensitive. Afterit is loaded, ANSI.SYS scans all text that is written to the screen, looking for commands.
4. The MODE command requires ANSI.SYS to be loaded in order to change the number of textlines displayed on your screen. MODE can switch between color and monochrome adapters,however, without ANSI.SYS.
5. When it’s loaded, ANSI.SYS resets your screen colors to the default (white on black). Ifyou’ve set screen colors with the MENUCOLOR= command, they are reset when ANSI.SYS loadsinto memory. If this is a problem, either insert an ANSI command into your AUTOEXEC.BATfile to reset your screen colors or load ANSI.SYS from a [COMMON] block located before your[MENU] block in CONFIG.SYS.
6. All ANSI commands begin with an Escape character (ASCII 27). When you press the Esckey at the DOS prompt, DOS interprets that as a request to cancel the current commandline, so you cannot simply send ANSI commands from the command line by typing them.To get around this problem, people often use PROMPT to send ANSI commands. Anotheralternative is to place the ANSI commands in a file and then copy the file to the consolelike this:COPY ANSI_CMD.TXT CON
7. Chapter 17, “Understanding ANSI.SYS,” provides a list of all the ANSI commands supported by ANSI.SYS.
FApp
610 Appendix F Command Reference
Examples
To use the PROMPT command to set your screen colors to blue on white, you would enter thefollowing command:
PROMPT $e[34;47m$p$g
Some people like to create very elaborate DOS prompts with ANSI.SYS. For example, enter-ing the command
PROMPT $e[s$e[H$d$e[0;68H$t$e[u”Good morning Mr. Phelps”$_$p$g
changes the DOS prompt to display the current date in the upper-left corner of the screenand the time in the upper-right corner; it also creates a two-line prompt that starts withGood morning Mr. Phelps and then has the familiar C:\> on the following line. Notice thatcase is significant in ANSI commands, and the preceding command does not work if, forexample, you type E rather than e.
See Also
DEVICE= and PROMPT
Chapter 17, “Understanding ANSI.SYS”
APPEND 3.3 and later—ExternalYou can use the APPEND command to set up a search path that enables DOS to find data fileseven if they’re not in the current directory. The subdirectories in the APPEND path areappended to the current directory when DOS searches for data files. APPEND was developedso that programs requiring you to make their program directories current can be run fromthe subdirectory that contains their data files rather than the one that contains their pro-gram files.
Syntax
To load APPEND into memory:
APPEND /X:onoff /E
or
APPEND path1;path2;... /X:onoff /PATH:onoff
To replace and/or set the appended directory search path:
APPEND path1;path2;... /X:onoff /PATH:onoff
To clear the appended directory search path:
APPEND ;
To display the current appended directory search path:
APPEND
C:\>
BATCHFILE
DEVICE =
TSR
611APPEND 3.3 and later—External
Parameters and Switchespath1;path2;... Each path specifies a valid subdirectory that exists on your system. Use full,
absolute pathnames that include drive letters for each subdirectory includedin your appended directory search path; the current subdirectory and diskdrive often change. Separate each subdirectory from the previous one with asemicolon (;).
/E Stores the appended directory search path in an environment variablenamed APPEND rather than internally. With this switch specified, you can useSET to view or change the appended directory search path. You can specifythis option only when you first load APPEND into memory.
/X:onoff Specifies whether DOS is to search appended directories (/X or /X:ON) ornot (/X:OFF) when executing programs. Directories on the APPEND path aresearched before those specified with the PATH command. To use this feature,you must specify it when you load APPEND into memory, after which you cantoggle it on (/X or /X:ON) and off (/X:OFF).
/PATH:onoff Normally, if you specify a full pathname for a file, DOS searches only thatdirectory. /PATH:ON instructs DOS to search the appended directories evenif the full pathname of the file is given. /PATH:OFF turns off this feature.
Notes1. The first time you run APPEND, it loads itself into memory as a TSR program, occupying
about 5KB of memory. APPEND does not remove itself from memory until you restart DOS.
2. After you load APPEND into memory, do not specify the .EXE file extension. At this point,APPEND is resident in memory and will not load more than once.
3. You can use the /E switches only when you first load APPEND into memory, and you cannotspecify any search paths on the same line. In other words, if you want the APPEND path to bestored in the environment, you have to run the command twice—once with /E and thenagain to set your appended directory search path.
4. To use the /X switch, you must specify it in the line that loads APPEND into memory. AfterAPPEND is loaded with this feature enabled, you can toggle it on and off by using /X:ON and/X:OFF.
5. Each path you specify in the appended directory search path must be separated by a semi-colon. Don’t include any spaces between paths. The total length of the appended directorysearch path cannot exceed 127 characters.
6. When DOS looks for a data file, it first searches the current directory and then theappended directories in the order you specified them. If DOS encounters an invalid path, itskips that path without displaying any error messages.
7. Do not use APPEND when running Microsoft Windows or Windows Setup.
8. APPEND can’t change the environment being used by running applications, so the /E switchdoes not work with shell programs, such as DOSSHELL, XTree, or Norton Commander. To
FApp
612 Appendix F Command Reference
work with these types of programs, APPEND must store the appended directory searchpath internally (in other words, don’t specify /E).
9. The DIR command ignores the appended directory search path and never displays filesfrom appended directories.
10. APPEND ignores any drive assignments made with the ASSIGN command. To use both util-ities, you must load APPEND into memory before using ASSIGN; otherwise, an error mes-sage appears.
11. DOS searches the appended directories when it opens files requested through Interrupt21h functions 0Fh (Open File), 3Dh (Open File Handle), and 23h (Get File Size). When/X or /X:ON is specified, functions 11h (Find First Entry), 4Eh (Find First File), and 4Bh(Execute Program) search the appended directories as well.
APPEND is intended for locating and reading files, but not for writing them. Any files writtento disk are placed in the current subdirectory, no matter what subdirectory they originallywere read from. This capability works out well for program overlay and help files, whichare rarely written to, but can be very frustrating if APPEND starts scattering data files allover your hard disk.
Examples
The following line loads APPEND into memory, enables searching for executable files inappended directories, and stores the active APPEND path in the environment. This lineassumes that the file APPEND.EXE is located in the C:\DOS subdirectory:
C:\DOS\APPEND /X /E
To instruct DOS to search the current directory, C:\BIN, and C:\BIN\OVR when opening datafiles, enter the following command:
APPEND C:\BIN;C:\BIN\OVR
When the program that needed data file path support terminates, disable APPEND by usingthe following command:
APPEND ;
To reactivate APPEND, simply specify a new APPEND path.
MessagesAPPEND/ASSIGN conflict
Error: You tried to load APPEND after reassigning disk drives with ASSIGN. Break any diskdrive reassignments you may have set, load APPEND, and then reset your ASSIGN settings.
APPEND already installed
Warning: You attempted to load APPEND a second time. Try running the command again,making sure to enter APPEND and not APPEND.EXE on the command line.
Incorrect APPEND version
613ATTRIB 3.0 and later—External
Error: You used a version of APPEND from a different version of DOS. Make sure that you donot use an APPEND version from the IBM local area network (LAN) program. The problemmay be that the wrong version of APPEND is loading first from a subdirectory included inyour DOS PATH.
No Append
Information: You typed APPEND to display the current appended directory path, and APPENDcurrently is inactive.
See AlsoPATH
ASSIGN 2.0 to 5.0—ExternalASSIGN was a utility that enabled you to attach an alias drive letter to an existing drive.Microsoft no longer distributes ASSIGN in the standard DOS package and is encouragingeveryone to begin using SUBST instead. ASSIGN is included on the DOS 6 Supplemental Disk.
Using SUBST Instead of ASSIGN
You can use ASSIGN to create an alias of A: for your B: drive if you want to fool an installa-tion program that runs only from drive A:. To accomplish this task with ASSIGN, you use thefollowing command:
ASSIGN B = A
To do the same thing with SUBST, you enter the following command:
SUBST A: B:\
See AlsoSUBST
“Changing Disk Drives” in Chapter 11
ATTRIB 3.0 and later—ExternalIn a file’s directory entry on disk, DOS stores information about the file’s size, the date andtime the file was last modified, and any attributes associated with that file. File attributesflag files that have to be backed up, control whether a file can be written to, and hide filesfrom view. With ATTRIB, you can view or change the attributes associated with a particularfile.
FApp
C:\>
BATCHFILE
TSR
DISK
AVOID
C:\>
BATCHFILE
614 Appendix F Command Reference
Syntax
Use this syntax to display the attributes currently set for a file or group of files:
ATTRIB pathname /S
Use this syntax to set or clear attributes for a file or group of files:
ATTRIB +|- A +|-R +|-S +|-H pathname /S
Parameters and Switches
+|- A Sets (+A) or clears (-A) the archive attribute for all files matching the path-name specified. By default, new files always have their archive attributeturned on. DOS sets this attribute each time a file is written to.
+|- R Sets (+R) or clears (-R) the read-only attribute for all files matching thepathname specified. Marking a file as read-only can prevent COPY fromoverwriting it, but many programs can override this flag.
+|- S Sets (+S) or clears (-S) the system attribute for all files matching the path-name specified. Few files use this attribute. It flags the hidden MS-DOSsystem files that are in the root directory of your startup disk drive.
+|- H Sets (+H) or clears (-H) the hidden attribute for all files matching the path-name specified. A file with the hidden attribute normally does not show upin a listing of the files in a directory. ATTRIB enables you to set the hiddenflag for subdirectories as well as for files.
pathname Indicates the file or files that you want ATTRIB to display information about.Wildcards are allowed in the filename portion. If no pathname is specified,all files (*.*) in the current directory are displayed. If no filename is speci-fied, ATTRIB displays or changes the attributes of that subdirectory. Noticethat the root directory has no attributes and therefore cannot be changed.
/S Searches for files in the specified subdirectory and all subdirectories below it.
Notes
1. If a file has either the hidden or system attribute set, you must clear that attributebefore you can change any other attributes for the file. Otherwise, you are denied accessto the file (see the following “Messages” section). If a single file has both the system andhidden attributes set, you must clear both attributes with a single ATTRIB command toavoid being denied access to the file.
2. Normally, ATTRIB only displays or alters the attributes of files. To change the attributesof a subdirectory, you must enter the full pathname for that subdirectory on the com-mand line with ATTRIB. You cannot use wildcards when you are specifying subdirecto-ries.
615ATTRIB 3.0 and later—External
FApp
Commas can make strange things happen with ATTRIB. If you include a comma in anATTRIB command, as shown here, ATTRIB clears all the attributes for all the files in thecurrent directory:
ATTRIB ,
If you also include the /S switch, as in the following example, ATTRIB clears the attributesof all the files on your hard disk, not just the ones below the current directory:
ATTRIB , /S
This problem has been confirmed by Microsoft and is present in DOS 5 versions of ATTRIBas well.
Examples
To display the attributes of all the .TXT files in the C:\MYWORK subdirectory, you would enterthe following:
ATTRIB C:\MYWORK\*.TXT
If you want to extend the search to include any subdirectories under the subdirectory, youwould include the /S switch, as in the following:
ATTRIB C:\MYWORK\*.TXT /S
To set the archive bit on for all the files you found so that MSBACKUP will be sure to backthem up the next time you run it, enter the following:
ATTRIB +A C:\MYWORK\*.TXT /S
To clear all the attributes of all the files in the root directory of drive C:, including the MS-DOS system files, enter the following:
ATTRIB -A -R -H -S C:\*.*
To hide the C:\SECRET subdirectory so that it no longer shows up in directory listings,enter the following:
ATTRIB +H C:\SECRET
MessagesNot resetting hidden fileNot resetting system file
Error: ATTRIB is unable to set or clear the attributes you’ve requested because the file haseither the hidden or system attribute set. To get around this problem, clear the hidden orsystem attribute for that file first (for example, use ATTRIB -H -S); then retry the com-mand.
See Also
XCOPY
“Understanding File Attributes” in Chapter 5
616 Appendix F Command Reference
BACKUP 2.0 to 5.0—ExternalThe BACKUP utility has been around for quite a while. You could use it to back up files fromyour hard disk drive to a series of floppy disks. It created a special file on each backup disk, afile that could be read only by the RESTORE utility. RESTORE, however, would often refuse torestore files if anything went wrong with your disks. With MS-DOS 6.0, Microsoft begandistributing the new MSBACKUP program. If you still want to use the old BACKUP utility,Microsoft has included it on the DOS 6 Supplemental Disk.
See Also
MSBACKUP and RESTORE
BREAK 2.0 and later—InternalBREAK= 2.0 and later—Internal
When DOS detects a Ctrl+Break (or Ctrl+C), it attempts to stop the program that is cur-rently running. DOS checks for a Ctrl+Break after performing any screen, keyboard, orprinter I/O operation. Turning BREAK ON or setting BREAK=ON in your CONFIG.SYS fileinstructs DOS to check for Ctrl+Break after performing disk I/O operations as well. Thisway, you can regain control more quickly when you are trying to stop disk-oriented DOScommands.
Syntax
In CONFIG.SYS, to set extended Ctrl+Break checking on or off, use the following format:
BREAK=onoff
To turn extended Ctrl+Break checking on or off from the command line, use the followingformat:
BREAK onoff
Parameters and Switches
onoff Specifies whether you want extended Ctrl+Break checking to be turned on or off. The only legal values for the onoff parameter are ON and OFF. In the CONFIG.SYS form of this command, this parameter is required. If you omit theonoff parameter when you run BREAK from the command line, the current stateof extended Ctrl+Break checking is displayed.
Notes
1. When DOS starts, it sets extended Ctrl+Break checking off by default.
2. Set BREAK=ON in your CONFIG.SYS file. The speed penalty is negligible, and if this settingsaves just one file from a mistyped COPY command, it is well worthwhile. Most long
C:\>
BATCHFILE
C:\>
BATCHFILE
CONFIGSYS
DISK
AVOID

617BUFFERS= 2.0 and later—Internal
operations involve reading or writing to disk. If BREAK is off, you may be unable to stopa lengthy process you would rather not wait for.
3. In most cases, pressing Ctrl+C produces the same effect as pressing Ctrl+Break, butthere is a subtle difference. The Ctrl+C key combination is passed through the key-board buffer. If any other key is pressed before Ctrl+C, it is ignored until the programreads the keyboard. For example, DIR stops if you press Ctrl+C, but not if you press thespacebar and then Ctrl+C. Ctrl+Break is passed directly to DOS without buffering andoften gets a quicker response.
4. In theory, turning on extended Ctrl+Break checking should slow down your system. Inpractice, any slowdown is so insignificant that you probably will never notice it.
5. Programs have complete control over what happens when a Ctrl+Break is detected. Thedefault action is for the running program to be halted, but applications often disableCtrl+Break so that you can save your work before exiting. Typically, short command-line utilities respond to Ctrl+Break, whereas most full-screen applications do not.
6. The state of the BREAK flag can be changed by a running program. Programming eti-quette dictates that when an application finishes running, it should reset all flags totheir original states. Still, you may run across applications that forget to reset BREAK. Ifthis causes problems, you can run the application from a batch file that restores theBREAK flag setting when the program terminates.
See Also
VERIFY
“Telling DOS When to Break” in Chapter 19
BUFFERS= 2.0 and later—InternalDOS stores any information read from or written to disk in memory buffers. With morebuffers available, it is more likely that DOS already has in memory the data requested by aprogram. The BUFFERS= command enables you to fine-tune your system so that DOS canperform disk I/O as efficiently as possible. BUFFERS= can be used only in your CONFIG.SYSfile.
SyntaxBUFFERS=number,read_ahead
Parameters and Switches
number The number of disk buffers DOS should use, from 1 to 99. The default valuevaries depending on the amount of memory in your computer. Normally, 15is used for a computer with at least 512KB of RAM.
FApp
CONFIGSYS
618 Appendix F Command Reference
read_ahead The number of buffers in the secondary, read-ahead cache. For DOS 5.0, thisvalue could be from 1 to 8, with a default value of 1. In DOS 6.0, you canspecify zero secondary cache buffers, and 0 is the default value.
Notes
1. Each disk buffer uses approximately 532 bytes of memory. If DOS is loaded HIGH, itattempts to locate these buffers in the HMA as well. About 48 buffers can fit in theHMA with DOS 6. If you have specified more buffers than can fit in the HMA, DOSloads them all into conventional memory.
Make sure that you explicitly set the number of DOS buffers in your CONFIG.SYS file. Ifyou aren’t using disk-caching software, the default for BUFFERS (usually 15) is too low. Youmay be slowing down your computer by not requesting more.
2. If you are using disk-caching software, such as SMARTDRV.EXE, you might want todecrease the number of buffers that DOS uses. A dedicated disk cache is much moreefficient at optimizing disk access time than the simple memory buffers that DOS uses,and having several DOS buffers can slow your system. In this situation, set the numberof buffers fairly low—using only 15 or 20.
3. Although the perfect setting for buffers can be found only through trial and error, agood place to start is to use half the size of your hard disk (in megabytes), adjusted to bein the range of 15 to 55. For example, if you have an 80MB drive, a good setting mightbe 40. With large drives, you may be tempted to specify a higher number of buffers, butunder normal circumstances, using a number higher than 50 hurts rather than helpsperformance.
4. The secondary read-ahead buffer setting can give you a performance boost if you aren’trunning any other caching software. Because many programs read files sequentially,DOS can perform fewer disk accesses by reading in more information than was request-ed. The number of read-ahead buffers you specify is the amount of data that DOS readsfrom disk in addition to the data requested by a program.
Cache software, such as SMARTDRV.EXE, usually includes much more sophisticated read-ahead capabilities than DOS can provide. If you are using any cache software, youshould turn off this feature by letting DOS default to zero read-ahead buffers.
See Also
DOS=HIGH, FASTOPEN, FILES, HIMEM.SYS, and SMARTDRV.EXE
Chapter 19, “Configuring Your Computer”
619CALL 3.3 and later—Internal
CALL 3.3 and later—InternalYou can use the CALL command to execute a second batch file and return control to the firstbatch file. CALL normally is used to replace the awkward COMMAND /C syntax that was requiredbefore DOS 3.3. CALL can be used to run any executable file, but there is no reason to use itfor .COM or .EXE files because they return control automatically. If you execute a batch filefrom a batch file without using CALL, control is never returned.
SyntaxCALL drive:\path\filename parameters
Parameters and Switches
drive:\path\ The drive and/or path to the batch file you want to execute. If no driveor path is specified, the DOS PATH is searched for filename.
filename The filename of the batch file you want to execute. This argument is requiredand wildcards cannot be used. You are not required to enter the .BAT extension, but you caninclude it if you want to ensure that a batch file, rather than an executable file, is found.
parameters Any parameters that you want passed to the batch file you are executing.
Notes
1. When you use the CALL command to execute a batch file from within a batch file, con-trol returns to the first batch file when the second one terminates. If you execute abatch file from within a batch file without the CALL command, control never returns tothe first batch file.
2. Any parameters specified are passed to the called batch file. You can access these parameters from within the called batch file by using replaceable parameters (for exam-ple, %1) as usual.
3. Avoid using redirection symbols (<, >, and >>) or the pipe character (|) in the parameters you pass to the batch file with the CALL command. DOS ignores any redi-rection operations you specify, which might cause some programs (such as MORE) to lockup or crash.
4. Although the CALL command is very similar to the COMMAND /C command, it has one sig-nificant difference: CALL doesn’t execute a temporary copy of the command interpreter,whereas COMMAND /C does. For this reason, CALL requires less memory to use.
5. If you use CALL to call a program that returns an exit code, that exit code value will beavailable after CALL returns. Unfortunately, you can’t set the exit code for a batch file, so CALL can’t return an exit code from a batch file you have executed. To return statusinformation from a batch file executed with the CALL command, create an environmentvariable and set it equal to your return status. You then can test this environment vari-able in the calling batch file.
FApp
BATCHFILE
620 Appendix F Command Reference
6. A batch file executed with the CALL command uses the same copy of the commandinterpreter that its parent is using; therefore, they share access to the same environmentarea. Any environment variables you set in the called batch file can be read by the par-ent batch file when it regains control. This is not true when you use COMMAND /C. Theenvironment of a batch file executed with COMMAND /C disappears when the temporarycopy of the command interpreter it is running under is removed from memory.
7. If you are going to load any resident software from a called batch file, make sure youuse CALL rather than COMMAND /C. When you return from COMMAND /C, the temporarycopy of the command interpreter is unloaded from memory. If you load any residentsoftware while this temporary copy is running, the memory occupied by the temporarycommand interpreter remains unavailable until you reboot your computer. This “mem-ory loss” doesn’t happen with the CALL command because no temporary copy of thecommand interpreter is loaded.
8. A batch file can call itself, but you must be careful to explicitly terminate the batch fileat some point to avoid an endless loop. A batch file can be terminated by instructing theuser to press Ctrl+Break at a PAUSE or by executing another batch file (without CALL) atsome point.
9. Although executing a .COM or .EXE file with the CALL command is perfectly legal, thereis little reason to do so. After a .COM or .EXE file is executed, control returns to the batchfile with or without using the CALL command. Executing the CALL command from theDOS prompt, although legal, is fairly useless unless it is part of a FOR-IN-DO loop.
Examples
To call a batch file from another batch file, simply include the name of the batch file in aCALL command, as shown in the following:
CALL OTHER.BAT
Note that you can omit the .BAT extension; however, if DOS locates an .EXE or .COM filenamed OTHER, it executes that program rather than your batch file. DOS searches the currentdirectory as well as any subdirectories listed in your DOS PATH looking for OTHER.BAT. Tosave time by limiting DOS’s search, you can specify the full pathname of the batch file.
Arguments can be passed to the called batch file. Suppose that you previously wrote a batchfile named COPYDOC.BAT, which copied all the .DOC files in a subdirectory (%1) to a flop-py disk (%2). The project you are working on is stored in five separate subdirectories, andyou want to write a batch file, as shown in the following example, that runs COPYDOC once foreach subdirectory:
@ECHO OFFCALL COPYDOC.BAT C:\PROJECT\WORK B:CALL COPYDOC.BAT C:\PROJECT\LTR B:CALL COPYDOC.BAT C:\PROJECT\EXPN B:CALL COPYDOC.BAT C:\PROJECT\RES B:CALL COPYDOC.BAT C:\PROJECT\OLD B:ECHO *** All Done ***
621CD or CHDIR 2.0 and later—Internal
Each CALL command executes COPYDOC with different parameters, backing up all five of theC:\PROJECT subdirectories. After all the copy commands are executed, the message *** AllDone *** is displayed onscreen. If you execute the COPYDOC.BAT file without using CALL, thebatch file is terminated after backing up one subdirectory because control never returns tothis batch file from COPYDOC.BAT.
To eliminate the repetition in the preceding example, you can combine all five CALL com-mands into a single FOR-IN-DO loop, as shown in the following:
@ECHO OFFFOR %%A IN (WORK LTR EXPN RES OLD) DO CALL COPYDOC.BAT C:\PROJECT\%%A B:ECHO *** All Done ***
Note that you can execute this FOR command from the command line, as long as youremember to substitute single percent signs for the double ones that are required in batchfiles, like this:
FOR %A IN (WORK LTR EXPN RES OLD) DO CALL COPYDOC.BAT C:\PROJECT\%A B:
MessagesBatch file missing
Error: DOS attempted to read the next line from the batch file it was executing and wasunable to find the file. This error can happen if you execute a batch file from a floppy diskand change disks before the batch file has finished. The batch file may have renamed ordeleted itself, in which case you have to edit it to avoid this behavior.
See Also
COMMAND
“Running Batch Files from Other Batch Files” in Chapter 16
CD or CHDIR 2.0 and later—InternalEach disk drive has one subdirectory that is referred to as the current directory. When apathname contains no subdirectories, DOS assumes the current directory for that drive isbeing referenced. The CD (or CHDIR) command enables you to display or change the currentdirectory for a disk drive.
SyntaxCD drive:\path
or
CHDIR drive:\path
FApp
C:\>
BATCHFILE
622 Appendix F Command Reference
Parameters and Switches
drive:\path The subdirectory (path) on a particular drive: that you want to make cur-rent. If only a path is specified, it becomes the current directory on the cur-rent drive. If only a drive: is specified, the name of the current subdirectoryon that drive is displayed. If this parameter is omitted, the name of the cur-rent directory of the current drive is displayed.
Notes
1. If a backslash (\) is the first (or only) character in a subdirectory path, it is consideredan absolute path and is specified starting from the root directory. If the subdirectory pathbegins with a subdirectory name, it is considered a relative path, and the current direc-tory is used as the starting point. A drive letter, followed by a colon, can precede eitheran absolute or relative path.
2. Two periods (..) represent the parent of the current directory. A common shorthandwith the CD command is to switch to the parent directory by using a CD .. command.The “double-dot” can be used in any pathname, but it is more useful in relative path-names than in absolute ones. Notice that the root directory has no parent; attemptingto switch to the parent of the root directory (for example, CD \..) causes an error mes-sage to be displayed. (See the first item in the following “Messages” section.)
3. Do not specify a filename with the CD (or CHDIR) command; otherwise, DOS interpretsthe filename as a subdirectory name and displays an error message. (See the first item inthe following “Messages” section.)
4. You must include a colon after the drive letter; otherwise, DOS interprets the drive let-ter as a subdirectory name and displays an error message. (See the first item in the fol-lowing “Messages” section.)
Examples
To change to the root directory of the current drive, enter CD (or CHDIR) followed by a back-slash:
CD \
To change to the parent or the current directory, enter CD followed by two periods:
CD ..
If the current directory was the root directory, switching to the parent directory with thepreceding command causes an Invalid directory message to be displayed (because the rootdirectory has no parent). (See the first item in the following “Messages” section.)
For the next set of examples, assume the following directory tree:
C:\
DOS
TEMP
623CD or CHDIR 2.0 and later—Internal
WIN
SYSTEM
WORK
STEVE
ALICE
Enter the following command to display the current directory on drive C:
CD C:
If you omit the C:, the current directory of the current drive is displayed. Assuming thatdrive C is the current drive, you enter the following command to change to theC:\WORK\STEVE subdirectory:
CD \WORK\STEVE
Then, if you want to change to the C:\WORK\ALICE subdirectory, you can use either of thefollowing two commands:
CD \WORK\ALICE
or
CD ..\ALICE
The second line uses the “double-dot” directory to specify a relative path to the new subdi-rectory. It is interpreted as “the subdirectory ALICE of the parent of the current directory.”
Relative pathnames can get very convoluted. If C:\WORK\ALICE is the current drive and direc-tory, and you want to change to the C:\WIN\SYSTEM subdirectory, enter one of the followingcommands:
CD ..\..\WIN\SYSTEM
or
CD ..\STEVE\..\..\DOS\..\WIN\SYSTEM
The preceding examples can help you understand how DOS interprets relative pathnames,but using absolute pathnames is much easier when you want to move to a remote part of thesubdirectory structure.
MessagesInvalid directory
Error: You have used the path argument to specify a directory that doesn’t exist. Make surethat you entered the subdirectory path correctly and that you did not include a filename atthe end of the path.
Invalid drive specified
Error: You have specified an invalid drive letter.
FApp
624 Appendix F Command Reference
See Also
DELTREE, MD (or MKDIR), MOVE, RD (or RMDIR), and TREE
“Changing the Current Directory with CHDIR (CD)” in Chapter 5
CHAINYou use CHAIN in your CONFIG.SYS file to start another configuration file and process thecommands in it.
SyntaxCHAIN drive:\path\filespec.ext
Parameters and Switches
drive:\path\filespec.ext The location and filename of the configuration file to process.If the configuration file is on a different drive, you need to specify the drive and full path forany device commands in the file.
CHCP 3.3 and later—InternalThe CHCP command is a systemwide, code-page (character-set) changer. CHCP simultaneouslyresets all affected devices to the changed font. MODE works in a similar manner but changesonly one device at a time.
Syntax
To change the current code page, use the following format:
CHCP codepage
To display the current code page, use the following format:
CHCP
Parameters and Switches
codepage A valid three-digit code-page number. See “International Country Codes” inChapter 14, “Understanding the International Features of DOS,” for a list of the code pagesthat MS-DOS supports.
Notes
1. Before using CHCP, you must use the COUNTRY command (to specify the location of thecountry-information file, normally COUNTRY.SYS), use the NLSFUNC command (to specify a location that overrides that of the COUNTRY command), or place COUNTRY.SYS in theroot directory of the current disk. Otherwise, DOS returns the message Cannot openspecified country information file.
DR-DOS
CONFIGSYS
C:\>
BATCHFILE
625CHCP 3.3 and later—Internal
2. Before using CHCP, you must use the NLSFUNC command.
3. When you select a code page, the new code page becomes the specified code page. If you include CONFIG.SYS directives for devices that use code pages, such asDEVICE=DISPLAY.SYS, CHCP loads the correct code pages for the devices.
4. You can access the COUNTRY.SYS file to get country information. If you do not specifythe location of COUNTRY.SYS when you invoke NLSFUNC, COUNTRY.SYS must exist in the current disk’s root directory. Otherwise, DOS returns the message Cannot openspecified country information file.
MessagesCode page nnn not prepared for device ddd
Error: CHCP could not select the code page nnn because of one of the following errors:
■ You did not use MODE to prepare a code page for this device.
■ An I/O error occurred while DOS was sending the new font information to the device.
■ The device is busy (for example, a printer is in use or offline).
■ The device does not support code-page switching.
Check to make sure that the command MODE CODEPAGE PREPARE was issued for the appropri-ate devices and the devices are online and ready. Then, try CHCP again.
Invalid code page
Error: CHCP could not select the code page because of one of the following errors:
■ You specified an invalid code page for the country.
■ You did not use the MODE command to prepare a code page.
Be sure that you run NLSFUNC and use the command MODE CODEPAGE PREPARE to prepare thecode page for the appropriate devices.
NLSFUNC not installed
Error: You attempted to change the code page but did not initiate NLSFUNC before using CHCP.If you plan to use code pages and have the correct directives in CONFIG.SYS, add NLSFUNC toyour AUTOEXEC.BAT file so that the command is executed when you boot the computer.
See Also
COUNTRY=, MODE device CP, and NLSFUNC
Chapter 14, “Understanding the International Features of DOS”
FApp
626 Appendix F Command Reference
CHDIR (see CD)CHDIR is an alternative name for the CD command. For information on using the CD or CHDIRcommand, see the entry for CD earlier in this command reference.
CHECKThe CHECK command checks a Stacker-compressed drive, produces a status report, and fixesany detected problems. The Stacker drive must be installed before using the CHECK com-mand.
SyntaxCHECK drive: /b /d /f /n /t /v /wp /?
Parameters and Switches
drive: Indicates the Stacker drive to check.
/b Runs in batch file mode, suppressing pauses.
/d Displays detailed error and statistics report.
/f Fixes detected problems.
/n Prevents new save-header files from being created.
/t Skips the SmartPack sector check.
/v Displays the name of each file in every directory as the drive is checked.
/wp Checks and repairs any write-protected Stacker drives.
/? Displays the abbreviated online help.
Remarks
To receive a Stacker drive space report on a compressed drive, use the command check e: /d.
CHKDSK 1.0 and later—ExternalThe CHKDSK command checks the directory and file allocation table (FAT) of the disk andreports disk and memory status. CHKDSK also can repair errors in the directories or the FAT.
SyntaxCHKDSK drive:\path\filename.ext /F /V
Parameters and Switches
drive: The disk drive to be analyzed.
PC-DOS
C:\>
BATCHFILE
627CHKDSK 1.0 and later—External
\path\ The directory path to the files to be analyzed.
filename.ext A valid DOS filename. Wildcards are permitted.
/F Fixes the FAT and other problems if errors are found. (Do not use thisswitch when you are running under Microsoft Windows or the DOSTask Swapper.)
/V Shows CHKDSK’s progress and displays more detailed information aboutthe errors that the program finds. (This switch is known as the verboseswitch.)
Exit Codes
ERRORLEVEL Value Meaning
0 No errors found
255 Errors were found
Rules
1. You must direct CHKDSK to repair the disk by using the /F switch. CHKDSK asks you toconfirm that you want the repairs made before it proceeds.
2. CHKDSK cannot process a directory in which you used the JOIN command—that is, a sec-ond disk joined to a subdirectory.
3. CHKDSK does not process a disk on which you used a SUBST command.
4. CHKDSK cannot process a disk drive on which you used the ASSIGN command.
5. CHKDSK cannot process a networked (shared) disk.
6. Do not use CHKDSK on disks that contain open files, or have another program runningthat may access the disk drive while CHKDSK is running.
7. (Not MS-DOS 6.2) After completing its normal checks on a DoubleSpace drive, CHKDSKautomatically runs DBLSPACE /CHKDSK on the drive.
Notes
1. In MS-DOS 6.2, CHKDSK now displays numbers with embedded commas, making themmuch easier to read.
2. CHKDSK displays the following information:
• Volume name and creation date (only disks with volume labels)
• Volume serial number (if it exists)
• Total disk space
• Number of files and bytes used for hidden or system files
• Number of files and bytes used for directories
• Number of files and bytes used for user (normal) files
FApp
628 Appendix F Command Reference
• Bytes used by bad sectors (flawed disk space)
• Bytes available on disk (free space)
• Bytes of total conventional memory (RAM)
• Bytes of available conventional memory
If you are using MS-DOS 6.2, Microsoft advises you to stop using the CHKDSK commandand use the new ScanDisk program instead. ScanDisk can identify and fix many more typesof errors than CHKDSK. If you use DoubleSpace, ScanDisk can identify and fix any errors itfinds on your compressed drives as well.
3. In DOS 4.0 and later, CHKDSK also reports the following information:
• Total bytes in each allocation unit
• Total allocation units on the disk
• Available allocation units on the disk (an allocation unit equates to a cluster)
4. CHKDSK checks the directories and the FAT of a disk. The command also checks theamount of memory in the system and determines how much of that memory is free. Iferrors are found, CHKDSK reports them onscreen before making a status report.
5. If lost clusters are found, CHKDSK asks whether you want to repair them. You must type Yor N. If you type Y, CHKDSK shows a report onscreen as though the lost clusters wererepaired. This report is only a simulation, however. To actually reclaim the lost clusters,you must issue a second command: CHKDSK /F.
6. The CHKDSK filename checks to see whether the specified files are stored contiguouslyon the disk. DOS reports any noncontiguously stored files and how many different sec-tions store the files. If CHKDSK reports many noncontiguous files, you might want to runDEFRAG on the disk.
7. CHKDSK does not check to see whether your files can be read, nor does CHKDSK test yourdisk to determine whether new bad spots have appeared.
MessagesAll specified file(s) are contiguous
Information: The files you specified are stored in contiguous sectors on the disk. Disk perfor-mance for the files should be optimal.
filename
Allocation error, size adjusted
Warning: The filename has an invalid sector number in the FAT. The file was truncated byCHKDSK at the end of the last valid sector.
629CHKDSK 1.0 and later—External
Check this file to verify that all information in the file is correct. If you find a problem, useyour backup copy of the file. This message usually appears when the problem is in the FAT,not in the file. Your file probably is still good.
filename
Contains xxx non-contiguous blocks
Information: filename is not stored continuously on the disk but in xxx number of pieces.This arrangement can diminish the performance of the disk. If you find that many files on adisk are stored in noncontiguous pieces, you might want to run DEFRAG.
directoryname
Convert directory to file (Y/N)?
Warning: directoryname contains so much bad information that the directory no longer isusable. If you type Y, CHKDSK converts the directory into a file so that you can use DEBUG oranother tool to repair the directory. If you type N, no action is taken.
The first time you see this message, type N. Try to copy files from this directory to anotherdisk and check the copied files to see whether they are usable. Then, rerun CHKDSK to con-vert the directory into a file and try to recover the rest of the files.
Errors found, F parameter not specifiedCorrections will not be written to the disk
Information: CHKDSK found an error. This message tells you that CHKDSK will go through themotions of repairing the disk but will not actually change the file because you did not usethe /F switch.
filename
First allocation unit is invalid, entry truncated
Warning: filename’s first entry in the FAT refers to a nonexistent portion of the disk. If youused the /F switch, the file becomes a zero-length file (truncated).
Try to copy this file to another floppy disk before CHKDSK truncates the file. You may not geta useful copy, however, and the original file will be lost.
. or ..Entry has a bad attributeor Entry has a bad size orEntry has a bad link
Warning: The link to the parent directory (..) or the current directory (.) has a problem. Ifyou used the /F switch, CHKDSK attempts to repair the problem. Normally, this procedure issafe, and you do not risk losing files.
filename
Has invalid allocation unit, file truncated
Information and warning: Part of the chain of FAT entries for filename points to a nonexis-tent part of the disk. The /F switch truncates the file at its last valid sector. If you did notuse the /F switch, DOS takes no corrective action. Try to copy this file to a different diskand then rerun CHKDSK with the /F switch. (You may lose part of the file.)
FApp
630 Appendix F Command Reference
filename1
Is cross linked on allocation unit xfilename2
Is cross linked on allocation unit x
Warning: Two files—filename1 and filename2—had entries in the FAT that point to thesame area (cluster) of the disk. In other words, the two files believe that they own the samepiece of the disk.
CHKDSK takes no action. To handle the problem, copy both files to another floppy disk, deletethe files from the original disk, and edit the files as necessary. (The files may containgarbage.)
Insufficient room in root directoryErase files from root and repeat CHKDSK
Error: CHKDSK recovered so many “lost” clusters from the disk that the root directory is full.CHKDSK aborts at this point.
Examine the FILExxxx.CHK files. If you find nothing useful, delete them. Rerun CHKDSK withthe /F switch to continue recovering lost clusters.
xxxxxxxxxx bytes disk space freed
Information: CHKDSK regained some disk space that was improperly marked as “in use.”xxxxxxxxxx tells you how many additional bytes are now available. To free this disk space,review and delete any FILExxxx.CHK file that does not contain useful information.
xxx lost allocation units found in yyy chainsConvert lost chains to files (Y/N)?
Information: Although CHKDSK found xxx blocks of data allocated in the FAT, no file on thedisk is using these blocks. The blocks are lost clusters, which CHKDSK normally can free if noother error or warning message appears.
If you use the /F switch and type Y, CHKDSK joins each set of lost chains into a file placed inthe root directory of the disk. That file is called FILExxxx.CHK, in which xxxx is a consecu-tive number between 0000 and 9999. Examine this file and delete any clusters that containno useful information.
If you use the /F switch and type N, CHKDSK simply frees the lost chains so that other files canreuse the disk space. No files are created. If you type Y and omit /F, CHKDSK displays theactions that you can take but takes no action itself.
See Also
DEFRAG, DOUBLESPACE/CHKDSK, and SCANDISK
“Analyzing a Disk with CHKDSK” in Chapter 7
631CHOICE 6.0 and later—External
CHKSTATE.SYS (see MEMMAKER)The CHKSTATE.SYS device driver helps MemMaker optimize memory use on your computer.MemMaker requires this driver only while optimizing your system; it’s not needed at anyother time. You should not attempt to use this device driver yourself.
Very few details about CHKSTATE.SYS’s operation are documented. It’s loaded into memory by MemMaker with a DEVICE= line in your CONFIG.SYS file during the optimization process.Presumably, CHKSTATE.SYS communicates with MEMMAKER about the state of your computer,verifying that system integrity is not violated as different combinations of drivers are loaded.When optimization is complete, MemMaker removes this driver from the CONFIG.SYS file.
See Also
MEMMAKER and SIZER
CHOICE 6.0 and later—ExternalThe CHOICE command suspends batch-file processing and prompts the user to make a choicebefore processing resumes. You can specify which keystrokes are accepted and what defaultchoices are made if no keys are pressed.
SyntaxCHOICE /C:keys /N /S /T:choice,seconds prompt
Parameters and Switches
/C:keys Specifies which keys are displayed in the prompt. The colon (:) is optional. If /Cis not specified, CHOICE acts as though you specified /C:YN.
/N Suppresses the key list and question mark that DOS normally adds to the prompt (see thefirst item in the following “Notes” section).
/S Enables case sensitivity for the keys. That is, if /S is specified, the uppercase key repre-sents a different response from the lowercase key. If /S is not specified, the uppercase key isthe same as the lowercase key.
/T:choice,seconds Specifies a default key and the number of seconds to wait for the userto press a key before the default is used. The colon (:) is optional. choice must be one ofthe keys specified by /C:keys, and seconds must be from 0 to 99 (0 means no pause beforechoice is used).
prompt Specifies the prompt line that is displayed to inform the user about the choicethat has to be made. To the end of the prompt you specify, DOS adds a bracketed list ofallowable keys and a question mark. Quotation marks (“) can be used around text, but youdon’t have to use them unless the prompt contains a switch character (/), redirection sym-bols, or trailing blank spaces. If no prompt is specified, DOS does not display any prompt at all.
FApp
BATCHFILE
632 Appendix F Command Reference
Exit Codes
ERRORLEVEL Value Meaning
0 CHOICE terminated by user (Ctrl+Break or Ctrl+C)
1 User picked the first key in /C:keys parameter
2 User picked the second key in /C:keys parameter
3 User picked the third key in /C:keys parameter
4 up … and so on …
255 Terminated by illegal syntax or other error conditions
Notes
1. When a CHOICE command is executed, the user sees the command’s prompt, followed bya prompt. The prompt is a left bracket ([), followed by the first key in /C:keys, fol-lowed by a comma, followed by any other keys in keys (separated by commas), followedby a right bracket (]), followed by a question mark (?). /C:YN, for example, produces theprompt [Y,N]?
2. CHOICE returns different exit code values to the batch file, depending on which of thekeys in /C:keys is pressed in response to the prompt. Pressing the first key returns 1,pressing the second returns 2, and so on.
3. If the user presses Ctrl+Break and then does not terminate the batch job, a value of 0 isreturned. If DOS detects an error, a value of 255 is returned.
4. If the user presses a key that is not one of the keys in /C:keys, the computer beeps.
Examples
To ask the user whether to continue with the batch file, issue the following commands:
CHOICE /C:YN “Yes to continue and No to exit “
IF ERRORLEVEL 2 GOTO EXIT
You then see the following line:
Yes to continue and No to exit [Y,N]?
Notice the trailing space at the end of the prompt text specified in the CHOICE command.CHOICE adds the [Y,N]? text to the end of the prompt you specify. Adding a trailing space toyour prompt text can make the final prompt more readable onscreen.
To load the mouse driver from your AUTOEXEC.BAT file unless told otherwise within threeseconds, issue the following commands:
CHOICE /C:YN /T:3,Y “Load the mouse driver “
IF ERRORLEVEL 2 GOTO NOMOUSE
633CLS 2.0 and later—Internal
To provide a menu of choices, enter the following:
@ECHO OFFCLSECHO.ECHO F First actionECHO S Second actionECHO T Third actionECHO.CHOICE /C:FST “Choose an action “IF ERRORLEVEL 255 GOTO ERRORIF ERRORLEVEL 3 GOTO THIRDIF ERRORLEVEL 2 GOTO SECONDIF ERRORLEVEL 1 GOTO FIRST
:ERRORECHO GOT AN ERROR OR BREAKGOTO END
:THIRDECHO PRESSED TGOTO END
:SECONDECHO PRESSED SGOTO END
:FIRSTECHO PRESSED FGOTO END
:END
See Also
IF
“Making a Two-Way Choice” in Chapter 16
CLS 2.0 and later—InternalThe CLS command clears a text screen and returns the cursor to the upper-left corner. It’svery useful for clearing away messages left by other commands or batch files. Normally, CLSis limited to clearing 25-line text mode screens, but if ANSI.SYS is loaded, CLS clears 43- and50-line text modes as well.
SyntaxCLS
Notes
1. This command clears all information from the screen and places the cursor at the homeposition in the upper-left corner.
FApp
C:\>
BATCHFILE
634 Appendix F Command Reference
2. This command affects only the active video display, not memory.
3. If you used the ANSI control codes to set the foreground and background, the colorsettings remain in effect.
4. If you did not set the foreground/background color, the screen reverts to light charac-ters on a dark background.
See Also
ANSI.SYS
“The CLS Command” in Chapter 13
CMOSCLK.SYSCMOSCLK.SYS replaces the default DOS clock so that any request for the current date andtime accesses this device driver instead of the DOS system clock.
SyntaxDEVICE=drive:\path CMOSCLK.SYS
Parameters and Switches
drive:\path Location of the CMOSCLK.SYS file.
Notes
This device driver must be loaded by either a DEVICE= or DEVICEHIGH= statement in the CONFIG.SYS file.
CNFIGNAM.EXEPCM Plus uses CNFIGNAM.EXE to specify configuration parameters for a specified setup con-figuration. The PCM Plus setup utility adds CNFIGNAM to the CONFIG.SYS file.
This device driver must be loaded by a DEVICE= statement in the CONFIG.SYS file. It cannotbe loaded high.
SyntaxDEVICE=cnfignam.exe /config_name
Parameters and Switches
config_name PCM Plus configuration to use. PCM Plus can have multiple setupconfigurations in the PCM.INI file.
PC-DOS
DEVICE =
PC-DOS
DEVICE =
635COMMAND 2.0 and later—External
Notes
The CNFIGNAM statement in the CONFIG.SYS file is inserted automatically through the PCMSET-UP program. Multiple configurations are identified and handled without user intervention.
COMMAND 2.0 and later—ExternalCOMMAND invokes another copy of COMMAND.COM, the command processor. If you write compli-cated batch files, this command may be useful. Normally, a user gets involved with this com-mand when setting up the SHELL= line in the CONFIG.SYS file.
SyntaxCOMMAND path\ cttydevice /E:size /K filename /P /MSG /C string
In your CONFIG.SYS file, use the following format:
SHELL=drive:\path\COMMAND.COM path\ condevice /E:size /P /MSG
Parameters and Switches
drive:\path\ Indicates the DOS drive and path to the copy of COMMAND.COM thatthe SHELL= command should load.
path\ Indicates the drive and directory location of COMMAND.COM. This pathis assigned to the COMSPEC environment variable.
condevice Indicates the device used for input and output. The default is CON:.The colon is optional. This parameter rarely is used.
/E:size Sets the size of the environment. size is a decimal number from 160to 32,768 bytes, rounded up to the nearest multiple of 16 (refer tothe SHELL command). The default is 256.
/K filename Runs filename (a program or batch file) and then displays the DOScommand prompt.
/P Keeps this copy permanently in memory (until the next systemreset). Generally used only as part of the SHELL command. Do notuse the /P parameter from a batch file.
/MSG Loads all error messages into memory. Must be used with /P.Generally useful only if you are running DOS from floppy disks.
/C string Passes the command and parameters represented by string to thenew copy of COMMAND.COM and returns to the primary commandprocessor.
FApp
BATCHFILE
636 Appendix F Command Reference
Rules
1. The string in the /C option is interpreted by the additional copy of COMMAND.COM, just asthough you typed the string at the system level. /C must be the last switch used in theline. Do not use the form COMMAND/C string /P.
2. You can exit from the second copy of the command processor by issuing the commandEXIT, unless you used the /P option (permanent).
3. If you issue the /P and /C switches together, /P is ignored.
4. Do not use the /K switch in the SHELL command line in your CONFIG.SYS file. Thisswitch can cause problems with applications and installation programs that alter yourAUTOEXEC.BAT file.
Notes
1. COMMAND often is used with the SHELL directive to enable COMMAND.COM to reside in a sub-directory rather than in the root directory.
2. You can use COMMAND with all versions of DOS to call a second batch file from an origi-nating batch file. Suppose that a batch file named BATCH1.BAT contains the followingline:COMMAND /C BATCH2
BATCH1 calls BATCH2.BAT. BATCH2.BAT executes and, after completing the last line of thebatch file, returns to BATCH1 to complete the originating batch file. This method of call-ing a batch file is similar to the CALL batch subcommand available in DOS version 3.3and later.
3. If you use DOS 5.0 or 6.0 with a floppy-disk–only system, you can specify the /MSGswitch in the SHELL directive of CONFIG.SYS. This switch loads all error messages inmemory. If an error occurs, you do not need a disk with COMMAND.COM in the drive. (Theswitch uses an additional 1KB of RAM.)
4. You can use the /K filename switch to specify that the DOS prompt in MicrosoftWindows should use a startup file other than AUTOEXEC.BAT. Open the DOSPRMPT.PIF file(using the PIF Editor) and type /K filename in the Optional Parameters box.
See Also
CALL and SHELL=
“Loading a Secondary Command Processor” in Chapter 10
COMP 1.0 to 5.0—ExternalYou can use COMP to compare two sets of disk files of the same name and length. The FCcommand, which is discussed later in this command reference, provides many of the samecapabilities as COMP. COMP is included on the DOS 6 Supplemental Disk, not in the standardDOS 6.0 package.
C:\>
BATCHFILE
DISK
AVOID
637COMP 1.0 to 5.0—External
SyntaxCOMP pathname1 pathname2 /D /A /L /N=x /C
Parameters and Switches
pathname1 Indicates the drive, path, and filename for the primary set of files.Wildcards are allowed. If no filename is specified, all files (*.*) areassumed.
pathname2 Indicates the drive, path, and filename for the secondary set of files.Wildcards are allowed. If no filename is specified, all files (*.*) areassumed.
/D Displays differences in hexadecimal format.
/A Displays differences as alphanumeric characters.
/L Displays the line number in which the difference occurred.
/N=x Compares the first x number of lines of a file.
/C Performs a non–case-sensitive comparison of files.
Notes
1. If you do not enter a filename, all files for that set, whether primary or secondary, arecompared (which is the same as typing *.*). However, only the files in the secondary setwith names that match filenames in the primary set are compared.
2. If you do not enter a drive, path, or filename, COMP prompts you for the primary andsecondary file sets to compare. Otherwise, the correct disks must be in the correct driveif you are comparing files on disks. COMP does not wait for you to insert disks if you useboth primary and secondary filenames.
3. After 10 mismatches (unequal comparisons) between the contents of two comparedfiles, COMP ends the comparison and aborts.
4. A more versatile utility for file comparison is FC, discussed later in this command refer-ence. COMP no longer is distributed with the standard DOS package.
MessagesCompare error at offset xxxxxxxx
Information: The files that you are comparing are not the same. The difference occurs atxxxxxxxx bytes from the start of the file. The number provided is in hexadecimal format,base 16. The values of the differing bytes in the files also are displayed in hexadecimal format.
Files are different sizes
FApp
638 Appendix F Command Reference
Warning: You asked COMP to compare two files of different lengths. Because COMP comparesonly files of the same size, COMP skips the comparison.
10 Mismatches - ending compare
Warning: COMP found 10 mismatches between the two files you compared. COMP, therefore,assumes that no reason exists to continue, and the comparison is aborted.
See Also
FC
CONFIGCONFIG re-creates the STACKER.INI file. It searches for all the STACVOL files on all the Stackerdrives, disables the current STACKER.INI file, and creates a new one.
SyntaxCONFIG drive: [-]drivelist /a=drivelist /c=filename /i=filename /s=dirname/a /a- /d /d- /?
Parameters and Switches
drive: Specifies the drive in which to update the configuration files.
[-]drivelist Specifies a list of removable drives with no colons. A minus sign infront of the drive letter removes the automount specification for thedrive.
/a=drivelist Updates automount specifications for these removable drives in theconfiguration file.
/c=filename Updates the named file instead of CONFIG.SYS.
/i=filename Updates the named file instead of STACKER.INI.
/s=dirname Uses dirname as the Stacker directory in the new configuration file.
/a Updates configuration files to turn on automount for removable drives.
/a- Updates configuration files to turn off automount for removable drives.
/d Adds the Stacker DPMS (DOS Protected Mode Services) driver to con-figuration files.
/d- Removes the Stacker DPMS driver from configuration files.
/? Displays the abbreviated online help.
639COPY 1.0 and later—Internal
COPY 1.0 and later—InternalYou can use the COPY command to copy files between disk drives or between drives anddevices. COPY enables you to keep or change the filenames and also enables you to combine(concatenate) files.
Syntax
The syntax used to copy files from one place to another is very simple:
COPY source destination /V /Y /Y-
You can tell DOS what kinds of files you are copying by using the /A (ASCII) and /B(BINARY) parameters:
COPY /A /B source /A /B destination /A /B /V /Y /Y-
By adding plus signs, you can specify more than one source file and have them all combined(concatenated) into one destination file:
COPY /A /B source /A /B +source2 /A /B +... /A /B destination
/A /B /V /Y /Y-
Parameters and Switches
source Specifies the file or files that you want to copy. A full pathname(for example, drive:\path\ ... \filename.ext) can be specified,and wildcards are allowed. This parameter is required and mustinclude a filename (*.* is not assumed). To combine files, specifymore than one source pathname and separate them with plus signs (+).
destination Specifies the location and optionally the filename you want to copyto. A full pathname can be specified, although normally only adrive and/or path is included. Wildcards are allowed when a file-name is specified. If this parameter is omitted, the current driveand subdirectory are used as the destination.
/V Verifies that the copy was recorded correctly. Similar to settingVERIFY ON for this COPY operation.
/Y Specifies that you want COPY to overwrite files without promptingyou for confirmation. Including this parameter overrides any set-ting specified with the COPYCMD environment variable.
/-Y Specifies that you want COPY to prompt you for confirmationbefore overwriting any files, even if the command is run from with-in a batch file. Including this parameter overrides any setting speci-fied with the COPYCMD environment variable.
The /A and /B switches create different effects on the source and destination files. Normally,you don’t have to specify these switches because DOS’s default assumptions are correct.
FApp
C:\>
BATCHFILE
640 Appendix F Command Reference
For the source file:
/A Treats the file as an ASCII (text) file. The command copies all theinformation in the file up to, but not including, the end-of-filemarker (Ctrl+Z). Data after the end-of-file marker is ignored. Thisis the default for copy operations that combine multiple files.
/B Copies the entire file (based on size, as listed in the directory) asthough the file were a program file (binary1). All end-of-file mark-ers (Ctrl+Z) are treated as normal characters, and EOF charactersare copied. This is the default for copy operations that do notcombine multiple files.
For the destination file:
/A Adds an end-of-file marker (Ctrl+Z) to the end of the ASCII textfile at the conclusion of the copying process. This is the default forcopy operations that combine multiple files.
/B Does not add the end-of-file marker to this binary file. This is thedefault for copy operations that do not combine multiple files.
Rules
Adhere to the following rules when you are copying files for which both the source and thedestination are given:
1. These rules apply to the filename:
• You must provide either a pathname or a filename. Wildcards are allowed in thesource filename. If you do not provide a filename but provide a pathname for thesource, DOS assumes *.*.
• If you do not provide a destination filename, the copied file has the same name,creation date, and creation time as the source file.
2. You can substitute a device name for the complete source or destination name.
3. When you copy between disk drives, COPY assumes that binary files are copied (asthough you used the /B switch).
4. When you copy to or from a device other than a disk drive, COPY assumes that ASCIIfiles are copied (as though you used the /A switch).
5. An /A or /B switch overrides the default settings for COPY.
Adhere to the following rules when you are copying files and only one file is specified:
1. The file specification you use (d1:path1\filename1.ext1) is the source. This specifica-tion must have one or both of these items:
641COPY 1.0 and later—Internal
• A valid filename. Wildcards are allowed.
• A drive name, pathname, or both. If you provide only one name, that name mustdiffer from the current drive name or pathname. If you provide both names, atleast one name must differ from the current drive name or pathname.
2. The source cannot be a device name.
3. The destination is the current drive and current directory.
4. The copied files use the same names as the source files.
5. COPY assumes that binary files are copied (as though you used the /B switch).
Adhere to these rules when you concatenate files:
1. The destination file is the last file in the list unless you add a plus sign (+) before thatfilename. If you do not specify a destination filename, the first source name becomesthe destination name.
2. If you do not provide a drive name, DOS uses the current drive.
3. If you do not provide a path, DOS uses the current directory.
4. These rules apply to source files:
• You must provide a valid filename. Wildcards are allowed, but using them can bedangerous. If you do not provide a destination filename, DOS uses the first file-name as the destination filename.
• After the first filename, any additional source file specifications must be precededby a plus sign (+).
5. These rules apply to the destination file:
• You can use only one destination file specification. If you provide a destinationwithout wildcards, DOS uses that name for the destination file. If you provide adestination filename with wildcards, DOS uses the first source filename for thedestination file.
• If you do not provide a destination, DOS uses the first source file as the destina-tion. The first file that matches the wildcard filename is used as the destinationfile if you used a wildcard as part of the first source filename, and the files to bejoined are appended to the first source file.
Notes
1. The COPY command, when run from the command line, now prompts you for confirma-tion before overwriting files. However, to avoid forcing you to rewrite all your batchfiles, COPY does not prompt you before overwriting a file when it is run from a batch file.
If you don’t like the way COPY now behaves, you can change it by defining an environ-ment variable named COPYCMD. Setting COPYCMD equal to /Y forces COPY to act as it has inall previous versions of DOS, never prompting for confirmation before overwriting afile. If you set COPYCMD equal to /-Y, COPY always prompts for confirmation—even whenit is run from within a batch file.
FApp
642 Appendix F Command Reference
2. The meanings of the /A and /B switches depend on their positions in the line. The /A or/B switch affects the file that immediately precedes the switch and all files that followthe switch until DOS encounters another /A or /B switch. When you use one of theseswitches before a filename, the switch affects all following files until DOS encountersanother /A or /B switch that contradicts the earlier switch.
3. Use XCOPY to copy zero-length files and all of a directory’s files and subdirectories.
4. To change the time and date of a file to the current time and date, enter the followingcommand:COPY /B filename.ext+,,
5. You can create a text file by copying what you type to a file. To do so, use the followingformat:COPY CON filename.ext
Everything you type is then copied to filename.ext until you press Ctrl+Z or F6.
MessagesCannot do binary reads from a device
Error: If you specify a device name such as CON or COM1 as the source in a COPY command,you cannot include the /B switch. These devices operate in character mode only. Try thecommand again without specifying the /B switch.
Content of destination lost before copy
Error: You may see this message when you are combining files with the COPY command. Ifthe destination file has the same name as any of the source files (except the first) that you’vespecified, COPY overwrites that source file before it has a chance to read it. When this mes-sage appears, at least one of your source files has been overwritten, and the file is gone forgood. Be very careful combining files with the COPY command, especially if you are usingwildcards in the source or destination parameters.
File cannot be copied onto itself
Error: COPY tried to copy a file onto itself. The destination file must have a different filenameor be in a different subdirectory than the source file. Change the destination parameteryou specified and try the COPY command again.
See Also
MOVE, REN or RENAME, and VERIFY
“Copying Files” in Chapter 8
COUNTRY= 3.0 and later—InternalYou can use the COUNTRY= command to instruct DOS to use certain country-specific conven-tions when it displays or accepts dates, times, numbers, currency, sort ordering, and case
CONFIGSYS
643COUNTRY= 3.0 and later—Internal
FApp
conversions. So that transitions from one set of conventions to another can be as painless forthe user as possible, application programs are encouraged to use this country-specific infor-mation. You can use COUNTRY= only in your CONFIG.SYS file.
SyntaxCOUNTRY=country_code,code_page,path\filename
Parameters and Switches
country_code A three-digit number that indicates the country whose conventions youwant to use. Typically, the number is the international long-distance tele-phone code for that country. (See Chapter 14, “Understanding theInternational Features of DOS.”)
code_ page The code page (character set) to use for the country that you are specify-ing. If no code page is specified, the default code page for that country isused. You can switch between the default and alternative code pages byusing MODE or CHCP.
path\filename The full path and filename of the file that contains country-specific infor-mation; it is usually COUNTRY.SYS. If no filename is specified, COUNTRY=looks for COUNTRY.SYS in the root directory of the startup drive.
Notes
1. COUNTRY= affects the following items:
• Date and time formats, both for display and input. DOS commands that use thecountry setting for date and time include DATE, TIME, RESTORE, DIR, PROMPT, and XCOPY.
• The thousands separator and decimal character used in numbers. In the U.S.,they are a comma and period, respectively (for example, 1,024.45).
• The location and symbol used for currency.
• Upper- to lowercase conversions. For each character set (code page), a table ofcase conversions is maintained by DOS.
• Alphabetical sorting order for characters in the set. This allows accented charac-ters to sort into their proper places.
Always include the full path to the COUNTRY.SYS file when you use the COUNTRY= com-mand. In this way, you can keep the COUNTRY.SYS file in a more logical place, such as inyour C:\DOS directory (which is the place Setup puts it, anyway).
2. The default country code is 001 (United States), code page 437, for versions of MS-DOS sold in the U.S.
644 Appendix F Command Reference
3. Not all application programs are written to support the international features of DOS,and many ignore the COUNTRY= settings.
4. The MS-DOS distribution disks include a special version of COUNTRY.SYS named COUNTRY.ICE (COUNTRY.IC_ in its compressed form) that contains information supportingan Icelandic keyboard and character set. For details, see the README.TXT file distributedwith DOS 6.
5. Microsoft has special versions of MS-DOS available for other languages and countriesnot listed in the country codes table, such as Arabic, Israel, Japan, Korea, the People’sRepublic of China, and Taiwan.
6. It is often best to leave out the code page argument in the COUNTRY= line and let DOSuse the default code page. To do so, just type two commas before you enter the locationand name of the COUNTRY.SYS file. (See the first example that follows.)
Examples
To set the country to France, insert the following line in your CONFIG.SYS file:
COUNTRY=033,,C:\DOS\COUNTRY.SYS
Notice that two commas are used so that DOS selects the default code page, which in thiscase is code page 850. Later, you could change to code page 437 by using the CHCP com-mand.
The following line sets the country to the United States with code page 437 active:
COUNTRY=001,437,C:\DOS\COUNTRY.SYS
In the U.S., this example is almost the same as not using the COUNTRY= command at all,except that you now have the ability to switch to code page 850 if you want to.
See Also
MODE device CP, CHCP, NLSFUNC, and KEYB
Chapter 14, “Understanding the International Features of DOS”
COUNTRY.SYS (see COUNTRY=)Despite the .SYS extension, COUNTRY.SYS is not a device driver. It is a file that contains coun-try information—such as code page symbol sets—used by the COUNTRY= command. A similarfile, containing information needed for an Icelandic configuration, is located in the fileCOUNTRY.ICE on the MS-DOS 6 distribution disks. (For details on setting up an Icelandicconfiguration, see the README.TXT file distributed with DOS 6.)
Do not attempt to load COUNTRY.SYS into memory by placing it in a DEVICE= orDEVICEHIGH= command in your CONFIG.SYS file. Your computer will lock up, and youwill have to reboot from a floppy disk.
645CPBACKUP
See Also
COUNTRY= and NLSFUNC
Chapter 14, “Understanding the International Features of DOS”
CPBACKUPCPBACKUP makes a backup copy of data to disks, tape, or a network drive using full, incre-mental, differential, or unattended methods. Data can be compressed, encrypted, andchecked for viruses as it is backed up.
SyntaxCPBACKUP d: setname filespec... /date=mmddyy-mddyy /exattr=hsr /full|/inc|/sep|/copy|/fullerase|/dif /drive=tape |/drive=d:n /addr=base-i-d /rate=rate/no /r setupfilename|filespec /ecc|/noecc /save|/nosave /sf|/nonsf /mtask /?/video /video options
Parameters and Switches
d: Specifies the drive to back up or restore to. This setting over-rides any drive that is specified in the CPBACKUP.CFG file and thesetup file.
setname Loads the specified setup file. When CPBACKUP is started with asetup file, the directory tree and file list are always visible.
filespec... Accepts any valid DOS filespec.
/date=mmddyy-mmddyy Specifies dates of files to back up.
/exattr=hsr Excludes (h)idden, (s)ystem, and (r)ead-only attributes.
/full Marks full backup as being backed up.
/copy Does not mark full backup as backed up.
/fullerase Specifies a full backup after the tape is erased.
/inc Specifies an incremental backup and appends to the full backup.
/sep Specifies a separate incremental backup.
/dif Specifies a differential backup.
/drive=tape | Specifies media as tape and drive size to back up to (360, 720, /drive=d:n 1200, or 1400).
FApp
PC-DOS
646 Appendix F Command Reference
/addr=base-i-d Specifies I/O addresses for a tape drive.
base Hexadecimal base address.
i Interrupt request (IRQ).
d Direct memory access (DMA) channel.
/rate=rate Sets the data rate (rate=1000KB per second, 500KB per secondor 250KB per second) that the controller must support.
/no Specifies not to use overlapped input and output. Use of this switch turns off the use of simultaneous hard disk and disk DMA.
/r Specifies that the restore mode is to start automatically using thespecifications in the .CFG file.
/r setupfilename Starts backup in restore mode and loads the settings saved in thesetup file. This parameter must be specified before any others.
/r filespec Restores specific files based on the filespec parameter with /r.
/save Saves history to the hard disk.
/nosave Does not save history to the hard disk.
/ecc Uses error correction.
/noecc Does not use error correction.
/sf Uses standard formatting.
/nonsf Uses nonstandard formatting.
/mtask Protects files from being changed in multitasking modes.
/? Displays help for the DOS command prompt options.
/video options Displays help for the following video and mouse selections:
/in Uses the default color scheme.
/bw Uses black and white.
/mono Uses monochrome color scheme (IBM mono-chrome).
/lcd Uses an LCD color scheme (for laptops).
/ff Speeds up the display.
/bf Specifies a BIOS font.
/nf Indicates no fonts; graphics characters are not to beused.
647CPSCHED
/ngm Indicates that a character mouse pointer is used.
/le Specifies a left-handed mouse.
/im Ignores mouse.
/ps2 Resets the mouse hardware on a PS/2.
Notes
Commands used to back up data require a compatible command to restore the data.
See Also
CPSCHED, SCHEDULE
CPBDIRCPBDIR determines the number of disks and the correct order of a high-speed or medium-speed disk backup and gives information about how the backup was made.
SyntaxCPBDIR drive: /x /v /?]
Parameters and Switches
drive: Specifies the drive containing the CPBACKUP disk to view.
/x Displays extended information about the disk.
/v Specifies that the disk is to be verified.
/? Displays the abbreviated online help.
See Also
CPBACKUP
CPSCHEDCPSCHED activates CPSCHED.EXE, which is the memory-resident portion of the Scheduler pro-gram. The Scheduler program schedules other DOS programs to run automatically at a pre-set date and time.
SyntaxCPSCHED /u /low /?
FApp
PC-DOS
PC-DOS
TSR
648 Appendix F Command Reference
Parameters and Switches
/u Removes the currently loaded resident version of CPSCHED from memory.
/low Specifies that CPSCHED not be loaded into the upper memory blocks.
/? Displays the abbreviated online help.
See Also
SCHEDULE
CRCThe CRC command gives a Cyclic Redundancy Check (CRC) number for a filename. Thisnumber uniquely identifies a file. CRC ensures that a file transfer has been completed withouterror. It also can be applied to disk copy operations, periodic checks for file corruption, andmore.
SyntaxCRC drive:\path filespec /s /p /?
Parameters and Switches
drive:\path filespec Specifies the location and name of the file for which the CRCnumber is required.
/s Processes files in all directories in the specified path.
/p Pauses after each screen of information.
/? Displays the abbreviated online help.
CREATEThe CREATE command creates an empty Stacker drive using available disk space or a RAMdrive.
SyntaxCREATE drive:\stacvol.xxx /c=n /r=n.n /s=sss.s /m /?
Parameters and Switches
drive: Specifies the drive letter of the uncompressed drive.
\stacvol.xxx Indicates the name of the stacvol file to create. The default isSTACVOL.DSK.
PC-DOS
PC-DOS
DR-DOS

649CSCRIPT
/c=n Sets cluster size, in kilobytes, for the Stacker drive. n can be 4, 8, 16, or 32.
/r=n.n Sets the maximum size of the Stacker drive by using an estimated com-pression ratio of n.n to 1.
/s=sss.s Allocates the amount of space in megabytes for the stacvol file.
/m Specifies monochrome display mode be used.
/? Displays the abbreviated online help.
See Also
RAMDRIVE.SYS
CSCRIPTThe CSCRIPT command-line tool starts the Windows Scripting Host. It runs batch files writ-ten in the Visual Basic Scripting Edition or JScript languages. These batch files can be usedto automate common tasks or create macros.
SyntaxCSCRIPT /filename //i //b //h:cscript //:wscript //logo //nologo //s //t:nn/arguments //?
Parameters and Switches
/filename Specifies the name of the VBScript or JScript file to run.
//i Sets interactive mode so that the user can respond to any prompts inthe script.
//b Sets batch mode, which doesn’t display errors or script prompts.
//h:cscript and Changes the default scripting host to cscript or wscript//h:wscript (the Windows version), respectively.
//logo and Displays the scripting host logo or //nologo suppresses it from displaying, respectively.
//s Saves the CSCRIPT command-line options for the current Windowsuser.
//t:nn Limits script running time to nn seconds.
//? Displays abbreviated online help.
FApp
Windows9x
650 Appendix F Command Reference
Notes
CSCRIPT was unavailable with the first Windows 95 release. It first appeared with Windows95 OSR2.
CTTY 2.0 and later—InternalYou can use the CTTY command to change the standard input and output devices to an auxil-iary console or to change the input and output devices back from an auxiliary console to thekeyboard and video display.
SyntaxCTTY device
Parameters and Switches
device The device you want to use as the new standard input and output device. Thisname must refer to a valid DOS character device. Normally, CON is the stan-dard input and output device, which allows you to enter standard input from thekeyboard and view standard output on the display. This parameter is required.
Notes
1. The device must be a character-oriented device capable of both input and output. DOSsupplies several such devices, including AUX, COM1, COM2, COM3, COM4, CON,LPT1, LPT2, LPT3, and PRN.
2. Typing a colon (:) after the device name is optional. If you don’t include a device in thecommand line for CTTY, an Invalid device message is displayed.
3. CTTY does not affect any other form of redirected I/O or piping. For example, the <(redirect input symbol), > (redirect output symbol), and | (pipe-between-programs char-acter) work as usual.
4. The CTTY command is designed so that you can use a terminal or teleprinter—ratherthan the normal keyboard and video display—for console input and output. This versa-tility has little effect on most PC users.
5. To return control to the standard console, type CTTY CON on the auxiliary console. If theauxiliary console isn’t working or you don’t have one connected to your computer, youmust reboot to re-enable the standard console.
6. The CTTY command does not affect programs that input and output directly to hard-ware. Most major software applications fall into this category, so the CTTY command israrely useful with them.
7. COMMAND also can be used to change the device that DOS uses for standard input andoutput.
C:\>
BATCHFILE
651CVT.EXE
8. Do not attempt to reconfigure Windows with the CTTY command. Windows can beconfigured to use devices other than the keyboard and video display, but not with theCTTY command.
See Also
COMMAND
“The CTTY Command” in Chapter 13
CURSOR.EXECURSOR.EXE makes a large cursor that is easier to see on LCD screens. You can even changethe blink rate.
SyntaxCURSOR /Snn /C OFF /H
Parameters and Switches
/Snn Sets the cursor blink interval to nn/20th of a second, where nn can be from 1 to 20.
/C Ensures compatibility with some CGA screens.
OFF Returns to using the built-in hardware cursor.
/H Displays abbreviated help.
CVT.EXEIn Windows 95 OSR2 and Windows 98, CVT.EXE converts a drive from FAT16 format toFAT32. The minimum drive size to convert to FAT32 is 512MB.
SyntaxCVT driveletter: /cvt32
Parameters and Switches
driveletter The letter of the drive to be converted.
/cvt32 As a safety measure, this parameter must be included to convert a drive. It helps prevent unintentional conversions.
Notes
When a drive has been converted to FAT32, Windows and DOS cannot convert it back.Some third-party utilities, such as PartitionMagic, can convert from FAT32 to FAT16. InDOS, the only way to do so is to reformat the drive, destroying all the data in the process.
FApp
DR-DOS
Windows9x
!DANGER
652 Appendix F Command Reference
If you use this drive with other operating systems that are not FAT32-compatible, they can-not read the converted drive.
DATAMONDATAMON provides protection against accidental file deletion. You can choose from twooptions to track deleted files: Delete Tracker or Delete Sentry. Delete Tracker saves thename of each deleted file and a list of the cluster numbers it occupied in a hidden file calledPCTRACKR.DEL. Delete Sentry saves each deleted file in a hidden directory called \SENTRY.
SyntaxDATAMON /load /low /u /s /sentry+ /sentry- /tracker+ /tracker- /?
Parameters and Switches
/load Loads the Data Monitor program using the options in the DATAMON.INI file.
/low Loads the Data Monitor program into conventional memory even if uppermemory is available.
/u Removes the Data Monitor program from the computer’s memory.
/s Indicates which tracking option is active in the Data Monitor program.
/sentry+ Activates the Delete Sentry option.
/sentry- Deactivates the Delete Sentry option.
/tracker+ Activates the Delete Tracker option.
/tracker- Deactivates the Delete Tracker option.
/? Displays the abbreviated online help.
Notes
Either the Delete Sentry or Delete Tracker option can be used at a time. DATAMON has to beadded with one of the options to the AUTOEXEC.BAT file.
To disable the option temporarily, use the following commands:
datamon /sentry-
datamon /tracker-
DATAMON should be turned off before starting the Stacker compression program and beforerunning Stacker uncompression.
PC-DOS
653DATE 1.0 and later—Internal
DATE 1.0 and later—InternalThe DATE command can display and set the current date for your computer. Normally, DOSand your computer’s hardware keep the date set properly for you. If you don’t have anAUTOEXEC.BAT file, DOS prompts you to enter the current date each time your computerreboots.
SyntaxDATE mon-day-year
Parameters and Switches
mon-day-year The current date in a format consistent with the COUNTRY= setting inyour CONFIG.SYS file. mon can be any number from 1 to 12. day can beany number from 1 to 31. year can be any number from 80 to 99 orfrom 1980 to 2099. In the United States, legal delimiters are thehyphen, period, or slash (/). If this parameter is omitted, the currentdate is displayed, and you are prompted to enter a new date.
Notes
1. The date entry and display correspond to the COUNTRY setting in your CONFIG.SYS file. If you are unsure of what format to use for the date, enter the DATE command with noparameters. DOS displays the current date in an appropriate format, and you can use itas a guide when entering a new date at the prompt.
2. When you boot the computer, DOS issues the DATE and TIME commands to set the sys-tem clock. If you placed an AUTOEXEC.BAT file on the boot disk, DOS does not display a prompt for the date or time. You can include the DATE or TIME commands in theAUTOEXEC.BAT file to have these functions set when DOS boots.
3. Most computers contain a real-time clock running on a battery. The date should stayset properly as you turn your computer on and off, but it’s a good idea to check the dateoccasionally.
4. When you create or update a file, DOS updates the directory using the current date inthe computer. This date shows which copy is the latest revision of the file. Several DOScommands (such as XCOPY) can use the date in selecting files.
5. The day-of-year calendar uses the time-of-day clock. If you leave your system onovernight, the day advances by one at midnight. DOS makes appropriate calendaradjustments for leap years.
See Also
COUNTRY= and TIME
“Changing the Date and Time” in Chapter 10
FApp
C:\>
BATCHFILE
654 Appendix F Command Reference
DBLSPACE 6.0 and later—ExternalDBLSPACE starts the full-screen interface to the DoubleSpace disk-compression utility.DoubleSpace automatically compresses information on hard disks or floppy disks and con-figures many aspects of the compression process. Compression enables you to put more pro-grams and information on a disk.
With switches and parameters, you can control each aspect of DoubleSpace from the DOScommand line. The many combinations are covered in the sections that deal with specificDoubleSpace commands.
MS-DOS 6.2 brought a number of new features to DoubleSpace. DoubleSpace can nowshare the HMA with MS-DOS, thereby decreasing DoubleSpace’s size in memory from43KB to 33KB (or 37KB if the new automount feature is enabled). A DoubleGuard featureverifies the integrity of your data before writing it to disk. Also added is the Uncompresscommand, which enables you to uncompress a DoubleSpace drive easily. Finally, removabledisks can now be automounted, enabling you to work with compressed floppy and cartridgedisks from Windows.
SyntaxDBLSPACE
Notes
1. The first time you use the DBLSPACE command, DoubleSpace Setup starts. The setupprogram enables you to compress one or more hard disks and loads DBLSPACE.BIN intomemory. (DBLSPACE.BIN is the device driver that provides access to compressed drives.)Subsequent uses of the DBLSPACE command start the full-screen interface. The full-screen interface and the DBLSPACE switches and parameters give you control of allDoubleSpace operations.
2. DoubleSpace creates a large hidden file, called a compressed volume file (CVF), on one ofyour drives, called the host drive, and presents that drive as a new drive, called a com-pressed drive. For example, you might make a CVF on your drive D that results in acompressed drive E; you and your programs then can use the files on the compresseddrive without taking any special action.
3. CVF names use the format DBLSPACE.xxx, where xxx is a number (such as 000 or 001).
4. Normally, after you have started using DoubleSpace on your computer, it automaticallyloads into memory every time you start your computer. To start your computer withoutloading DoubleSpace into memory, press Ctrl+F5 (Clean) or Ctrl+F8 (Interactive) whenthe Starting MS-DOS... message appears on your screen. Because DBLSPACE.BIN will notbe loaded, you may not be able to access any of your compressed drives. For moreinformation, see Appendix D, “DOS and DOS Utility Programs’ KeyboardCommands.”
C:\>
BATCHFILE

655DBLSPACE/AUTOMOUNT 6.2—External
See Also
“Understanding DoubleSpace” in Chapter 6
DBLSPACE/AUTOMOUNT 6.2—ExternalThe DBLSPACE /AUTOMOUNT command enables or disables automatic mounting of removabledrives such as floppy and cartridge disks. This command changes the automount settingssaved in the DBLSPACE.INI file. The default setting is for DoubleSpace to automaticallymount removable drives.
Automounting makes it possible for you to change compressed floppy and cartridge disksfrom Microsoft Windows. You cannot use the DBLSPACE /AUTOMOUNT command whileWindows is running.
SyntaxDBLSPACE /AUTOMOUNT=drives
Parameters and Switches
drives The removable drives that you want DoubleSpace to automatically mount.Enter each drive letter—without a colon—and with no spaces in between. You also can spec-ify 0 to disable automatic mounting or 1 to automatically mount all removable drives. Thedefault setting is 1.
Notes
1. For the automount setting to take effect, you must restart your computer.
2. Specifying 0 decreases the size of DoubleSpace in memory by approximately 4KB.
3. The parameters you specify are written to the AUTOMOUNT= line of the DBLSPACE.INI file.
Examples
To enable automounting of only two floppy drives A and B, enter the following command:
DBLSPACE /AUTOMOUNT=AB
To disable automounting of all removable drives (and save a little memory), enter the fol-lowing command:
DBLSPACE /AUTOMOUNT=0
See Also
“Understanding DoubleSpace” in Chapter 6
FApp
C:\>
BATCHFILE
656 Appendix F Command Reference
DBLSPACE/CHKDSK 6.0 only—ExternalDBLSPACE /CHKDSK checks the structure of a compressed drive. The command reports errors(such as lost clusters and cross-linked files) and can correct some errors. If you are runningDOS 6.2, this command is not available; you should use the SCANDISK utility instead.
SyntaxDBLSPACE /CHKDSK /F drive:
or
DBLSPACE /CHK /F drive:
Parameters and Switches
/F DoubleSpace attempts to repair any errors it finds rather than simply report them.
drive: The letter of the compressed drive you want to check. The default is the currentdrive.
Notes
If you run CHKDSK on a compressed drive, DBLSPACE /CHKDSK is invoked automatically afterCHKDSK finishes checking the integrity of the drive’s file allocation table (FAT).
See Also
CHKDSK and SCANDISK
“Understanding DoubleSpace” in Chapter 6
DBLSPACE/COMPRESS 6.0 and later—ExternalDBLSPACE /COMPRESS compresses the files on an existing hard disk, floppy disk, or otherremovable disk, making more space available.
SyntaxDBLSPACE /COMPRESS drive: /NEWDRIVE=host: /RESERVE=size /F
or
DBLSPACE /COM drive: /NEW=host: /RES=size /F
Parameters and Switches
drive: The uncompressed (host) drive that you want to compress.
/NEWDRIVE=host: The uncompressed (host) drive after compression. This parametercan be abbreviated to /NEW=host:. If you omit the /NEWDRIVE=host:parameter, DoubleSpace uses the next available drive letter. EnterDBLSPACE /LIST to see a list of drive assignments.
C:\>
BATCHFILE
C:\>
BATCHFILE
657DBLSPACE/CREATE 6.0 and later—External
/RESERVE=size The amount of space (in megabytes) to be left uncompressed on thehost drive. This parameter can be abbreviated to /RES=size. Thedefault is 2MB for hard disks and 0 for floppy disks.
[ic:C9]/F DoubleSpace doesn’t display the compression statistics screen whencompression is complete but simply returns to the DOS commandprompt. Use this switch when you are running DBLSPACE /COMPRESSfrom a batch file.
Notes
1. A drive must contain some free space before DoubleSpace can compress it. If you wantto compress your boot drive, for example, it must have at least 1.2MB of free space.Other hard disks and floppy disks must have at least 1.1MB of free space (650KB forDOS 6.0).
2. DoubleSpace cannot compress 360KB floppy disks because they do not have enoughfree space.
3. A compressed floppy disk must be mounted before you can use it. (For more informa-tion, see the DBLSPACE /MOUNT command.)
4. If you want to read a compressed floppy disk on another computer, that computer mustbe running DoubleSpace as well.
5. Your system probably needs some uncompressed disk space because some files (such asWindows permanent swap files) do not work properly if you store them on a com-pressed drive.
Examples
To compress drive D so that the compressed part is known as D and the uncompressed(host) part is known as E, and contains 3MB of uncompressed free space, use the following:
DBLSPACE /COMPRESS D: /NEWDRIVE=E: /RESERVE=3
See Also
DBLSPACE /CREATE, DBLSPACE /LIST, and DBLSPACE /MOUNT
“Understanding DoubleSpace” in Chapter 6
DBLSPACE/CREATE 6.0 and later—ExternalDBLSPACE /CREATE creates a new compressed drive by using free space on an uncompresseddrive. DBLSPACE /CREATE can be used only on nonremovable media, such as a hard drive.
FApp
C:\>
BATCHFILE

658 Appendix F Command Reference
SyntaxDBLSPACE /CREATE drive: /NEWDRIVE=host: /RESERVE=size /SIZE=size
or
DBLSPACE /CR drive: /N=host: /RE=size /SI=size
Parameters and Switches
drive: The uncompressed (host) drive that contains the free space fromwhich the new compressed drive will be created.
/NEWDRIVE=host: The new compressed drive. The default is the next available drive let-ter. This parameter can be abbreviated to /N=host:.
/RESERVE=size The amount of space (in megabytes) to be left uncompressed on thehost drive. This parameter can be abbreviated to /RE=size. To makethe compressed drive as large as possible, specify a size of 0. If youomit both the /RESERVE and /SIZE parameters, DoubleSpace reserves1MB of uncompressed space on your disk. You cannot specify/RESERVE if you specify /SIZE.
/SIZE=size The size (in megabytes) of the compressed volume file (CVF) that willbe created on the host drive. This parameter can be abbreviated to/SI=size. Depending on how well your files compress, the CVF canhold approximately twice as much information as you specify for size.You cannot specify /SIZE if you specify /RESERVE.
Notes
1. The DBLSPACE /CREATE command creates a compressed volume file (CVF) with thename DBLSPACE.001 on the drive specified with the drive: parameter. If this file alreadyexists, the 002 extension is added, and then the 003 extension is added, and so on.
2. When you use the DBLSPACE /CREATE command, unlike the DBLSPACE /COMPRESS com-mand, the letter with which you refer to the host drive does not change.
3. You can use the DBLSPACE /CREATE command to create additional CVF files on the hostdrive of a disk compressed with the DBLSPACE /COMPRESS command. However, after youhave created a CVF on a disk drive with the DBLSPACE /CREATE command, you cannotuse the DBLSPACE /COMPRESS command on that drive without first deleting the existingCVF files. DBLSPACE /COMPRESS reassigns the drive letter you will use when accessingthe host drive; it cannot do so if the host drive contains compressed drives.
4. You cannot use DBLSPACE /CREATE on removable media such as floppy disk drives or car-tridge hard drives. To compress a floppy disk or cartridge hard disk, use the DBLSPACE/COMPRESS command.
5. Microsoft recommends that you use DBLSPACE /CREATE rather than DBLSPACE /COMPRESSto create a compressed drive on a RAM disk.
659DBLSPACE/DEFRAGMENT 6.0 and later—External
6. Your system probably needs some uncompressed disk space because some files (such asWindows permanent swap files) do not work properly when you store them on a com-pressed drive.
Examples
To create a compressed drive that has the next available drive letter as its name and uses allthe available free space on the uncompressed drive D, use the following:
DBLSPACE /CREATE D: /RESERVE=0
To create a new compressed drive F that uses 20MB of free space on the uncompresseddrive D, enter this command:
DBLSPACE /CREATE D: /NEWDRIVE=F: /SIZE=20
See Also
DBLSPACE /COMPRESS, DBLSPACE /LIST, and DBLSPACE /MOUNT
“Understanding DoubleSpace” in Chapter 6
DBLSPACE/DEFRAGMENT 6.0 and later—ExternalDBLSPACE /DEFRAGMENT defragments a compressed drive by moving all the drive’s free spaceto the end of the drive. This command enables you to get the maximum reduction in thesize of the drive when you issue the DBLSPACE /SIZE command.
SyntaxDBLSPACE /DEFRAGMENT drive: /F
or
DBLSPACE /DEF drive: /F
Parameters and Switches
drive: Specifies the compressed drive that you want to defragment. The default isthe current drive.
/F Specifies that you would like the DoubleSpace drive defragmented more fully.
Notes
1. Unlike defragmenting an uncompressed hard disk, defragmenting a DoubleSpace diskdoes not improve the disk’s performance. Defragmenting only moves the free space tothe end of the compressed drive so that DBLSPACE /SIZE can be most effective.
2. You cannot tell how badly fragmented a compressed drive is before you decide todefragment it.
FApp
C:\>
BATCHFILE
660 Appendix F Command Reference
3. How long defragmenting takes depends on many factors, including the speed of yourcomputer, the size of your compressed drive, and the speed of your disk drive. Theprocess can take a long time—perhaps several hours.
4. You can stop the defragmentation process at any time by pressing Esc.
5. To thoroughly defragment a compressed drive, perform the following steps. First, cor-rect any errors on the host and compressed drives by using the ScanDisk utility. Next,defragment the host drive by using the DEFRAG command. Then, defragment the com-pressed drive by using the DBLSPACE /DEFRAGMENT /F command. Finally, collect all thefree space at the end of the compressed drive by entering the DBLSPACE /DEFRAGMENTcommand. (Don’t specify the /F switch.)
See Also
CHKDSK and SCANDISK
“Understanding DoubleSpace” in Chapter 6
DBLSPACE/DELETE 6.0 and later—ExternalThe DBLSPACE /DELETE command unmounts a compressed drive and deletes its compressedvolume file (CVF) from the host drive. If you simply want to delete all the files on a com-pressed drive, use the DBLSPACE /FORMAT command.
SyntaxDBLSPACE /DELETE drive:
or
DBLSPACE /DEL drive:
Parameters and Switches
drive: The compressed drive that you want to delete. Note that you should specify thecompressed drive, not the host drive.
Notes
1. Deleting a compressed drive deletes all the files in that drive.
2. If you accidentally delete a compressed drive, you may be able to restore it by usingUNDELETE because a compressed drive is a file on one of your uncompressed disks (itshost drive). The files corresponding to compressed drives are hidden and have names inthe format DBLSPACE.xxx, where xxx is a number such as 000 or 001. If you can undeletethe associated file, you can remount it by entering DBLSPACE /MOUNT.
3. DoubleSpace does not allow you to delete a compressed drive C.
C:\>
BATCHFILE
!DANGER
661DBLSPACE/FORMAT 6.0 and later—External
See Also
DBLSPACE /FORMAT and UNDELETE
“Understanding DoubleSpace” in Chapter 6
DBLSPACE/DOUBLEGUARD 6.2—ExternalDoubleGuard is a safety feature that monitors the integrity of the memory thatDoubleSpace is using to minimize damage by a runaway program. This setting is stored onthe DOUBLEGUARD= line in the DBLSPACE.INI file.
SyntaxDBLSPACE /DOUBLEGUARD=zero_one
Parameters and Switches
zero_one Enables (1) or disables (0) the DoubleGuard feature.
Notes
1. If DoubleGuard is enabled and memory corruption is detected, DoubleSpace halts yourcomputer to minimize damage to data on the disk. DoubleGuard is enabled by default.
2. Disabling DoubleGuard (/DOUBLEGUARD=0) may speed up your system a little but couldlead to a loss of data if an errant program overwrites DoubleSpace’s memory.
3. You must restart your computer for this setting to take effect.
Examples
To turn on DoubleGuard integrity checking, enter the following command and reboot yourcomputer:
DBLSPACE /DOUBLEGUARD=0
To turn on DoubleGuard integrity checking again, enter the following command and rebootyour computer:
DBLSPACE /DOUBLEGUARD=1
See Also
“Understanding DoubleSpace” in Chapter 6
DBLSPACE/FORMAT 6.0 and later—ExternalThe DBLSPACE /FORMAT command deletes all the files and subdirectories on a compresseddrive but leaves the drive itself intact. UNFORMAT cannot restore the files deleted with thiscommand, so be careful when you use it. To delete the drive as well, use the DBLSPACE/DELETE command.
FApp
C:\>
BATCHFILE
C:\>
BATCHFILE
!DANGER
662 Appendix F Command Reference
DBLSPACE /FORMAT is a dangerous command. Formatting a compressed drive is a quickoperation, and after you have given DoubleSpace the go-ahead, you cannot turn back. Youcannot use the UNFORMAT command to recover a formatted compressed drive. Makeabsolutely sure you don’t need anything on the drive before formatting it.
SyntaxDBLSPACE /FORMAT drive:
or
DBLSPACE /F drive:
Parameters and Switches
drive: The compressed drive that you want to format. Note that you should specify thecompressed drive, not the host drive.
Notes
1. Formatting a compressed drive deletes all the files on that drive.
2. You cannot unformat a compressed drive after performing a /FORMAT operation on it.
3. DoubleSpace does not allow you to format drive C.
See Also
DBLSPACE /DELETE
“Understanding DoubleSpace” in Chapter 6
DBLSPACE/INFO 6.0 and later—ExternalThe DBLSPACE /INFO command displays the following information about the specified com-pressed drive: its host drive, used and free space, actual and estimated compression ratio,and total size. DBLSPACE /INFO can be handy for monitoring the compression ratio on thedrive.
SyntaxDBLSPACE /INFO drive:
Parameters and Switches
/INFO This parameter can be omitted. If /INFO is included and drive: is omitted,information about the current drive is displayed. If both /INFO and drive: areomitted, the full-screen DoubleSpace program is run.
C:\>
BATCHFILE
663DBLSPACE/MOUNT 6.0 and later—External
drive: The compressed drive that you want information about. Note that you shouldspecify the compressed drive, not the host drive. If drive: is omitted and /INFOis specified, information about the current drive is displayed.
See Also
DBLSPACE /LIST
“Understanding DoubleSpace” in Chapter 6
DBLSPACE/LIST 6.0 and later—ExternalThe DBLSPACE /LIST command displays information about all the local drives connected toyour computer, whether or not they are compressed drives. For each drive, the letter, type,free space, total size, and compressed volume file (CVF) filename are displayed. DBLSPACE/LIST can be handy for finding out the host drive for a compressed drive because the hostdrive is included in the CVF filename. DBLSPACE /LIST cannot display information aboutnetwork or CD-ROM drives attached to your computer.
SyntaxDBLSPACE /LIST
or
DBLSPACE /L
See Also
DBLSPACE /INFO
“Understanding DoubleSpace” in Chapter 6
DBLSPACE/MOUNT 6.0 and later—ExternalThe DBLSPACE /MOUNT command associates a drive letter with a compressed volume file(CVF) so that you can access the files in the CVF as though they were on a disk. Normally,DoubleSpace mounts CVFs for you, so you must mount a CVF only if you have explicitlyunmounted it or if the CVF is on a removable (floppy) disk.
SyntaxDBLSPACE /MOUNT=nnn host: /NEWDRIVE=drive:
or
DBLSPACE /MO=nnn host: /NEW=drive:
FApp
C:\>
BATCHFILE
C:\>
BATCHFILE
664 Appendix F Command Reference
Parameters and Switches
=nnn Mounts the CVF named DBLSPACE.nnn on host:. This parameter canbe abbreviated to /MO=nnn. If nnn is not specified, DBLSPACE.000 isassumed.
host: The uncompressed (host) drive containing the CVF that you wantmounted.
/NEWDRIVE=drive: If you are mounting a CVF file created with the /COMPRESS parameter(nnn=000), drive: specifies the drive letter you want to use for the hostdrive after the CVF is mounted. If you are mounting a CVF file creat-ed with the /CREATE parameter (nnn>000), drive: specifies the drive letter you want to use for the compressed drive after the CVF ismounted. This parameter can be abbreviated to /NEW=drive:. Thedefault is the next available drive letter.
Notes
You cannot mount a compressed drive from Microsoft Windows. If you are running MS-DOS 6.2, you can get around this restriction by using the new automount feature, whichworks while Windows is running. If you are using MS-DOS 6.0, you must exit Windowsbefore mounting a compressed floppy or removable cartridge disk.
Examples
To mount CVF D:\DBLSPACE.001 as the next available drive letter, use the following:
DBLSPACE /MOUNT=001 D:
To mount a DoubleSpace compressed floppy disk in A as the next available drive letter,enter the following:
DBLSPACE /MOUNT A:
See Also
DBLSPACE /UNMOUNT
“Understanding DoubleSpace” in Chapter 6
DBLSPACE /RATIO 6.0 and later—ExternalDoubleSpace uses the estimated compression ratio to estimate how much free space a com-pressed drive contains. By using the DBLSPACE /RATIO command, you can change the esti-mated compression ratio that DoubleSpace is using for a compressed drive. You might wantto change the estimated ratio if you are about to copy to the compressed drive files that dif-fer significantly from those that already are on the drive.
C:\>
BATCHFILE
665DBLSPACE/SIZE 6.0 and later—External
SyntaxDBLSPACE /RATIO=ratio drive: /ALL
or
DBLSPACE /RA=ratio drive: /ALL
Parameters and Switches
=ratio Specifies the new estimated compression ratio from 1.0 to 16.0. ratio mustbe entered with one decimal place (for example, 2.0, not 2). The default isthe actual compression ratio for the drive.
drive: Specifies the compressed drive for which you want to change the estimatedcompression ratio. DOS uses the current drive unless you specify /ALL. Youcannot specify both drive: and /ALL.
/ALL Changes the estimated compression ratios for all mounted compressed drives.You cannot specify both drive: and /ALL.
Notes
To view the actual compression ratio for a compressed drive, use the DBLSPACE /INFOcommand.
Examples
To change all your mounted compressed drives so that their estimated compression ratiosequal their actual compression ratios, use the following:
DBLSPACE /RATIO D: /ALL
To change the estimated compression ratio of compressed drive E to 1.7, enter the following:
DBLSPACE /RATIO=1.7 E:
See Also
DBLSPACE /INFO
“Understanding DoubleSpace” in Chapter 6
DBLSPACE/SIZE 6.0 and later—ExternalThe DBLSPACE /SIZE command changes the size of a compressed drive. You might want tomake a compressed drive smaller if you need more free space on its host drive. Alternatively,you might want to make a compressed drive larger if its host drive has a great deal of freespace.
FApp
C:\>
BATCHFILE
666 Appendix F Command Reference
SyntaxDBLSPACE /SIZE=size /RESERVE=size drive:
or
DBLSPACE /SI=size /RES=size drive:
Parameters and Switches
=size The space (in megabytes) that the CVF on drive: should take up on its host (uncompressed) drive. You cannot specify both =size and/RESERVE=size. The default is to make the host drive as small as possible.
/RESERVE=size The space (in megabytes) to be left free on the host (uncompressed)drive after drive: is resized. This parameter can be abbreviated to/RES=size. You cannot specify both =size and /RESERVE=size. Thedefault is to make the host drive as small as possible.
drive: The compressed drive that you want to make larger or smaller.
Examples
To change the size of compressed drive E so that its CVF takes up 30MB on its host(uncompressed) drive, use the following:
DBLSPACE /SIZE=30 E:
To make compressed drive E as large as possible so that its host drive contains no uncom-pressed free space, enter the following:
DBLSPACE /SIZE /RESERVE=0 E:
Notice that when you specify the amount of space to reserve with the /RESERVE=0 parameter,you cannot specify a size with the /SIZE parameter.
See Also
“Understanding DoubleSpace” in Chapter 6
DBLSPACE/UNCOMPRESS 6.2—ExternalThe DBLSPACE /UNCOMPRESS command uncompresses a compressed DoubleSpace drive. Ifyou uncompress all the compressed drives in your system, DoubleSpace removes itself frommemory.
SyntaxDBLSPACE /UNCOMPRESS drive:
C:\>
BATCHFILE
667DBLSPACE/UNMOUNT 6.0 and later—External
Parameters and Switches
drive: The compressed drive that you want to uncompress.
Notes
1. You should always back up all the files on a compressed drive before uncompresssing it.(If anything can go wrong, it will.)
2. You can uncompress a drive only if the files in the compressed drive will fit on the hostdrive in their uncompressed state.
3. If files in the root directories of both the host and compressed drives have the samenames, DoubleSpace cannot uncompress the drive. When this happens, DoubleSpacedisplays an error message and saves to the DBLSPACE.LOG file a list of the duplicate filesinvolved. After you have resolved all the duplicate root directory filenames by renam-ing, moving, or deleting the files listed in DBLSPACE.LOG, you can try to uncompress thedrive again.
4. After the last compressed drive in your system has been uncompressed, DoubleSpaceremoves DBLSPACE.BIN from memory. Removing this file can free 40KB to 50KB of memory in your system. The next time you mount a compressed volume file, DBLSPACE.BIN must be loaded back into memory before you can access the compresseddrive.
See Also
DBLSPACE /COMPRESS and DBLSPACE /CREATE
“Understanding DoubleSpace” in Chapter 6
DBLSPACE/UNMOUNT 6.0 and later—ExternalThe DBLSPACE /UNMOUNT command breaks the association between a drive letter and a compressed volume file (CVF), temporarily making a compressed drive unavailable.
SyntaxDBLSPACE /UNMOUNT drive:
or
DBLSPACE /U drive:
Parameters and Switches
drive: The compressed drive that you want to unmount. The default is the currentdrive.
FApp
C:\>
BATCHFILE
668 Appendix F Command Reference
Notes
1. You cannot unmount drive C.
2. Use DBLSPACE /MOUNT to regain access to the compressed drive.
See Also
DBLSPACE /MOUNT
“Understanding DoubleSpace” in Chapter 6
DBLSPACE.SYS (device driver) 6.0 and later—External
To allow DoubleSpace to perform its compression magic, DOS loads the DBLSPACE.BIN fileinto memory early in the boot process. Initially, DBLSPACE.BIN is placed at the top of conven-tional memory. The DBLSPACE.SYS device driver enables you to move DBLSPACE.BIN to itsfinal location in conventional or upper memory. Moving DBLSPACE.BIN to upper memory cansave as much as 43KB of conventional memory for your DOS programs to use. To moveDBLSPACE.BIN, DBLSPACE.SYS must be loaded in a DEVICE= or DEVICEHIGH= statement in yourCONFIG.SYS file.
In MS-DOS 6.2, DoubleSpace can share the high memory area (HMA) with DOS, decreas-ing the size of DoubleSpace in upper or lower memory to 33KB or to 37KB if the auto-mounting feature is enabled.
Syntax
To relocate the DBLSPACE.BIN driver to the bottom of conventional memory, load the DBLSPACE.SYS device driver by using the DEVICE= command as follows:
DEVICE=drive:\path\DBLSPACE.SYS /MOVE /NOHMA
To relocate the DBLSPACE.BIN driver into upper memory, load the DBLSPACE.SYS device driverby using the DEVICEHIGH= command like this:
DEVICEHIGH=drive:\path\DBLSPACE.SYS /MOVE /NOHMA
Parameters and Switches
drive:\path\ Specifies the full path to the DBLSPACE.SYS file on your system. Setupplaces the DBLSPACE.SYS file in the C:\DOS subdirectory by default. If thefull path to DBLSPACE.SYS isn’t specified, DOS looks for the file in theroot directory of the startup drive.
/MOVE Makes DBLSPACE.SYS move the DBLSPACE.BIN driver in memory. Thisparameter is required.
/NOHMA Prevents DoubleSpace from locating a portion of itself in the HMA with DOS.
CONFIGSYS
DEVICE =
669DBLSPACE.SYS (device driver) 6.0 and later—External
Notes
1. When DBLSPACE.BIN is first loaded into memory, it locates itself at the top of conven-tional memory. If you let DBLSPACE.BIN remain in that position, a device driver thatrequires access to this area in memory may overwrite it, crashing your computer. If youare using DoubleSpace, you should always use the DBLSPACE.SYS device driver to relo-cate DBLSPACE.BIN to a more permanent, safe location.
2. To relocate DBLSPACE.BIN to the bottom of conventional memory, load DBLSPACE.SYS byusing the DEVICE= command. To relocate DBLSPACE.BIN to upper memory, load DBLSPACE.SYS by using the DEVICEHIGH= command. Note that you must specify the/MOVE parameter either way. If you do not load the DBLSPACE.SYS driver, DBLSPACE.BIN ismoved to the bottom of conventional memory after all other CONFIG.SYS processing is complete.
3. Moving DBLSPACE.BIN to upper memory by using DEVICEHIGH= frees approximately43KB of conventional memory. If not enough room is available in upper memory, DBLSPACE.BIN is moved to the bottom of conventional memory instead.
4. (DOS 6.2 only) DoubleSpace can share the HMA with DOS, thereby decreasing theamount of upper or lower memory it requires to 33KB or to 37KB if the automountingfeature is enabled. You can prevent DoubleSpace from loading into the HMA by usingthe /NOHMA parameter.
5. If DOS and DoubleSpace are sharing space in the HMA and you are using a disk cache(for example, SMARTDrive), you might want to decrease the BUFFERS= setting to 10.With DoubleSpace in the HMA, there is room for about 10 buffers, so specifying morethan this number may cause DOS to locate all its buffers in conventional memoryinstead.
6. MemMaker optimizes the placement of DBLSPACE.BIN in memory if it finds the DBLSPACE.SYS driver being loaded in CONFIG.SYS. Specifying the /L and /S options with DEVICEHIGH= causes DBLSPACE.SYS to move DBLSPACE.BIN to the specified region(s).Therefore, to MemMaker, optimization for this device driver works just like any other.
7. Unlike most device drivers, DBLSPACE.SYS doesn’t remain in memory. After it has movedDBLSPACE.BIN into upper or lower memory, it unloads itself. Therefore, you can installDBLSPACE.SYS more than once in your CONFIG.SYS file without wasting memory.DoubleSpace may insert more than one DEVICE=DBLSPACE.SYS statement in your CONFIG.SYS file to avoid certain problems with network device drivers.
8. You should load DBLSPACE.SYS before loading INTERLNK.EXE in your CONFIG.SYS file. Ifyou load INTERLNK.EXE first, you might not be able to access all the drives on the clientcomputer. In general, INTERLNK.EXE should be the last block device driver loaded inCONFIG.SYS.
9. If DBLSPACE.BIN is relocated after certain network drivers are loaded in memory, yoursystem may begin rebooting when certain DBLSPACE commands are run. If this happens,make sure that the device line for DBLSPACE.SYS comes before all network drivers loadedfrom CONFIG.SYS.
FApp
670 Appendix F Command Reference
10. The placement of the DEVICE=DBLSPACE.SYS line in your CONFIG.SYS file may affect thedrive letters used in your system. In general, to allow device drivers to allocate lettersthat follow the physical drives in the system, load them before the DBLSPACE.SYS driver.After DBLSPACE.BIN has been moved, it allocates extra drive letters for host drives. Anydevice drivers loaded after this are assigned drive letters that follow DoubleSpace’s driveletters.
Having drive letters change simply because you added a device driver to yourCONFIG.SYS file can result in time-consuming chores. Batch files often have to be editedto reflect the new drive letters. All references to drives that have changed must be correctedin your CONFIG.SYS and AUTOEXEC.BAT files. Microsoft Windows is sensitive to drive let-ter changes, and some Windows applications will fail if they are suddenly located on a dif-ferent drive.
Before you add or rearrange DEVICE= lines in your CONFIG.SYS file, think through thechanges you may be making to drive letter assignments. You often can accomplish whatyou need without changing drive letter assignments.
Examples
The following lines install a RAM disk and relocate the DBLSPACE.BIN driver in upper mem-ory if enough space is available:
DEVICEHIGH=C:\DOS\RAMDRIVE.SYS 1450 512 224 /E
DEVICEHIGH=C:\DOS\DBLSPACE.SYS /MOVE
Because the RAM drive was loaded before DBLSPACE.BIN was moved, RAMDRIVE.SYS allocatesdrive letters before DoubleSpace. In a typical system with one or two floppy drives and ahard disk (with a CVF), the RAM drive would be D, and DoubleSpace, which normallysaves four letters for later use, would use I as the host drive for C.
In the next example, the order is reversed, and the DEVICE= command is used to relocateDBLSPACE.BIN to the bottom of conventional memory instead of upper memory:
DEVICE=C:\DOS\DBLSPACE.SYS /MOVE
DEVICEHIGH=C:\DOS\RAMDRIVE.SYS 1450 512 224 /E
This time, DoubleSpace uses H for the host drive, and the RAM drive will become drive I.
See Also
DBLSPACE, DEVICE=, and DEVICEHIGH=
“Understanding DoubleSpace” in Chapter 6
671DEBUG 1.0 and later—External
DCONVERTConverts a DoubleSpace- or SuperStor/DS-compressed removable or unmounted disk to aStacker drive.
SyntaxDCONVERT source target /c compressed-volume-name /g compressed-volume-namestacvol-filename /m /?
Parameters and Switches
source Indicates the name of the DBL/DRVSPACE to convert.
target Indicates the name of the STACVOL file to create whenusing the /g switch.
/c compressed-volume-name Converts the named compressed DoubleSpace volume tothe new Stacker format.
/g compressed-volume-name Generates a STACVOL file in the new format by copying stacvol-filename the named compressed volume as a Stacker volume.
/m Use with either /c or /g on a monochrome monitor.
/? Displays the abbreviated online help.
Notes
DCONVERT needs some working space on a disk to convert it, as much as 1MB depending onthe situation. If it runs out of space and a WRITE ERROR is displayed, use /g instead to make aconverted copy of the compressed volume file on a different disk. Then, use COPY to transferthe resulting STACVOL file to the disk needed.
The attributes of the original file must be changed in order to delete it.
See Also
ATTRIB
DEBUG 1.0 and later—ExternalThe DEBUG utility tests and edits programs. You can use DEBUG to view and change the stateof your computer at the hardware level. Be very careful when using DEBUG because, with justa few keystrokes, you can wipe out your hard drive, destroy files, disable your mouse, lockup the keyboard, and cause all sorts of nasty problems. However, you can also learn a lotabout your computer by poking around with DEBUG. This program is a programmer’s tooland is rarely used by anyone else.
SyntaxDEBUG pathname parameters
FApp
PC-DOS
DR-DOS
!DANGER
672 Appendix F Command Reference
Parameters and Switches
pathname The program file that you would like DEBUG to load into memory. If thisparameter is omitted, DEBUG starts with no file loaded.
parameters Any parameters that you want to pass to the program file you specified withthe pathname parameter. You cannot specify parameters if you do not specifypathname. This parameter is useful only if you are loading program files thataccept arguments on their command line.
Notes
1. The DEBUG utility enables you to load a program into memory and then edit, test, andsave the edited program back to the disk. You also can use DEBUG to create small assem-bly language programs.
2. Most people come in contact with DEBUG only when they are given explicit instructionson patching a particular file. In most cases, this involves creating a text file and thenredirecting the input to DEBUG. The SPATCH.BAT file on the DOS 6 distribution disksuses this technique to patch (change) the Windows SWAPFILE.EXE program.
3. Details on using the DEBUG program are beyond the scope of this book. If you want to learn about using DEBUG, check the MS-DOS online help system or the DOS 6Technical Reference manual.
Examples
To start DEBUG, simply enter the following:
DEBUG
To start DEBUG and load PROGRAM.EXE from C:\UTILS for editing, enter this:
DEBUG C:\UTILS\PROGRAM.EXE
After you start the DEBUG program, it displays its prompt (the hyphen) and waits for you toenter commands. To quit DEBUG, enter the Q (quit) command.
DEFRAG 6.0 and later—ExternalFiles become fragmented because of the way MS-DOS stores them on the disk. If parts of asingle file are scattered over the disk, your disk drive requires more time to find and load allthe pieces into memory. DEFRAG rearranges the files on your disk so that each is located in aseries of contiguous clusters. Rearranging the files this way makes file access more efficient.
SyntaxDEFRAG drive: /F /Q /U /S:order /B /H /SKIPHIGH /LCD /BW /G0
C:\>
BATCHFILE
673DEFRAG 6.0 and later—External
Parameters and Switches
drive: Specifies the drive to be optimized. If this parameter is omitted, DEFRAGassumes that you want to defragment the current drive.
/F Performs the full optimization method, which provides the best optimizationbut takes the most time. It defragments all your files, moves them to thefront of the disk, and puts all the empty space at the end of the disk. You can-not specify the /U or /Q parameters with /F.
/Q (Undocumented) Performs the quick optimization method. This methodmoves all your files to the beginning of the disk and maximizes the amount ofcontiguous free space on the disk, but your files are still fragmented. You can-not specify the /F, /U, or /S parameters with /Q. This parameter is not docu-mented by Microsoft and may not be available in all versions.
/U Performs the unfragment-only optimization method. This method defrag-ments all your files but does not rearrange them on the disk. The emptyspace is left spread over the disk. You cannot specify the /F, /Q, or /S parame-ters with /U.
/S:order Controls the order of files in their directories. If you omit this switch, thecurrent order of files on your disk is unchanged. The colon (:) is optional.Use any combination of the following values for order, without separatingthem with spaces:
N Sorts in alphabetical order by name (A to Z)
N- Sorts in reverse alphabetical order by name (Z to A)
E Sorts in alphabetical order by extension (A to Z)
E- Sorts in reverse alphabetical order by extension (Z to A)
D Sorts by date and time (newest to oldest)
D- Sorts by date and time (oldest to newest)
S Sorts by size (smallest to largest)
S- Sorts by size (largest to smallest)
/B Restarts (reboots) your computer after the files have been reorganized. Makesure you use this switch if you use the FASTOPEN utility.
/H Allows DEFRAG to move a file even if it has the hidden attribute set. (Normally,DEFRAG does not move files with hidden attributes.) Note that even when /H isspecified, DEFRAG still does not move files with the system attribute.
/SKIPHIGH Normally, DEFRAG uses upper memory if it is available. Specifying the/SKIPHIGH switch forces DEFRAG not to use any upper memory.
FApp
674 Appendix F Command Reference
/LCD Uses screen colors suited to a liquid crystal display. You cannot specify the/BW parameter with /LCD.
/BW Uses screen colors suited to a monochrome display. You cannot specify the/LCD parameter with /BW.
/G0 Disables the graphic mouse and graphic character set on EGA and VGAscreens. (Note that this switch is G and a zero.) By combining /G0 with the/BW or /LCD parameter, you should be able to run DEFRAG on any DOS display.
Exit Codes
ERRORLEVEL Value Meaning
0 Disk was defragmented successfully
1 An internal error occurred
2 No free clusters (DEFRAG requires at least one)
3 Operation halted by the user (Ctrl+C)
4 Operation halted by a general error
5 Operation halted by a disk read error
6 Operation halted by a disk write error
7 Operation halted by an error in the FAT; use CHKDSK /F
8 Operation halted by a memory allocation error
9 Not enough free memory to defragment this disk
Notes
1. DOS starts DEFRAG in interactive mode if you omit one or more required parametersfrom the command line.
2. DEFRAG takes over the entire screen to show what it is doing.
3. By default, DEFRAG is loaded into upper memory if enough memory is free.
4. Do not use DEFRAG to optimize network drives or drives created with INTERLNK.
5. If you are using FASTOPEN when you defragment, specify DEFRAG /B so that out-of-datebuffers kept by FASTOPEN are not used after the defragmenting operation.
6. Do not run DEFRAG when any other program is running, including Microsoft Windows.If you have any programs resident in memory that might try to access the disk beingdefragmented, you should disable or remove them from memory before runningDEFRAG. An exception is the SMARTDRV disk cache. (You don’t have to remove it becauseDEFRAG disables it for you automatically.) If a program accesses a disk while it is beingdefragmented, data may be lost.
7. It is a good idea to run a utility such as CHKDSK or SCANDISK before running DEFRAG tocorrect any logical errors on the drive before defragmenting its files.
675DEL or ERASE 1.0 and later—Internal
See Also
CHKDSK and SCANDISK
“Defragmenting Your Disk” in Chapter 7
DEL or ERASE 1.0 and later—InternalThe DEL command deletes one or more files from the drive and directory you specify. ERASEis an alternative name for this command. Many times, you can restore an accidentally delet-ed file by using the UNDELETE command—if you use the command soon enough.
SyntaxDEL pathname /P
or
ERASE pathname /P
Parameters and Switches
pathname The file or files that you want to delete. If no drive is specified, the currentdrive is used. If no subdirectory path is specified, the current subdirectory isused. If only a path (with or without a drive) is specified, all files (*.*) areassumed. Wildcards are allowed.
/P DOS prompts you before deleting each file. This can make it easier to delete agroup of files that are difficult to specify with wildcards.
Notes
1. If you provide a drive name, pathname, or both, and specify either *.* or no name forthe filename, the DEL command prepares to delete all the files in the specified directory.Before it deletes them, DOS displays the following message:All files in directory will be deleted. Are you sure (Y/N)?
If you type Y, DOS erases all files in the specified directory (but not in the subdirecto-ries). If you type N, no files are erased.
2. If you specify the /P parameter, DEL prompts you before deleting each file by displayinga line such as the following:MYFILE.TXT Delete (Y/N)?
If you type Y, DOS erases the file. If you type N, the file is skipped.
3. You may be able to recover an erased file by using the special DOS 5.0 and 6.0UNDELETE utility program. Use UNDELETE immediately after accidentally erasing a file.
4. The DOS RECOVER utility does not recover erased files. RECOVER is designed only torepair a file that contains bad sectors or that has a bad directory entry.
FApp
C:\>
BATCHFILE
676 Appendix F Command Reference
MessagesAccess denied
Error: You attempted to erase a file that is marked as read-only or that is being used byanother program or computer and is temporarily marked as read-only. If the file that youintend to erase has the read-only, system, or hidden attribute set, use the ATTRIB commandto turn off these attributes before attempting to erase the file again.
See Also
DELTREE and UNDELETE
“Deleting Files” in Chapter 8
DELOLDOS 5.0 and later—ExternalDELOLDOS deletes from the hard disk all files from a previous version of DOS after a DOS5.0 or 6.0 installation.
SyntaxDELOLDOS /B
Parameters and Switches
/B Forces DELOLDOS to use black-and-white screen mode. You might want to use thisswitch if you have an LCD display screen or a one-color monitor attached to a CGAadapter.
Notes
1. When you upgrade to DOS 5.0 or 6.0, the old version of DOS is preserved in part onyour hard disk in the directory OLD_DOS.1 and on the Uninstall disks that the DOSSetup program creates. After you are sure that the upgrade works correctly and is com-patible with the programs that you normally use, you can delete the old DOS from thehard disk, thereby freeing additional storage space.
2. After you start DELOLDOS, you can exit without deleting the old version of DOS by press-ing any key except Y.
3. Be sure that all your programs are compatible with the new DOS before you delete theold version.
4. After running DELOLDOS, you cannot use the Uninstall disks created by DOS 5.0 or 6.0Setup to restore your previous DOS version.
5. After DELOLDOS deletes the previous version of DOS from your disk, it deletes itself. Itreally is a one-shot utility.
See Also
SETUP
677DELWATCH.EXE
DELPURGE.EXEDELPURGE.EXE permanently deletes deleted files being saved by DELWATCH.
SyntaxDELPURGE drive:\path\filespec /A /D:mm-dd-yy /T:hh:mm:ss /D:-nnn /L /P /S /H
Parameters and Switches
drive:\path\filespec Indicates the drive and directory to delete files from accord-ing to filespec filename parameters.
/A Purges matching files without prompting.
/D:mm-dd-yy Purges only files deleted before specified date.
/T:hh:mm:ss Purges only files deleted before specified time.
/D:-nnn Purges only files deleted more than nnn days ago.
/L Lists matching files without purging.
/P Pauses after each page is displayed.
/S Includes files in subdirectories.
/H Displays abbreviated help.
DELWATCH.EXEDELWATCH is a TSR that monitors file deletions on a drive and saves information about themto allow the UNDELETE command to function in restoring deleted files.
SyntaxDELWATCH /MPmemtype /MRmemtype /MBX- /U drive:.. /B:nnn /E:ext... /F:nnn|All/MBmemtype /0:ext... /D /S /H /HI /HD
Parameters and Switches
/MPmemtype Specifies the type of memory that the TSR is to be loaded into, where memtype can be X for extended DPMS memory, U for upper memory, or Cfor conventional memory. /MPmemtype- specifies that DELWATCH must not usethe specified memory type.
/MRmemtype Specifies the type of memory that the real mode code is to be loaded into,where memtype can be the same options listed for /MPmemtype. /MRmemtype-specifies that DELWATCH real mode code must not use the specified memorytype.
/MBX- Specifies not to use XMS memory.
/U Uninstalls DELWATCH. Allowed only if no drives are enabled.
FApp
DR-DOS
DR-DOS
TSR

678 Appendix F Command Reference
drive:.. Specifies the drive or drives to use.
/B:nnn Specifies how many files in the same directory with the same name can besaved, where nnn can be from 1 to 65,535.
/E:ext... Excludes saving files with the extension ext for up to 10 ext.
/F:nnn Specifies the maximum number of files to save. ALL saves all files until thedisk is full and overrides the /B setting.
/MBmemtype Specifies the type of memory to be used for drive data, where memtype can beX for extended DPMS memory, U for upper memory, or C for conventional./MBmemtype- specifies that the specified memory type cannot be used fordrive data buffers. Extended memory may not be used if /MBX- is specified.
/0:ext... Saves only files with the extension ext for up to 10 ext.
/D Disables DELWATCH on the specified drive or drives.
/S Shows the status of DELWATCH.
/H Displays an abbreviated help message.
/HI Displays an abbreviated help message on install switches.
/HD Displays an abbreviated help message on drive-enabled switches.
See Also
UNDELETE and DELPURGE
DELQ or ERAQDELQ or ERAQ deletes a file or files but prompts you before deleting each file.
SyntaxDELQ drive:\path\filespec /S /?
ERAQ drive:\path\filespec /S /?
Parameters and Switches
drive:\path\filespec Specifies the drive, path, and filename or file specification usingstandard wildcards to be deleted.
/S Includes system files if they match the filespec to be deleted.
/? Displays abbreviated help.
DR-DOS
679DEVICE= 2.0 and later—Internal
DELTREE 6.0 and later—ExternalBy using DELTREE, you can delete an entire branch of your subdirectory tree. Unlike RD (orRMDIR), DELTREE deletes subdirectories that contain files. Because you can delete so many filesso quickly with this command, you should always be careful when using it.
SyntaxDELTREE drive:\path /Y
Parameters and Switches
drive:\ Specifies the drive that contains the subdirectory you want to delete.
path Specifies the subdirectory to be deleted. All subdirectories and files contained inthe specified subdirectory are deleted as well. You are allowed to use wildcardsin the path parameter, but you must use extreme caution if you do.
/Y Suppresses prompting for permission to delete each directory specified by path.Do not use this switch. A typographical error could wipe out too many files.
Exit Codes
ERRORLEVEL Value Meaning
0 Subdirectory was successfully deleted
Notes
1. This command deletes all files, including hidden, read-only, and system files.
2. DOS prompts you for permission to delete each directory specified by path, unless youspecify /Y.
Use great care with the DELTREE command, particularly if you specify wildcards. You easilycan delete more files than you intend.
See Also
DEL or DELETE, and RD or RMDIR
“Using DELTREE to Delete Directories” in Chapter 5
DEVICE= 2.0 and later—InternalThe DEVICE= command loads device drivers into conventional memory. Through the use ofinstallable device drivers, DOS can be expanded to support many features and devices thataren’t supported in the DOS kernel. Installation programs often add device drivers to yourCONFIG.SYS file for you. DEVICE= can be used only in your CONFIG.SYS file.
FApp
C:\>
BATCHFILE
!DANGER
CONFIGSYS
680 Appendix F Command Reference
SyntaxDEVICE=drive:\path\filename parameters
Parameters and Switches
drive:\path\ Although this parameter is optional, you should always include the fulldrive and path to the device driver file. If you omit it, the device driverfile is assumed to be in the root directory of the startup drive.
filename The full filename, with extension, of the device driver to be loaded.Although many device drivers use a SYS extension, this isn’t assumed, andthe driver file’s extension must always be specified. No wildcards areallowed. This parameter is required.
parameters Any parameters that the device driver may require are included after itsname. DOS passes these parameters directly to the driver when it isloaded into memory. Some device drivers use case-sensitive or position-sensitive parameters. See the instructions provided with the device driverfor details.
Notes
1. If MS-DOS cannot find the specified device driver file, it displays a Bad or missingfilename message and continues processing CONFIG.SYS. (See the first message in the“Messages” section for the DEVICE= command.)
2. Device drivers are often sensitive to the order in which they are loaded. DOS executeseach DEVICE= or DEVICEHIGH= command in the order in which it appears in CONFIG.SYS.
3. The following device drivers are provided with MS-DOS:
ANSI.SYS
CHKSTATE.SYS*
DBLSPACE.SYS
DISPLAY.SYS
DRIVER.SYS
EGA.SYS
EMM386.EXE
HIMEM.SYS
INTERLNK.EXE
POWER.EXE
PRINTER.SYS**
RAMDRIVE.SYS
SETVER.EXE
SMARTDRV.EXE
SMARTDRV.SYS***
* CHKSTATE.SYS is used by MemMaker and shouldn’t be installed in your CONFIG.SYS file.** PRINTER.SYS is not distributed with DOS 6 but is available on the supplemental disk.
681DEVICE= 2.0 and later—Internal
*** SMARTDRV.SYS was replaced by SMARTDRV.EXE in MS-DOS version 6.
All the device drivers in this list can be installed with the DEVICE= command.
DOS 6 includes two files with the SYS extension that are not device drivers: COUNTRY.SYS and KEYBOARD.SYS. If you attempt to load these files by using the DEVICE= orDEVICEHIGH= commands, your computer may lock up, forcing you to reboot.COUNTRY.SYS and KEYBOARD.SYS are data files used by COUNTRY= and KEYB,respectively.
4. You cannot load normal executable files into memory by using the DEVICE= command.Entering CHKDSK.EXE or even DOSKEY.COM on a DEVICE= line generates an error message(see the first message in the “Messages” section) or lock up your computer. Device dri-vers are in a special format, and only files conforming to that format can be successfullyloaded with the DEVICE= command. If an executable program can be loaded during theprocessing of the CONFIG.SYS file (not all can), it can be placed in memory by theINSTALL= command.
External commands that load in a DEVICE= command line and run from the DOSprompt as well (such as EMM386, INTERLNK, POWER, and SETVER) are hybrid files that con-form to both formats. When loaded from a DEVICE= command in CONFIG.SYS, the devicedriver portion of the file is loaded into memory. Executing the same command from theDOS prompt runs the executable portion of the file, which typically sets operatingparameters or displays the status of the device driver already in memory.
Examples
Normally, the following two DEVICE= lines appear in CONFIG.SYS somewhere near the begin-ning of the file:
DEVICE=C:\DOS\HIMEM.SYSDEVICE=C:\DOS\EMM386.EXE RAM MIN=0DOS=HIGH,UMB
The DEVICE= lines load HIMEM.SYS and EMM386.EXE into memory, and provide the servicesnecessary for DOS to load into the HMA with the DOS=HIGH,UMB command. Note that theDEVICE= line for HIMEM.SYS must appear before the line for EMM386.EXE because EMM386requires memory provided by HIMEM to operate.
MessagesBad or missing filename
Error in CONFIG.SYS line number
Warning: DOS displays this message if it can’t find the file you specified in the DEVICE=,DEVICEHIGH=, or INSTALL= command in your CONFIG.SYS file. filename is the name of the filethat DOS was looking for, and number is the line in CONFIG.SYS where the command is locat-ed. Edit the line so that the path and filename are correct and then restart your computer.
FApp
682 Appendix F Command Reference
Unrecognized command in CONFIG.SYS
Error in CONFIG.SYS line number
Warning: A line in your CONFIG.SYS file contains an illegal command. Usually, this messageindicates that you have mistyped the name of a CONFIG.SYS command or have placed the ? inan illegal position.
See Also
DEVICEHIGH= and INSTALL=
Chapter 19, “Configuring Your Computer”
DEVICEHIGH= 5.0 and later—InternalWith the DEVICEHIGH= command, DOS can load device drivers into upper memory space,saving conventional memory for your application programs. To do so, DOS must have aUMB provider, such as EMM386, available. Also, the driver must be small enough to fit intothe available UMB space. If DOS cannot load a driver specified with the DEVICEHIGH= com-mand into upper memory, it loads the driver into conventional memory instead. Not alldevice drivers can run in upper memory. DEVICEHIGH= can be used only in your CONFIG.SYSfile.
Before you begin inserting DEVICEHIGH= commands in CONFIG.SYS, you should have abootable floppy disk available. That way, you can always start DOS from a floppy disk ifchanges you make in CONFIG.SYS prevent DOS from booting. Alternatively, with DOS 6,you can press the F5 (Clean boot) key to bypass CONFIG.SYS completely or F8(Interactive) to choose which lines in CONFIG.SYS to execute when problems arise.
Syntax
In its simplest form, which follows, the DEVICEHIGH= command works just like the DEVICE=command:
DEVICEHIGH=drive:\path\filename parameters
(DOS 6 only) DEVICEHIGH= has two additional switches that MemMaker uses to specify theplacement and size of the device driver in memory:
DEVICE /L:region,min;region,min;... /S =drive:\path\filename parameters
The following alternative syntax is used with DOS 5. Although the following is supportedunder DOS 6, you are advised to switch to the new syntax whenever possible:
DEVICE SIZE=hexsize drive:\path\filename parameters
CONFIGSYS
683DEVICEHIGH= 5.0 and later—Internal
Parameters and Switches
drive:\path\ Although this parameter is optional, you should always include the fulldrive and path to the device driver file. If you omit it, the device driverfile is assumed to be in the root directory of the startup drive.
filename The full filename, with extension, of the device driver to be loaded.Although many device drivers use a SYS extension, this isn’t assumed, andthe driver file’s extension must always be specified. No wildcards areallowed. This parameter is required.
parameters Any parameters that the device driver may need are included after itsname. DOS passes these parameters directly to the driver when it isloaded into memory. Some device drivers use case-sensitive or position-sensitive parameters. See the instructions provided with the device driverfor details.
/L:region,min (DOS 6 only) The region in upper memory, and optionally the minimumsize in bytes, that the device driver should be loaded into. You can speci-fy more than one region by separating each region from the previous onewith a semicolon. For instance, /L:1;2 gives the driver access to UMBregions 1 and 2. /L:1,4096;2,512 further specifies that the minimum sizeof regions 1 and 2 should be 4,096 bytes and 512 bytes, respectively.This parameter must precede the device driver filename. MemMakersets these values for you.
/S (DOS 6 only) If the /L parameter is specified with a minimum size, /Sinstructs DOS to shrink the UMB to the specified size and create a newUMB from the remainder. /S must precede the device driver filename.This switch is best left to MemMaker’s use.
SIZE=hexsize (DOS 5) The minimum size block, in hexadecimal notation, into whichDOS should attempt to load the driver. (MEM /D can provide the hexadec-imal value needed for this syntax.) This parameter must precede thedevice driver filename.
Notes
1. Before using the DEVICEHIGH= command, you must install a UMB provider and thenexecute a DOS=UMB command. Typically, this means that you must load HIMEM.SYS andEMM386.EXE with UMB support enabled and then specify DOS=UMB (or DOS=HIGH,UMB)before using the DEVICEHIGH= command.
You must install a UMB provider and add the DOS=UMB command before using theDEVICEHIGH= command in your CONFIG.SYS file. That way, you can always start DOSfrom a floppy disk if changes you make in CONFIG.SYS prevent DOS from booting.Alternatively, with DOS 6, you can press the F5 (Clean) and F8 (Interactive) boot keys tobypass completely or choose which lines in CONFIG.SYS to execute when problems arise.
FApp
684 Appendix F Command Reference
If you use other memory managers, such as 386MAX, BLUEMAX, QEMM, or CEMM, use theirversions of DEVICEHIGH= and LOADHIGH may be better than using the ones DOS pro-vides. Sometimes, simply specifying DOS=UMB is a mistake. Follow the instructions and recommendations that came with the product you purchased.
2. If DOS is unable to load the device driver into upper memory, it loads the driver intoconventional memory instead. No error messages are displayed when this happens. Tosee what device drivers have been loaded into upper memory, use the MEM /C command.
3. If MS-DOS cannot find the specified device driver file, it displays a Bad or missingfilename message and continues processing CONFIG.SYS. (See the first message in theDEVICEHIGH= command’s “Messages” section.)
4. Device drivers are often sensitive to the order in which they are loaded. DOS executeseach DEVICE= or DEVICEHIGH= command in the order in which it appears in CONFIG.SYS.
5. The following device drivers provided with MS-DOS can be loaded into UMB spacewith the DEVICEHIGH= command:
ANSI.SYS
DBLSPACE.SYS
DISPLAY.SYS
DRIVER.SYS
EGA.SYS
PRINTER.SYS*
RAMDRIVE.SYS
SETVER.EXE
*PRINTER.SYS is not distributed with DOS 6 but is available on the supplemental disk.
INTERLNK.EXE, POWER.EXE, and SMARTDRV.EXE all use UMB space automatically if it isavailable, so you don’t need to load them with a DEVICEHIGH= command. CHKSTATE.SYS isbest left for MemMaker to handle. HIMEM.SYS and EMM386.EXE minimize their use ofconventional memory when they load.
DOS 6 includes two files with the .SYS extension that are not device drivers: COUNTRY.SYSand KEYBOARD.SYS. If you attempt to load these files with the DEVICE= or DEVICEHIGH=command, your computer may lock up, forcing you to reboot. COUNTRY.SYS andKEYBOARD.SYS are data files used by COUNTRY= and KEYB, respectively.
6. MemMaker can optimize your CONFIG.SYS file for you, inserting DEVICEHIGH= and LOADHIGH commands as needed to load as many device drivers and resident programsinto upper memory space as possible. MemMaker also takes care of specifying the cor-rect parameters for EMM386.EXE, ensuring that you have the maximum amount of UMBspace available. This can be a big timesaver.
7. Before you start optimizing memory in your system, look at the resident softwareyou’re loading to see whether you need it all. For instance, the setup program for DOS
685DEVICEHIGH= 5.0 and later—Internal
6 installs SETVER.EXE whether or not you use any software that needs to be fooled intoworking with DOS 6. The cardinal rule is Less is More. Fewer drivers and TSRs meanfewer complicated interactions and fewer problems with load orders and “RAM cram.”Look for the balance of features and free memory that enables you to use your systemefficiently. Trim your system to the essentials and then let MemMaker optimize it.
8. By default, DOS loads a driver into the largest free UMB and makes the other UMBsavailable to that driver. The /L switch can be used to fine-tune your configuration byforcing small drivers to be loaded into small UMBs. However, loading a driver with the/L switch gives the driver access to only the UMB specified. Therefore, if the driverrequires more than one UMB, you must specify multiple regions by using the /L switch(for example, /L:1;2). To see how a driver uses memory and get a better idea of whatvalues to use with the /L switch, use the MEM /M driver_name command.
9. MEM can be an enormous help when you’re trying to understand memory usage in yourcomputer. If you redirect the output of MEM to a file with the line/C > MEM_USE.TXT
and then load that file into EDIT, you can page back and forth through MEM’s report.With the information MEM supplies, you can easily see how your computer’s memory has been divided and which drivers and TSRs are responsible for your “RAM cram”problems.
10. DOS doesn’t load a driver in a UMB if the UMB is smaller than the driver’s load size.(Usually, the device driver’s file size is equal to its load size.) If the driver requires morememory to run, you must specify one or more min parameters, which are the sizes ofthe UMBs that the driver requires when it runs. This procedure forces DOS to load thedriver into a larger than normal UMB. Specify min in bytes after the correspondingregion parameter, with a comma between (for example, /L:1,4096;2,512).
11. In DR DOS, HIDEVICE is an alternative command that functions the same asDEVICEHIGH.
Examples
Before you can use the DEVICEHIGH= command to load device drivers into upper memory,UMB space must be available to DOS. The following lines set the stage for using DEVICEHIGH= on a typical 80386 or 80486 computer system:
DEVICE=C:\DOS\HIMEM.SYSDEVICE=C:\DOS\EMM386.EXE RAMDOS=HIGH,UMB
First, the DEVICE= lines load HIMEM.SYS and EMM386.EXE into memory. These drivers providethe services necessary for the DOS=HIGH,UMB command, which comes next. Without thesethree lines at the beginning of your CONFIG.SYS file, the DEVICEHIGH= and LOADHIGH com-mands cannot access upper memory, so they use conventional memory instead. Note thatthe DEVICE= line for HIMEM.SYS must come before the line for EMM386.EXE because EMM386requires memory provided by HIMEM. Neither of these device drivers can be loaded with the
FApp
DR-DOS
686 Appendix F Command Reference
DEVICEHIGH= command, but both drivers do attempt to minimize their impact on conven-tional memory when they load.
Now that everything is ready, use the DEVICEHIGH= command to load device drivers intoupper memory just as you would use the DEVICE= command to load them into conventionalmemory. For instance, the following lines load the ANSI.SYS and SETVER.EXE device driversinto UMBs:
DEVICEHIGH=C:\DOS\ANSI.SYS
DEVICEHIGH=C:\DOS\SETVER.EXE
When MemMaker optimizes your CONFIG.SYS file for you, the DEVICEHIGH= command linesstart looking more complicated with the inclusion of the /L and /S switches:
DEVICEHIGH /L:1,4096 /S=C:\DOS\ANSI.SYS
DEVICEHIGH /L:1,1024 /S=C:\DOS\SETVER.EXE
At this point, if you want DOS to prompt you before loading ANSI.SYS and SETVER.EXE, addquestion marks directly after DEVICEHIGH on each command line:
DEVICEHIGH? /L:1,4096 /S=C:\DOS\ANSI.SYS
DEVICEHIGH? /L:1,1024 /S=C:\DOS\SETVER.EXE
Note that making these drivers optional defeats the purpose of optimizing their placementin memory, but it does clearly show that the question mark must be placed directly after thecommand name, not with the equal sign.
MessagesBad or missing filename
Error in CONFIG.SYS line number
Warning: DOS displays this message if it can’t find the file you specified in a DEVICE=,DEVICEHIGH=, or INSTALL= command in your CONFIG.SYS file. filename is the name of the filethat DOS is looking for, and number is the line in CONFIG.SYS where the command is located.Edit the line so that the path and filename are correct and then restart your computer.
Unrecognized command in CONFIG.SYS
Error in CONFIG.SYS line number
Warning: A line in your CONFIG.SYS file contains an illegal command. Usually, this messageindicates that you have mistyped the name of a CONFIG.SYS command or have placed ? in anillegal position.
See Also
DEVICE=, DOS=, EMM386.EXE, HIMEM.SYS, LH or LOADHIGH, MEM, and MEMMAKER
“Loading Device Drivers and TSRs into Upper Memory” in Chapter 19
687DIR 1.0 and later—Internal
DEVLOADThe DEVLOAD command can be used outside CONFIG.SYS to load some device drivers thatshould usually be loaded in CONFIG.SYS. Not all device drives can be loaded from the com-mand line with this command.
SyntaxDEVLOAD drive:\path\driver.ext arguments
Parameters and Switches
drive:\path\driver.ext The full drive, path, and filename for the device driver to beloaded.
arguments Any arguments or parameters specific to the device driver beingloaded.
DIR 1.0 and later—InternalThe DIR command displays information about files on your disks. It is one of the most com-monly used DOS commands. DIR is very handy for trying out complicated pathnames withwildcards to see whether they match the files you wanted.
SyntaxDIR pathname /P /W /A:attributes /O:sortorder /S /B /L /C /CH
Parameters and Switches
pathname Specifies the file or group of files that you want to display informationabout. Wildcards are permitted in the filename portion. If no drive isspecified, the current drive is used. If no subdirectory path is specified,the current subdirectory is used. If no filename is specified, all files (*.*)are assumed.
/P Pauses when the screen is full and waits for you to press any key.
/W Generates a wide (80-column) display of the filenames; the file size, date,and time are not displayed.
/A:attributes (DOS 5 and later) Displays only files with the attributes you specify. Ifthe /A:attributes parameter is omitted, DOS displays all files excepthidden and system files. The colon is optional. For attributes, you canuse any combination of the following, but do not separate them withspaces:
A Displays files that are ready for archiving (backup)
-A Displays files that have not changed since the last backup
FApp
DR-DOS
AVOID
C:\>
BATCHFILE
688 Appendix F Command Reference
D Displays only directories (no files)
-D Displays only files (no directories)
H Displays hidden files
-H Displays all files that are not hidden
R Displays read-only files
-R Displays files that are not read-only
S Displays only system files
-S Displays all files except system files
/O:sortorder (DOS 5 and later) Controls the order in which DOS displays the infor-mation about the files and directories. If you omit the /O:sortorderparameter, DOS displays directories and files in the order in which theyoccur on the disk. The colon is optional. sortorder can be any combina-tion of the following, but do not separate them with any spaces:
N Sorts alphabetically by name (A to Z)
-N Sorts by name in reverse alphabetical order (Z to A)
E Sorts alphabetically by extension (A to Z)
-E Sorts by extension in reverse alphabetical order (Z to A)
D Sorts by date and time (earliest to latest)
-D Sorts by date and time in reverse order (latest to earliest)
S Sorts by size (smallest to largest)
-S Sorts by size (largest to smallest)
C (DOS 6.0 only) Sorts by DoubleSpace compression ratio(lowest to highest)
-C (DOS 6.0 only) Sorts by DoubleSpace compression ratio(highest to lowest)
G Groups directories before files
-G Groups directories after files
/S (DOS 5 and later) Lists all the specified files in the specified directoryand any subdirectories below it.
/B (DOS 5 and later) Lists only filenames with no header or trailer informa-tion. This switch overrides /W. When it is combined with /S, the driveand path are included with each filename, but no date, time, or sizeinformation is displayed.
/L (DOS 5 and later) Displays directory names and filenames in lowercase.
/C (DOS 6.0 and later) Displays the compression ratios of files on aDoubleSpace volume, assuming an 8KB cluster size. /C is suppressed by/W or /B. This parameter cannot be combined with the /CH parameter.
689DIR 1.0 and later—Internal
/CH (DOS 6.0 and later) Displays the compression ratios of files on aDoubleSpace volume, assuming the cluster size of the host drive. /CH issuppressed by /W or /B. This parameter cannot be combined with the /Cparameter.
Notes
1. DIR now displays numbers with embedded commas, making them much easier to read.
2. By default, the list displayed by the DIR command includes the following information:
Volume label and serial number
One directory or filename per line
File size (in bytes)
Date and time of the last modification
Number of files listed
Total bytes listed
Number of available bytes remaining on the disk
3. When more than one sortorder value is specified, the filenames are sorted from the leftvalue to the right value.
4. You cannot use the DIR command for a drive in which you used the ASSIGN or JOINcommand. You must break the assignment before you view the directory for a drive inwhich you used ASSIGN. You cannot use the DIR command on the guest disk driveinvolved in a JOIN command.
5. DIR does not report statistics for disk drives in which you used the ASSIGN or JOIN com-mand. For disk drives in which you used JOIN, DIR reports the free space of the hostdisk drive (the disk drive to which the second disk drive is joined) but does not reportthe total of the two disk drives. You can remove ASSIGN or JOIN from the drive to findits amount of free space.
6. In DOS 5.0 or 6.0, you can use SET DIRCMD to set DIR switches in the AUTOEXEC.BAT file.If you want DIR to display files and directories a page at a time, enter the followingcommand in your AUTOEXEC.BAT file:SET DIRCMD=/P
To override the preset switch, use the following format:DIR /-P
To view the options set with the DIRCMD variable, type the following command:SET
See Also
SET
Appendix B, “DOS Environment Variables,” and “Searching for Files with the DIRCommand” in Chapter 8
FApp
690 Appendix F Command Reference
DISKCOMP 1.0 and later—ExternalDISKCOMP compares two floppy disks on a track-for-track, sector-for-sector basis to seewhether their contents are identical.
SyntaxDISKCOMP source: destination: /1 /8
Parameters and Switches
source: Indicates the source drive to use for the comparison. If this parameter isomitted, the current drive is used. The source drive must be a DOS flop-py disk drive.
destination: Indicates the destination drive to use for the comparison. If this parameteris omitted, the current drive is used. The destination drive must be aDOS floppy disk drive and can be the same as the source drive.
/1 Compares only the first side of the floppy disk, even if the disk or diskdrive is double-sided.
/8 Compares only eight sectors per track, even if the first disk has a differentnumber of sectors per track.
Exit Codes
ERRORLEVEL Value Meaning
0 Disks are the same (success)
1 Disks are not the same
2 Operation halted by the user (Ctrl+C)
3 Operation halted by a fatal disk error
4 Operation halted by an internal error
Notes
1. If you provide only one valid floppy drive name, DOS uses the current drive for thecomparison.
2. If source: and destination: are the same, DISKCOMP prompts you when disks must beswapped.
3. Compare only compatible floppy disks formatted with the same number of tracks, sec-tors, and sides. Other types of comparisons will fail or give misleading results.
4. Do not use DISKCOMP for a network drive or a drive in which you used the ASSIGN, JOIN,or SUBST command.
5. Two disks containing the same files do not compare the same with DISKCOMP if theinformation in the files is arranged differently. For that reason, DISKCOMP is useful onlywhen you’re comparing floppy disks that were duplicated with the DISKCOPY command.
C:\>
BATCHFILE
691DISKCOMP 1.0 and later—External
MessagesCompare error onTrack track, side side
Warning: The disks you are comparing are different at the indicated track and side. DISKCOMPdoes not specify which sectors are different. If you just used DISKCOPY on these disks andDOS reported no problem, the second disk probably has a flaw. Reformat the disk and tryDISKCOPY again. Otherwise, assume that the disks are different.
Compare OK
Information: DISKCOMP compared the two floppy disks and found that they match.
Drive types or diskette types not compatible
or
Incompatible disks
Error: The disk drives are of different types (3 1/2- or 5 1/4-inch disks), or the floppy disksare different. The first disk was successfully read on both sides. DOS noticed the discrepan-cy when it tried to read the second disk.
Unrecoverable read error on drive xTrack track, side side
Warning: DOS made four attempts to read the data from the floppy disk in the specifieddrive. The error is on the indicated track and side. If drive x is the disk that holds the desti-nation (copied) disk, the copy probably is bad. (The disk has a hard, or unrecoverable, readerror.) If drive x holds the original disk, a flaw existed when the disk was formatted, or a flawdeveloped during use.
Run CHKDSK on the original disk and look for the line bytes in bad sectors. Even if thisline is displayed, the original disk and copy may be good. (The bad sectors may not be usedby any of the files on the disk.) When you format a disk, FORMAT detects bad sectors and“hides” them. DISKCOMP, however, does not check for bad sectors; it tries to compare thetracks, even if bad sectors exist. For safety’s sake, retire the original disk soon.
Invalid drive specificationSpecified drive does not exist or is non-removable
Error: One (or both) of the specified drives does not exist or is a hard disk. This error canresult if you specify only one drive to DISKCOMP and the current drive is a hard disk.
See Also
DISKCOPY
“Comparing Disks with DISKCOMP” in Chapter 8
FApp
692 Appendix F Command Reference
DISKCOPY 1.0 and later—ExternalDISKCOPY copies the contents of one floppy disk to another on a track-for-track basis, makingan exact copy. DISKCOPY works only with floppy disks.
SyntaxDISKCOPY source: destination: /1 /8 /V
Parameters and Switches
source: Indicates the source drive to use for the copy. If this parameter is omitted,the current drive is used. The source drive must be a DOS floppy disk drive.
destination: Indicates the destination drive on which the copy will be made. If this para-meter is omitted, the current drive is used. The destination drive must be aDOS floppy disk drive and can be the same as the source drive.
/1 Compares only the first side of the floppy disk, even if the disk or disk driveis double-sided.
/8 (DOS 1.0 to 5.0 only) Compares only eight sectors per track, even if thefirst disk has a different number of sectors per track.
/V Verifies that the copy is correct by reading back all information written tothe destination disk. This verification slows the copy process. The /V switchis similar to VERIFY set ON.
Exit Codes
ERRORLEVEL Value Meaning
0 DISKCOPY operation successful
1 Operation halted by a nonfatal disk read/write error
2 Operation halted by the user (Ctrl+C)
3 Operation halted by a fatal disk error
4 Operation halted by an internal error
Notes
1. DISKCOPY now uses the directory that the TEMP environment variable points to if it runsout of memory while reading the source disk. Therefore, if you make single drive copies(for example, DISKCOPY A: A:), you no longer have to swap disks two or three times tomake those copies. As long as your hard drive has enough space, DISKCOPY reads theentire source disk before asking for the destination disk.
2. The source and destination disk drives must be floppy disk drives—not hard or net-worked disk drives, RAM disks, or disk drives in which you used the JOIN or SUBSTcommand. Defaulting to or specifying a nonreal source or destination disk drive causesDOS to return an error message and abort the copy operation.
C:\>
BATCHFILE
693DISKCOPY 1.0 and later—External
3. If you do not provide a source disk drive name, DISKCOPY uses the default disk drive. Ifyou provide an improper source disk drive, DISKCOPY issues an error message and aborts.
4. If your system has a single floppy disk drive and you provide only one valid floppy diskdrive name, DOS uses that drive as both the source and destination disk drive for thecopy. If your system uses two floppy disk drives and you provide only one valid diskdrive name, DOS displays the Invalid drive specification error message.
5. DISKCOPY destroys any information recorded on the destination disk. Do not use as thedestination disk one that contains information you want to keep.
6. To ensure that the copy is correct, run DISKCOMP on the two disks.
7. DISKCOPY ignores the effects of an ASSIGN command.
8. DISKCOPY recognizes unformatted destination disks and automatically formats them aspart of the copying process.
9. Write-protecting the source disk is important when you use only one floppy disk driveto make a copy of a disk. DOS periodically prompts you to change the disk. You cannotdamage a write-protected source disk if you inadvertently insert that disk when DOSasks for the destination disk.
10. When you use DISKCOPY, DOS reads into memory as much information as possible fromthe source disk. DOS then copies this information to the destination disk and reads thenext batch of information from the source disk. The more free memory is available, theless time you need to copy a disk.
11. DISKCOPY copies whatever level of file fragmentation is on the source disk to the destina-tion disk. To avert this problem, you might want to run DEFRAG on the source diskbefore copying it or use FORMAT on the destination disk and then use XCOPY to copy filesto it.
MessagesDrive types or diskette types not compatible
Error: The drive types or disk capacities that you tried to use are different and cannot han-dle the operation, or the destination disk is the wrong capacity. DOS read the first disk, butthe drive specified as the destination is not the right type. DISKCOPY cannot create a high-density copy in a double- or single-density disk drive, or a double-sided copy in a single-sided disk drive. Additionally, most high-density drives cannot make a high-density copyusing double-density disks.
Read error on drive d:Write error on drive d:
Warning: DISKCOPY cannot accurately read or write the disk in drive d. The disk is not prop-erly inserted, the source disk is not formatted (or is a non-DOS disk), or the drive door isopen. Check these possibilities.
FApp
694 Appendix F Command Reference
SOURCE diskette bad or incompatibleTARGET diskette bad or incompatible
Warning: DISKCOPY detected errors while reading the source disk (first message) or writing tothe destination, or target, disk (second message). Bad sectors may exist on either disk, or thedisk may be in the wrong type of drive.
Determine whether either floppy disk has bad sectors. If so, do not use DISKCOPY on eitherdisk. If the source disk is bad, use COPY *.* to copy files from the source disk. If the destina-tion disk is bad, try a different disk or try to reformat the disk and then use DISKCOPY.
Invalid drive specificationSpecified drive does not exist or is non-removable
Error: One or both of the two specified drives do not exist or are hard disks.
See Also
DISKCOMP and VERIFY
“Copying Entire Disks with DISKCOPY” in Chapter 8
DISKMAP.EXEDISKMAP.EXE creates a backup FAT that may aid UNDELETE in restoring deleted files. It is notas reliable as DELWATCH, but it uses less memory.
SyntaxDISKMAP drive:... /D
Parameters and Switches
drive:... Indicates the drive or drives to run DISKMAP on. Specifying a drive overwritesany existing DISKMAP file. Without this switch, the existing file is updated.
/D Overwrites any existing DISKMAP file with a new one.
DISKOPT.EXEDISKOPT.EXE optimizes drive performance by defragmenting files and free space and organiz-ing files in a directory in contiguous space.
SyntaxDISKOPT drive: /Sx /Mx /B /O /N /RESTORE=drive:\STACVOL.EXT
DR-DOS
DR-DOS
695DISPLAY.SYS (device driver) 3.3 and later—External
Parameters and Switches
drive: Indicates the drive to optimize.
/Sx Selects directory sort order, where x can be any of the following:
a Sort by name
e Sort by extension
d Sort by date
s Sort by file size
n No sort
/Mx Selects the disk optimization method, where x can be any of the following:
1 Full Optimization
2 Full with File Reordering
3 File Defragment Only
4 Free Space Defragment Only
5 Sort Directories Only
6 Full Optimization with Restack
/B Uses a monochrome display.
/O Starts optimization immediately without user intervention.
/N Does not redefine characters of EGA or VGA systems.
/RESTORE=drive: Restores an unmounted Stacker drive if optimization was interrupted.\STACVOL.EXT
DISPLAY.SYS (device driver) 3.3 and later—External
The DISPLAY.SYS device driver adds international code page switching to the DOS consoledevice. When combined with the other international utilities that DOS provides, it enablesyou to display one of six international character sets (code pages) on your EGA, VGA, orLCD screen. DISPLAY.SYS must be loaded in a DEVICE= or DEVICEHIGH= statement in yourCONFIG.SYS file.
SyntaxDEVICE=drive:\path\DISPLAY.SYS CON:=(type,hard_cp,num_cp)
DEVICEHIGH=drive:\path\DISPLAY.SYS CON:=(type,hard_cp,num_cp)
FApp
CONFIGSYS
DEVICE =
696 Appendix F Command Reference
To specify the number of subfonts that the display hardware can support, use the followingformat:
DEVICE=drive:\path\DISPLAY.SYS CON:=(type,hard_cp,(num_cp,subfonts))
DEVICEHIGH=drive:\path\DISPLAY.SYS CON:=(type,hard_cp,(num_cp,subfonts))
Parameters and Switches
drive:\path\ Specifies the full path to the DISPLAY.SYS file on your system. Setupplaces the DISPLAY.SYS file in the C:\DOS subdirectory by default. If thefull path to DISPLAY.SYS isn’t specified, DOS looks for the file in the rootdirectory of the startup drive.
CON:= Specifies that the CON device is being described. The colon is optional,but the parameter itself is required.
type Indicates the type of display being used. It must be one of the type codesfrom the following display type table. This parameter must be enclosedin parentheses.
Display Type type num_cp subfonts
Color Graphics Adapter CGA 0 0
Monochrome Display Adapter MONO 0 0
EGA, VGA, or Super VGA EGA 0 to 6 2
IBM PC Convertible LCD LCD 0 to 1 1
Note that although CGA and MONO display types are allowed, neither ofthese displays supports code page switching. Loading DISPLAY.SYS for aCGA or MDA display is a waste of memory.
hard_cp Specifies the hardware code page built into the display, normally 437 inthe United States. As long as you specify this parameter, you can alwaysswitch back to the default hardware code page built into your displayadapter. See Chapter 14, “Understanding the International Features ofDOS,” for a list of the code pages that MS-DOS supports.
num_cp Specifies the number of software code pages to allow space for in mem-ory. Valid values for num_cp are shown in the previous display type table. If this parameter is omitted, a default value of 1 is used. Specifying 0reserves no memory for display code pages, which effectively disablescode page switching.
subfonts Indicates the number of subfonts that your display hardware supports foreach code page. The default values for this parameter are shown in theprevious display type table. If subfonts is specified, it and the num_cpparameter must be enclosed in a second set of parentheses.
697DISPLAY.SYS (device driver) 3.3 and later—External
Notes
1. Load the DISPLAY.SYS driver after any other device drivers that affect the DOS consoledevice. For instance, you should load DISPLAY.SYS after you load ANSI.SYS in your CONFIG.SYS file. Otherwise, the other console driver is likely to disable DISPLAY.SYS.
2. When DISPLAY.SYS is loaded, it reserves memory for itself and for num_cp code pages.DISPLAY.SYS itself uses about 5KB of memory, the first code page adds 13KB, and eachadditional code page requires about another 10KB. In total, DISPLAY.SYS needs 18KB ofRAM for one code page, 28KB of RAM for two code pages, and so on.
3. If you do not specify the hardware code page that the display supports, you cannotswitch back to it after you activate an alternative software code page. For this reason,you should always specify a value for hard_cp.
4. Although you are allowed to specify num_cp equal to zero, doing so defeats the purposeof loading DISPLAY.SYS. With no additional code pages in memory, you can’t switch to adifferent one, which is the only reason for using DISPLAY.SYS in the first place. CGAand MDA displays do not support code page switching, so the maximum num_cp youcan specify for these displays is zero, which once again is a pointless configuration.
5. To display a software code page, you need to perform a number of additional steps. Youuse the MODE command to prepare and load the code page information into the memoryset aside by DISPLAY.SYS. Then, you can use MODE to select the display code page, or youcan load NLSFUNC and use the CHCP command to change the active code page for all yourdevices at once. Additionally, you might want to add the COUNTRY= command to yourCONFIG.SYS file to make case conversion and sort order information available.
6. The KEYB utility provides code page support for the input side of the DOS consoledevice. By using KEYB, you can remap your keyboard to conform with various interna-tional conventions.
7. PRINTER.SYS performs a similar function for certain IBM printers that support codepage switching. It is available on the DOS 6 Supplemental disk.
Examples
The following line enables an EGA or a VGA display, which uses hardware code page 437,to load and switch to an alternative code page:
DEVICE=C:\DOS\DISPLAY.SYS CON:=(EGA,437,1)
If you want to load DISPLAY.SYS into upper memory with room for two code pages, use thefollowing line:
DEVICEHIGH=C:\DOS\DISPLAY.SYS CON=(EGA,437,2)
Notice that you can use the CON= or the CON:= format. Two subfonts are available in both ofthese examples because a display type of EGA defaults to two subfonts.
FApp
698 Appendix F Command Reference
CONFIGSYS
If you have an IBM Convertible LCD display that uses hardware code page 865 (Nordic)and you want to enable code page switching on it, add the following line to your CONFIG.SYSfile:
DEVICE=C:\DOS\DISPLAY.SYS CON=(LCD,865,1)
Only one subfont is available because that is the default (and maximum) for LCD displays.
See Also
CHCP, COUNTRY=, MODE device CP, NLSFUNC, and PRINTER.SYS
Chapter 14, “Understanding the International Features of DOS”
DOS= 5.0 and later—InternalThe DOS= command offers two options that enable you to adjust the way DOS loads anduses upper memory. If you specify DOS=HIGH, DOS attempts to load itself into the highmemory area (HMA). The DOS=UMB command enables DOS to load resident programs intoupper memory blocks (UMBs) with the DEVICEHIGH= and LOADHIGH commands. DOS= can beused only in your CONFIG.SYS file.
SyntaxDOS=high_low,umb_noumb
Parameters and Switches
high_low Specifies whether DOS should attempt to load itself in the high memory area(DOS=HIGH) or in conventional memory (DOS=LOW). To load HIGH, DOS requiresan extended memory (XMS) manager such as HIMEM.SYS. The default value is LOW.
umb_noumb Specifies whether DOS should manage upper memory blocks created by aUMB provider such as EMM386.EXE (DOS=UMB) or not (DOS=NOUMB). The defaultvalue is NOUMB.
Notes
1. If you include a DOS= command in your CONFIG.SYS file, you must include at least oneparameter with it. To include more than one parameter, separate them with commas(for example, DOS=HIGH,UMB).
Always specify DOS=HIGH in CONFIG.SYS if your computer supports it. Few programs usethe HMA, and loading DOS high can easily free 45KB to 55KB of conventional memory.This is a rare opportunity to get something valuable without losing anything.
699DOS= 5.0 and later—Internal
2. Although you can enter more than one DOS= line in your CONFIG.SYS file, it’s better notto do so. In general, if the combination of parameters specified with more than oneDOS= line would be legal on the first DOS= line in the file, you are okay. Sometimes youcan specify DOS=UMB after using the DEVICEHIGH= command, but you should avoid doingso when possible. All the load order interactions are too confusing and aren’t guaran-teed to remain the same from one version of DOS to the next. Use one DOS= line, locat-ed directly after the line that loads your memory manager software.
3. You must load HIMEM.SYS (or another extended memory manager) before specifyingDOS=HIGH in your CONFIG.SYS file. DOS loads itself into the HMA after all other CON-FIG.SYS processing is complete. If the HMA is unavailable or in use at that time, DOSdisplays an error message (see the first message in the “Messages” section) and loadsitself into conventional memory. The HMA is not available on 8088 and 8086 proces-sors, but is available on 80286 computers with A20 line support and at least 1MB of RAM.
4. To allow DOS to load resident programs into upper memory blocks, you must load aUMB provider (such as EMM386.EXE) and specify DOS=UMB in your CONFIG.SYS file. Noerror message is displayed if DOS is unable to access the upper memory blocks.
Examples
A typical entry for DOS= in your CONFIG.SYS file follows:
DEVICE=C:\DOS\HIMEM.SYSDEVICE=C:\DOS\EMM386.EXE RAMDOS=HIGH,UMB
This entry loads DOS into the HMA and enables the use of the LOADHIGH and DEVICEHIGH=commands. Note that HIMEM.SYS and EMM386.EXE must be loaded before the DOS=HIGH,UMBcommand. The following series of commands uses an alternative syntax to do the samething:
DEVICE=C:\DOS\HIMEM.SYSDEVICE=C:\DOS\EMM386.EXE RAMDOS=HIGHDOS=UMB
Because you can split the DOS=HIGH and DOS=UMB commands, you may be tempted to addother commands between them. The following series of commands is legal, but you shouldavoid chaotic arrangements like this in your CONFIG.SYS file:
DEVICE=C:\DOS\HIMEM.SYSDOS=HIGHFILES=50BUFFERS=20DEVICE=C:\DOS\EMM386.EXE RAMLASTDRIVE=ZSWITCHES=/WDEVICEHIGH=C:\DOS\ANSI.SYSDEVICEHIGH=C:\DOS\RAMDRIVE.SYSDOS=UMB
FApp
700 Appendix F Command Reference
The use of DEVICEHIGH= before the DOS=UMB command is misleading. Also, if a future versionof DOS executes the UMB portion of the DOS= command with the first DOS=HIGH line, UMBsupport may not be present yet, and the command could fail without displaying an errormessage. Although this particular series of commands seems to work, other arrangementsand commands may cause problems. Because you gain nothing from this type of arrange-ment, avoid it. Use one DOS= line in your CONFIG.SYS file, located directly after the lines thatload HIMEM.SYS and EMM386.EXE, and insert blank lines to make logical groups of commandsstand out, as shown here:
DEVICE=C:\DOS\HIMEM.SYSDEVICE=C:\DOS\EMM386.EXE RAMDOS=HIGH,UMB
BUFFERS=20FILES=50LASTDRIVE=ZSWITCHES=/W
DEVICEHIGH=C:\DOS\ANSI.SYSDEVICEHIGH=C:\DOS\RAMDRIVE.SYS
You probably will agree that this example is much easier to read and understand than theone before it.
MessagesHMA not available: Loading DOS low
Warning: You specified DOS=HIGH, but DOS was unable to load into the HMA. Typically, itcannot load into this area because the DEVICE=C:\DOS\HIMEM.SYS line in your CONFIG.SYS fileis not present or is after the DOS=HIGH line. Less likely causes are that the HMA is already inuse or that HIMEM was unable to gain control of the A20 line.
See Also
DEVICEHIGH=, EMM386.EXE, HIMEM.SYS, and LH (or LOADHIGH)
Chapter 19, “Configuring Your Computer”
DOSBOOKDOSBOOK starts the full-screen help utility and online documentation for DR DOS. Normally,you would just enter DOSBOOK at the command line and choose from topics in the menu sys-tem. However, you can jump directly to topics using the following syntax.
SyntaxDOSBOOK topic
Parameters and Switches
topic The name of a DR DOS command
DR-DOS
701DOSKEY 5.0 and later—External
DOSDATADOSDATA loads the system tables into upper memory or conventional memory.
SyntaxDOSDATA=umb|noumb
Parameters and Switches
umb|noumb Specifies whether the system tables are loaded into upper memory or conven-tional memory. The umb parameter loads the system tables (FILES, FCBS,BUFFERS, LASTDRIVE, STACKS) into upper memory if available. The noumb para-meter loads the system tables into conventional memory. The default settingis noumb.
DOSDOCKDOSDOCK enables mobile computer users to use hot or warm docking. The command speci-fied must be any DOS executable format (for example, .EXE, .COM, or .BAT files).
DOSDOCK loads and remains resident waiting for a DOCK or UNDOCK event. You can set the DOCKor UNDOCK environment variable in the AUTOEXEC.BAT file by using the SET command. DOSDOCKcan run the SET DOCK= or SET UNDOCK= command only when no other applications, includingWindows, are running.
SyntaxDOSDOCK /?
Parameters and Switches
/? Displays the abbreviated online help.
DOSKEY 5.0 and later—ExternalDOSKEY enhances the usability of the DOS command line. It adds standard editing capabili-ties and the capability to recall recently used command lines. It also has fairly extensivemacro capabilities, with which you can create command aliases or fast batch files. WhenDOSKEY is first run, it loads itself into memory and remains there until you reboot your com-puter.
SyntaxDOSKEY /REINSTALL /BUFSIZE=size /MACROS /HISTORY /INSERT /OVERSTRIKEmacroname=text ...
or
DOSKEY /REINSTALL /BUFSIZE=size /M /H /INSERT /OVERSTRIKEmacroname=text ...
FApp
PC-DOS
PC-DOS
C:\>
BATCHFILE
TSR

702 Appendix F Command Reference
Parameters and Switches
/REINSTALL Installs a new copy of DOSKEY even if a copy already is installed. This is theonly way to resize the DOSKEY buffer without restarting your computer, butthe memory used by the previous copy of DOSKEY will be wasted. Thisclears the DOSKEY buffer.
/BUFSIZE=size Indicates the size of the buffer, in bytes, that DOSKEY uses to store macrosand command lines. The default is 512, and the minimum is 256.Increasing or decreasing the buffer size affects how much memory DOSKEYrequires when loaded.
/MACROS Displays a list of the DOSKEY macros you have defined. You can redirectoutput by using the redirection symbol, >. This switch can be abbreviatedas /M.
/HISTORY Displays a list of all commands currently stored by DOSKEY. You can redi-rect output by using the redirection symbol, >. This switch can be abbrevi-ated as /H.
/INSERT Inserts new text into the command line (insert mode on). The default is/OVERSTRIKE. Pressing the Insert key toggles between insert and overstrikemodes.
/OVERSTRIKE Makes new text overwrite old text on the command line (overstrike modeon). This is the default setting. Pressing the Insert key toggles betweeninsert and overstrike modes.
macroname Specifies the name of the macro that you want to define.
text Specifies the commands that you want DOS to execute when you typemacroname at a DOS command prompt. If text is null, the definition ofmacroname is deleted.
... Indicates that you can enter as many macroname=text definitions as will fitinto the current command line. (DOS is limited to 127 characters in a sin-gle command line.)
Notes
1. Ordinarily, DOS remembers the last command you typed at the command line. WithDOSKEY, however, DOS can store a history of commands in memory. The number ofcommands retained in memory depends on the size of the buffer (normally 512 bytes).When the buffer is full, DOSKEY eliminates the oldest command to make room for thenew command. The buffer contains macros and the history of commands.
2. You can press several keys to recall a command in the history. In addition, you can usemany keys and key combinations to edit a command on the command line. These keysand their functions are listed in Appendix D, “DOS and DOS Utility Programs’Keyboard Commands.”
703DOSKEY 5.0 and later—External
3. DOSKEY enables you to create macros. A macro, like a batch file, performs one or moreDOS commands assigned to a specific name. After you type the name of a macro andpress Enter, the macro executes the commands assigned to the macro name. When youcreate a macro, you can use the following special symbols:
Code Description
$g or $G Redirects output; use instead of >
$g$g or $G$G Adds to an output file; use instead of >>
$l or $L Redirects input; use instead of <
$b or $B Indicates piping; use instead of |
$t or $T Separates macro commands
$$ Places the dollar sign in the command line
$1 through $9 Replaceable parameters; same as %1 through %9 in a batch file
$* Replaceable parameter that represents everything typed in thecommand line after the macro name
When you create a macro, you can include any valid DOS command, including thename of a batch file. You can start a batch file from a macro, but you cannot start amacro from a batch file.
Examples
With DOSKEY installed, you can easily turn the last few DOS commands that you typed into abatch file. Simply ask DOSKEY to display the contents of the command-line history buffer andredirect the output to a file as follows:
DOSKEY /HISTORY > MYHIST.BAT
Next, load MYHIST.BAT into an ASCII editor such as EDIT and remove any command linesthat you don’t need.
To define a macro, enter the name of the macro followed by the commands you want exe-cuted. Separate the macro name from the commands with an equal sign. For example, thefollowing creates a macro named CDD that changes the current drive and current directory:
DOSKEY CDD=$1: $T CD $2
After the CDD macro is defined, you could enter the following command at the DOS promptto make drive D the current drive and \MYSTUFF the current directory on drive D:
C:\>CDD D \MYSTUFF
When the preceding command is executed, the CDD macro runs and executes the followingDOS commands:
C:\>D:
D:\>CD \MYSTUFF
D:\MYSTUFF>
FApp
704 Appendix F Command Reference
MessagesCannot change BUFSIZE
Error: You cannot change the DOSKEY buffer unless you also use the /REINSTALL switch,which clears the buffer.
Insufficient memory to store macro.Use the DOSKEY command with the /BUFSIZE switch to increase available memory.
Warning: Your DOSKEY macros have filled the total space set aside for them. You must enlargethe memory area for macros (the default is 512 bytes) by using the BUFSIZE switch (and the/REINSTALL switch) before you can enter any new macros. Using REINSTALL clears the buffer.
Invalid macro definition
Error: You entered an illegal character or command with DOSKEY or attempted to create aDOSKEY macro with an illegal definition. This message appears, for example, if you use a GOTOcommand in a DOSKEY macro. Correct any errors and carefully retype the macro.
See Also
Chapter 18, “Mastering DOSKEY and Macros” and Appendix D, “DOS and DOS UtilityPrograms’ Keyboard Commands”
DOSSHELL 4.0 to 6.0—ExternalThe DOSSHELL command starts the DOS Shell program, which is a full-screen graphical shellprogram that provides an alternative to using the traditional DOS command line. DOSSHELLis not included in the standard DOS 6.22 package but is available on the DOS 6.22Supplemental disk.
SyntaxDOSSHELL /B /T:screen /G:screen
Parameters and Switches
/B Starts the DOS Shell in black-and-white mode rather than in color.
/T:screen Displays the DOS Shell in text mode, using the resolution described byscreen. (See the screen table below.) You cannot specify /T:screen with/G:screen.
/G:screen Displays the DOS Shell in graphics mode, using the resolution described byscreen. (See the following table.) You cannot specify /G:screen with/T:screen.
Switch Monochrome or CGA EGA VGA
/T:L 25 lines 25 lines 25 lines
/T:M 43 lines 43 lines
DISK
705DOSSHELL 4.0 to 6.0—External
/T:M1 43 lines 43 lines
/T:M2 43 lines 50 lines
/T:H 43 lines 43 lines
/T:H1 43 lines 43 lines
/T:H2 43 lines 50 lines
/G:L 25 lines 25 lines 25 lines
/G:M 43 lines 30 lines
/G:M1 43 lines 30 lines
/G:M2 43 lines 34 lines
/G:H 43 lines 43 lines
/G:H1 43 lines 43 lines
/G:H2 43 lines 60 lines
Notes
1. When you start the DOS Shell without parameters, it uses the display and color set-tings from the last time DOSSHELL was run. To use a different display mode, specify a/T:screen or /G:screen parameter when you start the program. DOS Shell recordsthese settings in the DOSSHELL.INI file.
2. At least 384KB of free conventional memory are required to start the DOS Shell.
3. Each time you start the DOS Shell, it searches the disk for directories and files to dis-play up-to-date listings in file and tree windows. If you have a large hard disk or a com-plicated directory structure, this search may take a few seconds.
4. Do not start Microsoft Windows from the DOS Shell. If you need to run both pro-grams, start Microsoft Windows first and then run the DOS Shell from Windows.
5. Your DOSSHELL settings are preserved in your DOSSHELL.INI file. The DOS 6.0 installa-tion does not overwrite or modify this file if it exists, which may produce inconsisten-cies on your system (references to BACKUP rather than to MSBACKUP, for example). You canavoid these inconsistencies by renaming DOSSHELL.INI before you install DOS 6.0 andthen manually editing changes from the renamed DOSSHELL.INI into the newDOSSHELL.INI.
When the DOS 6.0 Setup program installs DOSSHELL, it expands one of three files(CGA.IN_ for CGA monitors, EGA.IN_ for EGA and VGA monitors, or MONO.IN_ formonochrome monitors) from the DOS 6.0 distribution disks and renames itDOSSHELL.INI. To restore your DOS Shell configuration to its defaults, you can expandone of these three files (by using EXPAND) and replace your present copy of DOSSHELL.INIwith it.
6. By defining an environment variable named DOSSHELL, you can specify where you wouldlike DOSSHELL.INI to be located. For instance, to store the DOSSHELL.INI file in theC:\DOS\MSDOSDATA subdirectory, you could add the following SET command to your
FApp
706 Appendix F Command Reference
AUTOEXEC.BAT file.SET DOSSHELL=C:\DOS\MSDOSDATA
If no environment variable named DOSSHELL is defined, DOS Shell searches for its set-tings file in the directory that contains DOSSHELL.EXE. If DOSSHELL.INI cannot be found,a new one is created.
7. DOS Shell creates any temporary files, including task swapping files, in the subdirecto-ry pointed to by the TEMP environment variable if it is defined. If TEMP isn’t defined,temporary files are created in the subdirectory that contains DOSSHELL.EXE.
8. If you are running POWER, the clock displayed in the DOS Shell program may slow downor stop completely. DOS Shell uses a timer to update the onscreen clock, and POWERslows down the timer. Note that only the onscreen clock displayed by DOS Shell isaffected. The MS-DOS system clock continues to reflect the correct time.
9. In DOS 4.0, DOS Shell was started by a batch file that recorded all the configurationinformation needed to run DOS Shell on your system. This version of the DOS Shellwas very different from later versions, and most of the information presented heredoesn’t apply to it.
Examples
To start the DOS Shell in the default screen mode, enter the following:
DOSSHELL
To start the DOS Shell in black-and-white mode, enter the following:
DOSSHELL /B
Use this command if you have a black-and-white monitor or a laptop or notebook computerwith an LCD screen.
MessagesNot enough memory to run DOSSHELL
Error: Not enough conventional memory is available to start DOSSHELL. The DOS Shell pro-gram requires 384KB of free conventional RAM to load into memory. You may have toomany resident programs (TSRs) loaded into memory, in which case you should attempt toremove any that you don’t need. You may be trying to start DOSSHELL from a secondary copyof the command processor launched from another program, in which case you should typeEXIT to return to your program, quit the program, and then run DOSSHELL.
Not enough free conventional memory to run program
or
Not enough free extended memory to run program
Either of these messages can appear when you try to start a program from the DOS Shellwithout sufficient available memory. Remove TSRs from memory to free conventionalmemory. If you are short of extended memory, use MEM /C to see what programs are using

707DPMS.EXE
extended memory in your computer. Often you can make more extended memory availableby decreasing the size of your SMARTDRV disk cache or by allocating less memory to use asexpanded memory with EMM386.
Unable to run specified program.Too many tasks running.
Error: You have already opened the maximum number of tasks for your configuration. Closeone or more of the open tasks.
Unable to run specified program.
Error: The program that you tried to start cannot be started correctly. You may have speci-fied the program name incorrectly.
You cannot quit MS-DOS Shell with programs in the Active Task List; quit thoseprograms first.
Error: You tried to exit the DOS Shell while at least one program was switched. Exit theswitched program and then quit the DOS Shell.
See Also
Chapter 4, “Using the DOS Shell”
DPMIDPMI temporarily loads or unloads DOS Protected Mode Interface support for the EMMmemory manager. DPMI is normally handled through a switch on the EMM386 drive in theCONFIG.SYS file. This enables you to unload or load it from the command line.
SyntaxDPMI ON|OFF /H
Parameters and Switches
ON|OFF ON loads DPMI support; OFF unloads it.
/H Displays abbreviated help.
DPMS.EXEDPMS.EXE allows most of the Stacker driver to be stored in extended memory, freeing con-ventional and upper memory for other programs.
SyntaxDEVICE=c:\stacker\dpms.exe /?
FApp
DR-DOS
PC-DOS
708 Appendix F Command Reference
Parameters and Switches
/? Displays the abbreviated online help.
Notes
DPMS requires at least a 386 computer with more than 1MB of RAM and a memory managerthat provides Virtual Control Program Interface (VCPI) services.
DPMS does not work unless the DPMS.EXE file is stored on the hard disk and referenced by aDEVICE= line in the CONFIG.SYS file.
Examining the CONFIG.SYS file and messages shown when the computer is started helpsdetermine whether DPMS is used.
Stacker Setup automatically uses DPMS when possible. However, if STACKER.INI contains an/EMS, /UM, or /-DPMS switch, Stacker does not use DPMS. Stacker Setup adds the EMS switchonly if DPMS cannot be used and if a large drive (more than 400MB) is compressed.
To use EMS, delete any switches that enable DPMS. Using expanded memory (EMS) requiresa special memory manager, such as EMM386.
DRIVER.SYS (device driver) 3.2 and later—External
The DRIVER.SYS device driver can be used to create an additional drive letter for a floppydisk drive or set the characteristics of a floppy disk drive. For instance, if an external floppydrive is attached to your computer, you can use DRIVER.SYS (or DRIVPARM=) to tell DOS to assign a drive letter to the drive. A more common use is to create a new drive letter—perhaps one with different characteristics—for a drive.
SyntaxDEVICE=drive:\path\DRIVER.SYS /D:num /C /F:type /H:heads /S:sectors/T:tracks
or
DEVICEHIGH=drive:\path\DRIVER.SYS /D:num /C /F:type /H:heads/S:sectors /T:tracks
Parameters and Switches
drive:\path\ Specifies the full path to the DRIVER.SYS file on your system. Setup placesthe DRIVER.SYS file in the C:\DOS subdirectory by default. If the full pathto DRIVER.SYS isn’t specified, DOS looks for the file in the root directoryof the startup drive.
/D:num Specifies the physical drive number (num). Valid numbers are 0 to 127.DOS assigns floppy drive numbers sequentially, with the first floppydrive as 0, the second as 1, the third as 2, and so on. Note that if you
CONFIGSYS
DEVICE =
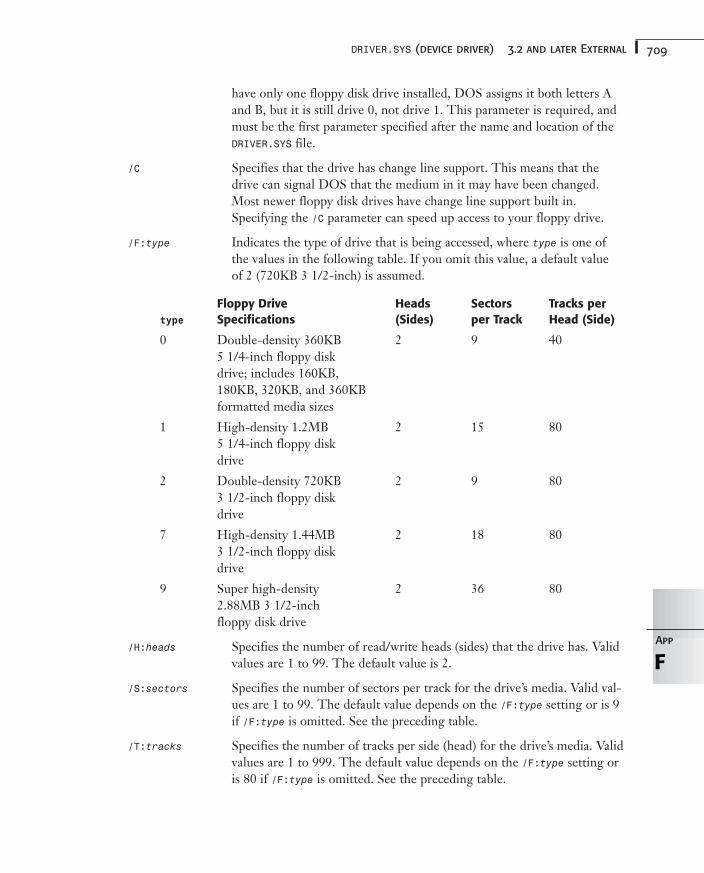
709DRIVER.SYS (device driver) 3.2 and later External
have only one floppy disk drive installed, DOS assigns it both letters Aand B, but it is still drive 0, not drive 1. This parameter is required, andmust be the first parameter specified after the name and location of theDRIVER.SYS file.
/C Specifies that the drive has change line support. This means that thedrive can signal DOS that the medium in it may have been changed.Most newer floppy disk drives have change line support built in.Specifying the /C parameter can speed up access to your floppy drive.
/F:type Indicates the type of drive that is being accessed, where type is one ofthe values in the following table. If you omit this value, a default value of 2 (720KB 3 1/2-inch) is assumed.
Floppy Drive Heads Sectors Tracks per
type Specifications (Sides) per Track Head (Side)
0 Double-density 360KB 2 9 405 1/4-inch floppy diskdrive; includes 160KB,180KB, 320KB, and 360KBformatted media sizes
1 High-density 1.2MB 2 15 805 1/4-inch floppy diskdrive
2 Double-density 720KB 2 9 803 1/2-inch floppy diskdrive
7 High-density 1.44MB 2 18 803 1/2-inch floppy diskdrive
9 Super high-density 2 36 802.88MB 3 1/2-inchfloppy disk drive
/H:heads Specifies the number of read/write heads (sides) that the drive has. Validvalues are 1 to 99. The default value is 2.
/S:sectors Specifies the number of sectors per track for the drive’s media. Valid val-ues are 1 to 99. The default value depends on the /F:type setting or is 9if /F:type is omitted. See the preceding table.
/T:tracks Specifies the number of tracks per side (head) for the drive’s media. Validvalues are 1 to 999. The default value depends on the /F:type setting oris 80 if /F:type is omitted. See the preceding table.
FApp
710 Appendix F Command Reference
Notes
1. DOS assigns drive letters in a specific order. A and B always refer to the first one or twofloppy drives in the system. If the system has a hard disk, the primary partition isassigned the letter C. Next, any remaining hard disk partitions are assigned letters.After that, each DOS-accessible block device driver listed in CONFIG.SYS is assigned aletter on a first-come, first-served basis. (If DoubleSpace is loaded, it modifies thisassignment order by skipping four letters and then working backward. See DBLSPACE formore information.)
For instance, if you have two floppy drives and one hard disk (with a single partition)and you include a single DRIVER.SYS line in your CONFIG.SYS file, the letter D would beassigned. DRIVER.SYS displays a message informing you of the letter assigned when it isinstalled. (See the first message in the “Messages” section.)
2. Most newer floppy disk drives can signal the computer when their drive door has beenopened. Because opening the door implies that the disk in the drive may have beenchanged, this feature is referred to as change line support. Unless you are installing a360KB 5 1/4-inch disk drive, the chances are good that your new floppy drive haschange line support built in. Specifying the /C parameter can speed up DOS access tothe drive.
3. MS-DOS 6 seems to have problems recognizing that the medium in a drive haschanged when the medium does not have a volume serial number. Disks most likely tonot have serial numbers are ones formatted by DOS versions before 4.0, preformatteddisks, and disks formatted with some third-party utilities. This is a good reason tomake sure that the hardware change line is working for your disk drive. If DOS isunaware that you have changed the disk in a floppy disk drive, it may write the wrongfile allocation table (FAT) to the disk, destroying any data that was previously storedon it.
4. If you specify the /F:type parameter, you can omit the /H:heads, /S:sectors, and/T:tracks parameters, and vice versa. You can use any combination of these parameters;the last ones entered have precedence.
5. Many times, the DRIVER.SYS device driver is simpler and more flexible to use than DRIVPARM=, although both often achieve the same results. They can both configure logi-cal drives, but only DRIVER.SYS can create a new one. DRIVPARM=, however, uses no addi-tional memory in your system.
6. You cannot use DRIVER.SYS to reconfigure an existing drive to support a format it wasnot made for. For instance, DRIVER.SYS cannot be used to allow an older 360KB 5 1/2-inch disk drive to read the newer 1.2MB disks. DRIVER.SYS can instruct DOS to makeuse of only the capabilities that both DOS and the drive support.
711DRIVPARM= 3.2 and later—Internal
Examples
Suppose that your system has two 5 1/4-inch disk drives and a hard disk. To configure anexternal 1.44MB 3 1/2-inch floppy disk drive that you have attached to your system, enter aline such as the following in your CONFIG.SYS file:
DEVICE=C:\DOS\DRIVER.SYS /D:2 /F:7
After loading, DRIVER.SYS displays the following message: Loaded External Disk Driverfor Drive D.
Or, if your system has a single 1.44MB 3 1/2-inch floppy and a hard drive, you might wantto create an alias for the floppy drive so that you can format 720KB disks without specifyingany switches for FORMAT. To create a 720KB alias for it, you might enter the following line inyour CONFIG.SYS file:
DEVICEHIGH=C:\DOS\DRIVER.SYS /D:0 /F:2
As far as DOS is concerned, drive D refers to a 720KB 3 1/2-inch floppy drive. Drives Aand B are unchanged and refer to a 1.44MB 3 1/2-inch floppy drive. All three drive lettersrefer to the same physical drive, but D has different characteristics from A and B.
MessagesLoaded External Disk Driver for Drive letter
Information: After installing DRIVER.SYS, DOS displays this message to tell you which driveletter has been assigned.
See Also
DRIVPARM=
DRIVPARM= 3.2 and later—InternalDRIVPARM is an advanced command that defines the characteristics of an existing blockdevice, such as a disk drive, and associates a drive letter with it. Normally, you use this com-mand only when instructed to do so by the manufacturer of the drive you are installing.DRIVPARM= can be used only in your CONFIG.SYS file.
SyntaxDRIVPARM=/D:num /C /F:type /H:heads /I /N /S:sectors /T:tracks
Parameters and Switches
/D:num Specifies the physical drive number (num). Valid numbers are 0 to 255,where drive A is 0, drive B is 1, drive C is 2, and so on. This parameter isrequired and must be the first parameter on the command line.
FApp
CONFIGSYS
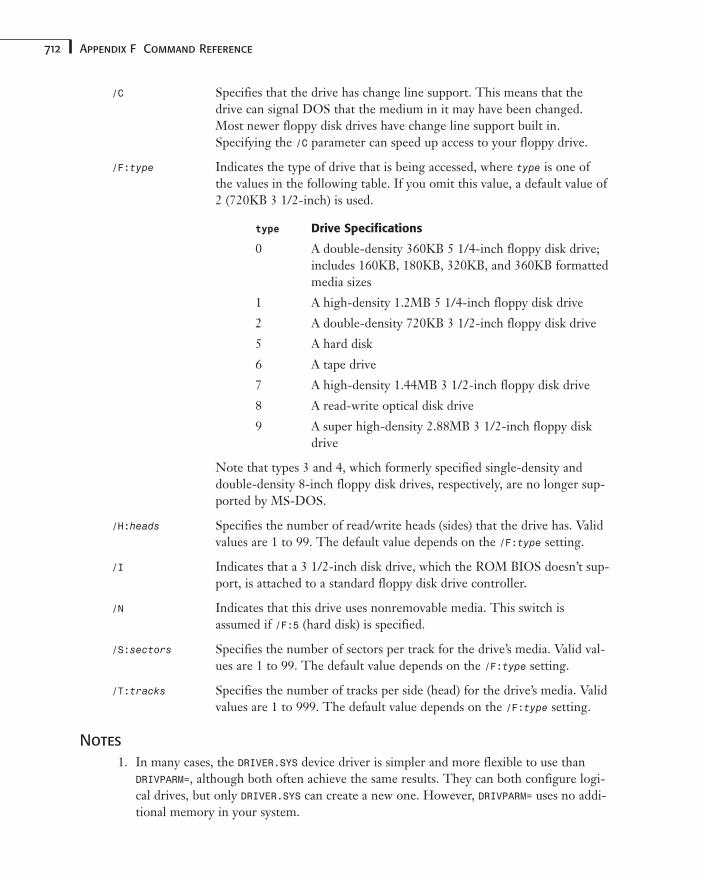
712 Appendix F Command Reference
/C Specifies that the drive has change line support. This means that thedrive can signal DOS that the medium in it may have been changed.Most newer floppy disk drives have change line support built in.Specifying the /C parameter can speed up access to your floppy drive.
/F:type Indicates the type of drive that is being accessed, where type is one ofthe values in the following table. If you omit this value, a default value of2 (720KB 3 1/2-inch) is used.
type Drive Specifications
0 A double-density 360KB 5 1/4-inch floppy disk drive;includes 160KB, 180KB, 320KB, and 360KB formattedmedia sizes
1 A high-density 1.2MB 5 1/4-inch floppy disk drive
2 A double-density 720KB 3 1/2-inch floppy disk drive
5 A hard disk
6 A tape drive
7 A high-density 1.44MB 3 1/2-inch floppy disk drive
8 A read-write optical disk drive
9 A super high-density 2.88MB 3 1/2-inch floppy diskdrive
Note that types 3 and 4, which formerly specified single-density anddouble-density 8-inch floppy disk drives, respectively, are no longer sup-ported by MS-DOS.
/H:heads Specifies the number of read/write heads (sides) that the drive has. Validvalues are 1 to 99. The default value depends on the /F:type setting.
/I Indicates that a 3 1/2-inch disk drive, which the ROM BIOS doesn’t sup-port, is attached to a standard floppy disk drive controller.
/N Indicates that this drive uses nonremovable media. This switch isassumed if /F:5 (hard disk) is specified.
/S:sectors Specifies the number of sectors per track for the drive’s media. Valid val-ues are 1 to 99. The default value depends on the /F:type setting.
/T:tracks Specifies the number of tracks per side (head) for the drive’s media. Validvalues are 1 to 999. The default value depends on the /F:type setting.
Notes
1. In many cases, the DRIVER.SYS device driver is simpler and more flexible to use thanDRIVPARM=, although both often achieve the same results. They can both configure logi-cal drives, but only DRIVER.SYS can create a new one. However, DRIVPARM= uses no addi-tional memory in your system.
713DRIVPARM= 3.2 and later—Internal
2. In most cases, the DRIVPARM= line should come immediately after the line that loads thedevice driver for the drive you are configuring. Normally, the instructions for installingthe drive’s device driver tell you which parameters to use with DRIVPARM=. An exceptionoccurs when you are adding support for a 3 1/2-inch floppy drive attached to a standardfloppy controller, which requires no device driver.
3. Most newer floppy disk drives can signal the computer when their drive door has beenopened. Because opening the door implies that the disk in the drive may have beenchanged, this feature is referred to as change line support. Unless you are installing a360KB 5 1/4-inch disk drive, the chances are good that your new floppy drive haschange line support built in. Specifying the /C parameter can speed up DOS access tothe drive.
4. MS-DOS 6 seems to have problems recognizing that the medium in a drive haschanged when the medium does not have a volume serial number. Disks most likely tonot have serial numbers are ones formatted by DOS versions before 4.0, preformatteddisks, and disks formatted with some third-party utilities. This is a good reason to makesure that the hardware change line is working for your disk drive. If DOS is unawarethat you have changed the disk in a floppy disk drive, it may write the wrong file alloca-tion table (FAT) to the disk, destroying any data that was previously stored on it.
5. Do not use DRIVPARM= unless the installation instructions for the hardware or softwareyou are installing in your system tells you to do so. Normally, DRIVPARM= can be usedonly to support additions to your system rather than reconfigure existing hardware orsoftware.
6. You cannot use DRIVER.SYS to reconfigure an existing drive to support a format it wasnot made for. For instance, DRIVER.SYS cannot be used to allow an older 360KB 5 1/2-inch disk drive to read the newer 1.2MB disks. DRIVER.SYS can instruct DOS to makeuse of only the capabilities that both DOS and the drive support.
Examples
Probably the most common use of the DRIVPARM= command is to create a drive letter for a 3 1/2-inch floppy disk drive that is not supported by the ROM BIOS in that computer. Thefollowing line defines the 3 1/2-inch 1.44MB floppy disk drive as drive D (3), using thedefault values for heads, sectors, and tracks:
DRIVPARM=/D:3 /F:7 /I
If the floppy disk drive were the second one in your system and supported only 720KBmedia, you would use the following line:
DRIVPARM=/D:1 /I
Note that you can omit the /F:2 because, in this case, the default value is correct. If you runthe preceding command on a system in which the second floppy drive is a 1.44MB 3 1/2-inch drive, you can read only 720KB disks; you cannot read 1.44MB disks.
FApp
714 Appendix F Command Reference
See Also
DRIVER.SYS
DRMOUSEThe DRMOUSE driver detects a serial or PS2 mouse and loads support for it.
SyntaxDRMOUSE /P /C /L /Rnm /U /H
Parameters and Switches
/P Forces PS2 port.
/C Forces the COM port to automatically detect the mouse.
/L Changes the mouse direction for left-hand use instead of the right-hand default.
/Rnm Sets the resolution manually, where n and m are the horizontal and vertical resolution in numbers from 1 to 9. /R0 specifies to use the hardware’s defaultresolution.
/U Unloads the mouse driver.
/H Displays abbreviated help.
DRVLOCKDRVLOCK locks or unlocks the specified drive or socket. When used to lock a drive, it securesthe medium. When used to lock a socket, it prevents PCMCIA PC Card removal.
SyntaxDRVLOCK drive:|socket: /on |/off /?
Parameters and Switches
drive: Specifies a drive to lock or unlock. If no drive or socket is specified, DRVLOCKdefaults to the current drive.
socket: Specifies a PCMCIA socket to be locked or unlocked. If no drive or socket isspecified, DRVLOCK defaults to the current drive.
/on Turns lock on.
/off Turns lock off.
/? Displays the abbreviated online help.
DR-DOS
PC-DOS
715E
DYNALOADDYNALOAD enables you to dynamically load a device driver from the DOS command prompt.
Syntax
To load the device driver into low memory, use the following syntax:
DYNALOAD device_driver parm1 parm2 ... /?]
To load the device driver into high memory, use the following syntax:
LOADHIGH DYNALOAD device_driver parm1 parm2 ... /?]
Parameters and Switches
device_driver Specifies the drive, path, and filename of the device driver to be loaded.
parm1 parm2 .... Specifies any command-line parameters required by the device driverfor proper execution.
/? Displays the abbreviated online help.
Notes
DYNALOAD cannot be run in a Windows Virtual DOS Machine (VDM) when task swapping isactive or when DESQview is active.
DYNALOAD works with the following DOS device drivers:
ANSI.SYS SETVER.EXE
CMOSCLK.SYS SMARTDRV.EXE
CNFIGNAM.EXE STACHIGH.SYS
DISPLAY.SYS UMBCGA.SYS
DRIVER.SYS UMBEMS.SYS
EMM386.EXE UMBHERC.SYS
HIMEM.SYS UMBMONO.SYS
SCREATE.SYS
EThe E command starts the PC DOS E Editor, a full-screen editor used to create, edit, save,and print ASCII text files.
SyntaxE /q /b /s /d /i /c /a /dm /80|/132 drive:\path\filename =filename /?
FApp
PC-DOS
PC-DOS
716 Appendix F Command Reference
Parameters and Switches
drive:\path\filename Specifies the drive, directory, and file to edit. Multiple files can beedited at one time. Each file requires its drive and path specifica-tion.
/q Turns off the display of the Loading... message.
/b Displays files in browse (read-only) mode.
/s Uses EMS (or hardfile if no EMS is available) to edit files toolarge for conventional memory.
/d Forces a file to be loaded from disk.
/i Opens the STACKER.INI file for editing.
/c Opens the CONFIG.SYS file for editing.
/a Opens the AUTOEXEC.BAT file for editing.
/dm Disables the mouse.
/80 Enables 80-column, 16-color text video (CGA/EGA/MCGA/VGA/SVGA/XGA).
/132 Enables 132-column, 16-color text video (XGA). Using thisswitch disables the mouse.
=filename Specifies use of the same path as last specified at the DOS com-mand prompt or “same as current file’s” at the editor commandline.
/? Displays the abbreviated online help.
Notes
The four switches /s, /dm, /80, and /132 can be preset in the E environment variable. Youtype them on the same line in the AUTOEXEC.BAT file as follows:
SET E=/s /dm /80
ECHO 2.0 and later—InternalThe ECHO command has two functions. First, you can use it to display messages onscreenfrom a batch file. Second, you can use ECHO to control whether DOS displays onscreen eachcommand line from the batch file before executing the command line.
Syntax
To display a message, use the following format:
ECHO message
BATCHFILE
717ECHO 2.0 and later—Internal
To turn on or off the display of commands and other batch-command messages, use the following format:
ECHO onoff
To see the status of ECHO, use the following format:
ECHO
Parameters and Switches
message Specifies the text of the message to be displayed onscreen.
onoff Specifies whether or not each command line in the batch file is displayed beforebeing executed. ECHO ON turns on the display of command lines. ECHO OFF turnsoff the display of command lines. Note that this setting has no effect on the out-put generated by a command, only on the display of the command line thatDOS is about to execute.
Notes
1. Setting ECHO ON or OFF controls only the display of command lines from the batch filebefore they are executed. It has no effect on the output generated by a DOS command.The message generated by the PAUSE command, Press any key to continue..., andthe message generated by the COPY command, 1 file(s) copied, are examples of out-put generated by a command. They are not suppressed by ECHO OFF.
2. When ECHO is ON, DOS displays each command line before executing it. This capabilitycan be handy when you are debugging a batch file. After the batch file is working cor-rectly, you generally want to include an ECHO OFF command at the beginning of thebatch file to suppress echoing command lines. Using ECHO OFF can speed up the batchfile a little as well.
3. You can suppress the display of a single batch file line by typing @ as the first characterin the line. The command itself is executed, but the command line is not displayed. Forexample, when you type the line @ECHO OFF, the command line ECHO OFF is not dis-played, but the ECHO flag is set to OFF.
4. To display a blank line onscreen, enter the command ECHO followed by a period (with nointervening spaces) in your batch file. This is a special use for the ECHO command andcan make your batch file screen output more attractive and readable.
5. You cannot display pipe characters (|) or redirection symbols (< or >) in an ECHO mes-sage. Redirection symbols are intercepted by the parser and are acted on.
6. DOS starts every batch file with ECHO ON. The ECHO setting (ON or OFF) remains in effectuntil DOS completes batch processing or encounters another ECHO ON or ECHO OFFcommand. If one batch file invokes another, the ECHO setting from the first batch fileremains in effect. When DOS returns control to the command line, ECHO is restored tothe ON state.
FApp
718 Appendix F Command Reference
7. If you issue an ECHO OFF command at the DOS prompt, the DOS prompt is not dis-played. You can still see the commands you are entering, however. To restore the DOSprompt, enter ECHO ON.
8. You can use ECHO to send ANSI commands to your screen. If ANSI.SYS is active in mem-ory and the message displayed by ECHO contains legal ANSI commands, they are actedon rather than displayed. You can use this technique to display very complex, multicol-ored screens from a batch file. To enter ANSI commands into your batch file, you needan editor that enables you to enter Escape characters (ASCII 27) into the text.
9. To suppress the output of a command, use I/O redirection to the null device (NUL).For example, to suppress the 1 file(s) copied message generated by the COPY com-mand, use the following format:COPY file1.ext file2.ext > NUL
The command output is sent to the null device instead of to the console, so it is not dis-played onscreen.
If you redirect the output of a program that is going to remain resident in memory (TSR),you may waste one of the file handles that DOS has available for programs to use. Whenyou redirect the output of a program to the NUL device, the NUL device is assigned a filehandle that isn’t released until the program terminates. In the case of resident programs,this file handle often remains unavailable until you restart DOS. This can cause problems ifyou are in the habit of suppressing the output of resident programs loaded in yourAUTOEXEC.BAT file.
Examples
Batch files commonly begin with the following line:
@ECHO OFF
This command turns ECHO OFF at the beginning of the batch file, and the at sign (@) tellsDOS not to display the ECHO OFF command itself. If you start a batch file with this com-mand, no unnecessary screen output is displayed.
Another very common use for ECHO is to explain the inclusion of a PAUSE command in abatch file. For example, to instruct the user to insert a particular floppy disk in drive B,include the following lines in a batch file:
ECHO Insert the Working Backup disk in drive B:ECHO.ECHO Press Ctrl-Break to abort the backup, orPAUSE
Assuming that ECHO is OFF when these commands are executed, the following messages aredisplayed:
Insert the Working Backup disk in drive B:
Press Ctrl-Break to abort the backup, orPress any key to continue...
719EDIT 5.0 and later—External
Note that the PAUSE message is anticipated in the ECHO messages. If you use the CHOICE com-mand instead, you can control all the text that is displayed onscreen.
To display a menu, you can use ECHO to display a screenful of messages. Then, you can letthe user pick an item from the list by using the CHOICE command, as the following linesdemonstrate:
@ECHO OFFCLSECHO.ECHO F First actionECHO S Second actionECHO T Third actionECHO.CHOICE /C:FST “Choose an action “
The CLS command is often used with ECHO to control the amount of distracting informationthat is left behind on the screen by other commands. Note that the ECHO. (ECHO period)command is used to display blank lines. (Blank lines included in a batch file are ignored byDOS and are not displayed onscreen.)
See Also
@, ANSI.SYS, CHOICE, CLS, and PAUSE
Chapter 16, “Understanding Batch Files”
EDIT 5.0 and later—ExternalThe EDIT command activates the DOS full-screen ASCII text-file editor. EDIT is very handyfor writing batch files or making changes to your AUTOEXEC.BAT or CONFIG.SYS file. Althoughlimited to working on one file at a time, EDIT offers block copy and move operations as wellas search and replace features. EDIT uses the editor built into QBASIC.EXE; so to use EDIT,QBASIC.EXE must be in one of the subdirectories listed in your PATH variable.
SyntaxEDIT pathname /B /G /H /NOHI
Parameters and Switches
pathname Specifies the file you want EDIT to load. If no drive is specified, the currentdrive is assumed. If no subdirectory path is specified, the current directory isassumed. Wildcards are not allowed.
/B Specifies that EDIT should use colors more appropriate for a black-and-white(monochrome) or LCD display.
/G Specifies that EDIT should use the fastest screen-updating method for a CGAmonitor. Don’t specify the /G switch if you see “snow” on your monitor.
FApp
720 Appendix F Command Reference
/H Specifies that EDIT should display 43 lines on an EGA monitor or 50 lines ona VGA monitor.
/NOHI Specifies that EDIT should limit itself to 8 colors rather than 16.
See Also
Chapter 15, “Using the DOS Editor”
EDLIN 1.0 to 5.0—ExternalEDLIN is an old-fashioned, line-oriented text editor that is much more awkward to use than EDIT.If you have anything else to use for editing ASCII text files, you probably should avoid usingEDLIN. The only good thing about EDLIN is that the program file is small. EDLIN is no longer dis-tributed with the standard DOS package but is available on the DOS 6 Supplemental Disk.Instructions for using EDLIN are in the COMMANDS.TXT file included on the Supplemental Disk.
See Also
EDIT
EGA.SYS (device driver) 5.0 and later—ExternalBecause of the way EGA display adapters are made, they present certain problems for task-switching software. EGA.SYS attempts to solve these problems. If you have an EGA displayand use the task-switching functions of the DOS Shell program, you need to load EGA.SYS.You must load EGA.SYS in either a DEVICE= or DEVICEHIGH= statement in your CONFIG.SYS file.
SyntaxDEVICE=drive:\path\EGA.SYS
or
DEVICEHIGH=drive:\path\EGA.SYS
Parameters and Switches
drive:\path\ The full path to the EGA.SYS file on your system. Setup places theEGA.SYS file in the C:\DOS subdirectory by default. If the full path toEGA.SYS isn’t specified, DOS looks for the file in the root directory ofthe startup drive.
Notes
1. You can use EGA.SYS only if your system uses an EGA display. With any other type ofdisplay, EGA.SYS does not load into memory.
DISK
AVOID
CONFIGSYS
DEVICE =
721EMM386 5.0 and later—External
2. In addition to being required by the task swapper in DOS Shell, EGA.SYS may berequired by Microsoft Windows. Third-party task-switching software often requires theassistance of EGA.SYS or a similar driver that it provides. You can have (and need) onlyone EGA.SYS type driver loaded at a time.
3. If you have an EGA display and you use the Microsoft Mouse driver, you may be ableto save some memory by loading EGA.SYS before loading your mouse driver into memo-ry. Many of the functions in EGA.SYS are duplicated in the Microsoft Mouse driver, andif it finds EGA support already in place, the mouse driver doesn’t load those functions.
Examples
To load the EGA.SYS device driver into upper memory, you might add the following line toyour CONFIG.SYS file:
DEVICEHIGH=C:\DOS\EGA.SYS
See Also
DOSSHELL and MOUSE
EJECTThe EJECT command ejects the medium from a drive. If no drive is specified, the medium isejected from the current drive.
SyntaxEJECT drive: /?
Parameters and Switches
drive: Specifies the drive letter of the drive from which to eject the medium.
/? Displays the abbreviated online help.
Remarks
The medium cannot be ejected from the drive specified when the drive is locked.
EMM386 5.0 and later—ExternalThe EMM386 command enables you to control the use of expanded memory (EMS) and uppermemory blocks (UMBs) in a computer with an 80386SX or higher CPU. Before you canrun EMM386 from the DOS command line, you must load the EMM386.EXE device driver intomemory by adding a DEVICE= statement in your CONFIG.SYS file. After the EMM386.EXE devicedriver is loaded into memory, you can use EMM386 from the DOS command line to view thestatus of EMS and UMB memory and turn various features on and off.
FApp
PC-DOS
C:\>
BATCHFILE

722 Appendix F Command Reference
SyntaxEMM386 onoffauto W=onoff
Parameters and Switches
onoffauto Enables EMM386.EXE (ON), disables it (OFF), or enables it to provide expandedmemory and upper memory block support only when a program requests it(AUTO). The default is ON.
W=onoff Enables (W=ON) or disables (W=OFF) support for the Weitek coprocessor. Thedefault is W=OFF.
Notes
1. Before you can use EMM386.EXE from the command line, you must install EMM386 as adevice driver in CONFIG.SYS.
2. Entering EMM386 with no parameters causes a status report of EMS and UMB memoryuse to be displayed.
3. EMM386 honors a request to be turned off only when no EMS or UMB memory is in use.In other words, you can’t use the OFF parameter if you are loading any programs intoupper memory.
4. The high memory area (HMA) must be available to enable a Weitek coprocessor. IfDOS is loaded into HMA by a DOS=HIGH statement in your CONFIG.SYS file, you mightnot be able to enable the Weitek coprocessor.
See Also
EMM386.EXE
“Using Expanded Memory and EMM386.EXE” in Chapter 19
EMM386.EXE (device driver)5.0 and later—ExternalThe EMM386.EXE device driver can convert extended memory (XMS) into LIM 4.0–compatibleexpanded memory (EMS) on a computer with an 80386SX or higher CPU. EMM386.EXE canalso create upper memory blocks (UMBs), which DOS can use to load other device driversand programs into when you add the DEVICEHIGH= and LOADHIGH commands, respectively.EMM386.EXE requires that an XMS-compatible memory manager, such as HIMEM.SYS, be presentbefore EMM386.EXE will load into memory. EMM386.EXE must be loaded in a DEVICE= statementin your CONFIG.SYS file.
SyntaxDEVICE=drive:\path\EMM386.EXE onoffauto ramval MIN=size W=onoff MsFRAME=xxxx /Pyyyy /Pn=yyyy X=mmmm-nnnn I=mmmm-nnnn B=zzzz L=xmsmemA=regs H=hhh D=nnn RAM=mmmm-nnnn NOEMS NOVCPI HIGHSCAN VERBOSEWIN=mmmm-nnnn NOHI ROM=mmmm-nnnn NOMOVEXBDA ALTBOOT
CONFIGSYS
DEVICE =
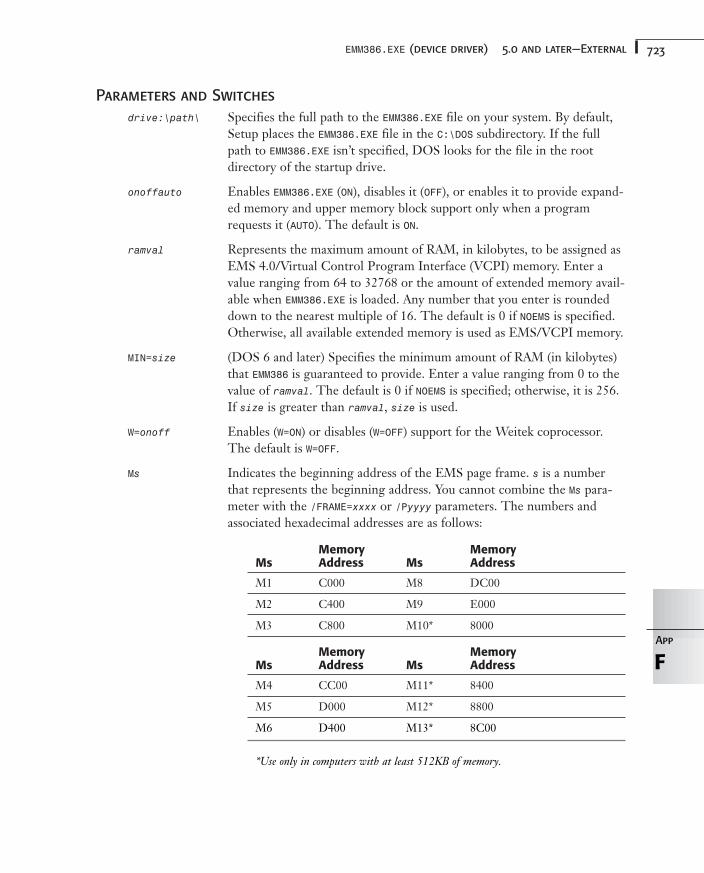
723EMM386.EXE (device driver) 5.0 and later—External
Parameters and Switches
drive:\path\ Specifies the full path to the EMM386.EXE file on your system. By default,Setup places the EMM386.EXE file in the C:\DOS subdirectory. If the fullpath to EMM386.EXE isn’t specified, DOS looks for the file in the rootdirectory of the startup drive.
onoffauto Enables EMM386.EXE (ON), disables it (OFF), or enables it to provide expand-ed memory and upper memory block support only when a programrequests it (AUTO). The default is ON.
ramval Represents the maximum amount of RAM, in kilobytes, to be assigned asEMS 4.0/Virtual Control Program Interface (VCPI) memory. Enter avalue ranging from 64 to 32768 or the amount of extended memory avail-able when EMM386.EXE is loaded. Any number that you enter is roundeddown to the nearest multiple of 16. The default is 0 if NOEMS is specified.Otherwise, all available extended memory is used as EMS/VCPI memory.
MIN=size (DOS 6 and later) Specifies the minimum amount of RAM (in kilobytes)that EMM386 is guaranteed to provide. Enter a value ranging from 0 to thevalue of ramval. The default is 0 if NOEMS is specified; otherwise, it is 256. If size is greater than ramval, size is used.
W=onoff Enables (W=ON) or disables (W=OFF) support for the Weitek coprocessor. The default is W=OFF.
Ms Indicates the beginning address of the EMS page frame. s is a numberthat represents the beginning address. You cannot combine the Ms para-meter with the /FRAME=xxxx or /Pyyyy parameters. The numbers andassociated hexadecimal addresses are as follows:
Memory MemoryMs Address Ms Address
M1 C000 M8 DC00
M2 C400 M9 E000
M3 C800 M10* 8000
Memory MemoryMs Address Ms Address
M4 CC00 M11* 8400
M5 D000 M12* 8800
M6 D400 M13* 8C00
*Use only in computers with at least 512KB of memory.
FApp
724 Appendix F Command Reference
FRAME=xxxx Specifies a hexadecimal address from 8000 through 9000, and C000through E000 in increments of 400 hexadecimal or NONE. The latter dis-ables the page frame and may cause programs that require expandedmemory to fail. You cannot combine the FRAME=xxxx parameter with theMs or /Pyyyy parameters.
/Pyyyy Specifies a hexadecimal address from 8000 through 9000, and C000through E000 in increments of 400 hexadecimal. You cannot combine the/Pyyyy parameter with the Ms or FRAME=xxxx parameters.
Pn=yyyy Defines an address for a page segment. n represents the page and canhave a value of 0 through 255. yyyy is a hexadecimal address from 8000through 9000, and C000 through E000 in increments of 400 hexadecimal.To remain compatible with EMS 3.2, P0 through P3 must be contiguousaddresses. You cannot specify P0 through P3 with this option if you usethe Ms, FRAME=xxxx, or /Pyyyy parameters.
X=mmmm-nnnn Specifies a range of memory that should not be used for an EMS pageframe or UMB space. mmmm and nnnn can have values ranging from A000Hthrough FFFFH and are rounded down to the nearest 4KB boundary.The X switch overrides the I switch if their ranges overlap.
I=mmmm-nnnn Specifies a range of memory that can be used for an EMS page frame orUMB space. mmmm and nnnn can have values ranging from A000H throughFFFFH and are rounded down to the nearest 4KB boundary. The Xswitch overrides the I switch if their ranges overlap.
B=zzzz Indicates the lowest address to use for bank switching (swapping of 16KBpages). zzzz can have a value from 1000H through 4000H. The default is4000H.
L=xmsmem Specifies the number of kilobytes that must remain as extended memoryinstead of being converted to EMS memory. The default is 0. For 1MB ofmemory to remain as extended memory, use L=1024.
A=regs Allocates the number of fast alternative register sets that EMM386.EXE mayuse (for multitasking). regs can have a value from 0 through 254. Thedefault is 7. Each alternative register set adds about 200 bytes to the sizeof EMM386.EXE in memory.
H=hhh Enables you to change the number of handles EMM386.EXE can use. hhhcan have a value from 2 to 255. The default is 64.
D=nnn Specifies the amount of memory (in kilobytes) reserved for DMA(buffered direct-memory access). This value should cover the largest nonfloppy transfer. nnn can have a value from 16 through 256. Thedefault is 32.
725EMM386.EXE (device driver) 5.0 and later—External
RAM=mmmm-nnnn Specifies a range of memory to be used for UMBs. If you specify RAMwithout a value, EMM386.EXE allocates all available extended memory, anEMS page frame is established in upper memory, and all remaining uppermemory space is converted to UMBs.
NOEMS Specifies that access to UMBs be provided, but not for expanded memo-ry; that is, an EMS page frame is prohibited.
NOVCPI (DOS 6.0 and later) Disables support for VCPI applications. Must beused with NOEMS, in which case ramval and MIN are ignored.
HIGHSCAN (DOS 6.0 and later) Causes EMM386.EXE to be more aggressive in scanningupper memory for UMBs. Your computer may stop responding if you usethis switch.
VERBOSE (DOS 6.0 and later) Directs EMM386.EXE to display status and error mes-sages when DOS boots. This switch can be abbreviated as V. (You can alsoget status and error messages by holding down the Alt key while DOSboots.)
V (DOS 6.0 and later) Same as VERBOSE (see preceding entry).
WIN=mmmm-nnnn (DOS 6.0 and later) Reserves the specified memory address range forMicrosoft Windows and prevents EMM386.EXE from using that area ofmemory. mmmm and nnnn can have values ranging from A000H throughFFFFH and are rounded down to the nearest 4KB boundary. The Xswitch overrides the WIN switch if their ranges overlap. The WIN switchoverrides the RAM, ROM, and I switches if their ranges overlap.
NOHI (DOS 6.0 and later) Prevents EMM386.EXE from loading any part of itselfinto upper memory. Normally, EMM386.EXE uses about 5KB of uppermemory for itself. Specifying this switch makes more UMB space avail-able but increases the size of EMM386.EXE in conventional memory.
ROM=mmmm-nnnn (DOS 6.0 and later) Specifies a range of memory for shadow RAM, whichis read-only memory (ROM) copied into faster RAM. mmmm and nnnn canhave values ranging from A000H through FFFFH and are rounded downto the nearest 4KB boundary.
NOMOVEXBDA (DOS 6.0 and later) Prevents EMM386.EXE from moving the extendedBIOS data from conventional memory to upper memory.
ALTBOOT (DOS 6 and later) Directs EMM386.EXE to use a different method ofrestarting your computer when you press Ctrl+Alt+Del. Specify this para-meter only if your computer stops responding or exhibits other unusualbehavior when EMM386.EXE is loaded into memory and you pressCtrl+Alt+Del.
FApp
726 Appendix F Command Reference
Notes
1. EMM386.EXE works only on 80386, 80386SX, and higher systems.
2. HIMEM.SYS must be installed as a device driver in CONFIG.SYS before EMM386.EXE.
3. You cannot use the DEVICEHIGH= command to load EMM386.EXE into memory. EMM386.EXEis required to provide the UMBs that the DEVICEHIGH= command loads device driversinto. EMM386.EXE does attempt to minimize its impact on conventional memory when itloads, using only about 3KB in most cases. To prevent EMM386.EXE from loading parts ofitself into upper memory, specify the NOHI parameter.
4. To create UMBs, you must include the RAM or NOEMS parameters, and you must includeat least DOS=UMB in CONFIG.SYS.
5. Before you can use EMM386 from the command line, you must install EMM386.EXE as adevice driver in CONFIG.SYS.
6. Any DEVICEHIGH= commands in CONFIG.SYS must come after the DEVICE=HIMEM.SYS andDEVICE=EMM386.EXE RAM (or NOEMS) commands.
7. When EMM386.EXE is used with Microsoft Windows 3.1, the I, X, NOEMS, Ms, FRAME, andPyyyy switches override the EMMINCLUDE, EMMEXCLUDE, and EMMPAGEFRAME settings in theWindows SYSTEM.INI file.
8. SMARTDRV double-buffering may be required before DEVICEHIGH= commands, which loadinstallable device drivers that use expanded memory.
9. When EMM386.EXE is not supplying expanded memory, non–VCPI-compliant programscan run (for example, Microsoft Windows 3.0 in Standard mode).
10. The high memory area (HMA) must be available to enable a Weitek coprocessor. IfDOS is loaded into HMA by a DOS=HIGH statement in your CONFIG.SYS file, you mightnot be able to enable the Weitek coprocessor.
See Also
DEVICE= and HIMEM.SYS
“Using Expanded Memory and EMM386.EXE” in Chapter 19
ERASE (see DEL)ERASE is an alternative name for the DEL command. For information on using the DEL orERASE command, see the entry for DEL in this command reference.
ERAQ (see DELQ)ERAQ is an alternative command for the DR DOS DELQ command. See the detailed descrip-tion under DELQ.
DR-DOS
727EXIT 2.0 and later—Internal
EXE2BIN 1.1 to 5.0—ExternalThe EXE2BIN command changes appropriately formatted .EXE files to .BIN or .COM files.EXE2BIN is a programmer’s utility; it is provided as a courtesy for those who have compilersthat cannot create a memory-image file directly. Most people never find an occasion to usethis program. EXE2BIN is included with the DOS 6.0 Supplemental Disk, not in the standardDOS 6.0 package.
SyntaxEXE2BIN exe_file binary_file
Parameters and Switches
exe_file The .EXE file to be converted into a memory-image file. If no drive is spec-ified, the current drive is assumed. If no subdirectory path is specified, thecurrent subdirectory is assumed. A filename is required, but if you don’tspecify an extension, .EXE is assumed. Wildcards are not allowed.
binary_file The name of the memory-image file to be created. If no drive is specified,the current drive is assumed. If no subdirectory path is specified, the cur-rent subdirectory is assumed. If no filename is specified, the filename desig-nated in exe_file is used. If no extension is specified, a .BIN extension isadded.
Notes
1. EXE2BIN is a programming utility that converts .EXE (executable) program files to .COMor .BIN (memory-image) files. The resulting program consumes less disk space andloads slightly faster. Unless you use a compiler-based programming language, you prob-ably will never use this command.
2. Before EXE2BIN converts an .EXE file to memory-image format, a number of require-ments have to be met. In most cases, a program has to be written with this transforma-tion in mind. You cannot convert the typical .EXE program file by using EXE2BIN.
EXIT 2.0 and later—InternalYou can use EXIT to remove a temporary copy of COMMAND.COM from memory. Typically, youuse this command to return to an application program that gives you access to the DOSprompt while it’s running. EXIT can remove only temporary copies of COMMAND.COM; it cannotaccidentally remove the permanent copy that is loaded when your computer starts up.
SyntaxEXIT
FApp
C:\>
BATCHFILE
DISK
C:\>
728 Appendix F Command Reference
Notes
1. EXIT has no effect on a copy of COMMAND.COM loaded with the /P switch. Normally, youload COMMAND.COM with the /P switch only in the SHELL= command in your CONFIG.SYSfile. Any additional copies that you run (from a batch file, for example) can be removedfrom memory with the EXIT command.
2. EXIT is used to close a DOS window in Microsoft Windows. It terminates the tempo-rary copy of COMMAND.COM that Windows launched to create the DOS window.
See Also
COMMAND
“Using EXIT to Leave the Current Copy of the Command Processor” in Chapter 10
EXPAND 5.0 and later—ExternalYou can use the EXPAND command to copy a compressed, unusable file from the DOS distri-bution disks to an uncompressed, usable form.
SyntaxEXPAND source1 source2 ... destination
Parameters and Switches
source1 The name of the compressed source file. If no drive is provided, the currentdrive is assumed. If no subdirectory path is provided, the current subdirec-tory is assumed. If this parameter is omitted, you are prompted for thesource and destination. Wildcards are not allowed.
source2 Additional compressed source files. You can designate as many as can fit inthe 127-character limit for a DOS command line. You cannot specify addi-tional source parameters without also specifying a destination parameter.
destination If only one source file is specified, destination can be the full name andlocation of the destination file, with normal default assumptions. If morethan one source file is specified, only a drive and/or path can be specifiedfor the destination. If destination is omitted, DOS prompts you for thename and location to use for expanded files.
Rules
1. You can use EXPAND to decompress files from the DOS distribution disks only.
2. If you specify more than one compressed file, you can specify only a destination driveor path (not a filename).
C:\>
BATCHFILE
729EXPAND 5.0 and later—External
3. If you don’t specify a compressed file or a destination, EXPAND prompts you for the miss-ing information.
4. If you use EXPAND on a file that is not compressed, an error message appears (see thefirst item in the following “Messages” section). Despite the error message, the file isstill copied to the destination; it just isn’t expanded.
Notes
1. Files stored on the original DOS 5.0 and 6.0 disks are compressed files. This compres-sion enables more data to be stored on fewer disks. Before you can use a file on thesedisks, however, you must decompress the file.
2. When you use SETUP to install DOS, the files are decompressed as they are transferredto the subdirectory you chose to install DOS into. If you delete a file accidentally or if afile becomes corrupted, you must retrieve the file again from the original DOS disk.EXPAND transfers the file and decompresses it in the process. Consider EXPAND to be akind of “one-way” COPY command.
3. Refer to the file PACKING.LST for a list of which files are included on each of the DOSdistribution disks. Microsoft marks the compressed files by replacing the last letter ofthe extension with an underscore (_). Setup copies the PACKING.LST file into your DOSsubdirectory when it installs MS-DOS 6.
Examples
To expand MOVE.EXE from DOS distribution disk #1 to the C:\DOS subdirectory, enter thefollowing line:
EXPAND A:MOVE.EX_ C:\DOS\MOVE.EXE
MessagesInput file ‘filename’ already in expanded format
Error: You attempted to expand an uncompressed file. Verify that you specified the correctcompressed file.
Error in compressed input file format: filename
Error: The compressed file was corrupted. Use a different copy of the compressed file.
See Also
SETUP
FApp
730 Appendix F Command Reference
EXTRACTEXTRACT extracts files from compressed cabinet, or .CAB, files. Microsoft uses .CAB files tocompress all the installation files for Windows 95 and Windows 98.
SyntaxEXTRACT /Y /A /D|/E /L drive:\path cabinet filename ...
EXTRACT /Y source newname
EXTRACT /Y /C source destination
Parameters and Switches
cabinet Specifies the name of the cabinet, or .CAB, file to extract files from.
filename Specifies the filename of the file or files to be extracted. Standard wild-cards can be used.
source Extracts a compressed file consisting of a cabinet file with only one filein it.
newname Specifies a newname to give the extracted file a name other than the origi-nal name.
/A Extracts all cabinet files in the set beginning with the specified file.
/C Copies a source file from Microsoft’s proprietary DMF format disks todestination.
/D Displays a cabinet directory.
/E Extracts all files.
/L drive:\path Specifies the location to place extracted files.
/Y Does not prompt before overwriting an existing file.
FASTHELP 6.0 and later—ExternalThe FASTHELP command provides a brief description and the syntax of a DOS command.This is the same help you get by including the /? switch when you issue a DOS command.
SyntaxFASTHELP command
Parameters and Switches
command The DOS command for which you want help. If you do not provide a com-mand name, DOS provides short, one-line descriptions of all DOS com-mands.
Windows9x
C:\>
731FASTOPEN 3.3 and later—External
Notes
The information FASTHELP provides about a command is the same as that provided by thefollowing:
command /?
For more extensive information on DOS commands, type HELP command.
See Also
HELP
“Getting Help” in Chapter 3
FASTOPEN 3.3 and later—ExternalFASTOPEN keeps directory information in memory so that DOS can quickly find and open thefiles you use most. FASTOPEN remains in memory (TSR), so be careful not to run it morethan once. If you use FASTOPEN, you should add it to your AUTOEXEC.BAT file.
SyntaxFASTOPEN drive:=num ... /X
Parameters and Switches
drive: Specifies the name of the drive for which directory information should beheld in memory.
=num Specifies the number of directory entries to be held in memory (10 to 999).The default is 48. The equal sign is optional.
... Specifies the number of additional drive:=num parameters you need.
/X Tells DOS to use expanded memory to store the information buffered byFASTOPEN.
Rules
1. You must specify the name of at least one drive for which entries are to be kept inmemory. The drive cannot be a floppy drive.
2. You can use FASTOPEN for up to 24 nonfloppy drives, for a total of 999 files. In the com-mand line, simply type the additional drive names, separated by spaces.
3. Do not use FASTOPEN from the DOS Shell or when you are running Windows or a diskdefragmentation program, such as DEFRAG.
4. If you provide nnn, the value must be between 10 and 999, inclusive. The minimumvalue for FASTOPEN is 10, or the maximum level of your deepest directory plus 1—whichever is greater.
FApp
C:\>
BATCHFILE
TSR
AVOID
732 Appendix F Command Reference
5. You cannot run more than one copy of FASTOPEN. If you want to change FASTOPEN set-tings, you must reboot your computer.
6. Each FASTOPEN entry you specify increases the size of FASTOPEN by approximately 48 bytes.
Notes
1. FASTOPEN works by keeping directory information in memory. Because disk buffersalready hold FAT information, FASTOPEN enables DOS to search memory for a file orsubdirectory entry, to locate the corresponding FAT entry quickly, and to open the file. Ifyou have many files and use FASTOPEN effectively, you can increase DOS’s performance.
2. As is true of BUFFERS, no predetermined best number exists. The default value of 48works well in many installations. If your subdirectories run many levels deep or if youuse many files, specifying a larger number can improve performance. Using too large avalue for nnn (greater than 200), however, slows the system. DOS spends more timeexamining in-memory directory entries than rereading the entries from the disk.
3. Alternatively, FASTOPEN can be loaded from your CONFIG.SYS file with the INSTALL= com-mand rather than in your AUTOEXEC.BAT file. With DOS 6, there is no advantage toeither placement. Just make sure that you do not attempt to load FASTOPEN from bothyour CONFIG.SYS and your AUTOEXEC.BAT files.
4. In most cases, you should use the SMARTDRV disk cache instead of FASTOPEN. SMARTDRV hasfewer dangerous interactions with other programs and can speed up your computereven more than FASTOPEN. If you don’t have enough memory to use SMARTDRV effectively,consider using the BUFFERS= command to optimize disk-access time.
See Also
BUFFERS= and SMARTDRV
“Using FASTOPEN” in Chapter 7
FC 3.3 and later—ExternalThe FC command enables you to compare files for differences. Using the FC switches, youcan configure it to do a strict byte-for-byte comparison (as COMP does) or to attempt toresynchronize after differences are detected.
Syntax
For ASCII text files, use the following syntax:
FC pathname1 pathname2 /A /C /L /LBbuffer /N /T /W /resync
For binary files, use the following syntax:
FC pathname1 pathname2 /B
C:\>
BATCHFILE
733FC 3.3 and later—External
Parameters and Switches
pathname1 Specifies a file or group of files to compare. Normal drive and subdirectorydefaults apply, and wildcards are permitted. This parameter must match atleast one existing file.
pathname2 Specifies the file or group of files that should be compared to pathname1.Normal drive and subdirectory defaults apply, and wildcards are permitted.Wildcards used with FC are interpreted the same way they are with COPY andREN:. Missing characters in the filename are replaced with the correspondingcharacters in pathname1. If this file isn’t found, FC moves on to the next set offiles.
/A Abbreviates the display of an ASCII comparison to the first and last lines ofeach group of differences.
/B Forces a binary file comparison, which involves a byte-by-byte comparisonwith no synchronization after a mismatch. This switch is the default for fileswith .EXE, .COM, .SYS, .OBJ, .LIB, and .BIN extensions.
/C Causes DOS to ignore the case of letters.
/L Compares files in ASCII mode, which involves a line-by-line comparisonwith resynchronization attempted after a mismatch. This switch is thedefault for files without .EXE, .COM, .SYS, .OBJ, .LIB, and .BIN extensions.
/LBbuffer Sets the internal buffer to the number of lines specified by buffer. A com-parison is terminated if the files have more than this number of consecutivediffering lines.
/N Displays line numbers for ASCII comparisons.
/T Suppresses expansion of tabs to spaces.
/W Compresses tabs and spaces to a single space and causes tabs and spaces tobe ignored if those characters are at the beginning or end of a line.
/resync Sets the number of lines (1 through 9) that must match before the files areconsidered to be resynchronized. The default is 2.
Notes
1. A difference in a binary file comparison is displayed as follows:aaaaaaaa: xx yy
aaaaaaaa represents the hexadecimal address of a mismatching pair of bytes, xx is themismatching hexadecimal byte from the first file, and yy is the mismatching hexadeci-mal byte from the second file.
2. If you use a wildcard in the first filename, DOS compares all the specified files with thesecond filename. If you use a wildcard in the second filename, DOS uses the corre-sponding value from the first filename in the second filename.
FApp
734 Appendix F Command Reference
Examples
To compare every text file in the current directory with C:\README.TXT, use the followingcommand:
FC *.TXT C:\README.TXT
To compare README.TXT in the current directory with C:\README.TXT, use the following com-mand:
FC README.TXT C:\*.TXT
To compare every text file in the current directory with the file of the same name in C:\, usethis command:
FC *.TXT C:\*.TXT
See Also
DISKCOMP
“Comparing Files with FC” in Chapter 8
FCBS= 3.1 and later—InternalFile handles were added in DOS 2.0. Most programs written since that time use file handles,not file control blocks (FCBs), to open files. The FCBS= command sets the maximum num-ber of open files a program using DOS 1.0 FCBs can have. With newer programs, you usu-ally don’t need this command. FCBS= can be used only in your CONFIG.SYS file.
SyntaxFCBS=maxopen
Parameters and Switches
maxopen The maximum number of open FCBs that a program can use. Any value in therange of 1 to 255 is allowed. The default value is 4.
Notes
1. Not many programs use FCBs anymore. Include the FCBS= command in yourCONFIG.SYS file only if a program asks you to, or if an old utility starts mysteriously fail-ing. Otherwise, accept DOS’s default setting of four FCBs. If you set maxopen to 1, youmight find that certain small command-line utilities begin to fail.
2. Be aware that FCBs are ancient history. If you depend on any programs that requirethem, you are living on borrowed time, and you should start looking for replacements.If you receive a new program that asks you to use the FCBS= command, complain (loud-ly) to the manufacturer. Microsoft has carried this legacy from CP/M for several years
CONFIGSYS
735FDISK 2.0 and later—External
!DANGER
now, and with every release of DOS comes the chance that FCBs will no longer be sup-ported.
3. If a program attempts to open more than maxopen FCBs, DOS automatically closessome of them.
4. Each FCB that is available to programs increases the size of DOS by approximately 60bytes.
5. For newer programs, set the maximum number of open files by using the FILES= com-mand.
6. Some older versions of DOS supported a second argument, neverclose, for FCBS=.DOS 5 and 6 have no need for the neverclose argument and will ignore it.
See Also
FILES=
“Accessing Files through FCBS” in Chapter 19
FDISK 2.0 and later—ExternalFDISK is a full-screen program that prepares a hard disk to accept an operating system, suchas DOS. It sets up partitions on a hard disk as well as designates which partitions are used tostart up the computer if no floppy disk is in drive A. On a new hard drive, you must runFDISK before you can use the FORMAT command on the drive.
FDISK is an extremely dangerous command. Making any changes with FDISK effectivelydeletes all the information on your hard drive. MS-DOS 6 does not include any utilities withwhich you can recover information lost through the use of FDISK.
SyntaxFDISK /STATUS
Parameters and Switches
/STATUS (DOS 6.0 and later) Displays some partition information without starting FDISK.
Rules
1. You must use FDISK to create a partition on a hard disk before you can use FORMAT toformat the hard disk.
2. You can change the size of a partition only by deleting existing partitions and creatingnew ones. This procedure deletes all data in the partitions.
FApp
736 Appendix F Command Reference
3. FDISK does not work with SUBST aliases, Interlnk drives, network drives, CD-ROMdrives, or removable drives of any kind. FDISK works only with hard drives that are sup-ported by the ROM BIOS in your computer. FDISK does not work with hard drives thatrequire you to load a device driver in your CONFIG.SYS file to operate.
Notes
1. Although Setup places FDISK in the C:\DOS subdirectory by default, consider copyingFDISK.EXE to a floppy disk and deleting it from your hard drive. If FDISK.EXE isn’t onyour hard disk, no one can run it, thus avoiding the possible data loss that could resultfrom someone’s curiosity.
2. If you need to use FDISK, back up your hard disk; make sure that you have a bootablefloppy disk with at least the FORMAT command and your backup software on it. AfterFDISK has finished with your hard drive, you cannot boot from it (or even read it) untilyou have reformatted the drive.
3. The MIRROR command can save partition information into a file, which can be used bythe UNFORMAT command to restore a damaged partition table. Although this capability isstill a part of UNFORMAT, the MIRROR command is no longer distributed with DOS and isavailable only on the Supplemental Disk. Before you use FDISK, you might want to get acopy of MIRROR and save your partition information so that you can restore it if you haveproblems.
4. Starting with DOS 3.3, you can use FDISK to create multiple logical partitions on a sin-gle drive. In DOS 4.0, FDISK and DOS were upgraded to handle partitions larger than32MB. The maximum size of a single partition for the DOS 6 version of FDISK is 2GB.
5. If you plan to use more than one operating system, use FDISK to partition part of thehard disk for DOS and another part of the hard disk for the other operating system.
See Also
MIRROR, UNDELETE, and UNFORMAT
“Dividing a Hard Disk with FDISK” in Chapter 7
FILELINKFILELINK is a utility to transfer files between two computers via a serial or parallel port con-nection. The FILELINK command with no parameters starts the FILELINK utility in full-screen mode. This command has so many command-line parameters that it is highlyrecommended you run it without any parameters to start the full-screen utility rather thanuse it via the command line.
DR-DOS
737FILES= 2.0 and later—Internal
CONFIGSYS
FILES= 2.0 and later—InternalWhen a program tries to open a file, DOS assigns that file a handle, which is just a fancyname for an ID number. The FILES= command sets the maximum number of file handlesthat DOS has available for programs to use. FILES= can be used only in your CONFIG.SYS file.
SyntaxFILES=maxopen
Parameters and Switches
maxopen The maximum number of open file handles that DOS allows. Any value in therange of 8 to 255 is allowed. The default value is 8.
Notes
1. Always specify a value for FILES= in your CONFIG.SYS file. DOS’s default value of 8 ismuch too low for today’s software programs. You typically need around 30 to 40 filehandles, perhaps more if you are running programs such as Microsoft Windows. Agood minimum setting is 20.
2. If a program attempts to open a file when DOS has no more file handles available, it isdenied access to the file. DOS does not close open file handles, unlike FCBs, while aprogram is running.
If you are in the habit of redirecting the output to the NUL device when you load residentsoftware in your AUTOEXEC.BAT file, you may be wasting file handles. Each such redirec-tion unnecessarily ties up one file handle until you restart your computer.
3. Each file handle available to programs increases the size of DOS by approximately 60bytes.
4. Most programs display a meaningful message if they run out of file handles. If this hap-pens, increase the FILES= setting in your CONFIG.SYS file by 5 and restart your computer.
5. Many software installation programs inspect the setting you are using for FILES= andmay even increase it without telling you. Always look through your CONFIG.SYS andAUTOEXEC.BAT files after installing new software, and make sure that any modificationsthey’ve made are acceptable to you.
Examples
The following line sets the maximum number of open file handles to 30:
FILES=30
FApp
738 Appendix F Command Reference
See Also
FCBS=
“Using the FILES Command” in Chapter 19
FILEUPFILEUP starts the File Update System application to maintain duplicate files in two locations.
SyntaxFILEUP /?
Parameters and Switches
/? Displays the abbreviated online help.
Notes
Using the File Update program with floppies requires that the File Update program resideon both systems. For INTERLNK or a LAN, the File Update program files need to reside inonly one system.
See Also
INTERLNK
FIND 2.0 and later—ExternalThe FIND command displays all the lines of the designated files that match (or do not match,depending on the switches used) the specified string.
SyntaxFIND /V /C /N /I “string” pathname ...
Parameters and Switches
“string” Represents the characters you want to find. The characters must be enclosedin quotation marks.
pathname Indicates the file that you want to search. All the normal drive and subdirec-tory defaults apply, but you cannot use wildcards. If you omit pathname, FINDacts as a filter, searching input that has been redirected to it.
... Indicates that you can enter as many pathname parameters as necessary.
/C Displays a count of the total number of lines that contain “string”.
PC-DOS
BATCHFILE
DISK
739FIND 2.0 and later—External
/I Specifies that the search is not case sensitive (DOS 5.0 and later versions).
/N Displays lines that contain “string”, preceded by the file line number.
/V Displays lines that do not contain “string”.
Exit Codes
ERRORLEVEL Value Meaning
0 FIND completed successfully and found at least one match.
1 FIND completed successfully but found no matches.
2 FIND aborted due to an error and cannot report whether any matcheswere found.
Rules
1. You can use more than one file specification. All file specifications must appear after thestring and must be separated by spaces.
2. If you do not provide any file specifications, FIND expects information from the key-board (standard input).
3. If you use switches with FIND, you must place them between FIND and the string. MostDOS commands require that you place switches at the end of the command line.
4. You must enclose the string in double quotation marks. To use the double–quotationmark character itself in the string, use two double quotation marks in a row.
5. Wildcards are not allowed in file specifications. You can get the effect of wildcards byusing FIND in a FOR command.
Notes
1. FIND is one of several filters provided with DOS 3.0 and later versions. The commandcan find lines that contain strings and those that do not. FIND also can number andcount lines of text, instead of simply displaying them.
2. This filter is useful when it is combined with DOS I/O redirection. You can redirect theFIND command’s output to a file by using the > redirection symbol. Because FIND acceptsa sequence of files to search, you do not have to redirect the input to FIND.
Examples
To search README.TXT for “Microsoft”, use the following command:
FIND “Microsoft” C:\DOS\README.TXT
To search all batch files in the current directory for “default”, use the following command:
FOR %%A IN (*.BAT) DO FIND “default” %%A
FApp
740 Appendix F Command Reference
To determine the path and filenames for all batch files on the current disk, use this com-mand:
DIR \ /S /B | FIND “.BAT”
See Also
MORE and SORT
“The FIND Filter” in Chapter 13
FOR 2.0 and later—InternalYou can use the FOR command to repeat a single command, executing it once for each mem-ber of a list or group of files. Unlike most of the other batch commands, FOR can be veryuseful from both the command line as well as in a batch file.
Syntax
When used in a batch file, the syntax is as follows:
FOR %%variable IN (set) DO command parameters
When used on the DOS command line, the syntax is as follows:
FOR %variable IN (set) DO command parameters
Parameters and Switches
variable Specifies a single character DOS uses to represent the current value of set.You can use any character for variable except the digits 0 through 9, theredirection symbols (<, >, and |), and the slash (/). In a batch file, variablemust be preceded by two percent signs (%%), but on the DOS command lineonly one is used.
set Specifies one or more words or pathnames separated by spaces or commas.Wildcards are allowed in the filename.ext portion of any pathname speci-fied. None of the members of set can include embedded spaces. The enclos-ing parentheses are required.
command Represents the DOS command to be executed for each word or file in theset. Almost all DOS internal or external commands can be used, with thenotable exception of the FOR command itself.
parameters Represents any parameters you would like to pass to the command being exe-cuted. Normally, one or more occurrences of variable are used in the com-mand parameters to pass the current value of set to the command.
C:\>
BATCHFILE
741FOR 2.0 and later—Internal
Notes
1. You can use more than one word or file pathname in the set. Use spaces or commas toseparate each word or file pathname from the next. Any or all parts of a pathname maybe used, but wildcards are allowed only in the filename and extension portions.
2. No member of the set can include embedded spaces. In other words, you can’t usevariable to replace more than a single “word.”
3. You must precede every occurrence of variable with two percent signs in a batch fileand one percent sign at the DOS prompt. The reason for this difference is that eachline in a batch file is passed through a routine called a parser, which fills in any replace-able parameters before DOS executes each command. The parser removes any singlepercent signs it finds; if two percent signs in a row are encountered, however, one willremain after the parser is finished. By the time DOS executes the command, only oneof the two percent signs you typed remains. When you execute the FOR command fromthe DOS prompt, the line isn’t parsed, and no percent signs are removed.
4. variable becomes each literal word or filename in set. If wildcards are used, each filematched becomes a member of the set. The DO command executes once for each valuein the set.
5. variable can be used in the command portion of the FOR command as well as in the parameters portion. This capability can be useful if you want to execute a series of com-mands. You can use the variable as many times as you need to after the DO keyword. Itwill be replaced with the current member of set every time it appears.
6. You cannot nest FOR..IN..DO commands. That is, you cannot use FOR as the commandexecuted in the DO portion of a FOR..IN..DO loop. All other DOS internal and externalcommands are legal.
7. If you execute a batch file directly in the DO portion of the FOR loop, batch file process-ing ends when that batch file terminates, and control never is returned to the FOR loop.To avoid this situation, use the CALL or COMMAND /C commands to execute batch files inFOR..IN..DO loops.
8. If you use a variable name that is more than one character long or if you omit IN, theparentheses around set, or DO, DOS displays a syntax error message.
9. Avoid using redirection symbols (<, >, and |) with the FOR command. In general, DOSignores output redirection, and most redirected input will fail.
10. Do not attempt to use the “at” sign (@) to suppress the display of the command in theDO loop. DOS does not interpret the @ correctly and searches for an executable file thatbegins with an “at” sign. To accomplish the same thing, use ECHO OFF before executingthe FOR command.
11. Although doing so is legal, you can’t use the GOTO command to jump to a series of labelsin a batch file from the DO portion of a FOR command. The GOTO command works justfine, but there is no mechanism available that enables you to return to the FOR loopwhen the section of the batch file that you jumped to is finished. To accomplish thistask, you have to use the CALL command to call separate batch files instead of jumpingto sections in the same batch file.
FApp
742 Appendix F Command Reference
12. Be very careful if you are using destructive commands such as DEL or DELTREE in a FORloop. Although you are debugging the FOR command, you might want to substitute theDIR command, which does not do any harm if anything goes wrong. Make sure that youthink through every possible situation. Also, make sure that the wrong files won’t bedeleted before putting any batch file with a destructive FOR loop into use.
Examples
Suppose that you want to back up all settings files that Windows uses from a batch file. Bycombining the COPY command with FOR, you could accomplish this with the following line inyour batch file:
FOR %%A IN (INI GRP PAR DAT) DO COPY C:\WINDOWS\*.%%A A:\
Assuming that you had previously prompted to insert the backup disk in drive A, the FORcommand would execute the COPY command once for each type of file (.INI, .GRP, .PAR, and.DAT) in which Windows typically saves configuration information.
To execute the same command from the DOS prompt, use single percent signs rather thandouble ones, as shown here:
FOR %A IN (INI GRP PAR DAT) DO COPY C:\WINDOWS\*.%A A:\
You can use the FOR command to execute a command a specific number of times. For exam-ple, to display five blank lines from a batch file, you could include the following command:
FOR %%A IN (1 2 3 4 5) DO ECHO.
After all, there is no rule that says you have to use the %%A variable in the DO portion of thecommand. The preceding FOR loop repeats the ECHO. (ECHO period) command once for eachmember in the set, displaying five blank lines onscreen.
You can use FOR to enable a command that doesn’t support wildcards to process a pathnamespecified with wildcards. A classic example of this technique involves the TYPE command. Todisplay multiple files with TYPE, you could enter the following command in a batch file:
FOR %%A IN (%1) DO TYPE %%A
If you specified a pathname that included wildcards as the first parameter to the batch file,TYPE would be executed once for each file that matched the pathname. The only thingwrong with this is that TYPE would display all the files without pausing; so, to see a particularfile, you would have to hover over the pause key. Despite this drawback, this example illus-trates how you can use the FOR command to overcome this limitation in a command.
See Also
“Using FOR..IN..DO” in Chapter 16
743FORMAT 1.0 and later—External
FORMAT 1.0 and later—ExternalThe FORMAT command initializes a disk to accept DOS information and files. FORMAT alsochecks the disk for defective tracks and (optionally) places DOS on the floppy disk or harddisk.
SyntaxFORMAT drive: /V /V:label /Q /U /F:size /N:sectors /T:tracks /S /B/1 /4 /8
Parameters and Switches
drive: Specifies a valid drive letter to be formatted, followed by a colon (:).
/V Prompts for a volume label for the disk.
/V:label Makes label (which can be up to 11 characters long) the disk’s volume label.
/Q Performs a quick format by clearing only the FAT and root directory on thedisk; this switch does not check the disk for bad sectors.
/U Performs an unconditional format for a floppy disk. Unconditional format-ting destroys all data on a floppy disk, which means that you cannot unformatthe disk. (For more information on unformatting, see UNFORMAT later in thiscommand reference.)
/F:size Specifies the size to which a disk should be formatted, which can be less thanthe drive’s maximum. Generally, you should use this switch in preference to acombination of /N and /T. The following table lists the possible values forsize:
Drive Capacity Allowable Values for size
160KB, 180KB 160, 160K, 160KB, 180, 180K, and 180KB
320KB, 360KB All preceding, plus 320, 320K, 320KB, 360, 360K,and 360KB
1.2MB All preceding, plus 1200, 1200K, 1200KB, 1.2, 1.2M,and 1.2MB
720KB 720, 720K, and 720KB
1.44MB All for 720KB, plus 1440, 1440K, 1440KB, 1.44,1.44M, and 1.44MB
2.88MB All for 1.44MB, plus 2880, 2880K, 2880KB, 2.88,2.88M, and 2.88MB
/N:sectors Formats the disk with the number of sectors (sectors ranges from 1 to 99).This switch must be used with /T. Generally, you should use /F instead ofthis switch.
FApp
C:\>
BATCHFILE
!DANGER
744 Appendix F Command Reference
/T:tracks Formats the disk with the number of tracks per side (tracks ranges from 1 to999). This switch must be used with /N. Generally, you should use /F insteadof this switch.
/S Places copies of the operating system files on the disk so that DOS can bootfrom the disk. For MS-DOS, those files are the command-line interpreterpointed to by the environment variable COMSPEC (generally COMMAND.COM), thehidden files IO.SYS and MSDOS.SYS, and, if necessary, DBLSPACE.BIN.
/B Leaves space for the system version but does not place the operating systemfiles on the disk. (See the section on the SYS command later in this commandreference.) This switch is not necessary in DOS 6.0.
/1 Formats only the first side of the floppy disk.
/4 Formats a floppy disk in a 1.2MB drive for double-density (320KB/360KB)use. Some systems, however, cannot reliably read the resulting disk.
/8 Formats an eight-sector 5 1/4-inch floppy disk (for compatibility with DOS 1.0).
Exit Codes
ERRORLEVEL Value Meaning
0 Format operation successful
3 Halted by user (Ctrl+C)
4 Halted by a fatal disk error
5 Halted by user at the Proceed with Format (Y/N)? prompt
Rules
1. If you do not provide a drive name, DOS uses the current drive.
2. Unless otherwise directed through a switch, DOS formats the disk to the DOS maxi-mum capacity for the drive.
3. Some switches do not work together. For example, you cannot use the following switchcombinations:
/V with /8
/1, /4, /8, or /B with the hard disk
/F with /N and /T
4. In DOS 5.0 and later versions, if you do not specify /U, FORMAT performs a “safe” for-mat. DOS creates a file containing file information and saves the file to a safe place ondisk where the UNFORMAT command can find it if you need to unformat the disk. FORMATthen clears the FAT and root directory of the disk but does not erase any data.Therefore, the UNFORMAT command enables you to restore a disk if you did not intend toformat it.

745FORMAT 1.0 and later—External
5. If you are formatting a hard disk, FORMAT displays the following message:WARNING, ALL DATA ON NON-REMOVABLE DISKDRIVE d: WILL BE LOST!Proceed with Format (Y/N)?
Type Y to format the hard disk or N to abort the formatting operation.
Notes
1. FORMAT now displays numbers with embedded commas, making them much easier toread.
2. Do not try to format any type of virtual disk; a disk that is part of an ASSIGN, SUBST, orJOIN command; or a networked or Interlnk disk.
3. Never try to format a RAM disk. Under some circumstances, FORMAT acts erraticallywhen you use it to format a RAM disk, particularly RAMDRIVE (the DOS RAM disk pro-gram). The responses can range from a Divide overflow message to a lockup of yourcomputer. If the computer locks up, turn off the system and then turn it on again.Obviously, you lose the RAM disk’s contents, but no hard or floppy disks are damaged.
4. In pre-5.0 versions of DOS, FORMAT destroys the information recorded on a floppy orhard disk. Do not use the command on any disk—floppy or hard—that contains usefulinformation.
5. In DOS 5.0 and later versions, FORMAT performs a safe format. When you use the com-mand to format a previously formatted disk, DOS copies the FAT and root directorybefore clearing them and then checks the disk. The existing data is not cleared. If youaccidentally format a safely formatted disk, you can unformat the disk. To erase all datafrom a previously used floppy disk, use the /U switch. An unconditional format takesabout 27 percent longer than the default safe format.
6. The /Q switch, another feature of DOS 5.0 and later, enables you to format a diskquickly. The /Q switch clears the FAT and root directory but does not check the disk forbad sectors. To reuse a disk that you know is good, use the /Q switch. The quick formatis nearly 80 percent faster than the default safe format.
7. The 160KB and 180KB disks are known as single-sided, double-density, 5 1/4-inchdisks.
The 320KB and 360KB disks are known as double-sided, double-density, 5 1/4-inchdisks.
The 1.2MB disks are known as double-sided, quadruple or high-density, 5 1/4-inchdisks.
The 720KB disks are known as double-sided, double-density, 3 1/2-inch disks.
The 1.44MB disks are known as double-sided, quadruple or high-density, 3 1/2-inchdisks.
The 2.88MB disks are known as double-sided, extra-high-density, 3 1/2-inch disks.
FApp
746 Appendix F Command Reference
MessagesChecking existing disk format
Information: FORMAT is checking the disk to see whether it has been formatted previously.
Saving UNFORMAT information
Information: If the disk has been formatted, the directory and FAT are saved on the disk, anda safe format is performed. A safely formatted disk can be unformatted.
Drive A error. Insufficient space for the MIRROR image file.There was an error creating the format recovery file.
Warning: The previously formatted disk doesn’t have room for the mirror-image file (the filethat contains a copy of the FAT and root directory). The disk doesn’t have enough room tosave a copy of the root directory and FAT. Be sure that you want to format the disk that islocated in the drive.
This disk cannot be unformatted.
Warning: FORMAT displays this message when it is prevented from saving information on thedisk for UNFORMAT to use. You most likely will see this message when the disk is too full andnot enough free space exists for the UNFORMAT information to be saved.
Invalid media or track 0 baddisk unusable
Warning: Track 0 holds the boot record, FAT, and directory. This track is bad, and the flop-py disk is unusable. Try reformatting the floppy disk. If the error reoccurs, you cannot usethe floppy disk.
This error can occur when you format 720KB floppy disks as 1.44MB floppy disks (if youforget to use the /N:9 or /F:720 switch when you format the disk in a 1.44MB drive), orwhen you format 360KB floppy disks as 1.2MB floppy disks (if you forget the /4 or /F:360switch).
This error also can occur when you format 1.2MB floppy disks at lower capacities (such as360KB) and use the /4 switch. In this case, try using a floppy disk rated for double-sided,double-density use.
WARNING, ALL DATA ON NON-REMOVABLE DISKDRIVE d: WILL BE LOST!Proceed with Format (Y/N)?
Warning: FORMAT is warning you that you are about to format a hard disk. To format the harddisk, type Y and press Enter. If you do not want to format the hard disk, type N and pressEnter.
See Also
SYS and UNFORMAT
Chapter 6, “Understanding Disks and Disk Drives”
747GRAFTABL 3.0 to 5.0—External
GOTO 2.0 and later—InternalGOTO transfers control to the line following a labeled line in the batch file and continues exe-cuting the batch file from that line. GOTO is an unconditional jump and always transfers con-trol whenever the command is encountered.
SyntaxGOTO label
Parameters and Switches
label The label that DOS should jump to. label transfers execution to the batch fileline following label.
Notes
1. To define a label, enter it at the beginning of a line, preceded by a colon (:). Only thefirst eight characters of a label are significant, although you can enter as many charac-ters as you want without generating an error. All characters on a line past the eighthcharacter of a label are ignored. Spaces are not allowed in labels.
2. When the command GOTO label is executed, DOS jumps to the line following the labeland continues executing the batch file. The label can be placed before or after the GOTOstatement in the batch file.
3. If a batch file does not contain the label specified by GOTO, the batch file stops and DOSdisplays a Label not found error message.
4. Adding a colon as the first character of a line in a batch file effectively “comments out”the line by causing DOS to treat it as a label rather than as a line to be executed. DOSinterprets it as a label, however, so using REM is safer.
5. Although GOTO doesn’t generate an error message when you use it from the DOS com-mand line, neither does it serve any purpose. Labels have no meaning on the commandline, so the GOTO command has no place to jump to.
See Also
:label and REM
“Branching with GOTO” in Chapter 16
GRAFTABL 3.0 to 5.0—ExternalGRAFTABL loads into memory the tables of additional character sets to be displayed on theColor Graphics Adapter (CGA). GRAFTABL is included on the DOS 6.0 Supplemental Disk,not in the standard DOS 6.0 package.
SyntaxGRAFTABL codepage /STATUS
FApp
BATCHFILE
C:\>
BATCHFILE
TSR
DISK
748 Appendix F Command Reference
Parameters and Switches
codepage Represents the three-digit number of the code page for the display. Thedefault value is 437, the code page for the U.S. See Chapter 14,“Understanding the International Features of DOS,” for a list of the codepages that DOS supports.
/STATUS Displays the code page selected for use by GRAFTABL. You cannot specify acodepage and request /STATUS information in the same command. This para-meter can be abbreviated as /STA.
Exit Codes
ERRORLEVEL Value Meaning
0 New character set loaded; no set was loaded previously
1 New character set loaded; previous set replaced
2 Disk error prevented loading new character set
3 Command line invalid; no action taken
4 Incorrect DOS version running
Notes
1. Load GRAFTABL to display legible characters in the ASCII range 128 to 255 when youare in graphics mode on the Color Graphics Adapter (CGA).
2. GRAFTABL increases the size of DOS by 1,360 bytes.
3. If you do not specify a codepage, DOS uses code page 437 in the USA.
4. After you invoke GRAFTABL, the only way to deactivate the command is to restart DOS.
5. The IBM CGA in graphics mode produces low-quality ASCII characters in the 128-to-255 range.
6. GRAFTABL is useful only when your system is equipped with the CGA and when you usethe CGA in medium- or high-resolution graphics mode.
See Also
DISPLAY.SYS and CHCP
GRAPHICS 2.0 and later—ExternalGRAPHICS enables the Print Screen key to print the contents of a graphics screen on a suit-able printer. When you first run GRAPHICS, it loads itself into memory and remains thereuntil you restart your computer.
SyntaxGRAPHICS printer pathname.pro /R /B /PRINTBOX:STD /PRINTBOX:LCD /LCD
C:\>
BATCHFILE
TSR
749GRAPHICS 2.0 and later—External
Parameters and Switches
printer Specifies the type of printer you are using. printer can be one of thefollowing values:
Printer Description
COLOR1 IBM Personal Color Printer with a black ribbon
COLOR4 IBM Personal Color Printer with an RGB(red, green, blue, and black) ribbon, whichproduces four colors
COLOR8 IBM Personal Color Printer with a CMYK(cyan, magenta, yellow, and black) ribbon,which produces eight colors
GRAPHICS IBM Personal Graphics Printer, IBMProPrinter, or IBM Quietwriter
THERMAL IBM PC-Convertible thermal printer
GRAPHICSWIDE IBM Personal Graphics Printer with an 11-inch-wide carriage
HPDEFAULT Any Hewlett-Packard PCL printer
DESKJET A Hewlett-Packard DeskJet printer
LASERJET A Hewlett-Packard LaserJet printer
LASERJETII A Hewlett-Packard LaserJet II printer
PAINTJET A Hewlett-Packard PaintJet printer
QUIETJET A Hewlett-Packard QuietJet printer
QUIETJETPLUS A Hewlett-Packard QuietJet Plus printer
RUGGEDWRITER A Hewlett-Packard RuggedWriter printer
RUGGEDWRITERWIDE A Hewlett-Packard RuggedWriter wide printer
THINKJET A Hewlett-Packard ThinkJet printer
pathname.pro Specifies the file that contains printer information. Normal drive andsubdirectory defaults apply, but wildcards are not allowed. If you do notspecify a printer information file, DOS looks for the file GRAPHICS.PROin the current directory or the directory containing the GRAPHICS.COMprogram file (normally C:\DOS).
/R Reverses the colors so that the image on the paper matches the imageonscreen (a white image on a black background).
/B Prints the background in the color displayed onscreen. You can use thisswitch only when the printer type is COLOR4 or COLOR8.
FApp
750 Appendix F Command Reference
/PRINTBOX:STD or Indicates the printbox size, or aspect ratio, to use when converting the /PRINTBOX:LCD image onscreen. This parameter must match the first Printbox state-
ment in the printer profile. You can abbreviate /PRINTBOX as /PB.
/LCD Prints the image as displayed on the PC Convertible’s LCD display.This switch is the equivalent of /PRINTBOX:LCD.
See Also
“The GRAPHICS Command” in Chapter 13
HCONVERTHCONVERT updates an earlier Stacker drive that was not mounted during Stacker Setup or aremovable Stacker drive that needs to be updated.
SyntaxHCONVERT drive: source target /c source|/g /m /?
Parameters and Switches
Drive Specifies the drive letter to be converted.
source Specifies the name of the STACVOL file to update.
target Indicates the STACVOL file to create when using the /g switch.
/c source Updates the named STACVOL file to the new Stacker format.
/g source target Generates a STACVOL file in the new storage format by copying thenamed old STACVOL file as a new Stacker volume. It does not change theexisting STACVOL file. If you omit the drive letter in either volume name,the current disk is used.
/m Use with either /c or /g on a monochrome monitor.
/? Displays the abbreviated online help.
Remarks
Do not interrupt the HCONVERT program and run it only from the DOS command prompt.
HELP 5.0 and later—ExternalHELP is a full-screen, online help system that includes information about every DOS com-mand. HELP contains the entire text of the “MS-DOS 6 Command Reference” section fromthe Technical Reference manual published by Microsoft. In addition, it provides hypertextlinks and a searchable index that can help you move quickly from one topic to the next.
PC-DOS
751HIINSTALL or INSTALLHIGH
DOS version 5.0 included a HELP command as well, but it bore more resemblance to theDOS 6 FASTHELP command than to the DOS 6 online help system.
SyntaxHELP command /B /G /H /NOHI
Parameters and Switches
command Indicates the command that you want information about. If this parameter isomitted, HELP displays its table of contents screen.
/B Specifies that HELP should use colors more appropriate for a black-and-white(monochrome) or LCD display.
/G Specifies that HELP should use the fastest screen-updating method for a CGAmonitor. Don’t specify the /G switch if you see “snow” on your monitor.
/H Specifies that HELP should display 43 lines on an EGA monitor or 50 lines ona VGA monitor.
/NOHI Specifies that HELP should limit itself to 8 colors rather than 16.
Notes
1. For HELP to work, QBASIC.EXE must be in the current directory, in your search path, orin the same directory as HELP.COM.
2. Help is available for many topics other than DOS commands (for example, CONFIG.SYScommands). See HELP’S table of contents for a complete list.
3. In addition to extensive syntax help, HELP displays usage notes, examples, and links-related material by hypertext links.
4. You can get simple syntax help for DOS commands from FASTHELP or by typing the fol-lowing command:command /?
See Also
FASTHELP
“Getting Help” in Chapter 3
HIINSTALL or INSTALLHIGHHIINSTALL (or INSTALLHIGH) executes a program from the CONFIG.SYS file and loads it intoupper memory.
SyntaxHIINSTALL drive:\path\filename arguments
FApp
DR-DOS
CONFIGSYS
752 Appendix F Command Reference
Parameters and Switches
drive:\path\filename The drive, path, and filename for the program to execute.
arguments Any optional or required arguments for the program being exe-cuted by HIINSTALL.
HILOAD (see LOADHIGH)HILOAD is a DR DOS alternative command for the LOADHIGH command. See the detaileddescription under LOADHIGH.
HIMEM.SYS (device driver) 4.0 and later—External
If your computer has more than 1MB of RAM installed, you should load HIMEM.SYS in yourCONFIG.SYS file. HIMEM.SYS is an XMS v3.0-compatible extended memory manager. Its ser-vices are required in order for DOS to use the extended memory your computer hasinstalled. HIMEM.SYS should be one of the first device drivers loaded with the DEVICE= com-mand in your CONFIG.SYS file.
Syntax
For most people, the DEVICE= line that loads HIMEM.SYS can be very simple:
DEVICE=drive:\path\HIMEM.SYS
The full syntax for HIMEM.SYS can seem intimidating, but all the optional parameters haveappropriate defaults:
DEVICE=drive:\path\HIMEM.SYS /A20CONTROL:onoff /CPUCLOCK:onoff /EISA/HMAMIN=min /INT15=size /NOTEST /NUMHANDLES=num /MACHINE:machcode/SHADOWRAM:onoff /VERBOSE /V
Parameters and Switches
drive:\path\ The full path to the HIMEM.SYS file on your system. Setup places theHIMEM.SYS file in the C:\DOS subdirectory by default. If the full pathto HIMEM.SYS isn’t specified, DOS looks for the file in the root direc-tory of the startup drive.
/A20CONTROL:onoff The A20 line is the address line that controls access to extendedmemory, including the high memory area (HMA). Specifying/A20CONTROL:OFF instructs HIMEM.SYS to take control of the A20 lineonly if it’s off when HIMEM.SYS loads into memory. The default valueis /A20CONTROL:ON, which allows HIMEM.SYS to take control of the A20address line no matter what state it is in. As long as HIMEM.SYS is thefirst program to access extended memory when you reboot yourcomputer, you should never need this parameter.
DR-DOS
CONFIGSYS
DEVICE =
753HIMEM.SYS (device driver) 4.0 and later—External
/CPUCLOCK:onoff On certain computers, HIMEM.SYS may change the CPU clock speedwhen it loads. If this happens to you, specify the /CPUCLOCK:ON para-meter to prevent HIMEM.SYS from changing the CPU clock speed.The default value is /CPUCLOCK:OFF, which allows HIMEM.SYS to load a little faster on most computers.
/EISA You need to include this parameter only if you have an EISA(Extended Industry Standard Architecture) computer with more than16MB of RAM installed. Including this parameter allows HIMEM.SYSto control all the available extended memory in such a system.
FApp
HIMEM.SYS versions 3.07 through 3.09 (v3.09 is distributed with DOS 6) may fail to recog-nize more than 64MB of memory on an EISA computer even with the /EISA parameterspecified. If you have this problem, contact Microsoft and ask for document numberQ98111 as well as any other available material that can help you get around this limitation.
/HMAMIN=min Only one application can use the HMA at a time. The /HMAMIN=minparameter specifies the minimum amount of RAM (in kilobytes) thatan application must request to be granted access to the HMA. Validvalues for min are in the range 0 through 63. If this parameter isomitted, a value of 0 is assumed, and the HMA is granted to the firstprogram that requests it.
Normally, you want to load DOS into the HMA to save 43KB of con-ventional memory. However, DOS does not allocate the HMA untilafter all other device drivers and programs in your CONFIG.SYS file areloaded. To prevent them from allocating the HMA before DOS canget to it, try specifying /HMAMIN=40 in the line that loads HIMEM.SYS.
/INT15=size Certain older applications use the Interrupt 15h interface to allocateextended memory. If you are using a program that requires this typeof memory, you can set some aside for it by using the /INT15=sizeparameter. size is specified in kilobytes and can be any value in therange 64 to 65,535, or the amount of extended memory you have inyour system—whichever is lower. Note that you should specify64KB more than your application requires because the HMA is allo-cated from this memory as well. Any memory you set aside with the/INT15 parameter is unavailable to programs using the standardXMS interface. If you do not specify the /INT15 parameter, no mem-ory is set aside (except the HMA).
/NOTEST This parameter specifies that you do not want HIMEM.SYS to scanextended memory when it loads. Normally, HIMEM.SYS attempts toidentify weak and unreliable RAM chips by scanning all extendedmemory.
754 Appendix F Command Reference
/NUMHANDLES=num When programs request extended memory, they are given a handleto an extended memory block by HIMEM.SYS. The /NUMHANDLES=numparameter specifies how many handles HIMEM.SYS should have avail-able. num can be any value in the range 1 to 128. If this parameter isomitted, 32 handles will be available. Each handle increases the sizeof HIMEM in memory by approximately 6 bytes. If the /VERBOSE (or /V)parameter is specified, HIMEM.SYS displays the number of handlesavailable when it finishes loading into memory. (See the message numextended memory handles available in the following “Messages”section.)
/MACHINE:machcode This parameter is required only if HIMEM.SYS is unable to gain con-trol of the A20 address line for your computer. When this happens,HIMEM.SYS stops loading and displays an error message. (See the mes-sage ERROR: Unable to control A20 line! in the following“Messages” section.) To enable HIMEM.SYS to work with your com-puter, you might have to specify one of the machine codes from thefollowing table. The default value for this parameter is /MACHINE:1or /MACHINE:AT.
machcode can be the number in the Code column or the abbreviationshown, whichever you find easier to type and remember. Note thatmore than one computer type can use the same code number.
Computer Type Code Abbreviation
IBM AT or 100% compatible 1 AT
CompuAdd 386 systems 1 or 8 AT
JDR 386/33 1 AT
Phoenix BIOS 1 or 8 AT or WYSE
IBM PS/2 2 PS2
Datamedia 386/486 2 PS2
UNISYS PowerPort 2 PS2
Phoenix Cascade BIOS 3 PTLCASCADE
HP Vectra (A and A+) 4 HPVECTRA
AT&T 6300 Plus 5 ATT6300PLUS
Acer 1100 6 ACER1100
Toshiba 1600, 1200XE, 7 TOSHIBAand 5100
Wyse 12.5MHz 286 8 WYSE
Hitachi HL500C 8 WYSE
Intel 301z or 302 8 WYSE
755HIMEM.SYS (device driver) 4.0 and later—External
Tulip SX 9 TULIP
Zenith ZBIOS 10 ZENITH
IBM PC / AT (alternative delay) 11 AT1
IBM PC / AT (alternative delay) 12 AT2
CSS Labs 12 CSS
IBM PC / AT (alternative delay) 13 AT3
Philips 13 PHILIPS
HP Vectra 14 FASTHP
IBM 7552 Industrial Computer * 15 IBM7552
Bull Micral 60 * 16 BULLMICRAL
Dell XBIOS * 17 DELL*Not available in the version of HIMEM.SYS distributed with DOS 5.
You might have to specify 1 or AT as the machine type for yourcomputer, despite the fact that 1 is the default value for the /MACHINEparameter. HIMEM.SYS tries to determine what type of computer youhave when it loads into memory; if it gets confused, it may select thewrong method for controlling the A20 line. In these cases, you mighthave to explicitly set the machine type to 1.
For the version of HIMEM.SYS that is distributed with DOS 6 (v3.09),the only systems that should require the use of the /MACHINE parame-ter to operate are the Acer 1100 (code 6), the Wyse 12.5MHz 286(code 8), and the IBM 7552 Industrial Computer (code 15). Systemsthat have the same code value as these systems are likely to requirethis parameter as well.
/SHADOWRAM:onoff This parameter is useful only on computer systems with less than2MB of RAM. On such systems, if HIMEM.SYS detects that the ROMBIOS is running from shadow RAM, it attempts to reclaim thatmemory and turn it into available XMS memory. If you don’t wantHIMEM.SYS to do this, specify the /SHADOWRAM:ON parameter.
Note that specifying /SHADOWRAM:ON allows only the ROM BIOS tocontinue to run from RAM. HIMEM.SYS cannot set up shadow RAMon a system that doesn’t already have it.
/VERBOSE This parameter specifies that HIMEM.SYS should display status mes-sages while it loads. By default, HIMEM.SYS doesn’t display any mes-sages unless an error occurs. You also can turn on the display ofmessages while HIMEM.SYS is loading by pressing the Alt key.
/V This switch is an abbreviated form of the /VERBOSE parameter.
FApp
756 Appendix F Command Reference
Notes
1. HIMEM.SYS now automatically performs a memory scan to identify RAM chips that arebecoming unreliable. An unreliable RAM chip can halt your computer in the middle ofa critical operation and could lead to a serious loss of data. If you don’t want HIMEM.SYSto perform this memory scan, include the new /NOTEST switch.
2. HIMEM.SYS requires at least an 80286-based computer with more than 1MB of RAMinstalled in order to run. Computers with less than 1MB of RAM have no extendedmemory to manage.
3. You cannot load HIMEM.SYS with a DEVICEHIGH= command. HIMEM.SYS is one of the pro-grams that enables you to load other device drivers or programs into upper memorywith the DEVICEHIGH= or LOADHIGH commands. HIMEM.SYS does attempt to minimize itsuse of conventional memory; after HIMEM.SYS is loaded, it uses only about 1KB of con-ventional memory.
4. The line that loads HIMEM.SYS should be one of the very first DEVICE= lines in your CONFIG.SYS file. If any other driver using extended memory is loaded before HIMEM.SYS,the chances are very good that HIMEM.SYS will refuse to load.
5. The DOS 6 Setup program inserts the DEVICE= line, which loads SETVER.EXE before theline for HIMEM.SYS. This doesn’t cause any problems, but it does prevent you from loadingSETVER.EXE into upper memory with the DEVICEHIGH= command. To gain a little conven-tional memory, move the DEVICE= line for SETVER.EXE after the lines that load HIMEM.SYSand EMM386.EXE and change the DEVICE= command into a DEVICEHIGH= command.
6. HIMEM.SYS (or another XMS-compatible memory manager) must be loaded before youcan use any of the following commands or drivers in your CONFIG.SYS file:DEVICEHIGH=DOS=HIGHDOS=UMBEMM386.EXE
The DOS=UMB and DEVICEHIGH= commands actually depend on a UMB provider such asEMM386.EXE. Because most UMB providers require the use of XMS memory, however,they all indirectly depend on HIMEM.SYS.
7. If HIMEM.SYS is unable to gain control of the A20 address line, it aborts with an errormessage. (See the message ERROR: Unable to control A20 line! in the following“Messages” section.) Unless your computer’s hardware is incompatible, HIMEM.SYSshould be able to gain control; its failure to do so usually means that another program ispreventing HIMEM.SYS from doing its job. Two programs cannot share control of extend-ed memory, so you have to remove one of them from your CONFIG.SYS file. Check to seewhether you are loading any third-party memory managers before the line that loadsHIMEM.SYS. (If HIMEM.SYS were loading first, your third-party memory manager would bethe one displaying the error message, probably telling you to remove HIMEM.SYS.)
If no other memory managers are loading before HIMEM.SYS, it might be baffled by themethod used to control the A20 address line in your computer. In these cases, you haveto specify a /MACHINE:machcode parameter to tell HIMEM how to control the A20 address
757HIMEM.SYS (device driver) 4.0 and later—External
line. Look for your computer in the table of machine codes. (See the table of machinecodes in the preceding “Parameters and Switches” section.) If you find your computerlisted, add a /MACHINE:machcode parameter to the line that loads HIMEM.SYS in your CONFIG.SYS file.
Examples
The first few lines in most people’s CONFIG.SYS files look something like this:
DEVICE=C:\DOS\HIMEM.SYSDEVICE=C:\DOS\EMM386.EXE RAM MIN=0DOS=HIGH,UMB
First, HIMEM.SYS is loaded into memory to provide access to the HMA and XMS-compatiblememory. Then, EMM386.EXE is loaded, which provides upper memory block (UMB) supportfor DOS as well as EMS-compatible memory for those programs that use it. (The RAMswitch enables UMB and EMS support, and MIN=0 lets EMM386.EXE release back into thememory pool EMS memory that’s not in use.) Finally, DOS is instructed to load itself intothe high memory area (HMA) provided by HIMEM.SYS and to establish connections with theUMBs provided by EMM386.EXE.
If you own an Acer 1100 computer, you might have to include a /MACHINE parameter to letHIMEM.SYS know how to control the A20 line in your computer, as shown in the followingexample:
DEVICE=C:\DOS\HIMEM.SYS /MACHINE:ACER1100 /V
When you include the /V (or /VERBOSE) parameter, HIMEM.SYS displays all messages while itloads into memory, so you can keep track of how it is doing. Notice that you can enter themachine code parameter as /MACHINE:ACER1100 or /MACHINE:6, but not as /ACER1100.
Messages64K High Memory Area is available
Information: If you have specified the /VERBOSE parameter, HIMEM.SYS displays this messageafter successfully gaining control of the A20 line.
ERROR: An Extended Memory Manager is already installed
Error: Another XMS memory manager was installed before HIMEM.SYS. If you are using athird-party memory manager, remove the line that loads HIMEM.SYS from your CONFIG.SYSfile. If you want to use HIMEM.SYS, remove the other memory manager instead.
ERROR: HIMEM.SYS requires an 80x86-based machine
Error: HIMEM.SYS can’t run on 8088- and 8086-based computers. The only function ofHIMEM.SYS is to control and regulate the use of extended memory, and these types of com-puters don’t have any.
ERROR: HIMEM.SYS requires DOS 3.00 or higher
FApp
758 Appendix F Command Reference
Error: Version 3.09 of HIMEM.SYS, which is the version distributed with MS-DOS 6.0,requires at least DOS 3 to run. If you know that you’re running DOS 5 or 6 (to find out,use the VER command), check your SETVER.EXE version table to make sure that no one hasentered HIMEM.SYS into it as a practical joke.
ERROR: No available extended memory was found
Error: HIMEM.SYS can’t find any extended memory in your system. You may not have enoughRAM installed to run HIMEM.SYS.
ERROR: Unable to control A20 line!
Error: HIMEM.SYS displays this message if it is unable to gain control of the A20 line in yourcomputer. Normally, this message means that you must specify a /MACHINE:machcode para-meter on the line that loads HIMEM.SYS in your CONFIG.SYS file.
ERROR: VDISK memory allocator already installedXMS Driver not installed
Error: A device driver that loaded before HIMEM.SYS allocated some extended memory withthe Interrupt 15h interface. To get HIMEM.SYS to load, make sure that the DEVICE= line forHIMEM.SYS precedes the driver using Interrupt 15h. To reserve memory for this other driver,specify an /INT15=size parameter on the line for HIMEM.SYS.
Installed A20 handler number num
Information: HIMEM.SYS has gained control of the A20 line using machine handler numbernum. Check the table shown earlier in the “Parameters and Switches” section to see whatcomputer system num corresponds to.
Minimum HMA size set to minK
Information: Programs that attempt to allocate less than minK RAM in the HMA are denied.If min is greater than zero, you’ve probably set the /HMAMIN=min parameter to prevent anoth-er program from grabbing the HMA before DOS can get to it.
num extended memory handles available
Information: HIMEM.SYS has created num extended memory block handles, either by default orthrough the use of the /NUMHANDLES=num parameter.
Shadow RAM disabled
Information: On computers with less than 2MB of RAM, HIMEM.SYS often disables shadowRAM to make more extended memory available. If you don’t want HIMEM.SYS to disableshadow RAM, specify the /SHADOWRAM:ON parameter.
WARNING: Invalid parameter ignored
Warning: An invalid parameter was specified on the line that loaded HIMEM.SYS. Check theline in CONFIG.SYS carefully and look any for mistyped options.
WARNING: Shadow RAM disable not supported on this system
759IBMAVSP
Warning: HIMEM.SYS is unable to disable shadow RAM for your computer. If you want toturn off shadow RAM, you have to use your computer’s CMOS Setup program or setjumpers on the motherboard.
WARNING: Shadow RAM is in use and can’t be disabled
Warning: You have specified /SHADOWRAM:OFF, but it’s already in use and HIMEM.SYS can’t dis-able it. You might have to use your CMOS Setup program if you want to turn off shadowRAM on your computer.
WARNING: The A20 Line was already enabled
Warning: Another program has enabled your computer’s A20 line, and HIMEM.SYS is unsurewhat to make of it. Usually, HIMEM.SYS still assumes control of extended memory. To avoidthis warning, make sure that HIMEM.SYS is loaded before any other drivers that use extendedmemory. If you have another device driver that needs to control the A20 line, you mighthave to specify the /A20CONTROL:OFF parameter to get HIMEM.SYS to cooperate with the otherdevice driver.
WARNING: The High Memory Area is unavailable
Warning: This message may appear if you have only 1MB of RAM or if another programhas taken over the HMA. Make sure that HIMEM.SYS is loaded before any other drivers thatuse extended memory.
See Also
DEVICE=, DOS=, and EMM386.EXE
“Using Extended Memory and HIMEM.SYS” in Chapter 19
IBMAVDIBMAVD opens the IBM AntiVirus/DOS full-screen utility program.
SyntaxIBMAVD
IBMAVSPYou use the IBMAVSP command to start IBMAVSP, the IBM AntiVirus standalone program.This program can help find and remove a virus when the system is too badly infected to usethe full-screen IBM AntiVirus program. It can also be incorporated into .BAT files. If nooptions are specified, IBMAVSP operates interactively.
SyntaxIBMAVSP * *n drive... -mem -allfiles -programs -oneflop -loglogfilename -vlog-nlog -nb -copenerr -cerr -nrep -nwipe -nfscan -yrep -ywipe -yfscan /?
FApp
PC-DOS
PC-DOS

760 Appendix F Command Reference
Parameters and Switches
* Scans all local fixed drives for viruses.
*n Scans all network drives.
drive:... Scans the drive specified. One or more drive letters can be specified onthe command-line statement.
-mem Scans memory. This parameter can be used when only memory (notdrives) needs to be checked.
-allfiles Scans all files on the specified drives for viruses.
-programs Scans only programs on the specified drives for viruses.
-oneflop Prevents the IBMAVSP program from asking for a second disk to scan.
-loglogfilename Specifies where IBMAVSP is to place the log file. If logfilename is not speci-fied, the log is written to the file IBMAVSP.LOG in the current directory.
-vlog Specifies that the names of all scanned files and boot sectors be placedinto the log file, whether an object was infected or not.
-nlog Specifies that no log file is to be created.
-nb Specifies no beep when a virus is found.
-copenerr Continues checking for viruses without asking, even if a file cannot beopened for scanning.
-cerr Continues checking for viruses without asking, even if a nonfatal error isencountered.
-nrep Specifies that infected files or boot sectors should not be repaired.
-nwipe Specifies that infected files should not be erased and infected boot sectorsshould not be replaced if they cannot be repaired.
-nfscan Specifies not to offer to perform a final, thorough scan if viruses arefound.
-yrep Specifies that infected files or boot sectors be repaired.
-ywipe Specifies that infected files should be erased and infected boot sectorsshould be replaced if they cannot be repaired.
-yfscan Specifies that a final, thorough scan should be performed automatically ifviruses are found.
/? Displays the abbreviated online help.
761IF 2.0 and later—Internal
IEXTRACTThe IEXTRACT command extracts a file from an Internet Explorer backup information filewith the .DAT extension.
SyntaxIEXTRACT /W /L dir drive:\path filename ...
Parameters and Switches
/W Generates a warning before overwriting a file.
/L dir Saves extracted files in the location specified by dir.
drive:\path Specifies the drive and path location of the .DAT file.
filename Specifies the name of the file or files to extract from the backup informationfile. If no filename is specified, all files in the .DAT file will be extracted.
IF 2.0 and later—InternalYou can use the IF command to add conditional execution of a DOS command to yourbatch files. You can test for three types of conditions with the IF command: the value of anexit code returned by a program, the equivalence of two alphanumeric strings, and the exis-tence of a file or subdirectory.
Syntax
To test the exit code returned by a program, use the following form of the IF command:
IF NOT ERRORLEVEL number command parameters
To compare two alphanumeric strings, use the following form of the IF command:
IF NOT string1==string2 command parameters
To check for the existence of a file or files, use the following form of the IF command:
IF NOT EXIST pathname command parameters
Parameters and Switches
NOT Tests for the opposite of the condition. In other words, IF NOT exe-cutes the command if the condition is false.
ERRORLEVEL number Tests the exit code (0 to 255) that a program returns when it termi-nates. If the exit code is greater than or equal to the number, the condi-tion is true.
string1==string2 Compares two alphanumeric strings to determine whether they areidentical. This comparison is case sensitive, so upper- and lowercase
FApp
Windows9x
C:\>
BATCHFILE
762 Appendix F Command Reference
characters are not considered equal. The strings can include literals,batch file replaceable parameters (such as %1), environment variables(such as %COMSPEC%), or any combination of the three.
EXIST pathname Tests whether the file specified by pathname exists. If no drive or pathis included in pathname, the current drive or directory is assumed. Thefilename portion is required. Wildcards are allowed in the filenameand extension portions of pathname.
command Represents the DOS command that is executed if the condition is true(or false if NOT is specified). If you want to run a batch file, use theCALL or COMMAND /C command instead of executing the batch filedirectly.
parameters Represents any parameters you want to pass to the command being exe-cuted.
Notes
1. For the IF command, if the condition is true, the command is executed. If the condition isfalse, DOS skips the command and immediately executes the next line of the batch file.
2. For the IF NOT subcommand, if the condition is false, the command is executed. If thecondition is true, DOS skips the command and immediately executes the next line of thebatch file.
3. If you want to run a batch file from the command portion of an IF command, use theCALL or COMMAND /C command instead of executing it directly. Without CALL or COMMAND/C, control never returns to your batch file.
4. IF commands can be nested. That is, you can use the IF command in the command por-tion of an IF command. This can be a handy way to test for a range of exit code values,freeing you from the tyranny of descending order IF ERRORLEVEL statements. (See thefollowing “Examples” section.)
5. Do not attempt to use the “at” sign (@) to suppress the display of the command specifiedin the command portion of an IF command. DOS will not interpret the @ correctly andwill search for an executable file that begins with an “at” sign. To accomplish the samething, enter ECHO OFF before executing the IF statement.
6. IF ERRORLEVEL number returns true if the number you specified is less than or equal tothe exit code returned by the previous program. For this reason, IF ERRORLEVEL com-mands usually have to be arranged in descending order to get the desired results. Youmust test for this value immediately after the program terminates. Executing any othercommand, even if it doesn’t return an exit code, may clear the previous exit code frommemory.
7. Not all programs return exit codes. If a program doesn’t return an exit code, an IFERRORLEVEL 0 command evaluates to true, but any other number causes the IF state-ment to be false. Presently, no DOS internal commands return exit codes, and,
763IF 2.0 and later—Internal
unfortunately, you can’t set the exit code for a batch file either. The following DOSexternal commands return exit codes:
BACKUP DISKCOPY MSAV
CHKDSK FIND REPLACE
CHOICE FORMAT RESTORE
DEFRAG GRAFTABL SCANDISK
DELTREE KEYB SETVER
DISKCOMP MOVE XCOPY
8. If you use CALL to call a program that returns an exit code, that exit code value is avail-able after CALL returns. Unfortunately, you can’t set the exit code for a batch file, soCALL can’t return an exit code from a batch file you have executed. To return statusinformation from a batch file executed with the CALL command, create an environmentvariable and set it equal to your return status. Then, you can test this environment vari-able in the calling batch file.
9. For string1==string2, DOS makes a literal, character-by-character comparison of thetwo strings. Neither string can contain embedded spaces or equal signs. If you want toinclude a percent sign (%) in either string, include it twice if this IF command is execut-ed from a batch file. The comparison IF performs is case sensitive; that is, uppercaseand lowercase characters are considered to be different.
10. When you include environment variables (such as %COMSPEC%) or replaceable parameters(such as %0 through %9) in either string argument in a batch file, they are replaced withthe value of the environment variable or replaceable parameter when DOS parses theline. DOS does not parse commands you enter at the DOS prompt, so you can’t includeeither type of variable in a command that you execute from the DOS prompt.
11. When IF is performing string1==string2 comparisons, each string must have at leastone character in it; otherwise, a syntax error will result, and DOS will abort the batchfile. In DOS 6 and later, string2 can be empty without causing an error. This problemoften happens in IF statements that test replaceable parameters or environment vari-ables and typically is solved by adding dummy characters to both strings. For instance,test %1x==ERNIEx or “%1”==”ERNIE” instead of %1==ERNIE.
12. Including only one equal sign in an IF string comparison results in a syntax error.Interestingly enough, you can use more than two equal signs without causing an error.
13. The EXIST pathname form of the IF command returns true if at least one file matchesthe pathname specified. If an invalid subdirectory or drive is specified, the condition isfalse. DOS does not search the DOS PATH for pathname; DOS searches only the driveand subdirectory specified. If pathname is omitted, DOS searches the current drive anddirectory.
14. Although the EXIST pathname form of the IF command is intended to test for the exis-tence of files, you can use it to test for the existence of a subdirectory by specifying theNUL device as the filename. The NUL device (or any other valid DOS device) exists inevery subdirectory; so if the specified subdirectory exists, the IF EXIST path\NUL com-mand is true.
FApp
764 Appendix F Command Reference
Examples
Notice that because of the way the IF ERRORLEVEL command works—testing whether an exitcode is greater than or equal to the number specified—the following statement always exe-cutes the GOTO statement:
IF ERRORLEVEL 0 GOTO ALWAYS_JUMP
When you’re testing an ERRORLEVEL number, be sure to test for the highest possible numberfirst. Consider the following example:
IF ERRORLEVEL 1 GOTO ONE_OR_GREATER
IF ERRORLEVEL 2 GOTO TWO_OR_GREATER
The preceding example always goes to ONE_OR_GREATER, even if an ERRORLEVEL of 2 isreturned because 2 is greater than or equal to 1. Make sure that when you use IF ERRORLEVEL commands, you include them in descending order.
You can get around the limitation just noted by nesting IF ERRORLEVEL commands, checkingfor ranges of values with upper and lower bounds. Test for the lowest value; then test for NOTthe highest value plus one in an embedded IF command. For example, consider the follow-ing IF commands:
IF ERRORLEVEL 1 IF NOT ERRORLEVEL 4 GOTO ONE_TO_THREE
In English, if the exit code returned by the program is greater than or equal to the firstvalue (1) and less than the second value (not greater than or equal to 4), execute the com-mand. Notice that this form of the IF ERRORLEVEL command executes the proper GOTO com-mand, no matter what order they are executed in. To test for a single value, simply embed anegative test for one more than the value you want, like this:
IF ERRORLEVEL 2 IF NOT ERRORLEVEL 3 GOTO ONLY_TWO
IF string comparisons are often used to make sure that at least one parameter is specifiedwhen the batch file is executed, as shown in these examples:
IF “%1”==”” GOTO HELP_MESSAGE
IF “%1”==”/?” GOTO HELP_MESSAGE
If no parameters to the batch file are specified, the first IF condition is true, and the GOTOcommand jumps to a section of the batch file where you can display a help message. Thesecond IF statement tests for the /? help switch, enabling this batch file to honor a requestfor help from the user as well.
Sometimes this technique is combined with the SHIFT command to enable a batch file toloop through a variable number of parameters, as shown in the following:
:LOOPIF “%1”==”” GOTO ENDTYPE %1 | MORESHIFTGOTO LOOP
:END
765INCLUDE= 6.0 and later—Internal
You could specify as many text files as you wanted to when executing this batch file, and theTYPE command would display each one in turn. After the last file had been displayed, the IFcommand would execute the GOTO END command, and the batch file would terminate. Whenyou combine IF and GOTO in this way, you can create a multiline loop in a batch file.
To jump around part of a batch file if the network menu choice was not chosen from a DOS6.0 startup menu, use the following line:
IF NOT “%CONFIG%”==”NETWORK” GOTO FINISH
Notice that in all the preceding examples, quotation marks are used to ensure that the stringcomparisons never try to evaluate a null string. For example, in the preceding command, ifthe CONFIG environment variable turns out to be undefined, DOS evaluates the followingstatement after the parser makes substitutions:
IF NOT “”==”NETWORK” GOTO FINISH
Without the quotation marks, one side of the comparison would be empty, and the batchfile would be aborted with a syntax error message. With the quotation marks included, DOSsimply finds “” not equal to “NETWORK”.
Suppose that you want to copy all the .DOC files in your C:\WORK subdirectory to a backupdisk. You could use the IF EXIST command, as follows, to make sure that at least one .DOCfile existed before executing the COPY command:
IF EXIST C:\WORK\*.DOC COPY C:\WORK\*.DOC A:
The IF EXIST command can be used to check for the existence of a subdirectory if you spec-ify the NUL device as the filename. You can use this technique to create a subdirectory if itdoesn’t already exist:
IF NOT EXIST C:\WORK\NUL MD C:\WORK
By nesting IF EXIST commands, you also can check to make sure that a file doesn’t exist:
IF EXIST C:\WORK\NUL IF NOT EXIST C:\WORK\MYFILE.TXT GOTO NOFILE
Notice that simply checking for the file with IF NOT EXIST can return true if the subdirecto-ry or drive is invalid, which might lead to errors later in your batch file. By testing for theexistence of the path and then checking that the file doesn’t exist, you can be sure that creat-ing MYFILE.TXT in the C:\WORK subdirectory will succeed without overwriting another file.
See Also
:label, %envir%, %n, and GOTO
“Using the IF Command” in Chapter 16
INCLUDE= 6.0 and later—InternalAfter you set up a startup menu, you might find that in certain configuration blocks, you areentering the same commands over and over. Instead of retyping them, you can gather themall together in a block of their own and use the INCLUDE= command to include that block
FApp
CONFIGSYS
766 Appendix F Command Reference
within the others. The [COMMON] block performs a similar function for commands that youwant to include in all your configuration blocks. INCLUDE= can be used only in yourCONFIG.SYS file.
SyntaxINCLUDE=blockname
Parameters and Switches
blockname The name of the configuration block that you want to include when theactive configuration block is processed. blockname must match a configura-tion block you have defined elsewhere in your CONFIG.SYS file, and it alsocan contain INCLUDE= commands. This argument is required.
Notes
1. The INCLUDE= command can appear only inside configuration blocks in CONFIG.SYS andcan refer only to another configuration block. You cannot use INCLUDE= to include theselections from one menu block within another.
2. CONFIG.SYS allows two types of blocks: menu blocks and configuration blocks. Eachblock begins with a [blockname] and includes all the lines that follow up to the next[blockname]. Menu blocks, which are blocks named [MENU] or defined with a SUBMENU=command, can include only menu-related commands. All other CONFIG.SYS commandsbelong in configuration blocks.
The [COMMON] block is a special kind of configuration block, and certain special rulesapply to it. It is the only block name that you can have more than once in your CONFIG.SYS file. All commands included in a [COMMON] block are always executed. Anycommands in CONFIG.SYS that are not included in any block (that is, they appear beforethe first [blockname]) are assumed to be in a [COMMON] block.
[COMMON] blocks are an alternative to using the INCLUDE= command. If you are usingINCLUDE= to include a single block of commands in all your configuration blocks, con-sider using a [COMMON] block instead.
3. You are allowed to nest INCLUDE= commands. That is, a block included with theINCLUDE= command can have another INCLUDE= command within it. Although there isno clear limit to how deep this nesting can go, for the sake of clarity, you should limityourself to no more than one or two levels of INCLUDE= commands.
Because nesting is allowed, there is the possibility of creating an endless loop. Make surethat an included block never includes any block that included it (that is, A includes B,which includes A).
767INCLUDE= 6.0 and later—Internal
4. The INCLUDE command is meant to help you eliminate repetition in your CONFIG.SYSfile. Its use, however, often makes your CONFIG.SYS file harder to understand. Weighthese factors carefully when you decide whether to use an INCLUDE block. When soft-ware you are installing makes a mess of your menu system, a clear, simple CONFIG.SYSfile is easier to repair than a complicated one.
Examples
The following sample CONFIG.SYS file illustrates the use of INCLUDE= blocks and [COMMON]blocks:
[MENU]MENUITEM=MINIMUM, Minimal ConfigurationMENUITEM=NORMAL, Normal Configuration (Default)MENUITEM=NORM_EMS, Normal Configuration with EMS AvailableMENUITEM=MAXIMUM, All the Bells and WhistlesMENUDEFAULT=NORMAL, 30
[COMMON]DEVICE=C:\DOS\HIMEM.SYSDOS=HIGHBREAK=ONNUMLOCK=OFF
[MINIMUM]BUFFERS=30LASTDRIVE=HSTACKS=9,256
[NORMAL]INCLUDE=MINIMUMDEVICE=C:\DOS\EMM386.EXE NOEMSDOS=UMB
[NORM_EMS]INCLUDE=MINIMUMDEVICE=C:\DOS\EMM386.EXE RAMDOS=UMB
[MAXIMUM]INCLUDE=NORM_EMSDEVICEHIGH=C:\DOS\RAMDRIVE.SYS 1450 512 224 /EDEVICEHIGH=C:\DOS\ANSI.SYS
[COMMON]SHELL=C:\DOS\COMMAND.COM C:\DOS\ /P /E:512
Notice that the MAXIMUM configuration includes the NORM_EMS configuration, which in turnincludes the MINIMUM configuration. All the configuration choices automatically “include” thecommands in the two COMMON blocks. As you can see, this kind of nesting can quickly becomeconfusing. Don’t use this example as a model for your own CONFIG.SYS file; it is only meantto illustrate the use of the INCLUDE= command and is much more complicated than it needsto be.
FApp
768 Appendix F Command Reference
As it turns out, all the commands in the MINIMUM block could be placed in the COMMON blockpreceding it, leaving the MINIMUM block empty. (No matter what configuration you choose,the MINIMUM block is included.) However, if you removed the MINIMUM block completely, thecorresponding menu line would not be displayed, and you would need to remove theINCLUDE=MINIMUM commands from the other blocks as well.
See Also
[blockname] and MENUITEM=
“Creating Multiple Configurations” in Chapter 2
INSTALL= 4.0 and later—InternalINSTALL= can load resident software (TSRs) from your CONFIG.SYS file into conventionalmemory. Programs loaded with INSTALL= are executed after all other CONFIG.SYS lines havebeen processed and just before the command-line interpreter (COMMAND.COM) is loaded intomemory. INSTALL= can be used only in your CONFIG.SYS file.
SyntaxINSTALL=drive:\path\filename parameters
Parameters and Switches
drive:\path\ Although this parameter is optional, you should always include the fulldrive and path to the resident program file. If they are omitted, the file isassumed to be in the root directory of the startup drive.
filename The full filename, with extension, of the resident program to be loaded.No extension is assumed, and wildcards are not allowed. This parameter isrequired.
parameters Any parameters that the resident program requires are included after itsname. DOS passes these parameters directly to the program when it’sloaded into memory. For more information, see the instructions for load-ing the resident program.
Notes
1. If MS-DOS cannot find the program file you have specified, it displays a Bad or missing filename message and continues processing CONFIG.SYS. (See the first item in the following “Messages” section.)
2. Resident programs included with DOS that can be safely loaded with the INSTALL=command include FASTOPEN.EXE, KEYB.COM, NLSFUNC.EXE, and SHARE.EXE.
3. In versions of DOS earlier than DOS 6, many resident programs could not be loadedwith INSTALL= because no environment was available to them. Starting with DOS 6, anenvironment is available to installed programs, and most resident software can now besuccessfully loaded this way.
CONFIGSYS
769INSTALLHIGH (see HIINSTALL)
4. With DOS 6, there is little reason to use INSTALL= anymore. In the past, one of themain reasons to use INSTALL= was to save the small amount of memory wasted on envi-ronments for resident software. But with DOS 6, you save little or nothing. Also,INSTALL= is limited to loading software into conventional memory, and you can’t includeLOADHIGH in an INSTALL= command to get around this limitation. All in all, you usuallyare better off avoiding INSTALL= entirely; instead, load your resident software from yourAUTOEXEC.BAT file.
5. DOS executes all other lines in CONFIG.SYS, including any SET commands, before exe-cuting any INSTALL= lines. When all the INSTALL= lines have been processed, the com-mand interpreter (COMMAND.COM) is loaded and begins to process your AUTOEXEC.BAT file.
6. Only resident software should be loaded with an INSTALL= command. DOS waits untilthe program terminates before continuing, and if a normal program is run, neither COMMAND.COM nor your AUTOEXEC.BAT file is loaded until you quit the program. Althoughthis setup might be interesting, it could make your system very unstable and should beavoided.
Examples
To load SHARE.EXE from your CONFIG.SYS file, you would include the following line:
INCLUDE=C:\DOS\SHARE.EXE /L:50
This line assumes that SHARE.EXE is located in the C:\DOS subdirectory and sets the numberof file locks to 50. For DOS to find SHARE.EXE, the file extension must always be includedwith the filename because no default extensions are assumed with INSTALL=.
MessagesBad or missing filenameError in CONFIG.SYS line number
Warning: DOS displays this message if it can’t find the file you specified in a DEVICE=,DEVICEHIGH=, or INSTALL= command in your CONFIG.SYS file. filename is the name of the filethat DOS was looking for, and number is the line in CONFIG.SYS where the command is locat-ed. Edit the line so that the path and filename are correct and then restart your computer.
See Also
DEVICE= and LOADHIGH
“Using the INSTALL Command” in Chapter 19
INSTALLHIGH (see HIINSTALL)INSTALLHIGH is a DR DOS alternative command for the HIINSTALL command. See thedetailed description under HIINSTALL.
FApp
DR-DOS
770 Appendix F Command Reference
INTERLNK 6.0 and later—ExternalWhen you run INTERLNK from the DOS command line, it communicates with theINTERLNK.EXE device driver in memory, allowing you to view or change the server drives youhave access to. If the connection to the server hasn’t been established, INTERLNK attempts to connect with the server, using the parameters you specified when you loaded theINTERLNK.EXE device driver. Before you can run INTERLNK from the DOS command line, youmust load the INTERLNK.EXE device driver into memory by adding a DEVICE= statement inyour CONFIG.SYS file.
SyntaxINTERLNK client:=server: ...
Parameters and Switches
client: The client drive letter that you want to use to access a disk drive on the Interlnkserver. client: must be one of the drive letters that the INTERLNK.EXE device dri-ver reserved when it loaded into memory. The trailing colon is optional.
server: The server drive that you want client: to refer to. server: must be a drive onthe Interlnk server that is available for redirection. The trailing colon is option-al. If this parameter is omitted, the client: drive letter is disconnected from theInterlnk server.
Notes
1. The INTERLNK.EXE device driver must be installed before you can run INTERLNK from thecommand line. If you try to run INTERLNK without installing the device driver, an errormessage is displayed. (See the following “Messages” section.)
2. INTERLNK.EXE actually is two files: a device driver and an executable program. Thedevice driver portion does all the real work and has to be loaded into memory with aDEVICE= command in your CONFIG.SYS file. After this device driver has been loaded intomemory, the executable portion of the file communicates with the device driver to reas-sign drive letters and display status information.
3. To display Interlnk’s status, type INTERLNK at the DOS prompt. Interlnk displays a list ofclient drive letters on the left, with the server drives they are connected to on the right.If any of the server drives have volume labels, they are displayed as well.
4. You can include as many client:=server: parameters as you need in a single INTERLNKcommand. Separate each client:=server: assignment with spaces.
5. To disconnect an Interlnk drive, specify the client:= parameter but omit the server:drive letter. A disconnected client: drive letter is immediately available for use con-necting to another server drive. You can perform a mixture of drive assignments anddisconnections in a single INTERLNK command by separating each one with spaces.
C:\>
BATCHFILE
771INTERLNK 6.0 and later—External
6. The drives that INTERLNK.EXE reserves when it loads into memory are private; they can’tbe used by other programs even if Interlnk isn’t using them. For example, you cannotuse an inactive Interlnk drive letter as a network drive or a SUBST alias. INTERLNK.EXEdisplays the drive letters it has reserved when it is loading into memory.
7. To use a printer on an Interlnk server from within Windows, you first have to accessthe Printer dialog box in Control Panel. Next, click the Connect button. In theConnect dialog box, either clear the Fast Printing Direct To Port check box, or specifythe port as LPT1.DOS or LPT2.DOS rather than LPT1 or LPT2. Normally, Windows printsdirectly to the hardware and bypasses Interlnk’s printer redirection. However, when youdisable Fast Printing or print to a filename rather than the port name, Windows printsthrough DOS, and Interlnk can redirect the data to the server’s printer port.
8. All disk drives redirected by Interlnk are considered removable drives because the con-nection to them can be lost at any time. DoubleSpace refers to Interlnk drives as nor-mal, removable local drives. MSD reports that Interlnk drives are floppy drives withone cylinder. SMARTDrive defaults to read-caching Interlnk drives, as it does withlocal floppy disk drives. Windows File Manager represents Interlnk drives with a “flop-py icon.”
9. An Interlnk client cannot access CD-ROM drives on the server. Interlnk can recognizeonly standard DOS drives, not network drives. CD-ROM drives use the network inter-face, so Interlnk cannot be used to give the client computer access to CD-ROM driveson the server.
10. Redirected Interlnk drives do not support disk-level operations, and the following DOScommands should not be used on redirected drives:
CHKDSK FORMAT
DEFRAG MIRROR
DEBUG SCANDISK
DISKCOMP SYS
DISKCOPY UNDELETE
FDISK UNFORMAT
Third-party utilities that require low-level disk access also should be avoided.
11. To be able to run, INTERLNK requires DOS 3.0 or later. You can run different versions ofDOS on the client and server computers, although the limitations of each version mustbe respected. For example, disk partitions greater than 32MB on an Interlnk server arenot accessible on an Interlnk client running DOS 3.0. (The Microsoft MS-DOS 6license agreement requires at least one of the two computers involved to be running alicensed copy of MS-DOS 6.)
12. An appropriate cable is required to connect two computers with Interlnk. If you areusing serial ports for the Interlnk connection, a 3-wire or 7-wire null-modem serial cableis required. If you are using parallel ports, an 11-wire parallel cable is required. Thesecables often are referred to as LapLink cables, in honor of the product that popularizedthis simple type of network. Check the two computers to see what type of connectors
FApp
772 Appendix F Command Reference
you need. Microsoft includes detailed wiring charts for these cables in the entry forINTERLNK in the DOS 6 online help system (that is, type HELP INTERLNK at the DOSprompt and click the Notes entry).
Examples
Assuming that Interlnk is running and you have successfully connected with the server, redi-rect the client drive letter D: to access drive C: on the server by entering the following com-mand.
INTERLNK D=C
Notice that you are not required to enter colons with the drive letters, although colons areacceptable.
To break the relationship (cancel the redirection) between the client’s D drive and the serverdrive, enter this command:
INTERLNK D=
You can make more than one assignment in a single command by separating them withspaces like this:
INTERLNK D=A E=B F=C
This command would connect you to three server drives. Drive D on the client computerwould refer to drive A on the server, drive E to drive B on the server, and drive F to drive Con the server.
If you ever get lost and want to see what assignments you have, type the INTERLNK commandwith no parameters as follows:
INTERLNK
INTERLNK displays a status screen that looks something like this:
This Computer Other Computer(Client) (Server)
------------ -----------------------D: equals A:E: equals B:F: equals C: (120Mb) CONNER 120LPT2: equals LPT1:
This screen reflects the assignments made earlier with the INTERLNK D=A E=B F=C command.You can’t control the assignment of printer ports from the command line, but the displaydoes show you what drive assignments Interlnk has made. To print to the server’s printer,you would print to LPT2 on the client computer.
Interlnk shows the size of any server hard drives in parentheses after the drive letter in theright column. Notice that if any of the server drives have volume labels, they’re displayed aswell (CONNER 120 is the volume label for the server’s C: drive in the example). Volume labelscan make a confusing assignment display a bit easier to understand.
773INTERLNK 6.0 and later—External
MessagesConnection NOT EstablishedMake sure that a serial or parallel cable connects the server and clientcomputers, and that INTERSVR.EXE is running on the server computer.
Error: Interlnk was unable to establish a connection with the server program. Before you tryto establish this connection from the client computer, make sure that the cable is connectedat both ends and that INTERSVR is running on the server computer.
Drive assignment syntax error.
Error: You have made a syntax error while attempting to assign drive letters to remote driveson the Interlnk server. This message is often caused by trying to assign drive letters thatweren’t reserved by INTERLNK.EXE. The only drive letters you can use to access drives on theInterlnk server are the ones that INTERLNK.EXE displays when it is loaded into memory fromyour CONFIG.SYS file.
Driver NOT installedTo install Interlnk, add the following line to your CONFIG.SYS file and reboot:
DEVICE=drive:\path\INTERLNK.EXE
Information: You have attempted to run the INTERLNK program without first installing theINTERLNK.EXE device driver. drive:\path\ in the preceding message reflects the current loca-tion of INTERLNK.EXE on your system. You can run INTERLNK from the command line onlywhen the client device driver is in memory, so you must load INTERLNK.EXE from your CON-FIG.SYS file before you can access the executable portion of the program.
Invalid unit reading drive driveAbort, Retry, Fail
Error: You’ve tried to access an Interlnk drive that isn’t assigned to a drive on the Interlnkserver. Press A to abort, R to Retry, and F to Fail. The safest choice is to fail the operationby pressing F. In most cases, Retry simply redisplays the error message. After you clear theerror message, you can assign this drive letter to a server drive by using the INTERLNKclient:=server: command.
Not ready reading drive driveAbort, Retry, Fail
Error: You have tried to access an Interlnk drive (or another reserved drive letter), but theconnection to the Interlnk server hasn’t been made yet. Press A to abort, R to Retry, and Fto Fail. Normally, you should fail the operation by pressing F. You can establish the connec-tion to the server by running INTERLNK from the command line.
The version number of Interlnk in memory does not match the versionnumber in the file: pathname
Error: The version of Interlnk you ran from the DOS command line doesn’t match the ver-sion of the device driver that is being loaded in your CONFIG.SYS file. Somehow, you haveended up with two different copies of INTERLNK.EXE on your disk. Locate the newer copy ofINTERLNK.EXE and make sure that you are loading that copy in your CONFIG.SYS file. Youmight want to remove the old copy of INTERLNK.EXE from your disk so that you do not run itby accident.
FApp
774 Appendix F Command Reference
See Also
INTERLNK.EXE and INTERSVR
“Using Interlnk to Share Another Computer’s Resources” in Chapter 8
INTERLNK.EXE (device driver) 6.0 and later—External
The INTERLNK.EXE device driver establishes a link by way of a serial or parallel cable withanother computer that is running the INTERSVR program. INTERLNK.EXE provides the clientside of this relationship and usually is installed on a laptop computer (the client) from whichyou want to access files or printers on a desktop computer (the server). INTERLNK.EXE mustbe loaded in a DEVICE= statement in your CONFIG.SYS file.
SyntaxDEVICE=drive:\path\INTERLNK.EXE /DRIVES:num /NOPRINTER /COM/COM:num /COM:addr /LPT /LPT:num /LPT:addr /AUTO /NOSCAN /LOW/BAUD:rate /V
Parameters and Switches
drive:\path\ The full path to the INTERLNK.EXE file on your system. Setup places theINTERLNK.EXE file in the C:\DOS subdirectory by default. If the full path toINTERLNK.EXE isn’t specified, DOS looks for the file in the root directoryof the startup drive.
/DRIVES:num The number of drive letters to reserve for redirected drives on the clientcomputer. Num can be any value from 0 to the number of drive letters stillavailable when INTERLNK.EXE is loaded. (DOS can allocate 26 drive letters,from A to Z.) If this parameter is omitted, 3 drive letters are reserved.Specifying /DRIVES:0 disables drive redirection, and only printers are redi-rected.
/NOPRINTER This parameter specifies that no printers should be redirected. Normally,Interlnk redirects all available printers. Specifying this parameter canreduce the size of INTERLNK.EXE in memory.
/COM This parameter specifies that Interlnk should scan all serial ports when it’slooking for a connection with the server. This is the default setting. If youhave a serial mouse, you might want to use a /COM:num or /LPT:num para-meter to specify the port that Interlnk should use.
/COM:num The serial port (by DOS number) that Interlnk should use to connectwith the server. This parameter can be entered as /COM:1 or as /COM1; thecolon is optional. Typical values are /COM1, /COM2, /COM3, and /COM4.
CONFIGSYS
DEVICE =
775INTERLNK.EXE (device driver) 6.0 and later—External
/COM:addr The serial port (by hexadecimal port address) that Interlnk should use toconnect with the server. Typical addresses for serial ports are 3F8 and2F8. Unless you have a particular reason to specify the serial port byaddress, you should use the more familiar port numbers.
/LPT This parameter specifies that Interlnk should scan all parallel ports whenit’s looking for a connection with the server. This is the default setting.
/LPT:num The parallel port (by DOS number) that Interlnk should use to connectwith the server. This parameter can be entered as /LPT:1 or as /LPT1; thecolon is optional. Typical values are /LPT1, /LPT2, and /LPT3. This para-meter has nothing to do with redirected printers. It specifies the portbeing used to connect the two computers together.
/LPT:addr The parallel port (by hexadecimal port address) that Interlnk should useto connect with the server. Typical addresses for parallel ports are 3BC,378, and 278. Unless you have a particular reason to specify the parallelport by address, you should use the more familiar port numbers instead.
/AUTO Specifying this parameter instructs INTERLNK.EXE not to remain in memo-ry if the server is unavailable. By using this parameter, you can leave inyour CONFIG.SYS file the DEVICE= line that loads INTERLNK.EXE. With /AUTOspecified, Interlnk loads into memory only if you are connected to a serv-er when you start up your computer.
/NOSCAN Specifying this parameter stops INTERLNK.EXE from trying to establish aconnection with the server when INTERLNK.EXE loads into memory. Youhave to establish the connection later by running INTERLNK from the DOScommand line.
/LOW If upper memory is available, INTERLNK.EXE normally tries to load itselfhigh. If you want to make sure that INTERLNK.EXE loads into conventionalmemory instead, specify the /LOW parameter.
/BAUD:rate The maximum baud rate you want Interlnk to use for serial communica-tions. rate can be one of the following values: 9600, 19200, 38400, 57600,and 115200. If no maximum rate is specified, 115200 is assumed.
Note that rate limits only the maximum data transfer rate that can beused between the client and server for a serial connection. If you are usinga parallel connection, the /BAUD:rate parameter has no effect.
/V If either the client or the server computer freezes while accessing Interlnkdrives, try specifying the /V parameter on one or both computers. Thisparameter attempts to correct problems that arise from conflicts with thesystem timers on connected computers.
FApp
776 Appendix F Command Reference
Notes
1. The INTERLNK.EXE device driver must be installed before you can run INTERLNK from thecommand line. If you try to run INTERLNK without installing the device driver, an errormessage is displayed. (See the first item in the following “Messages” section.)
When Interlnk scans serial ports looking for a server connection, it interferes with theoperation of any mouse drivers that are servicing those ports. If your mouse is attachedto a serial port, be sure to use a /COM:num or /LPT:num parameter to specify the portthat Interlnk should use.
2. INTERLNK.EXE actually is two files: a device driver and an executable program. Thedevice driver portion does all the real work and has to be loaded into memory with aDEVICE= command in your CONFIG.SYS file. After this device driver is loaded into mem-ory, the executable portion of the file communicates with the device driver to reassigndrive letters and display status information.
3. If you regularly use Interlnk to connect your laptop to a desktop computer, make surethat you specify the /AUTO parameter. Then, when you’re on the road, INTERLNK.EXEwill fail to find the server and not waste memory by loading anyway. Whenever youwant to use Interlnk, simply connect the cable to a server and reboot the laptop.
4. INTERLNK.EXE automatically loads into upper memory if it’s available. You don’t need touse the DEVICEHIGH= command with INTERLNK.EXE.
5. By default, all the client’s serial ports and then all the client’s parallel ports are scannedwhen Interlnk looks for a connection with the server. As soon as the server is found,scanning stops. If /COM is specified without /LPT, only the client’s serial ports are scanned.Similarly, if /LPT is specified without /COM, only the client’s parallel ports are scanned.Interlnk’s default behavior is equivalent to specifying both the /COM and /LPT parameters.
6. Under normal circumstances, INTERLNK.EXE requires about 15KB of memory. You can decrease this amount by specifying certain parameters. When you specify the/NOPRINTER parameter, Interlnk does not load the routines required to redirect printeroutput. If you specify the /DRIVES:0 parameter, Interlnk does not load the routinesrequired to redirect disk drives. If you specify either the /COM or /LPT parameter (butnot both), Interlnk does not load the routines required to access the type of port youare not using. Depending on what combination of Interlnk services you need, youmight be able to slim Interlnk’s memory use significantly.
7. The drives that INTERLNK.EXE reserves when it loads into memory are private and can’tbe claimed by other programs even if Interlnk isn’t using them. For example, you can-not use an inactive Interlnk drive letter as a network drive or a SUBST alias.
8. If INTERLNK.EXE fails to connect with a server when it loads or the /NOSCAN parameterprevents it from connecting, the drives it reserves will be empty. To establish a connec-tion with the server, you have to run INTERLNK from the command line and redirect theserver drives manually.
777INTERLNK.EXE (device driver) 6.0 and later—External
9. Because INTERLNK.EXE allocates drive letters, you should be very careful about where youlocate it in your CONFIG.SYS file. In most cases, you will want to load INTERLNK.EXE last sothat any drives it allocates leave other drive assignments in CONFIG.SYS unchanged.
FApp
Having your drive letters change simply because you added a device driver to your CONFIG.SYS file can be painful. Often, you have to edit batch files to reflect the newdrive letters. All references to drives that have changed have to be corrected in yourCONFIG.SYS and AUTOEXEC.BAT files. Microsoft Windows is very sensitive to drive-letter changes, and some Windows’ applications fail if they are suddenly located on adifferent drive.
Before you add or rearrange DEVICE= lines in your CONFIG.SYS file, think through thechanges you may be making to drive-letter assignments and the impact the changes willhave on your system. If you are careful, you can often accomplish your task withoutchanging any drive-letter assignments, or at least keep the changes to a minimum. Doingso can save you a great deal of work.
10. If you use DoubleSpace, always load the DBLSPACE.SYS driver before you loadINTERLNK.EXE. If you load INTERLNK.EXE first, the DoubleSpace host (uncompressed)drives may become unavailable on the client computer.
11. To use a printer on an Interlnk server from within Windows, you first have to accessthe Printer dialog box in Control Panel. Next, click the Connect button. In theConnect dialog box, either clear the Fast Printing Direct To Port check box, or specifythe port as LPT1.DOS or LPT2.DOS rather than LPT1 or LPT2. Normally, Windows printsdirectly to the hardware and bypasses Interlnk’s printer redirection. However, when youdisable Fast Printing or print to a filename instead of the port name, Windows printsthrough DOS, and Interlnk can redirect the data to the server’s printer port.
12. All disk drives redirected by Interlnk are considered removable drives because the con-nection to them can be lost at any time. DoubleSpace refers to Interlnk drives as normal,removable local drives. MSD reports that Interlnk drives are floppy drives with one cylin-der. SMARTDrive defaults to read-caching Interlnk drives, as it does with local floppydisk drives. Windows File Manager represents Interlnk drives with a “floppy icon.”
13. An Interlnk client cannot access CD-ROM drives on the server. Interlnk can recognizeonly standard DOS drives, not network drives. Because CD-ROM drives use the net-work interface, Interlnk cannot be used to give the client computer access to CD-ROMdrives on the server.
14. Redirected Interlnk drives do not support disk-level operations, and the following DOScommands should not be used on redirected drives:
CHKDSK FORMAT
DEFRAG MIRROR
DEBUG SCANDISK
DISKCOMP SYS
DISKCOPY UNDELETE
FDISK UNFORMAT
Third-party utilities that require low-level disk access also should be avoided.
778 Appendix F Command Reference
15. INTERLNK.EXE requires DOS 3.0 or later to run. You can run different versions of DOSon the client and server computers, although the limitations of each version must berespected. For example, disk partitions greater than 32MB on an Interlnk server are notaccessible on an Interlnk client running DOS 3.0. (The Microsoft MS-DOS 6 licenseagreement requires at least one of the two computers involved to be running a licensedcopy of MS-DOS 6.)
16. An appropriate cable is required to connect two computers with Interlnk. If you areusing serial ports for the Interlnk connection, a 3-wire or 7-wire null-modem serialcable is required. If you are using parallel ports, an 11-wire parallel cable is required.These cables often are referred to as LapLink cables, in honor of the product that pop-ularized this simple type of network. Check the two computers to see what type of con-nectors you need. Microsoft includes detailed wiring charts for these cables in the entryfor INTERLNK in the DOS 6 online help system (that is, type HELP INTERLNK at the DOSprompt and click the Notes entry).
Examples
A typical line that loads INTERLNK.EXE in the CONFIG.SYS file of your Laptop computer mightlook like this:
DEVICE=C:\DOS\INTERLNK.EXE /COM2 /AUTO
As long as the connection with the Interlnk server is established (on COM2), the Interlnk clientdevice driver will load into memory and reserve three drive letters (the default is three) withwhich it can access drives on the server. Any printers attached to the server will be availableon the client computer as well. Because of the /AUTO parameter, if INTERSVR isn’t running onthe server when this DEVICE= line is executed, INTERLNK.EXE won’t load into memory.
If memory is tight, and you don’t need access to more than one disk drive or any printers onthe Interlnk server, you could add the /NOPRINTER parameter, like this:
DEVICE=C:\DOS\INTERLNK.EXE /COM2 /AUTO /DRIVES:1 /NOPRINTER
Note that in both of the preceding examples, INTERLNK.EXE loads into upper memory if it’savailable. To force INTERLNK.EXE to load into conventional memory, specify the /LOW para-meter, as in the following:
DEVICE=C:\DOS\INTERLNK.EXE /COM2 /AUTO /LOW
If you used a parallel cable to connect the two computers instead of a serial cable, you wouldspecify a parallel port rather than a serial port:
DEVICE=C:\DOS\INTERLNK.EXE /LPT1 /AUTO
Note that you must use the same type of port on both computers. You can’t use a serial porton one computer and a parallel port on the other. The cables you need aren’t interchange-able, either.
After INTERLNK.EXE has successfully established a connection with the Interlnk server, itautomatically assigns the drive letters it has reserved to disk drives on the Interlnk server. Tosee what assignments have been made, run INTERLNK from the DOS command line.
779INTERLNK.EXE (device driver) 6.0 and later—External
Messages*** Bad /COM argument parameter
Error: Interlnk was unable to initialize the serial port you specified with a /COM:num parame-ter. Check to make sure that you specified /COM1, /COM2, /COM3, or /COM4, and that your com-puter has that port installed. If you can’t get this parameter to work, you may be forced touse the /COM:addr parameter.
*** Bad /DRIVES parameter ignored (/DRIVES:n, n = 0 - 24).
Error: You have specified an invalid /DRIVES:num parameter. Legal values for num are in therange 0 to 24, as indicated in the message. You may get this message if you have embeddedany spaces in the parameter or if you have specified a letter instead of a digit.
*** Bad /LPT argument parameter
Error: Interlnk was unable to initialize the parallel port you specified with an /LPT:num para-meter. Check to make sure that you specified /LPT1, /LPT2, or /LPT3, and that your comput-er has that port installed. If you can’t get this parameter to work, you may be forced to usethe /LPT:addr parameter.
*** Bad parallel port address: addr
or
*** Bad serial port address: addr
Error: Interlnk was unable to initialize the parallel or serial port you specified with an/LPT:num or /COM:num parameter. Make sure that you are specifying the correct value foraddr and that the value is entered in hexadecimal notation.
*** Invalid /BAUD parameter ignored.
Warning: You have specified an invalid /BAUD:rate parameter, and Interlnk has used thedefault value of 115200. Check to make sure that the value you specified for rate is 9600,19200, 38400, 57600, or 115200. You can’t embed commas in these values.
*** Specified COM port number not recognized by BIOS: COM#
or
*** Specified LPT port number not recognized by BIOS: LPT#
Error: You have specified a port with the /LPT:num or /COM:num parameter, which isn’t sup-ported by the ROM BIOS in your computer. You may get this message if you specify a portthat doesn’t exist in your computer, or if your ports are using nonstandard port addresses. Ifthe problem is nonstandard port addresses, you still might be able to use this port by speci-fying its address with an /LPT:addr or /COM:addr parameter.
Connection NOT EstablishedMake sure that a serial or parallel cable connects the server and clientcomputers, and that INTERSVR.EXE is running on the server computer.
FApp
780 Appendix F Command Reference
Error: Interlnk was unable to establish a connection with the server program. Before you tryto establish this connection from the client computer, make sure that the cable is connectedat both ends and that INTERSVR is running on the server computer.
Drive letters redirected: num (drive: through drive:)
Information: INTERLNK.EXE displays this message when it loads into memory. You might wantto write down the drive letters that the INTERLNK.EXE device driver has reserved. They arethe only letters you can use to access drives on the Interlnk server.
Driver NOT installedTo install Interlnk, add the following line to your CONFIG.SYS file and reboot:
DEVICE=drive:\path\INTERLNK.EXE
Information: You have attempted to run the INTERLNK program without first installing theINTERLNK.EXE device driver. The drive:\path\ in the preceding message reflects the currentlocation of INTERLNK.EXE on your system. You can run INTERLNK only from the commandline when the client device driver is in memory; therefore, you must load INTERLNK.EXE fromyour CONFIG.SYS file before you can access the executable portion of the program.
Invalid switch - parameter
Error: You have specified an invalid parameter on the DEVICE= line for INTERLNK.EXE in yourCONFIG.SYS file. The parameter displayed in the message is the one that’s confusingINTERLNK.EXE. Correct this entry and try the command again.
No drive letters redirected
Information: You have loaded the INTERLNK.EXE device driver with a /DRIVES:0 parameter.You cannot access any disk drives on the Interlnk server.
No printer ports redirected
Information: You have loaded the INTERLNK.EXE device driver with a /NOPRINTER parameter.You cannot access any printers on the Interlnk server.
The Interlnk device driver requires version 3.0 or later of DOS.
Error: INTERLNK.EXE requires that you be running at least DOS 3.0. If you know that thecomputer is running a later version of DOS than 3.0 (type VER), you may have a bad entryfor INTERLNK.EXE in your SETVER table.
Too many block devices
Warning: DOS has run out of drive letters and cannot load any more block devices fromyour CONFIG.SYS file. DOS will continue to start up, but some of your device drivers maynot be loaded. DOS can handle up to 26 accessible block devices.
Certain device drivers allocate more than one letter when they are loaded. DoubleSpaceallocates at least one letter for each compressed drive you have in your system, plus somespares. INTERLNK.EXE allocates the number requested with the /DRIVES:num parameter, orthree if a number isn’t specified. RAMDRIVE.SYS and DRIVER.SYS allocate one letter each timethey are loaded. Check your CONFIG.SYS file and eliminate any DEVICE= lines you don’t need,or decrease the number of drives set aside for Interlnk.
781INTERSVR 6.0 and later—External
See Also
DEVICE=, INTERLNK, and INTERSVR
“Using Interlnk to Share Another Computer’s Resources” in Chapter 8
INTERSVR 6.0 and later—ExternalINTERSVR provides server services for an Interlnk network. The server in an Interlnk networkis the computer that is making its drives and printers available for use on another computer(the client). INTERSVR monopolizes the server computer while it is running, preventing youfrom using the server computer for anything else. You have to have an appropriate serial orparallel cable to connect the two computers.
SyntaxINTERSVR drive: ... /X=drive: ... /COM /COM:num /COM:addr /LPT /LPT:num/LPT:addr /BAUD:rate /V /B
To copy the Interlnk files to a connected computer that is not running Interlnk, use the fol-lowing format:
INTERSVR /RCOPY
Parameters and Switches
drive: ... Specifies the letter of a drive that can be redirected. The ellipsis (...)indicates that more than one drive can be redirected by a singleINTERSVR command. By default, all drives are available for redirection.
/X=drive: ... Specifies the letter of a drive that will not be redirected. The ellipsis(...) indicates that more than one drive can be excluded by a singleINTERSVR command. By default, no drives are excluded.
/COM Specifies that INTERSVR should scan all serial ports when it’s looking for aconnection with the client. This is the default setting. If you have a seri-al mouse, you might want to use a /COM:num or /LPT:num parameter tospecify the port Interlnk should use.
/COM:num Indicates the serial port (by DOS number) that INTERSVR should use toconnect with the client. This parameter can be entered as /COM:1 or as/COM1; the colon is optional. Typical values are /COM1, /COM2, /COM3, and/COM4.
/COM:addr Indicates the serial port (by hexadecimal port address) that INTERSVRshould use to connect with the client. Typical addresses for serial portsare 3F8 and 2F8. Unless you have a particular reason to specify the seri-al port by address, you should use the more familiar port numbersinstead.
FApp
C:\>
BATCHFILE
782 Appendix F Command Reference
/LPT Specifies that INTERSVR should scan all parallel ports when it’s lookingfor a connection with the client. This is the default setting.
/LPT:num Specifies the parallel port (by DOS number) that INTERSVR should use toconnect with the client. This parameter can be entered as /LPT:1 or as/LPT1; the colon is optional. Typical values are /LPT1, /LPT2, and /LPT3.Note that this parameter has nothing to do with redirected printers; itspecifies the port being used to connect the two computers together.
/LPT:addr Indicates the parallel port (by hexadecimal port address) that INTERSVRshould use to connect with the client. Typical addresses for parallel portsare 3BC, 378, and 278. Unless you have a particular reason to specifythe parallel port by address, you should use the more familiar port num-bers instead.
/BAUD:rate Indicates the maximum baud rate you want Interlnk to use for serialcommunications. rate can be one of the following values: 9600, 19200,38400, 57600, and 115200. If no maximum rate is specified, 115200 isassumed.
rate limits only the maximum data transfer rate that can be usedbetween the client and server for a serial connection. If you are using a parallel connection, the /BAUD:rate parameter has no effect.
/V If either the client or server computer freezes while accessing Interlnkdrives, try specifying the /V parameter on one or both computers. Thisparameter attempts to correct problems that arise from conflicts withthe system timers on connected computers.
/B Forces the use of a color scheme appropriate for a black-and-white(monochrome) monitor or LCD display.
/RCOPY Copies the Interlnk files INTERLNK.EXE and INTERSVR.EXE to anothercomputer. If your laptop computer doesn’t have a floppy disk drive, usethis parameter to set up an Interlnk connection. The two computersmust be connected by a 7-wire, null-modem serial cable (sometimesreferred to as a LapLink cable). The MODE command must be availableon the target computer for this transfer to work. You can’t specify anyother parameters when you’re using the /RCOPY feature.
Notes
1. When INTERSVR scans serial ports looking for a client connection, it interferes with theoperation of any mouse drivers that are servicing those ports. If your mouse is attachedto a serial port, be sure to use a /COM:num or /LPT:num parameter to specify the port thatInterlnk should use.
783INTERSVR 6.0 and later—External
2. By default, all the server’s serial ports and then all the server’s parallel ports are scannedwhen Interlnk searches for a connection with the client computer. As soon as the clientis found, scanning stops. If /COM is specified without /LPT, only the server’s serial portsare scanned. Similarly, if /LPT is specified without /COM, only the server’s parallel portsare scanned. INTERSVR’s default behavior is equivalent to specifying both the /COM and/LPT parameters.
3. INTERSVR is unable to make network or CD-ROM drives available to the client comput-er. Network and CD-ROM drives are not considered local drives because DOS uses thenetwork redirector interface to access them.
4. While INTERSVR is running, it displays a list of redirected drives and printers onscreen.The left column lists the disk drives and printers on the server that are being shared,and the right column lists the letters and/or ports that are being used on the clientcomputer to access the server drives. To exit INTERSVR and disconnect the Interlnk net-work, press Alt+F4.
5. You can’t use the computer for anything else while INTERSVR is running. If you startINTERSVR in a task-switching environment such as Windows, it doesn’t allow you toswitch to another task without first exiting the INTERSVR program. Don’t try to accessany memory-resident programs; serious data loss could result. To be safe, you mightwant to disable or remove memory-resident programs before running INTERSVR.
6. Redirected Interlnk drives do not support disk-level operations, and the following DOScommands should not be used on redirected drives:
CHKDSK FORMAT
DEFRAG MIRROR
DEBUG SCANDISK
DISKCOMP SYS
DISKCOPY UNDELETE
FDISK UNFORMAT
Third-party utilities that require low-level disk access also should be avoided.
7. INTERSVR.EXE requires DOS 3.0 or later to run. You can run different versions of DOSon the client and server computers, although the limitations of each version must berespected. For example, disk partitions greater than 32MB on an Interlnk server areaccessible on an Interlnk client running DOS 3.0. (The Microsoft MS-DOS 6 licenseagreement requires at least one of the two computers involved to be running a licensedcopy of MS-DOS 6.)
8. An appropriate cable is required to connect two computers with Interlnk. If you’reusing serial ports for the Interlnk connection, a 3-wire or 7-wire null-modem serialcable is required. If you are using parallel ports, an 11-wire parallel cable is required.These cables often are referred to as LapLink cables in honor of the product that popu-larized this simple type of network. Check the two computers to see what type of con-nectors you need. Microsoft includes detailed wiring charts for these cables in the entryfor INTERLNK in the DOS 6 online help system (that is, type HELP INTERLNK at the DOSprompt and click the Notes entry).
FApp
784 Appendix F Command Reference
Examples
Before you start the Interlnk server program, connect the two computers you want to linkby using an appropriate serial or parallel cable. You also might want to remove or disableany resident programs you are running. You don’t have to quit Windows or the DOS Shell,but you cannot switch to another task while the Interlnk server program is running.
To start the Interlnk server program, type the following command:
INTERSVR
INTERSVR scans your ports looking for an Interlnk connection. After it finds one, INTERSVRmakes all local drives and printers on the server computer available to the Interlnk client.
If you are using a serial mouse, you should specify the port Interlnk should use. For exam-ple, if your mouse is attached to COM1 and you want to use COM2 on the server for theInterlnk connection, add the /COM2 parameter as follows:
INTERSVR /COM2
If you don’t need access to either of the server’s floppy disk drives (A: and B:, in this exam-ple) from the client computer, you can exclude them by adding an /X=drive: parameter likethis:
INTERSVR /COM2 /X=A: B:
If either computer stops responding when you access a remote drive or printer, you mighthave to specify the /V parameter for INTERSVR as follows:
INTERSVR /COM2 /V
To use the remote copy feature, you must first connect the two computers with a 7-wire null-modem serial cable. (These cables often are referred to as LapLink cables, in honor of thecompany that made this sort of connection popular.) You cannot use parallel ports for thisoperation. Next, make sure that the computer which is to receive the Interlnk files is runningDOS 3.0 or later and that the MODE command is available. Finally, on the computer contain-ing the Interlnk files, start the Interlnk server by using the /RCOPY parameter as follows:
INTERSVR /RCOPY
INTERSVR leads you through the copy operation, prompting you at each step. After the filesINTERLNK.EXE and INTERSVR.EXE have been successfully transferred, you can start up the Inter-lnk network by running INTERSVR on the server computer, adding the INTERLNK.EXE device dri-ver to the CONFIG.SYS file on the client computer, and rebooting the client computer.
MessagesError initializing port port at address addr
Error: INTERSVR found your Interlnk port but was unable to initialize it. This error can becaused by INTERSVR finding the wrong port when it scans your system. Specify the port thatyou want to use with the /COM:num or /LPT:num parameter and try the command again.
File allocation error in: pathname, run chkdsk /f to correct.
785INTERSVR 6.0 and later—External
Error: INTERSVR encountered a problem in the file allocation table (FAT) while it was access-ing the file in pathname. Quit INTERSVR, and run SCANDISK or CHKDSK /F to identify and fixthe problem.
If SHARE.EXE is loaded on the remote computer the remote install cannot beperformed on COM2. Please use COM1 or insure that SHARE.EXE is not loaded onthe remote computer before attempting a remote install.
Warning: You are performing a remote copy operation using COM2 on the remote comput-er. Interlnk is warning you that the operation may fail if SHARE.EXE is running on the remotecomputer. If SHARE.EXE is running on the remote computer, you might want to choose a dif-ferent serial port or restart the remote computer without loading SHARE.EXE.
Invalid /BAUD parameter - rate
Error: You have specified an invalid /BAUD:rate parameter. Check to make sure that thevalue you specified for rate is 9600, 19200, 38400, 57600, or 115200. You can’t embed com-mas in these values.
Invalid parallel port address LPT#: addr
Error: You have specified a parallel port address with the /LPT:addr parameter, but Interlnkis unable to communicate with it. Make sure that you are specifying the correct value foraddr and that the value is entered in hexadecimal notation.
Invalid serial port address COM#: addr
Error: You have specified a serial port address with the /COM:addr parameter, but Interlnk isunable to communicate with it. Make sure that you are specifying the correct value for addr,and that the value is entered in hexadecimal notation.
Invalid server drive letter - drive
Error: You have specified a server drive letter that either doesn’t exist or Interlnk is unable toredirect. You cannot redirect any network or CD-ROM drives connected to the server com-puter. Check your entry to make sure that all the drive letters you have specified are valid,local disk drives.
Invalid switch - parameter
Error: You have specified an invalid parameter on the command line for INTERSVR. Theparameter displayed in the message is the one that is confusing INTERSVR. Correct this entryand try the command again.
There are no serial or parallel ports available for communication.
Error: When INTERSVR scanned your computer’s ports, it couldn’t find the port you are usingfor the Interlnk connection. Specify the port that you want to use with the /COM:num or/LPT:num parameter and try the command again.
Unable to initialize serial port COM#
FApp
786 Appendix F Command Reference
Error: INTERSVR found your Interlnk port but was unable to initialize it. This error can becaused by specifying the wrong port. Correct your entry for the /COM:num or /LPT:num para-meter and try the command again.
Unrecoverable transmission error, maximum retries exceeded.
Error: Your Interlnk connection has failed. Make sure that the cable you are using hasn’tbecome unplugged at one or both ends. If you continue to see this error message, you mayhave to purchase a new cable.
You have started the Interlnk server in a task-switching environment. Task-switching, key combinations, and some disk-writing operations are disabled. Torestore these functions, exit the server.
Information: INTERSVR displays this message if you start the server program while a task-switching environment such as Windows is active. You cannot switch tasks until you exitINTERSVR by using the Alt+F4 command.
See Also
INTERLNK and INTERLNK.EXE
“Using Interlnk to Share Another Computer’s Resources” in Chapter 8
JOIN 3.1 to 5.0—ExternalThe JOIN command produces a directory structure by connecting one drive to a subdirec-tory of another drive. JOIN is included on the DOS 6.0 Supplemental Disk, not in the stan-dard DOS 6.0 package.
Syntax
To connect disk drives, use the following format:
JOIN drive: drive2:\dirname
To disconnect disk drives, use the following format:
JOIN drive: /D
To show currently connected drives, use the following format:
JOIN
Parameters and Switches
drive: Specifies the drive that you want to refer to as a subdirectory on anotherdrive. DOS calls drive: the guest disk drive.
drive2: Specifies the drive to which drive: is to be connected. DOS calls drive2: thehost disk drive. If drive2: isn’t specified, the current drive is assumed.
C:\>
BATCHFILE
DISK
AVOID

787JOIN 3.1 to 5.0—External
\dirname Specifies a subdirectory on drive2: (the host drive). DOS calls \dirname thehost subdirectory. \dirname holds the connection to drive: (the guest drive),and should be empty. If \dirname doesn’t exist, DOS creates it.
/D Disconnects the specified guest drive from the host drive.
Rules
1. You must specify the guest drive when you make or change assignments.
2. If you do not name a host drive, DOS uses the current drive.
3. You must specify the host subdirectory. The host subdirectory cannot be the root direc-tory of any drive.
4. The host and guest drives must not be network or CD-ROM drives.
5. The host and guest drives must not be part of a SUBST or ASSIGN command.
6. You cannot use the current drive as the guest drive.
7. If the host subdirectory does not exist, JOIN creates one. The subdirectory, if it exists,must be empty (DIR must show only the . and .. entries).
8. When the drives are joined, the guest drive’s root directory and entire directory tree areadded to the host subdirectory. All subdirectories of the guest’s root directory becomesubdirectories of the host subdirectory.
9. A guest drive, when joined to the host drive, appears to be part of the host subdirectory.You can access this drive only through the host drive and subdirectory.
10. To break the connection, specify the guest drive’s normal name with the /D switch. Youcan use the guest drive’s normal name only when you disconnect the drives.
11. To see all the current drive connections, type JOIN with no parameters. If no connec-tions exist, JOIN does not display any message, and the system prompt appears.
12. Do not use the BACKUP, CHKDSK, DISKCOMP, DISKCOPY, FDISK, RESTORE, or FORMAT commandin the guest or host drive.
13. When JOIN is in effect, the DIR command works normally but reports the bytes freeonly for the host drive.
14. While JOIN is in effect, CHKDSK processes the host drive but does not process or reportinformation on the guest portion of the drive. To run CHKDSK on the guest drive, youfirst must disconnect the guest drive from the host drive.
Notes
1. You can use JOIN to connect a RAM disk to a real disk so that you can use the RAMdisk as though it were part of a floppy disk or hard disk drive. You also can use JOIN toconnect two hard drives.
2. Some programs allow only one drive to hold data or certain parts of the program.Programs written for DOS 2.0 and later, however, enable you to specify subdirectory
FApp
788 Appendix F Command Reference
names. If you use such a program, you can invoke the JOIN command to trick the pro-gram into using multiple drives as though the drives were one large drive.
3. JOIN does not affect the guest drive. Rather, JOIN affects only the way you access thefiles in that drive. You cannot exceed the maximum number of files in the guest drive’sroot directory. In the host subdirectory, a file’s size cannot exceed the guest drive’s size.
MessagesDirectory not empty
Error: You tried to use a host subdirectory that is not empty; the subdirectory contains filesother than the . and .. entries. Perform any one of the following actions before you try thecommand again:
■ Delete all files in the host subdirectory.
■ Specify an empty subdirectory.
■ Create a new subdirectory.
■ Name a nonexistent host subdirectory.
See Also
ASSIGN and SUBST
“The JOIN Command” in Chapter 11
KBDBUF.SYS (device driver) ExternalThe keyboard buffer set aside by the ROM BIOS is normally 16 bytes long. If a programfails to read the keyboard before the 17th character arrives, characters are lost. If you’re afast typist, you might want to increase the size of the keyboard buffer with KBDBUF.SYS toavoid losing keystrokes. KBDBUF.SYS isn’t distributed with the standard DOS 6 package but isavailable from Microsoft on the MS-DOS 6 Supplemental Disk. You must load KBDBUF.SYSin a DEVICE= statement in your CONFIG.SYS file.
SyntaxDEVICE=drive:\path\KBDBUF.SYS bufsize
Parameters and Switches
drive:\path\ The full path to the KBDBUF.SYS file on your system. KBDBUF.SYS is avail-able on the DOS 6.22 Supplemental Disk. If you do not specify the fullpath to KBDBUF.SYS, DOS looks for the file in the root directory of thestartup drive.
bufsize The new keyboard buffer size, in bytes. Acceptable values are in therange of 16 to 1024. This parameter is required.
CONFIGSYS
DEVICE =
DISK
789KBDBUF.SYS (device driver) External
Notes
1. Some programs read keystrokes directly from the keyboard, bypassing the keyboardbuffer that the ROM BIOS maintains. KBDBUF.SYS does not affect programs that readthe keyboard directly.
2. Do not attempt to load KBDBUF.SYS into upper memory by using the DEVICEHIGH= com-mand. The ROM BIOS can’t use a keyboard buffer located in upper memory.
3. You should load the KBDBUF.SYS device driver as early as you can in CONFIG.SYS to avoidtroublesome interactions with other device drivers and resident programs.
4. Requesting a very large keyboard buffer is not normally a very good idea. If you haveincreased it to 50 or 100 characters and your software is still losing keystrokes, the pro-gram is probably not using the keyboard buffer at all. A large keyboard buffer might beuseful when you are injecting keystrokes into it from another source that can’t waitwhen the buffer is full.
Examples
To increase the size of the keyboard buffer to 32 characters, enter the following line in yourCONFIG.SYS file:
DEVICE=C:\DOS\KBDBUF.SYS 32
This line assumes that you have copied the KBDBUF.SYS file from the DOS 6 SupplementalDisk to your C:\DOS subdirectory.
MessagesPart of the new keyboard buffer is beyond the range of the ROM BIOS datasegment. Load this driver earlier in CONFIG.SYS, do not load it into highmemory, or decrease the size of the buffer.
Error: KBDBUF.SYS couldn’t create the keyboard buffer you requested, usually because youtried to load it with the DEVICEHIGH= command. Use the DEVICE= command to loadKBDBUF.SYS into conventional memory instead.
Requested buffer size is too large.
Error: You have specified a keyboard buffer size larger than 1,024 characters, which is themaximum size allowed by KBDBUF.SYS.
Requested buffer size is too small.
Error: You have specified a keyboard buffer size under 16 characters, which is the minimumsize allowed by KBDBUF.SYS.
See Also
DEVICE=
FApp
790 Appendix F Command Reference
KEYB 3.3 and later—ExternalThe KEYB command changes the keyboard layout and characters from American English toanother language/country.
Syntax
To change the current keyboard layout, use the following format:
KEYB keycode, codepage, drive:\path\KEYBOARD.SYS /ID:code /E
To display the current values for KEYB, use the following format:
KEYB
Parameters and Switches
keycode Specifies the two-character keyboard code for the keyboardlayout that you want to use. See Chapter 14, “Understandingthe International Features of DOS,” for a list of keyboardcodes that MS-DOS supports.
codepage Specifies the three-digit code page that you want to use. codepage must be one of the code pages available for use withthe keycode specified. If you omit codepage, DOS assumes thedefault code page for the keycode specified. See Chapter 14for a list of the code pages that MS-DOS supports.
drive:\path\KEYBOARD.SYS Specifies the drive and path to KEYBOARD.SYS or an equivalentfile that contains keyboard layout information. Setup placesthis file in the C:\DOS subdirectory by default.
/E Informs KEYB that an enhanced keyboard is being used. Thisswitch is necessary only on 8088- and 8086-based systems thatuse enhanced keyboards.
/ID:code Specifies the type of enhanced keyboard that you want to use.This switch is only for countries that have more than one key-board for the same language (for example, France, Italy, andthe United Kingdom). See Chapter 14 for a list of the key-board ID codes that MS-DOS supports.
Exit Codes
ERRORLEVEL Value Meaning
0 New keyboard template loaded successfully
1 Invalid keyboard code, code page, or command-line syntax
2 Keyboard definition file is bad or missing
4 Halted by console (CON) error
5 Requested code page not prepared
C:\>
BATCHFILE
TSR
791KEYB 3.3 and later—External
Notes
1. To use one of the foreign-language character sets, load the KEYB program and type theappropriate two-letter code for your country.
2. If you do not specify a code page, DOS uses the default code page for your country.The default code page is established by the COUNTRY directive in CONFIG.SYS or by theDOS default code page if the COUNTRY directive is not used.
3. You must specify a code page that is compatible with your keyboard code selection.
4. If you do not specify the keyboard definition file, it defaults to KEYBOARD.SYS. DOSlooks for this file in the current disk’s root directory. Otherwise, DOS uses the full file-name to search for the file. If you do not specify a disk drive, DOS searches the currentdisk drive. If you do not specify a path, DOS searches the current directory.
5. After loading, the program reconfigures the keyboard into the appropriate layout forthe specified language.
6. To use the American English layout after you issue the KEYB command, pressCtrl+Alt+F1. To return to the foreign-language layout, press Ctrl+Alt+F2. To switch to“typewriter mode,” press Ctrl+Alt+F7.
7. When you use KEYB command for the first time, it increases the size of DOS by approx-imately 10KB. After that, you can use KEYB as often as you want without further enlarg-ing DOS. You can load KEYB into upper memory by using the LOADHIGH command.
8. To display the active keyboard and the code pages, type KEYB without any parameters.
9. You can use KEYB with INSTALL in your CONFIG.SYS file.
MessagesActive code page not available from CON device
Information: You issued the KEYB command to display the current setting, but the commandcould not determine what code page was in use. The DEVICE=DISPLAY.SYS directive is not inCONFIG.SYS, or no currently loaded CON code page is active.
If the DISPLAY.SYS line was included in your CONFIG.SYS file, you must give the MODE CONCODEPAGE PREPARE command to load the font files into memory.
Bad or missing Keyboard Definition File
Error: The keyboard definition file (usually KEYBOARD.SYS) is corrupted, or KEYB cannot findthe file. If you did not specify a drive and pathname, KEYB looks for the file in the currentdrive’s root directory.
Copy the file to the root directory, or provide the full drive and pathname for the file to KEYB.
Code page requested (codepage) is not valid for given keyboard code
Error: You provided a keyboard code but not a code page, or the specified keyboard codedoes not match the currently active code page for the console. KEYB does not alter the cur-rent keyboard or code page. Choose a new console code page that matches the keyboard
FApp
792 Appendix F Command Reference
code (by using the MODE CON CODEPAGE SELECT command) or specify the appropriate match-ing code page when you reissue the KEYB command.
Code page specified is inconsistent with the selected code page
Warning: You specified a keyboard code and a code page, but a different code page is activefor the console (CON). The code page specified to KEYB is now active for the keyboard but notfor the video display.
Use the MODE CON CODEPAGE SELECT command to activate the correct code page (the onespecified to KEYB) for the video screen.
Code page specified has not been prepared
Error: The DEVICE=DISPLAY.SYS directive was included in your CONFIG.SYS file, but yourKEYB command specified a keyboard code that needs a code page that is not prepared. Usethe MODE CON CODEPAGE PREPARE command to prepare the code page for the keyboard codethat you want to use.
Current CON code page: codepage
Information: The console’s current code page is designated by the number codepage.
Current keyboard code: keycodecode page: codepage
Information: The current keyboard code is a two-character keycode, and the code page usedby the keyboard is a three-digit codepage. A list of the legal keyboard codes and their corre-sponding code pages is included in Chapter 14, “Understanding the International Featuresof DOS.”
One or more CON code pages invalid for given keyboard code
Warning: You used the MODE command to prepare several code pages for the console (CON),but you specified a keyboard code that is not compatible with one or more console codepages. KEYB creates the necessary information to work with those keyboard and code pagesthat are compatible. DOS ignores the incompatible keyboard and code page combinations.
See Also
CHCP, COUNTRY=, DISPLAY.SYS, MODE device CP, and NLSFUNC
“Understanding KEYB.COM” in Chapter 14, “Understanding the International Features of DOS”
KEYBOARD.SYS (see KEYB)Despite the .SYS extension, KEYBOARD.SYS is not a device driver. KEYBOARD.SYS is a data filethat contains information about the various keyboard layouts that are used in different coun-tries. The KEYB command uses this file.
793LABEL 3.0 and later—Internal
A similar file, containing information needed for an Icelandic keyboard layout, is the fileKEYBOARD.ICE on the MS-DOS 6 distribution disks. (For details on setting up an Icelandicconfiguration, see the README.TXT file distributed with DOS 6.) If you prefer a Dvorak key-board, you can use the DVORAK.SYS file on the DOS 6 Supplemental Disk; it supports two-handed, left-handed, and right-handed Dvorak layouts.
DOS 6.22 includes an alternative keyboard layout information file named KEYBRD2.SYS,which contains a few additional keyboard layouts. For details, see Chapter 14,“Understanding the International Features of DOS,” or the README.TXT file included withMS-DOS 6.22.
See Also
KEYB
“Understanding KEYB.COM” in Chapter 14, “Understanding the International Features of DOS”
LABEL 3.0 and later—InternalEach disk can have a volume label as well as a volume serial number. The volume label istext and can be up to 11 characters long. The LABEL command enables you to display, add,delete, or change the volume label for a disk.
SyntaxLABEL drive:volume_label
Parameters and Switches
drive: The disk whose label you want to change or display. (The colon is required.)
volume_label The disk’s new volume label.
Rules
1. A valid volume label immediately becomes the volume label for the specified drive.
2. If you do not specify a volume label, DOS prompts you to enter a new one. You canperform one of the following actions:
• Type a valid volume name and then press Enter. DOS makes this name the newvolume label. If a volume label already exists, DOS replaces the old volume labelwith the new.
FApp
Do not attempt to load KEYBOARD.SYS (or DVORAK.SYS) into memory by using aDEVICE= or DEVICEHIGH= command in CONFIG.SYS. If you do, your computer willlock up, and you will need to reboot from a floppy disk.
C:\>
BATCHFILE
794 Appendix F Command Reference
• Press Enter to delete the current label without specifying a replacement label.DOS asks you to confirm the deletion.
3. If you enter an invalid volume label, DOS responds with a warning message and asksagain for the new volume label.
4. Do not use LABEL in a networked disk drive (one that belongs to another computer). If you try to label a networked drive, DOS displays an error message and ignores thecommand.
5. Do not use LABEL on a disk in any drive that is affected by the SUBST, JOIN, or ASSIGNcommands because DOS labels the “real” disk in the drive instead.
Suppose that you use the command ASSIGN A=C. If you then enter the command LABELA:, DOS actually changes the volume label of the disk in drive C.
6. A label consists of up to 11 printing characters and may include spaces but not tabs orany of the following characters:* ? / \ | . , ; : + = [ ] ( ) & ^ < >
Lowercase ASCII characters are mapped to uppercase.
Notes
1. When you format a disk in DOS 4.0 and later versions, DOS prompts you to enter avolume label. Whether or not you assign a label, DOS gives the disk a serial number.The serial number is not part of the volume label. Remember that a space is a validcharacter in a volume label.
2. Spaces and underscores can increase the readability of a volume label. DOS 3.0 and 3.1,however, reject a space in a volume name when the name is typed in the command line(for example, LABEL MY DISK). To put a space in a volume label, type LABEL, press thespacebar, type the drive name (if needed), and then press Enter. Do not type a volumelabel in the command line. When LABEL asks for a new volume label, you can type thelabel with spaces.
MessagesDelete current volume label (Y/N)?
Information and Warning: You did not enter a volume label when DOS prompted you. DOSis asking whether to delete the current label or to leave it unaltered. To delete the currentlabel, press Y; to keep the label intact, press N.
See Also
FORMAT and VOL
“Naming Disks with LABEL” in Chapter 7
795LASTDRIVE= 3.0 and later—Internal
LASTDRIVE= 3.0 and later—InternalIf you’re connected to a network, running MSCDEX for access to a CD-ROM drive, or usingthe SUBST command to create drive aliases, you might need the LASTDRIVE= command to tellDOS to save space for the additional drive letters you’ll need. You can use LASTDRIVE= onlyin your CONFIG.SYS file.
SyntaxLASTDRIVE=drive
Parameters and Switches
drive The letter of the last disk drive that you want to have available. Note that driveis entered without a trailing colon. Valid letters are A to Z. The default value iseither E or the last drive letter allocated during the processing of yourCONFIG.SYS file, whichever is higher.
Notes
1. If you specify a letter lower than the number of letters needed for your system, DOSoverrides it and allocates space for the drives your system has. For instance, if you haveone floppy and one hard drive and you specify LASTDRIVE=A, DOS allocates space in the current directory data structure for drives A, B, and C (as if you had specified LASTDRIVE=C). DOS does not display an error message if it overrides your LASTDRIVE=parameter. Notice that DOS allocates two floppy drive letters (A and B) even if youhave only one floppy disk drive installed in the system.
2. Each additional drive letter (above E) you have available increases the size of DOS inmemory. If you aren’t attached to a network, running a CD-ROM drive, or using SUBSTdrive aliases, you have little reason to waste memory on extra drive letters.
3. You never need LASTDRIVE= for a device that is assigned a drive letter when its driver isloaded in CONFIG.SYS. This includes drives assigned by DoubleSpace, RAMDRIVE.SYS,INTERLNK.EXE, or DRIVER.SYS. LASTDRIVE= is needed only to reserve space for drive let-ters created after the processing of your CONFIG.SYS file is complete.
Examples
If you are attached to a network, you usually want the following line in your CONFIG.SYS file:
LASTDRIVE=Z
This line allows room for the maximum number of drive letters, leaving plenty of room toattach network drives. On the other hand, if you have two floppy drives (A and B), a harddisk with two partitions (C and D), a RAM disk (E), and have run DBLSPACE to compressboth partitions (hosts assigned to I and J), your highest drive letter is J. To leave room fortwo additional drives after J, you can enter the following command:
LASTDRIVE=L
FApp
CONFIGSYS
796 Appendix F Command Reference
Notice that in the preceding example, drive letters F, G, H, K, and L would be available fornetwork, CD-ROM, or SUBST drives. If you had included no LASTDRIVE= command, driveletters F, G, and H would still be available.
MessagesBad command or parameters Error in CONFIG.SYS line number
Warning: If you specify an invalid parameter for LASTDRIVE=, you get this error message. Avery common mistake is to enter a colon after the drive letter in the LASTDRIVE= command.
See Also
SUBST
“Using LASTDRIVE to Change the Available Disk Drives” in Chapter 19
LH (see LOADHIGH)LH is an alternative name for the LOADHIGH command. For information on using the LOADHIGHor LH command, see the entry for LOADHIGH in this command reference.
LOADERBy using LOADER, you can have more than one operating system installed on your computer.You can choose from a menu of installed operating systems to be started at boot time. If youinstall DR DOS on a computer with Windows 95, for example, the setup installs LOADER andsets up the correct files for it to run.
SyntaxLOADER bootfile.ext num /Q /S /U
DR-DOS
797LOADFIX 5.0 and later—External
Parameters and Switches
/Q or /S Specifies the quiet mode to run LOADER without any onscreen feedback.
/U Uninstalls LOADER from the hard disk.
bootfile.ext Specifies a text file that must be in the root directory. Each line (up to 20lines are allowed) lists the parameters for loading a different operating sys-tem at bootup. Use the following syntax for each line:
filename.ext x num text...
The parameters for this syntax are as follows:
filename.ext Specifies the name of the boot file for the operating system, such asMSDOS.SYS.
x Specifies the type of operating system. These types are listed in thedescription of LOADER in DOSBOOK.
num Specifies a timeout value that loads the operating system in this line afternum seconds if no other choice is made. Only one line can include a numstatement.
text... Displays an optional comment of your choosing on bootup.
LOADFIX 5.0 and later—ExternalSome programs may have trouble running if they are loaded in the first segment of memory.When this happens, they often display a Packed file corrupt message and abort. LOADFIXcan help a program with this problem to run by making sure that it’s loaded in the second64KB segment of memory.
SyntaxLOADFIX program parameters
FApp
C:\>
BATCHFILE
798 Appendix F Command Reference
Parameters and Switches
program The program file that you want to load into the second 64KB segment ofmemory. A drive and path can be specified. If they are omitted, the currentdirectory and all directories on the DOS PATH are searched for the executablefile. This parameter is required.
parameters The parameters you want passed to program when it’s loaded into memory.
Notes
If you are using DOS 5.0 or a later version to load DOS into the high memory area (HMA),a packed file may be loaded into the first 64KB of RAM and may fail to work. In such a case,DOS may display the error message Packed file corrupt, and the computer then returnsto the DOS prompt.
Use LOADFIX only to start a program when DOS displays the message Packed file corrupt.
LOADHIGH or LH 5.0 and later—InternalYou can use the LOADHIGH command to load programs into upper memory. By loading resi-dent software into upper memory, you can leave more conventional memory available forapplication programs to use. LOADHIGH is typically used in your AUTOEXEC.BAT file.
SyntaxLOADHIGH program parameters
or
LH program parameters
In DOS 6, LOADHIGH has two additional switches that MemMaker uses to specify the place-ment and size of the program in memory:
LOADHIGH /L:region,min;region,min;... /S program parameters
or
LH /L:region,min;region,min;... /S program parameters
Parameters and Switches
program Specifies the program file that you want to load into upper memory. Youcan specify a drive and path. If you omit them, DOS searches the currentdirectory and all directories on the DOS PATH for the executable file. Thisparameter is required.
parameters Specifies any parameters you want passed to program when it’s loaded intomemory.
C:\>
BATCHFILE
799LOADHIGH or LH 5.0 and later—Internal
/L:region,min (DOS 6) Specifies the region in upper memory, and optionally the mini-mum size in bytes, into which the program should be loaded. You can spec-ify more than one region by separating each region from the preceding onewith a semicolon. For instance, /L:1;2 allows the program access to UMBregions 1 and 2, and /L:1,4096;2,512 further specifies that the minimumsize of regions 1 and 2 should be 4,096 and 512 bytes, respectively. Thisparameter must precede the program’s filename on the line. MemMakersets these values for you.
/S (DOS 6) If you specify the /L parameter with a minimum size, /S instructsDOS to shrink the UMB to the specified size and create a new UMB fromthe remainder. /S must precede the program’s filename on the line. Thisswitch is best left to MemMaker’s use.
Notes
In DR DOS, HILOAD is an alternative to the LOADHIGH command that performs the samefunction.
Rules
1. You must use an upper memory manager. For a computer equipped with an 80386SX orhigher microprocessor and at least 1MB of RAM, DOS provides EMM386.EXE.
2. Your CONFIG.SYS file must contain at least the following statements (or the equivalentthird-party memory-management routines):DEVICE=HIMEM.SYSDEVICE=EMM386.EXE RAM (or NOEMS)DOS=UMB
3. If not enough upper memory is available to accommodate a program, DOS loads theprogram into conventional memory without warning.
4. When a program is loaded by default into the largest free UMB, that program automat-ically gains access to all other UMBs. If you use /L, you have to explicitly grant the pro-gram access to other upper memory regions by specifying other /L parameters.
5. /S normally is used only by MemMaker, which analyzes a program’s memory usage todetermine whether /S is safe.
6. You can use /S only when you also include an /L switch that specifies a minimum size.
7. Use min when a program is larger when it runs than when it loads.
8. Use MEM /F to determine the size of free regions.
Examples
To load the driver into upper memory regions 1 and 3, use the following format:
LOADHIGH /L:1;3 C:\BIN\MYDRV.COM
FApp
DR-DOS
800 Appendix F Command Reference
See Also
DEVICEHIGH=, MEM, and MEMMAKER
“Loading Device Drivers and TSRs into Upper Memory” in Chapter 19
MD or MKDIR 2.0 and later—InternalThe MD (or MKDIR) command can create new subdirectories on your disks. Storing files invarious subdirectories helps you to keep them organized, and with MD, you can create asmany as you need.
SyntaxMD drive:\path
MKDIR drive:\path
Parameters and Switches
drive: The drive: on which you want to create a new subdirectory. If you omit drive:,DOS assumes the current drive.
path The subdirectory on drive: that you want to create. path can be either absoluteor relative—that is, specified from the root directory or specified from the cur-rent directory (see Note 7 in the following section). If you specify only thename, DOS creates the new subdirectory in the current directory. You cannotcreate a subdirectory with the same name as a file in its parent directory.
Notes
1. Separate each subdirectory in path with a backslash (\) character. The last subdirectoryname in path is the subdirectory created.
2. You must specify the new subdirectory name (1 to 8 characters); specifying an extensionis optional. The name must conform to the rules for creating directory names.
C:\>
BATCHFILE
Avoid using extensions with subdirectory names. Although doing so is perfectly legal,having them “extensionless” makes them easier to pick out from the filenames in adirectory listing. This practice has become so pervasive that certain programs have diffi-culties using subdirectories with extensions because they are rather uncommon andrarely tested for in new software.
Keep your subdirectory names as short as you can. Doing so can help with DOS’s63-character pathname limit and 127-character command-line limit, and it saves typingas well.
801MD or MKDIR 2.0 and later—Internal
3. You cannot use a directory name that is identical to a filename in the parent directory. Ifyou have a file named MYFILE in the current directory, for example, you cannot createthe subdirectory MYFILE in this directory. If the file is named MYFILE.TXT, however, thenames do not conflict, and you can create the MYFILE subdirectory.
4. The maximum length of a path (from the root directory to the final directory) is 63characters, including the backslashes.
5. You are not restricted to creating subdirectories in the current directory. If you add apathname, DOS establishes a new subdirectory in the directory that you specify.
6. You must put a colon after the drive letter if it is included. If you don’t include thecolon, DOS interprets the drive letter as a subdirectory name, which is probably notwhat you wanted.
7. If a backslash (\) is the first (or only) character in a subdirectory path, it’s consideredabsolute and specified starting from the root directory. If the subdirectory path beginswith a subdirectory name, it’s considered relative, and the current directory is used as itsstarting point. A drive letter, followed by a colon, can precede either an absolute or arelative path.
MessagesUnable to create directory
Error: One of the following errors occurred:
■ You tried to create a directory that already exists.
■ You provided an incorrect pathname.
■ The disk’s directory is full.
■ The disk is full.
■ A file with the same name already exists.
Check the directory in which the new subdirectory was to be created. If a conflicting nameexists, either change the filename or use a new directory name. If the disk or the root direc-tory is full, delete some files, create the subdirectory in a different directory, or use a differ-ent disk.
Invalid drive specified
Error: You have specified an invalid drive letter.
See Also
CD or CHDIR, MOVE, and RD or RMDIR
“Creating Directories with MKDIR (MD)” in Chapter 5
FApp
802 Appendix F Command Reference
MEM 4.0 and later—ExternalMEM is a utility that displays the amount of used and unused memory, allocated and openmemory areas, and all programs currently in the system. MEM can be enormously useful whenyou want to see just how your memory is being used, and whether you have enough spaceleft for another resident program to be loaded high.
Syntax
For DOS 6, the following parameters are available for MEM:
MEM /CLASSIFY /DEBUG /FREE /MODULE name /PAGE
or
MEM /C /D /F /M name /P
For DOS 5.0, the following parameters are available for MEM:
MEM /CLASSIFY /DEBUG /PROGRAM
or
MEM /C /D /P
Parameters and Switches
/CLASSIFY or /C Displays programs that are in conventional and upper memory, theirlocation in memory, and their size. Also displays a summary of the totalfree bytes of conventional and upper memory and the size of the largestexecutable program. You cannot use this switch with /DEBUG, /FREE, or/MODULE name.
/DEBUG or /D Displays detailed information about the programs and driver in memory,including the address, name, size, and type of each segment for everyprogram. Also displays a summary of the total free bytes of conventionaland upper memory and the size of the largest executable program. Youcannot use this switch with /CLASSIFY, /FREE, or /MODULE name.
/FREE or /F (DOS 6) Displays the free areas of conventional and upper memory indecimal and hexadecimal format. You cannot use this switch with/CLASSIFY, /DEBUG, or /MODULE name.
/MODULE name (DOS 6) Displays the memory usage of the name program or driver, or /M name including the segment address, UMB region number, name, and type of
each segment. You cannot use this switch with /CLASSIFY, /DEBUG, or/FREE.
/PAGE or /P (DOS 6) Pauses after each screen of output. You can use this switchwith any of the other switches.
/PROGRAM or /P (DOS 4.0 and 5.0 only) Displays the status of programs that are loadedinto memory. You cannot use this switch with /CLASSIFY or /DEBUG.
C:\>
BATCHFILE
803MEMMAKER 6.0 and later—External
Rules
1. You must specify /CLASSIFY, /DEBUG, /FREE, and /MODULE one at a time. You cannot com-bine any of these parameters. You can combine the /PAGE parameter with any of them,however.
2. MEM displays the status of extended memory only if you have more than 1MB of memoryin your computer. If you have only 1MB or less, you don’t have any extended memory.
3. The status of expanded memory is displayed only if you have expanded memory thatconforms to Version 4.0 of the Lotus/Intel/Microsoft Expanded Memory Specification(LIM EMS). Loading EMM386.EXE in your CONFIG.SYS file can provide expanded mem-ory for 80386 or better computer systems with more than 1MB of memory installed.
4. MEM displays the status of upper memory only if a UMB provider (for example, EMM386)is installed and DOS=UMB is included in your CONFIG.SYS file.
5. MEM does not display the status of upper memory if you are running DOS underMicrosoft Windows 3.0.
Notes
1. Starting with DOS 6.2, MEM displays numbers with embedded commas, making themmuch easier to read.
2. A good way to determine a module name for MEM /MODULE name is first to issue the com-mand MEM /C.
3. If your PC has UMBs, you can use MEM /C or MEM /D extensively as you begin to loaddevice drivers and TSRs into upper memory. MEM displays the location and size of eachprogram in memory. This information can help you determine the order in whichdevice drivers and TSRs load so that you can determine how best to use UMBs.
See Also
DEVICEHIGH=, EMM386.EXE, HIMEM.SYS, LOADHIGH or LH, and MEMMAKER
“Displaying the Amount of Free and Used Memory” in Chapter 10
MEMMAKER 6.0 and later—ExternalMemMaker is a full-screen program that attempts to maximize the amount of freeconventional memory you have in your computer by moving device drivers and memory-resident programs (TSRs) into upper memory blocks (UMBs). To use MemMaker, you must have an 80386SX or higher computer with more than 1MB of memory installed.MemMaker relies on the services provided by HIMEM.SYS, EMM386.EXE and DOS. (If you areusing third-party memory management software, you should use its memory optimizationprogram instead of MemMaker.)
FApp
C:\>
804 Appendix F Command Reference
SyntaxMEMMAKER /B /BATCH /SESSION /SWAP:drive /T /UNDO /W:size1,size2
Parameters and Switches
/B Causes MemMaker to display correctly on a monochrome (black-and-white) monitor or LCD screen.
/BATCH Runs MemMaker in batch (unattended) mode. When you use this switch,DOS takes only the default actions and, if an error occurs, restores your CONFIG.SYS, AUTOEXEC.BAT, and (if necessary) Microsoft WindowsSYSTEM.INI files. You can determine what was done by looking in theMEMMAKER.STS file.
/SESSION Used only by MemMaker during its optimization process. Do not specifythis parameter.
/SWAP:drive Specifies your boot drive’s original disk letter, the one that refers to thedrive when your CONFIG.SYS file begins. You need this switch only in rarecases (for example, when disk-compression software, such as Stacker 1.0,swaps drive letters). Unless MemMaker knows your boot disk drive, itcannot find your startup files. You do not need this switch if you areusing DoubleSpace, Stacker 2.0 or later, or SuperStor.
/T Disables IBM Token Ring detection. Use this switch only if you are con-nected to a Token Ring network and have trouble running MemMaker.
/UNDO Undoes changes in the CONFIG.SYS, AUTOEXEC.BAT, and (if necessary)Microsoft Windows SYSTEM.INI files from a previous use of MemMaker.Use this switch if your system does not work after you run MemMakeror if you are dissatisfied with the new configuration.
/W:size1,size2 Specifies how much upper memory (in kilobytes) to reserve for MicrosoftWindows translation buffers. Windows needs two such buffers in eitherupper or conventional memory. size1 is the size of the first, and size2is the size of the second. You might need to increase these values ifWindows begins to run slowly after optimizing with MemMaker. Thedefault is /W:0,0; MemMaker reserves no upper memory for Windowstranslation buffers.
See Also
DEVICEHIGH=, EMM386.EXE, HIMEM.SYS, LOADHIGH or LH, and MEM
“Configuring Memory with MemMaker” in Chapter 19
805MENUCOLOR= 6.0 and later—Internal
MEMMAXYou can use MEMMAX to enable or disable sections of memory. You can run it from the systemprompt or in AUTOEXEC.BAT. MEMMAX is useful if programs you run have trouble attempting toload into memory and you need to disable an area to prevent the program from loading there.
SyntaxMEMMAX +|-U +|-L +|-V /U /L /V /?
Parameters and Switches
+|-U Enables or disables upper memory.
+|-L Enables or disables lower memory.
+|-V Allows or disallows loading programs into video memory area.
/U Displays upper memory status.
/L Displays lower memory status.
/V Displays video memory status.
/? Displays abbreviated help.
MENUCOLOR= 6.0 and later—InternalNormally, DOS displays a startup menu in white text on a black background. When you usethe MENUCOLOR= command, you can choose the screen colors that DOS uses. This commandaffects all text that DOS displays onscreen, not just the startup menu. You can use MENUCOLOR= only inside a menu block in your CONFIG.SYS file.
SyntaxMENUCOLOR=textcolor,background
Parameters and Switches
textcolor The color to use for foreground text. Legal values are 0 through 15 (see thefollowing table of color values). This parameter is required.
background The color to use for the background. Legal values are 0 through 15 (see thefollowing table of color numbers). On some displays, using backgroundcolors with values higher than 7 causes the screen to blink. Do not include aspace after the comma, or DOS ignores the entire MENUCOLOR= command. Ifno value is entered, DOS assumes Black (0).
Value Color Value Color
0 Black 8 Gray
1 Blue 9 Bright Blue
FApp
DR-DOS
CONFIGSYS
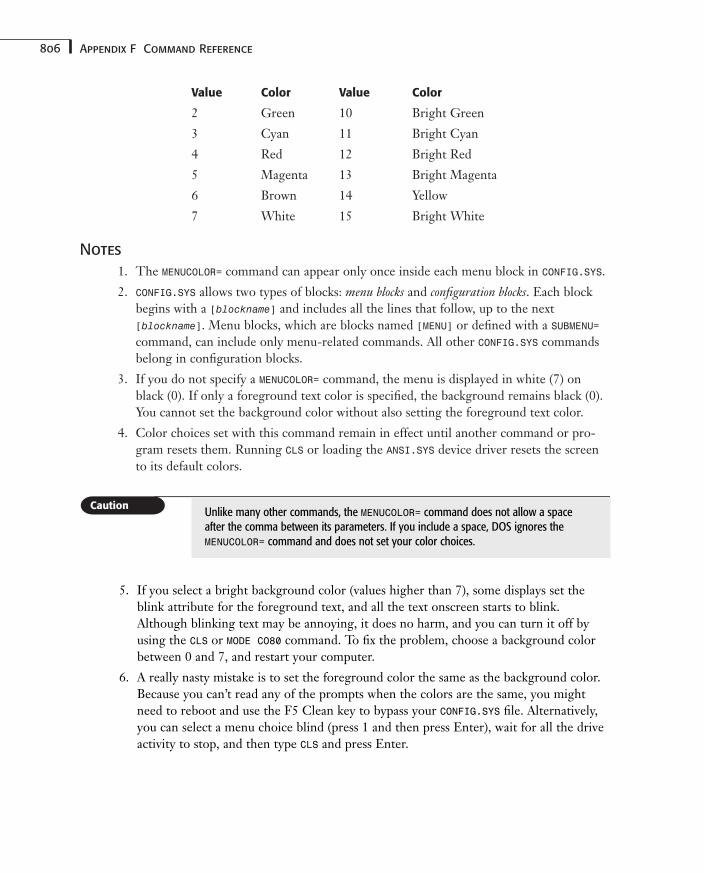
806 Appendix F Command Reference
Value Color Value Color
2 Green 10 Bright Green
3 Cyan 11 Bright Cyan
4 Red 12 Bright Red
5 Magenta 13 Bright Magenta
6 Brown 14 Yellow
7 White 15 Bright White
Notes
1. The MENUCOLOR= command can appear only once inside each menu block in CONFIG.SYS.
2. CONFIG.SYS allows two types of blocks: menu blocks and configuration blocks. Each blockbegins with a [blockname] and includes all the lines that follow, up to the next [blockname]. Menu blocks, which are blocks named [MENU] or defined with a SUBMENU=command, can include only menu-related commands. All other CONFIG.SYS commandsbelong in configuration blocks.
3. If you do not specify a MENUCOLOR= command, the menu is displayed in white (7) onblack (0). If only a foreground text color is specified, the background remains black (0).You cannot set the background color without also setting the foreground text color.
4. Color choices set with this command remain in effect until another command or pro-gram resets them. Running CLS or loading the ANSI.SYS device driver resets the screento its default colors.
Unlike many other commands, the MENUCOLOR= command does not allow a space after the comma between its parameters. If you include a space, DOS ignores the MENUCOLOR= command and does not set your color choices.
5. If you select a bright background color (values higher than 7), some displays set theblink attribute for the foreground text, and all the text onscreen starts to blink.Although blinking text may be annoying, it does no harm, and you can turn it off byusing the CLS or MODE CO80 command. To fix the problem, choose a background colorbetween 0 and 7, and restart your computer.
6. A really nasty mistake is to set the foreground color the same as the background color.Because you can’t read any of the prompts when the colors are the same, you mightneed to reboot and use the F5 Clean key to bypass your CONFIG.SYS file. Alternatively,you can select a menu choice blind (press 1 and then press Enter), wait for all the driveactivity to stop, and then type CLS and press Enter.
807MENUDEFAULT= 6.0 and later—Internal
Examples
Suppose that you want to set up a menu that enables you to choose from three basic config-urations for your computer: Windows, DOS, and Maintenance. To jazz it up a bit, you wantto set the screen colors to bright blue text on a white background. To do so, add the follow-ing lines to your CONFIG.SYS file:
[MENU]MENUITEM=WIN, Configure for Windows (Default)MENUITEM=DOS, Configure for MS-DOSMENUITEM=MAINT, Configure for File & Disk MaintenanceMENUDEFAULT=WIN, 30MENUCOLOR=9,7
The MENUCOLOR= command sets the foreground color to bright blue (9) and the backgroundcolor to white (7). These colors remain in effect until another program resets them.
See Also
[blockname], MENUDEFAULT=, MENUITEM=, and SUBMENU=
“Creating Multiple Configurations” in Chapter 2
MENUDEFAULT= 6.0 and later—InternalUsing the MENUDEFAULT= command, you can select which startup configuration DOS exe-cutes if no keys are pressed within the timeout period you specify. Without this command,DOS chooses menu item #1 and waits for you to press the Enter key. If you specify a defaultconfiguration and timeout period, DOS can continue booting without you. You can useMENUDEFAULT= only inside a menu block in your CONFIG.SYS file.
SyntaxMENUDEFAULT=blockname, timeout
Parameters and Switches
blockname The menu line that DOS should highlight when the menu is displayed. Ifyou specify a timeout value, DOS executes this configuration block automati-cally after timeout seconds. blockname must match the corresponding entryin a MENUITEM= or SUBMENU= command. This argument is required.
timeout The number of seconds, from 0 to 90, that DOS should wait before execut-ing the blockname configuration block. If you do not specify a timeout value,DOS waits until you press the Enter key before executing the selected con-figuration. A timeout value of 0 executes the blockname configuration blockwithout displaying the menu onscreen at all.
FApp
CONFIGSYS
808 Appendix F Command Reference
Notes
1. The MENUDEFAULT= command can appear only once inside each menu block inCONFIG.SYS.
2. CONFIG.SYS allows two types of blocks: menu blocks and configuration blocks. Each blockbegins with a [blockname] and includes all the lines that follow, up to the next [blockname]. Menu blocks, which are blocks named [MENU] or defined with a SUBMENU=command, can include only menu-related commands. All other CONFIG.SYS commandsbelong in configuration blocks.
3. The menu item selected with the MENUDEFAULT= command displays highlightedonscreen. You can move the highlight with the arrow keys or type the line number toselect a different menu line. The Enter a Choice: prompt displays the number of theselected menu item.
4. When you specify a timeout value, DOS displays a countdown onscreen as it waits foryou to override the default choice. If you press any key before the timeout period haselapsed, the timer stops, and DOS waits for you to make a menu selection and press theEnter key.
If the timeout parameter contains an illegal value, DOS assigns a timeout of zero, andthe menu isn’t displayed at all. Not having a menu display can be troublesome when youare debugging a new menu. To determine whether an incorrectly set timeout value iscausing the problem, press the F8 Interactive key when the Starting MS-DOS...message appears onscreen. If the menu appears, the timeout value is defaulting tozero. If the menu still doesn’t appear, look for undefined or misspelled blocknames.
Examples
Suppose that you want to set up a menu that enables you to choose from three basic config-urations for your computer: Windows, DOS, and Maintenance. Because you normally workwith Windows programs, you want the default choice to be the WIN configuration. To doso, add the following lines to your CONFIG.SYS file:
[MENU]MENUITEM=WIN, Configure for Windows (Default)MENUITEM=DOS, Configure for MS-DOSMENUITEM=MAINT, Configure for File & Disk MaintenanceMENUDEFAULT=WIN, 30
When you include these lines in your CONFIG.SYS file, DOS searches for blocks named[WIN], [DOS], and [MAINT]. As long as those blocks exist in the file, the menu that DOS displays looks something like this:
MS-DOS 6 Startup Menu=====================
1. Configure for Windows (Default)2. Configure for MS-DOS
809MENUITEM= 6.0 and later—Internal
3. Configure for File & Disk Maintenance
Enter a choice: 1
Entering 1, 2, or 3 at this menu instructs DOS to select the [WIN], [DOS], or [MAINT] block,respectively. If you don’t make an entry within about 30 seconds, DOS chooses the [WIN]configuration by default.
See Also
[blockname], MENUCOLOR=, MENUITEM=, and SUBMENU=
“Creating Multiple Configurations” in Chapter 2
MENUITEM= 6.0 and later—InternalNew with DOS 6 is the capability to define a startup menu from which you can choose thegroup of CONFIG.SYS commands to process when you reboot. You use the MENUITEM= com-mand to define the text of a menu line, as well as the configuration block that DOS shouldprocess when that menu line is chosen. You can use MENUITEM= only inside a menu block inyour CONFIG.SYS file.
SyntaxMENUITEM=blockname, menutext
Parameters and Switches
blockname The name of the configuration block that you want to execute when thismenu item is chosen. blockname can be up to 70 characters long, but it can’tcontain any spaces or the following special characters:
\ / , ; = [ ]
(For more details, see [blockname] in this command reference.) The CONFIGenvironment variable is set to the value of the blockname selected. This argu-ment is required.
menutext The text you want DOS to display for this menu line. menutext can be up to70 characters long and contain any text you want, including spaces. Separatemenutext from blockname with a comma. If you do not provide menutext,DOS displays the blockname in the menu.
Notes
1. The MENUITEM= command can appear only inside menu blocks in CONFIG.SYS.
2. CONFIG.SYS allows two types of blocks: menu blocks and configuration blocks. Each blockbegins with a [blockname], and includes all the lines that follow, up to the next
FApp
CONFIGSYS
810 Appendix F Command Reference
[blockname]. Menu blocks, which are blocks named [MENU] or defined with a SUBMENU=command, can include only menu-related commands. All other CONFIG.SYS commandsbelong in configuration blocks.
3. The top-level (first) menu block must be named [MENU] so that DOS can recognize it.You can name additional menu blocks that you define with the SUBMENU= command any-thing you like.
4. Up to nine choices can be displayed in a menu, so you are limited to nine MENUITEM=and/or SUBMENU= commands in a menu block. The menu items are displayed onscreen inthe order that they appear in the menu block, numbered from 1 to 9.
5. If DOS cannot find the block referred to by a MENUITEM= command in your CONFIG.SYSfile, it doesn’t display that choice in the menu. To get around this limitation, add a[blockname] line to your CONFIG.SYS file, but don’t include any commands in it.
6. DOS sets the CONFIG environment variable equal to the name of the configuration blockselected from the startup menu. You can use the CONFIG variable in your AUTOEXEC.BATfile to continue customizing your system’s configuration based on the choice you madeat the startup menu.
If you intend to use the CONFIG variable in GOTO statements in your AUTOEXEC.BATfile, try to keep your blocknames short. Only the first eight characters in a batch filelabel are significant, so if any of your blocknames start with the same eight characters,one or more of the GOTO labels you set up will never be reached. You can get aroundthis limitation by using the IF command to make comparisons or by simply usingshorter blocknames.
Examples
Suppose that you want to set up a menu that enables you choose from three basic configura-tions for your computer: Windows, DOS, and Maintenance. To do so, add the followinglines to your CONFIG.SYS file:
[MENU]MENUITEM=WIN, Configure for Windows (Default)MENUITEM=DOS, Configure for MS-DOSMENUITEM=MAINT, Configure for File & Disk MaintenanceMENUDEFAULT=WIN, 30
When you include these lines in your CONFIG.SYS file, DOS searches for blocks named[WIN], [DOS], and [MAINT]. As long as those blocks exist in the file, the menu that DOS dis-plays looks something like this:
MS-DOS 6 Startup Menu=====================
1. Configure for Windows (Default)2. Configure for MS-DOS
811MIRROR 5.0—External
3. Configure for File & Disk Maintenance
Enter a choice: 1
Entering 1, 2, or 3 at this menu instructs DOS to select the [WIN], [DOS], or [MAINT] block,respectively. If you don’t make an entry within about 30 seconds, DOS chooses the [WIN]configuration by default.
See Also
[blockname], MENUCOLOR=, MENUDEFAULT=, and SUBMENU=
“Creating Multiple Configurations” in Chapter 2
MIRROR 5.0—ExternalMIRROR is a utility that can record information about the file allocation table (FAT) and rootdirectory to enable you to use the UNFORMAT and UNDELETE commands. MIRROR also can savepartition table information to a file that UNFORMAT can use if your partition table becomescorrupted.
MIRROR is included on the DOS 6.0 Supplemental Disk, but not in the standard DOS 6 pack-age. For information about similar capabilities in DOS 6, see the section on the UNDELETEcommand later in this command reference.
SyntaxMIRROR drive: ... /Tdrive-entries /1
To save information about a drive partition, use the following format:
MIRROR /PARTN
To quit tracking deleted files, use the following format:
MIRROR /U
Parameters and Switches
drive: ... Specifies the drive(s) for which you want MIRROR to record FAT androot directory information. You can specify as many drive letters (withcolons) as you want; just separate each one from the others with aspace.
/Tdrive-entries Loads a memory-resident tracking program that records informationabout deleted files. The drive specifies the drive where MIRROR savesinformation about deleted files. -entries is an optional value (rangingfrom 1 to 999) that specifies the maximum number of deleted files tobe tracked. Default values are listed in the table in following the Notessection.
FApp
C:\>
BATCHFILE
DISK
TSR
812 Appendix F Command Reference
/1 Keeps MIRROR from creating a backup of the mirror file when the FATand root directory information are updated.
/PARTN Makes a copy of the drive’s partition table.
/U Removes the deleted-file tracking program from memory. You mightnot be able to unload MIRROR if you’ve loaded other resident softwareinto memory after MIRROR.
Rules
1. Do not use the /T switch with drives that use JOIN or SUBST.
2. If you use ASSIGN, you must place this command before the MIRROR command. If possi-ble, don’t use any “pretender” programs while Mirror’s deleted-file tracking program isactive.
3. DOS saves information about deleted files in the file PCTRACKR.DEL. The UNDELETE com-mand uses this file. With DOS 6, UNDELETE has Delete Tracker and Delete Sentryoptions of its own, and you should use them in preference to Mirror’s deleted-file track-ing features.
4. DOS saves system information, the FAT, and the root directory in the file MIRROR.FIL.The UNFORMAT command uses this file. FORMAT saves information for UNFORMAT as well.
5. DOS saves information about the hard drive partition in the file PARTNSAV.FIL. TheUNFORMAT command uses this file. In DOS 6, no utility in the standard package can savethis information for UNFORMAT to use.
Notes
The MIRROR and UNFORMAT commands are not replacements for proper backups ofyour hard disk. Although the information that MIRROR saves can be very handy, full andregular backups are a much safer and more reliable means of ensuring that you do notlose data.
1. When you track deleted files, you can specify how many files are contained in thePCTRACKR.DEL file (1 to 999) by using the /Tdrive-entries parameter. The default values, however, probably are satisfactory. Those values are as follows:
Size of Disk Entries Stored
360KB 25720KB 501.2MB/1.44MB 7520MB 10132MB 202Larger than 32MB 303
813MODE 1.1 and later—External
2. Using the /PARTN switch with MIRROR creates the file PARTNSAV.FIL, which containsinformation from the drive’s partition table. The partition initially is created with FDISK.You are instructed to place a floppy disk in drive A rather than save PARTNSAV.FIL on thehard disk. The file is saved on the disk. Label and store the disk in a safe place.
3. UNFORMAT, a companion command to MIRROR, uses these files. If you lose information, ifyou accidentally format a disk, or if the partition table is damaged, you can recover thelost information by using UNFORMAT if you previously used MIRROR.
MessagesCreates an image of the system area. Drive C being processed.The MIRROR process was successful.
Information: These messages appear when you issue the command MIRROR while drive C isthe current drive. The messages indicate that MIRROR performed successfully.
Deletion-tracking software being installed.The following drives are supported:Drive C - Default files saved.Installation complete.
Information: These messages appear when you install MIRROR with delete tracking. The mes-sages indicate that delete tracking for drive C is installed correctly.
WARNING! Unrecognized DOS INT 25h/26h handler. Some other TSRprograms may behave erratically while deletion-tracking software is residentTry installing MIRROR program before your other resident programs.
Warning: Some other TSR conflicted with delete tracking. Experiment with loading TSRsand delete tracking in a different order. As suggested in the message, you might have to installMIRROR before any other resident software you use. When you find the correct order, modifyAUTOEXEC.BAT so that the TSRs and delete tracking are loaded in the correct sequence.
See Also
FDISK, UNDELETE, and UNFORMAT
MKDIR (see MD)MKDIR is an alternative name for the MD command. For information on using the MD or MKDIRcommand, see the entry for MD in this command reference.
MODE 1.1 and later—ExternalThe MODE command generally configures system devices. The details of the command’s func-tions, however, are so varied that the syntax quickly becomes quite complex. Therefore, thefollowing sections cover each of the MODE command’s functions separately:
To set serial ports, see the entry for MODE COM#.
To configure the keyboard and display, see the entry for MODE CON.
FApp
C:\>
BATCHFILE
814 Appendix F Command Reference
To use MODE’s code page functions, see the entry for MODE device CP.
To set the display device and mode, see the entry for MODE display.
To set parallel (printer) ports, see the entry for MODE LPT#.
Display Device Status Information
To display the status of any or all the devices that MODE can control, use the following com-mand format:
MODE device /STATUS
Parameters and Switches
device The DOS device for which you want to see status information. device canbe any one of the following:
Device Name Description
COM1 through COM4 Serial communication ports
CON The console, which is your keyboard and display
LPT1 through LPT3 Parallel printer ports
PRN The primary printer port, normally LPT1
If you omit this parameter, MODE displays information about the status of allthe devices attached to your system.
/STATUS Including this parameter requests the status of any redirected parallel portsyou may have set without canceling the redirection. If you omit the /STATUSparameter and you are redirecting any parallel ports, the redirection is can-celed when the information about that port is displayed. You can abbreviate/STATUS as /STA.
Notes
1. If you ask for the status of the PRN device (for example, MODE PRN), MODE displays infor-mation about the code page status of the primary printer port. If you ask for the statusof LPT1, however, it reports on the retry setting currently in effect.
2. You can include a colon after the device name or leave it off; its use is optional.
3. The AUX device, which is normally the same as COM1, is not recognized by the MODEcommand.
4. Status information has been available from the MODE command since DOS 4.0.
MessagesIllegal device name - device
Error: You have specified a device name that is not present in your computer. device is thename of the device that you entered in the MODE command.
815MODE COM# 1.1 and later—External
Invalid parameter - parameter
Error: You have specified the name of a device that MODE doesn’t recognize or have includedan unsupported parameter. Check the command to make sure that you have entered it cor-rectly.
See Also
ANSI.SYS, CHCP, COUNTRY=, DISPLAY.SYS, KEYB, and NLSFUNC
“Altering the Look of the Screen with MODE” in Chapter 11, “The MODE Command” inChapter 13, and “Understanding Code Page Switching” in Chapter 14
MODE COM# 1.1 and later—ExternalYou use the MODE COM# form of the MODE command to initialize serial ports connected toyour computer. Many programs initialize the ports themselves, but in case they don’t, DOSprovides this functionality in the MODE COM# command. The INTERSVR /RCOPY remote copyoperation depends on the services of MODE COM# to make the remote copy operation succeed,for instance.
Syntax
The old syntax, which is simple but not very intuitive, is as follows:
MODE COM#: baud, parity, databits, stopbits, retry
If you are running DOS 4.0 or later, you can use the following format:
MODE COM#: BAUD=baud PARITY=parity DATA=databits STOP=stopbits RETRY=retry
Parameters and Switches
#: Specifies the serial port that you want to initialize. DOS supports COM ports1, 2, 3, and 4, but they may not all be installed in your computer. The colonafter the number is optional.
baud Specifies the baud rate to use. Legal values for baud are 110, 150, 300, 600,1200, 2400, 4800, 9600, or 19200. You need to enter only the first two digits—for instance, 24 instead of 2400. (Baud equals bits per second for rateshigher than 300.) Not all computers can support 19200-baud serial transmis-sions.
parity Indicates the parity checking setting. Legal values are N for None, O for Odd, Efor Even, M for Mark, or S for Space. Not all computers support the Mark andSpace parity settings. The default setting is E.
databits Specifies the number of data bits. Legal values are 5 through 8. The defaultvalue is 7. Not all computers support 5 and 6 data bits.
FApp
C:\>
BATCHFILE
TSR
816 Appendix F Command Reference
stopbits Specifies the number of stop bits. Legal values are 1, 1.5, and 2. If baud is 110,the default is 2; otherwise, the default is 1. Not all computers support 1.5 stopbits.
retry Instructs DOS about how to handle timeout errors. Using this parametercauses part of MODE to remain resident in memory. You can choose one of thefollowing options:
retry Action
B Return busy when the port is busy
E Return error when the port is busy
P Retry until output is accepted
R Return ready when the port is busy (infinite retry)
N or NONE Take no action (the default)
Notes
1. For DOS versions before 5.0, you must enter the adapter’s number, followed by a spaceand baud rate. If you type the optional colon, you must type the adapter number imme-diately before the colon. All other parameters are optional.
2. Note that with the older, unlabeled syntax, MODE interprets each parameter by positionalone, and you must enter them in the order shown. If you do not want to enter a valuefor a particular parameter, enter a comma for that value, or use the newer syntax whererelative position on the command line is unimportant.
3. If you enter an invalid parameter, DOS responds with an invalid-parameter messageand takes no further action.
4. You can abbreviate the baud rate parameter by using only the first two digits of thebaud rate. For example, you can specify 11 for 110 baud, or 96 for 9600 baud.
5. If you want continuous retries after a timeout, you must enter RETRY=B (or P for versionsof DOS before 5.0) every time you use the MODE COM#: command. Other settingsremain in effect if you do not specify new values for them.
6. If the adapter is set for continuous retries (RETRY=B) and the device is not ready, thecomputer may appear to hang up when it’s really just waiting for the port. You can abortthis loop by pressing Ctrl+Break.
7. If you use a networked printer, do not specify any of the RETRY values.
8. To display the current status of a serial port, enter the MODE COM# command without anyparameters. To display the status of all the DOS devices attached to your computer,enter the MODE command alone.
See Also
MODE LPT# and MODE device /STATUS
“Using MODE to Change Serial Port Settings” in Chapter 13
817MODE CON 4.0 and later—External
MODE CON 4.0 and later—ExternalMODE can configure various aspects of the console device, which refers to your keyboard anddisplay. For the keyboard, MODE can set the keyboard repeat rate and delay. For the monitor,MODE can, with the help of the ANSI.SYS device driver, control the number of lines andcolumns displayed in text mode.
Syntax
To configure the keyboard, use the following format:
MODE CON: RATE=rate DELAY=delay
To configure the monitor, use the following format:
MODE CON: COLS=columns LINES=lines
Parameters and Switches
CON: Specifies the console device. The colon is optional.
rate Specifies the rate at which a character repeats when you hold down a key. Legalvalues are in the range of 1 to 32, which represents approximately 2 to 30 char-acters per second. The default is 20 for most keyboards and 21 for IBM PS/2keyboards. To set the rate, you also must set the delay.
delay Specifies the length of the delay between the initial pressing of the key and thestart of automatic character repetition. This value can be 1, 2, 3, or 4, whichrepresent delays of 1/4 second, 1/2 second, 3/4 second, and one full second,respectively. The default is 2. To set the delay, you also must set the rate.
columns Indicates the number of columns to display onscreen. Legal values are 40 and80. Most computers start up in an 80-column screen mode. If you omit thisparameter, the display keeps its present column setting.
lines Indicates the number of lines to display onscreen. Legal values are different fordifferent types of monitors. CGA and MDA monitors support 25-line text modesonly. EGA monitors support 25- and 43-line text modes. VGA monitors support25-, 43-, and 50-line text modes. Most computers start up in a 25-line screenmode. If you omit this parameter, the display keeps its present lines setting.
Notes
1. To set the keyboard repeat rate, you must specify both rate and delay settings. Youcannot use these parameters individually.
2. The CapsLock, ScrollLock, NumLock, and Insert keys never repeat, no matter howlong you hold them down.
3. Only enhanced keyboards support having their repeat rate changed. The original 84-key keyboards supplied with the IBM PC use a fixed repeat rate and ignore the MODECON command.
FApp
C:\>
BATCHFILE
818 Appendix F Command Reference
4. Using the MODE CON command to change the number of lines and columns displayed onyour screen requires the assistance of the ANSI.SYS device driver. If ANSI.SYS isn’t in mem-ory when the command executes, an error message is displayed, and the requested screenmode change does not take place. (See the first message in the “Messages” section.)
Examples
To set the keyboard to repeat as quickly as possible but increase the delay before repeatingto 3/4 of a second, you enter the following command:
MODE COM RATE=32 DELAY=3
To reset the keyboard to its default values, you enter the following command:
MODE COM RATE=20 DELAY=2
To set an EGA or VGA monitor to a 43-line text mode, you enter the following command:
MODE CON LINES=43
MessagesANSI.SYS must be installed to perform requested function
Error: MODE requires the assistance of the ANSI.SYS device driver to perform the requestedoperation, but it isn’t loaded. To use this MODE command, you have to add a DEVICE= lineloading the ANSI.SYS device driver to your CONFIG.SYS file and restart your computer.
Rate and delay must be specified together
Error: MODE CON requires that you specify both the rate and delay settings in order tochange the keyboard settings for these parameters. Make sure that you specified both para-meters on the command line.
See Also
ANSI.SYS and MODE display
“Using MODE to Change the Typematic Rate” in Chapter 13
MODE device CP 3.3 and later—ExternalThe MODE command offers four subfunctions that you can use to prepare and manipulate codepages on your computer. You use these commands in conjunction with the other interna-tional commands to configure your computer to use standards popular in various countries.
Syntax
To prepare and load a code page into the DISPLAY.SYS and/or PRINTER.SYS device drivers,use the following format:
C:\>
BATCHFILE
819MODE device CP 3.3 and later—External
MODE device CODEPAGE PREPARE=((codepage...) cpi_file)
or
MODE device CP PREP=((codepage...) cpi_file)
To switch to a code page that has been previously prepared, use the following format:
MODE device CODEPAGE SELECT=codepage
or
MODE device CP SEL=codepage
To reload the current code page into the hardware, use the following format:
MODE device CODEPAGE REFRESH
or
MODE device CP REF
To display code page status information, use the following format:
MODE device CODEPAGE /STATUS
or
MODE device CP /STA
Parameters and Switches
device Specifies the DOS device that you want to use. This parameter is required.device can be any one of the following:
Device Name Description
CON The console, which is your keyboard and display
LPT1 through LPT3 Parallel printer ports
PRN The primary printer port, normally LPT1
CODEPAGE Prepares code pages (character sets), which simply means that it loads the PREPARE or specified code page into the device driver in memory (DISPLAY.SYS or CP PREP PRINTER.SYS). You must prepare a code page before you can use it with the
CHCP or the MODE device CODEPAGE SELECT commands. CODEPAGE can be abbre-viated as CP, and PREPARE can be abbreviated as PREP.
CODEPAGE Switches the current code page to the onespecified. The code page you SELECT or switch to must have been previously loaded with the MODE device CODEPAGE
CP SEL PREPARE command, or be permanently available from the hardware. CODEPAGEcan be abbreviated as CP, and SELECT can be abbreviated as SEL.
CODEPAGE Reloads the current code page. You need to use this command if your printer REFRESH loses the code page information loaded into it by being turned off. The code or CP REF page you refresh must have been previously loaded with the MODE device
CODEPAGE PREPARE command. CODEPAGE can be abbreviated as CP, and REFRESHcan be abbreviated as REF.
FApp
820 Appendix F Command Reference
codepage Specifies the code page (character set) that you want to prepare or select. Youcan enter more than one codepage in the PREPARE command. For a list of thecode pages supported by MS-DOS, see Chapter 14, “Understanding theInternational Features of DOS.”
cpi_file Specifies the name and location of the file that contains code page informa-tion for the specified device. If you don’t specify a drive, DOS assumes thecurrent drive. If you don’t specify a subdirectory path, DOS assumes the cur-rent directory. The filename is required. MS-DOS 6 provides the followingcode page information files for use with DISPLAY.SYS and PRINTER.SYS:
CPI File Description
EGA.CPI Code pages for EGA and VGA displays
EGA.ICE (DOS 6.0 only) Icelandic code pages for EGA and VGAdisplays
EGA2.CPI An alternative set of code pages for EGA and VGA displays
LCD.CPI (Supplemental Disk) Code pages for an IBMConvertible’s LCD display
4201.CPI (Supplemental Disk) Code pages for IBM Proprinters IIand III Model 4201 and IBM Proprinters II and III XLModel 4202
4208.CPI (Supplemental Disk) Code pages for IBM ProprintersX24E Model 4207 and IBM Proprinters XL24E Model 4208
5202.CPI (Supplemental Disk) Code pages for IBM Quietwriter IIIprinter
Setup places these files in the C:\DOS subdirectory by default.
/STATUS Displays the number of code pages prepared or selected for the specifieddevice. You can include this parameter or leave it out; it makes no difference.Microsoft states that you can abbreviate it as /STA, but because you canabbreviate it to nothing, it hardly matters.
Notes
1. You must specify a valid device. The options are CON:, PRN:, LPT1:, LPT2:, andLPT3:. The colon after the device name is optional.
2. MODE device CODEPAGE PREPARE prepares code pages (character sets) for the console(keyboard and display) and printers. Issue this subcommand before issuing the MODEdevice CODEPAGE SELECT subcommand, unless you use the IBM Quietwriter III printer,whose font information is contained in cartridges. If the code page that you need is in acartridge, you do not need to use the PREPARE command.

821MODE display 2.0 and later—External
3. For the PREPARE command, you must specify one or more code pages. You can use com-mas or spaces to separate the numbers if you specify more than one. You must enclosethe entire list of code pages in parentheses.
4. When you add or replace code pages by using a PREPARE command, enter a comma forany code page that you do not want to change.
5. For the SELECT command, you must specify a single code page. The code page must beeither part of a MODE device CODEPAGE PREPARE command for the device or the hard-ware code page specified to the appropriate device driver.
6. MODE device CODEPAGE SELECT activates a currently prepared code page or reactivates a hardware code page. You can use MODE device CODEPAGE SELECT only on these twotypes of code pages.
7. MODE device CODEPAGE SELECT usually downloads any software font to the device,except for the Quietwriter III printer, which uses cartridges.
8. MODE device CODEPAGE SELECT activates code pages for individual devices. You can usethe CHCP command to activate the code pages for all available devices.
9. MODE device CODEPAGE REFRESH downloads, if necessary, and reactivates the currentlyselected code page on a device. Use this command after you turn on your printer, orafter a program changes the video display and leaves the console code page in ruins.
10. MODE device CODEPAGE /STATUS displays the following information about the device:
• The selected (active) code page, if one is selected
• The hardware code page(s)
• Any prepared code page(s)
• Any available positions for additional prepared code pages
Examples
To prepare the first parallel port with the multilingual (Latin 1) code page found in the fileC:\DOS\4201.CPI, enter the following:
MODE LPT1 CP PREP=((850) C:\DOS\4201.CPI)
See Also
CHCP, COUNTRY=, DISPLAY.SYS, KEYB, NLSFUNC, and PRINTER.SYS
“Understanding Code Page Switching” in Chapter 14
MODE display 2.0 and later—ExternalThe MODE display form of the MODE command can switch the active display adapter betweenthe monochrome display (MDA) and a graphics display adapter (Color Graphics Adapter(CGA), Enhanced Color Graphics Adapter (EGA), or Video Graphics Array (VGA)) on atwo-display system.
FApp
C:\>
BATCHFILE
822 Appendix F Command Reference
SyntaxMODE display_mode, lines
For systems with CGA monitors, you can use the following syntax to shift the display onyour screen:
MODE display_mode, shift, T
Parameters and Switches
display_mode Indicates the display adapter to activate if you have more than oneinstalled in your computer. This parameter also specifies the text mode tobe used, so it’s handy even with only one monitor installed. Legal valuesfor display_mode are listed in the following table.
Display Mode Description
40 Sets the graphics display to 40 characters per line
80 Sets the graphics display to 80 characters per line
BW40 Makes the graphics display the active display and setsthe mode to 40 characters per line, black and white(color disabled)
BW80 Makes the graphics display the active display and setsthe mode to 80 characters per line, black and white(color disabled)
CO40 Makes the graphics display the active display and setsthe mode to 40 characters per line (color enabled)
CO80 Makes the graphics display the active display and setsthe mode to 80 characters per line (color enabled)
MONO Makes the monochrome display the active display
If your computer has an MDA adapter (monochrome or HerculesMono), it starts up in MONO mode. All other display adapters start up inCO80 mode.
lines Specifies the number of lines to display onscreen. Legal values are differ-ent for different types of monitors. CGA and MDA monitors support 25-line text modes only. EGA monitors support 25- and 43-line textmodes. VGA monitors support 25-, 43-, and 50-line text modes. Mostcomputers start up in a 25-line screen mode. If you omit this parameter,the display keeps its current lines setting.
shift (CGA displays only) Enables you to shift the onscreen image left or right.Legal values are L to shift left and R to shift right. In an 80-column mode,the screen shifts two characters at a time, and in a 40-column mode, onecharacter at a time.
823MODE display 2.0 and later—External
T (CGA displays only) Displays a test pattern. This parameter can help youwhen you are using the left and right shift parameter to get the screencentered.
Notes
1. The MODE CO80 command can be very handy for resetting your screen when it’s left inan unknown state by an inconsiderate program. It also restores the cursor to its normalsize and position. If your screen goes black when you exit a graphics utility program, forexample, try typing in this command, even if you can’t see what you’re typing.
2. For the first form of the command, you must enter the display_mode. All other parame-ters are optional.
3. The second form of this command is legal to use only with displays that use a ColorGraphics Adapter (CGA). On any other type of display, this form of the command doesnothing. To adjust a CGA display, you must enter the shift parameter (L or R), butyou can avoid resetting the display_mode by typing a comma before the shift parame-ter. Depending on whether you are in a 40- or an 80-column screen mode, the screenshifts one or two characters to the right or left. Including the T parameter displays a testpattern onscreen and prompts you to type Y if the screen is centered or N to shift thedisplay further left or right.
4. Using the MODE CON command to change the number of lines displayed on your screenrequires the assistance of the ANSI.SYS device driver. (You can change the display_modewithout ANSI.SYS, however.) If ANSI.SYS isn’t in memory when the command executes,an error message is displayed, and the requested screen mode change does not takeplace. (See the first message in the “Messages” section.)
Examples
If you have a CGA, EGA, or VGA display and you want to reset the screen to normal,including the shape of the cursor, enter the following command:
MODE CO80
MODE CO80 can be a lifesaver when a program leaves your screen in limbo. Even if you can’tsee what you’re typing, DOS resets the screen mode to its normal mode when you enterthese commands.
MessagesANSI.SYS must be installed to perform requested function
Error: MODE requires the assistance of the ANSI.SYS device driver to perform the requestedoperation, but it isn’t loaded. To use this MODE command, you have to add a DEVICE= line thatloads the ANSI.SYS device driver to your CONFIG.SYS file and restart your computer.
FApp
824 Appendix F Command Reference
See Also
CLS and MODE CON
“Altering the Look of the Screen with MODE” in Chapter 11
MODE LPT# 3.2 and later—ExternalYou can use the MODE LPT# form of the MODE command to set the operating characteristics ofyour printer or to redirect printer output to a serial port. You can set the lines and columnsonly for IBM- and Epson-compatible printers.
SyntaxMODE LPT#: columns, lines, retry
or
MODE LPT#: COLS=columns LINES=lines RETRY=retry
To force DOS to print to a serial printer instead of a parallel printer, use the following for-mat:
MODE LPT#:=COM#
Parameters and Switches
LPT#: Specifies the parallel printer port you want to configure. DOS supports LPTports 1, 2, and 3, but they may not all be installed in your computer. The colonafter the number is optional.
COM#: Specifies the serial port to which you want to redirect printer output. DOS sup-ports COM ports 1, 2, 3, and 4, but they may not all be installed in your com-puter. The colon after the number is optional.
columns (IBM- and Epson-compatible printers only) Indicates the number of charactersper line to print on the printer. Legal values are 80 and 132. Most printers startup in an 80-column mode. If you omit this parameter, the printer keeps its cur-rent characters-per-line setting.
lines (IBM- and Epson-compatible printers only) Specifies the number of lines perinch to print on the printer. Legal values are 6 and 8. Most printers start up in a6-line-per-inch mode. If you omit this parameter, the printer keeps its currentlines-per-inch setting.
retry Instructs DOS about how to handle timeout errors. Using this parameter causespart of MODE to remain resident in memory. You can choose one of the followingoptions:
retry Action
B Return busy when the port is busy
E Return error when the port is busy
C:\>
BATCHFILE
TSR
825MODE LPT# 3.2 and later—External
retry Action
P Retry until output is accepted
R Return ready when the port is busy (infinite retry)
N or NONE Take no action (the default)
Rules
1. When configuring a parallel port, you must specify a printer number, but all other para-meters are optional, including the colon after the printer number.
2. If you do not want to change a configuration parameter, enter a comma for that para-meter.
3. The MODE LPT#:=COM#: command cancels the effect of the MODE LPT#: command.
4. A parameter does not change if you skip that parameter or use an invalid parameter.The printer number, however, must be entered correctly.
5. In DOS 3.3 and earlier versions, if you specify P for continuous retries, you can cancel Ponly by reentering the MODE command without P. In later versions of DOS, the RETRY=Boption has the same effect as the P option of previous DOS versions.
6. If you use a networked printer, do not use any of the RETRY values.
7. The characters-per-line and lines-per-inch portions of the command affect only IBMprinters, Epson printers, and other printers that use Epson-compatible control codes.
8. When you are redirecting printer output, the ports you specify for both the parallelprinter port and serial printer port must be valid. In other words, you cannot redirectprinter output to a serial printer if you don’t have a parallel port, and you can’t use anonexistent parallel port to get around this problem.
9. After you issue the redirection command, all printing that normally goes to the parallelprinter goes to the designated serial printer. Programs that write directly to the hard-ware, such as Microsoft Windows, are not affected by this redirection. For such pro-grams, try printing to a file named LPT1.TXT, substituting whatever parallel port you’veredirected.
10. If you are using a serial printer, you usually have to use the MODE COM# command to setthe parameters on your serial port to match the printer. Check your printer’s documen-tation to find out the correct settings to use.
11. You can cancel or undo the redirection command by issuing the MODE LPT#: command.
Notes
This command controls IBM dot-matrix and graphics printers, all Epson printers, andEpson-compatible printers. The command may work partially or not at all on other printers.
When you change the column width, MODE sends the special printer-control code that speci-fies the normal font (80) or the condensed font (132). When you change the lines-per-inchsetting, MODE sends the correct printer-control code for printing 6 or 8 lines per inch. MODE
FApp
826 Appendix F Command Reference
also sets the printer to 88 lines per page for an 8-lines-per-inch setting and to 66 lines perpage for a 6-lines-per-inch setting.
If you use the P option of DOS 3.3 or earlier versions or the B retry option of later versionsof DOS and attempt to print on a deselected printer, the computer does not issue a timeouterror. Rather, the computer internally loops until the printer is ready (turned on, connectedto the PC, and selected). For about a minute, the computer appears to be locked up. Toabort the continuous retry, press Ctrl+Break.
The redirection capabilities of MODE are useful for systems that are connected to a serialprinter. When you type the following command, the serial printer receives all the outputthat usually is sent to the system printer (assuming that the serial printer is connected to thefirst Asynchronous Communications Adapter):
MODE LPT1: = COM1:
This output includes the print-screen (Shift+PrtSc) function. Before you issue the MODELPT=COMy command, use the MODE COMn: command to set up the serial adapter used for theserial printer.
See Also
MODE COM#
“Using MODE to Change Parallel Port Settings” and “Using MODE to Redirect a Parallel Portto a Serial Port” in Chapter 13
MONOUMB.386 6.0 and later—WindowsIf you have a VGA display, you might be able to increase the amount of upper memoryspace by instructing MemMaker to include the monochrome display region (B000h toB7FFh) in its search for available UMB space. If you run Windows, and you’re using thisregion as UMB space, you need to add a device line for the MONOUMB.386 driver to the[386Enh] section of SYSTEM.INI so that Windows knows what you’re up to.
Syntax
To use the monochrome region as UMB space, include the following line in the [386Enh]section of SYSTEM.INI:
DEVICE=drive:\path\MONOUMB.386
Parameters and Switches
drive:\path\ Specifies the full path to the MONOUMB.386 file on your system. The setupprogram for DOS 6 places this file in the C:\DOS subdirectory by default.
DISK
827MORE 2.0 and later—External
Notes
1. There are a few good reasons why you might not want to use the monochrome regionas upper memory space on a VGA system. If you or one of your software programsswitches the VGA to monochrome mode (perhaps with the MODE MONO command), thedisplay overwrites whatever resident software you have loaded there. Also, some SuperVGA adapters use this memory region when they are in high-resolution graphicsmodes.
2. To instruct MemMaker to include this region in its search for upper memory space,choose Custom Setup and answer yes to the question Use monochrome region (B000-B7FF) for running programs?.
See Also
MEMMAKER
MORE 2.0 and later—ExternalMORE displays one screen of information from the standard input device, pauses, and thendisplays the message -More-. When you press any key, MORE displays the next screen of infor-mation. MORE is one of the filter programs that MS-DOS provides and normally is used withinput redirection or pipes from the command line.
SyntaxMORE < pathname
or
command | MORE
Parameters and Switches
< pathname Indicates the name of a file that you want MORE to display one page at a timeon your screen. All the normal defaults for drives and subdirectories apply.Wildcards are not allowed.
command | Pipes the screen output from a command into the MORE program, which dis-plays it one screen at a time. command can be any legal DOS command thatwrites its output to the standard output device (normally the screen).
Rules
1. MORE displays one screen of information on a standard screen.
2. After displaying a screen of information, MORE waits for a keystroke before filling thescreen with new information. This process repeats until all output has been displayed.
3. MORE is useful with input and output redirection and piping.
FApp
C:\>
BATCHFILE
828 Appendix F Command Reference
Notes
1. MORE is a DOS filter that enables you to display information without manually pausingthe screen.
2. MORE, when used with redirection or piping, is similar to the TYPE command, but MOREpauses after each screen of information.
3. MORE intelligently handles two aspects of displaying text. The command pauses after dis-playing a screenful of lines, as you define by using the MODE command. The commandalso wraps lines that are longer than the width of your screen and reduces the numberof lines that appear so that unread lines do not scroll off the screen.
See Also
FIND and SORT
“The MORE Filter” in Chapter 13
MOVE 6.0 and later—ExternalYou can use MOVE to move a file or group of files from one location to another or to renamesubdirectories.
Syntax
To move a file or group of files, use the following format:
MOVE source, source, ... destination /Y /-Y
To rename a subdirectory, use the following format:
MOVE old_dirname new_dirname
Parameters and Switches
source Specifies the file or files that you want to move. You can specify a full pathname—that is, drive:\path\...\filename.ext)—and wildcards areallowed. You can enter additional source parameters by separating themwith commas. This parameter is required and must include a filename (*.* is not assumed).
destination Specifies the location to which you want to move the source file(s).Normally, just a drive and/or path is included, although you can enter a des-tination filename (to rename it) if you are moving only one file. If you omitparts of this parameter, DOS assumes the current drive and subdirectory asnecessary.
old_dirname Indicates the name of the subdirectory that you want to rename. You caninclude a disk drive and subdirectory path if you want. If old_dirname refersto a file, DOS moves the file instead.
C:\>
BATCHFILE
829MOVE 6.0 and later—External
new_dirname Indicates the new name that you want to give the old_dirname subdirectory.If new_dirname isn’t in the current directory, you must specify the same driveand/or path you specified with old_dirname; otherwise, DOS thinks you aretrying to move the subdirectory, which isn’t allowed.
/Y Specifies that you want MOVE to overwrite files without prompting you forconfirmation. Including this parameter overrides any setting specified withthe COPYCMD environment variable.
/-Y Specifies that you want MOVE to prompt you for confirmation before over-writing any files, even if the command is run from within a batch file.Including this parameter overrides any setting specified with the COPYCMDenvironment variable.
Exit Codes
ERRORLEVEL Value Meaning
0 Files were moved successfully.
1 Files weren’t moved due to errors or user abort.
Notes
1. Starting with DOS 6.2, the MOVE command, when run from the command line, promptsyou for confirmation before overwriting files. However, to avoid forcing you to rewriteall of your batch files, when you run MOVE from a batch file, it does not prompt youbefore overwriting a file.
If you don’t like MOVE’s new behavior, you can change it by defining an environmentvariable named COPYCMD. Setting COPYCMD equal to /Y forces MOVE to act as it did in allprevious versions of DOS, never prompting for confirmation before overwriting a file.If you set COPYCMD equal to /-Y, MOVE always prompts for confirmation, even when it’srun from within a batch file.
2. If you move a file to a directory that already includes a file with that name, DOS over-writes the file in the destination directory without warning.
3. You cannot rename a directory that you are moving to a different disk or to a differentrelative position on a disk. The drive and path in front of both old_dirname andnew_dirname have to be the same.
4. If the destination directory does not exist, DOS can create it automatically.
5. If you specify several files to be moved and a filename rather than a directory as the des-tination, DOS displays the message Cannot move multiple files to a single file.
6. If a MOVE operation is successful, DOS returns an ERRORLEVEL of 0. If an error occurs,DOS returns a value of 1.
FApp
830 Appendix F Command Reference
Examples
To move the file README.TXT in the current directory and the file C:\BIN\SETUP.EXE to thedirectory C:\TEMP (the files are not renamed), enter the following:
MOVE README.TXT, C:\BIN\SETUP.EXE C:\TEMP
To change the name of the file README.TXT in the current directory to README.1ST, enter thefollowing:
MOVE README.TXT README.1ST
To move and rename C:\INFO\README.TXT to C:\TEMP\README.BAK, enter the following:
MOVE C:\INFO\README.TXT C:\TEMP\README.BAK
To change the name of the directory C:\BIN to C:\OLDBIN, enter the following:
MOVE C:\BIN C:\OLDBIN
See Also
COPY, REN or RENAME, and XCOPY
“Using the MOVE Command” in Chapter 8
MSAV 6.0 and later—ExternalMicrosoft Anti-Virus (MSAV) is a full-screen program that can help you to detect and cleanany computer viruses found in your system. You can adapt it to be run from a batch file, soyou can automate routine scans of your system or floppy disk drives.
Syntax
To interact with MSAV’s full-screen interface, use the following format:
MSAV /R /video /mouse
To immediately start scanning one or more disks, directories, and/or files using MSAV’s full-screen interface to show progress, use the following format:
MSAV pathname drive: ... /S /C /R /A /L /video /mouse
To immediately start scanning one or more disks, directories, and/or files using a command-line interface to show progress, include the /N or the /P switch as follows:
MSAV pathname drive: ... /S /C /R /A /L /N /P /F /video /mouse
To get online help for MSAV’s video and mouse options, use the following format:
MSAV /VIDEO
C:\>
BATCHFILE
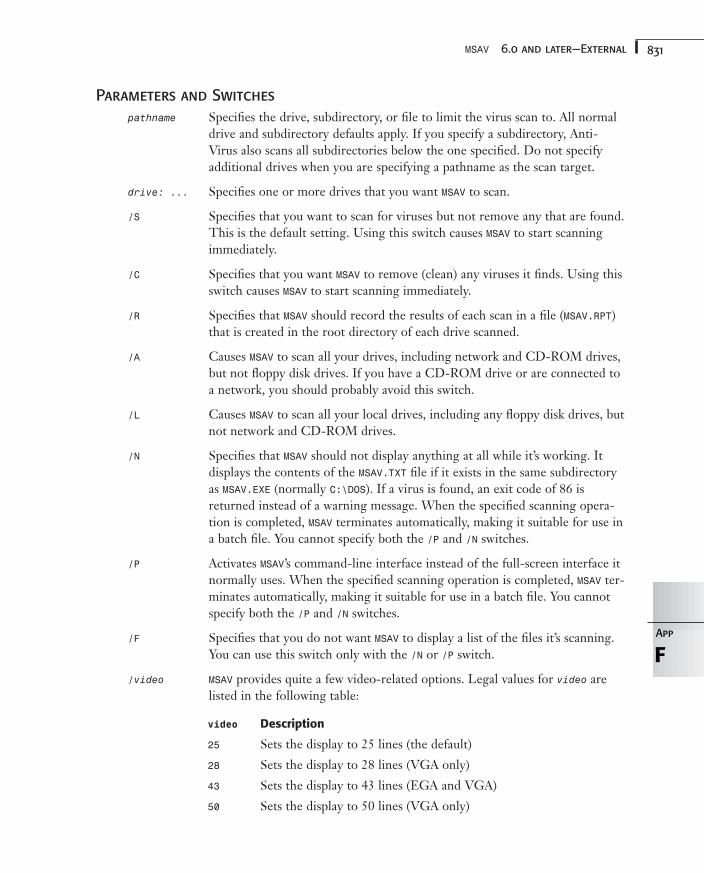
831MSAV 6.0 and later—External
Parameters and Switches
pathname Specifies the drive, subdirectory, or file to limit the virus scan to. All normaldrive and subdirectory defaults apply. If you specify a subdirectory, Anti-Virus also scans all subdirectories below the one specified. Do not specifyadditional drives when you are specifying a pathname as the scan target.
drive: ... Specifies one or more drives that you want MSAV to scan.
/S Specifies that you want to scan for viruses but not remove any that are found.This is the default setting. Using this switch causes MSAV to start scanningimmediately.
/C Specifies that you want MSAV to remove (clean) any viruses it finds. Using thisswitch causes MSAV to start scanning immediately.
/R Specifies that MSAV should record the results of each scan in a file (MSAV.RPT)that is created in the root directory of each drive scanned.
/A Causes MSAV to scan all your drives, including network and CD-ROM drives,but not floppy disk drives. If you have a CD-ROM drive or are connected toa network, you should probably avoid this switch.
/L Causes MSAV to scan all your local drives, including any floppy disk drives, butnot network and CD-ROM drives.
/N Specifies that MSAV should not display anything at all while it’s working. Itdisplays the contents of the MSAV.TXT file if it exists in the same subdirectoryas MSAV.EXE (normally C:\DOS). If a virus is found, an exit code of 86 isreturned instead of a warning message. When the specified scanning opera-tion is completed, MSAV terminates automatically, making it suitable for use ina batch file. You cannot specify both the /P and /N switches.
/P Activates MSAV’s command-line interface instead of the full-screen interface itnormally uses. When the specified scanning operation is completed, MSAV ter-minates automatically, making it suitable for use in a batch file. You cannotspecify both the /P and /N switches.
/F Specifies that you do not want MSAV to display a list of the files it’s scanning.You can use this switch only with the /N or /P switch.
/video MSAV provides quite a few video-related options. Legal values for video arelisted in the following table:
video Description
25 Sets the display to 25 lines (the default)
28 Sets the display to 28 lines (VGA only)
43 Sets the display to 43 lines (EGA and VGA)
50 Sets the display to 50 lines (VGA only)
FApp
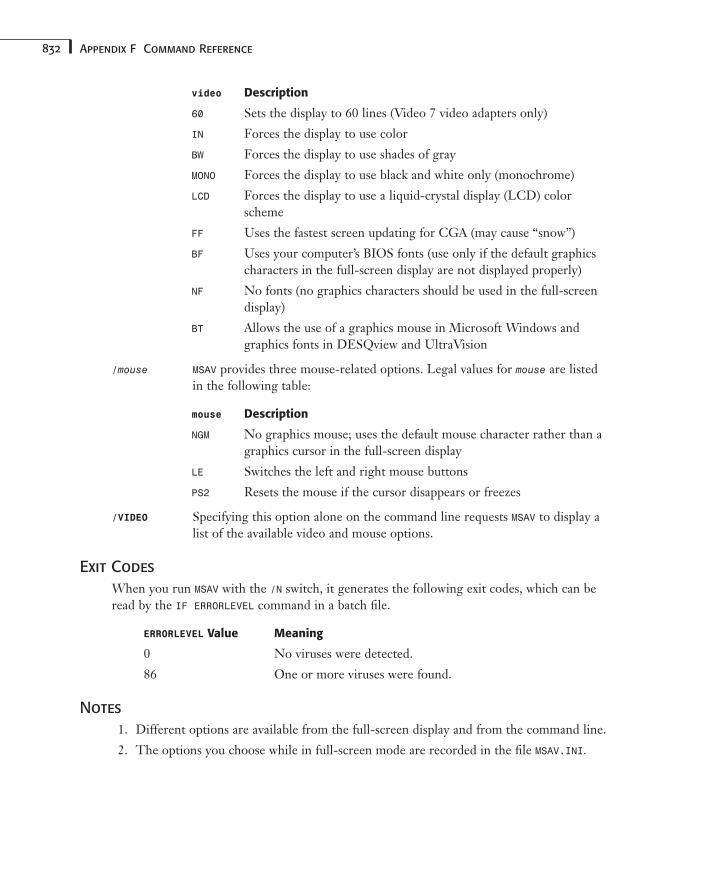
832 Appendix F Command Reference
video Description
60 Sets the display to 60 lines (Video 7 video adapters only)
IN Forces the display to use color
BW Forces the display to use shades of gray
MONO Forces the display to use black and white only (monochrome)
LCD Forces the display to use a liquid-crystal display (LCD) colorscheme
FF Uses the fastest screen updating for CGA (may cause “snow”)
BF Uses your computer’s BIOS fonts (use only if the default graphicscharacters in the full-screen display are not displayed properly)
NF No fonts (no graphics characters should be used in the full-screendisplay)
BT Allows the use of a graphics mouse in Microsoft Windows andgraphics fonts in DESQview and UltraVision
/mouse MSAV provides three mouse-related options. Legal values for mouse are listedin the following table:
mouse Description
NGM No graphics mouse; uses the default mouse character rather than agraphics cursor in the full-screen display
LE Switches the left and right mouse buttons
PS2 Resets the mouse if the cursor disappears or freezes
/VIDEO Specifying this option alone on the command line requests MSAV to display alist of the available video and mouse options.
Exit Codes
When you run MSAV with the /N switch, it generates the following exit codes, which can beread by the IF ERRORLEVEL command in a batch file.
ERRORLEVEL Value Meaning
0 No viruses were detected.
86 One or more viruses were found.
Notes
1. Different options are available from the full-screen display and from the command line.
2. The options you choose while in full-screen mode are recorded in the file MSAV.INI.
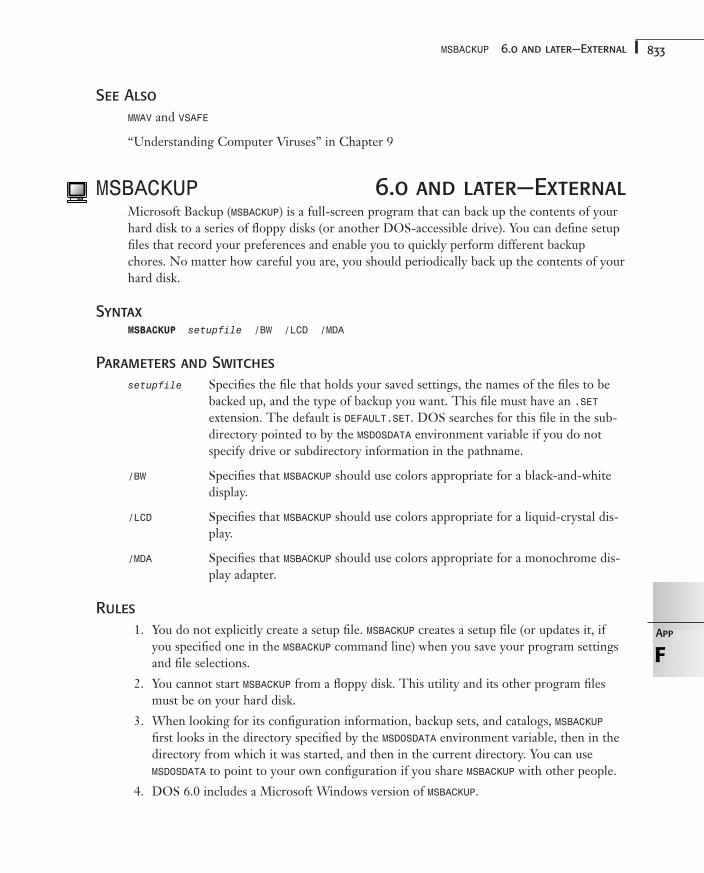
833MSBACKUP 6.0 and later—External
See Also
MWAV and VSAFE
“Understanding Computer Viruses” in Chapter 9
MSBACKUP 6.0 and later—ExternalMicrosoft Backup (MSBACKUP) is a full-screen program that can back up the contents of yourhard disk to a series of floppy disks (or another DOS-accessible drive). You can define setupfiles that record your preferences and enable you to quickly perform different backupchores. No matter how careful you are, you should periodically back up the contents of yourhard disk.
SyntaxMSBACKUP setupfile /BW /LCD /MDA
Parameters and Switches
setupfile Specifies the file that holds your saved settings, the names of the files to bebacked up, and the type of backup you want. This file must have an .SETextension. The default is DEFAULT.SET. DOS searches for this file in the sub-directory pointed to by the MSDOSDATA environment variable if you do notspecify drive or subdirectory information in the pathname.
/BW Specifies that MSBACKUP should use colors appropriate for a black-and-whitedisplay.
/LCD Specifies that MSBACKUP should use colors appropriate for a liquid-crystal dis-play.
/MDA Specifies that MSBACKUP should use colors appropriate for a monochrome dis-play adapter.
Rules
1. You do not explicitly create a setup file. MSBACKUP creates a setup file (or updates it, ifyou specified one in the MSBACKUP command line) when you save your program settingsand file selections.
2. You cannot start MSBACKUP from a floppy disk. This utility and its other program filesmust be on your hard disk.
3. When looking for its configuration information, backup sets, and catalogs, MSBACKUPfirst looks in the directory specified by the MSDOSDATA environment variable, then in thedirectory from which it was started, and then in the current directory. You can useMSDOSDATA to point to your own configuration if you share MSBACKUP with other people.
4. DOS 6.0 includes a Microsoft Windows version of MSBACKUP.
FApp
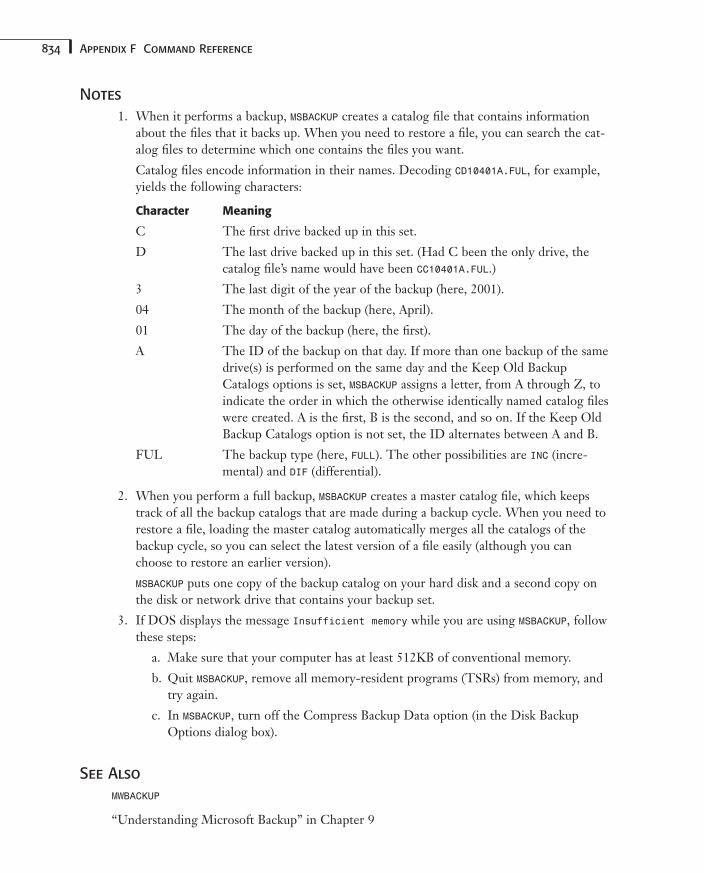
834 Appendix F Command Reference
Notes
1. When it performs a backup, MSBACKUP creates a catalog file that contains informationabout the files that it backs up. When you need to restore a file, you can search the cat-alog files to determine which one contains the files you want.
Catalog files encode information in their names. Decoding CD10401A.FUL, for example,yields the following characters:
Character Meaning
C The first drive backed up in this set.
D The last drive backed up in this set. (Had C been the only drive, thecatalog file’s name would have been CC10401A.FUL.)
3 The last digit of the year of the backup (here, 2001).
04 The month of the backup (here, April).
01 The day of the backup (here, the first).
A The ID of the backup on that day. If more than one backup of the samedrive(s) is performed on the same day and the Keep Old BackupCatalogs options is set, MSBACKUP assigns a letter, from A through Z, toindicate the order in which the otherwise identically named catalog fileswere created. A is the first, B is the second, and so on. If the Keep OldBackup Catalogs option is not set, the ID alternates between A and B.
FUL The backup type (here, FULL). The other possibilities are INC (incre-mental) and DIF (differential).
2. When you perform a full backup, MSBACKUP creates a master catalog file, which keepstrack of all the backup catalogs that are made during a backup cycle. When you need torestore a file, loading the master catalog automatically merges all the catalogs of thebackup cycle, so you can select the latest version of a file easily (although you canchoose to restore an earlier version).
MSBACKUP puts one copy of the backup catalog on your hard disk and a second copy onthe disk or network drive that contains your backup set.
3. If DOS displays the message Insufficient memory while you are using MSBACKUP, followthese steps:
a. Make sure that your computer has at least 512KB of conventional memory.
b. Quit MSBACKUP, remove all memory-resident programs (TSRs) from memory, andtry again.
c. In MSBACKUP, turn off the Compress Backup Data option (in the Disk BackupOptions dialog box).
See Also
MWBACKUP
“Understanding Microsoft Backup” in Chapter 9
835MSCDEX 6.0 and later—External
MSCDEX 6.0 and later—ExternalMSCDEX provides DOS access to CD-ROM drives. CD-ROM drives usually have their owndevice drivers, but these drivers aren’t directly accessible to DOS. MSCDEX uses the networkredirector interface to assign a drive letter to a CD-ROM drive. To be able to use MSCDEX,you must have one or more drive letters available and often have to include the LASTDRIVE=command in your CONFIG.SYS file to set them aside.
SyntaxMSCDEX /D:driversig ... /E /K /S /V /L:letter /M:number
Parameters and Switches
/D:driversig ... For each CD-ROM drive to which you want to assign a drive letter,you need to specify the driver signature (driversig) that you assignedto its device driver with the /D switch when you loaded it in your CONFIG.SYS file. You must specify at least one driver signature.
/E Enables the CD-ROM driver to use available expanded memory tostore its sector buffers, thus conserving conventional memory forapplication programs.
/K Enables recognition of Kanji (Japanese) CD-ROM labels. Normally,MSCDEX cannot recognize Japanese CD-ROM disks.
/S Enables sharing of CD-ROM drives on an MS-NET or Windows forWorkgroups network server.
/V Displays memory statistics when MSCDEX starts (Verbose).
/L:letter Specifies the drive letter to be assigned to the first CD-ROM.Additional CD-ROMs are assigned letters in sequence. These driveletters must be available for use. The default is to use the next avail-able drive letter(s).
/M:number Specifies the number of sector buffers MSCDEX should use to bufferCD-ROM reads. More buffers can increase the speed of your CD-ROM drive, but they also use more memory. You can put thesebuffers in expanded memory by using the /E switch.
Notes
1. Your CD-ROM’s device driver must be loaded by your CONFIG.SYS file. It should in-clude a /D parameter to assign a driver signature (also called a driver name) to the driver.
2. Your CONFIG.SYS file must include a LASTDRIVE command that provides enough deviceletters for your network, SUBST, and MSCDEX needs.
3. MSCDEX can be invoked by your AUTOEXEC.BAT file or from the DOS command line.
4. You need to invoke MSCDEX before you start Microsoft Windows.
FApp
C:\>
BATCHFILE
TSR
836 Appendix F Command Reference
Examples
Following is a typical CONFIG.SYS line that loads a device driver to access a CD-ROM drive.Notice that the driver signature is assigned with the /D switch:
DEVICE=C:\DEVICES\CDROMDRV.SYS /D:MSCD000
The following line would most likely be included in your AUTOEXEC.BAT file and wouldenable the MSCD000 CD-ROM drive as drive E:
C:\DOS\MSCDEX /D:MSCD000 /L:E
See Also
LASTDRIVE=
MSD 6.0 and later—ExternalMSD, which stands for Microsoft System Diagnostics, is a handy tool for checking what isgoing on in a computer system. Via certain command-line options, you can instruct MSD togenerate text files that record the state of your computer. These reports can be very usefulwhen you are troubleshooting.
Syntax
To use MSD interactively with a full-screen display, use the following format:
MSD /B /I
To use MSD to generate a report to a file, use the following format:
MSD /I /Fpathname /Ppathname /Spathname
Parameters and Switches
/B Forces the display to black and white for monochrome or LCD displays.
/I Prevents MSD from detecting hardware when it starts. Use this switch if MSDdoes not start or run properly on your computer.
/Fpathname Specifies that you want a full report generated. MSD prompts you for certaininformation (your name, company, address, country, telephone number, andcomments) and then incorporates that information into a report that it writesto the specified file. You can specify a full pathname with drive and/or pathinformation, but wildcards are not allowed. If you do not include pathname,MSD writes the report to the screen.
/Ppathname Specifies that you want a partial report generated. A partial report containsall the detailed system information but none of the identifying informationthat /F prompts you for. You can specify a full pathname with drive and/orpath information, but wildcards are not allowed. If you do not include pathname, MSD writes the report to the screen.
C:\>
BATCHFILE
837MSHERC 5.0—External
/Spathname Specifies that you want a summary report generated. A summary report provides a shorter listing that highlights the key features of your computer’sconfiguration. You can specify a full pathname with drive and/or path infor-mation, but wildcards are not allowed. If you do not include pathname, MSDwrites the report to the screen.
Notes
MSD provides information about your computer (for example, its manufacturer, bus type, andROM BIOS manufacturer) and about its upper memory use, video display, network, operat-ing system, mouse, other adapters, disk drives, LPT ports, COM ports, IRQ stations, TSRprograms, and device drivers. This information can be valuable when you are correctingproblems or installing new hardware.
See Also
MEM
MSHERC 5.0—ExternalBecause the Hercules Monochrome Graphics Adapter had no support built into the ROMBIOS of the computer, to use the display, programmers had to write their own drivers. TheMSHERC program, when run, installs itself in memory and provides BIOS-like services for aHercules Graphics Adapter. Certain QBasic programs require the use of this program torun. If you do not use a Hercules Graphics Adapter, you will have no use for this command.MSHERC is not distributed in the standard DOS 6 package but is available on the DOS 6Supplemental Disk.
SyntaxMSHERC /HALF
Parameters and Switches
/HALF Specifying this parameter enables you to use a Hercules Graphics Adapter and aColor Graphics Adapter (CGA) in the same system. It limits the driver to usingonly the memory on the Hercules card, which does not conflict with standardCGA memory space.
Notes
Hercules has stopped making these graphics cards for sale. If you need to set up a two-monitor system and need both monitors to be graphics capable, look into setting up twoVGA monitors or a VGA monitor with an 8514 display.
FApp
C:\>
BATCHFILE
TSR
DISK

838 Appendix F Command Reference
MWAV 6.0 and later—WindowsMicrosoft Anti-Virus for Windows (MWAV) is a Windows program that can help you to detectand clean any computer viruses found in your system. This program is the Windows coun-terpart 0201620 to the MSAV program.
You cannot run MWAV from the DOS command line; you need to start it from withinWindows, for example, by opening Program Manager’s File menu and choosing the Runcommand. For instruction on using the program, run MWAV and press F1, or choose Helpfrom the menu.
MWAV keeps its settings information in a separate file from MSAV, so the settings you make inone program are not honored in the other program. MWAV stores its settings in the MWAV.INIfile, which it creates in the main Windows directory. MSAV stores its settings in the MSAV.INIfile, which it creates in either the subdirectory that contains MSAV.EXE or the one pointed toby the MSDOSDATA environment variable.
See Also
MSAV, MWAVTSR, and VSAFE
“Using the Windows Version of Microsoft Anti-Virus” in Chapter 9
MWAVTSR 6.0 and later—WindowsWhen Windows is running, VSAFE cannot display its messages when a forbidden systemactivity arises. MWAVTSR provides a channel through which VSAFE can contact you if it needsyour attention while Windows is running. If you are using both Windows and VSAFE, youshould add MWAVTSR to your startup group or include it in the LOAD= line in WIN.INI so that itstarts up automatically every time you start Windows.
You cannot run MWAVTSR from the DOS command line; you need to start it from withinWindows, for example, by opening the Program Manager’s File menu and choosing the Runcommand.
See Also
MSAV, MWAV, and VSAFE
“Guarding Against Infection” in Chapter 9
MWBACKUP 6.0 and later—WindowsMicrosoft Backup for Windows (MWBACKUP) is a Windows program that can back up the con-tents of your hard disk to a series of floppy disks (or another DOS-accessible drive). You candefine setup files that record your preferences and enable you to quickly perform differentbackup chores. No matter how careful you are, you should periodically back up the contentsof your hard disk. This program is the Windows counterpart to the MSBACKUP program.
839MWUNDEL 6.0 and later—Windows
You cannot run MWBACKUP from the DOS command line; you need to start it from withinWindows, for example, by opening Program Manager’s File menu and choosing the Runcommand. For instruction on using the program, run MWBACKUP and press F1 or choose Helpfrom the menu.
MWBACKUP keeps its settings information in a separate file from MSBACKUP, so the settings youmake in one program are not honored in the other program. MWBACKUP stores its settings inthe MWBACKUP.INI file, which it creates in the main Windows directory. MSBACKUP stores itssettings in the MSBACKUP.INI file, which it creates in either the subdirectory that containsMSBACKUP.EXE or the one pointed to by the MSDOSDATA environment variable.
MWBACKUP and MSBACKUP can share catalog files and backup set files. If the MSDOSDATA environ-ment variable is defined, both programs look for these files in the subdirectory it points to.If MSDOSDATA is not defined, they create and look for these files in the subdirectory where thecorresponding executable file is located.
See Also
MSBACKUP
“Understanding Microsoft Backup” in Chapter 9
MWUNDEL 6.0 and later—WindowsMicrosoft Undelete for Windows (MWUNDEL) is a Windows program that enables you torecover files that you have deleted accidentally. This program is the Windows counterpartto the UNDELETE program. If you are running Windows, you should use this program in pref-erence to the DOS version. You can control various aspects of the “tracking” and “sentry”options of UNDELETE from within Windows by using MWUNDEL, but the resident portions ofUNDELETE need to be loaded into memory before you start Windows.
You cannot run MWUNDEL from the DOS command line; you need to start it from withinWindows, for example, by opening Program Manager’s File menu and then choosing theRun command. For instruction on using the program, run MWUNDEL and press F1 or chooseHelp from the menu.
MWUNDEL shares its settings file with UNDELETE. Both programs look for the UNDELETE.INI filein the subdirectory pointed to by the MSDOSDATA environment variable. If MSDOSDATA is notdefined, they create and look for UNDELETE.INI in the subdirectory where their executablefiles are located, which is C:\DOS by default.
See Also
UNDELETE
“Using the Microsoft Undelete Program for Windows” in Chapter 9
FApp
840 Appendix F Command Reference
NLSFUNC 3.3 and later—ExternalNLSFUNC is a resident program that provides support for code page switching on your com-puter. If you use code pages, you usually have to load NLSFUNC. You can load NLSFUNC fromyour CONFIG.SYS file by adding the INSTALL= command. Do not attempt to load NLSFUNC ifWindows is running on your computer.
SyntaxNLSFUNC drive:\path\COUNTRY.SYS
Parameters and Switches
drive:\path\COUNTRY.SYS The name and location of the country information file youwant to use. It normally is COUNTRY.SYS, which Setup placesin the C:\DOS subdirectory by default. You don’t have toinclude this parameter if you have included the full path-name of the country file in the COUNTRY= command in yourCONFIG.SYS file. If you don’t specify this parameter, eitherhere or in the COUNTRY= command, DOS searches for COUNTRY.SYS in the root directory of the startup drive.
Notes
1. If you provide a drive or pathname, you also must provide the name of the informationfile (usually COUNTRY.SYS).
2. If you omit the full filename, DOS searches for the file COUNTRY.SYS in the root direc-tory of the current disk.
3. After NLSFUNC is loaded, it remains active until you restart DOS.
4. You can load NLSFUNC into upper memory by using the LOADHIGH command if you haveupper memory available on your computer.
5. You can load NLSFUNC from your CONFIG.SYS file by adding the INSTALL= command. Ifyou use INSTALL=, remember that you must include the full pathname (with the exten-sion) of the NLSFUNC.EXE file on your system. Setup places the NLSFUNC.EXE file in theC:\DOS subdirectory by default.
See Also
CHCP, COUNTRY=, DISPLAY.SYS, KEYB, MODE device CP, and PRINTER.SYS
Chapter 14, “Understanding the International Features of DOS”
NUMLOCK= 6.0 and later—InternalNUMLOCK= was introduced with DOS 6. It enables you to choose the state of the NumLockkey (ON or OFF) when the system starts up. If your computer toggles the NumLock key the
C:\>
BATCHFILE
TSR
CONFIGSYS
841NUMLOCK= 6.0 and later—Internal
“wrong” way when you reboot, the NUMLOCK= command is just what you need. NUMLOCK= canbe used only in your CONFIG.SYS file.
Syntax
To have NumLock turned on (numbers on the keypad active) when you reboot your com-puter, include the following line in your CONFIG.SYS file:
NUMLOCK=ON
To have NumLock turned off (cursor keys on the keypad active) when you reboot yourcomputer, include the following line in your CONFIG.SYS file:
NUMLOCK=OFF
Notes
1. Although you may read information to the contrary, you can use NUMLOCK= anywhere inyour CONFIG.SYS file. You don’t have to set up menus in CONFIG.SYS to use the NUMLOCK=command. In its documentation, Microsoft erroneously implied that NUMLOCK= could beused only in a menu block, and this mistake has been duplicated in virtually everydescription of this command since then.
2. The CMOS Setup program in certain computers has a setting for controlling the stateof NumLock as well. If your computer has such a setting, you can either use it to setNumLock or use the NUMLOCK= command. If the settings disagree, no harm is done, butthe setting in CONFIG.SYS overrides the CMOS Setup because it is executed after theROM BIOS startup routines are complete.
3. If you are using an older computer, you might find that using the NUMLOCK= commandcauses the NumLock light on your keyboard to get out of sync with the state the key isin. In the design of the original IBM PC, there was no way for the computer to tell thekeyboard to toggle the lights. IBM fixed this problem when it introduced the enhanced101-key keyboard with the IBM AT. If your computer still uses the old-style interface,however, you might have to either ignore the light or avoid using the NUMLOCK= com-mand.
Examples
If your computer normally sets the NumLock key on at startup, and you want it turned off,include the following line anywhere in your CONFIG.SYS file:
NUMLOCK=OFF
If you want DOS to ask you whether to turn off the NumLock key at startup, insert a ? intothe NUMLOCK= command, like this:
NUMLOCK?=OFF
When DOS processes your CONFIG.SYS file, it prompts you with NUMLOCK=OFF [Y,N]?before executing the NUMLOCK= command. Type Y to turn off the NumLock key or N to leaveit on.
FApp
842 Appendix F Command Reference
NWCACHENWCACHE is a disk-caching program to speed up disk performance. The syntax and parametersare different depending on whether you are initially loading the cache program or it isalready started.
Syntax for Loading NWCACHENWCACHE MaxSize MinSize drive: +|- MaxSize MinSize /L /X=address /E /ML /MU/MLX /MUX /BL,/BU,/BE=size /LEND=ON|OFF /DELAY=ON|OFF|time /W=size /CHECK /A20
Parameters for Loading NWCACHE
MaxSize Specifies a maximum amount of memory in kilobytes to use for thecache—up to 7,670KB.
MinSize Specifies a minimum amount of memory in kilobytes to use for thecache.
drive: Enables write-through cache for the drive.
drive:+ Enables write-delay cache for the drive.
drive:- Disables caching of the drive.
/L Uses conventional memory for the cache.
/X=address Uses extended memory for the cache. If EMM386.EXE is not loaded,you need to specify the address for the cache in kilobytes.
/E Uses expanded memory (EMS) for the cache.
/ML,/MU,/MLX,/MUX Loads NWCACHE into one of the following:
/ML Conventional memory
/MU Upper memory
/MLX Conventional and XMS memory using DPMS
/MUX Upper and XMS memory using DPMS
/BL,/BU,/BE=size Specifies a lookahead buffer memory type and size from 4KB to 16KB:
/BL Uses conventional memory
/BU Uses upper memory
/BE Uses EMS memory
/LEND=ON|OFF Enables or disables lending extended or EMS cache memory toother applications.
/DELAY=ON|OFF|time Enables write delay (ON) or disables it (OFF). time is a value from 50to 5,000 milliseconds that writes are collected in the cache beforebeing written to disk.
DR-DOS
843NWCDEX
/W=size Sets delayed write data limit in kilobytes.
/CHECK Verifies that memory is performing correctly at startup time of thecache program.
/A20 If an XMS memory manager is not loaded and you are having com-patibility problems, you might need to use this setting to suppressenhanced line A20 handling.
Syntax for NWCACHE After It Is LoadedNWCACHE +|- drive:+|- /SIZE=MIN|MAX /DELAY=ON|OFF|time /S /U /?
Parameters for NWCACHE After It Is Loaded
+|- Flushes and reenables or disables caching for all drives.
drive: Reenables write-through cache for the drive.
drive:+|- Reenables (+) write delay cache for the drive or disables the cache (-).
/SIZE=MIN|MAX Completes writing anything in the cache if write delay is enabled,clears everything from the cache, and either resets the cache to theminimum allowable size or resets it to the maximum size if enoughmemory is available.
/DELAY=ON|OFF|time Enables write delay (ON) or disables it (OFF). time is a value from 50to 5,000 milliseconds that writes are collected in cache before beingwritten to disk.
/S Shows cache status.
/Q or /U Terminates and unloads the cache.
/? Displays abbreviated help.
NWCDEXYou can use NWCDEX to enable access to CD-ROM drives.
SyntaxNWCDEX /D:filename /E /K /N /V /F:handles /L:letter /M:buffers /?
Parameters and Switches
/D:filename Specifies the filename for the CD-ROM driver.
/E Uses expanded memory if DPMS is not available.
/K Enables recognition of Kanji (Japanese) CD-ROM labels.
FApp
DR-DOS
844 Appendix F Command Reference
/N Disables use of DPMS memory.
/V Prints debug information during initialization.
/F:handles Specifies the number of file handles to allocate.
/L:letter Specifies the drive letter to assign to the drive.
/M:buffers Specifies the number of buffers to allocate.
Notes
CONFIG.SYS must contain a DEVICE or DEVICEHIGH statement to load the appropriate driverfor the CD-ROM drive. The driver loaded here is the same one specified in the D:filenameparameter.
See Also
Files, Buffers
PASSWDYou can use PASSWD to set a read/write and read-only password for Stacker drives.
SyntaxPASSWD drive: oldpassword newpassword /ro /?
Parameters and Switches
drive: Indicates the Stacker drive for which to set a password.
oldpassword Identifies the old password.
newpassword Identifies the new password.
/ro Changes the read-only password.
/? Displays the abbreviated online help.
Notes
The first time a password is assigned to a Stacker drive, it must be a read/write password.
PASSWORDPASSWORD assigns passwords to files or directories.
SyntaxPASSWORD d:\path\filespec... /R|W|D|P|G:password /N /S /H
PC-DOS
DR-DOS
845PATH 2.0 and later—Internal
Parameters and Switches
d:\path\filespec Specifies the drive, path, and filename (or file specification usingwildcards) of the file (or files or directory) to be protected. Morethan one filename can be specified.
/R:password Sets a password for reading, writing, or deleting files.
/W:password Sets a password for writing or deleting files.
/D:password Sets a password required to delete files.
/P:password Sets a password for reading, writing, or deleting subdirectories.
/G:password Sets a global default password used by DR DOS to try to open anyfiles you access. This setting is useful if you set the same passwordfor many files.
/N Removes password protection from files.
/NP Removes password protection from directories.
/NG Removes a global default password.
/S Applies the specified password to files and subdirectories matchingthe filespec in the current directory.
/H Applies the specified password to hidden files and subdirectoriesmatching the filespec in the current directory.
Notes
If you run the PASSWORD command with no parameters, it displays the password status for thefiles in the directory.
PATH 2.0 and later—InternalThe PATH command can be used to change or display the PATH environment variable. WhenDOS cannot find an executable program in the current directory, it searches through eachdirectory listed in the PATH environment variable. Executable programs are files that end in.COM, .EXE, or .BAT, and DOS searches each directory on the search path, in that order, foreach type. By specifying a PATH, you can save yourself from having to enter the full path-name for each command you want to execute. The Setup program for DOS 6 places a PATHcommand in your AUTOEXEC.BAT file that places the C:\DOS subdirectory (or whatever installdirectory you specified) on your search path.
Syntax
To specify an executable file search path, use the following format:
PATH path1;path2;path3;...
FApp
C:\>
BATCHFILE
846 Appendix F Command Reference
To display the current PATH, use the following format:
PATH
To clear the current PATH, use the following format:
PATH ;
Parameters and Switches
path1;path2;path3;... Each path listed must specify a valid subdirectory that existson your system. The current subdirectory often changes, so itis a good idea to use full, absolute pathnames—including driveletters—for each subdirectory included in your PATH statement.Separate each subdirectory from the previous one by adding asemicolon (;).
Notes
1. If you specify more than one set of paths, the following rules apply:
• The path sets must be separated by semicolons.
• The order in which you list the path sets is the order DOS looks for the programsor batch files. First, DOS searches the current directory; then DOS searches thefirst path specified, then the second path specified, and so on, until the commandor batch file is found.
2. The maximum length of PATH is 127 characters. This is one of the most compelling rea-sons to use short subdirectory names whenever you can.
3. The PATH command establishes the value of an environment variable named PATH. Youcan view, set, or delete the PATH by using the SET command, as well as the PATH com-mand. The PATH command is simply shorthand for SET PATH=.
4. When you type the name of a program or batch file, DOS searches the current direc-tory. If the program or batch file is not found, DOS searches each path in sequence. Ifthe program or batch file is not found in any of the paths, DOS displays the error mes-sage Bad command or filename.
5. You can shorten PATH by using the SUBST command to substitute drive letters for deeplynested paths. Another technique is to remove a path that is included only to start oneprogram. Then, you can make a batch file that uses CD to change directory to that pathand invokes the program, and place the batch file in a directory that is still included inPATH.
MessagesInvalid drive in search path
Warning: You specified a nonexistent drive name in one of the paths. This message appearswhen DOS searches for a program or batch file, not when you give the PATH command.
847PAUSE 1.0 and later—Internal
Use PATH or SET to see the current path. If the drive temporarily is invalid because of a JOIN or SUBST command, you can ignore this message. If you specified the wrong disk drive,issue the PATH command again and provide the complete set of directory paths that youwant to use.
See Also
SET
“Helping DOS Find Files with PATH” in Chapter 5
PAUSE 1.0 and later—InternalThe PAUSE command displays a Press any key to continue... message and waits for theuser before continuing to execute the batch file. This command is useful if you want theuser to be able to abort a batch file, using Ctrl+C or Ctrl+Break, before some action istaken. You also can use PAUSE to give the user time to read a screen of messages displayedwith the ECHO command.
SyntaxPAUSE
Notes
1. The PAUSE command simply displays the Press any key to continue... message whenit is executed. The next key you press (except Ctrl+C or Ctrl+Break; see Note #2)releases the pause, and execution of the batch file continues.
2. Pressing Ctrl+C or Ctrl+Break in response to the Press any key to continue... mes-sage displays the Terminate batch job (Y/N)? message. Pressing Y aborts the batch file,returning you to the DOS prompt. Pressing N skips the line that was executing and con-tinues with the next line in the batch file.
3. If you are running the batch file from within a Shell program, such as DOS Shell, theTerminate batch job (Y/N)? message is not displayed. When you press Ctrl+C orCtrl+Break in these circumstances, the batch file is always aborted.
4. If you want to wait for a keypress but don’t want PAUSE to display the Press any key tocontinue... message, you can redirect the output of the PAUSE command to the NULdevice. DOS still waits for a keypress, but no message is displayed.
5. The CHOICE command included with DOS 6 gives you much more flexibility in choos-ing allowable keys and making decisions than PAUSE. If you are using DOS 6, considerusing CHOICE instead of PAUSE in your batch files.
FApp
BATCHFILE
848 Appendix F Command Reference
Examples
One very common use for PAUSE is to give the user time to do something. For example, ifyou want to make certain that a floppy disk had been placed in drive B, you might includethe following lines in a batch file:
ECHO Insert the Working Backup disk in drive B:ECHO.ECHO Press Ctrl+Break to abort the backup, orPAUSE
When these commands are executed, the following messages are displayed:
Insert the Working Backup disk in drive B:
Press Ctrl+Break to abort the backup, orPress any key to continue...
Note that the PAUSE message is anticipated in the ECHO messages. If you redirect the outputfrom PAUSE to the NUL device, you can control all the text displayed onscreen, as shown inthe following:
ECHO Insert the Working Backup disk in drive B:ECHO.ECHO Press Ctrl+Break to abort the backup, or anyECHO other key to update the Working Backup disk.PAUSE > NUL
When these commands are executed, the following messages are displayed:
Insert the Working Backup disk in drive B:
Press Ctrl+Break to abort the backup, or anyother key to update the Working Backup disk.
If you press Ctrl+C or Ctrl+Break at the pause, the following message is displayed (as longas you aren’t running this batch file from within a Shell program):
Terminate batch job (Y/N)?
Type Y to abort the batch file; type N to continue with the next line.
MessagesPress any key to continue...
Prompt: PAUSE displays this message any time it is executed. DOS waits for a key to bepressed before continuing execution of the batch file. Entering Ctrl+C or Ctrl+Break whenthis message is displayed enables you to terminate the batch file rather than continuing.
Terminate Batch Job (Y/N)?
Prompt: When you press Ctrl+C or Ctrl+Break while a batch file is running, DOS displaysthis message. Typing Y aborts the batch file, returning you to the DOS prompt. Typing Nskips the line that was executing and continues with the next line in the batch file. Note thatif you run the batch file from within a Shell program, such as DOS Shell, this message isn’tdisplayed, and the batch file is aborted.
849PCMDINST
See Also
CHOICE and ECHO
“Pausing for Input in a Batch File” in Chapter 16
PCMPCM enables the DOS version of the online PCMCIA configuration program shipped withPC DOS 7. You use this program to configure input/output (I/O) cards such as fax/modem,LAN, and other I/O cards.
SyntaxPCM
Notes
If you want to use the PCM command, the computer must be loaded with the version ofPCMCIA support provided with PC DOS 7.
PCMATA.SYSPCMATA.SYS enables the system to access ATA-configured PCMCIA cards as IDE hard drivedevices using an IDE partition table. It acts as an I/O client to Card Services.
With the PCMCIA version shipped with PC DOS 7, PCMATA settings are recorded in thePCM.INI file. This file is editable.
PCMCSPCMCS.EXE functions as an extension to the operating system. It must be loaded directly afterSocket Services. It coordinates access to the PCMCIA cards and allocates system resourcesamong client drivers. PCMCS runs as a driver loaded from CONFIG.SYS.
The parameters affecting the way PCMCS operates are added to the PCMCS= line in the PCM.INIfile.
PCMDINSTPCMDINST enables the PCMCIA support provided with PC DOS 7. The PCMDINST commandinitiates a program that backs up the current system PC DOS and Windows files as .PCMfiles. Common command-line statements for prior versions of PCMCIA are commented outof the current configuration files.
SyntaxPCMDINST
FApp
PC-DOS
PC-DOS
PC-DOS
PC-DOS
CONFIGSYS
850 Appendix F Command Reference
PCMFDISKPCMFDISK, like the DOS FDISK utility, sets the partition table for ATA rotating disk and solid-state mass-storage PCMCIA cards. PCMFDISK is a full-screen interface available to PCMCIAusers who have installed the PCMCIA version shipped with PC DOS 7.
SyntaxPCMFDISK
Notes
The PCMFDISK command should be used with extreme caution.
PCMRMAN (Standalone Utility)The PCMCIA Resource Management Utility (PCMRMAN), which is a standalone utility, man-ages and displays the resources used by PCM Plus, such as memory, I/O addresses, andinterrupts. It is full-screen interface available to PCMCIA users who have installed thePCMCIA version shipped with PC DOS 7.
SyntaxPCMRMAN
Notes
The PCMRMAN program should be used with extreme caution. When used improperly, it canadversely affect the way the computer operates with PCMCIA cards.
PCMRMAN (Command-Line Utility)The PCMRMAN command-line utility temporarily changes the current runtime values for theallocation of some system resources. The changes take effect when they are invoked and lastonly for the duration of the current session.
SyntaxPCMRMAN /mem=xx-yy /xmem=xx-yy /io=xxxx-yyyy /xio=xxxx-yyyy /irq=x-y/xirq=x-y /map /?
Parameters and Switches
/mem=xx-yy Permits PCM Plus to use the memory range xx00:0000 to yyFF:0000 inhexadecimal. The argument range is C0 to EF in hexadecimal.
/xmem=xx-yy Excludes PCM Plus from using the memory range xx00:0000 toyyFF:0000 in hexadecimal.
PC-DOS
!DANGER
PC-DOS
!DANGER
PC-DOS
!DANGER

851PCMSETUP
/io=xxxx-yyyy Permits PCM Plus to use the I/O range specified. Argument rangesmust be between 100 and 3FF in hexadecimal.
/xio= xxxx-yyyy Excludes PCM Plus from using the I/O range specified. Argumentranges must be between 100 and 3FF in hexadecimal.
/irq=x-y Permits PCM Plus to use IRQ in the range x to y. The argument rangeis between 0 and F in hexadecimal (0 to 15 in decimal).
/xirq=x-y Excludes PCM Plus from using IRQ in the range x to y. The argumentrange is between 0 and F in hexadecimal (0 to 15 in decimal).
/map Displays a map of card services and system resources.
/? Displays the abbreviated online help.
Notes
The PCMRMAN command should be used with caution. When used improperly, it can adverselyaffect the way the computer operates with PCMCIA cards.
PCMSCDThe Phoenix Super Client Driver, PCMSCD, is a Card Services client that increases the effi-ciency of resource acquisition by requesting system resources from Card Services, such asmemory, I/O, and IRQ. When requested in this way, they appear to the system as residentfor use by software.
SyntaxPCMSCD
Notes
PCMSCD must reside in the same directory as the active PCM.INI. PCMSCD reads its boot optionsas well as configuration information used to enable PCMCIA cards from PCM.INI.
PCMSETUPPCMSETUP enables the online configuration part of Phoenix Card Manager Plus Version 3.01.This is the PCMCIA support supplied with PC DOS 7.
SyntaxPCMSETUP
FApp
PC-DOS
PC-DOS
852 Appendix F Command Reference
POWER 6.0 and later—ExternalFor laptop computers that conform to the Advanced Power Management (APM) specifica-tion, the POWER command enables you to control the trade-off between extended batterylife and maximum performance from your computer. You also can use POWER to switch backand forth between the power-management system built into your laptop and the APM-style idle detection methods. Before you can run POWER from the command line, you mustuse a DEVICE= command to load the POWER.EXE device driver into memory from your CONFIG.SYS file.
SyntaxPOWER setting
Parameters and Switches
setting This value determines how aggressive you want the power-management featuresto be. setting can be one of the values listed in the following table. You canspecify only one setting at a time. If no value is included for setting, POWER dis-plays a short report on the current power settings in your computer. (See item#2 in the following “Notes” section.)
setting Value Description
ADV:MAX Enables the most aggressive power setting. Power savingscan be as much as 25%, but performance may suffer.
ADV:REG Enables the default setting.
ADV:MIN Enables the most conservative power setting. You can usethis setting when you are running programs that slow downtoo much when the ADV:REG setting is used.
ADV Performs the same as specifying ADV:REG.
STD Uses the computer’s built-in power-management features forcomputers that conform to the APM specification. For com-puters that don’t support the APM specification, this settingis the same as OFF.
OFF Disables the power-management features. You might want touse this setting (or STD) when you are running communica-tions software.
Notes
1. You must install the POWER.EXE device driver before you can run POWER from the com-mand line. If you try to run POWER without installing the device driver, an error messageappears. (See the following “Messages” section.)
2. POWER.EXE is actually two files: a device driver and an executable program. The devicedriver portion does all the real work. You have to load it into memory by adding a
C:\>
BATCHFILE
853POWER 6.0 and later—External
DEVICE= command in your CONFIG.SYS file for the DOS power-management features tobe enabled. After this device driver has been loaded into memory, the executable por-tion of POWER.EXE communicates with the device driver to adjust settings and displaystatus information.
3. If you enter the POWER command without specifying a new setting, you see a statusreport that summarizes the active settings and current power use in your system. Onnon–APM-compliant systems, POWER displays the following report:Power Management Status-----------------------Setting = ADV:REGCPU: idle 75% of the time
If your system supports the APM specification, a more detailed report, like the follow-ing, is displayed:Power Management Status-----------------------Setting = ADV:REGCPU: idle 75% of timeAC Line Status : OFFLINEBattery status : HighBattery life (%) : 90
The computer’s ROM BIOS provides the additional information in this report. Thisinformation is not displayed on non–APM-compliant computers.
4. When you are running communications software, CPU-intensive applications, or otherapplications that don’t access your hard disk very often, you might want to turn offpower-management features. With an ADV:MAX setting, POWER may think your computerwas idle when it was actually busy handling serial communications or recalculating alarge spreadsheet. To minimize the possibility of false idle-time detection but still keeppower-management features active, use a setting of ADV:MIN. To disable APM featuresand regain maximum performance from your computer, use a setting of OFF or STD.
5. POWER.EXE detects idle time with a variety of methods. It monitors hard disk activity,video functions, and MS-DOS service requests to determine whether your system isbusy. In addition, POWER.EXE monitors the keyboard polling and application-idle inter-rupts to sense idle time in active programs. When idle time is detected, a CPU HALTinstruction is executed, causing the CPU to sleep until the next hardware interruptarrives. (The timer interrupt occurs 18.2 times per second, so the CPU sleeps for only55 milliseconds or less.)
If a busy program routinely polls the keyboard, such as communication programs oftendo, POWER.EXE may think your computer is idle when it isn’t. False idle detection caninterfere with a program’s operation, unnecessarily slowing it down. The ADV:MAX, REG,and MIN settings control the level of keyboard polling detection that POWER.EXE uses. Ifyou are having performance problems with an application, try turning down keyboardpolling detection by using an ADV:REG setting or disabling it by using ADV:MIN.
6. Even if your system doesn’t support the APM specification, you still may get some ben-efit from POWER.EXE. Microsoft’s testing indicates that, on the average, a 5% reduction
FApp
854 Appendix F Command Reference
in power consumption can be realized by using POWER.EXE on non–APM-compliantcomputers. Of course, the power-management features built into your laptop mightsurpass this savings, in which case you are better off not using POWER.EXE at all.
Examples
Assuming the POWER.EXE device driver has been loaded from your CONFIG.SYS file, enteringthe following command requests maximum power savings:
POWER ADV:MAX
If you want to fax some work back to the office, you might want to turn down your power-management features to avoid interfering with your communications software. You couldenter the following line:
POWER ADV:MIN
Back in your hotel room, working on deadline, you want to disable the power-managementsystem entirely so that you can get maximum performance out of your laptop computer.After all, you don’t need to extend battery life when you are plugged into an AC outlet. Inthis case, just enter the following command:
POWER OFF
MessagesPower Manager (POWER.EXE) not installed
Information: You have attempted to run the POWER program without first installing thePOWER.EXE device driver. POWER can adjust the settings of the device driver in memory only,so you must load POWER.EXE by adding a DEVICE= command in your CONFIG.SYS file beforeyou can use any of its features.
See Also
POWER.EXE
POWER.EXE (device driver) 6.0 and later—External
For laptop computers that conform to the Advanced Power Management (APM) specifica-tion, POWER.EXE enables you to control the trade-off between extended battery life and maxi-mum performance from your computer. You must load POWER.EXE by adding a DEVICE=statement in your CONFIG.SYS file before you can use it from the command line.
SyntaxDEVICE=drive:\path\POWER.EXE setting /LOW
CONFIGSYS
DEVICE =
855POWER.EXE (device driver) 6.0 and later—External
Parameters and Switches
drive:\path\ The full path to the POWER.EXE file on your system. Setup places thePOWER.EXE file in the C:\DOS subdirectory by default. If the fullpath to POWER.EXE isn’t specified, DOS looks for the file in the rootdirectory of the startup drive.
setting This value determines how aggressive you want the power-managementfeatures to be. setting can be one of the values listed in the table below.You cannot specify more than one setting at a time. If no value isincluded, the ADV:REG setting is assumed.
Value Description
ADV:MAX Enables the most aggressive power setting. Power savingscan be as much as 25%, but performance may suffer.
ADV:REG Enables the default setting.
ADV:MIN Enables the most conservative power setting. You can usethis setting when you are running programs that slow downtoo much when the ADV:REG setting is used.
ADV Performs the same as specifying ADV:REG.
STD Uses your computer’s built-in power-management featuresfor computers that conform to the APM specification. Forcomputers that don’t support the APM specification, thissetting is the same as OFF.
OFF Disables the power-management features. You might wantto use this setting (or STD) when you are running communi-cations software.
/LOW Instructs POWER.EXE to load itself into conventional memory. Normally,POWER.EXE loads into upper memory if it is available.
Notes
1. You must install the POWER.EXE device driver before you can run POWER from the com-mand line. If you try to run POWER without installing the device driver, an error messageappears. (See the following “Messages” section.)
2. POWER.EXE is actually two files: a device driver and an executable program. The devicedriver portion does all the real work. You have to load it into memory by adding aDEVICE= command in your CONFIG.SYS file for the DOS power-management features tobe enabled. After this device driver has been loaded into memory, the executable por-tion of POWER.EXE communicates with the device driver to adjust settings and displaystatus information.
3. POWER.EXE automatically loads into upper memory if it is available. You do not need touse the DEVICEHIGH= command with POWER.EXE.
FApp
856 Appendix F Command Reference
4. When you are running communications software, CPU-intensive applications, or otherapplications that don’t access your hard disk very often, you might want to turn off thepower-management features. With an ADV:MAX setting, POWER might think your com-puter was idle when it was actually busy handling serial communications or recalculat-ing a large spreadsheet. To minimize the chance of false idle-time detection but keeppower-management features active, use a setting of ADV:MIN. To disable APM featuresand regain maximum performance from your computer, use a setting of OFF or STD.
5. POWER.EXE detects idle time with a variety of methods. It monitors hard disk activity,video functions, and MS-DOS service requests to determine whether your system isbusy. In addition, POWER.EXE monitors the keyboard polling and application-idle inter-rupts to sense idle time in active programs. When idle time is detected, a CPU HALTinstruction is executed, causing the CPU to sleep until the next hardware interruptarrives. (The timer interrupt occurs 18.2 times per second, so the CPU sleeps for only55 milliseconds or less.)
If a busy program routinely polls the keyboard, as communications programs often do,POWER.EXE may think your computer is idle when it isn’t. False idle detection caninterfere with a program’s operation, unnecessarily slowing it down. The ADV:MAX, REG,and MIN settings control the level of keyboard polling detection that POWER.EXE uses. Ifyou are having performance problems with an application, try turning down keyboardpolling detection by using an ADV:REG setting or disabling it by using ADV:MIN.
6. Even if your system doesn’t support the APM specification, you still may get some ben-efit from POWER.EXE. Microsoft’s testing indicates that, on the average, a 5% reductionin power consumption can be realized by using POWER.EXE on non–APM-compliantcomputers. Of course, the power-management features built into your laptop mightsurpass this savings, in which case you are better off not using POWER.EXE at all.
7. POWER.EXE is fully compatible with Windows. If you are running Windows 3.1 on a sys-tem with an APM-compliant ROM BIOS, you should select MS-DOS System with APMin Windows’s Setup as the type of computer you are using. When you do so, Windowscan cooperate and control the power-management features supplied by POWER.EXE. Onnon–APM-compliant computer systems, you can use POWER.EXE without selecting a spe-cial computer type.
Examples
To load the POWER.EXE device driver and enable the ADV:REG (default) level of power manage-ment, you could add the following line to your CONFIG.SYS file:
DEVICE=C:\DOS\POWER.EXE
If you want to enable the maximum level of power management, specify the ADV:MAX settinginstead of using the default, as shown in the following line:
DEVICE=C:\DOS\POWER.EXE ADV:MAX
857PRINT 2.0 and later—External
As long as enough upper memory is available, POWER.EXE loads high without using theDEVICEHIGH= command. If you want to force it to load into conventional memory instead,add the /LOW parameter, as shown here:
DEVICE=C:\DOS\POWER.EXE /LOW
MessagesPower Manager (POWER.EXE) not installed
Information: You have attempted to run the POWER program without first installing thePOWER.EXE device driver. POWER can adjust the settings of the device driver in memory only,so you must load POWER.EXE from your CONFIG.SYS file before you can use any of its features.
See Also
POWER
PRINT 2.0 and later—ExternalThe PRINT command is a memory-resident utility that enables you to print files in the back-ground on your computer. Unfortunately, PRINT is limited to printing text files; you can’t useit as a general-purpose print spooler.
Syntax
To load PRINT into memory, use the following format:
PRINT /D:device /B:bufsiz /M:maxticks /Q:maxfiles /S:timeslice/U:busyticks /T textfile /P /C
To add or delete files in the queue, use the following format:
PRINT /T /P /C textfile1 /P /C textfile2 /P /C ...
Parameters and Switches
When you first use the PRINT command after turning on or rebooting your computer, youcan specify any of the following switches:
/B:bufsiz The size (in bytes) of the memory buffer to be used while the files areprinting. bufsiz can be any number from 512 to 16,384. The default is512 bytes. You don’t have to increase this value unless you have a very fastprinter.
/D:device The device to be used for printing. Legal values are PRN, LPT1, LPT2,LPT3, COM1, COM2, COM3, or COM4. The default is PRN. Thisparameter must precede any textfile included on the command line.
/M:maxticks The maximum amount of time (in clock ticks) that PRINT uses to sendcharacters to the printer every time PRINT gets a turn. maxtick can be anynumber from 1 to 255. The default is 2.
FApp
C:\>
BATCHFILE
TSR
858 Appendix F Command Reference
/Q:maxfiles The number of files that can be held in the queue for printing. maxfilescan be any number from 4 to 32. The default is 10.
/S:timeslice The number of clock ticks allocated for PRINT. timeslice can be a numberfrom 1 to 255. The default is 8. Increasing timeslice speeds printing andslows other tasks.
/U:busyticks The maximum amount of time (in clock ticks) PRINT should wait for abusy or unavailable printer before releasing its timeslice. PRINT tries againthe next time it gets control. busytick can be any number from 1 to 255.The default is 1.
You can specify any of these switches whenever you use PRINT:
/C Cancels the background printing of files. (See item #3 in the following“Notes” section.)
/P Queues files for printing. (See item #3 in the following “Notes” section.)
/T Terminates the background printing of all files, including any file that cur-rently is printing (clears the queue).
Rules
1. If you do not provide a filename, DOS displays the background printing status.
2. You can specify the switches /B, /D, /M, /Q, /S, and /U only when you first use PRINT. If you use the /D switch, you must type this switch first in the line. You can list theremaining five switches in any order before you specify a filename.
3. The /D switch specifies the print device that you want to use (LPT1, LPT2, LPT3,COM1, COM2, COM3, or COM4). If you omit /D the first time you use PRINT, DOSdisplays the following prompt:Name of list device [PRN]:
You can respond in either of two ways:
• Press Enter to send the files to PRN (normally LPT1:). If LPT1: is redirected(refer to the MODE command entry earlier in this command reference), the files arererouted.
• Enter a valid DOS device name. Printing is directed to this device. If you enter adevice that is not connected to your system, PRINT accepts files in the queue. Thefiles are not processed, however, and you lose processing speed.
After you choose the print device that you want PRINT to use, you cannot change itwithout restarting DOS.
4. If you name a file with no switch, DOS assumes that you want to use the /P (print)switch.
5. Files print in the order in which you list their names. If you use wildcards, files areprinted in the order in which they are listed in the directory.
859PRINT 2.0 and later—External
6. The command PRINT /C has no effect if you do not specify a filename.
7. The first time you invoke PRINT, DOS increases in size by approximately 5,500 bytes.When you increase or decrease certain default settings, you proportionally change thesize of DOS. To regain this memory space, however, you must restart DOS.
8. If you use PRINT to print files to a serial printer, you might need to configure the serialport by using the MODE COM# command.
9. PRINT expands tab characters in the files it prints the same way the TYPE command does.Also, PRINT stops printing a file when it encounters an end-of-file marker (Ctrl+Z). Forthese two reasons, you should print only straight ASCII files with PRINT. Any other typeof file is likely to be garbled by tab expansion and truncated when it encounters aCtrl+Z character and terminates prematurely.
Notes
1. The /B switch acts like a disk buffer. PRINT reads into memory a portion of the docu-ment to be printed. As you increase the value of bufsiz, you decrease the number oftimes PRINT must read the file from the disk, thereby increasing printing speed. Alwaysuse a multiple of 512 (1,024, 2,048, and so on) as the value of bufsiz. The default size(512 bytes) is adequate for most printers.
2. When the default values are assumed, PRINT gets 22 percent of the computer’s time.
3. The positions of the /P, /C, and /T switches in the command line are important. Eachswitch affects the file immediately preceding it in the command line, and all subsequentfiles, until DOS encounters another switch. The following command, for example, usesthe /P switch to place the files LETTER.TXT and PROGRAM.DOC in the queue to be printed.The /C switch cancels the background printing of MYFILE.TXT and TEST.DOC:PRINT LETTER.TXT /P PROGRAM.DOC MYFILE.TXT /C TEST.DOC
In this example, the /P switch affects the preceding file (LETTER.TXT) and the followingfile (PROGRAM.DOC). Similarly, the /C switch affects the preceding file (MYFILE.TXT) andthe following file (TEXT.DOC).
4. If you use the /T switch, background printing is canceled for all files in the queue,including the file that is currently printing, and any files listed in the command line.
5. If a disk error occurs during background printing, DOS cancels the current print joband places a disk-error message on the printout. The printer then performs a form feed,the bell rings, and DOS prints all remaining files in the queue.
Messagesfilename is currently being printedfilename is in queue
Information: This message tells you which file is printing and names the files that are in lineto be printed. This message appears when you use PRINT with no parameters or when youqueue additional files.
FApp
860 Appendix F Command Reference
PRINT queue is empty
Information: No files are in line to be printed by PRINT.
PRINT queue is full
Warning: You attempted to place too many files in the PRINT queue. The request to addmore files fails for each file past the limit. You must wait until PRINT processes a file beforeyou can add another file to the queue.
Resident part of PRINT installed
Information: The first time you use PRINT, this message indicates that PRINT installed itself inDOS and increased the size of DOS by about 5,500 bytes.
See Also
MODE COM#
“The PRINT Command” in Chapter 13
PRINTER.SYS (device driver) 3.3 to 5.0—External
The PRINTER.SYS device driver provides international code page support for certain IBMprinters or close compatibles. When combined with the other international utilities DOSprovides, PRINTER.SYS enables you to use various international character sets with yourprinter. You must load PRINTER.SYS by using a DEVICE= or DEVICEHIGH= statement in yourCONFIG.SYS file. Microsoft no longer distributes PRINTER.SYS with MS-DOS, but it is avail-able on the MS-DOS 6 Supplemental Disk.
SyntaxDEVICE=drive:\path\PRINTER.SYS LPTx=(type,hard_cp,num_cp)
DEVICEHIGH=drive:\path\PRINTER.SYS LPTx=(type,hard_cp,num_cp)
Parameters and Switches
drive:\path\ The full path to the PRINTER.SYS file on your system. If the full path toPRINTER.SYS isn’t specified, DOS looks for the file in the root directory ofthe startup drive. The PRINTER.SYS file is included on the MS-DOS 6Supplemental Disk.
LPTx= The printer port (LPT1=, LPT2=, or LPT3=) your printer is attached to. Youcan enter a colon between the port name and equal sign (for example,LPT1:=). This parameter is required.
C:\>
DEVICE =
DISK
861PRINTER.SYS (device driver) 3.3 to 5.0—External
type The type code for the printer being used. You must use a type code fromthe following table, and you must enclose the parameter in parentheses.
type Code Printer
4201 IBM Proprinters II and III, Model 4201 IBMProprinters II XL and III XL, Model 4202
4208 IBM Proprinter X24E, Model 4207 IBM ProprinterXL24E, Model 4208
5202 IBM Quietwriter III, Model 5202
hard_cp The hardware code page built into the printer. See Chapter 14,“Understanding the International Features of DOS,” for a list of the codepages that MS-DOS supports.
num_cp The number of software code pages you want to use with the printer.Valid entries for num_cp are 1 and 2.
Notes
1. PRINTER.SYS no longer is distributed with MS-DOS, but it is available on the MS-DOS6 Supplemental Disk. Three printer code page information files are included as well:4201.CPI, 4208.CPI, and 5202.CPI. The MODE command requires these files when it ispreparing to download code page information to your printer.
2. When PRINTER.SYS is loaded, it uses about 11KB of memory.
3. Although you can have up to three printers attached to your computer, PRINTER.SYS cansupport international code pages on only one of them at a time. To change to a differ-ent printer or printer port, you have to edit the DEVICE= line for PRINTER.SYS and rebootyour computer.
4. You should always specify a value for hard_cp. IBM printers often use a hardware codepage of 850, but you should check your printer manual to be sure.
5. Even if you don’t own one of the printers listed in the table, your printer may be com-patible with one of them. To find out whether you can use PRINTER.SYS, check yourprinter’s documentation or call the manufacturer.
6. To print with a software code page, you must perform a number of additional steps. Youuse the MODE command to prepare and download code page information to your printer.After you do so, you can use MODE to select the downloaded code page, or you can loadNLSFUNC and use the CHCP command to change the active code page for all your devicesat once. Additionally, you might want to add the COUNTRY= command to yourCONFIG.SYS file to make case conversion and sort order information available.
7. DISPLAY.SYS performs a similar function for EGA, VGA, Super VGA, and LCD screens.
FApp
862 Appendix F Command Reference
Examples
You can add the following line to your CONFIG.SYS file to set up an IBM Proprinter X24E,attached to LPT1, for use with two additional code pages. The hardware code page for theX24E is 850, Multilingual (Latin I):
DEVICE=C:\DOS\PRINTER.SYS LPT1=(4208,850,2)
If an IBM Quietwriter is attached to LPT2, and you want to load PRINTER.SYS into uppermemory, you would use the following command:
DEVICEHIGH=C:\DOS\PRINTER.SYS LPT2=(5202,850,2)
See Also
CHCP, COUNTRY=, DISPLAY.SYS, MODE device CP, and NLSFUNC
Chapter 14, “Understanding the International Features of DOS”
PROMPT 2.0 and later—InternalYou can customize the prompt that MS-DOS displays by using the PROMPT command.PROMPT, like PATH, saves its settings in the DOS environment. People often use ANSI controlcodes in their prompt strings, in which case ANSI.SYS has to be loaded into memory fromthe CONFIG.SYS file.
SyntaxPROMPT promptstring
Parameters and Switches
promptstring The text of the DOS command-line prompt. It can include any of themeta-strings defined for use in the PROMPT command (see the followingtable).
Notes
1. If you do not enter the promptstring, the standard system prompt, which is equivalentto PROMPT $N$G (C>), reappears.
2. A very popular prompt string, and the one that the Setup program for MS-DOS 6inserts into your AUTOEXEC.BAT file, is PROMPT $P$G (C:\DOS>). Beginning with DOS 6.0,COMMAND.COM inserts the value $P$G in PROMPT if it finds the PROMPT environment variableundefined when the system starts up.
3. The new system prompt stays in effect until you restart DOS or reissue the PROMPTcommand.
4. The PROMPT command establishes the value of an environment variable named PROMPT. Youcan view, set, or delete the PROMPT environment variable by using the SET command, aswell as the PROMPT command. The PROMPT command is simply shorthand for SET PROMPT=.
C:\>
BATCHFILE
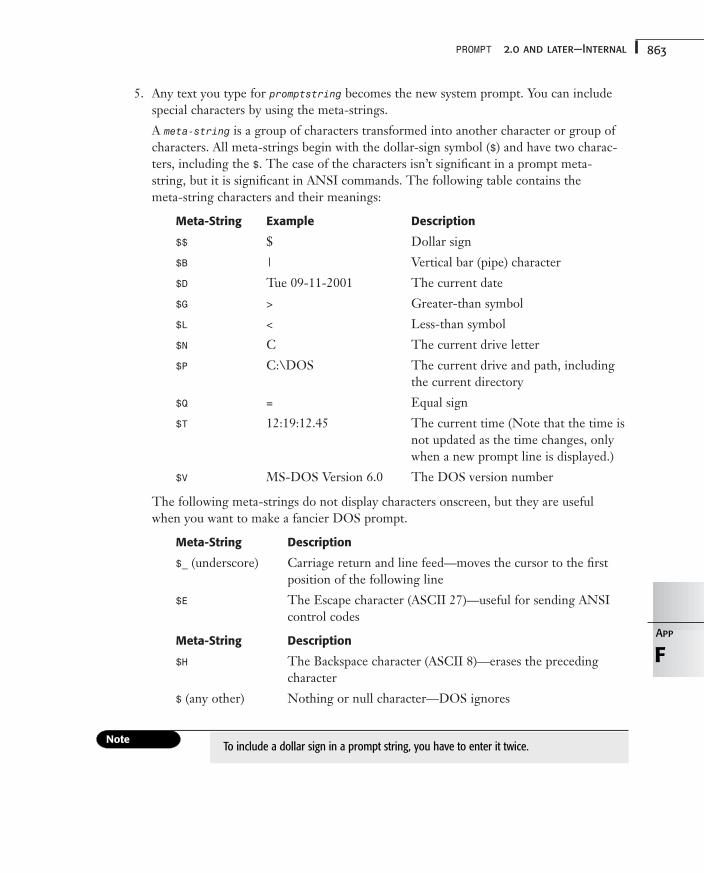
863PROMPT 2.0 and later—Internal
5. Any text you type for promptstring becomes the new system prompt. You can includespecial characters by using the meta-strings.
A meta-string is a group of characters transformed into another character or group ofcharacters. All meta-strings begin with the dollar-sign symbol ($) and have two charac-ters, including the $. The case of the characters isn’t significant in a prompt meta-string, but it is significant in ANSI commands. The following table contains themeta-string characters and their meanings:
Meta-String Example Description
$$ $ Dollar sign
$B | Vertical bar (pipe) character
$D Tue 09-11-2001 The current date
$G > Greater-than symbol
$L < Less-than symbol
$N C The current drive letter
$P C:\DOS The current drive and path, includingthe current directory
$Q = Equal sign
$T 12:19:12.45 The current time (Note that the time isnot updated as the time changes, onlywhen a new prompt line is displayed.)
$V MS-DOS Version 6.0 The DOS version number
The following meta-strings do not display characters onscreen, but they are usefulwhen you want to make a fancier DOS prompt.
Meta-String Description
$_ (underscore) Carriage return and line feed—moves the cursor to the firstposition of the following line
$E The Escape character (ASCII 27)—useful for sending ANSIcontrol codes
Meta-String Description
$H The Backspace character (ASCII 8)—erases the precedingcharacter
$ (any other) Nothing or null character—DOS ignores
FApp
To include a dollar sign in a prompt string, you have to enter it twice.
864 Appendix F Command Reference
6. When you open a DOS window within Windows, the prompt is changed to the valueof the WINPMT environment variable if it has been defined. If you want to have a differ-ent prompt under Windows, use the SET command to define an environment variablenamed WINPMT and set it equal to the prompt you want to use. For example, the lineSET WINPMT=**Windows** $P$G
gives you the following prompt in a DOS window within Windows:**Windows** C:\DOS>
This is a handy prompt to remind you that Windows is running.
Examples
To use the current drive and path as the prompt, followed by >, use this command:
PROMPT $P$G
Assuming that your CONFIG.SYS file loads ANSI.SYS and that you have white text (fore-ground) on a blue background, the following command changes the prompt to a blinkingred HI, followed by >:
PROMPT &E[5; 3/mHI$E[0; 37; 44m$G
See Also
ANSI.SYS and SET
“Changing the Command Prompt with PROMPT” in Chapter 11.
QBASIC 5.0 and later—ExternalQBasic is the Microsoft QuickBasic programming environment, a full-screen, interactiveprogramming tool for writing programs in BASIC. Traditionally, all operating system soft-ware came with a simple set of programming tools. Few microcomputer users have an inter-est in these programs anymore, but it is nice that Microsoft keeps providing them free forthose who want them. QBasic also is the “behind the scenes” program that EDIT and HELPrequire; so whether or not you actually write any BASIC programs, it’s likely that you willbe running QBasic on your computer.
SyntaxQBASIC /RUN pathname /EDITOR pathname /B /G /H /NOHI /MBF
Parameters and Switches
/RUN pathname Specifies the BASIC file that you want QBASIC to load into memoryand run. If no drive is specified, the current drive is assumed. If nosubdirectory path is specified, the current directory is assumed.Wildcards are not allowed. You cannot specify the /EDITOR parameterwith the /RUN parameter.
865QCONFIG
/EDITOR pathname Specifies the ASCII file that you want QBASIC to load into the full-screen text editor (EDIT). If no drive is specified, the current drive isassumed. If no subdirectory path is specified, the current directory isassumed. Wildcards are not allowed. If you don’t specify a pathname,the editor starts without a file. You cannot specify the /RUN parameterwith the /EDITOR parameter.
/B Specifies that QBASIC should use colors more appropriate for a black-and-white (monochrome) or LCD screen.
/G Specifies that QBASIC should use the fastest screen-updating method fora CGA monitor. Don’t specify the /G switch if you see “snow” on yourmonitor.
/H Specifies that QBASIC should display 43 lines on an EGA monitor or 50lines on a VGA monitor.
/NOHI Specifies that QBASIC should limit itself to 8 colors rather than 16.
/MBF Specifies that QBASIC should use the Microsoft Binary Format for floating-point numbers. Specifically, the /MBF switch converts CVS, CVD,MKS$, and MKD$ so that they act like CVSMBF, CVDMBF, MKSMBF$, andMKDMBF$, respectively.
Notes
1. QBasic is a comprehensive development environment for interpreted BASIC and a sub-set of Microsoft QuickBasic. BASIC, BASICA, and GWBASIC are no longer providedwith MS-DOS.
2. QBASIC.EXE is required to run EDIT and HELP.
3. The use and operation of QBasic is beyond the scope of this book. If you want to learnto write BASIC programs with QBasic, you can either try to find your way with theQBasic help system, or you can get a book on programming with QBasic.
QCONFIGQCONFIG displays detailed technical information about the computer.
SyntaxQCONFIG /a /c /d /e /i /o /o filename /p /q /? key=”text”
Parameters and Switches
/a Lists all the Micro Channel adapters supported by the QConfig program.
/c Provides specific details on asynchronous ports.
FAppPC-DOS
866 Appendix F Command Reference
/d Generates a detailed listing of hardware. This list also provides volume labeland file system reporting.
/i Displays CONFIG.SYS and AUTOEXEC.BAT files.
/o Redirects output to the file QCONFIG.OUT.
/o filename Redirects output.
/p Pauses the output between screens.
/q Indicates that the redirected message is not to be displayed.
key=”text” Defines key with text to appear in output. This option must be the lastoption.
/? Provides online help for the QCONFIG command.
RAMBOOSTThe RAMBOOST command monitors for any changes that take place in the system. It opti-mizes memory and then maintains DOS memory on an ongoing basis. This command is aterminate-and-stay-resident (TSR) utility that resides in memory.
SyntaxRAMBOOST active disable learn mode pif sync track filename id /?
Parameters and Switches
active Forces RAMBoost to remain fully active and reoptimizes memorythe next time the computer is restarted or any time it detects achange to a tracked file. Active mode is the default.
disable Disables RAMBoost by preventing it from loading.
learn Forces RAMBoost to enter learn mode the next time you restart thecomputer, even if no tracked file has changed.
mode Returns a value, indicating the current status of RAMBoost as notresident (0), in active mode (1), or in learn mode (2).
pif Displays a table listing of network drivers, TSRs, DOS tables, andany other files loaded into memory and indicates what block of mem-ory they are loaded into.
sync Updates the signatures for all tracked files in the RAMBOOST.INI file. It should be used only after a change is made to a tracked file thatdoes not affect memory such as a SET command, PATH adjustment,and so on.
PC-DOS
TSR
867RAMDRIVE.SYS (device driver) 3.2 and later—External
track filename /d Displays the names and signatures of the files that RAMBoost cur-rently tracks. The filename variable specifies a device driver or TSRto add (or delete if /d is specified) to the list of tracked files. The filesin the list are tracked for possible changes that would affect memoryusage.
/? Displays the online abbreviated help.
RAMBOOST.EXERAMBOOST.EXE increases the available conventional memory of the computer and reduces thecomplexity of using the DOS memory manager EMM386.EXE.
SyntaxDEVICE=drive:\path\ramboost.exe load /p=profile
Parameters and Switches
drive:\path Specifies the location of the device driver file.
load Installs RAMBoost resident in memory.
/p=profile Indicates the name of the alternative configuration profile.
Notes
The RAMBOOST.INI file is an ASCII text file that can be edited.
RAMDRIVE.SYS (device driver) 3.2 and later—External
A RAM disk is a simulated drive that uses RAM, rather than a magnetic disk, to store files.Because it has no moving parts, a RAM disk is much faster than a hard drive or floppy disk.Unfortunately, whenever you shut down or restart your computer, the contents of a RAMdisk are lost. Using RAMDRIVE.SYS, you can create a RAM disk in extended, expanded, orconventional memory. You must load RAMDRIVE.SYS by adding a DEVICE= or DEVICEHIGH=statement in your CONFIG.SYS file.
SyntaxDEVICE=drive:\path\RAMDRIVE.SYS disksize sectorsize dir_entries /E /A
To load the RAMDRIVE.SYS device driver into upper memory, use the DEVICEHIGH= commandto specify the placement in memory of the driver, not the RAM disk:
DEVICEHIGH=drive:\path\RAMDRIVE.SYS disksize sectorsize dir_entries /E /A
FApp
PC-DOS
CONFIGSYS
DEVICE =
868 Appendix F Command Reference
Parameters and Switches
drive:\path\ Specifies the full path to the RAMDRIVE.SYS file on your system. Setupplaces the RAMDRIVE.SYS file in the C:\DOS subdirectory by default. If thefull path to RAMDRIVE.SYS isn’t specified, DOS looks for the file in the rootdirectory of the startup drive.
disksize Indicates the size, in kilobytes, of the RAM disk you want to create. disksize can be from 4KB to 32,767KB. (For DOS 5, the limits were 16KBto 4,096KB.) If no disksize is specified, a 64KB RAM disk is created.
sectorsize Indicates the sector size the RAM disk should use. sectorsize can be 128,256, or 512. If this parameter is omitted, a sectorsize of 512 is assumed.(You should have a very good reason before setting sectorsize to a differ-ent value. All DOS disks use a sector size of 512, and many disk utilitiesfail if a different sector size is used.) To specify sectorsize, you also mustspecify disksize.
dir_entries Specifies the maximum number of root directory entries that the RAMdisk can hold (in other words, the size of the root directory). dir_entriescan be in the range 2 to 1024 and are rounded up to the nearest multiplethat fits evenly in sectorsize. Each directory entry takes 32 bytes of diskspace. If this parameter is omitted, a root directory with room for 64entries is created (four 512-byte sectors in size). To specify dir_entries,you also must specify disksize and sectorsize.
dir_entries limits only the size of the root directory, not any subdirecto-ries you create on the RAM disk. Subdirectories grow as needed toaccommodate an unlimited number of directory entries.
/E Creates the RAM disk in extended memory. An XMS-compatible memorymanager, such as HIMEM.SYS, must be available.
/A Creates the RAM disk in expanded memory. A LIM EMS-compatiblememory manager, such as EMM386.EXE, must be available.
Notes
1. DEVICEHIGH= loads the RAMDRIVE.SYS device driver into upper memory, but the RAMdisk still is created in the memory area you have specified with the command’s parame-ters. RAMDRIVE.SYS uses about 1KB of memory for the device driver.
2. If not enough room is available in memory for the RAM disk you have specified, RAMDRIVE.SYS decreases the size of the root directory to 16 entries and tries again. If the RAM disk still doesn’t fit, the driver aborts with an error message. (See the thirditem in the following “Messages” section.)
3. A RAM disk runs more efficiently from extended memory than from the simulatedexpanded memory provided by EMM386.EXE. Unless you have a hardware EMS board inyour computer, always create RAM disks in extended memory.
869RAMDRIVE.SYS (device driver) 3.2 and later—External
4. Normally, you don’t want to create RAM disks in conventional memory. Although theyrun efficiently there, they also use up memory that is required to run your applicationprograms. This memory trade-off might be worthwhile only when you are working ona floppy-disk–only system. The increased speed from a RAM disk could be worth theloss of memory for certain operations.
5. Although RAM disks are very fast, SMARTDrive can provide similar speed increasesfor all your programs—not just those that use the RAM disk. For many people, com-mitting memory into a disk cache such as SMARTDRV.EXE makes more sense than creatinga RAM drive. Of course, if you have a lot of RAM that you don’t use, you can always doboth.
FApp
If you use a RAM disk to store data files, remember to copy them to your hard drivebefore shutting off your system or rebooting. Whenever you restart your computer,everything on a RAM disk is lost.
6. One popular use of a RAM disk is to store temporary files generated by programs.When you set the TEMP and TMP environment variables to point to a RAM disk, manyprograms create their temporary files on the RAM disk. (See Appendix B, “DOSEnvironment Variables,” for a description of the DOS programs that use the TEMP envi-ronment variable.) Not only can this technique speed up your applications, but it alsocan eliminate the need to periodically delete temporary files that, for one reason oranother, have escaped automatic deletion by their parent programs.
7. If you run Windows and set the TEMP variable to point to a RAM disk, Microsoft advisesthat the RAM disk be at least 2MB (2,048KB) in size to avoid possible printing prob-lems.
8. You can load RAMDRIVE.SYS as many times as memory allows from CONFIG.SYS. Eachtime you load it, another RAM disk is created. When created, a RAM disk is assignedthe next available drive letter by DOS.
9. If RAMDRIVE.SYS is loaded after DBLSPACE.SYS, it receives a drive letter that follows theletters allocated by DoubleSpace. To avoid having your RAM disk drive letter change as you create and destroy DoubleSpace drives, always place the DEVICE= line for RAMDRIVE.SYS before the line for DBLSPACE.SYS in your CONFIG.SYS file.
10. You can use DoubleSpace to compress a RAM disk, but the compressed volume file(CVF) that DoubleSpace creates is lost each time you reboot your computer. To keepfrom having to create a new CVF file each time you start up, you could clear its attrib-utes with the ATTRIB command and copy it from the RAM disk to your hard disk. YourAUTOEXEC.BAT file could then copy the CVF file back to the RAM disk; restore the sys-tem, hidden, and read-only attributes; and mount it for you each time you reboot.
870 Appendix F Command Reference
Examples
For the following examples, assume that the computer you are using has 8MB of RAM,HIMEM.SYS loaded, EMM386.EXE loaded, and UMB support enabled. To create a 64KB RAMdisk in conventional memory, you can load RAMDRIVE.SYS with no parameters, as shownhere:
DEVICEHIGH=C:\DOS\RAMDRIVE.SYS
The DEVICEHIGH= command locates the RAMDRIVE.SYS driver in upper memory, but the RAMdisk itself still is created in conventional memory. To increase the size of the RAM disk to1MB (1,024KB) and place it in extended memory, you add the disksize and /E parameters,as the following line shows:
DEVICEHIGH=C:\DOS\RAMDRIVE.SYS 1024 /E
Because other values are not specified, the sector size is 512, and the root directory hasroom for 64 directory entries. If you want to create a RAM disk that is about the same sizeas a 1.44MB 3 1/2-inch floppy disk, you can use the following line in your CONFIG.SYS file:
DEVICEHIGH=C:\DOS\RAMDRIVE.SYS 1450 512 224 /E
To increase the number of root directory entries to 224, you have to specify a sector size of512, despite the fact that 512 is the default value for sector size.
Messages
Messages from the RAMDRIVE.SYS device driver all begin with the word RAMDrive:. You aremost likely to encounter the messages listed here.
RAMDrive: Expanded memory manager not present
Error: You have specified the /A switch to create a RAM drive in expanded memory; how-ever, expanded memory is not available, and the RAM disk was not created. Make sure thatyou have loaded EMM386.EXE (or another EMS provider), with EMS enabled, before theDEVICE= line in the CONFIG.SYS file that loads RAMDRIVE.SYS.
RAMDrive: Extended memory manager not present
Error: You have specified the /E switch to create a RAM drive in extended memory; how-ever, extended memory is not available, and the RAM disk was not created. Make sure thatyou have loaded HIMEM.SYS (or another XMS provider) before the DEVICE= line in the CONFIG.SYS file that loads RAMDRIVE.SYS.
RAMDrive: Insufficient memory
Error: Not enough memory was available to create the RAM drive you specified. Typically,this problem is caused by forgetting to specify the /E or /A switch, in which caseRAMDRIVE.SYS attempts to create the RAM disk in conventional memory. You also mayreceive this message if you specify the disksize in bytes rather than kilobytes. Edit theDEVICE= line for RAMDRIVE.SYS in your CONFIG.SYS file to correct any errors; then restart yourcomputer.
871RAMSETUP
RAMDrive: No extended memory available
Error: You have specified the /E switch to create a RAM drive in extended memory, but noextended memory is available. Usually, this error is caused when EMM386.EXE claims all avail-able XMS memory to use for EMS memory. With the DOS 6 version of EMM386.EXE, youcan include a MIN parameter so that EMM386.EXE returns unused EMS memory to the mem-ory pool when another program, such as RAMDRIVE.SYS, requests extended memory.
See Also
DEVICE=, DEVICEHIGH=, DBLSPACE.SYS, and SMARTDRV.EXE
“Using a RAM Disk” in Chapter 7 and Appendix B, “DOS Environment Variables”
RAMSETUPThe RAMSETUP command starts the RAMBoost Setup program. The RAMBoost Setup pro-gram installs the RAMBOOST device driver in the CONFIG.SYS file and then reboots the system.
SyntaxRAMSETUP /25 /28 /43 /50 /60 /in /bw /mono /lcd /ff /bf /nf /bt /ngm /le /im/ps2 /?
Parameters and Switches
/25 Sets screen display to 25 lines (the default).
/28 Sets screen display to 28 lines (VGA only).
/43 Sets screen display to 43 lines (VGA and EGA).
/50 Sets screen display to 50 lines (VGA only).
/60 Sets screen display to 60 lines (Video 7 only).
/in Runs the program in color mode even if a color display device is not detected.
/bw Uses the black-and-white color scheme.
/mono Uses the monochrome color scheme (IBM monochrome).
/lcd Uses the LCD color scheme (for laptops).
/ff Speeds up display (CGA only). Can cause a “snow” effect on some displaydevices.
/bf Uses the BIOS font (use if graphics are not displayed properly).
/nf Does not use fonts (does not use graphics characters).
/bt Allows graphics mouse in Windows, and graphics fonts with DESQview orUltraVision.
FApp
PC-DOS
872 Appendix F Command Reference
/ngm Does not use the graphics mouse pointer.
/le Uses the left-handed mouse.
/im Disables the mouse.
/ps2 Resets the mouse hardware.
/? Displays the abbreviated online help.
Notes
RAMSETUP strips all DEVICEHIGH= statements from the CONFIG.SYS file and converts them intoDEVICE= statements. It also strips out all LOADHIGH= or LH= statements in the AUTOEXEC.BATfile. The DOS LOADHIGH, DEVICEHIGH, and DOS=UMB functions are built into RAMBOOST and areno longer required.
RAMSETUP does not edit nested or called batch files.
See Also
RAMBOOST.EXE
RD or RMDIR 2.0 and later—InternalYou can use the RD (or RMDIR) command to delete empty subdirectories. If the subdirectorystill contains any files, RD aborts and displays an error message. To delete a subdirectory andall its files, use the DELTREE command.
SyntaxRD drive:\path
RMDIR drive:\path
Parameters and Switches
drive: The drive containing the subdirectory you want to delete. If drive: is omitted,the current drive is assumed.
path The subdirectory you want to delete on drive:. path can either be absolute orrelative—that is, specified from the root directory or specified from the currentdirectory (see item #4 in the following “Notes” section). If only the subdirectoryname is specified with no path information, the subdirectory in the currentdirectory with that name is deleted. You cannot delete the current directory.
Notes
1. You must explicitly name the subdirectory you want to delete.
2. The subdirectory you want to delete must be empty of all files, including hidden files.
C:\>
BATCHFILE

873RECOVER 2.0–5.0—External
3. You cannot delete the current directory of any drive.
4. If a backslash (\) is the first (or only) character in a subdirectory path, it is consideredabsolute and is specified starting from the root directory. If the subdirectory path beginswith a subdirectory name, it is considered relative, and the current directory is used asits starting point. A drive letter, followed by a colon, can precede either an absolute or arelative path.
MessagesInvalid path, not directoryor directory not empty
Error: RMDIR did not remove the specified directory because one of the following errorsoccurred:
■ You listed an invalid directory in the path.
■ Files other than the . and .. entries still exist.
■ You misspelled the path or directory name.
Check each possibility and try again.
You can delete all the files in a directory and remove the directory in one step by using DELTREE.
Attempt to remove current directory - drive:path
Error: RMDIR did not remove the specified directory for one of the following reasons:
■ The directory is the current directory of the current drive.
■ The directory is the current directory of another drive.
■ The directory is redirected with the SUBST command.
For the first two cases, perform a CHDIR operation on a directory that is not a subdirectory ofthe directory that you want to delete and then attempt the RMDIR operation again. For thethird case, perform an RMDIR operation on the actual directory affected by the SUBST command.
See Also
CD (or CHDIR), DELTREE, and MD (or MKDIR)
“Deleting Directories with RMDIR (RD)” in Chapter 5
RECOVER 2.0–5.0—ExternalRECOVER is a dangerous utility that can do more harm than good. If a disk develops a bad sec-tor within a file, DOS is unable to copy any part of the file. If the root directory of a diskbecomes damaged, DOS may not be able to read the disk at all. RECOVER is supposed to helpyou in these situations, but at times it is a case of a little help being worse than no help at
FApp
C:\>
!DANGER
AVOID
874 Appendix F Command Reference
all. With DOS 6, Microsoft stopped distributing RECOVER, and it’s not even available on theSupplemental Disk. If you have a copy of RECOVER on your disk, you might want to delete itto keep from running it accidentally.
Situations like the ones that RECOVER was supposed to address do arise. DOS 6.22 includesthe ScanDisk utility, which can repair many of the problems that can arise on your disks. IfScanDisk can’t fix the problem, or if you aren’t running DOS 6.22 when disaster strikes,reach for a good third-party utility package. The Norton Utilities, PC Tools, and the MaceUtilities are just a few of the packages that offer excellent tools to help you recover dam-aged files and disks. Any one of these packages will pay for itself many times over the firsttime you lose access to your hard disk due to a runaway program overwriting your rootdirectory.
See Also
SCANDISK
“Analyzing a Disk with SCANDISK” in Chapter 7
REM 1.0 and later—InternalYou can use the REM command to insert comments into batch files or your CONFIG.SYS file.Any text on the line after REM (with a few exceptions in batch files) is ignored when DOS isprocessing that line in the file. Using this command can be extremely handy for document-ing or temporarily “commenting out” lines in the file.
SyntaxREM comment
Parameters and Switches
comment Can be any text. DOS truncates any line longer than 127 characters, but thisusually doesn’t matter in a comment line. In batch files, comments are read bythe parser, so the pipe character (|) and redirection symbols (< and >) should beavoided.
Notes
1. REM should be placed at the beginning of a line, with only spaces or tabs preceding it. Alegal delimiter of some sort (for example, a space) needs to follow the REM so that DOScan recognize it.
2. In batch files, the pipe (|) and redirection symbols (< and >) should be avoided in com-ments because the parser may see and act on them. Including a greater-than sign in acomment line may cause an empty file to be created with the next eight characters as itsname.
BATCHFILE
CONFIGSYS
875REMOVDRV
3. DOS has a maximum line length of 127 characters; any line longer than that is trun-cated. Still, as long as you are not depending on the comment line being displayed, itreally doesn’t matter whether DOS cuts it off. Comments are for you to read when youare working on the file, and the length of the line is really limited by your editing soft-ware, not DOS.
4. In CONFIG.SYS, you can use a semicolon rather than REM as an easier and somewhatcleaner way to mark comments. The semicolon comment isn’t valid in batch files orversions of DOS before MS-DOS 6.
5. Blank lines can make your batch files and CONFIG.SYS file much easier to understand.DOS ignores any blank lines in these files, so you don’t need to mark them as com-ments with REM.
6. Although REM is legal at the DOS prompt, it serves no purpose. REM is useful only forinserting comments in batch files and CONFIG.SYS.
Examples
If you want to document why a particular environment variable is being created in yourAUTOEXEC.BAT file, you might include something like this:
REM I set DIRCMD here to avoid always telling DIR that I prefer myREM filenames in lowercase letters with screen pauses.SET DIRCMD=/L /P
Or perhaps you want to “comment out” the line that loads the driver for your tape driveuntil the replacement driver arrives in the mail:
REM DEVICE=C:\DOS\TAPE\SQ55.SYS
You also could use a semicolon to comment out the preceding line, like this:
;DEVICE=C:\DOS\TAPE\SQ55.SYS
See Also
;
Chapter 16, “Understanding Batch Files,” and Chapter 19, “Configuring Your Computer”
REMOVDRVREMOVDRV deletes the Stacker stacvol file and all the data from the specified Stacker drive.
SyntaxREMOVDRV drive: /?
Parameters and Switches
drive: Indicates the Stacker drive from which you want to delete all data.
/? Displays the abbreviated online help.
FApp
PC-DOS
876 Appendix F Command Reference
Notes
The drive must be a mounted Stacker drive.
REN or RENAME 1.0 and later—InternalREN (or RENAME) is a utility you can use to rename files. Unlike many third-party utilities, RENcannot move files from one subdirectory to another, and it cannot rename subdirectories. Torename subdirectories, see the MOVE command.
SyntaxREN old_name new_name
or
RENAME old_name new_name
Parameters and Switches
old_name The file, or files, that you want to rename. A full pathname (such asdrive:\path\...\filename.ext) can be specified, and wildcards are allowed.This parameter is required and must include a filename (*.* is not assumed).
new_name The new filename, or names, you want to use. Only a filename and extensioncan be specified; you can’t include any drive or path information. Wildcardsare allowed; if they are used, they are filled in with the corresponding charac-ters from old_name. This parameter is required.
Notes
1. REN (or the long form, RENAME) changes the name of a file on the disk. The commanddoes not rename directories. You can use the MOVE command to rename a directory.
2. Because you are renaming an established disk file, the file’s drive or path designationgoes with the old name so that DOS knows which file to rename.
3. Wildcard characters are acceptable in either the old or new name.
MessagesDuplicate filename or File not found
Error: You attempted to change a filename to a name that already exists, or you asked DOSto rename a file that does not exist in the directory. Check the directory for conflictingnames, make sure that the filename exists and that you spelled the name correctly, and thenreissue the command.
See Also
MOVE
“Renaming Files” in Chapter 8
C:\>
BATCHFILE
877REPLACE 3.2 and later—External
RENDIRYou can use the RENDIR command to rename a directory or subdirectory.
SyntaxRENDIR drive:\path\oldname drive:\path\newname /?
Parameters and Switches
drive:\path Specifies the full path to the subdirectory that is to be renamed. This pathcannot change when you are renaming the subdirectory.
oldname Specifies the name of the subdirectory to be changed.
newname Specifies the new name of the renamed subdirectory.
/? Displays abbreviated help.
REPLACE 3.2 and later—ExternalThe REPLACE command enables you to selectively update files on one disk from matchingfiles on another disk, thereby overwriting old copies of files. REPLACE has other options thatcan help you maintain backup floppy disks, such as adding new files only or prompting youfor confirmation before copying each file.
SyntaxREPLACE source_files destination_path /A /S /U /P /R /W
Parameters and Switches
source_files Specifies the file, or files, that you want to selectively copy. A fullpathname (such as drive:\path\...\filename.ext) can be specified,and wildcards are allowed. The filename portion of this parameter isrequired.
destination_path Specifies the location you want to selectively copy the source_filesto. You can include a drive and a path, but you cannot specify a file-name. If this parameter is omitted, the current drive and subdirectoryare used as the destination.
/A Adds all the files specified by source_files that do not exist on thedestination_path. You cannot combine the /A switch with the /S or/U switches.
/S Replaces all the files specified by source_files that are found in destination_path or any subdirectories below it. You cannot combinethe /S switch with the /A switch.
FApp
DR-DOS
C:\>
BATCHFILE
878 Appendix F Command Reference
/U Updates (replaces) all the files specified by source_files that arefound in destination_path with dates and times preceding the sourcefile’s date and time. You cannot combine the /U switch with the /Aswitch.
/P Prompts you as each file is replaced or added to destination_path.
/R Enables REPLACE to overwrite read-only files on thedestination_path. Normally, REPLACE terminates with an error if itattempts to overwrite a read-only file.
/W Tells REPLACE to display the Press any key to continue... messageand wait for a keystroke before beginning the replace operation.Using this switch gives you time to switch floppy disks if necessary.
Exit Codes
ERRORLEVEL Value Meaning
0 Replace operation successful
1 Incorrect DOS version running (6.0 and later)
1 Invalid command-line syntax (3.2 and 3.3)
2 Source file(s) not found
3 Source or destination path not found
5 Unable to replace files—access denied
8 Insufficient memory to complete replace operation
11 Invalid command-line syntax (4.0 and later)
15 Source or destination drive invalid (undocumented)
Rules
1. If you do not name the source drive, DOS uses the current drive.
2. If you do not name the source path, DOS uses the current directory.
3. You must specify a source filename. Wildcards are allowed.
4. If you do not name the destination drive, DOS adds files to, or replaces files in, the cur-rent drive.
5. If you do not name the destination path, DOS adds files to, or replaces files in, the cur-rent directory.
Notes
1. Use REPLACE with caution because this command’s speedy find-and-replace capabilitycan have the effect of an unrelenting search-and-destroy mission on your data. Be care-ful when you unleash REPLACE on several subdirectories at a time, particularly when you
879REPLACE 3.2 and later—External
use REPLACE /S on the entire disk. Because REPLACE updates a file based only on the file-name, you could accidentally replace a file somewhere on the disk that you intended tosave.
2. To prevent such unwanted replacements, limit the destination pathname to cover onlythe directories that hold the files you want replaced. Check the source and destinationdirectories for matching filenames. If you find conflicts or have doubts, use the /Pswitch; REPLACE asks for approval before replacing files.
3. If you use DOS 4.0 or later, the /U switch can help you avoid replacing wrong files. /Ucompares the files’ date and time stamps. The destination file is replaced only if the fileis older than the source file.
MessagesFile cannot be copied onto itself filename
Warning: The source and destination disk and directories are identical. You probably did notspecify a destination, so the source disk and directory are the current disk and directory.Otherwise, you specified the same drive and directory twice. REPLACE does not process filename.
Check the command line to ensure that you specified the correct source and destination forREPLACE and then try the command again.
nnn file(s) added
or
nnn file(s) replaced
Information: REPLACE indicates how many files are added or replaced. The first messageappears when you use the /A switch; the second message appears if you do not use the /Aswitch. The message does not indicate that potential files are added or replaced; rather, themessage appears when at least one file is added or replaced, regardless of errors that occurlater.
No files found filename
Error: REPLACE could not find any files that matched the source filename. One of the follow-ing errors probably occurred:
■ You misspelled the source filename.
■ You provided the drive and directory names but omitted the filename.
■ You provided the wrong drive or directory name for the source.
■ You inserted the wrong floppy disk into the drive.
Check the command line to ensure that the correct disk is in the drive and then retry thecommand.
Invalid parameter combination
FApp
880 Appendix F Command Reference
Error: You used both the /A and /S switches or the /A and /U switches, which you cannot usetogether in a REPLACE command. To replace files, omit /A. Because you cannot add files tomore than one directory at a time, you cannot use /S with /A. To add files to more than onedirectory, issue separate REPLACE commands, each time specifying a different directory towhich files are to be added.
See Also
COPY and XCOPY
“Combining Copying and Directory Management with XCOPY” and “Using the COPYCommand” in Chapter 8
REPORTThe REPORT command reports statistics for Stacker drives. Typing REPORT at the DOS com-mand prompt displays an online interface window that enables you to examine how the filesare compressed.
SyntaxREPORT drive: /m /?
Parameters and Switches
drive: Specifies the Stacker drive for which you want to see statistics.
/m Specifies a monochrome display.
/? Displays the online help screen for this command.
See Also
SDIR
RESIZEThe RESIZE command resizes a Stacker drive.
SyntaxRESIZE drive: /h /b /lcd /bw /?
Parameters and Switches
drive: Specifies the drive to resize. The current drive is the default.
/h Specifies hidden files to be moved.
/b Restarts the computer after resizing the drive.
PC-DOS
PC-DOS
881RESTORE 2.0 and later—External
/lcd Specifies an LCD color scheme (for laptops).
/bw Specifies a monochrome display.
/? Displays the abbreviated online help.
RESTORE 2.0 and later—ExternalYou can use the RESTORE command to restore from one disk to another disk one or morebackup files created with the BACKUP command. If your backup file was created by MSBACKUP,you must use MSBACKUP to restore data from that file.
SyntaxRESTORE drive1: drive2:path\filename.ext /S /P /M /N /B:date /A:date/L:time /E:time /D
Parameters and Switches
drive1: Indicates the drive that holds the backup files.
drive2: Indicates the drive that is to receive the restored files.
path\ Specifies the path to the directory that is to receive the restored files. Thisparameter must be the same as the directory from which the files werebacked up.
filename.ext Indicates the file, or files, that you want to restore. Wildcards are allowed.
/A:date Restores all files that were created or modified on or after the date youspecify. The format of date depends on the COUNTRY in your CONFIG.SYS file.
/B:date Restores all files that were created or modified on or before the date youspecify. The format of date depends on the COUNTRY in your CONFIG.SYS file.
/D (DOS 5.0 and later) Lists files to be restored without actually performingthe restoration. You must specify drive2:.
/E:time Restores all files that were created or modified either at the time or earlierthan the time you specify. The format of time depends on the COUNTRY inyour CONFIG.SYS file.
/L:time Restores all files that were created or modified either at the time or laterthan the time you specify. The format of time depends on the COUNTRY inyour CONFIG.SYS file.
/M Restores all files that were modified or deleted since the backup set wasmade.
/N Restores all files that no longer exist in the destination directory.
FApp
C:\>
BATCHFILE
AVOID
882 Appendix F Command Reference
/P Prompts you before restoring a file that was changed since the last backupor before restoring a file marked as read-only.
/S Restores files in the current directory and all subdirectories. When you usethis switch, RESTORE re-creates all necessary subdirectories that wereremoved and then restores the files in the re-created subdirectories.
Exit Codes
ERRORLEVEL Value Meaning
0 Restore operation successful
1 No files found to restore
2 Halted by file-sharing violation (undocumented)
3 Halted by user (Ctrl+C)
4 Halted by fatal disk error
Rules
1. You must provide the name of the drive that holds the backup files. If the current disk isto receive the restored files, you do not have to specify the destination drive.
2. If you do not name a path, RESTORE uses the current directory of the receiving disk.
3. If you do not provide a filename, RESTORE restores all backup files from the directory.Omitting the filename is the same as using *.*.
4. RESTORE prompts you to insert the backup disks in order. If you insert a disk out oforder, RESTORE prompts you to insert the correct disk.
5. Do not combine the /B, /A, and /N switches in the same RESTORE command.
6. Be cautious when you restore files that were backed up while an ASSIGN, SUBST, or JOINcommand was in effect. When you use RESTORE, clear any existing APPEND, ASSIGN,SUBST, or JOIN commands. Do not use RESTORE /M or RESTORE /N while APPEND /X is ineffect. RESTORE attempts to search the directories for modified or missing files. APPENDtricks RESTORE into finding files in the paths specified to the APPEND command. RESTOREmay then restore files that should not be restored, and not restore files that should berestored. To disable APPEND, issue the APPEND ; command.
7. RESTORE cannot restore DOS system files (for example, IO.SYS and MSDOS.SYS) to theappropriate positions in the file structure so that the disk is bootable.
Notes
BACKUP and RESTORE in DOS 3.3 and later are radically different from the correspondingcommands in previous versions. These commands place all backed-up files in one larger fileand maintain a separate information file on the same disk. In DOS 3.3 and later, RESTOREhandles the new and old backup-file formats, which means that these newer versions ofRESTORE can restore backups created by any version of BACKUP.
883RESTORE 2.0 and later—External
MessagesInsert backup diskette nn in drive d:Strike any key when ready
Information: RESTORE wants the next disk in sequence. This message appears when you arerestoring files that were backed up onto floppy disks. Insert the next floppy disk (in theproper sequence) into drive d: and then press any key.
Insert restore target in drive d:Strike any key when ready
Information: RESTORE is asking you to insert the floppy disk that is to receive the restoredfiles. This message appears only when you restore files onto floppy disks. Insert the targetdisk into drive d: and then press any key.
***Listing files on drive A:***
Information: You used the /D switch with RESTORE, and the files that would be restored are dis-played. The listed files follow the file specification that you used for restoration.
Source does not contain backup files
Error: RESTORE found no files that were backed up with the BACKUP command. BACKUP mayhave malfunctioned when backing up files, or you may have inserted the wrong disk.
Source and target drives are the same
Error: RESTORE determined that the drive that holds the backup files is the same as the drivethat you designated to receive the restored files. You may have forgotten to specify the drivethat holds the backup files or the target disk. If your system has one floppy drive and youtried to restore files onto a floppy disk, specify drives A and B.
System files restoredTarget disk may not be bootable
Warning: You restored the three system files (IO.SYS, MSDOS.SYS, and COMMAND.COM) from thebackup floppy disks. These files may not have been restored to the proper location on thedisk, and you cannot use them to start DOS.
Warning! Diskette is out of sequenceReplace the diskette or continue if okayStrike any key when ready
Warning: You inserted a backup floppy disk out of order. Place the correct disk in the driveand continue.
Warning! File filenamewas changed after it was backed upor is a read-only fileReplace the file (Y/N)?
Warning: This message appears when you use the /P switch. Either the file filename alreadyexists on the hard disk and is marked as read-only, or the date of the file on the target disk ismore recent than that of the backup copy (which may mean that the backup copy is obso-lete). Type Y to replace the existing file with the backup copy or N to skip the file.
FApp

884 Appendix F Command Reference
Warning! No files were found to restore
Warning: The files you wanted to restore are not on the disk from which you tried to restorethem. Try again with another disk or another file specification. If you did not create a logfile when you created the BACKUP floppy disk, you can determine which directories and filesare on the floppy disk by using the TYPE command to display the floppy disk’s binary CONTROL.xxx file and then interpreting what you see. The xxx in the filename reflects thebackup disk’s number. For example, the first disk in the backup set would have the file CONTROL.001 on it.
RMDIR (see RD)RMDIR is the alternative name for the RD command. For information on using the RD or RMDIRcommand, see the entry for RD in this command reference.
SCANDISK 6.22—ExternalThe ScanDisk program can locate and fix errors on disks. It works on most local drives,including DoubleSpace compressed drives. ScanDisk also can perform a surface scan, whichreads every sector on the disk to make sure that it is error free and readable.
Syntax
To check one or more disk drives for errors, use the following format:
SCANDISK drive: ... /ALL /CHECKONLY /AUTOFIX /NOSAVE /CUSTOM /SURFACE/MONO /NOSUMMARY
To check an unmounted DoubleSpace volume file for errors, use the following format:
SCANDISK cvf_file /CHECKONLY /AUTOFIX /NOSAVE /CUSTOM /MONO /NOSUMMARY
To check the degree of fragmentation in a group of files, use the following format:
SCANDISK /FRAGMENT pathname
To undo the changes ScanDisk previously made fixing files, use the following format:
SCANDISK /UNDO undo: /MONO
Parameters and Switches
drive: ... Specifies the disk drive, or drives, you want to scan for errors. You canspecify as many drive letters as you want. If drive: is omitted, the currentdrive is assumed. The colon following the drive letter is optional. You can’tcombine this parameter with the /ALL parameter.
cvf_file Specifies the name of an unmounted DoubleSpace volume file you want toscan for errors. You should include the drive letter and the full name of thecompressed volume file (CVF), such as C:\DBLSPACE.000.
C:\>
BATCHFILE
885SCANDISK 6.22—External
pathname Specifies the file, or files, you want to check for fragmentation. A full path-name is allowed, and all the normal defaults for drives and/or paths apply.Wildcards are allowed in the filename portion of the pathname.
undo: Specifies the disk drive containing the undo disk that ScanDisk previouslycreated. The colon following the drive letter is optional.
/ALL Requests that ScanDisk check all local disk drives. If you specify thisswitch, you should not include any drive: parameters.
/CHECKONLY Requests that ScanDisk check the drive for errors but not repair any errorsit finds. You must specify this parameter if you want to run ScanDisk whileother programs are running, such as Windows. You can’t combine thisparameter with the /AUTOFIX, /NOSAVE, or /CUSTOM parameters.
/AUTOFIX Requests that ScanDisk fix any errors it finds without prompting you first.Any lost clusters that are found are saved as files in the root directory ofthe drive. If you specify the /NOSAVE parameter with /AUTOFIX, any lostclusters are deleted. You can’t combine this parameter with the /CHECKONLYor /CUSTOM parameters.
/NOSAVE Requests that ScanDisk delete any lost clusters it finds on the disk. You canuse this parameter only if you also specify the /AUTOFIX parameter.
/CUSTOM Requests that ScanDisk follow the settings in the [CUSTOM] section of theSCANDISK.INI file. If you intend to run ScanDisk from a batch file, youmight want to use this parameter. For information about setting options inthe SCANDISK.INI file, read the comments included in the file itself. Youcan’t combine this parameter with the /AUTOFIX, /NOSAVE, or /CHECKONLYparameters.
/SURFACE Requests that ScanDisk automatically perform a surface scan after checkingthe disk for errors. Surface scans can take time, but they do verify that allthe data on your disk is error free and readable.
/MONO Configures ScanDisk to use display colors more appropriate for a mono-chrome monitor or LCD screen.
/NOSUMMARY Prevents ScanDisk from displaying a full-screen summary after scanningeach drive.
/FRAGMENT Requests that ScanDisk check all files specified with the pathname parame-ter to see how fragmented they are. You can’t specify any other parametersexcept pathname when you are requesting a fragmentation report.
/UNDO Requests that ScanDisk reverse the changes it made to your disk. The drivespecified with this parameter must be the drive containing the undo diskthat ScanDisk created. Note that you should not undo the changesScanDisk made if you have made any changes to the disk since fixing theerrors.
FApp
886 Appendix F Command Reference
Exit Codes
ERRORLEVEL Value Meaning
0 ScanDisk found no errors
1 Command-line syntax error
2 Terminated due to an internal error or lack of memory
3 ScanDisk halted by user during integrity checks
4 ScanDisk halted by user during surface scan
254 ScanDisk found errors, but they were all corrected
255 ScanDisk found errors, and they were not all corrected
Notes
1. If you enter SCANDISK with no parameters, ScanDisk scans the current drive.
2. Normally, if any errors are found, a dialog box appears with information explainingwhat the error is. You can choose to have ScanDisk fix the error or leave it alone. If youhave specified the /AUTOFIX parameter, these dialog boxes are skipped.
3. After the disk has been checked for errors in its logical structure, ScanDisk askswhether you want to perform a surface scan. If you have specified the /SURFACE parame-ter, the surface scan takes place automatically. If you have specified the /CHECKONLY para-meter, no surface scan is done.
4. ScanDisk can find and repair errors on most hard disk drives, floppy disk drives,DoubleSpace drives, RAM disk drives, and memory card drives.
5. ScanDisk can check only local disk drives. Do not attempt to run ScanDisk on any net-work, CD-ROM, or Interlnk drives attached to your system. You also shouldn’t runScanDisk on any alias drives created by the ASSIGN, JOIN, or SUBST commands.
6. If you try to run ScanDisk when other programs are running, ScanDisk refuses to fixany problems it encounters because the other programs might try to access the diskwhile ScanDisk is working, and more serious problems could be created. If Windows isrunning and you try to start ScanDisk, you see the message shown in the third item inthe following “Messages” section.
If you run ScanDisk with the /CHECKONLY parameter, it checks your disks for errorswhile other software, such as Windows, is running. If ScanDisk finds any errors, quit allyour active programs, including Windows, and run ScanDisk again. In multitasking sit-uations, ScanDisk might find errors when none really exist. By running ScanDisk againwith no outside interference, you can find out for sure.
7. If you ask ScanDisk to check a mounted or unmounted DoubleSpace drive, it askswhether it should first check the host drive for errors. Normally, you should answerYes. It is best to fix the host drive and then the DoubleSpace volume if errors exist ineither of them. Answer No only if you have just finished checking the host drive and aresure that no errors exist.
887SCANDISK 6.22—External
8. After ScanDisk repairs errors on a drive, it asks whether you want to create an undodisk. It is usually a good idea to make an undo disk. You must have a blank, formattedfloppy disk that you can place in drive A or B for the undo information to be written to.After you have exited ScanDisk, try not to write anything to the disk until you are surethat you don’t want to undo the changes ScanDisk has made. Do not undo changesafter writing to the disk; otherwise, serious damage could result.
9. ScanDisk can find and repair the following types of problems on your drives:
• Bad sectors on the disk
• Boot sector errors
• Crosslinked files
• Directory tree structural errors
• DoubleSpace compression structure errors
• DoubleSpace volume file allocation errors
• DoubleSpace volume header structure errors
• DoubleSpace volume signature errors
• File allocation table (FAT) errors
• Lost clusters
10. You can customize many of ScanDisk’s settings by editing the SCANDISK.INI file. Setupplaces this file in the C:\DOS subdirectory by default. By setting the features you want touse in SCANDISK.INI and using the /CUSTOM parameter, you can automate a ScanDisk ses-sion and run it all from a batch file. For instructions on editing the SCANDISK.INI file,see the comments included in the SCANDISK.INI file itself.
Examples
To scan drives C and D for errors, you enter the following command:
SCANDISK C: D:
If you want to perform a surface scan as well, and not be prompted about fixing errors, youinclude the /SURFACE and /AUTOFIX options as follows:
SCANDISK C: D: /AUTOFIX /SURFACE
If Windows is running, you have to do the surface scan later and for now specify the/CHECKONLY parameter, as in the following:
SCANDISK C: D: /CHECKONLY
To find out if it is time to run DEFRAG, you can check on the fragmentation level of the filesin your correspondence subdirectory, like this:
SCANDISK C:\LETTERS\*.* /FRAGMENT
FApp
888 Appendix F Command Reference
MessagesInvalid switch: parameter
Error: The parameter you specified is unknown to ScanDisk. Check the command line fortyping errors. To see a list of legal parameters for ScanDisk, enter the SCANDISK /? com-mand.
parameter is not a valid name for a DoubleSpace volume file
Error: You have entered an incorrect parameter for ScanDisk. You see this message if youomit one of the slashes (/), which begin most of ScanDisk’s parameters. Of course, you mayhave mistyped the name of a DoubleSpace CVF file as well.
You cannot use ScanDisk to fix problems while Windows is running.
To check for disk problems without fixing them, type SCANDISK /CHECKONLY atthe command prompt.
Error: You have attempted to run ScanDisk without the /CHECKONLY parameter whileMicrosoft Windows is running. Specify the /CHECKONLY parameter and try again.
See Also
CHKDSK and DEFRAG
SCANREGSCANREG, which is a Windows 98 tool (not available with Windows 95), can back up,restore, or fix the data files that make up the Windows Registry.
SyntaxSCANREG /backup /restore /fix /scanonly /autoscan /comment=”comment” /optfilename /?
Parameters and Switches
/backup Backs up the Registry data files to .CAB files.
/restore Displays a list of available backup files that can be used to restore theRegistry.
/fix Repairs any damaged Registry settings and optimizes the Registry byremoving unused space.
/opt Optimizes the Registry by removing unused space.
/scanonly Scans the Registry and displays any error messages but does not backit up.
/autoscan Scans the Registry and backs it up without prompting if there are nobackups already on the same date.
Windows9x
!DANGER
889SCHEDULE
/comment=”comment” Adds the “comment” to the .CAB file created by /backup.
filename Scans the specified Registry file and displays messages about any errorswithout backing up the Registry. The allowable files are as follows:
SYSTEM.DAT
USER.DAT
/? Displays the abbreviated online help.
Notes
SCANREG requires extended memory to run and does not run anything except the /restoreoption from the Windows Safe Mode command prompt.
If you restore an older backup, you lose any customizations and configurations you havemade since that backup. This can cause your system to be unstable if you have installed newsoftware or hardware since the backup.
When Windows is first installed, Setup creates an original Registry file named SYSTEM.1STin the root directory. You can use it to restore the original Registry if the Registry is everdamaged.
SCHEDULEThe SCHEDULE command starts the Schedule program, which is a full-screen utility programto specify a future date and time to automatically run DOS programs.
The CPSCHED terminate-and-stay resident program must be loaded for scheduled events torun at the preset date and time.
SyntaxSCHEDULE filename /25 /28 /43 /50 /60 /in /bw /mono /lcd /ff /bf /nf /bt /ngm/le /im /ps2 /?
Parameters and Switches
filename Displays events for the specified file.
/25 Sets the screen display to 25 lines (default).
/28 Sets the screen display to 28 lines (VGA only).
/43 Sets the screen display to 43 lines (VGA and EGA).
/50 Sets the screen display to 50 lines (VGA only).
/60 Sets the screen display to 60 lines (Video 7 only).
/in Runs the program in color even if a color display device is not detected.
/bw Uses the black-and-white color scheme.
FApp
PC-DOS
890 Appendix F Command Reference
/mono Uses the monochrome color scheme (IBM monochrome).
/lcd Uses the LCD color scheme (for laptops).
/ff Speeds up display (CGA only).
/bf Uses the BIOS font.
/nf Does not use fonts.
/bt Allows a graphics mouse in Windows, allow graphics fonts with DESQview orUltraVision.
/ngm Does not use the graphics mouse pointer. Uses a text-character mouse pointer.
/le Uses the left-handed mouse.
/im Disables the mouse.
/ps2 Resets the mouse hardware.
/? Displays the abbreviated online help.
See Also
CPSCHED
SCREATE.SYSSCREATE.SYS compresses RAM drives. It is one of the installable device drivers provided withPC DOS 7 and must be loaded by a DEVICE= statement in the CONFIG.SYS file.
SyntaxDEVICE=drive:\path\screate.sys drive: /c=cluster size
Parameters and Switches
drive:\path Location of the SCREATE.SYS file.
drive Drive letter of the RAM drive.
/c=cluster size Cluster size.
See Also
RAMDRIVE.SYS and STACHIGH.SYS
SCRIPTSCRIPT is a command-line utility for printing PostScript files. It also can be used to redirectoutput from the result of other commands to a PostScript file or output device.
PC-DOS
DEVICE =
DR-DOS
891SDEFRAG
SyntaxSCRIPT /O=P|L /T=size /L=size /P=size /TI=time /U /R drive:\path\filenamedevice /?
Parameters and Switches
/O=P|L Sets the page orientation to portrait or landscape.
/T=size Sets the top margin to size inches.
/L=size Sets the left margin to size inches.
/P=size Sets the font to size in points.
/TI=time Defines a printer timeout of time seconds.
/R Resets the printer.
/U Uninstalls the utility from memory.
drive:\path\filename Specifies the source file to be printed. Specifying no source sendsall output to the specified device until the utility is unloaded frommemory.
device Specifies the device to print to, such as LPT1. Can also be a filename.
/? Displays abbreviated help.
Notes
To send the result of commands to the SCRIPT utility, use this syntax:
command | script
SDEFRAGThe SDEFRAG command runs the Stacker Optimizer to defragment or recompress a Stackerdrive. It also can change the size of a Stacker drive, resulting in a corresponding change toits uncompressed drive.
SyntaxSDEFRAG drive: /r /p=n /f /d /u /b /gl /gp /sorder /batch /skiphigh /noxms/lcd /bw /h /v /buffer=nnnn /restore=drive:stacvol.ext: /?
Parameters and Switches
drive: Specifies the Stacker drive to optimize; the current drive isthe default.
/r Recompresses data to complete conversion or maximize theavailable space.
FApp
DR-DOS
PC-DOS
892 Appendix F Command Reference
/p=n Recompresses data using level n (n is from 1 to 9).
/f Specifies a full optimization.
/d Optimizes directories only.
/u Specifies a Quick optimization.
/b Restarts the computer after optimization.
/gl Changes the expected compression ratio for the Stackerdrive.
/gp Increases Stacker drive size or gets more uncompressedspace.
/sorder Sorts file information in the following order:
n By filename; this is the default
e By file extension
d By time of creation
s By file size
u No sort
- Following any of the above order, reverse the order
/batch Runs in batch mode.
/skiphigh Skips loading data in high memory.
/noxms Prevents SDEFRAG from using extended memory during pro-cessing.
/lcd Uses the monochrome display color setting.
/bw Uses the monochrome display color setting.
/h Moves hidden files.
/v Verifies all writes.
/buffer=nnnn Runs the optimizer with reduced memory requirements(where nnnn is between 256 and 4096). The default is 4096.
/restore=drive:stacvol.ext Restores the Stacker drive if optimization was interrupted bya restart or power failure.
/? Displays the abbreviated online help.
SDIRThe SDIR command displays the compression ratio for a list of files and directories. It shouldbe used only for Stacker-compressed drives.
PC-DOS
893SDIR
SyntaxSDIR drive:\path filename /p /w /a:attributes /o:attributes /s /b /l /ch /n /?
Parameters and Switches
drive:\path Specifies the Stacker drive and directory for which the listing is needed.
filename Specifies the file or group of files for which the listing is needed.
/p Displays one screen of the listing at a time.
/w Displays the listing in wide format, with as many as five filenames ordirectory names on each line.
/a:attributes Displays only the names of those directories and files with the attributesspecified. The options are as follows:
h Hidden files
-h Files that are not hidden
s System files
-s Files other than system files
d Directories
-d Files only (not directories)
a Files ready for archiving (backup)
-a Files that have not changed since the last backup
r Read-only files
-r Files that are not read-only
/o:attributes Controls the order in which directory names and filenames are sortedand displayed. The options are as follows:
n In alphabetical order by name
-n In reverse alphabetical order
e In alphabetical order by extension
-e In reverse alphabetical order by extension
d By date and time, earliest first
-d By date and time, latest first
s By size, smallest first
-s By size, largest first
g With directories grouped before files
-g With directories grouped after files
c By compression ratio (smallest first)
FApp
894 Appendix F Command Reference
/s Displays files in the specified directory and all subdirectories. You can usethis switch with the /p switch to see the file listing one screen at a time.
/b Lists each directory name or filename, one per line (including the file-name extension). This switch displays no heading information and nosummary. The /b switch overrides the /w switch.
/l Displays unsorted directory names and filenames in lowercase. Thisswitch does not convert extended characters to lowercase.
/ch Displays the file compression ratio for Stacker-compressed files. /ch usesthe host allocation size.
/n Specifies no switches. Resets SDIR to the defaults.
/? Displays the abbreviated online help.
See Also
REPORT
SET 2.0 and later—InternalThe SET command enables you to view, add, delete, or change variables contained in theDOS environment. Starting with DOS 6.0, you can use the SET command in yourCONFIG.SYS file. MS-DOS uses several environment variables to control different aspects of its operation.
Syntax
To display all the variables defined in the environment, use the following format:
SET
To add or replace an environment variable, use the following format:
SET name=string
Parameters and Switches
name The string that you want to add to the environment. DOS converts these char-acters to uppercase before storing the variable in the environment.
string The text that you want associated with name. string is stored in the environmentexactly as you enter it—with upper- and lowercase characters and including anyspaces you specify.
Notes
1. The environment is an area of memory that DOS sets aside to store a series of textstrings in the form name=string. The name portion is converted to uppercase beforebeing stored in memory, but the string portion is stored as is.
C:\>
BATCHFILE
CONFIGSYS
895SET 2.0 and later—Internal
2. If SET is executed with no parameters, the current contents of the DOS environment aredisplayed. (Don’t use this form of the SET command in your CONFIG.SYS file.) To displaythe value of a single environment variable, pipe the output from SET through the FINDfilter. (See the following “Examples” section.)
3. Entering SET with the name of the variable and an equal sign but no string deletes thespecified variable from the environment. Note that if no variable with the name you’vespecified is found, nothing happens, and no error message is displayed.
4. When SET is executed with both name and string parameters, DOS searches the currentenvironment looking for a variable that matches name. If a match is found, DOSreplaces the variable with the new value specified in string. If no match is found, a newvariable is defined in the current environment.
5. The total length of an environment variable, including the name and equal sign, cannotexceed the DOS 127-character limit. When you use SET to create environment vari-ables, the limit is actually 123 because the SET command itself uses 3 characters and aspace.
6. Spaces are legal in both the name and string portion of an environment variable. Infact, spaces are not ignored when searching for environment variables; so any trailingspaces you include after the name, but before the equal sign, become a significant por-tion of that variable’s name. Keep this point in mind when you define new environmentvariables.
7. Avoid using redirection symbols (<, >, and |) and equal signs (=) in environment vari-ables. Although you can use them in some cases, they can cause strange, hard-to-predictside effects when you use these variables in a batch file.
8. The DOS environment is limited to the size specified by the /E:size parameter speci-fied in the SHELL= statement that names the command interpreter (usually COMMAND.COM)in your CONFIG.SYS file. If you haven’t specified an /E:size parameter, it defaults to 256characters. When a program is run, it is passed a copy of the current environment thathas been shrunk to the smallest multiple of 16, which is big enough to hold all the vari-ables currently defined.
One annoying side effect of this behavior is that, if you normally run DOS from a Shellprogram, you will never have much environment space available—no matter how bigyou make it in your CONFIG.SYS file. To avoid the Out of environment space error mes-sages, you might have to define a DUMMY variable that you can delete from a batch filewhenever you need more environment space. (See the following “Examples” section.)
9. Several DOS commands use the environment to store their current values. PATH andPROMPT both store their settings in the environment. If you are running APPEND with the/E parameter, it stores its settings in the environment as well.
10. DOS defines a number of environment variables when you start up your computer, andcertain commands modify their behavior if certain variables are defined. For moreinformation about the environment variables DOS uses, refer to Appendix B, “DOSEnvironment Variables.”
FApp
896 Appendix F Command Reference
Examples
To display the contents of the current DOS environment, enter SET with no parameters, asshown here:
SET
A series of definitions similar to the following is then displayed on your screen:
CONFIG=WINCOMSPEC=C:\DOS\COMMAND.COMMOUSE=C:\DOSTEMP=C:\TEMPTMP=C:\TEMPDIRCMD=/LPATH=C:\BAT;C:\NORTON;C:\DOS;C:\UTILPROMPT=*Windows* $p$gwindir=d:\win
You can tell many interesting things from this list. First of all, the computer uses a startupmenu, and the configuration that was chosen is named WIN (CONFIG=WIN). Also, notice thatthe WINDIR environment variable is shown in lowercase. Microsoft Windows inserts this vari-able into the environment as a flag to indicate that it is active. Inserting it in lowercase is atrick that prevents you from changing or deleting it with the SET command.
If you want to see how a particular environment variable is defined, pipe the output of theSET command through the FIND filter, like this:
SET | FIND “COMSPEC”
Only the lines that contain “COMSPEC” are displayed. Note that FIND is case sensitive bydefault, so make sure that you enter the name of the variable you are looking for in alluppercase (or specify the /I switch).
To change the defaults for the DIR command to lowercase filenames (/L) five columns wide(/W), sorted by date with directories first (/OGD), you can define (or replace) the DIRCMD envi-ronment variable by using the following SET command:
SET DIRCMD=/L /W /OGD
Note that you can’t include any spaces before the equal sign; otherwise, a new variable(DIRCMD<space>) that the DIR command does not recognize is defined. To delete the DIRCMDvariable entirely and let DIR use its built-in defaults, use the following command.
SET DIRCMD=
If you want to make sure that an environment variable you define in a batch file was success-fully created, add an IF command after the SET command that defines the new variable:
SET NEWVAR=Do we have space for this?IF “%NEWVAR%”==”” GOTO OUT_OF_SPACE
One technique to help you avoid Out of environment space error messages when you runbatch files from a Shell program is to define a DUMMY variable in your AUTOEXEC.BAT file tosimply take up space:
SET DUMMY=XXXXXXXXXXXXXXXXXXXXXXXXXXXXXXXXXXXX
897SETUP (Stacker)
When you need space in the environment, simply delete the DUMMY variable, as follows,before you define any new variables that your batch file needs:
SET DUMMY=SET NEWVAR=Now we have space for this
When your batch file terminates, returning you to your Shell program, the copy of the envi-ronment that the batch file was using is discarded. Because it is being thrown away, there isno reason to restore the DUMMY variable before the batch file ends.
If you might run this batch file when your Shell program is not running, you should resetthe DUMMY variable and delete the NEWVAR variable before exiting the batch file like this:
SET NEWVAR=SET DUMMY=XXXXXXXXXXXXXXXXXXXXXXXXXXXXXXXXXXXX
Otherwise, the next time you need the DUMMY variable, it might not be there.
MessagesOut of environment space
Error: You see this message if the environment is not large enough to hold the string youwant to add with the PATH, PROMPT, or SET command. To increase the size of the environ-ment, use the /E:size parameter in the SHELL= statement in your CONFIG.SYS file.
Syntax error
Error: SET displays a syntax error message if you forget to include the equal sign. This errormost often happens after you have been using the PATH and PROMPT commands, which getyou out of the habit of including an equal sign between the variable name and its value.
See Also
COMMAND, PATH, PROMPT, and SHELL=
“Changing DOS Variables” in Chapter 11 and Appendix B, “DOS Environment Variables”
SETUP (Stacker)SETUP activates the Stacker online interface after running SSETUP.
SyntaxSETUP /m /t=drive /?
Parameters and Switches
/m Specifies the monochrome display mode to be used.
/t=drive Specifies the drive’s temporary installation location.
/? Displays the abbreviated online help.
FApp
PC-DOS
898 Appendix F Command Reference
SETVER 5.0 and later—ExternalWhen programmers write software, they often add code to check the version of DOS that isrunning. To be on the safe side, they may prevent their program from running if the prelim-inary check reveals the presence of a version of DOS that they didn’t test. In many cases,this paranoia is unnecessary, and lying to the program about which version of DOS is run-ning enables the software to operate safely. The SETVER.EXE device driver maintains in mem-ory a version table that tells it exactly which programs to lie to and what version of DOS totell the program it is running. When you run SETVER from the command line, you can view,add, change, or delete entries in SETVER.EXE’s version table. These changes take effect thenext time SETVER.EXE is loaded into memory.
SyntaxSETVER drive:\path filename n.nn
SETVER drive:\path filename /DELETE /D /QUIET
Parameters and Switches
drive:\path Specifies the drive and path to the SETVER.EXE file. Setup places theSETVER.EXE file in the C:\DOS subdirectory by default. If drive:\path is notspecified, SETVER searches the current directory and along the DOS PATH tofind the SETVER.EXE file. You usually can omit this parameter.
filename Specifies the full name of the program you want SETVER to locate in the ver-sion table. Include the filename and extension, but do not include any pathinformation. No default extensions are assumed, and wildcards are notallowed. If you include this parameter, you also must include either an n.nn,/DELETE, or /D parameter.
n.nn Specifies the DOS version number that SETVER.EXE reports to the programspecified by the filename parameter. Valid entries are in the range 2.11 to9.99. You are required to enter the period delimiting the major and minorversion numbers, and you should always enter the value with two decimalplaces (that is, 2.00, not 2.0 or 2). If you specify this parameter, you cannotspecify the /DELETE, /D, or /QUIET parameters.
/DELETE Deletes the version table entry for the program file specified by filename. Ifyou specify /DELETE, you cannot specify the n.nn parameter.
/D Same as /DELETE.
/QUIET Suppresses the two-line successful update message that appears after anentry is deleted from the version table. (Refer to the actual message in thefollowing “Messages” section.) You can specify /QUIET only with /DELETEor /D.
C:\>
BATCHFILE
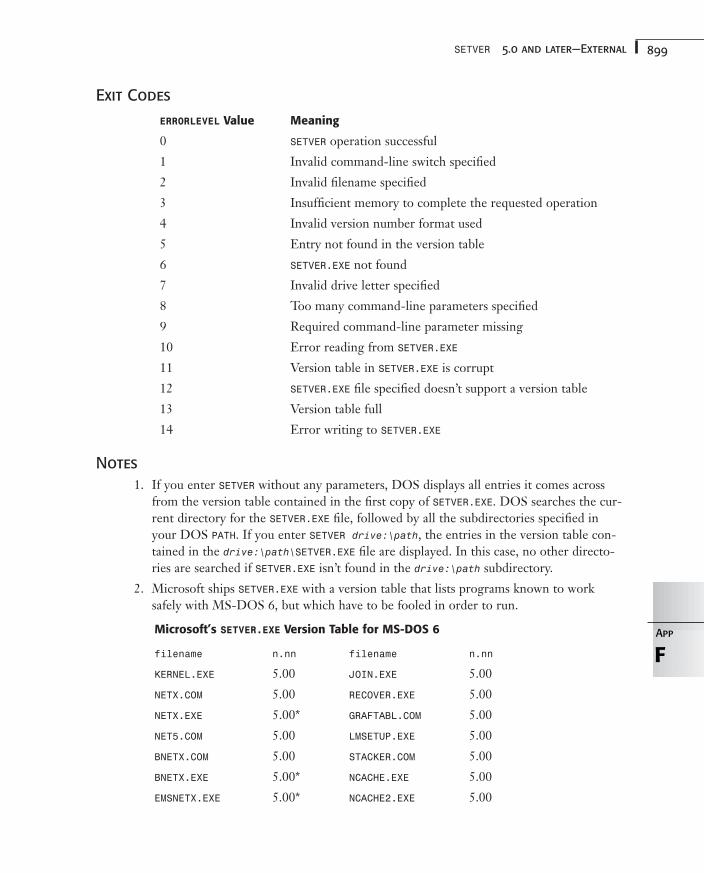
899SETVER 5.0 and later—External
Exit Codes
ERRORLEVEL Value Meaning
0 SETVER operation successful
1 Invalid command-line switch specified
2 Invalid filename specified
3 Insufficient memory to complete the requested operation
4 Invalid version number format used
5 Entry not found in the version table
6 SETVER.EXE not found
7 Invalid drive letter specified
8 Too many command-line parameters specified
9 Required command-line parameter missing
10 Error reading from SETVER.EXE
11 Version table in SETVER.EXE is corrupt
12 SETVER.EXE file specified doesn’t support a version table
13 Version table full
14 Error writing to SETVER.EXE
Notes
1. If you enter SETVER without any parameters, DOS displays all entries it comes acrossfrom the version table contained in the first copy of SETVER.EXE. DOS searches the cur-rent directory for the SETVER.EXE file, followed by all the subdirectories specified inyour DOS PATH. If you enter SETVER drive:\path, the entries in the version table con-tained in the drive:\path\SETVER.EXE file are displayed. In this case, no other directo-ries are searched if SETVER.EXE isn’t found in the drive:\path subdirectory.
2. Microsoft ships SETVER.EXE with a version table that lists programs known to worksafely with MS-DOS 6, but which have to be fooled in order to run.
Microsoft’s SETVER.EXE Version Table for MS-DOS 6
filename n.nn filename n.nn
KERNEL.EXE 5.00 JOIN.EXE 5.00
NETX.COM 5.00 RECOVER.EXE 5.00
NETX.EXE 5.00* GRAFTABL.COM 5.00
NET5.COM 5.00 LMSETUP.EXE 5.00
BNETX.COM 5.00 STACKER.COM 5.00
BNETX.EXE 5.00* NCACHE.EXE 5.00
EMSNETX.EXE 5.00* NCACHE2.EXE 5.00
FApp
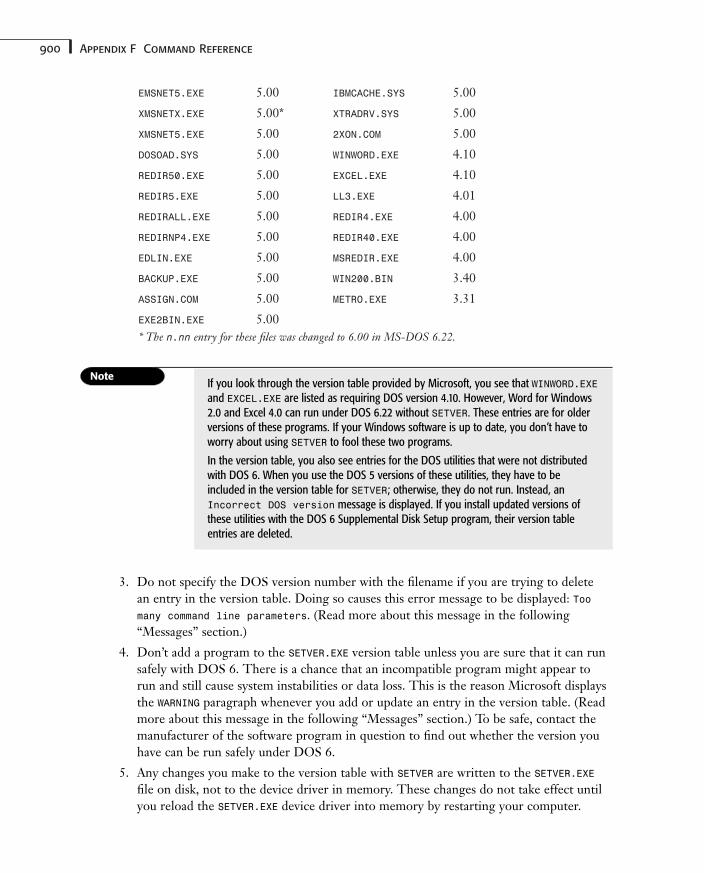
900 Appendix F Command Reference
EMSNET5.EXE 5.00 IBMCACHE.SYS 5.00
XMSNETX.EXE 5.00* XTRADRV.SYS 5.00
XMSNET5.EXE 5.00 2XON.COM 5.00
DOSOAD.SYS 5.00 WINWORD.EXE 4.10
REDIR50.EXE 5.00 EXCEL.EXE 4.10
REDIR5.EXE 5.00 LL3.EXE 4.01
REDIRALL.EXE 5.00 REDIR4.EXE 4.00
REDIRNP4.EXE 5.00 REDIR40.EXE 4.00
EDLIN.EXE 5.00 MSREDIR.EXE 4.00
BACKUP.EXE 5.00 WIN200.BIN 3.40
ASSIGN.COM 5.00 METRO.EXE 3.31
EXE2BIN.EXE 5.00* The n.nn entry for these files was changed to 6.00 in MS-DOS 6.22.
If you look through the version table provided by Microsoft, you see that WINWORD.EXEand EXCEL.EXE are listed as requiring DOS version 4.10. However, Word for Windows2.0 and Excel 4.0 can run under DOS 6.22 without SETVER. These entries are for olderversions of these programs. If your Windows software is up to date, you don’t have toworry about using SETVER to fool these two programs.
In the version table, you also see entries for the DOS utilities that were not distributedwith DOS 6. When you use the DOS 5 versions of these utilities, they have to beincluded in the version table for SETVER; otherwise, they do not run. Instead, anIncorrect DOS version message is displayed. If you install updated versions ofthese utilities with the DOS 6 Supplemental Disk Setup program, their version tableentries are deleted.
3. Do not specify the DOS version number with the filename if you are trying to deletean entry in the version table. Doing so causes this error message to be displayed: Toomany command line parameters. (Read more about this message in the following“Messages” section.)
4. Don’t add a program to the SETVER.EXE version table unless you are sure that it can runsafely with DOS 6. There is a chance that an incompatible program might appear torun and still cause system instabilities or data loss. This is the reason Microsoft displaysthe WARNING paragraph whenever you add or update an entry in the version table. (Readmore about this message in the following “Messages” section.) To be safe, contact themanufacturer of the software program in question to find out whether the version youhave can be run safely under DOS 6.
5. Any changes you make to the version table with SETVER are written to the SETVER.EXEfile on disk, not to the device driver in memory. These changes do not take effect untilyou reload the SETVER.EXE device driver into memory by restarting your computer.
901SETVER 5.0 and later—External
6. Specify the drive and path to the SETVER.EXE file you want to update and not the driveand path to the program you are looking for in the version table. If you don’t specifythe drive and path correctly, SETVER usually fails to find SETVER.EXE, and an error mes-sage is displayed (see the second item in the following “Messages” section). Normally,SETVER.EXE is located on your DOS PATH, and you can omit the drive:\path parameterto avoid this confusing syntax.
7. Remember to specify only the filename (with extension) of the program file you want toadd, update, or delete from the SETVER version table. No path information is stored inthe table, so only the filename is needed to locate the entry. The extension is includedin the table, so you must specify it as well. No default extensions are assumed, and wild-cards are not allowed.
8. Device drivers, as well as executable programs, can be included in the version table. IfSETVER.EXE is already in memory when the device driver loads in your CONFIG.SYS file,SETVER.EXE can lie to it about the version of DOS that is running.
Examples
To display the contents of the version table in the SETVER.EXE file located on your DOSPATH, enter SETVER on the command line as follows:
SETVER
You don’t use the METRO.EXE program, and you want to delete the entry from the versiontable. To do so, enter the following command:
SETVER METRO.EXE /DELETE
You can abbreviate the /DELETE switch as /D if you want to. To add METRO.EXE back into theversion table and restore its setting to DOS 3.31, you enter the following command:
SETVER METRO.EXE 3.31
If all goes well, you see the WARNING paragraph. (See the last item in the following“Messages” section.)
MessagesAn invalid path to SETVER.EXE was specified
Error: A subdirectory you specified in the path to SETVER.EXE is invalid.
Could not find the file SETVER.EXE
Error: SETVER.EXE was not found along the DOS search path or in the subdirectory youspecified. (ERRORLEVEL value 6 returned)
ERROR: Reading SETVER.EXE file
Error: A disk error occurred while the SETVER.EXE file was being read. This problem couldbe the result of file-sharing violations, errors in the disk’s FAT, corrupted formatting
FApp
902 Appendix F Command Reference
information, or bad sectors on the disk. The SETVER.EXE file may be corrupted. (ERROR-LEVEL value 10 returned)
ERROR: Writing SETVER.EXE file
Error: A disk error occurred while the SETVER.EXE file was being written to. This problemcan happen if the disk fills up or a bad sector is encountered. The SETVER.EXE file may becorrupted. (ERRORLEVEL value 14 returned)
Insuffient memory
Error: Not enough memory is available to run SETVER. (Note: The spelling error isMicrosoft’s, not ours.) (ERRORLEVEL value 3 returned)
Invalid drive specifier
Error: The disk drive you specified in the path to SETVER.EXE isn’t a valid DOS drive.(ERRORLEVEL value 7 returned)
Invalid filename
Error: An invalid filename was specified on the command line, or the specified file doesn’texist. (ERRORLEVEL value 2 returned)
Invalid switch
Error: On the command line, you have specified a switch that SETVER doesn’t understand.(ERRORLEVEL value 1 returned)
Invalid version number, format must be 2.11 - 9.99
Error: The version number you specified is invalid. You can report DOS versions 2.11through 9.99 only. You also may see this message if you specify DELETE or D without the slash(/R). (ERRORLEVEL value 4 returned)
Missing parameter
Error: You specified a filename, but you have not included either a version number (to addor update an entry) or /D (to delete an entry). (ERRORLEVEL value 9 returned)
No entries found in version table
Information: You asked SETVER to display the version table, but the copy of SETVER.EXE itfound has no entries in the version table. This can happen if you delete all the entries (oneby one) in SETVER.EXE by using the SETVER /D command.
NOTE: SETVER device not loaded. To activate SETVER version reporting you mustload the SETVER.EXE device in your CONFIG.SYS.
Warning: When you use SETVER without loading the SETVER.EXE device, it displays this mes-sage to remind you that the version table is active only when the SETVER.EXE device driver isloaded.
903SETVER 5.0 and later—External
Specified entry was not found in the version table
Warning: You have tried to delete an entry that is not in the version table. Check to seewhether you mistyped the name of the program or included the wrong extension. If every-thing looks correct, type SETVER and take another look at the current version table to makesure that the program you are trying to delete is indeed included in it. (ERRORLEVEL value 5returned)
There is no more space in version table new entries
Error: The version table in SETVER.EXE is full. You must delete one or two entries before youcan add any more. (Microsoft seems to have misplaced the for in this message.) (ERRORLEVELvalue 13 returned)
Too many command line parameters
Error: Too many command-line parameters were specified, and SETVER doesn’t know what todo with them all. (ERRORLEVEL value 8 returned)
Version table is corrupt
Error: The version table stored within SETVER.EXE has become damaged. You need to deletethe damaged file and replace it with a fresh copy from your MS-DOS 6 distribution disks.SETVER.EXE is compressed on the distribution disks, and you must use the EXPAND commandto expand it so that you can use it. (ERRORLEVEL value 11 returned)
Version table successfully updatedThe version change will take effect the next time you restart your system
Information: You have successfully deleted an entry in the version table. This is the messageyou can suppress by using the /QUIET parameter. (ERRORLEVEL value 0 returned)
WARNING - Contact your software vendor for information about whether aspecific program works with MS-DOS version 6.0. It is possible thatMicrosoft has not verified whether the program will successfully run ifyou use the SETVER command to change the program version number andversion table. If you run the program after changing the version tablein MS-DOS version 6.0, you may lose or corrupt data or introduce systeminstabilities. Microsoft is not responsible for any loss or damage, orfor lost or corrupted data.
Version table successfully updatedThe version change will take effect the next time you restart your system
Information: You have successfully updated the version table. The warning paragraph is areminder that lying to software programs can be a risky business, and you do so at your ownrisk. To be safe, contact the manufacturer of the program you are trying to fool and askwhether it’s safe to run that software under DOS 6. (ERRORLEVEL value 0 returned)
See Also
SETVER.EXE
“Setting the Version Using the SETVER Command” in Chapter 10
FApp
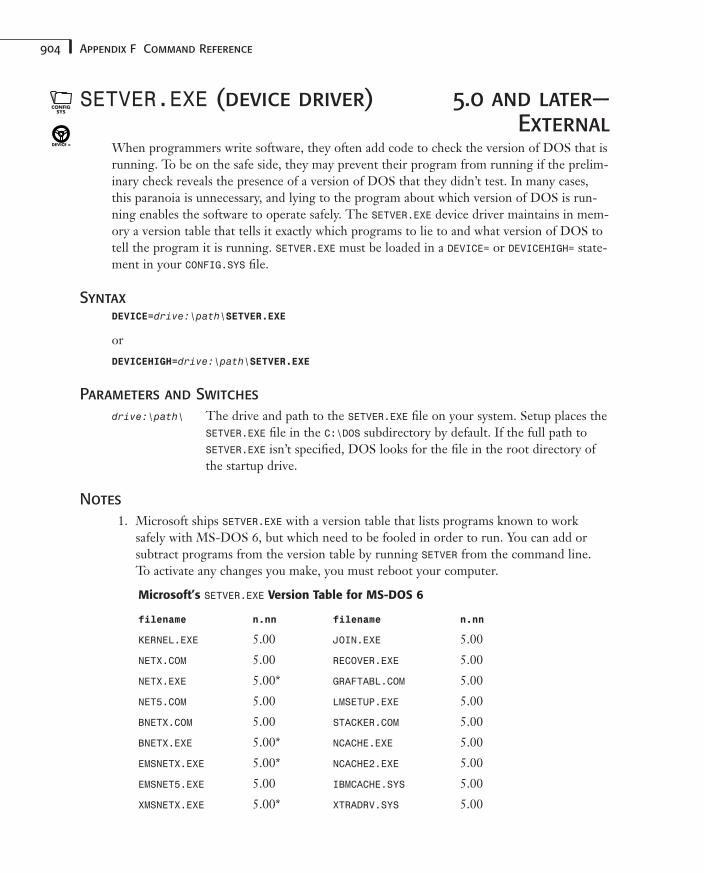
904 Appendix F Command Reference
SETVER.EXE (device driver) 5.0 and later—External
When programmers write software, they often add code to check the version of DOS that isrunning. To be on the safe side, they may prevent their program from running if the prelim-inary check reveals the presence of a version of DOS that they didn’t test. In many cases,this paranoia is unnecessary, and lying to the program about which version of DOS is run-ning enables the software to operate safely. The SETVER.EXE device driver maintains in mem-ory a version table that tells it exactly which programs to lie to and what version of DOS totell the program it is running. SETVER.EXE must be loaded in a DEVICE= or DEVICEHIGH= state-ment in your CONFIG.SYS file.
SyntaxDEVICE=drive:\path\SETVER.EXE
or
DEVICEHIGH=drive:\path\SETVER.EXE
Parameters and Switches
drive:\path\ The drive and path to the SETVER.EXE file on your system. Setup places theSETVER.EXE file in the C:\DOS subdirectory by default. If the full path toSETVER.EXE isn’t specified, DOS looks for the file in the root directory ofthe startup drive.
Notes
1. Microsoft ships SETVER.EXE with a version table that lists programs known to worksafely with MS-DOS 6, but which need to be fooled in order to run. You can add orsubtract programs from the version table by running SETVER from the command line. To activate any changes you make, you must reboot your computer.
Microsoft’s SETVER.EXE Version Table for MS-DOS 6
filename n.nn filename n.nn
KERNEL.EXE 5.00 JOIN.EXE 5.00
NETX.COM 5.00 RECOVER.EXE 5.00
NETX.EXE 5.00* GRAFTABL.COM 5.00
NET5.COM 5.00 LMSETUP.EXE 5.00
BNETX.COM 5.00 STACKER.COM 5.00
BNETX.EXE 5.00* NCACHE.EXE 5.00
EMSNETX.EXE 5.00* NCACHE2.EXE 5.00
EMSNET5.EXE 5.00 IBMCACHE.SYS 5.00
XMSNETX.EXE 5.00* XTRADRV.SYS 5.00
CONFIGSYS
DEVICE =
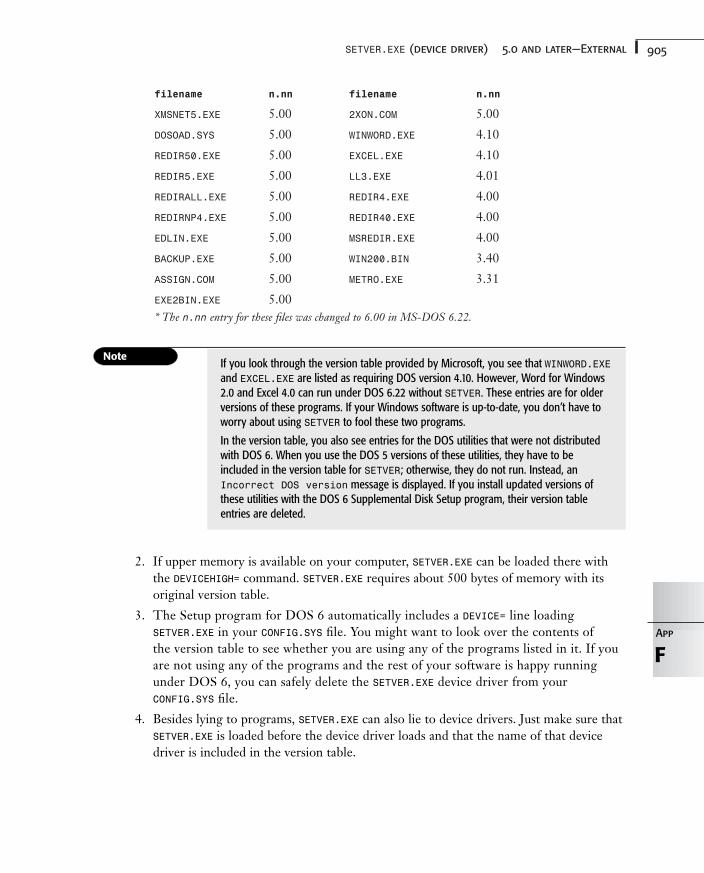
905SETVER.EXE (device driver) 5.0 and later—External
filename n.nn filename n.nn
XMSNET5.EXE 5.00 2XON.COM 5.00
DOSOAD.SYS 5.00 WINWORD.EXE 4.10
REDIR50.EXE 5.00 EXCEL.EXE 4.10
REDIR5.EXE 5.00 LL3.EXE 4.01
REDIRALL.EXE 5.00 REDIR4.EXE 4.00
REDIRNP4.EXE 5.00 REDIR40.EXE 4.00
EDLIN.EXE 5.00 MSREDIR.EXE 4.00
BACKUP.EXE 5.00 WIN200.BIN 3.40
ASSIGN.COM 5.00 METRO.EXE 3.31
EXE2BIN.EXE 5.00* The n.nn entry for these files was changed to 6.00 in MS-DOS 6.22.
FApp
If you look through the version table provided by Microsoft, you see that WINWORD.EXEand EXCEL.EXE are listed as requiring DOS version 4.10. However, Word for Windows2.0 and Excel 4.0 can run under DOS 6.22 without SETVER. These entries are for olderversions of these programs. If your Windows software is up-to-date, you don’t have toworry about using SETVER to fool these two programs.
In the version table, you also see entries for the DOS utilities that were not distributedwith DOS 6. When you use the DOS 5 versions of these utilities, they have to beincluded in the version table for SETVER; otherwise, they do not run. Instead, anIncorrect DOS version message is displayed. If you install updated versions ofthese utilities with the DOS 6 Supplemental Disk Setup program, their version tableentries are deleted.
2. If upper memory is available on your computer, SETVER.EXE can be loaded there withthe DEVICEHIGH= command. SETVER.EXE requires about 500 bytes of memory with itsoriginal version table.
3. The Setup program for DOS 6 automatically includes a DEVICE= line loadingSETVER.EXE in your CONFIG.SYS file. You might want to look over the contents of the version table to see whether you are using any of the programs listed in it. If youare not using any of the programs and the rest of your software is happy runningunder DOS 6, you can safely delete the SETVER.EXE device driver from yourCONFIG.SYS file.
4. Besides lying to programs, SETVER.EXE can also lie to device drivers. Just make sure thatSETVER.EXE is loaded before the device driver loads and that the name of that devicedriver is included in the version table.

906 Appendix F Command Reference
Examples
To load the DOS version table driver into memory, include the following line in your CON-FIG.SYS file:
DEVICE=C:\DOS\SETVER.EXE
This line assumes that the SETVER.EXE file is in the C:\DOS subdirectory. If your computerhas upper memory available, you might want to load SETVER.EXE into upper memory byusing the following command:
DEVICEHIGH=C:\DOS\SETVER.EXE
MessagesVersion table is corrupt
Error: The version table stored within SETVER.EXE has become damaged. You must deletethe damaged file and replace it with a fresh copy from your MS-DOS 6 distribution disks.SETVER.EXE is compressed on the distribution disks, so you must use the EXPAND command toexpand it before you can use it.
See Also
DEVICE=, DEVICEHIGH=, and SETVER
“Setting the Version with SETVER” in Chapter 10
SHARE 3.0 and later—ExternalThe SHARE program enables DOS support for file and record locking. When you run SHARE,it remains resident in memory, becoming a part of DOS. If you use any multitasking soft-ware, such as Microsoft Windows, you should run SHARE in your AUTOEXEC.BAT file. You canload SHARE into upper memory by using the LOADHIGH command on systems that have uppermemory available.
SyntaxSHARE /F:name_space /L:numlocks
Parameters and Switches
/F:name_space The amount of memory space in bytes to use for file sharing. Thedefault is 2,048.
/L:numlocks The maximum number of file/record locks that are available to pro-grams. The default is 20.
Rules
1. When SHARE is loaded, DOS checks for file and record locks as each file is opened, read,and written.
C:\>
BATCHFILE
TSR
907SHELL= 2.0 and later—Internal
2. SHARE normally enlarges DOS by approximately 6,192 bytes in DOS 5.0 and approxi-mately 5,248 bytes in DOS 6.0. If the number of locks (/L switch) or memory space (/Fswitch) increases or decreases, DOS also increases or decreases proportionately. You canload SHARE into upper memory by using the LOADHIGH command.
3. The only way to remove SHARE is to restart DOS.
4. In DOS 4.0, use SHARE if your hard disk is formatted with partitions larger than 32MB.SHARE is not required to use large partitions in DOS 5.0 and later versions.
5. You can load SHARE by using INSTALL= in your CONFIG.SYS file (DOS 4.0 and later ver-sions).
6. You should be running SHARE if you use any multitasking software on your computer. Ina multitasking environment, two programs might attempt to update the same file. Ifthat happens, data can be lost. Examples of multitasking environments include the DOSShell’s Task Swapper, Microsoft Windows, and DESQview.
Notes
1. Use SHARE when two or more programs or processes share a computer’s files. AfterSHARE is loaded, DOS checks each file for locks whenever the file is opened, read, orwritten. If a file is open for exclusive use, an error message results from subsequentattempts to open the file. If one program locks a portion of a file, an error messageresults if another program tries to read or write the locked portion.
2. SHARE is most effective when all file-sharing programs can handle the DOS functions forlocking files and records (DOS 3.0 and later versions). SHARE is either partially or com-pletely ineffective with programs that do not use the DOS file- and record-locking fea-tures.
3. SHARE affects two or more programs running on the same computer, not two or morecomputers using the same file (networked computers). For networks, record- and file-locking are made possible by software provided with the network.
4. You must use SHARE if you use DOS 4.0 or 4.01 and if your hard disk is formatted largerthan 32MB. For convenience, you can use INSTALL= in the CONFIG.SYS file to activateSHARE. In the CONFIG.SYS file, for example, the following command activates SHARE ifSHARE.EXE is located in the \DOS subdirectory of drive C:INSTALL=C:\DOS\SHARE.EXE
See Also
INSTALL= and LOADHIGH
SHELL= 2.0 and later—InternalYou use SHELL= to specify the name and location of the command interpreter that MS-DOSshould use. Normally, you use COMMAND.COM, but other third-party shells, such as 4DOS andNDOS, can use SHELL= to gain control of the command line. Another common use of the
FApp
CONFIGSYS
908 Appendix F Command Reference
SHELL= command is to change the size of the environment. SHELL= can be used only in yourCONFIG.SYS file.
SyntaxSHELL=drive:\path\filename parameters
Parameters and Switches
drive:\path\ The drive and path to the command interpreter must be specified here ifthe command interpreter isn’t located in the root directory of the startupdrive.
filename The name of the program to use as the command interpreter for DOS.Normally, it is COMMAND.COM.
parameters Any parameters or switches that the specified command interpreterrequires. (For the parameters and switches that COMMAND.COM uses, see thedescription for COMMAND earlier in this command reference.)
Notes
1. Be careful when you experiment with the SHELL= command and be sure that you have abootable floppy disk handy. If you set something incorrectly, chances are you either willhave to reboot from a floppy disk or perform a “clean boot” by pressing F5.
2. If no SHELL= command exists in CONFIG.SYS, DOS attempts to load COMMAND.COM fromthe root directory of the startup drive. If COMMAND.COM cannot be found or is from a dif-ferent version of DOS, an error message is displayed (see the following “Messages” sec-tion). When you receive this error message, you must either enter the full pathname ofa valid copy of COMMAND.COM or reboot the computer from a bootable floppy disk.
3. Do not confuse the SHELL= command with the DOSSHELL program. SHELL= is aCONFIG.SYS command that designates the program to be used as the command-lineinterface to MS-DOS. DOSSHELL is a program that provides a graphical interface fromwhich you can operate your computer if you choose. The DOSSHELL program and SHELL=command have nothing to do with each other.
4. MemMaker “comments out” the SHELL= line in your CONFIG.SYS file if the SHELL= linespecifies a command interpreter other than COMMAND.COM. If you are using a third-partyshell program, be sure that COMMAND.COM is in the root directory of the startup drivebefore you run MemMaker. After MemMaker is done, you must manually “uncom-ment” the SHELL= line that loads your command-line interpreter to restore the use ofyour third-party shell.
5. Many third-party shell programs do not require the /P switch to tell them that theyshould install themselves permanently in memory. Instead, they look for a valid envi-ronment. If one is present, they assume that they have already been run, do not install
909SHELL= 2.0 and later—Internal
themselves permanently, and do not execute the AUTOEXEC.BAT file. In DOS 6, an envi-ronment already may be present when the shell programs are loaded from the SHELL=line in CONFIG.SYS, which can lead to problems.
If you find yourself in the situation just described, try including the /P switch on theSHELL= line that loads your command-line interpreter. Also, you should contact themanufacturer of your shell program to see whether an upgrade that is more compatiblewith MS-DOS 6 is available.
Examples
The setup program for DOS 6 may insert a SHELL= line in your CONFIG.SYS file that lookssomething like this:
SHELL=C:\DOS\COMMAND.COM C:\DOS\ /E:512 /P
It sets the command interpreter to COMMAND.COM, located in the C:\DOS subdirectory, with areload path of C:\DOS and an environment size of 512 bytes. The final /P switch tells COM-MAND.COM to remain in memory permanently. Never specify the /P switch for COMMAND.COMexcept in the SHELL= line in your CONFIG.SYS file.
MessagesBad or missing Command InterpreterEnter correct name of Command Interpreter (eg, C:\COMMAND.COM)
Error: If the SHELL= command in your CONFIG.SYS file does not point to a valid commandinterpreter, and the copy of COMMAND.COM in the root directory of your startup drive is miss-ing or invalid, this message is displayed. To continue, you have to enter the full path to avalid (DOS 6) copy of COMMAND.COM so that DOS can load it into memory. DOS has alreadychecked the copy of COMMAND.COM in your root directory, so entering C:\COMMAND.COM as sug-gested in the error message usually does not work. You can try entering C:\DOS\COMMAND.COMbecause Setup places a copy of COMMAND.COM in the subdirectory in which DOS was installed.If a valid copy of COMMAND.COM can’t be found, you must reboot from a floppy disk.
Even if you locate a valid copy of COMMAND.COM and load it into memory, this copy of COMMAND.COM is only temporary; so typing EXIT brings this error message right backonscreen. Also, your AUTOEXEC.BAT file is not executed by temporary copies of COMMAND.COM,so none of the settings or resident software you typically use will be available. Use the COPYcommand to transfer a new copy of COMMAND.COM to the root directory of your startup disk(usually C:\) and reboot by pressing Ctrl+Alt+Del to set things back to the way they shouldbe.
See Also
COMMAND
“Using the SHELL Command” in Chapter 19
FApp
910 Appendix F Command Reference
SHIFT 2.0 and later—InternalThe SHIFT command shifts a batch file’s command-line parameters one position to the left.You have to use the SHIFT command if your batch file requires more than nine parameters.SHIFT also is handy for batch files that repeat an operation for each command-line parame-ter. SHIFT is useful only when used in a batch file.
SyntaxSHIFT
Notes
1. When you use SHIFT, DOS moves the command-line parameters one position to theleft. That is, the parameter %1 becomes %0, %2 becomes %1, %3 becomes %2, and so on.
2. DOS discards the former first parameter (%0). Any parameter shifted off the left end isgone for good.
3. DOS shifts parameter 10, if it exists, into %9, parameter 11 into parameter 10, and soon. Using SHIFT is the only way to access more than nine command-line parametersfrom within a batch file.
See Also
“Moving Parameters with SHIFT” in Chapter 16
SIZER (see MEMMAKER)MemMaker uses the SIZER program to help it optimize memory use on your computer.MemMaker requires this program while optimizing your system, but it is not necessary atany other time. You cannot use this program yourself. SIZER aborts if MemMaker (and pos-sibly CHKSTATE.SYS) is not in control when it is run, displaying the following message:
SIZER.EXE is used by MemMaker during the memory-optimization processand is not intended to be started from the command prompt.
Very few details about SIZER’s operation are documented. When MemMaker is optimizing,it adds a SIZER.EXE command to the beginning of every command that loads device driversor resident programs in your CONFIG.SYS and AUTOEXEC.BAT files. Load size informationabout these drivers and programs is written to the MEMMAKER.STS file by SIZER. When opti-mization is complete, MemMaker removes all references to the SIZER program from yourstartup files.
See Also
CHKSTATE.SYS and MEMMAKER
BATCHFILE
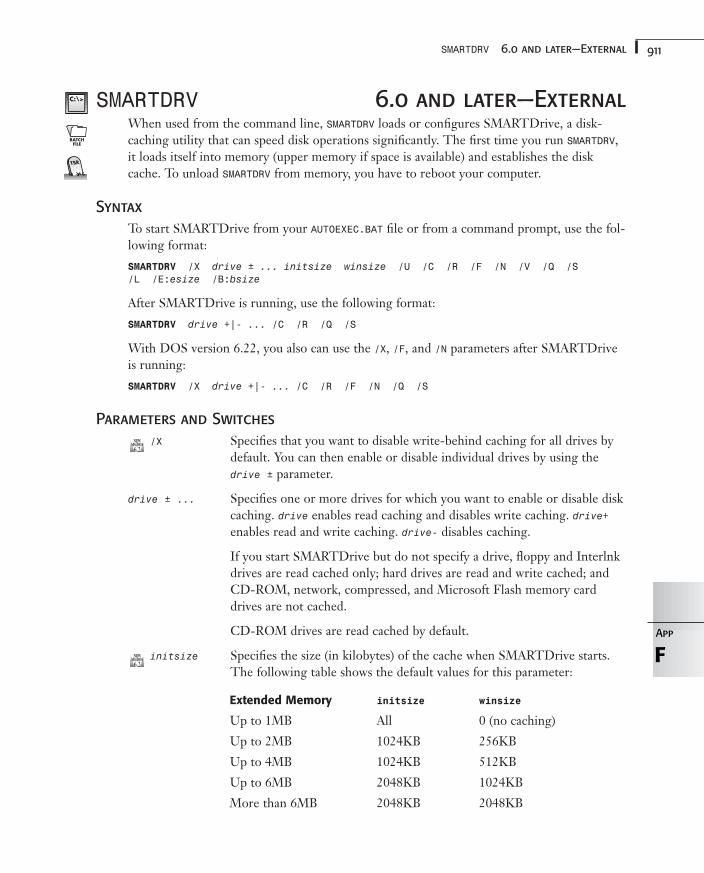
911SMARTDRV 6.0 and later—External
SMARTDRV 6.0 and later—ExternalWhen used from the command line, SMARTDRV loads or configures SMARTDrive, a disk-caching utility that can speed disk operations significantly. The first time you run SMARTDRV,it loads itself into memory (upper memory if space is available) and establishes the diskcache. To unload SMARTDRV from memory, you have to reboot your computer.
Syntax
To start SMARTDrive from your AUTOEXEC.BAT file or from a command prompt, use the fol-lowing format:
SMARTDRV /X drive ± ... initsize winsize /U /C /R /F /N /V /Q /S/L /E:esize /B:bsize
After SMARTDrive is running, use the following format:
SMARTDRV drive +|- ... /C /R /Q /S
With DOS version 6.22, you also can use the /X, /F, and /N parameters after SMARTDriveis running:
SMARTDRV /X drive +|- ... /C /R /F /N /Q /S
Parameters and Switches
/X Specifies that you want to disable write-behind caching for all drives bydefault. You can then enable or disable individual drives by using thedrive ± parameter.
drive ± ... Specifies one or more drives for which you want to enable or disable diskcaching. drive enables read caching and disables write caching. drive+enables read and write caching. drive- disables caching.
If you start SMARTDrive but do not specify a drive, floppy and Interlnkdrives are read cached only; hard drives are read and write cached; andCD-ROM, network, compressed, and Microsoft Flash memory carddrives are not cached.
CD-ROM drives are read cached by default.
initsize Specifies the size (in kilobytes) of the cache when SMARTDrive starts.The following table shows the default values for this parameter:
Extended Memory initsize winsize
Up to 1MB All 0 (no caching)
Up to 2MB 1024KB 256KB
Up to 4MB 1024KB 512KB
Up to 6MB 2048KB 1024KB
More than 6MB 2048KB 2048KB
FApp
C:\>
BATCHFILE
TSR
912 Appendix F Command Reference
winsize Specifies the size (in kilobytes) by which SMARTDrive reduces its cachewhen Microsoft Windows starts, freeing that memory for Windows touse. When you quit Windows, that memory is returned to SMARTDriveand defaults to the values listed in the preceding table. If winsize islarger than initsize, SMARTDrive acts as though the two parameterswere the same.
/U Specifies that you do not want SMARTDrive to load the CD-ROMcaching module. If you specify this switch, SMARTDrive cannot cacheany CD-ROM drives. If you don’t specify /U, you can enable or disableCD-ROM caching at any time by using the drive ± parameter.
/C Clears SMARTDrive by writing all write buffers to disk.
/R Resets SMARTDrive by clearing all caches and restarting SMARTDrive.
/F Writes cached data to the disk after each command finishes, before theDOS command prompt reappears. This is the default behavior.
/N Writes cached data to the disk whenever the system is idle. To ensurethat all data is written to disk, use the /C (Clear) switch.
/N (Not DOS 6.22) Forces “verbose” mode, so status messages appear whenSMARTDrive starts. In DOS 6.22, this switch has been renamed to /V.You cannot use this switch with /Q.
/V Forces “verbose” mode, so status messages appear when SMARTDrivestarts. You cannot use this switch with /Q.
/Q Forces “quiet” mode, so status messages do not appear whenSMARTDrive starts. (Error messages always appear.) /Q is the default.You cannot use this switch with /N.
/S Displays SMARTDrive’s status, including what and how drives arecached and a cache hit statistic.
/L Forces SMARTDrive to load into low (conventional) memory even ifroom exists in upper memory.
/E:esize The element size (in bytes), which is the amount of cache data thatSMARTDrive moves in one operation. Values can be 1024, 2048, 4096,and 8192. The default is 8192. The smaller the number, the less memorySMARTDrive takes and the slower the performance.
/B:bsize The size of the read-ahead buffer (in bytes that are a multiple of esize),which is how much SMARTDrive reads beyond a disk request. Thedefault is 16384. The smaller the number, the less memorySMARTDrive takes and the slower the performance.
913SMARTDRV 6.0 and later—External
Notes
1. Before you turn off or reset your computer, you must perform a SMARTDRV /C operationto guarantee that no data is lost from SMARTDrive’s write buffers. SMARTDrive per-forms the operation automatically if you press Ctrl+Alt+Del.
SMARTDrive now flushes all write buffers to disk before allowing COMMAND.COM to dis-play the DOS command-line prompt. As long as you haven’t turned off this option, youcan safely turn off your computer as soon as you see the DOS prompt.
2. For SMARTDrive to use extended memory, you must load HIMEM.SYS or some otherextended memory manager.
3. By default, SMARTDRV.EXE tries to load into upper memory. You do not need to use theLOADHIGH command.
4. If you are using double buffering and your system runs slowly, try loadingSMARTDrive with the /L switch.
5. Double buffering is required only by some ESDI and SCSI hard disk interfaces.
6. If you have a compressed disk drive, use SMARTDrive on the underlying uncom-pressed (host) drive.
7. If you want SMARTDrive to cache a CD-ROM drive, you have to load MSCDEX intomemory before SMARTDrive. MSCDEX creates the link that DOS needs to access a CD-ROM drive. If SMARTDrive is loaded before the drive letter is allocated, it willnever know that the drive exists. You can enable or disable CD-ROM read caching byusing the drive ± parameter, or you can disable it completely by using the /U switch.Using the /U switch decreases SMARTDrive’s memory use a little.
8. If you are using a third-party CONFIG.SYS and AUTOEXEC.BAT file manager, that utilityneeds to be set up to perform a SMARTDRV /C operation before it reboots your computer.
9. DOS 6.0 comes with SMARTMON.EXE, a Windows program for monitoring and adjustingSMARTDrive.
Examples
To start SMARTDrive with all the defaults (a good fit for most systems), use the followingcommand:
C:\DOS\SMARTDRV
To enable read caching for drive C, read and write caching for drive D, and using a 4MBcache for DOS that can get no smaller than 2MB when Microsoft Windows is running,issue the following command:
C:\DOS\SMARTDRV C D+ 4096 2048
See Also
BUFFERS=, EMM386.EXE, HIMEM.SYS, SMARTDRV.EXE, and SMARTMON
“Using a Disk Cache (SMARTDrive)” in Chapter 7
FApp
914 Appendix F Command Reference
SMARTDRV.EXE (device driver) 6.0 and later—External
When used as a device driver, SMARTDRV.EXE enables double buffering, which is required bycertain types of hard disk controllers that cannot work with the memory provided byEMM386.EXE.
SyntaxDEVICE=drive:\path\SMARTDRV.EXE /DOUBLE_BUFFER
Parameters and Switches
drive:\path\ Specifies the full path to the SMARTDRV.EXE file on your system. Setupplaces the SMARTDRV.EXE file in the C:\DOS subdirectory by default. Ifthe full path to SMARTDRV.EXE isn’t specified, DOS looks for the file inthe root directory of the startup drive.
/DOUBLE_BUFFER Enables double buffering. Inserting this switch into your CONFIG.SYSfile does not hurt if your system does not need it, but it does take upmemory. You can remove the switch if all the entries in the bufferingcolumn of the SMARTDRV /S display are no. (It may take a while for -entries to turn into no entries.)
Notes
1. Double buffering is required only by some ESDI and SCSI hard disk interfaces whenused on a computer that provides upper memory blocks for DOS to use.
2. If you are using double buffering and your system runs slowly, try loadingSMARTDrive with the /L switch.
Examples
To load the SMARTDrive double-buffering feature, add the following line to yourCONFIG.SYS file:
DEVICE=C:\DOS\SMARTDRV.EXE /DOUBLE_BUFFER
See Also
DEVICE= and SMARTDRV
“Using a Disk Cache (SMARTDrive)” in Chapter 7
SMARTMON 6.0 and later—WindowsThe SMARTDrive Monitor (SMARTMON) is a Windows program that can display the status ofthe SMARTDrive disk cache and adjust its settings. SMARTMON can even help you update the
CONFIGSYS
DEVICE =
915SORT 2.0 and later—External
setting you use to load SMARTDRV in your AUTOEXEC.BAT file. For SMARTMON to be useful, youmust be running the SMARTDrive disk cache on your computer.
SMARTMON cannot be run from the DOS command line. You can start SMARTMON from withinWindows, for example, by opening the Program Manager’s File menu and choosing the Runcommand. For instructions on using the program, run SMARTMON and press F1 or chooseHelp from the menu.
See Also
SMARTDRV
SORT 2.0 and later—ExternalSORT is a program that reads lines from the standard input device, performs an ASCII sorton those lines, and then writes them to the standard output device. The sort can be inascending or descending order and can start at any column in the line. SORT is one of the fil-ter programs provided by MS-DOS for use with redirection symbols from the commandline.
SyntaxSORT /R /+column < source_file > dest_file
or
command | SORT /R /+column
Parameters and Switches
< source_file Specifies the name of a file that you want SORT to sort. All the normaldefaults for drives and subdirectories apply. Wildcards are not allowed.
> dest_file Specifies the name of a file that you want SORT to write the sorted out-put to. All the normal defaults for drives and subdirectories apply.Wildcards are not allowed. If the output of SORT is not redirected, it iswritten to the screen.
command | Pipes the screen output from a command into the SORT program, whichdisplays it sorted. command can be any legal DOS command that writesits output to the standard output device (normally the screen).
/+column Starts sorting with the characters in column number column. columnneeds to be a positive integer. The default is 1.
/R Sorts in descending order. Thus, the letter Z comes first and the letterA comes last, followed by the numbers 9 to 0. The default sort order isascending.
FApp
C:\>
BATCHFILE
916 Appendix F Command Reference
Notes
1. If you do not redirect the input or output, all input is from the keyboard (standardinput), and all output is to the video display (standard output). If you redirect input andoutput, use different names for the input and output files.
2. SORT can handle a maximum file size of 64KB (65,535 characters).
3. SORT sorts text files and discards any information after, and including, the end-of-filemarker (Ctrl+Z).
4. SORT uses the collating sequence appropriate to your country code and code-page set-tings if you are using them.
5. SORT is not case sensitive; that is, the command treats b and B alike.
6. You cannot set the maximum column that SORT can use to resolve equalities. SORT startsat the /+column specified and continues the comparison until the lines are provenunequal or the end of the line is reached. Because of this sorting method, you cannotuse SORT to perform a multikey sort by sorting the file more than once.
Examples
To sort the lines in the file WORDS.TXT and display the sorted lines onscreen, use the follow-ing command:
SORT < WORDS.TXT
To sort, in reverse order, the lines in the file WORDS.TXT and display the lines onscreen, usethis command:
SORT < WORDS.TXT /R
To start sorting at the eighth character of each line in WORDS.TXT and display the outputonscreen, use this command:
SORT /+8 < WORDS.TXT
To display directory information, sorted by file size, use the following command:
DIR | SORT /+14
(The file size starts in the 14th column.) Unfortunately, other lines, such as the volumelabel, also are sorted, starting in the 14th column. DIR /O provides a more direct and elabo-rate way of sorting directory information.
See Also
FIND and MORE
“The SORT Filter” in Chapter 13
917STACHIGH.SYS
SSETUPSSETUP sets up Stacker software for use by moving the Stacker files from the C:\DOS direc-tory to the C:\Stacker directory.
SyntaxSSETUP /m /t=drive: /?
Parameters and Switches
drive: Specifies the Stacker drive for the temporary installation location.
/m Specifies that the monochrome display mode be used.
/t=drive Identifies the temporary installation location.
/? Displays the abbreviated online help.
STACSTAC accesses the Stacker toolbox to use the DOS Stacker tools.
SyntaxSTAC /m /?
Parameters and Switches
/m Specifies that the monochrome display mode be used.
/? Displays the abbreviated online help.
STACHIGH.SYSSTACHIGH.SYS loads Stacker high. You must load this device driver by inserting a DEVICE=statement in the CONFIG.SYS file.
SyntaxDEVICE=drive:\path\stachigh.sys
Parameters and Switches
drive:\path Locations of the STACHIGH.SYS file.
FApp
PC-DOS
PC-DOS
PC-DOS
DEVICE =
918 Appendix F Command Reference
STACKERSTACKER mounts or unmounts Stacker drives or displays the Stacker drive map.
SyntaxSTACKER -drive1: /?
or
STACKER drive2:=drive3:\stacvol.xxx
or
STACKER @drive4:=\stacvol.xxx
Parameters and Switches
drive1: Specifies the Stacker drive for an installation location.
-drive1: Unmounts the Stacker drive.
drive2:=drive3:\stacvol.xxx Mounts drive3\stacvol.xxx as drive d2.
@drive4:\stacvol.xxx Mounts drive4\stacvol.xxx as drive d4.
/? Displays the abbreviated online help.
STACKS= 3.2 and later—InternalWhenever a device needs the computer’s attention, it generates an interrupt. Before switch-ing to the appropriate interrupt service routine, DOS stores the information it needs toresume the interrupted task in an area called a stack. You can use the STACKS= command todetermine how many stacks DOS sets aside for this purpose and how big each stack is. Youcan use STACKS= only in your CONFIG.SYS file.
SyntaxSTACKS=numstacks,size
Parameters and Switches
numstacks The number of stacks to set aside for hardware interrupts. Legal values are 0and 8 through 64. The default value is 0 for 8088- and 8086-based comput-ers and 9 for all others.
size The size of each stack in bytes. Legal values are 0 (only if you specify 0 stacksas well) and 32 through 512. The default value is 0 for 8088- and 8086-basedcomputers and 128 for all others.
PC-DOS
DR-DOS
CONFIGSYS
919STACKS= 3.2 and later—Internal
Notes
1. Both parameters for the STACKS= command are required. Note that a size of 0 isallowed only if you are using 0 numstacks as well.
2. There is considerable controversy over whether separate hardware stacks are needed forthe average computer system, but in general, using at least MS-DOS’s default values is agood idea. This uses some memory, but if it saves you from losing your work, it’sworthwhile. Almost all the devices attached to your computer generate interrupts and ifthey all want attention at once, they can quickly exhaust a low STACKS= setting. Whenthe internal DOS stacks overflow, an error message appears (see the first item, InternalStack Overflow, in the following “Messages” section), and the system halts. MemMakeroften increases the STACKS= setting to 9,256.
STACKS=0,0 forces DOS to use the active program’s stack space when servicing hardwareinterrupts. Many people run their computers with this setting and never experience anyproblems. But be warned that STACKS=0,0 may work for months and then, withoutwarning, overflow a program’s stack space, crashing your computer. If you are using thissetting and see a Stack Overflow error message, increase the STACKS= setting to at least9,128 or 9,256.
3. If you are not using the STACKS=0,0 setting, try to limit your choices for the size para-meter to 128, 256, or 512. Using these settings isn’t required, but specifying a size thatis an even power of two makes the stacks easier for DOS to manage. Also, except whenyou’re using the STACKS=0,0 setting, avoid size values less than 128. A small stack ismuch more likely to overflow, and you are just asking for trouble if you set the size ofDOS’s hardware stacks to anything less than 128.
Examples
To use the default number of stacks but increase their size to 256 bytes each, use the follow-ing line in your CONFIG.SYS file. (This setting has virtually become the standard for peoplewho are not disabling internal stacks in their computers.)
STACKS=9,256
To instruct DOS not to set up any internal stacks, and use the active program’s stack spacefor servicing interrupts, include the following line in your CONFIG.SYS file:
STACKS=0,0
MessagesInternal stack overflowSystem halted
Error: The stack that MS-DOS was using to service interrupts has overflowed, and the sys-tem has been halted. You need to restart your computer. If you have this problem, increasethe numstacks and/or size setting for the STACKS= command in your CONFIG.SYS file.
FApp
920 Appendix F Command Reference
Exception Error 12
Error: Same as the preceding message, except that this message is displayed when you arerunning in protected mode (for example, under Windows).
Invalid STACK parameters
Warning: You have specified an invalid parameter on the STACKS= line in your CONFIG.SYSfile. Check the entry to make sure that you have specified values for both numstacks andsize and that these values are within the legal range for the STACKS= command.
SUBMENU= 6.0 and later—InternalSUBMENU= is one of the new CONFIG.SYS menu commands. With it, you can create a multi-level menu from which to choose your startup configuration. You can use SUBMENU= onlyinside a menu block in your CONFIG.SYS file.
SyntaxSUBMENU=blockname, menutext
Parameters and Switches
blockname The name of the menu block that you want to display when this menuitem is chosen. blockname can be up to 70 characters long, but it can’tcontain any spaces or the following special characters:
\ / , ; = [ ]
(For more details, see the entry for [blockname] in this command refer-ence.) This argument is required.
menutext The text you want DOS to display for this menu line. menutext can be up to 70 characters long and contain any text you want, includingspaces. Separate menutext from blockname with a comma. If no menutext is provided, DOS displays the blockname in the menu.
Notes
1. The SUBMENU= command can appear only inside menu blocks in CONFIG.SYS.
CONFIGSYS
CONFIG.SYS allows two types of blocks: menu blocks and configuration blocks. Eachblock begins with a [blockname], and includes all the lines that follow, up to the next[blockname]. Menu blocks, which are blocks named [MENU] or defined with a SUBMENU= command, can include only menu-related commands. All otherCONFIG.SYS commands belong in configuration blocks.
921SUBMENU= 6.0 and later—Internal
2. Up to nine choices can be displayed in a menu, so you are limited to nine MENUITEM=and SUBMENU= commands in each menu block. Each menu item appears onscreen in theorder that it appears in the menu block, numbered from 1 to 9.
FApp
Before you construct an extensive menu system in CONFIG.SYS, remember that youwill have to wade through it each time you reboot your computer. A simple startupmenu, with a handful of options and perhaps one submenu, works best.
3. If DOS cannot find the block referred to by a SUBMENU= command in your CONFIG.SYSfile, it doesn’t display that choice in the menu. Your startup menu may fail if SUBMENU=doesn’t refer to a valid menu block.
4. In a multiconfiguration submenu, you can return to the previous menu by pressing theBackspace key.
Examples
Suppose that you’re using a main menu that enables you to choose from three basic config-urations for your computer: Windows, DOS, and Maintenance. For the DOS configuration,you want to add a submenu with two variations: One configures memory for normal DOSprograms, and the other provides your CADD program with the special memory interface itrequires. To do so, add the following lines to your CONFIG.SYS file:
[MENU]MENUITEM=WIN, Configure for Windows (Default)SUBMENU=DOS, Configure for MS-DOSMENUITEM=MAINT, Configure for File & Disk MaintenanceMENUDEFAULT=WIN, 30[DOS]MENUITEM=NORMAL, Configure for Normal MS-DOS ProgramsMENUITEM=CADD, Configure for CADD with INT15 InterfaceMENUDEFAULT=NORMAL, 30
When you include these lines in your CONFIG.SYS file, DOS searches for blocks named[WIN], [DOS], and [MAINT]. If those blocks exist in the file, the main menu that DOS displayslooks something like the following:
MS-DOS 6 Startup Menu=====================
1. Configure for Windows (Default)2. Configure for MS-DOS3. Configure for File & Disk Maintenance
Enter a choice: 1
Entering 1, 2, or 3 at this menu instructs DOS to execute the [WIN], [DOS], or [MAINT]block, respectively. If no entry is made within about 30 seconds, DOS chooses the [WIN]

922 Appendix F Command Reference
configuration by default. As long as the [NORMAL] and [CADD] blocks exist in CONFIG.SYS,choosing 2 brings up the following submenu.
MS-DOS 6 Startup Menu=====================
1. Configure for Normal MS-DOS Programs2. Configure for CADD with INT15 Interface
Enter a choice: 1
Entering 1 or 2 at this menu instructs DOS to execute the [NORMAL] or [CADD] configurationblock, respectively. If you do not make an entry within about 30 seconds, DOS chooses the[NORMAL] configuration by default. To return to the first menu, press the Backspace key.
See Also
[blockname], MENUCOLOR=, MENUDEFAULT=, and MENUITEM=
“Creating Multiple Configurations” in Chapter 2
SUBST 3.1 and later—ExternalSUBST is one of the pretender commands. It can create a drive alias for a subdirectory andfool many (but not all) programs. You might need to use SUBST to get older programs thatdon’t understand subdirectories to run. Unless you have a specific use for SUBST, however,avoid it. You can easily make a mistake and lose data when you are pretending.
SyntaxSUBST alias: drive:path /D
Parameters and Switches
alias: Specifies a valid drive name that becomes the alias, or nickname. alias: maybe a nonexistent drive, but it must be available for use and less than or equalto the value specified by the LASTDRIVE= command in your CONFIG.SYS file.
drive:path Specifies the drive name and directory path to be nicknamed alias:. Thedefault for drive: is the current drive. You cannot specify the /D parameterwhen you create an alias by using drive:path.
/D Deletes the alias drive. Do not specify a drive:path parameter when you aredeleting an alias drive.
Notes
1. Entering SUBST with no parameters displays a list of all the drive substitutions currentlydefined.
C:\>
BATCHFILE
AVOID
923SUBST 3.1 and later—External
2. The drive letter you use as the alias drive must be available and within the range speci-fied with the LASTDRIVE= command in your CONFIG.SYS file. You cannot use drive lettersreserved by Interlnk as SUBST drive aliases. If a drive letter is already in use as a SUBSTdrive alias, you must delete the previous assignment before assigning that drive letter toanother drive:path.
3. You cannot create SUBST alias drives that refer to subdirectories on a drive that is notlocal to your computer. Network, CD-ROM, and Interlnk drives are all redirecteddrives and cannot be used with SUBST.
4. When you delete an alias drive created by the SUBST command, include the drive letterof the alias drive, not the subdirectory that the alias refers to. For example, to delete thealias drive E, enter the following line at the DOS prompt:SUBST E: /D
5. You can’t use any of the following DOS commands on an alias drive created by theSUBST command:
ASSIGN FORMAT
BACKUP JOIN
CHKDSK LABEL
DEFRAG MIRROR
DISKCOMP RECOVER
DISKCOPY RESTORE
FDISK SYS
The preceding commands refuse to work on an alias drive created by SUBST, so if youdo try to use them, no harm will be done.
6. Do not create or delete any SUBST alias drives while Microsoft Windows is running. Ifyou create the SUBST aliases before starting Microsoft Windows, you can use the aliasdrives from within a DOS session in Windows.
MessagesCannot SUBST a network drive
Error: You tried to use a nonlocal drive as the alias drive. You cannot use network, Interlnk,or CD-ROM drives with SUBST.
Drive already SUBSTed
Error: You are trying to create a new SUBST drive alias using a drive letter that already is aSUBST drive alias. Delete the previous assignment by entering SUBST drive: /D and tryagain.
Invalid parameter
Error: The value that you specified for the alias drive (alias:) is invalid. You might need toincrease the value specified by the LASTDRIVE= command in your CONFIG.SYS file. This mes-sage is also displayed if you try to create an alias for a subdirectory on an alias drive. Thedrive:path parameter for the SUBST command must refer to a real local disk drive.
FApp
924 Appendix F Command Reference
See Also
ASSIGN and JOIN
“The SUBST Command” in Chapter 11
SWITCHYou can use the SWITCH command to enable several different optional subroutines in a CONFIG.SYS file.
SyntaxSWITCH label1, label2, ...
Parameters and Switches
label1, label2, ... The names of up to nine subroutines in the CONFIG.SYS file. Thesubroutine names are preceded by a colon (:) at the beginning ofthe line in the CONFIG.SYS file and subroutine blocks end withRETURN.
SWITCHES= 5.0 and later—InternalThe SWITCHES= command is a collection of options that configure DOS for certain circum-stances. Options enable you to move the WINA20.386 file out of the root directory, cause anenhanced keyboard to behave like a standard keyboard, and disable DOS 6’s new startupkeys. You can use SWITCHES= only in your CONFIG.SYS file.
SyntaxSWITCHES=/K /F /N /W
Parameters and Switches
/K Forces an enhanced keyboard to behave as though it were an older, standard key-board.
/F (DOS 6 only) Eliminates the two-second pause that occurs when the Starting MS-DOS... message appears onscreen.
/N (DOS 6 only) Disables the F5 Clean and F8 Interactive boot keys.
/W Enables you to move the WINA20.386 file out of the root directory of your startupdrive.
Notes
1. The SWITCHES= command can be located anywhere in your CONFIG.SYS file. DOS scansthe file looking for it before displaying the Starting MS-DOS... message.
DR-DOS
CONFIGSYS
CONFIGSYS
925SWITCHES= 5.0 and later—Internal
2. If you are having problems with an older application incorrectly interpreting yourenhanced keyboard, the /K switch might solve your problems. Enhanced keyboards nor-mally generate certain key codes that were not available on the older 84-key keyboards.Specifying /K forces DOS to translate these new key codes into their equivalent 84-keykeyboard codes.
The /K switch affects only programs that get their keyboard input from DOS. Manyprograms bypass DOS, getting keyboard input from the BIOS or, in some cases,directly from the keyboard. For these programs, the /K switch has no effect.
3. If you are using both the /K switch and ANSI.SYS device driver, make sure to include a/K switch on the line that loads ANSI.SYS as well.
4. By disabling DOS 6.22’s F5 Clean and F8 Interactive boot keys with the /N switch, youforce your computer to always start up with the CONFIG.SYS and AUTOEXEC.BAT files thatare present in your root directory. If security is a concern, and you load security featuresin these files, you might want to specify this switch. To truly secure your computer,however, you might need to lock your floppy drives, protect your startup files, and takeother precautions as well. This switch is only a minor obstacle to a determined user andis meant as a simple means to perhaps “user-proof” a menu system.
FApp
Before you specify the /N switch, be sure that you have a bootable floppy disk thatstarts up your system in a usable condition. (You need access to your hard drive and atleast a text editor such as EDIT to fix your startup files.) Never specify this switch untilyou have completely debugged your CONFIG.SYS and AUTOEXEC.BAT files.
5. The /F switch is intended to be used with the /N switch. After you have disabled the F5and F8 keys, you don’t need a two-second pause at startup so that you can press them.
6. Windows 3.0 in enhanced mode requires the WINA20.386 driver file to be availablebefore it loads. (See the first message in the following “Messages” section.) If you wantto move the WINA20.386 file out of your root directory, you need to specify the /Wswitch in CONFIG.SYS and add the following line to the [386Enh] section of your SYSTEM.INI file:DEVICE=drive:\path\WINA20.386
You should specify the full drive and path to WINA20.386 in the device line inSYSTEM.INI.
Windows 3.1 can load successfully in enhanced mode without access to theWINA20.386 driver, but any version 3.0 drivers that you’re using may still require theservices of the WINA20.386 driver. If they do and that driver is unavailable, Windowsmay become unstable or crash. Because enhanced-mode drivers for Windows are dis-tributed with many software packages, most people are running Windows 3.1 withWindows 3.0 drivers without knowing it. To be safe, be sure that the WINA20.386 dri-ver is available, either in the root directory or through the /W switch and a device line inSYSTEM.INI.
926 Appendix F Command Reference
Examples
You depend on an older application that doesn’t respond to the right-side Shift and Ctrlkeys properly. To force your enhanced keyboard to return the same keycodes for both theleft and right Shift and Ctrl keys, you include the following line in your CONFIG.SYS file:
SWITCHES=/K
If you use ANSI.SYS, remember to add the /K switch to the DEVICE= line that loads ANSI.SYSas well.
Perhaps you have set up a menu system that you want everyone who uses your computer touse. To avoid having people bypass it, you might want to disable the new DOS 6 interactivestartup features by adding the following line in your CONFIG.SYS file:
SWITCHES=/F /N
Although you use Windows 3.1, you’re not sure whether all your Windows enhanced-modedrivers have been updated yet and want to make sure that the WINA20.386 driver is available,just in case. Because you’ve moved the WINA20.386 file into the C:\DOS subdirectory withyour other DOS 6.x files, you need to include the following line in your CONFIG.SYS file:
SWITCHES=/W
Now that DOS knows you’ve moved WINA20.386, you need to tell Windows where you putit. To do so, add the following line to the [386Enh] section of your SYSTEM.INI file, which islocated in your main Windows subdirectory:
DEVICE=C:\DOS\WINA20.386
MessagesYou must have the file WINA20.386 in the root directory of your boot drive torun Windows in Enhanced Mode
Error: This message is displayed only if you are running Windows 3.0 in enhanced modeand the WINA20.386 file is not present in your root directory. To enable Windows 3.0 to runin enhanced mode with the WINA20.386 driver located somewhere else, specify theSWITCHES=/W command in your CONFIG.SYS file and enter a DEVICE=drive:\path\WINA20.386line in the [386Enh] section of SYSTEM.INI.
See Also
ANSI.SYS and WINA20.386
“Using the SWITCHES Command” in Chapter 19
SYS 1.0 and later—ExternalSYS can make a floppy disk bootable without reformatting the disk. It places a copy of DOS (the hidden system files IO.SYS, MSDOS.SYS, and COMMAND.COM for MS-DOS; the filesIBMBIO.COM, IBMDOS.COM, and COMMAND.COM for IBM DOS) on the specified disk. In DOS 6,DBLSPACE.BIN also can be copied.
C:\>
BATCHFILE
927SYS 1.0 and later—External
SyntaxSYS source drive:
Parameters and Switches
source The source drive and path for the system files. This parameter defaults to theroot directory of the current drive for the system files and to the file pointed toby the environment variable COMSPEC for the command-line interpreter (gener-ally, COMMAND.COM).
drive: The drive that is to receive the copies of the DOS files from the root directoryof the current drive. The trailing colon (:) is required.
Notes
1. You must specify the drive that will receive a copy of DOS.
2. In pre-4.0 versions of DOS, the disk that was to receive the DOS operating system fileswas required to have sufficient contiguous free space for the files IO.SYS and MSDOS.SYS(IBMBIO.COM and IBMDOS.COM in IBM DOS). Subsequent versions of DOS require onlythat enough free space exist, not that the space be contiguous.
3. SYS copies the DOS system files from the root directory of the current disk (or sourceif it was specified) to the destination drive:. If the DOS system files (IO.SYS andMSDOS.SYS) are not found and the source drive is a floppy disk drive, you are promptedto insert a system disk into the drive. If the source disk is a hard drive, reenter the SYScommand and specify where the DOS system files are located by adding the sourceparameter.
4. You cannot use SYS in a networked drive; in a drive formed by ASSIGN, JOIN, or SUBST;or in an Interlnk drive.
5. In pre-5.0 versions of DOS, you have to copy COMMAND.COM to the target disk in a sepa-rate step.
6. SYS looks for a copy of COMMAND.COM either in the root directory of the current drive orin the subdirectory specified by the source parameter if one is specified. If COMMAND.COMis not found, a warning message is displayed. When you see this message, use the COPYcommand to add a copy of COMMAND.COM to the disk.
7. With DOS 6, SYS copies the DBLSPACE.BIN file to the system disk you are creating evenif you do not use DoubleSpace. If SYS is unable to find the DBLSPACE.BIN file, no errormessage is displayed. SYS searches the DOS PATH for DBLSPACE.BIN if the file isn’t foundin the same location as the other system files.
MessagesCould not copy COMMAND.COM onto target disk
Warning: SYS was unable to find the file COMMAND.COM in the root directory of the currentdrive or, if you specified a source parameter, in the source subdirectory. To make the diskbootable, use the COPY command to copy COMMAND.COM to the disk.
FApp
928 Appendix F Command Reference
Insert system disk in drive d:and strike any key when ready
Prompt: SYS cannot find the DOS system files (IO.SYS and MSDOS.SYS) on the floppy drivethat you specified with the source parameter (or the root directory of the current drive ifyou didn’t specify a source parameter). Insert a floppy disk that contains the DOS systemfiles.
Invalid path or System files not found
Error: You executed the SYS command with a source parameter, but SYS cannot find theDOS system files in the subdirectory you specified. This message is displayed if the sourcesubdirectory is invalid or does not contain the files IO.SYS and MSDOS.SYS. Correct yoursource parameter entry and retry the command.
No room for system on destination disk
Error: The disk you are trying to make bootable with SYS doesn’t have enough free space forthe system files. Delete some of the files on the disk and try the SYS command again.
No system on default disk drive
Error: You executed the SYS command without specifying a source parameter, but SYS can-not find the DOS system files (IO.SYS and MSDOS.SYS) on the current hard drive. Reenterthe SYS command, specifying the location of the DOS system files by adding the sourceparameter.
SYS cannot operate on target drive
Error: SYS cannot transfer the system files (IO.SYS and MSDOS.SYS) to the target drive. Youmay get this message if you try to use SYS to make a DoubleSpace-compressed drivebootable. SYS can transfer the DOS system files to the host drive but not to theDoubleSpace-compressed drive. SYS is unable to transfer the DOS system files to networkand Interlnk drives as well.
System transferred
Information: SYS has placed the files IO.SYS, MSDOS.SYS, COMMAND.COM, and possibly DBLSPACE.BIN on the target disk.
See Also
FORMAT
SYSINFOSYSINFO gathers and displays information about the computer system. This information isgathered in a file called SYSINFO.TXT or a filename designated. You can view it in browsemode by using the E editor.
PC-DOS
929TASKMGR
SyntaxSYSINFO /e=filename /h /n=filename /r /q /s /w /wr: /f /t /?
Parameters and Switches
/e=filename Uses the specified program for editing.
/h Gathers and displays hardware information only.
/n=filename Writes output to a specified file (rather than to SYSINFO.TXT).
/r Displays preexisting SYSINFO.TXT (or a file specified by /n).
/q Gathers and displays a Quick Info string only.
/s Gathers and displays software information only.
/w Gathers and displays Windows information only.
/wr: Gathers Windows information from all drives.
/f Gathers and displays Stacker volume information only.
/t Uses the TMP or TEMP directory for the output file.
/? Displays the abbreviated online help.
TASKMGRTASKMGR is a menu-driven utility to load more than one DOS program simultaneously andswitch between them. The following syntax and parameters are valid for systems with a 386or higher processor and at least 2MB of memory. Background programs continue to runwhen in multitasking mode.
SyntaxTASKMGR /M /S /? /S?
Parameters and Switches
/M Allows you to switch with the numbers on the main keyboard. Normally,you switch between tasks in TASKMGR by using the keys on the numerickeypad.
/S Loads TASKMGR in task-switching mode instead of multitasking. In task-switching mode, background applications are suspended.
/? Displays abbreviated help for multitasking.
/S? Displays abbreviated help for task switching.
FApp
DR-DOS
930 Appendix F Command Reference
Notes
Use the DR DOS setup utility to configure and load TASKMGR permanently.
TIME 1.0 and later—InternalThe TIME command can display and set the current time for your computer. Normally, DOSand your computer’s hardware attempt to keep the time set properly. If you don’t have anAUTOEXEC.BAT file, DOS prompts you to enter the current date each time your computerreboots.
SyntaxTIME hh:mm:ss.xx A|P
To display the time and have DOS prompt you to enter a new time, use the following format:
TIME
Parameters and Switches
hh The one- or two-digit number that represents hours (0 to 23). To set the time,this parameter is required.
mm The one- or two-digit number that represents minutes (0 to 59). This parameter is optional.
ss The one- or two-digit number that represents seconds (0 to 59). This parameteris optional.
xx The one- or two-digit number that represents hundredths of a second (0 to 99).This parameter is optional.
A|P Entering an A or a P can designate a.m. or p.m., respectively. You can use upper-or lowercase letters. If you do not use A or P, you must enter the time in 24-hour (military) format.
Notes
1. Depending on the country code setting in your CONFIG.SYS file, a comma may be theseparator between seconds and hundredths of seconds. (Refer to the section on theCOUNTRY command earlier in this command reference.)
2. The TIME command sets the computer’s internal 24-hour clock. The time and date arerecorded in the directory when you create or change a file. This information can helpyou find the most recent version of a file when you check your directory.
3. Most PCs use an internal clock, backed up by a battery, that is accurate to about oneminute a month, so you rarely have to set the time after you set it initially. If your sys-tem does not retain the time after you turn off your computer, however, put TIME and
C:\>
BATCHFILE
931TOUCH
DATE commands in your AUTOEXEC.BAT file so that DOS does not default to a nonsensetime and date when you turn on your computer.
4. If you press Enter after the time prompt, DOS does not change the current time.
See Also
COUNTRY= and DATE
“Issuing the TIME Command” in Chapter 10
TIMEOUTTIMEOUT specifies how long to wait for a user response to a SWITCH or ? statement in a CONFIG.SYS file. In the case of SWITCH, after the specified TIMEOUT period, the first option isexecuted. In the case of ?, the command that ? applies to is skipped. TIMEOUT should precedethe SWITCH or ? statement in the CONFIG.SYS file.
SyntaxTIMEOUT=n
Parameters and Switches
=n Time to wait in seconds.
See Also
? and SWITCH
TOUCHTOUCH modifies the date and time DOS lists for a file or set of files.
SyntaxTOUCH drive:\path\filespec /T:hh:mm:ss /D:date /F:E|J|U /P /R /S /?
Parameters and Switches
drive:\path\filespec The path and filename or file specification for which to changethe date or time.
/T:hh:mm:ss Sets the file time in hours hh starting at 00 for midnight and running to 23, minutes mm from 0 to 59, and seconds ss from 0 to 59.
FApp
DR-DOS
CONFIGSYS
DR-DOS
932 Appendix F Command Reference
/D:date Sets the file date. The date format is determined by your systemcountry code.
Europe date format is dd-mm-yyyy
Japan date format is yyyy-mm-dd
U.S. date format is mm-dd-yyyy
/F:E|J|U Overrides the system country code and uses European, Japanese,or U.S. date format.
/P Prompts before changing the date or time of each file.
/R Includes read-only files when changing the date and time.
/S Includes files in subdirectories when changing files according toa filespec.
/? Displays abbreviated help.
TREE 2.0 and later—ExternalThe TREE command displays a visual representation of the subdirectory structure on yourdisk, which is often referred to as the directory tree. TREE can be useful for printing a map ofyour hard drive if you redirect its output to your printer.
SyntaxTREE drive:path /F /A
Parameters and Switches
drive: Specifies the drive that holds the disk for which you want to display the direc-tory structure. If you omit drive:, DOS assumes the current drive.
path Specifies the subdirectory in which you want the examination to start. If youomit path, DOS displays a directory tree that starts with the current directory.
/F Displays all files in each directory. Using the /F switch can make the output gen-erated by TREE rather lengthy.
/A Uses ASCII characters rather than the default graphics characters to display theconnection of subdirectories. If you are redirecting the output of TREE to yourprinter, you might want to use this switch. Not all printers can print the blockgraphics characters that TREE uses in its display.
See Also
CD or CHDIR, DELTREE, MD or MKDIR, MOVE, and RD or RMDIR
“Listing Directories with TREE” in Chapter 5
C:\>
BATCHFILE
933TYPE 1.0 and later—Internal
TUNERTUNER displays the Stacker online tuner interface, allowing the choice of compression speedfor the system.
SyntaxTUNER /m /?
Parameters and Switches
/m Uses the monochrome display mode.
/? Displays the abbreviated online help.
TYPE 1.0 and later—InternalThe TYPE command displays the contents of a file onscreen. If the file is an ASCII text file,you are able to read it. If it’s a binary file, however, the screen may seem to fill up with gib-berish while beeping, and you may think you’ve broken your computer. No harm has beendone, but displaying binary files onscreen is a fairly useless operation. The CLS commandcleans up the mess for you.
SyntaxTYPE pathname
Parameters and Switches
pathname The file that you want TYPE to display. If you do not specify a drive, DOSassumes the current drive. If you do not specify a subdirectory path, DOSassumes the current directory. The filename portion of this parameter isrequired. Wildcards are not allowed.
Notes
1. The TYPE command displays a file’s characters onscreen. You can use TYPE to see a file’scontents.
2. Strange characters appear onscreen when you use TYPE for some data files and mostprogram files because TYPE tries to display the machine-language instructions as ASCIIcharacters.
3. As you can with most other DOS commands, you can redirect the output of TYPE to theprinter by adding > PRN to the command line or by pressing Ctrl+PrtSc. Don’t forget topress Ctrl+PrtSc again to turn off the printing instruction.
4. To keep the contents of a long file from scrolling off the screen before you can readthem, you can pipe the output of TYPE through MORE. Alternatively, you can press Ctrl+Sto stop the display and Ctrl+Q to restart it.
FApp
PC-DOS
C:\>
BATCHFILE

934 Appendix F Command Reference
Examples
To display the contents of the DOS README.TXT file one screen at a time, use the followingcommand:
TYPE C:\DOS\README.TXT | MORE
See Also
MORE
“Viewing Files” in Chapter 8
UMBCGA.SYSUMBCGA.SYS maps the video memory of a color adapter as upper memory blocks (UMBs) thatare used for loading programs with the LOADHIGH command if a CGA, EGA, or VGA adapteralso is present in combination with a monochrome adapter.
UMBCGA.SYS is one of the installable device drivers provided with DOS. You must load it byusing either a DEVICE= or DEVICEHIGH= command in the CONFIG.SYS file.
SyntaxDEVICE=drive:\path\umbcga.sys
Parameters and Switches
drive:\path\ Location of the device driver file.
Notes
Programs that directly write into color adapter memory are likely to crash the computer.UMBCGA.SYS includes defense mechanisms, but they are not foolproof.
UMBEMS.SYSUMBEMS.SYS maps a 64KB block of EMS memory as upper memory blocks (UMBs) that areused for loading programs with the LOADHIGH command if an EMS card with at least 64KBof EMS also is present in a computer.
UMBEMS.SYS is one of the installable device drivers provided with DOS. You must load it byusing either a DEVICE= or DEVICEHIGH= command in the CONFIG.SYS file.
SyntaxDEVICE=drive:\path\umbems.sys
Parameters and Switches
drive:\path\ Location of the device driver file.
PC-DOS
DEVICE =
PC-DOS
DEVICE =

935UMBMONO.SYS
UMBHERC.SYSUMBHERC.SYS maps the video memory of a Hercules adapter as upper memory blocks(UMBs) that are used for loading programs with the LOADHIGH command if a Herculesgraphics adapter or Hercules Graphics Adapter Plus also is present.
UMBHERC.SYS is one of the installable device drivers provided with DOS. You must load it byusing either a DEVICE= or DEVICEHIGH= command in the CONFIG.SYS file.
SyntaxDEVICE=drive:\path\umbherc.sys /x
Parameters and Switches
drive:\path\ Specifies the location of the device driver file.
/x Omits the video memory DMA test during startup. This switch shouldbe used only after an adapter has successfully passed the test. Adaptersthat fail this test are not compatible with UMBHERC.SYS.
Notes
Programs that use the Hercules card in its graphics modes are incompatible with this devicedriver. If the Hercules card is one of the RAMFONT type, any program that uses theRAMFONT capability also is incompatible with this device driver.
UMBMONO.SYSUMBMONO.SYS maps the video memory of the monochrome adapter as upper memory blocks(UMBs) that are used for loading programs with the LOADHIGH command if a CGA, EGA, orVGA adapter also is present.
UMBMONO.SYS is one of the installable device drivers provided with DOS. You must load it byusing either a DEVICE= or DEVICEHIGH= command in the CONFIG.SYS file.
SyntaxDEVICE=drive:\path\umbmono.sys
Parameters and Switches
drive:\path Location of the device driver file.
Notes
Programs that directly write into monochrome adapter memory are likely to crash the com-puter. UMBMONO.SYS includes defense mechanisms, but they are not foolproof.
FApp
DEVICE =
PC-DOS
936 Appendix F Command Reference
UNCOMPUNCOMP uncompresses all the data stored in the Stacker drive, storing it on the originaluncompressed disk. The stacvol file is deleted.
SyntaxUNCOMP drive: /?
Parameters and Switches
drive: Indicates the Stacker drive to decompress.
/? Displays the abbreviated online help.
UNDELETE 5.0 and later—ExternalUNDELETE recovers files that were deleted with the DEL command. In DOS 5.0, UNDELETE usesMIRROR’s delete tracking file (if available) to restore a deleted file. In DOS 6, UNDELETE uses adelete sentry file or a delete tracking file (if either exists) to restore a deleted file. Either ver-sion may be able to restore a deleted file without any special files if the file was deletedrecently and little disk activity has occurred since the deletion.
Syntax
In DOS 5.0, use the following format:
UNDELETE pathname /LIST /DT /DOS /ALL
In DOS 6, to load the memory-resident program that UNDELETE uses for delete sentry anddelete tracking protection, use the following format:
UNDELETE /LOAD /Sdrive /Tdrive-entries
In DOS 6, to manipulate UNDELETE, use the following format:
UNDELETE /LIST /ALL /PURGEdrive /STATUS /UNLOAD
In DOS 6, to undelete one or more files, use the following format:
UNDELETE pathname /DT /DS /DOS /LIST /ALL
Parameters and Switches
pathname Specifies the file or files that you want to undelete. If you do not specifya drive, DOS assumes the current drive. If you do not specify a subdi-rectory path, DOS assumes the current directory. Wildcards areallowed. If you omit this parameter, DOS undeletes all deleted files inthe current directory.
PC-DOS
C:\>
BATCHFILE
TSR
937UNDELETE 5.0 and later—External
/ALL Restores files without prompting. The Delete Sentry method is used ifit is available. Otherwise, the Delete Tracker method is used, if it isavailable. If neither method is available, the normal DOS directorymethod is used (see the “Notes” section for this command). You can use/ALL with any of the other switches.
/DOS Restores files that DOS lists as deleted. UNDELETE prompts you beforeeach file is restored.
/DS Recovers only the files listed in the SENTRY directory. UNDELETE promptsyou before each file is restored.
/DT Restores only the files listed in the delete tracking file. UNDELETEprompts you before each file is restored.
/LIST Provides a list of deleted files but does not undelete them. The type oflist produced varies with the use of the /DT, /DS, and /DOS switches.
/LOAD Loads the Undelete memory-resident program into conventional mem-ory, using the UNDELETE.INI file. If that file does not exist, UNDELETE cre-ates a default UNDELETE.INI file.
/PURGEdrive Deletes the contents of the SENTRY directory created by Delete Sentryprotection. drive defaults to the current drive.
/Sdrive Enables Delete Sentry protection and loads the Undelete memory-resident program into memory, using the UNDELETE.INI file. drivedefaults to the current drive.
/STATUS Displays the type of protection in effect for each drive.
/Tdrive-entries Enables Delete Tracker protection and loads the Undelete memory-resident program into memory, using the UNDELETE.INI file. The driveparameter is the drive for which you want Delete Tracker protection.entries is a number (ranging from 1 through 999) that specifies themaximum number of entries in the delete tracking file, PCTRACKR.DEL.DOS determines the default value by the factors in the following list:
Disk Size Entries PCTRACKR.DEL Size
360KB 25 5KB
720KB 50 9KB
1.2MB 75 14KB
1.44MB 75 14KB
20MB 101 18KB
32MB 202 36KB
Larger than 32MB 303 55KB
FApp
938 Appendix F Command Reference
/UNLOAD Unloads the Undelete memory-resident program from mem-ory, disabling Delete Tracker or Delete Sentry protection ifeither was active. UNDELETE is unable to release the memory itwas using if any other memory-resident software has beenloaded after it.
Rules
1. UNDELETE cannot restore deleted subdirectories.
2. UNDELETE cannot restore a file if you deleted the subdirectory that contained the file.
3. Do not use Delete Tracker for any drive that has been redirected with JOIN or SUBST.
Notes
1. UNDELETE restores deleted files, using the delete tracking or delete sentry file (if eitherexists), or the standard DOS directory.
2. Delete Sentry provides the highest level of protection by saving deleted files in a SENTRYdirectory. The size of the SENTRY directory (including the files that it contains) is limitedto approximately 7 percent of your disk. DOS purges old files to make room for newones.
3. Delete Tracker provides an intermediate level of protection by maintaining a hidden filecalled PCTRACKR.DEL that records the locations of a file’s allocation units (clusters). Youcan recover a deleted file until its freed allocation units are allocated to a new file.Delete Tracker takes the same amount of memory as Delete Sentry.
4. When you delete a file, DOS removes the first character in the filename. If you useUNDELETE with the /DOS switch, you are prompted for a character to replace the missingfirst character. If you use the /ALL switch, and if a delete tracking or delete sentry filedoes not exist, UNDELETE restores each deleted file without prompts, using the character# as the first character of the filename. A deleted file named BETTER.TXT, for example, isundeleted as #ETTER.TXT.
If BETTER.TXT and LETTER.TXT are deleted, DOS restores BETTER.TXT as #ETTER.TXT andLETTER.TXT as %ETTER.TXT. UNDELETE tries the following replacement characters for thefirst letter of the filename, in the order shown, until a unique filename is found:
The pound sign (#)
The percentage sign (%)
The ampersand (&)
The digits 0 through 9
The characters A through Z
5. Although UNDELETE enables you to recover files that you deleted accidentally, do not usethis command as a substitute for backing up data. Be sure to keep up to date backups ofyour data.
939UNFORMAT 5.0 and later—External
Examples
For the following examples, assume that the DOS commands are stored in a directory thatis in your PATH.
To restore all deleted files in the root directory of drive C without prompting for confirma-tion on each file, use this command:
C:\UNDELETE /ALL
To provide a list of all currently deleted files, use the following command:
UNDELETE /LIST
To create C:\PCTRACKR.DEL to track up to 200 deleted files on drive C and load the memory-resident portion of UNDELETE, use this command:
UNDELETE /TC-200
See Also
MWUNDEL and UNFORMAT
“Recovering Deleted Files with UNDELETE” in Chapter 9
UNFORMAT 5.0 and later—ExternalThe UNFORMAT utility can recover a disk that was inadvertently reformatted. In DOS 5.0,UNFORMAT uses the files produced by the MIRROR command (if those files are available) torestore the disk to its condition before reformatting. In DOS 5.0 and 6, you probably canunformat disks if they were not formatted with FORMAT /U. The UNFORMAT command workson both hard disks and floppy disks.
SyntaxUNFORMAT drive: /J /L /P /U /TEST /PARTN
Parameters and Switches
drive: Specifies the drive where the deleted file resides. This parameter is required.
/J Confirms that the MIRROR command contains the necessary information torestore the disk. This switch does not unformat the disk.
/L Lists all files and directory names found. If used with the /PARTN switch, /L dis-plays current partition tables. The default (no /L) is to list only subdirectoriesand fragmented files.
/P Directs all output to the printer connected to LPT1.
/PARTN Restores the partition table of a hard disk. You must use the PARTNSAV.FIL filecreated by the MIRROR /PARTN command.
FApp
C:\>
940 Appendix F Command Reference
/TEST Shows how UNFORMAT will re-create the information on the disk. Like the /Jswitch, this switch does not actually unformat the disk.
/U Unformats without using the mirror files.
Rules
1. To unformat your hard disk, you first must reboot from drive A, using a specially pre-pared floppy disk (see the “Notes” section for this command).
2. If you format a floppy disk by using the FORMAT /U switch, UNFORMAT cannot restore thedisk.
3. UNFORMAT works only on disks that use sector sizes of 512, 1024, or 2048 bytes.
4. The /J, /U, and /PARTN parameters for UNFORMAT were omitted from the documentationfor MS-DOS 6, but UNFORMAT still supports them. They are included in the FASTHELPthat you display by entering UNDELETE /? at the DOS command prompt.
Notes
1. UNFORMAT attempts to recover a formatted disk by using the MIRROR.FIL andMIRORSAV.FIL files created by the MIRROR command or by using information in the disk’sroot directory and file allocation table. The second process is slower and less reliablethan the first.
2. To prepare for the eventuality that you may need to use UNFORMAT, format a floppy disk(using the /S switch to make the disk bootable) and then transfer the UNFORMAT.EXE fileto that disk. Also, transfer the CONFIG.SYS files, the AUTOEXEC.BAT files, and any devicedrivers needed for the computer’s operation. Thereafter, if you accidentally format thehard disk, you can boot from the floppy disk and perform an UNFORMAT operation.
Before you use UNFORMAT to recover the disk, use the command with the /J or /TESTswitches to determine whether your mirror files are up to date or whether the UNFORMATcommand can recover files in the way that you want.
3. In DOS 6, UNFORMAT cannot recover fragmented files. DOS asks you whether you wantto recover such files by truncating them at the end of their contiguous sectors.
See Also
MIRROR and UNDELETE
“Unformatting a Disk” in Chapter 9
UNINSTALLIf you install DR DOS on a system that already contains an operating system, UNINSTALLremoves DR DOS and restores the previous operating system if you saved the OS during
DR-DOS
941UNPACK2
DR DOS setup. UNINSTALL also is used to delete the saved old OS files if you determine thatyou no longer need them. When you do that, you cannot uninstall DR DOS and restore theold OS by using this command.
SyntaxUNINSTALL /C /?
Parameters and Switches
/C Removes the old operating system files.
/? Displays abbreviated help.
UNPACK2UNPACK2 unpacks bundled files from PC DOS disks.
SyntaxUNPACK2 drive:\path source_drive:\destination_path /v /p /c /n:specific_file /?
or
UNPACK2 drive:\path source_ drive:\destination_path /show /sizes /?
Parameters and Switches
drive:\path Indicates the location of the UNPACK2 file.
source Specifies the name of the bundle from which to unpack files.
destination_path Specifies the directory to unpack to.
/v Writes with VERIFY.
/p Prepends the command-line path to the packed file path.
/c Creates a target directory if it does not exist.
/n:specific_file Unpacks a designated file from a bundle.
/show Shows all packed files in a bundle.
/sizes Shows the size of packed files in a bundle.
/? Displays the abbreviated online help.
Notes
The /sizes switch must be used with the /show switch. It cannot be used by itself.
FApp
PC-DOS
942 Appendix F Command Reference
UNSTACKUNSTACK uncompresses a compressed Stacker drive and writes the data to an uncompresseddrive.
SyntaxUNSTACK drive: /M /?
Parameters and Switches
drive: Specifies the compressed drive to be unstacked.
/M Displays the unstack screen on a monochrome monitor.
/? Displays abbreviated help.
VER 2.0 and later—InternalVER is a simple command that displays the version number of MS-DOS onscreen. If youever wonder what version of DOS is running on the computer you are using, type VER at theDOS command prompt.
SyntaxVER
Notes
1. The VER command displays a one-digit DOS version number, followed by a two-digitrevision number, reminding you which DOS version the computer is using.
2. If a computer is running a customized OEM version of MS-DOS, the name of thatcompany is normally included in the line that VER displays. For instance, Compaq com-puters usually display the name COMPAQ along with the DOS version number. IBM ver-sions normally display PC DOS instead of MS-DOS.
3. VER is unaffected by the SETVER program. VER always displays the actual version of DOSthat the computer is running.
Examples
To display the version of MS-DOS that’s running on a computer, enter the VER command atthe DOS prompt as follows:
VER
For MS-DOS 6.22, the following line is displayed onscreen:
MS-DOS Version 6.22
DR-DOS
C:\>
BATCHFILE
943VERIFY 2.0 and later—Internal
See Also
“Displaying the Version with VER” in Chapter 10
VERIFY 2.0 and later—InternalNormally, when DOS writes information to a disk, it trusts the disk hardware to make surethat the data was stored safely. If you want to be absolutely sure, you can enter VERIFY ON;DOS then reads back all the data written to disk and compares it to make sure that it wasstored safely. Using VERIFY ON, however, slows down disk-write operations substantially, sothis additional level of protection doesn’t come without a price.
SyntaxVERIFY onoff
Parameters and Switches
onoff Specifies whether you want to turn on (VERIFY ON) or off (VERIFY OFF) thiscommand. If you omit this parameter, the current state of the verify flag is dis-played.
Notes
1. By default, when DOS starts up, VERIFY is OFF.
2. VERIFY accepts only the parameters ON and OFF.
3. VERIFY works by instructing the disk controller to read back all data written to disk, cal-culate a new CRC (error checking) value from the data read, and compare it to theCRC value stored on the disk. (The disk controller normally does this every time data isread from the disk, which is how DOS discovers bad sectors when copying files.) Anydifferences between the two CRC values indicates that an error has occurred. SettingVERIFY ON doesn’t compare the data on disk to the data that DOS was requested towrite; it only makes sure that the data written to the disk is readable.
4. If VERIFY is set ON, you have more assurance that your data is being safely stored on disk.If VERIFY is set OFF, writing data to disk takes less time. When deciding which setting touse, you have to choose between data integrity and speed.
5. Specifying the /V parameter for COPY, DISKCOPY, or XCOPY sets VERIFY ON for the dura-tion of the command. When the copy operation is finished, these commands set VERIFYback to the state it was in before the command executed.
6. The VERIFY state can be changed by a running program. Programming etiquette dic-tates that, when done, an application should reset any flag, such as VERIFY, to the statein which it was found. Still, you might run across applications that forget to reset VERIFY. If this causes problems, run the application from a batch file to restore the VERIFY state when the program terminates.
FApp
C:\>
BATCHFILE
944 Appendix F Command Reference
Examples
If you are about to update your company’s accounts receivables, you might want to turn onthe verify flag, as follows, before starting your accounting software:
VERIFY ON
After you are finished, you might set the verify flag off again, as follows, so that your routinecomputer tasks aren’t unnecessarily slowed down:
VERIFY OFF
If you ever want to know whether the verify flag is off or on, enter the VERIFY commandwith no parameters at the DOS prompt like this:
VERIFY
MessagesMust specify ON or OFF
Error: The only parameters that the VERIFY command accepts are ON or OFF. Entering any-thing else displays the preceding error message.
VERIFY is on
or
VERIFY is off
Information: If you enter VERIFY with no parameters, one of the preceding messages is dis-played, informing you of the current state of the verify flag.
VFINTD.386 6.0 and later—WindowsSetup installs the VFINTD.386 device driver in the [386Enh] section of SYSTEM.INI to allowMicrosoft Backup for Windows access to your floppy disk drives. If you have any otherWindows backup software installed, this driver often conflicts with the drivers installed forthat software.
Syntax
To use Microsoft Backup for Windows, you must include the following line in the [386Enh]section of the SYSTEM.INI file:
DEVICE=drive:\path\VFINTD.386
Parameters and Switches
drive:\path\ The full path to the VFINTD.386 file on your system. The setup pro-gram for DOS 6 places this file in the C:\DOS subdirectory by default.
DISK
945VIEW
Notes
1. Almost all backup software for Windows adds a device driver to SYSTEM.INI that allowsaccess to your tape drives and floppy disk drives. Unfortunately, few of these drivers canget along with each other, and you’re usually forced to remove all but one driver beforeany of them will work. The following list includes some of the more common third-party drivers to look for in SYSTEM.INI:
Driver Filename Backup Program
VFINTD.386 Microsoft Backup for Windows (with DOS 6) and NortonBackup for Windows
CMSDTAPE.386 Colorado Tape Backup
MYABU.386 My Advanced Backup
FASTBACK.386 Fastback for Windows
VFD.386 Central Point Backup for Windows
CPBVXD.386 Central Point Backup for Windows
2. Microsoft suggests that you disable any third-party drivers you find in SYSTEM.INI byadding a semicolon to the front of the DEVICE= line that loads them. Be aware thatdoing so may cause your other backup software to stop working.
3. If your computer fails the compatibility test that Microsoft Backup for Windows runs,you are probably having a driver conflict in SYSTEM.INI. If this happens, quit Windows,“comment out” any lines in SYSTEM.INI that load third-party backup drivers (see the pre-ceding Driver table), restart Windows, and try the test again. As long as you commentout the driver lines (by placing a semicolon at the beginning of the line) instead of delet-ing them, you can easily restore them when you want to use your other backup software.
4. Be aware that Windows does not recognize any changes you make in SYSTEM.INI untilyou quit Windows completely and restart it from the DOS prompt.
Examples
Setup for DOS 6 adds the following line to the [386Enh] section of your SYSTEM.INI filewhen it installs Microsoft Backup for Windows on your computer:
DEVICE=C:\DOS\VFINTD.386
Setup does not, however, comment out third-party drivers in SYSTEM.INI that are known tocause conflicts with the VFINTD.386 driver.
VIEWYou can use VIEW to view an online document.
SyntaxVIEW drive:\path\filename.inf /?
FApp
PC-DOS
946 Appendix F Command Reference
Parameters and Switches
drive:\path\filename.inf Specifies the location and name of the file to view. The fol-lowing three online documents are available:
CMDREF.INF PC DOS 7 Command Reference
DOSREXX.INF PC DOS 7 REXX Reference
DOSERROR.INF PC DOS 7 Error Messages
/? Displays the abbreviated online help.
VOL 2.0 and later—InternalVOL displays the volume label and serial number of a disk if they exist. The volume label issimply a name that you can assign when you format a disk or later when you use the LABELcommand. DOS began adding serial numbers to disks with DOS 4.0.
SyntaxVOL drive:
Parameters and Switches
drive: The drive whose label and serial number you want to display. If you omit thisparameter, DOS assumes the current drive.
Notes
1. You can add a label to a disk when you format it by using the FORMAT /V command orlater by using the LABEL command.
2. The serial number is a unique identifier assigned to the disk when it’s formatted. DOSuses the serial number to verify that a disk hasn’t been changed in disk drives that don’thave change line support. Preformatted disks often do not have serial numbers on them,and some third-party formatting utilities neglect to add them, as well. DOS may beunable to tell whether you have changed a floppy disk if it has no serial number andyour drive doesn’t have change line support.
3. DOS can assign serial numbers to a disk only with the FORMAT command. You can’t addor change the serial number of a disk without reformatting it.
Examples
To display the volume label of a floppy disk in drive B:, enter the following command at theDOS prompt:
VOL B:
If you omit the drive: parameter (B:), DOS assumes the current disk.
C:\>
BATCHFILE
947VSAFE 6.0 and later—External
VOL displays the following messages if the disk specified has both a volume label and a serialnumber:
Volume in drive B: is NEW WORKVolume Serial Number is 4EF7-9C30
If the disk has no serial number, the second line is omitted. If the disk has no volume label,the following message is displayed:
Volume in drive B: has no label
MessagesInvalid drive specification
Error: You specified an invalid drive letter in the drive: parameter.
Invalid switch - switch
Error: You specified an invalid switch parameter. The only parameter that VOL accepts is asingle disk drive.
Too many parameters - parameter
Error: You’ve specified more than one parameter on the command line. The only parameterthat VOL accepts is a single disk drive.
See Also
FORMAT and LABEL
“Examining Volume Labels with VOL” in Chapter 7
VSAFE 6.0 and later—ExternalVSAFE is a memory-resident utility that can monitor the activity in your computer. If anyprogram is acting suspiciously, VSAFE can halt the process and request guidance from you asto what to do about it.
SyntaxVSAFE /option+|- ... /NE /NX /Akey /Ckey /N /D /U
Parameters and Switches
/Akey Sets the hot key as Alt plus the key specified by key.
/Ckey Sets the hot key as Ctrl plus the key specified by key.
/D Turns off checksumming.
/N Instructs VSAFE to monitor network drives.
/NE Prevents VSAFE from loading into expanded memory.
FApp
C:\>
BATCHFILE
TSR

948 Appendix F Command Reference
/NX Prevents VSAFE from loading into extended memory.
/option+|- ... Specifies how VSAFE checks for viruses. Use a plus sign (+) after optionto enable the switch; use a minus sign (-) after option to disable it.Choose option from the following list:
1 Warns of low-level formatting that could erase your hard disk(default: on)
2 Warns of a program’s attempt to stay resident in memory(default: off)
3 Prevents programs from writing to any of your disks (default: off)
4 Checks executable files that DOS opens for viruses (default: on)
5 Checks all disks for boot sector viruses (default: on)
6 Warns of attempts to write to the boot sector or to the partitiontable of the hard disk (default: on)
7 Warns of attempts to write to the boot sector of a floppy disk(default: off)
8 Warns of attempts to modify executable files (default: on)
/U Disables and unloads VSAFE from memory. If VSAFE wasn’t the last resi-dent program loaded, the memory it was using will not be released.
Rules
1. Turn off VSAFE before you install Microsoft Windows.
2. Do not use VSAFE after you start Microsoft Windows.
3. If you use VSAFE with Microsoft Windows, run the MWAVTSR.EXE memory-resident program by adding the following line to your WIN.INI file:LOAD=C:\DOS\MWAVTSR.EXE
MWAVTSR.EXE enables VSAFE messages to be displayed in Windows.
4. The default hot key is Alt+V.
Notes
VSAFE is a memory-resident program that takes up a varying amount of conventional,extended, and expanded memory. In DOS 6.0 and higher, VSAFE takes up 44KB of conven-tional memory, 23KB of conventional and 23KB of extended memory, or 7KB of conven-tional and 64KB of expanded memory.
Examples
To turn on warnings about programs’ attempts to stay in memory, to turn off checks forboot sector viruses, and to make Alt+Q the hot key, use the following command:
VSAFE /2+ /5- /AQ
949WINA20.386 5.0 and later—Windows
See Also
MSAV, MWAV, and MWAVTSR
“Guarding Against Infection” in Chapter 9
WINA20.386 5.0 and later—WindowsWindows 3.0 enhanced-mode drivers often require the help of the WINA20.386 driver to per-form their duties. Setup for MS-DOS 6 places this driver in the root directory if it findsWindows installed on your system. If you move the WINA20.386 file to another subdirectory,you need to tell Windows where it is and add a SWITCHES=/W line to your CONFIG.SYS file.
Syntax
To tell Windows where you have located the WINA20.386 driver, include the following line inthe [386Enh] section of SYSTEM.INI:
DEVICE=drive:\path\WINA20.386
Parameters and Switches
drive:\path\ The full path to the WINA20.386 file on your system. The setup pro-gram for DOS 6 places this file in the root directory of the startupdrive by default.
Notes
Windows 3.0 in enhanced mode requires the WINA20.386 driver file to be available before itcan load. (See the first message in the following “Messages” section.) If you want to movethe WINA20.386 file out of your root directory, you need to specify the /W switch inCONFIG.SYS and add a DEVICE=drive:\path\WINA20.386 line to the [386Enh] section of yourSYSTEM.INI file. You should specify the full drive and path to WINA20.386 in the device line inSYSTEM.INI.
FApp
DISK
Windows 3.1 will load successfully in enhanced mode without access to theWINA20.386 driver, but any version 3.0 drivers that you’re using may still require theservices of the WINA20.386 driver. If they do and that driver is unavailable, Windowsmay become unstable or crash. Because enhanced-mode drivers for Windows are dis-tributed with many software packages, most people are running Windows 3.1 withWindows 3.0 drivers without knowing it. To be safe, be sure that the WINA20.386 dri-ver is available, either in the root directory or through the /W switch and a device line inSYSTEM.INI.
950 Appendix F Command Reference
Examples
Although you use Windows version 3.1, you’re not sure whether all your Windowsenhanced-mode drivers have been updated yet and want to make sure that the WINA20.386driver is available, just in case. Because you’ve moved the WINA20.386 file into the C:\DOSsubdirectory with your other DOS 6 files, you need to include the following line in yourCONFIG.SYS file:
SWITCHES=/W
Now that DOS knows you’ve moved WINA20.386, you need to tell Windows where you putit. To do so, add the following line to the [386Enh] section of your SYSTEM.INI file, which isin your main Windows subdirectory:
DEVICE=C:\DOS\WINA20.386
MessagesYou must have the file WINA20.386 in the root directory of your boot drive torun Windows in Enhanced Mode
Error: This message is displayed only if you are running Windows 3.0 in enhanced modeand the WINA20.386 file is not present in your root directory. To allow Windows 3.0 to runin enhanced mode with the WINA20.386 driver located somewhere else, specify theSWITCHES=/W command in your CONFIG.SYS file and enter a DEVICE=drive:\path\WINA20.386line in the [386Enh] section of SYSTEM.INI.
See Also
SWITCHES=
XCOPY 3.2 and later—ExternalXCOPY can copy groups of files and subdirectories from one disk to another. When copyinglarge groups of files, XCOPY is somewhat faster than COPY because it reads more than one fileat a time into memory.
SyntaxXCOPY source destination /A /D:date /E /M /P /S /V /W /Y /-Y
Parameters and Switches
source Specifies the file or files that you want to copy. You can specify a full path-name (that is drive:\path\...\filename.ext), and wildcards are allowed.This parameter is required. If you include a drive and/or path but no file-name, DOS assumes all files (*.*).
destination Specifies the location and optionally the filename or names to which youwant to copy. You can specify a full pathname, although normally just a
C:\>
BATCHFILE
951XCOPY 3.2 and later—External
drive and/or path is included. Wildcards are allowed when a filename isspecified. If you omit this parameter, DOS uses the current drive and subdi-rectory as the destination.
/A Copies only files whose archive attribute is on (modified files) but doesn’tturn off the archive attribute. /A is similar to /M, except that /A does notreset the archive attribute.
/D:date Copies only files that were changed or created on or after the date youspecify. The date’s form depends on the setting of the COUNTRY= commandin CONFIG.SYS.
/E Creates parallel subdirectories on the destination disk, even if the originalsubdirectory is empty.
/M Copies only files whose archive attribute is on (modified files) and turns off the archive attribute. /M is similar to /A, except /M resets the archiveattribute.
/P Causes XCOPY to prompt you for approval before copying each file.
/S Copies all directories and subdirectories below source that contain files.
/V Verifies that the copy was written correctly.
/W Causes XCOPY to prompt you and wait for your response before starting thecopy operation. You can use this switch to give yourself time to insert thesource floppy disk, for example.
/Y Specifies that you want XCOPY to overwrite files without prompting you forconfirmation. Including this parameter overrides any setting specified withthe COPYCMD environment variable.
/-Y Specifies that you want XCOPY to prompt you for confirmation before over-writing any files, even if the command is run from within a batch file.Including this parameter overrides any setting specified with the COPYCMDenvironment variable.
Exit Codes
ERRORLEVEL Value Meaning
0 Extended copy operation successful
1 No files found to copy
2 Halted by user (Ctrl+C)
4 Copy operation failed—Invalid drive letter, invalid switchesor parameters, not enough memory, or not enough disk space
5 Halted by fatal error writing to disk
FApp
952 Appendix F Command Reference
Rules
1. You must specify the source drive, path, and filename first, and then the destinationdrive, path, and filename.
2. Do not use a device name other than a drive for source or destination. For example,you cannot use LPT1: or COM1:.
3. The source file specified must include one or both of the following:
• A valid filename. Wildcards are permitted.
• A drive name, a pathname, or both.
4. If you do not specify the source drive name, DOS uses the current drive.
5. If you do not specify the source path, DOS uses the drive’s current directory.
6. If you specify a drive or path for the source but do not specify a source filename, DOSassumes all files (*.*).
7. If you omit a new name for the destination file, the copied file has the same name as thesource file.
8. If you do not specify a destination parameter, the source parameter must include oneor both of the following:
• A drive name other than the current drive.
• A pathname other than the current disk’s current directory.
9. XCOPY sets the archive bit on for the files it creates.
Notes
1. Starting with DOS 6.22, the XCOPY command, when run from the command line,prompts you for confirmation before overwriting files. However, to avoid forcing you torewrite all your batch files, XCOPY does not prompt you before overwriting a file whenrun from a batch file.
If you don’t like XCOPY’s new behavior, you can change it by defining an environmentvariable named COPYCMD. Setting COPYCMD equal to /Y forces XCOPY to act as it did in allprevious versions of DOS, never prompting for confirmation before overwriting a file.If you set COPYCMD equal to /-Y, XCOPY always prompts for confirmation, even when it’srun from within a batch file.
2. To use XCOPY to copy more files than fit on one destination disk, make sure that thefiles’ archive attribute is on. You can use the ATTRIB command to perform this step.Then use the XCOPY command repeatedly with the /M or /M /S switches.
When the destination floppy disk is full, change floppy disks and reissue the command.The files that were copied now have their archive attribute turned off, so XCOPY skipsthese files. XCOPY copies the files not already copied—those files that have the archiveattribute turned on.
953XCOPY 3.2 and later—External
3. XCOPY and APPEND /X are a troublesome combination. To use XCOPY on a disk that is involved in an APPEND command, disconnect APPEND before you execute the XCOPY com-mand.
4. Use XCOPY, rather than DISKCOPY, to copy files to a device that is not the same format asthe source.
MessagesCannot perform a cyclic copy
Error: You used the /S switch, and at least one of the destination directories is a subdirectoryof the source directories. When you use /S, XCOPY cannot copy files to destination directo-ries that are part of the source directories. If you must copy files from more than one direc-tory, issue individual XCOPY commands to copy the directories one at a time.
Cannot XCOPY from a reserved device
Error: You specified one of DOS’s reserved device names (for example, LPT1) as the sourceof the files to be copied. Reissue XCOPY, using a disk path and directory.
Does pathname specify a filenameor directory name on the target(F = file, D = directory)?
Information: You specified a destination filename in which the final name does not exist as adirectory. XCOPY does not know whether the final name in the destination is a filename or adirectory.
If the destination name is a directory name, press D. XCOPY creates the needed directory andbegins copying files. If the destination name is a filename, press F. XCOPY copies files to thisfile.
nnn File(s) copied
Information: XCOPY copied nnn files to the destination disk. This message appears regardlessof any errors that occur.
Insufficient disk space
Error: The destination disk ran out of space. The file that you were copying when the erroroccurred was erased from the destination. Delete any unneeded files from the destinationdisk, or use a different disk and then retry the command.
Reading source file(s)...
Information: XCOPY is reading the source directories for filenames.
Unable to create directory
Error: XCOPY cannot create a subdirectory on the destination disk for one of the followingreasons:
■ Part of the destination pathname is wrong or misspelled.
■ The disk’s root directory is full.
FApp
954 Appendix F Command Reference
■ The disk is full.
■ A file with the same name as the created directory already exists.
■ You used a directory name that actually is a device name.
Be sure that the destination name is correct. Use the DIR command to check the destinationdisk. If the disk or the root directory is full, erase files or use another destination disk. If afile that uses the same name as the intended directory already exists, rename the file orchange the directory’s name when you reissue the XCOPY command.
See Also
COPY and REPLACE
“Management with XCOPY” in Chapter 8
XCOPY32XCOPY32 is functionally equal to XCOPY, but it is the 32-bit version for use with long file-names and 32-bit Windows 95 and Windows 98. All the syntax and parameters used withXCOPY are also used with XCOPY32. The following additional parameters also are availablewith XCOPY32:
/C Forces XCOPY32 to continue copying even if errors occur.
/I Makes destination a directory if destination does not exist and you’re copyingmore than one file.
/Q Copies in quiet mode without displaying filenames onscreen.
/F Displays full source and destination filenames while copying.
/L Displays files that would be copied.
/H Copies hidden and system files also.
/R Overwrites read-only files.
/T Creates directory structure but does not copy files. Does not include emptydirectories or subdirectories. /T /E includes empty directories and subdirec-tories.
/U Updates any files that already exist in destination.
/K Copies attributes. XCOPY resets read-only attributes.
/N Copies using the 8.3 DOS filename versions of long filenames.
Windows9x
955XDF
XDELXDEL is a utility to delete multiple files across subdirectories and delete empty subdirecto-ries.
SyntaxXDEL drive:\path\filespec /D /N /O /R /P /S /?
Parameters and Switches
drive:\path\filespec Specifies the drive, path, and filename or file specification usingwildcards to be deleted.
/D Deletes empty subdirectories.
/N Deletes files with no prompts or confirmation warnings.
/O Overwrites the file with other data before deleting it, makingthe deletion more secure and difficult to undelete.
/R Deletes read-only files.
/P Prompts you before overwriting each file.
/S Deletes files in subdirectories.
/? Displays abbreviated help.
XDFUsing the XDF command starts the XDF program, a terminate-and-stay-resident (TSR) pro-gram that supports XDF-formatted disks.
SyntaxXDF /u /?
Parameters and Switches
/u Unloads the XDF TSR.
/? Displays the abbreviated online help.
Notes
You can use the DIR command with XDF-formatted disks to view the entire contents of thedisk when the XDF program is loaded.
FApp
DR-DOS
PC-DOS
TSR
956 Appendix F Command Reference
XDFCOPYXDFCOPY copies the contents of an eXtended Density Format (XDF) disk.
XDFCOPY creates a temporary file on drive C during the copy process. When copying to adisk, XDFCOPY automatically formats (prepares) the target disk during the copy process. Thetarget disk must be the same size and type as the source disk.
SyntaxXDFCOPY source_drive target_drive /y /nv /?
Parameters and Switches
source_drive Specifies the drive that contains the disk to be copied. On systems withonly one disk drive, use XDFCOPY by specifying the same drive as thesource and target.
target_drive Specifies the drive where you want to copy the disk to. If the disk to beused is not empty, any existing information is overwritten.
/y Starts without waiting for a disk change.
/nv Turns off read-after-write verify.
/? Displays the abbreviated online help.
XDIRXDIR is an enhanced version of the standard DIR command.
SyntaxXDIR +|-attributes d:\path\filespec /B /C /L /N /P /S /T /W /X /Y /Z /R
Parameters and Switches
+|-attributes Displays only files that have (+) or do not have (-) the specified attrib-utes. See the DIR command for each of the attributes.
d:\path\filespec Specifies the drive and directory for which to list files. A filespecthat includes wildcards limits the listing to matching files.
/B Displays only the file path and name.
/C Computes and displays checksum for each file that you can use to ver-ify that two files are identical.
/L Displays the long display format with full information about each fileand subdirectory.
/N Displays files in the order they appear on the drive.
TSR
PC-DOS
DR-DOS
957XDIR
/P Pauses after each page is displayed.
/S Includes files in subdirectories in the listing.
/T Displays files sorted by date and time.
/W Displays only filenames in wide format.
/X Displays files sorted by extension.
/Y Displays files sorted by Stacker compression ratio for files on Stackerdrives.
/Z Displays files sorted by file size.
/R Displays the files in reverse sort order when used with /T, /X, /Y, or/Z.
See Also
DIR
FApp

GApp
Glossary
This glossary is designed to provide short, quick definitions of some of the more commonterms used in this book. If you require more in-depth information, refer to a computing dictionary such as Que’s Computer and Internet Dictionary, Sixth Edition.
GAPPENDIX
In this appendix
960 Appendix G Glossary
Absolute path The path named from the root directory, including all intervening subdi-rectories.
Attribute A directory-based indicator of a file’s status. Attributes include read-only,archive, system, hidden, and volume label.
AUTOEXEC.BAT A special batch file that DOS automatically executes during the bootingprocess. This file, usually placed in the root directory, is an ideal place to include commandsthat initialize the operation of a PC.
Batch file A text file containing commands that DOS executes as though the commandswere entered at the DOS prompt. Batch files always have the .BAT extension.
Binary file A file containing instructions or data that has meaning to the PC but cannotbe displayed or printed as ASCII characters.
Boot sector A special area in track 0 of each DOS disk. DOS uses this area to recordimportant information about a disk’s format to reference later when working with the disk.
Buffer A portion of memory reserved for storing data.
Character string A series of ASCII characters.
Clipboard An area of memory where text can be stored temporarily.
Cluster A unit of one, four, or eight sectors. This is the smallest amount of disk space thatDOS allocates to a file.
Cold boot To start a PC from a power-off condition.
Command A directive you type at the DOS prompt or include in a batch file to instructDOS to perform an action.
Compare To make a byte-by-byte comparison of the contents of a file or an entire disk toensure that they are accurate copies of each other.
CONFIG.SYS A special text file that DOS reads during booting to find and execute configu-ration commands.
Cylinder A unit of storage consisting of the set of tracks that occupy the same position onopposite sides of the same disk platter.
Default A condition or value that is used when you do not supply one.
Delimiter A character that separates the “words” in a command. Common delimiters arethe space and the slash (/).
Device driver A special program file, usually with a .SYS extension, that DOS can loadthrough a configuration command. Device drivers control how DOS and applications pro-grams interact with specific items of hardware.
Dialog box A window that pops open when a program needs more information beforeexecuting a command.
961Glossary
Directory A disk-based table of filenames and other file-related information that DOSuses with the file allocation table (FAT) to access a file’s data content.
Disk A magnetic storage medium and the predominant means of file storage for DOS.
Disk drive The electromechanical components that record and play back data from themagnetic surfaces of a disk.
Disk partition A division of a hard disk that DOS views as a separate disk.
Diskette Another term for a 5 1/4-inch or 3 1/2-inch disk.
DOS prompt The characters that COMMAND.COM displays to inform you that you can enter aDOS command.
End-of-file (EOF) marker In a text file, a Ctrl+Z (^Z) ASCII character, which tells DOSthat the end of the usable portion of a file has been reached.
Expanded memory Also referred to as EMS, or Expanded Memory Specification. SpecialRAM that DOS accesses as a device. Expanded memory conforms to theLotus/Intel/Microsoft (LIM) EMS 3.2 or 4.0 standards.
Extended memory Memory at addresses above 1MB on 80286, 80386, and 80486 PCs.DOS can load most of the operating system into the first 64KB of extended memory.
External command A DOS command whose instructions are stored in a file other thanCOMMAND.COM.
File A variable-length collection of related information referenced by a name.
File system The predefined organizational method that a disk operating system uses toread and write to data files on disks.
Filter A program that modifies information coming from a program before the informa-tion reaches the screen or is piped to another program.
Floppy disk Any disk with a lower capacity than the hard drive that you can remove fromyour PC’s drive.
Flow control The capability to control the order in which DOS processes lines of a batchfile.
Format The initial preparation of a disk for data storage.
Full backup A special series of disks containing all the data stored on a hard disk, alongwith information about the previous location of the data files.
Graphics mode A screen mode available to users of PCs equipped with graphics adapters.In graphics mode, the screen presentation uses bitmapped graphics.
Ground An electrical path directly to the earth. Grounds can dissipate static dischargessafely. A PC chassis normally is grounded, but this grounding is not always adequate to stopa static discharge.
GApp
962 Appendix G Glossary
Hard disk A high-capacity, typically nonremovable disk drive.
High memory area (HMA) The first 64KB of extended memory. DOS can load part ofthe operating system files into this area of memory.
Highlighted option A command or option that appears in reverse video. The highlightedoption executes when you press Enter.
Insert mode The editing mode in which a typed character is inserted into the existingtext at the current cursor position.
Intermediate backup A series of disks containing copies of all files modified since themost recent full backup.
Internal command A DOS command built into COMMAND.COM.
Keyword A word that specifically identifies the action you want DOS to perform.
LCD A liquid-crystal display. This type of screen is found on most laptop and notebookcomputers.
Location counter The two numbers at the right end of the status bar that indicate thecursor’s current row and column.
Logical drive A partitioned section of a hard disk that DOS views as an additional harddisk.
Macro A series of DOS commands stored in memory under a single name. You execute amacro by typing its name.
Meta-string A series of characters for which DOS applies a meaning different from thestring’s literal meaning. DOS displays substitute text when the program finds meta-strings inthe PROMPT command.
Mouse pointer The block- or arrow-shaped screen icon that indicates where the mouseaction occurs.
Name The first portion of a filename, consisting of up to eight characters. It usuallydescribes the contents of a file.
Overtype mode The editing mode in which a typed character replaces the character atthe current cursor position.
Parameter Additional information given with a command to more precisely control itsactions.
Parser A portion of a computer program that translates a command line into specificcommands that the program can act on.
Pipe To send information that normally goes to the screen to another program by usingthe pipe symbol (|).
Platter Synonymous with disk.
963Glossary
Pull-down menu A menu interface used in many programs that is characterized by a ver-tical list of main menu choices. When you use a mouse to select one of the choices, addi-tional choices appear below the main menu choices.
Queue A list of files to be printed.
Redirection The act of sending the output from a command or program to a device otherthan the one expected (usually the screen); sending input to a command or program from apoint other than the one expected (usually the keyboard).
Relative path A path specified with the current directory—as opposed to the root directory—as the starting point.
Root directory A master directory created on each disk by FORMAT.
Scrollbar An area of the screen containing arrows and icons that move (or scroll) text orgraphics through the window.
Sector A section of a track that is the disk’s smallest possible storage unit.
Selected text A block of text you highlight with various Shift+key combinations. Selectedtext can be deleted, moved, or edited as a single block.
Selection cursor An area of highlighted text that shows where the selected action occurs.
Shell A program that provides the user interface to the features and capabilities of anoperating system.
Shortcut key A keystroke combination that immediately activates an editing command,bypassing the menu system.
Sorting Ordering a list of items.
Source A filename expression that identifies the file(s) to be copied or the device that willserve as the source for a copy operation.
Static electricity A high-voltage charge that builds on objects (including people) and canbe discharged when another object is touched. Static electricity discharges can damage elec-tronic circuits.
Subdirectory A directory within another directory.
Surge protector A protective device inserted between a power outlet and a computer’spower plug. By acting as a circuit breaker, a surge protector helps block power surges thatcan damage the computer’s circuits.
Switch A slash followed by one or more characters that are used to enable a command’soptional functions. (Similar to a parameter.)
Syntax A specific set of rules you follow when issuing commands.
Target A filename expression that identifies the disk location of the files(s) to be createdas a result of a copy operation. A target also can be a DOS device other than a file.
GApp
964 Appendix G Glossary
Task A program that DOS has loaded into memory.
Text file A file that contains only ASCII text characters (without special formatting char-acters). The DOS Editor works only with text files.
Text mode The screen mode available to all PC users. In text mode, all screen presenta-tion is composed of ASCII characters.
Track A circular section of a disk’s surface that holds data.
Undelete To restore the FAT and directory entries of a file to undo a deletion.
Upper memory area A 386KB area of memory between 640KB and 1MB, usuallyreserved for use by certain system devices, such as a monitor. DOS can use a portion of thisupper memory area, referred to as upper memory blocks, for memory-resident programs anddevice drivers.
Voltage regulator An electrical device that keeps voltage fluctuations from reaching anelectrical device. Regulators usually don’t stop all power surges.
Volume label A name that identifies a particular disk.
Warm boot To restart a PC while the power is on.
Wildcard A character in a command that represents one or more characters. In DOS, the? wildcard presents any single character. The * wildcard represents any remaining charactersin the command.
XMS The Lotus/Intel/Microsoft/AST Extended Memory Specification. This standardspecifies a set of rules by which several programs can use extended memory cooperatively bymeans of a device driver.
Symbols
* (asterisk) wildcardcommands, 54-55character, 595
/1 switch, DISKCOPY com-mand, 211
/4 switch, FORMAT com-mand, 157
/8 switch, FORMAT com-mand, 157
/? (help switch) on commandline, 46
? (question mark), 604-605wildcard commands, 54-55,
595| (pipe character), 201,
597-598
@ (at symbol), 602-603
@ command, batch files, 397
3 1/2'' disks, capacities, 153
4DOS utility, 497batch file debugger, 500commands
BEEP, 498CANCEL, 498CDD, 498COLOR, 498DELAY, 498DESCRIBE, 498DIRHISTORY, 498DRAWBOX, 499DRAWHLINE, 499DRAWVLINE, 499ESET, 499EXCEPT, 499FFIND, 499FREE, 499
GLOBAL, 499GOSUB, 499HISTORY, 499IFF, 499improvements, 497-498INKEY, 499INPUT, 499KEYSTACK, 499LIST, 499LOADBTM, 499LOG, 499MEMORY, 499REBOOT, 499SCREEN, 499SCRPUT, 499SELECT, 499TEE, 499TEXT, 499TIMER, 499TOUCH, 499TREE, 499UNSET, 499VSCRPUT, 499
5 1/4'' disks, capacities, 153
10BASE-2 cabling, 472
10BASE-5 cabling, 472
10BASE-100 cabling, 472
10BASE-T cabling, 472
4201.CPI file, 514
4208.CPI file, 514
5202.CPI file, 514
80286 file designation, 504
80386 chips (Intel), 18
80386 file designation, 504
80486 chips (Intel), 18
A
/A switchCOPY command, 203DIR command, 194-196FC command, 216FORMAT command, 157XCOPY command, 207
abort (A) option, deviceerror messages, 557
About command (Helpmenu-DOS Editor), 387
accessingCD-ROM drives, 835-836,
843-844CVFs (compressed volume
files), 663-664files (FCBS command), 463online help commands,
46-47PCMCIA cards, 849servers, 770-773
activatingHelp system (DOS Editor),
387-388menu bar (DOS Editor),
365active display, 298
adapters (display), 720-721
Add Group dialog box, 79
Add Program dialog box, 82
addingdisk drives to other disk
directories (JOIN com-mand), 302
environment variables, 894-897
program groups (DOSShell), 78-80
program items to program(DOS Shell), 81-82
INDEX
ADOS.CFG file, 513
ADOS.COM file, 513
ADOS.OVL file, 513
ADOS.TXT file, 513
Advanced PowerManagement (APM), 852-857
aliases, disk drives, 613creating, 922-923
/ALL switchSCANDISK command, 189UNDELETE command,
263ALL command, batch files,
397
All Files view (DOS Shell),74
allocating system resourcesamong client drivers, 849
allocation units (FORMATcommand), 155
Alt shortcut key (DOSEditor), 367
Alt+B (Previous Topic),online help command key,49-50
Alt+C (Contents), onlinehelp command key, 49-50
Alt+Esc key, DOS Shellhotkey, 66
Alt+F keystroke (help systemexit), 51
Alt+F1 shortcut key (DOSEditor), 367
Alt+F4 key, DOS Shellhotkey, 66
Alt+minus shortcut key(DOS Editor), 367
Alt+N (New Topic), onlinehelp command key, 49-50
Alt+Tab key, DOS Shellhotkey, 66
American NationalStandards Institute. SeeANSI
analyzing disksCHKDSK command,
184-188SCANDISK utility,
188-189ANSI (American National
Standards Institute), 416,608
attribute control codes,425-426
cursor control codes, 426-427
display color codes, 425-426
keyboard layout controlcodes, 427-430
reset mode controls, 425set mode controls, 425
ANSI.SYS (device driver),444, 504
activating, 417character keys, reassigning,
424codes
issuing in batch files, 417-418
issuing in text files, 418-419
issuing with PROMPTcommand, 419
sending to DOS, 417commands
ECHO, 417-418parameters/switches, 609PROMPT, 419TYPE, 418-419
escape character, commandactivation, 417
installing, 416keyboards
controls, 416customizing, 423-424
screen controls, 419-420clearing (CLS command),
423cursor movement, 420cursor positioning, 420display codes, 421text attributes, 421-422
switches/K, 416/R, 416/X, 416
third-party features, 416video controls, 416
antivirus programsMicrosoft Anti-Virus,
253-255checklists, 255virus list, 256
Norton Antivirus, 253APM (Advanced Power
Management), 852-857
APPEND command, 610-613
APPEND environment vari-able, 520-521
APPEND.EXE file, 504
application-specific devicedrivers, 308
applicationsdedicated directories, 193defined, 192memory, troubleshooting,
460-461overlays, 192versus utilities, 192-193
ARC (Archive) filenameextension, 105, 108
archiving files for disk spacemaximization, 183
area (DOS Shell)moving, 63-64selecting, 62
AREADME.TXT file, 513
ASC (ASCII text) filenameextension, 105
ASCII (American StandardCode for InformationInterchange), 14, 574-581
code sets, 423-424DOS Shell, file displays, 59Extended character set, 14files, 200
combining (COPY com-mand), 204-205
viewing (TYPE com-mand), 200-201
ADOS.CFG file966
scan codes, 423text files, editing, 719-720
ASCII command (FTP), 487
ASM (Assembler source file)filename extension, 105
ASSIGN command, 468-469, 613
disk drive requests, assign-ing, 302
ASSIGN.COM file, 513
Associate command (Filemenu), 93
Associate File dialog box, 93
associating files with pro-grams (DOS Shell), 92-93
asterisk (*) wildcard com-mands, 54-55
AT processors, 17
at symbol (@), 602-603
ATA rotating disk, partition-ing, 850
ATTRIB command, 108,613-615
file attributes, changing,109-110
parameters/switches, 614ATTRIB.EXE file, 505
attributes (files), 107-108Archive, 108Hidden, 108modifying (ATTRIB com-
mand), 109-110Read-only, 108, 110Subdirectory, 108System, 108viewing (DIR command),
195-196, 613-615Volume Label, 108
audio tape recorders, mag-netic disk storage compari-son, 129
AUTOEXEC.BAT file, 511boot disk, 24-25boot process, 17
modifying, 38-39
dates/times, 276defining macros from
bootup (DOSKEY), 439device drivers
directory location, 312-313troubleshooting, 314-315
editing (EDIT command),32
function of, 30line-by-line examination,
31-32mouse drivers, 59SET command, 30system configuration, 26,
30-32UNDELETE command,
264/AUTOFIX switch,
SCANDISK command, 189
automatic indenting (DOSEditor), 372
auxiliary consoles, I/Odevices, 650-651
B
/B switchCOPY command, 203DIR command, 194, 197FC command, 216FORMAT command, 157
background printing, 857-860
backing updata, 645-647disks (XCOPY command),
208-209files, 616, 833-834hard disks, 833-834,
838-839high-speed/medium-speed,
647backslashes (\), command
syntax, 45
backspace meta-string, 297
BACKUP command, 616
backup files, restoring, 881-884
Backup Options dialog box,247-248
BACKUP.EXE file, 513
backups (data), 233-234differential, 238files
selecting manually, 243-245
selection criteria, 245-246frequency of, 238full, 238incremental, 238Microsoft Backup, 233
Backup function, 236-238Compare function,
236-238comparison with original
files, 241configuring, 235-236features, 233-234full, performing, 239-241MSBACKUP command,
239Options dialog box,
247-248Quit function, 236-238Restore function, 236-238
Microsoft Backup forWindows 3.x, 233
Backup function, 236-238Compare function,
236-238configuring, 235-236differential, performing,
242features, 233-234full, performing, 242incremental, performing,
242Options dialog box,
247-248Quit function, 236, 238Restore function, 236-238
policy development, 270-271
restoring, 248-251selective restoration, 251virus protection tactics, 497
967backups (data)
BAK (Backup) filenameextension, 105
BAS (BASIC program file)filename extension, 105
BAT (Batch) filename exten-sion, 105, 390
batch files, 390-391%envir%, 600-602@ (at symbol), 602-603ANSI.SYS codes, issuing in,
417-418as templates, 396automation features, 390branching to specific lines
(GOTO command), 398-399
calling/returning (CALLcommand), 411-412
CHECKIT.BAT, 408CHOICE command
display menu creation,406-407
simple menu creation, 405-406
command-history(DOSKEY), creating,435-436
commands, 390@, 397CALL, 397CHOICE, 397ECHO, 397FOR..IN..DO, 397GOTO, 397IF, 397PAUSE, 397REM, 397SHIFT, 397
comments, 874-875inserting, 398
conditional execution, 761-765
contents, 391COPYCOMP, 393copying files, 395-396creating
COPY command, 392-393DOS Editor, 391Edlin, 391guidelines, 391
DCOPY.BAT, 401-402debugging (4DOS utility),
500displaying contents, 396echo messaging, 391executing, 412FOR..IN..DO command,
407-409command interaction, 409DOS prompt, 409
frequently used commands,390
IF command, 399-400comparing strings,
402-403ERRORLEVEL testing,
400-402finding files, 404
installation types, 397messages, displaying, 398modifying (DOS Editor),
362on-screen messages,
716-719pausing, 847-848
CHOICE command, 404-405
processing, 390replaceable parameters,
393-397, 599-600running, 619-621running other batch files,
411calling/returning (CALL
command), 411-412shifting control, 411
SHIFT command, movingparameters, 409-411
starting, 392suspending, 631-633versus macros, 437
batch processing, 390
baud settings on serial ports(MODE command), 328-330
BEEP command (4DOS util-ity), 498
BGI (Borland GraphicsInterface) filename exten-sion, 105
BIN (Binary prgram file)filename extension, 105
converting .EXE files to,727
BINARY command (FTP),487
binary files, editing(DEBUG command), 200
binary mode, FC command,217-218
bindery logins (NovellNetWare), 473
bit buckets, 104
bits (binary digits), 13
block editingfundamentals, 373text
changing, 378-379Clipboard, 374-376finding, 377-378search and replace feature,
376-377selecting, 373-374
blocks (commands), 606-608
BMP (Windows bitmap) file-name extension, 105
boot diskAUTOEXEC.BAT file,
24-25COMMAND.COM file,
24-25CONFIG.SYS file, 24-25creating, 167-168, 926-928floppy, creating, 25-26FORMAT command, 25IO.SYS file, 24-25MSDOS.SYS file, 24-25SYS command, 25
bootingcold, 24from floppy disk, damaged
hard drive (COMMAND.COM file),25-26
PCs, reboot commands,809-811
possible data loss, 24warm, 24
BAK (Backup) filename extension968

booting process, 15AUTOEXEC.BAT file, 17
modifying, 38-39bootstrap loader, 16CMOS chip check, 16COMMAND.COM file, 17CONFIG.SYS file, 17
modifying, 38-39IO.SYS file, 16MSDOS.SYS file, 17Power On Self Test
(POST), 16bootstrap loader, 16
boundaries (sectors), 136
branches (directories)collapsing (DOS Shell),
84-86copying (XCOPY com-
mand), 209-210deleting, 679expanding (DOS Shell),
84-86BRB (Big Red Button
Time), 24
BREAK command, 616-617CONFIG.SYS file, 27parameters/switches, 616syntax, 468
Break key (Ctrl+Break key-stroke), ROM BIOS con-trols, 564
BREAK= command, 616-617
buffers, keyboard, 788-789
BUFFERS command, 461-462, 617-618
parameters/switches, 617bulletin board files, viewing
(DOS Editor), 362
bundled files, unpacking,941
BUSETUP.EXE file, 511
BYE command (FTP), 487
bytes, 13ASCII code, 14data storage, 138file storage, 199
C
/C string parameter (COMMAND command),289
/C switchDIR command, 194FC command, 216FORMAT command, 157
C&E.BAT file, 395
CAB (compressed cabinet)files, extracting, 730
cabling10BASE-2, 47210BASE-5, 47210BASE-100, 47210BASE-T, 472Interlnk configurations,
223-224network cards, installation
considerations, 472caching
directory information(FAST OPEN program),173-174
disks, 842-843SMARTDrive, 911-913
hard disks, 169-172CALL command, 619-621
calling/returning batch files,411-412
parameters/switches, 619calling batch files (CALL
command), 411-412
Canadian-French code page,354
CANCEL command(4DOS), 498
canceling commands(Ctrl+C keystroke), 52
carriage return/line feedmeta-string, 296
CBL (COBOL source file)filename extension, 105
CD command, 487, 621-623
cd command (Unix), 485
CD-ROM drivesaccessing, 835-836, 843-844device drivers, trou-
bleshooting, 316CD-Rs (write-once CDs),
128
CD-RWs (rewritable CDs),128
CDD command (4DOS),498
central processing units. See CPUs
CFG (program configurationinformation), filenameextension, 105
CGA (Color GraphicsAdapter), 299-300, 821
/CH switch, DIR command,194
CHAIN command, 624
Change Compression Ratiodialog box, 144
Change dialog box, 365-366,378-379
change all option, 379find and verify option, 379
Change Size dialog box, 143
changing text, block editing(DOS Editor), 378-379
character attribute codes(ANSI.SYS), 421-422
character setschanging, 624-625international, 860-862loading into memory,
747-748character tables, code page
switching, 344-345
charactersfilenames, 593-594keyboards
ASCII code sets, 423-424changing to other lan-
guages, 790-792dead keys, 352-353
969characters
international settings(KEYB.COM file), 342-344
macro substitutions, 424reassigning (ANSI.SYS),
424remapping, 351-353
wildcard, filenames, 594-596
characters per line (screendisplay), 298
CHCP command, 624-625code page switching, load-
ing, 349-350parameters/switches, 624
CHDIR command, 621-623directory modifications,
119-120CHECK command, 626
CHECKIT.BAT file, 408
/CHECKONLY switch,SCANDISK command, 189
CHKDSK command, 108,626-630
directory problems, 184disk analysis, 184-188FAT problems, 184parameters/switches,
626-627report display, 185-186switches, 185
CHKDSK.EXE file, 505
CHKLST.MS file, 508
CHKSTATE.SYS (devicedriver), 444, 507, 631
CHOICE command, 631-633
batch files, 397, 401pausing for input,
404-405display menus, creating,
406-407parameters/switches, 631simple menus, creating,
405-406CHOICE.COM file, 505
CHP (Chapter) filenameextension, 105
CHR (Character) filenameextension, 105
/CLASSIFY switch, MEMcommand, 283
Clean Boot, F5 startup con-trol key, 564
cleaning floppy driveread/write heads, 156
clearingcommand-history buffer
(DOSKEY), 436screen display (ANSI.SYS),
423clients, 781-786
network cards, installationconsiderations, 472
network software configura-tion tips, 482
Clipboard, textblock editing (DOS Editor),
374-376copying, 375cutting, 375deleting, 375pasting, 375
clockCMOSCLK.SYS com-
mand, 634DATE command, 277-278setting, 276-277, 930-932TIME command, 278-279
CLOCK$ devices, 104
CLOSE command (FTP),487
CLS command, 633-634ANSI.SYS, screen clears,
423uses, 319
clusters, 150-151FAT, 112-113hard disks, 195
CMOS (ComplementaryMetal OxideSemiconductor) chips, 16
CMOSCLK.SYS command,634
CNF (Program configura-tion information), filenameextension, 105
CNFIGNAM.EXE devicedriver, 634-635
code page switching, inter-nationalization, 340, 344-345
hardware requirements, 345installing (CHCP com-
mand), 349-350installing (DISPLAY.SYS),
346-347installing (MODE com-
mand), 348-349installing
(NLSFUNC.EXE), 348installing (PRINTER.SYS),
347-348code pages, 298
changing, 624-625configuring, 818-821international support,
860-862international switching,
695-698cold booting versus warm
booting, 24
COLOR command (4DOS),498
Color Graphics Adapter(CGA), 299-300, 747, 821
colorsmenus, displaying
(CONFIG.SYS file[menu] section), 34-35
screenchanging (DOS Editor),
385-386selecting, 805-807
columns, screen, adjusting,300-301
COM (Program) filenameextension, 105
COM files, converting .EXEfiles to, 727
combining ASCII files(COPY command), 204-205
characters970
COMMAND command,635-636
parameters, 289secondary command
processor, 288-291switches, 635
command interpreter, speci-fying, 907-909
command lineDOS Editor, launching, 363editing capabilities, 701-704editing keys, 52-54,
433-434with DOSKEY, 434, 567without DOSKEY,
565-566files, deleting from (ERASE
command), 221-222help switch (/?), 46versus DOS Shell, 59
command processor, 289-290
COMSPEC variable, 304copying, 635-636deleting temporary copy,
727-728exiting, 290secondary, 289
command prompt, changing,295-296
command referenceconventions, 590-592icons, 592
command-history bufferbatch files, creating
(DOSKEY), 435-436clearing (DOSKEY), 436viewing (DOSKEY), 435
COMMAND.COM file,289-290, 505
batch file execution, 412boot disk, 24-25booting process, 17copying, 635-636damaged, troubleshooting,
25-26deleting temporary copy,
727-728
exiting, 290second copy, 290-291
loading, 288-289
commands4DOS
BEEP, 498CANCEL, 498CDD, 498COLOR, 498DELAY, 498DESCRIBE, 498DIRHISTORY, 498DRAWBOX, 499DRAWHLINE, 499DRAWVLINE, 499ESET, 499EXCEPT, 499FFIND, 499FREE, 499GLOBAL, 499GOSUB, 499HISTORY, 499IFF, 499INKEY, 499INPUT, 499KEYSTACK, 499LIST, 499LOADBTM, 499LOG, 499MEMORY, 499REBOOT, 499SCREEN, 499SCRPUT, 499SELECT, 499TEE, 499TEXT, 499TIMER, 499TOUCH, 499TREE, 499UNSET, 499VSCRPUT, 499
? (question mark), 604-605@ (at symbol), 602-603
batch files, 397ANSI.SYS, 608-610
ECHO, 417-418Escape character, 417parameters/switches, 609PROMPT, 419TYPE, 418-419
APPEND, 610-613ASSIGN, 613
disk drive requests, 302ATTRIB, 108-110, 613-615AUTOEXEC.BAT file,
line-by-line examination,31-32
BACKUP, 616batch files, 390, 397-398,
584blocks, 606-608BREAK, 616-617
parameters/switches, 616syntax, 468
BREAK=, 616-617BUFFERS, 461-462,
617-618parameters/switches, 617
CALL, 619-621batch files, 397calling/returning batch
files, 411-412parameters/switches, 619
canceling (Ctrl+C), 52CD, 621-623
parameters/switches, 622CHAIN, 624CHCP, 624-625
code page switching, 349-350
parameters/switches, 624CHDIR, 621-623
directory modifications,119-120
CHECK, 626CHKDSK, 108, 184-188,
626-630parameters/switches,
626-627CHOICE, 631-633
batch files, 397, 401display menu creation,
406-407parameters/switches, 631pausing batch files for
input, 404-405simple menu creation,
405-406CLS, 633-634CMOSCLK.SYS, 634
971commands
COMMAND, 635-636parameters, 289, 635secondary command proces-
sor, 288-291COMP, 636-638Compress menu
Create new drive, 146Existing drive, 145
CONFIG, 638CONFIG.SYS DEVICE
drivers, 585-586CONFIG.SYS file, 584-585
BREAK, 27BUFFERS, 27COUNTRY, 27DEVICE, 27DEVICEHIGH, 27DOS, 27DRIVPARM, 27FCBS, 27FILE, 27INCLUDE, 27INSTALL, 27LASTDRIVE, 27line-by-line examination,
28-29MENUCOLOR, 27MENUDEFAULT, 27MENUITEM, 27NUMLOCK, 27REM, 27SET, 27SHELL, 27STACKS, 28SUBMENU, 28SWITCHES, 28
COPY, 108, 203, 639-642batch file creation,
392-393combining ASCII files,
204-205copying files, 202-203copying files from console
devices, 205-206defaults, 214groups of files, copying,
204parameters/switches,
639-640redirecting input to
COPYCOMP.BAT file,392
renaming files, 205switches, 203use guidelines, 202-203
COUNTRY=, 642-644CPBACKUP, 645-647CPBDIR, 647CPSCHED, 647-648CRC, 648CREATE, 648-649CSCRIPT, 649-650CTTY, 650-651CURSOR.EXE, 651CVT.EXE, 651-652DATAMON, 652DATE, 277-278, 653DBLSPACE, 654DBLSPACE/
AUTOMOUNT, 655DBLSPACE/CHKDSK,
656DBLSPACE/COMPRESS,
656-657DBLSPACE/CREATE,
657-659DBLSPACE/
DEFRAGMENT, 659-660
DBLSPACE/DELETE,660
DBLSPACE/DOUBLEGUARD, 661
DBLSPACE/FORMAT,661-662
DBLSPACE/INFO, 662-663
DBLSPACE/LIST, 663DBLSPACE/MOUNT,
663-664DBLSPACE/RATIO,
664-665DBLSPACE/SIZE,
665-666DBLSPACE/
UNCOMPRESS, 666-667
DBLSPACE/UNMOUNT,667-668
DCONVERT, 671DEBUG, 200, 671-672DEFRAG, 136, 672-674
DEL, 675-676deleting files, 135parameters/switches, 675
DELOLDOS, 676DELPURGE, 677DELQ, 678DELTREE, 679
directory deletions, 120-121
parameters/switches, 679DELWATCH, 677-678DEVICE, 223, 443-444
device drivers, loading,313
device controlsMODE, 469PRINT, 469SET, 469
device drivers, 588DEVICE=, 679-682DEVICEHIGH=, 19,
682-686parameters/switches, 683
devices, 318CLS, 319CTTY, 325-326GRAPHICS, 319-322MODE, 326-332PRINT, 322-325
DEVLOAD, 687DIR, 108, 687-689
customizing, 199directory entry views,
111-112finding files, 198issuing, 193-194listing files, 193-195parameters/switches,
687-689switches, 193viewing screen informa-
tion, 195directory, 586disk, 586-587DISKCOMP, 690-691
comparing disks, 219-220parameters/switches, 690
DISKCOPY, 692-694copying disks, 210-212exit codes, 400parameters/switches, 692switches, 211
commands972

DISKMAP.EXE, 694DISKOPT.EXE, 694-695DOS Editor, shortcut keys,
366, 568-569DOS Shell hotkeys
+ key, 66Alt key, 66Alt+Esc key, 66Alt+F4 key, 66Alt+Tab key, 66Ctrl+* key, 66Ctrl+/ key, 67Ctrl+F5 key, 67Ctrl+\ key, 67Del key, 66Esc key, 67F1 key, 66F3 key, 66F5 key, 66F7 key, 66F8 key, 66F9 key, 66F10 key, 66Shift+down arrow key, 66Shift+F5 key, 66Shift+F8 key, 66Shift+F9 key, 66Shift+left arrow key, 67Shift+right arrow key, 67Shift+Tab key, 67Shift+up arrow key, 66Tab key, 67
DOS=, 698-700DOSBOOK, 700DOSDATA, 701DOSDOCK, 701DOSKEY, 701-704
parameters, 432parameters/switches, 702reusing, 434-435
DOSSHELL, 705-707parameters/switches,
704-705DPMI, 707DPMS.EXE, 707-708DRIVPARM=, 711-713
parameters/switches, 711-712
DRLOCK, 714DRMOUSE, 714DRVLOCK, 714
DYNLOAD, 715E, 715-716ECHO, 397, 716-719
batch files, 397-398parameters/switches, 717
EDIT, 187, 719-720parameters/switches, 719
EDLIN, 720EJECT, 721EMM386, 721-722environment variables
PATH, 520PROMPT, 520SET, 520
ERAQ, 678ERASE, 675-676
deleting files, 221-222EXE2BIN, 727executing (DOS Editor),
364EXIT, 727-728
command processor, 290secondary command proces-
sor, 290-291EXPAND, 728-729external, 42, 192EXTRACT, 730FASTHELP, 730-731FASTOPEN, 731-732FC, 217, 732-734
ASCII mode, 217binary mode, 217-218comparing copied files to
originals, 218comparing text files,
218-219file integrity comparisons,
215-216parameters/switches, 733switches, 216
FCBS (file control blocks),463, 734-735
FDISK, 735-736parameters/switches, 735partitioning hard disks,
159-163read-only files, 110repartitioning hard disks,
164-165/STATUS switch,
163-164
File menuAssociate, 93Copy, 91Create Directory, 86-87Deselect All, 89Find Deleted File, 268Move, 91Select All, 89Undelete, 269Undelete To, 269View File Contents, 91-92
File menu (DOS Editor)Exit, 380New, 379Open, 380-383Print, 380, 383-384Save, 380-381Save As, 380-381
FILELINK, 736FILES, 463-464, 737FILEUP, 738FIND, 738-740finding (DOSKEY), 436FOR, 740-742FOR..IN..DO, 407-409
batch files, 397command interaction, 409DOS prompt, 409
FORMAT, 111, 140, 150-151, 259, 743-746
/1 switch, 157/4 switch, 157/8 switch, 157/B switch, 157boot disk, 25/C switch, 157/F switch, 153formatting floppy disks,
151-158formatting hard disks, 166/N switch, 157parameters/switches,
743-744/Q switch, 157quick formatting floppy
disks, 157read-only files, 110/S switch, 157switches, 156-157/T switch, 157
973commands
/U switch, 157unconditional formatting
floppy disks, 158/V switch, 157
FTP!, 488ASCII, 487BINARY, 487BYE, 487CD, 487CLOSE, 487DELETE, 487DIR, 487DISCONNECT, 487GET, 487LCD, 487LS, 487MDELETE, 488MGET, 488MKDIR, 488MPUT, 488OPEN, 488PROMPT, 488PUT, 488PWD, 488QUIT, 488RECV, 488REMOTEHELP, 488RENAME, 488RMDIR, 488SEND, 488STATUS, 488
GOTO, 747batch files, 397batch files, branching,
398-399GRAFTABL, 747-748GRAPHICS, 748-750grouping in blocks, 765-768HCONVERT, 750HELP, 588, 730-731,
750-751Help menu (DOS Editor)
About, 387activating, 387-388Getting Started, 387Keyboard, 387
HIINSTALL, 751-752IBAVD, 759IBMAVSP, 759-760IEXTRACT, 761
IF, 761-765batch files, 397-400comparing strings,
402-403ERRORLEVEL testing,
400-402finding files, 404parameters/switches, 761
INCLUDE=, 765-768parameters/switches, 766
input buffer, editing keys,52-54
INSTALLparameters, 466-467switches, 466-467
INSTALL=, 768-769INSTALLHIGH, 751-752,
769INTERLNK, 223, 770-780
parameters/switches, 770internal, 42international, 588INTERSVR, 223, 781-786
parameters/switches, 781-782
JOIN, 786-788adding disk drives to other
disk directories, 302parameters/switches, 786
KBDBUF.SYS, 788-789KEYB, 790-792KEYBOARD.SYS, 792-793keywords, 42-43LABEL, 166-167, 793-794
parameters/switches, 793LASTDRIVE, 464,
795-796LOADER, 796-797LOADFIX, 797-798LOADHIGH, 19, 798-799MEM, 283-288, 802-803
free/used displays, 453-454parameters/switches, 802
MEMMAKER, 803-804MEMMAX, 805memory, 589menu bar (DOS Editor),
365MENUCOLOR=, 805-807MENUDEFAULT=,
807-809
MENUITEM=, 809-811MIRROR, 811-813miscellaneous, 589-590MKDIR, 800-801
directory creation, 117-119
parameters/switches, 800MODE, 813-815
code page configuration,818-821
code page switching, 348-349
Color Graphics Adapter(CGA), 299-300
parameters/switches, 814,819-823
screen appearance, 298screen columns/lines,
300-301screen type, 299video adapters, 821-823
MODE COM#, 815-816MODE CON, 300,
817-818MODE LPT#, 824-826MONOUMB.386, 826-827MORE, 827-828
parameters/switches, 827viewing ASCII files, 201
mouse, cursor movement(DOS Editor), 369-370
MOVE, 828-830defaults, 214directories, 214directory movement,
121-122, 213files, 212-213parameters/switches, 828switches, 212
MSAV, 830-832MSBACKUP (Microsoft
Backup), 108, 239, 833-834
MSCDEX, 835-836MSD, 836-837MSHERC, 837MWA, 838MWAVTSR, 838MWBACKUP, 838-839MWUNDEL, 839NLSFUNC, 840
commands974

Novell networksFILER, 481LOGIN, 481MAP, 481
NUMLOCK=, 840-841NWCACHE, 842-843NWCDEX, 843-844online help
accessing, 46-47Alt+B (Previous Topic),
49-50Alt+C (Contents), 49-50Alt+N (Next Topic), 49-50exiting, 51jump words, 48-49menu options, 49navigating, 47-50topics, printing, 50-51topics, searching, 51
Optimize Menu(DEFRAG), 179
parameters, 42-44filespec, 45overriding, 51-52
PASSWD, 844PASSWORD, 844-845PATH, 845-847
finding files, 122-123parameters/switches, 846
PAUSE, 398, 847-848batch files, 397
PCM, 849PCMATA.SYS, 849PCMCS, 849PCMDINST, 849PCMFIDISK, 850PCMRMAN, 850-851PCMSCD, 851PCMSETUP, 851POWER, 852-854pretender
ASSIGN, 468-469JOIN, 468-469SUBST, 468-469
PRINT, 857-860processing when rebooting,
809-811PROMPT, 295-297,
862-864meta-strings, 296-298parameters/switches, 862
QBASIC, 864-865QCONFIG, 865RAMBOOST, 866-867RAMSETUP, 871-872RD, 872-873RECOVER, 259, 873REM, 874-875
batch files, 397-398parameters, 467
REMOVDRV, 875REN, 876RENAME, 214-215, 876RENDIR, 877repeating for group of files,
740-742REPLACE, 877-880replaceable parameters,
599-600REPORT, 880reserved names, 594RESIZE, 880RESTORE, 881-884reusing, 434-435RMDIR, 872-873
directory deletions, 120parameters/switches, 872
SCANDISK, 884-888/ALL switch, 189/AUTOFIX switch, 189/CHECKONLY switch,
189/CUSTOM switch, 189/FRAGMENT switch,
189/MONO switch, 189/NOSAVE switch, 189/NOSUMMARY switch,
189parameters/switches,
884-885/SURFACE switch, 189/UNDO switch, 189
SCANREG, 888-889SCHEDULE, 889-890SCRIPT, 890-891scrolling (DOS Editor), 370SDEFRAG, 891-892SDIR, 892-894
SET, 294, 894-897AUTOEXEC.BAT file, 30environment variables,
294-295parameters/switches, 894
SETUP, 897SETVER, 898-903
DOS versions, 280-283parameters/switches, 898
SHARE, 906-907SHELL, 464
environment size, 26parameters, 465-466switches, 465-466
SHELL=, 907-909SHIFT, 910
batch files, 397moving batch file parame-
ters, 409-410SIZER, 910SMARTDRV, 911-913SMARTMON, 914SORT, 915-916SSETUP, 917STAC, 917STACHIGH, 917STACKER, 918STACKS=, 918-920SUBMENU=, 920-922SUBST, 302-303, 922-923
parameters/switches, 922referencing drive paths,
303-304rules for use, 304
SWITCH, 924switches, 44-45
overriding, 51-52SWITCHES, 467-468,
924-926syntax, 42-43
backslashes (\), 45Drive\Files format, 43-44paradigm, 44slashes (/), 45SourceFiles format, 43-44
SYS, 167-168, 926-928boot disk, 25parameters/switches, 927
SYSINFO, 928-929system performance, 589TASKMGR, 929
975commands
TIME, 278-279, 930-931parameters/switches, 930
TIMEOUT, 931TOUCH, 931-932TREE, 113-114, 932
listing directories, 123-124parameters/switches, 932
TUNER, 933TYPE, 187, 933-934
displaying batch file con-tents, 396
parameters/switches, 933use guidelines, 201viewing ASCII files,
200-201UNCOMP, 936UNDELETE, 221,
936-939parameters/switches,
936-938recovering files, 262-266
UNFORMAT, 939-940parameters/switches, 939recovering partition tables,
261unformatting disks,
257-261UNINSTALL, 940UNPACK2, 941UNSTACK, 942VER, 942
DOS versions, 279VERIFY, 943-944VFINDTD, 944VIEW, 945-946View menu
Program List, 74Refresh, 71
VOL, 167, 946-947VSAFE, 947-948wildcards
asterisk (*), 54-55characters, 594-596question mark (?), 54-55
Windows programs, 590XCOPY, 950-954
backing up disks, 208-209copying directories,
206-207copying directory branches,
209-210
copying disks, 209defaults, 214parameters/switches,
950-951switches, 206use guidelines, 207-208
XCOPY32, 954XDEL, 955XDF, 955XDFCOPY, 956XDIR, 956-957
COMMANDS.TXT file, 513
comments, batch files, 874-875
inserting, 398COMP command, 636-638
COMP.EXE file, 513
comparingbackups against original
files (Microsoft Backup),241
disks (DISKCOMP com-mand), 219-220
files, 217, 636-638copied to originals (FC
command), 218integrity (FC command),
215-216with FC command,
732-734floppy disks, 690-691strings (IF command),
402-403text files (FC command),
218-219Complementary Metal
Oxide Semiconductorchips. See CMOS chips
Compress menu commandsCreate new drive, 146Existing drive, 145
compressed disk drives, 656changing sizes, 665-666defragmenting, 659-660deleting (DoubleSpace),
145files and subdirectories,
deleting, 661-662
formatting (DoubleSpace),145
free space, 657-659, 664-665
information, viewing, 662-663
uncompressing, 666-667unmounting, 660
Compressed DriveInformation dialog box,143
compressed files, copying,728-729
compressed volume files. SeeCVFs
compressingdisks (DoubleSpace),
140-141, 145-146, 654-657
files for disk space maxi-mization, 183
RAM drives, 890Stacker drives, 936, 942
compression ratio, 664-665DoubleSpace utility,
143-144files/directories, 892-894
compression utilities, down-load sites, 183
computer virusesMcAfee VirusScan, 496
disk scanning, 497downloading, 496frequency of scans, 497
potential damage, 496prevention, 496transmission of, 496
computers, linking, 774-786
COMSPEC variable, 304,521
CON devices, 104
CONFIG command, 638
CONFIG environment vari-able, 521-522
CONFIG.SYS DEVICE dri-ver command, 584-586
commands976

CONFIG.SYS file, 511ANSI.SYS driver, locating,
416blocks (commands),
606-608boot disk, 24-25boot process, modifying,
17, 38-39commands
BREAK, 27, 468BUFFERS, 27COUNTRY, 27DEVICE, 27DEVICEHIGH, 27DOS, 27DRIVPARM, 27FCBS, 27FILE, 27INCLUDE, 27INSTALL, 27LASTDRIVE, 27MENUCOLOR, 27MENUDEFAULT, 27MENUITEM, 27NUMLOCK, 27REM, 27SET, 27SHELL, 27STACKS, 28SUBMENU, 28SWITCHES, 28
[common] section, 33configuration menu, using
as system menu, 36-38default configuration, 34device drivers, 443-444
directory location, 312-313troubleshooting, 314-315
FCBS command, 463FILES command, 463-464LASTDRIVE command,
464line-by-line examination,
28-29[menu] section, 33
menu color selection, 34-35multiple configurations,
32-33subroutines, 924system configuration, 26-29
configuration filesmodifying (DOS Editor),
362starting, 624
configuringbackup utilities
Microsoft Backup, 235-236
Microsoft Backup forWindows 3.x, 235-236
cables (Interlnk), 223-224code pages, 818-821console devices, 817-818device drivers, 312-313DOS, 924-926DOS versions, 280-283Interlnk, 223-224keyboards, 817-818memory (MemMaker),
455-460Microsoft Undelete
(Windows), 267monitors, 817-818startup menu, 920-922system devices, 813-815
connectingInterlnk, 227Internet
FTP, 485-486, 489-491Gopher, 484ISP shell account, 484-485Telnet, 484-485troubleshooting guidelines,
491-492
consoles, 298auxiliary, I/O devices,
650-651configuring, 817-818copying files from (COPY
command), 205-206CTTY command, 325-326
Contents command (Alt+Ckeystroke), online help, 49-50
Control Program forMicrocomputers (CP/M),forerunner of DOS, 15
controllingDoubleSpace, 142screen display (ANSI.SYS),
419-423conventional memory,
283-288increasing, 867listing contents, 286-287loading
device drivers, 679-682TSRs, 768-769
maximizing, 803-804conventional memory
(RAM), 18-19
conventionscommand reference,
590-592country-specific, 642-644filenames, 104-107
convertingdrives from FAT16 to
FAT32, 651-652EXE files to .BIN/.COM
files, 727XMS (extended memory) to
LIM expanded memory(EMS), 722-726
COPY command, 108, 203,639-642
batch files, creating, 392-393
combining ASCII files,204-205
copying files from consoledevices, 205-206
defaults, 214files
copying, 202-203group copying, 204
parameters/switches, 639-640
redirecting input to COPYCOMP.BAT file,392
renaming files, 205switches, 203
/A, 203/B, 203/V, 203/Y, 203
use guidelines, 202-203
977COPY command

Copy command (File menu),91
Copy File dialog box, 67, 91
COPYCMD environmentvariable, 522
COPYCOMP.BAT file, redi-recting input with COPYcommand, 392
copyingcommand processor
(COMMAND.COM),635-636
directories, 950-954XCOPY command,
206-207directory branches
(XCOPY command), 209-210
disksDISKCOPY command,
210-212XCOPY command, 209
DOS Editor to floppy disks,363
environment, programloading, 520
eXtended Density Format(XDF) disk contents, 956
files, 639-642, 950-954compressed, 728-729COPY command, 202-203DOS Shell, 89-91from console devices
(COPY command), 205-206
groups of (COPY com-mand), 204
with batch files, 395-396floppy disks, 692-694subdirectories, 950-954text (Clipboard), 375
country codes, international-ization settings, 354-355
COUNTRY command(CONFIG.SYS file), 27
country-specific conven-tions, 642-644
COUNTRY.ICE file, 505
COUNTRY.SYS file, 505,644
COUNTRY= command,642-644
cp command (Unix), 485
CP/M (Control Program forMicrocomputers), 15
CPBACKUP command,645-647
CPBDIR command, 647
CPI (Code page informa-tion), 105
CPP (C++ source file) file-name extension, 105
CPSCHED command, 647-648
CPUs (central processingunits), 13
early versionsAT computers, 17XT computers, 17
expanded memory, 19Intel
80386 chips, 1880486 chips, 18
memory, real mode versusprotected mode, 17
motherboards, 13system buses, communica-
tion functions, 13CRC (Cyclic Redundancy
Check) numbers, 648
CRC command, 648
CREATE command, 648-649
Create Directory command(File menu), 86-87
Create Directory dialog box,86-87
Create new drive command(Compress menu), 146
creatingbatch files
COPY command, 392-393DOS Editor, 391Edlin, 391guidelines, 391
directoriesDOS Shell, 86-87MKDIR command,
117-119floppy boot disk, 25-26macros (DOSKEY),
436-439memos (DOS Editor), 362
crippleware, 495
CSCRIPT command, 649-650
Ctrl+* key, DOS Shellhotkey, 66
Ctrl+/ key, DOS Shellhotkey, 67
Ctrl+Alt+Del key combina-tion (warm booting), 24
ROM BIOS controls, 564Ctrl+Break keystroke,
Break, 564
Ctrl+C keystrokeBreak, 565commands, canceling, 52
Ctrl+F1 shortcut key (DOSEditor), 367
Ctrl+F5 keyClean Boot startup, 564DOS Shell hotkey, 67
Ctrl+F8 key (InteractiveBoot), startup control key,564
Ctrl+Ins shortcut key (DOSEditor), 367
Ctrl+P keystroke, Echo toPRN, 565
Ctrl+Q shortcut key (DOSEditor), 367
Ctrl+S keystroke, Pause, 565
Ctrl+\ key, DOS Shellhotkey, 67
CTTY command, 650-651guidelines for use, 326I/O devices, 325-326parameters/switches, 650syntax, 325
Copy command (File menu)978
currencies (COUNTRY.SYSfile), 340-342
current directory, changing,621-623
current drive meta-string,297
current path meta-string,297
CURSOR.EXE command,651
cursorsANSI control codes,
426-427LCD screens, 651mouse (DOS Editor),
368-370movement controls
(ANSI.SYS), 420positioning controls
(ANSI.SYS), 420/CUSTOM switch,
SCANDISK command, 189
Custom setup(DoubleSpace), 142
Custom Setup (MemMaker),456-460
customizingDIR command, 199environment variables (SET
command), 294, 894-897keyboards (ANSI.SYS),
423-424prompt, 862-864screen appearance (MODE
command), 298screen display (ANSI.SYS),
421-422upper memory, 698-700
cutting text (Clipboard), 375
CV.COM file, 513
CVFs (compressed volumefiles)
accessing, 663-664deleting, 660unmounting, 667-668
CVT.EXE command, 651-652
Cyclic Redundancy Check(CRC) numbers, 648
cylinders (disks), 134-136disks, 151hard disks, 139
D
/D switchSETVER command, 282XCOPY command, 207
danger! file designation, 504
DAT files, 105extracting files from, 761
databyte storage, 138loss
hardware causes, 232-233preventing, 232-233restoring from backups,
248-251software causes, 232-233
DATAMON command, 652
date, setting, 931-932
date and time stamp, 276-277
DATE command, 277-278,653
date meta-string, 296
datesCOUNTRY.SYS file,
340-342DATE command, 277-278international formats,
356-357setting, 276-277, 653TIME command, 278-279
DAYBACK.BAT file, 402
DB (Database, Paradox) file-name extension, 105
DBF (Database, dBASE)filename extension, 105
DBLBOOT.BAT file, 513
DBLBOOT.INI file, 513
DBLSPACE/AUTO-MOUNT command, 655
DBLSPACE/CHKDSK com-mand, 656
DBLSPACE/COMPRESScommand, 656-657
DBLSPACE/CREATE com-mand, 657-659
DBLSPACE/DEFRAG-MENT command, 659-660
DBLSPACE/DELETE com-mand, 660
DBLSPACE/DOUBLE-GUARD command, 661
DBLSPACE/FORMAT com-mand, 661-662
DBLSPACE/INFO com-mand, 662-663
DBLSPACE/LIST com-mand, 663
DBLSPACE/MOUNT com-mand, 663-664
DBLSPACE/RATIO com-mand, 664-665
DBLSPACE/SIZE com-mand, 665-666
DBLSPACE/UNCOM-PRESS command, 666-667
DBLSPACE/UNMOUNTcommand, 667-668
DBLSPACE command, 654
DBLSPACE.00x file, 505
DBLSPACE.BIN file (devicedriver), 444, 505
DBLSPACE.EXE file, 505
DBLSPACE.HLP file, 505
DBLSPACE.INF file, 505
DBLSPACE.INI file, 505
DBLSPACE.SYS device dri-ver, 668-670
DBLSPACE.SYS file, 505
DBLSPACE.WIN file, 505
979DBLSPACE.WIN file

DBLWIN.HLP file, 505
DCONVERT command,671
DCOPY.BAT file, 401-402
DCT (Dictionary) filenameextension, 105
dead keys, 352-353
/DEBUG switch, MEMcommand, 283
DEBUG command, 200,671-672
DEBUG program, 671-672
DEBUG.EXE file, 505
default system configura-tions, creating, 34
DEFAULT.SET file, 508
DEFAULT.SLT file, 509
defining environment vari-ables (SET command), 295
DEFRAG command, 136,672-674
DEFRAG program, 177-181Optimize menu commands,
179parameters, 180-181switches, 180-181use guidelines, 181
DEFRAG.EXE file, 505
DEFRAG.HLP file, 505
Defragment option(DoubleSpace), 146
defragmentingcompressed disk drives,
659-660files, 672-674hard disks, 177-181
(DEFRAG program)Stacker drives, 891-892
DEL command, 675-676deleting files, 135parameters/switches, 675
Del shortcut key (DOSEditor), 66, 367
DELAY command (4DOS),498
DELETE command (FTP),487
Delete Item dialog box, 80-81
delete sentry, 262installing, 264
delete tracker, 262installing, 264
deleted files, recovering,694, 839, 936-939
deletingcompressed drives
(DoubleSpace), 145CVFs (compressed volume
files), 660directories
DELTREE command,120-121
RMDIR command, 120directories/subdirectories
branches, 679empty subdirectories, 955environment variables,
894-897files, 222
being saved by DELWATCH, 677
from command line(ERASE command),221-222
compressed drives, 661-662
from disks, 135from drives and directories,
675-676ERASE command,
221-222maximizing hard disk
space, 182-183multiple, 955previous versions of DOS,
676prompting before, 678
macros (DOSKEY), 440partitions, 161program groups (DOS
Shell), 80-81program items to program
(DOS Shell), 82-83
Stacker stacvol file, 875subdirectories, 872-873
compressed drives, 661-662
temporary copy of COMMAND.COM file,727-728
textClipboard, 375DOS Editor, 370-371
DELOLDOS command, 676
DELOLDOS.EXE file, 505
DELPURGE command, 677
DELQ command, 678
DELTREE command, 505,679
directory deletions, 120-121parameters/switches, 679
DELWATCH, 677-678
DELWATCH.EXE com-mand, 677-678
demoware, 495
DESCRIBE command(4DOS), 498
Deselect All command (Filemenu), 89
deselecting all files (DOSShell), 89
Desktop SNMP (NovellNetWare Client), 474
DEV (Program device dri-ver) filename extension,105
DEVICE command, 223,443-444
CONFIG.SYS file, 27device drivers, loading, 313
device driversANSI.SYS, 444
commands, 608-610installing, 416
CHKSTATE.SYS, 444, 631CNFIGNAM.EXE,
634-635commands, 443-444, 588CONFIG.SYS file, 443-444
DBLWIN.HLP file980
configuring, 312-313DBLSPACE.BIN, 444DBLSPACE.SYS, 668-670defined, 443DISPLAY.SYS, 444,
695-698DMA channels, assign-
ments, 311-312DMDRVR.BIN, 444DRIVER.SYS, 444,
708-711EGA.SYS, 444, 720-721EMM386.EXE, 444,
722-726expanded memory,
449-451parameters/switches,
723-725floppy disk drives, 708-711hardware interrupts,
309-310IRQ assignments, 310-311
HIMEM.SYS, 444, 752-759Extended Memory
Manager, 445-448parameters/switches,
752-755syntax, 446
INTERLNK.EXE, 444,770-780
KBDBUF.SYS, 788-789loading, 687
from DOS commandprompt, 715
into conventional memory,679-682
into upper memory, 803into upper memory area,
682-686MONOUMB.386, 444MOUSE.COM, 444peripherals, 308-309POWER.EXE, 444,
854-857PRINTER.SYS, 444,
860-862RAMDRIVE.SYS, 444,
867-871SCREATE.SYS, 890SETVER.EXE, 444,
904-906
SMARTDRV.EXE, 444,914
SSTOR.SYS, 444STACHIGH.SYS, 917system configuration, 444troubleshooting scenarios
AUTOEXEC.BAT file,editing, 314-315
CD-ROM drives, 316CONFIG.SYS file, edit-
ing, 314-315conflicts, 314IRQ conflicts, 314-315modems, 316parallel printers, 316serial port cards, 316video cards, 316
UMBCGA.SYS, 934UMBEMS.SYS, 934UMBHERC.SYS, 935UMBMONO.SYS, 935upper memory area (UMA),
loading, 451-452VFINTD.386, 444,
944-945WINA20.386, 949-950
device error messagesabort (A) option, 557alphabetical listing, 557-561fail (F) option, 557igonore (I) option, 557retry (R) option, 557
device filtersFIND, 335-337MORE, 334-335SORT, 337-338
DEVICEHIGH command,19, 682-686
CONFIG.SYS file, 27upper memory area (UMA),
452devices
code pages, status viewing,350
commands, 318CLS, 319CTTY, 325-326GRAPHICS, 319-322MODE, 326-332PRINT, 322-325
control commandsMODE, 469PRINT, 469SET, 469
filters, 334-335logical, 103-104memory, I/O addresses, 312names
CLOCK$, 104COM, 104CON, 104LPT, 104NUL, 104
redirection operators, 332guidelines for use, 334issuing, 332-333
DEVLOAD command, 687
dialog boxesAdd Group, 79Add Program, 82Associate File, 93Backup Options, 247-248Change, 365-366, 378-379
change all option, 379find and verify option, 379
Change Compression Ratio,144
Change Size, 143Compressed Drive
Information, 143Copy File, 91Create Directory, 86-87Delete Item, 80-81DOS Backup, 236DOS Shell
command buttons, 70Copy File, 67File Display Options,
68-69list box entries, 68option buttons, 68-69option check boxes, 69text box entries, 67-68
Find, 51, 377-378match upper/lowercase
option, 378whole word option, 378
Find Deleted Files, 268function of, 364Move File, 91
981dialog boxes
New Program Object, 79Open, 382-383Print, 50-51, 383
Complete Documentoption, 384
Selected Text Only option,384
Program Group Properties,80
Screen Display Mode, 75-76
DIF (Data InterchangeFormat), 105
differential backupsexecuting (Microsoft
Backup for Windows 3.x),242
frequency of, 238Microsoft Backup, 238
DIR (Program data file,directory) filename exten-sion, 105
DIR command, 108, 687-689customizing, 199DIRCMD environment
variable, 199directory entries, viewing,
111-112finding files, 198issuing, 193-194listing files, 193-195parameters/switches,
687-689switches, 193
/A, 195-196/B, 197/L, 197/O, 197/P, 195/W, 195
syntax, 193viewing screen information,
195DIR command (FTP), 487
DIRCMD environment vari-able, 199, 522-523
directories, 102, 110adding disk drives (JOIN
command), 302branches
copying (XCOPY com-mand), 209-210
deleting, 679changing, 621-623checking, 626-630compression ratio, 892-894copying (XCOPY com-
mand), 206-207, 950-954creating (MKDIR com-
mand), 117-119, 800-801dedicated for applications,
193deleting
empty, 955DELTREE command,
120-121RMDIR command, 120
DOS Shellbranches, collapsing, 84-86branches, expanding,
84-86creating, 86-87hierarchical structure, 83tree structure, 83views, modifying, 70-74
entries, viewing (DIR com-mand), 111-112
filesdeleting, 675-676information, 687-689recovery of, 266selecting (DOS Shell), 89
FTPdisplaying, 490-491retrieving, 491
informationcaching (FASTOPEN),
173-174columns, 194
listing (TREE command),123-124
modifying (CHDIR com-mand), 119-120
moving (MOVE command),213
passwords, 844-845pathname expressions,
115-117renaming (MOVE com-
mand), 121-122, 214sorting (DEFRAG pro-
gram), 179-180splitting (SUBST com-
mand), 302-303temporary, 124-125trees, 932troubleshooting (CHKDSK
command), 184Unix, filename case sensi-
tivity, 485view options in DOS Shell,
61viewing (DIR command),
194-195DIRHISTORY command
(4DOS), 498
disabling memory, 805
DISCONNECT command(FTP), 487
disk buffersBUFFERS command,
461-462default number of, 462flushing, 461look-ahead buffers, 462secondary caches, 462suggested number of, 462
disk caching (SMARTDrive),169-172
disk commands, 586-587
disk drivesadding to directory of other
disks (JOIN command),302
aliases, 613compressed, 656
changing size, 665-666defragmenting, 659-660files and subdirectories,
deleting, 661-662free space, 664-665information, 662-663uncompressing, 666-667unmounting, 660
dialog boxes982
current directories, chang-ing, 621-623
cylinders, 134-136directories, splitting
(SUBST command), 302-303
free space, 657-659information, 663installing, 711-713mounting removable, 655names, 176networks, drive letters,
795-796number of, changing
(LASTDRIVE command),464
read/write heads, 133requests, redirecting
(ASSIGN command), 302sectors, 136-137tracks, 134
disk errors (ScanDisk), 884-888
disk failures, files, restoring,250-251
disk-based memory, 14floppy disks, 14hard disks, 14media, 20-21
disk-compression programs,654-657
DISKCOMP command, 505,690-691
comparing disks, 219-220parameters/switches, 690
DISKCOPY command, 505,692-694
copying disks, 210-212exit codes, 400parameters/switches, 692switches, 211
/1, 211/M, 211/V, 211
DISKMAP.EXE command,694
DISKOPT.EXE command,694-695
disks3 1/2'' capacities, 1535 1/4'' capacities, 153analyzing (CHKDSK com-
mand), 184-188analyzing (SCANDISK
utility), 188-189backing up (XCOPY com-
mand), 208-209bootable, creating, 167-168byte storage, 138caching, 842-843
SMARTDrive, 911-913capacity, 153clusters, 150-151comparing (DISKCOMP
command), 219-220, 690-691
compressing(DoubleSpace), 140-141,145-146
copyingdirectories to (XCOPY
command), 206-207DISKCOPY command,
210-212, 692-694XCOPY command, 209
cylinders, 151DOS Shell, logging to dif-
ferent disk, 70-71eXtended Density Format
(XDF), contents, copying,956
floppybootable, creating,
926-928formats, 138formatting (FORMAT
command), 150-151raw/usable capacity, 139SSDD (single-sided, double
density), 138formats, 137formatting, 136fragmentation effects, 177hard
cylinders, 139formats, 139-140recovering partition tables,
261
naming (LABEL com-mand), 166-167
RAM, 174-176reformatted, recovering,
939-940sectors, 134, 150-151serial numbers, 154-156
displaying, 946-947storage systems, evolution
of, 128system files, transferring to,
167-168tracks, 150unformatting, 257-258
recovering from accidentalformats, 258-261
volume labels, 154-156,793-794
displaying, 946-947VOL command, 167
display adaptersColor Graphics Adapter
(CGA), 747EGA, 720-721
display menus, creating(CHOICE command), 406-407
DISPLAY.SYS (device dri-ver), 444, 695-698
code page switching, load-ing, 346-347
displayingbatch file contents, 396compressed information
(DoubleSpace), 142-143compression ratio for
files/directories, 892-894DOS versions, 279, 942file contents, 933-934FTP directories, 490-491memory, free/used (MEM
command), 453-454, 802-803
messages, batch files, 398online documents, 945PC’s techinal information,
865serial numbers (disks),
946-947volume labels, 946-947
983displaying
DLL (Windows DynamicLink Library) filenameextension, 105
DMA (direct memoryaccess) channels, 311-312
large data-transfer func-tions, 311-312
DMDRVR.BIN (device dri-ver), 444, 506
DOC (Document) filenameextension, 106
docking laptops, 701
documents, on-line, display-ing, 945
dollar sign meta-string, 297
DOS (DIsk OperatingSystem)
introduction of, 15starting, timeout periods,
807-809versions
displaying, 279setting, 280-283
DOS Backup dialog box, 236
DOS control keysCtrl+C (Break), 565Ctrl+P (Echo to PRN), 565Ctrl+S (Pause), 565
DOS Editor, 362batch files
creating, 391modifying, 362
block editingClipboard, 374-376fundamentals, 373text, changing, 378-379text, finding, 377-378text searching and replac-
ing, 376-377text selection, 373-374
bulletin board files, viewing,362
commandsexecuting, 364shortcut keys, 366
configuration files, modify-ing, 362
cursor movement interfacescontrol keys, 369-370keypad, 369-370
dialog boxesChange, 365-366Enter key, 366Esc key, 366Tab key, 366
EDIT command/B switch, 384/G switch, 384/H switch, 385/NOHI switch, 385
exiting, 384File menu commands,
379-384files, loading when launch-
ing, 383floppy disks, using with,
363Help menu commands,
387-388Insert mode, 371keystroke commands,
568-569launching, 363memos, creating, 362menu bar, 364
activating, 365command options, 365Edit menu, 365ellipsis indicator, 365Esc key, 365File menu, 365Help menu, 365highlighted commands,
365Search menu, 365
mouseactions list, 368cursor movement, 369-370Microsoft-compatible, 367
Overtype mode, 371QBASIC.INI file, 386-387README files, writing,
362required files
EDIT.COM, 362EDIT.HLP, 362QBASIC.EXE, 362
screenappearance, 363colors, changing, 385-386saving custom options,
386-387scrollbars, removing, 386
scrollbars, 364scrolling commands, 370status bar, 364text
automatic indenting, 372overtyping, 371place markers, 373tab stops, 372
unknown text files, viewing,362
window appearance, 364DOS Protected Mode
Interface support, loading/unloading, 707
DOS Shelladvantages/disadvantages,
58All Files view, 74dialog boxes
command buttons, 70Copy File, 67File Display Options,
68-69list box entries, 68option buttons, 68-69option check boxes, 69text box entries, 67-68types, 67
directoriesbranches, collapsing, 84-86branches, expanding,
84-86creating, 86-87hierarchical structure, 83tree structure, 83views, modifying, 70-74
disks, logging to differentdisk, 70-71
DOS Editor, launching, 363file lists, switching between,
72-73files
ASCII display, 59associating with programs,
92-93
DLL (Windows Dynamic Link Library) filename extension984
copying, 89-91entire deselection, 89entire selection, 89hexadecimal display, 59moving, 91multiple selection, 87-88select across directories
option, 89single selection, 87viewing, 91-92views, modifying, 70-74
graphics mode, 58GUI simulation, 58help screen
commands, 94-95contextual, 94-95
hotkey commands+ key, 66Alt key, 66Alt+Esc key, 66Alt+F4 key, 66Alt+Tab key, 66Ctrl+* key, 66Ctrl+/ key, 67Ctrl+F5 key, 67Ctrl+\ key, 67Del key, 66Esc key, 67F1 key, 66F3 key, 66F5 key, 66F7 key, 66F8 key, 66F9 key, 66F10 key, 66Shift+down arrow key, 66Shift+F5 key, 66Shift+F8 key, 66Shift+F9 key, 66Shift+left arrow key, 67Shift+right arrow key, 67Shift+Tab key, 67Shift+up arrow key, 66Tab key, 67
installation of, 59introduction of, 58keystroke commands,
569-571launching, 59, 704-707
menusmenu bar, 64pull-down, 64-65
mouse requirements, 59multitasking features, 59point-and-click usage, 58program groups
adding, 78-80deleting, 80-81examples, 77-78hierarchy, 77-78naming guidelines, 79passwords, 80program items, adding,
81-82program items, deleting,
82-83program items, modifying,
82properties, modifying, 80reordering, 81
program list, viewing, 74screen modes, 75-76scrollbars, 63scrollboxes, 63selection cursor, 63-64shortcut keys, launching
programs, 83similarity to Windows
interface, 58Supplemental Programs
Disk inclusion, 58Task Swapper, activating,
93-94text-based interface, 58versus DOS command line,
58-59video modes, 75-76window
appearance, 59area title bar, 61area, moving, 63-64area, selecting, 62directory views, 61drive area, 61menu bar, 60program groups, 62scrollbars, 61status line, 60task list area, 62title bar, 60
DOS version meta-string,297
DOS= command, 698-700
DOSBOOK command, 700
DOSDATA command, 701
DOSDOCK command, 701
DOSHELP.HLP file, 506
DOSKEYbenefits, 432command-history buffer
keys, 435-436command-line editing keys,
433-434, 565-567commands, locating, 436loading, 432macros
creating, 436-439defining from bootup, 439deleting, 440naming, 440replaceable parameters,
438running, 439-440special characters, 437-438
parameters, 432command, 437macroname, 437
reusing commands, 434-435DOSKEY command, 506,
701-704
DOSSETUP.INI file, 511
DOSSHELL command, 704-707
DOT (Word for Windowstemplate) filename exten-sion, 106
double buffering, enabling,914
double-density disks, 138,153
DoubleGuard, 661
DoubleSpace, 656-659automounting, 655compressed disk drives,
145-146free space, 664-665information, 662-663size, 665-666
985DoubleSpace
compression ratio, chang-ing, 143-144
controlling, 142CVF access, 663-664Defragment option, 146deleting
compressed disk drive filesand subdirectories, 661-662
compressed drives, 145device driver, 668-670disk compression program,
140-141disk drive information, 663displaying compressed
information, 142-143DoubleGuard, 661drive sizes, changing, 143formatting compressed
drives, 145installing, 141-142SCANDISK, 147starting, 654uncompressing disk drives,
147, 666-667unmounting
CVFs, 667-668drives, 660
downloadingcompression utilities, Web
site resources, 183Novell NetWare Client,
473Downloads.com Web site,
183
DPMI command, 707
DPMS.EXE command, 707-708
DR-DOShelp, starting, 700uninstalling, 940
DRAWBOX command(4DOS), 499
DRAWHLINE command(4DOS), 499
DRAWVLINE command(4DOS), 499
drifting (hard disks), 148
drive area (DOS Shell), 61
drive letters for networks,795-796
DRIVER.SYS (device dri-ver), 444, 506, 708-711
driversdevice
ANSI.SYS, 608-610CHKSTATE.SYS, 631CNFIGNAM.EXE,
634-635commands, 588DBLSPACE.SYS,
668-670DISPLAY.SYS, 695-698DRIVER.SYS, 708-711EGA.SYS, 720-721EMM386.EXE, 722-726floppy disk drives, 708-711HIMEM.SYS, 752-759INTERLINK.EXE,
770-773INTERLNK.EXE,
774-780KBDBUF.SYS, 788-789loading, 679-687loading from DOS com-
mand prompt, 715POWER.EXE, 854-857PRINTER.SYS, 860-862RAMDRIVE.SYS,
867-871SCREATE.SYS, 890SETVER.EXE, 904-906SMARTDRV.EXE, 914STACHIGH.SYS, 917UMBCGA.SYS, 934UMBEMS.SYS, 934UMBHERC.SYS, 935UMBMONO.SYS, 935VFINTD.386, 944-945WINA20.386, 949-950
DRMOUSE, 714Novell NetWare Client,
configuring, 475Phoenix Super Client, 851Stacker, storing in extended
memory, 707-708
drives (disk)aliases, creating, 922-923CD-ROM, accessing,
835-836, 843-844converting from FAT16 to
FAT32, 651-652disk
cylinders, 134-136read/write heads, 133sectors, 136-137tracks, 134
ejecting medium, 721fixed, 130floppy disk
components, 129-130size evolution, 131-132versus hard disks, 131
hard disk, 130advantages/disadvantages,
131components diagram, 130future of, 131platters, 130
locking/unlocking, 714machine components, 130mounting removable, 655pathname expressions,
115-117performance, optimizing,
694-695RAM, compressing, 890removable, 130Stacker
checking, 626creating, 648-649defragmenting/recompress-
ing, 891-892mounting/unmounting,
918read/write, read-only pass-
words, 844resizing, 880statistics, 880uncompressing, 936, 942updating, 750
subdirectories, joining, 786-788
DoubleSpace986
Drive\Files command syn-tax, 43-44
DRIVPARM command,CONFIG.SYS file, 27, 711-713
DRMOUSE command, 714
DRV (program devicd dri-ver) filename extension,106
DRVLOCK command, 714
/DS switch, UNDELETEcommand, 263
/DT switch, UNDELETEcommand, 263
DTA (Data) filename exten-sion, 106
dual file lists, switching fromsingle type (DOS Shell),72-73
DVD-ROMs, storage evolu-tion, 128
DVORAK.SYS file, 513
E
/E switch, XCOPY com-mand, 206
E command, 715-716
ECHO command, 397, 716-719
ANSI.SYS, 417-418batch files, 397-398parameters/switches, 717
Echo to PRN key (Ctrl+Pkeystroke), 565
EDIT command, 187, 719-720
AUTOEXEC.BAT file,editing, 32
parameters/switches, 719switches
/B (DOS Editor), 384/G (DOS Editor), 384/H (DOS Editor), 385/NOHI (DOS Editor),
385
Edit menu (DOS Editor),365
EDIT.COM file (DOSEditor), 362, 506
EDIT.HLP file (DOSEditor), 362, 506
editingbinary files (DEBUG com-
mand), 200command line capabilities,
433-434, 701-704command line keys, 52-54
with DOSKEY, 566-567without DOSKEY,
565-566files
ASCII text, 719-720troubleshooting, 229
mouse, cursor-movementcommands (DOS Editor),369-370
programs, 671-672scrolling commands (DOS
Editor), 370text
automatic indenting (DOSEditor), 372
line deletion, 370-371line insertion, 370-371line joining, 371line splitting, 371place markers (DOS
Editor), 373tab stops (DOS Editor),
372
Editor. See DOS Editor
Edlin, batch files, creating(EDLIN command), 391,720
EDLIN.EXE file, 513
EEMS (Enhanced ExpandedMemory Specification), 19
EGA (Enhanced ColorGraphics Adapter), 821
display adapters, 720-721EGA.CGI file, 506
EGA.ICE file, 506
EGA.SYS device driver, 444,506, 720-721
EGA2.CPI file, 506
EISA (Extended IndustryStandard Architecture) bus,448
EJECT command, 721
ejecting media from drives,721
ellipsis indicator on menubar (DOS Editor), 365
EMM (Expanded MemoryManager), 20
DOS Protected ModeInterface support, loading/unloading, 707
EMM386 command, 721-722
EMM386.EXE (device dri-ver), 19, 444, 506, 722-726
expanded memory, 449-451switches, 449-451upper memory area (UMA),
449empty subdirectories, delet-
ing, 955
EMS (Expanded MemorySpecification), 19
controlling, 721-722converting XMS (extended
memory) into, 722-726mapping as upper memory
blocks, 934memory, 283-288
enablingdouble buffering, 914memory, 805PCMCIA configuration
program (DOS version),849
END label (batch files), 403
Enhanced Color GraphicsAdapter (EGA), 821
Enhanced ExpandedMemory Specification(EEMS), 19
987Enhanced Expanded Memory Specification (EEMS)
environmentcopying, 520default size, 26Out of environment space
message, 520size, setting (SHELL=
statement), 520environment variables
adding, 894-897APPEND, 520-521changing (SET command),
294commands
PATH, 520PROMPT, 520SET, 520
COMSPEC, 521CONFIG.SYS file, 521-522
using configuration menuas system menu, 36-38
COPYCMD, 522customizing, 894-897defining (SET command),
295deleting, 894-897DIRCMD, 522-523MS-DOS label, 520MSDOSDATA, 523-524PATH, 524-525, 845-847PROMPT, 525TEMP, 525-526TMP, 525-526User label, 520windir, 526Windows label, 520WINPMT, 526-527
EPS (EncapsulatedPostScript) filename exten-sion, 106
equal meta-string, 297
ERAQ command, 678
ERASE command, 675-676deleting files, 221-222deleting files from com-
mand line, 221-222/P switch, 221use guidelines, 221
error messagesalphabetical listing, 530-557device/drive
abort (A) option, 557alphabetical listing,
557-561fail (F) option, 557ignore (I) option, 557retry (R) option, 557
Invalid number of parame-ters, 395
Out of environment space,520
ERRORLEVEL, testing,400-402
Esc keydialog boxes (DOS Editor),
366DOS Shell hotkey, 67menu bar (DOS Editor),
365-367Escape character, ANSI.SYS
commands, 417
escape meta-string, 296
ESET command (4DOS),499
EXCEPT command (4DOS),499
EXE (Executable program)filename extension, 106
EXE files, converting to.BIN or .COM files, 727
EXE2BIN command, 727
EXEBIN.EXE file, 513
executingbatch files, 392, 412
from other batch files, 411commands (DOS Editor),
364DEFRAG program,
177-181differential backups
(Microsoft Backup forWindows 3.x), 242
full backupsMicrosoft Backup,
239-241Microsoft Backup for
Windows 3.x, 242incremental backups
(Microsoft Backup forWindows 3.x), 242
programs remotely withInterlnk, 229
Existing drive command(Compress menu), 145
exit codesDISKCOPY command, 400programs, 400
EXIT command, 727-728command processor, 290secondary command
processor, 290-291Exit command (Alt+F),
online help system, 51
Exit command (File menu-DOS Editor), 380
exitingcommand processor, 290DOS Editor, 384online help, 51
EXPAND command, 728-729
EXPAND.EXE file, 506
expanded memory (EMS),19
controlling, 721-722converting XMS (extended
memory) into, 722-726EEMS specification, 19EMM386.EXE, 449-451LIM 3.2 specification, 19RAM, 18
Expanded Memory Manager(EMM386), 20
Express Setup(DoubleSpace), 141
Express Setup (MemMaker),455-458
environment988
Extended ASCII codes, 574-581
eXtended Density Format(XDF) disks, 956
Extended Industry StandardArchitecture (EISA) bus,448
extended memory (ExtendedMemory Specification), 20
converting to LIMexpanded memory (EMS),722-726
storing Stacker drivers,707-708
extended memory blocks(XMS), 445
Extended Memory Manager(HIMEM.SYS), 445-448
Extended MemorySpecification (XMS), 20
extended partitions, 160-162
extended-memory managers,752-759
extensionsfilenames, 101-107utility files, 515-517
external commands, 42, 192
EXTRACT command, 730
extracting filesfrom .CAB (compressed
cabinet) files, 730from Interent Explorer
backup files (DAT), 761
F
/F switch, FORMAT com-mand, 153, 157
F1 keyDOS Editor, 367DOS Shell hotkey, 66
F3 keyDOS Editor, 367DOS Shell hotkey, 66
F5 keyClean Boot, 564DOS Shell hotkey, 66
F6 shortcut key (DOSEditor), 367
F7 key, DOS Shell hotkey,66
F8 keyDOS Shell hotkey, 66Interactive Boot, startup
control key, 564F9 key, DOS Shell hotkey,
66
F10 key, DOS Shell hotkey,66
fail (F) option, device errormessages, 557
FAKEMOUS.COM file, 513
FASTHELP command, 506,730-731
FASTOPEN command, 506,731-732
hard disks, directorycaching, 173-174
FATs (File AllocationTables), 101, 135, 626
checking, 626-630CHKDSK command, 184clusters, 112-113, 150-151file fragmentation, 136information, recording,
811-813FC command, 217, 506,
732-734ASCII mode, 217binary mode, 217-218comparing
copied files to originals,218
text files, 218-219files, integrity comparisons,
215-216parameters/switches, 733switches
/A, 216/B, 216/C, 216/L, 216/M, 217/T, 217/W, 217
FCBS (file control blocks),463
command, 734-735CONFIG.SYS file, 27files, accessing, 463number of open files,
734-735FDISK command, 735-736
hard disksformatting, 158-159partitioning, 159-163
parameters/switches, 735read-only files, 110repartitioning hard disks,
164-165/STATUS switch, 163-164
FDISK program, 506, 735-736
FFIND command (4DOS),499
File Allocation Tables. SeeFATs
FILE command,CONFIG.SYS file, 27
file control blocks (FCBs),number of open files, 734-735
File Display Options dialogbox (DOS Shell), 68-69
file fragmentation, 136
file handles, 463-464maximum number, 737
file lists (DOS Shell), dualversus single, switchingbetween, 72-73
File menu commandsAssociate, 93Copy, 91Create Directory, 86-87Deselect All, 89Find Deleted File, 268Move, 91Select All, 89Undelete, 269Undelete To, 269View File Contents, 91-92
989File menu commands
File menu commands (DOSEditor)
Exit, 380menu bar (DOS Editor),
365New, 379Open, 380-383Print, 380, 383-384Save, 380-381Save As, 380-381
file systems, organization of,100
File Transfer Protocol. SeeFTP
File Update System pro-gram, starting, 738
FILELINK command, 736
filenames, 101, 593character guidelines, 101characters, 593-594conventions, 104-107CRC, 648creating, rules for, 102-103extensions, listing of com-
mon, 105-107File Allocation Table (FAT),
101illegal characters, 102parsing, 103reserved names, logical
devices, 103-104troubleshooting, 125-126utility file extensions,
515-517wildcard characters,
594-596FILER command (Novell
networks), 481
filesaccessing (FCBS com-
mand), 463ANSI.SYS, 504APPEND.EXE, 504archiving for disk space
maximization, 183ASCII, 200
combining (COPY com-mand), 204-205
viewing (TYPE com-mand), 200-201
ATTRIB.EXE, 505attributes, 107-108
Archive, 108Hidden, 108modifying (ATTRIB com-
mand), 109-110Read-only, 108-110Subdirectory, 108System, 108viewing (DIR command),
195-196, 613-615Volume Label, 108
AUTOEXEC.BAT, 511dates/times, 276defining macros from
bootup (DOSKEY), 439backups, 616. 833-834
restoring from, 248-251,881-884
selecting, 243selecting manually,
243-245selection criteria, 245-246selective restoration, 251
bare listings (DIR com-mand), 197
batch. See batch filesbinary, 200bundled, unpacking, 941BUSETUP.EXE, 511byte storage, 199C&E.BAT, 395CAB (compressed cabinet),
extracting, 730CHECKIT.BAT, 408CHKDSK.EXE, 505CHKLST.MS, 508CHKSTATE.SYS, 507CHOICE.COM, 505COMMAND.COM,
289-290, 505deleting temporary copy,
727-728exiting, 290second copy, 288-291
comparing, 217, 636-638,732-734
copied to originals (FCcommand), 218
compressed disk drives,deleting, 661-662
compressing, 656-657for disk space maximiza-
tion, 183compression ratios, 892-894compression/decompression
utilities, 495-496CONFIG.SYS, 511
subroutines, 924contents, 100-101
displaying, 933-934COPYCOMP.BAT, redi-
recting input with COPYcommand, 392
copying, 202-203, 639-642,950-954
compressed, 728-729from console devices
(COPY command), 205-206
with batch files, 395-396COUNTRY.ICE, 505COUNTRY.SYS, 505, 644DAT, extracting files from,
761date and time stamp,
276-277DATE command, 277-278TIME command, 278-279
DAYBACK.BAT, 402DBLSPACE.00x, 505DBLSPACE.BIN, 505DBLSPACE.EXE, 505DBLSPACE.HLP, 505DBLSPACE.INF, 505DBLSPACE.INI, 505DBLSPACE.SYS, 505DBLSPACE.WIN, 505DBLWIN.HLP, 505DCOPY.BAT, 401-402DEBUG.EXE, 505DEFAULT.SET, 508DEFAULT.SLT, 509DEFRAG.EXE, 505DEFRAG.HLP, 505defragmenting, 672-674delete sentry, 262delete tracker, 262deleted
recovering, 839, 936-939restoring, 694
File menu commands (DOS Editor)990
deleting, 222being saved by
DELWATCH, 677from command line
(ERASE command),221-222
from disks, 135from drives and directories,
675-676maximizing hard disk
space, 182-183multiple, 955previous versions of DOS,
676prompting before, 678
deletion-tracking, 265DELOLDOS.EXE, 505DELTREE.EXE, 505designations
80286, 50480386, 504danger!, 504international, 504keep, 504remove?, 504vital, 504Windows, 504
DISKCOMP.COM, 505DISKCOPY.COM, 505DISPLAY.SYS, 506DMDRVR.BIN, 506DOS Shell
All Files view, 74ASCII display, 59associating with programs,
92-93copying, 89-91entire deselection, 89entire selection, 89hexadecimal display, 59moving, 91multiple selection, 87-88select across directories
option, 89single selection, 87viewing, 91-92views, modifying, 70-74
DOSHELP.HLP, 506DOSKEY.COM, 506DOSSETUP.INI, 511DRIVER.SYS, 506
EDIT.COM, 506EDIT.HLP, 506editing
ASCII text, 719-720troubleshooting, 229
EGA.CGI, 506EGA.ICE, 506EGA.SYS, 506EGA2.CPI, 506EMM386.EXE, 506EXE, converting to .BIN or
.COM files, 727EXPAND.EXE, 506extensions, 101FASTHELP.EXE, 506FASTOPEN.EXE, 506FAT clusters, 112-113FC.EXE, 506FDISK.EXE, 506filenames, character guide-
lines, 101FIND.EXE, 506finding, 738-740
APPEND command, 610-613
DIR command, 198IF command, 404PATH command, 122-123
FORMAT.COM, 506formats, 100GRAPHICS.COM, 507GRAPHICS.PRO, 507groups, copying (COPY
command), 204headers, 229HELP.COM, 507HELP.HLP, 507HIMEM.SYS, 507Include/Exclude list
editing (Microsoft Backupfor Windows 3.x), 246
editing (Microsoft Backup),245-246
included with MS-DOS6.22, 505-510, 512
information, viewing, 687-689
integrity comparisons (FCcommand), 215-216
INTERLNK.EXE, loading,225-226, 507
INTERSVR.EXE, loading,226, 507
IO.SYS, 507KEYB.COM, 507KEYBOARD.ICE, 507KEYBOARD.SYS, 507KEYBRD2.SYS, 507LABEL.EXE, 507listing (DIR command),
193-195LOADFIX.COM, 507loading when launching
DOS Editor, 383locating (FIND filter), 336locking, 906-907lower-case listings (DIR
command), 197MACROS.BAT, 439MEM.EXE, 507MEMMAKER.EXE, 507MEMMAKER.HLP, 507MEMMAKER.INF, 507MEMMAKER.STS, 507MIRROR image, 258
recovering data from acci-dental formats, 258-259
MODE.COM, 507MONOUMB.386, 507MORE.COM, 508MOUSE.COM, 508MOUSE.INI, 508MOVE.EXE, 508moving (MOVE command),
212-213, 828-830MSAV.EXE, 508MSAV.HLP, 508MSAV.INI, 508MSAVHELP.OVL, 508MSAVIRUS.LST, 508MSBACKDB.OVL, 508MSBACKDR.OVL, 508MSBACKFB.OVL, 508MSBACKFR.OVL, 508MSBACKUP.EXE, 508MSBACKUP.HLP, 508MSBACKUP.INI, 508MSBACKUP.LOG, 508MSBACKUP.OVL, 508MSCDEX.EXE, 509MSCONFG.HLP, 508
991files
MSCONFG.OVL, 508MSD.EXE, 509MSDOS.SYS, 509MSTOOLS.DLL, 509MWAV.EXE, 509MWAV.HLP, 509MWAV.INI, 509MWAVABSI.DLL, 509MWAVDLG.DLL, 509MWAVDOSL.DLL, 509MWAVDRVL.DLL, 509MWAVMGR.DLL, 509MWAVSCAN.DLL, 510MWAVSOS.DLL, 510MWAVTSR.EXE, 510MWBACKF.DLL, 510MWBACKR.DLL, 510MWBACKUP.EXE, 510MWBACKUP.HLP, 510MWBACKUP.INI, 510MWGRAFIC.DLL, 510MWUNDEL.EXE, 510MWUNDEL.HLP, 510naming, 101
conventions, 21, 104-107reserved names, 103-104rules, 102-103troubleshooting, 125-126
NETWORKS.TXT, 510NLSFUNC.EXE, 510opening, 731-732
FCBs, 734-735Open command (DOS
Editor), 382-383OS2.TXT, 510PACKING.LST, 510passwords, 844-845pathname expressions,
115-117PostScript, printing,
890-891POWER.EXE, 510PRINT.EXE, 510printing, 201
DOS Editor, 383-384in background, 857-860
protecting from accidentaldeletions, 652
QBASIC.EXE, 510QBASIC.HLP, 510
QBASIC.INI, 510RAMDRIVE.SYS, 510README.TXT, 511recovering, 262
DOS directory method,266
Microsoft Undelete(Windows), 269-270
selecting, 268UNDELETE command,
262-266Undelete program
(Windows), 267renaming (COPY com-
mand), 205renaming (RENAME com-
mand), 214-215REPLACE.EXE, 511replacing, 877-880RESTORE.EXE, 511saving
Save As command (DOSEditor), 380-381
Save command (DOSEditor), 381
SCANDISK.EXE, 511SCANDISK.INI, 511scratchpad, temporary
directories, 124-125selecting to recover
(Microsoft Undelete), 268SERVER.EXE, 511SETUP.EXE, 511SETUP.MSG, 511SHARE.EXE, 511SIZER.EXE, 507SMARTDRV.EXE, 511SMARTMON.EXE, 511SMARTMON.HLP, 511SMARTMON.LOG, 511software-dependent, 100SORT.EXE, 511sorting (DIR command),
197SPATCH.BAT, 512SSTOR.SYS, 512Stacker stacvol, deleting,
875STACKER.INI,
re-creating, 638
storagefloppy disks, 101hard disks, 101
SUBST.EXE, 512supplemental disk
4201.CPI, 5144208.CPI, 5145202.CPI, 514ADOS.CFG, 513ADOS.COM, 513ADOS.OVL, 513ADOS.TXT, 513AREADME.TXT, 513ASSIGN.COM, 513BACKUP.EXE, 513COMMANDS.TXT, 513COMP.EXE, 513CV.COM, 513DBLBOOT.BAT, 513DBLBOOT.INI, 513DVORAK.SYS, 513DVORAK.TXT, 513EDLIN.EXE, 513EXE2BIN.EXE, 513FAKEMOUS.COM, 513GORILLA.BAS, 514GRAFTABL.COM, 513JOIN.EXE, 514KBDBUF.SYS, 514LCD.CPI, 514MIRROR.COM, 514MONEY.BAS, 514MSHERC.COM, 514NET.1XE, 514NETBEUI.DOS, 514NETWKSTA.1XE, 514NETWKSTA.2XE, 514NIBBLES.BAS, 514NXT.TXT, 514PRINTER.SYS, 514PRINTFIX.COM, 514REDIR.1XE, 514REDIR.2XE, 514REMLINE.BAS, 514SETNAME.EXE, 514
SYS.CO, 512system
formatting disks, 158transferring to disks,
167-168
files992
text files, comparing (FCcommand), 218-219
transferring between two computers,
736via Interlnk, 228
TREE.COM, 512UNDELETE.EXE, 512UNDELETE.INI, 512undeleting, 221UNFORMAT.COM, 512UNINSTALL.EXE, 511VFINTD.386, 510VSAFE.COM, 512WINA20.386, 512WNTOOLS.GRP, 512XBIOS.OVL, 506XCOPY.EXE, 512
FILES command, CONFIG.SYS file, 463-464, 737
filespec parameters (com-mands), 45
FILEUP command, 738
filter programs, 827-828
filters, devicesFIND, 335-337MORE, 334-335SORT, 337-338
FIND command, 738-740
Find Deleted File command(File menu), 268
Find Deleted Files dialogbox, 268
Find dialog box, 377-378match upper/lowercase
option, 378online help, 51whole word option, 378
FIND filterfiles, locating , 336guidelines for use, 337switches, 335-336syntax, 335-336
FIND.EXE file, 506
findingcommands (DOSKEY), 436files, 738-740
APPEND command, 610-613
DIR command, 198IF command, 404PATH command, 122-123
text, block editing (DOSEditor), 377-378
fixed disks. See hard disks
floppy disk drivescleaning, 156components, 129-130device drivers, 708-711versus hard disk drives, 131
floppy disksanalyzing (CHKDSK com-
mand), 184-188analyzing (SCANDISK
utility), 188-189bootable, creating, 25-26,
926-928comparing, 690-691compressing files, 656-657copying, 692-694disk-based storage, 20-21DOS Editor, using with,
363evolution of, 21files, storing, 101formats, 138-139formatting, 155-156,
743-746grinding noises, 155preparation (FORMAT
command), 151-154quick, 157system files on, 158unconditional, 158
LS-120, 21naming (LABEL com-
mand), 166-167proper care, 232raw/usable capacity, 139rotational speeds, 134serial numbers, 154-156size evolution, 131-132
storage evolution, 128system files, transferring to,
167-168tracks, 150uses, 21volume labels, 154-156
VOL command, 167write-protecting, 132
flushing disk buffers, 461
FNT (Font) filename exten-sion, 106
FOR command, 740-742
FOR..IN..DO command,407-409
batch files, 397command interaction, 409DOS prompt, 409
foreign countries. See inter-nationalization
FORMAT command, 111,140, 150-151, 259, 743-746
/1 switch, 157/4 switch, 157/8 switch, 157allocation units, 155/B switch, 157boot disk, 25/C switch, 157/F switch, 153, 157formatting floppy disks,
151-156formatting hard disks, 166/N switch, 157parameters/switches,
743-744/Q switch, 157quick formatting floppy
disks, 157-158read-only files, 110/S switch, 157serial numbers, 154-156switches, 156-157/T switch, 157/U switch, 157unconditional formatting
floppy disks, 158/V switch, 157volume labels, 154-156
993FORMAT command
FORMAT.COM file, 506
formattingcompressed drives
(DoubleSpace), 145disks, 136, 743-746floppy disks, 138-139,
155-156FORMAT command,
152-154grinding noises, 155preparation (FORMAT
command), 151-152quick, 157system files on, 158unconditional, 158
hard disks, 139-140, 166FDISK command,
158-159
/FRAGMENT switch,SCANDISK command, 189
fragmentation (disks), 136,177
frames, network cards,installation considerations,472
/FREE switch, MEM com-mand, 283
FREE command (4DOS),499
freeware, 494
FTP (File TransferProtocol), 486
commands!, 488ASCII, 487BINARY, 487BYE, 487CD, 487CLOSE, 487DELETE, 487DIR, 487DISCONNECT, 487GET, 487LCD, 487LS, 487MDELETE, 488MGET, 488
MKDIR, 488MPUT, 488OPEN, 488PROMPT, 488PUT, 488PWD, 488QUIT, 488RECV, 488REMOTEHELP, 488RENAME, 488RMDIR, 488SEND, 488STATUS, 488
directoriesdisplaying, 490-491retrieving, 491
Internet connections, 485-486, 489-491
troubleshooting, 491-492sessions
launching, 489sample, 489-491
full backupsexecuting (Microsoft
Backup for Windows 3.x),242
executing (MicrosoftBackup), 239-241
frequency of, 238Microsoft Backup, 238
G
GET command (FTP), 487
Getting Started command(Help menu-DOS Editor),387
GIF (Graphics InterchangeFormat) filename exten-sion, 106
GLOBAL command(4DOS), 499
Gopher, Internet connectionoption, 484
GORILLA.BAS file, 514
GOSUB command (4DOS),499
GOTO command, 747batch files, 397
branching to specific lines,398-399
parameters/switches, 747GRAFTABL command,
747-748
GRAFTABL.COM file, 513
graphics, printing, 748-750
GRAPHICS command, 748-750
printer types, 320-321screen images, printing,
321-322syntax, 319uses, 319
graphics display adapter(Color Graphics Adapter),821
GRAPHICS.COM file, 507
GRAPHICS.PRO file, 507
greater-than meta-string,297
Greek code page, 354
grouping commands inblocks, 765-768
groups of files, copying(COPY command), 204
GRP (Windows ProgramGroup) filename extension,106
GUI (graphical user inter-face), DOS Shell, ASCIIdrawing characters, 58
H
handler codes (memory),447-448
handles (files), 463-464
hard disks, 130advantages/disadvantages,
131analyzing (CHKDSK com-
mand), 184-188
FORMAT.COM file994
analyzing (SCANDISKutility), 188-189
backup files, 616, 833-839restoring from, 248-251selective restoration, 251
buffers, 617-618clusters, 195components diagram, 13compressing, 656-657
DoubleSpace, 140-141cylinders, 139damaged state, booting
from floppy disks, 25-26defragmenting (DEFRAG
program), 177-181directories, splitting
(SUBST command), 302-303
disk buffers, suggestednumber of, 462
disk caching, 169-172disk-based storage, 20-21DoubleSpace
compression ratio, 143-144controlling, 142Defragment option, 146deleting compressed drives,
145displaying compressed
information, 142-143drive size changes, 143formatting compressed
drives, 145installing, 141-142SCANDISK, 147Uncompress option, 147
drifting, 148errors (ScanDisk), 884-888failures, restoring from
backup files, 250-251FASTOPEN program,
directory caching, 173-174
filesdeleting, 677-678deleting previous versions
of DOS, 676information, 687-689storing, 101
formats, 139-140formatting, 139-140,
158-159, 166, 743-746future of, 131maximizing space, 181-182
archiving, 183compression, 183deleting files, 182-183
naming (LABEL com-mand), 166-167
partitioning (FDISK com-mand), 159-164, 735-736
partitionsextended, 160primary, 160
performance optimization,168-169, 461-462
platter stacking, 21RAM disks, 174-176recovering partition tables,
261repartitioning (FDISK
command), 164-165rotational speeds, 134sector interleaving, 134status, 626storage evolution, 128subdirectories, creating,
800-801system files, transferring to,
167-168volume labels (VOL com-
mand), 167hardware
code pages, viewing status,350
CPUs, 13data loss, troubleshooting,
232-233device drivers, 308-309
application specific, 308CONFIG.SYS file,
443-444configuring, 312-313defined, 443DMA channel assign-
ments, 311-312memory I/O addresses, 312troubleshooting scenarios,
314-316
DOS communication func-tions, 13
logical devices, reservednames, 103-104
memorybits, 13bytes, 13
motherboards, 13overheating, 232peripherals, 13
diverse proprietary stan-dards, 15
examples, 14requirements for code page
switching, 345hardware interrupts (IRQs),
309edge-sensitive, 309-310IRQ assignments, 310-311level-sensitive, 309-310versus software interrupts,
310HCONVERT command,
750
headers (files), 229
helpcommands, 730-731DR-DOS, starting, 700
HELP command, 46, 750-751
summary listing, 47-50,750-751
Help menu commands (DOSEditor), 365
About, 387activating, 387-388Getting Started, 387Keyboard, 387
help screen (DOS Shell)commands, 94-95contextual, 94-95
help switch (/?), commandline, 46
HELP.COM file, 507
HELP.HLP file, 507
995HELP.HLP file
Hercules MonochromeGraphics Adapter, 837
video memory, mapping asupper memory blocks, 935
hexadecimal format, file dis-plays (DOS Shell), 59
Hidden file attribute, 108
high memory area (HMA),19, 445, 698
loading, 446-448high-density disks, 153
highlighted commands onmenu bar (DOS Editor),365
HIINSTALL command,751-752
HIMEM.SYS (device driver),444, 507, 752-759
extended memory blocks(XMS), 445
high memory area (HMA),445
syntax, 446upper memory area (UMA),
445HISTORY command
(4DOS), 499
HLP (Help) filename exten-sion, 106
hotkeys (DOS Shell)+ key, 66Alt key, 66Alt+Esc key, 66Alt+F4 key, 66Alt+Tab key, 66Ctrl+* key, 66Ctrl+/ key, 67Ctrl+F5 key, 67Ctrl+\ key, 67Del key, 66Esc key, 67F1 key, 66F3 key, 66F5 key, 66F7 key, 66F8 key, 66F9 key, 66
F10 key, 66Shift+down arrow key, 66Shift+F5 key, 66Shift+F8 key, 66Shift+F9 key, 66Shift+left arrow key, 67Shift+right arrow key, 67Shift+Tab key, 67Shift+up arrow key, 66Tab key, 67
I
I/O (input/output) devices,312
auxiliary consoles, 650-651consoles (CTTY com-
mand), 325-326device addresses, 312
IBM AntiVirus program,759-760
IBM PCintroduction of, 12introduction of DOS, 15
IBMAVD command, 759
IBMAVSP command, 759-760
Icelandic code page, 354
icons, command reference,592
IDX (Index file), 106
IEXTRACT command, 761
IF command, 761-765batch files, 397-400comparing strings, 402-403ERRORLEVEL testing,
400-402finding files, 404parameters/switches, 761
IFF command (4DOS), 499
ignore (I) option, deviceerror messages, 557
illegal characters (filenames),102
images (screen), printing(GRAPHICS command),321-322
IMG (GEM image) filenameextension, 106
INCLUDE command,CONFIG.SYS file, 27
Include/Exclude listediting (Microsoft Backup
for Windows 3.x), 246editing (Microsoft Backup),
245-246INCLUDE= command,
765-768
incremental backupsexecuting (Microsoft
Backup for Windows 3.x),242
frequency of, 238Microsoft Backup, 238
indenting text (DOS Editor),372
INF (Information) filenameextension, 106
infinite loops, 399
information messages,alphabetical listing, 530-557
INI (Initialization) filenameextension, 106
initializing serial ports, 815-816
INKEY command (4DOS),499
INPUT command (4DOS),499
Insert mode (DOS Editor),371
insertingcomments in batch files,
398text (DOS Editor), 370-371
INSTALL command, 768-769
CONFIG.SYS file, 27parameters, 466-467switches, 466-467
Hercules Monochrome Graphics Adapter996

installation batch files, 397
INSTALLHIGH command,751-752, 769
installingANSI.SYS, 416code page switching, 346
CHCP command, 349-350
DISPLAY.SYS file, 346-347
MODE command, 348-349
NLSFUNC.EXE file, 348PRINTER.SYS file,
347-348disk drives, 711-713DOS Shell, 59DoubleSpace, 141-142DR-DOS, 940Interlnk remotely, 228-229network cards
cabling considerations, 472client considerations, 472frame type considerations,
472network type considera-
tions, 472server protocols, 473slot availability, 472TCP/IP considerations,
473UNDELETE command in
AUTOEXEC.BAT, 264Intel, Pentium chips, evolu-
tion of, 18
Interactive BootCtrl+F8 startup control key,
564F8 startup control key, 564
interfaces, Stacker online,897, 933
Interlnk, 222-223cable configurations,
223-224client, loading, 225-226configuring, 223-224connecting, 227files, transferring, 228programs, remote execu-
tion, 229
remote installations, 228-229
remote printing, 228server, loading, 226
INTERLNK command, 223,770-780
INTERLNK.EXE (devicedriver), 444, 503, 770-780
loading, 224-226internal commands, 42
internationalizationcharacter sets, 860-862code page switching, 340,
344-345, 695-698, 860-862
hardware requirements,345
installing (CHCP com-mand), 349-350
installing (DISPLAY.SYSfile), 346-347
installing (MODE com-mand), 348-349
installing(NLSFUNC.EXE file),348
installing (PRINTER.SYSfile), 347-348
country codes, 354-355COUNTRY.SYS file set-
tings, 340-342date formats, 356-357file designation, 504KEYB.COM file, 340
settings, 342-344keyboards
dead keys, 352-353layouts, 357-358remapping, 351-353
number of countries sup-ported, 340
time formats, 356-357Internet
connection optionsFTP, 485-486, 489-491Gopher, 484ISP shell accounts,
484-485Telnet, 484-485troubleshooting, 491-492
interrupts, 918-920
INTERSVR command, 223,507, 781-786
loading, 226parameters/switches,
781-782/RCOPY switch, 224
Invalid number of parame-ters error message, 395
IO.SYS file, 507boot disk, 24-25booting process, 16
Iomega Zip drives, 21
IP/IPX Gateway (NovellNetWare Client), 474
IRQs (hardware interrupts),309
assignments, 310-311device drivers, trou-
bleshooting, 314-315edge-sensitive, 309-310level-sensitive, 309-310utilities, MSD.EXE
(Microsoft Diagnostics),314
ISPs (Internet serviceproviders), shell accounts,terminal emulation, 484-485
issuingANSI.SYS codes
in batch files, 417-418in text files, 418-419with PROMPT command,
419DIR command, 193-194
J - K
/J switch, UNFORMATcommand, 258
Jaz drives, 21
JOIN command, 514, 786-788
adding disk drives to otherdisk directories, 302
parameters/switches, 786pretender, 468-469
997JOIN command
joining text (DOS Editor),371
JP Software Web site, 4DOSutility, downloading, 497
/K switch (ANSI.SYS), 416
KBDBUF.SYS command,514, 788-789
keep file designation, 504
KEYB.COM file, 507command, 790-792international keyboard set-
tings, 340-344keyboards, remapping,
351-353Keyboard command (Help
menu-DOS Editor), 387
KEYBOARD.ICE file, 507
KEYBOARD.SYS file, 507
keyboardsANSI.SYS, 416
character keys, reassigning,424
customizing, 423-424layout control codes,
427-430switch options, 416
buffers, 788-789command, 792-793configuring, 817-818copying files from (COPY
command), 205-206dead keys, 352-353international layouts,
357-358international settings,
remapping, 351-353KEYB.COM file, interna-
tional characters, 342-344layout/characters
changing to other lan-guages, 790-792
data files for other coun-tries, 792-793
macro substitutions, 424typematic rates, changing
(MODE command), 331-332
KEYBRD2.SYS file, 507
keysDOS controls
Ctrl+C (Break), 565Ctrl+P (Echo to PRN),
565Ctrl+S (Pause), 565
Print Screen, 748ROM BIOS controls
Ctrl+Alt+Del (Reboot),564
Ctrl+Break (Break), 564Shift+PrtSc (Print screen),
565SysReq (System request),
565startup control
Ctrl+F5 (Clean Boot), 564Ctrl+F8 (Interactive Boot),
564
KEYSTACK command(4DOS), 499
keystroke commmandsDOS Editor, 568-569DOS Shell, 569-571
L
/L switchDIR command, 194, 197FC command, 216UNFORMAT command,
258LABEL command, 166-167,
793-794
LABEL.EXE file, 507
labels (batch files)END, 403TRY_AGAIN, 403volume, displaying, 946-947
laptopsdocking, 701extended battery life/maxi-
mum performance con-trol, 852-857
LASTDRIVE command,CONFIG.SYS file, 27, 464,795-796
launchingapplications via shortcut
keys (DOS Shell), 83DOS Editor, 363, 383DOS Shell, 59FTP sessions, 489
layouts (keyboards)changing to other lan-
guages, 790-792data files for other coun-
tries, 792-793LCD command (FTP), 487
LCD.CPI file, 514
less-than meta-string, 297
LET (Letter) filenameextension, 106
LH command, 796, 799
LHA (Compressed) filenameextension, 106
LIB (Program library) file-name extension, 106
LIM 3.2 specification(expanded memory), 19
line feed/carriage returnmeta-string, 296
lines, screen, adjusting, 300-301
linking computers, 774-786
/LIST switch, UNDELETEcommand, 263
LIST command (4DOS), 499
listingdirectories (TREE com-
mand), 123-124files (DIR command),
193-195/LOAD switch,
UNDELETE command,263
LOADBTM command(4DOS), 499
joining text (DOS Editor)998
LOADER command, 796-797
LOADFIX command, 507,797-798
LOADHIGH command, 19,798-799
parameters/switches, 798upper memory area (UMA),
452loading. See also installing
character sets into memory,747-748
device drivers, 687DEVICE command, 313from DOS command
prompt, 715TSRs, 451-452upper memory area
(UMA), 451-452device drivers
into conventional memory,679-682
into upper memory, 682-686
DOS in high memory area(HMA), 446-448
DOS Protected ModeInterface support, 707
DOSKEY, 432files, Open command (DOS
Editor), 382-383INTERLNK.EXE file
(client), 225-226INTERSVR.EXE file
(server), 226multiple programs, 929programs into upper mem-
ory, 798-799secondary command
processor, 288-289system tables in
conventional/upper mem-ory, 701
TSRs into conventionalmemory, 768-769
lockingdrives/sockets, 714files, 906-907records, 906-907
LOG (File logging actions)filename extension, 106
LOG command (4DOS), 499
logging disks (DOS Shell),70-71
logical devices, 103-104
LOGIN command (Novellnetworks), 481
look-ahead disk buffers, 462
LPT devices, 104
LS command (FTP), 487
ls command (Unix), 485
LS-120 floppy disks, 21
LST (Program listing) file-name extension, 106
M
/M switchDISKCOPY command, 211XCOPY command, 207
macros (DOSKEY)benefits, 432creating, 436-439defining from bootup, 439deleting 440naming, 440replaceable parameters, 438running, 439-440special characters, 437-438substitutions (keystrokes),
424syntax, 437-439versus batch files, 437
MACROS.BAT file, 439
magnetic disk storageaudio tape recorder com-
parison, 129evolution of, 128
MAK (Programmer’s makefile) filename extension,106
MAP (Linker map) filenameextension, 106
MAP command (Novell net-works), 481
maximizingconventional memory,
803-804hard disk space, 181-182
archiving, 183compression, 183deleting files, 182-183
McAfee VirusScan, 496disk scans
frequency of, 497launching, 497
downloading, 496MDA (monochrome display
adapter), 821
MDELETE command(FTP), 488
MEBACKR.DLL file, 510
MEM command, 283-288,802-803
free/used memory displays,453-454
parameters/switches, 802sample report, 453-454syntax, 453
MEM.EXE file, 507
MemMakerCustom Setup, 456,
459-460Express Setup, 455-458memory configuration,
455-460system configuration tool,
442MEMMAKER command,
803-804
MEMMAKER.EXE file, 507
MEMMAKER.HLP file, 507
MEMMAKER.INF file, 507
MEMMAKER.STS file, 507
MEMMAX command, 805
memoryapplications, troubleshoot-
ing, 460-461bits, 13buffers, 617-618bytes, 13-14
999memory
configuring (MemMaker),455-460
conventional, 283-288increasing, 867listing contents, 286-287loading TSRs, 768-769maximizing, 803-804
CPUs, real mode versusprotected mode, 17
disk-based storagefloppy disks, 14hard disks, 14media, 20-21
EMM386.EXE, 19EMS (expanded), 283-288
controlling, 721-722mapping as upper memory
blocks, 934enabling/disabling, 805expanded (EMM386.EXE),
19, 449-451extended memory blocks
(XMS), 445storing Stacker drivers,
707-708extended-memory man-
agers, 752-759free/used, displaying (MEM
command), 453-454handler codes, 447-448high memory area (HMA),
loading, 445-448HIMEM.SYS, 19, 445-448loading character sets,
747-748loading device drivers
conventional, 679-682upper memory, 682-686
loading system tables into,701
MEM command, 283-288monitoring integrity, 661optimizing, 631, 910overlays, 174programs loaded in first
segment, 797-798RAM, 14
conventional, 18-19disks, 174-176, 867-871early versions, 17volatility of, 14
ROM, 14shadow RAM, 448status, 626system configuration, opti-
mizing, 445-451Task Swapper, 93-94UMAs (upper memory
areas), 445UMBs (upper memory
blocks), creating, 722-726upper
customizing, 698-700listing contents, 286-287loading programs,
798-799VGA display, 826-827
used/unused amounts, dis-playing, 802-803
videoHercules adapters, map-
ping as upper memoryblocks, 935
mapping as upper memoryblocks, 934
monochrome adapters,mapping as upper mem-ory blocks, 935
XMS (extended memory),283-288
converting to LIMexpanded memory(EMS), 722-726
MEMORY command(4DOS), 499
memory I/O addresses(devices), 312
memory resident portion(Scheduler program), acti-vating, 647-648
memos, creating (DOSEditor), 362
menu bar (DOS Editor), 364activating, 365command options, 365Edit menu, 365Esc key, 365File menu, 365Help menu, 365highlighted commands, 365Search menu, 365
menu bar (DOS Shell), 60,64
File menu, 64Help menu, 64point-and-shoot method, 64Tree menu, 64View menu, 64
MENUCOLOR command,CONFIG.SYS file, 27, 805-807
MENUDEFAULT com-mand, CONFIG.SYS file,27, 807-809
MENUITEM command,CONFIG.SYS file, 27, 809-811
menuscolors, displaying
(CONFIG.SYS file[menu] section), 34-35
display, creating (CHOICEcommand), 406-407
DOS Shellmenu bar, 64pull-down, 64-65
simple, creating (CHOICEcommand), 405-406
messagesbatch files, displaying, 398error, alphabetical listing,
530-557information, alphabetical
listing, 530-557warning, alphabetical list-
ing, 530-557meta-strings, PROMPT
command, 296-298
MGET command (FTP),488
microprocessor chips. SeeCPUs
Microsoft Anti-Virus(MSAV), 253-255, 830-832
checklists, 255virus list, 256
Microsoft Anti-Virus forWindows (MWAV), 253-257, 838
memory1000
Microsoft Backup, 233, 833-834
Backup function, 236-238backup types
differential, 238full, 238incremental, 238
backups, comparing againstoriginal files, 241
Compare function, 236-238configuring, 235-236features, 233-234file restoration, 248-251full backups, executing,
239-241MSBACKUP command
switches, 239syntax, 239
options, setting, 247-248Quit function, 236-238Restore function, 236-238selection criteria
Display, 245Include/Exclude, 245-246Special, 245
Microsoft Backup forWindows, 838-839
Microsoft Backup forWindows 3.x, 233
Backup function, 236-238Compare function, 236-238configuring, 235-236differential backups, execut-
ing, 242features, 233-234file restoration, 248-251files, manual selection,
243-245full backups, executing, 242incremental backups, exe-
cuting, 242options, setting, 247-248Quit function, 236-238Restore function, 236-238selection criteria
Display, 245Include/Exclude, 245-246Legend, 245Print, 245Special, 245
Microsoft Diagnostics(MSD.EXE), 314
Microsoft Network Clientbasic redirector option, 479full redirector option, 479installing, 478-481logon validation, 479network card settings, 481network configuration, 479setup screen, 478-479startup options, 479
Microsoft QuickBASIC pro-gramming environment.See QBASIC
Microsoft SystemDiagnostics, 836-837
Microsoft Undelete forWindows, 267-270, 839
configuring, 267file selection, 268recovering files, 269
Microsoft Windows NTServer
client software, installing,478-481
NET commands, 481networking features, 472
MIRROR command, 811-813
MIRROR image files, recov-ering data from accidentalformats, 258-259
MIRROR.COM file, 514
MKDIR command, 800-801directories, creating,
117-119parameters/switches, 800
MKDIR command (FTP),488
mobile computers, docking,701
MODE command, 469, 813-815
code pagesconfiguration, 818-821switching, loading,
348-349
Color Graphics Adapter(CGA), 299-300
guidelines for use, 330-331keyboards, typematic rates,
changing, 331-332large files, printing, 328parallel ports, changing set-
tings, 326-328parameters/switches, 814,
819-823ports, redirecting, 331printer characteristics, 327screen appearance, 298screen columns/lines,
300-301screen type, 299serial ports, changing set-
tings, 328-330syntax, 327-332video adapters, 821-823
MODE CON command,300, 817-818
MODE LPT# command,824-826
MODE.COM file, 507
modems, drivers, trou-bleshooting, 316
modifyingbatch files (DOS Editor),
362boot process
AUTOEXEC.BAT file,38-39
CONFIG.SYS file, 38-39configuration files (DOS
Editor), 362directories (CHDIR com-
mand), 119-120DOS Shell
directory views, 70-74files views, 70-74
file attributes (ATTRIBcommand), 109-110
international settings,COUNTRY.SYS file,340-342
program group properties(DOS Shell), 80
program items to program(DOS Shell), 82
1001modifying
MONEY.BAS file, 514
monitoring system changes,866-867
monitorsconfiguring, 817-818GRAPHICS command, 319
images, printing, 321-322printer types, 320-321syntax, 319
screen colors, selecting,805-807
screen mode, ANSI.SYScontrols, 421
text attributes, ANSI.SYScontrols, 421-422
/MONO switch, SCANDISKcommand, 189
monochrome displayadapters (MDA), 821
mapping as UMB space,826-827, 935
MONOUMB.386 (devicedriver), 444, 507, 826-827
MORE command, 827-828viewing ASCII files, 201
MORE filterguidelines for use, 335piping (|) feature, 334screen pauses, 334-335syntax, 334
MORE.COM file, 508
motherboards, 13
mountingremovable drives, 655Stacker drives, 918
mousecursor, movement com-
mands (DOS Editor),369-370
DOS Editoractions list, 368cursor, 368Microsoft-compatible, 367
DOS Shell requirements,59
MOUSE.COM (device dri-ver), 444, 508
MOUSE.INI file, 508
MOVE command, 828-830defaults, 214directories
moving, 213renaming, 121-122, 214
files, 212-213parameters/switches, 828/Y switch, 212
Move command (File menu),91
Move File dialog box, 91
MOVE.EXE file, 508
movingdirectories (MOVE com-
mand), 213DOS Shell area, 63-64files, 828-830
DOS Shell, 91MOVE command,
212-213parameters of batch files
(SHIFT command), 409-410
MPUT command (FTP),488
MS-DOSage of, 12files included with version
6.22, 505-512introduction of, 15PC DOS 2000 incarnation,
12PC platforms, statistical
usage, 12MSAV command, 830-832
MSAV.EXE file, 508
MSAV.HLP file, 508
MSAV.INI file, 508
MSAVHELP.OVL file, 508
MSAVIRUS.LST file, 508
MSBACKDB.OVL file, 508
MSBACKDR.OVL file, 508
MSBACKFB.OVL file, 508
MSBACKFR.OVL file, 508
MSBACKUP command,108, 833-834
parameters/switches, 833switches, 239syntax, 239
MSBACKUP.EXE file, 233-234, 508
MSBACKUP.HLP file, 508
MSBACKUP.INI file, 508
MSBACKUP.LOG file, 508
MSBACKUP.OVL file, 508
MSCDEX command, 835-836
MSCDEX.EXE file, 509
MSCONFG.HLP file, 508
MSCONFG.OVL file, 508
MSD command, 836-837
MSD.EXE (MicrosoftDiagnostics) utility, 314,509
MSDOS.SYS file, 509boot disk, 24-25booting process, 17
MSDOSDATA environmentvariable, 523-524
MSG (Program message)filename extension, 106
MSHERC command, 837
MSHERC.COM file, 514,837
MSTOOLS.DLL file, 509
Multilingual (Latin I) codepage, 354
multiple filesDOS Shell, selecting, 87-88printing (PRINT com-
mand), 324multiple system configura-
tions, creating, 32-33
mv command (Unix), 485
MWA command, 838
MONEY.BAS file1002
MWAV.EXE file, 509
MWAV.HLP file, 509
MWAV.INI file, 509
MWAVABSI.DLL file, 509
MWAVDLG.DLL file, 509
MWAVDOSL.DLL file, 509
MWAVDRVL.DLL file, 509
MWAVMRG.DLL file, 509
MWAVSCAN.DLL file, 510
MWAVSOS.DLL file, 510
MWAVTSR command, 838
MWAVTSR.EXE file, 510
MWBACKF.DLL file, 510
MWBACKUP command,838-839
MWBACKUP.EXE file, 233-234, 510
MWBACKUP.HLP file, 510
MWBACKUP.INI file, 510
MWGRAFIC.DLL file, 510
MWUNDEL command, 839
MWUNDEL.EXE file, 510
MWUNDEL.HLP file, 510
N
/N switchFC command, 217FORMAT command, 157
namesdirectories, 877files, 593, 876
characters, 593-594CRC, 648wildcard characters,
594-596paths, 593reserved, 594subdirectories, 877
namingdirectories (MOVE com-
mand), 214disk drives, 176disks (LABEL command),
166-167
files, 101conventions, 21, 104-107RENAME command,
214-215reserved names, 103-104rules, 102-103troubleshooting, 125-126
macros (DOSKEY), 440program groups (DOS
Shell), 79navigating online help com-
mands, 47-50
NDS (Novell NetworkDirectory Service), 473
NDX (Index) filenameextension, 106
NET command (Microsoftnetworks), 481
NET1XE file, 514
NETBEUI.DOS file, 514
NetBIOS (Novell NetWareClient), 474
NetWare TSA for SMS, 474
NETWKSTA.1XE file, 514
NETWKSTA.2XE file, 514
network cardsMicrosoft Network Client,
configuring, 481requirements
cabling considerations, 472client considerations, 472frame type considerations,
472network type, 472slot availability, 472TCP/IP considerations,
473
network operating systems(NOSs), 472
networkscards
cabling considerations, 472client considerations, 472frame type considerations,
472network type considera-
tions, 472slot availability, 472
clients, software setup tips,482
commandsFILER (Novell NetWare),
481LOGIN (Novell
NetWare), 481MAP (Novell NetWare),
481NET (Microsoft Windows
NT Server), 481drive letters, 795-796Microsoft Network Client,
installing, 478-481Novell NetWare Client,
installing, 473-477servers
protocol considerations, 473TCP/IP considerations,
473types
Microsoft Windows NTServer, 472
Novell NetWare, 472
NETWORKS.TXT file, 510
New command (File menu-DOS Editor), 379
New Program Object dialogbox, 79
New Topic command (Alt+Nkeystroke), online help, 49-50
NIBBLES.BAS file, 514
NLSFUNC command, 840
NLSFUNC.EXE file, 510code page switching, load-
ing, 348Nordic code page, 354
Norton Antivirus, 253
/NOSAVE switch, SCANDISK command, 189
NOSs (network operatingsystems), 472
/NOSUMMARY switch,SCANDISK command, 189
Novell Client for DOS, 474
Novell Client WindowsSupport, 474
1003Novell Client Windows Support
Novell Distributed PrintServices, 474
Novell NetWarebindery logins, 473client software, installing,
473-477commands
FILER, 481LOGIN, 481MAP, 481
NDS logins, 473networking features, 472
Novell NetWare Clientdownloading, 473driver settings, configuring,
475installing, 473-477options
Desktop SNMP, 474IP/IPX Gateway, 474NetBIOS, 474NetWare TSA for SMS,
474Novell Client for DOS,
474Novell Client Windows
Support, 474Novell Distributed Print
Services, 474Workstation Manager 3.x,
474TCP/IP settings, configur-
ing, 475NUL devices, 104
NUMLOCK command,CONFIG.SYS file, 27
NumLock key, turningon/off, 840-841
NWCACHE command, 842-843
NWCDEX command, 843-844
NXT.TXT file, 514
O
/O switch, DIR command,194, 197
OBJ (Intermediate objectcode), filename extension,106
OLD (Backup) filenameextension, 106
online documents, display-ing, 945
online help, 750-751commands
accessing, 46-47Alt+B (Previous Topic),
49-50Alt+C (Contents), 49-50Alt+N (New Topic), 49-50exiting, 51jump words, 48-49menu options, 49navigating, 47, 49-50topics, printing, 50-51topics, searching, 51
onscreen messages, batchfiles, 716-719
Open command (File menu-DOS Editor), 380-383
OPEN command (FTP), 488
Open dialog box, 382-383
opening files, 731-732FCBs, 734-735Open command (DOS
Editor), 382-383operating characteristics
(printers), 824-826
Optimize menu commands(DEFRAG), 179
optimizingdrive performance, 694-695memory, 631, 910
system configuration, 445-451
option buttons, DOS Shelldialog boxes, 68-69
option check boxes, DOSShell dialog boxes, 69
original files, comparingwith backups (MicrosoftBackup), 241
OS2.TXT file, 510
Out of environment spacemessage, 520
overheated hardware anddata loss, 232
overlaysapplications, 192RAM disks, 174
Overtype mode (DOSEditor), 371
overtyping text in DOSEditor, 371
OVL (Program overlay) file-name extension, 106
OVR (Program overlay) file-name extension, 106
P
/P switchCOMMAND command,
289DIR command, 194-195ERASE command, 221XCOPY command, 206UNFORMAT command,
258PACKING.LST file, 510
PAK (Packed archive) file-name extension, 106
paradigmcommand syntax, 44
parallel ports (printers), 326device drivers, trou-
bleshooting, 316MODE command, 326
changing settings, 326-328redirection to serial ports,
331
parametersANSI.SYS command, 609APPEND command, 611ATTRIB command, 614
Novell Distributed Print Services1004
batch files, moving (SHIFTcommand), 409-410
BREAK command, 616BUFFERS= command, 617CALL command, 619CD command, 622CHAIN command, 624CHCP command, 624CHKDSK command,
626-627CHOICE command, 631CMOSCLK.SYS com-
mand, 634CNFIGNAM.EXE device
driver, 634COMMAND command,
635commands, 42-44
filespec, 45overriding, 51-52
COMP command, 637CONFIG command, 638COPY command, 639-640COUNTRY= command,
643CPBACKUP command,
645-647CPBDIR command, 647CPSCHED command, 648CRC command, 648CREATE command, 648CSCRIPT command, 649CTTY command, 650CURSOR.EXE command,
651CVT.EXE command, 651DATAMON command, 652DATE command, 653DBLSPACE/
AUTOMOUNT com-mand, 655
DBLSPACE/CHKDSKcommand, 656
DBLSPACE/COMPRESScommand, 656
DBLSPACE/CREATEcommand, 658
DBLSPACE/DEFRAGMENT com-mand, 659
DBLSPACE/DELETEcommand, 660
DBLSPACE/DOUBLEGUARD com-mand, 661
DBLSPACE/FORMATcommand, 662
DBLSPACE/INFO com-mand, 662
DBLSPACE/MOUNTcommand, 664
DBLSPACE/RATIO com-mand, 665
DBLSPACE/SIZE com-mand, 666
DBLSPACE/UNCOMPRESS com-mand, 667
DBLSPACE/UNMOUNTcommand, 667
DBLSPACE.SYS devicedriver, 668
DEBUG command, 672DEFRAG command,
673-674DEL command, 675DELOLDOS command,
676DELPURGE.EXE com-
mand, 677DELQ command, 678DELTREE command, 679DELWATCH.EXE com-
mand, 677-678DEVICE= command, 680DEVICEHIGH= com-
mand, 683DEVLOAD command, 687DIR command, 687-689DISKCOMP command,
690DISKCOPY command, 692DISKMAP.EXE command,
694DISKOPT.EXE command,
695DISPLAY.SYS device
driver, 696DOS= command, 698DOSBOOK command, 700DOSDATA command, 701DOSDOCK command, 701DOSKEY command, 702DOSSHELL command,
704-705
DPMI command, 707DPMS.EXE command, 708DRIVER.SYS device driver,
708-709DRIVPARM= command,
711-712DRMOUSE command, 714DRVLOCK command, 714DYNALOAD command,
715E command, 716ECHO command, 717EDIT command, 719EGA.SYS device driver, 720EJECT command, 721EMM386 command, 722EMM386.EXE device dri-
ver, 723-725EXE2BIN command, 727EXPAND command, 728EXTRACT command, 730FASTHELP command, 730FASTOPEN command,
731FC command, 733FCBS= command, 734FDISK command, 735FILES= command, 737FILEUP command, 738FIND command, 738FOR command, 740FOR..IN..DO command,
407FORMAT command,
743-744GOTO command, 747GRAFTABL command,
748GRAPHICS command,
749-750HCONVERT command,
750HELP command, 751HIINSTALL/
INSTALLHIGH com-mand, 752
HIMEM.SYS device driver,752-755
IBMAVSP command, 760IEXTRACT command, 761IF command, 761
1005parameters
INCLUDE= command,766
INSTALL= command, 768INTERLNK command,
770INTERLNK.EXE com-
mand, 774-775INTERSVR command,
781-782JOIN command, 786KBDBUF.SYS device dri-
ver, 788KEYB command, 790LABEL command, 793LASTDRIVE= command,
795LOADER command,
796-797LOADFIX command, 798MEM command, 802MEMMAKER command,
804MEMMAX command, 805MENUCOLOR= com-
mand, 805MENUDEFAULT= com-
mand, 807MENUITEM= command,
809MIRROR command, 811MKDIR command, 800MODE COM# command,
815MODE command, 814,
819-823MODE CON command,
817MODE LPT# command,
824MONOUMB.386 com-
mand, 826MORE command, 827MOVE command, 828MSAV command, 831-832MSBACKUP command,
833MSCDEX command, 835MSD command, 836MSHERC command, 837NLSFUNC command, 840
NWCACHE command,842-843
NWCDEX command, 843PASSWD command, 844PASSWORD command,
845PATH command, 846PCMRMAN command,
850POWER command, 852POWER.EXE device dri-
ver, 855PRINT command, 857PRINTER.SYS device dri-
ver, 860PROMPT command, 862QBASIC command, 864QCONFIG command, 865RAMBOOST command,
866RAMBOOST.EXT com-
mand, 867RAMDRIVE.SYS device
driver, 868RAMSETUP command,
871REM command, 874REMOVDRV command,
875RENAME command, 876RENDIR command, 877REPLACE command, 877replaceable, 599-600replaceable (batch files),
393-397REPORT command, 880RESIZE command, 880RESTORE command, 881RMDIR command, 872SCANDISK command,
884-885SCANREG command, 888SCHEDULE command,
889SCREATE.SYS device dri-
ver, 890SCRIPT command, 891SDEFRAG command,
891-892SDIR command, 893-894
SET command, 894SETUP command, 897SETVER command, 898SETVER.EXE device dri-
ver, 904SHARE command, 906SHELL= command, 908SMARTDRV command,
911-912SMARTDRV.EXE device
driver, 914SORT command, 915SSETUP command, 917STAC command, 917STACHIGH command,
917STACKER command, 918STACKS= command, 918SUBMENU= command,
920SUBST command, 922SWITCH command, 924SYS command, 927SYSINFO command, 929TASKMGR command, 929TIME command, 930TIMEOUT command, 931TOUCH command, 931TREE command, 932TUNER command, 933TYPE command, 933UMBCGA.SYS device dri-
ver, 934UMBEMS.SYS device dri-
ver, 934UMBHERC.SYS device
driver, 935UMBMONO.SYS device
driver, 935UNCOMP command, 936UNDELETE command,
936-938UNFORMAT command,
939UNINSTALL command,
941UNPACK2 command, 941UNSTACK command, 942VERIFY command, 943VFINDTD command, 944
parameters1006
VIEW command, 946VOL command, 946VSAFE command, 947WINA20.386 device driver,
949XCOPY command,
950-951XCOPY32 command, 954XDEL command, 955XDF command, 955XDFCOPY command, 956XDIR command, 956-957
parse, 103
partitioningATA rotating disk, 850hard disks, 735-736
FDISK command, 159-163
status (FDISK command),163-164
PCMCIA cards, 850partitions
deleting, 161extended, 160-162primary, 160tables
information, saving, 811-813
recovering, 261
/PARTN switch, UNFORMAT command,258, 261
PAS (Pascal source) filenameextension, 106
PASSWD command, 844
PASSWORD command,844-845
passwordsfiles/directories, 844-845program groups (DOS
Shell), 80Stacker drives, 844
pasting text (Clipboard), 375
PATH command, 845-847environment variables,
managing, 520finding files, 122-123parameters/switches, 846
PATH environment variable,524-525, 845-847
pathname expressions, 115-117, 593
absolute path, 116relative path, 116
paths, drives, referencing(SUBST command), 303-304
PAUSE command, 398, 847-848
batch files, 397Pause key (Ctrl+S keystroke),
DOS controls, 565
pausingbatch files, 847-848
for input (CHOICE com-mand), 404-405
screen output (MORE fil-ter), 334-335
PCM command, 849
PCMATA.SYS command,849
PCMCIA cardsaccess, 849enabling, 849partitioning, 850Resource Management
Utility command-line util-ity, 850-851
Resource ManagementUtility standalone utility,850
PCMCS.EXE command, 849
PCMDINST command, 849
PCMFDISK command, 850
PCMRMAN command, 850-851
PCMSCD command, 851
PCMSETUP command, 851
PCs (personal computers)booting process, 15
AUTOEXEC.BAT file, 17bootstrap loader, 16CMOS chip check, 16COMMAND.COM file,
17
CONFIG.SYS file, 17IO.SYS file, 16MSDOS.SYS file, 17Power On Self Test
(POST), 16reboot commands, 809-811
hardwareCPUs, 13DOS communication func-
tions, 13memory, 13motherboards, 13peripherals, 13-15
technical information, dis-playing, 865
troubleshooting withMicrosoft SystemDiagnostics, 836-837
PCX (Picture, PCPaintbrush) filenameextension, 106
Pentium chip family evolu-tion, 18
performancehard disks, 168-169,
461-462disk caching, 169-172FASTOPEN program,
173-174RAM disks, 174-176
peripherals, 13device drivers, 308-309
application-specific, 308hardware interrupts,
309-311diverse proprietary stan-
dards, 15DOS communication func-
tions, 13examples, 14
Phoenix Card Manager Plus,851
Phoenix Super ClientDriver, 851
PIF (Program InformationFile), filename extension,106
pipe symbol (|), 201, 597-598
1007pipe symbol (|)
piping (|) feature (MOREfilter), 334
PKUNZIP utility, 495-496
PKWare Web site, Zip utili-ties, 495
PKZIP utility, 495-496
place markers in text (DOSEditor), 373
platters, hard disk drives,130
PM4 (PageMaker 4 data)filename extension, 107
PM5 (PageMaker 5 data)filename extension, 107
portsparallel to serial, output
redirection (MODE com-mand), 331
serial, initializing, 815-816Portuguese code page, 354
POST (Power On Self Test),booting process, 16
PostScript files, printing,890-891
POWER command, 852-854
Power On Self Test (POST),booting process, 16
POWER.EXE device driver,444, 510, 854-857
Practical Unix, 492
preparing floppy disks forformatting (FORMATcommand), 151-152
Press any key to continue...message, 847
pretender commandsASSIGN, 468-469JOIN, 468-469SUBST, 468-469
preventingdata loss, 232-233viruses, protection guide-
lines, 257
Previous Topic command(Alt+B keystroke), onlinehelp, 49-50
primary partitions, 160
PRINT command, 322, 469,857-860
guidelines for use, 324-325issuing, 322-323multiple files, printing, 324parameters/switches, 857switches, 322-323syntax, 322-323
Print command (File menu-DOS Editor), 380, 383-384
Print dialog box, 383Complete Document
option, 384online help, 50-51Selected Text Only option,
384Print screen key
(Shift+PrtSc keystroke),565, 748
PRINT.EXE file, 510
PRINTER.SYS file, 444,514, 860-862
code page switching, load-ing, 347-348
printersdevice drivers, trou-
bleshooting, 316GRAPHICS command
images, printing, 321-322settings, 320-321
MODE commandlarge files, printing, 328settings, 327
operating characteristics,824-826
PRINTFIX.COM file, 514
printingbackground printing,
857-860files, 201
Print command (DOSEditor), 383-384
graphics, 748-750multiple files (PRINT com-
mand), 324online help topics , 50-51PostScript files, 890-891remote, 228text file contents, 201
PRN (Program listing, print-ing), filename extension,107
PRO (Profile) filenameextension, 107
Procomm Plus, terminalemulation, 484
Program Group Propertiesdialog box, 80
program groups (DOS Shell)adding, 78-80deleting, 80-81examples, 77-78naming guidelines, 79passwords, 80program items, adding,
81-82program items, deleting,
82-83program items, modifying,
82properties, modifying, 80reordering, 81
Program List command(View menu), 74
programsBACKUP, 616bootstrap loader, 16DEBUG, 671-672DEFRAG, 177-181DELWATCH, 677-678demoware, 495disk-compression, 654-657DOS commands, 587-588DOSKEY
command-history bufferkeys, 435
command-line editing,433-434
finding commands, 436loading, 432reusing commands,
434-435
piping (|) feature (MORE filter)1008
DOS Shell, starting, 704-707
DoubleSpace, 140-141,656-659
automounting, 655compressed disk drive free
space, 664-665compressed disk drive size,
665-666compressed drive informa-
tion, 662-663compressing drives,
145-146compression ratios,
143-144controlling, 142CVF access, 663-664Defragment option, 146deleting compressed disk
drive files and subdirecto-ries, 661-662
deleting compressed drives,145
device driver, 668-670disk drive information,
663displaying compressed
information, 142-143DoubleGuard, 661drive size changes, 143formatting compressed
drives, 145installing, 141-142SCANDISK, 147starting, 654uncompressing disk drives,
147, 666-667unmounting CVFs,
667-668unmounting drives, 660
editing, 671-672EXE2BIN, 727FASTOPEN, 731-732
directory caching, 173-174FDISK, 735-736File Update System, start-
ing, 738FILELINK, 736files, associating (DOS
Shell), 92-93
filter, 827-828freeware, 494HIMEM.SYS, 752-759IBM AntiVirus standalone,
759-760IBM AntiVirus/DOS full-
screen, starting, 759INTERSVR, 774, 781-786loading
in first segment of memory,797-798
into upper memory, 798-799
multiple, 929Microsoft Anti-Virus,
830-832Microsoft Anti-Virus for
Windows, 838Microsoft Backup, 833-834Microsoft Backup for
Windows, 838-839Microsoft System
Diagnostics, 836-837Microsoft Undelete for
Windows, 267-270, 839configuring, 267file selection, 268recovering files, 269
MSHERC, 837MWAVTSR, 838NWCACHE, 842-843PC DOS E Editor, starting,
715-716PCMCIA configuration
(DOS version), 849Phoenix Card Manager
Plus, 851QBASIC, 864-865RAMBoost Setup, 871-872remote execution (Interlnk),
229ScanDisk, 884-888Schedule, 889-890shareware, 494SIZER, 910SMARTDrive Monitor, 914Stacker Optimizer, 891-892stopping, 616-617Task Swapper, switching
features, 93-94
testing, 671-672troubleshooting, running
from C\ prompt, 55TSRs (Interlnk), 223VSAFE, running, 838Windows commands, 590XDF, starting, 955
projectsboot process, modifying,
38-39networks, client software
configuration tips, 482prompt, customizing,
862-864
PROMPT command, 295-297, 862-864
ANSI.SYS codes, issuingwith, 419
environment variables,managing, 520
meta-strings, 296-298parameters/switches, 862
PROMPT command (FTP),488
PROMPT environment vari-able, 525
protected mode, CPU mem-ory, 17
protecting files against acci-dental deletion, 652
protocols, network cards,installation considerations,473
PS (PostScript program)filename extension, 107
pull-down menus, DOSShell item selection, 64-65
/PURGE switch,UNDELETE command,263
PUT command (FTP), 488
PWD command (FTP), 488
1009PWD command (FTP)
Q
/Q switchFORMAT command, 157SETVER command, 282
QBASIC command, 864-865
QBASIC.EXE file (DOSEditor), 362, 510
QBASIC.HLP file, 510
QBASIC.INI file (DOSEditor), 386-387, 510
QCONFIG command, 865
Que’s Computer and InternetDictionary, Sixth Edition,959
question marks (?), 604-605wildcard commands, 54-55
quick formatting of disks,157
QUIT command (FTP), 488
R
/R switch (ANSI.SYS), 416
/RCOPY switch,INTERSVR command, 224
RAM (random access mem-ory), 14
conventional memory, 18-19
disk buffers, 461-462expanded memory, 18-19extended memory, 20high memory area, 19non-volatile nature, 14shadow RAM, 448Task Swapper, 93-94upper memory area, 19volatile nature, 14
RAM disks, 174-176, 867-871
overlays, 174RAMDRIVE.SYS, 175-176TEMP environment vari-
able, 176
RAM drives, compressing,890
RAMBOOST command,866-867
Setup program, 871-872RAMBOOST.EXE com-
mand, 867
RAMDRIVE.SYS (devicedriver), 444, 510, 867-871
RAM disks, 175-176RAMSETUP command,
871-872
random access memory. See RAM
raw capacity (disks), 139
RD command, 872-873
read only memory. See ROM
read-caching, 170
read-only file attribute, 108-110
read-only passwords(Stacker drives), 844
read/write heads, 133cleaning, 156
read/write passwords(Stacker drives), 844
README.TXT file, 511writing (DOS Editor), 362
real mode, CPU memory, 17
reassigning character keyson keyboards (ANSI.SYS),424
REBOOT command(4DOS), 499
Reboot key (Ctrl+Alt+Delkeystroke), ROM BIOScontrols, 564
recompressing Stacker drives, 891-892
recording FAT information,811-813
records, locking, 906-907
RECOVER command, 259,873
recovering. See also restoringdata, accidental formats,
258-261deleted files, 839, 936-939files, 262
DOS directory method,266
Microsoft Undelete(Windows), 269-270
selecting, 268UNDELETE command,
262-266Undelete program
(Windows), 267partition tables, 261reformatted disks, 939-940
RECV command (FTP), 488
REDIR.1XE file, 514
REDIR.2XE file, 514
redirectingdisk drive requests
(ASSIGN command), 302output, parallel port to ser-
ial port (MODE com-mand), 331
redirection operatorsdevices, 332guidelines for use, 334issuing, 332-333syntax, 332-333
referencing drive paths(SUBST command), 303-304
reformatted disks, recover-ing, 939-940
Refresh command (Viewmenu), 71
REM command, 874-875batch files, 397-398CONFIG.SYS file, 27parameters, 467, 874
remapping keyboards forinternational settings, 351-353
REMLINE.BAS file, 514
remote installations(Interlnk), 228-229
/Q switch1010
remote printing, Interlnkconnections, 228
REMOTEHELP command(FTP), 488
removable disk mediaIomega Zip drives, 21Jaz drives, 21mounting, 655
REMOVDRV command,875
remove? file designation,504
REN command, 876
RENAME command, 214-215, 876
RENAME command (FTP),488
renamingdirectories, 877
MOVE command, 121-122, 214
files, 876COPY command, 205RENAME command,
214-215subdirectories, 828-830,
877RENDIR command, 877
reordering program groupsin DOS Shell, 81
repartitioning hard disks(FDISK command), 164-165
repeating commands forgroups of files, 740-742
REPLACE command, 877-880
REPLACE.EXE file, 511
replaceable parameters, 599-600
batch files, 393-397macros (DOSKEY), 438
REPORT command, 880
reports (CHKDSK com-mand), 185-186
reserved names, 594logical devices, 103-104
RESIZE command, 880
resizing Stacker drives, 880
RESTORE command, 881-884
RESTORE.EXE file, 511
restoring. See also recoveringbackup files, 248-251,
881-884deleted files, 694
retrieving FTP directories,491
retry (R) option, deviceerror messages, 557
returning batch files (CALLcommand), 411-412
reusing commands, 434-435
REXX programming lan-guage, 12
RFT (Revisable Form Text)filename extension, 107
RMDIR command, 872-873directory deletions, 120parameters/switches, 872
RMDIR command (FTP),488
ROM (read only memory),14
ROM BIOS control keysCtrl+Alt+Del (Reboot), 564Ctrl+Break (Break), 564Shift+PrtSc (Print Screen),
565SysReq (System request),
565root directories, subdirecto-
ries, branching, 113-114
RPT (Report) filenameextension, 107
RTF (Rich Text Format,Microsoft), filename exten-sion, 107
running. See also executing;launching
batch files, 619-621calling/returning (CALL
command), 411-412shifting control, 411
macros (DOSKEY), 439-440
programs remotely withInterlnk, 229
VSAFE, 838
S
/S switchDIR command, 194FORMAT command, 157UNDELETE command,
263XCOPY command, 206
SAM (Ami-Pro) filenameextension, 107
SAV (Backup) filenameextension, 107
Save As command (Filemenu-DOS Editor), 380-381
Save command (File menu-DOS Editor), 380-381
savingfiles
Save As command (DOSEditor), 380-381
Save command (DOSEditor), 381
partition table information,811-813
scan codes, keyboards, 423
SCANDISK command, 884-888
/ALL switch, 189/AUTOFIX switch, 189/CHECKONLY switch,
189/CUSTOM switch, 189/FRAGMENT switch, 189/MONO switch, 189/NOSAVE switch, 189
1011SCANDISK command
/NOSUMMARY switch,189
parameters/switches, 884-885
/SURFACE switch, 189/UNDO switch, 189
SCANDISK utility, 147, 511,884-888
disk analysis, 188-189DoubleSpace, 147switches, 188-189
SCANDISK.INI file, 511
SCANREG command, 888-889
SCHEDULE command,889-890
Scheduler program, 889-890memory resident portion,
activating, 647-648scratchpad files, temporary
directories, 124-125
SCREATE.SYS device dri-ver, 890
screenANSI display controls
attribute control codes,425-426
color codes, 425-426cursors, 426-427reset mode, 425set mode, 425
ANSI.SYS controls, 416,419-420
clearing (CLS command),423
cursor movement, 420cursor positioning, 420modes, setting, 421text attributes, 421-422
appearance, customizing(MODE command), 298
CLS command, 319Color Graphics Adapter,
299-300colors, changing (DOS
Editor), 385-386, 805-807columns/lines, adjusting,
300-301
custom options, saving(DOS Editor), 386-387
GRAPHICS command, 319images, printing, 321-322printer types, 320-321syntax, 319
information output, pausing(MORE filter), 334-335
scroll control, 54scrollbars, removing (DOS
Editor), 386text, clearing, 633-634type, selecting (MODE
command), 299SCREEN command (4DOS),
499
Screen Display Mode displaybox, 75-76
screen modes (DOS Shell),75-76
SCRIPT command, 890-891
scrollbars, 364controlling screen displays,
54DOS Shell, 61-63screen, removing (DOS
Editor), 386scrollboxes (DOS Shell), 63
SCRPUT command (4DOS),499
SDEFRAG command, 891-892
SDIR command, 892-894
search and replace feature,block editing (DOSEditor), 376-377
Search menu bar (DOSEditor), 365
searchinglost files (FIND filter), 336online help topics, 51
secondary caches, diskbuffers, 462
secondary command proces-sor, 290-291
loading, 288-289
sector boundaries, 136
sector interleaving, 134
sectors (disks), 134-137,150-151
Select All command (Filemenu), 89
SELECT command (4DOS),499
selectingall files (DOS Shell), 89DOS Shell area, 62files
across directories (DOSShell), 89
for backups, 243-245for recovery, 268
multiple files (DOS Shell),87-88
screen colors, 805-807screen type (MODE com-
mand), 299single files (DOS Shell), 87text, block editing (DOS
Editor), 373-374selection cursor (DOS
Shell), 63-64
selective restores (backups),251
SEND command (FTP), 488
sending ANSI.SYS codes,417
serial numbers (disks), dis-playing, 154-156, 946-947
serial port cardsdevice drivers, trou-
bleshooting, 316initializing, 815-816MODE command, chang-
ing settings, 328-330SERVER.EXE file, 511
servers, 781-786accessing, 770-773Interlnk, loading, 226protocols, considerations,
473
SCANDISK command1012
SET command, 294, 469,894-897
AUTOEXEC.BAT file, 30CONFIG.SYS file, 27environment variables
changing, 294defining, 295managing, 520
parameters/switches, 894.SET file extension, 509
SETNAME.EXE file, 514
setting environment size(SHELL= statement), 520
SETUP command, 897
SETUP.EXE file, 511
SETUP.MSG file, 511
SETVER command, 898-903
DOS versions, 280-283parameters/switches, 898
SETVER.EXE (device dri-ver), 444, 904-906
shadow RAM, 448
SHARE command, 906-907
SHARE.EXE file, 511
shareware, 494
sharing computers. SeeInterlnk
shell accounts (ISPs)Internet connections,
484-485troubleshooting, 491-492
terminal emulation pro-grams, 484-485
SHELL command, 464CONFIG.SYS file, 27environment size, 26parameters, 465-466switches, 465-466
SHELL= command, 907-909
SHELL= statement, envi-ronment size, setting, 520
SHIFT command, 910batch files, 397moving batch file parame-
ters, 409-410
Shift+Ctrl+F1 shortcut key(DOS Editor), 367
Shift+Del shortcut key (DOSEditor), 367
Shift+down arrow key, DOSShell hotkey, 66
Shift+F1 shortcut key (DOSEditor), 367
Shift+F5 key, DOS Shellhotkey, 66
Shift+F6 shortcut key (DOSEditor), 367
Shift+F9 key, DOS Shellhotkey, 66
Shift+Ins shortcut key (DOSEditor), 367
Shift+left arrow key, DOSShell hotkey, 67
Shift+PrtSc keystroke, Printscreen, ROM BIOS con-trols, 565
Shift+right arrow key, DOSShell hotkey, 67
Shift+Tab key, DOS Shellhotkey, 67
Shift+up arrow key, DOSShell hotkey, 66
shortcut keys (DOS Editor),366
Alt, 367Alt+F1, 367Alt+minus, 367Alt+plus, 367Ctrl+F1, 367Ctrl+Ins, 367Ctrl+Q, 367Del, 367Esc, 367F1, 367F3, 367F6, 367Shift+Ctrl+F1, 367Shift+Del, 367Shift+F1, 367Shift+F6, 367Shift+Ins, 367
shortcut keys (DOS Shell),83
simple menus, creating(CHOICE command), 405-406
single files, selecting (DOSShell), 87
single-sided, double densityfloppy disks (SSDD), 138
SIZER command, 910
SIZER.EXE file, 507, 910
sizing Stacker drives, 880
slashes (/), command syntax,45
Slavic (Latin II) code page,354
SlickTerminal, terminalemulation, 484
.SLT file extension, 509
SMARTDrive Monitor pro-gram, 914
SMARTDrive utility, 911-913
disk caching, 169-172SMARTDRV command,
911-913parameters/switches,
911-912SMARTDRV.EXE device
driver, 444, 511, 914
SMARTMON command,914
SMARTMON.EXE file, 511
SMARTMON.HLP file, 511
SMARTMON.LOG file, 511
SmartTerm, terminal emula-tion, 484
sockets, locking/unlocking,714
softwaredata loss, troubleshooting,
232-233interrupts versus hardware
interrupts, 310
1013software
SORT command, 915-916
SORT filterguidelines for use, 338offset values, 337-338subdirectory listings, sort-
ing, 338syntax, 337-338
SORT.EXE file, 511
sortingdirectories (DEFRAG pro-
gram), 179-180files (DIR command), 197subdirectory lists (SORT
filter), 338source code, 163
SourceFiles command syn-tax, 43-44
SPATCH.BAT file, 512
special characters, DOSKEYmacros, 437-438
specifying shortcut key com-binations (DOS Shell), 83
splittingdirectories (SUBST com-
mand), 302-303text (DOS Editor), 371
SSDD floppy disks (single-sided, double density), 138
SSETUP command, 917
SSTOR.SYS file (device dri-ver), 444, 512
STAC command, 917
STACHIGH command, 917
STACKER command, 918
Stacker driveschecking compressed drives,
626creating, 648-649defragmenting/recompress-
ing, 891-892mounting/unmounting, 918online interface, 897, 933read/write, read-only pass-
words, 844resizing, 880stacvol file, deleting, 875
statistics, 880storing in extended mem-
ory, 707-708uncompressing, 936, 942updating, 750
Stacker Optimizer, 891-892
Stacker Toolbox, 917
STACKER.INI file, re-creating, 638
STACKS= command, 918-920
starting. See also executing;launching
batch files, 392configuration files, 624DOS after timeout periods,
807-809DOS Shell program,
704-707DoubleSpace, 654DR-DOS help, 700File Update System pro-
gram, 738IBM AntiVirus/DOS full-
screen program, 759PC DOS E Editor, 715-716Schedule program, 889-890Windows Scripting Host,
649-650XDF program, 955
startup control keysCtrl+F5 (Clean Boot), 564Ctrl+F8 (Interactive Boot),
564startup menus
configuration, 920-922defining, 809-811
static electricity and dataloss, 232
status bar (DOS Editor), 364
STATUS command (FTP),488
/STATUS switchFDISK command, 163-164UNDELETE command,
263
stopping programs, 616-617
storingfiles
floppy disks, 101hard disks, 101
Stacker driver, extendedmemory, 707-708
strings, comparing (IF com-mand), 402-403
STY (Stylesheet) filenameextension, 107
subdirectoriesbranches, deleting, 679compressed disk drives,
deleting, 661-662copying, 950-954creating (TREE command),
113-114, 800-801deleting, 872-873
empty, 955directory tree, 932joining to other drives,
786-788renaming, 828-830, 877viewing (DIR command),
194-195Subdirectory file attribute,
108
subdirectory lists, sorting(SORT filter), 338
SUBMENU command,CONFIG.SYS file, 28
SUBMENU= command,920-922
SUBST command, 302-303,922-923
parameters/switches, 922pretender, 468-469referencing drive paths,
303-304rules for use, 304
SUBST.EXE file, 512
supplemental disk files, 5124201.CPI, 5144208.CPI, 5145202.CPI, 514ADOS.CFG, 513
SORT command1014
ADOS.COM, 513ADOS.OVL, 513ADOS.TXT, 513AREADME.TXT, 513ASSIGN.COM, 513BACKUP.EXE, 513COMMANDS.TXT, 513COMP.EXE, 513CV.COM, 513DBLBOOT.BAT, 513DBLBOOT.INI, 513DVORAK.SYS, 513DVORAK.TXT, 513EDLIN.EXE, 513EXE2BIN.EXE, 513FAKEMOUS.COM, 513GORILLA.BAS, 514GRAFTABL.COM, 513JOIN.EXE, 514KBDBUF.SYS, 514LCD.CPI, 514MIRROR.COM, 514MONEY.BAS, 514MSHERC.COM, 514NET.1XE, 514NETWKSTA.1XE, 514NETWKSTA.2XE, 514NEUBEUI.DOS, 514NIBBLES.BAS, 514NXT.TXT, 514PRINTER.SYS, 514PRINTFIX.COM, 514REDIR.1XE, 514REDIR.2XE, 514REMLINE.BAS, 514SETNAME.EXE, 514
/SURFACE switch, SCANDISK command, 189
suspending batch files, 631-633
SWITCH command, 924
switches/1
DISKCOPY command,211
FORMAT command, 157/4, FORMAT command,
157/8, FORMAT command,
157
/? (help), 46/A
COPY command, 203DIR command, 194-196FC command, 216XCOPY command, 207
/ALLSCANDISK command,
189UNDELETE command,
263/AUTOFIX, SCANDISK
command, 189/B
COPY command, 203DIR command, 194, 197FC command, 216FORMAT command, 157
/CDIR command, 194FC command, 216FORMAT command, 157
/CH, DIR command, 194/CHECKONLY,
SCANDISK command,189
/CLASSIFY, MEM com-mand, 283
/CUSTOM, SCANDISKcommand, 189
/DSETVER command, 282XCOPY command, 207
/DEBUG, MEM com-mand, 283
/DOS, UNDELETE com-mand, 263
/DS, UNDELETE com-mand, 263
/DT, UNDELETE com-mand, 263
/E, XCOPY command, 206/F, FORMAT command,
153, 157/FRAGMENT,
SCANDISK command,189
/FREE, MEM command,283
/J, UNFORMAT com-mand, 258
/LDIR command, 194, 197FC command, 216UNFORMAT command,
258/LIST, UNDELETE com-
mand, 263/LOAD, UNDELETE
command, 263/M
DISKCOPY command,211
XCOPY command, 207/MODULE, MEM com-
mand, 283/MONO, SCANDISK
command, 189/N
FC command, 217FORMAT command, 157
/NOSAVE, SCANDISKcommand, 189
/NOSUMMARY, SCANDISK command,189
/O, DIR command, 194,197
/PDIR command, 194-195ERASE command, 221UNFORMAT command,
258XCOPY command, 206
/PARTN, UNFORMATcommand, 258, 261
/PURGE, UNDELETEcommand, 263
/QFORMAT command, 157SETVER command, 282
/RCOPY, INTERSVRcommand, 224
/SDIR command, 194FORMAT command, 157UNDELETE command,
263XCOPY command, 206
/STATUSFDISK command,
163-164UNDELETE command,
263
1015switches
/SURFACE, SCANDISKcommand, 189
/TFC command, 217FORMAT command, 157UNDELETE command,
263/TEST, UNFORMAT
command, 258/U
FORMAT command, 157UNFORMAT command,
258/UNDO, SCANDISK
command, 189/UNLOAD, UNDELETE
command, 263/V
COPY command, 203DISKCOPY command,
211EMM386.EXE, 451FORMAT command, 157XCOPY command, 206
/WDIR command, 194-195FC command, 217XCOPY command, 206
/YCOPY command, 203MOVE command, 212XCOPY command, 207
ANSI.SYS/K, 416/R, 416/X, 416
ANSI.SYS command, 609APPEND command, 611ATTRIB command, 614BREAK command, 616BUFFERS= command, 617CALL command, 619CD command, 622CHCP command, 624CHKDSK command, 185,
626-627CHOICE command, 631COMMAND command,
635COMP command, 637COPY command, 639-640COUNTRY= command,
643
CTTY command, 650DATE command, 653DBLSPACE/
AUTOMOUNT com-mand, 655
DBLSPACE/CHKDSKcommand, 656
DBLSPACE/COMPRESScommand, 656
DBLSPACE/CREATEcommand, 658
DBLSPACE/DEFRAGMENT com-mand, 659
DBLSPACE/DELETEcommand, 660
DBLSPACE/DOUBLEGUARD com-mand, 661
DBLSPACE/FORMATcommand, 662
DBLSPACE/INFO com-mand, 662
DBLSPACE/MOUNTcommand, 664
DBLSPACE/RATIO com-mand, 665
DBLSPACE/SIZE com-mand, 666
DBLSPACE/UNCOMPRESS com-mand, 667
DBLSPACE/UNMOUNTcommand, 667
DBLSPACE.SYS devicedriver, 668
DEBUG command, 672DEFRAG command,
673-674DEL command, 675DELOLDOS command,
676DELTREE command, 679DEVICE= command, 680DEVICEHIGH= com-
mand, 683DIR command, 193,
687-689DISKCOMP command,
690DISKCOPY command, 692DISPLAY.SYS device dri-
ver, 696
DOS= command, 698DOSKEY command, 702DOSSHELL command,
704-705DRIVER.SYS device driver,
708-709DRIVPARM= command,
711-712ECHO command, 717EDIT command, 719
/B (DOS Editor), 384/G (DOS Editor), 384/H (DOS Editor), 385/NOHI (DOS Editor),
385EGA.SYS device driver, 720EMM386 command, 722EMM386.EXE, 449-451,
723-725EXE2BIN command, 727EXPAND command, 728FASTHELP command, 730FASTOPEN command,
731FC command, 733FCBS= command, 734FDISK command, 735FILES= command, 737FIND command, 738FIND filter, 335-336FOR command, 740FORMAT command,
743-744GOTO command, 747GRAFTABL command,
748GRAPHICS command,
749-750HCONVERT command,
750HELP command, 751HIMEM.SYS device driver,
752-755IF command, 761INCLUDE= command,
766INSTALL command,
466-467INSTALL= command, 768INTERLNK command,
770-775
switches1016
INTERSVR command,781-782
JOIN command, 786KBDBUF.SYS device dri-
ver, 788KEYB command, 790LABEL command, 793LASTDRIVE= command,
795LOADFIX command, 798LOADHIGH command,
798MEM command, 283, 802MEMMAKER command,
804MENUCOLOR= com-
mand, 805MENUDEFAULT= com-
mand, 807MENUITEM= command,
809MIRROR command, 811MKDIR command, 800MODE COM# command,
815MODE command, 814,
819-823MODE CON command,
817MODE LPT# command,
824MONOUMB.386 com-
mand, 826MORE command, 827MOVE command, 212, 828MSAV command, 831-832MSBACKUP command,
833MSCDEX command, 835MSD command, 836MSHERC command, 837NLSFUNC command, 840PATH command, 846POWER command, 852POWER.EXE device dri-
ver, 855PRINT command,
322-323, 857PRINTER.SYS device dri-
ver, 860
PROMPT command, 862QBASIC command, 864RAMDRIVE.SYS device
driver, 868REM command, 874RENAME command, 876REPLACE command, 877RESTORE command, 881RMDIR command, 872SCANDISK command,
189, 884-885SCANDISK utility,
188-189SET command, 894SETVER command, 898,
904SHARE command, 906SHELL command, 465-466SHELL= command, 908SMARTDRV command,
911-914SORT command, 915STACKS= command, 918SUBMENU= command,
920SUBST command, 922SWITCHES= command,
924SYS command, 927TIME command, 930TREE command, 932TYPE command, 933UNDELETE command,
936-938UNFORMAT command,
258, 939VERIFY command, 943VFINDTD command, 944VOL command, 946VSAFE command, 947WINA20.386 device driver,
949XCOPY command, 206,
950-951SWITCHES command
CONFIG.SYS file, 28parameters, 467-468switches, 467-468
SWITCHES= command,924-926
switching file lists, dual ver-sus single (DOS Shell), 72-73
Symantec Web site, NortonAntivirus information, 253
syntax (commands)backslash (\) usage, 45Drive\Files format, 43-44paradigm, 44slash (/) usage, 45SourceFiles format, 43-44
SYS (System or device dri-ver) filename extension,107
SYS command, 167-168,926-928
boot disk, 25parameters/switches, 927
SYS.COM file, 512
SYSINFO command, 928-929
SysReq keystroke, ROMBIOS controls, 565
system buses, CPU commu-nication, 13
system configuration, 442AUTOEXEC.BAT file, 26,
30-32changes, monitoring,
866-867CONFIG.SYS file, 26-29default, 442
creating, 34device drivers, 444
configuring, 813-815hard disks, optimizing,
461-462information, gathering,
928-929memory
free/used, displaying, 453-454
MemMaker, 455-460optimizing, 445-451
1017system configuration
multiple, creating, 32-33performance commands,
589tool (MemMaker), 442
system filesattribute, 108formatting disks, 158transferring to disks,
167-168system resources, allocating
among client drivers, 849
system tables, loading intoconventional/upper mem-ory, 701
T
/T switchFC command, 217FORMAT command, 157UNDELETE command,
263Tab key
dialog boxes (DOS Editor),366
DOS Shell hotkey, 67tab stops in text, setting
(DOS Editor), 372
task list area (DOS Shell), 62
Task Swapper (DOS Shell),activating, 93-94
TASKMGR command, 929
TCP/IP (TransmissionControl Protocol/InternetProtocol)
Novell NetWare Client,configuring, 475
required information, 473technical information (PCs),
displaying, 865
TEE command (4DOS), 499
Telix, terminal emulation,484
TelnetInternet connections,
484-485troubleshooting, 491-492
passwords, 485usernames, 485
TEMP environment vari-able, 525-526
RAM disks, 176templates, batch files as, 396
temporary directories, 124-125
terminal emulationProcomm Plus, 484SlickTerminal, 484SmartTerm, 484Telix, 484Unix commands
cd, 485cp, 485ls, 485mv, 485
terminate-and-stay-ready(TSR) programs (Interlnk),223
/TEST switch, UNFORMAT command,258
testingERRORLEVEL command,
400-402programs, 671-672
textattributes, screen display
(ANSI.SYS controls), 421-422
automatic indenting (DOSEditor), 372
block editingClipboard, 374-376fundamentals, 373text, changing, 378-379text, finding, 377-378text searching and replac-
ing, 376-377text selection, 373-374
copying (Clipboard), 375cutting (Clipboard), 375deleting (Clipboard), 375deleting from line (DOS
Editor), 370-371inserting into line (DOS
Editor), 370-371
joining in line (DOSEditor), 371
overtyping (DOS Editor),371
pasting (Clipboard), 375place markers (DOS
Editor), 373splitting in line (DOS
Editor), 371tab stops (DOS Editor), 372
text boxes, DOS Shell dialogboxes, 67-68
TEXT command (4DOS),499
text editors. See DOS Editor
text filesANSI.SYS codes, issuing in,
418-419ASCII
editing, 719-720viewing (TYPE com-
mand), 200-201combining (COPY com-
mand), 204-205comparing (FC command),
218-219printing, 201
text screens, clearing, 633-634
text stringschanging (DOS Editor),
378-379finding (DOS Editor),
377-378searching and replacing,
376-377text-based user interfaces
changing, 295Color Graphics Adapter
(CGA), 299-300command prompt, modify-
ing (PROMPT com-mand), 295-296
screenappearance, customizing
(MODE command), 298columns/lines adjustments,
300-301type, selecting (MODE
command), 299
system configuration1018
Thick Ethernet, 472
Thin Ethernet, 472
TIF (Tagged Image FileFormat) filename exten-sion, 107
time, setting, 930-932
TIME command, 278-279,930-931
time meta-string, 297
TIMEOUT command, 931
timeout periodsstartup configuration,
807-809user response time, 931
TIMER command (4DOS),499
timesCOUNTRY.SYS file,
340-342international formats,
356-357setting, 276-277
title bar (DOS Shell), 60
TMP (Temporary) filenameextension, 107
TMP environment variable,525-526
topics (online help)printing, 50-51searching, 51
TOUCH command, 931-932
TOUCH command (4DOS),499
tracksdisk drives, 134floppy disks, 150
transferring filesbetween two computers,
736Interlnk, 228
transmitting viruses, 252-253
TREE command, 932listing directories, 123-124parameters/switches, 932subdirectories, creating,
113-114
TREE command (4DOS),499
TREE.COM file, 512
troubleshootingdata loss
hardware causes, 232-233software causes, 232-233
device driversAUTOEXEC.BAT file,
editing, 314-315CD-ROM drives, 316CONFIG.SYS file, edit-
ing, 314-315conflicts, 314IRQ conflicts, 314-315modems, 316parallel printers, 316serial port cards, 316video cards, 316
file editing, 229filenames, 125-126hard disks, drifting, 148Internet connections
FTP sessions, 491-492shell accounts (ISPs),
491-492Telnet, 491-492
memory problems, 460-461networks, client software
setup, 482PCs, Microsoft System
Diagnostics, 836-837programs, running from C\
prompt, 55TRY_AGAIN label (batch
files), 403
TSRs (terminate-and-stayresident programs), 451
DELWATCH, 677-678device drivers, loading,
451-452FASTOPEN, 731-732Interlnk, 223loading
into conventional memory,768-769
into upper memory, 451-452, 803
TST (Test) filename exten-sion, 107
TUNER command, 933
Turkish code page, 354
turning on/off NumLockkey, 840-841
TXT (Text) filename exten-sion, 107
TYPE command, 187, 933-934
ANSI.SYS, 418-419displaying batch file con-
tents, 396parameters/switches, 933use guidelines, 201viewing ASCII files,
200-201typematic rates, keyboards,
changing (MODE com-mand), 331-332
U
/U switchFORMAT command, 157UNFORMAT command,
258UMBCGA.SYS device dri-
ver, 934
UMBEMS.SYS device driver,934
UMBHERC.SYS device dri-ver, 935
UMBMONO.SYS devicedriver, 935
UMBs (upper memoryblocks)
controlling, 721-722creating, 722-726EMS memory mapping,
934video memory, mapping,
934Hercules adapters, 935monochrome adapters, 935
1019UMBs (upper memory blocks)
UNCOMP command, 936
Uncompress option(DoubleSpace), 147
uncompressingdisk drives, 147, 666-667Stacker drives, 936, 942
unconditional formatting ofdisks, 158
UNDELETE command,221, 936-939
parameters/switches, 936-938
recovering files, 262-266Undelete command (File
menu), 269
Undelete To command (Filemenu), 269
UNDELETE.EXE file, 512
UNDELETE.INI file, 512
undeleting files, 221
/UNDO switch, SCANDISKcommand, 189
UNFORMAT command,939-940
parameters/switches, 939recovering partition tables,
261unformatting disks, 257-261
UNFORMAT.COM file, 512
unformatting disks, 257-258recovering from accidental
formats, 258-261UNINSTALL command,
940-941
UNINSTALL.EXE file, 511
uninstalling DR-DOS, 940
United States code page, 354
Unixfilenames, case sensitivity,
485Practical Unix, 492terminal emulation,
484-485cd command, 485cp command, 485ls command, 485mv command, 485
unknown text files, viewing(DOS Editor), 362
/UNLOAD switch,UNDELETE command,263
unloading DOS ProtectedMode Interface support,707
unlocking drives/sockets,714
unmountingcompressed disk drives, 660CVFs, 667-668Stacker drives, 918
UNPACK2 command, 941
unpacking bundled files, 941
UNSET command (4DOS),499
UNSTACK command, 942
unused memory, displayingamount of, 802-803
updatingfiles, 877-880Stacker drives, 750
upper memorycustomizing, 698-700listing contents, 286-287loading device drivers,
682-686loading programs, 798-799VGA display, 826-827
upper memory area (UMA),445
device drivers, loading, 451-452
DEVICEHIGH command,452
EMM386.EXE, 449LOADHIGH command,
452RAM, 19
upper memory blocks(UMBs)
controlling, 721-722creating, 722-726loading
device drivers, 803TSRs, 803
usable capacity (disks), 139
used memory, displayingamount of, 802-803
user interfaceColor Graphics Adapter
(CGA), 299-300command prompt, modify-
ing (PROMPT com-mand), 295-296
screenappearance, customizing
(MODE command), 298columns/lines adjustments,
300-301type, selecting (MODE
command), 299text-based, changing, 295
User label, environmentvariables, 520
user response time (timeoutperiods), 931
utilities4DOS, 497
batch file debugger, 500command improvements,
497-498commands, 498-499
COM files, 192defined, 192demoware, 495EXE files, 192freeware, 494McAfee VirusScan, 496-497MemMaker, 442MSD.EXE (Microsoft
Diagnostics), 314PCMCIA Resource
Management command-line, 850-851
PKUNZIP, 495-496PKZIP, 495-496SCANDISK, 188-189shareware, 494SMARTDrive, 911-913versus applications, 192-193
UNCOMP command1020

V
/V switchCOPY command, 203DISKCOPY command, 211EMM386.EXE, 451FORMAT command, 157XCOPY command, 206
variablesenvironment, 294
APPEND, 520-521changing (SET command),
294COMSPEC, 521CONFIG, 521-522COPYCMD, 522defining (SET command),
295DIRCMD, 522-523MSDOSDATA, 523-524PATH, 524-525PROMPT, 525TEMP, 525-526TMP, 525-526windir, 526WINPMT, 526-527
system, 304VER command, 279, 942
VERIFY command, 943-944
version numbers (DOS)displaying, 279, 942setting, 280-283
vertical bar meta-string, 296
VFINDTD command, 944
VFINTD.386 device driver,444, 944-945
VFINTD.386 file, 510
VGA (Video Graphics Array)display, 821
upper memory, increasing,826-827
video cardsANSI.SYS controls, 416device drivers, trou-
bleshooting, 316
video displays. See alsoscreen
Hercules MonochromeGraphics Adapter, 837
switching between, 821-823VGA, upper memory space,
increasing, 826-827Video Graphics Array
(VGA), 821upper memory, increasing,
826-827video memory, mapping as
upper memory blocks, 935Hercules adapters, 934monochrome adapters, 935
video modes (DOS Shell),75-76
VIEW command, 945-946
View File Contents com-mand (File menu), 91-92
View menu commandsProgram List, 74Refresh, 71
viewingASCII files (TYPE com-
mand), 200-201bulletin board files (DOS
Editor), 362command-history buffer
(DOSKEY), 435compressed disk drive
information, 662-663directories (DIR command),
194-195disk drive information, 663DOS Shell
directories, modifying, 70-74
files, modifying, 70-74program list, 74
file attributes, 613-615file information, 687-689files (DOS Shell), 91-92subdirectories (DIR com-
mand), 194-195unknown text files (DOS
Editor), 362
virtual disks. See RAM disks
virusesdata loss, 232Microsoft Anti-Virus
(MSAV), 253-255, 830-832, 838
checklists, 255virus list, 256
Microsoft Anti-Virus forWindows (MWAV), 253-257
Norton Antivirus, 253number of, 252-253potential damage, 252-253protection guidelines, 257transmission, 252-253variations, 252-253
vital file designation, 504
VOL command, 167, 946-947
Volume Label file attribute,108
volume labelsdisks, 793-794
VOL command, 167displaying, 946-947floppy disks, 154-156
VSAFE command, 947-948
VSAFE.COM file, 512running, 838
VSCRPUT command(4DOS), 499
W
/W switchDIR command, 194-195FC command, 217XCOPY command, 206
warm bootingBRB (Big Red Button
Time), 24Ctrl+Alt+Del key combina-
tion, 24effect of, 24versus cold booting, 24
1021warm booting
warning messages, alphabet-ical listing, 530-557
Web sitesDownloads.com, 183JP Software, 4DOS utility,
497PKWare, Zip utilities, 495Symantec, 253ZDNet, 183
terminal emulation pro-grams, 484
wildcardscommands
asterisk (*), 54-55question mark (?), 54-55
filenames, 594-596WINA20.386 device driver,
512, 949-950
windir environment variable,526
window appearance (DOSEditor), 364
Windows 98, SCANREGtool, 888-889
Windows file designation,504
Windows label, environmentvariables, 520
Windows Scripting Host,starting, 649-650
WINPMT environmentvariable, 526-527
WK1 (Worksheet) filenameextension, 107
WK2 (Quattro Pro 5.0spreadsheet) filenameextension, 107
WK3 (Worksheet) filenameextension, 107
WKQ (Quattro) filenameextension, 107
WKS (Worksheet) filenameextension, 107
WNTOOLS.GRP file, 512
Workstation Manager 3.x(Novell NetWare Client),474
WQ1 (Quattro Pro spread-sheet) filename extension,107
write-caching, 170
write-protecting floppydisks, 132
write/read heads, 133
write/read passwords(Stacker drives), 844
writing README files(DOS Editor), 362
X - Y - Z
/X switch (ANSI.SYS), 416
XBIOS.OVL file, 506
XCOPY command, 950-954backing up disks, 208-209copying
directories, 206-207directory branches,
209-210disks, 209
defaults, 214parameters/switches,
950-951switches, 206
/A, 207/D, 207/E, 206/M, 207/P, 206/S, 206/V, 206/W, 206/Y, 207
use guidelines, 207-208XCOPY.EXE file, 512
XCOPY32 command, 954
XDEL command, 955
XDF command, 955
XDF program, starting, 955
XDFCOPY command, 956
XDIR command, 956-957
XLM (Excel macro) filenameextension, 107
XLS (Excel spreadsheet)filename extension, 107
XMS (Extended MemorySpecification), 20, 283-288
converting to LIMexpanded memory (EMS),722-726
XT processors, 17
/Y switchCOPY command, 203MOVE command, 212XCOPY command, 207
ZDNet Web site, 183terminal emulation pro-
grams, 484Zip drives, 21
Zip filesfilename extension, 107utilities
PKUNZIP, 495-496PKZIP, 495-496
warning messages, alphabetical listing1022