living project - 4-h alberta
TRANSCRIPT

r e f e r e n c e B O O K
Living Project

The 4-H MOTTO“Learn to Do by Doing”
4-H pledge
I pledge
My Head to clearer thinking
My Heart to greater loyalty
My Hands to larger service
My Health to better living
For my club, my community, and my country
Published by:
Canadian 4-H Council Resource Network, Ottawa ON
Written by
Karen Dowsett, Manitoba
Graphic Design by:
Perpetual Notion, www.perpetualnotion.ca
Date:
September, 2008

1
Outdoor Living Project
1
RefeRence BOOk Table of contents
To Use The Outdoor Living Project 3
Nature Journal/Record Book 6
Wonderful World Of Wildlife 7
Wildlife Treasure Hunt 8
Plaster Cast Tracks 16
Finding Prey 19
Looking For Animal Tracks 20
Judge Nature 20
Stalking 21
Animal Signs 21
A Search For Tracks And Habitats 22
Make A Bird Call 22
Listening For Bird Calls 22
Homemade Bird Feeders 23
Bird Observation 24
Nectar Feeder 24
Insects 25
Insect Art 26
Sweep Netting For Meadow Insects 26
Raise A Butterfly 27
Micro-Hike 28
Spying On An Anthill 28
Night Prowl 30
Fishing 31
Filleting A Fish 32
Homemade Fishing Pole 32
Casting 33
All Things Green 35
An Introduction 36
Crafting With Wildflowers 37
Collecting And Preparing Wildflower Seeds 38
Wildflower Seed Planting 39
Flower Face 40
Leaf Prints 40
Leaf Hunt 41
Meet My Friend 42
Sketch A Plant 42
Switch 42
Meet A Tree 43
Birch Bark Baskets 43
Collecting Wild Berries 44
Cooking With Wild Berries 45
Rose Hip Honey 45
Looking At The Sky And Weather 47
An Introduction 48
Summer Constellations 49
Winter Constellations 50
Admiral Beaufort Wind Scale 51
Natural Weather Report 52
Make A Rainbow 53
The Rain Game 53
Build A Rain Gauge 54
How Big Is A Rain Drop? 54
Make A Wind Streamer 55
What Does UV Do? 56
Make Your Own Tornado 57
How Water Vapor Enters The Air 58
Build A Thermometer 58
Make A Barometer 59
eye On The environment 61
An Introduction 62
What We All Need 62
A Home Is A Habitat 63
Jar Forest 63
2
Outdoor Living ProjectRecORD BOOk OUTDOOR LIVInG SkILLSRefeRence BOOk Table of contents
The Thicket Game 64
Damaging Games 64
Swamp Things 65
Make A Water Scope 66
Microtrek Scavenger Hunt 66
Seed Walk 67
Polar Bears In The Zoo 68
Predator Prey 69
Pesticides And The Food Chain 70
Environmental Coat Of Arms 71
The Habitat Game 72
Worms And Soil 72
Oil Spill 73
Town Hall Meeting 75
Values 75
Outdoor Survival 77
An Introduction 78
First Aid Courses 78
First Aid Coloring Sheets 79
Make A First Aid Kit 79
Make A Survival/Repair Kit 80
Make A Lean-To 81
Tarp Shelter 82
Debris Shelter 82
How Many Steps In A Mile? 82
Water Purification Taste Test 83
North By Northeast 83
The Giant Compass Game 84
Orienteering Scavenger Hunt 84
Telling Time Nature’s Way 85
Homemade Fire Starters 86
Building A Fire 86
Compass Direction Game 86
Survival Knots 87
Contour Line Activity 87
How Long Will It Take To Walk A Kilometer? 88
Blindfold Compass Walk 88
Adventures In The Wildnerness 89
An Introduction 90
Stream Hike 92
How To Dig For Clay 93
Senses Hike 93
Night Hike 93
Canoeing 94
Canoe And Paddle Parts Relay 94
Canoeing Skills 95
Breakfast Bake 95
Hole Potato 95
Winter fun 97
An Introduction 98
Snowshoeing 98
Cross Country Skiing 99
Ice Charms 101
Fleece Mitts And/Or Headband 101
Ice Castles 101
Winter Campfire 102
Building A Quinzee 103
References 104
3
Outdoor Living ProjectRecORD BOOk OUTDOOR LIVInG SkILLSRefeRence BOOk Introduct ion
HOW TO USE THIS BOOKThe Leaders Reference Book is to be used in conjunction with the Outdoor Living Activity Guide.
The seven themes in the Activity Guide and the activities of each theme appear in the exact order in the Reference Book.
The Objective of the Reference Book is to provide leaders with some additional information about the various activity topics. The information will hopefully make leaders feel more confident about explaining some of the activity topics that they are not as familiar with. Background information has been included for activities that were not explained in detail in Activity Guide. The background information is intended to supplement information the leader already knows about the topic. Tips are sometimes given to clarify specific instructions. As well, many pictures, diagrams and graphics have been added that you can share with the members to further clarify the instructions or proposed learning outcome of the activity. Information pertaining to Processing Prompts has been included to assist leaders in giving informed answers to the questions. Websites and books that offer more resources or information on the various topics are also included.
The recommended age level is listed at the top of each activity. As well, the topic and learning outcome are listed. Within these first three lines you should be able to determine whether this is an activity your group might be interested in doing.

4
Outdoor Living Project
HOW TO USE THE 4-H OUTDOOR LIVING PROJECTThe 4-H Outdoor Living Project consists of seven themes. Each theme is identified at the top of each page. Every activity is designed to stand alone. The activities do not need to be implemented in any specific order, but most of the activities complement one another. You will find an alphabetical index of the activities at the end of the Activity Guide.
The Wonderful World of Wildlife
This section will teach 4-H members how to identify animals and their track, birds, and insects. It also explores the topic of fishing and fishing techniques.
All Things Green
This section focuses on teaching 4-H members about plants, trees and shrubs. It also includes activities that focus on locating and preparing edible wild plants.
Looking at the Sky and Weather
In this section, members will learn about constellations, and different weather topics.
Eye on the Environment
The Eye on the Environment section teaches 4-H members to understand the ecosystem and food chains. It also has activities that focus on environmental resources, and the impact our lifestyle has on the environment.
Outdoor Survival
This section has activities that teach 4-H members about navigation, shelter building, fire starting, water collection, and first aid skills.
Adventures in the Wilderness
In this section there are activities that focus on outdoor expeditions including hiking, canoeing, and low impact camping.
Winter Fun
The Winter Fun section includes activities in the following areas: cross country skiing, snowshoeing, winter camping, and winter games and activities.
RefeRence BOOk Introduct ion

5
Outdoor Living Project
The 4-H Outdoor Living Project was designed with three age groups in mind.• Junior: 8 to 10 years of age
• Intermediate: 11-14 years of age
• Senior: 15 to 19 years of age
Each activity has been designed for one of these age groups, but occasionally activities are appropriate for more than one of the age categories. You will find an age category index of the activities at the end of the Activity Guide.
Each activity in the 4-H Outdoor Living Project has learning outcomes identified at the beginning of the activity, and processing prompts at the end. To gain a better understanding of why these were added to every activity, we have included the following section about Experiential Learning.
Experiential LearningExperiential learning is a model which, simply put, consists of action and reflection. Having fun while learning through a variety of hands-on experiences is an important element of experiential learning. Participating in fun activities creates a sense of togetherness within a group and helps members relate to one another, as well as allowing the group to relax, to feel safe and to feel at ease.
Research shows that learning is often best achieved when it is fun, active, interesting and easy to understand. Through guided reflection and discussion, activities with meaning often help individuals understand concepts and skills more easily than they would if the same meaning was presented in a lecture format.
A leader can help 4-H members and groups learn, by leading activities with meaning. These activities can then be processed to help the group find the meaning. These lessons learned can then be applied to other areas of the members’ lives – helping them to transfer the meaning from the activity to the real world.
This manual includes learning outcomes at the beginning of each activity. Members will discuss and explore the meaning behind the activities and transfer these insights, through the help of the 4-H leader, into their everyday lives whether it is in sports teams, school groups, community groups or families. This can be facilitated by the 4-H leader by using the processing prompts listed at the end of each activity.
What is Processing?
Processing is when individuals reflect, describe, analyze and communicate what they have just experienced in an activity.
Processing is easiest done with the group when standing or sitting in a circle, and when the entire group is attentive and focused on the discussion. Each activity has processing prompts. There will be a list of questions to ask the group or instructions on concepts to focus on in a group discussion. Some or all of the questions can be used to process the activity. Feel free to add your own processing prompts to an activity if you feel that there is a specific topic that should be discussed. Processing can be fast or slow; it will depend on the group and the activity.
Throughout the Outdoor Living Project, the nature journal is mentioned in many of the activities as a tool for members to record their observations, feelings and experiences. The instructions for this activity are included on the following page, and can be used with members of all ages as an introduction activity for the Project.
RefeRence BOOk Introduct ion Junior, Intermediate + Senior
6
Outdoor Living ProjectRecORD BOOk Introduct ion Junior, Intermediate + Senior
NATURE JOURNAL/RECORD BOOKTOPIC: Journal
LEARNING OUTCOMES:
To keep a personal record of encounters with plants, birds, bugs and wildlife.•
To reflect on experiences in the outdoors and various other activities within the curriculum.•
Optional: Members could combine the pages of their Record Book with their Journal. It would make an excellent presentation for Achievement Day.
Ideas for Nature Journal/Record Book
Help members use Scrapbook Techniques to display what they have learned:
Many craft and department stores carry all kinds of supplies such as background paper, captions, and stickers • for creatively displaying photos or pictures.
There are even some relatively inexpensive scrapbook software programs that allow you to create and print off • your own materials.
For a less expensive approach use scenes and pictures from magazines as backgrounds, or collages. Nature, • fishing and hunting magazines have lots to offer.
Make captions to capture personal or group involvement with the natural scene being displayed.•
Look for articles in local papers about Environmental Issues and use some of the articles to emphasize a topic.•
Make a predator/prey scene.•
Make a food chain scene.•
Press and dry foliage or flowers and attach them to the pages.•

7
Outdoor Living ProjectRefeRence BOOk Wonder ful World of Wildl i fe
WOnDeRfUL WORLD
Of WILDLIfe

8
Outdoor Living ProjectRefeRence BOOk Wonder ful World of Wildl i fe
WILDLIFE TREASURE HUNT Intermediate + Senior
TOPIC: Animals and Tracking
LEARNING OUTCOMES:
To teach members about local wildlife and their habitats.•
To explore community-based resources and practice valuable research skills that will be useful • for other 4-H projects.
This activity asks for the members to create index cards with a picture of local wildlife on one side and some basic facts about the animal on the other side.
The wildlife cards and basic facts about each animal supplied on the following pages should help get the activity started. Choose those that are common in your area. Members can add to the collection. If you wish, copies can be made so each member has a collection.
The activity suggests pinpointing locations where animals have been spotted on a map of the local area. These maps can often be obtained at municipal, town, economic development, or tourism offices.
BLACK BEAR
In the East, black bears are nearly black; in the West, they are black to cinnamon. The males are usually larger than the females.
BADGER
The badger has a flattish body, wider than it is high, with short, bowed legs. It has a shaggy grizzled gray to brown coat and a short, bushy, yellowish tail. Its face is dark brown or black with white cheeks.
GRAY SQUIRREL
The gray squirrel, as the name suggests is darker gray on top back, and feet, and paler gray on its stomach. It has a flattened bushy tail.
BEAVERThe beaver is a very large, bulky rodent, with rounded head and small, rounded ears. The dark brown fur is fine and soft. It has a large, black, flat, scaly tail that looks like a paddle.

9
Outdoor Living ProjectRefeRence BOOk Wonder ful World of Wildl i fe
FOX
The fox has a reddish, rusty-brown coat and a bushy tail. Their ears are alert and they have a fairly long nose. They are smaller than the coyote.
RACCOON
The raccoon is usually gray-brown or orange-brown above, and black/grayish below. The face has a black mask outlined in white. The tail is bushy, with 4–6 alternating black and brown or brownish-gray rings.
MOUNTAIN SHEEP
Mountain sheep have a medium-size, muscular body, with a thick neck. Color varies from dark brown above in northern mountains to pale tan in desert, with white belly, rump patch, back of legs, muzzle, and eye patch. They have a short, dark brown tail. Rams has massive brown horns that curve up and back over the ears, then down, around, and up past cheeks in a C formation.
WOLF
The wolf is a large animal, usually grizzled gray, but showing great variation in color, ranging from white to black. It has a long, bushy tail with black tip.
ELK
The elk is a large mammal, with a thick neck and slender legs. It is brown or tan on the main part of its body, and darker on its belly. Its rump patch and tail are yellowish brown. Males have dark brown manes on throat and large antlers.

10
Outdoor Living ProjectRefeRence BOOk Wonder ful World of Wildl i fe
WHITE TAILED DEER
The white tailed deer varies from small to medium-size. It is tan or reddish brown above in summer and grayish brown in winter. Its belly, throat, nose band, eye ring, and inside of ears are white. Its tail is brown, edged with white above.
MUSKRAT
The muskrat is a large rodent with dark brown glossy fur. It has a long scaly tail. The hind feet are partially webbed and larger than forefeet. The eyes and ears are small.
BUSH RABBIT
The bush rabbit is a small rabbit with short legs and a small tail. It has short dark ears. It is reddish brown with black in summer and white or mottled in winter.
THE PORCUPINE
The porcupine is a large, chunky animal, with a high-arching back, and short legs. There are long guard hairs on the front half of body, and quills on the rump and tail.
THE SKUNK
The skunk has a white head, back, and tail. The lower portions black. It has a long snout, naked on top, with a broad nose pad.

11
Outdoor Living ProjectRefeRence BOOk Wonder ful World of Wildl i fe
MOOSE
The moose is larger than an elk. It has long, dark brown hair, high, humped shoulders, and long slender legs. It has a huge muzzle, a large dewlap under the chin and large ears. The male has a huge rack of antlers.
SPARROW
The male sparrow has a black throat, white cheeks, and chestnut nape with a gray crown and rump. The females and young are streaked dull brown above, and dingy white below, with a pale eyebrow.
HUMMINGBIRD
The hummingbird is a tiny bird, with a needle-like bill that it uses to get nectar out of flowers. It has very fast wing movement, and can hover in one place and even fly backwards.
BLUEBIRD
The bluebird is a long-winged, short-tailed bird. The male has deep blue hood and back, a rusty red breast and a white belly. The female has a sooty grey back, with dull blue wings and tail.

12
Outdoor Living ProjectRefeRence BOOk Wonder ful World of Wildl i fe
ROBIN
The robin has a gray back and a brick red breast. The head and tail are black in males, dull gray in females.
SANDHILL CRANE
The sandhill crane is very tall, with a long neck and legs. It is mostly gray, with a red forehead.
RED WINGED BLACKBIRD
The blackbird is a little smaller than a robin. The male is black with bright red shoulder patches. The female and young are heavily streaked with dusty brown.
RED TAILED HAWK
The red tailed hawk is a large stocky hawk. It has a whitish breast and rust-colored tail. Young birds are duller, more streaked, lacking rust-colored tail of adult.
THE LOON
The loon has a black head and neck with white bands on the neck. It has a black back with white spots. Its call is kind of a mournful, half laughing, and half crying sound.
THE BALD EAGLE
The bald eagle is a large blackish eagle with a white head and tail and heavy yellow bill. Young birds lack the white head and tail, and resemble adult golden eagles, but are variably marked with white and have a black, bigger bill.

13
Outdoor Living ProjectRefeRence BOOk Wonder ful World of Wildl i fe
THE CHICKADEE
The chickadee has a black cap and throat, white cheeks, gray back, and dull white under parts. The wing feathers are edged with white. There are several chickadee varieties across Canada, each a little different in coloring.
THE CANADA GOOSE
The Canada goose has a brownish body with black head, long black neck, and a white cheek patch.
THE CANVAS BACK DUCK
The male has a whitish body, black chest, and reddish head. The female is grayish, with sandy-brown head.
THE MALLARD DUCK
The male has a green head, white neck ring, chestnut breast, and grayish body. The female is mottled brown with white tail and a mottled orange and brown bill.
SEAGULL
There are several different types of gulls in a variety of sizes and colors. Most like to be around or at least have access to a fairly large water source. Many have white or grayish coloring with darker marking especially the head.
JUNCO
The junco is a hardy bird and does not migrate to warmer climates in the winter. It has a charcoal body with whitish breast area.

14
Outdoor Living ProjectRefeRence BOOk Wonder ful World of Wildl i fe
WREN
The wren is a tiny bird with a short tail, often held cocked over the back. It is a dusky brown above, and paler below, with no distinctive markings. It has a beautiful cheerful song.
THE CROW
The crow is a black bird with a thick bill and a fan-shaped tail. There are a number of crow varieties across Canada.
THE GREAT HORNED OWL
The great horned owl is a large owl, varying in color from nearly white in the Arctic to dark brown and gray further south. It has widely spaced ear tufts, and yellow eyes.
THE MEADOW LARK
The meadow lark is a little bigger than the sparrow. It is brown, with black stripes below the eye and white or yellowish stripe above. It has a black crescent on its breast, and black “horns” that are not easily seen.
KILLDEER
The killdeer is the largest “ringed” plover. It is brown above and white below, with two black bands across the breast. It has long legs, and a fairly long tail.
PIGEON
This rock pigeon is common in towns and cities. It is chunky, with a short rounded tail. There are many color variants, ranging from all white through rusty to all black. There are many different varieties of pigeons.

15
Outdoor Living ProjectRefeRence BOOk Wonder ful World of Wildl i fe
CATBIRD
The catbird is grey with a black cap. They have a call that sounds like a cat-like meow.
AMERICAN GOLDFINCH
The female finch is olive in color and the male is bright yellow below, with black spots and streaks along sides.
THE PRAIRIE CHICKEN
The prairie chicken is mottled with buff, and slightly paler below. The tail short and pointed, with white outer tail feathers. The male has a purple neck patch and a yellow comb.
BARN SWALLOW
The barn swallow is a sparrow-sized bird. It has a deeply forked tail. Its back is dark steel-blue, and its stomach is buff. The throat and forehead are rusty.
16
Outdoor Living ProjectRefeRence BOOk Wonder ful World of Wildl i feLeADeRSHIP MAnUAL Wonder ful World of Wildl i fe
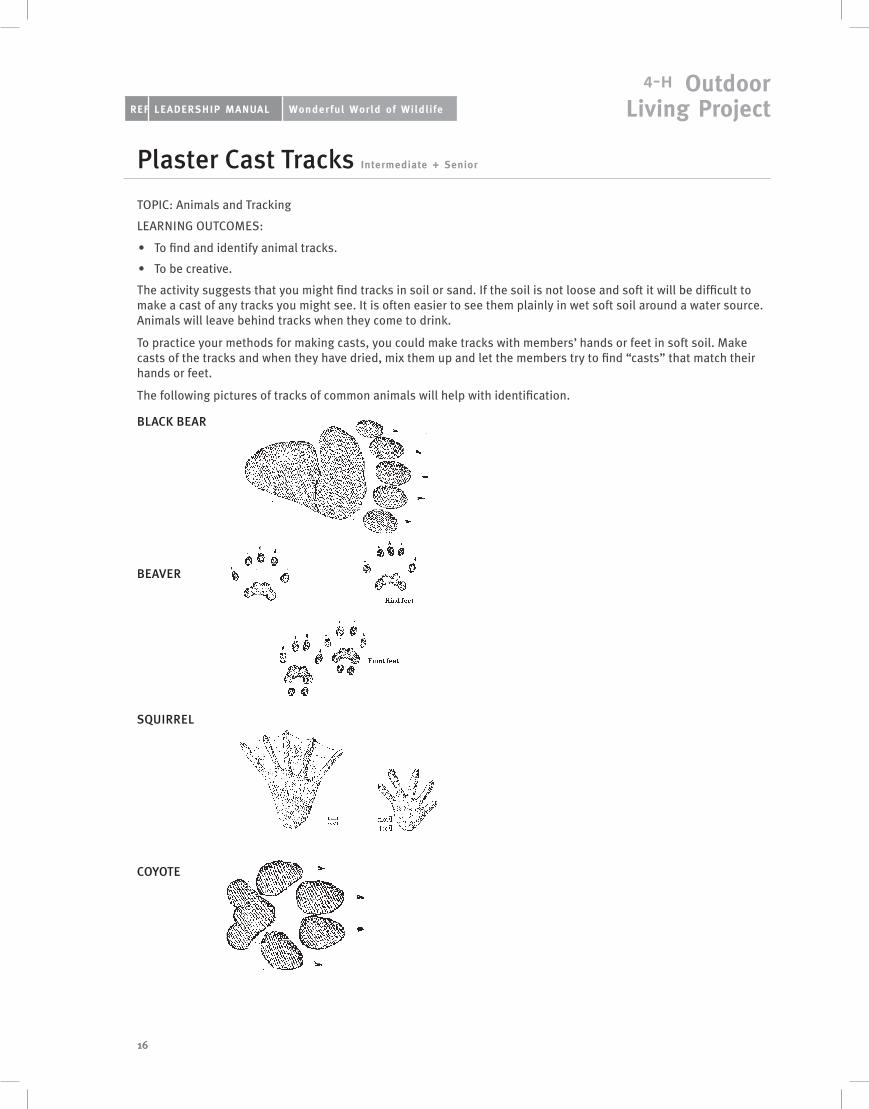
Plaster Cast Tracks Intermediate + Senior
TOPIC: Animals and Tracking
LEARNING OUTCOMES:
To find and identify animal tracks.•
To be creative.•
The activity suggests that you might find tracks in soil or sand. If the soil is not loose and soft it will be difficult to make a cast of any tracks you might see. It is often easier to see them plainly in wet soft soil around a water source. Animals will leave behind tracks when they come to drink.
To practice your methods for making casts, you could make tracks with members’ hands or feet in soft soil. Make casts of the tracks and when they have dried, mix them up and let the members try to find “casts” that match their hands or feet.
The following pictures of tracks of common animals will help with identification.
BLACK BEAR
BEAVER
SQUIRREL
COYOTE

17
Outdoor Living ProjectRefeRence BOOk Wonder ful World of Wildl i fe
MOOSE
RACCOON
DEER MOUSE
SKUNK
DEER
DUCK

18
Outdoor Living ProjectRefeRence BOOk Wonder ful World of Wildl i fe
ROBIN
RAVEN
KILDEER
Animal and Bird Tracks courtesy of Kim A. Cabrera.
19
Outdoor Living ProjectRefeRence BOOk Wonder ful World of Wildl i fe
Finding Prey Junior TOPIC: Animals
LEARNING OUTCOME:
To explore the concept of predator vs. prey.•
Definitions:
Predator: A living organism that eats all or part of another living organism. They are different from scavengers and decomposers (who feed on dead organisms) because they actually kill and eat a living organism.
Prey: An animal that is killed and partially or wholly eaten by another living organism.
Explanations for Processing Prompts:
What were you trying to do (goal) when playing the predator? What about the prey?
As predators, members will likely say they were listening for movement. Predators like the mountain lion, use their senses to help find prey.
As prey, members will likely say they were trying to keep quiet, trick the predator, or become invisible. You could use the killdeer as an example of prey trying to trick predators. The killdeer will pretend it has a broken wing to lure the predator away from the nest. Sometimes animals such as the rabbit will keep perfectly still using its camouflage with the environment around it.
Do you think there are more prey or predators? Why?
There are more prey than predators. Prey usually reproduce more often and produce more young. They are sometimes prey for more than one predator and this is nature’s way of ensuring their survival.
Why are these roles important in nature?
Predators help to control the numbers of the more abundant prey. Prey serve as food for the higher end of the food chain.

20
Outdoor Living ProjectRefeRence BOOk Wonder ful World of Wildl i fe
Looking for Animal Tracks Intermediate
TOPIC: Animals and tracking
LEARNING OUTCOME:
To find and identify animal tracks.•
The activity suggests using bread or some type of food to attract animals. Remember that feeding animals human food may encourage them to look for human food. That is how nuisance bears generally come into close contact with humans. Try to use food that would be found naturally as their food source such as nuts, berries, fish etc.
Refer to pictures of animal tracks found on pages 16-18 for help with identification.
Information for Processing Prompts:
What other signs of animal activity can you find?
Other signs might include scat (manure), bits of fur or feathers, broken limbs or packed grass, signs of digging in the soil, or strange odor.
Judge Nature Intermediate
TOPIC: Animals
LEARNING OUTCOMES:
To gain an understanding of the hardships and challenges animals experience in their quest for survival.•
To create a sense of empathy and respect for the resiliency and natural design of wild animals.•
Definitions for action calls:
Drought – when natural water sources dry up, and drinking water becomes difficult to find. Vegetation will also become scarce as the soil dries out and plants die.
Game Animals – are animals that are hunted for meat, furs etc.
Illegal Hunter – An illegal hunter could be a hunter who does not have a license, is hunting outside the allowed time period for a particular animal, or is hunting with equipment that is not allowed or in an area where hunting is prohibited.
Famine – refers to “starving” from lack of food.
Hibernation – is the practice of sleeping or being in a resting state to save energy through the winter.
Information for Processing Activity:Lead a discussion on how a particular animal survives nature’s challenges. Use challenges listed in the “action calls”.
A good example would be the rabbit:
Changes color to match the environment and avoid predators.•
Will eat a variety of vegetation depending upon the season and what’s available. It adapts its diet to the season.•
Is a fast and agile runner and can run on top of the snow with its large snow-shoe feet.•
21
Outdoor Living ProjectRefeRence BOOk Wonder ful World of Wildl i fe
Stalking Intermediate
TOPIC: Animals
LEARNING OUTCOMES:
To experience the concept and excitement of animals stalking.•
To tune in to the sense of hearing.•
Stalking is a method used by predators to hunt and catch another animals. Successful stalkers use skills like listening, smelling, being alert, keeping quiet, or reacting quickly, as well as, trying to out-think the hunted organism.
Some animals in nature that are stalkers include the mountain lion, the wolf, and the cougar.
Animals who are stalked try to protect themselves by hiding (camouflage), out-running or using obstacles that confuse or slow the stalker such as water, trees, and thick bush. Small animals like mice and rabbits might try to hide. Larger animals like deer might try to outrun a stalker. Animals that are stalked are often very attentive – always listening and looking for a stalker. They sometimes appear nervous and react quickly to any noise. On the other hand, animals that are stalkers appear more confident and perhaps more relaxed. Did the members show any of these characteristics when they played the game?
Animal Signs Senior TOPIC: Animals and tracking
LEARNING OUTCOME:
To discuss animals and their impact on humans.•
People from all cultures for as far back as we have records have used animals as symbols. The Chinese use animals to symbolize each year- their Chinese Zodiac. Aboriginal Canadians believed that animals were as important as humans and that many humans were reborn as animals. For example, the white buffalo was a symbol of the coming together of humanity into one heart, mind and spirit. Wolves were symbol of leadership and were pathfinders.
Sport teams often use animals to depict the type of play their team is capable of. The Miami Dolphins (sleek, agile, and smart) and the Hamilton Tiger Cats (aggressive, cunning) are good examples.
Advertisements make reference to animals to help describe their products. Examples are Ram Trucks (tough), Puma herbicide (lots of muscle – works fast), John Deere machinery (nothing runs like a deer), and Arctic Cat Snowmobiles (good for winter, moves easily over the snow).
The entertainment world has introduced characters like Batman, the MGM Lion, and the NBC Peacock. Smokey the Bear has long been an advocate for forest fire safety.

22
Outdoor Living ProjectRefeRence BOOk Wonder ful World of Wildl i fe
A Search for Tracks and Habitats Senior
TOPIC: Animals and tracking
LEARNING OUTCOME;
To discuss animals and their impact on humans.•
Note definition of Habitat in point 1 on page 21 (Activity Guide).
Refer to pictures of animal tracks found on pages 16-18 of this book.
Make a Bird Call Intermediate+ Senior
TOPIC: Birds
LEARNING OUTCOMES:
To attract birds by sound.•
To connect with nature.•
If internet is an option for your members or yourself, you might check out the website, www.learnbirdsongs.com. It has excellent pictures, descriptions and audio of many common birds.
Information for Processing Prompts
Why do birds have calls? Are they all the same?
Birds have songs or calls for a variety of uses. They use calls to scare off intruders, talk to their young, let other birds know their territory, to attract a mate or others of the same kind, to let others know about a good feeding spot, or to warn of danger.
For example “Discovermagazine.com” reports that biologists have found that the chickadee has specific calls for different situations. When there is danger from a predator, the more dee notes in the chick-a-dee call, the more dangerous the predator. The male chick-a-dee has a call that sounds like fee-beee.
Listening for Bird Calls Junior
TOPIC: Birds
LEARNING OUTCOMES:
To have fun, slow down, and appreciate nature.•
To become aware of the birds and the sounds around us.•
If possible have members listen to common bird calls at www.learnbirdsongs.com.

23
Outdoor Living ProjectRefeRence BOOk Wonder ful World of Wildl i fe
Homemade Bird Feeders Junior + Intermediate
TOPIC: Birds
LEARNING OUTCOMES:
To learn how to make a homemade bird feeder.•
To attract birds to a particular area for viewing.•
To learn about the local bird species.•
To feel proud about creating a welcoming environment for birds.•
NOTE: Safety Considerations concerning peanut allergies.You can make bird feeders at any time of the year, but winter is the most difficult time of year for birds. The days are short and the nights are cold, so they must eat a lot of food in a short amount of time to have the energy to survive. Food is harder for birds to find in the winter. Insects are hibernating, grubs are buried deep in the ground and snow and ice make it harder to find food.
These leftover foods would also make good snacks for birds.
Fat – Large pieces of fat from meat (not heavily salted) can be attached firmly to a tree or post out of reach of • other animals.
Roast Potatoes – Cold and opened up will be enjoyed by many birds.•
Vegetables – Such as cold brussel sprouts, carrots, and parsnips. •
Bruised apples, pears, or other fruit.•
Pastry – cooked or uncooked is excellent, especially if it has been made with real fats.•
Hard bits of Cheese. •
Here are some good rules for feeding birds:
Don’t put out salty feed – it can damage the bird’s nervous system.•
In the summer – only leave enough fresh food for one day. It may rot or attract other unwanted wildlife • such as ants, rats, raccoons or bears.
Always wash your hands before and after feeding the birds.•
Information for Processing Prompts
Why is it important to do kind things for animals?
Although it is kind to help animals find food, we need to be cautious about what we feed, and what other animals might show up that you aren’t expecting.
Remind members that sometimes the best thing you can do for birds and animals is to not disturb them. Changing their eating habits and feeding them food they don’t ordinarily eat could actually be harmful to them. Feeding large animals such as deer near buildings helps to lessen their fear of man. Leaving food and garbage where animals such as bears and raccoons can find it encourages them to become nuisance animals and may result in their death.

24
Outdoor Living ProjectRefeRence BOOk Wonder ful World of Wildl i fe
Bird Observation Intermediate + Senior
TOPIC: Bird Observation
LEARNING OUTCOME:
To learn to identify different species of birds.•
The Bird Pictures and Descriptions on pages 11-15 should be helpful with this activity.
Nectar Feeder Intermediate + Senior
TOPIC: Birds
LEARNING OUTCOMES:
To build a bird feeder that will attract hummingbirds.•
To learn about hummingbirds.•
There are many different kinds of nectar feeders you can buy. Here are some tips to keep in mind if you decide to buy a nectar feeder.
Red Color. Red is the most attractive to hummingbirds. Even a little red on the feeder will catch their attention.•
Ants. If you think ants might be a problem, you can buy feeders with moats or buy add-on ant moats.•
Bee guards. The most attractive color to bees and wasps is yellow. Avoid feeders that have yellow parts. The • saucer shaped feeders also discourage bees.
Built-in Perches. Hummingbirds prefer to sit while they eat.•
Size. The smaller the feeder, the better, until you see how much use it will get. That way nectar does not spoil • before it is used.
Easy to clean. Look for a feeder that doesn’t have too many little nooks and crannies where dirt can gather and • mold can grow. An old toothbrush or a pipe cleaner are good tools for cleaning.
Location. Try to hang your feeder where it is protected from the wind. The wind might cause it to sway, spilling • sticky nectar everywhere.
Nectar Tips:
Sugar solution can be made ahead and kept up to a week in the refrigerator. •
Discard any sugar solution that has turned cloudy or contains black mold, no matter how “fresh” the solution is. •
An alternative to using red food coloring is using a little beet juice. It is more natural. After hummingbirds have • found your feeder, it is not necessary to color the water at all.

25
Outdoor Living Project
INSECTS
INTRODUCTION
Pictures of common insects
Bumble-Bee Cricket Horse Fly
Ladybug Wood Tick House Fly
Mosquito Grasshopper Garden Spider
Insect are not shown to scale.
RefeRence BOOk Wonder ful World of Wildl i fe

26
Outdoor Living ProjectRefeRence BOOk Wonder ful World of Wildl i fe
Insect Art Junior TOPIC: Insects
LEARNING OUTCOMES:
To explore the world of insects.•
To feel a connection to, and appreciation of, insects through observations and understanding.•
The pictures and descriptions of insects found on page 25 may be useful for this activity. If you are looking for inexpensive modeling clay, try the following recipe.
Modeling Clay
1 cup flour•
cup table salt•
1 tsp. vegetable oil•
Add a little cold water at a time, working it in with your hands until you have clay that is workable.
Sweep Netting for Meadow Insects Intermediate
TOPIC: Insects
LEARNING OUTCOMES:
To explore and discover the world of meadow insects.•
To appreciate the diversity of life in a common and local environment.•
To teach respectful animal identification.•
You may see some of insects found on page 25.
Information for Processing Prompts
Why are insects important?
When many people think of insects, they think of things that bite, sting, eat their flowers, or get in their food. Many insects, though, do a lot of good for people and this includes some insects that you may not expect to be good for anything.
One of the most important things that insects do for people is to spread pollen from one plant to another. Without pollination, plants would not produce fruit.
Some insects damage or destroy plants. Sometimes the numbers of these damaging insects are kept from getting high enough to be a serious problem by other insects which kill them. One example of this is a type of wasp which kills the larvae of many other insects.
Some insects make materials which people like to use. Probably the two most well known examples are honey, made by the honeybee, and silk which is made by the silkworm.
In some parts of the world people eat insects, such a beetles, moths, and ants. Many animals eat insects. Insects are an important part of many food chains. (stemnet.nf.ca)

27
Outdoor Living ProjectRefeRence BOOk Wonder ful World of Wildl i fe
Raise a Butterfly Intermediate
TOPIC: Insects
LEARNING OUTCOMES:
To understand the change process from caterpillar to butterfly.•
To witness an amazing natural phenomenon.•
To practice caring for another living being.•
To feel a sense of responsibility.•
The pictures and descriptions of two common butterflies found below will be helpful in identifying butterflies.
The diagram and explanation of “metamorphosis” will help you answer questions that members might have about how a cocoon becomes a butterfly.
Metamorphosis Butterflies and moths undergo complete metamorphosis in which they go through four different life stages.
• Egg - A butterfly starts its life as an egg.
• Larva - The larva (caterpillar) hatches from an egg and eats leaves or flowers almost constantly. The caterpillar molts (loses its old skin) many times as it grows.
• Pupa - It turns into a pupa (chrysalis); this is a resting stage.
• Adult - A beautiful, flying adult emerges. There is no growth during this stage. This adult will continue the cycle and reproduce.
MONARCH BUTTERFLY
Bright, burnt-orange with black veins and black margins sprinkled with white dots.
SWALLOW TAIL BUTTERFLY
Yellow with black tiger-stripes across wings and black borders spotted with yellow.

28
Outdoor Living ProjectRefeRence BOOk Wonder ful World of Wildl i fe
Micro-Hike Intermediate
TOPIC: Insects
LEARNING OUTCOMES:
To explore a micro-environment.•
To appreciate even the smallest things in nature.•
To experience a new perspective.•
To be creative.•
Definition of:
Micro-environment: The environment of a very small, specific area. www.thefreedictionary.com.
An area where there is knee high grass and small brush would be an excellent habitat for this activity.
Spying on an Anthill Intermediate
TOPIC: Insects
LEARNING OUTCOMES:
To observe an anthill•
To discover the world from an ant’s perspective•
There are thousands of species of ants found all over the world and in just about every type of land environment.
Ants are social insects, and live in colonies. A colony is a group of related ants which can number in the thousands. Every ant colony consists of the following:
Queen• - The queen begins her life with wings, which she uses while mating. After mating with a male ant, she flies to her nesting area. Then she loses her wings and spends her life laying eggs.
Workers• - Workers are the non-reproducing, wingless female worker ants who are the daughters of the queen. These workers collect food and feed members of the colony, defend the colony, and enlarge the nest. Most of the ants in a colony are workers.
Soldiers• - Soldiers are large workers (non-reproducing females) who defend the colony and often raid other colonies, capturing slaves.
Males • - Males are small ants that have wings. They fly from the colony to mate with a queen. They die soon afterwards.
Diagram courtesy of www.enchantedlearning.com.
This page may be printed for non-commercial use only.

29
Outdoor Living ProjectRefeRence BOOk Wonnder ful World of Wildl i fe
Ants range in color from yellow to brown to red to black. Some ants have a stinger and some can even inject poisonous acid from the stinger. Ants can also bite using their jaws. Ants range in size from about 0.08 inch (2 mm) to up to about 1 inch (25 mm) long.
The life cycle of the ant has four stages: egg, larva, pupa, and adult. Fertilized eggs produce female ants (queens, workers, or soldiers); unfertilized eggs produce male ants. The worm-like larvae have no eyes and no legs. The larvae molt (shed their skin) many times as they grow. After reaching a certain size, they spin a silk-like cocoon. During this time the body changes into its adult form. The life cycle usually lasts from 6 to 10 weeks. Some queens can live over 15 years, and some workers can live for up to 7 years.
This page may be printed for non-commercial use only.

30
Outdoor Living ProjectRefeRence BOOk Wonnder ful World of Wildl i fe
Night Prowl Senior
TOPIC: Insects
LEARNING OUTCOMES:
To identify insects and other animals that are active at night.•
To increase familiarity of the natural world at night.•
The following are pictures and descriptions of insects that you would be most likely to see at night, and some other night creatures.
Cricket Raccoon
Mosquito Skunk
Bat

31
Outdoor Living ProjectRefeRence BOOk Wonnder ful World of Wildl i fe
FISHING
INTRODUCTIONThe sport of fishing is appropriate for all ages. This section will give you some important tips for when you decide to take your group on a fishing adventure!
Safety
The most important item in any tackle box is a first aid kit. Debarbing hooks is a regulation in many provinces. All you have to do is bend the barb back against the hook’s shaft with needle-nose pliers.
Tackle Box
A first tackle box should be small, simple and virtually empty. All a beginner needs is a few pre-tied hooks, a couple of bobbers, some swivels, a few sinkers, small scissors for cutting line, Local sports stores have tackle boxes, or you can use a plastic or metal container.
Fishing Tips
A first-time fisherperson will generally do one of three things when the bobber dives or there is a sharp tug on the line: (1) haul back on the pole with a lot of force, (2) crank the reel or (3) freeze. So, teach your group the following tips.
Keep the line taut
If there is a lot of slack in your line, you won’t be able to respond properly when you get a bite (and it will be harder to distinguish between a bite, a nibble, and a nudge).
Set the hook
Once the fish takes the bait in its mouth, give the (taut) line a quick, firm tug to set the hook in the fish’s lip. If you pull too hard, you’ll pull the hook right out of its mouth. Wait too long and the fish will decide the hook tastes unwormlike and will spit it out.
Play the fish
Even if the fish weighs just a few ounces and you have 12-pound test line, don’t force it out of the water. “Playing” a hooked fish – letting it struggle to get free-is a big part of the fun. But it’s also important for tiring out the fish so it can be landed. A fish that is still fighting when brought out of the water is more likely to be hurt when handled than a fish that has been tired out while you played.
Catch or Release?
You should never kill a fish that you do not intend to eat. If you and your group decide to release your catch, make sure it’s done the right way. Always be sure your hands are wet before handling a live fish. The thin protective coating on the fish’s body will stick to dry hands, exposing the fish to harmful bacteria once it’s back in the water. With one hand, firmly hold the fish just behind its head over its gill covers, being careful not to touch its gills or eyes. Run the other hand down the line to the base of the hook. Gripping the hook by its shank, push the barb back through the hole in the fish’s lip. If a fish has swallowed the hook, cut the line. You’ll probably have ruined its appetite for a while but, the fish will still survive. Try to keep the fish in the water if you can. Don’t throw the fish back in; the impact will cause internal damage, killing it an hour or so later. Instead, lower it gently into the water, cradling it until it gets its bearings and swims away on its own.
If you decide to eat your catch, it will stay freshest if it’s kept alive. You can do this by running a stringer hook through its bottom jaw and promptly getting it back into cool, circulating water. You can also kill the fish by severing its spinal cord just behind the head, and keep the fish on ice. Encourage your members to observe the gutting and cleaning procedure. Senior members could even help with the process.
If you are not comfortable with the process of fishing or filleting, you can call your local conservation office to see if they have instructors you can hire for help. They may also teach ice fishing in the winter time.

32
Outdoor Living ProjectRefeRence BOOk Wonder ful World of Wildl i fe
FILLETING A FISHBefore you fillet the fish you will need to gut it. With the sharp point of the knife, cut the fish open on the underside from the mouth to the vent. Remove the internal organs.
Make the first cut behind the gill cover, but only until the knife touches the backbone.
Turn the fish the opposite direction and run the knife along the backbone and dorsal fin. Cut deep enough to bounce the knife along the top of the rib cage.
When the knife blade no longer contacts the rib cage, push the knife through the width of the fish. The blade will exit on the bottom near the vent. Continue along the back until the fillet is cut off at the tail.
Remove the skin from the fillet by inserting the knife at the tail, and cutting the meat from the skin. Hold the fillet in place by pressing down on the skin with your thumb. Repeat the same steps on the other side of the fish.
Homemade Fishing Pole Junior, Intermediate + Senior
TOPIC: Fishing
LEARNING OUTCOMES:
To create a fishing pole and try the sport of fishing.•
To achieve a sense of mastery.•
This activity suggests tying knots in the fishing line with a granny or square knot. Instructions for the square knot can be found on page 128 of the Activity Guide. The following diagrams are of some other fishing equipment and methods that might be of interest to members who have a greater interest in fishing.
ROD
REEL

33
Outdoor Living ProjectRefeRence BOOk Wonder ful World of Wildl i fe
CASTINGPoint rod toward target.
Draw rod back sharply.
Bring rod forward.
Release line.
Information for Processing Prompts
What are some of the ways we can protect the fish, when we are fishing?
Releasing the fish properly back into the water to ensure it will live. Use barbless hooks so the fish are not damaged when you remove the hook. Only keep as many fish as the limit allows. Return small fish to the water so they can grow larger and reproduce. Only fish during the time period allowed for that type of fish. Do not throw garbage or other items that might pollute the water or endanger the fish. Volunteer to help with programs that restore fish habitat.
Equipment Diagrams courtesy of University Of Agriculture, Kansas State University
HOOKS SINKERS
Point rod toward target
Draw rod back sharply allowing it to flex behind you
Bring rod forward without pausing
Release line and follow through

34
Outdoor Living ProjectRefeRence BOOk Wonder ful World of Wildl i fe

35
Outdoor Living ProjectRefeRence BOOk All Things Green
ALL THInGS GReen

36
Outdoor Living ProjectRefeRence BOOk All Things Green
AN INTRODUCTIONWhen members are identifying plants, flowers or trees, it is important that they can recognize plants that can harm them. The following are three of the more common poisonous plants. Discuss their appearance, with your members and how they will be affected if they come in contact with the plants.
Poison Ivy
Poison ivy is a low erect plant with leaves that grow in threes. These leaves turn red in the fall. All parts of this plant contain a powerful skin irritant. If this plant is touched, wash area of the skin with dish soap and water.
Poison Oak
Poison oak is a low erect plant with leaves that look like they would grow on an oak tree. All parts of this plant contain a powerful skin irritant. If this plant is touched, wash area of the skin with dish soap and water.
Stinging Nettle
Stinging nettle grows fairly tall and is a thin plant. It has many leaves that grow off of one shoot. The leaves are long and skinny with jagged edges. If the plant is touched, you will feel a stinging sensation on your skin. Wash the area of the skin with soap and water.

37
Outdoor Living ProjectRefeRence BOOk All Things Green
Crafting with Wildflowers Junior
TOPIC: Wildflowers
LEARNING OUTCOMES:
To identify wildflowers.•
To be creative.•
To appreciate local flora.•
The following are some of the more common wildflowers in Canada. Encourage your members to collect pictures of other wildflowers to add to the collection.
Remind members to be careful not to disturb the root of the plant – take only flowers and leaves. Many flowers reproduce from the root and leaving the root will ensure that it will regrow. Members should only pick flowers where there are several more of the same kind to ensure that there are flowers left behind to reproduce.
Violets (white/mauve) Goldenrod (yellow) Water hemlock (white)
Columbine (pink and blue) Black Eyed Susan (yellow) Dandelion (yellow)
Yellow Cowslips Milkweed (purple)

38
Outdoor Living ProjectRefeRence BOOk All Things Green
Information for Processing Prompts
Why is it important to know about the local plants and flowers?
If you learn about local plants and flowers, you will be aware of what plants are poisonous, what plants are rare, and what kinds of habitats need to be protected to ensure the plants continue to survive.
What are some ways you can protect wild plants?
Encourage and help to save or create habitats that will allow the plants to continue to survive. Don’t pick too many wild plants.
What is the difference between wildflowers and the flowers we buy at the store?
The flowers at the store may be a wild variety, but they are grown in controlled gardens, not picked in the wild.
Collecting and Preparing Wildflower Seeds Intermediate + Senior
TOPIC: Wildflowers
LEARNING OUTCOMES:
To gain an appreciation of the plant lifecycle and nurture a seed to life.•
To learn about local flora.•
This activity offers a good opportunity to discuss how plants disperse their seeds to start new plants. You may even be able to find some examples of each of the dispersal methods.
Dispersal by Wind
Light seeds can be carried great distances by the wind.•
Some seeds (like the maple tree) are shaped to be carried by wind.•
Dispersal by Water
A heavy downpour might carry away plants and their seeds to a new location.•
Large raindrops might splash seeds out of their capsules.•
Some seeds have a waxy outer coat so that they can float for extended periods of time on water.•
Dispersal by Animals
Seeds may move with animals in their hair, or on their feet.•
Some animals like the squirrel actually bury seeds.•
Animals eat seeds – they are not broken down and are dispersed in their droppings.•
Other Dispersal Methods
Some plants eject their seeds in a small explosion.•
Some plants require extreme heat – like a forest fire to release their seeds.•
Humans transport and disperse more seeds than all other forms of nature.•

39
Outdoor Living ProjectRefeRence BOOk All Things Green
Wildflower Seed Planting Intermediate + Senior
TOPIC: Wildflowers
LEARNING OUTCOMES:
• To gain an appreciation of the plant lifecycle and nurture a seed to life.
• To learn about local flora.
Diagram information from www.enchantedlearning.com
This page may be printed for non-commercial use only
THE LIFE CYCLE OF A PLANT
The seed
The seed germinates with the help of the rain, sun and soil.
Stems reach for the sun. Roots hold the plant up and reach down for water and minerals.
Photosynthesis is a process that uses chlorophyll (green in plants) with carbon dioxide and water to make feed for the plants and oxygen for other forms of life including humans.
Many plants produce flowers
Flowers are pollinated by things like insects and wind and produces seeds.

40
Outdoor Living ProjectRefeRence BOOk All Things Green
Flower Face Intermediate + Senior TOPIC: Wildflowers
LEARNING OUTCOMES:
To identify local wildflowers.•
To practice teamwork in a natural setting.•
Use the pictures and description of wildflowers on page 37, and add others that might be found in your area. You will have to tour the area ahead of time to see what wildflowers are growing there.
Do a review of poisonous plants in the area before heading out.
Leaf Prints Junior + Intermediate
TOPIC: Trees and plants
LEARNING OUTCOMES:
To identify and appreciate local trees.•
To be creative.•
Information for Processing Prompts
Why do you think they like it here?
Trees may be growing in a particular area because they grow well in the type of soil that is there, the amount of moisture that falls, the daylight hours, possible shelter around it, and the environment surrounding it.
What resources do trees provide?
Different kinds of boards and lumber for building houses, fences, furniture, and many other things. Some trees produce edible nuts and fruit, or syrup. Some trees supply us with ingredients for medicine. Different kinds of trees are used for different kinds of products. For example: oak is good for furniture, maple produces maple syrup, poplar is good for posts and poles, and apple trees produce fruit.

41
Outdoor Living ProjectRefeRence BOOk All Things Green
Leaf Hunt Junior
TOPIC: Tree and plants
LEARNING OUTCOMES:
To discover the diversity of a healthy forest.•
To be creative.•
This activity asks the members to find four different looking leaves. The following leaves are common examples of these different shapes, textures and colors.
Alder Ash Elder Hawthorn
Hazelnut Holly Maple Oak
Willow

42
Outdoor Living ProjectRefeRence BOOk All Things Green
Meet my Friend Junior + Intermediate
TOPIC: Trees and plants
LEARNING OUTCOMES:
To identify what trees and plants need to survive in their natural environment.•
To encourage a sense of connection and concern for the natural environment.•
This activity asks each member to collect something from the natural environment. The item cannot be broken or picked from any living thing, such as a leaf, limb, or flower. Members will be looking for something that is lying on the ground, such as a rock or log, has fallen off a plant or tree such as leaves or flowers, or is from an animal such as a bone or a feather.
The members have to think of what the environment surrounding their item is like before planning their home. You might also have them give suggestions for why their item was lying on the ground. Was it a natural process? Did something happen to their habitat?
Sketch a Plant Intermediate + Senior
TOPIC: Trees and plants
LEARNING OUTCOMES:
To identify a variety of plant and tree species.•
To appreciate the design and intricacies of plants.•
Pictures from previous pages or a Plant Field Guide Book would be useful.
Switch Intermediate
TOPIC: Trees and plants
LEARNING OUTCOME:
To identify a variety of tree species•
For this activity you need to have an area where there are four different types of trees- enough so that there is a tree for each member. You may have to do a tour ahead of time to find a suitable area.
The pictures of leaves on the previos page might be useful.
Information for Processing Prompts
Why do some trees disappear from an area?
Sometimes a certain species of tree will disappear from an area. This could be caused by disease such as Dutch Elm Disease, and insect infestation such as Pine Beetles, exposure to a pesticide, forest fires, or because of a natural process where some species of trees are replaced by other species.
What impact does this have on the ecosystem in the area?
Whenever a living species disappears from an area, it has some effect on the ecosystem (the relationship between living resources, habitats, and residents of an area) around it. If a species of tree disappears it could affect the wildlife that eats it, lives in or around it, or uses the tree for shelter.

43
Outdoor Living ProjectRefeRence BOOk All Things Green
Meet a Tree Junior, Intermediate + Senior TOPIC: Trees and plants
LEARNING OUTCOMES:
To encourage an appreciation of local tree species.•
To identify local tree species.•
Some tree characteristics the members should be looking for while checking out their tree blindfolded are: texture (smooth or rough), size (try putting your arms around it), size and texture of the leaves, any special aroma or smell.
A Plant Field Guide will be useful for identification purposes.
Birch Bark Baskets Senior
TOPIC: Trees and plants
LEARNING OUTCOMES:
To learn about the birch tree.•
To be creative.•
Birch trees are not easily found in some areas. The activity information mentions that you do not have to take bark from a living tree. That is true. However, if the tree has been dead a long time, the bark may be very brittle and difficult to work with.
Information for Processing prompts
What other uses does birch bark have?
You might mention that birch bark was sometimes used in place of paper many years ago. There are many other crafts that can be made with birch bark. Patterns and pictures can be etched into the bark.

44
Outdoor Living ProjectRefeRence BOOk All Things Green
Collecting Wild Berries Junior + Intermediate + Senior TOPIC: Edible wilds
LEARNING OUTCOMES:
To collect and eat wild edible berries.•
To learn about local food sources.•
To learn the importance of identification.•
Strawberry Chokecherry Saskatoon
Blueberry Salmonberry Rose Hips
Cranberries Currants Raspberries
As suggested in the Activity Guide under Safety Considerations, be 100% sure that berries have been correctly identified before eating them.
45
Outdoor Living ProjectRefeRence BOOk All Things Green
Cooking with Wild Berries Junior, Intermediate + Senior
TOPIC: Edible wilds
LEARNING OUTCOMES:
To learn how to cook with local wild berries.•
To work as a team to create a homemade snack.•
Be sure to wash the berries by running water over them in a strainer. Some people believe that because they are wild berries, they are clean and without any harmful deposits. The berries may be dusty, and insects and small animals may have been on them. Some types of berries may even have to have a stem removed.
Help younger members when using the oven and the blender.
Rose Hip Honey Junior, Intermediate + Senior
TOPIC: Edible wilds
LEARNING OUTCOMES:
To learn about local food sources.•
To explore the process of making food from a natural food source.•
Rose hips become sweeter the longer they are on the branch. Eventually they will begin to dehydrate (dry) on the branches. Honey and tea will taste best if rose hips have had some time to sweeten. The greener rose hips will be quite hard to the touch, and riper ones will be softer.
Information for Processing PromptsAlthough the questions do not refer to berries and rose hips as a renewable resource, this would be a good opportunity for you to discuss renewable resources with the group. Ask what other examples they can give you of trees and plants that can be harvested without damaging or destroying the plant. Maple trees are a good example.
You might also discuss value added products. Explain that sometimes renewable resources can be sold just as they are – someone picks the rose hips and sells them to customers. You might then explain that if we make the rose hips into rose hip honey and sell the honey, then we have created a value added product.

46
Outdoor Living ProjectRefeRence BOOk All Things Green

47
Outdoor Living ProjectRefeRence BOOk Looking at the Sky & Weather
LOOkInG AT THe
SkY AnD WeATHeR

48
Outdoor Living ProjectRefeRence BOOk Looking at the Sky & Weather
AN INTRODUCTIONAstronomy
Many of the constellation names come from the ancient Greeks. The Northern sky is covered with these constellations, since this is the part of the sky that was visible from the Greek Empire. A few hundred years ago, scientific expeditions went to the Southern Hemisphere. It was then that they charted the other regions of the sky. These constellations reflect more modern ideas, with a focus on mechanical devices.
Weather
Canadians are always talking about the weather. Very few countries in the world have such a diversity of weather – not only from season to season but also from place to place. Weather affects what we eat, what we wear, how we feel, and even what we do.
Predicting weather is useful when traveling outdoors and can help members understand and connect with the natural world around them. People have been using these methods throughout human history to help plan all aspects of their lives.

49
Outdoor Living ProjectRefeRence BOOk Looking at the Sky & Weather
Summer Constellations Junior + Intermediate + Senior
TOPIC: Astronomy
LEARNING OUTCOMES:
To learn to identify constellations.•
To develop an appreciation of the night sky.•
The diagrams of the Summer Night Skies may be helpful in helping you to locate the various constellations. The Activity Guide talks about the Big and Little Dipper. These are actually Ursa Major and Ursa Minor. The North Star is Polaris.

50
Outdoor Living ProjectRefeRence BOOk Looking at the Sky & Weather
Winter Constellations Junior + Intermediate + Senior
TOPIC: Astronomy
LEARNING OUTCOMES:
To learn to identify constellations.•
To develop an appreciation of the night sky.•
Constellations are often easier to see on cold clear nights in the winter. The following diagrams will be helpful in spotting the different constellations.
Your members might spot several “stars” that are moving. If the light is red it is probably an airplane. If the light is white it is probably a satellite. There are thousands of satellites in the sky – you should easily be able to spot several while you are looking for constellations.
Ask members if they know what happens to satellites when they are no longer able to transmit information or are broken. Much of this equipment becomes space garbage.
51
Outdoor Living ProjectRefeRence BOOk Looking at the Sky & Weather
Admiral Beaufort Wind Scale Junior, Intermediate + Senior
TOPIC: Weather
LEARNING OUTCOMES:
To be able to predict the weather using natural signs.•
To develop an appreciation of weather patterns.•
This activity works best if you choose an area where there is a row of trees that get the same access to wind from all directions. See the diagram below. Large hills, forests and other forms of natural shelter might prevent an accurate reading of the wind.
Information for Processing Prompts
What role does the wind play in nature?
It carries seeds. It can help or hinder birds that are migrating depending on whether they are flying with it or into it. It can change the landscape by blowing soil.
How does it help humans?
The wind can generate power by turning windmills. It can move help or hinder airplanes, boats and other means of transportation. It can help to dry out wet land for agriculture, and move plants around so that they are pollinated. It can cool the air and people off.
52
Outdoor Living ProjectRefeRence BOOk Looking at the Sky & Weather
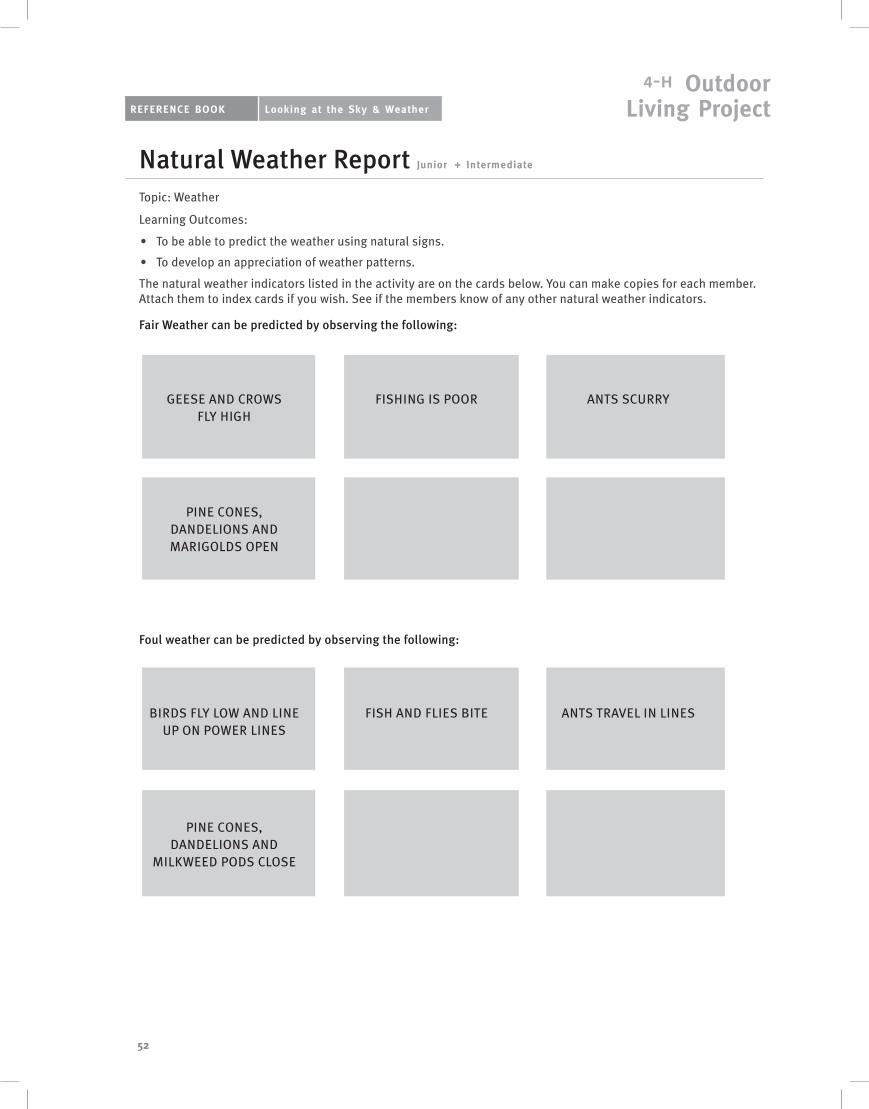
Natural Weather Report Junior + Intermediate
Topic: Weather
Learning Outcomes:
To be able to predict the weather using natural signs.•
To develop an appreciation of weather patterns.•
The natural weather indicators listed in the activity are on the cards below. You can make copies for each member. Attach them to index cards if you wish. See if the members know of any other natural weather indicators.
Fair Weather can be predicted by observing the following:
Foul weather can be predicted by observing the following:
GEESE AND CROWS FLY HIGH
FISHING IS POOR ANTS SCURRY
PINE CONES, DANDELIONS AND MARIGOLDS OPEN
BIRDS FLY LOW AND LINE UP ON POWER LINES
FISH AND FLIES BITE ANTS TRAVEL IN LINES
PINE CONES, DANDELIONS AND
MILKWEED PODS CLOSE
53
Outdoor Living ProjectRefeRence BOOk Looking at the Sky & Weather
Make a Rainbow Junior TOPIC: Weather
LEARNING OUTCOME:
To learn about precipitation.•
Members may have questions about real rainbows.
A rainbow may occur when light and water meet in the sky on a summer’s day. This often happens during or immediately following local showers, when the sun is shining and the air contains raindrops. We cannot follow the arc of a rainbow down below the horizon, because we cannot see those droplets in the air below the horizon. But the higher we are above the ground, the more of the rainbow circle we would see. From an airplane in flight, a rainbow will appear as a complete circle with the shadow of the airplane in the center.
The bow is divided into bands displaying the different colors of the spectrum and is formed by the refraction and reflection of the sun’s rays in drops of rain. Reflection is simply the return of light waves from the raindrop’s surface. Light which appears to be white is really made up of a mixture of red, orange, yellow, green, blue, indigo, and violet light.
When a shaft of sunlight enters a drop of water, a part of it does not pass directly through but is reflected from the inner surface and emerges from the side from which it entered. Moreover, it is refracted both on entering and leaving the water drop. This process, repeated in the same manner for millions and millions of drops, produces the primary rainbow, which appears in front of the observer, who has his back to the sun. It has the red band on the outer edges which are long light waves and the blue-to-violet on the inner edge which are short light waves. (www.deltatech.com)
The Rain Game Junior
TOPIC: Weather
LEARNING OUTCOME:
To learn about the precipitation process.•
This game gives members a hands-on simulation of how rain is formed. The following information on the formation of rain drops can be shared before or after playing the game.
The temperature of the air that the rain falls through is what determines what it will look like and how large it will be. Precipitation always starts out within the cloud as either liquid drops or snow crystals. It is the temperature and winds beneath the cloud that will determine whether this precipitation will change into one of many forms that eventually hit the earth’s surface.
In warmer clouds such as those over the tropics, the precipitation begins as rain and continues to grow through collision/coalescence (like you bumping into each other in the game) and falls all the way to the surface as raindrops. In much of the world though, rain begins as some form of ice and melts as it falls through warmer air near the surface.
Meteorologists (people who forecast weather), define rain as liquid water drops that have a diameter of at least 0.2 millimeters. Drops smaller than this are considered drizzle. (www.vortex.plymounth.edu)
54
Outdoor Living ProjectRefeRence BOOk Looking at the Sky & Weather
Build a Rain Gauge Junior
TOPIC: Weather
LEARNING OUTCOME:
To make a rain gauge.•
To learn about precipitation. •
Members may be interested to know that people all around the world measure rain and other precipitation. Some of these people record the precipitation and send it in to weather experts to record and keep track of precipitation not only here in Canada but around the world.
From these records, meteorologists are able to see patterns and predict what might happen in the future with regards to weather and the effect it has on people and our world. For example, patterns might indicate that certain parts of the world are receiving less precipitation each year than they did fifty years ago, which affects vegetation, wildlife and people. By testing precipitation samples, experts can determine if our rain is healthy or if it contains pollutants.
How Big is a Rain Drop? Intermediate
TOPIC: Weather
LEARNING OUTCOME:
To observe and compare different sizes of raindrops.•
The size of a raindrop when it falls to the ground depends on many things including how the rain drop developed evaporation rates, air turbulence, and wind.
The processes that allow cloud droplets to become raindrops are very complex and not well understood. Droplets that reach 0.2 mm are considered rain drops. They are usually heavy enough to overcome the force of upward flowing air that exists in every cloud. Rain can be either “cold rain”, originating from melting snowflakes, or “warm rain”, which evolves without the snowflakes. Cold rain has very large drops, but fewer drops overall. Warm rain contains very many, but small drops. Raindrops can range in size from 0.2 mm in diameter, to around 6 mm. Those larger than 6 mm are usually broken up in their fall to the earth. Raindrops are very rarely all the same size in any one rain. There are generally more small drops than large drops, but as the amount of the rainfall increases, the number of larger drops grows. The very largest drops are found only in downpours with rainfall rates greater than 2 inches per hour.
Once a raindrop has formed and begun to fall, evaporation of water from the droplet may reduce its size, and turbulence in the air may induce further collisions and breakups either enlarging or reducing the raindrop’s size. Wind can separate the drops according to size, with the larger ones falling to the ground faster, while the smaller ones are blown with the wind or the raindrops may get caught in updrafts or downdrafts within the cloud.

55
Outdoor Living ProjectRefeRence BOOk Looking at the Sky & Weather
Make a Wind Streamer Intermediate
TOPIC: Weather
LEARNING OUTCOME:
To learn a technique that demonstrates the direction the wind is blowing.•
Information for Processing Prompts
Why are people interested in wind direction?
Airplanes need to know wind direction to take off and land safely.
People in water boats need to be aware of how much wind there is and what direction it is blowing. Construction workers need to keep an eye on the wind when they are raising from walls or putting on roofing. Athletes like to know the strength and what direction the wind is blowing when they are running a marathon. Have the members think of more situations.
What are some ways humans use wind power?
People use wind power to generate electricity, operate water sources, and pollinate crops. Can the members think of other ways that people use wind power?
Wind turbines producing electric power

56
Outdoor Living ProjectRefeRence BOOk Looking at the Sky & Weather
What Does UV Do? Intermediate
TOPIC: Weather
LEARNING OUTCOME:
To demonstrate the effect of UV rays on newspaper.•
To discuss how to protect our skin from UV rays.•
UV Rays are on everyone’s mind these days. Youth are concerned about the long term effects on their health and our world. You can share any or all of this information with your members.
EFFECTS OF UV RAYS
While some exposure to sunlight is enjoyable, and supplies us with much needed Vitamin D, too much can be dangerous, causing immediate effects like blistering sunburns and longer-term problems like skin cancer and cataracts. Overexposure also causes wrinkling and aging of the skin.
WHAT ARE UV RAYS
The sun gives out energy over a broad spectrum of wavelengths. Ultraviolet (UV) radiation is responsible for sunburn and other adverse health effects. Fortunately for life on earth, stratospheric ozone screens most harmful UV radiation. The ozone layer has thinned in certain areas due to emissions of ozone-depleting chemicals widely used in industry.
TYPES OF UV RADIATION
Scientists have classified UV radiation into three types - UVA, UVB, and UVC. The stratospheric ozone layer absorbs some but not all of these types of UV: UVA is not absorbed by the ozone layer. UVB is partially absorbed by the ozone layer. UVC is completely absorbed by the ozone layer. UVA and especially UVB penetrate the surface of the skin and can cause adverse health effects.
TIME OF DAY
The sun is at its highest in the sky around the noon hour. At this time, the sun’s rays have the least distance to travel through the atmosphere and UVB levels are at their highest. In the early morning and late afternoon the sun’s rays pass obliquely through the atmosphere and the intensity of UVB is greatly reduced. UVA levels are not sensitive to ozone and vary throughout the day much like visible sunlight does.
TIME OF YEAR
The sun’s angle varies with the seasons, causing the intensity of UV rays to vary. UV intensity tends to be highest during the summer months.
LOCATION
The sun’s rays are strongest at the equator where the sun is most directly overhead and UV rays must travel the least distance through the atmosphere.
WEATHER
Cloud cover reduces UV levels, but not completely. Depending on the thickness of the cloud cover, it is possible to sunburn on a cloudy summer day even if it doesn’t feel very warm.
WHAT CAN WE EXPECT IN THE FUTURE?
Countries around the world have recognized the threats posed by ozone depletion. Scientists predict that CFC levels should peak by the year 2000 and should fall to 1979 levels between the years 2020 and 2050. As international control measures reduce the release of CFC’s and other ozone depleting substances, the natural atmospheric process will repair the ozone layer. Until that time, we can expect increased levels of UV at the Earth’s surface. These increased UV radiation levels can lead to a greater chance of overexposure to UV radiation and the consequent health effects.
Information on UV Rays from (www.epa.gov.com) U.S. Environmental Protection Agency – Sun Wise Program. (Sept. 22, 2007)

57
Outdoor Living ProjectRefeRence BOOk Looking at the Sky & Weather
Make Your Own Tornado Intermediate
TOPIC: Weather
LEARNING OUTCOME:
To create and observe a model tornado.•
This is what Environment Canada has to say about tornadoes.
“Twisters are rare in winter, but May to September are the prime tornado months, with the peak season in June and early July. Most tornadoes occur in the afternoon and early evening. “
“Tornadoes’ begin when warm humid weather and thunderstorms develop. This happens when cool northern air masses collide with hot air flowing north from the Gulf of Mexico. When complex patterns of updrafts and downdrafts in the atmosphere are added, part of the base of the thunder cloud begins to rotate and a tornado is born.”
“Most tornadoes look like a violently twisting funnel cloud, but some may look more like a large, low-lying cloud, a large rain shaft or even smoke from a fire. The shape can change before your eyes!”
Violent tornadoes are the most devastating storms on earth. With winds approaching 500 km/h, they can level even the most solid structures. The path of destruction can reach 42 km long and 390 m wide. Fortunately, Canada has never seen such a storm.
In Canada, during an average year, approximately 80 tornadoes occur and, on average, cause two deaths and 20 injuries, plus tens of millions of dollars in property damage. Many more tornadoes strike unpopulated areas and go undetected.
Just as the Richter scale measures the intensity of earthquakes, the Fujita scale measures tornado strength. F0 is the least intense; F5 the most intense. The scale is named for Dr. T. Fujita, a pioneer in tornado research. A tornado moves over the ground at speeds between 20 and 90 km/h. The path is usually southwest to northeast. The path of a tornado can be erratic and may suddenly change direction. If you see a tornado and it does not appear to be moving, it is either moving straight away or straight toward you
Canada’s “tornado alleys” are southern Ontario, Alberta, southeastern Quebec, and a band stretching from southern Saskatchewan and Manitoba through to Thunder Bay. The interior of British Columbia and western New Brunswick are also tornado zones.
58
Outdoor Living ProjectRefeRence BOOk Looking at the Sky & Weather
How Water Vapor Enters the Air Senior
TOPIC: Weather
LEARNING OUTCOMES:
To explore a component of the water cycle in nature.•
To actively study evaporation and transpiration.•
Evaporation: The process of turning from a liquid to a vapor (gas). (www.wordnet.princton.edu)
Transpiration: The process by which water absorbed by plants is evaporated into the atmosphere from the plant surface. (www.wordnet.princton.edu)
The main way water enters the air is through evaporation. Plants are another important source of atmospheric moisture. Plants contribute water to the atmosphere by transpiration. Transpiration is the transfer of water into the air via leaf pores or stomata. The transfer of water into the air removes heat from the plant and so transpiration, like evaporation, is a cooling process. Transpiration is an important means of transporting heat between the surface of plants and air above.
Water for transpiration is extracted from the soil by plant roots. The amount of water that is held in the soil is dependent on the texture and structure of the soil. Coarse textured soil dominated by sand-size particles holds less moisture than a finer textured soil.
Information for Processing Prompts
When does evaporation and transpiration occur in nature?
Evaporation and transpiration occur when heat (energy) raises the temperature of the air. There is more evaporation when it’s hot. There is faster photosynthesis and therefore transpiration when it’s warmer.
Why are they important?
They are important because evaporation from lakes, seas, rivers and oceans accounts for 90% of the moisture in the atmosphere. Transpiration accounts for the other 10%.
Build a Thermometer Senior
TOPIC: Weather
LEARNING OUTCOME:
To build a thermometer.•
When you look at a regular outside bulb thermometer, you’ll see a thin red or silver line that grows longer when it is hotter. The line goes down in cold weather.
This liquid is sometimes colored alcohol but can also be metallic liquid called mercury. Both mercury and alcohol expand when heated and contract when cooled. Inside the glass tube of a thermometer, the liquid has no place to go but up when the temperature is hot and down when the temperature is cold.
Numbers are placed alongside the glass tube that mark the temperature when the line is at that point.
Information for Processing Prompts
How did people tell the temperature before thermometers were invented?
People learned to determine the temperature by visual markers. These include watching how animals acted, how much ice was on the water, and how plants reacted to the weather. They were more in tune with the larger picture of the seasons, not the day to day temperatures.

59
Outdoor Living ProjectRefeRence BOOk Looking at the Sky & Weather
Make a Barometer Senior TOPIC: Weather
LEARNING OUTCOMES:
To build a homemade barometer.•
To explore and understand air pressure.•
A barometer is an instrument used for measuring pressure in the atmosphere. Torricelli, a student of Galileo, created the barometer in the year 1644 in Florence.
Ordinarily a barometer is a glass tube 3 ft. long, filled with mercury, and inverted into a vessel also containing mercury. This causes the liquid in the tube to go down a few inches, leaving a vacuum at the top.
While a barometer can monitor changes in air pressure, sometimes you will not actually see a visible change in the weather. However monitoring your barometer and comparing it to the outside weather can help you to gauge what the weather will be like in the coming day; and you will begin to understand how changing weather can be predicted based on pressure changes in the atmosphere.
Low pressure (below 29.92) is associated with less stable weather patterns, while high pressure (above 29.92) is associated with more stable weather patterns. To forecast weather with your barometer, it is important to watch the speed and direction of barometric change. If the atmospheric pressure is very high, such as 30.30 you might think that stable weather is in store, but if the barometer were dropping rapidly, less stable weather would be predicted (Weatherpatrol.com).

60
Outdoor Living ProjectRefeRence BOOk Looking at the Sky & Weather
eYe On THe enVIROnMenT

61
Outdoor Living ProjectRefeRence BOOk eye on the environment
eYe On THe enVIROnMenT

62
Outdoor Living ProjectRefeRence BOOk eye on the environment
AN INTRODUCTIONThis section will allow 4-H members to explore their environment and how it affects them.
They will learn about habitats, food chains, relationships, ecosystems, and have the opportunity to discuss environmental issues. You can use the following examples to discuss food chains and relationships within these different ecosystems and habitats.
What We All Need Junior TOPIC: Habitat
LEARNING OUTCOME:
To identify the basic concepts of what we need to survive: food, water, shelter, space, arrangement, sunlight, soil, air.•
Information for Processing Prompts
Examples of the concepts of the basic needs.
In a city park: A robin lives in the city park. It has enough space to feel comfortable, there are large and small trees for shelter and nesting, the green area provides worms and bugs, and the water fountain has a good supply of fresh water. The air is not as clear as in a rural area, but the robin seems to have adapted to city life.
A rural wooded area: A moose lives in a heavily forested area in rural Manitoba. There are other moose in the area, but there is enough space so that there is plenty of food in the summer (maybe a little scarce in the winter), a creek running through the area for water, and plenty of shelter in the bush from the elements. The underbrush offers a secure place for the moose to have her young.
An area outside a large city: A blue heron returns in the spring to a swampy area outside a large city where it has made its home and raised its young for the past five years. Upon returning it finds that the swamp has been partially drained to make way for a new suburb. The heron builds its nest in what habitat is still left. But the area is not protected by brush anymore and a skunk easily finds the nest and eats the eggs. Part way through the season, the swamp dries up and the heron is without food and water so has to find a new habitat.
In a remote village in Africa: Five children sit alone and hungry outside their hut in a small village in Africa. They have helped their parents till a small patch of land to grow enough food to feed the family. But there has been a drought. The crops have shriveled and died, and now they have to walk many miles just to find drinking water. Their father has gone to the city to look for work. Their mother has died from HIV infection. They are alone and waiting for aid to come to them.
Compare animal needs and human needs (the same) and lead a discussion around how we meet those needs.
Animals and humans have the same basic needs. However, animals are generally satisfied to just have the basics. Many animals can adapt to non-perfect conditions. Many co-exist with other animals. Sometimes nature can appear cruel. The strong survive and this would be perfectly natural, except that man sometimes creates circumstances where the playing field is made unfair for certain species.
Not all humans have their basic needs met. Every year millions of people die from hunger, thirst, wars over space and arrangement, and disease. Many humans are not satisfied with the minimum basic needs – they want a bigger house than they need, expensive food, and lots of luxuries. They use more energy and create more pollution.
Look around the community. Are there people that do not have all of the basic needs met each day? Why?
There are some people who do not have a place to live, or a house that will withstand the elements. There are people who sometimes don’t get something to eat every day. Some people don’t have nourishing food. Some people don’t even have a space of their own and live in public spaces.
There are several reasons why some people do not have all of the basic needs met each day such as poverty because of lack of education, job skills, mental or physical challenges.

63
Outdoor Living ProjectRefeRence BOOk eye on the environment
A Home is a Habitat Junior
Topic: Habitat
Learning Outcomes:
To explore what is needed for a healthy habitat.•
To appreciate why wildlife need a healthy habitat.•
Jar Forest Junior
TOPIC: Ecosystems
LEARNING OBJECTIVES:
To observe and describe succession.•
To understand this natural cycle and observe examples in the local environment.•
Definition of:
Ecosystem: is the relationship between the living resources, such as plants, trees, animals and fish within their shared habitat.
Succession: in nature is when an environment or habitat slowly changes and is replaced by a different habitat. Some organisms may arrive and others may be pushed out.
Example of Natural Succession: There is a huge forest of large, old pine and some smaller poplar trees, along with some scruffy underbrush. The pines take most of the sunlight and moisture, so there are very few small trees in the area. Lightning strike a tree and a forest fire roars through the forest in a dry summer. The old trees die. The sun now makes its way to the forest floor and new smaller trees begin to sprout in the fertile ashes. Both pine and poplar shoots begin to grow. The poplar grows faster and is soon larger than the pines. Other shrubs like hazelnut, rose bushes, and cranberries also begin to grow. Over several years, the pine trees begin to mature and are eventually larger than the brush and the poplar trees. They consume most of the moisture and shade the smaller trees so that they don’t get much sun. Eventually the large pine trees take over the habitat once again.

64
Outdoor Living ProjectRefeRence BOOk eye on the environment
The Thicket Game Junior + Intermediate
TOPIC: Relationships
LEARNING OUTCOME:
To explore the concept of camouflage and how animals hide in the wild.•
Camouflage: is the way in which an animal disguises itself, usually to surprise prey or hide from predators. Color and pattern play important role in camouflage, as well as behavior. Some animals blend into the surrounding vegetation. Examples of camouflage are found among all kinds of animals, from insects to mammals.
Plant look-a-likes: The praying mantis waits motionless like a leafy twig until its prey comes close. The stick inset is difficult to see among green shoots and dead twigs, and the moth caterpillar is so twig-like that it even has a “bud” growing out of its back.
Mammals: The sloth of the rain forests hides from its enemies in the wet season when it turns green from algae growing on its fur.
Behavior: Coloring may not be enough to camouflage an animal. Animals that don’t resemble their surroundings are active only at night. They keep still during the day to avoid being noticed.
Birds: The females of birds that nest on the ground, such as the pheasant and mallard, are camouflaged by their dull brown, speckled appearance, which helps them blend in with the vegetation near the nest.
Color Change: Frogs, toads, crabs, and prawns may become darker or lighter to match their surroundings. Some birds and mammals molt their summer coats and then grow a winter coat that blends in better with the winter white or gray to match the leafless trees. The snowshoe hare, arctic fox, ptarmigan, and ermine all turn white.
Damaging Games Junior TOPIC: Environmental Awareness
LEARNING OUTCOMES:
To create an awareness that some activities, games or pastimes can harm the environment.•
To brainstorm and offer environmentally friendly alternatives.•
Low Impact Camping Principles
Plan ahead by bringing low impact equipment.•
Avoid animal contact.•
Keep food away from wild animals.•
Dispose of human waste by burying it.•
Use deadwood for campfires – do not break off branches.•
Leave behind what you find.•
Leave things as you found them.•
Don’t leave garbage behind.•
Low Impact Games and Activities
I spy something nearby – instead of touching and handling a natural item.•
Build a thatched lean-to, instead of a tree house.•
Use a canoe instead of a motor boat.•
When hiking – hike spread out in several smaller groups – rather than one large group.•

65
Outdoor Living ProjectRefeRence BOOk eye on the environment
Swamp Things Junior + Intermediate
TOPIC: Ecosystems
LEARNING OUTCOMES:
To learn about the small aquatic life that is found in a swamp.•

66
Outdoor Living ProjectRefeRence BOOk eye on the environment
Make a Water Scope Intermediate
TOPIC: Ecosystems
LEARNING OUTCOMES:
To observe and learn about life that is found in the marsh.•
To gain an appreciation for wetlands; environments teaming with life.•
WHAT ARE WETLANDS – WHY ARE THEY IMPORTANT?
Wetlands come in several different names such as marsh, slough, and swamp. They are important to our ecosystem for many different reasons.
Wetlands act like a sponge. They help to keep river levels normal and help prevent flooding when the water level • is high and slowly release water when the levels are low.
Wetlands release vegetative matter into rivers, which helps feed fish.•
Many animals that live in other habitats use wetlands for migration or reproduction. For example, herons nest in • large old trees, but need shallow areas in order to wade for fish and aquatic life.
Unlike most other habitats, wetlands directly improve other ecosystems. They recycle nutrients, and filter and • purify the surface water. Human kidneys clean and help control the water flow. Wetlands are the kidneys of the outdoor world.
Microtrek Scavenger Hunt Intermediate
TOPIC: Environmental Awareness
LEARNING OUTCOMES:
To appreciate that humans share the environment with wildlife.•
To understand and be aware that wildlife is all around us, in our daily lives.•
Examples of:
Humans and wildlife share environments: City dwellers and hummingbirds.
Humans and wildlife must adjust to their environment, move to a more suitable environment or perish: Humans and wildlife living in a rainforest that has been clear cut.
Wildlife is all around us, even if we can’t see or hear it: No-see-ums and aphids.
Wildlife ranges from large to small: Forested area – small bugs to large elk.
People and wildlife experiencing same problems: Drainage causing water shortage.
People and wildlife both need a place to live: Farmers and animals displaced by a sprawling city.
67
Outdoor Living ProjectRefeRence BOOk eye on the environment
Seed Walk Intermediate
TOPIC: Relationships
LEARNING OUTCOME:
To explore how seeds are transported by animals and other forces of nature.•
Why do seeds disperse (scatter) to form new plants?
If the seeds simply fell and grew beneath the parent plants they would be overcrowded and would be starved of nutrients. So it is important that the seeds are dispersed over a wide area where they stand a better chance of finding the right conditions to grow.
How do seeds disperse to form new plants?
Wind Dispersal
Some seeds are carried to a new place by the wind. These seeds are very light.
Many have hairy growths which act like little parachutes and carry the seeds far away from the parent plant.
The seeds of the dandelion are carried by the wind.
The seeds of the thistle are also carried away by the wind.
These seeds are very light in weight.
Water Dispersal
Fruits which float such as those of the water lily and the coconut palm are carried by water. Coconuts can travel for thousands of kilometers across oceans.
Animal Dispersal
Some plants have juicy fruit that animals like to eat. The animal eats the fruit but only the juicy part is digested. The stones and pips pass through the animal’s digestive system and are excreted. Birds also like to eat fruit and they help to disperse seeds to other areas through their droppings.
Explosions
Some plants have pods that explode when ripe and shoot out the seeds.
Lupins, gorse, caragana and broom scatter their seeds in this way.
Fire
Some plants actually need a fire to disperse their seeds. A number of species of pine have cones that only open after a fire.

68
Outdoor Living ProjectRefeRence BOOk eye on the environment
Polar Bears in the Zoo Intermediate
TOPIC: Environmental awareness
LEARNING OUTCOME:
To have an open discussion about animals in zoos.•
Pros of Zoos
The general public will get a chance to visit them and learn about wild animals without having to travel too far • from home.
Any sick or injured animals can be treated almost immediately giving them a much higher chance of survival.•
Animals in zoos are fed at regular intervals – there’s no chance of any of them (particularly the young ones) • starving to death.
All of the animals have warm buildings in which to sleep, especially useful during the winter. •
Rare or endangered species can be kept and hopefully bred – ensuring the species continues to survive.•
All pens/enclosures are cleaned out on a regular basis ensuring that infections don’t start or spread.•
Cons of Zoos
Animals are kept in small enclosures, a much smaller space to roam in than if they were in the wild. •
It’s not natural for all the different species to live separately from each other – usually different animals depend • on each other for survival.
Being fed at set times is extremely un-natural especially for hunting animals like lions and tigers. These creatures • hunt their food and eat it fresh.
Moving tropical animals to a cold climate and vice versa is not good for the animals.•
Animals performing displays are not natural. If zoos want us to see these animals acting as close as possible to • their natural environment then we don’t want to see them doing anything special.

69
Outdoor Living ProjectRefeRence BOOk eye on the environment
Predator Prey Intermediate + Senior
TOPIC: Relationships
LEARNING OUTCOME:
To explore the predator/prey relationship.•
Examples of
Predators Prey
Polar Bears Seals
Lions Zebras
Coyotes Gophers
Grizzly Bears Salmon
Eagles Rabbits
Hawks Mice
Sharks Herring
Information for Processing Prompts
Why are there prey and predator in nature?
The prey generally reproduce more often and have more young than the predators. Predators keep their population in check while feeding themselves. Because they are usually bigger than their prey, they eat more.
What do you think the ratio is? Why?
A study done by E. Cohen of the Rockefeller University in New York concluded that in a study of various community food webs, there were approximately 314 prey to 1 predator.
The large top predators in any system generally obtain most of their food intake from large herbivores (plant eaters), as it is not usually worth the amount of effort required to hunt much smaller prey. For warm-blooded predators, a large quantity of food is required (10 times as much as for an equal-sized cold blooded predator). The larger the predator, the rarer it will be in any ecosystem.
How have humans affected this relationship?
When actions of humans on a certain species decrease their numbers, it upsets the balance between predators and prey. For example, if large numbers of polar bear die because they lose their habitats or they are hunted, the seal population will increase and in turn they will eat more fish causing another imbalance.

70
Outdoor Living ProjectRefeRence BOOk eye on the environment
Pesticides and the Food Chain Intermediate
TOPIC: Food Chains
LEARNING OUTCOMES:
• To explore the concept of “pesticides in the food chain”.
• To raise awareness of this environmental issue.
After playing the game you could use the diagram below to talk about Food Chains, and what would happen to each chain if a dangerous pesticide was introduced at different levels of the chain.
Trophic Level Grasslands Biome Pond Biome Ocean Biome
Primary Producer Grass Algae Phytoplankton
Primary consumer Grasshopper Mostquito Larva Zooplankton
Secondary consumer Rat Dragonfly Larva Fish
Tertiary consumer Snake Fish Seal
Quaternary consumer Hawk Raccoon White Shark
This page may be printed for non-commercial use only. Information for diagram from www.enchantedlearning.com.

71
Outdoor Living ProjectRefeRence BOOk eye on the environment
Environmental Coat of Arms Intermediate + Senior
TOPIC: Environmental awareness
LEARNING OUTCOMES:
To raise awareness of local environmental issues and to help in articulating personal values and beliefs around • those issues.
To personalize environmental advocacy and encourage discussion and action around issues.•
What is a Coat of Arms?
According to Wikipedia a “Coat of Arms” is a special crest, helmet, shield, motto, or emblem that is used by individuals, families or groups. It could be handed down through families. “The Coat Of Arms” generally signifies something that is very important to the holder. You might suggest some of the following symbols of environmental values.
ENVIRONMENTALLY
SAFE
RECYCLING IS EVERYBODY’S JOB FOR A SAFE ENVIRONMENT

72
Outdoor Living ProjectRefeRence BOOk eye on the environment
The Habitat Game Intermediate + Senior
TOPIC: Habitat
LEARNING OUTCOMES:
To explore the components that make a healthy habitat.•
To understand how those components are interdependent.•
After playing the game, you could use the following picture to discuss how the wildlife in this habitat depends on each other, and what would happen if one or more components are lost.
Worms and Soil Senior
TOPIC: Relationships
LEARNING OUTCOMES:
To explore the value of vegetable and animal material in soil.•
To appreciate the original form of “recycling” and why it is such an important and common natural concept.•
Some Facts on Earthworms
Earthworms have bristles or setae in groups around or under their body. The bristles, paired in groups on each • segment, can be moved in and out to grip the ground or the walls of a burrow. Worms travel through underground tunnels or move about on the soil surface by using their bristles as anchors pushing themselves forward or backward using strong stretching and contracting muscles.
Earthworms can live for approximately six and a half years.•
Earthworms do not have eyes but they do possess light- and touch-sensitive organs (receptor cells) to • distinguish differences in light intensity and to feel vibrations in the ground.
Earthworms possess very strong mouth muscles - they do not have teeth. They swallow soil as they burrow and • extract nutrients from it.
Earthworms eat many forms of organic matter in soil, things like decaying roots and leaves, and living organisms • such as nematodes, protozoa, rotifers, bacteria, and fungi. They will also feed on the decomposing remains of other animals. They can consume, in just one day, up to one third of their own body weight.

73
Outdoor Living ProjectRefeRence BOOk eye on the environment
Oil Spill Senior
TOPIC: Environmental Awareness
LEARNING OUTCOME:
To discover the effects of an oil spill on sea birds.•
The following article was written in 2002, 13 years after the Exxon Valdez oil spill in Alaska. You can use it as a “real life” example of what an oil spill can do to sea birds and the food chain.
Effects of Exxon Valdez oil spill linger in Alaska. Yereth Rosen / Reuters 24/jan/02
ANCHORAGE, Alaska — Oil from the Exxon Valdez, some of it nearly as fresh as when it spilled in 1989, still lingers on the once pristine beaches of Prince William Sound, harming sea ducks and otters, according to scientists who presented their findings at a conference here this week.
Surveys last summer by the National Marine Fisheries Service found there was twice as much oil remaining from the spill as had been predicted eight years earlier, said Jeff Short, a research chemist from the agency’s laboratory in Auke Bay, Alaska.
“We did indeed find quite a lot of oil in Prince William Sound,’’ said Short, who presented his findings at a week-long conference held by the Exxon Valdez Oil Spill Trustee Council.
That was no surprise to Gary Kompkoff, a tribal leader from the neighboring village of Tatitlek. “All you would have to do is ask anyone from Chenega Bay, and they would have told you how much oil’s out there,’’ he said. Kompkoff noted that over the past five years, unhappy villagers have even been carrying oil samples to various public meetings.
Short’s survey team sampled beaches that were heavily or moderately contaminated by the spill and found oil in various states remained. It ranged from fresh mousse and sheens to weathered tar balls and asphalt on at least 53 of the 96 beaches surveyed.
Of the 11 million gallons spilled in 1989, about 10,000 gallons remain, according to Short’s preliminary estimates. It is spread over 4.3 miles of shoreline and is vanishing at a rate of 26 percent a year, he estimated.
That may seem a tiny amount, but the oil is in ecologically sensitive areas. Instead of finding a so-called “bathtub ring’’ of contamination in the upper intertidal zone, his team found the most significant and fresher oil lower on the beaches and below the surface, Short said.

74
Outdoor Living ProjectRefeRence BOOk eye on the environment
CONTAMINATING THE FOOD CHAINOil there does more damage to wildlife because those underwater beach sections hold clams and other sea life that pass contaminants up the food chain.
Studies of sea otters and harlequin ducks in western Prince William Sound last summer also showed continued harm from the oil, according to other scientists at the conference. They found the otters and ducks from contaminated areas had higher levels of enzymes associated with hydrocarbon exposure and lower survival rates. Even sea otters born long after 1989 were suffering from oil exposure, said Brenda Ballachey of the U.S. Geological Survey.
Ballachey’s team took tissue and blood samples from live animals as well as internal photographs with tiny medical cameras mounted on scopes. Veterinarians who saw the images just shook their heads and said, “We would not expect this animal to survive another winter”, she said.
Survival rates of harlequin ducks from spill-affected areas are still lagging, said Dan Esler, a biologist from Simon Fraser University. “There’s no indication that things are getting any better out there than they were in 1998,’’ he said.
The studies by Short, Ballachey, and Esler were among those funded by the Exxon Valdez Oil Spill Trustee Council, established in 1991 when Exxon settled civil and criminal charges filed by the Alaska and the U.S. governments. The council has administered the $900 million that Exxon paid to settle the state and federal civil cases from the disaster, the worst tanker spill in U.S. waters.
One scientist on contract to Exxon Mobil said it is wrong to blame all Prince William Sound’s ecological problems on Exxon Valdez oil. “To say you have effects 12 years after an event, I think, is not really very scientifically credible,” said David Page of Bowdoin College in Maine.
Page argued that other sources of contamination could be affecting the wildlife of Prince William Sound, such as leaking oil from abandoned mine and dock sites and spills from fishing vessels. Also, he said the marine ecology is “dynamic,” with changes occurring from climate shifts and other factors.

75
Outdoor Living ProjectRefeRence BOOk eye on the environment
Town Hall Meeting Senior
TOPIC: Environmental Awareness
LEARNING OUTCOMES:
To explore issues around social and ecological consideration of land use.•
To appreciate the challenges that land managers face in regards to user conflicts and political, economic, and • environmental pressures.
To explore personal values and beliefs through role playing.•
Tips for the Game
You might want to write the three options up on a flip chart or poster so participants can keep in mind that they • will have to vote for one of those options when the presentations are over.
Remind the participants with roles that they have to vote as their role person would vote.•
The Town Councilor is in charge of the meeting, so try to choose someone who will be comfortable with this role.•
Values Senior
TOPIC: Environmental awareness
LEARNING OUTCOME:
To explore personal values and beliefs in regard to environmental ethics and issues.•
Discussion point:
After the games ask members if they can think of some examples in their community where people’s lack of respect for the environment has caused a problem? Is the problem reversible?

76
Outdoor Living ProjectRefeRence BOOk

77
Outdoor Living ProjectRefeRence BOOk Outdoor Survival
OUTDOORSURVIVAL
78
Outdoor Living ProjectRefeRence BOOk Outdoor Survival
AN INTRODUCTIONIn this section it is recommended that members take a certified first aid course based on their age. Each member who participates in outdoor activities should have this training. Members will also learn what to put in a first aid kit and survival kit to take with them on adventures. Survival skills like shelter and fire building are fun to do on their own, or to build and use on an outdoor adventure.
First Aid Courses Junior + Intermediate + Senior
TOPIC: First Aid
LEARNING OUTCOME:
To prevent and manage injury.•
The following is a description of the various courses offered by Canadian Red Cross. St. John’s Ambulance offer similar courses. All agencies offer the same basic skills.
PEOPLE SAVER COURSES
LEVELS 1 - 4
Reacting to emergencies, protecting yourself from other’s body fluids, major bleeding, choking, burns, poisons, and rescue breathing.
The People Saver Courses are non-certificate courses. Participants will receive a book and participation card.
EMERGENCY FIRST AID1 Day Course
Responding to emergencies, ABC’s of care, choking, major bleeding, CPR (for adult and child), Two person CPR, Using an AED (automated external defibrillator) machine. Participants will receive a manual and a certificate upon completion.
STANDARD FIRST AID2 Day Course
Choking, major bleeding, CPR (for adult, child and infant), fractures, strains, and sprains, head injury, burns, poisons, heat and cold emergencies, allergic reactions, diabetic emergencies, convulsions, child birth, AED(automated external defibrillator) training. Participants will receive a manual and a certificate upon completion.
CPR COURSES
CPR – LEVELS A, B and C
2 - 4 Hours
Teaches skills for CPR when an infants, children and adults has no heart beat or breathing, and AED (automated external defibrillator) training
The participants will receive a manual and a card upon completion.
Members who want to take a CPR or First Aid Course have to be strong enough to effectively perform CPR on the mannequins, and able to read at a grade 6-7 level. The course requires them to listen carefully, and practice the required skills.

79
Outdoor Living ProjectRefeRence BOOk Outdoor Survival
First Aid Coloring Sheets Junior
TOPIC: First Aid
LEARNING OUTCOME:
To spot the hazards on a beach and around the campsite.•
Topic Information
At the Beach:
The boy on the seadoo is headed for the buoys.•
There is a broken bottle on the beach.•
The sign says no diving, but the girl is diving.•
Inflatable balls sometimes float out of reach and children follow them into deep water.•
Only one girl has a flotation device.•
Campfire:
Fire too close to tent.•
Axe is in dangerous position.•
Burning marshmallow could drip and burn someone.•
Peg is sticking up out of the ground.•
The marshmallow sticks are sharp.•
Make a First Aid Kit Intermediate + Senior TOPIC: First Aid
LEARNING OUTCOME:
To create a first aid kit. •
Extra items that could be included in the First Aid Kit:
Tweezers•
Tube Sling•
Tension Bandage•
Eye Flush Cup•
Burn Ointment•
Antiseptic Solution•
New Skin (for blisters if you are planning a long hike)•
Tips:
Keep the first aid kit in an easy to find spot – not in the bottom of your backpack.•
Plasticware with snap-on lids make good containers – contents stay dry and do not get squashed.•

80
Outdoor Living ProjectRefeRence BOOk Outdoor Survival
Make a Survival/Repair Kit Senior
TOPIC: Survival Skills
LEARNING OUTCOME:
To create a survival/repair kit for each member.•
You might also want to include the following items in each Kit:
A space blanket.•
A tin can (for holding the candle, or boiling water – you can pack the matches and smaller items in the can to save space).•
Package of powered soup.•
Chocolate bar.•
Tips:
Keep the repair/survival kit in an easy to find spot – not in the bottom of your backpack.•
Plasticware with snap-on lids make good containers – contents stay dry and do not get squashed.•
Information for Processing Prompts
Uses for Items:
Fire starter – Start a quick fire even when tinder and kindling are damp.
Matches – Should be kept dry or coated with wax.
Flag tape – For marking a trail as you go.
Whistle – To call for help or discourage wild animals.
Flashlight – For emergencies in the dark. Try to leave it off as much as possible – let your night eyes do the work.
Multi-tool – Cutting, prying, poking etc.
Duct tape – Securing tarp, fixing rips, holding things together.
Safety pins – Fixing clothing or tarps, making a fish hook.
Wire – Securing items, making a snare, wrapping items together, hanging can over fire, hanging things to dry over fire.
Candles – For light, warmth in an enclosed area, mental comfort, warming water in can.
Needle and thread – Fixing clothing or tarp, thread as fishing line.
Tarp – Shelter, blanket, ground cover, water collector.

81
Outdoor Living ProjectRefeRence BOOk Outdoor Survival
Make a Lean-To Intermediate + Senior
TOPIC: Survival Skills
LEARNING OUTCOME:
To build a shelter.•
Warning:
Caution members about building a campfire too close to the lean-to shelter. Remember that the shelter is made from dry wood that would burn easily.
The diagram below might be helpful when building the shelter.
Diagrams courtesy of Manitoba 4-H Council

82
Outdoor Living ProjectRefeRence BOOk Outdoor Survival
Tarp Shelter Junior + Intermediate + Senior
TOPIC: Survival Skills
LEARNING OUTCOME:
To build a shelter.•
Information for Processing Prompts
How long do you think you could live in a tarp shelter?
Remind members that tarp shelters are meant to be temporary shelter, usually from rain. They rip easily, and the ends are both open. They do not really protect you from the wind; in fact the wind can get underneath it and rip or blow it away. You are not protected from insects.
When you are tenting, a tarp shelter over the top of the tent helps to keep you and your tent dry.
Debris Shelter Junior + Intermediate + Senior
TOPIC: Survival Skills
LEARNING OUTCOME:
To build a shelter.•
The debris shelter can also be quickly built by leaning the debris against a broken tree, or you could break off a small tree in an emergency situation. See diagram below.
Diagram courtesy of Manitoba 4-H Council
How Many Steps in a Mile? Junior + Intermediate + Senior
TOPIC: Navigation
LEARNING OUTCOME:
To estimate travel time.•
Tips:
Two or three small calculators would be a good idea. •
The group should decide to measure in either feet OR meters. It will be easier to compare if everyone is using the • same measure.

83
Outdoor Living ProjectRefeRence BOOk Outdoor Survival
Water Purification Taste Test Junior + Intermediate + Senior
TOPIC: Survival Skills
LEARNING OUTCOME:
To determine the best tasting purified water.•
Information for Processing Prompts
What are some of the benefits and drawbacks of each method?
Boiling is easy and does the job, but you have to have a fire or other heating source, and it has to be cooled to drink.
Chemical Purifiers are easy to use and relatively inexpensive (you can get a bottle of tablets for less than $5). The taste is less than ideal, but it does not take long to prepare and does not have to be cooled.
Water Filters give you the best tasting water, but they are fairly expensive, need replacement parts, and are bulkier to carry.
Why do we have to treat water today? Did they have to in the past?
We treat water to destroy microorganisms, and parasites that can cause illness and in humans. There may not have been as many man-made problems with the water in the past, but there were probably natural bacteria and parasites in the water – they were just unaware of it. In the past many people were careful about where they got their water, and usually looked for a spring where the water comes out of the ground fresh and clean.
North by Northeast Junior
TOPIC: Navigation
LEARNING OUTCOME:
To learn about navigation.•
Information for Processing Prompts
Who uses compasses?
Anyone can use a compass. Some people like soldiers, nature guides, forest fire fighters, and hikers should learn how to use a compass and carry it with them when they are out in wilderness areas.
What else can you do to find your way?
You might also consider talking about finding directions by using the sun, the stars, and moss on trees, or by following a river.

84
Outdoor Living ProjectRefeRence BOOk Outdoor Survival
The Giant Compass Game Junior
TOPIC: Navigation
LEARNING OUTCOME:
To learn the compass bearing points.•
Ideas for the Game:
After a couple of rounds, remove the pylons from all of the direction points except North, and gradually add in • Northeast, Southwest etc.
Remember that the caller has to count the paces out loud so everyone can hear.•
Orienteering Scavenger Hunt Junior + Intermediate + Senior
TOPIC: Navigation
LEARNING OUTCOME:
To follow directions relating to navigation.•
There are a variety of compasses on the market. It is not necessary to have the most expensive compass. The starter compass below is light weight, easy to read, and costs less than $10.00.

85
Outdoor Living ProjectRefeRence BOOk Outdoor Survival
Telling Time Nature’s Way Intermediate + Senior
TOPIC: Survival Skills
LEARNING OUTCOME:
To use nature to tell the time.•
You can make copies of these cues for members to carry with them.
MARIGOLD FLOWERS OPEN AT 7 AM AND
CLOSE AT 7 PM
BLUE CHICORY CLOSES AT NOON
PICKERELWEED CLOSES AT NOON
WHITE WATER LILY SHUTS AT 4 PM
DEER FLIES COME OUT AFTER 9 PM
HORSEFLIES COME OUT AFTER 2 PM
MOSQUITOES BITE AFTER 8 PM

86
Outdoor Living ProjectRefeRence BOOk Outdoor Survival
Homemade Fire Starters Intermediate + Senior
TOPIC: Survival Skills
LEARNING OUTCOME:
To make a fire starter.•
Tips:
This activity is much safer when the wax is melted in a double boiler.•
If sawdust or wood chips are hard to locate, lint from the dryer works well.•
Be sure to use the cardboard egg cartons as the Styrofoam cartons give off a toxic smoke when they are burned.•
Building a Fire Intermediate + Senior
TOPIC: Survival Skills
LEARNING OUTCOME:
To build a fire safely.•
The following diagrams may be helpful.
Diagram courtesy of Manitoba 4-H Council
Tinder Kindling Fuel Tepee Fire
Compass Direction Game Intermediate
TOPIC: Survival Skills
LEARNING OUTCOME:
To learn the directions of the compass.•
Variations of the Game:
The blindfold version is more complicated – once the blindfold is on it is very difficult to keep a perfect direction. •
If you have a lot of players, let some of the players take the place of the pylons. When you are calling out • directions, you can say the Direction “NW” and the person’s name to ”ANGIE”. This can be helpful if you have a lot of younger members playing.
Have the members hop on both feet, hop on one foot, frog hop etc. when directions are called out. Ex: “Frog hop • to the SW”

87
Outdoor Living ProjectRefeRence BOOk Outdoor Survival
Survival Knots Senior
TOPIC: Survival Skills
LEARNING OUTCOME:
To tie useful knots.•
Tip:
For practice purposes, use synthetic rope as it is easier to untie and retie than hemp or natural rope fibers.
When everyone has had time to practice the knots, you could plan a relay, where individuals or teams compete to see who can tie the different knots the fastest. Remind them that often we need a knot made quickly. For example: when the tarp is blowing away, when the boat is drifting, when an animal needs tied. This relay will help to quicken their skills.
If you decide on a two or three team relay, one person on each team could tie a specific knot, then run to the end of the line. The second person can’t start their knot until the first person has finished, and so on.
Contour Line Activity Senior
TOPIC: Navigation
LEARNING OUTCOME:
To understand how contour lines show shape elevation on a map.•
Information for Processing Prompts
How does elevation affect navigation?
If we are in a location we are not familiar with, and the map we are using does not show elevation, we would not realize what kind of terrain (landscape) we are dealing with. There may be hills that we are not equipped to travel through.
How does elevation affect wilderness travel?
When traveling in wilderness areas, we are often traveling with large packs. Elevation makes that extra weight even more difficult, or could result in lengthy detours.
Diagram courtesy of Manitoba 4-H Council

88
Outdoor Living ProjectRefeRence BOOk Outdoor Survival
How Long Will it Take to Walk a Kilometer? Intermediate + Senior
TOPIC: Navigation
LEARNING OUTCOME:
To estimate travel time.•
Information for Processing Prompts
What else affects travel time?
Elevation, soil type (sandy, muddy), weather and ground cover (bush, deep grass) can all affect travel time.
If the group members travel at different speeds, what should you do?
Large groups usually have problems keeping the same pace, because everyone has their own comfortable pace. It is just as difficult for a fast walker to walk slow, as it is for a slow walker to walk fast. Sometimes it works better to have two groups, a faster group in the front and a slower group in the rear. After a few kilometers these groups usually form naturally as people find their own pace. If it’s important for the entire group to keep with in a reasonable distance, let the faster group go ahead, and then stop after a designated time to let the other group catch up.
Blindfold Compass Walk Senior TOPIC: Navigation
LEARNING OUTCOME:
To follow a compass bearing.•
Diagram below might be helpful for understanding how the compass works.
Diagram courtesy of Alberta Junior Forest Warden Association
ADVenTUReS In THe
WILDneRneSS

89
Outdoor Living ProjectRecORD BOOk ADVenTUReS In THe WILDeRneSS
ADVenTUReS In THe
WILDneRneSS

90
Outdoor Living ProjectRefeRence BOOk Adventures in the Wilderness
AN INTRODUCTIONBefore going on an outdoor adventure with your 4-H members, it is important to plan ahead, know what to bring, understand the area and how to protect it using low impact camping principles.
Plan AheadBring a map on all outdoor adventures. The map will show you directions and point out woods, cliffs, lakes, portages and marked trails. Plan stops for eating, exploring and resting. When you have decided what route you are going to take, tell someone where you are going and how long you will be gone. If you know other people who have completed the route prior, ask them for advice and tips about the route and the area.
What to Bring
For day trips bring along:
Water and snacks•
A first aid kit•
A watch•
A garbage bag•
Sunscreen•
A hat•
A raincoat•
A pencil and notebook (or nature journal)•
Insect repellant•
Matches•
Ask members to wear several light layers, socks and comfortable runners or hiking boots.•
For overnight trips bring along everything you would for a day trip plus:
A camp stove and pot set•
Tent•
Sleeping bag•
Enough food for the group•
Other necessary equipments such as canoes, lifejackets and paddles.•
91
Outdoor Living ProjectRefeRence BOOk Adventures in the Wilderness
Low Impact Camping Principles
Prior to going on an outdoor adventure, it is important for you and your group to know and understand the following low impact camping principles. If your group discusses this before going on a trip, it will be easier to reinforce while on the trip.
Plan ahead and prepare.•
Prior to arriving at the trailhead it is important to learn about the environment including the weather patterns, the • wildlife and use patterns. Keeping the party size small, bringing appropriate low impact equipment and avoiding human-animal contact are important issues to keep in mind.
Travel and camp on durable surfaces.•
Avoid trails and soils where the ground is wet. Walking on wet trails causes trail deterioration, creation of • undesired additional trails and deterioration of grazing areas. Stay on the trails that are provided by hiking in a single file.
Dispose of waste properly.•
Human waste should be disposed of in the most appropriate manner. Ideally, human waste should be disposed • of in a cat hole at least six inches in depth, and, at least 100 meters away from water. All toilet paper should be packed out or burned.
Leave what your find.•
Always leave the natural environment as you found it. Unless it’s garbage, leave it behind.•
Minimize campfire impact.•
When making a fire in the wilderness, attempt to leave the site of the fire as natural and pleasant looking as you • found it. Secondly, minimize the effects of wood gathering. Burn only dead wood.
Respect wildlife.•
Avoid approaching animals. It is okay to observe from a distance, but do not disturb them. Humans should never • feed animals in the wild. When animals become accustomed to eating human food their behavior often changes causing problems for wilderness campers.
Be considerate of other visitors.•
Attempt to keep the noise level of your group to a minimum.•

92
Outdoor Living ProjectRefeRence BOOk Adventures in the Wilderness
Stream Hike Junior
TOPIC: Hiking
LEARNING OUTCOME:
To observe stream life.•
To gain an appreciation of ecosystems.•
You might see some of the following organisms in and around the stream.
Diagram courtesy of www.enchantedlearning.com This page may be printed for non-commercial use only

93
Outdoor Living ProjectRefeRence BOOk Adventures in the Wilderness
How to Dig for Clay Junior + Intermediate
TOPIC: Hiking
LEARNING OUTCOME:
To find natural clay, to prepare and sculpt.•
To be creative.•
Information for Processing Prompts
How has clay been used in the past?
Early humans discovered the useful properties of clay in prehistoric times, and one of the earliest artifacts ever uncovered is a drinking vessel made of sun-dried clay. They also used them for food dishes, washing bowls, and many other household items. Clay was also used as the very first writing medium. Thousands of years ago people wrote on clay tablets.
How is it used today?
Clay is still used for dishes, flower pots, bricks and hundreds of other items. Pottery (shaping clay) has become a unique hobby for some, and a business for others. Pottery that is fired in a kiln is durable and long lasting.
What is clay made of?
There are about thirty different types of “pure” clays but most “natural” clays are mixtures of the different types, along with other weathered minerals. Clays are distinguished from other small particles present in soils such as silt by their small size, flake or layered shape. Depending on the content of the soil, clay can appear in various colors, from a dull gray to a deep orange-red.
Senses Hike Intermediate
LEARNING OUTCOME:
To use listening and touch in the outdoors.•
Information for Processing PromptsYour five senses play an important role in your daily life. Every moment in your life, you use at least one of your five senses. You touch, hear, see, taste, and smell in order to adapt to a new environment. The five senses are important for everyone. For those who are blind or deaf, they still use their other senses. Our ability as human beings to adapt is remarkable. Losing one’s hearing or vision does not mean life is over. When a person loses one sense the other senses often become sharper. Instruct members to make a visual image in their mind of what they hear.
Night Hike Senior
TOPIC: Hiking
LEARNING OUTCOME:
To experience your surroundings in silence and in the dark.•
Tips
Unless it is absolutely necessary to have some light, leave all the flashlights off. If you give your eyes a few minutes • to adjust, you will be able to see shadows, and if the night sky is clear, you should have no trouble moving about without a light. Let your night eyes work for you. By turning the light on and off your eyes have to keep readjusting to the different levels of light.
It would be a good idea to walk over the area you plan to use in the day light to check for things like thorns and • poison ivy.
94
Outdoor Living ProjectRefeRence BOOk Adventures in the Wilderness
Canoeing
An Introduction:The following section about canoeing will help 4-H leaders teach the skills of canoeing to their members. It is recommended that leaders become certified with Paddle Canada or find a certified instructor in the local area to teach this skill.
If you plan on going on a multi-day canoe trip, please refer to Adventures in the Wilderness: An Introduction, to learn about how to plan ahead, what to bring and low impact camping.
Canoe and Paddle Parts Relay Junior, Intermediate + Senior
TOPIC: Canoeing
LEARNING OUTCOME:
To learn the parts of the canoe and the paddle.•
Information for Processing Prompts
How do you remember all of the parts?
Keep in mind that everyone learns differently. Some of us are very visual and might do best by reading or looking at the diagram. Some of us are auditory and need to hear about, perhaps more than once. There are others who are kinesthetic (hands on) who actually need to handle it and see how it works.
Why is it important to know the parts of the equipment?
Some members will be wondering why they need to know all the names of the parts. You can quickly make them realize the importance and safety measure of knowing the parts of the canoe and paddle by doing a little scenario. Have members get into the canoe on dry land or in very shallow water. Have them pretend that they are out canoeing and a storm comes up suddenly. Start giving them instructions on making adjustment in seating arrangements for balancing the boat against a wind, and then direct them to paddle or hold the paddle in a certain way to help with the situation. If they don’t all know the parts and make the correct movements, tell them they have capsized.

95
Outdoor Living ProjectRefeRence BOOk Adventures in the Wilderness
Canoeing Skills Junior, Intermediate + Senior
TOPIC: Canoeing
LEARNING OUTCOME:
To learn about the sport of canoeing.•
To practice the skill of canoeing.•
TIPS:
Canoes will float in shallow water. For members who are canoeing for the first time, keep them close to shore, • parallel to the shore. They will feel more comfortable if they know they can reach shore if the boat tips.
Practice tipping the boat in shallow water so members understand how much force it takes to tip the boat, what • it’s like to be dumped into the water, and how to respond once they are in the water.
Remind members that it is important to check the weather forecast before setting out on a canoe trip.•
Remind members to check for water flow before heading down a moving waterway such as a river. A heavy • overnight rain can often turn a creek into a fast moving river.
Breakfast Bake Junior + Intermediate
TOPIC: Outdoor cooking
LEARNING OUTCOME:
To make a tasty breakfast that will energize the group.•
Tips:
If you are hungry or don’t want to wait for the fire to burn down to coals, try piercing a pencil-sized green sharpened stick about an inch from the top of the orange peel. You can cook it over the flames the same way you would a hotdog.
Hole Potato Intermediate + Senior
TOPIC: Outdoor cooking
LEARNING OUTCOME:
To cook a potato in the outdoors.•
A variation on the hole potato:
Gather enough wet clay to wrap around the potato. You will want the layer of clay to be about 2 cm thick all • around the potato.
Put the potato directly into the fire.•
A medium-sized potato will cook in a hot fire in about 20-30 minutes. •
Be very careful when removing the clay – it will be very hot. You may have to tap it with a stone to break the clay.•

96
Outdoor Living ProjectRefeRence BOOk Adventures in the Wilderness

97
Outdoor Living ProjectRefeRence BOOk WInTeR fUn
WInTeR fUn
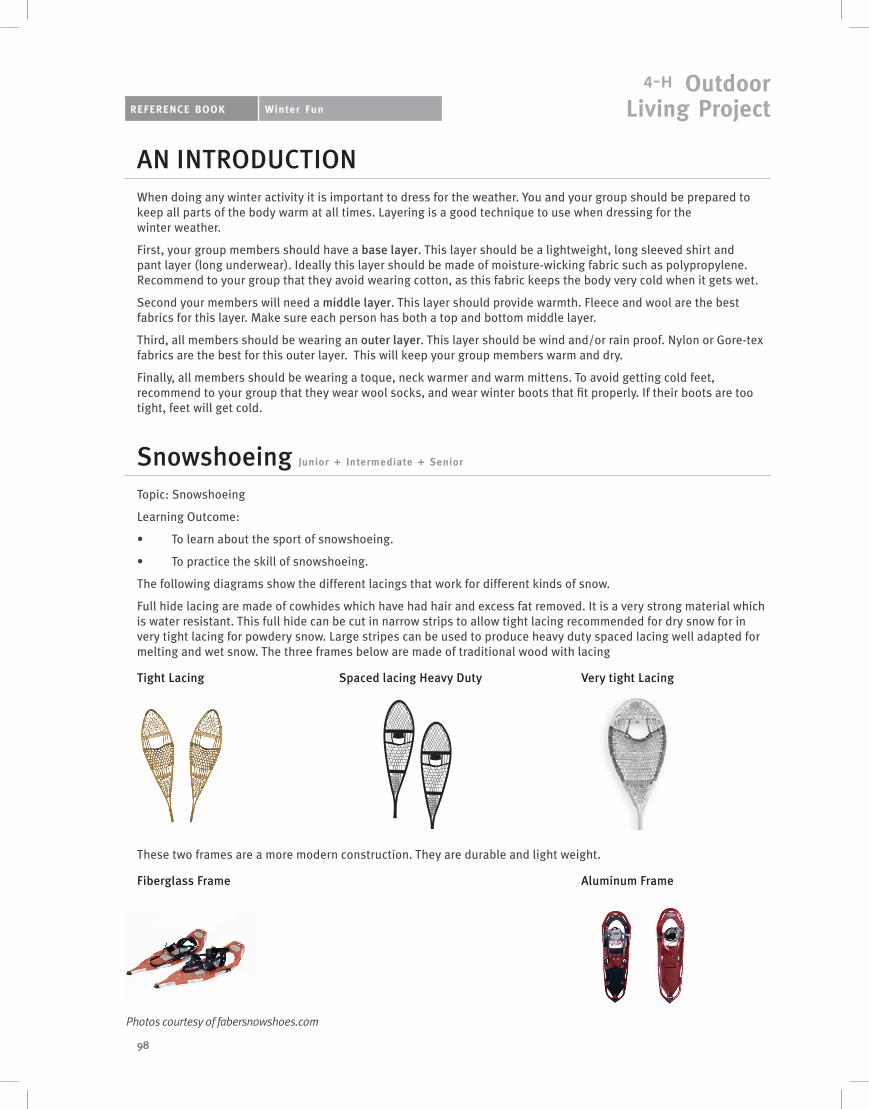
98
Outdoor Living ProjectRefeRence BOOk Winter fun
AN INTRODUCTIONWhen doing any winter activity it is important to dress for the weather. You and your group should be prepared to keep all parts of the body warm at all times. Layering is a good technique to use when dressing for the winter weather.
First, your group members should have a base layer. This layer should be a lightweight, long sleeved shirt and pant layer (long underwear). Ideally this layer should be made of moisture-wicking fabric such as polypropylene. Recommend to your group that they avoid wearing cotton, as this fabric keeps the body very cold when it gets wet.
Second your members will need a middle layer. This layer should provide warmth. Fleece and wool are the best fabrics for this layer. Make sure each person has both a top and bottom middle layer.
Third, all members should be wearing an outer layer. This layer should be wind and/or rain proof. Nylon or Gore-tex fabrics are the best for this outer layer. This will keep your group members warm and dry.
Finally, all members should be wearing a toque, neck warmer and warm mittens. To avoid getting cold feet, recommend to your group that they wear wool socks, and wear winter boots that fit properly. If their boots are too tight, feet will get cold.
Snowshoeing Junior + Intermediate + Senior
Topic: Snowshoeing
Learning Outcome:
• To learn about the sport of snowshoeing.
• To practice the skill of snowshoeing.
The following diagrams show the different lacings that work for different kinds of snow.
Full hide lacing are made of cowhides which have had hair and excess fat removed. It is a very strong material which is water resistant. This full hide can be cut in narrow strips to allow tight lacing recommended for dry snow for in very tight lacing for powdery snow. Large stripes can be used to produce heavy duty spaced lacing well adapted for melting and wet snow. The three frames below are made of traditional wood with lacing
Tight Lacing Spaced lacing Heavy Duty Very tight Lacing
These two frames are a more modern construction. They are durable and light weight.
Fiberglass Frame Aluminum Frame
Photos courtesy of fabersnowshoes.com

99
Outdoor Living ProjectRefeRence BOOk Winter fun
Cross Country Skiing Junior, Intermediate + Senior
TOPIC: Cross-country skiing
LEARNING OUTCOMES:
To wear skis that are the proper size.•
To learn to wax skis properly.•
To ski uphill and downhill.•
To practice the skill of cross-country skiing.•
THE BASICS OF CROSS COUNTRY SKIING
Types of Skis:
With waxable skis you will have to apply a thin layer of wax according to the snow conditions. No-wax skis have a grip pattern molded into the base. You just have to put them on and go.
Length Of Poles:
Your ski poles should be long enough to reach your arm pits. Don’t grip your poles too tightly – your arms will get tired. Push on the straps! Practice skiing with your pinkie fingers extended.
Boots & Bindings:
Ski boots may be the three pin binding type that fit over three pins on the skis and are clamped on. A newer boot is the integrated boot/binding combo. They are light, durable, and gives vastly improved edge control.
Clothing for Cross Country Skiing:
Cross Country skiing demands a fine balance between staying warm and overheating. Overheating is a major concern because you will sweat and if you don’t get rid of that moisture, you’re going to get cold as soon as you stop. Wearing three different layers works best.
Wicking Layer: In order to stay warm, the layer next to your skin MUST stay dry. Synthetics like polypropylene move the perspiration away from your body and into the outer layers. Cotton is cold when wet and will only make you colder when you stop! Wool is also possible too, but polypropylene is much better.
Insulating Layer: Wool sweaters, pile and synthetics are light and easy-to-pack and are best for an insulating layer.
Outer Layer: This protects you from wind and snow. A nylon shell works well for this layer.
Hats & Gloves: You lose a lot of energy through your neck and head, so insulate it with a toque. Cold hands are no fun. Liners, gloves and over-mitts will make a good system to keep your hands warm in almost any weather.
100
Outdoor Living ProjectRefeRence BOOk Winter fun
THE 8 ESSENTIAL SKILLS OF CROSS COUNTRY SKIING
The skills needed to ski XC can be broken down into eight easy-to-learn parts!
For example, the basic snowplow starts by SKIDDING the skis sideways into a, then EDGING them into the snow. When you add WEIGHT TRANSFER, you will start to turn!
By practicing the basic skills for a few minutes each day when you ski, you will become a smoother, more efficient, and faster skier.
SLIDING:• Gliding across the snow with a neutral, balanced stance with your feet side by side.
GLIDING ON ONE SKI:• Gliding across the snow on ONE ski, with your body mass centered over that ski.
WEIGHT• TRANSFER: Shifting your weight from ski to ski.
PUSHING• OFF: Also know as “kicking”, when you grip the snow with the ski to move forward. No wax skis grip with the fish scale pattern, waxable skis grip with the wax, and skating skis grip with the edges.
POLING:• Pushing off against the poles.
EDGING:• Tilting the skis on edge so that the bottom corner digs into the snow.
SKIDDING:• Slipping the skis sideways across the snow
STEERING:• Turning the leg and foot to turn the ski.
Information courtesy of the “New Hope Nordics” Cross Country Ski Club
101
Outdoor Living ProjectRefeRence BOOk Winter fun
Ice Charms Junior + Intermediate
TOPIC: Winter Activities
LEARNING OUTCOMES:
To do a fun winter activity.•
To be creative.•
Tip:
Remind members to be sure to pick up the pie plate and any other materials before they melt and blow away.
Fleece Mitts and/or Headband Intermediate + Senior
TOPIC: Winter activities
LEARNING OUTCOMES:
To make outdoor clothing to keep warm.•
To be creative.•
Tip:
Fleece mitts make an excellent liner for a slightly larger pair of leather mitts. Deer or elk hide is easy to work with and sew. Just make the pattern an inch or so bigger, and use the same process for sewing as you did for the fleece mitts.
Ice Castles Intermediate + Senior
TOPIC: Winter activities
LEARNING OUTCOMES:
To have fun outside (even when it’s cold).•
To be creative.•
To work as a team to accomplish a task.•
TIP:
Remind the members about the danger of tongues sticking to ice. The different colored ice might be tempting to lick.They might also try mixing in some sand, dirt, small twigs, dead leaves etc. for a bit of a different texture.
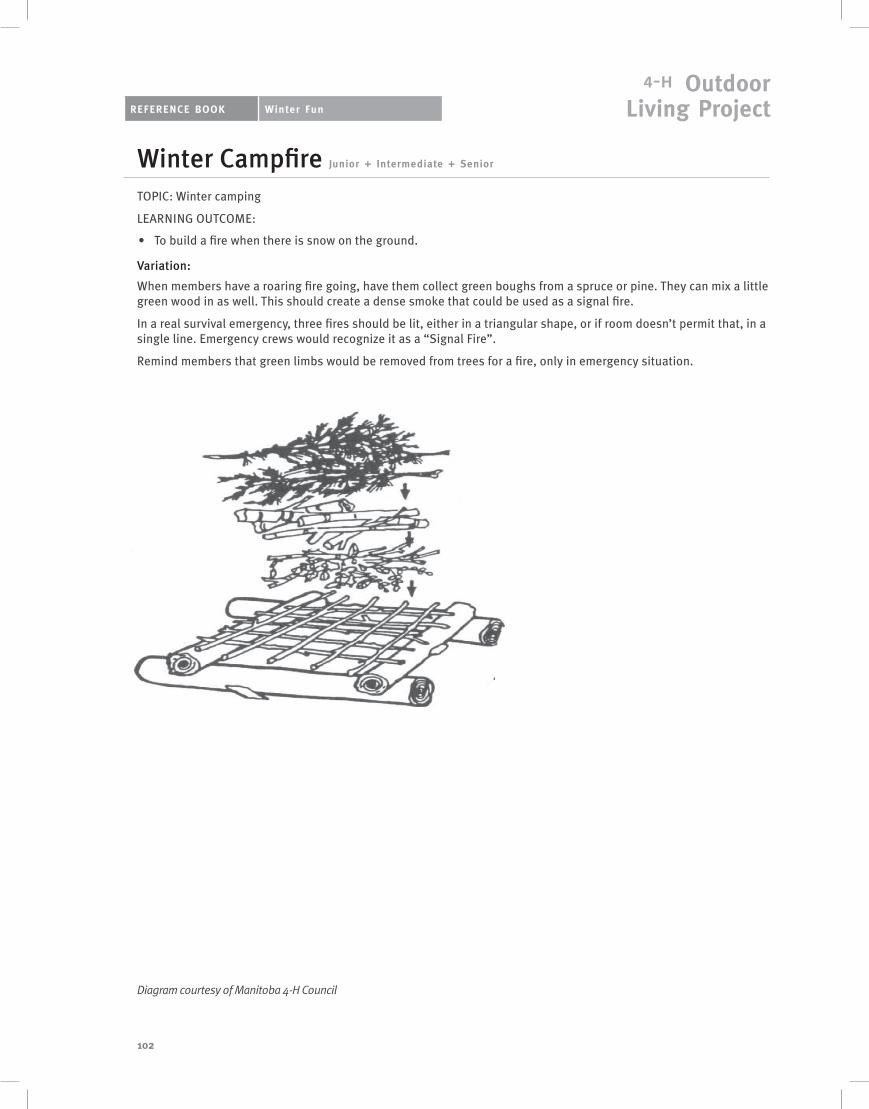
102
Outdoor Living ProjectRefeRence BOOk Winter fun
Winter Campfire Junior + Intermediate + Senior
TOPIC: Winter camping
LEARNING OUTCOME:
To build a fire when there is snow on the ground.•
Variation:
When members have a roaring fire going, have them collect green boughs from a spruce or pine. They can mix a little green wood in as well. This should create a dense smoke that could be used as a signal fire.
In a real survival emergency, three fires should be lit, either in a triangular shape, or if room doesn’t permit that, in a single line. Emergency crews would recognize it as a “Signal Fire”.
Remind members that green limbs would be removed from trees for a fire, only in emergency situation.
Diagram courtesy of Manitoba 4-H Council

103
Outdoor Living ProjectRefeRence BOOk Winter fun
Building a Quinzee Junior + Intermediate + Senior
TOPIC: Winter Camping
LEARNING OUTCOME:
To build a winter shelter.•
To experience sleeping in a winter shelter.•
If there isn’t enough snow (or it has all blown into banks) to make a quinzee, your group might try making a snow cave.
Diagrams courtesy of Alberta Junior Forest Warden Association
Snow Cave
Quinzee

104
Outdoor Living ProjectRefeRence BOOk References
REFERENCESAlberta Junior Forest Warden Association, 1993 (Canada), “Green Tree”.
Brown, W. Derek. www.vortex.plymouth.com. Precipitation: Formation to Measurement.
Cabrera, Kim A. www.bear-tracker.com
Kansas State University of Agriculture Experiment Station and Cooperative Extension Service, 4-H, :”Let’s Go Fishing”, July 2000.
Manitoba 4-H Council, “Outdoor Living Camping and Survival Skills”, 2007.
New Hope Nordic Cross Country Ski Club. http://prnt4u.com
Rosen, Yereth Reuters Jan 24/2002, “Effects of Exxon Valdez Oil Spill Linger in Alaska”.
The United States Environmental Protection Agency. www.epa.gov Sun Wise Program.
The United States Fish and Wildlife, Digital Library. www.fws.gov.
Woodgate Valley Country Park “Leaves”. www.schoolsliason.org.uk.
www.compassstore.com.
www.deltatech.com.
Col. Jeananda. www.enchantedlearning.com
www.fabersnowshoe.com.
www.learningbirdsongs.com.
Muma, Walter. www.ontariowildflowers.com.
www.stemnet.nf.ca.
The Free Dictionary by Farlex Inc. www.thefreedictionary.com.
www.vortex.plymouth.edu.
Windows to the Universe, Our Solar System. www.windows.ucar.edu.
The National Wilderness Preservation System. www.wilderness.net.
www.wordnet.princton.edu.