liquidity management channel setup oracle banking
TRANSCRIPT

Liquidity Management Channel Setup
Oracle Banking Liquidity Management
Release 14.0.0.0.0
[November] [2017]

Table of Contents 1. LIQUIDITY MANAGEMENT APPLICATION CONFIGURATION .......................................................... 1
1.1 INTRODUCTION ............................................................................................................................................... 1 1.2 STEPS TO BE FOLLOWED FOR CONFIGURATION OF ADMINISTRATIVE CONSOLE ............................................... 1
1.2.1 Create Managed Server ......................................................................................................................... 2 1.2.2 Create Machine ..................................................................................................................................... 4 1.2.3 Connect Data Source ............................................................................................................................. 7 1.2.4 Build Liquidity Managements Executable Files .................................................................................... 9 1.2.5 Deploy Liquidity Management Executable Files ................................................................................. 13 1.2.6 Start The Server ................................................................................................................................... 22 1.2.7 Configure SSL ...................................................................................................................................... 26 1.2.8 Test Channel Setup .............................................................................................................................. 26

1 | P a g e
Liquidity Management Channel Setup
1.1 Introduction
In this part basically, we will do configuration of Weblogic Administrative console.
Prerequisite: Weblogic Server should be installed and oracle weblogic server domain should
be installed as mentioned in “Oracle_Banking_Liquidity_Management_12 4 0 0 0_Application_Setup.doc”.
1.2 Steps to be followed for configuration of Administrative console
1. Give the credential in the console page that you have set in Administrator Account screen.
2. Now we can see home screen. In home screen in the left side you will find Domain Structure column. Go to Environment and click on sever under that.

2 | P a g e
1.2.1 Create Managed Server
1. Click on New to create a new server.
Enter the following details.
Server Name : CHANNEL_SERVER
Server Listen Port: 8004
Leave other fields as it is.
2. Click Next. The following screen will come.

3 | P a g e
3. Click on finish. The following screen will come.
4. Click CHANNEL_SERVER, Under Configuration click the Server Start Menu,
In Class Path field add the following Jar path /<<weblogic home>>/wlserver/server/lib/consoleapp/APP-INF/lib/commons-codec-1.3.jar

4 | P a g e
5. Click on Save.
1.2.2 Create Machine
1. Under Environment click on Machine then following screen will come. Click on New.

5 | P a g e
2. Give the following details.
Name: CHANNEL_MACHINE
Machine OS: others
3. Click on Next. Enter “localhost” or the I.P. Address of the system as Listen Address. Click on Finish.

6 | P a g e
4. CHANNEL_MACHINE is created
5. Map CHANNEL_SERVER to CHANNEL_MACHINE
7 | P a g e
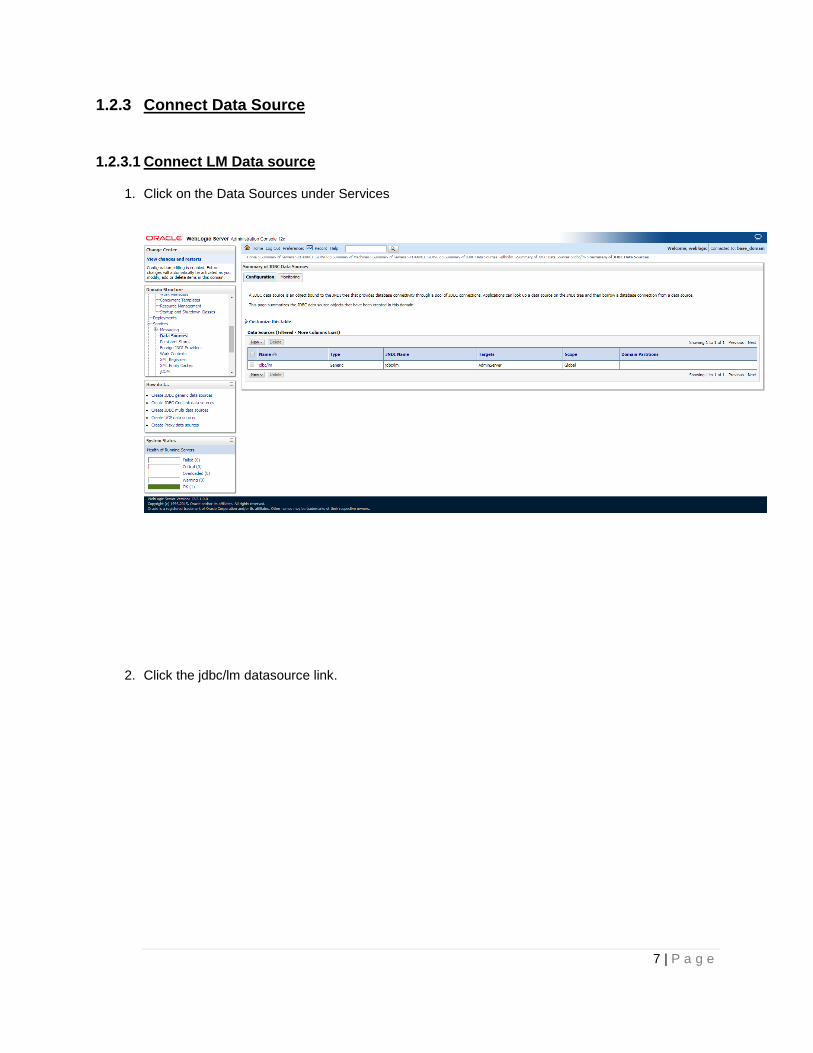
1.2.3 Connect Data Source
1.2.3.1 Connect LM Data source
1. Click on the Data Sources under Services
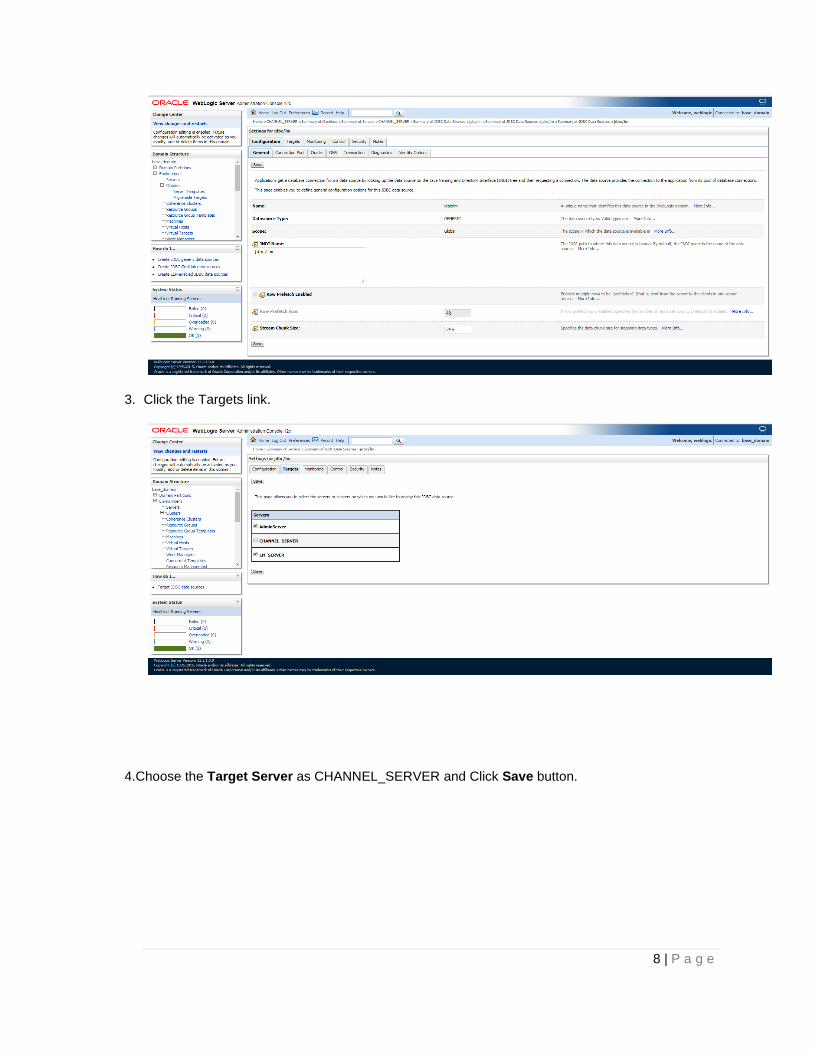
2. Click the jdbc/lm datasource link.
8 | P a g e
3. Click the Targets link.
4.Choose the Target Server as CHANNEL_SERVER and Click Save button.

9 | P a g e
1.2.4 Build Liquidity Managements Executable Files
1. Edit HostConfig.properties file
Go to the below folder (“…\HostWorkspace\host12.2.1\Common\com.ofss.glm.config\src\com\ofss\glm\config\properties”) of the OSDC Package and Open HostConfig.properties and edit the below values:
Protocol = http or https based on the protocol setting of the server
Host = Host Name or IP of the Server that is Listening Address
Port = Listening Port of the managed server (CHANNEL_SERVER)
basicAuthenticationEnable= Enable the basic Authentication for Rest Services.
**Note: Create folder as mentioned in LOG_PATH variable

10 | P a g e
2. Open the Command prompt and Point it to the OSDC package location
3. Add Path
Set the Ant path using the following Commands

11 | P a g e
set path=%path%;D:\ILM\osdc\apache-ant-1.9.7\bin
4. Enter the following command to build the Host side class files.
“ant -f build_host_jars.xml” and press “Enter”

12 | P a g e
13 | P a g e
1.2.5 Deploy Liquidity Management Executable Files
NOTE : If Oracle Fusion Middleware 12c Infrastructure (Example: Weblogic Server) is installed and any domain is available in local system, deployment can be done using the script see section 2.2.6.1 else Manual Deployment can be done see section 2.2.6.2.
1.2.5.1 Deployment using Scripts
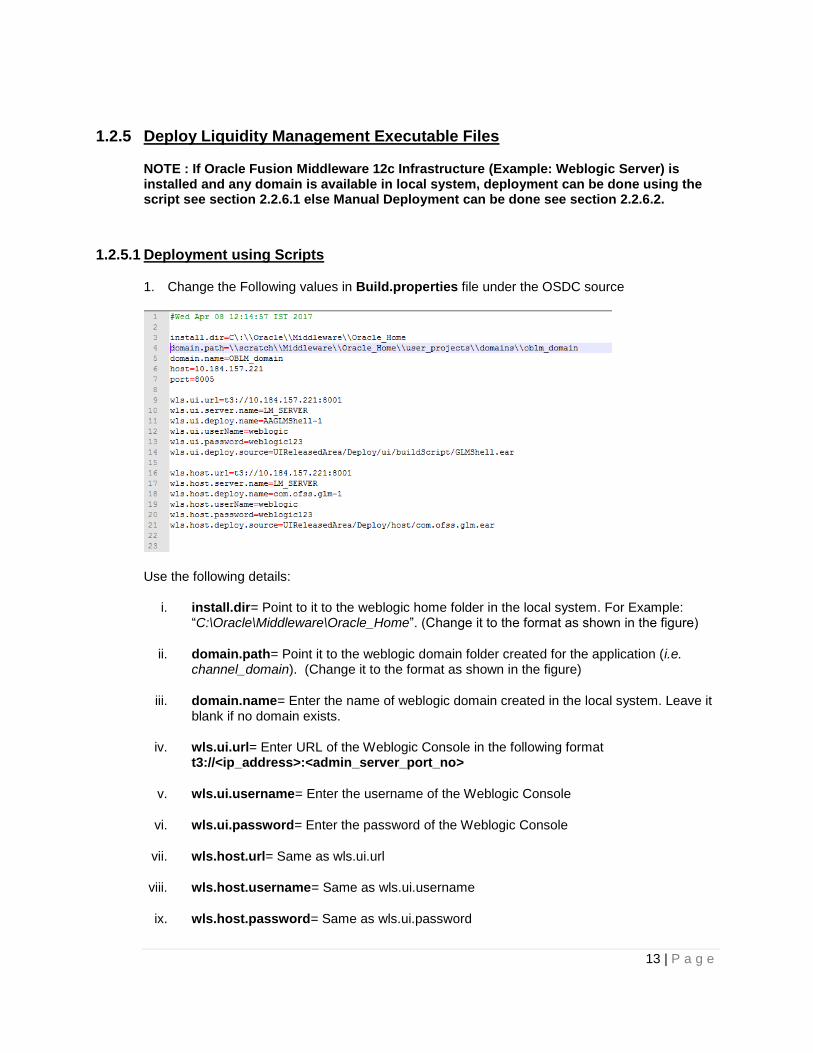
1. Change the Following values in Build.properties file under the OSDC source
Use the following details:
i. install.dir= Point to it to the weblogic home folder in the local system. For Example: “C:\Oracle\Middleware\Oracle_Home”. (Change it to the format as shown in the figure)
ii. domain.path= Point it to the weblogic domain folder created for the application (i.e. channel_domain). (Change it to the format as shown in the figure)
iii. domain.name= Enter the name of weblogic domain created in the local system. Leave it blank if no domain exists.
iv. wls.ui.url= Enter URL of the Weblogic Console in the following format t3://<ip_address>:<admin_server_port_no>
v. wls.ui.username= Enter the username of the Weblogic Console
vi. wls.ui.password= Enter the password of the Weblogic Console
vii. wls.host.url= Same as wls.ui.url
viii. wls.host.username= Same as wls.ui.username
ix. wls.host.password= Same as wls.ui.password

14 | P a g e
Define remaining properties as mentioned in above screen shot.
2. Open the Command prompt and Point it to the OSDC package location
3. Enter the following command to deploy the Host EAR file.
“ant -f DeployhostEar.xml” and press “Enter” (Windows System)

15 | P a g e
[Note: If user is having Linux system use the following command]
“ant -f DeployHostEar_Linux.xml” and press “Enter” (Linux System)

16 | P a g e
1.2.5.2 Manual Deployment:
For Manual Deployment, Ear (Enterprise Application aRchive) file can be deployed either from Local Machine or from server where Weblogic Server is installed, In case if deployment needs to be done from server then use FTP/SFTP client for Windows in order to move the Ear file to the server and do the deployment as given below. Suggested Software for FTP/SFTP client for Windows: Winscp
1.2.5.2.1 CHANNEL EAR Deployment

17 | P a g e
1. Click on Install and go o the Drive Location where the EAR files are kept.
2. Select the Host EAR File com.ofss.glm.channel.ear and click on Next

18 | P a g e
3. Click on Next
4. Select the target Server For example: ITR2

19 | P a g e
5. Select Name for the deployment file For Example: “com.ofss.glm.channel” and click on Next
6. Click on Finish.
20 | P a g e
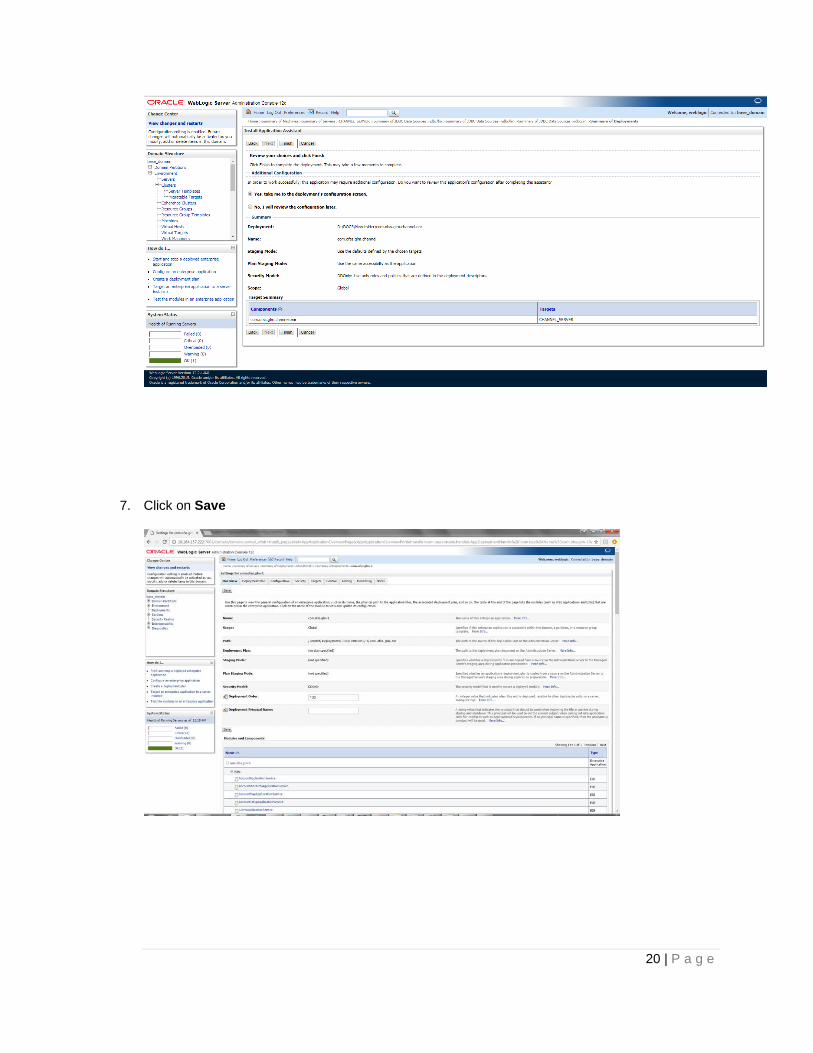
7. Click on Save

21 | P a g e
8. After Clicking Save the Follwing Screen should appear.
9. Click on Deployment and check the two newly installed EAR’s are available and Health column should have the OK status for the EAR’s

22 | P a g e
10. Config.xml change: Need to add the <enforce-valid-basic-auth-credentials> in config.xml file. Go to domain home and open the config.xml file. Add the below tags,
Weblogic domain config.xml file we have to create the below entry
(<WL_DOMAIN_HOME>/config/config.xml)
<security-configuration>
<name>base_domain</name>
<enforce-valid-basic-auth-credentials>false</enforce-valid-basic-auth-credentials> </security-configuration>
1.2.6 Start The Server
1. Go to the domain path of oblm_domain, (e.g. …\Middleware\Oracle_Home\user_projects\domains\OBLM_domain\). Right click on bin folder and Select the “CMD Prompt Here as Administrator” to open the Command Prompt.

23 | P a g e
2. Run the startNodeManager.cmd file
Note: If you get an error stating “5556 port is already in use” then follow the below steps before starting the node manager.
i. Go to Weblogic Console and click on Machines under the Environment tab in Domain Structure section
ii. Click on LM_MACHINE and then go to Node Manager tab

24 | P a g e
iii. Change the Listen Port to 5557 and click on Save
iv. Go to …/ Oracle/Middleware/Oracle_Home/user_projects/domains/oblm_domain/nodemanager path and edit nodemanager.properties file as follows,
ListenPort=5557
Leave the rest of the properties as it was.
v. Save the file
vi. Now, repeat the steps of Section 2.2.7
3. Go to Weblogic console and click on Server under the Environment tab in Domain Structure section
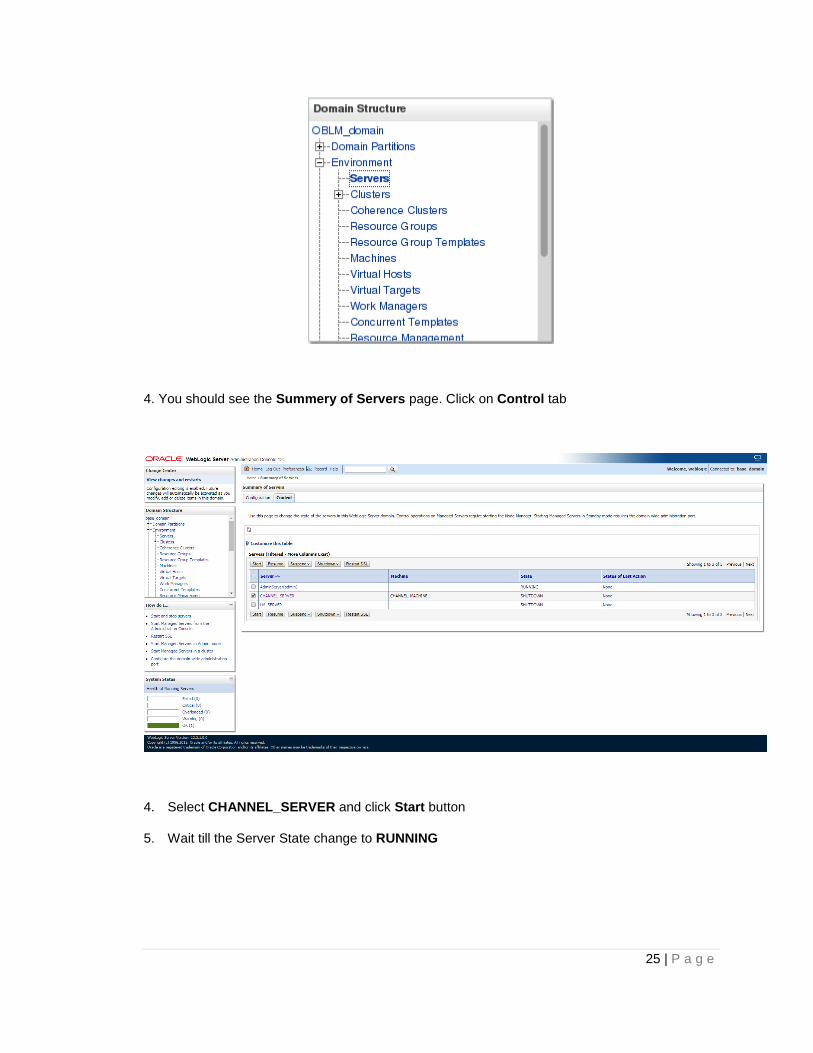
25 | P a g e
4. You should see the Summery of Servers page. Click on Control tab
4. Select CHANNEL_SERVER and click Start button
5. Wait till the Server State change to RUNNING

26 | P a g e
1.2.7 Configure SSL
To Configure SSL, Please refer to the SSL Configuration Manual (Oracle_Banking_Liquidity_Management_12 4 0 0 0_SSL_Configuration.pdf)
1.2.8 Test Channel Setup
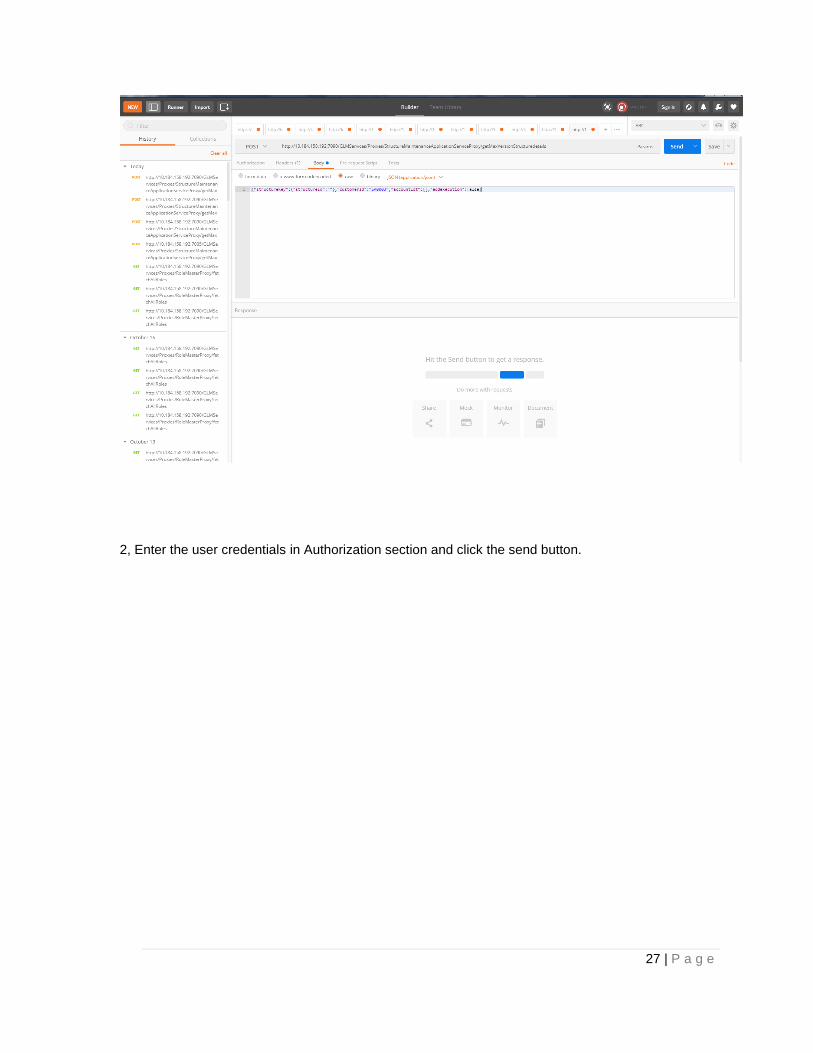
1. Open any Rest Client app EX: (POSTMAN) and select service whether GET or POST and provide the need request in body section.
27 | P a g e
2, Enter the user credentials in Authorization section and click the send button.

28 | P a g e
3, The credentials are correct then Response will be 200 OK and result will be shown in body section.

29 | P a g e
4, The credentials are wrong then Response will be 401 Unauthorized.

30 | P a g e

31 | P a g e
Liquidity Management Channel Setup Oracle Banking Liquidity Management Version 14.0.0.0.0 [November] [2017] Oracle Financial Services Software Limited Oracle Park Off Western Express Highway Goregaon (East) Mumbai, Maharashtra 400 063 India Worldwide Inquiries: Phone: +91 22 6718 3000 Fax:+91 22 6718 3001 www.oracle.com/financialservices/ Copyright © 2017, Oracle and/or its affiliates. All rights reserved. Oracle and Java are registered trademarks of Oracle and/or its affiliates. Other names may be trademarks of their respective owners. U.S. GOVERNMENT END USERS: Oracle programs, including any operating system, integrated software, any programs installed on the hardware, and/or documentation, delivered to U.S. Government end users are "commercial computer software" pursuant to the applicable Federal Acquisition Regulation and agency-specific supplemental regulations. As such, use, duplication, disclosure, modification, and adaptation of the programs, including any operating system, integrated software, any programs installed on the hardware, and/or documentation, shall be subject to license terms and license restrictions applicable to the programs. No other rights are granted to the U.S. Government. This software or hardware is developed for general use in a variety of information management applications. It is not developed or intended for use in any inherently dangerous applications, including applications that may create a risk of personal injury. If you use this software or hardware in dangerous applications, then you shall be responsible to take all appropriate failsafe, backup, redundancy, and other measures to ensure its safe use. Oracle Corporation and its affiliates disclaim any liability for any damages caused by use of this software or hardware in dangerous applications. This software and related documentation are provided under a license agreement containing restrictions on use and disclosure and are protected by intellectual property laws. Except as expressly permitted in your license agreement or allowed by law, you may not use, copy, reproduce, translate, broadcast, modify, license, transmit, distribute, exhibit, perform, publish or display any part, in any form, or by any means. Reverse engineering, disassembly, or decompilation of this software, unless required by law for interoperability, is prohibited. The information contained herein is subject to change without notice and is not warranted to be error-free. If you find any errors, please report them to us in writing. This software or hardware and documentation may provide access to or information on content, products and services from third parties. Oracle Corporation and its affiliates are not responsible for and expressly disclaim all warranties of any kind with respect to third-party content, products, and services. Oracle Corporation and its affiliates will not be responsible for any loss, costs, or damages incurred due to your access to or use of third-party content, products, or services.