led scrolling christmas tree ornament with built ... - instructables.com
TRANSCRIPT
http://www.instructables.com/id/Mini-8x8-LED-matrix-Christmas-display-with-built-i/
Home Sign Up! Browse Community Submit
All Art Craft Food Games Green Home Kids Life Music Offbeat Outdoors Pets Photo Ride Science Tech
LED scrolling Christmas tree ornament with built in video game!by bradsprojects on November 24, 2009
Table of Contents
LED scrolling Christmas tree ornament with built in video game! . . . . . . . . . . . . . . . . . . . . . . . . . . . . . . . . . . . . . . . . . . . . . . . . . . . . . . . . . . . . . . . . . . . . . . . . . . . 1
Intro: LED scrolling Christmas tree ornament with built in video game! . . . . . . . . . . . . . . . . . . . . . . . . . . . . . . . . . . . . . . . . . . . . . . . . . . . . . . . . . . . . . . . . . . . 2
File Downloads . . . . . . . . . . . . . . . . . . . . . . . . . . . . . . . . . . . . . . . . . . . . . . . . . . . . . . . . . . . . . . . . . . . . . . . . . . . . . . . . . . . . . . . . . . . . . . . . . . . . . . . . . . . 2
Step 1: Getting everything together. . . . . . . . . . . . . . . . . . . . . . . . . . . . . . . . . . . . . . . . . . . . . . . . . . . . . . . . . . . . . . . . . . . . . . . . . . . . . . . . . . . . . . . . . . . . . . 3
Step 2: Soldering in the pic microcontroller. . . . . . . . . . . . . . . . . . . . . . . . . . . . . . . . . . . . . . . . . . . . . . . . . . . . . . . . . . . . . . . . . . . . . . . . . . . . . . . . . . . . . . . . 3
Step 3: Ready for programming! . . . . . . . . . . . . . . . . . . . . . . . . . . . . . . . . . . . . . . . . . . . . . . . . . . . . . . . . . . . . . . . . . . . . . . . . . . . . . . . . . . . . . . . . . . . . . . . 4
File Downloads . . . . . . . . . . . . . . . . . . . . . . . . . . . . . . . . . . . . . . . . . . . . . . . . . . . . . . . . . . . . . . . . . . . . . . . . . . . . . . . . . . . . . . . . . . . . . . . . . . . . . . . . . . . 4
Step 4: Solder in the shorting links and slide switch. . . . . . . . . . . . . . . . . . . . . . . . . . . . . . . . . . . . . . . . . . . . . . . . . . . . . . . . . . . . . . . . . . . . . . . . . . . . . . . . . . 5
Step 5: Solder in the two 10k resistors. . . . . . . . . . . . . . . . . . . . . . . . . . . . . . . . . . . . . . . . . . . . . . . . . . . . . . . . . . . . . . . . . . . . . . . . . . . . . . . . . . . . . . . . . . . 5
Step 6: Bend, cut and solder the buttons. . . . . . . . . . . . . . . . . . . . . . . . . . . . . . . . . . . . . . . . . . . . . . . . . . . . . . . . . . . . . . . . . . . . . . . . . . . . . . . . . . . . . . . . . . 5
Step 7: Solder in the battery holder. . . . . . . . . . . . . . . . . . . . . . . . . . . . . . . . . . . . . . . . . . . . . . . . . . . . . . . . . . . . . . . . . . . . . . . . . . . . . . . . . . . . . . . . . . . . . . 6
Step 8: Solder in the 8x8 LED matrix. . . . . . . . . . . . . . . . . . . . . . . . . . . . . . . . . . . . . . . . . . . . . . . . . . . . . . . . . . . . . . . . . . . . . . . . . . . . . . . . . . . . . . . . . . . . 7
Step 9: Testing it out. . . . . . . . . . . . . . . . . . . . . . . . . . . . . . . . . . . . . . . . . . . . . . . . . . . . . . . . . . . . . . . . . . . . . . . . . . . . . . . . . . . . . . . . . . . . . . . . . . . . . . . . 8
Related Instructables . . . . . . . . . . . . . . . . . . . . . . . . . . . . . . . . . . . . . . . . . . . . . . . . . . . . . . . . . . . . . . . . . . . . . . . . . . . . . . . . . . . . . . . . . . . . . . . . . . . . . . . . 9
Comments . . . . . . . . . . . . . . . . . . . . . . . . . . . . . . . . . . . . . . . . . . . . . . . . . . . . . . . . . . . . . . . . . . . . . . . . . . . . . . . . . . . . . . . . . . . . . . . . . . . . . . . . . . . . . . . . 9
http://www.instructables.com/id/Mini-8x8-LED-matrix-Christmas-display-with-built-i/
Intro: LED scrolling Christmas tree ornament with built in video game!
Hello all and welcome to this Christmas tree decoration instructable.
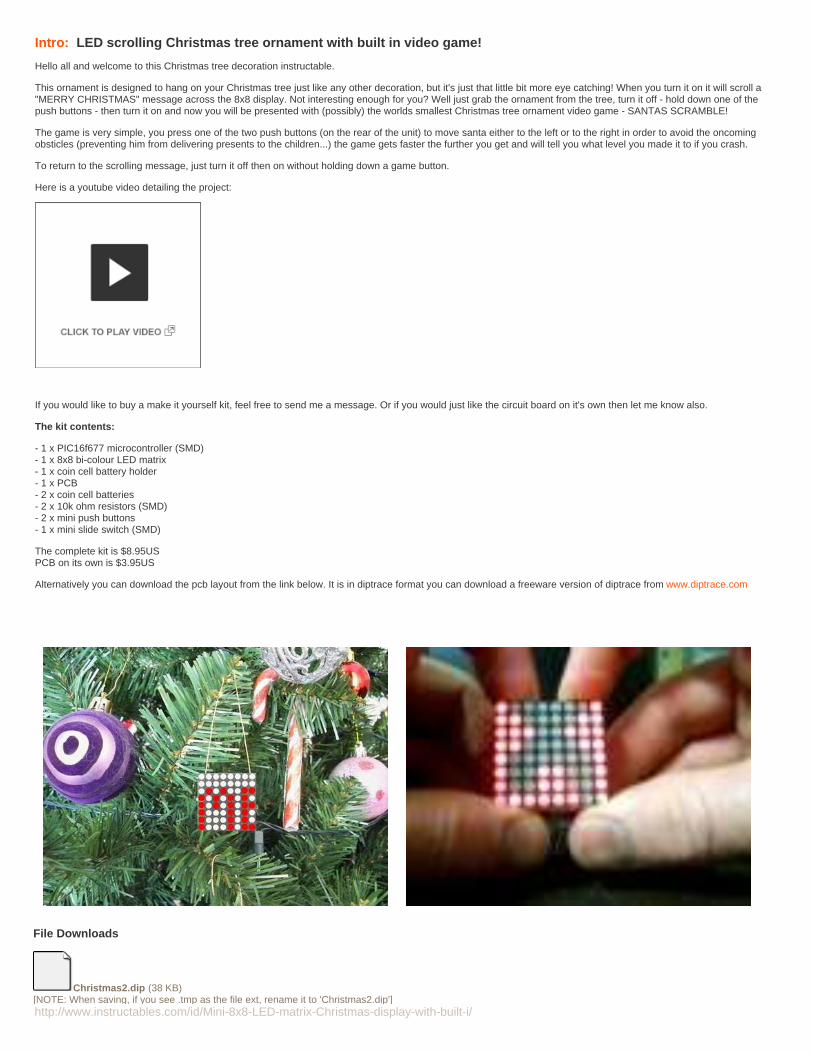
This ornament is designed to hang on your Christmas tree just like any other decoration, but it's just that little bit more eye catching! When you turn it on it will scroll a"MERRY CHRISTMAS" message across the 8x8 display. Not interesting enough for you? Well just grab the ornament from the tree, turn it off - hold down one of thepush buttons - then turn it on and now you will be presented with (possibly) the worlds smallest Christmas tree ornament video game - SANTAS SCRAMBLE!
The game is very simple, you press one of the two push buttons (on the rear of the unit) to move santa either to the left or to the right in order to avoid the oncomingobsticles (preventing him from delivering presents to the children...) the game gets faster the further you get and will tell you what level you made it to if you crash.
To return to the scrolling message, just turn it off then on without holding down a game button.
Here is a youtube video detailing the project:
If you would like to buy a make it yourself kit, feel free to send me a message. Or if you would just like the circuit board on it's own then let me know also.
The kit contents:
- 1 x PIC16f677 microcontroller (SMD)- 1 x 8x8 bi-colour LED matrix- 1 x coin cell battery holder- 1 x PCB- 2 x coin cell batteries- 2 x 10k ohm resistors (SMD)- 2 x mini push buttons- 1 x mini slide switch (SMD)
The complete kit is $8.95USPCB on its own is $3.95US
Alternatively you can download the pcb layout from the link below. It is in diptrace format you can download a freeware version of diptrace from www.diptrace.com
File Downloads
Christmas2.dip (38 KB)[NOTE: When saving, if you see .tmp as the file ext, rename it to 'Christmas2.dip']
http://www.instructables.com/id/Mini-8x8-LED-matrix-Christmas-display-with-built-i/
Step 1: Getting everything together.First off we need to gather together all the items required to make this kit.
The kit contents:
- 1 x PIC16f677 microcontroller (SMD)- 1 x 8x8 bi-colour LED matrix- 1 x coin cell battery holder- 1 x PCB- 2 x coin cell batteries- 2 x 10k ohm resistors (SMD)- 2 x mini push buttons- 1 x mini slide switch (SMD)
You will also need:
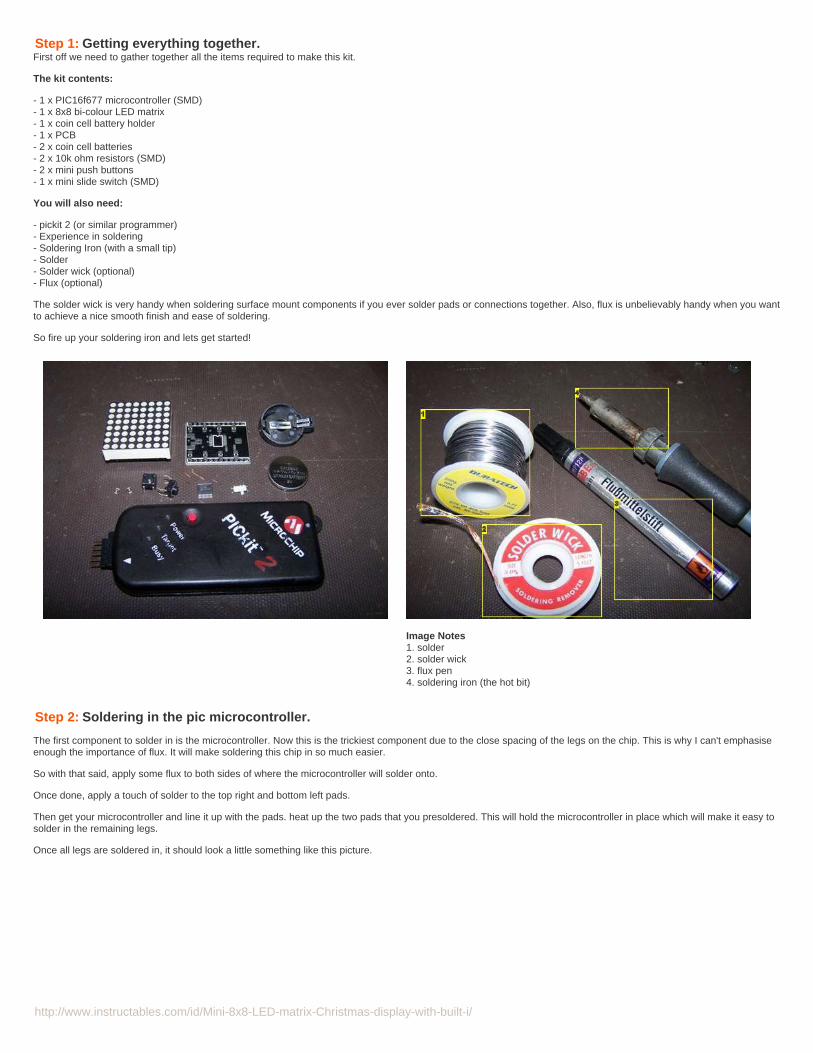
- pickit 2 (or similar programmer)- Experience in soldering- Soldering Iron (with a small tip)- Solder- Solder wick (optional)- Flux (optional)
The solder wick is very handy when soldering surface mount components if you ever solder pads or connections together. Also, flux is unbelievably handy when you wantto achieve a nice smooth finish and ease of soldering.
So fire up your soldering iron and lets get started!
Image Notes1. solder2. solder wick3. flux pen4. soldering iron (the hot bit)
Step 2: Soldering in the pic microcontroller.
The first component to solder in is the microcontroller. Now this is the trickiest component due to the close spacing of the legs on the chip. This is why I can't emphasiseenough the importance of flux. It will make soldering this chip in so much easier.
So with that said, apply some flux to both sides of where the microcontroller will solder onto.
Once done, apply a touch of solder to the top right and bottom left pads.
Then get your microcontroller and line it up with the pads. heat up the two pads that you presoldered. This will hold the microcontroller in place which will make it easy tosolder in the remaining legs.
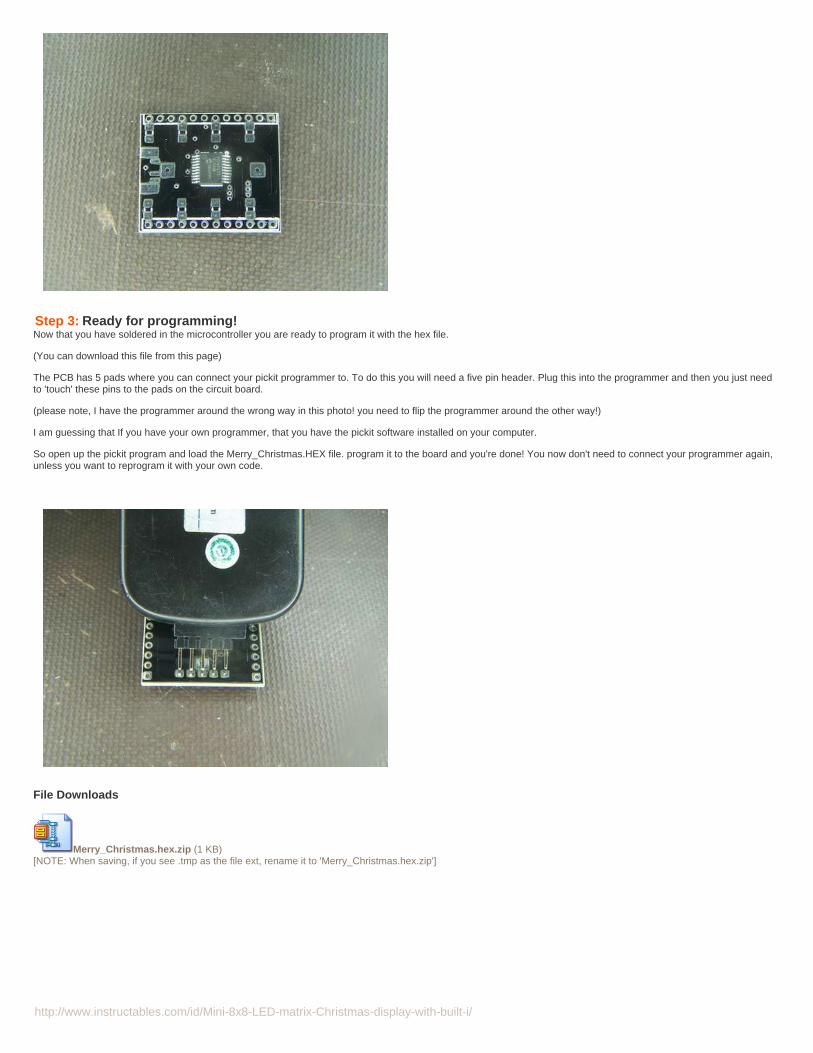
Once all legs are soldered in, it should look a little something like this picture.
http://www.instructables.com/id/Mini-8x8-LED-matrix-Christmas-display-with-built-i/
Step 3: Ready for programming!Now that you have soldered in the microcontroller you are ready to program it with the hex file.
(You can download this file from this page)
The PCB has 5 pads where you can connect your pickit programmer to. To do this you will need a five pin header. Plug this into the programmer and then you just needto 'touch' these pins to the pads on the circuit board.
(please note, I have the programmer around the wrong way in this photo! you need to flip the programmer around the other way!)
I am guessing that If you have your own programmer, that you have the pickit software installed on your computer.
So open up the pickit program and load the Merry_Christmas.HEX file. program it to the board and you're done! You now don't need to connect your programmer again,unless you want to reprogram it with your own code.
File Downloads
Merry_Christmas.hex.zip (1 KB)[NOTE: When saving, if you see .tmp as the file ext, rename it to 'Merry_Christmas.hex.zip']
http://www.instructables.com/id/Mini-8x8-LED-matrix-Christmas-display-with-built-i/
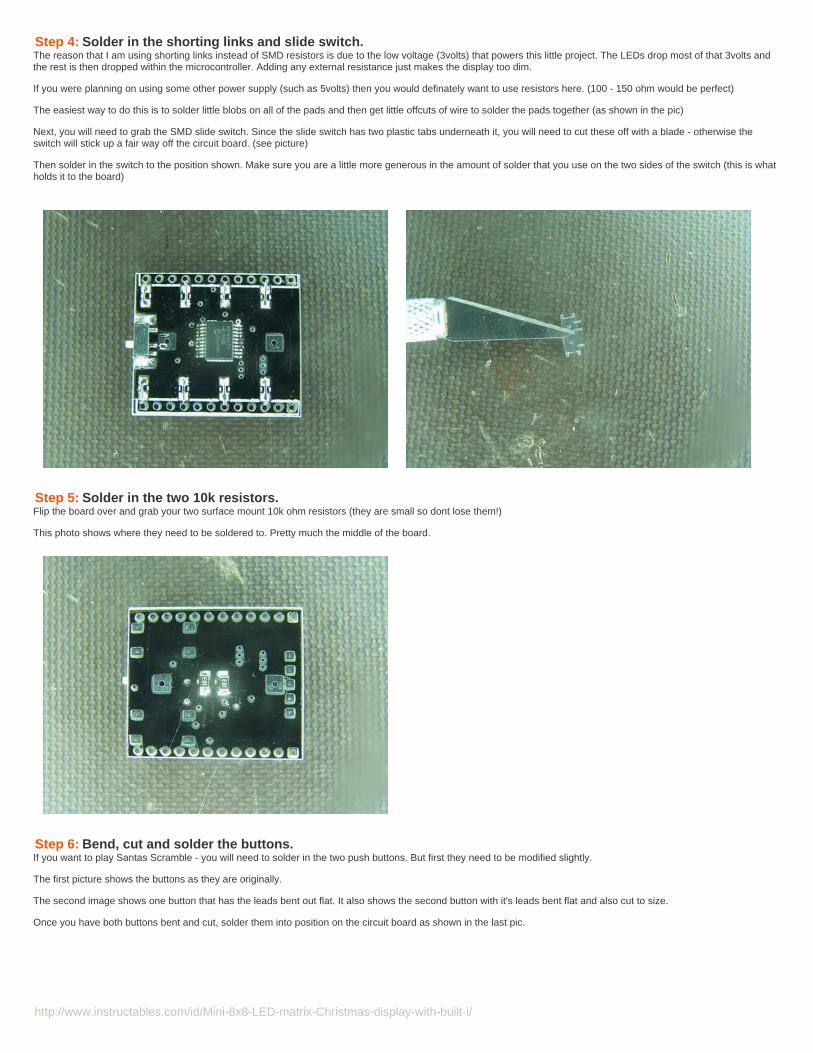
Step 4: Solder in the shorting links and slide switch.The reason that I am using shorting links instead of SMD resistors is due to the low voltage (3volts) that powers this little project. The LEDs drop most of that 3volts andthe rest is then dropped within the microcontroller. Adding any external resistance just makes the display too dim.
If you were planning on using some other power supply (such as 5volts) then you would definately want to use resistors here. (100 - 150 ohm would be perfect)
The easiest way to do this is to solder little blobs on all of the pads and then get little offcuts of wire to solder the pads together (as shown in the pic)
Next, you will need to grab the SMD slide switch. Since the slide switch has two plastic tabs underneath it, you will need to cut these off with a blade - otherwise theswitch will stick up a fair way off the circuit board. (see picture)
Then solder in the switch to the position shown. Make sure you are a little more generous in the amount of solder that you use on the two sides of the switch (this is whatholds it to the board)
Step 5: Solder in the two 10k resistors.Flip the board over and grab your two surface mount 10k ohm resistors (they are small so dont lose them!)
This photo shows where they need to be soldered to. Pretty much the middle of the board.
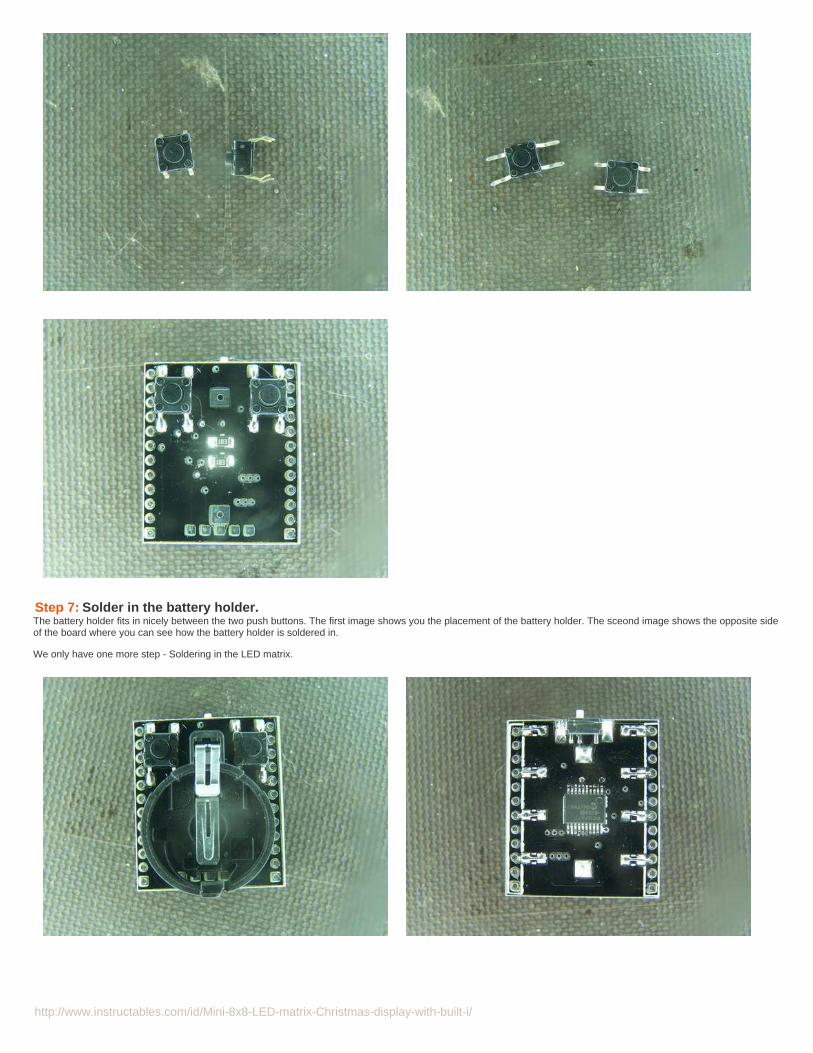
Step 6: Bend, cut and solder the buttons.If you want to play Santas Scramble - you will need to solder in the two push buttons. But first they need to be modified slightly.
The first picture shows the buttons as they are originally.
The second image shows one button that has the leads bent out flat. It also shows the second button with it's leads bent flat and also cut to size.
Once you have both buttons bent and cut, solder them into position on the circuit board as shown in the last pic.
http://www.instructables.com/id/Mini-8x8-LED-matrix-Christmas-display-with-built-i/
Step 7: Solder in the battery holder.The battery holder fits in nicely between the two push buttons. The first image shows you the placement of the battery holder. The sceond image shows the opposite sideof the board where you can see how the battery holder is soldered in.
We only have one more step - Soldering in the LED matrix.
http://www.instructables.com/id/Mini-8x8-LED-matrix-Christmas-display-with-built-i/
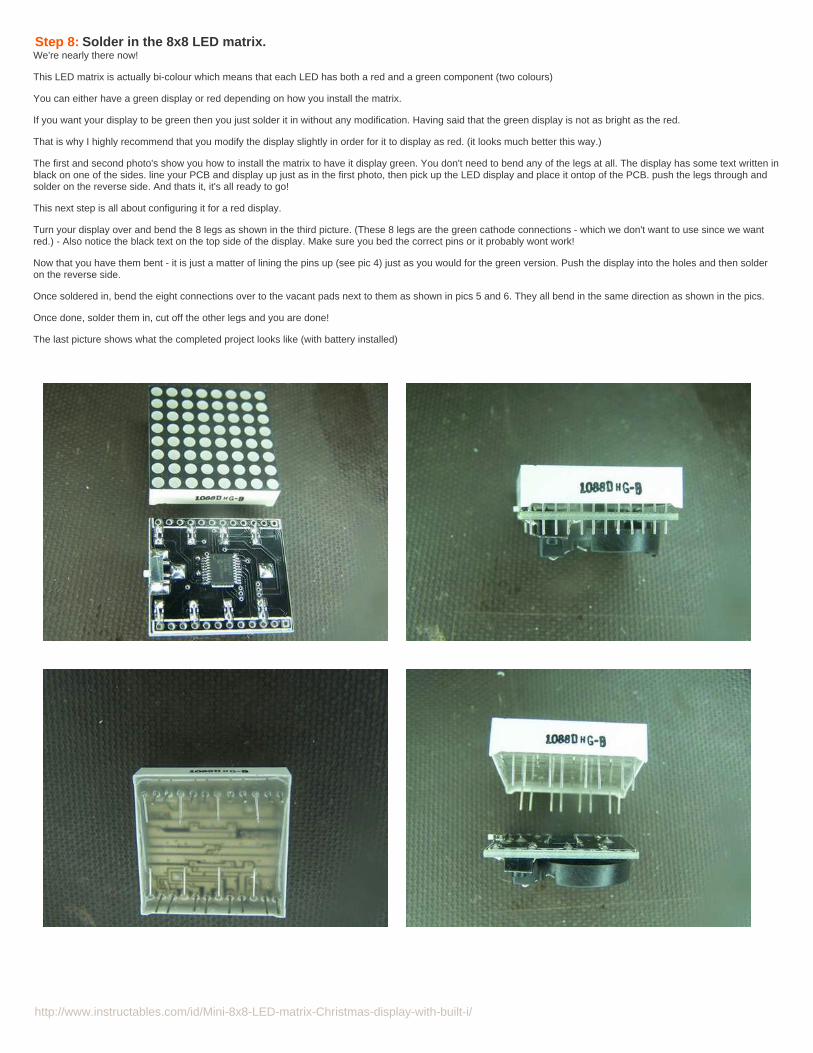
Step 8: Solder in the 8x8 LED matrix.We're nearly there now!
This LED matrix is actually bi-colour which means that each LED has both a red and a green component (two colours)
You can either have a green display or red depending on how you install the matrix.
If you want your display to be green then you just solder it in without any modification. Having said that the green display is not as bright as the red.
That is why I highly recommend that you modify the display slightly in order for it to display as red. (it looks much better this way.)
The first and second photo's show you how to install the matrix to have it display green. You don't need to bend any of the legs at all. The display has some text written inblack on one of the sides. line your PCB and display up just as in the first photo, then pick up the LED display and place it ontop of the PCB. push the legs through andsolder on the reverse side. And thats it, it's all ready to go!
This next step is all about configuring it for a red display.
Turn your display over and bend the 8 legs as shown in the third picture. (These 8 legs are the green cathode connections - which we don't want to use since we wantred.) - Also notice the black text on the top side of the display. Make sure you bed the correct pins or it probably wont work!
Now that you have them bent - it is just a matter of lining the pins up (see pic 4) just as you would for the green version. Push the display into the holes and then solderon the reverse side.
Once soldered in, bend the eight connections over to the vacant pads next to them as shown in pics 5 and 6. They all bend in the same direction as shown in the pics.
Once done, solder them in, cut off the other legs and you are done!
The last picture shows what the completed project looks like (with battery installed)
http://www.instructables.com/id/Mini-8x8-LED-matrix-Christmas-display-with-built-i/
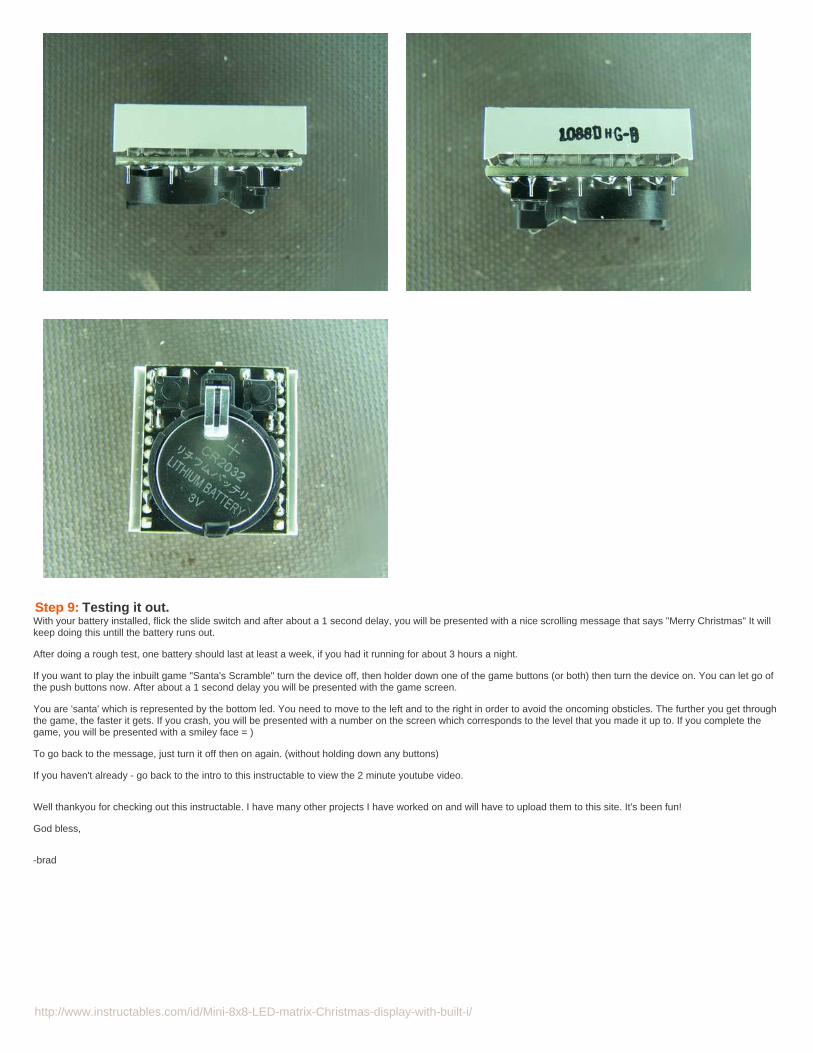
Step 9: Testing it out.With your battery installed, flick the slide switch and after about a 1 second delay, you will be presented with a nice scrolling message that says "Merry Christmas" It willkeep doing this untill the battery runs out.
After doing a rough test, one battery should last at least a week, if you had it running for about 3 hours a night.
If you want to play the inbuilt game "Santa's Scramble" turn the device off, then holder down one of the game buttons (or both) then turn the device on. You can let go ofthe push buttons now. After about a 1 second delay you will be presented with the game screen.
You are 'santa' which is represented by the bottom led. You need to move to the left and to the right in order to avoid the oncoming obsticles. The further you get throughthe game, the faster it gets. If you crash, you will be presented with a number on the screen which corresponds to the level that you made it up to. If you complete thegame, you will be presented with a smiley face = )
To go back to the message, just turn it off then on again. (without holding down any buttons)
If you haven't already - go back to the intro to this instructable to view the 2 minute youtube video.
Well thankyou for checking out this instructable. I have many other projects I have worked on and will have to upload them to this site. It's been fun!
God bless,
-brad

http://www.instructables.com/id/Mini-8x8-LED-matrix-Christmas-display-with-built-i/
Related Instructables
LED Matrix Test1 using anAS1107 IC(video) byearthshine
Christmas cardwith inbuilt retrovideo game forunder $10 bybradsprojects
LED ScollingDot Matrix Font& GraphicsGenerator 5x85x7 8x8 byroznerd
Pong with 8x8Led Matrix onArduino (video)by bsoares
Make a 8x10L.E.D Matrix bySyst3mX
Arduino drivenRGB LEDScrolling Clock(video) byearthshine
Comments
37 comments Add Comment
choop101 says: Apr 7, 2011. 12:22 PM REPLYBrad,
great site. Would you be willing to sell me a board with chip and program installed.(through step 3) This would be a good project for me and my 5YO. If so letme know what it would cost and how to complete transaction.
thanks
imonaboatfool says: Jan 21, 2011. 9:07 PM REPLYDo you have a PDF of the circuit board so I can etch my own...I have all the other parts and it would be so much easier not having to solder all those jumperwiresThanks
imonaboatfool says: Jan 20, 2011. 1:09 PM REPLYhey brad, i was just wondering if you still sell these kits if so where can i get one
bradsprojects says: Jan 21, 2011. 11:44 AM REPLYHi,
Unfortunately I only have the circuit boards left (about 100 of them!)
I am pretty sure that I have run out of all the other parts. I can check to see what I can find for you though.
pedronanez says: Jun 9, 2010. 1:49 PM REPLYhey brad ,I want to ask you an important question would you be able to send me this kit but with the microchip allready soldered and with the hex files of thegame and the merry cristmas,like you did in step 3. HOPE YOU RESOND BRAD AND HAVE A NICE DAY.
bradsprojects says: Jun 11, 2010. 9:03 PM REPLYI can do that, although it would cost a bit extra due to the time involved. It would cost US$15 all up. Just let me know if you're still happy to go ahead. -brad
Adum24 says: Dec 4, 2009. 5:26 PM REPLYHey bradsprojects, I noticed on your sight you talk a lot about Jesus. I like that about you. I'm the same way.
bradsprojects says: Dec 8, 2009. 3:51 AM REPLYThanks = )
I figure that God has given me the ability to work with electronics - so why not spread the great news about Him where I can = )
Adum24 says: Dec 9, 2009. 2:07 PM REPLYSo are you Catholic? Or Christian?
Zaphod Beeblebrox says: Dec 27, 2009. 1:20 PM REPLYi must say i am a tad bit offended by that,i am Catholic wich is just a kind of Christian,i do not like it when people say Catholics are not part of theChristian Faith.wether that is what you ment or not i don't know but i would appreciate a change of wording. thank you very much.

http://www.instructables.com/id/Mini-8x8-LED-matrix-Christmas-display-with-built-i/
bradsprojects says: Dec 27, 2009. 2:13 PM REPLYWe all belong to the one church family. As long as the faith is centered on Jesus then that's what matters. there are many denominationswhich all look to Jesus = )
Zaphod Beeblebrox says: Dec 27, 2009. 3:12 PM REPLYyep i know i just was just a bit annoyed by the wording :-)
Adum24 says: Jan 26, 2010. 12:54 PM REPLYUh, hey I am super sorry. I wasn't trying to offend any one. Really. I'm absolutely sorry.
Zaphod Beeblebrox says: Jan 26, 2010. 1:04 PM REPLYthanks alot,I dought that you were meaning what i thought you were at first :-)
Adum24 says: Feb 3, 2010. 11:46 AM REPLYYour Welcome. I'm just grateful no one was offended.
Zaphod Beeblebrox says: Feb 3, 2010. 11:52 AM REPLYyay! :-)
bradsprojects says: Dec 11, 2009. 2:24 AM REPLYI am Christian.
Adum24 says: Dec 14, 2009. 7:54 PM REPLYHey thanks you've been a huge help. I mean, we're talking sears tower big. Or is it the willis tower? Anyway thanks a lot for all the help and i'lltry to send you a patch.
bradsprojects says: Dec 16, 2009. 4:42 PM REPLYThanks very much. Glad I could help you out = )
rilson says: Jan 8, 2010. 7:22 PM REPLYYour project is excellent!How can purchase a kit?
bradsprojects says: Jan 9, 2010. 8:12 PM REPLYHi, you can get them straight from me (all though I only have a limited number left)<
--modder-- says: Dec 27, 2009. 9:25 AM REPLYwhere can I buy a pcb?
Adum24 says: Dec 2, 2009. 5:28 PM REPLYHey, I want to make stuff like tis, but have no experience what so ever. Could you tell me where to start?
bradsprojects says: Dec 4, 2009. 2:55 AM REPLYHi Adum24,
Have a look at my electronics website www.bradsprojects.com for some tutorials in programming microcontrollers and also some information on buildingmy other projects.
I will one day transfer all of my projects over to instructables.com (when I get the time)
You can also feel free to drop by the forum on my site and ask questions on the various projects that I have made. (eg if you wanted to build them foryourself and wanted help with something etc..)

http://www.instructables.com/id/Mini-8x8-LED-matrix-Christmas-display-with-built-i/
Adum24 says: Dec 4, 2009. 2:48 PM REPLYGreat,thanks! I'll definetely check it out. But do you know a book or other website to learn all this too? I mean like I also want to know what liketransistors and resistors do and stuff on a circuit board do. Does your website have this? Don't take this the wrong way, though.
bradsprojects says: Dec 8, 2009. 3:54 AM REPLYThere certainly are plenty of websites out there that can help you. Google is your friend!
I don't reallu have any information on my site just about individual components, but if you are going to be working with microcontrollers, then youwill certainly be interfacing them with transistors and resistors along the way.
I think more specifically you will want to search google for the operation of BJT's (bipoloar junction transistors) rather than fets.
Adum24 says: Dec 9, 2009. 2:08 PM REPLYOK, thanks alot!
bradsprojects says: Dec 11, 2009. 2:25 AM REPLYno problem buddy!
WhyIsThisOpen says: Dec 5, 2009. 9:56 AM REPLYThat's neat. I would consider something like this except that I don't think it would be worth writing in assembly again. (Congrats on having the patience forthat.)
I'm guessing that the circuitry for the multicolor games is too large to fit on the back of the grid?
Also, to answer your question about Xmas, although most people don't know it, the X is actually an abbreviation for Christ. (See the wikipedia. )
HANKS965 says: Dec 1, 2009. 9:17 AM REPLYi would like a kit
bradsprojects says: Dec 1, 2009. 11:49 AM REPLYHi, just send me an email through instructables.com so I can figure out the postage post to you.
-brad
ac1D says: Nov 26, 2009. 7:17 AM REPLYI like game like this! Ill make one only for the game :D
bradsprojects says: Nov 26, 2009. 11:54 AM REPLYIf you'd just like to make the game, I have full details on my electronics site (that I will one day upload to this site)
just goto:
www.bradsprojects.com
then click on "The Great Race"
it has sourcecode, schematic and parts list on that page.
ac1D says: Nov 26, 2009. 5:27 PM REPLYIt's a kind of a pocket version of your 8x8 game system. Would it be possible to adapt other game?(chopper ftw!)
bradsprojects says: Nov 26, 2009. 6:17 PM REPLYYes that would be possible.
The only thing with this version is that it is only one colour. Whereas the 8x8 game system has upto three (red / green / orange)
So it is a little more limited with this version
ac1D says: Nov 27, 2009. 6:31 PM REPLYAlso there is only two button, but most game could be OK with two anyway.What ever, I already started this one, and ill build your 8x8 game system too. I have a perfect housing for it.

http://www.instructables.com/id/Mini-8x8-LED-matrix-Christmas-display-with-built-i/
bradsprojects says: Nov 29, 2009. 4:07 AM REPLYSounds great, let me know how you go with building the project and if you have any problems.