kronos instructions - franklin county schools
TRANSCRIPT

0
FRANKLIN COUNTY PUBLIC SCHOOLS
Franklin.kyschools.us
KRONOS INSTRUCTIONS
1
TABLE OF CONTENTS
KRONOS INSTRUCTION GUIDE
EMPLOYEE INSTRUCTIONS –
Logging in to KRONOS………………………………………………………………2
Security Changes………………………………………………………................3
Completing your Timesheet………………………………………..…………..6
Entering in Sick Time……………………………………………………..………..8
Entering in Extended, Conference, Jury Duty, etc…………………..10
Requesting Time Off …………………………………………………..…………11
Rejected Timesheet………………………………………………..……………..14
MANAGER (ONLY) INSTRUCTIONS –
Approving/Rejecting Time Off Requests…………………………………17
Deleting Time Off on an Employee Timesheet…………….…………19
Approving/Rejecting Timesheets……………………………….………….21
2
KRONOS Instructions
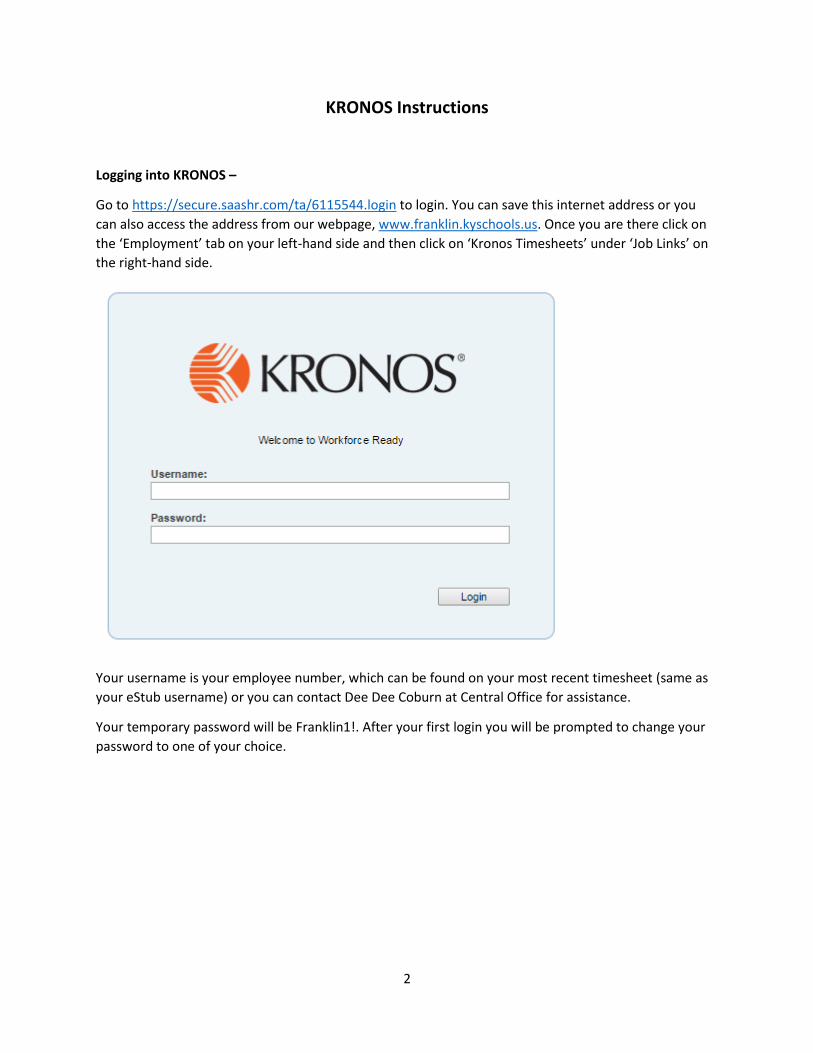
Logging into KRONOS –
Go to https://secure.saashr.com/ta/6115544.login to login. You can save this internet address or you
can also access the address from our webpage, www.franklin.kyschools.us. Once you are there click on
the ‘Employment’ tab on your left-hand side and then click on ‘Kronos Timesheets’ under ‘Job Links’ on
the right-hand side.
Your username is your employee number, which can be found on your most recent timesheet (same as
your eStub username) or you can contact Dee Dee Coburn at Central Office for assistance.
Your temporary password will be Franklin1!. After your first login you will be prompted to change your
password to one of your choice.
3
Security Changes –
KRONOS has made some changes to “enhance” the security of their Workforce Ready platform. You may
have already noticed that you are prompted to change your password to include one of each of the
following:
Upper Case Letter
Lower Case Letter
Number
Symbol
KRONOS also requires you to authenticate the computer you’re using and validate your identity. It will
require you to have a code sent to your email and once you retrieve that code, you must enter it into
KRONOS before logging on. Any time you use a different computer, it will ask you for a code (the code
will be different each time, you cannot use the same code). KRONOS will only ask you to do this once for
each computer you use UNLESS you do not log in for 30 days, then it will ask you for a code again.
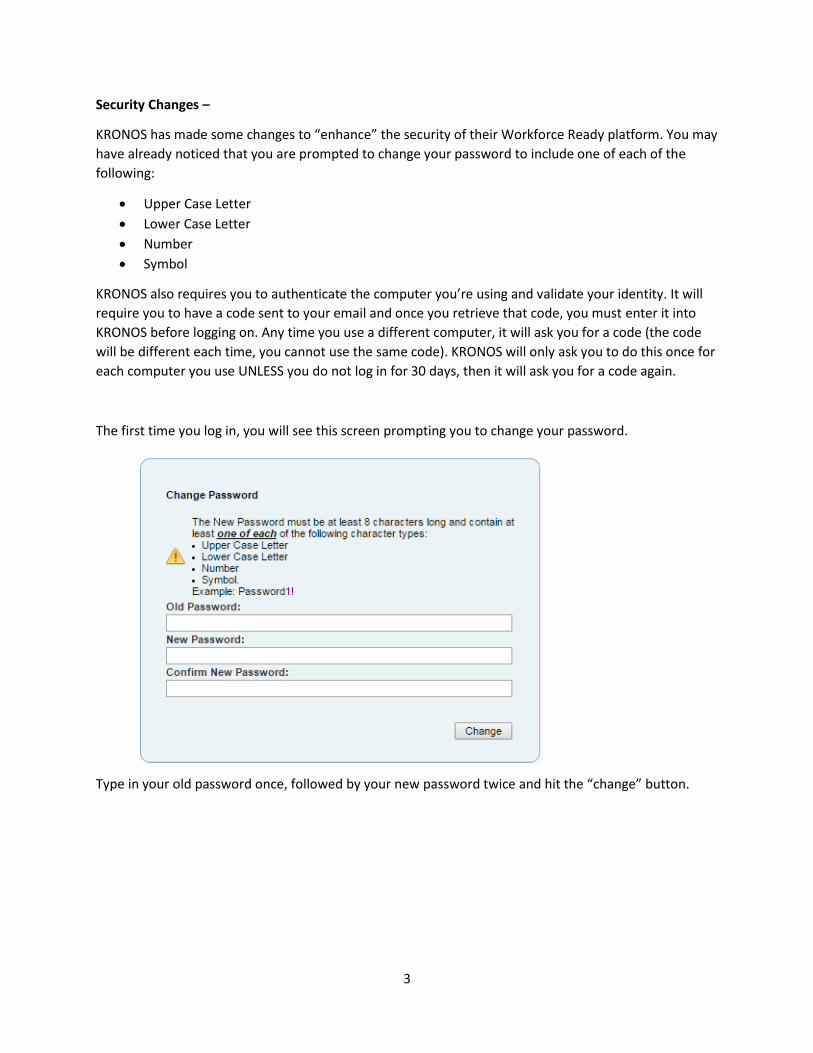
The first time you log in, you will see this screen prompting you to change your password.
Type in your old password once, followed by your new password twice and hit the “change” button.
4
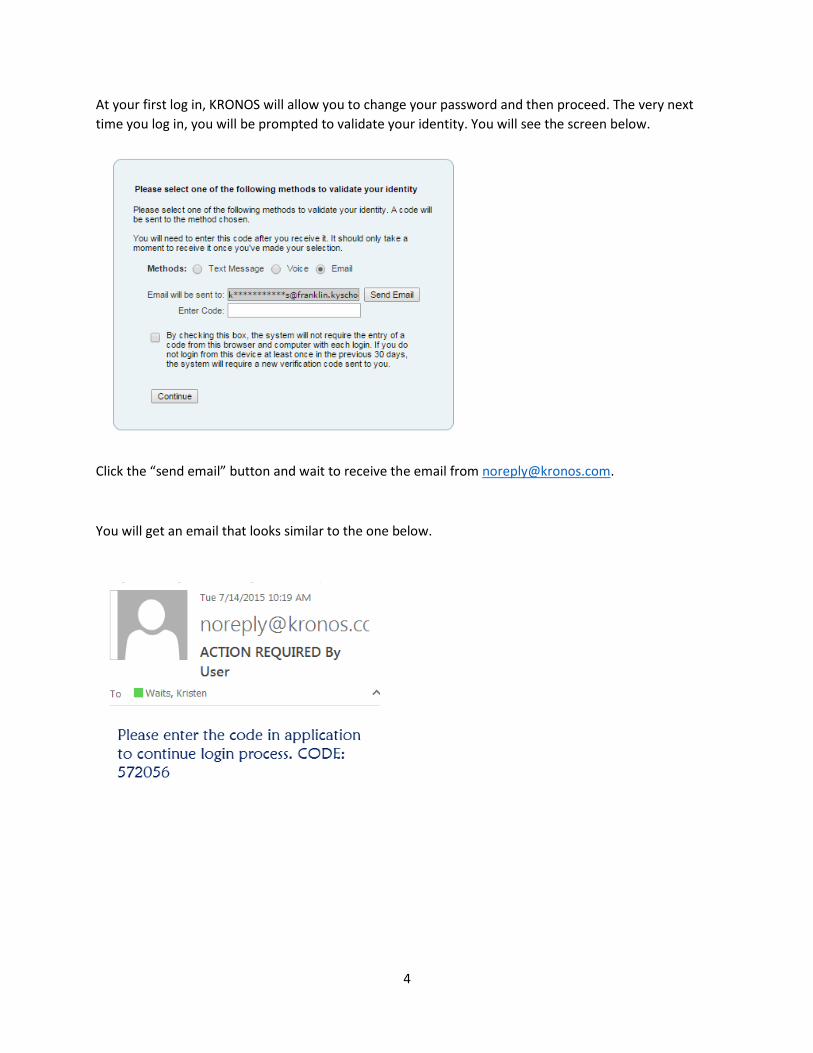
At your first log in, KRONOS will allow you to change your password and then proceed. The very next
time you log in, you will be prompted to validate your identity. You will see the screen below.
Click the “send email” button and wait to receive the email from [email protected].
You will get an email that looks similar to the one below.
5
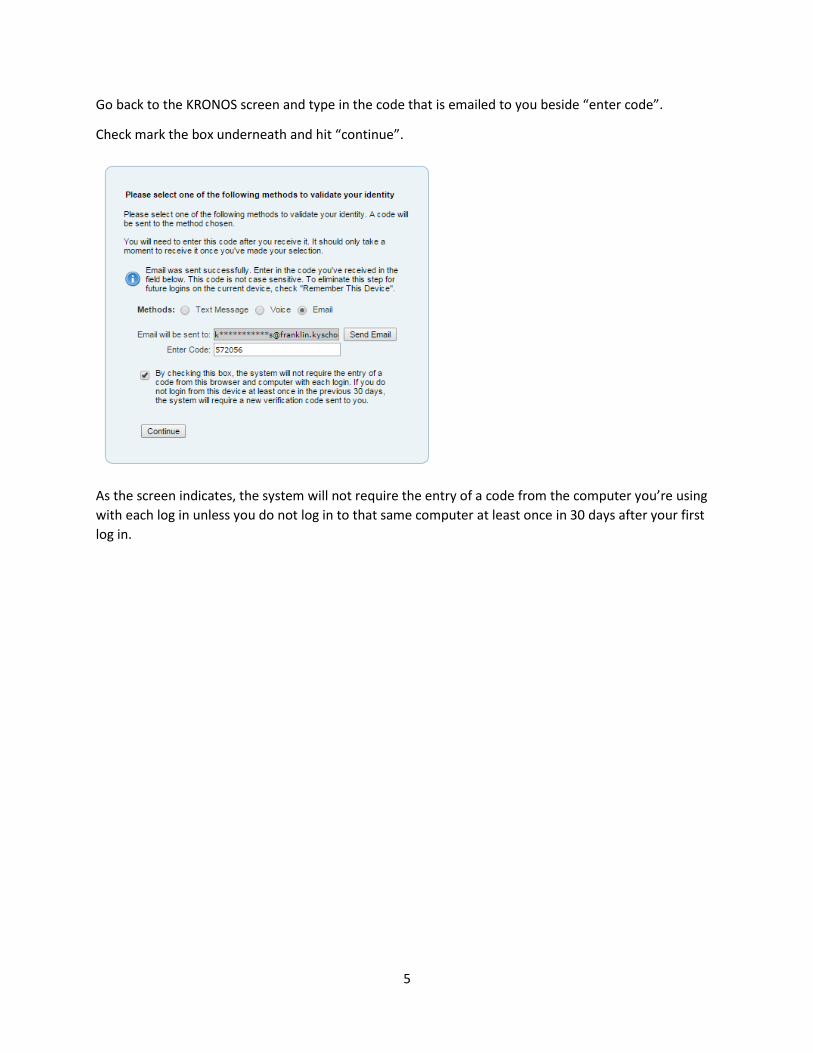
Go back to the KRONOS screen and type in the code that is emailed to you beside “enter code”.
Check mark the box underneath and hit “continue”.
As the screen indicates, the system will not require the entry of a code from the computer you’re using
with each log in unless you do not log in to that same computer at least once in 30 days after your first
log in.
6
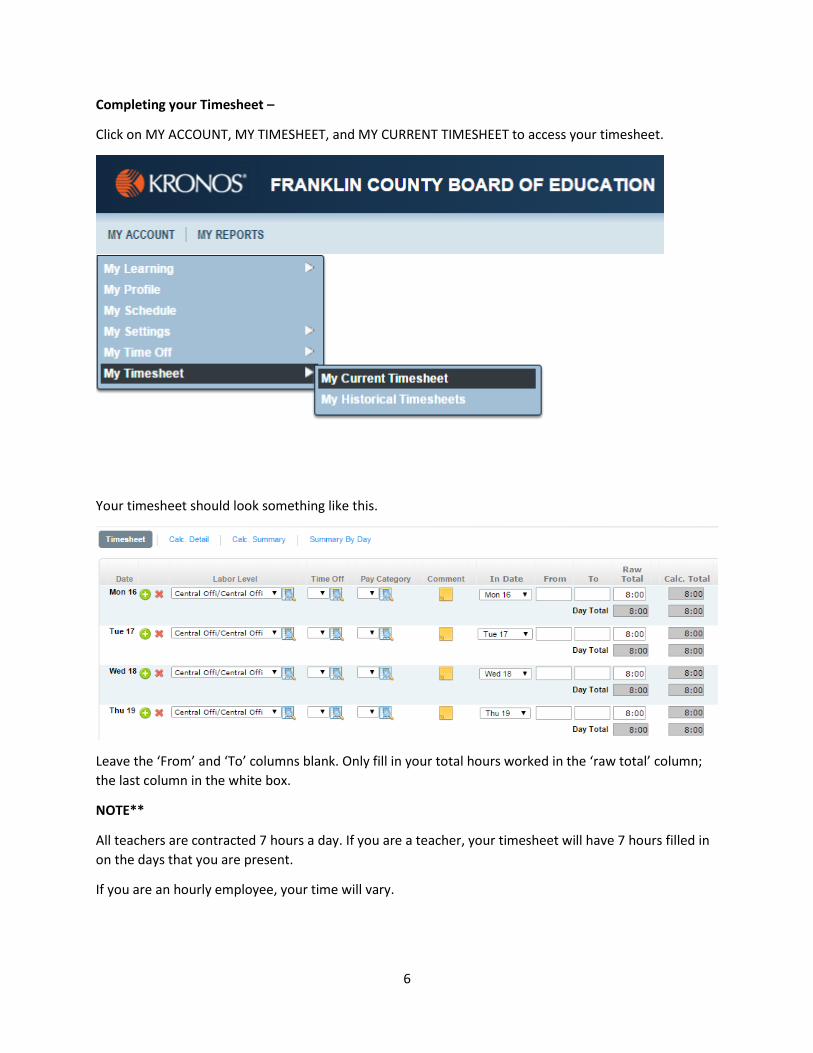
Completing your Timesheet –
Click on MY ACCOUNT, MY TIMESHEET, and MY CURRENT TIMESHEET to access your timesheet.
Your timesheet should look something like this.
Leave the ‘From’ and ‘To’ columns blank. Only fill in your total hours worked in the ‘raw total’ column;
the last column in the white box.
NOTE**
All teachers are contracted 7 hours a day. If you are a teacher, your timesheet will have 7 hours filled in
on the days that you are present.
If you are an hourly employee, your time will vary.
7
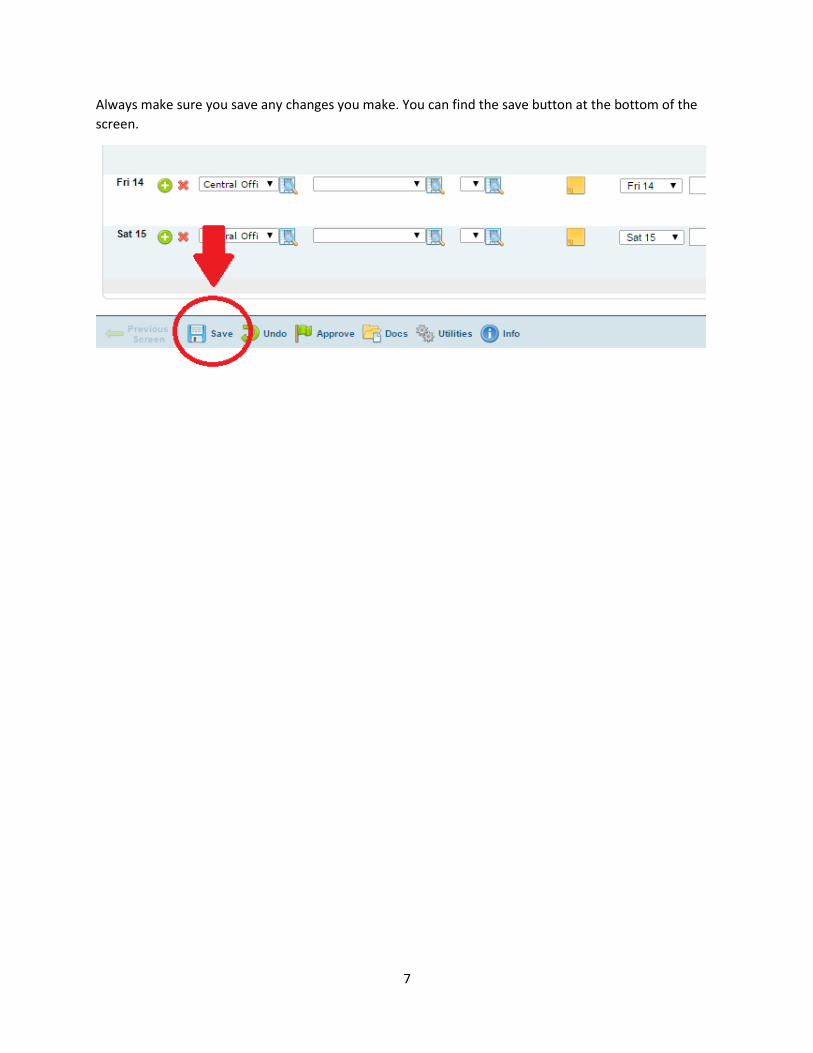
Always make sure you save any changes you make. You can find the save button at the bottom of the
screen.
8
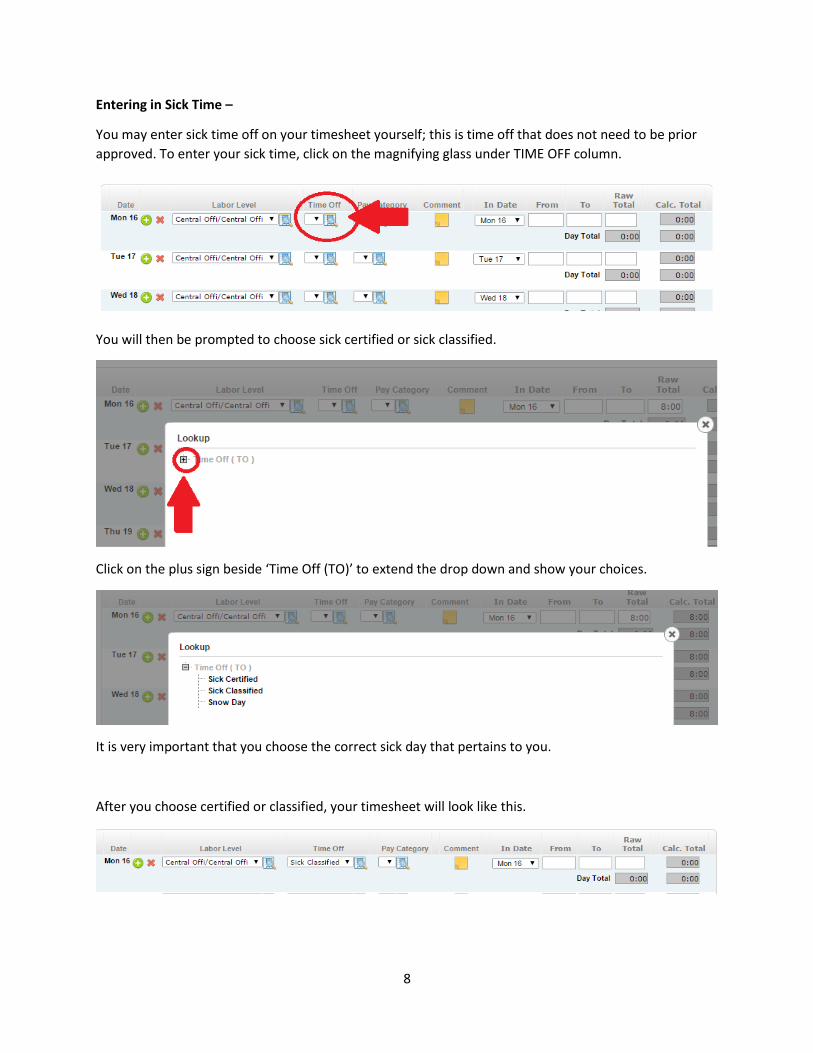
Entering in Sick Time –
You may enter sick time off on your timesheet yourself; this is time off that does not need to be prior
approved. To enter your sick time, click on the magnifying glass under TIME OFF column.
You will then be prompted to choose sick certified or sick classified.
Click on the plus sign beside ‘Time Off (TO)’ to extend the drop down and show your choices.
It is very important that you choose the correct sick day that pertains to you.
After you choose certified or classified, your timesheet will look like this.
9
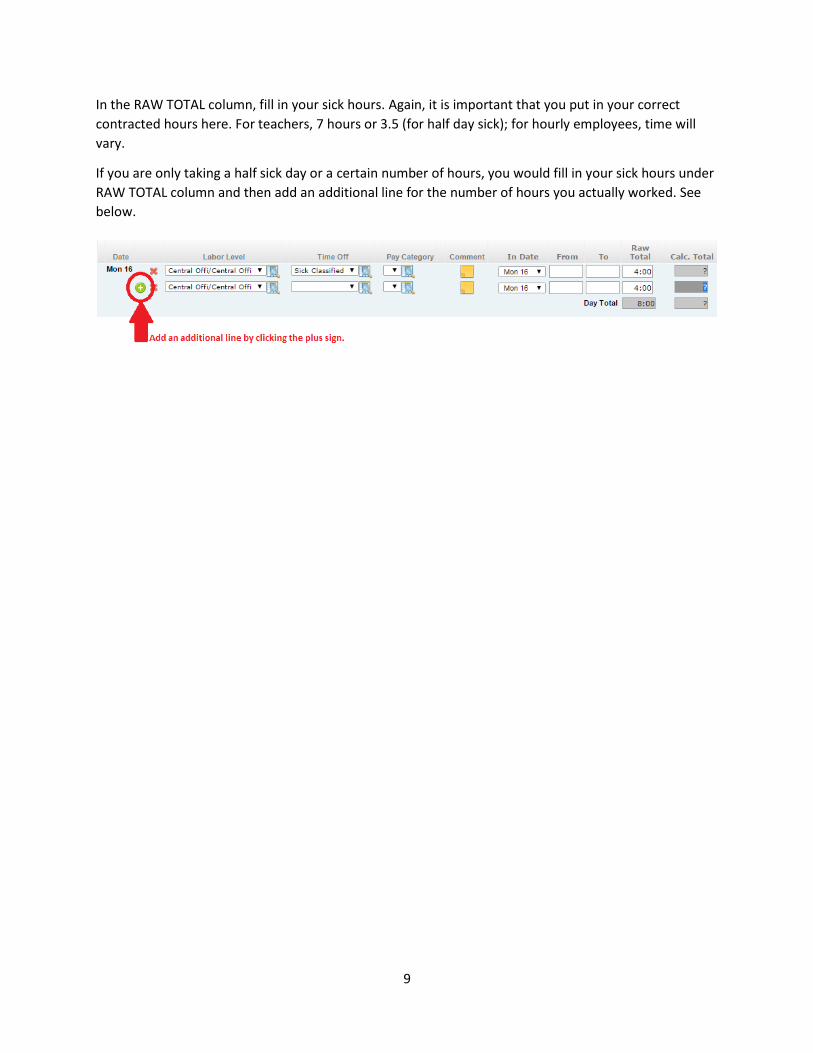
In the RAW TOTAL column, fill in your sick hours. Again, it is important that you put in your correct
contracted hours here. For teachers, 7 hours or 3.5 (for half day sick); for hourly employees, time will
vary.
If you are only taking a half sick day or a certain number of hours, you would fill in your sick hours under
RAW TOTAL column and then add an additional line for the number of hours you actually worked. See
below.
10
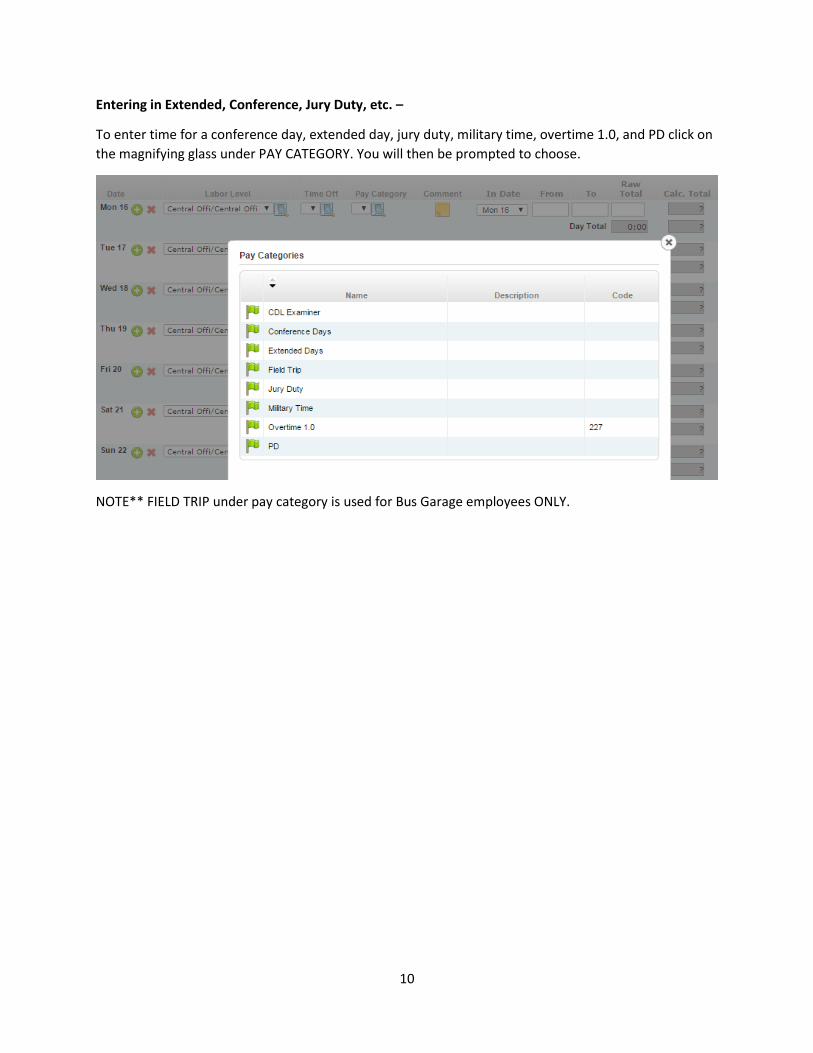
Entering in Extended, Conference, Jury Duty, etc. –
To enter time for a conference day, extended day, jury duty, military time, overtime 1.0, and PD click on
the magnifying glass under PAY CATEGORY. You will then be prompted to choose.
NOTE** FIELD TRIP under pay category is used for Bus Garage employees ONLY.
11
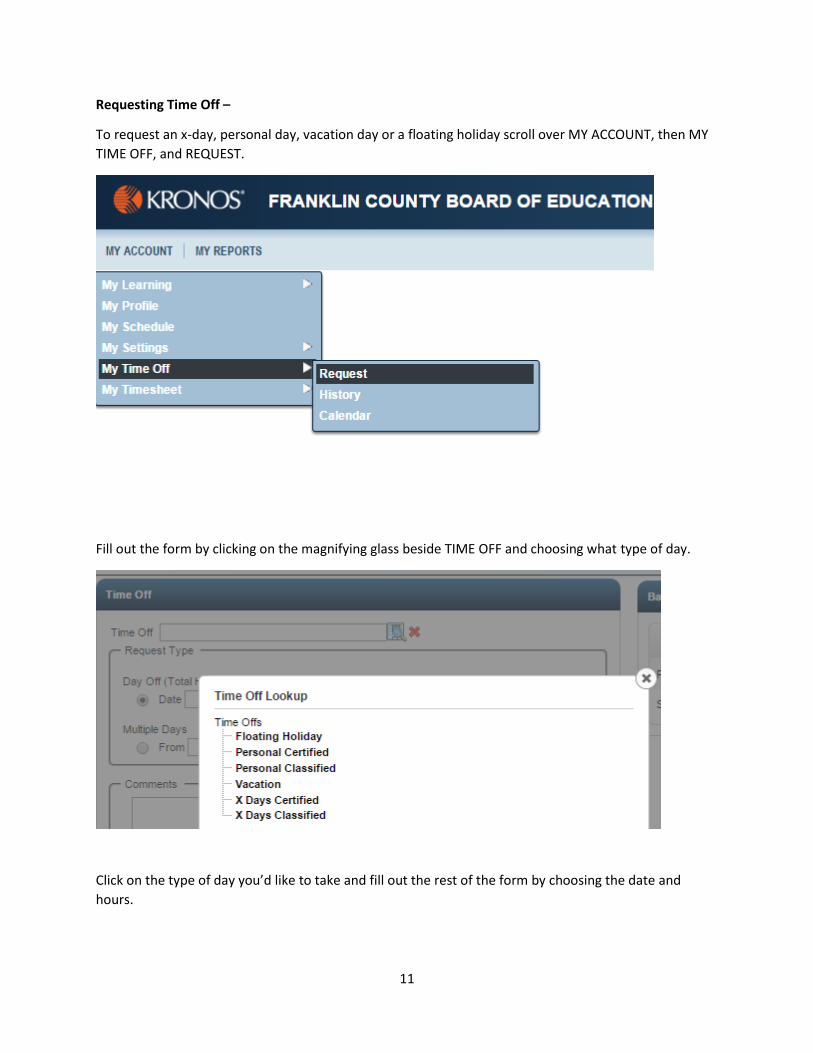
Requesting Time Off –
To request an x-day, personal day, vacation day or a floating holiday scroll over MY ACCOUNT, then MY
TIME OFF, and REQUEST.
Fill out the form by clicking on the magnifying glass beside TIME OFF and choosing what type of day.
Click on the type of day you’d like to take and fill out the rest of the form by choosing the date and
hours.

12
NOTE** It is very important to only choose the type of day that pertains to you. Not all employees
receive X days, vacation days, floating holiday etc.
You can also request multiple days.
13
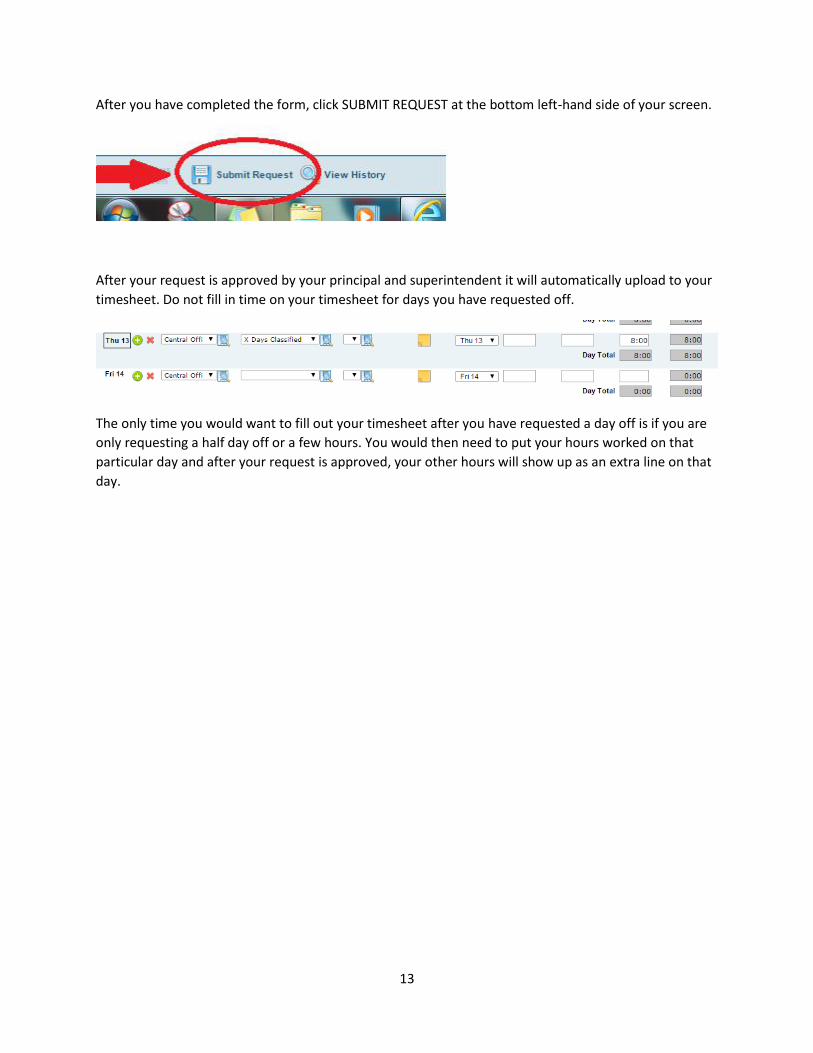
After you have completed the form, click SUBMIT REQUEST at the bottom left-hand side of your screen.
After your request is approved by your principal and superintendent it will automatically upload to your
timesheet. Do not fill in time on your timesheet for days you have requested off.
The only time you would want to fill out your timesheet after you have requested a day off is if you are
only requesting a half day off or a few hours. You would then need to put your hours worked on that
particular day and after your request is approved, your other hours will show up as an extra line on that
day.
14
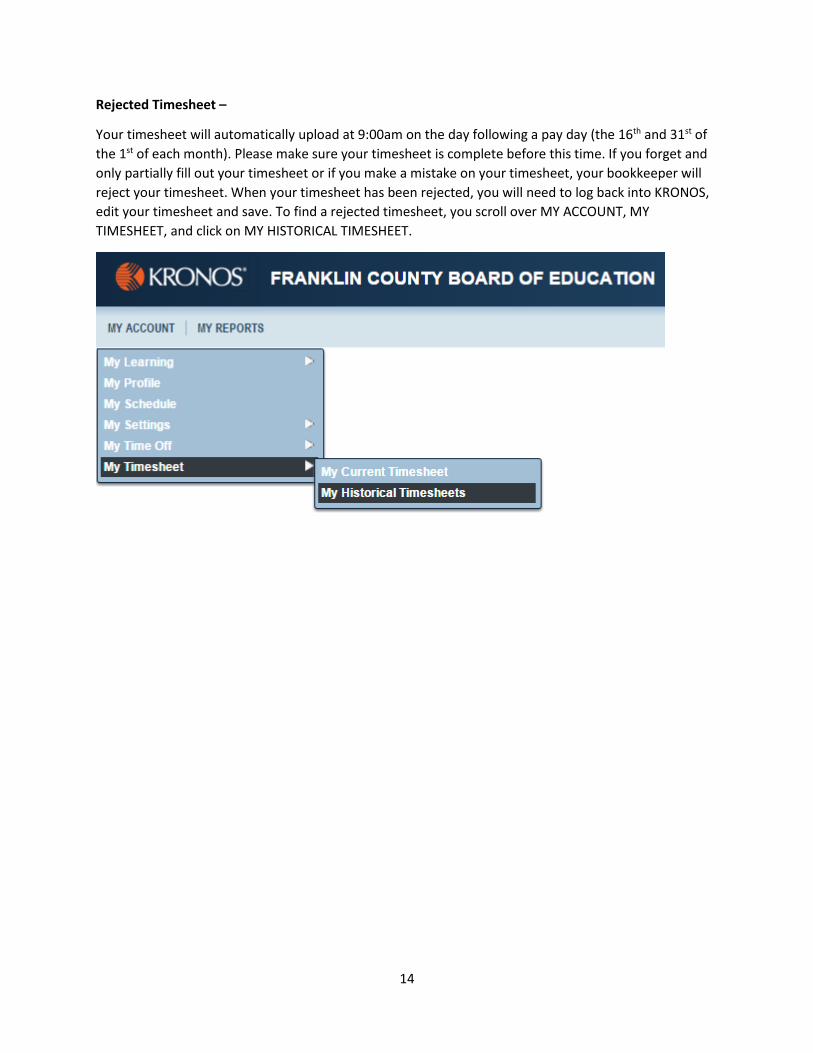
Rejected Timesheet –
Your timesheet will automatically upload at 9:00am on the day following a pay day (the 16th and 31st of
the 1st of each month). Please make sure your timesheet is complete before this time. If you forget and
only partially fill out your timesheet or if you make a mistake on your timesheet, your bookkeeper will
reject your timesheet. When your timesheet has been rejected, you will need to log back into KRONOS,
edit your timesheet and save. To find a rejected timesheet, you scroll over MY ACCOUNT, MY
TIMESHEET, and click on MY HISTORICAL TIMESHEET.
15
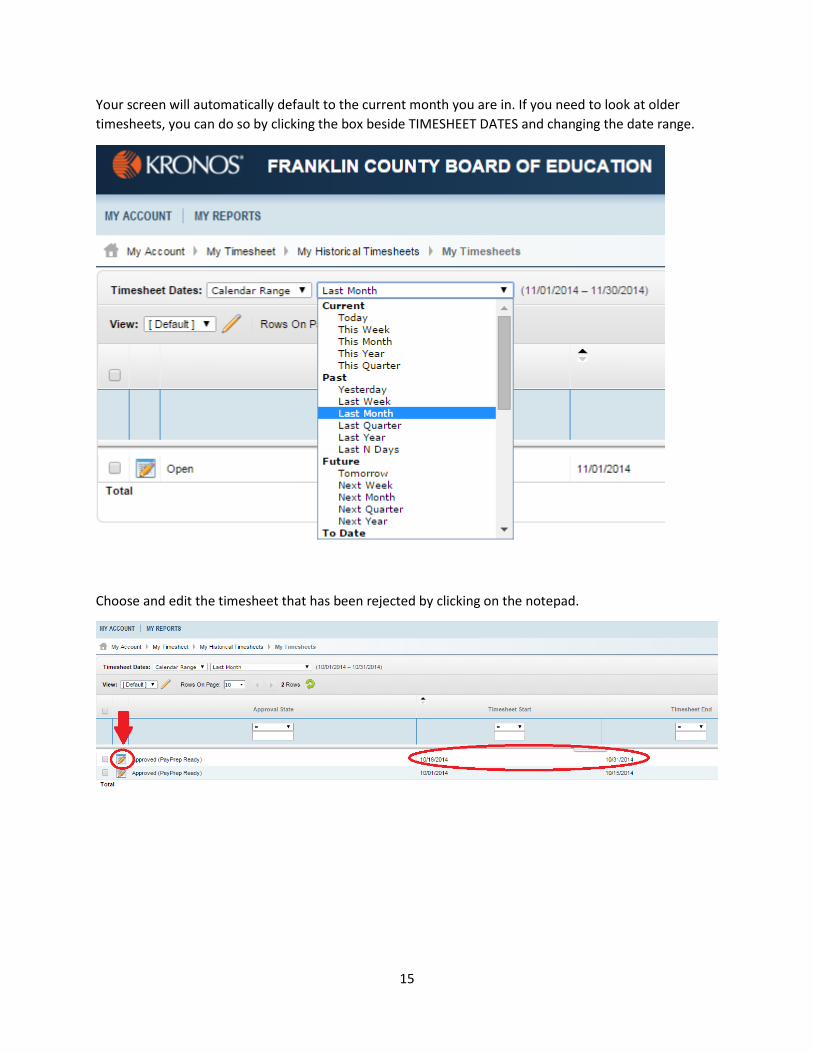
Your screen will automatically default to the current month you are in. If you need to look at older
timesheets, you can do so by clicking the box beside TIMESHEET DATES and changing the date range.
Choose and edit the timesheet that has been rejected by clicking on the notepad.
16
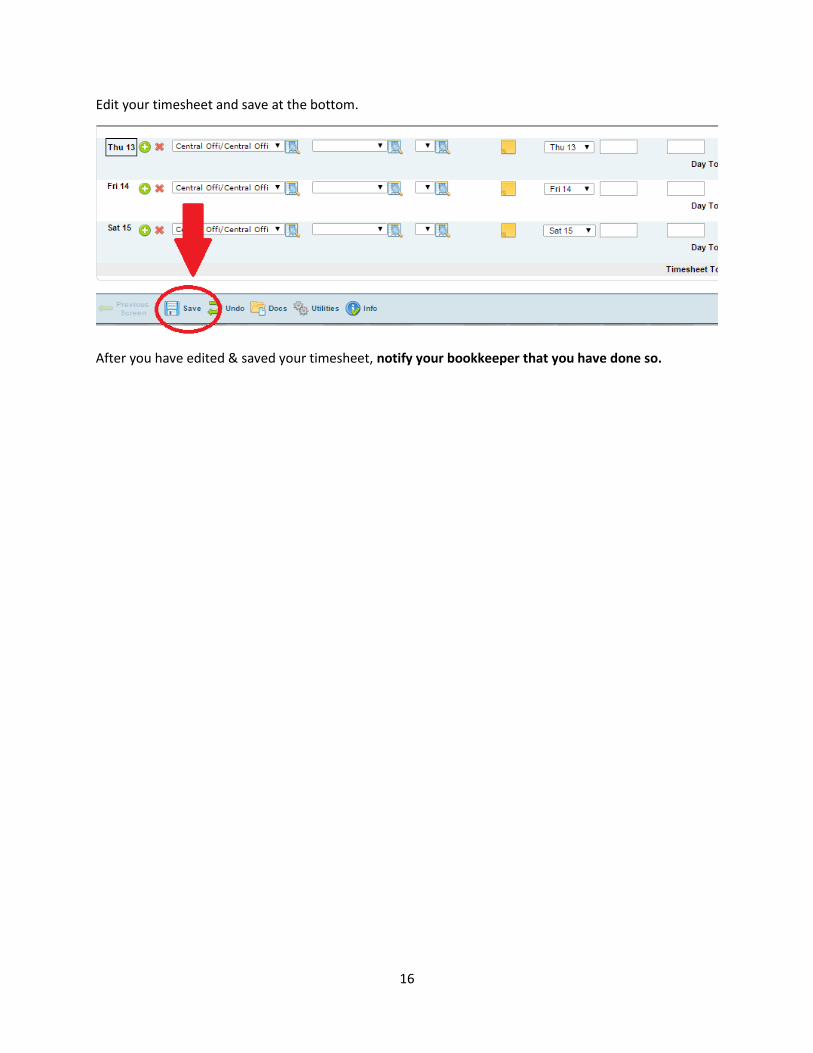
Edit your timesheet and save at the bottom.
After you have edited & saved your timesheet, notify your bookkeeper that you have done so.
17
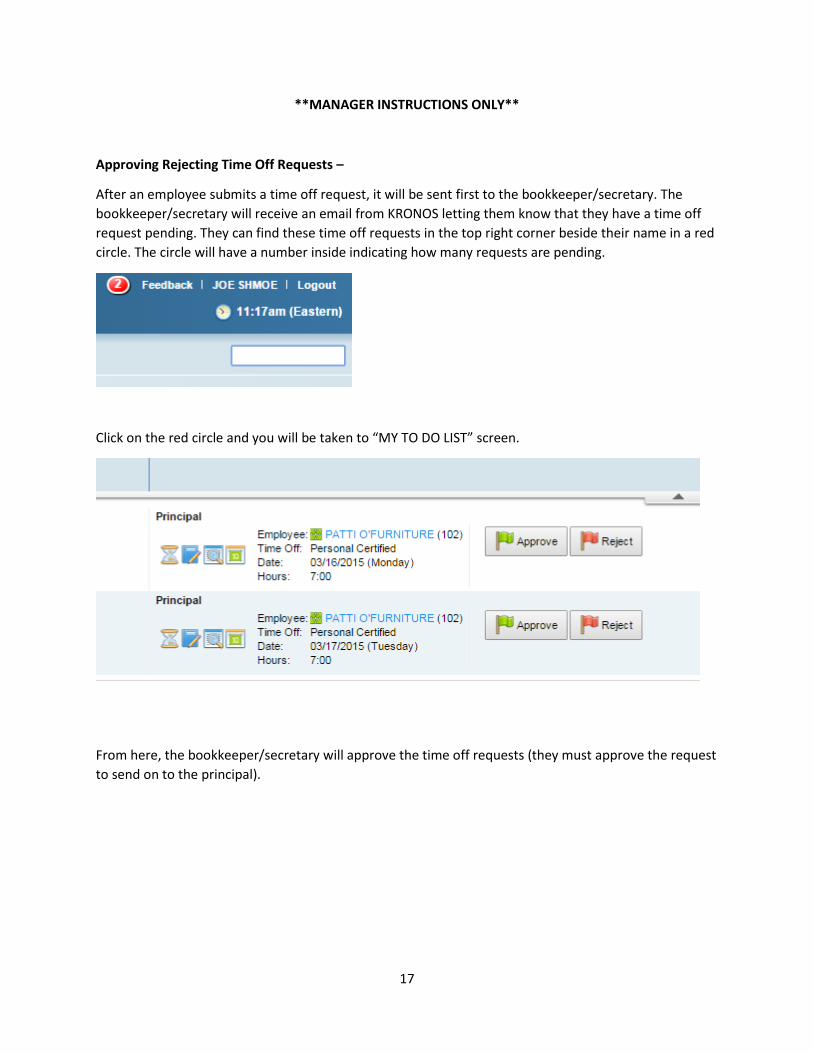
**MANAGER INSTRUCTIONS ONLY**
Approving Rejecting Time Off Requests –
After an employee submits a time off request, it will be sent first to the bookkeeper/secretary. The
bookkeeper/secretary will receive an email from KRONOS letting them know that they have a time off
request pending. They can find these time off requests in the top right corner beside their name in a red
circle. The circle will have a number inside indicating how many requests are pending.
Click on the red circle and you will be taken to “MY TO DO LIST” screen.
From here, the bookkeeper/secretary will approve the time off requests (they must approve the request
to send on to the principal).
18
The principal will then be notified by email that they have a time off request pending. They will use the
same steps to find and approve/reject the request.
After the principal approves, the request is sent on to the Superintendent. After the request is approved
by the Superintendent it will automatically populate on the employee’s timesheet.
NOTE** It is VERY important to approve or reject all requests daily to ensure the employee timesheets
are correct when it is time for the approval process.
19
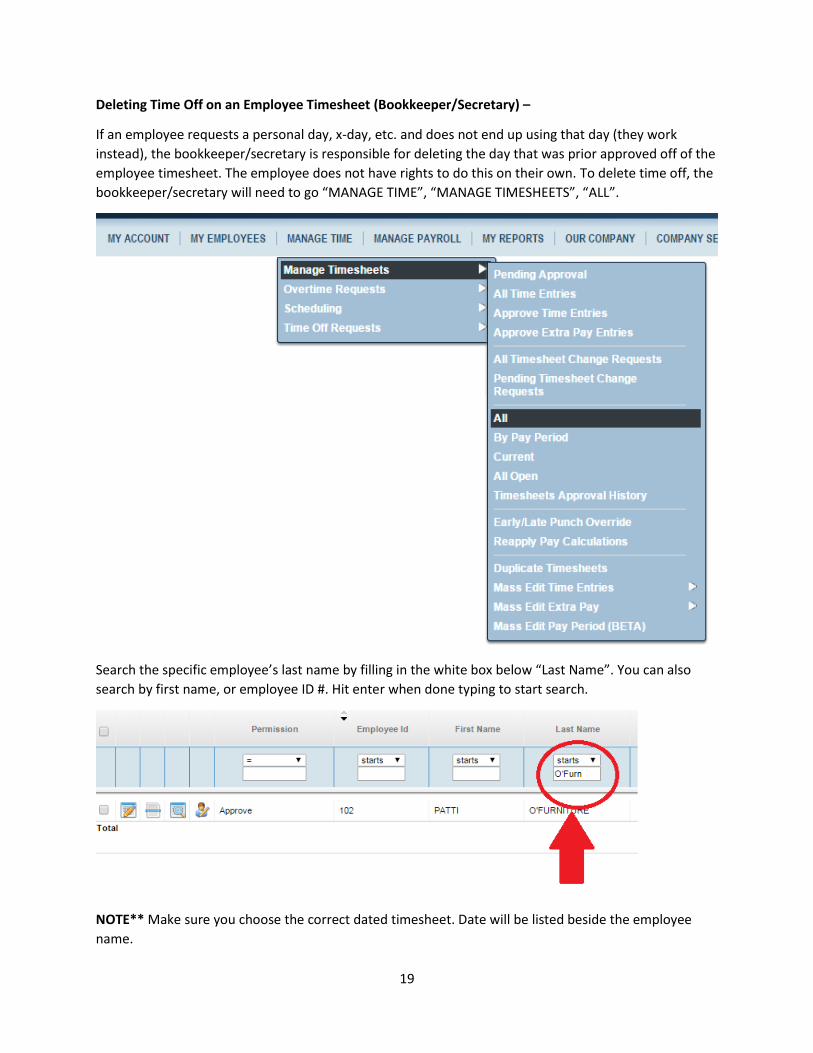
Deleting Time Off on an Employee Timesheet (Bookkeeper/Secretary) –
If an employee requests a personal day, x-day, etc. and does not end up using that day (they work
instead), the bookkeeper/secretary is responsible for deleting the day that was prior approved off of the
employee timesheet. The employee does not have rights to do this on their own. To delete time off, the
bookkeeper/secretary will need to go “MANAGE TIME”, “MANAGE TIMESHEETS”, “ALL”.
Search the specific employee’s last name by filling in the white box below “Last Name”. You can also
search by first name, or employee ID #. Hit enter when done typing to start search.
NOTE** Make sure you choose the correct dated timesheet. Date will be listed beside the employee
name.
20
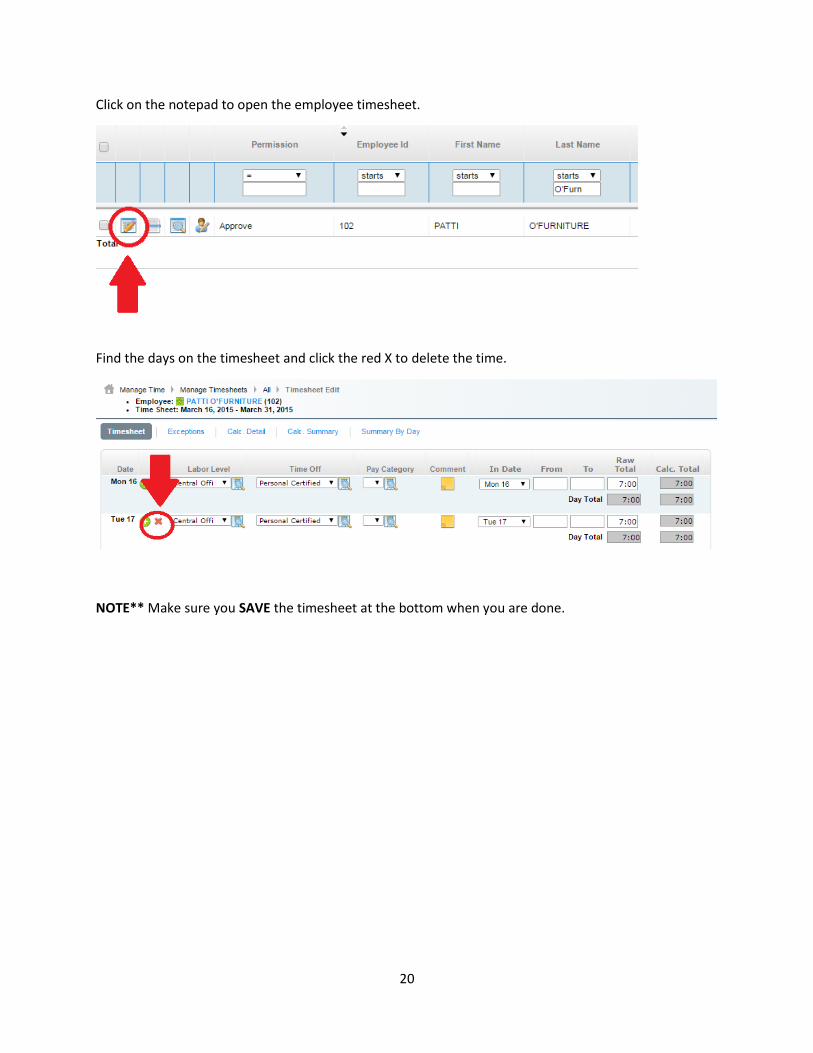
Click on the notepad to open the employee timesheet.
Find the days on the timesheet and click the red X to delete the time.
NOTE** Make sure you SAVE the timesheet at the bottom when you are done.
21
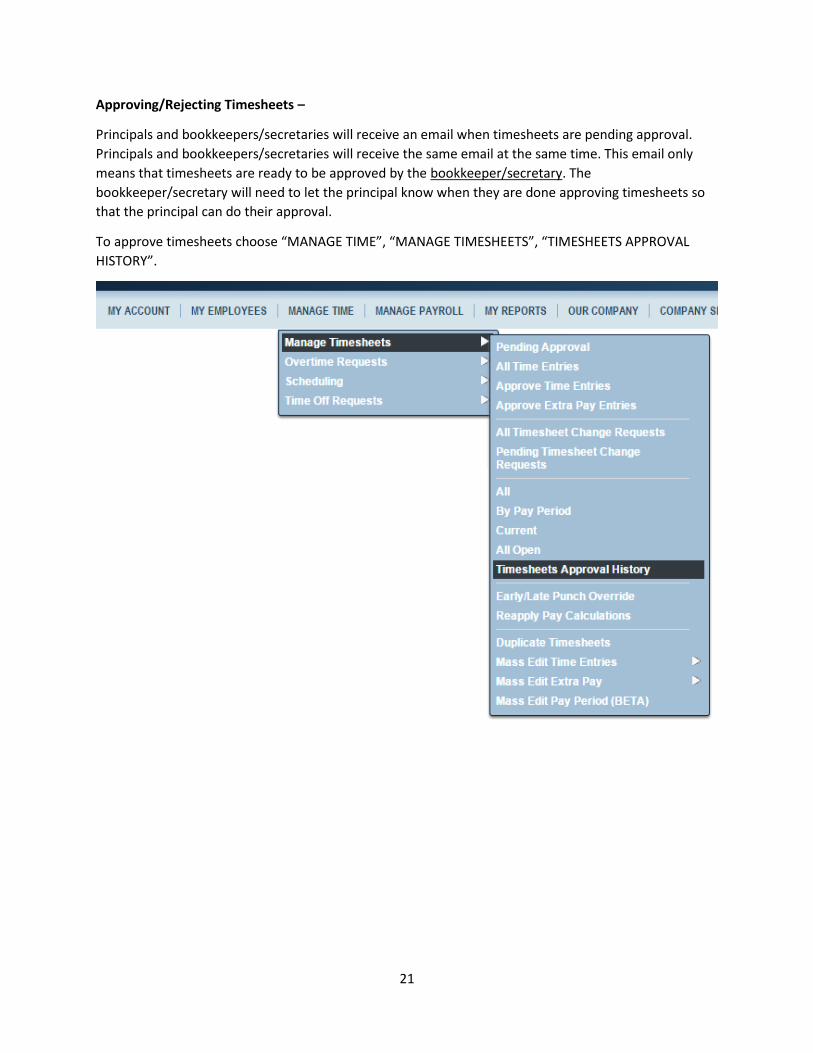
Approving/Rejecting Timesheets –
Principals and bookkeepers/secretaries will receive an email when timesheets are pending approval.
Principals and bookkeepers/secretaries will receive the same email at the same time. This email only
means that timesheets are ready to be approved by the bookkeeper/secretary. The
bookkeeper/secretary will need to let the principal know when they are done approving timesheets so
that the principal can do their approval.
To approve timesheets choose “MANAGE TIME”, “MANAGE TIMESHEETS”, “TIMESHEETS APPROVAL
HISTORY”.

22
There are a few settings that you’ll need to change once you get to the “TIMESHEETS APPROVAL
HISTORY” screen to ensure you’re looking at the correct employees and correct timesheets.
First, check the “Employee Filter” located in the top left-hand corner.
Beside “Employee Filter” in the above picture, it says “All Employees”. Yours should reflect the name of
your school. To change this setting, click on the man with the magnifying glass beside “All Employees”.
Click on “COMPANY GROUPS”, then type in your school name in the white box under “Group Name”. Hit
Enter.
After KRONOS has searched your school name, click on the green flag next to your name.
23
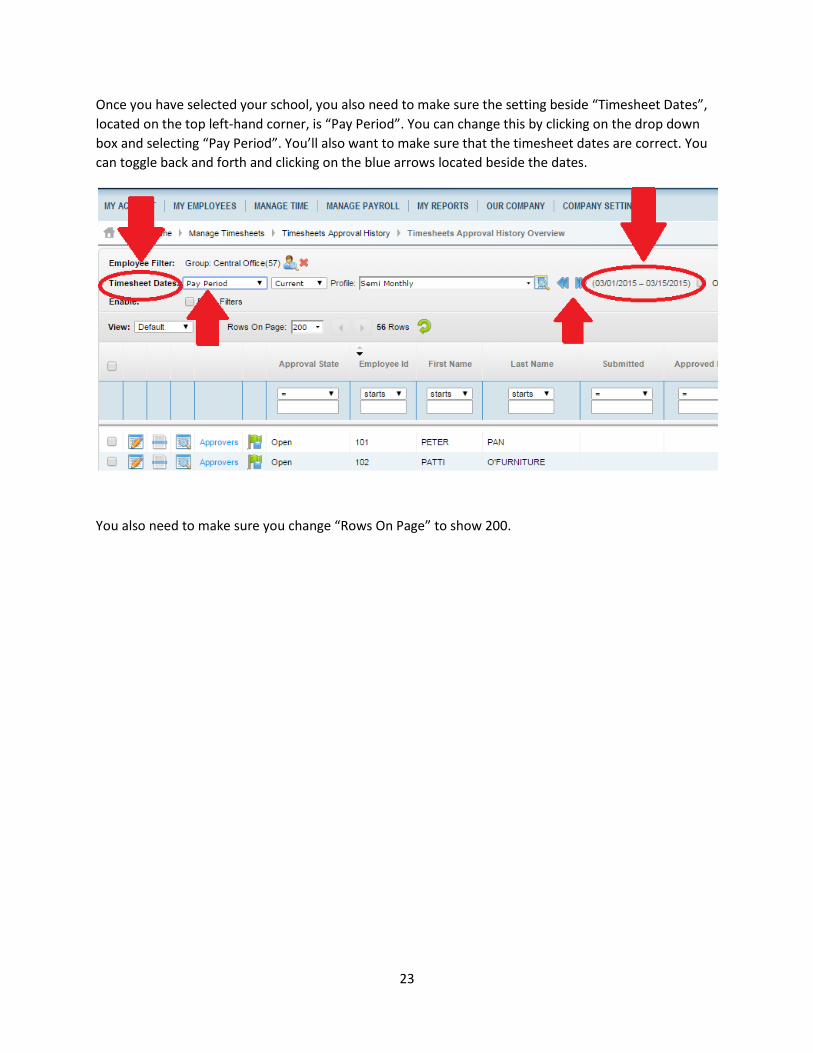
Once you have selected your school, you also need to make sure the setting beside “Timesheet Dates”,
located on the top left-hand corner, is “Pay Period”. You can change this by clicking on the drop down
box and selecting “Pay Period”. You’ll also want to make sure that the timesheet dates are correct. You
can toggle back and forth and clicking on the blue arrows located beside the dates.
You also need to make sure you change “Rows On Page” to show 200.
24
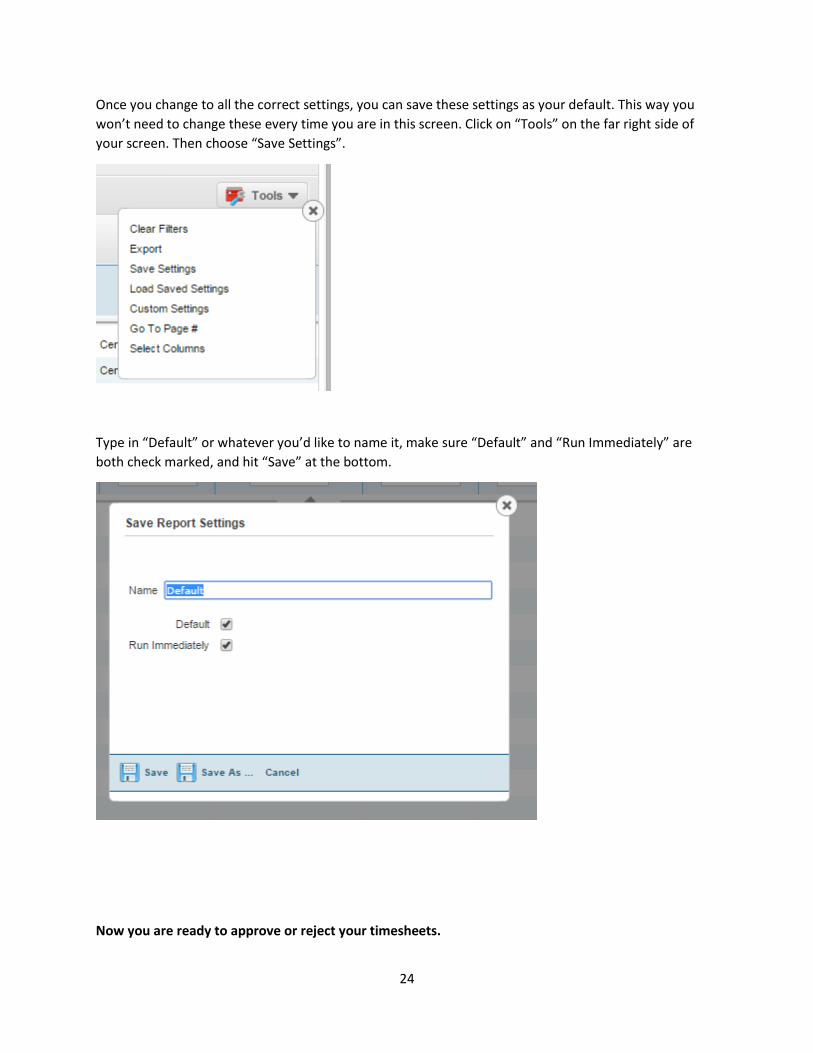
Once you change to all the correct settings, you can save these settings as your default. This way you
won’t need to change these every time you are in this screen. Click on “Tools” on the far right side of
your screen. Then choose “Save Settings”.
Type in “Default” or whatever you’d like to name it, make sure “Default” and “Run Immediately” are
both check marked, and hit “Save” at the bottom.
Now you are ready to approve or reject your timesheets.
25
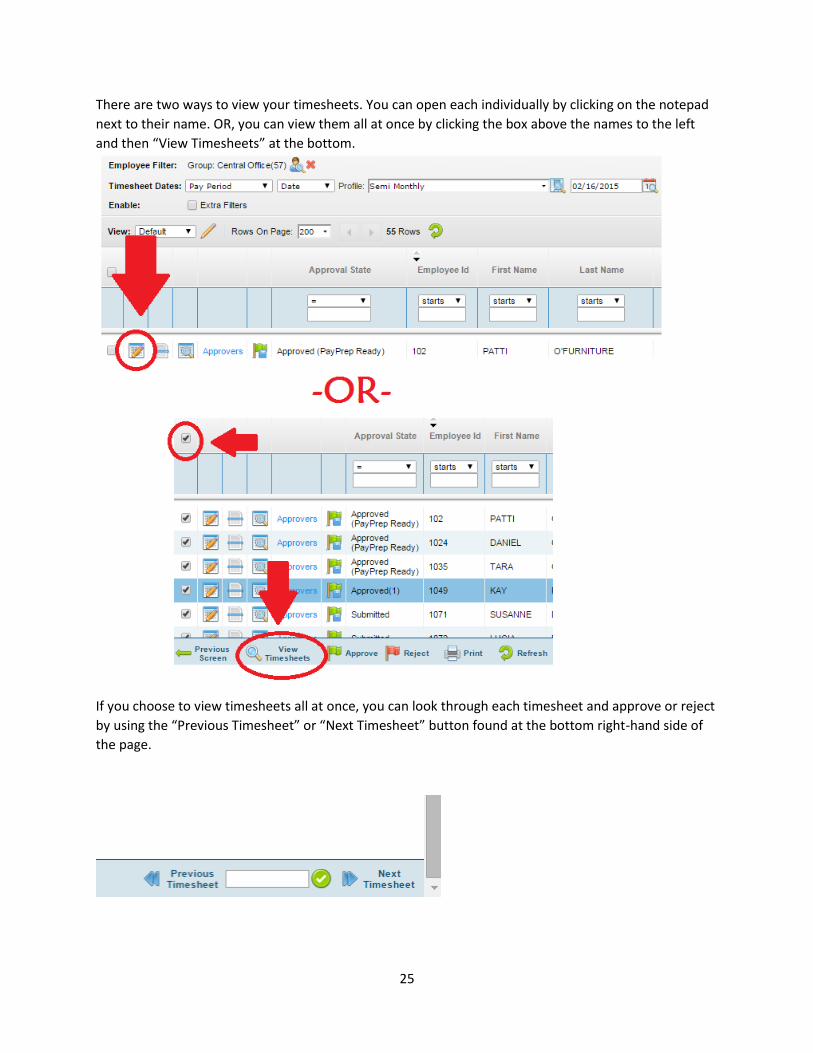
There are two ways to view your timesheets. You can open each individually by clicking on the notepad
next to their name. OR, you can view them all at once by clicking the box above the names to the left
and then “View Timesheets” at the bottom.
If you choose to view timesheets all at once, you can look through each timesheet and approve or reject
by using the “Previous Timesheet” or “Next Timesheet” button found at the bottom right-hand side of
the page.
26
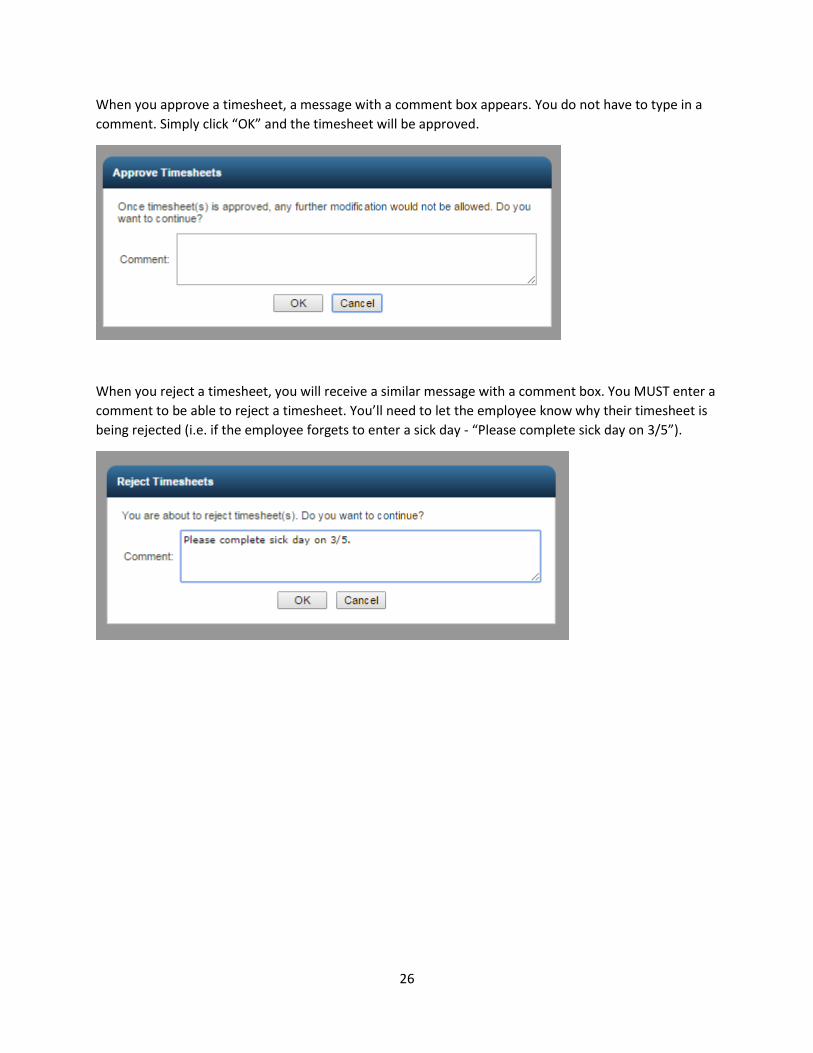
When you approve a timesheet, a message with a comment box appears. You do not have to type in a
comment. Simply click “OK” and the timesheet will be approved.
When you reject a timesheet, you will receive a similar message with a comment box. You MUST enter a
comment to be able to reject a timesheet. You’ll need to let the employee know why their timesheet is
being rejected (i.e. if the employee forgets to enter a sick day - “Please complete sick day on 3/5”).
27
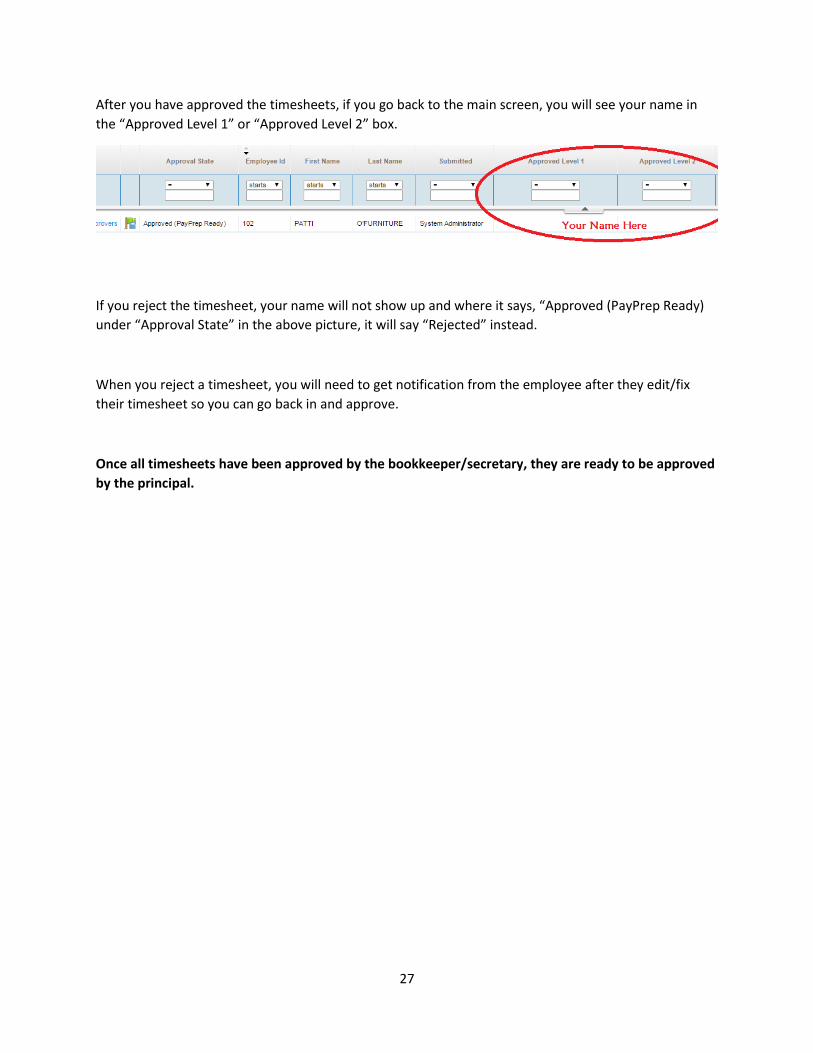
After you have approved the timesheets, if you go back to the main screen, you will see your name in
the “Approved Level 1” or “Approved Level 2” box.
If you reject the timesheet, your name will not show up and where it says, “Approved (PayPrep Ready)
under “Approval State” in the above picture, it will say “Rejected” instead.
When you reject a timesheet, you will need to get notification from the employee after they edit/fix
their timesheet so you can go back in and approve.
Once all timesheets have been approved by the bookkeeper/secretary, they are ready to be approved
by the principal.