introductory crop physiology
TRANSCRIPT
LABORATORY PRACTICAL MANUAL
INTRODUCTORY CROP PHYSIOLOGY
ABB-160 2(1+1)
Dr. Ashutosh Srivastava
Rani Lakshmi Bai Central Agricultural University Jhansi-284003, Uttar Pradesh
COURSE- INTRODUCTORY CROP PHYSIOLOGY 2(1+1)
PRACTICAL:
Measurement of water potential, osmosis, root pressure, structure of the stomata, distribution, opening and closing of the stomata, measurement, transpiration and calculation of transpiration pull demonstration. Importance of light and chlorophyll in photosynthesis, pigment identification in horticultural crops, measurement of relative water content (RWC), studying plant movements.
Name of Students .........................................................................................
Roll No. ..........................................................................................................
Batch ............................................................................................................
Session ........................................................................................................
Semester ......................................................................................................
Course Name : ............................................................................................
Course No. : .................................................................................................
Credit .............................................................................................................
Published: 2018
No. of copies: ……..
Price: Rs.
CERTIFICATE
This is to certify that Shri./Km. .................................................................ID
No.....................................has completed the practical of
course...........................................................................................course No. ................ as per the
syllabus of B.Sc. (Hons.) Agriculture/ Horticulture/ Forestry ............ semester in the year.....................in
the respective lab/field of College.
Date: Course Teacher
CONTENTS
S. No.
Name of the Experiments Page No. Remarks
1 To study the process of diffusion
2 To demonstrate the process of osmosis by potato osmoscope
3 To study the phenomenon of plasmolysis
4 To demonstrate the phenomenon of imbibition
5 To measure the water potential by Gravimetric method
6 To measure the water potential by Chardakov‘s dye method
7 Demonstration of root pressure
8 Studying the structure and distribution of stomata
9 Studying the opening and closing of stomata
10 To demonstrate the phenomenon of transpiration
11 To measure the rate of transpiration by Ganong‘s potometer
12 Calibration of ocular and stage micrometer
13 To study stomatal frequency and index
14 To study that light is necessary for photosynthesis
15 To study that chlorophyll is necessary for photosynthesis
16 Identification of photosynthetic pigments in horticultural crops: Chlorophyll and carotenoids
17 Separation of photosynthetic pigments by paper chromatography
18 Measurement of relative water content (RWC)
19 Studying the plant movements
20 APPENDIX
EXPERIMENT NO. 1
OBJECTIVE: To study the process of diffusion
It is the movement of particles or molecules of a substance (gas, liquid or solid) from the region of its higher concentration to the region of lower concentration. This process is known as diffusion. OR it can also be defined as movement of particles of matter due to their own kinetic energy.
The various examples of diffusion of different status of matter can be; Gas into gas: Diffusion of ammonia into air. Gas into liquid: Foam Gas into solid: Precious stone Liquid into gas: Clouds Liquid into liquid: Diffusion of alcohol into water. Solid into liquid: Diffusion of KMnO4 crystals placed into water
Liquid in solid: Diffusion of KOH solution into solidified agar containing phenolphthalein for indicating the movement of KOH solution. Solid into gas: Smoke Solid into solid: Diffusion of copper into zinc and zinc into copper, if the bars of both the metals are kept pressed with one another.
Types of membranes
1. Permeable membrane: Membrane through which both solvent and solute either in the form of molecules or ions can pass easily. e.g., Cellulose wall of cell, lignified cell wall, filter paper, etc., permits water to pass and when it gets wet it allows solute molecules or ions to pass through them.
2. Semi-permeable membrane: Membrane through which diffusion of only solvent molecules takes place but not solute molecules e.g., Copper ferrocyanide membrane
3. Impermeable membrane: Membrane that prohibits the diffusion of both solvent and solute molecules through them e.g., Heavily cutinized cell walls of plants.
4. Differentially permeable membrane: All the membranes present in the plants allows some solute to pass through them and these kinds of membranes are called as differentially permeable membrane e.g., Plasma membrane, tonoplast, etc.
DEMONSTRATION OF DIFFUSION
MATERIALS REQUIRED: Potassium permanganate (KMnO4), test tube and water PROCEDURE:
1. Take a clean test tube and add some amount of water in the test tube. 2. Then add few crystals of KMnO4 are dipped into the test tube.
OBSERVATION: There will be slow change in the colour of water, which is due to the movement of the KMnO4 crystals from its higher concentration to the lower concentration i.e., diffusion of KMnO4 crystals in water. The water in the test tube completely changes into pink colour that is because of evenly distributed particles of KMnO4.
DISCUSSION:
EXPERIMENT NO. 2
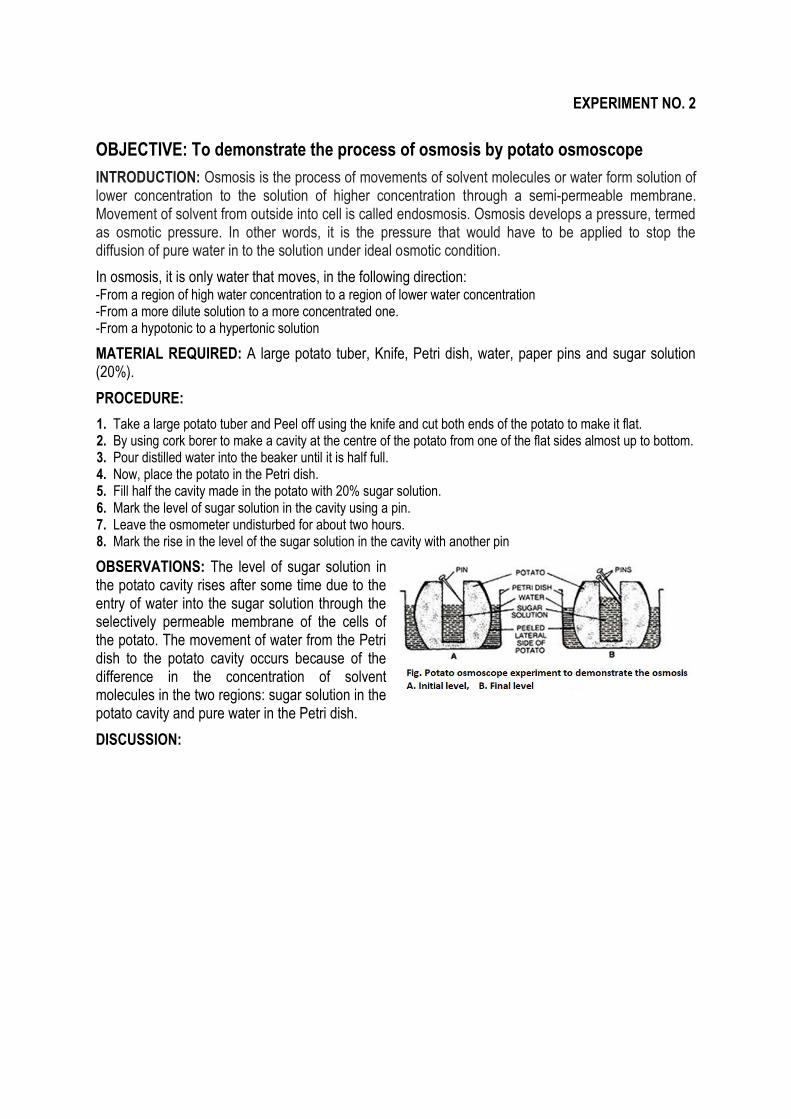
OBJECTIVE: To demonstrate the process of osmosis by potato osmoscope
INTRODUCTION: Osmosis is the process of movements of solvent molecules or water form solution of lower concentration to the solution of higher concentration through a semi-permeable membrane. Movement of solvent from outside into cell is called endosmosis. Osmosis develops a pressure, termed as osmotic pressure. In other words, it is the pressure that would have to be applied to stop the diffusion of pure water in to the solution under ideal osmotic condition.
In osmosis, it is only water that moves, in the following direction: -From a region of high water concentration to a region of lower water concentration -From a more dilute solution to a more concentrated one. -From a hypotonic to a hypertonic solution
MATERIAL REQUIRED: A large potato tuber, Knife, Petri dish, water, paper pins and sugar solution (20%).
PROCEDURE:
1. Take a large potato tuber and Peel off using the knife and cut both ends of the potato to make it flat. 2. By using cork borer to make a cavity at the centre of the potato from one of the flat sides almost up to bottom. 3. Pour distilled water into the beaker until it is half full. 4. Now, place the potato in the Petri dish. 5. Fill half the cavity made in the potato with 20% sugar solution. 6. Mark the level of sugar solution in the cavity using a pin. 7. Leave the osmometer undisturbed for about two hours. 8. Mark the rise in the level of the sugar solution in the cavity with another pin
OBSERVATIONS: The level of sugar solution in the potato cavity rises after some time due to the entry of water into the sugar solution through the selectively permeable membrane of the cells of the potato. The movement of water from the Petri dish to the potato cavity occurs because of the difference in the concentration of solvent molecules in the two regions: sugar solution in the potato cavity and pure water in the Petri dish.
DISCUSSION:
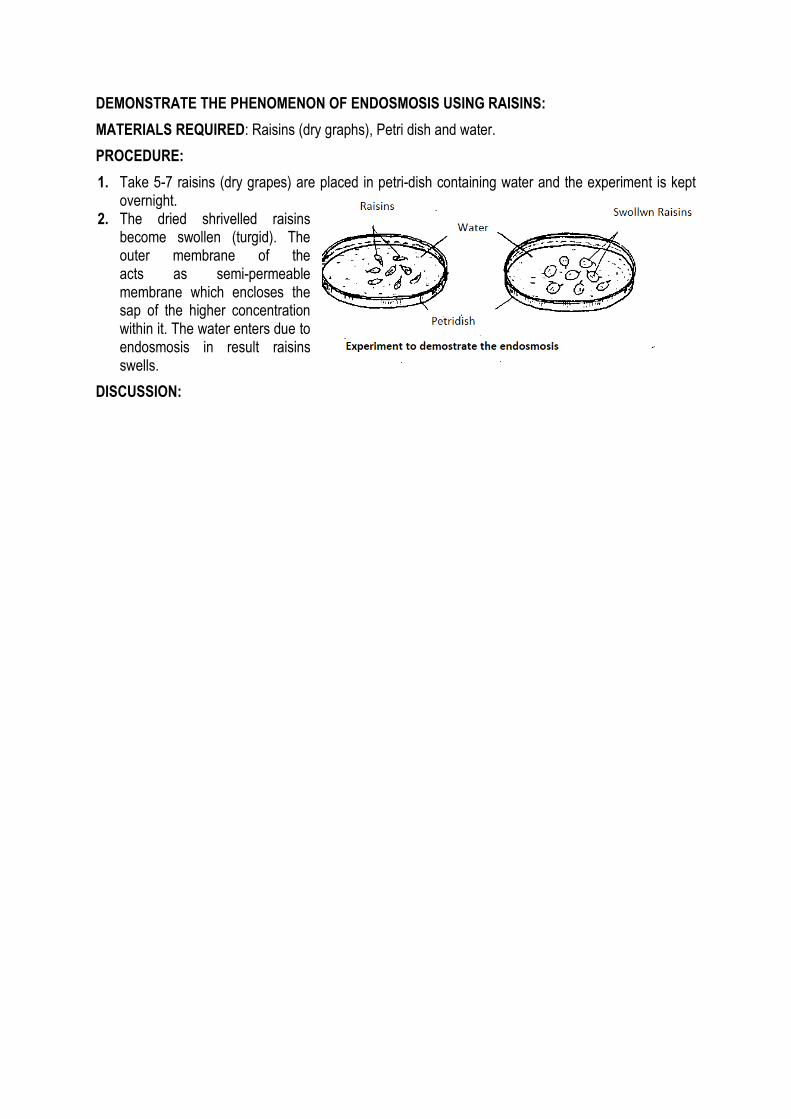
DEMONSTRATE THE PHENOMENON OF ENDOSMOSIS USING RAISINS:
MATERIALS REQUIRED: Raisins (dry graphs), Petri dish and water.
PROCEDURE:
1. Take 5-7 raisins (dry grapes) are placed in petri-dish containing water and the experiment is kept overnight.
2. The dried shrivelled raisins become swollen (turgid). The outer membrane of the acts as semi-permeable membrane which encloses the sap of the higher concentration within it. The water enters due to endosmosis in result raisins swells.
DISCUSSION:

PHENOMENON OF EXOSMOSIS USING FRESH GRAPES:
MATERIALS REQUIRED: Freshly harvested graphs, Petridish and sugar solution.
PROCEDURE:
1. Fresh grapes are placed in petri-dish containing concentrated sugar solution and kept overnight. 2. The fresh grapes will shrink; the outer membrane of grape is acts as semi-permeable membrane.
The water will come out due to exosmosis and grapes shrinks.
DISCUSSION:
EXPERIMENT NO. 3
OBJECTIVE: To study the phenomenon of plasmolysis
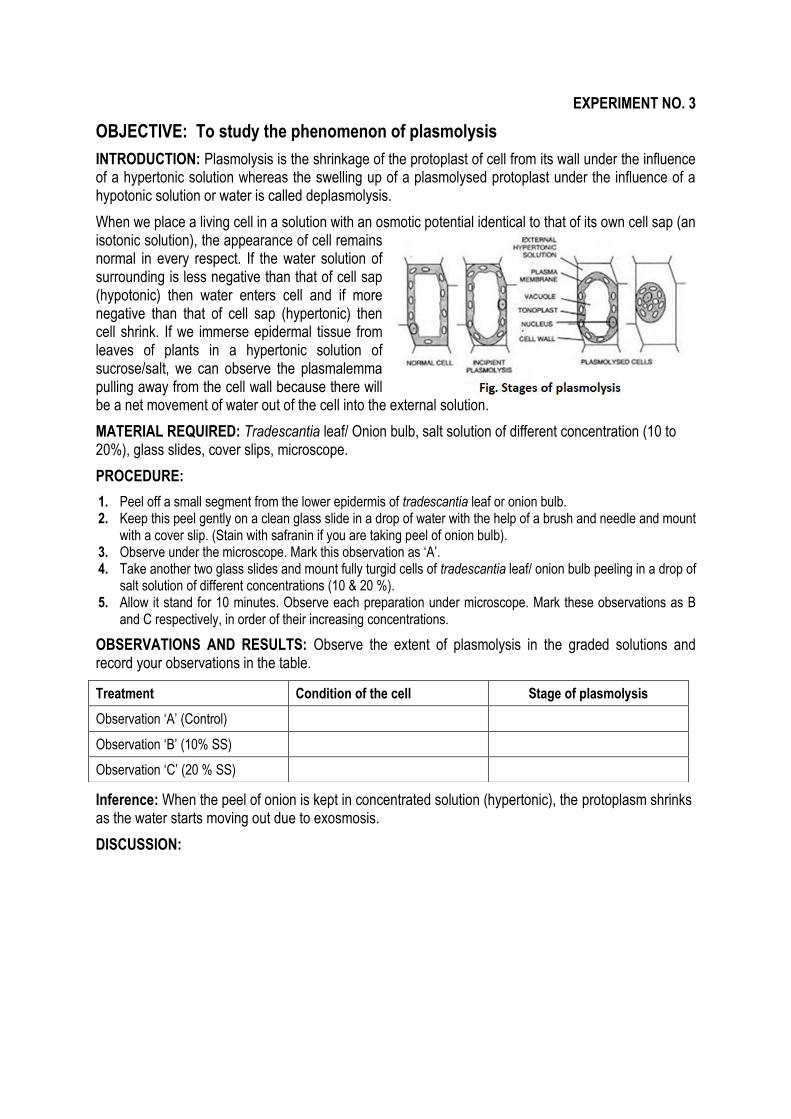
INTRODUCTION: Plasmolysis is the shrinkage of the protoplast of cell from its wall under the influence of a hypertonic solution whereas the swelling up of a plasmolysed protoplast under the influence of a hypotonic solution or water is called deplasmolysis.
When we place a living cell in a solution with an osmotic potential identical to that of its own cell sap (an isotonic solution), the appearance of cell remains normal in every respect. If the water solution of surrounding is less negative than that of cell sap (hypotonic) then water enters cell and if more negative than that of cell sap (hypertonic) then cell shrink. If we immerse epidermal tissue from leaves of plants in a hypertonic solution of sucrose/salt, we can observe the plasmalemma pulling away from the cell wall because there will be a net movement of water out of the cell into the external solution.
MATERIAL REQUIRED: Tradescantia leaf/ Onion bulb, salt solution of different concentration (10 to 20%), glass slides, cover slips, microscope.
PROCEDURE:
1. Peel off a small segment from the lower epidermis of tradescantia leaf or onion bulb. 2. Keep this peel gently on a clean glass slide in a drop of water with the help of a brush and needle and mount
with a cover slip. (Stain with safranin if you are taking peel of onion bulb). 3. Observe under the microscope. Mark this observation as ‗A‘. 4. Take another two glass slides and mount fully turgid cells of tradescantia leaf/ onion bulb peeling in a drop of
salt solution of different concentrations (10 & 20 %). 5. Allow it stand for 10 minutes. Observe each preparation under microscope. Mark these observations as B
and C respectively, in order of their increasing concentrations.
OBSERVATIONS AND RESULTS: Observe the extent of plasmolysis in the graded solutions and record your observations in the table.
Inference: When the peel of onion is kept in concentrated solution (hypertonic), the protoplasm shrinks as the water starts moving out due to exosmosis.
DISCUSSION:
Treatment Condition of the cell Stage of plasmolysis
Observation ‗A‘ (Control)
Observation ‗B‘ (10% SS)
Observation ‗C‘ (20 % SS)
EXPERIMENT NO. 4
OBJECTIVE: To demonstrate the phenomenon of imbibition
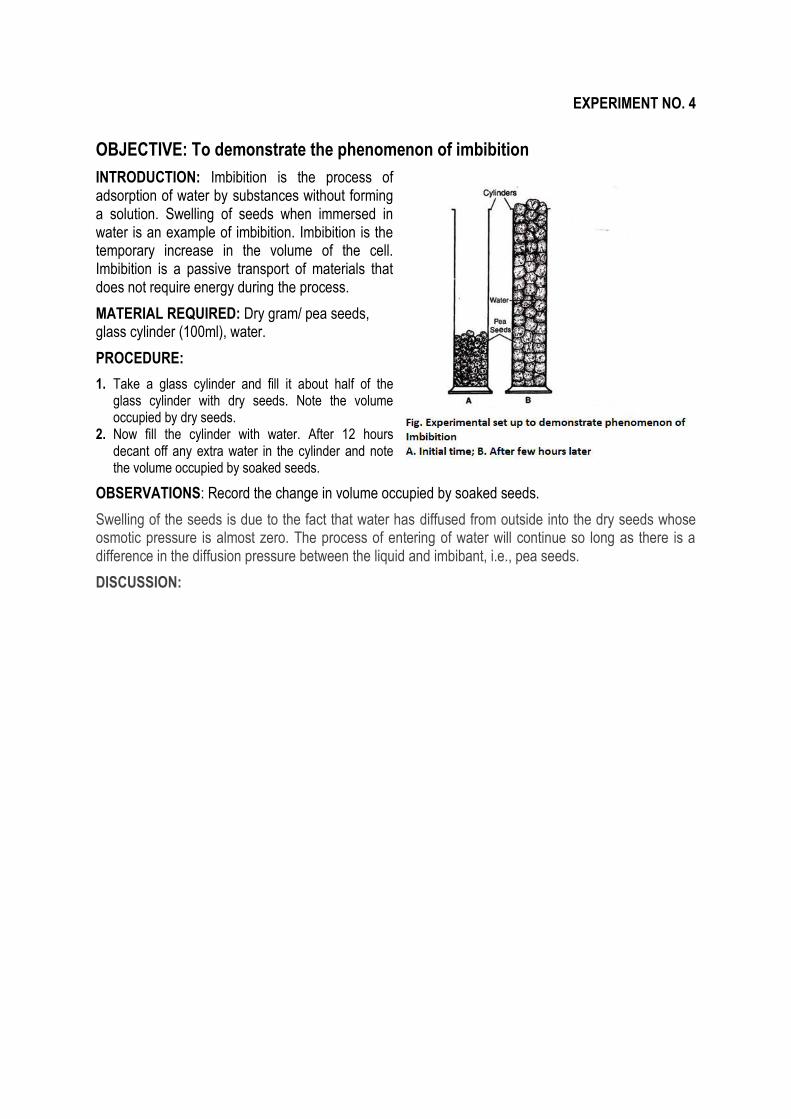
INTRODUCTION: Imbibition is the process of adsorption of water by substances without forming a solution. Swelling of seeds when immersed in water is an example of imbibition. Imbibition is the temporary increase in the volume of the cell. Imbibition is a passive transport of materials that does not require energy during the process.
MATERIAL REQUIRED: Dry gram/ pea seeds, glass cylinder (100ml), water.
PROCEDURE:
1. Take a glass cylinder and fill it about half of the glass cylinder with dry seeds. Note the volume occupied by dry seeds.
2. Now fill the cylinder with water. After 12 hours decant off any extra water in the cylinder and note the volume occupied by soaked seeds.
OBSERVATIONS: Record the change in volume occupied by soaked seeds.
Swelling of the seeds is due to the fact that water has diffused from outside into the dry seeds whose osmotic pressure is almost zero. The process of entering of water will continue so long as there is a difference in the diffusion pressure between the liquid and imbibant, i.e., pea seeds.
DISCUSSION:
EXPERIMENT NO. 5
OBJECTIVE: To measure the water potential by weight/Gravimetric method
INTRODUCTION: Water potential is defined as the difference between the free energy statuses of water in a system to that of free energy of pure water. Water potential is denoted by the Greek letter ―Psi‘ (Ψ). Water potential is expressed either in bars or mega pascals (1 MPa = 10 bars). Water potential is diagnostic tool that enables the plant scientist to assign a precise value to the water status in plant cells and tissue. Absolute values of water potential are not measured. Instead measurement is made of the difference between the water potential in a system under investigation and that in a reference state. The reference state is pure liquid water at the same temperature and same atmospheric pressure as the system under investigation. Water potential in the reference stat is arbitrarily assigned a value of 0 bar. Water potential in a plant tissue is always less than 0 bar and hence a negative number. Water potential is experimentally determined by the following methods.
1. Gravimetric method 2. Chardakov‘s method 3. Pressure bomb method 4. Vapour pressure or thermocouple method or Psychrometer
1. GRAVIMETRIC METHOD
MATERIAL REQUIRED: Potato, sucrose or mannitol, distilled water, analytical balance, test tube, cork borer, blade, filter paper
PROCEDURE:
1. Take 11 test tubes and prepare different concentration of molar sucrose solutions of 0.1 M, 0.2M, 0.3M, 0.4M, 0.5M, 0.6M, 0.7M, 0.8M, 0.9M and 1.0M with control water.
2. Take potato and take out 12 potato cylindrical sections with the help cork borer and cut each of at least 2-3 cm long in uniform length with razor blade.
3. Weigh each potato cylinder with analytical balance to the nearest milligram. 4. After weighing, each potato cylinder place in each of the series of known concentration of sucrose solutions. 5. After incubation of 1.5 -2.0 hours remove the potato cylinder and blot them gently on filter paper and weigh
them again. 6. The weighing should be done in chronological order, in which they were initially placed. 7. Note down the molal concentration of sucrose solution, at which there is neither loss nor gain in potato
cylinder weight. 8. Then plot a graph following the changes in weight against sucrose concentration.
OBSERVATIONS: When the points are connected, intercept at the abscissa represents the water potential of tissue, with zero weight gain or loss. It indicates the solution that had the same water potential as that of the tissue at the state of the experiment. So the water potential of the tissue must be equal to that of the solution.
CALCULATIONS: Calculate the water potential () using the following formula:
= -miRT Where, m = Molarity of the solution I = Ionization constant (1.0 for sucrose)
R = Roul‘s gas constant 90.083 litre bar/mole degree) T = Absolute temperature (°C + 273)
From the graph, determine the sucrose concentration at which no change in weight occurred. Calculate the for
this solution. This value equals to the water potential of the tissue.
DISCUSSION:
EXPERIMENT NO. 6
OBJECTIVE: To determine water potential by Chardakov’s dye method or falling drop method
INTRODUCTION: A Russian scientist V.S. Chardakov devised this method in 1948. It is a simple and efficient method of determining the test solution in which no change in concentration occurs. It can be often used in the field. Chardakov‘s dye method is based on the change in density of the solution, the drop sinks or rises as a result of absorbed water from the tissue water potential of the tissue is determined.
MATERIAL REQUIRED: Plant tissue (potato or leaf), test tube, sucrose, methylene blue indicator, dropper, measuring cylinder and water
PROCEDURE:
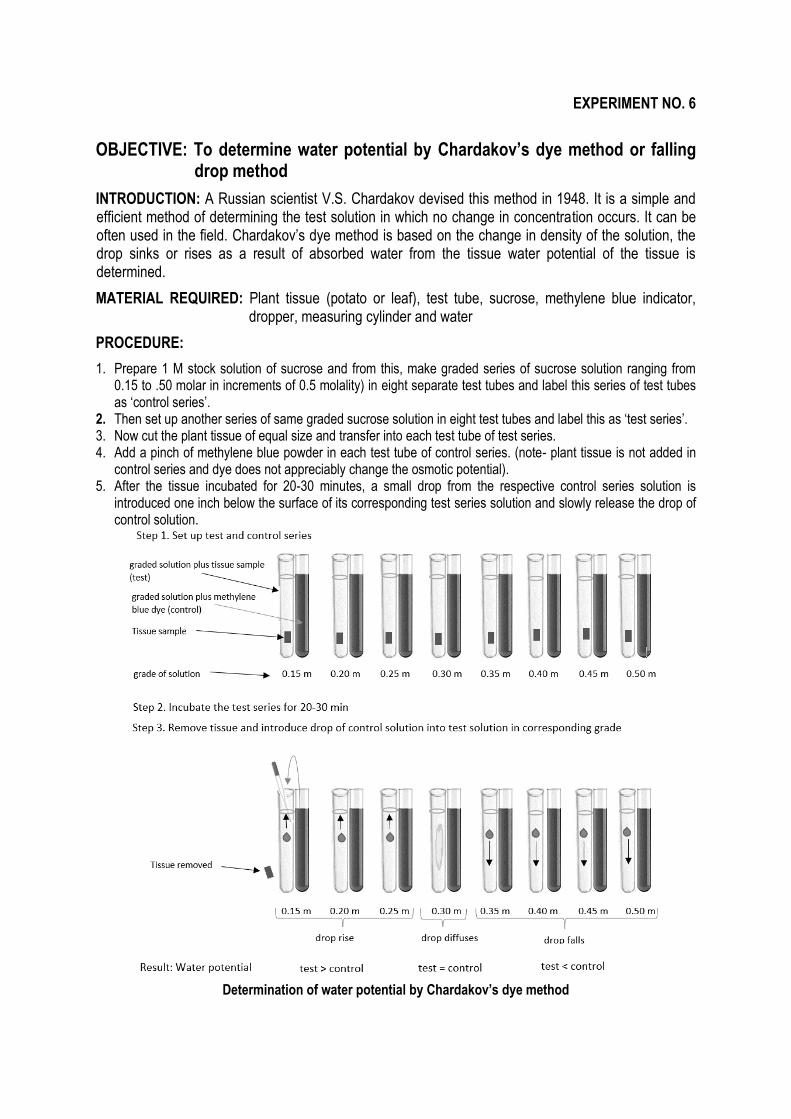
1. Prepare 1 M stock solution of sucrose and from this, make graded series of sucrose solution ranging from 0.15 to .50 molar in increments of 0.5 molality) in eight separate test tubes and label this series of test tubes as ‗control series‘.
2. Then set up another series of same graded sucrose solution in eight test tubes and label this as ‗test series‘. 3. Now cut the plant tissue of equal size and transfer into each test tube of test series. 4. Add a pinch of methylene blue powder in each test tube of control series. (note- plant tissue is not added in
control series and dye does not appreciably change the osmotic potential). 5. After the tissue incubated for 20-30 minutes, a small drop from the respective control series solution is
introduced one inch below the surface of its corresponding test series solution and slowly release the drop of control solution.
Determination of water potential by Chardakov’s dye method
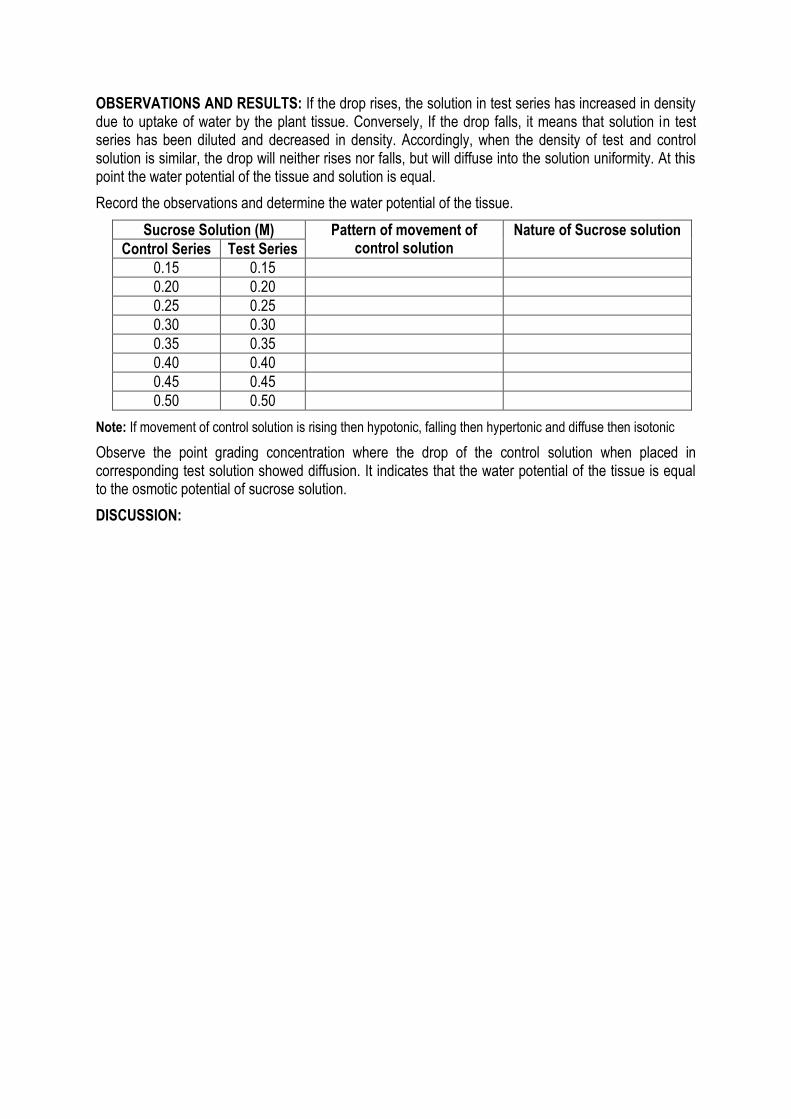
OBSERVATIONS AND RESULTS: If the drop rises, the solution in test series has increased in density due to uptake of water by the plant tissue. Conversely, If the drop falls, it means that solution in test series has been diluted and decreased in density. Accordingly, when the density of test and control solution is similar, the drop will neither rises nor falls, but will diffuse into the solution uniformity. At this point the water potential of the tissue and solution is equal.
Record the observations and determine the water potential of the tissue.
Sucrose Solution (M) Pattern of movement of control solution
Nature of Sucrose solution
Control Series Test Series
0.15 0.15
0.20 0.20
0.25 0.25
0.30 0.30
0.35 0.35
0.40 0.40
0.45 0.45
0.50 0.50
Note: If movement of control solution is rising then hypotonic, falling then hypertonic and diffuse then isotonic
Observe the point grading concentration where the drop of the control solution when placed in corresponding test solution showed diffusion. It indicates that the water potential of the tissue is equal to the osmotic potential of sucrose solution.
DISCUSSION:
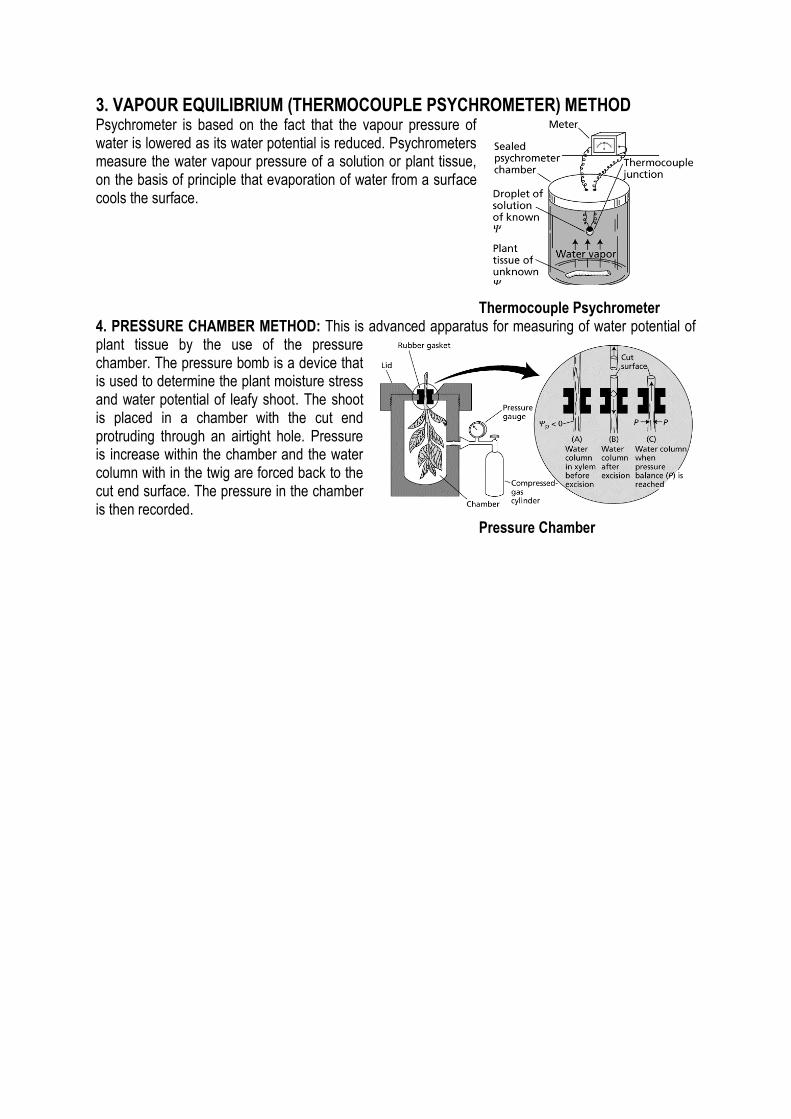
3. VAPOUR EQUILIBRIUM (THERMOCOUPLE PSYCHROMETER) METHOD Psychrometer is based on the fact that the vapour pressure of water is lowered as its water potential is reduced. Psychrometers measure the water vapour pressure of a solution or plant tissue, on the basis of principle that evaporation of water from a surface cools the surface.
Thermocouple Psychrometer 4. PRESSURE CHAMBER METHOD: This is advanced apparatus for measuring of water potential of plant tissue by the use of the pressure chamber. The pressure bomb is a device that is used to determine the plant moisture stress and water potential of leafy shoot. The shoot is placed in a chamber with the cut end protruding through an airtight hole. Pressure is increase within the chamber and the water column with in the twig are forced back to the cut end surface. The pressure in the chamber is then recorded.
Pressure Chamber
Demonstration of root pressure by Manometer
EXPERIMENT NO. 7
OBJECTIVE: To demonstrate the root pressure by root manometer
INTRODUCTION: The water with the mineral salts is absorbed from the soil by the root hairs and gradually accumulates in the cortex. As a result of cortical cells become fully turgid. Under this condition, their elastic walls being much stretched exerts pressure on the fluid contents and forces out a quantity of them towards the xylem vessels and the cortical cells become flaccid.
They again absorbs water and become turgid and the process continuous. Thus, an intermittent pumping action naturally gives rise to a considerable pressure. As a result of this process the water forced into the xylem vessels through the passage cells of the endodermis and the unthicken areas and the pits that the vessels are provided with. Beside the lignified walls of the vessels are also permeable by water.
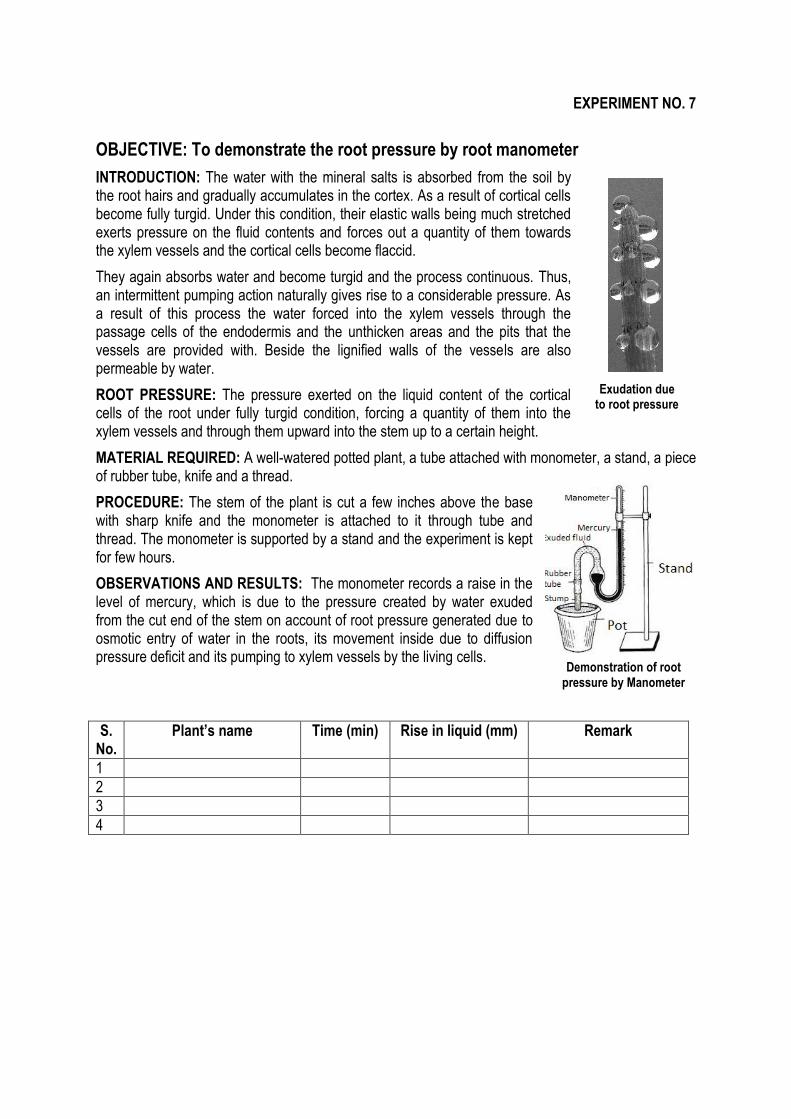
ROOT PRESSURE: The pressure exerted on the liquid content of the cortical cells of the root under fully turgid condition, forcing a quantity of them into the xylem vessels and through them upward into the stem up to a certain height.
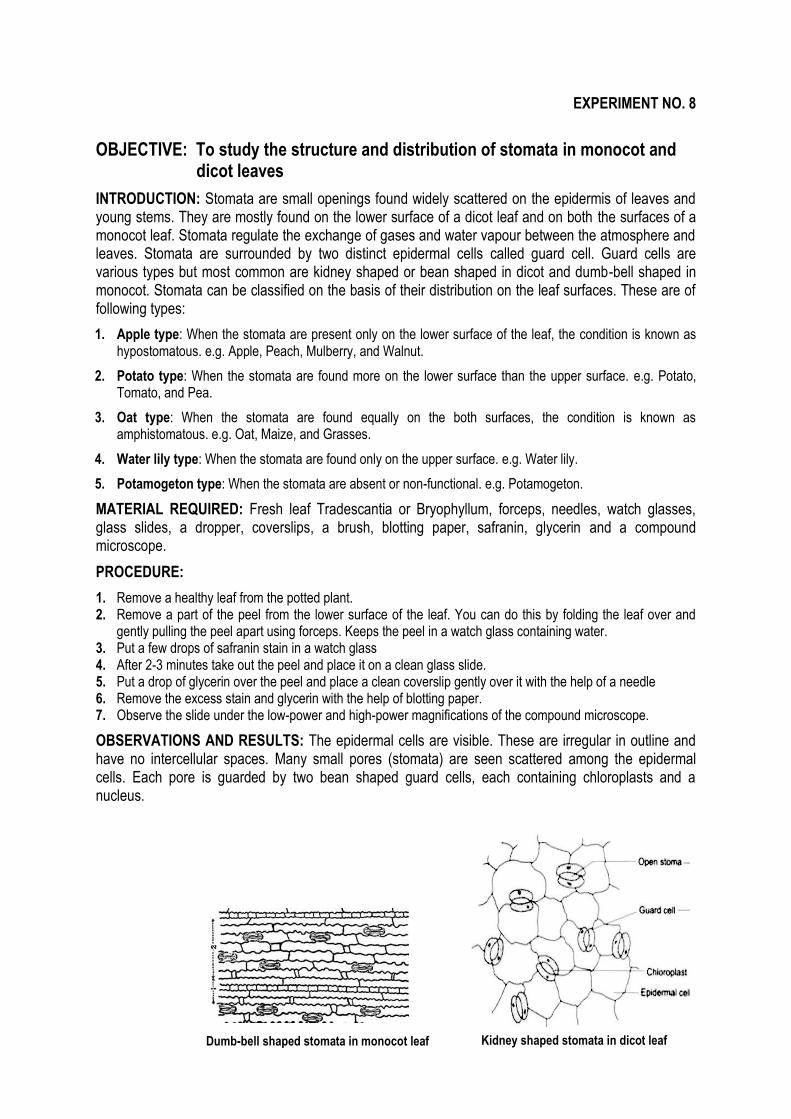
MATERIAL REQUIRED: A well-watered potted plant, a tube attached with monometer, a stand, a piece of rubber tube, knife and a thread.
PROCEDURE: The stem of the plant is cut a few inches above the base with sharp knife and the monometer is attached to it through tube and thread. The monometer is supported by a stand and the experiment is kept for few hours.
OBSERVATIONS AND RESULTS: The monometer records a raise in the level of mercury, which is due to the pressure created by water exuded from the cut end of the stem on account of root pressure generated due to osmotic entry of water in the roots, its movement inside due to diffusion pressure deficit and its pumping to xylem vessels by the living cells.
S. No.
Plant’s name Time (min) Rise in liquid (mm) Remark
1
2
3
4
Exudation due to root pressure
EXPERIMENT NO. 8
OBJECTIVE: To study the structure and distribution of stomata in monocot and dicot leaves
INTRODUCTION: Stomata are small openings found widely scattered on the epidermis of leaves and young stems. They are mostly found on the lower surface of a dicot leaf and on both the surfaces of a monocot leaf. Stomata regulate the exchange of gases and water vapour between the atmosphere and leaves. Stomata are surrounded by two distinct epidermal cells called guard cell. Guard cells are various types but most common are kidney shaped or bean shaped in dicot and dumb-bell shaped in monocot. Stomata can be classified on the basis of their distribution on the leaf surfaces. These are of following types:
1. Apple type: When the stomata are present only on the lower surface of the leaf, the condition is known as hypostomatous. e.g. Apple, Peach, Mulberry, and Walnut.
2. Potato type: When the stomata are found more on the lower surface than the upper surface. e.g. Potato, Tomato, and Pea.
3. Oat type: When the stomata are found equally on the both surfaces, the condition is known as amphistomatous. e.g. Oat, Maize, and Grasses.
4. Water lily type: When the stomata are found only on the upper surface. e.g. Water lily.
5. Potamogeton type: When the stomata are absent or non-functional. e.g. Potamogeton.
MATERIAL REQUIRED: Fresh leaf Tradescantia or Bryophyllum, forceps, needles, watch glasses, glass slides, a dropper, coverslips, a brush, blotting paper, safranin, glycerin and a compound microscope.
PROCEDURE:
1. Remove a healthy leaf from the potted plant. 2. Remove a part of the peel from the lower surface of the leaf. You can do this by folding the leaf over and
gently pulling the peel apart using forceps. Keeps the peel in a watch glass containing water. 3. Put a few drops of safranin stain in a watch glass 4. After 2-3 minutes take out the peel and place it on a clean glass slide. 5. Put a drop of glycerin over the peel and place a clean coverslip gently over it with the help of a needle 6. Remove the excess stain and glycerin with the help of blotting paper. 7. Observe the slide under the low-power and high-power magnifications of the compound microscope.
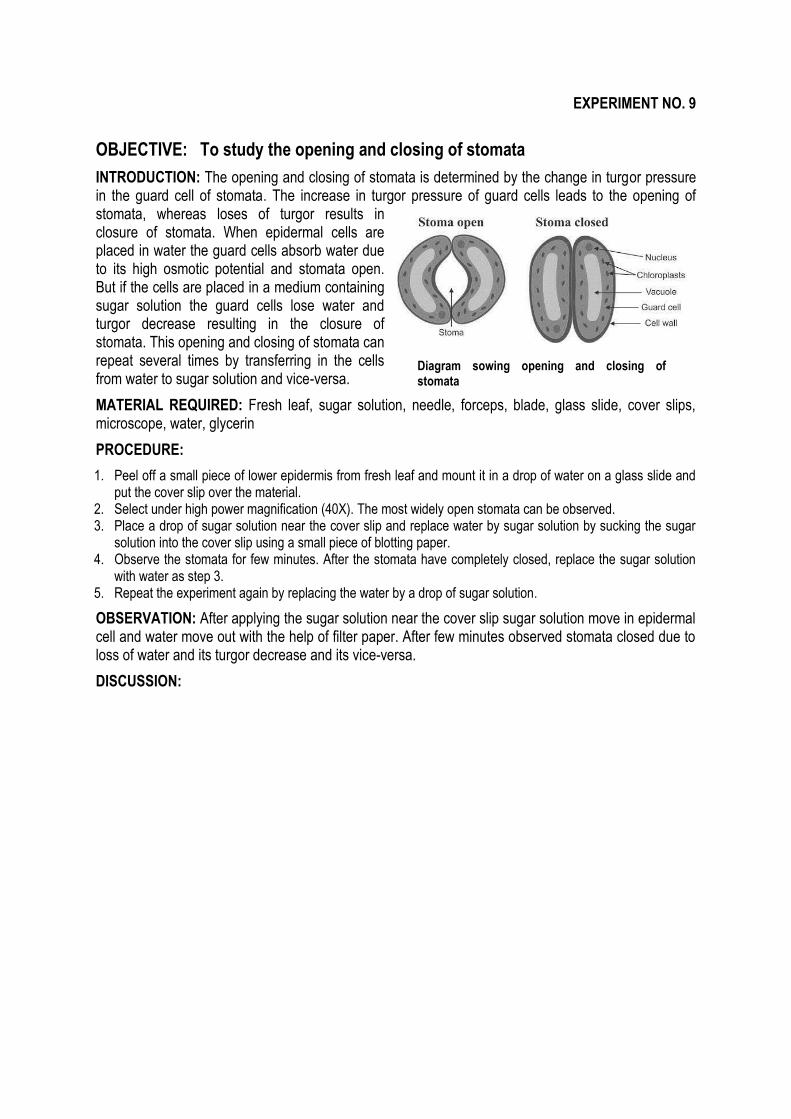
OBSERVATIONS AND RESULTS: The epidermal cells are visible. These are irregular in outline and have no intercellular spaces. Many small pores (stomata) are seen scattered among the epidermal cells. Each pore is guarded by two bean shaped guard cells, each containing chloroplasts and a nucleus.
Kidney shaped stomata in dicot leaf
Dumb-bell shaped stomata in monocot leaf

S. No.
Name of the plant Type of plant Shape of guard cells Distribution of stomata
Adaxial Abaxial
1
2
3
4
5
Draw Well-Labelled Diagram of Monocot and Dicot stomata:
EXPERIMENT NO. 9
OBJECTIVE: To study the opening and closing of stomata
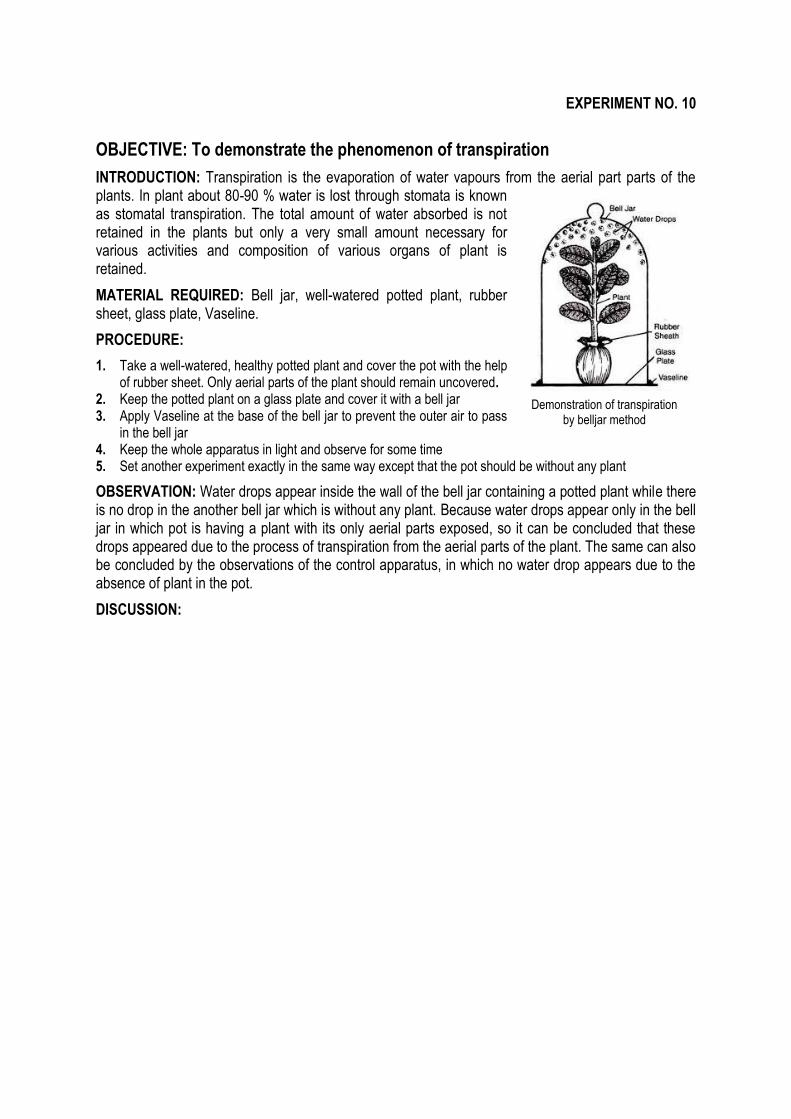
INTRODUCTION: The opening and closing of stomata is determined by the change in turgor pressure in the guard cell of stomata. The increase in turgor pressure of guard cells leads to the opening of stomata, whereas loses of turgor results in closure of stomata. When epidermal cells are placed in water the guard cells absorb water due to its high osmotic potential and stomata open. But if the cells are placed in a medium containing sugar solution the guard cells lose water and turgor decrease resulting in the closure of stomata. This opening and closing of stomata can repeat several times by transferring in the cells from water to sugar solution and vice-versa.
MATERIAL REQUIRED: Fresh leaf, sugar solution, needle, forceps, blade, glass slide, cover slips, microscope, water, glycerin
PROCEDURE:
1. Peel off a small piece of lower epidermis from fresh leaf and mount it in a drop of water on a glass slide and put the cover slip over the material.
2. Select under high power magnification (40X). The most widely open stomata can be observed. 3. Place a drop of sugar solution near the cover slip and replace water by sugar solution by sucking the sugar
solution into the cover slip using a small piece of blotting paper. 4. Observe the stomata for few minutes. After the stomata have completely closed, replace the sugar solution
with water as step 3. 5. Repeat the experiment again by replacing the water by a drop of sugar solution.
OBSERVATION: After applying the sugar solution near the cover slip sugar solution move in epidermal cell and water move out with the help of filter paper. After few minutes observed stomata closed due to loss of water and its turgor decrease and its vice-versa.
DISCUSSION:
Diagram sowing opening and closing of stomata
EXPERIMENT NO. 10
OBJECTIVE: To demonstrate the phenomenon of transpiration
INTRODUCTION: Transpiration is the evaporation of water vapours from the aerial part parts of the plants. In plant about 80-90 % water is lost through stomata is known as stomatal transpiration. The total amount of water absorbed is not retained in the plants but only a very small amount necessary for various activities and composition of various organs of plant is retained.
MATERIAL REQUIRED: Bell jar, well-watered potted plant, rubber sheet, glass plate, Vaseline.
PROCEDURE:
1. Take a well-watered, healthy potted plant and cover the pot with the help of rubber sheet. Only aerial parts of the plant should remain uncovered.
2. Keep the potted plant on a glass plate and cover it with a bell jar 3. Apply Vaseline at the base of the bell jar to prevent the outer air to pass
in the bell jar 4. Keep the whole apparatus in light and observe for some time 5. Set another experiment exactly in the same way except that the pot should be without any plant
OBSERVATION: Water drops appear inside the wall of the bell jar containing a potted plant while there is no drop in the another bell jar which is without any plant. Because water drops appear only in the bell jar in which pot is having a plant with its only aerial parts exposed, so it can be concluded that these drops appeared due to the process of transpiration from the aerial parts of the plant. The same can also be concluded by the observations of the control apparatus, in which no water drop appears due to the absence of plant in the pot.
DISCUSSION:
Demonstration of transpiration by belljar method
Experiment No.11
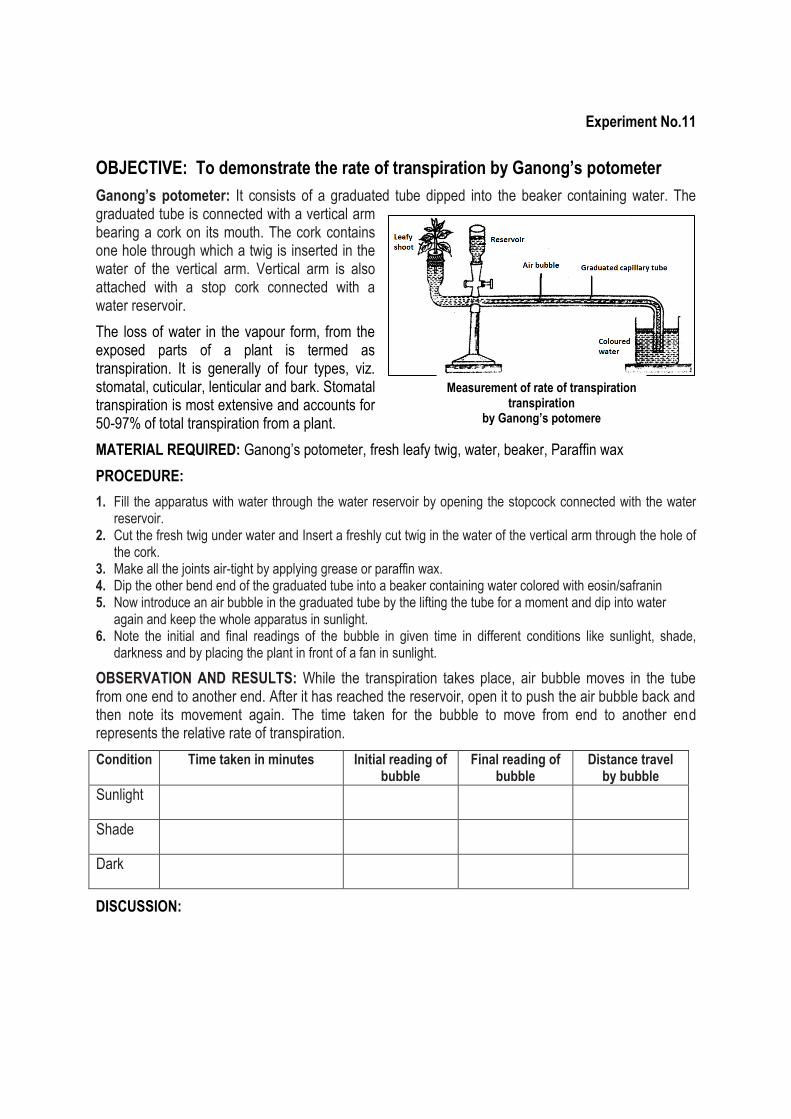
OBJECTIVE: To demonstrate the rate of transpiration by Ganong’s potometer
Ganong’s potometer: It consists of a graduated tube dipped into the beaker containing water. The graduated tube is connected with a vertical arm bearing a cork on its mouth. The cork contains one hole through which a twig is inserted in the water of the vertical arm. Vertical arm is also attached with a stop cork connected with a water reservoir.
The loss of water in the vapour form, from the exposed parts of a plant is termed as transpiration. It is generally of four types, viz. stomatal, cuticular, lenticular and bark. Stomatal transpiration is most extensive and accounts for 50-97% of total transpiration from a plant.
MATERIAL REQUIRED: Ganong‘s potometer, fresh leafy twig, water, beaker, Paraffin wax
PROCEDURE:
1. Fill the apparatus with water through the water reservoir by opening the stopcock connected with the water reservoir.
2. Cut the fresh twig under water and Insert a freshly cut twig in the water of the vertical arm through the hole of the cork.
3. Make all the joints air-tight by applying grease or paraffin wax. 4. Dip the other bend end of the graduated tube into a beaker containing water colored with eosin/safranin 5. Now introduce an air bubble in the graduated tube by the lifting the tube for a moment and dip into water
again and keep the whole apparatus in sunlight. 6. Note the initial and final readings of the bubble in given time in different conditions like sunlight, shade,
darkness and by placing the plant in front of a fan in sunlight.
OBSERVATION AND RESULTS: While the transpiration takes place, air bubble moves in the tube from one end to another end. After it has reached the reservoir, open it to push the air bubble back and then note its movement again. The time taken for the bubble to move from end to another end represents the relative rate of transpiration.
Condition Time taken in minutes Initial reading of bubble
Final reading of bubble
Distance travel by bubble
Sunlight
Shade
Dark
DISCUSSION:
Measurement of rate of transpiration transpiration
by Ganong’s potomere
EXPERIMENT NO.12
OBJECTIVE: Calibration of ocular and stage micrometer
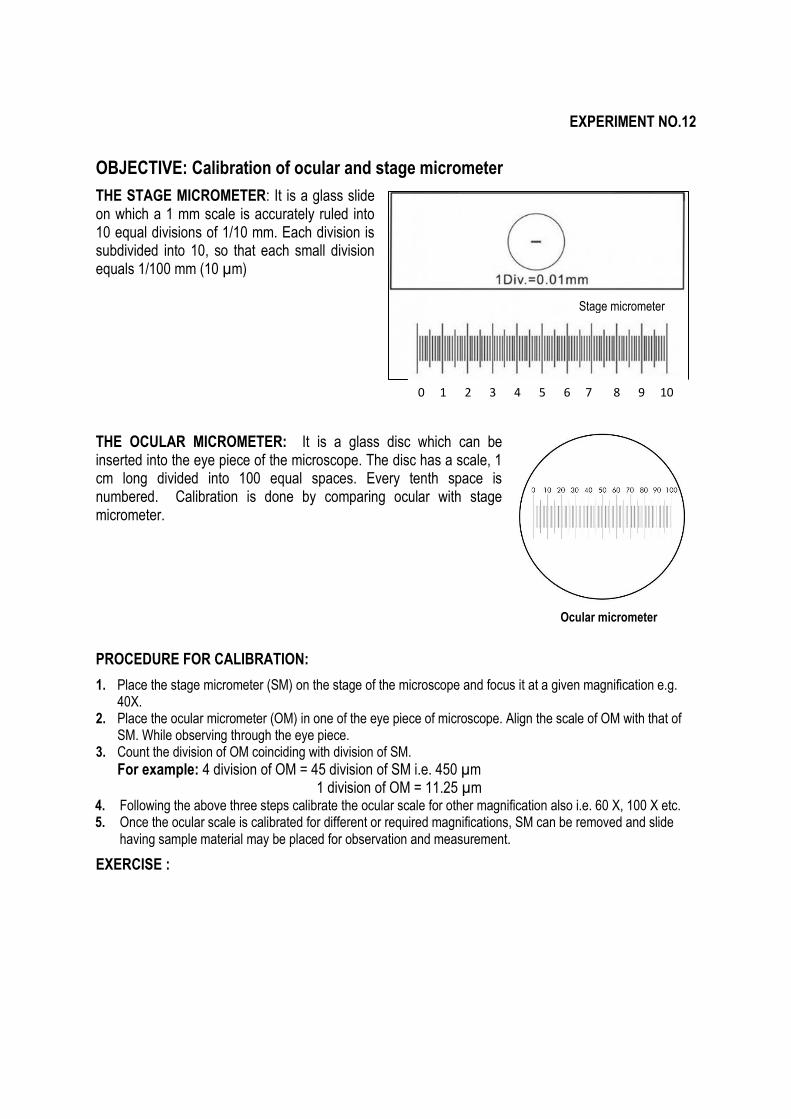
THE STAGE MICROMETER: It is a glass slide on which a 1 mm scale is accurately ruled into 10 equal divisions of 1/10 mm. Each division is subdivided into 10, so that each small division equals 1/100 mm (10 µm)
THE OCULAR MICROMETER: It is a glass disc which can be inserted into the eye piece of the microscope. The disc has a scale, 1 cm long divided into 100 equal spaces. Every tenth space is numbered. Calibration is done by comparing ocular with stage micrometer.
PROCEDURE FOR CALIBRATION:
1. Place the stage micrometer (SM) on the stage of the microscope and focus it at a given magnification e.g. 40X.
2. Place the ocular micrometer (OM) in one of the eye piece of microscope. Align the scale of OM with that of SM. While observing through the eye piece.
3. Count the division of OM coinciding with division of SM.
For example: 4 division of OM = 45 division of SM i.e. 450 µm 1 division of OM = 11.25 µm
4. Following the above three steps calibrate the ocular scale for other magnification also i.e. 60 X, 100 X etc. 5. Once the ocular scale is calibrated for different or required magnifications, SM can be removed and slide
having sample material may be placed for observation and measurement.
EXERCISE :
Stage micrometer
0 1 2 3 4 5 6 7 8 9 10
Ocular micrometer
micrometer

EXPERIMENT NO.13
OBJECTIVE: To prepare temporary slide of leaf peel to show stomatal density and stomatal index
Stoma (plural-stomata) is a minute epidermal opening covered by two kidney shaped guard cells in dicot leaves. These guard cells, in turn, are surrounded by epidermal (subsidiary) cells. Stomata perform the functions of gaseous exchange and transpiration in plants. The nature of the stomata, as well as, the stomatal index and stomatal number are important diagnostic characteristics of dicot leaves. Stomatal number is defined as the average number of stomata per mm2 of epidermis of the leaf. The actual number of stomata per sq mm may vary for the leaves of the different plant grown in different climatic conditions. Stomatal index is the percentage which the number of stomata form to the total number of epidermal cells present in microscopic view field.
MATERIAL REQUIRED: Fresh leaf of Tradescantia or Bryophyllum plant, forceps, needles, watch glasses, glass slides, a dropper, coverslips, a brush, blotting paper, safranin, glycerine and a compound microscope.
PROCEDURE:
1. Take healthy leaf from the potted plant. 2. Remove a part of the peel from the lower surface of the leaf. You can do this by folding the leaf over and
gently pulling the peel apart using forceps. 3. Place the peel on a clean glass slide and Put a few drops safranin stain for staining the epidermal peel. 4. Put a drop of glycerin over the peel and place a clean coverslip gently over it with the help of a needle. 5. Remove the excess stain and glycerine with the help of blotting paper. 6. Observe the slide under the low-power and high-power magnifications of the compound microscope. 7. Now count the number of stomata present in microscopic view field can be recorded for calculating the
stomatal density that can be expressed in terms of number of stomata/mm2 and stomatal index by using the formula, stomatal index (%) = (S/S+E) x 100 where, S and E are the number of stomata and epidermal cells respectively in microscopic view field.
8. Calculate the diameter of view field by ocular scale. Now the area of circle under microscopic view field can
be calculated by following formula: r2 where, r is the radius of the circle (view field) i.e., ½ of the diameter of circle.
Now calculate the number of stomata for mm2 of area for upper and lower surface of leaves.
Plant species
Replicate No of stomata cm2 No. of epidermal cell
Upper Lower Upper Lower
Sample A 1
2
3
Mean
Sample B 1
2
3
Mean
CALCULATION
Stomatal Index
Sample A

Sample B

EXPERIMENT NO.14
OBJECTIVE: To show experimentally that light is necessary for Photosynthesis
Photosynthesis is a biochemical process by which green plants synthesize sugar in the presence of sunlight using carbon dioxide from the atmosphere and water from the soil. Most important factor for photosynthesis is light. The rate of photosynthesis depends on the quantity and quality of light. The chlorophyll molecule in green leaves absorb light, get excited and emit electrons. The emitted electrons are used in the production of adenosine triphosphate (ATP). Finally, the solar energy is converted into chemical energy and stored in the glucose produced.
The overall reaction of photosynthesis is: 6CO2 +12 H2O Chlorophyll C6H12O6+6H2O+ 6O2 Light
MATERIAL REQUIRED: A healthy potted plant, a petri dish, beaker, water, forceps, heating mantle, alcohol, a strip of black paper, iodine solution and clips
PROCEDURE:
1. Take the potted plant and keep it in a dark place for 48-72 hours so that the leaves get destarched. 2. Cover a part of one of its leaves with the strip of black paper. Make sure that you cover both the sides of the
leaf. 3. Now place this plant in sunlight for 5—6 hours. 4. Pluck the selected covered leaf and remove the
black paper covering it. 5. Place this leaf in the beaker containing water and
boil it for about 10 minutes. 6. Take out the leaf and now boil it in alcohol, using
the water bath, for 10 minutes. This removes the chlorophyll.
7. Take out the leaf and wash it under running water. 8. Place this leaf in the Petri dish and put a few drops of iodine solution on it. Now observe the change in colour.
OBSERVATION: The leaf turns blue-black except in the covered region. As this covered region did not receive light, photosynthesis did not occur. Hence no starch was formed there. The uncovered region received light and starch was formed there due to photosynthesis.
PRECAUTIONS:
1. Before starting the experiment, the leaf must be distracted by keeping it in dark. 2. The leaf must be covered with black paper properly to prevent the entry of light. 3. Boiling the leaf in alcohol should be done in the water bath.
DISCUSSION:
Experiment No.15
OBJECTIVE: To demonstrate that Chlorophyll is necessary for Photosynthesis
Photosynthesis is an important physiological activity of all green plants. For photosynthesis to occur in green plants the factors required are Sunlight, Chlorophyll and Carbon dioxide. One factor that is more important for green plants to prepare their own food is the presence of chlorophyll pigment in their leaves.
MATERIAL REQUIRED: A potted variegated leaf plant (Croton or coleus), beaker, test tube, water, blotting paper, heating mantle, ethanol, iodine solution
PROCEDURE:
1. Detach a leaf from a variegated plant (Croton or coleus), which has been exposed to sunlight for at least three (3) hours.
2. Now immersed leaf in boiling water for few minutes so that the cells of the leaf will be killed and at the same time metabolic activities of the leaf cells will be stopped
3. Now the boiled leaf is taken out from the beaker with the help of a forceps. It is then placed in a test tube containing ethanol.
4. Then the leaf is boiled in ethanol over a water bath by keeping it in boiling water for about 10 minutes. The purpose of boiling leaf in ethanol is that dissolved greenish part i.e. chlorophyll and then become pale-white.
5. Pale-white leaf is removed from the test tube by forceps and then it is washed in under cold water to make it soft.
6. Dry this leaf with the help of blotting paper and pour a few drop of iodine solution over it and observe the colour change of leaf.
OBSERVATION: Iodine is a purple colored reagent used to test the presence or absence of starch in the leaf conducted for photosynthesis process. In the presence of starch iodine solution will turn into blue-black color and in the absence of starch iodine added to leaf will turn into brown-yellow color.
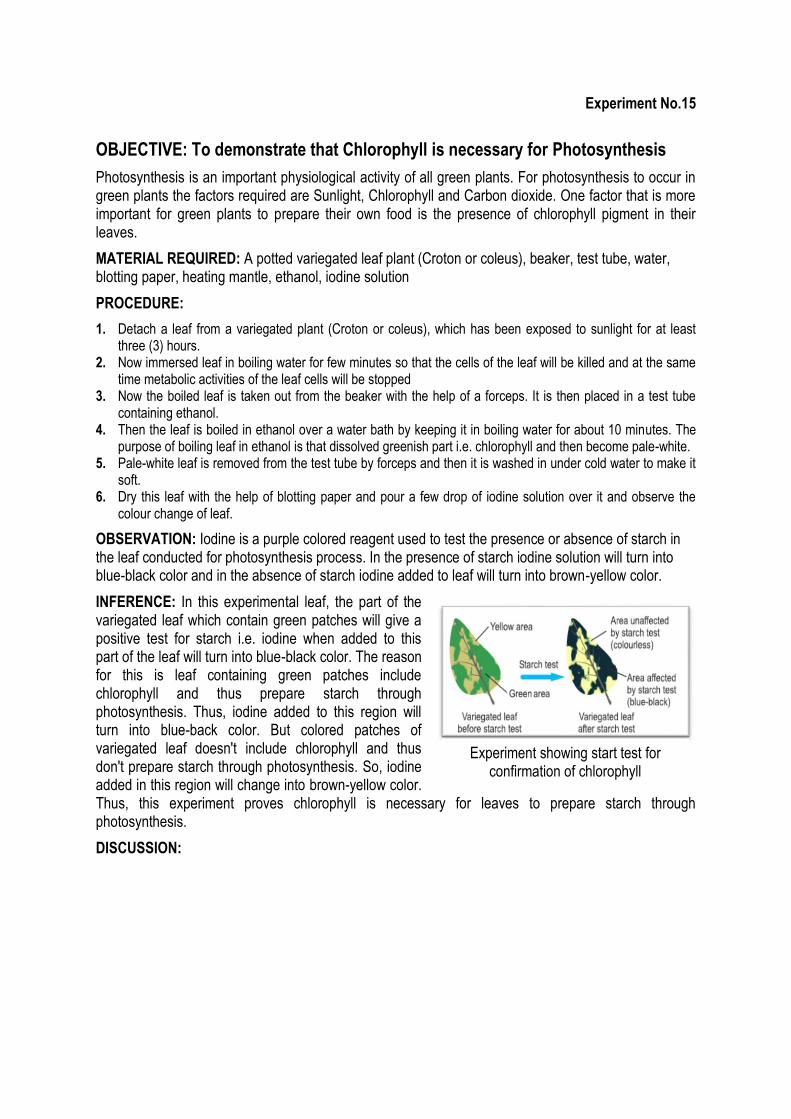
INFERENCE: In this experimental leaf, the part of the variegated leaf which contain green patches will give a positive test for starch i.e. iodine when added to this part of the leaf will turn into blue-black color. The reason for this is leaf containing green patches include chlorophyll and thus prepare starch through photosynthesis. Thus, iodine added to this region will turn into blue-back color. But colored patches of variegated leaf doesn't include chlorophyll and thus don't prepare starch through photosynthesis. So, iodine added in this region will change into brown-yellow color. Thus, this experiment proves chlorophyll is necessary for leaves to prepare starch through photosynthesis.
DISCUSSION:
Experiment showing start test for confirmation of chlorophyll
EXPERIMENT NO.16
OBJECTIVE: Identification of photosynthetic pigments in horticultural crops: Chlorophyll and carotenoids
(A) Extraction and estimation of chlorophyll pigment in plant tissues
INTRODUCTION: Chlorophylls is the green pigment of plants that take part in photosynthesis. There are several types of chlorophylls which differ from one another in the details of their molecular structure and the absorption properties. Most common chlorophyll types in the vascular plants are chlorophyll a and b. Chlorophyll a is found in all photosynthetic eukaryotes, which converts light energy into the chemical energy. Chlorophyll a is a large molecule with a tetra pyrrol ring and a magnesium ion held in it. Attached to one of the rings is a long insoluble hydrocarbon ring, a 20-carbon phytol
group. Chlorophyll b has a -CHO group in the third carbon of second pyrrol ring instead of -CH3 group as in the case of chlorophyll a. Chlorophyll a and chlorophyll b have typical absorption spectra of solar radiation. Maximum peak of chlorophyll a is observed in blue violet (429 nm) and in red region (660 nm) while the chlorophyll b absorbs at 453 nm and 642 nm. Chlorophyll a is usually blue green and chlorophyll b is yellow green in colour. The formula for the chlorophyll a molecule is C55H72O5N4Mg and chlorophyll b molecule is C55H70O6N4Mg.
MATERIALS REQUIRED: Fresh leaf, 80 % acetone, distilled water, balance, spectrophotometer, mortar and pestle
PROCEDURE:
1. Take 250 mg of leaf sample and macerated with 10ml of 80% acetone using a pestle and mortar
2. Extract or slurry is centrifuged at 3000 rpm for 10 minutes. 3. The supernatant solution is transferred into a 25ml test tube and made up to 20ml using 80%
acetone. 4. The color intensity of the green pigment is read at 645nm, 663nm and 652nm for chlorophyll a,
chlorophyll b and total chlorophyll content respectively using spectrophotometer against the solvent (80% acetone) blank.
Formula for calculation
The spectrophotometer is calibrated by using 80% acetone as blank sample. V
Chlorophyll a = 12.7 (A663) - 2.69 (A 645) x --------------- 1000 x W V
Chlorophyll b = 22.9 (A 645) - 4.69 (A 663) x -------------- 1000 x W A652 x 1000 V
Total chlorophyll = --------------------- x -------------- 34.5 1000 x W Where A= Optical density V= Final volume of leaf sample (25 ml) W= Weight of leaf tissue (in gm i.e. 025 g)

The chlorophyll content of the leaf sample is expressed as mg/ g of fresh leaf
CALCULATION:
17 (B) Extraction and estimation of carotenoids pigment in plant tissues
The Carotenoids are a group of yellow, orange and orange red fat–soluble pigment widely distributes in nature. In green leaves, they occur in grana of chloroplast. The green colour of the chlorophyll masks the yellow to red colour of the carotene except in very young leaves and in variegated leaves, wherein chloroplast content is less. These pigments are present in mango, papaya, tomato, carrot, red pepper, most of the flowers, etc. Carotenoids are of two groups carotenes and xanthophylls. Carotenes are hydrocarbons with the empirical formula C40H56 composed of eight isoprene units. There are several isomers of which β- carotene, the precursor of vitamin A, is most abundant and may make up as much as 0.1% of the leaf dry weight. The red pigment, lycopene, found in ripe tomatoes, rose fruits and other plant parts, is also as isomer of carotene.
Most xanthophylls have the formula C40H56O2 and are yellow to brown in colour. Xanthophylls can be separated physically from carotene because they are more soluble in alcohol and much less soluble in petroleum ether. The most abundant leaf xanthophyll is lutein which sometimes occurs in higher concentration that β- carotene. Carotenoids function as accessory pigments in photosynthesis and may also protect chlorophyll form irreversible photo oxidation
PROCEDURE:
1. Take 250 mg of leaf sample and macerated with 10ml of 80% acetone using a pestle and mortar 2. Extract or slurry is centrifuged at 3000 rpm for 10 minutes and the residue is re-extracted with another 5ml of
80% acetone until homogenate becomes colorless 3. The supernatant solution is transferred into a 25ml test tube and made up to 20ml using 80% acetone. 4. The optical density of the extract is measured at 480 and 510nm wavelength in a Spectrophotometer against
the solvent (80% acetone) blank.
Formula
7.6 (A 480) - 1.49 (A 510) V Carotenoids: ----------------------------------------------- 1000 x W Where A= Optical density V= Final volume of leaf sample (25 ml) W= Weight of leaf tissue (in gm i.e. 025 g)
The chlorophyll content of the leaf sample is expressed as mg/ g of fresh leaf
CALCULATION:
DISCUSSION:
EXPERIMENT NO.17
OBJECTIVE: Separation of photosynthetic pigments by paper chromatography
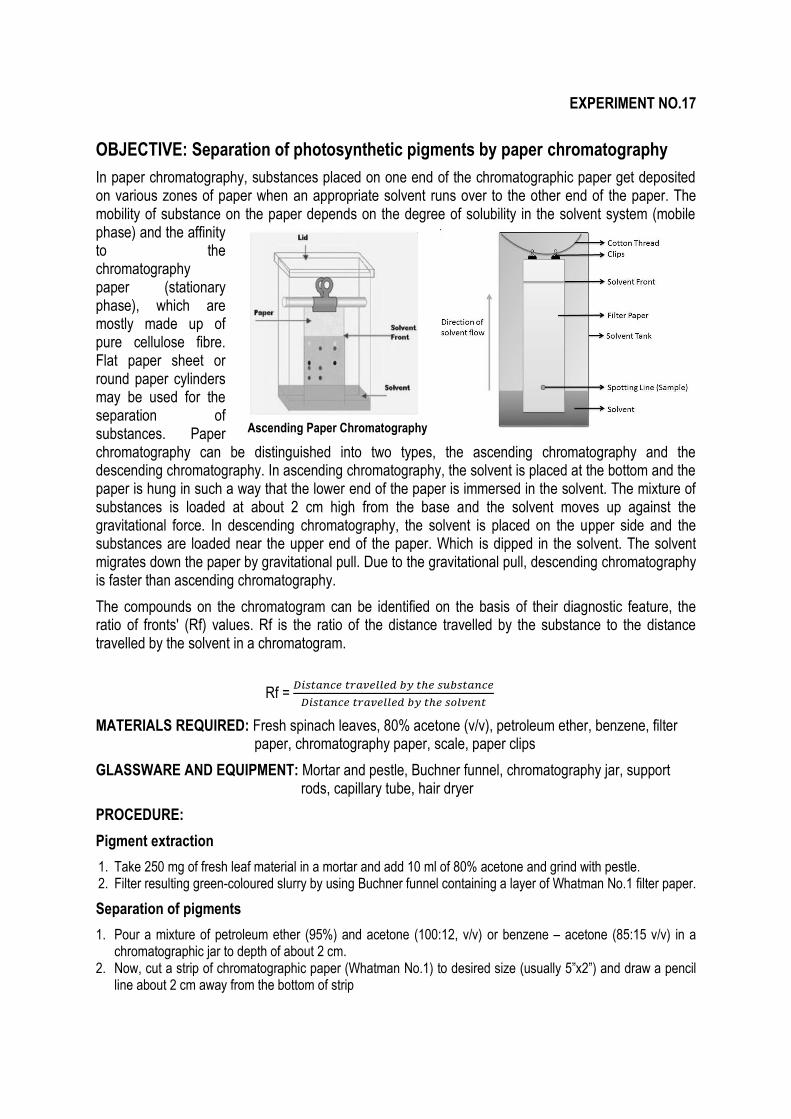
In paper chromatography, substances placed on one end of the chromatographic paper get deposited on various zones of paper when an appropriate solvent runs over to the other end of the paper. The mobility of substance on the paper depends on the degree of solubility in the solvent system (mobile phase) and the affinity to the chromatography paper (stationary phase), which are mostly made up of pure cellulose fibre. Flat paper sheet or round paper cylinders may be used for the separation of substances. Paper chromatography can be distinguished into two types, the ascending chromatography and the descending chromatography. In ascending chromatography, the solvent is placed at the bottom and the paper is hung in such a way that the lower end of the paper is immersed in the solvent. The mixture of substances is loaded at about 2 cm high from the base and the solvent moves up against the gravitational force. In descending chromatography, the solvent is placed on the upper side and the substances are loaded near the upper end of the paper. Which is dipped in the solvent. The solvent migrates down the paper by gravitational pull. Due to the gravitational pull, descending chromatography is faster than ascending chromatography.
The compounds on the chromatogram can be identified on the basis of their diagnostic feature, the ratio of fronts' (Rf) values. Rf is the ratio of the distance travelled by the substance to the distance travelled by the solvent in a chromatogram.
Rf =
MATERIALS REQUIRED: Fresh spinach leaves, 80% acetone (v/v), petroleum ether, benzene, filter paper, chromatography paper, scale, paper clips
GLASSWARE AND EQUIPMENT: Mortar and pestle, Buchner funnel, chromatography jar, support rods, capillary tube, hair dryer
PROCEDURE:
Pigment extraction
1. Take 250 mg of fresh leaf material in a mortar and add 10 ml of 80% acetone and grind with pestle. 2. Filter resulting green-coloured slurry by using Buchner funnel containing a layer of Whatman No.1 filter paper.
Separation of pigments
1. Pour a mixture of petroleum ether (95%) and acetone (100:12, v/v) or benzene – acetone (85:15 v/v) in a chromatographic jar to depth of about 2 cm.
2. Now, cut a strip of chromatographic paper (Whatman No.1) to desired size (usually 5‖x2‖) and draw a pencil line about 2 cm away from the bottom of strip
Ascending Paper Chromatography
3. With the help of a glass capillary tube drawn to a fine tip spot two or three points about 3 cm apart from one another with pigment extract.
4. Allow each pigment drop to dry completely before apply the next drops. 5. Repeat the application of drops until the marks are dark green 6. Now, hang the paper in the chromatography jar with lower end dipped in the solvent but make sure the
loading spots just above from upper layer of solvent. 7. Remove the paper when the solvent has moved up to the top of the paper. Allow the paper to dry.
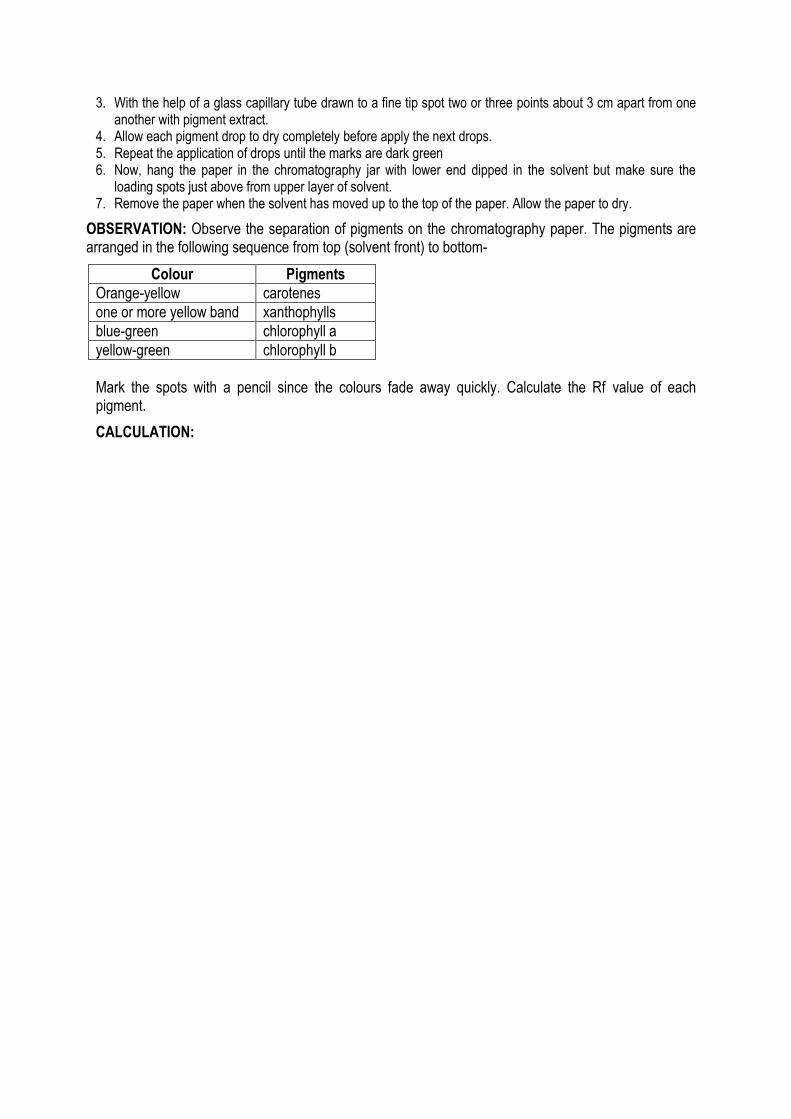
OBSERVATION: Observe the separation of pigments on the chromatography paper. The pigments are arranged in the following sequence from top (solvent front) to bottom-
Colour Pigments
Orange-yellow carotenes
one or more yellow band xanthophylls
blue-green chlorophyll a
yellow-green chlorophyll b
Mark the spots with a pencil since the colours fade away quickly. Calculate the Rf value of each pigment.
CALCULATION:
EXPERIMENT NO.18
OBJECTIVE: Measurement of relative water content (RWC)
The relative water content (RWC) is a useful indicator of the status of water balance of a plant essentially because it expresses the absolute amount of water, which the plant requires to reach artificial full saturation. Thus there are a relationship between RWC and water potential. It estimates the current water content of the samples leaf tissue relative to the maximal water content it can hold at full turgidity. This relation varies significantly according to nature and age of plant material. The RWC express the water content in per cent at a given time as related to the water content at full turgor:
Formula:
RWC =
MATERIAL REQUIRED: Fresh leaf material, petri plates, distilled water, scissor, polythene bags, electronic balance, hot air oven
PROCEDURE:
1. Collect the leaf sample; usually fully expended top most leaf is preferable. 2. Immediately after sampling place the sample in a polythene bag and seal properly to minimize water loss from
the leaf and Sample should reach the lab as soon as possible. 3. Cut 5-10 leaf discs of around 1.5 cm in diameter or take several leaflets (in smaller composite leaves)
depending upon the plant species. 4. Weight the sample quickly to record the fresh weight. 5. Hydrate the sample to full turgidity by floating on de-ionized water in closed petri-dish for 4 hours at normal
room temperature. 6. After 4 hours take out the sample and remove any surfaces moisture quickly and lightly with tissue paper and
immediately weigh to obtain fully turgid weight. 7. Dry the samples in a hot air oven at 70◦C for 48 hours 8. Weight the dry weight of the samples after proper drying.
OBSERVATION and RESULTS:
Sample Fresh weight (g) Turgid weight (g) Dry weight (g) RWC (%)
A
B
CALCULATION:

RECAUTIONS:
1. Avoid large veins and mid-rib of leaf tissue 2. Excess water should blotted from the leaf surface before recording its turgid weight 3. We should not take samples of different ages, different exposures or collected at different time of day.
DISCUSSION:
EXPERIMENT NO.19
OBJECTIVE: To study the plant movements
Most of the plants are rooted in the ground and do not move bodily from one place to another like animals. Movements in higher plants are chiefly in the form of bending, twisting, elongation of certain parts, etc. Plant may respond both to directional and non-directional stimuli. A response to a directional stimulus, such as gravity or sunlight is called a tropism. A response to a non-directional stimulus such as temperature or humidity is a nastic movement.
1. PHOTOTROPISM: Common tropism seen in plants is the bending of the plants towards a source of light. The plant organs, such as stems and leaf-petioles which bend towards the lights, are said to positively phototropic while the underground organs, such as roots which bend away from the source of light are called as negatively phototropic. Organs such as leaves which position themselves vertically to the source of light are termed as transversally phototropic.
MATERIALS REQUIRED: Seedling such radish, pea etc, Beaker, Cork slice, cardboard box.
PROCEDURE:
1. Take some seeds and sows in the plastic box or in a beaker line with few layers of moist filter paper.
2. Grow the seedlings till two pairs of leaves have developed. 3. Remove one the seedling and together with a cotton plug insert the seedling through a hole in a
cork slice in such a way that the root remains below the hole whereas, the stem and leaves are above hole.
4. Float the cork slice on water in a beaker. Place the beaker near a window of the laboratory or sunlight.
5. Cover the beaker with a cardboard box with a hole at the upper end to allow light.
OBSERVATION: After few days it will be found that stem grows towards the source of light (positive phototropic) while the root will bend away from the light (negative phototropic). The leaves will orient themselves vertically to the source of light (transversally phototropic).
2. GRAVITROPISM: Plants organs orient their special position in response to gravity of the earth. For example, roots grow towards downward towards the earth (positive gravitropsim) whereas the stems grow upward, away from the earth (negative gravitropsim). In contrast, leaves generally grow at a right angle to the direction of gravity (transverse gravitropsim).
MATERIALS REQUIRED: Vegetable seeds such rice / pea / tomato seeds, Petri dishes, filter paper, glass tubes.
PROCEDURE
1. Take some seeds of pea or rice and germinate in the dark on moist filter paper in a petri dish. 2. After the seeds have well germinated, place a seed inside a glass tube of appropriate diameter. Place the
tube in a moist chamber. 3. Germinate rice seeds in the dark for 4-5 days on petri dishes lined with moist filter. Similarly, germinate few
seeds under submerged conditions in a beaker containing freshly boiled and cooled water. Place the seedlings grown on petri dish and in the beaker in the horizontal position in a petri dish containing moist paper.
OBSERVATION: After week it will distinctly be seen that in the pea seedlings the root will grow downward whereas the shoot will grow upward. Coleoptile of rice seedlings grown on petri dish (aerobic condition) will grow upward whereas, the coleoptile from the seedlings grown under submerged condition (anerobic condition).
3. SEISMONASTIC MOVEMENTS: Nastic movements are the plant movements in which the direction of movement is not influenced by the direction of the external stimulus. Rather, the direction of movement depends upon the nature of the responding plant organ. Seismonastic movements are the nasitc movements which occur in response to mechanical stimulation, such as touching or shaking. Such movements are exemplified by the sensitive plant of Mimosa pudica. The leaf and leaflets of this plant droop suddenly when they are touched or shaken. This response takes place due to the sudden change in the turgor pressure in the specific cells of pulvinus, a joint like thickening found at the base of each leaflet.
MATERIALS REQUIRED: A well- watered potted plant of Mimosa pudica, ethanol
PROCEDURE:
1. Take a well water potted plant of Mimosa pudica and stimulate the leaflets by gently touching, shaking at the apical end of leaflet.
2. Repeat the experiment on other leaves by placing a drop of boiling water or ethanol on the apical pinnule. In order to obtain best results, the plant must be adequately water several hours before the experiment.
OBSERVATION and DISCUSSION:
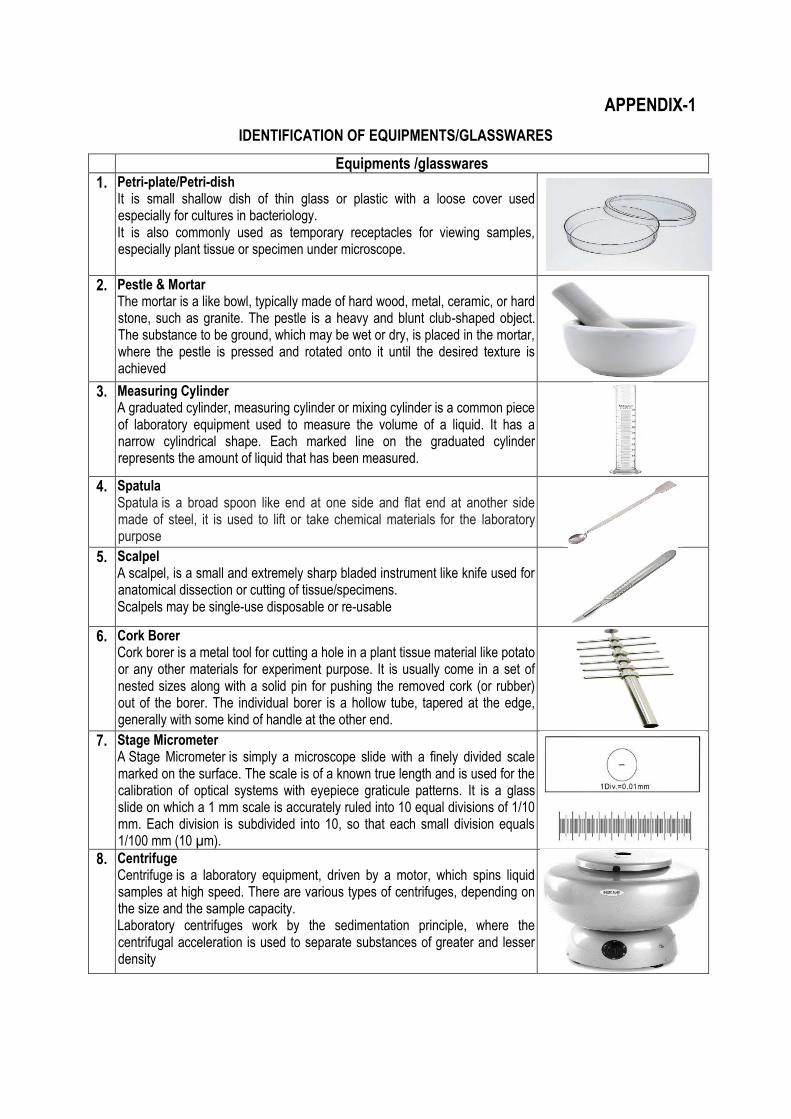
APPENDIX-1
IDENTIFICATION OF EQUIPMENTS/GLASSWARES
Equipments /glasswares
1. Petri-plate/Petri-dish It is small shallow dish of thin glass or plastic with a loose cover used especially for cultures in bacteriology. It is also commonly used as temporary receptacles for viewing samples, especially plant tissue or specimen under microscope.
2. Pestle & Mortar
The mortar is a like bowl, typically made of hard wood, metal, ceramic, or hard stone, such as granite. The pestle is a heavy and blunt club-shaped object. The substance to be ground, which may be wet or dry, is placed in the mortar, where the pestle is pressed and rotated onto it until the desired texture is achieved
3. Measuring Cylinder
A graduated cylinder, measuring cylinder or mixing cylinder is a common piece of laboratory equipment used to measure the volume of a liquid. It has a narrow cylindrical shape. Each marked line on the graduated cylinder represents the amount of liquid that has been measured.
4. Spatula
Spatula is a broad spoon like end at one side and flat end at another side made of steel, it is used to lift or take chemical materials for the laboratory purpose
5. Scalpel A scalpel, is a small and extremely sharp bladed instrument like knife used for anatomical dissection or cutting of tissue/specimens. Scalpels may be single-use disposable or re-usable
6. Cork Borer
Cork borer is a metal tool for cutting a hole in a plant tissue material like potato or any other materials for experiment purpose. It is usually come in a set of nested sizes along with a solid pin for pushing the removed cork (or rubber) out of the borer. The individual borer is a hollow tube, tapered at the edge, generally with some kind of handle at the other end.
7. Stage Micrometer A Stage Micrometer is simply a microscope slide with a finely divided scale marked on the surface. The scale is of a known true length and is used for the calibration of optical systems with eyepiece graticule patterns. It is a glass slide on which a 1 mm scale is accurately ruled into 10 equal divisions of 1/10 mm. Each division is subdivided into 10, so that each small division equals 1/100 mm (10 µm).
8. Centrifuge Centrifuge is a laboratory equipment, driven by a motor, which spins liquid samples at high speed. There are various types of centrifuges, depending on the size and the sample capacity. Laboratory centrifuges work by the sedimentation principle, where the centrifugal acceleration is used to separate substances of greater and lesser density
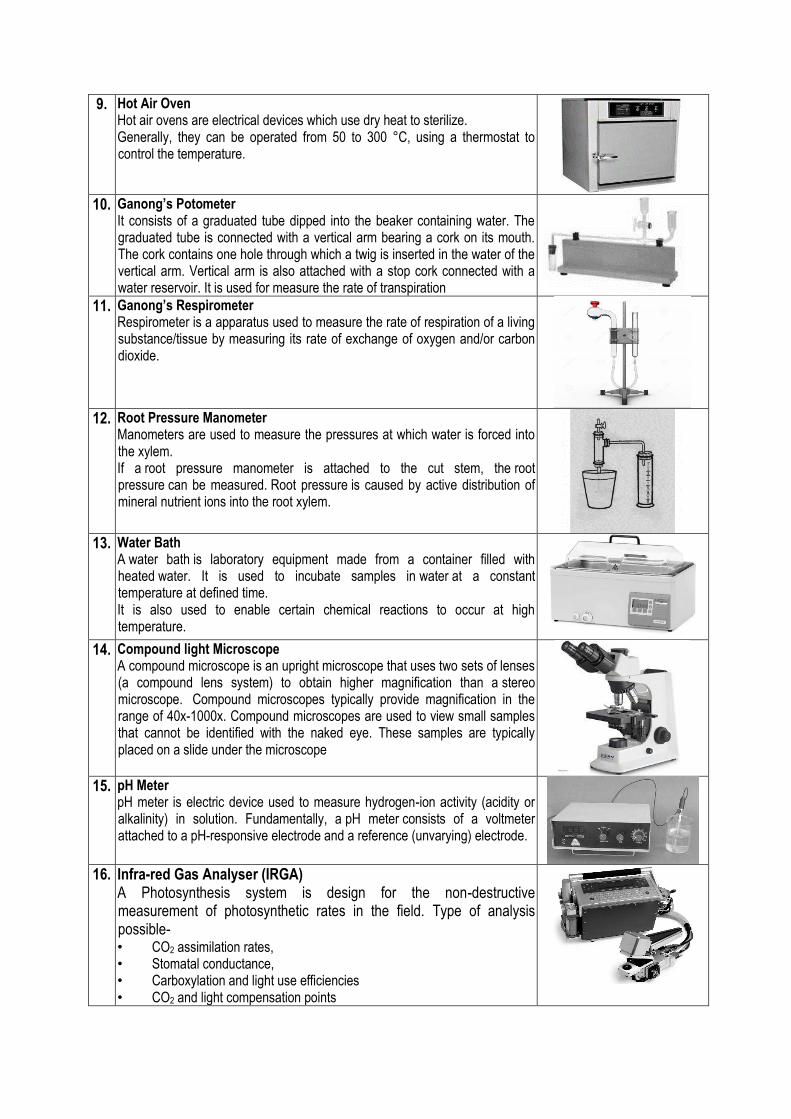
9. Hot Air Oven Hot air ovens are electrical devices which use dry heat to sterilize. Generally, they can be operated from 50 to 300 °C, using a thermostat to control the temperature.
10. Ganong’s Potometer
It consists of a graduated tube dipped into the beaker containing water. The graduated tube is connected with a vertical arm bearing a cork on its mouth. The cork contains one hole through which a twig is inserted in the water of the vertical arm. Vertical arm is also attached with a stop cork connected with a water reservoir. It is used for measure the rate of transpiration
11. Ganong’s Respirometer Respirometer is a apparatus used to measure the rate of respiration of a living substance/tissue by measuring its rate of exchange of oxygen and/or carbon dioxide.
12. Root Pressure Manometer
Manometers are used to measure the pressures at which water is forced into the xylem. If a root pressure manometer is attached to the cut stem, the root pressure can be measured. Root pressure is caused by active distribution of mineral nutrient ions into the root xylem.
13. Water Bath
A water bath is laboratory equipment made from a container filled with heated water. It is used to incubate samples in water at a constant temperature at defined time. It is also used to enable certain chemical reactions to occur at high temperature.
14. Compound light Microscope
A compound microscope is an upright microscope that uses two sets of lenses (a compound lens system) to obtain higher magnification than a stereo microscope. Compound microscopes typically provide magnification in the range of 40x-1000x. Compound microscopes are used to view small samples that cannot be identified with the naked eye. These samples are typically placed on a slide under the microscope
15. pH Meter
pH meter is electric device used to measure hydrogen-ion activity (acidity or alkalinity) in solution. Fundamentally, a pH meter consists of a voltmeter attached to a pH-responsive electrode and a reference (unvarying) electrode.
16. Infra-red Gas Analyser (IRGA)
A Photosynthesis system is design for the non-destructive measurement of photosynthetic rates in the field. Type of analysis possible- • CO2 assimilation rates, • Stomatal conductance, • Carboxylation and light use efficiencies • CO2 and light compensation points
• PAR(photosynthetically active radiation)
APPENDIX-2
PREPARATION OF STANDARD SOLUTIONS
A standard solution contains a known weight of the substance is known volume of solvent.
1. Percent (%) solution: It contains in 100 ml of solvent, particular grams of a solute which is denoted by the percentage, e.g., for preparing 10% NaCl, 10 g of the salt is dissolved in water and the volume is made to 100 ml. 10% Glycerol will contain 10 ml Glycerol and 90 ml water.
2. Parts per million (ppm) solution: 1 ppm solution is prepared by dissolving 1 mg of solute to 1 litre of solvent. For solutions 1 ml is diluted to 1 litre.
3. Normal solution: Normal solution contains in 1 litre of solution, one gram equivalent of dissolved substance. One gram equivalent of a substance corresponds to its molecular weight expressed in grams divided by its velency, e.g. 1 N Na OH contains 40 g NaOH in 1 litre. 1 N HCl may be prepared as follows:
36.5 g of HCl per litr5e make a normal solution. Converting weight into volume = 36.5/1.16 = 31.4 ml. (Sp. Gravity of HCL = 1.16). The purity of HCl is 26 to 28%, hence (100/28) x 31.4 = 112.1 ml. Approximately 113 ml HCl dissolved per litre will give strength equal to 1 N.
4. Molar solution: A molar solution of a compound is defined as one mole of that compound per litre. 1 mole/1=molecular weight in grams/litre of solution, e.g., a solution of 0.1 M H2SO4, molecular weight 98 contains 9.80 g H2SO4, in 1 litre of solution. When 95% H2SO4, is available, the required 0.1 M is prepared as follows:
95 g H2SO4, is contained in 100 g 95% H2SO4, 9.8 g H2SO4, is contained in x g 95% H2SO4,
Then x = (9.8 x 100)/ 95 = 10.315 g. Converting weight into volume = 10.315/1.84 specific gravity of H2SO4, = 5.605
Thus 5.605 ml of 95% H2SO4, is diluted to 1 litre with water to obtain 0.1 M H2SO4,
Dilution of stock solutions: The stock solution of 1000 ppm can be diluted further to the required concentrations.
Suppose the required concentration is 25 ppm.
Stock concentration/ Required concentration =1000/25 = 40
Therefore, to dilute 1000 ppm stock to 25 ppm solution, dilute 1 ml of the stock solution to 40 ml with water.

ROUGH WORK

ROUGH WORK