introduction to programming arcobjects using dot net frameworrk
TRANSCRIPT

Introduction toProgramming
ArcObjectsTM Using theMicrosoft® .NET
Framework

Copyright © 2001-2009 ESRI
All rights reserved.
Course version 2.1. Revised April 2009.
Printed in the United States of America.
The information contained in this document is the exclusive property of ESRI. This work is protected under United States copyright lawand other international copyright treaties and conventions. No part of this work may be reproduced or transmitted in any form or by anymeans, electronic or mechanical, including photocopying and recording, or by any information storage or retrieval system, except asexpressly permitted in writing by ESRI. All requests should be sent to Attention: Contracts and Legal Services Manager, ESRI, 380 NewYork Street, Redlands, CA 92373-8100 USA.
The information contained in this document is subject to change without notice.
U. S. GOVERNMENT RESTRICTED/LIMITED RIGHTSAny software, documentation, and/or data delivered hereunder is subject to the terms of the LicenseAgreement. In no event shall the U.S. Government acquire greater than RESTRICTED/LIMITED RIGHTS. Ata minimum, use, duplication, or disclosure by the U.S. Government is subject to restrictions as set forth in FAR§52.227-14 Alternates I, II, and III (JUN 1987); FAR §52.227-19 (JUN 1987) and/or FAR §12.211/12.212(Commercial Technical Data/Computer Software); and DFARS §252.227-7015 (NOV 1995) (Technical Data)and/or DFARS §227.7202 (Computer Software), as applicable. Contractor/Manufacturer is ESRI, 380 NewYork Street, Redlands, CA 92373-8100 USA.
@esri.com, 3D Analyst, ACORN, Address Coder, ADF, AML, ArcAtlas, ArcCAD, ArcCatalog, ArcCOGO, ArcData, ArcDoc, ArcEdit,ArcEditor, ArcEurope, ArcExplorer, ArcExpress, ArcGIS, ArcGlobe, ArcGrid, ArcIMS, ARC/INFO, ArcInfo, ArcInfo Librarian,ArcInfo—Professional GIS, ArcInfo—The World's GIS, ArcLessons, ArcLocation, ArcLogistics, ArcMap, ArcNetwork, ArcNews,ArcObjects, ArcOpen, ArcPad, ArcPlot, ArcPress, ArcQuest, ArcReader, ArcScan, ArcScene, ArcSchool, ArcScripts, ArcSDE, ArcSdl,ArcSketch, ArcStorm, ArcSurvey, ArcTIN, ArcToolbox, ArcTools, ArcUSA, ArcUser, ArcView, ArcVoyager, ArcWatch, ArcWeb,ArcWorld, ArcXML, Atlas GIS, AtlasWare, Avenue, Business Analyst Online, BusinessMAP, CommunityInfo, Data Automation Kit,Database Integrator, DBI Kit, EDN, ESRI, ESRI BIS, ESRI—Team GIS, ESRI—The GIS Company, ESRI—The GIS People, ESRI—TheGIS Software Leader, FormEdit, GeoCollector, Geographic Design System, Geography Matters, Geography Network, GIS by ESRI, GISData ReViewer, GIS Day, GIS for Everyone, GISData Server, JTX, MapBeans, MapCafé, MapData, MapObjects, Maplex, MapStudio,ModelBuilder, MOLE, MPS-Atlas, NetEngine, PC ARC/INFO, PC ARCPLOT, PC ARCSHELL, PC DATA CONVERSION, PCSTARTER KIT, PC TABLES, PC ARCEDIT, PC NETWORK, PC OVERLAY, PLTS, Rent-a-Tech, RouteMAP, SDE, Site·Reporter,SML, Sourcebook·America, Spatial Database Engine, StreetEditor, StreetMap, Tapestry, the ARC/INFO logo, the ArcAtlas logo, theArcCAD logo, the ArcCAD WorkBench logo, the ArcCOGO logo, the ArcData logo, the ArcData Online logo, the ArcEdit logo, theArcEurope logo, the ArcExplorer logo, the ArcExpress logo, the ArcGIS logo, the ArcGIS Explorer logo, the ArcGrid logo, the ArcIMSlogo, the ArcInfo logo, the ArcLogistics Route logo, the ArcNetwork logo, the ArcPad logo, the ArcPlot logo, the ArcPress for ArcViewlogo, the ArcPress logo, the ArcScan logo, the ArcScene logo, the ArcSDE CAD Client logo, the ArcSDE logo, the ArcStorm logo, theArcTIN logo, the ArcTools logo, the ArcUSA logo, the ArcView 3D Analyst logo, the ArcView Data Publisher logo, the ArcView GISlogo, the ArcView Image Analysis logo, the ArcView Internet Map Server logo, the ArcView logo, the ArcView Network Analyst logo,the ArcView Spatial Analyst logo, the ArcView StreetMap 2000 logo, the ArcView StreetMap logo, the ArcView Tracking Analyst logo,the ArcWorld logo, the Atlas GIS logo, the Avenue logo, the BusinessMAP logo, the Community logo, the Data Automation Kit logo, theDigital Chart of the World logo, the ESRI Data logo, the ESRI globe logo, the ESRI Press logo, the Geography Network logo, the MapCafélogo, the MapObjects Internet Map Server logo, the MapObjects logo, the MOLE logo, the NetEngine logo, the PC ARC/INFO logo, theProduction Line Tool Set logo, the RouteMAP IMS logo, the RouteMAP logo, the SDE logo, The Geographic Advantage, The World'sLeading Desktop GIS, Water Writes, www.esri.com, www.esribis.com, www.geographynetwork.com, www.gis.com, www.gisday.com,and Your Personal Geographic Information System are trademarks, registered trademarks, or service marks of ESRI in the United States,the European Community, or certain other jurisdictions.
Other companies and products mentioned herein may be trademarks or registered trademarks of their respective trademark owners.
1
2
3
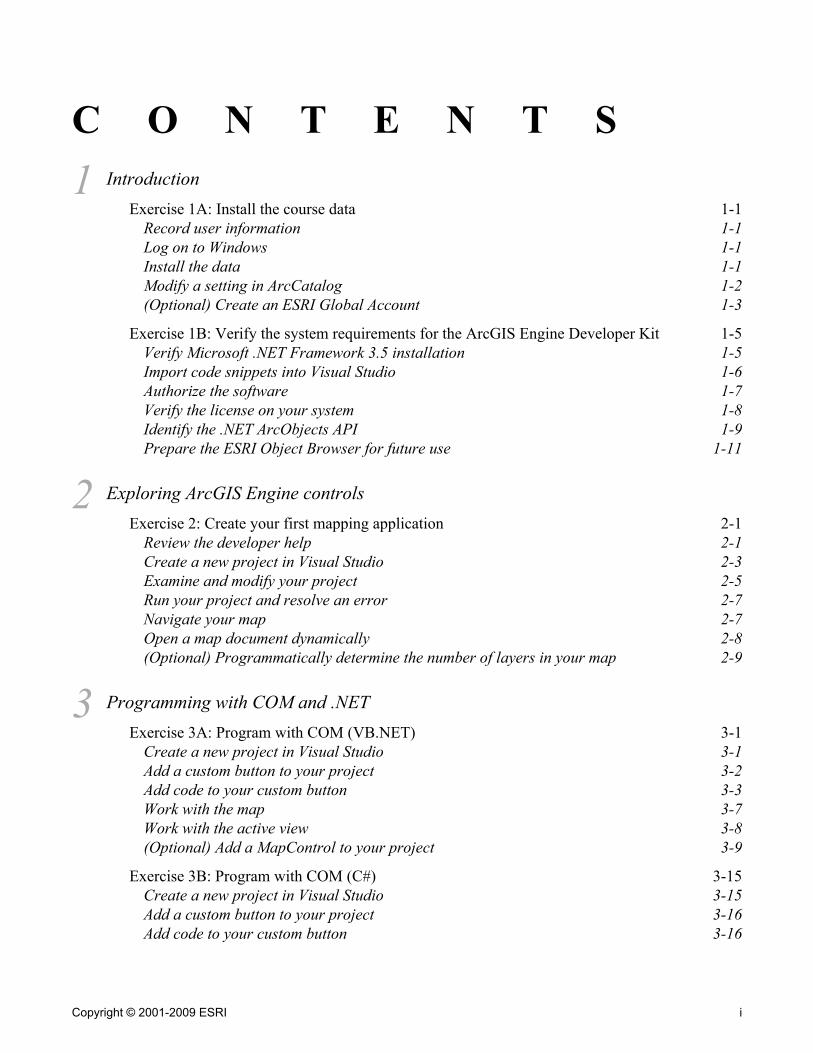
C O N T E N T SIntroduction
Exercise 1A: Install the course data 1-1Record user information 1-1Log on to Windows 1-1Install the data 1-1Modify a setting in ArcCatalog 1-2(Optional) Create an ESRI Global Account 1-3
Exercise 1B: Verify the system requirements for the ArcGIS Engine Developer Kit 1-5Verify Microsoft .NET Framework 3.5 installation 1-5Import code snippets into Visual Studio 1-6Authorize the software 1-7Verify the license on your system 1-8Identify the .NET ArcObjects API 1-9Prepare the ESRI Object Browser for future use 1-11
Exploring ArcGIS Engine controlsExercise 2: Create your first mapping application 2-1
Review the developer help 2-1Create a new project in Visual Studio 2-3Examine and modify your project 2-5Run your project and resolve an error 2-7Navigate your map 2-7Open a map document dynamically 2-8(Optional) Programmatically determine the number of layers in your map 2-9
Programming with COM and .NETExercise 3A: Program with COM (VB.NET) 3-1
Create a new project in Visual Studio 3-1Add a custom button to your project 3-2Add code to your custom button 3-3Work with the map 3-7Work with the active view 3-8(Optional) Add a MapControl to your project 3-9
Exercise 3B: Program with COM (C#) 3-15Create a new project in Visual Studio 3-15Add a custom button to your project 3-16Add code to your custom button 3-16
Copyright © 2001-2009 ESRI i
4
5
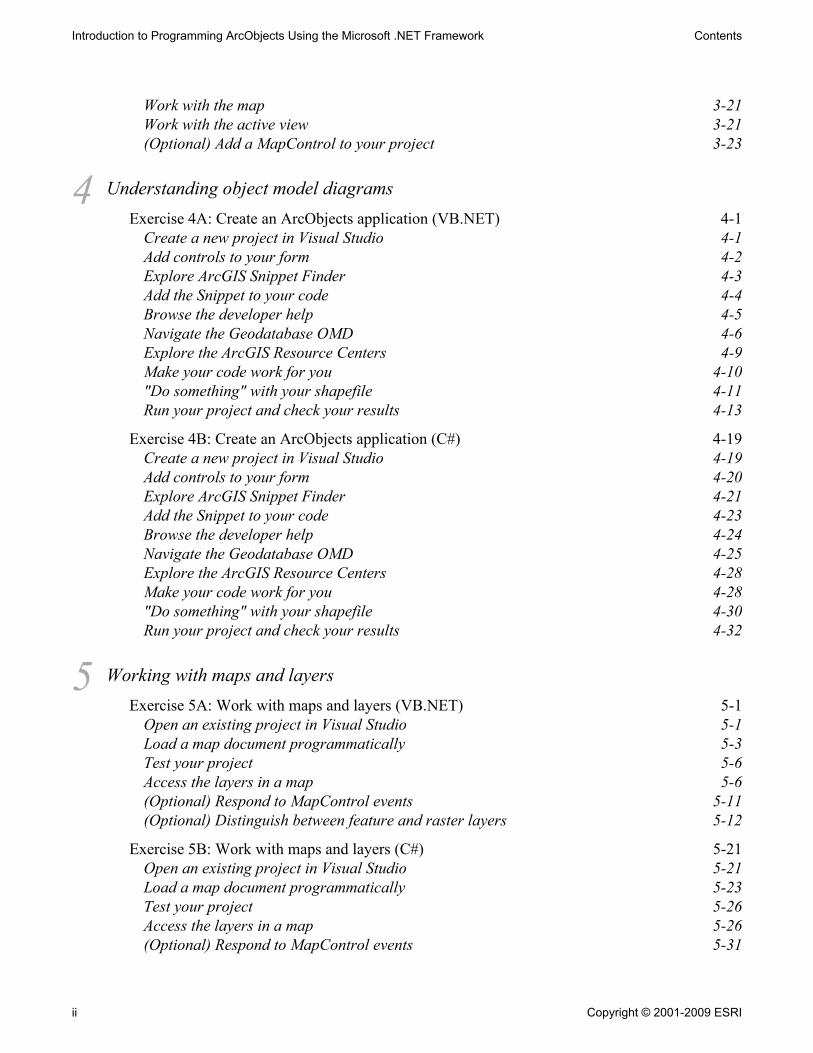
Work with the map 3-21Work with the active view 3-21(Optional) Add a MapControl to your project 3-23
Understanding object model diagramsExercise 4A: Create an ArcObjects application (VB.NET) 4-1
Create a new project in Visual Studio 4-1Add controls to your form 4-2Explore ArcGIS Snippet Finder 4-3Add the Snippet to your code 4-4Browse the developer help 4-5Navigate the Geodatabase OMD 4-6Explore the ArcGIS Resource Centers 4-9Make your code work for you 4-10"Do something" with your shapefile 4-11Run your project and check your results 4-13
Exercise 4B: Create an ArcObjects application (C#) 4-19Create a new project in Visual Studio 4-19Add controls to your form 4-20Explore ArcGIS Snippet Finder 4-21Add the Snippet to your code 4-23Browse the developer help 4-24Navigate the Geodatabase OMD 4-25Explore the ArcGIS Resource Centers 4-28Make your code work for you 4-28"Do something" with your shapefile 4-30Run your project and check your results 4-32
Working with maps and layersExercise 5A: Work with maps and layers (VB.NET) 5-1
Open an existing project in Visual Studio 5-1Load a map document programmatically 5-3Test your project 5-6Access the layers in a map 5-6(Optional) Respond to MapControl events 5-11(Optional) Distinguish between feature and raster layers 5-12
Exercise 5B: Work with maps and layers (C#) 5-21Open an existing project in Visual Studio 5-21Load a map document programmatically 5-23Test your project 5-26Access the layers in a map 5-26(Optional) Respond to MapControl events 5-31
Introduction to Programming ArcObjects Using the Microsoft .NET Framework Contents
ii Copyright © 2001-2009 ESRI
6
7
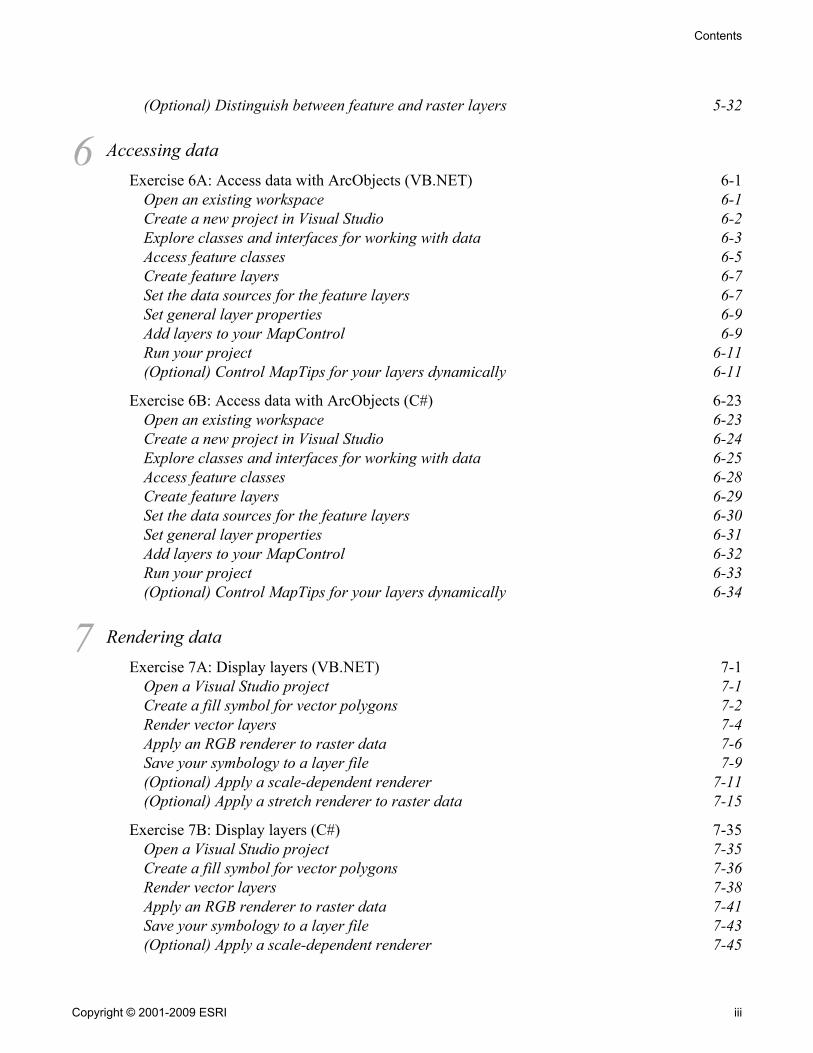
(Optional) Distinguish between feature and raster layers 5-32
Accessing dataExercise 6A: Access data with ArcObjects (VB.NET) 6-1
Open an existing workspace 6-1Create a new project in Visual Studio 6-2Explore classes and interfaces for working with data 6-3Access feature classes 6-5Create feature layers 6-7Set the data sources for the feature layers 6-7Set general layer properties 6-9Add layers to your MapControl 6-9Run your project 6-11(Optional) Control MapTips for your layers dynamically 6-11
Exercise 6B: Access data with ArcObjects (C#) 6-23Open an existing workspace 6-23Create a new project in Visual Studio 6-24Explore classes and interfaces for working with data 6-25Access feature classes 6-28Create feature layers 6-29Set the data sources for the feature layers 6-30Set general layer properties 6-31Add layers to your MapControl 6-32Run your project 6-33(Optional) Control MapTips for your layers dynamically 6-34
Rendering dataExercise 7A: Display layers (VB.NET) 7-1
Open a Visual Studio project 7-1Create a fill symbol for vector polygons 7-2Render vector layers 7-4Apply an RGB renderer to raster data 7-6Save your symbology to a layer file 7-9(Optional) Apply a scale-dependent renderer 7-11(Optional) Apply a stretch renderer to raster data 7-15
Exercise 7B: Display layers (C#) 7-35Open a Visual Studio project 7-35Create a fill symbol for vector polygons 7-36Render vector layers 7-38Apply an RGB renderer to raster data 7-41Save your symbology to a layer file 7-43(Optional) Apply a scale-dependent renderer 7-45
Contents
Copyright © 2001-2009 ESRI iii
8
9
10
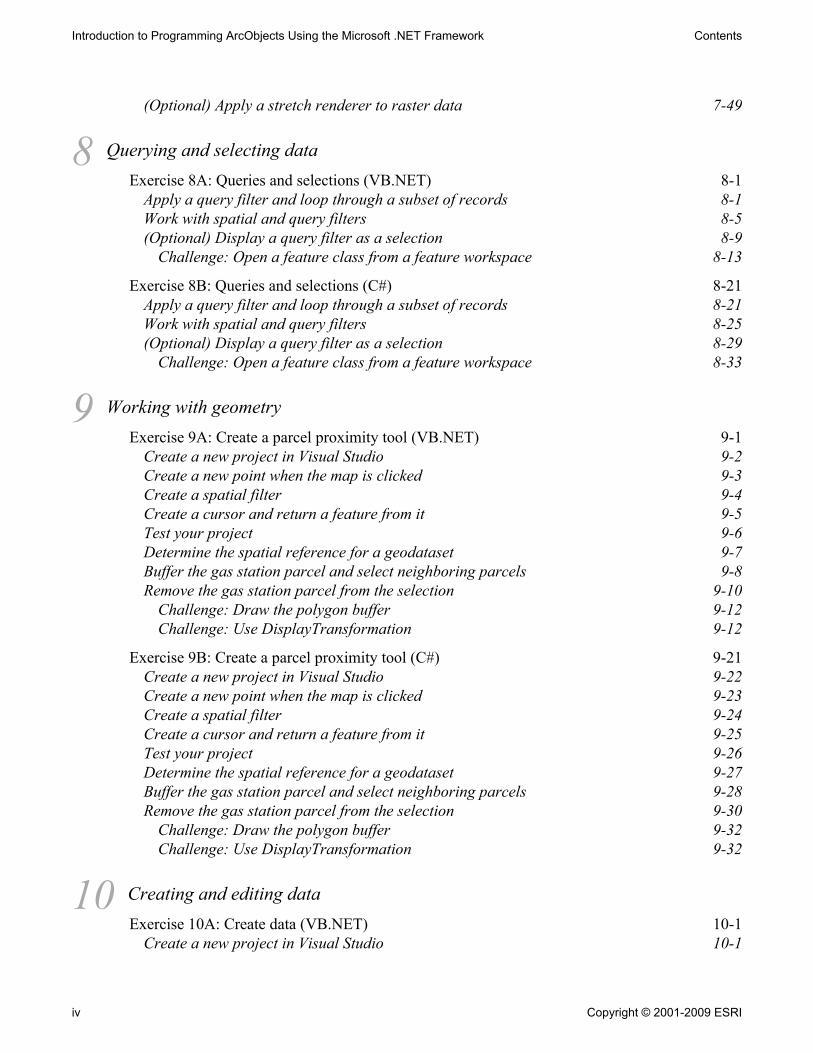
(Optional) Apply a stretch renderer to raster data 7-49
Querying and selecting dataExercise 8A: Queries and selections (VB.NET) 8-1
Apply a query filter and loop through a subset of records 8-1Work with spatial and query filters 8-5(Optional) Display a query filter as a selection 8-9
Challenge: Open a feature class from a feature workspace 8-13
Exercise 8B: Queries and selections (C#) 8-21Apply a query filter and loop through a subset of records 8-21Work with spatial and query filters 8-25(Optional) Display a query filter as a selection 8-29
Challenge: Open a feature class from a feature workspace 8-33
Working with geometryExercise 9A: Create a parcel proximity tool (VB.NET) 9-1
Create a new project in Visual Studio 9-2Create a new point when the map is clicked 9-3Create a spatial filter 9-4Create a cursor and return a feature from it 9-5Test your project 9-6Determine the spatial reference for a geodataset 9-7Buffer the gas station parcel and select neighboring parcels 9-8Remove the gas station parcel from the selection 9-10
Challenge: Draw the polygon buffer 9-12Challenge: Use DisplayTransformation 9-12
Exercise 9B: Create a parcel proximity tool (C#) 9-21Create a new project in Visual Studio 9-22Create a new point when the map is clicked 9-23Create a spatial filter 9-24Create a cursor and return a feature from it 9-25Test your project 9-26Determine the spatial reference for a geodataset 9-27Buffer the gas station parcel and select neighboring parcels 9-28Remove the gas station parcel from the selection 9-30
Challenge: Draw the polygon buffer 9-32Challenge: Use DisplayTransformation 9-32
Creating and editing dataExercise 10A: Create data (VB.NET) 10-1
Create a new project in Visual Studio 10-1
Introduction to Programming ArcObjects Using the Microsoft .NET Framework Contents
iv Copyright © 2001-2009 ESRI
11
12
Create a geodatabase 10-2Create a new file geodatabase 10-4Create a new table 10-6Add rows and values to the table 10-9Calculate field values using an update cursor 10-11(Optional) Compare methods for editing 10-12
Exercise 10B: Create data (C#) 10-23Create a new project in Visual Studio 10-23Create a geodatabase 10-24Create a new file geodatabase 10-26Create a new table 10-28Add rows and values to the table 10-30Calculate field values using an update cursor 10-31(Optional) Compare methods for editing 10-33
GeoprocessingExercise 11A: Access the GeoProcessor (VB.NET) 11-1
Start ArcCatalog and view your data 11-2Create a new project in Visual Studio 11-3Create and work with a GeoProcessor object 11-4Buffer a feature class 11-6Work with messaging and overwriting output 11-9Run multiple tools in the same process 11-12(Optional) Perform a batch process using a "List" method 11-14
Challenge: List environments 11-19
Exercise 11B: Access the GeoProcessor (C#) 11-27Start ArcCatalog and view your data 11-28Create a new project in Visual Studio 11-29Create and work with a GeoProcessor object 11-30Buffer a feature class 11-33Work with messaging and overwriting output 11-35Run multiple tools in the same process 11-38(Optional) Perform a batch process using a "List" method 11-40
Challenge: List environments 11-44
Working with layoutsExercise 12A: Update and export a layout (VB.NET) 12-1
Explore a map template in ArcMap 12-2Create a new project in Visual Studio 12-4Load a map template 12-5Load your map document 12-6Add your map template to the layout 12-7
Contents
Copyright © 2001-2009 ESRI v
Tag your elements with a unique type 12-8Modify the map title 12-10Export your layout to a file 12-12(Optional) Associate the units from your map with the scale bar 12-15
Challenge: Modify the second text element 12-17Challenge: Create layouts for all maps 12-17
Exercise 12B: Update and export a layout (C#) 12-25Explore a map template in ArcMap 12-26Create a new project in Visual Studio 12-28Load a map template 12-29Load your map document 12-29Add your map template to the layout 12-31Tag your elements with a unique type 12-32Modify the map title 12-34Export your layout to a file 12-35(Optional) Associate the units from your map with the scale bar 12-38
Challenge: Modify the second text element 12-40Challenge: Create layouts for all maps in the map document 12-40
Appendix A: ESRI data license agreement
Appendix B: Suggested reading
Appendix C: Additional information
Appendix D: Extend ArcGIS Desktop with a custom tool (VB.NET)
Appendix E: Extend ArcGIS Desktop with a custom tool (C#)
Introduction to Programming ArcObjects Using the Microsoft .NET Framework Contents
vi Copyright © 2001-2009 ESRI

1Introduction
Exercise 1A: Install the course dataEstimated time: 10 minutes
Exercise 1B: Verify the systemrequirements for the ArcGIS EngineDeveloper KitEstimated time: 25 minutes

Exercise 1A: Install the course data
Estimated time: 10 minutes
In this exercise, you will install the data that you will use throughout this course. The datais stored on a CD and will be copied to your hard drive by an automated install program.After installing the data, you will have the opportunity to create an ESRI Global Account,which will allow you to access all pages on the ESRI Support Center, a valuable onlinetechnical resource.
Step 1: Record user information
You need to log on to your Windows workstation to install the course data. A unique username, password, and domain (if applicable) are required to log on. Your instructor willprovide these to you.
Record the workstation information provided by your instructor in the spaces below.
▪ Workstation user name: ____________________________________▪ Workstation password: ____________________________________▪ Workstation domain, if any: ________________________________
Step 2: Log on to Windows
In the Log On to Windows dialog box, enter the workstation user name and passwordprovided by your instructor.
If your workstation is part of a domain, in the "Log on to" drop-down list, choose theappropriate domain.
Click OK.
Note: If you have trouble logging on to Windows, ask your instructor for help.
Step 3: Install the data
Now that you are logged on, you can install the course data.
Remove the training data CD from the back of your exercise book and place it in theCD drive.
Exercise 1A
Copyright © 2001-2009 ESRI 1-1
Click Next in the welcome panel.
Click the option to accept the ESRI license agreement, then click Next.
By default, the course data will be installed to the C:\Student folder.
Note: If for some reason you need to install the course data to a different location, clickChange and browse to that location. Select the folder where you want to store the coursedata, then click OK. Be sure to note the location of the folder you've selected so that youcan easily access the data in the upcoming exercises.
Click Next.
Click Finish when the data installation is complete.
Remove the training data CD from your CD drive and return it to its sleeve in yourexercise book.
Step 4: Modify a setting in ArcCatalog
In this step, you will modify a setting in ArcCatalog to explicitly view file extensions.
From your Start menu, choose All Programs > ArcGIS > ArcCatalog to startArcCatalog.
From the Tools menu, choose Options.
In the Options dialog box, at the bottom of the General tab, uncheck the Hide fileextensions check box.
Introduction to Programming ArcObjects Using the Microsoft .NET Framework
1-2 Copyright © 2001-2009 ESRI
Click OK to apply the change, then close ArcCatalog.
Step 5: (Optional) Create an ESRI Global Account
To access certain pages on the ESRI Support Center Web site, you must log on with anESRI Global Account.
Creating an account is free and takes only a few moments. If you don't already have anESRI Global Account and want to create one, this step will guide you the process.
Open Internet Explorer and type support.esri.com in the Address bar.
The ESRI Support Center Web site displays.
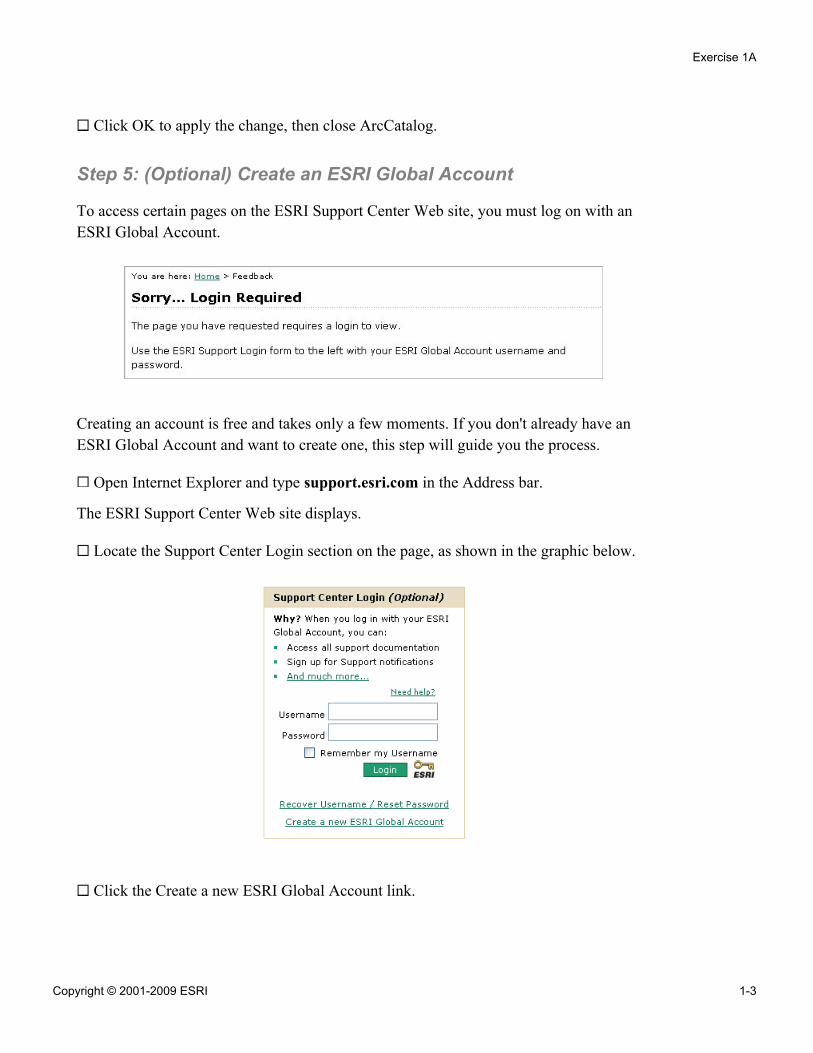
Locate the Support Center Login section on the page, as shown in the graphic below.
Click the Create a new ESRI Global Account link.
Exercise 1A
Copyright © 2001-2009 ESRI 1-3
In the form that displays, provide a user name and password of your choice and fill outthe remaining fields displayed in bold (required).
When you have filled out the required fields, click "create my ESRI Global Account."
Note: If the user name you chose is already taken, you will be prompted to chooseanother one.
Your account will be created and activated upon confirmation of your e-mail address.
Conclusion
You have now installed the data that you will work with in the upcoming exercises in thiscourse. If you have any problems accessing this data, please ask your instructor forassistance.
Introduction to Programming ArcObjects Using the Microsoft .NET Framework
1-4 Copyright © 2001-2009 ESRI
Exercise 1B: Verify the system requirements for theArcGIS Engine Developer Kit
Estimated time: 25 minutes
By default, ArcObjects applications developed using the Microsoft .NET Framework donot have a visual component (a container for the map). In this course, you will use theMapControl from the ArcGIS Engine Developer Kit, which will allow you to createapplications that display maps.
Before you begin writing your applications, you will verify the system requirements touse the ArcGIS Engine Developer Kit, and also configure your developmentenvironment.
In this exercise, you will:
▪ Verify system requirements for the ArcGIS Engine Developer Kit▪ Import code snippets▪ Perform software authorization▪ Verify the ArcGIS license
Step 1: Verify Microsoft .NET Framework 3.5 installation
Prior to installing the ArcGIS Engine Developer Kit, the Microsoft .NET Framework 3.5and Visual Studio 2008 must be installed. In this step, you will verify that the correctversion of the .NET Framework is installed on your machine.
From your Start menu, choose Control Panel and then open Add or Remove Programs.
Exercise 1B
Copyright © 2001-2009 ESRI 1-5
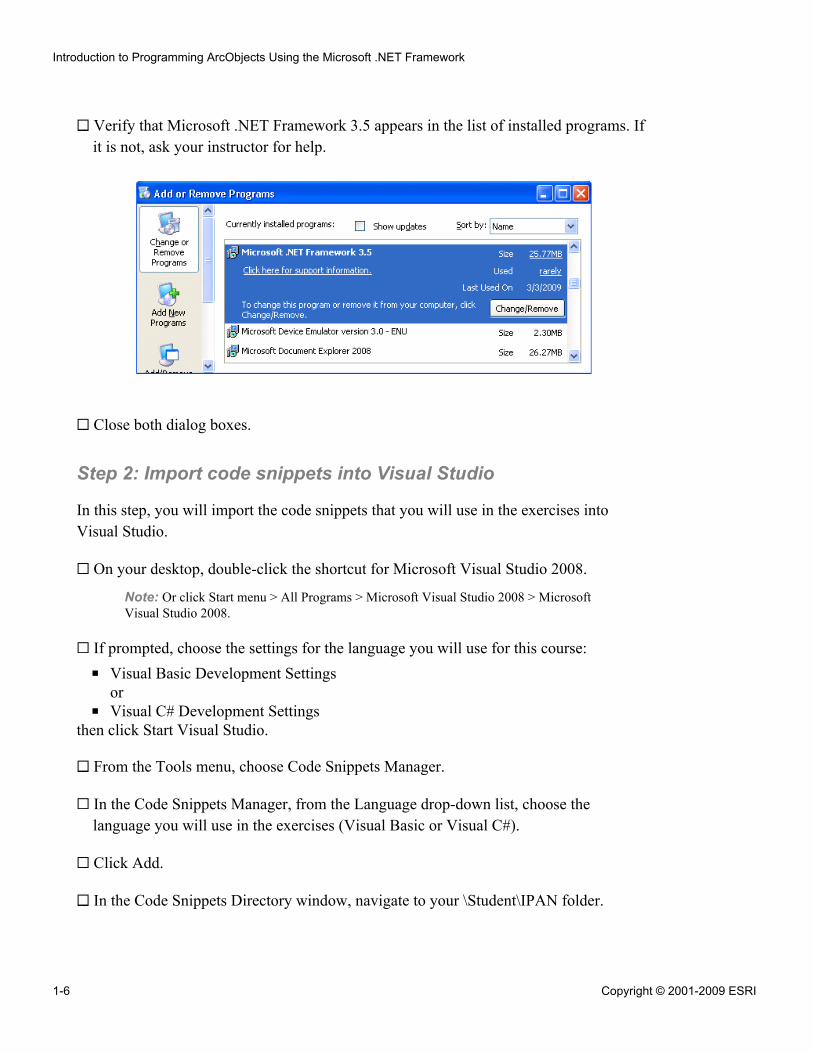
Verify that Microsoft .NET Framework 3.5 appears in the list of installed programs. Ifit is not, ask your instructor for help.
Close both dialog boxes.
Step 2: Import code snippets into Visual Studio
In this step, you will import the code snippets that you will use in the exercises intoVisual Studio.
On your desktop, double-click the shortcut for Microsoft Visual Studio 2008.
Note: Or click Start menu > All Programs > Microsoft Visual Studio 2008 > MicrosoftVisual Studio 2008.
If prompted, choose the settings for the language you will use for this course:
▪ Visual Basic Development Settingsor
▪ Visual C# Development Settingsthen click Start Visual Studio.
From the Tools menu, choose Code Snippets Manager.
In the Code Snippets Manager, from the Language drop-down list, choose thelanguage you will use in the exercises (Visual Basic or Visual C#).
Click Add.
In the Code Snippets Directory window, navigate to your \Student\IPAN folder.
Introduction to Programming ArcObjects Using the Microsoft .NET Framework
1-6 Copyright © 2001-2009 ESRI
Select IPAN_CodeSnippets and click OK.
Click OK to close the Code Snippets Manager, then close Visual Studio.
Step 3: Authorize the software
Software copy protection of ArcGIS products requires the use of an authorization file tocomplete the installation process. In this step, you will run the Software AuthorizationWizard to enable the ArcGIS Engine Developer Kit for use. To save time, anauthorization file has been provided for you.
From the Start menu, choose All Programs > ArcGIS > Software AuthorizationDevKit.
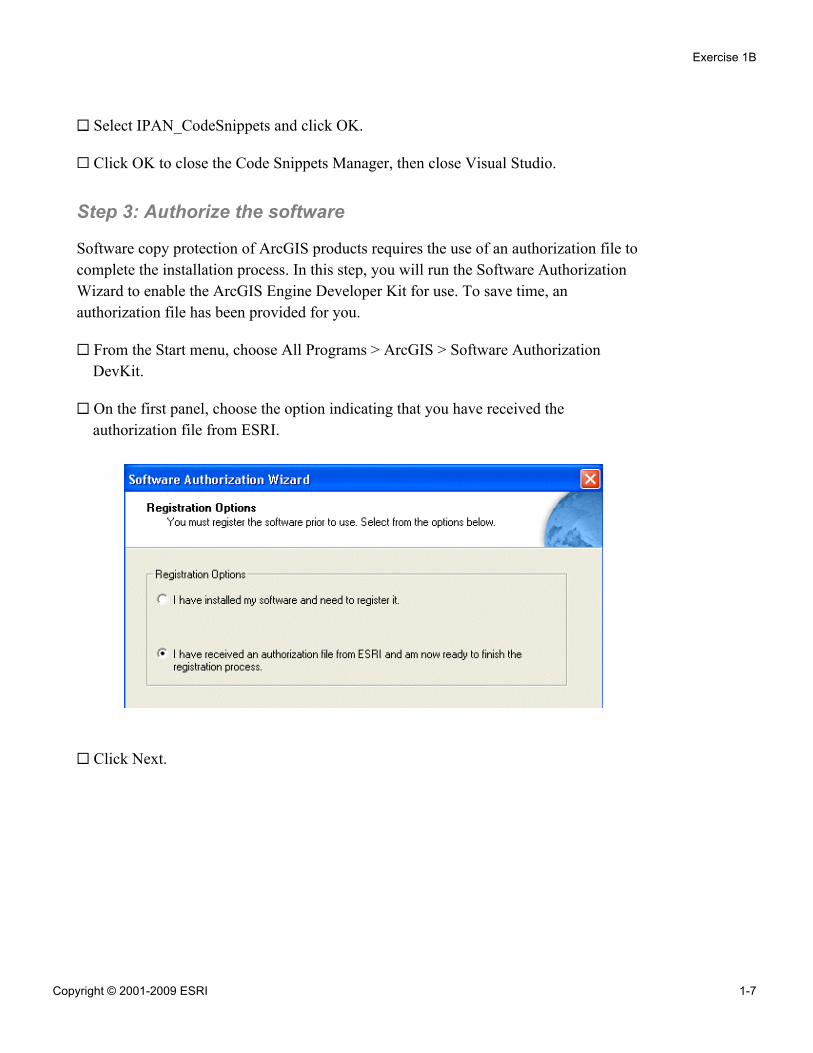
On the first panel, choose the option indicating that you have received theauthorization file from ESRI.
Click Next.
Exercise 1B
Copyright © 2001-2009 ESRI 1-7
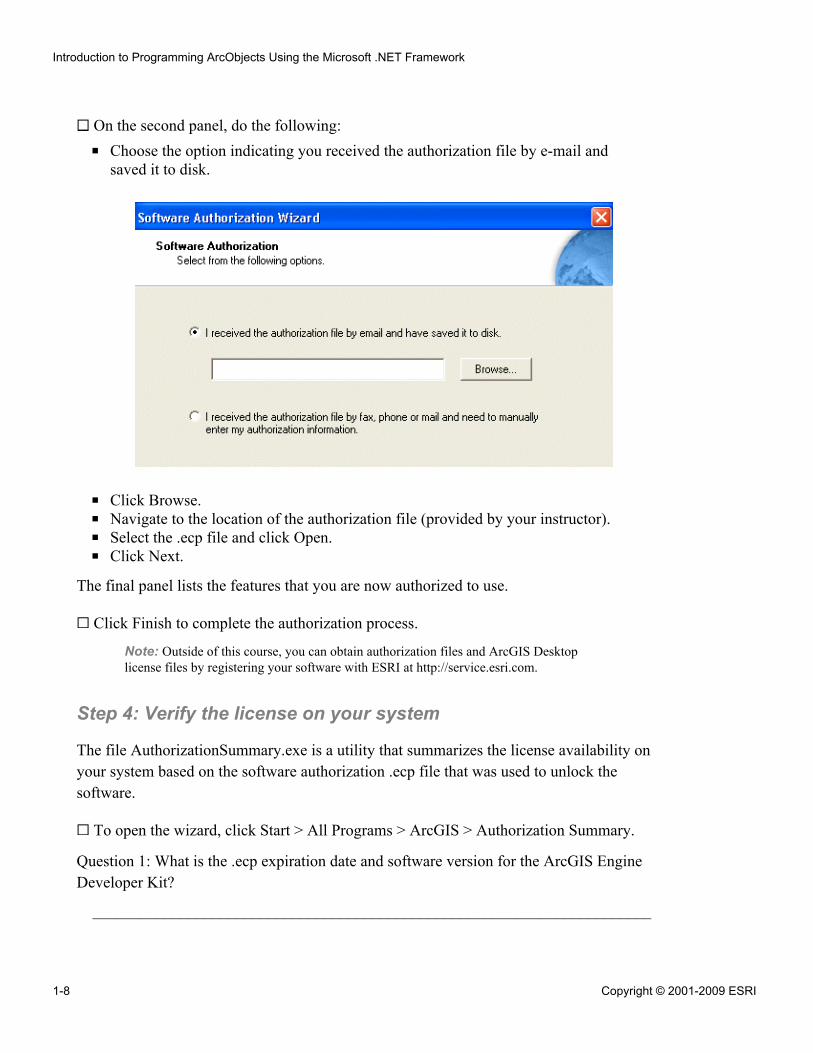
On the second panel, do the following:
▪ Choose the option indicating you received the authorization file by e-mail andsaved it to disk.
▪ Click Browse.▪ Navigate to the location of the authorization file (provided by your instructor).▪ Select the .ecp file and click Open.▪ Click Next.
The final panel lists the features that you are now authorized to use.
Click Finish to complete the authorization process.
Note: Outside of this course, you can obtain authorization files and ArcGIS Desktoplicense files by registering your software with ESRI at http://service.esri.com.
Step 4: Verify the license on your system
The file AuthorizationSummary.exe is a utility that summarizes the license availability onyour system based on the software authorization .ecp file that was used to unlock thesoftware.
To open the wizard, click Start > All Programs > ArcGIS > Authorization Summary.
Question 1: What is the .ecp expiration date and software version for the ArcGIS EngineDeveloper Kit?
______________________________________________________________________
Introduction to Programming ArcObjects Using the Microsoft .NET Framework
1-8 Copyright © 2001-2009 ESRI
If you run your application within a few days of the expiration date, a warning messagewill remind you that it is time to renew your license.
Click Close.
Step 5: Identify the .NET ArcObjects API
The modular and cross-platform nature of ArcObjects allows you to choose anapplication programming interface (API) to begin ArcObjects development. An API is aset of interfaces, methods, protocols, and tools that you can use to build or customizesoftware programs. In this step, you will explore the folder structure of the .NETArcObjects API.
In Windows Explorer, navigate to the C:\Program Files\ArcGIS directory and scrollthrough the list of folders.
Each API (COM, .NET, Java) is represented with its own directory. For example, the Bindirectory contains the ArcObjects binary files that can be used with all developer APIs.During this class, you will work with ArcObjects from some of these libraries.
Question 2: In the Bin directory, which file's name indicates that it controls licensing?
______________________________________________________________________
The DotNet directory contains the .NET ArcObjects binary files that can be used with the.NET API.
Note: As long as the name of a file does not end with UI, you can use it to createapplications on any machine. However, if a file's name ends with UI, it can only be usedon machines that have ArcGIS Desktop installed.
Notice the period-delimited (.) naming convention of the files in this folder. You willlearn about this naming convention in a later lesson.
Question 3: In the DotNet directory, which .DLL's name indicates that it allows you towork with raster data sources on machines that do not have ArcGIS Desktop installed?
______________________________________________________________________
You will also work with the COM libraries, even though you are developing in .NET.
Exercise 1B
Copyright © 2001-2009 ESRI 1-9
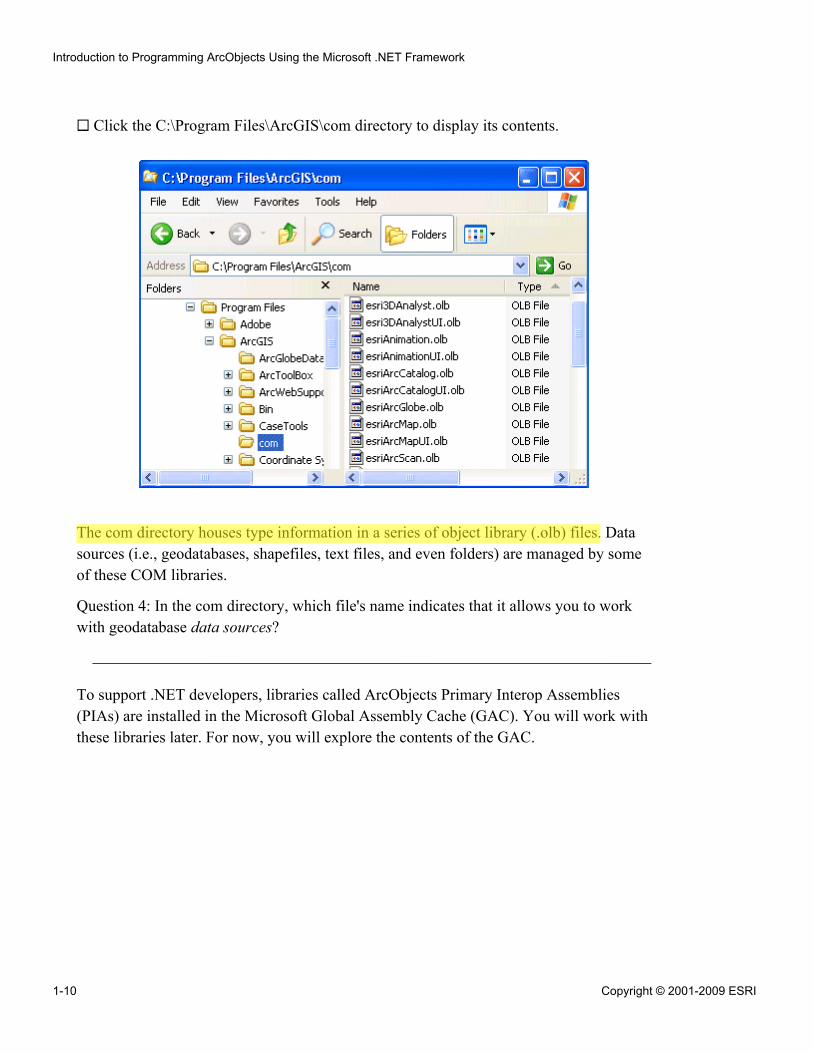
Click the C:\Program Files\ArcGIS\com directory to display its contents.
The com directory houses type information in a series of object library (.olb) files. Datasources (i.e., geodatabases, shapefiles, text files, and even folders) are managed by someof these COM libraries.
Question 4: In the com directory, which file's name indicates that it allows you to workwith geodatabase data sources?
______________________________________________________________________
To support .NET developers, libraries called ArcObjects Primary Interop Assemblies(PIAs) are installed in the Microsoft Global Assembly Cache (GAC). You will work withthese libraries later. For now, you will explore the contents of the GAC.
Introduction to Programming ArcObjects Using the Microsoft .NET Framework
1-10 Copyright © 2001-2009 ESRI
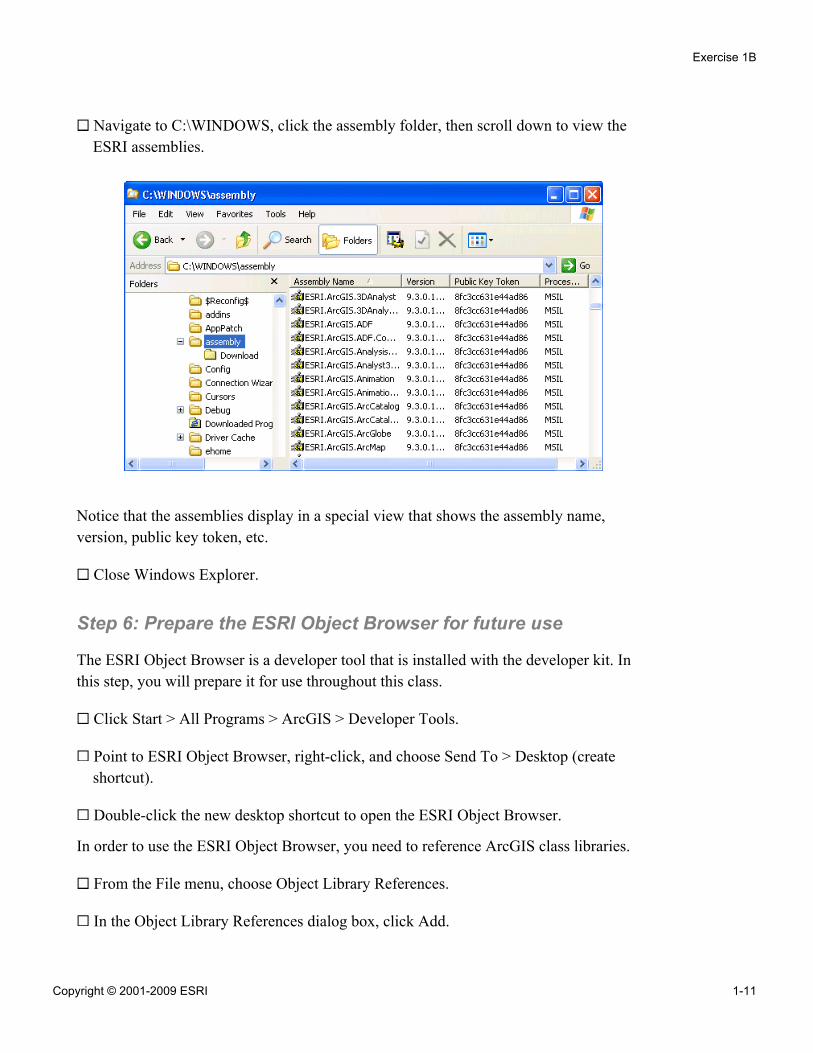
Navigate to C:\WINDOWS, click the assembly folder, then scroll down to view theESRI assemblies.
Notice that the assemblies display in a special view that shows the assembly name,version, public key token, etc.
Close Windows Explorer.
Step 6: Prepare the ESRI Object Browser for future use
The ESRI Object Browser is a developer tool that is installed with the developer kit. Inthis step, you will prepare it for use throughout this class.
Click Start > All Programs > ArcGIS > Developer Tools.
Point to ESRI Object Browser, right-click, and choose Send To > Desktop (createshortcut).
Double-click the new desktop shortcut to open the ESRI Object Browser.
In order to use the ESRI Object Browser, you need to reference ArcGIS class libraries.
From the File menu, choose Object Library References.
In the Object Library References dialog box, click Add.
Exercise 1B
Copyright © 2001-2009 ESRI 1-11
In the Select Type Library dialog box, leave the default option (Select by file name)and click Browse.
In the dialog box that appears, do the following:
▪ For File name, type *.olb and press Enter.(This narrows the list to object library reference files.)
▪ Select all the files.▪ Click Open.
Click OK to return to the ESRI Object Browser.
When you search for ArcObjects in the ESRI Object Browser in later exercises, you mayfind it helpful for them to display the same way as in the OMDs (object model diagrams).
In the center of the ESRI Object Browser, next to Show Selected Objects, click thedrop-down arrow and choose as AO Diagram.
Now you will perform a search.
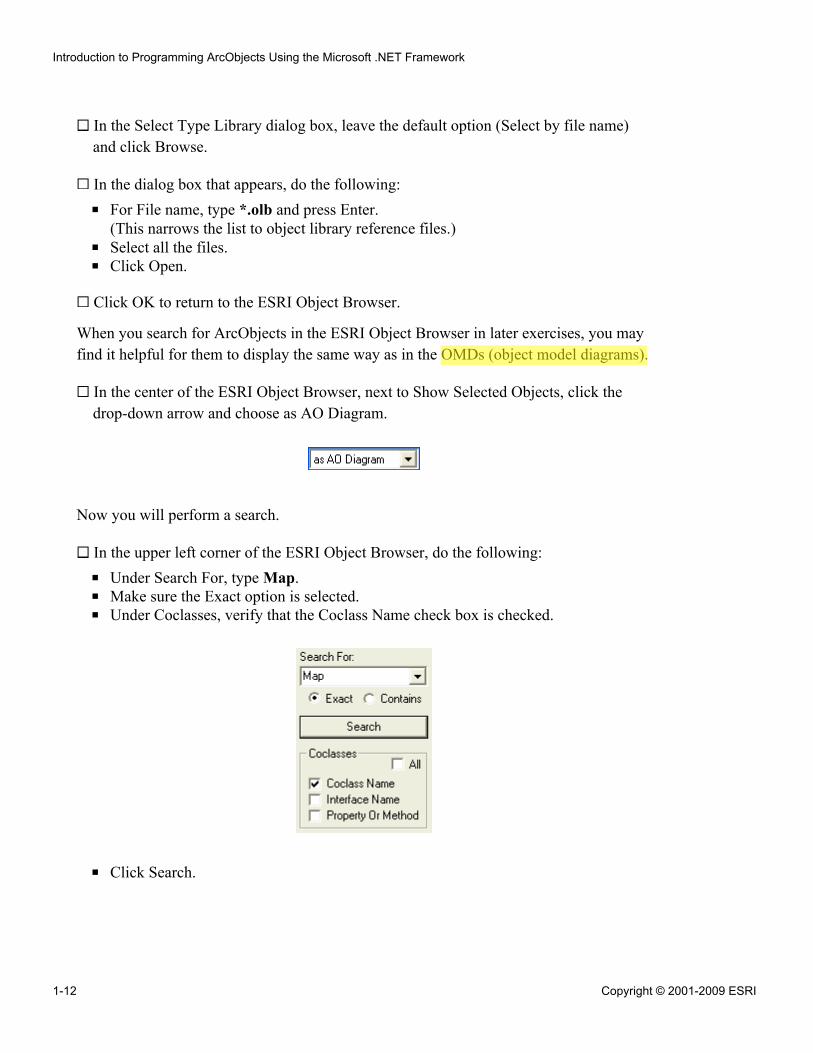
In the upper left corner of the ESRI Object Browser, do the following:
▪ Under Search For, type Map.▪ Make sure the Exact option is selected.▪ Under Coclasses, verify that the Coclass Name check box is checked.
▪ Click Search.
Introduction to Programming ArcObjects Using the Microsoft .NET Framework
1-12 Copyright © 2001-2009 ESRI
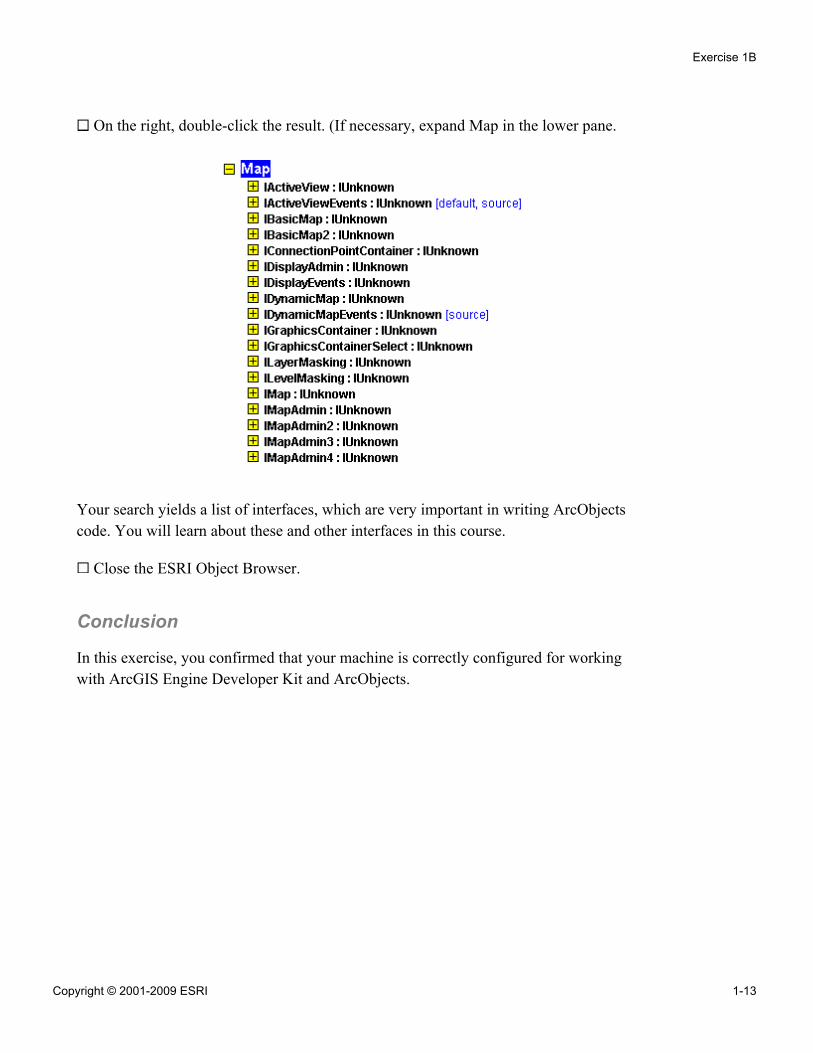
On the right, double-click the result. (If necessary, expand Map in the lower pane.
Your search yields a list of interfaces, which are very important in writing ArcObjectscode. You will learn about these and other interfaces in this course.
Close the ESRI Object Browser.
Conclusion
In this exercise, you confirmed that your machine is correctly configured for workingwith ArcGIS Engine Developer Kit and ArcObjects.
Exercise 1B
Copyright © 2001-2009 ESRI 1-13
Answers to Exercise 1B Questions
Question 1: What is the .ecp expiration date and software version for the ArcGIS EngineDeveloper Kit?
Answer: Answers will vary.
Question 2: In the Bin directory, which file's name indicates that it controls licensing?
Answer: LicenseControl.ocx
Question 3: In the DotNet directory, which .DLL's name indicates that it allows you towork with raster data sources on machines that do not have ArcGIS Desktop installed?
Answer: ESRI.ArcGIS.DataSourcesRaster.dll
Question 4: In the com directory, which file's name indicates that it allows you to workwith geodatabase data sources?
Answer: esriDataSourcesGDB.olb
Introduction to Programming ArcObjects Using the Microsoft .NET Framework
1-14 Copyright © 2001-2009 ESRI

2Exploring ArcGIS
Engine controls
Exercise 2: Create your first mappingapplicationEstimated time: 45 minutes

Exercise 2: Create your first mapping application
Estimated time: 45 minutes
In this exercise, you will become familiar with several controls as you create anapplication to display and navigate a map.
In this exercise, you will:
▪ Explore the ArcGIS Engine application framework▪ Work with visual controls you can use within the framework▪ Create a simple application using components of the framework
Exercise shortcut1. In Visual Studio, create a new Windows Forms Application.
2. Add a MapControl, TOCControl, and ToolbarControl to your form. Buddy theTOCControl and ToolbarControl with the MapControl. Modify some of theproperties of your controls in the property pages.
3. Add a LicenseControl to the form and test your project.
4. To your ToolbarControl, add a Button control that will open a map document. Besure to remove the current map document from your MapControl's property pages.
** (Optional) Add a Button control to programmatically determine the number oflayers in your map.
Step 1: Review the developer help
The developer help offers general information about ArcObjects, as well as technicaldocuments, sample code, and more. In this step, you will review some developer helptopics.
On your desktop, double-click the shortcut for the Desktop Help for .Net (VS2008).
The developer help opens with a list of topics on the left and a welcome page on theright.
Note: If necessary, click the Contents button .
Exercise 2
Copyright © 2001-2009 ESRI 2-1
The high-level topics display in an expandable tree and vary depending on the softwaredevelopment kits (SDKs) installed on your computer. During this class, you will use thelibraries for ArcGIS Desktop and ArcGIS Engine.
In the table of contents, expand Building solutions with ArcGIS Engine using .NET.
Navigate to:
▪ Getting started >▪ ArcObjects: Foundation of ArcGIS >▪ ArcObjects libraries shared across the ArcGIS platform
The topic that you selected displays on the right. Notice that the topic title correlates withthe name of the tab.
Also notice a URL that displays. With this URL, you can view the help topic in a Webbrowser on any computer that has the ArcGIS Developer Help installed.
Introduction to Programming ArcObjects Using the Microsoft .NET Framework
2-2 Copyright © 2001-2009 ESRI
In the table of links on the page, click the Controls library link ( ).
Take a moment to read the description of this library.
With the controls in this library, you can build an ArcGIS Engine application that isvisually similar to ArcMap – for example, one that contains a map, layout, table ofcontents, and toolbar.
Click the MapControl link.
The help for the MapControlClass opens in a new tab.
Take a moment to read the Description to learn about the MapControl's functionality.
The MapControl provides properties, methods, and events for managing layers that youdraw in your map. You will use one of the properties in this exercise, and learn aboutother properties, methods, and events in later lessons.
Minimize the help window.
Step 2: Create a new project in Visual Studio
There are several different types of .NET applications you can create. You will begin bycreating a new Windows application.
Start Visual Studio.
Before you create your project, you will set the default location for saving your VisualStudio projects.
From the Tools menu, choose Options.
In the Options dialog box, do the following:
▪ In the tree on the left, select Projects and Solutions (you don't need to expand it).▪ For Visual Studio projects location, click the ellipsis button , browse to your
\Student\IPAN folder, and click OK.▪ Verify that the Save new projects when created box is checked.▪ Click OK.
Now you will create your project.
From the File menu, point to New, then choose Project.
Exercise 2
Copyright © 2001-2009 ESRI 2-3
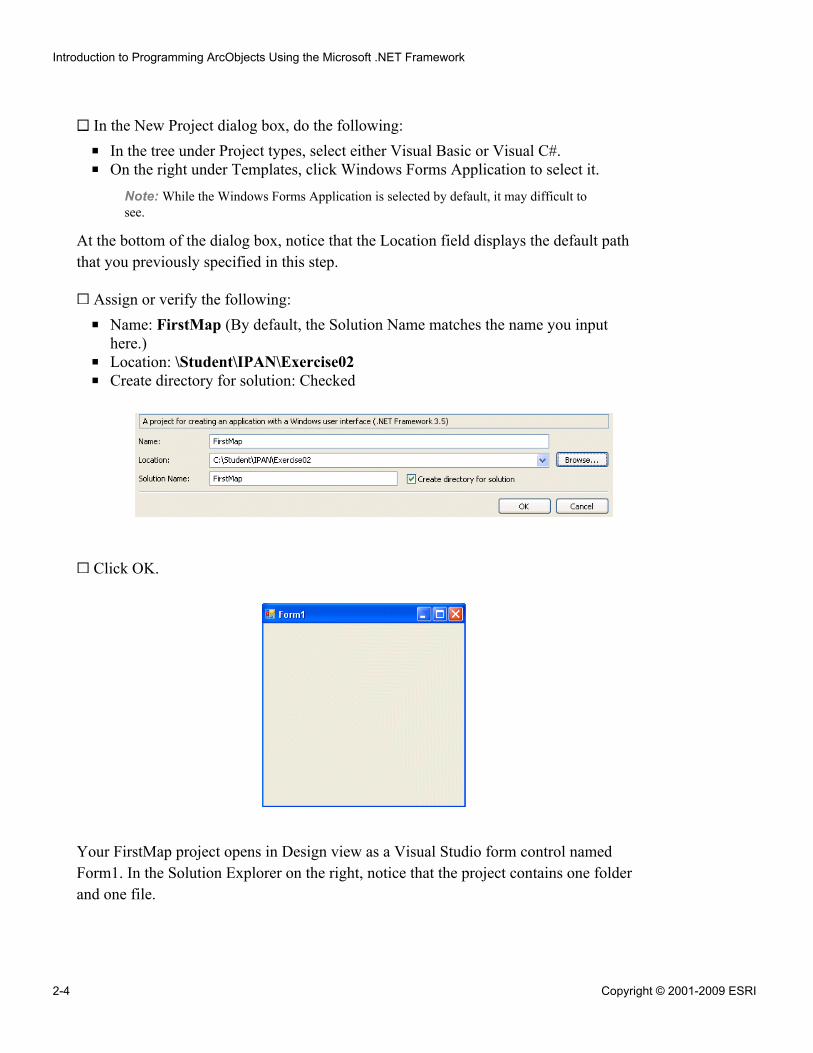
In the New Project dialog box, do the following:
▪ In the tree under Project types, select either Visual Basic or Visual C#.▪ On the right under Templates, click Windows Forms Application to select it.
Note: While the Windows Forms Application is selected by default, it may difficult tosee.
At the bottom of the dialog box, notice that the Location field displays the default paththat you previously specified in this step.
Assign or verify the following:
▪ Name: FirstMap (By default, the Solution Name matches the name you inputhere.)
▪ Location: \Student\IPAN\Exercise02▪ Create directory for solution: Checked
Click OK.
Your FirstMap project opens in Design view as a Visual Studio form control namedForm1. In the Solution Explorer on the right, notice that the project contains one folderand one file.
Introduction to Programming ArcObjects Using the Microsoft .NET Framework
2-4 Copyright © 2001-2009 ESRI
Note: If the Form1 form control does not display, right-click the Form1 file in theSolution Explorer and choose View Designer.
Question 1: What is the extension of the Form1 file?
______________________________________________________________________
Beneath the Solution Explorer is the Properties window, which allows you to modifycertain properties of forms and controls used in your applications.
Note: If you do not see the Properties window, click View menu > Properties Window.
Step 3: Examine and modify your project
In this step, you will modify your form.
Click the Form1 form control to display its properties in the Properties window.
In the Properties window, do the following:
▪ Locate the Text property. (Hint: Appearance category)▪ Replace the default text with First Map.▪ Press Enter.
You will now add controls from a toolbox to your form.
From the View menu, choose Toolbox.
The Toolbox window displays. Notice that the controls are grouped into severalcategories.
Locate the ArcGIS Windows Forms group and expand it, if necessary.
Drag a MapControl, TOCControl, and ToolbarControl onto your form.
Resize your form and/or controls as needed.
Right-click your MapControl and choose Properties.
On the General tab in the Properties dialog box, do the following:
▪ For Map Document, browse to the \Student\IPAN\Exercise02 folder and openSouthAmerica.mxd.
▪ Make sure that Brazil is selected in the Available Maps drop-down list.▪ Modify some other properties for the MapControl as you wish.▪ Click OK.
Exercise 2
Copyright © 2001-2009 ESRI 2-5
Modify some properties for the other controls to change their appearance.
Question 2: On which controls can you assign a buddy control? What can you set it to?
______________________________________________________________________
Using your answer, set the Buddy Control property for the two controls that have it.
Open the Properties dialog box for the ToolbarControl.
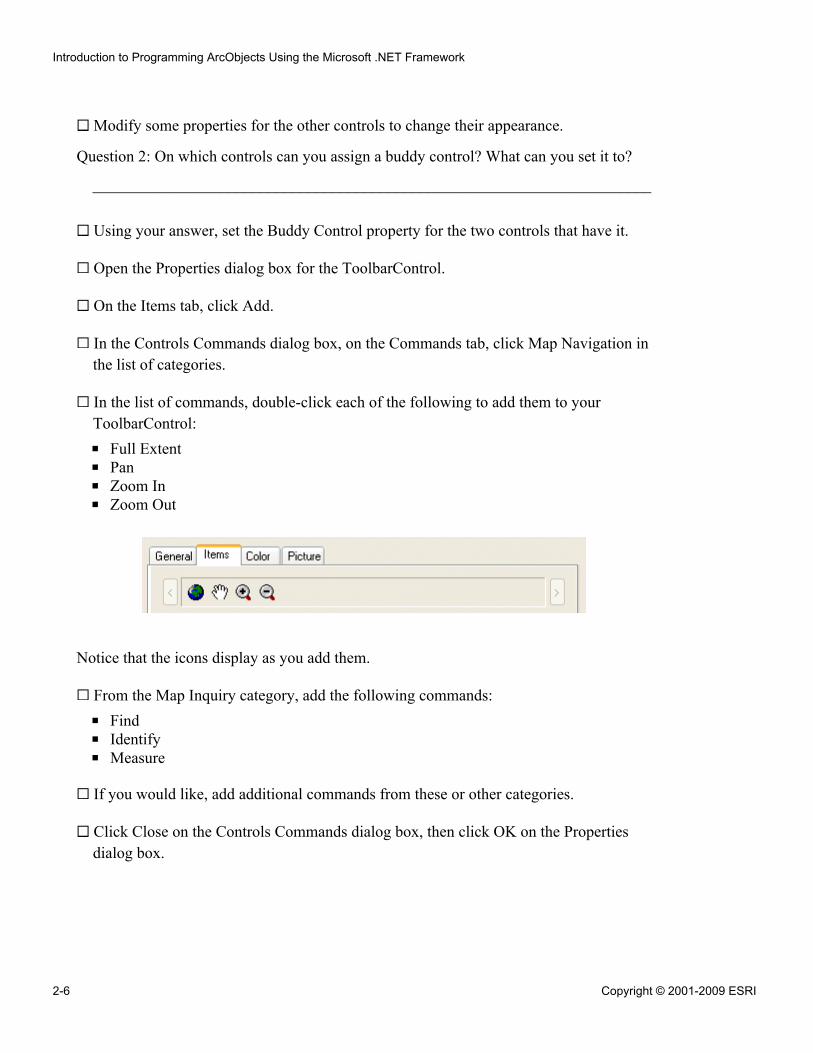
On the Items tab, click Add.
In the Controls Commands dialog box, on the Commands tab, click Map Navigation inthe list of categories.
In the list of commands, double-click each of the following to add them to yourToolbarControl:
▪ Full Extent▪ Pan▪ Zoom In▪ Zoom Out
Notice that the icons display as you add them.
From the Map Inquiry category, add the following commands:
▪ Find▪ Identify▪ Measure
If you would like, add additional commands from these or other categories.
Click Close on the Controls Commands dialog box, then click OK on the Propertiesdialog box.
Introduction to Programming ArcObjects Using the Microsoft .NET Framework
2-6 Copyright © 2001-2009 ESRI
Step 4: Run your project and resolve an error
Now that you have set up the properties for your controls, you are ready to test yourchanges.
Click the Start Debugging button .
An error message appears, indicating that the application has not been initialized with anESRI license. Even though you have created a small application without any code, thecontrols still need a license.
Click OK to close the error message, then close your application.
Question 3: Which control can you add to your form to eliminate the error?
______________________________________________________________________
Drag the necessary control from the Toolbox window onto your form.
Open the Properties dialog box for the control.
Check the box to shut down the application if the selected licenses are not available.
Question 4: Which license is in effect? How many product licenses can you choose from?
______________________________________________________________________
Click OK to close the Properties dialog box.
Click the Start Debugging button to run your project.
Your project now deploys without any errors.
Step 5: Navigate your map
You are ready to use the commands just you added. In this step, you will experiment withthe tools on your toolbar.
Spend a minute or two using some of the zoom tools on your toolbar.
Notice that your map display responds to the commands just as it would in ArcMap.
Click the Full Extent button , then click the Measure tool .
Exercise 2
Copyright © 2001-2009 ESRI 2-7
In the Measure window, click the Choose Units button and choose Distance >Kilometers.
Use the Measure tool to answer the following question.
Question 5: What is the approximate distance between Manaus and Porto Velho?
______________________________________________________________________
Click the Identify tool and click the city of Belem in the map.
Question 6: What is the population of Belem?
______________________________________________________________________
Use the Find tool or other tool(s) to locate the city of Goiania.
Question 7: What city is nearest to Goiania?
______________________________________________________________________
Your project offers functionality similar to that of ArcMap – without writing any code!
Close your application.
Step 6: Open a map document dynamically
There is almost always more than one way to accomplish a task programmatically. In thisstep, you will modify your ToolbarControl so that you can click a built-in button on yourapplication to browse to and open a map document.
Open the Properties dialog box for your ToolbarControl and do the following:
▪ Add the Open command to your ToolbarControl. (Hint: Generic category)▪ Click OK.
Open the Properties dialog box for your MapControl and do the following:
▪ On the Map tab, click Reset and then click Yes on the prompt that appears.▪ Click OK.
Run your project.
Click the new Open button , browse to your \Student\IPAN\Exercise02 folder, andopen SouthAmerica.mxd.
Introduction to Programming ArcObjects Using the Microsoft .NET Framework
2-8 Copyright © 2001-2009 ESRI
The map document displays in the MapControl.
Close your application.
You have finished this exercise; however, you may wish to complete the optional step:
▪ Step 3 shows you how to add a button that programmatically determines thenumber of layers in your map.
If you want to complete the optional step, do so now. Otherwise, save your project andclose Visual Studio.
Step 7: (Optional) Programmatically determine the number oflayers in your map
Like Visual Studio controls, the ArcGIS Engine controls have properties and methods. Inthis step, you will use Microsoft's IntelliSense to help you programmatically determinehow many layers are in your map. You will learn more about properties and methods forother ArcGIS Engine controls in upcoming lessons.
Question 8: Where can you find the name of your MapControl?
______________________________________________________________________
You will use this name to access the MapControl in your code.
In the Toolbox window, expand the Common Controls group and drag a Buttoncontrol onto your form.
Double-click the Button to open the code for its Click event.
In the Click event for your button, begin a line of code by typing the following:MessageBox.Show(String.Format("{0:#} layers in map",
Type the name of your MapControl followed by a period (.).
Question 9: Which property of the MapControl will return the number of layers in yourmap?
______________________________________________________________________
Based on your answer, finish the line of code.
Run your project.
Exercise 2
Copyright © 2001-2009 ESRI 2-9
Open SouthAmerica.mxd.
Click your new button to display the message box.
Question 10: How many layers are in your map?
______________________________________________________________________
Close the message box, then close your application.
Save your project and close Visual Studio.
Conclusion
In this exercise, you learned how to easily introduce lots of GIS functionality into anArcGIS Engine project by merely working with some of the controls. You created asimple Windows application with four ArcGIS Engine Controls (MapControl,ToolbarControl, TOCControl, and LicenseControl) and modified some of theirproperties. If you completed the optional step, you also saw an example of how you canprogrammatically customize your projects.
Introduction to Programming ArcObjects Using the Microsoft .NET Framework
2-10 Copyright © 2001-2009 ESRI
Answers to Exercise 2 Questions
Question 1: What is the extension of the Form1 file?
Answer: The file extension is .cs or .vb, depending on the language you are using.
Question 2: On which controls can you assign a buddy control? What can you set it to?
Answer: ToolbarControl, TOCControl; AxMapControl1
Question 3: Which control can you add to your form to eliminate the error?
Answer: LicenseControl
Question 4: Which license is in effect? How many product licenses can you choose from?
Answer: ArcGIS Engine; five
Question 5: What is the approximate distance between Manaus and Porto Velho?
Answer: 760 kilometers
Question 6: What is the population of Belem?
Answer: 1,200,000
Question 7: What city is nearest to Goiania?
Answer: Brasilia
Question 8: Where can you find the name of your MapControl?
Answer: It appears on the control itself in Design view, and in the (Name) propertyin the Properties window.
Question 9: Which property of the MapControl will return the number of layers in yourmap?
Answer: LayerCount
Question 10: How many layers are in your map?
Answer: Three
Exercise 2
Copyright © 2001-2009 ESRI 2-11
Exercise Solution: Exercise 2 (VB.NET)Public Class Form1
Private Sub Button1_Click(ByVal sender As System.Object, _ByVal e As System.EventArgs) Handles Button1.Click
'Optional step: Determine the number of layers in the mapMessageBox.Show(String.Format("{0:#} layers in map", AxMapControl1.LayerCount))
End SubEnd Class
Introduction to Programming ArcObjects Using the Microsoft .NET Framework
2-12 Copyright © 2001-2009 ESRI
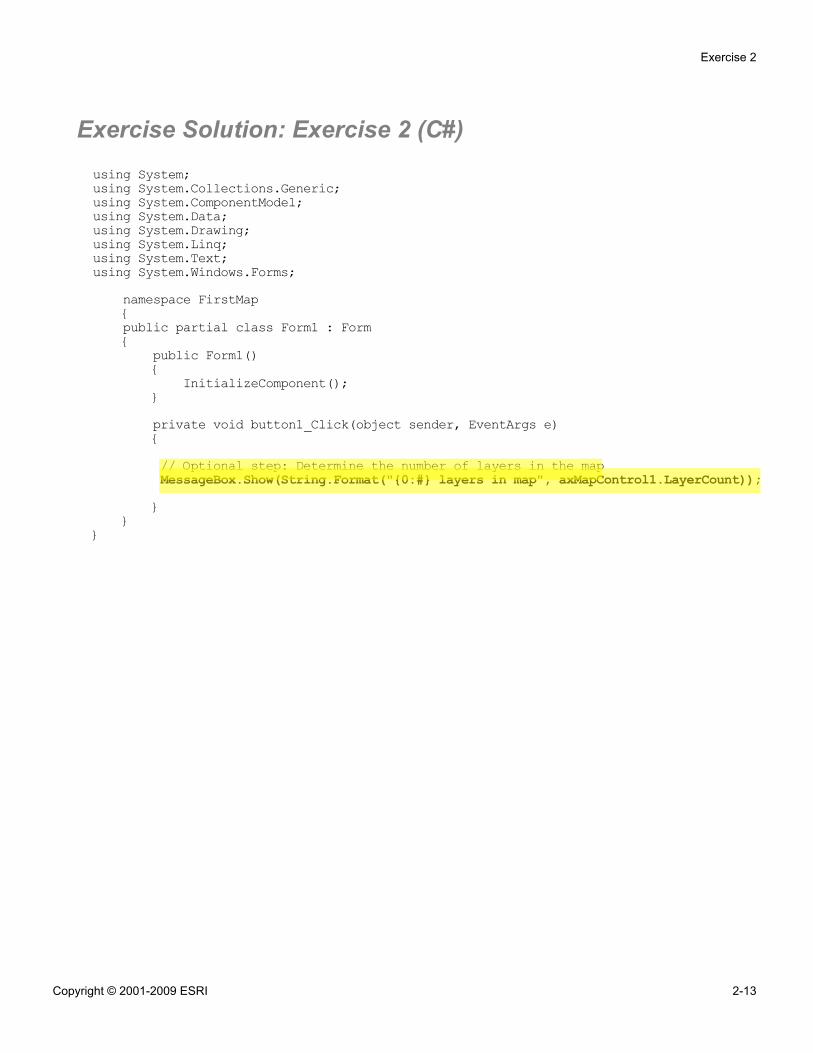
Exercise Solution: Exercise 2 (C#)using System;using System.Collections.Generic;using System.ComponentModel;using System.Data;using System.Drawing;using System.Linq;using System.Text;using System.Windows.Forms;
namespace FirstMap{public partial class Form1 : Form{
public Form1(){
InitializeComponent();}private void button1_Click(object sender, EventArgs e){// Optional step: Determine the number of layers in the mapMessageBox.Show(String.Format("{0:#} layers in map", axMapControl1.LayerCount));}
}}
Exercise 2
Copyright © 2001-2009 ESRI 2-13


3Programming with
COM and .NET
Exercise 3A: Program with COM(VB.NET)Estimated time: 45 minutes
Exercise 3B: Program with COM (C#)Estimated time: 45 minutes


Exercise 3A: Program with COM (VB.NET)
Estimated time: 45 minutes
In this exercise, you will access the properties of a map in a map document.
In this exercise, you will:
▪ Use developer resources▪ Access the properties of a map and list their values
Exercise shortcut1. In Visual Studio, create a new Windows Forms Application.
2. Add a Button control to your form.
3. Write code to the Button control's Click event to create a map document object.
4. Output the first map in your map document and write its name to the Outputwindow.
5. Output the name of the active view's focus map, minimum and maximum X and Yproperties of the active view's extent to the Output window.
** (Optional) Add an ArcGIS Engine MapControl to your form, thenprogrammatically call a method on it to load your map document.
Step 1: Create a new project in Visual Studio
Start Visual Studio and create a new project, using the following table as a guide:
Property Value
Language Visual Basic
Template Windows Forms Application
Name MapDocInfo
Location \Student\IPAN\Exercise03
Solution name MapDocInfo
Exercise 3A
Copyright © 2001-2009 ESRI 3-1
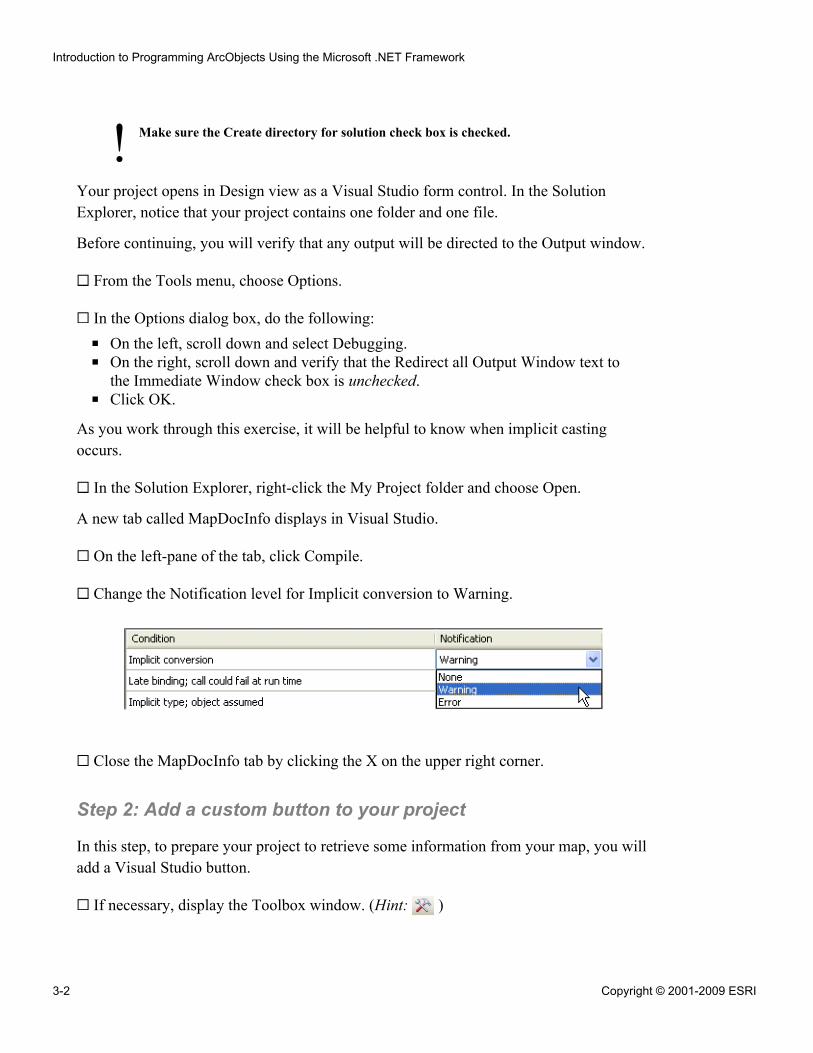
! Make sure the Create directory for solution check box is checked.
Your project opens in Design view as a Visual Studio form control. In the SolutionExplorer, notice that your project contains one folder and one file.
Before continuing, you will verify that any output will be directed to the Output window.
From the Tools menu, choose Options.
In the Options dialog box, do the following:
▪ On the left, scroll down and select Debugging.▪ On the right, scroll down and verify that the Redirect all Output Window text to
the Immediate Window check box is unchecked.▪ Click OK.
As you work through this exercise, it will be helpful to know when implicit castingoccurs.
In the Solution Explorer, right-click the My Project folder and choose Open.
A new tab called MapDocInfo displays in Visual Studio.
On the left-pane of the tab, click Compile.
Change the Notification level for Implicit conversion to Warning.
Close the MapDocInfo tab by clicking the X on the upper right corner.
Step 2: Add a custom button to your project
In this step, to prepare your project to retrieve some information from your map, you willadd a Visual Studio button.
If necessary, display the Toolbox window. (Hint: )
Introduction to Programming ArcObjects Using the Microsoft .NET Framework
3-2 Copyright © 2001-2009 ESRI
In the Toolbox window, drag a Button control from the Common Controls group ontoyour form.
In the Properties window, specify the following:
▪ (Name): btnInfo▪ Text: Info
Step 3: Add code to your custom button
In this step, you will access a map document and determine its name and other propertieswithout viewing the data. Instead, you will rely on other resources, such as the DesktopHelp for .Net (VS2008), Microsoft's IntelliSense, and your lecture book.
Double-click your Info button to open its Click event.
Declare the variable mapDoc to hold a reference to IMapDocument.
Notice that blue squiggles appear below IMapDocument.
Hover your mouse pointer over IMapDocument.
Your syntax is not recognized, so you will need to add the appropriate reference. Youwill use the Library Locator to determine which reference you need.
Open Windows Explorer and do the following:
▪ Navigate to C:\Program Files\ArcGIS\DeveloperKit\Tools.▪ Right-click LibraryLocator.exe and choose Send To > Desktop (create shortcut).▪ Close Windows Explorer.
Double-click the new shortcut to open the Library Locator.
Exercise 3A
Copyright © 2001-2009 ESRI 3-3
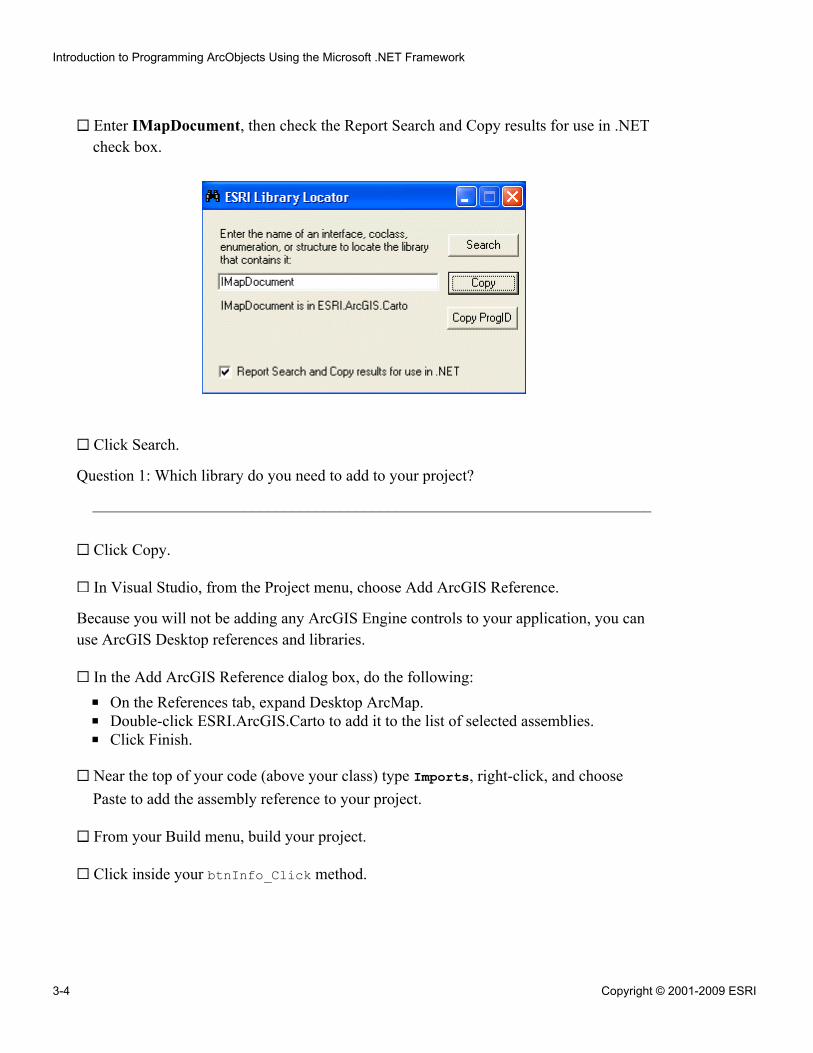
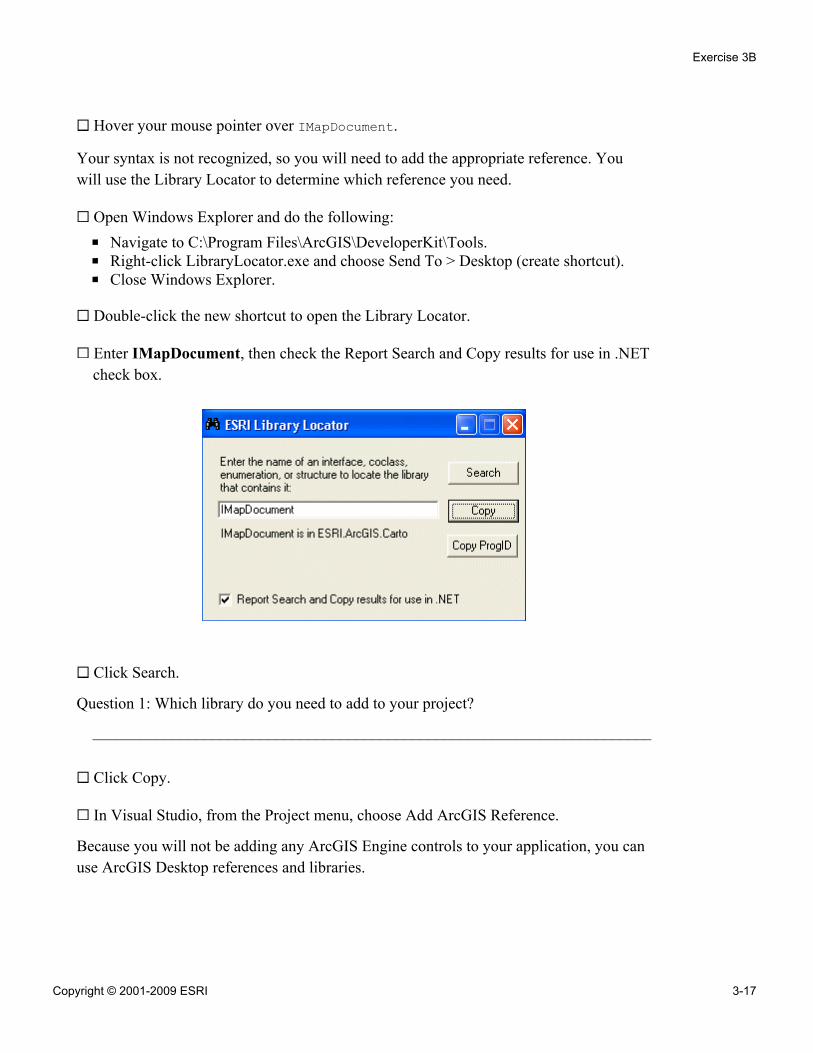
Enter IMapDocument, then check the Report Search and Copy results for use in .NETcheck box.
Click Search.
Question 1: Which library do you need to add to your project?
______________________________________________________________________
Click Copy.
In Visual Studio, from the Project menu, choose Add ArcGIS Reference.
Because you will not be adding any ArcGIS Engine controls to your application, you canuse ArcGIS Desktop references and libraries.
In the Add ArcGIS Reference dialog box, do the following:
▪ On the References tab, expand Desktop ArcMap.▪ Double-click ESRI.ArcGIS.Carto to add it to the list of selected assemblies.▪ Click Finish.
Near the top of your code (above your class) type Imports, right-click, and choosePaste to add the assembly reference to your project.
From your Build menu, build your project.
Click inside your btnInfo_Click method.
Introduction to Programming ArcObjects Using the Microsoft .NET Framework
3-4 Copyright © 2001-2009 ESRI
Question 2: What changed in the Dim statement you wrote?
______________________________________________________________________
______________________________________________________________________
The IMapDocument interface is found on the MapDocument coclass, which makes yourmapDoc variable a creatable object.
Use the following code to create a new MapDocument object.
Dim mapDoc as IMapDocument = New MapDocumentNote: You will learn more about this syntax in the next lesson.
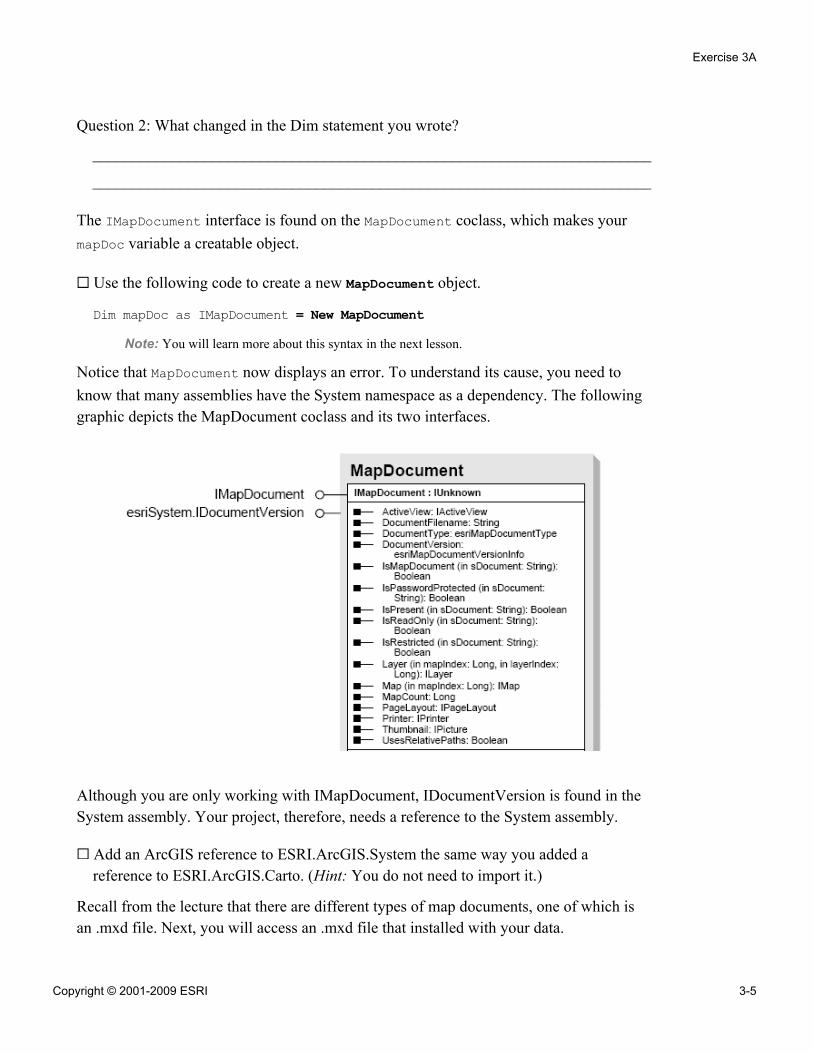
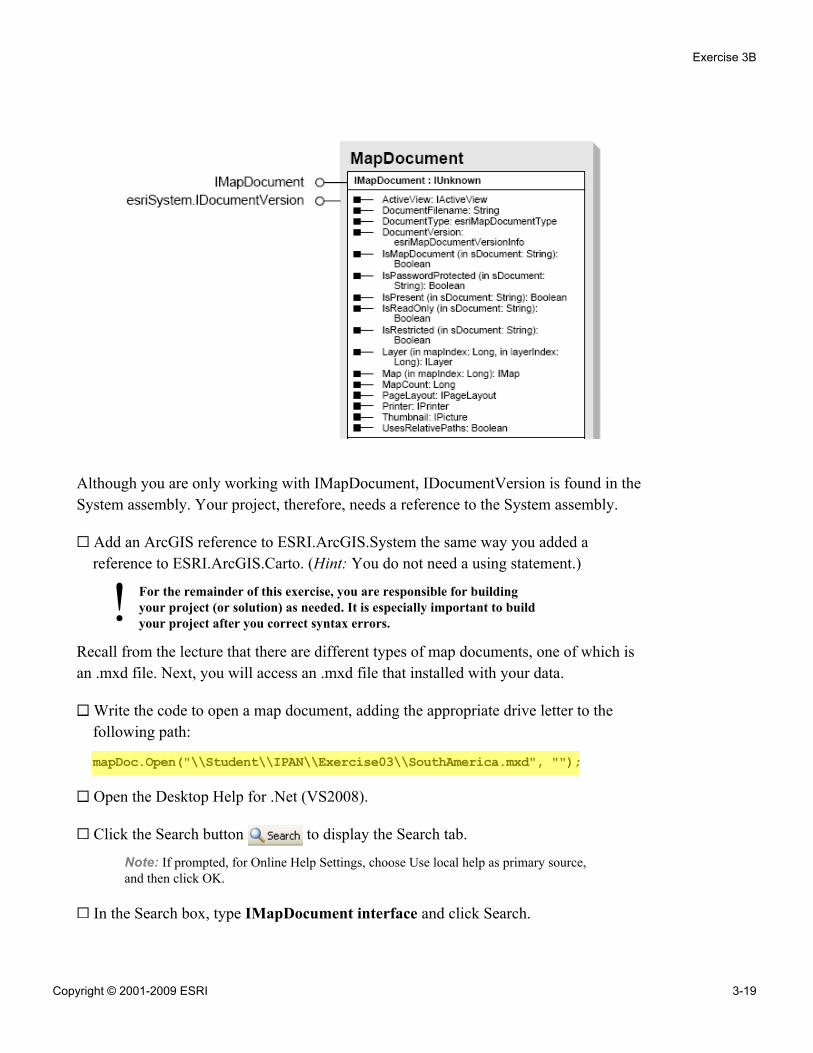
Notice that MapDocument now displays an error. To understand its cause, you need toknow that many assemblies have the System namespace as a dependency. The followinggraphic depicts the MapDocument coclass and its two interfaces.
Although you are only working with IMapDocument, IDocumentVersion is found in theSystem assembly. Your project, therefore, needs a reference to the System assembly.
Add an ArcGIS reference to ESRI.ArcGIS.System the same way you added areference to ESRI.ArcGIS.Carto. (Hint: You do not need to import it.)
Recall from the lecture that there are different types of map documents, one of which isan .mxd file. Next, you will access an .mxd file that installed with your data.
Exercise 3A
Copyright © 2001-2009 ESRI 3-5
!
Write the code to open a map document, adding the appropriate drive letter to thefollowing path:
mapDoc.Open("\Student\IPAN\Exercise03\SouthAmerica.mxd")
Open the Desktop Help for .Net (VS2008).
Click the Search button to display the Search tab.
Note: If prompted, for Online Help Settings, choose Use local help as primary source,and then click OK.
In the Search box, type IMapDocument interface and click Search.
In the list of results, do the following:
▪ On the right, click Local Help.▪ On the left, click the IMapDocument Interface link.
Question 3: What parameter does the property return? How many types of documentsdoes it include?
______________________________________________________________________
After the code that opens the map document, complete the following code to write thevalue of the property to the Output window:
Debug.WriteLine(mapDoc.________________________)
In Visual Studio, make sure the Output window is displayed.
Note: Debug menu > Windows > Output
Save your project, then build it.
For the remainder of this exercise, you are responsible for buildingyour project as needed. It is especially important to build your projectafter you correct syntax errors.
Run your project (Hint: ).
In your application, click the Info button.
Question 4: What value is returned when you click the Info button?
______________________________________________________________________
Close your application.
Introduction to Programming ArcObjects Using the Microsoft .NET Framework
3-6 Copyright © 2001-2009 ESRI
!
In your button's Click event, skip several lines after Debug.WriteLine and then usethe following syntax to close your application as soon as the process finishes:
Me.Close()
Run your project and test the change.
Step 4: Work with the map
Although your application does not currently display a map, you can still access the mapand the active view for your map document. In this step, you will use .NET casting tomove between the interfaces for the map and the active view.
Before the code that closes the window, declare the variable inMap to hold a referenceto IMap.
Complete the following code to set inMap equal to the first map in your mapdocument:
inMap = ________.Map(0)
Write the name of the map to the Output window.
Run your project and test your code.
After the application closes, click the Clear All button in your Output window.
Using the developer resource of your choice, find additional properties for your map.
Find the property that will indicate the value for the map's distance units.
Write the value for this property to the Output window.
Note: Remember to use ToString() on the property to output the map's distance units.
If you would like, write the value of any other properties to the Output window.
Beware of non-string and non-numeric properties as they may causeruntime errors.
Build and run your project.
Test your changes.
Exercise 3A
Copyright © 2001-2009 ESRI 3-7
Question 5: What are the map's distance units?
______________________________________________________________________
Step 5: Work with the active view
In this step, you will find the X and Y values for the lower-left and upper-right corners ofthe extent of your map. You will add your code to your custom button.
Continuing with your code, declare the variable actView as IActiveView.
Write code to cast implicitly (perform a COM QueryInterface) from IMap toIActiveView. (Hint: For help with the syntax, refer to your lecture book.)
Write the name of the focus map to the Output window.
Test your code.
Notice that the name of the active view's focus map is the same as the name of the mapyou are accessing from your map document. The variables inMap and actView arepointing to the same map.
Change your implicit cast to an explicit cast.
Test your change.
Inside your sub procedure, write the Extent property of the active view to the Outputwindow.
Click inside your sub procedure.
Notice the error on the Extent property of the active view.
Hover your mouse pointer over the error.
Question 6: Which assembly is required?
______________________________________________________________________
Add an ArcGIS reference to the required assembly.
At the top of your code, import the assembly to your project with the following code:
Introduction to Programming ArcObjects Using the Microsoft .NET Framework
3-8 Copyright © 2001-2009 ESRI
Imports ESRI.ArcGIS.CartoImports ESRI.ArcGIS.____________Public Class Form1
Modify your code to write the minimum X value of the extent. Include a descriptivelabel in the argument for Debug.WriteLine.
Test your code.
Question 7: What is the minimum X value (rounded to the nearest integer)?
______________________________________________________________________
Revise your code to write the minimum X and Y and the maximum X and Y. (Tip: Usethe Round function in the Math library to round to zero decimal places.)
Test your code.
Question 8: What is the maximum Y?
______________________________________________________________________
You have finished this exercise; however, you may wish to complete the optional step:
▪ Step 5 shows you how to load a map document into the application using aMapControl.
If you want to complete the optional step, do so now. Otherwise, save your project andclose Visual Studio.
Step 6: (Optional) Add a MapControl to your project
In this step, you will add your map document to a MapControl.
To view your project in Design view, click the View Designer button at the top ofthe Solution Explorer.
In the Toolbox window, drag a MapControl from the ArcGIS Windows Forms grouponto your form.
Resize your form, if necessary.
Run your project.
Exercise 3A
Copyright © 2001-2009 ESRI 3-9
A license error appears. Recall that ArcMap and ArcCatalog use ArcObjects to performGIS tasks. When you start ArcMap, for example, some processing behind the sceneschecks for a license. Your custom application also uses ArcObjects to perform a GIStask; therefore, when you run your custom application, you are responsible for checkingfor a license.
In order to use the MapControl, you need to include license handling in your project. Inthe previous exercise, you added the LicenseControl. This time, you will add code thathas already been written.
Close the error message and close your application.
From the Project menu, choose Add ArcGIS License Checking.
In the ArcGIS License Initializer dialog box, do the following:
▪ In the Products list, check the box for ArcView.▪ Check the box to shut down the application if the selected licenses are not
available.▪ Click OK.
Two code modules are added to your project. They contain code that will manage thelicense for you.
Question 9: Which module initializes the license with the application and shuts down thelicense?
______________________________________________________________________
Now you will load your map document into the MapControl.
View the Form1 code.
In your button's Click event, just before the line Me.Close(), complete the followingcode to load the same map document that you have been exploring, by file name:
AxMapControl1.LoadMxFile(mapDoc.________________________________)
Comment the line Me.Close().
Click the Info button to test your code.
SouthAmerica.mxd displays in the MapControl.
Close your application, then close Visual Studio.
Introduction to Programming ArcObjects Using the Microsoft .NET Framework
3-10 Copyright © 2001-2009 ESRI

Conclusion
In this exercise, you accessed the properties of an existing map without viewing it. Inyour code, you moved between two interfaces on the same object by casting, the .NETtechnique for the process known as QueryInterface (QI) in the world of COM.
Exercise 3A
Copyright © 2001-2009 ESRI 3-11

Answers to Exercise 3A Questions
Question 1: Which library do you need to add to your project?
Answer: ESRI.ArcGIS.Carto
Question 2: What changed in the Dim statement you wrote?
Answer: IMapDocument no longer displays an error, but the variable mapDoc isflagged as an unused local variable
Question 3: What parameter does the property return? How many types of documentsdoes it include?
Answer: esriMapDocumentType; four types
Question 4: What value is returned when you click the Info button?
Answer: esriMapDocumentTypeMxd
Question 5: What are the map's distance units?
Answer: esriMiles
Question 6: Which assembly is required?
Answer: ESRI.ArcGIS.Geometry
Question 7: What is the minimum X value (rounded to the nearest integer)?
Answer: -84
Question 8: What is the maximum Y?
Answer: 7
Question 9: Which module initializes the license with the application and shuts down thelicense?
Answer: ApplicationEvents.vb
Introduction to Programming ArcObjects Using the Microsoft .NET Framework
3-12 Copyright © 2001-2009 ESRI
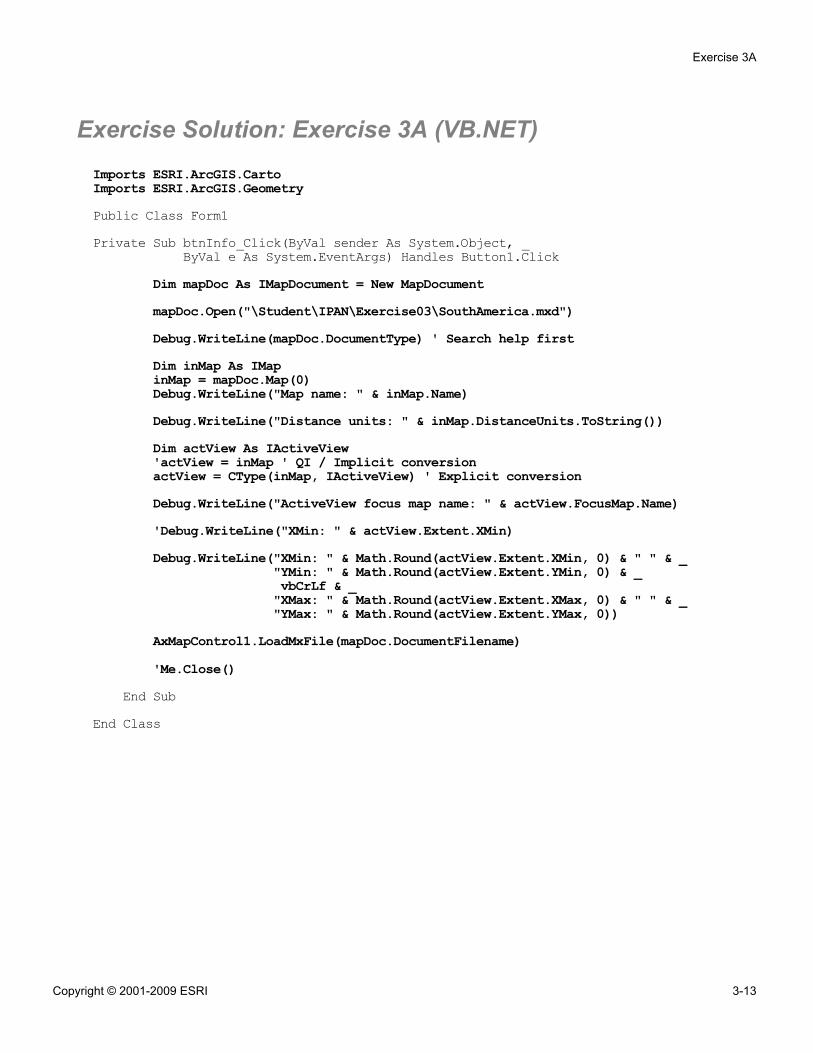
Exercise Solution: Exercise 3A (VB.NET)Imports ESRI.ArcGIS.CartoImports ESRI.ArcGIS.GeometryPublic Class Form1Private Sub btnInfo_Click(ByVal sender As System.Object, _
ByVal e As System.EventArgs) Handles Button1.ClickDim mapDoc As IMapDocument = New MapDocumentmapDoc.Open("\Student\IPAN\Exercise03\SouthAmerica.mxd")Debug.WriteLine(mapDoc.DocumentType) ' Search help firstDim inMap As IMapinMap = mapDoc.Map(0)Debug.WriteLine("Map name: " & inMap.Name)Debug.WriteLine("Distance units: " & inMap.DistanceUnits.ToString())Dim actView As IActiveView'actView = inMap ' QI / Implicit conversionactView = CType(inMap, IActiveView) ' Explicit conversionDebug.WriteLine("ActiveView focus map name: " & actView.FocusMap.Name)'Debug.WriteLine("XMin: " & actView.Extent.XMin)Debug.WriteLine("XMin: " & Math.Round(actView.Extent.XMin, 0) & " " & _
"YMin: " & Math.Round(actView.Extent.YMin, 0) & _vbCrLf & _"XMax: " & Math.Round(actView.Extent.XMax, 0) & " " & _"YMax: " & Math.Round(actView.Extent.YMax, 0))
AxMapControl1.LoadMxFile(mapDoc.DocumentFilename)'Me.Close()
End SubEnd Class
Exercise 3A
Copyright © 2001-2009 ESRI 3-13

Exercise 3B: Program with COM (C#)
Estimated time: 45 minutes
In this exercise, you will access the properties of a map in a map document.
In this exercise, you will:
▪ Use developer resources▪ Access the properties of a map and list their values
Exercise shortcut1. In Visual Studio, create a new Windows Forms Application.
2. Add a Button control to your form.
3. Write code to the Button control's Click event to create a map document object.
4. Output the first map in your map document and write its name to the Outputwindow.
5. Output the name of the active view's focus map, minimum and maximum X and Yproperties of the active view's extent to the Output window.
** (Optional) Add an ArcGIS Engine MapControl to your form, thenprogrammatically call a method on it to load your map document.
Step 1: Create a new project in Visual Studio
Start Visual Studio and create a new project, using the following table as a guide:
Property Value
Language Visual C#
Template Windows Forms Application
Name MapDocInfo
Location \Student\IPAN\Exercise03
Solution name MapDocInfo
Exercise 3B
Copyright © 2001-2009 ESRI 3-15
! Make sure the Create directory for solution check box is checked.
Your project opens in Design view as a Visual Studio form control. In the SolutionExplorer, notice that your project contains one folder, two files, and project references.
Before continuing, you will verify that any output will be directed to the Output window.
From the Tools menu, choose Options.
In the Options dialog box, do the following:
▪ On the left, scroll down and select Debugging.▪ On the right, scroll down and verify that the Redirect all Output Window text to
the Immediate Window check box is unchecked.▪ Click OK.
Step 2: Add a custom button to your project
In this step, to prepare your project to retrieve some information from your map, you willadd a Visual Studio button.
If necessary, display the Toolbox window. (Hint: )
In the Toolbox window, drag a Button control from the Common Controls group ontoyour form.
In the Properties window, specify the following:
▪ (Name): btnInfo▪ Text: Info
Step 3: Add code to your custom button
In this step, you will access a map document and determine its name and other propertieswithout viewing the data. Instead, you will rely on other resources, such as the DesktopHelp for .Net (VS2008), Microsoft's IntelliSense, and your lecture book.
Double-click your Info button to open its Click event.
Declare the variable mapDoc to hold a reference to IMapDocument.
From the Build menu, choose Build MapDocInfo to build your project.
Introduction to Programming ArcObjects Using the Microsoft .NET Framework
3-16 Copyright © 2001-2009 ESRI
Hover your mouse pointer over IMapDocument.
Your syntax is not recognized, so you will need to add the appropriate reference. Youwill use the Library Locator to determine which reference you need.
Open Windows Explorer and do the following:
▪ Navigate to C:\Program Files\ArcGIS\DeveloperKit\Tools.▪ Right-click LibraryLocator.exe and choose Send To > Desktop (create shortcut).▪ Close Windows Explorer.
Double-click the new shortcut to open the Library Locator.
Enter IMapDocument, then check the Report Search and Copy results for use in .NETcheck box.
Click Search.
Question 1: Which library do you need to add to your project?
______________________________________________________________________
Click Copy.
In Visual Studio, from the Project menu, choose Add ArcGIS Reference.
Because you will not be adding any ArcGIS Engine controls to your application, you canuse ArcGIS Desktop references and libraries.
Exercise 3B
Copyright © 2001-2009 ESRI 3-17
In the Add ArcGIS Reference dialog box, do the following:
▪ On the References tab, expand Desktop ArcMap.▪ Double-click ESRI.ArcGIS.Carto to add it to the list of selected assemblies.▪ Click Finish.
Near the top of your code (above your namespace) type using, right-click, and choosePaste to add the assembly reference to your project.
Build your project (Hint: ).
Click inside your btnInfo_Click method.
Question 2: What changed in the variable declaration you wrote?
______________________________________________________________________
______________________________________________________________________
The IMapDocument interface is found on the MapDocument coclass, which makes yourmapDoc variable a creatable object.
Use the following code to create a new MapDocument object.
IMapDocument mapDoc = new MapDocumentClass();Note: You will learn more about this syntax in the next lesson. Also, you may havenoticed the additional "Class" added to the class name. You will learn more about it inLesson 10.
Build your project.
Notice that MapDocument now displays an error. To understand its cause, you need toknow that many assemblies have the System namespace as a dependency. The followinggraphic depicts the MapDocument coclass and its two interfaces.
Introduction to Programming ArcObjects Using the Microsoft .NET Framework
3-18 Copyright © 2001-2009 ESRI
!
Although you are only working with IMapDocument, IDocumentVersion is found in theSystem assembly. Your project, therefore, needs a reference to the System assembly.
Add an ArcGIS reference to ESRI.ArcGIS.System the same way you added areference to ESRI.ArcGIS.Carto. (Hint: You do not need a using statement.)
For the remainder of this exercise, you are responsible for buildingyour project (or solution) as needed. It is especially important to buildyour project after you correct syntax errors.
Recall from the lecture that there are different types of map documents, one of which isan .mxd file. Next, you will access an .mxd file that installed with your data.
Write the code to open a map document, adding the appropriate drive letter to thefollowing path:
mapDoc.Open("\\Student\\IPAN\\Exercise03\\SouthAmerica.mxd", "");
Open the Desktop Help for .Net (VS2008).
Click the Search button to display the Search tab.
Note: If prompted, for Online Help Settings, choose Use local help as primary source,and then click OK.
In the Search box, type IMapDocument interface and click Search.
Exercise 3B
Copyright © 2001-2009 ESRI 3-19
In the list of results, do the following:
▪ On the right, click Local Help.▪ On the left, click the IMapDocument Interface link.
Locate the property that will tell you the type of map document currently loaded in theobject, then explore its links.
Question 3: What parameter does the property return? How many types of documentsdoes it include?
______________________________________________________________________
After the code that opens the map document, complete the following code to write thevalue of the property to the Output window:
System.Diagnostics.Debug.WriteLine(mapDoc.________________________);
In Visual Studio, make sure the Output window is displayed.
Note: Debug menu > Windows > Output
Build your project, then run it.
If necessary, display the Output window.
Click the Info button on your application.
Question 4: What value is returned in the Output window when you click the Info button?
______________________________________________________________________
Close your application.
In your button's Click event, skip several lines afterSystem.Diagnostics.Debug.WriteLine and then use the following syntax to closeyour application as soon as the process finishes:
this.Close();
Run your project and test the change.
Introduction to Programming ArcObjects Using the Microsoft .NET Framework
3-20 Copyright © 2001-2009 ESRI

!
Step 4: Work with the map
Although your application does not currently display a map, you can still access the mapand the active view for your map document. In this step, you will use .NET casting tomove between the interfaces for the map and the active view.
Before the code that closes the application, declare the variable inMap to hold areference to IMap.
Complete the following code to assign inMap to the first map in your map document:
inMap = ________.get_Map(0);
Write the name of the map to the Output window.
Run your project and test your code.
After the application closes, click the Clear All button in your Output window.
Using the developer resource of your choice, find additional properties for your map.
Find the property for the map's distance units.
Write the value for this property to the Output window.
If you would like, write the value of any other properties to the Output window.
Beware of non-string and non-numeric properties as they may causeruntime errors.
Build and run your project.
Test your changes.
Question 5: What are the map's distance units?
______________________________________________________________________
Step 5: Work with the active view
In this step, you will find the X and Y values for the lower-left and upper-right corners ofthe extent of your map. You will add your code to your custom button.
Exercise 3B
Copyright © 2001-2009 ESRI 3-21
Continuing with your code, declare the variable actView to hold a reference toIActiveView.
Write code to cast (perform a COM QueryInterface) from IMap to IActiveView.(Hint: For help with the syntax, refer to your lecture book.)
Write the name of the focus map to the Output window.
Test your code.
Notice that the name of the active view's focus map is the same as the name of the mapyou are accessing from your map document. The variables inMap and actView arepointing to the same map.
Write the Extent property of the active view to the Output window.
Build your project.
Notice the error on the Extent property of the active view.
Hover your mouse pointer over the error.
Question 6: Which assembly is required?
______________________________________________________________________
Add an ArcGIS reference to the required assembly.
At the top of your code, import the assembly to your project with the following code:
using ESRI.ArcGIS.Carto;using ESRI.ArcGIS.____________;namespace MapDocInfo{
public partial class Form1 : Form
Modify your code to write the minimum X value of the extent. Include a descriptivelabel in the argument for System.Diagnostics.Debug.WriteLine.
Test your code.
Question 7: What is the minimum X value (rounded to the nearest integer)?
______________________________________________________________________
Introduction to Programming ArcObjects Using the Microsoft .NET Framework
3-22 Copyright © 2001-2009 ESRI
Revise your code to write the minimum X and Y and the maximum X and Y. (Tip: Usethe Round function in the Math library to round to zero decimal places.)
Test your code.
Question 8: What is the maximum Y?
______________________________________________________________________
You have finished this exercise; however, you may wish to complete the optional step:
▪ Step 5 shows you how to load a map document into the application using aMapControl.
If you want to complete the optional step, do so now. Otherwise, save your project andclose Visual Studio.
Step 6: (Optional) Add a MapControl to your project
In this step, you will add your map document to a MapControl.
To view your project in Design view, click the View Designer button at the top ofthe Solution Explorer.
In the Toolbox window, drag a MapControl from the ArcGIS Windows Forms grouponto your form.
Resize your form, if necessary.
Run your project.
A license error appears. Recall that ArcMap and ArcCatalog use ArcObjects to performGIS tasks. When you start ArcMap, for example, some processing behind the sceneschecks for a license. Your custom application also uses ArcObjects to perform a GIStask; therefore, when you run your custom application, you are responsible for checkingfor a license.
In order to use the MapControl, you need to include license handling in your project. Inthe previous exercise, you added the LicenseControl. This time, you will add code thathas already been written.
Close the error message and close your application.
Exercise 3B
Copyright © 2001-2009 ESRI 3-23
From the Project menu, choose Add ArcGIS License Checking.
In the ArcGIS License Initializer dialog box, do the following:
▪ In the Products list, check the box for ArcView.▪ Check the box to shut down the application if the selected licenses are not
available.▪ Click OK.
Code that manages the license is added to your project.
Question 9: Which module initializes the license with the application and shuts down thelicense?
______________________________________________________________________
The license-handling routine added references and namespaces that it needs, but you needto add a using statement to the code for your form.
View the Form1 code.
Add the following code after the other using statements:
using ESRI.ArcGIS.esriSystem;
Now you will load your map document into the MapControl.
In your button's Click event, just before the line this.Close(), complete thefollowing code to load the same map document that you have been exploring, by filename:
axMapControl1.LoadMxFile(mapDoc.________________________________);
Comment the line this.Close().
Click the Info button to test your code.
SouthAmerica.mxd displays in the MapControl.
Close your application.
Save your project and close Visual Studio.
Introduction to Programming ArcObjects Using the Microsoft .NET Framework
3-24 Copyright © 2001-2009 ESRI

Conclusion
In this exercise, you accessed the properties of an existing map without viewing it. Inyour code, you moved between two interfaces on the same object by casting, the .NETtechnique for the process known as QueryInterface (QI) in the world of COM.
Exercise 3B
Copyright © 2001-2009 ESRI 3-25
Answers to Exercise 3B Questions
Question 1: Which library do you need to add to your project?
Answer: ESRI.ArcGIS.Carto
Question 2: What changed in the variable declaration you wrote?
Answer: IMapDocument no longer displays an error, but the variable mapDoc isflagged as never used
Question 3: What parameter does the property return? How many types of documentsdoes it include?
Answer: esriMapDocumentType; four types
Question 4: What value is returned in the Output window when you click the Info button?
Answer: esriMapDocumentTypeMxd
Question 5: What are the map's distance units?
Answer: esriMiles
Question 6: Which assembly is required?
Answer: ESRI.ArcGIS.Geometry
Question 7: What is the minimum X value (rounded to the nearest integer)?
Answer: -84
Question 8: What is the maximum Y?
Answer: 7
Question 9: Which module initializes the license with the application and shuts down thelicense?
Answer: LicenseInitializer.cs
Introduction to Programming ArcObjects Using the Microsoft .NET Framework
3-26 Copyright © 2001-2009 ESRI
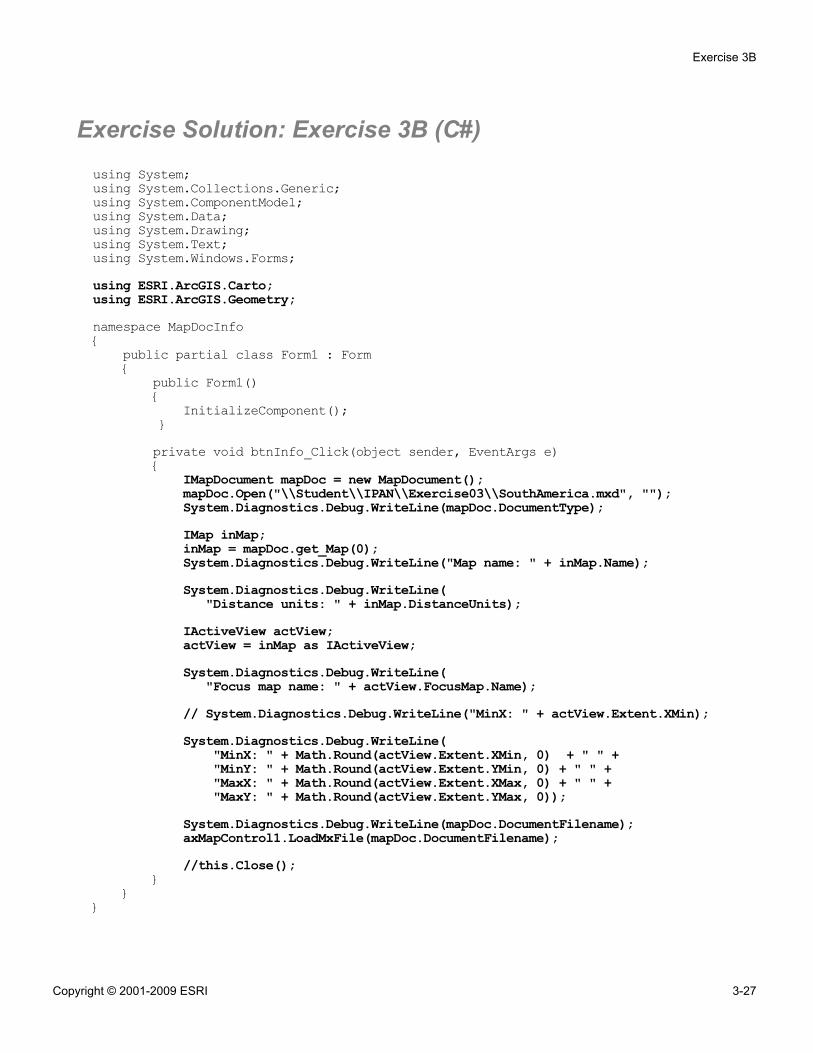
Exercise Solution: Exercise 3B (C#)using System;using System.Collections.Generic;using System.ComponentModel;using System.Data;using System.Drawing;using System.Text;using System.Windows.Forms;using ESRI.ArcGIS.Carto;using ESRI.ArcGIS.Geometry;namespace MapDocInfo{
public partial class Form1 : Form{
public Form1(){
InitializeComponent();}private void btnInfo_Click(object sender, EventArgs e){
IMapDocument mapDoc = new MapDocument();mapDoc.Open("\\Student\\IPAN\\Exercise03\\SouthAmerica.mxd", "");System.Diagnostics.Debug.WriteLine(mapDoc.DocumentType);IMap inMap;inMap = mapDoc.get_Map(0);System.Diagnostics.Debug.WriteLine("Map name: " + inMap.Name);System.Diagnostics.Debug.WriteLine(
"Distance units: " + inMap.DistanceUnits);IActiveView actView;actView = inMap as IActiveView;System.Diagnostics.Debug.WriteLine(
"Focus map name: " + actView.FocusMap.Name);// System.Diagnostics.Debug.WriteLine("MinX: " + actView.Extent.XMin);System.Diagnostics.Debug.WriteLine(
"MinX: " + Math.Round(actView.Extent.XMin, 0) + " " +"MinY: " + Math.Round(actView.Extent.YMin, 0) + " " +"MaxX: " + Math.Round(actView.Extent.XMax, 0) + " " +"MaxY: " + Math.Round(actView.Extent.YMax, 0));
System.Diagnostics.Debug.WriteLine(mapDoc.DocumentFilename);axMapControl1.LoadMxFile(mapDoc.DocumentFilename);//this.Close();
}}
}
Exercise 3B
Copyright © 2001-2009 ESRI 3-27


4Understanding object
model diagrams
Exercise 4A: Create an ArcObjectsapplication (VB.NET)Estimated time: 45 minutes
Exercise 4B: Create an ArcObjectsapplication (C#)Estimated time: 45 minutes

Exercise 4A: Create an ArcObjects application (VB.NET)
Estimated time: 45 minutes
Several help systems are available for ArcObjects developers. In this exercise, you willuse these systems to help you create a simple application to access geographic data. Youwill count the number of features in a shapefile, taking advantage of a pre-written snippetto jump-start your application.
In this exercise, you will:
▪ Explore and use various developer resources▪ Navigate object model diagrams (OMDs)▪ Make simple modifications to the code
Exercise shortcut1. In Visual Studio, create a Windows Form Application.
2. Add a Button control and a TextBox to your form.
3. In the Button control's Click event, insert a snippet that counts features in ashapefile.
4. Browse appropriate developer resources to help you understand the snippet.
5. Add code to the snippet to count the records in a shapefile's attribute table.
6. Run your project and check your results.
Step 1: Create a new project in Visual Studio
Start Visual Studio and create a new project, using the following table as a guide:
Property Value
Language Visual Basic
Template Windows Forms Application
Name CountFeatures
Location \Student\IPAN\Exercise04
Solution name CountFeatures
Exercise 4A
Copyright © 2001-2009 ESRI 4-1

! Make sure the Create directory for solution check box is checked.
Your project opens in Design view as a Visual Studio form control.
Step 2: Add controls to your form
In this step, you will add a button and a text box to your form.
Right-click Form1 and choose Properties.
In the Properties window, specify the following:
▪ (Name): frmCount▪ Text: Count Features in a Shapefile
In the Toolbox window, expand the Common Controls group and drag a Buttoncontrol onto your form.
In the Properties window, change the following properties for your button:
▪ (Name): btnCount▪ Text: Count Features
If necessary, resize the button on your form so that all of the text displays.
Drag a TextBox control onto your form, then change its (Name) property to txtCount.
Verify that your form resembles the following graphic:
Introduction to Programming ArcObjects Using the Microsoft .NET Framework
4-2 Copyright © 2001-2009 ESRI
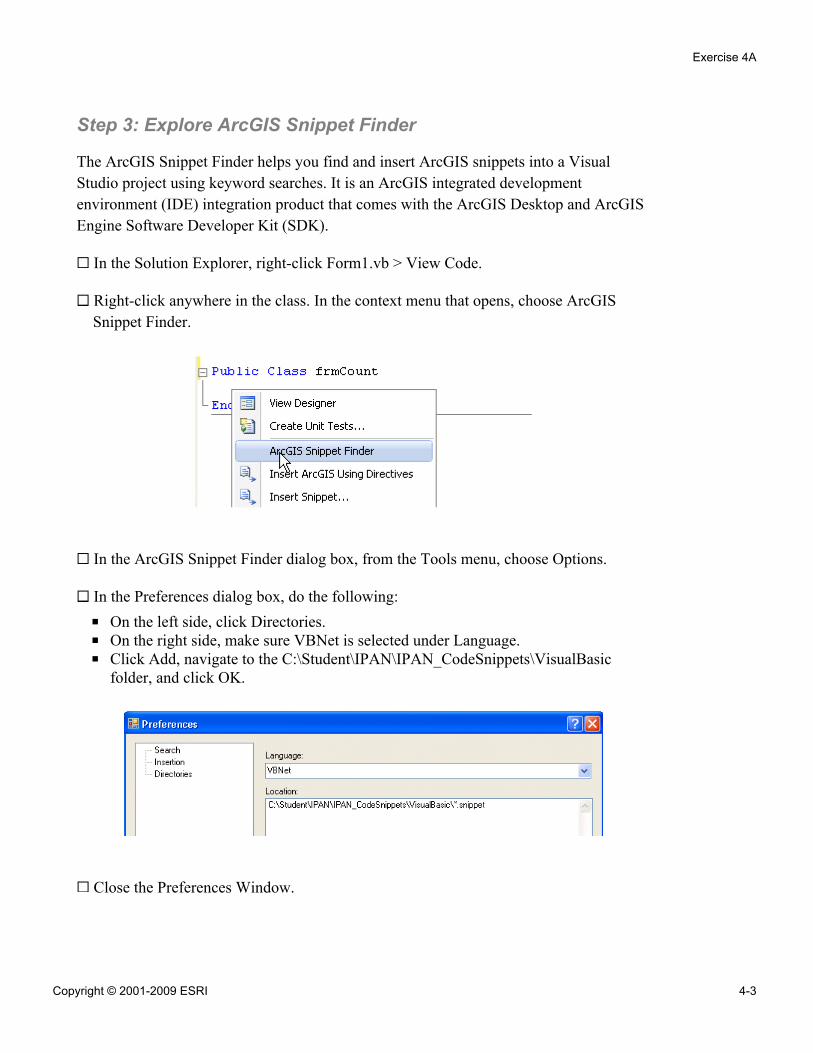
Step 3: Explore ArcGIS Snippet Finder
The ArcGIS Snippet Finder helps you find and insert ArcGIS snippets into a VisualStudio project using keyword searches. It is an ArcGIS integrated developmentenvironment (IDE) integration product that comes with the ArcGIS Desktop and ArcGISEngine Software Developer Kit (SDK).
In the Solution Explorer, right-click Form1.vb > View Code.
Right-click anywhere in the class. In the context menu that opens, choose ArcGISSnippet Finder.
In the ArcGIS Snippet Finder dialog box, from the Tools menu, choose Options.
In the Preferences dialog box, do the following:
▪ On the left side, click Directories.▪ On the right side, make sure VBNet is selected under Language.▪ Click Add, navigate to the C:\Student\IPAN\IPAN_CodeSnippets\VisualBasic
folder, and click OK.
Close the Preferences Window.
Exercise 4A
Copyright © 2001-2009 ESRI 4-3
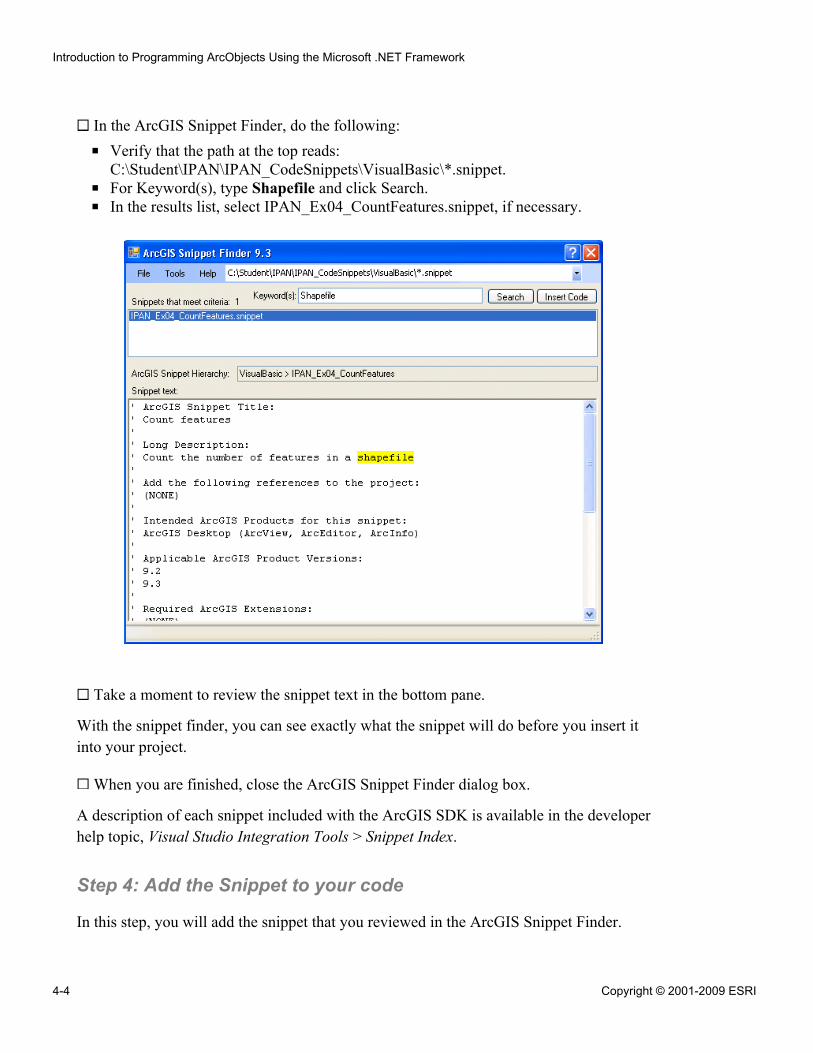
In the ArcGIS Snippet Finder, do the following:
▪ Verify that the path at the top reads:C:\Student\IPAN\IPAN_CodeSnippets\VisualBasic\*.snippet.
▪ For Keyword(s), type Shapefile and click Search.▪ In the results list, select IPAN_Ex04_CountFeatures.snippet, if necessary.
Take a moment to review the snippet text in the bottom pane.
With the snippet finder, you can see exactly what the snippet will do before you insert itinto your project.
When you are finished, close the ArcGIS Snippet Finder dialog box.
A description of each snippet included with the ArcGIS SDK is available in the developerhelp topic, Visual Studio Integration Tools > Snippet Index.
Step 4: Add the Snippet to your code
In this step, you will add the snippet that you reviewed in the ArcGIS Snippet Finder.
Introduction to Programming ArcObjects Using the Microsoft .NET Framework
4-4 Copyright © 2001-2009 ESRI
In Design view, double-click Count Features button on the form to open its Clickevent.
Place your cursor inside the btnCount_Click method, right-click, and choose InsertSnippet.
Navigate to and double-click IPAN_CodeSnippets > Visual Basic >IPAN_Ex04_CountFeatures.
Notice the syntax errors indicated by the blue squiggly underscores. You will resolvethose errors and provide the path to your data later in the exercise.
Take a moment to examine the snippet you just added.
Notice that the code contains several variables that hold references to interfaces. Oneobject is created as a new instance of a coclass. In addition, the code contains twomethods that open data.
Question 1: How many interfaces does the sample use? What is the name of the coclass?
______________________________________________________________________
Question 2: What are the two methods?
______________________________________________________________________
You will use the available help resources to learn more about the ArcObjects in thesample and how to correct the errors to make your code work.
Step 5: Browse the developer help
In this step, you will use the developer help to find out information about classes,interfaces, properties, and methods.
Double-click your desktop shortcut to the Desktop Help for .NET (VS2008).
In the table of contents, navigate to:
▪ Building solutions with ArcGIS Engine using .NET >▪ Getting started >▪ ArcObjects: Foundation of ArcGIS >▪ ArcObjects libraries shared across the ArcGIS platform
On the right, scroll down and read the description for the Geodatabase library.
Exercise 4A
Copyright © 2001-2009 ESRI 4-5

This library provides the programming API (application programming interface) for thegeodatabase—the objects, methods, and properties that you need to work with.
Click the Geodatabase link.
Additional documentation displays, including the software that can access the library.
Scroll down to the Core geodatabase model diagram.
Notice that the Dataset abstract class appears at the top of the diagram. A dataset is thehighest-level container for data.
Note: Abstract classes are not shown in the help system or in the ESRI Object Browser;however, they are viewable in the OMDs.
The attributes for your shapefile are stored in a table.
Question 3: What is the relationship between Table and Dataset?
______________________________________________________________________
Question 4: What is the relationship between the Table object and the Row object? Whatis the minimum number of Rows in a Table?
______________________________________________________________________
Scroll down past the Workspace Objects diagram to the WorkspaceFactory objects.
Question 5: Based on the symbology for the WorkspaceFactory objects, what is therelationship between a ShapefileWorkspaceFactory and a WorkspaceFactory?
______________________________________________________________________
Leave the help open as you will continue using it in the next step.
Note: In the interest of completing the exercise, if you want to review more of thedocumentation in this topic, you may wish to do so after you finish.
Step 6: Navigate the Geodatabase OMD
In this step, you will examine one of the standard OMDs for ArcObjects to help youunderstand relationships between classes.
Return to the top of the Geodatabase help page.
Introduction to Programming ArcObjects Using the Microsoft .NET Framework
4-6 Copyright © 2001-2009 ESRI
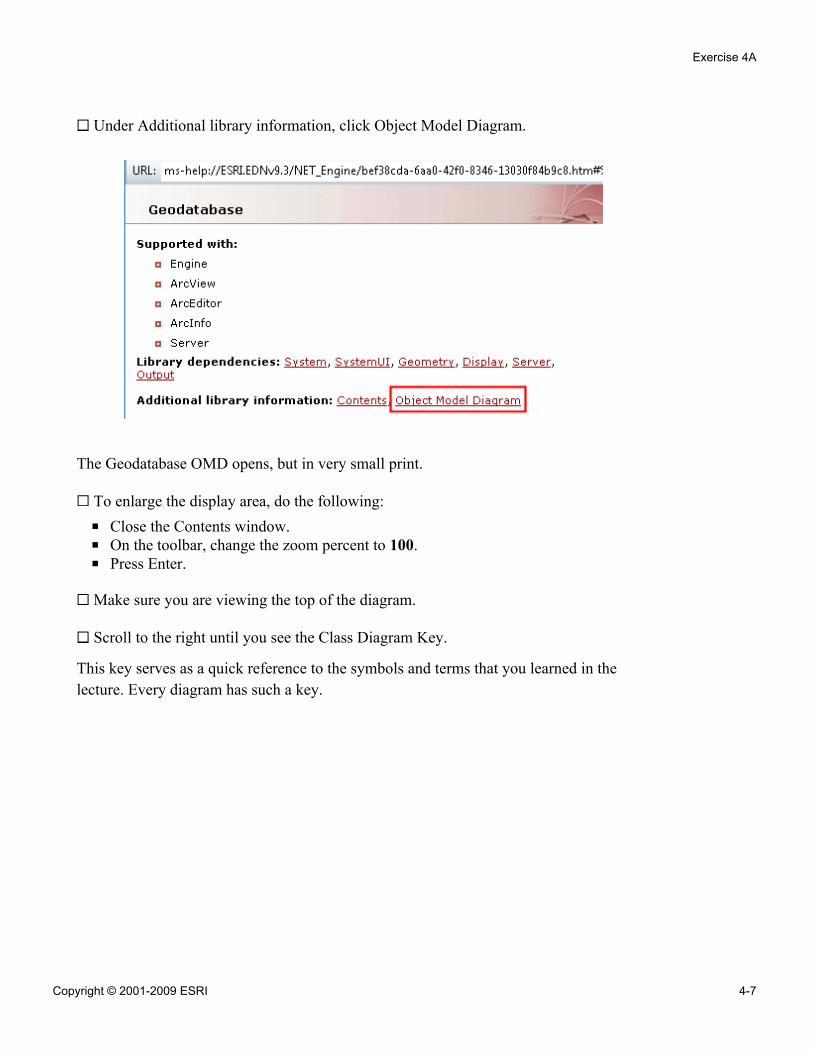
Under Additional library information, click Object Model Diagram.
The Geodatabase OMD opens, but in very small print.
To enlarge the display area, do the following:
▪ Close the Contents window.▪ On the toolbar, change the zoom percent to 100.▪ Press Enter.
Make sure you are viewing the top of the diagram.
Scroll to the right until you see the Class Diagram Key.
This key serves as a quick reference to the symbols and terms that you learned in thelecture. Every diagram has such a key.
Exercise 4A
Copyright © 2001-2009 ESRI 4-7
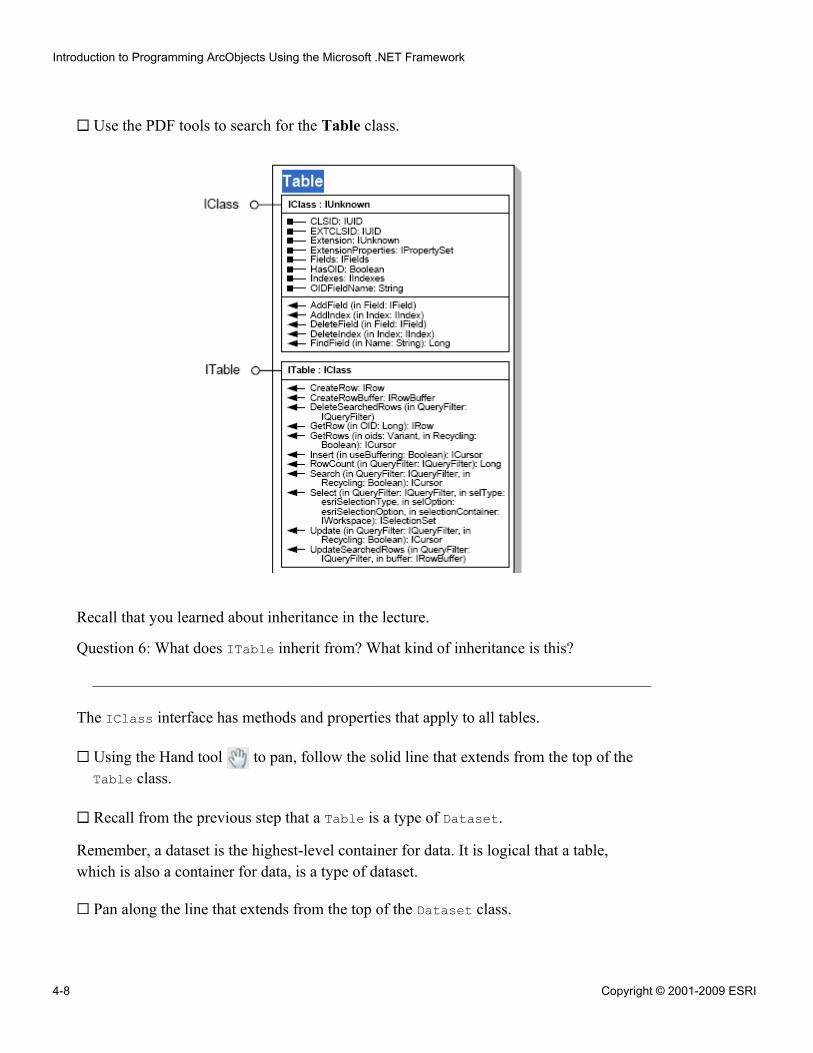
Use the PDF tools to search for the Table class.
Recall that you learned about inheritance in the lecture.
Question 6: What does ITable inherit from? What kind of inheritance is this?
______________________________________________________________________
The IClass interface has methods and properties that apply to all tables.
Using the Hand tool to pan, follow the solid line that extends from the top of theTable class.
Recall from the previous step that a Table is a type of Dataset.
Remember, a dataset is the highest-level container for data. It is logical that a table,which is also a container for data, is a type of dataset.
Pan along the line that extends from the top of the Dataset class.
Introduction to Programming ArcObjects Using the Microsoft .NET Framework
4-8 Copyright © 2001-2009 ESRI
Question 7: Can a Workspace contain more than one Dataset?
______________________________________________________________________
Pan and zoom to find the dashed arrow that points to the Workspace class.
In the lecture, you learned that this is a "creates a" relationship.
Question 8: Which class can instantiate (or create) a Workspace?
______________________________________________________________________
Workspace is a generic class containing methods that will allow you to create an objectfor data that resides in a file (such as a shapefile) on disk.
In the previous step, you found two methods, OpenFromFile and OpenTable, in yourcode.
Find the two methods in the OMD.
Question 9: What does OpenFromFile return, and what does OpenTable return?
______________________________________________________________________
Once you know the return type for a method, you know how to declare the variable thatwill store the result.
Read through your snippet code again and locate the lines of code that use these twomethods.
Question 10: What are the variables returned by OpenFromFile and OpenTable? Are thevariables declared to the correct return data types?
______________________________________________________________________
Browsing developer resources as you have just done helps you understand the snippetthat you added to your code.
Close the Desktop Help for .NET (VS2008).
Step 7: Explore the ArcGIS Resource Centers
The Desktop Help for .NET (VS2008) is a static version of ArcGIS developer help. Themost current documentation and help, however, is available in the ArcGIS Resource
Exercise 4A
Copyright © 2001-2009 ESRI 4-9
Centers. In this step, you will explore the ArcGIS Resource Centers that provide onlineaccess to various developer communities.
From your desktop, open Internet Explorer.
In the URL box, type resources.esri.com, then press Enter.
The ArcGIS Resource Centers Web site displays.
Under Products, click ArcGIS Desktop.
Click the For Developers tab.
Click the .NET link, then click the Concept and Samples tab.
In the tree on the left, click Working with ArcGIS Components and examine thecontents.
Take a few minutes to explore the help. You will quickly realize how valuable thisresource is to an ArcObjects developer.
Step 8: Make your code work for you
To make your code work, you will begin by adding the necessary assembly references toyour code in Visual Studio.
In the code view, hover your mouse pointer over IWorkspaceFactory.
Question 11: What is the error that displays?
______________________________________________________________________
You will search for IWorkspaceFactory in the Library Locator. First, you will add theLibrary Locator to Visual Studio for easier navigation.
From the Tools menu, choose External Tools.
In the External Tools dialog box, do the following:
▪ Click Add.▪ For Title, type ESRI Library Locator.▪ For Command, click the ellipses button , browse to C:\Program
Files\ArcGIS\DeveloperKit\Tools and open LibraryLocator.exe.▪ Click OK.
Introduction to Programming ArcObjects Using the Microsoft .NET Framework
4-10 Copyright © 2001-2009 ESRI
Now you can open the Library Locator directly from Visual Studio.
From the Tools menu, choose ESRI Library Locator.
In the ESRI Library Locator, do the following:
▪ Type IWorkspaceFactory.▪ Check the check box for Report Search and Copy results for use in .NET.▪ Click Search.
Question 12: Which library contains the IWorkspaceFactory interface?
______________________________________________________________________
Click Copy.
In the Solution Explorer, right-click CountFeatures and choose Add ArcGISReference.
In the Add ArcGIS Reference dialog box, expand Desktop ArcMap and add thenecessary reference.
Scroll to the top of your class.
Before the code for your class, import the namespace.
On your own, resolve the syntax error for ShapefileWorkspaceFactory.
Modify the values for the two string variables in your code as follows (remember toinclude the drive letter in the path):
▪ filePath: \Student\IPAN\Database▪ tableName: Cities.shp
Note: Remember to enter the values for filePath and tableName within quotes.
Step 9: "Do something" with your shapefile
The code that you have entered so far finds and opens a shapefile. For your code to beuseful, it needs to perform at least one additional action. In this step, you will "dosomething," as directed by the comment in the snippet.
Review the code.
Exercise 4A
Copyright © 2001-2009 ESRI 4-11
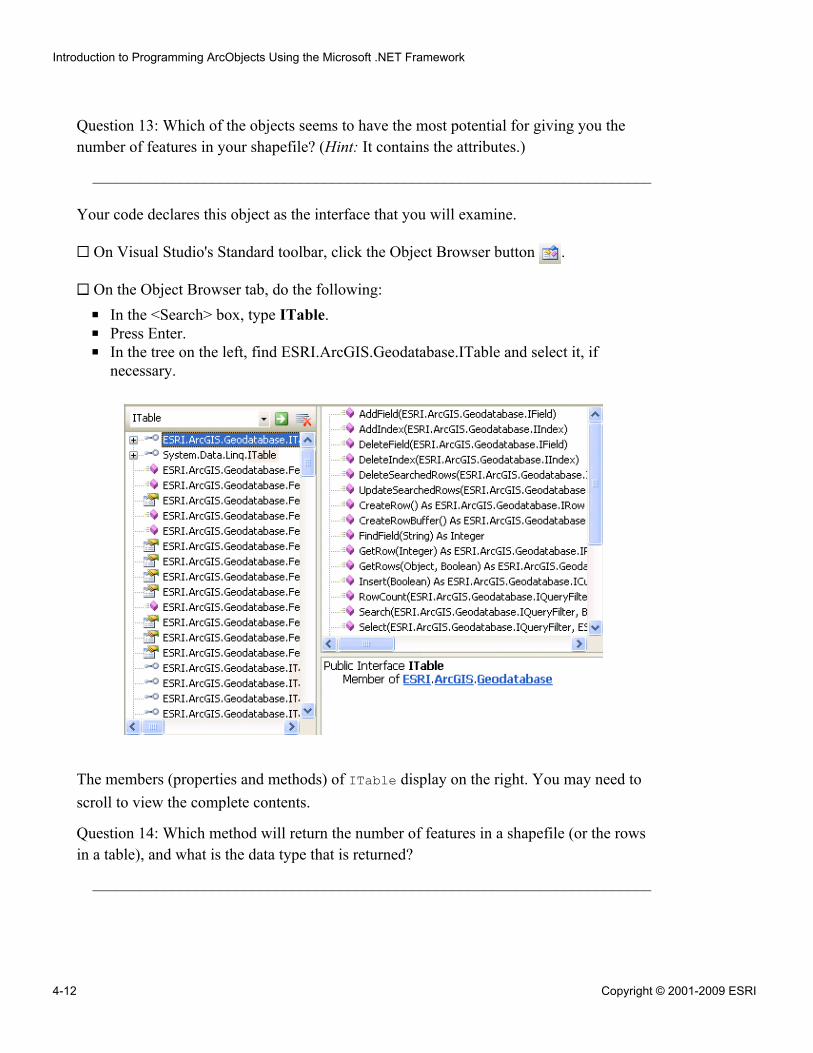
Question 13: Which of the objects seems to have the most potential for giving you thenumber of features in your shapefile? (Hint: It contains the attributes.)
______________________________________________________________________
Your code declares this object as the interface that you will examine.
On Visual Studio's Standard toolbar, click the Object Browser button .
On the Object Browser tab, do the following:
▪ In the <Search> box, type ITable.▪ Press Enter.▪ In the tree on the left, find ESRI.ArcGIS.Geodatabase.ITable and select it, if
necessary.
The members (properties and methods) of ITable display on the right. You may need toscroll to view the complete contents.
Question 14: Which method will return the number of features in a shapefile (or the rowsin a table), and what is the data type that is returned?
______________________________________________________________________
Introduction to Programming ArcObjects Using the Microsoft .NET Framework
4-12 Copyright © 2001-2009 ESRI
You now know that you can determine the number of features, or rows, in your table.What should you do next? You need to create a selection, or query, of the desiredfeatures. In this case, you want to know the count of all features.
Question 15: Which method lets you select features, and what does this method accept asits first argument?
______________________________________________________________________
In ArcObjects, the QueryFilter object lets you write the WHERE clause portion of aSQL statement. Because you want to return all of the rows, or records, in a table, you donot need to write the WHERE clause. Instead, you can just pass Nothing as theargument. This is just a preview of QueryFilter—you will learn more in a later lesson.
Click the X on the Object Browser tab to close it.
Your goal is to count the number of records in a shapefile's attribute table.
Complete the following code to declare the variable numRows as the appropriate datatype (Tip: Place the code immediately after the comment):
Dim numRows As _______
Return the number of rows (or features) in your shapefile and store the result innumRows.
numRows = pTable.________________(Nothing)
Make an additional modification to place your results in the text box on your form.
txtCount.________ = ________.ToString
The code will populate your text box with the number of rows (or records or features) inyour shapefile. In addition, the code will convert the numeric value to a string.
Save and build your project.
Step 10: Run your project and check your results
In this step, you will run your project. Before you do, you will add license checking to it.
From the Project menu, choose Add ArcGIS License Checking.
Exercise 4A
Copyright © 2001-2009 ESRI 4-13
In the ArcGIS License Initializer dialog box, do the following:
▪ Under Products, check the check box for ArcView.▪ Check the Shut down this application if any selected license(s) is not available
check box.▪ Click OK.
Question 16: Based on the license you have chosen, if you wanted to share yourapplication with another person, what software would need to be installed on thatperson's computer?
______________________________________________________________________
Now you are ready to run your project.
Return to your code and run your project.
Click your Count Features button to test your code.
Question 17: How many features are in your shapefile?
______________________________________________________________________
Close your application.
Save your project and close Visual Studio.
Now you will preview the Cities shapefile in ArcCatalog to confirm your results.
Start ArcCatalog.
In the Catalog tree, browse to the \Student\IPAN\Database folder.
Click the Cities shapefile.
In the display area, click the Preview tab.
At the bottom of the tab, choose Table from the Preview drop-down list.
Question 18: How many records are in the table? Did your code return the correctnumber?
______________________________________________________________________
Close ArcCatalog.
Introduction to Programming ArcObjects Using the Microsoft .NET Framework
4-14 Copyright © 2001-2009 ESRI
Conclusion
In this exercise, you created a small application to count the number of features in ashapefile. To save time, you inserted a snippet into your application and then used thedeveloper resources to understand the code it contained. You learned how useful thedeveloper help is for searching classes, interfaces, methods, and properties to see what isavailable and which library they are located in, while OMDs allow you to easily viewrelationships between objects. You also explored the ArcGIS Resource Centers.
In future lessons, you will use the skills you developed here for searching the help systemand OMDs for casting between interfaces.
Exercise 4A
Copyright © 2001-2009 ESRI 4-15
Answers to Exercise 4A Questions
Question 1: How many interfaces does the sample use? What is the name of the coclass?
Answer: Four; ShapefileWorkspaceFactory
Question 2: What are the two methods?
Answer: OpenFromFile and OpenTable
Question 3: What is the relationship between Table and Dataset?
Answer: A Table is a type of Dataset.
Question 4: What is the relationship between the Table object and the Row object? Whatis the minimum number of Rows in a Table?
Answer: A Table is composed of Rows; 0
Question 5: Based on the symbology for the WorkspaceFactory objects, what is therelationship between a ShapefileWorkspaceFactory and a WorkspaceFactory?
Answer: ShapefileWorkspaceFactory is a type of WorkspaceFactory.
Question 6: What does ITable inherit from? What kind of inheritance is this?
Answer: IClass; interface inheritance
Question 7: Can a Workspace contain more than one Dataset?
Answer: Yes
Question 8: Which class can instantiate (or create) a Workspace?
Answer: WorkspaceFactory
Question 9: What does OpenFromFile return, and what does OpenTable return?
Answer: IWorkspace; ITable
Introduction to Programming ArcObjects Using the Microsoft .NET Framework
4-16 Copyright © 2001-2009 ESRI
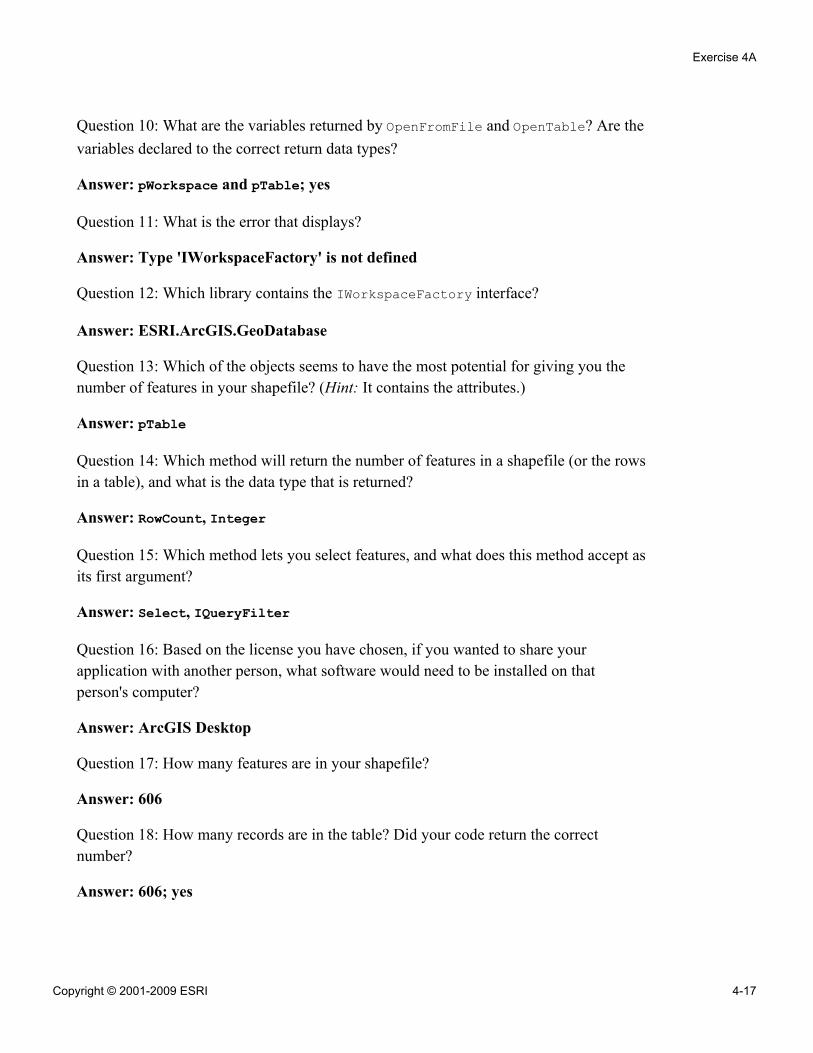
Question 10: What are the variables returned by OpenFromFile and OpenTable? Are thevariables declared to the correct return data types?
Answer: pWorkspace and pTable; yes
Question 11: What is the error that displays?
Answer: Type 'IWorkspaceFactory' is not defined
Question 12: Which library contains the IWorkspaceFactory interface?
Answer: ESRI.ArcGIS.GeoDatabase
Question 13: Which of the objects seems to have the most potential for giving you thenumber of features in your shapefile? (Hint: It contains the attributes.)
Answer: pTable
Question 14: Which method will return the number of features in a shapefile (or the rowsin a table), and what is the data type that is returned?
Answer: RowCount, Integer
Question 15: Which method lets you select features, and what does this method accept asits first argument?
Answer: Select, IQueryFilter
Question 16: Based on the license you have chosen, if you wanted to share yourapplication with another person, what software would need to be installed on thatperson's computer?
Answer: ArcGIS Desktop
Question 17: How many features are in your shapefile?
Answer: 606
Question 18: How many records are in the table? Did your code return the correctnumber?
Answer: 606; yes
Exercise 4A
Copyright © 2001-2009 ESRI 4-17
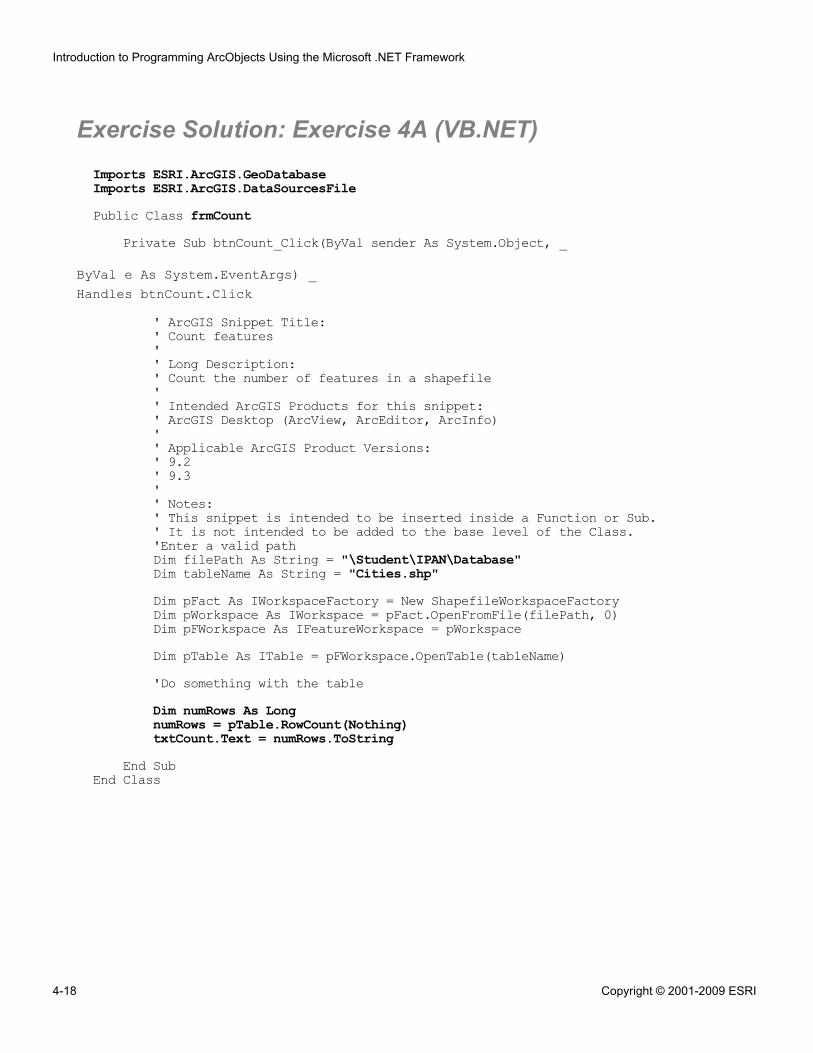
Exercise Solution: Exercise 4A (VB.NET)Imports ESRI.ArcGIS.GeoDatabaseImports ESRI.ArcGIS.DataSourcesFilePublic Class frmCount
Private Sub btnCount_Click(ByVal sender As System.Object, _
ByVal e As System.EventArgs) _Handles btnCount.Click
' ArcGIS Snippet Title:' Count features'' Long Description:' Count the number of features in a shapefile'' Intended ArcGIS Products for this snippet:' ArcGIS Desktop (ArcView, ArcEditor, ArcInfo)'' Applicable ArcGIS Product Versions:' 9.2' 9.3'' Notes:' This snippet is intended to be inserted inside a Function or Sub.' It is not intended to be added to the base level of the Class.'Enter a valid pathDim filePath As String = "\Student\IPAN\Database"Dim tableName As String = "Cities.shp"Dim pFact As IWorkspaceFactory = New ShapefileWorkspaceFactoryDim pWorkspace As IWorkspace = pFact.OpenFromFile(filePath, 0)Dim pFWorkspace As IFeatureWorkspace = pWorkspaceDim pTable As ITable = pFWorkspace.OpenTable(tableName)'Do something with the tableDim numRows As LongnumRows = pTable.RowCount(Nothing)txtCount.Text = numRows.ToString
End SubEnd Class
Introduction to Programming ArcObjects Using the Microsoft .NET Framework
4-18 Copyright © 2001-2009 ESRI
Exercise 4B: Create an ArcObjects application (C#)
Estimated time: 45 minutes
Several help systems are available for ArcObjects developers. In this exercise, you willuse these systems to help you create a simple application to access geographic data,taking advantage of a pre-written snippet to jump-start your application.
In this exercise, you will:
▪ Explore and use various developer resources▪ Navigate object model diagrams (OMDs)▪ Make simple modifications to the code
Exercise shortcut1. In Visual Studio, create a Windows Form Application.
2. Add a Button control and a TextBox to your form.
3. In the Button control's Click event, insert a snippet that counts features in ashapefile.
4. Browse appropriate developer resources to help you understand the snippet.
5. Add code to the snippet to count the records in a shapefile's attribute table.
6. Run your project and check your results.
Step 1: Create a new project in Visual Studio
Start Visual Studio and create a new project, using the following table as a guide:
Property Value
Language Visual C#
Template Windows Forms Application
Name CountFeatures
Location \Student\IPAN\Exercise04
Solution name CountFeatures
Exercise 4B
Copyright © 2001-2009 ESRI 4-19
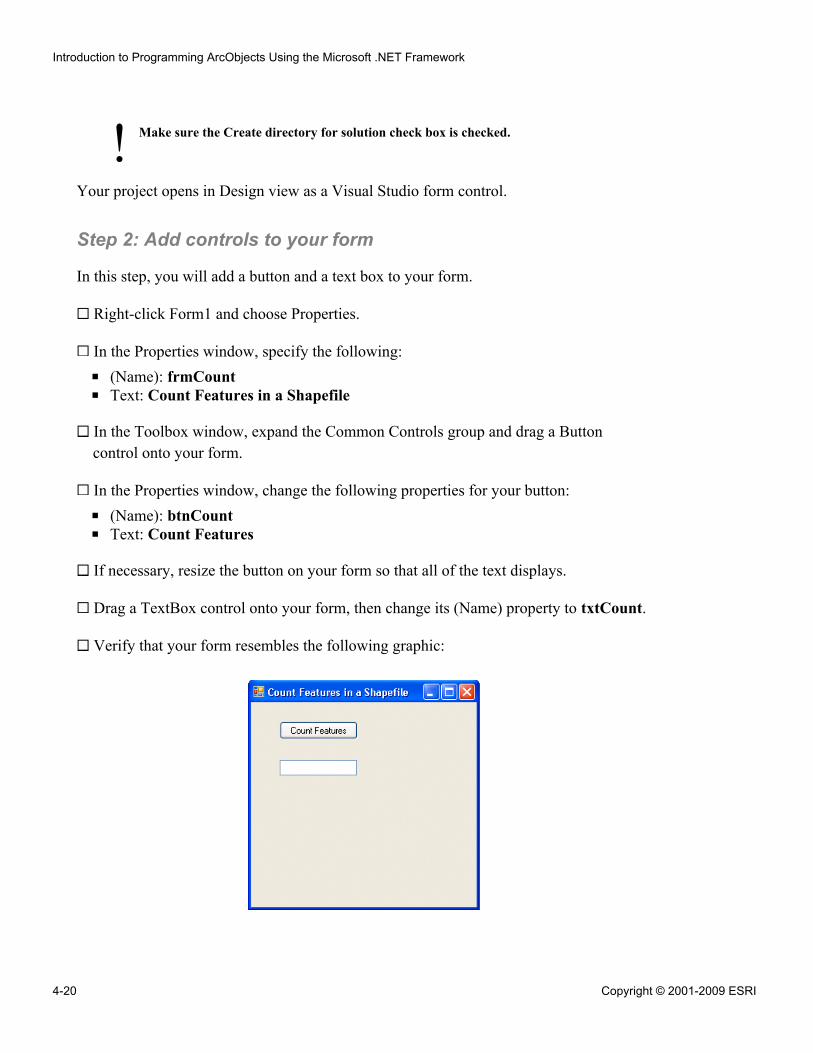
! Make sure the Create directory for solution check box is checked.
Your project opens in Design view as a Visual Studio form control.
Step 2: Add controls to your form
In this step, you will add a button and a text box to your form.
Right-click Form1 and choose Properties.
In the Properties window, specify the following:
▪ (Name): frmCount▪ Text: Count Features in a Shapefile
In the Toolbox window, expand the Common Controls group and drag a Buttoncontrol onto your form.
In the Properties window, change the following properties for your button:
▪ (Name): btnCount▪ Text: Count Features
If necessary, resize the button on your form so that all of the text displays.
Drag a TextBox control onto your form, then change its (Name) property to txtCount.
Verify that your form resembles the following graphic:
Introduction to Programming ArcObjects Using the Microsoft .NET Framework
4-20 Copyright © 2001-2009 ESRI
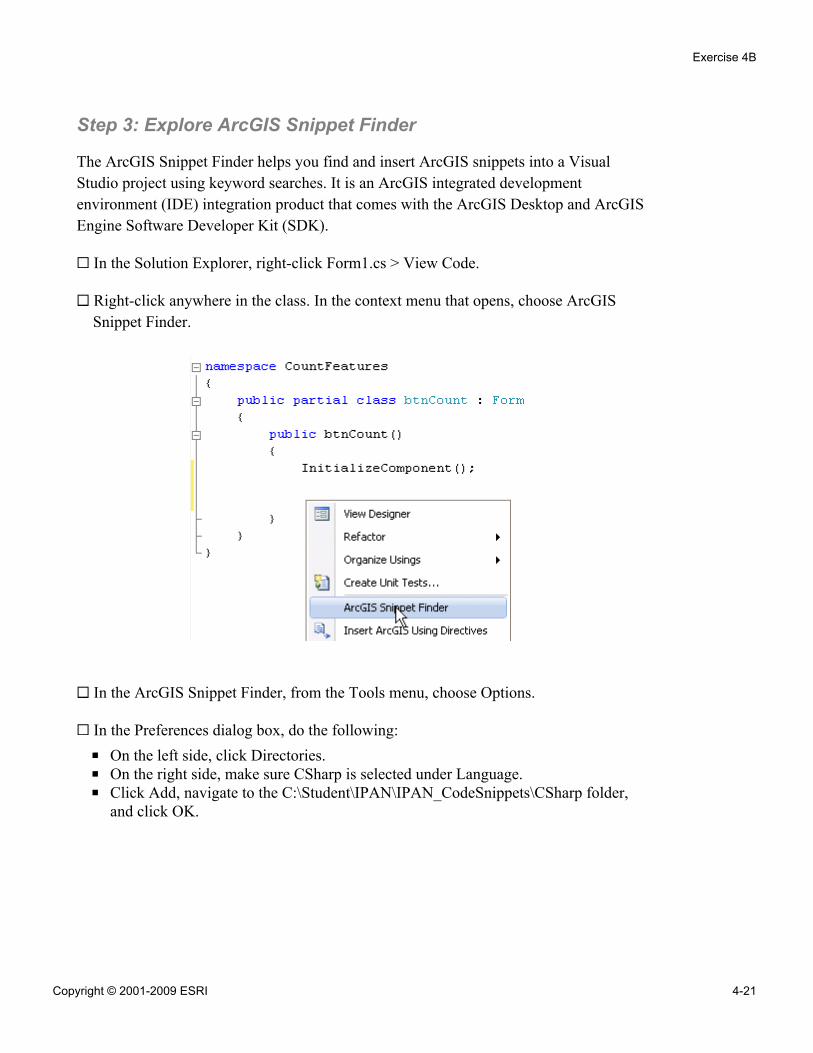
Step 3: Explore ArcGIS Snippet Finder
The ArcGIS Snippet Finder helps you find and insert ArcGIS snippets into a VisualStudio project using keyword searches. It is an ArcGIS integrated developmentenvironment (IDE) integration product that comes with the ArcGIS Desktop and ArcGISEngine Software Developer Kit (SDK).
In the Solution Explorer, right-click Form1.cs > View Code.
Right-click anywhere in the class. In the context menu that opens, choose ArcGISSnippet Finder.
In the ArcGIS Snippet Finder, from the Tools menu, choose Options.
In the Preferences dialog box, do the following:
▪ On the left side, click Directories.▪ On the right side, make sure CSharp is selected under Language.▪ Click Add, navigate to the C:\Student\IPAN\IPAN_CodeSnippets\CSharp folder,
and click OK.
Exercise 4B
Copyright © 2001-2009 ESRI 4-21
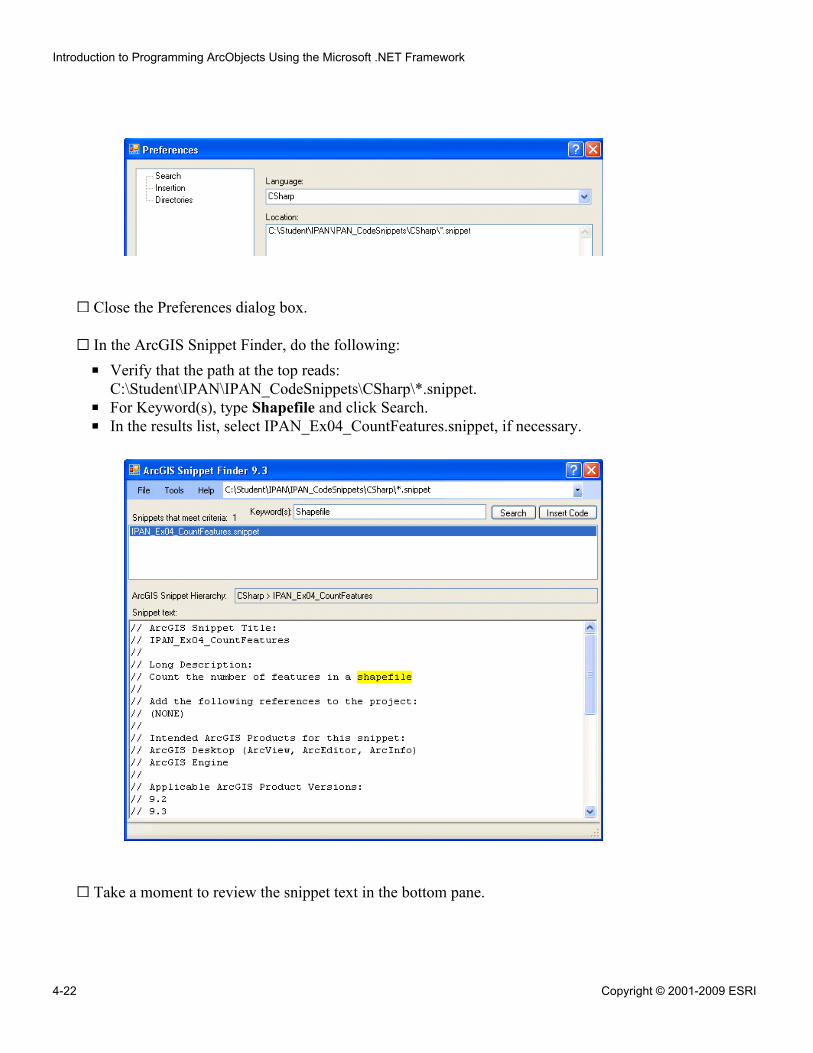
Close the Preferences dialog box.
In the ArcGIS Snippet Finder, do the following:
▪ Verify that the path at the top reads:C:\Student\IPAN\IPAN_CodeSnippets\CSharp\*.snippet.
▪ For Keyword(s), type Shapefile and click Search.▪ In the results list, select IPAN_Ex04_CountFeatures.snippet, if necessary.
Take a moment to review the snippet text in the bottom pane.
Introduction to Programming ArcObjects Using the Microsoft .NET Framework
4-22 Copyright © 2001-2009 ESRI
With the snippet finder, you can see exactly what the snippet will do before you insert itinto your project.
When you are finished, close the ArcGIS Snippet Finder dialog box.
A description of each snippet included with ArcGIS SDK is available in the developerhelp topic, Visual Studio Integration Tools > Snippet Index.
Step 4: Add the Snippet to your code
In this step, you will add the snippet that you previewed in the ArcGIS Snippet Finder.
In Design view, double-click Count Features button on the form to open its Clickevent.
Place your cursor inside the btnCount_Click method, right-click, and choose InsertSnippet.
Navigate to and double-click IPAN_CodeSnippets > CSharp>IPAN_Ex04_CountFeatures.
Build your solution.
Notice the syntax errors indicated by the blue squiggly underscores. You will resolvethose errors and provide the path to your data later in the exercise.
Take a moment to examine the snippet you just added.
Notice that the code contains several variables that hold references to interfaces. Oneobject is created as a new instance of a coclass. In addition, the code contains twomethods that open data.
Question 1: How many interfaces does the sample use? What is the name of the coclass?
______________________________________________________________________
Question 2: What are the two methods?
______________________________________________________________________
You will use the available help resources to learn more about the ArcObjects in thesample and how to correct the errors to make your code work.
Exercise 4B
Copyright © 2001-2009 ESRI 4-23
Step 5: Browse the developer help
In this step, you will use the developer help to find out information about classes,interfaces, properties, and methods.
Double-click your desktop shortcut to the Desktop Help for .NET (VS2008).
In the table of contents, navigate to:
▪ Building solutions with ArcGIS Engine using .NET >▪ Getting started >▪ ArcObjects: Foundation of ArcGIS >▪ ArcObjects libraries shared across the ArcGIS platform
On the right, scroll down and read the description for the Geodatabase library.
This library provides the programming API (application programming interface) for thegeodatabase—the objects, methods, and properties that you need to work with.
Click the Geodatabase link.
Additional documentation displays, including the software that can access the library.
Scroll down to the Core geodatabase model diagram.
Notice that the Dataset abstract class appears at the top of the diagram. A dataset is thehighest-level container for data.
Note: Abstract classes are not shown in the help system or in the ESRI Object Browser;however, they are viewable in the OMDs.
The attributes for your shapefile are stored in a table.
Question 3: What is the relationship between Table and Dataset?
______________________________________________________________________
Question 4: What is the relationship between the Table object and the Row object? Whatis the minimum number of Rows in a Table?
______________________________________________________________________
Scroll down past the Workspace Objects diagram to the WorkspaceFactory objects.
Introduction to Programming ArcObjects Using the Microsoft .NET Framework
4-24 Copyright © 2001-2009 ESRI
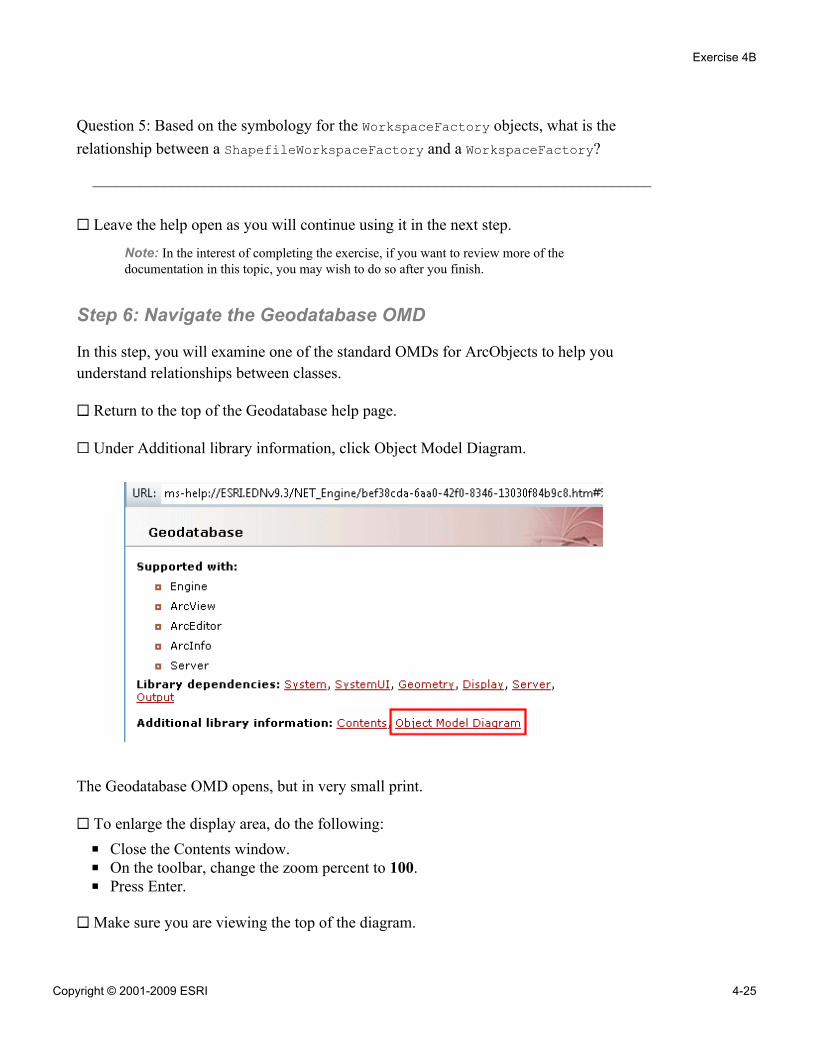
Question 5: Based on the symbology for the WorkspaceFactory objects, what is therelationship between a ShapefileWorkspaceFactory and a WorkspaceFactory?
______________________________________________________________________
Leave the help open as you will continue using it in the next step.
Note: In the interest of completing the exercise, if you want to review more of thedocumentation in this topic, you may wish to do so after you finish.
Step 6: Navigate the Geodatabase OMD
In this step, you will examine one of the standard OMDs for ArcObjects to help youunderstand relationships between classes.
Return to the top of the Geodatabase help page.
Under Additional library information, click Object Model Diagram.
The Geodatabase OMD opens, but in very small print.
To enlarge the display area, do the following:
▪ Close the Contents window.▪ On the toolbar, change the zoom percent to 100.▪ Press Enter.
Make sure you are viewing the top of the diagram.
Exercise 4B
Copyright © 2001-2009 ESRI 4-25
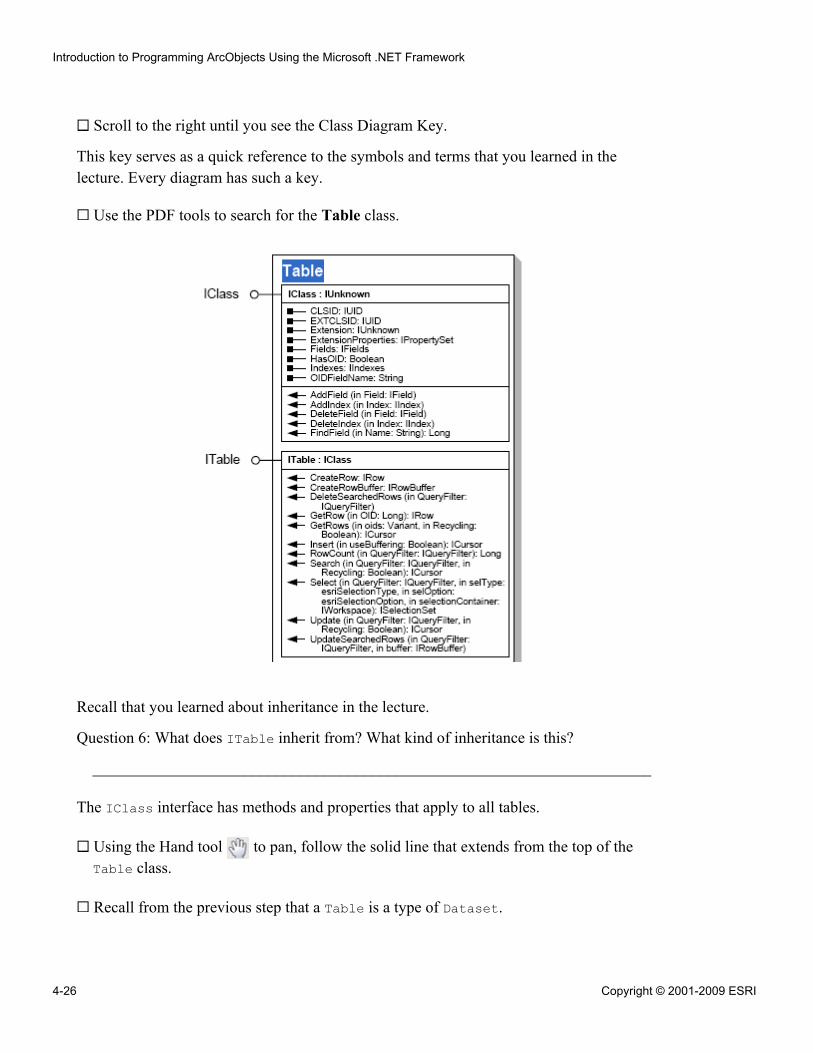
Scroll to the right until you see the Class Diagram Key.
This key serves as a quick reference to the symbols and terms that you learned in thelecture. Every diagram has such a key.
Use the PDF tools to search for the Table class.
Recall that you learned about inheritance in the lecture.
Question 6: What does ITable inherit from? What kind of inheritance is this?
______________________________________________________________________
The IClass interface has methods and properties that apply to all tables.
Using the Hand tool to pan, follow the solid line that extends from the top of theTable class.
Recall from the previous step that a Table is a type of Dataset.
Introduction to Programming ArcObjects Using the Microsoft .NET Framework
4-26 Copyright © 2001-2009 ESRI
Remember, a dataset is the highest-level container for data. It is logical that a table,which is also a container for data, is a type of dataset.
Pan along the line that extends from the top of the Dataset class.
Question 7: Can a Workspace contain more than one Dataset?
______________________________________________________________________
Pan and zoom to find the dashed arrow that points to the Workspace class.
In the lecture, you learned that this is a "creates a" relationship.
Question 8: Which class can instantiate (or create) a Workspace?
______________________________________________________________________
Workspace is a generic class containing methods that will allow you to create an objectfor data that resides in a file (such as a shapefile) on disk.
In the previous step, you found two methods, OpenFromFile and OpenTable, in yourcode.
Find the two methods in the OMD.
Question 9: What does OpenFromFile return, and what does OpenTable return?
______________________________________________________________________
Once you know the return type for a method, you know how to declare the variable thatwill store the result.
Read through your sample code again and locate the lines of code that use these twomethods.
Question 10: What are the variables returned by OpenFromFile and OpenTable? Are thevariables declared to the correct return data types?
______________________________________________________________________
Browsing developer resources as you have just done helps you understand the snippetthat you added to your code.
Close the Desktop Help for .NET (VS2008).
Exercise 4B
Copyright © 2001-2009 ESRI 4-27
Step 7: Explore the ArcGIS Resource Centers
The Desktop Help for .NET (VS2008) is a static version of ArcGIS developer help. Themost current documentation and help, however, is available in the ArcGIS ResourceCenters. In this step, you will explore the ArcGIS Resource Centers that provide onlineaccess to various developer communities.
From your desktop, open Internet Explorer.
In the URL box, type resources.esri.com, then press Enter.
The ArcGIS Resource Centers Web site displays.
Under Products, click ArcGIS Desktop.
Click the For Developers tab.
Click the link to .NET, then click the Concept and Samples tab.
In the tree on the left, click Working with ArcGIS Components and examine thecontents.
Take a few minutes to explore the help. You will quickly realize how valuable thisresource is to an ArcObjects developer.
Step 8: Make your code work for you
To make your code work, you will begin by adding the necessary assembly references toyour code in Visual Studio.
Build your project.
In the code view, hover your mouse pointer over IWorkspaceFactory.
Question 11: What is the error that displays?
______________________________________________________________________
You will search for IWorkspaceFactory in the Library Locator. First, you will add theLibrary Locator to Visual Studio for easier navigation.
From the Tools menu, choose External Tools.
Introduction to Programming ArcObjects Using the Microsoft .NET Framework
4-28 Copyright © 2001-2009 ESRI
!
In the External Tools dialog box, do the following:
▪ Click Add.▪ For Title, type ESRI Library Locator.▪ For Command, click the ellipses button , browse to C:\Program
Files\ArcGIS\DeveloperKit\Tools and open LibraryLocator.exe.▪ Click OK.
Now you can open the Library Locator directly from Visual Studio.
From the Tools menu, choose ESRI Library Locator.
In the ESRI Library Locator, do the following:
▪ Type IWorkspaceFactory.▪ Check the check box for Report Search and Copy results for use in .NET.▪ Click Search.
Question 12: Which library contains the IWorkspaceFactory interface?
______________________________________________________________________
Click Copy.
In the Solution Explorer, right-click CountFeatures and choose Add ArcGISReference.
In the Add ArcGIS Reference dialog box, expand Desktop ArcMap and add thenecessary reference.
Scroll to the top of your class.
Before the code for your class, import the namespace with the using directive.
For the library name, use Geodatabase (with a lowercase "d").
Build your project.
On your own, resolve the remaining syntax error.
Exercise 4B
Copyright © 2001-2009 ESRI 4-29
Modify the values for the two string variables in your code as follows (remember toinclude the drive letter in the path):
▪ filePath: \\Student\\IPAN\\Database▪ tableName: Cities.shp
Note: Remember to enter the values for filePath and tableName within quotes.
Step 9: "Do something" with your shapefile
The code that you have entered so far finds and opens a shapefile. For your code to beuseful, it needs to perform at least one additional action. In this step, you will "dosomething," as directed by the comment in the snippet.
Review the code.
Question 13: Which of the objects seems to have the most potential for giving you thenumber of features in your shapefile? (Hint: It contains the attributes.)
______________________________________________________________________
Your code declares this object as the interface that you will examine.
On Visual Studio's Standard toolbar, click the Object Browser button .
On the Object Browser tab, do the following:
▪ In the <Search> box, type ITable.▪ Press Enter.▪ In the tree on the left, find ESRI.ArcGIS.Geodatabase.ITable and select it, if
necessary.
Introduction to Programming ArcObjects Using the Microsoft .NET Framework
4-30 Copyright © 2001-2009 ESRI
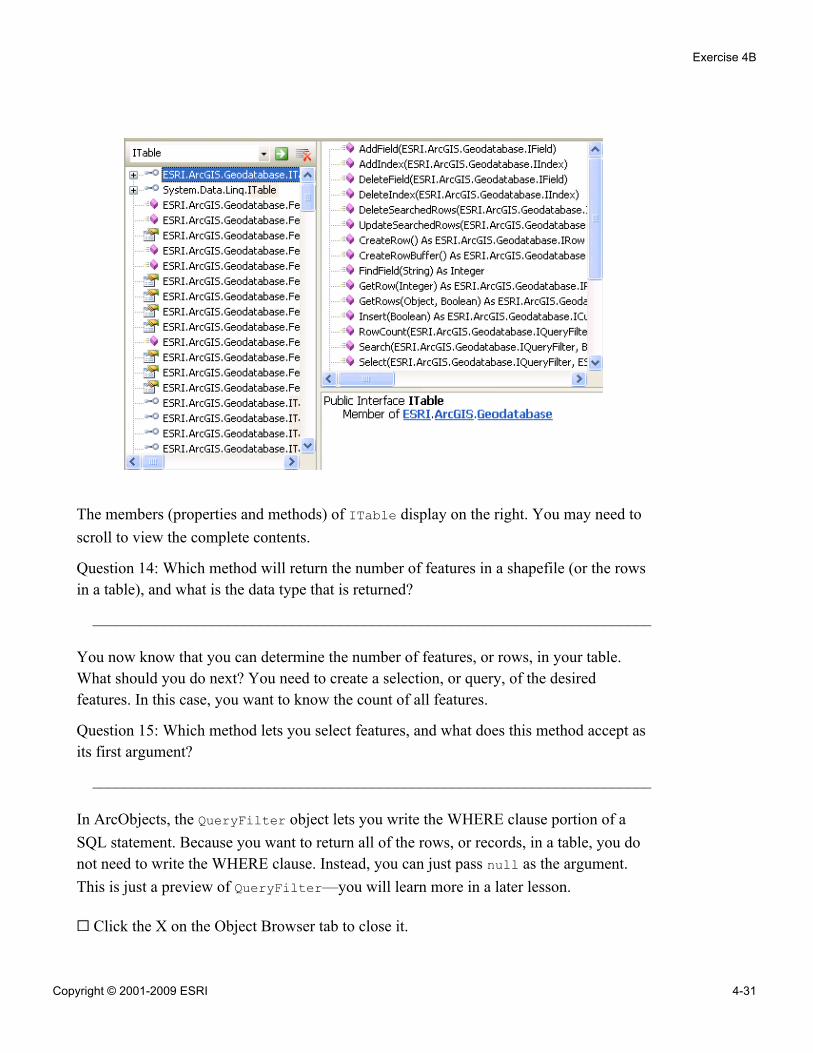
The members (properties and methods) of ITable display on the right. You may need toscroll to view the complete contents.
Question 14: Which method will return the number of features in a shapefile (or the rowsin a table), and what is the data type that is returned?
______________________________________________________________________
You now know that you can determine the number of features, or rows, in your table.What should you do next? You need to create a selection, or query, of the desiredfeatures. In this case, you want to know the count of all features.
Question 15: Which method lets you select features, and what does this method accept asits first argument?
______________________________________________________________________
In ArcObjects, the QueryFilter object lets you write the WHERE clause portion of aSQL statement. Because you want to return all of the rows, or records, in a table, you donot need to write the WHERE clause. Instead, you can just pass null as the argument.This is just a preview of QueryFilter—you will learn more in a later lesson.
Click the X on the Object Browser tab to close it.
Exercise 4B
Copyright © 2001-2009 ESRI 4-31
Your goal is to count the number of records in a shapefile's attribute table.
Complete the following code to declare the variable numRows as the appropriate datatype (place the code immediately after the comment):
________ numRows;
Return the number of rows (or features) in your shapefile and store the result innumRows.
numRows = tab.________________(null);
Make an additional modification to place your results in the text box on your form.
txtCount.________ = ________.ToString();
The code will populate your text box with the number of rows (or records or features) inyour shapefile. In addition, the code will convert the numeric value to a string.
Build your project.
Step 10: Run your project and check your results
In this step, you will run your project. Before you do, you will add license checking to it.
From the Project menu, choose Add ArcGIS License Checking.
In the ArcGIS License Initializer dialog box, do the following:
▪ Under Products, check the check box for ArcView.▪ Check the Shut down this application if any selected license(s) is not available
check box.▪ Click OK.
Question 16: Based on the license you have chosen, if you wanted to share yourapplication with another person, what software would need to be installed on thatperson's computer?
______________________________________________________________________
Now you are ready to run your project.
Return to your code and run your project.
Click your Count Features button to test your code.
Introduction to Programming ArcObjects Using the Microsoft .NET Framework
4-32 Copyright © 2001-2009 ESRI
Question 17: How many features are in your shapefile?
______________________________________________________________________
Close your application, then close Visual Studio.
Now you will preview the Cities shapefile in ArcCatalog to confirm your results.
Start ArcCatalog.
In the Catalog tree, browse to the \Student\IPAN\Database folder.
Click the Cities shapefile.
In the display area, click the Preview tab.
At the bottom of the tab, choose Table from the Preview drop-down list.
Question 18: How many records are in the table? Did your code return the correctnumber?
______________________________________________________________________
Close ArcCatalog.
Conclusion
In this exercise, you created a small application to count the number of features in ashapefile. To save time, you inserted a snippet into your application and then used thedeveloper resources to understand the code it contained. You learned how useful thedeveloper help is for searching classes, interfaces, methods, and properties to see what isavailable and which library they are located in, while OMDs allow you to easily viewrelationships between objects. You also explored the ArcGIS Resource Centers.
In future lessons, you will use the skills you developed here for searching the help systemand OMDs for casting between interfaces.
Exercise 4B
Copyright © 2001-2009 ESRI 4-33
Answers to Exercise 4B Questions
Question 1: How many interfaces does the sample use? What is the name of the coclass?
Answer: Four; ShapefileWorkspaceFactory
Question 2: What are the two methods?
Answer: OpenFromFile and OpenTable
Question 3: What is the relationship between Table and Dataset?
Answer: A Table is a type of Dataset.
Question 4: What is the relationship between the Table object and the Row object? Whatis the minimum number of Rows in a Table?
Answer: A Table is composed of Rows; 0
Question 5: Based on the symbology for the WorkspaceFactory objects, what is therelationship between a ShapefileWorkspaceFactory and a WorkspaceFactory?
Answer: ShapefileWorkspaceFactory is a type of WorkspaceFactory.
Question 6: What does ITable inherit from? What kind of inheritance is this?
Answer: IClass; interface inheritance
Question 7: Can a Workspace contain more than one Dataset?
Answer: Yes
Question 8: Which class can instantiate (or create) a Workspace?
Answer: WorkspaceFactory
Question 9: What does OpenFromFile return, and what does OpenTable return?
Answer: IWorkspace; ITable
Introduction to Programming ArcObjects Using the Microsoft .NET Framework
4-34 Copyright © 2001-2009 ESRI

Question 10: What are the variables returned by OpenFromFile and OpenTable? Are thevariables declared to the correct return data types?
Answer: ws and tab; yes
Question 11: What is the error that displays?
Answer: Type 'IWorkspaceFactory' could not be found
Question 12: Which library contains the IWorkspaceFactory interface?
Answer: ESRI.ArcGIS.GeoDatabase
Question 13: Which of the objects seems to have the most potential for giving you thenumber of features in your shapefile? (Hint: It contains the attributes.)
Answer: tab (or ITable)
Question 14: Which method will return the number of features in a shapefile (or the rowsin a table), and what is the data type that is returned?
Answer: RowCount, int
Question 15: Which method lets you select features, and what does this method accept asits first argument?
Answer: Select, IQueryFilter
Question 16: Based on the license you have chosen, if you wanted to share yourapplication with another person, what software would need to be installed on thatperson's computer?
Answer: ArcGIS Desktop
Question 17: How many features are in your shapefile?
Answer: 606
Question 18: How many records are in the table? Did your code return the correctnumber?
Answer: 606; yes
Exercise 4B
Copyright © 2001-2009 ESRI 4-35
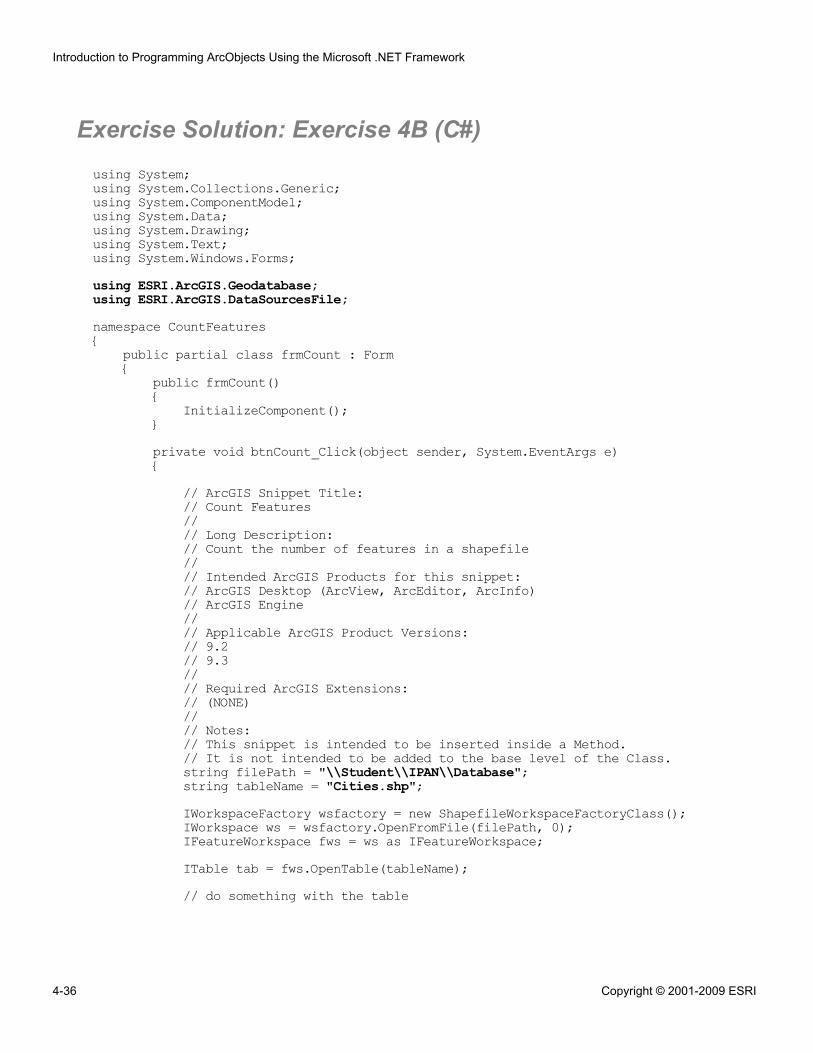
Exercise Solution: Exercise 4B (C#)using System;using System.Collections.Generic;using System.ComponentModel;using System.Data;using System.Drawing;using System.Text;using System.Windows.Forms;using ESRI.ArcGIS.Geodatabase;using ESRI.ArcGIS.DataSourcesFile;namespace CountFeatures{
public partial class frmCount : Form{
public frmCount(){
InitializeComponent();}private void btnCount_Click(object sender, System.EventArgs e){
// ArcGIS Snippet Title:// Count Features//// Long Description:// Count the number of features in a shapefile//// Intended ArcGIS Products for this snippet:// ArcGIS Desktop (ArcView, ArcEditor, ArcInfo)// ArcGIS Engine//// Applicable ArcGIS Product Versions:// 9.2// 9.3//// Required ArcGIS Extensions:// (NONE)//// Notes:// This snippet is intended to be inserted inside a Method.// It is not intended to be added to the base level of the Class.string filePath = "\\Student\\IPAN\\Database";string tableName = "Cities.shp";IWorkspaceFactory wsfactory = new ShapefileWorkspaceFactoryClass();IWorkspace ws = wsfactory.OpenFromFile(filePath, 0);IFeatureWorkspace fws = ws as IFeatureWorkspace;ITable tab = fws.OpenTable(tableName);// do something with the table
Introduction to Programming ArcObjects Using the Microsoft .NET Framework
4-36 Copyright © 2001-2009 ESRI

long numRows;numRows = tab.RowCount(null);txtCount.Text = numRows.ToString();
}}
}
Exercise 4B
Copyright © 2001-2009 ESRI 4-37

5Working with maps
and layers
Exercise 5A: Work with maps and layers(VB.NET)Estimated time: 45 minutes
Exercise 5B: Work with maps and layers(C#)Estimated time: 45 minutes

Exercise 5A: Work with maps and layers (VB.NET)
Estimated time: 45 minutes
As an ArcObjects programmer, there are several ways you can access maps in adocument. In this exercise, you will work with maps and layers and learn more abouthandling events.
Remember that what you define as a map in ArcObjects is referred to as a data frame inthe ArcMap interface. A map is simply a collection of layers. Different maps in the samedocument can have a different set of layers, can represent various extents, and can evenhave different spatial references (projections, map units, and so on).
In this exercise, you will:
▪ Display map and layer properties in a custom form▪ Work with layer properties▪ Work with map events
Exercise shortcut1. In Visual Studio, open the MapsAndLayers.sln solution from the
\Student\IPAN\Exercise05\VisualBasic folder.
2. Load a map document programmatically and access the collection of maps foundin the map document.
3. Programmatically allow the user to browse to the desired map and add each map'sname to the list box.
4. Access the layers in your map and add each layer's name to the list box.
** (Optional) Respond to MapControl events to copy the map to aPageLayoutControl.
** (Optional) Distinguish between feature layers and raster layers in your mapdocument.
Step 1: Open an existing project in Visual Studio
You will begin this exercise by opening an existing project that has been created for you.
Exercise 5A
Copyright © 2001-2009 ESRI 5-1
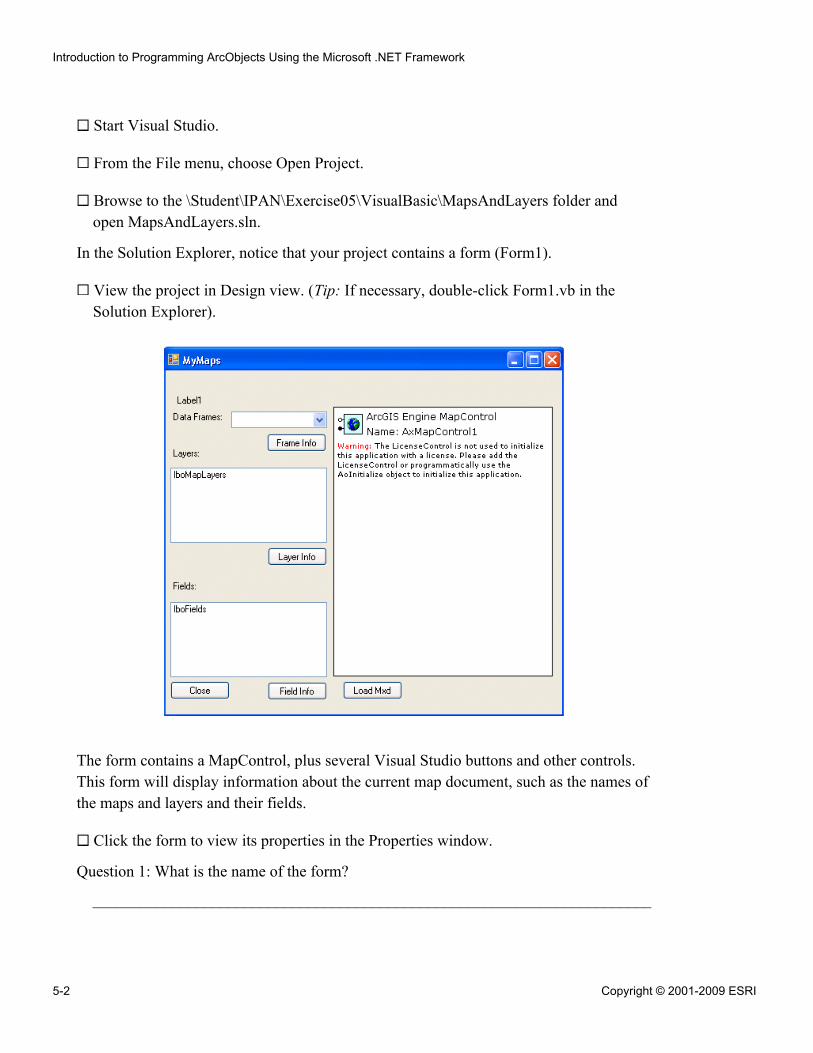
Start Visual Studio.
From the File menu, choose Open Project.
Browse to the \Student\IPAN\Exercise05\VisualBasic\MapsAndLayers folder andopen MapsAndLayers.sln.
In the Solution Explorer, notice that your project contains a form (Form1).
View the project in Design view. (Tip: If necessary, double-click Form1.vb in theSolution Explorer).
The form contains a MapControl, plus several Visual Studio buttons and other controls.This form will display information about the current map document, such as the names ofthe maps and layers and their fields.
Click the form to view its properties in the Properties window.
Question 1: What is the name of the form?
______________________________________________________________________
Introduction to Programming ArcObjects Using the Microsoft .NET Framework
5-2 Copyright © 2001-2009 ESRI
At the top of the form, click the combo box and view its (Name) property in theProperties window.
You will use this combo box, cboMaps, to display a list of the names of the data frames(maps) contained in a map document.
Question 2: What type of control are lboMapLayers and lboFields? What type of itemscan be stored in them?
______________________________________________________________________
You will use the lboMapLayers control to display a list of layers contained in the dataframe that are selected in the combo box.
Step 2: Load a map document programmatically
In a previous exercise, you used the properties of the MapControl to load a mapdocument and choose a map to display. That is one way to add a map. Another way is toadd the map document programmatically, and then allow the user to browse to thedesired map.
Your first step is to access the collection of maps found in the map document. You willthen populate the cboMaps combo box with the names of the maps.
The map document you will load contains three data frames, each of which containsmany layers. This reinforces the OMD relationships; a document is composed of manymaps and a map is composed of many layers.
Using the developer resource of your choice, find the members on the MapControlobject.
Question 3: Which interface is returned by the Map property?
______________________________________________________________________
In the Toolbox window, drag an OpenFileDialog control from the Dialogs group ontoyour form and place it anywhere you like.
Note: If you cannot access the Toolbox window, make sure you are in Design view .
Now you will access the dialog box from a button.
Double-click your Load Mxd button to open its Click event.
Exercise 5A
Copyright © 2001-2009 ESRI 5-3
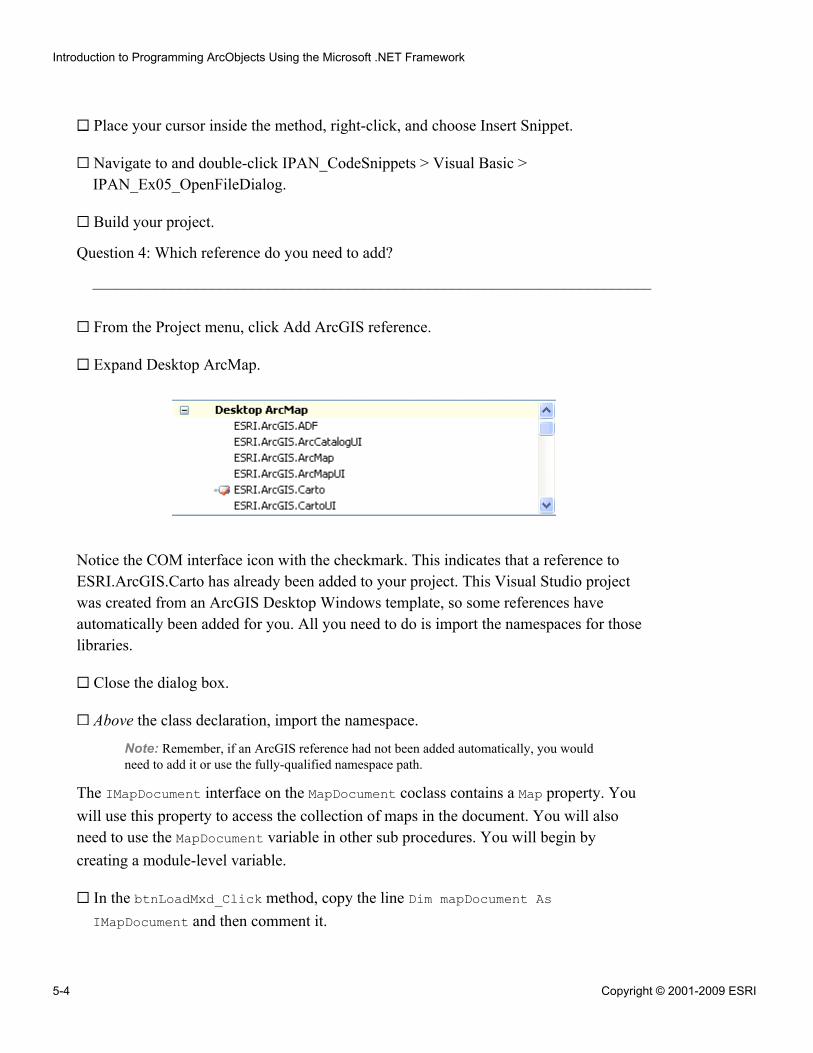
Place your cursor inside the method, right-click, and choose Insert Snippet.
Navigate to and double-click IPAN_CodeSnippets > Visual Basic >IPAN_Ex05_OpenFileDialog.
Build your project.
Question 4: Which reference do you need to add?
______________________________________________________________________
From the Project menu, click Add ArcGIS reference.
Expand Desktop ArcMap.
Notice the COM interface icon with the checkmark. This indicates that a reference toESRI.ArcGIS.Carto has already been added to your project. This Visual Studio projectwas created from an ArcGIS Desktop Windows template, so some references haveautomatically been added for you. All you need to do is import the namespaces for thoselibraries.
Close the dialog box.
Above the class declaration, import the namespace.
Note: Remember, if an ArcGIS reference had not been added automatically, you wouldneed to add it or use the fully-qualified namespace path.
The IMapDocument interface on the MapDocument coclass contains a Map property. Youwill use this property to access the collection of maps in the document. You will alsoneed to use the MapDocument variable in other sub procedures. You will begin bycreating a module-level variable.
In the btnLoadMxd_Click method, copy the line Dim mapDocument AsIMapDocument and then comment it.
Introduction to Programming ArcObjects Using the Microsoft .NET Framework
5-4 Copyright © 2001-2009 ESRI
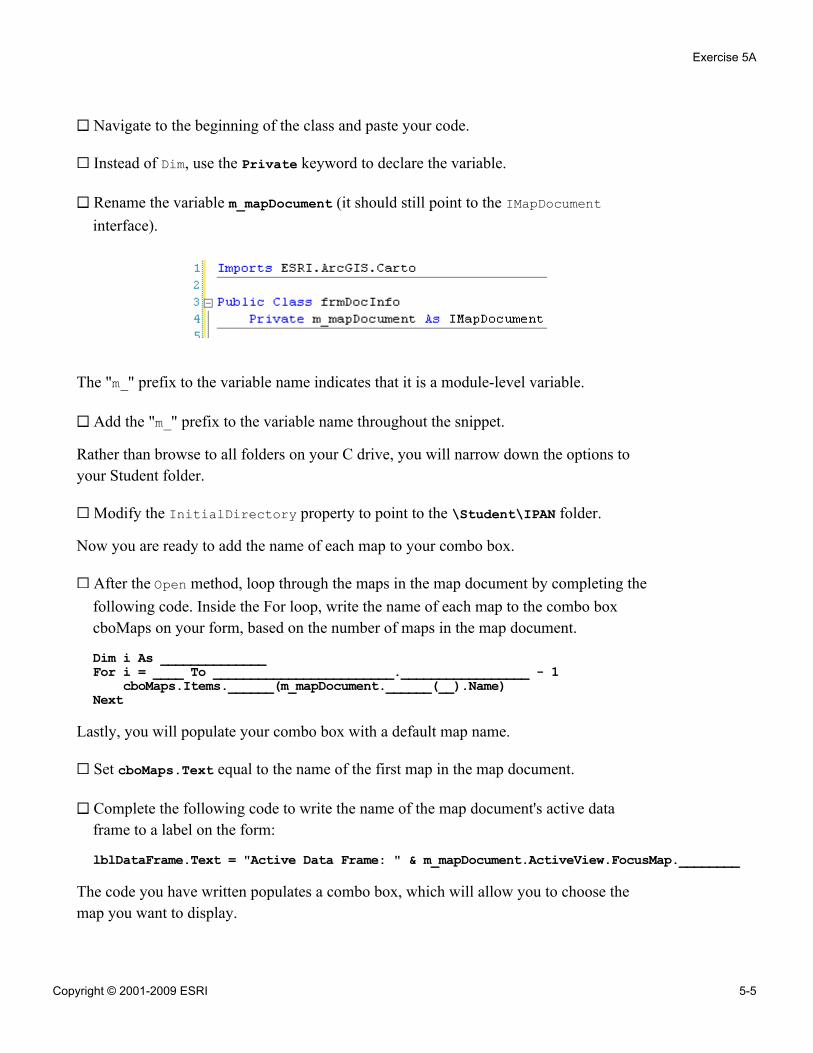
Navigate to the beginning of the class and paste your code.
Instead of Dim, use the Private keyword to declare the variable.
Rename the variable m_mapDocument (it should still point to the IMapDocumentinterface).
The "m_" prefix to the variable name indicates that it is a module-level variable.
Add the "m_" prefix to the variable name throughout the snippet.
Rather than browse to all folders on your C drive, you will narrow down the options toyour Student folder.
Modify the InitialDirectory property to point to the \Student\IPAN folder.
Now you are ready to add the name of each map to your combo box.
After the Open method, loop through the maps in the map document by completing thefollowing code. Inside the For loop, write the name of each map to the combo boxcboMaps on your form, based on the number of maps in the map document.
Dim i As ______________For i = ____ To ________________________._________________ - 1
cboMaps.Items.______(m_mapDocument.______(__).Name)Next
Lastly, you will populate your combo box with a default map name.
Set cboMaps.Text equal to the name of the first map in the map document.
Complete the following code to write the name of the map document's active dataframe to a label on the form:
lblDataFrame.Text = "Active Data Frame: " & m_mapDocument.ActiveView.FocusMap.________
The code you have written populates a combo box, which will allow you to choose themap you want to display.
Exercise 5A
Copyright © 2001-2009 ESRI 5-5
Step 3: Test your project
You will now test your code.
Build and run your project.
A license error message displays.
Click OK on the error message, then close your application.
From the Project menu, choose Add ArcGIS License Checking.
In the ArcGIS License Initializer dialog box, do the following:
▪ Under Products, check the check box for ArcView.▪ Check the Shut down this application if any selected license(s) is not available
check box.▪ Click OK.
Run your project again.
Click the Load Mxd button.
Browse to your \Student\IPAN\Exercise05 folder and open MapsAndLayers.mxd.
Question 5: What is the name of the active data frame in the map document?
______________________________________________________________________
Although you have added the map document, notice that the map in the MapControl iscurrently empty. In a previous exercise, you specified a map in the MapControl'sProperties dialog box. In the next step, you will replicate that process by writing code toselect a map from the combo box.
Close your application.
Step 4: Access the layers in a map
When accessing a map from a maps collection, you do not refer to it by its name. Instead,you use its index number, which represents the position of the map in the collection).When you want to find a particular map according to its name, you can use an Ifstatement inside a looping structure. You will begin that process by declaring somemodule-level variables.
Introduction to Programming ArcObjects Using the Microsoft .NET Framework
5-6 Copyright © 2001-2009 ESRI
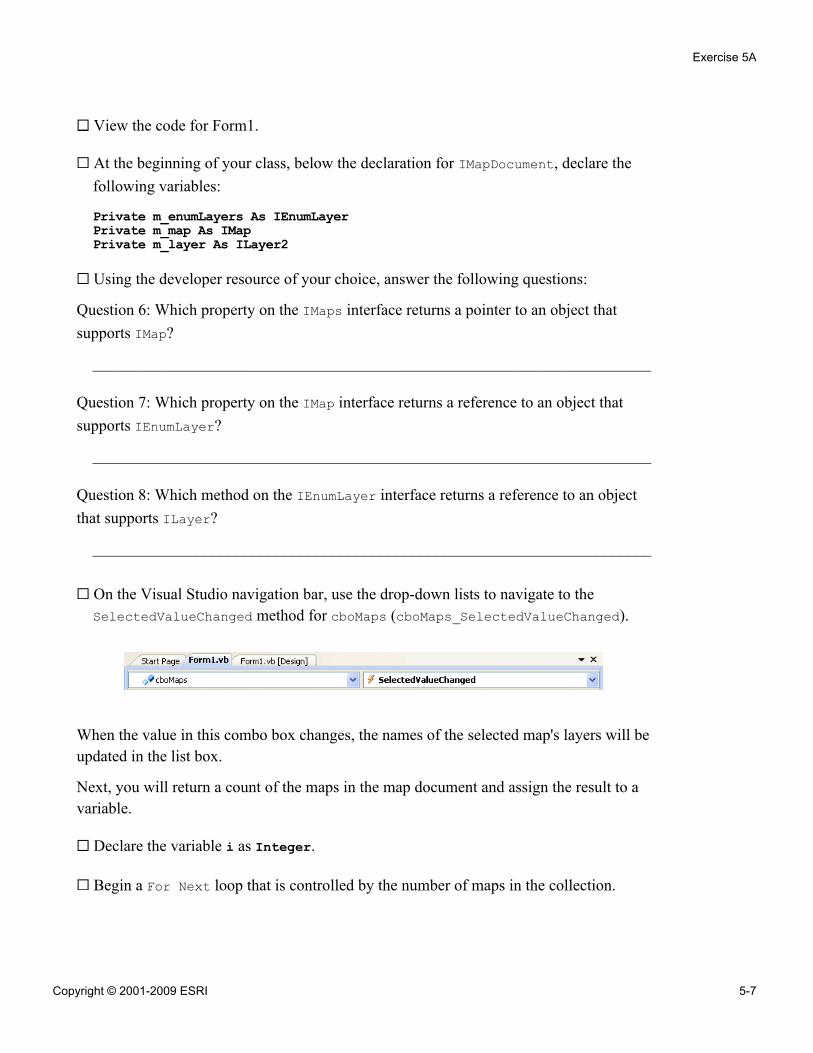
View the code for Form1.
At the beginning of your class, below the declaration for IMapDocument, declare thefollowing variables:
Private m_enumLayers As IEnumLayerPrivate m_map As IMapPrivate m_layer As ILayer2
Using the developer resource of your choice, answer the following questions:
Question 6: Which property on the IMaps interface returns a pointer to an object thatsupports IMap?
______________________________________________________________________
Question 7: Which property on the IMap interface returns a reference to an object thatsupports IEnumLayer?
______________________________________________________________________
Question 8: Which method on the IEnumLayer interface returns a reference to an objectthat supports ILayer?
______________________________________________________________________
On the Visual Studio navigation bar, use the drop-down lists to navigate to theSelectedValueChanged method for cboMaps (cboMaps_SelectedValueChanged).
When the value in this combo box changes, the names of the selected map's layers will beupdated in the list box.
Next, you will return a count of the maps in the map document and assign the result to avariable.
Declare the variable i as Integer.
Begin a For Next loop that is controlled by the number of maps in the collection.
Exercise 5A
Copyright © 2001-2009 ESRI 5-7
You will loop through all the maps in the map document until you find the one whosename matches the one selected in the combo box.
Inside the loop, write the following code to provide the logic for finding the chosenmap and adding it to your MapControl:
m_map = m_mapDocument.______(i) ' Pull a map from the collectionIf m_map.____ = cboMaps.SelectedItem() Then ' Is this the chosen map?
axMapControl1.______ = m_mapExit For ' Exits the loop once the map is found
End IfNote: From this point forward, the code may contain comments to help you understandit. Although it is not required, if you want to type them, remember to begin commentswith a quotation mark and surround text strings with double quotation marks.
Now that you have found the specified map, you will write another loop to add the nameof each layer in the map to a list box.
After the For Next loop, initialize m_enumLayers with all the layers in the chosenmap by completing the following code:
m_enumLayers = m_map.____________ ' Not just one layer!
Complete the following code to initialize the layer variable by pulling the first layerout of the enumLayers enumeration:
m_layer = m_enumLayers.________()
Remember that there are two kinds of looping structures:
▪ A For Next loop (like you just wrote) is useful if you know how many times toloop.
▪ The loop you need to write now uses syntax to loop based on a condition.
Complete the following loop to write the name of each layer to the lboMapLayers listbox:
Do __________ m_layer Is NothinglboMapLayers.Items.Add(m_layer.________)m_layer = m_enumLayers.Next()
Loop
Run the project to test your code.
Introduction to Programming ArcObjects Using the Microsoft .NET Framework
5-8 Copyright © 2001-2009 ESRI
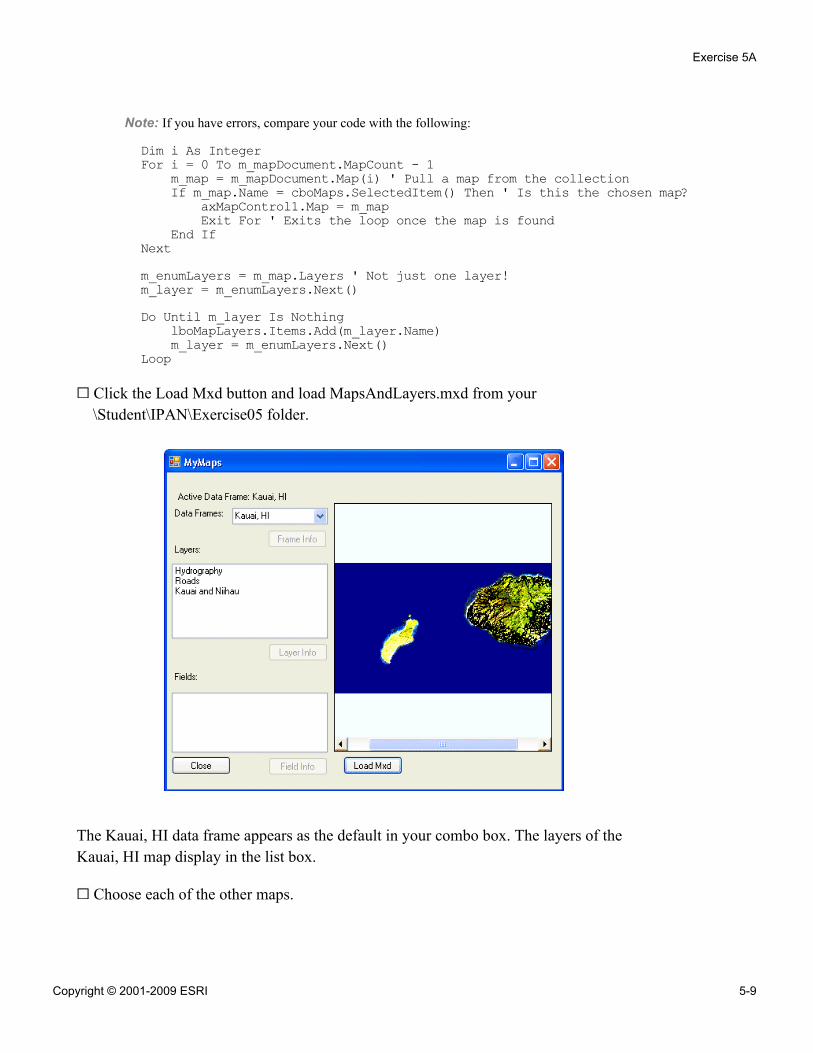
Note: If you have errors, compare your code with the following:
Dim i As IntegerFor i = 0 To m_mapDocument.MapCount - 1
m_map = m_mapDocument.Map(i) ' Pull a map from the collectionIf m_map.Name = cboMaps.SelectedItem() Then ' Is this the chosen map?
axMapControl1.Map = m_mapExit For ' Exits the loop once the map is found
End IfNextm_enumLayers = m_map.Layers ' Not just one layer!m_layer = m_enumLayers.Next()Do Until m_layer Is Nothing
lboMapLayers.Items.Add(m_layer.Name)m_layer = m_enumLayers.Next()
Loop
Click the Load Mxd button and load MapsAndLayers.mxd from your\Student\IPAN\Exercise05 folder.
The Kauai, HI data frame appears as the default in your combo box. The layers of theKauai, HI map display in the list box.
Choose each of the other maps.
Exercise 5A
Copyright © 2001-2009 ESRI 5-9

In the list box, notice that the layers for each map that you choose are added to the end ofthe list of layers for the previously chosen map. You will take care of this next.
Close your application.
Add the following code to the top of the cboMaps_SelectedValueChanged method toremove any existing text items from the lboMapLayers list box before new items areadded:
lboMapLayers.Items.Clear()
Next, write the following single line of code to enable the Frame Info button when amap name is chosen in the combo box:
btnFrameInfo.Enabled = cboMaps.Text <> ""Note: The button will be disabled until a map name is chosen.
Write a line of code to enable the Layer Info button once a map name is chosen.
Navigate to the Click event of the btnFrameInfo and expand it, if necessary.
Uncomment the code.
Navigate to the Click event of the btnLayerInfo and uncomment the code.
Run your project.
In your application, load MapsAndLayers.mxd.
Choose a data frame, then click your Frame Info button to test it.
Click OK on the message box.
From the Data Frames combo box, choose each of the maps to make sure that the listbox is cleared properly and that the buttons are enabled when the corresponding listbox has been populated.
You now know how to loop through each map in the document, as well as through eachlayer in a map.
Close your application.
Introduction to Programming ArcObjects Using the Microsoft .NET Framework
5-10 Copyright © 2001-2009 ESRI
You have finished this exercise, however, you may wish to complete the optional steps:
▪ Step 5 shows you how to create a layout whenever you choose a new map.▪ Step 6 shows you how to distinguish feature layers from raster layers.
If you want to complete the optional steps, do so now. Otherwise, close Visual Studio.
Step 5: (Optional) Respond to MapControl events
In this optional step, you will respond to an event on the MapControl and copy the map toa PageLayoutControl. You will begin by adding a PageLayoutControl to your form.
View your form in Design view.
In the Toolbox window, drag a PageLayoutControl from the ArcGIS Windows Formsgroup onto your form and place it anywhere you like.
If necessary, resize your form and/or controls.
Note: The controls can be small and even overlap.
In the Solution Explorer, click the View Code button to switch to code view.
On the Visual Studio navigation bar, do the following:
▪ In the Class Name drop-down list, choose AxMapControl1.▪ Open the Method Name drop-down list.
You see a long list of the events on the MapControl. You can customize your project bywriting code to respond to any of these events.
Choose the OnMapReplaced event in the list.
Insert the IPAN_Ex05_CopyMapToLayout code snippet. (Hint: Right-click > InsertSnippet.)
Review the code and add any necessary references to your project.
Note that the code responds to an event that occurs automatically whenever a new map isadded.
Before the code that copies the map, clear the active view of the page layout.
Run your project.
Exercise 5A
Copyright © 2001-2009 ESRI 5-11
Load MapsAndLayers.mxd and display a map.
Notice that the map now displays in the PageLayoutControl.
To synchronize the MapControl's focus map with the PageLayoutControl so that theyboth display the same map data, you would need to write more code; however, this topicis outside the scope of this course.
Note: For sample code that illustrates how to synchronize the PageLayoutControl withthe MapControl, refer to C:\ProgramFiles\ArcGIS\DeveloperKit\SamplesNET\Engine\MapAndPageLayoutSynchApp.
Close your application.
To learn how to distinguish feature layers from raster layers, continue on to the nextstep. Otherwise, close Visual Studio.
Step 6: (Optional) Distinguish between feature and raster layers
In this optional step, you will determine whether the layers in your map document arefeature or raster layers.
Make sure you are in code view .
On the Visual Studio navigation bar, use the drop-down lists to navigate to theSelectedValueChanged method for the lboMapLayers list box(lboMapLayers_SelectedValueChanged).
In the same way that you previously cleared the contents of lboMapLayers, clear theitems from the lboFields list box.
Now you will write a looping routine to find the layer chosen in the lboMapLayers listbox.
Complete the following loop to locate the selected layer. (Tip: Because most variablesused earlier were declared as module-level, you can use them here.)
m_enumLayers.__________ ' Move the enum pointer above the first layerm_layer = m_enumLayers.________ ' Return the first layer from the enumeration____ __________ m_layer ____ Nothing ' Begin the conditional loop
If m_layer.Name = lboMapLayers.Text Then ' Check whether this is the layerExit ____ ' If the layer is found, exit the loop (but not the Sub)
End Ifm_layer = ____________________.________ ' Return another layer
Loop ' End the loop
Introduction to Programming ArcObjects Using the Microsoft .NET Framework
5-12 Copyright © 2001-2009 ESRI
After the loop finishes, m_layer will be set to the layer selected in the list box.
Next, you will test the type of layer that is selected. You will use the TypeOf structure todetermine which interfaces an object variable supports.
Complete the following code to determine whether the selected layer (m_layer) is atype of feature layer. If it is not, write "Not a feature layer" in the lboFields listbox.
If Not ____________ m_layer Is IFeatureLayer2 ________'Does it support this interface?lboFields.__________.______("Not a feature layer")Exit Sub ' Stop executing the procedure
End If
Because the loop exits the sub procedure if the chosen layer does not support theIFeatureLayer interface, the remainder of your code can assume that a feature layer waschosen in the list box.
Below the If statement, enter the following code to enable the Field Info button:
btnFieldInfo.Enabled = lboMapLayers.Text <> ""
Navigate to the top of the lboMapLayers_SelectedValueChanged event and enter thefollowing code:
btnLayerInfo.Enabled = lboMapLayers.Text <> ""
Run your project and test your changes.
One by one, choose each map to answer the following question.
Question 9: Which layer is not a feature layer?
______________________________________________________________________
Now that you can programmatically distinguish between feature layers and raster layers,your next step might be to populate the Fields list box. You will learn how to accessfields in a later lesson.
Close your application, then close Visual Studio.
Exercise 5A
Copyright © 2001-2009 ESRI 5-13
Conclusion
In this exercise, you programmatically loaded an existing map document into an ArcGISEngine MapControl. You created your own "table of contents" by using properties on themap document to access the maps, or data frames, that it contained, as well as the layersin each map.
If you completed the optional steps, you responded to the associated map event bypopulating a page layout whenever the map changed, and distinguished feature layersfrom raster layers. You also learned how to access GIS data programmatically—evenwithout a visual table of contents.
Introduction to Programming ArcObjects Using the Microsoft .NET Framework
5-14 Copyright © 2001-2009 ESRI

Answers to Exercise 5A Questions
Question 1: What is the name of the form?
Answer: frmDocInfo
Question 2: What type of control are lboMapLayers and lboFields? What type of itemscan be stored in them?
Answer: ListBox; a collection of strings
Question 3: Which interface is returned by the Map property?
Answer: IMap
Question 4: Which reference do you need to add?
Answer: ESRI.ArcGIS.Carto
Question 5: What is the name of the active data frame in the map document?
Answer: Kauai, HI
Question 6: Which property on the IMaps interface returns a pointer to an object thatsupports IMap?
Answer: Item
Question 7: Which property on the IMap interface returns a reference to an object thatsupports IEnumLayer?
Answer: Layers
Question 8: Which method on the IEnumLayer interface returns a reference to an objectthat supports ILayer?
Answer: Next
Question 9: Which layer is not a feature layer?
Answer: The Kauai and Nihau layer in the Kauai, HI map
Exercise 5A
Copyright © 2001-2009 ESRI 5-15
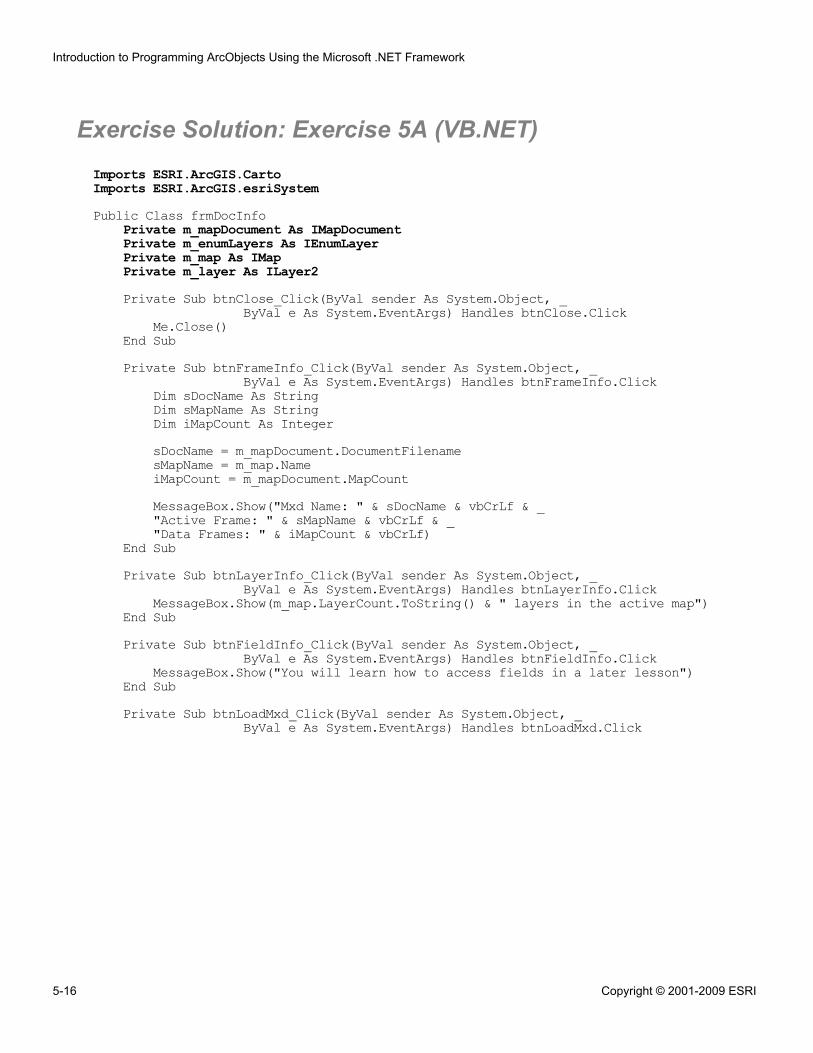
Exercise Solution: Exercise 5A (VB.NET)Imports ESRI.ArcGIS.CartoImports ESRI.ArcGIS.esriSystemPublic Class frmDocInfo
Private m_mapDocument As IMapDocumentPrivate m_enumLayers As IEnumLayerPrivate m_map As IMapPrivate m_layer As ILayer2Private Sub btnClose_Click(ByVal sender As System.Object, _
ByVal e As System.EventArgs) Handles btnClose.ClickMe.Close()
End SubPrivate Sub btnFrameInfo_Click(ByVal sender As System.Object, _
ByVal e As System.EventArgs) Handles btnFrameInfo.ClickDim sDocName As StringDim sMapName As StringDim iMapCount As IntegersDocName = m_mapDocument.DocumentFilenamesMapName = m_map.NameiMapCount = m_mapDocument.MapCountMessageBox.Show("Mxd Name: " & sDocName & vbCrLf & _"Active Frame: " & sMapName & vbCrLf & _"Data Frames: " & iMapCount & vbCrLf)
End SubPrivate Sub btnLayerInfo_Click(ByVal sender As System.Object, _
ByVal e As System.EventArgs) Handles btnLayerInfo.ClickMessageBox.Show(m_map.LayerCount.ToString() & " layers in the active map")
End SubPrivate Sub btnFieldInfo_Click(ByVal sender As System.Object, _
ByVal e As System.EventArgs) Handles btnFieldInfo.ClickMessageBox.Show("You will learn how to access fields in a later lesson")
End SubPrivate Sub btnLoadMxd_Click(ByVal sender As System.Object, _
ByVal e As System.EventArgs) Handles btnLoadMxd.Click
Introduction to Programming ArcObjects Using the Microsoft .NET Framework
5-16 Copyright © 2001-2009 ESRI
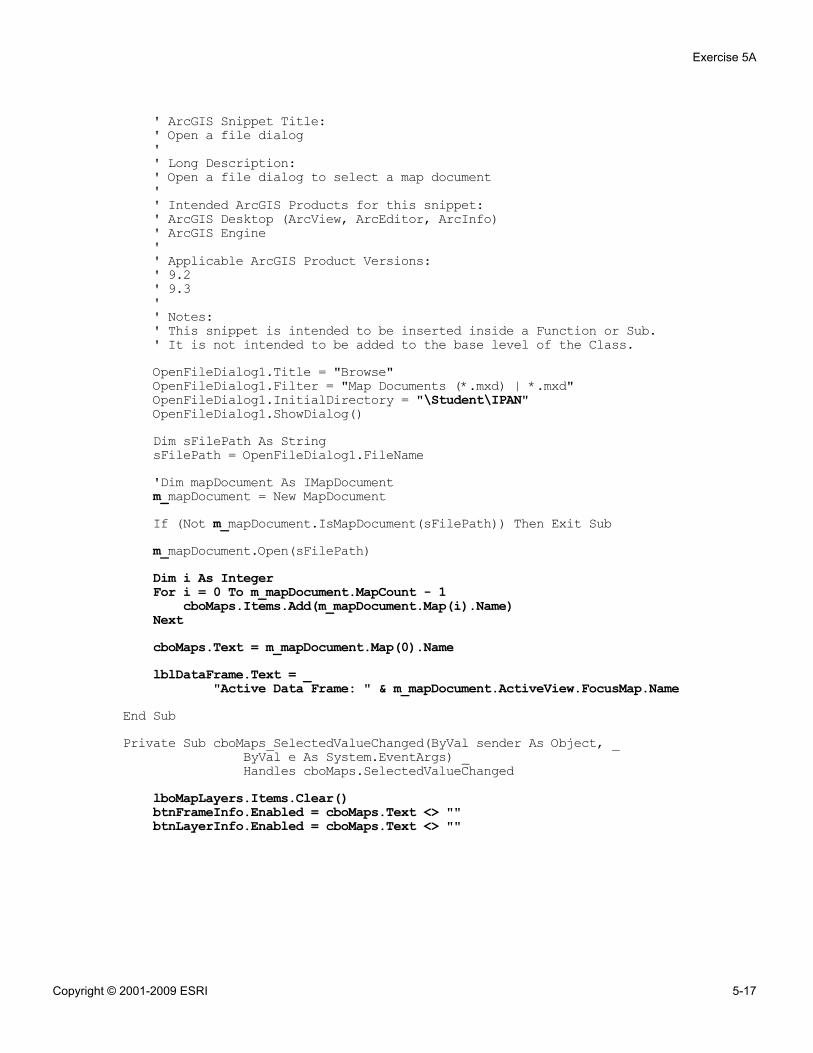
' ArcGIS Snippet Title:' Open a file dialog'' Long Description:' Open a file dialog to select a map document'' Intended ArcGIS Products for this snippet:' ArcGIS Desktop (ArcView, ArcEditor, ArcInfo)' ArcGIS Engine'' Applicable ArcGIS Product Versions:' 9.2' 9.3'' Notes:' This snippet is intended to be inserted inside a Function or Sub.' It is not intended to be added to the base level of the Class.OpenFileDialog1.Title = "Browse"OpenFileDialog1.Filter = "Map Documents (*.mxd) | *.mxd"OpenFileDialog1.InitialDirectory = "\Student\IPAN"OpenFileDialog1.ShowDialog()Dim sFilePath As StringsFilePath = OpenFileDialog1.FileName'Dim mapDocument As IMapDocumentm_mapDocument = New MapDocumentIf (Not m_mapDocument.IsMapDocument(sFilePath)) Then Exit Subm_mapDocument.Open(sFilePath)Dim i As IntegerFor i = 0 To m_mapDocument.MapCount - 1
cboMaps.Items.Add(m_mapDocument.Map(i).Name)NextcboMaps.Text = m_mapDocument.Map(0).NamelblDataFrame.Text = _
"Active Data Frame: " & m_mapDocument.ActiveView.FocusMap.NameEnd SubPrivate Sub cboMaps_SelectedValueChanged(ByVal sender As Object, _
ByVal e As System.EventArgs) _Handles cboMaps.SelectedValueChanged
lboMapLayers.Items.Clear()btnFrameInfo.Enabled = cboMaps.Text <> ""btnLayerInfo.Enabled = cboMaps.Text <> ""
Exercise 5A
Copyright © 2001-2009 ESRI 5-17
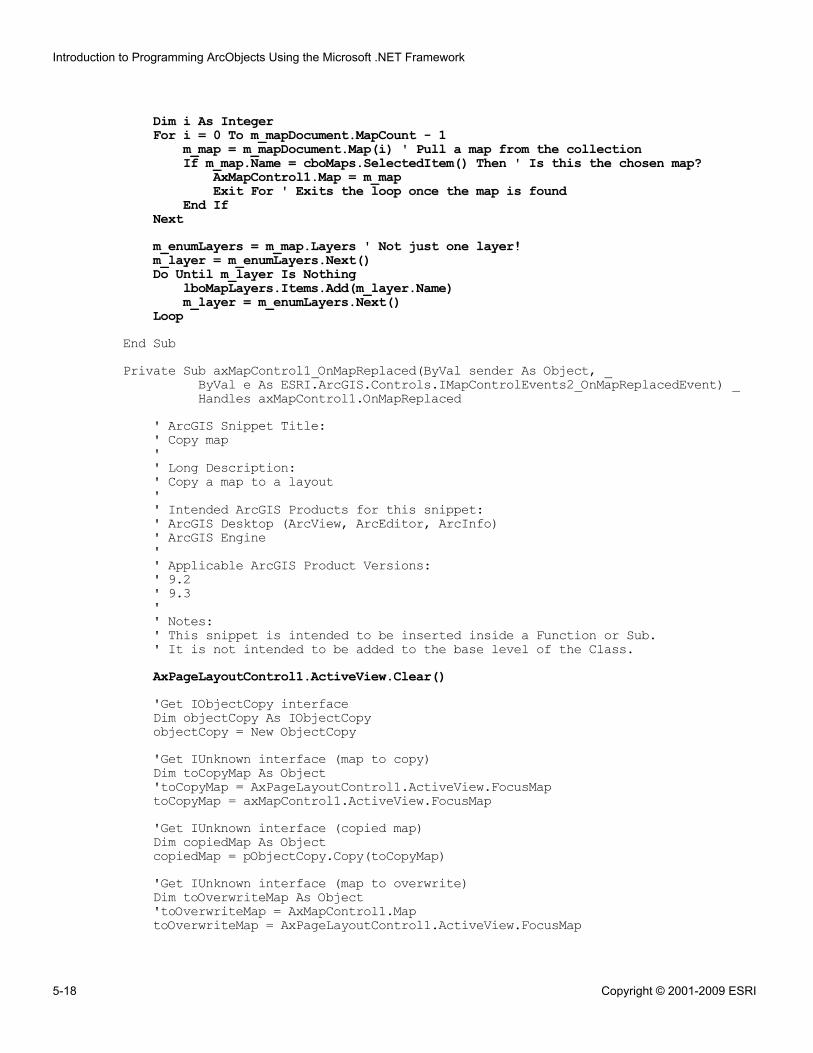
Dim i As IntegerFor i = 0 To m_mapDocument.MapCount - 1
m_map = m_mapDocument.Map(i) ' Pull a map from the collectionIf m_map.Name = cboMaps.SelectedItem() Then ' Is this the chosen map?
AxMapControl1.Map = m_mapExit For ' Exits the loop once the map is found
End IfNextm_enumLayers = m_map.Layers ' Not just one layer!m_layer = m_enumLayers.Next()Do Until m_layer Is Nothing
lboMapLayers.Items.Add(m_layer.Name)m_layer = m_enumLayers.Next()
LoopEnd SubPrivate Sub axMapControl1_OnMapReplaced(ByVal sender As Object, _
ByVal e As ESRI.ArcGIS.Controls.IMapControlEvents2_OnMapReplacedEvent) _Handles axMapControl1.OnMapReplaced
' ArcGIS Snippet Title:' Copy map'' Long Description:' Copy a map to a layout'' Intended ArcGIS Products for this snippet:' ArcGIS Desktop (ArcView, ArcEditor, ArcInfo)' ArcGIS Engine'' Applicable ArcGIS Product Versions:' 9.2' 9.3'' Notes:' This snippet is intended to be inserted inside a Function or Sub.' It is not intended to be added to the base level of the Class.AxPageLayoutControl1.ActiveView.Clear()'Get IObjectCopy interfaceDim objectCopy As IObjectCopyobjectCopy = New ObjectCopy'Get IUnknown interface (map to copy)Dim toCopyMap As Object'toCopyMap = AxPageLayoutControl1.ActiveView.FocusMaptoCopyMap = axMapControl1.ActiveView.FocusMap'Get IUnknown interface (copied map)Dim copiedMap As ObjectcopiedMap = pObjectCopy.Copy(toCopyMap)'Get IUnknown interface (map to overwrite)Dim toOverwriteMap As Object'toOverwriteMap = AxMapControl1.MaptoOverwriteMap = AxPageLayoutControl1.ActiveView.FocusMap
Introduction to Programming ArcObjects Using the Microsoft .NET Framework
5-18 Copyright © 2001-2009 ESRI
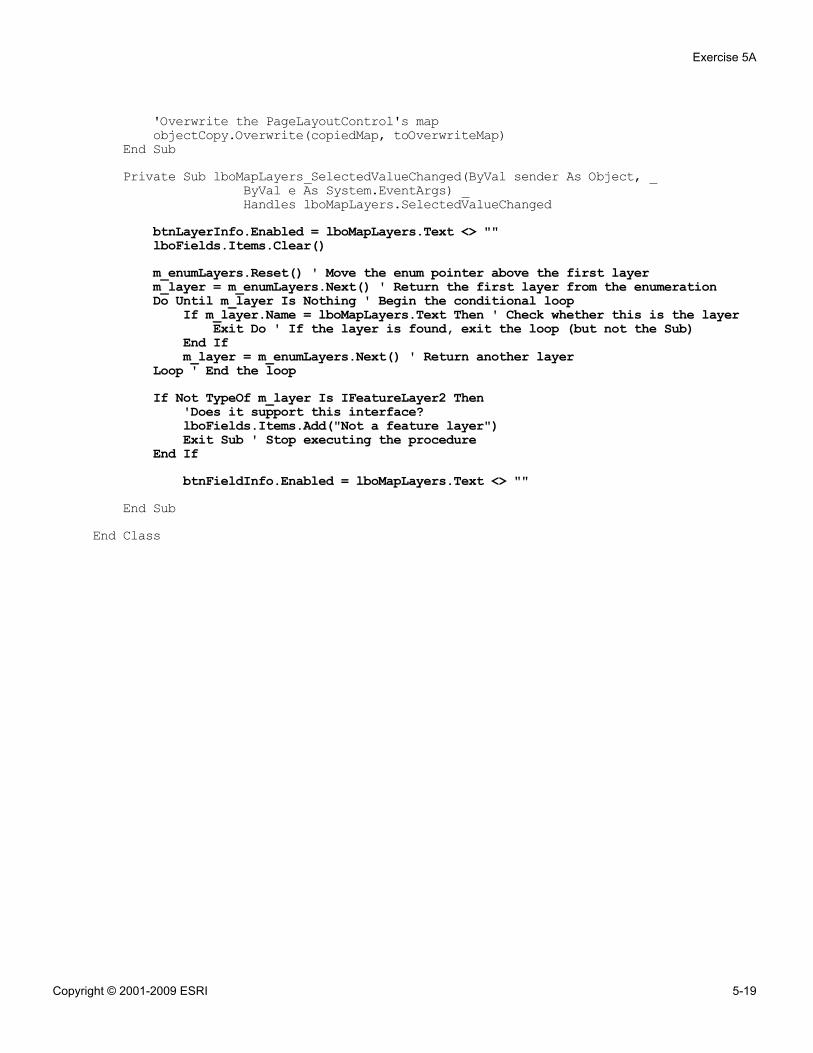
'Overwrite the PageLayoutControl's mapobjectCopy.Overwrite(copiedMap, toOverwriteMap)
End SubPrivate Sub lboMapLayers_SelectedValueChanged(ByVal sender As Object, _
ByVal e As System.EventArgs) _Handles lboMapLayers.SelectedValueChanged
btnLayerInfo.Enabled = lboMapLayers.Text <> ""lboFields.Items.Clear()m_enumLayers.Reset() ' Move the enum pointer above the first layerm_layer = m_enumLayers.Next() ' Return the first layer from the enumerationDo Until m_layer Is Nothing ' Begin the conditional loop
If m_layer.Name = lboMapLayers.Text Then ' Check whether this is the layerExit Do ' If the layer is found, exit the loop (but not the Sub)
End Ifm_layer = m_enumLayers.Next() ' Return another layer
Loop ' End the loopIf Not TypeOf m_layer Is IFeatureLayer2 Then
'Does it support this interface?lboFields.Items.Add("Not a feature layer")Exit Sub ' Stop executing the procedure
End IfbtnFieldInfo.Enabled = lboMapLayers.Text <> ""
End SubEnd Class
Exercise 5A
Copyright © 2001-2009 ESRI 5-19


Exercise 5B: Work with maps and layers (C#)
Estimated time: 45 minutes
As an ArcObjects programmer, there are several ways you can access maps in adocument. In this exercise, you will work with maps and layers and learn more abouthandling events.
Remember that what you define as a map in ArcObjects is referred to as a data frame inthe ArcMap interface. A map is simply a collection of layers. Different maps in the samedocument can have a different set of layers, can represent various extents, and can evenhave different spatial references (projections, map units, and so on).
In this exercise, you will:
▪ Display map and layer properties in a custom form▪ Work with layer properties▪ Work with map events
Exercise shortcut1. In Visual Studio, open the MapsAndLayers.sln solution from the
\Student\IPAN\Exercise05\CSharp folder.
2. Load a map document programmatically and access the collection of maps foundin the map document.
3. Programmatically allow the user to browse to the desired map and add each map'sname to the list box.
4. Access the layers in your map and add each layer's name to the list box.
** (Optional) Respond to MapControl events to copy the map to aPageLayoutControl.
** (Optional) Distinguish between feature layers and raster layers in your mapdocument.
Step 1: Open an existing project in Visual Studio
You will begin this exercise by opening an existing project that has been created for you.
Exercise 5B
Copyright © 2001-2009 ESRI 5-21

Start Visual Studio.
From the File menu, choose Open Project.
Browse to the \Student\IPAN\Exercise05\CSharp\MapsAndLayers folder, then openMapsAndLayers.sln.
In the Solution Explorer, notice that your project contains a form, Form1.
View the project in Design view. (Tip: If necessary, double-click Form1.vb in theSolution Explorer).
The form contains a MapControl, plus several Visual Studio buttons and other controls.This form will display information about the current map document, such as the names ofthe maps and layers and their fields.
Click the form to view its properties in the Properties window.
Question 1: What is the name of the form?
______________________________________________________________________
Introduction to Programming ArcObjects Using the Microsoft .NET Framework
5-22 Copyright © 2001-2009 ESRI

At the top of the form, click the combo box and view its (Name) property in theProperties window.
You will use this combo box, cboMaps, to display a list of the names of the data frames(maps) contained in a map document.
Question 2: What type of control are lboMapLayers and lboFields? What type of itemscan be stored in them?
______________________________________________________________________
You will use the lboMapLayers control to display a list of layers contained in the dataframe that are selected in the combo box.
Step 2: Load a map document programmatically
In a previous exercise, you used the properties of the MapControl to load a mapdocument and choose a map to display. That is one way to add a map. Another way is toadd the map document programmatically, and then allow the user to browse to thedesired map.
Your first step is to access the collection of maps found in the map document. You willthen populate the cboMaps combo box with the names of the maps.
The map document you will load contains three data frames, each of which containsmany layers. This reinforces the OMD relationships; a document is composed of manymaps and a map is composed of many layers.
Using the developer resource of your choice, find the members on the MapControlobject.
Question 3: Which interface is returned by the Map property?
______________________________________________________________________
In the Toolbox window, drag an OpenFileDialog control from the Dialogs group ontoyour form and place it anywhere you like.
Note: If you cannot access the Toolbox window, make sure you are in Design view .
Now you will access the dialog box from a button.
Double-click your Load Mxd button to open its Click event.
Exercise 5B
Copyright © 2001-2009 ESRI 5-23
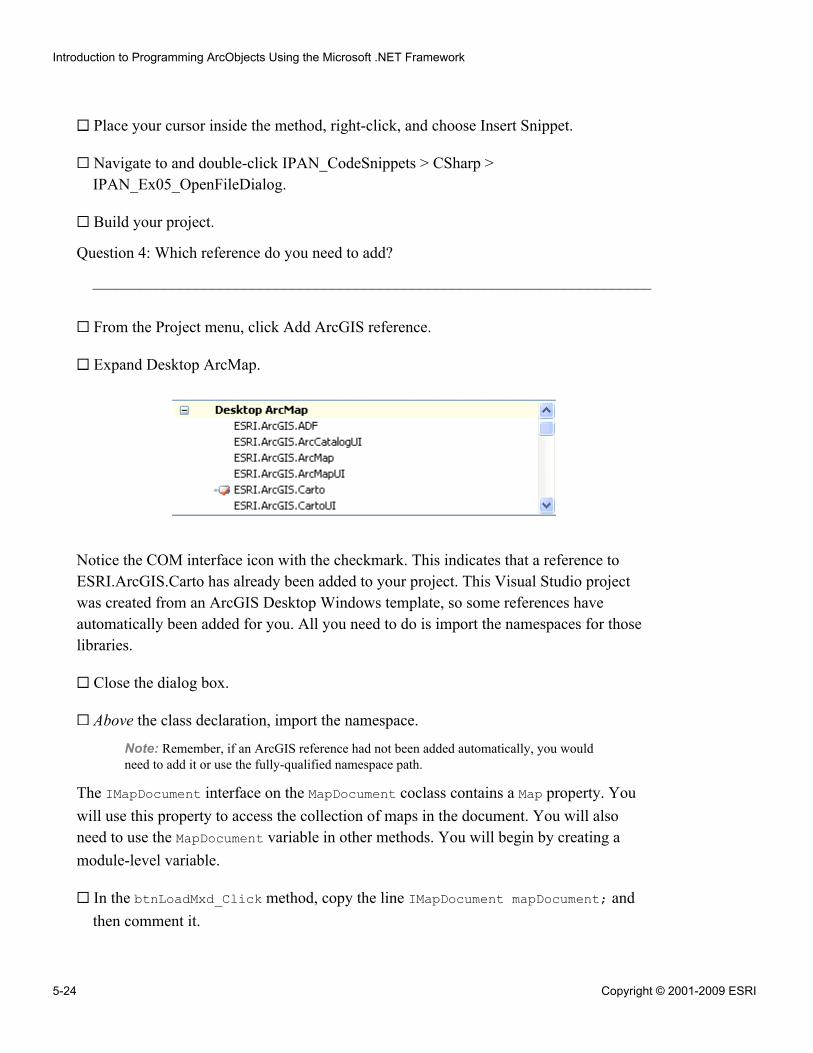
Place your cursor inside the method, right-click, and choose Insert Snippet.
Navigate to and double-click IPAN_CodeSnippets > CSharp >IPAN_Ex05_OpenFileDialog.
Build your project.
Question 4: Which reference do you need to add?
______________________________________________________________________
From the Project menu, click Add ArcGIS reference.
Expand Desktop ArcMap.
Notice the COM interface icon with the checkmark. This indicates that a reference toESRI.ArcGIS.Carto has already been added to your project. This Visual Studio projectwas created from an ArcGIS Desktop Windows template, so some references haveautomatically been added for you. All you need to do is import the namespaces for thoselibraries.
Close the dialog box.
Above the class declaration, import the namespace.
Note: Remember, if an ArcGIS reference had not been added automatically, you wouldneed to add it or use the fully-qualified namespace path.
The IMapDocument interface on the MapDocument coclass contains a Map property. Youwill use this property to access the collection of maps in the document. You will alsoneed to use the MapDocument variable in other methods. You will begin by creating amodule-level variable.
In the btnLoadMxd_Click method, copy the line IMapDocument mapDocument; andthen comment it.
Introduction to Programming ArcObjects Using the Microsoft .NET Framework
5-24 Copyright © 2001-2009 ESRI
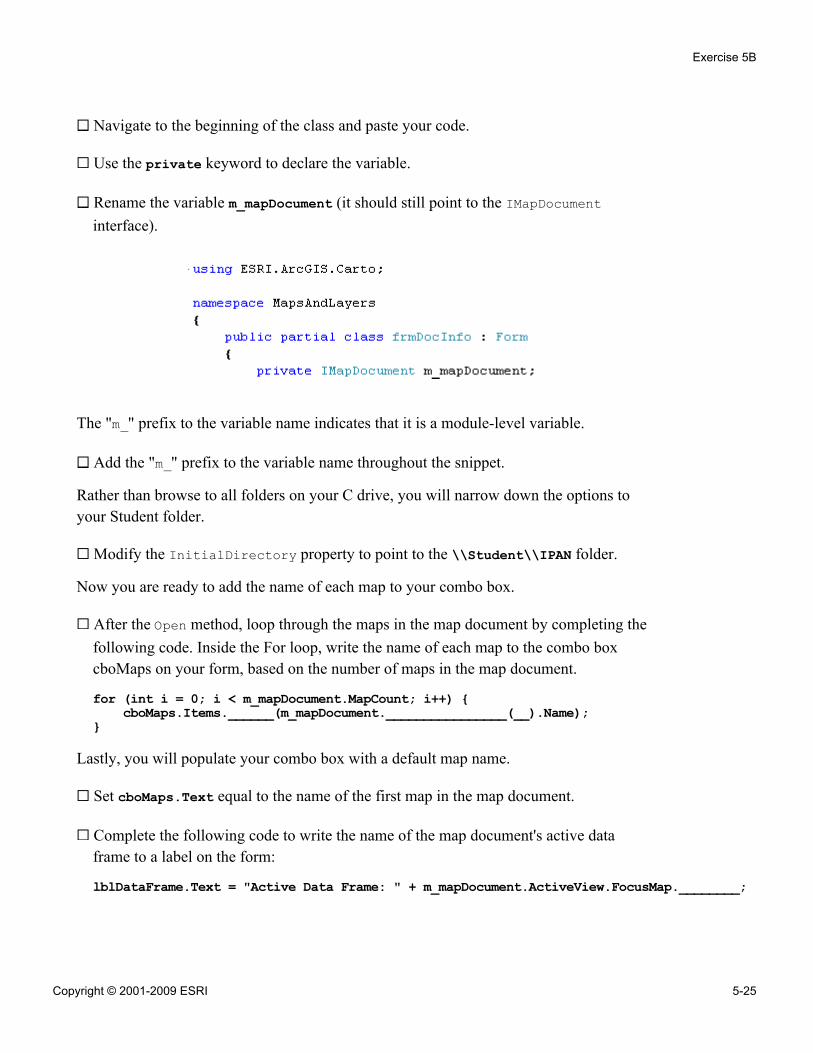
Navigate to the beginning of the class and paste your code.
Use the private keyword to declare the variable.
Rename the variable m_mapDocument (it should still point to the IMapDocumentinterface).
The "m_" prefix to the variable name indicates that it is a module-level variable.
Add the "m_" prefix to the variable name throughout the snippet.
Rather than browse to all folders on your C drive, you will narrow down the options toyour Student folder.
Modify the InitialDirectory property to point to the \\Student\\IPAN folder.
Now you are ready to add the name of each map to your combo box.
After the Open method, loop through the maps in the map document by completing thefollowing code. Inside the For loop, write the name of each map to the combo boxcboMaps on your form, based on the number of maps in the map document.
for (int i = 0; i < m_mapDocument.MapCount; i++) {cboMaps.Items.______(m_mapDocument.________________(__).Name);
}
Lastly, you will populate your combo box with a default map name.
Set cboMaps.Text equal to the name of the first map in the map document.
Complete the following code to write the name of the map document's active dataframe to a label on the form:
lblDataFrame.Text = "Active Data Frame: " + m_mapDocument.ActiveView.FocusMap.________;
Exercise 5B
Copyright © 2001-2009 ESRI 5-25
The code you have written populates a combo box, which will allow you to choose themap you want to display.
Step 3: Test your project
You will now test your code.
Build and run your project.
A license error message displays.
Click OK on the error message, then close your application.
From the Project menu, choose Add ArcGIS License Checking.
In the ArcGIS License Initializer dialog box, do the following:
▪ Under Products, check the check box for ArcView.▪ Check the Shut down this application if any selected license(s) is not available
check box.▪ Click OK.
Run your project again.
Click the Load Mxd button.
Browse to your \Student\IPAN\Exercise05 folder and open MapsAndLayers.mxd.
Question 5: What is the name of the active data frame in the map document?
______________________________________________________________________
Although you have added the map document, notice that the map in the MapControl iscurrently empty. In a previous exercise, you specified a map in the MapControl'sProperties dialog box. In the next step, you will replicate that process by writing code toselect a map from the combo box.
Close your application.
Step 4: Access the layers in a map
When accessing a map from a maps collection, you do not refer to it by its name. Instead,you use its index number, which represents the position of the map in the collection.
Introduction to Programming ArcObjects Using the Microsoft .NET Framework
5-26 Copyright © 2001-2009 ESRI

When you want to find a particular map according to its name, you can use an ifstatement inside a looping structure. You will begin that process by declaring somemodule-level variables.
View the code for Form1.
At the beginning of your class, below the declaration for IMapDocument, declare thefollowing variables:
private IEnumLayer m_enumLayers;private IMap m_map;private ILayer2 m_layer;
Using the developer resource of your choice, answer the following questions:
Question 6: Which property on the IMaps interface returns a pointer to an object thatsupports IMap?
______________________________________________________________________
Question 7: Which property on the IMap interface returns a reference to an object thatsupports IEnumLayer?
______________________________________________________________________
Question 8: Which method on the IEnumLayer interface returns a reference to an objectthat supports ILayer?
______________________________________________________________________
In Design view, click the cboMaps combo box to display its properties in theProperties window.
In the Properties window, click the Events button.
You see a list of the events on the combo box. You can customize your project by writingcode to respond to any of these events.
In the list of events, find SelectedValueChanged and double-click it to open the codefor this event.
When the value in this combo box changes, the names of the selected map's layers will beupdated in the list box.
Exercise 5B
Copyright © 2001-2009 ESRI 5-27
Next, you will return a count of the maps in the map document and assign the result to avariable.
Begin a For loop that is controlled by the number of maps in the collection.
You will loop through all the maps in the map document until you find the one whosename matches the one selected in the combo box.
Inside the loop, write the following code to provide the logic for finding the chosenmap and adding it to your MapControl:
{//Pull a map from the collectionm_map = m_mapDocument.get_Map(i);if (m_map.Name.Equals(cboMaps.SelectedItem))//Is this the chosen map?{
axMapControl1.Map = m_map;break;//Exits the loop once the map is found
}}
Note: From this point forward, the code may contain comments to help you understandit. Although it is not required, if you want to type them, remember to begin commentswith a quotation mark and surround text strings with double quotation marks.
Now that you have found the specified map, you will write another loop to add the nameof each layer in the map to a list box.
After the For loop, initialize m_enumLayers with all the layers in the chosen map bycompleting the following code:
m_enumLayers = m_map.____________(null, true); //Not just one layer!
Complete the following code to initialize the layer variable by pulling the first layerout of the enumLayers enumeration:
m_layer = m_enumLayers.________() as ______________;
Remember that there are two kinds of looping structures:
▪ A For loop (like you just wrote) is useful if you know how many times to loop.▪ The loop you need to write now uses syntax to loop based on a condition.
Add the following code to write the name of each layer to the lboMapLayers list box:
Introduction to Programming ArcObjects Using the Microsoft .NET Framework
5-28 Copyright © 2001-2009 ESRI
do{
lboMapLayers.Items.Add(m_layer.Name);m_layer = m_enumLayers.Next() as ILayer2;
} while (m_layer != null);
Run the project to test your code.
Note: If you have errors, compare your code with the following:
for (int i = 0; i < m_mapDocument.MapCount; i++){
m_map = m_mapDocument.get_Map(i);if (m_map.Name.Equals(cboMaps.SelectedItem)){
axMapControl1.Map = m_map;break; // Exits once the map is found
}}
m_enumLayers = m_map.get_Layers(null, true);// Not just one layer!m_layer = m_enumLayers.Next() as ILayer2;do{
lboMapLayers.Items.Add(m_layer.Name);m_layer = m_enumLayers.Next() as ILayer2;
} while (m_layer != null);
Exercise 5B
Copyright © 2001-2009 ESRI 5-29
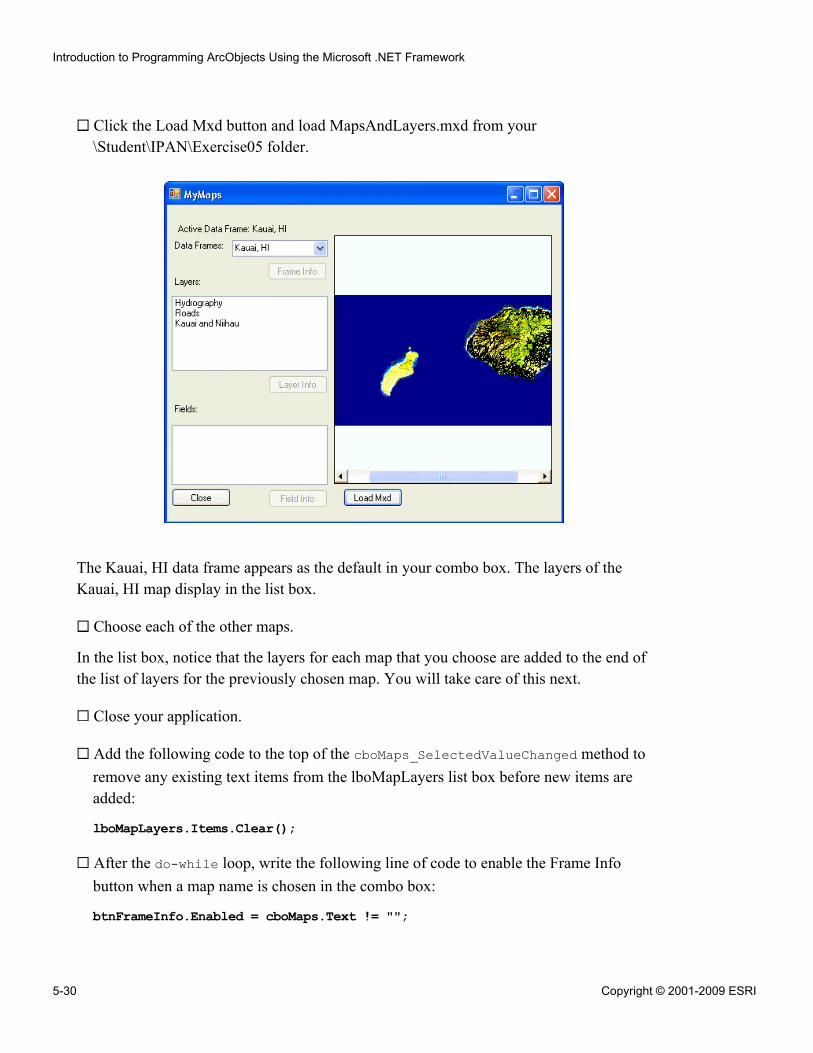
Click the Load Mxd button and load MapsAndLayers.mxd from your\Student\IPAN\Exercise05 folder.
The Kauai, HI data frame appears as the default in your combo box. The layers of theKauai, HI map display in the list box.
Choose each of the other maps.
In the list box, notice that the layers for each map that you choose are added to the end ofthe list of layers for the previously chosen map. You will take care of this next.
Close your application.
Add the following code to the top of the cboMaps_SelectedValueChanged method toremove any existing text items from the lboMapLayers list box before new items areadded:
lboMapLayers.Items.Clear();
After the do-while loop, write the following line of code to enable the Frame Infobutton when a map name is chosen in the combo box:
btnFrameInfo.Enabled = cboMaps.Text != "";
Introduction to Programming ArcObjects Using the Microsoft .NET Framework
5-30 Copyright © 2001-2009 ESRI
Note: The button will be disabled until a map name is chosen.
Write a line of code to enable the Layer Info button when a map name is chosen.
Navigate to the Click event of the btnFrameInfo and expand it, if necessary.
Uncomment the code.
Navigate to the Click event of the btnLayerInfo and uncomment the code.
Run your project.
In your application, load MapsAndLayers.mxd.
Choose a data frame, then click your Frame Info button to test it.
Click OK on the message box.
From the Data Frames combo box, choose each of the maps to make sure that the listbox is cleared properly and that the buttons are enabled when the corresponding listbox has been populated.
You now know how to loop through each map in the document, as well as through eachlayer in a map.
Close your application.
You have finished this exercise, however, you may wish to complete the optional steps:
▪ Step 5 shows you how to create a layout whenever you choose a new map.▪ Step 6 shows you how to distinguish feature layers from raster layers.
If you want to complete the optional steps, do so now. Otherwise, close Visual Studio.
Step 5: (Optional) Respond to MapControl events
In this optional step, you will respond to an event on the MapControl and copy the map toa PageLayoutControl. You will begin by adding a PageLayoutControl to your form.
View your form in Design view.
In the Toolbox window, drag a PageLayoutControl from the ArcGIS Windows Formsgroup onto your form and place it anywhere you like.
Exercise 5B
Copyright © 2001-2009 ESRI 5-31
If necessary, resize your form and/or controls.
Note: The controls can be small and even overlap.
Click your MapControl to display its properties in the Properties window.
Click the Events button .
Double-click the OnMapReplaced event.
The code for the event displays.
Insert the IPAN_Ex05_CopyMapToLayout code snippet. (Hint: Right-click > InsertSnippet.)
Review the code and add any necessary references to your project.
Note that the code responds to an event that occurs automatically whenever a new map isadded.
Before the code that copies the map, clear the active view of the page layout.
Run your project.
Load MapsAndLayers.mxd and display a map.
Notice that the map now displays in the PageLayoutControl.
To synchronize the MapControl's focus map with the PageLayoutControl so that theyboth display the same map data, you would need to write more code; however, this topicis outside the scope of this course.
Note: For sample code that illustrates how to synchronize the PageLayoutControl withthe MapControl, refer to C:\ProgramFiles\ArcGIS\DeveloperKit\SamplesNET\Engine\MapAndPageLayoutSynchApp.
Close your application.
To learn how to distinguish feature layers from raster layers, continue on to the nextstep. Otherwise, close Visual Studio.
Step 6: (Optional) Distinguish between feature and raster layers
In this optional step, you will determine whether the layers in your map document arefeature or raster layers.
Introduction to Programming ArcObjects Using the Microsoft .NET Framework
5-32 Copyright © 2001-2009 ESRI

In Design view, click the lboMapLayers list box to display its properties in theProperties window.
Click the Events button .
Double-click the SelectedValueChanged event.
The code for the event displays.
In the same way that you previously cleared the contents of lboMapLayers, clear theitems from the lboFields list box.
Now you will write a looping routine to find the layer chosen in the lboMapLayers listbox.
Complete the following loop to locate the selected layer. (Tip: Because most variablesused earlier were declared as module-level, you can use them here.)
//Move the enum pointer above the first layerm_enumLayers.__________();// Return first layer from the enumerationm_layer = m_enumLayers.________() as ILayer2;// Begin the loopdo{
if (m_layer.Name == lboMapLayers.Text) //Check whether this is the layer{// Determine whether you have a feature layer}m_layer = ____________________.________() as ILayer2; //Return another layer
} while (m_layer != null);
After the loop finishes, m_layer will be set to the layer selected in the list box.
Next, you will test the type of layer that is selected. You will use the is structure todetermine which interfaces an object variable supports.
After the //Determine comment, complete the following code to determine whetherthe selected layer (m_layer) is a type of feature layer. If it is not, write "Not afeature layer" in the lboFields list box.
if (!(m_layer is IFeatureLayer2)){lboFields.Items.______("Not a feature layer");}break; //If the layer is found, exit the loop
Exercise 5B
Copyright © 2001-2009 ESRI 5-33
Because the loop exits the method if the chosen layer does not support theIFeatureLayer interface, the remainder of your code can assume that a feature layer waschosen in the list box.
Below the while loop, enter the following code to enable the Field Info button:
btnFieldInfo.Enabled = (lboMapLayers.Text != "");
Navigate to the top of the lboMapLayers_SelectedValueChanged event and enter thefollowing code:
btnLayerInfo.Enabled = (lboMapLayers.Text != "");
Run your project and test your changes.
One by one, choose each map to answer the following question.
Question 9: Which layer is not a feature layer?
______________________________________________________________________
Now that you can programmatically distinguish between feature layers and raster layers,your next step might be to populate the Fields list box. You will learn how to accessfields in a later lesson.
Close your application, then close Visual Studio.
Conclusion
In this exercise, you programmatically loaded an existing map document into an ArcGISEngine MapControl. You created your own "table of contents" by using properties on themap document to access the maps, or data frames, that it contained, as well as the layersin each map.
If you completed the optional steps, you responded to the associated map event bypopulating a page layout whenever the map changed, and distinguished feature layersfrom raster layers. You also learned how to access GIS data programmatically—evenwithout a visual table of contents.
Introduction to Programming ArcObjects Using the Microsoft .NET Framework
5-34 Copyright © 2001-2009 ESRI

Answers to Exercise 5B Questions
Question 1: What is the name of the form?
Answer: frmDocInfo
Question 2: What type of control are lboMapLayers and lboFields? What type of itemscan be stored in them?
Answer: ListBox; a collection of strings
Question 3: Which interface is returned by the Map property?
Answer: IMap
Question 4: Which reference do you need to add?
Answer: ESRI.ArcGIS.Carto
Question 5: What is the name of the active data frame in the map document?
Answer: Kauai, HI
Question 6: Which property on the IMaps interface returns a pointer to an object thatsupports IMap?
Answer: Item
Question 7: Which property on the IMap interface returns a reference to an object thatsupports IEnumLayer?
Answer: Layers
Question 8: Which method on the IEnumLayer interface returns a reference to an objectthat supports ILayer?
Answer: Next
Question 9: Which layer is not a feature layer?
Answer: The Kauai and Nihau layer in the Kauai, HI map
Exercise 5B
Copyright © 2001-2009 ESRI 5-35
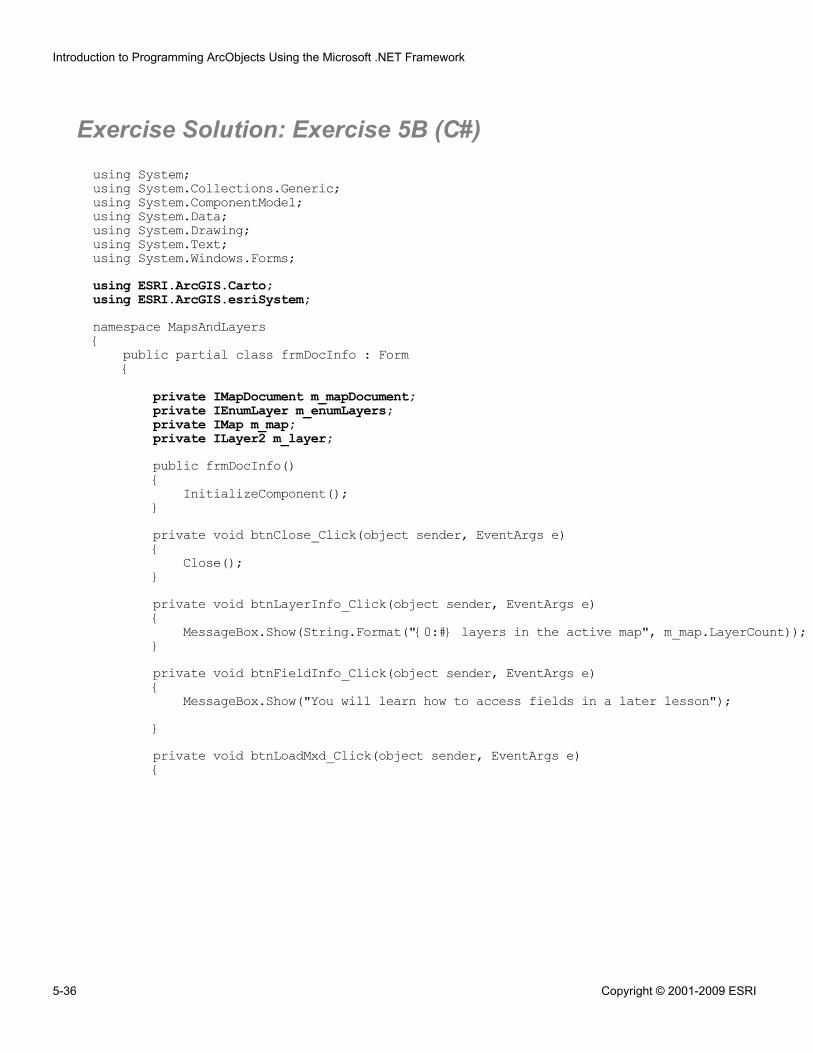
Exercise Solution: Exercise 5B (C#)using System;using System.Collections.Generic;using System.ComponentModel;using System.Data;using System.Drawing;using System.Text;using System.Windows.Forms;using ESRI.ArcGIS.Carto;using ESRI.ArcGIS.esriSystem;namespace MapsAndLayers{
public partial class frmDocInfo : Form{
private IMapDocument m_mapDocument;private IEnumLayer m_enumLayers;private IMap m_map;private ILayer2 m_layer;public frmDocInfo(){
InitializeComponent();}private void btnClose_Click(object sender, EventArgs e){
Close();}private void btnLayerInfo_Click(object sender, EventArgs e){
MessageBox.Show(String.Format("{0:#} layers in the active map", m_map.LayerCount));}private void btnFieldInfo_Click(object sender, EventArgs e){
MessageBox.Show("You will learn how to access fields in a later lesson");}private void btnLoadMxd_Click(object sender, EventArgs e){
Introduction to Programming ArcObjects Using the Microsoft .NET Framework
5-36 Copyright © 2001-2009 ESRI
// ArcGIS Snippet Title:// Open file dialog//// Long Description:// Opens a file dialog to select a map document//// Intended ArcGIS Products for this snippet:// ArcGIS Desktop (ArcView)// ArcGIS Engine//// Applicable ArcGIS Product Versions:// 9.2// 9.3//// Notes:// This snippet is intended to be inserted inside a Method.// It is not intended to be added to the base level of the Class.openFileDialog1.Title = "Browse";openFileDialog1.Filter = "Map Documents (*.mxd) | *.mxd";openFileDialog1.InitialDirectory = "\\Student\\IPAN";openFileDialog1.ShowDialog();string sFilePath;sFilePath = openFileDialog1.FileName;//IMapDocument mapDocument;m_mapDocument = new MapDocument();if (!m_mapDocument.get_IsMapDocument(sFilePath)){
return;}m_mapDocument.Open(sFilePath, "");for (int i = 0; i < m_mapDocument.MapCount; i++){
cboMaps.Items.Add(m_mapDocument.get_Map(i).Name);}cboMaps.Text = m_mapDocument.get_Map(0).Name;lblDataFrame.Text = "Active Data Frame: "
+ m_mapDocument.ActiveView.FocusMap.Name;}private void cboMaps_SelectedValueChanged(object sender, EventArgs e){
lboMapLayers.Items.Clear();for (int i = 0; i < m_mapDocument.MapCount; i++){
//Pull a map from the collectionm_map = m_mapDocument.get_Map(i);if (m_map.Name.Equals(cboMaps.SelectedItem))//Is this the chosen map?{
axMapControl1.Map = m_map;break;//Exits the loop once the map is found
}}m_enumLayers = m_map.get_Layers(null,true);m_layer = m_enumLayers.Next() as ILayer2;
Exercise 5B
Copyright © 2001-2009 ESRI 5-37
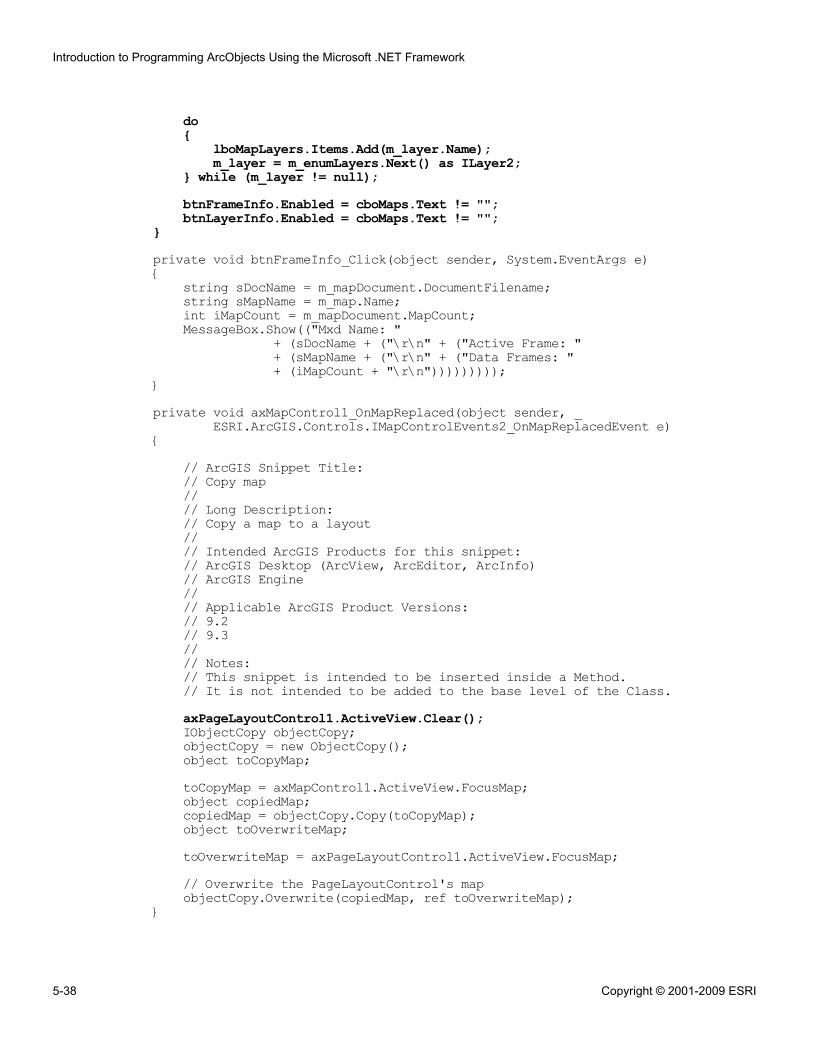
do{
lboMapLayers.Items.Add(m_layer.Name);m_layer = m_enumLayers.Next() as ILayer2;
} while (m_layer != null);btnFrameInfo.Enabled = cboMaps.Text != "";btnLayerInfo.Enabled = cboMaps.Text != "";
}private void btnFrameInfo_Click(object sender, System.EventArgs e){
string sDocName = m_mapDocument.DocumentFilename;string sMapName = m_map.Name;int iMapCount = m_mapDocument.MapCount;MessageBox.Show(("Mxd Name: "
+ (sDocName + ("\r\n" + ("Active Frame: "+ (sMapName + ("\r\n" + ("Data Frames: "+ (iMapCount + "\r\n")))))))));
}private void axMapControl1_OnMapReplaced(object sender, _
ESRI.ArcGIS.Controls.IMapControlEvents2_OnMapReplacedEvent e){
// ArcGIS Snippet Title:// Copy map//// Long Description:// Copy a map to a layout//// Intended ArcGIS Products for this snippet:// ArcGIS Desktop (ArcView, ArcEditor, ArcInfo)// ArcGIS Engine//// Applicable ArcGIS Product Versions:// 9.2// 9.3//// Notes:// This snippet is intended to be inserted inside a Method.// It is not intended to be added to the base level of the Class.axPageLayoutControl1.ActiveView.Clear();IObjectCopy objectCopy;objectCopy = new ObjectCopy();object toCopyMap;toCopyMap = axMapControl1.ActiveView.FocusMap;object copiedMap;copiedMap = objectCopy.Copy(toCopyMap);object toOverwriteMap;toOverwriteMap = axPageLayoutControl1.ActiveView.FocusMap;// Overwrite the PageLayoutControl's mapobjectCopy.Overwrite(copiedMap, ref toOverwriteMap);
}
Introduction to Programming ArcObjects Using the Microsoft .NET Framework
5-38 Copyright © 2001-2009 ESRI
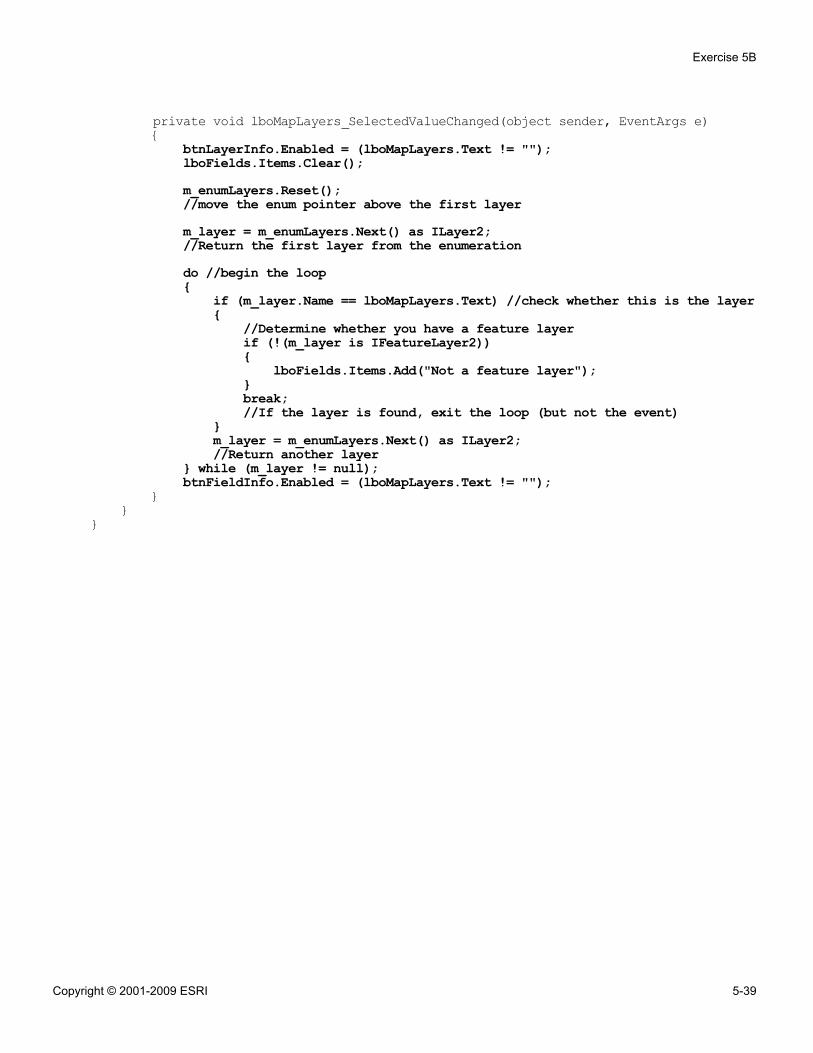
private void lboMapLayers_SelectedValueChanged(object sender, EventArgs e){
btnLayerInfo.Enabled = (lboMapLayers.Text != "");lboFields.Items.Clear();m_enumLayers.Reset();//move the enum pointer above the first layerm_layer = m_enumLayers.Next() as ILayer2;//Return the first layer from the enumerationdo //begin the loop{
if (m_layer.Name == lboMapLayers.Text) //check whether this is the layer{
//Determine whether you have a feature layerif (!(m_layer is IFeatureLayer2)){
lboFields.Items.Add("Not a feature layer");}break;//If the layer is found, exit the loop (but not the event)
}m_layer = m_enumLayers.Next() as ILayer2;//Return another layer
} while (m_layer != null);btnFieldInfo.Enabled = (lboMapLayers.Text != "");
}}
}
Exercise 5B
Copyright © 2001-2009 ESRI 5-39


6Accessing data
Exercise 6A: Access data withArcObjects (VB.NET)Estimated time: 45 minutes
Exercise 6B: Access data withArcObjects (C#)Estimated time: 45 minutes

Exercise 6A: Access data with ArcObjects (VB.NET)
Estimated time: 45 minutes
In this exercise, you will use the WorkspaceFactory in order to access an existing filegeodatabase. You will access feature datasets and feature classes and create new featurelayers. You will then set the data source and general properties of the new feature layersand add them to your MapControl.
In this exercise, you will:
▪ Access a workspace▪ Access feature classes▪ Add feature layers to a MapControl
Exercise shortcut1. In ArcCatalog, open an existing workspace, the World.gdb file geodatabase from
\Student\IPAN\Database folder.
2. In Visual Studio, create a new Visual Basic ArcGIS Engine MapControlApplication.
3. Programmatically open the Countries feature class from the World feature datasetand then open the Lakes stand-alone feature class.
4. Create new FeatureLayer object variables to store layers for your two featureclasses.
5. Set the data sources for your feature layers to reference the data.
6. Set the Name and some other general properties for your new feature layers.
7. Add your feature layers to the MapControl.
** (Optional) Conditionally show MapTips for a selected layer.
Step 1: Open an existing workspace
In this step, you will use ArcObjects code to open an existing workspace, the World.gdbfile geodatabase. You will begin by examining the geodatabase and its contents.
Start ArcCatalog.
Exercise 6A
Copyright © 2001-2009 ESRI 6-1
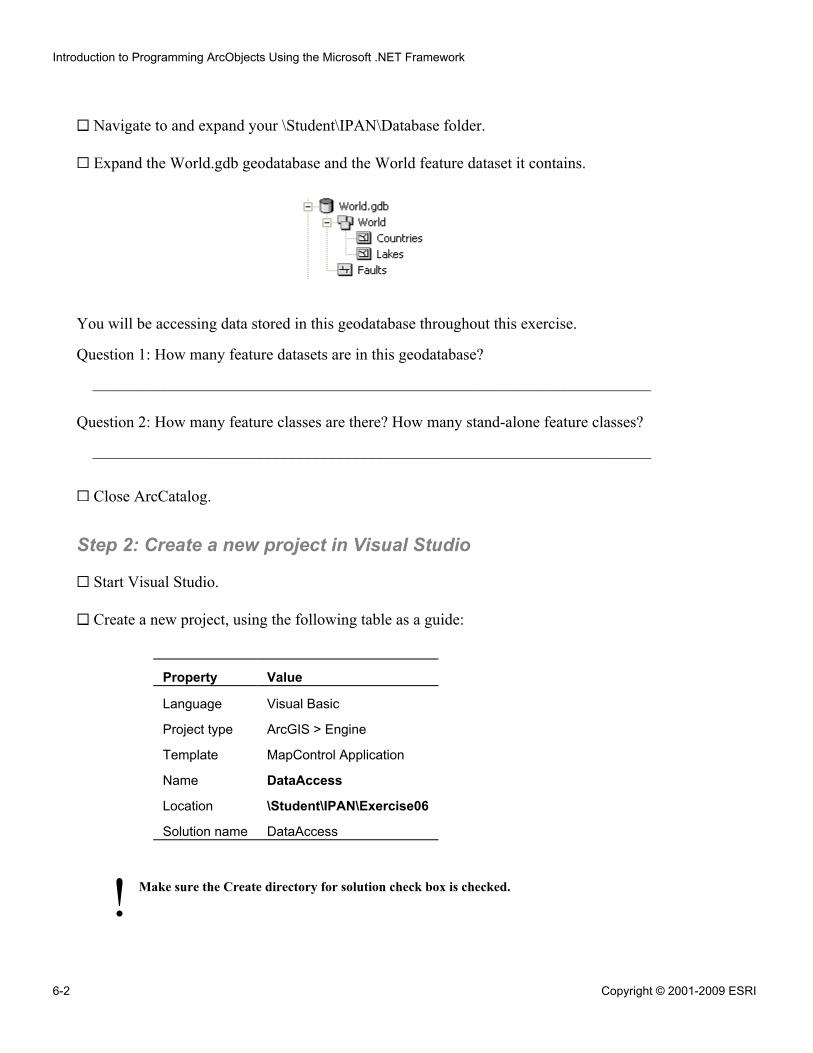
!
Navigate to and expand your \Student\IPAN\Database folder.
Expand the World.gdb geodatabase and the World feature dataset it contains.
You will be accessing data stored in this geodatabase throughout this exercise.
Question 1: How many feature datasets are in this geodatabase?
______________________________________________________________________
Question 2: How many feature classes are there? How many stand-alone feature classes?
______________________________________________________________________
Close ArcCatalog.
Step 2: Create a new project in Visual Studio
Start Visual Studio.
Create a new project, using the following table as a guide:
Property Value
Language Visual Basic
Project type ArcGIS > Engine
Template MapControl Application
Name DataAccess
Location \Student\IPAN\Exercise06
Solution name DataAccess
Make sure the Create directory for solution check box is checked.
Introduction to Programming ArcObjects Using the Microsoft .NET Framework
6-2 Copyright © 2001-2009 ESRI
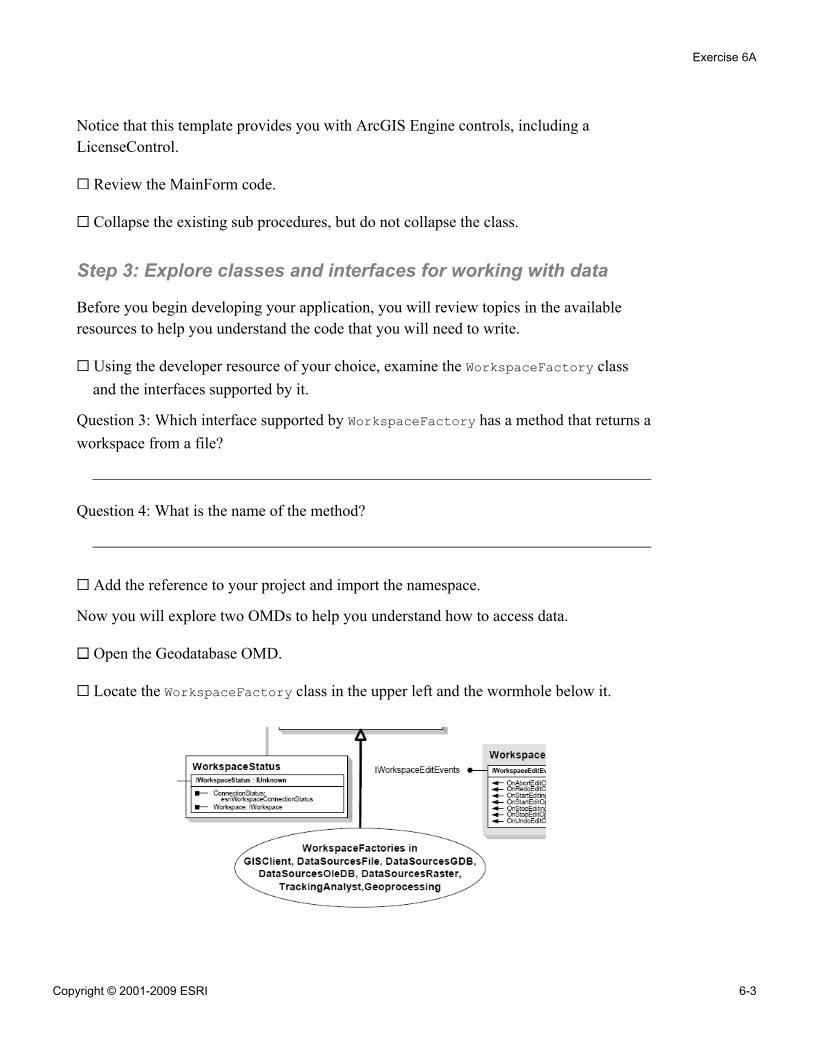
Notice that this template provides you with ArcGIS Engine controls, including aLicenseControl.
Review the MainForm code.
Collapse the existing sub procedures, but do not collapse the class.
Step 3: Explore classes and interfaces for working with data
Before you begin developing your application, you will review topics in the availableresources to help you understand the code that you will need to write.
Using the developer resource of your choice, examine the WorkspaceFactory classand the interfaces supported by it.
Question 3: Which interface supported by WorkspaceFactory has a method that returns aworkspace from a file?
______________________________________________________________________
Question 4: What is the name of the method?
______________________________________________________________________
Add the reference to your project and import the namespace.
Now you will explore two OMDs to help you understand how to access data.
Open the Geodatabase OMD.
Locate the WorkspaceFactory class in the upper left and the wormhole below it.
Exercise 6A
Copyright © 2001-2009 ESRI 6-3
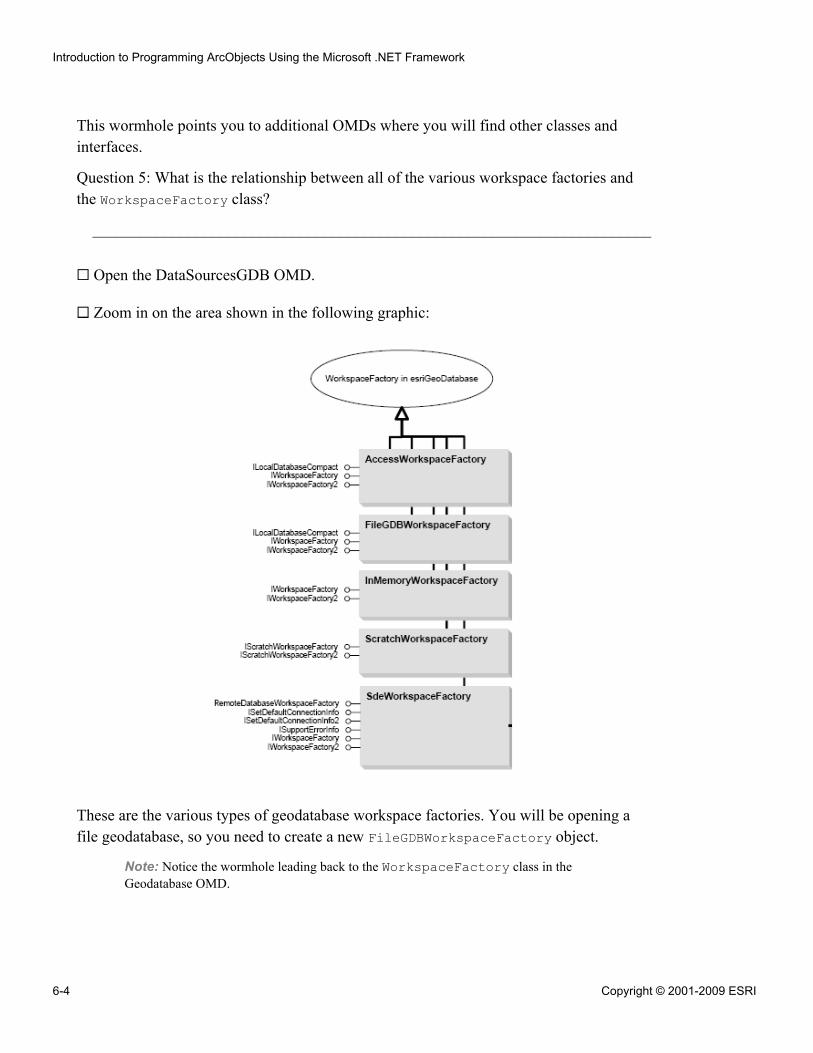
This wormhole points you to additional OMDs where you will find other classes andinterfaces.
Question 5: What is the relationship between all of the various workspace factories andthe WorkspaceFactory class?
______________________________________________________________________
Open the DataSourcesGDB OMD.
Zoom in on the area shown in the following graphic:
These are the various types of geodatabase workspace factories. You will be opening afile geodatabase, so you need to create a new FileGDBWorkspaceFactory object.
Note: Notice the wormhole leading back to the WorkspaceFactory class in theGeodatabase OMD.
Introduction to Programming ArcObjects Using the Microsoft .NET Framework
6-4 Copyright © 2001-2009 ESRI
!
In Visual Studio, just before the end of the class, add a new private sub procedurenamed AddData with no arguments.
In your sub procedure, declare a variable named wsFactory as a newFileGDBWorkspaceFactory object.
Add the necessary reference and namespace to your project.
Now that you have had some practice adding references, importingnamespaces, and resolving implicit conversions, it is yourresponsibility for the remainder of the course to address these issues inyour code as necessary.
Declare a variable named workspace to return the interface based on what is returnedby the OpenFromFile method.
Verify that your code looks like the following:
Dim wsFactory As IWorkspaceFactorywsFactory = New FileGDBWorkspaceFactory
Dim workspace As IWorkspace
Set the workspace variable by writing the following code:
workspace = wsFactory.OpenFromFile _("\Student\IPAN\Database\World.gdb", 0)
Note: The second parameter for OpenFromFile is a window handle object (hWnd),which is an integer that references an application's window and can be used to tie otherdialog boxes or data to a particular application.
Build your project.
Step 4: Access feature classes
Now that you have used the WorkspaceFactory class to open your geodatabase, you areready to access the data in that workspace. In this step, you will access feature classesthat reside in the workspace.
Using the Geodatabase OMD, locate the IFeatureWorkspace interface. (Hint: Lookin the Workspace class.)
Exercise 6A
Copyright © 2001-2009 ESRI 6-5
Question 6: Which method can be used to access a feature class?
______________________________________________________________________
Question 7: What is returned by this method?
______________________________________________________________________
Declare the variable fWS as a reference to IFeatureWorkspace.
Do a QI to the workspace with the following code:
fWS = workspace
Hover your mouse pointer over workspace and notice the reference to implicit casting.
Use the CType structure to change the code from an implicit cast to an explicit cast.
Declare a variable named fcCountries to the interface that is returned by theOpenFeatureClass method.
Instantiate the new variable with the following code:
fcCountries = fWS.OpenFeatureClass("Countries")
The fcCountries variable now references the Countries feature class. Recall that theWorld feature dataset contains two feature classes that you want to add to the map:Countries and Lakes. You will now access the Lakes feature class.
Declare a variable named fcLakes to the IFeatureClass interface.
Instantiate fcLakes with the following code:
fcLakes = fWS.OpenFeatureClass("Lakes")
You now have two variables, each referencing a feature class within the World featuredataset. You do not need to open the feature dataset to access the feature classes becauseeach feature class in the workspace has a unique name; thus, there are no conflictsbetween stand-alone feature classes and feature classes that reside in a feature dataset.
Introduction to Programming ArcObjects Using the Microsoft .NET Framework
6-6 Copyright © 2001-2009 ESRI
Step 5: Create feature layers
In order to add these data sources to the map, you need to create layers. These layers arein-memory copies of the corresponding feature classes that are stored on disk.
Question 8: What type of layers are Countries and Lakes?
______________________________________________________________________
Declare a variable named countriesLayer to the IFeatureLayer interface.
Complete the following code to create a new feature layer:
countriesLayer = ______ ________________________
Declare another variable named lakesLayer to the IFeatureLayer interface.
Complete the following code to create a new feature layer:
lakesLayer= ______ ________________________;
Verify that the code for your two new feature layers matches the following:
Dim countriesLayer As IFeatureLayercountriesLayer = New FeatureLayerDim lakesLayer As IFeatureLayerlakesLayer = New FeatureLayer
Step 6: Set the data sources for the feature layers
In order for a feature layer to reference data correctly, it must point to its data source ondisk. If you were to add the Countries and Lakes layers to the map right now, they wouldbe empty layers, referencing no data. In this step, you will set the data source for the newfeature layers.
Open the ESRI Object Browser, if necessary, and do the following:
▪ In the Interfaces area, verify that you are searching for an interface name.
Exercise 6A
Copyright © 2001-2009 ESRI 6-7
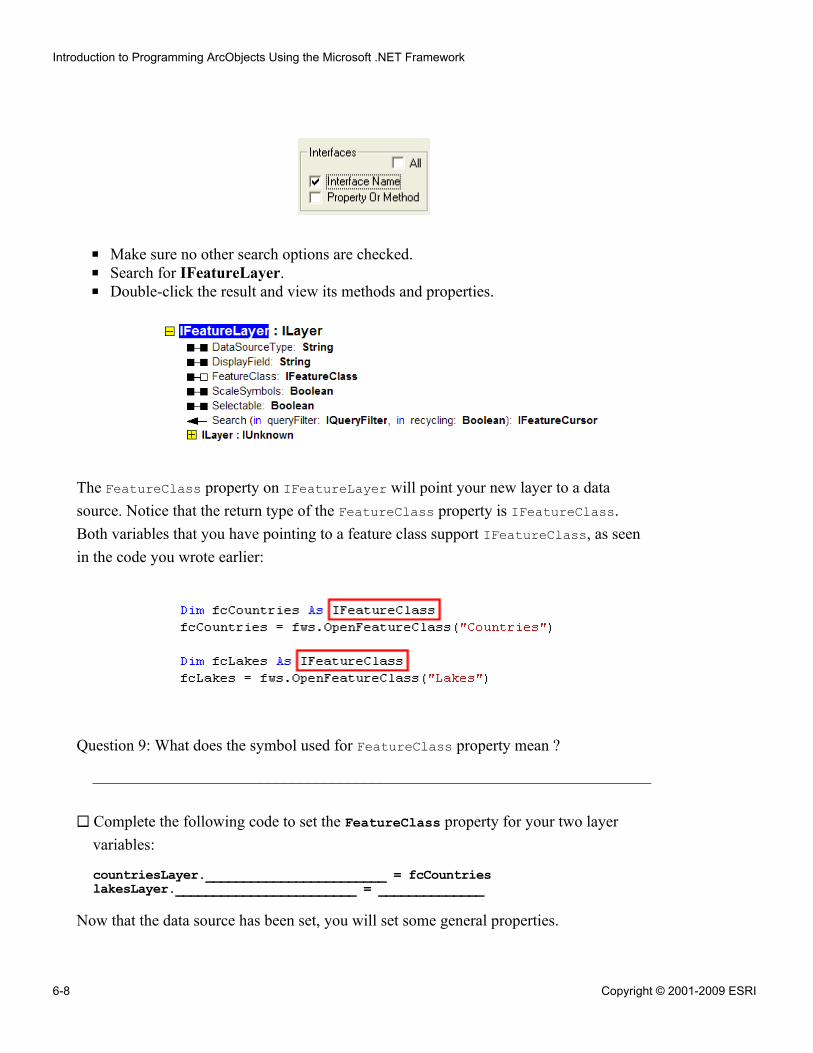
▪ Make sure no other search options are checked.▪ Search for IFeatureLayer.▪ Double-click the result and view its methods and properties.
The FeatureClass property on IFeatureLayer will point your new layer to a datasource. Notice that the return type of the FeatureClass property is IFeatureClass.Both variables that you have pointing to a feature class support IFeatureClass, as seenin the code you wrote earlier:
Question 9: What does the symbol used for FeatureClass property mean ?
______________________________________________________________________
Complete the following code to set the FeatureClass property for your two layervariables:
countriesLayer.________________________ = fcCountrieslakesLayer.________________________ = ______________
Now that the data source has been set, you will set some general properties.
Introduction to Programming ArcObjects Using the Microsoft .NET Framework
6-8 Copyright © 2001-2009 ESRI
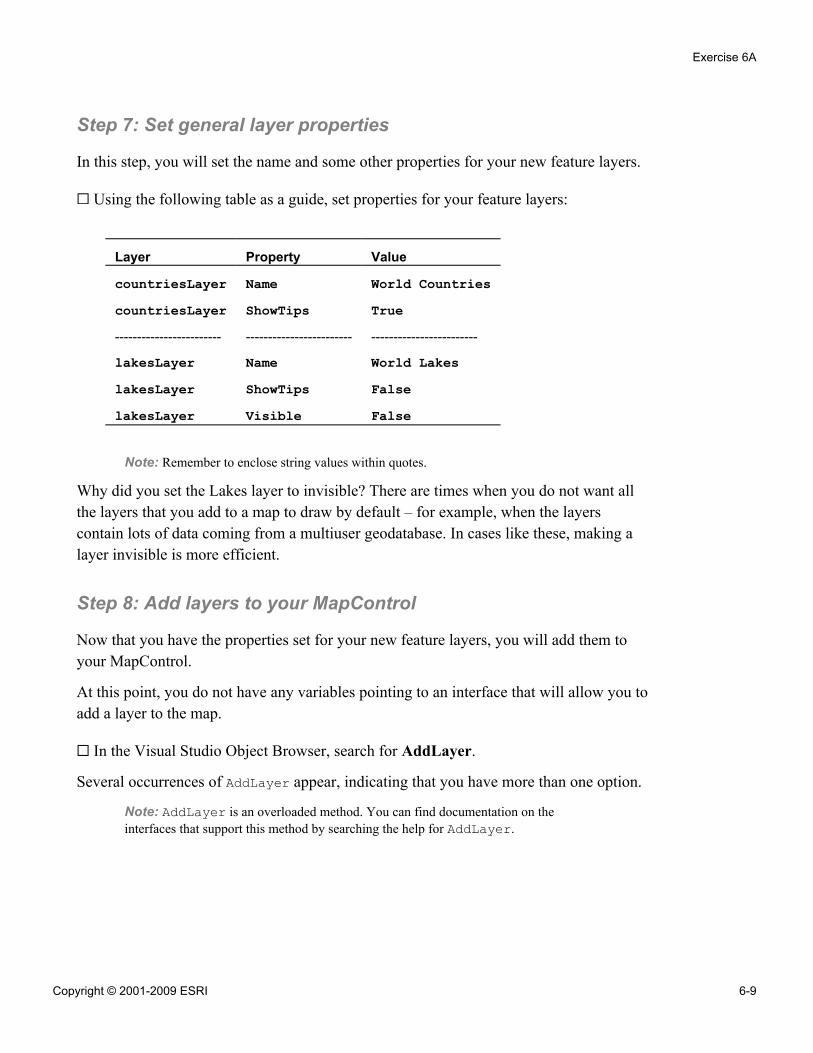
Step 7: Set general layer properties
In this step, you will set the name and some other properties for your new feature layers.
Using the following table as a guide, set properties for your feature layers:
Layer Property Value
countriesLayer Name World CountriescountriesLayer ShowTips True------------------------ ------------------------ ------------------------
lakesLayer Name World LakeslakesLayer ShowTips FalselakesLayer Visible False
Note: Remember to enclose string values within quotes.
Why did you set the Lakes layer to invisible? There are times when you do not want allthe layers that you add to a map to draw by default – for example, when the layerscontain lots of data coming from a multiuser geodatabase. In cases like these, making alayer invisible is more efficient.
Step 8: Add layers to your MapControl
Now that you have the properties set for your new feature layers, you will add them toyour MapControl.
At this point, you do not have any variables pointing to an interface that will allow you toadd a layer to the map.
In the Visual Studio Object Browser, search for AddLayer.
Several occurrences of AddLayer appear, indicating that you have more than one option.
Note: AddLayer is an overloaded method. You can find documentation on theinterfaces that support this method by searching the help for AddLayer.
Exercise 6A
Copyright © 2001-2009 ESRI 6-9
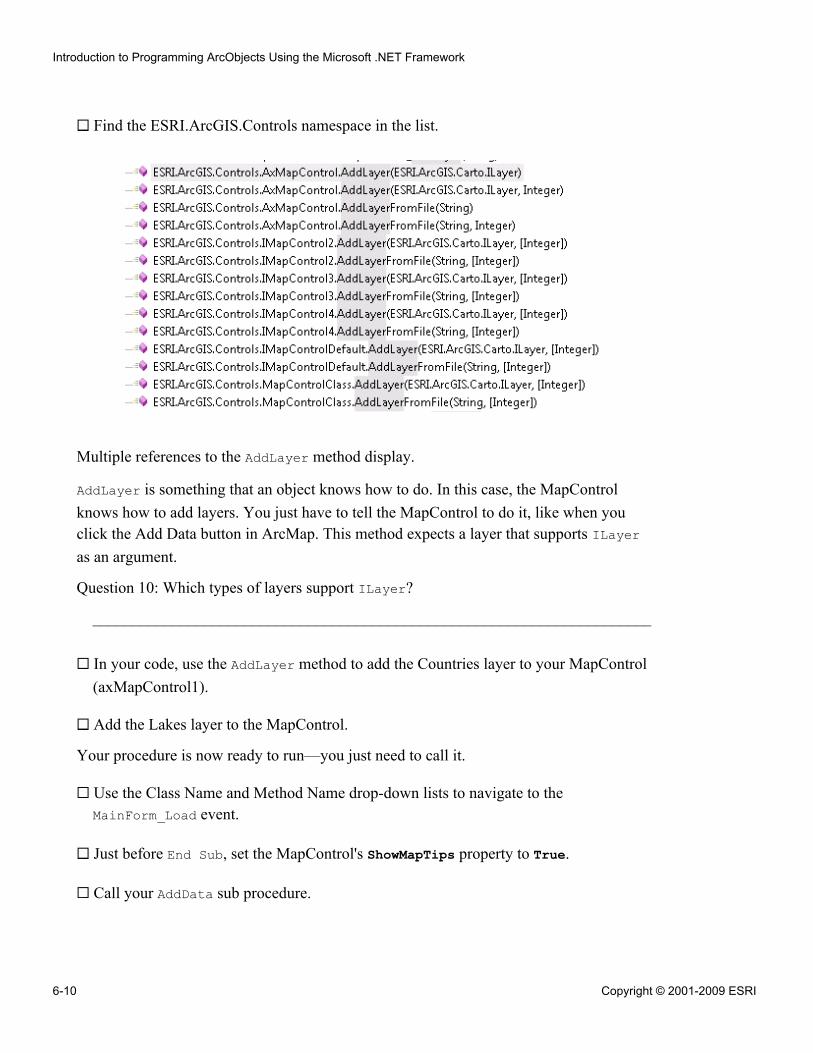
Find the ESRI.ArcGIS.Controls namespace in the list.
Multiple references to the AddLayer method display.
AddLayer is something that an object knows how to do. In this case, the MapControlknows how to add layers. You just have to tell the MapControl to do it, like when youclick the Add Data button in ArcMap. This method expects a layer that supports ILayeras an argument.
Question 10: Which types of layers support ILayer?
______________________________________________________________________
In your code, use the AddLayer method to add the Countries layer to your MapControl(axMapControl1).
Add the Lakes layer to the MapControl.
Your procedure is now ready to run—you just need to call it.
Use the Class Name and Method Name drop-down lists to navigate to theMainForm_Load event.
Just before End Sub, set the MapControl's ShowMapTips property to True.
Call your AddData sub procedure.
Introduction to Programming ArcObjects Using the Microsoft .NET Framework
6-10 Copyright © 2001-2009 ESRI
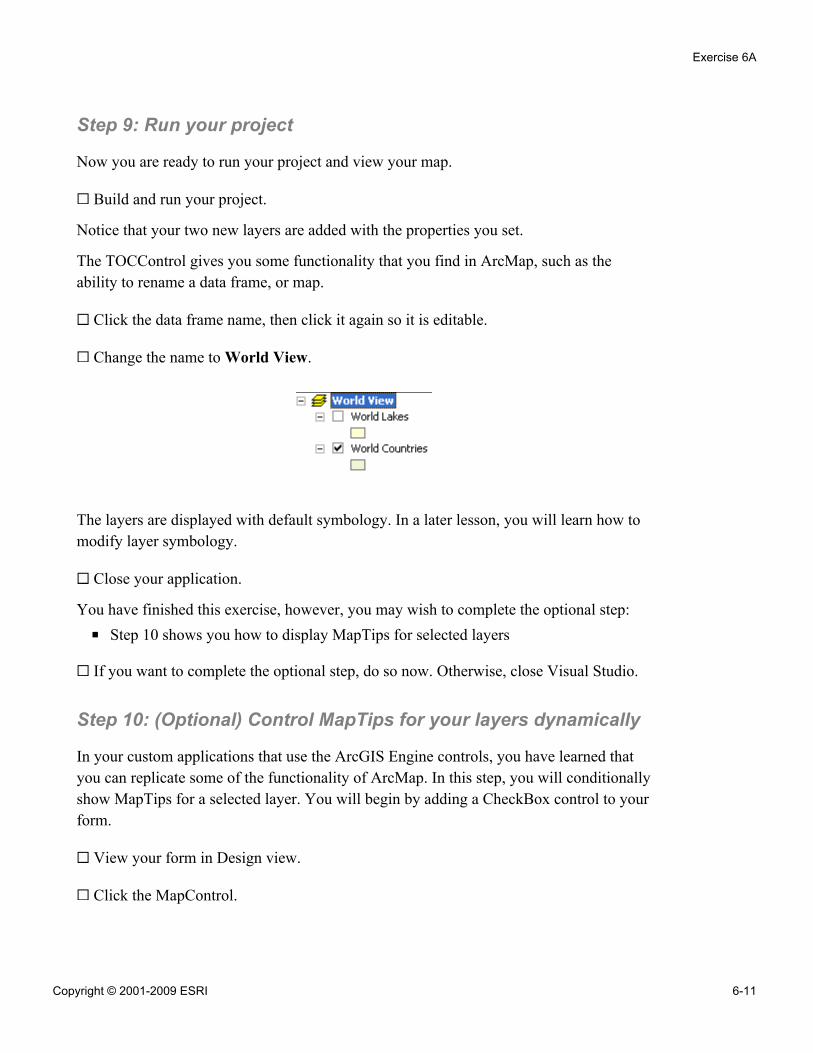
Step 9: Run your project
Now you are ready to run your project and view your map.
Build and run your project.
Notice that your two new layers are added with the properties you set.
The TOCControl gives you some functionality that you find in ArcMap, such as theability to rename a data frame, or map.
Click the data frame name, then click it again so it is editable.
Change the name to World View.
The layers are displayed with default symbology. In a later lesson, you will learn how tomodify layer symbology.
Close your application.
You have finished this exercise, however, you may wish to complete the optional step:
▪ Step 10 shows you how to display MapTips for selected layers
If you want to complete the optional step, do so now. Otherwise, close Visual Studio.
Step 10: (Optional) Control MapTips for your layers dynamically
In your custom applications that use the ArcGIS Engine controls, you have learned thatyou can replicate some of the functionality of ArcMap. In this step, you will conditionallyshow MapTips for a selected layer. You will begin by adding a CheckBox control to yourform.
View your form in Design view.
Click the MapControl.
Exercise 6A
Copyright © 2001-2009 ESRI 6-11
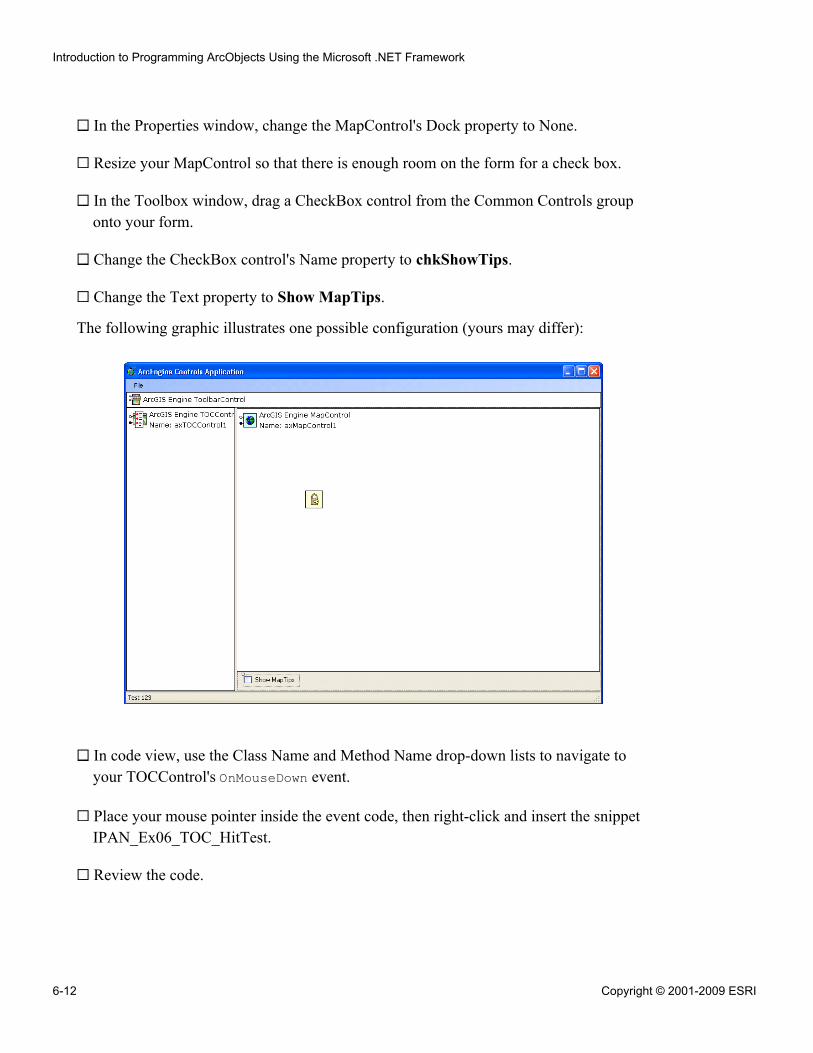
In the Properties window, change the MapControl's Dock property to None.
Resize your MapControl so that there is enough room on the form for a check box.
In the Toolbox window, drag a CheckBox control from the Common Controls grouponto your form.
Change the CheckBox control's Name property to chkShowTips.
Change the Text property to Show MapTips.
The following graphic illustrates one possible configuration (yours may differ):
In code view, use the Class Name and Method Name drop-down lists to navigate toyour TOCControl's OnMouseDown event.
Place your mouse pointer inside the event code, then right-click and insert the snippetIPAN_Ex06_TOC_HitTest.
Review the code.
Introduction to Programming ArcObjects Using the Microsoft .NET Framework
6-12 Copyright © 2001-2009 ESRI
Question 11: Which variable do you need to add to your code?
______________________________________________________________________
Add the module-level variable to the beginning of your class.
Return to the TOCControl's OnMouseDown event.
Note: Ignore the implicit conversion warnings.
In the event, find the line of code that contains the HitTest method.
Right-click the HitTest method and choose Go To Definition.
Question 12: What data type do the x and y properties of e return?
______________________________________________________________________
The x,y coordinates represent the pixels of items clicked in the table of contents.
Now that you have entered the code that will tell you whether a layer has been selected,you need to know whether to show MapTips.
In code view, navigate to the chkShowTips check box's CheckStateChanged event.
Insert the snippet IPAN_Ex06_ShowTips.
Question 13: Which types of layers will display MapTips?
______________________________________________________________________
Navigate to the MainForm_Load event.
Immediately before AddData(), enter the following code to initialize MapTips to theoff state:
axMapControl1.ShowMapTips = FalsechkShowTips.CheckState = CheckState.Unchecked
Navigate to the CheckedChanged event of chkShowTips and enter the followingcondition to manage the visibility of the MapTips:
If chkShowTips.CheckState = CheckState.Checked ThenaxMapControl1.ShowMapTips = True
ElseaxMapControl1.ShowMapTips = False
End If
Exercise 6A
Copyright © 2001-2009 ESRI 6-13
Finally, navigate to the AddData sub procedure.
Comment the lines that currently control the visibility of MapTips for your two featurelayers.
Run your project.
In the table of contents, check the World Lakes layer to turn it on, and if necessary,click the layer to select it.
Check the Show MapTips box.
Hover your mouse pointer over lake features in the map to view the MapTips.
Uncheck the Show MapTips box.
Select the World Countries layer, turn MapTips on again, and view them in the map.
When you are finished, close your application and close Visual Studio.
Conclusion
In this exercise, you learned how to add feature layers to your map using ArcObjectscode. You accessed a workspace to open feature classes, created new feature layersreferencing the feature classes, and set properties for the feature layers. Finally, youadded the feature layers to ArcMap.
Introduction to Programming ArcObjects Using the Microsoft .NET Framework
6-14 Copyright © 2001-2009 ESRI
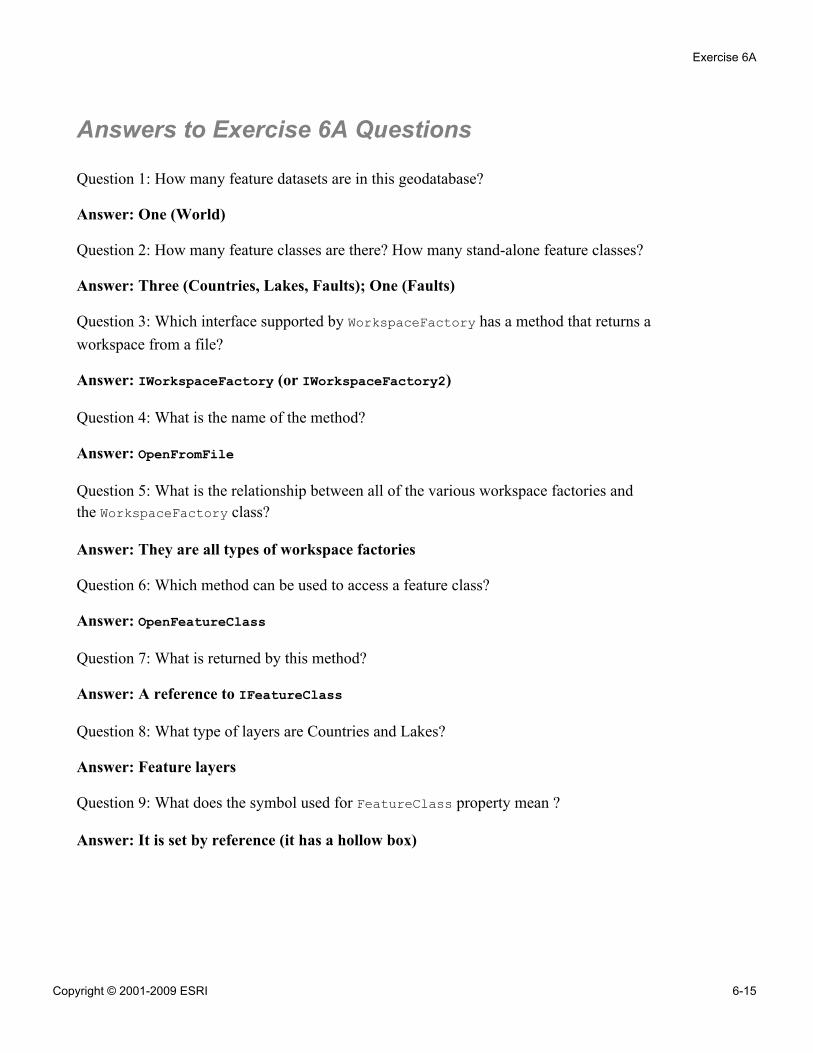
Answers to Exercise 6A Questions
Question 1: How many feature datasets are in this geodatabase?
Answer: One (World)
Question 2: How many feature classes are there? How many stand-alone feature classes?
Answer: Three (Countries, Lakes, Faults); One (Faults)
Question 3: Which interface supported by WorkspaceFactory has a method that returns aworkspace from a file?
Answer: IWorkspaceFactory (or IWorkspaceFactory2)
Question 4: What is the name of the method?
Answer: OpenFromFile
Question 5: What is the relationship between all of the various workspace factories andthe WorkspaceFactory class?
Answer: They are all types of workspace factories
Question 6: Which method can be used to access a feature class?
Answer: OpenFeatureClass
Question 7: What is returned by this method?
Answer: A reference to IFeatureClass
Question 8: What type of layers are Countries and Lakes?
Answer: Feature layers
Question 9: What does the symbol used for FeatureClass property mean ?
Answer: It is set by reference (it has a hollow box)
Exercise 6A
Copyright © 2001-2009 ESRI 6-15

Question 10: Which types of layers support ILayer?
Answer: All, since the ILayer interface is found on the abstract class that all layersinherit from.
Question 11: Which variable do you need to add to your code?
Answer: m_layer as ILayer
Question 12: What data type do the x and y properties of e return?
Answer: Integer
Question 13: Which types of layers will display MapTips?
Answer: Feature layers
Introduction to Programming ArcObjects Using the Microsoft .NET Framework
6-16 Copyright © 2001-2009 ESRI
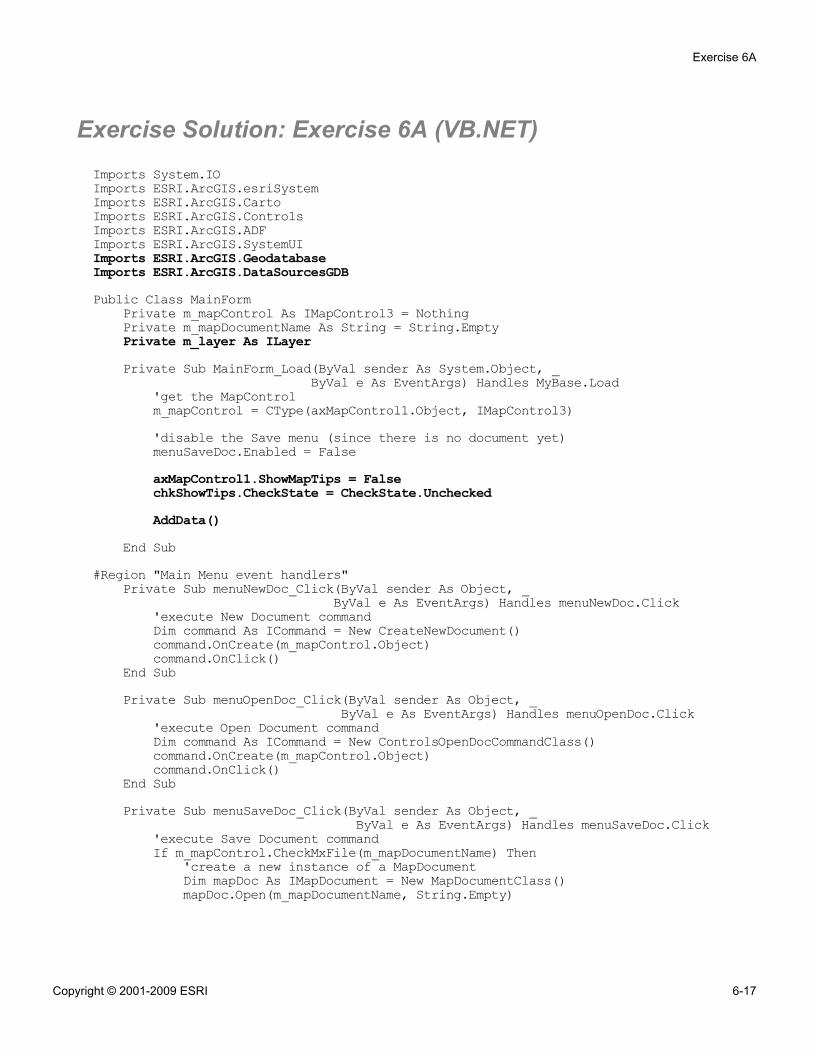
Exercise Solution: Exercise 6A (VB.NET)Imports System.IOImports ESRI.ArcGIS.esriSystemImports ESRI.ArcGIS.CartoImports ESRI.ArcGIS.ControlsImports ESRI.ArcGIS.ADFImports ESRI.ArcGIS.SystemUIImports ESRI.ArcGIS.GeodatabaseImports ESRI.ArcGIS.DataSourcesGDBPublic Class MainForm
Private m_mapControl As IMapControl3 = NothingPrivate m_mapDocumentName As String = String.EmptyPrivate m_layer As ILayerPrivate Sub MainForm_Load(ByVal sender As System.Object, _
ByVal e As EventArgs) Handles MyBase.Load'get the MapControlm_mapControl = CType(axMapControl1.Object, IMapControl3)'disable the Save menu (since there is no document yet)menuSaveDoc.Enabled = FalseaxMapControl1.ShowMapTips = FalsechkShowTips.CheckState = CheckState.UncheckedAddData()
End Sub#Region "Main Menu event handlers"
Private Sub menuNewDoc_Click(ByVal sender As Object, _ByVal e As EventArgs) Handles menuNewDoc.Click
'execute New Document commandDim command As ICommand = New CreateNewDocument()command.OnCreate(m_mapControl.Object)command.OnClick()
End SubPrivate Sub menuOpenDoc_Click(ByVal sender As Object, _
ByVal e As EventArgs) Handles menuOpenDoc.Click'execute Open Document commandDim command As ICommand = New ControlsOpenDocCommandClass()command.OnCreate(m_mapControl.Object)command.OnClick()
End SubPrivate Sub menuSaveDoc_Click(ByVal sender As Object, _
ByVal e As EventArgs) Handles menuSaveDoc.Click'execute Save Document commandIf m_mapControl.CheckMxFile(m_mapDocumentName) Then
'create a new instance of a MapDocumentDim mapDoc As IMapDocument = New MapDocumentClass()mapDoc.Open(m_mapDocumentName, String.Empty)
Exercise 6A
Copyright © 2001-2009 ESRI 6-17
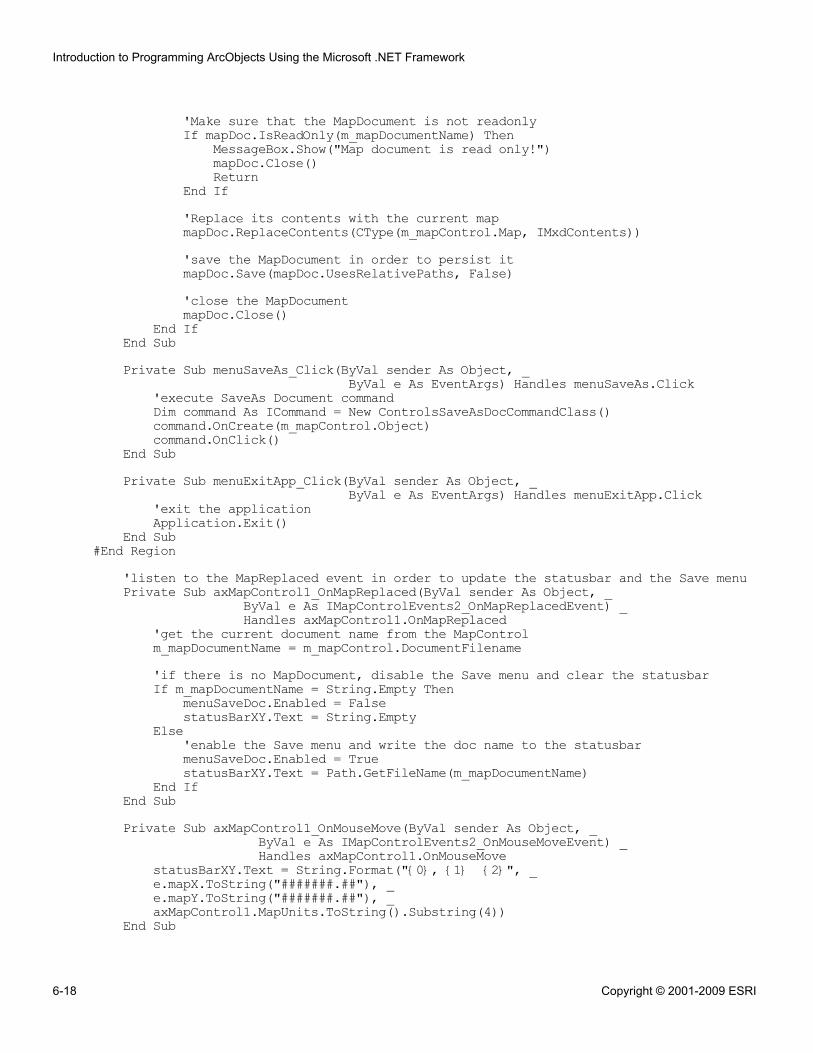
'Make sure that the MapDocument is not readonlyIf mapDoc.IsReadOnly(m_mapDocumentName) Then
MessageBox.Show("Map document is read only!")mapDoc.Close()Return
End If'Replace its contents with the current mapmapDoc.ReplaceContents(CType(m_mapControl.Map, IMxdContents))'save the MapDocument in order to persist itmapDoc.Save(mapDoc.UsesRelativePaths, False)'close the MapDocumentmapDoc.Close()
End IfEnd SubPrivate Sub menuSaveAs_Click(ByVal sender As Object, _
ByVal e As EventArgs) Handles menuSaveAs.Click'execute SaveAs Document commandDim command As ICommand = New ControlsSaveAsDocCommandClass()command.OnCreate(m_mapControl.Object)command.OnClick()
End SubPrivate Sub menuExitApp_Click(ByVal sender As Object, _
ByVal e As EventArgs) Handles menuExitApp.Click'exit the applicationApplication.Exit()
End Sub#End Region
'listen to the MapReplaced event in order to update the statusbar and the Save menuPrivate Sub axMapControl1_OnMapReplaced(ByVal sender As Object, _
ByVal e As IMapControlEvents2_OnMapReplacedEvent) _Handles axMapControl1.OnMapReplaced
'get the current document name from the MapControlm_mapDocumentName = m_mapControl.DocumentFilename'if there is no MapDocument, disable the Save menu and clear the statusbarIf m_mapDocumentName = String.Empty Then
menuSaveDoc.Enabled = FalsestatusBarXY.Text = String.Empty
Else'enable the Save menu and write the doc name to the statusbarmenuSaveDoc.Enabled = TruestatusBarXY.Text = Path.GetFileName(m_mapDocumentName)
End IfEnd SubPrivate Sub axMapControl1_OnMouseMove(ByVal sender As Object, _
ByVal e As IMapControlEvents2_OnMouseMoveEvent) _Handles axMapControl1.OnMouseMove
statusBarXY.Text = String.Format("{0}, {1} {2}", _e.mapX.ToString("#######.##"), _e.mapY.ToString("#######.##"), _axMapControl1.MapUnits.ToString().Substring(4))
End Sub
Introduction to Programming ArcObjects Using the Microsoft .NET Framework
6-18 Copyright © 2001-2009 ESRI
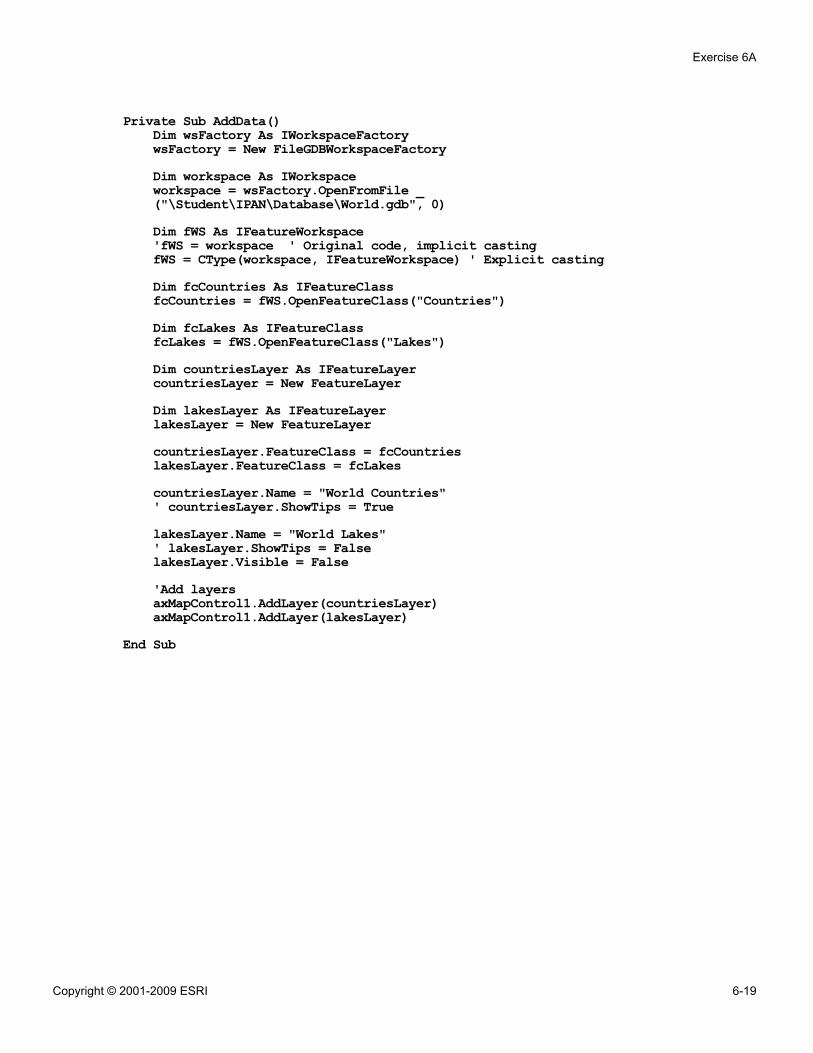
Private Sub AddData()Dim wsFactory As IWorkspaceFactorywsFactory = New FileGDBWorkspaceFactoryDim workspace As IWorkspaceworkspace = wsFactory.OpenFromFile _("\Student\IPAN\Database\World.gdb", 0)Dim fWS As IFeatureWorkspace'fWS = workspace ' Original code, implicit castingfWS = CType(workspace, IFeatureWorkspace) ' Explicit castingDim fcCountries As IFeatureClassfcCountries = fWS.OpenFeatureClass("Countries")Dim fcLakes As IFeatureClassfcLakes = fWS.OpenFeatureClass("Lakes")Dim countriesLayer As IFeatureLayercountriesLayer = New FeatureLayerDim lakesLayer As IFeatureLayerlakesLayer = New FeatureLayercountriesLayer.FeatureClass = fcCountrieslakesLayer.FeatureClass = fcLakescountriesLayer.Name = "World Countries"' countriesLayer.ShowTips = TruelakesLayer.Name = "World Lakes"' lakesLayer.ShowTips = FalselakesLayer.Visible = False'Add layersaxMapControl1.AddLayer(countriesLayer)axMapControl1.AddLayer(lakesLayer)
End Sub
Exercise 6A
Copyright © 2001-2009 ESRI 6-19
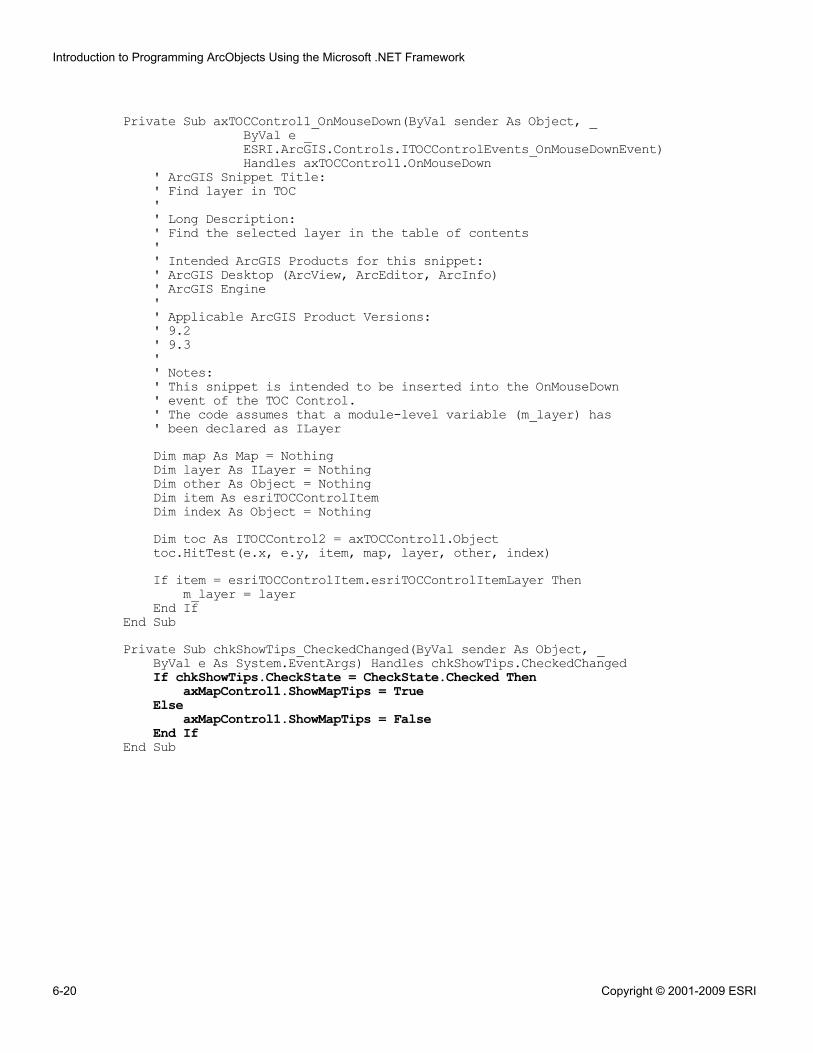
Private Sub axTOCControl1_OnMouseDown(ByVal sender As Object, _ByVal e _ESRI.ArcGIS.Controls.ITOCControlEvents_OnMouseDownEvent)Handles axTOCControl1.OnMouseDown
' ArcGIS Snippet Title:' Find layer in TOC'' Long Description:' Find the selected layer in the table of contents'' Intended ArcGIS Products for this snippet:' ArcGIS Desktop (ArcView, ArcEditor, ArcInfo)' ArcGIS Engine'' Applicable ArcGIS Product Versions:' 9.2' 9.3'' Notes:' This snippet is intended to be inserted into the OnMouseDown' event of the TOC Control.' The code assumes that a module-level variable (m_layer) has' been declared as ILayerDim map As Map = NothingDim layer As ILayer = NothingDim other As Object = NothingDim item As esriTOCControlItemDim index As Object = NothingDim toc As ITOCControl2 = axTOCControl1.Objecttoc.HitTest(e.x, e.y, item, map, layer, other, index)If item = esriTOCControlItem.esriTOCControlItemLayer Then
m_layer = layerEnd If
End SubPrivate Sub chkShowTips_CheckedChanged(ByVal sender As Object, _
ByVal e As System.EventArgs) Handles chkShowTips.CheckedChangedIf chkShowTips.CheckState = CheckState.Checked Then
axMapControl1.ShowMapTips = TrueElse
axMapControl1.ShowMapTips = FalseEnd If
End Sub
Introduction to Programming ArcObjects Using the Microsoft .NET Framework
6-20 Copyright © 2001-2009 ESRI
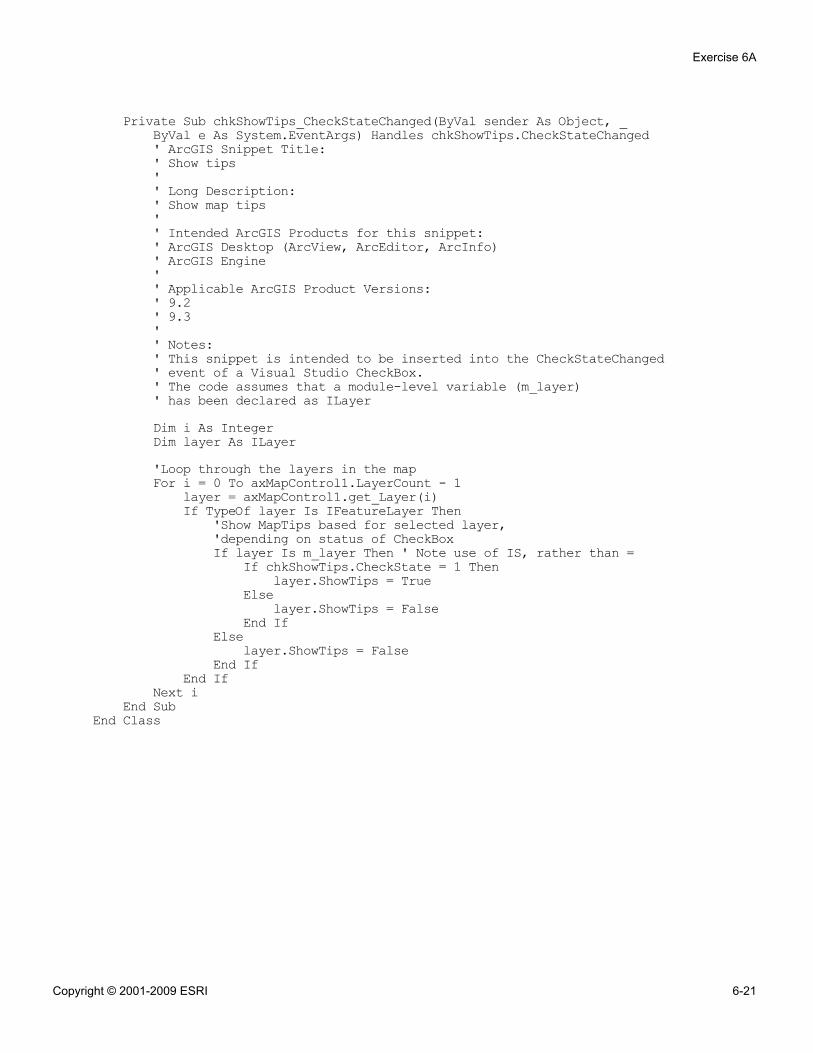
Private Sub chkShowTips_CheckStateChanged(ByVal sender As Object, _ByVal e As System.EventArgs) Handles chkShowTips.CheckStateChanged' ArcGIS Snippet Title:' Show tips'' Long Description:' Show map tips'' Intended ArcGIS Products for this snippet:' ArcGIS Desktop (ArcView, ArcEditor, ArcInfo)' ArcGIS Engine'' Applicable ArcGIS Product Versions:' 9.2' 9.3'' Notes:' This snippet is intended to be inserted into the CheckStateChanged' event of a Visual Studio CheckBox.' The code assumes that a module-level variable (m_layer)' has been declared as ILayerDim i As IntegerDim layer As ILayer'Loop through the layers in the mapFor i = 0 To axMapControl1.LayerCount - 1
layer = axMapControl1.get_Layer(i)If TypeOf layer Is IFeatureLayer Then
'Show MapTips based for selected layer,'depending on status of CheckBoxIf layer Is m_layer Then ' Note use of IS, rather than =
If chkShowTips.CheckState = 1 Thenlayer.ShowTips = True
Elselayer.ShowTips = False
End IfElse
layer.ShowTips = FalseEnd If
End IfNext i
End SubEnd Class
Exercise 6A
Copyright © 2001-2009 ESRI 6-21

Exercise 6B: Access data with ArcObjects (C#)
Estimated time: 45 minutes
In this exercise, you will use the WorkspaceFactory in order to access an existing filegeodatabase. You will access feature datasets and feature classes and create new featurelayers. You will then set the data source and general properties of the new feature layersand add them to your MapControl.
In this exercise, you will:
▪ Access a workspace▪ Access feature classes▪ Add feature layers to a MapControl
Exercise shortcut1. In ArcCatalog, open an existing workspace, the World.gdb file geodatabase from
\Student\IPAN\Database folder.
2. In Visual Studio, create a new Visual C# ArcGIS Engine MapControl Application.
3. Programmatically open the Countries feature class from the World feature datasetand then open the Lakes stand-alone feature class.
4. Create new FeatureLayer object variables to store layers for your two featureclasses.
5. Set the data sources for your feature layers to reference the data.
6. Set the Name and some other general properties for your new feature layers.
7. Add your feature layers to the MapControl.
** (Optional) Conditionally show MapTips for a selected layer.
Step 1: Open an existing workspace
In this step, you will use ArcObjects code to open an existing workspace, the World.gdbfile geodatabase. You will begin by examining the geodatabase and its contents.
Start ArcCatalog.
Exercise 6B
Copyright © 2001-2009 ESRI 6-23
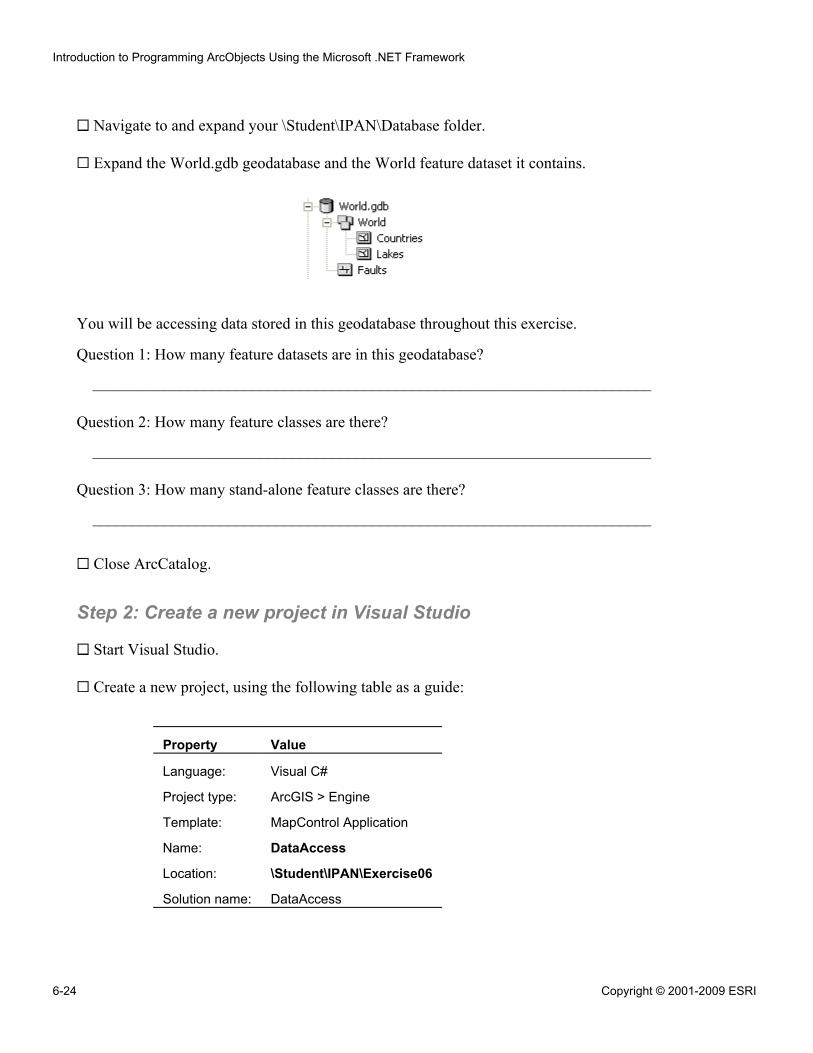
Navigate to and expand your \Student\IPAN\Database folder.
Expand the World.gdb geodatabase and the World feature dataset it contains.
You will be accessing data stored in this geodatabase throughout this exercise.
Question 1: How many feature datasets are in this geodatabase?
______________________________________________________________________
Question 2: How many feature classes are there?
______________________________________________________________________
Question 3: How many stand-alone feature classes are there?
______________________________________________________________________
Close ArcCatalog.
Step 2: Create a new project in Visual Studio
Start Visual Studio.
Create a new project, using the following table as a guide:
Property Value
Language: Visual C#
Project type: ArcGIS > Engine
Template: MapControl Application
Name: DataAccess
Location: \Student\IPAN\Exercise06
Solution name: DataAccess
Introduction to Programming ArcObjects Using the Microsoft .NET Framework
6-24 Copyright © 2001-2009 ESRI
! Make sure the Create directory for solution check box is checked.
Notice that this template gives you ArcGIS Engine controls, including a LicenseControl.
Review the MainForm code.
Collapse the existing methods, but do not collapse the class.
Step 3: Explore classes and interfaces for working with data
Before you begin developing your application, you will review topics in the availableresources to help you understand the code that you will need to write.
Using the developer resource of your choice, examine the WorkspaceFactory classand the interfaces supported by it.
Question 4: Which interface supported by WorkspaceFactory has a method that returns aworkspace from a file?
______________________________________________________________________
Question 5: What is the name of the method?
______________________________________________________________________
Add the reference to your project and import the namespace.
Now you will explore two OMDs to help you understand how to access data.
Open the Geodatabase OMD.
Exercise 6B
Copyright © 2001-2009 ESRI 6-25
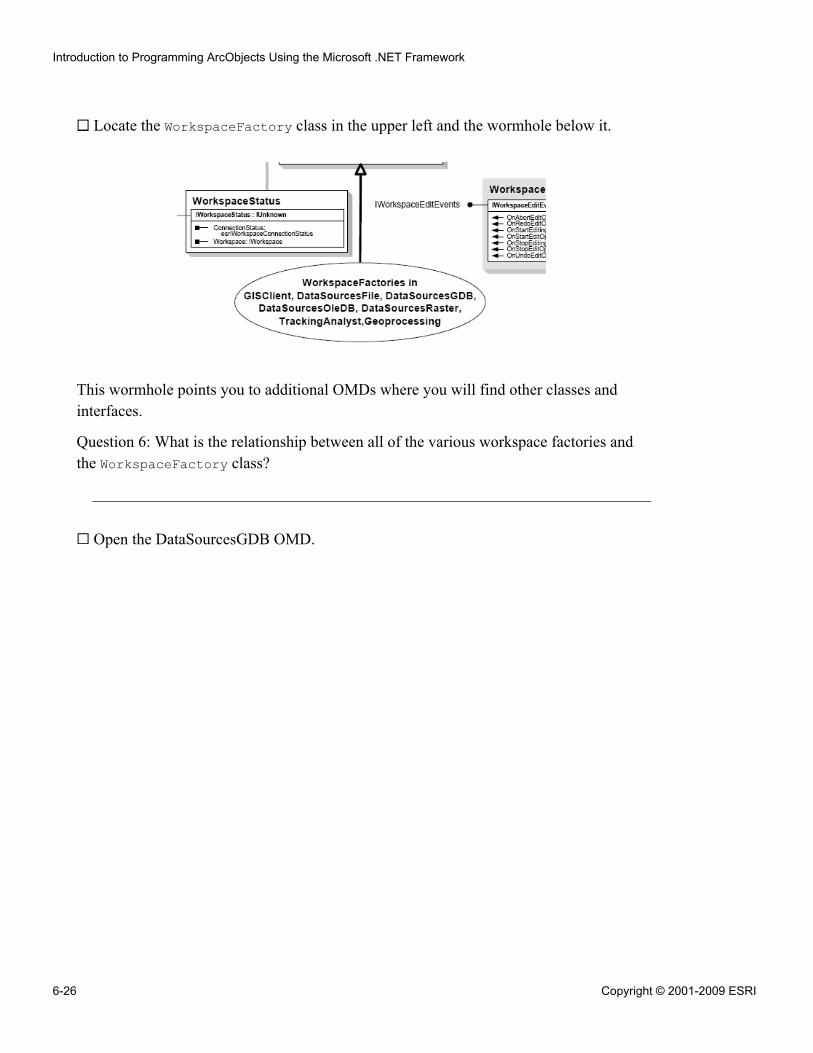
Locate the WorkspaceFactory class in the upper left and the wormhole below it.
This wormhole points you to additional OMDs where you will find other classes andinterfaces.
Question 6: What is the relationship between all of the various workspace factories andthe WorkspaceFactory class?
______________________________________________________________________
Open the DataSourcesGDB OMD.
Introduction to Programming ArcObjects Using the Microsoft .NET Framework
6-26 Copyright © 2001-2009 ESRI
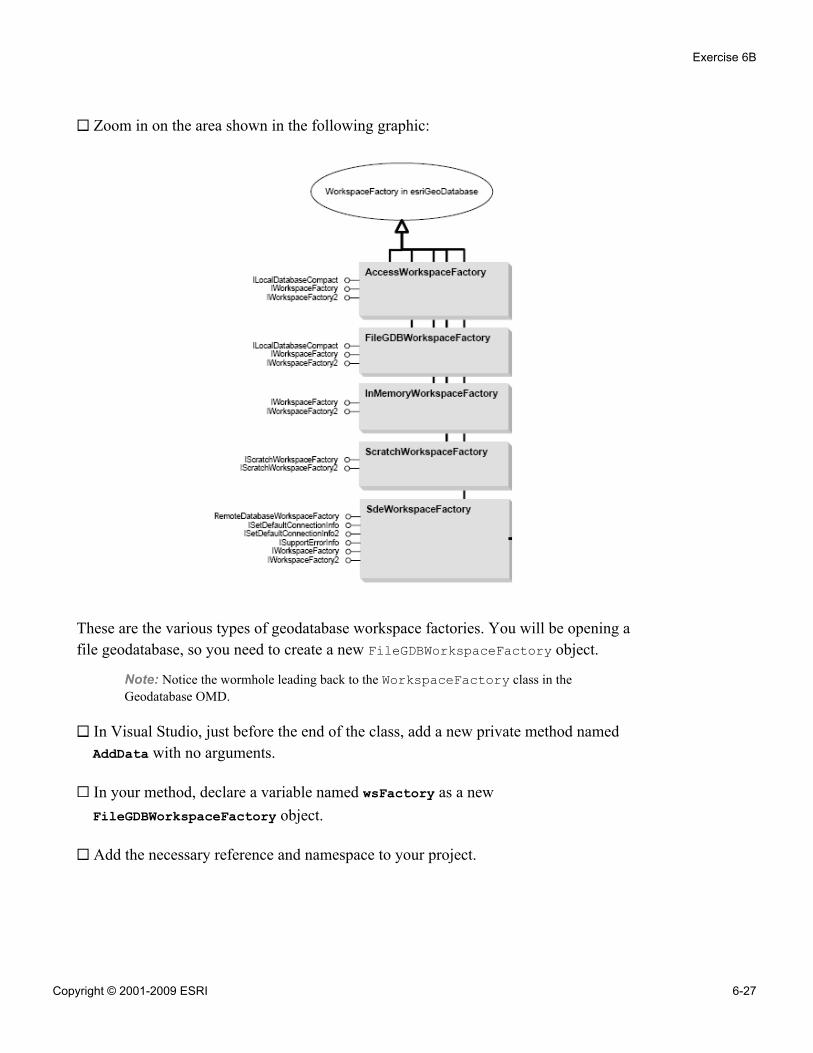
Zoom in on the area shown in the following graphic:
These are the various types of geodatabase workspace factories. You will be opening afile geodatabase, so you need to create a new FileGDBWorkspaceFactory object.
Note: Notice the wormhole leading back to the WorkspaceFactory class in theGeodatabase OMD.
In Visual Studio, just before the end of the class, add a new private method namedAddData with no arguments.
In your method, declare a variable named wsFactory as a newFileGDBWorkspaceFactory object.
Add the necessary reference and namespace to your project.
Exercise 6B
Copyright © 2001-2009 ESRI 6-27
! Now that you have had some practice adding references, importingnamespaces, and resolving implicit conversions, it is yourresponsibility for the remainder of the course to address these issues inyour code as necessary.
Declare a variable named workspace to return the interface based on what is returnedby theOpenFromFile method.
Verify that your code looks like the following:
IWorkspaceFactory wsFactory = new FileGDBWorkspaceFactoryClass();IWorkspace workspace;
Set the workspace variable by writing the following code:
workspace = wsFactory.OpenFromFile("\\Student\\IPAN\\Database\\World.gdb", 0);Note: The second parameter for OpenFromFile is a window handle object (hWnd),which is an integer that references an application's window and can be used to tie otherdialog boxes or data to a particular application.
Build your project.
Step 4: Access feature classes
Now that you have used the WorkspaceFactory class to open your geodatabase, you areready to access the data in that workspace. In this step, you will access feature classesthat reside in the workspace.
Using the Geodatabase OMD, locate the IFeatureWorkspace interface. (Hint: Lookin the Workspace class.)
Question 7: Which method can be used to access a feature class?
______________________________________________________________________
Question 8: What is returned by this method?
______________________________________________________________________
Declare the variable fWS as a reference to IFeatureWorkspace.
Cast to the workspace with the following code:
Introduction to Programming ArcObjects Using the Microsoft .NET Framework
6-28 Copyright © 2001-2009 ESRI
fWS = workspace as IFeatureWorkspace;
Declare a variable named fcCountries to the interface that is returned by theOpenFeatureClass method.
Instantiate the new variable with the following code:
fcCountries = fWS.OpenFeatureClass("Countries");
The fcCountries variable now references the Countries feature class. Recall that theWorld feature dataset contains two feature classes that you want to add to the map:Countries and Lakes. You will now access the Lakes feature class.
Declare a variable named fcLakes to the IFeatureClass interface.
Instantiate fcLakes with the following code:
fcLakes = fWS.OpenFeatureClass("Lakes");
You now have two variables, each referencing a feature class within the World featuredataset. You do not need to open the feature dataset to access the feature classes becauseeach feature class in the workspace has a unique name; thus, there are no conflictsbetween stand-alone feature classes and feature classes that reside in a feature dataset.
Step 5: Create feature layers
In order to add these data sources to the map, you need to create layers. These layers arein-memory copies of the corresponding feature classes that are stored on disk.
Question 9: What type of layers are Countries and Lakes?
______________________________________________________________________
Declare a variable named countriesLayer to the IFeatureLayer interface.
Complete the following code to create a new feature layer:
countriesLayer = ______ ________________________;
Declare another variable named lakesLayer to the IFeatureLayer interface.
Complete the following code to create a new feature layer:
lakesLayer= ______ ________________________;
Exercise 6B
Copyright © 2001-2009 ESRI 6-29
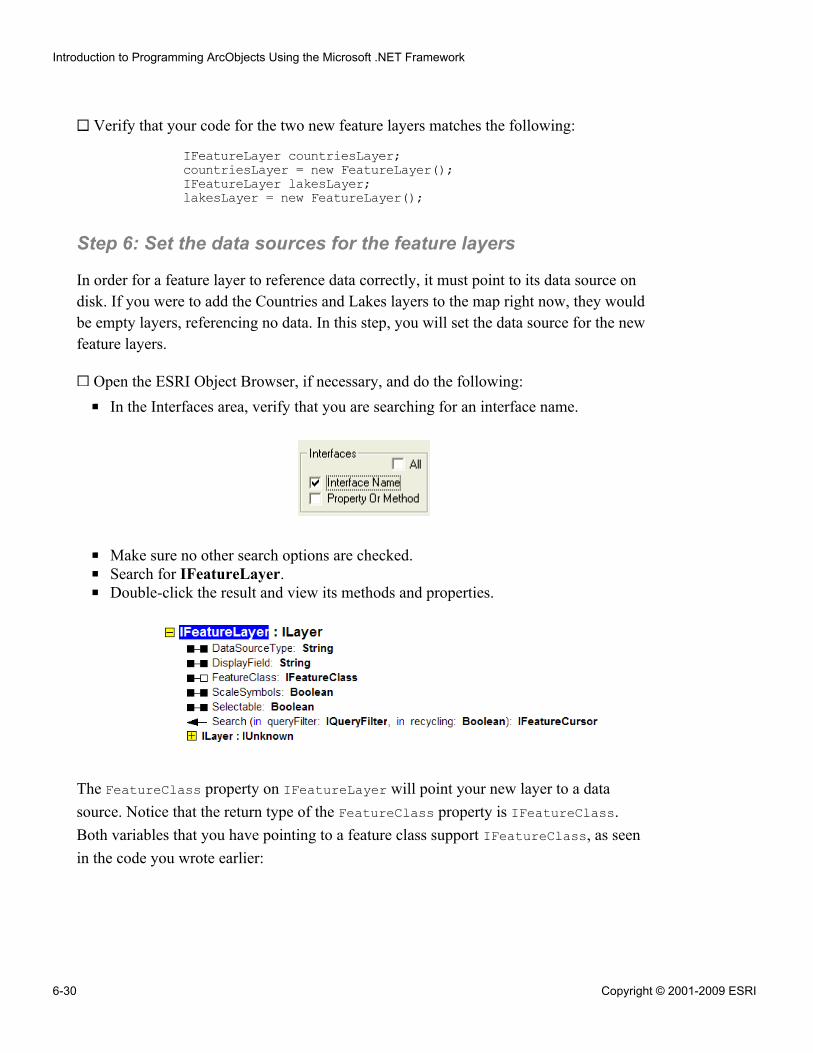
Verify that your code for the two new feature layers matches the following:
IFeatureLayer countriesLayer;countriesLayer = new FeatureLayer();IFeatureLayer lakesLayer;lakesLayer = new FeatureLayer();
Step 6: Set the data sources for the feature layers
In order for a feature layer to reference data correctly, it must point to its data source ondisk. If you were to add the Countries and Lakes layers to the map right now, they wouldbe empty layers, referencing no data. In this step, you will set the data source for the newfeature layers.
Open the ESRI Object Browser, if necessary, and do the following:
▪ In the Interfaces area, verify that you are searching for an interface name.
▪ Make sure no other search options are checked.▪ Search for IFeatureLayer.▪ Double-click the result and view its methods and properties.
The FeatureClass property on IFeatureLayer will point your new layer to a datasource. Notice that the return type of the FeatureClass property is IFeatureClass.Both variables that you have pointing to a feature class support IFeatureClass, as seenin the code you wrote earlier:
Introduction to Programming ArcObjects Using the Microsoft .NET Framework
6-30 Copyright © 2001-2009 ESRI
Question 10: What does the symbol used for FeatureClass property mean ?
______________________________________________________________________
Complete the following code to set the FeatureClass property for your two layervariables:
countriesLayer.________________________ = fcCountries;lakesLayer.________________________ = ______________;
Now that the data source has been set, you will set some general properties.
Step 7: Set general layer properties
In this step, you will set the name and some other properties for your new feature layers.
Using the following table as a guide, set properties for your feature layers:
Layer Property Value
countriesLayer Name World CountriescountriesLayer ShowTips true------------------------ ------------------------ ------------------------
lakesLayer Name World LakeslakesLayer ShowTips falselakesLayer Visible false
Note: Remember to enclose string values within quotes.
Why did you set the Lakes layer to invisible? There are times when you do not want allthe layers that you add to a map to draw by default – for example, for example when the
Exercise 6B
Copyright © 2001-2009 ESRI 6-31
layers contain lots of data coming from a multiuser geodatabase. In cases like these,making a layer invisible is more efficient.
Step 8: Add layers to your MapControl
Now that you have the properties set for your new feature layers, you will add them toyour MapControl.
At this point, you do not have any variables pointing to an interface that will allow you toadd a layer to the map.
In the Visual Studio Object Browser, search for AddLayer.
Several occurrences of AddLayer appear, indicating that you have more than one option.
Note: AddLayer is an overloaded method. You can find documentation on theinterfaces that support this method by searching the help for AddLayer.
Find the ESRI.ArcGIS.Controls namespace in the list.
Multiple references to the AddLayer method display.
AddLayer is something that an object knows how to do. In this case, the MapControlknows how to add layers. You just have to tell the MapControl to do it, like when youclick the Add Data button in ArcMap. This method expects a layer that supports ILayeras an argument.
Question 11: Which types of layers support ILayer?
______________________________________________________________________
In your code, use the AddLayer method to add the Countries layer to your MapControl(axMapControl1).
Add the Lakes layer to the MapControl.
Introduction to Programming ArcObjects Using the Microsoft .NET Framework
6-32 Copyright © 2001-2009 ESRI
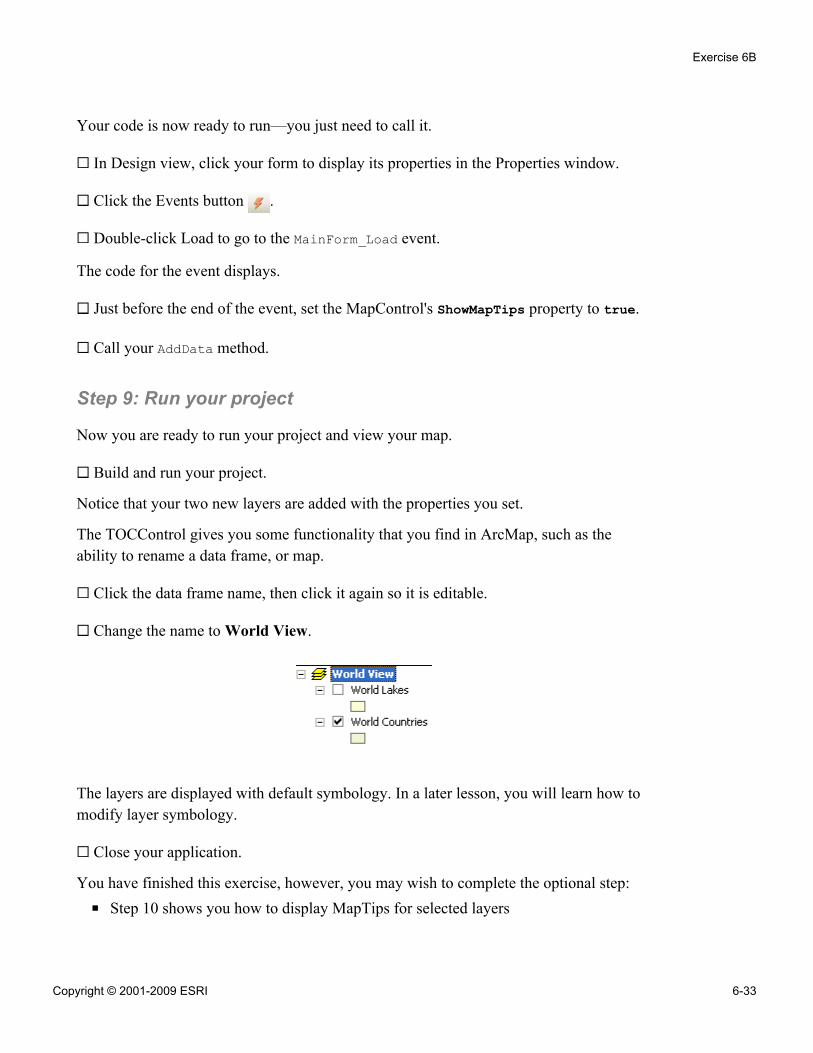
Your code is now ready to run—you just need to call it.
In Design view, click your form to display its properties in the Properties window.
Click the Events button .
Double-click Load to go to the MainForm_Load event.
The code for the event displays.
Just before the end of the event, set the MapControl's ShowMapTips property to true.
Call your AddData method.
Step 9: Run your project
Now you are ready to run your project and view your map.
Build and run your project.
Notice that your two new layers are added with the properties you set.
The TOCControl gives you some functionality that you find in ArcMap, such as theability to rename a data frame, or map.
Click the data frame name, then click it again so it is editable.
Change the name to World View.
The layers are displayed with default symbology. In a later lesson, you will learn how tomodify layer symbology.
Close your application.
You have finished this exercise, however, you may wish to complete the optional step:
▪ Step 10 shows you how to display MapTips for selected layers
Exercise 6B
Copyright © 2001-2009 ESRI 6-33
If you want to complete the optional step, do so now. Otherwise, close Visual Studio.
Step 10: (Optional) Control MapTips for your layers dynamically
In your custom applications that use the ArcGIS Engine controls, you have learned thatyou can replicate some of the functionality of ArcMap. In this step, you will conditionallyshow MapTips for a selected layer. You will begin by adding a CheckBox control to yourform.
View your form in Design view.
Click the MapControl.
In the Properties window, change the MapControl's Dock property to None.
Resize your MapControl so that there is enough room on the form for a check box.
In the Toolbox window, drag a CheckBox control from the Common Controls grouponto your form.
Change the CheckBox control's Name property to chkShowTips.
Change the Text property to Show MapTips.
The following graphic illustrates one possible configuration (yours may differ):
Introduction to Programming ArcObjects Using the Microsoft .NET Framework
6-34 Copyright © 2001-2009 ESRI
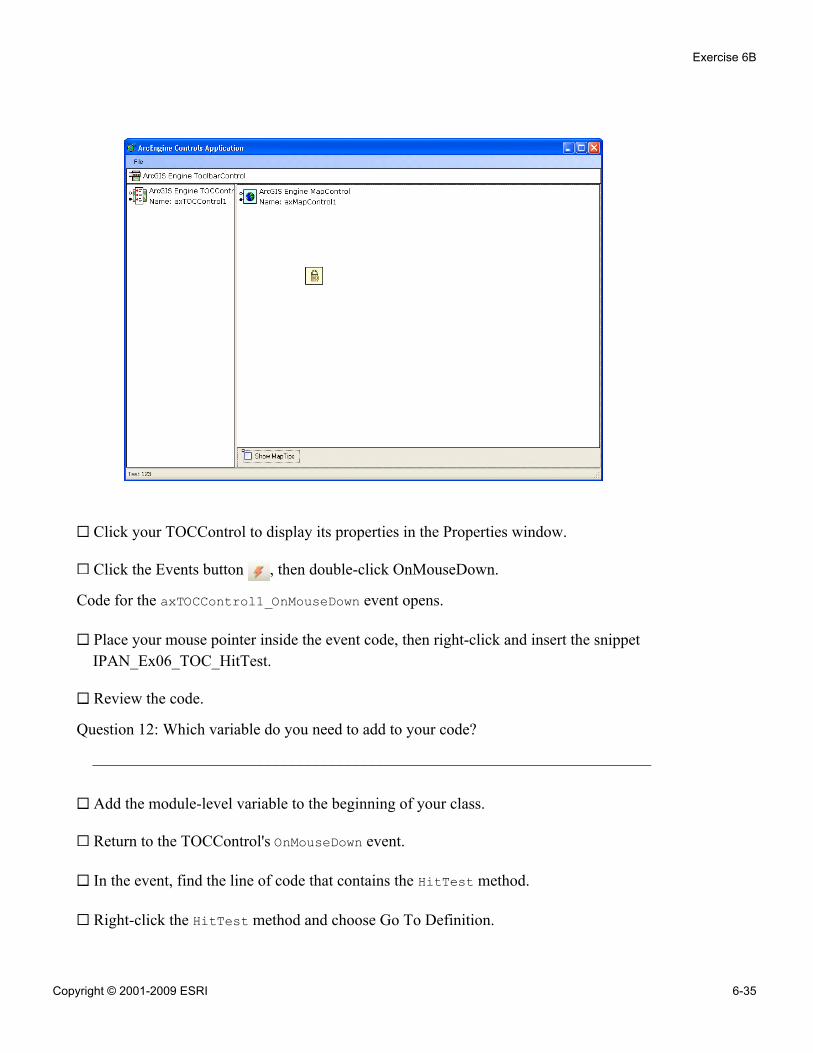
Click your TOCControl to display its properties in the Properties window.
Click the Events button , then double-click OnMouseDown.
Code for the axTOCControl1_OnMouseDown event opens.
Place your mouse pointer inside the event code, then right-click and insert the snippetIPAN_Ex06_TOC_HitTest.
Review the code.
Question 12: Which variable do you need to add to your code?
______________________________________________________________________
Add the module-level variable to the beginning of your class.
Return to the TOCControl's OnMouseDown event.
In the event, find the line of code that contains the HitTest method.
Right-click the HitTest method and choose Go To Definition.
Exercise 6B
Copyright © 2001-2009 ESRI 6-35
Question 13: What data type do the x and y properties of e return?
______________________________________________________________________
The x,y coordinates represent the pixels of items clicked in the table of contents.
Now that you have entered the code that will tell you whether a layer has been selected,you need to know whether to show MapTips.
In code view, navigate to the chkShowTips check box's CheckStateChanged event.(Hint: View the properties for chkShowTips and click Events .)
Insert the snippet IPAN_Ex06_ShowTips.
Question 14: Which types of layers will display MapTips?
______________________________________________________________________
Navigate to the MainForm_Load event.
Immediately before AddData();, enter the following code to initialize MapTips to theoff state:
axMapControl1.ShowMapTips = false;chkShowTips.CheckState = CheckState.Unchecked;
Navigate to the CheckedChanged event of chkShowTips and enter the followingcondition to manage the visibility of the MapTips:
if (chkShowTips.CheckState == CheckState.Checked)axMapControl1.ShowMapTips = true;
elseaxMapControl1.ShowMapTips = false;
Finally, navigate to your AddData method.
Comment the lines that currently control the visibility of MapTips for your two featurelayers.
Build and run your project.
In the table of contents, check the box for the World Lakes layer to turn it on, and ifnecessary, click the layer to select it.
Check the Show MapTips check box.
Introduction to Programming ArcObjects Using the Microsoft .NET Framework
6-36 Copyright © 2001-2009 ESRI
Hover your mouse pointer over lake features in the map to view the MapTips.
Uncheck the Show MapTips box.
Select the World Countries layer, turn MapTips on again, and view them in the map.
When you are finished, close your application and close Visual Studio.
Conclusion
In this exercise, you learned how to add feature layers to your map using ArcObjectscode. You accessed a workspace to open feature classes, created new feature layersreferencing the feature classes, and set properties for the feature layers. Finally, youadded the feature layers to ArcMap.
Exercise 6B
Copyright © 2001-2009 ESRI 6-37
Answers to Exercise 6B Questions
Question 1: How many feature datasets are in this geodatabase?
Answer: One (World)
Question 2: How many feature classes are there?
Answer: Three (Countries, Lakes, Faults)
Question 3: How many stand-alone feature classes are there?
Answer: One (Faults)
Question 4: Which interface supported by WorkspaceFactory has a method that returns aworkspace from a file?
Answer: IWorkspaceFactory (or IWorkspaceFactory2)
Question 5: What is the name of the method?
Answer: OpenFromFile
Question 6: What is the relationship between all of the various workspace factories andthe WorkspaceFactory class?
Answer: They are all types of workspace factories
Question 7: Which method can be used to access a feature class?
Answer: OpenFeatureClass
Question 8: What is returned by this method?
Answer: A reference to IFeatureClass
Question 9: What type of layers are Countries and Lakes?
Answer: Feature layers
Question 10: What does the symbol used for FeatureClass property mean ?
Answer: It is set by reference (it has a hollow box)
Introduction to Programming ArcObjects Using the Microsoft .NET Framework
6-38 Copyright © 2001-2009 ESRI

Question 11: Which types of layers support ILayer?
Answer: All, since the ILayer interface is found on the abstract class that all layersinherit from.
Question 12: Which variable do you need to add to your code?
Answer: ILayer m_layer;
Question 13: What data type do the x and y properties of e return?
Answer: Integer
Question 14: Which types of layers will display MapTips?
Answer: Feature layers
Exercise 6B
Copyright © 2001-2009 ESRI 6-39
Exercise Solution: Exercise 6B (C#)using System;using System.Drawing;using System.Collections;using System.ComponentModel;using System.Windows.Forms;using System.Data;using System.IO;using System.Runtime.InteropServices;using ESRI.ArcGIS.esriSystem;using ESRI.ArcGIS.Carto;using ESRI.ArcGIS.Controls;using ESRI.ArcGIS.ADF;using ESRI.ArcGIS.SystemUI;using ESRI.ArcGIS.Geodatabase;using ESRI.ArcGIS.DataSourcesGDB;namespace DataAccess{
public sealed partial class MainForm : Form{
#region class private membersprivate IMapControl3 m_mapControl = null;private string m_mapDocumentName = string.Empty;private ILayer m_layer;#endregion#region class constructorpublic MainForm(){
InitializeComponent();}#endregionprivate void MainForm_Load(object sender, EventArgs e){
//get the MapControlm_mapControl = (IMapControl3)axMapControl1.Object;//disable the Save menu (since there is no document yet)menuSaveDoc.Enabled = false;axMapControl1.ShowMapTips = false;chkShowTips.CheckState = CheckState.Unchecked;AddData();
}
Introduction to Programming ArcObjects Using the Microsoft .NET Framework
6-40 Copyright © 2001-2009 ESRI
#region Main Menu event handlersprivate void menuNewDoc_Click(object sender, EventArgs e){
//execute New Document commandICommand command = new CreateNewDocument();command.OnCreate(m_mapControl.Object);command.OnClick();
}private void menuOpenDoc_Click(object sender, EventArgs e){
//execute Open Document commandICommand command = new ControlsOpenDocCommandClass();command.OnCreate(m_mapControl.Object);command.OnClick();
}private void menuSaveDoc_Click(object sender, EventArgs e){
//execute Save Document commandif (m_mapControl.CheckMxFile(m_mapDocumentName)){
//create a new instance of a MapDocumentIMapDocument mapDoc = new MapDocumentClass();mapDoc.Open(m_mapDocumentName, string.Empty);//Make sure that the MapDocument is not readonlyif (mapDoc.get_IsReadOnly(m_mapDocumentName)){
MessageBox.Show("Map document is read only!");mapDoc.Close();return;
}//Replace its contents with the current mapmapDoc.ReplaceContents((IMxdContents)m_mapControl.Map);//save the MapDocument in order to persist itmapDoc.Save(mapDoc.UsesRelativePaths, false);//close the MapDocumentmapDoc.Close();
}}private void menuSaveAs_Click(object sender, EventArgs e){
//execute SaveAs Document commandICommand command = new ControlsSaveAsDocCommandClass();command.OnCreate(m_mapControl.Object);command.OnClick();
}private void menuExitApp_Click(object sender, EventArgs e){
//exit the applicationApplication.Exit();
}#endregion
Exercise 6B
Copyright © 2001-2009 ESRI 6-41
//listen to MapReplaced event in order to update the statusbar//and the Save menuprivate void axMapControl1_OnMapReplaced(object sender,IMapControlEvents2_OnMapReplacedEvent e){
//get the current document name from the MapControlm_mapDocumentName = m_mapControl.DocumentFilename;//if there is no MapDocument, disable the Save menu and clear the statusbarif (m_mapDocumentName == string.Empty){
menuSaveDoc.Enabled = false;statusBarXY.Text = string.Empty;
}else{
//enable the Save menu and write the doc name to the statusbarmenuSaveDoc.Enabled = true;statusBarXY.Text = Path.GetFileName(m_mapDocumentName);
}}private void axMapControl1_OnMouseMove(object sender,
IMapControlEvents2_OnMouseMoveEvent e){
statusBarXY.Text =string.Format("{0}, {1} {2}", e.mapX.ToString("#######.##"),e.mapY.ToString("#######.##"),axMapControl1.MapUnits.ToString().Substring(4));
}private void AddData(){
IWorkspaceFactory wsFactory;wsFactory = new FileGDBWorkspaceFactory();IWorkspace workspace;workspace = wsFactory.OpenFromFile(
"\\Student\\IPAN\\Database\\World.gdb", 0);IFeatureWorkspace fWS;fWS = workspace as IFeatureWorkspace;IFeatureClass fcCountries;fcCountries = fWS.OpenFeatureClass("Countries");IFeatureClass fcLakes;fcLakes = fWS.OpenFeatureClass("Lakes");IFeatureLayer countriesLayer;countriesLayer = new FeatureLayer();IFeatureLayer lakesLayer;lakesLayer = new FeatureLayer();countriesLayer.FeatureClass = fcCountries;lakesLayer.FeatureClass = fcLakes;
Introduction to Programming ArcObjects Using the Microsoft .NET Framework
6-42 Copyright © 2001-2009 ESRI
countriesLayer.Name = "World Countries";//countriesLayer.ShowTips = true;lakesLayer.Name = "World Lakes";//lakesLayer.ShowTips = false;lakesLayer.Visible = false;axMapControl1.AddLayer(countriesLayer);axMapControl1.AddLayer(lakesLayer);
}private void axTOCControl1_OnMouseDown(object sender,
ITOCControlEvents_OnMouseDownEvent e){
// ArcGIS Snippet Title:// Find layer in TOC//// Long Description:// Find the selected layer in the table of contents//// Intended ArcGIS Products for this snippet:// ArcGIS Desktop (ArcView, ArcEditor, ArcInfo)// ArcGIS Engine//// Applicable ArcGIS Product Versions:// 9.2// 9.3//// Notes:// This snippet is intended to be inserted into the OnMouseDown event// of the TOC Control// The code assumes that a module-level variable (m_layer)// has been declared as ILayerIBasicMap map = null;ILayer layer = null;object other = null;object index = null;esriTOCControlItem item = esriTOCControlItem.esriTOCControlItemNone;axTOCControl1.HitTest(e.x, e.y, ref item, ref map, ref layer,
ref other, ref index);if ((item == esriTOCControlItem.esriTOCControlItemLayer)){
m_layer = layer as ILayer;}
}
Exercise 6B
Copyright © 2001-2009 ESRI 6-43
private void chkShowTips_CheckStateChanged(object sender, System.EventArgs e){
// ArcGIS Snippet Title:// Show tips//// Long Description:// Show map tips//// Intended ArcGIS Products for this snippet:// ArcGIS Desktop (ArcView, ArcEditor, ArcInfo)// ArcGIS Engine//// Applicable ArcGIS Product Versions:// 9.2// 9.3//// Notes:// This snippet is intended to be inserted into the CheckStateChanged// event of a Visual Studio CheckBox// The code assumes that a module-level variable (m_layer)// has been declared as ILayerILayer layer;// Loop through the layers in the mapfor (int i = 0; (i < (axMapControl1.LayerCount)); i++){
layer = axMapControl1.get_Layer(i);if (layer is IFeatureLayer){
// Show MapTips based for selected layer,// depending on status of CheckBoxif (layer == m_layer){
if (chkShowTips.CheckState == CheckState.Checked){
layer.ShowTips = true;}else{
layer.ShowTips = false;}
}else{
layer.ShowTips = false;}
}}
}
Introduction to Programming ArcObjects Using the Microsoft .NET Framework
6-44 Copyright © 2001-2009 ESRI

private void chkShowTips_CheckedChanged(object sender, EventArgs e){
if (chkShowTips.CheckState == CheckState.Checked){
axMapControl1.ShowMapTips = true;else
axMapControl1.ShowMapTips = false;}
}}
}
Exercise 6B
Copyright © 2001-2009 ESRI 6-45

7Rendering data
Exercise 7A: Display layers (VB.NET)Estimated time: 90 minutes
Exercise 7B: Display layers (C#)Estimated time: 90 minutes

Exercise 7A: Display layers (VB.NET)
Estimated time: 90 minutes
In this exercise, you will display data in different ways by rendering a feature layer and araster layer. In addition, you will save symbology to a layer file, which can then be usedby others who access the same data.
In this exercise, you will:
▪ Create a simple renderer▪ Create a raster renderer▪ Save symbology to a layer file
Exercise shortcut1. In Visual Studio, open the DisplayingData.sln solution from the
\Student\IPAN\Exercise07\VisualBasic\DisplayingData folder.
2. Programmatically create a new simple fill symbol and set properties (e.g., style,color). Apply the new symbol to a polygon layer with a simple renderer. Use thesame techniques to apply class breaks and unique value.
OR
3. Apply an RGB renderer to render raster data.
4. Save the symbology you created to a layer (.lyr) file.
** (Optional) Apply a scale-dependent renderer to set a scale threshold to the layers.
** (Optional) Apply a stretch color ramp renderer to render your raster data.
Step 1: Open a Visual Studio project
To save time, you will begin by opening a project that has already been started for you.
Start Visual Studio.
From the File menu, choose Open Project.
Browse to your \Student\IPAN\Exercise07\VisualBasic\DisplayingData folder andopen the DisplayingData solution.
Exercise 7A
Copyright © 2001-2009 ESRI 7-1
View MainForm in code view.
Notice that the project contains many lines of pre-written code.
To reduce the code that you need to scroll through, by right-click anywhere in the codewindow and choose Outlining > Collapse to Definitions.
View MainForm in Design view.
This project is based on the ArcGIS Engine MapControl Application template andcontains four ArcGIS Engine controls: a ToolbarControl, TOCControl, MapControl, andLicenseControl. In addition, several Visual Studio controls have been added for choosingrenderer properties at run time.
Using the Properties window, note the names of some of the controls.
You will use these names in the code later.
Before continuing, decide which type of data you want to work with in this exercise.Choose one of the following options:
▪ Option 1: Complete steps 2 and 3 to work with symbology for vector data.OR
▪ Option 2: Complete step 4 (skip 2 and 3) to work with symbology for raster data.
After completing either option, you will save your symbology to a layer file in step 5.
Step 2: Create a fill symbol for vector polygons
In this step, you will create a new fill symbol, set properties on it, and then apply it to apolygon layer with a simple renderer.
Double-click the Render button on the form to view the code for its Click event(btnRender_Click).
When a user clicks this button, a new renderer will be applied to the layer that the userspecifies.
Examine the first two lines of code.
This code creates a reference to the chosen layer by passing the selected name in thecboLayer combo box to the GetLayerByName function, which has been written for you.You will browse the code in the function to learn how it works.
Introduction to Programming ArcObjects Using the Microsoft .NET Framework
7-2 Copyright © 2001-2009 ESRI
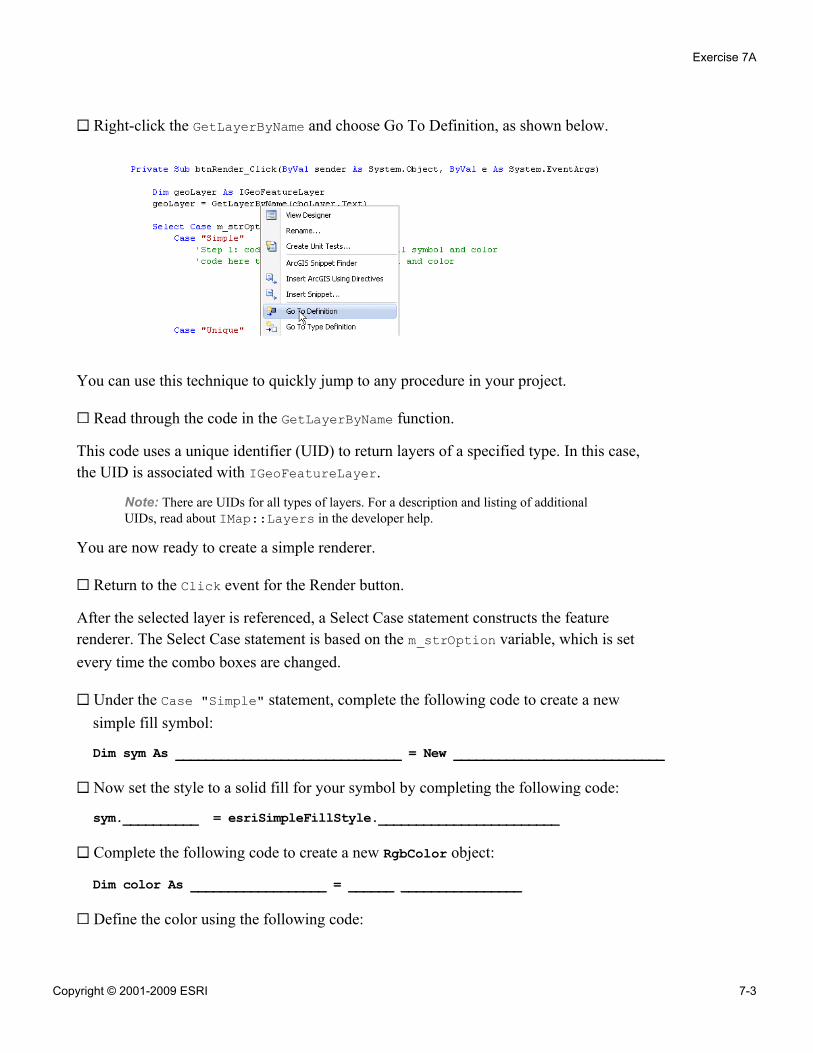
Right-click the GetLayerByName and choose Go To Definition, as shown below.
You can use this technique to quickly jump to any procedure in your project.
Read through the code in the GetLayerByName function.
This code uses a unique identifier (UID) to return layers of a specified type. In this case,the UID is associated with IGeoFeatureLayer.
Note: There are UIDs for all types of layers. For a description and listing of additionalUIDs, read about IMap::Layers in the developer help.
You are now ready to create a simple renderer.
Return to the Click event for the Render button.
After the selected layer is referenced, a Select Case statement constructs the featurerenderer. The Select Case statement is based on the m_strOption variable, which is setevery time the combo boxes are changed.
Under the Case "Simple" statement, complete the following code to create a newsimple fill symbol:
Dim sym As ______________________________ = New ____________________________
Now set the style to a solid fill for your symbol by completing the following code:
sym.__________ = esriSimpleFillStyle.________________________
Complete the following code to create a new RgbColor object:
Dim color As __________________ = ______ ________________
Define the color using the following code:
Exercise 7A
Copyright © 2001-2009 ESRI 7-3
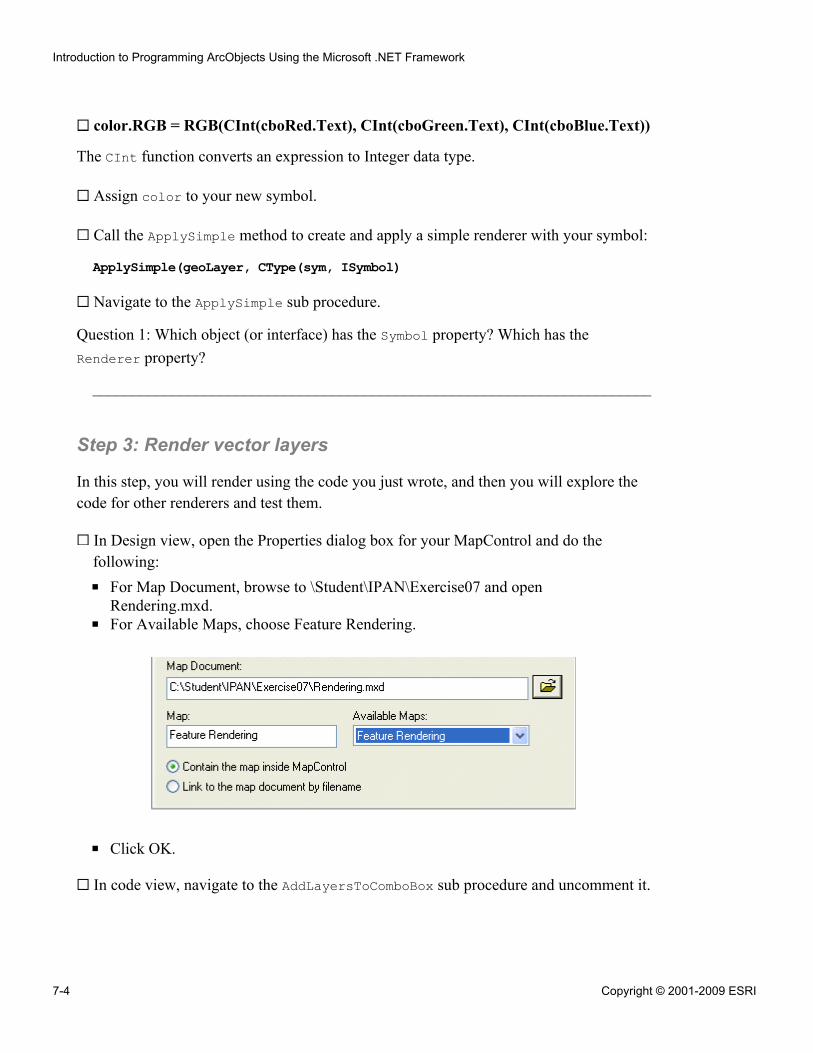
color.RGB = RGB(CInt(cboRed.Text), CInt(cboGreen.Text), CInt(cboBlue.Text))
The CInt function converts an expression to Integer data type.
Assign color to your new symbol.
Call the ApplySimple method to create and apply a simple renderer with your symbol:
ApplySimple(geoLayer, CType(sym, ISymbol)
Navigate to the ApplySimple sub procedure.
Question 1: Which object (or interface) has the Symbol property? Which has theRenderer property?
______________________________________________________________________
Step 3: Render vector layers
In this step, you will render using the code you just wrote, and then you will explore thecode for other renderers and test them.
In Design view, open the Properties dialog box for your MapControl and do thefollowing:
▪ For Map Document, browse to \Student\IPAN\Exercise07 and openRendering.mxd.
▪ For Available Maps, choose Feature Rendering.
▪ Click OK.
In code view, navigate to the AddLayersToComboBox sub procedure and uncomment it.
Introduction to Programming ArcObjects Using the Microsoft .NET Framework
7-4 Copyright © 2001-2009 ESRI
Question 2: What types of layers are added to the cboLayer combo box?
______________________________________________________________________
Build and run your project.
From your application's Feature Layer drop-down list, choose States to render thislayer.
First, you will apply a simple renderer.
Below the Feature Layer drop-down list, choose the Simple option to apply a simplerenderer.
Notice that the R, G, and B drop-down lists are now enabled.
Choose values for R, G, and B, then click Render.
Your single color, simple renderer is applied to the States layer.
Close your application.
Now you will experiment with two other renderers for feature layers: unique value andclass breaks.
In code view, navigate to MainForm_Load.
Review the code where the three color combo boxes are enabled and populated.
Note that the values in the drop-down lists will range from 0 to 255.
Navigate to the following MainForm sub procedures and functions, and uncomment thecode in each:
▪ ApplyUniqueValue▪ ApplyClassBreaks▪ GetColors▪ FillFieldsComboBox
Question 3: Which ArcGIS reference do you need to add to your project?
______________________________________________________________________
Exercise 7A
Copyright © 2001-2009 ESRI 7-5
Note: This course hasn't covered all of the objects in these renderers, so you might notunderstand all of the code. For example, you may have noticed references to cursors andfields. You will learn more about these objects in later lessons. For now, use the renderersand observe how your layers display in the map.
Add the necessary reference.
Build and run your project.
To apply a class breaks renderer, do the following in your application:
▪ In the table of contents, turn on the Counties layer.▪ From the Feature Layer drop-down list, choose Counties.▪ Choose the Class Breaks option, then choose any field from the drop-down list.▪ Click Render to apply your class breaks renderer to the field.
Choose a different field and vary the number of breaks, then run your class breaksrenderer again.
To test the unique values renderer, choose the Unique Value option, then run it on afield of your choice.
When you are finished, close your application.
Skip to step 5, where you will save your symbology to a layer file.
Step 4: Apply an RGB renderer to raster data
In this step, you will render raster data using an RGB renderer. With a newRasterRGBRenderer, you can switch the band colors and thus change the display of theraster.
In Design view, open the Properties dialog box for your MapControl and do thefollowing:
▪ For Map Document, browse to \Student\IPAN\Exercise07 and openRendering.mxd.
▪ For Available Maps, choose Raster Rendering.▪ Click OK.
Introduction to Programming ArcObjects Using the Microsoft .NET Framework
7-6 Copyright © 2001-2009 ESRI
Because you will not be working with feature layers, comment the code in thefollowing sub procedures and then collapse them:
▪ ApplySimple▪ AddLayersToComboBox▪ btnRender_Click▪ cboLayer_SelectedValueChanged
Open the Desktop Help for .NET (VS2008), if necessary.
Search for IRasterLayer and review its properties.
You will use this interface to access properties such as Raster and Renderer. Before youcan do so, you will need to return a reference to a map, or data frame.
Navigate to the btnChangeRGBRenderer_Click sub procedure.
Complete the following code to access the map (data frame) and the first raster layer inthe active map:
Dim map As IMapmap = AxMapControl1.ActiveView.________________Dim rLayer As ________________________rLayer = map.Layer(0)
The Raster property on IRasterLayer represents a layer's raster object.
Create and set a variable to store the raster object:
Dim raster As IRasterraster = rLayer.Raster
You will use the IRasterBandCollection interface to verify that this raster has at leastthree bands. If it doesn't, you will exit the sub procedure.
Complete the following code to return the bands and check if there are at least three:
Dim bandCol As ________________________________________bandCol = raster ' QIIf bandCol.__________ < 3 Then Exit Sub
Complete the following code to create a new raster RGB renderer and a rasterrenderer:
Dim rgbRen As IRasterRGBRenderer = New __________________________________Dim rasRen As ______________________________
Exercise 7A
Copyright © 2001-2009 ESRI 7-7
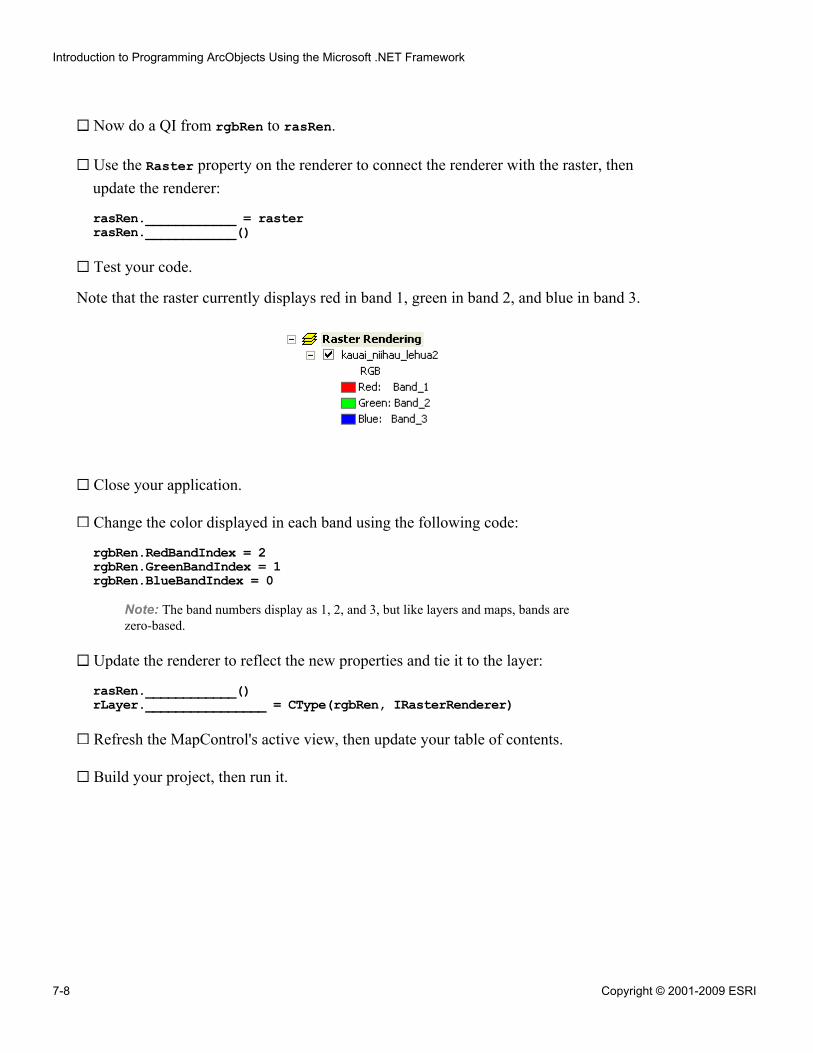
Now do a QI from rgbRen to rasRen.
Use the Raster property on the renderer to connect the renderer with the raster, thenupdate the renderer:
rasRen.____________ = rasterrasRen.____________()
Test your code.
Note that the raster currently displays red in band 1, green in band 2, and blue in band 3.
Close your application.
Change the color displayed in each band using the following code:
rgbRen.RedBandIndex = 2rgbRen.GreenBandIndex = 1rgbRen.BlueBandIndex = 0
Note: The band numbers display as 1, 2, and 3, but like layers and maps, bands arezero-based.
Update the renderer to reflect the new properties and tie it to the layer:
rasRen.____________()rLayer.________________ = CType(rgbRen, IRasterRenderer)
Refresh the MapControl's active view, then update your table of contents.
Build your project, then run it.
Introduction to Programming ArcObjects Using the Microsoft .NET Framework
7-8 Copyright © 2001-2009 ESRI
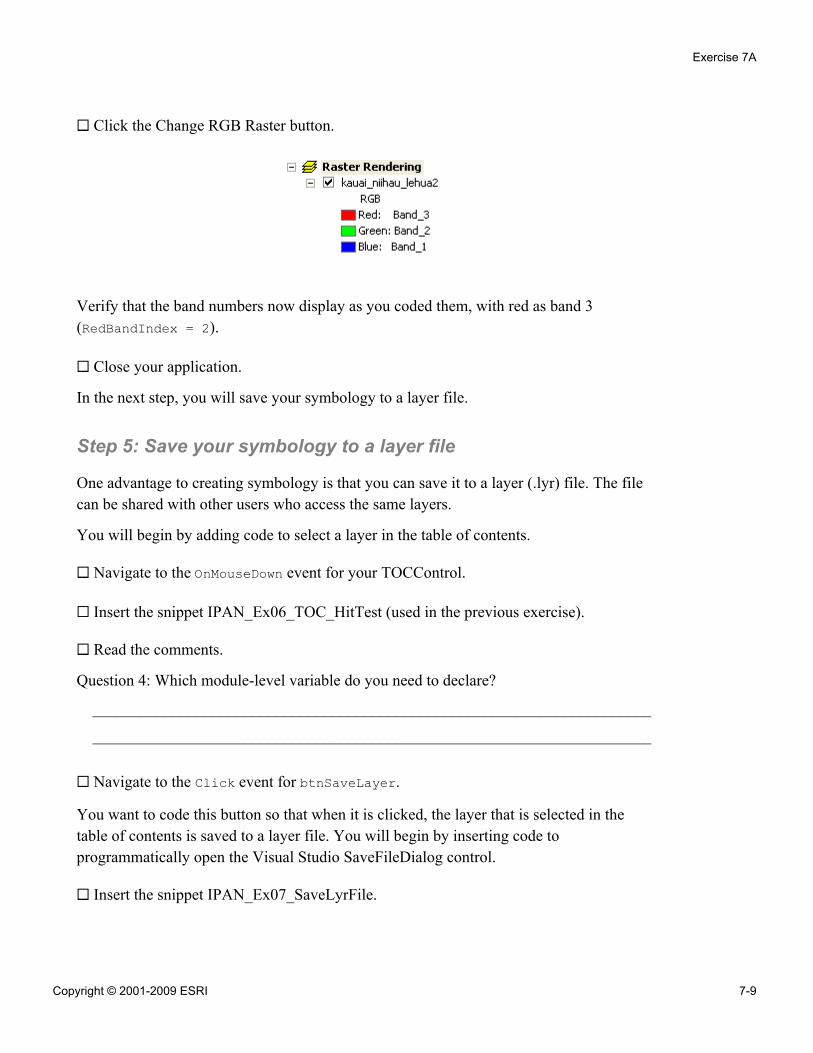
Click the Change RGB Raster button.
Verify that the band numbers now display as you coded them, with red as band 3(RedBandIndex = 2).
Close your application.
In the next step, you will save your symbology to a layer file.
Step 5: Save your symbology to a layer file
One advantage to creating symbology is that you can save it to a layer (.lyr) file. The filecan be shared with other users who access the same layers.
You will begin by adding code to select a layer in the table of contents.
Navigate to the OnMouseDown event for your TOCControl.
Insert the snippet IPAN_Ex06_TOC_HitTest (used in the previous exercise).
Read the comments.
Question 4: Which module-level variable do you need to declare?
______________________________________________________________________
______________________________________________________________________
Navigate to the Click event for btnSaveLayer.
You want to code this button so that when it is clicked, the layer that is selected in thetable of contents is saved to a layer file. You will begin by inserting code toprogrammatically open the Visual Studio SaveFileDialog control.
Insert the snippet IPAN_Ex07_SaveLyrFile.
Exercise 7A
Copyright © 2001-2009 ESRI 7-9
!
Read through the code.
The code uses the layer name selected by the user at run time as the output file name. The.lyr extension is added to the file so that ArcGIS can recognize it as a layer file.
Now that you know the output name, you will create the new layer file object.
After the line of code that assigns a value to the path variable, use the LayerFileclass to create a new instance of a layer file with the layerFile variable.
Create the new layer file by calling ILayerFile::New, passing the file name selectedin the dialog box as the argument.
At the bottom of the method, after the code that assigns the variable, complete thefollowing code to load m_layer into the layer file:
layerFile.ReplaceContents(______________)
Save the layer file:
layerFile.________()
Create a message box to notify the user of the layer file's name and location on disk.
Run your project.
When your form displays, if you are using vector layers, symbolize one of the layers.(If you are using raster layers, you do not need to symbolize the layer.)
Click the same layer in the table of contents to select it, then click your Save Layerbutton.
Clicking the Save Layer button without first selecting a layer in thetable of contents may result in an error.
Save the layer file to your \Student\IPAN\Exercise07 folder.
Click OK on the message box.
Turn off and collapse the layer in the table of contents.
To confirm that your code is working, click the Add Data button and add your newlayer file to the map. (Hint: In the dialog box that opens, on the left, click Layers.)
Introduction to Programming ArcObjects Using the Microsoft .NET Framework
7-10 Copyright © 2001-2009 ESRI
Close your application.
You have finished this exercise; however, you may wish to complete the optional steps:
▪ Step 6 shows you how to create a scale-dependent renderer.▪ Step 7 shows you how to add a stretch color ramp renderer to symbolize raster
data.
If you want to complete the optional steps, do so now. Otherwise, close Visual Studio.
Step 6: (Optional) Apply a scale-dependent renderer
In ArcMap, you can change the way layers are rendered using the layer properties, orthrough code. One example of functionality that can only be done through code is ascale-dependent renderer, which combines several renderers into one layer. For example,you can combine a simple renderer and a unique value renderer all within one layer. It isscale-dependent because you set the scale threshold at which a particular rendererdisplays.
Start ArcMap and choose to open an existing map.
Browse to \Student\IPAN\Exercise07 and open Scale_Renderer.mxd.
Note that the map contains three layers: COUNTY1, COUNTY2, and COUNTY3.
One by one, right-click each layer, choose Properties, and view the Source tab in theLayer Properties dialog box.
Question 5: What feature class is used as the data source for all three layers?
______________________________________________________________________
Close the Layer Properties dialog box.
Expand each layer in the table of contents.
Notice that the same layer has been added three times, each time with differentsymbology.
Exercise 7A
Copyright © 2001-2009 ESRI 7-11
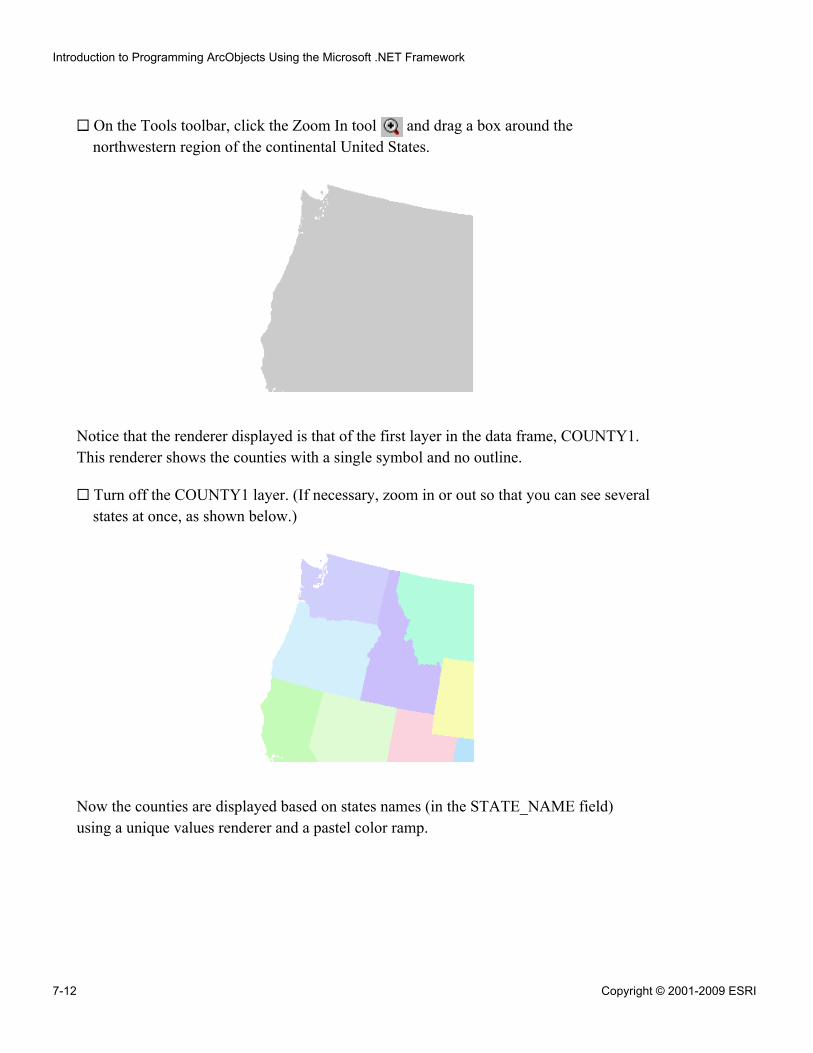
On the Tools toolbar, click the Zoom In tool and drag a box around thenorthwestern region of the continental United States.
Notice that the renderer displayed is that of the first layer in the data frame, COUNTY1.This renderer shows the counties with a single symbol and no outline.
Turn off the COUNTY1 layer. (If necessary, zoom in or out so that you can see severalstates at once, as shown below.)
Now the counties are displayed based on states names (in the STATE_NAME field)using a unique values renderer and a pastel color ramp.
Introduction to Programming ArcObjects Using the Microsoft .NET Framework
7-12 Copyright © 2001-2009 ESRI

Turn off the COUNTY2 layer.
Now the counties are displayed based on county names (in the NAME field) using aunique values renderer and a blue color ramp.
Turn on the COUNTY1 and COUNTY2 layers.
Right-click the COUNTY1 layer and choose Properties.
Click the General tab and select the Don't show layer when zoomed option.
In this dialog box, you can add a display scale range to each individual layer. As youzoom in and out of your map display, you will notice that layers will either draw or notdraw based on their scale range.
For In beyond, type 50000000 (7 zeros) and click OK.
You are specifying that you do not want this layer to draw when the display scale iswithin 1:50,000,000.
Exercise 7A
Copyright © 2001-2009 ESRI 7-13
Use the zoom tools to zoom out past 50,000,000 and in less than 50,000,000 to seewhat happens in the display.
Question 6: What happens in the display when you zoom?
______________________________________________________________________
______________________________________________________________________
Open the layer properties for COUNTY1, select the Show layer at all scales option,and click OK.
You want to mimic this type of functionality all within one layer in ArcMap, as opposedto multiple layers.
To save time, the code to create the new renderer has been written for you. You will runthe code and examine how it works. You will begin by setting your MapControl to openthe map document that you currently see in ArcMap.
Close ArcMap. Do not save changes.
In Visual Studio, open the Properties dialog box for your MapControl.
For Map Document, browse to \Student\IPAN\Exercise07 and openScale_Renderer.mxd.
Click OK.
In code view, navigate to the following sub procedures and uncomment the code:
▪ AddLayersToComboBox▪ btnScale_Click
In the btnScale_Click sub procedure, explore the code that uses IGeoFeatureLayer.
Use the developer resource of your choice to search for IGeoFeatureLayer. (Tip:Remember, you can use the Visual Studio Object Browser.)
Question 7: What is returned when you use the Renderer property?
______________________________________________________________________
Introduction to Programming ArcObjects Using the Microsoft .NET Framework
7-14 Copyright © 2001-2009 ESRI
!
In your code, scroll down a few lines to the IScaleDependentRenderer interfacecode and view the portion that sets the scale thresholds for the renderers within thescale-dependant renderer:
scaleDependentRenderer.Break(0) = 10000000scaleDependentRenderer.Break(1) = 50000000scaleDependentRenderer.Break(2) = 500000000
Run your project.
Click the Scale Dependent button.
Close the message boxes that appear.
A new layer named USA is added to the table of contents.
It may take a little time for the new layer to display in the table ofcontents.
Turn off all layers except USA.
Click the Full Extent button to view the map at a smaller map scale.
Click the Fixed Zoom In button several times to zoom in past 1:10,000,000. (Tip:Use the Pan tool to keep your map in view.)
The simple renderer switches to unique values for states at 1:50,000,000, then to uniquevalues for counties at 1:10,000,000. There are three renderers embedded in the singleUSA layer.
You created each renderer by referencing layers in the map document. Then, you addedthem into the scale-dependent renderer. If you wanted, you could now save the USAlayer to a layer file and add it to other maps.
Close your application.
To learn how to add a stretch color ramp renderer to symbolize raster data, continue onto the next step. Otherwise, close Visual Studio.
Step 7: (Optional) Apply a stretch renderer to raster data
In this step, you will apply a stretch color ramp renderer to your raster data. To save time,you will work with some code that has already been written for you.
Exercise 7A
Copyright © 2001-2009 ESRI 7-15
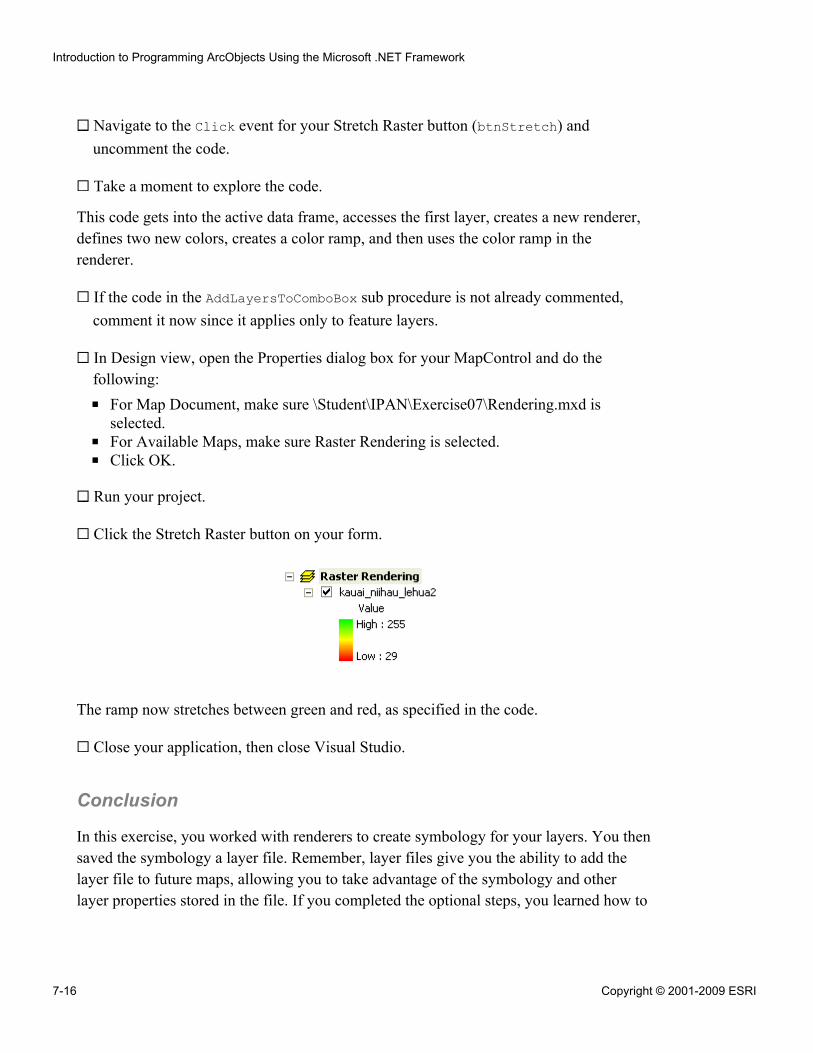
Navigate to the Click event for your Stretch Raster button (btnStretch) anduncomment the code.
Take a moment to explore the code.
This code gets into the active data frame, accesses the first layer, creates a new renderer,defines two new colors, creates a color ramp, and then uses the color ramp in therenderer.
If the code in the AddLayersToComboBox sub procedure is not already commented,comment it now since it applies only to feature layers.
In Design view, open the Properties dialog box for your MapControl and do thefollowing:
▪ For Map Document, make sure \Student\IPAN\Exercise07\Rendering.mxd isselected.
▪ For Available Maps, make sure Raster Rendering is selected.▪ Click OK.
Run your project.
Click the Stretch Raster button on your form.
The ramp now stretches between green and red, as specified in the code.
Close your application, then close Visual Studio.
Conclusion
In this exercise, you worked with renderers to create symbology for your layers. You thensaved the symbology a layer file. Remember, layer files give you the ability to add thelayer file to future maps, allowing you to take advantage of the symbology and otherlayer properties stored in the file. If you completed the optional steps, you learned how to
Introduction to Programming ArcObjects Using the Microsoft .NET Framework
7-16 Copyright © 2001-2009 ESRI

apply a scale-dependent renderer to vector data and a stretch color ramp renderer to rasterdata for more sophisticated data display.
Exercise 7A
Copyright © 2001-2009 ESRI 7-17

Answers to Exercise 7A Questions
Question 1: Which object (or interface) has the Symbol property? Which has theRenderer property?
Answer: ISimpleRenderer; IGeoFeatureLayer
Question 2: What types of layers are added to the cboLayer combo box?
Answer: Feature layers—point, polyline, and polygon
Question 3: Which ArcGIS reference do you need to add to your project?
Answer: ESRI.ArcGIS.CartoUI
Question 4: Which module-level variable do you need to declare?
Answer: m_layer as ILayer (or m_layer as ILayer2)
Question 5: What feature class is used as the data source for all three layers?
Answer: USCounties
Question 6: What happens in the display when you zoom?
Answer: When you zoom out past 50,000,000, the simple renderer draws. When youzoom within 50,000,000, the unique value renderer based on state name draws.
Question 7: What is returned when you use the Renderer property?
Answer: A reference to IFeatureRenderer
Introduction to Programming ArcObjects Using the Microsoft .NET Framework
7-18 Copyright © 2001-2009 ESRI

Exercise Solution: Exercise 7A (VB.NET)
Imports System.IOImports ESRI.ArcGIS.esriSystemImports ESRI.ArcGIS.CartoImports ESRI.ArcGIS.ControlsImports ESRI.ArcGIS.ADFImports ESRI.ArcGIS.SystemUIImports ESRI.ArcGIS.Geometry ' Used in AddLayersToComboBox()Imports ESRI.ArcGIS.CartoUIImports ESRI.ArcGIS.DataSourcesRasterImports ESRI.ArcGIS.DisplayImports ESRI.ArcGIS.GeodatabasePublic Class MainForm
Private m_mapControl As IMapControl3 = NothingPrivate m_mapDocumentName As String = String.EmptyPrivate m_strOption As StringPrivate m_layer As ILayerPrivate Sub MainForm_Load(ByVal sender As System.Object, _
ByVal e As EventArgs) Handles MyBase.Load'get the MapControlm_mapControl = CType(AxMapControl1.Object, IMapControl3)'disable the Save menu (since there is no document yet)menuSaveDoc.Enabled = FalseAddLayersToComboBox()' Populate the color comboboxes with values 0 to 255Dim i As IntegerFor i = 0 To 255
If i > 1 And i < 11 Then cboBreaks.Items.Add(i)cboRed.Items.Add(i)cboGreen.Items.Add(i)cboBlue.Items.Add(i)cboRed.Text = "0"cboGreen.Text = "0"cboBlue.Text = "0"
Next iEnd Sub
#Region "Main Menu event handlers"Private Sub menuNewDoc_Click(ByVal sender As Object, _
ByVal e As EventArgs) Handles menuNewDoc.Click'execute New Document commandDim command As ICommand = New CreateNewDocument()command.OnCreate(m_mapControl.Object)command.OnClick()
End Sub
Exercise 7A
Copyright © 2001-2009 ESRI 7-19

Private Sub menuOpenDoc_Click(ByVal sender As Object, _ByVal e As EventArgs) Handles menuOpenDoc.Click
'execute Open Document commandDim command As ICommand = New ControlsOpenDocCommandClass()command.OnCreate(m_mapControl.Object)command.OnClick()
End SubPrivate Sub menuSaveDoc_Click(ByVal sender As Object, _
ByVal e As EventArgs) Handles menuSaveDoc.Click'execute Save Document commandIf m_mapControl.CheckMxFile(m_mapDocumentName) Then
'create a new instance of a MapDocumentDim mapDoc As IMapDocument = New MapDocumentClass()mapDoc.Open(m_mapDocumentName, String.Empty)'Make sure that the MapDocument is not readonlyIf mapDoc.IsReadOnly(m_mapDocumentName) Then
MessageBox.Show("Map document is read only!")mapDoc.Close()Return
End If'Replace its contents with the current mapmapDoc.ReplaceContents(CType(m_mapControl.Map, IMxdContents))'save the MapDocument in order to persist itmapDoc.Save(mapDoc.UsesRelativePaths, False)'close the MapDocumentmapDoc.Close()
End IfEnd SubPrivate Sub menuSaveAs_Click(ByVal sender As Object, _
ByVal e As EventArgs) Handles menuSaveAs.Click'execute SaveAs Document commandDim command As ICommand = New ControlsSaveAsDocCommandClass()command.OnCreate(m_mapControl.Object)command.OnClick()
End SubPrivate Sub menuExitApp_Click(ByVal sender As Object, _
ByVal e As EventArgs) Handles menuExitApp.Click'exit the applicationApplication.Exit()
End Sub#End Region
'listen to MapReplaced event in order to update the statusbar and the Save menuPrivate Sub axMapControl1_OnMapReplaced(ByVal sender As Object, _
ByVal e As IMapControlEvents2_OnMapReplacedEvent) _Handles axMapControl1.OnMapReplaced
'get the current document name from the MapControlm_mapDocumentName = m_mapControl.DocumentFilename
Introduction to Programming ArcObjects Using the Microsoft .NET Framework
7-20 Copyright © 2001-2009 ESRI
'if there is no MapDocument, disable the Save menu and clear the statusbarIf m_mapDocumentName = String.Empty Then
menuSaveDoc.Enabled = FalsestatusBarXY.Text = String.Empty
Else'enable the Save manu and write the doc name to the statusbarmenuSaveDoc.Enabled = TruestatusBarXY.Text = System.IO.Path.GetFileName(m_mapDocumentName)
End IfEnd SubPrivate Sub axMapControl1_OnMouseMove(ByVal sender As Object, _
ByVal e As IMapControlEvents2_OnMouseMoveEvent) _Handles axMapControl1.OnMouseMove
statusBarXY.Text = String.Format("{0}, {1} {2}", _e.mapX.ToString("#######.##"), e.mapY.ToString("#######.##"), _axMapControl1.MapUnits.ToString().Substring(4))
End SubPrivate Sub btnChangeRGBRenderer_Click(ByVal sender As System.Object, _
ByVal e As System.EventArgs) Handles btnChangeRGBRenderer.Click''RGB Raster renderingDim map As IMapmap = AxMapControl1.ActiveView.FocusMapDim rLayer As IRasterLayerrLayer = CType(map.Layer(0), IRasterLayer)Dim raster As IRasterraster = rLayer.RasterDim bandCol As IRasterBandCollectionbandCol = CType(raster, IRasterBandCollection)If bandCol.Count < 3 Then Exit SubDim rgbRen As IRasterRGBRenderer = New RasterRGBRendererDim rasRen As IRasterRendererrasRen = CType(rgbRen, IRasterRenderer)rasRen.Raster = rasterrasRen.Update()rgbRen.RedBandIndex = 2rgbRen.GreenBandIndex = 1rgbRen.BlueBandIndex = 0rasRen.Update()rLayer.Renderer = CType(rgbRen, IRasterRenderer)AxMapControl1.ActiveView.Refresh()AxTOCControl1.Update()
End SubPrivate Sub AxTOCControl1_OnMouseDown(ByVal sender As Object, _
ByVal e As ESRI.ArcGIS.Controls.ITOCControlEvents_OnMouseDownEvent) _Handles AxTOCControl1.OnMouseDown
Exercise 7A
Copyright © 2001-2009 ESRI 7-21
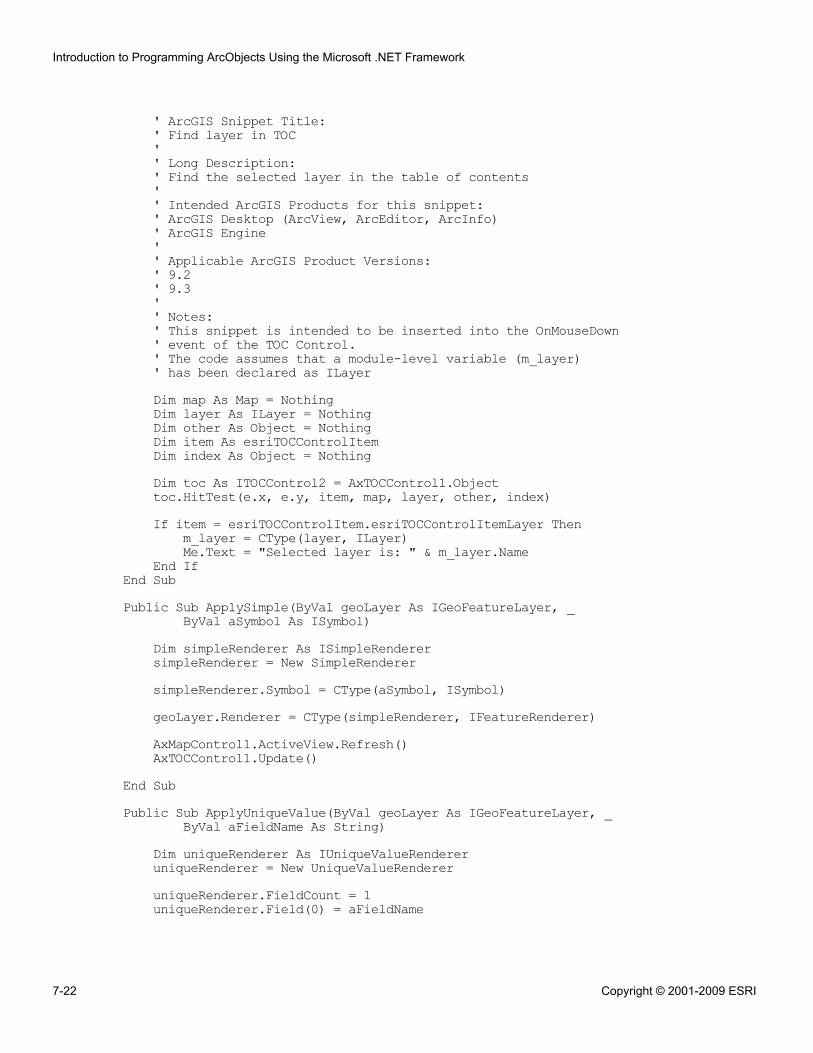
' ArcGIS Snippet Title:' Find layer in TOC'' Long Description:' Find the selected layer in the table of contents'' Intended ArcGIS Products for this snippet:' ArcGIS Desktop (ArcView, ArcEditor, ArcInfo)' ArcGIS Engine'' Applicable ArcGIS Product Versions:' 9.2' 9.3'' Notes:' This snippet is intended to be inserted into the OnMouseDown' event of the TOC Control.' The code assumes that a module-level variable (m_layer)' has been declared as ILayerDim map As Map = NothingDim layer As ILayer = NothingDim other As Object = NothingDim item As esriTOCControlItemDim index As Object = NothingDim toc As ITOCControl2 = AxTOCControl1.Objecttoc.HitTest(e.x, e.y, item, map, layer, other, index)If item = esriTOCControlItem.esriTOCControlItemLayer Then
m_layer = CType(layer, ILayer)Me.Text = "Selected layer is: " & m_layer.Name
End IfEnd SubPublic Sub ApplySimple(ByVal geoLayer As IGeoFeatureLayer, _
ByVal aSymbol As ISymbol)Dim simpleRenderer As ISimpleRenderersimpleRenderer = New SimpleRenderersimpleRenderer.Symbol = CType(aSymbol, ISymbol)geoLayer.Renderer = CType(simpleRenderer, IFeatureRenderer)AxMapControl1.ActiveView.Refresh()AxTOCControl1.Update()
End SubPublic Sub ApplyUniqueValue(ByVal geoLayer As IGeoFeatureLayer, _
ByVal aFieldName As String)Dim uniqueRenderer As IUniqueValueRendereruniqueRenderer = New UniqueValueRendereruniqueRenderer.FieldCount = 1uniqueRenderer.Field(0) = aFieldName
Introduction to Programming ArcObjects Using the Microsoft .NET Framework
7-22 Copyright © 2001-2009 ESRI
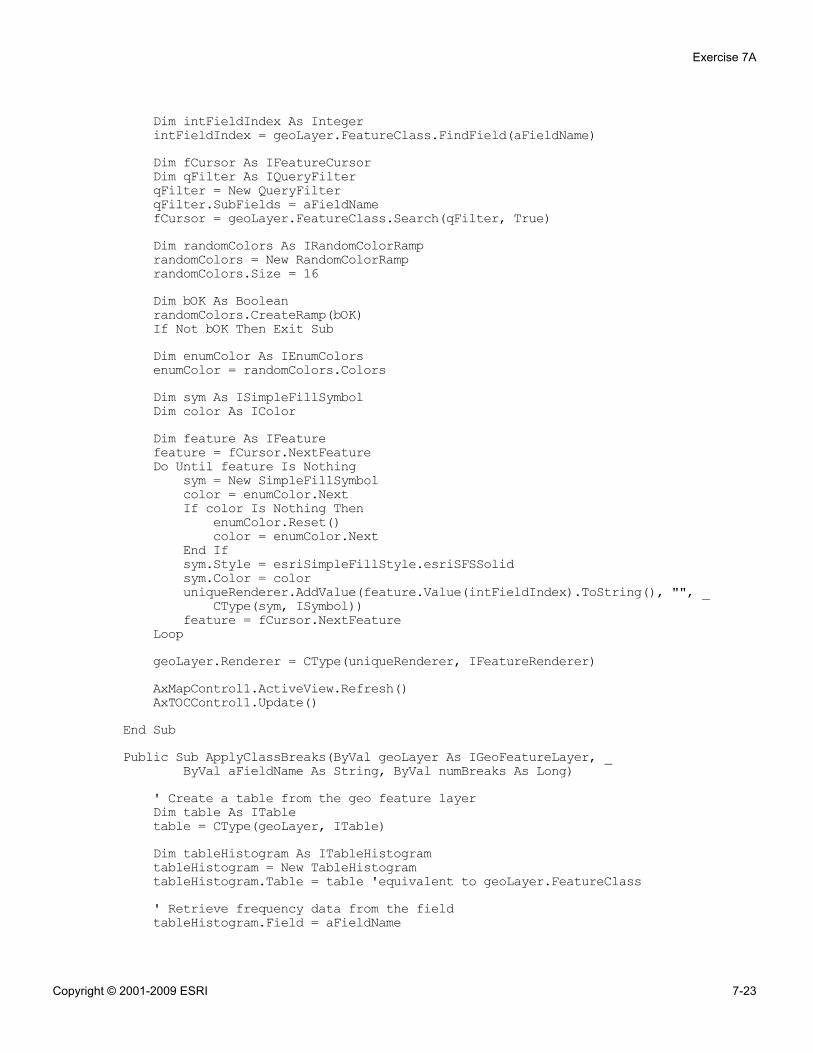
Dim intFieldIndex As IntegerintFieldIndex = geoLayer.FeatureClass.FindField(aFieldName)Dim fCursor As IFeatureCursorDim qFilter As IQueryFilterqFilter = New QueryFilterqFilter.SubFields = aFieldNamefCursor = geoLayer.FeatureClass.Search(qFilter, True)Dim randomColors As IRandomColorRamprandomColors = New RandomColorRamprandomColors.Size = 16Dim bOK As BooleanrandomColors.CreateRamp(bOK)If Not bOK Then Exit SubDim enumColor As IEnumColorsenumColor = randomColors.ColorsDim sym As ISimpleFillSymbolDim color As IColorDim feature As IFeaturefeature = fCursor.NextFeatureDo Until feature Is Nothing
sym = New SimpleFillSymbolcolor = enumColor.NextIf color Is Nothing Then
enumColor.Reset()color = enumColor.Next
End Ifsym.Style = esriSimpleFillStyle.esriSFSSolidsym.Color = coloruniqueRenderer.AddValue(feature.Value(intFieldIndex).ToString(), "", _
CType(sym, ISymbol))feature = fCursor.NextFeature
LoopgeoLayer.Renderer = CType(uniqueRenderer, IFeatureRenderer)AxMapControl1.ActiveView.Refresh()AxTOCControl1.Update()
End SubPublic Sub ApplyClassBreaks(ByVal geoLayer As IGeoFeatureLayer, _
ByVal aFieldName As String, ByVal numBreaks As Long)' Create a table from the geo feature layerDim table As ITabletable = CType(geoLayer, ITable)Dim tableHistogram As ITableHistogramtableHistogram = New TableHistogramtableHistogram.Table = table 'equivalent to geoLayer.FeatureClass' Retrieve frequency data from the fieldtableHistogram.Field = aFieldName
Exercise 7A
Copyright © 2001-2009 ESRI 7-23
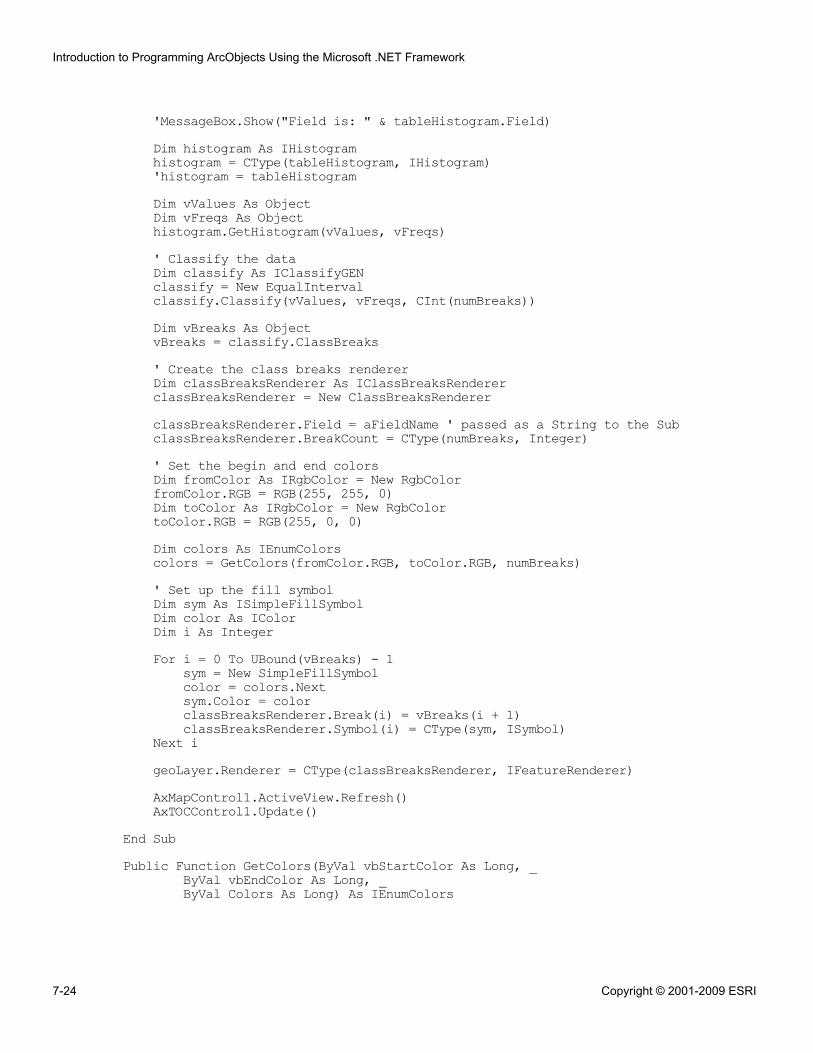
'MessageBox.Show("Field is: " & tableHistogram.Field)Dim histogram As IHistogramhistogram = CType(tableHistogram, IHistogram)'histogram = tableHistogramDim vValues As ObjectDim vFreqs As Objecthistogram.GetHistogram(vValues, vFreqs)' Classify the dataDim classify As IClassifyGENclassify = New EqualIntervalclassify.Classify(vValues, vFreqs, CInt(numBreaks))Dim vBreaks As ObjectvBreaks = classify.ClassBreaks' Create the class breaks rendererDim classBreaksRenderer As IClassBreaksRendererclassBreaksRenderer = New ClassBreaksRendererclassBreaksRenderer.Field = aFieldName ' passed as a String to the SubclassBreaksRenderer.BreakCount = CType(numBreaks, Integer)' Set the begin and end colorsDim fromColor As IRgbColor = New RgbColorfromColor.RGB = RGB(255, 255, 0)Dim toColor As IRgbColor = New RgbColortoColor.RGB = RGB(255, 0, 0)Dim colors As IEnumColorscolors = GetColors(fromColor.RGB, toColor.RGB, numBreaks)' Set up the fill symbolDim sym As ISimpleFillSymbolDim color As IColorDim i As IntegerFor i = 0 To UBound(vBreaks) - 1
sym = New SimpleFillSymbolcolor = colors.Nextsym.Color = colorclassBreaksRenderer.Break(i) = vBreaks(i + 1)classBreaksRenderer.Symbol(i) = CType(sym, ISymbol)
Next igeoLayer.Renderer = CType(classBreaksRenderer, IFeatureRenderer)AxMapControl1.ActiveView.Refresh()AxTOCControl1.Update()
End SubPublic Function GetColors(ByVal vbStartColor As Long, _
ByVal vbEndColor As Long, _ByVal Colors As Long) As IEnumColors
Introduction to Programming ArcObjects Using the Microsoft .NET Framework
7-24 Copyright © 2001-2009 ESRI
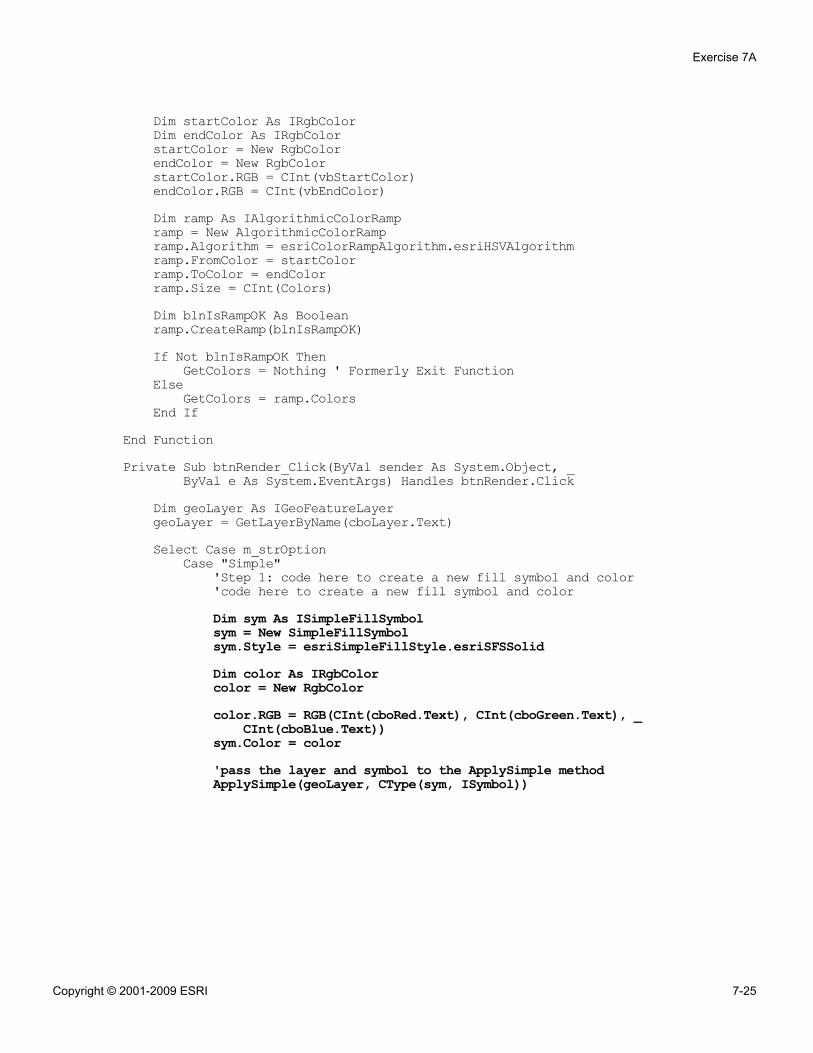
Dim startColor As IRgbColorDim endColor As IRgbColorstartColor = New RgbColorendColor = New RgbColorstartColor.RGB = CInt(vbStartColor)endColor.RGB = CInt(vbEndColor)Dim ramp As IAlgorithmicColorRampramp = New AlgorithmicColorRampramp.Algorithm = esriColorRampAlgorithm.esriHSVAlgorithmramp.FromColor = startColorramp.ToColor = endColorramp.Size = CInt(Colors)Dim blnIsRampOK As Booleanramp.CreateRamp(blnIsRampOK)If Not blnIsRampOK Then
GetColors = Nothing ' Formerly Exit FunctionElse
GetColors = ramp.ColorsEnd If
End FunctionPrivate Sub btnRender_Click(ByVal sender As System.Object, _
ByVal e As System.EventArgs) Handles btnRender.ClickDim geoLayer As IGeoFeatureLayergeoLayer = GetLayerByName(cboLayer.Text)Select Case m_strOption
Case "Simple"'Step 1: code here to create a new fill symbol and color'code here to create a new fill symbol and colorDim sym As ISimpleFillSymbolsym = New SimpleFillSymbolsym.Style = esriSimpleFillStyle.esriSFSSolidDim color As IRgbColorcolor = New RgbColorcolor.RGB = RGB(CInt(cboRed.Text), CInt(cboGreen.Text), _
CInt(cboBlue.Text))sym.Color = color'pass the layer and symbol to the ApplySimple methodApplySimple(geoLayer, CType(sym, ISymbol))
Exercise 7A
Copyright © 2001-2009 ESRI 7-25
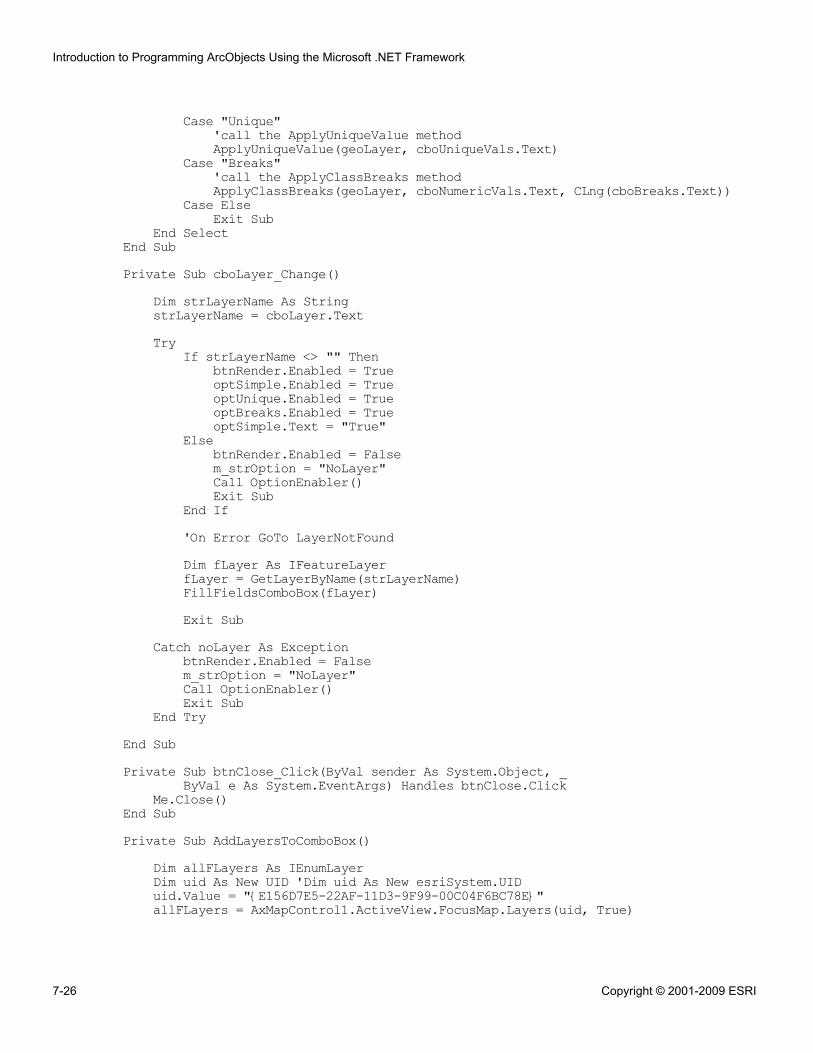
Case "Unique"'call the ApplyUniqueValue methodApplyUniqueValue(geoLayer, cboUniqueVals.Text)
Case "Breaks"'call the ApplyClassBreaks methodApplyClassBreaks(geoLayer, cboNumericVals.Text, CLng(cboBreaks.Text))
Case ElseExit Sub
End SelectEnd SubPrivate Sub cboLayer_Change()
Dim strLayerName As StringstrLayerName = cboLayer.TextTry
If strLayerName <> "" ThenbtnRender.Enabled = TrueoptSimple.Enabled = TrueoptUnique.Enabled = TrueoptBreaks.Enabled = TrueoptSimple.Text = "True"
ElsebtnRender.Enabled = Falsem_strOption = "NoLayer"Call OptionEnabler()Exit Sub
End If'On Error GoTo LayerNotFoundDim fLayer As IFeatureLayerfLayer = GetLayerByName(strLayerName)FillFieldsComboBox(fLayer)Exit Sub
Catch noLayer As ExceptionbtnRender.Enabled = Falsem_strOption = "NoLayer"Call OptionEnabler()Exit Sub
End TryEnd SubPrivate Sub btnClose_Click(ByVal sender As System.Object, _
ByVal e As System.EventArgs) Handles btnClose.ClickMe.Close()
End SubPrivate Sub AddLayersToComboBox()
Dim allFLayers As IEnumLayerDim uid As New UID 'Dim uid As New esriSystem.UIDuid.Value = "{E156D7E5-22AF-11D3-9F99-00C04F6BC78E}"allFLayers = AxMapControl1.ActiveView.FocusMap.Layers(uid, True)
Introduction to Programming ArcObjects Using the Microsoft .NET Framework
7-26 Copyright © 2001-2009 ESRI
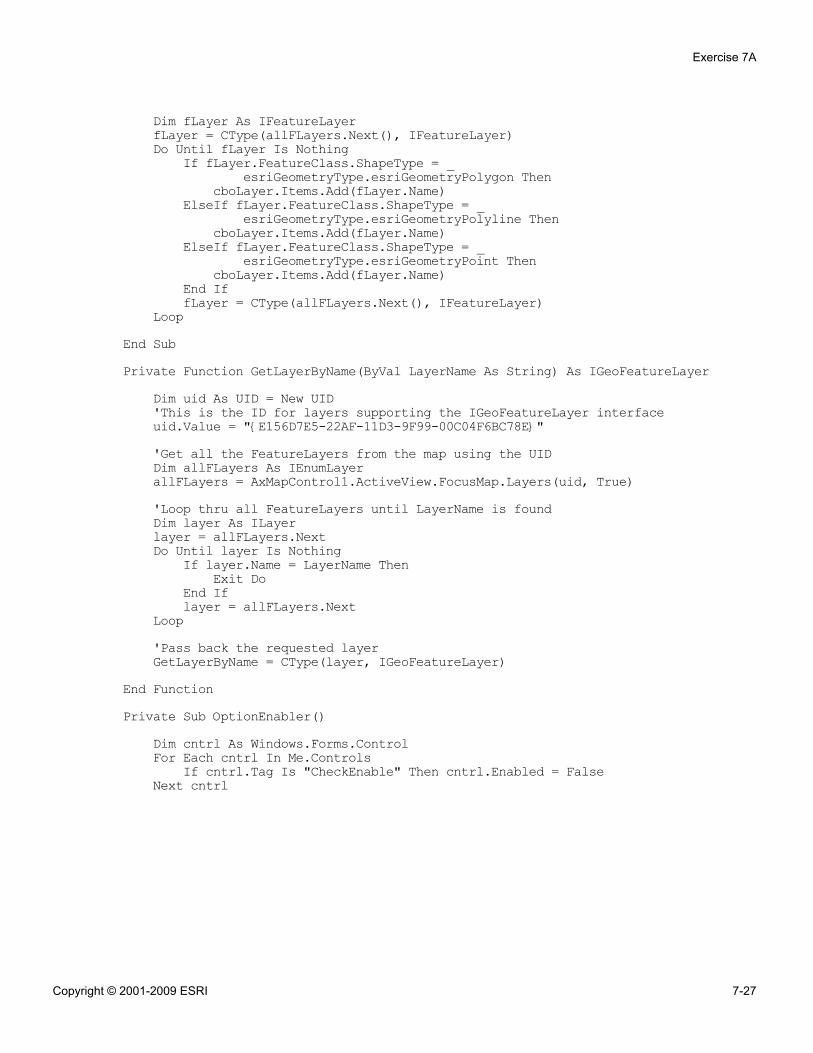
Dim fLayer As IFeatureLayerfLayer = CType(allFLayers.Next(), IFeatureLayer)Do Until fLayer Is Nothing
If fLayer.FeatureClass.ShapeType = _esriGeometryType.esriGeometryPolygon Then
cboLayer.Items.Add(fLayer.Name)ElseIf fLayer.FeatureClass.ShapeType = _
esriGeometryType.esriGeometryPolyline ThencboLayer.Items.Add(fLayer.Name)
ElseIf fLayer.FeatureClass.ShapeType = _esriGeometryType.esriGeometryPoint Then
cboLayer.Items.Add(fLayer.Name)End IffLayer = CType(allFLayers.Next(), IFeatureLayer)
LoopEnd SubPrivate Function GetLayerByName(ByVal LayerName As String) As IGeoFeatureLayer
Dim uid As UID = New UID'This is the ID for layers supporting the IGeoFeatureLayer interfaceuid.Value = "{E156D7E5-22AF-11D3-9F99-00C04F6BC78E}"'Get all the FeatureLayers from the map using the UIDDim allFLayers As IEnumLayerallFLayers = AxMapControl1.ActiveView.FocusMap.Layers(uid, True)'Loop thru all FeatureLayers until LayerName is foundDim layer As ILayerlayer = allFLayers.NextDo Until layer Is Nothing
If layer.Name = LayerName ThenExit Do
End Iflayer = allFLayers.Next
Loop'Pass back the requested layerGetLayerByName = CType(layer, IGeoFeatureLayer)
End FunctionPrivate Sub OptionEnabler()
Dim cntrl As Windows.Forms.ControlFor Each cntrl In Me.Controls
If cntrl.Tag Is "CheckEnable" Then cntrl.Enabled = FalseNext cntrl
Exercise 7A
Copyright © 2001-2009 ESRI 7-27
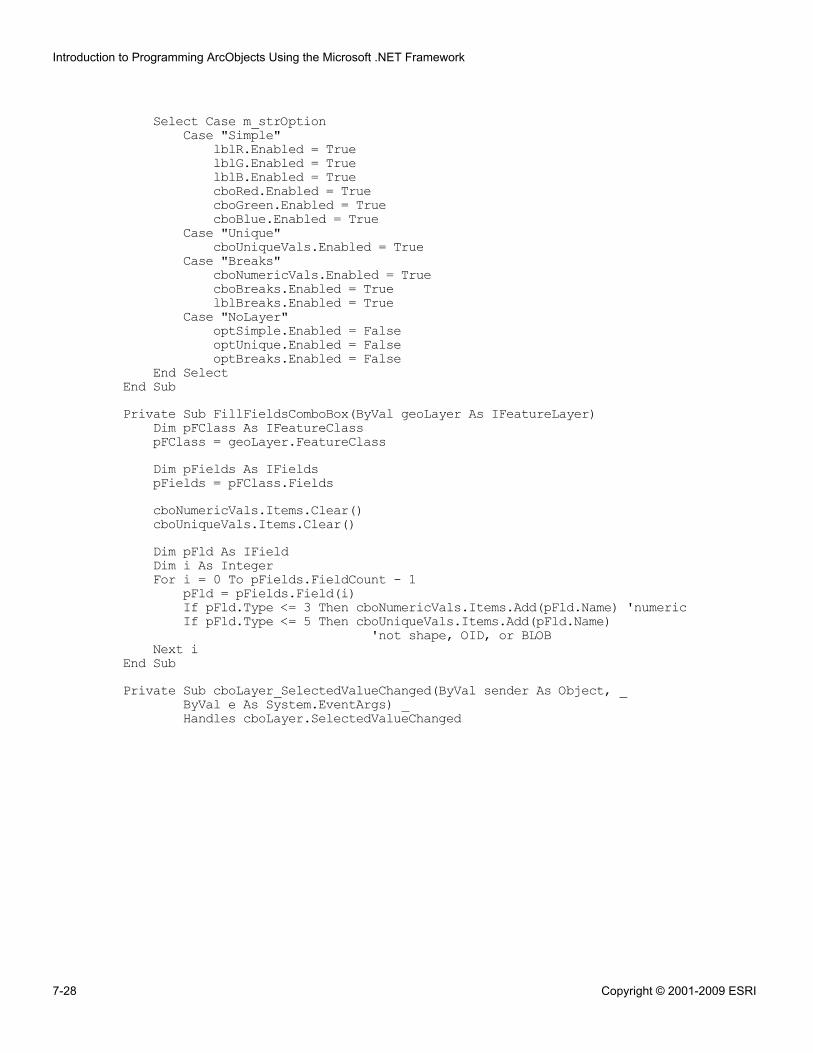
Select Case m_strOptionCase "Simple"
lblR.Enabled = TruelblG.Enabled = TruelblB.Enabled = TruecboRed.Enabled = TruecboGreen.Enabled = TruecboBlue.Enabled = True
Case "Unique"cboUniqueVals.Enabled = True
Case "Breaks"cboNumericVals.Enabled = TruecboBreaks.Enabled = TruelblBreaks.Enabled = True
Case "NoLayer"optSimple.Enabled = FalseoptUnique.Enabled = FalseoptBreaks.Enabled = False
End SelectEnd SubPrivate Sub FillFieldsComboBox(ByVal geoLayer As IFeatureLayer)
Dim pFClass As IFeatureClasspFClass = geoLayer.FeatureClassDim pFields As IFieldspFields = pFClass.FieldscboNumericVals.Items.Clear()cboUniqueVals.Items.Clear()Dim pFld As IFieldDim i As IntegerFor i = 0 To pFields.FieldCount - 1
pFld = pFields.Field(i)If pFld.Type <= 3 Then cboNumericVals.Items.Add(pFld.Name) 'numericIf pFld.Type <= 5 Then cboUniqueVals.Items.Add(pFld.Name)
'not shape, OID, or BLOBNext i
End SubPrivate Sub cboLayer_SelectedValueChanged(ByVal sender As Object, _
ByVal e As System.EventArgs) _Handles cboLayer.SelectedValueChanged
Introduction to Programming ArcObjects Using the Microsoft .NET Framework
7-28 Copyright © 2001-2009 ESRI
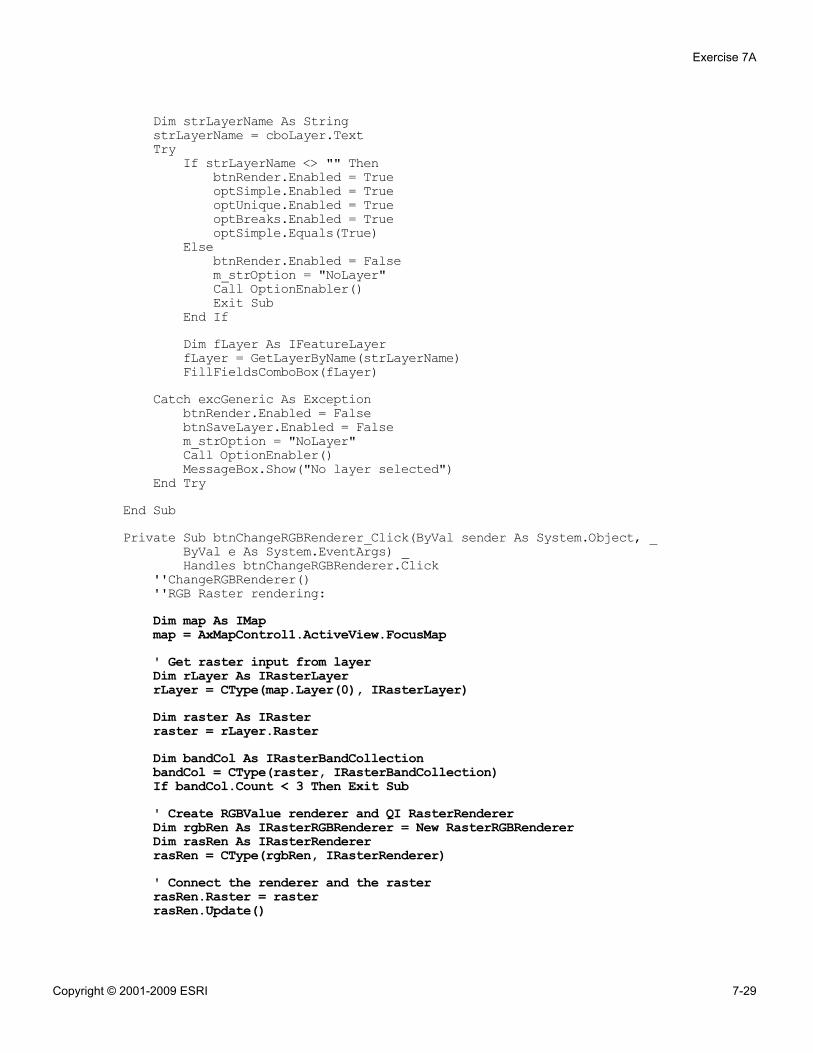
Dim strLayerName As StringstrLayerName = cboLayer.TextTry
If strLayerName <> "" ThenbtnRender.Enabled = TrueoptSimple.Enabled = TrueoptUnique.Enabled = TrueoptBreaks.Enabled = TrueoptSimple.Equals(True)
ElsebtnRender.Enabled = Falsem_strOption = "NoLayer"Call OptionEnabler()Exit Sub
End IfDim fLayer As IFeatureLayerfLayer = GetLayerByName(strLayerName)FillFieldsComboBox(fLayer)
Catch excGeneric As ExceptionbtnRender.Enabled = FalsebtnSaveLayer.Enabled = Falsem_strOption = "NoLayer"Call OptionEnabler()MessageBox.Show("No layer selected")
End TryEnd SubPrivate Sub btnChangeRGBRenderer_Click(ByVal sender As System.Object, _
ByVal e As System.EventArgs) _Handles btnChangeRGBRenderer.Click
''ChangeRGBRenderer()''RGB Raster rendering:Dim map As IMapmap = AxMapControl1.ActiveView.FocusMap' Get raster input from layerDim rLayer As IRasterLayerrLayer = CType(map.Layer(0), IRasterLayer)Dim raster As IRasterraster = rLayer.RasterDim bandCol As IRasterBandCollectionbandCol = CType(raster, IRasterBandCollection)If bandCol.Count < 3 Then Exit Sub' Create RGBValue renderer and QI RasterRendererDim rgbRen As IRasterRGBRenderer = New RasterRGBRendererDim rasRen As IRasterRendererrasRen = CType(rgbRen, IRasterRenderer)' Connect the renderer and the rasterrasRen.Raster = rasterrasRen.Update()
Exercise 7A
Copyright © 2001-2009 ESRI 7-29
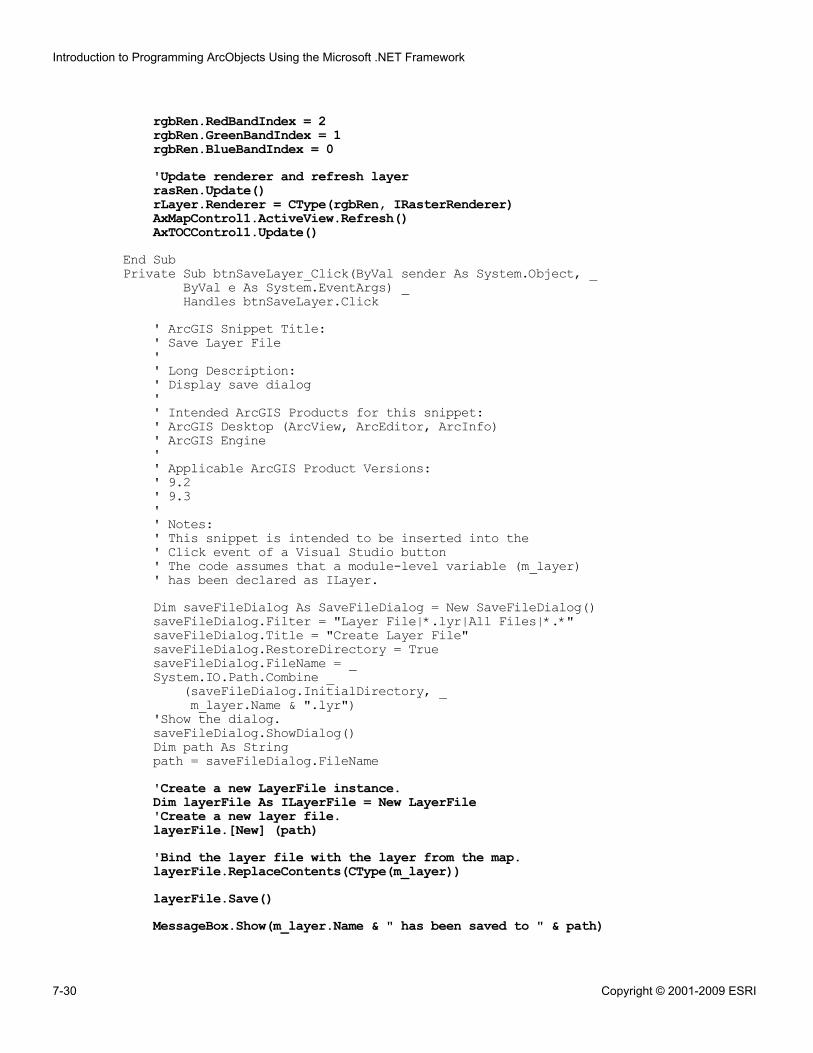
rgbRen.RedBandIndex = 2rgbRen.GreenBandIndex = 1rgbRen.BlueBandIndex = 0'Update renderer and refresh layerrasRen.Update()rLayer.Renderer = CType(rgbRen, IRasterRenderer)AxMapControl1.ActiveView.Refresh()AxTOCControl1.Update()
End SubPrivate Sub btnSaveLayer_Click(ByVal sender As System.Object, _
ByVal e As System.EventArgs) _Handles btnSaveLayer.Click
' ArcGIS Snippet Title:' Save Layer File'' Long Description:' Display save dialog'' Intended ArcGIS Products for this snippet:' ArcGIS Desktop (ArcView, ArcEditor, ArcInfo)' ArcGIS Engine'' Applicable ArcGIS Product Versions:' 9.2' 9.3'' Notes:' This snippet is intended to be inserted into the' Click event of a Visual Studio button' The code assumes that a module-level variable (m_layer)' has been declared as ILayer.Dim saveFileDialog As SaveFileDialog = New SaveFileDialog()saveFileDialog.Filter = "Layer File|*.lyr|All Files|*.*"saveFileDialog.Title = "Create Layer File"saveFileDialog.RestoreDirectory = TruesaveFileDialog.FileName = _System.IO.Path.Combine _
(saveFileDialog.InitialDirectory, _m_layer.Name & ".lyr")
'Show the dialog.saveFileDialog.ShowDialog()Dim path As Stringpath = saveFileDialog.FileName'Create a new LayerFile instance.Dim layerFile As ILayerFile = New LayerFile'Create a new layer file.layerFile.[New] (path)'Bind the layer file with the layer from the map.layerFile.ReplaceContents(CType(m_layer))layerFile.Save()MessageBox.Show(m_layer.Name & " has been saved to " & path)
Introduction to Programming ArcObjects Using the Microsoft .NET Framework
7-30 Copyright © 2001-2009 ESRI

End SubPrivate Sub optBreaks_Click1(ByVal sender As Object, _
ByVal e As System.EventArgs) Handles optBreaks.Clickm_strOption = "Breaks"Call OptionEnabler()
End SubPrivate Sub optSimple_Click(ByVal sender As Object, _
ByVal e As System.EventArgs) Handles optSimple.Clickm_strOption = "Simple"Call OptionEnabler()
End SubPrivate Sub optUnique_Click(ByVal sender As Object, _
ByVal e As System.EventArgs) Handles optUnique.Clickm_strOption = "Unique"Call OptionEnabler()
End SubPrivate Sub btnStretch_Click(ByVal sender As System.Object, _
ByVal e As System.EventArgs) Handles btnStretch.ClickDim map As IMapmap = AxMapControl1.ActiveView.FocusMap'Get raster input from layerDim rLayer As IRasterLayerrLayer = CType(map.Layer(0), IRasterLayer)Dim raster As IRasterraster = rLayer.Raster'Create renderer and QI for RasterRendererDim stretchRen As IRasterStretchColorRampRendererstretchRen = New RasterStretchColorRampRendererDim rasRen As IRasterRendererrasRen = CType(stretchRen, IRasterRenderer)'Set raster for the renderer and updaterasRen.Raster = rasterrasRen.Update()'Define two colorsDim fromColor As IColorDim toColor As IColorfromColor = New RgbColorfromColor.RGB = RGB(255, 0, 0)toColor = New RgbColortoColor.RGB = RGB(0, 255, 0)'Create color rampDim ramp As IAlgorithmicColorRampramp = New AlgorithmicColorRampramp.Size = 255ramp.FromColor = fromColorramp.ToColor = toColorramp.CreateRamp(True)
Exercise 7A
Copyright © 2001-2009 ESRI 7-31
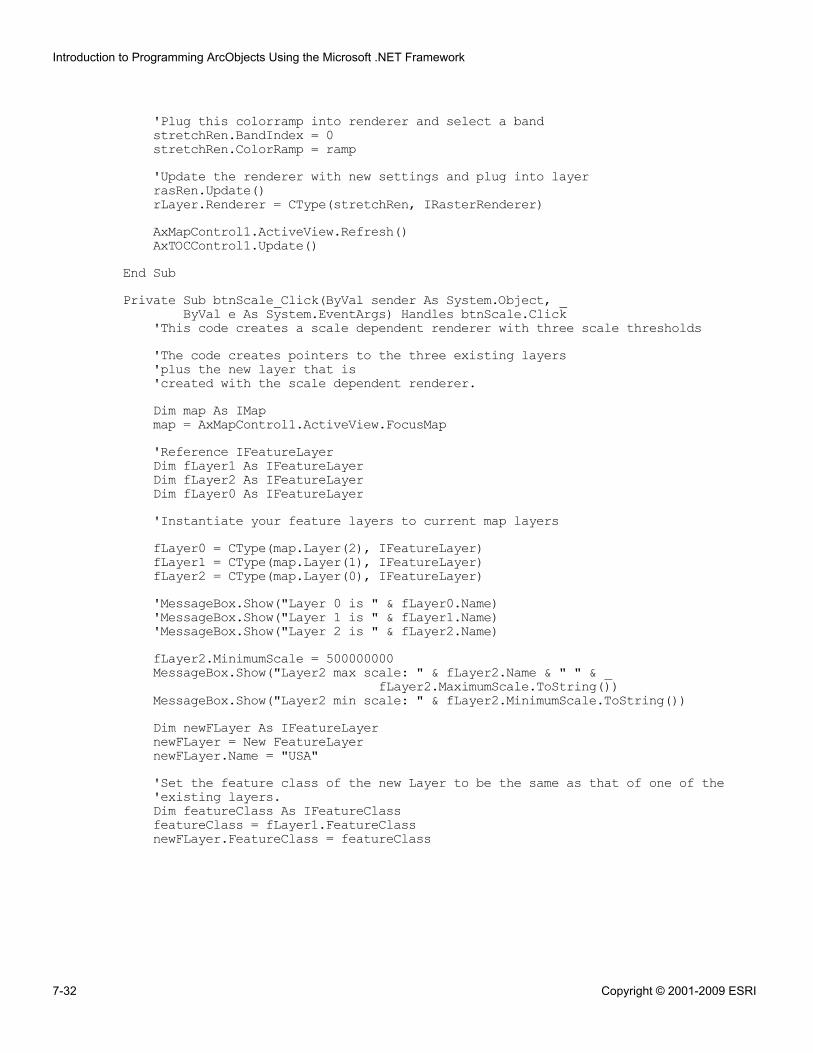
'Plug this colorramp into renderer and select a bandstretchRen.BandIndex = 0stretchRen.ColorRamp = ramp'Update the renderer with new settings and plug into layerrasRen.Update()rLayer.Renderer = CType(stretchRen, IRasterRenderer)AxMapControl1.ActiveView.Refresh()AxTOCControl1.Update()
End SubPrivate Sub btnScale_Click(ByVal sender As System.Object, _
ByVal e As System.EventArgs) Handles btnScale.Click'This code creates a scale dependent renderer with three scale thresholds'The code creates pointers to the three existing layers'plus the new layer that is'created with the scale dependent renderer.Dim map As IMapmap = AxMapControl1.ActiveView.FocusMap'Reference IFeatureLayerDim fLayer1 As IFeatureLayerDim fLayer2 As IFeatureLayerDim fLayer0 As IFeatureLayer'Instantiate your feature layers to current map layersfLayer0 = CType(map.Layer(2), IFeatureLayer)fLayer1 = CType(map.Layer(1), IFeatureLayer)fLayer2 = CType(map.Layer(0), IFeatureLayer)'MessageBox.Show("Layer 0 is " & fLayer0.Name)'MessageBox.Show("Layer 1 is " & fLayer1.Name)'MessageBox.Show("Layer 2 is " & fLayer2.Name)fLayer2.MinimumScale = 500000000MessageBox.Show("Layer2 max scale: " & fLayer2.Name & " " & _
fLayer2.MaximumScale.ToString())MessageBox.Show("Layer2 min scale: " & fLayer2.MinimumScale.ToString())Dim newFLayer As IFeatureLayernewFLayer = New FeatureLayernewFLayer.Name = "USA"'Set the feature class of the new Layer to be the same as that of one of the'existing layers.Dim featureClass As IFeatureClassfeatureClass = fLayer1.FeatureClassnewFLayer.FeatureClass = featureClass
Introduction to Programming ArcObjects Using the Microsoft .NET Framework
7-32 Copyright © 2001-2009 ESRI
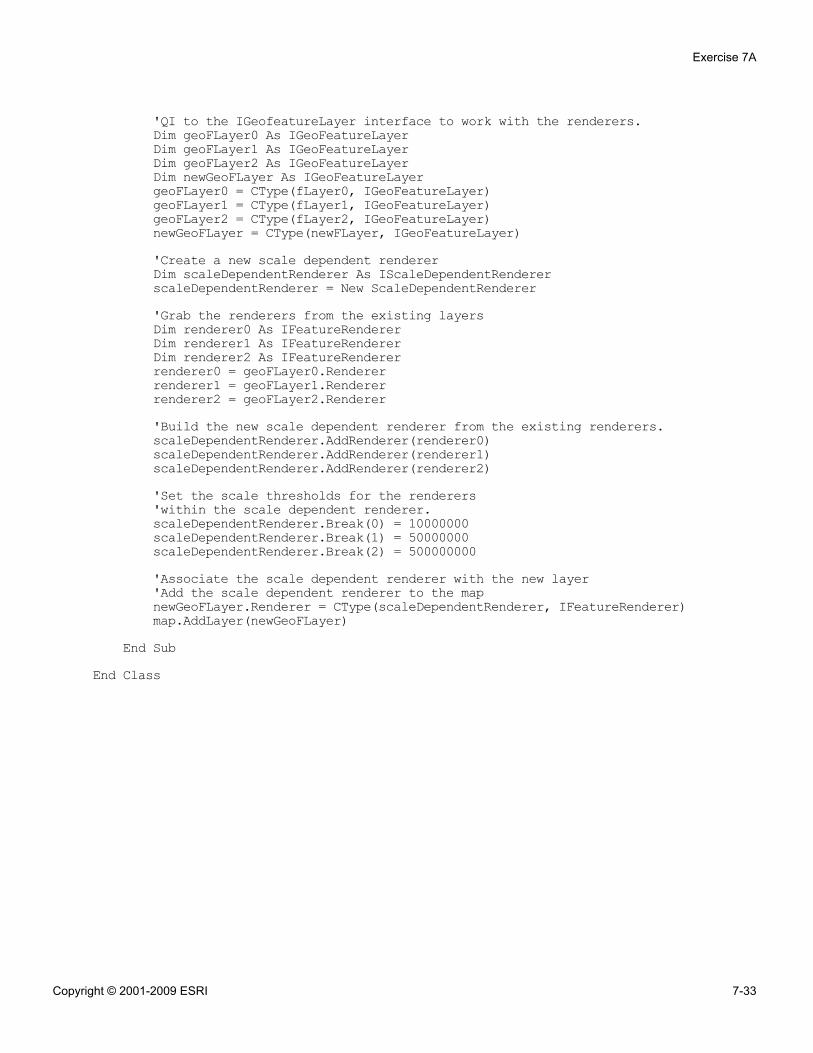
'QI to the IGeofeatureLayer interface to work with the renderers.Dim geoFLayer0 As IGeoFeatureLayerDim geoFLayer1 As IGeoFeatureLayerDim geoFLayer2 As IGeoFeatureLayerDim newGeoFLayer As IGeoFeatureLayergeoFLayer0 = CType(fLayer0, IGeoFeatureLayer)geoFLayer1 = CType(fLayer1, IGeoFeatureLayer)geoFLayer2 = CType(fLayer2, IGeoFeatureLayer)newGeoFLayer = CType(newFLayer, IGeoFeatureLayer)'Create a new scale dependent rendererDim scaleDependentRenderer As IScaleDependentRendererscaleDependentRenderer = New ScaleDependentRenderer'Grab the renderers from the existing layersDim renderer0 As IFeatureRendererDim renderer1 As IFeatureRendererDim renderer2 As IFeatureRendererrenderer0 = geoFLayer0.Rendererrenderer1 = geoFLayer1.Rendererrenderer2 = geoFLayer2.Renderer'Build the new scale dependent renderer from the existing renderers.scaleDependentRenderer.AddRenderer(renderer0)scaleDependentRenderer.AddRenderer(renderer1)scaleDependentRenderer.AddRenderer(renderer2)'Set the scale thresholds for the renderers'within the scale dependent renderer.scaleDependentRenderer.Break(0) = 10000000scaleDependentRenderer.Break(1) = 50000000scaleDependentRenderer.Break(2) = 500000000'Associate the scale dependent renderer with the new layer'Add the scale dependent renderer to the mapnewGeoFLayer.Renderer = CType(scaleDependentRenderer, IFeatureRenderer)map.AddLayer(newGeoFLayer)
End SubEnd Class
Exercise 7A
Copyright © 2001-2009 ESRI 7-33


Exercise 7B: Display layers (C#)
Estimated time: 90 minutes
In this exercise, you will display data in different ways by rendering a feature layer and araster layer. In addition, you will save symbology to a layer file, which can then be usedby others who access the same data.
In this exercise, you will:
▪ Create a simple renderer▪ Create a raster renderer▪ Save symbology to a layer file
Exercise shortcut1. In Visual Studio, open the DisplayingData.sln solution from the
\Student\IPAN\Exercise07\CSharp\DisplayingData folder.
2. Programmatically create a new simple fill symbol and set properties (e.g., style,color). Apply the new symbol to a polygon layer with a simple renderer. Use thesame techniques to apply class breaks and unique value.
OR
3. Apply an RGB renderer to render raster data.
4. Save the symbology you created to a layer (.lyr) file.
** (Optional) Apply a scale-dependent renderer to set a scale threshold to the layers.
** (Optional) Apply a stretch color ramp renderer to render your raster data.
Step 1: Open a Visual Studio project
To save time, you will begin by opening a project that has already been started for you.
Start Visual Studio.
From the File menu, choose Open Project.
Browse to your \Student\IPAN\Exercise07\CSharp\DisplayingData folder and open theDisplayingData solution.
Exercise 7B
Copyright © 2001-2009 ESRI 7-35
View MainForm in code view.
Notice that the project contains many lines of pre-written code.
To reduce the code that you need to scroll through, by right-click anywhere in the codewindow and choose Outlining > Collapse to Definitions.
View MainForm in Design view.
This project is based on the ArcGIS Engine MapControl Application template andcontains four ArcGIS Engine controls: a ToolbarControl, TOCControl, MapControl, andLicenseControl. In addition, several Visual Studio controls have been added for choosingrenderer properties at run time.
Using the Properties window, note the names of some of the controls.
You will use these names in the code later.
Before continuing, decide which type of data you want to work with in this exercise.Choose one of the following options:
▪ Option 1: Complete steps 2 and 3 to work with symbology for vector data.OR
▪ Option 2: Complete step 4 (skip 2 and 3) to work with symbology for raster data.
After completing either option, you will save your symbology to a layer file in step 5.
Step 2: Create a fill symbol for vector polygons
In this step, you will create a new fill symbol, set properties on it, and then apply it to apolygon layer with a simple renderer.
Navigate to the btnRender_Click method in the code view.
When a user clicks this button, a new renderer will be applied to the layer that the userspecifies.
Examine the first two lines of code.
This code creates a reference to the chosen layer by passing the selected name in thecboLayer combo box to the GetLayerByName function, which has been written for you.You will browse the code in the function to learn how it works.
Introduction to Programming ArcObjects Using the Microsoft .NET Framework
7-36 Copyright © 2001-2009 ESRI
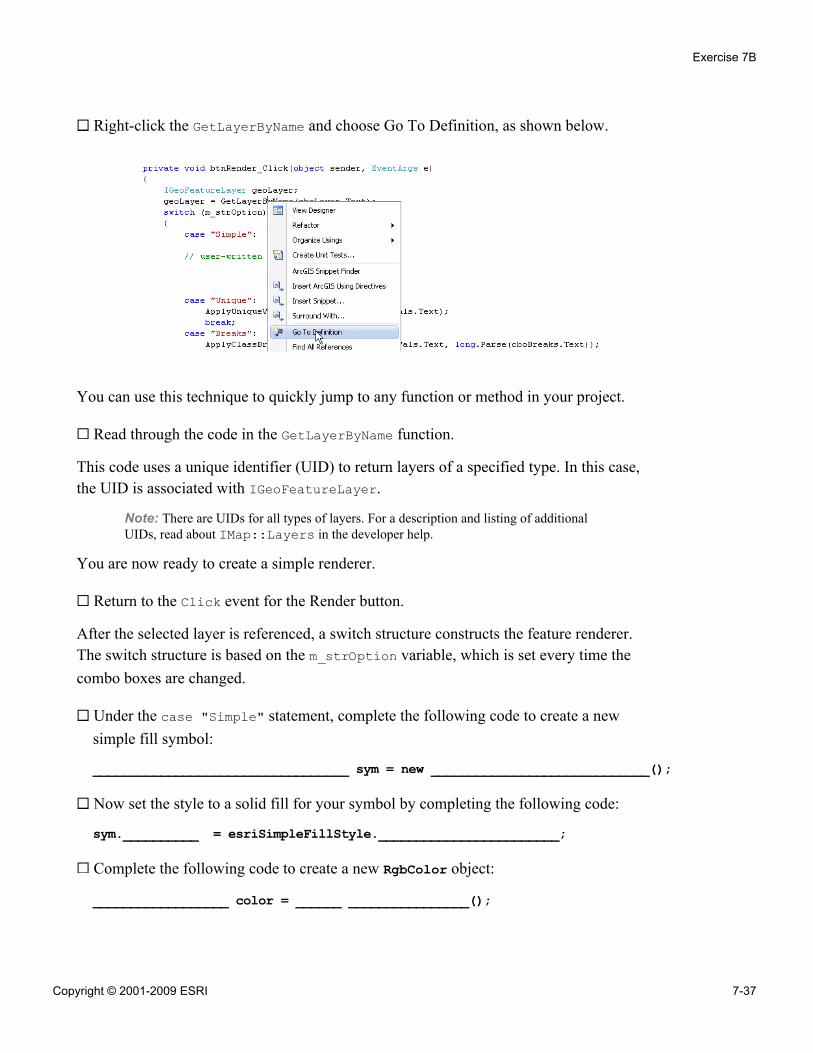
Right-click the GetLayerByName and choose Go To Definition, as shown below.
You can use this technique to quickly jump to any function or method in your project.
Read through the code in the GetLayerByName function.
This code uses a unique identifier (UID) to return layers of a specified type. In this case,the UID is associated with IGeoFeatureLayer.
Note: There are UIDs for all types of layers. For a description and listing of additionalUIDs, read about IMap::Layers in the developer help.
You are now ready to create a simple renderer.
Return to the Click event for the Render button.
After the selected layer is referenced, a switch structure constructs the feature renderer.The switch structure is based on the m_strOption variable, which is set every time thecombo boxes are changed.
Under the case "Simple" statement, complete the following code to create a newsimple fill symbol:
__________________________________ sym = new _____________________________();
Now set the style to a solid fill for your symbol by completing the following code:
sym.__________ = esriSimpleFillStyle.________________________;
Complete the following code to create a new RgbColor object:
__________________ color = ______ ________________();
Exercise 7B
Copyright © 2001-2009 ESRI 7-37
Define the color using the following code:
color.Red = Convert.ToInt32(cboRed.Text);
The Convert.ToInt32 function converts the specified string representation of a numberto an equivalent 32-bit signed integer.
Repeat for Green and Blue.
Assign the new color to your new symbol.
Call the ApplySimple method to create and apply a simple renderer with your symbol:
ApplySimple(geoLayer, sym as ISymbol);break;
Navigate to the ApplySimple method.
Question 1: Which object (or interface) has the Symbol property? Which has theRenderer property?
______________________________________________________________________
Step 3: Render vector layers
In this step, you will render using the code you just wrote, and then you will explore thecode for other renderers and test them.
In Design view, open the Properties dialog box for your MapControl and do thefollowing:
▪ For Map Document, browse to \Student\IPAN\Exercise07 and openRendering.mxd.
▪ For Available Maps, choose Feature Rendering.
Introduction to Programming ArcObjects Using the Microsoft .NET Framework
7-38 Copyright © 2001-2009 ESRI
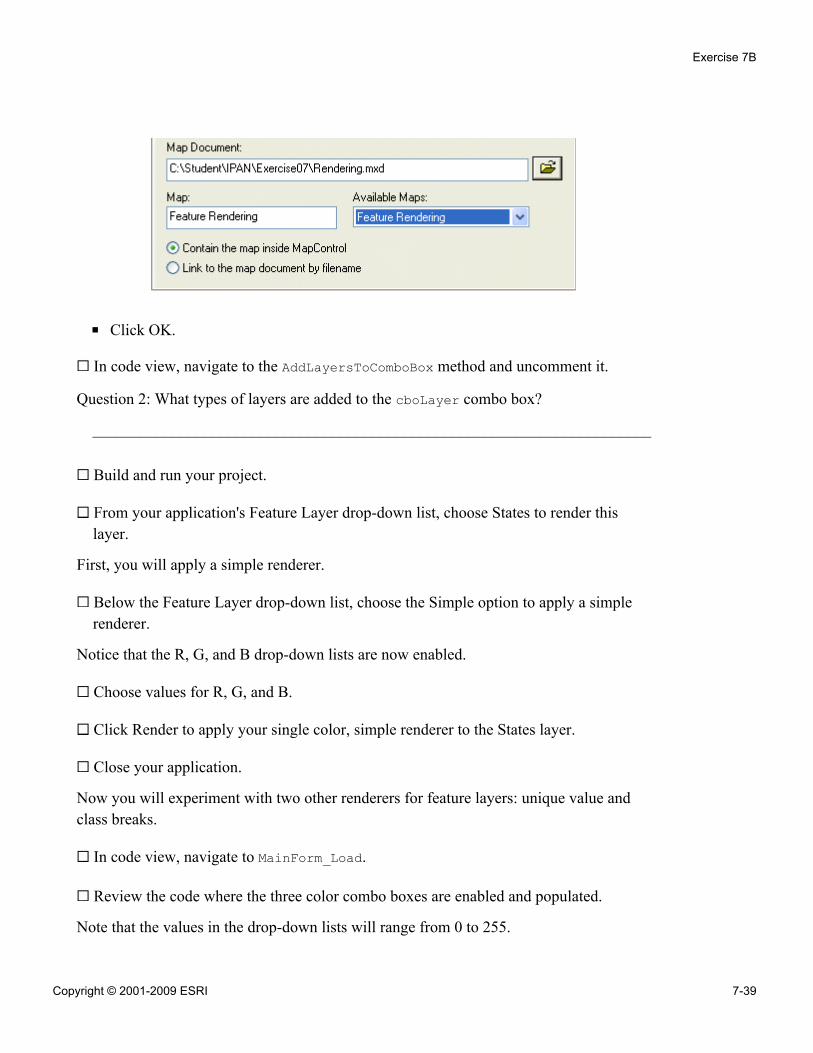
▪ Click OK.
In code view, navigate to the AddLayersToComboBox method and uncomment it.
Question 2: What types of layers are added to the cboLayer combo box?
______________________________________________________________________
Build and run your project.
From your application's Feature Layer drop-down list, choose States to render thislayer.
First, you will apply a simple renderer.
Below the Feature Layer drop-down list, choose the Simple option to apply a simplerenderer.
Notice that the R, G, and B drop-down lists are now enabled.
Choose values for R, G, and B.
Click Render to apply your single color, simple renderer to the States layer.
Close your application.
Now you will experiment with two other renderers for feature layers: unique value andclass breaks.
In code view, navigate to MainForm_Load.
Review the code where the three color combo boxes are enabled and populated.
Note that the values in the drop-down lists will range from 0 to 255.
Exercise 7B
Copyright © 2001-2009 ESRI 7-39
!
Navigate to the following MainForm methods and functions, and uncomment the codein each:
▪ ApplyUniqueValue▪ ApplyClassBreaks▪ GetColors
Be sure to uncomment the GetColors argument list.
▪ FillFieldsComboBox
Question 3: Which ArcGIS references do you need to add to your project?
______________________________________________________________________
Note: This course hasn't covered all of the objects in these renderers, so you might notunderstand all of the code. For example, you may have noticed references to cursors andfields. You will learn more about these objects in later lessons. For now, use the renderersand observe how your layers display in the map.
Add the necessary references. (Hint: Be sure to add Microsoft.VisualBasic.)
Build and run your project.
To apply a class breaks renderer, do the following in your application:
▪ In the table of contents, turn on the Counties layer.▪ From the Feature Layer drop-down list, choose Counties.▪ Choose the Class Breaks option, then choose any field from the drop-down list.▪ Click Render to apply your class breaks renderer to the field.
Choose a different field and vary the number of breaks, then run your class breaksrenderer again.
To test the unique values renderer, choose the Unique Value option, then run it on afield of your choice.
When you are finished, close your application.
Skip to step 5, where you will save your symbology to a layer file.
Introduction to Programming ArcObjects Using the Microsoft .NET Framework
7-40 Copyright © 2001-2009 ESRI
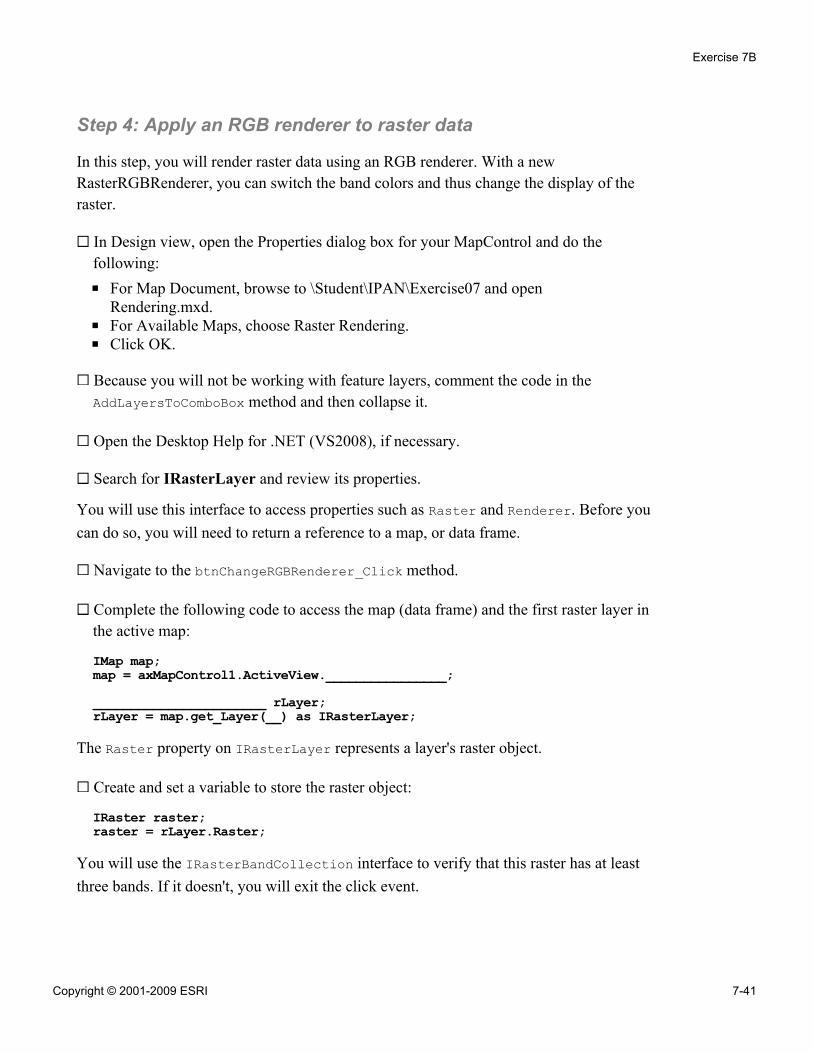
Step 4: Apply an RGB renderer to raster data
In this step, you will render raster data using an RGB renderer. With a newRasterRGBRenderer, you can switch the band colors and thus change the display of theraster.
In Design view, open the Properties dialog box for your MapControl and do thefollowing:
▪ For Map Document, browse to \Student\IPAN\Exercise07 and openRendering.mxd.
▪ For Available Maps, choose Raster Rendering.▪ Click OK.
Because you will not be working with feature layers, comment the code in theAddLayersToComboBox method and then collapse it.
Open the Desktop Help for .NET (VS2008), if necessary.
Search for IRasterLayer and review its properties.
You will use this interface to access properties such as Raster and Renderer. Before youcan do so, you will need to return a reference to a map, or data frame.
Navigate to the btnChangeRGBRenderer_Click method.
Complete the following code to access the map (data frame) and the first raster layer inthe active map:
IMap map;map = axMapControl1.ActiveView.________________;_______________________ rLayer;rLayer = map.get_Layer(__) as IRasterLayer;
The Raster property on IRasterLayer represents a layer's raster object.
Create and set a variable to store the raster object:
IRaster raster;raster = rLayer.Raster;
You will use the IRasterBandCollection interface to verify that this raster has at leastthree bands. If it doesn't, you will exit the click event.
Exercise 7B
Copyright © 2001-2009 ESRI 7-41
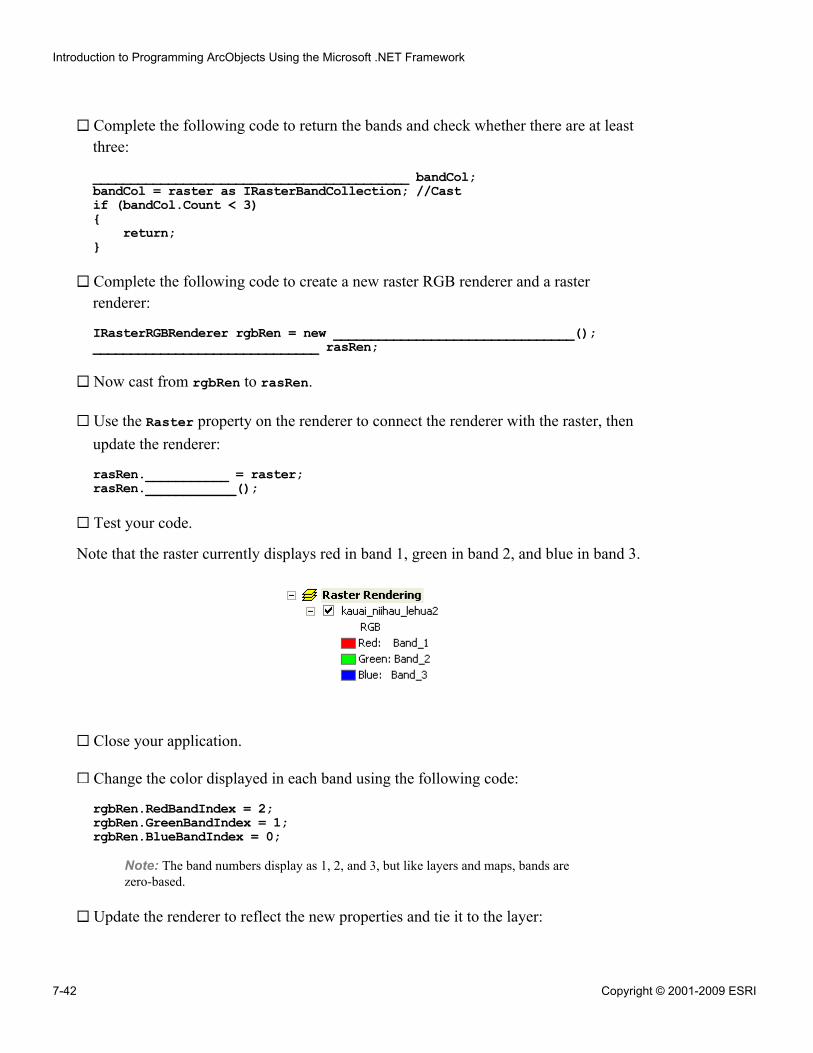
Complete the following code to return the bands and check whether there are at leastthree:
__________________________________________ bandCol;bandCol = raster as IRasterBandCollection; //Castif (bandCol.Count < 3){
return;}
Complete the following code to create a new raster RGB renderer and a rasterrenderer:
IRasterRGBRenderer rgbRen = new ________________________________();______________________________ rasRen;
Now cast from rgbRen to rasRen.
Use the Raster property on the renderer to connect the renderer with the raster, thenupdate the renderer:
rasRen.___________ = raster;rasRen.____________();
Test your code.
Note that the raster currently displays red in band 1, green in band 2, and blue in band 3.
Close your application.
Change the color displayed in each band using the following code:
rgbRen.RedBandIndex = 2;rgbRen.GreenBandIndex = 1;rgbRen.BlueBandIndex = 0;
Note: The band numbers display as 1, 2, and 3, but like layers and maps, bands arezero-based.
Update the renderer to reflect the new properties and tie it to the layer:
Introduction to Programming ArcObjects Using the Microsoft .NET Framework
7-42 Copyright © 2001-2009 ESRI
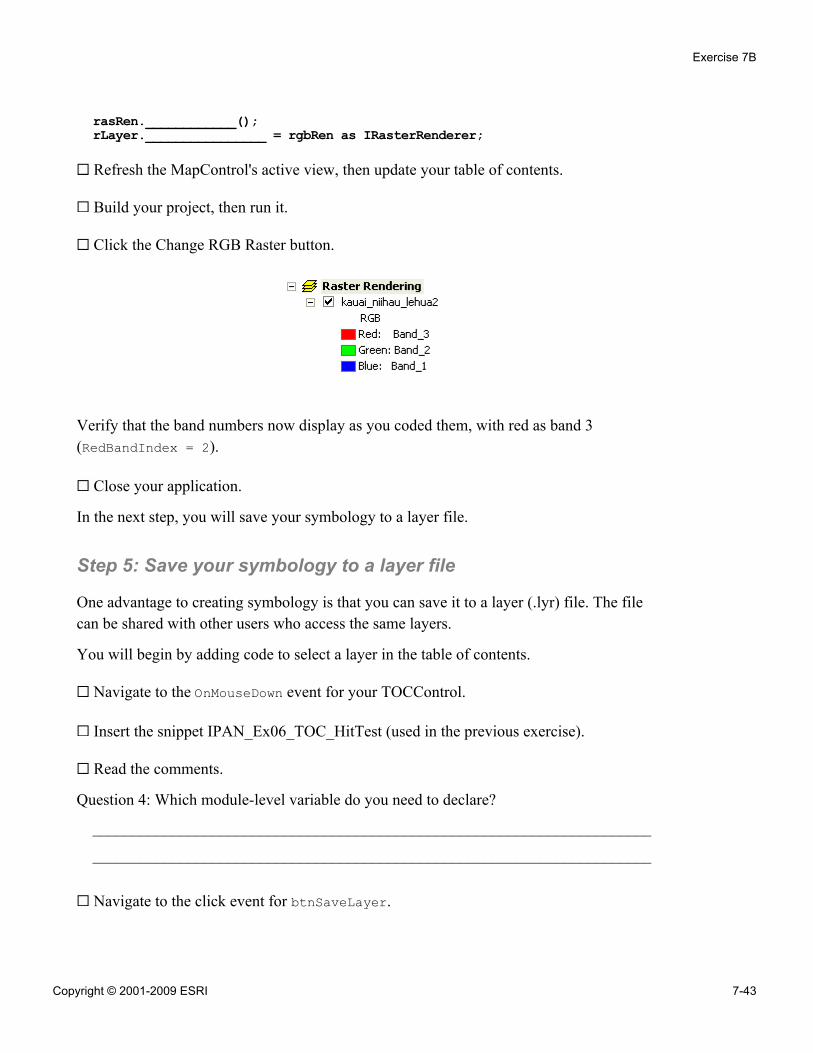
rasRen.____________();rLayer.________________ = rgbRen as IRasterRenderer;
Refresh the MapControl's active view, then update your table of contents.
Build your project, then run it.
Click the Change RGB Raster button.
Verify that the band numbers now display as you coded them, with red as band 3(RedBandIndex = 2).
Close your application.
In the next step, you will save your symbology to a layer file.
Step 5: Save your symbology to a layer file
One advantage to creating symbology is that you can save it to a layer (.lyr) file. The filecan be shared with other users who access the same layers.
You will begin by adding code to select a layer in the table of contents.
Navigate to the OnMouseDown event for your TOCControl.
Insert the snippet IPAN_Ex06_TOC_HitTest (used in the previous exercise).
Read the comments.
Question 4: Which module-level variable do you need to declare?
______________________________________________________________________
______________________________________________________________________
Navigate to the click event for btnSaveLayer.
Exercise 7B
Copyright © 2001-2009 ESRI 7-43
!
You want to code this button so that when it is clicked, the layer that is selected in thetable of contents is saved to a layer file. You will begin by inserting code toprogrammatically open the Visual Studio SaveFileDialog control.
Insert the snippet IPAN_Ex07_SaveLyrFile.
Read through the code.
The code uses the layer name selected by the user at run time as the output file name. The.lyr extension is added to the file so that ArcGIS can recognize it as a layer file.
Now that you know the output name, you will create the new layer file object.
After the line of code that assigns a value to the path variable, use the LayerFileclass to create a new instance of a layer file with the layerFile variable.
Create the new layer file by calling ILayerFile::New, passing the file name selectedin the dialog box as the argument.
At the bottom of the method, after the code that assigns the variable, complete thefollowing code to load m_layer into the layer file:
layerFile.ReplaceContents(______________);
Save the layer file:
layerFile.________();
Create a message box to notify the user of the layer file's name and location on disk.
Run your project.
When your form displays, if you are using vector layers, symbolize one of the layers.(If you are using raster layers, you do not need to symbolize the layer.)
Click the same layer in the table of contents to select it, then click your Save Layerbutton.
Clicking the Save Layer button without first selecting a layer in thetable of contents may result in an error.
Save the layer file to your \Student\IPAN\Exercise07 folder.
Click OK on the message box.
Introduction to Programming ArcObjects Using the Microsoft .NET Framework
7-44 Copyright © 2001-2009 ESRI
Turn off and collapse the layer in the table of contents.
To confirm that your code is working, click the Add Data button and add your newlayer file to the map. (Hint: In the dialog box that opens, on the left, click Layers.)
Close your application.
You have finished this exercise; however, you may wish to complete the optional steps:
▪ Step 6 shows you how to create a scale-dependent renderer.▪ Step 7 shows you how to add a stretch color ramp renderer to symbolize raster
data.
If you want to complete the optional steps, do so now. Otherwise, close Visual Studio.
Step 6: (Optional) Apply a scale-dependent renderer
In ArcMap, you can change the way layers are rendered using the layer properties, orthrough code. One example of functionality that can only be done through code is ascale-dependent renderer, which combines several renderers into one layer. For example,you can combine a simple renderer and a unique value renderer all within one layer. It isscale-dependent because you set the scale threshold at which a particular rendererdisplays.
Start ArcMap and choose to open an existing map.
Browse to \Student\IPAN\Exercise07 and open Scale_Renderer.mxd.
Note that the map contains three layers: COUNTY1, COUNTY2, and COUNTY3.
One by one, right-click each layer, choose Properties, and view the Source tab in theLayer Properties dialog box.
Question 5: What feature class is used as the data source for all three layers?
______________________________________________________________________
Close the Layer Properties dialog box.
Expand each layer in the table of contents.
Notice that the same layer has been added three times, each time with differentsymbology.
Exercise 7B
Copyright © 2001-2009 ESRI 7-45

On the Tools toolbar, click the Zoom In tool and drag a box around thenorthwestern region of the continental United States.
Notice that the renderer displayed is that of the first layer in the data frame, COUNTY1.This renderer shows the counties with a single symbol and no outline.
Turn off the COUNTY1 layer. (If necessary, zoom in or out so that you can see severalstates at once, as shown below.)
Now the counties are displayed based on states names (in the STATE_NAME field)using a unique values renderer and a pastel color ramp.
Introduction to Programming ArcObjects Using the Microsoft .NET Framework
7-46 Copyright © 2001-2009 ESRI
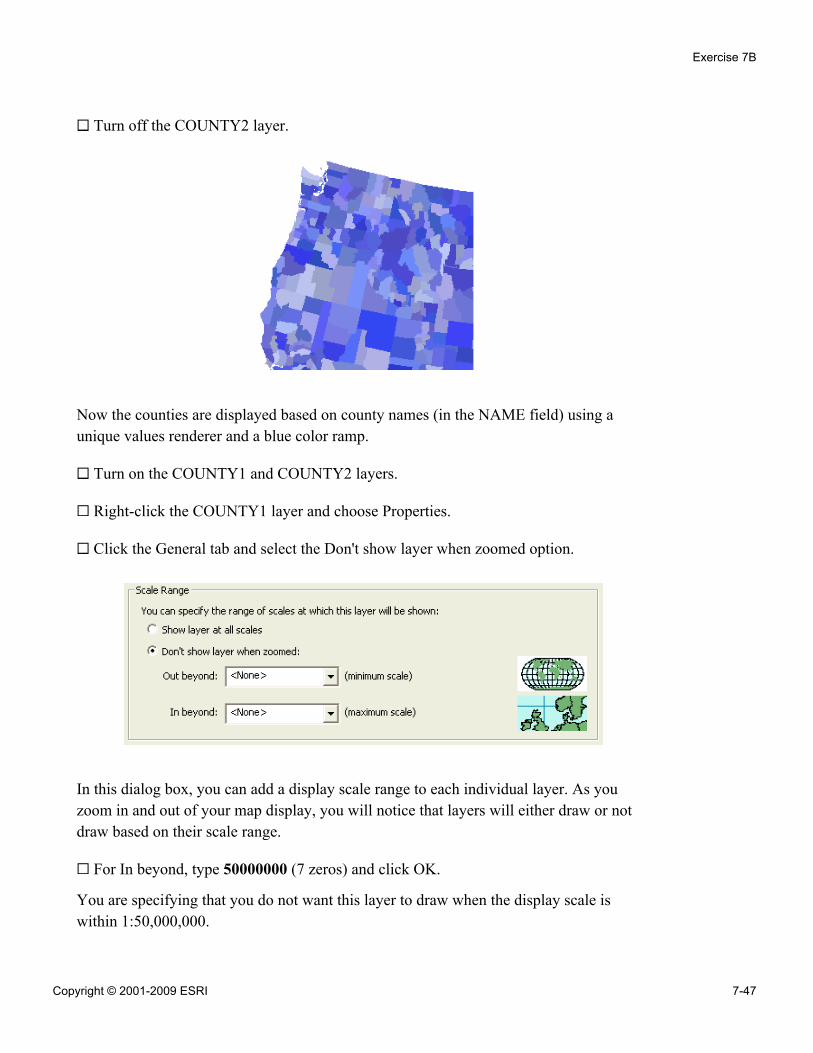
Turn off the COUNTY2 layer.
Now the counties are displayed based on county names (in the NAME field) using aunique values renderer and a blue color ramp.
Turn on the COUNTY1 and COUNTY2 layers.
Right-click the COUNTY1 layer and choose Properties.
Click the General tab and select the Don't show layer when zoomed option.
In this dialog box, you can add a display scale range to each individual layer. As youzoom in and out of your map display, you will notice that layers will either draw or notdraw based on their scale range.
For In beyond, type 50000000 (7 zeros) and click OK.
You are specifying that you do not want this layer to draw when the display scale iswithin 1:50,000,000.
Exercise 7B
Copyright © 2001-2009 ESRI 7-47
Use the zoom tools to zoom out past 50,000,000 and in less than 50,000,000 to seewhat happens in the display.
Question 6: What happens in the display when you zoom?
______________________________________________________________________
______________________________________________________________________
Open the layer properties for COUNTY1, select the Show layer at all scales option,and click OK.
You want to mimic this type of functionality all within one layer in ArcMap, as opposedto multiple layers.
To save time, the code to create the new renderer has been written for you. You will runthe code and examine how it works. You will begin by setting your MapControl to openthe map document that you currently see in ArcMap.
Close ArcMap. Do not save changes.
In Visual Studio, open the property pages for your MapControl.
For Map Document, browse to \Student\IPAN\Exercise07 and openScale_Renderer.mxd.
Click OK.
Navigate to the following methods and uncomment them:
▪ AddLayersToComboBox▪ btnScale_Click
In the btnScale_Click method, explore the code that uses IGeoFeatureLayer.
Use the developer resource of your choice to search for IGeoFeatureLayer. (Tip:Remember, you can use the Visual Studio Object Browser.)
Question 7: What is returned when you use the Renderer property?
______________________________________________________________________
Introduction to Programming ArcObjects Using the Microsoft .NET Framework
7-48 Copyright © 2001-2009 ESRI
!
In your code, scroll down a few lines to the IScaleDependentRenderer interfacecode and view the portion that sets the scale thresholds for the renderers within thescale-dependant renderer:
scaleDependentRenderer.set_Break(0) = 10000000scaleDependentRenderer.set_Break(1) = 50000000scaleDependentRenderer.set_Break(2) = 500000000
Run your project.
Click the Scale Dependent button.
Close the message boxes that appear.
A new layer named USA is added to the table of contents.
It may take a little time for the new layer to display in the table ofcontents.
Turn off all layers except USA.
Click the Full Extent button to view the map at a smaller map scale.
Click the Fixed Zoom In button several times to zoom in past 1:10,000,000. (Tip:Use the Pan tool to keep your map in view.)
The simple renderer switches to unique values for states at 1:50,000,000, then to uniquevalues for counties at 1:10,000,000. There are three renderers embedded in the singleUSA layer.
You created each renderer by referencing layers in the map document. Then, you addedthem into the scale-dependent renderer. If you wanted, you could now save the USAlayer to a layer file and add it to other maps.
Close your application.
To learn how to add a stretch color ramp renderer to symbolize raster data, continue onto the next step. Otherwise, close Visual Studio.
Step 7: (Optional) Apply a stretch renderer to raster data
In this step, you will apply a stretch color ramp renderer to your raster data. To save time,you will work with some code that has already been written for you.
Exercise 7B
Copyright © 2001-2009 ESRI 7-49
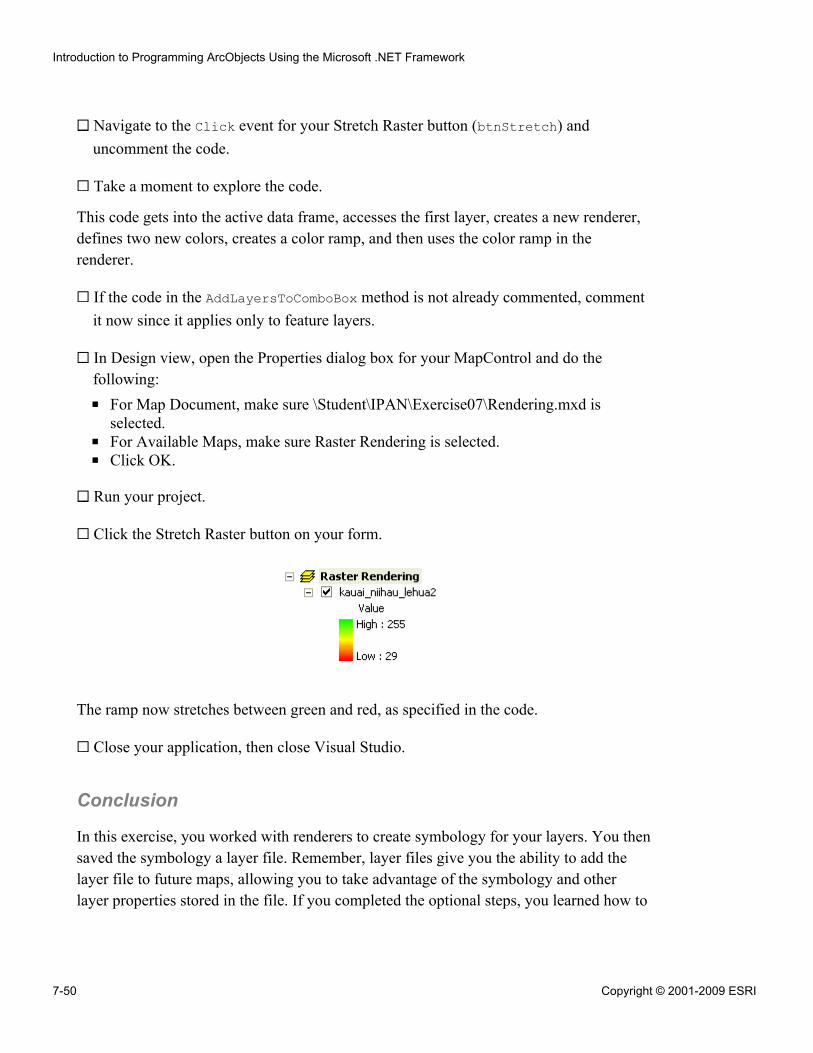
Navigate to the Click event for your Stretch Raster button (btnStretch) anduncomment the code.
Take a moment to explore the code.
This code gets into the active data frame, accesses the first layer, creates a new renderer,defines two new colors, creates a color ramp, and then uses the color ramp in therenderer.
If the code in the AddLayersToComboBox method is not already commented, commentit now since it applies only to feature layers.
In Design view, open the Properties dialog box for your MapControl and do thefollowing:
▪ For Map Document, make sure \Student\IPAN\Exercise07\Rendering.mxd isselected.
▪ For Available Maps, make sure Raster Rendering is selected.▪ Click OK.
Run your project.
Click the Stretch Raster button on your form.
The ramp now stretches between green and red, as specified in the code.
Close your application, then close Visual Studio.
Conclusion
In this exercise, you worked with renderers to create symbology for your layers. You thensaved the symbology a layer file. Remember, layer files give you the ability to add thelayer file to future maps, allowing you to take advantage of the symbology and otherlayer properties stored in the file. If you completed the optional steps, you learned how to
Introduction to Programming ArcObjects Using the Microsoft .NET Framework
7-50 Copyright © 2001-2009 ESRI

apply a scale-dependent renderer to vector data and a stretch color ramp renderer to rasterdata for more sophisticated data display.
Exercise 7B
Copyright © 2001-2009 ESRI 7-51

Answers to Exercise 7B Questions
Question 1: Which object (or interface) has the Symbol property? Which has theRenderer property?
Answer: ISimpleRenderer; IGeoFeatureLayer
Question 2: What types of layers are added to the cboLayer combo box?
Answer: Feature layers—point, polyline, and polygon
Question 3: Which ArcGIS references do you need to add to your project?
Answer: ESRI.ArcGIS.Geodatabase and ESRI.ArcGIS.CartoUI
Question 4: Which module-level variable do you need to declare?
Answer: m_layer as ILayer (or m_layer as ILayer2)
Question 5: What feature class is used as the data source for all three layers?
Answer: USCounties
Question 6: What happens in the display when you zoom?
Answer: When you zoom out past 50,000,000, the simple renderer draws. When youzoom within 50,000,000, the unique value renderer based on state name draws.
Question 7: What is returned when you use the Renderer property?
Answer: A reference to IFeatureRenderer
Introduction to Programming ArcObjects Using the Microsoft .NET Framework
7-52 Copyright © 2001-2009 ESRI
Exercise Solution: Exercise 7B (C#)using System;using System.Drawing;using System.Collections;using System.ComponentModel;using System.Windows.Forms;using System.Data;using System.IO;using System.Runtime.InteropServices;using Microsoft.VisualBasic;using ESRI.ArcGIS.esriSystem;using ESRI.ArcGIS.Carto;using ESRI.ArcGIS.Controls;using ESRI.ArcGIS.ADF;using ESRI.ArcGIS.SystemUI;using ESRI.ArcGIS.Display;using ESRI.ArcGIS.CartoUI;using ESRI.ArcGIS.DataSourcesRaster;using ESRI.ArcGIS.Geometry;using ESRI.ArcGIS.Geodatabase;namespace DisplayingData{
public sealed partial class MainForm : Form{
#region class private membersprivate IMapControl3 m_mapControl = null;private string m_mapDocumentName = string.Empty;private string m_strOption = string.Empty;private ILayer m_layer = null;#endregion#region class constructorpublic MainForm(){
InitializeComponent();}#endregion
private void MainForm_Load(object sender, EventArgs e){
//get the MapControlm_mapControl = (IMapControl3)axMapControl1.Object;//disable the Save menu (since there is no document yet)AddLayersToComboBox();
Exercise 7B
Copyright © 2001-2009 ESRI 7-53
for (int i = 0; (i < 255); i++){
if (((i > 1)&& (i < 11)))
{cboBreaks.Items.Add(i);
}cboRed.Items.Add(i);cboGreen.Items.Add(i);cboBlue.Items.Add(i);cboRed.Text = "0";cboGreen.Text = "0";cboBlue.Text = "0";
}}
#region Main Menu event handlersprivate void menuNewDoc_Click(object sender, EventArgs e){
//execute New Document commandICommand command = new CreateNewDocument();command.OnCreate(m_mapControl.Object);command.OnClick();
}private void menuOpenDoc_Click(object sender, EventArgs e){
//execute Open Document commandICommand command = new ControlsOpenDocCommandClass();command.OnCreate(m_mapControl.Object);command.OnClick();
}private void menuSaveDoc_Click(object sender, EventArgs e){
//execute Save Document commandif (m_mapControl.CheckMxFile(m_mapDocumentName)){
//create a new instance of a MapDocumentIMapDocument mapDoc = new MapDocumentClass();mapDoc.Open(m_mapDocumentName, string.Empty);//Make sure that the MapDocument is not readonlyif (mapDoc.get_IsReadOnly(m_mapDocumentName)){
MessageBox.Show("Map document is read only!");mapDoc.Close();return;
}//Replace its contents with the current mapmapDoc.ReplaceContents((IMxdContents)m_mapControl.Map);//save the MapDocument in order to persist itmapDoc.Save(mapDoc.UsesRelativePaths, false);
Introduction to Programming ArcObjects Using the Microsoft .NET Framework
7-54 Copyright © 2001-2009 ESRI
//close the MapDocumentmapDoc.Close();
}}private void menuSaveAs_Click(object sender, EventArgs e){
//execute SaveAs Document commandICommand command = new ControlsSaveAsDocCommandClass();command.OnCreate(m_mapControl.Object);command.OnClick();
}private void menuExitApp_Click(object sender, EventArgs e){
//exit the applicationApplication.Exit();
}#endregion//listen to MapReplaced event in order to//update the statusbar and the Save menuprivate void axMapControl1_OnMapReplaced(
object sender, IMapControlEvents2_OnMapReplacedEvent e){
//get the current document name from the MapControlm_mapDocumentName = m_mapControl.DocumentFilename;//if there is no MapDocument, disable the Save menu and clear the statusbarif (m_mapDocumentName == string.Empty){
menuSaveDoc.Enabled = false;statusBarXY.Text = string.Empty;
}else{
//enable the Save menu and write the doc name to the statusbarmenuSaveDoc.Enabled = true;statusBarXY.Text = System.IO.Path.GetFileName(m_mapDocumentName);
}}public void ApplySimple(IGeoFeatureLayer geoLayer, ISymbol aSymbol){
ISimpleRenderer simpleRenderer;simpleRenderer = new SimpleRenderer();simpleRenderer.Symbol = aSymbol as ISymbol;geoLayer.Renderer = simpleRenderer as IFeatureRenderer;axMapControl1.ActiveView.Refresh();axTOCControl1.Update();
}
Exercise 7B
Copyright © 2001-2009 ESRI 7-55

public void ApplyUniqueValue(IGeoFeatureLayer geoLayer, string aFieldName){
IUniqueValueRenderer uniqueRenderer;uniqueRenderer = new UniqueValueRenderer();uniqueRenderer.FieldCount = 1;uniqueRenderer.set_Field(0, aFieldName);int intFieldIndex;intFieldIndex = geoLayer.FeatureClass.FindField(aFieldName);IFeatureCursor fCursor;IQueryFilter qFilter;qFilter = new QueryFilter();qFilter.SubFields = aFieldName;fCursor = geoLayer.FeatureClass.Search(qFilter, true);IRandomColorRamp randomColors;randomColors = new RandomColorRamp();randomColors.Size = 16;bool bOK;randomColors.CreateRamp(out bOK);if (!bOK){
return;}IEnumColors enumColor;enumColor = randomColors.Colors;ISimpleFillSymbol sym;IColor color;IFeature feature;feature = fCursor.NextFeature();while (feature != null){
sym = new SimpleFillSymbol();color = enumColor.Next();if ((color == null)){
enumColor.Reset();color = enumColor.Next();
}sym.Style = esriSimpleFillStyle.esriSFSSolid;sym.Color = color;Console.WriteLine(feature.get_Value(intFieldIndex).ToString());uniqueRenderer.AddValue(
feature.get_Value(intFieldIndex).ToString(), "",((ISymbol)(sym)));
feature = fCursor.NextFeature();}geoLayer.Renderer = ((IFeatureRenderer)(uniqueRenderer));axMapControl1.ActiveView.Refresh();axTOCControl1.Update();
}
Introduction to Programming ArcObjects Using the Microsoft .NET Framework
7-56 Copyright © 2001-2009 ESRI
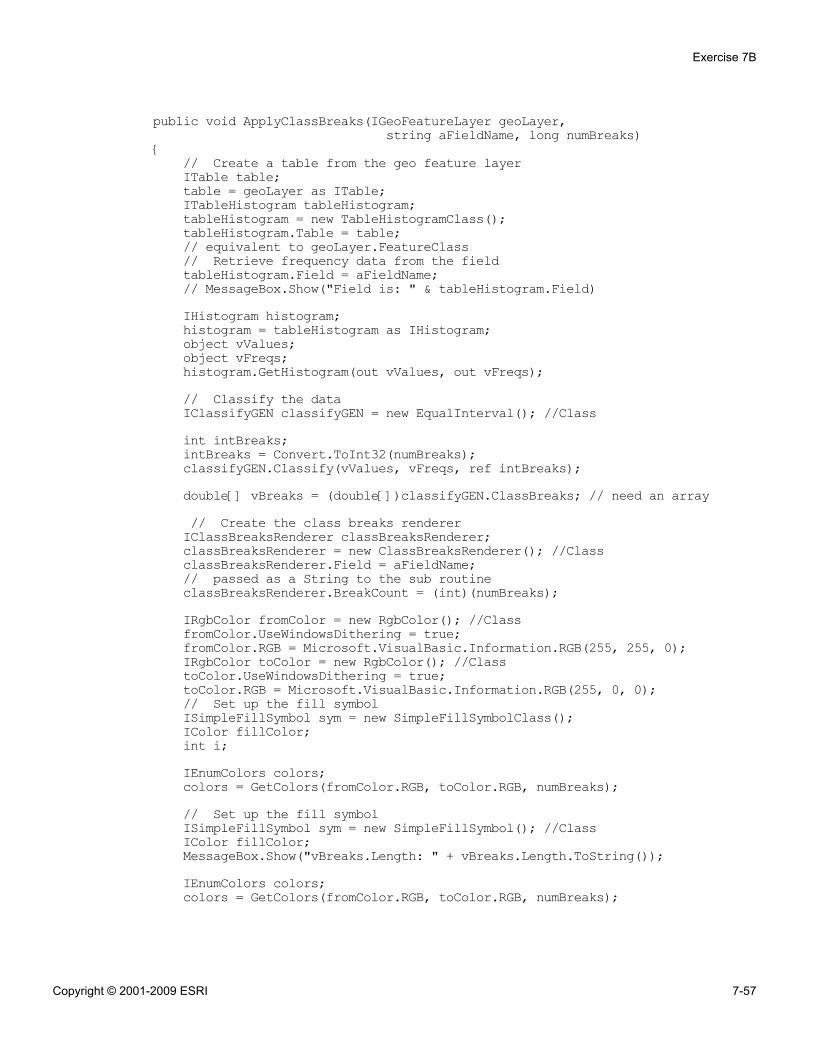
public void ApplyClassBreaks(IGeoFeatureLayer geoLayer,string aFieldName, long numBreaks)
{// Create a table from the geo feature layerITable table;table = geoLayer as ITable;ITableHistogram tableHistogram;tableHistogram = new TableHistogramClass();tableHistogram.Table = table;// equivalent to geoLayer.FeatureClass// Retrieve frequency data from the fieldtableHistogram.Field = aFieldName;// MessageBox.Show("Field is: " & tableHistogram.Field)IHistogram histogram;histogram = tableHistogram as IHistogram;object vValues;object vFreqs;histogram.GetHistogram(out vValues, out vFreqs);// Classify the dataIClassifyGEN classifyGEN = new EqualInterval(); //Classint intBreaks;intBreaks = Convert.ToInt32(numBreaks);classifyGEN.Classify(vValues, vFreqs, ref intBreaks);double[] vBreaks = (double[])classifyGEN.ClassBreaks; // need an array// Create the class breaks rendererIClassBreaksRenderer classBreaksRenderer;classBreaksRenderer = new ClassBreaksRenderer(); //ClassclassBreaksRenderer.Field = aFieldName;// passed as a String to the sub routineclassBreaksRenderer.BreakCount = (int)(numBreaks);IRgbColor fromColor = new RgbColor(); //ClassfromColor.UseWindowsDithering = true;fromColor.RGB = Microsoft.VisualBasic.Information.RGB(255, 255, 0);IRgbColor toColor = new RgbColor(); //ClasstoColor.UseWindowsDithering = true;toColor.RGB = Microsoft.VisualBasic.Information.RGB(255, 0, 0);// Set up the fill symbolISimpleFillSymbol sym = new SimpleFillSymbolClass();IColor fillColor;int i;IEnumColors colors;colors = GetColors(fromColor.RGB, toColor.RGB, numBreaks);// Set up the fill symbolISimpleFillSymbol sym = new SimpleFillSymbol(); //ClassIColor fillColor;MessageBox.Show("vBreaks.Length: " + vBreaks.Length.ToString());IEnumColors colors;colors = GetColors(fromColor.RGB, toColor.RGB, numBreaks);
Exercise 7B
Copyright © 2001-2009 ESRI 7-57
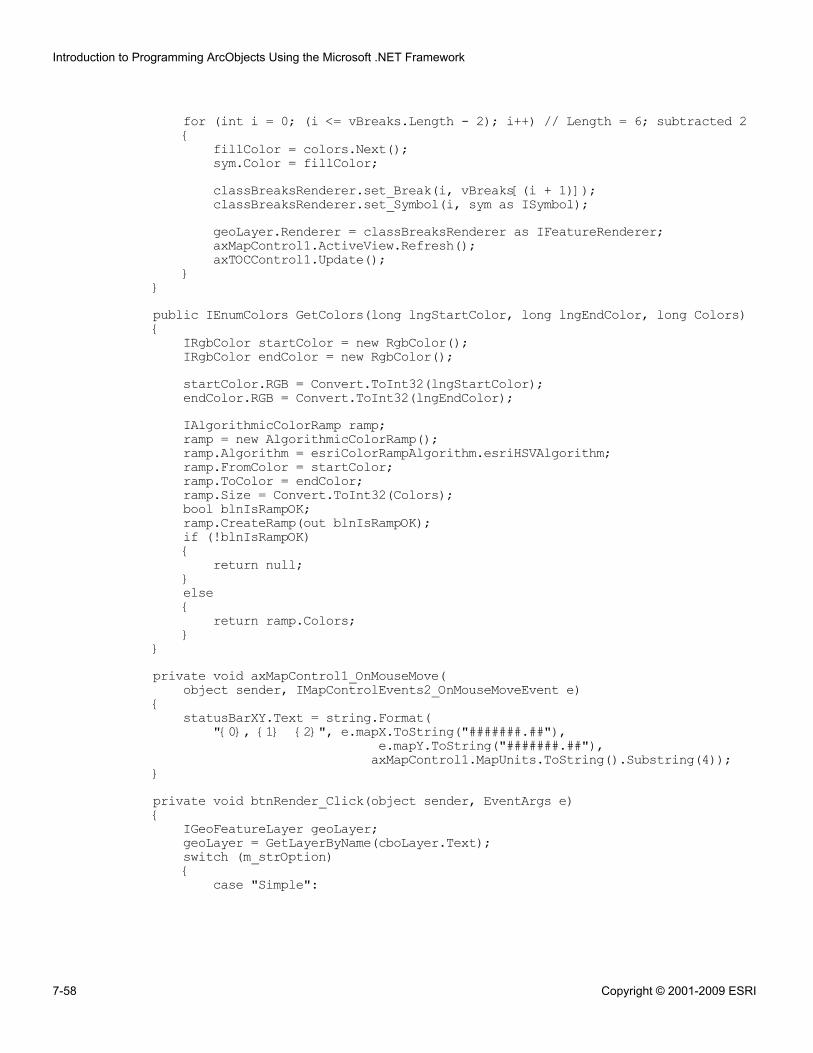
for (int i = 0; (i <= vBreaks.Length - 2); i++) // Length = 6; subtracted 2{
fillColor = colors.Next();sym.Color = fillColor;classBreaksRenderer.set_Break(i, vBreaks[(i + 1)]);classBreaksRenderer.set_Symbol(i, sym as ISymbol);geoLayer.Renderer = classBreaksRenderer as IFeatureRenderer;axMapControl1.ActiveView.Refresh();axTOCControl1.Update();
}}public IEnumColors GetColors(long lngStartColor, long lngEndColor, long Colors){
IRgbColor startColor = new RgbColor();IRgbColor endColor = new RgbColor();startColor.RGB = Convert.ToInt32(lngStartColor);endColor.RGB = Convert.ToInt32(lngEndColor);IAlgorithmicColorRamp ramp;ramp = new AlgorithmicColorRamp();ramp.Algorithm = esriColorRampAlgorithm.esriHSVAlgorithm;ramp.FromColor = startColor;ramp.ToColor = endColor;ramp.Size = Convert.ToInt32(Colors);bool blnIsRampOK;ramp.CreateRamp(out blnIsRampOK);if (!blnIsRampOK){
return null;}else{
return ramp.Colors;}
}private void axMapControl1_OnMouseMove(
object sender, IMapControlEvents2_OnMouseMoveEvent e){
statusBarXY.Text = string.Format("{0}, {1} {2}", e.mapX.ToString("#######.##"),
e.mapY.ToString("#######.##"),axMapControl1.MapUnits.ToString().Substring(4));
}private void btnRender_Click(object sender, EventArgs e){
IGeoFeatureLayer geoLayer;geoLayer = GetLayerByName(cboLayer.Text);switch (m_strOption){
case "Simple":
Introduction to Programming ArcObjects Using the Microsoft .NET Framework
7-58 Copyright © 2001-2009 ESRI
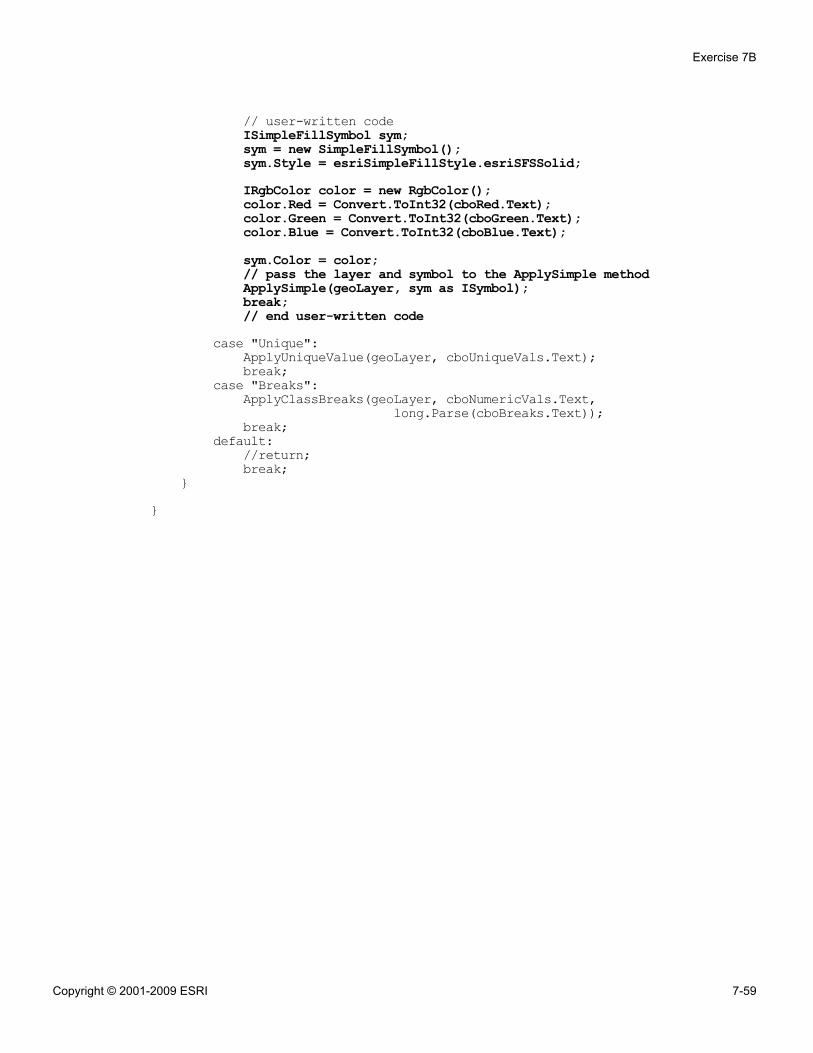
// user-written codeISimpleFillSymbol sym;sym = new SimpleFillSymbol();sym.Style = esriSimpleFillStyle.esriSFSSolid;IRgbColor color = new RgbColor();color.Red = Convert.ToInt32(cboRed.Text);color.Green = Convert.ToInt32(cboGreen.Text);color.Blue = Convert.ToInt32(cboBlue.Text);sym.Color = color;// pass the layer and symbol to the ApplySimple methodApplySimple(geoLayer, sym as ISymbol);break;// end user-written code
case "Unique":ApplyUniqueValue(geoLayer, cboUniqueVals.Text);break;
case "Breaks":ApplyClassBreaks(geoLayer, cboNumericVals.Text,
long.Parse(cboBreaks.Text));break;
default://return;break;
}}
Exercise 7B
Copyright © 2001-2009 ESRI 7-59
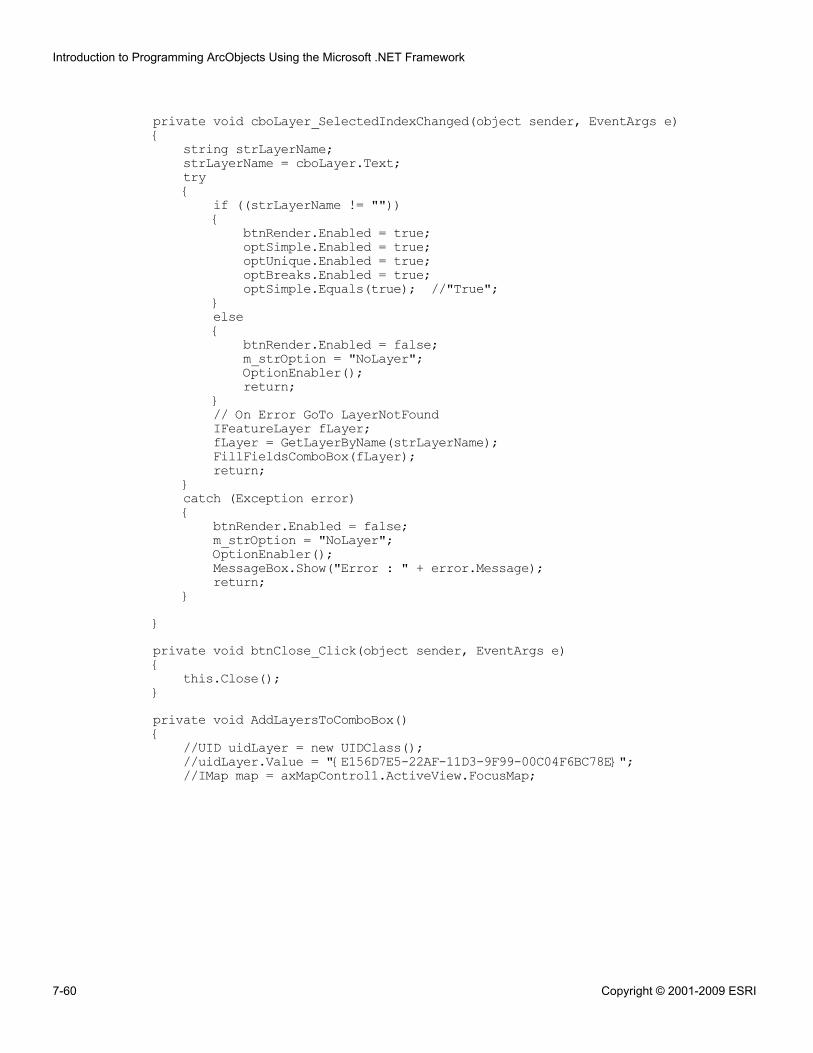
private void cboLayer_SelectedIndexChanged(object sender, EventArgs e){
string strLayerName;strLayerName = cboLayer.Text;try{
if ((strLayerName != "")){
btnRender.Enabled = true;optSimple.Enabled = true;optUnique.Enabled = true;optBreaks.Enabled = true;optSimple.Equals(true); //"True";
}else{
btnRender.Enabled = false;m_strOption = "NoLayer";OptionEnabler();return;
}// On Error GoTo LayerNotFoundIFeatureLayer fLayer;fLayer = GetLayerByName(strLayerName);FillFieldsComboBox(fLayer);return;
}catch (Exception error){
btnRender.Enabled = false;m_strOption = "NoLayer";OptionEnabler();MessageBox.Show("Error : " + error.Message);return;
}}private void btnClose_Click(object sender, EventArgs e){
this.Close();}private void AddLayersToComboBox(){
//UID uidLayer = new UIDClass();//uidLayer.Value = "{E156D7E5-22AF-11D3-9F99-00C04F6BC78E}";//IMap map = axMapControl1.ActiveView.FocusMap;
Introduction to Programming ArcObjects Using the Microsoft .NET Framework
7-60 Copyright © 2001-2009 ESRI

//IEnumLayer allFLayers;//allFLayers = map.get_Layers(uidLayer, true);//IFeatureLayer fLayer;//fLayer = allFLayers.Next() as IFeatureLayer;//while (fLayer != null)//{// if ((fLayer.FeatureClass.ShapeType ==
esriGeometryType.esriGeometryPolygon))// {// cboLayer.Items.Add(fLayer.Name);// }// else if ((fLayer.FeatureClass.ShapeType ==
esriGeometryType.esriGeometryPolyline))// {// cboLayer.Items.Add(fLayer.Name);// }// else if ((fLayer.FeatureClass.ShapeType ==
esriGeometryType.esriGeometryPoint))// {// cboLayer.Items.Add(fLayer.Name);// }// fLayer = allFLayers.Next() as IFeatureLayer;//}
}private IGeoFeatureLayer GetLayerByName(string LayerName){
UID uid = new UID();// This is the ID for layers supporting the IGeoFeatureLayer interfaceuid.Value = "{E156D7E5-22AF-11D3-9F99-00C04F6BC78E}";IEnumLayer allFLayers;allFLayers = axMapControl1.ActiveView.FocusMap.get_Layers(uid, true);// Loop thru all FeatureLayers until LayerName is foundILayer layer;layer = allFLayers.Next();while (layer != null){
if ((layer.Name == LayerName)){
// Pass back the requested layerreturn ((IGeoFeatureLayer)(layer));//break;
}layer = allFLayers.Next();
}return null;
}
Exercise 7B
Copyright © 2001-2009 ESRI 7-61
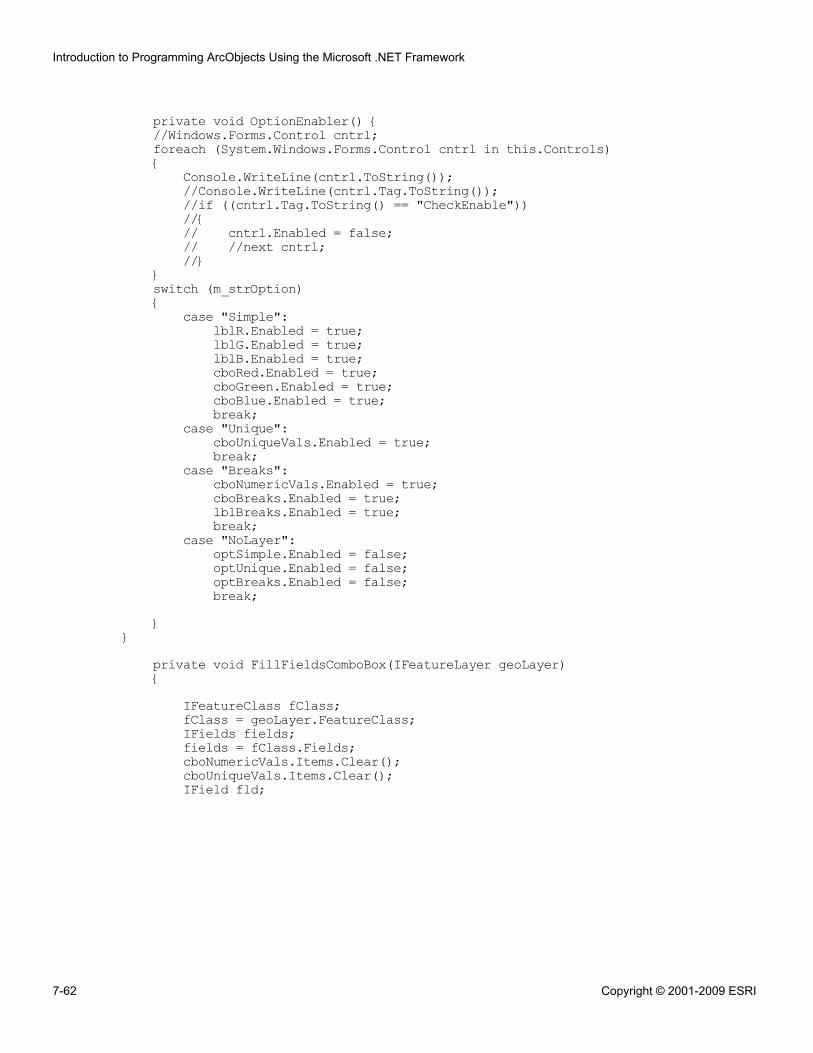
private void OptionEnabler() {//Windows.Forms.Control cntrl;foreach (System.Windows.Forms.Control cntrl in this.Controls){
Console.WriteLine(cntrl.ToString());//Console.WriteLine(cntrl.Tag.ToString());//if ((cntrl.Tag.ToString() == "CheckEnable"))//{// cntrl.Enabled = false;// //next cntrl;//}
}switch (m_strOption){
case "Simple":lblR.Enabled = true;lblG.Enabled = true;lblB.Enabled = true;cboRed.Enabled = true;cboGreen.Enabled = true;cboBlue.Enabled = true;break;
case "Unique":cboUniqueVals.Enabled = true;break;
case "Breaks":cboNumericVals.Enabled = true;cboBreaks.Enabled = true;lblBreaks.Enabled = true;break;
case "NoLayer":optSimple.Enabled = false;optUnique.Enabled = false;optBreaks.Enabled = false;break;
}}
private void FillFieldsComboBox(IFeatureLayer geoLayer){
IFeatureClass fClass;fClass = geoLayer.FeatureClass;IFields fields;fields = fClass.Fields;cboNumericVals.Items.Clear();cboUniqueVals.Items.Clear();IField fld;
Introduction to Programming ArcObjects Using the Microsoft .NET Framework
7-62 Copyright © 2001-2009 ESRI
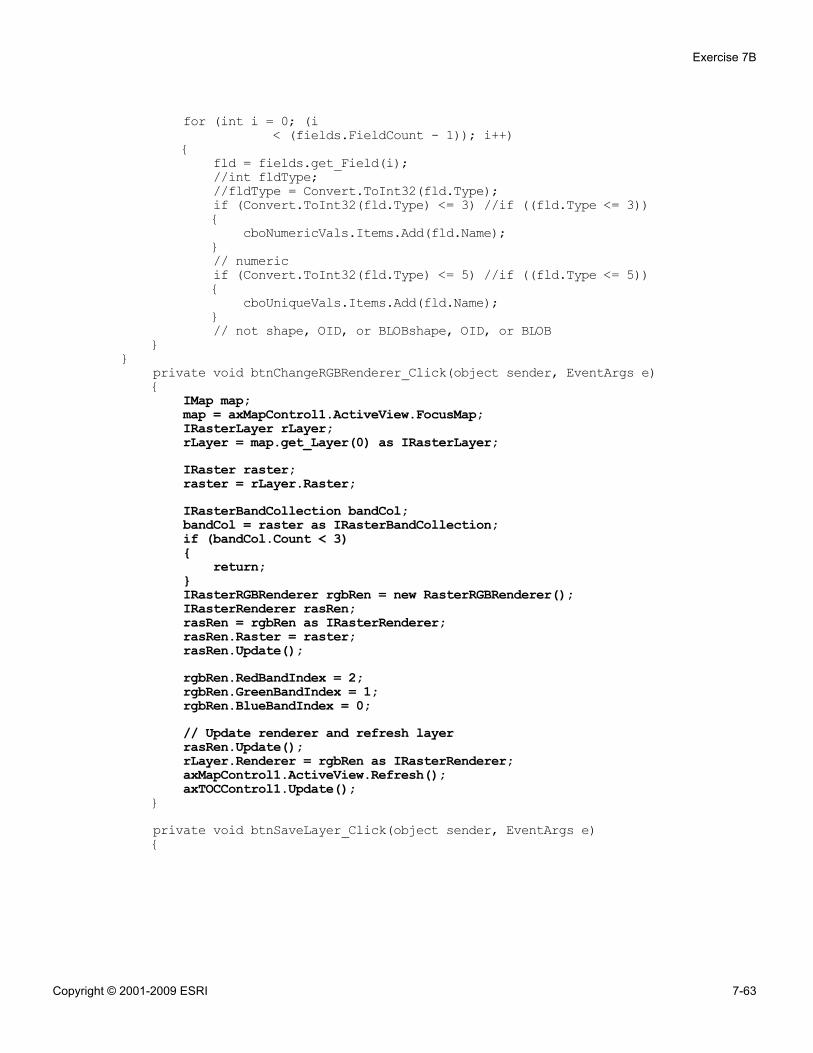
for (int i = 0; (i< (fields.FieldCount - 1)); i++)
{fld = fields.get_Field(i);//int fldType;//fldType = Convert.ToInt32(fld.Type);if (Convert.ToInt32(fld.Type) <= 3) //if ((fld.Type <= 3)){
cboNumericVals.Items.Add(fld.Name);}// numericif (Convert.ToInt32(fld.Type) <= 5) //if ((fld.Type <= 5)){
cboUniqueVals.Items.Add(fld.Name);}// not shape, OID, or BLOBshape, OID, or BLOB
}}
private void btnChangeRGBRenderer_Click(object sender, EventArgs e){
IMap map;map = axMapControl1.ActiveView.FocusMap;IRasterLayer rLayer;rLayer = map.get_Layer(0) as IRasterLayer;IRaster raster;raster = rLayer.Raster;IRasterBandCollection bandCol;bandCol = raster as IRasterBandCollection;if (bandCol.Count < 3){
return;}IRasterRGBRenderer rgbRen = new RasterRGBRenderer();IRasterRenderer rasRen;rasRen = rgbRen as IRasterRenderer;rasRen.Raster = raster;rasRen.Update();rgbRen.RedBandIndex = 2;rgbRen.GreenBandIndex = 1;rgbRen.BlueBandIndex = 0;// Update renderer and refresh layerrasRen.Update();rLayer.Renderer = rgbRen as IRasterRenderer;axMapControl1.ActiveView.Refresh();axTOCControl1.Update();
}private void btnSaveLayer_Click(object sender, EventArgs e){
Exercise 7B
Copyright © 2001-2009 ESRI 7-63
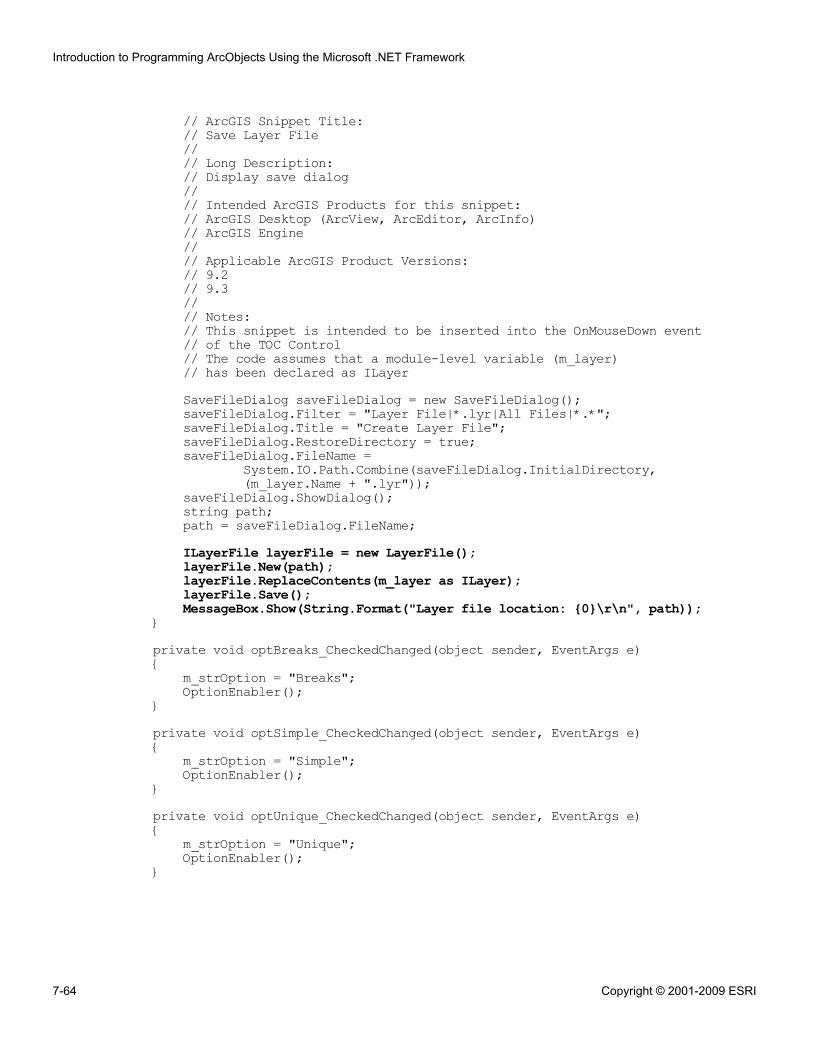
// ArcGIS Snippet Title:// Save Layer File//// Long Description:// Display save dialog//// Intended ArcGIS Products for this snippet:// ArcGIS Desktop (ArcView, ArcEditor, ArcInfo)// ArcGIS Engine//// Applicable ArcGIS Product Versions:// 9.2// 9.3//// Notes:// This snippet is intended to be inserted into the OnMouseDown event// of the TOC Control// The code assumes that a module-level variable (m_layer)// has been declared as ILayerSaveFileDialog saveFileDialog = new SaveFileDialog();saveFileDialog.Filter = "Layer File|*.lyr|All Files|*.*";saveFileDialog.Title = "Create Layer File";saveFileDialog.RestoreDirectory = true;saveFileDialog.FileName =
System.IO.Path.Combine(saveFileDialog.InitialDirectory,(m_layer.Name + ".lyr"));
saveFileDialog.ShowDialog();string path;path = saveFileDialog.FileName;ILayerFile layerFile = new LayerFile();layerFile.New(path);layerFile.ReplaceContents(m_layer as ILayer);layerFile.Save();MessageBox.Show(String.Format("Layer file location: {0}\r\n", path));
}private void optBreaks_CheckedChanged(object sender, EventArgs e){
m_strOption = "Breaks";OptionEnabler();
}private void optSimple_CheckedChanged(object sender, EventArgs e){
m_strOption = "Simple";OptionEnabler();
}private void optUnique_CheckedChanged(object sender, EventArgs e){
m_strOption = "Unique";OptionEnabler();
}
Introduction to Programming ArcObjects Using the Microsoft .NET Framework
7-64 Copyright © 2001-2009 ESRI
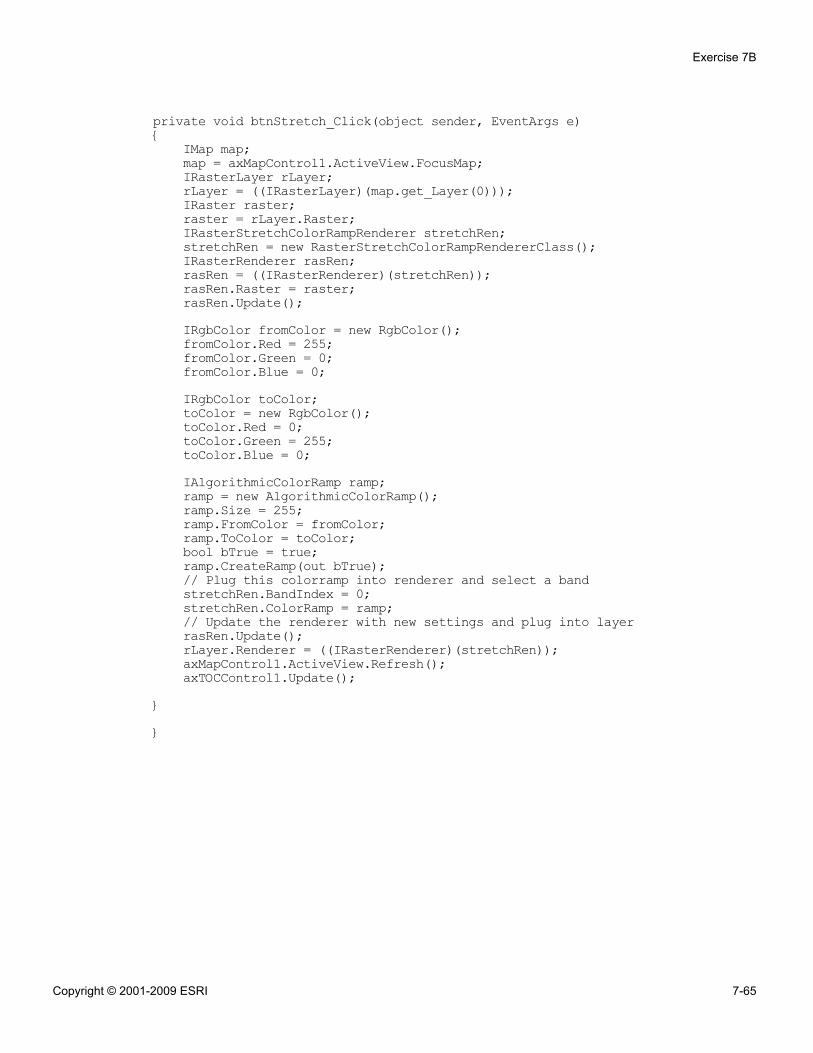
private void btnStretch_Click(object sender, EventArgs e){
IMap map;map = axMapControl1.ActiveView.FocusMap;IRasterLayer rLayer;rLayer = ((IRasterLayer)(map.get_Layer(0)));IRaster raster;raster = rLayer.Raster;IRasterStretchColorRampRenderer stretchRen;stretchRen = new RasterStretchColorRampRendererClass();IRasterRenderer rasRen;rasRen = ((IRasterRenderer)(stretchRen));rasRen.Raster = raster;rasRen.Update();IRgbColor fromColor = new RgbColor();fromColor.Red = 255;fromColor.Green = 0;fromColor.Blue = 0;IRgbColor toColor;toColor = new RgbColor();toColor.Red = 0;toColor.Green = 255;toColor.Blue = 0;IAlgorithmicColorRamp ramp;ramp = new AlgorithmicColorRamp();ramp.Size = 255;ramp.FromColor = fromColor;ramp.ToColor = toColor;bool bTrue = true;ramp.CreateRamp(out bTrue);// Plug this colorramp into renderer and select a bandstretchRen.BandIndex = 0;stretchRen.ColorRamp = ramp;// Update the renderer with new settings and plug into layerrasRen.Update();rLayer.Renderer = ((IRasterRenderer)(stretchRen));axMapControl1.ActiveView.Refresh();axTOCControl1.Update();
}}
Exercise 7B
Copyright © 2001-2009 ESRI 7-65
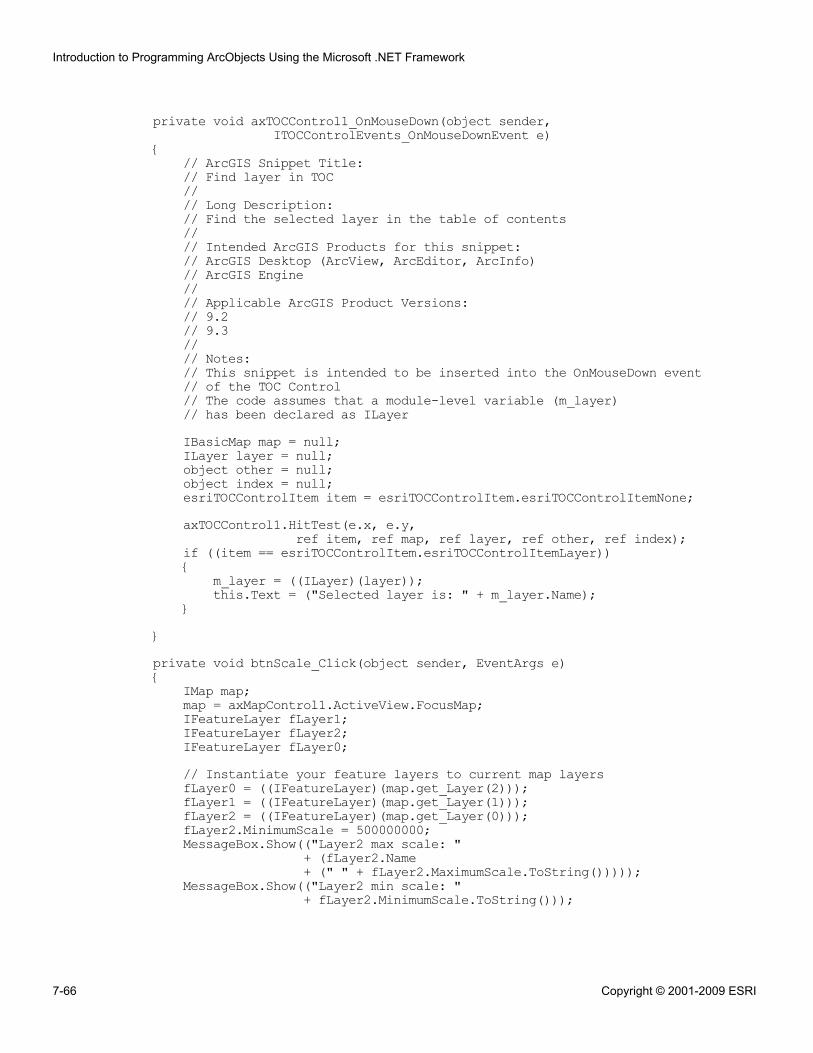
private void axTOCControl1_OnMouseDown(object sender,ITOCControlEvents_OnMouseDownEvent e)
{// ArcGIS Snippet Title:// Find layer in TOC//// Long Description:// Find the selected layer in the table of contents//// Intended ArcGIS Products for this snippet:// ArcGIS Desktop (ArcView, ArcEditor, ArcInfo)// ArcGIS Engine//// Applicable ArcGIS Product Versions:// 9.2// 9.3//// Notes:// This snippet is intended to be inserted into the OnMouseDown event// of the TOC Control// The code assumes that a module-level variable (m_layer)// has been declared as ILayerIBasicMap map = null;ILayer layer = null;object other = null;object index = null;esriTOCControlItem item = esriTOCControlItem.esriTOCControlItemNone;axTOCControl1.HitTest(e.x, e.y,
ref item, ref map, ref layer, ref other, ref index);if ((item == esriTOCControlItem.esriTOCControlItemLayer)){
m_layer = ((ILayer)(layer));this.Text = ("Selected layer is: " + m_layer.Name);
}}private void btnScale_Click(object sender, EventArgs e){
IMap map;map = axMapControl1.ActiveView.FocusMap;IFeatureLayer fLayer1;IFeatureLayer fLayer2;IFeatureLayer fLayer0;// Instantiate your feature layers to current map layersfLayer0 = ((IFeatureLayer)(map.get_Layer(2)));fLayer1 = ((IFeatureLayer)(map.get_Layer(1)));fLayer2 = ((IFeatureLayer)(map.get_Layer(0)));fLayer2.MinimumScale = 500000000;MessageBox.Show(("Layer2 max scale: "
+ (fLayer2.Name+ (" " + fLayer2.MaximumScale.ToString()))));
MessageBox.Show(("Layer2 min scale: "+ fLayer2.MinimumScale.ToString()));
Introduction to Programming ArcObjects Using the Microsoft .NET Framework
7-66 Copyright © 2001-2009 ESRI
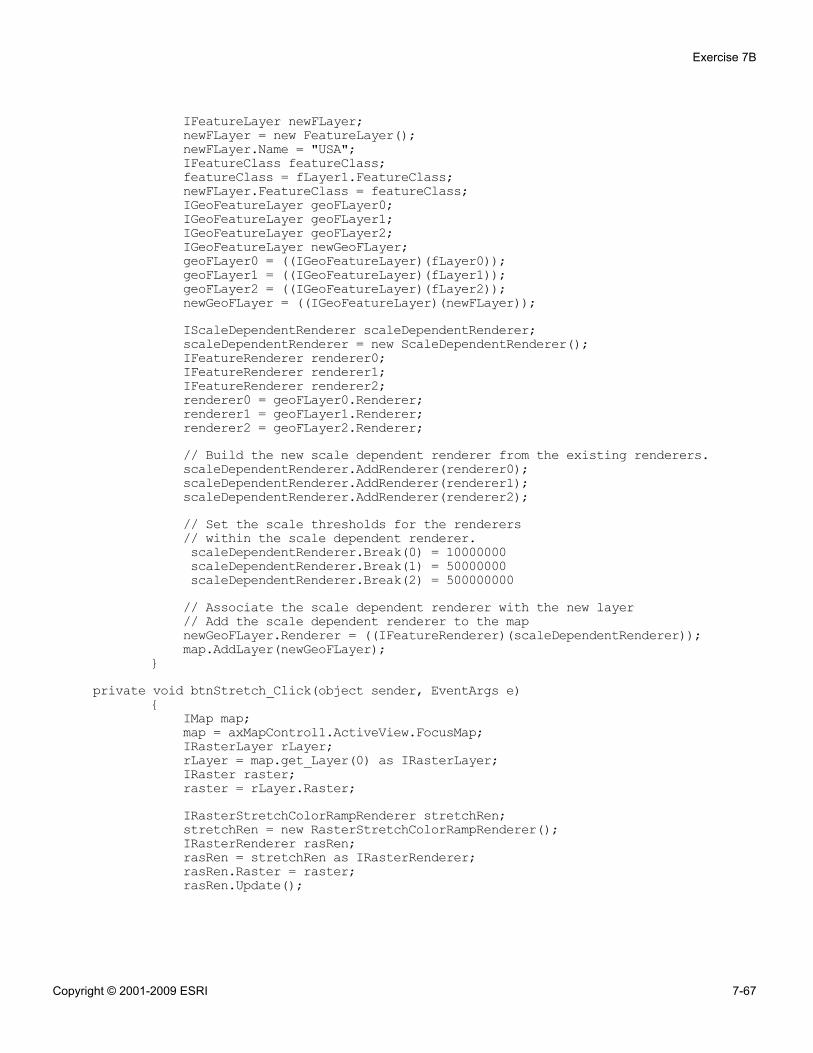
IFeatureLayer newFLayer;newFLayer = new FeatureLayer();newFLayer.Name = "USA";IFeatureClass featureClass;featureClass = fLayer1.FeatureClass;newFLayer.FeatureClass = featureClass;IGeoFeatureLayer geoFLayer0;IGeoFeatureLayer geoFLayer1;IGeoFeatureLayer geoFLayer2;IGeoFeatureLayer newGeoFLayer;geoFLayer0 = ((IGeoFeatureLayer)(fLayer0));geoFLayer1 = ((IGeoFeatureLayer)(fLayer1));geoFLayer2 = ((IGeoFeatureLayer)(fLayer2));newGeoFLayer = ((IGeoFeatureLayer)(newFLayer));IScaleDependentRenderer scaleDependentRenderer;scaleDependentRenderer = new ScaleDependentRenderer();IFeatureRenderer renderer0;IFeatureRenderer renderer1;IFeatureRenderer renderer2;renderer0 = geoFLayer0.Renderer;renderer1 = geoFLayer1.Renderer;renderer2 = geoFLayer2.Renderer;// Build the new scale dependent renderer from the existing renderers.scaleDependentRenderer.AddRenderer(renderer0);scaleDependentRenderer.AddRenderer(renderer1);scaleDependentRenderer.AddRenderer(renderer2);// Set the scale thresholds for the renderers// within the scale dependent renderer.scaleDependentRenderer.Break(0) = 10000000scaleDependentRenderer.Break(1) = 50000000scaleDependentRenderer.Break(2) = 500000000// Associate the scale dependent renderer with the new layer// Add the scale dependent renderer to the mapnewGeoFLayer.Renderer = ((IFeatureRenderer)(scaleDependentRenderer));map.AddLayer(newGeoFLayer);
}private void btnStretch_Click(object sender, EventArgs e)
{IMap map;map = axMapControl1.ActiveView.FocusMap;IRasterLayer rLayer;rLayer = map.get_Layer(0) as IRasterLayer;IRaster raster;raster = rLayer.Raster;IRasterStretchColorRampRenderer stretchRen;stretchRen = new RasterStretchColorRampRenderer();IRasterRenderer rasRen;rasRen = stretchRen as IRasterRenderer;rasRen.Raster = raster;rasRen.Update();
Exercise 7B
Copyright © 2001-2009 ESRI 7-67
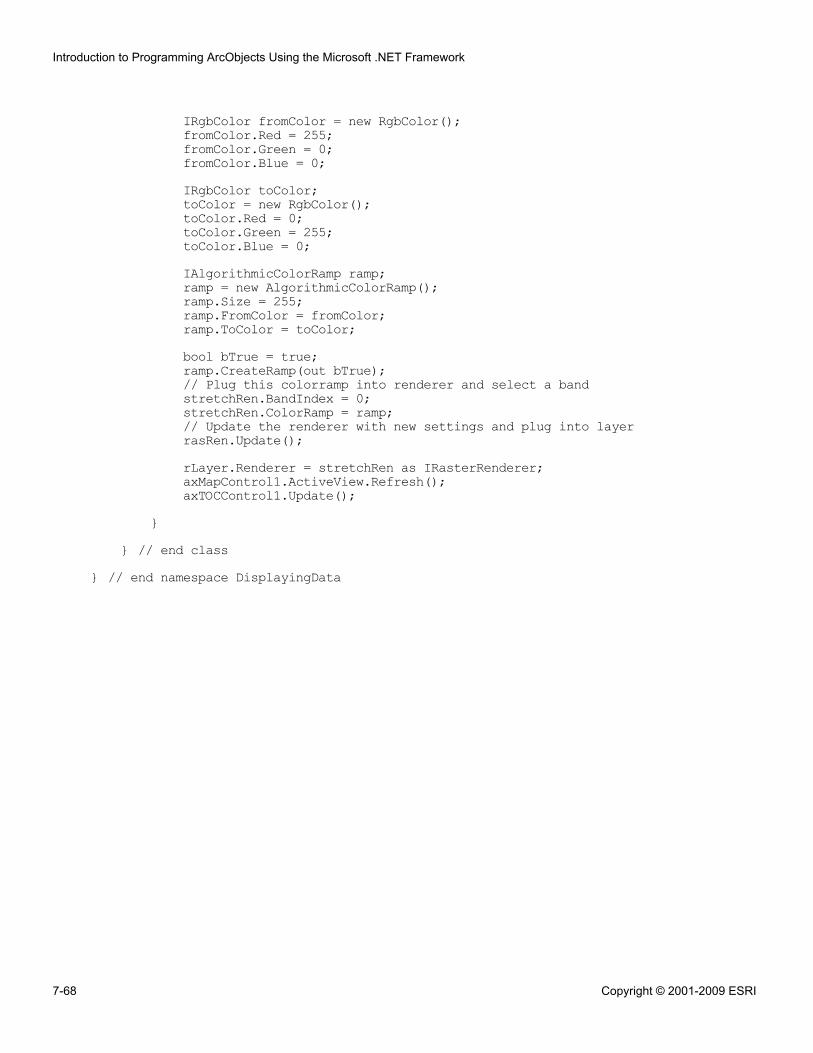
IRgbColor fromColor = new RgbColor();fromColor.Red = 255;fromColor.Green = 0;fromColor.Blue = 0;IRgbColor toColor;toColor = new RgbColor();toColor.Red = 0;toColor.Green = 255;toColor.Blue = 0;IAlgorithmicColorRamp ramp;ramp = new AlgorithmicColorRamp();ramp.Size = 255;ramp.FromColor = fromColor;ramp.ToColor = toColor;bool bTrue = true;ramp.CreateRamp(out bTrue);// Plug this colorramp into renderer and select a bandstretchRen.BandIndex = 0;stretchRen.ColorRamp = ramp;// Update the renderer with new settings and plug into layerrasRen.Update();rLayer.Renderer = stretchRen as IRasterRenderer;axMapControl1.ActiveView.Refresh();axTOCControl1.Update();
}} // end class
} // end namespace DisplayingData
Introduction to Programming ArcObjects Using the Microsoft .NET Framework
7-68 Copyright © 2001-2009 ESRI

8Querying andselecting data
Exercise 8A: Queries and selections(VB.NET)Estimated time: 45 minutesChallenge: Open a feature class from afeature workspaceEstimated time: 10 minutes
Exercise 8B: Queries and selections (C#)Estimated time: 45 minutesChallenge: Open a feature class from afeature workspaceEstimated time: 10 minutes


Exercise 8A: Queries and selections (VB.NET)
Estimated time: 45 minutes
In this exercise, you will work with query filters, spatial filters, and feature cursors. Youwill most often use these objects to work with data that meets certain criteria. As you willsee, you can also use a query filter to display a selection set.
In this exercise, you will:
▪ Create query filters▪ Loop through records in a cursor▪ Create a spatial filter▪ Display a query filter as a selection
Exercise shortcut1. In Visual Studio, open the QueryFilters.sln solution from your
\Student\IPAN\Exercise08\VisualBasic\QueryFilters folder.
2. Apply a query filter to highlight landlocked countries in the Country feature classof QueryFilters.mxd.
3. Use a query filter and a spatial filter to select cities with a population greater than2 million that fall within the country that the user has selected in the table ofcontents.
** (Optional) Display a query filter as a selection to report the number of selectedcities.
** (Challenge) Open a feature class from a feature workspace.
Step 1: Apply a query filter and loop through a subset of records
In this step, you will use a query filter to select landlocked countries from a feature classof world countries. You will access each of these records from a feature cursor in order tocalculate basic statistics for records matching the criteria of the query filter.
You will begin by previewing a feature class of world countries.
Start ArcMap and open QueryFilters.mxd from your \Student\IPAN\Exercise08 folder.
Exercise 8A
Copyright © 2001-2009 ESRI 8-1
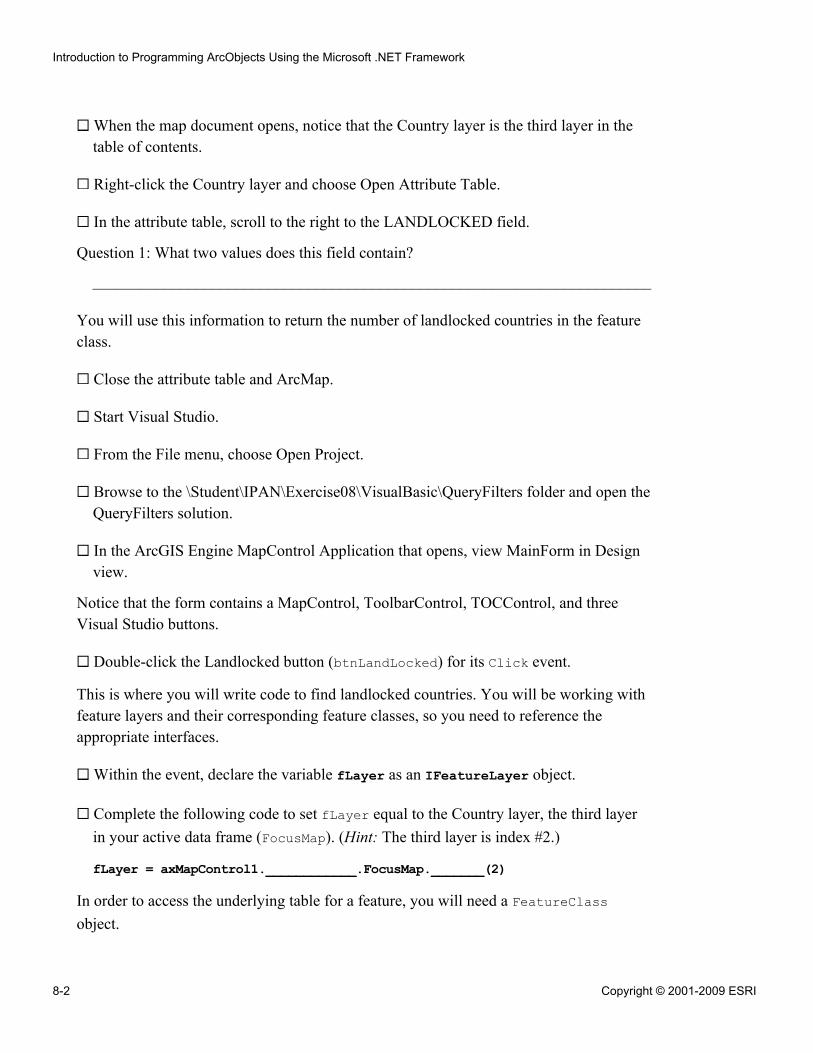
When the map document opens, notice that the Country layer is the third layer in thetable of contents.
Right-click the Country layer and choose Open Attribute Table.
In the attribute table, scroll to the right to the LANDLOCKED field.
Question 1: What two values does this field contain?
______________________________________________________________________
You will use this information to return the number of landlocked countries in the featureclass.
Close the attribute table and ArcMap.
Start Visual Studio.
From the File menu, choose Open Project.
Browse to the \Student\IPAN\Exercise08\VisualBasic\QueryFilters folder and open theQueryFilters solution.
In the ArcGIS Engine MapControl Application that opens, view MainForm in Designview.
Notice that the form contains a MapControl, ToolbarControl, TOCControl, and threeVisual Studio buttons.
Double-click the Landlocked button (btnLandLocked) for its Click event.
This is where you will write code to find landlocked countries. You will be working withfeature layers and their corresponding feature classes, so you need to reference theappropriate interfaces.
Within the event, declare the variable fLayer as an IFeatureLayer object.
Complete the following code to set fLayer equal to the Country layer, the third layerin your active data frame (FocusMap). (Hint: The third layer is index #2.)
fLayer = axMapControl1.____________.FocusMap._______(2)
In order to access the underlying table for a feature, you will need a FeatureClassobject.
Introduction to Programming ArcObjects Using the Microsoft .NET Framework
8-2 Copyright © 2001-2009 ESRI
Declare the variable fClass to hold your feature class.
Set fClass equal to the FeatureClass property on fLayer.
Next, you need to create a query filter and a feature cursor.
Create a new instance of QueryFilter and store it in the variable qFilter.
Declare the variable fCursor as IFeatureCursor.
Open the Visual Studio Object Browser, if necessary.
Search for IQueryFilter and examine its members.
Question 2: Which property will you use to set up the query filter?
______________________________________________________________________
Complete the following code to create the query filter:
qFilter.______________________ = "LANDLOCKED = 'Y'"
You discovered earlier that the LANDLOCKED attribute has two values (Y and N).Landlocked countries (without a coastline) have a values of Y, while countries that arenot landlocked (with a coastline) have a value of N.
Complete the following code to search the Country feature class for all records with avalue of Y for the LANDLOCKED attribute:
fCursor = fClass.____________(qFilter, ________)
The records matching this criterion will be stored in fCursor. In other words, the featurecursor (fCursor) will store a subset of landlocked country features.
Question 3: How did you set memory recycling?
______________________________________________________________________
Next, you need to write a looping structure to access each of the records in the cursor andto calculate basic statistics.
Declare the following variables to reference an individual feature in the cursor, thepopulation value, the area, and the number of countries, respectively:
Exercise 8A
Copyright © 2001-2009 ESRI 8-3
!
Dim feat As IFeatureDim dblArea As DoubleDim lngCountries As Long
Determine the value for lngCountries by setting it equal to the FeatureCountproperty on fClass.
Question 4: What is the argument that you need to pass to the FeatureCount property?
______________________________________________________________________
Complete the following code to pull the first record out of the cursor:
feat = fCursor.______________________Note: Remember that a cursor is initialized with the pointer above the first item. Thefirst time NextFeature (or NextRow) is called, the first item in the cursor is returned.
Next, you want to loop until all the records have been pulled from the cursor.
Begin a Do Until loop by completing the following code:
Do Until feat Is _________________
Inside the loop, write the following code to sum the area of all the countries in thecursor:
dblarea = dblarea + dblarea + feat.Value(10) 'Area in square km is the 11th fieldNote: You will learn more about accessing fields in a later lesson.
End the loop with the following code to return the next feature from the cursor:
feat = fCursor.______________________
If you do not include this line of code inside the Do Until loop, yourcode will loop endlessly.
After the loop, display information about the total number and average area of thelandlocked countries in a message box, for example:
MessageBox.Show("Number of landlocked countries: " _& lngCountries & vbCrLf & _"Average area: " & Math.Round(dblarea / lngCountries, 0))
Note: Remember, Math is a class in the System namespace.
Build your project, then run it.
Introduction to Programming ArcObjects Using the Microsoft .NET Framework
8-4 Copyright © 2001-2009 ESRI
Click the Open button , browse to \Student\IPAN\Exercise08, and openQueryFilters.mxd.
If necessary, turn on the Country layer.
Click your Landlocked button.
Question 5: How many countries are landlocked?
______________________________________________________________________
Click OK to close the message box.
Close your application.
In your code, collapse the btnLandlocked_Click event.
In the next step, you will create a subset of features based on spatial and attribute criteria.
Step 2: Work with spatial and query filters
In this step, you will summarize a subset of features based on both spatial and attributecriteria. You will write code to report the number of cities within the currently selectedcountry that have a population greater than 2 million.
Your code will produce a feature cursor of cities that fall within the selected country inthe Country layer. To accomplish this, you will make a spatial filter that uses the selectedcountry's shape as the Geometry property. Your code will reference the selected countryby getting the layer's selection and storing it in a cursor.
In Design view, double-click the Spatial Filter button (btnSpatialFilter) for itsClick event.
Within the sub procedure, declare the following variables to reference the layercontaining the selection, the selection set itself, and the feature cursor, respectively:
Dim cntryLyr As IFeatureSelectionDim cntrySel As ISelectionSetDim cntryCursor As IFeatureCursor = Nothing
Complete the following code to set the required object variables (Hint: Country is thethird layer):
Exercise 8A
Copyright © 2001-2009 ESRI 8-5
cntryLyr = axMapControl1.ActiveView.__________________.Layer(2)cntrySel = cntryLyr.SelectionSet
Because cntryLyr was declared with the IFeatureSelection interface, you can accessselected features by using the SelectionSet property.
Next, you will transfer the selection set (cntrySel) to a feature cursor (cntryCursor) soyou can easily retrieve the selected country.
Note: The syntax for the Search method works slightly differently on theISelectionSet interface. Instead of storing the returned cursor using an assignmentstatement, such as myCursor = myTable.Search, the cursor variable is passed inas one of the required parameters.
Complete the following code to search your selection set and populate your featurecursor (Tip: Use Nothing as a query filter parameter to return all features):
cntrySel.____________(______________, True, ______________________)
Complete the following code to declare the variable country so that it can contain theselected feature (or the first feature, if more than one is selected):
Dim country As ________________
Access the first feature in the feature cursor:
country = cntryCursor._________________
Complete the following code to make sure a country was selected. If no country wasselected, report an error to the user, then stop execution of the procedure.
If country Is ___________ ThenMessageBox.Show("Please select a country")_______ Sub
End If
Now that you have referenced the selected country, you will create a new spatial filter bypassing the feature's shape to the Geometry property of your cursor. You will declare twovariables to work with the same SpatialFilter object:
▪ One will point to the ISpatialFilter interface.▪ The other will point to the IQueryFilter interface.
Create the variable spatFilt as a new SpatialFilter.
Complete the following code to declare a QueryFilter object, then use QI to pointyour qFilt variable to the spatial filter you just created:
Introduction to Programming ArcObjects Using the Microsoft .NET Framework
8-6 Copyright © 2001-2009 ESRI
Dim qFilt As ________________________qFilt = __________________________
Note: Because SpatialFilter is a type of QueryFilter, it inherits all interfacesdefined on QueryFilter. By using both the ISpatialFilter interface and theIQueryFilter interface on the same object, it is possible to define an attributeexpression (WhereClause property) and spatial criteria (Geometry andSpatialRel properties) for a single filter.
Complete the following code to set all of the filter's selection criteria using the twovariables that point to it:
Note: Because you want to locate cities inside the selected country, the spatialrelationship will be contains.
______________.WhereClause = "Population > 2000000"______________.Geometry = country.ShapespatFilt.______________ = esriSpatialRelEnum._______________________________________
Now that you have produced the filter and defined the spatial and attribute criteria, youwill apply the filter to the Cities feature class.
Declare the following variables:
Dim cityLyr As IFeatureLayerDim cityFClass As IFeatureClass
Complete the following code to set the variables:
cityLyr = axMapControl1.ActiveView.________.Layer(0)cityFClass = cityLyr.____________
Next, you will display a message box to report the number of cities that meet the searchcriteria.
Declare the variable intCities as an Integer.
Complete the following code to return the number of features in your cityFClassfeature class.
intCities = cityFClass.________________________(________________)
Create the message box:
MessageBox.Show(intCities.ToString & " cities with population more than 2 million")
Build your project, then run it.
Open QueryFilters.mxd and turn on the Country layer, if necessary.
Exercise 8A
Copyright © 2001-2009 ESRI 8-7
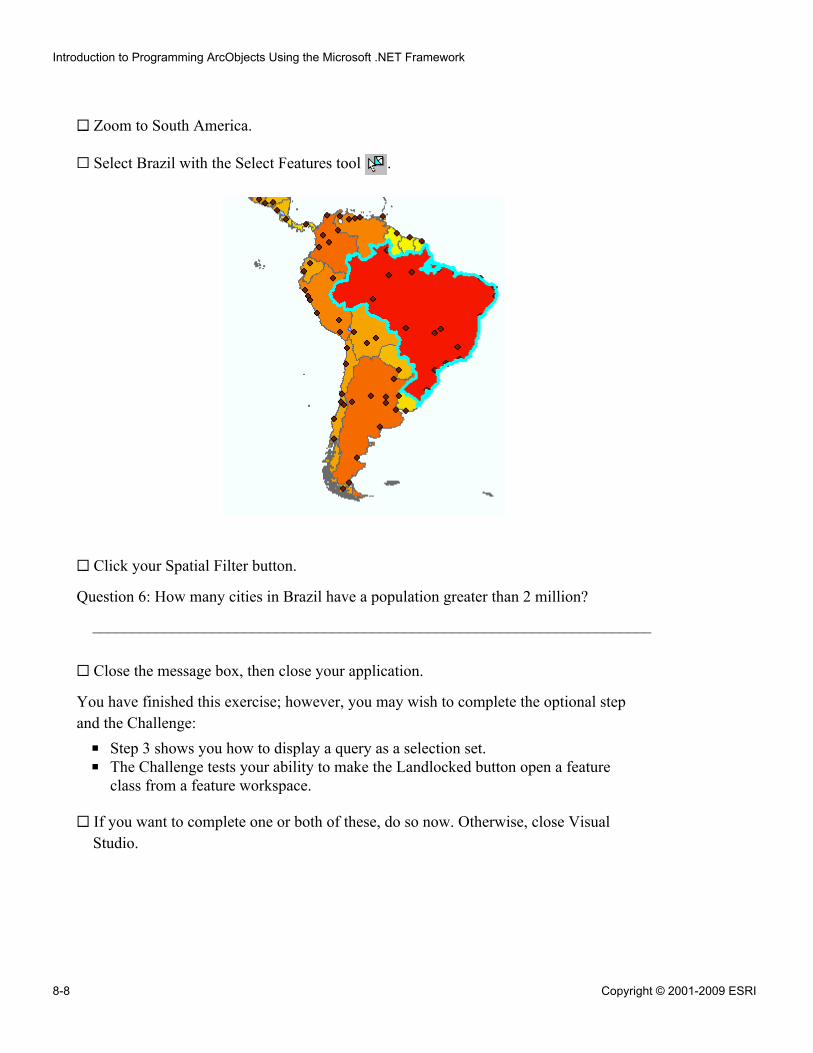
Zoom to South America.
Select Brazil with the Select Features tool .
Click your Spatial Filter button.
Question 6: How many cities in Brazil have a population greater than 2 million?
______________________________________________________________________
Close the message box, then close your application.
You have finished this exercise; however, you may wish to complete the optional stepand the Challenge:
▪ Step 3 shows you how to display a query as a selection set.▪ The Challenge tests your ability to make the Landlocked button open a feature
class from a feature workspace.
If you want to complete one or both of these, do so now. Otherwise, close VisualStudio.
Introduction to Programming ArcObjects Using the Microsoft .NET Framework
8-8 Copyright © 2001-2009 ESRI
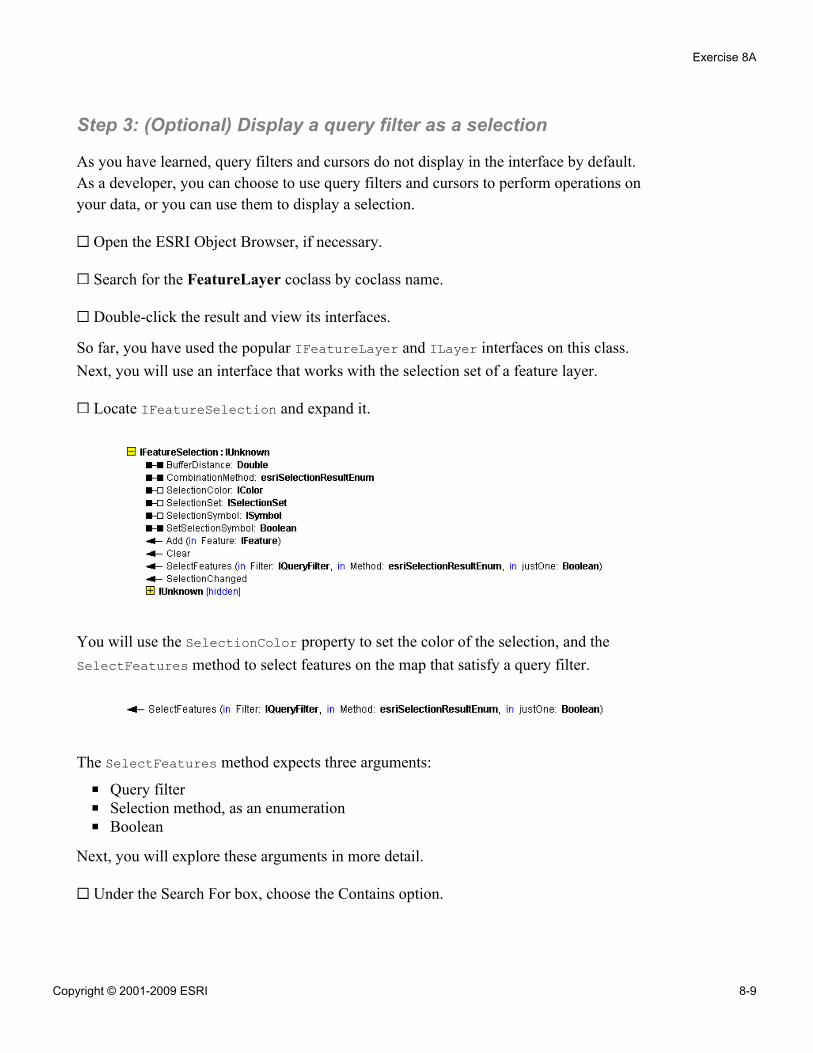
Step 3: (Optional) Display a query filter as a selection
As you have learned, query filters and cursors do not display in the interface by default.As a developer, you can choose to use query filters and cursors to perform operations onyour data, or you can use them to display a selection.
Open the ESRI Object Browser, if necessary.
Search for the FeatureLayer coclass by coclass name.
Double-click the result and view its interfaces.
So far, you have used the popular IFeatureLayer and ILayer interfaces on this class.Next, you will use an interface that works with the selection set of a feature layer.
Locate IFeatureSelection and expand it.
You will use the SelectionColor property to set the color of the selection, and theSelectFeatures method to select features on the map that satisfy a query filter.
The SelectFeatures method expects three arguments:
▪ Query filter▪ Selection method, as an enumeration▪ Boolean
Next, you will explore these arguments in more detail.
Under the Search For box, choose the Contains option.
Exercise 8A
Copyright © 2001-2009 ESRI 8-9
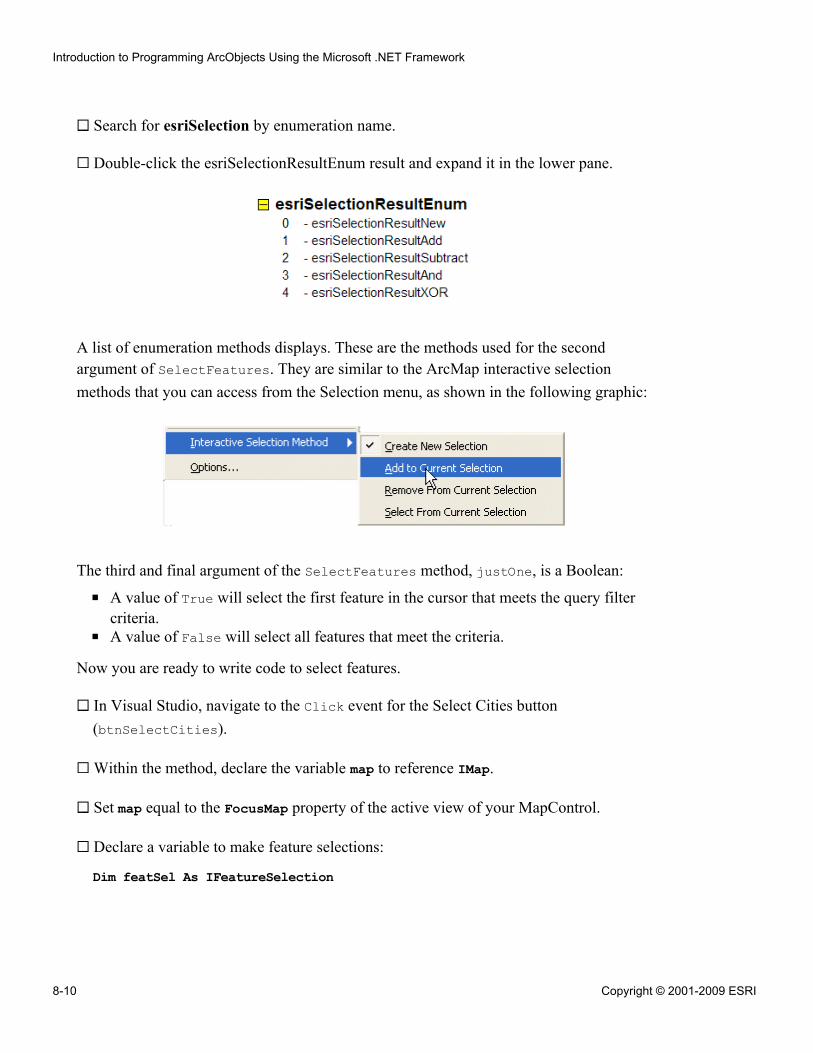
Search for esriSelection by enumeration name.
Double-click the esriSelectionResultEnum result and expand it in the lower pane.
A list of enumeration methods displays. These are the methods used for the secondargument of SelectFeatures. They are similar to the ArcMap interactive selectionmethods that you can access from the Selection menu, as shown in the following graphic:
The third and final argument of the SelectFeatures method, justOne, is a Boolean:
▪ A value of True will select the first feature in the cursor that meets the query filtercriteria.
▪ A value of False will select all features that meet the criteria.
Now you are ready to write code to select features.
In Visual Studio, navigate to the Click event for the Select Cities button(btnSelectCities).
Within the method, declare the variable map to reference IMap.
Set map equal to the FocusMap property of the active view of your MapControl.
Declare a variable to make feature selections:
Dim featSel As IFeatureSelection
Introduction to Programming ArcObjects Using the Microsoft .NET Framework
8-10 Copyright © 2001-2009 ESRI
Question 7: Which variable holds the map's selected layer? (Hint: The variable ispopulated in the OnMouseDown event of your TOCControl.)
______________________________________________________________________
Set your new variable to your map's selected layer.
This will allow you to make a selection within the selected layer in the map. Next, youwill create a query filter as you did earlier.
Create a new instance of a QueryFilter object and store it in the variable qFilt.
Complete the following code to set its WhereClause property (Hint: Be sure to typeseven zeroes):
qFilt.______________________ = "Population > 10000000"
Make sure there are no selected features by clearing the feature selection:
featSel.Clear()
Complete the following code to call the SelectFeatures method on featSel whilesupplying the query filter, creating a new selection, and allowing more than one featureto be selected:
featSel.______________________________(qFilt, _esriSelectionResultEnum.__________________________________________, __________)
Report the number of selected cities in a message box.
Refresh the active view.
Build and run your project.
Open QueryFilters.mxd.
In the table of contents, click the Cities layer.
Click the Select Cities button.
Question 8: How many cities meet the query filter's criteria and are selected in the map?
______________________________________________________________________
Close the message box.
Exercise 8A
Copyright © 2001-2009 ESRI 8-11
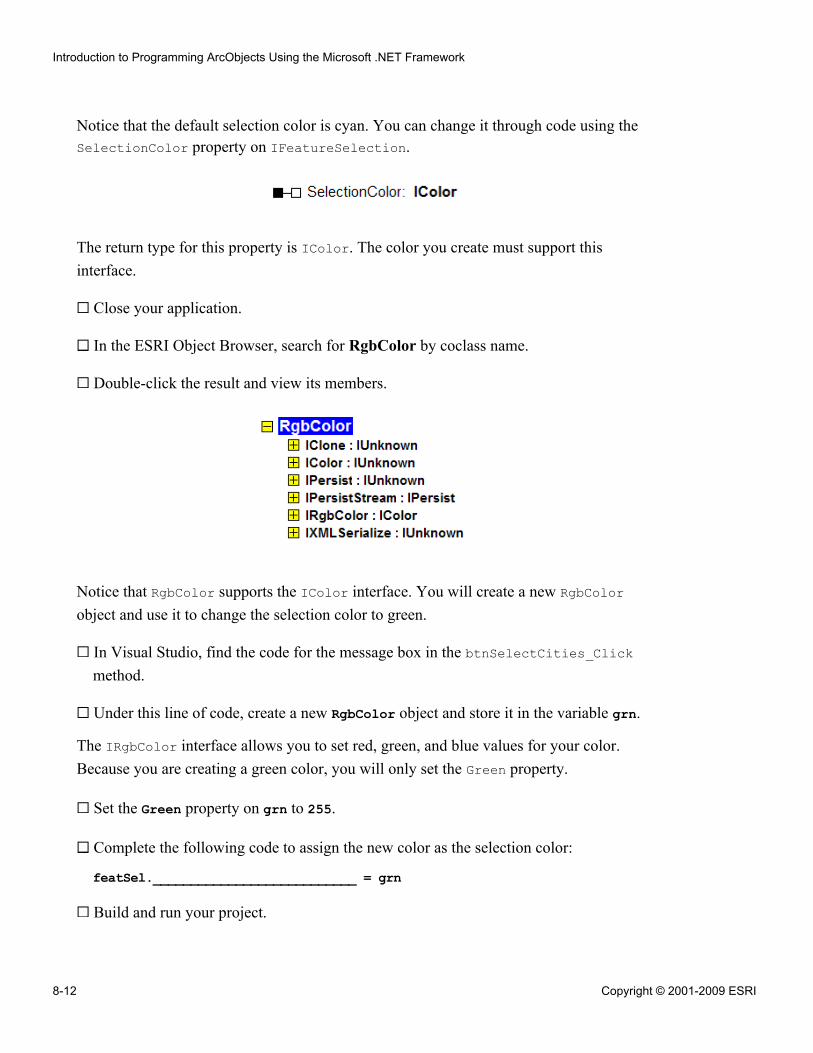
Notice that the default selection color is cyan. You can change it through code using theSelectionColor property on IFeatureSelection.
The return type for this property is IColor. The color you create must support thisinterface.
Close your application.
In the ESRI Object Browser, search for RgbColor by coclass name.
Double-click the result and view its members.
Notice that RgbColor supports the IColor interface. You will create a new RgbColorobject and use it to change the selection color to green.
In Visual Studio, find the code for the message box in the btnSelectCities_Clickmethod.
Under this line of code, create a new RgbColor object and store it in the variable grn.
The IRgbColor interface allows you to set red, green, and blue values for your color.Because you are creating a green color, you will only set the Green property.
Set the Green property on grn to 255.
Complete the following code to assign the new color as the selection color:
featSel.___________________________ = grn
Build and run your project.
Introduction to Programming ArcObjects Using the Microsoft .NET Framework
8-12 Copyright © 2001-2009 ESRI
Test your changes. (Hint: Open QueryFilters.mxd, click the Cities layer, and click theSelect Cities button.)
Verify that the cities selected by your query filter now display in green.
Zoom to some of the selected cities and Identify them.
When you are finished, close the Identify window and your application.
If you want to complete the Challenge, do so now. Otherwise, close Visual Studio.
Conclusion
In this exercise, you worked with objects for creating selections and working with featurecursors. These objects are used for data analysis and display.
Challenge: Open a feature class from a feature workspaceEstimated time: 10 minutes
In an earlier lesson, you learned how to access workspaces from WorkspaceFactoryobjects. One advantage to this approach is that you can run the code from an applicationthat does not contain a MapControl.
To complete this Challenge, apply that same knowledge to revise the code for yourLandlocked button so that it opens the Country feature class from a feature workspace.
(Hint: The Country feature class is contained in the Selections.gdb file geodatabase in the\Student\IPAN\Database folder.)
Exercise 8A
Copyright © 2001-2009 ESRI 8-13
Answers to Exercise 8A Questions
Question 1: What two values does this field contain?
Answer: Y and N
Question 2: Which property will you use to set up the query filter?
Answer: WhereClause
Question 3: How did you set memory recycling?
Answer: By setting a value of True; this is a search cursor, so it is read-only and canreuse memory.
Question 4: What is the argument that you need to pass to the FeatureCount property?
Answer: qFilter
Question 5: How many countries are landlocked?
Answer: 43
Question 6: How many cities in Brazil have a population greater than 2 million?
Answer: Six
Question 7: Which variable holds the map's selected layer? (Hint: The variable ispopulated in the OnMouseDown event of your TOCControl.)
Answer: m_layer
Question 8: How many cities meet the query filter's criteria and are selected in the map?
Answer: 11
Introduction to Programming ArcObjects Using the Microsoft .NET Framework
8-14 Copyright © 2001-2009 ESRI
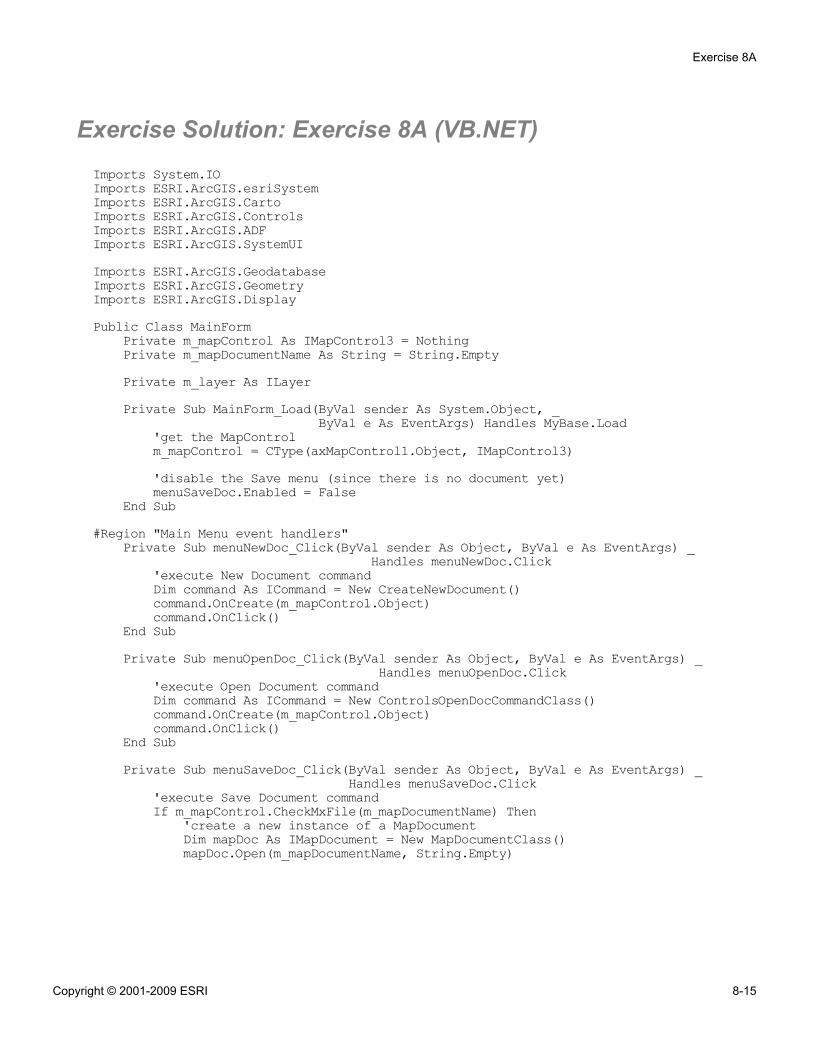
Exercise Solution: Exercise 8A (VB.NET)Imports System.IOImports ESRI.ArcGIS.esriSystemImports ESRI.ArcGIS.CartoImports ESRI.ArcGIS.ControlsImports ESRI.ArcGIS.ADFImports ESRI.ArcGIS.SystemUIImports ESRI.ArcGIS.GeodatabaseImports ESRI.ArcGIS.GeometryImports ESRI.ArcGIS.DisplayPublic Class MainForm
Private m_mapControl As IMapControl3 = NothingPrivate m_mapDocumentName As String = String.EmptyPrivate m_layer As ILayerPrivate Sub MainForm_Load(ByVal sender As System.Object, _
ByVal e As EventArgs) Handles MyBase.Load'get the MapControlm_mapControl = CType(axMapControl1.Object, IMapControl3)'disable the Save menu (since there is no document yet)menuSaveDoc.Enabled = False
End Sub#Region "Main Menu event handlers"
Private Sub menuNewDoc_Click(ByVal sender As Object, ByVal e As EventArgs) _Handles menuNewDoc.Click
'execute New Document commandDim command As ICommand = New CreateNewDocument()command.OnCreate(m_mapControl.Object)command.OnClick()
End SubPrivate Sub menuOpenDoc_Click(ByVal sender As Object, ByVal e As EventArgs) _
Handles menuOpenDoc.Click'execute Open Document commandDim command As ICommand = New ControlsOpenDocCommandClass()command.OnCreate(m_mapControl.Object)command.OnClick()
End SubPrivate Sub menuSaveDoc_Click(ByVal sender As Object, ByVal e As EventArgs) _
Handles menuSaveDoc.Click'execute Save Document commandIf m_mapControl.CheckMxFile(m_mapDocumentName) Then
'create a new instance of a MapDocumentDim mapDoc As IMapDocument = New MapDocumentClass()mapDoc.Open(m_mapDocumentName, String.Empty)
Exercise 8A
Copyright © 2001-2009 ESRI 8-15
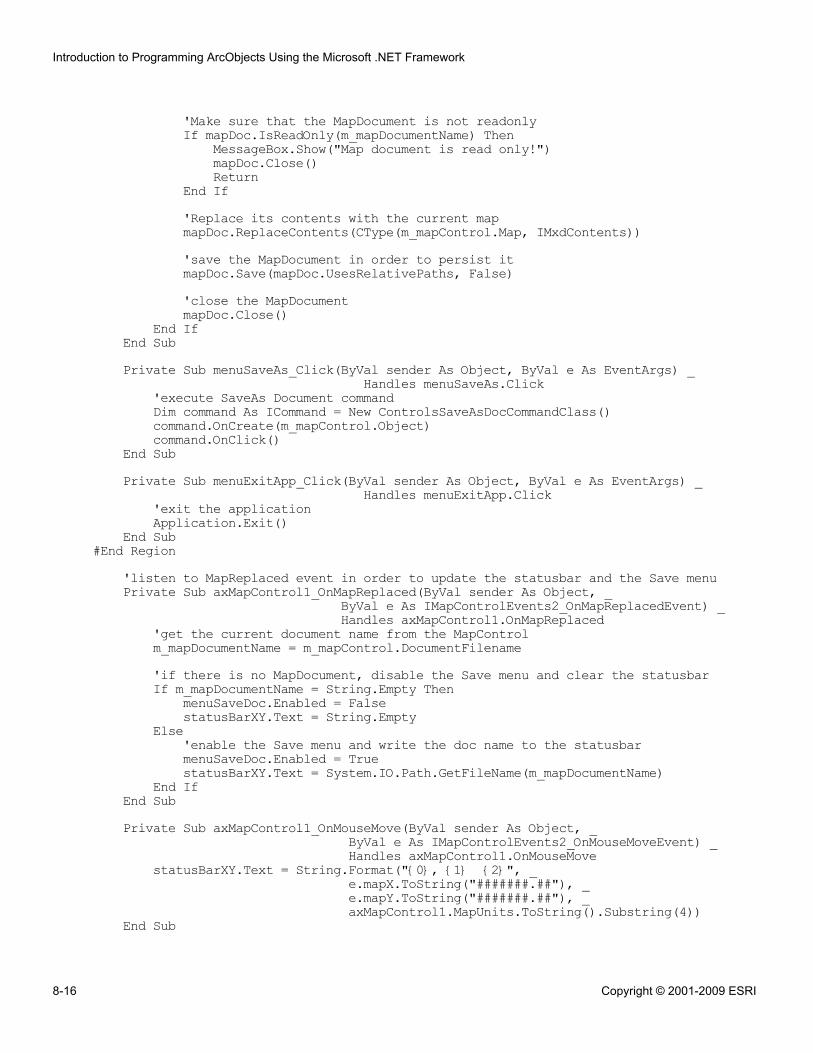
'Make sure that the MapDocument is not readonlyIf mapDoc.IsReadOnly(m_mapDocumentName) Then
MessageBox.Show("Map document is read only!")mapDoc.Close()Return
End If'Replace its contents with the current mapmapDoc.ReplaceContents(CType(m_mapControl.Map, IMxdContents))'save the MapDocument in order to persist itmapDoc.Save(mapDoc.UsesRelativePaths, False)'close the MapDocumentmapDoc.Close()
End IfEnd SubPrivate Sub menuSaveAs_Click(ByVal sender As Object, ByVal e As EventArgs) _
Handles menuSaveAs.Click'execute SaveAs Document commandDim command As ICommand = New ControlsSaveAsDocCommandClass()command.OnCreate(m_mapControl.Object)command.OnClick()
End SubPrivate Sub menuExitApp_Click(ByVal sender As Object, ByVal e As EventArgs) _
Handles menuExitApp.Click'exit the applicationApplication.Exit()
End Sub#End Region
'listen to MapReplaced event in order to update the statusbar and the Save menuPrivate Sub axMapControl1_OnMapReplaced(ByVal sender As Object, _
ByVal e As IMapControlEvents2_OnMapReplacedEvent) _Handles axMapControl1.OnMapReplaced
'get the current document name from the MapControlm_mapDocumentName = m_mapControl.DocumentFilename'if there is no MapDocument, disable the Save menu and clear the statusbarIf m_mapDocumentName = String.Empty Then
menuSaveDoc.Enabled = FalsestatusBarXY.Text = String.Empty
Else'enable the Save menu and write the doc name to the statusbarmenuSaveDoc.Enabled = TruestatusBarXY.Text = System.IO.Path.GetFileName(m_mapDocumentName)
End IfEnd SubPrivate Sub axMapControl1_OnMouseMove(ByVal sender As Object, _
ByVal e As IMapControlEvents2_OnMouseMoveEvent) _Handles axMapControl1.OnMouseMove
statusBarXY.Text = String.Format("{0}, {1} {2}", _e.mapX.ToString("#######.##"), _e.mapY.ToString("#######.##"), _axMapControl1.MapUnits.ToString().Substring(4))
End Sub
Introduction to Programming ArcObjects Using the Microsoft .NET Framework
8-16 Copyright © 2001-2009 ESRI
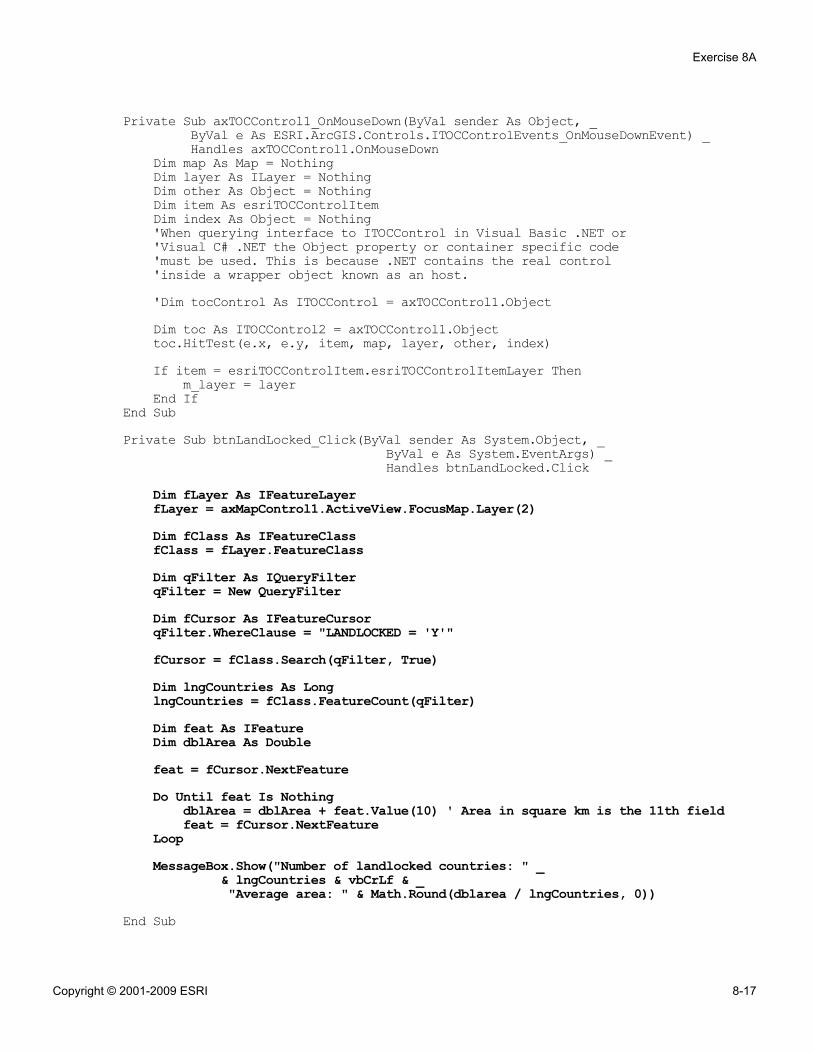
Private Sub axTOCControl1_OnMouseDown(ByVal sender As Object, _ByVal e As ESRI.ArcGIS.Controls.ITOCControlEvents_OnMouseDownEvent) _Handles axTOCControl1.OnMouseDown
Dim map As Map = NothingDim layer As ILayer = NothingDim other As Object = NothingDim item As esriTOCControlItemDim index As Object = Nothing'When querying interface to ITOCControl in Visual Basic .NET or'Visual C# .NET the Object property or container specific code'must be used. This is because .NET contains the real control'inside a wrapper object known as an host.'Dim tocControl As ITOCControl = axTOCControl1.ObjectDim toc As ITOCControl2 = axTOCControl1.Objecttoc.HitTest(e.x, e.y, item, map, layer, other, index)If item = esriTOCControlItem.esriTOCControlItemLayer Then
m_layer = layerEnd If
End SubPrivate Sub btnLandLocked_Click(ByVal sender As System.Object, _
ByVal e As System.EventArgs) _Handles btnLandLocked.Click
Dim fLayer As IFeatureLayerfLayer = axMapControl1.ActiveView.FocusMap.Layer(2)Dim fClass As IFeatureClassfClass = fLayer.FeatureClassDim qFilter As IQueryFilterqFilter = New QueryFilterDim fCursor As IFeatureCursorqFilter.WhereClause = "LANDLOCKED = 'Y'"fCursor = fClass.Search(qFilter, True)Dim lngCountries As LonglngCountries = fClass.FeatureCount(qFilter)Dim feat As IFeatureDim dblArea As Doublefeat = fCursor.NextFeatureDo Until feat Is Nothing
dblArea = dblArea + feat.Value(10) ' Area in square km is the 11th fieldfeat = fCursor.NextFeature
LoopMessageBox.Show("Number of landlocked countries: " _
& lngCountries & vbCrLf & _"Average area: " & Math.Round(dblarea / lngCountries, 0))
End Sub
Exercise 8A
Copyright © 2001-2009 ESRI 8-17
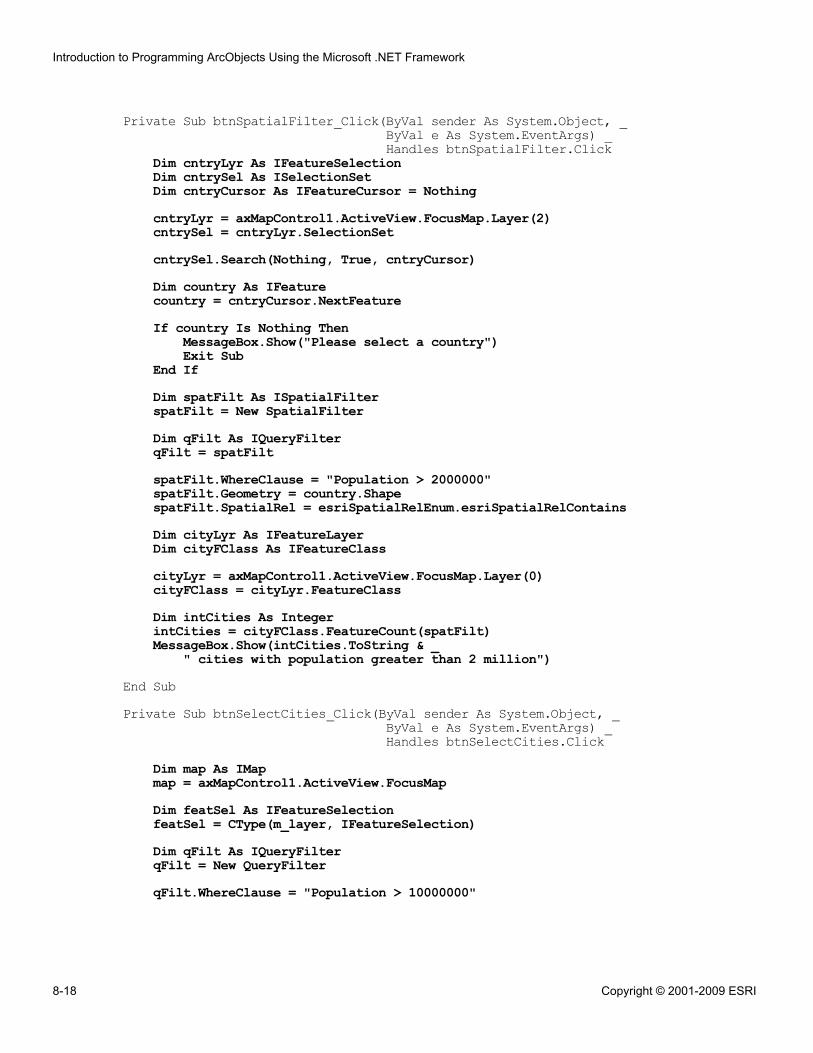
Private Sub btnSpatialFilter_Click(ByVal sender As System.Object, _ByVal e As System.EventArgs) _Handles btnSpatialFilter.Click
Dim cntryLyr As IFeatureSelectionDim cntrySel As ISelectionSetDim cntryCursor As IFeatureCursor = NothingcntryLyr = axMapControl1.ActiveView.FocusMap.Layer(2)cntrySel = cntryLyr.SelectionSetcntrySel.Search(Nothing, True, cntryCursor)Dim country As IFeaturecountry = cntryCursor.NextFeatureIf country Is Nothing Then
MessageBox.Show("Please select a country")Exit Sub
End IfDim spatFilt As ISpatialFilterspatFilt = New SpatialFilterDim qFilt As IQueryFilterqFilt = spatFiltspatFilt.WhereClause = "Population > 2000000"spatFilt.Geometry = country.ShapespatFilt.SpatialRel = esriSpatialRelEnum.esriSpatialRelContainsDim cityLyr As IFeatureLayerDim cityFClass As IFeatureClasscityLyr = axMapControl1.ActiveView.FocusMap.Layer(0)cityFClass = cityLyr.FeatureClassDim intCities As IntegerintCities = cityFClass.FeatureCount(spatFilt)MessageBox.Show(intCities.ToString & _
" cities with population greater than 2 million")End SubPrivate Sub btnSelectCities_Click(ByVal sender As System.Object, _
ByVal e As System.EventArgs) _Handles btnSelectCities.Click
Dim map As IMapmap = axMapControl1.ActiveView.FocusMapDim featSel As IFeatureSelectionfeatSel = CType(m_layer, IFeatureSelection)Dim qFilt As IQueryFilterqFilt = New QueryFilterqFilt.WhereClause = "Population > 10000000"
Introduction to Programming ArcObjects Using the Microsoft .NET Framework
8-18 Copyright © 2001-2009 ESRI
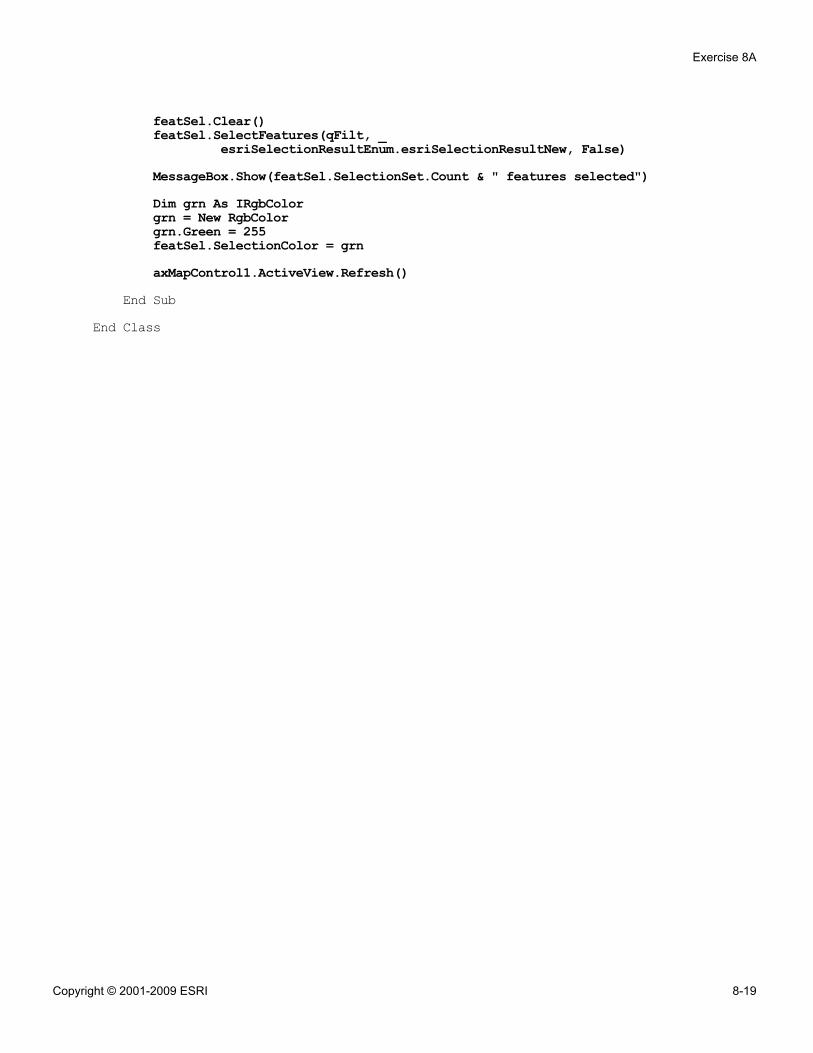
featSel.Clear()featSel.SelectFeatures(qFilt, _
esriSelectionResultEnum.esriSelectionResultNew, False)MessageBox.Show(featSel.SelectionSet.Count & " features selected")Dim grn As IRgbColorgrn = New RgbColorgrn.Green = 255featSel.SelectionColor = grnaxMapControl1.ActiveView.Refresh()
End SubEnd Class
Exercise 8A
Copyright © 2001-2009 ESRI 8-19
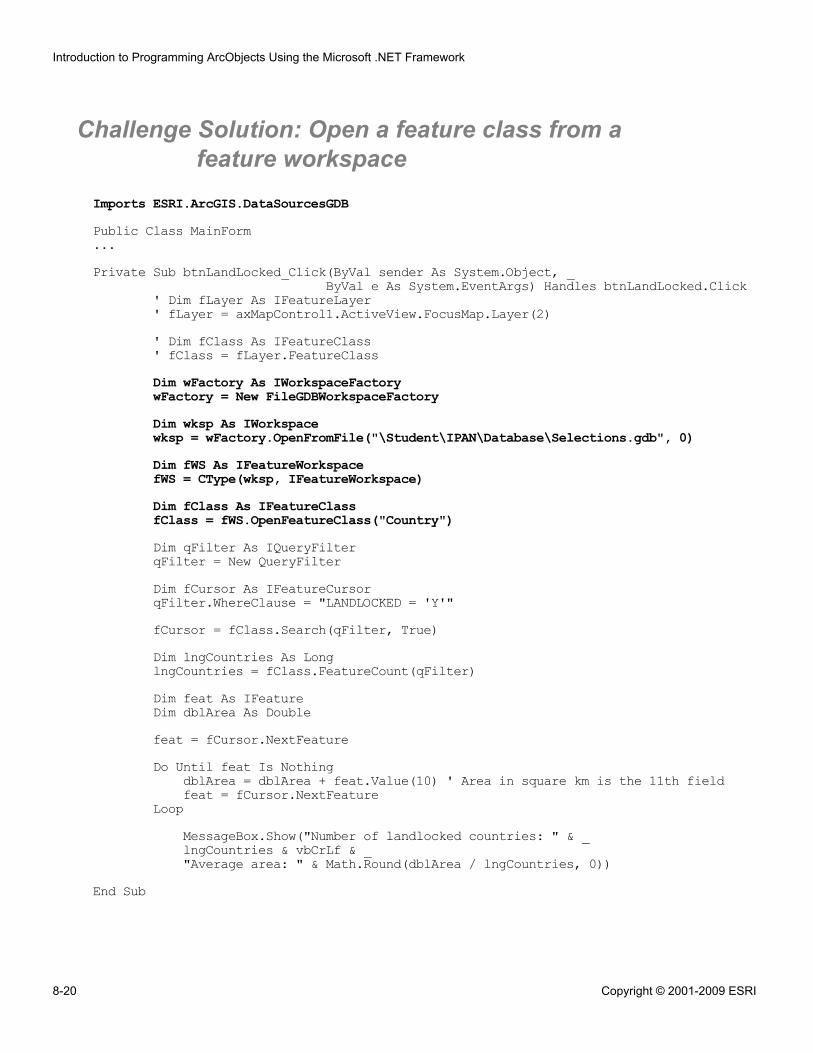
Challenge Solution: Open a feature class from afeature workspace
Imports ESRI.ArcGIS.DataSourcesGDBPublic Class MainForm...Private Sub btnLandLocked_Click(ByVal sender As System.Object, _
ByVal e As System.EventArgs) Handles btnLandLocked.Click' Dim fLayer As IFeatureLayer' fLayer = axMapControl1.ActiveView.FocusMap.Layer(2)' Dim fClass As IFeatureClass' fClass = fLayer.FeatureClassDim wFactory As IWorkspaceFactorywFactory = New FileGDBWorkspaceFactoryDim wksp As IWorkspacewksp = wFactory.OpenFromFile("\Student\IPAN\Database\Selections.gdb", 0)Dim fWS As IFeatureWorkspacefWS = CType(wksp, IFeatureWorkspace)Dim fClass As IFeatureClassfClass = fWS.OpenFeatureClass("Country")Dim qFilter As IQueryFilterqFilter = New QueryFilterDim fCursor As IFeatureCursorqFilter.WhereClause = "LANDLOCKED = 'Y'"fCursor = fClass.Search(qFilter, True)Dim lngCountries As LonglngCountries = fClass.FeatureCount(qFilter)Dim feat As IFeatureDim dblArea As Doublefeat = fCursor.NextFeatureDo Until feat Is Nothing
dblArea = dblArea + feat.Value(10) ' Area in square km is the 11th fieldfeat = fCursor.NextFeature
LoopMessageBox.Show("Number of landlocked countries: " & _lngCountries & vbCrLf & _"Average area: " & Math.Round(dblArea / lngCountries, 0))
End Sub
Introduction to Programming ArcObjects Using the Microsoft .NET Framework
8-20 Copyright © 2001-2009 ESRI
Exercise 8B: Queries and selections (C#)
Estimated time: 45 minutes
In this exercise, you will work with query filters, spatial filters, and feature cursors. Youwill most often use these objects to work with data that meets certain criteria. As you willsee, you can also use a query filter to display a selection set.
In this exercise, you will:
▪ Create query filters▪ Loop through records in a cursor▪ Create a spatial filter▪ Display a query filter as a selection
Exercise shortcut1. In Visual Studio, open the QueryFilters.sln solution from your
\Student\IPAN\Exercise08\CSharp\QueryFilters folder.
2. Apply a query filter to highlight landlocked countries in the Country feature classof QueryFilters.mxd.
3. Use a query filter and a spatial filter to select cities with a population greater than2 million that fall within the country that the user has selected in the table ofcontents.
** (Optional) Display a query filter as a selection to report the number of selectedcities.
** (Challenge) Open a feature class from a feature workspace.
Step 1: Apply a query filter and loop through a subset of records
In this step, you will use a query filter to select landlocked countries from a feature classof world countries. You will access each of these records from a feature cursor in order tocalculate basic statistics for records matching the criteria of the query filter.
You will begin by previewing a feature class of world countries.
Start ArcMap and open QueryFilters.mxd from your \Student\IPAN\Exercise08 folder.
Exercise 8B
Copyright © 2001-2009 ESRI 8-21

When the map document opens, notice that the Country layer is the third layer in thetable of contents.
Right-click the Country layer and choose Open Attribute Table.
In the attribute table, scroll to the right to the LANDLOCKED field.
Question 1: What two values does this field contain?
______________________________________________________________________
You will use this information to return the number of landlocked countries in the featureclass.
Close the attribute table and ArcMap.
Start Visual Studio.
From the File menu, choose Open Project.
Browse to the \Student\IPAN\Exercise08\CSharp\QueryFilters folder and open theQueryFilters solution.
In the ArcGIS Engine MapControl Application that opens, view MainForm in Designview.
Notice that the form contains a MapControl, ToolbarControl, TOCControl, and threeVisual Studio buttons.
Double-click the Landlocked button (btnLandLocked) for its Click event.
This is where you will write code to find landlocked countries. You will be working withfeature layers and their corresponding feature classes, so you need to reference theappropriate interfaces.
Within the event, declare the variable fLayer as an IFeatureLayer object.
Complete the following code to set fLayer equal to the Country layer, the third layerin your map (get_Layer). (Hint: The third layer is index #2.)
fLayer = axMapControl1.__________________(__) as IFeatureLayer;
In order to access the underlying table for a feature, you will need a FeatureClassobject.
Introduction to Programming ArcObjects Using the Microsoft .NET Framework
8-22 Copyright © 2001-2009 ESRI
Declare the variable fClass to hold your feature class.
Set fClass equal to the FeatureClass property on fLayer.
Next, you need to create a query filter and a feature cursor.
Create a new instance of QueryFilter and store it in the variable qFilter.
Declare the variable fCursor as IFeatureCursor.
Build your project.
Open the Visual Studio Object Browser, if necessary.
Search for IQueryFilter and examine its members.
Question 2: Which property will you use to set up the query filter?
______________________________________________________________________
Complete the following code to create the query filter:
qFilter.______________________ = "LANDLOCKED = \'Y\'";
You discovered earlier that the LANDLOCKED attribute has two values (Y and N).Landlocked countries (without a coastline) have a values of Y, while countries that arenot landlocked (with a coastline) have a value of N.
Complete the following code to search the Country feature class for all records with avalue of Y for the LANDLOCKED attribute:
fCursor = fClass.____________(qFilter, ________);
The records matching this criterion will be stored in fCursor. In other words, the featurecursor (fCursor) will store a subset of landlocked country features.
Question 3: How did you set memory recycling?
______________________________________________________________________
Next, you need to write a looping structure to access each of the records in the cursor andto calculate basic statistics.
Declare and initialize the following variables for the area and the number of countries:
Exercise 8B
Copyright © 2001-2009 ESRI 8-23
!
double dblArea = 0;long lngCountries = 0;
Determine the value for lngCountries by setting it equal to the FeatureCountproperty on fClass.
Question 4: What is the argument that you need to pass to the FeatureCount property?
______________________________________________________________________
Complete the following code to pull the first record out of the cursor:
IFeature feat = fCursor.______________________();Note: Remember that a cursor is initialized with the pointer above the first item. Thefirst time NextFeature (or NextRow) is called, the first item in the cursor is returned.
Next, you want to loop until all the records have been pulled from the cursor.
Begin a while loop by completing the following code:
while (feat != ________)
Inside the loop. write the following code to sum the area of all the countries in thecursor:
dblArea += Convert.ToDouble(feat.get_Value(10)); //Area in square km is the 11th fieldNote: You will learn more about accessing fields in a later lesson.
End the loop with the following code by returning the next feature from the cursor:
feat = fCursor.NextFeature();
If you do not include this line of code inside the loop, your code willloop endlessly.
After the loop, display information about the total number and average area of thelandlocked countries in a message box.
Build and run your project.
Click the Open button , browse to \Student\IPAN\Exercise08, and openQueryFilters.mxd.
If necessary, turn on the Country layer.
Introduction to Programming ArcObjects Using the Microsoft .NET Framework
8-24 Copyright © 2001-2009 ESRI
Click your Landlocked button.
Question 5: How many countries are landlocked?
______________________________________________________________________
Click OK to close the message box.
Close your application.
In your code, collapse the btnLandlocked_Click method.
In the next step, you will create a subset of features based on spatial and attribute criteria.
Step 2: Work with spatial and query filters
In this step, you will summarize a subset of features based on both spatial and attributecriteria. You will write code to report the number of cities within the currently selectedcountry that have a population greater than 2 million.
Your code will produce a feature cursor of cities that fall within the selected country inthe Country layer. To accomplish this, you will make a spatial filter that uses the selectedcountry's shape as the Geometry property. Your code will reference the selected countryby getting the layer's selection and storing it in a cursor.
In Design view, double-click the Spatial Filter button (btnSpatialFilter) for itsClick event.
Within the method, declare the following variables to reference the layer containingthe selection, the selection set itself, and the feature cursor, respectively:
IFeatureSelection cntryLyr;ISelectionSet cntrySel;ICursor cntryCursor;
Complete the following code to return the layer (Hint: Country is the third layer):
cntryLyr = axMapControl1.get_Layer(2) as __________________________________;
Question 6: Because cntryLyr was declared with the IFeatureSelection interface,which property can you use to access selected features?
______________________________________________________________________
Exercise 8B
Copyright © 2001-2009 ESRI 8-25
Use your answer to complete the following code:
cntrySel = cntryLyr.__________________;
Next, you will transfer the selection set (cntrySel) to a feature cursor (cntryCursor) soyou can easily retrieve the selected country.
Note: The syntax for the Search method works slightly differently on theISelectionSet interface. Instead of storing the returned cursor using an assignmentstatement, such as myCursor = myTable.Search;, the cursor variable is passed inas one of the required parameters.
Complete the following code to search your selection set and populate your featurecursor: (Tip: Use null as the query filter parameter to return all features):
cntrySel.____________(________, true, out _______________________);
The Search method on ISelectionSet returns an ICursor object. Since you want towork with features, you will need to cast from ICursor to IFeatureCursor.
Declare the variable featCursor as IFeatureCursor.
Complete the following code to cast from ICursor:
featCursor = cntryCursor as _____________________________;
Now you are ready to begin working with the individual features in your feature cursor.
Complete the following code to declare the country so that it can contain the selectedfeature (or the first feature, if there was more than one selected):
IFeature country;
Access the first feature in the feature cursor:
country = featCursor._________________();
Complete the following code to make sure a country was selected. If no country wasselected, report an error to the user, then stop execution of the method.
if (country == null){MessageBox.Show("Please select a country");return;}
Introduction to Programming ArcObjects Using the Microsoft .NET Framework
8-26 Copyright © 2001-2009 ESRI
Now that you have referenced the selected country, you will create a new spatial filter bypassing the feature's shape to the Geometry property of your cursor. You will declare twovariables to work with the same SpatialFilter object:
▪ One will point to the ISpatialFilter interface.▪ The other will point to the IQueryFilter interface.
Create the variable spatFilt as a new SpatialFilter.
Complete the following code to declare a QueryFilter object, then cast to point yourqFilt variable to the spatial filter you just created:
____________________________ qFilt;qFilt = ____________________;
Note: Because SpatialFilter is a type of QueryFilter, it inherits all interfacesdefined on QueryFilter. By using both the ISpatialFilter interface and theIQueryFilter interface on the same object, it is possible to define an attributeexpression (WhereClause property) and spatial criteria (Geometry andSpatialRel properties) for a single filter.
Complete the following code to set all of the filter's selection criteria using the twovariables that point to it:
Note: Because you want to locate cities inside the selected country, the spatialrelationship will be contains.
______________.WhereClause = "Population > 2000000";______________.Geometry = country.Shape;spatFilt.______________ =esriSpatialRelEnum.____________________________________________;
Now that you have produced the filter and defined the spatial and attribute criteria, youwill apply the filter to the Cities feature class.
Declare the following variables:
IFeatureLayer cityLyr;IFeatureClass cityFClass;
Complete the following code to set the variables:
cityLyr = axMapControl1.get_Layer(0) as __________________________;cityFClass = cityLyr.____________;
Build your project.
Declare the following variable to work with the feature cursor:
Exercise 8B
Copyright © 2001-2009 ESRI 8-27
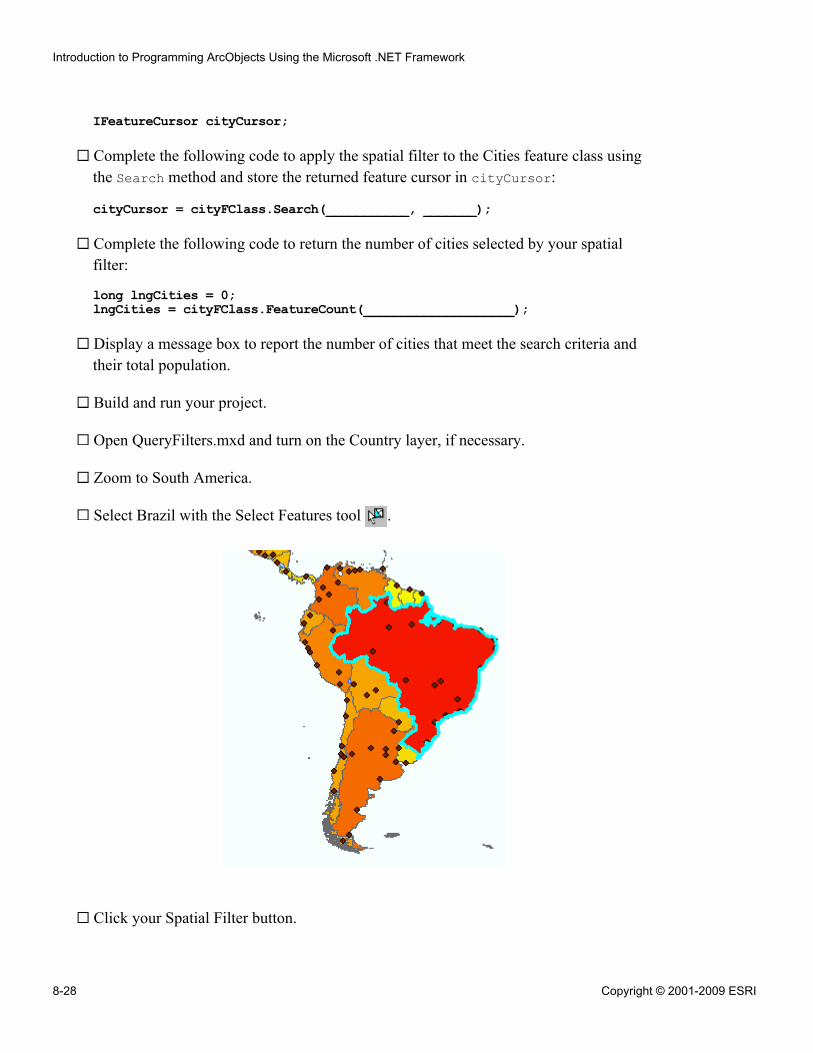
IFeatureCursor cityCursor;
Complete the following code to apply the spatial filter to the Cities feature class usingthe Search method and store the returned feature cursor in cityCursor:
cityCursor = cityFClass.Search(___________, _______);
Complete the following code to return the number of cities selected by your spatialfilter:
long lngCities = 0;lngCities = cityFClass.FeatureCount(____________________);
Display a message box to report the number of cities that meet the search criteria andtheir total population.
Build and run your project.
Open QueryFilters.mxd and turn on the Country layer, if necessary.
Zoom to South America.
Select Brazil with the Select Features tool .
Click your Spatial Filter button.
Introduction to Programming ArcObjects Using the Microsoft .NET Framework
8-28 Copyright © 2001-2009 ESRI
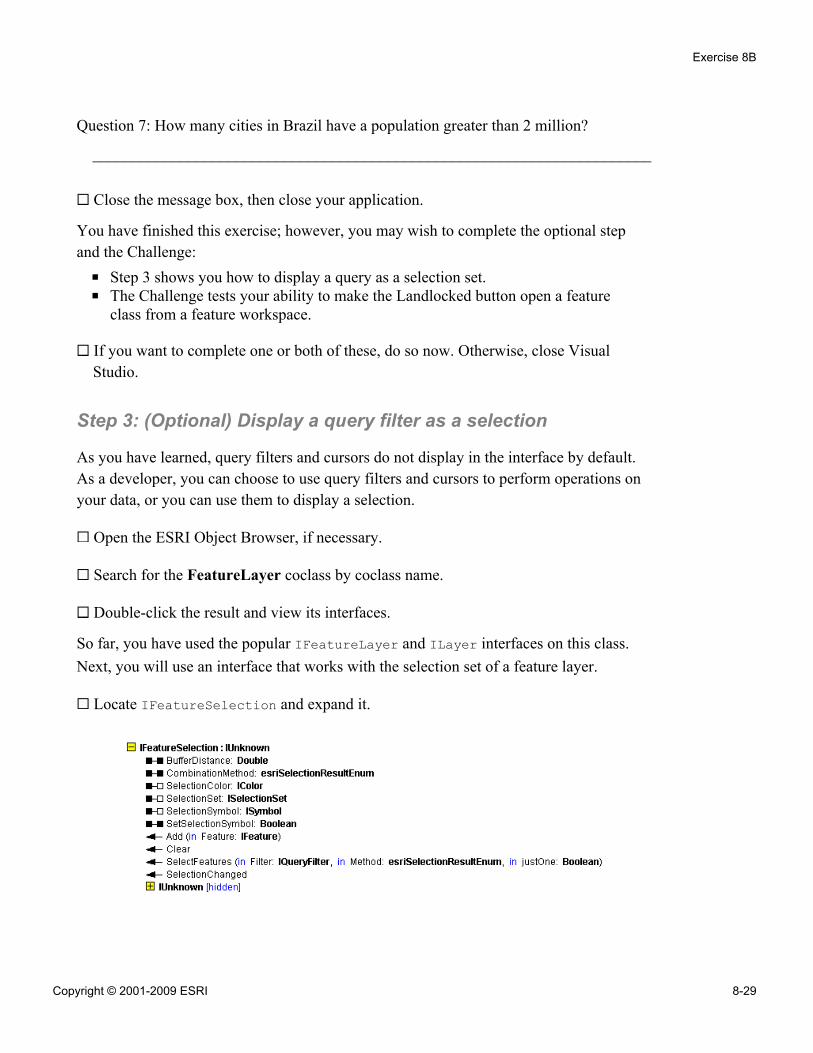
Question 7: How many cities in Brazil have a population greater than 2 million?
______________________________________________________________________
Close the message box, then close your application.
You have finished this exercise; however, you may wish to complete the optional stepand the Challenge:
▪ Step 3 shows you how to display a query as a selection set.▪ The Challenge tests your ability to make the Landlocked button open a feature
class from a feature workspace.
If you want to complete one or both of these, do so now. Otherwise, close VisualStudio.
Step 3: (Optional) Display a query filter as a selection
As you have learned, query filters and cursors do not display in the interface by default.As a developer, you can choose to use query filters and cursors to perform operations onyour data, or you can use them to display a selection.
Open the ESRI Object Browser, if necessary.
Search for the FeatureLayer coclass by coclass name.
Double-click the result and view its interfaces.
So far, you have used the popular IFeatureLayer and ILayer interfaces on this class.Next, you will use an interface that works with the selection set of a feature layer.
Locate IFeatureSelection and expand it.
Exercise 8B
Copyright © 2001-2009 ESRI 8-29
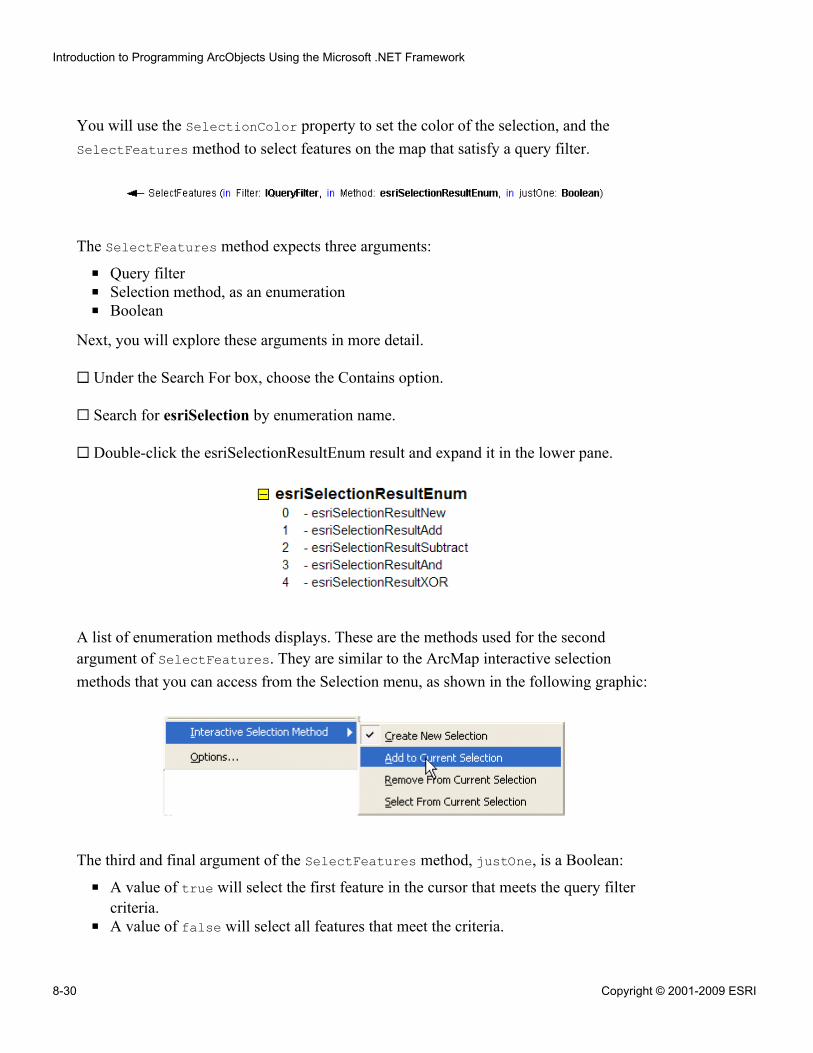
You will use the SelectionColor property to set the color of the selection, and theSelectFeatures method to select features on the map that satisfy a query filter.
The SelectFeatures method expects three arguments:
▪ Query filter▪ Selection method, as an enumeration▪ Boolean
Next, you will explore these arguments in more detail.
Under the Search For box, choose the Contains option.
Search for esriSelection by enumeration name.
Double-click the esriSelectionResultEnum result and expand it in the lower pane.
A list of enumeration methods displays. These are the methods used for the secondargument of SelectFeatures. They are similar to the ArcMap interactive selectionmethods that you can access from the Selection menu, as shown in the following graphic:
The third and final argument of the SelectFeatures method, justOne, is a Boolean:
▪ A value of true will select the first feature in the cursor that meets the query filtercriteria.
▪ A value of false will select all features that meet the criteria.
Introduction to Programming ArcObjects Using the Microsoft .NET Framework
8-30 Copyright © 2001-2009 ESRI
Now you are ready to write code to select features.
In Visual Studio, navigate to the Click event for the Select Cities button(btnSelectCities).
Within the method, declare the variable map to reference IMap.
Set map equal to the FocusMap property of the active view of your MapControl.
Declare a variable to make feature selections:
IFeatureSelection featSel;
Question 8: Which variable holds the map's selected layer? (Hint: The variable ispopulated in the OnMouseDown event of your TOCControl.)
______________________________________________________________________
Set your new variable to your map's selected layer.
This will allow you to make a selection within the selected layer in the map. Next, youwill create a query filter as you did earlier.
Create a new instance of a QueryFilter object and store it in the variable qFilt.
Complete the following code to set its WhereClause property (Hint: Be sure to typeseven zeroes):
qFilt.______________________ = "Population > 10000000";
Make sure there are no selected features by clearing the feature selection:
featSel.Clear();Note: You can also call the Clear method conditionally when featSel is not null.
Complete the following code to call the SelectFeatures method on featSel whilesupplying the query filter, creating a new selection, and allowing more than one featureto be selected:
featSel.______________________________(qFilt,esriSelectionResultEnum.__________________________________________, __________);
Report the number of selected cities in a message box.
Exercise 8B
Copyright © 2001-2009 ESRI 8-31
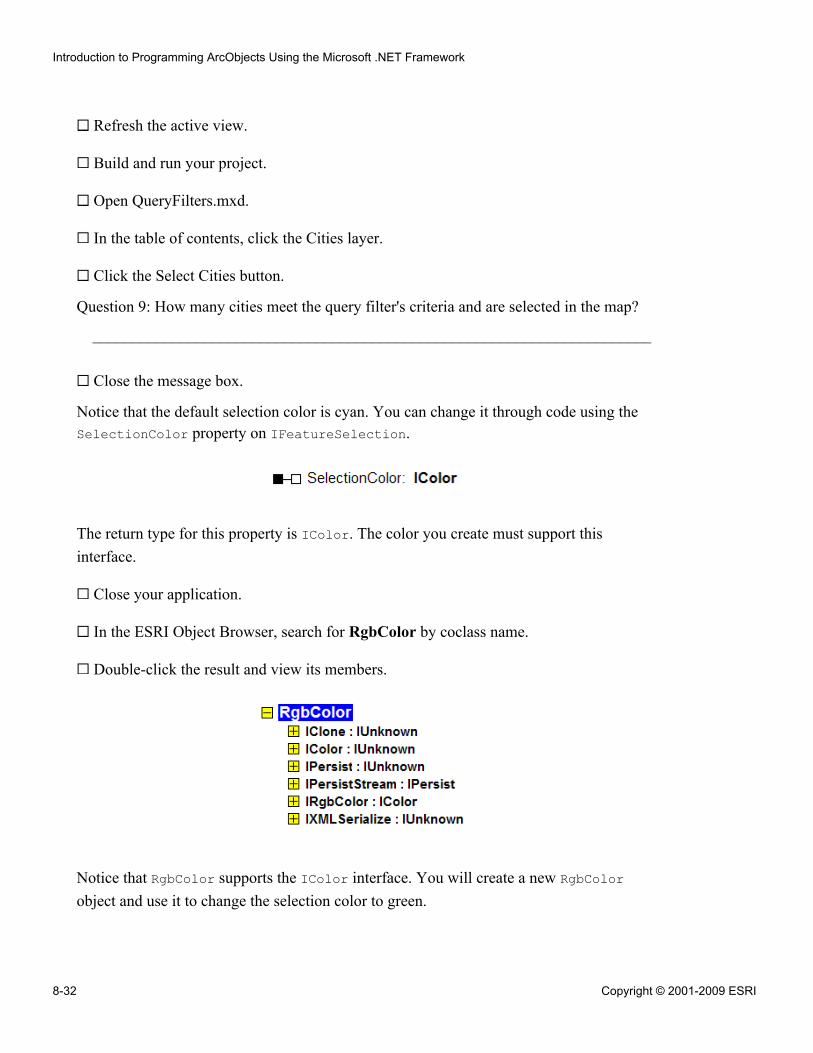
Refresh the active view.
Build and run your project.
Open QueryFilters.mxd.
In the table of contents, click the Cities layer.
Click the Select Cities button.
Question 9: How many cities meet the query filter's criteria and are selected in the map?
______________________________________________________________________
Close the message box.
Notice that the default selection color is cyan. You can change it through code using theSelectionColor property on IFeatureSelection.
The return type for this property is IColor. The color you create must support thisinterface.
Close your application.
In the ESRI Object Browser, search for RgbColor by coclass name.
Double-click the result and view its members.
Notice that RgbColor supports the IColor interface. You will create a new RgbColorobject and use it to change the selection color to green.
Introduction to Programming ArcObjects Using the Microsoft .NET Framework
8-32 Copyright © 2001-2009 ESRI
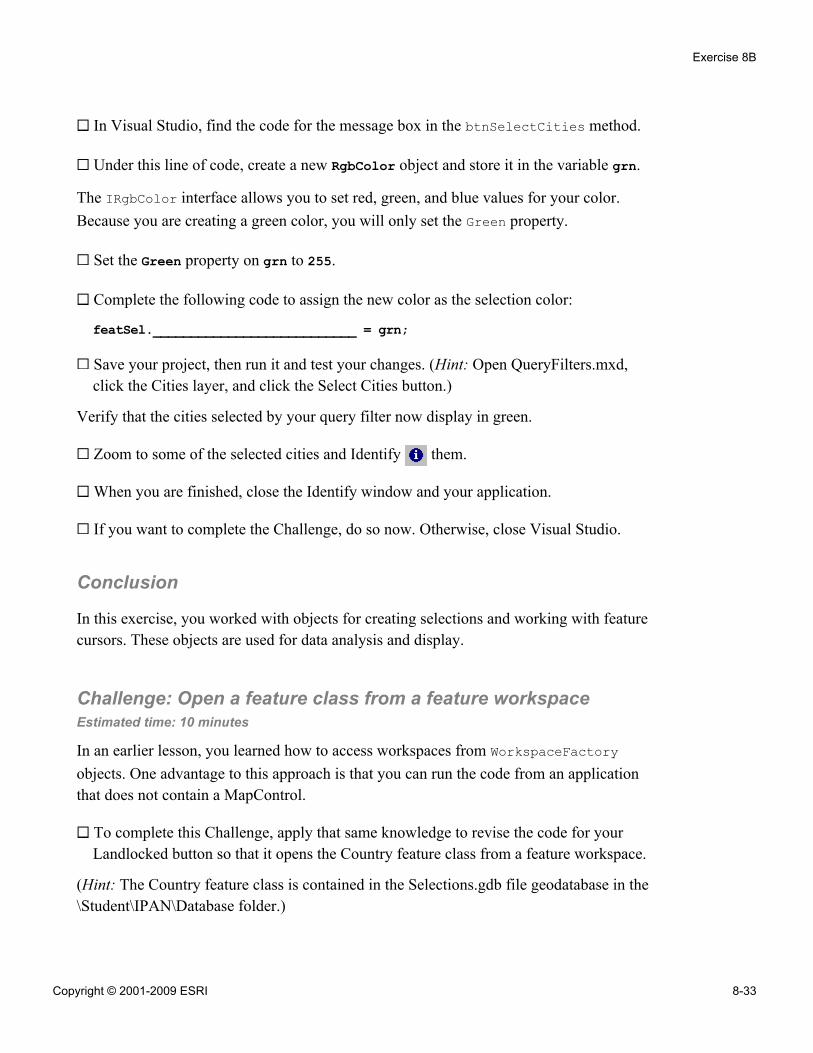
In Visual Studio, find the code for the message box in the btnSelectCities method.
Under this line of code, create a new RgbColor object and store it in the variable grn.
The IRgbColor interface allows you to set red, green, and blue values for your color.Because you are creating a green color, you will only set the Green property.
Set the Green property on grn to 255.
Complete the following code to assign the new color as the selection color:
featSel.___________________________ = grn;
Save your project, then run it and test your changes. (Hint: Open QueryFilters.mxd,click the Cities layer, and click the Select Cities button.)
Verify that the cities selected by your query filter now display in green.
Zoom to some of the selected cities and Identify them.
When you are finished, close the Identify window and your application.
If you want to complete the Challenge, do so now. Otherwise, close Visual Studio.
Conclusion
In this exercise, you worked with objects for creating selections and working with featurecursors. These objects are used for data analysis and display.
Challenge: Open a feature class from a feature workspaceEstimated time: 10 minutes
In an earlier lesson, you learned how to access workspaces from WorkspaceFactoryobjects. One advantage to this approach is that you can run the code from an applicationthat does not contain a MapControl.
To complete this Challenge, apply that same knowledge to revise the code for yourLandlocked button so that it opens the Country feature class from a feature workspace.
(Hint: The Country feature class is contained in the Selections.gdb file geodatabase in the\Student\IPAN\Database folder.)
Exercise 8B
Copyright © 2001-2009 ESRI 8-33
Answers to Exercise 8B Questions
Question 1: What two values does this field contain?
Answer: Y and N
Question 2: Which property will you use to set up the query filter?
Answer: WhereClause
Question 3: How did you set memory recycling?
Answer: By setting a value of true; this is a search cursor, so it is read-only and canreuse memory
Question 4: What is the argument that you need to pass to the FeatureCount property?
Answer: qFilter
Question 5: How many countries are landlocked?
Answer: 43
Question 6: Because cntryLyr was declared with the IFeatureSelection interface,which property can you use to access selected features?
Answer: SelectionSet
Question 7: How many cities in Brazil have a population greater than 2 million?
Answer: Six
Question 8: Which variable holds the map's selected layer? (Hint: The variable ispopulated in the OnMouseDown event of your TOCControl.)
Answer: m_layer
Question 9: How many cities meet the query filter's criteria and are selected in the map?
Answer: 11
Introduction to Programming ArcObjects Using the Microsoft .NET Framework
8-34 Copyright © 2001-2009 ESRI
Exercise Solution: Exercise 8B (C#)using System;using System.Drawing;using System.Collections;using System.ComponentModel;using System.Windows.Forms;using System.Data;using System.IO;using System.Runtime.InteropServices;using ESRI.ArcGIS.esriSystem;using ESRI.ArcGIS.Carto;using ESRI.ArcGIS.Controls;using ESRI.ArcGIS.ADF;using ESRI.ArcGIS.SystemUI;using ESRI.ArcGIS.Geodatabase;using ESRI.ArcGIS.Display;namespace QueryFilters{
public sealed partial class MainForm : Form{
#region class private membersprivate IMapControl3 m_mapControl = null;private string m_mapDocumentName = string.Empty;#endregion#region class constructorpublic MainForm(){
InitializeComponent();}#endregionprivate void MainForm_Load(object sender, EventArgs e){
//get the MapControlm_mapControl = (IMapControl3)axMapControl1.Object;//disable the Save menu (since there is no document yet)menuSaveDoc.Enabled = false;
}#region Main Menu event handlersprivate void menuNewDoc_Click(object sender, EventArgs e){
//execute New Document commandICommand command = new CreateNewDocument();command.OnCreate(m_mapControl.Object);command.OnClick();
}
Exercise 8B
Copyright © 2001-2009 ESRI 8-35
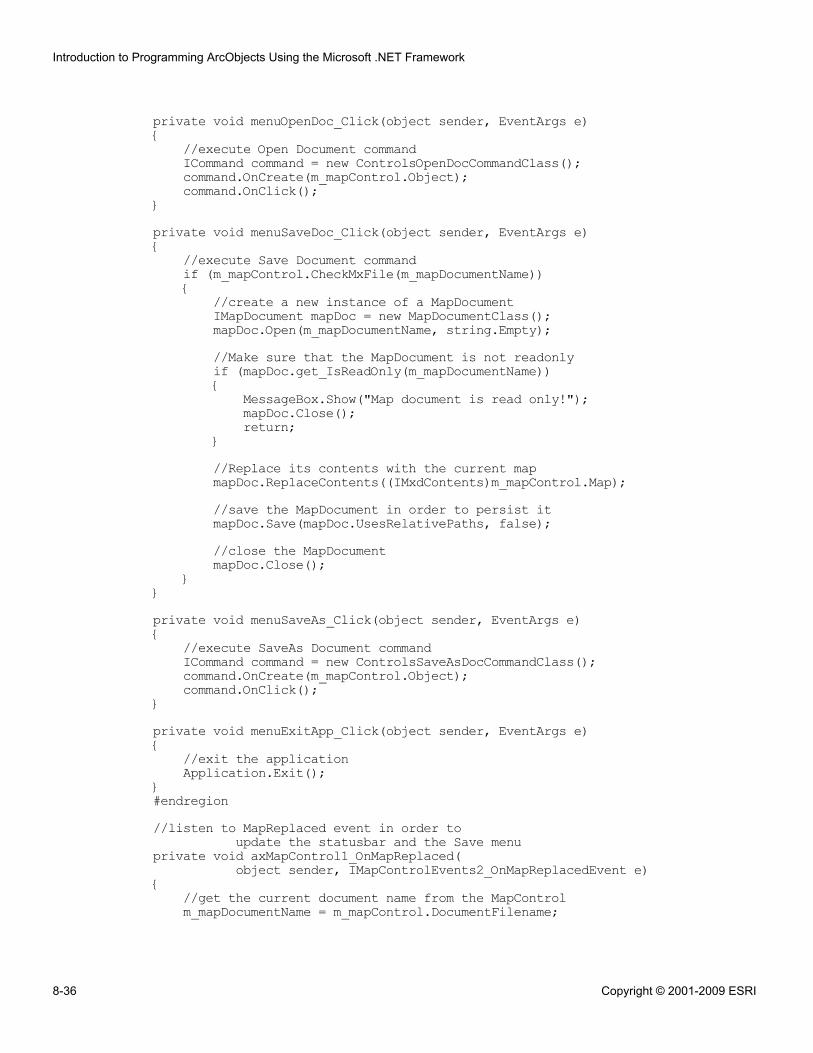
private void menuOpenDoc_Click(object sender, EventArgs e){
//execute Open Document commandICommand command = new ControlsOpenDocCommandClass();command.OnCreate(m_mapControl.Object);command.OnClick();
}private void menuSaveDoc_Click(object sender, EventArgs e){
//execute Save Document commandif (m_mapControl.CheckMxFile(m_mapDocumentName)){
//create a new instance of a MapDocumentIMapDocument mapDoc = new MapDocumentClass();mapDoc.Open(m_mapDocumentName, string.Empty);//Make sure that the MapDocument is not readonlyif (mapDoc.get_IsReadOnly(m_mapDocumentName)){
MessageBox.Show("Map document is read only!");mapDoc.Close();return;
}//Replace its contents with the current mapmapDoc.ReplaceContents((IMxdContents)m_mapControl.Map);//save the MapDocument in order to persist itmapDoc.Save(mapDoc.UsesRelativePaths, false);//close the MapDocumentmapDoc.Close();
}}private void menuSaveAs_Click(object sender, EventArgs e){
//execute SaveAs Document commandICommand command = new ControlsSaveAsDocCommandClass();command.OnCreate(m_mapControl.Object);command.OnClick();
}private void menuExitApp_Click(object sender, EventArgs e){
//exit the applicationApplication.Exit();
}#endregion//listen to MapReplaced event in order to
update the statusbar and the Save menuprivate void axMapControl1_OnMapReplaced(
object sender, IMapControlEvents2_OnMapReplacedEvent e){
//get the current document name from the MapControlm_mapDocumentName = m_mapControl.DocumentFilename;
Introduction to Programming ArcObjects Using the Microsoft .NET Framework
8-36 Copyright © 2001-2009 ESRI
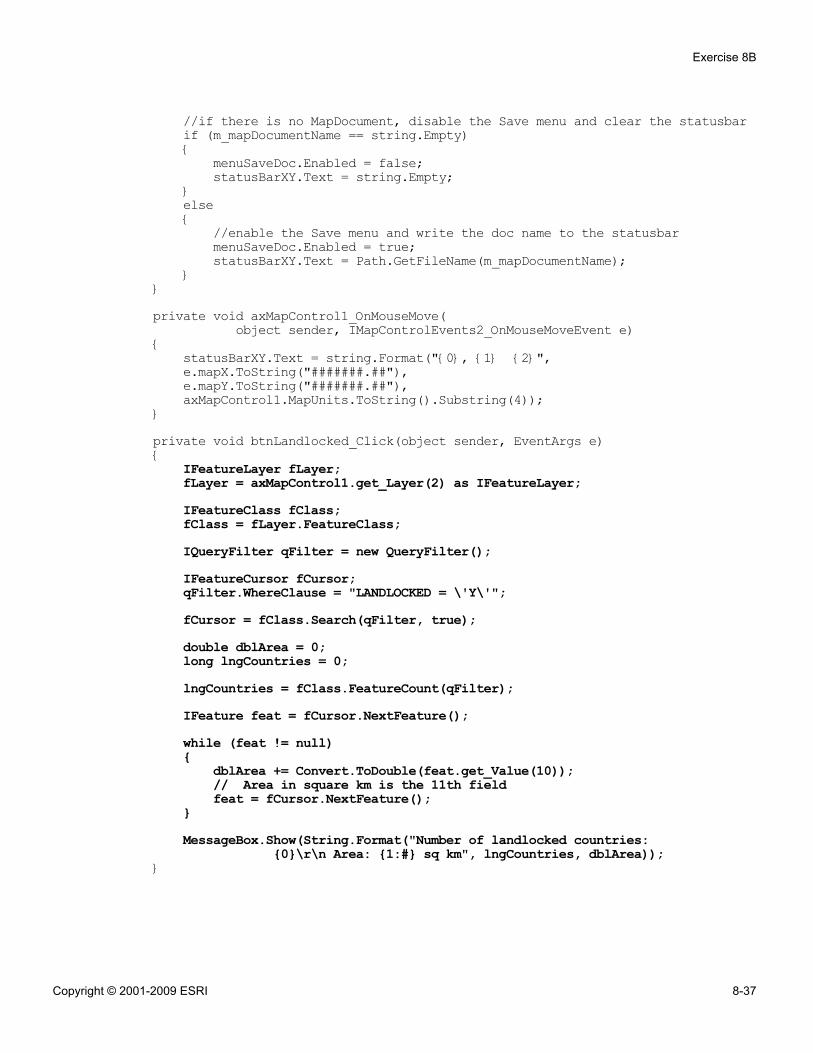
//if there is no MapDocument, disable the Save menu and clear the statusbarif (m_mapDocumentName == string.Empty){
menuSaveDoc.Enabled = false;statusBarXY.Text = string.Empty;
}else{
//enable the Save menu and write the doc name to the statusbarmenuSaveDoc.Enabled = true;statusBarXY.Text = Path.GetFileName(m_mapDocumentName);
}}private void axMapControl1_OnMouseMove(
object sender, IMapControlEvents2_OnMouseMoveEvent e){
statusBarXY.Text = string.Format("{0}, {1} {2}",e.mapX.ToString("#######.##"),e.mapY.ToString("#######.##"),axMapControl1.MapUnits.ToString().Substring(4));
}private void btnLandlocked_Click(object sender, EventArgs e){
IFeatureLayer fLayer;fLayer = axMapControl1.get_Layer(2) as IFeatureLayer;IFeatureClass fClass;fClass = fLayer.FeatureClass;IQueryFilter qFilter = new QueryFilter();IFeatureCursor fCursor;qFilter.WhereClause = "LANDLOCKED = \'Y\'";fCursor = fClass.Search(qFilter, true);double dblArea = 0;long lngCountries = 0;lngCountries = fClass.FeatureCount(qFilter);IFeature feat = fCursor.NextFeature();while (feat != null){
dblArea += Convert.ToDouble(feat.get_Value(10));// Area in square km is the 11th fieldfeat = fCursor.NextFeature();
}MessageBox.Show(String.Format("Number of landlocked countries:
{0}\r\n Area: {1:#} sq km", lngCountries, dblArea));}
Exercise 8B
Copyright © 2001-2009 ESRI 8-37
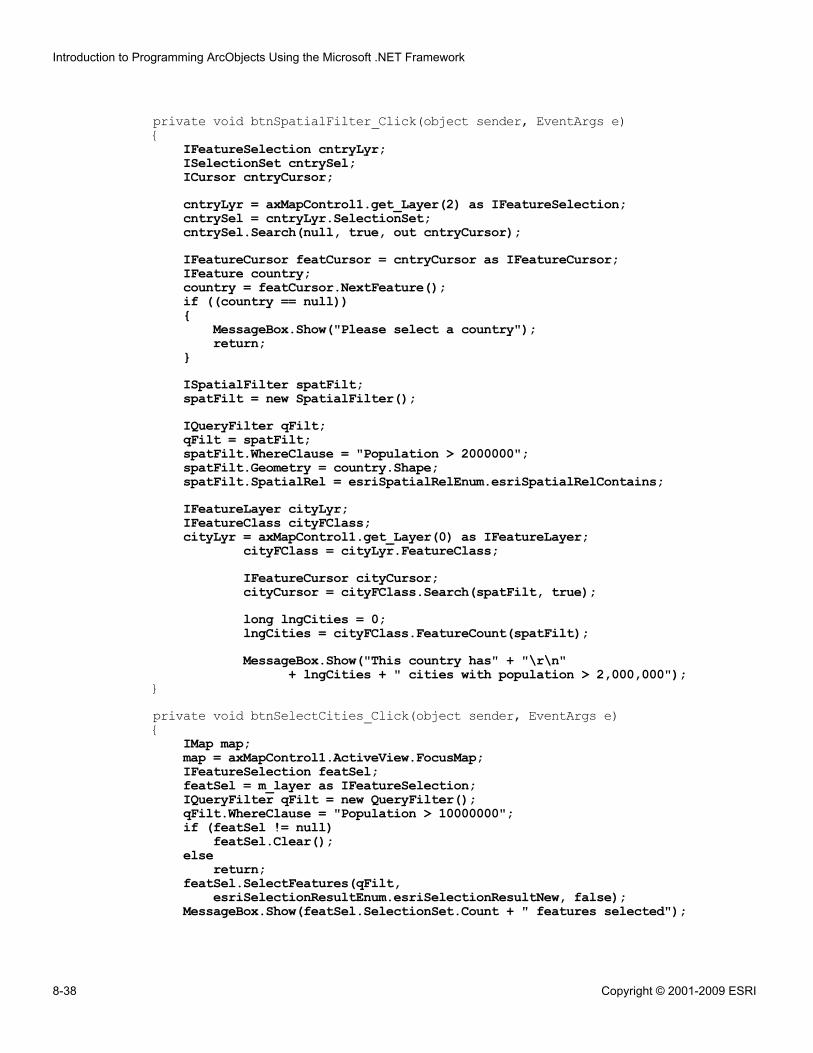
private void btnSpatialFilter_Click(object sender, EventArgs e){
IFeatureSelection cntryLyr;ISelectionSet cntrySel;ICursor cntryCursor;cntryLyr = axMapControl1.get_Layer(2) as IFeatureSelection;cntrySel = cntryLyr.SelectionSet;cntrySel.Search(null, true, out cntryCursor);IFeatureCursor featCursor = cntryCursor as IFeatureCursor;IFeature country;country = featCursor.NextFeature();if ((country == null)){
MessageBox.Show("Please select a country");return;
}ISpatialFilter spatFilt;spatFilt = new SpatialFilter();IQueryFilter qFilt;qFilt = spatFilt;spatFilt.WhereClause = "Population > 2000000";spatFilt.Geometry = country.Shape;spatFilt.SpatialRel = esriSpatialRelEnum.esriSpatialRelContains;IFeatureLayer cityLyr;IFeatureClass cityFClass;cityLyr = axMapControl1.get_Layer(0) as IFeatureLayer;
cityFClass = cityLyr.FeatureClass;IFeatureCursor cityCursor;cityCursor = cityFClass.Search(spatFilt, true);long lngCities = 0;lngCities = cityFClass.FeatureCount(spatFilt);MessageBox.Show("This country has" + "\r\n"
+ lngCities + " cities with population > 2,000,000");}private void btnSelectCities_Click(object sender, EventArgs e){
IMap map;map = axMapControl1.ActiveView.FocusMap;IFeatureSelection featSel;featSel = m_layer as IFeatureSelection;IQueryFilter qFilt = new QueryFilter();qFilt.WhereClause = "Population > 10000000";if (featSel != null)
featSel.Clear();else
return;featSel.SelectFeatures(qFilt,
esriSelectionResultEnum.esriSelectionResultNew, false);MessageBox.Show(featSel.SelectionSet.Count + " features selected");
Introduction to Programming ArcObjects Using the Microsoft .NET Framework
8-38 Copyright © 2001-2009 ESRI
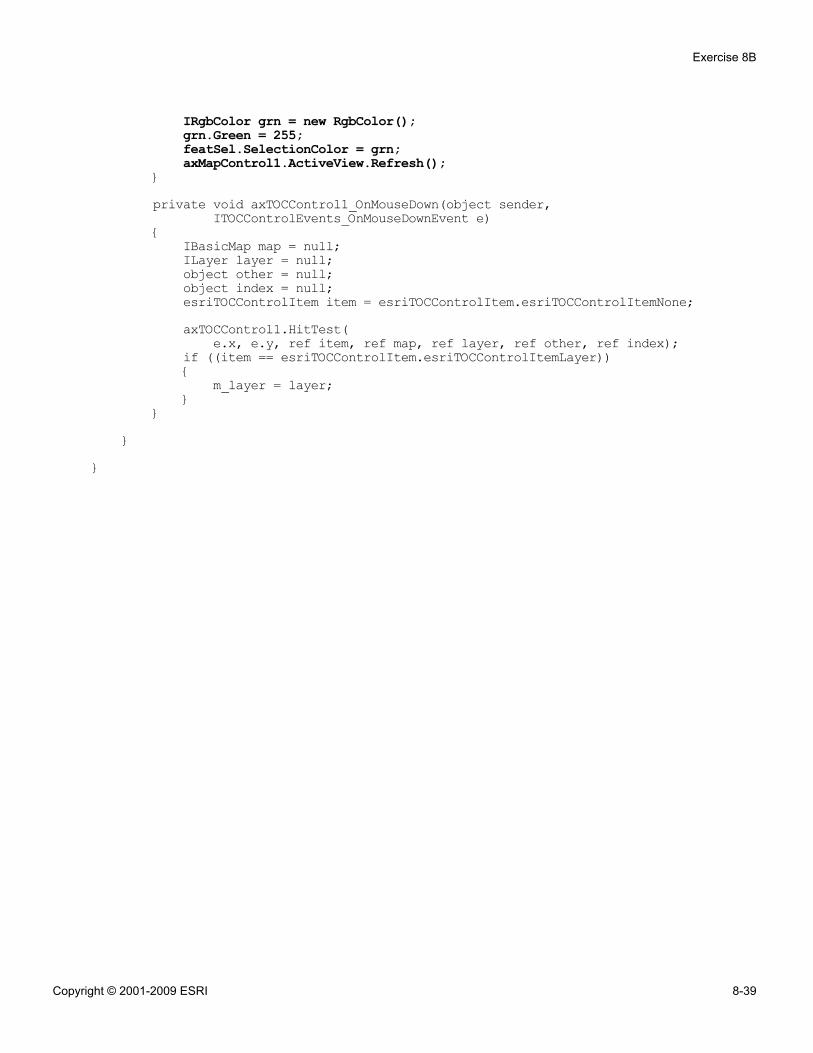
IRgbColor grn = new RgbColor();grn.Green = 255;featSel.SelectionColor = grn;axMapControl1.ActiveView.Refresh();
}private void axTOCControl1_OnMouseDown(object sender,
ITOCControlEvents_OnMouseDownEvent e){
IBasicMap map = null;ILayer layer = null;object other = null;object index = null;esriTOCControlItem item = esriTOCControlItem.esriTOCControlItemNone;axTOCControl1.HitTest(
e.x, e.y, ref item, ref map, ref layer, ref other, ref index);if ((item == esriTOCControlItem.esriTOCControlItemLayer)){
m_layer = layer;}
}}
}
Exercise 8B
Copyright © 2001-2009 ESRI 8-39
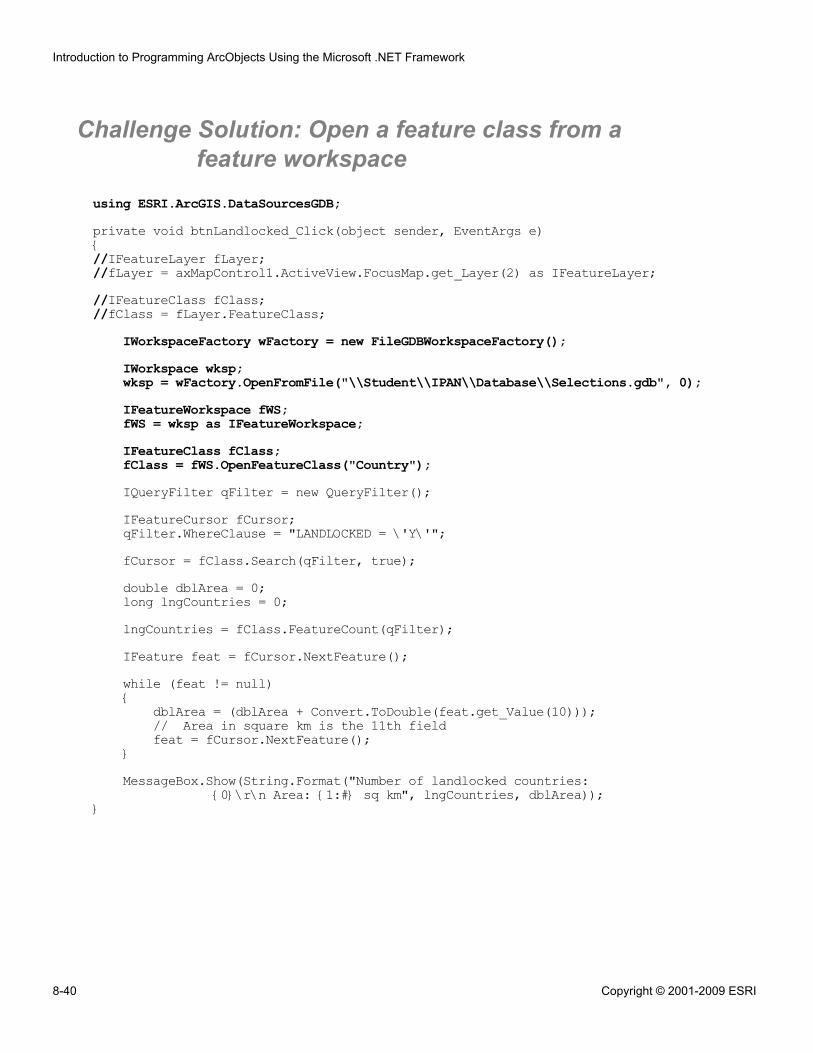
Challenge Solution: Open a feature class from afeature workspace
using ESRI.ArcGIS.DataSourcesGDB;private void btnLandlocked_Click(object sender, EventArgs e){//IFeatureLayer fLayer;//fLayer = axMapControl1.ActiveView.FocusMap.get_Layer(2) as IFeatureLayer;//IFeatureClass fClass;//fClass = fLayer.FeatureClass;
IWorkspaceFactory wFactory = new FileGDBWorkspaceFactory();IWorkspace wksp;wksp = wFactory.OpenFromFile("\\Student\\IPAN\\Database\\Selections.gdb", 0);IFeatureWorkspace fWS;fWS = wksp as IFeatureWorkspace;IFeatureClass fClass;fClass = fWS.OpenFeatureClass("Country");IQueryFilter qFilter = new QueryFilter();IFeatureCursor fCursor;qFilter.WhereClause = "LANDLOCKED = \'Y\'";fCursor = fClass.Search(qFilter, true);double dblArea = 0;long lngCountries = 0;lngCountries = fClass.FeatureCount(qFilter);IFeature feat = fCursor.NextFeature();while (feat != null){
dblArea = (dblArea + Convert.ToDouble(feat.get_Value(10)));// Area in square km is the 11th fieldfeat = fCursor.NextFeature();
}MessageBox.Show(String.Format("Number of landlocked countries:
{0}\r\n Area: {1:#} sq km", lngCountries, dblArea));}
Introduction to Programming ArcObjects Using the Microsoft .NET Framework
8-40 Copyright © 2001-2009 ESRI

9Working with
geometry
Exercise 9A: Create a parcel proximitytool (VB.NET)Estimated time: 45 minutesChallenge: Draw the polygon bufferEstimated time: 10 minutesChallenge: Use DisplayTransformationEstimated time: 2 minutes
Exercise 9B: Create a parcel proximitytool (C#)Estimated time: 45 minutesChallenge: Draw the polygon bufferEstimated time: 10 minutesChallenge: Use DisplayTransformationEstimated time: 2 minutes

Exercise 9A: Create a parcel proximity tool (VB.NET)
Estimated time: 45 minutes
Scenario: As the GIS analyst for an oil company, you are responsible for notifyingneighboring residents whenever your company builds a new gas station. Eachmunicipality defines a different radius for determining which residents to notify. In somecities, you must notify residents within 30 meters, while in others, you must contactresidents within 150 meters. To accomplish this task efficiently, you will create a tool toselect parcels within a specified distance of the gas station parcel under development.
In this exercise, you will:
▪ Create a buffer based on the location clicked in the map and select nearby features▪ Work with spatial filters, feature cursors, and spatial reference objects
Exercise shortcut1. Create a new Visual Basic ArcGIS Engine MapControl Application.
2. Add the Select Features command to your ToolbarControl.
3. Create a point to represent a new gas station based on a location the user clicks.
4. Create a spatial filter to select the parcel intersecting the new point in\Student\IPAN\Exercise09\ParcelProximity.mxd.
5. Using your spatial filter, create a cursor that contains the parcel on which the newgas station will be located. Fetch a single feature from the cursor. Report the landuse of the parcel that was clicked in a text box.
6. Test your project to confirm that the land use displays in the text box.
7. Determine the buffer distance in the parcel layer's native map units.
8. Create a buffer around the polygon clicked with your new tool, then select theparcels that are within the buffer distance.
9. If the gas station parcel is selected with the neighboring parcels, create a newselection environment to remove it from the selection.
** (Challenge) Draw the polygon buffer on your map.
** (Challenge) Create the point object and Use DisplayTransformation.
Exercise 9A
Copyright © 2001-2009 ESRI 9-1
!
Step 1: Create a new project in Visual Studio
Start Visual Studio and create a new project, using the following as a guide:
Property Value
Language Visual Basic
Project type ArcGIS > Engine
Template MapControl Application
Name ParcelBuffer
Location \Student\IPAN\Exercise09
Solution name ParcelBuffer
Make sure the Create directory for solution check box is checked.
The code that you write will select features based on a location clicked by the user. Tomake it easy to deselect features, you will use a built-in tool.
View the form in Design view.
You will to add a new item to the toolbar.
Open the Properties dialog box for your ToolbarControl.
From the Feature Selection category, add the Select Features tool just to the left of themap scale.
Open the Properties dialog box for your MapControl.
For Map Document, assign ParcelProximity.mxd from your \Student\IPAN\Exercise09folder.
Drag two TextBox controls and two Label controls onto your form and position eachtext box with a label next to it. (Tip: Place these controls in the upper-right corner ofyour map or in another location of your choice. Also, make the TextBox controls widerto accommodate longer text.)
You will use one set of controls to display projection information and the other set todisplay land use.
Introduction to Programming ArcObjects Using the Microsoft .NET Framework
9-2 Copyright © 2001-2009 ESRI
Assign the following properties to your controls:
Control (Name) Text
Label lblProj Projection:
TextBox txtProj
Label lblLU Land Use:
TextBox txtLU
Switch to code view.
Right-click anywhere in the code window and choose Outlining > Collapse toDefinitions.
Step 2: Create a new point when the map is clicked
The most basic geometry type is the point. In this step, you will create a point that willrepresent a new gas station based on a location that the user clicks. To begin, you willmake your code recognize when your user has used your "tool" to click the map.
Navigate to the axMapControl1_OnMouseDown method.
Scroll to the right and note the second of the two parameters passed to theOnMouseDown event.
The properties of the parameter e vary depending on the event to which it is passed. Youwill first use a property of e to determine whether the right mouse button has beenclicked.
Complete the following If statement to test for a mouse button right-click:
If e.____________ = 2 Then
In addition to button, other properties for e display in the code completer.
Question 1: Which properties return map units and which properties return display units?
______________________________________________________________________
______________________________________________________________________
Exercise 9A
Copyright © 2001-2009 ESRI 9-3
Now you are ready to begin writing the code that will select a parcel and buffer it. Youwill start by accessing the active view.
Inside your If statement, complete the following code to instantiate the active view:
Dim activeView As _____________________ = axMapControl1.______________
Next, you will add code to the OnMouseDown event to capture the point where your userclicks in the map display. Your code will eventually use this point to identify theneighboring parcels.
To capture the point clicked by your user, you need a variable to hold a point object.Because you are working with an event on the MapControl, there are two options forinstantiating a point object and assigning its x,y coordinates:
1. Populate x and y on your point object with coordinates already in map units2. Populate x and y on your point object with coordinates that have been
transformed from display units
In this exercise, you will use the first option.
Instantiate a new instance of a point object in the variable aPoint.
Complete the following code to assign the x coordinate from one of the properties of e:
aPoint.X = e.________
Repeat the process for the y coordinate.
Your variable aPoint now contains a point with coordinates stored in map units based onthe user's mouse click. This point will represent the location of a new gas station. Next,you will find the proposed parcel where the new gas station will be built.
Step 3: Create a spatial filter
A spatial filter retrieves features based on their spatial relationship with a geometricsearch feature, such as a point, area, or line. In this step, you will use a spatial filter toselect the parcel that intersects the point you created in the previous step.
Below the assignment statement for aPoint, instantiate a new instance ofISpatialFilter in the variable spatFilt.
Introduction to Programming ArcObjects Using the Microsoft .NET Framework
9-4 Copyright © 2001-2009 ESRI
The Geometry property on SpatialFilter is used to specify the geometric searchfeatures, and the SpatialRel property is used to define the spatial relationship to applyto the search feature.
You will begin by selecting the parcel where the gas station is located.
Set the Geometry property of spatFilt equal to aPoint.
Assign a value for the SpatialRel property of spatFilt that will identify the parcelintersected by the point.
You have now defined the spatial criterion needed to identify the parcel where the newgas station will be built.
Step 4: Create a cursor and return a feature from it
In this step, you will use the spatial filter to create a cursor containing the parcel on whichthe new gas station is located.
Just before the End If line, insert the IPAN_Ex09_Cursor snippet.
Review the code in the snippet.
Notice that the code uses a TypeOf statement to test whether the layer supports theIFeatureLayer interface.
You now have a cursor object with the gas station's parcel. You will fetch a single featurefrom the cursor. Once you have the feature, you will use it to search for neighboringparcels so you can contact the residents of those parcels.
The variable feat will store each feature in the cursor and has already been set to the firstfeature in the cursor.
Next, you will test whether the user has actually clicked a feature and report the result inthe projection text box.
Complete the following code to test and report if you have selected a valid feature; ifnot, then exit:
Exercise 9A
Copyright © 2001-2009 ESRI 9-5
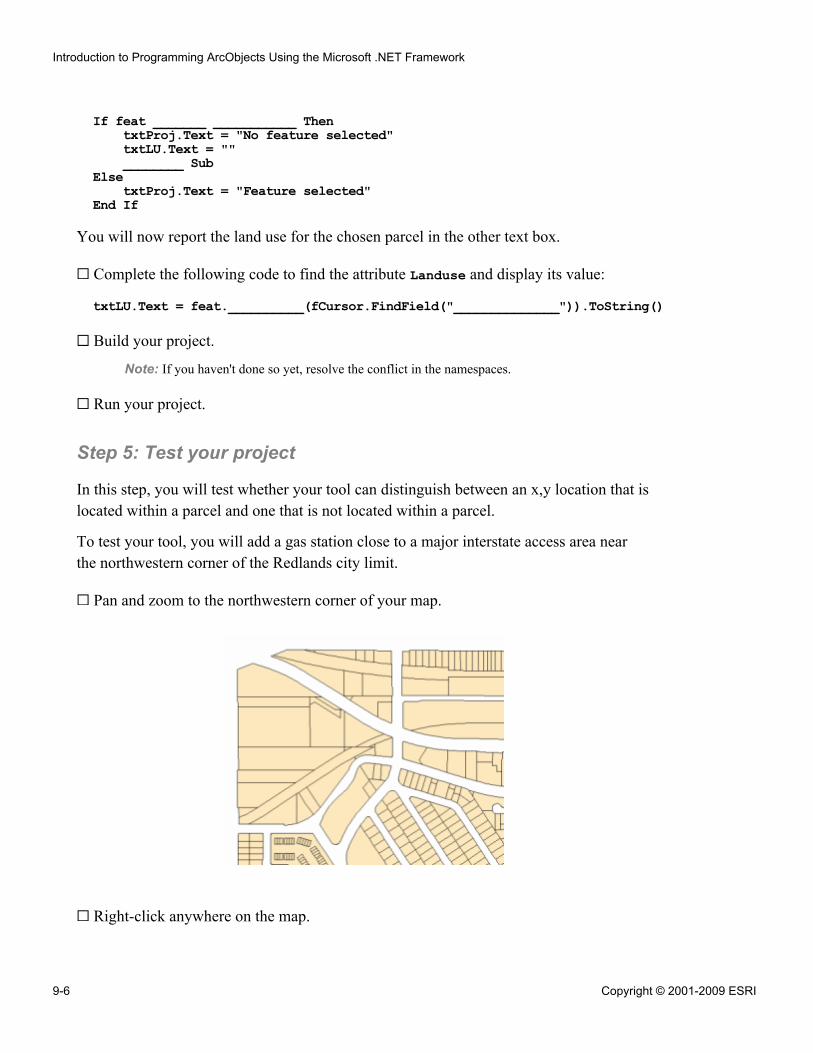
If feat _______ ___________ ThentxtProj.Text = "No feature selected"txtLU.Text = ""________ Sub
ElsetxtProj.Text = "Feature selected"
End If
You will now report the land use for the chosen parcel in the other text box.
Complete the following code to find the attribute Landuse and display its value:
txtLU.Text = feat.__________(fCursor.FindField("______________")).ToString()
Build your project.
Note: If you haven't done so yet, resolve the conflict in the namespaces.
Run your project.
Step 5: Test your project
In this step, you will test whether your tool can distinguish between an x,y location that islocated within a parcel and one that is not located within a parcel.
To test your tool, you will add a gas station close to a major interstate access area nearthe northwestern corner of the Redlands city limit.
Pan and zoom to the northwestern corner of your map.
Right-click anywhere on the map.
Introduction to Programming ArcObjects Using the Microsoft .NET Framework
9-6 Copyright © 2001-2009 ESRI
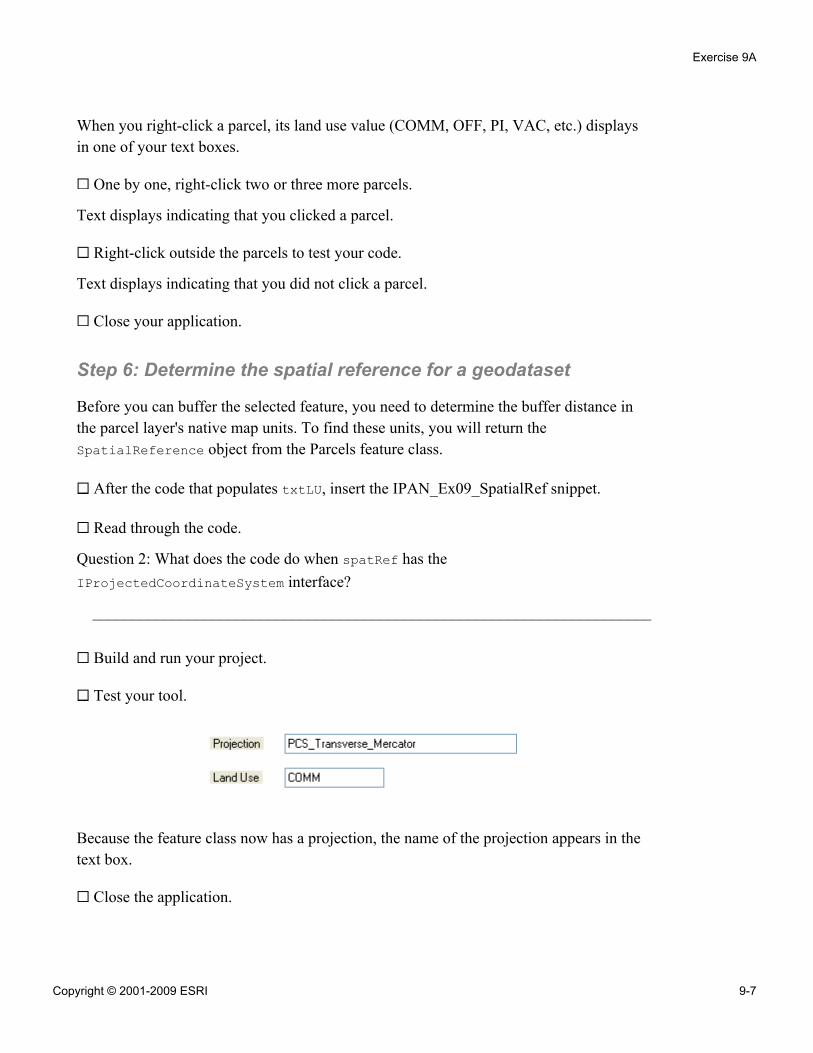
When you right-click a parcel, its land use value (COMM, OFF, PI, VAC, etc.) displaysin one of your text boxes.
One by one, right-click two or three more parcels.
Text displays indicating that you clicked a parcel.
Right-click outside the parcels to test your code.
Text displays indicating that you did not click a parcel.
Close your application.
Step 6: Determine the spatial reference for a geodataset
Before you can buffer the selected feature, you need to determine the buffer distance inthe parcel layer's native map units. To find these units, you will return theSpatialReference object from the Parcels feature class.
After the code that populates txtLU, insert the IPAN_Ex09_SpatialRef snippet.
Read through the code.
Question 2: What does the code do when spatRef has theIProjectedCoordinateSystem interface?
______________________________________________________________________
Build and run your project.
Test your tool.
Because the feature class now has a projection, the name of the projection appears in thetext box.
Close the application.
Exercise 9A
Copyright © 2001-2009 ESRI 9-7
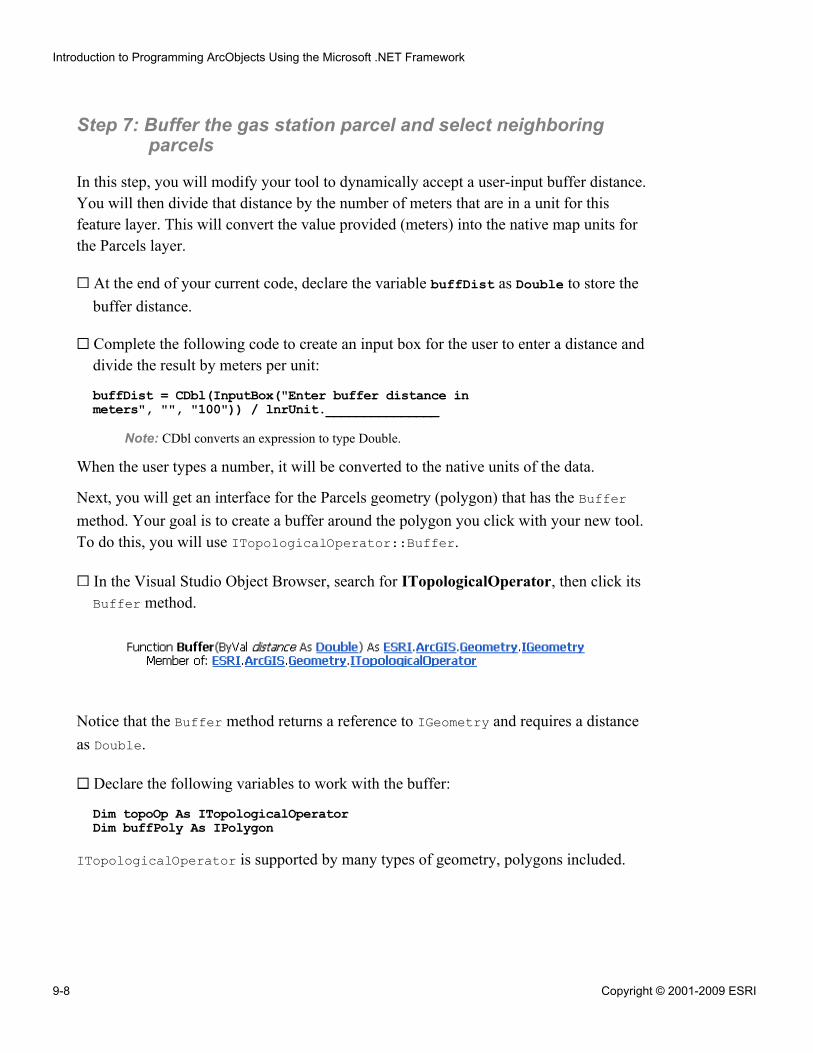
Step 7: Buffer the gas station parcel and select neighboringparcels
In this step, you will modify your tool to dynamically accept a user-input buffer distance.You will then divide that distance by the number of meters that are in a unit for thisfeature layer. This will convert the value provided (meters) into the native map units forthe Parcels layer.
At the end of your current code, declare the variable buffDist as Double to store thebuffer distance.
Complete the following code to create an input box for the user to enter a distance anddivide the result by meters per unit:
buffDist = CDbl(InputBox("Enter buffer distance inmeters", "", "100")) / lnrUnit._______________
Note: CDbl converts an expression to type Double.
When the user types a number, it will be converted to the native units of the data.
Next, you will get an interface for the Parcels geometry (polygon) that has the Buffermethod. Your goal is to create a buffer around the polygon you click with your new tool.To do this, you will use ITopologicalOperator::Buffer.
In the Visual Studio Object Browser, search for ITopologicalOperator, then click itsBuffer method.
Notice that the Buffer method returns a reference to IGeometry and requires a distanceas Double.
Declare the following variables to work with the buffer:
Dim topoOp As ITopologicalOperatorDim buffPoly As IPolygon
ITopologicalOperator is supported by many types of geometry, polygons included.
Introduction to Programming ArcObjects Using the Microsoft .NET Framework
9-8 Copyright © 2001-2009 ESRI
!
Question 3: Which variable holds the distance?
______________________________________________________________________
Complete the following code to return the feature's shape and then buffer it:
topoOp = CType(feat.__________, ITopologicalOperator)buffPoly = CType(topoOp.____________(________________), IPolygon)
Next, you will select the neighboring parcels.
Instantiate a new instance of ISelectionEnvironment in the variable selEnv.
Question 4: What does the ISelectionEnvironment::DefaultColor property return?
______________________________________________________________________
Complete the following code to set the default color for displaying the selectedfeatures and to set the search tolerance in pixels:
selEnv.________________________.______ = RGB(0, 255, 255)selEnv.______________________________ = 3
Next, you will call IMap::SelectByShape.
Complete the following code, making sure that you choose the option to select morethan one feature:
axMapControl1.ActiveView.FocusMap.SelectByShape(_____________, ____________, __________)
Insert a few blank lines into your code.
You will insert code into this empty area in the next step.
Enter the following code to refresh the display:
axMapControl1.ActiveView.PartialRefresh(esriViewDrawPhase.esriViewGeoSelection, _Nothing, Nothing)
Build and run your project.
Right-click different parcels to test your tool.
To avoid potential conflict with tools on your ToolbarControl, pressEnter to accept a value from your InputBox.
Exercise 9A
Copyright © 2001-2009 ESRI 9-9
Notice that each time you click a parcel to place a new gas station and buffer it, theparcels neighboring it are highlighted. However, the clicked parcel itself is alsohighlighted. You will remove that parcel from the selection in the next step.
Close your application.
Step 8: Remove the gas station parcel from the selection
You only need to notify residents in the parcels surrounding the gas station, not in the gasstation parcel itself. In this step, you will create a new selection environment to removethe gas station parcel from the selection.
Here is some pseudo code for the process you will code in this step:
▪ Modify the selection environment to subtract features from the current selection.▪ Subtract the gas station parcel.▪ Set the selection environment to the default and create a new selection.
Place your cursor in the empty space before the line of code that calls thePartialRefresh method.
Complete the following code to assign the proper enumeration to theCombinationMethod property of selEnv to subtract features from the selection:
____________.CombinationMethod = esriSelectionResultEnum._______________________
Next, you will call the SelectByShape method on the IMap interface to subtract the gasstation parcel from the selection set.
Write the following code to select only the gas station polygon:
axMapControl1.ActiveView.FocusMap.SelectByShape(aPoint, selEnv, ________)
Build and run your project.
Zoom to the northwestern corner of your map and test your tool with two or threedifferent parcels.
Notice that the first parcel you clicked is removed from the selection. However, whenyou clicked another parcel and buffered it, the selected records did not change—not whatyou expected.
Close the application.
Introduction to Programming ArcObjects Using the Microsoft .NET Framework
9-10 Copyright © 2001-2009 ESRI
Below the code you just wrote, complete the following the code to programmaticallyrestore a new selection:
selEnv.CombinationMethod = esriSelectionResultEnum._____________________________
Your code should look something like the following:
Dim selEnv As ISelectionEnvironment = New SelectionEnvironmentselEnv.DefaultColor.RGB = RGB(0, 255, 255)selEnv.SearchTolerance = 3axMapControl1.ActiveView.FocusMap.SelectByShape(buffPoly, selEnv, False)selEnv.CombinationMethod = esriSelectionResultEnum.esriSelectionResultSubtractaxMapControl1.ActiveView.FocusMap.SelectByShape(aPoint, selEnv, True)selEnv.CombinationMethod = esriSelectionResultEnum.esriSelectionResultNewaxMapControl1.ActiveView.PartialRefresh( _esriViewDrawPhase.esriViewGeoSelection, Nothing, Nothing)
End Sub
Now the selection method will remove the parcel you clicked from the selection, thenrestore the default setting so you can run the tool again.
Build and run your project.
Test your tool.
When you are finished, close your application.
Your application currently displays the parcels affected by the buffer, but it doesn't showthe buffer itself.
You have finished this exercise; however, you may wish to complete the Challenges:
▪ The first Challenge tests your ability to draw the buffer polygon on your map.▪ The second Challenge tests your ability to work with DisplayTransformation.
If you want to complete one or both Challenges, do so now. Otherwise, close VisualStudio.
Conclusion
In this exercise, you applied knowledge you learned in previous lessons to select featureswithin a specified distance of a location clicked in the map. You worked with spatialfilters, feature cursors, geometry elements, spatial reference, and topological operators.
Exercise 9A
Copyright © 2001-2009 ESRI 9-11
These operations are very powerful on their own; you learned here that they can becombined to do exactly what you want.
Challenge: Draw the polygon bufferEstimated time: 10 minutes
In a previous lesson, you learned how to draw graphics on your map. To complete thisChallenge, you need to apply that knowledge to draw your buffer polygon on the map.
Write code to:
▪ Set your buffer polygon to the Geometry property of a polygon element▪ Set the FocusMap property of your axMapControl1.ActiveView to a
GraphicsContainer object▪ Add your buffer polygon element to the graphics container
Test your tool.
When you are finished, use the SelectFeatures tool to clear the selection.
Use the Select Elements tool to select the buffer graphic, then delete it.
Challenge: Use DisplayTransformationEstimated time: 2 minutes
Earlier, you used created a point object from coordinates in map units passed to theMapControl's OnMouseDown event via the mapx and mapy properties of the parameter e.
To complete this Challenge, create the point object from coordinates that are passed tothe MapControl's OnMouseDown event using the x and y properties of the parameter e.
(Hint: You will need to convert from display units to map units.)
Introduction to Programming ArcObjects Using the Microsoft .NET Framework
9-12 Copyright © 2001-2009 ESRI

Answers to Exercise 9A Questions
Question 1: Which properties return map units and which properties return display units?
Answer: mapx and mapy return map units, x and y return display units
Question 2: What does the code do when spatRef has theIProjectedCoordinateSystem interface?
Answer: It displays the projCoordSys name in a text box
Question 3: Which variable holds the distance?
Answer: buffDist
Question 4: What does the ISelectionEnvironment::DefaultColor property return?
Answer: IColor
Exercise 9A
Copyright © 2001-2009 ESRI 9-13
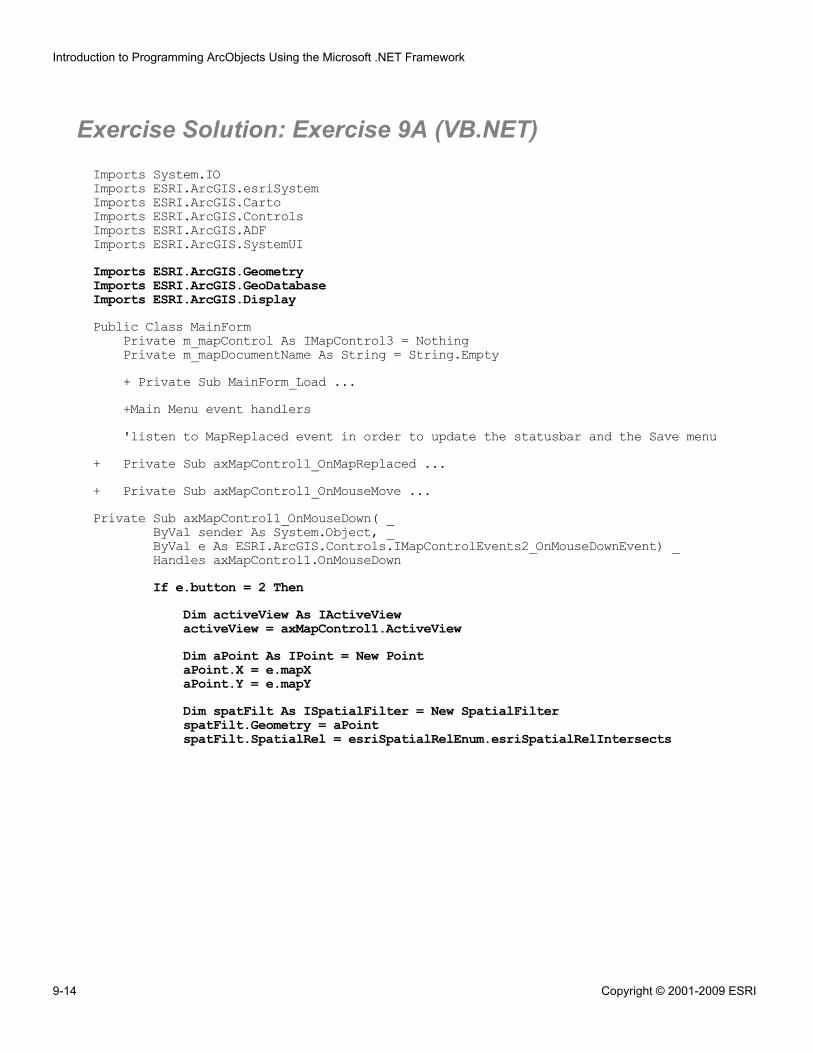
Exercise Solution: Exercise 9A (VB.NET)Imports System.IOImports ESRI.ArcGIS.esriSystemImports ESRI.ArcGIS.CartoImports ESRI.ArcGIS.ControlsImports ESRI.ArcGIS.ADFImports ESRI.ArcGIS.SystemUIImports ESRI.ArcGIS.GeometryImports ESRI.ArcGIS.GeoDatabaseImports ESRI.ArcGIS.DisplayPublic Class MainForm
Private m_mapControl As IMapControl3 = NothingPrivate m_mapDocumentName As String = String.Empty+ Private Sub MainForm_Load ...+Main Menu event handlers'listen to MapReplaced event in order to update the statusbar and the Save menu
+ Private Sub axMapControl1_OnMapReplaced ...+ Private Sub axMapControl1_OnMouseMove ...Private Sub axMapControl1_OnMouseDown( _
ByVal sender As System.Object, _ByVal e As ESRI.ArcGIS.Controls.IMapControlEvents2_OnMouseDownEvent) _Handles axMapControl1.OnMouseDownIf e.button = 2 Then
Dim activeView As IActiveViewactiveView = axMapControl1.ActiveViewDim aPoint As IPoint = New PointaPoint.X = e.mapXaPoint.Y = e.mapYDim spatFilt As ISpatialFilter = New SpatialFilterspatFilt.Geometry = aPointspatFilt.SpatialRel = esriSpatialRelEnum.esriSpatialRelIntersects
Introduction to Programming ArcObjects Using the Microsoft .NET Framework
9-14 Copyright © 2001-2009 ESRI
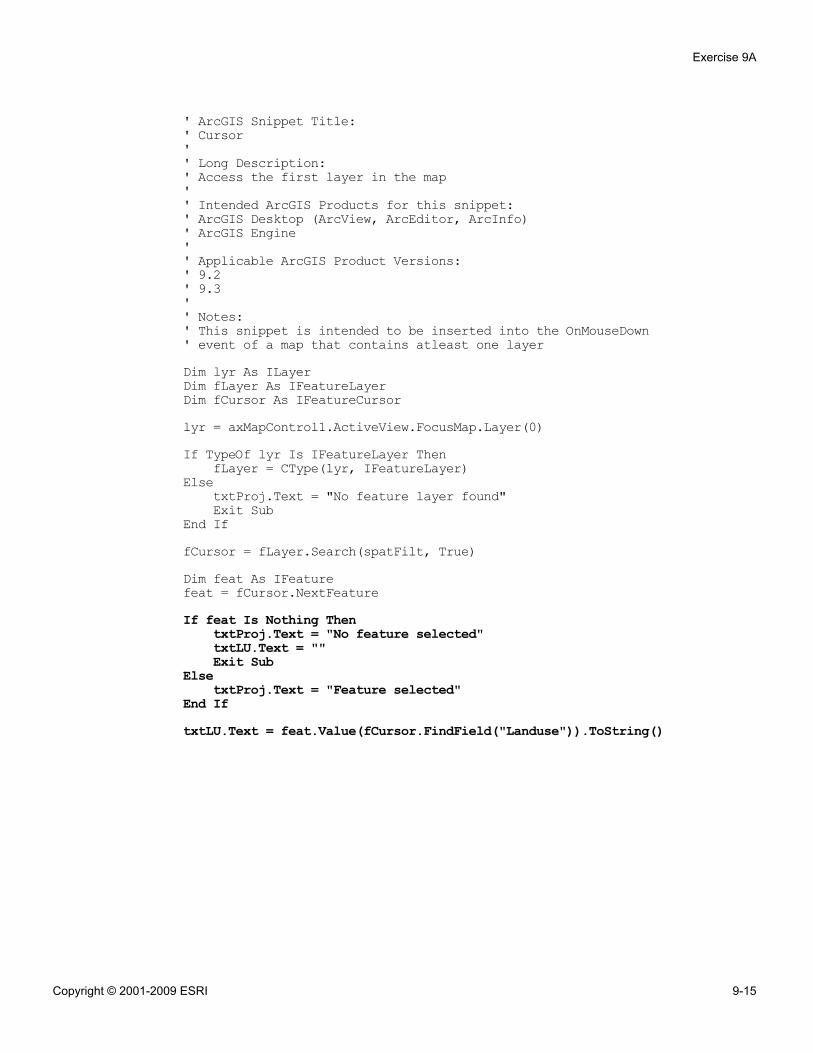
' ArcGIS Snippet Title:' Cursor'' Long Description:' Access the first layer in the map'' Intended ArcGIS Products for this snippet:' ArcGIS Desktop (ArcView, ArcEditor, ArcInfo)' ArcGIS Engine'' Applicable ArcGIS Product Versions:' 9.2' 9.3'' Notes:' This snippet is intended to be inserted into the OnMouseDown' event of a map that contains atleast one layerDim lyr As ILayerDim fLayer As IFeatureLayerDim fCursor As IFeatureCursorlyr = axMapControl1.ActiveView.FocusMap.Layer(0)If TypeOf lyr Is IFeatureLayer Then
fLayer = CType(lyr, IFeatureLayer)Else
txtProj.Text = "No feature layer found"Exit Sub
End IffCursor = fLayer.Search(spatFilt, True)Dim feat As IFeaturefeat = fCursor.NextFeatureIf feat Is Nothing Then
txtProj.Text = "No feature selected"txtLU.Text = ""Exit Sub
ElsetxtProj.Text = "Feature selected"
End IftxtLU.Text = feat.Value(fCursor.FindField("Landuse")).ToString()
Exercise 9A
Copyright © 2001-2009 ESRI 9-15
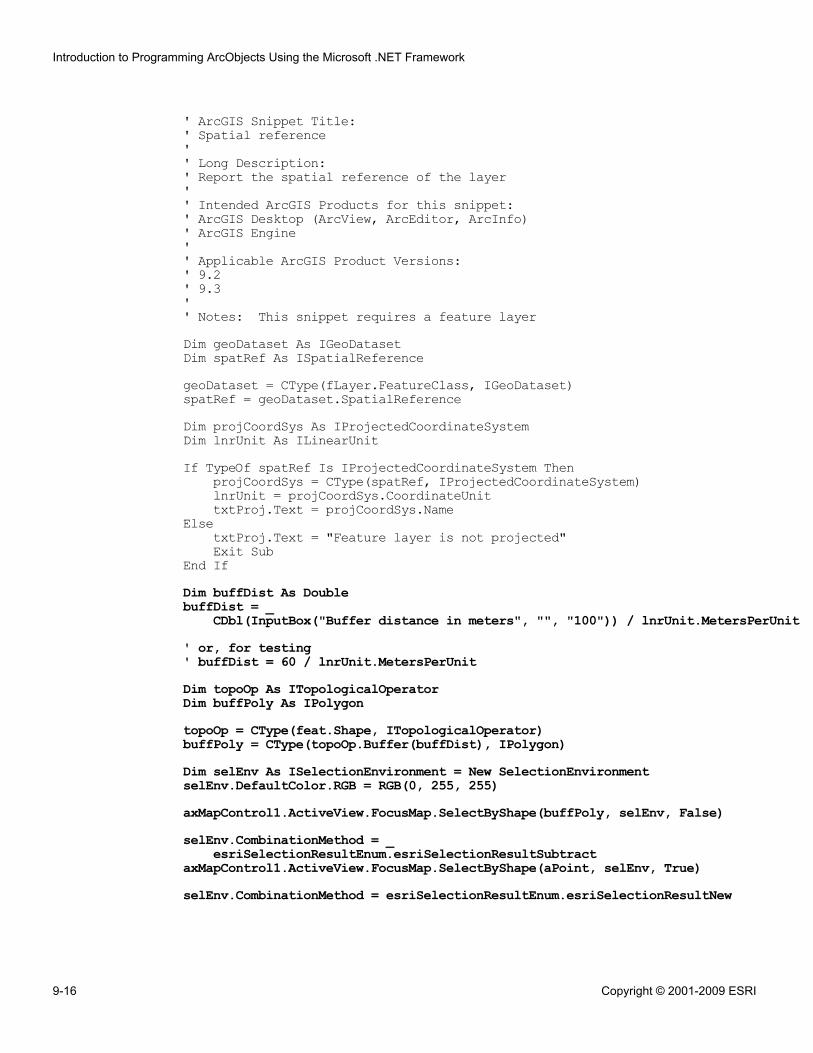
' ArcGIS Snippet Title:' Spatial reference'' Long Description:' Report the spatial reference of the layer'' Intended ArcGIS Products for this snippet:' ArcGIS Desktop (ArcView, ArcEditor, ArcInfo)' ArcGIS Engine'' Applicable ArcGIS Product Versions:' 9.2' 9.3'' Notes: This snippet requires a feature layerDim geoDataset As IGeoDatasetDim spatRef As ISpatialReferencegeoDataset = CType(fLayer.FeatureClass, IGeoDataset)spatRef = geoDataset.SpatialReferenceDim projCoordSys As IProjectedCoordinateSystemDim lnrUnit As ILinearUnitIf TypeOf spatRef Is IProjectedCoordinateSystem Then
projCoordSys = CType(spatRef, IProjectedCoordinateSystem)lnrUnit = projCoordSys.CoordinateUnittxtProj.Text = projCoordSys.Name
ElsetxtProj.Text = "Feature layer is not projected"Exit Sub
End IfDim buffDist As DoublebuffDist = _
CDbl(InputBox("Buffer distance in meters", "", "100")) / lnrUnit.MetersPerUnit' or, for testing' buffDist = 60 / lnrUnit.MetersPerUnitDim topoOp As ITopologicalOperatorDim buffPoly As IPolygontopoOp = CType(feat.Shape, ITopologicalOperator)buffPoly = CType(topoOp.Buffer(buffDist), IPolygon)Dim selEnv As ISelectionEnvironment = New SelectionEnvironmentselEnv.DefaultColor.RGB = RGB(0, 255, 255)axMapControl1.ActiveView.FocusMap.SelectByShape(buffPoly, selEnv, False)selEnv.CombinationMethod = _
esriSelectionResultEnum.esriSelectionResultSubtractaxMapControl1.ActiveView.FocusMap.SelectByShape(aPoint, selEnv, True)selEnv.CombinationMethod = esriSelectionResultEnum.esriSelectionResultNew
Introduction to Programming ArcObjects Using the Microsoft .NET Framework
9-16 Copyright © 2001-2009 ESRI

Dim elem As IElement = New PolygonElementelem.Geometry = buffPolyDim gCont As IGraphicsContainergCont = CType(axMapControl1.ActiveView.FocusMap, IGraphicsContainer)gCont.AddElement(elem, 0)axMapControl1.ActiveView.PartialRefresh( _
esriViewDrawPhase.esriViewGeoSelection, Nothing, Nothing)End If
End SubEnd Class
Exercise 9A
Copyright © 2001-2009 ESRI 9-17

Challenge Solution: Draw the polygon bufferselEnv.CombinationMethod = esriSelectionResultEnum.esriSelectionResultNewDim elem As IElementelem = New PolygonElementelem.Geometry = buffPolyDim gCont As IGraphicsContainergCont = CType(axMapControl1.ActiveView.FocusMap, IGraphicsContainer)gCont.AddElement(elem, 0)axMapControl1.ActiveView.PartialRefresh(esriViewDrawPhase.esriViewGeoSelection, _
Nothing, Nothing)End Sub
Introduction to Programming ArcObjects Using the Microsoft .NET Framework
9-18 Copyright © 2001-2009 ESRI

Challenge Solution: Use DisplayTransformationDim activeView As IActiveViewactiveView = axMapControl1.ActiveViewDim aPoint As IPointaPoint = activeView.ScreenDisplay.DisplayTransformation.ToMapPoint(e.x, e.y)' Dim aPoint As IPoint = New Point' aPoint.X = e.mapX' aPoint.Y = e.mapY
Exercise 9A
Copyright © 2001-2009 ESRI 9-19

Exercise 9B: Create a parcel proximity tool (C#)
Estimated time: 45 minutes
Scenario: As the GIS analyst for an oil company, you are responsible for notifyingneighboring residents whenever your company builds a new gas station. Eachmunicipality defines a different radius for determining which residents to notify. In somecities, you must notify residents within 30 meters, while in others, you must contactresidents within 150 meters. To accomplish this task efficiently, you will create a tool toselect parcels within a specified distance of the gas station parcel under development.
In this exercise, you will:
▪ Create a buffer based on the location clicked in the map and select nearby features▪ Work with spatial filters, feature cursors, and spatial reference objects
Exercise shortcut1. Create a new Visual C# ArcGIS Engine MapControl Application.
2. Add the Select Features command to your ToolbarControl.
3. Create a point to represent a new gas station based on a location the user clicks.
4. Create a spatial filter to select the parcel intersecting the new point in\Student\IPAN\Exercise09\ParcelProximity.mxd.
5. Using your spatial filter, create a cursor that contains the parcel on which the newgas station will be located. Fetch a single feature from the cursor. Report the landuse of the parcel that was clicked in a text box.
6. Test your project to confirm that the land use displays in the text box.
7. Determine the buffer distance in the parcel layer's native map units.
8. Create a buffer around the polygon clicked with your new tool, then select theparcels that are within the buffer distance.
9. If the gas station parcel is selected with the neighboring parcels, create a newselection environment to remove it from the selection.
** (Challenge) Draw the polygon buffer on your map.
** (Challenge) Create the point object and Use DisplayTransformation.
Exercise 9B
Copyright © 2001-2009 ESRI 9-21
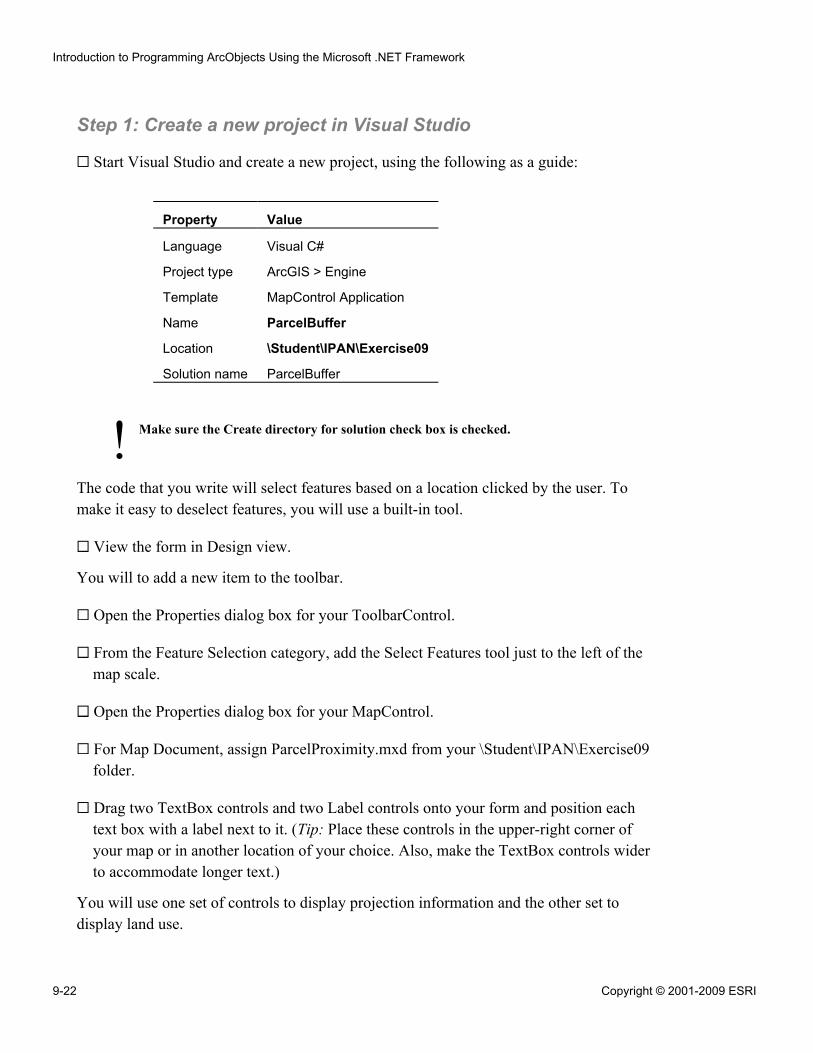
!
Step 1: Create a new project in Visual Studio
Start Visual Studio and create a new project, using the following as a guide:
Property Value
Language Visual C#
Project type ArcGIS > Engine
Template MapControl Application
Name ParcelBuffer
Location \Student\IPAN\Exercise09
Solution name ParcelBuffer
Make sure the Create directory for solution check box is checked.
The code that you write will select features based on a location clicked by the user. Tomake it easy to deselect features, you will use a built-in tool.
View the form in Design view.
You will to add a new item to the toolbar.
Open the Properties dialog box for your ToolbarControl.
From the Feature Selection category, add the Select Features tool just to the left of themap scale.
Open the Properties dialog box for your MapControl.
For Map Document, assign ParcelProximity.mxd from your \Student\IPAN\Exercise09folder.
Drag two TextBox controls and two Label controls onto your form and position eachtext box with a label next to it. (Tip: Place these controls in the upper-right corner ofyour map or in another location of your choice. Also, make the TextBox controls widerto accommodate longer text.)
You will use one set of controls to display projection information and the other set todisplay land use.
Introduction to Programming ArcObjects Using the Microsoft .NET Framework
9-22 Copyright © 2001-2009 ESRI
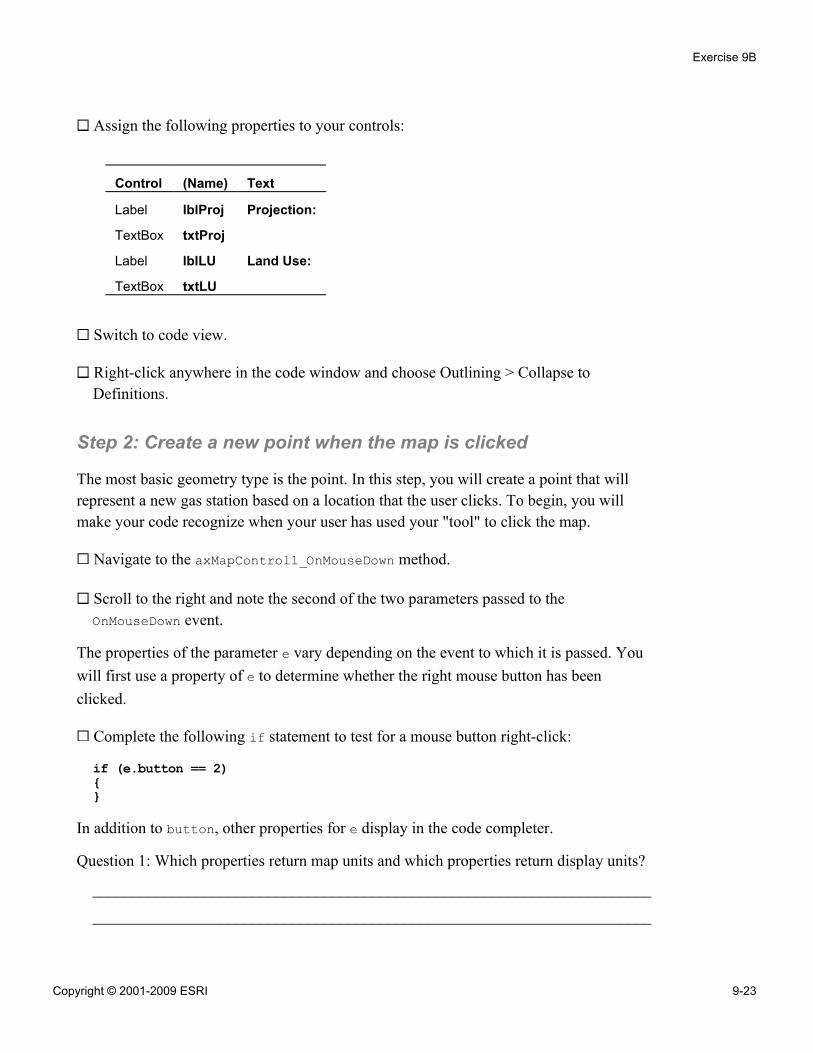
Assign the following properties to your controls:
Control (Name) Text
Label lblProj Projection:
TextBox txtProj
Label lblLU Land Use:
TextBox txtLU
Switch to code view.
Right-click anywhere in the code window and choose Outlining > Collapse toDefinitions.
Step 2: Create a new point when the map is clicked
The most basic geometry type is the point. In this step, you will create a point that willrepresent a new gas station based on a location that the user clicks. To begin, you willmake your code recognize when your user has used your "tool" to click the map.
Navigate to the axMapControl1_OnMouseDown method.
Scroll to the right and note the second of the two parameters passed to theOnMouseDown event.
The properties of the parameter e vary depending on the event to which it is passed. Youwill first use a property of e to determine whether the right mouse button has beenclicked.
Complete the following if statement to test for a mouse button right-click:
if (e.button == 2){}
In addition to button, other properties for e display in the code completer.
Question 1: Which properties return map units and which properties return display units?
______________________________________________________________________
______________________________________________________________________
Exercise 9B
Copyright © 2001-2009 ESRI 9-23
Now you are ready to begin writing the code that will select a parcel and buffer it. Youwill start by accessing the active view.
Inside your If statement, complete the following code to instantiate the active view:
______________________ activeView = axMapControl1.______________;
Next, you will add code to the OnMouseDown event to capture the point where your userclicks in the map display. Your code will eventually use this point to identify theneighboring parcels.
To capture the point clicked by your user, you need a variable to hold a point object.Because you are working with an event on the MapControl, there are two options forinstantiating a point object and assigning its x and y coordinates:
1. Populate x and y on your point object with coordinates already in map units2. Populate x and y on your point object with coordinates that have been
transformed from display units
In this exercise, you will use the first option.
Build your project and resolve any conflicts.
Instantiate a new instance of a point object in the variable aPoint.
Complete the following code to assign the x coordinate from one of the properties of e:
aPoint.X = e.________;
Repeat the process for the y coordinate.
Your variable aPoint now contains a point with coordinates stored in map units based onthe user's mouse click. This point will represent the location of a new gas station. Next,you will find the proposed parcel where the new gas station will be built.
Step 3: Create a spatial filter
A spatial filter retrieves features based on their spatial relationship with a geometricsearch feature, such as a point, area, or line. In this step, you will use a spatial filter toselect the parcel that intersects the point you created in the previous step.
Below the assignment statement for aPoint, instantiate a new instance ofISpatialFilter in the variable spatFilt.
Introduction to Programming ArcObjects Using the Microsoft .NET Framework
9-24 Copyright © 2001-2009 ESRI
The Geometry property on SpatialFilter is used to specify the geometric searchfeatures, and the SpatialRel property is used to define the spatial relationship to applyto the search feature.
You will begin by selecting the parcel where the gas station is located.
Set the Geometry property of spatFilt equal to aPoint.
Assign a value for the SpatialRel property of spatFilt that will identify the parcelintersected by the point.
You have now defined the spatial criterion needed to identify the parcel where the newgas station will be built.
Step 4: Create a cursor and return a feature from it
In this step, you will use the spatial filter to create a cursor containing the parcel on whichthe new gas station is located.
Just before the end of your if statement, insert the IPAN_Ex09_Cursor snippet.
Review the code in the snippet.
Notice that the code uses the is operator to test whether the layer supports theIFeatureLayer2 interface.
You now have a cursor object with the gas station's parcel. You will fetch a single featurefrom the cursor. Once you have the feature, you will use it to search for neighboringparcels so you can contact the residents of those parcels.
The variable feat will store each feature in the cursor and has already been set to the firstfeature in the cursor.
Next, you will test whether the user has actually clicked a feature and report the result inthe projection text box.
Complete the following code to test and report if you have selected a valid feature; ifnot, then exit:
Exercise 9B
Copyright © 2001-2009 ESRI 9-25
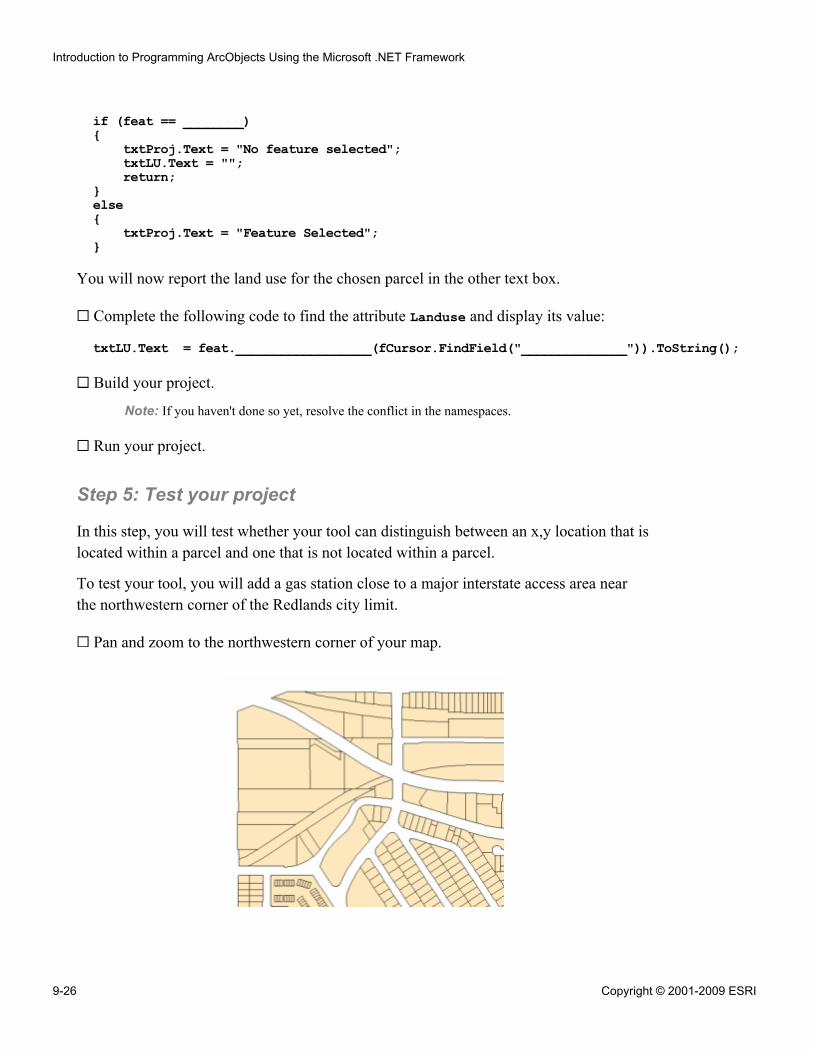
if (feat == ________){
txtProj.Text = "No feature selected";txtLU.Text = "";return;
}else{
txtProj.Text = "Feature Selected";}
You will now report the land use for the chosen parcel in the other text box.
Complete the following code to find the attribute Landuse and display its value:
txtLU.Text = feat.__________________(fCursor.FindField("______________")).ToString();
Build your project.
Note: If you haven't done so yet, resolve the conflict in the namespaces.
Run your project.
Step 5: Test your project
In this step, you will test whether your tool can distinguish between an x,y location that islocated within a parcel and one that is not located within a parcel.
To test your tool, you will add a gas station close to a major interstate access area nearthe northwestern corner of the Redlands city limit.
Pan and zoom to the northwestern corner of your map.
Introduction to Programming ArcObjects Using the Microsoft .NET Framework
9-26 Copyright © 2001-2009 ESRI
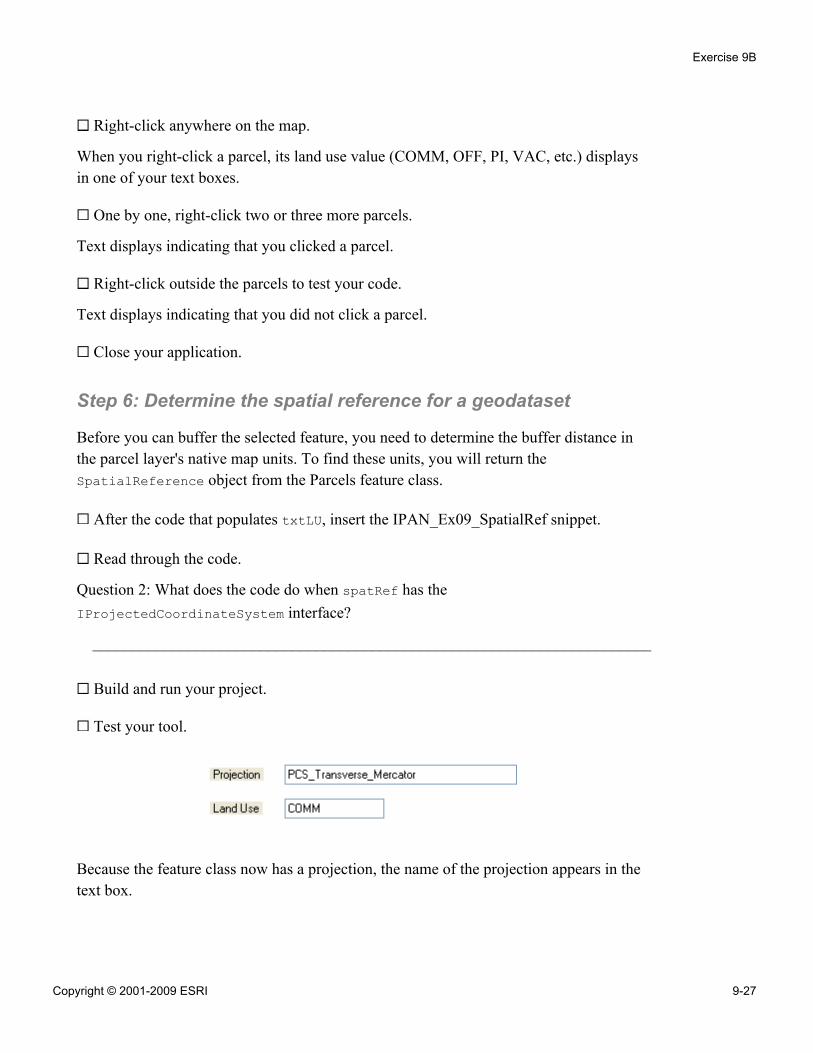
Right-click anywhere on the map.
When you right-click a parcel, its land use value (COMM, OFF, PI, VAC, etc.) displaysin one of your text boxes.
One by one, right-click two or three more parcels.
Text displays indicating that you clicked a parcel.
Right-click outside the parcels to test your code.
Text displays indicating that you did not click a parcel.
Close your application.
Step 6: Determine the spatial reference for a geodataset
Before you can buffer the selected feature, you need to determine the buffer distance inthe parcel layer's native map units. To find these units, you will return theSpatialReference object from the Parcels feature class.
After the code that populates txtLU, insert the IPAN_Ex09_SpatialRef snippet.
Read through the code.
Question 2: What does the code do when spatRef has theIProjectedCoordinateSystem interface?
______________________________________________________________________
Build and run your project.
Test your tool.
Because the feature class now has a projection, the name of the projection appears in thetext box.
Exercise 9B
Copyright © 2001-2009 ESRI 9-27
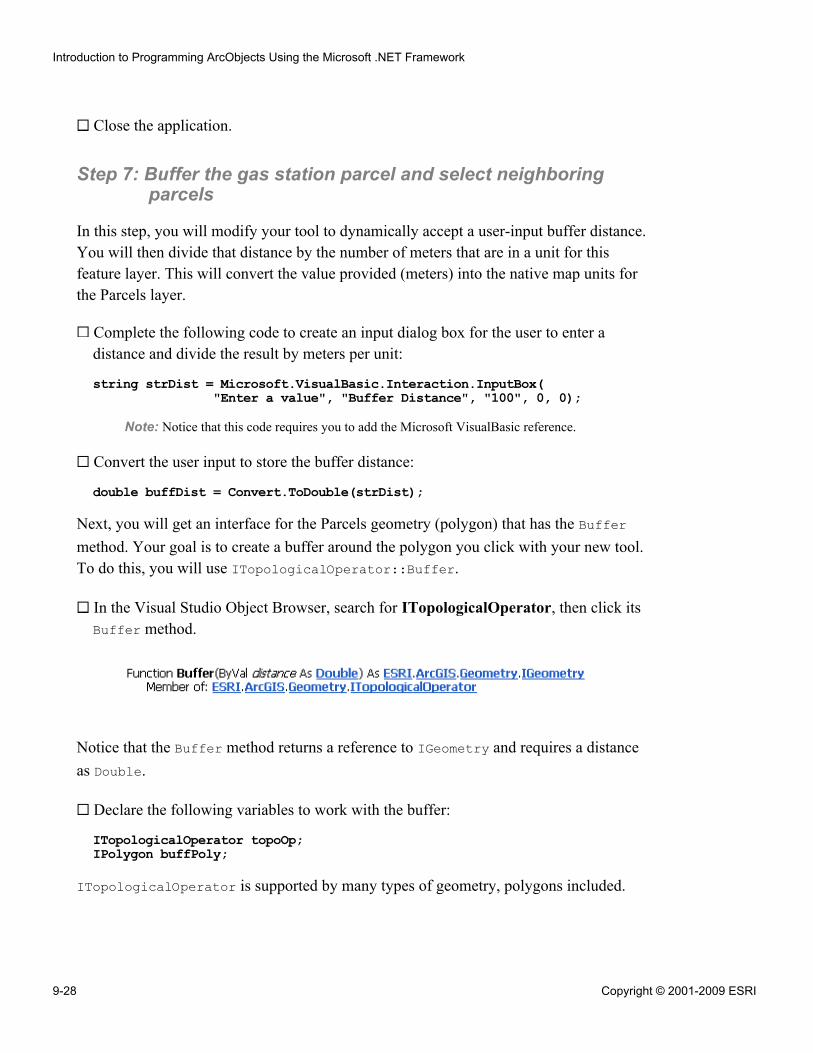
Close the application.
Step 7: Buffer the gas station parcel and select neighboringparcels
In this step, you will modify your tool to dynamically accept a user-input buffer distance.You will then divide that distance by the number of meters that are in a unit for thisfeature layer. This will convert the value provided (meters) into the native map units forthe Parcels layer.
Complete the following code to create an input dialog box for the user to enter adistance and divide the result by meters per unit:
string strDist = Microsoft.VisualBasic.Interaction.InputBox("Enter a value", "Buffer Distance", "100", 0, 0);
Note: Notice that this code requires you to add the Microsoft VisualBasic reference.
Convert the user input to store the buffer distance:
double buffDist = Convert.ToDouble(strDist);
Next, you will get an interface for the Parcels geometry (polygon) that has the Buffermethod. Your goal is to create a buffer around the polygon you click with your new tool.To do this, you will use ITopologicalOperator::Buffer.
In the Visual Studio Object Browser, search for ITopologicalOperator, then click itsBuffer method.
Notice that the Buffer method returns a reference to IGeometry and requires a distanceas Double.
Declare the following variables to work with the buffer:
ITopologicalOperator topoOp;IPolygon buffPoly;
ITopologicalOperator is supported by many types of geometry, polygons included.
Introduction to Programming ArcObjects Using the Microsoft .NET Framework
9-28 Copyright © 2001-2009 ESRI
Question 3: Which variable holds the distance?
______________________________________________________________________
Complete the following code to return the feature's shape and then buffer it:
topoOp = feat.__________ as ________________________________________;buffPoly = topoOp.____________(________________) as IPolygon;
Next, you will select the neighboring parcels.
Create a new instance of ISelectionEnvironment in the variable selEnv.
Question 4: What does the ISelectionEnvironment::DefaultColor property return?
______________________________________________________________________
Complete the following code to set the default color for displaying the selectedfeatures:
IRgbColor selColor = new RgbColor();selColor.Red = 0;selColor.Green = 255;selColor.Blue = 255;selEnv.DefaultColor.RGB = selColor.______;
Next, you will call IMap::SelectByShape.
Complete the following code, making sure that you choose the option to select morethan one feature:
axMapControl1.ActiveView.FocusMap.SelectByShape(_____________, ___________, _________);
Insert a few blank lines into your code.
You will insert code into this empty area in the next step.
Enter the following code to refresh the display:
axMapControl1.ActiveView.PartialRefresh(esriViewDrawPhase.esriViewGeoSelection,null, null);
Build and run your project.
Right-click different parcels to test your tool.
Exercise 9B
Copyright © 2001-2009 ESRI 9-29
! To avoid potential conflict with tools on your ToolbarControl, pressEnter to accept a value from your InputBox.
Notice that each time you click a parcel to place a new gas station and buffer it, theparcels neighboring it are highlighted. However, the clicked parcel itself is alsohighlighted. You will remove that parcel from the selection in the next step.
Close your application.
Step 8: Remove the gas station parcel from the selection
You only need to notify residents in the parcels surrounding the gas station, not in the gasstation parcel itself. In this step, you will create a new selection environment to removethe gas station parcel from the selection.
Here is some pseudo code for the process you will code in this step:
▪ Modify the selection environment to subtract features from the current selection▪ Subtract the gas station parcel▪ Set the selection environment to the default and create a new selection
Place your cursor in the empty space before the line of code that calls thePartialRefresh method.
Complete the following code to assign the proper enumeration to theCombinationMethod property of selEnv to subtract features from the selection:
______.CombinationMethod = esriSelectionResultEnum.______________________________;
Next, you will call the SelectByShape method on the IMap interface to subtract the gasstation parcel from the selection set.
Write the following code to select only the gas station polygon:
axMapControl1.ActiveView.FocusMap.SelectByShape(aPoint, selEnv, ________);
Build and run your project.
Zoom to the northwestern corner of your map and test your tool with two or threedifferent parcels.
Introduction to Programming ArcObjects Using the Microsoft .NET Framework
9-30 Copyright © 2001-2009 ESRI

Notice that the first parcel you clicked is removed from the selection. However, whenyou clicked another parcel and buffered it, the selected records did not change—not whatyou expected.
Close the application.
Below the code you just wrote, complete the following the code to programmaticallyrestore a new selection:
selEnv.CombinationMethod = esriSelectionResultEnum.__________________________;
Your code should look something like the following:
ISelectionEnvironment selEnv = new SelectionEnvironment();IRgbColor selColor = new RgbColor();selColor.Red = 0;selColor.Green = 255;selColor.Blue = 255;selEnv.DefaultColor.RGB = selColor.RGB;axMapControl1.ActiveView.FocusMap.SelectByShape(buffPoly, selEnv, false);selEnv.CombinationMethod = esriSelectionResultEnum.esriSelectionResultSubtract;axMapControl1.ActiveView.FocusMap.SelectByShape(aPoint, selEnv, true);selEnv.CombinationMethod = esriSelectionResultEnum.esriSelectionResultNew;axMapControl1.ActiveView.PartialRefresh(esriViewDrawPhase.esriViewGeoSelection, null, null);
Now the selection method will remove the parcel you clicked from the selection, thenrestore the default setting so you can run the tool again.
Build and run your project.
Test your tool.
When you are finished, close your application.
Your application currently displays the parcels affected by the buffer, but it doesn't showthe buffer itself.
You have finished this exercise; however, you may wish to complete the Challenges:
▪ The first Challenge tests your ability to draw the buffer polygon on your map.▪ The second Challenge tests your ability to work with DisplayTransformation.
If you want to complete one or both Challenges, do so now. Otherwise, close VisualStudio.
Exercise 9B
Copyright © 2001-2009 ESRI 9-31
Conclusion
In this exercise, you applied knowledge you learned in previous lessons to select featureswithin a specified distance of a location clicked in the map. You worked with spatialfilters, feature cursors, geometry elements, spatial reference, and topological operators.These operations are very powerful on their own; you learned here that they can becombined to do exactly what you want.
Challenge: Draw the polygon bufferEstimated time: 10 minutes
In a previous lesson, you learned how to draw graphics on your map. To complete thisChallenge, you need to apply that knowledge to draw your buffer polygon on the map.
Write code to:
▪ Set your buffer polygon to the Geometry property of a polygon element▪ Set the FocusMap property of your axMapControl1.ActiveView to a
GraphicsContainer object▪ Add your buffer polygon element to the graphics container
Test your tool.
When you are finished, use the SelectFeatures tool to clear the selection.
Use the Select Elements tool to select the buffer graphic, then delete it.
Challenge: Use DisplayTransformationEstimated time: 2 minutes
Earlier, you used created a point object from coordinates in map units passed to theMapControl's OnMouseDown event using the mapx and mapy properties of the parameter e.
To complete this Challenge, create the point object from coordinates that are passed tothe MapControl's OnMouseDown event via the x and y properties of the parameter e.
(Hint: You will need to convert from display units to map units.)
Introduction to Programming ArcObjects Using the Microsoft .NET Framework
9-32 Copyright © 2001-2009 ESRI

Answers to Exercise 9B Questions
Question 1: Which properties return map units and which properties return display units?
Answer: mapx and mapy return map units, x and y return display units
Question 2: What does the code do when spatRef has theIProjectedCoordinateSystem interface?
Answer: It displays the projCoordSys name in a text box.
Question 3: Which variable holds the distance?
Answer: buffDist
Question 4: What does the ISelectionEnvironment::DefaultColor property return?
Answer: IColor
Exercise 9B
Copyright © 2001-2009 ESRI 9-33

Exercise Solution: Exercise 9B (C#)using System;using System.Drawing;using System.Collections;using System.ComponentModel;using System.Windows.Forms;using System.Data;using System.IO;using System.Runtime.InteropServices;using ESRI.ArcGIS.esriSystem;using ESRI.ArcGIS.Carto;using ESRI.ArcGIS.Controls;using ESRI.ArcGIS.ADF;using ESRI.ArcGIS.SystemUI;using ESRI.ArcGIS.Geodatabase;using ESRI.ArcGIS.Geometry;using ESRI.ArcGIS.Display;using Microsoft.VisualBasic;namespace ParcelBuffer{
public sealed partial class MainForm : Form{
+ class private members+ class constructor+ private void MainForm_Load(object sender, EventArgs e) ...+ Main menu event handlers
//listen to MapReplaced event in order to update the statusbar and//the Save menu
+ private void axMapControl1_OnMapReplaced(object sender, IMapControlEvents2_OnMapReplacedEvent e) ...
+ private void axMapControl1_OnMouseMove(object sender, IMapControlEvents2_OnMouseMoveEvent e) ...
private void axMapControl1_OnMouseDown(object sender, IMapControlEvents2_OnMouseDownEvent e)
{if (e.button == 2){
IActiveView activeView = axMapControl1.ActiveView;IPoint aPoint = new Point();aPoint.x = e.mapX;aPoint.y = e.mapY;ISpatialFilter spatFilt = new SpatialFilter();spatFilt.Geometry = aPoint;spatFilt.SpatialRel = esriSpatialRelEnum.esriSpatialRelIntersects;
Introduction to Programming ArcObjects Using the Microsoft .NET Framework
9-34 Copyright © 2001-2009 ESRI
// ArcGIS Snippet Title:// Cursor//// Long Description:// Access the first layer in the map.//// Intended ArcGIS Products for this snippet:// ArcGIS Desktop (ArcView, ArcEditor, ArcInfo)// ArcGIS Engine//// Applicable ArcGIS Product Versions:// 9.2// 9.3//// Notes:// This snippet is intended to be inserted into the OnMouseDown// event of a map that contains atleast one layerILayer lyr;IFeatureLayer2 fLayer;lyr = axMapControl1.ActiveView.FocusMap.get_Layer(0);if (lyr is IFeatureLayer2){
fLayer = lyr as IFeatureLayer2;}else{
txtProj.Text = "No feature layer found";return;
}IFeatureCursor fCursor;fCursor = fLayer.Search(spatFilt, true);IFeature feat;feat = fCursor.NextFeature();if (feat == null){
txtProj.Text = "No feature selected";txtLU.Text = "";return;
}else{
txtProj.Text = "Feature Selected";}txtLU.Text = feat.get_Value(fCursor.FindField("Landuse")).ToString();
Exercise 9B
Copyright © 2001-2009 ESRI 9-35
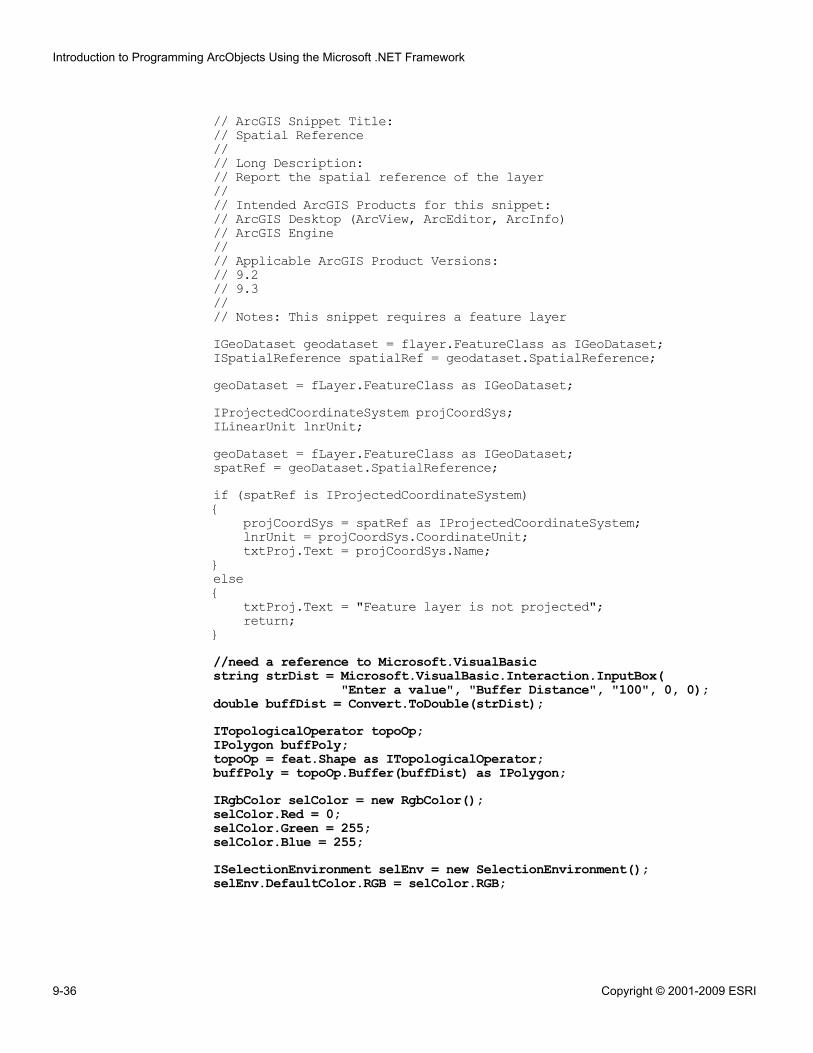
// ArcGIS Snippet Title:// Spatial Reference//// Long Description:// Report the spatial reference of the layer//// Intended ArcGIS Products for this snippet:// ArcGIS Desktop (ArcView, ArcEditor, ArcInfo)// ArcGIS Engine//// Applicable ArcGIS Product Versions:// 9.2// 9.3//// Notes: This snippet requires a feature layerIGeoDataset geodataset = flayer.FeatureClass as IGeoDataset;ISpatialReference spatialRef = geodataset.SpatialReference;geoDataset = fLayer.FeatureClass as IGeoDataset;IProjectedCoordinateSystem projCoordSys;ILinearUnit lnrUnit;geoDataset = fLayer.FeatureClass as IGeoDataset;spatRef = geoDataset.SpatialReference;if (spatRef is IProjectedCoordinateSystem){
projCoordSys = spatRef as IProjectedCoordinateSystem;lnrUnit = projCoordSys.CoordinateUnit;txtProj.Text = projCoordSys.Name;
}else{
txtProj.Text = "Feature layer is not projected";return;
}//need a reference to Microsoft.VisualBasicstring strDist = Microsoft.VisualBasic.Interaction.InputBox(
"Enter a value", "Buffer Distance", "100", 0, 0);double buffDist = Convert.ToDouble(strDist);ITopologicalOperator topoOp;IPolygon buffPoly;topoOp = feat.Shape as ITopologicalOperator;buffPoly = topoOp.Buffer(buffDist) as IPolygon;IRgbColor selColor = new RgbColor();selColor.Red = 0;selColor.Green = 255;selColor.Blue = 255;ISelectionEnvironment selEnv = new SelectionEnvironment();selEnv.DefaultColor.RGB = selColor.RGB;
Introduction to Programming ArcObjects Using the Microsoft .NET Framework
9-36 Copyright © 2001-2009 ESRI
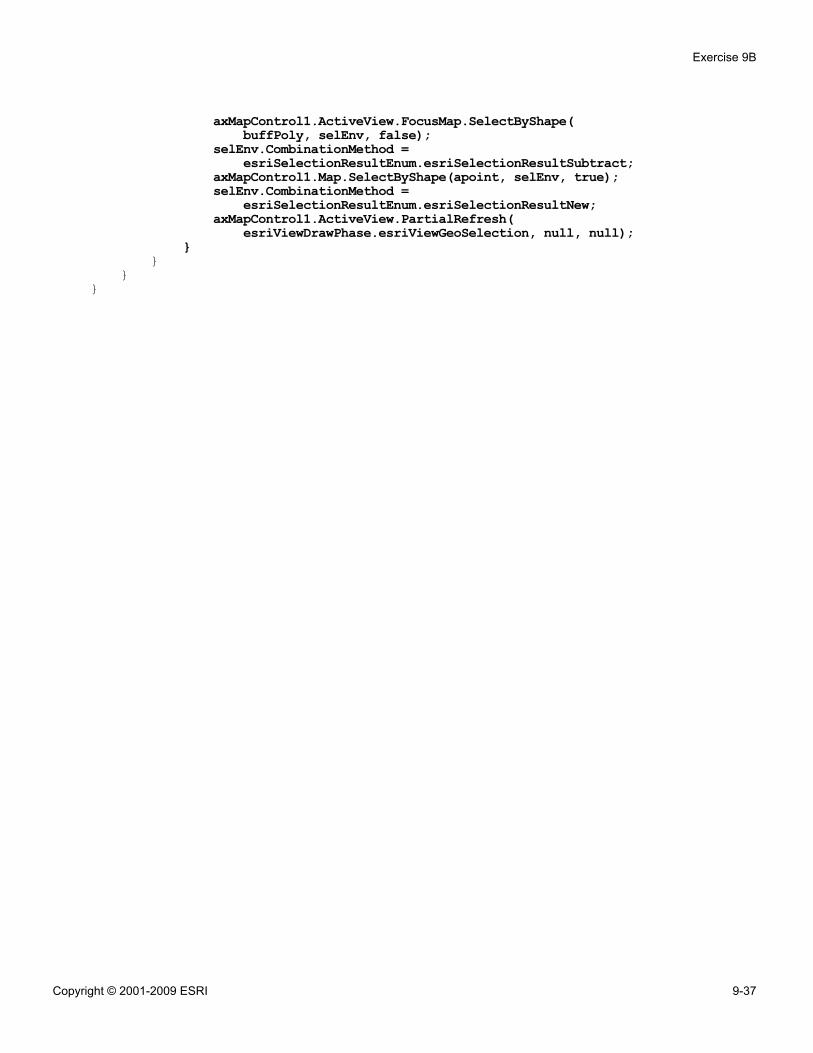
axMapControl1.ActiveView.FocusMap.SelectByShape(buffPoly, selEnv, false);
selEnv.CombinationMethod =esriSelectionResultEnum.esriSelectionResultSubtract;
axMapControl1.Map.SelectByShape(apoint, selEnv, true);selEnv.CombinationMethod =
esriSelectionResultEnum.esriSelectionResultNew;axMapControl1.ActiveView.PartialRefresh(
esriViewDrawPhase.esriViewGeoSelection, null, null);}
}}
}
Exercise 9B
Copyright © 2001-2009 ESRI 9-37

Challenge Solution: Draw the polygon bufferselEnv.CombinationMethod = esriSelectionResultEnum.esriSelectionResultNew;IElement elem = new PolygonElement();elem.Geometry = buffPoly;IGraphicsContainer gCont;gCont = axMapControl1.ActiveView.GraphicsContainer;gCont.AddElement(elem, 0);axMapControl1.ActiveView.PartialRefresh(esriViewDrawPhase.esriViewGeoSelection, null, null);
Introduction to Programming ArcObjects Using the Microsoft .NET Framework
9-38 Copyright © 2001-2009 ESRI

Challenge Solution: Use DisplayTransformationIActiveView activeView = axMapControl1.ActiveView;// IPoint aPoint = new ESRI.ArcGIS.Geometry.Point();// aPoint.X = e.mapX;// aPoint.Y = e.mapY;IPoint aPoint;aPoint = activeView.ScreenDisplay.DisplayTransformation.ToMapPoint(e.x, e.y);
Exercise 9B
Copyright © 2001-2009 ESRI 9-39


10Creating and editing
data
Exercise 10A: Create data (VB.NET)Estimated time: 60 minutes
Exercise 10B: Create data (C#)Estimated time: 60 minutes

Exercise 10A: Create data (VB.NET)
Estimated time: 60 minutes
In this exercise, you will learn how to create new workspaces and datasets. You willbegin by creating a new file geodatabase, then you will use the Workspace object in yourcode to create a new table in the geodatabase. Next, you will create a collection of fieldsfor the table, add records (rows), and provide values for each row. Although you willonly work with a file geodatabase, you can use the same basic procedure with any type ofdata.
In this exercise, you will:
▪ Create a new file geodatabase▪ Create a new table▪ Add rows and values to a table using the Store method▪ Calculate field values using an update cursor
Exercise shortcut1. In Visual Studio, create a new Visual Basic Windows Console Application.
2. Programmatically create a new file geodatabase.
3. Create a table in your geodatabase.
4. Add three fields to your table: an OID field, string field, and number field.
5. Add some records to your table. Populate the string and number field for each.
6. Add a new field, PopPerMH, to the USCounties feature class in\Student\IPAN\Database\US_States.gdb.
7. Use an update cursor to modify existing features in the dataset.
** (Optional) Compare timings for two different ways of storing changes to a table:using a cursor vs. the Store method.
Step 1: Create a new project in Visual Studio
Start Visual Studio and create a new project, using the following as a guide:
Exercise 10A
Copyright © 2001-2009 ESRI 10-1
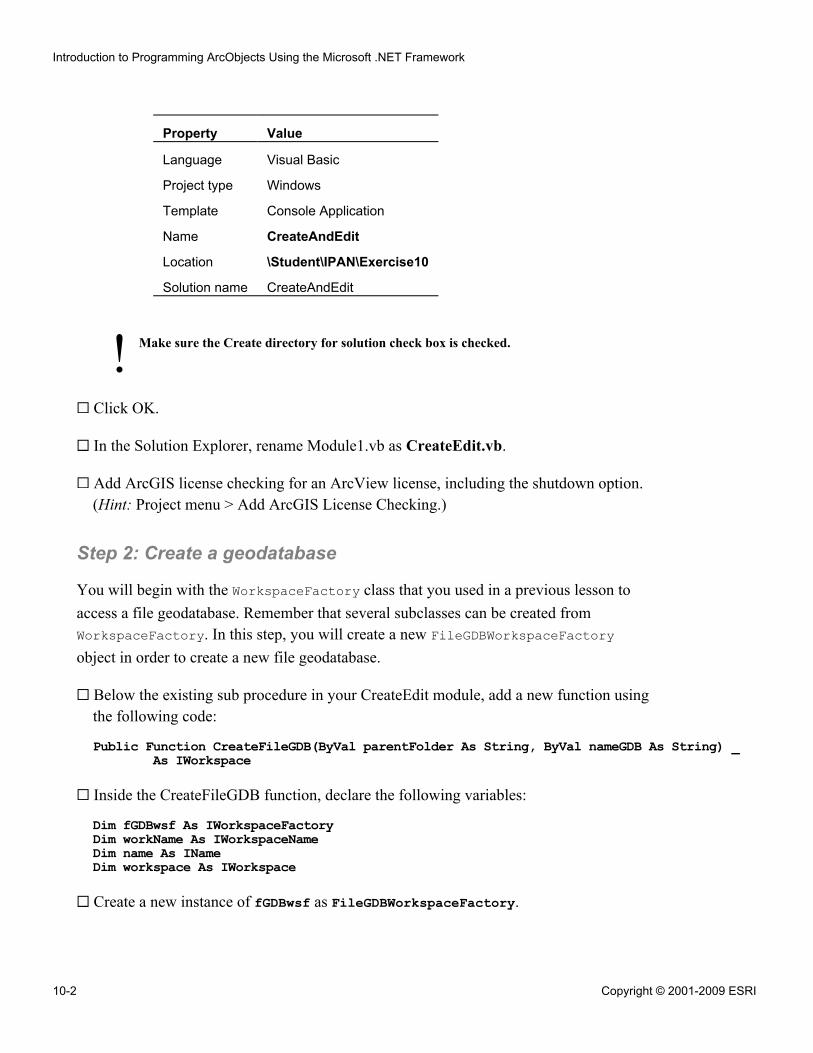
!
Property Value
Language Visual Basic
Project type Windows
Template Console Application
Name CreateAndEdit
Location \Student\IPAN\Exercise10
Solution name CreateAndEdit
Make sure the Create directory for solution check box is checked.
Click OK.
In the Solution Explorer, rename Module1.vb as CreateEdit.vb.
Add ArcGIS license checking for an ArcView license, including the shutdown option.(Hint: Project menu > Add ArcGIS License Checking.)
Step 2: Create a geodatabase
You will begin with the WorkspaceFactory class that you used in a previous lesson toaccess a file geodatabase. Remember that several subclasses can be created fromWorkspaceFactory. In this step, you will create a new FileGDBWorkspaceFactoryobject in order to create a new file geodatabase.
Below the existing sub procedure in your CreateEdit module, add a new function usingthe following code:
Public Function CreateFileGDB(ByVal parentFolder As String, ByVal nameGDB As String) _As IWorkspace
Inside the CreateFileGDB function, declare the following variables:
Dim fGDBwsf As IWorkspaceFactoryDim workName As IWorkspaceNameDim name As INameDim workspace As IWorkspace
Create a new instance of fGDBwsf as FileGDBWorkspaceFactory.
Introduction to Programming ArcObjects Using the Microsoft .NET Framework
10-2 Copyright © 2001-2009 ESRI
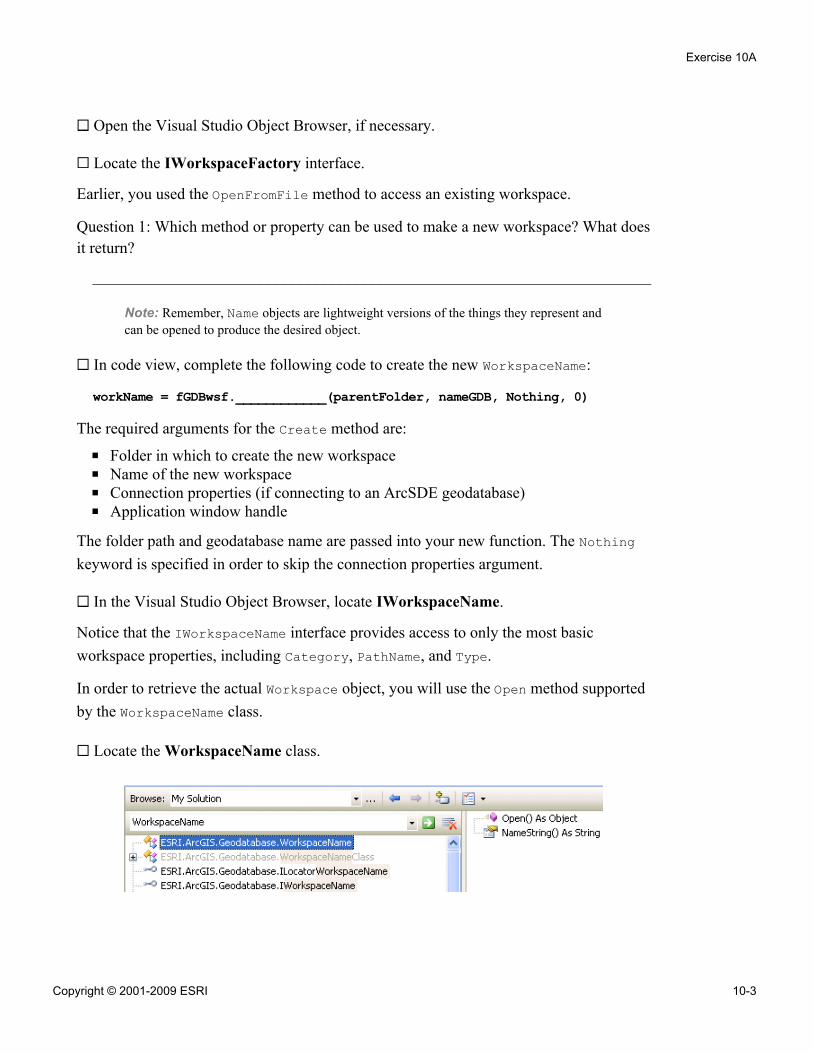
Open the Visual Studio Object Browser, if necessary.
Locate the IWorkspaceFactory interface.
Earlier, you used the OpenFromFile method to access an existing workspace.
Question 1: Which method or property can be used to make a new workspace? What doesit return?
______________________________________________________________________
Note: Remember, Name objects are lightweight versions of the things they represent andcan be opened to produce the desired object.
In code view, complete the following code to create the new WorkspaceName:
workName = fGDBwsf.____________(parentFolder, nameGDB, Nothing, 0)
The required arguments for the Create method are:
▪ Folder in which to create the new workspace▪ Name of the new workspace▪ Connection properties (if connecting to an ArcSDE geodatabase)▪ Application window handle
The folder path and geodatabase name are passed into your new function. The Nothingkeyword is specified in order to skip the connection properties argument.
In the Visual Studio Object Browser, locate IWorkspaceName.
Notice that the IWorkspaceName interface provides access to only the most basicworkspace properties, including Category, PathName, and Type.
In order to retrieve the actual Workspace object, you will use the Open method supportedby the WorkspaceName class.
Locate the WorkspaceName class.
Exercise 10A
Copyright © 2001-2009 ESRI 10-3
! Make sure Show Inherited Members is checked under Object BrowserSettings.
In the list of properties and methods, click the Open method.
Question 2: Which interface on this class contains the Open method?
______________________________________________________________________
Question 3: What does the Open method on IName return?
______________________________________________________________________
Because there are several subtypes of the Name class, any one of a variety of objects canbe returned when the Open method is called. Because IName has no way of anticipatingwhich class the Open method will be used on, IUnknown is the return value. This simplymeans that you will get the default interface of the type of Name object you open.
In your code, set name equal to workName.
This QI gives you access to the IName interface on your WorkspaceName object.
Open the workspace name and store the returned Workspace object in workspace.
Complete the following code to return the new workspace from the CreateFileGDBfunction:
CreateFileGDB = _____________________
Build your project.
You now have a function that creates a file geodatabase by specifying the output locationand name.
Step 3: Create a new file geodatabase
In the previous step, you wrote a function to create a new file geodatabase; in this step,you will write a sub procedure to call it. Your new sub procedure will pass in a path and aname for the geodatabase, then return a pointer to the IWorkspace interface on the newworkspace.
Add a new sub procedure named MakeSalesGDB with no arguments.
Introduction to Programming ArcObjects Using the Microsoft .NET Framework
10-4 Copyright © 2001-2009 ESRI
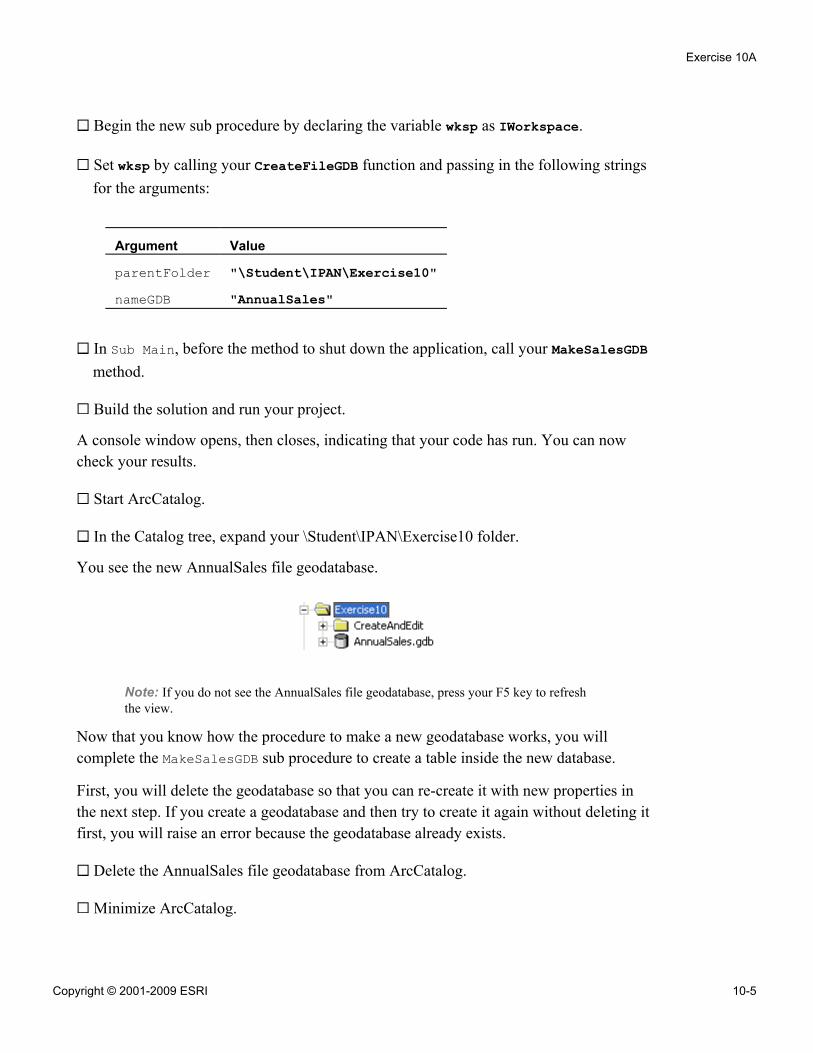
Begin the new sub procedure by declaring the variable wksp as IWorkspace.
Set wksp by calling your CreateFileGDB function and passing in the following stringsfor the arguments:
Argument Value
parentFolder "\Student\IPAN\Exercise10"nameGDB "AnnualSales"
In Sub Main, before the method to shut down the application, call your MakeSalesGDBmethod.
Build the solution and run your project.
A console window opens, then closes, indicating that your code has run. You can nowcheck your results.
Start ArcCatalog.
In the Catalog tree, expand your \Student\IPAN\Exercise10 folder.
You see the new AnnualSales file geodatabase.
Note: If you do not see the AnnualSales file geodatabase, press your F5 key to refreshthe view.
Now that you know how the procedure to make a new geodatabase works, you willcomplete the MakeSalesGDB sub procedure to create a table inside the new database.
First, you will delete the geodatabase so that you can re-create it with new properties inthe next step. If you create a geodatabase and then try to create it again without deleting itfirst, you will raise an error because the geodatabase already exists.
Delete the AnnualSales file geodatabase from ArcCatalog.
Minimize ArcCatalog.
Exercise 10A
Copyright © 2001-2009 ESRI 10-5
Step 4: Create a new table
Earlier, you used IFeatureWorkspace to open existing data. Now you will use it tocreate new data.
In Visual Studio, return to the MakeSalesGDB sub procedure.
After the call to CreateFileGDB, create a variable named fWS, storing a refrence toIFeatureWorkspace.
Instantiate fWS by setting it to the Workspace object you created earlier in this subprocedure.
In the Visual Studio Object Browser, locate IFeatureWorkspace.
Notice that one of the arguments for its CreateTable method is IFields, a collection offields. Before you can call CreateTable, you will need to make a fields collection.
In your code, declare the variable fldsEdit as IFieldsEdit.
Instantiate fldsEdit as a new instance of Fields. (Or, optionally, instantiate it as anew instance of FieldsClass, as you learned during the lecture.)
Note: For the remainder of the course, when you create a new COM object, you canchoose to use either the COM coclass or the .NET class.
Next, you will create three fields in your fields collection.
Declare each of the following variables as an IFieldEdit object:
▪ oidFld▪ nameFld▪ salesFld
Instantiate each object as a new Field.
Complete the following With block to set the properties for the oidFld field. Make sureto set the field type as OID.
With oidFld.Name_2 = "OID".Type_2 = esriFieldType.________________________________.Length_2 = 8
End With
Introduction to Programming ArcObjects Using the Microsoft .NET Framework
10-6 Copyright © 2001-2009 ESRI
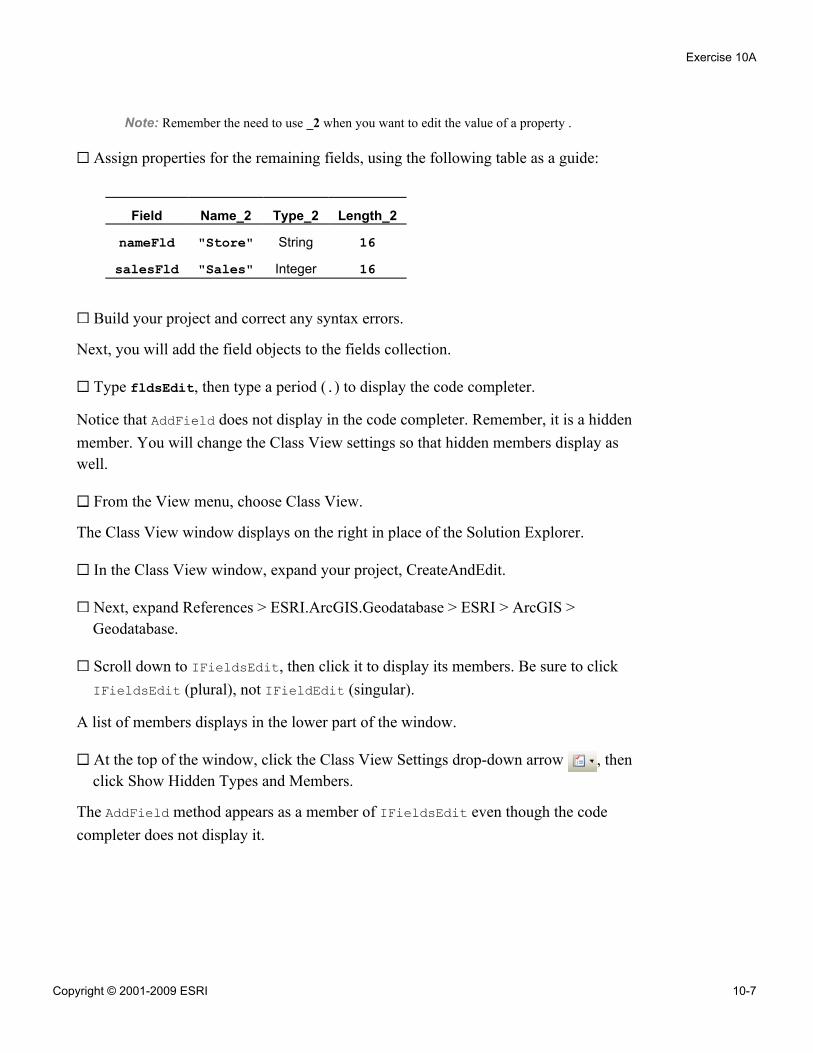
Note: Remember the need to use _2 when you want to edit the value of a property .
Assign properties for the remaining fields, using the following table as a guide:
Field Name_2 Type_2 Length_2
nameFld "Store" String 16salesFld "Sales" Integer 16
Build your project and correct any syntax errors.
Next, you will add the field objects to the fields collection.
Type fldsEdit, then type a period (.) to display the code completer.
Notice that AddField does not display in the code completer. Remember, it is a hiddenmember. You will change the Class View settings so that hidden members display aswell.
From the View menu, choose Class View.
The Class View window displays on the right in place of the Solution Explorer.
In the Class View window, expand your project, CreateAndEdit.
Next, expand References > ESRI.ArcGIS.Geodatabase > ESRI > ArcGIS >Geodatabase.
Scroll down to IFieldsEdit, then click it to display its members. Be sure to clickIFieldsEdit (plural), not IFieldEdit (singular).
A list of members displays in the lower part of the window.
At the top of the window, click the Class View Settings drop-down arrow , thenclick Show Hidden Types and Members.
The AddField method appears as a member of IFieldsEdit even though the codecompleter does not display it.
Exercise 10A
Copyright © 2001-2009 ESRI 10-7
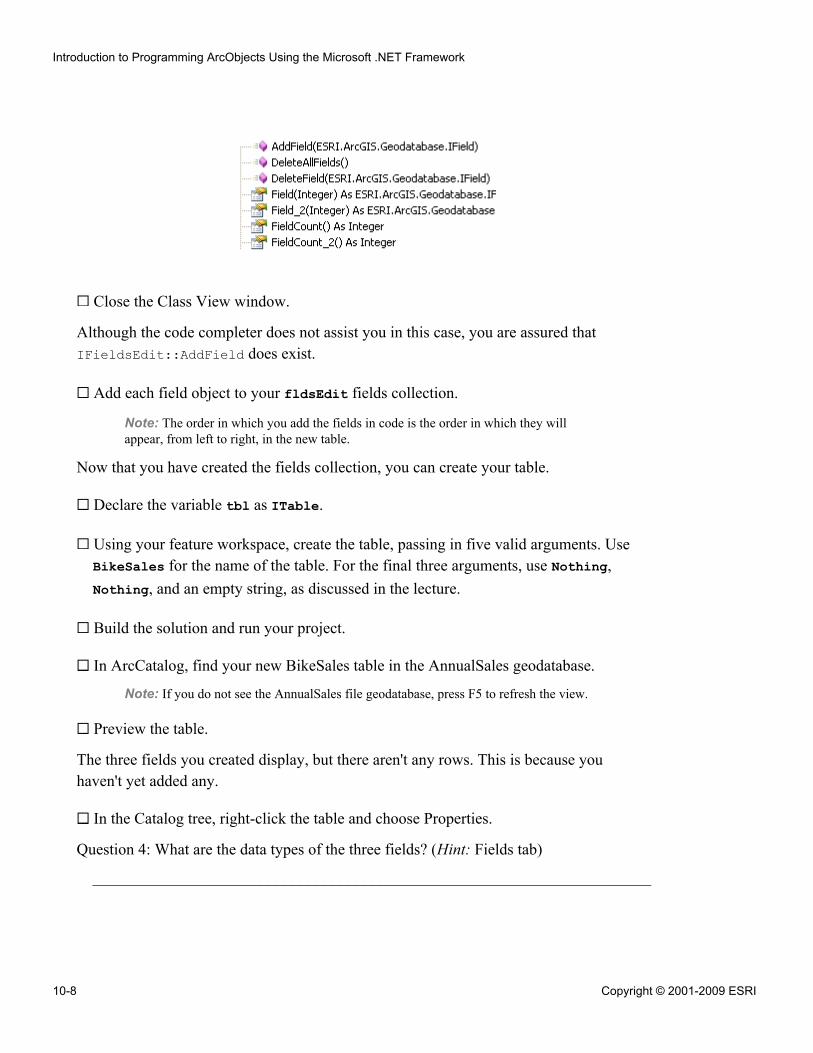
Close the Class View window.
Although the code completer does not assist you in this case, you are assured thatIFieldsEdit::AddField does exist.
Add each field object to your fldsEdit fields collection.
Note: The order in which you add the fields in code is the order in which they willappear, from left to right, in the new table.
Now that you have created the fields collection, you can create your table.
Declare the variable tbl as ITable.
Using your feature workspace, create the table, passing in five valid arguments. UseBikeSales for the name of the table. For the final three arguments, use Nothing,Nothing, and an empty string, as discussed in the lecture.
Build the solution and run your project.
In ArcCatalog, find your new BikeSales table in the AnnualSales geodatabase.
Note: If you do not see the AnnualSales file geodatabase, press F5 to refresh the view.
Preview the table.
The three fields you created display, but there aren't any rows. This is because youhaven't yet added any.
In the Catalog tree, right-click the table and choose Properties.
Question 4: What are the data types of the three fields? (Hint: Fields tab)
______________________________________________________________________
Introduction to Programming ArcObjects Using the Microsoft .NET Framework
10-8 Copyright © 2001-2009 ESRI
Although the data formats are what you designated, the names of the data types inArcCatalog differ from the names of the field types you used as input (OID, String,Integer).
Close the table properties.
Delete your AnnualSales geodatabase from ArcCatalog.
In the next step, you will add data to your table.
Minimize ArcCatalog.
Step 5: Add rows and values to the table
In this step, you will add several new records (rows) to your table. You will also populatethese rows with some values. Although the code you write here will be technicallycorrect, you probably would not hard code the values into your application. You wouldmore likely use a Windows application with text boxes on a form, or dynamically readdata stored in a database or file.
In the Visual Studio Object Browser, locate the ITable interface and examine itsproperties and methods.
Question 5: Which method returns a reference to IRow?
______________________________________________________________________
In your code, declare the variable row to store a row object.
Set the row variable by calling the CreateRow method on your table object.
There is more than one way to write code to modify the value for a row in a table. Youwill create and populate each row, then call the Store method.
For the first row of your table, assign the following values for the store name and thetotal sales. (Hint: Refer to your lecture slides for the syntax, and remember that theStore field is a string field.)
Exercise 10A
Copyright © 2001-2009 ESRI 10-9
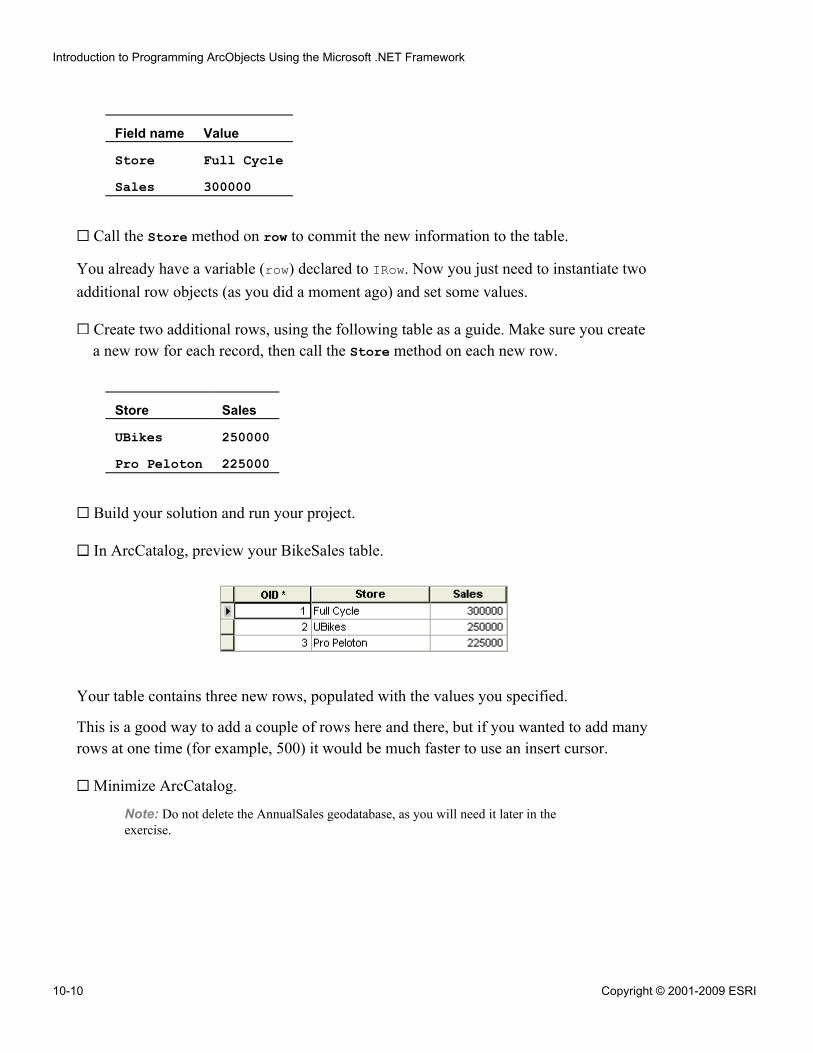
Field name Value
Store Full CycleSales 300000
Call the Store method on row to commit the new information to the table.
You already have a variable (row) declared to IRow. Now you just need to instantiate twoadditional row objects (as you did a moment ago) and set some values.
Create two additional rows, using the following table as a guide. Make sure you createa new row for each record, then call the Store method on each new row.
Store Sales
UBikes 250000Pro Peloton 225000
Build your solution and run your project.
In ArcCatalog, preview your BikeSales table.
Your table contains three new rows, populated with the values you specified.
This is a good way to add a couple of rows here and there, but if you wanted to add manyrows at one time (for example, 500) it would be much faster to use an insert cursor.
Minimize ArcCatalog.
Note: Do not delete the AnnualSales geodatabase, as you will need it later in theexercise.
Introduction to Programming ArcObjects Using the Microsoft .NET Framework
10-10 Copyright © 2001-2009 ESRI
Step 6: Calculate field values using an update cursor
In this step, you will use an update cursor to modify existing features in a dataset. Youwill begin by inserting a snippet written specifically to save some time with this exercise.
In the Visual Studio, collapse your CreateFileGDB and MakeSalesGDB subprocedures.
Below the MakeSalesGDB sub procedure, add a new sub procedure named CalcFieldwith no arguments.
Insert the snippet IPAN_Ex10_OpenFeatureClass and examine the code.
Question 6: What type of data is being accessed in this module?
______________________________________________________________________
Question 7: Which feature class will be updated?
______________________________________________________________________
The value for the PopPerMH field represents the population per mobile home, and will becalculated by dividing the total population by the total number of mobile homes.
Under the comment line 'Step 6 goes here, set feat so it points to the first featurein the update cursor updFeatures.
Create a Do Until loop that will run until feat is Nothing.
Complete the following code to retrieve the value for the Pop1999 field for the featureand store it in the variable lngPop:
lngPop = CType(feat.__________(intPopFld), Long)
Retrieve the value for the Mobilehome field for the feature and store it in the variablelngHomes.
Complete the following code to calculate the value of the PopPerMH field:
feat.__________(intPopMH) = lngPop / lngHomesupdFeatures.__________________________(________)
Write code to go to the next feature in the cursor.
Exercise 10A
Copyright © 2001-2009 ESRI 10-11
The code for your loop is now complete. The next lines you write will be executed afterthe code inside the loop has finished running.
After the loop, enter the following code to notify the operator that the process hascompleted, then wait for a response:
Console.WriteLine("Update complete – press any key to exit")Console.ReadKey()
The ReadKey method waits for the operator to intervene by pressing any key, such as Qor Enter, to resume the process.
In the Sub Main, comment MakeSalesGDB().
Call your CalcField() sub procedure.
Run your project.
When prompted, close the console window.
In ArcCatalog, expand \Student\IPAN\Database\US_States.gdb.
Preview the table for the USCounties feature class and verify that the PopPerMH fieldhas been updated.
You have finished this exercise; however, you may wish to complete the optional step:
▪ Step 7 shows you two ways of storing changes to a table.
If you want to complete the optional step, do so now. Otherwise, close ArcCatalog andVisual Studio.
Step 7: (Optional) Compare methods for editing
In this step, you will compare timings for two different ways of storing changes to atable: by using a cursor and by using the Store method.
In the Sub Main, comment the call to your CalcField sub procedure.
Collapse the CreateFileGDB and MakeSalesGDB sub procedures, if necessary.
Collapse the CalcField sub procedure.
Introduction to Programming ArcObjects Using the Microsoft .NET Framework
10-12 Copyright © 2001-2009 ESRI
After the CalcField sub procedure, insert the IPAN_Ex10_Timings code snippet.
Declare the necessary module-level variables as documented in the snippet.
Navigate to the AccessData sub procedure and review its code.
The sub procedure begins with a list of variables that you will populate after you haveexplored all the code.
Question 8: What type of geodatabase will be opened?
______________________________________________________________________
The AccessData sub procedure calls two other sub procedures: StoreEdit andUpdateEdit. Each of these calculates the elapsed time for a series of edits.
Navigate to the StoreEdit sub procedure and review its code.
Question 9: What unit of time is used for the elapsed time calculation?
______________________________________________________________________
The code loops for a specified number of iterations, adds rows to a table, and updates anattribute for each row. Each new row is saved with the Store method on the row object.
Navigate to the UpdateEdit sub procedure and review its code.
Question 10: What type of cursor is used for these edits?
______________________________________________________________________
Return to the AccessData sub procedure.
You want to add several rows to your table and enter an initial sales value for each newrecord.
Supply values for each of the variables, using the following table as a guide:
Exercise 10A
Copyright © 2001-2009 ESRI 10-13
Variable Value
m_gdb "\Student\IPAN\Exercise10\AnnualSales.gdb"m_tblName "BikeSales"m_numRecs 100m_newValue 0m_fldName "Sales"
From Sub Main, call your AccessData sub procedure.
Note: Make sure the AnnualSales geodatabase and the BikesSales table exist inside\Student\IPAN\Exercise10.
Run your project.
Read the message in the console window to see how much time it took to edit therecords using the Store method.
Press any key to see how long it took to edit the records using the insert cursor.
Note the time difference. The cursor operation took less time than the Store method toadd and update the records. With 100 records, it might not be impressive, but imagine thedifference you would experience if you were adding thousands of records and updatingmore values.
Close the console window.
In ArcCatalog, preview the BikeSales table to confirm that the new records wereadded.
If time permits, experiment with fields in other datasets in your\Student\IPAN\Database folder (Hint: You may need to change the data type ofm_newValue).
Close ArcCatalog and Visual Studio.
Conclusion
In this exercise, you used several ArcObjects for creating data. You created a newgeodatabase, created a table within it, and added rows and values to the table using the
Introduction to Programming ArcObjects Using the Microsoft .NET Framework
10-14 Copyright © 2001-2009 ESRI
Store method. Then, you used an update cursor to calculate the value of a field in afeature class in another geodatabase.
If you completed the optional step, you compared two ways of editing a table: using theStore method vs. using an insert cursor. You discovered that, although the Store methodis useful for adding a few records and updating a few values, it is faster to use an insertcursor when you want to add many records at the same time.
Exercise 10A
Copyright © 2001-2009 ESRI 10-15

Answers to Exercise 10A Questions
Question 1: Which method or property can be used to make a new workspace? What doesit return?
Answer: Create; IWorkspaceName
Question 2: Which interface on this class contains the Open method?
Answer: IName (from the abstract class Name)
Question 3: What does the Open method on IName return?
Answer: Object (In the Geodatabase OMD, the Open method returns IUnknown.)
Question 4: What are the data types of the three fields? (Hint: Fields tab)
Answer: Object ID, Text, Long Integer
Question 5: Which method returns a reference to IRow?
Answer: CreateRow
Question 6: What type of data is being accessed in this module?
Answer: File geodatabase
Question 7: Which feature class will be updated?
Answer: The USCounties feature class in the US_States geodatabase
Question 8: What type of geodatabase will be opened?
Answer: File geodatabase
Question 9: What unit of time is used for the elapsed time calculation?
Answer: Millisecond
Question 10: What type of cursor is used for these edits?
Answer: Insert
Introduction to Programming ArcObjects Using the Microsoft .NET Framework
10-16 Copyright © 2001-2009 ESRI
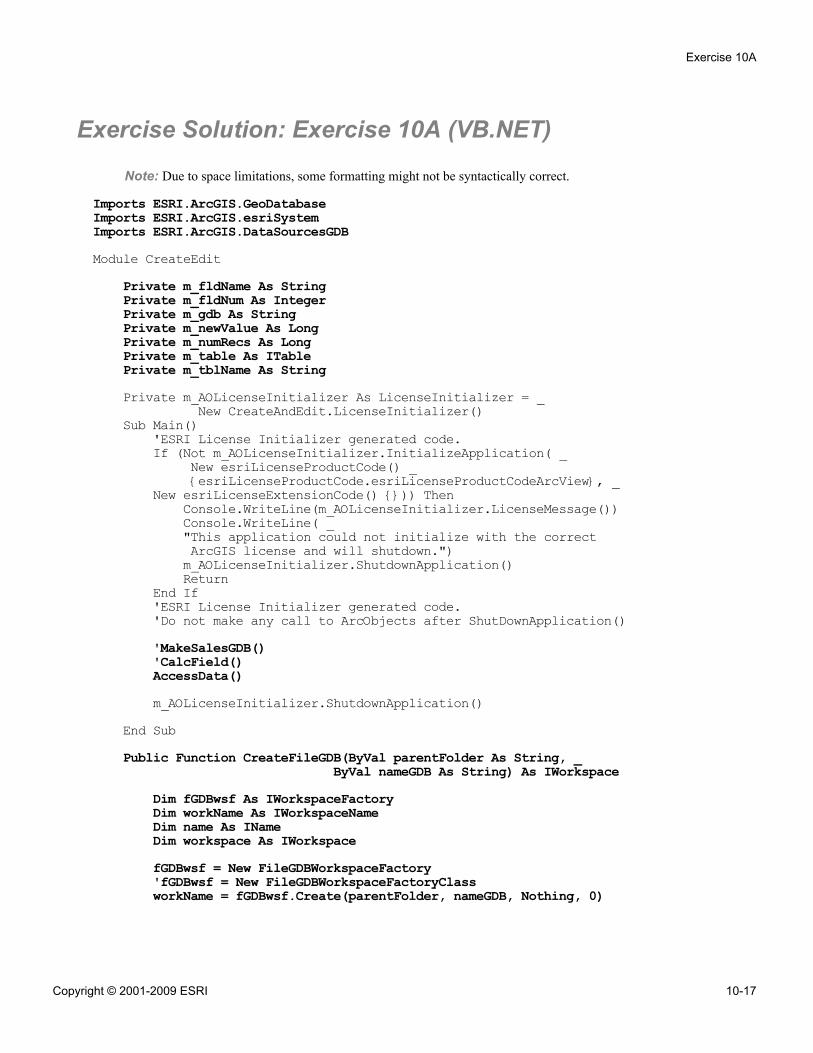
Exercise Solution: Exercise 10A (VB.NET)
Note: Due to space limitations, some formatting might not be syntactically correct.
Imports ESRI.ArcGIS.GeoDatabaseImports ESRI.ArcGIS.esriSystemImports ESRI.ArcGIS.DataSourcesGDBModule CreateEdit
Private m_fldName As StringPrivate m_fldNum As IntegerPrivate m_gdb As StringPrivate m_newValue As LongPrivate m_numRecs As LongPrivate m_table As ITablePrivate m_tblName As StringPrivate m_AOLicenseInitializer As LicenseInitializer = _
New CreateAndEdit.LicenseInitializer()Sub Main()
'ESRI License Initializer generated code.If (Not m_AOLicenseInitializer.InitializeApplication( _
New esriLicenseProductCode() _{esriLicenseProductCode.esriLicenseProductCodeArcView}, _
New esriLicenseExtensionCode() {})) ThenConsole.WriteLine(m_AOLicenseInitializer.LicenseMessage())Console.WriteLine( _"This application could not initialize with the correctArcGIS license and will shutdown.")m_AOLicenseInitializer.ShutdownApplication()Return
End If'ESRI License Initializer generated code.'Do not make any call to ArcObjects after ShutDownApplication()'MakeSalesGDB()'CalcField()AccessData()m_AOLicenseInitializer.ShutdownApplication()
End SubPublic Function CreateFileGDB(ByVal parentFolder As String, _
ByVal nameGDB As String) As IWorkspaceDim fGDBwsf As IWorkspaceFactoryDim workName As IWorkspaceNameDim name As INameDim workspace As IWorkspacefGDBwsf = New FileGDBWorkspaceFactory'fGDBwsf = New FileGDBWorkspaceFactoryClassworkName = fGDBwsf.Create(parentFolder, nameGDB, Nothing, 0)
Exercise 10A
Copyright © 2001-2009 ESRI 10-17
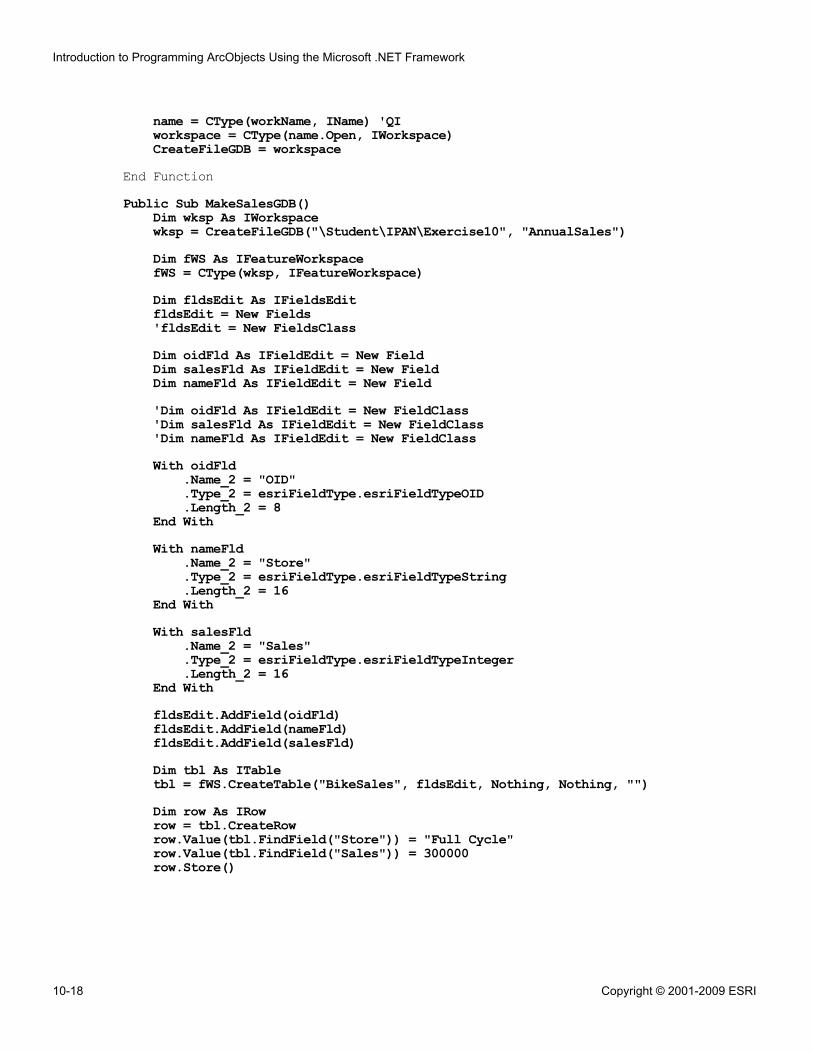
name = CType(workName, IName) 'QIworkspace = CType(name.Open, IWorkspace)CreateFileGDB = workspace
End FunctionPublic Sub MakeSalesGDB()
Dim wksp As IWorkspacewksp = CreateFileGDB("\Student\IPAN\Exercise10", "AnnualSales")Dim fWS As IFeatureWorkspacefWS = CType(wksp, IFeatureWorkspace)Dim fldsEdit As IFieldsEditfldsEdit = New Fields'fldsEdit = New FieldsClassDim oidFld As IFieldEdit = New FieldDim salesFld As IFieldEdit = New FieldDim nameFld As IFieldEdit = New Field'Dim oidFld As IFieldEdit = New FieldClass'Dim salesFld As IFieldEdit = New FieldClass'Dim nameFld As IFieldEdit = New FieldClassWith oidFld
.Name_2 = "OID"
.Type_2 = esriFieldType.esriFieldTypeOID
.Length_2 = 8End WithWith nameFld
.Name_2 = "Store"
.Type_2 = esriFieldType.esriFieldTypeString
.Length_2 = 16End WithWith salesFld
.Name_2 = "Sales"
.Type_2 = esriFieldType.esriFieldTypeInteger
.Length_2 = 16End WithfldsEdit.AddField(oidFld)fldsEdit.AddField(nameFld)fldsEdit.AddField(salesFld)Dim tbl As ITabletbl = fWS.CreateTable("BikeSales", fldsEdit, Nothing, Nothing, "")Dim row As IRowrow = tbl.CreateRowrow.Value(tbl.FindField("Store")) = "Full Cycle"row.Value(tbl.FindField("Sales")) = 300000row.Store()
Introduction to Programming ArcObjects Using the Microsoft .NET Framework
10-18 Copyright © 2001-2009 ESRI
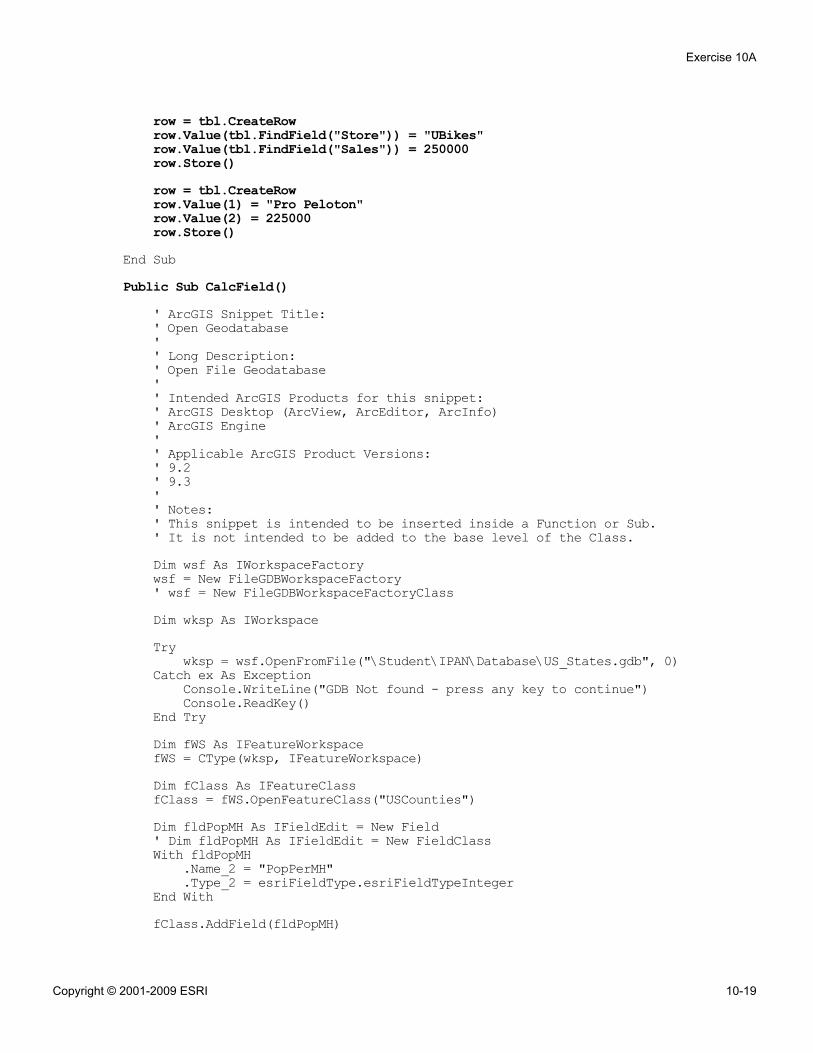
row = tbl.CreateRowrow.Value(tbl.FindField("Store")) = "UBikes"row.Value(tbl.FindField("Sales")) = 250000row.Store()row = tbl.CreateRowrow.Value(1) = "Pro Peloton"row.Value(2) = 225000row.Store()
End SubPublic Sub CalcField()
' ArcGIS Snippet Title:' Open Geodatabase'' Long Description:' Open File Geodatabase'' Intended ArcGIS Products for this snippet:' ArcGIS Desktop (ArcView, ArcEditor, ArcInfo)' ArcGIS Engine'' Applicable ArcGIS Product Versions:' 9.2' 9.3'' Notes:' This snippet is intended to be inserted inside a Function or Sub.' It is not intended to be added to the base level of the Class.Dim wsf As IWorkspaceFactorywsf = New FileGDBWorkspaceFactory' wsf = New FileGDBWorkspaceFactoryClassDim wksp As IWorkspaceTry
wksp = wsf.OpenFromFile("\Student\IPAN\Database\US_States.gdb", 0)Catch ex As Exception
Console.WriteLine("GDB Not found - press any key to continue")Console.ReadKey()
End TryDim fWS As IFeatureWorkspacefWS = CType(wksp, IFeatureWorkspace)Dim fClass As IFeatureClassfClass = fWS.OpenFeatureClass("USCounties")Dim fldPopMH As IFieldEdit = New Field' Dim fldPopMH As IFieldEdit = New FieldClassWith fldPopMH
.Name_2 = "PopPerMH"
.Type_2 = esriFieldType.esriFieldTypeIntegerEnd WithfClass.AddField(fldPopMH)
Exercise 10A
Copyright © 2001-2009 ESRI 10-19
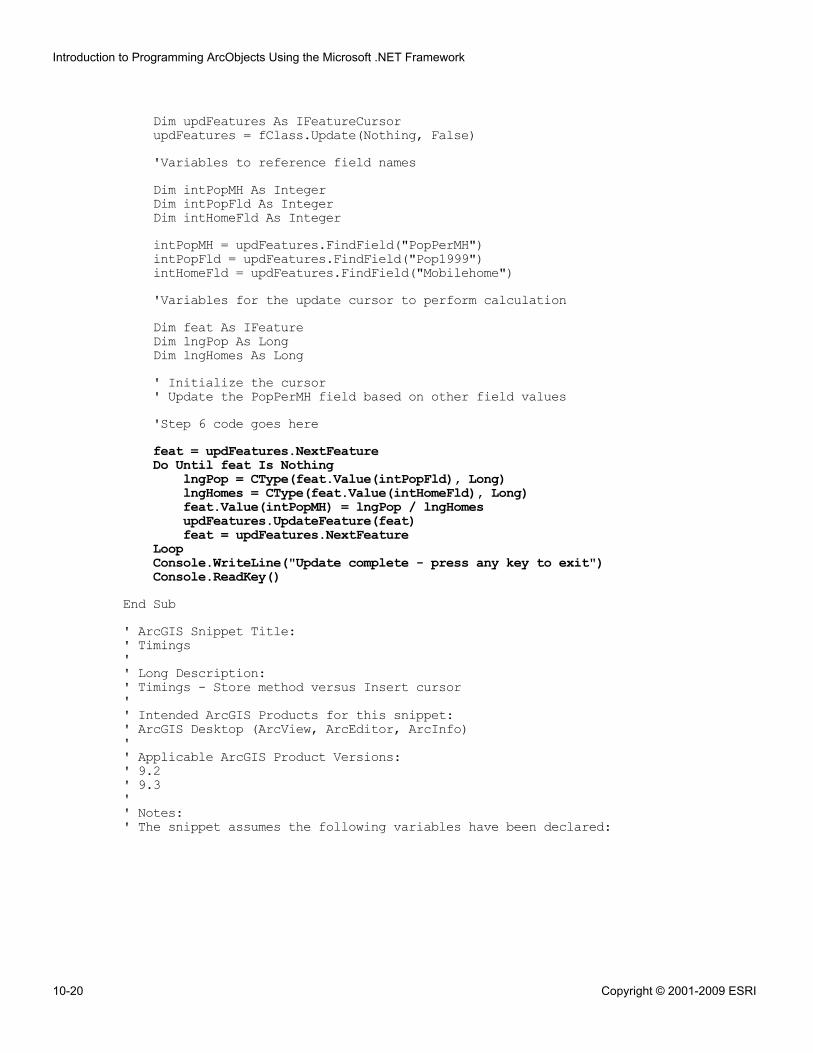
Dim updFeatures As IFeatureCursorupdFeatures = fClass.Update(Nothing, False)'Variables to reference field namesDim intPopMH As IntegerDim intPopFld As IntegerDim intHomeFld As IntegerintPopMH = updFeatures.FindField("PopPerMH")intPopFld = updFeatures.FindField("Pop1999")intHomeFld = updFeatures.FindField("Mobilehome")'Variables for the update cursor to perform calculationDim feat As IFeatureDim lngPop As LongDim lngHomes As Long' Initialize the cursor' Update the PopPerMH field based on other field values'Step 6 code goes herefeat = updFeatures.NextFeatureDo Until feat Is Nothing
lngPop = CType(feat.Value(intPopFld), Long)lngHomes = CType(feat.Value(intHomeFld), Long)feat.Value(intPopMH) = lngPop / lngHomesupdFeatures.UpdateFeature(feat)feat = updFeatures.NextFeature
LoopConsole.WriteLine("Update complete - press any key to exit")Console.ReadKey()
End Sub' ArcGIS Snippet Title:' Timings'' Long Description:' Timings - Store method versus Insert cursor'' Intended ArcGIS Products for this snippet:' ArcGIS Desktop (ArcView, ArcEditor, ArcInfo)'' Applicable ArcGIS Product Versions:' 9.2' 9.3'' Notes:' The snippet assumes the following variables have been declared:
Introduction to Programming ArcObjects Using the Microsoft .NET Framework
10-20 Copyright © 2001-2009 ESRI
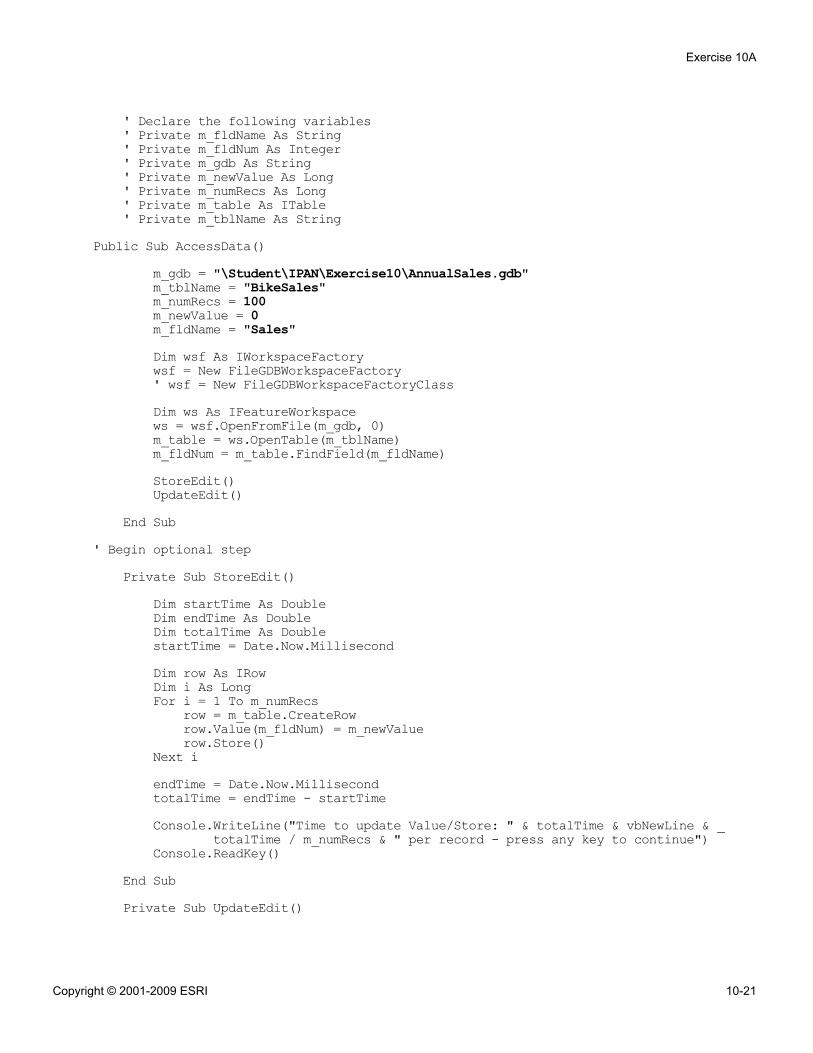
' Declare the following variables' Private m_fldName As String' Private m_fldNum As Integer' Private m_gdb As String' Private m_newValue As Long' Private m_numRecs As Long' Private m_table As ITable' Private m_tblName As String
Public Sub AccessData()m_gdb = "\Student\IPAN\Exercise10\AnnualSales.gdb"m_tblName = "BikeSales"m_numRecs = 100m_newValue = 0m_fldName = "Sales"Dim wsf As IWorkspaceFactorywsf = New FileGDBWorkspaceFactory' wsf = New FileGDBWorkspaceFactoryClassDim ws As IFeatureWorkspacews = wsf.OpenFromFile(m_gdb, 0)m_table = ws.OpenTable(m_tblName)m_fldNum = m_table.FindField(m_fldName)StoreEdit()UpdateEdit()
End Sub' Begin optional step
Private Sub StoreEdit()Dim startTime As DoubleDim endTime As DoubleDim totalTime As DoublestartTime = Date.Now.MillisecondDim row As IRowDim i As LongFor i = 1 To m_numRecs
row = m_table.CreateRowrow.Value(m_fldNum) = m_newValuerow.Store()
Next iendTime = Date.Now.MillisecondtotalTime = endTime - startTimeConsole.WriteLine("Time to update Value/Store: " & totalTime & vbNewLine & _
totalTime / m_numRecs & " per record - press any key to continue")Console.ReadKey()
End SubPrivate Sub UpdateEdit()
Exercise 10A
Copyright © 2001-2009 ESRI 10-21
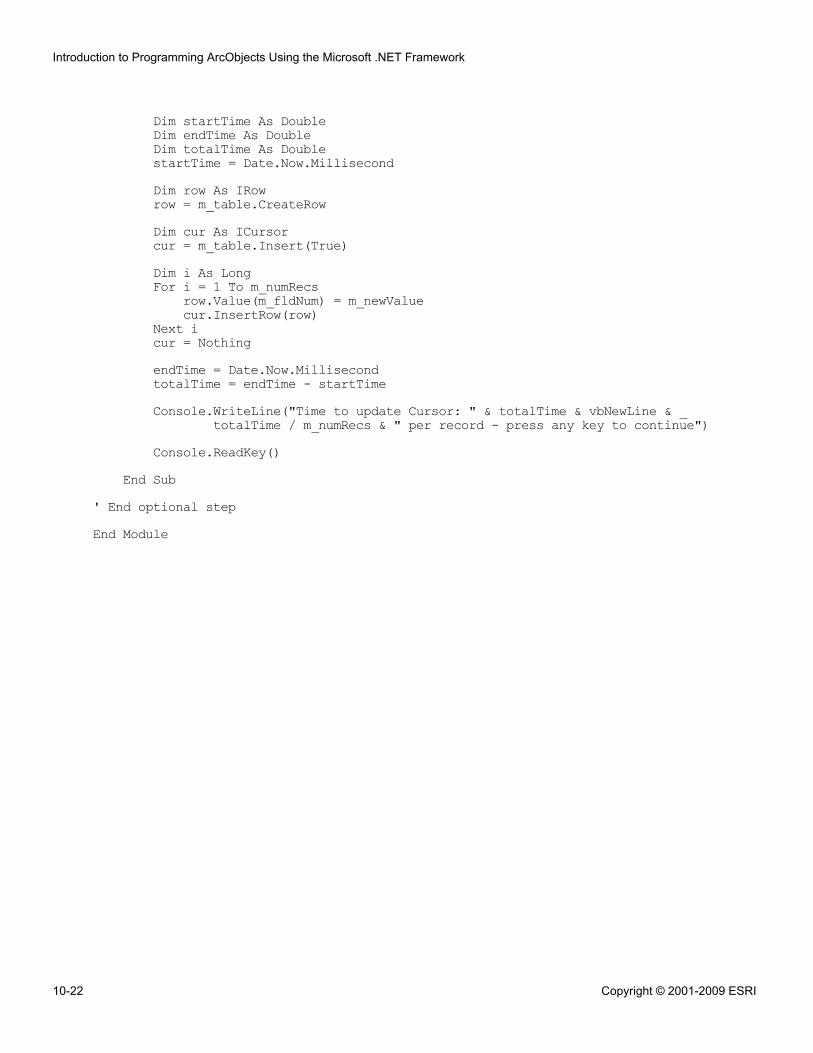
Dim startTime As DoubleDim endTime As DoubleDim totalTime As DoublestartTime = Date.Now.MillisecondDim row As IRowrow = m_table.CreateRowDim cur As ICursorcur = m_table.Insert(True)Dim i As LongFor i = 1 To m_numRecs
row.Value(m_fldNum) = m_newValuecur.InsertRow(row)
Next icur = NothingendTime = Date.Now.MillisecondtotalTime = endTime - startTimeConsole.WriteLine("Time to update Cursor: " & totalTime & vbNewLine & _
totalTime / m_numRecs & " per record - press any key to continue")Console.ReadKey()
End Sub' End optional stepEnd Module
Introduction to Programming ArcObjects Using the Microsoft .NET Framework
10-22 Copyright © 2001-2009 ESRI
Exercise 10B: Create data (C#)
Estimated time: 60 minutes
In this exercise, you will learn how to create new workspaces and datasets. You willbegin by creating a new file geodatabase, then you will use the Workspace object in yourcode to create a new table in the geodatabase. Next, you will create a collection of fieldsfor the table, add records (rows), and provide values for each row. Although you willonly work with a file geodatabase, you can use the same basic procedure with any type ofdata.
In this exercise, you will:
▪ Create a new file geodatabase▪ Create a new table▪ Add rows and values to a table using the Store method▪ Calculate field values using an update cursor
Exercise shortcut1. In Visual Studio, create a new Visual C# Windows Console Application.
2. Programmatically create a new file geodatabase.
3. Create a table in your geodatabase.
4. Add three fields to your table: an OID field, string field, and number field.
5. Add some records to your table. Populate the string and number field for each.
6. Add a new field, PopPerMH, to the USCounties feature class in\Student\IPAN\Database\US_States.gdb.
7. Use an update cursor to modify existing features in the dataset.
** (Optional) Compare timings for two different ways of storing changes to a table:using a cursor vs. the Store method.
Step 1: Create a new project in Visual Studio
Start Visual Studio and create a new project, using the following as a guide:
Exercise 10B
Copyright © 2001-2009 ESRI 10-23
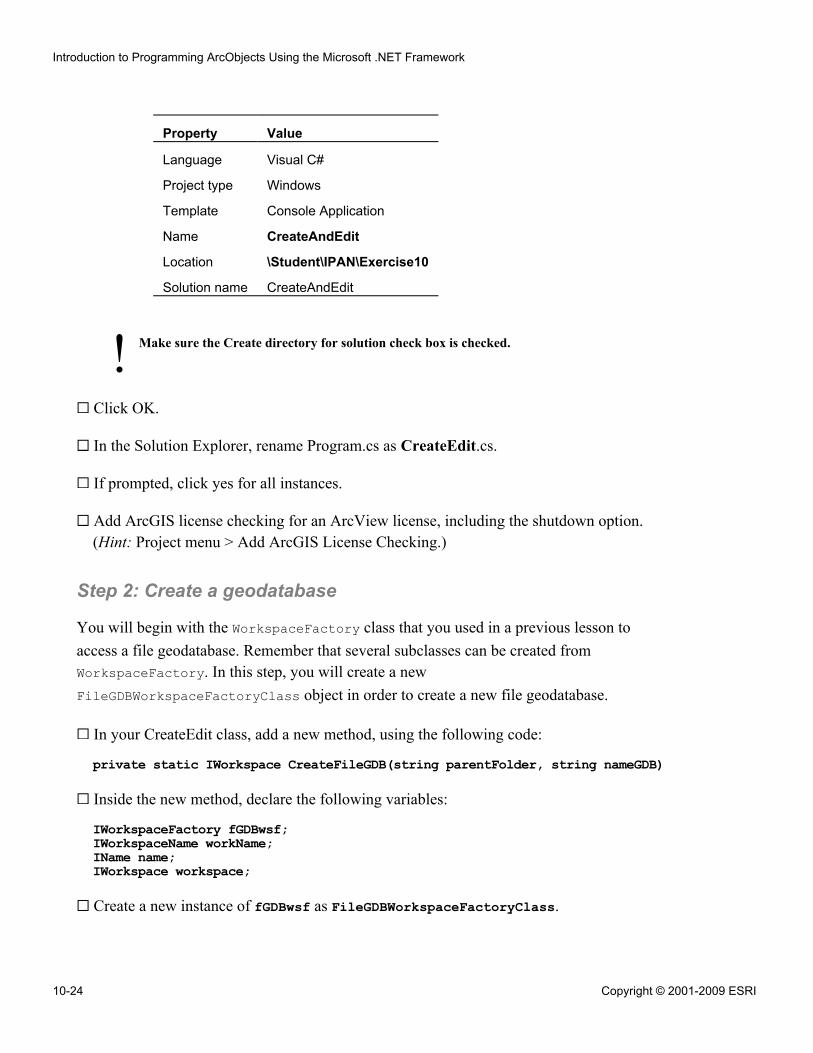
!
Property Value
Language Visual C#
Project type Windows
Template Console Application
Name CreateAndEdit
Location \Student\IPAN\Exercise10
Solution name CreateAndEdit
Make sure the Create directory for solution check box is checked.
Click OK.
In the Solution Explorer, rename Program.cs as CreateEdit.cs.
If prompted, click yes for all instances.
Add ArcGIS license checking for an ArcView license, including the shutdown option.(Hint: Project menu > Add ArcGIS License Checking.)
Step 2: Create a geodatabase
You will begin with the WorkspaceFactory class that you used in a previous lesson toaccess a file geodatabase. Remember that several subclasses can be created fromWorkspaceFactory. In this step, you will create a newFileGDBWorkspaceFactoryClass object in order to create a new file geodatabase.
In your CreateEdit class, add a new method, using the following code:
private static IWorkspace CreateFileGDB(string parentFolder, string nameGDB)
Inside the new method, declare the following variables:
IWorkspaceFactory fGDBwsf;IWorkspaceName workName;IName name;IWorkspace workspace;
Create a new instance of fGDBwsf as FileGDBWorkspaceFactoryClass.
Introduction to Programming ArcObjects Using the Microsoft .NET Framework
10-24 Copyright © 2001-2009 ESRI

Add the necessary references.
Open the Visual Studio Object Browser, if necessary.
Locate the IWorkspaceFactory interface.
Earlier, you used the OpenFromFile method to access an existing workspace.
Question 1: Which method or property can be used to make a new workspace? What doesit return?
______________________________________________________________________
Note: Remember, Name objects are lightweight versions of the things they represent andcan be opened to produce the desired object.
In code view, complete the following code to create the new WorkspaceName:
workName = fGDBwsf.____________(parentFolder, nameGDB, null, 0);
The required arguments for the Create method are:
▪ Folder in which to create the new workspace▪ Name of the new workspace▪ Connection properties (if connecting to an ArcSDE geodatabase)▪ Application window handle
The folder path and geodatabase name are passed into your new method. The nullkeyword is specified in order to skip the connection properties argument.
In the Geodatabase OMD, locate IWorkspaceName. Tip: Search forIWorkspaceName :, i.e., the interface name followed by a space and a colon.
IWorkspaceName is an interface on the WorkspaceName class.
Notice that the IWorkspaceName interface provides access to only the most basicworkspace properties, including Category, PathName, and Type.
In order to retrieve the actual Workspace object, you will use the Open method supportedby the WorkspaceName class.
Follow the line that extends from the top of the WorkspaceName coclass.
In the list of properties and methods, click the Open method.
Exercise 10B
Copyright © 2001-2009 ESRI 10-25
!
Question 2: Which interface on this class contains the Open method?
______________________________________________________________________
Question 3: What does the Open method on IName return?
______________________________________________________________________
Because there are several subtypes of the Name class, any one of a variety of objects canbe returned when the Open method is called. Because IName has no way of anticipatingwhich class the Open method will be used on, IUnknown is the return value. This simplymeans that you will get the default interface of the type of Name object you open.
In your code, set name equal to workName.
This cast gives you access to the IName interface on your WorkspaceName object.
Open the workspace name and store the returned Workspace object in workspace.
Did you remember to cast to IWorkspace? The Open methodreturns IUnknown, so you must cast to IWorkspace. IUnknownobjects are returned as type Object.
Complete the following code to return the new workspace from CreateFileGDB:
return ________________________;
Build your project.
You now have a function that creates a file geodatabase by specifying the output locationand name.
Step 3: Create a new file geodatabase
Now that you have written a method that creates a new file geodatabase, you are ready tocall it. You will pass in a path and a name for the geodatabase, then return a pointer to theIWorkspace interface on the new workspace.
Add a new method named MakeSalesGDB with no arguments.
Begin the new method by declaring the variable wksp as IWorkspace.
Introduction to Programming ArcObjects Using the Microsoft .NET Framework
10-26 Copyright © 2001-2009 ESRI
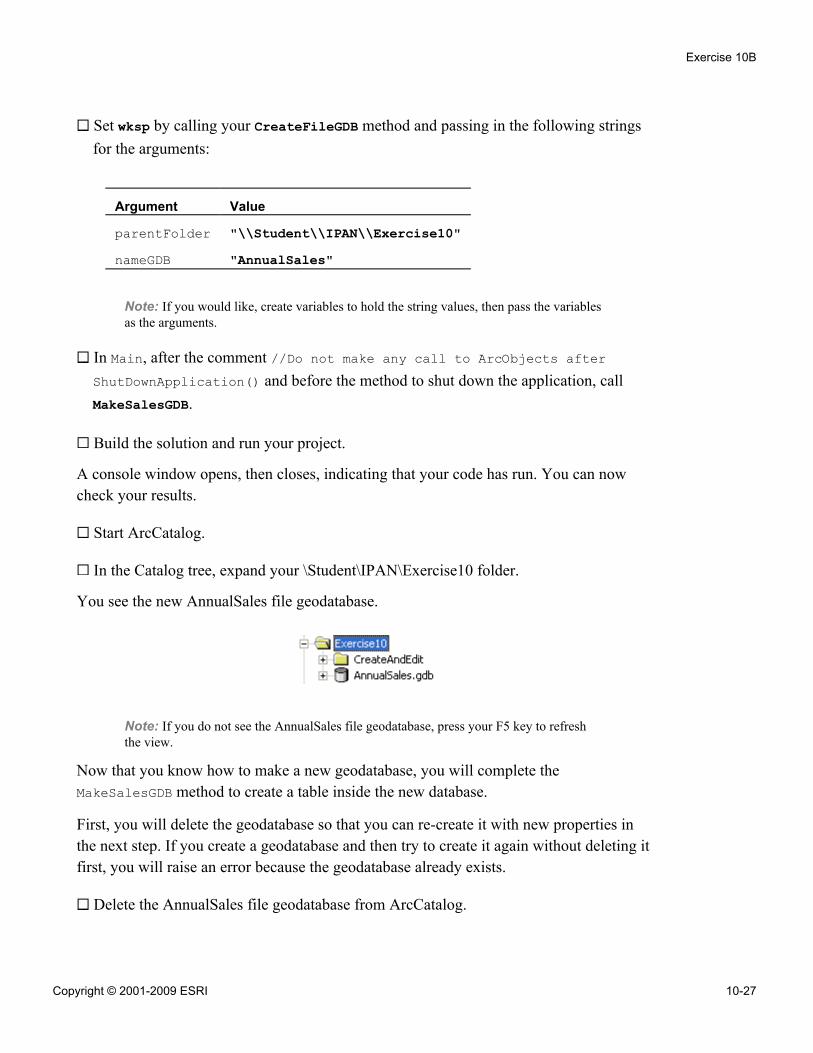
Set wksp by calling your CreateFileGDB method and passing in the following stringsfor the arguments:
Argument Value
parentFolder "\\Student\\IPAN\\Exercise10"nameGDB "AnnualSales"
Note: If you would like, create variables to hold the string values, then pass the variablesas the arguments.
In Main, after the comment //Do not make any call to ArcObjects afterShutDownApplication() and before the method to shut down the application, callMakeSalesGDB.
Build the solution and run your project.
A console window opens, then closes, indicating that your code has run. You can nowcheck your results.
Start ArcCatalog.
In the Catalog tree, expand your \Student\IPAN\Exercise10 folder.
You see the new AnnualSales file geodatabase.
Note: If you do not see the AnnualSales file geodatabase, press your F5 key to refreshthe view.
Now that you know how to make a new geodatabase, you will complete theMakeSalesGDB method to create a table inside the new database.
First, you will delete the geodatabase so that you can re-create it with new properties inthe next step. If you create a geodatabase and then try to create it again without deleting itfirst, you will raise an error because the geodatabase already exists.
Delete the AnnualSales file geodatabase from ArcCatalog.
Exercise 10B
Copyright © 2001-2009 ESRI 10-27
Minimize ArcCatalog.
Step 4: Create a new table
Earlier, you used IFeatureWorkspace to open existing data. Now you will use it tocreate new data.
In Visual Studio, return to the MakeSalesGDB code.
After the call to CreateFileGDB, create a variable named fWS, storing a refrence toIFeatureWorkspace.
Instantiate fWS by setting it to the Workspace object you created earlier in this method.
In the Visual Studio Object Browser, locate IFeatureWorkspace.
Notice that one of the arguments for its CreateTable method is IFields, a collection offields. Before you can call CreateTable, you will need to make a fields collection.
In your code, declare the variable fldsEdit as IFieldsEdit.
Instantiate fldsEdit as a new instance of FieldsClass.
Note: For the remainder of the course, when you create a new COM object, you canchoose to use either the COM coclass or the .NET class.
Next, you will create three fields in your fields collection.
Declare each of the following variables as an IFieldEdit object and instantiate eachobject as a new FieldClass.
▪ oidFld▪ nameFld▪ salesFld
Just below the declaration for oidFld, complete the following code to set itsproperties. Make sure to set the field type as OID.
oidFld.Name_2 = "OID";oidFld.Type_2 = esriFieldType.________________________________;
Note: Remember the need to use _2 when you want to edit the value of a property
Assign properties for the remaining fields, using the following table as a guide:
Introduction to Programming ArcObjects Using the Microsoft .NET Framework
10-28 Copyright © 2001-2009 ESRI
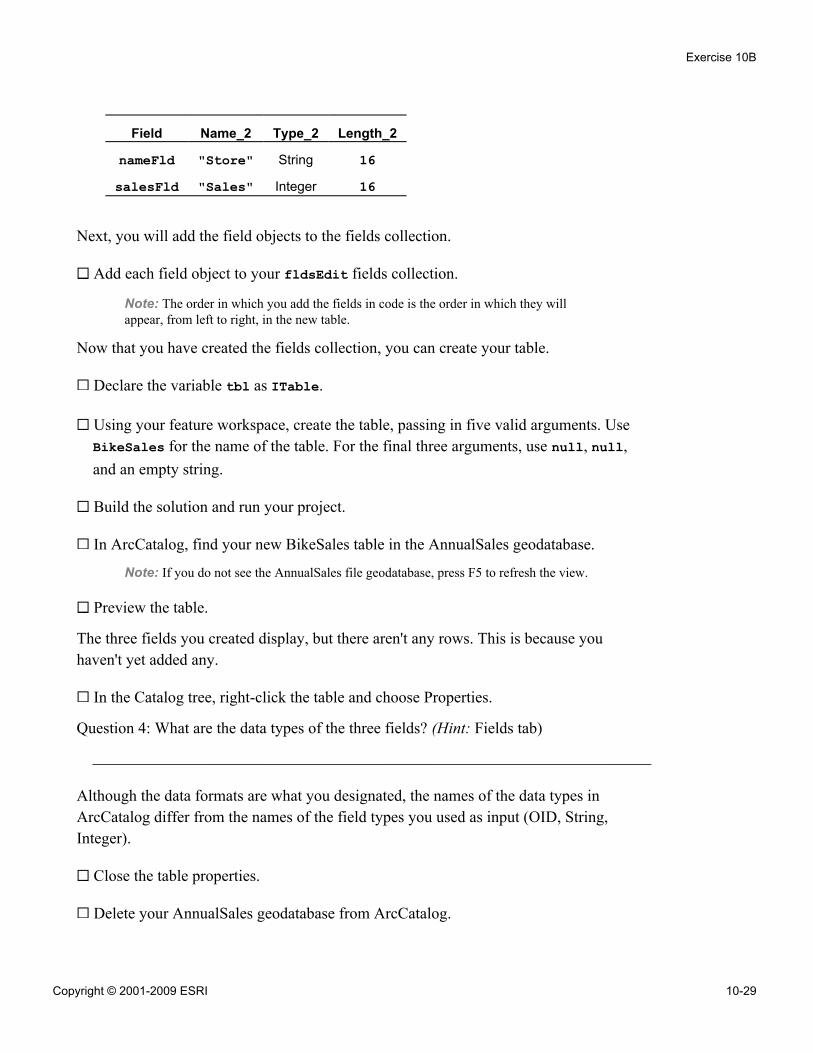
Field Name_2 Type_2 Length_2
nameFld "Store" String 16salesFld "Sales" Integer 16
Next, you will add the field objects to the fields collection.
Add each field object to your fldsEdit fields collection.
Note: The order in which you add the fields in code is the order in which they willappear, from left to right, in the new table.
Now that you have created the fields collection, you can create your table.
Declare the variable tbl as ITable.
Using your feature workspace, create the table, passing in five valid arguments. UseBikeSales for the name of the table. For the final three arguments, use null, null,and an empty string.
Build the solution and run your project.
In ArcCatalog, find your new BikeSales table in the AnnualSales geodatabase.
Note: If you do not see the AnnualSales file geodatabase, press F5 to refresh the view.
Preview the table.
The three fields you created display, but there aren't any rows. This is because youhaven't yet added any.
In the Catalog tree, right-click the table and choose Properties.
Question 4: What are the data types of the three fields? (Hint: Fields tab)
______________________________________________________________________
Although the data formats are what you designated, the names of the data types inArcCatalog differ from the names of the field types you used as input (OID, String,Integer).
Close the table properties.
Delete your AnnualSales geodatabase from ArcCatalog.
Exercise 10B
Copyright © 2001-2009 ESRI 10-29
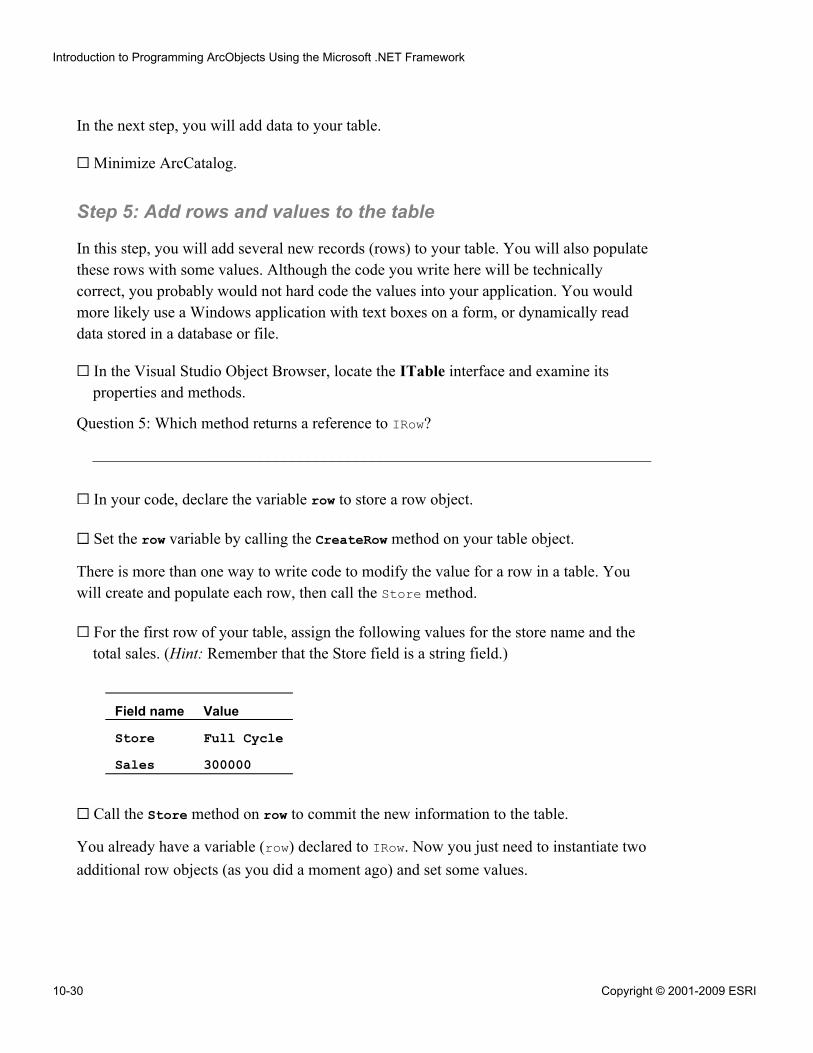
In the next step, you will add data to your table.
Minimize ArcCatalog.
Step 5: Add rows and values to the table
In this step, you will add several new records (rows) to your table. You will also populatethese rows with some values. Although the code you write here will be technicallycorrect, you probably would not hard code the values into your application. You wouldmore likely use a Windows application with text boxes on a form, or dynamically readdata stored in a database or file.
In the Visual Studio Object Browser, locate the ITable interface and examine itsproperties and methods.
Question 5: Which method returns a reference to IRow?
______________________________________________________________________
In your code, declare the variable row to store a row object.
Set the row variable by calling the CreateRow method on your table object.
There is more than one way to write code to modify the value for a row in a table. Youwill create and populate each row, then call the Store method.
For the first row of your table, assign the following values for the store name and thetotal sales. (Hint: Remember that the Store field is a string field.)
Field name Value
Store Full CycleSales 300000
Call the Store method on row to commit the new information to the table.
You already have a variable (row) declared to IRow. Now you just need to instantiate twoadditional row objects (as you did a moment ago) and set some values.
Introduction to Programming ArcObjects Using the Microsoft .NET Framework
10-30 Copyright © 2001-2009 ESRI
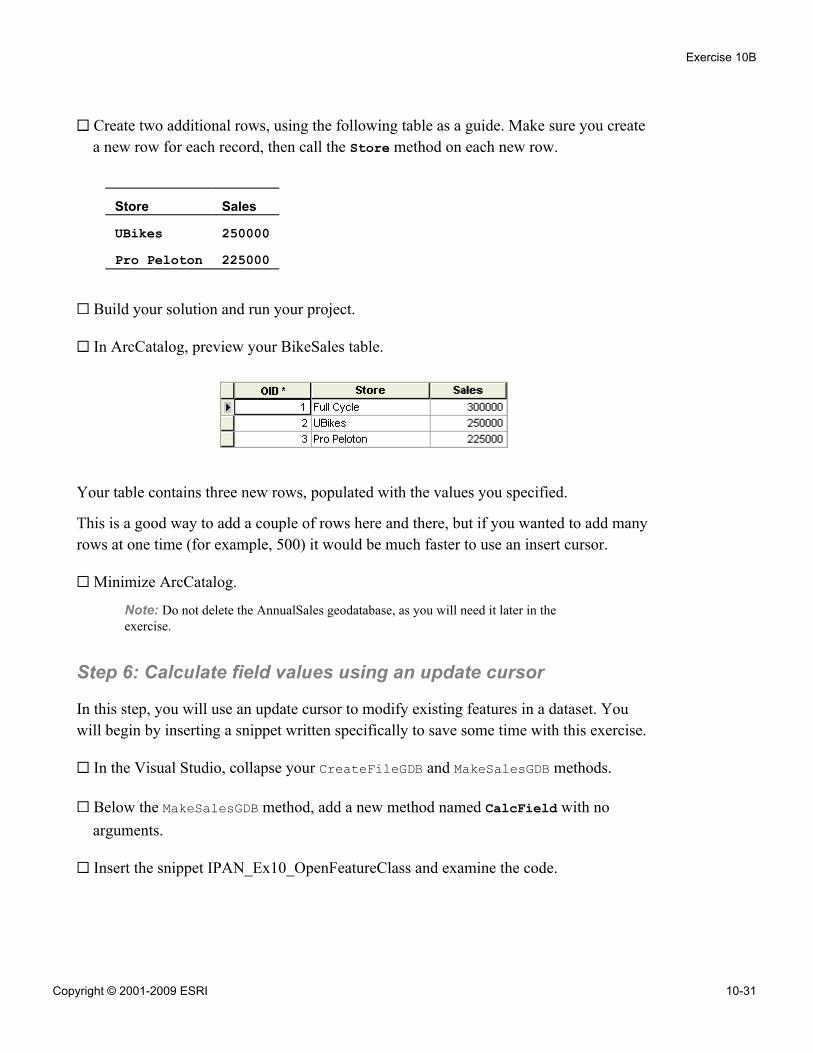
Create two additional rows, using the following table as a guide. Make sure you createa new row for each record, then call the Store method on each new row.
Store Sales
UBikes 250000Pro Peloton 225000
Build your solution and run your project.
In ArcCatalog, preview your BikeSales table.
Your table contains three new rows, populated with the values you specified.
This is a good way to add a couple of rows here and there, but if you wanted to add manyrows at one time (for example, 500) it would be much faster to use an insert cursor.
Minimize ArcCatalog.
Note: Do not delete the AnnualSales geodatabase, as you will need it later in theexercise.
Step 6: Calculate field values using an update cursor
In this step, you will use an update cursor to modify existing features in a dataset. Youwill begin by inserting a snippet written specifically to save some time with this exercise.
In the Visual Studio, collapse your CreateFileGDB and MakeSalesGDB methods.
Below the MakeSalesGDB method, add a new method named CalcField with noarguments.
Insert the snippet IPAN_Ex10_OpenFeatureClass and examine the code.
Exercise 10B
Copyright © 2001-2009 ESRI 10-31
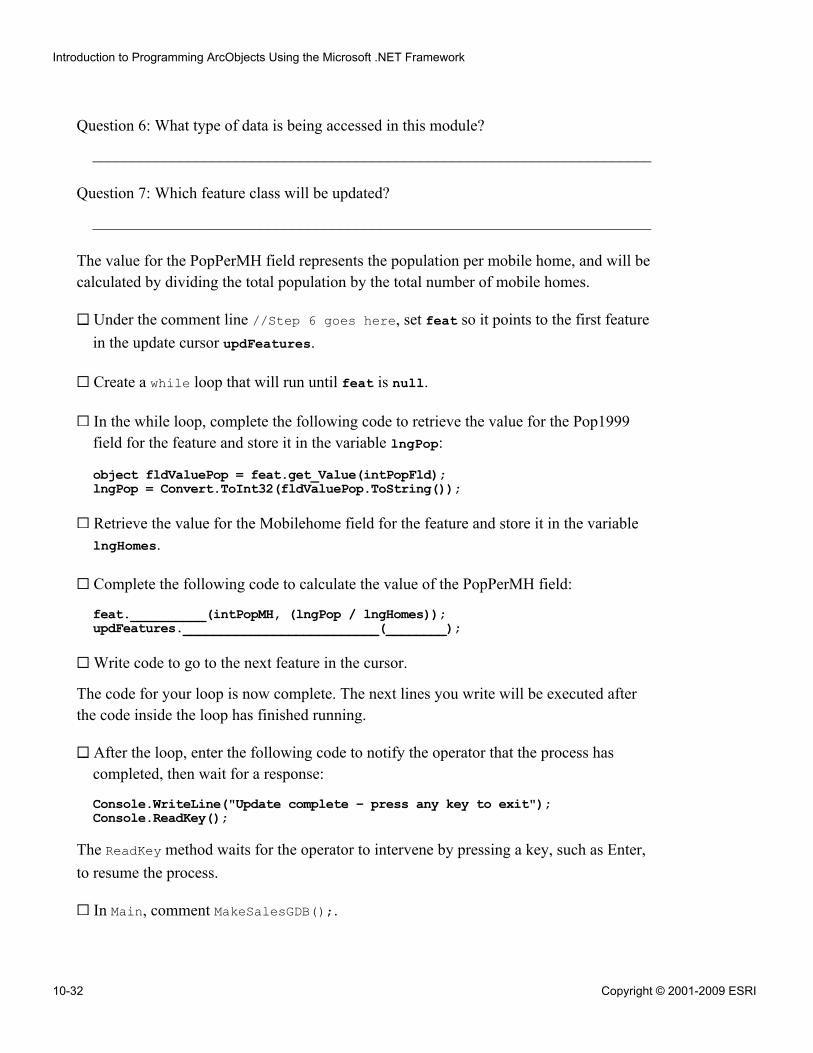
Question 6: What type of data is being accessed in this module?
______________________________________________________________________
Question 7: Which feature class will be updated?
______________________________________________________________________
The value for the PopPerMH field represents the population per mobile home, and will becalculated by dividing the total population by the total number of mobile homes.
Under the comment line //Step 6 goes here, set feat so it points to the first featurein the update cursor updFeatures.
Create a while loop that will run until feat is null.
In the while loop, complete the following code to retrieve the value for the Pop1999field for the feature and store it in the variable lngPop:
object fldValuePop = feat.get_Value(intPopFld);lngPop = Convert.ToInt32(fldValuePop.ToString());
Retrieve the value for the Mobilehome field for the feature and store it in the variablelngHomes.
Complete the following code to calculate the value of the PopPerMH field:
feat.__________(intPopMH, (lngPop / lngHomes));updFeatures.__________________________(________);
Write code to go to the next feature in the cursor.
The code for your loop is now complete. The next lines you write will be executed afterthe code inside the loop has finished running.
After the loop, enter the following code to notify the operator that the process hascompleted, then wait for a response:
Console.WriteLine("Update complete – press any key to exit");Console.ReadKey();
The ReadKey method waits for the operator to intervene by pressing a key, such as Enter,to resume the process.
In Main, comment MakeSalesGDB();.
Introduction to Programming ArcObjects Using the Microsoft .NET Framework
10-32 Copyright © 2001-2009 ESRI
Call your CalcField(); method.
Build and run your project.
When prompted, close the console window.
In ArcCatalog, expand \Student\IPAN\Database\US_States.gdb.
Preview the table for the USCounties feature class and verify that the PopPerMH fieldhas been updated.
You have finished this exercise; however, you may wish to complete the optional step:
▪ Step 7 shows you two ways of storing changes to a table.
If you want to complete the optional step, do so now. Otherwise, close ArcCatalog andVisual Studio.
Step 7: (Optional) Compare methods for editing
In this step, you will compare timings for two different ways of storing changes to atable: by using a cursor and by using the Store method.
In the Sub Main, comment the call to your CalcField method.
If necessary, collapse the code to definitions. (Hint: Right-click, choose Outlining >Collapse to Definitions.)
After the CalcField method, insert the IPAN_Ex10_Timings code snippet.
Navigate to the AccessData method and review its code.
The method begins with a list of variables that you will populate after you have exploredall the code.
Question 8: What type of geodatabase will be opened?
______________________________________________________________________
The AccessData method calls two other methods: StoreEdit and UpdateEdit. Each ofthese calculates the elapsed time for a series of edits.
Navigate to the StoreEdit method and review its code.
Exercise 10B
Copyright © 2001-2009 ESRI 10-33
Question 9: What unit of time is used for the elapsed time calculation?
______________________________________________________________________
The code loops for a specified number of iterations, adds rows to a table, and updates anattribute for each row. Each new row is saved with the Store method on the row object.
Navigate to the UpdateEdit method and review its code.
Question 10: What type of cursor is used for these edits?
______________________________________________________________________
Return to the AccessData method.
You want to add several rows to your table and enter an initial sales value for each newrecord.
Supply values for each of the variables, using the following table as a guide:
Variable Value
m_gdb "\\Student\\IPAN\\Exercise10\\AnnualSales.gdb"m_tblName "BikeSales"m_numRecs 100m_newValue 0m_fldName "Sales"
From Main, call your AccessData method.
Note: Make sure the AnnualSales geodatabase and the BikesSales table exist inside\Student\IPAN\Exercise10.
Run your project.
Read the message in the console window to see how much time it took to edit therecords using the Store method.
Press any key to see how long it took to edit the records using the insert cursor.
Note the time difference. The cursor operation took less time than the Store method toadd and update the records. With 100 records, it might not be impressive, but imagine the
Introduction to Programming ArcObjects Using the Microsoft .NET Framework
10-34 Copyright © 2001-2009 ESRI
difference you would experience if you were adding thousands of records and updatingmore values.
Close the console window.
In ArcCatalog, preview the BikeSales table to confirm that the new records wereadded.
If time permits, experiment with fields in other datasets in your\Student\IPAN\Database folder.
If time permits, experiment with fields in other datasets in your\Student\IPAN\Database folder (Hint: You may need to change the data type ofm_newValue).
Close ArcCatalog and Visual Studio.
Conclusion
In this exercise, you used several ArcObjects for creating data. You created a newgeodatabase, created a table within it, and added rows and values to the table using theStore method. Then, you used an update cursor to calculate the value of a field in afeature class in another geodatabase.
If you completed the optional step, you compared two ways of editing a table: using theStore method vs. using an insert cursor. You discovered that, although the Store methodis useful for adding a few records and updating a few values, it is faster to use an insertcursor when you want to add many records at the same time.
Exercise 10B
Copyright © 2001-2009 ESRI 10-35
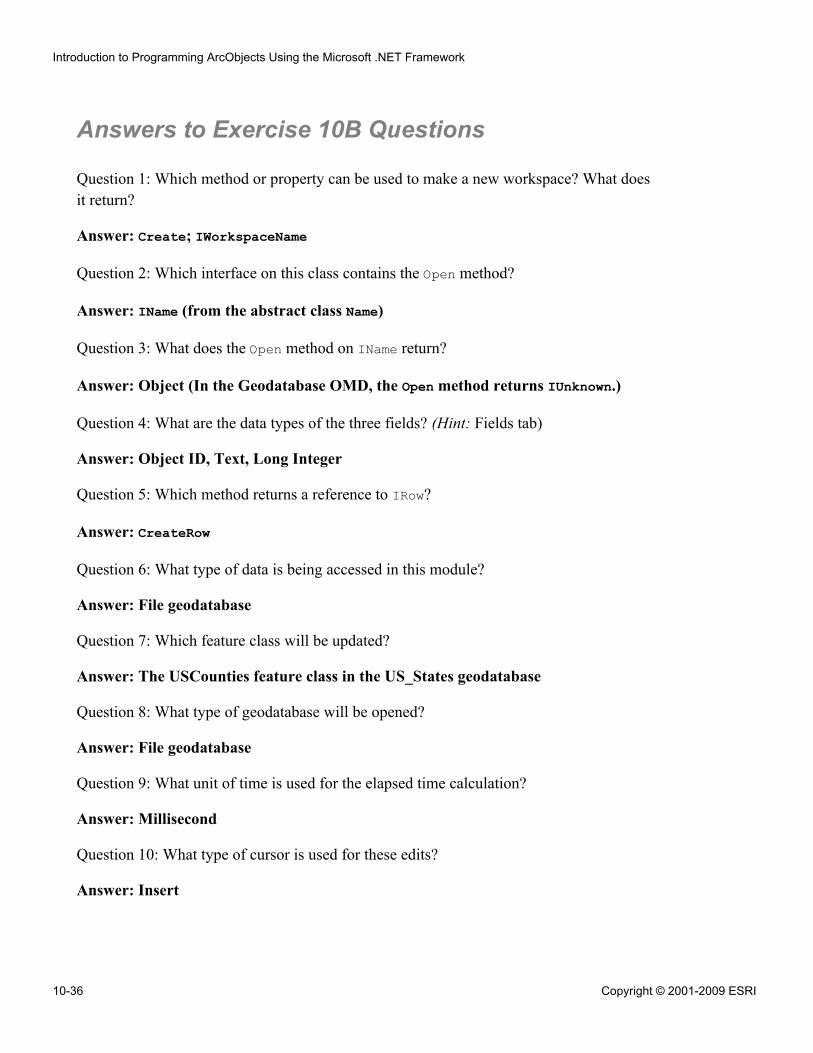
Answers to Exercise 10B Questions
Question 1: Which method or property can be used to make a new workspace? What doesit return?
Answer: Create; IWorkspaceName
Question 2: Which interface on this class contains the Open method?
Answer: IName (from the abstract class Name)
Question 3: What does the Open method on IName return?
Answer: Object (In the Geodatabase OMD, the Open method returns IUnknown.)
Question 4: What are the data types of the three fields? (Hint: Fields tab)
Answer: Object ID, Text, Long Integer
Question 5: Which method returns a reference to IRow?
Answer: CreateRow
Question 6: What type of data is being accessed in this module?
Answer: File geodatabase
Question 7: Which feature class will be updated?
Answer: The USCounties feature class in the US_States geodatabase
Question 8: What type of geodatabase will be opened?
Answer: File geodatabase
Question 9: What unit of time is used for the elapsed time calculation?
Answer: Millisecond
Question 10: What type of cursor is used for these edits?
Answer: Insert
Introduction to Programming ArcObjects Using the Microsoft .NET Framework
10-36 Copyright © 2001-2009 ESRI
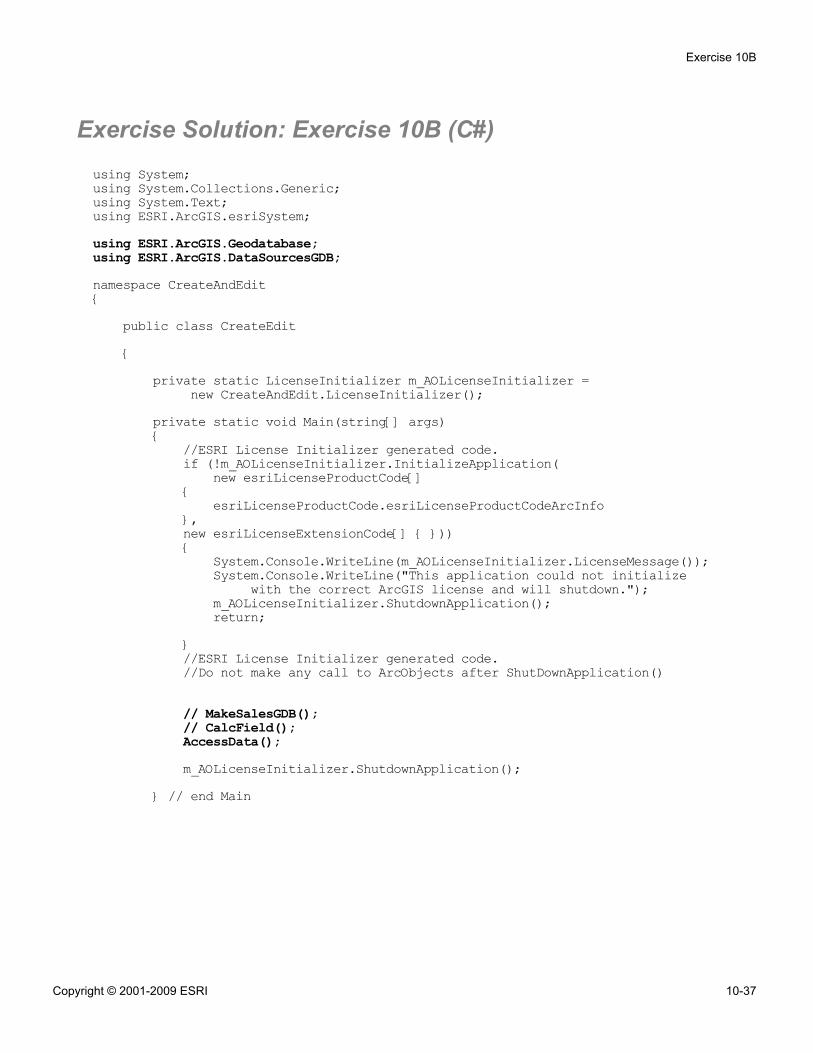
Exercise Solution: Exercise 10B (C#)using System;using System.Collections.Generic;using System.Text;using ESRI.ArcGIS.esriSystem;using ESRI.ArcGIS.Geodatabase;using ESRI.ArcGIS.DataSourcesGDB;namespace CreateAndEdit{
public class CreateEdit{
private static LicenseInitializer m_AOLicenseInitializer =new CreateAndEdit.LicenseInitializer();
private static void Main(string[] args){
//ESRI License Initializer generated code.if (!m_AOLicenseInitializer.InitializeApplication(
new esriLicenseProductCode[]{
esriLicenseProductCode.esriLicenseProductCodeArcInfo},new esriLicenseExtensionCode[] { })){
System.Console.WriteLine(m_AOLicenseInitializer.LicenseMessage());System.Console.WriteLine("This application could not initialize
with the correct ArcGIS license and will shutdown.");m_AOLicenseInitializer.ShutdownApplication();return;
}//ESRI License Initializer generated code.//Do not make any call to ArcObjects after ShutDownApplication()
// MakeSalesGDB();// CalcField();AccessData();m_AOLicenseInitializer.ShutdownApplication();
} // end Main
Exercise 10B
Copyright © 2001-2009 ESRI 10-37
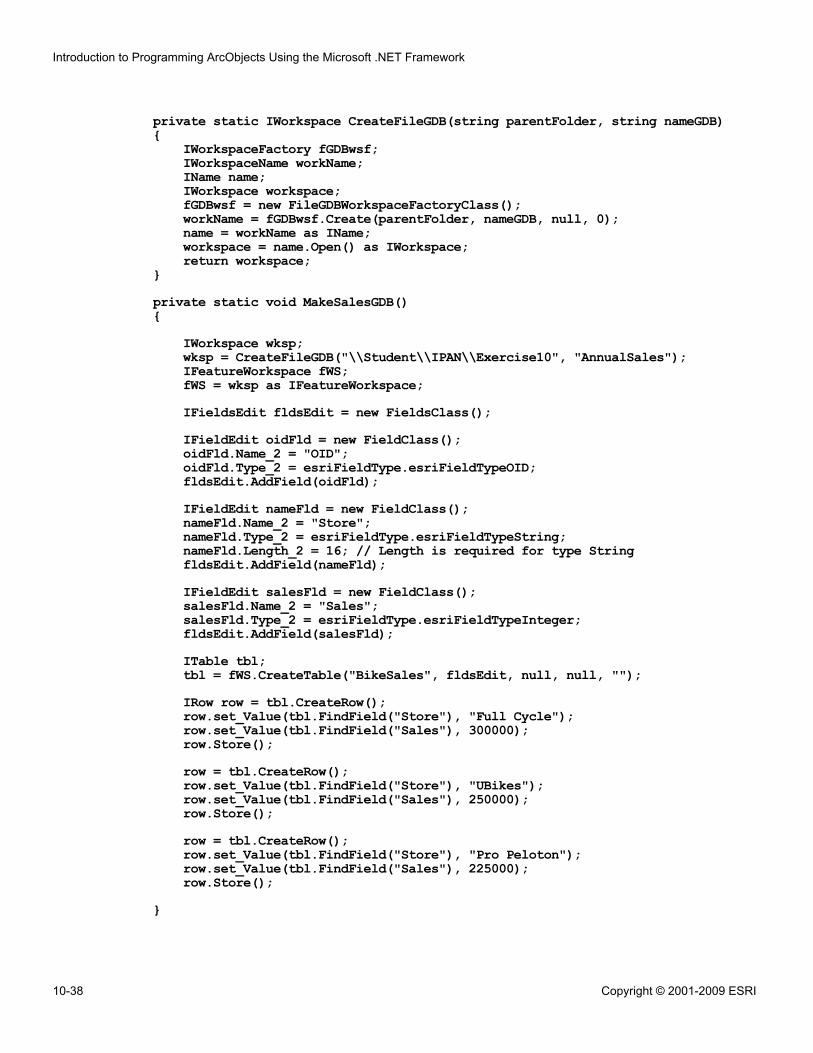
private static IWorkspace CreateFileGDB(string parentFolder, string nameGDB){
IWorkspaceFactory fGDBwsf;IWorkspaceName workName;IName name;IWorkspace workspace;fGDBwsf = new FileGDBWorkspaceFactoryClass();workName = fGDBwsf.Create(parentFolder, nameGDB, null, 0);name = workName as IName;workspace = name.Open() as IWorkspace;return workspace;
}private static void MakeSalesGDB(){
IWorkspace wksp;wksp = CreateFileGDB("\\Student\\IPAN\\Exercise10", "AnnualSales");IFeatureWorkspace fWS;fWS = wksp as IFeatureWorkspace;IFieldsEdit fldsEdit = new FieldsClass();IFieldEdit oidFld = new FieldClass();oidFld.Name_2 = "OID";oidFld.Type_2 = esriFieldType.esriFieldTypeOID;fldsEdit.AddField(oidFld);IFieldEdit nameFld = new FieldClass();nameFld.Name_2 = "Store";nameFld.Type_2 = esriFieldType.esriFieldTypeString;nameFld.Length_2 = 16; // Length is required for type StringfldsEdit.AddField(nameFld);IFieldEdit salesFld = new FieldClass();salesFld.Name_2 = "Sales";salesFld.Type_2 = esriFieldType.esriFieldTypeInteger;fldsEdit.AddField(salesFld);ITable tbl;tbl = fWS.CreateTable("BikeSales", fldsEdit, null, null, "");IRow row = tbl.CreateRow();row.set_Value(tbl.FindField("Store"), "Full Cycle");row.set_Value(tbl.FindField("Sales"), 300000);row.Store();row = tbl.CreateRow();row.set_Value(tbl.FindField("Store"), "UBikes");row.set_Value(tbl.FindField("Sales"), 250000);row.Store();row = tbl.CreateRow();row.set_Value(tbl.FindField("Store"), "Pro Peloton");row.set_Value(tbl.FindField("Sales"), 225000);row.Store();
}
Introduction to Programming ArcObjects Using the Microsoft .NET Framework
10-38 Copyright © 2001-2009 ESRI

private static void CalcField(){
// ArcGIS Snippet Title:// Open Geodatabase//// Long Description:// Open File Geodatabase//// Intended ArcGIS Products for this snippet:// ArcGIS Desktop (ArcView, ArcEditor, ArcInfo)//// Applicable ArcGIS Product Versions:// 9.2// 9.3//// Notes:// This snippet is intended to be inserted inside a Method.// It is not intended to be added to the base level of the Class.// Variables to reference field namesIWorkspaceFactory wsf;wsf = new FileGDBWorkspaceFactory();//wsf = new FileGDBWorkspaceFactoryClass();//IWorkspace wksp;//try//{IWorkspace wksp;wksp = wsf.OpenFromFile("\\Student\\IPAN\\Database\\US_States.gdb", 0);IFeatureWorkspace fWS = wksp as IFeatureWorkspace;IFeatureClass fClass;fClass = fWS.OpenFeatureClass("USCounties");IFieldEdit fldPopMH = new Field() as IFieldEdit;//IFieldEdit fldPopMH = new FieldClass();fldPopMH.AliasName_2 = "PopPerMH";fldPopMH.Name_2 = "PopPerMH";fldPopMH.Type_2 = esriFieldType.esriFieldTypeInteger;fClass.AddField(fldPopMH);IFeatureCursor updFeatures;updFeatures = fClass.Update(null, false);int intPopMH = updFeatures.FindField("PopPerMH");int intPopFld = updFeatures.FindField("Pop1999");int intHomeFld = updFeatures.FindField("Mobilehome");IFeature feat;int lngPop;int lngHomes;// Initialize the cursor// Update the PopPerMH field based on other field values//Step 6 code goes herefeat = updFeatures.NextFeature();while (feat != null){
Exercise 10B
Copyright © 2001-2009 ESRI 10-39
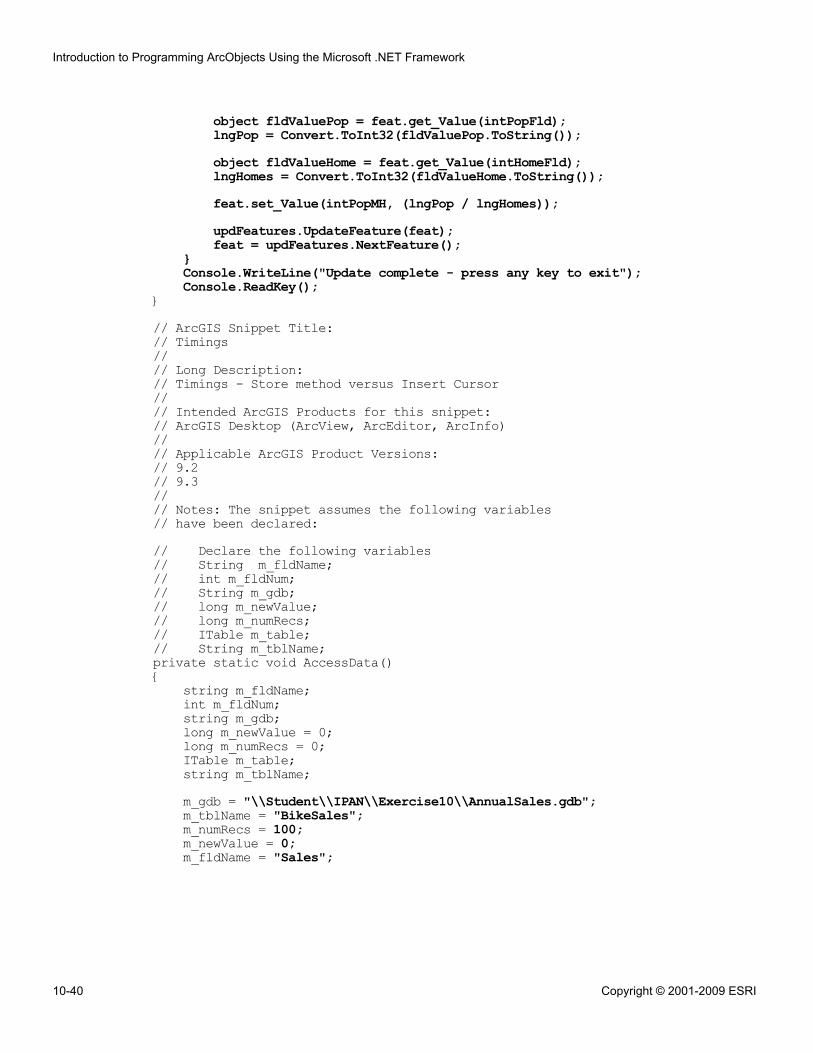
object fldValuePop = feat.get_Value(intPopFld);lngPop = Convert.ToInt32(fldValuePop.ToString());object fldValueHome = feat.get_Value(intHomeFld);lngHomes = Convert.ToInt32(fldValueHome.ToString());feat.set_Value(intPopMH, (lngPop / lngHomes));updFeatures.UpdateFeature(feat);feat = updFeatures.NextFeature();
}Console.WriteLine("Update complete - press any key to exit");Console.ReadKey();
}// ArcGIS Snippet Title:// Timings//// Long Description:// Timings - Store method versus Insert Cursor//// Intended ArcGIS Products for this snippet:// ArcGIS Desktop (ArcView, ArcEditor, ArcInfo)//// Applicable ArcGIS Product Versions:// 9.2// 9.3//// Notes: The snippet assumes the following variables// have been declared:// Declare the following variables// String m_fldName;// int m_fldNum;// String m_gdb;// long m_newValue;// long m_numRecs;// ITable m_table;// String m_tblName;private static void AccessData(){
string m_fldName;int m_fldNum;string m_gdb;long m_newValue = 0;long m_numRecs = 0;ITable m_table;string m_tblName;m_gdb = "\\Student\\IPAN\\Exercise10\\AnnualSales.gdb";m_tblName = "BikeSales";m_numRecs = 100;m_newValue = 0;m_fldName = "Sales";
Introduction to Programming ArcObjects Using the Microsoft .NET Framework
10-40 Copyright © 2001-2009 ESRI
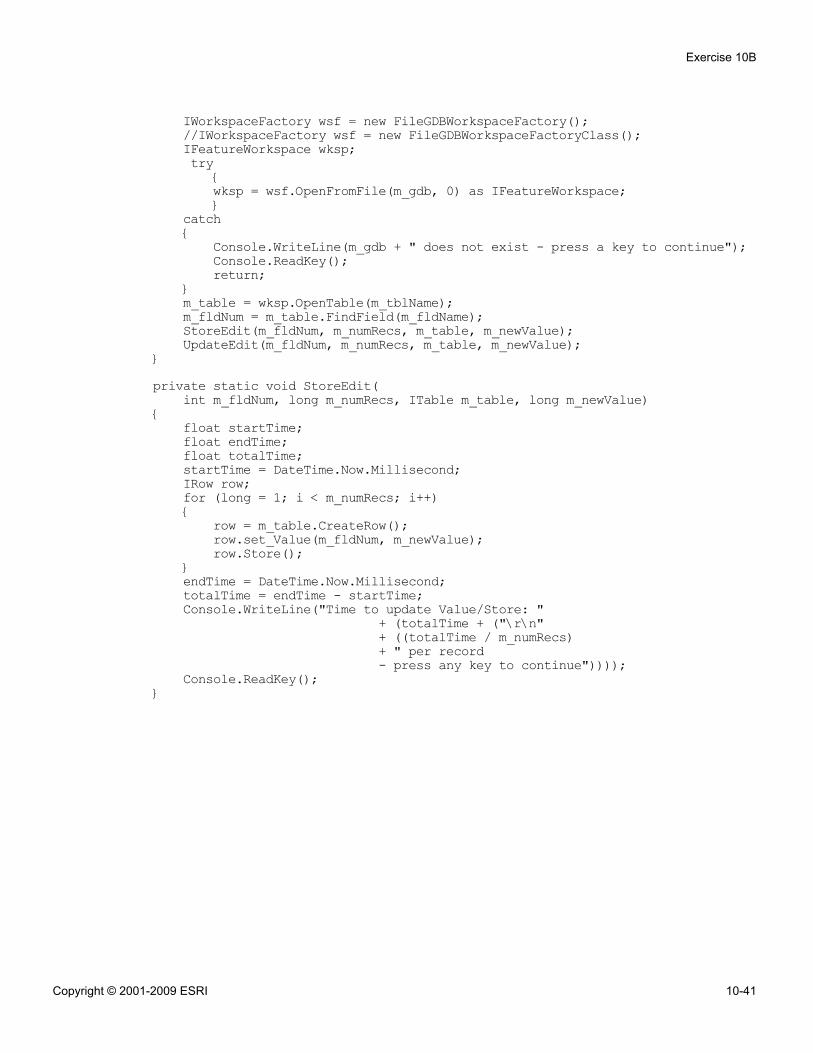
IWorkspaceFactory wsf = new FileGDBWorkspaceFactory();//IWorkspaceFactory wsf = new FileGDBWorkspaceFactoryClass();IFeatureWorkspace wksp;try
{wksp = wsf.OpenFromFile(m_gdb, 0) as IFeatureWorkspace;}
catch{
Console.WriteLine(m_gdb + " does not exist - press a key to continue");Console.ReadKey();return;
}m_table = wksp.OpenTable(m_tblName);m_fldNum = m_table.FindField(m_fldName);StoreEdit(m_fldNum, m_numRecs, m_table, m_newValue);UpdateEdit(m_fldNum, m_numRecs, m_table, m_newValue);
}private static void StoreEdit(
int m_fldNum, long m_numRecs, ITable m_table, long m_newValue){
float startTime;float endTime;float totalTime;startTime = DateTime.Now.Millisecond;IRow row;for (long = 1; i < m_numRecs; i++){
row = m_table.CreateRow();row.set_Value(m_fldNum, m_newValue);row.Store();
}endTime = DateTime.Now.Millisecond;totalTime = endTime - startTime;Console.WriteLine("Time to update Value/Store: "
+ (totalTime + ("\r\n"+ ((totalTime / m_numRecs)+ " per record- press any key to continue"))));
Console.ReadKey();}
Exercise 10B
Copyright © 2001-2009 ESRI 10-41
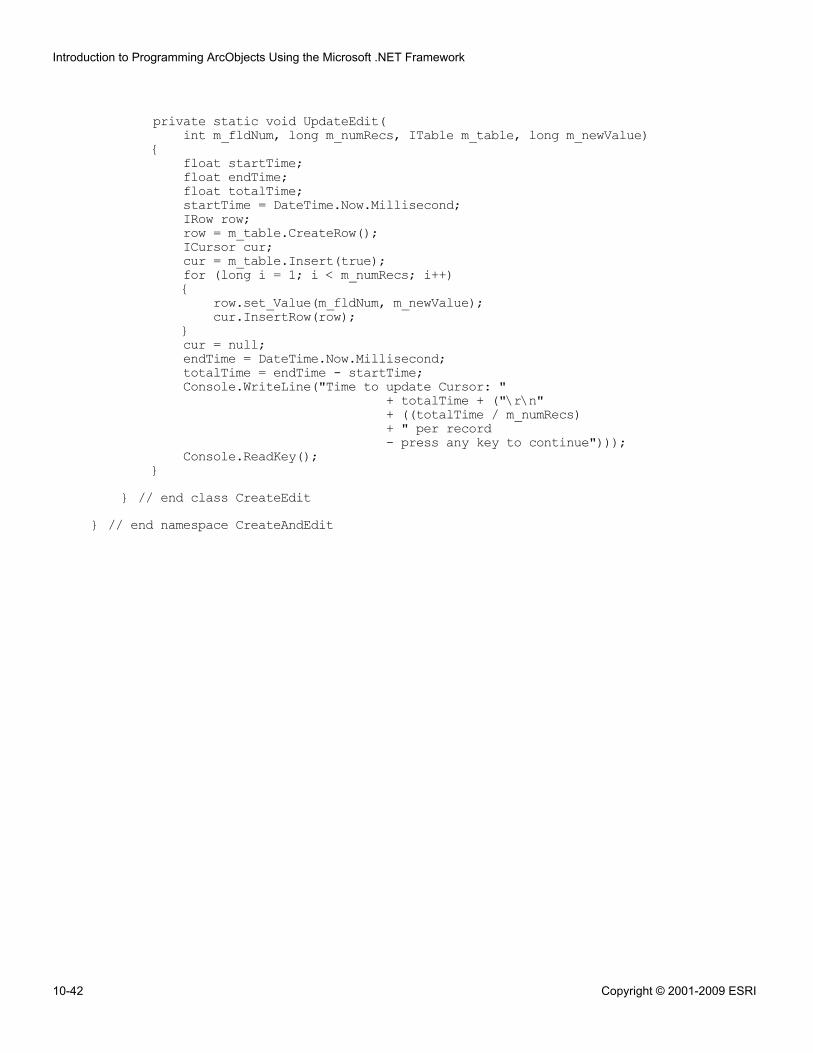
private static void UpdateEdit(int m_fldNum, long m_numRecs, ITable m_table, long m_newValue)
{float startTime;float endTime;float totalTime;startTime = DateTime.Now.Millisecond;IRow row;row = m_table.CreateRow();ICursor cur;cur = m_table.Insert(true);for (long i = 1; i < m_numRecs; i++){
row.set_Value(m_fldNum, m_newValue);cur.InsertRow(row);
}cur = null;endTime = DateTime.Now.Millisecond;totalTime = endTime - startTime;Console.WriteLine("Time to update Cursor: "
+ totalTime + ("\r\n"+ ((totalTime / m_numRecs)+ " per record- press any key to continue")));
Console.ReadKey();}
} // end class CreateEdit} // end namespace CreateAndEdit
Introduction to Programming ArcObjects Using the Microsoft .NET Framework
10-42 Copyright © 2001-2009 ESRI
11Geoprocessing
Exercise 11A: Access the GeoProcessor(VB.NET)Estimated time: 60 minutesChallenge: List environmentsEstimated time: 5 minutes
Exercise 11B: Access the GeoProcessor(C#)Estimated time: 60 minutesChallenge: List environmentsEstimated time: 5 minutes


Exercise 11A: Access the GeoProcessor (VB.NET)
Estimated time: 60 minutes
In this exercise, you will use a GeoProcessor object to run system tools, run multipletools sequentially in the same process, and run a batch process. You will work with theGeoProcessor object's methods and properties with your spatial data.
In this exercise, you will:
▪ Work with methods and properties on IGeoProcessor▪ Run a geoprocessing system tool▪ Run multiple tools in succession▪ Run a batch process using a "List" method
Exercise shortcut1. Open and review an existing workspace, the Geoprocessing.gdb file geodatabase,
from \Student\IPAN\Database folder.
2. In Visual Studio, create a new Visual Basic Windows Console Application.
3. Programmatically determine whether the Buildings feature class resides in the filegeodatabase.
4. Buffer the Buildings feature class.
5. Modify your code to overwrite any existing output. Introduce error handling andreturn all geoprocessing messages when an error occurs.
6. Buffer the Buildings feature class and create a new feature class of the outputbuffer features. Find the areas of intersection among the output buffer features.
7. Add a field to each polygon feature class in the CityData feature dataset.
** (Optional) Perform a batch process on a larger volume of data using a "List"method and add a field to each feature class in the CityData feature dataset.
** (Challenge): List the environment properties in the console window, and reportthe total number of environments.
Exercise 11A
Copyright © 2001-2009 ESRI 11-1
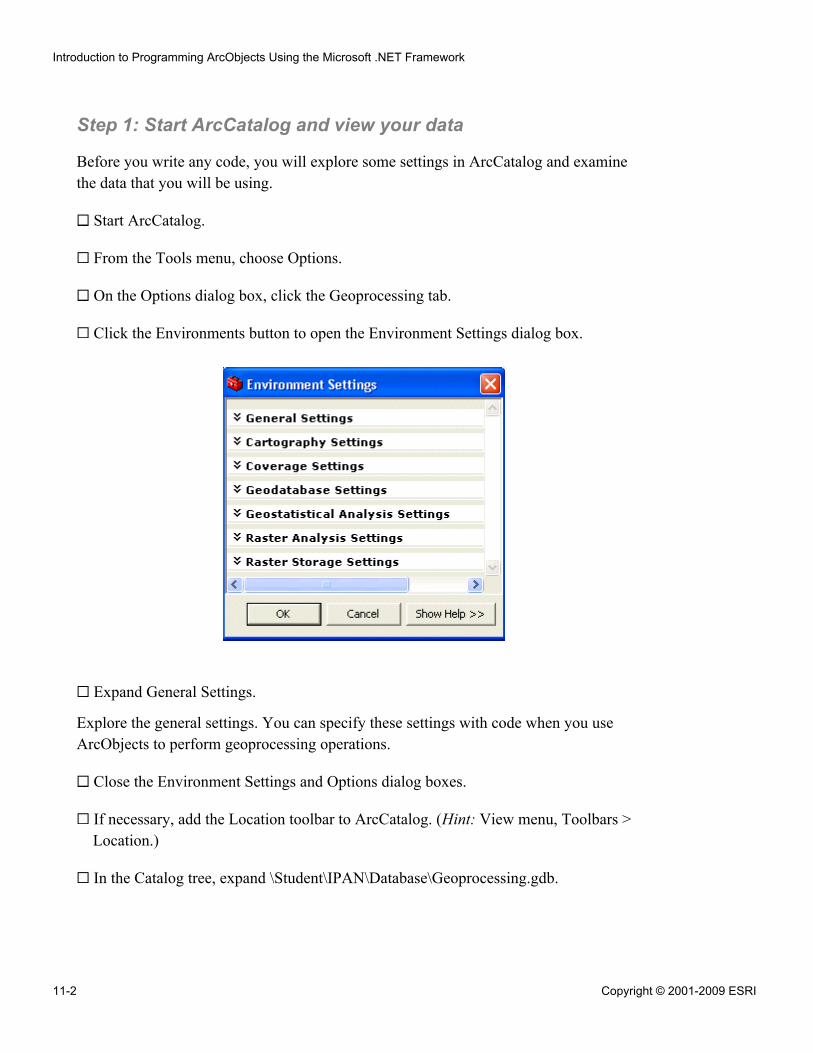
Step 1: Start ArcCatalog and view your data
Before you write any code, you will explore some settings in ArcCatalog and examinethe data that you will be using.
Start ArcCatalog.
From the Tools menu, choose Options.
On the Options dialog box, click the Geoprocessing tab.
Click the Environments button to open the Environment Settings dialog box.
Expand General Settings.
Explore the general settings. You can specify these settings with code when you useArcObjects to perform geoprocessing operations.
Close the Environment Settings and Options dialog boxes.
If necessary, add the Location toolbar to ArcCatalog. (Hint: View menu, Toolbars >Location.)
In the Catalog tree, expand \Student\IPAN\Database\Geoprocessing.gdb.
Introduction to Programming ArcObjects Using the Microsoft .NET Framework
11-2 Copyright © 2001-2009 ESRI
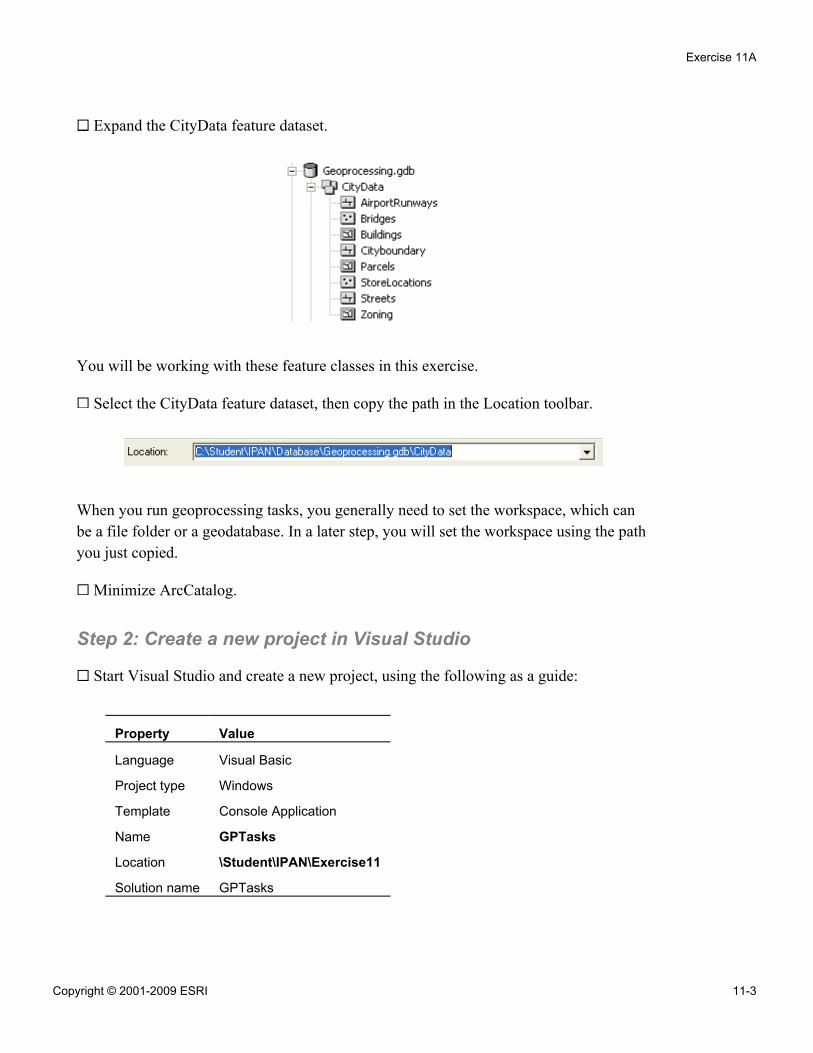
Expand the CityData feature dataset.
You will be working with these feature classes in this exercise.
Select the CityData feature dataset, then copy the path in the Location toolbar.
When you run geoprocessing tasks, you generally need to set the workspace, which canbe a file folder or a geodatabase. In a later step, you will set the workspace using the pathyou just copied.
Minimize ArcCatalog.
Step 2: Create a new project in Visual Studio
Start Visual Studio and create a new project, using the following as a guide:
Property Value
Language Visual Basic
Project type Windows
Template Console Application
Name GPTasks
Location \Student\IPAN\Exercise11
Solution name GPTasks
Exercise 11A
Copyright © 2001-2009 ESRI 11-3
! Make sure the box for Create directory for solution is checked.
Click OK.
In the Solution Explorer, rename Module1.vb as GeoProc.vb.
Add license checking for an ArcView license, including the shutdown option. (Hint:Project menu, Add ArcGIS License Checking)
Step 3: Create and work with a GeoProcessor object
Before you can run any geoprocessing tools, you need to create a GeoProcessor object.You will begin by exploring the Geoprocessor OMD.
If necessary, open the Desktop Help for .NET (VS2008).
In the table of contents, expand Building solutions with ArcGIS Engine using .NET >ArcObjects library reference > Geoprocessing > ESRI.ArcGIS.Geoprocessing.
Click Geoprocessing Namespace Object Model Diagram to openGeoprocessingObjectModel.pdf.
Zoom in on the coclass in the upper left of the diagram.
Question 1: What is the name of the coclass? What interface does it support?
______________________________________________________________________
This interface allows you to run any tool in ArcToolbox, set environments, and run batchprocesses on many types of data. You will use it to create your GeoProcessor object.
In the GeoProc module in your code, create a new sub procedure namedGeoprocessing with no arguments.
Create a new instance of a GeoProcessor object and store it in the variable gp.
Introduction to Programming ArcObjects Using the Microsoft .NET Framework
11-4 Copyright © 2001-2009 ESRI
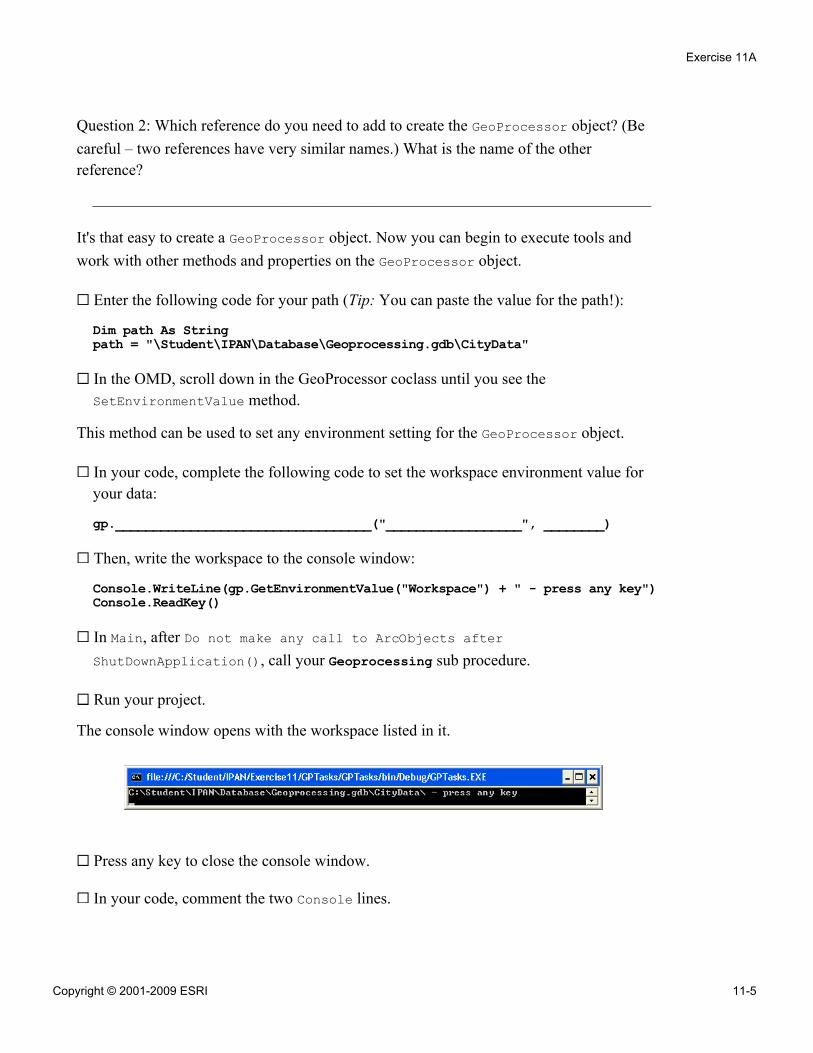
Question 2: Which reference do you need to add to create the GeoProcessor object? (Becareful – two references have very similar names.) What is the name of the otherreference?
______________________________________________________________________
It's that easy to create a GeoProcessor object. Now you can begin to execute tools andwork with other methods and properties on the GeoProcessor object.
Enter the following code for your path (Tip: You can paste the value for the path!):
Dim path As Stringpath = "\Student\IPAN\Database\Geoprocessing.gdb\CityData"
In the OMD, scroll down in the GeoProcessor coclass until you see theSetEnvironmentValue method.
This method can be used to set any environment setting for the GeoProcessor object.
In your code, complete the following code to set the workspace environment value foryour data:
gp.__________________________________("__________________", ________)
Then, write the workspace to the console window:
Console.WriteLine(gp.GetEnvironmentValue("Workspace") + " - press any key")Console.ReadKey()
In Main, after Do not make any call to ArcObjects afterShutDownApplication(), call your Geoprocessing sub procedure.
Run your project.
The console window opens with the workspace listed in it.
Press any key to close the console window.
In your code, comment the two Console lines.
Exercise 11A
Copyright © 2001-2009 ESRI 11-5
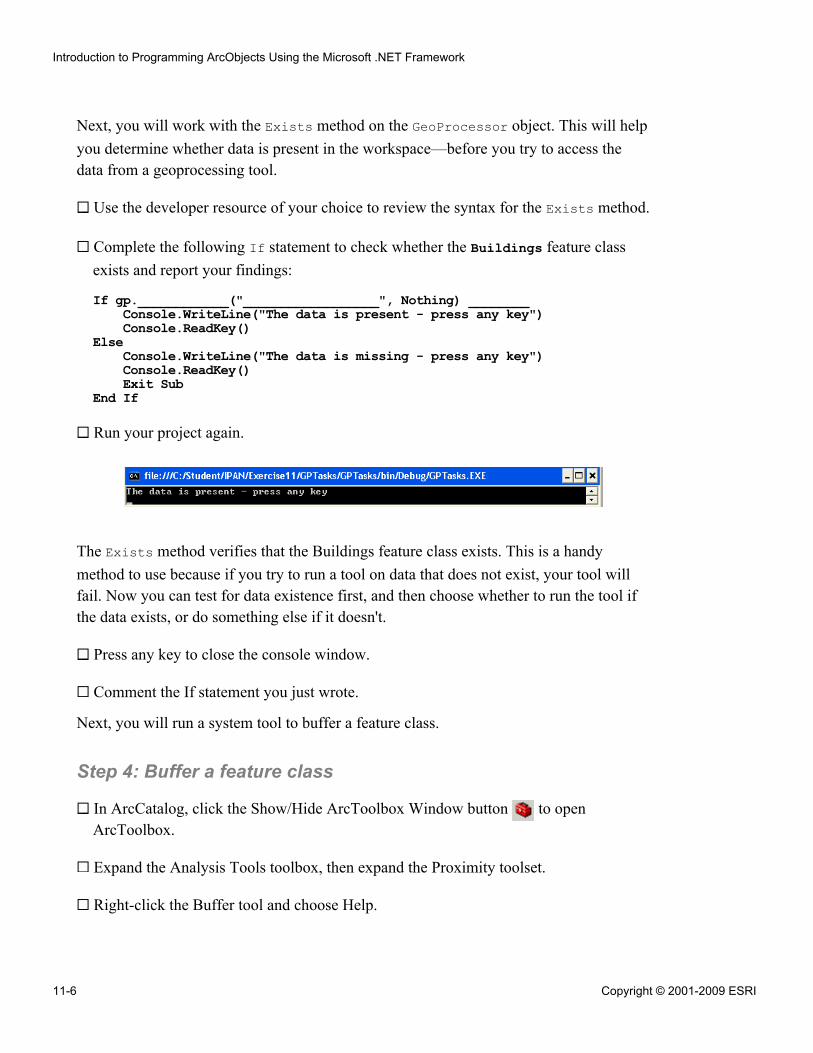
Next, you will work with the Exists method on the GeoProcessor object. This will helpyou determine whether data is present in the workspace—before you try to access thedata from a geoprocessing tool.
Use the developer resource of your choice to review the syntax for the Exists method.
Complete the following If statement to check whether the Buildings feature classexists and report your findings:
If gp.____________("__________________", Nothing) ________Console.WriteLine("The data is present - press any key")Console.ReadKey()
ElseConsole.WriteLine("The data is missing - press any key")Console.ReadKey()Exit Sub
End If
Run your project again.
The Exists method verifies that the Buildings feature class exists. This is a handymethod to use because if you try to run a tool on data that does not exist, your tool willfail. Now you can test for data existence first, and then choose whether to run the tool ifthe data exists, or do something else if it doesn't.
Press any key to close the console window.
Comment the If statement you just wrote.
Next, you will run a system tool to buffer a feature class.
Step 4: Buffer a feature class
In ArcCatalog, click the Show/Hide ArcToolbox Window button to openArcToolbox.
Expand the Analysis Tools toolbox, then expand the Proximity toolset.
Right-click the Buffer tool and choose Help.
Introduction to Programming ArcObjects Using the Microsoft .NET Framework
11-6 Copyright © 2001-2009 ESRI
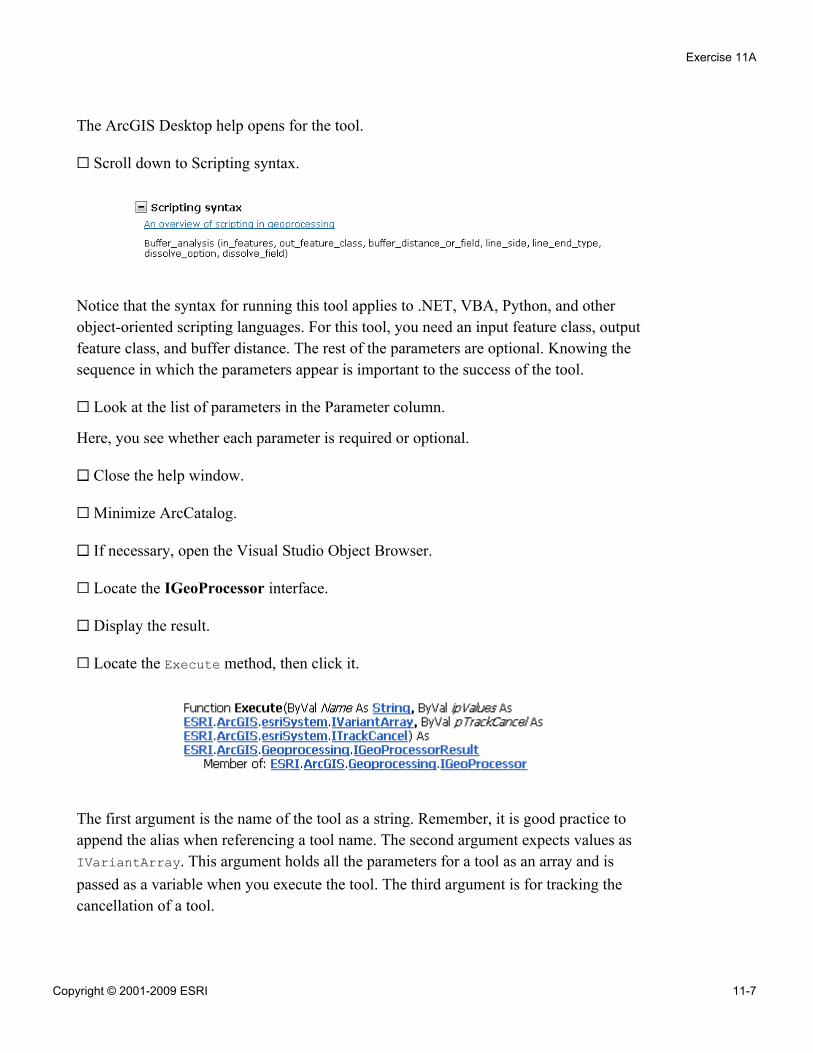
The ArcGIS Desktop help opens for the tool.
Scroll down to Scripting syntax.
Notice that the syntax for running this tool applies to .NET, VBA, Python, and otherobject-oriented scripting languages. For this tool, you need an input feature class, outputfeature class, and buffer distance. The rest of the parameters are optional. Knowing thesequence in which the parameters appear is important to the success of the tool.
Look at the list of parameters in the Parameter column.
Here, you see whether each parameter is required or optional.
Close the help window.
Minimize ArcCatalog.
If necessary, open the Visual Studio Object Browser.
Locate the IGeoProcessor interface.
Display the result.
Locate the Execute method, then click it.
The first argument is the name of the tool as a string. Remember, it is good practice toappend the alias when referencing a tool name. The second argument expects values asIVariantArray. This argument holds all the parameters for a tool as an array and ispassed as a variable when you execute the tool. The third argument is for tracking thecancellation of a tool.
Exercise 11A
Copyright © 2001-2009 ESRI 11-7
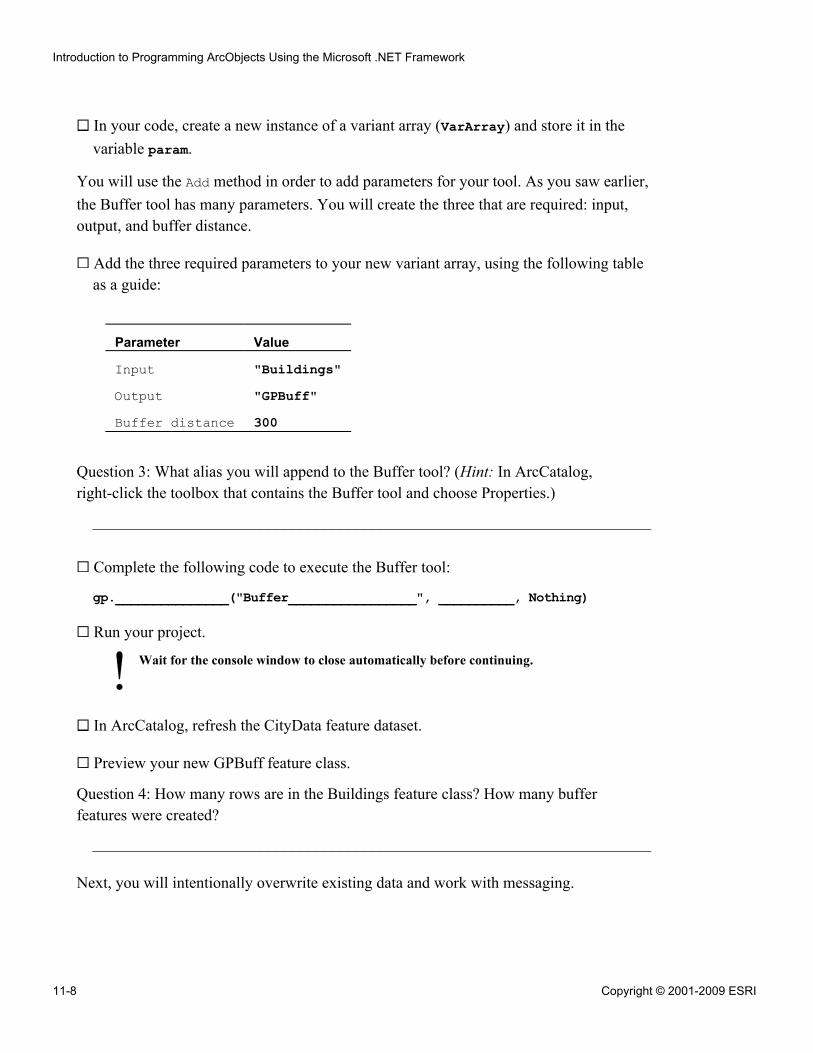
!
In your code, create a new instance of a variant array (VarArray) and store it in thevariable param.
You will use the Add method in order to add parameters for your tool. As you saw earlier,the Buffer tool has many parameters. You will create the three that are required: input,output, and buffer distance.
Add the three required parameters to your new variant array, using the following tableas a guide:
Parameter Value
Input "Buildings"Output "GPBuff"Buffer distance 300
Question 3: What alias you will append to the Buffer tool? (Hint: In ArcCatalog,right-click the toolbox that contains the Buffer tool and choose Properties.)
______________________________________________________________________
Complete the following code to execute the Buffer tool:
gp._______________("Buffer_________________", __________, Nothing)
Run your project.
Wait for the console window to close automatically before continuing.
In ArcCatalog, refresh the CityData feature dataset.
Preview your new GPBuff feature class.
Question 4: How many rows are in the Buildings feature class? How many bufferfeatures were created?
______________________________________________________________________
Next, you will intentionally overwrite existing data and work with messaging.
Introduction to Programming ArcObjects Using the Microsoft .NET Framework
11-8 Copyright © 2001-2009 ESRI
Step 5: Work with messaging and overwriting output
In this step, you will use the GetMessage method on the GeoProcessor object in order tofind out why a tool does not run. The GeoProcessor object usually provides a descriptivemessage indicating why an operation has failed. Messages from the GeoProcessor objectare often more helpful than standard .NET messages.
First, you will make sure that an ArcCatalog setting to overwrite output is not enabled.
In ArcCatalog, from the Tools menu, choose Options.
On the Geoprocessing tab, uncheck the Overwrite the outputs of geoprocessingoperations check box, if necessary.
Click OK.
Minimize ArcCatalog.
In Visual Studio, run your project.
Note: Remember that you just ran it in the previous step and created the GPBuff featureclass. By default, when you are geoprocessing in ArcObjects, data that already exists willnot be overwritten. Instead, an error will occur.
An unhandled COM exception displays. Not very friendly, is it?
On the warning message, click View Detail.
Exercise 11A
Copyright © 2001-2009 ESRI 11-9
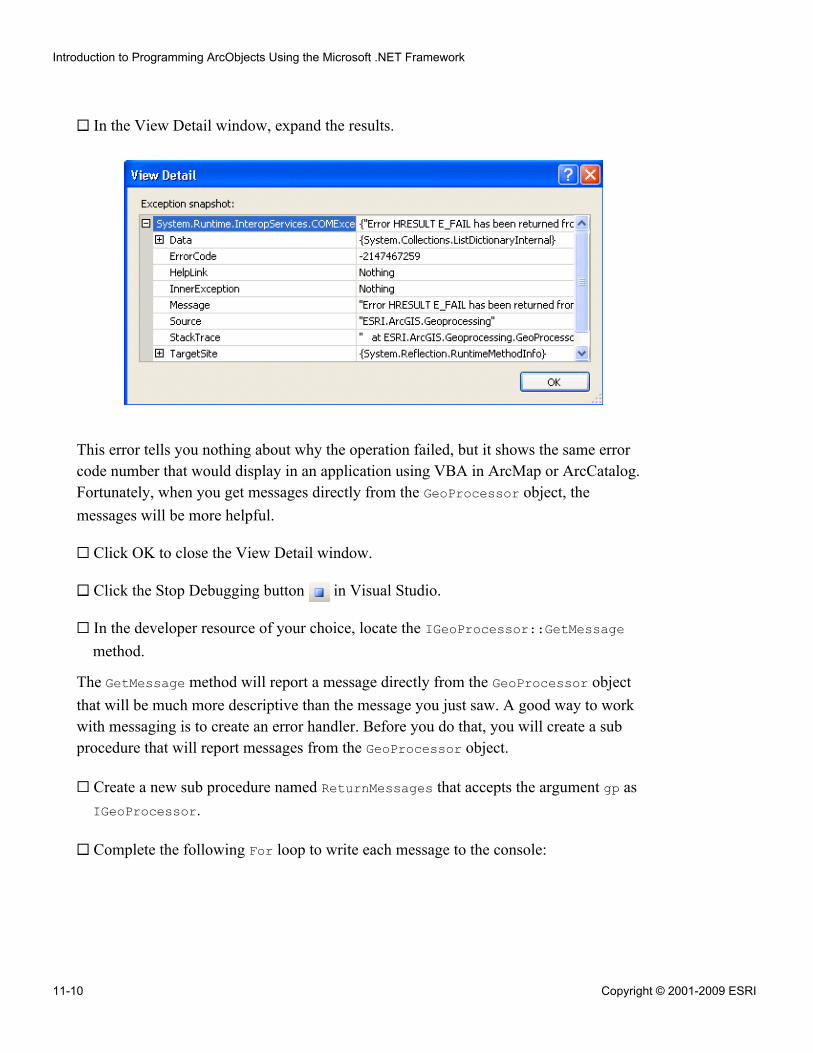
In the View Detail window, expand the results.
This error tells you nothing about why the operation failed, but it shows the same errorcode number that would display in an application using VBA in ArcMap or ArcCatalog.Fortunately, when you get messages directly from the GeoProcessor object, themessages will be more helpful.
Click OK to close the View Detail window.
Click the Stop Debugging button in Visual Studio.
In the developer resource of your choice, locate the IGeoProcessor::GetMessagemethod.
The GetMessage method will report a message directly from the GeoProcessor objectthat will be much more descriptive than the message you just saw. A good way to workwith messaging is to create an error handler. Before you do that, you will create a subprocedure that will report messages from the GeoProcessor object.
Create a new sub procedure named ReturnMessages that accepts the argument gp asIGeoProcessor.
Complete the following For loop to write each message to the console:
Introduction to Programming ArcObjects Using the Microsoft .NET Framework
11-10 Copyright © 2001-2009 ESRI
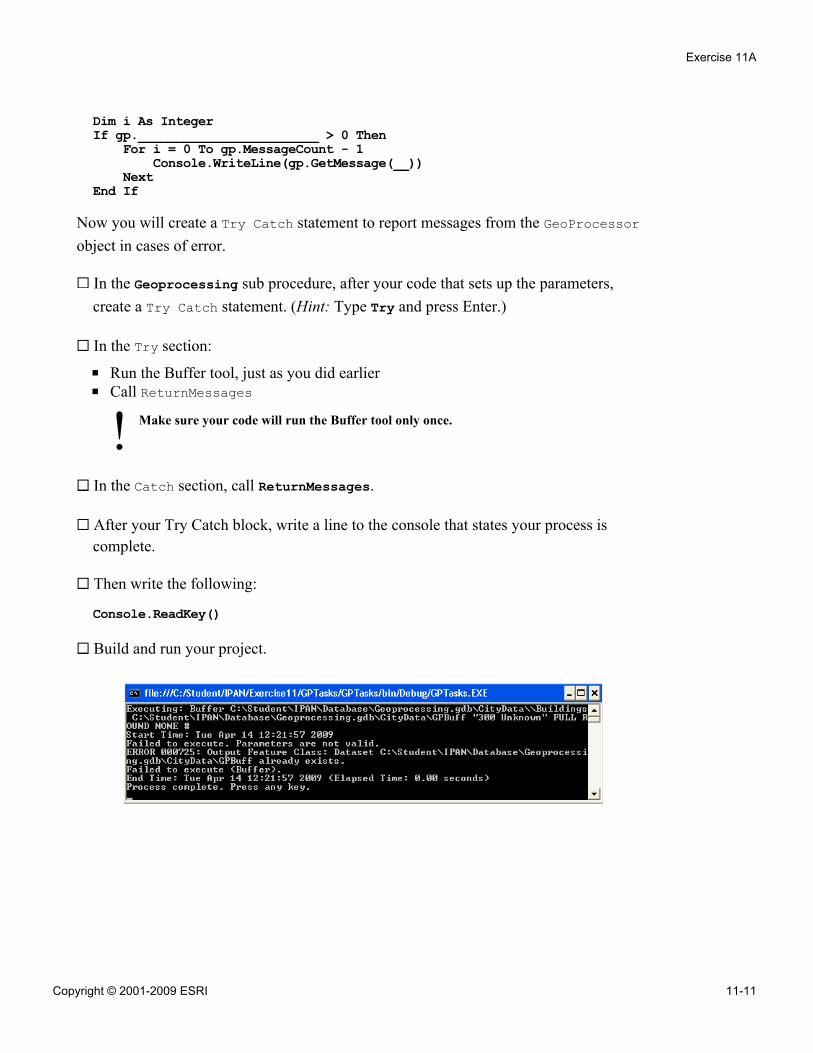
!
Dim i As IntegerIf gp.________________________ > 0 Then
For i = 0 To gp.MessageCount - 1Console.WriteLine(gp.GetMessage(__))
NextEnd If
Now you will create a Try Catch statement to report messages from the GeoProcessorobject in cases of error.
In the Geoprocessing sub procedure, after your code that sets up the parameters,create a Try Catch statement. (Hint: Type Try and press Enter.)
In the Try section:
▪ Run the Buffer tool, just as you did earlier▪ Call ReturnMessages
Make sure your code will run the Buffer tool only once.
In the Catch section, call ReturnMessages.
After your Try Catch block, write a line to the console that states your process iscomplete.
Then write the following:
Console.ReadKey()
Build and run your project.
Exercise 11A
Copyright © 2001-2009 ESRI 11-11
The error message states that the GPBuff feature class already exists. This is much morehelpful than the previous error. In this case, you can devise a solution because you knowthe cause of the error. You have a few options:
▪ Insert more tests in your code using the Exists method▪ Rename the output▪ Tell the GeoProcessor to overwrite existing data
For this situation, you will use the third option.
Close the console window.
In the developer resource of your choice, locate the OverwriteOutput property.
This is a Boolean property that evaluates to either True or False. By default, it is set toFalse. If you want to overwrite existing data, it needs to be set to True.
Within your Try statement, just before the line of code that executes the tool, set theOverwriteOutput property to True to overwrite existing data.
Run your project.
This time, there are no errors and the GPBuff feature class is overwritten.
Step 6: Run multiple tools in the same process
In this step, you will run multiple tools in one geoprocessing operation. You will use theoutput from one tool (Buffer) as the input for the next one (Intersect).
Create a new sub procedure called MultipleTools with no arguments.
Within the Geoprocessing sub procedure, copy the lines of code that create theGeoProcessor object and set the workspace.
Paste the code into your MultipleTools sub procedure.
Instantiate a new VarArray in the variable buffParams.
Add three parameters to buffParams:
▪ "Buildings"▪ "BldgsBuff300"▪ 300
Introduction to Programming ArcObjects Using the Microsoft .NET Framework
11-12 Copyright © 2001-2009 ESRI
In ArcToolbox of your ArcCatalog, expand the Analysis Tools toolbox and theOverlay toolset.
Right-click the Intersect tool and choose Help.
Scroll down to the Scripting syntax.
Question 5: What are the required parameters?
______________________________________________________________________
Close the help window.
In addition to the variant array for the Buffer tool, you will also need a variant array forthe Intersect tool.
In your code, create a new instance of VarArray and store it in the variableintParams.
Complete the following code to add the input and output parameters for the Intersecttool. For the input parameter, use the output from your Buffer tool.
intParams.______("_______________________")intParams.______("OverlapAreas")
Set the OverwriteOutput property of the GeoProcessor object to True.
Complete the following code to execute both tools:
gp.______________("Buffer_Analysis", ___________, Nothing)gp.______________("Intersect_Analysis", __________, Nothing)
In Sub Main, comment Geoprocessing().
Call your MultipleTools sub procedure.
Run your project. Wait for the console window to close automatically.
Start ArcMap with a new, empty map.
Add the BldgsBuff300, OverlapAreas, and Buildings feature classes to the map.
Exercise 11A
Copyright © 2001-2009 ESRI 11-13
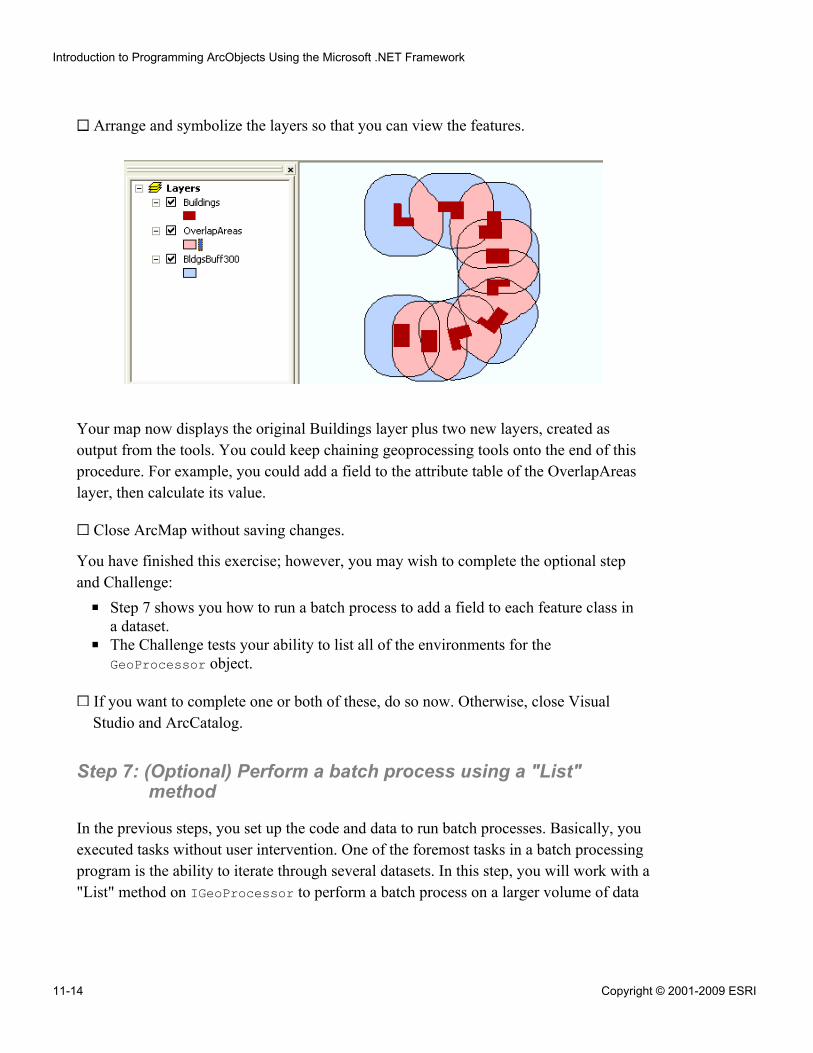
Arrange and symbolize the layers so that you can view the features.
Your map now displays the original Buildings layer plus two new layers, created asoutput from the tools. You could keep chaining geoprocessing tools onto the end of thisprocedure. For example, you could add a field to the attribute table of the OverlapAreaslayer, then calculate its value.
Close ArcMap without saving changes.
You have finished this exercise; however, you may wish to complete the optional stepand Challenge:
▪ Step 7 shows you how to run a batch process to add a field to each feature class ina dataset.
▪ The Challenge tests your ability to list all of the environments for theGeoProcessor object.
If you want to complete one or both of these, do so now. Otherwise, close VisualStudio and ArcCatalog.
Step 7: (Optional) Perform a batch process using a "List"method
In the previous steps, you set up the code and data to run batch processes. Basically, youexecuted tasks without user intervention. One of the foremost tasks in a batch processingprogram is the ability to iterate through several datasets. In this step, you will work with a"List" method on IGeoProcessor to perform a batch process on a larger volume of data
Introduction to Programming ArcObjects Using the Microsoft .NET Framework
11-14 Copyright © 2001-2009 ESRI
and add a field to each feature class in the CityData feature dataset. You will begin bycreating a GeoProcessor object.
Create a new sub procedure called BatchProcessing with no arguments.
Create the GeoProcessor object and set the workspace. Tip: Copy existing code fromthe MultipleTools sub procedure.
The GeoProcessor coclass contains several methods built specifically for creating listsof data. These methods work with different types of data and provide flexibility forrestricting a search by name or data category.
In the developer resource of your choice, locate the GeoProcessor coclass.
In the list of members, locate the methods that begin with the word "List."
Locate the ListFeatureClasses method.
This method creates a list of all, or some, of the feature classes in the current workspace.
Question 6: What types of filters does the ListFeatureClasses method accept?
______________________________________________________________________
Question 7: What does the ListFeatureClasses method return?
______________________________________________________________________
Declare a variable named gpEnumList to the appropriate interface.
Complete the following code to list all the polygon feature classes in the currentworkspace:
gpEnumList = gp.____________________________________("*", "______________", "")
In the Visual Studio Object Browser, search for and display the IGPEnumListinterface.
Exercise 11A
Copyright © 2001-2009 ESRI 11-15
Just like the enumerations for layers, this enumeration has only two methods: Next andReset. Notice that the Next method returns a string. In this case, the string represents afeature class name. To access each feature class in the list, you will need a string variable.
Declare a string variable named strFCName to store each feature class.
Set the variable to the Next item in gpEnumList.
In ArcCatalog, refresh the view to display the data you created in the CityData featuredataset in previous steps.
Question 8: How many polygon feature classes does CityData contain?
______________________________________________________________________
You will programmatically identify which feature classes are in this enumeration andreport their names in the console window.
Create a Do While loop that runs as long as strFCName is not equal to an empty string.
Inside the loop, complete the following code to list the names of each feature class:
Console.WriteLine(_________)
Move to the next item in the enumeration.
After your loop, write the following code:
Console.WriteLine("Press any key")Console.ReadKey()
In Sub Main, comment MultipleTools().
Call your BatchProcessing sub procedure.
Run your project.
Question 9: How many polygon feature classes are listed in the console window?
______________________________________________________________________
Now you know that all of the polygon feature classes are in this list. Next, you will add anew field to each of these feature classes.
Close the console window.
Introduction to Programming ArcObjects Using the Microsoft .NET Framework
11-16 Copyright © 2001-2009 ESRI
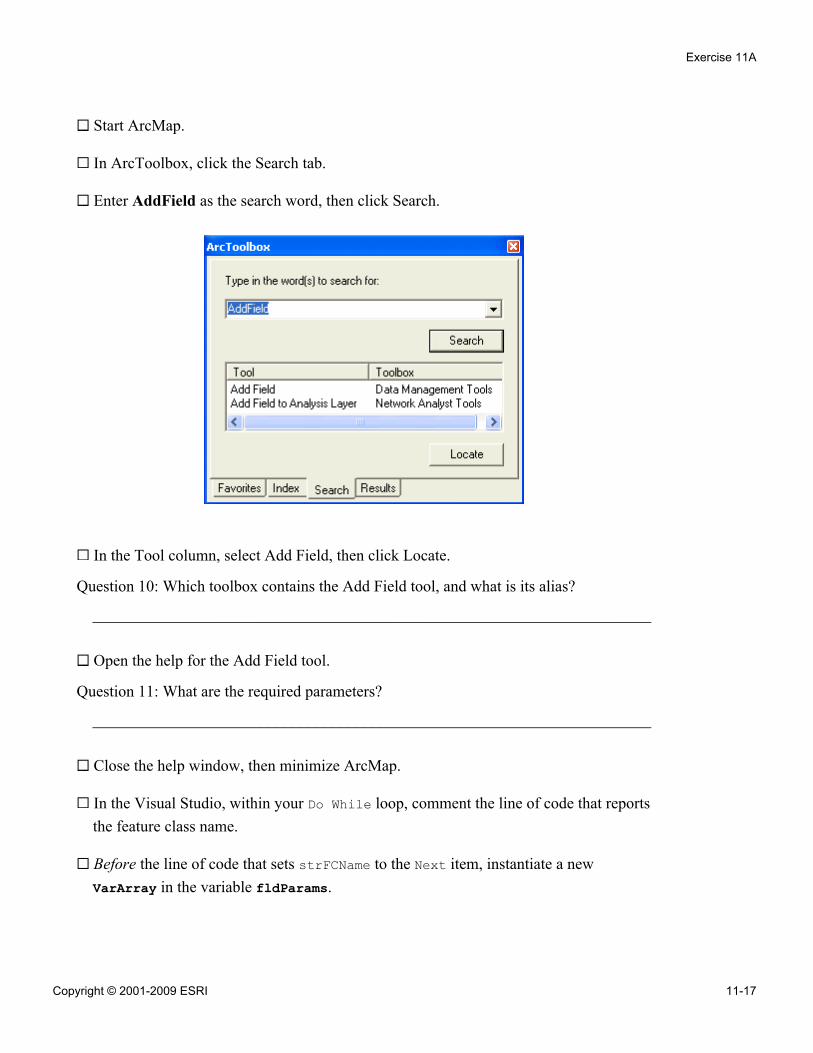
Start ArcMap.
In ArcToolbox, click the Search tab.
Enter AddField as the search word, then click Search.
In the Tool column, select Add Field, then click Locate.
Question 10: Which toolbox contains the Add Field tool, and what is its alias?
______________________________________________________________________
Open the help for the Add Field tool.
Question 11: What are the required parameters?
______________________________________________________________________
Close the help window, then minimize ArcMap.
In the Visual Studio, within your Do While loop, comment the line of code that reportsthe feature class name.
Before the line of code that sets strFCName to the Next item, instantiate a newVarArray in the variable fldParams.
Exercise 11A
Copyright © 2001-2009 ESRI 11-17
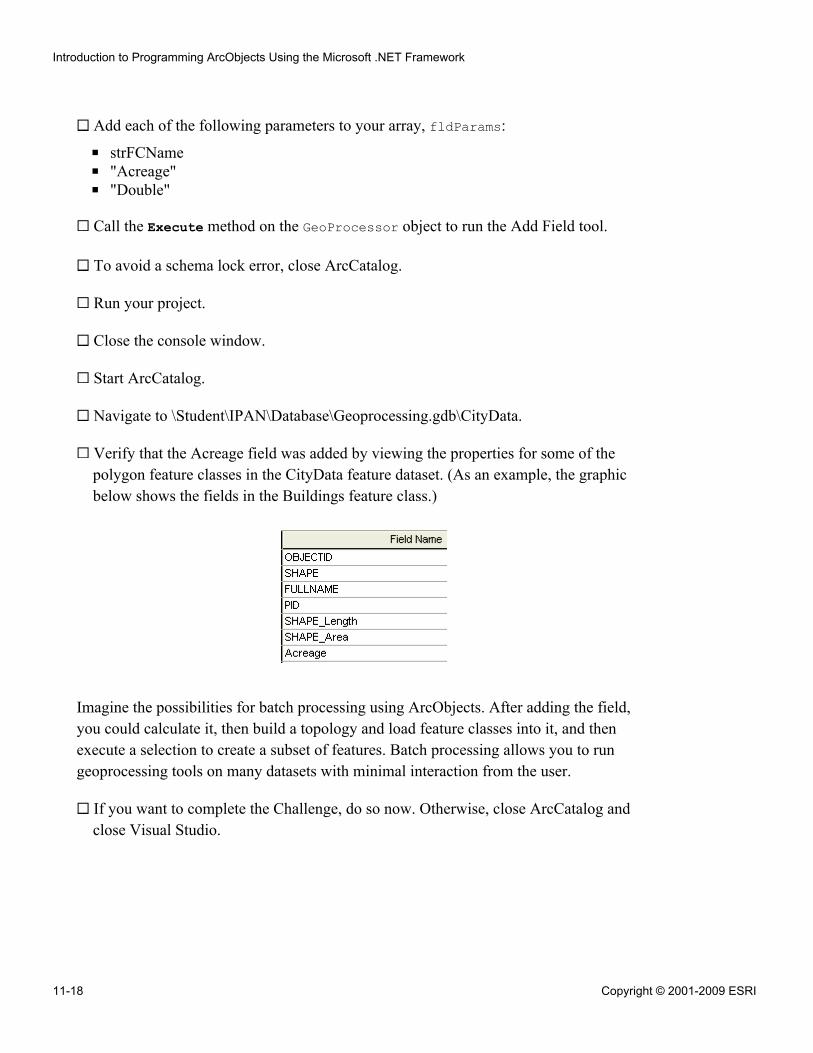
Add each of the following parameters to your array, fldParams:
▪ strFCName▪ "Acreage"▪ "Double"
Call the Execute method on the GeoProcessor object to run the Add Field tool.
To avoid a schema lock error, close ArcCatalog.
Run your project.
Close the console window.
Start ArcCatalog.
Navigate to \Student\IPAN\Database\Geoprocessing.gdb\CityData.
Verify that the Acreage field was added by viewing the properties for some of thepolygon feature classes in the CityData feature dataset. (As an example, the graphicbelow shows the fields in the Buildings feature class.)
Imagine the possibilities for batch processing using ArcObjects. After adding the field,you could calculate it, then build a topology and load feature classes into it, and thenexecute a selection to create a subset of features. Batch processing allows you to rungeoprocessing tools on many datasets with minimal interaction from the user.
If you want to complete the Challenge, do so now. Otherwise, close ArcCatalog andclose Visual Studio.
Introduction to Programming ArcObjects Using the Microsoft .NET Framework
11-18 Copyright © 2001-2009 ESRI
Conclusion
In this exercise, you worked with a GeoProcessor object. This is a very powerful objectin that it has many properties and methods you can use to facilitate geoprocessing yourdata. The ability to run a single geoprocessing tool, multiple geoprocessing tools, anddata-intensive batch processes without user intervention boosts productivity.
Challenge: List environmentsEstimated time: 5 minutes
When you created a GeoProcessor object in previous steps, you also assigned anenvironment setting. The instructions guided you to code Workspace as the argument.But, what if you wanted to assign a different environment setting? How would you knowits value? And how many environments are there, anyway? To complete this Challenge,you will derive the answers to these questions.
Use developer resources to find the method on the GeoProcessor object that will listthe environment properties.
Write code to list each property, report its name in the console window, and report thetotal number of environments.
Exercise 11A
Copyright © 2001-2009 ESRI 11-19

Answers to Exercise 11A Questions
Question 1: What is the name of the coclass? What interface does it support?
Answer: GeoProcessor; IGeoProcessor
Question 2: Which reference do you need to add to create the GeoProcessor object? (Becareful – two references have very similar names.) What is the name of the otherreference?
Answer: ESRI.ArcGIS.Geoprocessing; ESRI.ArcGIS.Geoprocessor
Question 3: What alias you will append to the Buffer tool? (Hint: In ArcCatalog,right-click the toolbox that contains the Buffer tool and choose Properties.)
Answer: analysis
Question 4: How many rows are in the Buildings feature class? How many bufferfeatures were created?
Answer: Nine; nine
Question 5: What are the required parameters?
Answer: Input features (in_features) and output features (out_feature_class)
Question 6: What types of filters does the ListFeatureClasses method accept?
Answer: Wild card, feature type, dataset
Question 7: What does the ListFeatureClasses method return?
Answer: An object reference to IGpEnumList
Question 8: How many polygon feature classes does CityData contain?
Answer: Six
Question 9: How many polygon feature classes are listed in the console window?
Answer: Six
Introduction to Programming ArcObjects Using the Microsoft .NET Framework
11-20 Copyright © 2001-2009 ESRI

Question 10: Which toolbox contains the Add Field tool, and what is its alias?
Answer: Data Management Tools; management
Question 11: What are the required parameters?
Answer: Input table (in_table), field name (field_name), field type (field_type)
Exercise 11A
Copyright © 2001-2009 ESRI 11-21

Exercise Solution: Exercise 11A (VB.NET)Imports ESRI.ArcGIS.esriSystemImports ESRI.ArcGIS.GeoprocessingImports ESRI.ArcGIS.esriSystemModule GeoProc
Private m_AOLicenseInitializer As LicenseInitializer = _New VB_Win_ConsoleApp.LicenseInitializer()
Sub Main()'ESRI License Initializer generated code.m_AOLicenseInitializer.InitializeApplication( _
New esriLicenseProductCode() _{esriLicenseProductCode.esriLicenseProductCodeArcView}, _New esriLicenseExtensionCode() {})
'ESRI License Initializer generated code.'Do not make any call to ArcObjects after ShutDownApplication()'Geoprocessing()'MultipleTools()BatchProcessing()m_AOLicenseInitializer.ShutdownApplication()
End SubSub Geoprocessing()
Dim gp As IGeoProcessor = New GeoProcessor'Dim gp As IGeoProcessor = New GeoProcessorClassDim path As Stringpath = "\Student\IPAN\Database\Geoprocessing.gdb\CityData"gp.SetEnvironmentValue("Workspace", path)'Console.WriteLine(gp.GetEnvironmentValue("Workspace") + " = press any key")'Console.ReadKey()'If gp.Exists("Buildings", Nothing) Then
'Console.WriteLine("The data is present - press any key")'Console.ReadKey()
'Else'Console.WriteLine("The data is missing - press any key")'Console.ReadKey()'Exit Sub
'End IfDim param As IVariantArray = New VarArray'Dim param As IVariantArray = New VarArrayClassparam.Add("Buildings")param.Add("GPBuff")param.Add(300)
Introduction to Programming ArcObjects Using the Microsoft .NET Framework
11-22 Copyright © 2001-2009 ESRI

Trygp.OverwriteOutput = Truegp.Execute("Buffer_analysis", param, Nothing)ReturnMessages(gp)
Catch ex As ExceptionReturnMessages(gp)
End TryConsole.WriteLine("Process finished - press any key")Console.ReadKey()
End SubSub ReturnMessages(ByVal gp As IGeoProcessor)
' Print messages from tool executionDim i As IntegerIf gp.MessageCount > 0 Then
For i= 0 To gp.MessageCount - 1Console.WriteLine(gp.GetMessage(i))
NextEnd If
End SubSub MultipleTools()
Dim gp As IGeoProcessor = New GeoProcessor'Dim gp As IGeoProcessor = New GeoProcessorClassDim path As Stringpath = "\Student\IPAN\Database\Geoprocessing.gdb\CityData"gp.SetEnvironmentValue("Workspace", path)Dim buffParams As IVariantArray = New VarArray'Dim buffParams As IVariantArray = New VarArrayClassbuffParams.Add("Buildings")buffParams.Add("BldgsBuff300")buffParams.Add(300)Dim intParams As IVariantArray = New VarArray'Dim intParams As IVariantArray = New VarArrayClassintParams.Add("BldgsBuff300")intParams.Add("OverlapAreas")gp.OverwriteOutput = Truegp.Execute("Buffer_Analysis", buffParams, Nothing)gp.Execute("Intersect_Analysis", intParams, Nothing)
End SubSub BatchProcessing()
Dim gp As IGeoProcessor = New GeoProcessor'Dim gp As IGeoProcessor = New GeoProcessorClassDim path As Stringpath = "\Student\IPAN\Database\Geoprocessing.gdb\CityData"gp.SetEnvironmentValue("Workspace", path)
Exercise 11A
Copyright © 2001-2009 ESRI 11-23
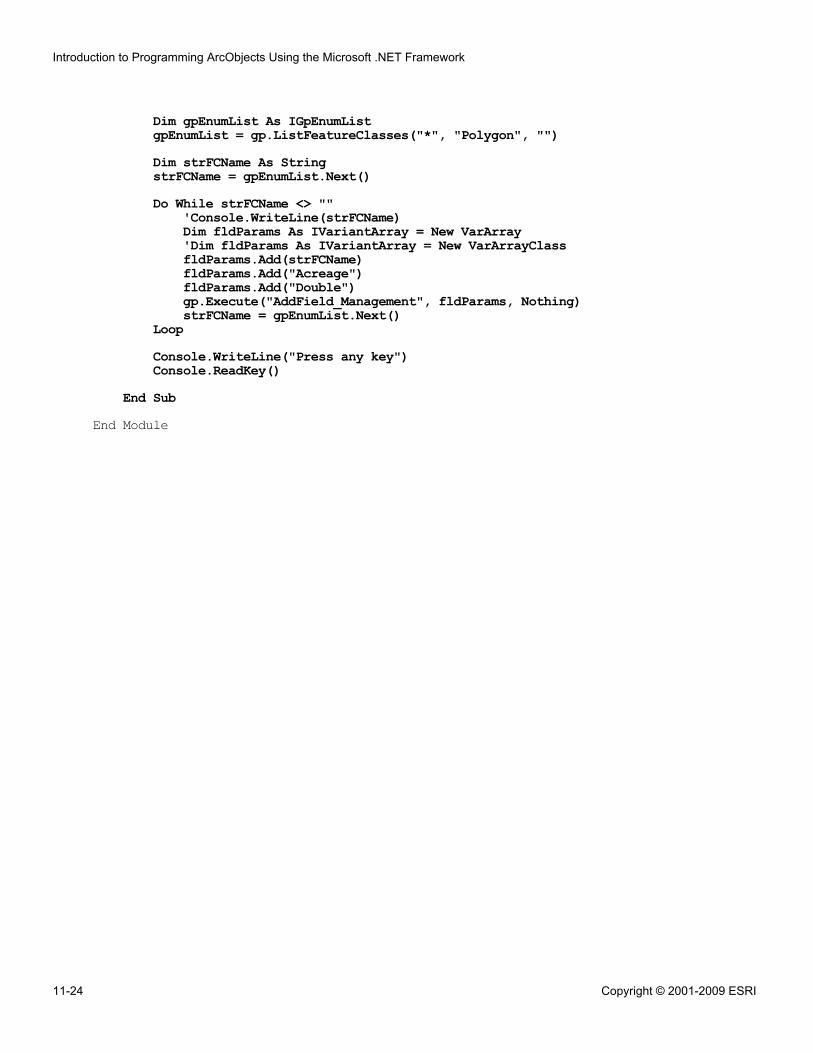
Dim gpEnumList As IGpEnumListgpEnumList = gp.ListFeatureClasses("*", "Polygon", "")Dim strFCName As StringstrFCName = gpEnumList.Next()Do While strFCName <> ""
'Console.WriteLine(strFCName)Dim fldParams As IVariantArray = New VarArray'Dim fldParams As IVariantArray = New VarArrayClassfldParams.Add(strFCName)fldParams.Add("Acreage")fldParams.Add("Double")gp.Execute("AddField_Management", fldParams, Nothing)strFCName = gpEnumList.Next()
LoopConsole.WriteLine("Press any key")Console.ReadKey()
End SubEnd Module
Introduction to Programming ArcObjects Using the Microsoft .NET Framework
11-24 Copyright © 2001-2009 ESRI
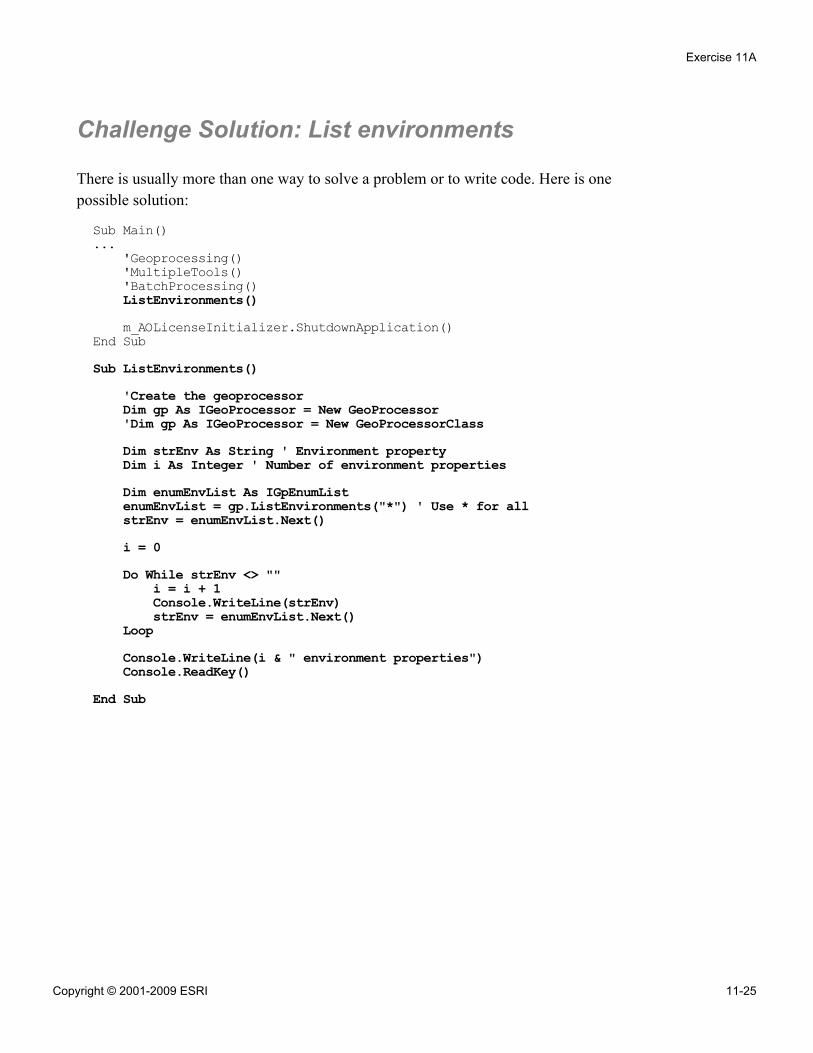
Challenge Solution: List environments
There is usually more than one way to solve a problem or to write code. Here is onepossible solution:
Sub Main()...
'Geoprocessing()'MultipleTools()'BatchProcessing()ListEnvironments()m_AOLicenseInitializer.ShutdownApplication()
End SubSub ListEnvironments()
'Create the geoprocessorDim gp As IGeoProcessor = New GeoProcessor'Dim gp As IGeoProcessor = New GeoProcessorClassDim strEnv As String ' Environment propertyDim i As Integer ' Number of environment propertiesDim enumEnvList As IGpEnumListenumEnvList = gp.ListEnvironments("*") ' Use * for allstrEnv = enumEnvList.Next()i = 0Do While strEnv <> ""
i = i + 1Console.WriteLine(strEnv)strEnv = enumEnvList.Next()
LoopConsole.WriteLine(i & " environment properties")Console.ReadKey()
End Sub
Exercise 11A
Copyright © 2001-2009 ESRI 11-25

Exercise 11B: Access the GeoProcessor (C#)
Estimated time: 60 minutes
In this exercise, you will use a GeoProcessor object to run system tools, run multipletools sequentially in the same process, and run a batch process. You will work with theGeoProcessor object's methods and properties with your spatial data.
In this exercise, you will:
▪ Work with methods and properties on IGeoProcessor▪ Run a geoprocessing system tool▪ Run multiple tools in succession▪ Run a batch process using a "List" method
Exercise shortcut1. Open and review an existing workspace, the Geoprocessing.gdb file geodatabase,
from \Student\IPAN\Database folder.
2. In Visual Studio, create a new Visual C# Windows Console Application.
3. Programmatically determine whether the Buildings feature class resides in the filegeodatabase.
4. Buffer the Buildings feature class.
5. Modify your code to overwrite any existing output. Introduce error handling andreturn all geoprocessing messages when an error occurs.
6. Buffer the Buildings feature class and create a new feature class of the outputbuffer features. Find the areas of intersection among the output buffer features.
7. Add a field to each polygon feature class in the CityData feature dataset.
** (Optional) Perform a batch process on a larger volume of data using a "List"method and add a field to each feature class in the CityData feature dataset.
** (Challenge): List the environment properties in the console window, and reportthe total number of environments.
Exercise 11B
Copyright © 2001-2009 ESRI 11-27
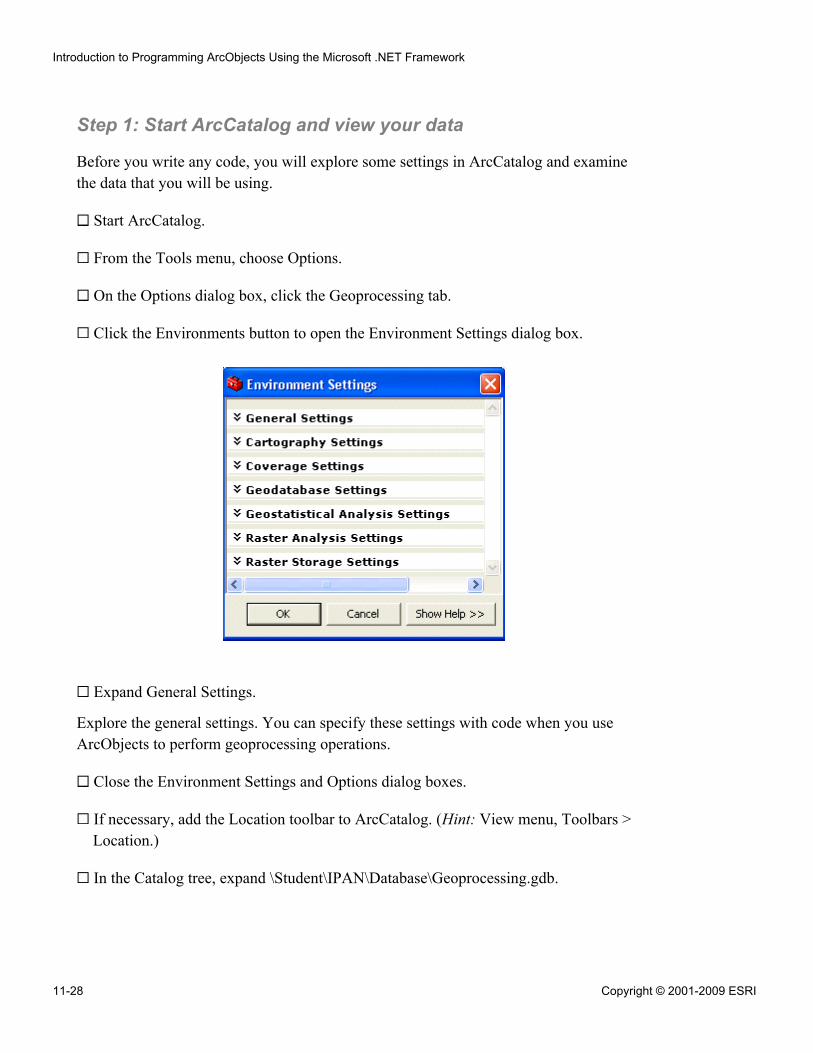
Step 1: Start ArcCatalog and view your data
Before you write any code, you will explore some settings in ArcCatalog and examinethe data that you will be using.
Start ArcCatalog.
From the Tools menu, choose Options.
On the Options dialog box, click the Geoprocessing tab.
Click the Environments button to open the Environment Settings dialog box.
Expand General Settings.
Explore the general settings. You can specify these settings with code when you useArcObjects to perform geoprocessing operations.
Close the Environment Settings and Options dialog boxes.
If necessary, add the Location toolbar to ArcCatalog. (Hint: View menu, Toolbars >Location.)
In the Catalog tree, expand \Student\IPAN\Database\Geoprocessing.gdb.
Introduction to Programming ArcObjects Using the Microsoft .NET Framework
11-28 Copyright © 2001-2009 ESRI
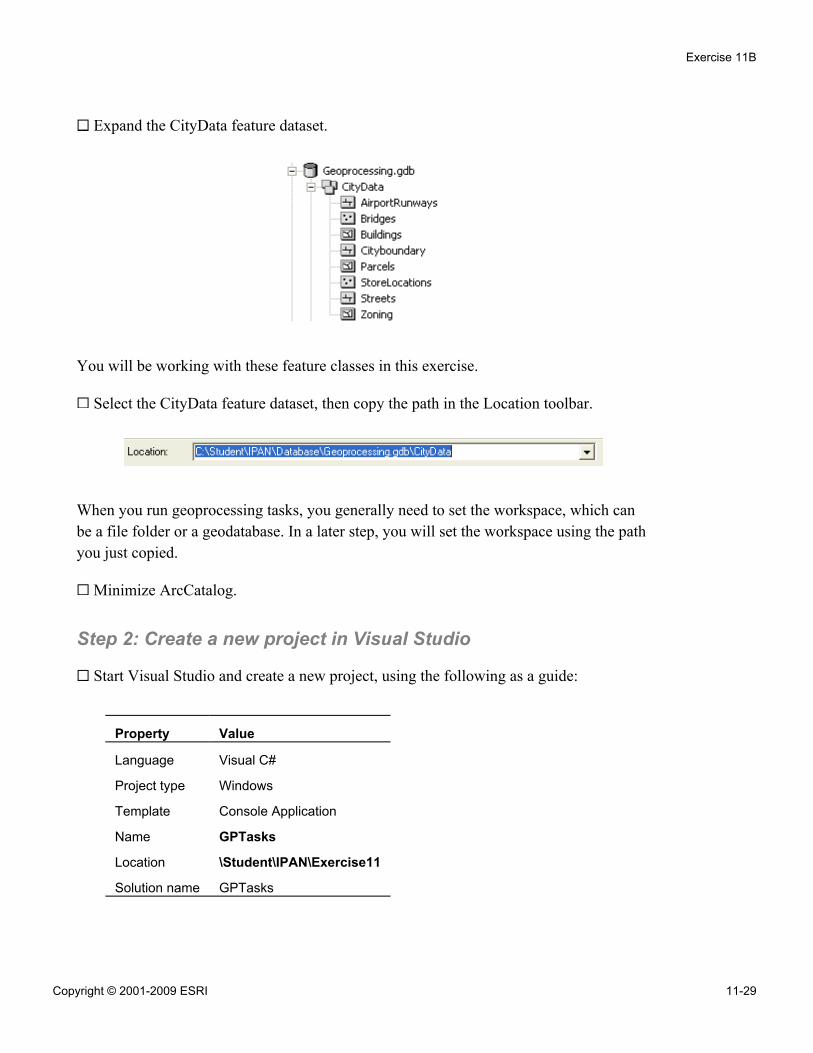
Expand the CityData feature dataset.
You will be working with these feature classes in this exercise.
Select the CityData feature dataset, then copy the path in the Location toolbar.
When you run geoprocessing tasks, you generally need to set the workspace, which canbe a file folder or a geodatabase. In a later step, you will set the workspace using the pathyou just copied.
Minimize ArcCatalog.
Step 2: Create a new project in Visual Studio
Start Visual Studio and create a new project, using the following as a guide:
Property Value
Language Visual C#
Project type Windows
Template Console Application
Name GPTasks
Location \Student\IPAN\Exercise11
Solution name GPTasks
Exercise 11B
Copyright © 2001-2009 ESRI 11-29
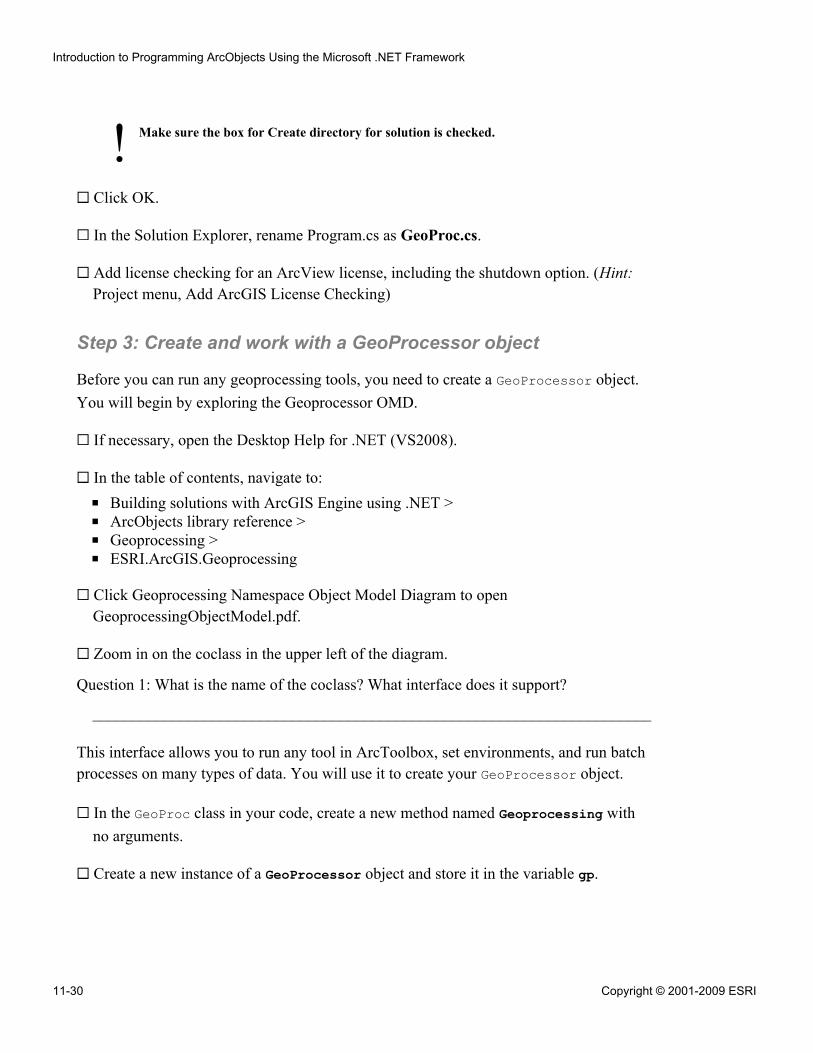
! Make sure the box for Create directory for solution is checked.
Click OK.
In the Solution Explorer, rename Program.cs as GeoProc.cs.
Add license checking for an ArcView license, including the shutdown option. (Hint:Project menu, Add ArcGIS License Checking)
Step 3: Create and work with a GeoProcessor object
Before you can run any geoprocessing tools, you need to create a GeoProcessor object.You will begin by exploring the Geoprocessor OMD.
If necessary, open the Desktop Help for .NET (VS2008).
In the table of contents, navigate to:
▪ Building solutions with ArcGIS Engine using .NET >▪ ArcObjects library reference >▪ Geoprocessing >▪ ESRI.ArcGIS.Geoprocessing
Click Geoprocessing Namespace Object Model Diagram to openGeoprocessingObjectModel.pdf.
Zoom in on the coclass in the upper left of the diagram.
Question 1: What is the name of the coclass? What interface does it support?
______________________________________________________________________
This interface allows you to run any tool in ArcToolbox, set environments, and run batchprocesses on many types of data. You will use it to create your GeoProcessor object.
In the GeoProc class in your code, create a new method named Geoprocessing withno arguments.
Create a new instance of a GeoProcessor object and store it in the variable gp.
Introduction to Programming ArcObjects Using the Microsoft .NET Framework
11-30 Copyright © 2001-2009 ESRI
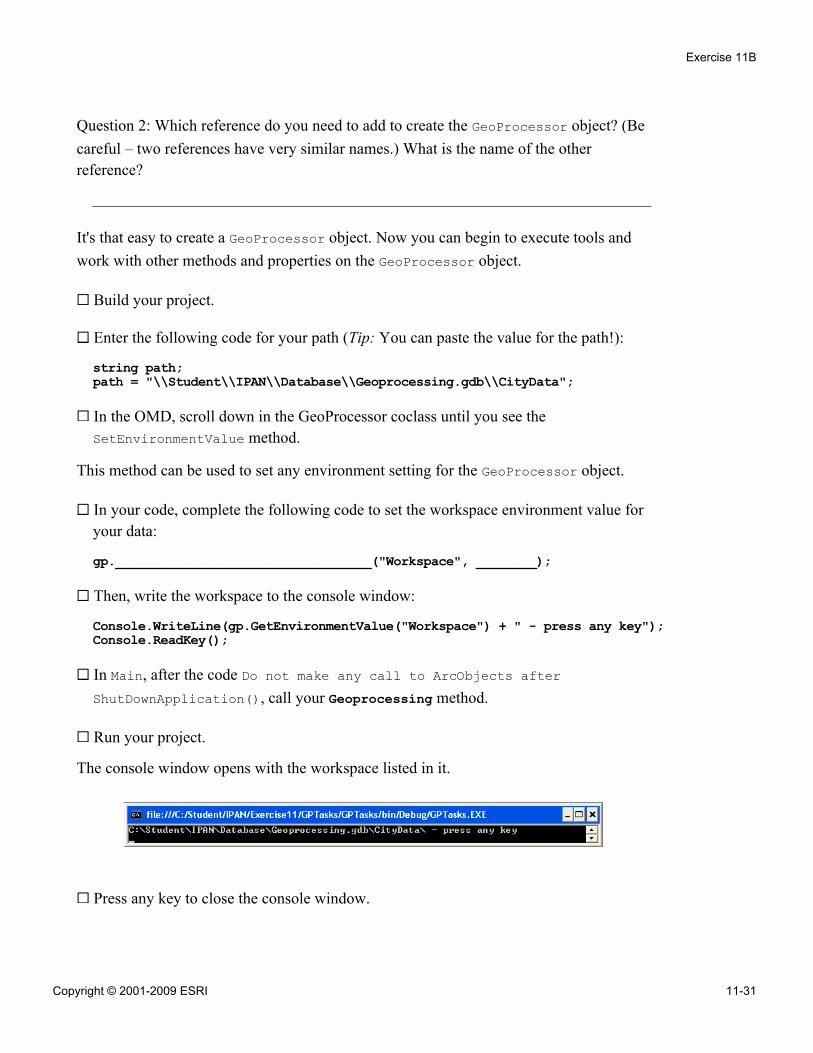
Question 2: Which reference do you need to add to create the GeoProcessor object? (Becareful – two references have very similar names.) What is the name of the otherreference?
______________________________________________________________________
It's that easy to create a GeoProcessor object. Now you can begin to execute tools andwork with other methods and properties on the GeoProcessor object.
Build your project.
Enter the following code for your path (Tip: You can paste the value for the path!):
string path;path = "\\Student\\IPAN\\Database\\Geoprocessing.gdb\\CityData";
In the OMD, scroll down in the GeoProcessor coclass until you see theSetEnvironmentValue method.
This method can be used to set any environment setting for the GeoProcessor object.
In your code, complete the following code to set the workspace environment value foryour data:
gp.__________________________________("Workspace", ________);
Then, write the workspace to the console window:
Console.WriteLine(gp.GetEnvironmentValue("Workspace") + " - press any key");Console.ReadKey();
In Main, after the code Do not make any call to ArcObjects afterShutDownApplication(), call your Geoprocessing method.
Run your project.
The console window opens with the workspace listed in it.
Press any key to close the console window.
Exercise 11B
Copyright © 2001-2009 ESRI 11-31
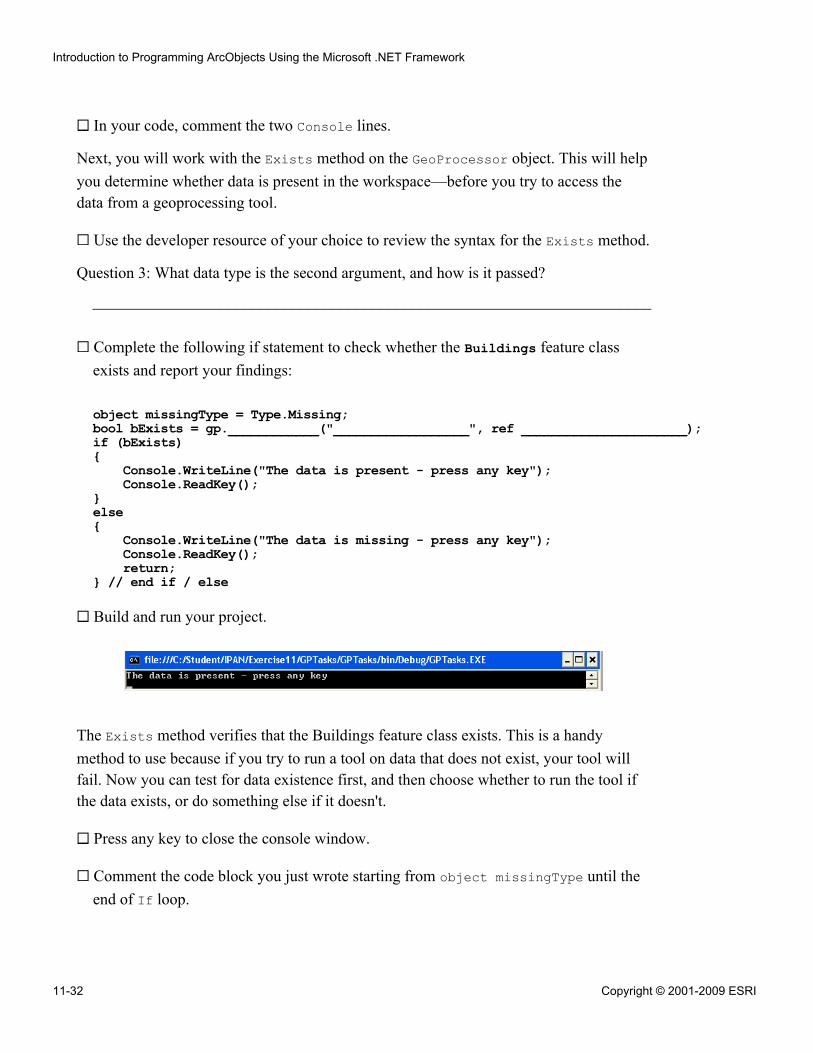
In your code, comment the two Console lines.
Next, you will work with the Exists method on the GeoProcessor object. This will helpyou determine whether data is present in the workspace—before you try to access thedata from a geoprocessing tool.
Use the developer resource of your choice to review the syntax for the Exists method.
Question 3: What data type is the second argument, and how is it passed?
______________________________________________________________________
Complete the following if statement to check whether the Buildings feature classexists and report your findings:
object missingType = Type.Missing;bool bExists = gp.____________("__________________", ref ______________________);if (bExists){
Console.WriteLine("The data is present - press any key");Console.ReadKey();
}else{
Console.WriteLine("The data is missing - press any key");Console.ReadKey();return;
} // end if / else
Build and run your project.
The Exists method verifies that the Buildings feature class exists. This is a handymethod to use because if you try to run a tool on data that does not exist, your tool willfail. Now you can test for data existence first, and then choose whether to run the tool ifthe data exists, or do something else if it doesn't.
Press any key to close the console window.
Comment the code block you just wrote starting from object missingType until theend of If loop.
Introduction to Programming ArcObjects Using the Microsoft .NET Framework
11-32 Copyright © 2001-2009 ESRI
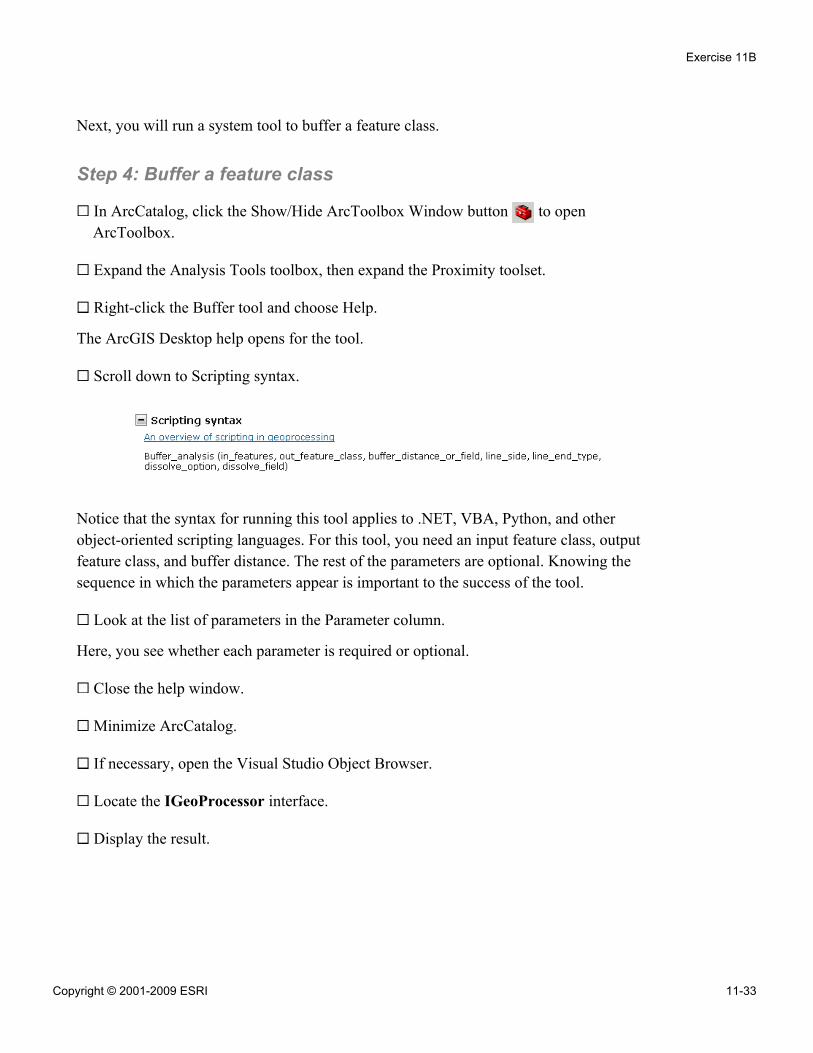
Next, you will run a system tool to buffer a feature class.
Step 4: Buffer a feature class
In ArcCatalog, click the Show/Hide ArcToolbox Window button to openArcToolbox.
Expand the Analysis Tools toolbox, then expand the Proximity toolset.
Right-click the Buffer tool and choose Help.
The ArcGIS Desktop help opens for the tool.
Scroll down to Scripting syntax.
Notice that the syntax for running this tool applies to .NET, VBA, Python, and otherobject-oriented scripting languages. For this tool, you need an input feature class, outputfeature class, and buffer distance. The rest of the parameters are optional. Knowing thesequence in which the parameters appear is important to the success of the tool.
Look at the list of parameters in the Parameter column.
Here, you see whether each parameter is required or optional.
Close the help window.
Minimize ArcCatalog.
If necessary, open the Visual Studio Object Browser.
Locate the IGeoProcessor interface.
Display the result.
Exercise 11B
Copyright © 2001-2009 ESRI 11-33
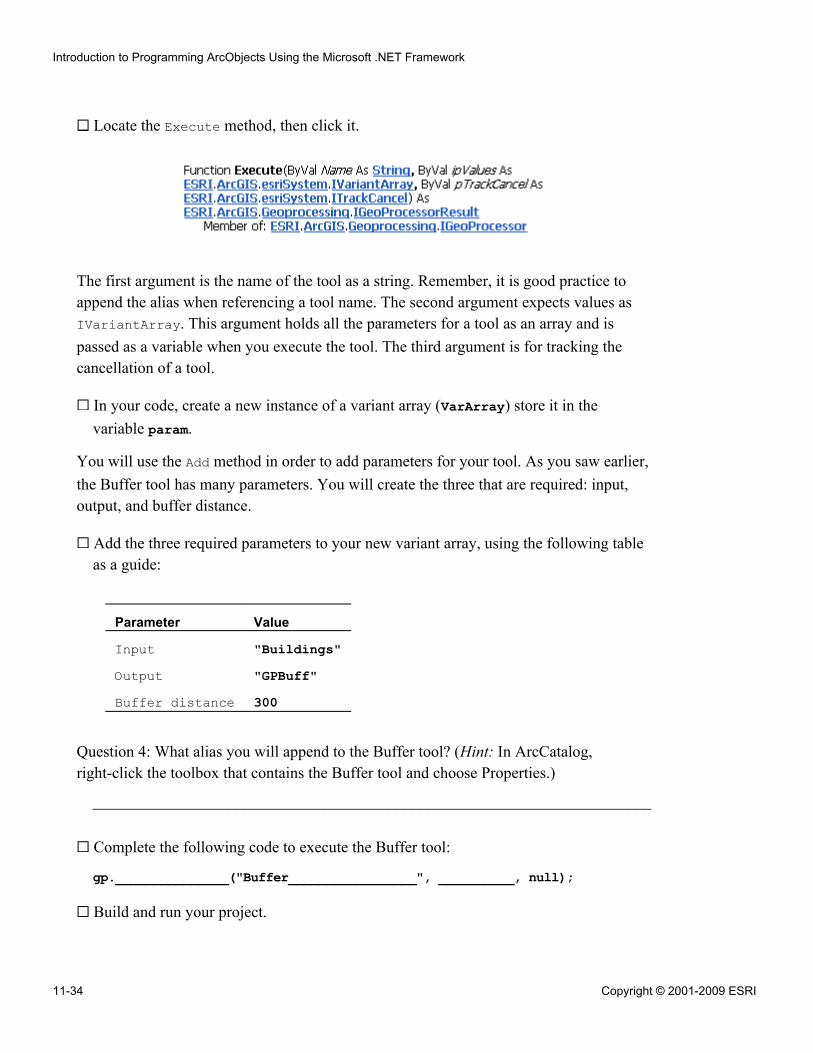
Locate the Execute method, then click it.
The first argument is the name of the tool as a string. Remember, it is good practice toappend the alias when referencing a tool name. The second argument expects values asIVariantArray. This argument holds all the parameters for a tool as an array and ispassed as a variable when you execute the tool. The third argument is for tracking thecancellation of a tool.
In your code, create a new instance of a variant array (VarArray) store it in thevariable param.
You will use the Add method in order to add parameters for your tool. As you saw earlier,the Buffer tool has many parameters. You will create the three that are required: input,output, and buffer distance.
Add the three required parameters to your new variant array, using the following tableas a guide:
Parameter Value
Input "Buildings"Output "GPBuff"Buffer distance 300
Question 4: What alias you will append to the Buffer tool? (Hint: In ArcCatalog,right-click the toolbox that contains the Buffer tool and choose Properties.)
______________________________________________________________________
Complete the following code to execute the Buffer tool:
gp._______________("Buffer_________________", __________, null);
Build and run your project.
Introduction to Programming ArcObjects Using the Microsoft .NET Framework
11-34 Copyright © 2001-2009 ESRI
! Wait for the console window to close automatically before continuing.
In ArcCatalog, refresh the CityData feature dataset.
Preview your new GPBuff feature class.
Question 5: How many rows are in the Buildings feature class? How many bufferfeatures were created?
______________________________________________________________________
Next, you will intentionally overwrite existing data and work with messaging.
Step 5: Work with messaging and overwriting output
In this step, you will use the GetMessage method on the GeoProcessor object in order tofind out why a tool does not run. The GeoProcessor object usually provides a descriptivemessage indicating why an operation has failed. Messages from the GeoProcessor objectare often more helpful than standard .NET messages.
First, you will make sure that an ArcCatalog setting to overwrite output is not enabled.
In ArcCatalog, from the Tools menu, choose Options.
On the Geoprocessing tab, uncheck the Overwrite the outputs of geoprocessingoperations check box, if necessary.
Click OK.
Minimize ArcCatalog.
In Visual Studio, run your project.
Note: Remember that you just ran it in the previous step and created the GPBuff featureclass. By default, when you are geoprocessing in ArcObjects, data that already exists willnot be overwritten. Instead, an error will occur.
An unhandled COM exception displays. Not very friendly, is it?
On the warning message, click View Detail.
In the View Detail window, expand the results.
Exercise 11B
Copyright © 2001-2009 ESRI 11-35
!
The error tells you nothing about why the operation failed, but it shows the same errorcode number that would display in an application using VBA in ArcMap or ArcCatalog.Fortunately, when you get messages directly from the GeoProcessor object, themessages will be more helpful.
Click OK to close the View Detail window.
Click the Stop Debugging button in Visual Studio.
In the developer resource of your choice, locate the IGeoProcessor::GetMessagemethod.
The GetMessage method will report a message directly from the GeoProcessor objectthat will be much more descriptive than the message you just saw. A good way to workwith messaging is to create an error handler. Before you do that, you will create a methodthat will report messages from the GeoProcessor object.
Create a new method named returnMessages that accepts the argument gp asIGeoProcessor.
Complete the following for loop to write each message to the console:
if (gp.________________________ > 0){
for (int i = 0; i < gp.MessageCount; i++){
Console.WriteLine(gp.GetMessage(__));}
}
Now you will create a try catch statement to report messages from the GeoProcessorobject, regardless of whether your tool ran successfully or failed.
In the Geoprocessing method, after your code that sets up the parameters, create atry catch block.
In the try section:
▪ Run the Buffer tool, just as you did earlier▪ Call returnMessages
Make sure your code will run the Buffer tool only once.
Introduction to Programming ArcObjects Using the Microsoft .NET Framework
11-36 Copyright © 2001-2009 ESRI
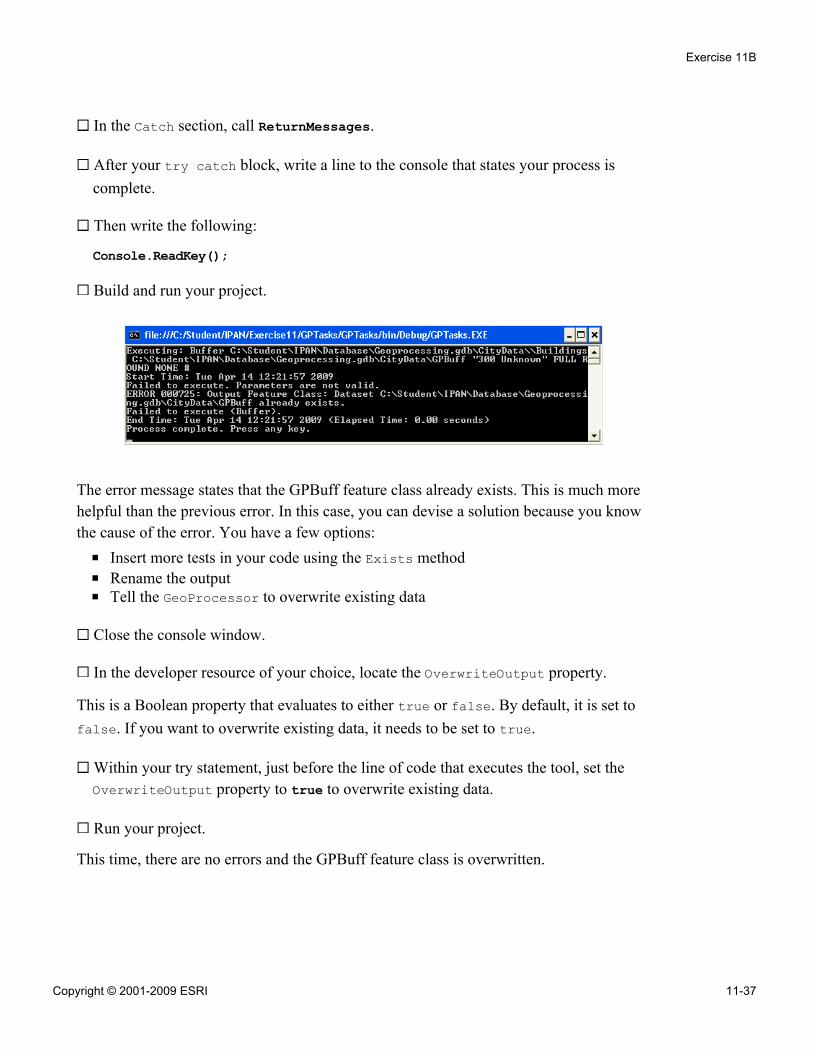
In the Catch section, call ReturnMessages.
After your try catch block, write a line to the console that states your process iscomplete.
Then write the following:
Console.ReadKey();
Build and run your project.
The error message states that the GPBuff feature class already exists. This is much morehelpful than the previous error. In this case, you can devise a solution because you knowthe cause of the error. You have a few options:
▪ Insert more tests in your code using the Exists method▪ Rename the output▪ Tell the GeoProcessor to overwrite existing data
Close the console window.
In the developer resource of your choice, locate the OverwriteOutput property.
This is a Boolean property that evaluates to either true or false. By default, it is set tofalse. If you want to overwrite existing data, it needs to be set to true.
Within your try statement, just before the line of code that executes the tool, set theOverwriteOutput property to true to overwrite existing data.
Run your project.
This time, there are no errors and the GPBuff feature class is overwritten.
Exercise 11B
Copyright © 2001-2009 ESRI 11-37
Step 6: Run multiple tools in the same process
In this step, you will run multiple tools in one geoprocessing operation. You will use theoutput from one tool (Buffer) as the input for the next one (Intersect).
Create a new method called MultipleTools with no arguments.
Within the Geoprocessing method, copy the lines of code that create theGeoProcessor object and set the workspace.
Paste the code into your MultipleTools method.
Instantiate a new VarArray in the variable buffParams.
Add three parameters to buffParams:
▪ "Buildings"▪ "BldgsBuff300"▪ 300
In ArcToolbox of your ArcCatalog, expand the Analysis Tools toolbox and theOverlay toolset.
Right-click the Intersect tool and choose Help.
Scroll down to the Scripting syntax.
Question 6: What are the required parameters?
______________________________________________________________________
Close the help window.
In addition to the variant array for the Buffer tool, you will also need a variant array forthe Intersect tool.
In your code, create a new instance of VarArray and store it in the variableintParams.
Complete the following code to add the input and output parameters for the Intersecttool. For the input parameter, use the output from your Buffer tool.
intParams.______("_______________________");intParams.______("OverlapAreas");
Introduction to Programming ArcObjects Using the Microsoft .NET Framework
11-38 Copyright © 2001-2009 ESRI
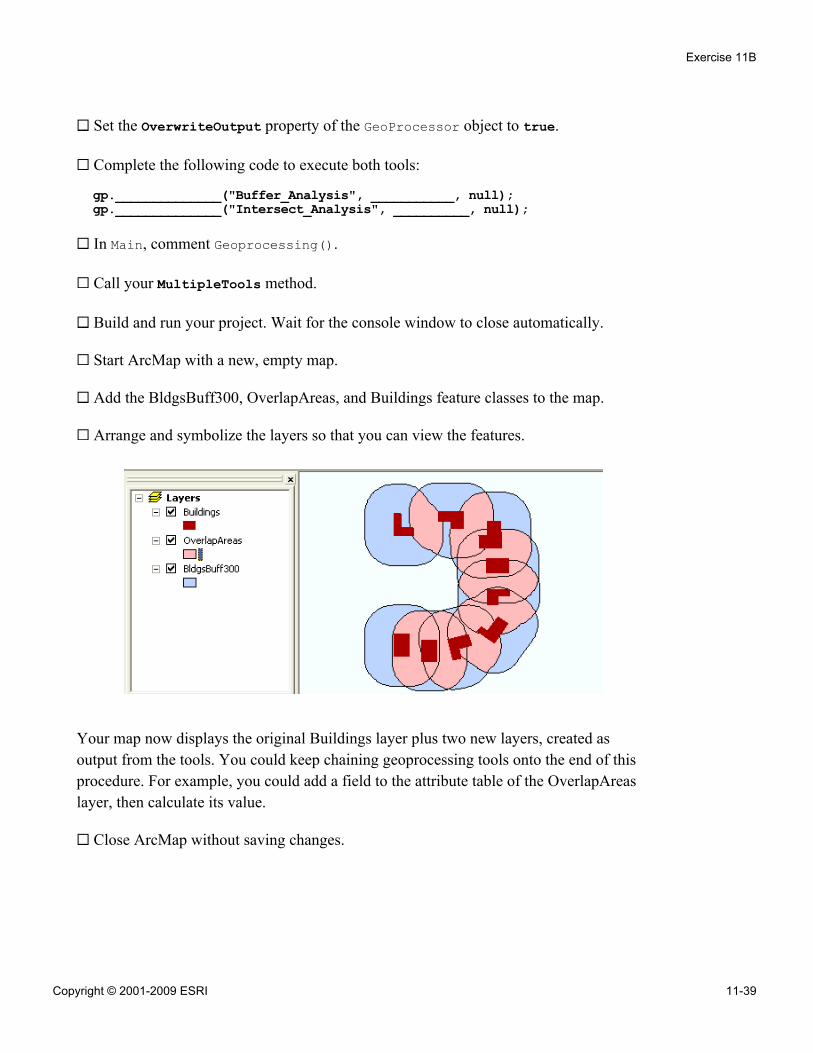
Set the OverwriteOutput property of the GeoProcessor object to true.
Complete the following code to execute both tools:
gp.______________("Buffer_Analysis", ___________, null);gp.______________("Intersect_Analysis", __________, null);
In Main, comment Geoprocessing().
Call your MultipleTools method.
Build and run your project. Wait for the console window to close automatically.
Start ArcMap with a new, empty map.
Add the BldgsBuff300, OverlapAreas, and Buildings feature classes to the map.
Arrange and symbolize the layers so that you can view the features.
Your map now displays the original Buildings layer plus two new layers, created asoutput from the tools. You could keep chaining geoprocessing tools onto the end of thisprocedure. For example, you could add a field to the attribute table of the OverlapAreaslayer, then calculate its value.
Close ArcMap without saving changes.
Exercise 11B
Copyright © 2001-2009 ESRI 11-39
You have finished this exercise; however, you may wish to complete the optional stepand Challenge:
▪ Step 7 shows you how to run a batch process to add a field to each feature class ina dataset.
▪ The Challenge tests your ability to list all of the environments for theGeoProcessor object.
If you want to complete one or both of these, do so now. Otherwise, close VisualStudio and ArcCatalog.
Step 7: (Optional) Perform a batch process using a "List"method
In the previous steps, you set up the code and data to run batch processes. Basically, youexecuted tasks without user intervention. One of the foremost tasks in a batch processingprogram is the ability to iterate through several datasets. In this step, you will work with a"List" method on IGeoProcessor to perform a batch process on a larger volume of dataand add a field to each feature class in the CityData feature dataset. You will begin bycreating a GeoProcessor object.
Create a new method named BatchProcessing with no arguments.
Create the GeoProcessor object and set the workspace. Tip: Copy existing code fromthe MultipleTools method.
The GeoProcessor coclass contains several methods built specifically for creating listsof data. These methods work with different types of data and provide flexibility forrestricting a search by name or data category.
In the developer resource of your choice, locate the GeoProcessor coclass.
In the list of members, locate the methods that begin with the word "List."
Locate the ListFeatureClasses method.
This method creates a list of all, or some, of the feature classes in the current workspace.
Question 7: What types of filters does the ListFeatureClasses method accept?
______________________________________________________________________
Introduction to Programming ArcObjects Using the Microsoft .NET Framework
11-40 Copyright © 2001-2009 ESRI
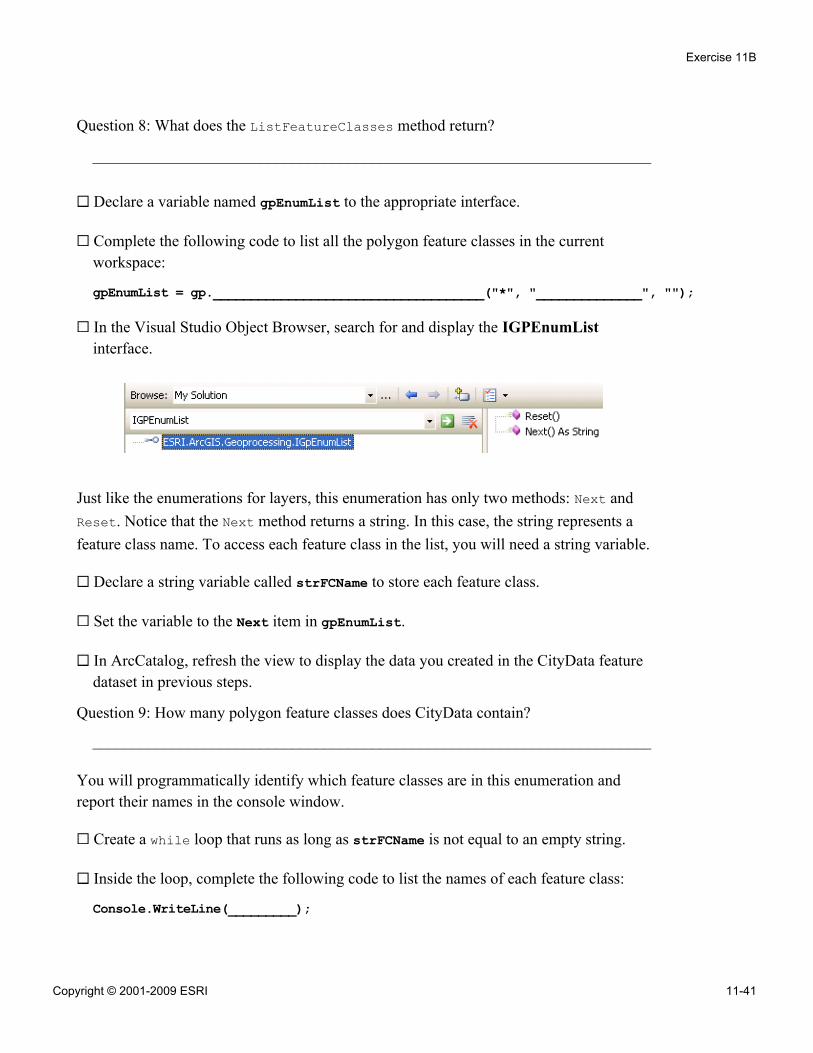
Question 8: What does the ListFeatureClasses method return?
______________________________________________________________________
Declare a variable named gpEnumList to the appropriate interface.
Complete the following code to list all the polygon feature classes in the currentworkspace:
gpEnumList = gp.____________________________________("*", "______________", "");
In the Visual Studio Object Browser, search for and display the IGPEnumListinterface.
Just like the enumerations for layers, this enumeration has only two methods: Next andReset. Notice that the Next method returns a string. In this case, the string represents afeature class name. To access each feature class in the list, you will need a string variable.
Declare a string variable called strFCName to store each feature class.
Set the variable to the Next item in gpEnumList.
In ArcCatalog, refresh the view to display the data you created in the CityData featuredataset in previous steps.
Question 9: How many polygon feature classes does CityData contain?
______________________________________________________________________
You will programmatically identify which feature classes are in this enumeration andreport their names in the console window.
Create a while loop that runs as long as strFCName is not equal to an empty string.
Inside the loop, complete the following code to list the names of each feature class:
Console.WriteLine(_________);
Exercise 11B
Copyright © 2001-2009 ESRI 11-41
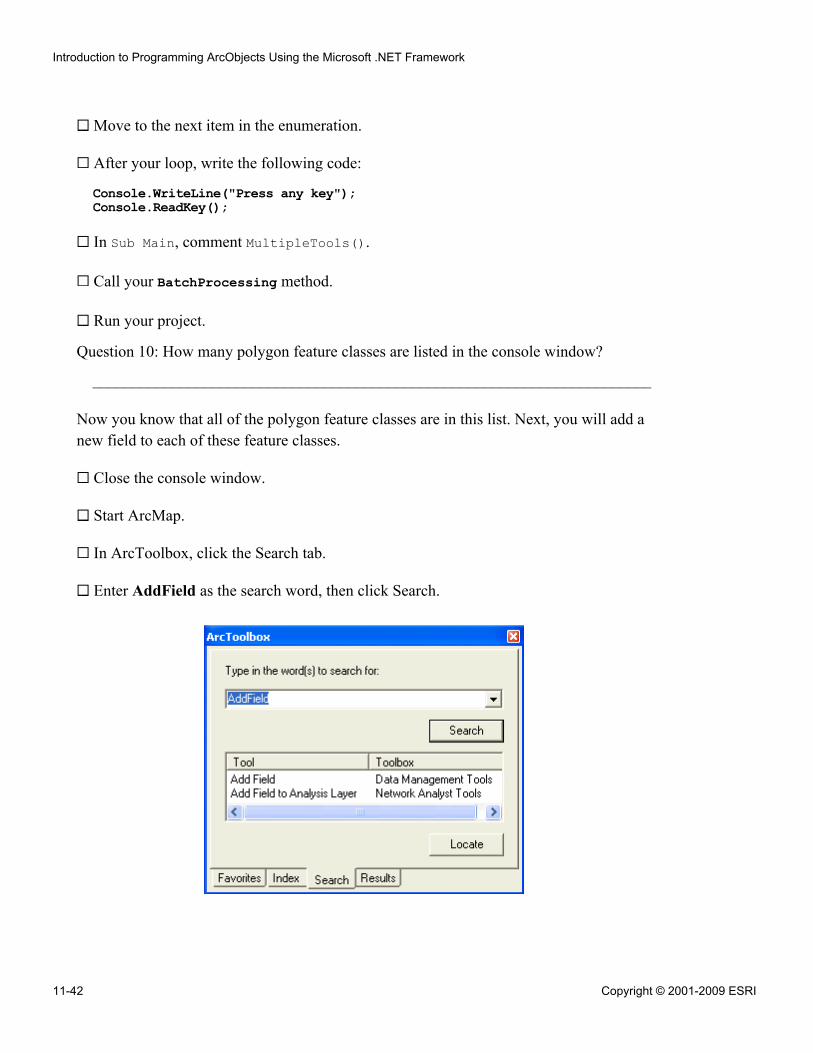
Move to the next item in the enumeration.
After your loop, write the following code:
Console.WriteLine("Press any key");Console.ReadKey();
In Sub Main, comment MultipleTools().
Call your BatchProcessing method.
Run your project.
Question 10: How many polygon feature classes are listed in the console window?
______________________________________________________________________
Now you know that all of the polygon feature classes are in this list. Next, you will add anew field to each of these feature classes.
Close the console window.
Start ArcMap.
In ArcToolbox, click the Search tab.
Enter AddField as the search word, then click Search.
Introduction to Programming ArcObjects Using the Microsoft .NET Framework
11-42 Copyright © 2001-2009 ESRI
In the Tool column, select Add Field, then click Locate.
Question 11: Which toolbox contains the Add Field tool, and what is its alias?
______________________________________________________________________
Open the help for the Add Field tool.
Question 12: What are the required parameters?
______________________________________________________________________
Close the help window, then minimize ArcMap.
In the Visual Studio, within your while loop, comment the line of code that reports thefeature class name.
Before the line of code that sets strFCName to the Next item, instantiate a newVarArray in the variable fldParams.
Add each of the following parameters to your array, fldParams:
▪ strFCName▪ "Acreage"▪ "Double"
Call the Execute method on the GeoProcessor object to run the Add Field tool.
Build your project.
To avoid a schema lock error, close ArcCatalog.
Run your project.
Close the console window.
Start ArcCatalog.
Navigate to \Student\IPAN\Database\Geoprocessing.gdb\CityData.
Exercise 11B
Copyright © 2001-2009 ESRI 11-43
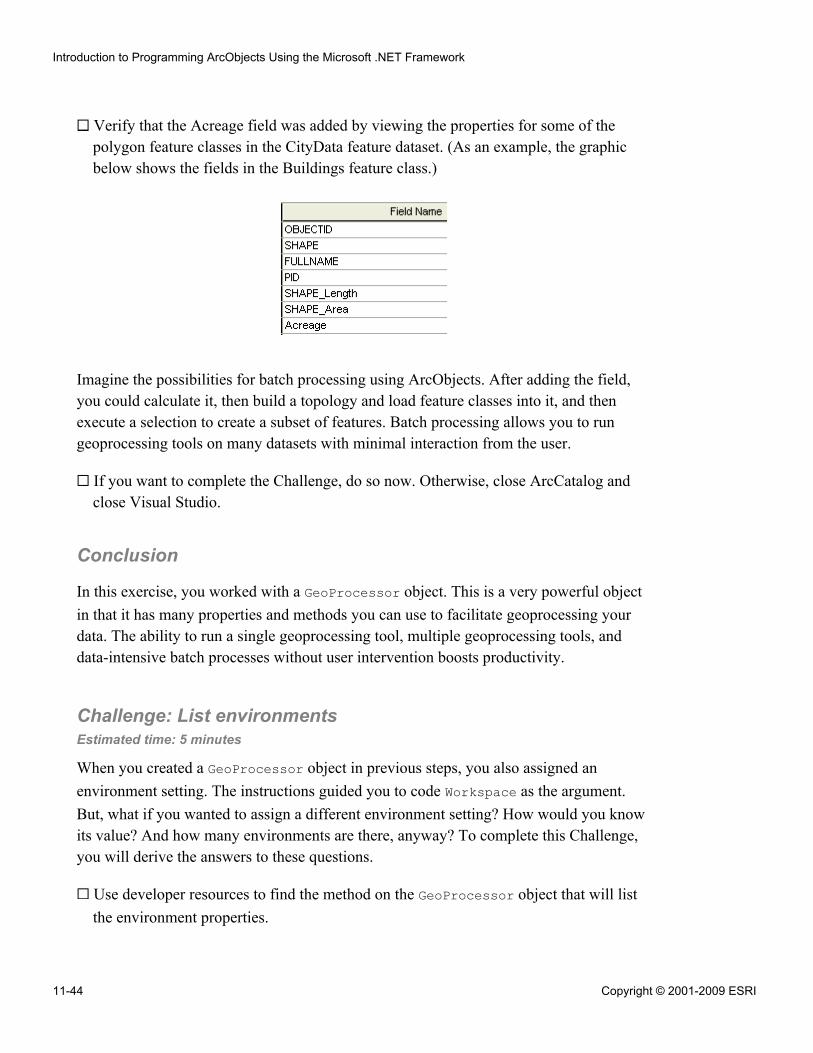
Verify that the Acreage field was added by viewing the properties for some of thepolygon feature classes in the CityData feature dataset. (As an example, the graphicbelow shows the fields in the Buildings feature class.)
Imagine the possibilities for batch processing using ArcObjects. After adding the field,you could calculate it, then build a topology and load feature classes into it, and thenexecute a selection to create a subset of features. Batch processing allows you to rungeoprocessing tools on many datasets with minimal interaction from the user.
If you want to complete the Challenge, do so now. Otherwise, close ArcCatalog andclose Visual Studio.
Conclusion
In this exercise, you worked with a GeoProcessor object. This is a very powerful objectin that it has many properties and methods you can use to facilitate geoprocessing yourdata. The ability to run a single geoprocessing tool, multiple geoprocessing tools, anddata-intensive batch processes without user intervention boosts productivity.
Challenge: List environmentsEstimated time: 5 minutes
When you created a GeoProcessor object in previous steps, you also assigned anenvironment setting. The instructions guided you to code Workspace as the argument.But, what if you wanted to assign a different environment setting? How would you knowits value? And how many environments are there, anyway? To complete this Challenge,you will derive the answers to these questions.
Use developer resources to find the method on the GeoProcessor object that will listthe environment properties.
Introduction to Programming ArcObjects Using the Microsoft .NET Framework
11-44 Copyright © 2001-2009 ESRI

Write code to list each property, report its name in the console window, and report thetotal number of environments.
Exercise 11B
Copyright © 2001-2009 ESRI 11-45

Answers to Exercise 11B Questions
Question 1: What is the name of the coclass? What interface does it support?
Answer: GeoProcessor;IGeoProcessor
Question 2: Which reference do you need to add to create the GeoProcessor object? (Becareful – two references have very similar names.) What is the name of the otherreference?
Answer: ESRI.ArcGIS.Geoprocessing; ESRI.ArcGIS.Geoprocessor
Question 3: What data type is the second argument, and how is it passed?
Answer: variant; passed by ref
Question 4: What alias you will append to the Buffer tool? (Hint: In ArcCatalog,right-click the toolbox that contains the Buffer tool and choose Properties.)
Answer: analysis
Question 5: How many rows are in the Buildings feature class? How many bufferfeatures were created?
Answer: Nine; nine
Question 6: What are the required parameters?
Answer: Input features (in_features) and output features (out_feature_class)
Question 7: What types of filters does the ListFeatureClasses method accept?
Answer: Wild card, feature type, dataset
Question 8: What does the ListFeatureClasses method return?
Answer: An object reference to IGpEnumList
Question 9: How many polygon feature classes does CityData contain?
Answer: Six
Introduction to Programming ArcObjects Using the Microsoft .NET Framework
11-46 Copyright © 2001-2009 ESRI

Question 10: How many polygon feature classes are listed in the console window?
Answer: Six
Question 11: Which toolbox contains the Add Field tool, and what is its alias?
Answer: Data Management Tools; management
Question 12: What are the required parameters?
Answer: Input table (in_table), field name (field_name), field type (field_type)
Exercise 11B
Copyright © 2001-2009 ESRI 11-47

Exercise Solution: Exercise 11B (C#)using System;using System.Collections.Generic;using System.Text;using ESRI.ArcGIS.esriSystem;using ESRI.ArcGIS.Geoprocessing;namespace GPTasks{
class GeoProc{
private static LicenseInitializer m_AOLicenseInitializer1 =new GPTasks.LicenseInitializer();
private static LicenseInitializer m_AOLicenseInitializer =new GPTasks.LicenseInitializer();
static void Main(string[] args){
//ESRI License Initializer generated code.if (!m_AOLicenseInitializer1.InitializeApplication(
new esriLicenseProductCode[]{ esriLicenseProductCode.esriLicenseProductCodeArcView },
new esriLicenseExtensionCode[] { })){
System.Console.WriteLine(m_AOLicenseInitializer1.LicenseMessage());System.Console.WriteLine("This application could not initialize with the
correct ArcGIS license andwill shutdown.");
m_AOLicenseInitializer1.ShutdownApplication();return;
}//ESRI License Initializer generated code.//Do not make any call to ArcObjects after ShutDownApplication()
//Geoprocessing();//MultipleTools();BatchProcessing();m_AOLicenseInitializer1.ShutdownApplication();
}private static void Geoprocessing(){
IGeoProcessor gp = new GeoProcessorClass();string path = "\\Student\\IPAN\\Database\\Geoprocessing.gdb\\CityData";gp.SetEnvironmentValue("Workspace", path);//Console.WriteLine(gp.GetEnvironmentValue("Workspace") +
" - press any key");//Console.ReadKey();
Introduction to Programming ArcObjects Using the Microsoft .NET Framework
11-48 Copyright © 2001-2009 ESRI
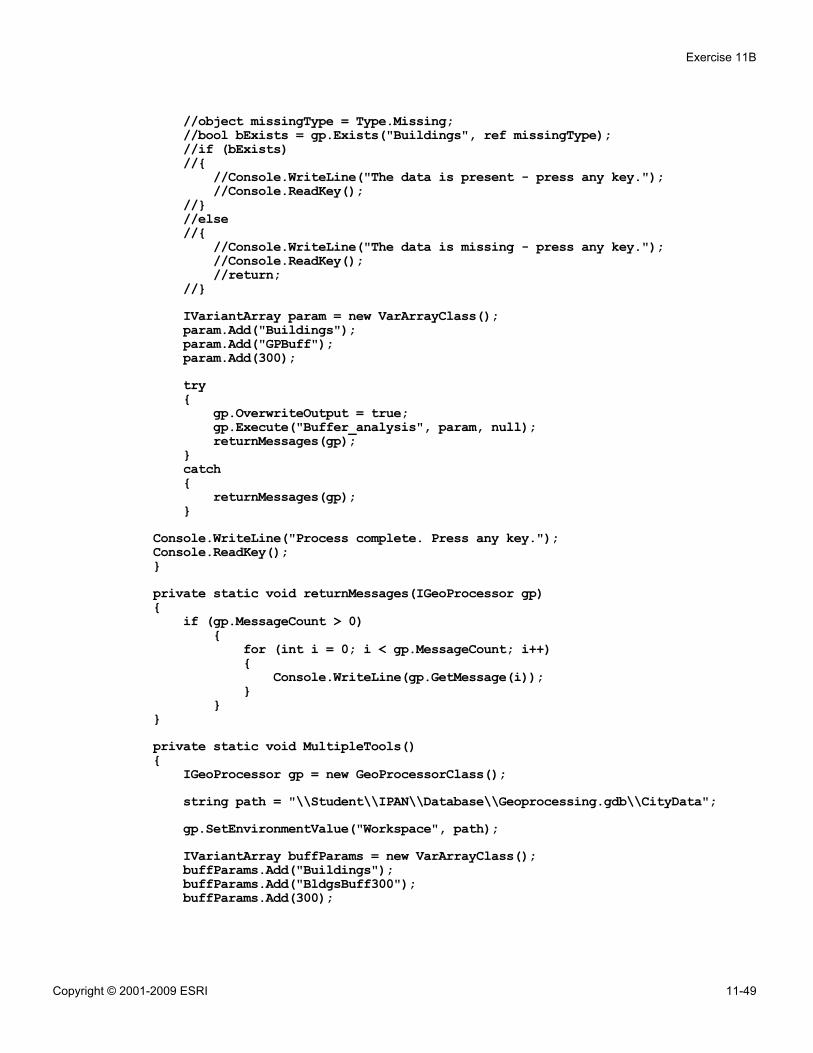
//object missingType = Type.Missing;//bool bExists = gp.Exists("Buildings", ref missingType);//if (bExists)//{
//Console.WriteLine("The data is present - press any key.");//Console.ReadKey();
//}//else//{
//Console.WriteLine("The data is missing - press any key.");//Console.ReadKey();//return;
//}IVariantArray param = new VarArrayClass();param.Add("Buildings");param.Add("GPBuff");param.Add(300);try{
gp.OverwriteOutput = true;gp.Execute("Buffer_analysis", param, null);returnMessages(gp);
}catch{
returnMessages(gp);}
Console.WriteLine("Process complete. Press any key.");Console.ReadKey();}private static void returnMessages(IGeoProcessor gp){
if (gp.MessageCount > 0){
for (int i = 0; i < gp.MessageCount; i++){
Console.WriteLine(gp.GetMessage(i));}
}}private static void MultipleTools(){
IGeoProcessor gp = new GeoProcessorClass();string path = "\\Student\\IPAN\\Database\\Geoprocessing.gdb\\CityData";gp.SetEnvironmentValue("Workspace", path);IVariantArray buffParams = new VarArrayClass();buffParams.Add("Buildings");buffParams.Add("BldgsBuff300");buffParams.Add(300);
Exercise 11B
Copyright © 2001-2009 ESRI 11-49
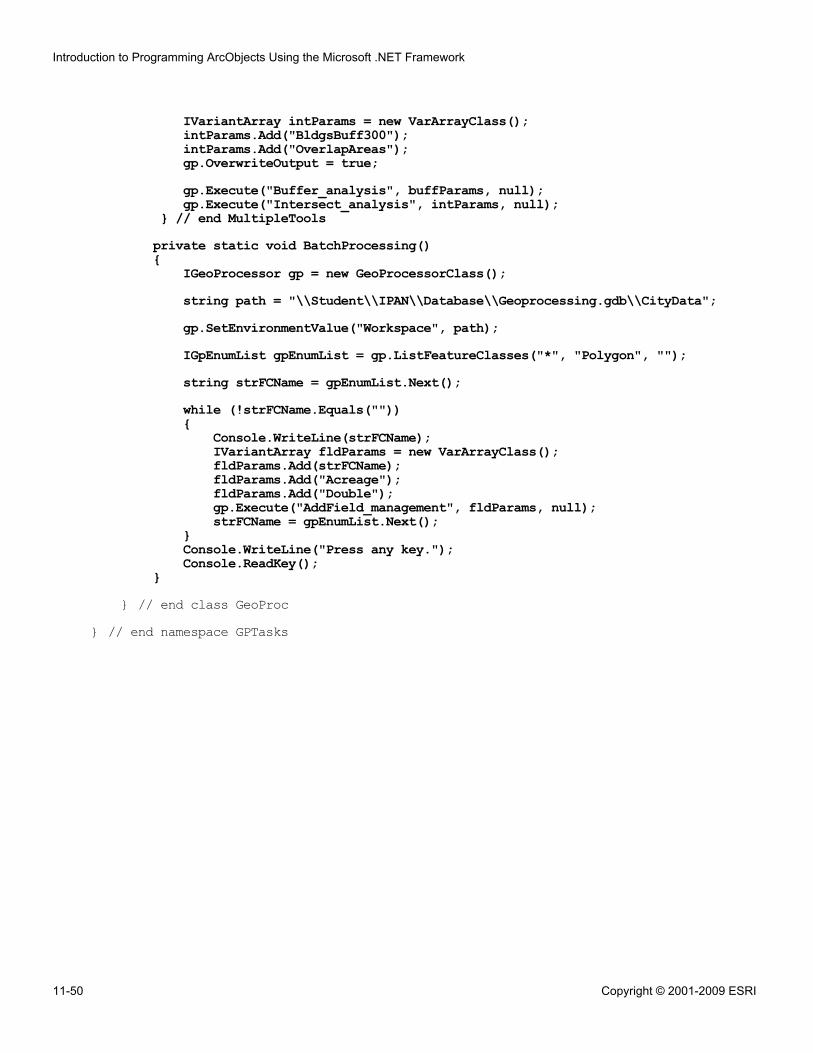
IVariantArray intParams = new VarArrayClass();intParams.Add("BldgsBuff300");intParams.Add("OverlapAreas");gp.OverwriteOutput = true;gp.Execute("Buffer_analysis", buffParams, null);gp.Execute("Intersect_analysis", intParams, null);
} // end MultipleToolsprivate static void BatchProcessing(){
IGeoProcessor gp = new GeoProcessorClass();string path = "\\Student\\IPAN\\Database\\Geoprocessing.gdb\\CityData";gp.SetEnvironmentValue("Workspace", path);IGpEnumList gpEnumList = gp.ListFeatureClasses("*", "Polygon", "");string strFCName = gpEnumList.Next();while (!strFCName.Equals("")){
Console.WriteLine(strFCName);IVariantArray fldParams = new VarArrayClass();fldParams.Add(strFCName);fldParams.Add("Acreage");fldParams.Add("Double");gp.Execute("AddField_management", fldParams, null);strFCName = gpEnumList.Next();
}Console.WriteLine("Press any key.");Console.ReadKey();
}} // end class GeoProc
} // end namespace GPTasks
Introduction to Programming ArcObjects Using the Microsoft .NET Framework
11-50 Copyright © 2001-2009 ESRI

Challenge Solution: List environments
There is usually more than one way to solve a problem or to write code. Here is onepossible solution:
static void Main(string[] args)...
//Geoprocessing();//MultipleTools();//BatchProcessing();ListEnvironments();m_AOLicenseInitializer1.ShutdownApplication();
+ private static void BatchProcessing()public static void ListEnvironments(){
IGeoProcessor gp = new GeoProcessor();//IGeoProcessor gp = new GeoProcessorClass();string path = "\\Student\\IPAN\\Database\\Geoprocessing.gdb\\CityData";gp.SetEnvironmentValue("Workspace", path);IGpEnumList gpEnumList = gp.ListEnvironments("*");int environmentsCount = 0;string envName = gpEnumList.Next();while (!envName.Equals("")){
++environmentsCount;Console.WriteLine(envName);envName = gpEnumList.Next();
}Console.WriteLine("Total number of environments: " + environmentsCount);Console.WriteLine("Press any key.");Console.ReadKey();
}} // end class GeoProc
} // end namespace GPTasks
Exercise 11B
Copyright © 2001-2009 ESRI 11-51

12Working with layouts
Exercise 12A: Update and export a layout(VB.NET)Estimated time: 60 minutesChallenge: Modify the second text elementEstimated time: 15 minutesChallenge: Create layouts for all mapsEstimated time: 15 minutes
Exercise 12B: Update and export a layout(C#)Estimated time: 60 minutesChallenge: Modify the second text elementEstimated time: 15 minutesChallenge: Create layouts for all maps in themap documentEstimated time: 15 minutes

Exercise 12A: Update and export a layout (VB.NET)
Estimated time: 60 minutes
In this exercise, you will add a template to the PageLayoutControl in an ArcGIS Engineapplication. Using ArcObjects, you will modify some of the elements in the layout andthen export it to PDF format.
In this exercise, you will:
▪ Add a template to the PageLayoutControl▪ Modify elements on the layout▪ Export the layout to a PDF file
Exercise shortcut1. In ArcMap, open an existing template from \Student\IPAN\Database\Templates
folder. Modify the template in layout view and save it as MyTemplates.mxt.
2. In Visual Studio, create a new Visual Basic Windows Forms Application. Add aPageLayoutControl, ToolbarControl, and LicenseControl to the form.
3. Load MyTemplates.mxt template into your PageLayoutControl.
4. Load the first map in the map document into your PageLayoutControl from\Student\IPAN\Exercise12\MapsAndLayers.mxd.
5. Programmatically loop though the elements in the template and find the mapframe. Overwrite the default map with your new template.
6. Loop through the elements to find the two text elements, then tag these two withan appropriate identifier.
7. Use the tag you just created to find the current map title and modify it.
8. Export the active view of your layout to a PDF file.
** (Optional) Associate the units from your map with the scale bar.
** (Challenge) Modify the second text element with your name.
** (Challenge) Loop through all the maps in your map document and process thelayout for each map.
Exercise 12A
Copyright © 2001-2009 ESRI 12-1
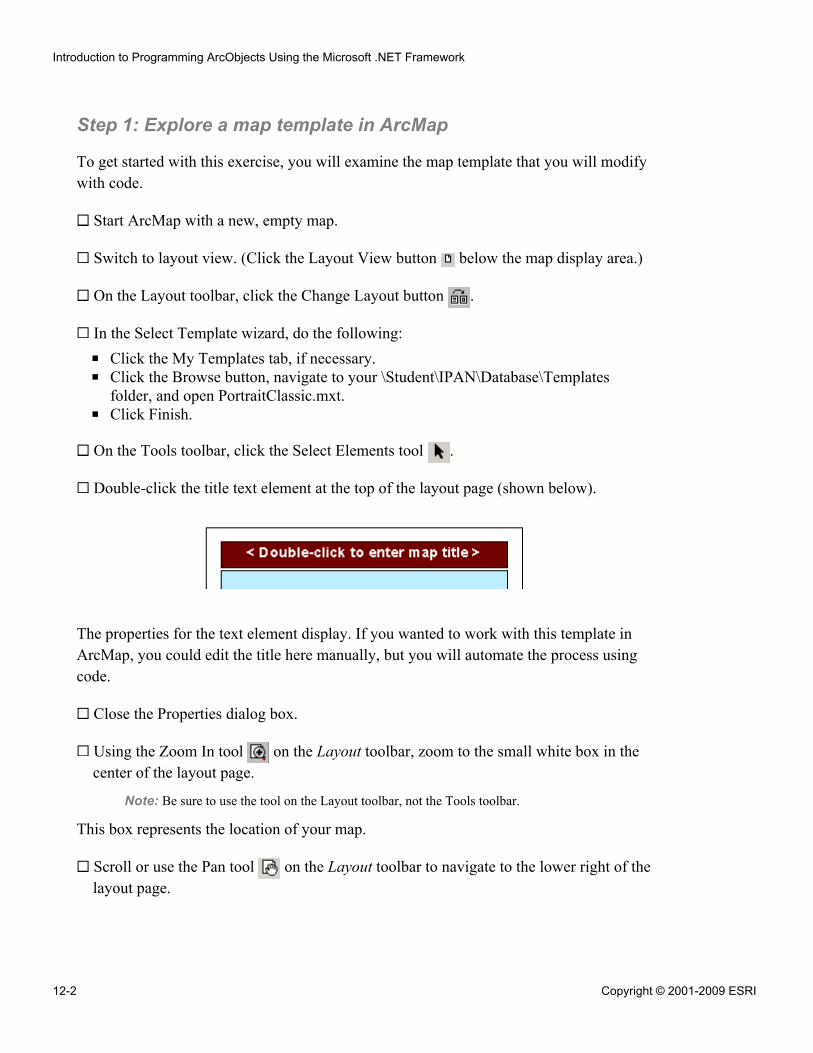
Step 1: Explore a map template in ArcMap
To get started with this exercise, you will examine the map template that you will modifywith code.
Start ArcMap with a new, empty map.
Switch to layout view. (Click the Layout View button below the map display area.)
On the Layout toolbar, click the Change Layout button .
In the Select Template wizard, do the following:
▪ Click the My Templates tab, if necessary.▪ Click the Browse button, navigate to your \Student\IPAN\Database\Templates
folder, and open PortraitClassic.mxt.▪ Click Finish.
On the Tools toolbar, click the Select Elements tool .
Double-click the title text element at the top of the layout page (shown below).
The properties for the text element display. If you wanted to work with this template inArcMap, you could edit the title here manually, but you will automate the process usingcode.
Close the Properties dialog box.
Using the Zoom In tool on the Layout toolbar, zoom to the small white box in thecenter of the layout page.
Note: Be sure to use the tool on the Layout toolbar, not the Tools toolbar.
This box represents the location of your map.
Scroll or use the Pan tool on the Layout toolbar to navigate to the lower right of thelayout page.
Introduction to Programming ArcObjects Using the Microsoft .NET Framework
12-2 Copyright © 2001-2009 ESRI
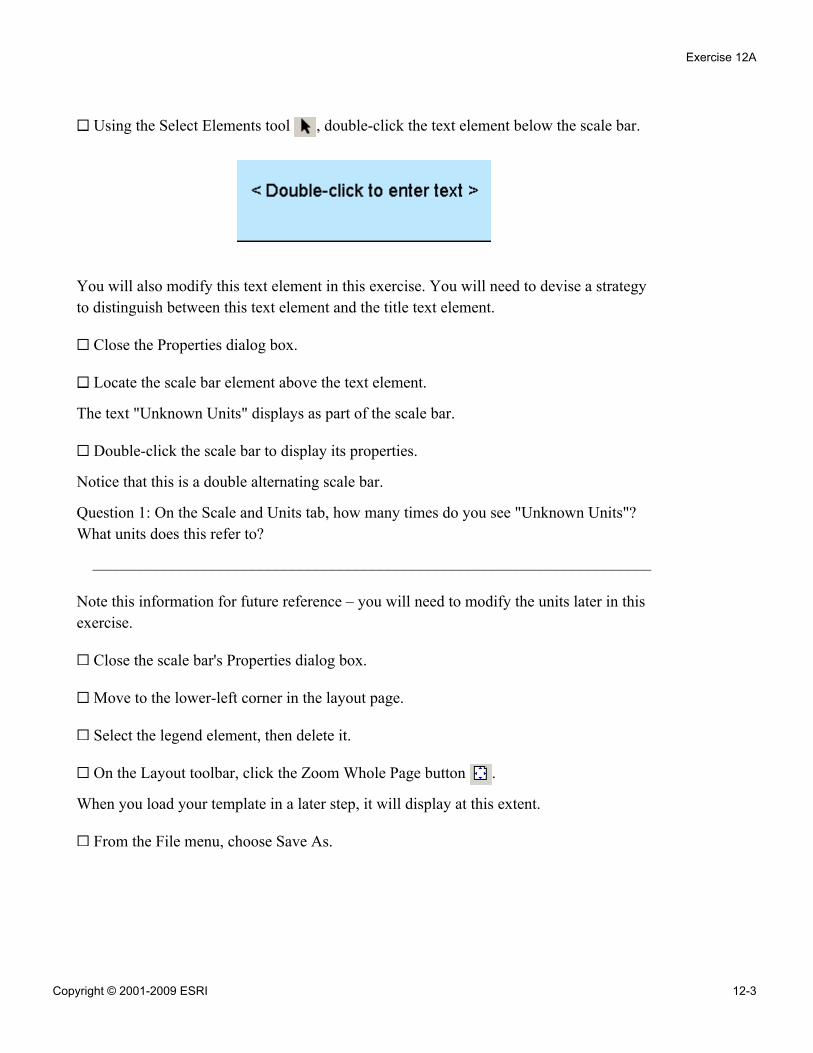
Using the Select Elements tool , double-click the text element below the scale bar.
You will also modify this text element in this exercise. You will need to devise a strategyto distinguish between this text element and the title text element.
Close the Properties dialog box.
Locate the scale bar element above the text element.
The text "Unknown Units" displays as part of the scale bar.
Double-click the scale bar to display its properties.
Notice that this is a double alternating scale bar.
Question 1: On the Scale and Units tab, how many times do you see "Unknown Units"?What units does this refer to?
______________________________________________________________________
Note this information for future reference – you will need to modify the units later in thisexercise.
Close the scale bar's Properties dialog box.
Move to the lower-left corner in the layout page.
Select the legend element, then delete it.
On the Layout toolbar, click the Zoom Whole Page button .
When you load your template in a later step, it will display at this extent.
From the File menu, choose Save As.
Exercise 12A
Copyright © 2001-2009 ESRI 12-3
!
In the Save As dialog box, specify the following:
▪ Save in: \Student\IPAN\Database\Templates▪ File name: MyTemplate.mxt▪ Save as type: ArcMap Template (*.mxt)
Close ArcMap.
Now that your are familiar with your template, you can begin writing code for it.
Step 2: Create a new project in Visual Studio
Start Visual Studio.
Create a new project, using the following as a guide:
Property Value
Language Visual Basic
Project type Windows
Template Windows Forms Application
Name PageLayout
Location \Student\IPAN\Exercise12
Solution name PageLayout
Make sure the box for Create directory for solution is checked.
In Design view, click Form1.
Change its Text property to Layout in the Properties window.
Add the following controls to your form, resizing your form and/or controls as needed:
▪ PageLayoutControl▪ ToolbarControl▪ LicenseControl
Introduction to Programming ArcObjects Using the Microsoft .NET Framework
12-4 Copyright © 2001-2009 ESRI
Open the Properties dialog box for the ToolbarControl and do the following:
▪ Designate the PageLayoutControl as the ToolbarControl's buddy control.▪ Click the Items tab.▪ Click Add.
On the Controls Commands dialog box, do the following:
▪ Click the Toolsets tab.▪ In the Toolsets list, double-click PageLayout to add all its commands to your
ToolbarControl.▪ Click Close.
Click OK on the Properties dialog box.
Step 3: Load a map template
In this step, you will load a map template into your PageLayoutControl.
In code view, navigate to the Form1_Load event.
Declare the variable fName as String.
Set it equal to MyTemplate.mxt in your \Student\IPAN\Database\Templatesfolder. Tip: To avoid typographical errors, copy the path from the Location toolbar inArcCatalog.
Pass fName as the argument to the LoadMxFile method on the PageLayoutControl.
Run your project.
Your layout displays on the form at run time.
Close your application.
In Visual Studio, return to Design view.
If you would like, resize your form and layout.
Exercise 12A
Copyright © 2001-2009 ESRI 12-5
Step 4: Load your map document
Now that your template has been loaded, you are ready to customize the template. Youwill begin by loading your map, then modifying elements that are already found on thetemplate.
Add a Button control to your form.
In the Properties window, set the following properties for the button:
Property Value
Text Add Map
(Name) btnAddMap
Navigate to your new button's Click event.
Declare the variable mName as String.
Set mName equal to MapsAndLayers.mxd in your \Student\IPAN\Exercise12 folder.
Declare the variable mapDoc as IMapDocument and instantiate a New MapDocument.
Use the developer resource of your choice to answer the following question.
Question 2: What is the data type passed as the argument to the Open method onIMapDocument? Which variable will you pass as the argument?
______________________________________________________________________
Write the code to open your map document.
Because the elements on your layout reside in the graphics container, you will need towork with a GraphicsContainer object in code.
Declare the variable gc as IGraphicsContainer and set it equal toAxPageLayoutControl1.PageLayout.
Introduction to Programming ArcObjects Using the Microsoft .NET Framework
12-6 Copyright © 2001-2009 ESRI
Declare the following variables, which you will populate later:
▪ Dim map As IMap▪ Dim mFrame As IMapFrame▪ Dim mapCopy As IObjectCopy
You need to specify which map (data frame) you want to access.
Set map to point to the first map in your map document.
In the next few steps, you will overwrite some of the elements on your template withvalues specific to your map. You will pass gc as an argument to those procedures.
Step 5: Add your map template to the layout
In this step, you will add your map to the layout. You will begin by calling a customfunction that will loop through all the elements and find the map frame.
In your class, create a new function called returnMapFrame that will accept thevariable gc as the input argument IGraphicsContainer and return a reference toIMapFrame.
All of the map elements on the PageLayout control reside in the graphics container. Youneed to locate the map frame within that graphics container.
Open the Carto OMD.
Question 3: What is the relationship between IPageLayout and IGraphicsContainer?
______________________________________________________________________
______________________________________________________________________
______________________________________________________________________
Inside your function, call the Reset method on gc to reinitialize the internal cursor sothat the Next method will return the first element.
Complete the following code to determine whether the current element is a map frameelement. When the map frame element is found, set it as the return value for yourreturnMapFrame function.
Exercise 12A
Copyright © 2001-2009 ESRI 12-7
Dim elem As ________________elem = gc.________ ' Move to the first elementDo Until elem ____ ______________
If ____________ elem Is __________________ ThenReturn ________
End Ifelem = gc.________
Loop
Navigate to the Click event of your btnAddMap.
After the code that assigns the first map, complete the following code to call yourcustom function:
mFrame = ____________________________(gc)
In a previous exercise, you used the IObjectCopy interface to copy a map from aMapControl to a PageLayoutControl. In this exercise, you will use IObjectCopy tooverwrite the default map template with your custom template.
Instantiate a new instance of ObjectCopy in your variable mapCopy.
Locate IObjectCopy in the Visual Studio Object Browser.
Question 4: How many members does it have? Which method of IObjectCopy will youuse to overwrite the map frame in the center of your template?
______________________________________________________________________
Call this method on mapCopy to copy your map, passing map and mFrame.Map asarguments.
Build your project, then run it.
Test the Add Map button.
The first map MapsAndLayers.mxd replaces the default map frame on your template.
Close your application.
Step 6: Tag your elements with a unique type
Just as you did earlier for the map frame, you will need to loop through the elements tolocate the title text element. When you explored the template, you discovered that it
Introduction to Programming ArcObjects Using the Microsoft .NET Framework
12-8 Copyright © 2001-2009 ESRI
contains more than one text element. You will need to determine whether you have foundthe title element.
One way to identify the title element is to examine its text and search for a uniquekeyword. The default title on the template is "< Double-click to enter map title >". Youcould incorporate code that uses the Like operator, for example, to search for the word"title":
If txtElem.Text Like "*title*" Then
For a single map, this code would solve your dilemma. However, if you are creating morethan one map, the title will change. A different solution is to assign a unique type(analogous to a tag) to each text element.
Insert a new sub procedure called TagTheElements that accepts the argument gc asIGraphicsContainer.
Copy the code from your returnMapFrame function and paste it into yourTagTheElements function.
Collapse the returnMapFrame function.
Modify your code so it looks like the following:
gc.Reset()Dim elem As IElementelem = gc.Next ' Move to the first elementDo Until elem Is Nothing
If TypeOf elem Is ITextElement ThenEnd Ifelem = gc.Next
Loop
After the Dim elem statement, declare txtElem as ITextElement and elemProps asIElementProperties3.
Inside the If statement, complete the following code to assign a value to txtElem:
txtElem = ________
Question 5: Is the assignment statement txtElem = elem a QI? Why or why not?
______________________________________________________________________
______________________________________________________________________
Exercise 12A
Copyright © 2001-2009 ESRI 12-9
After the txtElem assignment statement, begin an If statement to check whether thetext element contains the string "*title*". (Hint: The code appears earlier in thisstep.)
Then, if element's Text property contains "*title*", set the variable elemProps equalto elem.
Once you know that you have a title element, you can "tag" it by assigning its Typeproperty.
Set the Type property of elemProps to "Title".
To finish, for cases when the element is not the title, write an ElseIf statement thattests for the string "*text*" in the element's Text property, then set the Type propertyto "Cartographer".
Now that you have "tagged" the two text elements, you can use the element's Typeproperty to assign a title to your map.
Step 7: Modify the map title
You are now ready to update other elements on your map, starting with the map's titletext.
Create a new sub procedure named UpdateTitle that accepts the followingarguments:
▪ gc as IGraphicsContainer▪ mapName as String
The code will be somewhat similar to the map frame function you just wrote, so you canborrow from it.
Copy the code from your returnMapFrame function and paste it into yourUpdateTitle sub procedure.
Modify your sub procedure's code just as you did in the previous step so it looks likethe following:
gc.Reset()Dim elem As IElement
Introduction to Programming ArcObjects Using the Microsoft .NET Framework
12-10 Copyright © 2001-2009 ESRI
elem = gc.Next ' Move to the first elementDo Until elem Is Nothing
If TypeOf elem Is ITextElement ThenEnd Ifelem = gc.Next
Loop
From your TagTheElements sub procedure, copy the following declarations and pastethem into your UpdateTitle sub procedure:
Dim txtElem As ITextElementDim elemProps As IElementProperties3
Insert and complete the following code after the line that checks for TypeOf:
txtElem = elemelemProps = ________If elemProps.Type = "Title" Then
txtElem.________ = mapNameEnd If
For the final two lines within your "Title" If statement, call the UpdateElementmethod on gc, passing txtElem as the argument, then exit the loop.
Navigate to the Click event of btnAddMap.
After the line of code that calls mapCopy.Overwrite, complete the following code tocall the two sub procedures you just wrote:
TagTheElements(____)UpdateTitle(____, map.________)
To display your changes, enter the following code:
AxPageLayoutControl1.Refresh()
Build and run your project.
Test the Add Map button.
The title updates to Kauai, HI.
Close your application.
Exercise 12A
Copyright © 2001-2009 ESRI 12-11
Step 8: Export your layout to a file
After you have added or modified layout elements, you can create a digital or hard-copyversion of your map. In this step, you will export your map to a file. You will begin byreading about the interface that you will use for exporting.
Add a new sub procedure named Export that accepts the string mapName as its onlyargument.
In your new sub procedure, declare the variable activeView as IActiveView.
Set activeView to the ActiveView property of your PageLayoutControl.
Next, you will set up the device rectangle to be exported.
In the Desktop Help for .NET (VS2008), view the help for the IActiveView interfaceand its members.
Click the ExportFrame property.
Question 6: What data type does ExportFrame return?
______________________________________________________________________
Click tagRECT.
Question 7: Where is its origin (XMin, YMin)?
______________________________________________________________________
Question 8: In which library will you find the tagRECT structure?
______________________________________________________________________
Complete the following code to create the export frame that will be exported:
Dim expFrame As tagRECTexpFrame = activeView.______________________
For a PageLayoutControl, this export frame is always the height and width of the page indevice units (pixels) when the layout is zoomed to 100%. Because these values alwayscorrespond to the page instead of the full client area of the application, they are ideal foruse when you want to export a map to a graphics file.
Introduction to Programming ArcObjects Using the Microsoft .NET Framework
12-12 Copyright © 2001-2009 ESRI
To prepare for the export, you will need to create an envelope that holds the extent of themap that you want to export.
Instantiate env as a new Envelope.
Call the PutCoords method on your envelope object.
Use the inline help as a guide for passing the appropriate properties from expFrame asthe arguments.
Your Kauai, HI map contains two special characters (a space and a comma) in its name.It is good practice to avoid special characters in file names, so you will remove thosecharacters.
Enter the following code to call the Visual Studio Replace function to substitute anempty string for the comma and space combination:
mapName = Replace(mapName, ", ", "")
In the Desktop Help for .NET (VS2008), view the help for the IExport interface.
Question 9: On which OMD will you find this interface? How many export formats doesIExport support?
______________________________________________________________________
The help for IExport refers to a sample that illustrates how to export to JPEG format. Atthe conclusion of this exercise, if you have time, explore the sample code. For now, youwill continue writing your code.
Complete the following code to instantiate ExportPDF:
Dim expPDF As ______________ = New ExportPDF
Set the following properties on expPDF:
C:\Student\IPAN\Exercise12\" & mapname & ".pdf"
Exercise 12A
Copyright © 2001-2009 ESRI 12-13
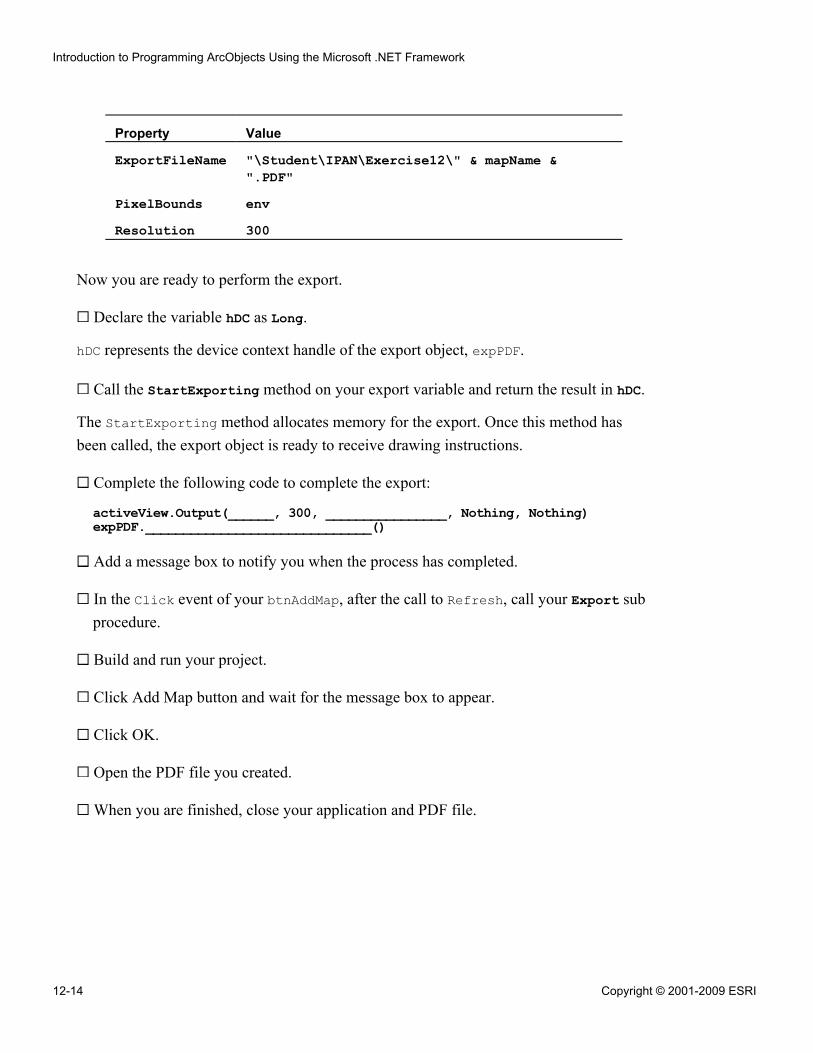
Property Value
ExportFileName "\Student\IPAN\Exercise12\" & mapName &".PDF"
PixelBounds envResolution 300
Now you are ready to perform the export.
Declare the variable hDC as Long.
hDC represents the device context handle of the export object, expPDF.
Call the StartExporting method on your export variable and return the result in hDC.
The StartExporting method allocates memory for the export. Once this method hasbeen called, the export object is ready to receive drawing instructions.
Complete the following code to complete the export:
activeView.Output(______, 300, ________________, Nothing, Nothing)expPDF.______________________________()
Add a message box to notify you when the process has completed.
In the Click event of your btnAddMap, after the call to Refresh, call your Export subprocedure.
Build and run your project.
Click Add Map button and wait for the message box to appear.
Click OK.
Open the PDF file you created.
When you are finished, close your application and PDF file.
Introduction to Programming ArcObjects Using the Microsoft .NET Framework
12-14 Copyright © 2001-2009 ESRI
You have finished this exercise; however, you may wish to complete the optional stepand Challenges:
▪ Step 9 shows you how to update the scale bar units on the layout.▪ The first Challenge tests your ability to modify the second text element in the
layout.▪ The second Challenge tests your ability to update layouts for all three maps in
your map document.
If you want to complete one or more of these, do so now. Otherwise, close VisualStudio.
Step 9: (Optional) Associate the units from your map with thescale bar
Currently, your scale bar designates the units as unknown. When you work with data inArcMap, each data frame (or map) has a spatial reference including the units associatedwith it. In this step, you will determine the units of your map and use them to label yourscale bar.
Create a new sub procedure named UpdateUnits that accepts two arguments: gc asIGraphicsContainer and map as IMap.
Some of the code will be similar to code that you have already written.
To save time, copy the code from your UpdateTitle sub procedure to UpdateUnits,then modify the code in your UpdateUnits sub procedure to match the following:
gc.Reset()Dim elem As IElementDim surFrame As IMapSurroundFrameDim sBar As __________________elem = gc.Next ' Move to the first elementDo Until elem Is Nothing
elem = gc.NextLoop
Instead of checking for ITextElement, you will now determine whether you have asurround frame.
Inside your Do Until loop, check whether elem is a type of IMapSurroundFrame.
Use your knowledge of inheritance to assign surFrame as the element.
Exercise 12A
Copyright © 2001-2009 ESRI 12-15
Complete the following code to test whether the name of your map surround is thename of a scale bar:
If surFrame.______________________.________ Like "*Scale Bar*" ThensBar = surFrame.______________________sBar.__________ = map.MapUnitsgc.UpdateElement(________________)Exit Do
End If
Insert a message box to display the name of your scale bar.
In the Click event of your btnAddMap, call UpdateUnits immediately after the call toUpdateTitle.
Verify that your code matches the following:
TagTheElements(gc)UpdateTitle(gc, map.Name)UpdateUnits(gc, map)AxPageLayoutControl1.Refresh()Export(map.Name)
Run your project and test your button.
Question 10: What type of scale bar is in the map surround frame?
______________________________________________________________________
The units now display.
Close your application.
You have finished this step.
If you will be completing either of the Challenges, comment your message box.
Save your project.
Continue on to the Challenges, if you wish. Otherwise, close Visual Studio.
Conclusion
Map elements and map surrounds provide meaningful information about your map. Aprogrammer does not usually create a layout using code. Typically, it is the cartographeror map technician who manually creates one or more detailed layout templates. As a
Introduction to Programming ArcObjects Using the Microsoft .NET Framework
12-16 Copyright © 2001-2009 ESRI
programmer, however, you can automate map production processes by associating alayout with a map or a collection of maps and then updating elements such as the title,other text, and scale bar.
Challenge: Modify the second text elementEstimated time: 15 minutes
Earlier in this exercise, you discovered that the layout template contains two textelements. You have already updated the title text element on the layout.
To complete this Challenge, update the second text element with your name.
Challenge: Create layouts for all mapsEstimated time: 15 minutes
One advantage of updating layouts in code is that you can update more than one map in asingle process. You learned how to access each map in a map document in a previouslesson.
To complete this Challenge, modify your code to loop through all the maps in yourmap document and process the layout for each map.
Tip: To make your code more efficient and less cluttered, begin your loop after all thevariable declarations.
Exercise 12A
Copyright © 2001-2009 ESRI 12-17

Answers to Exercise 12A Questions
Question 1: On the Scale and Units tab, how many times do you see "Unknown Units"?What units does this refer to?
Answer: Twice; division units and label units
Question 2: What is the data type passed as the argument to the Open method onIMapDocument? Which variable will you pass as the argument?
Answer: String; mName
Question 3: What is the relationship between IPageLayout and IGraphicsContainer?
Answer: IPageLayout and IGraphicsContainer are both interfaces on thePageLayout coclass. You can QI to access one of these interfaces from the other.
Question 4: How many members does it have? Which method of IObjectCopy will youuse to overwrite the map frame in the center of your template?
Answer: Two; Overwrite
Question 5: Is the assignment statement txtElem = elem a QI? Why or why not?
Answer: No, it illustrates "type of" inheritance—ITextElement is a type ofIElement.
Question 6: What data type does ExportFrame return?
Answer: tagRECT structure
Question 7: Where is its origin (XMin, YMin)?
Answer: Left, top
Question 8: In which library will you find the tagRECT structure?
Answer: ESRI.ArcGIS.Display
Introduction to Programming ArcObjects Using the Microsoft .NET Framework
12-18 Copyright © 2001-2009 ESRI

Question 9: On which OMD will you find this interface? How many export formats doesIExport support?
Answer: ESRI.ArcGIS.Output (OutputObjectModel.pdf); 10
Question 10: What type of scale bar is in the map surround frame?
Answer: Double alternating scale bar
Exercise 12A
Copyright © 2001-2009 ESRI 12-19
Exercise Solution: Exercise 12A (VB.NET)
Imports ESRI.ArcGIS.CartoImports ESRI.ArcGIS.esriSystemImports ESRI.ArcGIS.DisplayImports ESRI.ArcGIS.GeometryImports ESRI.ArcGIS.OutputPublic Class Form1
Private Sub Form1_Load(ByVal sender As Object, _ByVal e As System.EventArgs) Handles Me.Load
Dim fName As StringfName = "\Student\IPAN\Database\Templates\MyTemplate.mxt"AxPageLayoutControl1.LoadMxFile(fName)
End SubPrivate Sub btnAddMap_Click(ByVal sender As System.Object, _
ByVal e As System.EventArgs) Handles btnAddMap.ClickDim mName As StringmName = "\Student\IPAN\Exercise12\MapsAndLayers.mxd"Dim mapDoc As IMapDocument = New MapDocument'Dim mapDoc As IMapDocument = New MapDocumentClassmapDoc.Open(mName)Dim gc As IGraphicsContainer = AxPageLayoutControl1.PageLayoutDim map As IMapDim mFrame As IMapFrameDim mapCopy As IObjectCopymap = mapDoc.Map(0)mFrame = returnMapFrame(gc)mapCopy = New ObjectCopy'mapCopy = New ObjectCopyClassmapCopy.Overwrite(map, mFrame.Map)TagTheElements(gc)UpdateTitle(gc, map.Name)UpdateUnits(gc, map) ' Optional stepAxPageLayoutControl1.Refresh()Export(map.Name)
End SubPrivate Sub UpdateTitle(ByVal gc As IGraphicsContainer, ByVal mapName As String)
gc.Reset()
Introduction to Programming ArcObjects Using the Microsoft .NET Framework
12-20 Copyright © 2001-2009 ESRI
Dim elem As IElementDim txtElem As ITextElementDim elemProps As IElementProperties3elem = gc.Next ' Move to the first elementDo Until elem Is Nothing
If TypeOf elem Is ITextElement ThentxtElem = elemelemProps = elemIf elemProps.Type = "Title" Then
txtElem.Text = mapNamegc.UpdateElement(txtElem)Exit Do
End IfEnd Ifelem = gc.Next
LoopEnd SubPrivate Function returnMapFrame(ByVal gc As IGraphicsContainer) As IMapFrame
gc.Reset()Dim elem As IElementelem = gc.Next ' Move to the first elementDo Until elem Is Nothing
If TypeOf elem Is IMapFrame ThenReturn elem
End Ifelem = gc.Next
LoopEnd FunctionPrivate Sub TagTheElements(ByVal gc As IGraphicsContainer)
gc.Reset()Dim elem As IElementDim txtElem As ITextElementDim elemProps As IElementProperties3elem = gc.Next ' Move to the first elementDo Until elem Is Nothing
If TypeOf elem Is ITextElement ThentxtElem = elemIf txtElem.Text Like "*title*" Then
elemProps = elemelemProps.Type = "Title"
ElseIf txtElem.Text Like "*text*" ThenelemProps = elemelemProps.Type = "Cartographer"
End IfEnd Ifelem = gc.Next
LoopEnd Sub
Exercise 12A
Copyright © 2001-2009 ESRI 12-21
Private Sub Export (ByVal mapName As String)Dim activeView As IActiveViewactiveView = AxPageLayoutControl1.ActiveViewDim expFrame As tagRECTexpFrame = activeView.ExportFrameDim env As IEnvelopeenv = New Envelope'env = New EnvelopeClassenv.PutCoords(expFrame.left, expFrame.top, expFrame.right, expFrame.bottom)mapName = Replace(mapName, ",", "")Dim expPDF As IExport = New ExportPDF'Dim expPDF As IExport = New ExportPDFClassexpPDF.ExportFileName = "\Student\IPAN\Exercise12\" & mapName & ".PDF"expPDF.PixelBounds = envexpPDF.Resolution = 300Dim hDC As LonghDC = expPDF.StartExporting()activeView.Output(hDC, 300, expFrame, Nothing, Nothing)expPDF.FinishExporting()MessageBox.Show("Export complete!")
End Sub' Begin optional stepPrivate Sub UpdateUnits(ByVal gc As IGraphicsContainer, ByVal map As IMap)
gc.Reset()Dim elem As IElementDim surFrame As IMapSurroundFrameDim sBar As IScaleBarelem = gc.Next ' Move to the first elementDo Until elem Is Nothing
If TypeOf elem Is IMapSurroundFrame ThensurFrame = elemIf surFrame.MapSurround.Name Like "*Scale Bar*" Then
'MessageBox.Show(surFrame.MapSurround.Name)sBar = surFrame.MapSurroundsBar.Units = map.MapUnitsgc.UpdateElement(surFrame)Exit Do
End IfEnd Ifelem = gc.Next
LoopEnd Sub' End optional step
End Class
Introduction to Programming ArcObjects Using the Microsoft .NET Framework
12-22 Copyright © 2001-2009 ESRI
Challenge Solution: Modify the second textelement
btnAddMap_Click
TagTheElements(gc)UpdateTitle(gc, map.Name)UpdateUnits(gc, map) ' Optional stepUpdateElement(gc, map.Name)AxPageLayoutControl1.Refresh()Export(map.Name)
New sub procedure
Private Sub UpdateElement(ByVal gc As IGraphicsContainer, ByVal mapName As String)gc.Reset()Dim elem As IElementDim txtElem As ITextElementDim elemProps As IElementProperties3elem = gc.Next ' Move to the first elementDo Until elem Is Nothing
If TypeOf elem Is ITextElement ThentxtElem = elemelemProps = elemIf elemProps.Type = "Cartographer" Then
txtElem.Text = "J.K. Smith, Map Technician"gc.UpdateElement(txtElem)
End IfEnd Ifelem = gc.Next
LoopEnd Sub
Exercise 12A
Copyright © 2001-2009 ESRI 12-23
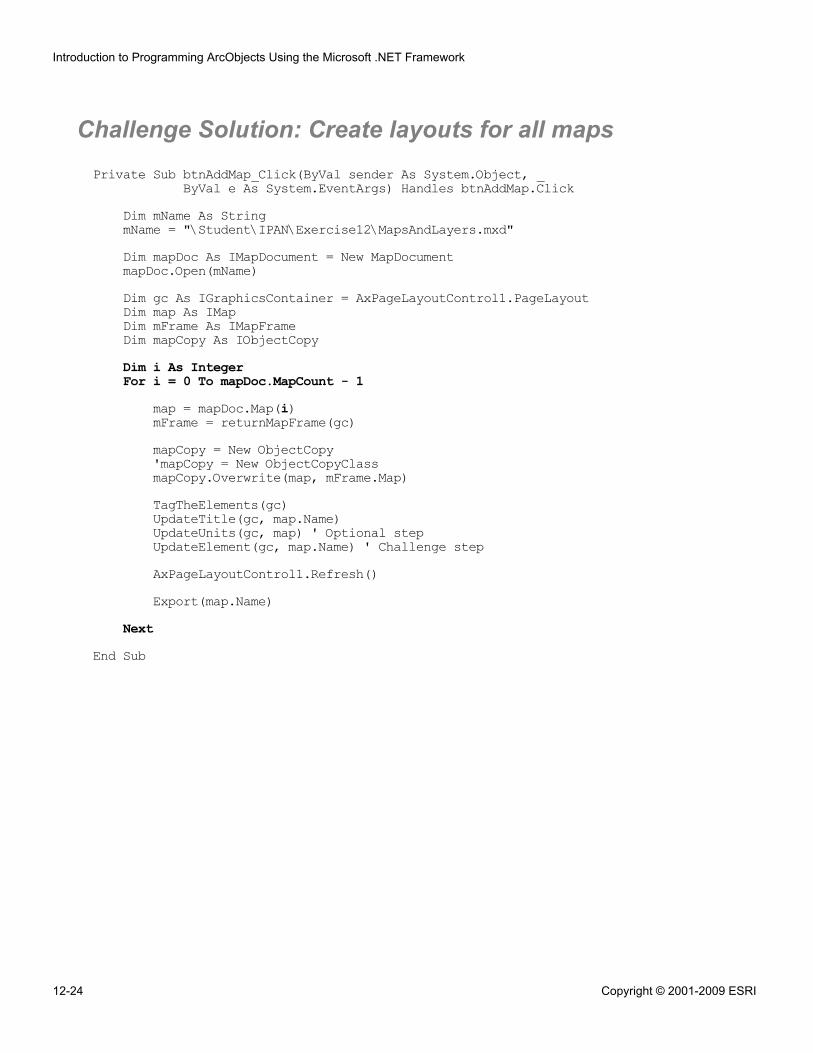
Challenge Solution: Create layouts for all mapsPrivate Sub btnAddMap_Click(ByVal sender As System.Object, _
ByVal e As System.EventArgs) Handles btnAddMap.ClickDim mName As StringmName = "\Student\IPAN\Exercise12\MapsAndLayers.mxd"Dim mapDoc As IMapDocument = New MapDocumentmapDoc.Open(mName)Dim gc As IGraphicsContainer = AxPageLayoutControl1.PageLayoutDim map As IMapDim mFrame As IMapFrameDim mapCopy As IObjectCopyDim i As IntegerFor i = 0 To mapDoc.MapCount - 1
map = mapDoc.Map(i)mFrame = returnMapFrame(gc)mapCopy = New ObjectCopy'mapCopy = New ObjectCopyClassmapCopy.Overwrite(map, mFrame.Map)TagTheElements(gc)UpdateTitle(gc, map.Name)UpdateUnits(gc, map) ' Optional stepUpdateElement(gc, map.Name) ' Challenge stepAxPageLayoutControl1.Refresh()Export(map.Name)
NextEnd Sub
Introduction to Programming ArcObjects Using the Microsoft .NET Framework
12-24 Copyright © 2001-2009 ESRI
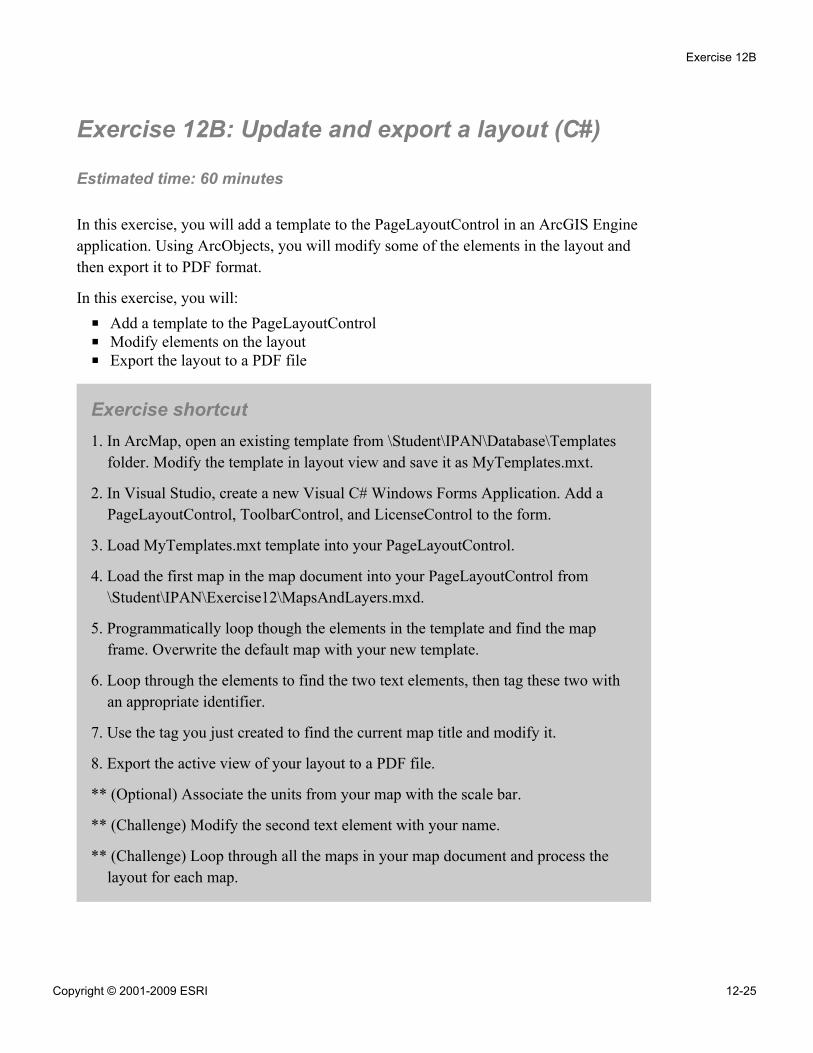
Exercise 12B: Update and export a layout (C#)
Estimated time: 60 minutes
In this exercise, you will add a template to the PageLayoutControl in an ArcGIS Engineapplication. Using ArcObjects, you will modify some of the elements in the layout andthen export it to PDF format.
In this exercise, you will:
▪ Add a template to the PageLayoutControl▪ Modify elements on the layout▪ Export the layout to a PDF file
Exercise shortcut1. In ArcMap, open an existing template from \Student\IPAN\Database\Templates
folder. Modify the template in layout view and save it as MyTemplates.mxt.
2. In Visual Studio, create a new Visual C# Windows Forms Application. Add aPageLayoutControl, ToolbarControl, and LicenseControl to the form.
3. Load MyTemplates.mxt template into your PageLayoutControl.
4. Load the first map in the map document into your PageLayoutControl from\Student\IPAN\Exercise12\MapsAndLayers.mxd.
5. Programmatically loop though the elements in the template and find the mapframe. Overwrite the default map with your new template.
6. Loop through the elements to find the two text elements, then tag these two withan appropriate identifier.
7. Use the tag you just created to find the current map title and modify it.
8. Export the active view of your layout to a PDF file.
** (Optional) Associate the units from your map with the scale bar.
** (Challenge) Modify the second text element with your name.
** (Challenge) Loop through all the maps in your map document and process thelayout for each map.
Exercise 12B
Copyright © 2001-2009 ESRI 12-25
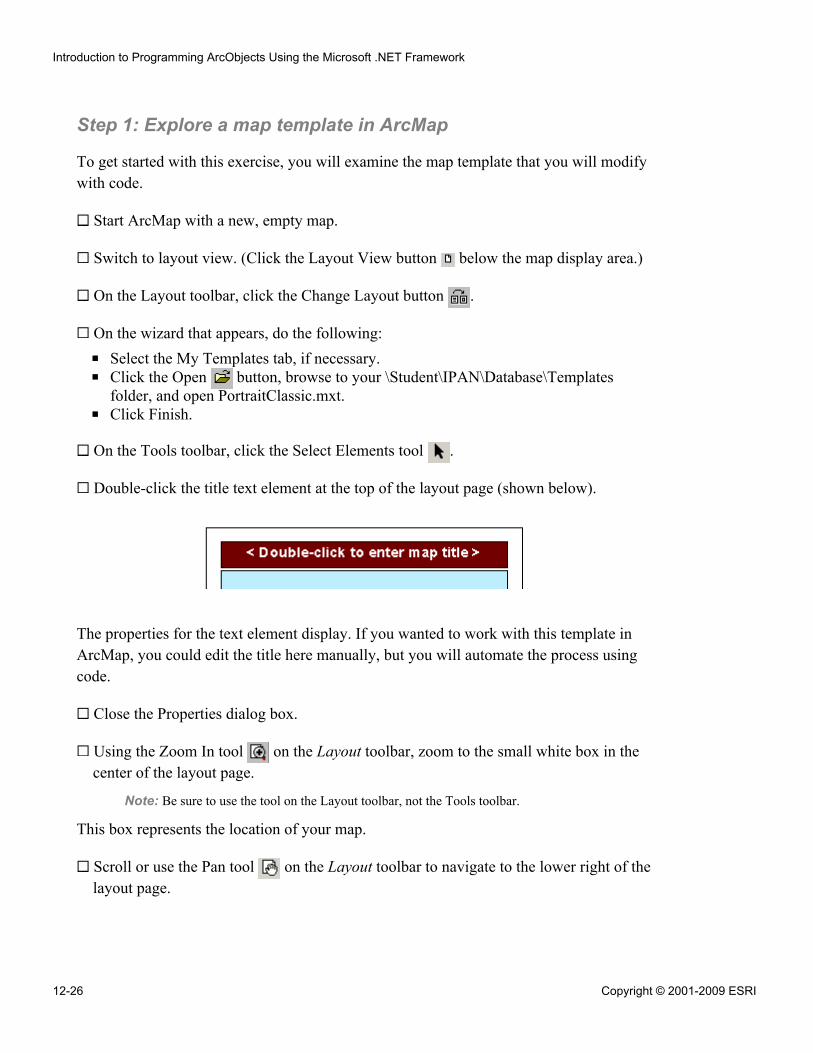
Step 1: Explore a map template in ArcMap
To get started with this exercise, you will examine the map template that you will modifywith code.
Start ArcMap with a new, empty map.
Switch to layout view. (Click the Layout View button below the map display area.)
On the Layout toolbar, click the Change Layout button .
On the wizard that appears, do the following:
▪ Select the My Templates tab, if necessary.▪ Click the Open button, browse to your \Student\IPAN\Database\Templates
folder, and open PortraitClassic.mxt.▪ Click Finish.
On the Tools toolbar, click the Select Elements tool .
Double-click the title text element at the top of the layout page (shown below).
The properties for the text element display. If you wanted to work with this template inArcMap, you could edit the title here manually, but you will automate the process usingcode.
Close the Properties dialog box.
Using the Zoom In tool on the Layout toolbar, zoom to the small white box in thecenter of the layout page.
Note: Be sure to use the tool on the Layout toolbar, not the Tools toolbar.
This box represents the location of your map.
Scroll or use the Pan tool on the Layout toolbar to navigate to the lower right of thelayout page.
Introduction to Programming ArcObjects Using the Microsoft .NET Framework
12-26 Copyright © 2001-2009 ESRI
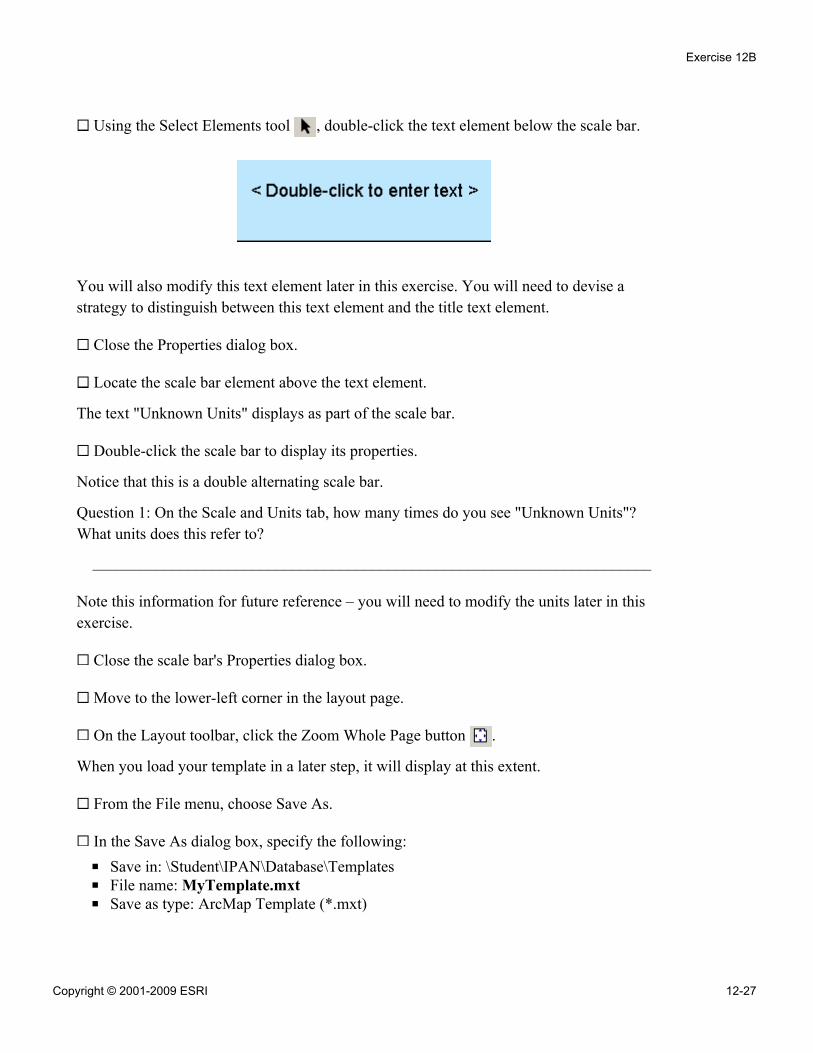
Using the Select Elements tool , double-click the text element below the scale bar.
You will also modify this text element later in this exercise. You will need to devise astrategy to distinguish between this text element and the title text element.
Close the Properties dialog box.
Locate the scale bar element above the text element.
The text "Unknown Units" displays as part of the scale bar.
Double-click the scale bar to display its properties.
Notice that this is a double alternating scale bar.
Question 1: On the Scale and Units tab, how many times do you see "Unknown Units"?What units does this refer to?
______________________________________________________________________
Note this information for future reference – you will need to modify the units later in thisexercise.
Close the scale bar's Properties dialog box.
Move to the lower-left corner in the layout page.
On the Layout toolbar, click the Zoom Whole Page button .
When you load your template in a later step, it will display at this extent.
From the File menu, choose Save As.
In the Save As dialog box, specify the following:
▪ Save in: \Student\IPAN\Database\Templates▪ File name: MyTemplate.mxt▪ Save as type: ArcMap Template (*.mxt)
Exercise 12B
Copyright © 2001-2009 ESRI 12-27
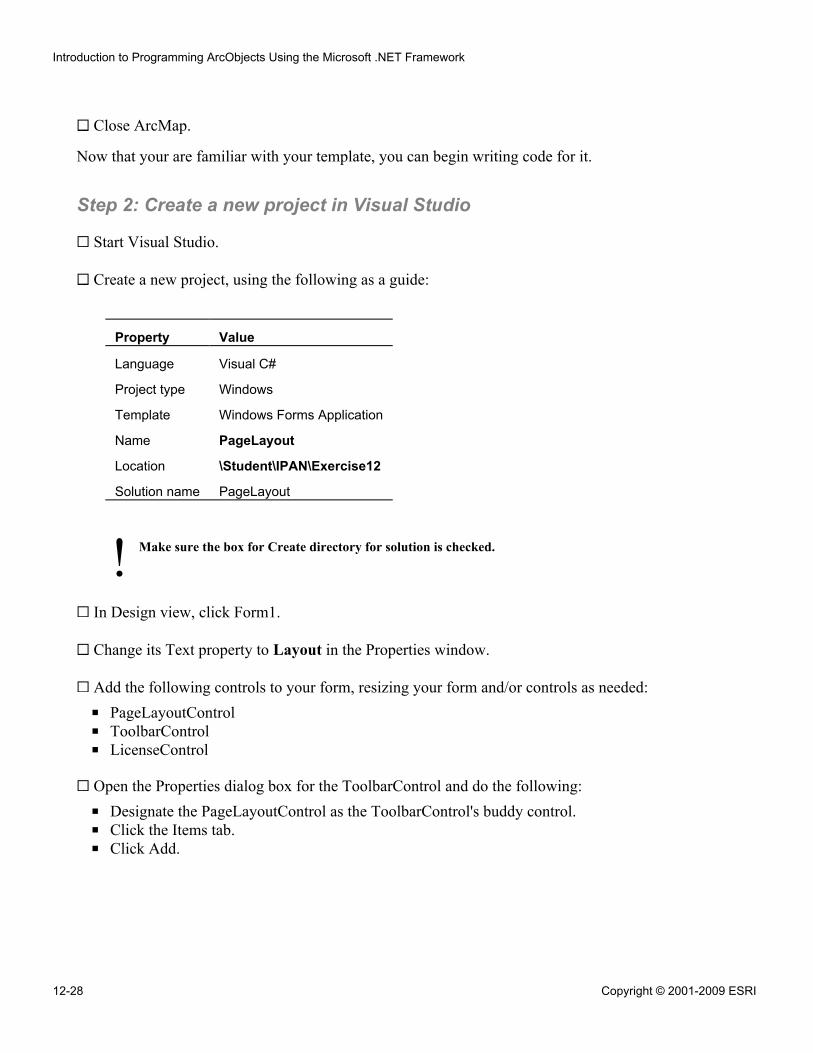
!
Close ArcMap.
Now that your are familiar with your template, you can begin writing code for it.
Step 2: Create a new project in Visual Studio
Start Visual Studio.
Create a new project, using the following as a guide:
Property Value
Language Visual C#
Project type Windows
Template Windows Forms Application
Name PageLayout
Location \Student\IPAN\Exercise12
Solution name PageLayout
Make sure the box for Create directory for solution is checked.
In Design view, click Form1.
Change its Text property to Layout in the Properties window.
Add the following controls to your form, resizing your form and/or controls as needed:
▪ PageLayoutControl▪ ToolbarControl▪ LicenseControl
Open the Properties dialog box for the ToolbarControl and do the following:
▪ Designate the PageLayoutControl as the ToolbarControl's buddy control.▪ Click the Items tab.▪ Click Add.
Introduction to Programming ArcObjects Using the Microsoft .NET Framework
12-28 Copyright © 2001-2009 ESRI
On the Controls Commands dialog box, do the following:
▪ Click the Toolsets tab.▪ In the Toolsets list, double-click PageLayout to add all its commands to your
ToolbarControl.▪ Click Close.
Click OK on the Properties dialog box.
Step 3: Load a map template
In this step, you will load a map template into your PageLayoutControl.
Navigate to the Form1_Load method.
Inside the method, declare the variable fName as String.
Set it equal to MyTemplate.mxt in your \Student\IPAN\Database\Templates folder.Tip: To avoid typographical errors, copy the path from the Location toolbar inArcCatalog.
Pass fName as the argument to the LoadMxFile method on the PageLayoutControl.
Run your project.
Your layout displays on the form at run time.
Close your application.
In Visual Studio, return to Design view.
If you would like, resize your form and layout.
Step 4: Load your map document
Now that your template has been loaded, you are ready to customize the template. Youwill begin by loading your map, then modifying elements that are already found on thetemplate.
Add a Button control to your form.
In the Properties window, set the following properties for the button:
Exercise 12B
Copyright © 2001-2009 ESRI 12-29
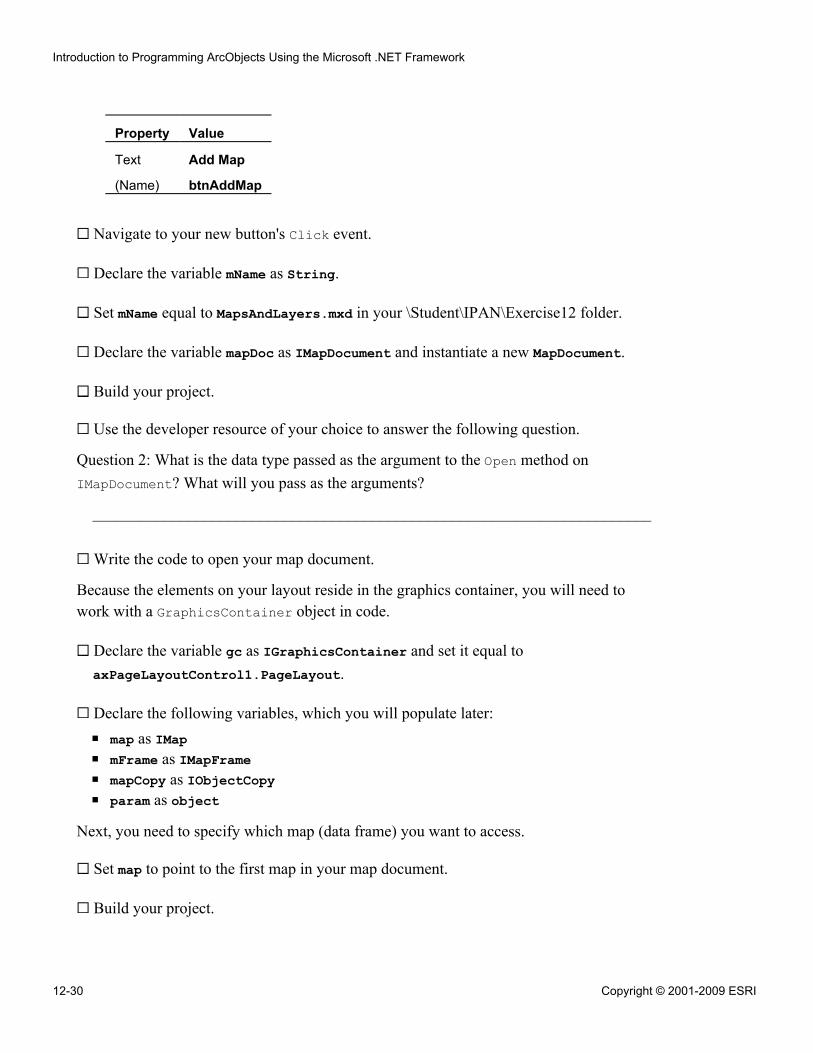
Property Value
Text Add Map
(Name) btnAddMap
Navigate to your new button's Click event.
Declare the variable mName as String.
Set mName equal to MapsAndLayers.mxd in your \Student\IPAN\Exercise12 folder.
Declare the variable mapDoc as IMapDocument and instantiate a new MapDocument.
Build your project.
Use the developer resource of your choice to answer the following question.
Question 2: What is the data type passed as the argument to the Open method onIMapDocument? What will you pass as the arguments?
______________________________________________________________________
Write the code to open your map document.
Because the elements on your layout reside in the graphics container, you will need towork with a GraphicsContainer object in code.
Declare the variable gc as IGraphicsContainer and set it equal toaxPageLayoutControl1.PageLayout.
Declare the following variables, which you will populate later:
▪ map as IMap▪ mFrame as IMapFrame▪ mapCopy as IObjectCopy▪ param as object
Next, you need to specify which map (data frame) you want to access.
Set map to point to the first map in your map document.
Build your project.
Introduction to Programming ArcObjects Using the Microsoft .NET Framework
12-30 Copyright © 2001-2009 ESRI
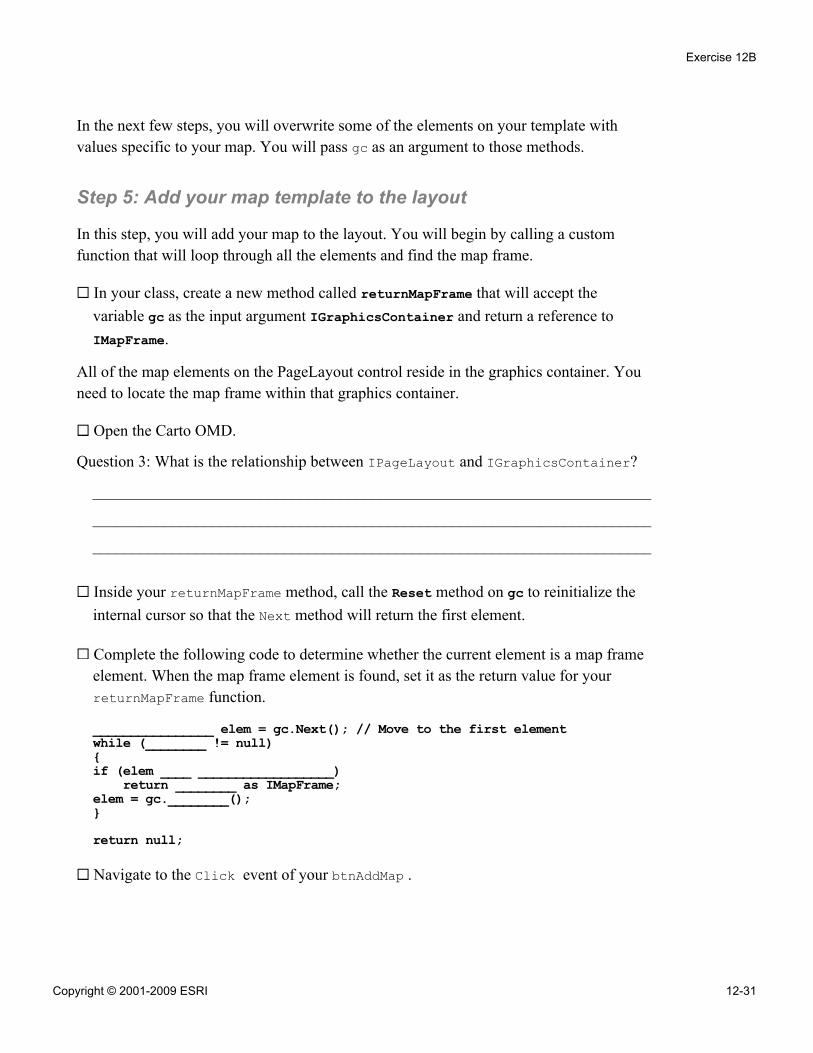
In the next few steps, you will overwrite some of the elements on your template withvalues specific to your map. You will pass gc as an argument to those methods.
Step 5: Add your map template to the layout
In this step, you will add your map to the layout. You will begin by calling a customfunction that will loop through all the elements and find the map frame.
In your class, create a new method called returnMapFrame that will accept thevariable gc as the input argument IGraphicsContainer and return a reference toIMapFrame.
All of the map elements on the PageLayout control reside in the graphics container. Youneed to locate the map frame within that graphics container.
Open the Carto OMD.
Question 3: What is the relationship between IPageLayout and IGraphicsContainer?
______________________________________________________________________
______________________________________________________________________
______________________________________________________________________
Inside your returnMapFrame method, call the Reset method on gc to reinitialize theinternal cursor so that the Next method will return the first element.
Complete the following code to determine whether the current element is a map frameelement. When the map frame element is found, set it as the return value for yourreturnMapFrame function.
________________ elem = gc.Next(); // Move to the first elementwhile (________ != null){if (elem ____ __________________)
return ________ as IMapFrame;elem = gc.________();}return null;
Navigate to the Click event of your btnAddMap .
Exercise 12B
Copyright © 2001-2009 ESRI 12-31
After the code that assigns the first map, complete the following code to call yourreturnMapFrame method, passing gc as the argument:
mFrame = ____________________(__);
In a previous exercise, you used the IObjectCopy interface to copy a map from aMapControl to a PageLayoutControl. In this exercise, you will use IObjectCopy tooverwrite the default map template with your custom template.
Instantiate a new instance of ObjectCopy in your variable mapCopy.
Set param equal to mFrame.Map.
Locate IObjectCopy in the Visual Studio Object Browser.
Question 4: How many members does it have? Which method of IObjectCopy will youuse to overwrite the map frame in the center of your template? How is the secondargument passed to Overwrite?
______________________________________________________________________
Call this method on mapCopy to copy your map, passing map and param as arguments.
Build your project, then run it.
Test the Add Map button.
The first map in MapsAndLayers.mxd replaces the default map frame on your template.
Close your application.
Step 6: Tag your elements with a unique type
Just as you did earlier for the map frame, you will need to loop through the elements tolocate the title text element. When you explored the template, you discovered that itcontains more than one text element. You will need to determine whether you have foundthe title element.
One way to identify the title element is to examine its text and search for a uniquekeyword. The default title on the template is "< Double-click to enter map title >". Youwill need to search for a unique keyword, such as "title," such as in the following code:
if (txtElem.Text.Contains("title"))
Introduction to Programming ArcObjects Using the Microsoft .NET Framework
12-32 Copyright © 2001-2009 ESRI
For a single map, this code would solve your dilemma. However, if you are creating morethan one map, the title will change. A different solution is to assign a unique type(analogous to a tag) to each text element.
Insert a new method called tagTheElements that accepts the argument gc asIGraphicsContainer.
Copy the code from your returnMapFrame function and paste it into yourtagTheElements function.
Collapse the returnMapFrame function.
Modify your code so it looks like the following:
gc.Reset();IElement elem = gc.Next(); // Move to the first elementwhile (elem != null){
if (elem is ITextElement)elem = gc.Next();
}
After the declaration and assignment for IElement, declare txtElem as ITextElementand elemProps as IElementProperties3.
Inside the if statement, complete the following code to assign a value to txtElem:
txtElem = ________ as ITextElement;
Complete the following code to test for the string "title":
if (txtElem.Text.Contains(______________)){}
Once you know that you have a title element, you can "tag" it by assigning its Typeproperty.
Inside your if statement, set elemProps equal to elem.
Then, set the Type property of elemProps to "Title".
Exercise 12B
Copyright © 2001-2009 ESRI 12-33
To finish, for cases when the element is not the title, write code that tests whether theelement's Text property contains "text" and, if it does, set the Type property to"Cartographer".
Now that you have "tagged" the two text elements, you can use the element's Typeproperty to assign a title to your map.
Step 7: Modify the map title
You are now ready to update other elements on your map, starting with the map's titletext.
Create a new method named UpdateTitle that accepts the following arguments:
▪ gc as IGraphicsContainer▪ mapName as string
The code will be somewhat similar to the map frame method you wrote earlier, so youcan borrow from it.
Copy the code from your returnMapFrame method and paste it into yourUpdateTitle function.
Delete the return statements.
You want to test whether the element is a type of ITextElement, so make that changeto your code, then delete the return statements.
Just as you did earlier for the map frame, you will need to loop through the elements tolocate the title text element. When you explored the template, you discovered that itcontains more than one text element. You will need to determine whether you have foundthe title element.
One way to identify the title element is to examine its Type property and search for aunique keyword, such as in the following code:
if (elemProps.Type.Equals("Title"))
Before the while statement, declare txtElem as ITextElement and elemProps asIElementProperties.
Complete the following code after the line that checks for ITextElement:
Introduction to Programming ArcObjects Using the Microsoft .NET Framework
12-34 Copyright © 2001-2009 ESRI
while (elem != null){
if (elem is ITextElement){
txtElem = ________ as ITextElement;elemProps = ________ as IElementProperties3;if (elemProps.Type.Equals("Title"))
txtElem._________ = mapName;}elem = gc.Next();
}
As the final line within your if statement, call the UpdateElement method on gc,passing txtElem as the argument.
Navigate to the Click event of btnAddMap.
After the line of code that calls mapCopy.Overwrite, complete the following code tocall the two methods you just wrote:
tagTheElements(____);UpdateTitle(____, map.________);
To display your changes, enter the following code:
axPageLayoutControl1.Refresh();
Run your project and test the Add Map button.
The title updates to Kauai, HI.
Close your application.
Step 8: Export your layout to a file
After you have added or modified layout elements, you can create a digital or hard-copyversion of your map. In this step, you will export your map to a file. You will begin byreading about the interface that you will use for exporting.
Add a new private method named Export that accepts the string mapName as its onlyargument.
In your Export method, declare the variable activeView as IActiveView.
Set activeView to the ActiveView property of your PageLayoutControl.
Exercise 12B
Copyright © 2001-2009 ESRI 12-35
Next, you will set up the device rectangle to be exported.
In the Desktop Help for .NET (VS2008), view the help for the IActiveView interfaceand its members.
Click the ExportFrame property.
Question 5: What data type does ExportFrame return?
______________________________________________________________________
Click tagRECT.
Question 6: Where is its origin (XMin, YMin)?
______________________________________________________________________
Complete the following code to create the export frame that will be exported:
tagRECT expFrame = activeView.______________________;
For a PageLayout, this export frame is always the height and width of the page in deviceunits (pixels) when the layout is zoomed to 100%. Because these values alwayscorrespond to the page instead of the full client area of the application, they are ideal foruse when you want to export a map to a graphics file.
To prepare for the export, you will need to create an envelope that holds the extent of themap that you want to export.
Instantiate env as a new EnvelopeClass.
Call the PutCoords method on your envelope object.
Use the inline help as a guide for passing the appropriate properties from expFrame asthe arguments.
Your Kauai, HI map contains two special characters (a space and a comma) in its name.It is good practice to avoid special characters in file names, so you will remove thosecharacters.
Enter the following code to call the Visual Studio Replace function to substitute anempty string for the comma and space:
mapName = mapName.Replace(", ", "");
Introduction to Programming ArcObjects Using the Microsoft .NET Framework
12-36 Copyright © 2001-2009 ESRI
In the Desktop Help for .NET (VS2008), view the help for the IExport interface.
Question 7: On which OMD will you find this interface? How many export formats doesIExport support?
______________________________________________________________________
The help for IExport refers to a sample that illustrates how to export to JPEG format. Atthe conclusion of this exercise, if you have time, explore the sample code. For now, youwill continue writing your code.
Complete the following code to instantiate ExportPDFClass:
______________ expPDF = new ExportPDFClass() as ______________;
Set the following properties on expPDF:
Property Value
ExportFileName "\\Student\\IPAN\\Exercise12\\" + mapName +".PDF"
PixelBounds envResolution 300
Now you are ready to perform the export.
Declare the variable hDC as int.
hDC represents the device context handle of the export object, expPDF.
Call the StartExporting method on your export variable and return the result in hDC.
The StartExporting method allocates memory for the export. Once this method hasbeen called, the export object is ready to receive drawing instructions.
Complete the following code to complete the export:
activeView.Output(______, 300, ______ ________________, null, null);expPDF._____________________________();
Add a message box to notify you when the process has completed.
Exercise 12B
Copyright © 2001-2009 ESRI 12-37
In the Click event of your btnAddMap, call the Export method after you refresh thelayout.
Build and run your project.
Click Add Map button and wait for the message box to appear.
Click OK.
Open the PDF file you created.
When you are finished, close your application and PDF file.
You have finished this exercise; however, you may wish to complete the optional stepand Challenges:
▪ Step 9 shows you how to update the scale bar units on the layout.▪ The first Challenge tests your ability to modify the second text element in the
layout.▪ The second Challenge tests your ability to update layouts for all three maps in
your map document.
If you want to complete one or more of these, do so now. Otherwise, close VisualStudio.
Step 9: (Optional) Associate the units from your map with thescale bar
Currently, your scale bar designates the units as unknown. When you work with data inArcMap, each data frame (or map) has a spatial reference including the units associatedwith it. In this step, you will determine the units of your map and use them to label yourscale bar.
Create a new method named UpdateUnits that accepts two arguments: gc asIGraphicsContainer and map as IMap.
Some of the code will be similar to code that you have already written.
To save time, copy the code from your UpdateTitle method to UpdateUnits, thenmodify the code in your UpdateUnits method to match the following:
gc.Reset();IElement elem = gc.Next(); // Move to the first element
Introduction to Programming ArcObjects Using the Microsoft .NET Framework
12-38 Copyright © 2001-2009 ESRI
while (elem != null){
elem = gc.Next();}
Instead of checking for ITextElement, you will now determine whether you have asurround frame.
After the declaration for IElement, declare the variable surFrame asIMapSurroundFrame and sBar as IScaleBar.
Inside your while loop, check whether elem is IMapSurroundFrame.
Use your knowledge of inheritance to assign surFrame as the element.
Complete the following code to test whether the name of your map surround is thename of a scale bar:
if (elem is IMapSurroundFrame){
surFrame = elem as IMapSurroundFrame;sBar = surFrame.Object as _____________;sBar.__________ = map.MapUnits;gc.UpdateElement(________________ as ____________________);break;
}
Insert a message box to display the name of your scale bar.
In the Click event of your btnAddMap, call UpdateUnits immediately after you callUpdateTitle.
Verify that your code matches the following:
tagTheElements(gc);UpdateTitle(gc, map.Name);UpdateUnits(gc, map);axPageLayoutControl1.Refresh();Export(map.Name);
Build and run your project.
Test your button.
Question 8: What type of scale bar is in the map surround frame?
______________________________________________________________________
Exercise 12B
Copyright © 2001-2009 ESRI 12-39
The units now display.
Close your application.
You have finished this step.
If you will be completing either of the Challenges, comment your message box.
Save your project.
Continue on to the Challenges, if you wish. Otherwise, close Visual Studio.
Conclusion
Map elements and map surrounds provide meaningful information about your map. Aprogrammer does not usually create a layout using code. Typically, it is the cartographeror map technician who manually creates one or more detailed layout templates. As aprogrammer, however, you can automate map production processes by associating alayout with a map or a collection of maps and then updating elements such as the title,other text, and scale bar.
Challenge: Modify the second text elementEstimated time: 15 minutes
You have already updated the title text element on the layout. In the first step, youdiscovered that the layout template contains two text elements.
To complete this Challenge, update the second text element with your name.
Challenge: Create layouts for all maps in the map documentEstimated time: 15 minutes
One advantage of updating layouts in code is that you can update more than one map in asingle process. You learned how to access each map in a map document in a previouslesson.
To complete this Challenge, modify your code to loop through all the maps in yourmap document and process the layout for each map.
Introduction to Programming ArcObjects Using the Microsoft .NET Framework
12-40 Copyright © 2001-2009 ESRI

Tip: To make your code more efficient and less cluttered, begin your loop after all thevariable declarations.
Exercise 12B
Copyright © 2001-2009 ESRI 12-41

Answers to Exercise 12B Questions
Question 1: On the Scale and Units tab, how many times do you see "Unknown Units"?What units does this refer to?
Answer: Twice; division units and label units
Question 2: What is the data type passed as the argument to the Open method onIMapDocument? What will you pass as the arguments?
Answer: String; (mName, "")
Question 3: What is the relationship between IPageLayout and IGraphicsContainer?
Answer: IPageLayout and IGraphicsContainer are both interfaces on thePageLayout coclass. You can cast to access one of these interfaces from the other.
Question 4: How many members does it have? Which method of IObjectCopy will youuse to overwrite the map frame in the center of your template? How is the secondargument passed to Overwrite?
Answer: Two; Overwrite; with the ref keyword
Question 5: What data type does ExportFrame return?
Answer: tagRECT structure
Question 6: Where is its origin (XMin, YMin)?
Answer: Left, top
Question 7: On which OMD will you find this interface? How many export formats doesIExport support?
Answer: ESRI.ArcGIS.Output (OutputObjectModel.pdf); 10
Question 8: What type of scale bar is in the map surround frame?
Answer: Double alternating scale bar
Introduction to Programming ArcObjects Using the Microsoft .NET Framework
12-42 Copyright © 2001-2009 ESRI
Exercise Solution: Exercise 12B (C#)using System;using System.Collections.Generic;using System.ComponentModel;using System.Data;using System.Drawing;using System.Text;using System.Windows.Forms;using ESRI.ArcGIS.Carto;using ESRI.ArcGIS.esriSystem;using ESRI.ArcGIS.Geometry;using ESRI.ArcGIS.Output;using ESRI.ArcGIS.Display;namespace PageLayout{
public partial class Form1 : Form{
public Form1(){
InitializeComponent();}private void Form1_Load(object sender, EventArgs e){
string fName = "\\Student\\IPAN\\Database\\Templates\\MyTemplate.mxt";axPageLayoutControl1.LoadMxFile(fName);
}private void btnAddMap_Click(object sender, EventArgs e){
string mName = "\\Student\\IPAN\\Exercise12\\MapsAndLayers.mxd";IMapDocument mapDoc = new MapDocumentClass();mapDoc.Open(mName, "");IGraphicsContainer gc =
axPageLayoutControl1.PageLayout as IGraphicsContainer;IMap map;IMapFrame mFrame;IObjectCopy mapCopy;object param;map = mapDoc.get_Map(0);mFrame = returnMapFrame(gc);mapCopy = new ObjectCopyClass();param = mFrame.Map;mapCopy.Overwrite(map, ref param);tagTheElements(gc);UpdateTitle(gc, map.Name);UpdateUnits(gc, map); // Optional step
Exercise 12B
Copyright © 2001-2009 ESRI 12-43
axPageLayoutControl1.Refresh();Export(map.Name);
}public static IMapFrame returnMapFrame(IGraphicsContainer gc){
gc.Reset();IElement elem = gc.Next(); // Move to the first elementwhile (elem != null){
if (elem is IMapFrame)return elem as IMapFrame;
elem = gc.Next();}return null;
}public static void tagTheElements(IGraphicsContainer gc){
gc.Reset();IElement elem = gc.Next(); // Move to the first elementITextElement txtElem;IElementProperties3 elemProps;while (elem != null){
if (elem is ITextElement){
txtElem = elem as ITextElement;if (txtElem.Text.Contains("title")){
elemProps = elem as IElementProperties3;elemProps.Type = "Title";
}else if(txtElem.Text.Contains("text")){
elemProps = elem as IElementProperties3;elemProps.Type = "Cartographer";
}}elem = gc.Next();
}}public static void UpdateTitle(IGraphicsContainer gc, string mapName){
gc.Reset();IElement elem = gc.Next(); // Move to the first elementITextElement txtElem;IElementProperties3 elemProps;
Introduction to Programming ArcObjects Using the Microsoft .NET Framework
12-44 Copyright © 2001-2009 ESRI
while (elem != null){
if (elem is ITextElement){
txtElem = elem as ITextElement;elemProps = elem as IElementProperties3;if (elemProps.Type.Equals("Title"))
txtElem.Text = mapName;gc.UpdateElement(txtElem as IElement);
}elem = gc.Next();
}}private void Export(string mapName){
IActiveView activeView = axPageLayoutControl1.ActiveView;tagRECT expFrame = activeView.ExportFrame;IEnvelope env = new EnvelopeClass();env.PutCoords(
expFrame.left, expFrame.top, expFrame.right, expFrame.bottom);mapName = mapName.Replace(", ", "");IExport expPDF = new ExportPDFClass();expPDF.ExportFileName =
"\\Student\\IPAN\\Exercise12\\" + mapName + ".pdf";expPDF.PixelBounds = env;expPDF.Resolution = 300;int hDC = expPDF.StartExporting();activeView.Output(hDC, 300, ref expFrame, null, null);expPDF.FinishExporting();MessageBox.Show("Export complete!");
}// Begin optional stepprivate static void UpdateUnits(IGraphicsContainer gc, IMap map){
gc.Reset();IElement elem = gc.Next(); // Move to the first elementIMapSurroundFrame surFrame;IScaleBar sbar;
Exercise 12B
Copyright © 2001-2009 ESRI 12-45
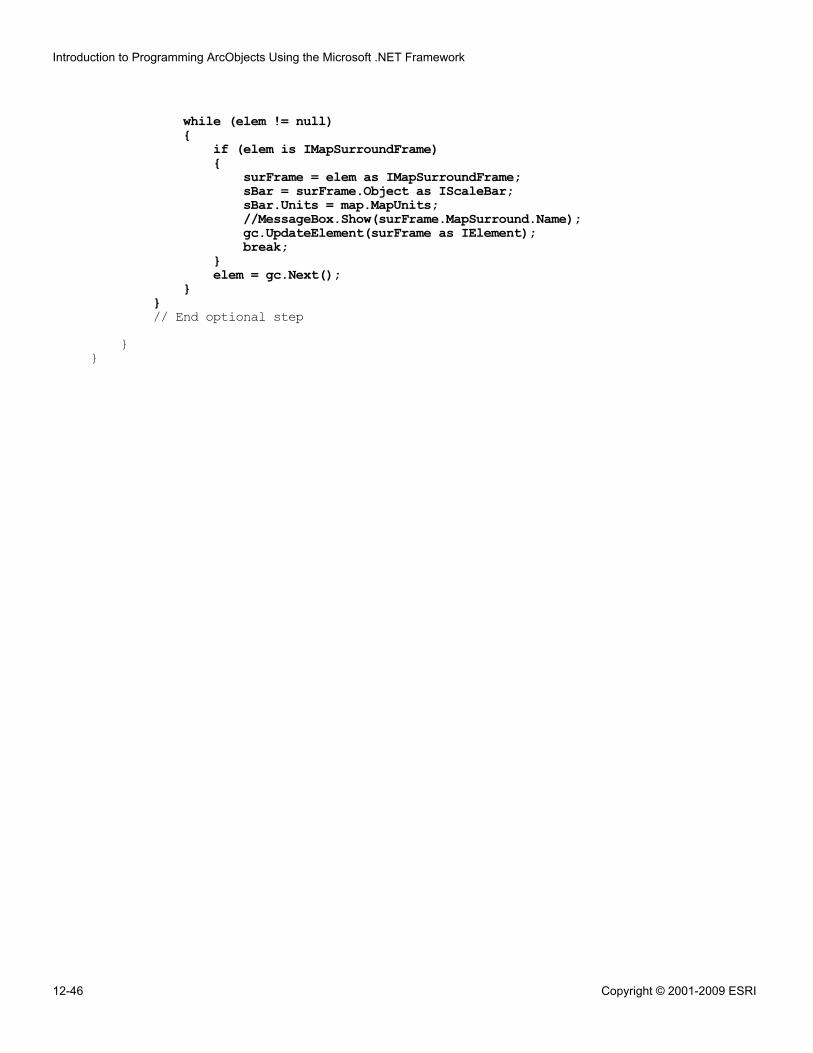
while (elem != null){
if (elem is IMapSurroundFrame){
surFrame = elem as IMapSurroundFrame;sBar = surFrame.Object as IScaleBar;sBar.Units = map.MapUnits;//MessageBox.Show(surFrame.MapSurround.Name);gc.UpdateElement(surFrame as IElement);break;
}elem = gc.Next();
}}// End optional step
}}
Introduction to Programming ArcObjects Using the Microsoft .NET Framework
12-46 Copyright © 2001-2009 ESRI

Challenge Solution: Modify the second textelement
tagTheElements(gc);UpdateTitle(gc, map.Name);UpdateUnits(gc, map); // Optional stepUpdateElement(gc); // ChallengeaxPageLayoutControl1.Refresh();Export(map.Name);
public static void UpdateElement(IGraphicsContainer gc){
gc.Reset();IElement elem = gc.Next(); // Move to the first elementITextElement txtElem;IElementProperties3 elemProps;while (elem != null){
if (elem is ITextElement){
txtElem = elem as ITextElement;elemProps = elem as IElementProperties3;if (elemProps.Type.Equals("Cartographer"))
txtElem.Text = "J.K. Smith, Map Technician";gc.UpdateElement(txtElem as IElement);
}elem = gc.Next();
}}
Exercise 12B
Copyright © 2001-2009 ESRI 12-47

Challenge Solution: Create layouts for all maps inthe map document
for (int i = 0; i < mapDoc.MapCount; i++){
map = mapDoc.get_Map(i);mFrame = returnMapFrame(gc);mapCopy = new ObjectCopy();//mapCopy = new ObjectCopyClass();param = mFrame.Map;mapCopy.Overwrite(map, ref param);tagTheElements(gc);UpdateTitle(gc, map.Name);UpdateUnits(gc, map); // Optional stepUpdateElement(gc); // ChallengeaxPageLayoutControl1.Refresh();Export(map.Name);
}
Introduction to Programming ArcObjects Using the Microsoft .NET Framework
12-48 Copyright © 2001-2009 ESRI

AESRI data license
agreement

IMPORTANT — READ CAREFULLYBEFORE OPENING THE SEALED MEDIA PACKAGE
ENVIRONMENTAL SYSTEMS RESEARCH INSTITUTE, INC. (ESRI), IS WILLING TO LICENSE THEENCLOSED ELECTRONIC VERSION OF THIS TRAINING COURSE TO YOU ONLY UPON THECONDITION THAT YOU ACCEPT ALL OF THE TERMS AND CONDITIONS CONTAINED IN THISESRI DATA LICENSE AGREEMENT. PLEASE READ THE TERMS AND CONDITIONS CAREFULLYBEFORE OPENING THE SEALED MEDIA PACKAGE. BY OPENING THE SEALED MEDIAPACKAGE, YOU ARE INDICATING YOUR ACCEPTANCE OF THE ESRI DATA LICENSEAGREEMENT. IF YOU DO NOT AGREE TO THE TERMS AND CONDITIONS AS STATED, THENESRI IS UNWILLING TO LICENSE THE TRAINING COURSE TO YOU. IN SUCH EVENT, YOUSHOULD RETURN THE MEDIA PACKAGE WITH THE SEAL UNBROKEN AND ALL OTHERCOMPONENTS (E.G., THE CD-ROM, TRAINING COURSE MATERIALS, TRAINING DATABASE, ASAPPLICABLE) TO ESRI OR ITS AUTHORIZED INSTRUCTOR FOR A REFUND. NO REFUND WILLBE GIVEN IF THE MEDIA PACKAGE SEAL IS BROKEN OR THERE ARE ANY MISSINGCOMPONENTS.
ESRI DATA LICENSE AGREEMENT
This is a license agreement, and not an agreement for sale, between you (Licensee) and ESRI. This ESRI datalicense agreement (Agreement) gives Licensee certain limited rights to use the electronic version of thetraining course materials, training database, software, and related materials (hereinafter collectively referredto as the "Training Course"). All rights not specifically granted in this Agreement are reserved to ESRI and itslicensor(s).
Reservation of Ownership and Grant of License: ESRI and its licensor(s) retain exclusive rights, title,and ownership to the copy of the Training Course licensed under this Agreement and hereby grant to Licenseea personal, nonexclusive, nontransferable license to use the Training Course as a single package forLicensee's own personal use only pursuant to the terms and conditions of this Agreement. Licensee agrees touse reasonable efforts to protect the Training Course from unauthorized use, reproduction, distribution, orpublication.
Proprietary Rights and Copyright: Licensee acknowledges that the Training Course is proprietary andconfidential property of ESRI and its licensor(s) and is protected by United States copyright laws andapplicable international copyright treaties and/or conventions.
Appendix A
Copyright © 2001-2009 ESRI A-1
Permitted Uses:
▪ Licensee may run the setup and install one (1) copy of the Training Course onto a permanentelectronic storage device and reproduce one (1) copy of the Training Course and/or any onlinedocumentation in hard-copy format for Licensee's own personal use only.
▪ Licensee may use one (1) copy of the Training Course on a single processing unit.▪ Licensee may make only one (1) copy of the original Training Course for archival purposes during
the term of this Agreement, unless the right to make additional copies is granted to Licensee inwriting by ESRI.
▪ Licensee may use the Training Course provided by ESRI for the stated purpose of Licensee's ownpersonal GIS training and education.
Uses Not Permitted:
▪ Licensee shall not sell, rent, lease, sublicense, lend, assign, time-share, or transfer, in whole or in part,or provide unlicensed third parties access to the Training Course, any updates, or Licensee's rightsunder this Agreement.
▪ Licensee shall not separate the component parts of the Training Course for use on more than one (1)computer, used in conjunction with any other software package, and/or merged and compiled into aseparate database(s) for other analytical uses.
▪ Licensee shall not reverse engineer, decompile, or disassemble the Training Course, except and onlyto the extent that such activity is expressly permitted by applicable law notwithstanding thisrestriction.
▪ Licensee shall not make any attempt to circumvent the technological measure(s) (e.g., software orhardware key) that effectively controls access to the Training Course, except and only to the extentthat such activity is expressly permitted by applicable law notwithstanding this restriction.
▪ Licensee shall not remove or obscure any copyright, trademark, and/or proprietary rights notices ofESRI or its licensor(s).
Term: The license granted by this Agreement shall commence upon Licensee's receipt of the Training Courseand shall continue until such time that (1) Licensee elects to discontinue use of the Training Course andterminates this Agreement or (2) ESRI terminates for Licensee's material breach of this Agreement. TheAgreement shall automatically terminate without notice if Licensee fails to comply with any provision of thisAgreement. Upon termination of this Agreement in either instance, Licensee shall return to ESRI or destroyall copies of the Training Course, and any whole or partial copies, in any form and deliver evidence of suchdestruction to ESRI, which evidence shall be in a form acceptable to ESRI in its sole discretion. The partieshereby agree that all provisions that operate to protect the rights of ESRI and its licensor(s) shall remain inforce should breach occur.
Limited Warranty and Disclaimer: ESRI warrants that the media upon which the Training Course isprovided will be free from defects in materials and workmanship under normal use and service for a period ofninety (90) days from the date of receipt.
EXCEPT FOR THE LIMITED WARRANTY SET FORTH ABOVE, THE TRAINING COURSECONTAINED THEREIN IS PROVIDED "AS-IS," WITHOUT WARRANTY OF ANY KIND, EITHER
Introduction to Programming ArcObjects Using the Microsoft .NET Framework
A-2 Copyright © 2001-2009 ESRI
EXPRESS OR IMPLIED, INCLUDING, BUT NOT LIMITED TO, THE IMPLIED WARRANTIES OFMERCHANTABILITY, FITNESS FOR A PARTICULAR PURPOSE, AND NONINFRINGEMENT. ESRIDOES NOT WARRANT THAT THE TRAINING COURSE WILL MEET LICENSEE'S NEEDS OREXPECTATIONS; THAT THE USE OF THE TRAINING COURSE WILL BE UNINTERRUPTED; ORTHAT ALL NONCONFORMITIES, DEFECTS, OR ERRORS CAN OR WILL BE CORRECTED. THETRAINING DATABASE HAS BEEN OBTAINED FROM SOURCES BELIEVED TO BE RELIABLE,BUT ITS ACCURACY AND COMPLETENESS, AND THE OPINIONS BASED THEREON, ARE NOTGUARANTEED. THE TRAINING DATABASE MAY CONTAIN SOME NONCONFORMITIES,DEFECTS, ERRORS, AND/OR OMISSIONS. ESRI AND ITS LICENSOR(S) DO NOT WARRANT THATTHE TRAINING DATABASE WILL MEET LICENSEE'S NEEDS OR EXPECTATIONS, THAT THEUSE OF THE TRAINING DATABASE WILL BE UNINTERRUPTED, OR THAT ALLNONCONFORMITIES CAN OR WILL BE CORRECTED. ESRI AND ITS LICENSOR(S) ARE NOTINVITING RELIANCE ON THIS TRAINING DATABASE, AND LICENSEE SHOULD ALWAYSVERIFY ACTUAL DATA, WHETHER MAP, SPATIAL, RASTER, TABULAR INFORMATION, ANDSO FORTH. THE DATA CONTAINED IN THIS PACKAGE IS SUBJECT TO CHANGE WITHOUTNOTICE.
Exclusive Remedy and Limitation of Liability: During the warranty period, Licensee's exclusiveremedy and ESRI's entire liability shall be the return of the license fee paid for the Training Course upon theLicensee's deinstallation of all copies of the Training Course and providing a Certification of Destruction in aform acceptable to ESRI.
IN NO EVENT SHALL ESRI OR ITS LICENSOR(S) BE LIABLE TO LICENSEE FOR COSTS OFPROCUREMENT OF SUBSTITUTE GOODS OR SERVICES, LOST PROFITS, LOST SALES ORBUSINESS EXPENDITURES, INVESTMENTS, OR COMMITMENTS IN CONNECTION WITH ANYBUSINESS, LOSS OF ANY GOODWILL, OR FOR ANY INDIRECT, SPECIAL, INCIDENTAL, AND/ORCONSEQUENTIAL DAMAGES ARISING OUT OF THIS AGREEMENT OR USE OF THE TRAININGCOURSE, HOWEVER CAUSED, ON ANY THEORY OF LIABILITY, AND WHETHER OR NOT ESRIOR ITS LICENSOR(S) HAVE BEEN ADVISED OF THE POSSIBILITY OF SUCH DAMAGE. THESELIMITATIONS SHALL APPLY NOTWITHSTANDING ANY FAILURE OF ESSENTIAL PURPOSE OFANY LIMITED REMEDY.
No Implied Waivers: No failure or delay by ESRI or its licensor(s) in enforcing any right or remedy underthis Agreement shall be construed as a waiver of any future or other exercise of such right or remedy by ESRIor its licensor(s).
Order for Precedence: This Agreement shall take precedence over the terms and conditions of anypurchase order or other document, except as required by law or regulation.
Export Regulation: Licensee acknowledges that the Training Course and all underlying information ortechnology may not be exported or re-exported into any country to which the U.S. has embargoed goods, or to
Appendix A
Copyright © 2001-2009 ESRI A-3
anyone on the U.S. Treasury Department's list of Specially Designated Nationals, or to the U.S. CommerceDepartment's Table of Deny Orders. Licensee shall not export the Training Course or any underlyinginformation or technology to any facility in violation of these or other applicable laws and regulations.Licensee represents and warrants that it is not a national or resident of, or located in or under the control of,any country subject to such U.S. export controls.
Severability: If any provision(s) of this Agreement shall be held to be invalid, illegal, or unenforceable by acourt or other tribunal of competent jurisdiction, the validity, legality, and enforceability of the remainingprovisions shall not in any way be affected or impaired thereby.
Governing Law: This Agreement, entered into in the County of San Bernardino, shall be construed andenforced in accordance with and be governed by the laws of the United States of America and the State ofCalifornia without reference to conflict of laws principles.
Entire Agreement: The parties agree that this Agreement constitutes the sole and entire agreement of theparties as to the matter set forth herein and supersedes any previous agreements, understandings, andarrangements between the parties relating hereto.
Introduction to Programming ArcObjects Using the Microsoft .NET Framework
A-4 Copyright © 2001-2009 ESRI

BSuggested reading

Reading list
1. C# & VB.NET Conversion Pocket ReferenceJose Mojica. O'Reilly Media, Inc.
2. C# How to ProgramH.M. Deitel, P. J. Deitel, J. Listfield, T.R. Nieto, C. Yaeger, M. Zlatkina. PrenticeHall.
3. Getting to Know ArcObjects: Programming ArcObjects with VBARobert Burke. ESRI Press.
4. Microsoft Press books about developer toolsAvailable from Microsoft atwww.microsoft.com/learning/books/devtools/default.mspx.
5. Microsoft Press books about Microsoft .NETAvailable from Microsoft at www.microsoft.com/learning/books/net/default.mspx.
6. Professional Visual Studio 2008Nick Randolph, David Gardner. John Wiley & Sons, Incorporated (2008)
Appendix B
Copyright © 2001-2009 ESRI B-1


CAdditional information

Additional informationWhat is e?
In a few of the exercises, you worked with events. Some of the events passed a variable ethat you accessed. You learned that the value of e varied, depending on the event.
Private Sub axMapControl1_OnMouseMove(ByVal sender As Object, _ByVal e As IMapControlEvents2_OnMouseMoveEvent) _Handles axMapControl1.OnMouseMove
The mapX and mapY properties of e return coordinates in map units. The x and yproperties of e return coordinates in display units.
Coding tip
After typing the first few characters of a variable that you have already declared, pressCTRL+SPACEBAR for the code completer. If the variable name is unique, the codecompleter will finish the variable. If the sequence of characters is not unique, a codecompletion list will appear.
Help resources
The resources on your computer may vary depending on which developer kit(s) you haveinstalled.
▪ Tools in the ...\ArcGIS\DeveloperKit folder
▪ ESRI Object Browser▪ Library Locator▪ Object model diagrams▪ COM samples▪ .NET samples
▪ ArcGIS developer resources (Start menu > All Programs > ArcGIS > DeveloperHelp)
▪ Desktop Help for .NET (VS2008)▪ Engine Help for .NET (VS2008)
▪ Visual Studio resources
▪ Help▪ MSDN Forums▪ Samples▪ Visual Studio Object Browser
▪ Online resources
▪ ESRI Resource Center (http://resources.esri.com)▪ ESRI Support Center (http://support.esri.com)▪ Use the search engine of your choice to search for VB versus C#.
Appendix C
Copyright © 2001-2009 ESRI C-1
Working with snippets
With the ArcGIS Snippet Finder, you can find and insert ArcGIS snippets into a VisualStudio 2008 project using keyword searches.
▪ ESRI-written snippets reside in the following folders:
▪ ...\Program Files\Microsoft Visual Studio 9.0\VC#\Snippets▪ ...\Program Files\Microsoft Visual Studio 9.0\VB\Snippets
▪ An index of snippets is available in the Desktop or Engine Help for .NET(VS2008):
▪ Visual Studio Integration Tools >▪ Snippet Index
Shortcut keys for Visual Basic 2008
To find lists of useful keyboard shortcuts, search the Microsoft Download Center for:
▪ Visual Basic 2008 Keybinding Reference Poster▪ Visual C# 2008 Keybinding Reference Poster
Unregistering your command
You can unregister a DLL sample from your machine when you are finished using it. Tounregister a DLL, use the Assembly Registration Tool (regasm.exe) with the commandline flag /unregister.
▪ For example: regasm MySample.dll/unregister
Regasm.exe is located in: %windir%\Microsoft.NET\Framework\v2.0.xxxx (where xxxxis the build number of the .NET framework you are using).
▪ From your Start menu, click Run. In the Run dialog box, type cmd (Start > Run >cmd).
▪ In the Command Window:
▪ Type cd C:\WINDOWS\Microsoft.NET\Framework\v2.0.xxxxx(where
xxxxx
represents your version)▪ Type regasm.exe <path to your DLL>/dllname.dll/unregister
Introduction to Programming ArcObjects Using the Microsoft .NET Framework
C-2 Copyright © 2001-2009 ESRI
EExtend ArcGIS
Desktop with a customtool (VB.NET)

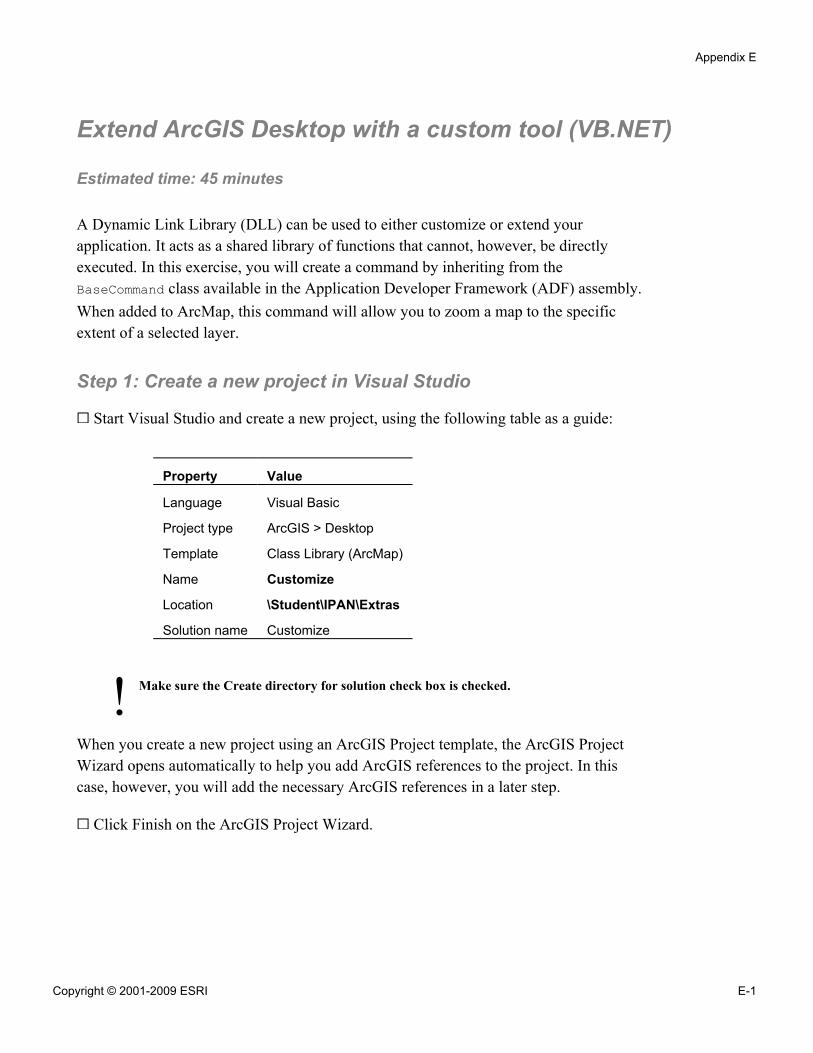
!
Extend ArcGIS Desktop with a custom tool (VB.NET)
Estimated time: 45 minutes
A Dynamic Link Library (DLL) can be used to either customize or extend yourapplication. It acts as a shared library of functions that cannot, however, be directlyexecuted. In this exercise, you will create a command by inheriting from theBaseCommand class available in the Application Developer Framework (ADF) assembly.When added to ArcMap, this command will allow you to zoom a map to the specificextent of a selected layer.
Step 1: Create a new project in Visual Studio
Start Visual Studio and create a new project, using the following table as a guide:
Property Value
Language Visual Basic
Project type ArcGIS > Desktop
Template Class Library (ArcMap)
Name Customize
Location \Student\IPAN\Extras
Solution name Customize
Make sure the Create directory for solution check box is checked.
When you create a new project using an ArcGIS Project template, the ArcGIS ProjectWizard opens automatically to help you add ArcGIS references to the project. In thiscase, however, you will add the necessary ArcGIS references in a later step.
Click Finish on the ArcGIS Project Wizard.
Appendix E
Copyright © 2001-2009 ESRI E-1
Step 2: Create the COM class: myExtent
COM requires every non-private object to have a unique identifier, called a GUID(Globally Unique Identifier). To make it easier to write a GUID, it is normally expressedas a hexadecimal number (e.g., 99B42120-6EC7-11CF-A6C7-00AA00A47DD2) and iscalled CLSID (Class Identifier) when the GUID is the identification number for a COMobject. Also, the Programmatic Identifier (ProgID) presents a human-readable version ofthe CLSID to identify COM objects. The project and class names make up the ProgIDand can be used to uniquely identify your component.
In this step, you will create your own COM component by setting some of the classproperties. A number of COM interoperability attributes will be used to define the classas a COM class.
In the Solution Explorer window, right-click Class1.vb and choose Delete.
Click OK on the message about the class being deleted permanently.
In the Solution Explorer window, right-click Customize and choose Add > New Item.
In the Add New Item dialog box, specify the following properties:
▪ Categories: ArcGIS▪ Templates: Base Command▪ Name: myExtent.vb
Click Add.
In the ArcGIS New Item Wizard Options dialog box, select Desktop ArcMapCommand and then click OK.
In the myExtent.vb code window, notice that most of the plumbing code has beenautomatically generated for you:
▪ A member variable m_application is declared for the IApplication interfacerepresenting ArcMap. application
▪ The constructor is set up with stub code.▪ The overridden OnCreate method with the application hook is created.▪ The overridden OnClick method is stubbed out.
Expand the COM GUIDs section and review the code.
Introduction to Programming ArcObjects Using the Microsoft .NET Framework
E-2 Copyright © 2001-2009 ESRI
Notice that the <ComClass> attributes and the COM GUIDs region are automaticallyadded to the class for you when using the COM class template. The GUIDs provide theCOM identity for the class you just added and its COM interfaces.
Collapse the region when you are finished.
The ProgID is determined in a logical way: from the Project Name and the Class Name.In this case, the Customize.DLL is implemented in a project named Customize and hasone class called myExtent. Therefore, the ProgID is Customize.myExtent.
Finally, notice how the class is set to inherit from BaseCommand abstract class.Inheriting the BaseCommand allows you to create commands more easily.
Save the solution.
Step 3: Reference ArcGIS Libraries
In the .NET framework, namespaces are the basic building blocks that define the classesin a hierarchical structure. Using a namespace in a project requires a reference, which youmust add to the project before the classes in the namespace can be used.
In this step, you will reference the appropriate type libraries to build the customcommand.
From the Project menu, choose Add ArcGIS Reference.
In the Add ArcGIS Reference dialog box, add the following references:
▪ ESRI.ArcGIS.Carto▪ ESRI.ArcGIS.Geometry▪ ESRI.ArcGIS.SystemUI
Note: To know more about these libraries, see the Desktop Help for .NET (VS2008).
Click Finish.
At the top of the code window, before the beginning of the class declaration, add allthe references that you imported in your code.
Step 4: Make simple changes to the code
In the myExtent.vb code window, scroll down to the constructor for the class.
Notice that all the command properties are empty strings.
Appendix E
Copyright © 2001-2009 ESRI E-3
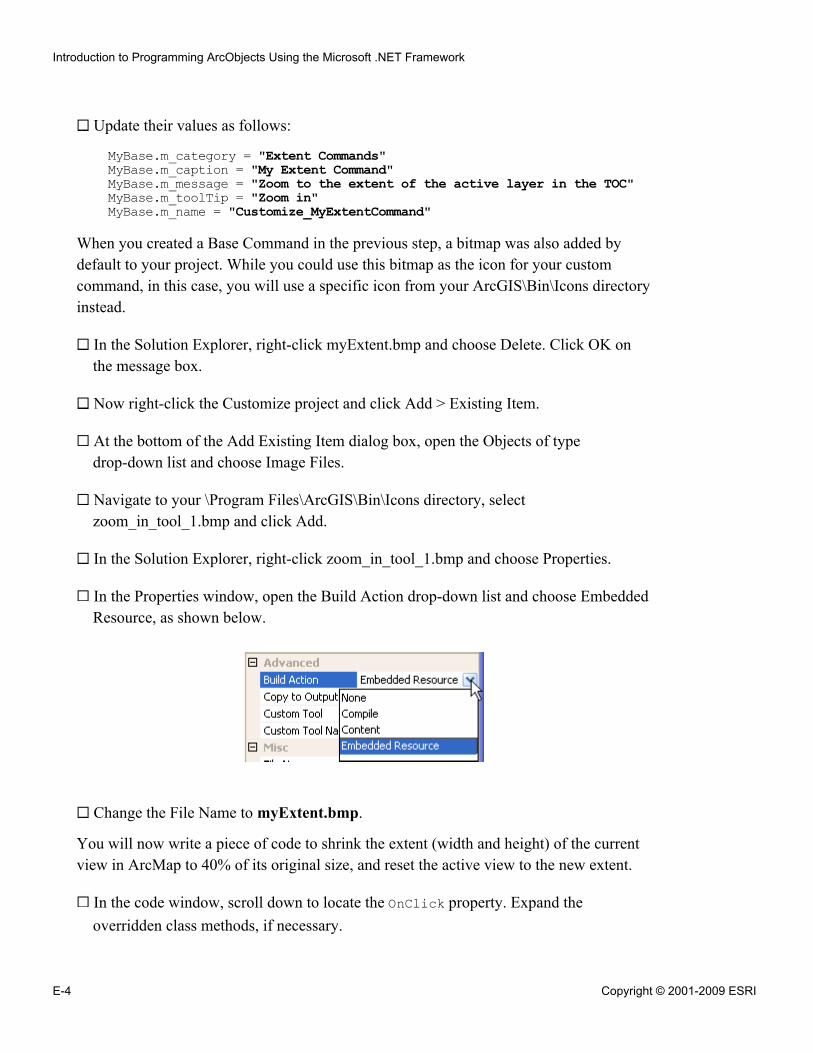
Update their values as follows:
MyBase.m_category = "Extent Commands"MyBase.m_caption = "My Extent Command"MyBase.m_message = "Zoom to the extent of the active layer in the TOC"MyBase.m_toolTip = "Zoom in"MyBase.m_name = "Customize_MyExtentCommand"
When you created a Base Command in the previous step, a bitmap was also added bydefault to your project. While you could use this bitmap as the icon for your customcommand, in this case, you will use a specific icon from your ArcGIS\Bin\Icons directoryinstead.
In the Solution Explorer, right-click myExtent.bmp and choose Delete. Click OK onthe message box.
Now right-click the Customize project and click Add > Existing Item.
At the bottom of the Add Existing Item dialog box, open the Objects of typedrop-down list and choose Image Files.
Navigate to your \Program Files\ArcGIS\Bin\Icons directory, selectzoom_in_tool_1.bmp and click Add.
In the Solution Explorer, right-click zoom_in_tool_1.bmp and choose Properties.
In the Properties window, open the Build Action drop-down list and choose EmbeddedResource, as shown below.
Change the File Name to myExtent.bmp.
You will now write a piece of code to shrink the extent (width and height) of the currentview in ArcMap to 40% of its original size, and reset the active view to the new extent.
In the code window, scroll down to locate the OnClick property. Expand theoverridden class methods, if necessary.
Introduction to Programming ArcObjects Using the Microsoft .NET Framework
E-4 Copyright © 2001-2009 ESRI
Add the following code to the OnClick property:
Dim mxDoc As IMxDocument = m_application.DocumentDim activeView As IActiveView = mxDoc.ActiveViewDim currExtent As IEnvelope = activeView.ExtentcurrExtent.Expand(0.4D, 0.4D, True)activeView.Extent = currExtentactiveView.Refresh()
Save the solution.
Step 5: Compile and register
In this step, you will compile the project. When you do so, .NET will automaticallyregister the component with COM for you.
Build your solution and check for any errors. (Tip: Ctrl+Shift+B)
To check the results of the Build operation, examine the sub-directories of your projectin Windows Explorer. (Hint: \bin\Debug directory)
Notice that the Debug directory contains a debug information (.pdb) file and a typelibrary file (.tlb) produced by the Assembly Registration tool.
Step 6: Test your control in ArcMap
In this step, you will verify that the component has been registered correctly with COMby testing it in ArcMap.
Start ArcMap and browse to \Student\IPAN\Exercise05\MapsAndLayers.mxd.
From the Tools menu, choose Customize.
In the Customize dialog box, click the Commands tab.
In the Save in pull-down list, verify that the current map is chosen.
Click the Add From File button.
Appendix E
Copyright © 2001-2009 ESRI E-5
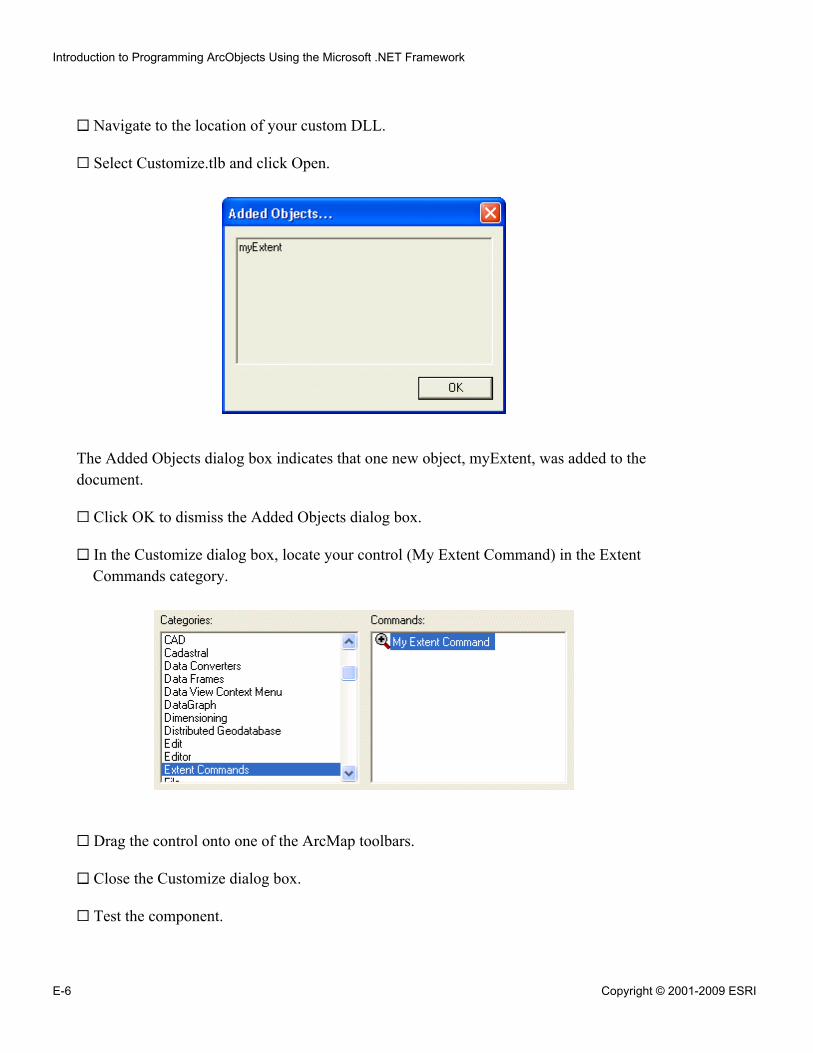
Navigate to the location of your custom DLL.
Select Customize.tlb and click Open.
The Added Objects dialog box indicates that one new object, myExtent, was added to thedocument.
Click OK to dismiss the Added Objects dialog box.
In the Customize dialog box, locate your control (My Extent Command) in the ExtentCommands category.
Drag the control onto one of the ArcMap toolbars.
Close the Customize dialog box.
Test the component.
Introduction to Programming ArcObjects Using the Microsoft .NET Framework
E-6 Copyright © 2001-2009 ESRI
!
Close ArcMap without saving any changes.
Step 7: Use ILDASM to read the DLL
In this step, you will use the MSIL Disassembler (Ildasm.exe) to read the actual contentsof the DLL file that you created.
Note: You need to compile a project at least once before you can run ILDASM on itsexecutable.
In Visual Studio, from the Tools menu, choose External Tools.
Click the Add button.
Specify the following:
▪ Title: ILDASM▪ Command: ...\Program Files\Microsoft SDKs\Windows\v6.0A\bin\ildasm.exe
Click OK.
Now you are ready to use ILDASM.
From the Tools menu, choose ILDASM.
In ILDASM, click File > Open.
Navigate to Customize.DLL and click Open.
Explore the metadata and the Intermediate Language code for your DLL.
Close ILDASM.
You must close ILDASM before recompiling the application or VisualStudio will not be able to overwrite the executable file. In some cases,it is not possible to recover from this error and you will have to restartVisual Studio.
Close Visual Studio.
Step 8: Using Component Category Manager
Currently, the classes in your DLL are registered to the Extent Commands category. Thismeans that they are also registered to the ESRI Mx Commands component category,which allows the DLL to be used in ArcMap.
Appendix E
Copyright © 2001-2009 ESRI E-7
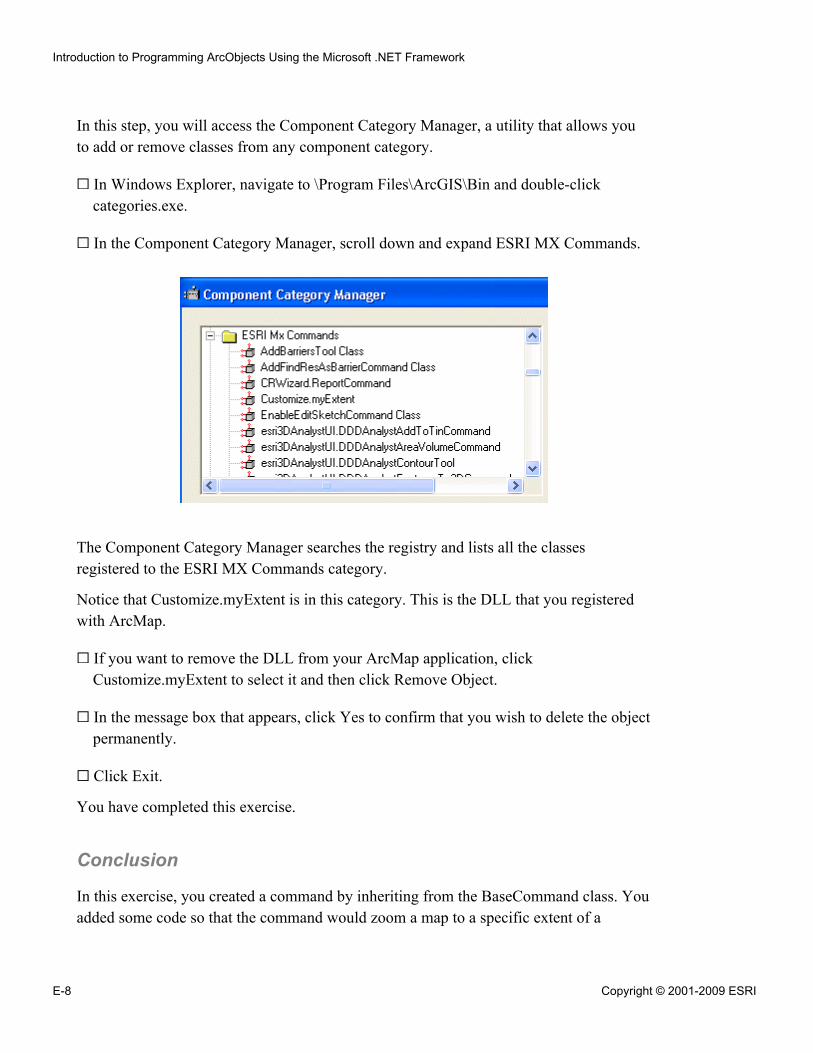
In this step, you will access the Component Category Manager, a utility that allows youto add or remove classes from any component category.
In Windows Explorer, navigate to \Program Files\ArcGIS\Bin and double-clickcategories.exe.
In the Component Category Manager, scroll down and expand ESRI MX Commands.
The Component Category Manager searches the registry and lists all the classesregistered to the ESRI MX Commands category.
Notice that Customize.myExtent is in this category. This is the DLL that you registeredwith ArcMap.
If you want to remove the DLL from your ArcMap application, clickCustomize.myExtent to select it and then click Remove Object.
In the message box that appears, click Yes to confirm that you wish to delete the objectpermanently.
Click Exit.
You have completed this exercise.
Conclusion
In this exercise, you created a command by inheriting from the BaseCommand class. Youadded some code so that the command would zoom a map to a specific extent of a
Introduction to Programming ArcObjects Using the Microsoft .NET Framework
E-8 Copyright © 2001-2009 ESRI

selected layer in ArcMap. You then used ILDASM to explore the metadata and theIntermediate Language code of your DLL. Finally, you learned how to use theComponent Category Manager to add or remove objects from ArcMap.
Appendix E
Copyright © 2001-2009 ESRI E-9

FExtend ArcGIS
Desktop with a customtool (C#)

!
Extend ArcGIS Desktop with a custom tool (C#)
Estimated time: 45 minutes
A Dynamic Link Library (DLL) can be used to either customize or extend yourapplication. It acts as a shared library of functions that cannot, however, be directlyexecuted. In this exercise, you will create a command by inheriting from theBaseCommand class available in the Application Developer Framework (ADF) assembly.When added to ArcMap, this command will allow you to zoom a map to the specificextent of a selected layer.
Step 1: Create a new project in Visual Studio
Start Visual Studio and create a new project, using the following table as a guide:
Property Value
Language Visual C#
Project type ArcGIS > Desktop
Template Class Library (ArcMap)
Name Customize
Location \Student\IPAN\Extras
Solution name Customize
Make sure the Create directory for solution check box is checked.
When you create a new project using an ArcGIS Project template, the ArcGIS ProjectWizard opens automatically to help you add ArcGIS references to the project. In thiscase, however, you will add the necessary ArcGIS references in a later step.
Click Finish on the ArcGIS Project Wizard.
Appendix F
Copyright © 2001-2009 ESRI F-1
Step 2: Create the COM class: myExtent
COM requires every non-private object to have a unique identifier, called a GUID(Globally Unique Identifier). To make it easier to write a GUID, it is normally expressedas a hexadecimal number (e.g., 99B42120-6EC7-11CF-A6C7-00AA00A47DD2) and iscalled CLSID (Class Identifier) when the GUID is the identification number for a COMobject. Also, the Programmatic Identifier (ProgID) presents a human-readable version ofthe CLSID to identify COM objects. The project and class names make up the ProgIDand can be used to uniquely identify your component.
In this step, you will create your own COM component by setting some of the classproperties. A number of COM interoperability attributes will be used to define the classas a COM class.
In the Solution Explorer window, right-click Class1.cs and choose Delete.
Click OK on the message about the class being deleted permanently.
In the Solution Explorer window, right-click Customize and choose Add > New Item.
In the Add New Item dialog box, specify the following properties:
▪ Categories: ArcGIS▪ Templates: Base Command▪ Name: myExtent.cs
Click Add.
In the ArcGIS New Item Wizard Options dialog box, select Desktop ArcMapCommand and then click OK.
In the myExtent.cs code window, notice that most of the plumbing code has beenautomatically generated for you:
▪ A member variable m_application is declared for the IApplication interfacerepresenting ArcMap application.
▪ The constructor is set up with stub code.▪ The overridden OnCreate method with the application hook is created.▪ The overridden OnClick method is stubbed out.
The GUIDs are automatically added to the class for you when using the COM classtemplate. The GUIDs provide the COM identity for the class you just added and its COMinterfaces. The ProgID is determined in a logical way: from the Project Name and theClass Name. In this case, the Customize.DLL is implemented in a project named
Introduction to Programming ArcObjects Using the Microsoft .NET Framework
F-2 Copyright © 2001-2009 ESRI
Customize and has one class called myExtent. Therefore, the ProgID isCustomize.myExtent.
Finally, notice how the class is set to inherit from BaseCommand abstract class.Inheriting the BaseCommand allows you to create commands more easily.
Save the solution.
Step 3: Reference ArcGIS Libraries
In the .NET framework, namespaces are the basic building blocks that define the classesin a hierarchical structure. Using a namespace in a project requires a reference, which youmust add to the project before the classes in the namespace can be used.
In this step, you will reference the appropriate type libraries to build the customcommand.
From the Project menu, choose Add ArcGIS Reference.
In the Add ArcGIS Reference dialog box, add the following references:
▪ ESRI.ArcGIS.Carto▪ ESRI.ArcGIS.Geometry▪ ESRI.ArcGIS.SystemUI
Note: To know more about these libraries, see the Desktop Help for .NET (VS2008).
Click Finish.
At the top of the code window, before the beginning of the class declaration, add allthe references that you imported in your code.
Step 4: Make simple changes to the code
In the myExtent.cs code window, scroll down to the constructor for the class.
Notice that all the command properties are empty strings.
Update their values as follows:
base.m_category = "Extent Commands";base.m_caption = "My Extent Command";base.m_message = "Zoom to the extent of the active layer in the TOC";base.m_toolTip = "Zoom in";base.m_name = "Customize_MyExtentCommand";
Appendix F
Copyright © 2001-2009 ESRI F-3
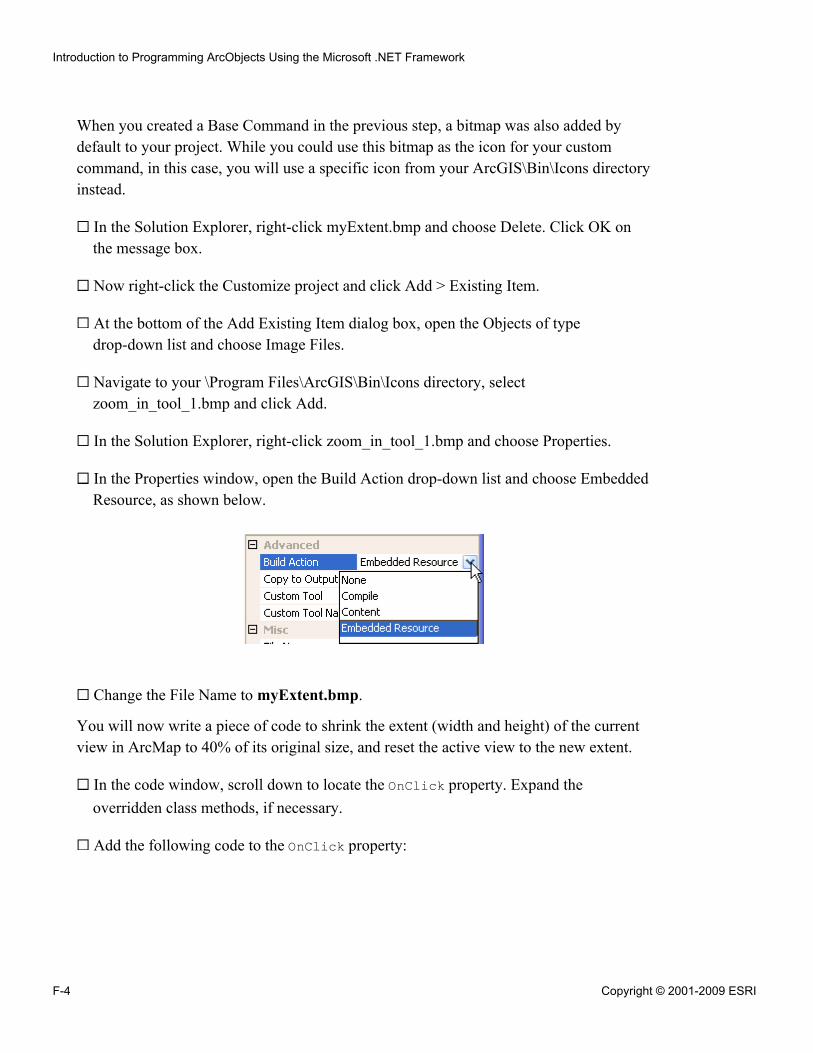
When you created a Base Command in the previous step, a bitmap was also added bydefault to your project. While you could use this bitmap as the icon for your customcommand, in this case, you will use a specific icon from your ArcGIS\Bin\Icons directoryinstead.
In the Solution Explorer, right-click myExtent.bmp and choose Delete. Click OK onthe message box.
Now right-click the Customize project and click Add > Existing Item.
At the bottom of the Add Existing Item dialog box, open the Objects of typedrop-down list and choose Image Files.
Navigate to your \Program Files\ArcGIS\Bin\Icons directory, selectzoom_in_tool_1.bmp and click Add.
In the Solution Explorer, right-click zoom_in_tool_1.bmp and choose Properties.
In the Properties window, open the Build Action drop-down list and choose EmbeddedResource, as shown below.
Change the File Name to myExtent.bmp.
You will now write a piece of code to shrink the extent (width and height) of the currentview in ArcMap to 40% of its original size, and reset the active view to the new extent.
In the code window, scroll down to locate the OnClick property. Expand theoverridden class methods, if necessary.
Add the following code to the OnClick property:
Introduction to Programming ArcObjects Using the Microsoft .NET Framework
F-4 Copyright © 2001-2009 ESRI
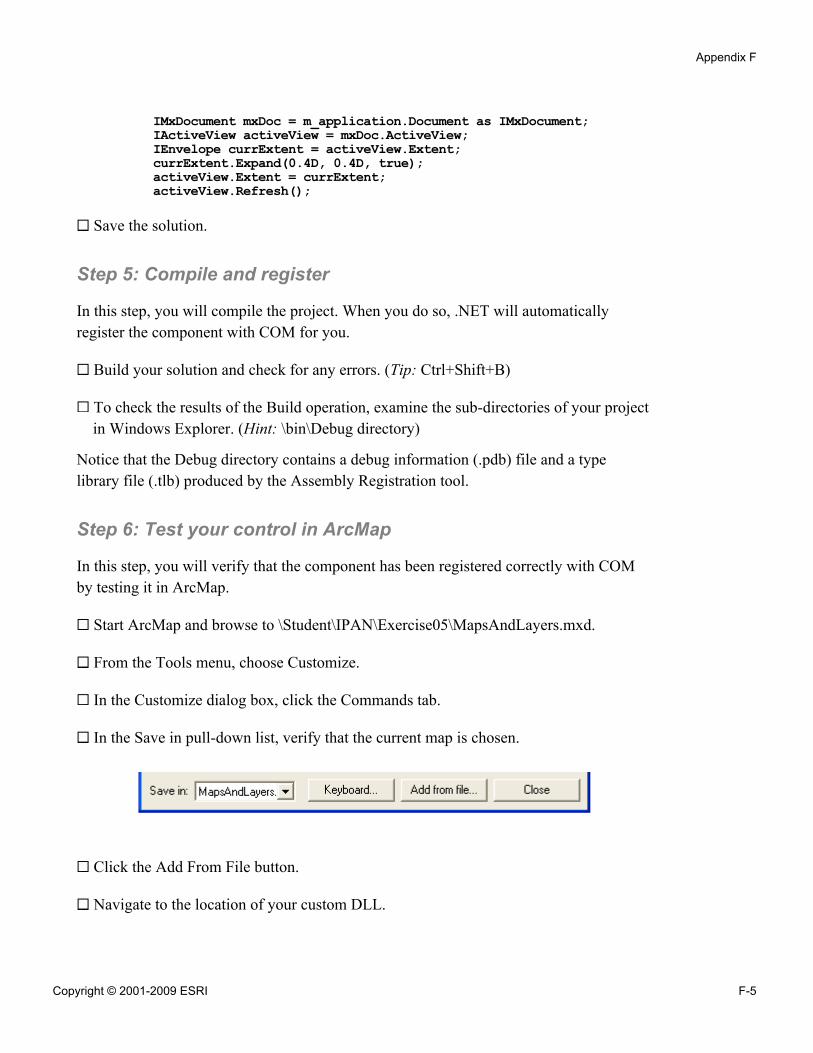
IMxDocument mxDoc = m_application.Document as IMxDocument;IActiveView activeView = mxDoc.ActiveView;IEnvelope currExtent = activeView.Extent;currExtent.Expand(0.4D, 0.4D, true);activeView.Extent = currExtent;activeView.Refresh();
Save the solution.
Step 5: Compile and register
In this step, you will compile the project. When you do so, .NET will automaticallyregister the component with COM for you.
Build your solution and check for any errors. (Tip: Ctrl+Shift+B)
To check the results of the Build operation, examine the sub-directories of your projectin Windows Explorer. (Hint: \bin\Debug directory)
Notice that the Debug directory contains a debug information (.pdb) file and a typelibrary file (.tlb) produced by the Assembly Registration tool.
Step 6: Test your control in ArcMap
In this step, you will verify that the component has been registered correctly with COMby testing it in ArcMap.
Start ArcMap and browse to \Student\IPAN\Exercise05\MapsAndLayers.mxd.
From the Tools menu, choose Customize.
In the Customize dialog box, click the Commands tab.
In the Save in pull-down list, verify that the current map is chosen.
Click the Add From File button.
Navigate to the location of your custom DLL.
Appendix F
Copyright © 2001-2009 ESRI F-5
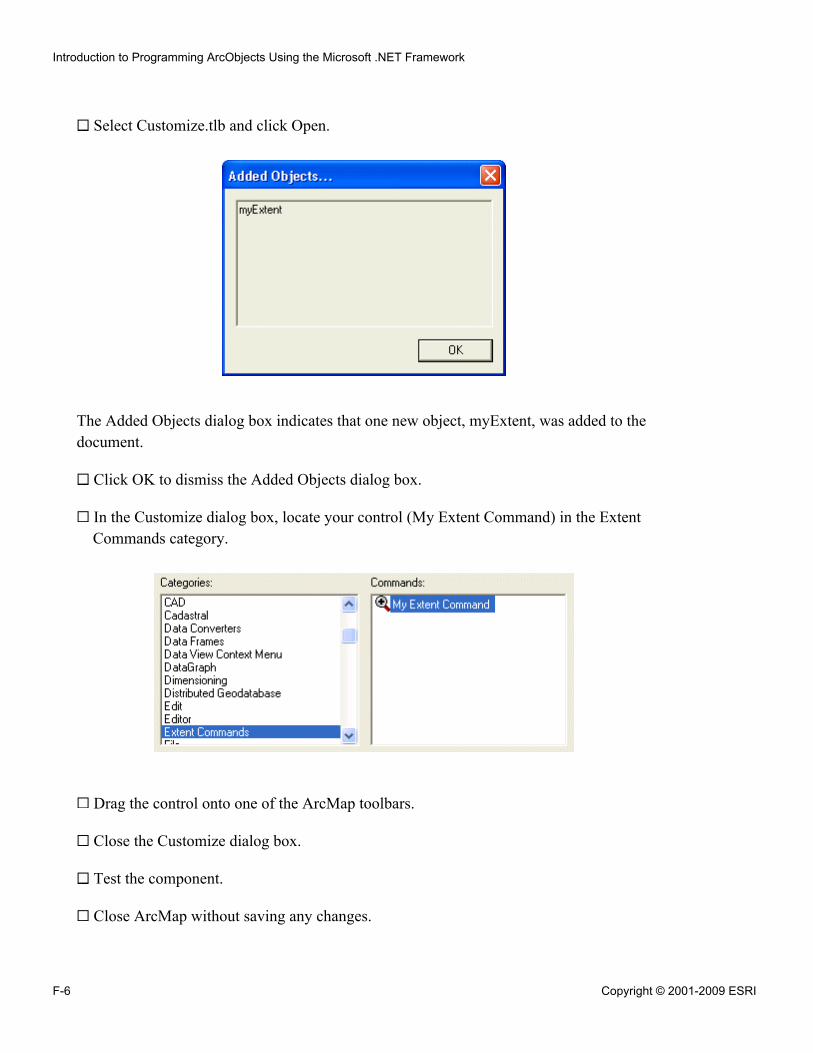
Select Customize.tlb and click Open.
The Added Objects dialog box indicates that one new object, myExtent, was added to thedocument.
Click OK to dismiss the Added Objects dialog box.
In the Customize dialog box, locate your control (My Extent Command) in the ExtentCommands category.
Drag the control onto one of the ArcMap toolbars.
Close the Customize dialog box.
Test the component.
Close ArcMap without saving any changes.
Introduction to Programming ArcObjects Using the Microsoft .NET Framework
F-6 Copyright © 2001-2009 ESRI
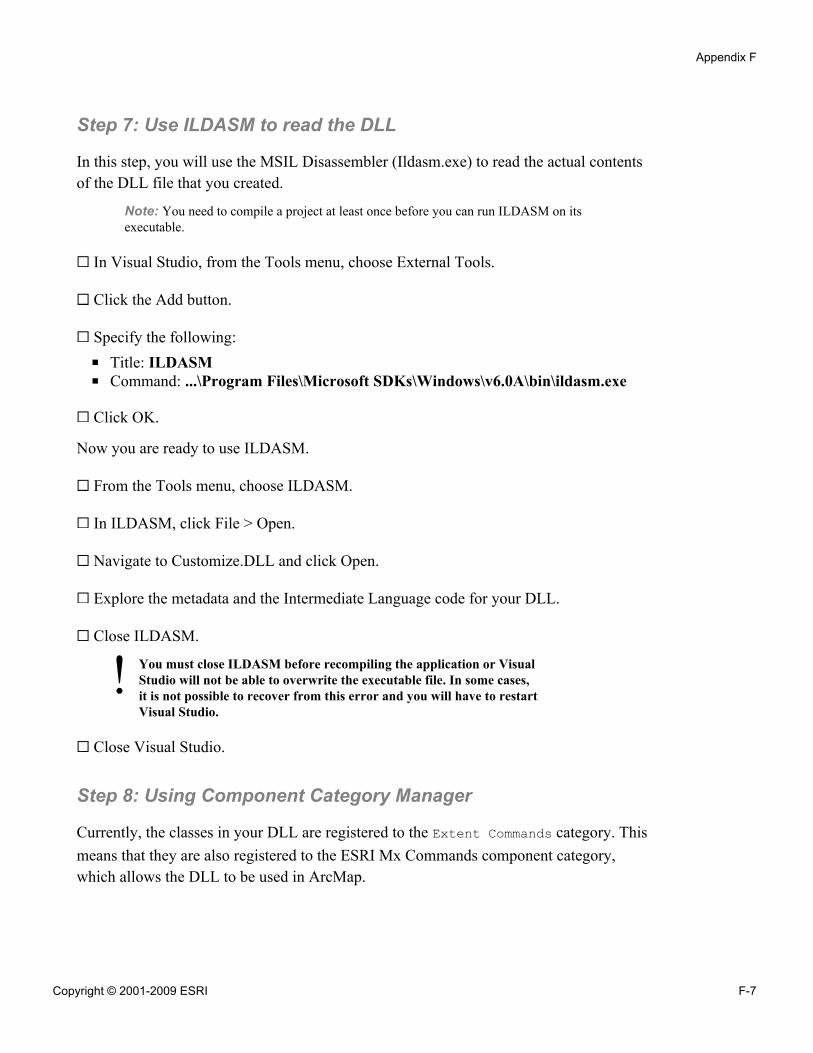
!
Step 7: Use ILDASM to read the DLL
In this step, you will use the MSIL Disassembler (Ildasm.exe) to read the actual contentsof the DLL file that you created.
Note: You need to compile a project at least once before you can run ILDASM on itsexecutable.
In Visual Studio, from the Tools menu, choose External Tools.
Click the Add button.
Specify the following:
▪ Title: ILDASM▪ Command: ...\Program Files\Microsoft SDKs\Windows\v6.0A\bin\ildasm.exe
Click OK.
Now you are ready to use ILDASM.
From the Tools menu, choose ILDASM.
In ILDASM, click File > Open.
Navigate to Customize.DLL and click Open.
Explore the metadata and the Intermediate Language code for your DLL.
Close ILDASM.
You must close ILDASM before recompiling the application or VisualStudio will not be able to overwrite the executable file. In some cases,it is not possible to recover from this error and you will have to restartVisual Studio.
Close Visual Studio.
Step 8: Using Component Category Manager
Currently, the classes in your DLL are registered to the Extent Commands category. Thismeans that they are also registered to the ESRI Mx Commands component category,which allows the DLL to be used in ArcMap.
Appendix F
Copyright © 2001-2009 ESRI F-7

In this step, you will access the Component Category Manager, a utility that allows youto add or remove classes from any component category.
In Windows Explorer, navigate to \Program Files\ArcGIS\Bin and double-clickcategories.exe.
In the Component Category Manager, scroll down and expand ESRI MX Commands.
The Component Category Manager searches the registry and lists all the classesregistered to the ESRI MX Commands category.
Notice that Customize.myExtent is in this category. This is the DLL that you registeredwith ArcMap.
If you want to remove the DLL from your ArcMap application, clickCustomize.myExtent to select it and then click Remove Object.
In the message box that appears, click Yes to confirm that you wish to delete the objectpermanently.
Click Exit.
You have completed this exercise.
Conclusion
In this exercise, you created a command by inheriting from the BaseCommand class. Youadded some code so that the command would zoom a map to a specific extent of a
Introduction to Programming ArcObjects Using the Microsoft .NET Framework
F-8 Copyright © 2001-2009 ESRI

selected layer in ArcMap. You then used ILDASM to explore the metadata and theIntermediate Language code of your DLL. Finally, you learned how to use theComponent Category Manager to add or remove objects from ArcMap.
Appendix F
Copyright © 2001-2009 ESRI F-9