introduction to multimedia and the internet - computing science
TRANSCRIPT
Computing Science 165-3 • Study Guide
Introduction to Multimediaand the Internet
Summer 2007 Draft [On-campus Sections]
by
Greg Baker
Faculty of Applied SciencesSimon Fraser University
Centre for Distance Education • Continuing Studiesc© Simon Fraser University, 2001–2007

2 [DRAFT, 1074]
Contents
I Introduction 11
Course Introduction 13Learning Resources . . . . . . . . . . . . . . . . . . . . . . 14Requirements . . . . . . . . . . . . . . . . . . . . . . . . . 17Evaluation . . . . . . . . . . . . . . . . . . . . . . . . . . . 18Schedule . . . . . . . . . . . . . . . . . . . . . . . . . . . . 21Getting through CMPT 165 . . . . . . . . . . . . . . . . . 21About the Author . . . . . . . . . . . . . . . . . . . . . . . 23
II The Web and Web Pages 25
1 The World Wide Web 271.1 Basics of the Internet . . . . . . . . . . . . . . . . . . . . . 271.2 Protocols . . . . . . . . . . . . . . . . . . . . . . . . . . . . 311.3 How Web Pages Travel . . . . . . . . . . . . . . . . . . . . 331.4 MIME Types . . . . . . . . . . . . . . . . . . . . . . . . . 341.5 Fetching a Web Page . . . . . . . . . . . . . . . . . . . . . 36
Summary . . . . . . . . . . . . . . . . . . . . . . . . . . . 37
2 Markup and XHTML 392.1 Making Web Pages . . . . . . . . . . . . . . . . . . . . . . 392.2 First XHTML Page . . . . . . . . . . . . . . . . . . . . . . 412.3 XHTML Tags . . . . . . . . . . . . . . . . . . . . . . . . . 412.4 Why Do Markup? . . . . . . . . . . . . . . . . . . . . . . . 452.5 Another XHTML Page . . . . . . . . . . . . . . . . . . . . 46
3

4 [DRAFT, 1074] CONTENTS
2.6 Attributes . . . . . . . . . . . . . . . . . . . . . . . . . . . 47
2.7 XHTML Reference . . . . . . . . . . . . . . . . . . . . . . 48
2.8 Images in HTML . . . . . . . . . . . . . . . . . . . . . . . 49
2.9 Relative URLs . . . . . . . . . . . . . . . . . . . . . . . . . 52
2.10 Choosing Tags . . . . . . . . . . . . . . . . . . . . . . . . . 56
Summary . . . . . . . . . . . . . . . . . . . . . . . . . . . 57
3 Cascading Style Sheets 593.1 Styles . . . . . . . . . . . . . . . . . . . . . . . . . . . . . . 59
3.2 CSS . . . . . . . . . . . . . . . . . . . . . . . . . . . . . . 60
3.3 CSS Details . . . . . . . . . . . . . . . . . . . . . . . . . . 64
3.4 Why CSS? . . . . . . . . . . . . . . . . . . . . . . . . . . . 68
Summary . . . . . . . . . . . . . . . . . . . . . . . . . . . 70
4 Advanced XHTML and CSS 714.1 Validating XHTML . . . . . . . . . . . . . . . . . . . . . . 72
4.2 Block vs. Inline Tags . . . . . . . . . . . . . . . . . . . . . 74
4.3 Entities . . . . . . . . . . . . . . . . . . . . . . . . . . . . 76
4.4 Generic Tags . . . . . . . . . . . . . . . . . . . . . . . . . . 78
4.5 Classes and Identifiers . . . . . . . . . . . . . . . . . . . . 79
4.6 More Selectors . . . . . . . . . . . . . . . . . . . . . . . . . 81
4.7 Colours in CSS . . . . . . . . . . . . . . . . . . . . . . . . 82
4.8 Positioning in CSS . . . . . . . . . . . . . . . . . . . . . . 85
4.9 Markup for Meaning . . . . . . . . . . . . . . . . . . . . . 90
Summary . . . . . . . . . . . . . . . . . . . . . . . . . . . 93
III Graphics and Design 95
5 Graphics and Images 975.1 Graphics and Image Types . . . . . . . . . . . . . . . . . . 97
5.2 Bitmap vs. Vector Images . . . . . . . . . . . . . . . . . . 98
5.3 File Formats . . . . . . . . . . . . . . . . . . . . . . . . . . 100
5.4 File Formats, Common . . . . . . . . . . . . . . . . . . . . 104
Summary . . . . . . . . . . . . . . . . . . . . . . . . . . . 106
CONTENTS [DRAFT, 1074] 5
6 Design 109
6.1 General Design . . . . . . . . . . . . . . . . . . . . . . . . 109
6.2 Design Principles and XHTML/CSS . . . . . . . . . . . . . 114
6.3 Conventions . . . . . . . . . . . . . . . . . . . . . . . . . . 116
6.4 Readability . . . . . . . . . . . . . . . . . . . . . . . . . . 118
6.5 Page Design . . . . . . . . . . . . . . . . . . . . . . . . . . 119
Summary . . . . . . . . . . . . . . . . . . . . . . . . . . . 120
IV Web Programming 121
7 Programming Introduction 123
7.1 What is Programming? . . . . . . . . . . . . . . . . . . . . 124
7.2 Starting with Python . . . . . . . . . . . . . . . . . . . . . 125
7.3 Web Programming . . . . . . . . . . . . . . . . . . . . . . 127
7.4 Expressions and Variables . . . . . . . . . . . . . . . . . . 129
Summary . . . . . . . . . . . . . . . . . . . . . . . . . . . 131
8 Forms and Web Programming 133
8.1 Forms . . . . . . . . . . . . . . . . . . . . . . . . . . . . . 134
8.2 Reading Form Input . . . . . . . . . . . . . . . . . . . . . 136
8.3 Handling Types . . . . . . . . . . . . . . . . . . . . . . . . 139
Summary . . . . . . . . . . . . . . . . . . . . . . . . . . . 141
9 More Programming 143
9.1 Python Modules . . . . . . . . . . . . . . . . . . . . . . . . 143
9.2 Making Decisions . . . . . . . . . . . . . . . . . . . . . . . 144
9.3 String Formatting (optional) . . . . . . . . . . . . . . . . . 147
9.4 Debugging . . . . . . . . . . . . . . . . . . . . . . . . . . . 148
9.5 Coding Style (optional) . . . . . . . . . . . . . . . . . . . . 150
Summary . . . . . . . . . . . . . . . . . . . . . . . . . . . 151
6 [DRAFT, 1074] CONTENTS
10 Internet Internals 15310.1 URLs . . . . . . . . . . . . . . . . . . . . . . . . . . . . . . 15310.2 Cookies . . . . . . . . . . . . . . . . . . . . . . . . . . . . 15510.3 HTTP Tricks (optional) . . . . . . . . . . . . . . . . . . . 15610.4 Security and Encryption (optional) . . . . . . . . . . . . . 160
Summary . . . . . . . . . . . . . . . . . . . . . . . . . . . 161
V Appendices 163
A Technical Startup 165A.1 Installing Software . . . . . . . . . . . . . . . . . . . . . . 165A.2 SFU Computing Account . . . . . . . . . . . . . . . . . . . 167A.3 CMPT 165 Server Account . . . . . . . . . . . . . . . . . . 168
B Software Instructions 169B.1 Mozilla Firefox . . . . . . . . . . . . . . . . . . . . . . . . 169B.2 TextPad . . . . . . . . . . . . . . . . . . . . . . . . . . . . 170B.3 Transferring Web Pages . . . . . . . . . . . . . . . . . . . . 170B.4 Validators . . . . . . . . . . . . . . . . . . . . . . . . . . . 174B.5 The GIMP . . . . . . . . . . . . . . . . . . . . . . . . . . . 175B.6 Python . . . . . . . . . . . . . . . . . . . . . . . . . . . . . 179
List of Figures
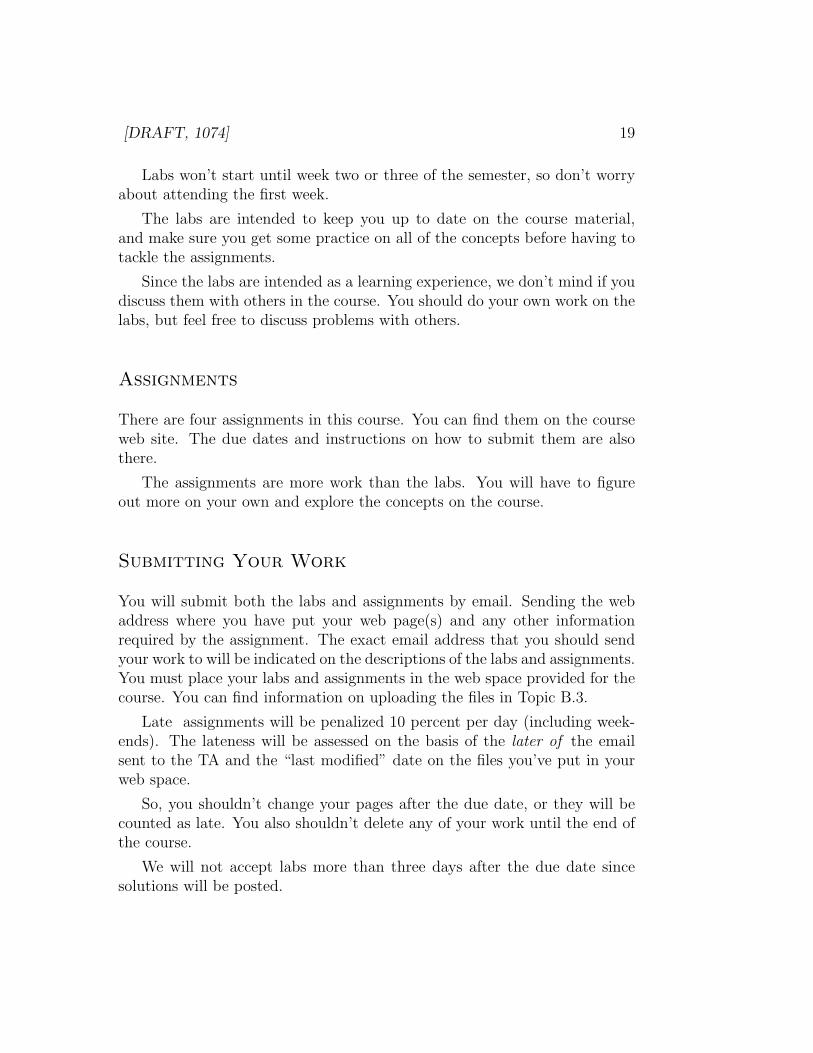
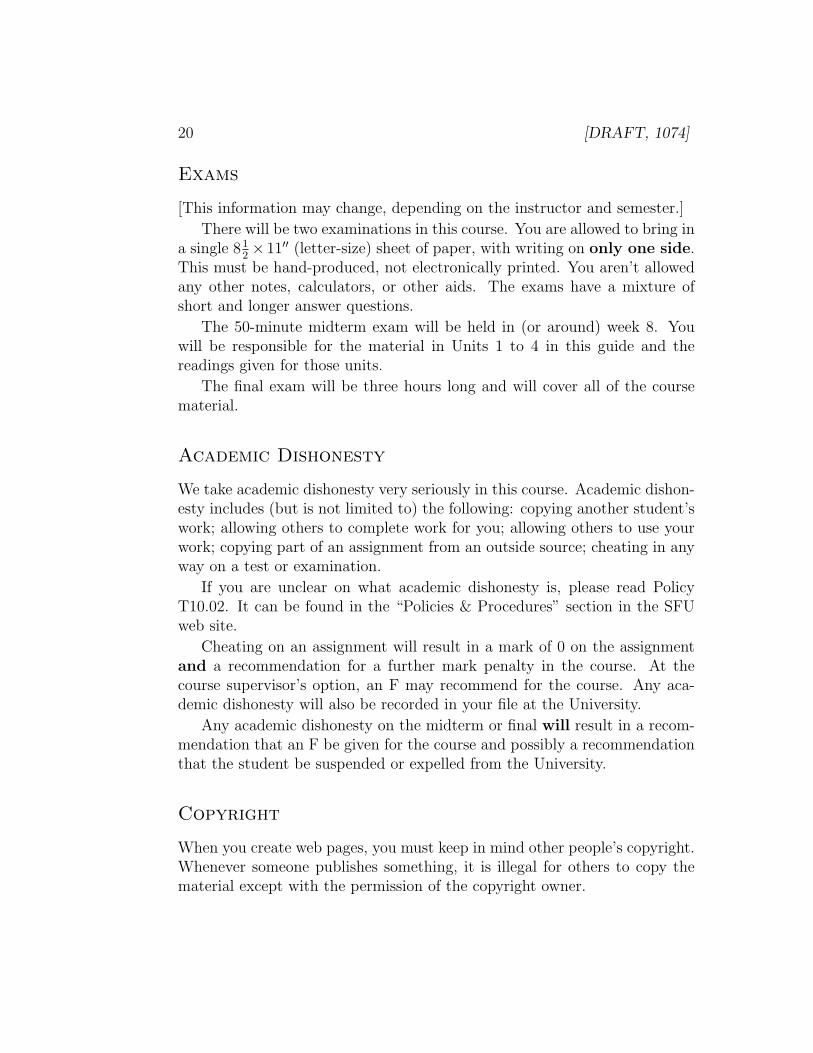
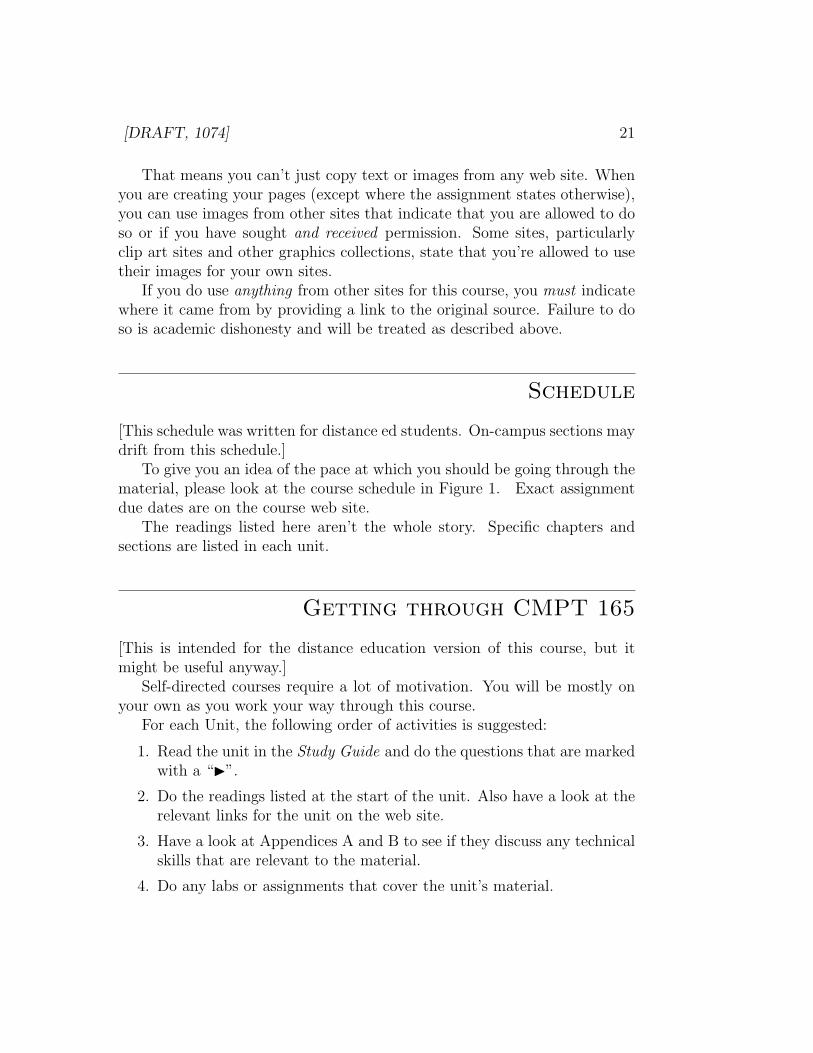
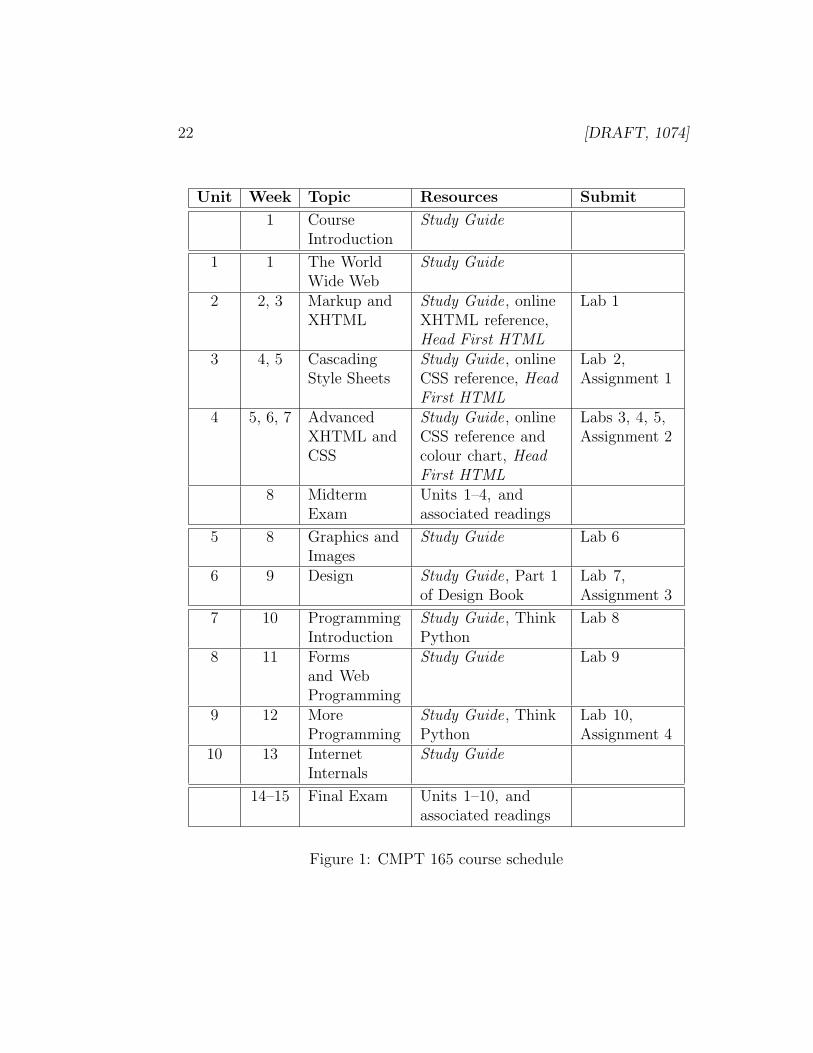
1 CMPT 165 course schedule . . . . . . . . . . . . . . . . . . . 22
1.1 How information might get from the SFU web server to ahome computer . . . . . . . . . . . . . . . . . . . . . . . . . 29
1.2 The conversation that a web client and web server might havewhen you view a web page . . . . . . . . . . . . . . . . . . . 31
1.3 The parts of a simple URL . . . . . . . . . . . . . . . . . . . 341.4 Some example MIME types . . . . . . . . . . . . . . . . . . . 36
2.1 A simple first XHTML page . . . . . . . . . . . . . . . . . . 412.2 Display of Figure 2.1 in a browser . . . . . . . . . . . . . . . 442.3 A sample web page about houses. . . . . . . . . . . . . . . . 462.4 Display of Figure 2.3 in a browser . . . . . . . . . . . . . . . 472.5 A sample page from the XHTML reference . . . . . . . . . . 492.6 A web page with an image . . . . . . . . . . . . . . . . . . . 512.7 Display of Figure 2.6 in a browser . . . . . . . . . . . . . . . 512.8 URLs starting at http://www.sfu.ca/∼somebody/pics/index.html 55
3.1 A simple XHTML page with a stylesheet applied . . . . . . . 613.2 A simple CSS style (simple.css) . . . . . . . . . . . . . . . . . 613.3 Figure 3.1 without a stylesheet . . . . . . . . . . . . . . . . . 623.4 Figure 3.1 with the CSS in Figure 3.2 . . . . . . . . . . . . . 623.5 The CSS “Box Model” . . . . . . . . . . . . . . . . . . . . . 643.6 Examples of relative units . . . . . . . . . . . . . . . . . . . . 66
4.1 Some non-valid XHTML with a doctype specified . . . . . . . 734.2 Part of the validation results of Figure 4.1 . . . . . . . . . . . 744.3 Block and inline tags . . . . . . . . . . . . . . . . . . . . . . 75
7
8 [DRAFT, 1074] LIST OF FIGURES
4.4 Entities required for reserved XHTML characters . . . . . . . 764.5 Other sample entities . . . . . . . . . . . . . . . . . . . . . . 774.6 XHTML fragment using a <div> . . . . . . . . . . . . . . . . 794.7 CSS that changes certain classes and identifiers . . . . . . . . 814.8 Effect of the float property . . . . . . . . . . . . . . . . . . 854.9 Adding a margin around a float . . . . . . . . . . . . . . . . 864.10 An XHTML page with a menu . . . . . . . . . . . . . . . . . 874.11 CSS for Figure 4.10 . . . . . . . . . . . . . . . . . . . . . . . 874.12 Screenshot of Figure 4.10 . . . . . . . . . . . . . . . . . . . . 884.13 Effect of the clear property . . . . . . . . . . . . . . . . . . 884.14 Effect of setting position to absolute . . . . . . . . . . . . 89
5.1 Scaling (a) a vector image and (b) a bitmapped image . . . . 995.2 Colour dithering . . . . . . . . . . . . . . . . . . . . . . . . . 1025.3 An image with a low-quality lossy compression . . . . . . . . 1035.4 Various types of transparency in images . . . . . . . . . . . . 105
6.1 A design illustrating proximity . . . . . . . . . . . . . . . . . 1116.2 A design illustrating alignment . . . . . . . . . . . . . . . . . 1126.3 A design illustrating repetition . . . . . . . . . . . . . . . . . 1136.4 A design illustrating contrast . . . . . . . . . . . . . . . . . . 115
7.1 Our first Python program . . . . . . . . . . . . . . . . . . . . 1257.2 Fetching a static XHTML file . . . . . . . . . . . . . . . . . . 1277.3 Fetching a static XHTML file . . . . . . . . . . . . . . . . . . 1287.4 A program that generates a simple web page . . . . . . . . . 128
8.1 Example form on an XHTML page . . . . . . . . . . . . . . . 1358.2 The display of Figure 8.1 in a browser . . . . . . . . . . . . . 1358.3 A web script that uses the input from Figure 8.1 . . . . . . . 1378.4 Example XHTML produced by Figure 8.3 . . . . . . . . . . . 140
B.1 Starting a secure copy connection . . . . . . . . . . . . . . . 170B.2 Entering the host and user name . . . . . . . . . . . . . . . . 171B.3 Entering the password . . . . . . . . . . . . . . . . . . . . . . 171B.4 Successful secure copy connection . . . . . . . . . . . . . . . 172B.5 Enter the public_html folder . . . . . . . . . . . . . . . . . . . 172B.6 File successfully transferred . . . . . . . . . . . . . . . . . . . 173B.7 Web space listing . . . . . . . . . . . . . . . . . . . . . . . . 173
LIST OF FIGURES [DRAFT, 1074] 9
B.8 Page on web server . . . . . . . . . . . . . . . . . . . . . . . 174B.9 The main toolbox in the GIMP . . . . . . . . . . . . . . . . . 175B.10 The GIMP’s right-click menu with the option for saving the
current file selected . . . . . . . . . . . . . . . . . . . . . . . 176B.11 The main tool buttons in the GIMP . . . . . . . . . . . . . . 177B.12 The initial IDLE window . . . . . . . . . . . . . . . . . . . . 179B.13 Opening an editor window in IDLE . . . . . . . . . . . . . . 180B.14 IDLE editor window with statements typed . . . . . . . . . . 180B.15 Running a program in IDLE . . . . . . . . . . . . . . . . . . 181B.16 Result of running the program in IDLE . . . . . . . . . . . . 181

10 [DRAFT, 1074] LIST OF FIGURES

Part I
Introduction
11

Course Introduction
[This version of the Guide is written for on-campus sections of this course.If you are a distance ed student, you will find that this introduction mightnot match your section of the course. In addition, different instructors willprogress differently through the course material, so the schedule and otherdetails will probably change.]
[This introduction was written with the distance education course inmind. Some attempt has been made to adapt it to the on-campus offer-ing, but if some bits sound a little strange, that’s probably why.]
Welcome to CMPT 165, Multimedia and the Internet. This course is anintroduction to the Internet and WWW for non-computer science majors. Itisn’t intended to teach you how to use your computer, starting with “Turnit on.” You are expected to have a basic knowledge of how to use your com-puter. You should be comfortable using it for simple tasks such as runningprograms, finding and opening files, and so forth. You should also be able touse the Internet.
Here are some of the goals set out for students in this course. By the endof the course, you should be able to
• Explain some of the underlying technologies of the World Wide Weband the Internet.
• Create well-designed web sites using modern web technologies that canbe viewed in any web browser.
• Use basic programming skills to create dynamically generated web sites.
• Begin to combine these skills to develop full-featured web sites.
Keep these goals in mind as you progress through the course.
13
14 [DRAFT, 1074]
Learning Resources
Study Guide
The Study Guide is intended to guide you through this course. It will helpyou learn the content and determine what information to focus on in thetexts.
The readings for each section are listed at the beginning of the units. Youshould also look at the key terms listed at the end of each unit.
In some places, there are references to other sections. A reference to“Topic 3.4,” for example, means Topic 4 in Unit 3.
In the Study Guide, side-notes are indicated with this symbol.They are meant to replace the asides that usually happen in lec-tures when students ask questions. They aren’t strictly part of the“course”.
Required Texts
This Study Guide is the only required text.There are also Online References that are required. See below for more
information.
Recommended Texts
There are several other texts recommended for this course. Whether or notyou buy or read these is up to you—you certainly aren’t expected to buy allof them. They are all available in the reserve section of the Library—youcan look at them there if you’re not sure if you want to buy them.
The recommended texts provide more information than we can put in theStudy Guide, and a different perspective on the material they cover. If wantmore information on, or a different explanation of specific topics, have a lookat the corresponding recommended texts.
Head First HTML with CSS & XHTML by Elisabeth Freeman andEric Freeman is an excellent introduction to the concepts of creatingweb pages with XHTML and CSS, as we will in Units 2 to 4. It coversmuch of the same material as the Study Guide, but from a slightly
[DRAFT, 1074] 15
different perspective (and a slightly different order). This book is highlyrecommended.
The Non-Designer’s Design Book by Robin Williams (no, not thatRobin Williams) is recommended for the material in Unit 6. It is anice discussion of general design principles, and is applicable to any de-sign work, not just web pages. Any edition of this book is acceptable.
How to Think Like a Computer Scientist: Learning With Python
by Downey, Elkner, and Meyers is recommended as a reference for theprogramming done in the last part of the course. This book is a niceintroduction to Python programming.
The title of the book is a little misleading. The book does not discusscomputer science; it only covers computer programming.
There are also Online References that are required. See below for moreinformation.
Online References
There are several online references that are as important as the texts. Youcan find links to them on the course web site section titled “References.”
These resources are very important to your success in this course. Theyaren’t meant to be read from beginning to end like the readings in the text-book. You should use them to get an overall picture of the topic and asreferences as you do the assignments.
XHTML Reference: This will be used as a definitive reference for XHTML,which is the markup language used to create web pages. It should beused along with Units 2–4.
CSS Reference: This will be used as a definitive reference for CSS, whichis used to restyle web pages. It should be used along with Units 3–4.
Web Materials
The web materials for this course can be found at http://www.cs.sfu.ca/CC/165/. To access some parts of the site, you will need to log with yourGradebook userid and password. Use the same username and as Webmailand my.sfu.ca . The password will be set to your student number initially.
The course web site has several main sections:
16 [DRAFT, 1074]
Administrative Information: In this section, you will find informationabout the course, the course supervisor, and your teaching assistants.You will also find information on due dates and grading.
References: Here, you find information about the various references for thiscourse, including links to the online references that you are expectedto use.
Tools: The “Tools” section contains links to all of the software tools youwill need for the course. It lists software that you can download andinstall on your computer as well as tools that you will use online. Moredetails on the required software can be found in Appendices A and B.
Technical: This section contain technical information about working withsoftware, or other aspects of the course. This section will be used tosupplement information in Appendices A and B if necessary.
Materials: This section contains supplementary material directly related tothe course content. You can download all of the code that is used inthis guide if you’d like to try it for yourself or modify it.
You will also find an archive of the course email list.
Links: The links are organized into categories corresponding to units in thisguide. You can use them to supplement the material the guide andother readings present. If you have suggestions for additions to thislist, feel free to email the course supervisor.
Labs and Assignments: Here, you will find all of the labs and assignmentsfor this course. See “Evaluation” below for more information on these.
Email Communications
The TAs and course supervisor will use email to send announcements andtips during the semester. You should read your SFU email account regularly.
You can also contact the TAs and course supervisor by email if you needhelp. See the “Getting Help” section at the end of the Introduction fordetails.
CMPT 165 Web Server
Throughout the course, you will be creating web pages. You have web spaceavailable on a web server set up specifically for this course. Appendices A

[DRAFT, 1074] 17
and B contain information on working with this server.
You must use this server for all web pages in this course. Work on otherweb servers will not be marked.
Requirements
Computer Requirements
You need to have access to a computer with the minimum requirements notedon the back of the course outline. The assignment lab or your own computercan be used. The following applies only to your own computer. Instructionson using the assignment lab can be found on the course web site.
You will also need a connection to the Internet through a dialup connec-tion (one is provided with your SFU registration) or through another type ofconnection like a cable modem or a DSL line. A high-speed connection willmake your life easier, but it isn’t required.
You should activate your SFU computing account as soon as possible ifyou haven’t done to already. Instructions can be found in your registrationmaterial.
Software Requirements
All of the software that you need for this course can be downloaded free.Links to obtain the course software are on the course web site under “Tools.”Appendix A contains instructions for installing the software and gettingstarted with the course. Appendix B contains other instructions neededto complete work in the course.
A web browser: You will be creating web pages in this course. To seethem and the other pages you need to read, you need to have a webbrowser installed on your computer. We strongly recommend that youuse Mozilla Firefox or Netscape 8. These browsers are the only onesthat have near-perfect support for the style sheets we will be using.
Netscape 8 and Firefox are actually the same browser with some minordifferences. Firefox has been released by a group of developers forfree use. The same program was modified slightly and released by
18 [DRAFT, 1074]
Netscape. In this course, we recommend Firefox because it is updatedmore frequently.
Macintosh users can use the Safari browser that comes with OS X aswell.
Internet Explorer and earlier versions of Netscape don’t support stylesheets as well as the recommended browsers so they are harder to workwith. Since we use them a lot, you will find other browsers harder towork with.
A text editor: You will be making your web pages and style sheets with atext editor. For Windows, we recommend TextPad; for a Macintosh,TextWrangler. You could get by with Notepad or Simpletext, but abetter editor will make your life easier.
You can use any text editor—they can all create the XHTML and CSSfiles you need for the course.
A graphics program: To create graphics for your web pages, you will usea graphics editor. You should use GIMP for Windows or Graphic-Converter for a Mac. You won’t be able to use Windows Paint. If youalready have a program like Photoshop or PhotoPaint, you can use it,but the TAs will not have access to them, so they won’t be able to helpwith any software problems.
Python: The last part of the course will involve programming with thePython programming language. Python is a good language to workwith when you’re learning to program, and it can be downloaded free.
Other software: There is some other software that you may need to trans-fer files and install certain software. See Appendix A for instructionsand descriptions.
Evaluation
Labs
There will be weekly labs for this course. You will have registered for a labsection when registering for this course. The lab exercise will consist of someshort exercises that you should be able to complete in the allotted time.
[DRAFT, 1074] 19
Labs won’t start until week two or three of the semester, so don’t worryabout attending the first week.
The labs are intended to keep you up to date on the course material,and make sure you get some practice on all of the concepts before having totackle the assignments.
Since the labs are intended as a learning experience, we don’t mind if youdiscuss them with others in the course. You should do your own work on thelabs, but feel free to discuss problems with others.
Assignments
There are four assignments in this course. You can find them on the courseweb site. The due dates and instructions on how to submit them are alsothere.
The assignments are more work than the labs. You will have to figureout more on your own and explore the concepts on the course.
Submitting Your Work
You will submit both the labs and assignments by email. Sending the webaddress where you have put your web page(s) and any other informationrequired by the assignment. The exact email address that you should sendyour work to will be indicated on the descriptions of the labs and assignments.You must place your labs and assignments in the web space provided for thecourse. You can find information on uploading the files in Topic B.3.
Late assignments will be penalized 10 percent per day (including week-ends). The lateness will be assessed on the basis of the later of the emailsent to the TA and the “last modified” date on the files you’ve put in yourweb space.
So, you shouldn’t change your pages after the due date, or they will becounted as late. You also shouldn’t delete any of your work until the end ofthe course.
We will not accept labs more than three days after the due date sincesolutions will be posted.
20 [DRAFT, 1074]
Exams
[This information may change, depending on the instructor and semester.]
There will be two examinations in this course. You are allowed to bring ina single 81
2× 11′′ (letter-size) sheet of paper, with writing on only one side.
This must be hand-produced, not electronically printed. You aren’t allowedany other notes, calculators, or other aids. The exams have a mixture ofshort and longer answer questions.
The 50-minute midterm exam will be held in (or around) week 8. Youwill be responsible for the material in Units 1 to 4 in this guide and thereadings given for those units.
The final exam will be three hours long and will cover all of the coursematerial.
Academic Dishonesty
We take academic dishonesty very seriously in this course. Academic dishon-esty includes (but is not limited to) the following: copying another student’swork; allowing others to complete work for you; allowing others to use yourwork; copying part of an assignment from an outside source; cheating in anyway on a test or examination.
If you are unclear on what academic dishonesty is, please read PolicyT10.02. It can be found in the “Policies & Procedures” section in the SFUweb site.
Cheating on an assignment will result in a mark of 0 on the assignmentand a recommendation for a further mark penalty in the course. At thecourse supervisor’s option, an F may recommend for the course. Any aca-demic dishonesty will also be recorded in your file at the University.
Any academic dishonesty on the midterm or final will result in a recom-mendation that an F be given for the course and possibly a recommendationthat the student be suspended or expelled from the University.
Copyright
When you create web pages, you must keep in mind other people’s copyright.Whenever someone publishes something, it is illegal for others to copy thematerial except with the permission of the copyright owner.
[DRAFT, 1074] 21
That means you can’t just copy text or images from any web site. Whenyou are creating your pages (except where the assignment states otherwise),you can use images from other sites that indicate that you are allowed to doso or if you have sought and received permission. Some sites, particularlyclip art sites and other graphics collections, state that you’re allowed to usetheir images for your own sites.
If you do use anything from other sites for this course, you must indicatewhere it came from by providing a link to the original source. Failure to doso is academic dishonesty and will be treated as described above.
Schedule
[This schedule was written for distance ed students. On-campus sections maydrift from this schedule.]
To give you an idea of the pace at which you should be going through thematerial, please look at the course schedule in Figure 1. Exact assignmentdue dates are on the course web site.
The readings listed here aren’t the whole story. Specific chapters andsections are listed in each unit.
Getting through CMPT 165
[This is intended for the distance education version of this course, but itmight be useful anyway.]
Self-directed courses require a lot of motivation. You will be mostly onyour own as you work your way through this course.
For each Unit, the following order of activities is suggested:
1. Read the unit in the Study Guide and do the questions that are markedwith a “◮”.
2. Do the readings listed at the start of the unit. Also have a look at therelevant links for the unit on the web site.
3. Have a look at Appendices A and B to see if they discuss any technicalskills that are relevant to the material.
4. Do any labs or assignments that cover the unit’s material.
22 [DRAFT, 1074]
Unit Week Topic Resources Submit
1 CourseIntroduction
Study Guide
1 1 The WorldWide Web
Study Guide
2 2, 3 Markup andXHTML
Study Guide, onlineXHTML reference,Head First HTML
Lab 1
3 4, 5 CascadingStyle Sheets
Study Guide, onlineCSS reference, Head
First HTML
Lab 2,Assignment 1
4 5, 6, 7 AdvancedXHTML andCSS
Study Guide, onlineCSS reference andcolour chart, Head
First HTML
Labs 3, 4, 5,Assignment 2
8 MidtermExam
Units 1–4, andassociated readings
5 8 Graphics andImages
Study Guide Lab 6
6 9 Design Study Guide, Part 1of Design Book
Lab 7,Assignment 3
7 10 ProgrammingIntroduction
Study Guide, ThinkPython
Lab 8
8 11 Formsand WebProgramming
Study Guide Lab 9
9 12 MoreProgramming
Study Guide, ThinkPython
Lab 10,Assignment 4
10 13 InternetInternals
Study Guide
14–15 Final Exam Units 1–10, andassociated readings
Figure 1: CMPT 165 course schedule
[DRAFT, 1074] 23
After doing the readings, look at the Summary at the end of the unit.It will give you an idea of what you should have learned. The list of termsis particularly useful. These terms are italicized when they are first used.Also, look at the Learning Outcomes listed at the start of the unit for a moredetailed list.
You should also pay attention to the course web site. There are usefulresources there that can give you help if you need it. If the content of theweb site is updated during the course, email will be sent to the course list.
About the Author
I hesitated about writing this section. It seems sort of self-congratulatory—a few paragraphs about who I am aren’t so bad, but they set a dangerousprecedent. The next thing you know, I’ll have 8× 10 glossy photos of myselfand I’ll start writing an autobiography.
On the other hand, I’m reminded that students in an on-campus classwould learn something about me over the course of the semester. In an effortto duplicate that experience, I relented. . . .
I’m a lecturer at SFU in the School of Computing Science. I started inSeptember of 2000. I finished my M.Sc. in Computing Science at SFU justbefore that (and I do mean just). My undergraduate degree is in Math andComputer Science from Queen’s University (Kingston, not Belfast).
I am neither a professor nor a doctor, which causes problems for studentswho are accustomed to using these titles. For the record, I prefer “Greg.”
When I’m not working, I enjoy food and cooking. Unfortunately, I’mgetting to an age where enjoyment of food is going to cause buying newpants more often than I like. Vancouver is a great place to be into food. Themix of cultures and available ingredients makes for very interesting cuisine.I’m always interested in good restaurant suggestions if you have any youwould like to make.
I’d like to thank Tim Beamish and Rong She, the TAs for the summer2001 offering of CMPT 165, for helping me prepare this Study Guide. I’d alsolike to thank the students in the summer 2001 offering who suffered throughits draft version.
If you have any comments on the course or restaurant suggestions, pleasefeel free to contact me at [email protected].

24 [DRAFT, 1074]
Part II
The Web and Web Pages
25

Unit 1
The World Wide Web
Learning Outcomes
• Explain how information is transmitted on the Internet.
• Describe how computers are connected on the Internet.
• Describe the way a web page gets to your computer.
• List some services available on the Internet and their protocols.
Learning Activities
• Read this unit and do the questions marked with a “◮”.
• Browse through the links for this unit on the course web site.
• (optional) Read Sections 3.1–3.3 in How to Think Like a Computer
Scientist.
Topic 1.1 Basics of the Internet
As mentioned in the Introduction, we will assume that you have some fa-miliarity with computers and the Internet. In particular, we’re going toassume that you have used the Internet and know what the World Wide
Web (WWW ) is and how to work with it. You don’t have to be an expert,but you should be comfortable using your computer and navigating the web.
27
28 [DRAFT, 1074] UNIT 1. THE WORLD WIDE WEB
Connecting to the Internet
So, what is the Internet anyway? Basically, it is a huge network of con-nected computers. One computer is connected to the next, and they passinformation along from one to another. That’s really all there is to it—manydifferent computers, all passing information around so it eventually gets toits destination.
When a desktop computer is connected to the Internet, it is probably onlyconnected to one other computer: its gateway. The gateway computer mightbe in a nearby server room (if you’re on-campus at SFU for example), or itmight be at you service provider’s offices (when you’re at home, connectedwith a cable modem, for example). The gateway will be connected to oneor more other computers and will pass along whatever information is sent orreceived.
When you connect your computer to “the Internet”, all that is reallyhappening is that you are getting a connection to a gateway machine. All ofyour information is passed through the gateway. An Internet service provider
(or ISP) really provides with you with a way to connect to a suitable gateway.There are many ways to make that connection, as you will see below.
The gateway and other computers that form the Internet’s infrastructureor backbone may be connected to many other machines, instead of just one.Their job is to receive information and pass it along in the right direction.They might be computers that are more-or-less like desktop PCs, or theymight be specialized devices called routers designed specifically for this job.
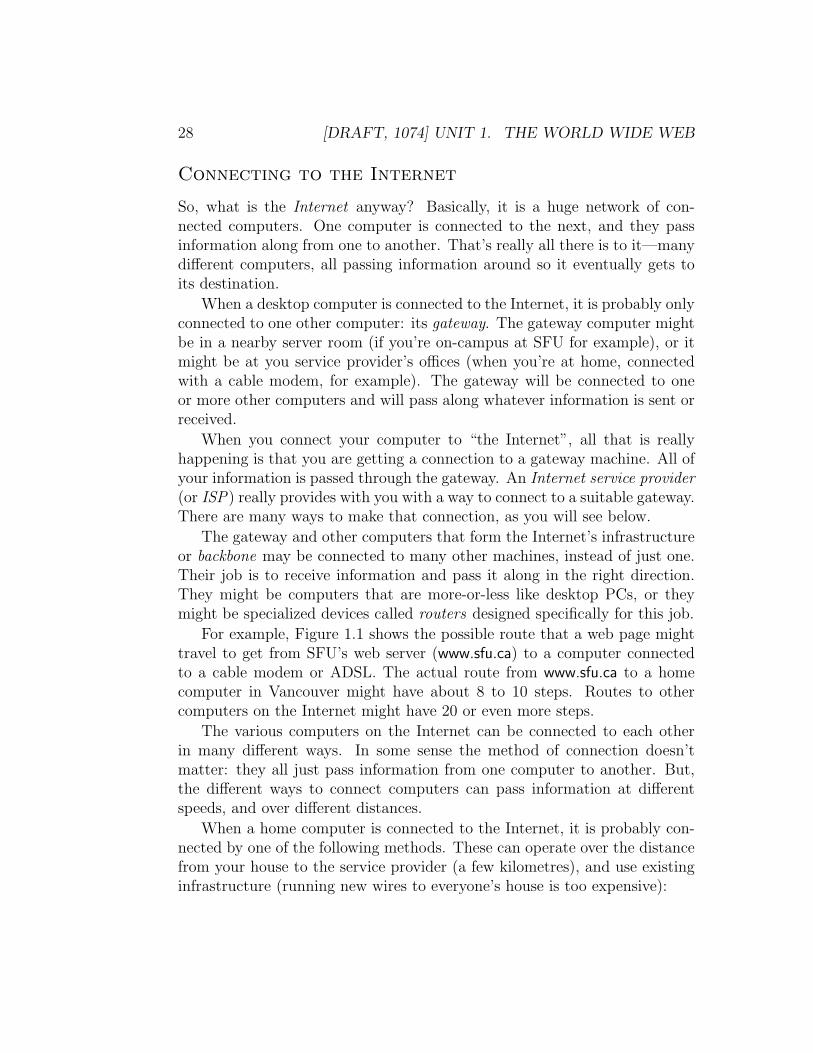
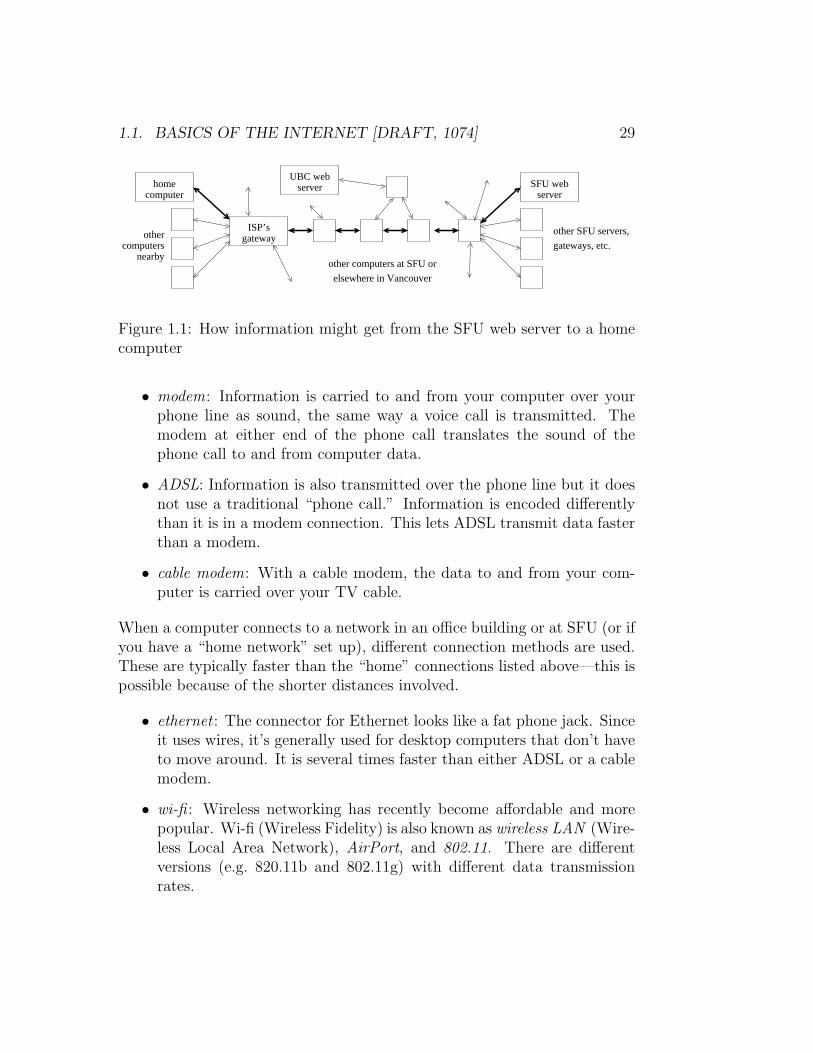
For example, Figure 1.1 shows the possible route that a web page mighttravel to get from SFU’s web server (www.sfu.ca) to a computer connectedto a cable modem or ADSL. The actual route from www.sfu.ca to a homecomputer in Vancouver might have about 8 to 10 steps. Routes to othercomputers on the Internet might have 20 or even more steps.
The various computers on the Internet can be connected to each otherin many different ways. In some sense the method of connection doesn’tmatter: they all just pass information from one computer to another. But,the different ways to connect computers can pass information at differentspeeds, and over different distances.
When a home computer is connected to the Internet, it is probably con-nected by one of the following methods. These can operate over the distancefrom your house to the service provider (a few kilometres), and use existinginfrastructure (running new wires to everyone’s house is too expensive):
1.1. BASICS OF THE INTERNET [DRAFT, 1074] 29
UBC webhome
other SFU servers,
SFU web
computersnearby
otherISP’s
computerserver
gateway
server
gateways, etc.
elsewhere in Vancouver
other computers at SFU or
Figure 1.1: How information might get from the SFU web server to a homecomputer
• modem: Information is carried to and from your computer over yourphone line as sound, the same way a voice call is transmitted. Themodem at either end of the phone call translates the sound of thephone call to and from computer data.
• ADSL: Information is also transmitted over the phone line but it doesnot use a traditional “phone call.” Information is encoded differentlythan it is in a modem connection. This lets ADSL transmit data fasterthan a modem.
• cable modem: With a cable modem, the data to and from your com-puter is carried over your TV cable.
When a computer connects to a network in an office building or at SFU (or ifyou have a “home network” set up), different connection methods are used.These are typically faster than the “home” connections listed above—this ispossible because of the shorter distances involved.
• ethernet : The connector for Ethernet looks like a fat phone jack. Sinceit uses wires, it’s generally used for desktop computers that don’t haveto move around. It is several times faster than either ADSL or a cablemodem.
• wi-fi : Wireless networking has recently become affordable and morepopular. Wi-fi (Wireless Fidelity) is also known as wireless LAN (Wire-less Local Area Network), AirPort, and 802.11. There are differentversions (e.g. 820.11b and 802.11g) with different data transmissionrates.
30 [DRAFT, 1074] UNIT 1. THE WORLD WIDE WEB
Wi-fi is often used for laptops, which makes it possible to move the ma-chine without having to worry about network cables. Wi-fi is availableat SFU and increasingly in other locations.
There are also many other connection types used to make connectionsbetween buildings and across cities and over long distances across countries.
Clients and Servers
You may have noticed that in the discussion above, the home computer,gateway, and the SFU web server are all described only as “computers con-nected to the Internet”. In fact, all of them are connected to the Internet infundamentally the same way, only the speed of the connection is different.So, why is www.sfu.ca a web server when your computer isn’t?
The only real difference is that www.sfu.ca will answer requests for webpages. The gateway and your home computer won’t. What makes it possibleis the web server software installed on the server. This program runs all thetime and answers requests for web pages. If you ran similar software on yourcomputer, people could get web pages from it as well.
If you did install web server software on your computer, you’d run intosome problems. First, the SFU web server has an easy to remember name:www.sfu.ca. When home computers are connected to the Internet, theytend to have names like akjx74wuc23nf.bc.hsia.telus.net or h24-84-78-194.vc.shawcable.net—a lot harder to remember and type in correctly. These namesalso change occasionally, making it even harder to find them.
Second, www.sfu.ca has a very fast connection to the Internet: enough toserve up a lot of web pages at the same time. It’s also on all the time, whichyour computer might not be.
When you want to access web pages, you use a web browser. A webbrowser is one example of client software. A web client (like Firefox orInternet Explorer) is the software you use to make the request to a webserver. The client has to transmit the request to the server, receive theresponse, and then process the information so you can use it.
Think of the process like a phone call: the client “calls” the server, theserver answers, and they have a conversation. The client must be set up tomake the call; the server must be set up to answer it.
Client and server software let people use computers to transfer informa-tion over the Internet. Everything that you transfer is done by interacting
1.2. PROTOCOLS [DRAFT, 1074] 31
1. Please send me the web page
2. Here it is
4. Here it is
Web ServerYour Computer
3. Send me this image
����������������
����������������
������������
������������
�����������
�����������
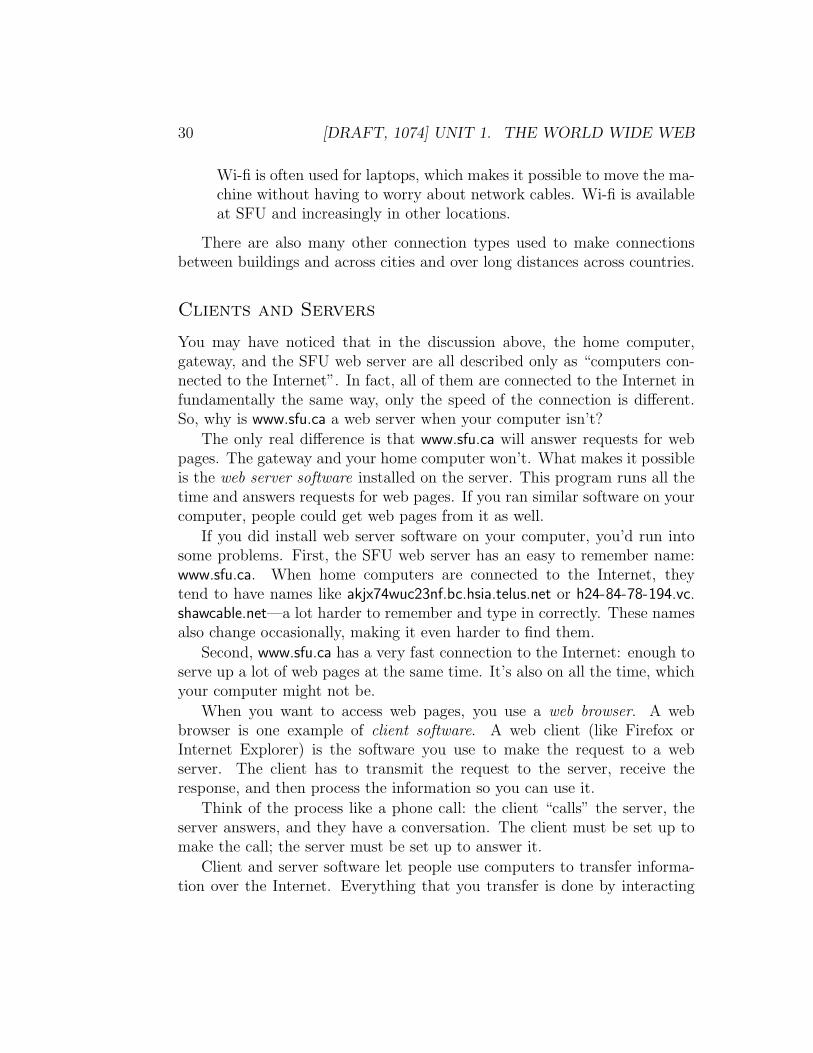
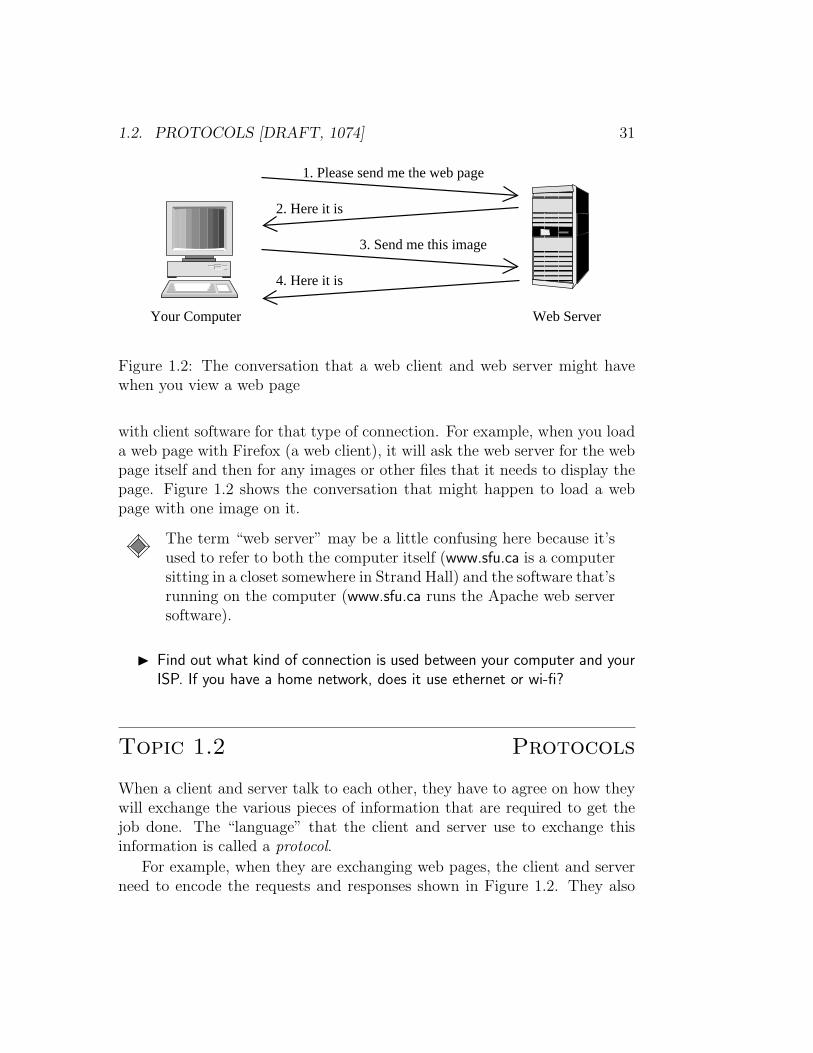
Figure 1.2: The conversation that a web client and web server might havewhen you view a web page
with client software for that type of connection. For example, when you loada web page with Firefox (a web client), it will ask the web server for the webpage itself and then for any images or other files that it needs to display thepage. Figure 1.2 shows the conversation that might happen to load a webpage with one image on it.
The term “web server” may be a little confusing here because it’sused to refer to both the computer itself (www.sfu.ca is a computersitting in a closet somewhere in Strand Hall) and the software that’srunning on the computer (www.sfu.ca runs the Apache web serversoftware).
◮ Find out what kind of connection is used between your computer and yourISP. If you have a home network, does it use ethernet or wi-fi?
Topic 1.2 Protocols
When a client and server talk to each other, they have to agree on how theywill exchange the various pieces of information that are required to get thejob done. The “language” that the client and server use to exchange thisinformation is called a protocol.
For example, when they are exchanging web pages, the client and serverneed to encode the requests and responses shown in Figure 1.2. They also
32 [DRAFT, 1074] UNIT 1. THE WORLD WIDE WEB
must be able to indicate errors and other behind-the-scenes messages (like“Page not found” or “Page moved to here”).
Web pages are transferred using a protocol called the HyperText Transfer
Protocol (HTTP). We will discuss HTTP more in Topic 1.3 and Topic 1.5.
Information on the Internet
There are many different kinds of information that travel over the Internet.The one you’re probably most familiar with is web traffic—web pages andall of the graphics, sounds, and other files that go with them. But, a lot ofother stuff travels around as well—the web is just one of many ways thatinformation can travel across the Internet.
Here are some other ways information can be exchanged between com-puters on the Internet that you might be familiar with:
• Email. Even if you check your email on the web (with SFU’s Webmailor something similar), the mail itself still has to get from the sender toreceiver. If someone at Hotmail sends email to your SFU account, ithas to travel from the computers at Hotmail to the mail server at SFU.
• Instant Messaging. The various instant messaging services each havetheir own protocols (which is why they don’t generally work together).These include ICQ, AOL Instant Messenger, Yahoo! Messenger, andMSN Messenger.
• Peer-to-peer file transfer. These methods of file transfer sidestep thetraditional client-server model and let people transfer files directly fromone client to another. (Technically, the ”client” software is performingthe duties of a client and a server.) Because of their dubious legality,they tend to come and go, but they have included Napster, Kazaa, andBittorrent.
• FTP. FTP stands for “File Transfer Protocol.” It is an older methodof transferring files but it is still used to transfer some things.
• network gaming. Games that allow network play generally act as aclient; a server is run by the company that produced the game. Theclient and server exchange information about the game: moves that aremade, changes in the game’s “map,” and other information to makesure the game works properly for all users.
1.3. HOW WEB PAGES TRAVEL [DRAFT, 1074] 33
Each of the examples above uses a different protocol to exchange informa-tion. That is why you need different client software for each of them—theyneed clients that speak different languages.
There are many other services that you might not think of. There areprotocols for sharing files and printers on a small network (like WindowsFile/Print Sharing). There are many other protocols, for things like clocksynchronization and remote access to computers, that you might never usedirectly.
◮ Are there more examples of protocols/client software that you use?
Topic 1.3 How Web Pages Travel
We have covered web servers and web clients in Topic 1.1. The two computershave to talk to each other in order to deliver web pages.
As noted in Topic 1.2, the “language” a client and server use to talk toeach other is called a protocol, and the protocol used to transfer web pages iscalled HTTP. You may have noticed that web addresses start with http:// ;this part of the address tells your web browser that you want it to use HTTPto talk to the server. A web server’s job is to communicate with HTTP toany clients that connect to it.
URLs
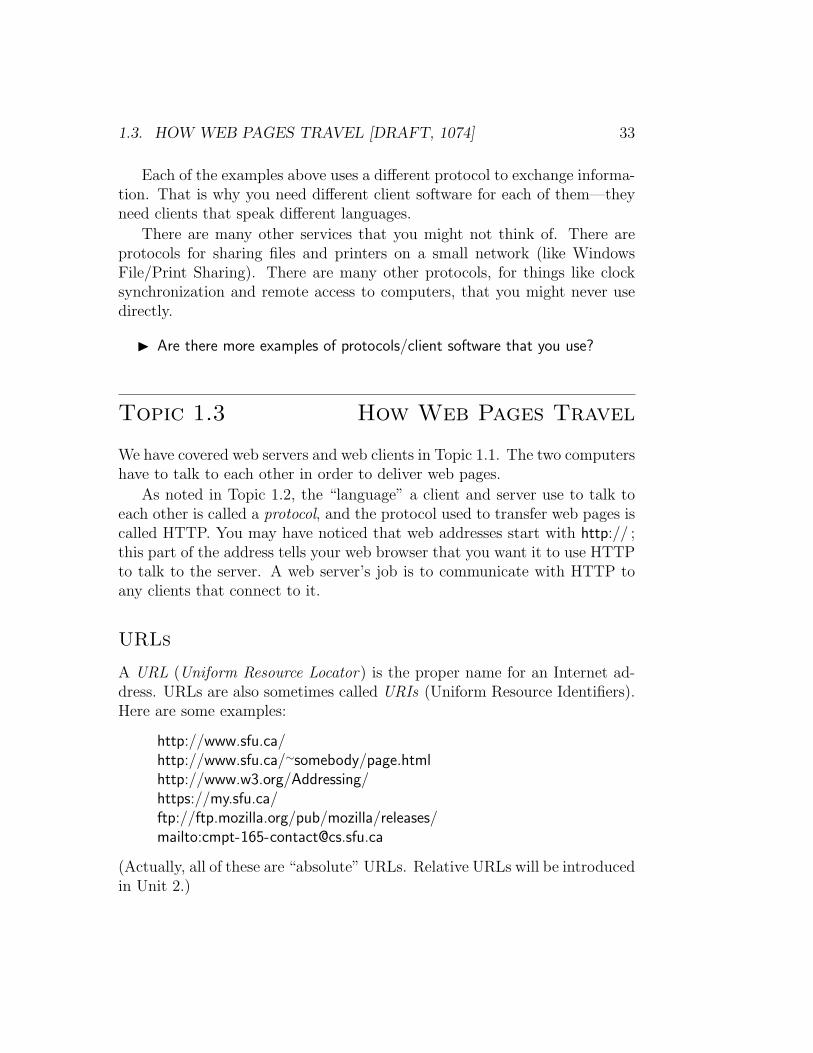
A URL (Uniform Resource Locator) is the proper name for an Internet ad-dress. URLs are also sometimes called URIs (Uniform Resource Identifiers).Here are some examples:
http://www.sfu.ca/http://www.sfu.ca/∼somebody/page.htmlhttp://www.w3.org/Addressing/https://my.sfu.ca/ftp://ftp.mozilla.org/pub/mozilla/releases/mailto:[email protected]
(Actually, all of these are “absolute” URLs. Relative URLs will be introducedin Unit 2.)
34 [DRAFT, 1074] UNIT 1. THE WORLD WIDE WEB
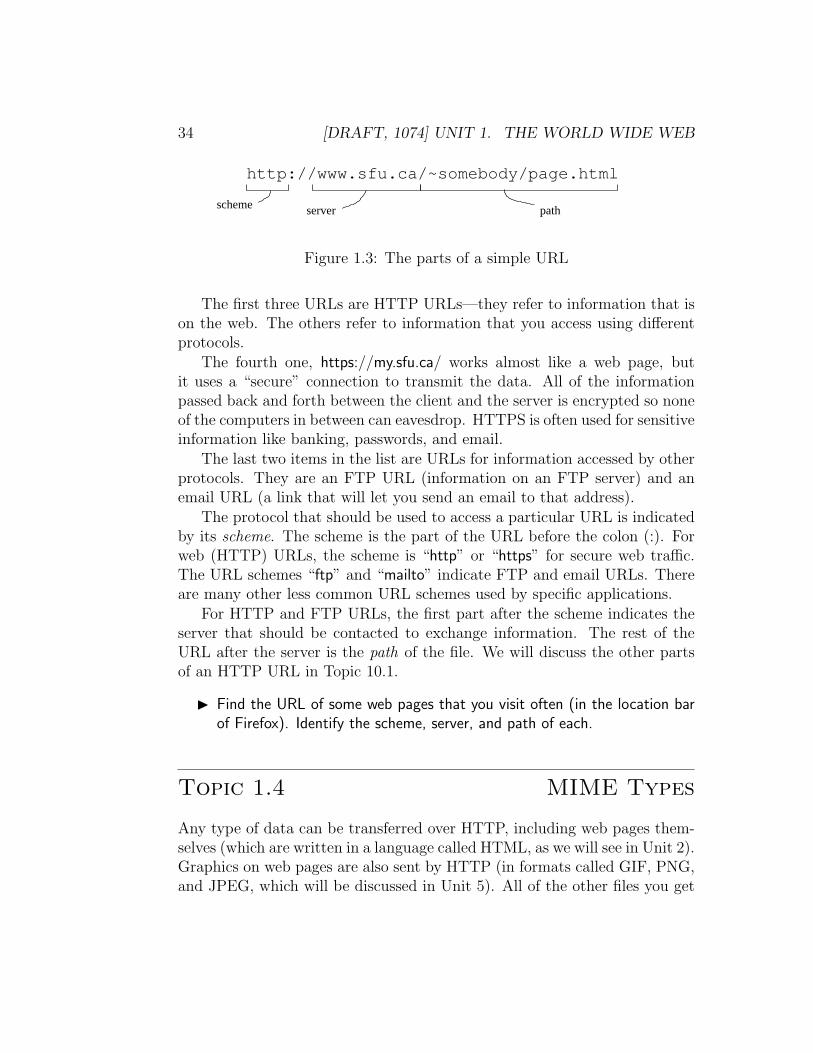
http://www.sfu.ca/~somebody/page.html
scheme pathserver
Figure 1.3: The parts of a simple URL
The first three URLs are HTTP URLs—they refer to information that ison the web. The others refer to information that you access using differentprotocols.
The fourth one, https://my.sfu.ca/ works almost like a web page, butit uses a “secure” connection to transmit the data. All of the informationpassed back and forth between the client and the server is encrypted so noneof the computers in between can eavesdrop. HTTPS is often used for sensitiveinformation like banking, passwords, and email.
The last two items in the list are URLs for information accessed by otherprotocols. They are an FTP URL (information on an FTP server) and anemail URL (a link that will let you send an email to that address).
The protocol that should be used to access a particular URL is indicatedby its scheme. The scheme is the part of the URL before the colon (:). Forweb (HTTP) URLs, the scheme is “http” or “https” for secure web traffic.The URL schemes “ftp” and “mailto” indicate FTP and email URLs. Thereare many other less common URL schemes used by specific applications.
For HTTP and FTP URLs, the first part after the scheme indicates theserver that should be contacted to exchange information. The rest of theURL after the server is the path of the file. We will discuss the other partsof an HTTP URL in Topic 10.1.
◮ Find the URL of some web pages that you visit often (in the location barof Firefox). Identify the scheme, server, and path of each.
Topic 1.4 MIME Types
Any type of data can be transferred over HTTP, including web pages them-selves (which are written in a language called HTML, as we will see in Unit 2).Graphics on web pages are also sent by HTTP (in formats called GIF, PNG,and JPEG, which will be discussed in Unit 5). All of the other files you get
1.4. MIME TYPES [DRAFT, 1074] 35
from the web are also sent by HTTP: video, audio, Office documents, and soon.
When your web browser receives these files, it has to know what to dowith them. For example, it treats graphics data very differently from a textfile. The browser also has to know what program to open for files it can’thandle itself, like Acrobat files, Office documents, and MP3 audio files.
You may be used to looking at the file extension to figure out whattype of file you have. For example, MS Word documents are usually namedsomething like essay.doc; the .doc indicates that it is a Word document. Otherextensions include .html or .htm for web pages and .pdf for Acrobat files.
Unfortunately, the file extension can’t be used on the web to decide thetype of the file. For one thing, some operating systems don’t use file exten-sions, so we don’t know for sure they will be available. It’s also possible thatthe browser wouldn’t even know a file name when the data is sent. We willalso see other reasons later in the course.
Instead of using file extensions, the type of data sent by email or HTTPis indicated by a MIME type. MIME stands for “Multipurpose Internet MailExtensions”.
MIME types were first used for email attachments (thus the name). Likefiles transmitted over the web, email attachments need to have their typeindicated, and you can’t rely on the extension to tell you. So, it makes senseto use the same solution in both places.
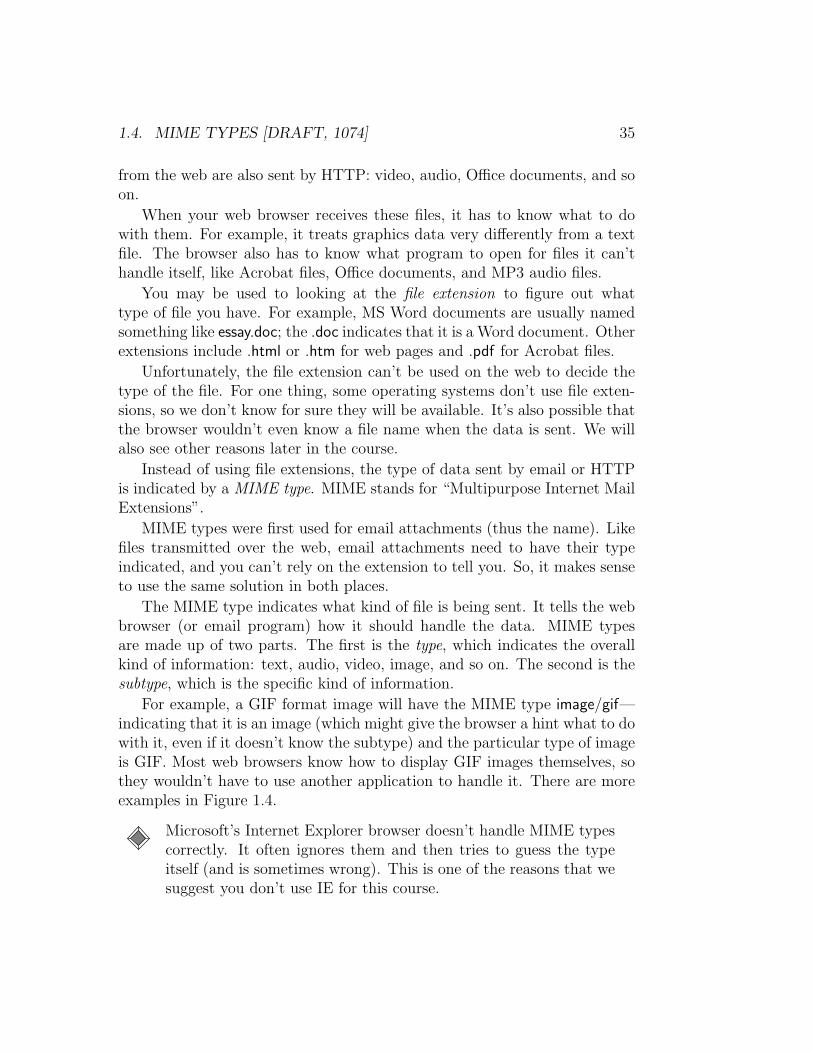
The MIME type indicates what kind of file is being sent. It tells the webbrowser (or email program) how it should handle the data. MIME typesare made up of two parts. The first is the type, which indicates the overallkind of information: text, audio, video, image, and so on. The second is thesubtype, which is the specific kind of information.
For example, a GIF format image will have the MIME type image/gif—indicating that it is an image (which might give the browser a hint what to dowith it, even if it doesn’t know the subtype) and the particular type of imageis GIF. Most web browsers know how to display GIF images themselves, sothey wouldn’t have to use another application to handle it. There are moreexamples in Figure 1.4.
Microsoft’s Internet Explorer browser doesn’t handle MIME typescorrectly. It often ignores them and then tries to guess the typeitself (and is sometimes wrong). This is one of the reasons that wesuggest you don’t use IE for this course.

36 [DRAFT, 1074] UNIT 1. THE WORLD WIDE WEB
MIME type File Contents How it might be handled
text/html HTML (web page) display in browser as a webpage
application/pdf Acrobat file open in Adobe Acrobatapplication/msword MS Word document open in Word
image/jpeg JPEG image display in browseraudio/mpeg MP3 audio open with iTunes
video/quicktime Quicktime video open with Windows Media
Figure 1.4: Some example MIME types
When you put a file on a web server, the server usually determines theMIME type based on the file’s extension. This isn’t always the case—in fact,we will see cases where we have to set the MIME type manually later in thecourse. For the moment the MIME type will come from the file’s extension.However, you should remember that the type and the extension are differentthings.
◮ You can determine the MIME type of a file with Firefox in the “Page Info”window (in the “Tools” menu). Try going to a web page and have alook—you should see text/html.
◮ When you’re viewing an image (right-click and select “View Image”) youwill see the image’s MIME type in the “Page Info” window. Try it out witha few images.
Topic 1.5 Fetching a Web Page
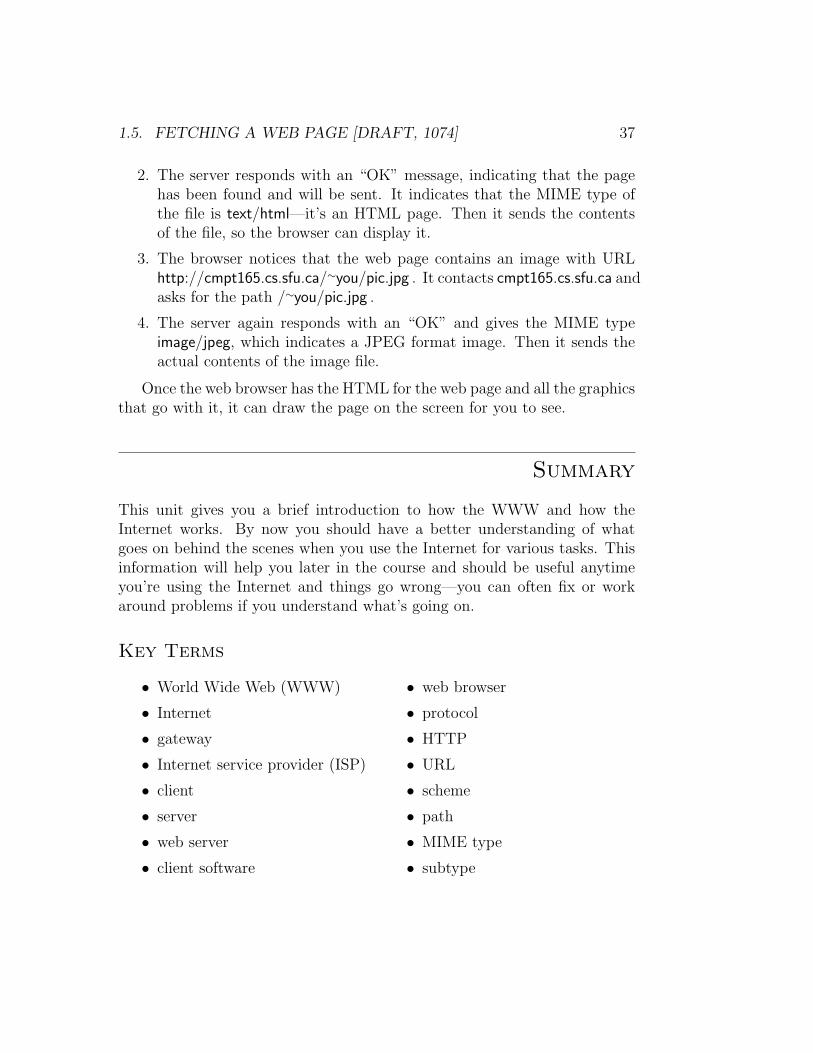
Let’s look back at Figure 1.2, now that we know a few more details aboutthe process.
Suppose that the web page that is being requested is at the URL http://cmpt165.cs.sfu.ca/∼you/page.html and that one of the graphics on the pageis the JPEG image at http://cmpt165.cs.sfu.ca/∼you/pic.jpg .
We can now give a more detailed description of what happens in theconversation indicated by each of the four arrows in Figure 1.2.
1. The web browser contacts the server specified in the URL, cmpt165.cs.sfu.ca. It asks for the file with path /∼you/page.html .
1.5. FETCHING A WEB PAGE [DRAFT, 1074] 37
2. The server responds with an “OK” message, indicating that the pagehas been found and will be sent. It indicates that the MIME type ofthe file is text/html—it’s an HTML page. Then it sends the contentsof the file, so the browser can display it.
3. The browser notices that the web page contains an image with URLhttp://cmpt165.cs.sfu.ca/∼you/pic.jpg . It contacts cmpt165.cs.sfu.ca andasks for the path /∼you/pic.jpg .
4. The server again responds with an “OK” and gives the MIME typeimage/jpeg, which indicates a JPEG format image. Then it sends theactual contents of the image file.
Once the web browser has the HTML for the web page and all the graphicsthat go with it, it can draw the page on the screen for you to see.
Summary
This unit gives you a brief introduction to how the WWW and how theInternet works. By now you should have a better understanding of whatgoes on behind the scenes when you use the Internet for various tasks. Thisinformation will help you later in the course and should be useful anytimeyou’re using the Internet and things go wrong—you can often fix or workaround problems if you understand what’s going on.
Key Terms
• World Wide Web (WWW)
• Internet
• gateway
• Internet service provider (ISP)
• client
• server
• web server
• client software
• web browser
• protocol
• HTTP
• URL
• scheme
• path
• MIME type
• subtype

38 [DRAFT, 1074] UNIT 1. THE WORLD WIDE WEB
Unit 2
Markup and XHTML
Learning Outcomes
• Create web pages in XHTML with a text editor, following the rules ofXHTML syntax, and using appropriate XHTML tags.
• Create a web page that includes links and images using XHTML.
• List some common XHTML tags.
• Use relative URLs to refer to other resources on a web site.
Learning Activities
• Read this unit and do the questions marked with a “◮”.
• Browse through the links for this unit on the course web site.
• Review the XHTML Reference pages found in the “Online References”section of the course web site.
• (optional) Review Head First HTML with XHTML and CSS, Chapters1–4.
Topic 2.1 Making Web Pages
We pages are described to your computer using a markup language calledXHTML. XHTML stands for “eXtensible HyperText Markup Language”.Older versions of the markup language are called HTML. HTML and XHTML
39
40 [DRAFT, 1074] UNIT 2. MARKUP AND XHTML
are quite similar; we will only cover XHTML in this course. (We will comeback to what a “markup language” is later.)
XHTML is used to describe all of the parts of a web page in a waythat computers (and computer programs) can understand. In particular,a program called a web browser is used to display XHTML (or HTML).Web browsers include Mozilla Firefox, Internet Explorer, and Safari. Theseprograms can read XHTML from the Internet (using HTTP), or from thecomputer’s hard drive.
This brings up a very important point that you need to remember whencreating web pages: you always rely on the user’s web browser to displayyour web pages. There may be some differences in the way your XHTML isdisplayed, depending on their browser, operating system, and other factors.This is unavoidable, and just part of making web pages.
Editing XHTML
XHTML (and HTML) is created with a text editor. You might not haveused a text editor before: some include TextPad, Notepad, and BBEdit. Allof these programs are just a way to enter plain text. They do not includeoptions for formatting, graphics, or other features. So, word processors (likeMicrosoft Word) are not text editors.
You can find links to download a text editor on the course webpage. If you use Windows, Notepad will be installed, but you willfind it much easier to work with a more full-featured text editor.
You will use a text editor to edit not only XHTML, but CSS and Pythonlater in the course. Text editors are also used to edit programs in otherlanguages like Java, C, and others.
Web pages can also be created with graphical editors like Nvu, Dream-weaver and Frontpage. These do not generally do a good job of creatingXHTML. We have already seen one reason: XHTML may be displayed dif-ferently, depending on the user’s browser, so it doesn’t make sense to thinkof it as having a single “look”. Graphical editors give you this (false) impres-sion. They can not be used in this course.
2.2. FIRST XHTML PAGE [DRAFT, 1074] 41
<html>
<head>
<title>Page Title</title>
</head>
<body>
<h1>Page Heading</h1>
</body>
</html>
Figure 2.1: A simple first XHTML page
Topic 2.2 First XHTML Page
Once you have a text editor that you can use on your computer, you can startcreating XHTML pages (and other text-based documents, of course). Startyour text editor program—you will use this program to create XHTML.
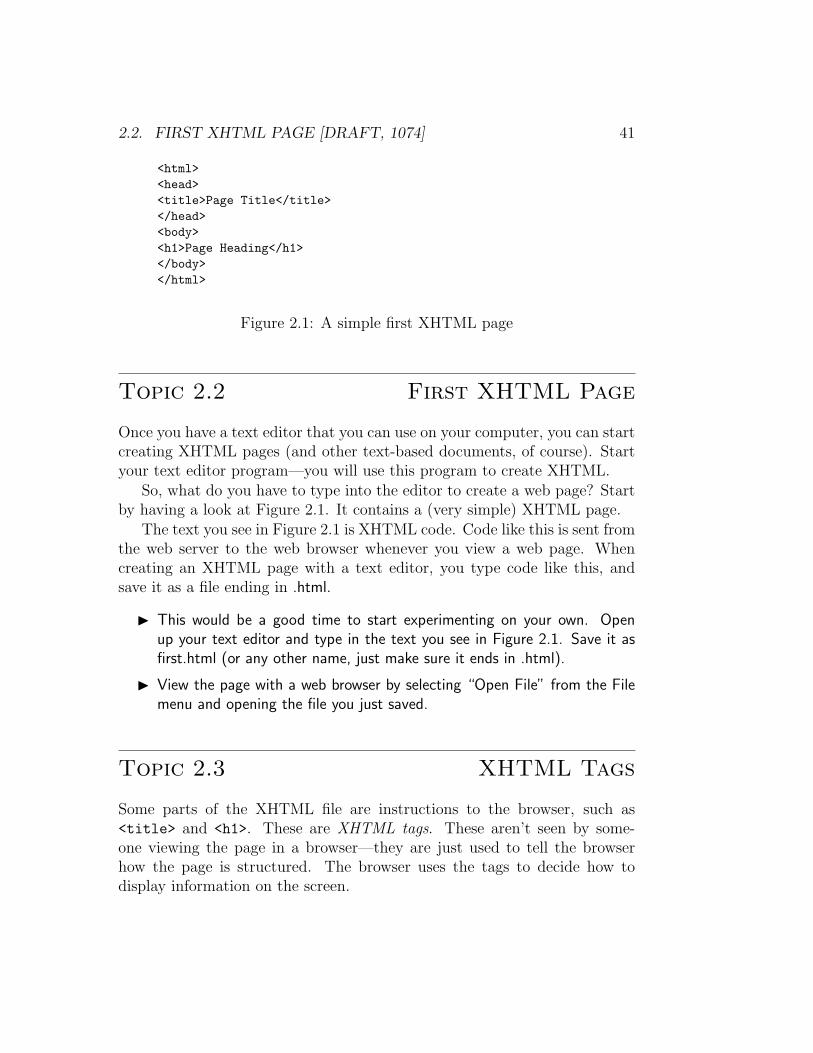
So, what do you have to type into the editor to create a web page? Startby having a look at Figure 2.1. It contains a (very simple) XHTML page.
The text you see in Figure 2.1 is XHTML code. Code like this is sent fromthe web server to the web browser whenever you view a web page. Whencreating an XHTML page with a text editor, you type code like this, andsave it as a file ending in .html.
◮ This would be a good time to start experimenting on your own. Openup your text editor and type in the text you see in Figure 2.1. Save it asfirst.html (or any other name, just make sure it ends in .html).
◮ View the page with a web browser by selecting “Open File” from the Filemenu and opening the file you just saved.
Topic 2.3 XHTML Tags
Some parts of the XHTML file are instructions to the browser, such as<title> and <h1>. These are XHTML tags. These aren’t seen by some-one viewing the page in a browser—they are just used to tell the browserhow the page is structured. The browser uses the tags to decide how todisplay information on the screen.
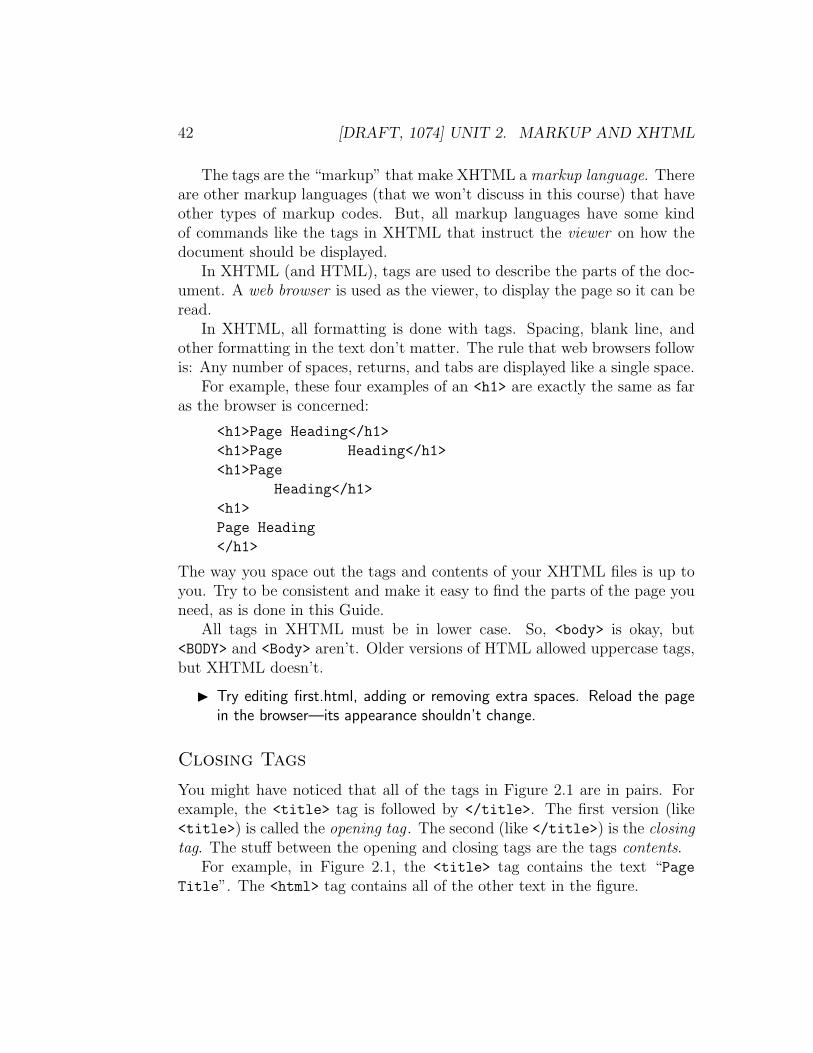
42 [DRAFT, 1074] UNIT 2. MARKUP AND XHTML
The tags are the “markup” that make XHTML a markup language. Thereare other markup languages (that we won’t discuss in this course) that haveother types of markup codes. But, all markup languages have some kindof commands like the tags in XHTML that instruct the viewer on how thedocument should be displayed.
In XHTML (and HTML), tags are used to describe the parts of the doc-ument. A web browser is used as the viewer, to display the page so it can beread.
In XHTML, all formatting is done with tags. Spacing, blank line, andother formatting in the text don’t matter. The rule that web browsers followis: Any number of spaces, returns, and tabs are displayed like a single space.
For example, these four examples of an <h1> are exactly the same as faras the browser is concerned:
<h1>Page Heading</h1>
<h1>Page Heading</h1>
<h1>Page
Heading</h1>
<h1>
Page Heading
</h1>
The way you space out the tags and contents of your XHTML files is up toyou. Try to be consistent and make it easy to find the parts of the page youneed, as is done in this Guide.
All tags in XHTML must be in lower case. So, <body> is okay, but<BODY> and <Body> aren’t. Older versions of HTML allowed uppercase tags,but XHTML doesn’t.
◮ Try editing first.html, adding or removing extra spaces. Reload the pagein the browser—its appearance shouldn’t change.
Closing Tags
You might have noticed that all of the tags in Figure 2.1 are in pairs. Forexample, the <title> tag is followed by </title>. The first version (like<title>) is called the opening tag . The second (like </title>) is the closing
tag. The stuff between the opening and closing tags are the tags contents.For example, in Figure 2.1, the <title> tag contains the text “Page
Title”. The <html> tag contains all of the other text in the figure.
2.3. XHTML TAGS [DRAFT, 1074] 43
The opening and closing tags have to be “nested” together properly. Thatis, the last tag opened must be the first one closed. For example, these pairsof tags are nested properly:
<em><a></a></em>
<a><em></em></a>
These are not:
<em><a></em></a>
<a><em></a></em>
Another way to look at it: any time you have two sets of overlapping tags,one must be entirely inside the other. One cannot be partially inside, andpartially outside the other.
Some XHTML Tags
Here are (all but one of) the XHTML tags we have seen so far:
<html>. . . </html>: This tags wraps the entire XHTML page. It is the firsttag opened and the last one closed. (It is still just “html”, even thoughwe are using XHTML, not HTML. The tag wasn’t changed when themarkup language was renamed.)
<head>. . . </head>: This tag is used to hold information about the page. Wewe have only seen one tag so far that is allowed in <head>.
<title>. . . </title>: This is the one tag that is allowed inside the <head>.It gives the page title—the browser usually displays the title in thewindow’s title bar. For example the display of Figure 2.1 might looklike this in Firefox:
<body>. . . </body>: This contains the actual contents of the page: the stuffyou see in the main window of the browser.
These tags will be in every XHTML page you create. They must bearranged as you see in Figure 2.1: <head> before <body>, <title> inside of<head>, and so on.
44 [DRAFT, 1074] UNIT 2. MARKUP AND XHTML
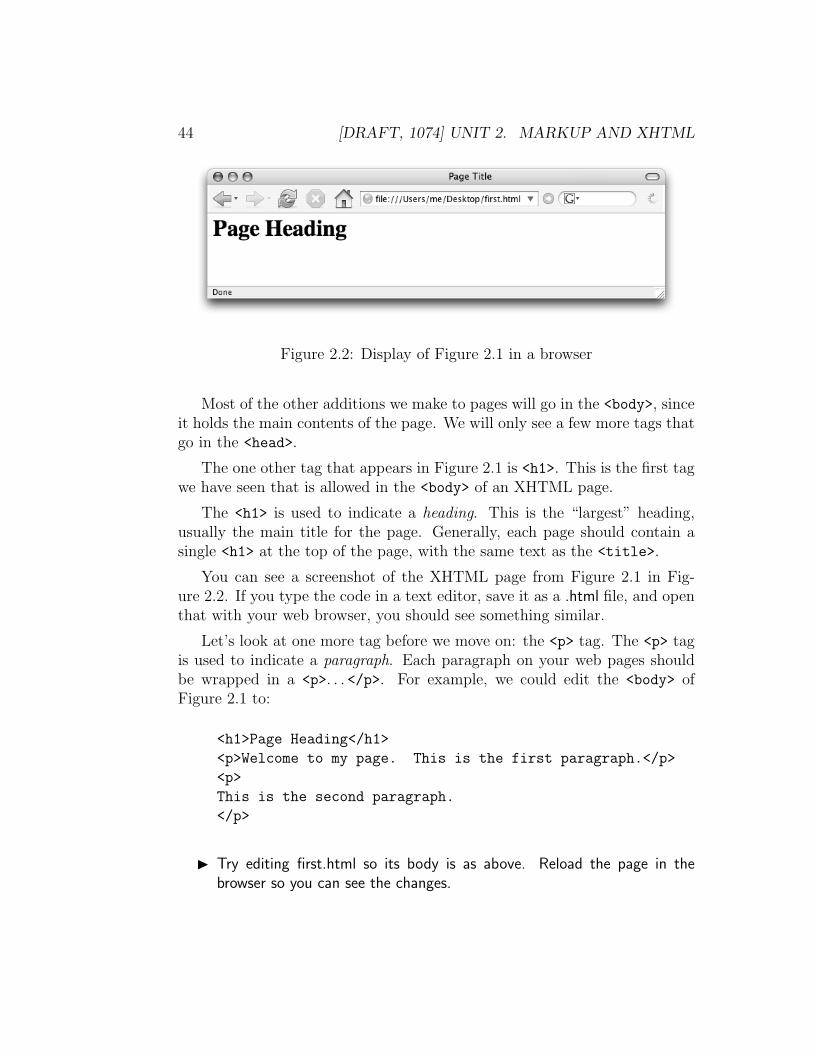
Figure 2.2: Display of Figure 2.1 in a browser
Most of the other additions we make to pages will go in the <body>, sinceit holds the main contents of the page. We will only see a few more tags thatgo in the <head>.
The one other tag that appears in Figure 2.1 is <h1>. This is the first tagwe have seen that is allowed in the <body> of an XHTML page.
The <h1> is used to indicate a heading. This is the “largest” heading,usually the main title for the page. Generally, each page should contain asingle <h1> at the top of the page, with the same text as the <title>.
You can see a screenshot of the XHTML page from Figure 2.1 in Fig-ure 2.2. If you type the code in a text editor, save it as a .html file, and openthat with your web browser, you should see something similar.
Let’s look at one more tag before we move on: the <p> tag. The <p> tagis used to indicate a paragraph. Each paragraph on your web pages shouldbe wrapped in a <p>. . . </p>. For example, we could edit the <body> ofFigure 2.1 to:
<h1>Page Heading</h1>
<p>Welcome to my page. This is the first paragraph.</p>
<p>
This is the second paragraph.
</p>
◮ Try editing first.html so its body is as above. Reload the page in thebrowser so you can see the changes.
2.4. WHY DO MARKUP? [DRAFT, 1074] 45
Topic 2.4 Why Do Markup?
You may be asking at this point: why do we have to create web pages withthis markup language? As mentioned earlier, there are graphical tools suchas Nvu, Frontpage and Dreamweaver that can be used to create web pages.
As mentioned in Topic 2.1, web pages will look different for differentusers. This depends on several factors, including:
• The browser being used. Different browsers (Firefox, Safari, InternetExplorer) will have differences in the way pages are displayed. Evendifferent versions of browsers have different capabilities. The operatingsystem being used (Windows, MacOS, Linux) and the fonts installedon the computer can also affect the appearance.
• The size of the browser window. Of course, the number of words thatfit on a line (and other aspects of the formatting) depend on the sizeof the browser window. Remember that some users don’t keep theirbrowser “maximized” to the full size of their screen, preferring to beable to view a web page and another program at the same time.
• The size of the font the user prefers. Some users need larger fonts(because of poor eyesight or a very high resolution monitor) or likesmaller fonts (to get more text on the screen at once) and set theirbrowser’s defaults accordingly.
• The format of the browser. Don’t forget that people can view webpages on devices other than regular computers. For example, manyphones and PDAs are capable of viewing web pages. There are alsobrowsers that will read web pages to visually-impaired users.
All of these factors are out of your control as a web page author. Youneed to make web pages that are flexible enough to adapt to these differentcircumstances.
When working with a graphical web page editor, it is difficult to keep thisreformatting in mind, since you see only one representation of the page. Itis very easy to create pages that don’t reformat well when necessary. TheXHTML code they generate is also not generally well-suited to the widevariety of devices that access the web.
XHTML (or HTML) produced by-hand is typically much better-suited tobeing used in a variety of ways on the web. When creating XHTML yourself,
46 [DRAFT, 1074] UNIT 2. MARKUP AND XHTML
<html>
<head>
<title>Finding Housing</title>
</head>
<body>
<h1>Finding Housing</h1>
<h2>Types of Housing</h2>
<p>There are many types of housing you can either
<a href="http://en.wikipedia.org/wiki/Renting">rent</a>
or buy. For example,</p>
<ul>
<li>a detatched house</li>
<li>an apartment</li>
<li>a townhouse</li>
</ul>
<h2>Other ways</h2>
<p>You can also find housing in other ways. Many students live
with their parents or in residence.</p>
</body>
</html>
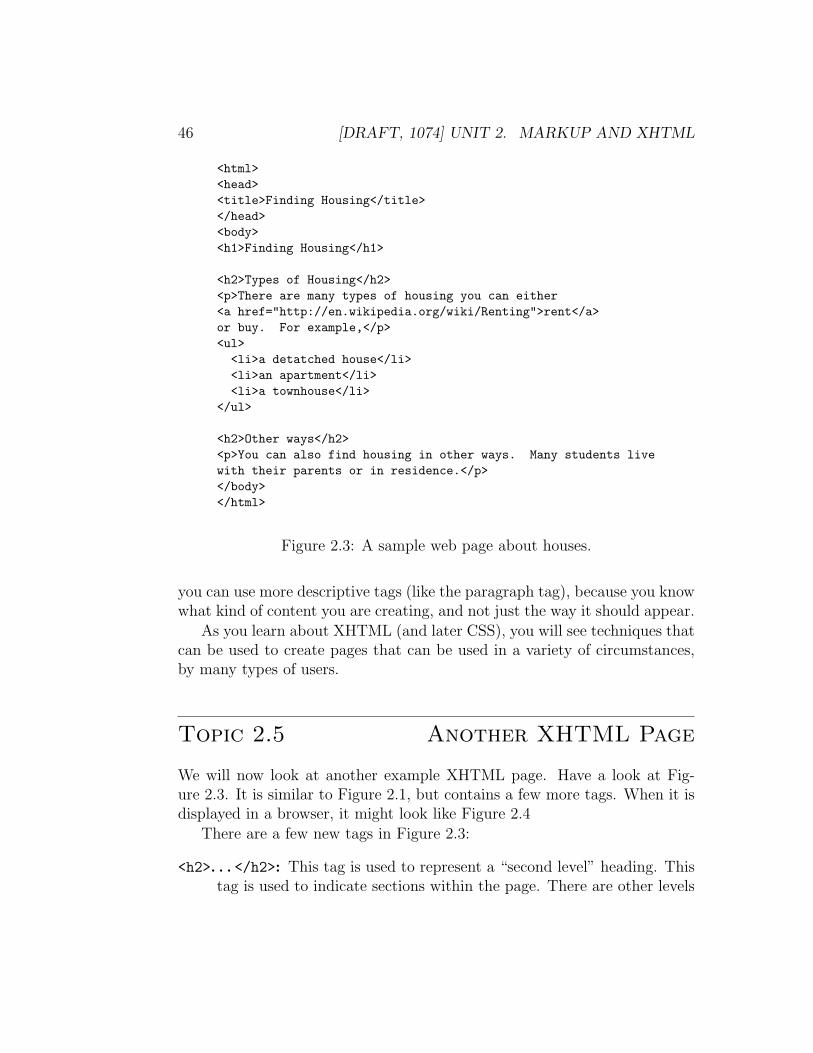
Figure 2.3: A sample web page about houses.
you can use more descriptive tags (like the paragraph tag), because you knowwhat kind of content you are creating, and not just the way it should appear.
As you learn about XHTML (and later CSS), you will see techniques thatcan be used to create pages that can be used in a variety of circumstances,by many types of users.
Topic 2.5 Another XHTML Page
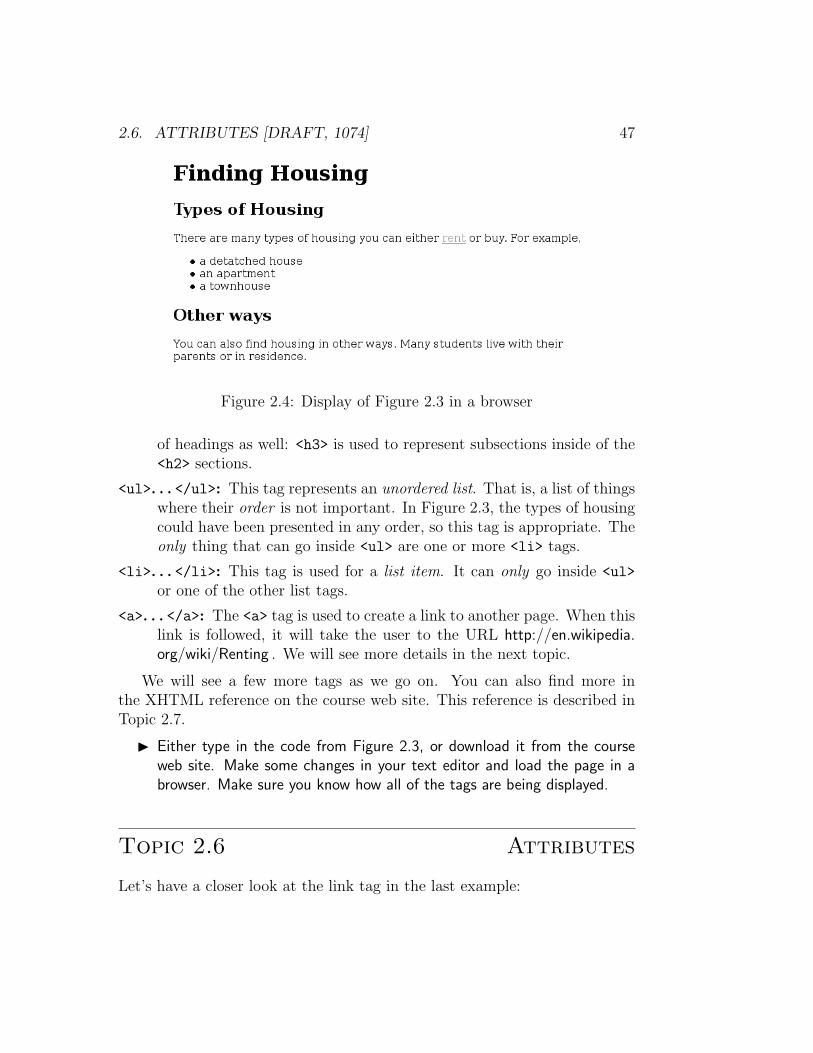
We will now look at another example XHTML page. Have a look at Fig-ure 2.3. It is similar to Figure 2.1, but contains a few more tags. When it isdisplayed in a browser, it might look like Figure 2.4
There are a few new tags in Figure 2.3:
<h2>. . . </h2>: This tag is used to represent a “second level” heading. Thistag is used to indicate sections within the page. There are other levels
2.6. ATTRIBUTES [DRAFT, 1074] 47
Figure 2.4: Display of Figure 2.3 in a browser
of headings as well: <h3> is used to represent subsections inside of the<h2> sections.
<ul>. . . </ul>: This tag represents an unordered list. That is, a list of thingswhere their order is not important. In Figure 2.3, the types of housingcould have been presented in any order, so this tag is appropriate. Theonly thing that can go inside <ul> are one or more <li> tags.
<li>. . . </li>: This tag is used for a list item. It can only go inside <ul>
or one of the other list tags.
<a>. . . </a>: The <a> tag is used to create a link to another page. When thislink is followed, it will take the user to the URL http://en.wikipedia.org/wiki/Renting . We will see more details in the next topic.
We will see a few more tags as we go on. You can also find more inthe XHTML reference on the course web site. This reference is described inTopic 2.7.
◮ Either type in the code from Figure 2.3, or download it from the courseweb site. Make some changes in your text editor and load the page in abrowser. Make sure you know how all of the tags are being displayed.
Topic 2.6 Attributes
Let’s have a closer look at the link tag in the last example:
48 [DRAFT, 1074] UNIT 2. MARKUP AND XHTML
<a href="http://en.wikipedia.org/wiki/Renting">rent</a>
The href part is attribute. An attribute is used to modify a tag in someway. For <a>, the href attribute gives the destination URL for the link.(The word “attribute” here should be pronounced with the stress on the firstsyllable, not on the second as in the verb that is spelled the same way.)
The attribute’s value is given after the equal sign, and must be in quotes.In the example, the value is http://en.wikipedia.org/wiki/Renting .
Attributes are always put in the opening tag, after the tag name, and be-fore the >. If you want to specify more than one attribute, they are separatedby a space. For example,
<a href="page.html" class="internal">...</a>
The attributes that each tag can have are described in the online XHTMLreference, described in the next topic.
Topic 2.7 XHTML Reference
There are many more XHTML tags and attributes than have been mentionedhere, and you should explore them further. You can visit the definitivereference from the course web site from the “References” section.
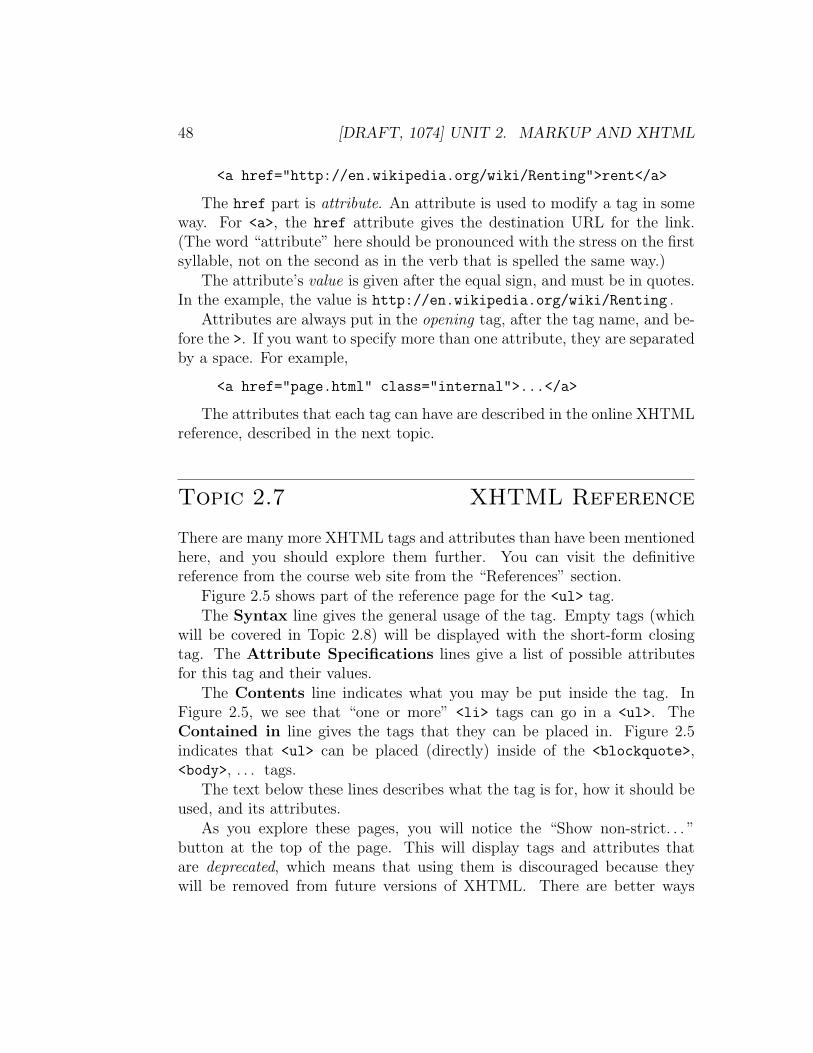
Figure 2.5 shows part of the reference page for the <ul> tag.The Syntax line gives the general usage of the tag. Empty tags (which
will be covered in Topic 2.8) will be displayed with the short-form closingtag. The Attribute Specifications lines give a list of possible attributesfor this tag and their values.
The Contents line indicates what you may be put inside the tag. InFigure 2.5, we see that “one or more” <li> tags can go in a <ul>. TheContained in line gives the tags that they can be placed in. Figure 2.5indicates that <ul> can be placed (directly) inside of the <blockquote>,<body>, . . . tags.
The text below these lines describes what the tag is for, how it should beused, and its attributes.
As you explore these pages, you will notice the “Show non-strict. . . ”button at the top of the page. This will display tags and attributes thatare deprecated, which means that using them is discouraged because theywill be removed from future versions of XHTML. There are better ways
2.8. IMAGES IN HTML [DRAFT, 1074] 49
Figure 2.5: A sample page from the XHTML reference
to accomplish the same task, often with style sheets, which are discussedin Unit 3. You should just leave these tags and attributes hidden for thiscourse.
◮ Have a look at the XHTML reference pages and familiarize yourself withsome of the tags that are available
◮ Modify one of the XHTML files you have been working on to use someother tags.
Topic 2.8 Images in HTML
We will discuss creating and editing images in Unit 5. For the moment, wewill just look at how to put an image that has already been created on a webpage.
Images are inserted with the <img> tag. This tag has two required at-tributes: that is, an <img> tag without them is illegal. The first requiredattribute is src, which is used to indicate the URL where the image can be
50 [DRAFT, 1074] UNIT 2. MARKUP AND XHTML
found. The second is alt, which is used to specify alternate text for theimage.
The alternate text is used in several situations. It can be displayed ifthe image cannot be loaded for some reason (network congestion, bad URL,deleted file, etc.), if the image hasn’t been downloaded yet, or if the browserdoes not support images. When you are creating alt text, you should try towrite text that gives users as much of the meaning of the image as possible.
Browsers that don’t support images are rare, but there some still inuse. For example, the visually impaired, who cannot use a graph-ical browser, often use a text browser and a speech synthesizer.Also note that search engines will look at the alt text for yourimages, not the images themselves.
The <img> tag is empty, so the closing tag is unnecessary. You insert animage in the following way:
<img src="house.png" alt="picture of a house" />
Empty tags are ones that aren’t allowed to have any contents. That is, youaren’t allowed to put anything between the opening and closing. So, if youwere going to use the closing tag as before, it would have to look like this:
<img src="house.png" alt="picture of a house"></img>
The “/>” closing is a short-form that can be used with empty tags—thebrowser should treat the two lines of code above in exactly the same way. Inthis Guide, we will be using the short-form where possible.
The <img> tag must be inside of a paragraph, heading, or other similartag. It cannot be placed directly inside the <body>.
<img> actually must be inside any block-level tag, which will beexplained in Topic 4.2.
A web page with an image included can be see in Figure 2.6. In this case,the image file house.png must be placed in the same directory as the .htmlfile, so it will be found by the browser.
You can specify the size of the image, in pixels, using the height andwidth attributes. (If you’re unsure what a “pixel” is, ignore this until Unit 5and then come back here.) With this information, the browser can displaythe page before the images are downloaded, since it knows how much spaceit needs to leave for them. As a result, your page will be displayed faster,especially for people with a slow connection, and it is a good idea. So, wemight do something like this:
2.8. IMAGES IN HTML [DRAFT, 1074] 51
<html>
<head>
<title>Finding Housing</title>
</head>
<body>
<h1>Finding Housing</h1>
<h2>Types of Housing</h2>
<p>There are many types of housing you can either
<a href="http://en.wikipedia.org/wiki/Renting">rent</a>
or buy. For example,</p>
<ul>
<li>a detatched house
<img src="house.png" alt="drawing of a house" /></li>
<li>an apartment</li>
<li>a townhouse</li>
</ul>
<h2>Other ways</h2>
<p>You can also find housing in other ways. Many students live
with their parents or in residence.</p>
</body>
</html>
Figure 2.6: A web page with an image
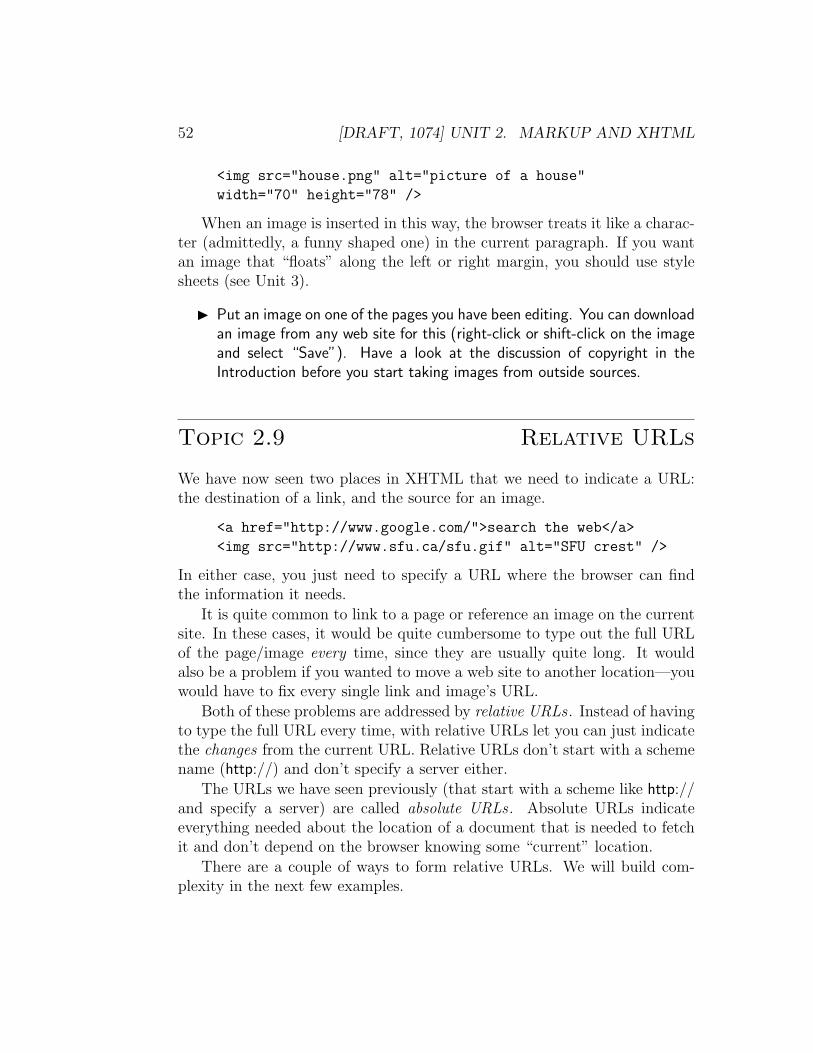
Figure 2.7: Display of Figure 2.6 in a browser
52 [DRAFT, 1074] UNIT 2. MARKUP AND XHTML
<img src="house.png" alt="picture of a house"
width="70" height="78" />
When an image is inserted in this way, the browser treats it like a charac-ter (admittedly, a funny shaped one) in the current paragraph. If you wantan image that “floats” along the left or right margin, you should use stylesheets (see Unit 3).
◮ Put an image on one of the pages you have been editing. You can downloadan image from any web site for this (right-click or shift-click on the imageand select “Save”). Have a look at the discussion of copyright in theIntroduction before you start taking images from outside sources.
Topic 2.9 Relative URLs
We have now seen two places in XHTML that we need to indicate a URL:the destination of a link, and the source for an image.
<a href="http://www.google.com/">search the web</a>
<img src="http://www.sfu.ca/sfu.gif" alt="SFU crest" />
In either case, you just need to specify a URL where the browser can findthe information it needs.
It is quite common to link to a page or reference an image on the currentsite. In these cases, it would be quite cumbersome to type out the full URLof the page/image every time, since they are usually quite long. It wouldalso be a problem if you wanted to move a web site to another location—youwould have to fix every single link and image’s URL.
Both of these problems are addressed by relative URLs . Instead of havingto type the full URL every time, with relative URLs let you can just indicatethe changes from the current URL. Relative URLs don’t start with a schemename (http://) and don’t specify a server either.
The URLs we have seen previously (that start with a scheme like http://and specify a server) are called absolute URLs . Absolute URLs indicateeverything needed about the location of a document that is needed to fetchit and don’t depend on the browser knowing some “current” location.
There are a couple of ways to form relative URLs. We will build com-plexity in the next few examples.
2.9. RELATIVE URLS [DRAFT, 1074] 53
Filename Only
In the simplest form of a relative URL, you specify only a filename. Forexample, you might have noticed that in the image tag example in Topic 2.8,we specified only src="house.png", not a full URL. This was a relative URL.
In this case, the browser looks for a file with that name in the same
directory as the current page. To display the image as you see in Figure 2.7,the house.png file was placed in the same directory as the XHTML file, andthe page was opened in a browser.
This can be done with a link as well:
<a href="page2.html">the next page</a>
When the user clicks this link, they will be taken to the page in page2.html,in the same directory as the current file.
Directory and Filename
Having all of your files in a single directory is fine for small sites, but forlarger sites, you will want to organize your files into directories. RelativeURLs can be used to navigate between directories, as well as to files in thesame directory.
You can give a directory name and a filename, separated by a forwardslash (/). The web browser will move into the given directory and look forthe named file.
Backslashes (\) are never used in URLs. They occasionally findtheir way onto web pages because they are common in Windowspath names, but this is an error.
For example, have a look at this link:
<a href="section1/page2.html">
When the user clicks this link, the browser will look for the file page2.html inthe directory section1. The directory section1 must be in the same directoryas the current page. So, you could read section1/page2.html as “move intothe section1 and look for page2.html.
Another example in an image tag:
<img src="party/IMG0001.JPG" alt="us at a party" />
54 [DRAFT, 1074] UNIT 2. MARKUP AND XHTML
It is often convenient to put all of your images in a directory (or directories).In this case, the browser looks in the party directory and finds the imageIMG0001.JPG.
Note that filenames are case-sensitive. For example, IMG0001.JPGand IMG0001.jpg are considered to be different files when you putthem on a web server. Make sure the case of your filenames andURLs match.
Moving Up
The last possibility for relative URLs that we will discuss is how to moveup a level through the directory structure. That is, if the current file is in adirectory, and you want to refer to a file in the directory above it.
To do this with a relative URL, use the special directory name “..”. Thetwo-dots directory name has a special meaning: move up a level.
For example, consider this link:
<a href="../menu.html">
This will look for the file menu.html in the parent directory.
The same can be done with the image tag:
<img src="../logo.png">
Combining
These forms can be combined and repeated. For example, if you want to usethe landscape.jpg file in the directory tofino which is itself in the vacationsdirectory, you can use an image tag like this:
<img src="vacations/tofino/landscape.jpg">
Similarly, you can move up two directory levels:
<img src="../../menu.html">
2.9. RELATIVE URLS [DRAFT, 1074] 55
URL Destination
img.png http://www.sfu.ca/∼somebody/pics/img.png../file.html http://www.sfu.ca/∼somebody/file.html../../test.html http://www.sfu.ca/test.htmldir/img.png http://www.sfu.ca/∼somebody/pics/dir/img.pnghttp://www.cs.sfu.ca/ http://www.cs.sfu.ca/ (absolute URL)
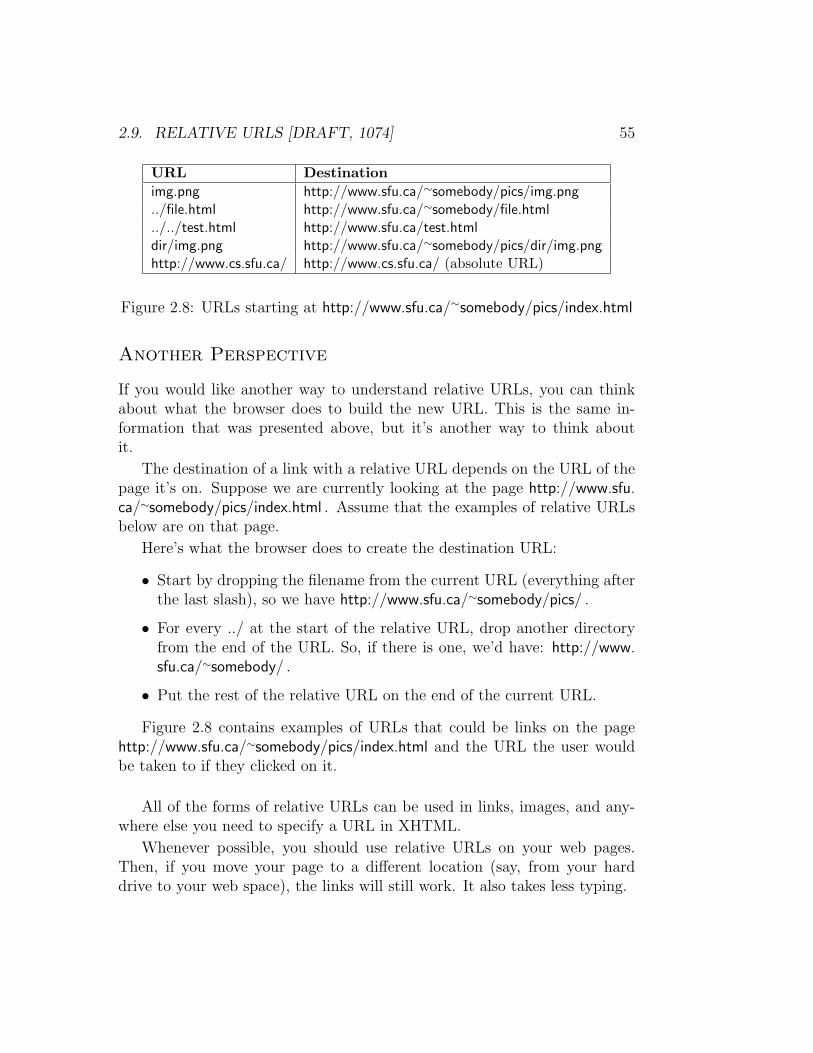
Figure 2.8: URLs starting at http://www.sfu.ca/∼somebody/pics/index.html
Another Perspective
If you would like another way to understand relative URLs, you can thinkabout what the browser does to build the new URL. This is the same in-formation that was presented above, but it’s another way to think aboutit.
The destination of a link with a relative URL depends on the URL of thepage it’s on. Suppose we are currently looking at the page http://www.sfu.ca/∼somebody/pics/index.html . Assume that the examples of relative URLsbelow are on that page.
Here’s what the browser does to create the destination URL:
• Start by dropping the filename from the current URL (everything afterthe last slash), so we have http://www.sfu.ca/∼somebody/pics/ .
• For every ../ at the start of the relative URL, drop another directoryfrom the end of the URL. So, if there is one, we’d have: http://www.sfu.ca/∼somebody/ .
• Put the rest of the relative URL on the end of the current URL.
Figure 2.8 contains examples of URLs that could be links on the pagehttp://www.sfu.ca/∼somebody/pics/index.html and the URL the user wouldbe taken to if they clicked on it.
All of the forms of relative URLs can be used in links, images, and any-where else you need to specify a URL in XHTML.
Whenever possible, you should use relative URLs on your web pages.Then, if you move your page to a different location (say, from your harddrive to your web space), the links will still work. It also takes less typing.
56 [DRAFT, 1074] UNIT 2. MARKUP AND XHTML
You may have noticed URLs with no filename on the end. Forexample, “http://www.apple.com/” or “part1/” (absolute and rela-tive URLs, respectively). What happens when a browser requests aURL like this depends on the server, but typically the server looksfor the file index.html and returns its contents. If you name thefront page of a site index.html, you won’t have to specify a filenamein URLs to it.
◮ Put some links and image tags on a web page. Try both an absolute anda relative link. Upload these to the course web server and make sure theURLs still work as expected.
Topic 2.10 Choosing Tags
When creating and XHTML page, you should use tags that have a meaning
that is as close as possible to the contents you are marking up. You shouldn’tworry (yet) about the appearance of the page. Markup that is done this wayis called semantic markup.
Semantic: having to do with meaning. So, semantic markup ismarkup that concerns itself with the meaning of the contents (asopposed to their appearance).
For example, if you are giving instructions to complete some task, youwill probably have a list of instructions. Since you have a list, either the <ol>or <ul> tag is appropriate. Since it matters what order the steps appear in,the <ol> (ordered list) tag should be used, with an <li> (list item) enclosingeach individual step.
If you want to highlight an important word in a sentence, you can useeither the <em> (emphasized text) or <strong> (strongly emphasized text),depending of the level of emphasis you want. For example, the word “mean-ing” in the first sentence in this topic is emphasized—the <em> tag would beappropriate for this content in XHTML.
Have a look at the index of the XHTML reference. You don’t have tomemorize all of the tags, but you should have an idea of what’s there, so youcan find the right tag when you need it.
You should not use the tags that have no meaning, but only specify anappearance, like <b> (bold text) and <small> (small text).
2.10. CHOOSING TAGS [DRAFT, 1074] 57
We will discuss more details and reasons for doing this in Topic 3.4, whenwe have a more complete picture of both XHTML and CSS.
◮ Look back at some of the XHTML pages you have created. Do you see anyplaces where a more semantically meaningful tag could have been used?
Summary
After doing this unit, you should be comfortable creating a simple web pagesusing a text editor. You should know some of the basic tags and be learningmore.
Key Terms
• markup
• XHTML
• tag
• opening/closing tags
• attribute
• link
• absolute and relative URLs
• semantic markup

58 [DRAFT, 1074] UNIT 2. MARKUP AND XHTML
Unit 3
Cascading Style Sheets
Learning Outcomes
• Use CSS to style XHTML content.
• Describe commonly used CSS properties.
• Use CSS to implement a simple visual design.
Learning Activities
• Read this unit and do the questions marked with a “◮”.
• Browse through the links for this unit on the course web site.
• Browse the CSS reference pages in the “Online References” section ofthe course web site.
• (optional) Review Head First HTML with XHTML and CSS, Chapters8, 10.
Topic 3.1 Styles
So far, we haven’t really had any ways to control the appearance of XHTMLpages. All we could do was use appropriate tags and hope that the browserdisplayed it appropriately. All of the tags we used specified the meaning orpurpose of its contents (a heading, list, etc.), not its appearance (red, bold,etc.). We relied on the browser to associate an appearance with the meaningwe gave.
59
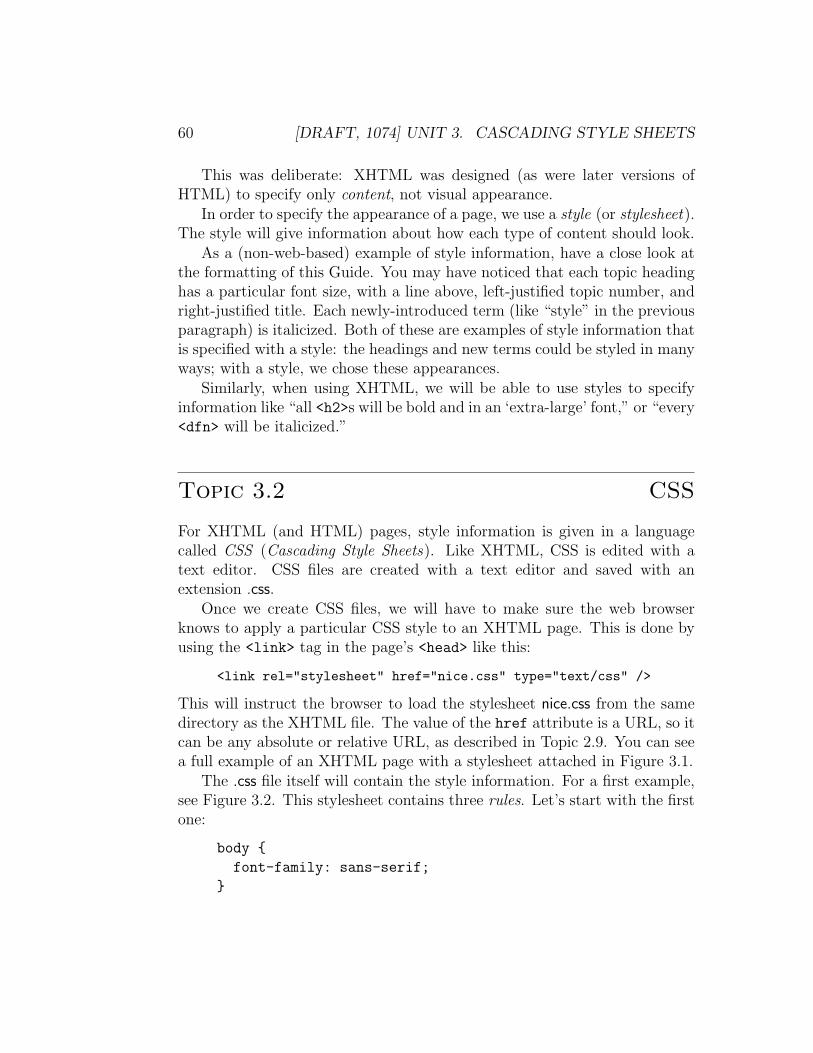
60 [DRAFT, 1074] UNIT 3. CASCADING STYLE SHEETS
This was deliberate: XHTML was designed (as were later versions ofHTML) to specify only content, not visual appearance.
In order to specify the appearance of a page, we use a style (or stylesheet).The style will give information about how each type of content should look.
As a (non-web-based) example of style information, have a close look atthe formatting of this Guide. You may have noticed that each topic headinghas a particular font size, with a line above, left-justified topic number, andright-justified title. Each newly-introduced term (like “style” in the previousparagraph) is italicized. Both of these are examples of style information thatis specified with a style: the headings and new terms could be styled in manyways; with a style, we chose these appearances.
Similarly, when using XHTML, we will be able to use styles to specifyinformation like “all <h2>s will be bold and in an ‘extra-large’ font,” or “every<dfn> will be italicized.”
Topic 3.2 CSS
For XHTML (and HTML) pages, style information is given in a languagecalled CSS (Cascading Style Sheets). Like XHTML, CSS is edited with atext editor. CSS files are created with a text editor and saved with anextension .css.
Once we create CSS files, we will have to make sure the web browserknows to apply a particular CSS style to an XHTML page. This is done byusing the <link> tag in the page’s <head> like this:
<link rel="stylesheet" href="nice.css" type="text/css" />
This will instruct the browser to load the stylesheet nice.css from the samedirectory as the XHTML file. The value of the href attribute is a URL, so itcan be any absolute or relative URL, as described in Topic 2.9. You can seea full example of an XHTML page with a stylesheet attached in Figure 3.1.
The .css file itself will contain the style information. For a first example,see Figure 3.2. This stylesheet contains three rules. Let’s start with the firstone:
body {
font-family: sans-serif;
}
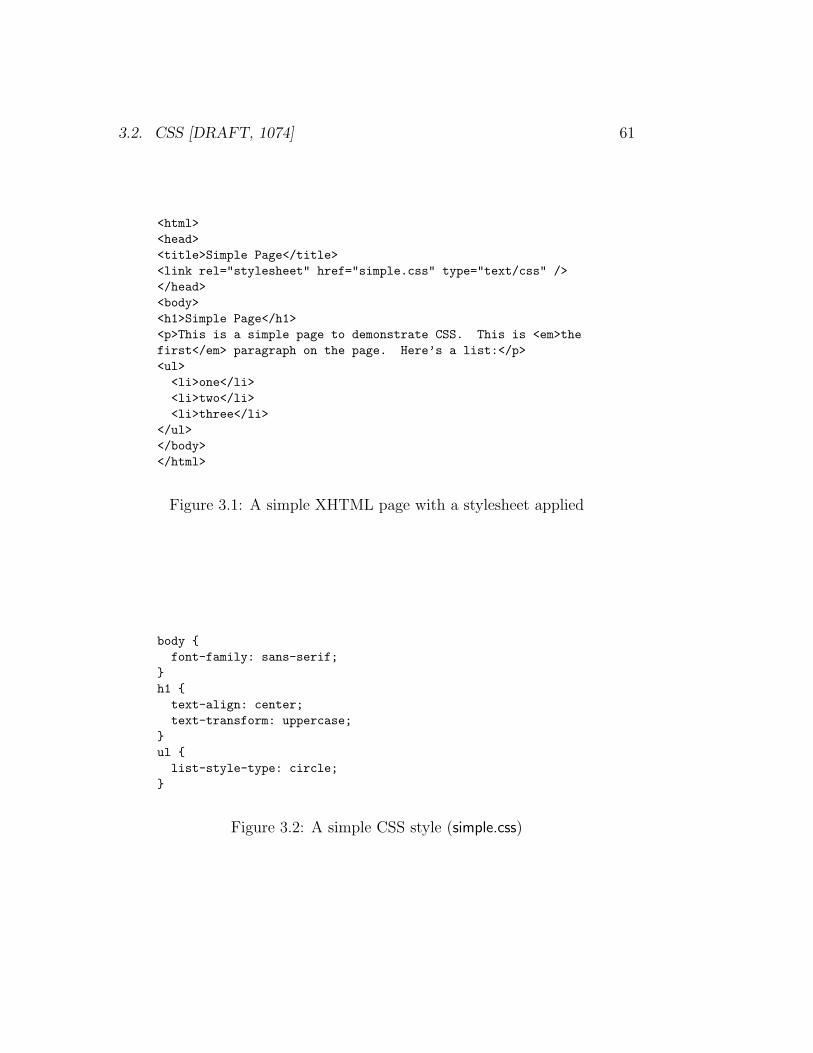
3.2. CSS [DRAFT, 1074] 61
<html>
<head>
<title>Simple Page</title>
<link rel="stylesheet" href="simple.css" type="text/css" />
</head>
<body>
<h1>Simple Page</h1>
<p>This is a simple page to demonstrate CSS. This is <em>the
first</em> paragraph on the page. Here’s a list:</p>
<ul>
<li>one</li>
<li>two</li>
<li>three</li>
</ul>
</body>
</html>
Figure 3.1: A simple XHTML page with a stylesheet applied
body {
font-family: sans-serif;
}
h1 {
text-align: center;
text-transform: uppercase;
}
ul {
list-style-type: circle;
}
Figure 3.2: A simple CSS style (simple.css)
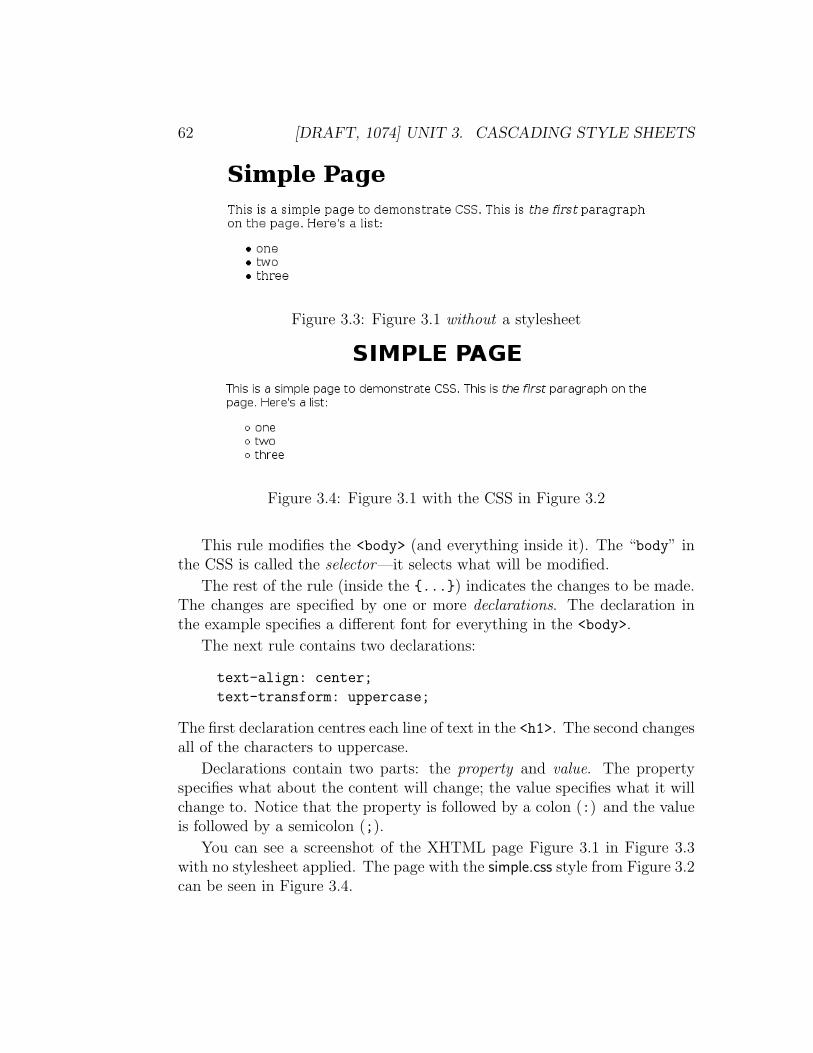
62 [DRAFT, 1074] UNIT 3. CASCADING STYLE SHEETS
Figure 3.3: Figure 3.1 without a stylesheet
Figure 3.4: Figure 3.1 with the CSS in Figure 3.2
This rule modifies the <body> (and everything inside it). The “body” inthe CSS is called the selector—it selects what will be modified.
The rest of the rule (inside the {...}) indicates the changes to be made.The changes are specified by one or more declarations. The declaration inthe example specifies a different font for everything in the <body>.
The next rule contains two declarations:
text-align: center;
text-transform: uppercase;
The first declaration centres each line of text in the <h1>. The second changesall of the characters to uppercase.
Declarations contain two parts: the property and value. The propertyspecifies what about the content will change; the value specifies what it willchange to. Notice that the property is followed by a colon (:) and the valueis followed by a semicolon (;).
You can see a screenshot of the XHTML page Figure 3.1 in Figure 3.3with no stylesheet applied. The page with the simple.css style from Figure 3.2can be seen in Figure 3.4.
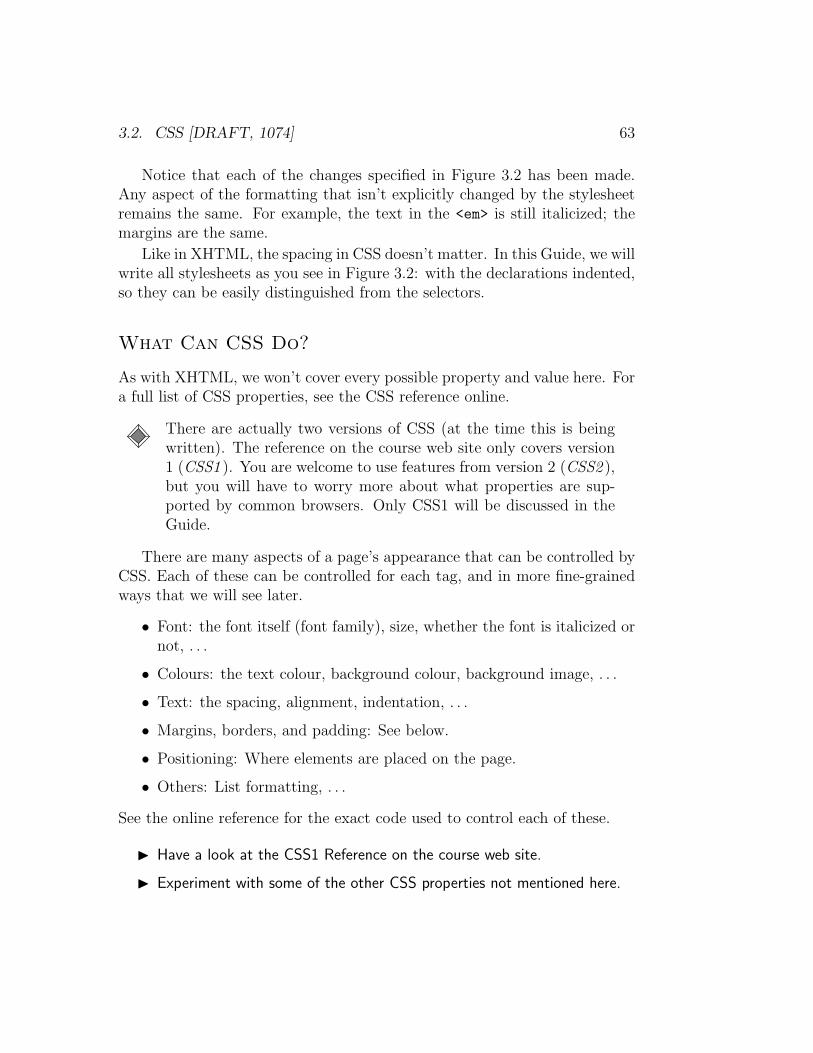
3.2. CSS [DRAFT, 1074] 63
Notice that each of the changes specified in Figure 3.2 has been made.Any aspect of the formatting that isn’t explicitly changed by the stylesheetremains the same. For example, the text in the <em> is still italicized; themargins are the same.
Like in XHTML, the spacing in CSS doesn’t matter. In this Guide, we willwrite all stylesheets as you see in Figure 3.2: with the declarations indented,so they can be easily distinguished from the selectors.
What Can CSS Do?
As with XHTML, we won’t cover every possible property and value here. Fora full list of CSS properties, see the CSS reference online.
There are actually two versions of CSS (at the time this is beingwritten). The reference on the course web site only covers version1 (CSS1 ). You are welcome to use features from version 2 (CSS2 ),but you will have to worry more about what properties are sup-ported by common browsers. Only CSS1 will be discussed in theGuide.
There are many aspects of a page’s appearance that can be controlled byCSS. Each of these can be controlled for each tag, and in more fine-grainedways that we will see later.
• Font: the font itself (font family), size, whether the font is italicized ornot, . . .
• Colours: the text colour, background colour, background image, . . .
• Text: the spacing, alignment, indentation, . . .
• Margins, borders, and padding: See below.
• Positioning: Where elements are placed on the page.
• Others: List formatting, . . .
See the online reference for the exact code used to control each of these.
◮ Have a look at the CSS1 Reference on the course web site.
◮ Experiment with some of the other CSS properties not mentioned here.
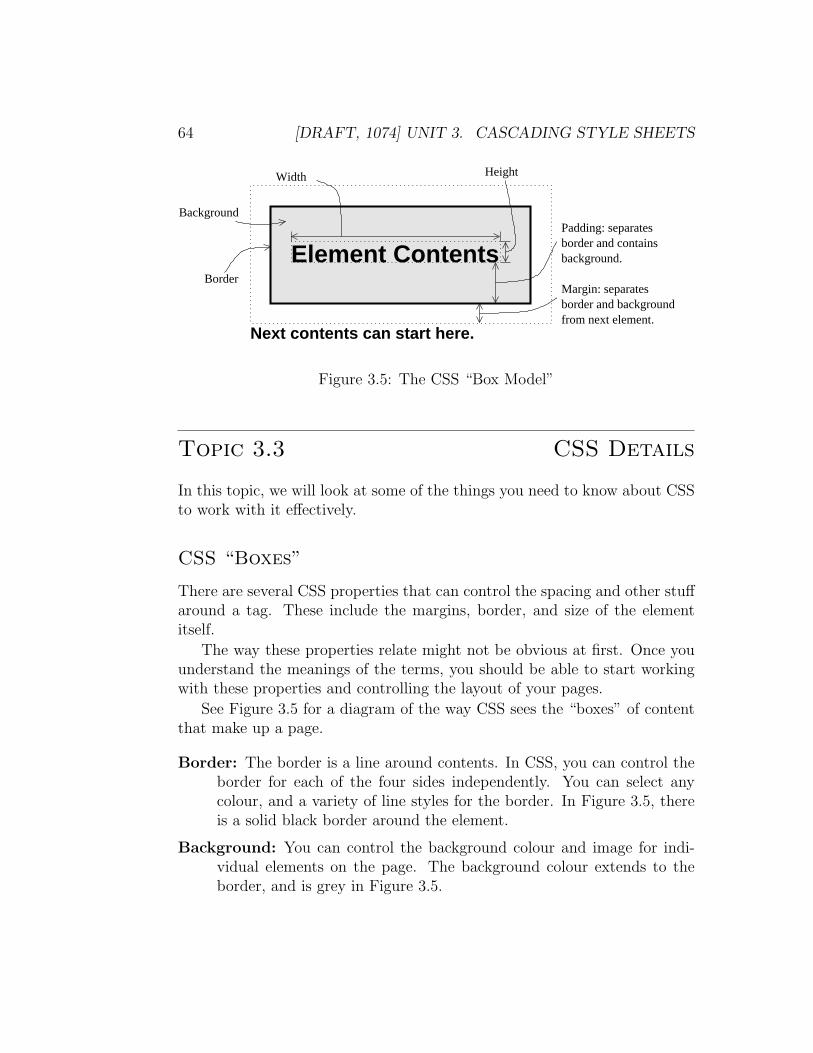
64 [DRAFT, 1074] UNIT 3. CASCADING STYLE SHEETS
Border
Background
Width Height
Padding: separatesborder and containsbackground.
Margin: separatesborder and backgroundfrom next element.
Element Contents
Next contents can start here.
Figure 3.5: The CSS “Box Model”
Topic 3.3 CSS Details
In this topic, we will look at some of the things you need to know about CSSto work with it effectively.
CSS “Boxes”
There are several CSS properties that can control the spacing and other stuffaround a tag. These include the margins, border, and size of the elementitself.
The way these properties relate might not be obvious at first. Once youunderstand the meanings of the terms, you should be able to start workingwith these properties and controlling the layout of your pages.
See Figure 3.5 for a diagram of the way CSS sees the “boxes” of contentthat make up a page.
Border: The border is a line around contents. In CSS, you can control theborder for each of the four sides independently. You can select anycolour, and a variety of line styles for the border. In Figure 3.5, thereis a solid black border around the element.
Background: You can control the background colour and image for indi-vidual elements on the page. The background colour extends to theborder, and is grey in Figure 3.5.
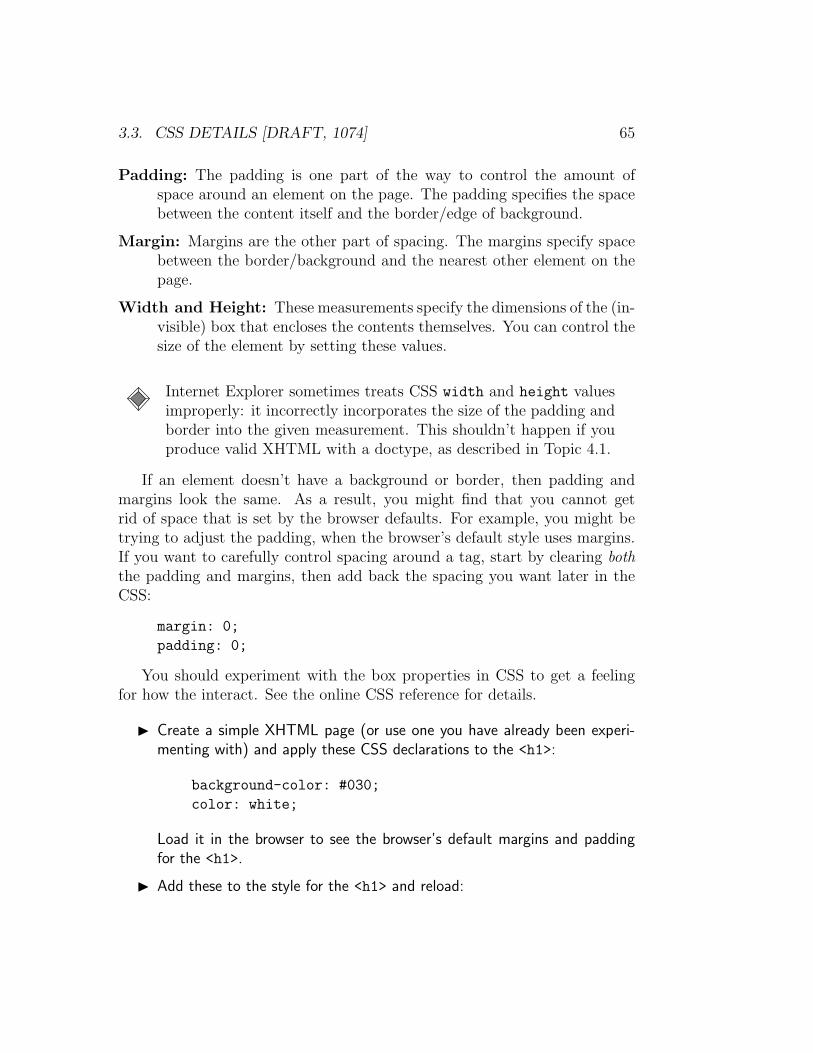
3.3. CSS DETAILS [DRAFT, 1074] 65
Padding: The padding is one part of the way to control the amount ofspace around an element on the page. The padding specifies the spacebetween the content itself and the border/edge of background.
Margin: Margins are the other part of spacing. The margins specify spacebetween the border/background and the nearest other element on thepage.
Width and Height: These measurements specify the dimensions of the (in-visible) box that encloses the contents themselves. You can control thesize of the element by setting these values.
Internet Explorer sometimes treats CSS width and height valuesimproperly: it incorrectly incorporates the size of the padding andborder into the given measurement. This shouldn’t happen if youproduce valid XHTML with a doctype, as described in Topic 4.1.
If an element doesn’t have a background or border, then padding andmargins look the same. As a result, you might find that you cannot getrid of space that is set by the browser defaults. For example, you might betrying to adjust the padding, when the browser’s default style uses margins.If you want to carefully control spacing around a tag, start by clearing both
the padding and margins, then add back the spacing you want later in theCSS:
margin: 0;
padding: 0;
You should experiment with the box properties in CSS to get a feelingfor how the interact. See the online CSS reference for details.
◮ Create a simple XHTML page (or use one you have already been experi-menting with) and apply these CSS declarations to the <h1>:
background-color: #030;
color: white;
Load it in the browser to see the browser’s default margins and paddingfor the <h1>.
◮ Add these to the style for the <h1> and reload:
66 [DRAFT, 1074] UNIT 3. CASCADING STYLE SHEETS
Figure 3.6: Examples of relative units
border-style: solid;
border-color: #0F0;
border-width: medium;
◮ Now, add some declarations that change the margin and the padding. makesure you know the difference between the two. For example,
padding: 0.5em;
margin-bottom: 1em;
[We will discuss these units of length more in the next subtopic.]
Lengths in CSS
When specifying widths, paddings, and other properties in CSS, we need togive a length. For example, when setting the padding, we need to give thedistance from the border to the contents somehow. There are several lengthunits that can be used in CSS.
It’s best to specify lengths relative to the current font size. This can bedone with the unit em, which represents the current font size. For example,setting padding: 0.5em; will set the space between the text and border tobe half the current font size.
See Figure 3.6 for an example of using relative units to specify variousamounts of padding around some text. If the browser’s font size was madelarger or smaller, the whole design would scale proportionately.
The benefit of using relative units is that the design of the page will scaleproperly as the font size changes. Remember that you don’t get absolutecontrol over the display of your page—it is done by the reader’s browser, andthey may want a larger or smaller font. With good CSS design and relativeunits, the page should still look good.
3.3. CSS DETAILS [DRAFT, 1074] 67
There are other units that can be used in CSS as well. Here are someexamples:
p {
margin-top: 50%;
margin-left: 1.5cm;
text-indent: 2em;
border: 2px solid black;
}
This CSS fragment sets the top margin for all paragraphs to half of itsprevious value. The left margin is set to 1.5 centimetres. The first line ofeach paragraph will be indented by double the font size. Each paragraph willbe given a border that is two pixels wide.
The less-flexible units (like cm and px) can be used if you have a goodreason to do so. There are other length units that can be used as well. Detailscan be found in the online CSS reference.
Fonts in CSS
The font used for the text of an element can be changed with the font-familyproperty. But again, you are limited by the user’s browser when it comes todisplaying particular fonts: you have no way to guarantee that all of yourreaders will have the fonts you need.
The solution to this is to specify several options for the font. A list offonts can be given, in order of preference:
font-family: "Verdana", "Helvetica", "Arial", sans-serif;
In this case, the browser will use the font “Verdana” if it is available. If not,it will look for “Helvetica”, then “Arial”, then any sans serif font.
The last item here is a generic font family . There are five generic fontfamilies defined in CSS, and your list of fonts must end with one of them.The idea is that every web browser should be able to find one of each type.
Here is another example of specifying a font in CSS:
font-family: "Bodini", "Georgia", "Times", serif;
68 [DRAFT, 1074] UNIT 3. CASCADING STYLE SHEETS
Topic 3.4 Why CSS?
Before CSS was commonly used by web page designers, visual information forweb pages was included in the HTML itself. There were tags and attributesin HTML that gave visual information such as colour, font, and alignment.These parts of HTML are now deprecated (that is, they should not be used)in favour of CSS.
As we have discussed, XHTML and CSS are used for distinct purposes.XHTML is used only to describe the content of the page: what the partsare and what is their meaning/purpose? Think about the XHTML tags youhave seen: paragraphs, lists, headings. All of these specify what kind ofcontent there is; they don’t directly indicate an appearance. As mentionedin Topic 2.10, you should choose XHTML tags to maximize the meaning youconvey in the tags.
CSS is used to give information about how all of these parts should bepresented. For example, there are many different ways that a heading couldbe presented and still be interpreted as a heading by the reader. We havebeen keeping the ideas in the page separated from the way they look.
Why are we making this distinction, and using two different languages tocreate web pages?
• There are more options for controlling the appearance of pages withCSS than in old HTML designs. This gives more flexibility when de-signing a page.
• The combination of XHTML and CSS actually produces smaller files(even though there are two files instead of one). Smaller files result infaster transfer times and quicker response for the user.
When appearance was specified in HTML, it was necessary to indicatethe appearance of every paragraph separately. With CSS, you canspecify a look for every paragraph at once in the CSS. When you usethe same .css file on many pages, the .css file only has to be downloadedonce (with the first page), so loading times (for subsequent pages onthe site) are even faster.
• Using XHTML and CSS for different purposes forces authors to sepa-rate the meaning of the content from its appearance. Authors must ask
3.4. WHY CSS? [DRAFT, 1074] 69
themselves why they want different parts of the page to look a partic-ular way. If some part of the page is a list, the author should use <ul>
or <ol>, as appropriate. Then, CSS can be used to get a particularappearance.
This helps keep pages organized and makes it easy to create a consis-tent design. This can also make it possible to have experts create therelevant content: a designer can create CSS, and an author can createthe XHTML.
• It’s easy to update the appearance of an entire site. As long as a singlestylesheet has been used, there is only one file to be changed when youwant to change the site’s design.
Old HTML-only layouts were often very difficult to change. Not onlywould every instance of a paragraph (for instance) need to be updated,but the designs were often quite fragile, and small changes could haveunintended consequences.
• Having only content in the XHTML files allows the pages to be usedin many situations. For example, it’s possible to create a differentstylesheet that will be used on phones, PDAs, or other small-screendevices; or you could create a different stylesheet with larger fonts forusers who need them.
The stylesheet can also be ignored if necessary. For example, it’s pos-sible for a speech-browser to read a well-constructed XHTML page toa user who can’t see. It does this by applying its own “style” whatspecifies the type of voice used for different parts of a page.
All of this can be done without changing the XHTML.
• Finally, search engines can easily read pages designed this way. Searchengines only look at XHTML (since they don’t care about appearance,only content). A well-designed XHTML page will contain a lot of infor-mation about what the parts of the page are (titles, lists, etc.), withoutinformation about presentation mixed in. Search engines can use thisinformation to get a better idea what the page is about.
Pages designed with semantic XHTML and CSS are typically rankedbetter by search engines because they are easier for the software thatruns the search engine to understand.
70 [DRAFT, 1074] UNIT 3. CASCADING STYLE SHEETS
When creating XHTML pages, remember to focus only on the meaningof all of the parts of the page. The idea is to give as much informationas possible to programs other than standard browsers that use your page:search engines, speciality browsers, and so on. These programs can use theXHTML tags to figure out what the parts of the page are for and interpretthem appropriately.
You can then use CSS to make the pages look the way you want. It cantake some practise to get comfortable working with CSS: experiment anddon’t get discouraged.
Another tip that will help make your pages better for search en-gines: don’t something like “click here” for your links. Some searchengines use the link text to determine what the linked page isabout. “Click here” isn’t useful: try to create link text that de-scribes what the page is about.
Summary
After you complete this unit, you should be able to create apply cascadingstyle sheets to an XHTML page/site. You should be able to create CSS filesthat make visual changes to a page. Experiment with the CSS propertiesintroduced here and make sure you understand what they do.
While you are doing labs and assignments, you should experiment furtherwith style sheets and become more comfortable with them.
Key Terms
• CSS
• rule
• selector
• declaration
• property
• value
• padding
• margin
• em (length unit)

Unit 4
Advanced XHTML and CSS
Learning Outcomes
• Use XHTML to create valid web pages.
• Design XHTML so it can be easily styled with CSS.
• Develop CSS rules to create particular appearances.
• Make reasonable guesses about CSS colour codes for a given colour.
• Given a visual design, construct a CSS that implements it.
• Justify the separation of content and structure (in XHTML) from ap-pearance (in CSS).
• Select appropriate XHTML tags to correctly describe the different partsof the page.
Learning Activities
• Read this unit and do the questions marked with a “◮”.
• Browse through the links for this unit on the course web site.
• Browse the XHTML and CSS reference pages in the “Online Refer-ences” section of the course web site.
• (optional) Review Head First HTML with XHTML and CSS, Chapters6, 7, 9, 11, 12.
71
72 [DRAFT, 1074] UNIT 4. ADVANCED XHTML AND CSS
Topic 4.1 Validating XHTML
Several “rules” of XHTML have been mentioned. For example, <li> canonly be inside a <ul> or <ol>. The XHTML reference gives many such rulesfor the places various tags can be used. But, what if you don’t follow theserules?
Web browsers always do their best to display a page, even if everythingisn’t exactly correct. For example, most browsers will properly display thefollowing as an emphasized link, even though it isn’t nested correctly:
<a href="bad.html"><em>improperly nested tags</a></em>
Browsers want to be able to display as many pages as possible, so they tryto work around bad XHTML. Because they let some errors pass, many peo-ple creating web pages wrongly assume that every web browser will displayincorrect XHTML that they produce and so they develop bad habits.
When you are creating web pages, you should assume that web browsersare very picky about what they display—that will give you the best chancethat your pages will work in all browsers. Again, remember that there are alot of web browsers: you can only test a few.
To help solve this problem, several people have developed HTML valida-
tors (or just validators). These programs check your page against the formaldefinition of XHTML (or HTML) and report any errors. Putting your webpage through a validator will help you find errors that your browser let passand discourage bad habits.
For a validator to work, you must tell it what version of HTML or XHTMLyou are using. To do so, you insert a document type (or doctype) declarationin your XHTML file as the first line, even before the <html>. The documenttype we will be using is:
<!DOCTYPE html PUBLIC "-//W3C//DTD XHTML 1.0 Strict//EN"
"http://www.w3.org/TR/xhtml1/DTD/xhtml1-strict.dtd">
(This declaration can be on one line or split across two. You can copy andpaste it from one of the examples on the web site—you don’t have to type ityourself or memorize it.)
This line indicates that the document is written in XHTML version 1.0as defined by the World Wide Web Consortium (W3C ). You should add thisline to the start of every web page from now on.
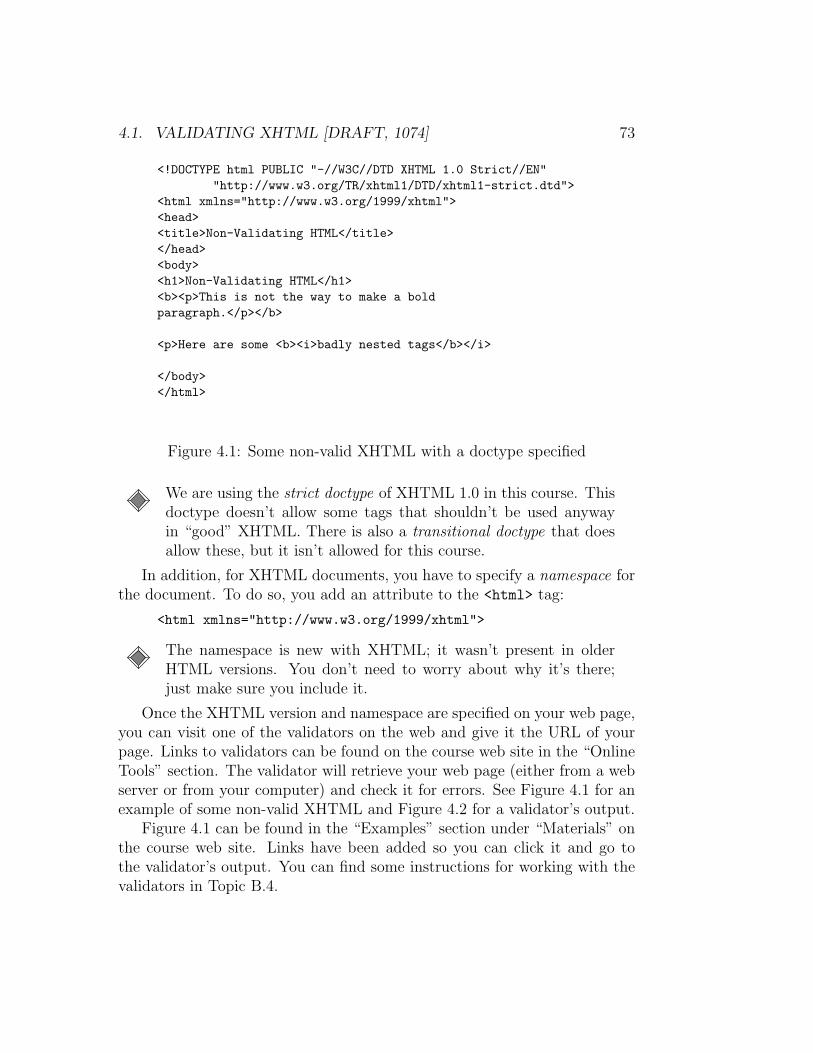
4.1. VALIDATING XHTML [DRAFT, 1074] 73
<!DOCTYPE html PUBLIC "-//W3C//DTD XHTML 1.0 Strict//EN"
"http://www.w3.org/TR/xhtml1/DTD/xhtml1-strict.dtd">
<html xmlns="http://www.w3.org/1999/xhtml">
<head>
<title>Non-Validating HTML</title>
</head>
<body>
<h1>Non-Validating HTML</h1>
<b><p>This is not the way to make a bold
paragraph.</p></b>
<p>Here are some <b><i>badly nested tags</b></i>
</body>
</html>
Figure 4.1: Some non-valid XHTML with a doctype specified
We are using the strict doctype of XHTML 1.0 in this course. Thisdoctype doesn’t allow some tags that shouldn’t be used anywayin “good” XHTML. There is also a transitional doctype that doesallow these, but it isn’t allowed for this course.
In addition, for XHTML documents, you have to specify a namespace forthe document. To do so, you add an attribute to the <html> tag:
<html xmlns="http://www.w3.org/1999/xhtml">
The namespace is new with XHTML; it wasn’t present in olderHTML versions. You don’t need to worry about why it’s there;just make sure you include it.
Once the XHTML version and namespace are specified on your web page,you can visit one of the validators on the web and give it the URL of yourpage. Links to validators can be found on the course web site in the “OnlineTools” section. The validator will retrieve your web page (either from a webserver or from your computer) and check it for errors. See Figure 4.1 for anexample of some non-valid XHTML and Figure 4.2 for a validator’s output.
Figure 4.1 can be found in the “Examples” section under “Materials” onthe course web site. Links have been added so you can click it and go tothe validator’s output. You can find some instructions for working with thevalidators in Topic B.4.
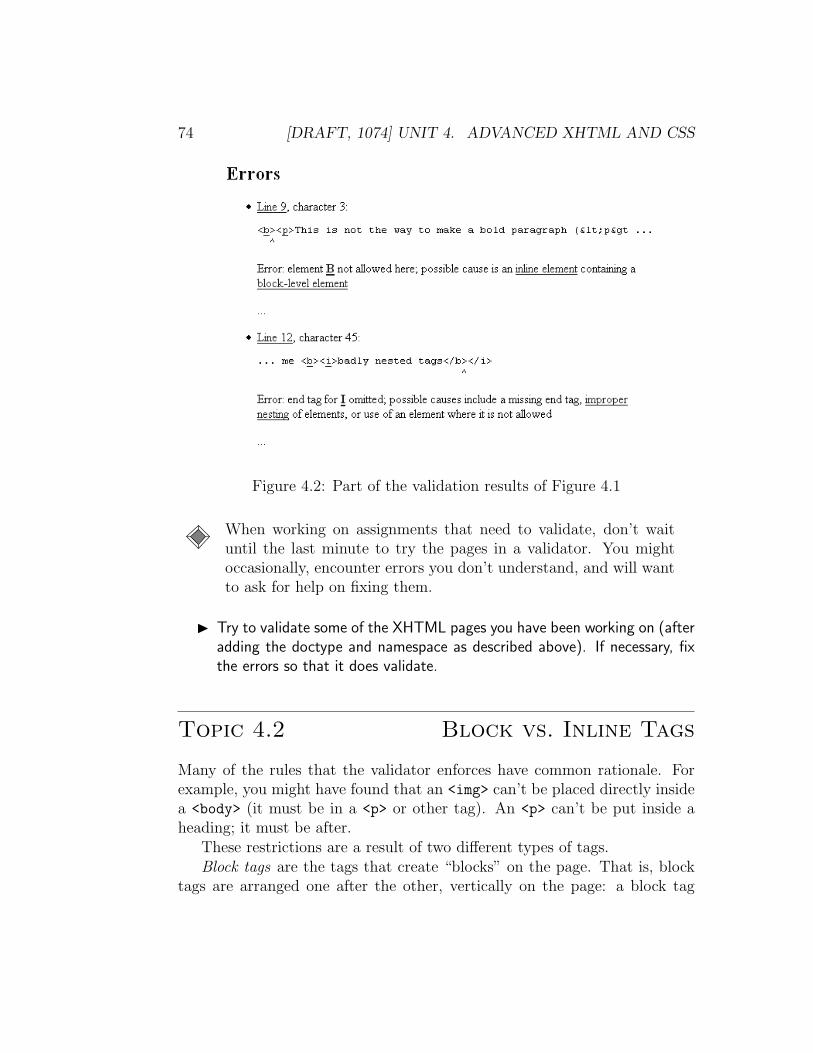
74 [DRAFT, 1074] UNIT 4. ADVANCED XHTML AND CSS
Figure 4.2: Part of the validation results of Figure 4.1
When working on assignments that need to validate, don’t waituntil the last minute to try the pages in a validator. You mightoccasionally, encounter errors you don’t understand, and will wantto ask for help on fixing them.
◮ Try to validate some of the XHTML pages you have been working on (afteradding the doctype and namespace as described above). If necessary, fixthe errors so that it does validate.
Topic 4.2 Block vs. Inline Tags
Many of the rules that the validator enforces have common rationale. Forexample, you might have found that an <img> can’t be placed directly insidea <body> (it must be in a <p> or other tag). An <p> can’t be put inside aheading; it must be after.
These restrictions are a result of two different types of tags.Block tags are the tags that create “blocks” on the page. That is, block
tags are arranged one after the other, vertically on the page: a block tag
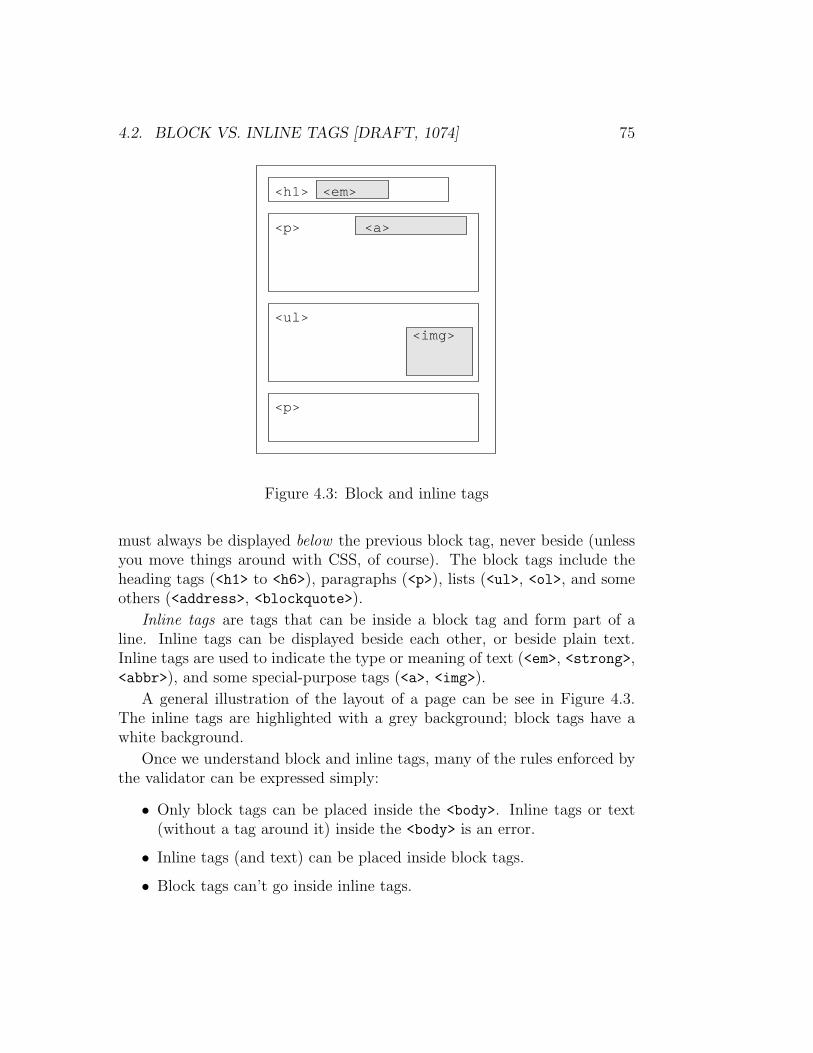
4.2. BLOCK VS. INLINE TAGS [DRAFT, 1074] 75
<h1>
<p>
<ul>
<em>
<a>
<img>
<p>
Figure 4.3: Block and inline tags
must always be displayed below the previous block tag, never beside (unlessyou move things around with CSS, of course). The block tags include theheading tags (<h1> to <h6>), paragraphs (<p>), lists (<ul>, <ol>, and someothers (<address>, <blockquote>).
Inline tags are tags that can be inside a block tag and form part of aline. Inline tags can be displayed beside each other, or beside plain text.Inline tags are used to indicate the type or meaning of text (<em>, <strong>,<abbr>), and some special-purpose tags (<a>, <img>).
A general illustration of the layout of a page can be see in Figure 4.3.The inline tags are highlighted with a grey background; block tags have awhite background.
Once we understand block and inline tags, many of the rules enforced bythe validator can be expressed simply:
• Only block tags can be placed inside the <body>. Inline tags or text(without a tag around it) inside the <body> is an error.
• Inline tags (and text) can be placed inside block tags.
• Block tags can’t go inside inline tags.
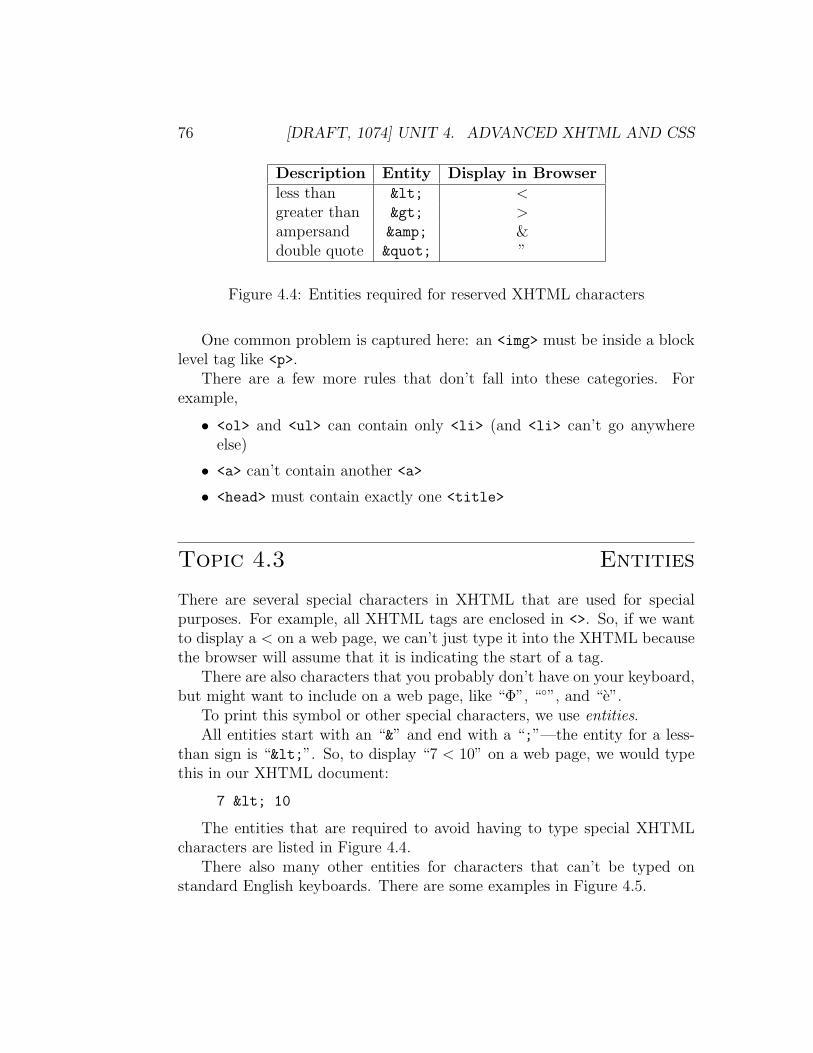
76 [DRAFT, 1074] UNIT 4. ADVANCED XHTML AND CSS
Description Entity Display in Browserless than < <
greater than > >
ampersand & &double quote " ”
Figure 4.4: Entities required for reserved XHTML characters
One common problem is captured here: an <img> must be inside a blocklevel tag like <p>.
There are a few more rules that don’t fall into these categories. Forexample,
• <ol> and <ul> can contain only <li> (and <li> can’t go anywhereelse)
• <a> can’t contain another <a>
• <head> must contain exactly one <title>
Topic 4.3 Entities
There are several special characters in XHTML that are used for specialpurposes. For example, all XHTML tags are enclosed in <>. So, if we wantto display a < on a web page, we can’t just type it into the XHTML becausethe browser will assume that it is indicating the start of a tag.
There are also characters that you probably don’t have on your keyboard,but might want to include on a web page, like “Φ”, “◦”, and “e”.
To print this symbol or other special characters, we use entities.All entities start with an “&” and end with a “;”—the entity for a less-
than sign is “<”. So, to display “7 < 10” on a web page, we would typethis in our XHTML document:
7 < 10
The entities that are required to avoid having to type special XHTMLcharacters are listed in Figure 4.4.
There also many other entities for characters that can’t be typed onstandard English keyboards. There are some examples in Figure 4.5.
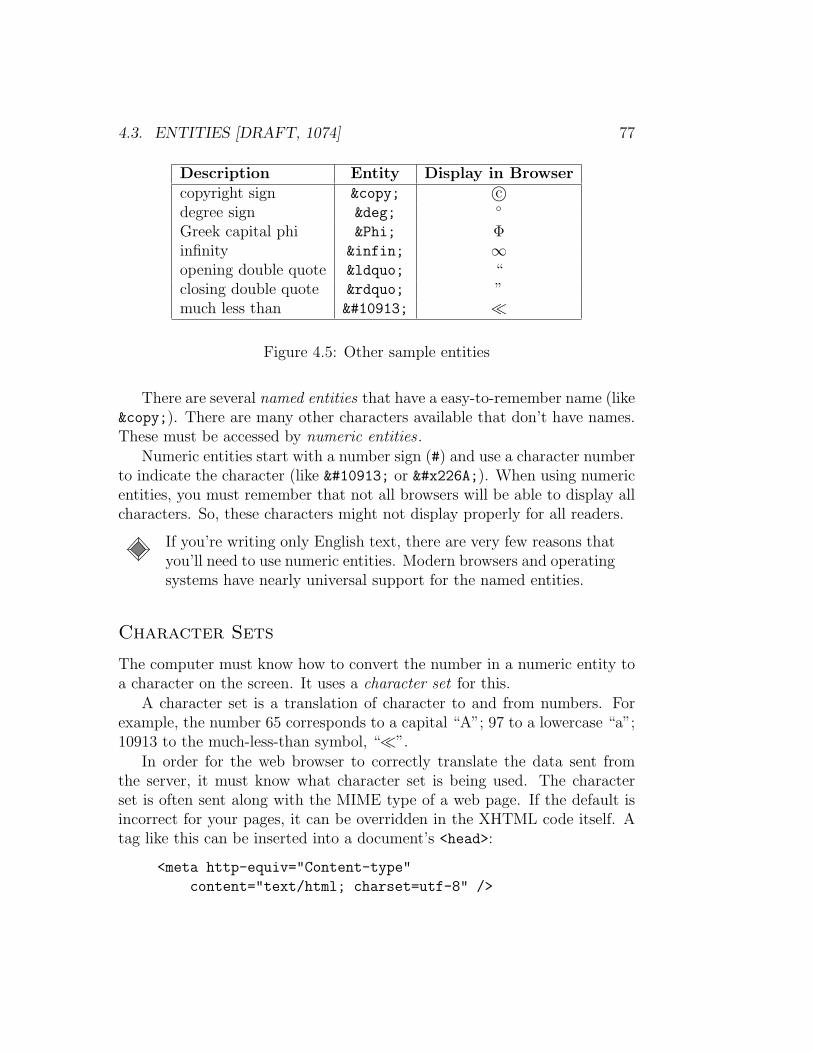
4.3. ENTITIES [DRAFT, 1074] 77
Description Entity Display in Browsercopyright sign © c©degree sign ° ◦
Greek capital phi Φ Φinfinity ∞ ∞
opening double quote “ “closing double quote ” ”much less than ⪡ ≪
Figure 4.5: Other sample entities
There are several named entities that have a easy-to-remember name (like©). There are many other characters available that don’t have names.These must be accessed by numeric entities .
Numeric entities start with a number sign (#) and use a character numberto indicate the character (like ⪡ or ≪). When using numericentities, you must remember that not all browsers will be able to display allcharacters. So, these characters might not display properly for all readers.
If you’re writing only English text, there are very few reasons thatyou’ll need to use numeric entities. Modern browsers and operatingsystems have nearly universal support for the named entities.
Character Sets
The computer must know how to convert the number in a numeric entity toa character on the screen. It uses a character set for this.
A character set is a translation of character to and from numbers. Forexample, the number 65 corresponds to a capital “A”; 97 to a lowercase “a”;10913 to the much-less-than symbol, “≪”.
In order for the web browser to correctly translate the data sent fromthe server, it must know what character set is being used. The characterset is often sent along with the MIME type of a web page. If the default isincorrect for your pages, it can be overridden in the XHTML code itself. Atag like this can be inserted into a document’s <head>:
<meta http-equiv="Content-type"
content="text/html; charset=utf-8" />
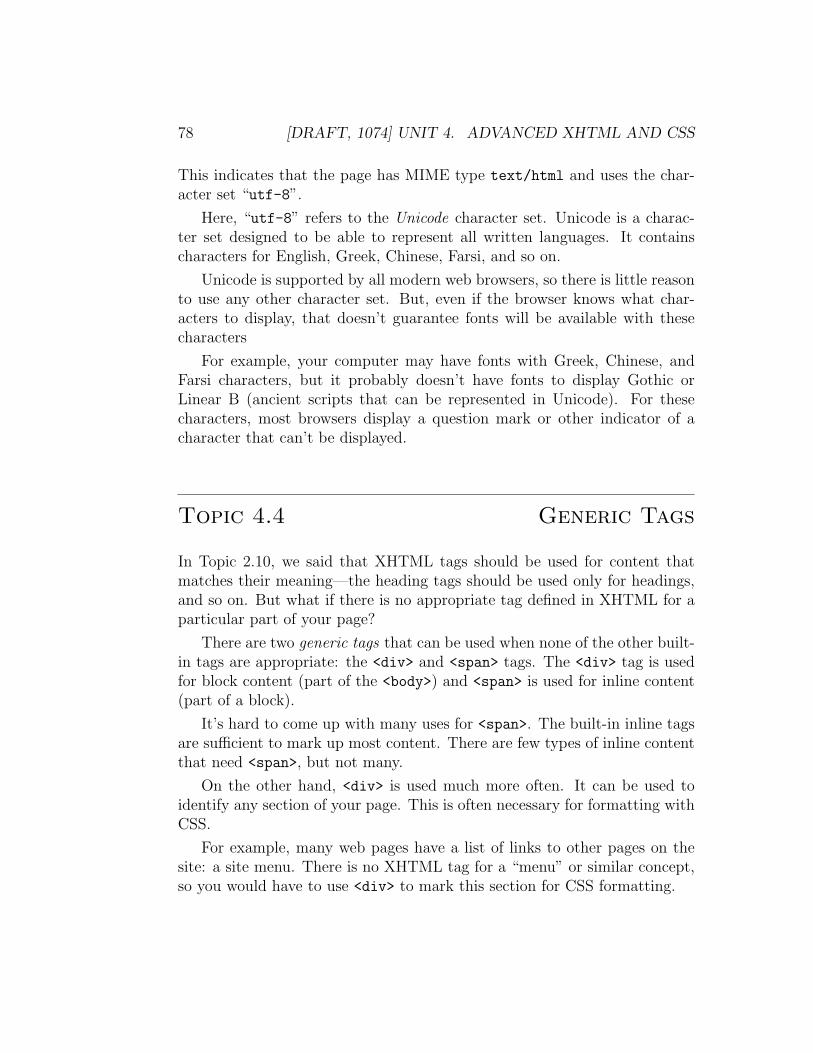
78 [DRAFT, 1074] UNIT 4. ADVANCED XHTML AND CSS
This indicates that the page has MIME type text/html and uses the char-acter set “utf-8”.
Here, “utf-8” refers to the Unicode character set. Unicode is a charac-ter set designed to be able to represent all written languages. It containscharacters for English, Greek, Chinese, Farsi, and so on.
Unicode is supported by all modern web browsers, so there is little reasonto use any other character set. But, even if the browser knows what char-acters to display, that doesn’t guarantee fonts will be available with thesecharacters
For example, your computer may have fonts with Greek, Chinese, andFarsi characters, but it probably doesn’t have fonts to display Gothic orLinear B (ancient scripts that can be represented in Unicode). For thesecharacters, most browsers display a question mark or other indicator of acharacter that can’t be displayed.
Topic 4.4 Generic Tags
In Topic 2.10, we said that XHTML tags should be used for content thatmatches their meaning—the heading tags should be used only for headings,and so on. But what if there is no appropriate tag defined in XHTML for aparticular part of your page?
There are two generic tags that can be used when none of the other built-in tags are appropriate: the <div> and <span> tags. The <div> tag is usedfor block content (part of the <body>) and <span> is used for inline content(part of a block).
It’s hard to come up with many uses for <span>. The built-in inline tagsare sufficient to mark up most content. There are few types of inline contentthat need <span>, but not many.
On the other hand, <div> is used much more often. It can be used toidentify any section of your page. This is often necessary for formatting withCSS.
For example, many web pages have a list of links to other pages on thesite: a site menu. There is no XHTML tag for a “menu” or similar concept,so you would have to use <div> to mark this section for CSS formatting.
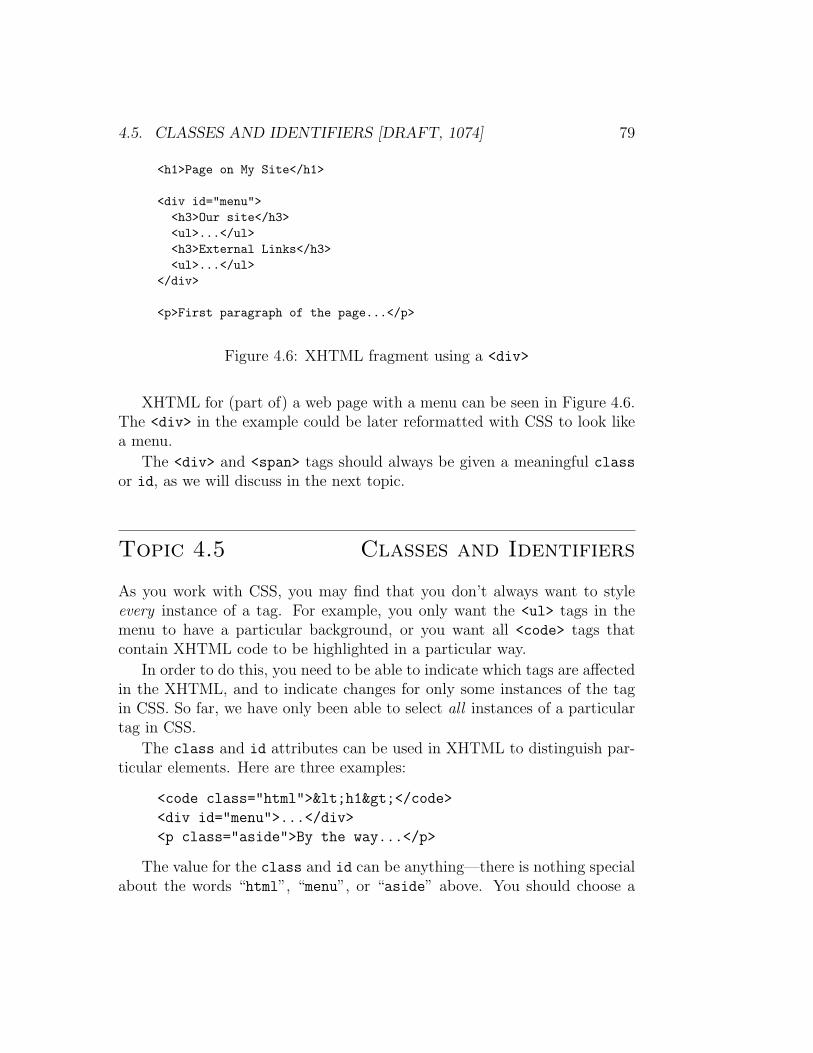
4.5. CLASSES AND IDENTIFIERS [DRAFT, 1074] 79
<h1>Page on My Site</h1>
<div id="menu">
<h3>Our site</h3>
<ul>...</ul>
<h3>External Links</h3>
<ul>...</ul>
</div>
<p>First paragraph of the page...</p>
Figure 4.6: XHTML fragment using a <div>
XHTML for (part of) a web page with a menu can be seen in Figure 4.6.The <div> in the example could be later reformatted with CSS to look likea menu.
The <div> and <span> tags should always be given a meaningful classor id, as we will discuss in the next topic.
Topic 4.5 Classes and Identifiers
As you work with CSS, you may find that you don’t always want to styleevery instance of a tag. For example, you only want the <ul> tags in themenu to have a particular background, or you want all <code> tags thatcontain XHTML code to be highlighted in a particular way.
In order to do this, you need to be able to indicate which tags are affectedin the XHTML, and to indicate changes for only some instances of the tagin CSS. So far, we have only been able to select all instances of a particulartag in CSS.
The class and id attributes can be used in XHTML to distinguish par-ticular elements. Here are three examples:
<code class="html"><h1></code>
<div id="menu">...</div>
<p class="aside">By the way...</p>
The value for the class and id can be anything—there is nothing specialabout the words “html”, “menu”, or “aside” above. You should choose a
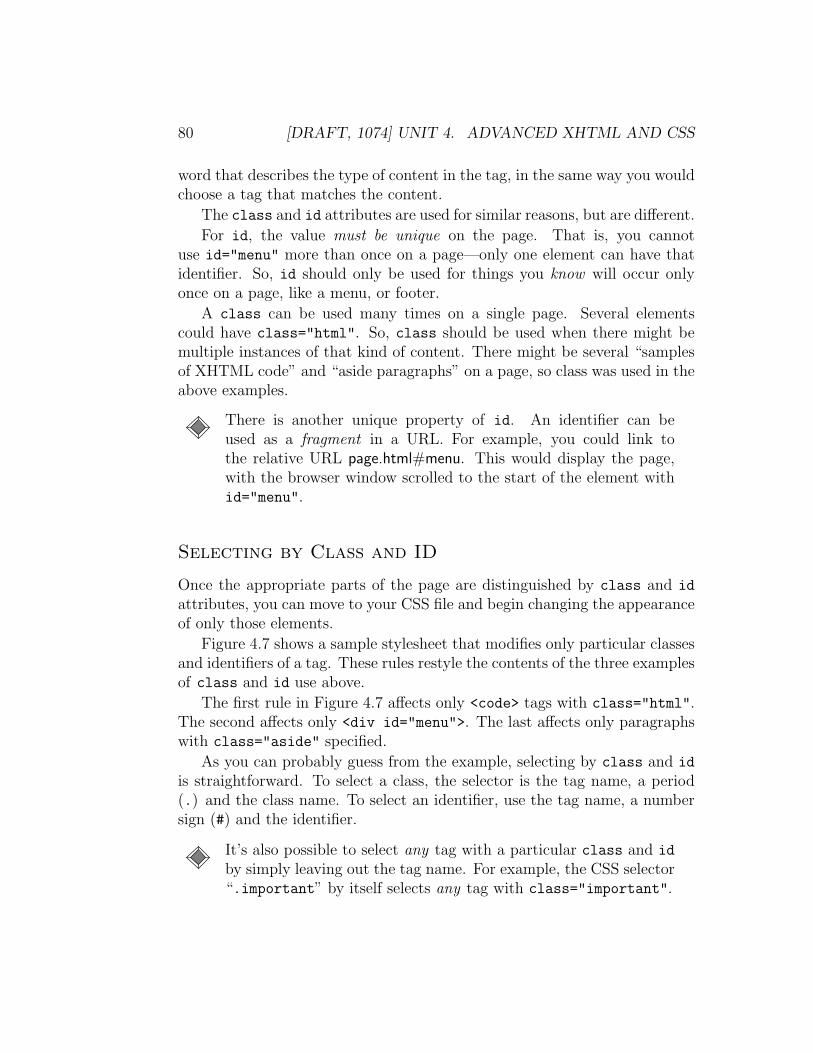
80 [DRAFT, 1074] UNIT 4. ADVANCED XHTML AND CSS
word that describes the type of content in the tag, in the same way you wouldchoose a tag that matches the content.
The class and id attributes are used for similar reasons, but are different.
For id, the value must be unique on the page. That is, you cannotuse id="menu" more than once on a page—only one element can have thatidentifier. So, id should only be used for things you know will occur onlyonce on a page, like a menu, or footer.
A class can be used many times on a single page. Several elementscould have class="html". So, class should be used when there might bemultiple instances of that kind of content. There might be several “samplesof XHTML code” and “aside paragraphs” on a page, so class was used in theabove examples.
There is another unique property of id. An identifier can beused as a fragment in a URL. For example, you could link tothe relative URL page.html#menu. This would display the page,with the browser window scrolled to the start of the element withid="menu".
Selecting by Class and ID
Once the appropriate parts of the page are distinguished by class and id
attributes, you can move to your CSS file and begin changing the appearanceof only those elements.
Figure 4.7 shows a sample stylesheet that modifies only particular classesand identifiers of a tag. These rules restyle the contents of the three examplesof class and id use above.
The first rule in Figure 4.7 affects only <code> tags with class="html".The second affects only <div id="menu">. The last affects only paragraphswith class="aside" specified.
As you can probably guess from the example, selecting by class and id
is straightforward. To select a class, the selector is the tag name, a period(.) and the class name. To select an identifier, use the tag name, a numbersign (#) and the identifier.
It’s also possible to select any tag with a particular class and id
by simply leaving out the tag name. For example, the CSS selector“.important” by itself selects any tag with class="important".
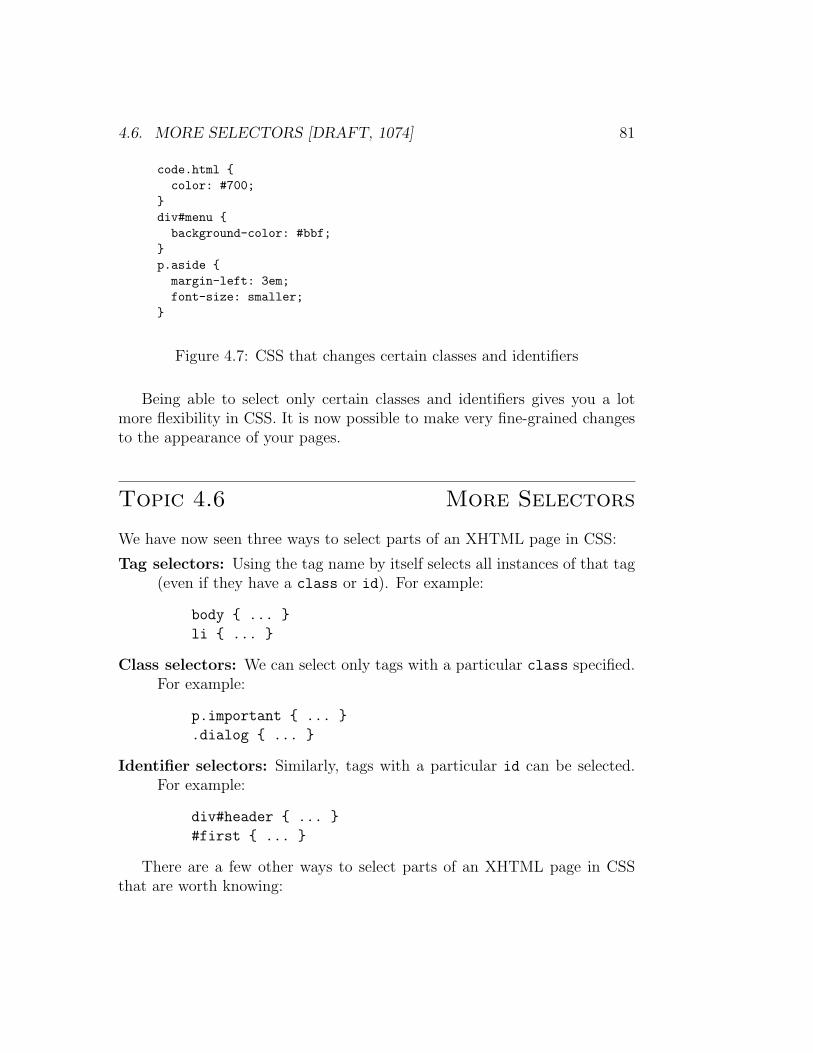
4.6. MORE SELECTORS [DRAFT, 1074] 81
code.html {
color: #700;
}
div#menu {
background-color: #bbf;
}
p.aside {
margin-left: 3em;
font-size: smaller;
}
Figure 4.7: CSS that changes certain classes and identifiers
Being able to select only certain classes and identifiers gives you a lotmore flexibility in CSS. It is now possible to make very fine-grained changesto the appearance of your pages.
Topic 4.6 More Selectors
We have now seen three ways to select parts of an XHTML page in CSS:
Tag selectors: Using the tag name by itself selects all instances of that tag(even if they have a class or id). For example:
body { ... }
li { ... }
Class selectors: We can select only tags with a particular class specified.For example:
p.important { ... }
.dialog { ... }
Identifier selectors: Similarly, tags with a particular id can be selected.For example:
div#header { ... }
#first { ... }
There are a few other ways to select parts of an XHTML page in CSSthat are worth knowing:
82 [DRAFT, 1074] UNIT 4. ADVANCED XHTML AND CSS
Tags within others (contextual selectors): It is possible to select par-ticular tags only if they are inside another, by separating the selectorswith a space. For example, to select only <li> tags that are inside a<ul>:
ul li { ... }
This can also be combined with other selectors. For example, to selectonly list items in your menu:
div#menu li { ... }
Link states (pseudoclasses): Links in XHTML are generally displayeddifferently, depending on their current state.
You are probably used to seeing this on the web, even if you haven’tthought about it: links are blue, but turn purple if you have alreadyvisited their destination; they are usually red when you are clicking onthem. All of these can be customized with CSS:
a:link { color: #00E; }
a:visited { color: #529; }
a:active { color: #F00; }
The three rules here set the color for an unvisited link (a:link), avisited link (a:visited), and a link that’s currently being clicked(a:active). These colours are approximately the same as the defaultcolours in most browsers.
There are a few more ways to select content that we won’t go into here.See the online CSS reference for more information.
There are also other pseudoclasses in CSS version 2. They aren’t as wellsupported by browsers, so we won’t go into them here.
Topic 4.7 Colours in CSS
There have been a few examples where we have had to set a colour in CSS.For example, above in Topic 4.6, we used this rule to set the link colour:
a:link { color: #00E; }
4.7. COLOURS IN CSS [DRAFT, 1074] 83
The “#00E” certainly deserves some explanation.There are two ways to specify a colour in CSS. The easiest way is to use
one of the 17 built-in keywords:
h2 { color: navy; }
See the online CSS reference for the full list of keywords.The keywords are easy, but with only 17 of them, they are quite limited.
Colours can also be specified with numeric colour values, which are muchmore flexible.
About Colours
Before we start giving numeric colour values, you should know at least a littleabout how colour works.
If you’ve ever mixed colours together, you’ve probably done it with paint.Paints and dyes are mixed with the primary colours cyan (blue), yellow, andmagenta (red) in the CYM colour model. With paint, the coloured surfaceabsorbs parts of the (usually white) light that illuminates it. Since the paintremoves parts of the reflected light, this is also referred to as the subtractive
colour model.However, paints and computer screens create colours differently. Com-
puter screens actually produce light. Computer screens start black, and lightis added to produce a colour, using the additive colour model. The primarycolours in the additive colour model are red, green and blue. Additive colouris also called the RGB colour model.
To mix light to produce a colour on the screen, we will have to mix variousamounts of red, green, and blue to get the desired result.
Working with RGB
We will use the three-character method of specifying a CSS colour. Theamount of each primary colour is specified with a character on this scale:
0, 1, 2, 3, 4, 5, 6, 7, 8, 9, A, B, C, D, E, F
The 0 end of the scale is little of the colour (dark/off). The F end is a lot ofthe colour (bright/on).
The three primary colours are specified in the order red, green, blue. Forexample, the colour #F70 indicates a lot of red, a medium amount of green,and no blue.
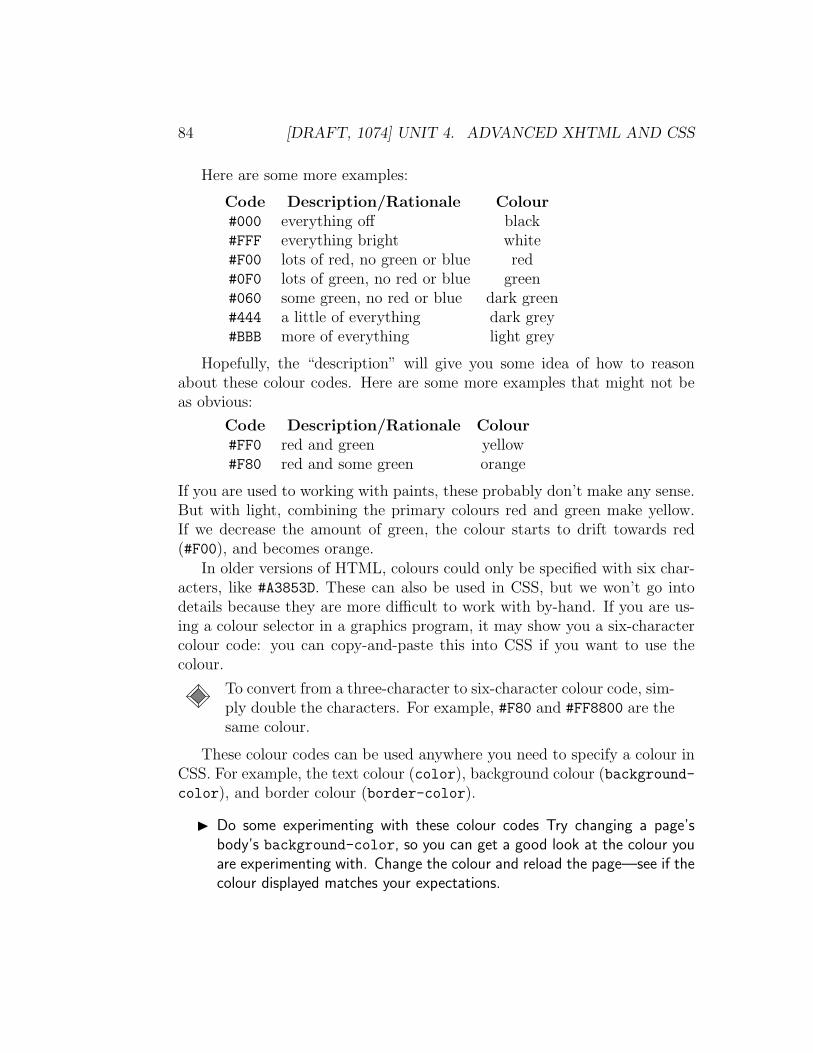
84 [DRAFT, 1074] UNIT 4. ADVANCED XHTML AND CSS
Here are some more examples:
Code Description/Rationale Colour#000 everything off black#FFF everything bright white#F00 lots of red, no green or blue red#0F0 lots of green, no red or blue green#060 some green, no red or blue dark green#444 a little of everything dark grey#BBB more of everything light grey
Hopefully, the “description” will give you some idea of how to reasonabout these colour codes. Here are some more examples that might not beas obvious:
Code Description/Rationale Colour#FF0 red and green yellow#F80 red and some green orange
If you are used to working with paints, these probably don’t make any sense.But with light, combining the primary colours red and green make yellow.If we decrease the amount of green, the colour starts to drift towards red(#F00), and becomes orange.
In older versions of HTML, colours could only be specified with six char-acters, like #A3853D. These can also be used in CSS, but we won’t go intodetails because they are more difficult to work with by-hand. If you are us-ing a colour selector in a graphics program, it may show you a six-charactercolour code: you can copy-and-paste this into CSS if you want to use thecolour.
To convert from a three-character to six-character colour code, sim-ply double the characters. For example, #F80 and #FF8800 are thesame colour.
These colour codes can be used anywhere you need to specify a colour inCSS. For example, the text colour (color), background colour (background-color), and border colour (border-color).
◮ Do some experimenting with these colour codes Try changing a page’sbody’s background-color, so you can get a good look at the colour youare experimenting with. Change the colour and reload the page—see if thecolour displayed matches your expectations.

4.8. POSITIONING IN CSS [DRAFT, 1074] 85
float: left;width: 50%;
Figure 4.8: Effect of the float property
Topic 4.8 Positioning in CSS
Most of the properties in CSS are relatively easy to use. As you review theonline CSS reference, you can experiment with them and get a feeling forwhat they do.
There are some properties that aren’t as straightforward. In particular,the properties that are used to move elements around the page can be hardto figure out.
The float Property
The float property is probably the easiest way to move parts of the pagearound; it is also the best supported by browsers.
Applying float to an element lets it “float” to the side of the page. Thatis, the element sits at the side of the page, while the following content flowsaround it.
As a visual example, see Figure 4.8. Think of the contents here as threetags. The first is represented by solid lines; the second by a box with an “X”;and the third by dashed lines.
As you can see, when the second element (the box) is floated to the leftof the page (by the float property), the following text (dotted lines) flowsaround it.
Once the floating element has finished, the remaining content returns tothe margins, flowing under the floating element. For some floating elements,
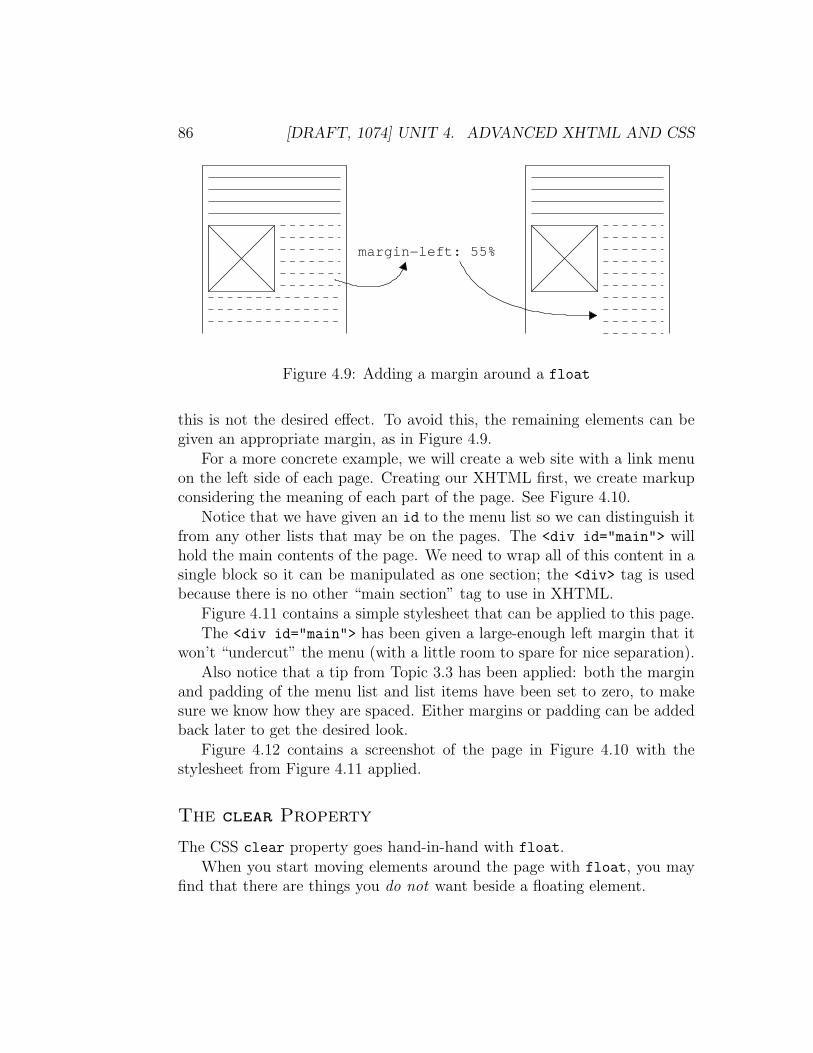
86 [DRAFT, 1074] UNIT 4. ADVANCED XHTML AND CSS
margin−left: 55%
Figure 4.9: Adding a margin around a float
this is not the desired effect. To avoid this, the remaining elements can begiven an appropriate margin, as in Figure 4.9.
For a more concrete example, we will create a web site with a link menuon the left side of each page. Creating our XHTML first, we create markupconsidering the meaning of each part of the page. See Figure 4.10.
Notice that we have given an id to the menu list so we can distinguish itfrom any other lists that may be on the pages. The <div id="main"> willhold the main contents of the page. We need to wrap all of this content in asingle block so it can be manipulated as one section; the <div> tag is usedbecause there is no other “main section” tag to use in XHTML.
Figure 4.11 contains a simple stylesheet that can be applied to this page.The <div id="main"> has been given a large-enough left margin that it
won’t “undercut” the menu (with a little room to spare for nice separation).Also notice that a tip from Topic 3.3 has been applied: both the margin
and padding of the menu list and list items have been set to zero, to makesure we know how they are spaced. Either margins or padding can be addedback later to get the desired look.
Figure 4.12 contains a screenshot of the page in Figure 4.10 with thestylesheet from Figure 4.11 applied.
The clear Property
The CSS clear property goes hand-in-hand with float.When you start moving elements around the page with float, you may
find that there are things you do not want beside a floating element.
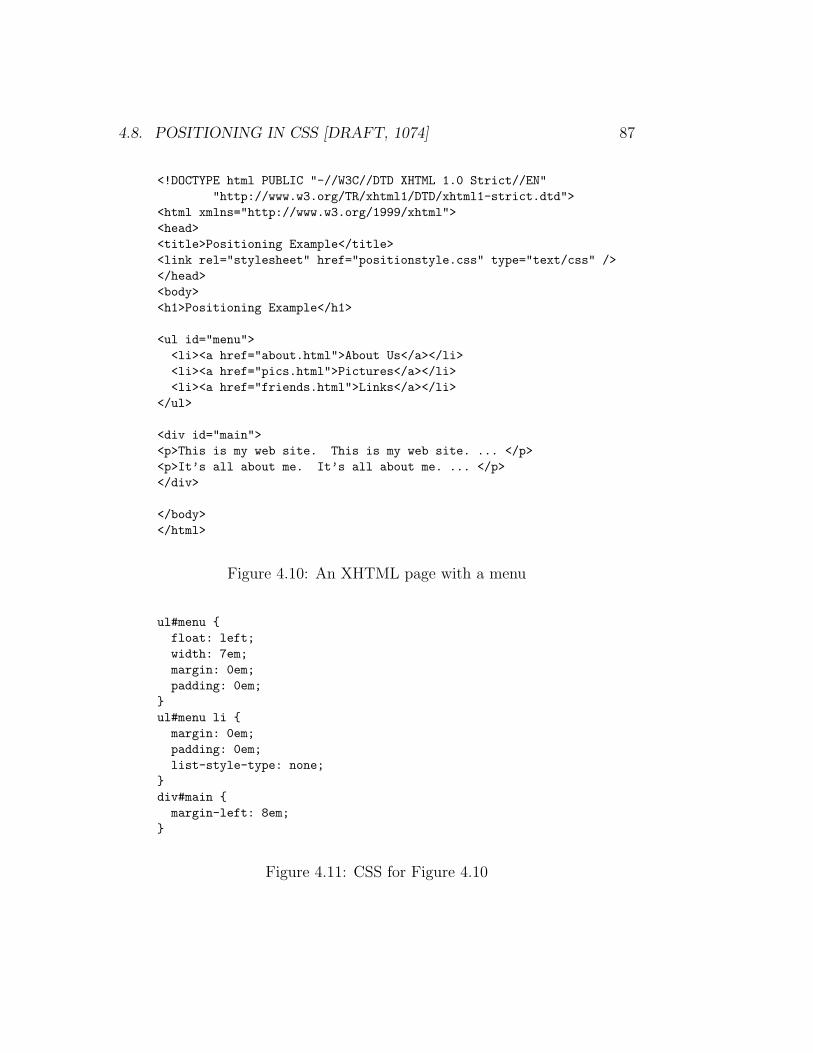
4.8. POSITIONING IN CSS [DRAFT, 1074] 87
<!DOCTYPE html PUBLIC "-//W3C//DTD XHTML 1.0 Strict//EN"
"http://www.w3.org/TR/xhtml1/DTD/xhtml1-strict.dtd">
<html xmlns="http://www.w3.org/1999/xhtml">
<head>
<title>Positioning Example</title>
<link rel="stylesheet" href="positionstyle.css" type="text/css" />
</head>
<body>
<h1>Positioning Example</h1>
<ul id="menu">
<li><a href="about.html">About Us</a></li>
<li><a href="pics.html">Pictures</a></li>
<li><a href="friends.html">Links</a></li>
</ul>
<div id="main">
<p>This is my web site. This is my web site. ... </p>
<p>It’s all about me. It’s all about me. ... </p>
</div>
</body>
</html>
Figure 4.10: An XHTML page with a menu
ul#menu {
float: left;
width: 7em;
margin: 0em;
padding: 0em;
}
ul#menu li {
margin: 0em;
padding: 0em;
list-style-type: none;
}
div#main {
margin-left: 8em;
}
Figure 4.11: CSS for Figure 4.10
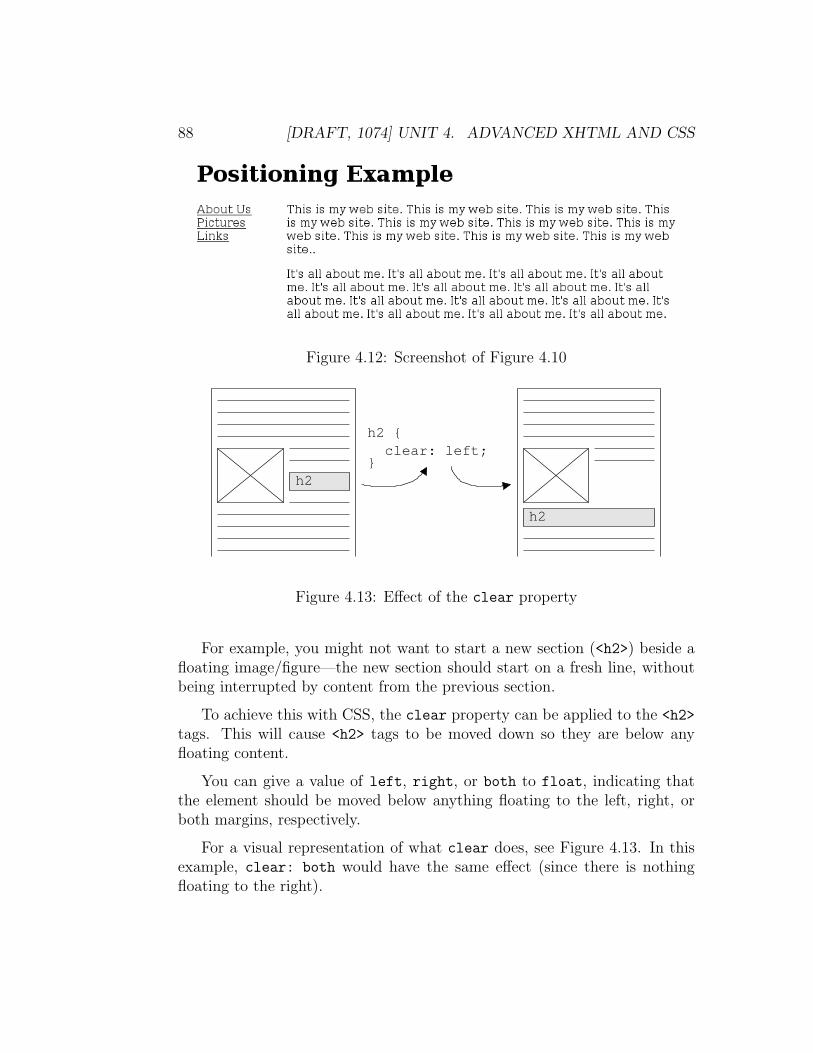
88 [DRAFT, 1074] UNIT 4. ADVANCED XHTML AND CSS
Figure 4.12: Screenshot of Figure 4.10
h2 { clear: left;}
h2
h2
Figure 4.13: Effect of the clear property
For example, you might not want to start a new section (<h2>) beside afloating image/figure—the new section should start on a fresh line, withoutbeing interrupted by content from the previous section.
To achieve this with CSS, the clear property can be applied to the <h2>
tags. This will cause <h2> tags to be moved down so they are below anyfloating content.
You can give a value of left, right, or both to float, indicating thatthe element should be moved below anything floating to the left, right, orboth margins, respectively.
For a visual representation of what clear does, see Figure 4.13. In thisexample, clear: both would have the same effect (since there is nothingfloating to the right).
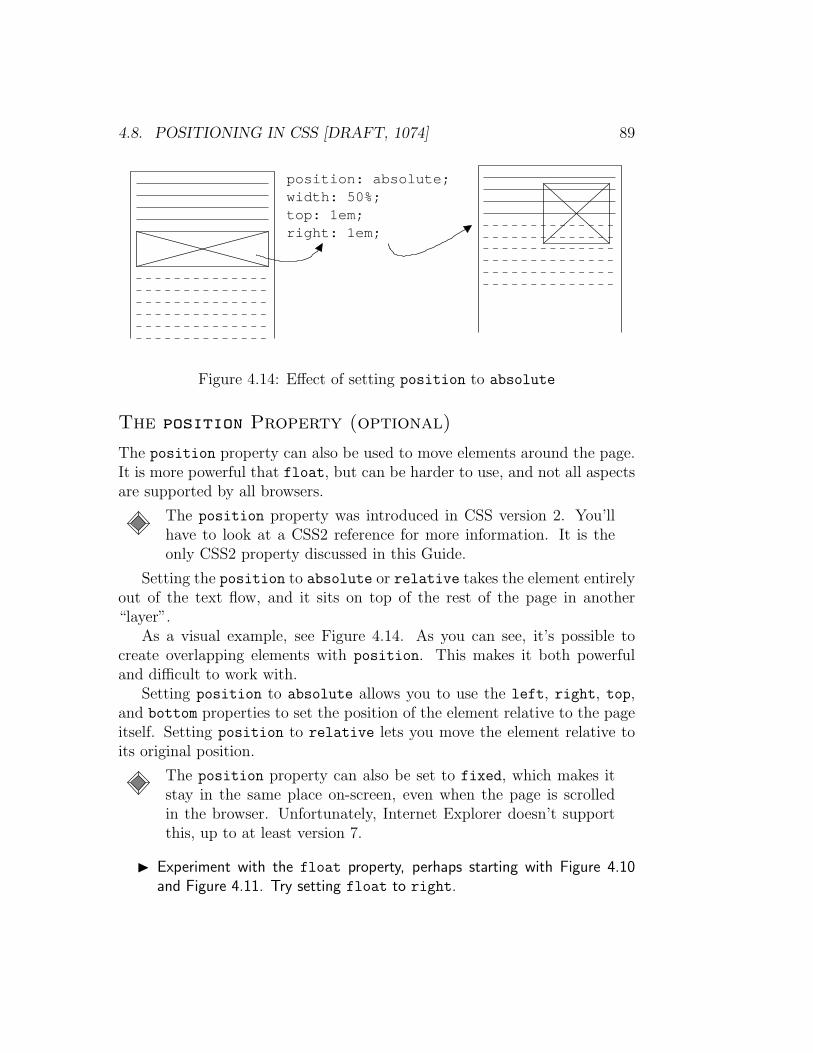
4.8. POSITIONING IN CSS [DRAFT, 1074] 89
right: 1em;top: 1em;width: 50%;position: absolute;
Figure 4.14: Effect of setting position to absolute
The position Property (optional)
The position property can also be used to move elements around the page.It is more powerful that float, but can be harder to use, and not all aspectsare supported by all browsers.
The position property was introduced in CSS version 2. You’llhave to look at a CSS2 reference for more information. It is theonly CSS2 property discussed in this Guide.
Setting the position to absolute or relative takes the element entirelyout of the text flow, and it sits on top of the rest of the page in another“layer”.
As a visual example, see Figure 4.14. As you can see, it’s possible tocreate overlapping elements with position. This makes it both powerfuland difficult to work with.
Setting position to absolute allows you to use the left, right, top,and bottom properties to set the position of the element relative to the pageitself. Setting position to relative lets you move the element relative toits original position.
The position property can also be set to fixed, which makes itstay in the same place on-screen, even when the page is scrolledin the browser. Unfortunately, Internet Explorer doesn’t supportthis, up to at least version 7.
◮ Experiment with the float property, perhaps starting with Figure 4.10and Figure 4.11. Try setting float to right.
90 [DRAFT, 1074] UNIT 4. ADVANCED XHTML AND CSS
◮ Try using float to move a figure (an image and its caption) so the textflows around it.
Topic 4.9 Markup for Meaning
We have already discussed some reasons for writing markup, and how tocreate useful markup.
In Topic 2.4, we saw reasons to write markup directly. In particular,we want to create a document that is flexible and can be used in manysituations. The best way to do this is to ignore the way the page looks (to acertain extent), and worry about the markup itself.
In Topic 2.10, we discussed choosing XHTML tags to maximize theamount of meaning we convey in the tags themselves (semantic markup).This is done so a browser (or other computer program) can figure out whatthe parts of your page are, and interpret the page correctly. We have sincelearned about the generic tags (<div> and <span>) that can be used whenno other tag has the right meaning.
Finally, in Topic 3.4, these ideas were combined with CSS. With CSS,we can take the semantic XHTML we have written, and restyle it so it takeson the appearance we want.
At the risk of being repetitive, this would be a good time to look back atthese sections. Look at the advice in each, now that you know more aboutboth XHTML and CSS.
With these things in mind, here are the (approximate) steps you shoulduse to create a good web site:
1. Start by writing XHTML code for a few of the pages on your site.Don’t worry about what the pages look like at this point; just use thetags that are semantically appropriate to each piece of content on thepage.
Do not use tags just because the “look right”. Use them for meaning.Use meaningful class and id values when necessary.
2. Make sure these pages are valid XHTML.
3. Create a stylesheet for your site. Start to change colours, positioning,and other aspects of the page’s design.
4.9. MARKUP FOR MEANING [DRAFT, 1074] 91
4. As you create the stylesheet, you may find that it’s necessary to returnto the XHTML and add class or id attributes to some content. Youmay also need to add <div> tags to wrap parts of the page that youneed to be in a single element for modification in CSS.
For example, if you want to float several things together, they needto be wrapped in a single tag, like a <div>. The <div class="main">
used in Figure 4.10 is another example of an addition to the XHTMLmade for the stylesheet.
5. Create XHTML for any remaining pages on your site, keeping in mindthe additions you had to make to the XHTML in the last step. Checkthese pages for validity as well.
Common Mistakes
As mentioned above, you shouldn’t use XHTML tags because of the waythey look, but because of their intended meaning. But, many web authorsslip into bad habits and don’t do this (or never knew they were supposed to).
Here are some common mistakes that are make by authors. Avoid thesewhen creating web pages.
Heading tags for non-headings: People often use the smaller headings(<h4>–<h6>) for paragraphs or page footers because they like the fontthat comes with their default style. Of course you should use an ap-propriate tag (<p> or <div class="footer"> for these examples) andchange the appearance with CSS.
The <br> tag for spacing: The <br> (line break) tag should never be usedto create a blank line. It should only be used when a line must endto properly convey meaning. For example, they might be used whenmarking up poetry or a mailing address:
<address>Your Name<br />
123 Fake St.</address>
The margin-top and margin-bottom properties can be used to openup space before or after particular parts of the page.
The table tags for layout: Before CSS was implemented by the majorityof browsers, there were few options if an author wanted to control the
92 [DRAFT, 1074] UNIT 4. ADVANCED XHTML AND CSS
layout of their pages. The <table> tag was used to move elementsaround. This lead to complicated HTML pages that are very difficultto work with.
The table tags should only be used to markup tabular data. For exam-ple, it would be appropriate to use the table tags to mark up Figures 4.4and 4.5 for a web page.
Of course, CSS should be used to control the position of elements onthe page.
The appearance-only tags: There are several XHTML tags that have nomeaning associated with them, only an appearance (<b>, <i>, <big>,<small>, <sub>, <sup>).
These tags should not be used. Pick a more meaningful tag instead.
Transitional tags: There is another doctype for XHTML 1.0 that allowsuse of transitional tags. These tags are intended to allow a smoothertransition from pre-CSS web pages to modern sites.
Don’t design web pages as if it’s still 1998. Let’s all move on.
The entity for spacing: The entity is for a non-breaking
space. It looks like a space, but the browser isn’t allowed to go toa new line there. For example, it’s considered bad style to break aline in the middle of someone’s name, so in XHTML, you might typeJohn Smith.
Some authors use several of these to create extra horizontal space. Ofcourse, you should use appropriate CSS properties instead (probablymargin-left and margin-right).
Of course, there are many other ways to misuse XHTML markup, butthese are the most commonly seen.
When it comes to the “meaning-only” tags mentioned above, onecould argue here that <span> doesn’t have any meaning associatedwith it either. So if you’re allowed to use <span>, why not usethese tags too?We’ll leave the argument to some mailing list somewhere. Thesetags might be acceptable, but they should be used like <span>:they must have a meaningful class or id specified.
◮ Look back at some of your earlier work in this course. Did you do any ofthese things? Do you know how to do it the “right” way now?
4.9. MARKUP FOR MEANING [DRAFT, 1074] 93
Summary
This unit contains a lot of new information and techniques. It will probablytake you a while to go through it and absorb all of the information. Exper-imenting is the key to actually figuring out how these things work, so makesure you (at least) do the labs and questions within this unit.
Once you have worked through this unit, you should be reasonably profi-cient at creating both semantic, valid XHTML, and at restyling these pageswith CSS to achieve the appearance you want in your pages.
Key Terms
• validator
• valid XHTML
• doctype
• block tag
• inline tag
• entity
• character set
• Unicode
• generic tags
• class
• identifier (id)
• RGB
• floating element

94 [DRAFT, 1074] UNIT 4. ADVANCED XHTML AND CSS
Part III
Graphics and Design
95

Unit 5
Graphics and Images
Learning Outcomes
• Compare and contrast the characteristics of basic types and formats ofcomputer graphics.
• Identify an appropriate format for a given image.
• Select an appropriate graphics file format for use in a web page.
Learning Activities
• Read this unit and do the questions marked with a “◮”.
• Browse through the links for this unit on the course web site.
• Install your graphics program as described in Appendix A.
We have already seen how to use the <img> tag in Topic 2.8. In this unit, wewill learn more about the images themselves, both on the web and elsewhere.
Topic 5.1 Graphics and Image Types
The term computer graphics refers to using a computer to create or manip-ulate any kind of picture, image, or diagram. There are many different waysto create computer graphics, and you should choose a program that fits yourneeds. We cannot cover them all here, so we will discuss some of the commonconcepts and terms.
97
98 [DRAFT, 1074] UNIT 5. GRAPHICS AND IMAGES
There are two basic ways to store an image in a computer: vector graphicsand bitmapped graphics.
You are probably most familiar with bitmapped graphics (sometimes cal-led raster graphics). Bitmapped graphics are used in paint programs. Whenyou use bitmapped graphics, the image is stored in an array of dots or pixels.Each pixel in the grid is assigned a colour. If the pixels are small enough,the image will closely resemble the intended image.
The other basic image type is vector graphics. Vector graphics are used indrawing programs. A vector format stores a description of the image, usingvarious shapes like circles, lines, curves, and so on. For example, a vectorimage could contain the information “a green line from here to here, a redfilled circle with centre here and with this radius.”
Some of the bitmap graphics programs you might know are Photoshop,Photo-Paint, Paint Shop Pro, GIMP, and Graphic Converter. Since most webgraphics are bitmap graphics, these are the programs you will likely want touse for this course. Some vector programs are Inkscape, Corel Draw, andAdobe Illustrator. Most vector graphics programs have the ability to includebitmaps in vector images, but it doesn’t make them paint programs—thebitmaps are just one type of object that can be inserted into the vectorimage.
◮ What graphics programs do you have on your computer? What have youused in the past? Do those programs work with bitmap or vector images?
◮ Open up the bitmap graphics program you’re using for this course (probablythe GIMP; you can find instructions in Appendices A and B). Open a newimage and draw something.
◮ Experiment with a vector drawing program. You can download Inkscapefor free.
Topic 5.2 Bitmap vs. Vector Images
Bitmap and vector images each have strengths and weaknesses when it comesto storing various kinds of images and to being manipulated in certain ways.Because of the way they store their images, they are also edited differently.
Scaling and Rotating: Since bitmap images are just a grid of pixels, theycan’t be easily scaled up. Basically, the only way to enlarge the image
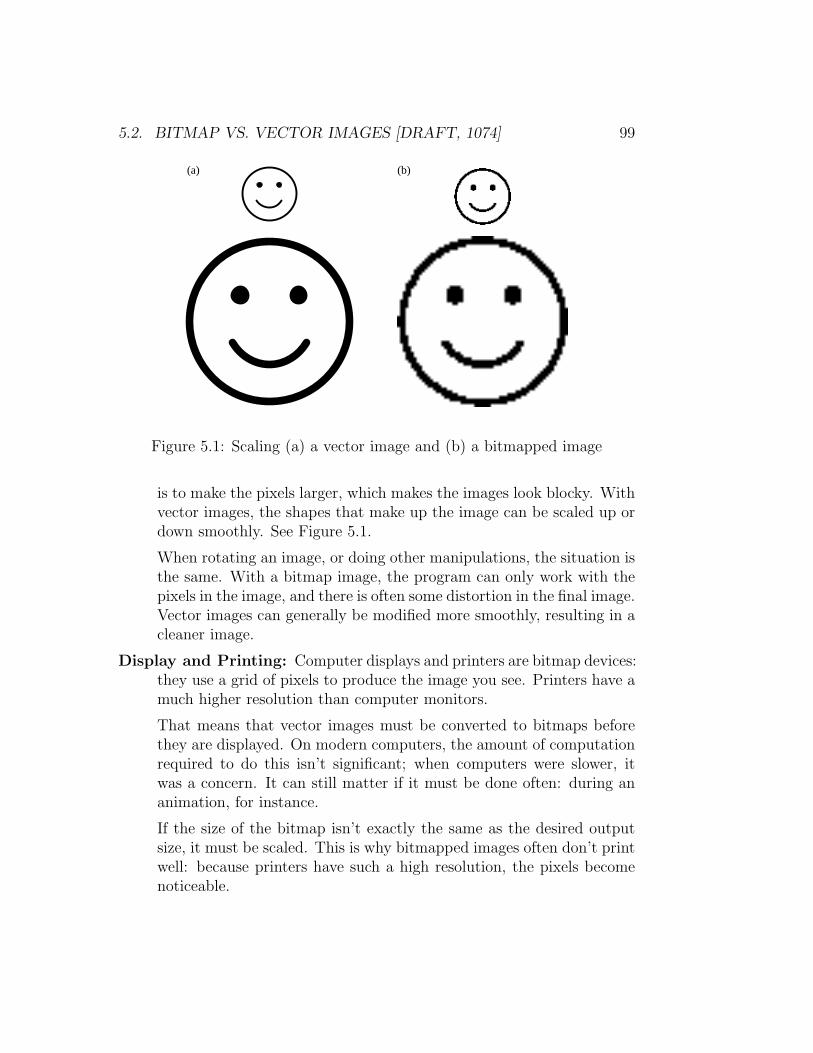
5.2. BITMAP VS. VECTOR IMAGES [DRAFT, 1074] 99
(b)(a)
Figure 5.1: Scaling (a) a vector image and (b) a bitmapped image
is to make the pixels larger, which makes the images look blocky. Withvector images, the shapes that make up the image can be scaled up ordown smoothly. See Figure 5.1.
When rotating an image, or doing other manipulations, the situation isthe same. With a bitmap image, the program can only work with thepixels in the image, and there is often some distortion in the final image.Vector images can generally be modified more smoothly, resulting in acleaner image.
Display and Printing: Computer displays and printers are bitmap devices:they use a grid of pixels to produce the image you see. Printers have amuch higher resolution than computer monitors.
That means that vector images must be converted to bitmaps beforethey are displayed. On modern computers, the amount of computationrequired to do this isn’t significant; when computers were slower, itwas a concern. It can still matter if it must be done often: during ananimation, for instance.
If the size of the bitmap isn’t exactly the same as the desired outputsize, it must be scaled. This is why bitmapped images often don’t printwell: because printers have such a high resolution, the pixels becomenoticeable.
100 [DRAFT, 1074] UNIT 5. GRAPHICS AND IMAGES
Producing: Programs that edit bitmaps images are more common, and thefile formats are more universally accepted. The SVG format (discussedlater) is causing more common use of vector images, however.
Devices such as digital cameras and scanners produce bitmap imagesbecause of the way their sensors work. Editing vector images is ofteneasier because shapes can be manipulated separately.
File size: Vector files are often smaller than bitmaps because there is simplyless information to store.
To see why, consider the information that has to be stored in eithercase. For a bitmap image, the computer must store millions of pixelcolours. For a vector image, it only has to store the list of shapes inthe image.
◮ If you have created any computer graphics in the past, did you use abitmap or vector program? Looking at these strengths and weaknesses, doyou think you made the right choice?
Topic 5.3 File Formats
There are many ways to store images. Each is called a file format. Once wehave decided to use a bitmap or vector format, the program we’re using muststill be told how to store and represent the information we need on the disk.Since there are many choices to make here, many different image formatshave been created.
Each file format has a different way of converting the image informationinto a string of information that can be stored on a disk or transmitted overthe Internet. We won’t discuss the details of how each format works. Theprocess is far too complicated for this course. We will just discuss some ofthe capabilities of common formats. The differences in file formats are thereason you can’t take a GIF file, rename it .jpg , and expect things to work.To convert a file from one type to another, a program must convert the imagedata from one type to the other.
The program Graphic Converter for the Macintosh can handle 145 differ-ent graphics formats. Some have more strengths than others and are usedmore often.
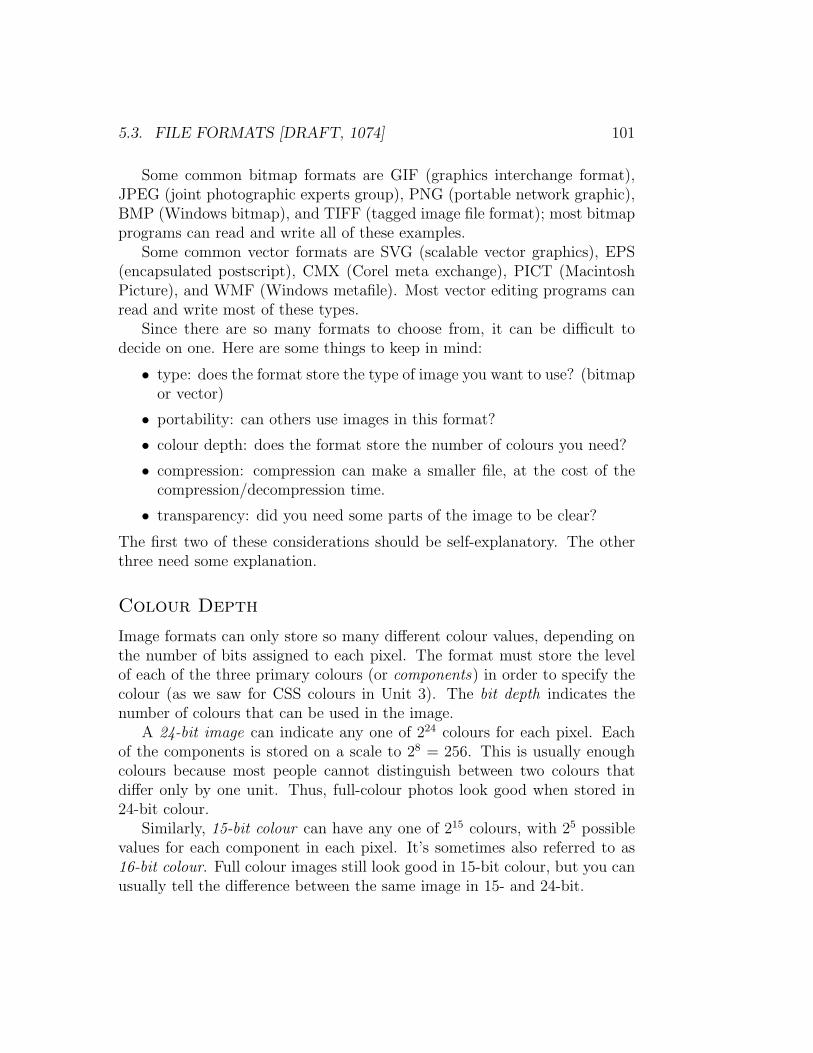
5.3. FILE FORMATS [DRAFT, 1074] 101
Some common bitmap formats are GIF (graphics interchange format),JPEG (joint photographic experts group), PNG (portable network graphic),BMP (Windows bitmap), and TIFF (tagged image file format); most bitmapprograms can read and write all of these examples.
Some common vector formats are SVG (scalable vector graphics), EPS(encapsulated postscript), CMX (Corel meta exchange), PICT (MacintoshPicture), and WMF (Windows metafile). Most vector editing programs canread and write most of these types.
Since there are so many formats to choose from, it can be difficult todecide on one. Here are some things to keep in mind:
• type: does the format store the type of image you want to use? (bitmapor vector)
• portability: can others use images in this format?
• colour depth: does the format store the number of colours you need?
• compression: compression can make a smaller file, at the cost of thecompression/decompression time.
• transparency: did you need some parts of the image to be clear?
The first two of these considerations should be self-explanatory. The otherthree need some explanation.
Colour Depth
Image formats can only store so many different colour values, depending onthe number of bits assigned to each pixel. The format must store the levelof each of the three primary colours (or components) in order to specify thecolour (as we saw for CSS colours in Unit 3). The bit depth indicates thenumber of colours that can be used in the image.
A 24-bit image can indicate any one of 224 colours for each pixel. Eachof the components is stored on a scale to 28 = 256. This is usually enoughcolours because most people cannot distinguish between two colours thatdiffer only by one unit. Thus, full-colour photos look good when stored in24-bit colour.
Similarly, 15-bit colour can have any one of 215 colours, with 25 possiblevalues for each component in each pixel. It’s sometimes also referred to as16-bit colour. Full colour images still look good in 15-bit colour, but you canusually tell the difference between the same image in 15- and 24-bit.
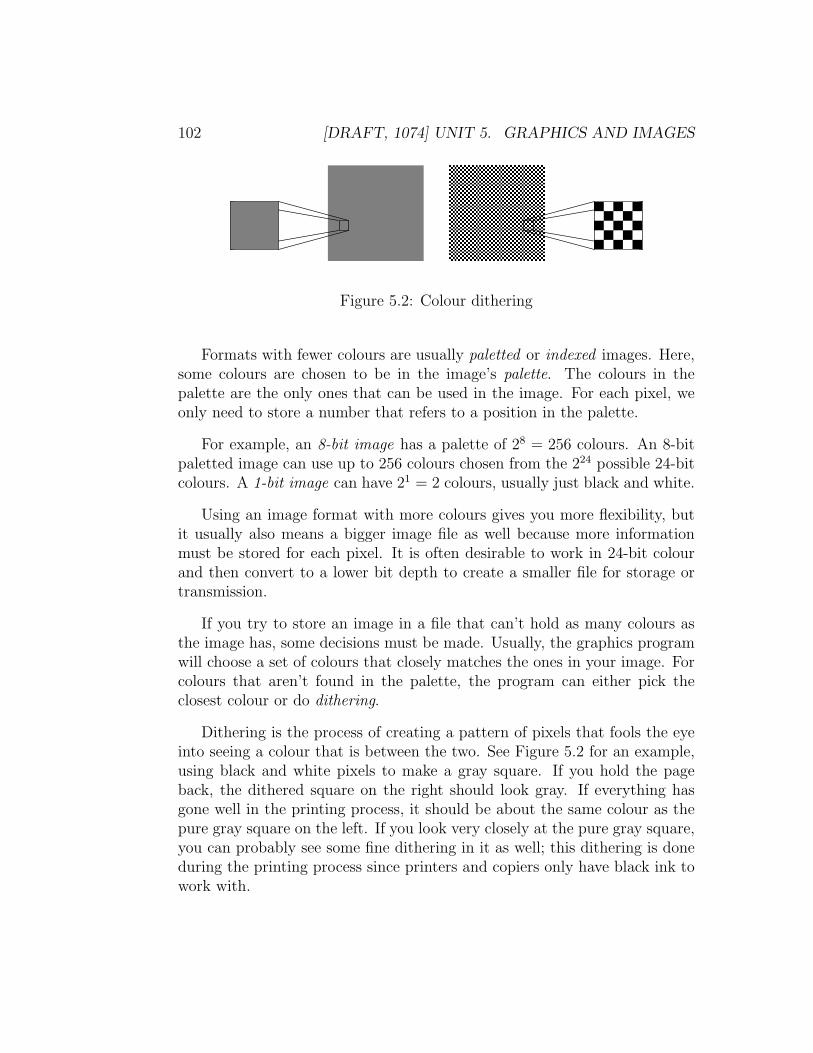
102 [DRAFT, 1074] UNIT 5. GRAPHICS AND IMAGES
Figure 5.2: Colour dithering
Formats with fewer colours are usually paletted or indexed images. Here,some colours are chosen to be in the image’s palette. The colours in thepalette are the only ones that can be used in the image. For each pixel, weonly need to store a number that refers to a position in the palette.
For example, an 8-bit image has a palette of 28 = 256 colours. An 8-bitpaletted image can use up to 256 colours chosen from the 224 possible 24-bitcolours. A 1-bit image can have 21 = 2 colours, usually just black and white.
Using an image format with more colours gives you more flexibility, butit usually also means a bigger image file as well because more informationmust be stored for each pixel. It is often desirable to work in 24-bit colourand then convert to a lower bit depth to create a smaller file for storage ortransmission.
If you try to store an image in a file that can’t hold as many colours asthe image has, some decisions must be made. Usually, the graphics programwill choose a set of colours that closely matches the ones in your image. Forcolours that aren’t found in the palette, the program can either pick theclosest colour or do dithering.
Dithering is the process of creating a pattern of pixels that fools the eyeinto seeing a colour that is between the two. See Figure 5.2 for an example,using black and white pixels to make a gray square. If you hold the pageback, the dithered square on the right should look gray. If everything hasgone well in the printing process, it should be about the same colour as thepure gray square on the left. If you look very closely at the pure gray square,you can probably see some fine dithering in it as well; this dithering is doneduring the printing process since printers and copiers only have black ink towork with.
5.3. FILE FORMATS [DRAFT, 1074] 103
(a) (b)
Figure 5.3: An image with a low-quality lossy compression
Compression
It is also possible to create a smaller file with compression. Without com-pression, bitmap images can be very large. For example, a 640 × 480 pixelimage with 24-bit colour depth would take
640 × 480 × 24 bits = 7372800 bits = 900 kB .
Images this large would take a long time to transfer over the Internet. Thisis the reason the uncompressed Windows BMP format is not used on theweb.
There are many different ways to compress data. The various methodsfall into two categories: lossless compression and lossy compression.
Most image compression techniques are lossless. When data is compressedand then uncompressed with a lossless algorithm, it is exactly the same.
When an image is compressed with a lossy algorithm and then uncom-pressed, it may be slightly different. This technique is often acceptable forimages, particularly if the changes are so slight that they can’t be seen withthe naked eye.
The JPEG format was created to store photographs at a high quality invery small files. It uses a lossy compression format. JPEG images mightchange some small details, but the changes can’t usually be seen, except atthe lowest quality settings. See Figure 5.3 for an example of a small image(a) that has been compressed and uncompressed with a low-quality lossyformat (b). Note that this isn’t a full-colour image; that’s why the JPEGcompression has done such a bad job with it—it wasn’t made for that job.
The GIF format uses the LZW compression algorithm, and the Unisyscorporation had a patent on this method. The PNG format was created sothere would be a free lossless format available for use on the web. In this
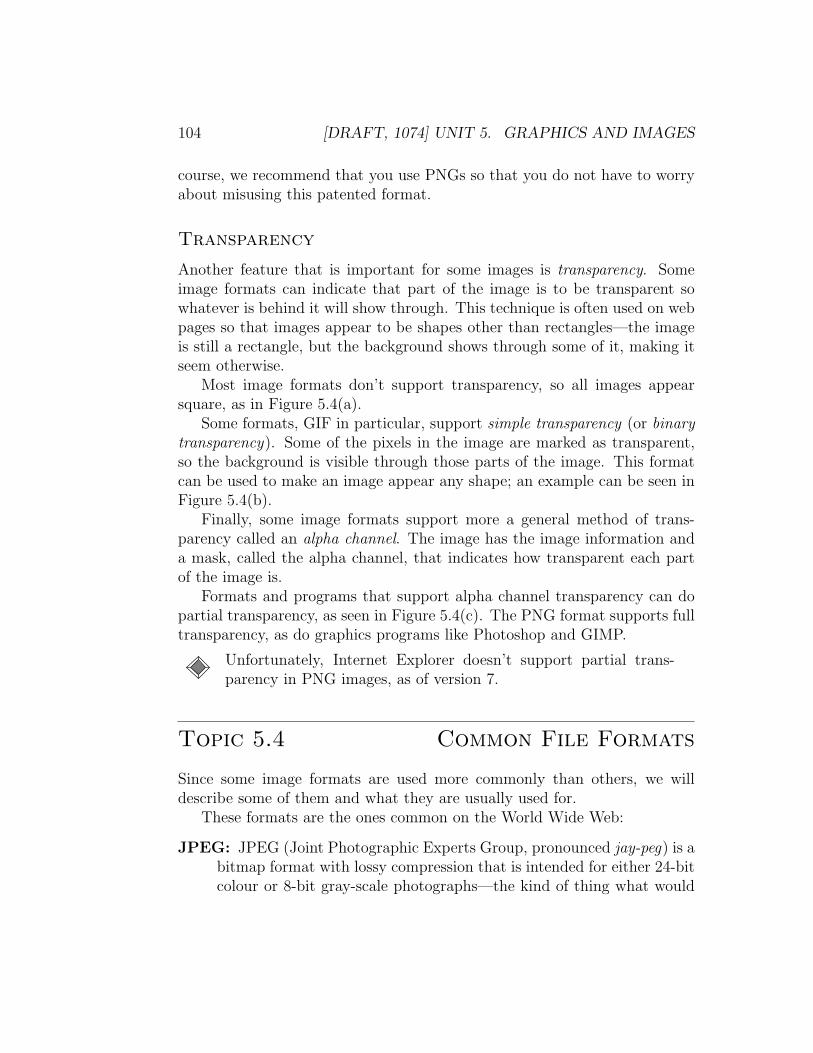
104 [DRAFT, 1074] UNIT 5. GRAPHICS AND IMAGES
course, we recommend that you use PNGs so that you do not have to worryabout misusing this patented format.
Transparency
Another feature that is important for some images is transparency. Someimage formats can indicate that part of the image is to be transparent sowhatever is behind it will show through. This technique is often used on webpages so that images appear to be shapes other than rectangles—the imageis still a rectangle, but the background shows through some of it, making itseem otherwise.
Most image formats don’t support transparency, so all images appearsquare, as in Figure 5.4(a).
Some formats, GIF in particular, support simple transparency (or binary
transparency). Some of the pixels in the image are marked as transparent,so the background is visible through those parts of the image. This formatcan be used to make an image appear any shape; an example can be seen inFigure 5.4(b).
Finally, some image formats support more a general method of trans-parency called an alpha channel. The image has the image information anda mask, called the alpha channel, that indicates how transparent each partof the image is.
Formats and programs that support alpha channel transparency can dopartial transparency, as seen in Figure 5.4(c). The PNG format supports fulltransparency, as do graphics programs like Photoshop and GIMP.
Unfortunately, Internet Explorer doesn’t support partial trans-parency in PNG images, as of version 7.
Topic 5.4 Common File Formats
Since some image formats are used more commonly than others, we willdescribe some of them and what they are usually used for.
These formats are the ones common on the World Wide Web:
JPEG: JPEG (Joint Photographic Experts Group, pronounced jay-peg) is abitmap format with lossy compression that is intended for either 24-bitcolour or 8-bit gray-scale photographs—the kind of thing what would
5.4. FILE FORMATS, COMMON [DRAFT, 1074] 105
(a) (c)(b)
Figure 5.4: Various types of transparency in images
come out of a digital camera or from scanning a photograph. It doesan excellent job of storing this kind of information but a poor job withother kinds of images. Figure 5.3 is an example of what happens whenan image that isn’t a photograph is compressed with JPEG.
GIF: The GIF (pronounced jiff ) bitmap format uses a lossless compressionalgorithm. GIF is well supported on the web and can be used forsimple animations and simple transparency. It is, however, limited to256 colours in an image (8-bit colour). It is also burdened by a patenton its compression algorithm.
PNG: The PNG (pronounced ping) bitmap format was created as a freereplacement for GIF. It uses a better and free compression algorithm.It can also support up to 24-bit colour and full transparency. ThePNG format came along after GIF, so it wasn’t supported in someolder browsers. All browsers that support any graphics support PNG,so you should be able to use it safely.
SVG: SVG (Scalable Vector Graphics) is a vector format that was created bythe WWW Consortium in the hopes of making vector graphics possibleon web pages. SVG is increasingly supported by web browsers, and canbe edited by most vector graphics programs, including Inkscape, whichcan be downloaded for free.
The following formats, while not common on the web, are often used inother types of digital multimedia:
106 [DRAFT, 1074] UNIT 5. GRAPHICS AND IMAGES
BMP: The Windows BMP format is a bitmap format. It is usually uncom-pressed (for speed), but it can use a simple compression algorithm.
TIFF: TIFF (Tagged Image File Format) is a common bitmap format amongpeople who do publishing and graphic design. It can be compressed inseveral different ways and and can hold colour depths up to 24-bits.
EPS: EPS (Encapsulated Postscript) is a vector format. It is quite widelysupported and can be used in most drawing programs.
Most computer graphics programs also have a file format of their own,usually called native formats . For example, Photoshop uses PSD files, theGIMP uses XCF files, Corel Draw uses CDR, and so on. These file formatsuse either no compression or a lossless compression scheme. They are de-signed so that they can store any of the information that particular programcan produce.
So, you should be able to save these files and open them back up withoutlosing any information. That is a good reason to use them while you areworking on an image. When you’re ready to publish it or pass it along toothers, you should probably convert it into one of the more universal formatsdescribed above.
◮ If you have created any computer graphics in the past, what file format(s)did you use? Do you think you made the right choice(s)?
◮ What is the native format that your image editing program uses (if any)?
Summary
This unit isn’t intended to teach you everything about image editing or evenhow to use a particular program. You should know some of the basic termsand ideas behind computer graphics. With this background knowledge, youcan easily learn more about graphics and how to use a graphics program foryour assignments.
Key Terms
• bitmap graphics
• vector graphics
• colour depth
• paletted or indexed colour
5.4. FILE FORMATS, COMMON [DRAFT, 1074] 107
• dithering
• compression
• lossless compression
• lossy compression
• transparency
• alpha channel
• graphics file format

108 [DRAFT, 1074] UNIT 5. GRAPHICS AND IMAGES
Unit 6
Design
Learning Outcomes
• Explain some principles of design.
• Apply the four design principles to the creation of web sites.
• Evaluate the design of web sites and other materials.
• Create web sites where the user can quickly navigate to the desiredinformation.
Learning Activities
• Read this unit and do the questions marked with a “◮”.
• Browse through the links for this unit on the course web site.
• (optional) Read the first half of The Non-Designer’s Design Book.
Topic 6.1 General Design
When we discuss how to design web pages, we must first describe somegeneral principles of design. This section discusses design for any medium.
The points made here are based on the first half of The Non-Designer’s
Design Book by Robin Williams. Williams lays out four principles of de-sign for creating well-designed documents. The four principles are proximity,alignment, repetition, and contrast. Used together, these ideas can help you
109
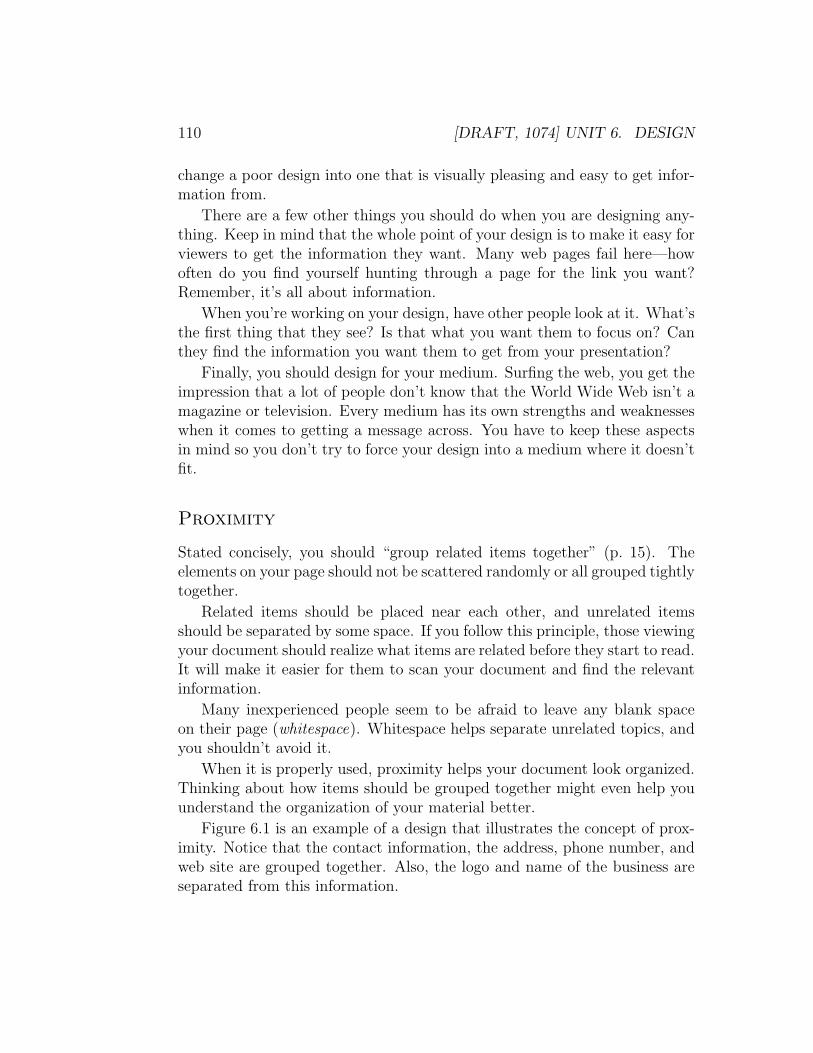
110 [DRAFT, 1074] UNIT 6. DESIGN
change a poor design into one that is visually pleasing and easy to get infor-mation from.
There are a few other things you should do when you are designing any-thing. Keep in mind that the whole point of your design is to make it easy forviewers to get the information they want. Many web pages fail here—howoften do you find yourself hunting through a page for the link you want?Remember, it’s all about information.
When you’re working on your design, have other people look at it. What’sthe first thing that they see? Is that what you want them to focus on? Canthey find the information you want them to get from your presentation?
Finally, you should design for your medium. Surfing the web, you get theimpression that a lot of people don’t know that the World Wide Web isn’t amagazine or television. Every medium has its own strengths and weaknesseswhen it comes to getting a message across. You have to keep these aspectsin mind so you don’t try to force your design into a medium where it doesn’tfit.
Proximity
Stated concisely, you should “group related items together” (p. 15). Theelements on your page should not be scattered randomly or all grouped tightlytogether.
Related items should be placed near each other, and unrelated itemsshould be separated by some space. If you follow this principle, those viewingyour document should realize what items are related before they start to read.It will make it easier for them to scan your document and find the relevantinformation.
Many inexperienced people seem to be afraid to leave any blank spaceon their page (whitespace). Whitespace helps separate unrelated topics, andyou shouldn’t avoid it.
When it is properly used, proximity helps your document look organized.Thinking about how items should be grouped together might even help youunderstand the organization of your material better.
Figure 6.1 is an example of a design that illustrates the concept of prox-imity. Notice that the contact information, the address, phone number, andweb site are grouped together. Also, the logo and name of the business areseparated from this information.
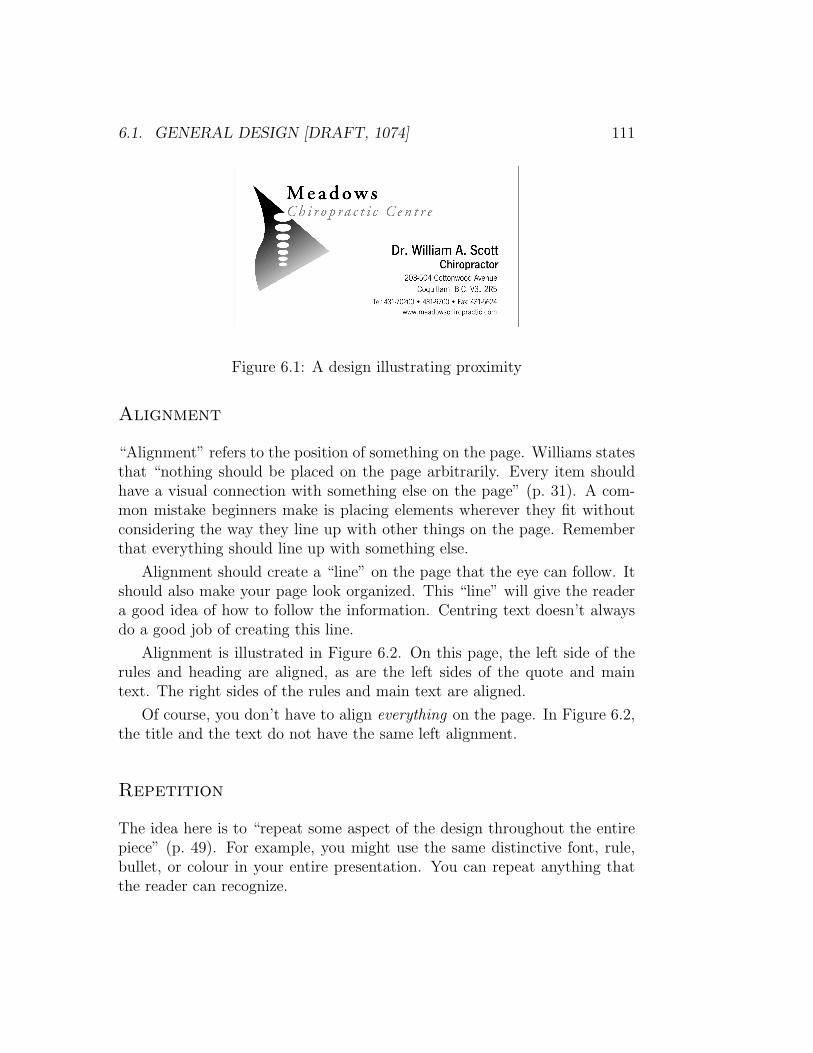
6.1. GENERAL DESIGN [DRAFT, 1074] 111
Figure 6.1: A design illustrating proximity
Alignment
“Alignment” refers to the position of something on the page. Williams statesthat “nothing should be placed on the page arbitrarily. Every item shouldhave a visual connection with something else on the page” (p. 31). A com-mon mistake beginners make is placing elements wherever they fit withoutconsidering the way they line up with other things on the page. Rememberthat everything should line up with something else.
Alignment should create a “line” on the page that the eye can follow. Itshould also make your page look organized. This “line” will give the readera good idea of how to follow the information. Centring text doesn’t alwaysdo a good job of creating this line.
Alignment is illustrated in Figure 6.2. On this page, the left side of therules and heading are aligned, as are the left sides of the quote and maintext. The right sides of the rules and main text are aligned.
Of course, you don’t have to align everything on the page. In Figure 6.2,the title and the text do not have the same left alignment.
Repetition
The idea here is to “repeat some aspect of the design throughout the entirepiece” (p. 49). For example, you might use the same distinctive font, rule,bullet, or colour in your entire presentation. You can repeat anything thatthe reader can recognize.
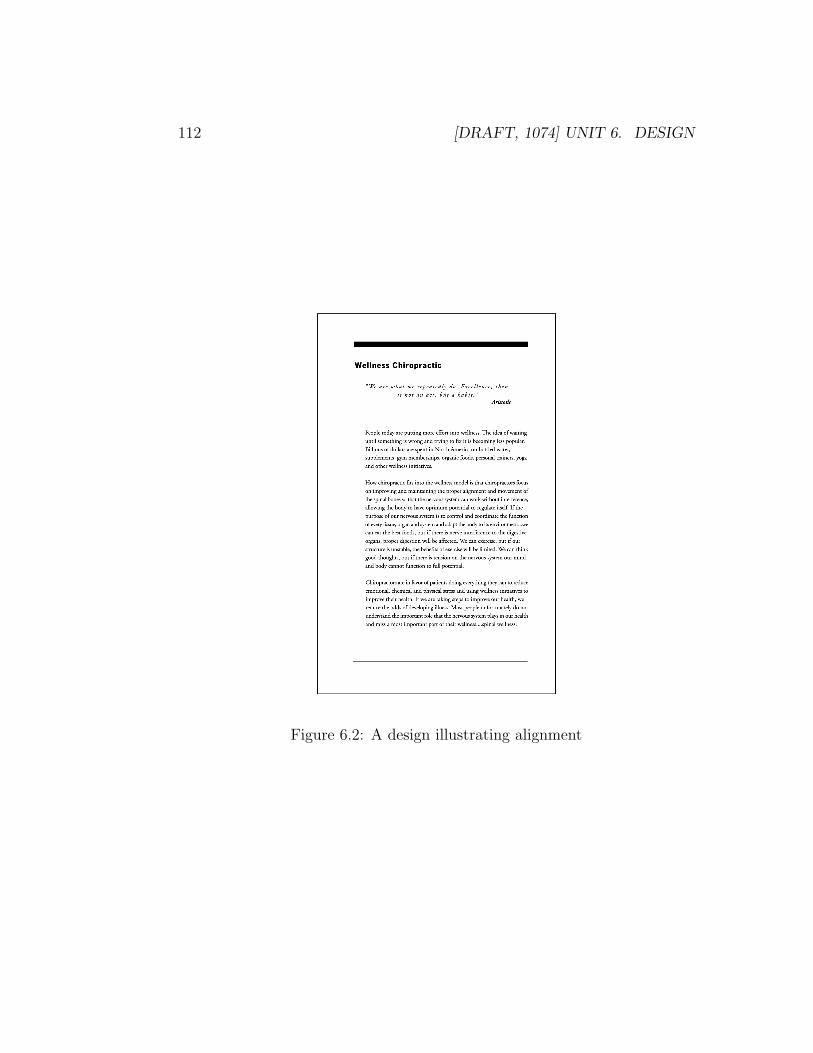
112 [DRAFT, 1074] UNIT 6. DESIGN
Figure 6.2: A design illustrating alignment
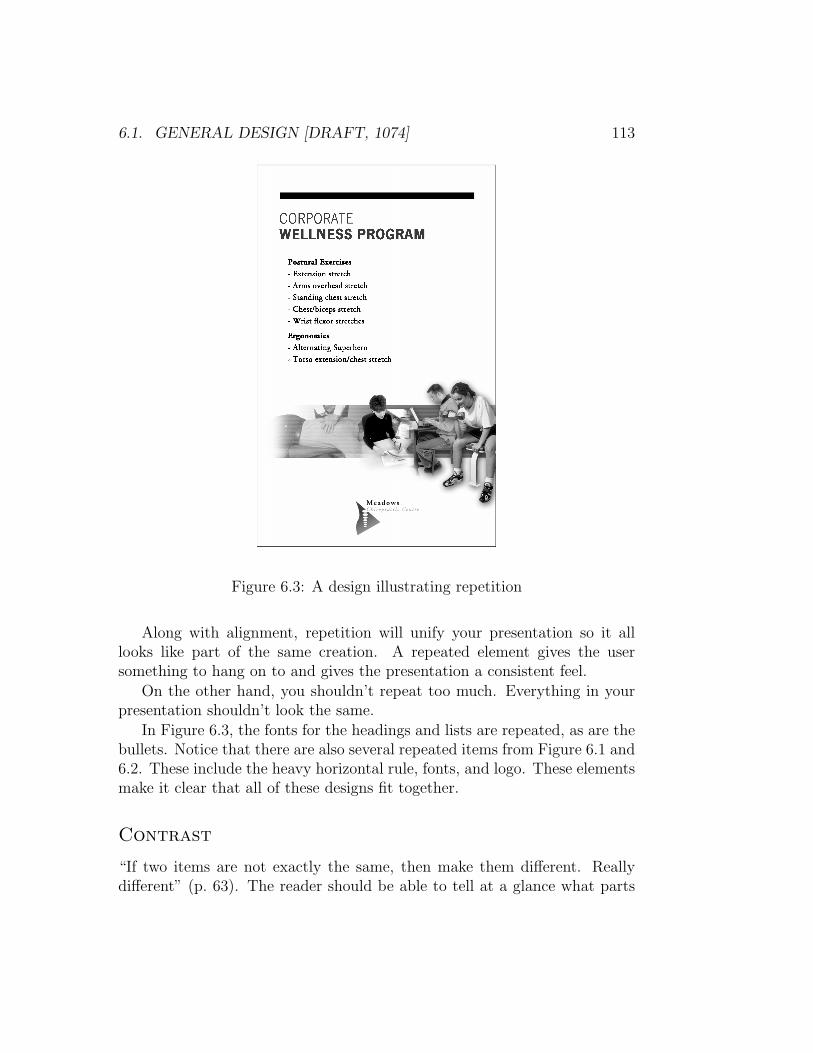
6.1. GENERAL DESIGN [DRAFT, 1074] 113
Figure 6.3: A design illustrating repetition
Along with alignment, repetition will unify your presentation so it alllooks like part of the same creation. A repeated element gives the usersomething to hang on to and gives the presentation a consistent feel.
On the other hand, you shouldn’t repeat too much. Everything in yourpresentation shouldn’t look the same.
In Figure 6.3, the fonts for the headings and lists are repeated, as are thebullets. Notice that there are also several repeated items from Figure 6.1 and6.2. These include the heavy horizontal rule, fonts, and logo. These elementsmake it clear that all of these designs fit together.
Contrast
“If two items are not exactly the same, then make them different. Reallydifferent” (p. 63). The reader should be able to tell at a glance what parts
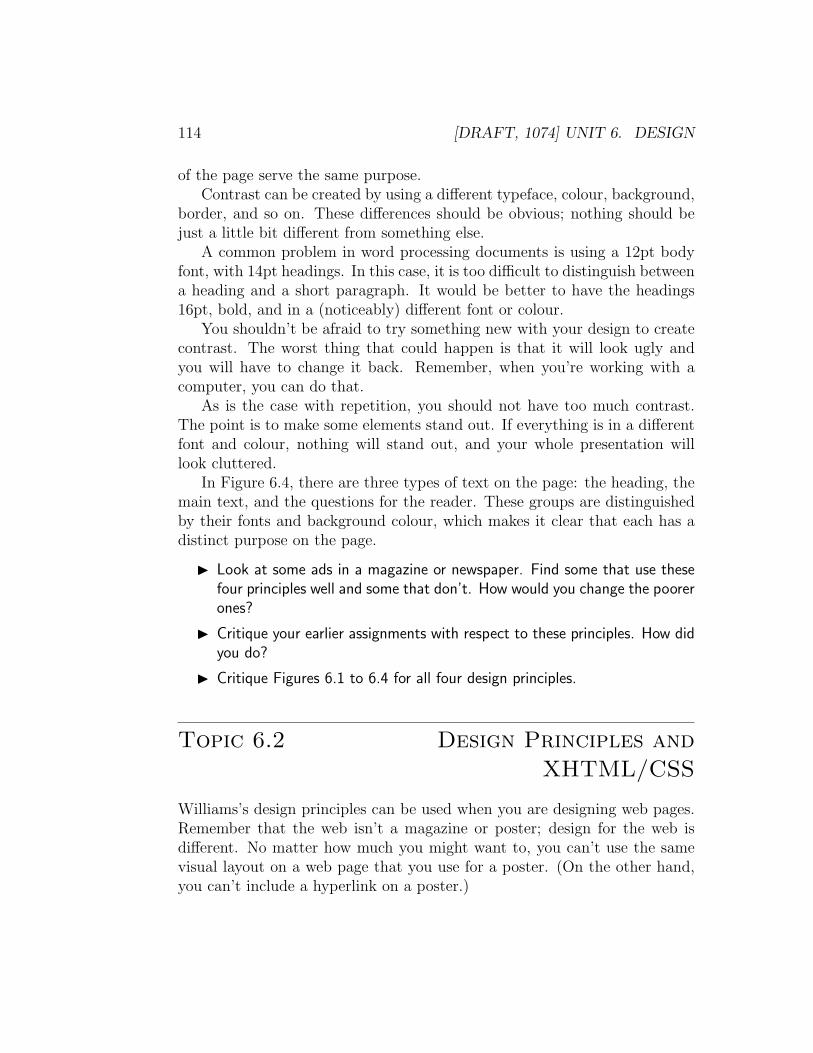
114 [DRAFT, 1074] UNIT 6. DESIGN
of the page serve the same purpose.Contrast can be created by using a different typeface, colour, background,
border, and so on. These differences should be obvious; nothing should bejust a little bit different from something else.
A common problem in word processing documents is using a 12pt bodyfont, with 14pt headings. In this case, it is too difficult to distinguish betweena heading and a short paragraph. It would be better to have the headings16pt, bold, and in a (noticeably) different font or colour.
You shouldn’t be afraid to try something new with your design to createcontrast. The worst thing that could happen is that it will look ugly andyou will have to change it back. Remember, when you’re working with acomputer, you can do that.
As is the case with repetition, you should not have too much contrast.The point is to make some elements stand out. If everything is in a differentfont and colour, nothing will stand out, and your whole presentation willlook cluttered.
In Figure 6.4, there are three types of text on the page: the heading, themain text, and the questions for the reader. These groups are distinguishedby their fonts and background colour, which makes it clear that each has adistinct purpose on the page.
◮ Look at some ads in a magazine or newspaper. Find some that use thesefour principles well and some that don’t. How would you change the poorerones?
◮ Critique your earlier assignments with respect to these principles. How didyou do?
◮ Critique Figures 6.1 to 6.4 for all four design principles.
Topic 6.2 Design Principles and
XHTML/CSS
Williams’s design principles can be used when you are designing web pages.Remember that the web isn’t a magazine or poster; design for the web isdifferent. No matter how much you might want to, you can’t use the samevisual layout on a web page that you use for a poster. (On the other hand,you can’t include a hyperlink on a poster.)
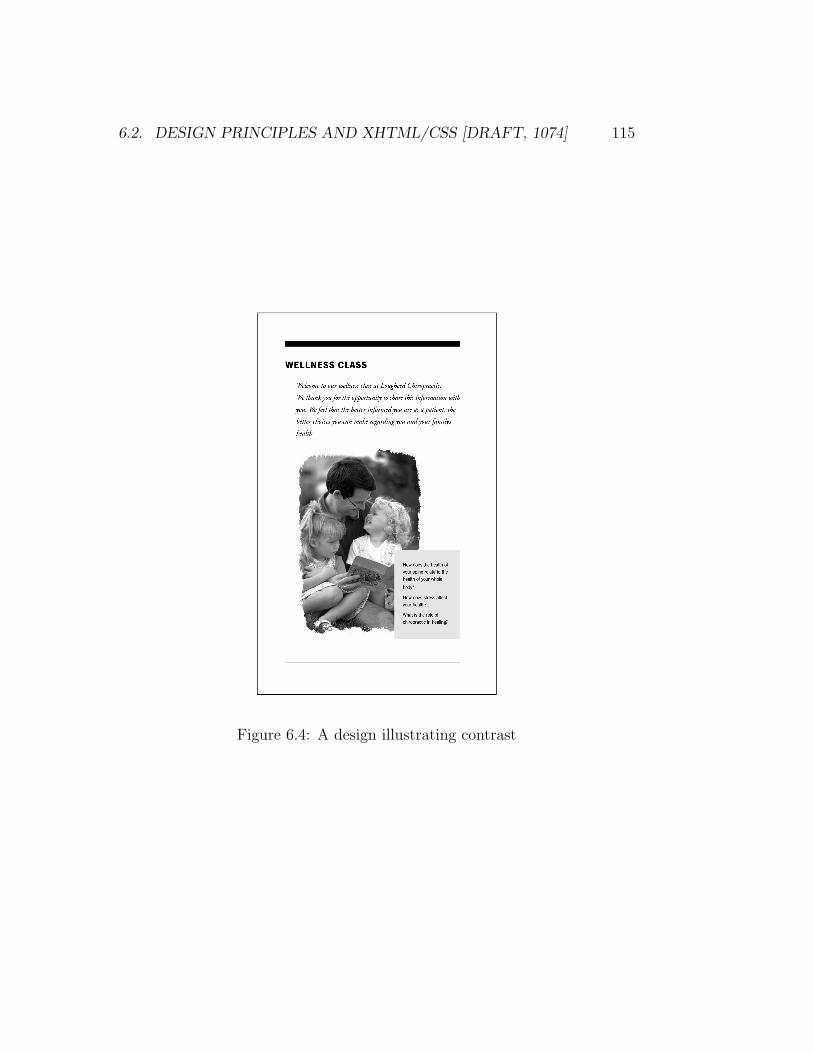
6.2. DESIGN PRINCIPLES AND XHTML/CSS [DRAFT, 1074] 115
Figure 6.4: A design illustrating contrast
116 [DRAFT, 1074] UNIT 6. DESIGN
If you stay within the confines of what XHTML and CSS are intendedto do, you can still do some very interesting design. In addition, if you do,your web page will look and act like a web page, not like a print or TV ad.It will be a lot less confusing for your users.
To achieve proximity on a web page, you have to think about how yourinformation fits together. You can then separate the different groups ofinformation using heading and the CSS margin properties. When you arecreating a web site, you also have the option of moving some information toanother page—which certainly qualifies as separation.
Web pages usually have a strong left alignment with no style sheet chan-ges. You can further affect alignment using the text-align property for textand the float property for images and other elements.
CSS can easily be used to create repetition. You can create a distinctivestyle for heading, links, or other common elements on your pages. You canalso use the list-style-type and list-style-image properties to give allof your lists a distinctive bullet. It is also easy to use CSS to use a particularcolour for accents on your pages (links, borders, etc.).
Finally, contrast is easily lost on web pages. You should be careful thatyour headings do not look too similar and that they stand out from otherelements. You should also make sure that your links stand out from therest of your page—some web authors make links look almost exactly like thesurrounding text, which makes it difficult for users to find them.
Topic 6.3 Conventions
People make a lot of “assumptions” about how things work in their dailylives. For example, if someone walks up to you, extends their right hand andsays “Hi”, you probably know what to do: shake their hand and say “hi”back. You know to do that based on a lot of experience in similar situations.These aren’t “rules” that you must follow, but things that you know youshould do. It is a social convention.
There are many conventions on the World Wide Web as well. For exam-ple, if you see a list of links on the left or right of the page, near the top, youknow that it’s probably the site menu. Large text near the top of a page isprobably the page title. There are many more examples.
6.3. CONVENTIONS [DRAFT, 1074] 117
When creating a web page (or creating anything else for people to interactwith), you should use these conventions to your advantage. If you followcommon conventions for you web site, you can use the knowledge your readersalready have, so they can instantly figure out how to use your site.
Also, conventions usually become common because they work well. Byusing common conventions on your side, it will help you create a site that’seasy to navigate and work with.
Remember: users spend most of their time on other sites, and are usedto the way they work. If you make your site work differently, your users willbe confused.
Example
Let’s look at one common convention as an example: blue/purple underlinedtext. When you see this, you know it’s a link.
As discussed in Topic 4.6, you can change the colours and other propertiesof links with CSS. But, should you? If you make the links on your side orangeand italics (but not underlined), people visiting your site won’t immediatelyknow how things work. They might figure it out, or they might just leaveannoyed.
You can probably get away with changing one property of the links onyour site without leaving visitors bewildered. For example, you could removethe underline, but leave your links blue/purple.
You should also avoid having any other (non-link) text that’s blue andunderlined. Users will certainly try to click on it, thinking it’s a link.
As you browse the web, you will encounter many more such conventions.Try to keep them in mind when designing your sites. Your page doesn’t haveto look exactly like every other pages, but there are many aspects of the waypages work and are navigated that you should follow.
◮ Test your knowledge of web conventions: Where is the “log out” link onmost web sites? Where can you find information about the author of anonline news article? From the main page of a blog site, how do make acomment on an entry?
118 [DRAFT, 1074] UNIT 6. DESIGN
Topic 6.4 Readability
Much of this section is based on a column by Jakob Nielsen. For moreinformation, see http://www.useit.com/alertbox/9710a.html .
When people write web pages, they often assume that visitors will readevery word, top-to-bottom. But, most visitors don’t “read” web pages thisway: they scan for the information they want. Visitors often scan titles,headings, and links, and make a very quick decision about whether theywant to look further.
When creating pages, you should keep this in mind. You should makeit easy for visitors to quickly scan your page and find the information theywant. If you don’t, a visitor might scan your page, decide that it doesn’tcontain useful information, and go elsewhere.
There are several things you can do to make your page “scannable”.
• Divide your page into sections. Have a clear, meaningful heading foreach part (<h2> for sections, <h3> for subsections).
• Keep your pages short. Divide your site into pages of a manageablesize, and keep the amount of text to a minimum.
• Create obvious areas of the page for main parts the users may be lookingfor: page title, menus, etc.
• Follow conventions, so users can use what they know about the rest ofthe web when scanning your site.
• Make your links clear. As mentioned in Topic 6.3, your links shouldlook like links. Also, don’t use link text like “click here”. So, don’tdo this:
<a href="xyz.html">Click here</a> for more information
about XYZ.
Use link text that can stand alone if someone reads only that text: thelink text should describe the destination of the link. For example,
We also have <a href="xyz.html">more information about
XYZ</a>.
6.5. PAGE DESIGN [DRAFT, 1074] 119
Here, the link text “more information about XYZ” describes the des-tination of the link, without having to read any of the surroundingtext.
• Avoid “rollovers”. A rollover is a menu that pops up when the usermoves the mouse over it. Sites often use rollovers so they can have alot of options in their menus, without taking up a lot of space on theirpage.
But, because users often scan pages, they often don’t realize the rollovermenus are there, and certainly can’t easily scan their contents. Usersmay navigate away without ever noticing the hidden options.
◮ How easy has it been to scan the web pages you have created? How couldyou have reoranized them to facilitate scanning?
◮ Think about sites you visit frequently. Are they easy to scan for relevantinformation? Have you ever read them top-to-bottom?
Topic 6.5 Page Design
When designing a site, many people forget that there are many ways to getto the pages of your site. For example, visitors might have followed a linkfrom a search engine, or they might have followed a link from another site.
So, you must remember that someone looking at one of your pages doesn’tnecessarily know how it fits into the rest of your site, or even what the restof your site is about. They also can’t click their browser’s “back” button tomove back within your site.
Because of this, every page on your site should have enough informationfor a reader to orient themselves. There should be information about wherethey are on the site. Is it a small corner of a large site, or the top of a siteon this topic?
You should also include good information about what this page is about.Having a meaningful <title> and <h1> can make a big difference in howeasy it is to figure out the content of the page.
Finally, you shouldn’t have any “dead end” pages with no links back toother parts of your site. You should have a link up to the menu, or othernavigation that makes sense for your site.

120 [DRAFT, 1074] UNIT 6. DESIGN
Summary
This unit should help you design good web sites and other multimedia pre-sentations. A lot of guidelines have been presented here, and it’s hard tokeep them all in mind at once. When you’re doing assignments, look backthrough this unit and try to put the guidelines into practise.
Key Terms
• proximity
• alignment
• repetition
• contrast
• conventions
• readability
Part IV
Web Programming
121

Unit 7
Programming Introduction
Learning Outcomes
• Explain what programming is and what Python is.
• Create simple Python programs Develop Python web scripts using out-put and variables.
• Create programs that create web pages when uploaded to a web server.
• Compare and contrast the actions performed by the client and theserver when a static vs. a dynamic request is made.
Learning Activities
• Read this unit and do the questions marked with a “◮”.
• Browse through the links for this unit on the course web site.
• (optional) Read Chapters 1 and 2 in How to Think Like a Computer
Scientist.
• .
The next units cover some of the material found in How to Think Like a
Computer Scientist. You can do these readings to get another perspectiveon the material covered in this Study Guide. You shouldn’t worry aboutany new material in How to Think Like a Computer Scientist, just use it toreinforce the material covered here.
123
124 [DRAFT, 1074] UNIT 7. PROGRAMMING INTRODUCTION
Topic 7.1 What is Programming?
The last part of this course focuses on computer programming. We won’tassume you have programmed before and will start at the first step: Whatis programming?
Basically, a computer program is a list of steps that a computer can followto accomplish some task. The hard part about creating a computer programis that computer are dumb: they need a lot of detail specified so that theycan follow the instructions. The instructions also have to be specified in away the computer can understand.
A programming language is a particular way of expressing instructions toa computer. There are many programming languages. They are all designedfor different reasons, and all have strengths and weaknesses, but they sharemany of the same concepts.
We have already covered XHTML, which we said was a markup language.You might be wondering what makes a programming language different froma markup language. For one thing, a markup language is used to create adocument, whereas a programming language is used to create a computerprogram.
Also, there are some thing that a programming language must be able todo that XHTML cannot. XHTML doesn’t have any variables (Topic 7.4),conditional statements (Topic 9.2), or other features needed to create pro-grams. Anything called a “programming language” will have these (or some-thing equivalent). Basically, writing XHTML (or HTML) isn’t “program-ming”.
Why Learn to Program?
There’s a good chance that if you’re in this course, you’ll never make a livingat programming. So, why would you bother learning how to do it?
For a lot of people, the answer may be “because it’s fun.” Programmingis an interesting challenge.
It is also nice to have another tool you can use to solve problems. If youknow how to program, it’s surprising how often you will find that a quickprogram is the easiest way to deal with a problem.
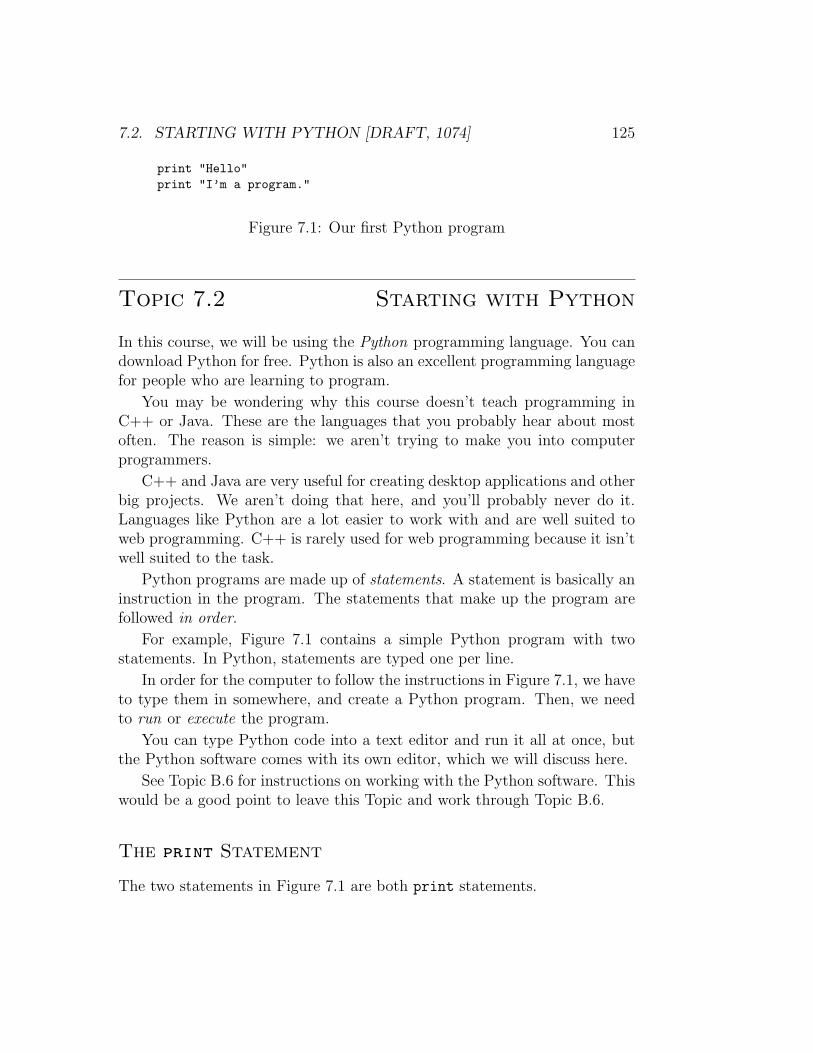
7.2. STARTING WITH PYTHON [DRAFT, 1074] 125
print "Hello"
print "I’m a program."
Figure 7.1: Our first Python program
Topic 7.2 Starting with Python
In this course, we will be using the Python programming language. You candownload Python for free. Python is also an excellent programming languagefor people who are learning to program.
You may be wondering why this course doesn’t teach programming inC++ or Java. These are the languages that you probably hear about mostoften. The reason is simple: we aren’t trying to make you into computerprogrammers.
C++ and Java are very useful for creating desktop applications and otherbig projects. We aren’t doing that here, and you’ll probably never do it.Languages like Python are a lot easier to work with and are well suited toweb programming. C++ is rarely used for web programming because it isn’twell suited to the task.
Python programs are made up of statements. A statement is basically aninstruction in the program. The statements that make up the program arefollowed in order.
For example, Figure 7.1 contains a simple Python program with twostatements. In Python, statements are typed one per line.
In order for the computer to follow the instructions in Figure 7.1, we haveto type them in somewhere, and create a Python program. Then, we needto run or execute the program.
You can type Python code into a text editor and run it all at once, butthe Python software comes with its own editor, which we will discuss here.
See Topic B.6 for instructions on working with the Python software. Thiswould be a good point to leave this Topic and work through Topic B.6.
The print Statement
The two statements in Figure 7.1 are both print statements.
126 [DRAFT, 1074] UNIT 7. PROGRAMMING INTRODUCTION
The print statement in Python is used to put text on the screen. What-ever comes after it on the line will be put on the screen.
Any text in quotes, like "Hello" in the first line, is called a string. Stringsare just a bunch of characters. They have to be placed in quotes to distinguishthen from Python commands. If we had left out the quotes, Python wouldhave complained that it didn’t know what “Hello” meant, since there is nobuilt-in command called Hello.
Here are some more example of the print statement:
print "Goodbye"
print "100 + 65"
print 100 + 65
Here are the results of these statements:
Goodbye
100 + 65
165
The first two print statements should be no surprise. They work thesame way as the others we have seen: they display the string they are given.
In the last print statement, the stuff to be printed isn’t in quotes, so itisn’t a string. In this case, it’s an expression. As you can see, the print
statement can also be used to display the result of an expression.
Expressions
An expression is basically a calculation that is specified for Python to carryout. The example expression above, 100 + 65 is a numeric expression. Thatis, it’s an expression that, when evaluated, gives a number as its result.
There are other types of expressions in Python as well. Expressions canproduce strings, or other types of Python information.
We will explore these more later.
◮ If you haven’t already, type in the program from Figure 7.1, following theinstructions in Topic B.6.
◮ Add a few more print statements to that program (one per line). Run itagain and see what happens. Try some other expressions
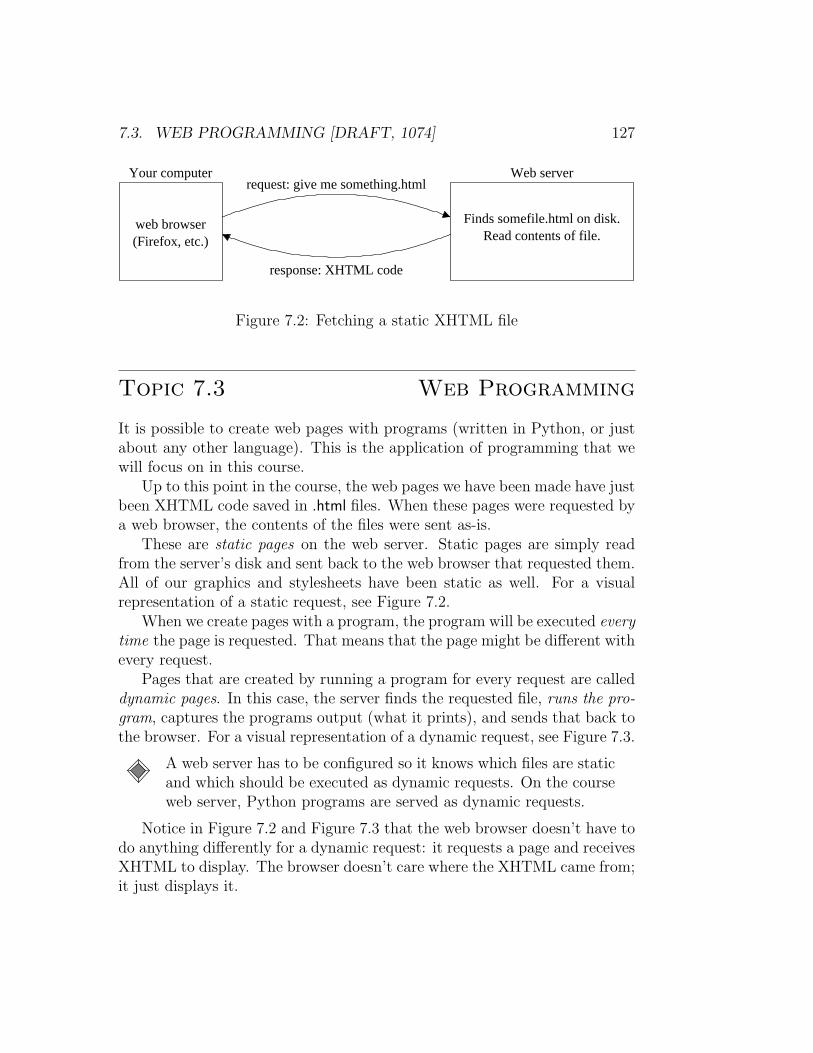
7.3. WEB PROGRAMMING [DRAFT, 1074] 127
Your computer
web browser(Firefox, etc.)
request: give me something.html
response: XHTML code
Web server
Finds somefile.html on disk.Read contents of file.
Figure 7.2: Fetching a static XHTML file
Topic 7.3 Web Programming
It is possible to create web pages with programs (written in Python, or justabout any other language). This is the application of programming that wewill focus on in this course.
Up to this point in the course, the web pages we have been made have justbeen XHTML code saved in .html files. When these pages were requested bya web browser, the contents of the files were sent as-is.
These are static pages on the web server. Static pages are simply readfrom the server’s disk and sent back to the web browser that requested them.All of our graphics and stylesheets have been static as well. For a visualrepresentation of a static request, see Figure 7.2.
When we create pages with a program, the program will be executed every
time the page is requested. That means that the page might be different withevery request.
Pages that are created by running a program for every request are calleddynamic pages. In this case, the server finds the requested file, runs the pro-
gram, captures the programs output (what it prints), and sends that back tothe browser. For a visual representation of a dynamic request, see Figure 7.3.
A web server has to be configured so it knows which files are staticand which should be executed as dynamic requests. On the courseweb server, Python programs are served as dynamic requests.
Notice in Figure 7.2 and Figure 7.3 that the web browser doesn’t have todo anything differently for a dynamic request: it requests a page and receivesXHTML to display. The browser doesn’t care where the XHTML came from;it just displays it.
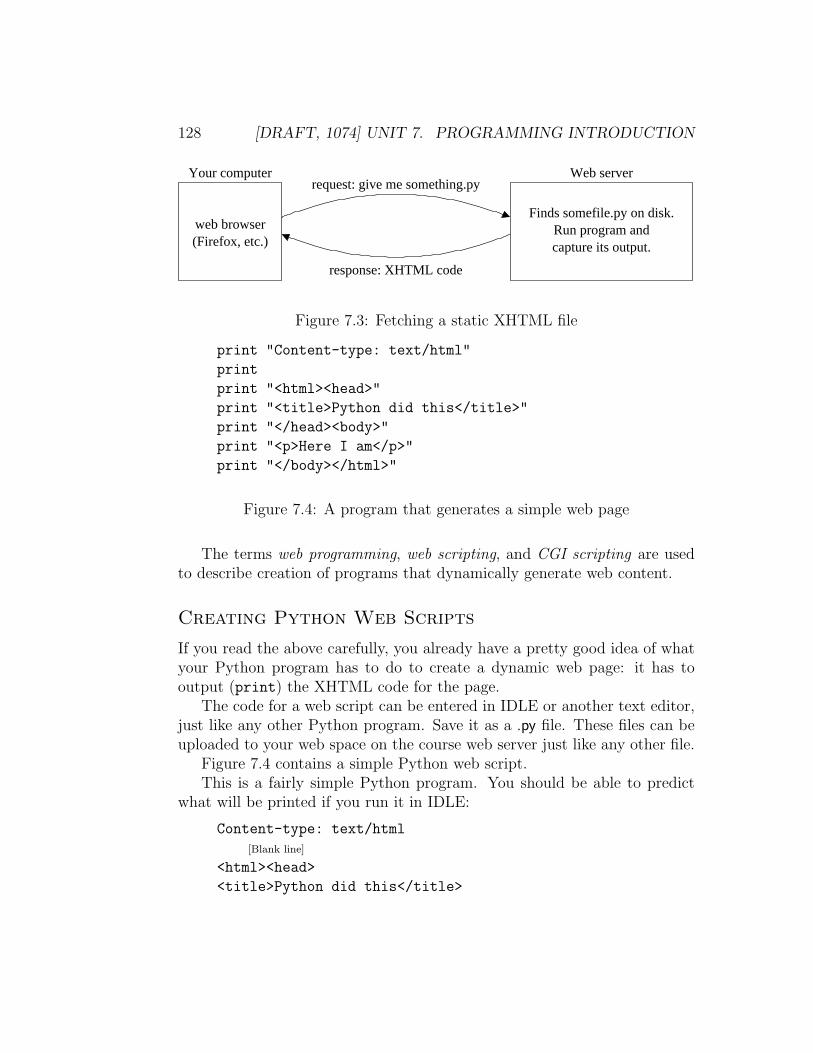
128 [DRAFT, 1074] UNIT 7. PROGRAMMING INTRODUCTION
Your computer
web browser(Firefox, etc.)
response: XHTML code
Web serverrequest: give me something.py
Run program andFinds somefile.py on disk.
capture its output.
Figure 7.3: Fetching a static XHTML file
print "Content-type: text/html"
print "<html><head>"
print "<title>Python did this</title>"
print "</head><body>"
print "<p>Here I am</p>"
print "</body></html>"
Figure 7.4: A program that generates a simple web page
The terms web programming, web scripting, and CGI scripting are usedto describe creation of programs that dynamically generate web content.
Creating Python Web Scripts
If you read the above carefully, you already have a pretty good idea of whatyour Python program has to do to create a dynamic web page: it has tooutput (print) the XHTML code for the page.
The code for a web script can be entered in IDLE or another text editor,just like any other Python program. Save it as a .py file. These files can beuploaded to your web space on the course web server just like any other file.
Figure 7.4 contains a simple Python web script.This is a fairly simple Python program. You should be able to predict
what will be printed if you run it in IDLE:
Content-type: text/html
[Blank line]
<html><head>
<title>Python did this</title>
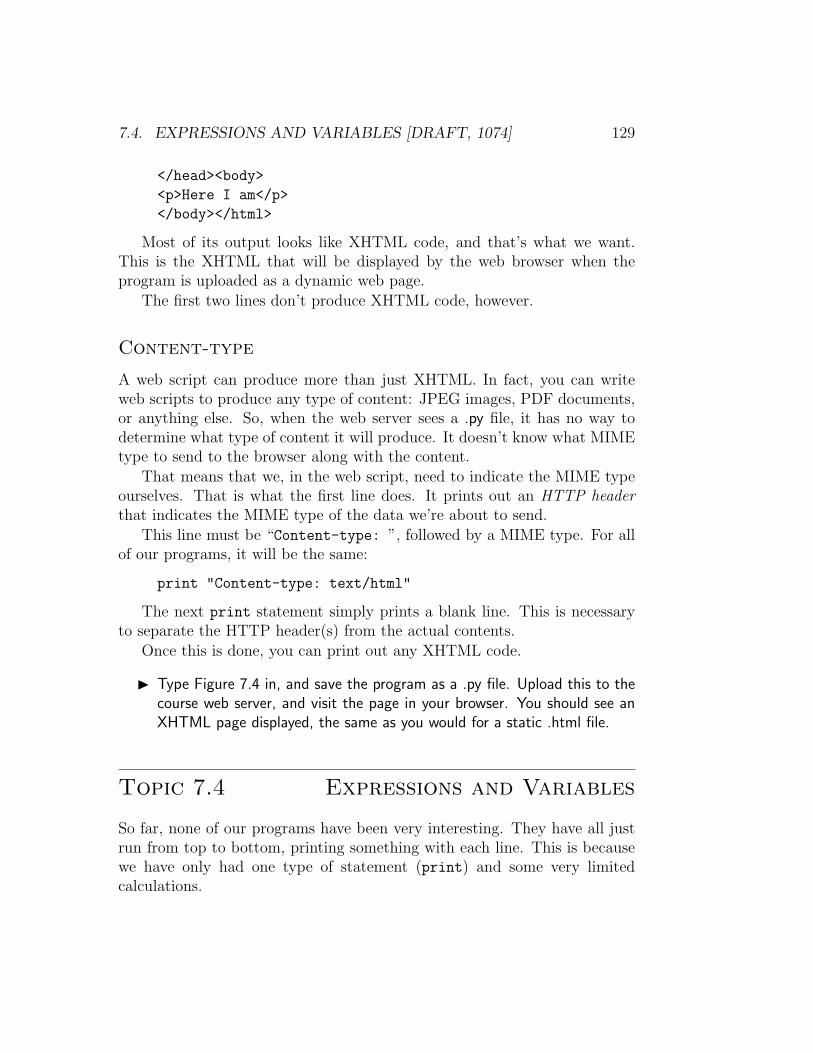
7.4. EXPRESSIONS AND VARIABLES [DRAFT, 1074] 129
</head><body>
<p>Here I am</p>
</body></html>
Most of its output looks like XHTML code, and that’s what we want.This is the XHTML that will be displayed by the web browser when theprogram is uploaded as a dynamic web page.
The first two lines don’t produce XHTML code, however.
Content-type
A web script can produce more than just XHTML. In fact, you can writeweb scripts to produce any type of content: JPEG images, PDF documents,or anything else. So, when the web server sees a .py file, it has no way todetermine what type of content it will produce. It doesn’t know what MIMEtype to send to the browser along with the content.
That means that we, in the web script, need to indicate the MIME typeourselves. That is what the first line does. It prints out an HTTP header
that indicates the MIME type of the data we’re about to send.
This line must be “Content-type: ”, followed by a MIME type. For allof our programs, it will be the same:
print "Content-type: text/html"
The next print statement simply prints a blank line. This is necessaryto separate the HTTP header(s) from the actual contents.
Once this is done, you can print out any XHTML code.
◮ Type Figure 7.4 in, and save the program as a .py file. Upload this to thecourse web server, and visit the page in your browser. You should see anXHTML page displayed, the same as you would for a static .html file.
Topic 7.4 Expressions and Variables
So far, none of our programs have been very interesting. They have all justrun from top to bottom, printing something with each line. This is becausewe have only had one type of statement (print) and some very limitedcalculations.
130 [DRAFT, 1074] UNIT 7. PROGRAMMING INTRODUCTION
In order to write programs that do more, we need to add some more typesof statements, and other Python features.
We have seen that’s it’s possible to do calculations in Python:
print 33 * 5 ⇒ 165
print "abc" + "def" ⇒ abcdef
In this Guide, we will use the “⇒” to indicate the output of aprint statement, or the result of a calculation. So, the first printstatement above prints “165”.
The second statement above contains a string expression. When the +
sign is applied to strings, it joins or concatenates them.
The print statement works well when we want to immediately displaythe results of an expression. But, it’s often necessary to save the result ofsome calculation so it can be used later.
Results of any calculation can be stored in a variable. A variable is justa part of the computer’s memory that you can use in your program to holdinformation temporarily.
To store a value in a variable, a variable assignment statement is used.A variable assignment statement looks like this:
area = 12 * 7
After this statement is executed, a variable named area will be created, andthe result of the calculation (84) will be stored in that variable.
The * is used to indicate multiplication in Python. It can alsobe used to represent string repetition, as we will see in the nextexample.
The = is used to indicate a variable assignment, with the name of thevariable on the left, and the expression to evaluate on the right. Variablenames in Python can contain letters, numbers, and underscores (_). Notethat the result of the calculation is stored in the variable (the number 84),not the expression itself.
To use the value stored in a variable, just mention it by name in anexpression. In this example, the a variable containing the course name iscreated an used to create several lines of output:

7.4. EXPRESSIONS AND VARIABLES [DRAFT, 1074] 131
course = "CMPT 165"
print course
print "This is " + course
print course*2
The output of this program is:
CMPT 165
This is CMPT 165
CMPT 165CMPT165
As we see more examples of Python programs, we will use variables more.
Summary
You should now be able to start writing programs that do simple calculations,and produce web pages when uploaded to the server.
If you’re intimidated about starting to write programs, don’t panic. Writ-ing your first few programs will be difficult, since you’re learning about pro-gramming, Python, the Python tools, and error messages all at once. Afteryou get a few programs working and get the feeling of the steps you have totake, it will get easier.
Key Terms
• computer programming
• programming language
• Python
• web programming/web scripts
• static page
• dynamic page
• Content-type
• expression
• variable
• assignment statement

132 [DRAFT, 1074] UNIT 7. PROGRAMMING INTRODUCTION

Unit 8
Forms and Web Programming
Learning Outcomes
• Create XHTML forms to capture user input.
• Create Python programs to generate web pages, using a user’s input.
• Convert the types of values in Python as appropriate for calculationsand output.
Learning Activities
• Read this unit and do the questions marked with a “◮”.
• Browse through the links for this unit on the course web site.
• (optional) Review Head First HTML with XHTML and CSS, Chapter14.
•
We have now seen (1) a tiny introduction to programming and (2) how tocreate web pages on-the-fly with a program.
But, things don’t get really interesting until you can somehow get inputfrom the users of your site—then you can make web applications that reallydo something.
133
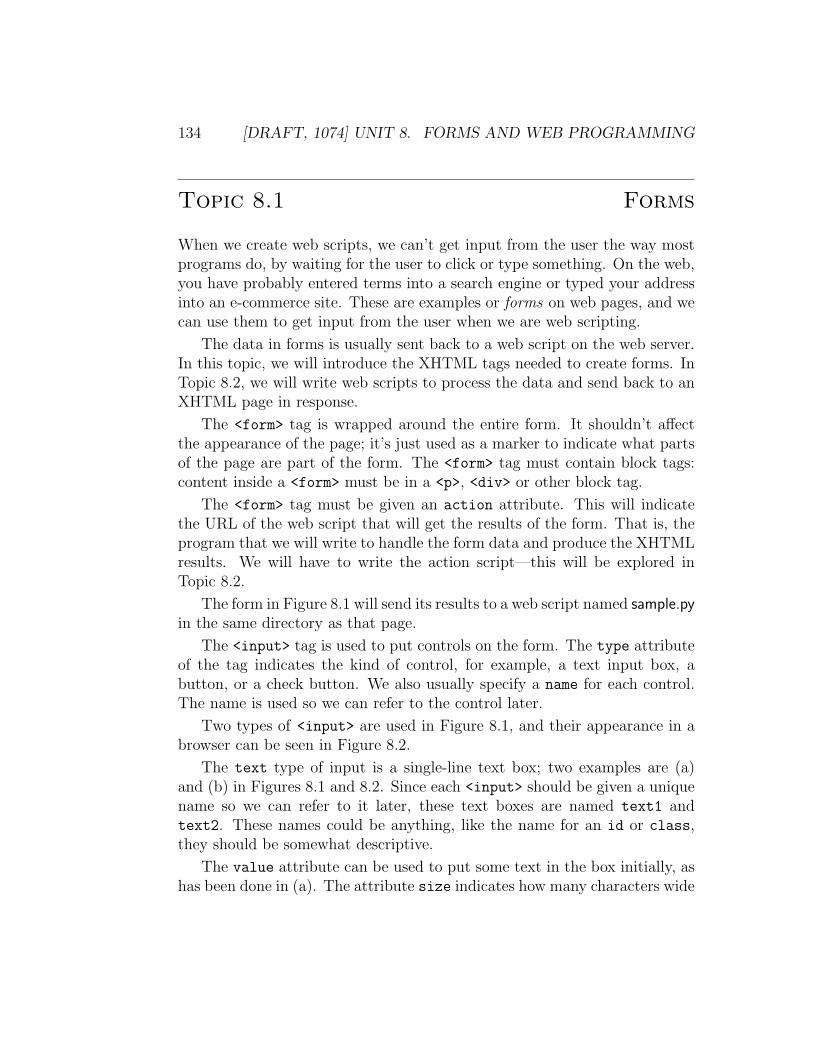
134 [DRAFT, 1074] UNIT 8. FORMS AND WEB PROGRAMMING
Topic 8.1 Forms
When we create web scripts, we can’t get input from the user the way mostprograms do, by waiting for the user to click or type something. On the web,you have probably entered terms into a search engine or typed your addressinto an e-commerce site. These are examples or forms on web pages, and wecan use them to get input from the user when we are web scripting.
The data in forms is usually sent back to a web script on the web server.In this topic, we will introduce the XHTML tags needed to create forms. InTopic 8.2, we will write web scripts to process the data and send back to anXHTML page in response.
The <form> tag is wrapped around the entire form. It shouldn’t affectthe appearance of the page; it’s just used as a marker to indicate what partsof the page are part of the form. The <form> tag must contain block tags:content inside a <form> must be in a <p>, <div> or other block tag.
The <form> tag must be given an action attribute. This will indicatethe URL of the web script that will get the results of the form. That is, theprogram that we will write to handle the form data and produce the XHTMLresults. We will have to write the action script—this will be explored inTopic 8.2.
The form in Figure 8.1 will send its results to a web script named sample.pyin the same directory as that page.
The <input> tag is used to put controls on the form. The type attributeof the tag indicates the kind of control, for example, a text input box, abutton, or a check button. We also usually specify a name for each control.The name is used so we can refer to the control later.
Two types of <input> are used in Figure 8.1, and their appearance in abrowser can be seen in Figure 8.2.
The text type of input is a single-line text box; two examples are (a)and (b) in Figures 8.1 and 8.2. Since each <input> should be given a uniquename so we can refer to it later, these text boxes are named text1 andtext2. These names could be anything, like the name for an id or class,they should be somewhat descriptive.
The value attribute can be used to put some text in the box initially, ashas been done in (a). The attribute size indicates how many characters wide
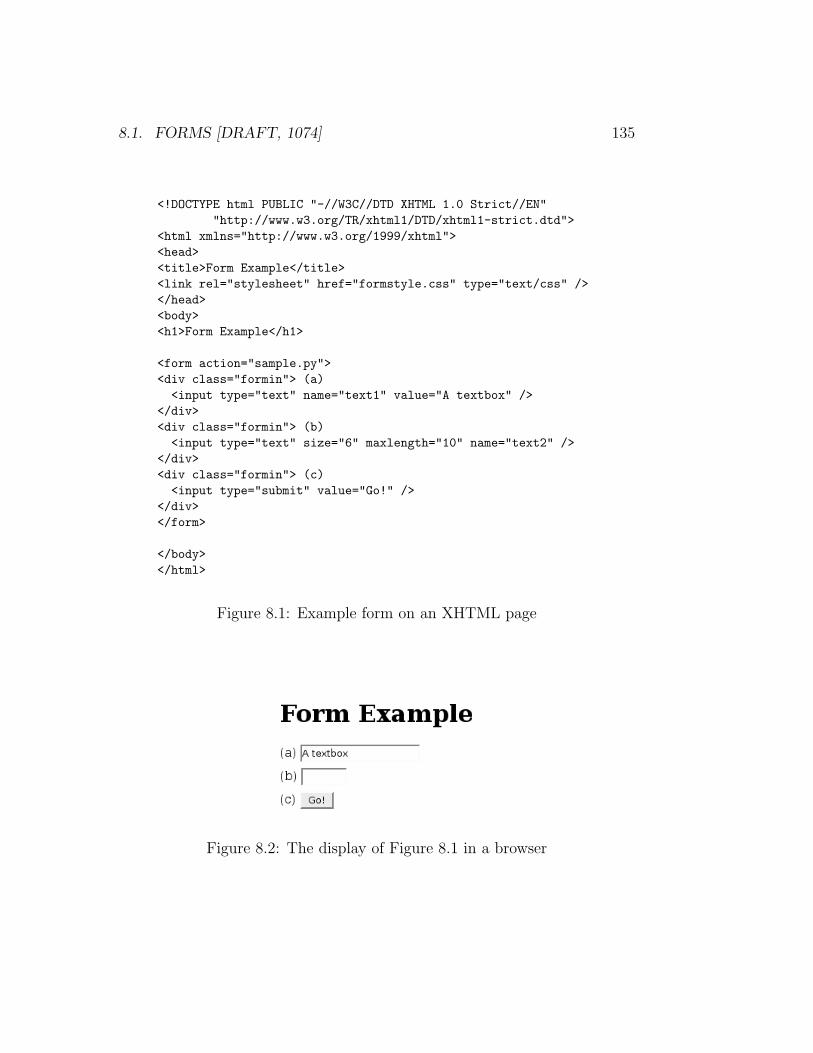
8.1. FORMS [DRAFT, 1074] 135
<!DOCTYPE html PUBLIC "-//W3C//DTD XHTML 1.0 Strict//EN"
"http://www.w3.org/TR/xhtml1/DTD/xhtml1-strict.dtd">
<html xmlns="http://www.w3.org/1999/xhtml">
<head>
<title>Form Example</title>
<link rel="stylesheet" href="formstyle.css" type="text/css" />
</head>
<body>
<h1>Form Example</h1>
<form action="sample.py">
<div class="formin"> (a)
<input type="text" name="text1" value="A textbox" />
</div>
<div class="formin"> (b)
<input type="text" size="6" maxlength="10" name="text2" />
</div>
<div class="formin"> (c)
<input type="submit" value="Go!" />
</div>
</form>
</body>
</html>
Figure 8.1: Example form on an XHTML page
Figure 8.2: The display of Figure 8.1 in a browser
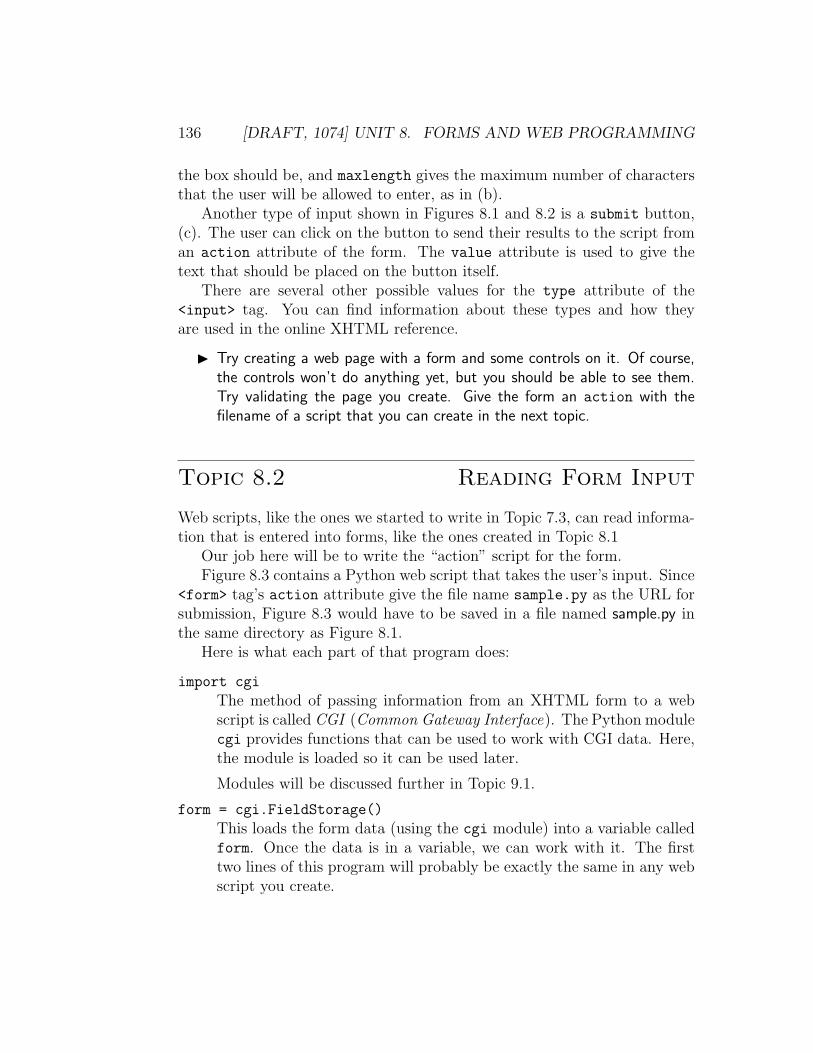
136 [DRAFT, 1074] UNIT 8. FORMS AND WEB PROGRAMMING
the box should be, and maxlength gives the maximum number of charactersthat the user will be allowed to enter, as in (b).
Another type of input shown in Figures 8.1 and 8.2 is a submit button,(c). The user can click on the button to send their results to the script froman action attribute of the form. The value attribute is used to give thetext that should be placed on the button itself.
There are several other possible values for the type attribute of the<input> tag. You can find information about these types and how theyare used in the online XHTML reference.
◮ Try creating a web page with a form and some controls on it. Of course,the controls won’t do anything yet, but you should be able to see them.Try validating the page you create. Give the form an action with thefilename of a script that you can create in the next topic.
Topic 8.2 Reading Form Input
Web scripts, like the ones we started to write in Topic 7.3, can read informa-tion that is entered into forms, like the ones created in Topic 8.1
Our job here will be to write the “action” script for the form.Figure 8.3 contains a Python web script that takes the user’s input. Since
<form> tag’s action attribute give the file name sample.py as the URL forsubmission, Figure 8.3 would have to be saved in a file named sample.py inthe same directory as Figure 8.1.
Here is what each part of that program does:
import cgi
The method of passing information from an XHTML form to a webscript is called CGI (Common Gateway Interface). The Python modulecgi provides functions that can be used to work with CGI data. Here,the module is loaded so it can be used later.
Modules will be discussed further in Topic 9.1.
form = cgi.FieldStorage()
This loads the form data (using the cgi module) into a variable calledform. Once the data is in a variable, we can work with it. The firsttwo lines of this program will probably be exactly the same in any webscript you create.
8.2. READING FORM INPUT [DRAFT, 1074] 137
import cgi
form = cgi.FieldStorage()
text1 = form["text1"].value
text2 = form["text2"].value
# print HTTP/HTML headers
print """Content-type: text/html
<!DOCTYPE html PUBLIC "-//W3C//DTD XHTML 1.0 Strict//EN"
"http://www.w3.org/TR/xhtml1/DTD/xhtml1-strict.dtd">
<html><head>
<title>A CGI Script</title>
</head><body>
"""
# print HTML body using form data
print "<p>In the first text box, you entered " + text1 + ".</p>"
print "<p>In the second text box, you entered " + text2 + ".</p>"
print "</body></html>"
Figure 8.3: A web script that uses the input from Figure 8.1
138 [DRAFT, 1074] UNIT 8. FORMS AND WEB PROGRAMMING
text1 = form["text1"].valuetext2 = form["text2"].value
These lines take data from the form variable, and put it into sim-ple string variables that we can easily work with. The expressionform["text1"].value retrieves the string that the user typed in theinput with name="text1".
We will keep the names of the variables and the inputs the same, sothey are easy to keep track of. That is, the string typed into an inputwith name="age" will go into a Python variable age.
A Key Error when doing this indicates that there is no matching forminput: you have asked for something like form["abcd"].value, butthere is no input with name="abcd" in the submitted form.
# print HTTP/HTML headers
This line is just a Python comment. It has no effect on the programwhen it runs. It’s just there for someone reading the code. In this case,it indicates what the next few lines do.
print """Content-type . . . <body>"""
The next eight lines are actually a single print statement.
Many web scripts have to output large chunks of XHTML code thatwon’t change. In Figure 7.4, the whole program is just a collection ofprint statements. It’s often tedious to write these statements.
In Python, there’s a shortcut you can use whenever you need to workwith large chunks of text. You can use a pair of """ to wrap up alarge string. A triple-quoted string can also contain line breaks, whichregular strings (quoted with ") cannot.
These two fragments of Python code do exactly the same thing:
print "Line one"
print "Line two"
print """Line one
Line two"""
This makes it easy to copy-and-paste large pieces of XHTML from astatic file into a Python program. You can just copy the code into aprint """. . . """ wherever it should go.
8.3. HANDLING TYPES [DRAFT, 1074] 139
We could have written eight separate print statements here. The resultwould have been exactly the same (but it’s hard to print quotes in thedoctype, so this just works out better).
# print HTML body using form data
Another comment. Again, it indicates what the next few lines do.
print "<p>In the first ... " + text1 + ".</p>"print "<p>In the second ... " + text2 + ".</p>"
These lines actually output the contents of the <body>. Since the vari-ables text1 and text2 contain the text the user entered, we can usethem here.
Each line combines some text that is always the same ("<p>. . . entered" and ".</p>") with the contents of a variable. If the user entered“abcdef” in the first textbox in Figure 8.1, the first of these lines wouldprint
<p>In the first text box, you entered abcdef.</p>
print "</body></html>"
A final print statement to close the open tags and complete the XHTMLpage.
Suppose someone visits the XHTML page from Figure 8.1 and leaves thefirst textbox containing “A textbox”, and enters “other” in the second textbox.
When they click the submit button, sample.py from Figure 8.3 will pro-duce the XHTML code in Figure 8.4; this will be sent to the user’s browser.When displayed in the browser, it will look exactly like a static page withthe same contents.
◮ Modify the program in Figure 8.3 and experiment with different output.
◮ Write your own web script that takes some form data and displays it.
Topic 8.3 Handling Types
We have already seen that there are different kinds of information thatPython can handle. For example, these expressions highlight the differencebetween two types:
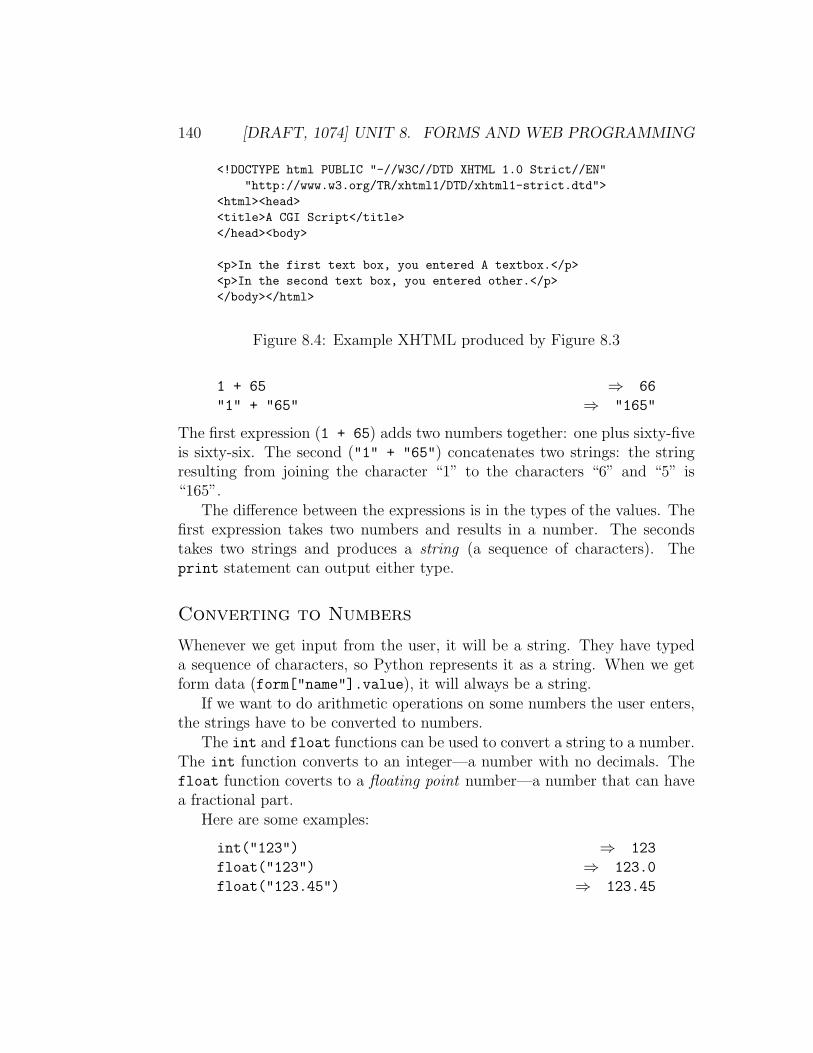
140 [DRAFT, 1074] UNIT 8. FORMS AND WEB PROGRAMMING
<!DOCTYPE html PUBLIC "-//W3C//DTD XHTML 1.0 Strict//EN"
"http://www.w3.org/TR/xhtml1/DTD/xhtml1-strict.dtd">
<html><head>
<title>A CGI Script</title>
</head><body>
<p>In the first text box, you entered A textbox.</p>
<p>In the second text box, you entered other.</p>
</body></html>
Figure 8.4: Example XHTML produced by Figure 8.3
1 + 65 ⇒ 66
"1" + "65" ⇒ "165"
The first expression (1 + 65) adds two numbers together: one plus sixty-fiveis sixty-six. The second ("1" + "65") concatenates two strings: the stringresulting from joining the character “1” to the characters “6” and “5” is“165”.
The difference between the expressions is in the types of the values. Thefirst expression takes two numbers and results in a number. The secondstakes two strings and produces a string (a sequence of characters). Theprint statement can output either type.
Converting to Numbers
Whenever we get input from the user, it will be a string. They have typeda sequence of characters, so Python represents it as a string. When we getform data (form["name"].value), it will always be a string.
If we want to do arithmetic operations on some numbers the user enters,the strings have to be converted to numbers.
The int and float functions can be used to convert a string to a number.The int function converts to an integer—a number with no decimals. Thefloat function coverts to a floating point number—a number that can havea fractional part.
Here are some examples:
int("123") ⇒ 123
float("123") ⇒ 123.0
float("123.45") ⇒ 123.45
8.3. HANDLING TYPES [DRAFT, 1074] 141
int("123.45") ⇒ error
These would typically be used when you are first fetching the user’s in-put. Suppose you have asked the user to enter their age in an input withname="age". Their age is an integer, so you would probably want to convertit to an integer right away:
age = int( form["age"].value )
This code takes the text the user entered in the text input (form["age"].value)and converts it to an integer (with int) before storing it in the variable age.
If you are asking the user for a number that may have a fractional part,like a length, you should convert it appropriately:
length = float( form["length"].value )
Converting to Strings
When printing a value, it’s often necessary to convert it to a string.The print statement will convert a single value automatically, but you
often want to output more than just a single variable or other value. Forexample, in Figure 8.3, the variable contents were printed out as part of asentence that was constructed by concatenating strings (with +).
But, to join items together with +, they must both be strings. For exam-ple, if count is a variable containing a number, this would cause an error:
print "<p>Number so far: " + count + "</p>"
In order to put a number into the string we’re going to print, it must beconverted to a string. This can be done with the str function:
print "<p>Number so far: " + str(count) + "</p>"
Basically, if you need to print a number, you should convert it to a stringfirst.
Summary
There aren’t many new programming skills in this unit. It is really about tak-ing the programming ideas from Unit 7, and adding user input from XHTMLforms. You should also be able to deal with numbers in the program as well:converting string input to numbers, and numeric values to strings for output.
142 [DRAFT, 1074] UNIT 8. FORMS AND WEB PROGRAMMING
Key Terms
• XHTML form
• input tag
• triple-quoted string
• CGI
• type
Unit 9
More Programming
Learning Outcomes
• Develop Python web scripts using conditionals, modules, and functions.
• Make decisions in programs and take appropriate actions.
Learning Activities
• Read this unit and do the questions marked with a “◮”.
• Browse through the links for this unit on the course web site.
• (optional) Read Sections 4.1–4.7 in How to Think Like a Computer
Scientist.
•
Topic 9.1 Python Modules
In Python (and other programming languages), you aren’t expected to do ev-erything from scratch. Some prepackaged functions come with the language,and you can use them whenever you need to. So far, we have seen int, str,and a few others.
In modern programming languages, there are so many functions for com-mon tasks provided, that it doesn’t make sense to have all of them availableall the time. Many of the provided functions are separated into libraries. InPython, each part of the total built-in library is called a module.
143
144 [DRAFT, 1074] UNIT 9. MORE PROGRAMMING
In our web scripts, the cgi module is used to grab the user’s input so wecan use it in our program. The statement “import cgi” tells Python thatwe want to use the cgi module in our program. If all of the modules wereloaded all the time, our programs would take a very long time to start up.So, we have to import the modules we’re actually going to use.
Inside the cgi module, there is a function named FieldStorage that weused to extract the CGI data. Since the function is in the cgi module, weused it by calling cgi.FieldStorage().
As you can see, to call a function in a module, we first import the module.Then, the function is called by giving the module name, a period, and thefunction name. So, the sin function from the math module would be calledas math.sin(...).
As another example, the random module contains many functions thatgenerate random numbers. These can be used to introduce an element ofchance into a game.
Looking at the online reference for the random module, you’ll see that itcontains a function named random that returns a random number between 0and 1 (possibly including 0, but never 1). For example:
import random...
print random.random()
There are Python modules to do all kinds of things. Far too many tomention here. There is a reference to the Python modules linked from thecourse web site. You will be pointed to relevant modules when necessary.
Topic 9.2 Making Decisions
All of our programs so far have run straight from top-to-bottom. We need tohave some way to implement conditional code. That is, code that only runsunder certain circumstances. For example, we might want to ask the user fora password, and only display certain information if the password they enteris correct.
In order to do this, we need two things: a way to express the condition(e.g. is the password correct?), and a way to indicate which code only runswhen the condition is true.
9.2. MAKING DECISIONS [DRAFT, 1074] 145
Boolean Expressions
First, we will explore the first problem: expression conditions. These condi-tions are written with boolean expressions. The two boolean values are “true”and “false.” A boolean expression is any expression that evaluates to true orfalse.
We have already seen numeric operators (like - and *) that do a calcu-lation and produce a number. We will now see some boolean operators thatresult in a boolean value.
Here are some basic boolean operators:
< less than> greater than than== equal to!= not equal to
So, each of these expressions evaluate to a boolean value. Assume thevariable count contains the integer 10.
1+2 < count ⇒ True
1+2 > count ⇒ False
count == 11 ⇒ False
count != 11 ⇒ True
In Python, True and False are special values indicating the twoboolean values.
To check to see if two values are equal, the == operator is used. Note thedifference between = and ==. The = is used for variable assignment; you’retelling Python to put a value into a variable. The == is used for comparison—you’re asking Python a question about the two operands. Python won’t letyou accidentally use a = as part of a boolean expression, for this reason.
The if statement
The most common way to make decisions in Python is by using the if
statement. The if statement lets you ask if some condition is true. If it is,the body of the if will be executed.
For example, consider this program fragment:
146 [DRAFT, 1074] UNIT 9. MORE PROGRAMMING
if num < 10:
print "num if less than 10."
print "It sure is."
print "This code runs no matter what."
We will assume that a number has been assigned to num before this codestarts. If num has a number less than ten, the condition (num < 10) is true,so this code will print three lines:
num if less than 10.
It sure is.
This code runs no matter what.
If num contains a number 10 or larger, the condition is false and this codeonly prints one line:
This code runs no matter what.
As you can see, the two indented print statements are not executed whenthe if condition is false. These two statements make up the body of the if
statement. The last print is executed no matter what; it isn’t part of theif.
In Python (unlike many programming languages), the amount of spaceyou use is important. The only way you can indicate what statements arepart of the if body is by indenting, which means you’ll have to be carefulabout spacing in your program.
How much you indent is up to you, but you have to be consistent. MostPython programmers indent 4 spaces and all of the example code for thiscourse is written that way.
In the Python interpreter, a “...” prompt is used to indicate thatyou’re expected to keep typing because you haven’t finished thestatement yet. This will happen if you try an if statement in theinteractive interpreter.
The else clause
We have seen how to check a condition, and execute some code if it’s true.It is quite common to want to check a condition, execute some code whenit’s true, but execute other code if it’s false.
9.3. STRING FORMATTING (OPTIONAL) [DRAFT, 1074] 147
In the if statement, you can specify an else clause. The purpose of theelse is to give an “if not” block of code. The else code is executed if thecondition in the if is false.
For example, suppose we were checking the password a user entered. Thecode might look like this:
passwd = form["passwd"].value
if passwd=="secretpass":
print "<p>Password correct."
print "Here’s the secret information:</p>"...
else:
print "<p>Sorry, incorrect password.</p>"
Topic 9.3 String Formatting (optional)
So far, we have built all of out strings for output with the concatenation (+)operator. This can quickly become cumbersome:
print "Hello, " + name + "."
print "<p>Total needed: " + str(total - onhand) + ".</p>"
There is an easier way to substitute values into Python strings. Thestring formatting operator can be used to insert values into marked places ina string.
For example,
print "Hello, %s." % (name)
print "<p>Total needed: %i.</p>" % (total - onhand)
We build the template string for the output by indicating a substitutionwith a % and a character. The character after the % indicates the type ofvalue that will be substituted. A %s indicates that a string will be inserted;a %i indicates substitution of an integer; %f indicates a floating point value.
After the string, the % (string formatting) operator indicates that youwant to do a substitution. Then, you give a list of values to fill in. So, usingthe string formatting operator looks like this:
"template string " % (substitutions )
148 [DRAFT, 1074] UNIT 9. MORE PROGRAMMING
You have have as many substitutions (the %s, %i) as you like indicatedin the format string. Values are taken in order from the list of substitutionsthat follow.
label = "Item 1"
width = 15
height = 6
print "<p>%s: %i x %i</p>" % (label, width, height)
This code will print this line:
<p>Item 1: 15 x 6</p>
The string formatting operator gives you a very quick and flexible way tocreate output, based on values in variables.
Topic 9.4 Debugging
Unfortunately, when you write programs, they usually won’t work the firsttime. They will have errors or bugs. This is perfectly normal, and youshouldn’t get discouraged when your programs don’t work the first time.Debugging is as much a part of programming as writing code.
Section 1.3 and Appendix A in How to Think Like a Computer Scientist
cover the topic of bugs and debugging very well, so we won’t repeat too muchhere. You should read those before you start to write programs on your own.
Beginning programmers often make the mistake of concentrating toomuch on trying to fix errors in their programs without understanding whatcauses them. If you start to make random changes to your code in the hopesof getting it to work, you’re probably going to introduce more errors andmake everything worse.
When you realize there’s a problem with your program, you should dothings in this order:
1. Figure out where the problem is.
2. Figure out what’s wrong.
3. Fix it.
9.4. DEBUGGING [DRAFT, 1074] 149
Getting it right the first time
The easiest way to get through the first two steps here quickly is to writeyour programs so you know what parts are working and what parts mightnot be.
Write small pieces of code and test them as you go. As you write yourfirst few programs, it’s perfectly reasonable to test your program with everynew line or two of code.
It’s almost impossible to debug a complete program if you haven’t testedany of it. If you get yourself into this situation, it’s often easier to removemost of the code and add it back slowly, testing as you do. Obviously, it ismuch easier to test as you write.
Don’t write your whole program without testing and then ask theTAs to fix it. Basically, they would have to rewrite your wholeprogram to fix it, and they aren’t going to do that.
As you add code and test, you should temporarily insert some print
statements. These will let you test the values that are stored in variables soyou can confirm that they are holding the correct values. If not, you have abug somewhere in the code you’ve written and should fix it before you moveon.
Finding bugs
Unfortunately, you won’t always catch every problem in your code as youwrite it, no matter how careful you are. Sooner or later, you’ll realize thereis a bug somewhere in your program that is causing problems.
Again, you should resist the urge to try to fix the problem before you knowwhat’s wrong. Appendix A of How to Think Like a Computer Scientist talksabout different kinds of errors and what to do about them.
When you realize you have a bug in your program, you’re going to haveto figure out where it is. When you are narrowing the source of a bug, theprint statement can be your best friend.
Usually, you’ll first notice either that a variable doesn’t contain the valueyou think it should or that the flow of control isn’t the way you think itshould be because the wrong part of an if is executed.
You need to work backwards from the symptom of the bug to its cause.For example, suppose you had an if statement like this:
150 [DRAFT, 1074] UNIT 9. MORE PROGRAMMING
if length*width < possible area:
If the condition doesn’t seem to be working properly, you need to figure outwhy. You can add in some print statements to help you figure out what’sreally going on. For example,
print "l*w: " + str(length*width)
print "possible: " + str(possible area)
if length*width < possible area:
print "I’m here"
When you check this way, be sure to copy and paste the exact expressionsyou’re testing. If you accidentally mistype them here, it could take a long
time to figure out what has happened.You’ll probably find that at least one of the print statements isn’t doing
what it should. In the example, suppose the value of length*width wasn’twhat we expected. Then, we could look at both variables separately:
print "l, w: " + str(length) + ", " + str(width)
If length was wrong, you would have to backtrack further and look at what-ever code sets length. Remove these print statements and add in somemore around the length=. . . statement.
Topic 9.5 Coding Style (optional)
Whenever you’re writing a computer program of any kind, there’s more toworry about than getting it to work. You should also make sure your programis easy for you or someone else to read and follow.
There are no fixed rules for creating a good program. It’s a matter ofstyle, just like writing good essays. But, there are some guidelines you shouldfollow to get yourself started in the right direction.
• Use descriptive names for all of your variables and functions. Don’tuse variables names like x and x2. Try to describe what the variableor function is for: total, calc tax
• Include comments (lines that start with #) to describe parts of yourcode that are hard to follow. For example,
# get the user’s input and make sure it’s a number
9.5. CODING STYLE (OPTIONAL) [DRAFT, 1074] 151
All of these tips will make it easier for someone else to read your codeand also make it easier for you to come back and work on your code later. Inaddition, if your code is easier to read, it will probably be easier to debug.
◮ Look back at any code you have written. How easy is it to read? Have alook at someone else’s code. Can you follow it?
Summary
This unit adds some more tools that you can use in Python to make yourprograms do different things.
Consider reading the optional topics, even though they aren’t required.They provide useful information about programming.
Key Terms
• module
• boolean value
• boolean expression
• if statement
• else clause
• string formatting operator
• debugging
• coding style

152 [DRAFT, 1074] UNIT 9. MORE PROGRAMMING
Unit 10
Internet Internals
Learning Outcomes
• Identify the parts of a URL and their uses.
• Describe what cookies are and why they are used.
• Describe some things that can be done with HTTP besides simplytransferring files.
• Identify uses of encryption on the Internet and outline why it is neces-sary.
Learning Activities
• Read this unit and do the questions marked with a “◮”.
• Browse through the links for this unit on the course web site.
Topic 10.1 URLs
We have learned a lot about the web since we first discussed URLs inTopic 1.3. As we have discussed different things that can be done on theweb, more has been added to our URLs.
153
154 [DRAFT, 1074] UNIT 10. INTERNET INTERNALS
Query String
You might have noticed that when we create forms and use them to accessweb scripts, the data from the form is transmitted as part of the URL. Forexample, if we had a form with two text inputs named text1 and text2, asin Figure 8.1, we would submit it and see a URL link this in the browser’slocation bar:
http://cmpt165.cs.sfu.ca/∼student/sample.py?text1=Hi&text2=There
The part after the ? is called the query string. It contains an encodedversion of the CGI data. The different fields are separated by an ampersand,&. Note that if you want to include a URL like this in an <a> tag, you needto use the & entity to encode each ampersand.
When you send CGI data this way, it will be recorded in logs of webtraffic and will generally make a very long and awkward URL. You can avoidthis problem by using the post method to transmit your form data. You justhave to change the way your form submits:
<form action="sample.py" method="post">...</form>
This way there will be no query string in your URL, and the form data istransmitted out-of-sight of the user.
Fragment
In Topic 4.5, we discussed the id attribute and pointed out that these iden-tifiers can be used as fragments or anchors. This is a way of creating a linkto a position within a page.
To include an anchor in a URL, it is put at the very end (after a querystring), starting with a #. Suppose we have a page at the URL http://cmpt165.cs.sfu.ca/∼student/page.html with an identifier <h2 id="contents">.To create a link that scrolls to this <h2>, we would use this URL:
http://cmpt165.cs.sfu.ca/∼student/page.html#contents
Fragments can also be used in relative URLs on a web page:
<a href="../page.html#contents">...</a>

10.2. COOKIES [DRAFT, 1074] 155
URL Encoding
In HTML, entities are needed to let us display characters like < that areused for special purposes in the language. We run into similar problemsin URLs. The characters ? and # are used to indicate the query string andfragment, respectively. What if we have a file name or CGI data that containsa question mark?
There are also characters that aren’t allowed in a URL, like spaces. Inorder to allow URLs to transmit these filenames and form data, these char-acters must be encoded.
Spaces are replaced with a plus sign, so if someone entered “John Smith”into a form, the URL including the query string would look like this:
http://cmpt165.cs.sfu.ca/∼student/test.py?name=John+Smith
Other characters are encoded with the hexadecimal number of their charactervalue. If someone entered “Who?” in a form, it would be encoded like this:
http://cmpt165.cs.sfu.ca/∼student/test.py?name=Who%3F
Fortunately, you don’t usually have to worry about URL encoding. Whenyou use web sites, it’s done automatically by the browser. If you ever need tocreate a link with encoded characters, you can just type it into the Locationbar in Mozilla, which will convert it automatically. You can also type theproblem characters into a form and get the encoded version from the querystring after you submit.
◮ Use the <a> tag and a URL with a query string to create a link to createa link to CGI script without using a form.
◮ Try method="post" in a form.
◮ Use an id attribute on a tag on a web page and use a fragment to link toit.
◮ Experiment with URL encoding by typing some punctuation into an HTMLform and look at the query string that is used when you submit the form.
Topic 10.2 Cookies
When a user accesses web pages from your site, there isn’t really any wayfor you to connect one page view to another. There’s no way of knowing
156 [DRAFT, 1074] UNIT 10. INTERNET INTERNALS
if the same user is following links from one page to another—all you knowis which pages are being loaded. You can only guess that they are beingloaded by the same user. In short, the web is stateless—every page is loadedindependently.
This fact can cause problems if you need to follow a particular user fromone page to the next. For example, suppose you were creating an onlineshopping application. You would need to keep track of the items that usersplaced in their “shopping carts” so you could give them the right total whenthey eventually got to the “checkout” page.
One way to keep track of a user on the web is to use cookies. Cookies aresmall pieces of information that a web site can store on the user’s computer.Once a web server has stored a cookie, it can retrieve its value and use it todetermine who the user is, what is in their shopping cart, and so on.
Because they can be used to track users, many people don’t like acceptingcookies from all web sites. Some companies, Doubleclick in particular, havehuge databases of people’s browsing habits that they have collected throughtheir cookies.
Firefox includes sophisticated tools for managing who can set acookie in your web browser. It also contains a “Cookie Manager”that you can use to view and delete the cookies stored in yourbrowser.
Cookies can be created when a page loads, as part of the HTTP conversa-tion between the server and client. Cookies come with an expiry date. Theyare stored on your hard drive until they expire.
There is a Python module named Cookie that can be used in CGI scriptsto create cookies. We won’t discuss it here, and you will not be expected touse it in this course.
◮ Use Mozilla’s “Cookie Manager” to see what cookies you have stored.
Topic 10.3 HTTP Tricks (optional)
So far, we have only thought of HTTP as a way to transfer web pages fromthe server to the client. This is its primary job and all you usually have toworry about. But there are many other things that can be done with HTTPthat are worth knowing about, particularly if you want to create “real” web
10.3. HTTP TRICKS (OPTIONAL) [DRAFT, 1074] 157
sites. You should keep these possibilities in mind and remember when theyare needed.
Caching
If your web browser needs the same page twice, do you really need to transferthe whole thing over the network each time? You could store a copy on thehard drive and use it when you need it again. This is called caching.
For example, when you use the same CSS file for your entire site, a browserwill load it the first time it views a page from your site, but after that, it cancache the file and use it as the reader browses your site, without having toreload it every time.
Caching decreases the amount of network traffic and makes pages appearfaster. It is important for files like graphics and style sheets that appear onevery page.
Caching can cause a problem if a file changes. Suppose a web site’s stylesheet changes between visits. How is your web browser supposed to knowwhether it can use its cached copy, or has to reload the style sheet?
A web browser can ask the web server to send a file only if it has changedsince it last downloaded the file. It does this by sending information aboutthe version of the file it has cached in the HTTP request. If the server has anewer version, it sends the file. If not, it just tells the browser that its cachedversion is up to date.
In addition to your web browser’s cache, your ISP might have acache server that stores web pages that their subscribers have re-cently accessed. This is one way they can decrease the amount ofinformation that must be transmitted between them and the out-side Internet and thus reduce their expenses. Cache servers can beentirely invisible to the users.
Web scripts can’t usually be cached since their content could change everytime they are viewed.
When you create web pages, you should keep caching in mind. For exam-ple, if you use the same style sheet file for every page, most users will onlyhave to transfer it once. It will save them time and reduce your bandwidthcosts. If you use a different style sheet on each page, every one will be loadedseparately.

158 [DRAFT, 1074] UNIT 10. INTERNET INTERNALS
The same is true for images. If you use a single image (maybe a site logo)on every one of your pages, users probably won’t notice the time it takes theimage to transfer. If you use a different image on every page, the images willhave to be loaded every time the user goes to a new page.
Redirects
As you have travelled the WWW, you have probably followed a link to asite and found a message like “We have reorganized our page, so you shouldgo to. . . ”. You have probably also seen many “Not Found” errors becausepages have moved to another location.
This is a sign that people don’t understand HTTP or the features of theirweb server. People browsing a web site should never have to see messageslike this.
The web server can handle moved pages transparently. When the userrequests a page, the web server can indicate that the page has moved toanother URL. The web browser will follow the redirect without the user everseeing it. Search engines also understand automatic redirects and will takethem into account when returning search results.
Without an automatic redirect, all links from other web sites or searchengines will take users to the old page. Basically, when somebody else linksto your web site, it is a good thing and you don’t want to break those links.
The way a redirect is set up depends on the web server you are using.
Content Negotiation
As you should know by now, different web browsers have different capabili-ties. Some can display SVG images; some can’t. Some can display Unicodecharacters, and some can’t. It’s possible that every person browsing the webhas a different combination of files that they consider acceptable.
There is a way of dealing with these differences using HTTP that isn’tvery well known. It is possible for a web client and server to exchangeinformation about what files are acceptable and decide on the best version.This process is called content negotiation.
When a web browser requests a web page, it can send along informationabout acceptable information in four areas:
10.3. HTTP TRICKS (OPTIONAL) [DRAFT, 1074] 159
File type: The browser sends a list of MIME types that it knows how tohandle, and a level of “preference” for each type. So, the browser mightprefer a XHTML file, but if all that’s available is a PDF, it will acceptthat and try to find a program to open it. Browsers that can display aSVG image might be sent that, while other browsers would receive thePNG version of the same image.
Language: The web browser should have a list of the languages that theuser knows how to read and an order of preference. The web server willtry to send a page that the browser can actually read. On multilingualweb sites, using these preferences lets different people read the web sitein different languages with no changes to the site and no effort for theuser.
Character set: Some web browsers know about Unicode and some don’t.There are also several other character sets used for various reasons thatbrowsers may or may not be able to handle.
Compression: Most web browsers can automatically handle files that havebeen compressed, uncompressing them when they are received. Thisallows pages to load faster, since they are smaller and can be sent morequickly. Negotiating compression allows web servers to take advantageof this when its available, but send regular uncompressed files when itisn’t.
When these three kinds of information are combined, content negotiationallows web authors to create web sites with many different visitors in mind.All visitors will see the content that is best suited to them.
Once content negotiation is activated in the web server, the only changethat must be made on the web site is to link to files without an extension.For example, instead of linking to page.html, the link would simply point topage. The browser and server would then negotiate for the XHTML file oranother variant if one is available.
Content negotiation is not used frequently on the web, partially becausemost people don’t know it is possible. Even for those that do, content nego-tiation presents problems.
When web browsers are installed, they usually assume that system’s de-fault language is the only one that the user can read. If users don’t changethis setting and go to a web site written in another language, they may getan error message that says there is no page that’s acceptable.
160 [DRAFT, 1074] UNIT 10. INTERNET INTERNALS
Content negotiation has been used on the course web site. If youhave a non-English version of Windows or the MacOS, you proba-bly had to change your browser’s settings to view the web site.
A side benefit of content negotiation is that you don’t have to use fileextensions in your URLs. If you have used content negotiation and want toturn a static XHTML page into a Python web script, you would just haveto replace the page.html file with page.py. Since all of the links only point topage, they will all still work correctly.
Topic 10.4 Security and Encryption
(optional)
Have a look at Figure 1.1 again. As we have just seen, there are manyother computers between your home computer and SFU that pass the datayou send from one to the other. You probably have no idea who runs theseintermediate computers. There’s no reason you would, and it’s not easy todetermine. Most people don’t care.
All of the information that you send across the Internet passes throughintermediate computers like these. It’s possible for any of these computersto watch all of the information that passes through them and scan for thingslike passwords and credit card numbers that you want to keep secret.
When the Internet was originally designed, there were only a fewsites connected, mostly universities. Everybody knew and trustedthe administrators at the various sites that might be responsiblefor passing along their data. Now, with millions of people send-ing information across the Internet at any time and thousands ofservice providers, blind trust isn’t really an option.
It is possible to keep secrets, even when you are passing informationaround this way. The information can be encrypted so that only the intendedrecipient can decrypt it and read the contents. The computers in between canpass the information along, but they can’t (easily) decrypt it to see what’sinside. The details of how these encryption methods work is beyond thescope of this course.
Most information that is transmitted over the Internet isn’t encrypted.HTTP (web) traffic and emails are sent without encryption.
10.4. SECURITY AND ENCRYPTION (OPTIONAL) [DRAFT, 1074]161
Secure HTTP (HTTPS or S-HTTP) is a version of HTTP where allinformation is encrypted when it is transmitted. Using HTTPS ensures thatany sensitive information you send will only be seen by the intended receiver.URLs that begin with https:// instead of http:// use the encrypted versionof HTTP. HTTPS isn’t always used because encrypting and decrypting datais extra work for web servers.
Most web browsers have a small icon in the bottom of their windowto indicate whether or not they are using a secure connection. Youshould keep your eye on this icon when sending passwords andother sensitive information.
You may have used FTP (File Transfer Protocol) to transfer files overthe Internet. So, you may have been wondering why you can’t use FTP totransfer files to the course web server.
FTP isn’t encrypted. Since you have to provide your password to uploadfiles into your account, it would be sent unencrypted every time you loggedin. The technical staff in Computing Science don’t FTP for security reasons.The SCP (Secure CoPy, also called SFTP) protocol does use encryption, soit was chosen as an alternative.
It is also possible to encrypt email by adding an encryption program toyour email program. The most common encryption programs for email arePGP (Pretty Good Privacy) and GPG (GNU Privacy Guard).
Whenever you send information like credit card numbers or sensitive pass-words over the Internet, you should make sure you are using some kind ofencrypted connection.
◮ You probably use some programs not listed here on the Internet. Do theyencrypt the data they send? Are there secure versions?
◮ Try to find an encryption plug-in for your email client.
Summary
After completing this unit, you should have a better understanding of howsome parts of the Internet work. As in Unit 1, you should gain an under-standing of what’s happening behind the scenes when you use the WWW.
162 [DRAFT, 1074] UNIT 10. INTERNET INTERNALS
Key Terms
• query string
• fragment
• URL encoding
• cookie
• caching
• redirect
• content negotiation
• encryption
Part V
Appendices
163


Appendix A
Technical Startup
Learning Outcomes
This material is intended to help you get over the technical hurdles necessaryto get started in the course. You won’t be tested on it.
Learning Activities
• Install whatever software you need (when you need it).
• Get acquainted with the software needed for the course.
This Appendix explains how to install and get started with some of thesoftware that we will be using in the course. The instructions cover thesoftware used with Windows. You can also do this course with a Mac orother operating system. See the course web page for more information.
Appendix B contains instructions on working with individual pieces ofsoftware.
The instructions assume that you have a basic understanding of how touse your computer—you can open programs, load and save files, use menusand buttons, and so on. If you don’t know all these things, you should firstspend some time with the tutorial that came with your operating system orsit down with someone and have them show you the basics.
Topic A.1 Installing Software
This software can be used on your own computer. Instructions for the soft-ware in the lab will be provided separately.
165
166 [DRAFT, 1074] APPENDIX A. TECHNICAL STARTUP
Links to all of the software you need can be found on the course web siteunder “Tools.” Initially you should install at least a web browser, a securefile transfer client and a text editor.
The instructions here are for Windows installations. If you have a Mac,you can use the software mentioned in the Introduction and on the courseweb site. The installation procedures for these programs are are fairly easy,but you will have to figure them out on your own.
Mozilla Firefox
We recommend Firefox as the web browser for this course. It is the “opensource” version of Netscape 8; the two programs are very similar.
Once you’ve downloaded the Firefox Setup. . . .exe file, run it. The instal-lation is straightforward; you can select defaults for the installation.
TextPad
TextPad is a powerful text editor. Using it instead of Notepad will makeediting HTML and CSS easier.
Download and run the executable file. You can just accept all of thedefaults for the installation.
SSH Client
The SSH Client software includes a SCP (secure copy) program that youwill use to transfer your web pages to the web server. You cannot use FTPto transfer files to the course web server because FTP connections are notallowed; you will have to use SCP.
Once you have downloaded the installation file, you can run it and acceptthe defaults for the installation. See Topic B.3 for instructions on uploadingfiles.
The GIMP
The GIMP is distributed as a ZIP file. Unless you have Windows XP, youwill need to use WinZIP to uncompress it. When you unzip, you will get asingle file called gimp-setup-. . . .exe. Run this program.
A.2. SFU COMPUTING ACCOUNT [DRAFT, 1074] 167
Once the installation has started, you have to click your way throughseveral screens. You can choose the “Typical” installation.
Once it is installed, you will probably get several questions about fileassociations. They are of the form “The file type ’.???’ has already beenregistered with Windows. Do you want to replace those settings?” If youwant the GIMP to open when you double-click this file type, say “Yes.” It’sprobably easiest to say “Yes” to all of these questions.
Once you’ve installed GIMP, you will be asked to install GTK+ as well.You must install it for the GIMP to work. All you have to do is click “Okay.”
The first time you start the GIMP, there is a short setup process. Youcan accept all of the defaults here as well. At one point during the setup, aCommand window might pop up—you’ll have to switch to that window andpress Enter to get things moving again.
Python
After you download the Python Windows installer, you need to run it.
You can accept the defaults for this installation too. If you want to savedisk space, you won’t need the “Python test suite” for this course, so youdon’t have to install it.
WinZip
If you have a version of Windows earlier than Windows XP, you need WinZipto expand ZIP files that you download. If you need to work with a ZIP file,you must have it installed.
The installation is quite easy, consisting mostly of saying “Yes” to anumber of questions. You should probably have the program start with its“Wizard” interface and have it search your entire hard drive for ZIP files.
Topic A.2 SFU Computing Account
If your SFU account isn’t activated yet, you will need to do it for this course.You can go to http://my.sfu.ca/ to activate your account.
168 [DRAFT, 1074] APPENDIX A. TECHNICAL STARTUP
Topic A.3 CMPT 165 Server Account
In addition to your regular SFU computing account, you will have an accounton a web server set up just for this course. You will use the file space on thisserver for your assignments. It is set up to make the web programming wewill be doing in the last part of the course as straightforward as possible.
This account will have a different password than your SFU computingaccount. At the start of the semester, you can find your password for thisaccount from http://my.sfu.ca. Go to the “myCourses” section of my.sfu.ca.Under the “CMPT165” heading, you should see your initial password for theserver.
You should change the initial password immediately after you are con-nected. You can do this from the server’s front web page, http://cmpt165.cs.sfu.ca/ .
See Topic B.3 for information on transferring files to this web server.You won’t be able to access this server after you’re done the course, so
make sure you keep your own copies of the files you upload there if you thinkyou might want them in the future.
Appendix B
Software Instructions
Learning Outcomes
This material will help you to learn how to use the software you need to dothe assignments. You won’t be tested on it.
Learning Activities
• Explore the software more on your own.
Again, this is software that can be used on your own computer. Instructionsfor the software in the lab will be provided separately.
If there are any updates to these instructions, they will be posted in the“Technical” section of the course web site.
Topic B.1 Mozilla Firefox
We’re going to assume that you’ve used the web before, so you should haveused some web browser. Using Firefox is similar.
One thing that you must know is how to open web pages on your com-puter. From the “File” menu, select “Open File.” Here, you can select anXHTML file and view it. It should look the same as it will when you put iton the web.
169
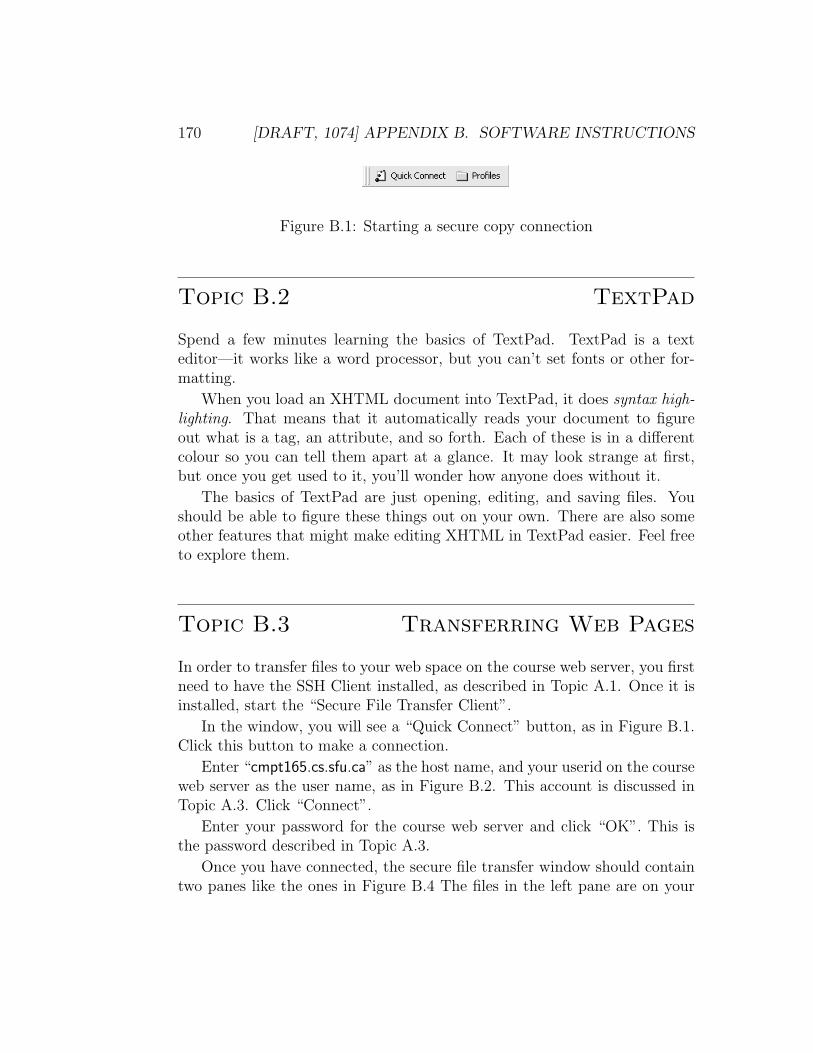
170 [DRAFT, 1074] APPENDIX B. SOFTWARE INSTRUCTIONS
Figure B.1: Starting a secure copy connection
Topic B.2 TextPad
Spend a few minutes learning the basics of TextPad. TextPad is a texteditor—it works like a word processor, but you can’t set fonts or other for-matting.
When you load an XHTML document into TextPad, it does syntax high-
lighting. That means that it automatically reads your document to figureout what is a tag, an attribute, and so forth. Each of these is in a differentcolour so you can tell them apart at a glance. It may look strange at first,but once you get used to it, you’ll wonder how anyone does without it.
The basics of TextPad are just opening, editing, and saving files. Youshould be able to figure these things out on your own. There are also someother features that might make editing XHTML in TextPad easier. Feel freeto explore them.
Topic B.3 Transferring Web Pages
In order to transfer files to your web space on the course web server, you firstneed to have the SSH Client installed, as described in Topic A.1. Once it isinstalled, start the “Secure File Transfer Client”.
In the window, you will see a “Quick Connect” button, as in Figure B.1.Click this button to make a connection.
Enter “cmpt165.cs.sfu.ca” as the host name, and your userid on the courseweb server as the user name, as in Figure B.2. This account is discussed inTopic A.3. Click “Connect”.
Enter your password for the course web server and click “OK”. This isthe password described in Topic A.3.
Once you have connected, the secure file transfer window should containtwo panes like the ones in Figure B.4 The files in the left pane are on your

B.3. TRANSFERRING WEB PAGES [DRAFT, 1074] 171
Figure B.2: Entering the host and user name
Figure B.3: Entering the password
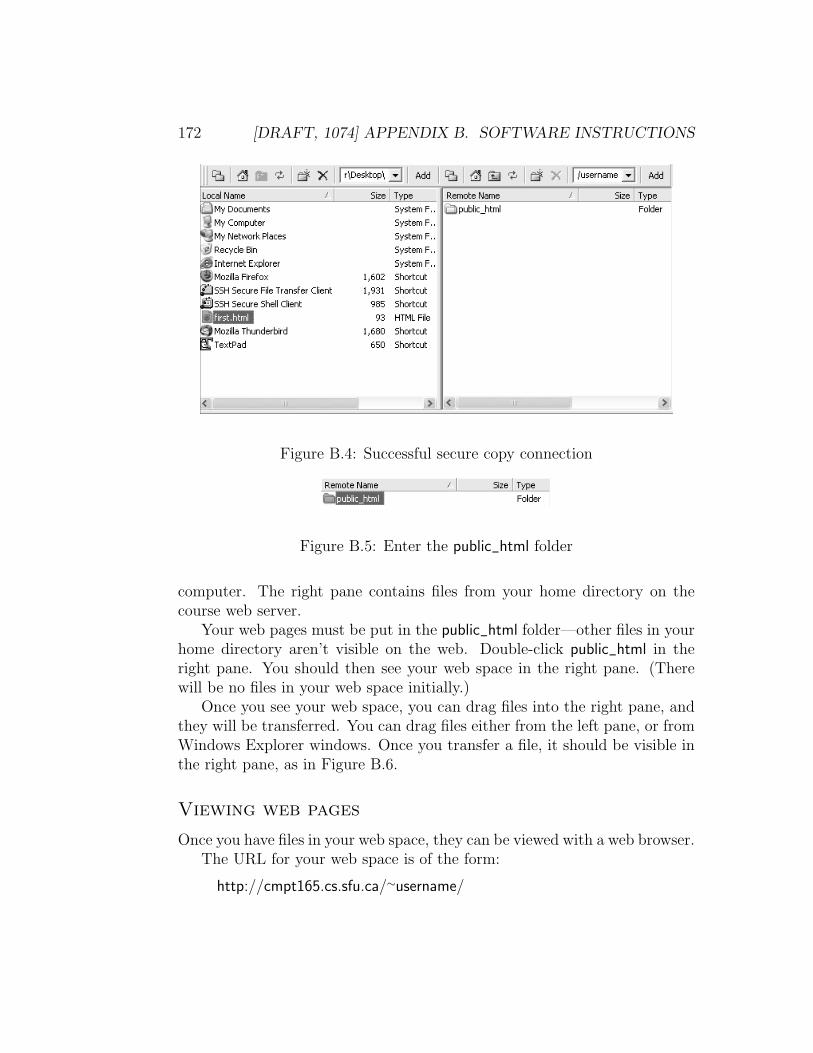
172 [DRAFT, 1074] APPENDIX B. SOFTWARE INSTRUCTIONS
Figure B.4: Successful secure copy connection
Figure B.5: Enter the public_html folder
computer. The right pane contains files from your home directory on thecourse web server.
Your web pages must be put in the public_html folder—other files in yourhome directory aren’t visible on the web. Double-click public_html in theright pane. You should then see your web space in the right pane. (Therewill be no files in your web space initially.)
Once you see your web space, you can drag files into the right pane, andthey will be transferred. You can drag files either from the left pane, or fromWindows Explorer windows. Once you transfer a file, it should be visible inthe right pane, as in Figure B.6.
Viewing web pages
Once you have files in your web space, they can be viewed with a web browser.The URL for your web space is of the form:
http://cmpt165.cs.sfu.ca/∼username/
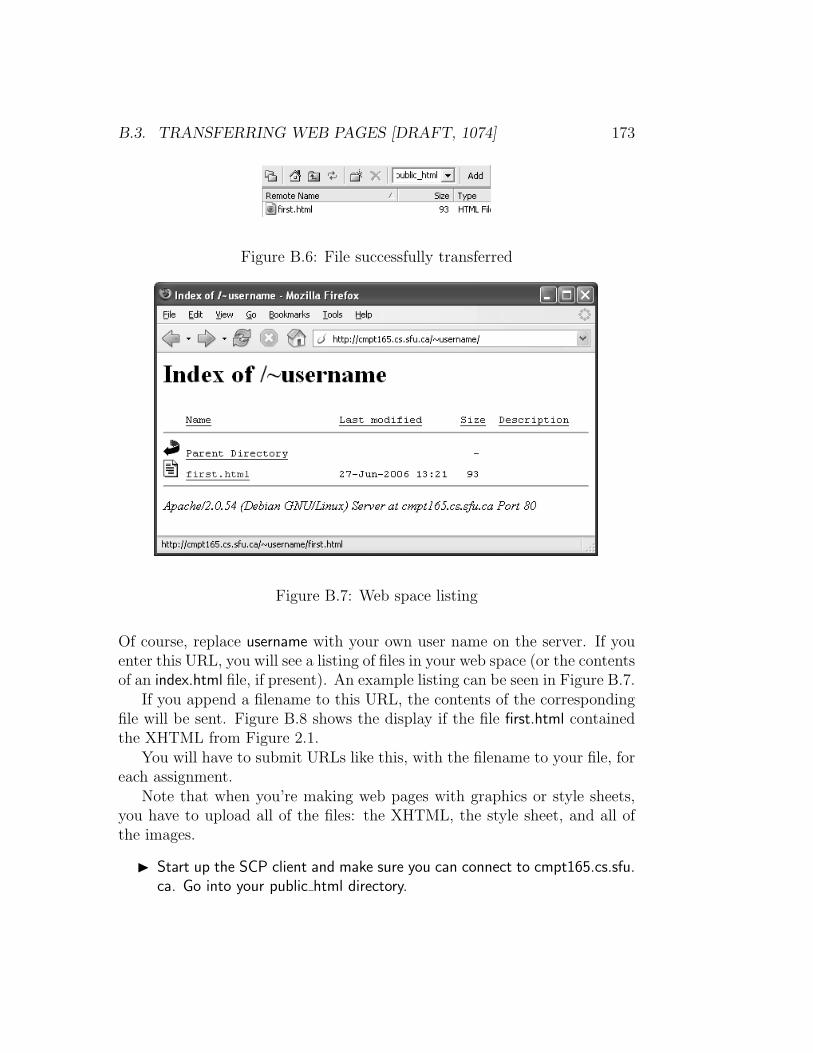
B.3. TRANSFERRING WEB PAGES [DRAFT, 1074] 173
Figure B.6: File successfully transferred
Figure B.7: Web space listing
Of course, replace username with your own user name on the server. If youenter this URL, you will see a listing of files in your web space (or the contentsof an index.html file, if present). An example listing can be seen in Figure B.7.
If you append a filename to this URL, the contents of the correspondingfile will be sent. Figure B.8 shows the display if the file first.html containedthe XHTML from Figure 2.1.
You will have to submit URLs like this, with the filename to your file, foreach assignment.
Note that when you’re making web pages with graphics or style sheets,you have to upload all of the files: the XHTML, the style sheet, and all ofthe images.
◮ Start up the SCP client and make sure you can connect to cmpt165.cs.sfu.ca. Go into your public html directory.
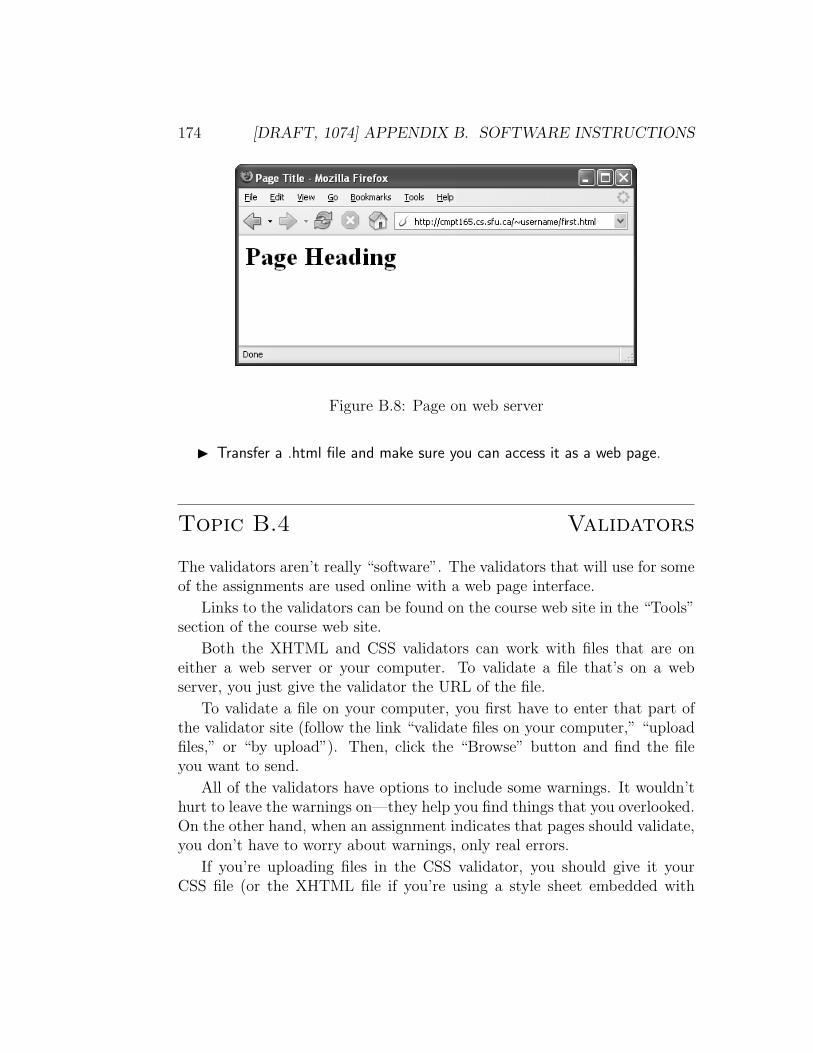
174 [DRAFT, 1074] APPENDIX B. SOFTWARE INSTRUCTIONS
Figure B.8: Page on web server
◮ Transfer a .html file and make sure you can access it as a web page.
Topic B.4 Validators
The validators aren’t really “software”. The validators that will use for someof the assignments are used online with a web page interface.
Links to the validators can be found on the course web site in the “Tools”section of the course web site.
Both the XHTML and CSS validators can work with files that are oneither a web server or your computer. To validate a file that’s on a webserver, you just give the validator the URL of the file.
To validate a file on your computer, you first have to enter that part ofthe validator site (follow the link “validate files on your computer,” “uploadfiles,” or “by upload”). Then, click the “Browse” button and find the fileyou want to send.
All of the validators have options to include some warnings. It wouldn’thurt to leave the warnings on—they help you find things that you overlooked.On the other hand, when an assignment indicates that pages should validate,you don’t have to worry about warnings, only real errors.
If you’re uploading files in the CSS validator, you should give it yourCSS file (or the XHTML file if you’re using a style sheet embedded with
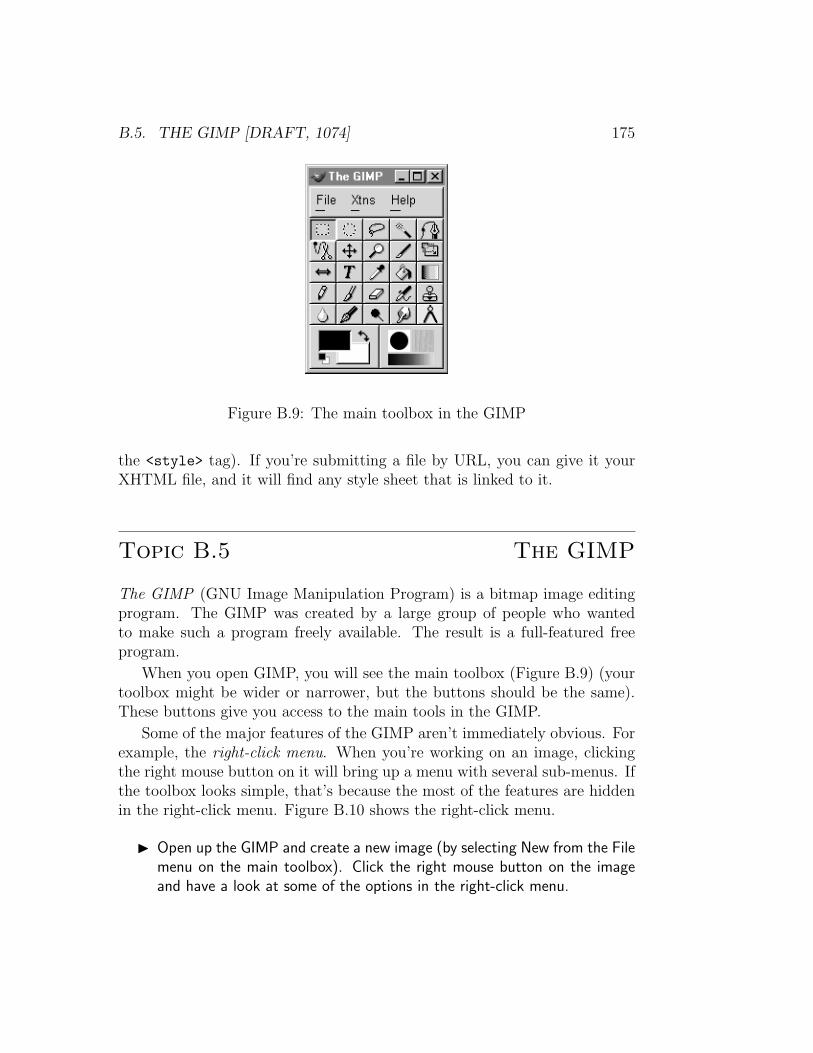
B.5. THE GIMP [DRAFT, 1074] 175
Figure B.9: The main toolbox in the GIMP
the <style> tag). If you’re submitting a file by URL, you can give it yourXHTML file, and it will find any style sheet that is linked to it.
Topic B.5 The GIMP
The GIMP (GNU Image Manipulation Program) is a bitmap image editingprogram. The GIMP was created by a large group of people who wantedto make such a program freely available. The result is a full-featured freeprogram.
When you open GIMP, you will see the main toolbox (Figure B.9) (yourtoolbox might be wider or narrower, but the buttons should be the same).These buttons give you access to the main tools in the GIMP.
Some of the major features of the GIMP aren’t immediately obvious. Forexample, the right-click menu. When you’re working on an image, clickingthe right mouse button on it will bring up a menu with several sub-menus. Ifthe toolbox looks simple, that’s because the most of the features are hiddenin the right-click menu. Figure B.10 shows the right-click menu.
◮ Open up the GIMP and create a new image (by selecting New from the Filemenu on the main toolbox). Click the right mouse button on the imageand have a look at some of the options in the right-click menu.
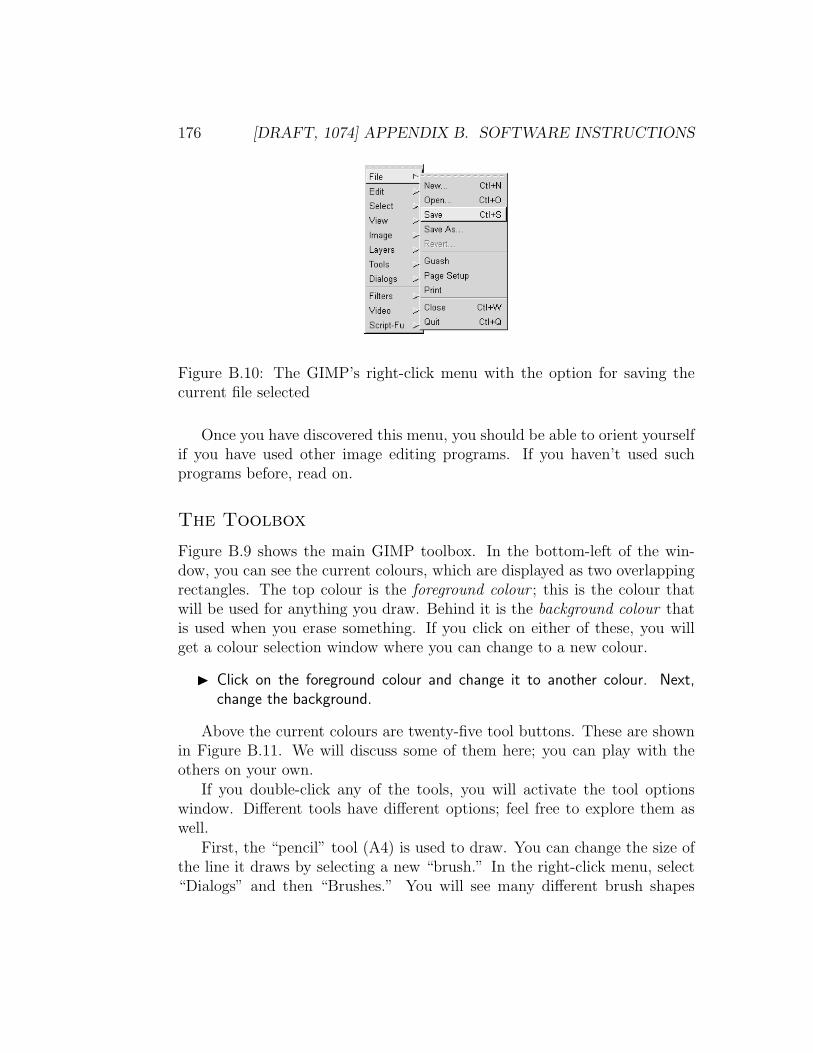
176 [DRAFT, 1074] APPENDIX B. SOFTWARE INSTRUCTIONS
Figure B.10: The GIMP’s right-click menu with the option for saving thecurrent file selected
Once you have discovered this menu, you should be able to orient yourselfif you have used other image editing programs. If you haven’t used suchprograms before, read on.
The Toolbox
Figure B.9 shows the main GIMP toolbox. In the bottom-left of the win-dow, you can see the current colours, which are displayed as two overlappingrectangles. The top colour is the foreground colour ; this is the colour thatwill be used for anything you draw. Behind it is the background colour thatis used when you erase something. If you click on either of these, you willget a colour selection window where you can change to a new colour.
◮ Click on the foreground colour and change it to another colour. Next,change the background.
Above the current colours are twenty-five tool buttons. These are shownin Figure B.11. We will discuss some of them here; you can play with theothers on your own.
If you double-click any of the tools, you will activate the tool optionswindow. Different tools have different options; feel free to explore them aswell.
First, the “pencil” tool (A4) is used to draw. You can change the size ofthe line it draws by selecting a new “brush.” In the right-click menu, select“Dialogs” and then “Brushes.” You will see many different brush shapes
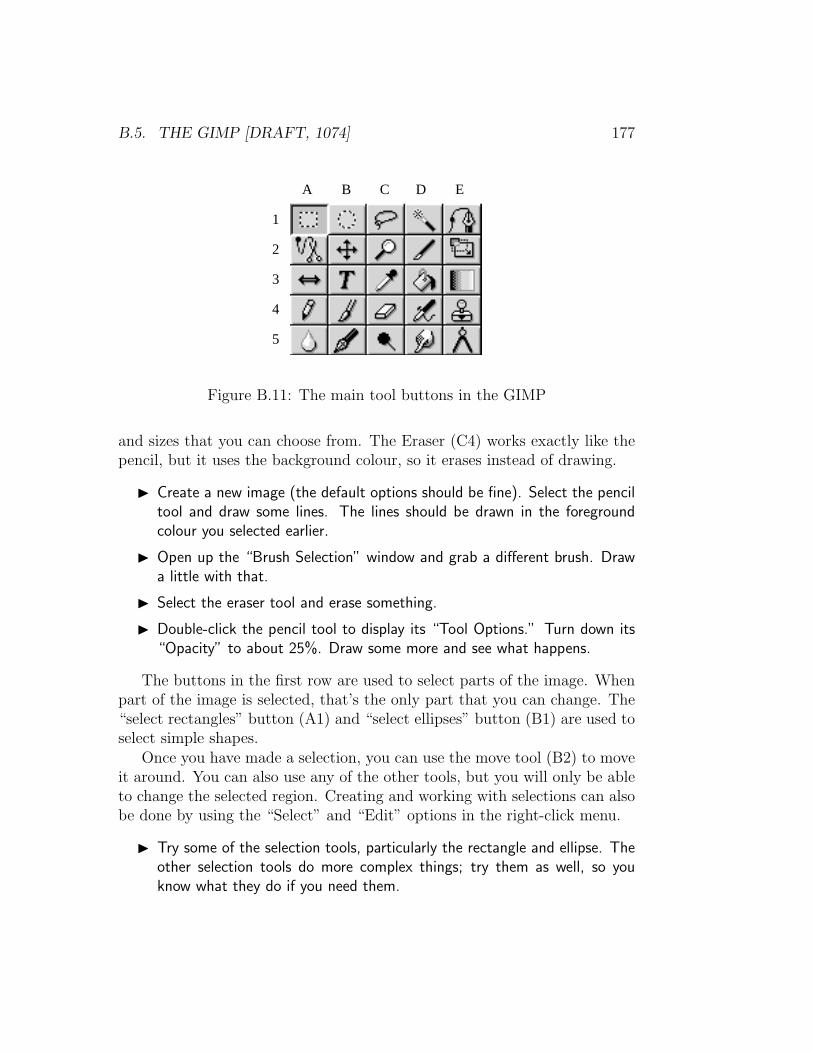
B.5. THE GIMP [DRAFT, 1074] 177
A C D E
4
5
3
2
1
B
Figure B.11: The main tool buttons in the GIMP
and sizes that you can choose from. The Eraser (C4) works exactly like thepencil, but it uses the background colour, so it erases instead of drawing.
◮ Create a new image (the default options should be fine). Select the penciltool and draw some lines. The lines should be drawn in the foregroundcolour you selected earlier.
◮ Open up the “Brush Selection” window and grab a different brush. Drawa little with that.
◮ Select the eraser tool and erase something.
◮ Double-click the pencil tool to display its “Tool Options.” Turn down its“Opacity” to about 25%. Draw some more and see what happens.
The buttons in the first row are used to select parts of the image. Whenpart of the image is selected, that’s the only part that you can change. The“select rectangles” button (A1) and “select ellipses” button (B1) are used toselect simple shapes.
Once you have made a selection, you can use the move tool (B2) to moveit around. You can also use any of the other tools, but you will only be ableto change the selected region. Creating and working with selections can alsobe done by using the “Select” and “Edit” options in the right-click menu.
◮ Try some of the selection tools, particularly the rectangle and ellipse. Theother selection tools do more complex things; try them as well, so youknow what they do if you need them.
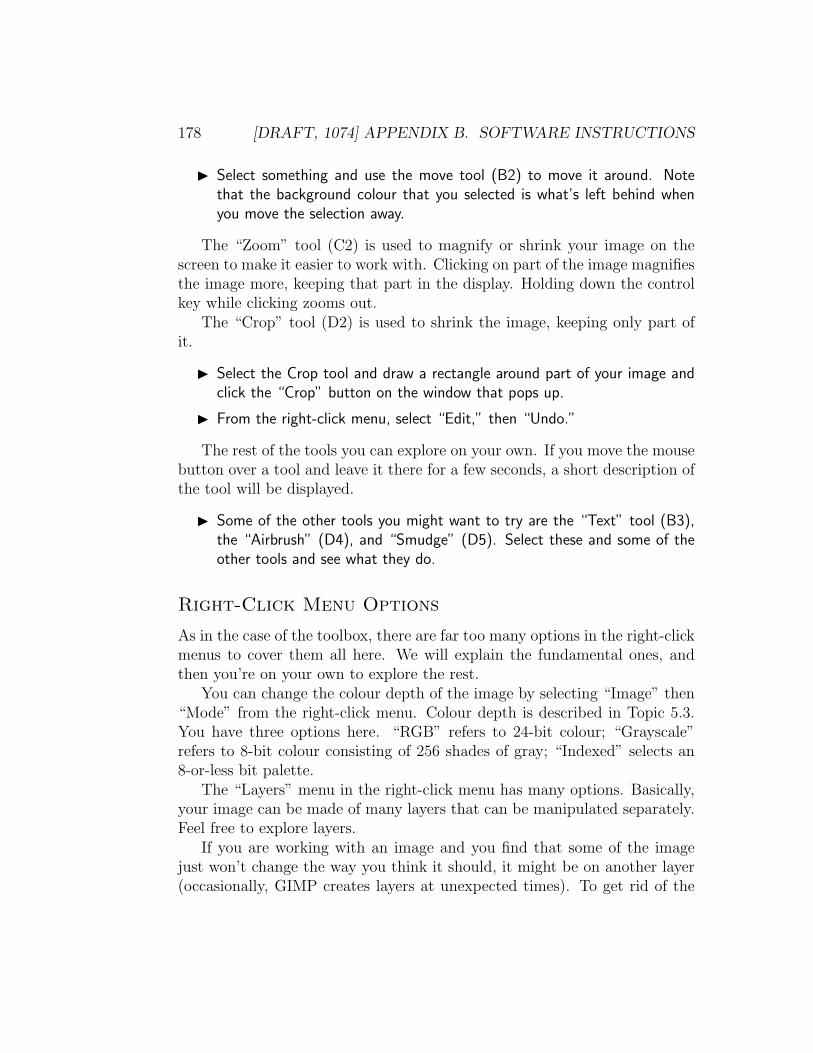
178 [DRAFT, 1074] APPENDIX B. SOFTWARE INSTRUCTIONS
◮ Select something and use the move tool (B2) to move it around. Notethat the background colour that you selected is what’s left behind whenyou move the selection away.
The “Zoom” tool (C2) is used to magnify or shrink your image on thescreen to make it easier to work with. Clicking on part of the image magnifiesthe image more, keeping that part in the display. Holding down the controlkey while clicking zooms out.
The “Crop” tool (D2) is used to shrink the image, keeping only part ofit.
◮ Select the Crop tool and draw a rectangle around part of your image andclick the “Crop” button on the window that pops up.
◮ From the right-click menu, select “Edit,” then “Undo.”
The rest of the tools you can explore on your own. If you move the mousebutton over a tool and leave it there for a few seconds, a short description ofthe tool will be displayed.
◮ Some of the other tools you might want to try are the “Text” tool (B3),the “Airbrush” (D4), and “Smudge” (D5). Select these and some of theother tools and see what they do.
Right-Click Menu Options
As in the case of the toolbox, there are far too many options in the right-clickmenus to cover them all here. We will explain the fundamental ones, andthen you’re on your own to explore the rest.
You can change the colour depth of the image by selecting “Image” then“Mode” from the right-click menu. Colour depth is described in Topic 5.3.You have three options here. “RGB” refers to 24-bit colour; “Grayscale”refers to 8-bit colour consisting of 256 shades of gray; “Indexed” selects an8-or-less bit palette.
The “Layers” menu in the right-click menu has many options. Basically,your image can be made of many layers that can be manipulated separately.Feel free to explore layers.
If you are working with an image and you find that some of the imagejust won’t change the way you think it should, it might be on another layer(occasionally, GIMP creates layers at unexpected times). To get rid of the
B.6. PYTHON [DRAFT, 1074] 179
Figure B.12: The initial IDLE window
layers, select “Layers” and “Flatten Image” from the right-click menu. Allof the layers will merge.
Something else that’s easy to overlook is the current selection. Rememberthat you can only change the pixels that are currently selected. To get rid ofyour current selection, select “Select” and “None” from the right-click menu.
Topic B.6 Python
There are two aspects to the Windows Python software. If you double-click .py files, they will be executed with the Python interpreter directly. Awindow will appear that runs the program and disappears as soon as it’sfinished (which often isn’t desirable).
If you’re working on a program, you should use the Python IDLE (Inte-grated DeveLopment Environment). This gives a more friendly way to workwith Python programs.
Start Python by running “IDLE (Python GUI)”. A window should openthat resembles Figure B.12.
The screen shots here are from Windows, but the instructions applyto any operating system.
This initial window in an interactive interpreter that can be used to teststatement. If you want to actually write a program (that can be saved andsubmitted), you need to create an editor window in IDLE. See Figure B.13.
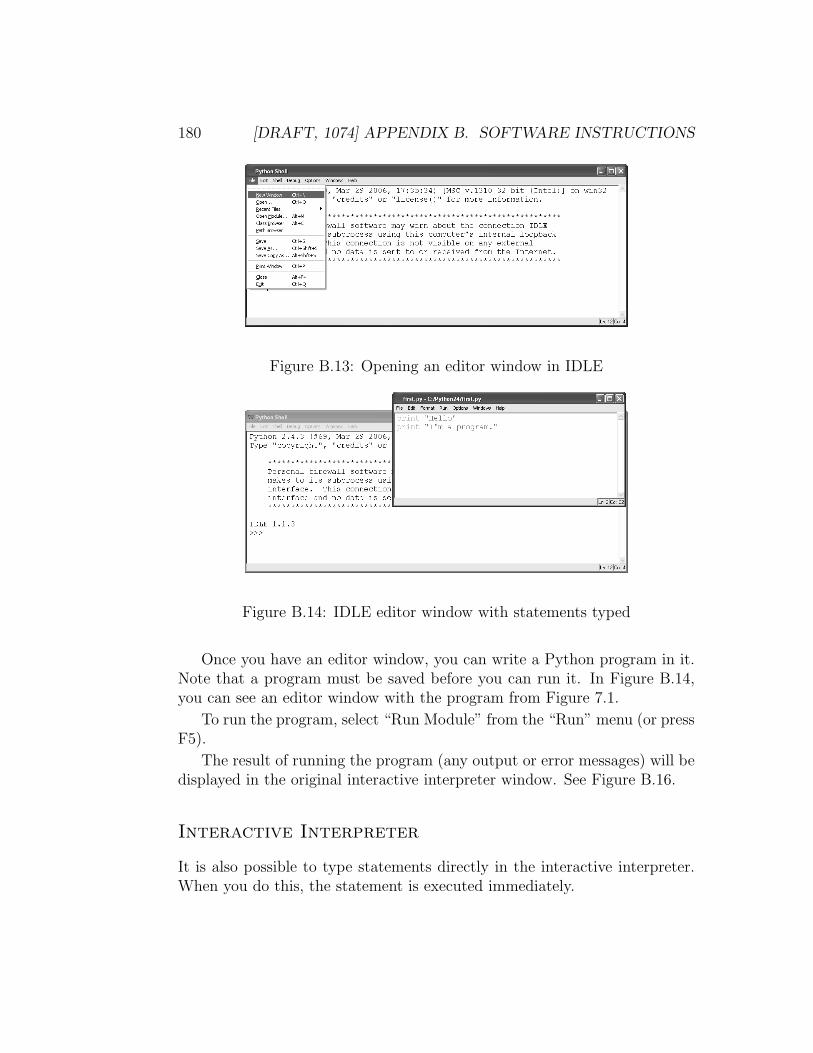
180 [DRAFT, 1074] APPENDIX B. SOFTWARE INSTRUCTIONS
Figure B.13: Opening an editor window in IDLE
Figure B.14: IDLE editor window with statements typed
Once you have an editor window, you can write a Python program in it.Note that a program must be saved before you can run it. In Figure B.14,you can see an editor window with the program from Figure 7.1.
To run the program, select “Run Module” from the “Run” menu (or pressF5).
The result of running the program (any output or error messages) will bedisplayed in the original interactive interpreter window. See Figure B.16.
Interactive Interpreter
It is also possible to type statements directly in the interactive interpreter.When you do this, the statement is executed immediately.
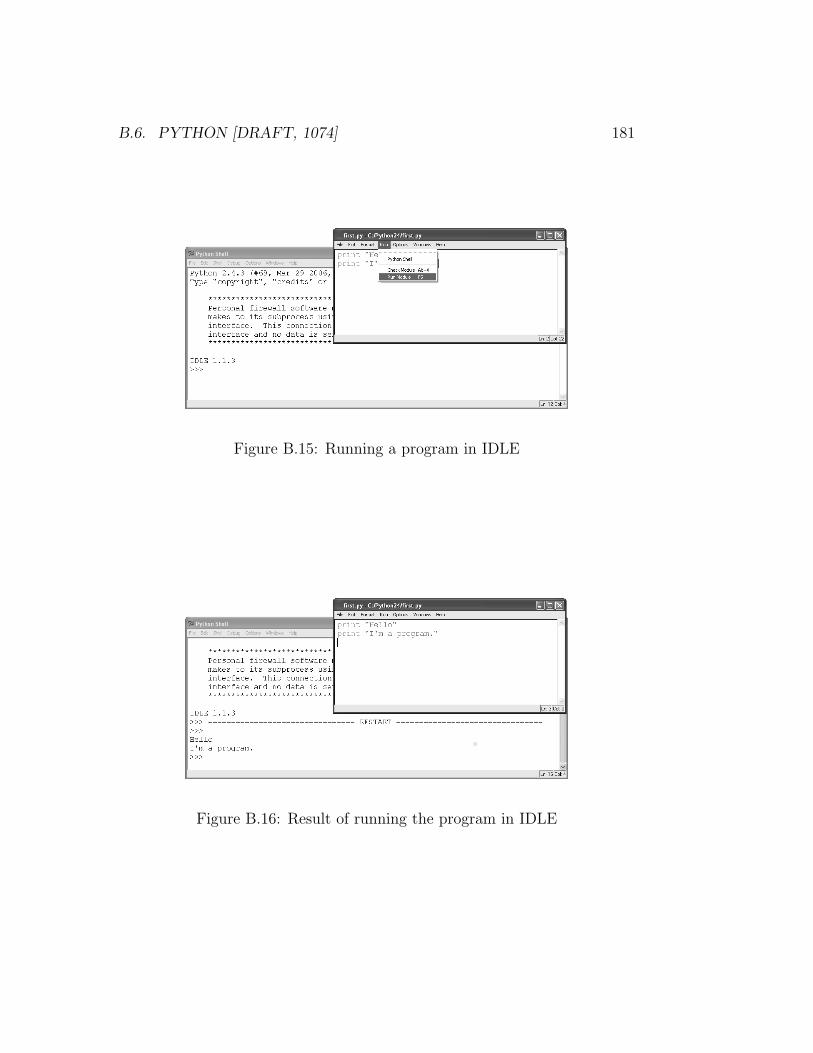
B.6. PYTHON [DRAFT, 1074] 181
Figure B.15: Running a program in IDLE
Figure B.16: Result of running the program in IDLE
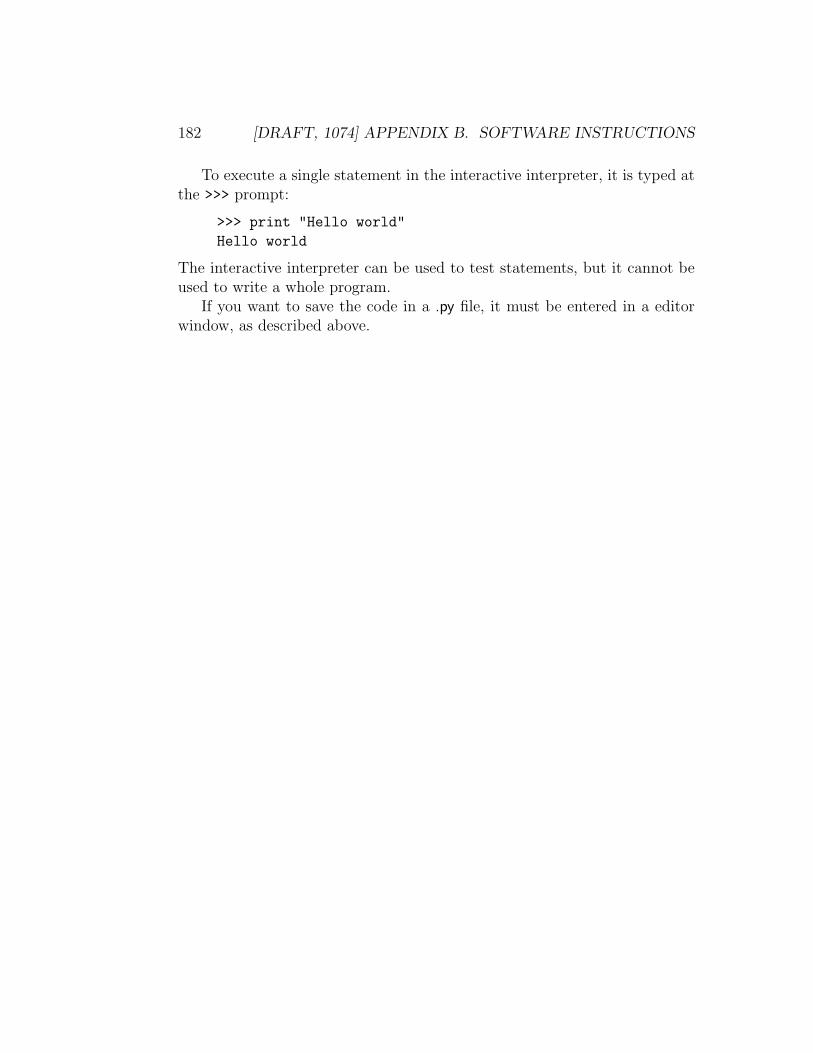
182 [DRAFT, 1074] APPENDIX B. SOFTWARE INSTRUCTIONS
To execute a single statement in the interactive interpreter, it is typed atthe >>> prompt:
>>> print "Hello world"
Hello world
The interactive interpreter can be used to test statements, but it cannot beused to write a whole program.
If you want to save the code in a .py file, it must be entered in a editorwindow, as described above.
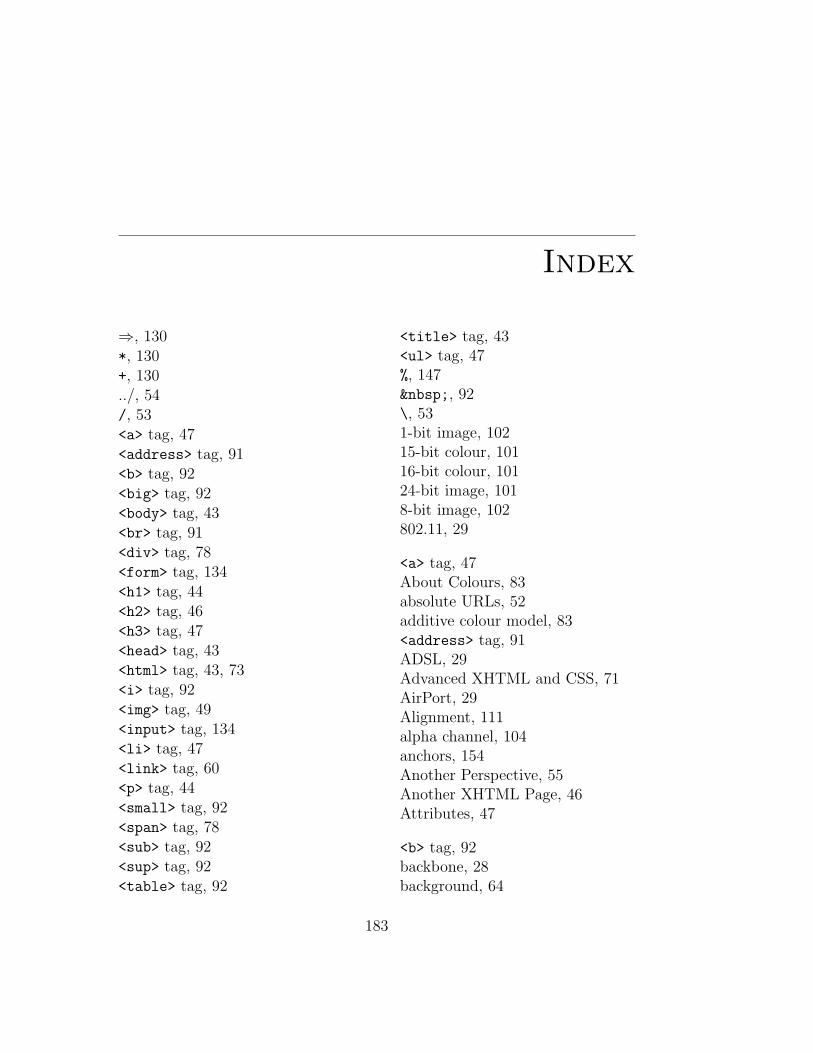
Index
⇒, 130*, 130+, 130../, 54/, 53<a> tag, 47<address> tag, 91<b> tag, 92<big> tag, 92<body> tag, 43<br> tag, 91<div> tag, 78<form> tag, 134<h1> tag, 44<h2> tag, 46<h3> tag, 47<head> tag, 43<html> tag, 43, 73<i> tag, 92<img> tag, 49<input> tag, 134<li> tag, 47<link> tag, 60<p> tag, 44<small> tag, 92<span> tag, 78<sub> tag, 92<sup> tag, 92<table> tag, 92
<title> tag, 43<ul> tag, 47%, 147 , 92\, 531-bit image, 10215-bit colour, 10116-bit colour, 10124-bit image, 1018-bit image, 102802.11, 29
<a> tag, 47About Colours, 83absolute URLs, 52additive colour model, 83<address> tag, 91ADSL, 29Advanced XHTML and CSS, 71AirPort, 29Alignment, 111alpha channel, 104anchors, 154Another Perspective, 55Another XHTML Page, 46Attributes, 47
<b> tag, 92backbone, 28background, 64
183
184 [DRAFT, 1074] INDEX
background colour, 176backslash, 53Basics of the Internet, 27<big> tag, 92binary transparency, 104bit depth, 101Bitmap vs. Vector Images, 98bitmapped graphics, 98block tags, 74Block vs. Inline Tags, 74block-level tag, 50BMP, 103, 105body, 145, 146<body> tag, 43Boolean Expressions, 145boolean expressions, 145boolean operators, 145boolean values, 145borders, 64box model
in CSS, 64<br> tag, 91bugs, 148
C++, 125cable modem, 29Caching, 157Cascading Style Sheets, 59, 60case
in URLs, 54CGI, 136cgi module, 136CGI scripting, 128Character Sets, 77Choosing Tags, 56class, 79class selectors, 81Classes and Identifiers, 79
clauseelse, 146
clear, 86client software, 30Clients and Servers, 30closing tag, 42
short-form, 50Closing Tags, 42CMPT 165 Server Account, 168CMPT 165 Web Server, 16Coding Style (optional), 150Colour Depth, 101colour depth, 178Colours in CSS, 82Combining, 54comment, 138Common Gateway Interface, 136Common Mistakes, 91components, 101Compression, 103computer graphics, 97computer programming, 124concatenates, 130Connecting to the Internet, 28content, 60Content Negotiation, 158Content-type, 129contents, 42contextual selectors, 82Contrast, 113Conventions, 116Converting to Numbers, 140Converting to Strings, 141Cookies, 155cookies, 156Creating Python Web Scripts, 128CSS, 60
box model, 64
INDEX [DRAFT, 1074] 185
selectors, 81CSS “Boxes”, 64CSS Details, 64CSS1, 63CSS2, 63, 89CYM, 83
Debugging, 148declarations, 62deprecated, 48, 68Design, 109Design Principles and
XHTML/CSS, 114Directory and Filename, 53dithering, 102<div> tag, 78doctype, 72
strict, 73transitional, 73
document type, 72drawing programs, 98dynamic pages, 127
Editing XHTML, 40else clause, 146Email, 32empty tag, 50encrypted, 160Entities, 76entity
named, 77numeric, 77
EPS, 106ethernet, 29Example, 117execute, 125Expressions, 126Expressions and Variables, 129
Fetching a Web Page, 36file extension, 35File Formats, 100
native, 106File Formats, Common, 104Filename Only, 53Finding bugs, 149Firefox, 17First XHTML Page, 41float, 85floating point, 140font
generic family, 67Fonts in CSS, 67foreground colour, 176<form> tag, 134Forms, 134forms, 134Forms and Web Programming,
133Fragment, 154fragment, 80fragments, 154FTP, 32, 161
gateway, 28General Design, 109generic font family, 67Generic Tags, 78Getting it right the first time, 149GIF, 105GIMP, see The GIMPGPG, 161Graphics and Image Types, 97Graphics and Images, 97
<h1> tag, 44<h2> tag, 46
186 [DRAFT, 1074] INDEX
<h3> tag, 47Handling Types, 139<head> tag, 43heading, 44height
in CSS, 65How Web Pages Travel, 33HTML, 39
uppercase/lowercase, 42validating, 72
<html> tag, 43, 73HTML validators, see validatorsHTTP, 32
secure, 161HTTP header, 129HTTP Tricks (optional), 156HTTPS, 161HyperText Transfer Protocol, 32
<i> tag, 92id, 79id selectors, 81identifier selectors, 81if statement, 145Images in HTML, 49<img> tag, 49index.html, 56indexed, 102Information on the Internet, 32inline tags, 75<input> tag, 134Installing Software, 165Instant Messaging, 32Interactive Interpreter, 180interactive interpreter, 179Internet, 28Internet Explorer, 17Internet Internals, 153
Internet service provider, 28ISP, 28
Java, 125JPEG, 104
Key Error, 138
layers, 178Lengths in CSS, 66<li> tag, 47libraries, 143<link> tag, 60link state selectors, 82list item tag, 47lossless, 103lossy, 103
Making Decisions, 144Making Web Pages, 39margins, 65markup
semantic, 56Markup and XHTML, 39Markup for Meaning, 90markup language, 42meaning, 68MIME type, 35, 129MIME Types, 34modem, 29module, 143More Programming, 143More Selectors, 81Moving Up, 54Mozilla, 17Mozilla Firefox, 166, 169
named entities, 77namespace, 73
INDEX [DRAFT, 1074] 187
native formats, 106Netscape, 17network gaming, 32non-breaking space, 92numeric colour values, 83numeric entities, 77numeric expression, 126
opening tag, 42
<p> tag, 44padding, 65Page Design, 119paint programs, 98palette, 102paragraph tag, 44path, 34Peer-to-peer file transfer, 32PGP, 161pixels, 98PNG, 105position, 89Positioning in CSS, 85post, 154print statement, 126Programming Introduction, 123programming language, 124property, 62protocol, 31, 33Protocols, 31Proximity, 110pseudoclass selectors, 82Python, 125, 167, 179Python Modules, 143
Query String, 154
raster graphics, 98Readability, 118
Reading Form Input, 136Recommended Texts, 14Redirects, 158Relative URLs, 52relative URLs, 52Repetition, 111required, 49RGB, 83right-click menu, 175Right-Click Menu Options, GIMP,
178rollover, 119routers, 28rule
in CSS, 60run, 125
S-HTTP, 161scheme, 34SCP, 161Secure HTTP, 160Security and Encryption
(optional), 160Selecting by Class and ID, 80selector, 62selectors
CSS, 81semantic markup, 56SFU Computing Account, 167simple transparency, 104slash, 53<small> tag, 92Software Instructions, 169Some XHTML Tags, 43<span> tag, 78SSH Client, 166Starting with Python, 125stateless, 156
188 [DRAFT, 1074] INDEX
statementprint, 126variable assignment, 130
statements, 125static pages, 127strict doctype, 73string, 126, 140string expression, 130String Formatting (optional), 147string formatting operator, 147Styles, 59stylesheet, 60<sub> tag, 92subtractive colour model, 83subtype, 35<sup> tag, 92SVG, 105syntax highlighting, 170
<table> tag, 92tag
empty, 50opening and closing, 42
tag selectors, 81tags
block, 74inline, 75
Technical Startup, 165template string, 147text editor, 40TextPad, 166, 170The clear Property, 86The float Property, 85The position Property
(optional), 89The print Statement, 125The GIMP, 166, 175The World Wide Web, 27
TIFF, 106<title> tag, 43Toolbox, GIMP, 176Transferring Web Pages, 170transitional doctype, 73transitional tags, 92Transparency, 104triple-quoted string, 138type, 35
<ul> tag, 47Unicode, 78Uniform Resource Locator, 33unordered list tag, 47URIs, 33URL, 33
absolute, 52of your files, 172relative, 52
URL Encoding, 155URLs, 33, 153
Validating XHTML, 72Validators, 174validators, 72value, 62
attribute, 48variable, 130variable assignment statement,
130vector graphics, 98viewer, 42Viewing web pages, 172
W3C, 72web browser, 30, 40, 42Web Programming, 127web programming, 128web scripting, 128
INDEX [DRAFT, 1074] 189
web server software, 30What Can CSS Do?, 63What is Programming?, 124whitespace, 110Why CSS?, 68Why Do Markup?, 45Why Learn to Program?, 124wi-fi, 29width
in CSS, 65WinZip, 167wireless LAN, 29Working with RGB, 83World Wide Web, 27WWW, 27
XHTML, 39strict, 73transitional, 73validating, 72
XHTML Reference, 48XHTML Tags, 41