installation recommendations – joint sealing of nora® floorings
TRANSCRIPT
12/2019 Page 1/6
Installation Recommendations – Joint sealing of nora® floorings
In general, the joints of nora® floor coverings do not have to be sealed on the entire surface.
However, joint sealing is recommended with moisture sensitive subfloors and in rooms which are subject to intensive wet cleaning (e. g. hygienic areas/operating theatres in hospitals and laboratories).
Joint sealing is mandatory for:• nora® floor coverings with a foam backing (noraplan® acoustic)• noraplan® ed floor coverings using nora® 1-component cold weld • joints between floor covering and skirting S 3003 using nora® 1-component cold weld
Execution 24 hours after installation at the earliest.(Exception: nora nTx)
If joints have to be sealed longitudinally as well as transversely 12 hours have to pass between the two work steps.
We recommend nora® 1-component cold weld for the sealing of joints between nora® floor coverings and rising elements like masonry, door frames etc.
A. nora® 1-component cold weld
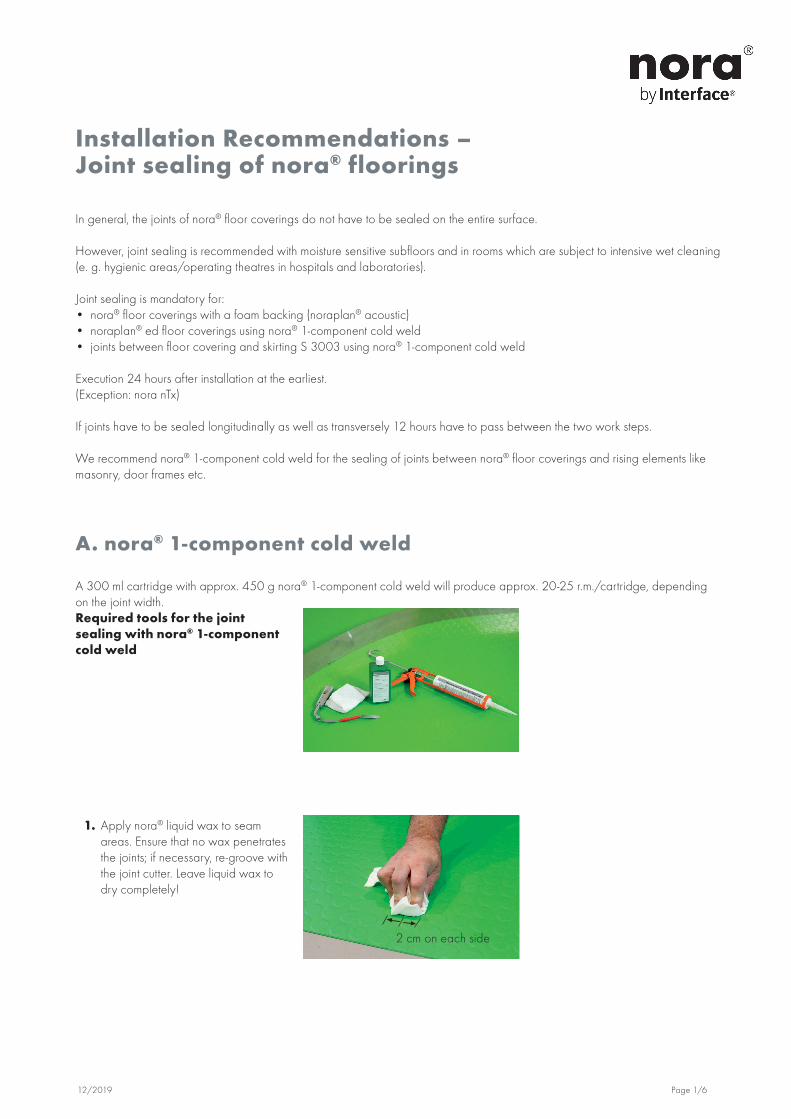
A 300 ml cartridge with approx. 450 g nora® 1-component cold weld will produce approx. 20-25 r.m./cartridge, depending on the joint width.Required tools for the joint sealing with nora® 1-component cold weld
1. Apply nora® liquid wax to seam areas. Ensure that no wax penetrates the joints; if necessary, re-groove with the joint cutter. Leave liquid wax to dry completely!
2 cm on each side
12/2019 Page 2/6
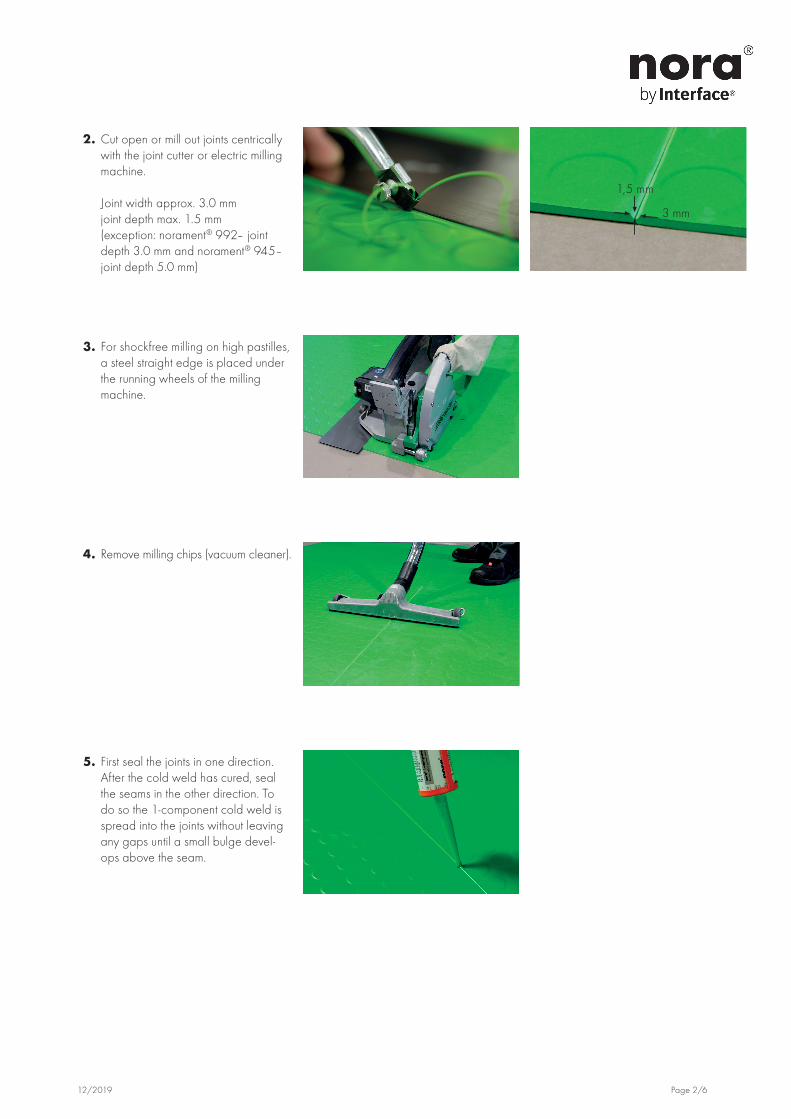
2. Cut open or mill out joints centrically with the joint cutter or electric milling machine.
Joint width approx. 3.0 mm joint depth max. 1.5 mm (exception: norament® 992– joint depth 3.0 mm and norament® 945– joint depth 5.0 mm)
3. For shockfree milling on high pastilles, a steel straight edge is placed under the running wheels of the milling machine.
3 mm
1,5 mm
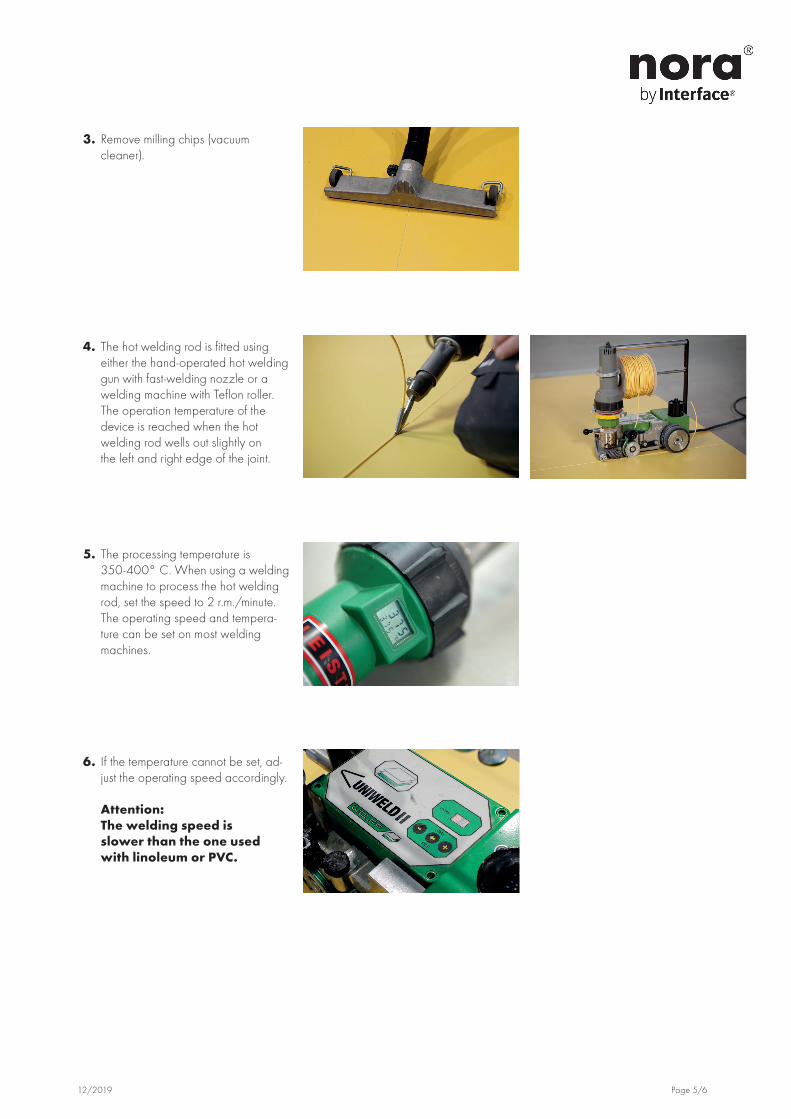
4. Remove milling chips (vacuum cleaner).
5. First seal the joints in one direction. After the cold weld has cured, seal the seams in the other direction. To do so the 1-component cold weld is spread into the joints without leaving any gaps until a small bulge devel-ops above the seam.
12/2019 Page 3/6
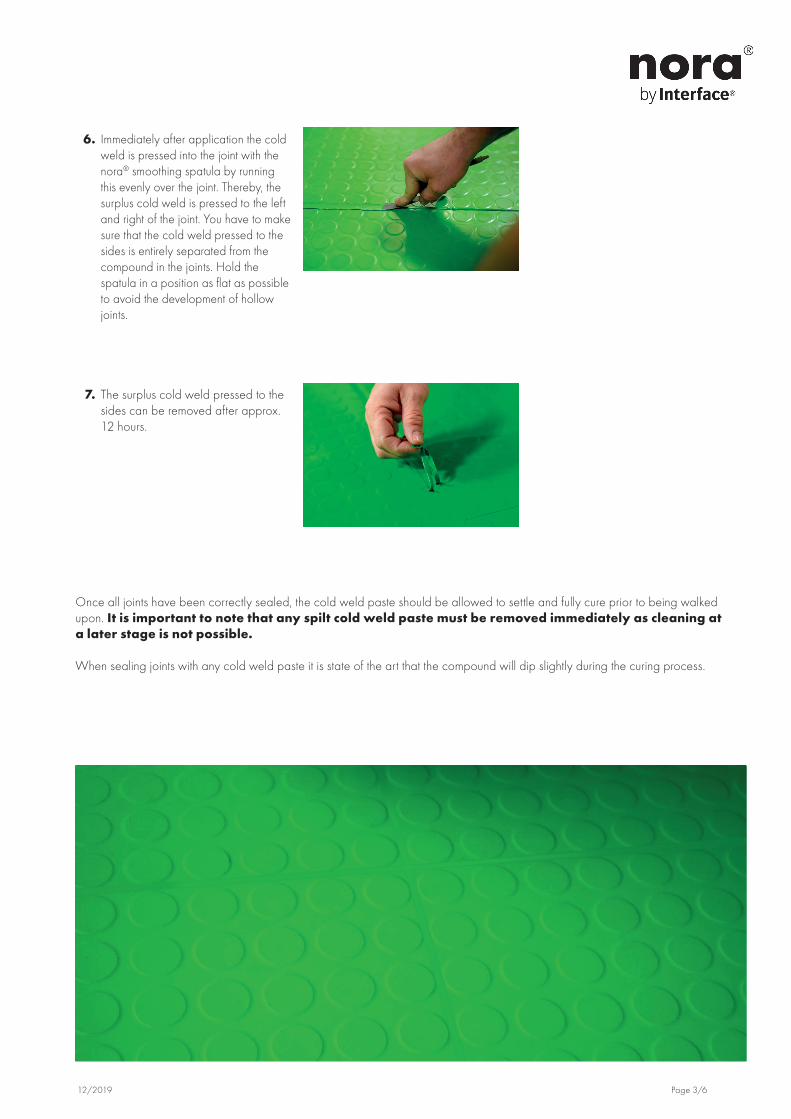
6. Immediately after application the cold weld is pressed into the joint with the nora® smoothing spatula by running this evenly over the joint. Thereby, the surplus cold weld is pressed to the left and right of the joint. You have to make sure that the cold weld pressed to the sides is entirely separated from the compound in the joints. Hold the spatula in a position as flat as possible to avoid the development of hollow joints.
7. The surplus cold weld pressed to the sides can be removed after approx. 12 hours.
Once all joints have been correctly sealed, the cold weld paste should be allowed to settle and fully cure prior to being walked upon. It is important to note that any spilt cold weld paste must be removed immediately as cleaning at a later stage is not possible.
When sealing joints with any cold weld paste it is state of the art that the compound will dip slightly during the curing process.
12/2019 Page 4/6
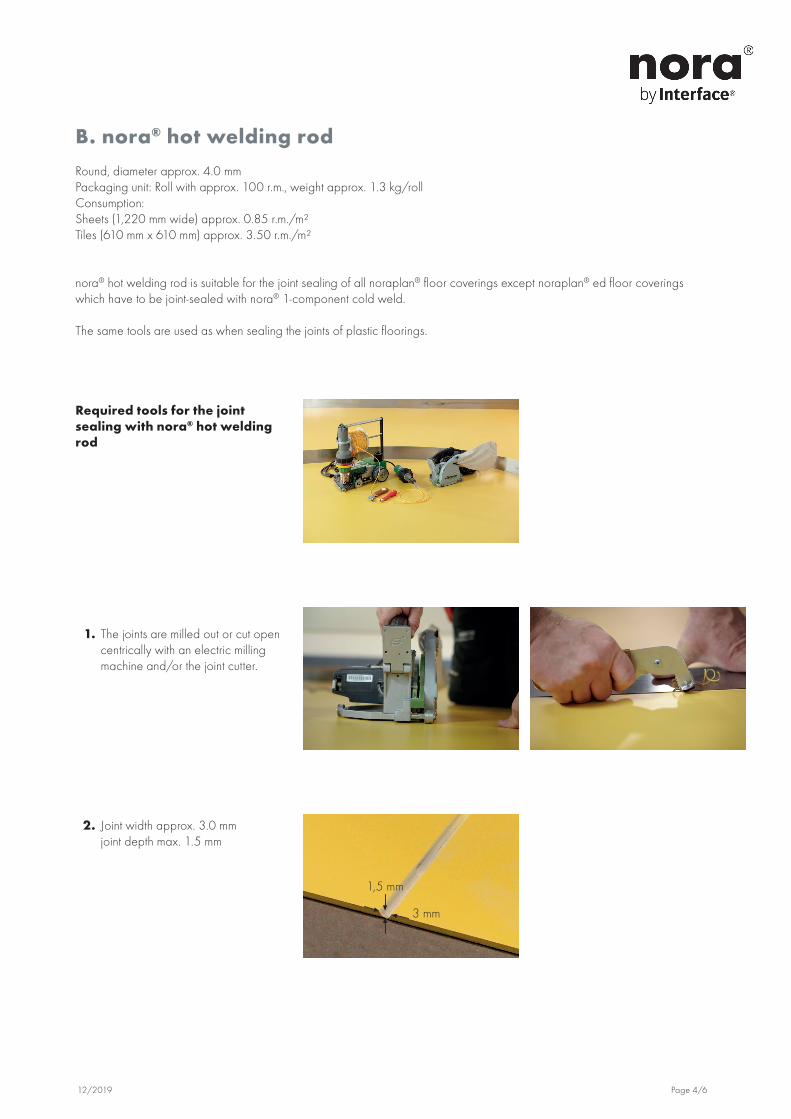
B. nora® hot welding rodRound, diameter approx. 4.0 mmPackaging unit: Roll with approx. 100 r.m., weight approx. 1.3 kg/rollConsumption:Sheets (1,220 mm wide) approx. 0.85 r.m./m²Tiles (610 mm x 610 mm) approx. 3.50 r.m./m²
nora® hot welding rod is suitable for the joint sealing of all noraplan® floor coverings except noraplan® ed floor coverings which have to be joint-sealed with nora® 1-component cold weld.
The same tools are used as when sealing the joints of plastic floorings.
Required tools for the joint sealing with nora® hot welding rod
1. The joints are milled out or cut open centrically with an electric milling machine and/or the joint cutter.
2. Joint width approx. 3.0 mm joint depth max. 1.5 mm
3 mm
1,5 mm
12/2019 Page 5/6
3. Remove milling chips (vacuum cleaner).
4. The hot welding rod is fitted using either the hand-operated hot welding gun with fast-welding nozzle or a welding machine with Teflon roller. The operation temperature of the device is reached when the hot welding rod wells out slightly on the left and right edge of the joint.
5. The processing temperature is 350-400° C. When using a welding machine to process the hot welding rod, set the speed to 2 r.m./minute. The operating speed and tempera-ture can be set on most welding machines.
6. If the temperature cannot be set, ad-just the operating speed accordingly. Attention: The welding speed is slower than the one used with linoleum or PVC.
12/2019 Page 6/6
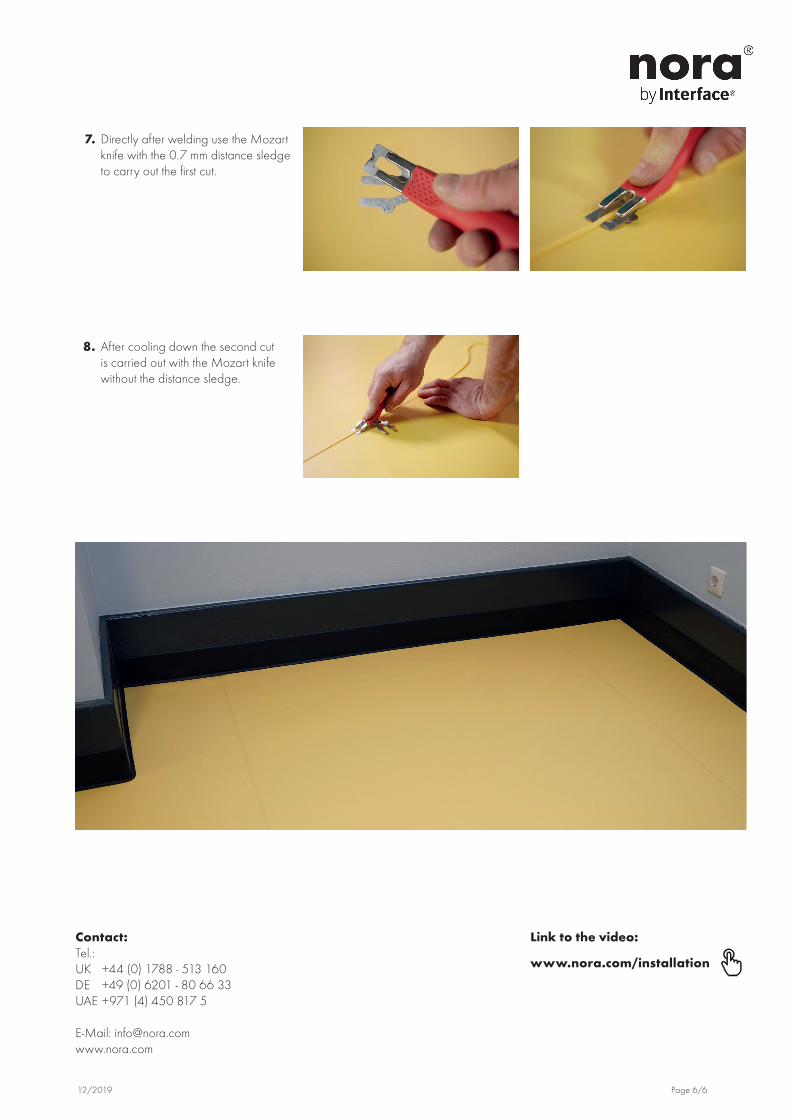
7. Directly after welding use the Mozart knife with the 0.7 mm distance sledge to carry out the first cut.
8. After cooling down the second cut is carried out with the Mozart knife without the distance sledge.
www.nora.com/installation
Link to the video:Contact: Tel.:UK +44 (0) 1788 - 513 160DE +49 (0) 6201 - 80 66 33 UAE +971 (4) 450 817 5
E-Mail: [email protected]