identity agent deployment guide - trend micro
TRANSCRIPT


Legal and notice information
© Copyright 2017 Trend Micro Incorporated. All rights reserved. TippingPoint, the TippingPoint logo, and Digital Vaccine are trademarks or registered trademarks of Trend Micro Incorporated. TippingPoint Reg. U.S. Pat. & Tm. Off. All other company and/or product namesmay be trademarks of their respective owners.
Trend Micro Incorporated makes no warranty of any kind with regard to this material, including, but not limited to, the implied warranties of merchantability and fitness for a particular purpose. Trend Micro Incorporated shall not be liable for errors contained herein or for incidental or consequential damages in connection with the furnishing, performance, or use of this material.
This document contains proprietary information, which is protected by copyright. No part of this document may be photocopied, reproduced in any form or by any means, or translated into another language without the prior written consent of Trend Micro Incorporated. The information is provided “as is” without warranty of any kind and is subject to change without notice. The only warranties for Trend Micro Incorporated products and services are set forth in the express warranty statements accompanying such products and services. Nothing herein should be construed as constituting an additional warranty. Trend Micro Incorporated shall not be liable for technical or editorial errors or omissions contained herein.
Identity Agent Deployment Guide October 2017

Identity Agent Deployment Guide i
ContentsOverview...................................................................................................................................................1
System requirements..............................................................................................................................2
Installation summary.............................................................................................................................. 3
Pre-installation steps.............................................................................................................................. 5
Create a new Active Directory user....................................................................................................... 5
Add the user to the Domain Administrators group................................................................................ 6
Assign permissions for the Active Directory user.................................................................................. 6
Windows Firewall....................................................................................................................................7
Enable predefined Windows Firewall rules......................................................................................... 8
Create a new Inbound Windows Firewall rule.....................................................................................8
Specify the amount of Identity Agent data to retain in the SMS............................................................9
Install Identity Agent.............................................................................................................................11
Add logon credentials for the Identity Agent service........................................................................... 11
Provide full access for the Identity Agent service account.................................................................. 12
Allow port access for Identity Agent user..........................................................................................13
Identity Agent........................................................................................................................................ 14
Identity Agent configuration..................................................................................................................14
Create the initial Identity Agent configuration....................................................................................15
Manage domain controllers.............................................................................................................16
Add an IP address to the Mapped IPs list......................................................................................16Remove an IP address from the Mapped IPs list........................................................................ 17
Add an IP address to the Excluded IPs list....................................................................................17Remove an IP address from the Excluded IPs list...................................................................... 17
Manage custom schemas............................................................................................................... 17

ii Identity Agent Deployment Guide
Uninstall Identity Agent........................................................................................................................19
Where to go next.................................................................................................................................. 20
Identity Agent issues and resolutions................................................................................................21
Agent service not able to query domain controller security log events................................................21
Agent service not able to query domain controller OS information..................................................... 22
OS information resolution.................................................................................................................. 23
Agent service is not able to communicate to domain controller.......................................................... 26
To enable Windows Firewall rules.....................................................................................................26
Agent service running but not querying domain controllers for security event logs............................. 29
To modify the account....................................................................................................................... 29
Agent service is not creating db and logs folders................................................................................30
To provide full access........................................................................................................................ 30
Agent APIs are not listening in agent port...........................................................................................32
Agent APIs are not accessible outside agent server...........................................................................33
Groups API call response with no data............................................................................................... 34
Configuration changes are not reflected in the agent service............................................................. 34
SMS is not able to establish connectivity with the Identity Agent........................................................35
Agent not able to establish LDAP connectivity.................................................................................... 36
Agent not able to establish secure LDAPS connectivity......................................................................36
To test domain controller connectivity............................................................................................... 36
To test agent machine connectivity................................................................................................... 38

Identity Agent Deployment Guide 1
OverviewThis guide provides information for installing and configuring the Identity Agent in a Windowsenvironment (Windows Server 2008, 2008 R2, 2012, and 2012 R2).
Once configured, the Identity Agent will poll the Active Directory domain controller to collect user accountand user group information. The Identity Agent will also poll the domain controller for security loginevents.
Once the SMS is configured to poll the Identity Agent, the SMS will display the User ID to User IPcorrelation and security login events.
You can configure the Identity Agent to:
• Connect to one or more domain controllers to poll user login information.
• Change the default user/group and security log connection settings.
• Enable secure LDAP.
• Map or exclude IP addresses.
• If you customized your Active Directory schema, you can match the same schema in the Identity Agent.

2 Identity Agent Deployment Guide
System requirementsThe tables in this topic provide the hardware, operating system, and software requirements for the IdentityAgent.
Hardware requirements
RAM 4 GB
Disk space 40 GB
Supported server operating system
Note the following requirements for the Identity Agent and the Active Directory Server.
Operating system Supported editions
Windows Server 2012 R2 64-bit
Windows Server 2012 (64-bit edition) 64-bit
Windows Server 2008 R2 64-bit
Windows Server 2008 64-bit
Microsoft Kerberos
Microsoft Kerberos is an integral part of an Active Directory implementation. Kerberos provides secureuser authentication that permits interoperability. The Active Directory domain controller maintains useraccount and log-in information to support the Kerberos service.
The Identity Agent depends on Kerberos protocol being used in the Active Directory authenticationprocess. To make use of Kerberos, you must add Kerberos to your Active Directory Server.

Identity Agent Deployment Guide 3
Installation summaryThese checklists include cross-reference links to important concepts and tasks about deploying the IdentityAgent. Complete the tasks in this checklists in order.
When a reference link takes you to a topic, return to this topic after you complete the tasks so that you canproceed with the remaining tasks in this checklist.
If the Identity Agent Service account will have Administrative permissions
Follow the steps below if the Identity Agent Service account will have administrative permissions.
Step 1 Enable predefined Windows Firewall rules on page 8
Step 2 Create a new Inbound Windows Firewall rule on page 8
Step 3 Add logon credentials for the Identity Agent service on page 11
Step 4 Provide full access for the Identity Agent service account on page 12
Step 5 Specify the amount of Identity Agent data to retain in the SMS on page 9
Step 6 Install Identity Agent on page 11
Step 7 Create the initial Identity Agent configuration on page 15
If the Identity Agent Service account will not have Administrative permissions
Follow the steps below if the Identity Agent Service account will not have administrative permissions.
Step 1 Create a new Active Directory user on page 5
Step 2 Add the user to the Domain Users group on page 11
Step 3 Assign permissions for the Active Directory user on page 6
Step 4 Enable predefined Windows Firewall rules on page 8

4 Identity Agent Deployment Guide
Step 5 Create a new Inbound Windows Firewall rule on page 8
Step 6 Add logon credentials for the Identity Agent service on page 11
Step 7 Provide full access for the Identity Agent service account on page 12
Step 8 Specify the amount of Identity Agent data to retain in the SMS on page 9
Step 9 Allow port access for Identity Agent user on page 13
Step 10 Install Identity Agent on page 11
Step 11 Create the initial Identity Agent configuration on page 15

Identity Agent Deployment Guide 5
Pre-installation stepsThis section describes the items that must be done before installing the Identity Agent. Instructions areincluded in each topic.
Before you begin, see the Installation Summary on page 3 and the latestTippingPoint SMS Release Notes availableon the TMC.
Important: To secure your environment against POODLE, disable SSLv3 in the Windows OS where theAgent will be installed. For assistance, contact Microsoft.
Create a new Active Directory userUse Active Directory Users and computers to create a new user account. This user account will be used forrunning the agent service and connecting to the domain controllers.
As a security best practice, consider using Run as Administrator to perform this procedure. Thisprocedure must be preformed on the domain controller.
1. Open Active Directory Users and Computers (Start > Control Panel > Administrative Tools >Active Directory User and Computers).
To open Active Directory Users and Computers in Windows Server 2012, click Start, and then typedsa.msc.
2. In the console tree, right-click the folder in which you want to add a user account.
3. Point to New, and then click User.
4. Enter the following information, and then click Next.
Field Description
First name Type the user's first name.
Last name Type the user's last name.
Full name Modify the user's full name to add initials or reverse the order of the first andlast names.
User logon name Type the user logon name, and then click the user principal name (UPN) suffixin the drop-down list.

6 Identity Agent Deployment Guide
5. Enter the following information, and then click Next.
Field/check box Description
Password Type the user's password.
Confirm password Type the user's last name.
User cannot changepassword
Select this check box to prevent the user from changing his or her passwordand to maintain control over the user account.
Password never expires Select this checkbox to prevent the user password from expiring. Werecommend that service accounts have this option enabled and use strongpasswords.
6. Review the user account settings, and then click Finish.
Add the user to the Domain Administrators groupIf you are going to provide administrative permissions to the Identity Agent service account, you must addthe Identity Agent service account to the Domain Administrators group.
As a security best practice, consider using Run as Administrator to perform this procedure. Thisprocedure must be preformed on the domain controller.
1. Open Active Directory Users and Computers (Start > Control Panel > Administrative Tools >Active Directory User and Computers).
To open Active Directory Users and Computers in Windows Server 2012, click Start, and then typedsa.msc.
2. In the console tree, click Users.
3. Right-click on the user account, and then click Properties.
4. On the Member Of tab, click the Domain Admins group to set as the user's primary group.
5. Click Set Primary Group.
Assign permissions for the Active Directory userIf you do not have administrative credentials, you must assign certain permissions to allow the ActiveDirectory user to perform specific actions, such as connecting to the Identity Agent.

Identity Agent Deployment Guide 7
If you have administrative credentials, skip this procedure, as the user already has these permissions assignedby default.
As a security best practice, consider using Run as Administrator to perform this procedure. Thisprocedure must be preformed on the domain controller.
1. Open Computer Management (Start > Control Panel > System and Security > AdministrativeTools > Computer Management).
2. In the navigation pane, expand Services and Applications, right-click WMI Control, and then clickProperties.
3. Expand Root, select CIMV2, and then click Security.
4. Click the Security tab.
5. Click Add.
6. On the Select Users, Computers, Service Accounts, or Groups dialog box, select the following items,and then click OK.
• (Optional) Click Locations to define the root location from which to begin your search for theIdentity Agent user.
• Type the name of the Identity Agent user in the Enter the object names to select field.
• (Optional) Click Check Names to locate all matching or similar object names listed in the Enter theobject names to select field.
7. Select the Identity Agent user from the Group or user names list, and then select the following checkboxes to Allow permissions:
• Enable Account
• Remote Enable
• Read Security
8. Click Apply.
9. Repeat this procedure in all domain controllers that are configured in the Identity Agent.
Windows FirewallWindows Firewall with Advanced Security allows you to require that computers authenticate beforecommunicating with the Identity Agent. From here, you must:
• Enable predefined firewall rules to activate the rule and allow the user to connect to the Identity Agentthrough Windows Firewall.
• Create a new rule to allow a connection based on the TCP port number over which the computer istrying to connect to the Identity Agent. You can specify more than one port number. The port numberswill display in the Agent Port field in the Identity Agent.

8 Identity Agent Deployment Guide
Enable predefined Windows Firewall rulesUse Windows Firewall with Advanced Security to enable predefined rules.
This procedure must be preformed on the domain controller.
1. Open Windows Firewall (Start > Control Panel > System and Security > Windows Firewall).
2. In the Control Panel Home navigation pane, click Advanced Settings.
3. In the navigation pane, click Inbound Rules.
4. Search for the following rules, right-click on the rule, and then click Enable Rule.
For this Windowsversion:
Enable the following rules ...
Windows Server 2008 • Remote Administration (RPC)
• Windows Management Instrumentation (DCOM-In)
• Remote Event Log Management (RPC)
Windows Server 2012 • Remote Service Management (RPC)
• Windows Management Instrumentation (DCOM-In)
• Remote Event Log Management (RPC)
Create a new Inbound Windows Firewall ruleTo perform this procedure, you must be a member of the Domain Administrators group. This proceduremust be preformed on the Identity Agent server.
1. Open Windows Firewall (Start > Control Panel > System and Security > Windows Firewall).
2. In the Control Panel Home navigation pane, click Advanced Settings.
3. In the navigation pane, click Inbound Rules.
4. In the Actions navigation pane, click New Rule.
The New Inbound Rule Wizard opens.
5. Use the wizard to create a rule to explicitly allow a connection to the Identity Agent through WindowsFirewall. Click Next to go through each wizard page.

Identity Agent Deployment Guide 9
On this wizard step(page):
Select the following ...
Rule Type Port.
Protocol and Ports • TCP
• Specific local ports, and then type the port number (8443).
Only the port number listed in this field will be able to communicate with theIdentity Agent.
You can specify multiple port numbers, separated by commas.
You can also include a range of port numbers by separating the low and highvalues with a hyphen.
Action Allow the connection.
Profile • Domain
• Private
• Public
Name Type a name for the rule in the Name field.
6. Click Finish. The rule appears in the Inbound Rules list, and the port for the Identity Agent in theWindows Firewall is open.
Specify the amount of Identity Agent data to retain inthe SMSUse the Database Maintenance table in the SMS (Admin > Database) to manage the followingmaintenance settings for the Identity Agent:
• User ID IP Correlation
• IP User Mapping
• Historical IP User Mapping

10 Identity Agent Deployment Guide
By default, the each maintenance settings is set to a default of a maximum of 10 million rows, and the SMSpolls the Identity Agent for security login events at a rate of up to 7000 per minute.
When you reach the maximum number of entries, the SMS automatically deletes a percentage of the oldestevents and a cleanup is requested/scheduled by the SMS.
You can manage the User ID IP Correlation data maintained by the SMS when you perform DatabaseMaintenance and specify retention parameters for the data. For more information about managingTippingPoint systems, see the TippingPoint SMS User Guide or the SMS online Help.
Kerberos events
Use the following Kerberos event IDs in the Identity Agent security logs as a guide for adjusting themaximum number of rows in the Database Maintenance tables:
• 4768
• 4769
• 4770

Identity Agent Deployment Guide 11
Install Identity Agent1. Log in to the TMC.
2. Download the TippingPoint Identity Agent zip file.
3. Log in with the administrator account in the Identity Agent service account and copy the zip file.
4. Unzip the file, right-click on setup, and then click Run as administrator.
The Identity Agent - InstallShield Wizard opens.
5. Use the wizard to accept the terms of the license agreement, create a user name, and to select or changethe location where the application will be installed. Click Next to go through each wizard page.
On this wizard step(page):
Do the following ...
License Agreement Read and accept the terms in the license agreement. You can also print acopy of the agreement.
Customer Information Type a user name and organization.
Destination Folder Review and confirm the location or browse to and select a new location toinstall the Identity Agent.
6. Click Install, and then click Finish.
The Identity Agent installs the service and configuration tool and creates a desktop icon.
Add logon credentials for the Identity Agent serviceUse Services to configure the user account for the Identity Agent. This user account is used for running theagent service to connect to the domain controllers.
As a security best practice, consider using Run as Administrator to perform this procedure.
1. Open Services (Start > Control Panel > Administrative Tools > Services).
2. In the details pane, right-click the Identity Agent service, and then click Properties.
3. Click the Log On tab.
4. Select This account, and then click Browse.
5. On the Select User dialog box, select the following items, and then click OK.

12 Identity Agent Deployment Guide
• Verify that the location listed in the From this location field is the name of the machine hosting theagent.
Note: If the location listed is not the domain in which the agent will connect, click the Locationsbutton, and then browse to and select the appropriate domain.
• Type the name of the Identity Agent user in the Enter the object names to select field.
• (Optional) Click Check Names to locate all matching or similar object names listed in the Enterthe object names to select field.
The Identity Agent user displays in the This account field.
6. Enter and confirm the password, and then click OK.
Provide full access for the Identity Agent serviceaccountAfter you install the Identity Agent, update the security properties.
1. Navigate to the folder in which you installed the Identity Agent.

Identity Agent Deployment Guide 13
If you used the default settings, the Identity Agent is located in the Program Files.
2. Right-click TippingPoint, and then click Properties.
3. Click the Security tab.
4. Click Edit.
5. On the Permissions for Identity Agent dialog box, click Add.
6. On the Select Users, Computers, Service Accounts, or Groups dialog box, select the following items,and then click OK.
• (Optional) Click Locations to define the root location from which to begin your search for theIdentity Agent user.
• Type the name of the Identity Agent user in the Enter the object names to select field.
• (Optional) Click Check Names to locate all matching or similar object names listed in the Enterthe object names to select field.
7. Select the Identity Agent user from the Group or user names list, and then select the Full control checkbox under Allow permissions.
8. Click Apply.
Allow port access for Identity Agent userIf the Identity Agent user does not have administrative rights, use the command-line to allow port access tothe Identity Agent.
netsh http add urlacl url=https://*:8443/user=USERIDAGENT1\TP_IdentityAgent
In the example above:
• 8443 is the Identity Agent port number
• USERIDAGENT is the Identity Agent domain
• TP_IdentityAgent is the Identity Agent service account

14 Identity Agent Deployment Guide
Identity AgentThe Identity Agent keeps track of specific groups based on IP address with the goal of maintaining IdentityManagement and efficiently enforcing user policies.
The Identity Agent adds another layer of network policy refinement by using Active Directory (AD) ofusers and user groups. Through its interaction with an AD domain controller, the Identity Agent enablesSMS administrators to keep track of specific users and groups based on IP address. The Agent constantlypolls the security logs of the AD domain controller--at a rate of every four to five seconds for security loginevents and every 15 minutes for metadata and diagnostics--and communicates this information to the SMS.
With this degree of visibility for the SMS, administrators can target policies according to, for example, anengineering group vs a marketing group. The service is most useful in environments where control andvisibility are a higher priority than filter management.
This enables the SMS to determine the IP address of any user/group.
Identity Agent configurationIdentity Agent configuration is the Identity Agent component where the you configure the agent, managedomain controllers, set connection settings, and maintain a list of mapped or excluded IP addresses.
The following table describes the main areas of the Identity Agent interface is divided into four main areas.
Field Description
Agent Host IP Displays all available IP addresses. Once you select an IP address andclick save, this field will be unavailable. If you want to select a different IPaddress, you must uninstall and reinstall the Identity Agent.
Agent Port The port in which the Identity Agent will communicate with the SMS.Remember that this port must also be the port that is open in the WindowsFirewall.
Domain Name The domain name that the Identity Agent is connected to.
Base DN The distinguished name of the node in the active directory under which allusers and groups are located.
Domain Controller

Identity Agent Deployment Guide 15
Field Description
IP Address The IP address of the domain controller. You can have up to 30 domaincontrollers, but remember that the first one entered will be the primarydomain. If you want to set a different primary domain controller, you mustremove all IP addresses from the list, and then reenter the IP address orhostname.
Connection Settings
User/Group Poll The amount of time that the Identity Agent will poll the user and groupinformation. The default frequency of is every 15 minutes.
Security Log Poll The amount of time that the Identity Agent will poll the login securityevents. The default frequency is every four to five seconds.
Secure LDAP Determines whether the LDAP is secure.
Mapped IPs Displays a list of correlated, or permitted, IP addresses. You can add an individual IP address, a range, or a CIDR. If the list is blank, the Identity Agent will correlate all IP addresses.
Excluded IPs Displays a list of values that you do not want to correlate from the IdentityAgent.
Custom Schema If you customized your Active Directory schema, you can match the sameschema in the Identity Agent.
Create the initial Identity Agent configuration1. Double-click the Identity Agent desktop icon.
2. Select an IP address from the Agent Host IP drop-down list.
Important: The Agent Host IP is only entered one time. The next time you access the configuration,this field will appear unavailable. After you save the initial configuration, you must reinstall the IdentityAgent if you want to update the host IP address.
3. Type the Identity Agent domain name in the Domain Name field.

16 Identity Agent Deployment Guide
Important: The domain name must be the same name listed in the Permissions for Identity Agent dialog boxon page 12.
4. Type the distinguished name of the node in the Active Directory under which all the users and groupsare located in the Base DN field.
Important: Separate the CN, OU, and DC with commas.
5. Type an individual IP address, range or CIDR in the IP Address field, and then click the + icon.
6. Enter the user/group mapping polling frequency in the User/Group Poll field.
7. Enter the security log polling frequency in the Secuirty Log Poll field.
8. (Optional) Select the check box to enable secure LDAP.
9. Click Save.
10. Click Yes to restart the Identity Agent service and to apply the configuration.
Manage domain controllers
You can have up to 30 domain controllers listed for each Identity Agent.
Multi-domain users: Each domain (or subdomain) must have an Identity Agent configured on a serverlocated within that domain (or subdomain).
Load balancing: If your network uses multiple domain controllers for load balancing, then each domaincontroller (up to 30) must connect to the same Identity Agent.
1. Double-click the Identity Agent desktop icon.
2. Select an IP address from the Domain Controller list.
3. Click the - icon.
4. Click Save.
5. Click Yes to overwrite the existing configuration.
Add an IP address to the Mapped IPs list
You can have up to 64 IP addresses listed for each Identity Agent.
1. Double-click the Identity Agent desktop icon.
2. Click the Mapped IPs tab.
3. Enter an individual IP address, range or CIDR in the IP Address field.
4. Click the + icon.
5. Click Save.
6. Click Yes to overwrite the existing configuration.

Identity Agent Deployment Guide 17
Remove an IP address from the Mapped IPs list
1. Double-click the Identity Agent desktop icon.
2. Click the Mapped IPs tab.
3. Select an individual IP address, range or CIDR from the IP Address field.
4. Click the - icon.
5. Click Save.
6. Click Yes to overwrite the existing configuration.
Add an IP address to the Excluded IPs list
You can have up to 64 IP addresses listed for each Identity Agent.
1. Double-click the Identity Agent desktop icon.
2. Click the Excluded IPs tab.
3. Enter an individual IP address, range or CIDR in the IP Address field.
4. Click the + icon.
5. Click Save.
6. Click Yes to overwrite the existing configuration.
Remove an IP address from the Excluded IPs list
1. Double-click the Identity Agent desktop icon.
2. Click the Excluded IPs tab.
3. Select an individual IP address, range or CIDR from the IP Address field.
4. Click the- icon.
5. Click Save.
6. Click Yes to overwrite the existing configuration.
Manage custom schemas
If you customize your Active Directory schema, you can match the same schema in the Identity Agent.
1. Double-click the Identity Agent desktop icon.
2. Click the Custom Schemas tab.
3. Enter a value in the User Object Class field.
4. Enter a value in the Unique Identifier field.
5. Enter a value in the Member Of field.
6. Enter a value in the Groups Object Class field.

18 Identity Agent Deployment Guide
7. Enter a value in the Distinguished Name field.
8. Click Save.
9. Click Yes to overwrite the existing configuration.

Identity Agent Deployment Guide 19
Uninstall Identity AgentFollow these steps to uninstall the Identity Agent. Alternatively, you can also uninstall the agent from theWindows Control Panel.
1. Navigate to the folder in which you installed the Identity Agent.
If you used the default settings, the Identity Agent is located in the Program Files.
2. Right-click on setup, and then click Run as administrator.
The Identity Agent - Install Shield Wizard opens.
3. Use the wizard to remove the Identity Agent from your computer. Click Next to go through eachwizard page.
On this wizard step(page):
Do the following ...
License Agreement Read and accept the terms in the license agreement. You can also print a copyof the agreement.
Customer Information Type a user name and organization.
Destination Folder Review and confirm the location or browse to and select a new location toinstall the Identity Agent.
4. Click Remove, and then click Finish.
The Identity Agent removes all installed files except for the logs and the Config file.

20 Identity Agent Deployment Guide
Where to go nextThe SMS is a central console where you can manage multiple TippingPoint devices, products, and services.After the initial setup, you can begin monitoring and managing your TippingPoint systems.
Connect the Identity Agent in the SMS from the Admin workspace (Admin > User Id IP correlation).
Once the SMS is configured to poll the Identity Agent, the SMS will display the User ID to User IPcorrelation and security login events. When you first connect the Identity Agent in the SMS, the SMS willautomatically poll the domain controller for the last 15 minutes of historical information.
For complete information about managing TippingPoint systems, see the TippingPoint SMS User Guide or theSMS online Help.

Identity Agent Deployment Guide 21
Identity Agent issues and resolutionsThis document covers the agent issues found during pre-installation, installation, and post installation as wellas the steps required to resolve these issues.
Agent service not able to query domain controllersecurity log eventsIssue
The agent service is not able to query domain controller security log events.
Root cause
The Identity Agent service logon user does not have sufficient privileges in the active directory (AD) toaccess security log events.
Resolution
To resolve this problem, verify in the AD that the Identity Agent service logon user account has thefollowing group membership:
• Domain Users
(OR)
• Distributed COM Users
• Event Log Readers
• Performance Monitor Users
If it doesn't have the correct membership, then it should be added.
The image below shows an example of adding a group membership to a user account.

22 Identity Agent Deployment Guide
Note: If you are using the Domain Admins approach, only that group will be displayed in the membershiptab.
Agent service not able to query domain controller OSinformationIssue
The agent service is not able to query domain controller OS information for the meta-data.
Additional info in agent logs
[DIAGNOSTICS] WARN ADAgentService.Diagnostics.DiagnosticWorker -Encountered unexpected exception trying to obtain directory controllermeta-data:System.Management.ManagementException: Access denied
Root cause
The Identity Agent service logon user does not have sufficient WMI privileges in the domain controller toaccess OS information.

Identity Agent Deployment Guide 23
OS information resolutionFollow these steps to allow the Identity Agent Service account to have access to WMI in the domaincontroller. These steps need to be executed in all domain controllers, which will be configured in the agent.
1. In the domain controller, click Start, click Administrative Tools, and then click ComputerManagement.
2. Within the management console, navigate to Services and Applications > WMI Control.
3. Right-click WMI Control, and select Properties.
4. Navigate to Security.
5. Add your Identity Agent service logon user account, and modify the domain controller permissions sothat the agent will be able to connect.
6. Expand the namespace to Root > CIMV2, and select the Security button as shown in the imagebelow.

24 Identity Agent Deployment Guide
7. Select Add, and choose your service account, as described above, to the list of users that will have thespecified permissions.
8. Enter the name of the account that you will operate the service under, verifying that the value forLocation is appropriate.
In the example below, it points to the AD domain.

Identity Agent Deployment Guide 25
Note: Select Check Names if you are uncertain of the correct location, and the user account will bevalidated.
9. After adding the user successfully, select the appropriate permissions for the CIMV2 Namespace for theuser account as shown below.
The specified permissions that are required are:
◦ Enable account
◦ Remote Enable
◦ Read Security
No other permissions should be necessary.

26 Identity Agent Deployment Guide
Agent service is not able to communicate to domaincontrollerIssue
The agent service is not able to communicate with the domain controller.
Root cause
The domain controllers are protected by a firewall.
Resolution
If your domain controllers are protected by the built-in Windows Firewall with Advanced Security, you willneed to enable the following rules on each domain controller to be monitored by the Identity Agent.
In Windows 2008
• Remote Administration (RPC)
• Windows Management Instrumentation (DCOM-In)
• Remote Event Log Management (RPC)
In Windows 2012
• Remote Service Management (RPC)
• Windows Management Instrumentation (DCOM-In)
• Remote Event Log Management (RPC)
To enable Windows Firewall rules1. Go to Start > Control Panel.
2. Click the System and Security link, and then click Windows Firewall.

Identity Agent Deployment Guide 27
3. In the main Windows Firewall control window, click the Advanced Settings link on the left.
You will see the Windows Firewall and Advanced Security window as shown below.

28 Identity Agent Deployment Guide
4. On the left, click Inbound Rules.
5. Within the list of Inbound Rules, search for the correct rule, right click it, and then click Enable Rule.
6. Verify that the firewall rule is enabled after completing the above steps.

Identity Agent Deployment Guide 29
Agent service running but not querying domaincontrollers for security event logsIssue
The agent service is running, but it is not querying domain controllers for the security event logs.
Root cause
A valid domain logon user account is not specified in the Identity Agent service.
Resolution
Follow the steps in To modify the account on page 29 to resolve this issue.
To modify the accountTo modify the account under which the agent will operate, perform the following steps.
1. Open Control Panel > Administrative Tools > Services.
2. Navigate to the entry for the Identity Agent Service, right click the entry, and select Properties.
3. Navigate to the Log On tab within the service properties.
4. Select the icon next to This account, and click Browse as shown in the image below.
5. Search for the correct domain account, click OK, and then restart the Identity Agent service.
6. Restart the Identity Agent service after completing the above steps.

30 Identity Agent Deployment Guide
Agent service is not creating db and logs foldersIssue
The agent service is not creating the db and logs folders and files that are needed for agent functioning.
Root cause
The Identity Agent service logon user does not have sufficient permission to create or modify folders andfiles in the agent installed folder.
Resolution
Provide full access for the service account to the Identity Agent installed folders. Follow the steps in Toprovide full access on page 30 to resolve this issue.
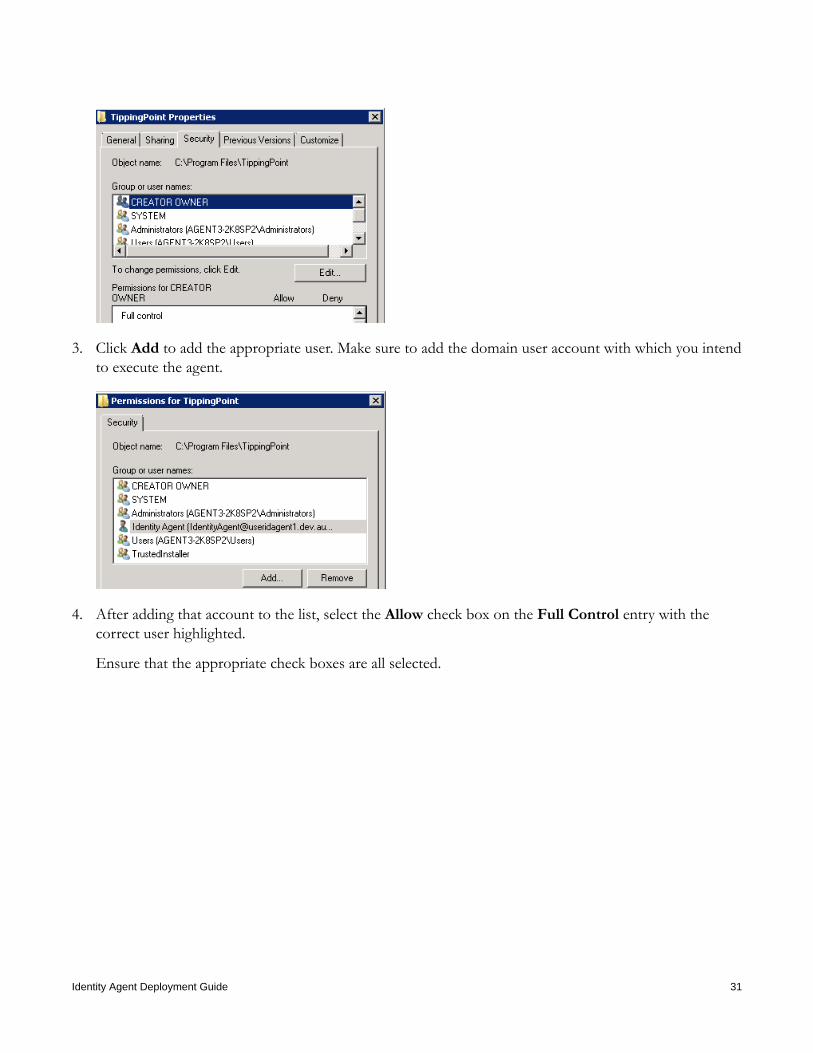
To provide full access1. Right click the TippingPoint folder in which the agent has been installed, and select the Properties
action at the bottom of the context menu.
2. Navigate to the Security tab, and select the Edit button.
Identity Agent Deployment Guide 31
3. Click Add to add the appropriate user. Make sure to add the domain user account with which you intendto execute the agent.
4. After adding that account to the list, select the Allow check box on the Full Control entry with thecorrect user highlighted.
Ensure that the appropriate check boxes are all selected.

32 Identity Agent Deployment Guide
5. Click OK.
Agent APIs are not listening in agent portIssue
The agent APIs are not listening in the agent port. There is no response to API calls.
Additional information in event logs
Description:
The process was terminated due to an unhandled exception.
Exception Info:
System.Net.HttpListenerExceptionStack: at System.Net.HttpListener.Start() atADAgentService.Http.HttpServer..ctor(System.Collections.Generic.List`1<ADAgentService.Http.PortConfiguration>)
Root cause
The following are possible causes:
• The Identity Agent service logon user does not have sufficient permission to register HTTP Listeners.
• The agent port might already be reserved for other services.

Identity Agent Deployment Guide 33
Resolution
• Add the Identity Agent service logon user to the local administrator group, and restart the IdentityAgent service.
OR
• Verify that any URL reservation is already present for that port. If it is, delete the URL reservation, addthe new URL ACL, and restart the Identity Agent service.
Commands
Command to show URL ACL:
netsh http show urlacl
Command to delete URL ACL:
netsh http delete urlacl url=https://*:agentport/
Example:
netsh http delete urlacl url=https://*:8445/
Command to add URL ACL:
netsh http add urlacl url=https://*:Agent Port/ user=Domain\agentservice account
Example:
netsh http add urlacl url=https://*:8445/user=USERIDAGENT1\TP_IdentityAgent
Agent APIs are not accessible outside agent serverIssue
The agent APIs are not accessible outside of the agent server.
Root cause
The agent server firewall is restricting access to the agent port.
Resolution
Open the port for the Identity Agent in the Windows Firewall in an agent-installed machine.

34 Identity Agent Deployment Guide
Groups API call response with no dataIssue
The groups API call (GET/groups) has a response with no data.
Root cause
The following are possible causes:
• The Identity Agent service logon user does not have sufficient privileges in the AD to query group anduser objects.
• An invalid Base DN value is specified in the configuration tool.
• There are invalid user and group object attributes specified in the configuration tool.
Resolution
There are several possible solutions to resolve this problem:
• Verify that the Identity Agent service logon user has sufficient privileges in AD to query group anduser objects. If not, add the necessary privileges to the service logon domain user account. Add the useraccount to the Domain Users group.
• Verify that a valid Base DN value is specified in the configuration tool. There is a high probability of atypo error occurrence. Validate that the Base DN value specified in the configuration tool is present inthe configured AD.
• Verify that there are valid user and group object attributes specified in the configuration tool. There isa high probability of a typo error occurrence. Validate that the user and group object attributes valuespecified in the configuration tool is present in the configured AD.
Make sure to restart the service after any changes are made in the configuration tool.
Configuration changes are not reflected in the agentserviceIssue
Configuration changes made in the configuration tool are not reflected in the agent service.
Root cause
The agent service is running with stale configuration data, and it was not restarted after configurationchanges were made.

Identity Agent Deployment Guide 35
Resolution
Restart the Identity Agent service to reflect the latest configuration changes.
SMS is not able to establish connectivity with theIdentity AgentIssue
The SMS is not able to establish connectivity with the Identity Agent.
Root cause
The following are possible causes:
• The agent service is not running.
• The SMS does not connect using the agent configured IP.
• The SMS mandatory certificates are not properly installed in the agent server.
• The agent self-signed certificate was not properly created and installed in the agent server.
• The agent port is not open in the firewall.
Resolution
There are several possible solutions to resolve this problem:
• Verify that the agent service is running in the agent server. If not, restart the Identity Agent service.
• Verify that the SMS is trying to connect using the agent IP, which is present in the agent configurationtool. To validate the agent IP, log in to the agent server and open the configuration tool.
• Verify that the SMS root certificates are properly installed in the agent server.
To do this, go to run > mmc > File > Add/Remove snap-in > Certificates > Add > Computeraccount > Finish > OK.Verify that the SMS root certificate is present in Trusted Root Certification Authorities/Certificates.
• Verify that the self-signed certificates are properly created and installed in the agent server.
To do this, go to run > mmc > File > Add/Remove snap-in > Certificates > Add > Computeraccount > Finish > OK.Verify that the SMS root certificate is present in Personal/Certificates.
• Verify that the IP address is the same on the Identity Agent (on the server) and the SMS. If you receivean error message that the Identity Agent certificate is invalid, uninstall the Identity Agent and theninstall it again on the server.

36 Identity Agent Deployment Guide
Agent not able to establish LDAP connectivityIssue
The agent is not able to establish LDAP connectivity for user group mapping.
Root cause
• The AD is not configured to listen on LDAP port (389).
• The firewall is blocking the connection that uses the LDAP port (389).
Resolution
Verify that the LDAP port is blocked by the firewall. If the firewall is blocking the LDAP port connectivitybetween the domain controller and the agent server, then open the port.
Agent not able to establish secure LDAPS connectivityIssue
The agent is not able to establish LDAPS connectivity for user group mapping.
Root cause
• The AD is not configured to listen on the LDAPS port (636).
• The firewall is blocking the connection that uses the LDAP port (636).
Resolution
Verify that the domain controller is configured to listen on the LDAPS port (636).
Verify that the LDAPS port is blocked by the firewall. If the firewall is blocking the LDAPS portconnectivity between the domain controller and the agent server, then open the port.
To test domain controller connectivityTo test the LDAPS connectivity in the domain controller using ldp.exe, perform the following steps.
1. Login to the domain controller by going to Start > Run > type Idp.exe.
2. Click Connection, and then click Connect as shown in the image below.

Identity Agent Deployment Guide 37
3. Enter the full FQDN of the domain controller for the server, enter 636 for the port, and select the SSLcheck box, as shown in the image below.
4. Click OK.
5. If you receive the domain information, the LDAPS connection was performed successfully, as shown inthe image below.

38 Identity Agent Deployment Guide
To test agent machine connectivityTo test the LDAPS connectivity in agent machine using ldp.exe, perform the following steps.
1. Login to the agent machine by going to Start > Run > type Idp.exe.
2. Click Connection, and then click Connect as shown in the image below.
3. Enter the full FQDN of the domain controller for the server, enter 636 for the port, and select the SSLcheck box, as shown in the image below.

Identity Agent Deployment Guide 39
4. Click OK.
5. If you receive the domain information, the LDAPS connection was performed successfully, as shown inthe image below.
