ibm maximo asset management: installation guide (weblogic
TRANSCRIPT

IBM Maximo Asset ManagementVersion 7 Release 6
Installation Guide(WebLogic Server, Oracle, Active Directory)
IBM
NoteBefore using this information and the product it supports, read the information in “Notices” on page 135.
This edition applies to version 7, release 6, modification 0, fix pack 5 of IBM Maximo Asset Management and to allsubsequent releases and modifications until otherwise indicated in new editions.
© Copyright IBM Corporation 2007, 2014.US Government Users Restricted Rights – Use, duplication or disclosure restricted by GSA ADP Schedule Contractwith IBM Corp.
Contents
Chapter 1. Preparing for installation . . 1Software installation images . . . . . . . . . 1Before you begin . . . . . . . . . . . . . 1
Programmatically verifying prerequisites from thecommand-line.. . . . . . . . . . . . . 1Checking port availability . . . . . . . . . 7AIX tar command requirements . . . . . . . 7AIX font requirements . . . . . . . . . . 8Checking for required libraries on Linux . . . . 8Configuring the JRE in Linux . . . . . . . . 8Setting the ulimit . . . . . . . . . . . . 9Setting the swap size . . . . . . . . . . 9Setting shared memory . . . . . . . . . . 9Remote configuration enablement . . . . . . 10Microsoft SQL Server preparation . . . . . . 11System password policy settings . . . . . . 11
Starting the launchpad . . . . . . . . . . 12Installation program overview . . . . . . . . 13Configuration program overview . . . . . . . 14
Chapter 2. Automatically configuringexisting middleware during deployment 17Running the Maximo Asset Management 7.6.0.5installation program . . . . . . . . . . . 17Configuring Maximo Asset Management version7.6.0.5 using the Maximo Asset Management version7.6.0.5 configuration program . . . . . . . . 18
Chapter 3. Manually configuringWebLogic Server . . . . . . . . . . 21Creating the MAXIMOSERVER domain . . . . . 21Configuring JMS options for integration framework 22Configuring JMS for the email listener in WebLogicServer . . . . . . . . . . . . . . . . 23Post installation for Oracle WebLogic Serverdeployments . . . . . . . . . . . . . . 25Deploying ear files . . . . . . . . . . . . 27Setting the Oracle WebLogic Server host name. . . 28
Chapter 4. Manually configuringexisting middleware during deployment 31Maximo Asset Management installation withmanual middleware configuration . . . . . . . 31
Manual configuration of the database. . . . . 31Manually configuring Oracle 12c . . . . . 31
Manual configuration of the directory server . . 34Manually configuring Microsoft ActiveDirectory version 2012 . . . . . . . . . 35
Manual configuration of the J2EE server . . . . 37Manually configuring WebLogic Server . . . 37
Running the Maximo Asset Management 7.6.0.5installation program . . . . . . . . . . 42Configuring Maximo Asset Management version7.6.0.5 with manually configured middleware . . 43
Post installation for Oracle WebLogic Serverdeployments . . . . . . . . . . . . . . 43Deploying ear files . . . . . . . . . . . . 45Setting the Oracle WebLogic Server host name. . . 46
Chapter 5. Update the applicationdatabase with the UpdateDB Litecommand . . . . . . . . . . . . . 49
Chapter 6. Silent installation . . . . . 51Creating silent response files for installation . . . 51
Sample silent installation response files . . . . 52Updating password values in silent response files 53
Silently installing the Installation Manager software 53Silently installing Maximo Asset Management andrelated middleware . . . . . . . . . . . . 54Silently uninstalling Maximo Asset Managementand related middleware . . . . . . . . . . 55
Chapter 7. Silent configuration . . . . 57Creating silent response files for middlewareconfiguration . . . . . . . . . . . . . . 57
Sample silent middleware configuration responsefiles . . . . . . . . . . . . . . . . 57
Creating a response file for silent Maximo AssetManagement configuration . . . . . . . . . 58Silently configuring middleware . . . . . . . 59Silently configuring Maximo Asset Management . . 59Silently remove middleware configuration . . . . 60Remove product configuration silently . . . . . 60
Chapter 8. Programmatically verifyingthat the installation was successful . . 63
Chapter 9. Verifying the installationmanually . . . . . . . . . . . . . . 67
Chapter 10. Installation andconfiguration programs log information 69
Chapter 11. Post installation tasks . . . 71Installing help locally . . . . . . . . . . . 71
Installing help . . . . . . . . . . . . 71IBM Knowledge Center configuration . . . . 72Help components . . . . . . . . . . . 73Maximo Asset Management documentationlibrary . . . . . . . . . . . . . . . 74
Configuring initial data . . . . . . . . . . 76Synchronizing users and groups . . . . . . . 79Adding sample data to the Maximo AssetManagement database post configuration . . . . 79
© Copyright IBM Corp. 2007, 2014 iii

Chapter 12. Installing Version 7.5industry solutions . . . . . . . . . . 83Installing version 7.5 industry solutions from thelaunchpad . . . . . . . . . . . . . . . 83Installing version 7.5 industry solutions from thecommand line . . . . . . . . . . . . . 83Installing version 7.5 industry solutions silently . . 84
Chapter 13. Configuring and managingOracle WebLogic Server . . . . . . . 87Starting Oracle WebLogic Server . . . . . . . 87Stopping the Oracle WebLogic Server. . . . . . 87
Chapter 14. Maintaining EAR files . . . 89Building EAR files . . . . . . . . . . . . 89Manually deploying Work Center WAR files . . . 89Manually uninstalling applications from OracleWebLogic Server. . . . . . . . . . . . . 90
Manually uninstalling applications from OracleWebLogic Server. . . . . . . . . . . . 90
Chapter 15. Command lineconfiguration . . . . . . . . . . . . 91Configuration parameter validation . . . . . . 91Input properties files . . . . . . . . . . . 92Command line interface parameters . . . . . . 93Command line configuration program actions . . 100
action updateDatabaseConfiguration . . . . 100action validateDatabaseConfiguration . . . . 100actionvalidateAndUpdateDatabaseConfiguration . . 101action deployDatabaseConfiguration. . . . . 101action removeDatabaseConfiguration . . . . 102action enableDB2TextSearch . . . . . . . 102action updateJ2eeConfiguration . . . . . . 102
action validateJ2eeConfiguration . . . . . . 102action validateAndUpdateJ2eeConfiguration . . 102action deployJ2eeConfiguration . . . . . . 103action removeJ2EEConfiguration . . . . . . 103action deployConfiguration. . . . . . . . 103action removeConfiguration . . . . . . . 103action reapplyAppServerTuning . . . . . . 104action enableAppSecurity . . . . . . . . 104action disableAppSecurity . . . . . . . . 104action updateApplication . . . . . . . . 104action addLanguages . . . . . . . . . . 104action configureProducts . . . . . . . . 105action deployMiddlewareConfiguration . . . 105action upgrade75Configuration . . . . . . 106action updateApplicationDBLite . . . . . . 107action configureProductsDBLite . . . . . . 107
Configuration program properties . . . . . . 108
Chapter 16. Backup and restoration 129Backing up the administrative workstation . . . 129Restoring the administrative workstation . . . . 130
Chapter 17. Uninstalling the product 131Remove Maximo Asset Management configuration 131Removing WebSphere Application Server NetworkDeployment configuration . . . . . . . . . 132Uninstalling Maximo Asset Management andmiddleware . . . . . . . . . . . . . . 132
Notices . . . . . . . . . . . . . . 135Trademarks . . . . . . . . . . . . . . 137Terms and conditions for product documentation 137IBM Online Privacy Statement. . . . . . . . 138
Index . . . . . . . . . . . . . . . 139
iv IBM Maximo Asset Management: Installation Guide (WebLogic Server, Oracle, Active Directory)

Chapter 1. Preparing for installation
These topics provide information about product media, preinstallationconsiderations, overview of the installation procedure, and instructions on usingthe Maximo® Asset Management launchpad.
Use the planning information to familiarize yourself with the overall process of aMaximo Asset Management deployment before you use this information toconduct the installation.
Software installation imagesYou access the IBM® Maximo Asset Management product software from IBMPassport Advantage.
The installation images that you download from Passport Advantage can comprisemultiple downloadable files. Download all files in the package to a single directoryand extract the files for execution.
For instructions and a full list of installation images, see the IBM Maximo AssetManagement 7.6 Download Document (http://www.ibm.com/support/docview.wss?uid=swg24038431).
Before you beginYou must prepare your environment before you install Maximo AssetManagement. In some cases, to perform steps for preparation, you must be loggedin as a user with administrator privileges on Windows or as root on UNIX. Someprocesses, such as anti-virus programs, can negatively affect Maximo AssetManagement installation on the system. You must temporarily shut down anynoncritical processes before running the Maximo Asset Management installationprogram.
Make a copy of the image of the system, database, and application server on whichyou are planning to install the product.
Ensure that you have adequate disk space for the future on the systems being usedfor the Maximo Asset Management deployment. Filling up the disk space on aMaximo Asset Management deployment system can cause problems with MaximoAsset Management operations.
Fully qualified host names provided to the installation programs must resolvebetween systems involved in the product deployment. Ensure all IP addressesconfigured for systems targeted for the product deployment are reachable usingthe ping command from the administrative workstation.
Programmatically verifying prerequisites from thecommand-line.
You can use the prerequisite verification utility from the command-line to verifythat installation program prerequisites are present on a system. Use this utilitybefore you start the product installation programs.
© Copyright IBM Corp. 2007, 2014 1

About this task
When started from the command line, the prerequisite verification utility acceptsvarious parameters. The prerequisite verification utility must be run on the systemthat hosts the prerequisite to check. You cannot use this utility to checkprerequisites on a remote system.
Table 1. System verification parameters
Parameters Details
-component Specifies the type of component to verify. At least one component must be usedwith the prerequisite verification utility.
asset_mgtUse the asset_mgt parameter to have the prerequisite verification utility checkfor prerequisites that are required by Maximo Asset Management. Run theprerequisite verification utility with the asset_mgt parameter on theadministrative workstation.
asset_mgt_upgUse the asset_mgt_upg parameter to have the prerequisite verification utilitycheck for prerequisites that are required to connect remotely duringconfiguration. .
rxaUse the rxa parameter to have the prerequisite verification utility check forprerequisites that are required by Maximo Asset Management.
performanceUse the performance parameter to have the prerequisite verification utilitycheck for prerequisites performance settings for Maximo Asset Management.
Syntax example:
tpae_req_check.bat -component asset_mgt
If you do not use the -component parameter, you are prompted to specifycomponents when you use the utility.
Multiple components can be specified as comma-separated values.
-input The prerequisite verification utility can accept a property file as input. The utilityverifies property values that are found in the file.
The default input property file is tpae.properties, and is found on themiddleware installation media in the SystemRequirements directory. Severalsample property files are found in the SystemRequirements\sample_property_files directory. These sample property files contain customvalues that are defined for particular operating systems. You can copy theseproperty files to the system and modify them, or create your own, before you runthe prerequisite verification utility.
Syntax example:
tpae_req_check.bat -component db2 -input path to the property file
If you do not use the input parameter when you run the prerequisite verificationutility, the utility is run in interactive mode. You are prompted for individualvalues to be verified.
2 IBM Maximo Asset Management: Installation Guide (WebLogic Server, Oracle, Active Directory)

Table 1. System verification parameters (continued)
Parameters Details
-mode The prerequisite verification utility can be run in silent or interactive mode.
interactiveBy default, the prerequisite verification utility is run in interactive mode. Ifyou do not specify the -mode parameter, the utility defaults to running ininteractive mode.
silentIf you use the silent qualifier, you can also use the input parameter andsupply a property file. If an input file not provided, default property valuesare used.
Syntax example:
tpae_req_check.bat-component db2-mode silent-input path to the property file > prereqresults.log
-trace Parameter that is used to specify trace output statements while the utility isrunning.
NoneSelecting this qualifier results in no trace information that is generated whilethe utility is running.
VerboseSelecting this qualifier results in detailed trace information that is generatedwhile the utility is running.
NormalSelecting this qualifier results in default trace information that is generatedwhile the utility is running.
Syntax example:
tpae_req_check.bat-component db2-trace None
Procedure1. Log on to the system you are checking for prerequisites with a user ID that has
permission to run scripts on the system. For Windows, ensure that the userbelongs to the local Administrators group. Ensure that the middlewareinstallation media is mounted or otherwise available to the system.
2. Open a command-line window and change directory to the SystemRequirementsdirectory of the middleware installation media.
3. Run the prerequisite verification utility. Specify the component to check andthe property file to use.tpae_req_check.bat-component db2-input d:\SystemRequirements\tpae.properties
In this example, the tpae.properties file is in the same directory as thetpae_req_check.bat script.
Results
After the prerequisite verification utility successfully completes the verificationtask, results are printed to the screen.
Chapter 1. Preparing for installation 3

CTGIN8117I : The Tivoli Pre-requisite Scanner has been launched.CTGIN8118I : The Tivoli Pre-requisite Scanner exited with the return codeIBM Prerequisite Scanner
Version : 1.0.34Build : 20101109OS Name : Microsoft Windows Server 2012, Enterprise Edition Service Pack 2User Name: Administrator
Machine InfoMachine name : MYMACHINESerial Number: KKKKKK0OS Serial : 66666-666-6666666-66666
PAE [not defined] [version 07500000]:Property Result Found Exp...======== ====== ===== ===...os.totalPhysicalMemory PASS 2.00GB 1.90GBnetwork.hasFQDN FAIL False TrueDisk#1 (C:\ibm\tivoli\mwi\workspace) PASS 27.99GB 300MBDisk#2 (C:\Temp\1) PASS 27.99GB 1000MBDisk#3 (C:\Temp\1) PASS 27.99GB 250MBnetwork.availablePorts.db2 PASS 135,445,1025,2967,3389,5800,5900,139 50000network.availablePorts.ctginst PASS 135,445,1025,2967,3389,5800,5900,139 50005Disk#4 (C:\Program Files\IBM\SQLLIB) PASS 27.99GB 1.40GB
ALL COMPONENTS :Property Result Found Exp...======== ====== ===== ===...C: PASS 27.99GB 2.91GB
Prereq Scanner Overall Result: FAILprereq_checker.bat 1
These values can also be redirected to a file when you start the command from thecommand line.
If any of the verification steps report a failure, resolve the issue and rerun theverification utility before you install Maximo Asset Management components.
The Table 2 table contains a list of the properties used by the prerequisiteverification utility. These are not properties found in the tpae.properties file. Usethis information to analyze prerequisite verification utility results.
Table 2. Prerequisite verification utility properties
Property Description
browser.Version Checks browser version.
CpuArchitecture Verifies that the machine architecture is supported.
network.availablePorts.* Verifies that required ports are available.
network.dns Verifies that there is a DNS entry for the system on theDNS server.
network.fqdn Verifies that the system host name is fully qualified.
os.architecture Verifies that the operating system architecture issupported.
os.dir.tmp/home Verifies required permissions for the system directories
os.FreePagingSpace Verifies that adequate free paging space is available onthe system.
os.iodevicestatus Verifies the I/O device status of the system.
os.kernelversion Checks kernel version.
4 IBM Maximo Asset Management: Installation Guide (WebLogic Server, Oracle, Active Directory)

Table 2. Prerequisite verification utility properties (continued)
Property Description
os.lib.* Verifies that a prerequisite library is available on thesystem.
os.mountcheck Checks for the existence of nosuid on the file system.
os.MozillaVersion Checks browser version.
os.package.atk Verifies a prerequisite library that is required for GTKon AIX® is available on the system.
os.package.cairo Verifies a prerequisite library that is required for GTKon AIX is available on the system.
os.package.expat Verifies a prerequisite library that is required for GTKon AIX is available on the system.
os.package.fontconfig Verifies a prerequisite library that is required for GTKon AIX is available on the system.
os.package.freetype2 Verifies a prerequisite library that is required for GTKon AIX is available on the system.
os.package.gettext Verifies a prerequisite library that is required for GTKon AIX is available on the system.
os.package.glib2 Verifies a prerequisite library that is required for GTKon AIX is available on the system.
os.package.gtk2 Verifies a prerequisite library that is required for GTKon AIX is available on the system.
os.package.libjpeg Verifies a prerequisite library that is required for GTKon AIX is available on the system.
os.package.libpng Verifies a prerequisite library that is required for GTKon AIX is available on the system.
os.package.libtiff Verifies a prerequisite library that is required for GTKon AIX is available on the system.
os.package.pango Verifies a prerequisite library that is required for GTKon AIX is available on the system.
os.package.pixman Verifies a prerequisite library that is required for GTKon AIX is available on the system.
os.package.rpm Verifies that prerequisite packages are available on thesystem.
os.package.xcursor Verifies a prerequisite library that is required for GTKon AIX is available on the system.
os.package.xft Verifies a prerequisite library that is required for GTKon AIX is available on the system.
os.package.xrender Verifies a prerequisite library that is required for GTKon AIX is available on the system.
os.package.zlib Verifies a prerequisite library that is required for GTKon AIX is available on the system.
os.registry.TcpTimedWaitDelay Windows performance setting.
os.registry.StrictTimeWaitSeqCheck Windows performance setting.
os.registry.MaxFreeTcbs Windows performance setting.
os.registry.MaxHashTableSize Windows performance setting.
os.registry.TcpWindowSize Windows performance setting.
os.registry.EnableDynamicBacklog Windows performance setting.
Chapter 1. Preparing for installation 5

Table 2. Prerequisite verification utility properties (continued)
Property Description
os.registry.MinimumDynamicBacklog Windows performance setting.
os.registry.MinimumDynamicBacklog Windows performance setting.
os.registry.DynamicBacklogGrowthDelta Windows performance setting.
os.registry.TcpAckFrequency Windows performance setting.
os.registry.MaxUserPort Windows performance setting.
os.networkTuningParameter.sb_max AIX performance setting.
os.networkTuningParameter.tcp_sendspace AIX performance setting.
os.networkTuningParameter.tcp_recvspace AIX performance setting.
os.networkTuningParameter.udp_sendspace AIX performance setting.
os.networkTuningParameter.udp_recvspace AIX performance setting.
os.networkTuningParameter.rfc1323 AIX performance setting.
os.networkTuningParameter.ipqmaxlen AIX performance setting.
os.networkTuningParameter.clean_partial_conns AIX performance setting.
os.networkTuningParameter.tcp_keepidle AIX performance setting.
os.networkTuningParameter.tcp_keepintvl AIX performance setting.
os.networkTuningParameter.tcp_keepinit AIX performance setting.
os.networkTuningParameter.tcp_timewait AIX performance setting.
os.networkTuningParameter.tcp_finwait2 AIX performance setting.
os.networkTuningParameter.tcp_ephemeral_low AIX performance setting.
os.virtualMemoryTuningParameter.lru_file_repage AIX performance setting.
os.virtualMemoryTuningParameter.maxclient% AIX performance setting.
os.virtualMemoryTuningParameter.maxperm% AIX performance setting.
os.virtualMemoryTuningParameter.minperm% AIX performance setting.
os.ulimit:filesizelimit AIX performance setting.
os.ulimit:datasegmentlimit AIX performance setting.
os.ulimit:stacksizelimit AIX performance setting.
os.ulimit:maxmemorysizelimit AIX performance setting.
os.ulimit:corefilesizelimit AIX performance setting.
os.ulimit:filedescriptorlimit AIX performance setting.
os.ulimit:threadlimit AIX performance setting.
os.ulimit:processlimit AIX performance setting.
oos.kernelTuningParameter.net.ipv4.ip_local_port_range Linux performance setting.
os.RAMSize Reports system RAM available.
os.SeaMonkeyVersion Checks browser version.
os.SELinux Determines whether selinux is enabled.
os.ServicePack Verifies that required service packs are installed on thesystem.
os.shell.default Determines the default shell for users.
6 IBM Maximo Asset Management: Installation Guide (WebLogic Server, Oracle, Active Directory)

Table 2. Prerequisite verification utility properties (continued)
Property Description
os.space.* Determines disk space availability for various filesystems.
The following example shows the check that is made forthe middleware installation program workspace.
os.space.var=[dir:root=/var,unit:MB]512
os.totalPhysicalMemory Reports physical RAM available to the operating system.
os.ulimit Identifies user limits that are configured on the system.
OS.Version Reports the operating system type and version.
Checking port availabilityBefore you use the product installation programs, you must ensure that certainports in your environment are available for use with the middleware that you areinstalling. You can either use the prerequisite verification utility to check for portavailability or you can check manually.
About this task
Default port values are assigned for the middleware that you deploy.
Port 7001 or an alternative port must be made available for Oracle WebLogicServer.
For a full list of port requirements, see the System requirements information on theMaximo Asset Management wiki.
Procedure1. Check the available ports on the host system:
Option Description
Automatic Run the prerequisite verification utility. Thenetwork.availablePorts.* parameterindicates the availability of the requiredports.
Manual Run the following command to see a list ofactive connections:
netstat -ao
2. If you find that a port is already assigned, specify the value of an open portwhen you are prompted to by the installation program.
AIX tar command requirementsBoth the native UNIX tar command and the GNU version of the tar command arerequired by the installation and configuration programs. Because the native utilitydoes not support long file names, ensure that GNU tar version 1.14 or higher isinstalled. GNU tar version 1.14 ensures that installation files can be extracted.
Chapter 1. Preparing for installation 7

Verify that the system path variable contains both native UNIX tar and GNU tarpaths. The GNU tar path must be defined before the native UNIX tar path. Forexample, the native tar utility is installed in /usr/bin and the GNU tar utility isinstalled in /opt/freeware/bin/tar.
If you have set a symbolic link to overwrite the native UNIX tar command withthe GNU tar command an error occurs.
http://www.ibm.com/systems/p/os/aix/linux/toolbox/download.html
AIX font requirementsAIX requires specific fonts to produce reports.
About this task
When you produce reports from AIX systems, TrueType fonts must be available onthe system.
Procedure1. Install TrueType fonts on the AIX system.2. Ensure the fonts-path environment variable refers to the location of the fonts.
Checking for required libraries on LinuxThe Maximo Asset Management deployment requires certain Linux systemlibraries.
Procedure1. Locate the libstdc++.so.5, libstdc++.so.6, and libaio.so.1 libraries in the
/usr/lib64/ directory. If these libraries are not installed, the Maximo AssetManagement installation program produces an error when run in graphicalmode. If you cannot locate this library on your system, locate the Red HatPackage Manager package for your system that contains these libraries andinstall the packages.
2. Ensure that you have the libstdc++33-32bit-3.3.3-11.9.x86_64.rpm packagethat is installed before you run the product installation program. SUSE LinuxEnterprise Server 10 64-bit systems that host manually configured middlewaremust host this package.
Configuring the JRE in LinuxIn some cases, the Maximo Asset Management installation or configurationprogram fails on Red Hat Enterprise Linux systems, or other systems withSecurity-Enhanced Linux (SELinux) enabled.
About this task
In one scenario, the Maximo Asset Management installation or configurationprogram fails with an error that states that the Java™ Runtime Environment (JRE)cannot be found. In another scenario, the Maximo Asset Management installationor configuration program fails stating that it cannot find the VM.
Procedure1. Temporarily disable SELinux by using the setenforce 0 command.2. Run the Maximo Asset Management installation or configuration program.
8 IBM Maximo Asset Management: Installation Guide (WebLogic Server, Oracle, Active Directory)

3. Re-enable SELinux by using the setenforce 1 command.4. Manually issue the chcon command.
chcon -R -t textrel_shlib_t install_home/jvm/jre
Results
The Maximo Asset Management installation or configuration program is now ableto locate the JRE. Alternatively, you can edit the /etc/selinux/config file and setSELINUX to either permissive or disabled for a more permanent fix. This solution,however, affects the level of security for the entire system.
Setting the ulimitSet the ulimit in Linux. The ulimit setting is used to define user system andprocess resource limits.
About this task
For Linux systems, you must set the ulimit for the system before you use theMaximo Asset Management installation program.
If you set the ulimit in .profile for root, the ulimit setting applies to all processes.
Procedure1. From a command line, type ulimit -f unlimited2. From a command line, type ulimit -n 8192
Setting the swap sizeMaximo Asset Management can be a resource-intensive application. Configure andtune your system for maximum performance. Set the size of the swap space that isused in Linux systems.
About this task
Typically, the swap size for Linux is set to twice the amount of physical RAM inthe server. See the product documentation for your Linux distribution for moreinformation.
More swap space can be made available to the system.
Procedurev Increase the size of the existing swap partition.v Create a new, extra swap partition.v Create a swap file.
Setting shared memorySet a minimum shared memory value in Linux.
About this task
For Linux systems, you must set a minimum shared memory value for the systembefore you use the Maximo Asset Management installation program.
Chapter 1. Preparing for installation 9

Procedure1. From a command line, type sysctl kernel.shmmax and determine whether the
value is less than 268435456 bytes (256 Mb).2. If you must increase the value, from a command line, type sysctl -w
kernel.shmmax=268435456.3. Update the value in /etc/sysctl.conf.
Remote configuration enablementThe Maximo Asset Management configuration program can automaticallyconfigure middleware. You must enable a remote access protocol for each systemon which you intend to configure the middleware.
Use SSH for accessing remote Linux and UNIX systems. Use Windows SMBaccessing remote Windows systems. Windows SMB is a Windows protocol. TheIBM JRE on the Maximo Asset Management administrative workstation includesSSH.
Before you start the Maximo Asset Management configuration program, ensurethat you can log on to any remote servers with the protocols that you intend touse. Use the credentials that you plan to supply to the Maximo Asset Managementconfiguration program.
For remote Windows systems, ensure that the following requirements are metbefore you configure the software.v The user name that you provide to the Maximo Asset Management
configuration program must exist as a local account on the remote system. Thisuser must be a member of the Windows Administrators group.
v The following Windows services must be started on the remote system beforeyou begin a remote configuration:– winmgmt (Windows Management Instrumentation)– RemoteRegistry (Remote Registry)– lanmanserver (Service)
v The SMB protocol must be enabled and configured to send NetBIOS overTCP/IP, by choosing to use port 139. Alternatively, you can configure SMB touse TCP/IP as the transport protocol, without NetBIOS, by configuring it to useport 445.
v Ensure that any ports that you use for remote protocols are not blocked byfirewall software or security policies, including ports 137 and 139. Port 139 isused if SMB is configured to run on NetBIOS over TCP/IP. Port 445 is used ifSMB is run directly on TCP/IP, without NetBIOS.
v To disable simple file sharing, start Windows Explorer. Click Tools > FolderOptions, and clear the Use Simple File Sharing check box.
v The Windows administrative share (C$) and the interprocess communications(IPC$) folder must be shared.
v For Windows systems that support password-protected sharing, disablepassword-protection. Shares must be shared for the Guest or Everyone accounts.
v For Windows systems that have User Account Control (UAC) enabled, it mustbe disabled before software can be remotely installed and configured.
v If Cygwin is installed on the remote Windows system the SSH daemon (sshd)must be uninstalled or disabled.
10 IBM Maximo Asset Management: Installation Guide (WebLogic Server, Oracle, Active Directory)

For remote Linux or UNIX systems, ensure that the following requirements are metbefore you configure the software.v For AIX systems, set the following SSH parameters in the /etc/ssh/sshd_config
file.– ClientAliveInterval 900– ClientAliveCountMax 10
Stop the SSH daemon with the stopsrc -s sshd command and then restart itusing the startsrc -s sshd command.
v For AIX systems, set the TMOUT and TIMEOUT variables in the user profilescript to 0. This setting prevents the user from idling out and being logged offthe remote system during the configuration.
v The user name that you provide to the Maximo Asset Managementconfiguration program must exist as a privileged account (for example, root) onthe remote systems.
v Ensure that a current version of OpenSSH is installed and running. Do not useOpenSSH 4.7.0.5302.
v For Oracle Solaris systems, the remote access protocols require the use ofinternal shell scripts that must be run within the Korn (ksh) shell. The methodsneed ksh, even if the user ID that you use to log on to the remote system isconfigured to use a different shell. Oracle Solaris systems must have the kshenvironment installed and properly configured.
v If you plan to remotely configure software on remote Linux or UNIX computers,ensure that SSH is installed.
Remote configuration does not support accessing network drives on the local orremote system.
Microsoft SQL Server preparationMicrosoft SQL Server must be configured using specific options before you can useit with Maximo Asset Management.
Ensure you have the following options set for the Microsoft SQL Server databaseyou intend to use with Maximo Asset Management. These settings must beconfigured before you use the Maximo Asset Management configuration programto configure Maximo Asset Management.v Use the SQL Server Configuration Manager to disable TCP/IP dynamic ports
usage on the server.v Verify that you enabled the Full-text Search setting during the installation of
Microsoft SQL Server.v Set Microsoft SQL Server Database Collation settings to the following options:
– Dictionary order– Case-insensitive– For use with 1252 Character set
System password policy settingsFamiliarize yourself with the password policies of systems you are using as part ofa Maximo Asset Management deployment.
Chapter 1. Preparing for installation 11

Your organization might have password policy regulations that are enforced onsystems on your network. Before deploying Maximo Asset Management, be surethat you are familiar with the password policies of systems that are used in thedeployment.
For example, Windows systems can have a stricter set of password requirementsthan previous versions configured by default. If you are not familiar with thesestronger password requirements, you might experience an error during theinstallation of Maximo Asset Management. This error can occur when you createusers on a Windows system.
Password values that you provide during the Maximo Asset Managementinstallation and configuration must be compliant with the password policies set forthe target system. Passwords are not validated against the password policies oftarget systems at the time you enter them on the installation and configurationprogram panels. If your passwords do not conform to the password policies, errorsoccur when the installation or configuration program attempts to create thesepasswords.
Starting the launchpadThe IBM Maximo Asset Management launchpad serves as a centralized interfacefor starting the product installation and configuration programs. The launchpadalso contains links to product information.
Before you begin
Before you start the launchpad, ensure that you meet the middleware prerequisites.Ensure that you have the correct service pack levels for your environments.
The launchpad program uses the system default browser to run. If the defaultbrowser on AIX is Firefox, it is likely that the launchpad program does not runproperly due to the ksh shell interface. If you must use the launchpad with theFirefox browser, follow these steps to modify it.1. Download and extract the launchpad images which is described in the
download document.2. Modify th e/user_dir/launchpad/Firefox.sh file and remove the following
linestypeset +r LOGNAME 2>/dev/nullLOGNAME=lp_user_$$; export LOGNAME
3. Run the launchpad from /user_dir.
About this task
The launchpad generates messages that are captured in a hidden log frame whilethe launchpad is running. To show the log frame on the launchpad panels, holdthe Ctrl key and simultaneously click the banner frame of the launchpad. Messagesthat are generated while the launchpad is running are not automatically saved onthe hard disk drive. You can save the messages from a session by clicking Save atthe bottom of the log frame.
Always use fully qualified domain names when you enter values for theinstallation and configuration programs.
12 IBM Maximo Asset Management: Installation Guide (WebLogic Server, Oracle, Active Directory)

Procedure1. Log on to an account with system administration privileges on the system
where you want to install Maximo Asset Management.2. Start the launchpad from the root directory of the installation image.
Option Description
Windows Start the launchpad by using thelaunchpad64.exe program.
AIX and Linux Start the launchpad from the root directoryby using the launchpad.sh program, forexample,
./launchpad.sh
Related information:Software Product Compatibility Reports
Installation program overviewYou use the Maximo Asset Management installation program to install MaximoAsset Management, IBM WebSphere® Application Server, and IBM DB2®.
Select packages to install from the Figure 1 user interface.
Figure 1. Maximo Asset Management installation program
Chapter 1. Preparing for installation 13

You must run the installation program on the target system to install thecomponent. For example, to install IBM WebSphere Application Server, you startthe installation program locally on the system that is designated as the IBMWebSphere Application Server server.
Use the Check for Other Versions, Fixes, and Extensions button to search forfixes, updates, and extensions for the packages listed. The installation programdownloads the latest version of the packages listed from IBM Fix Central.
Configuration program overviewYou use the Maximo Asset Management configuration program to configureMaximo Asset Management and associated middleware.
The Maximo Asset Management configuration program is used to perform thefollowing configuration tasks.v Prepare IBM WebSphere Application Server for configuration of your productv Configure a new Maximo Asset Management deploymentv Update database access credentialsv Change the Maximo Asset Management security modelv Change the database server hostv Update IBM WebSphere Application Server access credentialsv Change IBM WebSphere Application Server hostv Update database and build and deploy application EAR filesv Install product help information in another languagev Remove IBM WebSphere Application Server configurationv Remove Maximo Asset Management configuration
The Maximo Asset Management configuration program records configurationchoices that you make about your Maximo Asset Management deployment andthen deploys Maximo Asset Management based on the information that youentered.
14 IBM Maximo Asset Management: Installation Guide (WebLogic Server, Oracle, Active Directory)

Information that you enter for the Maximo Asset Management configurationprogram is stored in the maximo.properties and install.properties files. Some ofthis information is also written to the Maximo database. These values aredisplayed in the panel fields of the Maximo Asset Management configurationprogram during an upgrade or fix pack application.
The Maximo Asset Management configuration program validates the values thatyou enter in configuration item fields. Some configuration item fields are validatedas a pair, for example, user name and password fields.
In most cases, you can run the configuration program locally or remotely. You arerequired to run the configuration program locally on the IBM WebSphereApplication Server server when you are preparing it for Maximo AssetManagement configuration.
The Maximo Asset Management configuration program cannot automate theconfiguration of Oracle WebLogic Server.
If you choose not to have the Maximo Asset Management configuration programautomatically configure middleware, you must configure that piece of middlewaremanually before the configuration of Maximo Asset Management.
Note: If you are using a directory server to secure Maximo Asset Management, beaware of the product-specific syntax rules for using special characters in LDAPstrings that you enter. In most cases, special characters must be preceded by anescape character to make them readable by the directory server.
Many directory server products consider a blank space to be a special character inan LDAP string. If you enter an LDAP string with an unescaped blank character atthe end of a field value, you encounter Maximo Asset Management errors.
Figure 2. Maximo Asset Management configuration program
Chapter 1. Preparing for installation 15

For more information about special character usage in LDAP strings, see theproduct documentation for your directory server.
16 IBM Maximo Asset Management: Installation Guide (WebLogic Server, Oracle, Active Directory)
Chapter 2. Automatically configuring existing middlewareduring deployment
Use the Maximo Asset Management configuration program to automaticallyconfigure existing middleware within your enterprise for use with Maximo AssetManagement
About this task
This information provides a high-level overview or roadmap of tasks you mustcomplete to deploy Maximo Asset Management automatically. You use middlewarethat is already established in your enterprise.
In this scenario, you use the Maximo Asset Management configuration programautomatically configure existing middleware resources.
Oracle WebLogic Server must always be configured manually.
Running the Maximo Asset Management 7.6.0.5 installation programUse the Maximo Asset Management version 7.6.0.5 installation program to installMaximo Asset Management version 7.6.0.5.
About this task
In order to install Maximo Asset Management version 7.6.0.5, run the MaximoAsset Management version 7.6.0.5 installation program on the Maximo AssetManagement administrative system.
Procedure1. Log in to the Maximo Asset Management administrative workstation. If you
run the IBM Maximo Asset Management version 7.6.0.5 installation programfrom a Linux or UNIX terminal window, you must be logged in as the rootuser.
2. Launch the IBM Maximo Asset Management version 7.6.0.5 installationprogram from the launchpad.a. Start the launchpad.
WindowsFrom the downloaded installation image, browse to the rootdirectory and run the following command: launchpad64.exe.
Linux and UNIXFrom the downloaded installation image, browse to the rootdirectory and run the following command: launchpad.sh.
b. Select a language for the installation session and click OK.c. In the launchpad navigation pane, click Install Product.d. From the Install Product panel, select IBM Maximo Asset Management
v7.6 and then click Install IBM Maximo Asset Management components.3. In the package selection panel, click Next.
© Copyright IBM Corp. 2007, 2014 17

4. In the package prerequisite validation panel, review the results of theprerequisite check, and then click Next. If any errors are reported on thispanel, resolve the issue and then click Recheck Status before continuing.
5. In the license agreement panel, review the license information for eachpackage being installed, select I accept the terms in the license agreements ifyou agree with the terms, and then click Next.
6. In the Installation Manager installation location panel, specify pathinformation for the shared resources directory and the Installation Managerinstallation directory, and then click Next. Installation Manager is theinstallation framework that is used to install Maximo Asset Managementversion 7.6.0.5 components. The shared resources directory is a commonworkspace directory used by Installation Manager when installing packages.
7. In the package installation location panel, select the IBM Tivoli’s processautomation suite package group, specify the path information for the MaximoAsset Management version 7.6.0.5 installation directory, and then click Next.
8. In the package features panel, leave all default options checked, and then clickNext.
9. In the package summary panel, review the information for the plannedinstallation, and then click Install. If you install in a non-English environment,you might notice the environment summary is listed as English. You configuresupported languages for Maximo Asset Management later with the MaximoAsset Management configuration program.
10. After the installation is complete, select the option to start the Maximo AssetManagement version 7.6.0.5 configuration program, and then click Finish. TheMaximo Asset Management version 7.6.0.5 installation program exits and theMaximo Asset Management version 7.6.0.5 configuration program is startedautomatically.
What to do next
Use the Maximo Asset Management version 7.6.0.5 configuration program toconfigure Maximo Asset Management version 7.6.0.5.
Configuring Maximo Asset Management version 7.6.0.5 using theMaximo Asset Management version 7.6.0.5 configuration program
Use the Maximo Asset Management version 7.6.0.5 configuration program toconfigure Maximo Asset Management version 7.6.0.5.
Procedure1. If the Maximo Asset Management version 7.6.0.5 configuration program is not
open, start it from the Maximo Asset Management launchpad. In the launchpadnavigation pane, click Configure Product, specify Maximo Asset Managementinstallation location, and then click Launch the Tivoli’s Process AutomationSuite configuration program.
2. In the IBM Maximo Asset Management configuration operations page, clickConfigure a New Deployment.
3. In the Define Deployment Environment panel, specify information about theyour database and application server, in this example, DB2 and WebLogicServer servers that you installed and prepared. Select Create and configure thedatabase and Complete configuration of WebSphere for your product toautomatically configure DB2. After you define your deployment environment,click Finish.
18 IBM Maximo Asset Management: Installation Guide (WebLogic Server, Oracle, Active Directory)

4. In the Configure General Product Information panel, review summary detailsabout the product components that you are installing. Specify the appearanceand navigation features for your product, add an e-mail address to receiveworkflow messages, and choose whether or not to deploy sample data.
5. In the Configure the DB2 Instance panel, specify information about the DB2instance to create for Maximo Asset Management.
6. In the Configure the DB2 Database panel, specify information about the DB2database to create for Maximo Asset Management.
7. In the Configure Application Security panel, Enter the user names andpasswords for users that must be created for Maximo Asset Management. Donot use the user name as a password value.
8. Choose the base language and any additional languages you want to install.9. In the Apply Deployment Operations panel, select all available deployment
operations, and then click Finish.
Results
Maximo Asset Management version 7.6.0.5 is installed and configured to useWebSphere Application Server Network DeploymentWebLogic Server and DB2.
Chapter 2. Automatically configuring existing middleware during deployment 19

20 IBM Maximo Asset Management: Installation Guide (WebLogic Server, Oracle, Active Directory)

Chapter 3. Manually configuring WebLogic Server
WebLogic Server can be used with Maximo Asset Management if it is manuallyconfigured.
About this task
You can use a WebLogic Server as your J2EE server. The Maximo AssetManagement installation process prepares EAR files on the Maximo AssetManagement administrative workstation. These files are then manually deployedto your WebLogic Server. The Maximo Asset Management installation programdoes not automatically configure a WebLogic Server environment It does not installor otherwise deploy Maximo Asset Management applications into a WebLogicServer server.
Manually configuring WebLogic Server consists of the following tasks:
Creating the MAXIMOSERVER domainThis section details how to create the MAXIMOSERVER domain within WebLogicServer.
About this task
To create the MAXIMOSERVER domain within WebLogic Server, complete thefollowing steps:
Procedure1. Launch the Configuration wizard tool.v For Windows systems, select Windows icon > All Applications > Oracle
WebLogic (BEAHOME1) > Configuration Wizard.v For UNIX systems, launch the Configuration wizard using the config.sh
command located in <WebLogic_Home>/weblogic10/common/bin.2. From the welcome panel, select Create a new WebLogic Server domain, and
then click Next.3. From the Select a Domain Source panel, select Generate a domain configured
automatically to support the following products, and then click Next.4. From the Specify Domain Name and Location panel, name the domain
MAXIMOSERVER, and then click Next
5. From the Configure Administrator Username and Password panel, enter anadministrator user ID and password, and then click Next.
6. From the Configure Server Start Mode and JDK panel, enter the followinginformation, and then click Next.
WebLogic Server Domain Startup ModeSelect Production.
Selecting this option requires that you provide a user ID and passwordin order to deploy applications.
JDK SelectionSelect a JDK with a version number 1.7.0 or greater from the suppliedJDKs.
© Copyright IBM Corp. 2007, 2014 21

7. Proceed through the next few panels until you reach the CustomizeEnvironment and Services Settings panel. From the Customize Environmentand Services Settings panel, select the default option No, and then click Next.
8. From the Create WebLogic Server Domain panel, change the Domain Namevalue to MaximoServer, and then click Create to create the domain.
9. Once the domain has been created, ensure that the Start Admin Server optionis cleared, and then click Done to close the Configuration wizard. On UNIXsystems, this option is not displayed.
Configuring JMS options for integration frameworkThis procedure provides details on steps to configure JMS queues.
Before you begin
You need to be familiar with the Oracle WebLogic Server Administration Consoleto complete the following procedure. See your Oracle WebLogic Serverdocumentation on how to navigate through the Oracle WebLogic ServerAdministration Console.
Procedure1. Launch Internet Explorer and open the MAXIMOSERVER Administration Console
by typing the following URL:http://host_name:7001/console
2. Sign in by entering your user ID and password.3. Create three persistent file stores with the following configuration parameters:
Option Description
File Store Name sqinstore, sqoutstore, cqinstore
File Store Target MAXIMOSERVER
File Store Directory C:\WebLogic, or another directory of your choice
File stores have better performance in general. However, you can choose tocreate database-based stores. To choose between file stores and database-basedstores, consult your Oracle WebLogic Server documentation.
4. Create three JMS servers with the following configuration parameters:
Option Description
Properties Name sqinserver, sqoutserver, cqinserver
Server Target MAXIMOSERVER
Bytes Maximum 20% or below of the allotted JVM heap size
It is recommended that you configure the Bytes Maximum for the JMS serversto a value of 20% or below of the allotted JVM heap size to prevent the OracleWebLogic Server from running out of memory.
5. Create a JMS system module named intjmsmodule with MAXIMOSERVER asthe target server.
6. Add a connection factory resource to the JMS module:
Option Description
Name intjmsconfact
JNDI Name jms/maximo/int/cf/intcf
Target MAXIMOSERVER
22 IBM Maximo Asset Management: Installation Guide (WebLogic Server, Oracle, Active Directory)

7. Add queue resources to the JMS Module:a. Create the queue resource type.b. Create a new subdeployment with the same name as the queue.c. Assign the subdeployment_nameserver server target to the subdeployment.
Option Description
Queue 1 Name: sqin JNDI Name: jms/maximo/int/queues/sqin
Queue 2 Name: sqout JNDI Name: jms/maximo/int/queues/sqout
Queue 3 Name: cqin JNDI Name: jms/maximo/int/queues/cqin
Queue 4 Name: cqinerr JNDI Name: jms/maximo/int/queues/cqinerr For Subdeployment, select cqin,for Target, select cqinserver.
Template None
8. Enable the JMS connection factory for integration framework:a. Select the intjmsconfact link.b. From the Transactions tab, check the XA Connection Factory Enabled
check box.c. Set the Maximum Messages per Session to -1.
9. Configure cqinerr queue.a. Under intjmsmodule > Summary of Resources, click the cqin queue.b. Click the Delivery Failure tab.c. Set the redelivery limit to 5.d. Set the error destination to cqinerr.
10. Save and activate the changes.
What to do next
You need to stop and restart the MAXIMOSERVER application server for the update totake effect.
Configuring JMS for the email listener in WebLogic ServerYou use the email listeners application to receive and process requests throughemail in the form of email messages.
About this task
To configure JMS queues for the WebLogic Server, complete the following steps:
Procedure1. Log in to the WebLogic Server administration console.2. Create a persistent store.
a. In the Domain Structure panel, expand Services and then click PersistentStores.
b. Click New and select the option to create a file store.c. Enter lsnrstore for the name of the file store and c:\wls10 as the directory,
and then click Finish.3. Create a JMS Server
Chapter 3. Manually configuring WebLogic Server 23

a. In the Domain Structure panel, under Services > Messaging , click JMSServers, enter the following information, and then click Next.
Name Enter a name for a new JMS server, for example, lsnrserver.
Persistent StoreSelect lsnrstore.
b. For the Target, select AdminServer, and then click Finish.4. Create a JMS System Module
a. In the Domain Structure panel, under Services > Messaging , click JMSModules, and then click New.
b. Enter a value for the Name field, such as lsnrjmsmodule, and then clickNext.
c. Select the option for AdminServer, and then click Next.d. Select the option for Would you like to add resources to the JMS system
module?, and then click Finish.5. Add a connection factory to the JMS module.
a. From the Summary of Resources table of the lsnrjmsmodule module, clickNew to add a resource.
b. Select the Connection Factory option, and then click Next.c. From the Connection Factory Properties panel, enter the following
information, and then click Next.
Name Enter a name for the new connection factory. For example,lsnrconnfact.
JNDI NameEnter jms/mro/lsnr/lsnrcf.
d. Ensure AdminServer is selected, and then click Finish
6. Add a queue to the JMS module.a. From the Summary of Resources table of the lsnrjmsmodule module, click
New to add a resource.b. Select the Queue option, and then click Next.c. From the JMS Destination Properties panel, enter the following information,
and then click Next.
Name Enter a name for the new queue. For example, lsnrqueue.
JNDI NameEnter jms/mro/lsnr/qin.
TemplateNo template is necessary.
d. Click Create a new Subdeployment, select lsnrserver, and then clickFinish.
7. Set the XA option for the connection factory.a. Select lsnrconnfact, and then select the Transactions tab.b. Ensure that the XA Connection Factory Enabled option is selected, and then
click Save.8. Click Activate Changes to save and activate all changes.9. To enable an email listener to use JMS queues, a Message Driven Bean is
configured through a deployment descriptor file that is part of the installation.
24 IBM Maximo Asset Management: Installation Guide (WebLogic Server, Oracle, Active Directory)

You configure the Message Driven Bean by removing comment lines fromsections within the deployment descriptor files. Edit the ejb-jar.xml andweblogic-ejb-jar.xml files.a. Open the install_dir\applications\maximo\mboejb\ejbmodule\META-INF\
ejb-jar.xml file in an editor, uncomment the following sections, and thensave the file:Email Listener JMS is not deployed by default<message-driven id="MessageDriven_LSNRMessageBean"><ejb-name>LSNRMessageBean</ejb-name>ejb-class>psdi.common.emailstner.LSNRMessageBean</ejb-class>transaction-type>Container</transaction-type><message-destination-type>javax.jms.Queue</messagedestination-type></message-driven>
Email Listener JMS is not deployed by default<container-transaction><method><ejb-name>LSNRMessageBean</ejb-name><method-name>*</method-name></method><trans-attribute>Required</trans-attribute></container-transaction>
b. Open the c:\ibm\smp\maximo\applications\maximo\mboejb\ejbmodule\META-INF\weblogic-ejb-jar.xml file in an editor, uncomment the followingsection, and then save the file:Email Listener JMS is not deployed by default<weblogic-enterprise-bean><ejb-name>LSNRMessageBean</ejb-name><message-driven-descriptor><destination-jndi-name>jms/mro/lsnr/qin</destination-jndiname><connection-factory-jndi-name>jms/mro/lsnr/lsnrcf</connection-factory-jndi-name></message-driven-descriptor><transaction-descriptor><trans-timeout-seconds>600</trans-timeout-seconds></transaction-descriptor><jndi-name>LSNRMessageBean</jndi-name></weblogic-enterprise-bean>
Post installation for Oracle WebLogic Server deploymentsThere is a post installation step required for Oracle WebLogic Server deployments.
About this task
When using Oracle WebLogic Server as the application server for your MaximoAsset Management deployment, the installation program produces an EAR file.You must then manually deploy that file to Oracle WebLogic Server.
When using Oracle WebLogic Server, you must modify the weblogic.xml file andrebuild the maximo.ear file before deploying it.
Procedure1. Install the updated JDK 1.7 program.
a. Obtain the latest JDK program with a version number 1.7.0 or greater, fromhttp://www.oracle.com/technetwork/java/index.html
b. Start the installation program.c. Accept the license agreement.
Chapter 3. Manually configuring WebLogic Server 25

d. Change the installation destination path to your Oracle home folder, andclick OK , then Next.
e. Accept any additional prompts to install the JDK program so that theinstallation process can complete successfully.
2. If you are using an Oracle database, copy the oraclethin.jar file.a. Copy the oraclethin.jar file from the administrative workstation to the
server where you installed Oracle WebLogic Server. Use any file transferprotocol that is available.
b. The oraclethin.jar file is in the install_home\maximo\applications\maximo\lib directory. The default install_home directory isC:\IBM\SMP\Maximo\Applications\Maximo\lib. Copy the oraclethin.jar fileto the J2EE server and into the wls11g/server/lib directory. For example,C:/Oracle/wls11g/server/lib.
3. Edit the domain configuration file for appropriate Java settings.a. Navigate to Install_dir\user_projects\domains\mydomain\bin.b. Right-click and edit (do not double-click) setDomainEnv.cmd (Windows) or
setDomainEnv.sh (UNIX).c. Using your text editor, search for and replace jdk entries with entries that
configure Oracle WebLogic Server to use the updated JDK program. Twoinstances must be replaced.
d. (Oracle only) Search for PRE_CLASSPATH. Include the following parameters:if NOT "%EXT_PRE_CLASSPATH%"=="" (if NOT "%PRE_CLASSPATH%"=="" (set PRE_CLASSPATH=%EXT_PRE_CLASSPATH%;%PRE_CLASSPATH%) else (set PRE_CLASSPATH=%EXT_PRE_CLASSPATH%
Note: This step is required for connecting to Oracle databases from OracleWebLogic Server.
e. Increase the Java Heap parameters by searching for MEM_ARGS and settingthe parameter as follows:WLS_MEM_ARGS_64BIT=-Xms4096m -Xmx4096mset MEM_PERM_SIZE_64BIT=-XX:PermSize=512mset MEM_MAX_PERM_SIZE_64BIT=-XX:MaxPermSize=512m
These parameters are case-sensitive. Ensure to include the minus (-) signbefore each parameter and to include the m after each value.
f. Search for set JAVA_OPTIONS=%JAVA_OPTIONS% %JAVA_PROPERTIES%. Insert anoption directly after this string, as follows:-Dcom.sun.xml.namespace.QName.useCompatibleSerialVersionUID=1.0
The entry looks like this example when complete:set JAVA_OPTIONS=%JAVA_OPTIONS% %JAVA_PROPERTIES%-Dcom.sun.xml.namespace.QName.useCompatibleSerialVersionUID=1.0-Dwlw.iterativeDev=%iterativeDevFlag% -Dwlw.testConsole=%testConsoleFlag%-Dwlw.logErrorsToConsole=%logErrorsToConsoleFlag%
g. Save and close the setDomainEnv.cmd file.4. Edit the \IBM\SMP\maximo\applications\maximo\maximouiweb\webmodule\WEB-
INF\weblogic.xml file and add the following entries if they do not already exist:<session-descriptor><cookie-http-only>false</cookie-http-only></session-descriptor>
26 IBM Maximo Asset Management: Installation Guide (WebLogic Server, Oracle, Active Directory)

5. Start the server without being prompted for user name and password. Create adirectory called security within theweblogic_home\user_projects\domains\maximoserver\servers\AdminServer directory. From the security directory,create a text file called boot.properties and enter a user name and passwordin the following format:username=<administrator username>password=<administrator password>
The first time you use this file to start a server, the server reads the file andthen overwrites it with an encrypted version of the user name and password.
6. Verify settings by starting Oracle WebLogic Server. To ensure that the edits thatyou made to the previous Oracle WebLogic Server files were accurate, start theOracle WebLogic Server.
7. Rebuild the maximo.ear file.\IBM\SMP\maximo\deployment\buildmaximoear
8. Deploy the maximo.ear file to Oracle WebLogic Server.
Deploying ear filesYou are now ready to deploy the EAR files from the Oracle WebLogic ServerAdministration Console. Deploying the EAR files starts the Maximo ApplicationServer.
Before you begin
Windows WindowsIf MAXIMOSERVER is not running, start it from a command prompt.
UNIX UNIXEnsure that the Oracle WebLogic Server daemon is running.
About this task
In order to view the Oracle WebLogic Server Administration Console, you need toalso install a Java Virtual Machine (JVM). Newer versions of Windows might notship with JVM.
Procedure1. Change to the my_domain directory:
Windows WindowsFrom a command prompt, change directory path to:drive_name:\weblogic_install_dir\user_projects\domain\my_domain
UNIX UNIXOpen a Terminal window (or a command prompt, if you are telnetingfrom a Windows computer) and change directory as follows:cd /home/mxadmin/weblogic_install_dir/user_projects/domains/my_domain
2. Type
Windows WindowsstartWebLogic.cmd
UNIX UNIX./startWebLogic.sh
Chapter 3. Manually configuring WebLogic Server 27

and press Enter. Once the phrase: Server started in RUNNING mode displays,the Oracle WebLogic Server is running.
3. Start the MAXIMOSERVER Oracle WebLogic Server Administration Console bytyping the following URL in the address bar of your browser:http://host_name:7001/console
4. Log in to the administrative console with the administrative user name andpassword.
5. Click the Lock&Edit button in the Change Center section to set the server toedit mode.
6. Click the Deployments link in the Domain Structure section.7. In the Summary of Deployments section, click the Install button. The Install
Application Assistant opens.8. Click the upload your file(s) link.9. Click the Browse button next to the Deployment Archive field. Browse to
where you have maximo.ear file installed (c:/ibm/smp/maximo/deployment/default/ of the administrative workstation), select the file and click Open.
10. Click Next to upload the file to the Oracle WebLogic Server server.11. Click the radio button next to the maximo.ear file, and Next to continue the
deployment.12. Accept the default value to install the deployment as an application and click
Next.13. Accept all other default values and click Finish to start the deployment
process.14. When the deployment process is complete, click the Activate Changes button
in the Change Center to apply the changes. The following message displays:All changes have been activated. No restarts are necessary.
15. Repeat Steps 8 through 14 to deploy maximoiehs.ear.16. Click the checkbox next to the maximo application.17. Click the dropdown arrow of the Start button and select Servicing all
requests. The Start Application Assistant displays.18. Click Yes to start the system.
Setting the Oracle WebLogic Server host nameSetting the Oracle WebLogic Server host name manually to access application helpinformation.
About this task
By default, the property used to store the host name for the Maximo AssetManagement help system is set to localhost. The fully qualified host name of theOracle WebLogic Server must be configured in the help system property to viewMaximo Asset Management application help topics. Complete this step after youhave deployed Maximo Asset Management EAR files to the Oracle WebLogicServer.
Procedure1. Log in to the Maximo Asset Management console as maxadmin.2. Browse to Go To > System Configuration > Platform Configuration > System
Properties
3. Using the Filter feature, search for the mxe.help.host Property Name.
28 IBM Maximo Asset Management: Installation Guide (WebLogic Server, Oracle, Active Directory)

4. Expand the mxe.help.host property and set the attribute to the fully qualifiedhost name of the Oracle WebLogic Server.
5. Select the mxe.help.host record check box.6. Click the Live Refresh icon in the toolbar.7. From the Live Refresh dialog, click OK.
Results
You are now able to access application help topics in the Maximo AssetManagement user interface.
Chapter 3. Manually configuring WebLogic Server 29

30 IBM Maximo Asset Management: Installation Guide (WebLogic Server, Oracle, Active Directory)

Chapter 4. Manually configuring existing middleware duringdeployment
You can deploy Maximo Asset Management by reusing existing middlewareservers and manually configuring them to work with Maximo Asset Management.
This information provides a high-level overview or road map of tasks you need tocomplete in order to deploy Maximo Asset Management automatically, usingmiddleware already established in your enterprise.
In this scenario, you manually configure existing middleware resources beforerunning the Maximo Asset Management configuration program.
Maximo Asset Management installation with manual middlewareconfiguration
Manually configured installations involve configuring middleware components, thedatabase server, the directory server, and the J2EE server, to work with MaximoAsset Management before you use the Maximo Asset Management installation andconfiguration programs.
You can automatically configure one or more Maximo Asset Managementmiddleware components with the Maximo Asset Management configurationprogram. Alternatively, you can manually configure middleware servers to workwith Maximo Asset Management before you run the Maximo Asset Managementinstallation and configuration programs..
Before you begin, ensure that the following prerequisite conditions are met:v You designate a Windows or UNIX server to start the Maximo Asset
Management configuration program.
You must complete the manual configuration of each middleware server beforeyou use the Maximo Asset Management configuration program to configureMaximo Asset Management to work with the servers.
Ensure that the middleware you intend to use with Maximo Asset Management issupported.
Manual configuration of the databaseYou can manually configure the database server that is used with Maximo AssetManagement. You must manually configure the database server before you use theMaximo Asset Management installation and configuration programs.
Manually configuring Oracle 12cUse the following instructions to manually configure Oracle 12c for use withMaximo Asset Management.
Before you begin
Oracle instance names must be limited to 8 characters in length. For Oracledatabases, the schema owner must use the same user ID as the database user.
© Copyright IBM Corp. 2007, 2014 31

About this task
To configure an existing Oracle 12c server for use with Maximo AssetManagement, complete the following steps before you start the Maximo AssetManagement installation program:
Procedure1. Log in as the Oracle software user. Typically this user is named oracle.2. Create the database listener if it does not exist. The listener manages requests to
connect to the database.a. Open the Oracle Network Configuration Assistant application.b. From the Welcome panel, select Listener configuration, and then click Next.c. From the action panel, select Add, and then click Next.d. Enter a name for the listener or accept the default value, and then click
Next.e. Accept the default Selected Protocols that are listed by clicking Next.f. From the port panel, select Use the standard port of 1521, and then click
Next.g. Select No to indicate that you are finished configuring listeners, and then
click Next.h. From the Listener Configuration Done panel, click Next.i. Click Finish.
3. Create a database for use by Maximo Asset Management.a. Open the Oracle Database Configuration Assistant.b. Select Create Database, and then click Next.c. Select Advanced Mode, and then click Next.d. Select General Purpose or Transaction Processing, and then click Next.e. Enter ctginst1 for both the Global Database Name value and the SID
value, and then click Next.f. Leave the defaults selected, and click Next.g. Ensure Use the Same Administrative Password for All Accounts is
selected, enter a password for Oracle users, and then click Next.h. Leave the defaults selected, and click Next.i. Ensure File System is selected as the storage type to use for the database.
Ensure Use Database File Locations from Template is selected as the valueto use for database file location, leave defaults selected for the databaserecovery options, and then click Next.
j. From the Sample Schemas panel, click Next.k. From the Initialization Parameters panel, on the Memory tab, select Custom
Settings and provide the following values (measured in Mb):
Memory ManagementSet this value to Manual Shared Memory Management.
Shared PoolSet this value to 152.
Buffer CacheSet this value to 36.
Java PoolSet this value to 32.
32 IBM Maximo Asset Management: Installation Guide (WebLogic Server, Oracle, Active Directory)

Large PoolSet this value to 8.
PGA SizeSet this value to 36.
l. From the Character Sets tab, select Use Unicode (AL32UTF8).m. Click All Initialization Parameters....n. Click Show Advanced Parameters.o. Locate the following parameters, change them to the values indicated, and
then click Close.
nls_length_semanticsChange this value to CHAR.
open_cursorsChange this value to 1000.
cursor_sharingSet this value to FORCE.
p. From the Initialization Parameters panel, click Next.q. From the Creation Options panel, click Next.r. From the Summary panel, click Finish.s. Click Exit to exit the Database Configuration Assistant. The database is
successfully created.
Note: The Oracle Database Configuration Assistant starts theORACLE_HOME/ctx/admin/defaults/drdefus.sql script as part of theconfiguration of the CTXSYS user. If you do not use the Oracle DatabaseConfiguration Assistant, you must start this script manually.
4. In SQL*Plus, create a table space by running the following command. Replacethe directory with the path to the database location.Create tablespace maxdata datafile’C:\oracle\product\12.1.0.1\db_1\dbs\maxdata.dbf’size 1000M autoextend on;
To create table spaces for indexes, repeat the command and use a similarsyntax.
5. Create a temporary table space by running the following command. Replace thedirectory with the path to the database location.create temporary tablespace maxtemp tempfile’C:\oracle\product\12.1.0.1\db_1\dbs\maxtemp.dbf’size 1000M autoextend on maxsize unlimited;
6. To create the maximo user and grant permissions, run the following command:create user maximo identified by maximo default tablespace maxdata temporarytablespace maxtemp;grant connect to maximo;grant create job to maximo;grant create trigger to maximo;grant create session to maximo;grant create sequence to maximo;grant create synonym to maximo;grant create table to maximo;grant create view to maximo;grant create procedure to maximo;grant alter session to maximo;grant execute on ctxsys.ctx_ddl to maximo;alter user maximo quota unlimited on maxdata;
Chapter 4. Manually configuring existing middleware during deployment 33

If you created a separate table space for indexing, you must also grant access tothat index table space to the maximo user. For example, if you created aseparate table space for indexing called TSI_MAM_OWN, then run the followingcommand:alter user maximo quota unlimited on TSI_MAM_OWN
7. Create an Oracle preference arbitrary that is called MAXIMO_STORAGE and storethe Oracle text indexes in dedicated table spaces.v Store implicit indexes in MAXINDX table space.v Store implicit tables in MAXDATA table space.v Store implicit LOB tables in LOB table space.
For example, run the following preference definition to split the implicit objectsin a text index across three table spaces; MAXDATA, MAXINDX, andMAXLOBS.beginctx_ddl.create_preference(’MAXIMO_STORAGE’, ’BASIC_STORAGE’);ctx_ddl.set_attribute(’MAXIMO_STORAGE’, ’I_TABLE_CLAUSE’,’tablespace MAXDATA LOB(token_info) store as (tablespace MAXLOBSenable storage in row)’);ctx_ddl.set_attribute(’MAXIMO_STORAGE’, ’I_INDEX_CLAUSE’,’tablespace MAXINDX compress 2’);ctx_ddl.set_attribute(’MAXIMO_STORAGE’, ’K_TABLE_CLAUSE’,’tablespace MAXINDX’);ctx_ddl.set_attribute(’MAXIMO_STORAGE’, ’R_TABLE_CLAUSE’,’tablespace MAXDATA LOB(data) store as (tablespace MAXLOBScache)’);ctx_ddl.set_attribute(’MAXIMO_STORAGE’, ’N_TABLE_CLAUSE’,’tablespace MAXINDX’);end;
To create an Oracle text index, the preference definition must be specified in theCREATE INDEX clause as follows:create index pm_ndx6 on pm (description) indextype isctxsys.context parameters (’lexer global_lexer language columnLANGCODE storage MAXIMO_STORAGE’);
What to do next
If you modified default role sets that are assigned to the user ID that is used toconnect to the database, or if you restricted the default privileges that are grantedto user IDs, then you must explicitly grant them to the Maximo user. For example,if you do not grant a role such as the select_catalog_role role, you mustexplicitly grant that role to the Maximo user. Make the assignment by running thefollowing SQL*Plus command:grant select_catalog_role to maximo
Manual configuration of the directory serverYou can manually configure a directory server for Maximo Asset Management tomanage authentication and authorization.
There are several methods to secure Maximo Asset Management.If want to use adirectory server to secure Maximo Asset Management, you must complete themanual configuration of the directory server before you use the Maximo AssetManagement installation and configuration programs.
Note: The base dn, bind user, and other various node values that are listed aredefault values. These values are replaced with values applicable to existing LDAPhierarchies within your organization.
34 IBM Maximo Asset Management: Installation Guide (WebLogic Server, Oracle, Active Directory)

Important: When you enter LDAP values for Maximo Asset Managementconfiguration panel fields, entries in LDIF files, or values you enter directly into adirectory instance with directory server tools, be aware of the product-specificsyntax rules for using special characters in an LDAP string. In most cases, specialcharacters must be preceded by an escape character to make it readable by thedirectory server. Failing to escape special characters that are contained in an LDAPstring that is used with Maximo Asset Management results in Maximo AssetManagement errors.
Many directory server products consider a blank space as a special character that ispart of the LDAP string. If you mistakenly enter an LDAP string that contains ablank, at the end of a field value, for example, and you do not precede the blankcharacter with an escape character, you encounter Maximo Asset Managementerrors that are difficult to troubleshoot.
For more information about special characters in LDAP strings, see the productdocumentation for your directory server.
Manually configuring Microsoft Active Directory version 2012You can manually configure Microsoft Active Directory for use with Maximo AssetManagement.
Before you begin
Manually configure Microsoft Active Directory for authorization and authenticationwithin Maximo Asset Management.
Important: The users and passwords you create in the following steps must matchthis exact configuration for the deployment to succeed. It is sometimes necessary totemporarily alter theMicrosoft Active Directory security policy to create theseaccounts in the required format. After installation, you can change these defaultpasswords to conform to a stricter security policy.
About this task
Before you start theMaximo Asset Management installation and configurationprograms, configure Microsoft Active Directory. Complete the following steps
Procedure1. Add the Active Directory Domain Services role.
a. Start the Server Manager.b. Click Add roles and features.c. From the Before You Begin page, click Next.d. For Installation Type, select Role-based or feature-based installation, and
then click Next.e. Select the Select a server from the server pool option, and then choose
your local server from the Server Pool list. Click Next
f. In the Roles list, select Active Directory Domain Services.g. Click Add Features.h. Click Next.i. From the Select Features page , accept the defaults and click Next
j. On the confirmation page, click Install
k. Click Close when the installation is complete and then restart the server.
Chapter 4. Manually configuring existing middleware during deployment 35

2. Promote the server to a Domain Controller.a. Start the Server Manager.b. Click AD DS in the dashboard.c. Click the Configuration required for Active Directory Domain Services
warning indicator.d. From the All Servers Task Details and Notifications page, click the Promote
this server to a domain controller action.e. From the Deployment Configuration page, select Add a new forest. Specify
the root domain name with a unique fully qualified domain name, forexample, qawin01ldap.swg.usma.ibm.com, and then click Next
f. From the Domain Controller Options page, clear the Domain Name System(DNS) server option, and provide a password for Directory Services RestoreMode (DSRM). Click Next.
g. Accept the default NetBIOS name and click Next.h. Accept the default paths for AD DS database, log files, and SYSVOL. Click
Next.i. Review the summary, click Next, and then click Install.j. Restart the server
When the system restarts, you must include the domain that you specified withyour login credentials. In this example, a QAWIN01LDAP domain was created.Specify QAWIN01LDAP\Administrator as the user when you log in to the system.
3. Create containers, users, and groups for Maximo Asset Management.a. Select Control Panel > Administrative Tools > Active Directory Users and
Computers.b. Select your server, right-click, and choose New > Organizational Unit.c. Specify a name for the organizational unit, for example, SWG, and then click
OK.d. Select the new organizational unit that is located under your server, in this
example, SWG, right-click, and choose New > Organizational Unit.e. Specify a name for the organizational unit, for example, users, and then
click OK.f. Create another organizational unit under SWG and name it groups.g. Right-click the users organizational unit, and click New > User.h. Create a user who is called maxadmin. Specify maxadmin as the First name
and User logon name. Click Next.i. Provide a password for maxadmin. Click Next and then Finish.j. Create two more users who are named mxintadm and maxreg.k. Right-click the groups organizational unit and select and choose New >
Group
l. Name the group maximousers and click OK.m. Right-click the maximousers group and select Properties.n. On the Members tab, click Add.o. Type maxadmin in the Enter the object names to select field, and then click
OK. The maxadmin user is now a member of the maximousers Memberslist.
p. Add the mxintadm and maxreg users to the maximousers group.q. Click Apply, then OK.
36 IBM Maximo Asset Management: Installation Guide (WebLogic Server, Oracle, Active Directory)

What to do next
Microsoft Active Directory configuration is finished and you are now ready toconfigure the J2EE server to use Microsoft Active Directory.
Manual configuration of the J2EE serverManually configuring an existing J2EE server for use by Maximo AssetManagement.
Manual configuration of the J2EE server is required if you choose to deployMaximo Asset Management with Oracle WebLogic Server. You must complete themanual configuration before you use the Maximo Asset Management installationand configuration programs.
Maximo Asset Management requires Java 7. Java 7 must be installed andconfigured on the J2EE server you want tu use with Maximo Asset Management.
Manually configuring WebLogic ServerWebLogic Server can be used with Maximo Asset Management if it is manuallyconfigured.
About this task
You can use a WebLogic Server as your J2EE server. The Maximo AssetManagement installation process prepares EAR files on the Maximo AssetManagement administrative workstation. These files are then manually deployedto your WebLogic Server. The Maximo Asset Management installation programdoes not automatically configure a WebLogic Server environment It does not installor otherwise deploy Maximo Asset Management applications into a WebLogicServer server.
Manually configuring WebLogic Server consists of the following tasks:
Creating the MAXIMOSERVER domain:
This section details how to create the MAXIMOSERVER domain within WebLogicServer.
About this task
To create the MAXIMOSERVER domain within WebLogic Server, complete thefollowing steps:
Procedure
1. Launch the Configuration wizard tool.v For Windows systems, select Windows icon > All Applications > Oracle
WebLogic (BEAHOME1) > Configuration Wizard.v For UNIX systems, launch the Configuration wizard using the config.sh
command located in <WebLogic_Home>/weblogic10/common/bin.2. From the welcome panel, select Create a new WebLogic Server domain, and
then click Next.3. From the Select a Domain Source panel, select Generate a domain configured
automatically to support the following products, and then click Next.
Chapter 4. Manually configuring existing middleware during deployment 37

4. From the Specify Domain Name and Location panel, name the domainMAXIMOSERVER, and then click Next
5. From the Configure Administrator Username and Password panel, enter anadministrator user ID and password, and then click Next.
6. From the Configure Server Start Mode and JDK panel, enter the followinginformation, and then click Next.
WebLogic Server Domain Startup ModeSelect Production.
Selecting this option requires that you provide a user ID and passwordin order to deploy applications.
JDK SelectionSelect a JDK with a version number 1.7.0 or greater from the suppliedJDKs.
7. Proceed through the next few panels until you reach the CustomizeEnvironment and Services Settings panel. From the Customize Environmentand Services Settings panel, select the default option No, and then click Next.
8. From the Create WebLogic Server Domain panel, change the Domain Namevalue to MaximoServer, and then click Create to create the domain.
9. Once the domain has been created, ensure that the Start Admin Server optionis cleared, and then click Done to close the Configuration wizard. On UNIXsystems, this option is not displayed.
Configuring JMS options for integration framework:
This procedure provides details on steps to configure JMS queues.
Before you begin
You need to be familiar with the Oracle WebLogic Server Administration Consoleto complete the following procedure. See your Oracle WebLogic Serverdocumentation on how to navigate through the Oracle WebLogic ServerAdministration Console.
Procedure
1. Launch Internet Explorer and open the MAXIMOSERVER Administration Consoleby typing the following URL:http://host_name:7001/console
2. Sign in by entering your user ID and password.3. Create three persistent file stores with the following configuration parameters:
Option Description
File Store Name sqinstore, sqoutstore, cqinstore
File Store Target MAXIMOSERVER
File Store Directory C:\WebLogic, or another directory of your choice
File stores have better performance in general. However, you can choose tocreate database-based stores. To choose between file stores and database-basedstores, consult your Oracle WebLogic Server documentation.
4. Create three JMS servers with the following configuration parameters:
Option Description
Properties Name sqinserver, sqoutserver, cqinserver
38 IBM Maximo Asset Management: Installation Guide (WebLogic Server, Oracle, Active Directory)

Option Description
Server Target MAXIMOSERVER
Bytes Maximum 20% or below of the allotted JVM heap size
It is recommended that you configure the Bytes Maximum for the JMS serversto a value of 20% or below of the allotted JVM heap size to prevent the OracleWebLogic Server from running out of memory.
5. Create a JMS system module named intjmsmodule with MAXIMOSERVER asthe target server.
6. Add a connection factory resource to the JMS module:
Option Description
Name intjmsconfact
JNDI Name jms/maximo/int/cf/intcf
Target MAXIMOSERVER
7. Add queue resources to the JMS Module:a. Create the queue resource type.b. Create a new subdeployment with the same name as the queue.c. Assign the subdeployment_nameserver server target to the subdeployment.
Option Description
Queue 1 Name: sqin JNDI Name: jms/maximo/int/queues/sqin
Queue 2 Name: sqout JNDI Name: jms/maximo/int/queues/sqout
Queue 3 Name: cqin JNDI Name: jms/maximo/int/queues/cqin
Queue 4 Name: cqinerr JNDI Name: jms/maximo/int/queues/cqinerr For Subdeployment, select cqin,for Target, select cqinserver.
Template None
8. Enable the JMS connection factory for integration framework:a. Select the intjmsconfact link.b. From the Transactions tab, check the XA Connection Factory Enabled
check box.c. Set the Maximum Messages per Session to -1.
9. Configure cqinerr queue.a. Under intjmsmodule > Summary of Resources, click the cqin queue.b. Click the Delivery Failure tab.c. Set the redelivery limit to 5.d. Set the error destination to cqinerr.
10. Save and activate the changes.
What to do next
You need to stop and restart the MAXIMOSERVER application server for the update totake effect.
Chapter 4. Manually configuring existing middleware during deployment 39

Configuring JMS for the email listener in WebLogic Server:
You use the email listeners application to receive and process requests throughemail in the form of email messages.
About this task
To configure JMS queues for the WebLogic Server, complete the following steps:
Procedure
1. Log in to the WebLogic Server administration console.2. Create a persistent store.
a. In the Domain Structure panel, expand Services and then click PersistentStores.
b. Click New and select the option to create a file store.c. Enter lsnrstore for the name of the file store and c:\wls10 as the directory,
and then click Finish.3. Create a JMS Server
a. In the Domain Structure panel, under Services > Messaging , click JMSServers, enter the following information, and then click Next.
Name Enter a name for a new JMS server, for example, lsnrserver.
Persistent StoreSelect lsnrstore.
b. For the Target, select AdminServer, and then click Finish.4. Create a JMS System Module
a. In the Domain Structure panel, under Services > Messaging , click JMSModules, and then click New.
b. Enter a value for the Name field, such as lsnrjmsmodule, and then clickNext.
c. Select the option for AdminServer, and then click Next.d. Select the option for Would you like to add resources to the JMS system
module?, and then click Finish.5. Add a connection factory to the JMS module.
a. From the Summary of Resources table of the lsnrjmsmodule module, clickNew to add a resource.
b. Select the Connection Factory option, and then click Next.c. From the Connection Factory Properties panel, enter the following
information, and then click Next.
Name Enter a name for the new connection factory. For example,lsnrconnfact.
JNDI NameEnter jms/mro/lsnr/lsnrcf.
d. Ensure AdminServer is selected, and then click Finish
6. Add a queue to the JMS module.a. From the Summary of Resources table of the lsnrjmsmodule module, click
New to add a resource.b. Select the Queue option, and then click Next.
40 IBM Maximo Asset Management: Installation Guide (WebLogic Server, Oracle, Active Directory)

c. From the JMS Destination Properties panel, enter the following information,and then click Next.
Name Enter a name for the new queue. For example, lsnrqueue.
JNDI NameEnter jms/mro/lsnr/qin.
TemplateNo template is necessary.
d. Click Create a new Subdeployment, select lsnrserver, and then clickFinish.
7. Set the XA option for the connection factory.a. Select lsnrconnfact, and then select the Transactions tab.b. Ensure that the XA Connection Factory Enabled option is selected, and then
click Save.8. Click Activate Changes to save and activate all changes.9. To enable an email listener to use JMS queues, a Message Driven Bean is
configured through a deployment descriptor file that is part of the installation.You configure the Message Driven Bean by removing comment lines fromsections within the deployment descriptor files. Edit the ejb-jar.xml andweblogic-ejb-jar.xml files.a. Open the install_dir\applications\maximo\mboejb\ejbmodule\META-INF\
ejb-jar.xml file in an editor, uncomment the following sections, and thensave the file:Email Listener JMS is not deployed by default<message-driven id="MessageDriven_LSNRMessageBean"><ejb-name>LSNRMessageBean</ejb-name>ejb-class>psdi.common.emailstner.LSNRMessageBean</ejb-class>transaction-type>Container</transaction-type><message-destination-type>javax.jms.Queue</messagedestination-type></message-driven>
Email Listener JMS is not deployed by default<container-transaction><method><ejb-name>LSNRMessageBean</ejb-name><method-name>*</method-name></method><trans-attribute>Required</trans-attribute></container-transaction>
b. Open the c:\ibm\smp\maximo\applications\maximo\mboejb\ejbmodule\META-INF\weblogic-ejb-jar.xml file in an editor, uncomment the followingsection, and then save the file:Email Listener JMS is not deployed by default<weblogic-enterprise-bean><ejb-name>LSNRMessageBean</ejb-name><message-driven-descriptor><destination-jndi-name>jms/mro/lsnr/qin</destination-jndiname><connection-factory-jndi-name>jms/mro/lsnr/lsnrcf</connection-factory-jndi-name></message-driven-descriptor><transaction-descriptor><trans-timeout-seconds>600</trans-timeout-seconds></transaction-descriptor><jndi-name>LSNRMessageBean</jndi-name></weblogic-enterprise-bean>
Chapter 4. Manually configuring existing middleware during deployment 41

Running the Maximo Asset Management 7.6.0.5 installationprogram
Use the Maximo Asset Management version 7.6.0.5 installation program to installMaximo Asset Management version 7.6.0.5.
About this task
In order to install Maximo Asset Management version 7.6.0.5, run the MaximoAsset Management version 7.6.0.5 installation program on the Maximo AssetManagement administrative system.
Procedure1. Log in to the Maximo Asset Management administrative workstation. If you
run the IBM Maximo Asset Management version 7.6.0.5 installation programfrom a Linux or UNIX terminal window, you must be logged in as the rootuser.
2. Launch the IBM Maximo Asset Management version 7.6.0.5 installationprogram from the launchpad.a. Start the launchpad.
WindowsFrom the downloaded installation image, browse to the rootdirectory and run the following command: launchpad64.exe.
Linux and UNIXFrom the downloaded installation image, browse to the rootdirectory and run the following command: launchpad.sh.
b. Select a language for the installation session and click OK.c. In the launchpad navigation pane, click Install Product.d. From the Install Product panel, select IBM Maximo Asset Management
v7.6 and then click Install IBM Maximo Asset Management components.3. In the package selection panel, click Next.4. In the package prerequisite validation panel, review the results of the
prerequisite check, and then click Next. If any errors are reported on thispanel, resolve the issue and then click Recheck Status before continuing.
5. In the license agreement panel, review the license information for eachpackage being installed, select I accept the terms in the license agreements ifyou agree with the terms, and then click Next.
6. In the Installation Manager installation location panel, specify pathinformation for the shared resources directory and the Installation Managerinstallation directory, and then click Next. Installation Manager is theinstallation framework that is used to install Maximo Asset Managementversion 7.6.0.5 components. The shared resources directory is a commonworkspace directory used by Installation Manager when installing packages.
7. In the package installation location panel, select the IBM Tivoli’s processautomation suite package group, specify the path information for the MaximoAsset Management version 7.6.0.5 installation directory, and then click Next.
8. In the package features panel, leave all default options checked, and then clickNext.
9. In the package summary panel, review the information for the plannedinstallation, and then click Install. If you install in a non-English environment,you might notice the environment summary is listed as English. You configure
42 IBM Maximo Asset Management: Installation Guide (WebLogic Server, Oracle, Active Directory)

supported languages for Maximo Asset Management later with the MaximoAsset Management configuration program.
10. After the installation is complete, select the option to start the Maximo AssetManagement version 7.6.0.5 configuration program, and then click Finish. TheMaximo Asset Management version 7.6.0.5 installation program exits and theMaximo Asset Management version 7.6.0.5 configuration program is startedautomatically.
What to do next
Use the Maximo Asset Management version 7.6.0.5 configuration program toconfigure Maximo Asset Management version 7.6.0.5.
Configuring Maximo Asset Management version 7.6.0.5 withmanually configured middleware
This procedure explains how to use the Maximo Asset Management version 7.6.0.5configuration program to configure Maximo Asset Management version 7.6.0.5.
Procedure1. If the Maximo Asset Management version 7.6.0.5 configuration program is not
open, start it from the Maximo Asset Management launchpad. In the launchpadnavigation pane, click Configure Product, specify Maximo Asset Managementinstallation location, and then click Launch the Tivoli’s Process AutomationSuite configuration program.
2. In the IBM Maximo Asset Management configuration operations page, clickConfigure a New Deployment.
3. In the Define Deployment Environment panel, specify information about DB2and WebLogic Server After you define your deployment environment, clickFinish.
4. In the Configure General Product Information panel, review summary detailsabout the product components you are installing. Specify the appearance andnavigation features for your product, add an e-mail address to receiveworkflow messages, and choose whether or not to deploy sample data.
5. In the Configure the DB2 Instance panel, specify information about the DB2instance for Maximo Asset Management.
6. In the Configure the DB2 Database panel, specify information about the DB2database for Maximo Asset Management.
7. In the Configure Application Security panel, Enter the user names andpasswords for users that must be created for Maximo Asset Management.
8. Choose the base language and any additional languages you want to install.9. In the Apply Deployment Operations panel, specify user interface preferences,
select all available deployment operations, and then click Finish.
Results
Maximo Asset Management version 7.6.0.5 is installed and configured to useWebSphere Application Server Network DeploymentWebLogic Server and DB2.
Post installation for Oracle WebLogic Server deploymentsThere is a post installation step required for Oracle WebLogic Server deployments.
Chapter 4. Manually configuring existing middleware during deployment 43

About this task
When using Oracle WebLogic Server as the application server for your MaximoAsset Management deployment, the installation program produces an EAR file.You must then manually deploy that file to Oracle WebLogic Server.
When using Oracle WebLogic Server, you must modify the weblogic.xml file andrebuild the maximo.ear file before deploying it.
Procedure1. Install the updated JDK 1.7 program.
a. Obtain the latest JDK program with a version number 1.7.0 or greater, fromhttp://www.oracle.com/technetwork/java/index.html
b. Start the installation program.c. Accept the license agreement.d. Change the installation destination path to your Oracle home folder, and
click OK , then Next.e. Accept any additional prompts to install the JDK program so that the
installation process can complete successfully.2. If you are using an Oracle database, copy the oraclethin.jar file.
a. Copy the oraclethin.jar file from the administrative workstation to theserver where you installed Oracle WebLogic Server. Use any file transferprotocol that is available.
b. The oraclethin.jar file is in the install_home\maximo\applications\maximo\lib directory. The default install_home directory isC:\IBM\SMP\Maximo\Applications\Maximo\lib. Copy the oraclethin.jar fileto the J2EE server and into the wls11g/server/lib directory. For example,C:/Oracle/wls11g/server/lib.
3. Edit the domain configuration file for appropriate Java settings.a. Navigate to Install_dir\user_projects\domains\mydomain\bin.b. Right-click and edit (do not double-click) setDomainEnv.cmd (Windows) or
setDomainEnv.sh (UNIX).c. Using your text editor, search for and replace jdk entries with entries that
configure Oracle WebLogic Server to use the updated JDK program. Twoinstances must be replaced.
d. (Oracle only) Search for PRE_CLASSPATH. Include the following parameters:if NOT "%EXT_PRE_CLASSPATH%"=="" (if NOT "%PRE_CLASSPATH%"=="" (set PRE_CLASSPATH=%EXT_PRE_CLASSPATH%;%PRE_CLASSPATH%) else (set PRE_CLASSPATH=%EXT_PRE_CLASSPATH%
Note: This step is required for connecting to Oracle databases from OracleWebLogic Server.
e. Increase the Java Heap parameters by searching for MEM_ARGS and settingthe parameter as follows:WLS_MEM_ARGS_64BIT=-Xms4096m -Xmx4096mset MEM_PERM_SIZE_64BIT=-XX:PermSize=512mset MEM_MAX_PERM_SIZE_64BIT=-XX:MaxPermSize=512m
These parameters are case-sensitive. Ensure to include the minus (-) signbefore each parameter and to include the m after each value.
44 IBM Maximo Asset Management: Installation Guide (WebLogic Server, Oracle, Active Directory)

f. Search for set JAVA_OPTIONS=%JAVA_OPTIONS% %JAVA_PROPERTIES%. Insert anoption directly after this string, as follows:-Dcom.sun.xml.namespace.QName.useCompatibleSerialVersionUID=1.0
The entry looks like this example when complete:set JAVA_OPTIONS=%JAVA_OPTIONS% %JAVA_PROPERTIES%-Dcom.sun.xml.namespace.QName.useCompatibleSerialVersionUID=1.0-Dwlw.iterativeDev=%iterativeDevFlag% -Dwlw.testConsole=%testConsoleFlag%-Dwlw.logErrorsToConsole=%logErrorsToConsoleFlag%
g. Save and close the setDomainEnv.cmd file.4. Edit the \IBM\SMP\maximo\applications\maximo\maximouiweb\webmodule\WEB-
INF\weblogic.xml file and add the following entries if they do not already exist:<session-descriptor><cookie-http-only>false</cookie-http-only></session-descriptor>
5. Start the server without being prompted for user name and password. Create adirectory called security within theweblogic_home\user_projects\domains\maximoserver\servers\AdminServer directory. From the security directory,create a text file called boot.properties and enter a user name and passwordin the following format:username=<administrator username>password=<administrator password>
The first time you use this file to start a server, the server reads the file andthen overwrites it with an encrypted version of the user name and password.
6. Verify settings by starting Oracle WebLogic Server. To ensure that the edits thatyou made to the previous Oracle WebLogic Server files were accurate, start theOracle WebLogic Server.
7. Rebuild the maximo.ear file.\IBM\SMP\maximo\deployment\buildmaximoear
8. Deploy the maximo.ear file to Oracle WebLogic Server.
Deploying ear filesYou are now ready to deploy the EAR files from the Oracle WebLogic ServerAdministration Console. Deploying the EAR files starts the Maximo ApplicationServer.
Before you begin
Windows WindowsIf MAXIMOSERVER is not running, start it from a command prompt.
UNIX UNIXEnsure that the Oracle WebLogic Server daemon is running.
About this task
In order to view the Oracle WebLogic Server Administration Console, you need toalso install a Java Virtual Machine (JVM). Newer versions of Windows might notship with JVM.
Procedure1. Change to the my_domain directory:
Chapter 4. Manually configuring existing middleware during deployment 45

Windows
Windows
From a command prompt, change directory path to:drive_name:\weblogic_install_dir\user_projects\domain\my_domain
UNIX UNIXOpen a Terminal window (or a command prompt, if you are telnetingfrom a Windows computer) and change directory as follows:cd /home/mxadmin/weblogic_install_dir/user_projects/domains/my_domain
2. Type
Windows WindowsstartWebLogic.cmd
UNIX UNIX./startWebLogic.sh
and press Enter. Once the phrase: Server started in RUNNING mode displays,the Oracle WebLogic Server is running.
3. Start the MAXIMOSERVER Oracle WebLogic Server Administration Console bytyping the following URL in the address bar of your browser:http://host_name:7001/console
4. Log in to the administrative console with the administrative user name andpassword.
5. Click the Lock&Edit button in the Change Center section to set the server toedit mode.
6. Click the Deployments link in the Domain Structure section.7. In the Summary of Deployments section, click the Install button. The Install
Application Assistant opens.8. Click the upload your file(s) link.9. Click the Browse button next to the Deployment Archive field. Browse to
where you have maximo.ear file installed (c:/ibm/smp/maximo/deployment/default/ of the administrative workstation), select the file and click Open.
10. Click Next to upload the file to the Oracle WebLogic Server server.11. Click the radio button next to the maximo.ear file, and Next to continue the
deployment.12. Accept the default value to install the deployment as an application and click
Next.13. Accept all other default values and click Finish to start the deployment
process.14. When the deployment process is complete, click the Activate Changes button
in the Change Center to apply the changes. The following message displays:All changes have been activated. No restarts are necessary.
15. Repeat Steps 8 on page 28 through 14 on page 28 to deploy maximoiehs.ear.16. Click the checkbox next to the maximo application.17. Click the dropdown arrow of the Start button and select Servicing all
requests. The Start Application Assistant displays.18. Click Yes to start the system.
Setting the Oracle WebLogic Server host nameSetting the Oracle WebLogic Server host name manually to access application helpinformation.
46 IBM Maximo Asset Management: Installation Guide (WebLogic Server, Oracle, Active Directory)

About this task
By default, the property used to store the host name for the Maximo AssetManagement help system is set to localhost. The fully qualified host name of theOracle WebLogic Server must be configured in the help system property to viewMaximo Asset Management application help topics. Complete this step after youhave deployed Maximo Asset Management EAR files to the Oracle WebLogicServer.
Procedure1. Log in to the Maximo Asset Management console as maxadmin.2. Browse to Go To > System Configuration > Platform Configuration > System
Properties
3. Using the Filter feature, search for the mxe.help.host Property Name.4. Expand the mxe.help.host property and set the attribute to the fully qualified
host name of the Oracle WebLogic Server.5. Select the mxe.help.host record check box.6. Click the Live Refresh icon in the toolbar.7. From the Live Refresh dialog, click OK.
Results
You are now able to access application help topics in the Maximo AssetManagement user interface.
Chapter 4. Manually configuring existing middleware during deployment 47

48 IBM Maximo Asset Management: Installation Guide (WebLogic Server, Oracle, Active Directory)

Chapter 5. Update the application database with theUpdateDB Lite command
UpdateDB Lite splits the tasks of preparing class files and updating the database inMaximo Asset Management.
Starting with the v7.6.0.5 fix pack, you can minimize downtime by using newprograms to manually perform configuration steps. Tasks that are performed bythe UpdateDB Lite program, preparation of product class files and databaseupdates, are split into two separate commands. These commands includepre-processing and post-processing.
Pre-processing tasks prepare class files before they are built into the applicationEAR files without stopping the application server. The UpdateDB Lite commandcan also perform this work, but it stops the application server.
In post-processing, UpdateDB Lite can perform updates to the database, but theapplication server must be stopped before you run the command. UpdateDB andUpdateDB Lite use the exact same parameters.
The Maximo Asset Management 7.6 configuration tool uses the UpdateDB tocomplete configuration.
© Copyright IBM Corp. 2007, 2014 49

50 IBM Maximo Asset Management: Installation Guide (WebLogic Server, Oracle, Active Directory)

Chapter 6. Silent installation
The Maximo Asset Management silent installation option interacts with theMaximo Asset Management installation program by using a command prompt anda response file.
You must install the Installation Manager software before you can silently installthe Maximo Asset Management or related middleware packages
Creating silent response files for installationA response file records selections that you make and values that you provide whenusing the Maximo Asset Management installation program. The Maximo AssetManagement installation program can then be run silently using the response filefor input.
Before you begin
You can create a silent installation response file by setting the record environmentvariable, and then starting the installation program through the Maximo AssetManagement launchpad. The response file is generated in the home directory ofthe user that started the program. You can determine the home directory of thecurrent user the command appropriate for your operating system by using thefollowing commands.
Windowsset HOMEPATH
UNIXecho $HOME
The name of the file is tpaeInstallerRspdate_and_time_stamp.xml, for example,tpaeInstallerRsp20130716105258.xml
Procedure1. Open a command prompt and set the record environment variable.
Option Description
Windows set record=true
Linux or UNIX export record=true
2. Start the Maximo Asset Management launchpad.
Option Description
Windows launchpad64.exe
Linux or UNIX ./launchpad.sh
3. Click Install Product.4. Select the components that you want to install, and then click Install to start
the Maximo Asset Management installation program.
© Copyright IBM Corp. 2007, 2014 51

5. Select the packages you want to install silently, and specifying the sharedresources and installation directories. When you are satisfied with yourinstallation choices, click Install to install the packages.
6. Click Finish to exit the Maximo Asset Management installation program.
Sample silent installation response filesInstead of using the tpaeInstallerRspdate_and_time_stamp.xml file, you can use asample response file and modify it according to your needs.
Sample files
Sample response files are provided in the directory where you extracted the IBMMaximo Asset Management 7.6.0.5 launchpad. If you update the values that areused in the sample response files, limit your updates to parameters such asinstallation locations, host names, port numbers, and user names. If you need toupdate non-environmental values, such as the main product name or theInstallation Manager repository, create your own silent response file with theInstallation Manager software.
Table 3. Samples of silent response files
File Description
launchpad_directory\SilentResponseFiles\Installer\Unix\ResponseFile_MAM_Install_Unix.xml
Install Maximo Asset Management onLinux and UNIX.
launchpad_directory\SilentResponseFiles\Installer\Unix\ResponseFile_MAM_Uninstall_Unix.xml
Uninstall Maximo Asset Management onLinux and UNIX.
launchpad_directory\SilentResponseFiles\Installer\Windows\ResponseFile_MAM_Install_Windows.xml
Install Maximo Asset Management onWindows.
launchpad_directory\SilentResponseFiles\Installer\Windows\ResponseFile_MAM_Uninstall_Windows.xml
Uninstall Maximo Asset Management onWindows.
launchpad_directory\SilentResponseFiles\Installer\Unix\ResponseFile_DB2_Install_Unix.xml
Install IBM DB2 on Linux and UNIX.
launchpad_directory\SilentResponseFiles\Installer\Windows\ResponseFile_DB2_Install_Windows.xml
Install IBM DB2 on Windows.
launchpad_directory\SilentResponseFiles\Installer\Unix\ResponseFile_DB2_Uninstall_Unix.xml
Uninstall IBM DB2 on Linux and UNIX.
launchpad_directory\SilentResponseFiles\Installer\Windows\ResponseFile_DB2_Uninstall_Windows.xml
Uninstall IBM DB2 on Windows.
launchpad_directory\SilentResponseFiles\Installer\Unix\ResponseFile_TPAE_WAS_Install_Unix.xml
Install base components of WebSphereApplication Server on Linux and UNIX.
launchpad_directory\SilentResponseFiles\Installer\Windows\ResponseFile_TPAE_WAS_Install_Windows.xml
Install base components of WebSphereApplication Server on Windows.
52 IBM Maximo Asset Management: Installation Guide (WebLogic Server, Oracle, Active Directory)

Table 3. Samples of silent response files (continued)
File Description
launchpad_directory\SilentResponseFiles\Installer\Unix\ResponseFile_TPAE_WAS_Uninstall_Unix.xml
Uninstall base components ofWebSphere Application Server on Linuxand UNIX.
launchpad_directory\SilentResponseFiles\Installer\Windows\ResponseFile_TPAE_WAS_Uninstall_Windows.xml
Uninstall base components ofWebSphere Application Server onWindows.
Updating password values in silent response filesThe Maximo Asset Management installation program requires the encryption ofpassword values that are in the response files. If you need to update encryptedpassword values in a response file, use the Installation Manager string encryptionutility.
About this task
The Installation Manager string encryption utility accepts a plain text passwordvalue and produces an encrypted version of that password. You must then copyand paste the encrypted value into the password field of the response file.
Procedure1. Start the Installation Manager string encryption utility from the command line.
Option Description
Windows c:\Program Files\IBM\InstallationManager\eclipse\tools\imutilsc newpasswordvalue
AIX or Linux /opt/IBM/InstallationManager/eclipse/tools/imutilsc encryptStringnewpasswordvalue
Replace newpasswordvalue with your new plain text password value.2. Copy the string in the Encrypted version of the string field.3. Open the response file in a text editor, replace the password value with the
copied encrypted password, and then save the file.
Silently installing the Installation Manager softwareIn order to install Maximo Asset Management and related middleware silently, theInstallation Manager software must first be installed.
Procedure1. Open a command prompt on the system and change to the directory where
you unzipped the launchpad files.2. Change directory to the folder that contains the installation manager program
for your operating system, for example, \Install\IM\installer.win64.3. Optional: Open the silent-install.ini file in a text editor and update default
values.4. Start the Installation Manager silent installation process.
Chapter 6. Silent installation 53

Option Description
Windows installc –acceptLicense
Other operating systems ./installc –acceptLicense
Results
The Installation Manager software is successfully installed on the system. You cannow proceed with silently installing Maximo Asset Management.
Silently installing Maximo Asset Management and related middlewareYou can deploy Maximo Asset Management and associated middleware silently toperform an unattended installation based on predefined settings.
Before you begin
You must complete a successful installation to produce a response file that can beused to silently install Maximo Asset Management and relatedmiddleware. Alternatively, you can use one of the sample response files that areprovided on the product media and modify the sample file.
If the response file was created on a different system, ensure that all values that arerecorded in the response file are valid for the target system. Ensure that the pathvalues that were defined when the response file was created are still valid for thetarget system. For example, you might need to update the repository locationparameter values to indicate the correct path for product and middlewareinstallation images.
If you are installing the product in a directory different from the path used duringcreation of the response file, update the installLocation parameter value. If youupdate the value for the installLocation parameter, you must also provide a newvalue for the profile id parameter.
Procedure1. Copy the response file that you generated earlier and the Maximo Asset
Management files to the target system.2. Open a command prompt and change directory to the location of the
Installation Manager program that is appropriate for your operating system, forexample, cd /opt/IBM/InstallationManager/eclipse/tools/.
3. Silently start the Installation Manager program.imcl -input responsefilename-log logfilename-acceptLicense
The -input parameter determines the response file to use, for example,/SI/tpaeInstallerRsp20130716105258.xml. The -log parameter determineswhere log files are written, for example, /tmp/linuxDB2WASMAM_Log.xml. Youmust include the full path when you specify the response and log files.
Results
The installation proceeds silently with the values that you provided in the responsefile. Using different response files as input, you can silently install middleware onseparate systems. You can then use another response file to silently install Maximo
54 IBM Maximo Asset Management: Installation Guide (WebLogic Server, Oracle, Active Directory)

Asset Management on the system that is designated as the administrativeworkstation.
Silently uninstalling Maximo Asset Management and relatedmiddleware
You can silently uninstall Maximo Asset Management and associated middlewarebased on settings that were used during the installation.
Procedure1. Open a command prompt and change to the launchpad_home\
SilentResponseFiles\Installer directory, which contains the sampleuninstallation response file.
2. Update the sample uninstallation response file with values that are used inyour environment.
3. Silently start the Maximo Asset Management uninstallation program.imcl -input responsefilename-log logfilename-acceptLicense
The default home directory for the imcl command is c:\ProgramFiles\IBM\Installation Manager\eclipse\tools\ on Windows systems and/opt/IBM/InstallationManager/eclipse/ on Linux and UNIX systems.The -input parameter determines the response file to use, for example,C:\tmp\install_response.xml.The -log parameter determines where log files are written, for example,C:\tmp\silent.log.You must include the full path when you specify the response and log files.The -acceptLicense parameter is used to accept the license automatically.
4. You can remove the Installation Manager software from the system using theuninstall program.uninstallc
Table 4. Location of uninstallc command
Windows Other operating systems
Admin
64-bit C:\ProgramData\IBM\InstallationManager\uninstall
Admin
var/ibm/InstallationManager/uninstall
User
64-bit C:\Users\User ID\AppData\Roaming\IBM\InstallationManager\uninstall
User
User Home/var/ibm/InstallationManager/uninstall
Chapter 6. Silent installation 55

56 IBM Maximo Asset Management: Installation Guide (WebLogic Server, Oracle, Active Directory)

Chapter 7. Silent configuration
The silent configuration option allows you to interact with the Maximo AssetManagement configuration program by using a command prompt and a responsefile.
The following tasks are required for silent configuration:1. “Creating silent response files for middleware configuration”2. “Creating a response file for silent Maximo Asset Management configuration”
on page 583. “Silently configuring middleware” on page 594. “Silently configuring Maximo Asset Management” on page 59
Creating silent response files for middleware configurationYou create a response file by modifying one of the sample response files that isprovided. The configuration program can then be run silently using the responsefile for input.
Procedure1. Create a copy of the sample file, for example, my-cfg-silent-win.properties.
Sample response files are in launchpad_home\SilentResponseFiles\ConfigTool.2. Open the response file in a text editor, update values as required, and save the
file.Ensure that all values listed in the response file are valid for the target system,particularly path values. For example, you might need to update theWAS.InstallLocation parameter value to indicate the correct path forWebSphere Application Server Network Deployment relative to the targetsystem.If there are any Maximo Asset Management components you do not want toautomatically configure, set the appropriate property value to false. Forexample, if you do not want to configure WebSphere Application ServerNetwork Deployment on the system, set the WAS.ND.AutomateConfig value tofalse.
What to do next
After you have completed silent middleware configuration, you can proceed withsilently configuring Maximo Asset Management.Related tasks:“Silently configuring middleware” on page 59Middleware used with Maximo Asset Management can be configured silently byusing a configuration response file.
Sample silent middleware configuration response filesSeveral sample response files are provided on the IBM Maximo AssetManagement7.6.0.5 product image. You can use a sample response file and modifyit according to your needs.
© Copyright IBM Corp. 2007, 2014 57

Sample files
Silent response files are in the launchpad_home\SilentResponseFiles\ConfigTooldirectory of the product image.
Table 5. Samples of silent response files for middleware
File Description
cfg-silent-aix.properties Configure Maximo Asset Managementmiddleware on AIX.
cfg-silent-linux.properties Configure Maximo Asset Managementmiddleware on Linux.
Creating a response file for silent Maximo Asset Managementconfiguration
You create a response file by modifying one of the sample response files providedaccording to your needs. The configuration program can then be run silently usingthe response file for input.
Before you begin
There are several sample response files provided on the IBM Maximo AssetManagement product image. The files are in the directory where youuncompressed the product image under the \SilentResponseFile\ConfigTooldirectory.
About this task
When you run the configuration program in silent mode, it uses the data in theresponse file to configure the product.
Procedure1. Create a copy of the sample file and name it something appropriate, for
example, my-maximocfg-silent-win.properties.2. Open the response file in a text editor, update values as required, and save the
file.Ensure that all values listed in the response file are valid for the target system,particularly path values. For example, you might need to update theWAS.InstallLocation parameter value to indicate the correct path forWebSphere Application Server Network Deployment relative to the targetsystem.If there are any Maximo Asset Management components you do not want toautomatically configure, set the appropriate property value to false. Forexample, if you do not want to configure WebSphere Application ServerNetwork Deployment virtual member manager on the system, set theWAS.VmmFullyAutomatedConfig value to false.
Related tasks:“Silently configuring Maximo Asset Management” on page 59Maximo Asset Management can be configured silently by using an configurationresponse file.
58 IBM Maximo Asset Management: Installation Guide (WebLogic Server, Oracle, Active Directory)

Silently configuring middlewareMiddleware used with Maximo Asset Management can be configured silently byusing a configuration response file.
Procedure1. Copy the response file you created earlier to the target system.2. Open a command prompt and start the configuration program silently.
reconfigurePae-action deployMiddlewareConfiguration-inputFile responsefilename
The responsefilename parameter determines the response file to use, for example,C:\tmp\my-cfg-silent.properties. You must include the full path when youspecify the response and log files.
Results
The configuration proceeds silently with the values that you provided in theresponse file.
What to do next
You can modify the silent configuration response file, copy it to another server, andperform further configuration. For example, you can use the configurationprogram to silently configure WebSphere Application Server Network Deploymenton one server, and then modify the response file to configure IBM SecurityDirectory Server on another server.
Silently configuring Maximo Asset ManagementMaximo Asset Management can be configured silently by using an configurationresponse file.
Procedure1. Copy the response file you created earlier to the target system.2. Open a command prompt and start the Maximo Asset Management
configuration program silently.reconfigurePae-action deployConfiguration-inputFile responsefilename middlewarecomponents
The responsefilename parameter determines the response file to use, for example,C:\tmp\my-cfg-silent.properties. The middlewarecomponents parameterindicates which middleware component to configure, for example, -dbvendorDB2 or -j2eevendor WebSphere. In most cases, you configure middlewarecomponents together. You must include the full path when you specify theresponse files.
Results
The configuration proceeds silently with the values that you provided in theresponse file.
Chapter 7. Silent configuration 59

What to do next
You can modify the silent configuration response file, copy it to another server, andperform further configuration. For example, you can use the configurationprogram to silently configure WebSphere Application Server Network Deploymenton one server, and then modify the response file to configure IBM SecurityDirectory Server on another server.
Silently remove middleware configurationYou can use the same file you used to silently configure middleware to remove theconfiguration information.
About this task
Maximo Asset Management middleware configuration can be removed silentlyusing the same configuration response file that was used to configure the productpreviously. You must edit the configuration response file that was used toconfigure the product previously before it can be used to remove configurationinformation from the product.
Procedure1. Change to the directory containing the response file used to silently configure
previously.2. Make a copy of the response file and rename it. For example, rename the file to
my-uncfg-silent.properties.3. Open the file in a text editor and change the MW.Operation property value to
unconfigure, and then save the file.4. Open a command prompt and start the Maximo Asset Management
unconfiguration program silently.reconfigurePae-action deployMiddlewareConfiguration-inputFile responsefilename
The responsefilename parameter determines the response file to use, for example,C:\tmp\my-uncfg-silent.properties. You must include the full path when youspecify the response file.
Remove product configuration silentlyYou can use the removeConfiguration action of the reconfigurePae command toremove Maximo Asset Management configuration information.
About this task
The removeConfiguration action is used to remove Maximo Asset Managementconfiguration from the database and application server that was performed by theconfiguration tool. This action is equivalent to running theremoveJ2EEConfiguration and removeDatabaseConfiguration actions together.
Procedure1. Log on to the Maximo Asset Management administrative workstation.2. Open a command prompt and change directory to Install_Home\ConfigTool\
scripts.
60 IBM Maximo Asset Management: Installation Guide (WebLogic Server, Oracle, Active Directory)

3. Start the Maximo Asset Management configuration program silently.reconfigurePae -action removeConfiguration-dbuser userid-dbpwd password-wasuser userid-waspwd password
The -dbuser and -dbpwd parameters are the user ID and password used toconfigure the database. The -wasuser and -waspwd parameters are the user IDand password used to configure IBM WebSphere Application Server NetworkDeployment.
Chapter 7. Silent configuration 61

62 IBM Maximo Asset Management: Installation Guide (WebLogic Server, Oracle, Active Directory)

Chapter 8. Programmatically verifying that the installation wassuccessful
After you have exited the Maximo Asset Management installation program withoutencountering any errors, you can verify that the installation completed successfully.The installation is programmatically verified through the use of post installationvalidation utilities.
Before you begin
The JAVA_HOME environment variable must be set on the system before you canuse the verification utilities.
About this task
During installation, the Maximo Asset Management installation program performsa simple health check. This health check consists of logging in to the application toverify availability. This health check might not be sufficient to verify a successfulinstallation in all deployment scenarios. For example, if, during installation, youselect the option to deploy the application EAR file at a later date, this healthcheck cannot verify the installation. This simple health check is also insufficient forverifying an upgrade.
Post installation validation utilities are available after the product has beendeployed.
The installValidation utility is used to validate the product installation. Thesecommand-line utilities are used to verify the installation and configuration of theproduct in a more complete manner. These utilities can also be used to verify anexisting deployment after changes in the environment, such as changes to hostnames, user IDs, and passwords.
Results of the installValidation utility are logged ininstallValidationTrace00.log. This log is found in the \smp\configtools\logsdirectory on the administrative workstation.
Procedure1. Log in to the server using the user ID that was used to run the installation
program. If you intend to use the installValidation utility, log in to theadministrative workstation.
2. Ensure the JAVA_HOME environment variable is set properly to the location ofa JRE 1.7 installation.
3. To verify product installation, from the administrative workstation, changedirectory to ibm\smp\configtool\scripts and run theinstallValidation.[sh|bat] command. For either command, use theparameters in Table 1.
© Copyright IBM Corp. 2007, 2014 63

Table 6. Verification utilities parameters
Program Syntax parameters Input
installValidation.bat -action Use -action validate to start thevalidation of the product installation.
The -action parameter is the onlymandatory parameter when using theinstallValidation utility.
-trace Verification progress information iswritten to the screen during theverification process. You can modifythe output using the -tracingparameter.
v minimal
Progress information is limited toerror information.
v normal
Information includes individualtest progress, individual testresults, and overall progress of theentire verification process.
This is the default mode of tracing.
v verbose
In addition to providing normalprogress information, verbosetracing includes the test classname, test method name, andcorrective action information.
-confirm You are prompted before each test isstarted. You must confirm each testto be performed. There is no inputfor this parameter.
-component You can provide a comma-delimitedlist of directories containing the testobjects to limit testing to a specificset of tests.
These test objects must be located inthe \ibm\smp\HealthValidation\directory. For the product installationprogram, only the CTGIN folder isprovided.
-dbuser Provide the user ID used to accessthe database.
-dbpwd Provide the password of the user IDused to access the database.
-maxuser Provide the Maximo AssetManagement administrator userID. For example, maxadmin.
-maxpwd Provide the password for theMaximo Asset Managementadministrator user ID.
For example,installValidation.bat -action validate
64 IBM Maximo Asset Management: Installation Guide (WebLogic Server, Oracle, Active Directory)

Results
The installValidation.bat validation utility results are logged inctginstallvalidationtrace00.log. This log is found in the \smp\configtools\logsdirectory on the administrative workstation.
Chapter 8. Programmatically verifying that the installation was successful 65

66 IBM Maximo Asset Management: Installation Guide (WebLogic Server, Oracle, Active Directory)

Chapter 9. Verifying the installation manually
After you exit the Maximo Asset Management installation program without errors,you can further verify that the installation completed successfully. The installationis manually verified by locating key artifacts and performing a few simple tasks.
Before you begin
The product installation program performs installation verification, or a healthcheck, by logging on to the product before exiting the installation. The productinstallation program returns a success message if all installation steps, includingthe product log in task, are successful. If the health check task is unsuccessful, aHealthCheckFailed error is thrown for the getUrlContentString function. Thiserror is in the install_home\configtools\logs\CTGConfigurationXX.log file.
About this task
To further verify that the Maximo Asset Management installation was completedsuccessfully, perform the following verification procedures:
Procedure1. Examine the CTGConfigurationXX.log files for success messages.
The following success messages are found in the CTGConfigurationTraceXX.logfile and can be used to verify which phases of the installation were successful:v CTGIN2114I: The database was created successfullyv CTGIN2135I: Tablespace maxdata created successfullyv CTGIN2135I: Tablespace maxtemp created successfullyv CTGIN2079I: process automation engine database configuration completed
successfully (This message indicates that maxinst finished successfully.)v CTGIN2253I: buildmaximoear.cmd completed successfullyv CTGIN2253I: buildhelpear.cmd completed successfullyv CTGIN2208I: runConfigurationStep completed successfullyv CTGIN2370I: The installation finished successfullySearch the CTGConfigurationTraceXX.log file for the following message, whichindicates that the maxinst task completed successfully:CTGIN2079I, maxinst.*completed
2. Compare the packages chosen for installation with the packages that wereinstalled. The Package Summary panel of the Maximo Asset Managementinstallation program provides a summary of all the packages to be installed.You can compare the contents of that panel with a listing of what was installedon the system by using the configuration tool and selecting the update databasetask. The resulting list matches the packages listed in the Package Summarypanel.
3. Log in to the product and verify that applications are present. Being able to login to the product manually is a good indicator that the installation wassuccessful. Once you have logged in, navigate through the GoTo menu toverify that it has been populated with the applications you expect. If youexperience access problems with the product, clear the cache of your browserand try again.
© Copyright IBM Corp. 2007, 2014 67

68 IBM Maximo Asset Management: Installation Guide (WebLogic Server, Oracle, Active Directory)

Chapter 10. Installation and configuration programs loginformation
Log files generated by the Maximo Asset Management and configuration programscan provide details on completed and configuration tasks and any errors thatmight occur.
Maximo Asset Management installation and configurationprograms log locations
Maximo Asset Management and associated middleware is installed throughInstallation Manager. The log files of Installation Manager are common to anyinstallation, regardless of which components you choose to install. Log files for theMaximo Asset Management installation program are found on the system where itis run.
Table 7. Log file directories
Log file directory
C:\ProgramData\IBM\Installation Manager\logs
/var/ibm/InstallationManager/logs
C:\IBM\SMP\ConfigTool\logs
opt/IBM/SMP/ConfigTool/logs
When engaging IBM product support services, be prepared to provide these logfiles in an archive file. The LogZipper utility provided in the install_home\configtool\scripts directory can be used for this task. If you use the LogZipperutility, all relevant log files are archived in install_home/configtool/debug/YYYYMMDD_hhmmss.zip.
© Copyright IBM Corp. 2007, 2014 69

70 IBM Maximo Asset Management: Installation Guide (WebLogic Server, Oracle, Active Directory)

Chapter 11. Post installation tasks
There are several post installation tasks required in order to complete the MaximoAsset Management deployment.
Installing help locallyProduct help for Maximo Asset Management is provided online in IBM KnowledgeCenter. If you want to install help locally, you can download IBM KnowledgeCenter and help packages from Fix Central.
Installing helpYou can download help packages from Fix Central that contain the samedocumentation packages that are available online in IBM Knowledge Center. Youadd the help packages and configuration files to a local installation of IBMKnowledge Center
Procedure1. To download a locally-installable version of IBM Knowledge Center and help
packages from Fix Central, follow the instructions at http://www-01.ibm.com/support/docview.wss?uid=swg24041962.
2. Extract the IBM Knowledge Center package to the location where you want toinstall it. The default installation location is C:\KnowledgeCenter. If you installIBM Knowledge Center to a different location, you must update the pathvalue in the taxonomy.properties file for each help package that you install.
3. Extract a help package to a temporary location. The extracted files include oneor more plugin folders, a properties file and a taxonomy file.
4. Copy all com.ibm.prod.doc plugin folders from the help package to theinstall_home/KnowledgeCenter/usr/content/KCXhtml directory.
5. Copy the properties file to the configuration directory, for example toinstall_home/KnowledgeCenter/usr/conf/SSLKT6_7.6.0.5.properties.
6. Open the taxonomy.properties file in a text editor and update the path value,if necessary, to point to the installed location. For example, change the valueof the Path property from C:/KnowledgeCenter/usr/content/KCXhtml toE:/IBM/SMP/KnowledgeCenter/usr/content/KCXhtml, where IBM KnowledgeCenter is installed at E:/IBM/SMP/KnowledgeCenter.
7. Replace the install_home/KnowledgeCenter/usr/taxonomy/KC_taxonomy.ditamap with the version of the KC_taxonomy.ditamap file that isincluded in the help package.
8. In the install_home/KnowledgeCenter/bin directory, click startKC.bat onWindows or startKC.sh on Linux or AIX to start IBM Knowledge Center.
9. In a browser, open http://install_home:port/kc to view the product help, forexample http://127.0.0.1:9090/kc.
10. In Maximo Asset Management, redirect the application help links to point toyour local installation of IBM Knowledge Center:a. In the System Properties application, filter for mxe.help properties.b. Change the mxe.help.host and mxe.help.port properties to the host and
port values for your local installation of IBM Knowledge Center, such asthe default host value of 127.0.0.1 and default port value of 9090.
© Copyright IBM Corp. 2007, 2014 71

c. Change the mxe.help.path property value from /support/knowledgecenter/to /kc/.
d. Save the changes and click Live Refresh to update the values in theproduct database.
11. To stop IBM Knowledge Center, in the install_home/KnowledgeCenter/bindirectory, click stopKC.bat on Windows or stopKC.sh on Linux or AIX.
IBM Knowledge Center configurationIBM Knowledge Center requires minimal configuration to run help packages forIBM products in your local environment. You can also configure it to providedifferent content in separate instances of IBM Knowledge Center or to run existingEclipse help plugins in IBM Knowledge Center.
Changing the IBM Knowledge Center URL
If you install IBM Knowledge Center on your local computer, when you start theserver, the help is available in a browser at the default URL ofhttp://localhost:9090/kc. The host value changes, depending on where youinstall IBM Knowledge Center. If the default port is already in use, you can changethe port value in the kc_ant.properties file in the etc directory.
If you want to provide different help to different audiences or if you want to hosthelp for product versions that are not compatible with each other, you can installmultiple instances of IBM Knowledge Center on the same computer . You renamethe additional instances to unique directory names, such as KnowledgeCenter2 andKnowledgeCenter3, and you configure the kc_ant.properties file in the etcdirectory so that each instance runs on a different port.
Maintaining taxonomy files
Each product version in the IBM software catalog has a unique taxonomy valuethat forms part of the URL for the product help on www.ibm.com. For example,the taxonomy value for Maximo Asset Management, version 7.6.0.5, isSSLKT6_7.6.0.5, and the URL for the product welcome page ishttp://www.ibm.com/support/knowledgecenter/SSLKT6_7.6.0.5/com.ibm.mam.doc/welcome.html. The taxonomy.properties file and the KC_taxonomy.ditamap filecontrol the taxonomy values in IBM Knowledge Center.
Each help package includes a taxonomy.properties file that is specific to the productversion. You must add this file to the usr/conf directory in IBM KnowledgeCenter. If you add help packages for multiple products to IBM Knowledge Center,the usr/conf directory must contain a separate taxonomy.properties file for eachhelp package.
The KC_taxonomy.ditamap file lists each product version in the IBM softwarecatalog, and the file is frequently updated as new products and new versions ofproducts are released. A basic version of the KC_taxonomy.ditamap file is providedas a placeholder in the usr/taxonomy directory in IBM Knowledge Center but itdoes not contain a comprehensive list of product taxonomy values. You mustreplace this placeholder file with the version of the KC_taxonomy.ditamap that isincluded in the help package.
When you add multiple help packages to IBM Knowledge Center, each helppackage includes a KC_taxonomy.ditamap file. Because of the dynamic nature of thisfile, the included KC_taxonomy.ditamap files might be at different versions. Always
72 IBM Maximo Asset Management: Installation Guide (WebLogic Server, Oracle, Active Directory)

use the most recent version of the file because taxonomy values are added to thefile incrementally.
Troubleshooting
When you start IBM Knowledge Center after adding a new help package, indexand cache files are created to enable faster search and retrieval of help topics. If thenew help topics do not show in a browser, check if subdirectories were created forthe product version in the runtime/diskcache and runtime/index directories. Ifthese subdirectories were not created, check that the taxonomy.properties fileexists in the usr/conf directory and that it contains the correct path to the mainhelp plugin in the usr/content/KCXhtml directory. If the taxonomy.properties is inthe correct location and contains the correct path to the help plugin, it is likely thatyou forgot to add the latest version of the KC_taxonomy.ditamap to theusr/taxonomy directory.
After troubleshooting, before you start IBM Knowledge Center, you can delete theproduct version subdirectories in the runtime/diskcache and runtime/indexdirectories, to ensure that the content is fully refreshed.
Help componentsHelp components include a locally installable version of IBM Knowledge Centerand help packages that contain content plug-ins for product versions. You candownload a locally installable version of IBM Knowledge Center to deploy helppackages in your local environment.
IBM Knowledge CenterA stand-alone help system that includes a WebSphere Application ServerLiberty, version 8.5.5.x, embedded server. IBM Knowledge Center isdistributed to Maximo customers on https://www-933.ibm.com/support/fixcentral/. IBM Knowledge Center is available for Windows, Linux, orAIX operating systems and you can run IBM Knowledge Center on a localcomputer, server, or read-only media.
After you extract the IBM Knowledge Center package, you add producthelp packages to it to deploy help in your local environment. You can useIBM Knowledge Center to host help packages for several products at thesame time, if the products are on compatible release versions. If you wantto host help packages that are not compatible with one another, you canrun more instances of IBM Knowledge Center that you configure to run ondifferent ports.
Help packagesContain the same documentation that is available on http://www.ibm.com/support/knowledgecenter and include one or more contentplug-ins. Help packages also include the following files that are requiredby IBM Knowledge Center:v A taxonomy.properties file contains the taxonomy value for the product
version and the path to the main toc.ditamap file for the plug-in orplug-ins in the help package.
v The KC_taxonomy.ditamap file lists the taxonomy values for all productsin the IBM software catalog. A basic version of this file is included inIBM Knowledge Center but this version of the file is not up-to-date. TheKC_taxonomy.ditamap file that is included in the help package is thecurrent version of the file when the help package is created.
Chapter 11. Post installation tasks 73

Help packages include instructions for where to add the plug-ins and theadditional files to IBM Knowledge Center.
IBM Knowledge Center versionsThe locally installable versions of IBM Knowledge Center are based onIBM Knowledge Center, version 1.5. This version has a differentappearance to IBM Knowledge Center, version 2.0, which is onhttp://www.ibm.com/support/knowledgecenter. The functions are similarbut some differences in navigation and search exist. PDF creation is notsupported on the locally installable version.
When a locally installable IBM Knowledge Center, version 2.0, is available,it will be distributed to customers who want to update their local version.
Maximo Asset Management documentation libraryThe help packages in the documentation library mirror the product catalog andinstallation environment. Either the Maximo Asset Management help package orthe Maximo Asset Management Multitenancy help package must be installed in thesame IBM Knowledge Center environment where you install help packages forindustry solutions and add-on products.
The Maximo Asset Management and Maximo Asset Management Multitenancyhelp packages contain multiple plugins. Most industry solution and add-on helppackages contain just one plugin but some contain multiple plugins. When a helppackage contains multiple plugins, one plugin acts as the navigation plugin andcontains the main toc.ditamap file that controls the table of contents for all pluginsin the help package. In IBM Knowledge Center, the taxonomy.properties file in thehelp package specifies the path to the main toc.ditamap file in the navigationplugin.
Maximo Asset Management help package
This help package includes the following plugins:
com.ibm.mam.docNavigation plugin that manages the table of contents and sets the producttaxonomy values for all plugins in the help package. Content includes thewelcome page and product overview, planning, getting started, andmanaging financial processes topics.
com.ibm.mam.inswas.docHelp for installing Maximo Asset Management on WebSphere ApplicationServer.
com.ibm.mam.inswl.docHelp for installing Maximo Asset Management on Oracle WebLogic Server.
com.ibm.mbs.docHelp for administering Maximo Asset Management, application design,workflow design, working with Migration Manager, implementing highavailability, and using applications. This plugin is a content reuse pluginthat provides topics for use by other plugins but does not have a table ofcontents or a taxonomy value of its own. The content is used extensivelyby most help packages and you must include this plugin in IBMKnowledge Center to ensure that content is coherent and that links resolvefor all help packages.
com.ibm.mif.docHelp for integrating Maximo Asset Management data with external
74 IBM Maximo Asset Management: Installation Guide (WebLogic Server, Oracle, Active Directory)

applications. Similar to com.ibm.mbs.doc, this plugin is a content reuseplugin and must be included in IBM Knowledge Center.
com.ibm.support.mbs.docTroubleshooting and support information for Maximo Asset Managementand for industry solutions and add-on products. Industry solution andadd-on product troubleshooting topics are managed conditionally and arevisible only if that help plugin is also available in IBM Knowledge Center.
Maximo Asset Management Multitenancy help package
This help package contains a subset of the plugins in the Maximo AssetManagement help package and the content is specifically aimed at tenants in amultitenancy environment. You cannot install Maximo Asset Management pluginsand Maximo Asset Management Multitenancy plugins in the same instance of IBMKnowledge Center environment. If you want to support both libraries, you mustconfigure separate instances of IBM Knowledge Center to support them.
This help package includes the following plugins:
com.ibm.mt.docNavigation plugin that manages the table of contents and sets the producttaxonomy values for all plugins in the help package. Content includes thewelcome page and product overview, planning, getting started, andmanaging financial processes topics. Content also includes topics that arespecific to a tenant in a multitenancy environment.
com.ibm.mbs.docContent reuse plugin and content is filtered to exclude information that isnot relevant to tenants in a multitenancy environment.
com.ibm.mif.docContent reuse plugin and content is filtered to exclude information that isnot relevant to tenants in a multitenancy environment.
Industry solution and add-on help packages
Most industry solution and add-on help packages contain just one plugin, butsome contain multiple plugins. If there are multiple plugins in a help package, oneplugin acts as the navigation plugin and controls the table of contents for all of theplugins in the help package. You must ensure that you add all of the plugins thatare included in a help package to IBM Knowledge Center so that links resolve andcontent is complete.
The help packages for industry solutions and add-on products are designed to beused with the associated version of the Maximo Asset Management help package.You can check which version of Maximo Asset Management or Maximo AssetManagement is a prerequisite for an industry solution or add-on product versionat https://www.ibm.com/developerworks/community/wikis/home?lang=en#!/wiki/IBM%20Maximo%20Asset%20Management/page/Other%20Maximo%20products%20system%20requirements. You can install non-recommendedversions of help packages together but some links might not resolve or some of thefunctionality described in topics might not be available to users.
Chapter 11. Post installation tasks 75

Configuring initial dataAfter you successfully install and configure Maximo Asset Managementcomponents, you must complete several data configuration tasks before you useMaximo Asset Management.
Before you beginv Create security groups and add users to the security groups.v If you are using a directory server as part of your deployment, ensure that the
user names are created in your LDAP repository.v To ensure that you have the accounting information that you need, consult the
Financial department of your organization.
Procedure1. Log in to Maximo Asset Management by entering the user name maxadmin and
the password that you specified during the installation.2. If you didn't set the SMTP server by using the Configuration tool, configure
the SMTP server to send users email notifications of system events. To learnabout the range of system properties in Maximo Asset Management, see theSystem properties information.a. From the Go To menu, select System Configuration > Platform
Configuration > System Properties.b. In the Global Properties table window, use the filter feature to search for
and expand the mail.smtp.host property.c. In the Global Value field, specify the SMTP host name.d. Select the mail.smtp.host check box.e. From the Common Actions menu, click Live Refresh.f. In the Live Refresh window, click OK.g. In the Global Properties table window, use the filter feature to search for
the mxe.adminEmail property.h. Expand the mxe.adminEmail property and in the Global Value field,
specify your email address.i. Select the mxe.adminEmail record check box.j. From the Common Actions menu, click Live Refresh.k. In the Live Refresh window, click OK.
3. Define a currency code.a. From the Go To menu, select Financial > Currency Codes
b. Click New Row and specify a currency code and a description. Forexample, enter USD for United States of America Dollar.
c. Click Save Currency.4. Define item sets and company sets.
a. From the Go To menu, select Administration > Sets.b. Click New Row.c. Specify an item set name. For example, enter IT Items.d. In the Type field, specify ITEM.e. Click New Row.f. Specify a company set name. For example, enter IT Comps.g. In the Type field, specify COMPANY.h. Click Save Sets.
76 IBM Maximo Asset Management: Installation Guide (WebLogic Server, Oracle, Active Directory)

5. Create an organization.a. From the Go To menu, select Administration > Organizations.b. From the toolbar, click New Organization.c. Specify an organization name. For example, enter EAGLENA, and enter a
long description.d. Specify the base currency that you defined in step 3.e. Specify the item set and the company set that you defined in step 4.f. In the Default Item Status field, set the status to PENDING.g. Click the Sites tab and select New Row under the Sites table window.h. Specify a site name. For example, enter Factory01 and enter a long
description.i. Click Save Organization.
6. Create a general ledger account component.a. From the Go To menu, select System Configuration > Platform
Configuration > Database Configuration.b. From the More Actions menu, select GL Account Configuration.c. Click New Row.d. Specify a component name. For example, enter MYCOMPONENT.e. Specify a length for the component. For example, enter 5.f. Specify a type for the component. For example, select Alphanumeric.g. Click OK.
7. Apply changes to the database.a. From the More Actions menu, select Manage Admin Mode.b. Select Turn Admin Mode ON and click OK. This task takes several
minutes to complete. You can click Refresh Status to view the progress.c. From the More Actions menu, select Apply Configuration Changes.
Ensure that the status To Be Changed does not appear in the status columnof the listed objects.
d. From the More Actions menu, select Manage Admin Mode.e. Select Turn Admin Mode OFF and click OK. If you do not turn off Admin
Mode, cron tasks fail.8. Create a general ledger account.
a. From the Go To menu, select Financial > Chart of Accounts.b. In the Organizations table window, select your organization.c. From the More Actions menu, select GL Component Maintenance.d. In the Components table window, select the component that you entered
in step 6 and click New Row.e. Specify a GL Component value and a description, and then click OK.f. In the GL Accounts table window, click New Row.g. Specify a General Ledger Account and click Save GL Account.h. From the Go To menu, select Administration > Organizations.i. Find your organization and select the record.j. In the Clearing Account field, specify the general ledger account that you
created.k. Select Active.l. Click Save Organization.
9. Authorize a security group to modify a general ledger component type.
Chapter 11. Post installation tasks 77

a. From the Go To menu, select Security > Security Groups.b. Select the group that provides authorization. For example, select
FINANCE.c. Click the GL Components tab.d. For each GL Component that is listed, select the Authorized check box. As
a shortcut, you can select Authorize Group to Change All GL ComponentTypes.
e. Click Save Group.10. Update the company-related accounts.
a. From the Go To menu, select Financials > Chart of Accounts.b. Select your organization and from the More Actions menu, select
Company-Related Accounts.c. Click New Row and specify the company type Courier.d. Enter an account number in the RBNI Account, AP Suspense Account,
and AP Control Account fields. You can specify the same account numberin each field.
e. Click OK.f. From the More Actions menu, select Update Database and click OK.
11. Create a default insert site.a. From the Go To menu, select Security > Users.b. Find maxadmin and select the record.c. In the Default Insert Site field, specify the site name that you created in
step 5.d. In the Storeroom Site for Self-Service Requisitions field, specify the same
site name.e. Click Save User.
12. Define work types. Work types denote the importance of the work task.a. From the Go To menu, select Administration > Organizations.b. Find your organization and select the record.c. From the More Actions menu, select Work Order Options > Work Type.d. Click New Row.e. In the Work Order Class field, select WORKORDER.f. Specify a Work Type. For example, enter MAJOR.g. Set the Start Status to In Progress.h. Set the Complete Status to Completed.i. Click New Row and repeat steps f-i to create another work order class with
a different work type. For example, enter MINOR.j. Click New Row and repeat steps f-i to create a CHANGE work order class
with a different work type. For example, enter SIG to represent a significantchange.
k. Click OK and click Save Organization.Related information:Integrating data with external applicationsSystem properties
78 IBM Maximo Asset Management: Installation Guide (WebLogic Server, Oracle, Active Directory)

Synchronizing users and groupsWhen you select application server security, the scheduled synchronization of usersand groups that occurs between LDAP repositories and Maximo AssetManagement is governed by the federated repositories.
Before you begin
View the cron task configuration information in the Administering section of theKnowledge Center.
About this task
LDAP repositories are synchronized with Oracle WebLogic Server using the LDAPcron task.
To configure the synchronization schedule between LDAP repositories and MaximoAsset Management, complete the following steps:
Procedure1. Open a web browser and point to http://host name:port/maximo.2. Log in to Maximo Asset Management using the maxadmin user ID.3. From the Maximo Asset Management interface, navigate to Go To > System
Configuration > Platform Configuration > Cron Task Setup.4. Search for the appropriate cron task in the Cron Task field and configure it.5. Set the task to active.
What to do next
By default, the cron task performs its task every 5 minutes. Change the Schedulefield of the cron task if you want to change the interval.
Adding sample data to the Maximo Asset Management database postconfiguration
Using the maxinst command, you can add sample data to the Maximo AssetManagement database after the initial installation and configuration of MaximoAsset Management.
Before you begin
The maxinst command does not provide default values for table space parameters.You must specify the data table space name and the index table space name thatyou specified during the installation. The maxinst command replaces the currentdatabase schema and data. Do not add sample data to the Maximo AssetManagement database if you want to preserve records currently stored in thedatabase.
About this task
If you created a database either automatically or manually during the installation,you can use the maxinst command to create a sample data in that databaseinstance.
Chapter 11. Post installation tasks 79

Procedure1. Back up the existing database.2. Unzip the install_home\IBM\SMP\Maximo\tools\maximo\en\maxdemo.dbtype.zip
file. Replace the dbtype variable with the extension that is appropriate for thetype of database you used for the Maximo Asset Management deployment.Available options are ora, sqs, or db2.
3. Change the install_home\IBM\SMP\Maximo\tools\maximo\en\maxdemo.dbtype fileto the name of the Maximo Asset Management database you configured duringthe initial deployment. For example, rename the file to max76db.db2
4. Open a command prompt and change to the install_home\IBM\SMP\Maximo\tools\maximo directory.
5. Populate the database with sample data. You must specify the table space nameparameters when you run the maxinst command.maxinst -stablespacename -ttablespacename -imax76db For example, forOracle Database or for DB2, enter maxinst -sMAXDATA -tMAXDATA -imax76db.The system reads the maximo.properties file for database connectivityinformation. The maximo.properties file is in the install_home\IBM\SMP\Maximo\Applications\Maximo\Properties directory.
6. Populate the database by running commands with specific parameter values.Use the following maxinst database parameters:
Parameter Description
-a Database alias. If not specified, the aliasmxe.db.url.property is used.
-d Log file directory. If you are using the -lparameter, the log file is sent to the specifieddirectory. Otherwise, the log file is sent tothe log directory, for exampleinstall_home\IBM\SMP\Maximo\tools\maximo\logs.
-e Runs the SQL. This parameter is requiredand already present in the maxinst.bat file.
-f File name for the properties file. If notspecified, maximo.properties is used.
-i File name of the input file (without path orextension).
-k Directory of the properties file.
-l Creates a detailed log file. This parameter isalready present in the maxinst.bat file.
-o If you are using the -l parameter, the -oparameter specifies the file name for the logfile.
-p Password for the database connection. If notspecified, the mxe.db.password property orMAXIMO is used. If MAXIMO is used, it must beentered in uppercase letters.
-s Required value: Table space for indexstorage.
-t Required value: Table space for tablestorage.
80 IBM Maximo Asset Management: Installation Guide (WebLogic Server, Oracle, Active Directory)

Parameter Description
-u User name for database connection. If notspecified, the mxe.db.user property orMAXIMO is used. If MAXIMO is used, it must beentered in uppercase letters.
-x Required value for UNIX: Fixes the doclinkfile separators in UNIX environments. Note:If a UNIX environment is deployed withoutusing this parameter, the attacheddocuments do not function properly.
-y Multiplies the column width for strings by 2.This value is required for double-bytecharacter sets.
7. From the install_home\IBM\SMP\ETC directory, open the install.propertiesfile and specify the installation-related properties. You can add these propertiesto the database from the System Properties application.
Results
The Maximo Asset Management database is populated with sample data.
If an error occurs when you run the maxinst command, check the log file in theinstall_home\IBM\SMP\Maximo\tools\maximo\logs directory. If the maxinstcommand fails, you must correct the error and rerun the maxinst command tocomplete the Maximo database schema deployment before you can start theapplication.
.
Chapter 11. Post installation tasks 81

82 IBM Maximo Asset Management: Installation Guide (WebLogic Server, Oracle, Active Directory)
Chapter 12. Installing Version 7.5 industry solutions
Version 7.5 of industry solutions can be installed on Maximo Asset Management7.6.
Version 7.5 of industry solutions can be installed on Maximo Asset Management7.6 using several methods. The industry solution can be installed from thelaunchpad if one is included with the industry solution package. The industrysolution can also be installed from the command-line. Silent installation is alsosupported.
Ensure that you download the latest version and fixes available for the industrysolution or add-on before you install it. Refer to the Maximo Upgrade Resourcessupport page for the latest information about industry solution and add-onrequirements.
http://www.ibm.com/support/docview.wss?uid=swg21266217
Installing version 7.5 industry solutions from the launchpadIf a launchpad is included with an industry solution package, you can use it toinstall the industry solution on Maximo Asset Management 7.6.
Procedure1. Log on to the administrative workstation.2. Create a backup image of your Maximo Asset Management 7.6 administrative
workstation. When you install version 7.5 industry solutions in Maximo AssetManagement 7.6, you do not have an automated uninstallation method thatreturns the system to its previous state.
3. Open the archive for your industry solution package, and start the launchpad.4. Click Install from the menu of options.5. Follow the steps in the installation program.6. When the installation is complete, click Done. After the industry solution
installation program exits, the Maximo Asset Management 7.6 configurationtool starts.
7. From the Deployment Operations panel, select the options for applying changesto the database, and building and deploying application EAR files to completethe deployment.
Installing version 7.5 industry solutions from the command lineVersion 7.5 industry solutions can be installed in Maximo Asset Management 7.6from the command line.
Procedure1. Log on to the administrative workstation.2. Create a backup image of your Maximo Asset Management 7.6 administrative
workstation. When you install version 7.5 industry solutions in Maximo AssetManagement 7.6, you do not have an automated uninstallation method thatreturns the system to its previous state.
© Copyright IBM Corp. 2007, 2014 83

3. Start the process solution installation program by changing to theinstall_home\bin directory of your Maximo Asset Management 7.6 installationand use the solutionInstaller command.solutioninstaller.bat -pkgpath path_to_industry_solution_package-license accept
The -pkgpath option specifies the path to the industry solution package.Replace path_to_industry_solution_package with the path to the industry solutionpackage file you are installing. The -license option is used to accept licenseterms. For example,solutioninstaller.bat -pkgpathC:\TEMP\Spatial75_launchpad\Install\SPATIAL\Spatial75.zip-license accept
4. Follow the steps in the installation program.5. When the installation is complete, click Done. After the industry solution
installation program exits, the Maximo Asset Management 7.6 configurationtool starts.
6. From the Deployment Operations panel, select the options for applying changesto the database, and building and deploying application EAR files to completethe deployment.
Installing version 7.5 industry solutions silentlyVersion 7.5 industry solutions can be installed in Maximo Asset Management 7.6silently from the command line.
Procedure1. Log on to the administrative workstation.2. Create a backup image of your Maximo Asset Management 7.6 administrative
workstation. When you install version 7.5 industry solutions in Maximo AssetManagement 7.6, you do not have an automated uninstallation method thatreturns the system to its previous state.
3. Start the process solution installation program by changing to theinstall_home\bin directory of your Maximo Asset Management 7.6 installationand use the solutionInstallerGUI command.solutioninstallerGUI.bat -pkgpath path_to_industry_solution_package -nl locale-S -license accept
The -pkgpath option specifies the path to the industry solution package.Replace path_to_industry_solution_package with the path to the industry solutionpackage file you are installing. The -nl option specifies the language that isused during the installation. Replace locale with the abbreviation for thelanguage to use. The -s option indicates that the installation is processedsilently. The -license option is used to accept license terms. For example,solutioninstallerGUI.bat -pkgpathC:\TEMP\Spatial75_launchpad\Install\SPATIAL\Spatial75.zip-nl es -S -license accept
.4. Follow the steps in the installation program.5. When the installation is complete, click Done. After the industry solution
installation program exits, configure it with the Maximo Asset Management 7.6configuration tool.
84 IBM Maximo Asset Management: Installation Guide (WebLogic Server, Oracle, Active Directory)

6. From the Deployment Operations panel, select the options for applying changesto the database, and building and deploying application EAR files to completethe deployment.
Chapter 12. Installing Version 7.5 industry solutions 85

86 IBM Maximo Asset Management: Installation Guide (WebLogic Server, Oracle, Active Directory)

Chapter 13. Configuring and managing Oracle WebLogicServer
This section describes common tasks on configuring and administering the OracleWebLogic Server.
For more comprehensive information on running and administering OracleWebLogic Server visit the Oracle Web site.
Starting Oracle WebLogic ServerStarting the Oracle WebLogic Server.
About this task
To start the MAXIMOSERVER application, complete the following steps:
Procedure1. Open a command prompt window and change the directory to:
Windows Windows:C:\bea\user_projects\domains\mydomain
UNIX UNIX:weblogic_install_dir/user_projects/domains/mydomain
2. Launch:
Windows Windows:startWebLogic.cmd
UNIX UNIX:./startWebLogic.sh
3. If prompted, type the administrator user name and password. Once you see thephrase: server started in RUNNING Mode or Started weblogic Admin ServerMAXIMOSERVER for domain mydomain running in production mode (dependingon your operating system), the Oracle WebLogic Server is running.
Stopping the Oracle WebLogic ServerYou can use the Administrative Console to stop the Oracle WebLogic Server.
About this task
To stop the MAXIMOSERVER from the Administrative Console, complete thefollowing steps:
Procedure1. Open a browser window and enter the URL: http://localhost:7001/console This
URL is the administration URL for Oracle WebLogic Server domain youcreated.
2. Log in to the Administration Console with the administrator user name andpassword.
© Copyright IBM Corp. 2007, 2014 87

3. In the Domain Structure section, click Environment > Servers.4. In the main section of the console, click the AdminServer link.5. Click the Control tab.6. Click Shutdown and then Force Shutdown Now. The MAXIMOSERVER is
stopped.
88 IBM Maximo Asset Management: Installation Guide (WebLogic Server, Oracle, Active Directory)
Chapter 14. Maintaining EAR files
This section contains information about maintaining Maximo Asset ManagementEAR files.
The following instructions are used to manually build or uninstall the MaximoAsset Management maximo.ear file on Oracle WebLogic Server.v If you modify any database connection parameters in the maximo.properties file
after the initial installation, you must rebuild of the maximo.ear file, and thenredeploy it in Oracle WebLogic Server. In this scenario, you would likely onlyrebuild and redeploy the maximo.ear file.
v If you have installed Maximo Asset Management into a developmentenvironment, you might at some point like to migrate the deployment into a testor production environment. In this scenario, you must deploy both the maximoand maximo help applications into the new environment.
Building EAR filesYou can manually build Maximo Asset Management EAR files if, for example, youmodify a database connection parameter in the maximo.properties file after theinitial installation.
About this task
To manually build Maximo Asset Management EAR files, use the buildmaximoearcommand.
Windowsinstall_home\maximo\deployment\buildmaximoear.cmd
Linux and UNIXinstall_home/maximo/deployment/buildmaximoear.sh
Manually deploying Work Center WAR filesThe Work Center WAR file, maximo-x.war, is automatically built and deployedduring the installation and configuration process. However, you can manuallybuild the Work Center WAR file by using the buildmaximo-xwar command.
Procedure1. Log on to the administrative workstation, open a command line, and change to
the maximo-root\deployment directory.2. Run the buildmaximo-xwar command. The maximo-x.war file is created in
maximo-root\deployment\default directory.3. Deploy the maximo-x.war file on the Maximo Asset Management application
server.
Configuration Action
Simple Deploy the maximo-x.war file on the MaximoAsset Management application server or UIcluster.
© Copyright IBM Corp. 2007, 2014 89

Configuration Action
Proxy server that communicates withMaximo Asset Management by using asingle hostname and port
Deploy the maximo-x.war file on a separateapplication server.
Cross origin requests to the Maximo AssetManagement server.
Configure the CORS settings by usingservlet filters that set access control headerson the application server that hosts themaximo-x application.
Results
After you build and deploy the maximo-x.war file, use the default context path/maximo-x to access the Work Centers.
Manually uninstalling applications from Oracle WebLogic ServerThis section contains information about uninstalling Maximo Asset Managementapplications from Oracle WebLogic Server.
Manually uninstalling applications from Oracle WebLogicServer
Procedure1. Log into the Administration Console. For example, http://<server>:<port>/
console2. Click Lock & Edit.3. Click Deployments.4. Select the application for the EAR to uninstall.5. Click Delete.
90 IBM Maximo Asset Management: Installation Guide (WebLogic Server, Oracle, Active Directory)

Chapter 15. Command line configuration
Maximo Asset Management includes a configuration program, reconfigurePae,located in the Install_Home \ConfigTool\scripts\ directory, that is accessed fromthe command line. This command line configuration program performs the sameduties as the Maximo Asset Management configuration program user interface.Command line configuration is used to quickly update configuration values whenyou choose to not use the configuration tool user interface.
When you install a fix pack or upgrade Maximo Asset Management, theconfiguration program uses values that are recorded from the previousdeployment. These values are stored on the administrative system in theinstall.properties and maximo.properties files that are located under theinstall_home\etc and install_home\maximo\applications\maximo\propertiesdirectories.
If you make any environmental changes to any of the systems that are used for theoriginal deployment, they must be recorded in the install.properties andmaximo.properties files. Typically, these types of changes would include changinga host name or updating a password, for example.
You can update these values manually, or you can use the configuration commandline interface tool to update configuration values for your existing deploymentwhen they change. Properties that are specified for the configuration command lineinterface tool, either as parameters, or in an input properties file, replace existingproperties in the maximo.properties and install.properties files. Properties areencrypted when they are saved.
You can complete the following tasks with the configuration command lineinterface tool:v Change the security model for the original deployment. For example, you can
migrate from Maximo Asset Management-based security to WebSphereApplication Server security. This option is not available for Oracle WebLogicServer.
v Confirm that updated property values conform to required input domains.Validate credentials, host names, and available ports.
v Update database or application server configuration settings without the serveravailable. These values cannot be validated in this scenario.
v Clone an existing environment and use the configuration command line interfacetool to reconfigure the administrative workstation to use the new servers. Thecloned environment must use the same directory structure as the original.
v Create an environment (non-cloned) and use the configuration command lineinterface tool to create all required artifacts database, table spaces, andapplication server objects, for example.
v Remove configuration from a previously configured database.
Configuration parameter validationUse the Maximo Asset Management command line configuration program tovalidate input in the same way the Maximo Asset Management configurationprogram validates input in the user interface.
© Copyright IBM Corp. 2007, 2014 91

You can validate the following items with the Maximo Asset Managementcommand line configuration program.v Host names or IP addresses are correctly formatted and are reachable.v User IDs and passwords meet length and character set criteria.v Specified credentials are used to authenticate to WebSphere Application Server.v Specified port values are listening on the corresponding host. Port values contain
numbers only and are within a valid range.v Middleware installation directories that are supplied exist.v Preconfigured middleware can authenticate to the product database.v Required objects such as JMS queues, SIB destinations, databases, and table
spaces exist.v Required WebSphere Application Server virtual member manager users exist.v Sufficient authority is available to create WebSphere Application Server virtual
member manager users.v Remote login credentials are valid.v There is enough space in the supplied directories to create database objects.
Input properties filesYou can use property files as input for the Maximo Asset Managementcommand-line configuration program.
The following sample input property files are provided with the Maximo AssetManagement command-line configuration program.v DB2_Sample_input.properties
v Oracle_Sample_input.properties
v SQLServer_Sample_input.properties
v WebSphere_App_Server_Sample_input.properties
These sample files are in the ibm\smp\configtools\samples directory. Each of thesesample files contains properties that are associated with a specific database orapplication server type. They contain comments and properties you can updatewith values from your environment. You can then use the updated file as input forthe configuration command line interface tool with the –input parameter.
All input properties, introduced from either the command line or in the inputproperties file, are validated before they are used. After validation is successful, themaximo.properties and install.properties files are updated with the values youprovided.
92 IBM Maximo Asset Management: Installation Guide (WebLogic Server, Oracle, Active Directory)

Command line interface parametersThe following parameters can be used with the configuration command lineprogram to configure your environment.
Table 8. Maximo Asset Management command line configuration program parameters
Parameter name Description
-action Configuration action.
v addLanguages – Adds additional languages to a currentdeployment.
v configureProducts - Configures more products after an initialinstallation and configuration. This action should be used toconfigure multiple products after they are installed and shouldalso be used in an upgrade scenario.
v configureProductsDBLite - Configures more products after aninitial installation and configuration using the DB Lite feature.This action can configure multiple products after they areinstalled and can also be used in an upgrade scenario.
v deployConfiguration - Configures initial installation. This actioncan configure multiple products after they are installed. Thisaction is used for new installations only.
v deployDatabaseConfiguration - Validates command input anddefines configuration property values for a new database for thecurrent product.
v deployJ2eeConfiguration - Validates command input anddefines configuration property values for a new applicationserver for the current product.
v deployMiddlewareConfiguration – Configures initial middlewareinstallation.
v disableAppSecurity - Disables application security for theapplication. Security is handled entirely through Maximo AssetManagement. This action sets the mxe.useAppServerSecurityproperty to a value of 0. This value is written to the databasewhen updated.
v disableDB2TextSearch - Disable the full text search feature on aDB2 database.
v enableAppSecurity – Enables application security for theapplication. This action sets the mxe.useAppServerSecurityproperty to a value of 1, and updates themxe.ldapUserManagement flag. This value is written to thedatabase when the database is updated.
v enableDB2TextSearch – Enables the full text search feature on aDB2 database.
v reapplyAppServerTuning – Reapplies tuning configuration to anapplication server.
v removeDatabaseConfiguration – Removes product configurationinformation from a previously configured database.
v removeJ2EEConfiguration – Removes application serverconfiguration that was added by the configuration tool.
v updateApplication – Updates the Maximo Asset Managementapplication by updating the database and redeployingapplication EAR files. This action should not be used in anupgrade scenario or when a new product is installed in anexisting product.
Chapter 15. Command line configuration 93

Table 8. Maximo Asset Management command line configuration program parameters (continued)
Parameter name Description
v updateApplicationDBLite – Update the database using the DBLite feature and then rebuild and redeploy the EARs.
v updateDatabaseConfiguration – Updates existing databaseconfiguration values.
v updateJ2eeConfiguration - Updates existing application serverconfiguration values.
v upgrade75Configuration - Performs database propertiesvalidation for your Maximo Asset Management 7.5 deploymentto ensure a valid connection to the database, and also configuresWebSphere Application Server for Maximo Asset Management7.6. When you upgrade from Maximo Asset Management 7.5,you must configure a new instance of WebSphere ApplicationServer.
v validateAndUpdateDatabaseConfiguration – Validatesreconfiguration command line interface tool input and thenupdates existing database configuration property values.
v validateAndUpdateJ2eeConfiguration - Validates reconfigurationcommand line interface tool input and then updates existingdatabase configuration property values.
v validateDatabaseConfiguration - Validates databaseconfiguration values specified as input for the reconfigurationcommand line interface tool.
v validateJ2eeConfiguration - Validates application serverconfiguration values that are specified as input for thereconfiguration command line interface tool.
v removeConfiguration - Removes database and applicationconfiguration performed by the configuration tool.
The actions that modify the security setting for Maximo AssetManagement also updates Maximo Asset Managementweb.xmlfiles.
-additionalLangs Adds one or more additional languages to the deployment.
This parameter requires one or more locale abbreviations for input.For example, ES for Spanish.
-allowUpdateDB The database update task is run to add the languages that arespecified to the database.
-applicationServerName Name of the application server.
-applicationServerNode Name of the application server node.
-automatedbconfig Automates the configuration of the database. Use this parameter tocreate the database instance, database users, the database, tablespaces, and creates database schema.
-automatej2eeconfig Automates the configuration of WebSphere Application Server.Using this parameter creates, for example, JMS queues andprofiles.
-buildAndDeployEAR Rebuilds and deploys application EAR files. Application EAR filesmust be rebuilt and redeployed for configuration changes to takeeffect in the application.
-buildears Rebuilds application EAR files.
94 IBM Maximo Asset Management: Installation Guide (WebLogic Server, Oracle, Active Directory)

Table 8. Maximo Asset Management command line configuration program parameters (continued)
Parameter name Description
-bypassJ2eeValidation Skips the validation and configuration of the application server.
If you use this parameter, then you must manually configure theapplication server before you can deploy Maximo AssetManagement.
Validation of a manually configured application server requireslogging in to the application server with application serveradministrative credentials. If you do not want to provide thosecredentials to the configuration program, you can skip thevalidation task.
If you use the bypassJ2eeValidation parameter, you cannot alsouse the following parameters:
v applicationServerName
v applicationServerNode
v automatej2eeconfig
v buildAndDeployEAR
v createResourcesIfMissing
v deploymaximoear
v enableappsecurity
v enableEnhancedNavigation
v enableSkin
v inputfile
v j2eeserverport
v usermanagement
v wasuser
v waspwd
-bypassUpdateDB Specifies that the database update task is not run and theinstallation program does not update the database.
Languages files for the locales that are specified are built into theapplication EAR file.
Use this parameter if you have run the database update task andincluded the language files in the database through anothermethod.
-createResourcesIfMissing Creates any resources that are not found during configuration.
-db2_english_only Specifies that alphanumeric data is stored as a varchar data type.Using this parameter limits you to using English in the userinterface.
If you do not use this parameter, alphanumeric data is stored as avargraphic data type.
-db2textsearchport Port that is used by the DB2 server for full text search.
-dbname Name of the database.
-dbpwd Password for the user ID that accesses the database.
-dbrxapwd Password for the user ID used to access a remote middlewareserver.
-dbrxauser User ID used to access a remote middleware server.
-dbserverhost Host name of the database server.
Chapter 15. Command line configuration 95

Table 8. Maximo Asset Management command line configuration program parameters (continued)
Parameter name Description
-dbserverport Port name of the database server.
-dbuser User ID that accesses the database.
-dbvendor Database software name.
v DB2
v Oracle
v SQLServer
-deleteInstanceUsersAndGroups Removes the instance owner and database user IDs and associatedgroups from the DB2 server. This parameter has cannot be usedwith and Microsoft SQL Server.
The deleteInstanceUsersAndGroups parameter requires thedbrxauser and dbrxapwd and the dbuser and dbpwd parameters.
-deleteWASprofiles Deletes the WebSphere Application Server profiles that are createdfor the application.
-deployDemoData Includes sample data.
-deploymaximoear Deploys Maximo application EAR file.
-enableappsecurity Enables application security for the application. This parameterworks the same as the enableAppSecurity action.
This action sets the mxe.useAppServerSecurity property to a valueof 1, and updates the mxe.ldapUserManagement flag. This value iswritten to the database when updated.
-enableEnhancedNavigation Enables enhanced navigational elements in the user interface,including enhancements for switching between applications andviewing record lists.
The enableEnhancedNavigation parameter must be used with theenableSkin parameter.
If you enable enhanced navigation, and then you enable a differentuser interface skin with the –enableSkin parameter, you mustre-enable enhanced navigation.
-enableMultiTenancy Enables the multitenancy feature.
Multitenancy refers to software or services that can be configuredto serve multiple groups of clients referred to as tenants. Eachgroup of tenants is served by an instance of the software that usesdata that only they can access.
96 IBM Maximo Asset Management: Installation Guide (WebLogic Server, Oracle, Active Directory)

Table 8. Maximo Asset Management command line configuration program parameters (continued)
Parameter name Description
-enableRestrictivePasswordPolicy Enables a more restrictive password policy for Maximo AssetManagement users.v Login attempts
Standard policy allows 10 login attempts before the account islocked.
Restrictive policy allows 3 login attempts before the account islocked.
v Number of times that the forgotten password link can be used
Standard policy allows 5 uses of the forgotten password linkbefore locking the account.
Restrictive policy allows 3 uses of the forgotten password linkbefore locking the account.
v Password duration (days)
Standard policy passwords never expire.
Restrictive policy passwords expire after 90 days.v Password expiration warning (days)
Standard policy does not warn the user that the accountpassword is about to expire.
Restrictive policy warns the user that the account password isabout to expire seven days before it expires.
v Password threshold
Standard policy does not enforce a password threshold.
Restrictive policy enforces a password threshold of 270characters.
v Password minimum character length
Standard policy passwords must be at least six characters.
Restrictive policy passwords must be at least eight characters.
v Limit of allowed consecutive characters
Standard policy has no restrictions to the amount of times acharacter can be repeated consecutively in a password.
Restrictive policy allows a character to be repeated two timesconsecutively in a password value.
v Password can be same value as user name
Standard policy allows you to use the same value for the username and password.
Restrictive policy does not allow you to use the same value forthe user name and password.
v Number of numeric characters required in the password
Standard policy does not require numeric characters in apassword value.
Restrictive policy requires one or more numeric characters in apassword value.
v Number of alphabetic characters required in the password
Standard policy does not require alphabetic characters in apassword value.
Restrictive policy requires one or more alphabetic characters in apassword value.
Chapter 15. Command line configuration 97

Table 8. Maximo Asset Management command line configuration program parameters (continued)
Parameter name Description
-enableSkin Change the appearance of the user interface.
v Classic
Removes settings for the following properties:
– mxe.webclient.homeButtonHeaders
– mxe.webclient.systemNavBar
– mxe.webclient.tabBreadCrumbs
– mxe.webclient.verticalLabels
– mxe.webclient.skin
v tivoli09
Removes settings for the following properties:
– mxe.webclient.homeButtonHeaders
– mxe.webclient.systemNavBar
– mxe.webclient.tabBreadCrumbs
– mxe.webclient.verticalLabels
Sets the following property:
– mxe.webclient.skin=tivoli09
v tivoli13
Sets the following properties to a value of 1:
– mxe.webclient.homeButtonHeaders
– mxe.webclient.systemNavBar
– mxe.webclient.tabBreadCrumbs
– mxe.webclient.verticalLabels
Sets the following property:
– mxe.webclient.skin=tivoli13
-force Indicates that an input property file updates the properties file andskips the validation of parameters input to the command line toolthrough an input properties file.
When you use this parameter, you are not prompted forconfirmation of the property update task.
-inputfile Fully qualified path to the properties file that is used to setproperties in an environment.
Values that are specified as command line parameters for theconfiguration command line interface tool supersede values fromthe input file.
-j2eeserverhost Host name of the domain manager of the application server.
If deployment manager host name or server port is specified thethinwsadmin scripts are updated accordingly.
-j2eeserverport Port name of the application server domain manager server.
If deployment manager host name or server port is specified thethinwsadmin scripts are updated accordingly.
-j2eevendor Application server software.
v WebSphere
v WebLogic
-mtadminpwd Password for the user ID of the multitenancy configurationmanager.
98 IBM Maximo Asset Management: Installation Guide (WebLogic Server, Oracle, Active Directory)
Table 8. Maximo Asset Management command line configuration program parameters (continued)
Parameter name Description
-mtadminuser User ID of the multitenancy configuration manager.
-mtdbpwd Password for the user ID of the multitenancy configurationmanager that is used to connect to the database.
-mtdbuser User ID of the multitenancy configuration manager that is used toconnect to the database.
-removeCreatedArtifacts Removes any artifacts that are created by the configuration tool.Examples include directories that are created by the configurationprogram, JMS objects, and the application server.
-removeInstance Removes the database instance for DB2 and Oracle. This parametercannot be used with Microsoft SQL Server.
The removeInstance parameter requires the dbrxauser anddbrxapwd, and the dbuser and dbpwd parameters.
-setjdbcurl Sets the JDBC connection URL string.
-stopAppServer The application server must be stopped when you add languages.If you do not use the stopAppServer parameter with theaddLanguages action, you must stop the application servermanually before you use the addLanguages action.
This parameter is used for WebSphere Application Server only.
-unsetjdbcurl Removes the currently used JDBC connection URL string.
-updatedb Runs the updatedb configuration task.
-usermanagement Changes the security configuration of the existing Maximodeployment.
v j2ee
Change the security setting in Maximo so that both Maximousers and Maximo groups are managed through applicationserver security mechanisms.
v mixed
Manage users through application server security mechanisms,and manage groups using Maximo.
-validateForNewDeploy Validate middleware configuration.
When this parameter is specified, validation is performed as if thetool was configuring the middleware. Additional configurationdetails are checked, including disk space availability and remoteaccess credentials.
If this parameter is not specified, validation is performed in thecontext of a component that is already established in theenvironment.
-validateUsers Used with the enableAppSecurity action to validate users exist inthe LDAP repository.
If the users do not exist, the existing security model is notmodified.
-waspwd WebSphere Application Server administrator user ID password.
-wasrxapwd Password for user ID to access remote WebSphere ApplicationServer server host.
Chapter 15. Command line configuration 99

Table 8. Maximo Asset Management command line configuration program parameters (continued)
Parameter name Description
-wasrxauser Operating system user ID used to access remote WebSphereApplication Server host. Typically this user ID is defined either asAdministrator or root.
-wasuser WebSphere Application Server administrator user ID.
This is the user ID that is used to log in to the WebSphereApplication Server administrative client application. Typically, thisuser ID is defined as wasadmin.
Command line configuration program actionsUse the command line configuration program to configure new or existingdeployments of Maximo Asset Management.
action updateDatabaseConfigurationThe updateDatabaseConfiguration action is used to update existing databaseconfiguration values.-action updateDatabaseConfiguration [-force] [-buildAndDeployEAR][-dbserverhost hostname] [-dbserverport port number][-dbname database name] [-dbuser userid][-dbpwd password] [-dbrxauser userid][-dbrxapwd password] [-setjdbcurl jdbcurl][-unsetjdbcurl] [-inputfile path to input properties file]
action validateDatabaseConfigurationUse the validateDatabaseConfiguration action to validate current databaseconfiguration properties. This action can be used to verify database propertiesbefore they are updated, or following an update action.-action validateDatabaseConfiguration [-validateForNewDeploy][-dbserverhost hostname][-dbserverport port number][-dbname database name][-dbuser userid] [-dbpwd password][-dbrxauser userid][-dbrxapwd password] [-setjdbcurl jdbcurl][-unsetjdbcurl] [-enableMultiTenancy][-mtadminuser userid] [-mtadminpwd password][-mtdbuser userid] [-mtdbpwd password][-inputfile path to input properties file]
The following properties are required if the -validateForNewDeploy parameter isused.v Database.DB2.InstanceAdminGroup
v Database.DB2.InstanceAdminUserName (Windows only)v Database.DB2.InstanceAdminPassword (Windows only)v Database.DB2.FencedUser
v Database.DB2.FencedUserPassword
v Database.DB2.FencedGroupName
v Database.DB2.InstanceUserPassword
These properties must be added manually to the install.properties file.
100 IBM Maximo Asset Management: Installation Guide (WebLogic Server, Oracle, Active Directory)

action validateAndUpdateDatabaseConfigurationThe validateAndUpdateDatabaseConfiguration action is used to both validatereconfiguration command-line interface tool input and then update existingdatabase configuration property values.-action validateAndUpdateDatabaseConfiguration [-validateForNewDeploy] [-force][-buildAndDeployEAR] [-dbserverhost hostname][-dbserverport port number] [-dbname database name][-dbuser userid] [-dbpwd password][-dbrxauser userid] [-dbrxapwd password][-setjdbcurl jdbcurl] [-unsetjdbcurl] [-enableMultiTenancy][-mtadminuser userid] [-mtadminpwd password] [-mtdbuser userid][-mtdbpwd password] [-inputfile path to input properties file]
The following properties are required if the -validateForNewDeploy parameter isused.v Database.DB2.InstanceAdminGroup
v Database.DB2.InstanceAdminUserName (Windows only)v Database.DB2.InstanceAdminPassword (Windows only)v Database.DB2.FencedUser
v Database.DB2.FencedUserPassword
v Database.DB2.FencedGroupName
v Database.DB2.InstanceUserPassword
These properties that must be added manually to the install.properties file.
The -enableMultiTenancy parameter must be used with the -validateForNewDeployparameter.
action deployDatabaseConfigurationThe deployDatabaseConfiguration action is used to validate command-lineconfiguration program input and define configuration property values for a newdatabase for the currently deployed product. This action can be run after asuccessful deployConfiguration action.-action deployDatabaseConfiguration [-buildAndDeployEAR] [-createResourcesIfMissing][-dbserverhost hostname] [-dbserverport port number]\[-dbname database name] [-dbuser userid][-dbpwd password] [-dbrxauser userid] [-dbrxapwd password][-setjdbcurl jdbcurl] [-unsetjdbcurl] [-enableMultiTenancy][-mtadminuser userid] [-mtadminpwd password] [-mtdbuser userid][-mtdbpwd password] [-deployDemoData][-inputfile path to input properties file] [-enableRestrictivePasswordPolicy]
The following properties are required if the -createResourcesIfMissing parameteris used.v Database.DB2.InstanceAdminGroup
v Database.DB2.InstanceAdminUserName (Windows only)v Database.DB2.InstanceAdminPassword (Windows only)v Database.DB2.FencedUser
v Database.DB2.FencedUserPassword
v Database.DB2.FencedGroupName
v Database.DB2.InstanceUserPassword
These properties that must be added manually to the install.properties file.
Chapter 15. Command line configuration 101

action removeDatabaseConfigurationThe removeDatabaseConfiguration action is used to remove configuration settingsfrom a previously configured database.-action removeDatabaseConfiguration [-removeInstance] [-dbrxauser userid][-dbrxapwd password] [-dbuser userid][-dbpwd password] [-deleteInstanceUsersAndGroups]
action enableDB2TextSearchThe enableDB2TextSearch action is used to enable the full text search feature for aDB2 database.-action enableDB2TextSearch [-db2textsearchport port number]
action updateJ2eeConfigurationThe updateJ2eeConfiguration action is used to update existing application serverconfiguration values.-action updateJ2eeConfiguration [-force] [-buildAndDeployEAR][-j2eeserverhost hostname] [-j2eeserverport port number][-wasuser userid] [-waspwd password][-applicationServerNode nodeName] [-applicationServerName appServerName][-inputfile path to input properties file]
action validateJ2eeConfigurationThe validateJ2eeConfiguration action is used to validate application serverconfiguration values specified as input for the reconfiguration command-lineinterface tool.-action validateJ2eeConfiguration [-validateForNewDeploy] [-j2eeserverhost hostname][-j2eeserverport port number] [-wasuser userid][-waspwd password] [-applicationServerNode nodeName][-applicationServerName appServerName] [-inputfile path to input properties file]
The following properties are required if the –validateForNewDeploy parameter isused and the WAS.SibPersistMessages property is set to true.v Database.DB2.FencedUser
v Database.DB2.FencedUserPassword
v Database.DB2.InstanceUserPassword
These properties that must be added manually to the install.properties file.
action validateAndUpdateJ2eeConfigurationThe validateAndUpdateJ2eeConfiguration action is used to both validatereconfiguration command-line interface tool input and then update existingapplication server configuration property values.-action validateAndUpdateJ2eeConfiguration [-force] [-validateForNewDeploy][-buildAndDeployEAR] [-j2eeserverhost hostname][-j2eeserverport port number] [-wasuser userid][-waspwd password] [-applicationServerNode nodeName][-applicationServerName appServerName][-inputfile path to input properties file]
The following properties are required if the –validateForNewDeploy parameter isused and the WAS.SibPersistMessages property is set to true.v Database.DB2.FencedUser
v Database.DB2.FencedUserPassword
102 IBM Maximo Asset Management: Installation Guide (WebLogic Server, Oracle, Active Directory)

v Database.DB2.InstanceUserPassword
These properties must be added manually to the install.properties file.
action deployJ2eeConfigurationThe deployJ2eeConfiguration action is used to validate command lineconfiguration program input and define configuration property values for a newapplication server for the currently deployed product. This action can be run aftera successful deployConfiguration action.-action deployJ2eeConfiguration [-bypassJ2eeValidation] [-buildAndDeployEAR][-createResourcesIfMissing] [-j2eeserverhost hostname][-j2eeserverport port number] [-wasuser userid][-waspwd password] [-applicationServerNode nodeName][-applicationServerName appServerName][-inputfile path to input properties file][–enableSkin Classic|tivoli09|tivoli13] [-enableEnhancedNavigation]
The following properties are required if the -validateForNewDeploy parameter isused and the WAS.SibPersistMessages property is set to true.v Database.DB2.FencedUser
v Database.DB2.FencedUserPassword
v Database.DB2.InstanceUserPassword
These properties that must be added manually to the install.properties file.
action removeJ2EEConfigurationThe removeJ2EEConfiguration action is used to remove configuration settings froma previously configured application server. Items removed include domainmanager and application server profiles, and JMS objects.-action removeJ2EEConfiguration [-wasuser userid] [waspwd password][-wasrxauser userid] [-wasrxapwd password][-removeCreatedArtifacts] [-deleteWasProfiles]
action deployConfigurationUse the deployConfiguration action to configure the initial installation. This actionis used for new Maximo Asset Management installation scenarios only. This actioncan configure multiple middleware products after they are installed. ThedeployConfiguration action requires the inputfile parameter and an inputproperties file populated with the configuration values you want to use.-action deployConfiguration [-inputfile path to input properties file][-dbvendor Oracle|DB2|SQLServer] [-j2eevendor WebSphere|WebLogic][-bypassJ2eeValidation][-automatedbconfig] [-automatej2eeconfig][-usermanagement j2ee|mixed] [-buildears] [-deploymaximoear][-enableappsecurity] [-deployDemoData] [-enableMultiTenancy] [-db2_english_only][–enableSkin Classic|tivoli09|tivoli13] [-enableEnhancedNavigation][-enableRestrictivePasswordPolicy]
action removeConfigurationThe removeConfiguration action is used to removes database and applicationconfiguration that is performed by the configuration tool. This action is equivalentto running the removeJ2EEConfiguration and removeDatabaseConfiguration actionstogether-action removeConfiguration -dbuser userid-dbpwd password -wasuser userid-waspwd password [-wasrxauser userid]
Chapter 15. Command line configuration 103
[-wasrxapwd password] [-dbrxauser userid][-dbrxapwd password] [-removeInstance] [-deleteInstanceUsersAndGroups][-removeCreatedArtifacts] [-deleteWasProfiles][-inputfile path to input properties file]
action reapplyAppServerTuningThe reapplyAppServerTuning action is used to reapply best practices applicationserver tuning settings.-action reapplyAppServerTuning [-wasuser userid][-waspwd password] [-applicationServerNode nodeName][-applicationServerName appServerName]
You must restart the application server after the settings are applied.
action enableAppSecurityThe enableAppSecurity action is used to enable application security for theapplication. This action sets the mxe.useAppServerSecurity property to a value of1, and updates the mxe.ldapUserManagement property according to the setting of the–usermanagement parameter. This value is written to the database when updated.The maximouiweb, maxrestweb, meaweb, and mboweb web.xml files are updated duringthis action.-action enableAppSecurity -usermanagement {j2ee,mixed}[-buildAndDeployEAR] [-validateUsers] [-force]
action disableAppSecurityThe disableAppSecurity action is used to disable application security for theapplication. This action sets the mxe.useAppServerSecurity property to a value of0. This value is written to the database when updated. Using this action reverts thesecurity implementation to Maximo security for users and groups. Themaximouiweb, maxrestweb, meaweb, and mboweb web.xml files are updated during thisaction.-action disableAppSecurity [-buildAndDeployEar] [-force]
action updateApplicationThe updateApplication action is used to update the application by updating thedatabase and redeploying application EAR files. This action should not be used inan upgrade scenario or when a new product is installed in an existing product.-action updateApplication [-updatedb] [-deploymaximoear][–enableSkin Classic|tivoli09|tivoli13] [-enableEnhancedNavigation][-enableRestrictivePasswordPolicy]
action addLanguagesUse the addLanguages action to configure additional languages for a deployment.-action addLanguages [-additionalLangs locale1,locale2,locale3][-buildAndDeployEAR] [-allowUpdateDB | -bypassUpdateDB] [-stopAppServer][-inputfile path to input properties file]
The application server must be stopped when you add languages. If you do notuse the stopAppServer parameter with the addLanguages action, you must stop theapplication server manually before you use the addLanguages action.
The following locale values are supported.
104 IBM Maximo Asset Management: Installation Guide (WebLogic Server, Oracle, Active Directory)

Table 9. Locales supported by the configuration program
Language Locale
Arabic ar
Brazilian Portuguese pt_BR
Croatian hr
Czech cs
Danish da
Dutch nl
Finnish fi
French fr
German de
Hebrew he
Hungarian hu
Italian it
Japanese ja
Korean ko
Norwegian no
Polish pl
Russian ru
Simplified Chinese zh_CN
Slovak sk
Slovenian sl
Spanish es
Swedish sv
Traditional Chinese zh_TW
Turkish tr
action configureProductsThe configureProducts action should be used to configure more products that areinstalled after an initial installation and configuration. This action verifies a fullinstallation and configuration of an existing product was completed successfullybefore it continues. This action can configure multiple products after they areinstalled. This action should be used in an upgrade scenario.-action configureProducts [-updatedb] [-buildears] [-deploymaximoear]
action deployMiddlewareConfigurationThe deployMiddlewareConfiguration action is used to configures middleware afterit is installed.-action deployMiddlewareConfiguration [-inputfile path to input properties file]
The following properties can be included in the input properties file used with thedeployMiddlewareConfiguration action.
Chapter 15. Command line configuration 105

Table 10. Properties that can be used in the deployMiddlewareConfiguration action input file
Category Property
HTTP Server properties IHS.HTTPPort
IHS.InstallLocation
IHS.WebserverName
LDAP server properties LDAP.AdminDN
LDAP.AdminPassword
LDAP.BaseEntry
LDAP.GroupSuffix
LDAP.OrgContainerSuffix
LDAP.ServerHostName
LDAP.ServerPort
LDAP.UserSuffix
LDAP.Vendor
General middleware configuration properties MW.Operation
WebSphere properties PLG.InstallLocation
WAS.AdminPassword
WAS.AdminUserName
WAS.ApplicationServerName
WAS.CellName
WAS.DeploymentManagerNodeName
\ WAS.DeploymentManagerProfileName
WAS.InstallLocation
WAS.LDAPAutomatedConfig
WAS.ND.AutomateConfig
WAS.NodeName
WAS.ServerProfileName
WAS.SOAPConnectorPort
WCT.InstallLocation
action upgrade75ConfigurationThe upgrade75Configuration action performs database properties validation foryour Maximo Asset Management 7.5 deployment to ensure a valid connection tothe database, and also configures WebSphere Application Server for Maximo AssetManagement 7.6. When you upgrade fromMaximo Asset Management 7.5, youmust configure a new instance of WebSphere Application Server.-action upgrade75Configuration [-inputfile path to input properties file][-dbvendor <Oracle|DB2|SQLServer>] [-j2eevendor <WebSphere|WebLogic>][-automatej2eeconfig] [-usermanagement <j2ee|mixed>][-enableappsecurity] [-bypassJ2eeValidation]
106 IBM Maximo Asset Management: Installation Guide (WebLogic Server, Oracle, Active Directory)

action updateApplicationDBLiteThe updateApplicationDBLite action is used to update the database using the DBLite feature and then rebuild and redeploy the EARs. This action should not beused in an upgrade scenario or when a new product is installed in an existingproduct.-action updateApplicationDBLite [-preprocessor] [-updatedb][-buildears] [-deploymaximoear] [-enableSkin tivoli09|tivoli13|classic][-enableEnhancedNavigation] [-disableEnhancedNavigation][-enableRestrictivePasswordPolicy]
The -preprocessor attribute can be used to prepare class files before they are builtinto the application EAR files. The non-lite version of the updatedb command canalso perform this work, however, it requires that you stop the application server. Ifyou use the -preprocessor attribute, you are not required to stop the applicationserver while class files are prepared, deceasing the amount of downtime for yourenvironment.
The -updatedb attribute can be used to update the database independently. Whenyou use this attribute, the application server must be stopped. The updatedbprocess does not include preparing class files, which shortens the amount of timethat your application server is down.
The -preprocessor and -updatedb attributes are mutually exclusive. You cannot usethem together. The -buildears attribute can only be used with the -preprocessorattribute. The -deploymaximoear attribute can only be used in conjunction with the-updatedb attribute.
action configureProductsDBLiteThe configureProductsDBLite action should be used to configure products after aninitial installation and configuration using the DB Lite feature. This action canconfigure multiple products after they are installed and should be used in anupgrade scenario.-action configureProductsDBLite [-preprocessor] [-updatedb][-buildears] [-deploymaximoear]
The -preprocessor attribute can be used to prepare class files before they are builtinto the application EAR files. The non-lite version of the updatedb command canalso perform this work, however, it requires that you stop the application server. Ifyou use the -preprocessor attribute, you are not required to stop the applicationserver while class files are prepared, deceasing the amount of downtime for yourenvironment.
The -updatedb attribute can be used to update the database independently. Whenyou use this attribute, the application server must be stopped. The updatedbprocess does not include preparing class files, which shortens the amount of timethat your application server is down.
The -preprocessor and -updatedb attributes are mutually exclusive. You cannot usethem together. The -buildears attribute can only be used with the -preprocessorattribute. The -deploymaximoear attribute can only be used in conjunction with the-updatedb attribute.
Chapter 15. Command line configuration 107

Configuration program propertiesMaximo Asset Management properties can be modified with the command lineconfiguration program by using an input.properties file. When you set a propertyvalue to a Windows path, you must use two consecutive backslashes, for example,C:\\IBM\\WebSphere\\AppServer. When you set property values to a Linux orUNIX path, use single forward slashes. For example, /opt/IBM/db2/V10.5.
Table 11. Maximo Asset Management properties
Category Property Definition
Shared databaseproperties
mxe.db.schemaowner Owner of the database schema.
For example, maximo.
This value is written to the databasewhen updated.
mxe.db.user User ID that accesses the database.
mxe.db.password Password for the user ID that accessesthe database.
Database.RemoteAccessUserName Database server system user ID that isused for configure the databaseremotely.
This property is only required if thecreateResourcesIfMissing,validatefornewdeploy, orautomatedbconfig parameters arespecified.
Database.RemoteAccessPassword Password for user ID named inDatabase.RemoteAccessUserName.
This property is only required if thecreateResourcesIfMissing,validatefornewdeploy, orautomatedbconfig parameters arespecified.
DB2 Properties Database.DB2.ServerHostName Fully qualified host name of the DB2server.
For example, mymachine.mydomain.com.
This value is written to the databasewhen updated.
Database.DB2.ServerPort Database server port.
For example, 50005.
This value is written to the databasewhen updated.
108 IBM Maximo Asset Management: Installation Guide (WebLogic Server, Oracle, Active Directory)

Table 11. Maximo Asset Management properties (continued)
Category Property Definition
Database.DB2.InstanceName Name of the database instance.
For example, ctginst1.
This value is written to the databasewhen updated.
This property is only required if thecreateResourcesIfMissing,validatefornewdeploy, orautomatedbconfig parameters arespecified.
Database.DB2.InstanceUserPassword Password for the database instanceowner
This property is only required if thecreateResourcesIfMissing,validatefornewdeploy, orautomatedbconfig parameters arespecified.
Database.DB2.InstanceAdminGroup Group for the instance administrator.
For example, ctgiadm1.
This property is only required if thecreateResourcesIfMissing,validatefornewdeploy, orautomatedbconfig parameters arespecified.
Database.DB2.DatabaseName Name of the database.
For example, maxdb76.
This value is written to the databasewhen updated.
Database.DB2.InstallLocation Install location of the database.
For example, /opt/IBM/db2/V10.5.
This property is only required if thecreateResourcesIfMissing,validatefornewdeploy, orautomatedbconfig parameters arespecified.
Database.DB2.LogFileSize Set the size for transaction logs.
For example, 8192.
This property is only required if thecreateResourcesIfMissing,validatefornewdeploy, orautomatedbconfig parameters arespecified.
Chapter 15. Command line configuration 109

Table 11. Maximo Asset Management properties (continued)
Category Property Definition
Database.DB2.AppCtlHeapSize Application control heap size.
For example, 1024.
This property is only required if thecreateResourcesIfMissing,validatefornewdeploy, orautomatedbconfig parameters arespecified.
Database.DB2.ApplHeapSize Application heap size.
For example, 1024.
This property is only required if thecreateResourcesIfMissing,validatefornewdeploy, orautomatedbconfig parameters arespecified.
Database.DB2.LockListSize Size that is allocated to the lock list.
For example, AUTOMATIC.
This property is only required if thecreateResourcesIfMissing,validatefornewdeploy, orautomatedbconfig parameters arespecified.
Database.DB2.LogSecond Number of secondary log files allowed.
For example, 100.
This property is only required if thecreateResourcesIfMissing,validatefornewdeploy, orautomatedbconfig parameters arespecified.
Database.DB2.ServiceUser User ID used to autostart.
This property is only required if thecreateResourcesIfMissing,validatefornewdeploy, orautomatedbconfig parameters arespecified.
This property is only required if DB2 isinstalled on a Windows system.
Database.DB2.ServicePassword Password forDatabase.DB2.ServiceUser.
This property is only required if thecreateResourcesIfMissing,validatefornewdeploy, orautomatedbconfig parameters arespecified.
This property is only required if DB2 isinstalled on a Windows system.
110 IBM Maximo Asset Management: Installation Guide (WebLogic Server, Oracle, Active Directory)

Table 11. Maximo Asset Management properties (continued)
Category Property Definition
Database.DB2.ExtentSize Number of pages per extent (group ofpages).
For example, 32.
This property is only required if thecreateResourcesIfMissing,validatefornewdeploy, orautomatedbconfig parameters arespecified.
Database.DB2.FencedUser Fenced user ID for DB2 on Linux orUNIX systems.
For example, db2fenc1.
This property is only required if thecreateResourcesIfMissing,validatefornewdeploy, orautomatedbconfig parameters arespecified.
Database.DB2.FencedUserPassword Password for the fenced user ID forDB2 on Linux or UNIX systems.
This property is only required if thecreateResourcesIfMissing,validatefornewdeploy, orautomatedbconfig parameters arespecified.
Database.DB2.FencedGroupName Default group for database fenced user.
For example, ctgfgrp1.
This property is only required if thecreateResourcesIfMissing,validatefornewdeploy, orautomatedbconfig parameters arespecified.
This property is only required if DB2 isinstalled on a Linux or UNIX system.
Database.DB2.AuthType Method DB2 uses to authenticate users.
For example, server.
This property is only required if thecreateResourcesIfMissing,validatefornewdeploy, orautomatedbconfig parameters arespecified.
Database.DB2.DataTablespaceName DB2 table space name for the productdatabase.
For example, maxdata.
Chapter 15. Command line configuration 111

Table 11. Maximo Asset Management properties (continued)
Category Property Definition
Database.DB2.BufferPoolName DB2 buffer pool name.
For example, MAXBUFPOOL.
This property is only required if thecreateResourcesIfMissing,validatefornewdeploy, orautomatedbconfig parameters arespecified.
Database.DB2.BufferPoolSize Size of the buffer pool.
For example, 4096.
This property is only required if thecreateResourcesIfMissing,validatefornewdeploy, orautomatedbconfig parameters arespecified.
Database.DB2.DataTablespaceLocation Location of DB2 database table spacedata files.
For example, CTGDAT.
This property is only required if thecreateResourcesIfMissing,validatefornewdeploy, orautomatedbconfig parameters arespecified.
Database.DB2.DataTablespaceSize Table space size, which is measured inMb.
For example, 5000.
This property is only required if thecreateResourcesIfMissing,validatefornewdeploy, orautomatedbconfig parameters arespecified.
Database.DB2.TempTablespaceName Temporary table space name.
For example, maxtemp.
This property is only required if thecreateResourcesIfMissing,validatefornewdeploy, orautomatedbconfig parameters arespecified.
Database.DB2.TempTablespaceLocation Location of temporary table space.
For example, CTGTMP.
This property is only required if thecreateResourcesIfMissing,validatefornewdeploy, orautomatedbconfig parameters arespecified.
112 IBM Maximo Asset Management: Installation Guide (WebLogic Server, Oracle, Active Directory)

Table 11. Maximo Asset Management properties (continued)
Category Property Definition
Database.DB2.TempTablespaceSize Temporary table space size, which ismeasured in Mb.
For example, 1000.
This property is only required if thecreateResourcesIfMissing,validatefornewdeploy, orautomatedbconfig parameters arespecified.
Database.DB2.IndexTablespaceName Index table space name.
For example, maxdata.
Database.DB2.IndexTablespaceLocation Location of index table space.
For example, CTGDAT.
This property is only required if thecreateResourcesIfMissing,validatefornewdeploy, orautomatedbconfig parameters arespecified.
Database.DB2.IndexTablespaceSize Index table space size, which ismeasured in Mb.
For example, 5000.
This property is only required if thecreateResourcesIfMissing,validatefornewdeploy, orautomatedbconfig parameters arespecified.
Database.DB2.InstanceAdminUserName Administrative user or the databaseinstance.
For example, db2admin.
This property is only required if thecreateResourcesIfMissing,validatefornewdeploy, orautomatedbconfig parameters arespecified.
For Unix and Linux platforms, thisvalue must be the same as the instanceowner.
Database.DB2.InstanceAdminPassword Password for the user ID specified forDatabase.DB2.InstanceAdminUserName.
This property is only required if thecreateResourcesIfMissing,validatefornewdeploy, orautomatedbconfig parameters arespecified.createResourcesIfMissing
Oracle Database.Oracle.SchemaPassword Password for the schema owner.
Chapter 15. Command line configuration 113

Table 11. Maximo Asset Management properties (continued)
Category Property Definition
Database.Oracle.InstanceName Oracle instance name.
This value is written to the databasewhen updated.
Database.Oracle.SoftwareOwner Owner of the software installation.
For example, oracle.
This property is only required if thecreateResourcesIfMissing,validatefornewdeploy, orautomatedbconfig parameters arespecified.
Database.Oracle.SoftwareOwnerPassword Password for the user ID listed inDatabase.Oracle.SoftwareOwner.
This property is only required if thecreateResourcesIfMissing,validatefornewdeploy, orautomatedbconfig parameters arespecified.
Database.Oracle.InstallLocation Oracle installation location. Forexample, /opt/app/oracle/product/10.2.0/db_1.
This property is only required if thecreateResourcesIfMissing,validatefornewdeploy, orautomatedbconfig parameters arespecified.
Database.Oracle.DataTablespaceName Oracle table space name for theproduct database.
For example, maxdata.
Database.Oracle.InstanceLocation Oracle instance location.
For example, /opt/app/oracle/product/10.2.0/db_1.
This property is only required if thecreateResourcesIfMissing,validatefornewdeploy, orautomatedbconfig parameters arespecified.
Database.Oracle.DataTablespaceSize Table space size, which is measured inMb.
For example, 5000.
This property is only required if thecreateResourcesIfMissing,validatefornewdeploy, orautomatedbconfig parameters arespecified.
114 IBM Maximo Asset Management: Installation Guide (WebLogic Server, Oracle, Active Directory)

Table 11. Maximo Asset Management properties (continued)
Category Property Definition
Database.Oracle.TempTablespaceName Temporary table space name.
For example, maxtemp.
This property is only required if thecreateResourcesIfMissing,validatefornewdeploy, orautomatedbconfig parameters arespecified.
Database.Oracle.TempTablespaceSize Temporary table space size, which ismeasured in Mb.
For example, 1000.
This property is only required if thecreateResourcesIfMissing,validatefornewdeploy, orautomatedbconfig parameters arespecified.
Database.Oracle.IndexTablespaceName Index table space name.
For example, maxdata.
Database.Oracle.IndexTablespaceSize Index table space size, which ismeasured in Mb.
For example, 1000.
This property is only required if thecreateResourcesIfMissing,validatefornewdeploy, orautomatedbconfig parameters arespecified.
Database.Oracle.ServerHostName Fully qualified host name of the Oracleserver.
Database.Oracle.ServerPort Port number that is used by Oracle.
For example, 1521.
This value is written to the databasewhen updated.
Database.DBAUserName Oracle DBA user name.
For example, sys.
This property is only required if thecreateResourcesIfMissing,validatefornewdeploy, orautomatedbconfig parameters arespecified.
Database.DBAPassword Password for user ID listed forDatabase.DBAUserName.
This property is only required if thecreateResourcesIfMissing,validatefornewdeploy, orautomatedbconfig parameters arespecified.
Chapter 15. Command line configuration 115
Table 11. Maximo Asset Management properties (continued)
Category Property Definition
Microsoft SQL Server Database.SQL.DatabaseName Name of the database.
For example, maxdb76.
This value is written to the databasewhen updated.
Database.SQL.DataFileName A way to specify the name of the datafile used for the database.
For example, maxdb76_dat.
This property is only required if thecreateResourcesIfMissing,validatefornewdeploy, orautomatedbconfig parameters arespecified.
Database.SQL.DataFileMaxSize Maximum size for data file for thedatabase.
Database.SQL.DataFileSize Initial size for data file for the databasein kb.
For example, 5000.
This property is only required if thecreateResourcesIfMissing,validatefornewdeploy, orautomatedbconfig parameters arespecified.
Database.SQL.LogFileName A way to specify the name for thedatabase transaction log file.
For example, maxdb76_log.
This property is only required if thecreateResourcesIfMissing,validatefornewdeploy, orautomatedbconfig parameters arespecified.
Database.SQL.LogFileSize Microsoft SQL Server transaction logfile size.
This property is only required if thecreateResourcesIfMissing,validatefornewdeploy, orautomatedbconfig parameters arespecified.
Database.SQL.DataFilegroupName Database logical name file group.
For example, PRIMARY.
This property is only required if thecreateResourcesIfMissing,validatefornewdeploy, orautomatedbconfig parameters arespecified.
116 IBM Maximo Asset Management: Installation Guide (WebLogic Server, Oracle, Active Directory)

Table 11. Maximo Asset Management properties (continued)
Category Property Definition
Database.SQL.ServerHostName Host name of the database server.
For example, myhost.mydomain.com.
Database.SQL.ServerPort Database server port.
For example, 1433.
This value is written to the databasewhen updated.
Database.SQL.InstanceAdminUserName Administrative user for the MicrosoftSQL Server instance. Used duringinstallation for creating and modifyingthe database and database user.
For example, sa.
This property is only required if thecreateResourcesIfMissing,validatefornewdeploy, orautomatedbconfig parameters arespecified.
Database.SQL.InstanceAdminPassword Administrative user password.
This property is only required if thecreateResourcesIfMissing,validatefornewdeploy, orautomatedbconfig parameters arespecified.
WebSphere ApplicationServer NetworkDeployment
WAS.InstallLocation Installation location for WebSphereApplication Server NetworkDeployment.
For example, C:\\IBM\\WebSphere\\AppServer.
This property is required if theWAS.SibPersistMessages property is setto true.
This property is required in theproperties file that is specified in oneof the following properties.
v WAS.MIFSIBPropertiesFile
v WAS.CronSIBPropertiesFile
v WAS.UISIBPropertiesFile
WAS.DeploymentManagerHostName Host name of the WebSphereApplication Server NetworkDeployment deployment manager.
This value is written to the databasewhen updated.
Chapter 15. Command line configuration 117

Table 11. Maximo Asset Management properties (continued)
Category Property Definition
WAS.DeploymentManagerProfileName WebSphere Application ServerNetwork Deployment profile name.
For example, ctgDmgr01.
This property is required if theWAS.SibPersistMessages property is setto true.
This property is required in theproperties file that is specified in oneof the following properties.
v WAS.MIFSIBPropertiesFile
v WAS.CronSIBPropertiesFile
v WAS.UISIBPropertiesFile
WAS.DeploymentManagerProfileRoot Location of the WebSphere ApplicationServer Network Deployment profile.
For example, C:\\IBM\\WebSphere\\AppServer\\profiles\\ctgDmgr01
This property is only required if theWAS.SibPersistMessages property is setto true.
This property is required in theproperties file that is specified in oneof the following properties.
v WAS.MIFSIBPropertiesFile
v WAS.CronSIBPropertiesFile
v WAS.UISIBPropertiesFile
WAS.NodeName WebSphere Application ServerNetwork Deployment node name.
For example, ctgNode01
WAS.ApplicationServerName WebSphere Application ServerNetwork Deployment applicationserver name.
For example, MXServer.
This value is written to the databasewhen updated.
WAS.CellName WebSphere Application ServerNetwork Deployment cell name.
For example, ctgCell01.
WAS.AdminUserName WebSphere Application ServerNetwork Deployment administratorname.
For example, wasadmin.
118 IBM Maximo Asset Management: Installation Guide (WebLogic Server, Oracle, Active Directory)
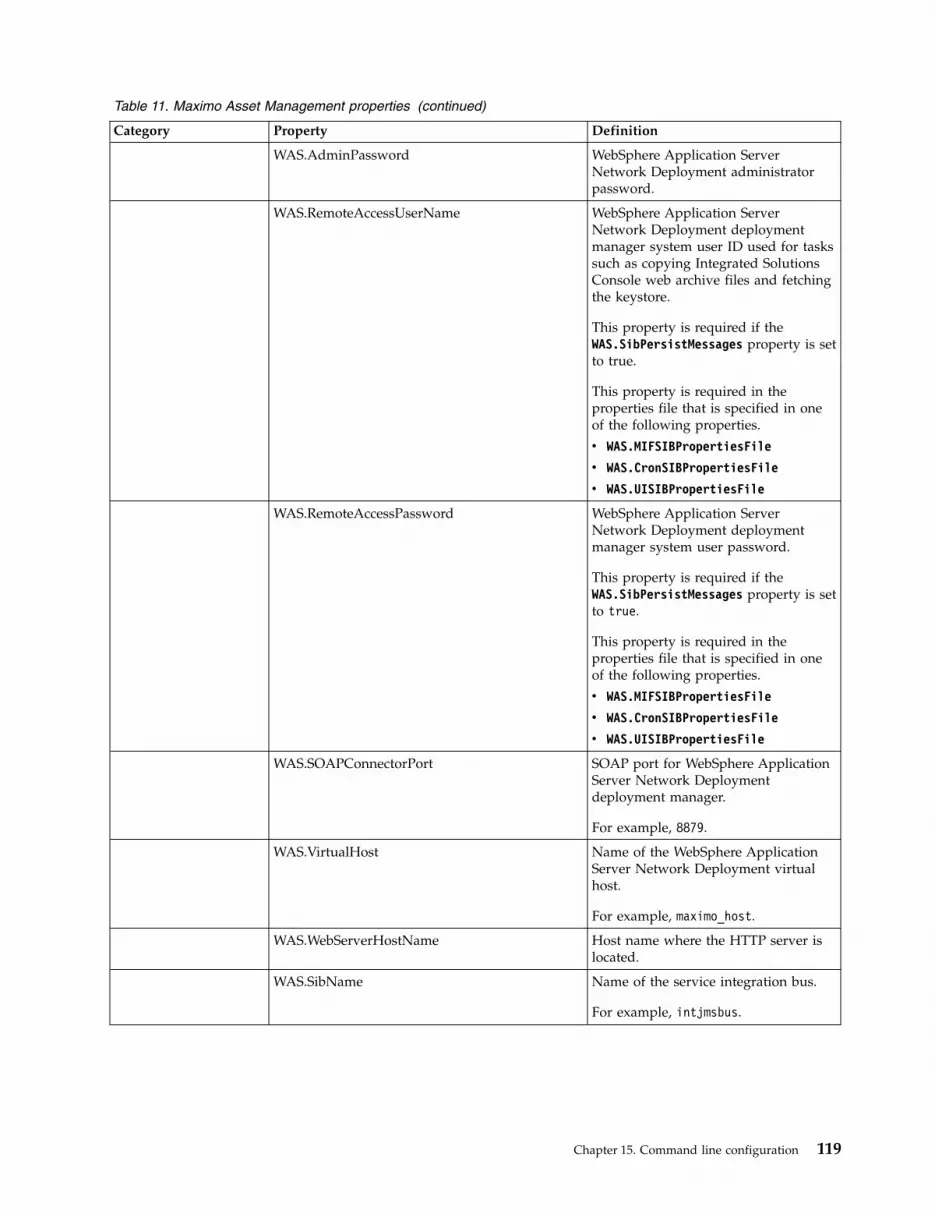
Table 11. Maximo Asset Management properties (continued)
Category Property Definition
WAS.AdminPassword WebSphere Application ServerNetwork Deployment administratorpassword.
WAS.RemoteAccessUserName WebSphere Application ServerNetwork Deployment deploymentmanager system user ID used for taskssuch as copying Integrated SolutionsConsole web archive files and fetchingthe keystore.
This property is required if theWAS.SibPersistMessages property is setto true.
This property is required in theproperties file that is specified in oneof the following properties.
v WAS.MIFSIBPropertiesFile
v WAS.CronSIBPropertiesFile
v WAS.UISIBPropertiesFile
WAS.RemoteAccessPassword WebSphere Application ServerNetwork Deployment deploymentmanager system user password.
This property is required if theWAS.SibPersistMessages property is setto true.
This property is required in theproperties file that is specified in oneof the following properties.
v WAS.MIFSIBPropertiesFile
v WAS.CronSIBPropertiesFile
v WAS.UISIBPropertiesFile
WAS.SOAPConnectorPort SOAP port for WebSphere ApplicationServer Network Deploymentdeployment manager.
For example, 8879.
WAS.VirtualHost Name of the WebSphere ApplicationServer Network Deployment virtualhost.
For example, maximo_host.
WAS.WebServerHostName Host name where the HTTP server islocated.
WAS.SibName Name of the service integration bus.
For example, intjmsbus.
Chapter 15. Command line configuration 119

Table 11. Maximo Asset Management properties (continued)
Category Property Definition
WAS.SibHiMsg Service integration bus high messagecount.
For example, 500000.
This property is only required if thecreateResourcesIfMissing,validatefornewdeploy, orautomatej2eeconfig parameters arespecified.
This property is required in theproperties file that is specified in oneof the following properties.
v WAS.MIFSIBPropertiesFile
v WAS.CronSIBPropertiesFile
v WAS.UISIBPropertiesFile
WAS.WebServerName Name of the WebSphere ApplicationServer Network Deployment webserver. Used to manage HTTP serverfrom within WebSphere ApplicationServer Network Deployment.
For example, webserver1.
WAS.SibPersistMessages Binary value that indicates if serviceintegration bus messages are persistedin either the product database or alocal derby database.
A value of true indicates that themessages are persisted.
This property is only required if thecreateResourcesIfMissing,validatefornewdeploy, orautomatej2eeconfig parameters arespecified.
This property is required in theproperties file that is specified in oneof the following properties.
v WAS.MIFSIBPropertiesFile
v WAS.CronSIBPropertiesFile
v WAS.UISIBPropertiesFile
120 IBM Maximo Asset Management: Installation Guide (WebLogic Server, Oracle, Active Directory)

Table 11. Maximo Asset Management properties (continued)
Category Property Definition
WAS.SibDSName Service integration bus data sourcename that is created to access theservice integration bus persistencestore.
For example, intjmsds.
This property is only required if theWAS.SibPersistMessages property is setto true.
This property is required in theproperties file that is specified in oneof the following properties.
v WAS.MIFSIBPropertiesFile
v WAS.CronSIBPropertiesFile
v WAS.UISIBPropertiesFile
WAS.SibDBName Name of the service integration busmessages database.
This property is required in theproperties file that is specified in oneof the following properties.
v WAS.MIFSIBPropertiesFile
v WAS.CronSIBPropertiesFile
v WAS.UISIBPropertiesFile
WAS.SibDBInstance Instance name of the serviceintegration bus database.
This property is required if theWAS.SibPersistMessages property is setto true.
This property is required in theproperties file that is specified in oneof the following properties.
v WAS.MIFSIBPropertiesFile
v WAS.CronSIBPropertiesFile
v WAS.UISIBPropertiesFile
WAS.SibDBInstancePassword IBM DB2 instance users password forthe SIB IBM DB2 data store.
This property is required if theWAS.SibPersistMessages property is setto true.
This property is required in theproperties file that is specified in oneof the following properties.
v WAS.MIFSIBPropertiesFile
v WAS.CronSIBPropertiesFile
v WAS.UISIBPropertiesFile
Chapter 15. Command line configuration 121

Table 11. Maximo Asset Management properties (continued)
Category Property Definition
WAS.SibDBServerName Server name of the system that ishosting the service integration busmessage database.
This property is required if theWAS.SibPersistMessages property is setto true.
This property is required in theproperties file that is specified in oneof the following properties.
v WAS.MIFSIBPropertiesFile
v WAS.CronSIBPropertiesFile
v WAS.UISIBPropertiesFile
WAS.SibDBServerPort Database server port for the databasethat contains the service integrationbus messages.
For example, 50005.
This property is required if theWAS.SibPersistMessages property is setto true.
This property is required in theproperties file that is specified in oneof the following properties.
v WAS.MIFSIBPropertiesFile
v WAS.CronSIBPropertiesFile
v WAS.UISIBPropertiesFile
WAS.SibDBUserName User ID used to access the persistencedata store database for serviceintegration bus messages.
This property is required if theWAS.SibPersistMessages property is setto true.
This property is required in theproperties file that is specified in oneof the following properties.
v WAS.MIFSIBPropertiesFile
v WAS.CronSIBPropertiesFile
v WAS.UISIBPropertiesFile
122 IBM Maximo Asset Management: Installation Guide (WebLogic Server, Oracle, Active Directory)

Table 11. Maximo Asset Management properties (continued)
Category Property Definition
WAS.SibDBUserPass Password for user ID named inWAS.SibDBUserName.
This property is only required if theWAS.SibPersistMessages property is setto true.
This property is required in theproperties file that is specified in oneof the following properties.
v WAS.MIFSIBPropertiesFile
v WAS.CronSIBPropertiesFile
v WAS.UISIBPropertiesFile
WAS.SibDBInstallDir Where the service integration busdatabase is installed.
For example, c:\\programfiles\\ibm\\sqllib.
This property is required if theWAS.SibPersistMessages property is setto true.
This property is required in theproperties file that is specified in oneof the following properties.
v WAS.MIFSIBPropertiesFile
v WAS.CronSIBPropertiesFile
v WAS.UISIBPropertiesFile
WAS.SibDbFencedUser Fenced user ID for the serviceintegration bus database. This propertyis only used for databases that arehosted on Linux and UNIX systems.
For example, db2fenc1.
This property is required if theWAS.SibPersistMessages property is setto true.
This property is required if thedatabase is hosted on a Linux or UNIXsystem.
This property is required in theproperties file that is specified in oneof the following properties.
v WAS.MIFSIBPropertiesFile
v WAS.CronSIBPropertiesFile
v WAS.UISIBPropertiesFile
Chapter 15. Command line configuration 123

Table 11. Maximo Asset Management properties (continued)
Category Property Definition
WAS.SibDbFencedPassword Password for the fenced user ID for theservice integration bus database.
This property is required if theWAS.SibPersistMessages property is setto true.
This property is required if thedatabase is hosted on a Linux or UNIXsystem.
This property is required in theproperties file that is specified in oneof the following properties.
v WAS.MIFSIBPropertiesFile
v WAS.CronSIBPropertiesFile
v WAS.UISIBPropertiesFile
WAS.SibDbInstanceAdminUser Instance owner for the serviceintegration bus database.
This property is required if theWAS.SibPersistMessages property is setto true.
This property is required if thedatabase is hosted on a Windowssystem.
This property is required in theproperties file that is specified in oneof the following properties.
v WAS.MIFSIBPropertiesFile
v WAS.CronSIBPropertiesFile
v WAS.UISIBPropertiesFile
WAS.SibDbInstanceAdminPassword Password for the instance owner of theservice integration bus database.
This property is required if theWAS.SibPersistMessages property is setto true.
This property is required if thedatabase is hosted on a Windowssystem.
This property is required in theproperties file that is specified in oneof the following properties.
v WAS.MIFSIBPropertiesFile
v WAS.CronSIBPropertiesFile
v WAS.UISIBPropertiesFile
124 IBM Maximo Asset Management: Installation Guide (WebLogic Server, Oracle, Active Directory)

Table 11. Maximo Asset Management properties (continued)
Category Property Definition
WAS.SibDbRemoteAccessUser Database server system user that isused to configure the serviceintegration bus remotely.
This property is required if theWAS.SibPersistMessages property is setto true.
This property is required in theproperties file that is specified in oneof the following properties.
v WAS.MIFSIBPropertiesFile
v WAS.CronSIBPropertiesFile
v WAS.UISIBPropertiesFile
WAS.SibDbRemoteAccessPassword Password for user ID named inWAS.SibDbRemoteAccessUser.
This property is required if theWAS.SibPersistMessages property is setto true.
This property is required in theproperties file that is specified in oneof the following properties.
v WAS.MIFSIBPropertiesFile
v WAS.CronSIBPropertiesFile
v WAS.UISIBPropertiesFile
WAS.VmmGroupRDN Relative Distinguished Name of thelocation of virtual member managergroups.
For example,ou=groups,ou=SWG,o=IBM,c=US.
WAS.VmmUserRDN Relative Distinguished Name of thelocation of virtual member managerusers.
For example,ou=users,ou=SWG,o=IBM,c=US.
WAS.UseClustersForDeploy Deploy the application EAR to acluster.
For example, true.
WAS.UIClusterName Name of the cluster that manages UItasks.
Set a value for this parameter ifWAS.UseClustersForDeploy is set totrue.
Chapter 15. Command line configuration 125

Table 11. Maximo Asset Management properties (continued)
Category Property Definition
WAS.WAS.UIEnableJMS Enable or disable JMS for MaximoEnterprise Adapter for the UI cluster.
For example, true.
Set a value for this parameter ifWAS.UseClustersForDeploy is set totrue.
WAS.UISIBPropertiesFile File that contains SIB persistenceproperties if you are persistingmessages in the UI clusters bus.
For example, c:\\sibdb_ui.properties.
Set a value for this parameter ifWAS.UseClustersForDeploy is set totrue.
WAS.CronClusterName Name of the cluster that manages crontasks.
For example, maximocron.
Set a value for this parameter ifWAS.UseClustersForDeploy is set totrue.
WAS.CronEnableJMS Enable JMS for Maximo EnterpriseAdapter for the cron task cluster.
For example, true.
Set a value for this parameter ifWAS.UseClustersForDeploy is set totrue.
WAS.CronSIBPropertiesFile File that contains SIB persistenceproperties if you are persistingmessages in the cron clusters bus.
For example, c:\\sibdb_cr.properties.
Set a value for this parameter ifWAS.UseClustersForDeploy is set totrue.
WAS.ReportingClusterName Name of the cluster that managesreporting tasks.
For example, maximorpt.
Set a value for this parameter ifWAS.UseClustersForDeploy is set totrue.
126 IBM Maximo Asset Management: Installation Guide (WebLogic Server, Oracle, Active Directory)

Table 11. Maximo Asset Management properties (continued)
Category Property Definition
WAS.MIFClusterName Name of the cluster that managesMaximo Integration Framework tasks.
For example, maximomea.
Set a value for this parameter ifWAS.UseClustersForDeploy is set totrue.
WAS.MIFEnableJMS Enable JMS for Maximo EnterpriseAdapter for the Maximo IntegrationFramework task cluster.
For example, true.
Set a value for this parameter ifWAS.UseClustersForDeploy is set totrue.
WAS.MIFSIBPropertiesFile File that contains SIB persistenceproperties if you are persistingmessages in the Maximo IntegrationFramework clusters bus.
For example, c:\\sibdb_mif.properties.
Set a value for this parameter ifWAS.UseClustersForDeploy is set totrue.
Multi-tenancy mt.sysprovider.tenantcode Tenant code identifier for themulti-tenancy system provider.
For example, MTM.
This property is required to enablemulti-tenancy.
mt.sysprovider.desc Description of the multi-tenancymanager.
mt.configmanager.adminuserid User ID of the multi-tenancyconfiguration manager.
For example, maxadmin.
This property is required to enablemulti-tenancy.
This value can be the same value usedfor the mtadminuser user.
mt.configmanager.adminpassword Password for the User ID of themulti-tenancy configuration manager.
This property is required to enablemulti-tenancy.
This value can be the same value usedfor the mtadminpwd value.
Chapter 15. Command line configuration 127

Table 11. Maximo Asset Management properties (continued)
Category Property Definition
mt.configmanager.tenantcode Tenant code identifier for themulti-tenancy configuration manager.
For example, GA.
This is property is required to enablemulti-tenancy.
mt.configmanager.desc Description of the multi-tenancy globaladministrator.
mt.configmanager.dbuser User ID of the multi-tenancyconfiguration manager used to connectto the database.
For example, ADMIN.
This property is required to enablemulti-tenancy.
This value can be the same value usedfor the mtdbuser user.
mt.configmanager.dbpassword Password for the user ID of themulti-tenancy configuration managerthat is used to connect to the database.
This property is required to enablemulti-tenancy.
This value can be the same value usedfor the mtdbpwd value.
mxe.mt.enabled Value that indicates whethermulti-tenancy is enabled.
For example, a value of 1 indicates thatmulti-tenancy is enabled. A value of 0indicates that multi-tenancy is notenabled for the product.
mxe.mt.db.adminuser This value is the same as the value setfor the mtdbuser parameter.
This property is set in themaximo.properties file during themaxinst operation.
mxe.mt.demo.extratenants Number of sample tenants to createwhen you enable multi-tenancy.
For example, 10.
This property is set in themaximo.properties file during themaxinst operation.
128 IBM Maximo Asset Management: Installation Guide (WebLogic Server, Oracle, Active Directory)

Chapter 16. Backup and restoration
Like all important business data, it is a good idea to establish a process andschedule for backing up Maximo Asset Management data.
Back up and restore middleware application data using the methods described inthe documentation for that product is important. Also, establish a process forbacking up data contained on the Maximo Asset Management administrativeworkstation.
The default installation directory on the Maximo Asset Management administrativeworkstation is C:\ibm. This directory contains the critical files for your MaximoAsset Management deployment, which includes all class files and customizationsthat have been performed in your environment, the current Enterprise Archive(EAR) file, and the properties files and installation tools used for yourenvironment. Plan to back up Maximo Asset Management administrativeworkstation data just after initial deployment and schedule periodic backups on anongoing basis.
Backing up the administrative workstationIt is recommended that you back up all Maximo Asset Management middlewareapplications and Maximo Asset Management administrative workstation on aregular basis.
About this task
The default installation directory on the administrative workstation is \ibm. Thisdirectory contains the critical files for your Maximo Asset Managementdeployment.
Specifically, the administrative workstation contains the following items:v Class files and customizations performed in your environment.v The current Enterprise Archive (EAR) file.v The properties files and installation tools used for your environment.
It is important to make a back up of the database at the same time that you backup the administrative workstation. During restoration, you restore the databaseback up at the same time you restore the administrative workstation back up itwas paired with.
To back up critical Maximo Asset Management information, complete the followingsteps:
Procedure1. Back up the Maximo Asset Management database, J2EE server, and
authentication server information using the instructions provided by yourmiddleware vendors.
2. Create a backup of the installation directory. By default, this directory is\IBM\SMP. Ensure that all file permissions are preserved.
© Copyright IBM Corp. 2007, 2014 129

Restoring the administrative workstationThis section details how to restore previously backed up Maximo AssetManagement administrative workstation information. This information can be usedto return an existing Maximo Asset Management administrative workstation to aprevious state.
Before you begin
It is important to restore the back up of the database that was made when youbacked up the administrative workstation. A database back up should be restoredwith the administrative workstation back up it was paired with.
About this task
To restore Maximo Asset Management information to an administrativeworkstation, complete the following steps:
Procedure1. Restore the database back up that was paired with the administrative
workstation back up you are restoring.2. Log on to the target administrative system with the same user ID that was used
to install the product on the existing administrative workstation.3. Copy the Maximo Asset Management installation files and directories to the file
system of the target administrative system. You must maintain the directorystructure of the original installation. For example, if the Maximo AssetManagement installation directory on the existing administrative system is\IBM\SMP, you cannot copy those files to a \NewAdminWS\IBM\SMP directory onthe target administrative workstation.
130 IBM Maximo Asset Management: Installation Guide (WebLogic Server, Oracle, Active Directory)

Chapter 17. Uninstalling the product
Uninstalling Maximo Asset Management version 7.6.0.5 includes removingconfiguration values from Maximo Asset Management and associated middleware,and then uninstalling Maximo Asset Management.
Maximo Asset Management uninstallation is a comprehensive procedure and doesnot support partial removal of individual components or process managers,including process managers that are deployed by other products. Process managersof previously deployed products are also removed when you uninstall MaximoAsset Management.
Maximo Asset Management can only be uninstalled using the Maximo AssetManagement installation and configuration programs as directed. Do not use othermethods to attempt to uninstall Maximo Asset Management, such as using theAdd/Remove Programs panel.
After the Maximo Asset Management uninstallation process is complete, you canreinstall Maximo Asset Management by using the Maximo Asset Managementinstallation and configuration programs.
Remove Maximo Asset Management configurationThe first step to uninstall Maximo Asset Management is to remove configurationvalues using the Maximo Asset Management configuration program.
About this task
If you choose the option to delete the database instance, table spaces, the database,and the database instance are removed. The instance user, database users, andsystem users that were created with the configuration program can also beremoved. For WebSphere Application Server Network Deployment, specifycredentials for the WebSphere administrative user to uninstall the Maximo AssetManagement application. If you choose the option to delete WebSphere artifacts,the application server and JMS queue information are removed.
Procedure1. Log on to the WebSphere Application Server Network Deployment server with
the WebSphere Application Server admin console and stop all of the MaximoAsset Management applications.
2. If the Maximo Asset Management configuration program is not open, start itfrom the Maximo Asset Management launchpad. In the launchpad navigationpane, click Configure Product, specify Maximo Asset Management installationlocation, and then click Launch the Tivoli’s Process Automation Suiteconfiguration program.
3. In the IBM Maximo Asset Management configuration operations page, clickRemove Product Configuration Information.
4. In the Remove Product Configuration Information panel, specify credentials toaccess the database and WebSphere Application Server Network Deploymentservers you previously configured for Maximo Asset Management.
5. Click Finish, and then OK to confirm.
© Copyright IBM Corp. 2007, 2014 131

Removing WebSphere Application Server Network Deploymentconfiguration
Removing WebSphere Application Server Network Deployment configuration withthe Maximo Asset Management configuration program deletes all configurationdata.
Procedure1. If the Maximo Asset Management configuration program is not open, start it
from the Maximo Asset Management launchpad. In the launchpad navigationpane, click Configure Product, specify Maximo Asset Management installationlocation, and then click Launch the Tivoli’s Process Automation Suiteconfiguration program.
2. In the IBM Maximo Asset Management configuration operations page, clickUnconfigure WebSphere Application Server.
3. In the Unconfigure WebSphere panel, specify credentials for the WebSphereadministrative user to remove WebSphere Application Server NetworkDeployment profile information, and then click Next.
4. In the Unconfigure Middleware panel, select the Unconfigure WebSphereApplication Server Network Deployment option, click Finish, and then OK toconfirm.
Uninstalling Maximo Asset Management and middlewareUse the Installation Manager software to uninstall Maximo Asset Management andany middleware that was installed with the Maximo Asset Managementinstallation program.
About this task
After you use the Maximo Asset Management configuration program tounconfigure Maximo Asset Management and associated middleware, use theInstallation Manager software to uninstall previously installed components. Youmust run Installation Manager locally on the system that hosts the component youwant to uninstall.
Procedure1. Stop all DB2 and WebSphere Application Server Network Deployment
processes on the system.2. Open a command prompt and start Installation Manager.
Windows UNIX
C:\Program Files\IBM\InstallationManager\eclipse\IBMIM.exe
IBMIM.sh
3. From the IBM Installation Manager interface, select Uninstall.4. Select the packages that you want to remove and then click Next.5. Review the package summary information and click Uninstall to remove the
selected packages.
132 IBM Maximo Asset Management: Installation Guide (WebLogic Server, Oracle, Active Directory)

What to do next
Log files and other historical data is left behind for evaluation purposes. If youwould like to reinstall the product in the same directory as before, you must firstdelete the directory completely before attempting the next installation.
Chapter 17. Uninstalling the product 133

134 IBM Maximo Asset Management: Installation Guide (WebLogic Server, Oracle, Active Directory)

Notices
This information was developed for products and services offered in the US. Thismaterial might be available from IBM in other languages. However, you may berequired to own a copy of the product or product version in that language in orderto access it.
IBM may not offer the products, services, or features discussed in this document inother countries. Consult your local IBM representative for information on theproducts and services currently available in your area. Any reference to an IBMproduct, program, or service is not intended to state or imply that only that IBMproduct, program, or service may be used. Any functionally equivalent product,program, or service that does not infringe any IBM intellectual property right maybe used instead. However, it is the user's responsibility to evaluate and verify theoperation of any non-IBM product, program, or service.
IBM may have patents or pending patent applications covering subject matterdescribed in this document. The furnishing of this document does not grant youany license to these patents. You can send license inquiries, in writing, to:
IBM Director of LicensingIBM CorporationNorth Castle Drive, MD-NC119Armonk, NY 10504-1785US
For license inquiries regarding double-byte character set (DBCS) information,contact the IBM Intellectual Property Department in your country or sendinquiries, in writing, to:
Intellectual Property LicensingLegal and Intellectual Property LawIBM Japan Ltd.19-21, Nihonbashi-Hakozakicho, Chuo-kuTokyo 103-8510, Japan
INTERNATIONAL BUSINESS MACHINES CORPORATION PROVIDES THISPUBLICATION "AS IS" WITHOUT WARRANTY OF ANY KIND, EITHEREXPRESS OR IMPLIED, INCLUDING, BUT NOT LIMITED TO, THE IMPLIEDWARRANTIES OF NON-INFRINGEMENT, MERCHANTABILITY OR FITNESSFOR A PARTICULAR PURPOSE. Some jurisdictions do not allow disclaimer ofexpress or implied warranties in certain transactions, therefore, this statement maynot apply to you.
This information could include technical inaccuracies or typographical errors.Changes are periodically made to the information herein; these changes will beincorporated in new editions of the publication. IBM may make improvementsand/or changes in the product(s) and/or the program(s) described in thispublication at any time without notice.
Any references in this information to non-IBM websites are provided forconvenience only and do not in any manner serve as an endorsement of those
© Copyright IBM Corp. 2007, 2014 135

websites. The materials at those websites are not part of the materials for this IBMproduct and use of those websites is at your own risk.
IBM may use or distribute any of the information you provide in any way itbelieves appropriate without incurring any obligation to you.
Licensees of this program who wish to have information about it for the purposeof enabling: (i) the exchange of information between independently createdprograms and other programs (including this one) and (ii) the mutual use of theinformation which has been exchanged, should contact:
IBM Director of LicensingIBM CorporationNorth Castle Drive, MD-NC119Armonk, NY 10504-1785US
Such information may be available, subject to appropriate terms and conditions,including in some cases, payment of a fee.
The licensed program described in this document and all licensed materialavailable for it are provided by IBM under terms of the IBM Customer Agreement,IBM International Program License Agreement or any equivalent agreementbetween us.
The performance data and client examples cited are presented for illustrativepurposes only. Actual performance results may vary depending on specificconfigurations and operating conditions.
Information concerning non-IBM products was obtained from the suppliers ofthose products, their published announcements or other publicly available sources.IBM has not tested those products and cannot confirm the accuracy ofperformance, compatibility or any other claims related to non-IBM products.Questions on the capabilities of non-IBM products should be addressed to thesuppliers of those products.
This information is for planning purposes only. The information herein is subject tochange before the products described become available.
This information contains examples of data and reports used in daily businessoperations. To illustrate them as completely as possible, the examples include thenames of individuals, companies, brands, and products. All of these names arefictitious and any similarity to actual people or business enterprises is entirelycoincidental.
COPYRIGHT LICENSE:
This information contains sample application programs in source language, whichillustrate programming techniques on various operating platforms. You may copy,modify, and distribute these sample programs in any form without payment toIBM, for the purposes of developing, using, marketing or distributing applicationprograms conforming to the application programming interface for the operatingplatform for which the sample programs are written. These examples have notbeen thoroughly tested under all conditions. IBM, therefore, cannot guarantee orimply reliability, serviceability, or function of these programs. The sample
136 IBM Maximo Asset Management: Installation Guide (WebLogic Server, Oracle, Active Directory)

programs are provided "AS IS", without warranty of any kind. IBM shall not beliable for any damages arising out of your use of the sample programs.
TrademarksIBM, the IBM logo, and ibm.com are trademarks or registered trademarks ofInternational Business Machines Corp., registered in many jurisdictions worldwide.Other product and service names might be trademarks of IBM or other companies.A current list of IBM trademarks is available on the web at "Copyright andtrademark information" at www.ibm.com/legal/copytrade.shtml.
Java and all Java-based trademarks and logos are trademarks or registeredtrademarks of Oracle and/or its affiliates.
Linux is a trademark of Linus Torvalds in the United States, other countries, orboth.
Microsoft, Windows, Windows NT, and the Windows logo are trademarks ofMicrosoft Corporation in the United States, other countries, or both.
UNIX is a registered trademark of The Open Group in the United States and othercountries.
Terms and conditions for product documentationPermissions for the use of these publications are granted subject to the followingterms and conditions.
Applicability
These terms and conditions are in addition to any terms of use for the IBMwebsite.
Personal use
You may reproduce these publications for your personal, noncommercial useprovided that all proprietary notices are preserved. You may not distribute, displayor make derivative work of these publications, or any portion thereof, without theexpress consent of IBM.
Commercial use
You may reproduce, distribute and display these publications solely within yourenterprise provided that all proprietary notices are preserved. You may not makederivative works of these publications, or reproduce, distribute or display thesepublications or any portion thereof outside your enterprise, without the expressconsent of IBM.
Rights
Except as expressly granted in this permission, no other permissions, licenses orrights are granted, either express or implied, to the publications or anyinformation, data, software or other intellectual property contained therein.
Notices 137

IBM reserves the right to withdraw the permissions granted herein whenever, in itsdiscretion, the use of the publications is detrimental to its interest or, asdetermined by IBM, the above instructions are not being properly followed.
You may not download, export or re-export this information except in fullcompliance with all applicable laws and regulations, including all United Statesexport laws and regulations.
IBM MAKES NO GUARANTEE ABOUT THE CONTENT OF THESEPUBLICATIONS. THE PUBLICATIONS ARE PROVIDED "AS-IS" AND WITHOUTWARRANTY OF ANY KIND, EITHER EXPRESSED OR IMPLIED, INCLUDINGBUT NOT LIMITED TO IMPLIED WARRANTIES OF MERCHANTABILITY,NON-INFRINGEMENT, AND FITNESS FOR A PARTICULAR PURPOSE.
IBM Online Privacy StatementIBM Software products, including software as service solutions, (“SoftwareOfferings”) may use cookies or other technologies to collect product usageinformation, to help improve the end user experience, to tailor interactions withthe end user or for other purposes. In many cases no personally identifiableinformation is collected by the Software Offerings. Some of our Software Offeringscan help enable you to collect personally identifiable information. If this SoftwareOffering uses cookies to collect personally identifiable information, specificinformation about this offering’s use of cookies is set forth below.
Depending upon the configurations deployed, this Software Offering may usesession and persistent cookies that collect each user’s name, user name, password,or other personally identifiable information for purposes of session management,authentication, single sign-on configuration or other usage tracking or functionalpurposes. These cookies can be disabled, but disabling them will also likelyeliminate the functionality they enable.
If the configurations deployed for this Software Offering provide you as customerthe ability to collect personally identifiable information from end users via cookiesand other technologies, you should seek your own legal advice about any lawsapplicable to such data collection, including any requirements for notice andconsent.
For more information about the use of various technologies, including cookies, forthese purposes, see IBM’s Privacy Policy at http://www.ibm.com/privacy andIBM's Online Privacy Statement at http://www.ibm.com/privacy/details in thesection entitled “Cookies, Web Beacons and Other Technologies” and the "IBMSoftware Products and Software-as-a-Service Privacy Statement" athttp://www.ibm.com/software/info/product-privacy.
138 IBM Maximo Asset Management: Installation Guide (WebLogic Server, Oracle, Active Directory)

Index
Aaction addLanguages 104action configureProducts 105action configureProductsDBLite 107action deployConfiguration 103action deployDatabaseConfiguration 101action deployJ2eeConfiguration 103action
deployMiddlewareConfiguration 105action disableAppSecurity 104action enableAppSecurity 104action enableDB2TextSearch 102action reapplyAppServerTuning 104action removeConfiguration 103action
removeDatabaseConfiguration 102action removeJ2EEConfiguration 103action updateApplication 104action updateApplicationDBLite 107action updateDatabaseConfiguration 100action updateJ2eeConfiguration 102action upgrade75Configuration 106action validate And Update Database
Configuration 101action validate And Update J2ee
Configuration 102action
validateDatabaseConfiguration 100action validateJ2eeConfiguration 102administrative workstation
backing up 129restoring 130
AIXfonts 8tar command 8
Bbackup 129
Ccommand line configuration program
input properties files 92parameters 93
Command line configuration programactions 100
configuration 76configuration actions
addLanguages 104configureProducts 105configureProductsDBLite 107deployConfiguration 103deployDatabaseConfiguration 101deployJ2eeConfiguration 103deployMiddlewareConfiguration 105disableAppSecurity 104enableAppSecurity 104enableDB2TextSearch 102reapplyAppServerTuning 104
configuration actions (continued)removeConfiguration 103removeDatabaseConfiguration 102removeJ2EEConfiguration 103updateApplication 104updateApplicationDBLite 107updateDatabaseConfiguration 100updateJ2eeConfiguration 102upgrade75Configuration 106validate And Update Database
Configuration 101validate And Update J2ee
Configuration 102validateDatabaseConfiguration 100validateJ2eeConfiguration 102
configure Maximo Asset Managementsilently 59
configure middleware silently 59configuring
database server 31silent 57
configuring Maximo Asset Managementcommand line configuration
program 91validate configuration parameters
from the command line 92
Ddatabase server 31deploying ear files 27, 45directory server
manually configuring 34
Ee-mail listener
configuring in WebLogic Server 23,40
EAR filesbuilding manually 89maintaining 89
Ffonts
AIX 8
Iindustry solutions 83
installing from command-line 83installing silently 84installing with launchpad 83
install silently 54installation
automatically configuring existingmiddleware 17
installation (continued)deploying using manual middleware
configuration 31deploying with manually configured
middleware 31preparing 1program logs 69
Installationpost-installation tasks 76
Installation Managerinstalling silently 53
installation programlogs 69
installingsilent 51
integration frameworkJMS options
configuring 22, 38
JJ2EE server
manually configuring 37JRE
configuring in Linux 8
Llaunchpad
starting 12libraries
Linux 8required libraries 8
LinuxJRE, configuring 8shared memory, setting 9swap size, setting 9ulimit, setting 9
MMaximo Application Server
starting 27, 45Maximo Asset Management
configuring with the Maximo AssetManagement configurationprogram 18, 43
installing version 7.6 17, 42remove configuration 131uninstalling 132
MAXIMOSERVER domaincreating 21, 37
MediaInstallation 1
Microsoft Active Directoryconfiguring 35
middleware 51, 57remote configuration 10remove configuration silently 60
© Copyright IBM Corp. 2007, 2014 139

middleware installationbefore you begin 1
middlware configurationsilent sample response files 58
Nnstallation
before you begin 1
OOracle
manual configuration, 12c 31Oracle WebLogic Server
configuring 87managing 87manually uninstalling 90post product installation 25, 44setting the host name in the
application 28, 47starting 87
Ppassword
updating in response files 53password policies 12port availability
check 7post installation 71post product installation
Oracle WebLogic Server 25, 44prerequisite 51, 57product
remove configuration silently 60product configuration program
overview 14product installation
before you begin 1product installation program
overview 13properties
Maximo Asset Management 108
Rremove configuration
Maximo Asset Management 131WebSphere Application Server
Network Deployment 132restoration 129
Sshared memory
setting in Linux 9silent install 54, 59
sample response files 52silent installation
uninstallation 55silent response file
installation 51Maximo Asset Management
configuration 58
silent response file (continued)middleware configuration 57
SQL Serverpreparing 11
swap sizesetting in Linux 9
Ttar command
AIX 8
Uulimit
setting in Linux 9uninstall
Maximo Asset Management 132middleware 132product 131
usersgroups
synchronizing 79synchronizing 79
Vverifying prerequisites
command-line 2verifying the installation
manually 67programmatically 63
WWebLogic Server
manually configuring 21, 37stopping 87
WebSphere Application Server NetworkDeployment
remove configuration 132Work Center
manually building WAR file 89
140 IBM Maximo Asset Management: Installation Guide (WebLogic Server, Oracle, Active Directory)


IBM®
Printed in USA