handheld weapons - pdf text files
TRANSCRIPT

FM 3-25.150CFM 21-150)
CHAPTER 7
HANDHELD WEAPONS
Handheld weapons provide a significant advantage during afight. Forsoldiers to be well trained in their use there must be connectivity betweenthe techniques of armed and unarmed fighting. As soldiers progress intheir training, bayonet fighting techniques that are taught in initial entrytraining will merge with the other elements of hand-to-hand fighting toproduce a soldier who is capable of operating across the full range offorce.
Section I. OFFENSIVE TECHNIQUESIn most combat situations, small arms and grenades are the weapons of choice. However,in some scenarios, soldiers must engage the enemy in confined areas, such as trenchclearing or room clearing or where noncombatants are present. In these instances, orwhen your primary weapon fails, the bayonet or knife may be the ideal weapon todispatch the enemy. Soldiers must transition immediately and instinctively into theappropriate techniques based on the situation and the weapons at hand.
7-1. ANGLES OF ATTACKAny attack, regardless of the type weapon, can be directed along one of nine angles ofattack (Figure 7-1).
NO.6
NO." NO.3
Figure 7-1. Angles of attack.
7-1
FM 3-25.150
a. No.1 Angle of Attack. A downward diagonal slash, stab, or strike toward the leftside of the defender's head, neck, or torso.
b. No.2 Angle of Attack. A downward diagonal slash, stab, or strike toward theright side of the defender's head, neck, or torso.
c. No.3 Angle of Attack. A horizontal attack to the left side of the defender's torsoin the ribs, side, or hip region.
d. No.4 Angle of Attack. The same as No.3 angle, but to the right side.e. No.5 Angle of Attack. A jabbing, lunging, or punching attack directed straight
toward the defender's front.f. No.6 Angle of Attack. An attack directed straight down upon the defender.g. No.7 Angle of Attack. An upward diagonal attack toward the defender's lower-
left side.h. No.8 Angle of Attack. An upward diagonal attack toward the defender's lower-
right side.i. No.9 Angle of Attack. An attack directed straight up-for example, to the
defender's groin.
7-2. RIFLE WITH FIXED BAYONETThe principles used in fighting with the rifle and fixed bayonet are the same as whenknife fighting. Use the same angles of attack and similar body movements. The principlesof timing and distance remain paramount; the main difference is the extended distanceprovided by the length of the weapon. It is imperative that the soldier fighting with rifleand fixed bayonet use the movement of his entire body behind all of his fightingtechniques-not just upper-body strength. Unit trainers should be especially conscious ofstressing full body mass in motion for power and correcting all deficiencies duringtraining. Whether the enemy is armed or unarmed, a soldier fighting with rifle and fixedbayonet must develop the mental attitude that he will survive the fight. He mustcontinuously evaluate each moment in a fight to determine his advantages or options, aswell as the enemy's. He should base his defenses on keeping his body moving and off theline of any attacks from his opponent. The soldier seeks openings in the enemy'sdefenses and starts his own attacks, using all available body weapons and angles ofattack. The angles of attack with rifle and fixed bayonet are shown in Figures 7-2through 7-8.
7-2

FM 3-25.150
Figure 7-2. No.1 angle of attack with rifle and fixed bayonet.
--- )ILl - ~ - .u'-~:---' ---::-- -
Figure 7-3. No.2 angle of attack with rifle and fixed bayonet.
7-3

FM 3-25.150
~'1':~._. --z:-...............---. ':+~J...
Figure 7-4. No.3 angle of attack with rifle and fixed bayonet.
- -~.-.;
~..~~=-- .
Figure 7-5. No.4 angle of attack with rifle and fixed bayonet.
7-4

FM 3-25.150
---=-~---;;~:i.~'~=--=--~~
Figure 7-6. Low No.5 angle of attack with rifle and fixed bayonet.
~-, ~ -- -
~- ~-:: - c::::: ...:3--=- =
Figure 7-7. High No.5 angle of attack with rifle and fixed bayonet.
7-5
FM 3-25.150
<-.
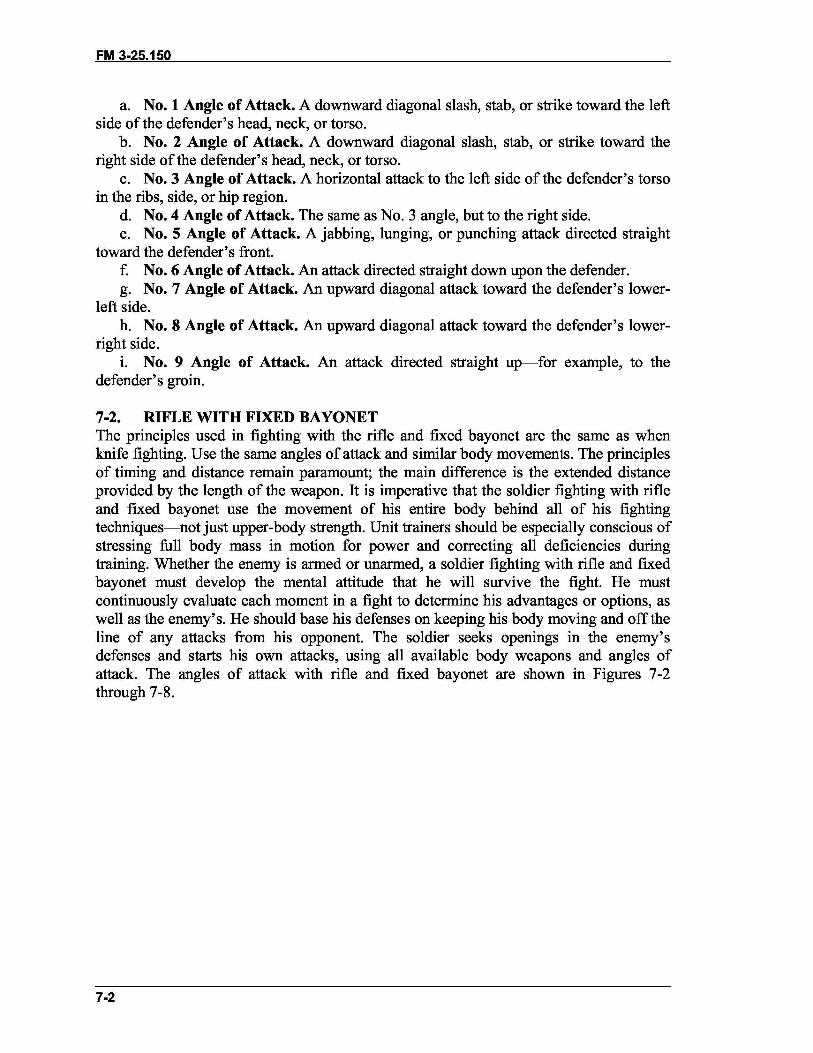
~Figure 7-8. No.6 angle of attack with rifle and fixed bayonet.
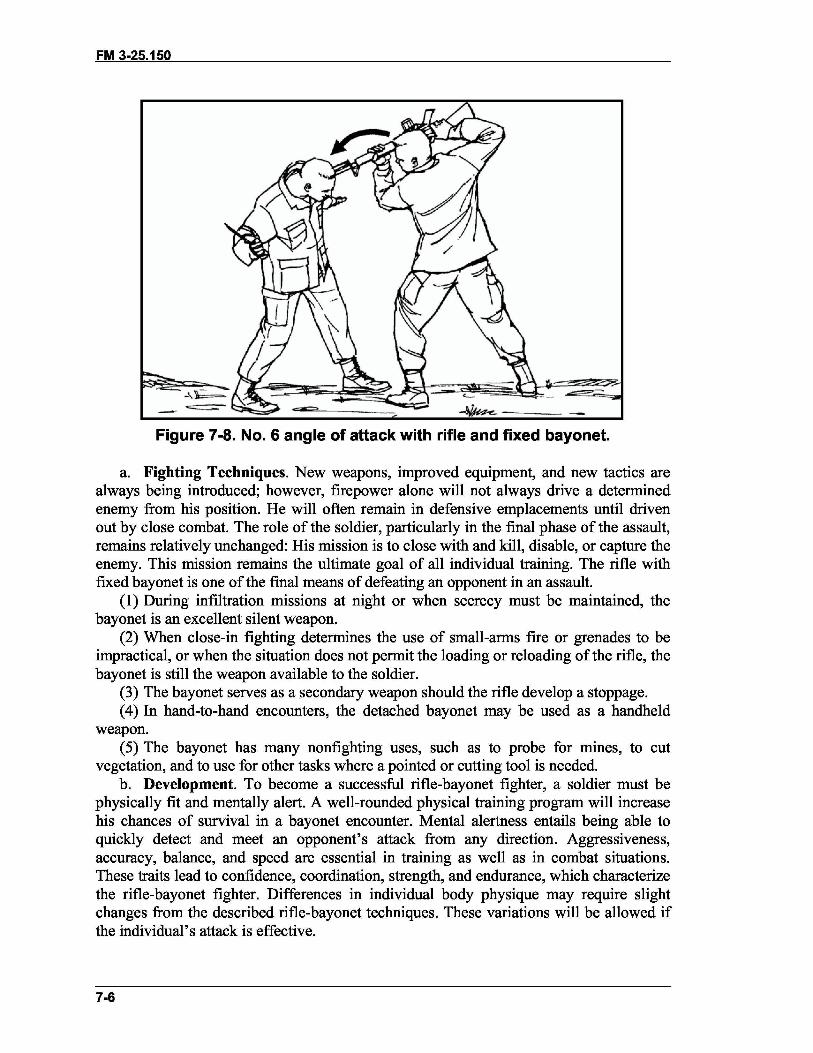
a. Fighting Techniques.New weapons,improved equipment, and new tactics arealways being introduced; however, firepower alone will not always drive a determinedenemy from his position. He will often remain in defensive emplacements until drivenout by close combat. The role of the soldier, particularly in the final phase of the assault,remains relatively unchanged: His mission is to close with and kill, disable, or capture theenemy. This mission remains the ultimate goal of all individual training. The rifle withfixed bayonet is one of the final means of defeating an opponent in an assault.
(1) During infiltration missions at night or when secrecy must be maintained, thebayonet is an excellent silent weapon.
(2) When close-in fighting determines the use of small-arms fire or grenades to beimpractical, or when the situation does not permit the loading or reloading of the rifle, thebayonet is still the weapon available to the soldier.
(3) The bayonet serves as a secondary weapon should the rifle develop a stoppage.(4) In hand-to-hand encounters, the detached bayonet may be used as a handheld
weapon.(5) The bayonet has many nonfighting uses, such as to probe for mines, to cut
vegetation, and to use for other tasks where a pointed or cutting tool is needed.b. Development. To become a successful rifle-bayonet fighter, a soldier must be
physically fit and mentally alert. A well-rounded physical training program will increasehis chances of survival in a bayonet encounter. Mental alertness entails being able toquickly detect and meet an opponent's attack from any direction. Aggressiveness,accuracy, balance, and speed are essential in training as well as in combat situations.These traits lead to confidence, coordination, strength, and endurance, which characterizethe rifle-bayonet fighter. Differences in individual body physique may require slightchanges from the described rifle-bayonet techniques. These variations will be allowed ifthe individual's attack is effective.
7-6
FM 3-25.150
c. Principles. The bayonet is an effective weapon to be used aggressively; hesitationmay mean sudden death. The soldier must attack in a relentless assault until his opponentis disabled or captured. He should be alert to take advantage of any opening. If theopponent fails to present an opening, the bayonet fighter must make one by parrying hisopponent's weapon and driving his blade or rifle butt into the opponent with force.
(1) The attack should be made to a vulnerable part of the body: face, throat, chest,abdomen, or groin.
(2) In both training and combat, the rifle-bayonet fighter displays spirit by soundingoff with a low and aggressive growl. This instills a feeling of confidence in his ability toclose with and disable or capture the enemy.
(3) The instinctive rifle-bayonet fighting system is designed to capitalize on thenatural agility and combative movements of the soldier. It must be emphasized thatprecise learned movements will NOT be stressed during training.
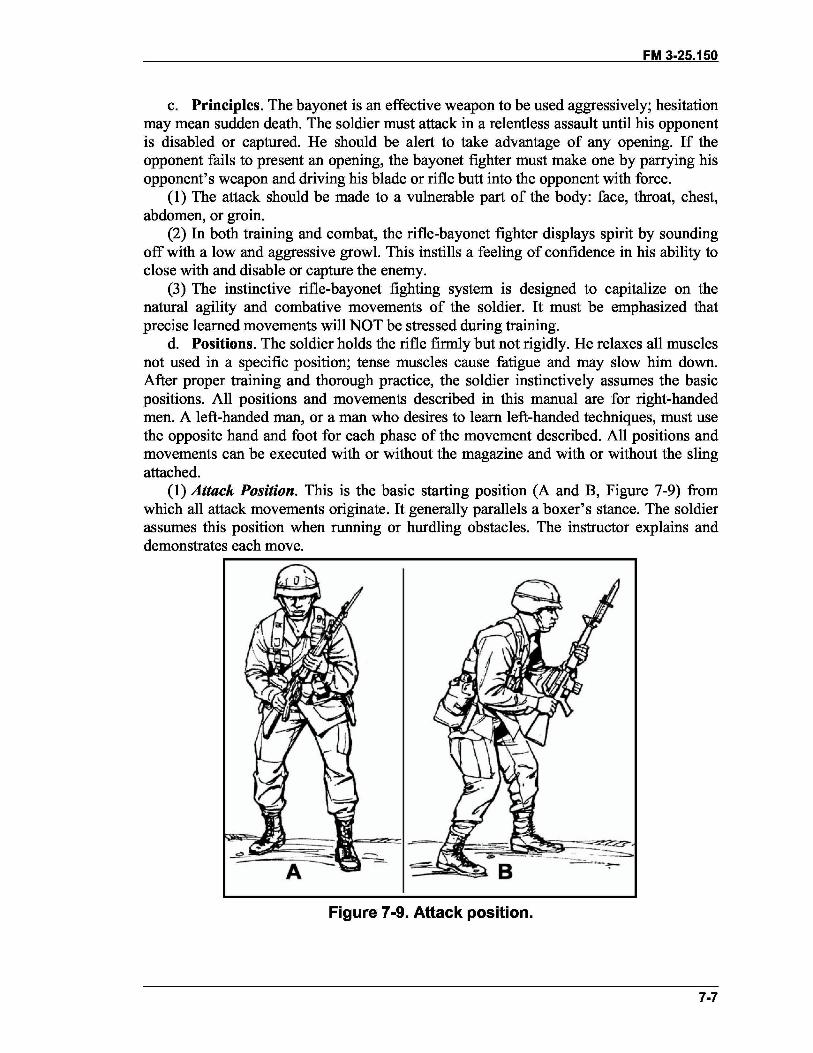
d. Positions. The soldier holds the rifle firmly but not rigidly. He relaxes all musclesnot used in a specific position; tense muscles cause fatigue and may slow him down.After proper training and thorough practice, the soldier instinctively assumes the basicpositions. All positions and movements described in this manual are for right-handedmen. A left-handed man, or a man who desires to learn left-handed techniques, must usethe opposite hand and foot for each phase of the movement described. All positions andmovements can be executed with or without the magazine and with or without the slingattached.
(1) Attack Position. This is the basic starting position (A and B, Figure 7-9) fromwhich all attack movements originate. It generally parallels a boxer's stance. The soldierassumes this position when running or hurdling obstacles. The instructor explains anddemonstrates each move.
.~--~
--=:.: : ~
Figure 7-9. Attack position.
7-7

FM 3-25.150
(a) Take a step forward and to the side with your left foot so that your feet are acomfortable distance apart.
(b) Hold your body erect or bend slightly forward at the waist. Flex your knees andbalance your body weight on the balls of your feet. Your right forearm is roughly parallelto the ground. Hold the left arm high, generally in front of the left shoulder. Maintaineye-to-eye contact with your opponent, watching his weapon and body through peripheralVISIon.
(c) Hold your rifle diagonally across your body at a sufficient distance from the bodyto add balance and protect you from enemy blows. Grasp the weapon in your left handjust below the upper sling swivel, and place the right hand at the small of the stock. Keepthe sling facing outward and the cutting edge of the bayonet toward your opponent. Thecommand is, ATTACK POSITION, MOVE. The instructor gives the command, and thesoldiers perform the movement.
(2) Relaxed Position. The relaxed position (Figure 7-10) gives the soldier a chance torest during training. It also allows him to direct his attention toward the instructor as hediscusses and demonstrates the positions and movements. To assume the relaxed positionfrom the attack position, straighten the waist and knees and lower the rifle across thefront of your body by extending the arms downward. The command is, RELAX. Theinstructor gives the command, and the soldiers perform the movement.
~---
Figure 7-10. Relaxed position.
e. Movements. The soldier will instinctively strike at openings and becomeaggressive in his attack once he has learned to relax and has developed instinctive
7-8
FM 3-25.150
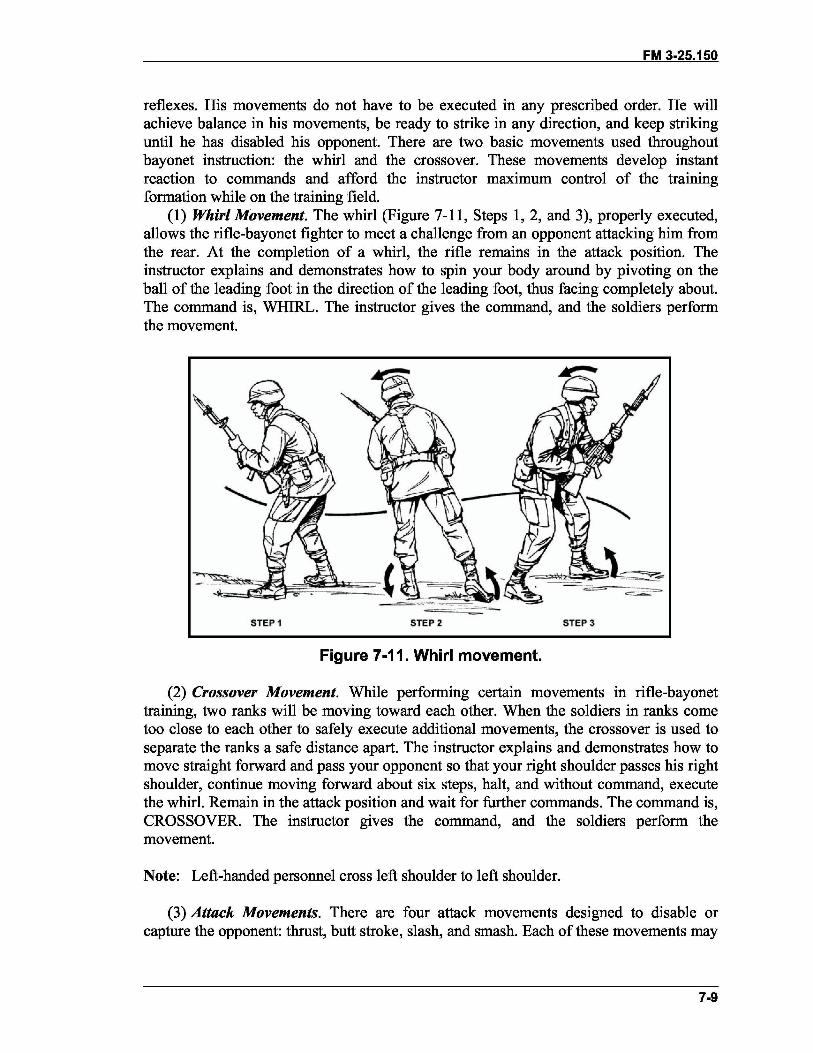
reflexes. His movements do not have to be executed in any prescribed order. He willachieve balance in his movements, be ready to strike in any direction, and keep strikinguntil he has disabled his opponent. There are two basic movements used throughoutbayonet instruction: the whirl and the crossover. These movements develop instantreaction to commands and afford the instructor maximum control of the trainingformation while on the training field.
(1) Whirl Movement. The whirl (Figure 7-11, Steps 1, 2, and 3), properly executed,allows the rifle-bayonet fighter to meet a challenge from an opponent attacking him fromthe rear. At the completion of a whirl, the rifle remains in the attack position. Theinstructor explains and demonstrates how to spin your body around by pivoting on theball of the leading foot in the direction of the leading foot, thus facing completely about.The command is, WHIRL. The instructor gives the command, and the soldiers performthe movement.
~=~
STEP 1 STEP 2 STEP 3
Figure 7-11. Whirl movement.
(2) Crossover Movement. While performing certain movements in rifle-bayonettraining, two ranks will be moving toward each other. When the soldiers in ranks cometoo close to each other to safely execute additional movements, the crossover is used toseparate the ranks a safe distance apart. The instructor explains and demonstrates how tomove straight forward and pass your opponent so that your right shoulder passes his rightshoulder, continue moving forward about six steps, halt, and without command, executethe whirl. Remain in the attack position and wait for further commands. The command is,CROSSOVER. The instructor gives the command, and the soldiers perform themovement.
Note: Left-handed personnel cross left shoulder to left shoulder.
(3) Attack Movements. There are four attack movements designed to disable orcapture the opponent: thrust, butt stroke, slash, and smash. Each of these movements may
7-9
FM 3-25.150
be used for the initial attack or as a follow-up should the initial movement fail to find itsmark. The soldiers learn these movements separately. They will learn to execute thesemovements in a swift and continuous series during subsequent training. During alltraining, the emphasis will be on conducting natural, balanced movements to effectivelydamage the target. Precise, learned movements will not be stressed.
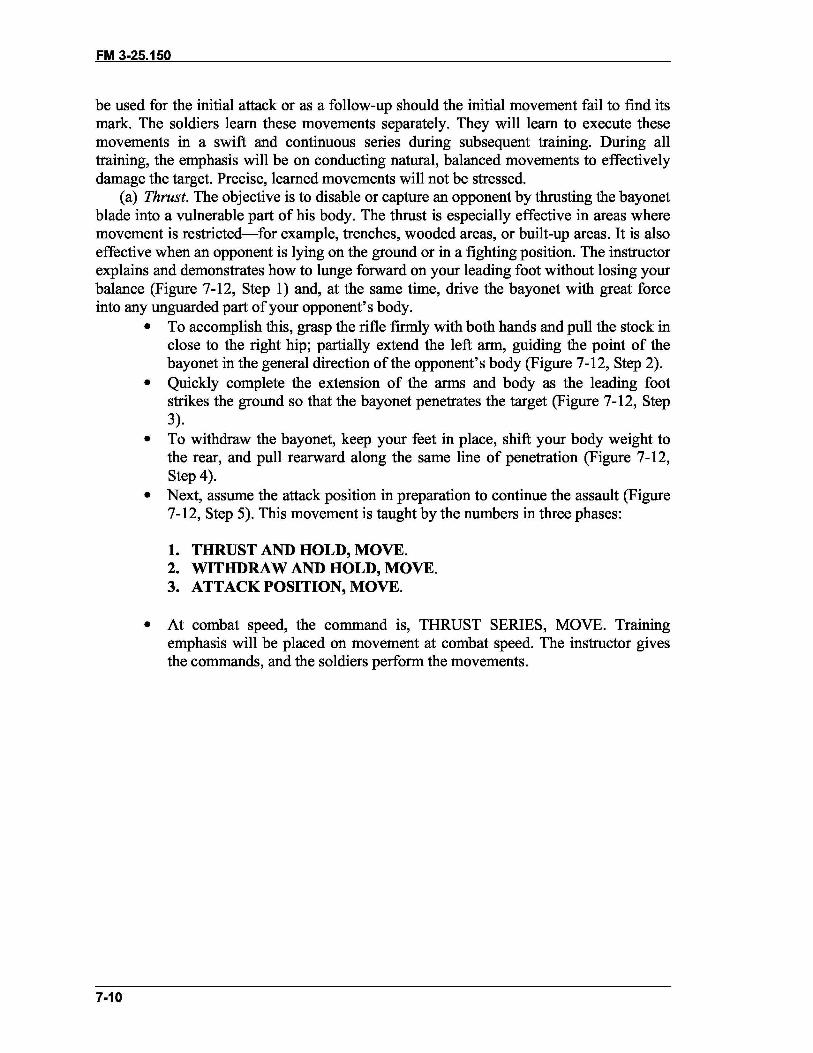
(a) Thrust. The objective is to disable or capture an opponent by thrusting the bayonetblade into a vulnerable part of his body. The thrust is especially effective in areas wheremovement is restricted-for example, trenches, wooded areas, or built-up areas. It is alsoeffective when an opponent is lying on the ground or in a fighting position. The instructorexplains and demonstrates how to lunge forward on your leading foot without losing yourbalance (Figure 7-12, Step 1) and, at the same time, drive the bayonet with great forceinto any unguarded part of your opponent's body.
. To accomplish this, grasp the rifle firmly with both hands and pull the stock inclose to the right hip; partially extend the left arm, guiding the point of thebayonet in the general direction of the opponent's body (Figure 7-12, Step 2).
. Quickly complete the extension of the arms and body as the leading footstrikes the ground so that the bayonet penetrates the target (Figure 7-12, Step3).
. To withdraw the bayonet, keep your feet in place, shift your body weight tothe rear, and pull rearward along the same line of penetration (Figure 7-12,Step 4).
. Next, assume the attack position in preparation to continue the assault (Figure7-12, Step 5). This movement is taught by the numbers in three phases:
1. THRUST AND HOLD, MOVE.2. WITHDRAW AND HOLD, MOVE.3. ATTACK POSITION, MOVE.
. At combat speed, the command is, THRUST SERIES, MOVE. Trainingemphasis will be placed on movement at combat speed. The instructor givesthe commands, and the soldiers perform the movements.
7-10

FM 3-25.150
STEP 1
,r--
STEP 4
STEP 5
~~"~---=.:.=; ~
"" ..-~-'C!- - -'W'~ --:--~~
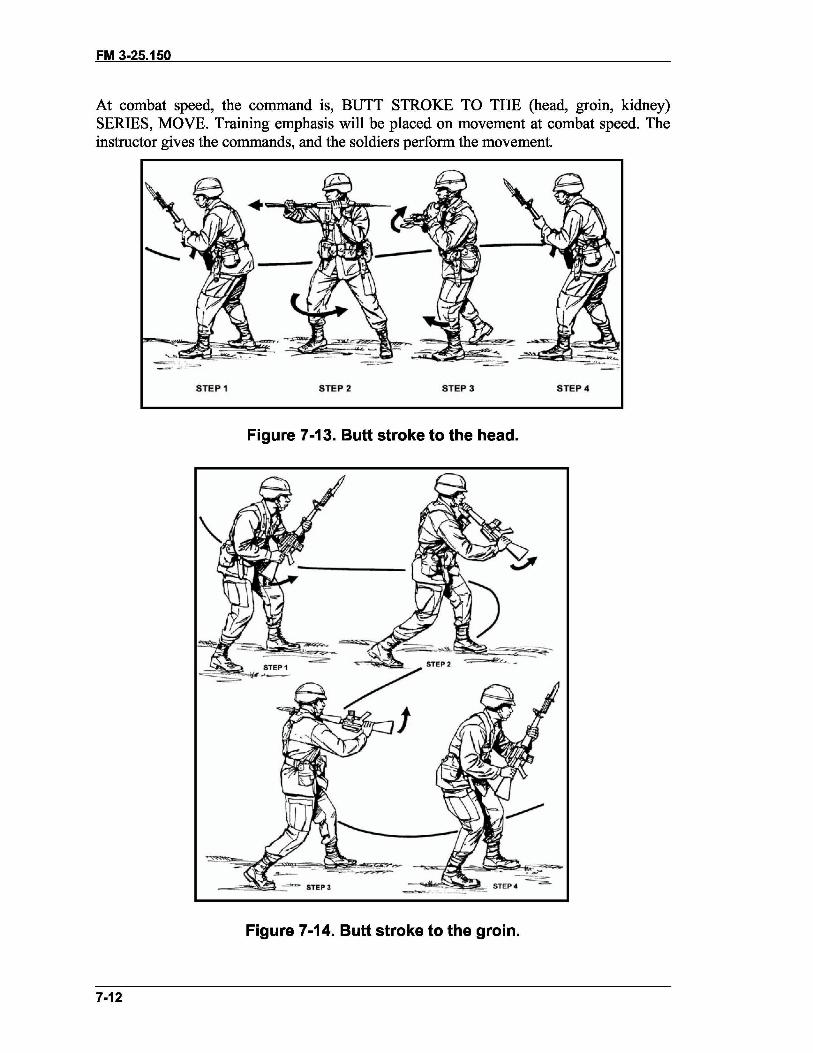
Figure 7-12. Thrust movement.(b) Butt Stroke. The objective is to disable or capture an opponent by delivering a
forceful blow to his body with the rifle butt (Figure 7-13, Steps 1, 2, 3, and 4, andFigure 7-14, Steps 1, 2, 3, and 4). The aim of the butt stroke may be the opponent'sweapon or a vulnerable portion of his body. The butt stroke may be vertical, horizontal,or somewhere between the two planes. The instructor explains and demonstrates how tostep forward with your trailing foot and, at the same time using your left hand as a pivot,swing the rifle in an arc and drive the rifle butt into your opponent. To recover, bringyour trailing foot forward and assume the attack position. The movement is taught by thenumbers in two phases:
1. BUTT STROKE TO THE (head, groin, kidney) AND HOLD, MOVE.2. ATTACK POSITION, MOVE.
7-11
FM 3-25.150
At combat speed, the command is, BUTT STROKE TO THE (head, groin, kidney)SERIES, MOVE. Training emphasis will be placed on movement at combat speed. Theinstructor gives the commands, and the soldiers perform the movement.
,-""~-:-.~,--~
STEP 1 STEP 2 STEP 3 STEP 4
Figure 7-13. Butt stroke to the head.
~-~ :_~-- -&_- STEP4 ~
Figure 7-14. Butt stroke to the groin.
7-12
FM 3-25.150
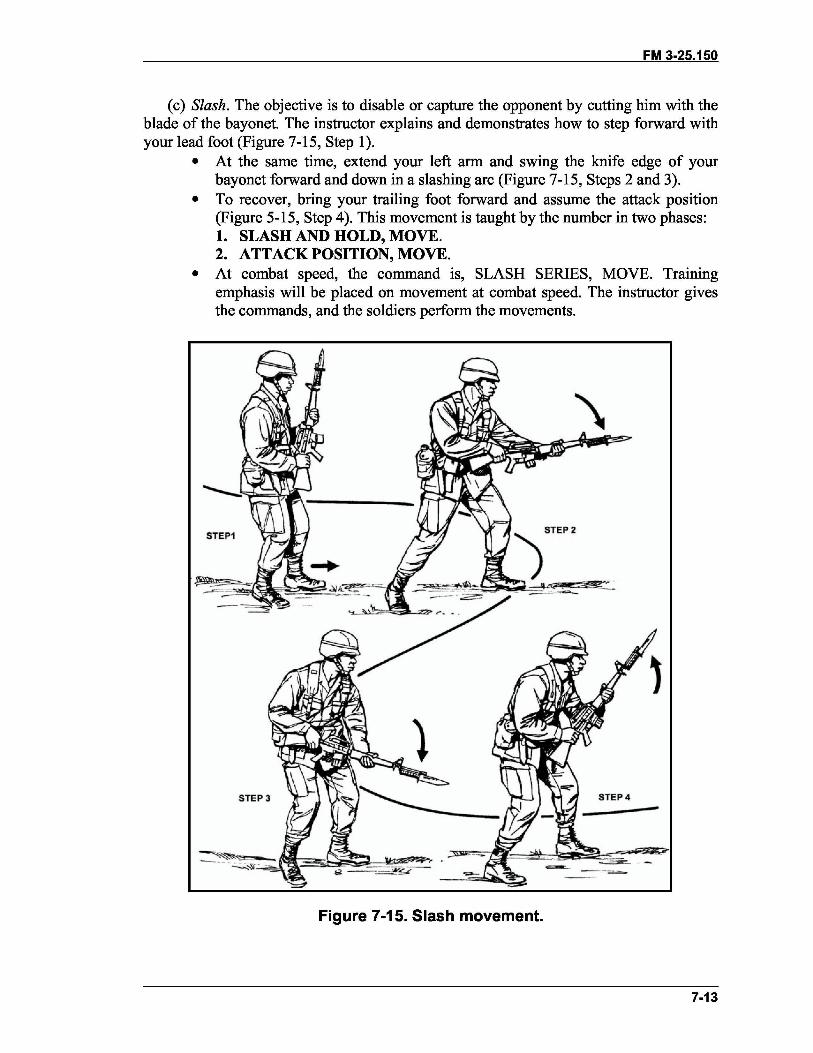
(c) Slash. The objective is to disable or capture the opponent by cutting him with theblade of the bayonet. The instructor explains and demonstrates how to step forward withyour lead foot (Figure 7-15, Step 1).
. At the same time, extend your left arm and swing the knife edge of yourbayonet forward and down in a slashing arc (Figure 7-15, Steps 2 and 3).
. To recover, bring your trailing foot forward and assume the attack position(Figure 5-15, Step 4). This movement is taught by the number in two phases:1. SLASH AND HOLD, MOVE.2. ATTACK POSITION, MOVE.
. At combat speed, the command is, SLASH SERIES, MOVE. Trainingemphasis will be placed on movement at combat speed. The instructor givesthe commands, and the soldiers perform the movements.
STEP1
~._::
STEP 3 STEP 4 -
~t..---- ..~'" -- --~
Figure 7-15. Slash movement.
7-13
FM 3-25.150
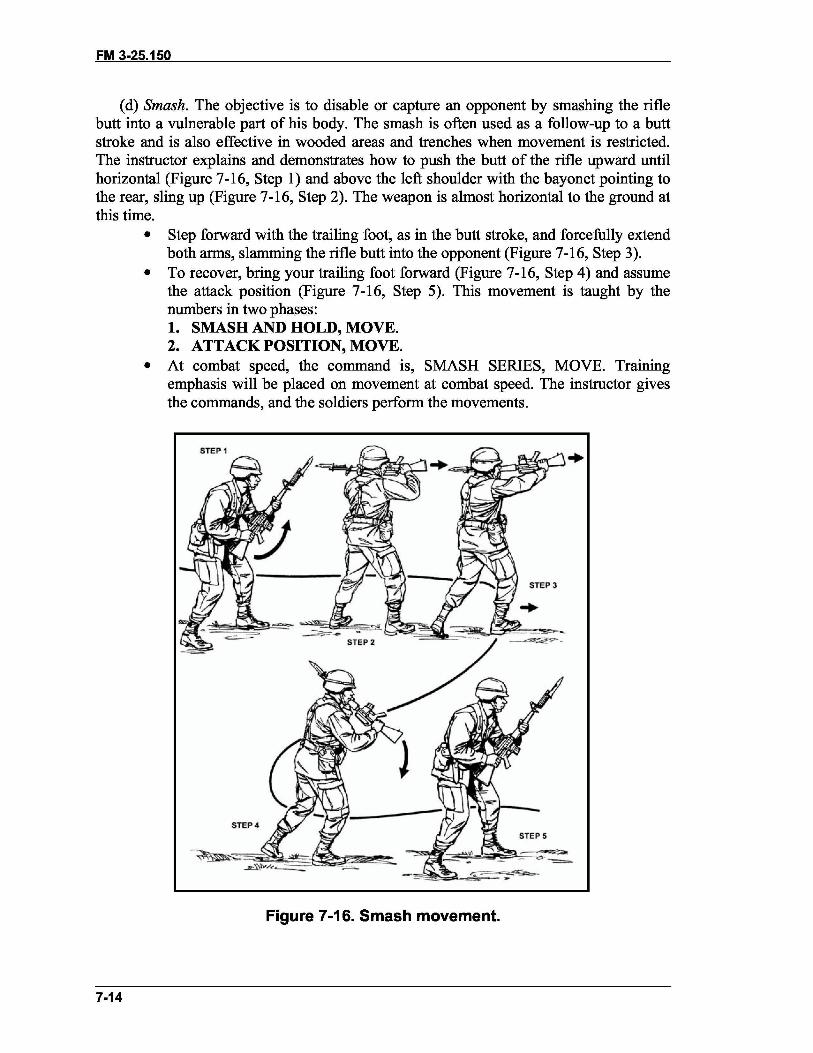
(d) Smash. The objective is to disable or capture an opponent by smashing the riflebutt into a vulnerable part of his body. The smash is often used as a follow-up to a buttstroke and is also effective in wooded areas and trenches when movement is restricted.The instructor explains and demonstrates how to push the butt of the rifle upward untilhorizontal (Figure 7-16, Step 1) and above the left shoulder with the bayonet pointing tothe rear, sling up (Figure 7-16, Step 2). The weapon is almost horizontal to the ground atthis time.
. Step forward with the trailing foot, as in the butt stroke, and forcefully extendboth arms, slamming the rifle butt into the opponent (Figure 7-16, Step 3).
. To recover, bring your trailing foot forward (Figure 7-16, Step 4) and assumethe attack position (Figure 7-16, Step 5). This movement is taught by thenumbers in two phases:1. SMASH AND HOLD, MOVE.2. ATTACK POSITION, MOVE.
. At combat speed, the command is, SMASH SERIES, MOVE. Trainingemphasis will be placed on movement at combat speed. The instructor givesthe commands, and the soldiers perform the movements.
..
STEP 3
~
STEP 4
Figure 7-16. Smash movement.
7-14

FM 3-25.150
(4) Defensive Movements. At times, the soldier may lose the initiative and be forcedto defend himself. He may also meet an opponent who does not present a vulnerable areato attack. Therefore, he must make an opening by initiating a parry or block movement,then follow up with a vicious attack. The follow-up attack is immediate and violent.
CAUTIONTo minimize weapon damage while using blocks andparries, limit weapon-to-weapon contact to half speedduring training.
(a) Parry Movement. The objective is to counter a thrust, throw the opponent offbalance, and hit a vulnerable area of his body. Timing, speed, and judgment are essentialfactors in these movements. The instructor explains and demonstrates how to--
. Parry right. If your opponent carries his weapon on his left hip (left-handed),
you will parry it to your right. In execution, step forward with your leadingfoot (Figure 7-17, Step 1), strike the opponent's rifle (Figure 7-17, Step 2),deflecting it to your right (Figure 7-17, Step 3), and follow up with a thrust,slash, or butt stroke.
Figure 7-17. Parry right.
7-15
FM 3-25.150
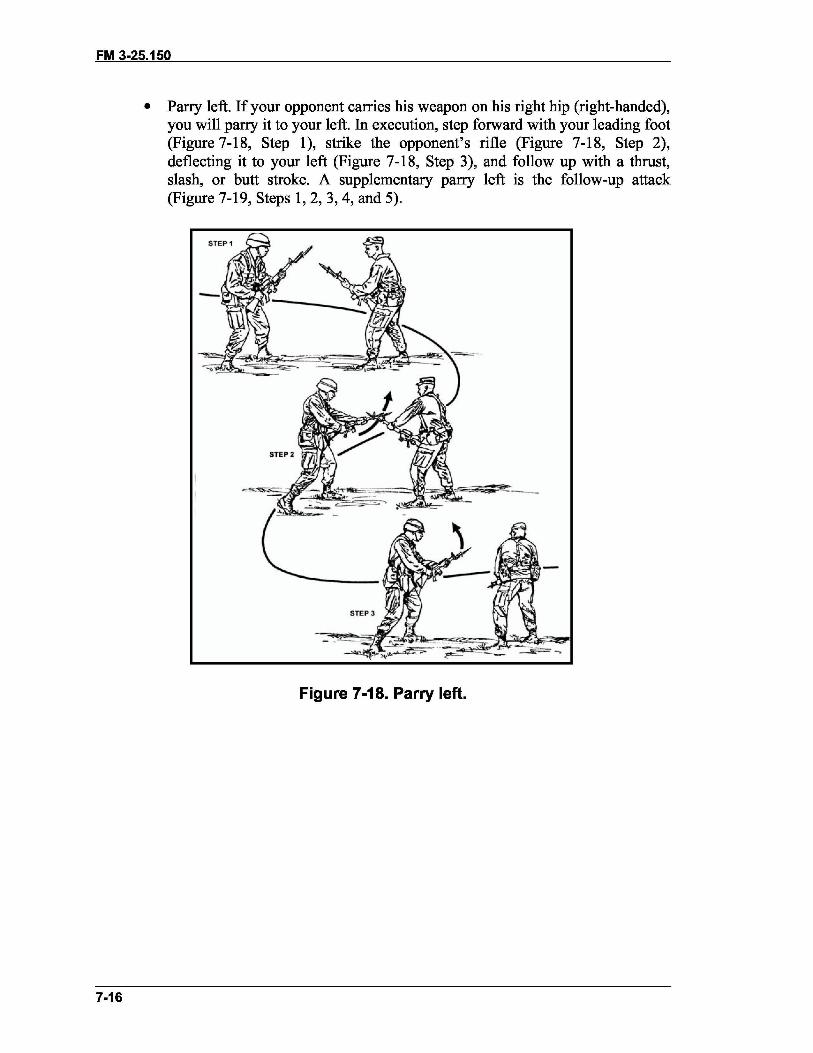
. Parry left. If your opponent carries his weapon on his right hip (right-handed),you will parry it to your left. In execution, step forward with your leading foot(Figure 7-18, Step 1), strike the opponent's rifle (Figure 7-18, Step 2),deflecting it to your left (Figure 7-18, Step 3), and follow up with a thrust,slash, or butt stroke. A supplementary parry left is the follow-up attack(Figure 7-19, Steps 1,2,3,4, and 5).
Figure 7-18. Parry left.
7-16

FM 3-25.150
Figure 7-19. Parry left, slash, with follow-up butt stroke to kidney region.
. Recovery. Immediately return to the attack position after completing eachparry and follow-up attack. The movement is taught by the numbers in threephases:1. PARRY RIGHT (OR LEFT), MOVE.2. THRUST, MOVE.3. ATTACK POSITION, MOVE.
. At combat speed, the command is, PARRY RIGHT (LEFT) or PARRY(RIGHT OR LEFT) WITH FOLLOW-UP ATTACK. The instructor gives thecommands, and the soldiers perform the movements.
(b) Block. When surprised by an opponent, the block is used to cut off the path of hisattack by making weapon-to-weapon contact. A block must always be followedimmediately with a vicious attack. The instructor explains and demonstrates how toextend your arms using the center part of your rifle as the strike area, and cut off theopponent's attack by making weapon-to-weapon contact. Strike the opponent's weaponwith enough power to throw him off balance. Blocks are taught by the numbers in twophases:
1. HIGH (LOW) or (SIDE) BLOCK.2. ATTACK POSITION, MOVE.
7-17
FM 3-25.150
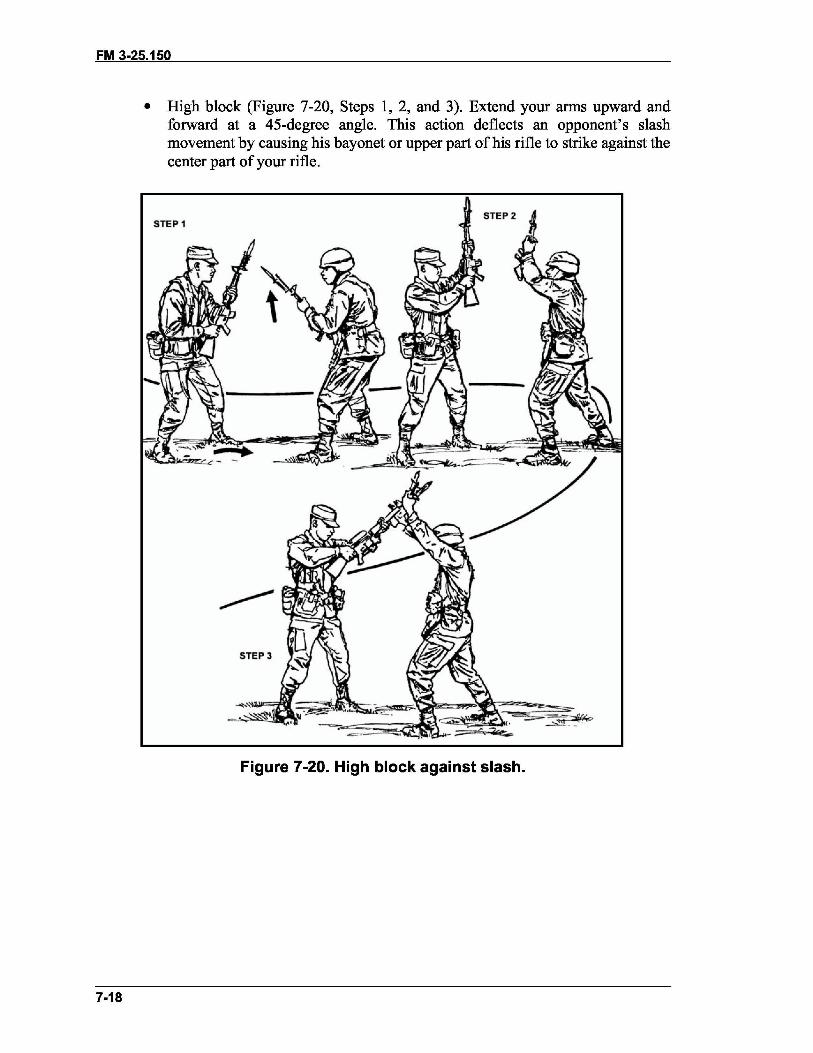
High block (Figure 7-20, Steps 1, 2, and 3). Extend your arms upward andforward at a 45-degree angle. This action deflects an opponent's slashmovement by causing his bayonet or upper part of his rifle to strike against thecenter part of your rifle.
.
STEP 1STEP 2
~~>-
~~, (. -~---=-~
Figure 7-20. High block against slash.
7-18

FM 3-25.150
. Low block (Figure 7-21, Steps 1,2, and 3). Extend your arms downward andforward about 15 degrees from your body. This action deflects an opponent'sbutt stroke aimed at the groin by causing the lower part of his rifle stock tostrike against the center part of your rifle.
~~ STEP1
~-- .):~~TEP2
.~~
STEP 3
Figure 7-21. Low block against butt stroke to groin.
7-19
FM 3-25.150
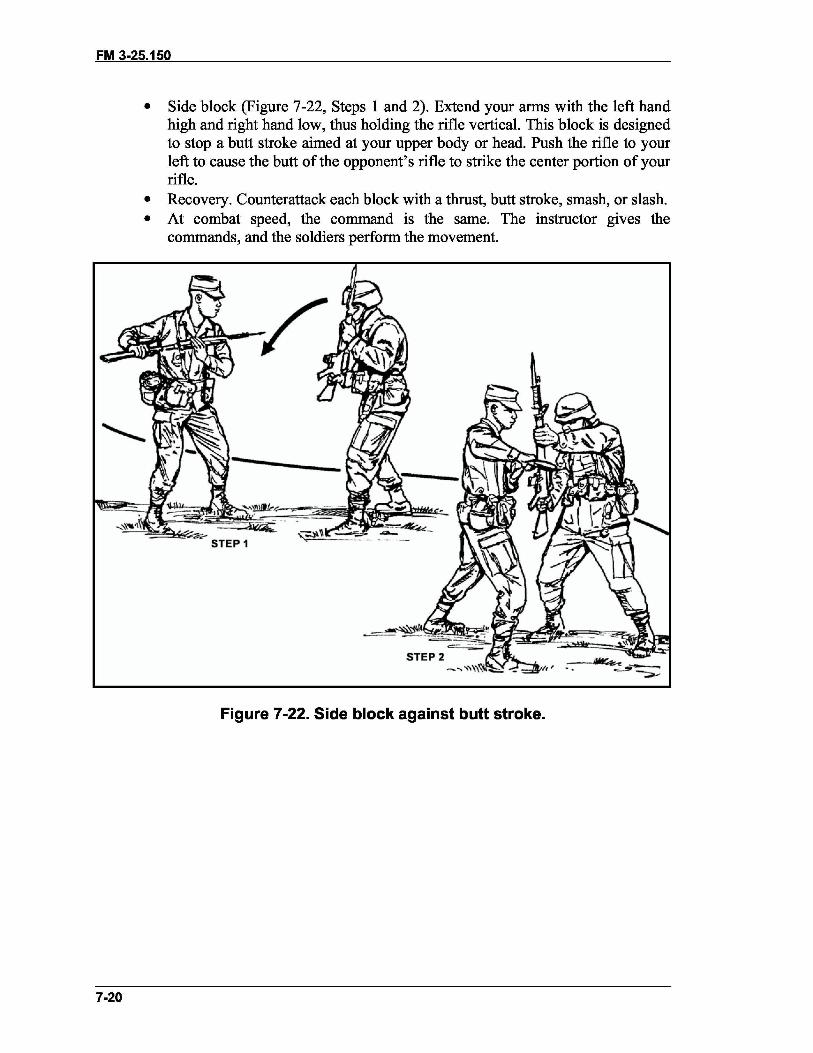
. Side block (Figure 7-22, Steps I and 2). Extend your arms with the left handhigh and right hand low, thus holding the rifle vertical. This block is designedto stop a butt stroke aimed at your upper body or head. Push the rifle to yourleft to cause the butt of the opponent's rifle to strike the center portion of yourrifle.
. Recovery. Counterattack each block with a thrust, butt stroke, smash, or slash.
. At combat speed, the command is the same. The instructor gives thecommands, and the soldiers perform the movement.
-~
II' :-:--~-- -;;;....
Figure 7-22. Side block against butt stroke.
7-20
FM 3-25.150
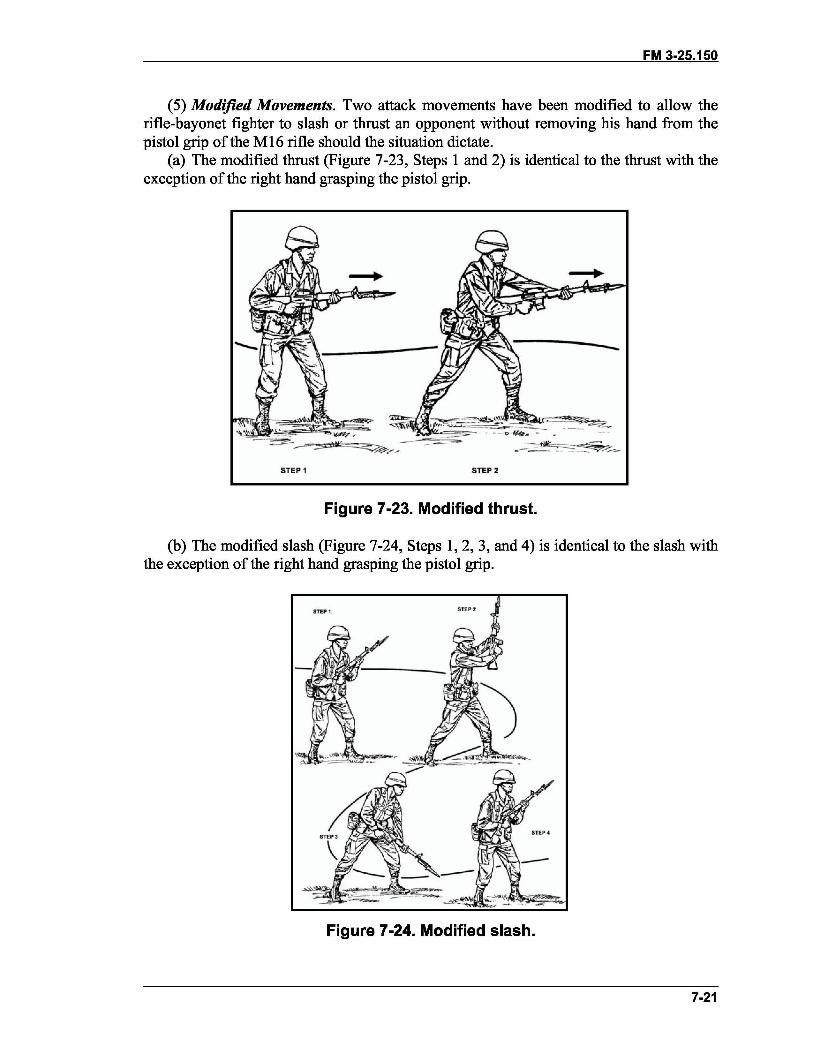
(5) Modified Movements. Two attack movements have been modified to allow therifle-bayonet fighter to slash or thrust an opponent without removing his hand from thepistol grip of the Ml6 rifle should the situation dictate.
(a) The modified thrust (Figure 7-23, Steps 1 and 2) is identical to the thrust with theexception of the right hand grasping the pistol grip.
--.......
STEP 1 STEP 2
Figure 7-23. Modified thrust.
(b) The modified slash (Figure 7-24, Steps 1,2,3, and 4) is identical to the slash withthe exception of the right hand grasping the pistol grip.
STEP1 STEP:!:
Figure 7-24. Modified slash.
7-21
FM 3-25.150
(6) Follow-up Movements. Follow-up movements are attack movements thatnaturally follow from the completed position of the previous movement. If the initialthrust, butt stroke, smash, or slash fails to make contact with the opponent's body, thesoldier should instinctively follow up with additional movements until he has disabled orcaptured the opponent. It is important to follow-up the initial attack with anotheraggressive action so the initiative is not lost. The instructor explains and demonstrateshow instinct should govern your selection of a specific follow-up movement. Forexample-
. PARRY LEFT, BUTT STROKE TO THE HEAD, SMASH, SLASH,ATTACK POSITION.
. PARRY LEFT, SLASH, BUTT STROKE TO THE KIDNEY, ATTACKPOSITION.
. PARRY RIGHT, THRUST, BUTT STROKE TO THE GROIN, SLASH,ATTACK POSITION.
Two examples of commands using follow-up movements are:. PARRY LEFT (soldier executes), THRUST (soldier executes), BUTT
STROKE TO THE HEAD (soldier executes), SMASH (soldier executes),SLASH (soldier executes), ATTACK POSITION (soldier assumes theattack position).
. THRUST (soldier executes), THRUST (soldier executes), THRUST (soldierexecutes), BUTT STROKE TO THE GROIN (soldier executes), SLASH(soldier executes), ATTACK POSITION (soldier assumes the attackposition).
All training will stress damage to the target and violent action, using natural movementsas opposed to precise, stereotyped movements. Instinctive, aggressive action and balanceare the keys to offense with the rifle and bayonet.
Note: For training purposes, the instructor may and should mix up the series ofmovements.
7-3. BAYONETIKNIFEAs the bayonet is an integral part of the combat soldier's equipment, it is readily availablefor use as a multipurpose weapon. The bayonet produces a terrifying mental effect on theenemy when in the hands of a well-trained and confident soldier. The soldier skilled inthe use of the knife also increases his ability to defend against larger opponents andmultiple attackers. Both these skills increase his chances of surviving and accomplishingthe mission. (Although the following paragraphs say "knife," the information also appliesto bayonets.)
a. Grips. The best way to hold the knife is either with the straight grip or the reversegrIp.
(1) Straight Grip. Grip the knife in the strong hand by forming a "vee" and byallowing the knife to fit naturally, as in gripping for a handshake. The handle should laydiagonally across the palm. Point the blade toward the enemy, usually with the cutting
7-22

FM 3-25.150
edge down. The cutting edge can also be held vertically or horizontally to the ground.Use the straight grip when thrusting and slashing.
(2) Reverse Grip. Grip the knife with the blade held parallel with the forearm, cuttingedge facing outward. This grip conceals the knife from the enemy's view. The reversegrip also affords the most power for lethal insertion. Use this grip for slashing, stabbing,and tearing.
b. Stances. The primary stances are the knife fighter's stance and the modifiedstance.
(1) Knife Fighter's Stance. In this stance, the fighter stands with his feet aboutshoulder-width apart, dominant foot toward the rear. About 70 percent of his weight is onthe front foot and 30 percent on the rear foot. He stands on the balls of both feet andholds the knife with the straight grip. The other hand is held close to his body where it isready to use, but protected (Figure 7-25).
Figure 7-25. Knife fighter's stance.
7-23

FM 3-25.150
(2) Modified Stance. The difference in the modified stance is the knife is held closeto the body with the other hand held close over the knife hand to help conceal it(Figure 7-26).
JI --- --
Figure 7-26. Modified stance.
c. Range. The two primary ranges in knife fighting are long range and mediumrange. In long-range knife fighting, attacks consist of figure-eight slashes along the No.1,No.2, No.7, and No.8 angles of attack; horizontal slashes along the No.3 and No.4angles of attack; and lunging thrusts to vital areas on the No.5 angle of attack. Usually,the straight grip is used. In medium-range knife fighting, the reverse grip provides greaterpower. It is used to thrust, slash, and tear along all angles of attack.
7-4. KNIFE-AGAINST-KNIFE SEQUENCEThe knife fighter must learn to use all available weapons of his body and not limithimself to the knife. The free hand can be used to trap the enemy's hands to createopenings in his defense. The enemy's attention will be focused on the weapon; therefore,low kicks and knee strikes will seemingly come from nowhere. The knife fighter'spriority of targets are the eyes, throat, abdominal region, and extended limbs. Thefollowing knife attack sequences can be used in training to help develop soldiers'knowledge of movements, principles, and techniques in knife fighting.
7-24
FM 3-25.150
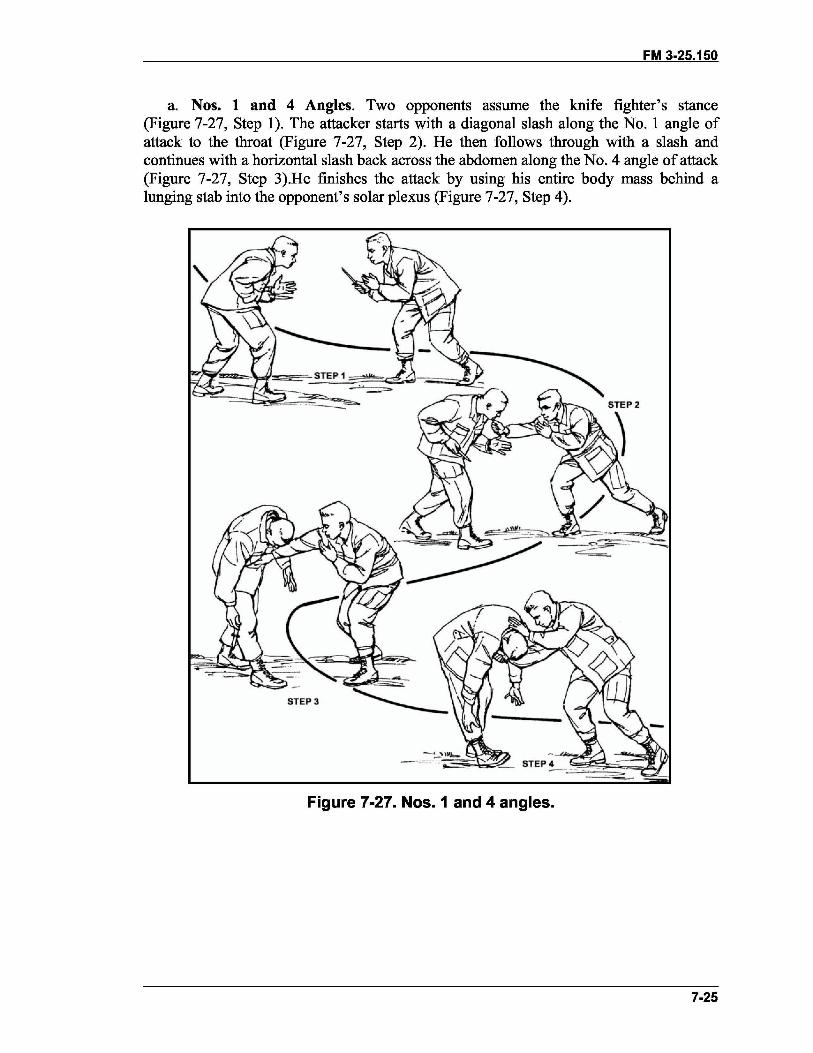
a. Nos. 1 and 4 Angles. Two opponents assume the knife fighter's stance(Figure 7-27, Step 1). The attacker starts with a diagonal slash along the No.1 angle ofattack to the throat (Figure 7-27, Step 2). He then follows through with a slash andcontinues with a horizontal slash back across the abdomen along the No.4 angle of attack(Figure 7-27, Step 3).He finishes the attack by using his entire body mass behind alunging stab into the opponent's solarplexus (Figure 7-27, Step 4).
STEP 3
Figure 7-27. Nos. 1 and 4 angles.
7-25
FM 3-25.150
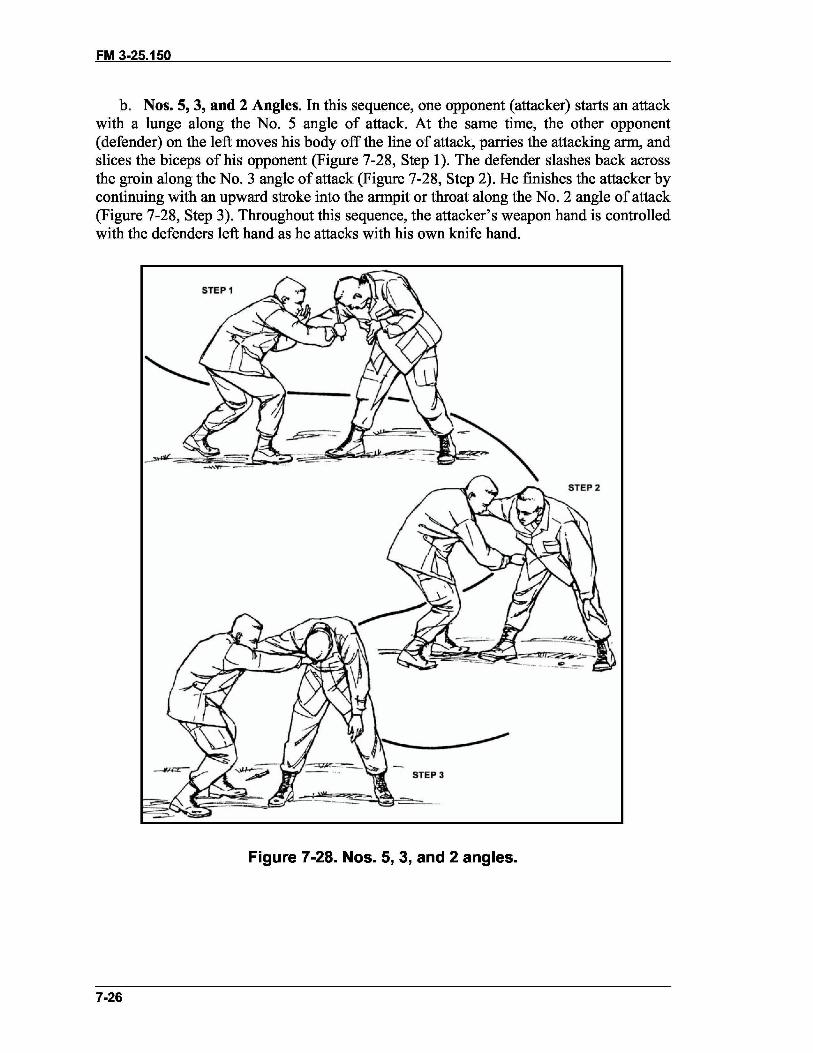
b. Nos. 5, 3, and 2 Angles. In this sequence, one opponent (attacker) starts an attackwith a lunge along the No.5 angle of attack. At the same time, the other opponent(defender) on the left moves his body off the line of attack, parries the attacking arm, andslices the biceps of his opponent (Figure 7-28, Step 1). The defender slashes back acrossthe groin along the No.3 angle of attack (Figure 7-28, Step 2). He finishes the attacker bycontinuing with an upward stroke into the armpit or throat along the No.2 angle of attack(Figure 7-28, Step 3). Throughout this sequence, the attacker's weapon hand is controlledwith the defenders left hand as he attacks with his own knife hand.
STEP 1
STEP 3
Figure 7-28. Nos. 5, 3, and 2 angles.
7-26
FM 3-25.150
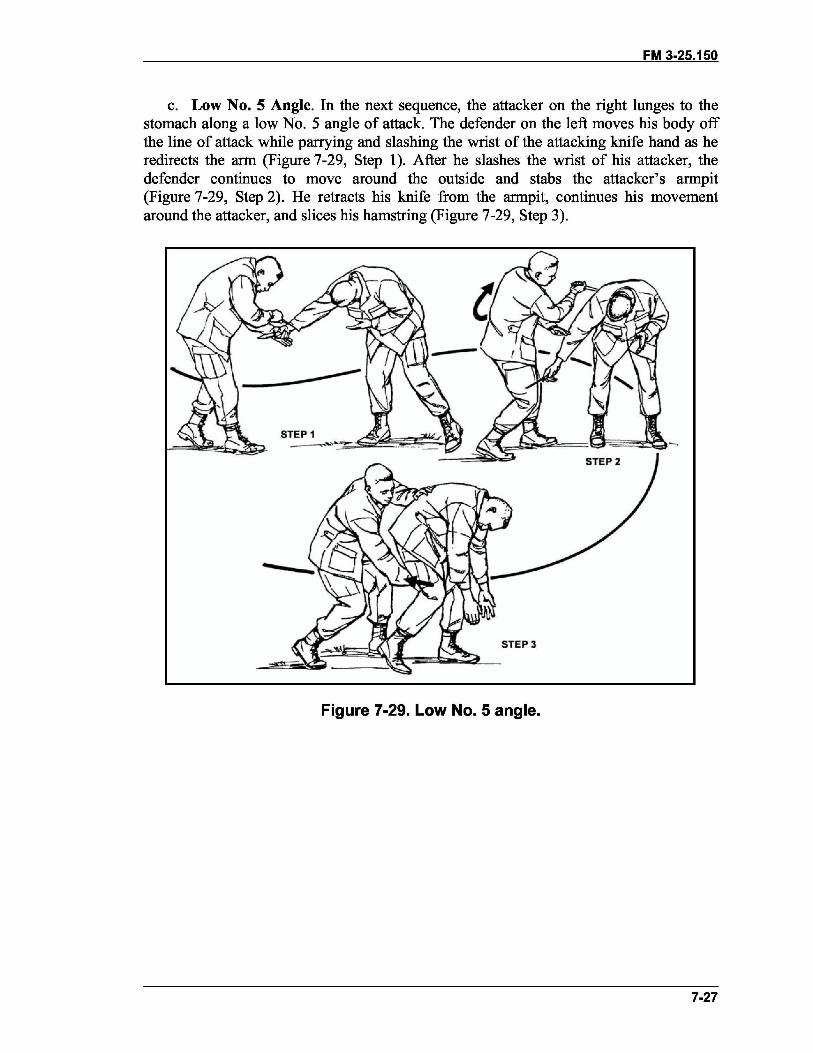
c. Low No.5 Angle. In the next sequence, the attacker on the right lunges to thestomach along a low No.5 angle of attack. The defender on the left moves his body offthe line of attack while parrying and slashing the wrist of the attacking knife hand as heredirects the arm (Figure 7-29, Step 1). After he slashes the wrist of his attacker, thedefender continues to move around the outside and stabs the attacker's armpit(Figure 7-29, Step 2). He retracts his knife from the armpit, continues his movementaround the attacker, and slices his hamstring (Figure 7-29, Step 3).
STEP 1~~ ,...
-
STEP 3
Figure 7-29. Low No.5 angle.
7-27

FM 3-25.150
d. Optional Low No.5 Angle. The attacker on the right lunges to the stomach of hisopponent (the defender) along the low No.5 angle of attack. The defender moves hisbody off the line of attack of the knife. Then he turns and, at the same time, delivers aslash to the attacker's throat along the No.1 angle of attack (Figure 7-30, Step 1). hedefender immediately follows with another slash to the opposite side of the attacker'sthroat along the No.2 angle of attack (Figure 7-30, Step 2). The attacker is finished as theopponent on the left (defender) continues to slice across the abdomen with a stroke alongthe No.3 angle (Figure 7-30, Step 3).
Figure 7-30. Optional low No.5 angle.
7-5. ADVANCED WEAPONS TECHNIQUES AND TRAININGFor advanced training in weapons techniques, training partners should have the same skilllevel. Attackers can execute attacks along multiple angles of attack in combinations. Theattacker must attack with a speed that offers the defender a challenge, but does notoverwhelm him. It should not be a contest to see who can win, but a training exercise forboth individuals.
a. Continued training in weapons techniques will lead to the partners' ability toengage in free-response fighting or sparring-that is, the individuals become adeptenough to understand the principles of weapons attacks, defense, and movements so theycan respond freely when attacking or defending from any angle.
b. Instructors must closely monitor training partners to ensure that the speed andcontrol of the individuals does not become dangerous during advanced training practice.Proper eye protection and padding should be used, when applicable. The instructorshould stress the golden rule in free-response fighting-Do unto others as you wouldhave them do unto you.
7-28
FM 3-25.150
Section II. FIELD-EXPEDIENT WEAPONSTo survive, the soldier in combat must be able to deal with any situation that develops.His ability to adapt any nearby object for use as a weapon in a win-or-die situation islimited only by his ingenuity and resourcefulness. Possible weapons, although notdiscussed herein, include ink pens or pencils; canteens tied to string to be swung; snaplinks at the end of sections of rope; kevlar helmets; sand, rocks, or liquids thrown into theenemy's eyes; or radio antennas. The following techniques demonstrate a few expedientweapons that are readily available to most soldiers for defense and counterattack againstthe bayonet and rifle with fixed bayonet.
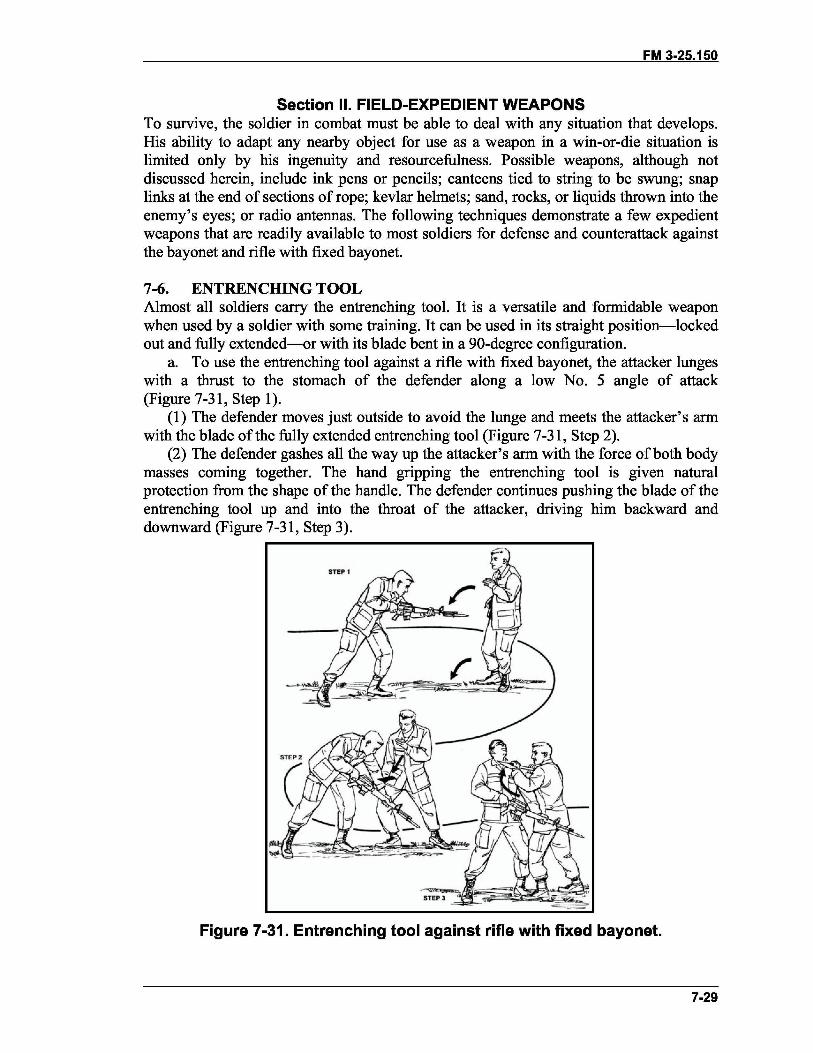
7-6. ENTRENCHING TOOLAlmost all soldiers carry the entrenching tool. It is a versatile and formidable weaponwhen used by a soldier with some training. It can be used in its straight position-lockedout and fully extended-or with its blade bent in a 90-degree configuration.
a. To use the entrenching tool against a rifle with fixed bayonet, the attacker lungeswith a thrust to the stomach of the defender along a low No.5 angle of attack(Figure 7-31, Step 1).
(1) The defender moves just outside to avoid the lunge and meets the attacker's armwith the blade of the fully extended entrenching tool (Figure 7-31, Step 2).
(2) The defender gashes all the way up the attacker's arm with the force of both bodymasses coming together. The hand gripping the entrenching tool is given naturalprotection from the shape of the handle. The defender continues pushing the blade of theentrenching tool up and into the throat of the attacker, driving him backward anddownward (Figure 7-31, Step 3).
STEP1
Figure 7-31. Entrenching tool against rifle with fixed bayonet.
7-29

FM 3-25.150
b. An optional use of entrenching tool against a rifle with fixed bayonet is for theattacker to lunge to the stomach of the defender (Figure 7-32, Step 1).
(1) The defender steps to the outside of the line of attack at 45 degrees to avoid theweapon. He then turns his body and strikes downward onto the attacking arm (on theradial nerve) with the blade of the entrenching tool (Figure 7-32, Step 2).
(2) He drops his full body weight down with the strike, and the force causes theattacker to collapse forward. The defender then strikes the point of the entrenching toolinto the jugular notch, driving it deeply into the attacker (Figure 7-32, Step 3).
STEP 1
,
Figure 7-32. Optional use of the entrenching tool againstrifle with fixed bayonet.
7-30

FM 3-25.150
c. In the next two sequences, the entrenching tool is used in the bent configuration-that is, the blade is bent 90 degrees to the handle and locked into place.
(1) The attacker tries to stick the bayonet into the chest of the defender (Figure 7-33,Step 1).
(a) When the attack comes, the defender moves his body off the line of attack bystepping to the outside. He allows his weight to shift forward and uses the blade of theentrenching tool to drag along the length of the weapon, scraping the attacker's arm andhand (Figure 7-33, Step 2). The defender's hand is protected by the handle's naturaldesign.
(b) He continues to move forward into the attacker, strikes the point of the blade intothe jugular notch, and drives it downward (Figure 7-33, Step 3).
STEP 1
STEP 2 STEP 3
Figure 7-33. Entrenching tool in bent configuration.
7-31
FM 3-25.150
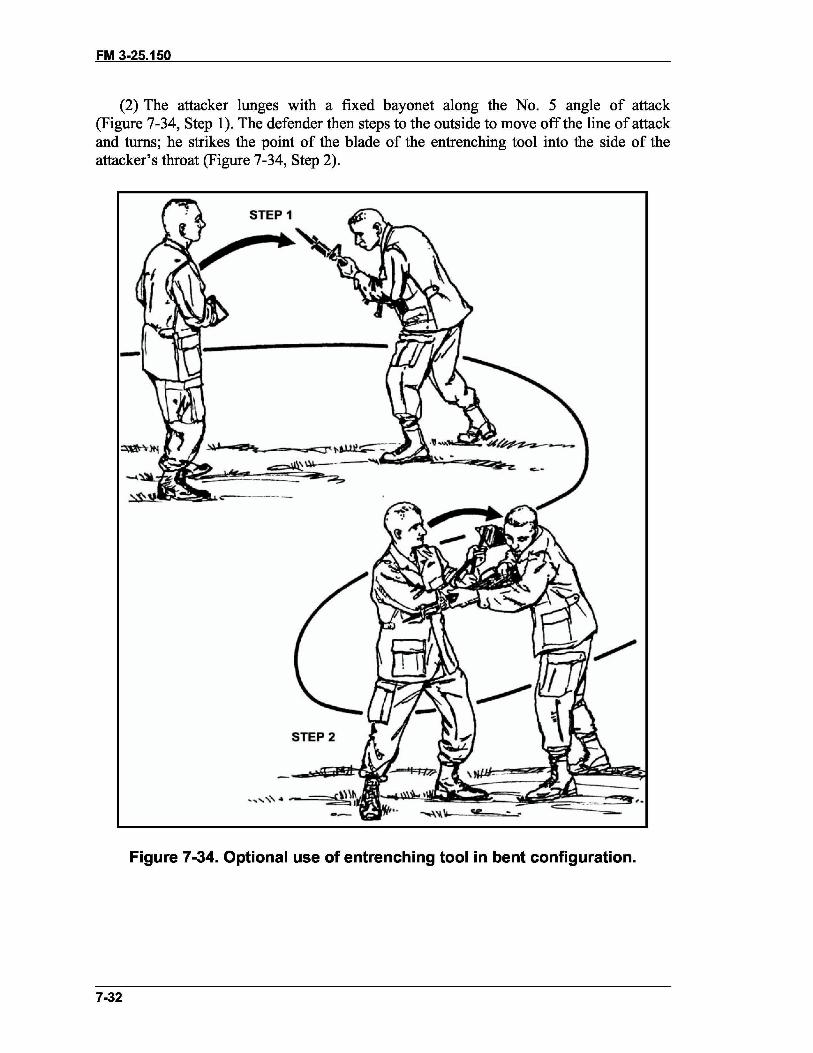
(2) The attacker lunges with a fixed bayonet along the No.5 angle of attack(Figure 7-34, Step 1). The defender then steps to the outside to move off the line of attackand turns; he strikes the point of the blade of the entrenching tool into the side of theattacker's throat (Figure 7-34, Step 2).
STEP 1
.:----------
STEP 2
-"",~
Figure 7-34. Optional use of entrenching tool in bent configuration.
7-32
FM 3-25.150
7-7. THREE-FOOT STICKSince a stick can be found almost anywhere, a soldier should know its uses as afield-expedient weapon. The stick is a versatile weapon; its capability ranges from simpleprisoner control to lethal combat.
a. Use a stick about 3 feet long and grip it by placing it in the "vee" formed betweenthe thumb and index finger, as in a handshake. It may also be grasped by two hands andused in an unlimited number of techniques. The stick is not held at the end, but at acomfortable distance from the butt end.
b. When striking with the stick, achieve maximum power by using the entire bodyweight behind each blow. The desired point of contact of the weapon is the last 2 inchesat the tip of the stick. The primary targets for striking with the stick are the vital bodypoints in Chapter 4. Effective striking points are usually the wrist, hand, knees, and otherbony protuberances. Soft targets include the side of the neck, jugular notch, solar plexus,and various nerve motor points. Attack soft targets by striking or thrusting the tip of thestick into the area. Three basic methods of striking are-
(1) Thrusting. Grip the stick with both hands and thrust straight into a target with thefull body mass behind it.
(2) Whipping. Hold the stick in one hand and whip it in a circular motion; use thewhole body mass in motion to generate power.
(3) Snapping. Snap the stick in short, shocking blows, again with the body massbehind each strike.
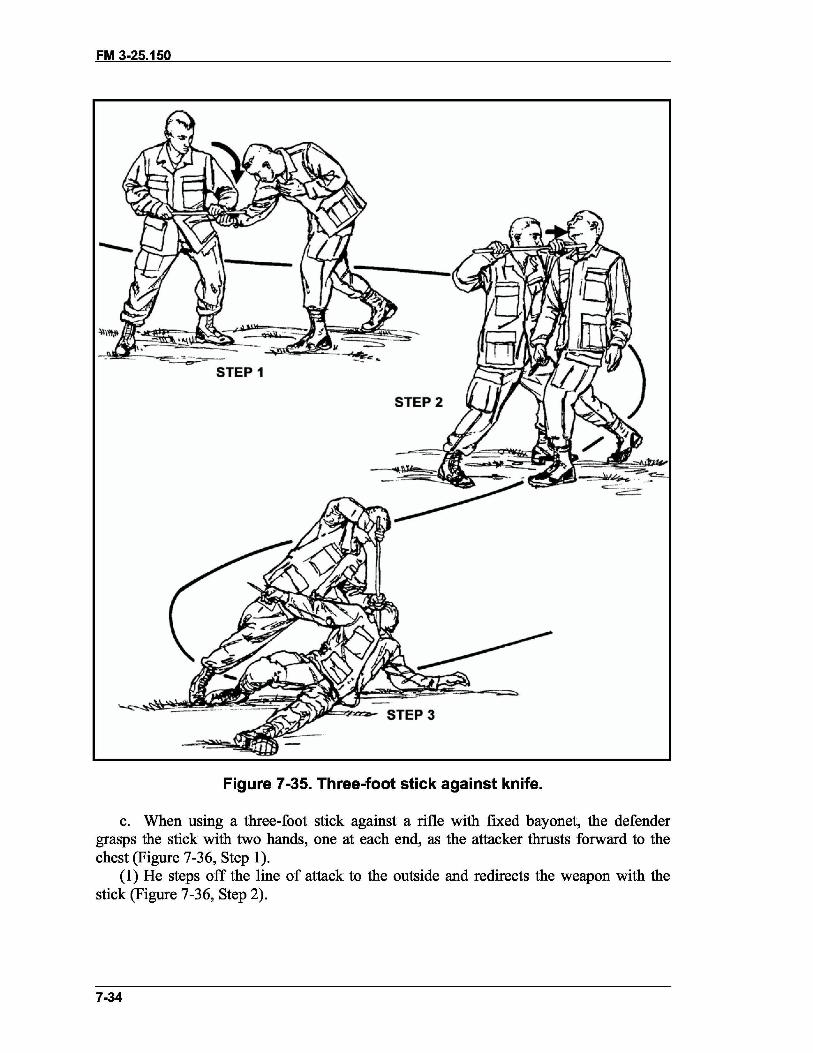
(a) When the attacker thrusts with a knife to the stomach of the defender with a lowNo.5 angle of attack, the defender moves off the line of attack to the outside and strikesvigorously downward onto the attacking wrist, hand, or arm (Figure 7-35, page 7-34,Step 1).
(b) The defender then moves forward, thrusts the tip of the stick into the jugularnotch of the attacker (Figure 7-35, Step 2), and drives him to the ground with his bodyweight-not his upper body strength (Figure 7-35, Step 3).
7-33
FM 3-25.150
-~ -'--.,......---c:::r-
:! ~~~ :-=
~~c,
STEP 1
STEP 2
STEP 3
~
Figure 7-35. Three-foot stick against knife.
c. When using a three-foot stick against a rifle with fixed bayonet, the defendergrasps the stick with two hands, one at each end, as the attacker thrusts forward to thechest (Figure 7-36, Step 1).
(1) He steps off the line of attack to the outside and redirects the weapon with thestick (Figure 7-36, Step 2).
7-34

FM 3-25.150
(2) He then strikes forward with the forearm into the attacker's throat (Figure 7-36,Step 3). The force of the two body weights coming together is devastating. The attacker'sneck is trapped in the notch formed by the stick and the defender's forearm.
(3) Using the free end of the stick as a lever, the defender steps back and uses hisbody weight to drive the attacker to the ground. The leverage provided by the stickagainst the neck creates a tremendous choke with the forearm, and the attacker losescontrol completely (Figure 7-36, Step 4).
STEP 2
===-~STEP 1
~
~~
STEP 3
Figure 7-36. Three-foot stick against rifle with fixed bayonet.
7-35

FM 3-25.150
7-8. SIX-FOOT POLEAnother field-expedient weapon that can mean the difference between life and death for asoldier in an unarmed conflict is a pole about 6 feet long. Examples of poles suitable foruse are mop handles, pry bars, track tools, tent poles, and small trees or limbs cut to forma pole. A soldier skilled in the use of a pole as a weapon is a formidable opponent. Thesize and weight of the pole requires him to move his whole body to use it effectively. Itslength gives the soldier an advantage of distance in most unarmed situations. There aretwo methods usually used in striking with a pole:
a. Swinging. Becoming effective in swinging the pole requires skilled bodymovement and practice. The greatest power is developed by striking with the last2 inches of the pole.
b. Thrusting. The pole is thrust straight along its axis with the user's body massfirmly behind it.
(1) An attacker tries to thrust forward with a fixed bayonet (Figure 7-37, Step 1). Thedefender moves his body off the line of attack; he holds the tip of the pole so that theattacker runs into it from his own momentum. He then aims for the jugular notch andanchors his body firmly in place so that the full force of the attack is felt at the attacker'sthroat (Figure 7-37, Step 2).
(2) The defender then shifts his entire body weight forward over his lead foot anddrives the attacker off his feet (Figure 7-37, Step 3).
Note: During high stress, small targets, such as the throat, may be difficult to hit. Good,large targets include the solar plexus and hip/thigh joint.
STEP 1
'-../
~--
STEP 2
STEP 3
Figure 7-37. Thrusting with 6-foot pole.
7-36