fully programmable combi steam oven & fully programmable
TRANSCRIPT

Service & Installation manual
Fully programmable combi steam oven
& Fully programmable oven with
boiler
GB

- 2 -
Table of Contents Page Preface and terms of warranty 3 Approval plate 4 Installation and connection 5 -Installation 6 -Water connection 7 -Drain connection 8 -Electrical connection/survey of supply lines 9 Exhaust 10 Checking before use 11 Annual service check 12-13 Start menu 14 Main menu 15 Set-up menu 16-22 -Select language 17 -Network 18-19 -Setting sound 20 -Setting time 21 -Oven set-up 22 Service menu 23-60 -Select USB key service 24 Restoring backup 25-27 Selecting backup menu 26 USB key service menu 28 -Energy meters 29 -Reading Meters 30 Error log 31 Error statistics 3-21 32 Service counters 33 -Lime-scale diagnosis 34-35 -Software updating menu 36-39 -ClimaOptima calibration 40 -Door sensor calibration 41-42 -Technician service 43-62 Test function 44-50 Oven number 51 Display oven set-up 52 Edit oven set-up 53-59 Logo 60-61 Language update 62 Enter codes 63 Survey of error codes 64 Appendices 65-66 -Appendix 1: WHIRLPOOL installation checklist 67 -Appendix 2: WHIRLPOOL instruction checklist 68-69 -Appendix 3: Oven set-up (set-up menu)

- 3 -
Preface and Terms of Warranty
You are now the owner of one of the leading oven products on the market. All WHIRLPOOL products are currently subjected to intensive product development, which ensures that the products always contain the latest technology and the most up-to-date and energy-saving methods of preparation. Furthermore, the WHIRLPOOL products are entirely up-to-date with the latest developments/ technology in terms of
• ERGONOMICS AND SAFETY • SIMPLE AND LOGICAL OPERATION • USER FRIENDLY DESIGN • RELIABILITY AND SERVICE
To ensure that our customers get an optimum and reliable product, all WHIRLPOOL units are passed through an extensive test program in which all functions are subjected to a continuous and extreme load. For optimum results Before you start using the oven, we recommend that you study the user’s manual thoroughly in order to be able to fully utilise the many facilities and to ensure optimum cooking results. Furthermore, by going through the manual, you will obtain a better understanding of the advanced technology and feel safer when using the oven in your daily work. Terms of warranty Provided that it has been registered on the WHIRLPOOL website, your new WHIRLPOOL oven is covered by a 48-month factory warranty. The warranty covers the oven cabinet and spare parts. Furthermore, there is a 10-year warranty on the exterior door glass. The period of warranty takes effect from the date of production. For further information on the warranty terms, please visit www.houno.com/warranty. The warranty does not include.... We especially draw your attention to the fact that the factory warranty does not cover glass parts such as interior door glass, lamp glass and halogen lamps, nor does it cover sealings. Furthermore, the factory warranty does not apply in the case of
• defects that are due to the fact that installation has not been carried out in accordance with the WHIRLPOOL Installation & Service Manual at present in force (electricity, gas, water/drain, exhaust),
• damage resulting from accidents, including damage caused by water, transport,
misapplication or negligence,
• defects and interruptions of operation that are the result of the oven not being handled/operated as specified in the user's manual.
WHIRLPOOL cannot be made liable for indirect loss, including loss of profits. If you utilise all the technological facilities of this oven, you are guaranteed perfect results with only a minimum of resources. Enjoy your new WHIRLPOOL oven. Yours sincerely, WHIRLPOOL

- 4 -
Rating Plate When communicating with WHIRLPOOL, we kindly ask you to inform us of the serial number of the oven that is stated on the rating plate. The rating plate is located on the right-hand corner post of the oven cabinet, as shown below.

- 5 -
Installation and Connection Unpacking the oven The oven is best handled while still in its wrapping. Wherever possible, use a lifting trolley. Introduce the lifting trolley under the lower cross tube of the stand and place a couple of wooden blocks between the cross tube and the lifting trolley. To achieve the best possible balance, introduce the lifting trolley from the front of the oven or from the motor side. Note that the oven can be lifted off the stand.
Remove the original packaging from the oven. Do not remove the foil that covers the surfaces until the oven has been installed, as once the foil has been removed the surfaces are vulnerable to sharp objects such as tools. Remove all packaging material that secures the racks in the oven chamber.
The packaging should be destroyed in accordance with national rules and regulations governing waste disposal. Information on the composition of the packaging material can be obtained from the WHIRLPOOL Customer Centre.

- 6 -
Installation and Connection Installing the oven To ensure that the oven functions correctly when installed, it should be placed upright and level (horizontally). This is measured at the front and side edge of the roof, and adjustment is made by means of the adjusting screws on the stand or on the legs of table models. The height of the oven can also be adjusted to fit the trolley for rack.
Correct
Wrong
The oven should be placed 5 cm / 2 inches from the rear wall and the distance between the right side of the oven and the nearest wall or piece of furniture, etc. should be at least 7 cm / 2.75 inches. This is to ensure the necessary flow of cooling air to the oven. Strong sources of heat such as hotplates, tilting frying pans, deep fat fryers, etc. should not be placed near the oven, otherwise the warranty may cease to apply.
(NSF) On an oven with stand, the distance to the floor must be at least 150 mm / 5.9 inches. Only 2½ threads must be visible on the adjustable feet. (NSF) On table models, the legs must be adjusted to allow a minimum clearance of 76 mm / 3 inches to the surface on which the oven stands.

- 7 -
Installation and Connection
Water connection WHIRLPOOL ovens have one or two water connections. To facilitate cleaning and service, the oven should be connected with an approved flexible ¾’’ hose and the permanent installations should be fitted with a stop tap. Before connecting the oven to water, flush the tubes thoroughly. Hardness of the water: max. 3 dH Conductivity: min. 75 microsiemens Water pressure: min. 2.5 bar (36 PSI) dynamic pressure (when CombiWash on),
max. 6 bar (87 PSI) Water flow: min. 12 l/m Water temperature: max. 20°C (68°F) Chloride concentration: max. 100 mg/litre Sulphate: max. 150 mg/litre If the feeder is connected to the water distribution system with a flexible hose, this hose should be VA approved.
If the water temperature exceeds 20°C / 68°F, problems with regard to ClimaOptima calibration and cooling of the oven may occur.
Ovens with a steam generator must not be connected to a reversed osmosis plant, as this may cause problems with the reading of the water level in the steam generator.
The water connection must be carried out by an authorised plumber in accordance with existing rules and regulations
Clogged up water filters and dirt in the solenoid valves are not covered by the warranty. To ensure that the water quality is in conformity with the above requirements, the installation of a water filter in front of the water connection to the oven is recommended.
The installation of a particle filter (0.25mm) is also recommended.
In the case of two water connections, the following applies: 1) 1 connection for raw water for the condensation jet (cold water). Located at the back. 2) 1 connection for the steam generator and the jet in the oven chamber. Must meet the
requirements applying to water supplied to household appliances; however, hot water with a temperature not exceeding 20°C / 68°F can be used. Located at the front.

- 8 -
Installation and Connection Drain connection From the factory, the WHIRLPOOL ovens are equipped with a drain system that removes surplus water from the oven chamber. This water may be condensed water from the products, or it may occur when the oven chamber is cooled down with cold water, or when the oven chamber is cleaned.
Connection must be carried out by an authorised plumber, to an open or to a closed drain. It is recommended that a water outlet is available/established in the floor of the room where the oven is located.
The drain must never end directly under the oven.
The drain must be of stainless steel or an equally temperature-resistant material, have a diameter of at least 50 mm / 2 inches and a fall of at least 3° or 5%.

- 9 -
Installation and Connection Electrical connection/survey of supply lines
The electrical connection must be carried out by an authorised electrician in accordance with existing rules and regulations. The wiring diagram is located in the motor compartment. The terminal for the electrical connection is located behind the right side plate.
An approved plug outlet or a safety cutout must be located close to the oven so that the oven can be disconnected during installation and repair. The safety cutout must be able to cut off all poles with a total distance of break of at least 3 mm. Each of the two units in a stacked arrangement (CombiPlus) must have its own plug outlet or safety cut-out.
The warranty does not cover incorrect connection.
Supply lines - survey (applies to all electric models ) (All cross sections in mm² )
382, 395
382, 395
AFO ---- 375, 388
375, 388
376, 377, 378, 389, 390, 391
376, 377, 378, 389, 390, 391
379, 392
379, 392
380, 393
380, 393
383, 396
383, 396
384, 397
384, 397
9 kW Fuse 18 kW Fuse 24 kW Fuse 36 kW Fuse 27 kW Fuse 60 kW Fuse 400V 3N ~ 50/60
Hz 5x2,5 16A 5x4 35A 5x10 50A 5x10 63A 5x10 50A 5x25 100A
400V 3 ~ 50/60 Hz
4x2,5 16A 4x4 35A 4x10 50A 4x10 63A 4x10 50A * *
415V 3N ~ 50/60 Hz
5x2,5 16A 5x4 25A 5x10 50A 5x10 50A 5x10 50A 5x25 100A
440V 3 ~ 50/60 Hz
4x2,5 16A 4x4 25A 4x10 50A 4x10 50A 4x6 35A * *
200V 3 ~ 50/60 Hz
4x4 35A 4x16 63A 4x25 100A 4x35 125A 4x25 80A * *
230V 3 ~ 50/60 Hz
4x4 25A 4x10 50A 4x25 80A 4x35 100A 4x25 80A * *
480V 3 ~ 50/60 Hz
4x2,5 16A 4x4 25A 4x6 35A 4x10 50A 4x6 35A * *
208V 3 ~ 50/60 Hz
4x4 25A 4x10 50A 4x25 80A 4x35 100A 4x25 80A * *
* Not possible
Recommended supply line: H07RN-F
When you connect the oven, you should
• Follow the installation instructions and the information given on the rating plate. • Comply with local rules and regulations. WHIRLPOOL recommends the use of a (Type B) RCD/RCCB. 300 mA.

- 10 -
Exhaust The WHIRLPOOL ovens are equipped with an open/direct exhaust system that removes surplus humidity from the oven chamber. The exhaust system has an electrically operated damper. The exhaust tube can be connected to a ventilating system. In that case, a special extraction funnel is fitted to avoid suction directly from the oven chamber. This extraction funnel can be ordered from WHIRLPOOL. The scope of supply also includes a specially designed extraction hood, see illus. below.
If an extraction hood is installed in the ceiling above the oven, it should project 50 cm over the front of the oven. The suction effect should be 400 – 800 m3/h. The ventilation motor can be controlled directly from the oven. This means that the ventilation starts when a program is started and runs for 10 minutes after the program is completed.
The installation of the ventilation must be carried out in compliance with national rules and regulations.

- 11 -
Checking before Use The oven should be checked before you start using it. On the outside • Check that the oven has not been damaged in transit (dents, scratches, etc.) • Check/adjust the height and check that the oven is placed level (horizontally) • Check/adjust oven door Connections • Check for correct water connection • Turn on water supply • Check for leaks • Turn off water supply • Check and clean dirt filter • Turn on water supply again • Check hand shower • Check for correct electrical connection • Check connection to drip tray • Check for correct mounting of drip tray • Check for correct fall of hose from drip tray, and check for leaks • Check for correct exhaust and drain connection • Clean the oven • Apply steel oil Oven chamber • Check that filter housing is mounted correctly • Check interior light • Clean the oven Operation panel • Check and adjust, if necessary, each of the preset values • Heat up the oven at 250°C for approx. 5 min.
The installation checklist and the instruction checklist (appendices 1 and 2) should be filled in and returned to WHIRLPOOL 30 days after the installation, at the latest.

- 12 -
Annual Service Check
Customer: Address: By: Postal code: Serial No of the oven: Model: 1. Connection: Functioning correctly? YES NO Water connection – dirt filter (may need tightening) Electrical connection (may need tightening) Drain connection (May need tightening) Positioning of oven 2. Door: Closing device (may need adjusting) Catch (may need adjusting) Sealing (must be tight at 100°C steam or combi steam) Hinging (may need adjusting) Interior glass (hinging, fastening) Calibrate door sensor
3. Inside: Interior light Jets (may need cleaning) Fan (should rotate freely and be tightly fitted) Heating element (may need tightening)
4. Under oven: Drain system (check for leaks and blocks) Condensation jet and drain sensor Drip tray Drip slide on oven door
5. Motor room: Connection to heating elements Load distribution on phases Wire connection (overloading, bad connection, and tightening) Exhaust motor Fan motor (may need tightening) Frequency transformer (check regulation) ClimaOptima Cooling fan Filter for intake (may need cleaning) Cooling plate for Solid State Relay (clean) Check for moisture

- 13 -
6. Steam generator: Functioning correctly? YES NO Heating elements (check for leaks) Load distribution on phases Level sensor – to be cleaned Drain pump May need descaling 7. Functional test: Components (use test function) Core temperature probe Operation modes CombiWash (clean nozzle arm) Service Engineer: Date and signature
Parts to be replaced at 12-, 24- and 36-month service intervals:
12-month inspection Follow the annual service check (see above). Change: Door seal Light bulbs Gasket for lamp glass Nozzles Bearing for nozzle arm Update software
24-month inspection Follow the annual service check (see above). Change: Door seal Light bulbs Gasket for lamp glass Nozzles Main contactor Spring for handle Bearing for nozzle arm Update software
36-month inspection Follow the annual service check (see above). Change: Door seal Light bulbs Gasket for lamp glass Nozzles Exhaust for damper motor Detergent/rinse pump Nozzle arm assy Update software

- 14 -
Start Menu
• For further information on the modes shown on this page, see user’s manuals
Access to MAIN MENU (see p. 15)
Chooses next function to the left (see user’s manual)
Temperature down
Time down (for operation without time setting, press key until "-:--" appears)
Access to fan and exhaust functions (see user’s manual)
Not active
Not active in HOT AIR
Chooses next function to the right (see user’s manual)
Temperature up
Time up
Access to core temperature mode (see user’s manual)
Not active in HOT AIR
Access to preset programs On/off
Main switch

- 15 -
Main Menu • Please note that prior to delivery, the oven’s computer has been thoroughly tested and
correctly set up and we therefore recommend that all users, with or without a code, navigate in the engineering with the utmost care. Incorrect handling may result in inappropriate changes to the computer set-up.
• Changing the computer set-up requires extended knowledge as to the design and structure
of the oven. If in doubt, please contact your oven supplier.
Return to start screen
See user’s manual
See user’s manual
See user’s manual
See user’s manual
Not active
Not active
Access to oven set-up menu (see p. 16)
Access to service menu (see p. 23)
Not active
Not active
Access to entering code (see p. 63)
Main switch

- 16 -
Set-up Menu
• Access to various settings. Avoid changing the settings inappropriately (contact your oven supplier for further information).
Not active
Access to SETTING CLOCK (see p. 21)
Access to OVEN SET-UP (see p. 22)
Not active
Return to MAIN MENU
Access to SETTING CONTRAST in display (see p. 23)
Access to SELECTING LANGUAGE (see p. 17)
Access to NETWORK (see p. 18-19)
Not active
Not active
Access to SETTING ALARM (see p. 20)
Not active
Main switch

- 17 -
Select Language
• Showing the languages available. The red square indicates which language has been selected.
Return to SET-UP MENU
Selecting Danish
Selecting English
Selecting Swedish
Selecting Italian
Selecting French
Access to more languages
Selecting Icelandic
Selecting Estonian
Selecting German
Selecting Spanish
Selecting Finnish
Main switch

- 18 -
Network
• IP addr: Use Not active IP address that is compatible with the network in question.
• Netmask: Use Not active netmask that is compatible with the network in question.
• Gateway: Set for internet router in question.
• SMTP: Set for mail server of internet access provider.
• INFO: PORT FORWARD 5900 and 80 of the internet router should be open for the IP address of the oven if the user wants WHIRLPOOL to have free access to the oven.
• INFO: If the user wants the oven to be updated via the WHIRLPOOL server, it suffices
to set the Gateway, however, WHIRLPOOL must be named as UPDATE SERVER in the SET-UP SECTION.
• Only an internet browser is required to access the oven from a computer.
Return to SET-UP MENU
Not active
Not active
Not active
Move cursor to the left
Number down
Confirmation of setting and return to SET-UP MENU
Not active
Not active
Not active
Move cursor to the right
Number up
Main switch

- 19 -
Example of network + oven
IP / 24 = IP / 255.255.255.0 Network set-up for oven: IP addr: 192.168.1.5 Netmask: 255.255.255.0 Gateway: 192.168.1.254 Access code for CombiNet: USER: Superuser Access code: 87 64 12
Example of direct connection to computer Network set-up for oven: IP addr: 192.168.1.5 Netmask: 255.255.255.0
INTERNET
Router
192.168.1.1/24 192.168.1.2/24 192.168.1.3/24 192.168.1.4/24
192.168.1.5/24
192.168.1.254/24
IP address from internet supplier
OR
Must be crossed cables
192.168.1.5/24
192.168.1.1

- 20 -
Setting Sound
• It is possible to change the volume and the frequency of the sound and to determine for how long the sound should be heard. You choose between 10, 30, 60, 180 and 600 seconds, which means that the sound will be heard continuously for the chosen period of time after which it will change into a beep.
Return to SET-UP MENU
Volume down
Sound frequency down
Testing sound
Not active
Not active
Confirmation of setting and return to SET-UP MENU
Volume up
Sound frequency up
Not active
Not active
Not active
Main switch

- 21 -
Setting Time
Return to SET-UP MENU
Not active
Not active
Move cursor to the left
Day/month/year/hours/ minutes down
Not active
Confirmation of setting and return to SET-UP MENU
Not active
Not active
Move cursor to the right
Day/month/year/hours/ minutes up
Not active
Main switch

- 22 -
Oven Set-up • With a code for the computer, the service engineer has the option of many settings.
Changing the set-up requires extended knowledge of the WHIRLPOOL ovens. Unnecessary or incorrect changes to the settings may change the computer set-up inappropriately.
• See Appendix 3, pp. 66 – 67 for a survey of the oven set-up.
Return to SET-UP MENU
Not active
Not active
Not active
Not active
Changing status
Confirm setting, oven starts automatically
Moving one menu up
Moving one line up
Moving one line down
Moving one menu down
Changing status
Main switch
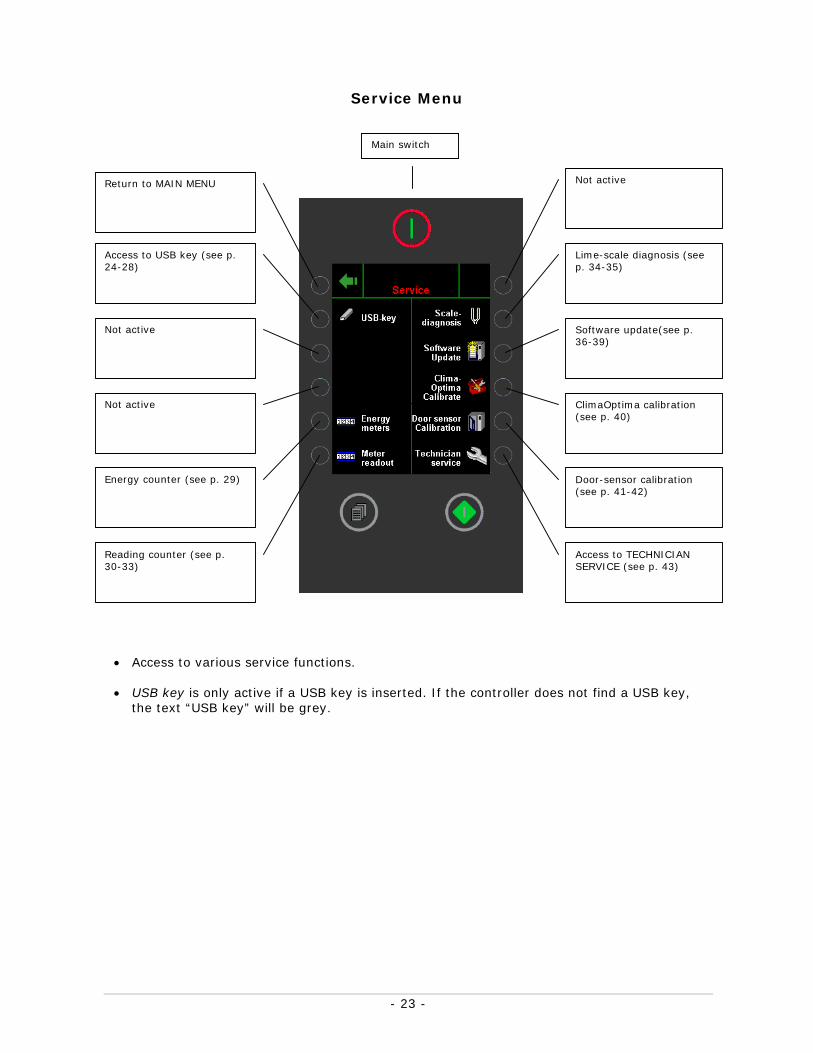
- 23 -
Service Menu • Access to various service functions.
• USB key is only active if a USB key is inserted. If the controller does not find a USB key,
the text “USB key” will be grey.
Return to MAIN MENU
Access to USB key (see p. 24-28)
Not active
Not active
Energy counter (see p. 29)
Reading counter (see p. 30-33)
Not active
Lime-scale diagnosis (see p. 34-35)
Software update(see p. 36-39)
ClimaOptima calibration (see p. 40)
Door-sensor calibration (see p. 41-42)
Access to TECHNICIAN SERVICE (see p. 43)
Main switch

- 24 -
Select USB Key Service • In this menu, you can take a backup and restore data from the backup of the oven set-up
and of the programs.
Return to SERVICE MENU
Take backup
Access to restore from backup (see p. 27)
Access to USB key service (see p. 28)
Not active
Not active
Not active
Retrieve recipes from USB (see user’s manual)
Send recipes to USB (see user’s manual)
Not active
Not active
Not active
Main switch

- 25 -
Restoring Backup • In this menu, you select the oven backup to restore from. • This oven XXXXXXXXX(A/B) (ex. this oven 010755667): Shows the number of the oven in
question.
Return to SERVICE MENU
Not active
Not active
Not active
Not active
Not active
Select oven and proceed to SELECT BACKUP (see p. 26)
One line up
Not active
Not active
Not active
One line down
Main switch

- 26 -
Selecting Backup Menu
• In this menu, you select the backup to restore from.
• Format: Backup ÅÅMMDDTTMM.
Return to OVEN MENU
Not active
Not active
Not active
Not active
Not active
Select backup and proceed to RETRIEVE BACKUP (see p. 27)
One line up
Not active
Not active
Not active
One line down
Main switch

- 27 -
Restoring from Backup Menu • In this menu, you select the features to be restored from the backup.
Start restoring features selected and restart when completed.
Not active
Not active
Not active
Not active
Not active
Main switch
Return to SELECT BACKUP
Select recipes when restoring from backup
Select counters when restoring from backup
Select error log when restoring from backup Not active
Select set-up when restoring from backup
Select ClimaOptima calibration when restoring from backup

- 28 -
USB Key Service Menu • This menu is a survey of the contents of the USB memory key. • With this menu, it is possible to test the USB memory key. • NOTE that when pressing Delete key, the entire contents of the key are deleted.
Return to SERVICE MENU
Not active
Not active
Not active
Not active
Select Test key
Not active
Not active
Not active
Not active
Not active
Select Delete key
Main switch

- 29 -
Energy Meters • Shows consumption of electricity – in total and since last resetting (trip).
Return to SERVICE MENU
Not active
INFO: Shows oven’s total power consumption since last resetting (counter total)
Not active
INFO: Shows time of last resetting of counter total
Not active
Not active
Not active
INFO: Shows oven’s total power consumption since last resetting (trip counter)
Not active
INFO: Shows time of last resetting of trip counter.
Resetting of trip counter
Main switch

- 30 -
Reading Meters • Reading of various counters (units, consumption, errors).
Return to SERVICE MENU
Access to error log (see p. 31)
Access to error statistics (see p. 32)
Access to service counters (see p. 33)
Not active
Not active
Not active
Not active
Not active
Not active
Not active
Not active
Main switch

- 31 -
Error Log • This menu shows the last 30 errors that have occurred, the most recent one at the top.
Return to READ METERS
Not active
Not active
Not active
Not active
Not active
Move to next page
Not active
Not active
Not active
Not active
Not active
Main switch

- 32 -
Error Statistics 3-20 • This menu shows the number of times the various errors have occurred, and the time of
the most recent error.
Return to READ METERS
Not active
Not active
Not active
Not active
INFO: Shows time of last resetting
Next page
Not active
Not active
Not active
Not active
Resetting of error statistics
Main switch

- 33 -
Service Counters ACT: Shows how many times the unit in question has been active. TIME: Shows for how long the unit in question has been active.
Return to READ METERS
Not active
Not active
Not active
Not active
INFO: Shows time of last resetting
Not active
Not active
Not active
Not active
Not active
Resetting of all counters
Main switch

- 34 -
Lime-scale Diagnosis • Do not interrupt the descaling process.
Return to SERVICE MENU
Not active
Not active INFO: This bar shows the level of lime-scale from 0 to 100%.
Not active
Not active
Not active
Not active
Not active
Not active
Not active
Start descaling of steam generator
Not active
Main switch

- 35 -
Lime-Scale Diagnosis – Description of steps Step 1 of 14 Emptying (40 sec.), filling, heating to 40°C
Step 2 of 14 Display shows: „Remove exhaust valve and add WHIRLPOOL descaling agent by means of WHIRLPOOL descaling funnel“ Alarm sounds for 5 sec. Press OK
Step 3 of 14 Display shows: „Fit exhaust valve“ Press OK
Step 4 of 14 Heating to 90°C Step 5 of 14 3-minute interval Step 6 of 14 Heating to 105°C Step 7 of 14 3-minute interval Step 8 of 14 Heating to 105°C, interval (cooling down to 99°C), duration: 30 min. Step 9 of 14 Emptying for 40 seconds. Step 10 of 14 Filling to upper level Step 11 of 14 Heating to 105°C
Step 12 of 14 1/3 rinsing – emptying 1/3 rinsing – filling 2/3 rinsing – emptying 2/3 rinsing – filling Step 13 of 14 Reboil at 105°C – to flush tubes Step 14 of 14 3/3 rinsing – emptying 3/3 rinsing – filling
Done
Display shows: „Descale is done“ Alarm sounds for 5 sec. Press OK

- 36 -
Software Updating Menu • Software updating via WHIRLPOOL server, requires Internet access.
Return to SERVICE MENU
INFO: Shows current software and IO board version and oven serial no
Select WHIRLPOOL server for updating (see p. 37)
Select USB key for updating (see p. 38)
Not active
Not active
Not active
Not active
Not active
Not active
Not active
Not active
Main switch

- 37 -
WHIRLPOOL Server, Software Updating Menu • In this menu, you update the controller with the latest version of the software via the
Internet. • This process usually takes 10 – 20 minutes; the oven must not be turned off during this
time.
• The oven restarts automatically and is ready for use when the main menu appears.
Return to SOFTWARE UPDATE
INFO: Software installed in oven Not active
INFO: Software accessible via FTP server Not active
Not active
Not active
Not active
Not active
Not active
Not active
Select Update Only visible if more recent version is available
Not active
Not active
Main switch

- 38 -
USB Key (1), Software Updating Menu • In this menu, you update the controller with the latest version of the software via a USB
key. • This process usually takes 10 – 20 minutes; the oven must not be turned off during this
time.
• The oven restarts automatically and is ready for use when the main menu appears.
Return to SOFTWARE UPDATE
INFO: Software installed in oven Not active
INFO: Software accessible via USB key Not active
Not active
Not active
Not active
Not active
Not active
Not active
Select Update Only visible if more recent version is available
Not active
Not active
Main switch

- 39 -
USB Key (2), Software Updating Menu • This function is possible if the controller is updated with software version 1.50 or higher.
Can be downloaded from www.houno.com.
1. Oven must be off. 2. Insert USB key in oven. 3. Turn oven on. 4. This menu appears.
Not active
INFO: Shows current software version in oven (Not active)
Not active
Not active
Not active
Not active
Not active
INFO: Shows software version to which controller is being updated (not active)
Not active
Not active
Press OK to start updating process
Not active
Main switch

- 40 -
Step Time Temp. Oven Exhaust1 Cal. Abt 15 min, 70 Dry Open2 Cal. Abt. 2 min. 70 Dry Open3 Cal. Abt. 2 min. 70 Dry Closed4 Cal. Abt. 8 min 250 Dry Open5 Cal. Abt. 3 min. 250 Dry Closed6 Cal. Abt. 5 min. 190 Wet Closed7 Cooling Abt. 30 sec 105 Open8 Cal. Abt. 5 min. 130 Wet Closed9 Cooling Abt. 8 min. 45 Open
10 Cal Abt. 4 min. 70 Wet Closed
ClimaOptima Calibration
Calibration should be carried out when • CPU board is replaced • Differential pressure sensor is replaced • Fan wheel is removed and mounted again
or replaced • Filter housing is replaced
The oven should be as dry as possible before calibration is carried out. The oven temperature must not be higher than 40°C when calibration is started.
NOTE: If calibration is started by mistake, turn off the oven (no other keys are active). NOTE: Do not interrupt the calibration process.
Not active
Not active
Not active
Not active
Not active
Not active
Not active
Not active
Not active
Not active
Not active
Not active
Main switch

- 41 -
Door Sensor Calibration
• With this menu, you calibrate the door sensor. On the following page, the calibration
process is explained step by step. • The measurement is an internal value for the distance between the magnet and the sensor. • When the door is door open, the voltage is approx. 2.5 V. • When the door is closed, the voltage moves towards 5 or 0 V depending on the direction of
the magnet. • When PassThrough is active, door 2 appears on the right side of the menu.
Return to SERVICE MENU
Not active
Start calibration of door sensor
Not active
INFO: During the calibra-tion process, the controller finds the set point automa-tically on the basis of the measurements taken with door closed and door open.
INFO: The measurement taken with door closed should be between 10 and 100. The difference be-tween door closed and door open should be at least 10.
Not active
Not active
Not active
Not active
Not active
Not active
Main switch

- 42 -
How to Calibrate Door Sensor • Note that if the oven is a PassThrough oven, there are two doors to be calibrated. • It is not possible to adjust the door sensor physically, only by means of software.
Press ”Start calibration” to start calibration process
Close door firmly and press key again
Open door in first step and press key again
Press ”OK” to confirm calibration

- 43 -
Technician Service • In this menu, you access TEST FUNCTIONS and SHOW/EDIT OVEN SET-UP and enter a new
boot logo.
Return to SERVICE MENU
Select Test functions (see pp. 44-50)
Not active
Select Oven number (see p. 51)
Not active
Not active
Not active
Select show oven setup (see p. 52)
Select Edit oven setup (see pp. 53-59)
Select New boot logo (see pp. 56-57)
Select Language update (See p. 58)
Not active
Main switch

- 44 -
Test Functions
Return to TECHNICIAN SERVICE
Access to Test function, oven (see p. 45)
Access to Test function, fan (see p. 46)
Access to Test function, steam generator (see p. 47)
Access to Test function, CombiWash (see p. 48)
Access to miscellaneous test functions (see p. 49)
Not active
Access to Main alarm (survey of thermo-switches) (see p. 50)
Not active
Not active
Not active
Not active
Main switch

- 45 -
Test Function, Oven • Heat can only be activated when main contactor and fan motor are on.
• Door 1 and Door 2 show status of doors. Door 2 will/must always be closed unless the
oven in question is a PassThrough.
• Oven shows current temperature in oven chamber.
• Drain shows current temperature in drain.
• Exhaust shows status of exhaust motor.
Return to TEST FUNCTION
Activate main contactor
Activate heat
Activate cooling fan
Activate oven chamber jet
Activate interior lighting
Not active
Activate exhaust motor
Activate condensation jet
Not active
Not active
Not active
Main switch

- 46 -
Test Functions, Fan
• RPM 1 is used for all oven models.
Return to TEST FUNCTION
Activate low fan speed, motor running left
Activate high fan speed, motor running left
Activate stop
Not active
Motor speed down.
Not active
Activate low fan speed, motor running right
Activate high fan speed, motor running right
Activate main contactor (otherwise motor unable to run)
Not active
Motor speed up
Main switch

- 47 -
Test Function, Steam Generator
• How to set the water level:
1. Empty steam generator and read sensor input. 2. Fill steam generator until water level is high, and read sensor input. 3. Set level to a value between high and low sensor input. 4. Conclude by pressing OK.
Return to TEST FUNCTION
Cannot be activated until water level in steam generator is high and main contactor is active.
Not active
Not active
Not active
Level DOWN
Confirm level setting
Activate filling jet
Activate drain pump
Not active INFO: Current temperature in steam generator
INFO: Water level in steam generator (high or low)
Level UP
Main switch

- 48 -
Test Function, CombiWash
Return to TEST FUNCTION
Activate pump for detergent
Activate pump for rinse aid
Activate solenoid valve for water
Not active
Not active
Not active
INFO: Status for water pressure sensor (2 bar pressure sensitive switch)
Not active
Not active
Not active
Not active
Main switch

- 49 -
Test Functions, Misc. • Core 1: Shows current temperature of core temperature probe 1 (3 measuring points). • Core 2: Shows current temperature of core temperature probe 2 (3 measuring points). • When the external ventilation is activated, the oven control leaves the outlet active
during program performance and 10 minutes after the program has ended.
• Note that as external vent. 1 and 2 are merely control voltage, they should be connected through an external relay (max.: 24V).
• Press sens shows voltage from pressure sensor (between 0 and 5 volts). • IO temp shows temperature of IO board.
• CPU temp shows temperature of CPU board.
Return to TEST FUNCTION
Activate external vent. 1 Terminal 4
Activate external vent. 2 Terminal 5
Activate restart lamp
INFO: Restart status
INFO: Voltage at pressure sensor for ClimaOptima Not active
Not active
INFO: Temperature core temperature probe 1 Not active
Not active
INFO: Temperature Core temp. probe 2 Not active
Not active
INFO: Temperature at IO board and CPU Not active
Main switch

- 50 -
Test Function, Main Alarm
Return to TEST FUNCTION
Activate main contactor
INFO: Shows status of thermo-switch circuit
Not active
Not active
Not active
Not active
Not active
Not active
Not active
Not active
Not active
Main switch

- 51 -
Oven Number
• In this menu, you enter the serial number of the oven.
• The serial number consists of 9 figures. The serial number of the CombiPlus models includes the letters A or B (A = upper oven – B = lower oven).
• The serial number is printed on the approval plate.
• The serial number is used in the HACCP mode and in the menus Oven back-up and
Restore from backup.
• The serial number can only be deleted if it holds 9 figures. Press 4/CE.
Return to TECHNICIAN SERVICE
Key in 0/A
Key in 1
Key in 2
Key in 3
Key in 4/CE
Press OK to save oven number, and return to TECHNICIAN SERVICE
Key in 5/B
Key in 6
Key in 7
Key in 8
Key in 9
Main switch

- 52 -
Display Oven Set-up • This menu shows the features incorporated in this particular oven. Changes not possible.
Return to TECHNICIAN SERVICE
Not active
Not active
Not active
Not active
Not active
Not active
Not active
Not active
Not active
Not active
Not active
Main switch

- 53 -
Oven Set-up 1: Select Generation • We recommend that you write down the settings of DISPLAY OVEN SET-UP before making
any changes to the set-up.
Return to TECHNICIAN SERVICE
Select VC1 for previous generation of Visual Cooking
Not active
Not active
Not active
Not active
Not active
Select VC2 for the new generation of Visual Cooking
Not active
Not active
Not active
Not active
Main switch

- 54 -
Oven Set-up 2: Select Oven Model • We recommend that you write down the settings of DISPLAY OVEN SET-UP before making
any changes to the set-up.
Return to OVEN SET-UP 1: SELECT GENERATION
Not active
Not active
Not active
Not active
Not active
Press OK to confirm
Select ”BPE”
Select ”CPE”
Select ”KPE”
Not active
Not active
Main switch

- 55 -
Oven Set-up 3: Select Oven Size
• We recommend that you write down the settings of DISPLAY OVEN SET-UP before making any changes to the set-up.
Return to OVEN SET-UP 2: SELECT OVEN MODEL
Select oven size 1.06
Select oven size 1.08
Select oven size 1.10
Select oven size 1.12
Select oven size 1.16
Press OK to confirm
Select oven size 1.20
Select oven size 2.10
Select oven size 2.14
Select oven size 2.20
Not active
Main switch

- 56 -
Oven Set-up 4
Return to OVEN SET-UP 3: SELECT OVEN SIZE
Not active
Not active
Not active
Not active
Not active
Press OK Next menu
Is this a PassThrough oven? YES / NO
Does oven have a restart button? NONE / DISPLAY / EXTERN / BOTH (PassTrough ovens only)
Restart time 1-10 min.
Does oven have core temp. probe 1? YES / NO
Does oven have core temp. probe 2? YES / NO
Main switch

- 57 -
Oven Set-up 5
• *Special oven set-up for BKI UK.
• **Special oven set-up for EUROSPICE in Sweden.
• *** For ovens that start up in the recipes menu (not in the start menu). CombiClean / CombiWash is then found with each recipe.
Return to OVEN SET-UP 4
Not active
Not active
Not active
Not active
Not active
Press OK Next menu
Is oven set-up to be BKI UK* / EUROSP** / CC Menu***
When oven starts, you are logged on as USER / SUPERUSER
Is oven to start in recipes? YES / NO
Does oven have CombiNet? YES / NO
Does oven have HACCP? YES / NO
Main switch

- 58 -
Oven Set-up 6
Oven Set-up 7
Return to OVEN SET-UP
Not active
Not active
Not active
Not active
Not active
Press OK Next menu
Does customer want more speeds than high and low?
Set hardness of water. 0-8 dH / 8-18 dH / 18→dH
Should the level of detergent be monitored? YES / NO
Should clock show 12 or 24 hours?
Temperature scale: Celsius or Fahrenheit?
Main switch

- 59 -
• This is the final set-up of the oven. Changes not possible.
Return to OVEN SET-UP 6
Not active
Not active
Not active
Not active
Not active
Press OK Oven restarts
Not active
Not active
Not active
Not active
Not active
Main switch

- 60 -
Logo • In this menu, you select new boot logo / logo screen saver. • You can have your own logo affixed to the oven. Please contact HOUNÖ.
Main switch
Return to TECHNICIAN SERVICE
Select boot logo if available, otherwise not active
Select boot logo if available, otherwise not active
Select boot logo if available, otherwise not active
Select boot logo if available, otherwise not active
Select boot logo if available, otherwise not active
Not active
Select boot logo if available, otherwise not active
Select boot logo if available, otherwise not active
Select boot logo if available, otherwise not active
Select boot logo if available, otherwise not active
Select boot logo if available, otherwise not active

- 61 -
Logo
• Oven restarts automatically after downloading of new logo.
• The new boot logo will be active after restart and the logo screen saver appears when oven has been idle for a while.
Return to TECHNICIAN SERVICE
Not active
Not active
Not active
Not active
Not active
Not active
Not active
Not active
Not active
Not active
Not active
Main switch

- 62 -
Language Update
• In this menu, you update language files from the USB key.
Return to TECHNICIAN SERVICE
Not active
Not active
Not active
Not active
Not active
Select font for the language in question
One line up
Not active
Not active
Not active
One line down
Main switch

- 63 -
Enter Code
Codes: SUPER USER: 87 64 12 SERVICE ENGINEER: 57 60 21
Return to MAIN MENU
Press for 0
Press for 1
Press for 2
Press for 3
Press for 4
Confirmation of setting and return to MAIN MENU
Press for 5
Press for 6
Press for 7
Press for 8
Press for 9
Main switch

- 64 -
Error Codes
Error code 3: Generator too hot (Generator thermoswitch has tripped. Reconnect by pressing button under oven.)
Error code 4: Oven too hot (Oven chamber thermoswitch has tripped. Reconnect by pressing button under oven.)
Error code 5: Fan too hot (Thermoswitch in motor has tripped. Wait for 10 minutes and try again.
Error code 6: Drain too hot (Drain temperature has been above 75°C for more than 5 min. Check that jet in drain is working.)
Error code 7: Oven sensor defective (Temperature sensor in oven chamber not working properly.)
Error code 8: Core temp. probe not connected (A program using core temp. probe has been selected but probe has not been connected.)
Error code 9: Generator sensor defective (Temperature sensor in generator not working.) Error code 10: Drain sensor defective (Sensor in drain not working. Oven can still be used.)
Error code 11: Water shortage (Steam generator was not filled within two minutes. Check that the water has been turned on.)
Error code 12: SSR too hot (Solid-state relay too hot.)
Error code 13: Generator too hot (Temperature in steam generator higher than 130°C. If fault recurs, descale generator)
Error code 14: Fan running too slow Error code 16: IO board too hot Error code 19: Internal defect (Internal failure in SW process. Restart oven.) Error code 20: Internal defect (Failure in communication between computer and IO board.) Error code 21: Invalid program (Program uses function which oven does not support.)
Error code 22: Program interrupted (Power cut-out during program performance. Cut-out has lasted so long that program cannot be restarted.)
Error code 24: Draining failure (Steam generator could not be emptied during flushing. Level sensor reports high water level when generator is emptied.)
Error code 25: ClimaOptima (ClimaOptima not calibrated. Enter service menu and calibrate.)
Error code 26: ClimaOptima (ClimaOptima sensor defective. Pressure sensor does not give out correct signal.)
Error code 28: Alarm defective (An invalid combination of the main alarms has been detected. The main alarms are not shown correctly.)
Error code 29: Door sensor defective (Door sensor does not work. Note: Oven does not stop when door is opened. Oven can still be used.)
Error code 34: Water pressure too low (Check that water is turned on.) Error code 36: No detergent (Detergent or rinse aid has run out.)
Error code 38: Detergent in oven (CombiWash interrupted while detergent in oven chamber. Run CombiWash step 0 before using oven.)
Error code 39: Memory insufficient (Memory insufficient for this operation.)
Error code 40: IO board hot (Internal temperature of IO board has been too high. Clean filter at the bottom of the panel. This is a warning: If temperature rises further, oven stops showing error code 16.
Error code 41: Main alarm (Steam generator thermoswitch has tripped during out-of-service time. Main contactor disconnected.)
Error code 42: SW defect (An SW defect has been detected during operation. Steam generator activated by mistake. Contact WHIRLPOOL Technical Support.)
Error code 45: 24V failure (No 24V AC. Check fuse F1. Main contactor output not working.)

- 65 -
Appendix No 1
WHIRLPOOL INSTALLATION CHECKLIST FOR DESIGN LINE OVENS
To be filled out at each installation of a WHIRLPOOL oven.
In order for the oven to qualify for warranty, this check list must be filled out by the service engineer installing the oven and returned to WHIRLPOOL within 30 days of the date of installation.
Serial No:_________________________________
Installed by:____________________________________________________
Date of installation:________________/_____/__________
The installation was carried out not carried out on the basis of the requirements specified in the service and installation manual, please tick.
If the measurements do not correspond with the values stated in the service and installation manual, your WHIRLPOOL distributor should be notified. We confirm that the installation has been carried out on the basis of the attached check list and in compliance with the rules/requirements applying in the country/area in question. When the oven was handed over, it was free from any kind of defect.
--------------------------------------- -------------------------------------- Signature / date – service engineer Signature / date - customer

- 66 -
Access to the oven: (Recommended distance for service and for installation near other heat-generating appliances (all oven sizes). All ovens Distance measured in mm
Left side minimum 50 mm (2”)
Rear side minimum 50 mm (2”)
Right side minimum 400 mm (15”)
Drain connection: Heat-resistant drain tube connected.
Fall of at least 3º or 5%.
CombiPlus fitted with open drain for both ovens.
The drain must never end directly beneath the oven. Voltage and water supply: (Please insert the measured value)
Voltage measured at:
Water pressure measured at: (min. 2 bar/28,5 psi max. 6 bar/88
psi).
Does the voltage on site comply with the voltage stated on the approval plate? Function test:
All electrical connections are tight.
All water connections are tight and have been fastened.
All functions are operable.
All equipment is operable.
Yes No
Yes No
Yes No

- 67 -
Appendix No 2
WHIRLPOOL INSTRUCTION CHECKLIST FOR DESIGN LINE OVENS
To be filled out for each installation of a WHIRLPOOL oven.
In order for the oven to be qualified for warranty, this check list must be filled out and returned to WHIRLPOOL within 30 days of the date of instruction.
Customer:_______________________________________________
Address:________________________________________________________
_______________________________________________________________
_______________________________________________________________
Tel.:_____________________________________ Fax:_____________________________________
E-mail address:____________________________
Serial no.:_________________________________
Instruction carried out by:__________________________________________
Date of instruction:_________________/_____/__________ (Please tick the appropriate box) Yes No
The customer has been instructed in the manual use and programming of the oven.
The customer has been instructed in the daily cleaning of the oven.
The customer has been instructed in the maintenance of the oven.
When the oven was handed over, it was free from any kind of defect. The handling, maintenance and cleaning of the oven have been explained to the customer. --------------------------------------- --------------------------------------
Signature / date – Sales person Signature / date - Customer

- 68 -
Appendix 3 Oven Set-up (Set-up menu)
Nr Parameter Setting Dansk English Deutsch
1 Oven light door NO, YES Sluk ovnlyset ved åben dør (B-
ovn med lys i døren).
Oven light off when door is open (B oven with lights in door).
Licht aus bei geöffneter Tür. (B- Ofen mit Licht in der Tür).
2 Oven light 5 mins NO, YES Ovnlys går ud efter 5 min.,
ellers konstant.
Oven light off after 5 min., otherwise oven light on continuously.
Licht aus nach 5 min., sonst andauernd.
3 Screen saver Off, 5sec, 15sec, 1min, 5min,15min, 1hour
Vis pauselogo efter valgt tid. Show screen saver after selected time of inactivity.
Bildschirmschoner erscheint nach angewählter Zeit.
4 Menu start NO, YES Ovnen starter med visning af
valg af programmer i stedet for de manuelle funktioner.
Oven starts by showing selection of programs instead of manual functions.
Anfangs zeigt der Ofen Programmauswahl statt manueller Funktionen.
5 Start up permission User, SUPER Skal ovnen starte op som User
eller Superuser? Choose if oven should start in the user or superuser mode.
Anwählen, ob der Ofen im Modus „User“ oder „Superuser“ starten soll.
6 DeltaT C/F 10/18 - 20/36 - 70/126
Ønsket forskel mellem ovn og kernetemperatur i Delta-T.
Select difference between core temperature and oven temperature during Delta-T.
Gewünschter Unterschied zwischen Garraum- und Kern-temperatur während Delta-T.
7 C&H diff C/F
3/5.4, 5/9, 10/18
Cook & Hold: Ved hvilken for-skel mellem aktuel kernetemp. og set-punktet for kernetemp. begynder ønsket ovntemperatur at blive sat ned? 5°C / 9°F
Cook & Hold: Choose at which difference between actual and set-point core temperature the oven temperature should be reduced.
Cook & Hold: Bei welchem Unterschied zwischen dem Soll- und Ist-Wert der Kerntemp. startet die Herabsetzung der Ofentemperatur?
8 Restart key None, Display, Extern,Both
PassTrough. Genstart sidste step. Fra hvilken side af ovnen skal der genstartes?
PassThrough.Restart last step. From which side of the oven should the restart be operated?
PassThrough. Neustart, letzter Schritt. Von welcher Seite des Ofens soll die Restart-Funktion bedient werden?
9 Restart time 1-5-10 min PassThrough. Antal minutter
der skal genstartes.
PassThrough. Select for how long the oven has to restart (minutes).
PassThrough. Dauer des Neustarts einstellen ((Minuten).
10 Exhaust 1 YES, NO Ekstern ventilation, hastighed 1. External ventilation, speed 1 on-off.
Externe Ventilation, Geschwindigkeit 1.
11 Exhaust 2 NO, YES Ekstern ventilation, hastighed 2
(er ikke implementeret). External ventilation, speed 2 on-off (not yet implemented).
Externe Ventilation, Geschwindigkeit 2 (ist noch nicht eingeführt).
12 Hand steam YES, NO Skal der være mulighed for
manuel dysedamp under kørsel?
Select possibility of manual steam while oven is running.
Manuelle Feuchtezufuhr während des Betriebs möglich.
13 Steam int 1 6 - 12 - 30 sec Interval for dyse ved Combi 1. Injection interval, Combi 1. Einspritzsintervall beir Combi 1.
14 Steam int 2 3 - 5 - 17 sec Interval for dyse ved Combi 2. Injection interval, Combi 2. Einspritzinyrtbsll bei Combi 2. 15 Steam int 3 1 - 8 sec Interval for dyse ved Combi 3. Injection interval, Combi 3. Einspritzintervall bei Combi 3.
16 Reheat Steam int 4 - 8 - 18 sec Interval for dyse ved Genopvarmning. Injection interval, Reheating. Einspritzintervall bei
Wiederaufwärmen.
17 Proving Steam int 12 - 20 - 32 sec Interval for dyse ved Raskning. Injection interval, Proving. Einspritzintervall bei Gären.
18 Proving Steam pulse 0.6 - 1.0 - 2.0 sec
Impulstid for dyse ved Raskning.
Duration of injection pulse, Proving. Impulszeit der Düse bei Gären.
19 Temp. Unit Cels. Fahr.
Temperaturenhed, Celsius eller Fahrenheit.
Temperature unit, Celsius or Fahrenheit.
Temperatureinheit, Celsius oder Fahrenheit.
20 Oven type BPE, CPE, KPE Ovntype Oven type. Ofen-Modell
21 Oven size 1.06-2.14 Ovnstørrelse Oven size. Ofen-Gröe.
22 Mechanical vc1, vc2 Ovngeneration (VC II efter okt. 07).
Oven generation (VC II after Oct. 07).
Ofen-Generation (VC II ab Okt. 07).
23 PassThrough NO. YES Ovn med to døre. Oven with two doors. Ofen mit beidseitigen Türen.
24 Two fans NO, YES Er ovnen med to blæsere?
(1.20 og nye 1.16). Is oven equipped with two fans (1.20 and new 1.16)?
Ist der Ofen mit zwei Gebläsen ausgerüstet (1.20 und neuer 1.16)?
25 Custom mode
None, BKI, EURO, CC i Menu,
Speciel funktion for kunde. Om CombiWash er under programmer, besked om tømning af fedtbakke, specielle ikoner.
Customer-specific function. CombiWash selectable in Recipes menu; notice about emptying of fat tray; special recipe icons.
Kundenspezifische Funktion. CombiWash anwählbar im Menü Rezepte, Meldung bei Fettabscheidung, neue Ikonen.

- 69 -
26 Recipes 20/4, 200/10 Max. antal opskrifter og trin. Max. number of recipes and
steps. Höchstzahl der Rezepte und Prosessschritte.
27 Fan freq. Inv NO, YES Er blæseren med frekvensomformer? Is fan with frequency inverter? Ist das Gebläse mit Frequenz-
umformer ausgerüstet?
28 Fan freq. volt. 5, 10 Styrespænding til
frekvensomformer, 5 eller 10V. Kun 10V bruges
Control voltage for frequency inverter, 5 or 10V. Only 10V is used.
Steuerspannung für Frekvenzumformer. 5 oder 10V. Nur 10V wird benutzt.
29 dT/C&H NO, YES Skal Delta-T og Cook & Hold være tilgængelig? Yes
Should Delta-T and Cook & Hold be selectable?
Delta-T und Cook & Hold anwählbar?
30 Core temp 1 NO, YES Skal Stegespyd 1 være valgbar?
Should core temperature 1 be selectable? Kerntemperatur 1 anwählbar.
31 Core temp 2 NO, YES Skal Stegespyd 2 være valgbar?
Should core temperature 2 be selectable. Kerntemperatur 2 anwählbar.
32 Pre heat max C/F 250/482, 300/572
Max. temperatur ved forvarmning. 300°C/572°F (250°C eller 300°C).
Max. preheat temperature 300°C/572°F (250°C or 300°C).
Höchsttemperatur bei Vorheizen 300°C/572°F (250°C or 300°C).
33 CombiNet NO, YES CombiNet giver adgang til
programredigering via web og offline via USB.
CombiNet is access to recipe editing through web and offline through USB key.
Mit CombiNet gibt es Zugang zum Programm-Editieren übers Web und offline über ein USB- Stick.
34 ClimaOptima NO, YES Er ovnen med ClimaOptima
(automatisk fugtregulering)? E- ovne er altid med ClimaOptima.
Is oven equipped with ClimaOptima (automatic humidity control)?
Ist der Ofen mit ClimaOptima (automatischer Feuchtigkeits-kontrolle) ausgerüstet?
35 CombiClean/ CombiWash
No, Yes, Wash Er ovnen med CombiClean eller
CombiWash (automatisk vaskeprogram)?
Is oven equipped with CombiClean or CombiWash (automatic cleaning system)?
Ist der Ofen mit CombiClean oder CombiWash (automa-tisches Reinigungssystem) ausgerüstet?
36 CC Level NO, YES Overvågning af indhold i
sæbedunke under CombiWash.
Monitoring of content of detergent container during CombiWash.
Überwachung des Füllstandes des Reinigerbehälters.
37 Energy Count NO, YES Energitællere (kWt). Energy counters (kWh) Energiezähler (kWS)
38 Drain cooling NO, YES Afløbskøling med dyse. (Kondensering)
Drain cooling with water nozzle (condensation).
Abflusskühlung mit Düse. (Kondensierung)
39 HACCP logging NO, YES Logning af opskriftskørsler. Logging of recipe runs. Loggen von Programmläufen.
40 Update server None, Local, Houno, Laptop PC
Valg af kilde til opdatering af SW via web.
Select source for SW update through web.
Anwahl der Quelle für SW-Aktualisieren übers Web.
41 Demo mode NO, YES Indstilling til brug på udstillinger
(ingen varme og med temperatur-simulering).
Setting for use at exhibitions (no heat and with temperature simulation).
Zum Gebrauch auf Ausstellungen (keine Hitze und mit Simulieren der Temperatur).
42 Oven temp offset C/F -10/-18 - 0/0 - 10/18
Justering af ovntemperaturføler Adjustment of oven temperature sensor.
Justieren des Garraumtemperaturfühlers
43 Core 1 temp offset C/F -10/-18 - 0/0 - 10/18
Justering af kernetemperatur 1. Adjustment of core temperature sensor 1.
Justierung des Kerntemperatur -Fühlers 1.
44 Core 2 temp offset C/F -10/-18 - 0/0 - 10/18
Justering af kernetemperatur 2. Adjustment of core temperature sensor 2.
Justierung des Kerntemperatur- Fühlers 2.
45 Enable FAN alarm NO, YES Aktiver ”blæser-for-langsom”-alarm (Err 14,15). Activate fan alarm (Err 14, 15). Aktivieren des Gebläse-
drehzahl-Alarms (14,15)
46 Restart after PF Never, 10min, 30min, 60min
Genstart efter strømudfald. Vælg, hvor lang tids afbrydelse der er tilladt, før ovnen skal genstarte automatisk.
Restart after power failure. Select duration of interruption until oven restarts automatically.
Neustart nach Stromausfall. Anwahl der Dauer des Ausfalls, bis der Ofen automatisch starten soll.
47 Descale NO, YES Afkalkningsprogram til dampgenerator (KPE).
Descale program for steam generator (KPE).
Entkalkungsprogram für Dampfgenerator (KPE).
48 Lime saturation factor 18-> dH, 8-18 dH, 0-8 dH
Kalkdiagnose, overvågning af tilkalkning i generator. Indstil vandets hårdhedsgrad.
Scale diagnosis, monitoring of scale in generator. Select hardness of water.
Kalkdiagnose, Überwachung des Kalkgehaltes des Dampf-generators. Härte des Wassers eingeben.
49 Multistep Fan speed NO, YES ”Trinløs” blæserhastighed, 20-
100%, i spring af 10%. Multistep fan speed, 20-100%, 1 step = 10%
Mehrstufige Gebläse-geschwindigkeit, 20-100%, 1 Stufe = 10%.
1-3 USER 1-19 SUPER USER 1-49 SERVICE ENGINEER

- 70 -
Notes: _________________________________________________________________________ _________________________________________________________________________ _________________________________________________________________________ _________________________________________________________________________ _________________________________________________________________________ _________________________________________________________________________ _________________________________________________________________________ _________________________________________________________________________ _________________________________________________________________________ _________________________________________________________________________ _________________________________________________________________________ _________________________________________________________________________ _________________________________________________________________________ _________________________________________________________________________ _________________________________________________________________________ _________________________________________________________________________ _________________________________________________________________________ _________________________________________________________________________ _________________________________________________________________________ _________________________________________________________________________ _________________________________________________________________________ _________________________________________________________________________ _________________________________________________________________________ _________________________________________________________________________ _________________________________________________________________________ _________________________________________________________________________ _________________________________________________________________________ _________________________________________________________________________

- 71 -
Noter: _________________________________________________________________________ _________________________________________________________________________ _________________________________________________________________________ _________________________________________________________________________ _________________________________________________________________________ _________________________________________________________________________ _________________________________________________________________________ _________________________________________________________________________ _________________________________________________________________________ _________________________________________________________________________ _________________________________________________________________________ _________________________________________________________________________ _________________________________________________________________________ _________________________________________________________________________ _________________________________________________________________________ _________________________________________________________________________ _________________________________________________________________________ _________________________________________________________________________ _________________________________________________________________________ _________________________________________________________________________ _________________________________________________________________________ _________________________________________________________________________ _________________________________________________________________________ _________________________________________________________________________ _________________________________________________________________________ _________________________________________________________________________ _________________________________________________________________________ _________________________________________________________________________